Since making its grand entry into the market way back in 2000, the Amazon Kindle has continued to revolutionize the way we read.
The latest releases come with unprecedented features to allow you to better enjoy your favorite newspapers, magazines, and every other digital media.
For this piece, we have compared several Kindle deals available on the market and found the best ones for you. Check them out below.
NOTE
Deals are subject to change. Sometimes, some of the deals listed in our guides may no longer be available by the time you hit the buy button. So, hurry up and grab them while they’re hot.
Which are the best deals for Kindle readers right now?
The awesome Amazon’s 6” Paperwhite optimized display technology and the built-in light grabs the headlines here.
It can display at 300ppi and use sleek fonts thanks to the maximized font technology and grayscale.
The new model is now waterproof to allow keen readers to take their Kindle outdoors in any weather condition.
To make things livelier, you can now choose between several colors, including Plum, Sage or Twilight Blue.
The new Paperwhite also adds an audio function, so that you can pair Bluetooth headphones or speakers and listen to your favorite audiobooks.
In terms of formats, it supports Kindle Format 8 (AZW3), Kindle (AZW), TXT, PDF, unprotected MOBI, PRC natively; HTML DOC, DOCX, JPEG, GIF, PNG, PMP through conversion; Audible audio format (AAX).
This is the 7th generation of Amazon’s Paperwhite Kindle, the predecessor of our first pick. It is still the most popular model, so if you don’t want to pay some extra bucks for a few new features in your e-reader, this one would do.
Battery life might last longer at this model, though, since with every new Kindle, this is the trend – to add more features, make the device more compact, but compromise on days of use without charging.
One of the devices that are still trending is the 6-inch 167ppi glare-free Kindle reader. And it has lots of standout new features in the latest design.
I am talking about a Kindle that is not just 11% thinner but also 16% lighter than all the old-generation Kindles. Plus, it’s one of the easiest and most comfortable on your hand.
Taking the trophy here is the largest 7-inch, 300ppi display screen which is one of the largest in the entire Kindle family.
The display is crisp and reads almost like ordinary papers with zero glare, all thanks to the antiglare ability plus laser-quality text.
This is the first waterproof Kindle (IPX8) so you can freely read even in humid places.
You can listen to Amazon’s mammoth library of audiobooks by pairing it with Bluetooth speakers while on the go.
We mentioned it’s pricey, however, compared to the previous Kindle models, it comes with auto-adjustable light sensors, auto-rotating page, and page turn buttons.
As you might have guessed, this is a bundle special offer that includes, a Paperwhite Kindle (our second recommendation from this list), plus a leather cover to match the color of the device and an Amazon power plug.
To conclude, Amazon Kindle has over 6 million e-books and plenty of magazines, audiobooks, and comics.
You can now get instant access to this festival of reads including new releases and global bestsellers by taking advantage of the Kindle deals listed here.
If you’re a real estate agent, or you simply want to show someone what a certain location looks like, you might be interested in virtual tour software.
These tools can create a virtual environment through which you can navigate with ease.
If you’re looking for such a tool, today we’re going to show you the best virtual tour software on the market. Here’s a quick preview of our top picks:
My 360 – top-notch 360 virtual tour software
iStaging – best virtual tour software for real estate
Tourweaver – interactive multimedia support
3DVista – 3D virtual tour software with granular panorama controls
Pano2VR – amazing free virtual tour software with automatic linking
Note: All the prices and offers in this article are subject to change, so be sure to check the official product page to get the latest deal. If the product or offer you’re looking for is no longer available, you can try to find it on its official manufacturer page or get another one from our list.
What is the best virtual tour software deal this year?
My360 online property virtual tour software is a great software to build your interactive virtual tours. It’s compatible with any 360-degree camera from Insta360, GoPro, Samsung, LG, Ricoh Theta, and many others. You can even use DSLR images that can be stitched.
With this software, you don’t need to hire professionals because the virtual tour software is very easy to use. Also, they offer a 2-week free trial period without any payment details so that you can try it and adjust it to your exact needs.
And even if you still need assistance, a support team is available 7 days a week from 10 AM to 10 PM to guide you through the process using the live chat.
After you start the free trial, you will have to upload your images quickly using the My360 App and create your virtual tour with just a few clicks.
Next, you just need to hit the publish button and use the link and embed codes to display your virtual tour on your website, portal, and on social media.
You can easily also add a floor plan to your tour. This way, visitors will see exactly where they are all the time.
My360
With My360 it’s extremely easy to make your own virtual tour by using any 360 camera.
iStaging – best virtual tour software for real estate
With iStaging it’s even easier to create your own virtual tours because you don’t even need to use a 3D camera, you can make everything with your phone.
Actually, iStaging is not just an application, it’s a platform where you get to work with more solutions that will get you the perfect result. For instance, you can start with the VR Maker app that will transform your smartphone into a 360 camera.
The catch here is to get the iStaging motorized support for smartphones that will automatically turn your phone to get the perfect 3D shots.
The app captures up to 16 photos, which are then instantly and automatically stitched and will result in awesome panoramas.
To create your virtual tour there is the VR Editor app. With this tool, you will be able to put together the panoramas, build the floor plan and even brand it if you desire.
After you finish, you can, of course, embed the tour on a website or portal.
iStaging
It’s really easy and pleasant to create virtual tours using only your phone.
This is a professional virtual tour software that allows you to create realistic 360-degree presentations. The application allows you to create a virtual tour in Flash or in HTML5 format.
Regarding the supported features, there’s Google / Bing map available that will show you the location and directions while viewing the presentation. We have to mention that Bing map works only with Flash tours while Google Maps work with HTML5 tours.
The application allows you to add multimedia elements such as voice narration and text to all your virtual tours. Tourweaver also supports interactivity, and you can add buttons and hotspots to your tours, thus making them interactive.
The application also supports multiple scenes, and each scene is represented by a thumbnail. As a result, you can easily navigate to the desired scene.
Tourweaver also supports 3D models and you can add them to your virtual tours with ease. There are a few limitations though, and you can only use models in 3ds format. In addition, 3D models are only available in Flash tours.
Regarding the virtual tours, you can host them online and share them easily on Facebook. In addition, you can save your virtual tour locally as an EXE file and send it to your clients.
You can also save the tour in HTML5 format that will work on any mobile device. If you want, you can even create a local app for your virtual tour and run it on Android or iOS devices.
3DVista – 3D virtual tour software with granular panorama controls
If you’re looking for professional virtual tour software, we have to recommend 3DVista Virtual Tour. This application allows you to create interactive tours simply by using a set of pictures.
This software offers great compatibility, and all your tours are compatible with any computer, tablet, Android, or iOS device.
There are two versions of this tool available, and the Standard version is perfect for amateurs or first-time users. If you’re an advanced user or a professional, you might want to consider using the Pro version.
In addition, you can also export your tour to your local hard drive. This allows you to copy it to a USB flash drive or send it via email.
This application is simple to use, and you don’t need to have any programming skills in order to create impressive virtual tours. 3DVista Virtual Tour has a simple user interface, so it will be perfect for first-time users.
It’s worth mentioning that 3DVista Virtual Tour can also optimize your tours for mobile devices. By using this feature you’ll create a smaller version of the virtual tour that will preserve the bandwidth of mobile users.
It works with all kinds of cameras and lenses, which is also a major plus. However, if you want to achieve the best results, we advise you to use a wide-angle lens, fisheye lens, or one-shot lens. In order to create interactive tours, the application will use automatic control points detection feature.
This feature allows you to easily merge your pictures automatically. In addition, you can edit and create your own control points in order to get optimal results. The application also supports HDR stitching, and you can combine multiple HDR images and create panoramas with a single click.
3DVista Virtual Tour also supports the Live Panorama feature. This feature allows you to create time-lapse panoramas and show how the tour looks at different times of the day.
The application also has automatic color and exposure correction, so all your photos will be automatically adjusted before you merge them. It supports 18 types of projections as well as Batch Stitching. This feature is great since it allows you to quickly stitch your panorama and add it to the queue.
3DVista Virtual Tour also supports audio, and you can add different audio files to your virtual tour. You can add natural sounds or voice narration, which can be rather useful.
In addition, you can set the starting point of your panoramas as well as the spinning speed. You can also limit the speed and zoom level for the users that are interacting with your panorama.
Pano2VR – amazing free virtual tour software with automatic linking
If you want to create virtual tours and panoramas, you might be interested in Pano2VR. This application comes with a special Patches mode that lets you fix your images.
For example, if you use a tripod to create a panorama, you can use this tool to remove the tripod or any other object from your panorama.
To do that, simply select the area that you want to fix in order to extract it.
After that, open it in your image editor and apply the necessary changes.
The changes will be applied to your panorama as well.
The application also has Leveling tool that allows you to straighten the horizon of your panoramas easily.
Pano2VR allows you to create virtual tours easily thanks to the Automatic Linking feature. If you want to change the linking or the location, you can do so by using the Tour Map feature.
Of course, you can filter your images using tags. The application has a Master Node feature that allows you to add information or patches to all your nodes.
The software also supports interactivity, and you can add hotspots to your panoramas. In addition, you can also add directional sound and videos.
It’s worth mentioning that you can use hotspots to show additional information such as text, video, or image. There’s also a Skin Editor that lets you create custom buttons and controllers for your presentations.
Pano2VR also supports automated virtual tours. This is perfect if you don’t want users to interact or interfere with your presentation.
Of course, you can stop the automatic tour at any time and navigate freely. In addition, you can also export the automatic tour as a video file and share it with others.
Regarding the file export, you can save your tours in HTML5, Flash, and QuickTime VR formats. We have to mention that this tool supports a wide range of plugins so you can easily upload your virtual tour to WordPress, Joomla, or Drupal.
Vtility – versatile Cloud-based & built-in HTML app
If you’re looking for cloud-based virtual tour software, this is the perfect choice for you. This application is mobile-friendly, and it will adapt to any screen size and device.
Vtility also offers a simple and straightforward user interface, so you can easily create virtual tours. The application is fully built in HTML5, so it doesn’t require any third-party plugins in order to work.
Thanks to HTML5 technology, you can embed your presentation on any website with ease. We also have to mention that this web app doesn’t require any special photography gear, which is a major plus.
The application offers a simple interface, and you can add hotspots for simple navigation through different scenes.
We have to mention that this service isn’t free, so you’ll need to purchase a package in order to use it. The main difference between the packages is the number of supported virtual tours that you can have at a time.
The most basic package offers only one virtual tour which should be enough for the most basic users. However, certain packages have ads, so you might want to choose yours carefully.
Vtility is a decent virtual tour web app, and a more affordable solution compared to other virtual tour software. Since this is a web app, it lacks certain advanced features, but it should be perfect for basic users.
MakeVT – convenient tour embedding into any website
MakeVT is another virtual tour web app. Just like any other virtual tour software, this one allows you to use spherical or cylindrical panoramas. We have to mention that this web app works only with panoramas in .jpg format.
After uploading your panorama, you can edit it by adding hotspots to it. You can switch between panoramas with ease by using hotspots. In addition, you can add popup images, text, and external links thanks to hotspots.
MakeVT also supports sharing, so you can publish your virtual tour online or share it on social networks. In addition, you can also embed the virtual tour into any website with ease. Alternatively, you can simply share the link to your virtual tour with others.
We have to mention that this service comes with several pricing plans. If you want your tours to work on mobile devices and use custom styles or icons, you might want to use the Ultimate plan.
Each plan offers different features, so we strongly advise you to check the list of available features before choosing a specific plan. MakeVT looks like a decent virtual tour web app, and you can try it out for free.
Another virtual tour software that we need to mention is TourMaster. This tool supports spherical, full, vertical, and partial panoramas. The application also supports Tour Movie mode which will automatically guide the user through the presentation.
If necessary, the user can cancel the automatic tour at any time. In addition, the application supports the Tour Map feature as well.
There are also tour map pages and static hotspots that can show additional information such as text, images, or URLs. There’s also support for soundtracks, so you can play music or narration during the tour. The application also allows you to export your tour and add it to any web page with ease.
We have to mention that this is an older application, so it doesn’t have a sleek user interface and some advanced features like other entries on our list.
Despite these minor flaws, TourMaster is still a decent virtual tour software. You can download and try TourMaster for free, but you’ll need to purchase a license if you want to continue using it.
Virtual tour software is perfect for real estate agents or any users that want to make beautiful and interactive panoramas.
There are many great virtual tour applications, and we hope that you found a suitable one for you on our list.
The age-old question is debated over, yet no one ever seems to get an answer. Is it Outlook or Gmail? Gmail and Outlook are two of the most popular email services on the market. They have their own strengths and weaknesses, but which one is right for you?
This article will break down some of the pros and cons for both email providers and tell you what we’ve found to be the best solution. Let’s get into it.
Is it better to use Outlook or Gmail?
If you’re an Outlook user, you may wonder if it’s time to make the switch to Gmail. And if you’re a Gmail user, you may have wondered what all the fuss is about with Microsoft’s email service.
There are many factors that go into choosing which email client is best for you. The kind of hardware you have, the kind of software you use, and how much time you can afford to spend on email are all important aspects.
Other factors include:
Ease of use – Many users like Outlook because it’s familiar. The interface is similar to other Microsoft products like Word and Excel. This makes it easier for people who are used to using those programs to get used to using Outlook without much effort at all. On the other hand, Gmail’s web interface can be confusing at first because it doesn’t look like any other web-based email program out there (and that’s a good thing). It takes some getting used to but once you do, you’ll never want to go back.
Security – Security is a touchy subject and given the kind of information shared across emails, it’s easy to see why it would be a war when it comes to Outlook vs Gmail for business.
Integrations – If you use other Microsoft products like Skype or Office 365, then having an integrated inbox will be helpful because it allows users to see their messages all at once without having to log in multiple times throughout the day. Gmail also has Google-integrated products such as Google Meet, Google Calendar, and more.
The answer is that neither one is necessarily better than the other. It depends on your needs and preferences.
What are the similarities and differences between Outlook and Gmail?
Outlook’s main features
Email Scheduler – This can be useful if you prefer to send out your newsletters at a certain time of day or week, or if you want to send out your emails on the weekends.
Tasks – If you’ve ever asked yourself: Why do companies prefer Outlook over Gmail? This feature is part of the reason because there’s no need for other productivity apps. You can create tasks for yourself or assign them to others so you can stay organized throughout the day. Your tasks will be synced across devices so that you can always access them on any device where you have Outlook installed.
Calendar – View your calendar events in one place, with reminders for upcoming events and invitations. You can add new events, invite people and set reminders directly from the calendar view. This makes it easier without needing Calendar apps.
Mail – You can send and receive emails using your Gmail address or any other account that you’ve added to Outlook. You can also send attachments or forward messages, or create new drafts by using your keyboard shortcuts.
Contact management – Stay organized by storing all your contacts in one place — including their photos — so they’re always available when you need them.
Automated organization tools – Gmail automatically classifies your emails into different categories like Primary, Social, and Promotions. This way you can easily find any message that you have received from any of your contacts.
Snooze – Another notable feature is Snooze, which allows you to snooze a message until later during the week or at a specific time. When you snooze an email it will move out of your inbox and show up again at a later date when it’s back on your radar.
Smart email – The smart compose feature uses artificial intelligence to suggest complete phrases and sentences while you’re typing an email. It helps you respond to messages more quickly by offering replies based on your message content.
Integration with Google Services – This integration allows you to send and receive files up to 10GB in size, as well as upload photos from your Google Drive to Gmail.
Free storage space – Google’s basic Gmail account comes with 15GB of free storage space for all your emails and attachments. The storage is spread across other Google services so it can be limited for some users.
Calendar – Gmail lets you create events using Google Calendar right from the email headers. You can add times, locations, descriptions, and more so you never have to miss a meeting.
Contact management – This feature allows you to keep track of all the people in your life by storing their contact information in one place.
Scheduler – Gmail has a built-in email scheduler that allows you to send out emails at specific times or on specific dates.
Search – Searching through your inbox can be tedious if you have thousands upon thousands of messages stored there. Luckily, Gmail makes it easier with various filtering options.
Features
Outlook
Gmail
Email storage limits
15GB
15GB
Security
✓
✓
Web-based access
✓
✓
Email organization
✓
✓
Scheduler
✓
✓
Calendar
✓
✓
Is Outlook safer than Gmail?
Outlook uses Microsoft infrastructure and is not as susceptible to attacks. While Microsoft has been criticized for its anti-privacy practices in the past, it’s important to note that Outlook doesn’t share your data with third parties.
Gmail doesn’t even come close when it comes to privacy protections. It uses TLS encryption but only for servers making users more susceptible to security risks.
Google has been repeatedly criticized by privacy advocates for collecting user data without permission and sharing that information with third parties — including advertisers who want to target users based on their interests.
With so many email providers out there, it can be tough to figure out which one is right for you. If you’re like most people, you probably use one of these two email services. And if you’ve used both of them before, then you already know their strengths and weaknesses.
There are certainly pros and cons of Gmail vs Outlook. Each platform has features that fit certain people better than others. In the end, it all boils down to personal preference. You’ll need to figure out which one works best for you but we hope that our comparison has helped you make a more informed decision.
Since both email clients are also web-based, we have excellent recommendations of the best browsers for emails in case you don’t have enough space for the applications.
What are your thoughts on the Outlook vs Gmail battle? Let us know in the comment section below.
Whether you’re on a tight budget or eager to splash the cash, amazing season deals are already arriving from Microsoft.
The Surface Go 2 Essentials bundle is worthy of your full attention. This bundle includes Surface Go 2, Surface Go Type Cover, Microsoft 365, as well as Microsoft’s Complete Protection Plan.
You may easily save up a bunch of cash if you are interested in Microsoft’s Surface Go 2 Essentials bundle and that’s not all. Keep in mind that Microsoft Store offers world-class customer support.
Note: All the prices and offers in this article are subject to change, so be sure to check the official product page to get the latest deal. If the product/offer you’re looking for is no longer available, you can try to find it on its official manufacturer page or get another one from our list.
Is the Surface Go 2 Essentials bundle perfect for me?
Assuming that’s the question you have in mind as well, note that you can use Surface Go 2 like a laptop or tablet for all daily tasks. The choice is all yours.
The vivid 10.5” PixelSense display with touchscreen is perfect for eBooks. When you finish reading your mystery novel, connect the Surface Go Type Cover for a great typing experience.
Even your kids can enjoy it thanks to the countless parent-managed screen time limits, spending control, and content filtering options included.
As for that battery life of up to 10 hours per charge, that’s just another sign that Surface Go 2 is indeed ideal for browsing, gaming, shopping, and working on your projects all day long.
Seasonal deals are full of surprises and we expect to see the very best deals on the big day itself. In spite of that, it’s tricky to refuse many of these offers.
There’s no guarantee that stocks will last or that all these deals will return. Let us know if you’re ready to buy the Surface Go 2 Essentials bundle in the comments area below.
Tablet computers are much more practical than regular laptops or desktop computers. They’re versatile, ultra-portable, easy to carry around, have great battery life and the list could go on.
Well, if you’re looking for a Windowstablet that has all the features listed above, look no further. In this quick guide, we’ll list some great models available on the market.
How to choose the best Windows tablet?
Our team of expert testers, with a combined experience of 15 years, has tackled a variety of testing tasks for any device you could imagine.
Their experience comes into play as a very important element when choosing the products we described in this guide, and a large variety of factors have been taken into consideration.
The options that have been chosen offer great quality and cover the entire spectrum of price ranges, thus enabling everybody to find something that fits their needs both financially and otherwise.
Note: All the prices and offers in this article are subject to change, so be sure to check the official product page to get the latest deal. If the product/offer you’re looking for is no longer available, you can try to find it on its official manufacturer page or get another one from our list.
What is the best Windows tablet to get?
Microsoft Surface Pro X – awesome battery & portabilty
CHUWI UBook X Tablet 12″ – thin and lightweight
Microsoft Surface Pro 7, 12.3″ – a powerhouse on the go
Fusion5 Ultra Slim – great low-budget option
Vanquisher 8-inch – the rugged pick
Now, let’s take a closer look at the pros and cons of each Windows tablet.
When it comes to this model, Microsoft has completely updated the design of its tablets with thinner, rounded edges and small screen bezels.
Note that Surface Pro X is just 7.3mm thin and starts at 1.7 pounds. That’s your chance to do it all while using a single product – enjoy improved performance, graphics, and not only in a thin and light device.
Its screen is configured at 60Hz by default in order to save battery life, but you can enable 120Hz at any time via the display settings.
The Surface Pro X also has one of the best webcams you can find at the moment. And since it’s powered by Qualcomm, the new custom Microsoft SQ1 processor, expect long battery life and faster LTE and Wi-Fi connectivity.
The Chuwi UBook X tablet is just 9 mm thick engineered from a lightweight aluminum-magnesium amalgam. This makes it very efficient for your daily multitasking.
The 12-inch panel offers great visibility with flexible viewing angles, and the 38 Wh lithium battery is capable of reaching a range of (up to) 9 hours, with an approximate 220 hours long standby time.
Microsoft Surface Pro 7 has the ability to transform from laptop to tablet to portable studio, and better connectivity with the USB-C and USB-A ports.
This laptop-to-tablet Surface Pro 7 comes with pre-installed Windows 10 Home, and it has a battery life of up to 10.5 hours based on typical Surface device usage.
You can work and play anywhere with this ultra-slim and light Surface Pro 7 tablet.
Most hardware manufacturers prefer to focus on 2-in-1 tablets rather than standard tablets – for obvious reasons. However, this Fusion5 tablet is one of the best Windows 10 touchscreen tablets that you can get right now.
The device features 32GB of storage, 2GB RAM, Bluetooth 4.0, and a full-size USB port.
The Fusion5 Ultra Slim is a great tablet for your kids, it’s ready for fun and play the moment you take it out of the box.
If you need a Windows 10 tablet to use in harsh conditions, then this Vanquisher ultra-rugged model is a great choice.
The device features a wrist strap which comes in very handy when outdoors. It features a fully rugged case, it’s waterproof, dustproof, and can survive a maximum 1.2-meter drop.
Let’s end this list by mentioning Microsoft’s own Surface devices. The company is offering impressive discounts for most of its Surface models, including the new Surface Pro X one.
The registry is a database that stores a lot of important information needed to keep Windows up and running. When the registry gets corrupted, Windows will not function properly.
A corrupted registry can cause many issues, including blue screens of death, problems in installing or running programs, slow performance, and even computer freezing.
What causes a corrupted registry?
The Windows failed to load because the system registry file is missing or corrupt error message is common in all versions of Windows. It happens because of:
Virus/malware – Viruses and malware are programs designed to damage your computer and steal information from it. That’s why you need a comprehensive antivirus solution.
Hardware failure – A hardware malfunction can sometimes render some components useless, which may result in serious corruption in your registry.
Accidental deletion of a crucial file in the registry directory – Such deletions more often occur due to improper use of registry editor applications like Regedit by inexperienced users.
Improperly uninstalling programs – The improper removal of software from your PC can leave invalid keys behind in Registry, leading to problems such as these. A good uninstaller app should do the trick.
Corrupt Windows Updates – A corrupt Windows Update may cause issues with the operating system and create problems with your PC’s hardware and software settings.
What can I do if the system registry file is missing or corrupt?
1. Run the CHKDSK command
Press the Windows key, type cmd on the search bar, and clickRun as administrator.
Type in the following command then press Enter: chkdsk:/f
2. Run DISM and SFC commands
Hit the Windows key, type cmd in the search bar, and select Run as administrator.
Type the following command and press Enter: DISM.exe /Online /Restorehealth
Allow for the command to be executed then type in the next one: sfc /scannow
Open the BIOS Settings by pressing the corresponding key shown on the screen. Usually, there can be any of the F10, F2, F12, F1, or DEL keys and it is different for each manufacturer/BIOS.
Now, switch to the Boot tab. Then, under Boot Option Priorities, go to each boot option and press Enter.
Change the boot order to the HDD or SSD you have the system installed on.
Connect the USB drive to your PC and try booting from it.
When the installation window appears, click on Repair your PC.
Next, select Troubleshoot.
Click on Advanced options.
Launch Command Prompt on the system.
Type the following commands and press Enter after each: bootrec /FixMbrbootrec /FixBootbootrec /ScanOsbootrec /RebuildBcd
Exit, remove the installation drive, and try starting the system normally.
Click on the Restart now button next to Advanced startup.
Select the Troubleshoot option.
Now, click on Advanced options.
Select the Startup Repair option.
Windows 7 users facing the system file is missing or corrupt issue can revert to Windows Last Known Good Configuration setting and see if this gets rid of the issue.
If none of the above work, you might have to perform a clean Windows install and see if this gets rid of the problem. To prevent such issues in the future, the best way to ensure that your registry stays in good health is to only use programs that are intended to modify the registry.
They will make backups automatically before making any changes so that if something goes wrong, your original copy will be safe and you can revert to it easily. You should also clean your registry often to keep your system efficient.
When running the chkdsk command in Command Prompt, you might get chkdsk cannot lock the current drive error message. Let us tell you all you need to know about this error.
While it is often an annoying obstacle, a few solutions have been proven to work by many users.
Note that for some users, the error may read Cannot lock current drive because it is write protected or Chkdsk cannot run because the volume is in use by another process.
Also, users told us that they got the following message after running the chkdsk /f command:
The type of file system is ntfs cannot lock current drive
Regardless of what it is, these solutions will come in handy.
What does Cannot lock current drive mean?
This chkdsk /r cannot lock current drive error usually means precisely what it says. The current drive you are trying to run the command on can not be accessed.
Usually, Windows will postpone the scan on the next boot-up of your system, but sometimes that doesn’t work.
Some of the primary triggers of this error include:
Running processes – The error occurs if there’s another process running and is preventing your drive from being used by the chkdsk process.
Malware – The device could be infected, and your access to specific components is restricted. Effective antivirus software is always recommended.
It is often one or the other, so let us show you some of the most efficient fixes.
How can I fix the chkdsk cannot lock current drive error?
1. Disable Safe Boot and your antivirus
Click on the hidden access arrow in the Taskbar.
Click on your antivirus icon, hover over Avast shields Control and select Disable for 10 minutes (This step varies for different antivirus software).
Try rerunning the command.
Consider switching to a better security tool if your antivirus is causing the problem.
There are various options available, and you might be surprised at what you can get if you’re open to having a different antivirus software that doesn’t interfere with any driver updates.
2. Run chkdsk with drive letters
Click on the Start menu, type command, right-click on the Command Prompt option, and select Run as administrator.
Type the script below and hit Enter. chkdsk C: /f /r /x
Now go back to step 2 and untick safe mode.
You’re all set.
This is the most common solution for most users.
3. Run chkdsk in Safe Mode
Press both the Windows key and R, type msconfig, and press Enter or click OK.
Select the Boot section, click on the option for Safe Boot, select the Minimal option and click OK.
Click Restart.
Click on the Start menu, type command, right-click on the Command Prompt option, and select Run as administrator.
Type the script below and hit Enter. chkdsk C: /f /r /x
Now go back to step 2 and untick safe mode.
You’re all set.
This solution is a bit more time-consuming than the first, but it can fix Chkdsk cannot lock current drive error.
To learn more about this command, we have a guide on how to run chkdsk in Windows 11, so you might want to check it out for more information.
Right-click on the Start menu and select Task manager.
Click the Processes tab.
Click on the different processes and select the End tasks button.
Now try rerunning the command.
This solution is essential if chkdsk cannot run because another process uses the volume.
We hope these solutions were helpful and that you managed to fix Chkdsk’s inability to lock current drive error. This isn’t the only chkdsk error you can encounter, and we already covered Unable to determine volume version and state in a separate guide.
In the meantime, let us know about other issues related to your drive you have experienced in the comment section below.
Gone are the days when outdoor adventure and daily outings used to be drab and boring affairs. With the portable DVD player available at reasonable prices, it’s time to spice things up.
Indeed, most portable DVD players can play your favorite music, videos, photos, and provide a wholesome experience, similar to a mini home theater system.
Well, it’s the sales season and we felt obliged to check around for some rousing portable DVD player offers.
And, we were lucky to find some budget deals for those planning an upgrade or a replacement. Here is a summary.
How do I find the best portable DVD player to purchase?
As the name suggests, look for a DVD player that’s portable. It shouldn’t have too large of a display so as to make carrying it nearly impossible. It should easily fit into your backpack.
Secondly, purchase models that support Blu-Ray Discs. The more formats your portable DVD player supports, the better your experience. Also, it should have a high-quality display.
Battery life and surround sound are two other features to look out for in a portable DVD player. Surround sound offers a wholesome experience and is sure to liven your mood. Also, look for models that offer a high battery life to use the DVD player on the go.
Note: All the prices and offers in this article are subject to change, so be sure to check the official product page to get the latest deal. If the product or offer you’re looking for is no longer available, you can try to find it on its official manufacturer page or get another one from our list.
What are the best portable DVD player deals this year?
Watching movies on the go, especially on a long road trip is an excellent way to pass the time, especially if the trip is long.
For such occasions, you can use a portable DVD player like the DBPOWER 12″ Portable DVD Player, because it has everything you may ever need.
This includes a long-lasting battery, a screen that can rotate 270 degrees and flip 180 degrees, and a compact size that makes it an excellent carry-on. This portable Blu-Ray DVD player is awesome.
The highlight is the massive 15.6-inch LCD folding display which not only produces a bigger display but one of the best viewing angles thanks to the swivel adjustable design.
The double full-range stereo speakers complete what is a wholesome media entertainment experience.
Key features include:
Lightweight and Compact: With a compact size, it will easily fit in a backpack or luggage
Versatile Digital Media Player: It supports playback audio, a variety of video and image files, and, of course, CDs or DVDs
Hassle-Free Operation: It features an easy-to-operate button control center plus a readily accessible top-loading disc tray
Extreme Mobility: It’s powered by a long-lasting battery, USB flash memory, an SD memory card reader, outstanding headphones, and many other portability-enabling features
HD video: The screen displays brilliant, crisp video in HD
A handy and portable DVD player, this is built to withstand mishandling and falls from a small height.
It’s a favorite among parents searching for an entertainment system to keep youngsters busy during long trips. Plus, it’s so easy to start and load discs.
Key features include:
1-inch TFT LCD Panel: The resolution of 1024*600 helps it deliver stunningly clear pictures. Additionally, the included canvas mount helps to mount it easily on the car headrest easily for a vantage view
Anti-Shock and Lightweight: Carrying it is a breeze. It weighs just 2 pounds and resists impact thanks to the built-in shock-resistant function
Play Flexibility: Users have impressive playing choices. For example, they can listen privately via earphones or the extraordinary built-in dual speakers. One can also connect it to a bigger screen via the AV Out port when watching movies
Power-Off Resume Function- The portable DVD player stores the last point of playback prior to shutting down so it picks things up from where they were last left off
Lasting Battery: On average, the accompanying lithium battery delivers between 4-5 hours of immersive viewing
The ieGeek 11.5-inch swivel-screen DVD Player is yet another excellent and powerful entrant to these revolutionary mobile entertainment devices.
It’s also a fine example of the latest trend in portable DVD players where more focus is put on swiveling up to 360° to allow multi-angle viewing.
Key features include:
Compact design: This makes it magically easy to carry to the basketball court, a road trip, and camping adventures. Like the rest, it easily swivels and attaches to car headrests
Upgraded battery capacity: The battery is durable and safe and has an average of 5 hours of thrilling shows. The certified AC power adapter plus a high-quality car charger eliminates all worries
Super Loud Volume: ieGeek portable DVD player comes with twin high-power speakers which give it a crystal clear and louder volume. There is even an additional 3.5mm earphone jack for a more concentrated sound
Gorgeous, Protective Screen: ieGeek adopts an HD eye-protective screen to help alleviate the inevitable eye fatigue after hours of watching. This screen is more comfortable and safe for kids’ eyes
Multi-Formats: This versatile player easily plays all the DVDs including multi-media files via SD Card (16-32GB) and USB (except the Blu-ray)
These are some of the best deals you will find on portable DVD players this season. Identify your needs and budget, check out the models listed here, and go ahead with the purchase.
A portable DVD player is here to stay and investing in it won’t be a bad idea. Just ensure you make an informed decision to enjoy movies, pictures, and videos on the go.
Asus offers an AI Suite, a tool to control fan settings and other components. However, the user has reported about the AsusFanControlService.Fan Control Manager error while booting their computer.
This error usually occurs after installing a Windows update or running a registry cleaning software and concerns AI Suite’s Fan Control Manager. Don’t worry; we’ve researched this problem and will help you fix it.
What causes AsusFanControlService.Fan Control Manager error?
Suppose you are facing the AsusFanControlService.Fan Control Manager error, below are some of the factors that could cause it:
Issues with the AI Suite: The primary reason for the Invalid class string, Progid Asus Fan Control error, is problems with the AI Suite. You need to uninstall the app entirely with an uninstaller software and reinstall it.
Problems with Windows update: If the Asus Fan speed control is not working, it might be because of the latest OS update you installed. To get past this, you need to uninstall this update till Asus fixes the compatibility issue.
Issues with the registry: Another cause of this problem is alterations in the registry. The solution to this is to tweak your registry.
How can I fix AsusFanControlService.Fan Control Manager error?
Outdated or faulty versions of the AI Suite can cause the AsusFanControlService.Fan Control Manager error. To fix this Asus fan control service error, uninstall and reinstall the app.
If you cannot uninstall the AI Suite, it’s recommended to use a dedicated program in CCleaner that will entirely uninstall any app.
The best thing about CCleaner is that it will remove any leftovers from the AI Suite. This feature is helpful as the installer will fail to initialize if the bits and pieces of the removed program are left in the system.
2. Fix the Registry
2.1. Stop the AsusFanControlService service
Press the Windows key + R, type services.msc, and click OK to open Services.
In the Service window, locate AsusFanControlService and right-click.
Now, select Stop and close the Services window.
The first step toward fixing the AsusFanControlService.Fan Control Manager error is to disable the service. This is to prevent any issues during the operation.
2.2. Delete the AsusFanControlService folder
Open File Explorer and navigate to the following location: C:/Program Files (x86)/Asus
Right-click on the AsusFanControlService folder
Finally, select Delete and close File Explorer.
Now you need to delete the AsusFanControlService folder from the installation drive. Follow the steps above to do it.
2.3. Delete the Registry entry
Press the Windows key + R, type regedit, and press OK to open the Registry Editor.
In the Registry Editor, navigate to the following location: HKEY_LOCAL_MACHINE/SOFTWARE/WOW6432Node
Expand the key and locate AsusFanService folder. Right-click on the key and select Delete.
Close the registry editor.
The next step is to delete a registry entry in the Registry Editor. Perform the above steps to get it done. Finally, try to install the AI Suite or Fan Xpert again and reboot the system to check for any improvements.
Nintendo games used to be our favorite back in the 90s, but the consoles slowly phased out. Yet the old-timers managed to play their favorite titles using an NES Emulator. And we will help you find the best NES Emulator for Windows 7.
An emulator shouldn’t just be able to run the game, but it should do so seamlessly without any glitches and offer a thrilling experience. And that’s why you should choose only the best NES emulator for Windows 7.
Are NES emulators any good?
Though a common notion amongst many that NES emulators don’t offer the same experience as the console, the modern emulators are at par and just as good. Here are some of the features that most emulators offer:
Controller support – Almost all the best NES emulators for Windows 7 allow users to connect a controller and enhance the fun.
Customizations – The ability to customize settings and appearance ensures that users get a personalized experience and can enjoy gaming to the fullest.
Full-screen capabilities –Some NES emulators only work in windowed mode, while the recent ones offer full-screen capabilities.
One of the best emulators for Windows 7, FCEUX, offers the most thrilling experience to Nintendo lovers. It offers more features than most of the other emulators here combined and is the first choice of gamers.
It’s an open-source emulator with cross-compatibility, support for third-party plug-ins, a wide array of customizations, and the ability to use a controller, amongst others.
If this is the first time you are downloading an emulator, it’s recommended to go with FCEUX, one of the best options available. Apart from Windows, FCEUX also works on macOS and Linux.
Nesbox is undoubtedly one of the best NES emulators in Windows 7 and can be accessed via the web. All you need to do is log in with the OneDrive account and have the ROM file ready.
Nesbox is compatible with a gamepad and allows users to save their progress to OneDrive, in addition to supporting multiplayer with the use of two controllers. Also, it offers support to GENESIS, SNES, ADVANCE, and GAMEBOY.
Nestopia UE is another popular NES emulator that has been a favorite amongst gamers. Since support for its previous version ended quite a while ago, the developers came up with Nestopia UE, an emulator capable of running almost every game developed for NES.
It offers a straightforward UI that is easily customizable as per individual preferences, the option to map keys, and allows users to record gameplay with the built-in dedicated tool.
Though unsupported, the VirtuaNES emulator is still the preferred choice for Nintendo lovers. The emulator allows a range of customizations, provides gamepad and joystick support, and has full-screen capabilities.
Also, it offers support for the Cheat Code Mode, a feature that even some of the best seem to lack. If you are looking for a reliable NES emulator for Windows 7, VirtuaNES will be a good choice.
The jNES emulator is one of the more straightforward options for those who are not a pro with installation and other intricate aspects. It’s quite simple to run, though don’t expect a feature-loaded experience.
Besides, the jNES emulator allows users to control the screen size, connect their gamepad, and adjust the sound setting. Some reported that it’s a little hard on the resources and has higher requirements than the other options, but that’s all worth the experience.
These are some of the best NES emulators for Windows 7, and all these are good enough to deliver a gripping and fascinating experience. So, choose the one that best matches your requirements.
King is the publisher of hugely popular franchises like Candy Crush Saga.
Epic Games’ lawsuit alleges that Google has engaged in anticompetitive practices in regards to its Play Store. Particularly the suit sites this deal with ABK—which Epic complains was made on the part of Google because it knew it would stop ABK from creating a competing app store, which it had told Google in intended to do—and several other deals with companies like Tencent Holdings’ Riot Games, Ubisoft, and others.
Last year Epic Games was also involved with a similar lawsuit against Apple, which it largely lost.
In this article, we’ll be looking at Dell’s all-in-one desktops, which come with some impressive discounts this season sale. We’ve previously analyzed a similar deal for a Lenovo all-in-one, which is nevertheless more expensive.
Besides, Dell brings to the front more options, so you can choose what’s best for you.
Just to compare the discounted prices, the cheapest desktop now sells for $599.99 which is similar to a premium laptop. All deals include 23.8-inch or 27-inch monitors, a mouse, and a keyboard.
Note: All the prices and offers in this article are subject to change, so be sure to check the official product page to get the latest deal. If the product/offer you’re looking for is no longer available, you can try to find it on its official manufacturer page or get another one from our list.
What is the best Dell all in one to get?
Inspiron 24 5000 Black Touch – best price for value
Inspiron 24 5000 Silver Touch – has the arch stand
This is the cheapest offer, $599.99 as mentioned, and includes the following: a 23.8-inch InfinityEdge display with space-efficient stand, wireless mouse and keyboard, 1-year McAfee LiveSafe subscription, 1-year hardware service on-sire or in-home, after remote diagnosis.
The total storage of this desktop is 1TB 7200 rpm 2.5″. You’ll also find plenty of ports, including 3 x USB 3.1 Gen 1 Type-A, 1 SD card reader, and 2 x HDMI (input and output).
This Inspiron 24 500 Touch comes with less storage space than the previous model and apparently no other difference than a few design touches such as the monitor arch stand.
A white Dell KM636 wireless keyboard and mouse are included in the package, as is the 1-year McAfee antivirus subscription and Windows 10 Home preinstalled OS.
Things are heating up a bit with this second mode of Inspiron 24 5000. It boasts more RAM and more storage space, plus NVIDIA’s entry-level GeForce® MX110 graphics card which is decent for less-demanding gameplay.
The peripherals and other benefits included are the same as in previous offers.
Ending the list, but with the highest available discount, is this Inspiron 27 7000 all-in-one with space efficient A-frame stand, 27-inch monitor, Dell Cinema and a pop up webcam.
It comes with a powerful 10th Generation Intel® Core™ i7-10510U processor (8MB Cache, up to 4.9 GHz), and plenty of RAM for your apps and games.
So if you’re shopping for an all-in-one desktop right now, these offers are noteworthy. take a good look at all the specs and hopefully, you’ll find one that matches your needs.
Adobe Photoshop is one of the most sought-after image editing and manipulation software for most creators and it is easy to see why. However, like any other man-made app, it is not without its faults.
One such issue that users have to deal with is during exportation. They will get a message that reads: An unknown error occurred during Photoshop export. If you have experienced this issue, this article is for you.
Why does Photoshop keep saying program error when saving?
If you are having trouble saving your files and keep getting bombarded with an unknown error exporting Photoshop, below are some possible reasons:
Outdated app – If you are using an older version of Photoshop, the problem may lie there. You’re likely to experience this export issue because your version is missing some necessary updates.
Minimum system requirements – Sometimes, errors occur when there is a hardware disconnect between applications.
Your OS is outdated – Both the Photoshop app and your OS need to be updated to work seamlessly. An old OS version may not be supported with the new Photoshop features.
Corrupt file – If the file you are trying to export is damaged or corrupt in any way, you may have a Photoshop export problem.
Hard drive failure – If your hard drive is damaged or corrupted, you may have trouble exporting any files and getting them to save in that location.
Software conflict – There may be a problem with other similar software that is preventing you from exporting your file.
Problem with Photoshop servers – It’s also likely that there is an issue with Photoshop itself and you should contact Adobe customer support for further assistance.
How do I fix an unknown error has occurred when exporting in Photoshop?
Before moving on to more technical solutions, try these:
Ensure you are running the latest version of Photoshop.
Aside from the export error covered above, you may also come across a plethora of other Photoshop issues such as:
Blue screen Photoshop error – This is a common error that occurs when Photoshop freezes. It is normally caused by bad drivers.
Not enough RAM error – Users who encounter this error are known to commonly work with large files that are RAM-hungry.
Could not print because of a program error – This is an error that prevents Photoshop users from printing their photos. It usually happens because of an outdated application that’s missing critical updates.
Not a PNG file Photoshop error – This error limits you on the type of image formats you can use with Photoshop, specifically the PNG format.
Scratch disks are full – This error prevents users from saving files because there are too many temporary files that are occupying the hard drive space.
Adobe Photoshop error 16 – This is closely related to permission settings to Adobe folders and needs to be reset.
Hopefully one of the solutions above has come to your rescue and you can now export your files with no issues. The error may also manifest itself in other forms such as: Could not complete this operation. An unknown error has occurred when dealing with Photoshop gifs.
In the future, it is good practice to always ensure you have enough storage space when dealing with Photoshop. You can empty your scratch disk often so that you don’t run into Photoshop could not complete this operation an unknown error has occurred.
If you solved this issue using a method not mentioned here, we’d love to hear about it. Leave us a comment down below.
Before you make any other plans for the next few days of the current year, you might want to pick up a new laptop. As part of the season sale, you can save up a bunch on a Surface Pro X bundle.
That’s your chance to be one step ahead with a Surface Pro X. With a sleek design, Microsoft SQ® 1 and new Microsoft SQ® 2 chipsets, and edge-to-edge 13” touchscreen, it’s definitely worthy of your attention.
Even better, you are about to enjoy a black Surface Pro X + black Signature Type Cover with Slim Pen bundle.
Note: All the prices and offers in this article are subject to change, so be sure to check the official product page to get the latest deal. If the product/offer you’re looking for is no longer available, you can try to find it on its official manufacturer page or get another one from our list.
What’s the best deal on Surface Pro X?
Perfect for an active lifestyle, the slim Surface Pro X is just 7.3mm thin. Taking it with you while on the go won’t ever turn into a challenge.
Moreover, it comes with a generous 13” screen. This edge-to-edge PixelSense display touchscreen and Surface signature 3:2 ratio gives you the workspace you dream of for a long time.
No less important, keep in mind that it is powered by Qualcomm. The latest Microsoft SQ1 processor is already known for delivering multitasking laptop performance, faster LTE / Wi-Fi connectivity, and great battery life.
You can easily check the ultra slim, versatile design, and reliable power boxes, and that’s not all. It also includes a Type Cover and Pen.
With these being said, the Surface Pro X bundle is a solid pick, not to mention that Microsoft offers 60-day returns on all Surface products. Let us know if the low price tag on this bundle is tempting you as well.
There is no secret that Microsoft will kick off its Black Friday & Cyber Monday sale early. But, because we all know how quickly time flies, we’re always on the lookout for new and interesting deals to offer our readers.
We are here to help you find the latest savings on top-rated devices, including Microsoft Surface Book 3.
Many of you probably heard about the most powerful Surface laptop up to date. It simply combines the speed of a gaming laptop with the versatility of a regular tablet.
However, such a device doesn’t come cheap. In order to enjoy it without emptying your pockets, just take a closer look at our Microsoft Surface Book 3 deals listed below.
Note: All the prices and offers in this article are subject to change, so be sure to check the official product page to get the latest deal. If the product/offer you’re looking for is no longer available, you can try to find it on its official manufacturer page or get another one from our list.
What are the best Microsoft Surface Book 3 deals?
Your intentions are as clear as they can be – you are looking for a reliable Surfacelaptop and that’s precisely what you are about to get.
Microsoft Surface Book 3 gets its power from quad-core, 10th Gen Intel Core processors, which easily make it more than 50% faster than Surface Book 2 13.5”.
Don’t forget that you can turn Surface Book 3 into an efficient desktop workstation in mere seconds. You just need to take advantage of the new Surface Dock 2.
Simply plug in the Surface Connect cable to charge your device and access any external monitors, your mouse, the keyboard, and so on.
Even more, that’s your chance to increase your workflow and create your best work on Microsoft 365. Long story short, there’s no reason to deny that Microsoft Surface Book 3 is built for performance.
That’s why these great deals are worthy of your full attention:
We are seeing some interesting deals on a variety of other Microsoft products, and there are bound to be more to come as the Christmas holidays approach.
With these being said, just let us know what devices are you expecting to see this on sale by leaving your feedback in the comments area.
A good external SSD always comes in handy. But a good SSD is also quite expensive. Luckily, if you’re looking to add a new external SSD to your equipment, the timing can’t be better.
To save you some time (and money), we compiled a list of the best external SSD deals, so you can choose one that suits your needs.
If you change your mind about SSDs, we also have the best deals for HDDs, external storage media, and even memory cards.
How to choose the best external SSD?
Our team of expert testers, with a combined experience of 15 years, has tackled a variety of testing tasks for any device you could imagine.
Their experience comes into play as a very important element when choosing the products we described in this guide, and a large variety of factors have been taken into consideration.
The options that have been chosen offer great quality and cover the entire spectrum of price ranges, thus enabling everybody to find something that fits their needs both financially and otherwise.
Note: All the prices and offers in this article are subject to change, so be sure to check the official product page to get the latest deal. If the product or offer you’re looking for is no longer available, you can try to find it on its official manufacturer page or get another one from our list.
This small but sturdy Samsung T7 SSD transfers files nearly 9.5x faster than an external hard disk drive (HDD).
And while we’re talking about durability, the SSD can withstand drops from 6ft. That’s pretty impressive for a shock-resistant device.
Another winning feature is the Dynamic Thermal Guard technology. You don’t have to worry about your SSD overheating because it protects it by automatically slowing down data transfer if necessary.
This gadget comes with USB Type-C to C and USB Type-C to A cables, so you don’t have to worry about device limitations. You can use it with a lot of devices, including smartphones and tablets.
Whether you want to back-up sensitive data from your PC or smartphone, Sandisk 1TB Extreme will help you do that very fast.
With 1050MB/s read and 1000MB/s write speeds, this gadget will get even the largest files in a blink.
This device has a 5-year limited warranty, but you probably won’t need it as it’s safe for a 2-meter drop. In addition, it also has IP55 water and dust resistance.
Another thing you won’t have to worry about is privacy and security because of its password protection featuring 256‐bit AES military-grade hardware encryption.
SanDisk Extreme offers something that doesn’t usually go together with SSDs. And that’s portability and durability at the same time.
This ultra-portable SSD is also water and dust-resistant, with an IP55 rating. There are multiple storage options available, starting from 500GB to up to 2TB.
Western Digital’s popular My Passport series also has an SSD variant, which is enough for most people to consider getting this drive. It offers up to 2TB of storage, with file transfers of up to 540 MB/s.
The drive is also compatible with WD’s in-house utilities, like WD Backup, WD Security, social media and Cloud Storage import, and WD Drive Utilities. This is the version of the WD My Passport SSD with enhanced durability.
When it comes to features, this SSD offers the same capabilities as its relative but comes with a drop resistance of up to 2 meters.
Having a reliable wireless router is important, especially if you want to have a secure and fast network in your home or workspace.
While there are many great models and brands on the market, Netgear devices have been proven to be the most efficient ones.
All models from this company offer great performance and advanced features, which makes them perfect for home users and experts alike.
In today’s guide, we’re going to take a look at some of these devices, and help you find the best Netgear router for your network.
How we chose the best Netgear router
Our team of expert testers, with a combined experience of 15 years, has tackled a variety of testing tasks for any device you could imagine.
Their experience comes into play as a very important element when choosing the products we described in this guide, and a large variety of factors have been taken into consideration.
The options that have been chosen offer great quality and cover the entire spectrum of price ranges, thus enabling everybody to find something that fits their needs both financially and otherwise.
Netgear Nighthawk RAX120 is a high-end device that supports Wi-Fi 6 standards, thus offering unparalleled speed to its users at 6Gbps.
The router uses the 802.11ax standard, but it’s backward compatible, so you won’t have any compatibility issues.
Regarding the range, the device can cover up to 3500 square feet and support up to 30 devices. This model also has four Gigabit Ethernet ports and a single 1/2.5/5 Gbps port.
Two USB 3.0 ports are available as well, allowing you to share data from your flash drive with ease. As for compatibility, multi-gig Internet plans up to 2Gbps are supported, and the device will work with any modem.
Other features include MU-MIMO, Dynamic QoS, beamforming, dynamic QoS, guest Wi-Fi, DOS, firewall, VPN, and more.
Netgear Nighthawk RAX120 offers amazing features, incredible speed, and easy configuration thanks to the dedicated mobile app, so it’s a perfect choice for all types of users.
This model is optimized for gaming since it comes with DumaOS 3.0 and according to the manufacturer, it can reduce ping up to 93%, thus providing a lag-free gaming experience.
Wi-Fi 6 standard is fully supported, and the router can cover 2500 squire feet and support up to 25 devices simultaneously. It’s also worth mentioning that MU-MIMO and OFDMA features are available.
The device is equipped with a triple-core 1.5GHz processor, so it can handle 4K streaming and gaming with ease.
Of course, an Ethernet connection is supported, and there are four 1Gbps Ethernet ports that you can use, as well as a single USB 3.0 port.
To ensure that your connection is running smoothly at all times, there’s an Application QoS feature that will help you prioritize important apps.
Overall, Netgear Nighthawk Pro XR1000 is a great device, and a must-have if you’re a gamer or just a user that wants a stable and fast Wi-Fi connection.
This router is all about performance and stability. Wifi 6 compatible Netgear Nighthawk RAX40 will let you stream more of what you love from movies to games while downloading or transferring files. All that at 3Gbps.
The only thing more impressive than its speed is its versatility. The router is compatible with any ISP and it’s extremely easy to set up and customize in a matter of minutes.
Its USB 3.0 port further facilitates usage and it delivers a couple of additional bonuses such as a shared storage drive with allocated cloud space.
This Netgear Black Friday deal is one opportunity you wouldn’t want to miss. Enjoy a gigantic Wifi coverage that stretches to 7500 square feet and connect all the devices you want under one single network name.
Stream, surf, download, and transfer files at unprecedented satellite-powered speeds and forget all about ISP restrictions. This powerful router works with all Internet Provider plans including cable, satellite, fiber, and more.
You can also go wired if you prefer it that way – just choose one of the 5 Ethernet ports or use them all and get 4 more in the satellite.
Netgear Nighthawk X6S is a tri-band WiFi router that uses MU-MIMO and is also compatible with Amazon Echo/Alexa (R8000P).
The device is capable of speeds up to 4Gbps, and it comes with four gigabit Ethernet ports. USB 3.0 and 2.0 ports are available, allowing you to share your files over the network easily.
The range is suitable for very large homes, but if you prefer a wired connection, you’ll be pleased to hear that there are five Gigabit ports and a single WAN port.
Regarding the supported technologies, this model supports Beamforming+ for both 2.4GHz and 5GHz bands alike.
Guest Wi-Fi and VPN are also supported, as well as a double firewall (SPI and NAT), and denial of service attack protection.
Overall, Netgear Nighthawk X6S is an amazing router, especially if you need a tri-band device, so be sure to consider it.
Bottom runners
We covered some of the best Netgear routers, and all of them are amazing devices with great performance.
Unfortunately, not every device managed to make it to our list, but if you’re looking for a quality router that won’t break your bank, consider one of these models:
The server did not register with DCOM within the required timeout error occurs when DCOM software cannot register itself in a certain period.
This guide will discuss all solutions to help you fix the issue right after we discuss how the problem occurs in the first place.
What causes The server did not register with DCOM within the required timeout error?
Spotting the exact error that caused the issue could be challenging. However, there could be a few reasons behind the error:
Faulty certificate: If Microsoft Store Apps has a faulty certificate, it could cause the issue. To resolve that, you can run Windows Troubleshooter.
Firewall Settings: The external firewall could be why DCOM cannot connect, causing the issue; try disabling the firewall.
Administrator account: The admin account can also cause the issue so disabling the admin account might help.
Antivirus blocking the program: There is a possibility that your third-party antivirus is not allowing the app to access the DCOM server.
How do I fix the server did not register with DCOM within the required timeout?
Before diving into the in-depth solutions for this issue, try disabling the third-party firewall temporarily. And, if it seems to be the issue, use Windows Firewall instead to avoid the error.
1. Use Services
Press Windows + R to get the Run window.
Typeservices.msc and press Enter.
Go to Function Discovery Resource Publication and right-click on it to select Properties.
On the Properties tab, go to General, then Startup type.
Choose Automatic (Delayed Start).
Click Apply and OK.
Restart your computer.
2. Use Windows Update
Press Windows + I to get Settings.
Go to Windows Update, then Advanced Options.
Click Delivery Optimization.
Toggle off the switch beside Allow downloads from other PCs.
3. Use Windows Troubleshooter: fix faulty certificate of Windows Store Apps
Press the Windows key and type Troubleshoot. Click on Troubleshoot settings.
On the right pane, right-click on My computer and select Properties.
Go to COM Security, and click Edit Default.
Click Apply, then OK.
5. Reset DCOM from Component Services
Press Windows + R to get the Run console.
Type comexp.msc and press Enter.
Follow this path:
Component services\Computers
On the right pane, right-click on My computer and select Properties.
Go to the Default Properties tab, and uncheck Enable Distributed COM on this computer.
Click Apply, then OK.
Note: Ensure Windows Impersonation Level is set to Identify and Default Authentication Level is set to Connect.
6. Check Environment Variables in System Properties
Press Windows + R to get the Run window.
Type sysdm.cpl and hit Enter.
Go to the Advanced tab, and click Environmental Variables.
Locate Path under the System variables and double-click on it.
On the next window, select %SystemRoot%\System32\Wbem and click OK.
Restart your PC.
7. Use Registry Editor
Press Windows + R to get the Run console.
Type Regedit and hit Enter.
Noting that the GUID is the string that appears in the error, follow the path: HKEY_CLASSES_ROOT\CLSID\GUID
On the right pane, double-click AppID.
Copy the Value data and close the window.
Copy and paste the following address in the address bar: HKEY_CLASSES_ROOT\AppID\
Press Ctrl + F and paste the Value data you copied in step 5 to locate the AppID.
Right-click on AppID and click Permissions.
On the next window, click Add.
On Select Users or Groups window, click Advanced.
Now click Find Now.
Select LOCAL SERVICE and press OK.
Press OK on Select Users or Groups window.
On the Permissions window, select LOCAL SERVICE, and click Allow for Full Control.
Click Apply, then OK.
Restart your PC.
So, these are troubleshooting methods to fix the server did not register with DCOM within the required timeout error. Feel free to let us know which method worked for you in the comments section below.
Chances are you’re using a device that sooner or later will get filled up with all that memorabilia you hold dear. And, what’s a better way to expand the often-lacking internal storage with a small and tidy micro SD card?
Not to mention, the professional usage and enormous impact reliable external storage might have on your workflow. We decided to bring forth a collection of some limited deals for micro SD cards.
You can have a look at these below, and purchase them for your own use or as a perfect present for a friend or family member. Who doesn’t need extra memory in their phone or DSLR these days?
How do I find a micro SD card that best suits my needs?
Buying a micro SD card is a tricky affair if you aren’t aware of the various factors to look out for. First, identify the storage requirements.
You can find memory cards with both 128 GB and 256 GB capacity, with the latter costing more than the former. So it’s best that you find out the required storage and then proceed with the purchase.
Another factor to look out for is the transfer speed. Always choose a micro SD card that offers a decent speed, say 20-50 MB/s. In case you purchase one with below-par transfer capabilities, it would take a long time to move large files.
If you identify your requirements based on these two factors, finding the right micro SD card would be a cakewalk.
Note: All the prices and offers in this article are subject to change, so be sure to check the official product page to get the latest deal. If the product or offer you’re looking for is no longer available, you can try to find it on its official manufacturer page or get another one from our list.
This Sandisk micro SD card is one of the best deals this year. This memory card is usually best suited for Android-based devices, but it works with all kinds of operating systems.
The fast transfer speed helps a lot when it comes to moving large files. Also, keep in mind that the Sandisk ultra is shockproof, temperature-proof, water-resistant, and X-ray-proof.
Samsung MicroSD Evo is perfect for high-res photos, gaming, music, tablets, laptops, action cameras, DSLRs, drones, and smartphones, including all the latest models from Samsung.
The card has 100 MB/s and 90 MB/s read & write speeds respectively and a 10-year limited warranty.
You can use this smart piece of technology to record 4K videos on the new Video Cam you just bought.
Get your point-and-shoot camera or camcorder ready because this card is more than up to the task of storing your stand-still or video memories.
The SanDisk Ultra SDHC memory card can reach speeds of up to 80 MB/s and that’s very good as we’re talking about a Class 10 card.
This memory can take a lot of abuse since it’s shockproof, waterproof, temperature proof, magnet proof, and even X-Ray proof so you can leave it in the bag at airport scanning without risking anything.
With very high speed and reliability, the Samsung 32GB MicroSDXC EVO memory card can get under the skin of most mobile devices including drones and smartphones.
To be more specific, this card can read with 95 MB/s and write with a stunning 20 MB/s speed. It’s a pity that it’s just a 32 GB card but you will find higher capacities in our top too.
Although it’s a small card, this one is shockproof, waterproof, and high-temperature proof but be careful where you put it because you might lose it.
Sandisk’s card is compatible with microSDHC and microSDXC-supporting host devices, which includes all contemporary Android smartphones, DSLRs, and tablets.
Its operating temperature is from minus 25 degrees to 85 degrees Celsius and the card is also shockproof, waterproof, and X-ray-proof.
Sandisk Ultra 64GB Micro SDXC UHS-I Card with Adapter is one of the fastest Micro SDXC cards in the market so you should give it a shot.
This card boasts speeds up to 100 MB/s for reading and 60 MB/s for writing so, for instance, you will be able to transfer a 3 GB movie from the card on your laptop or PC in just 38 seconds.
This is a Class 10 card so you will be able to record even 4K UHD video, high-resolution pictures, mobile gaming, and audio files.
This tiny Samsung card is extremely sturdy and, if you ask us, it has the right capacity for a digital camera or a drone.
Get this 200 GB memory card on your smartphone and you will forget about any memory problems. Truth be told, the Sandisk Ultra 200GB Micro SDXC card could also work perfectly in a DSLR or any other camera for great amounts of recordings.
Moreover, it’s rated A1 for faster app performance which makes it ideal for storing mobile games.
You can easily use it on your laptop or PC with a card reader because it comes with an SD card adapter.
This card is the perfect external storage for professional photographers and content creators, substantially improving their workflow with amazing read/write speeds.
The Extreme in its name is granted by read speeds of up to 95MB/s and write speeds of up to 90MB/s. That’s really fast so a professional camera would be the perfect place for it.
As you might have guessed, the SanDisk card is shock-proof, temperature-proof, waterproof, and X-ray-proof.
Everybody wants a high-capacity, fast card in any mobile device, and not only so Samsung’s 256 GB MicroSDXC EVO Select memory card can come as a serious upgrade for any device.
As for the speed, the 100 MB/s & 90 MB/s read and write speeds respectively classify this high-tech card as the top part in its class.
It comes with a full-size adapter for use in cameras and laptop/ desktop PCs. This 256 GB micro SD card should be one of your first choices this year.
There’s an old saying which can be very helpful with memory cards: Don’t put all your eggs in the same basket. So why get a single 64 GB when you can get 2 32 GB cards at a better price?
The SanDisk deal implies 2 x 32 GB A1 rated cards that can suit any digital storage purposes like high-quality photos, videos, music, and more.
Of course, both of them come with SD adapters so you can easily copy their contents to your PC or laptop. Of course, you need a card reader for that.
This card is extremely cheap for a 128 GB Class 10 microSDXC memory card but it does have an 80 MB/s speed and up to 20 MB/s write speed with a UHS-1 interface.
The card is compatible with Nintendo Switch but it can also go with smartphones, drones, cameras, laptops, PCs, and other devices.
This is a top-of-the-line 256GB microSDXC Memory Card EVO Plus by Samsung with reading speeds up to 100 MB/s while writing speeds go up to 90 MB/s with the UHS-1 interface.
The card comes with an SD adapter and it is waterproof, temperature-proof, X-ray-proof, and magnet-proof.
The 256 GB is enough for storing about 12 hours of UHD video.
This is a professional-grade SD storage for 4K UHD and Full HD video enthusiasts.
The card has transfer speeds of up to 100MB/s and it’s shock-, temperature-, water-, and X-ray-proof.
Additionally, you can use the SanDisk Memory Zone app for easy file management and RescuePRO Deluxe data recovery software. This is one of the best 128 GB micro SD card deals you will come across this year.
At 400 GB capacity, this Sandisk card is like a hard drive in a tiny package. You’ll get to record and keep hours of FullHD video or tens of thousands of photos.
It’s great for all portable devices supporting this kind of storage size. Probably the best fit is in cameras and DSLRs.
It has up to 100 MB/s transfer speeds and lets you move up to 1200 photos in a minute. Its A1-rated app performance makes it great storage for mobile games.
These are some of the best deals on micro SD cards for 2022. Grab them before it’s too late.
A micro SD card has been there for a long time and, given the trend, will stay for years to come. Most of your devices will offer a dedicated slot for these, hence it’s best that you purchase one this sale season.
PowerShell is a handy, free task automation tool provided by Microsoft that lets you manage and, as you might’ve guessed from its name, automate your tasks on Windows with ease. However, that’s not all, though.
You can, for instance, also download internet files thanks to your PowerShell app. In this piece, we dive into the most straightforward method to get files with PowerShell. Here’s how you can get started.
How to download a file with PowerShell
One of the most common ways to download your file with PowerShell is by using the URL of the file you’d like to download. That’s precisely what we’ll be covering in this short guide. To complete your download, you’ll be using the Invoke-WebRequest cmdlet.
Also, before we head to the actual download, we’d also want to specify that you’ll need a specific destination where you can store the downloaded file. You’ll have to add a particular parameter to your cmdlet file.
Depending on where you’d like to download the files from and the place you’d like to put your files, replace the source and destination variable with the URL of the file you’d like to download and the place you’d like to download it to.
After you’ve launched the PowerShell, type in the following dummy command. This is what it will look like:
# Source file location$source = 'https://www.majorgeeks.com/files/details/4diskclean_free.html/4dskcln.exe'
# Destination to save the file$destination = 'C:\programfiles\newfolder'
#Download the file
Invoke-WebRequest -Uri $source -OutFile $destination
Here, the command downloads the file source from ‘https://www.majorgeeks.com/files/details/4diskclean_free.html/4dskcln.exe’, and then saves it to ‘c:\programfiles\newfolder’.
This should download the required files fairly simply. However, in some cases, you might get asked for login access before you can proceed with the download. You can do that by adding the -Credential parameter. Just add the following command to your code:
$credential = Get-Credential
Here’s what the complete command will look like now:
Downloading a file with PowerShell without any hassles
Downloading files with PowerShell doesn’t have to be super complicated. With the method we’ve explained above, we believe it was a breeze for you. However, don’t hit the brakes just now. PowerShell packs tons of commands that can help you do just about anything on your PC. So, don’t stop just now; keep exploring things out there.
Command Prompt is popular among normal users as well as professionals. It is a great way to complete your mundane tasks on the computer. It can run several commands, automate your tasks, and allow you to operate your PC via commands.
This guide will talk about DOS Command Prompt, how to use it, and the most popular commands you must know. Let’s begin!
What is DOS Command Prompt?
Command Prompt is a command-line interface in Windows computers that lets you control your computer via text commands. Most of the text commands automate tasks using batch files and scripts. These commands can also troubleshoot common Windows problems and perform advanced administrative functions.
Command Prompt is often called MS-DOS or the DOS prompt, but it is incorrect. Command Prompt is a program replicating command line abilities in MS-DOS but can’t be referred to as DOS.
How can I use Command Prompt?
You can use Command Prompt for various tasks, including checking and repairing system errors, moving a file, removing viruses, and creating a bootable media drive. All you need to do is fire up Command Prompt, type in the correct command, and press Enter to execute it.
To access Command Prompt, follow these steps:
First, press the Windows key and type CMD and select Run as administrator.
You will get a UAC prompt; click on Yes.
Now, the Command Prompt window will be open on your screen.
What are the most used commands on Command Prompt?
Before going through the popular command line utilities, make sure you keep these things in mind:
First, always run the command prompt as Administrator to avoid any error.
Please type or paste the command as mentioned for it to work properly
Press Enter after every command for it to execute.
Let’s check out some of the most used and helpful commands that you can keep handy:
1. Ping
To check whether there is network connectivity and reachability on your device, you can type the following command:
ping (website address)
2. System File Checker
SFC scan is a scan and repair tool that scans your computer for corrupt or missing files. Also, it replaces the damaged files with cached copies saved by the computer.
sfc/scannow
3. DISM
Deployment Image Servicing and Management fixes damaged or corrupted Windows operating system files and features directly via Windows online servers.
With the below-mentioned command-line shell command, you can establish connections to remote computers or remote desktop session host servers. mstsc /v:192.168.122.20
To launch and edit the RDP configuration file hostconnection.rdp, type this command: mstsc /edit hostconnection.rdp
6. Change the Directory
The command, when executed, helps you change the current working directory. In other words, with this, you can navigate to another folder on your computer.
To come out of a present directory C:\Windows\System32>cd\
To go to the following directory C:\>cd Windows\BrowserCore
7. Rename the file
REN and Rename are the same commands, and these are used interchangeably to rename a file or folder.
ren “original_filename.ext” “new_filename.ext”
8. Power Configuration
The command shows your computer’s power settings. It helps you manage and track the way your PC uses energy.
Intel Bluetooth usually enables users to connect wireless devices with desktops and laptops. This gives you the flexibility and dynamicity to use different devices easily.
However, some users are complaining that the Intel Wireless Bluetooth driver is showing an error message in the Device Manager. In this guide, we will equip you with everything needed to fix this issue.
Why does the Intel Wireless Bluetooth driver error occur?
The Intel Wireless Bluetooth driver error is a widespread issue that can be caused by different factors. Listed below are some of the common causes:
Driver issue: The Intel Wireless Bluetooth driver error codes 54, 43, or any other variations can be caused by problems with your driver. In some cases, it is due to unsigned drivers by Microsoft with the company promising to fix it. In other scenarios, it can be due to an outdated driver or a faulty update. You can fix this easily by reinstalling or updating the driver.
Fast startup feature: Some users have also been able to trace this issue to the fast startup feature. In this case, you need to uninstall your driver and disable the fast startup feature.
How can I fix Intel Wireless Bluetooth errors?
1. Use the generic driver
Press the Windows key + X and select the Device Manager option.
Double-click the Bluetooth option and right-click the Intel Wireless Bluetooth driver.
Select the Update driver option.
Now, choose Browse my computer for drivers.
Select Let me pick from a list of available drivers on my computer.
Choose the default driver and click Next.
The Intel Wireless Bluetooth driver error code 31 issue can be caused by an unsigned driver. The generic drivers by Microsoft are usually signed.
So, using the driver should fix the issue. Remember to restart your PC after making the changes.
2. Update the Intel Bluetooth drivers
Right-click the Start icon and select Device Manager.
Expand the Bluetooth option and right-click the Intel Wireless Bluetooth driver.
Choose the Update driver option.
Select the Search automatically for drivers option.
Wait for the search to complete and install any available updates.
If you are facing the Intel Wireless Bluetooth driver missing error or other versions of this issue, it might be because of an outdated driver. The issue has been fixed in the latest versions of the driver.
To avoid trouble and installing the wrong driver, you can also use an automated driver updater. Such a tool helps you to find driver updates automatically and install them before they can lead to problems.
3. Rollback driver
Launch the Device Manager and expand the Bluetooth option.
Double-click the Intel Wireless Bluetooth driver.
Now, click the Driver tab at the top.
Finally, click the Roll Back Driver button.
In a case where you started noticing the Intel Wireless Bluetooth driver error after updating your driver, you need to roll it back to fix this issue. You should restart your PC after doing this.
4. Reinstall the Bluetooth driver and disable Fast Startup
Open Device Manager, expand the Bluetooth option, and right-click the Intel Wireless Bluetooth driver.
Select the Uninstall device option.
Check the box for Delete the driver software for this device and click the Uninstall button to confirm.
Press the Windows key + S, type power plan, and select Choose a power plan.
Click Choose what the power buttons do in the left pane.
Click Change settings that are currently unavailable.
Uncheck the box for the Turn on fast startup (recommended) option.
Click the Save changes button and restart your PC.
Your PC should reinstall a working version of the driver when it restarts.
According to some users, the Intel Wireless Bluetooth driver error can be fixed by reinstalling the driver. However, you need to disable the fast startup feature that prevents PCs from turning off completely.
This solution signals the end of this extensive guide. We believe you now have all the right information needed to fix the Intel Wireless Bluetooth driver for good, provided you follow the steps carefully.
In case you have issues and don’t know how to properly update the drivers, you can visit our guide and learn how to install Bluetooth driver for Windows 11.
Feel free to let us know the solution that helped you fix this issue in the comments below.
When it comes to the News and Interests panel in Windows 10, the Widgets panel in Windows 11 will be a natural fit for you. Today, we will show you how to use Windows 11 widgets without signing in, so that you can take advantage of the swift user experience provided by them.
Are there new widgets in Windows 11?
There are quite a few new widgets that Windows 11 has brought for us. Below we have listed only some of them. Also, you may find out more about novel features in Windows 11.
The Entertainment Widget notifies you when new episodes of your favorite series, new episodes of new shows, and much more get uploaded.
If you are interested in finding out who will be participating next or which team won the most recent match, the Esports Widget makes it simple for fans, watchers, and newcomers to Esports to keep track of all of the most current matches.
In real-time, the Sports Widget keeps you up to date on everything from current scores and recent results to other highlights. Change yours to reflect your preferred leagues and teams to make it more personalized.
How can I use Windows 11 widgets without signing in?
NOTE
The steps here are for Windows 11 22H2 and would work on the previous iterations as well. There might be minor changes to the UI but the process remains rather straightforward.
Press Windows + I to open Settings, go to the Accounts tab, and click on Sign-in options.
Make sure the toggle next to For improved security, only allow Windows… is OFF. Then select Never from the drop-down menu underneath. If you can’t access the dropdown menu, disable Windows Hello.
Now, press Ctrl + Shift + Esc to open the Task Manager, navigate to the Startup tab, individually select the widgets that you want to run at startup, and click on Enable.
In the event that you’ve reached the end of the solution and are determined to remove your password, there are a few things you should be aware of before you disable your startup sign-in feature.
What are the security risks of not signing in at startup?
The first and most obvious security risk associated with deleting the password from your Windows 11 device is that it will grant access to anyone who is physically in close proximity to the computer without your knowledge.
Also, if it’s an administrator account on the PC and you remove the password, any malicious programs operating on your device would have greater access. To protect your online presence, check out the best website security software.
A general rule of thumb is that you should avoid using this strategy, even if it appears to be convenient and usable from any perspective. Microsoft itself discourages doing so because it exposes your device to a plethora of potential risks.
Besides, if you thought disabling passwords would fix issues with widgets, that’s not the case.
In order to improve our future posts, leave us a comment in the section below. Also, share your thoughts as well as other solutions that you have in mind.
If an application on your computer is trying to access the internet but is blocked by your Avast antivirus. Avast blocks the connection as it thinks it is unsafe or potentially harmful. However, if you think it is safe, you need to allow the connection on Avast.
In this guide, we will explain how to allow programs through the Avast Firewall. Additionally, we will discuss how to check, enable and disable application rules. Let’s start!
Click on the drop-down menu and click Add New Rule.
Enter the details and click Save.
That’s it; this is how you allow programs through Avast Firewall and configure how your antivirus behaves when the app tries to connect to the internet.
If you have questions regarding the guide, feel free to mention them in the comments below.
Known as “Insignia,” the project came to fruition on the 20-year anniversary of the launch of Xbox Live. Insignia is a free service for original Xbox consoles that replicates Xbox Live 1.0. and provides the same features that were present with it, including online multiplayer. (Note that access to Insignia is only available for Xbox consoles that have a certain softmod installed).
Insignia is still in beta form, and only for a few thousand members as it is presently available through invite only. Those interested can sign up on the Insignia website and wait for an invite.
25 games are compatible with Insignia’s online services at launch. Among them: MechAssault, Phantasy Star Online Episode I & II, and Crimson Skies: High Road to Revenge. More games will be added each month, and three new additions will arrive on November 21st. These are,
Star Wars Battlefront
Star Wars Battlefront II
Star Wars: The Clone Wars
The Insignia website states that it intends to eventually support the entire Xbox library. The launch marks the first time online functionality has been restored to these original Xbox games since 2010.
The Command and Conquer Generals options.ini file is a key component that determines how the game runs on modern systems. If you’re playing on Windows 10 and the game crashes or refuses to launch, chances are this file is either missing or corrupted. Fixing it can often get the game working again without further hassle.
The Generals options.ini file holds the main configuration settings for the game, such as screen resolution, detail levels, audio preferences, and performance tweaks. Without it, the game struggles to apply stable defaults and may crash on startup. Since Command and Conquer Generals is an older title, newer operating systems like Windows 10 sometimes fail to generate this file correctly.
Where to Find the options.ini File
Normally, the file is located in your Documents folder:
Documents → Command and Conquer Generals Data → options.ini
If the folder or file doesn’t exist, the game won’t boot properly. In that case, you’ll need to create it manually.
How do I get Command and Conquer Generals to work on Windows 10?
1. Create a new options.ini file
Go to the following folder: C:/Users/username/Documents/Command and Conquer Generals/ Data
Right-click anywhere inside it, select New > Text document.
Save the file and change the extension of your file from .txt to .ini (To do this, you must enable file extensions for known type of files).
Right-click the options.txt file and choose Rename from the list.
Now, rename it from options.txt to options.ini.
After creating a new options.ini file you can patch the game to version 1.04 if you want.
Try starting the game and see if it works.
One of our readers also recommended changing the resolution settings in the options.ini file but creating a new file as instructed in this procedure will also change the resolution.
2. Delete the dbghelp.dll file
Open the File Explorer and navigate to the path below: C:\Program Files (x86)\Origin Games\Command and Conquer Generals Zero Hour
Open either of the Command and Conquer General & Zero Hour folders and right-click the dbghelp.dll file.
Now, select the Delete option.
If you are facing the Command and Conquer Generals Directx 8.1 error on Windows 10, the steps below should help you fix it.
3. Install the Genpatcher
Press the Windows key, type virus, and select the Virus & threat protection option.
Click Manage settings.
Toggle the switch for Real-time protection backward to disable it. If you have any other third-party antivirus, make sure you disable it.
Press Windows key + R, enter regedit, and Click OK.
In the left pane, navigate to the following path: HKEY_LOCAL_MACHINE/SYSTEM/CurrentControlSet/Services/secdrv
In the right pane, double-click the secdrv DWORD.
Set its Value data to 2 and click OK to save changes.
Close the Registry Editor.
Keep in mind that this solution won’t work for you unless you can access the key from Step 2. If you don’t have this key on your PC, you can just skip this solution.
5. Use Command Prompt
Click the Start icon, type cmd, and click on Run as administrator under Command Prompt.
Type the command below and press Enter to run it: sc config secdrv start= auto
Finally, wait for the command to finish running and try the game alone.
6. Install legacy components
Open Search and type Turn Windows features on or off. Select the first result.
Expand Legacy Components and ensure DirectPlay is checked.
Save changes.
We have come to the end of this guide. With the information in this guide, you should be able to fix issues with Command and Conquer Generals on Windows 10.
If the issue still persists, you can get the Ultimate edition on Origin that is optimized for newer systems.
This isn’t the only game from the series that is having issues, and users reported various Red Alert 2 issues on Windows.
In the comments below, let us know the solution that helped you fix this issue.
iSpring is well-known for its course design software, and for this shopping season, the company has prepared major discounts.
Join us while we take a quick overview of iSpring’s products and their discounts in this guide.
What are the best iSpring deals to get for this season?
iSpring Presenter
iSpring Presenter allows you to create courses in PowerPoint quickly and without too much hassle. Just create your slides, and click the Publish button in PowerPoint. It’s simple as that!
All your effects will remain unaffected and you’ll be able to create SCORM, AICC, and xAPI courses with ease. The software supports quizzes as well as video lectures, allowing you to make high-quality courses.
The courses that you create are compatible with all types of devices, so you can take them on any computer, phone, or tablet. Regarding the supported LMSs, iSpring Presenter is fully compatible with more than 150 services.
If you’re looking to create professional courses with PowerPoint, don’t hesitate to get an iSpring Presenter subscription at a discounted price.
iSpring Quizmaker
If you’re looking to create quizzes quickly, then you might want to give QuizMaker a chance. There are 14 types of questions available, allowing you to create quizzes suitable for any type of organization.
This software also has an answer feedback feature, and it allows you to give detailed answers to the users and help them learn from their mistakes.
Speaking of learning, info slides are available as well, and they allow you to enhance your questions with slides with detailed information.
Branching paths are also available, and they allow you to direct users to different sections depending on their performance. This is perfect if you want to provide additional information to employees that might be struggling with certain questions.
The software also supports audio questions and equations, and it’s compatible with 156 LMSs, so it’s a perfect choice for any type of online learning.
iSpring Converter Pro
PowerPoint presentations are great, but you can’t use them without accompanying software. This is where iSpring Converter Pro 11 comes to help. With it, you can convert PowerPoint presentations to HTML5 or MP4 format.
The software is installed as a PowerPoint add-in, and you can quickly access it from the PowerPoint ribbon. Using this tool, you’ll preserve 167 different types of animations and 48 effects.
The same applies to other content including video, audio, shapes, tables, images, text, buttons, and SmartArt objects.
Since the software converts the presentations to HTML5 format, it will work on all devices, and you can even protect your presentations with a watermark, password, time limit, and domain restriction.
If you need to share your presentations with other users and you want to ensure maximum compatibility, iSpring Converter Pro 11 is a must-have.
iSpring Cam Pro
Creating narrated tutorials is easy, and you can do it with iSpring Cam Pro. With it, you can easily add audio narration or create picture-in-picture screencasts.
The software also supports annotations, allowing you to add visual guides and tips to learners. Keystroke and mouse recording are also available, so your employees will be able to track your input during the presentation.
Screen recording is available as well and you can even add various elements to the canvas to help users focus on certain elements. Of course, the multi-layer timeline is available, allowing you to easily edit your videos.
Lastly, we have to mention that you can save and export your videos directly to LMS or YouTube for quick and easy sharing, so don’t hesitate to try this software out.
If you prefer a less interactive type of media, then iSpring Flip might be just what you need. With it, you can turn any Word, PDF, and PowerPoint document into an HTML5 book.
All books can be accessed on the web, and they’ll work perfectly on mobile devices as well. This software will ensure that all your fonts and images are crystal-clear, so they will look perfect on any device.
It’s worth mentioning that all converted books support links, so you can add them if you want your employees to further research a specific topic.
Once you convert a presentation, you can share it to any LMS that meets SCORM 1.2, SCORM 2004, AICC, xAPI, or cmi5 standard. Of course, you can assign books to learners and follow their reading progress at any time.
Discounts
All of these products are on discount, starting from November 19th to November 28th, and you can get a one-year subscription at great rates for this holiday season.
iSpring Presenter comes bundled with all of the products mentioned in this guide, except iSpring Flip, and it comes with the largest discount. If you don’t need the advanced functionality, you can always get products individually during the discount period.
iSpring
Create professional online courses and share them on over 150 LMSs with iSpring software.
Overall, iSpring offers amazing software that will turn your PowerPoint presentation easily into powerful courses, and it’s perfect for both small and large companies that use LMSs or any user that wants to create tutorials and share them online.
OneDrive is the default cloud solution to securely store your files on Windows PC. It serves some other purposes such as protecting your files against ransomware.
However, some users are complaining that they can’t Access OneDrive on their PC. In this guide, we have prepared the fixes that will help you regain access to your files, just like we did with the file syncing issue on OneDrive.
Why can’t I access my OneDrive?
The reasons you can’t access OneDrive are not many. It can either be due to issues with the app or a problem with your PC. Below are some of the causes:
Server downtime: The first thing to check if you can’t access the OneDrive link online is the server status. If the server is down then, you have to wait till the issue is resolved.
Corrupt browser cookies: If you are trying to access OneDrive on your browser and it is not going through, it might be due to corrupt browser data. You need to clear the cookies using an effective cookie cleaner to get fix the issue.
Issues with the OneDrive app: Another possible reason OneDrive can’t open files on desktop is some glitches with the app. Resetting the app or removing it with one of the best uninstaller software should do the trick.
What can I do if I can’t access OneDrive?
Try the following preliminary troubleshooting steps:
Temporarily disable your antivirus. Here’s what to do in order to quickly disable Windows Defender, for example.
Try incognito mode on your browser.
If these prerequisite checks do not solve the issue, you can now proceed to the ensuing fixes.
1. Reset the app
Press the Windows key + R to open the run utility.
Type the command below in the run box and click OK. %localappdata%\Microsoft\OneDrive\onedrive.exe /reset
The app will reset and show in the system tray after some minutes.
If you can’t access OneDrive, it might be due to some changes you made to the app. This can cause glitches within the app. Resetting the app will return all settings to default and solve the problem.
The app will reset and show in the system tray after some minutes. If you want more details on using the reset command, check out this step-by-step OneDrive reset guide.
2. Turn off Controlled folder access
Press the Windows key, type virus, and select Virus & threat protection.
Click Manage settings.
Choose Manage controlled folder access under the Controlled folder access section.
Toggle the switch under Controlled folder access backward to disable it.
Controlled folder access is one of the Windows Security features for protecting your files. It acts like a sort of folder encryption tool. However, it might be the reason you can’t access OneDrive or some of the folders there.
Thus, you need to disable the feature to fix this issue.
Launch your browser and click the menu button in the top right corner.
Select the History option.
Now, click Clear recent history…
Click the Time range dropdown at the top and select Everything.
Finally, check the box for Cookies and click the OK button.
Most times, if you can’t access OneDrive on browsers like Firefox, it is down to corrupt cookies and other browser data. Many users have been able to fix this issue by clearing their cookies. Thus, you should give it a try too.
If you want to avoid the stress of having to clear your cookies and other browser data one after the other, you can employ the services of CCleaner.
This impressive, lightweight third-party tool removes all unwanted browser data with just a few clicks of the mouse. CCleaner is not just limited to browser data, as it eliminates just about any junk file.
Lastly, it also works as a software uninstaller for removing apps and their most hidden components. It just might be the only tool you need to keep your PC optimized.
4. Uninstall and reinstall OneDrive
Press the Windows key + I and select the Apps option.
Select the Microsoft OneDrive option and click the Uninstall button.
Follow the onscreen instructions to complete the removal.
If you still can’t sign into or access OneDrive due to error code 0x8004def7 or other factors, it is advisable to reinstall the app. The new app you will download should be devoid of this problem.
5. Use another cloud storage service
If you want a quicker solution to the can’t access OneDrive issue than troubleshooting the problems our recommendation is to switch to Sync.com.
Sync.com is a very user-friendly cloud storage and file-sharing tool. It uses end-to-end encrypted technology to keep your database accessible only to you. So there’s a minor chance that your database gets corrupted and that you get blocked from accessing it.
What’s more, recovering deleted files and previous versions of any file, at any time, is extremely hassle-free.
Sync.com
With Sync, your important files are stored safely in the cloud and easily accessible only to you anytime, anywhere.
Not being able to access your OneDrive account can have devastating effects. This is because it prevents you from accessing important files that you might need urgently.
Thankfully, the fixes in this guide have proven effective for solving the problem. You only need to follow the instructions strictly and everything should be fine.
If you need a list of the best file syncing software you can use as an alternative to OneDrive, check the carefully-curated tools in our guide for the top options you can get today.
This isn’t the only issue you can encounter, and we have a guide on how to fix error 1001 in OneDrive, so don’t miss it.
Feel free to let us know the solution that helped you fix this issue in the comments below.
Yesterday, Microsoft Teams added a new feature, Sign Language View in Public Preview. The Microsoft Teams Calling, Meeting, and Devices team has been working on creating “a best-in-class experience” for users with hearing impairment.
Sign Language View in Teams
The team’s efforts were majorly community-driven, as they depended on feedback from affected parties and incorporated the concerns and needs they highlighted into the design rather than building it from scratch without consulting users of the end product.
While the team is still in the process of improving the overall meeting experience for the Deaf and Hard of Hearing (D/HH) community, they have made a new entry that has gotten them a step closer.
According to Microsoft:
Sign Language View, which will enable you to prioritize up to two other participants’ videos so they stay visible and in a consistent location throughout the meeting.
With this feature in place, both interpreters’ and other signers’ video feeds will be placed in a consistent location and the video feeds will also be sizable enough or sign language to be visible.
It will also allow participants to have up to two other signers in view throughout each meeting and finally, it will also cut down on repetitive tasks such as pinning interpreters and turning on captions whenever you hop on a meeting. Your settings can be saved for future use via the new Accessibility pane in the Settings menu.
Once you have enabled the feature, prioritized video streams will feature at the right aspect ratio with the highest available quality automatically. However, certain aspects like Sign Language View and captioning are user-specific, meaning other meeting participants will not be affected when you make these changes.
What happens if someone shares content during the meeting? The prioritized interpreter’s video feed changes position. However, this will not affect the quality of the video. It will also be larger compared to those of other participants.
What’s more, the feed of the participant that you have prioritized remains at the center of attention provided they keep their video on. You can also pin other participants’ video feeds, this will not impact the designated signer’s position or size in the display.
Both the Sign Language View and the Accessibility Settings Pane are available in Microsoft Teams Public Preview but will hit broad availability for the Teams desktop and web clients for commercial and GCC customers in the coming weeks.
DLL files play a critical role in the effective functioning of apps on the computer, and an issue with one file can affect several programs since these are usually shared. And many users reported that mfc100.dll is not found in Windows.
The error is usually encountered when opening an application, and the complete message reads: The program can’t start because mfc100.dll is missing from your computer. So, let’s find out all about the problem and how you can install mfc100.dll.
Why is Mfc100.dll missing on my PC?
Here are some of the reasons why mfc100.dll is not found or missing:
Programs making unrecognizable changes – Since the file is shared by multiple programs, it’s likely that one of these has made changes that left mfc100.dll unusable.
Corrupt system files – In many cases, corrupt system files were the reason behind mfc100.dll not being found in Windows.
File deleted inadvertently – Oftentimes, users mistakenly delete the file, or the same could be done by programs with access to it, and getting mfc100.dll again is the only viable solution.
PC infected by malware – Malware or virus can also cause issues with the DLL files in some cases.
Also, here are some of the programs usually affected by the error:
msvcr100.dll is not found for Developer –If you are having trouble installing the SQL Developer, download mfc100.dll from Microsoft.
msvcr100.dll is not found for WAMP – The error prevents the installation of WAMP. And getting Visual C++ Redistributable should do in this case.
msvcr100.dll is not found DeSmuME – Many users reported that this Nintendo emulator doesn’t launch and throws this error instead.
msvcr100.dll is not found for youtube-dl –The problem is usually encountered when installing the youtube-dl.
What can I do if Mfc100.dll is not found?
Before you try the slightly complex solutions, here are a few quick ones that might help:
Restart the computer since, in some cases, it’s a trivial bug in the OS that is eliminated after a fresh boot. Here’s what to do if your computer is stuck on restarting.
Check if mfc100.dll is in the Recycle Bin and restore it. Also, make sure that the file is in the dedicated folder for DLL files or the one for the program.
Run a malware scan using the built-in Windows Security, or go with a reliable antivirus. In case malware/virus is found, remove it.
If these didn’t work, try the fixes listed next.
1. Use a dedicated troubleshooter
Oftentimes, DLL errors can be hard to troubleshoot, especially for non-tech-savvy users. And it takes a great deal of time and effort to try and test all methods found online. Specialized repair software will greatly reduce this time and streamline the repair process.
2. Download the Microsoft Visual C++ Service Redistributable package
Just make sure to choose the correct version depending on the architecture of the OS. Though for Windows 11, you will need an x64-bit package since the OS doesn’t support x32-bit.
3. Run the DISM tool and SFC scan
Press Windows + R to open Run, type cmd, and hit Ctrl + Shift + Enter.
Click Yes in the UAC prompt.
Now, type/paste the following two commands and hit Enter: DISM /Online /Cleanup-Image /ScanHealthDISM /Online /Cleanup-Image /RestoreHealth
Once done, execute the following command to run the SFC scan: sfc /scannow
After you are done running the DISM tool and SFC scan, check whether mfc100.dll is still not found. If that’s the case, head to the next method.
Press Windows + R to open Run, type appwiz.cpl in the text field, and click OK.
Now, locate the application that’s persistently throwing the error, select it, and then click on Uninstall.
Follow the on-screen instructions to complete the uninstall process.
Once done, reinstall the app from a reliable source, for instance, the official website or Microsoft Store.
Applications usually have the required DLL files, which are automatically installed when you complete the program’s setup process. So, if mfc100.dll is not found, reinstalling the app should work.
Run the setup and wait for a while until it’s ready.
Next, click on Accept to acknowledge the license terms.
Choose the Upgrade this PC now option, and then click on Next.
Now, wait for the download to complete, and follow the instructions to complete the in-place upgrade.
An in-place upgrade is an effective troubleshooting method that eliminates a range of issues, some intricate enough to bypass the most extensive scans. And you wouldn’t lose any personal files or installed apps.
VRAM is a critical component since the performance of most games, and certain graphics-intensive applications depend on it. And for those running low on it, it’s essential to know how to increase the VRAM in Windows 10.
VRAM or Video Random Access Memory should be set ideally for best performance. So it’s imperative to identify the current VRAM and learn how to change shared GPU memory in Windows 10.
What happens if you have too little VRAM?
Too little VRAM basically affects the performance of games or applications that extensively rely on it. In case you run out of VRAM, the affected application will lag and stutter, and the FPS will drop.
The lag happens because the OS now relies on system memory (RAM) for the same task, and it is considerably slower than VRAM. In some rare cases, the application may crash as well.
How do I increase VRAM in Windows 10?
1. Increase VRAM via BIOS
The best and easiest way to increase the dedicated VRAM in Windows 10 is to use BIOS settings.
Usually, the default value for VRAM is either 64MB or 128MB, and you can choose 256MB or 512MB to via BIOS. Also, in case you were wondering how to increase VRAM in NVIDIA, this method would do.
1. Restart your PC and hit either F2, F5, F8 or Del to enter BIOS. Check the manufacturer’s website or the manual that came along with the computer for the exact key on your PC.
2. Now click on Advanced, Advanced Options or anything that looks similar.
3. Look for VGA Share Memory Size, Graphics Settings, Video Settings, or anything similar and click on it.
4. Choose Pre-Allocated VRAM and change the value to one that best fits your needs. If it’s a dropdown menu, choose one from the list.
5. Save changes and restart your PC.
Now, you know how to increase VRAM in BIOS. This is often the preferred method for users since it has a good chance of success and should be the first thing you try.
However, you might be wondering how to increase VRAM in Windows 10 without BIOS, and there’s actually a way for that.
2. Increase dedicated VRAM via Registry Editor (integrated Intel GPUs)
Press Windows + R to open Run, type regedit, and then hit Enter.
Click Yes in the UAC prompt.
Paste the following path in the address bar and hit Enter:Computer\HKEY_LOCAL_MACHINE\SOFTWARE\Intel
Right-click on the Intel entry in the navigation pane, hover the cursor over New, select Key, and then name it GMM.
Next, select the GMM key, right-click on the empty portion, hover the cursor over New, select DWORD (32-bit) Value, and then name it DedicatedSegmentSize.
Double-click on the DedicatedSegmentSize DWORD, enter a value between 0 and 512 under Value data, and then click on OK to save the changes.
You now know how to increase the dedicated video RAM for Intel HD Graphics, but there’s a catch with this method. It doesn’t really increase the VRAM but gives applications the appearance that it has been increased to eliminate compatibility issues.
Usually, the system automatically adjusts the amount of VRAM needed by any application at any given time. Sometimes, when you need just a little bit more to run an app or a game, you can fake a VRAM increase through Registry Editor.
Though, don’t expect any drastic improvement in terms of performance since the BIOS method is the only sure-shot chance at increasing VRAM in Windows 10. Also, if you were wondering how to increase VRAM using CMD, that, too, does it via Registry.
Increasing the VRAM in Windows 10 through BIOS or Registry Editor is a nifty solution that may come in handy sometimes, but if you are looking for real horsepower under the hood, then we suggest buying a dedicated graphics card.
If you’re rocking a dedicated GPU, even an older one, the results are much better compared to any brand-new integrated one. A dedicated GPU has way more VRAM and computing power overall, which helps when playing games or editing videos on the computer.
You will find yourself experiencing FPS drops most of the time during gameplay, and your video editors will take ages to load your meshes, especially when 3D modeling.
Your OS consists of many processes important for the normal functioning of the device. Taskhostw.exe is one such process.
In most cases, it runs normally, but there are a few exceptions where it triggers excess resource consumption. A few other users even complain that it stops the device from shutting down.
What causes Taskhostw.exe high CPU usage?
Taskhost.exe is a Windows system process that serves as a host process for many Windows tasks. A few elements can trigger its high CPU use. However, we must also note that for many users, it remains unclear what the actual triggers are.
Here are the two known causes of Taskhostw.exe high CPU usage:
Malware – Once a device is infected, you can expect it to trigger random odd behavior, and high CPU usage is on this list. A thorough scan with a reliable antivirus is recommended.
Bad system files– If you have corrupted essential OS files, it may trigger this problem.
Because Taskhost.exe can take any format that a dynamic link library file demands, it uploads multiple instances, each catering to certain DLL-based services.
This is how Taskhost ends up monopolizing lots of system resources which in turn causes high CPU usage. A couple of solutions can eliminate this frustrating error, as you will see shortly.
What is a Taskhostw exe?
Taskhost.exe is a process that hosts various Windows processes running from a dynamic link library instead of the conventional .exes (executable files).
Libraries (.dlls) can only run through .exe files, and they must rely on the Taskhost to support their execution.
Note that Taskhost.exe file is not malware. However, cunning developers of worms, viruses, and trojans sometimes name various malware processes Taskhost.exe to trick unsuspecting users.
Now let’s go directly into how to fix the Taskhost.exe high CPU problem.
How can I fix Taskhostw.exe high CPU issues?
1. Fix corrupted DLL files
Press Ctrl + Alt + Del.
Click Task Manager.
Click on the Performance tab, and look at the graphs under the CPU (the computer’s processor).
To track down apps/systems triggering the CPU strain, click on the Details, then click on the CPU tab to sort the results in that column in descending order.
Then look for the process(es) repeatedly showing high usage (ignore the system idle process).
Right-click on each of these processes as necessary and choose End task.
In most cases, the challenge arises due to some .DLL files getting corrupted, making it impossible for Taskhostw.exe to open them on demand.
To fix your system, locate all the error-ridden DLL files and either replace or erase them. You can view in-depth performance data from the Windows resource monitor either from the system logs or in real time.
It displays details about the utilization of hardware (CPU, disk, memory, and network) and software and hardware usage in real time.
You can use it to identify the programs/processes slowing down your PC and stop them.
You can also use a dedicated third-party tool to repair any corrupted .DLL files from your system. It scans and automatically fixes the files.
2. Reset the Windows reliability monitor
Open Control Panel.
Click System and Security.
Now select Security and Maintenance.
Select the View reliability history hyperlink under the Maintenance tab.
Click on View all problem reports (near the bottom).
Select Clear all problem reports in the next window.
Then click Clear all when prompted by the next dialog box.
Check if the Taskhostw.exe high CPU usage is resolved.
Though not exactly popular, the reliability monitor feature has been part of the Windows operating system for some time.
It keeps an eye on the system’s functionality and stability and will report any critical occurrences affecting your PC.
Ironically, despite playing a crucial role in system maintenance, it can be the source of troubles on your PC, such as high CPU usage. To fix the problem, do the following:
Hopefully, your CPU usage will return to normal after performing these steps.
3. Check for corruption in system files
Locate the search box on your taskbar and type PowerShell, then right-click on Windows PowerShell and choose Run as administrator, then Yes.
Now type the following commandand hit Enter: dism.exe /Online /Cleanup-image /Restorehealth
DISM will try to find and replace any corrupted files. Wait for the process to finish, and then restart your PC.
Next, type the command below and hit Enter. sfc /scannow
SFC will run and replace the affected files.
Restart your PC.
Problematic system files might also contribute to the Taskhost.exe high CPU error. You can check the status of these files and use the right tools to repair/replace those affected.
The powerful Deployment Image Service & Management Tool (DISM) is the first utility for this purpose.
Select Virus & threat protection from Protection Areas.
Click on Scan Options, then select Windows Defender Offline Scan and click the Scan now button.
Finally, your PC will restart, and the scanning procedure will commence.
Since hackers may hijack the file and use it to corrupt and open countless other processes and put extra strain on your CPU, start with a virus check.
This will remove any traces of stressful infections on your computer and free up the CPU. You can use the built-in Defender or a reliable antivirus and make sure its database is updated before starting.
We recommend you use a third-party antivirus solution enhanced with more extensive machine learning capabilities across multiple layers of protection.
Locate the search box on your Taskbar and type restore, then from the displayed results, click Create a restore point.
Go to the System Protection option and select System Restore, then click OK.
Select a restore point and click Next.
Click Finish.
Let the system run the restore. It will restart after it’s done.
See if your computer is running normally.
If the Taskhostw.exe high CPU issue arose after making some changes to your PC, for example, installing a new App or a driver/Windows update, it could be that your modification is what brought issues.
The utility is an integral component of Windows; thus, we wouldn’t encourage you to remove it. We hope you managed to fix the problem with Taskhost.exe with one of our solutions.
Please write us a comment below if you have any other suggestions or solutions that we should add to our guide.
You might have experienced problems with the WiFi connection; more specifically, your computer won’t stay connected to a WiFi network. As it happens, the system connects to the wireless G networks, but it keeps disconnecting after a few seconds if you connect to the wireless N network in Windows 10.
In some cases, users have reported not being able to find the wireless network in the first place. A few solutions in this guide will also come in handy.
Why won’t my PC stay connected to WiFi?
If your computer won’t stay connected to a WiFi network, a few elements may have contributed to this. On top of the list of triggers, we have the following:
Driver issues – It is possible that your network drivers are outdated, corrupted, or bad. In this case, you may have to replace them.
Antivirus compatibility – You may have conflicting issues with the antivirus and the OS. We recommend using only the most compatible anti-malware software with Windows.
Issues with your service provider – In this case, there may be nothing you can do other than wait it out.
Peripherals – In some cases, connected devices, like phones, may conflict with your WiFi connection. In such cases, they must be detached.
Carefully follow the steps posted below, and you should be able to fix the connection to the wireless N network.
How do I fix a wireless network connection in Windows 10?
Before you proceed with the solutions suggested in this article, we recommend that you do the following:
Restarting the device serves to reboot some processes, which may, in turn, resolve any WiFi problems you are experiencing.
If you have a phone connected to your computer or any other peripheral, remove it and see if this stabilizes your WiFi connection.
1. Reinstall the adapter driver
Right-click on the Start menu and select Device Manager.
Expand the Network Adapter section, then right-click on your WiFi adapter and select Uninstall device.
Select Uninstall to confirm the choice.
Right-click on the Network adapters category and select Scan for hardware changes.
Alternatively, to save time and ensure you’re downloading the right driver, use third-party dedicated tools that will do the job for you.
Outbyte Driver Updater is such a tool. It scans the system for outdated drivers, then suggests actions you should take depending on what it finds on the system.
Besides, this simple software can help you detect outdated drivers and recommend downloading the latest compatible components.
Outbyte Driver Updater
Have your adapter driver updated along with all other outdated drivers found on your PC.
Click on your antivirus icon, hover over Avast shields Control and select Disable for 10 minutes (This step varies for different antivirus software).
Try reconnecting the WiFi and see if the problem persists.
If your computer won’t stay connected to a WiFi connection, disabling the antivirus might help.
This is only a workaround, and we don’t recommend disabling the antivirus while online. Rather use software that does not interfere with other processes while offering full-time protection.
You should know that more effective antiviruses are compatible with your Windows PC so that you can use a more lightweight solution.
In this article, we explore the error code 0x800700b7. System Restore is an invaluable tool that restores Windows to an earlier date. The utility enables you to undo system changes.
However, System Restore doesn’t always work for some Windows users and returns an error message stating: System Restore did not complete successfully. This can include the 0x800700b7 code.
What does error code 0x800700b7 mean?
This error means that there has been a problem with the Restore process. It is usually followed by the message: Windows couldn’t complete the requested changes, and it appears that certain Windows components are damaged.
This code can also appear as a Windows Update error and, more recently, as a Windows Subsystem for Android in Windows 11.
There are a few triggers for this error, and on top of the list are the following:
Antivirus software – The 0x800700b7 error can be due to antivirus software interfering with System Restore or incomplete software installations, leaving invalid registry entries.
Damaged installation – If your installation is damaged, then you might encounter the System Restore did not complete successfully message when trying to restore your PC, and this is a trigger for error code 0x800700b7.
Bad system files – Being so diverse, it’s hard to pinpoint this error to a single cause, but most are related to corrupted system files that need fixing to resolve the 0x800700b7 error.
Update problems – This critical error appears when you’re trying to update your OS, when you want to restore it to a different point, or now, in Windows 11, when installing a subsystem.
Here are a few potential fixes for the 0x800700b7 error for your Windows devices.
How can I fix the System Restore error 0x800700b7?
1. Use specialized software
If you’re dealing with system errors such as 0x800700b7 then specialized software might be able to help you. These tools are able to scan, identify, and quickly replace any broken system file.
2. Uninstall and reinstall software
Click the Start button and select Settings.
Select Apps from the list.
Click on the recently installed app and choose Uninstall.
Next, check if the error persists and if not, try reinstalling the app, with full settings.
This problem might be caused by apps not being installed properly because the process was somehow interrupted.
So, make sure you uninstall the ones you’ve recently installed and restart the process. Also, if they have some optional components you’ve left out, this time, include them.
Click the Windows button, type cmd, and select Run as administrator to run Command Prompt with administrative privileges.
Next, paste the following command and press Enter: sfc /scannow
If SFC repairs files, the Command Prompt will state: Windows Resource Protection found corrupt files and successfully repaired them. Restart Windows if the SFC does fix something.
4. Run the Check Disk utility
Select the Start button, type cmd, and click on Run as administrator to run Command Prompt with full privileges.
Paste the following command and press Enter to run it: chkdsk /r
Check Disk might then fix some corrupt entries. If it does, it might also request that you restart Windows.
This procedure will check any disk errors and attempt to repair them, but it will take a little while, depending on your drive size, so wait until the procedure finishes.
5. Restore Windows 10 in Safe Mode
First, press the Power button on the Start menu.
Hold the Shift key and then select Restart.
Windows will reboot and open its Advanced Startup options. Press the Troubleshoot button.
Now, select Advanced options to open further settings.
Select Startup Settings and press the Restart button to reboot.
Press the 4 key to start Windows in Safe Mode.
After restarting, type system restore in Cortana’s search box. Select Create a restore point.
Press the System Restore button.
Now select Choose a different restore point if available, and click the Next button.
Select a listed system restore point and press the Next and Finish buttons.
Safe Mode is a great troubleshooting mode for Windows. System Restore might work in Safe Mode. In this case, you can restore Windows to a date when you experienced no issues in System Restore.
6. Turn off the antivirus software
First, right-click the third-party antivirus icon and click the required option to start the tool. In our example, it’s Bitdefender, and the option is Show.
Press the Protection button from the left pane and click on Open from the Antivirus section.
Select the Advanced tab and toggle off the Bitdefender shield button from the right.
Then select the duration of the deactivation and hit the OK button. 5 or 15 minutes would be more than enough to confirm that System Restore works without antivirus protection.
Try to see if System Restore works now.
Third-party anti-virus software can block System Restore from accessing flagged files. As such, disabling the antivirus can also be a potential fix for the 0x800700b7 error.
The solution above is just an example of how to deactivate an antivirus temporarily. With your antivirus, the settings to do that might be completely different
Some of our readers reported that the Norton antivirus software blocks System Restore from making any changes to the utility so try deactivating it temporarily.
Alternatively, you can remove the anti-virus software from the Windows startup with the Task Manager’s Start-up tab.
7. Delete the Task Cache key from the Registry
Press the Windows key + R to start Run, type regedit, and press Enter to launch the Registry Editor.
Navigate to this registry path: Computer\HKEY_LOCAL_MACHINE\SOFTWARE\Microsoft\Windows NT\CurrentVersion\Schedule\TaskCache
First, back up the TaskCache registry key. Right-click TaskCache and select Export on its context menu.
Enter a title for the backup file, select a folder for it, and press the Save button.
Next, navigate to the following path: Computer\HKEY_LOCAL_MACHINE\SOFTWARE\Microsoft\Windows NT\CurrentVersion\Schedule\TaskCache\Tree\Microsoft\Windows
Right-click the Windows key and click Delete on its context menu.
Press the Yes button to confirm, and then close the Registry Editor.
Restart your laptop or desktop.
Deleting the Task Cache key from the registry has fixed the 0x800700b7 error for some Windows users.
Those are a few remedies that might kick-start System Restore so you can revert Windows to previous dates. All the errors with the code 0x800700b7 have a common ground in missing or corrupted system files.
Error 0xc0000188 is associated with an affected PC’s Event Viewer. The complete error message says Session Perfdiag Logger Stopped Due to the Following Error: 0xc0000188.
If you’re encountering this, we’ll explain why it’s happening and how to fix it, so stay with us.
On your desktop window, click the Windows icon, type cmd, and select Run as administrator.
In the Command Prompt window, type the following command keys and hit Enter: DISM.exe /Online /Cleanup-image /Scanhealth
Now, type the following code and hit Enter: sfc /scannow
Exit Command Prompt and reboot the PC.
If you want to try other methods for the above procedure, there is dedicated software to detect corrupt or missing OS files and automatically find healthy elements as replacements.
4. Run PC in Clean Boot State
Press Windows + R to open the Run dialog, type msconfig, and press Enter.
Navigate to the Services section, tich Hide all Microsoft services, and click on Disable all.
Navigate to the Startup section; locate and click on Open Task Manager.
Right-click on any task that is enabled, and select Disable.
Click OK to finish up the process.
Exit the program and restart your system.
That is as far as we will go with solutions to this error. If you have followed the guide, we hope you have successfully fixed it.
Some users have reported the error message Session perfdiag logger stopped due to the following error: 0xc0000188. You should note that the solutions we have given will also come in handy. If you also got a PerfDiag Logger 0xC0000188 error, you should try any of the above fixes.
Let us know in the comments what has worked for you.
An average Blu-ray movie can take up to 25GB of storage space which makes it essential to have external hard drives with at least 2TB or more storage. In the last few years, external hard drives have become cheaper and cheaper, and hard drive manufacturers are offering great deals on storage devices.
If you’re more inclined to use your HDD on a variety of devices, then we recommend investing in a good cross-platform HDD, which will offer you this capability.
In case you want the best speeds available, then going for a USB SSD is the better option.
Even more, to ensure that your data is constantly protected from any damage, choosing a good external hard drive backup software is always a good idea. To save you some time, we have taken the liberty to research and found some of the best deals on 2TB external hard drives.
The Seagate Portable 2TB ensures that you will always have enough space to hold your apps, music, photos, documents, and videos without worrying about them becoming corrupted.
The device ensures speedy transfers with a USB 3.0 interface which works with an 18-inch USB cable that is included in the package.
To ensure that you won’t have any issues across time, you also get a 1-year rescue service.
This 2TB HDD from WD offers your Mac device more than enough space to store all files without worrying about any of it getting lost or corrupted on the system.
This device ensures great compatibility as it has USB-C and USB 3.1 compatibility.
The metal cover protects your data from any shocks, while also making the HDD look great, and you also have two colorways to choose from.
The WD Elements is a compact external hard drive offering 2TB of storage space without burning your pocket.
The design is simple, and the drive itself works well with computers, PlayStation 4, and other devices compatible with external storage.
For connectivity, it comes with a USB 3.0 and USB 2.0 port and spins at 5400rpm while offering a steady 100 MBps reading and 95MBps writing speed in real-life performance tests.
The 2TB portable USB HDD from Transcend is another good option if you’re interested in investing in this type of device.
With a more affordable price than the other options we presented in this list, the 2TB storage capacity offers you enough space to store all your files, and the USB 3.1 interface ensures good transfer speeds between the devices.
You can choose from 3 colorways available, and also comes with Transcend Elite data management software and the RecoverRx data recovery software.
The Toshiba Canvio Advanced comes with the same 2TB of storage space and offers a similar kind of transfer speed that is 117 MBps reading and 114 MBps writing speed over a USB 3.0 port.
However, the Advanced tag offers a little extra. It comes in 4 different colors with a glossy finish along with Auto-backup software and Password protection software integrated.
If the auto backup and password protection is something you want, then the Toshiba Canvio Advanced is a better choice over the Canvio Basic drive.
Armor A60 is built like a tank and comes with a military-grade shockproof case that can withstand accidental drops and protect your data from accidental water splashes as well.
It comes with 2TB of storage space and is compatible with PC and gaming consoles.
It is one of the fastest hard drives in the segment offering stable 104 MBps of writing and 114 MBps of reading speed.
As you can see, our list includes a variety of powerful external HDD options which cover the entire price spectrum and offer a wide range of features. As the prices can be a bit high normally, especially if you want to invest in a good external HDD, you can check out a broader selection of the best external HDD with Black Friday deals.
Feel free to let us know in the comments section which one you chose and why.


 NOTE













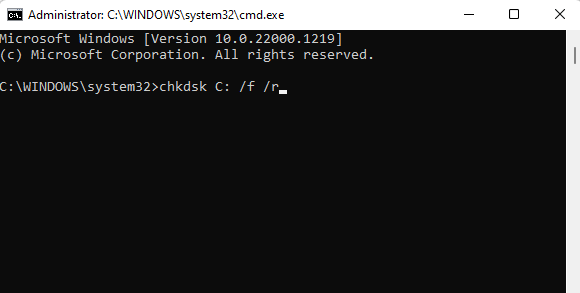


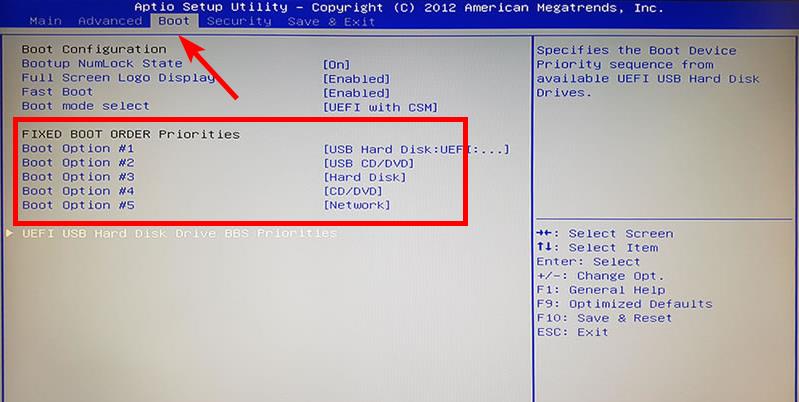
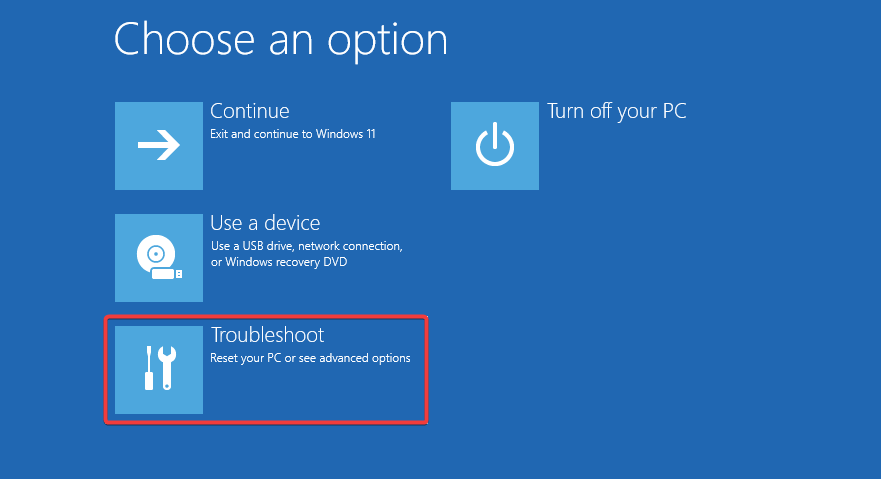
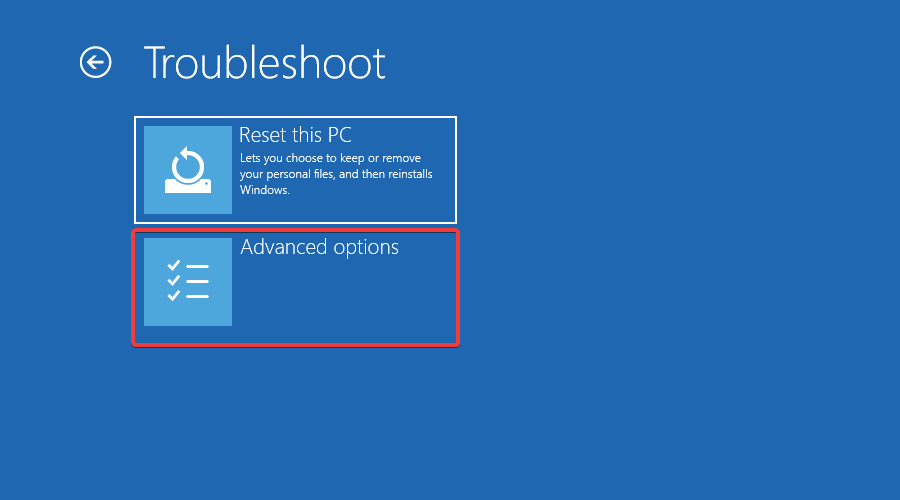

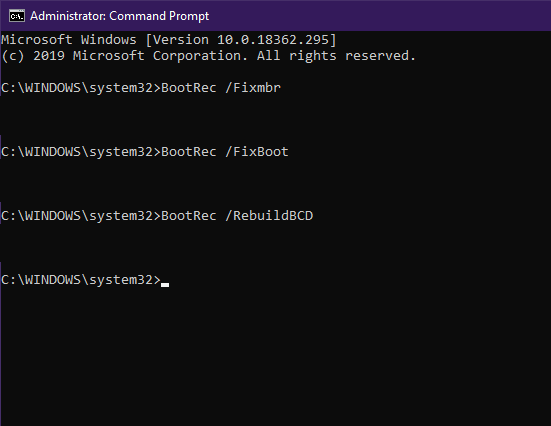


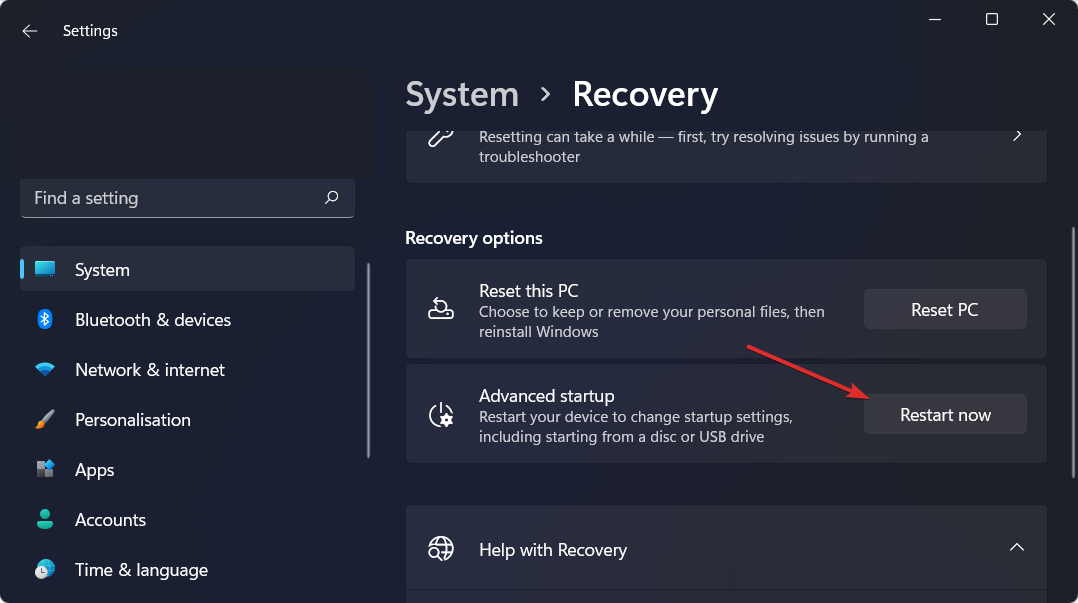






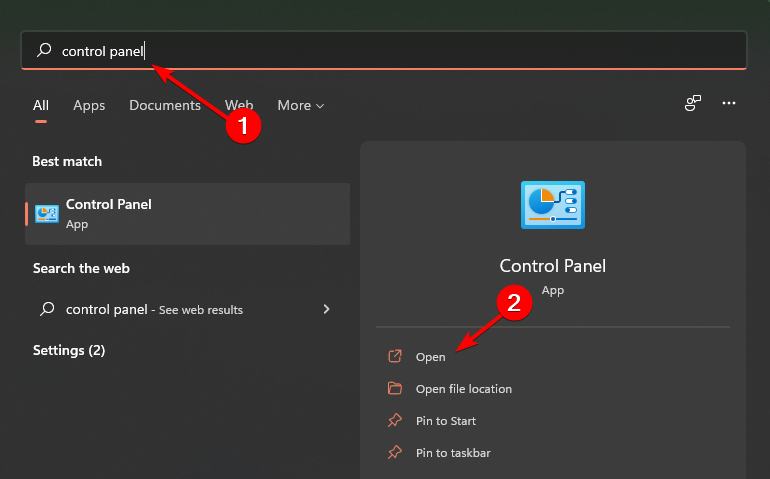



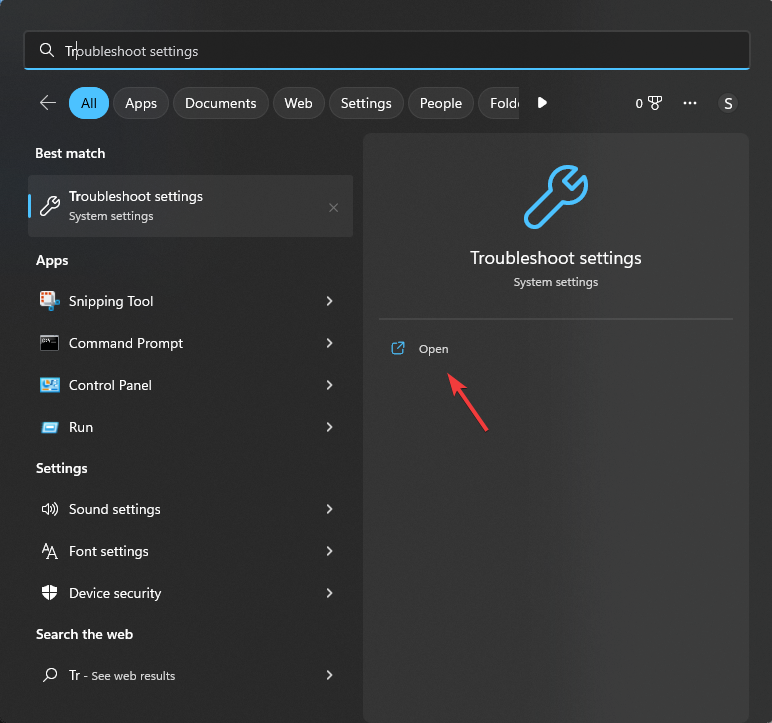


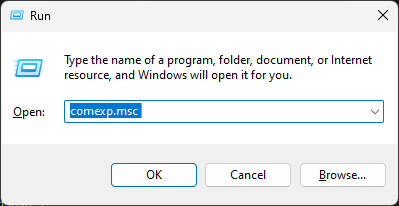





 You can get a list of installed programs on your computer and