Desktop Window Manager High Memory Usage: 4 Tested Fixes

Many have complained regarding Desktop Window Manager and high memory usage, and since this is a core Windows process, this can be a problem. However, the solution is simpler than you think.

Why is Desktop Window Manager using so much memory?

Bugs with File Explorer or driver issues can cause this problem. Certain performance settings can also cause this problem.

How do I fix the Desktop Windows Manager high memory usage?

Before trying anything else, restart your PC. You can also try keeping your system up to date. In some cases, a malware scan can also help with this problem.

1. Restart File Explorer from Task Manager

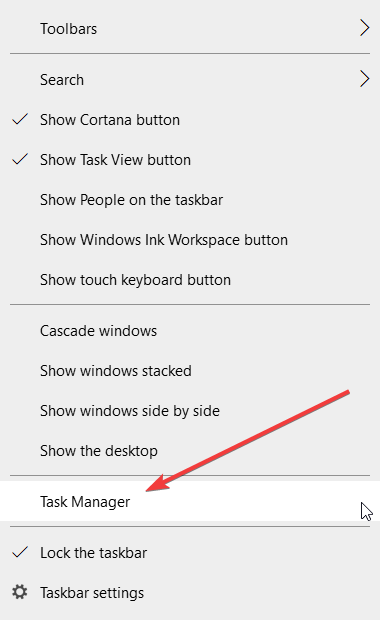
  1. 1. Right-click on a free space from your taskbar, and select Task Manager.

    desktop-window-manager-high-memory
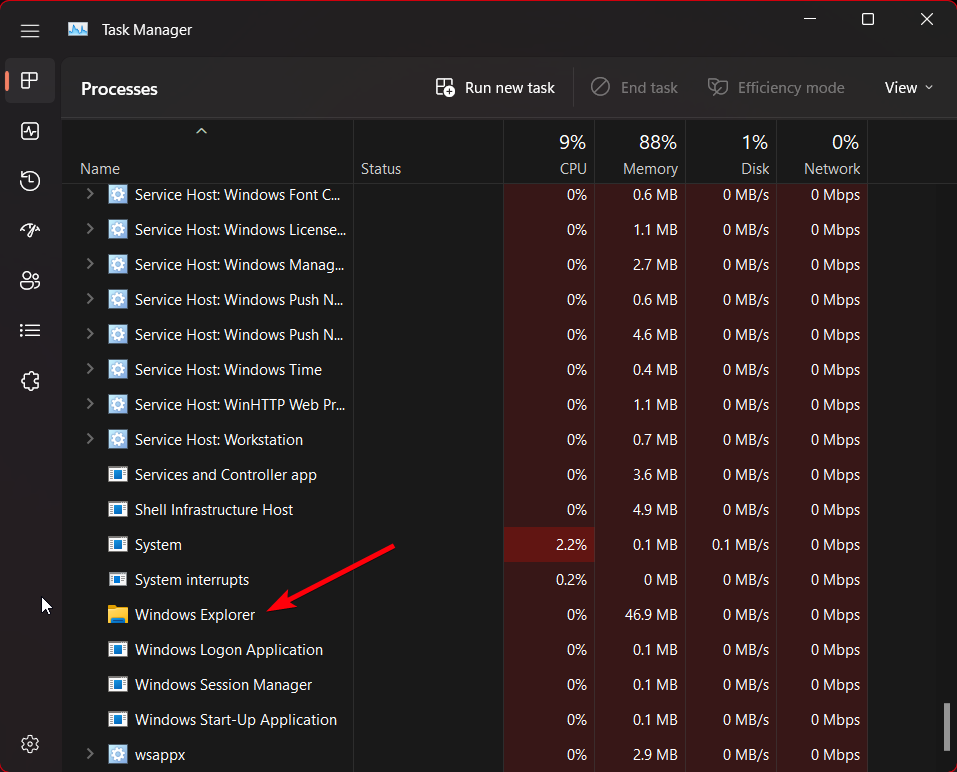
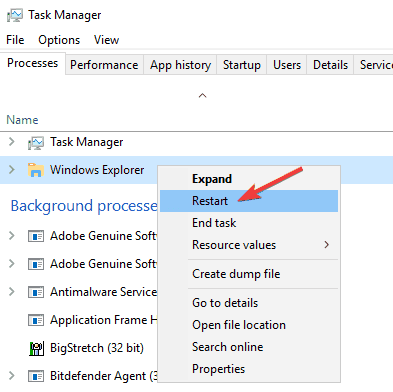
  2. 2. Locate the Windows Explorer process and click on the Restart button from the lower right part of your screen.

    desktop-window-manager-high-memory
  3. 3. Now check for Desktop Window Manager’s high memory.

2. Update the Intel graphics driver

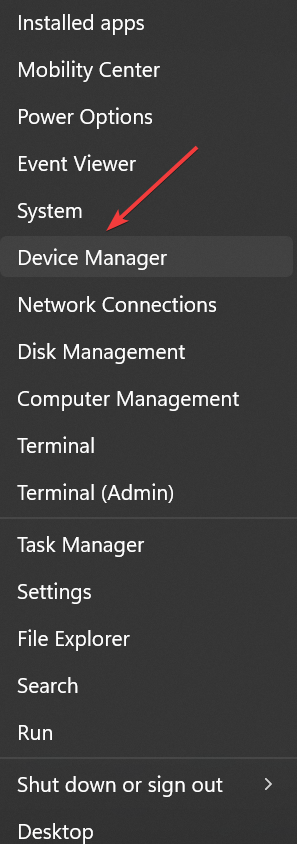
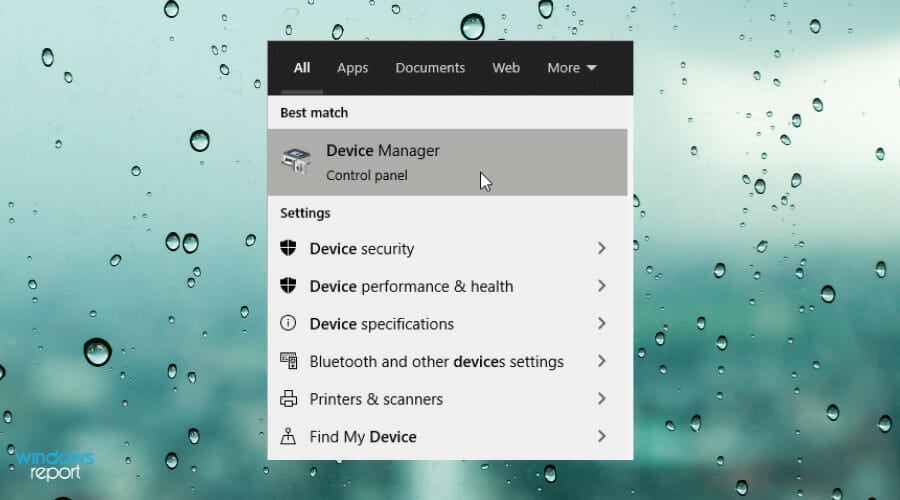
  1. Press Windows + X to open the Power User menu, and select Device Manager.device manager
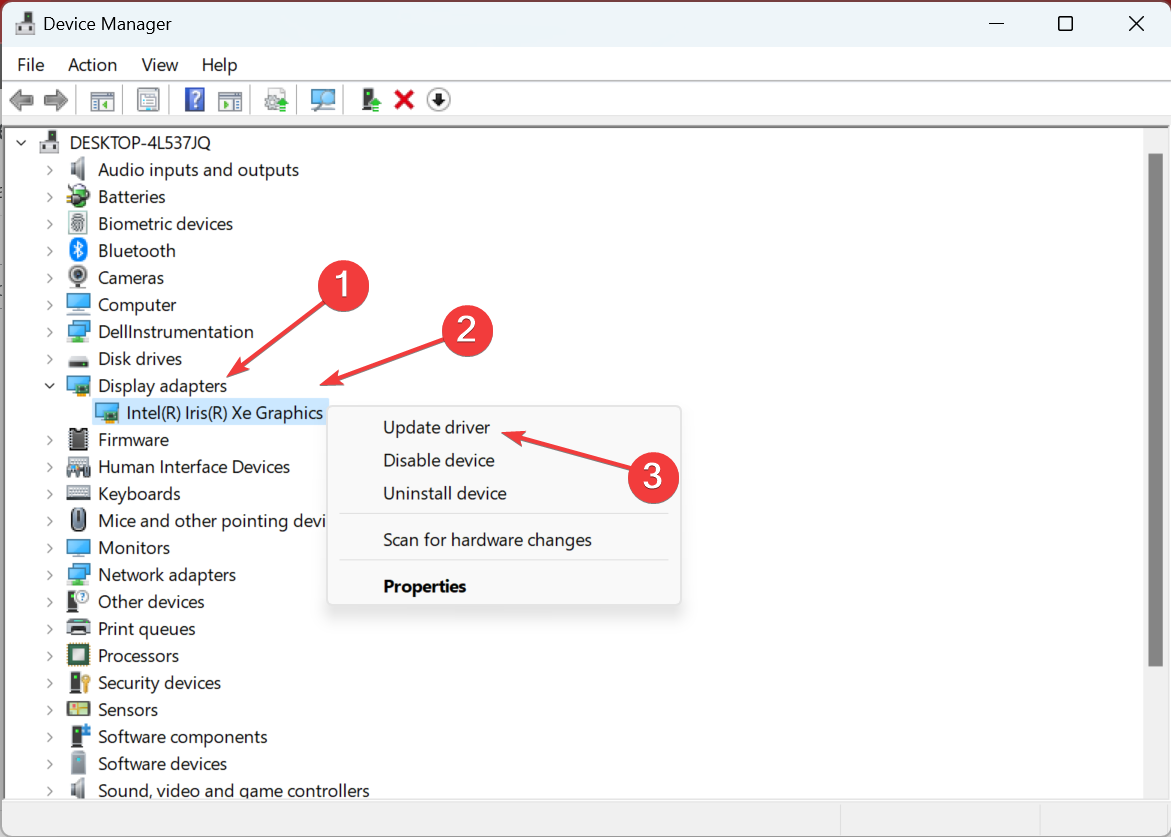
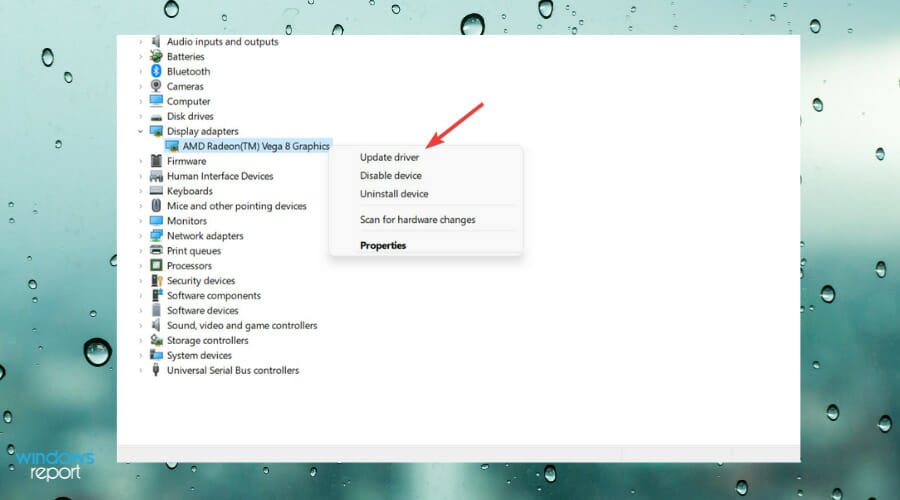
  2. Expand Display adapters, right-click on the graphics driver, and select Update driver from the menu.update driver to fix Desktop Window Manager high memory
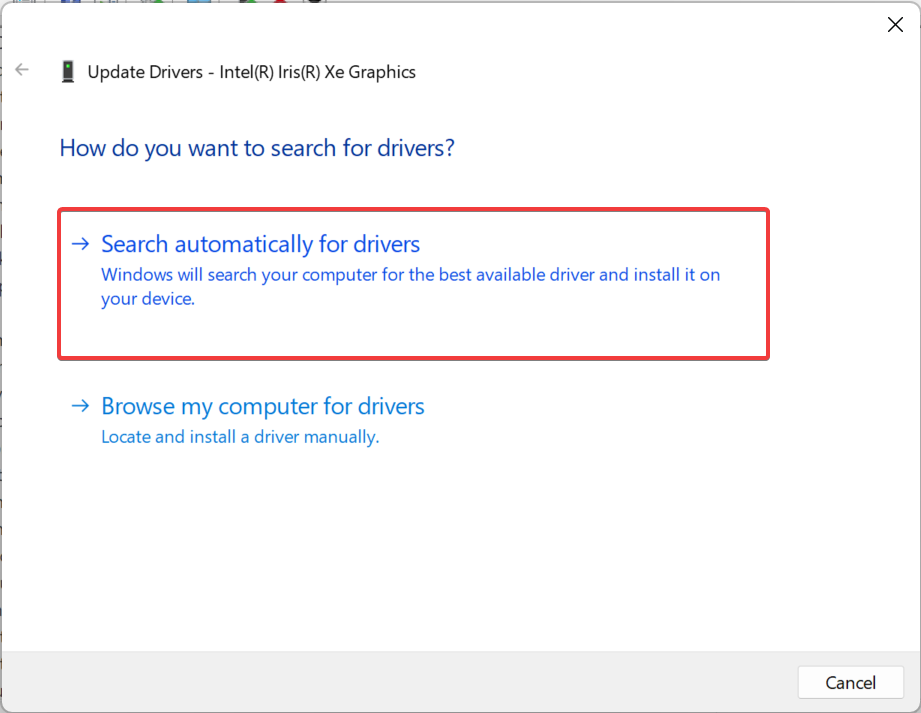
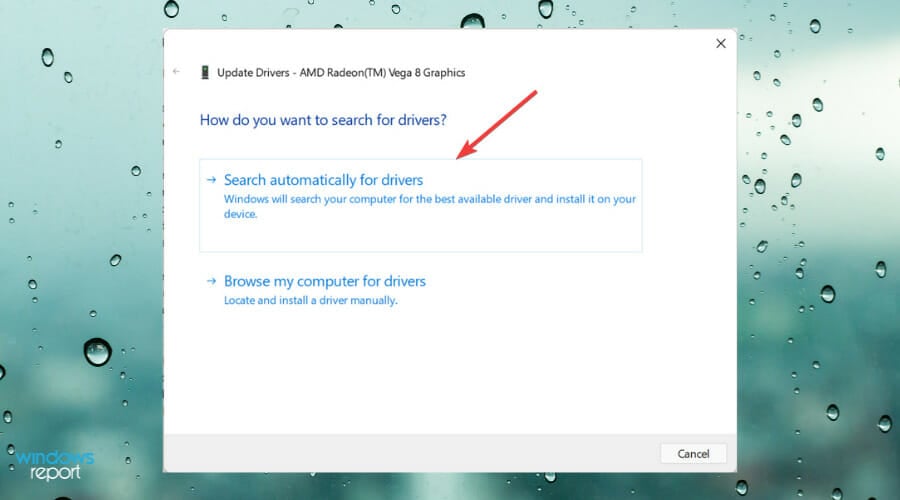
  3. Select Search automatically for drivers and wait for Windows to install the best one.search automatically for drivers

Though Windows is more than capable of keeping the drivers up-to-date, you may have to manually install the driver in cases like these. Also, the problem has been acknowledged by Intel, and the recommended solution is to update the graphics driver.

To avoid any driver issues, we recommend you use an automated driver updater utility, such as Fortect Driver Updater. This lightweight tool uses a frequently updated driver database to find the perfect version for your hardware.

It is easy to use, and you can set it up and let it run in the background. It can update, install, and fix corrupt drivers individually and in bulk.

⇒ Get Fortect Driver Updater

3. Change the performance options

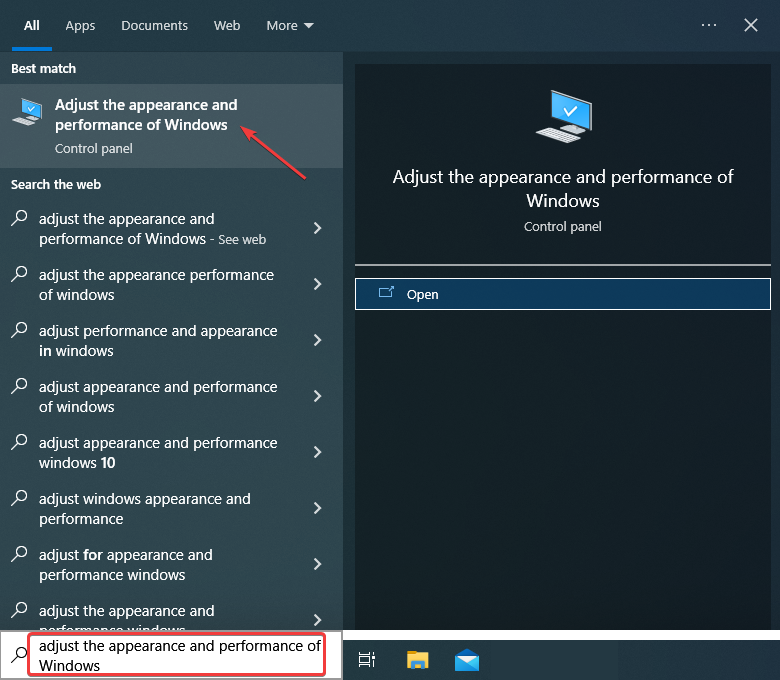
  1. Press Windows + S, type Adjust the appearance and performance of Windows, and click on the relevant search result.performance and appearance
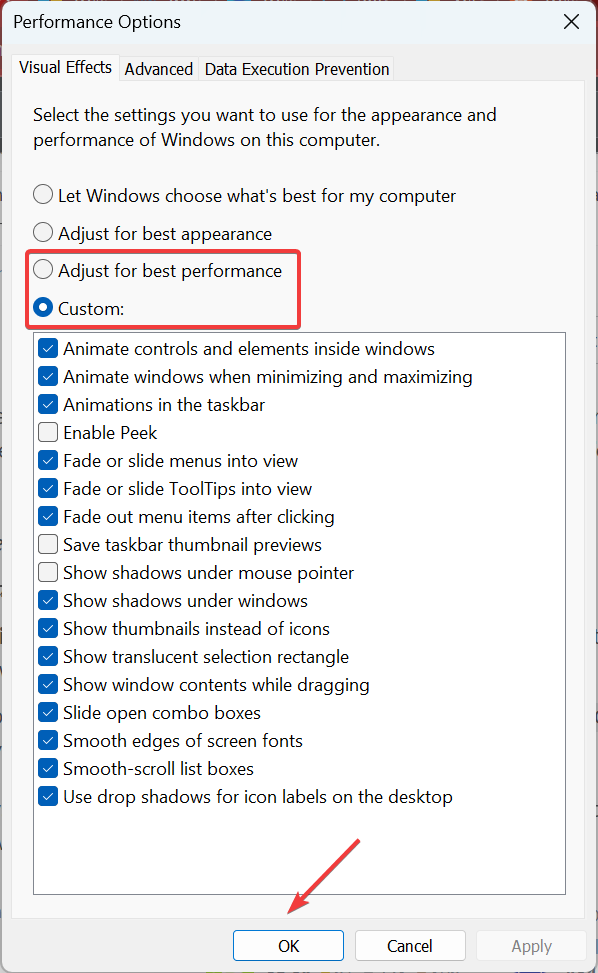
  2. Now, either choose Adjust for best performance or Custom, and then click OK to save the changes. If you go with the latter, make sure to select the features that you want, though try to keep it minimal.adjust for best performance Desktop Window Manager high memory

4. Disable Fast Startup

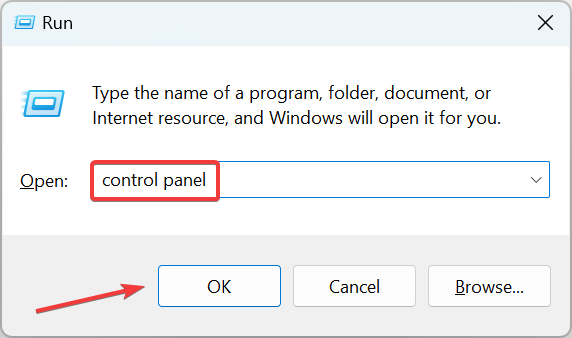
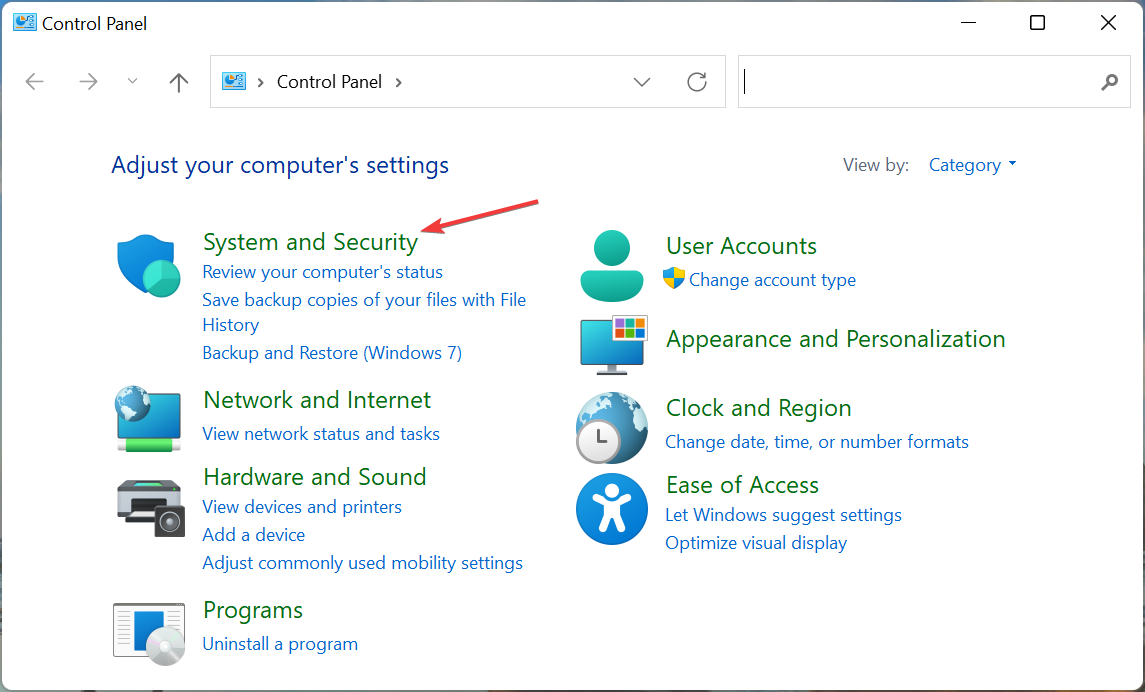
  1. Press Windows + R to open Run, type control panel, and hit Enter.control panel
  2. Click on System and Security.system and security
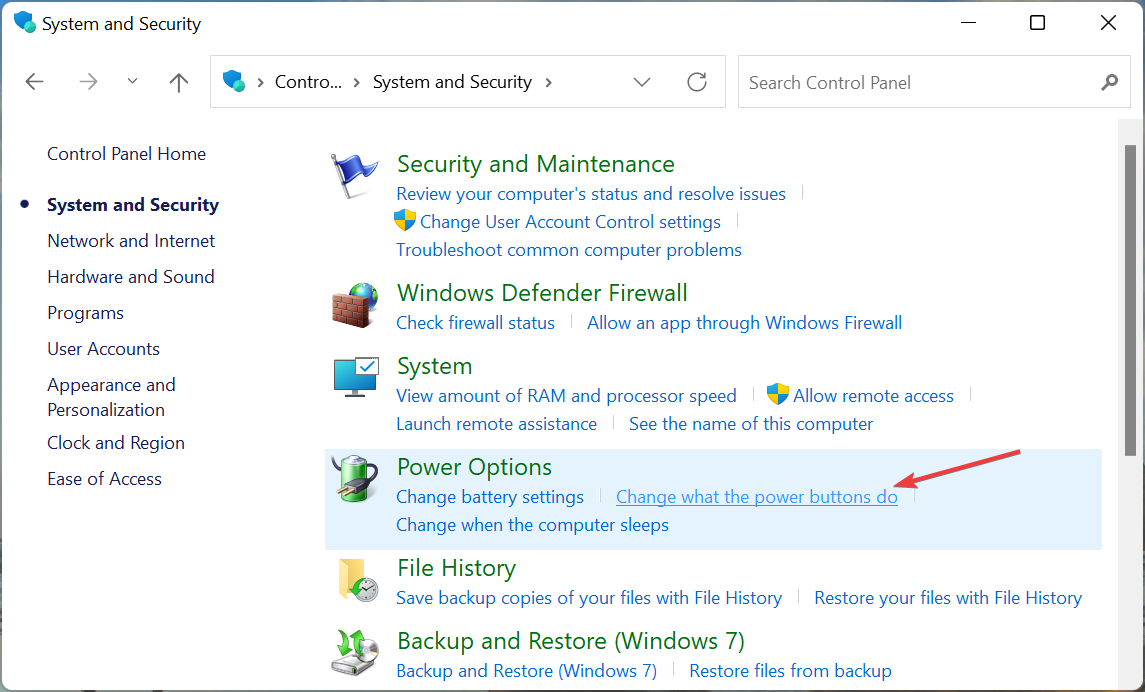
  3. Now, click on Change what the power buttons do under Power Options.change what the power buttons do to fix Desktop Window Manager high memory
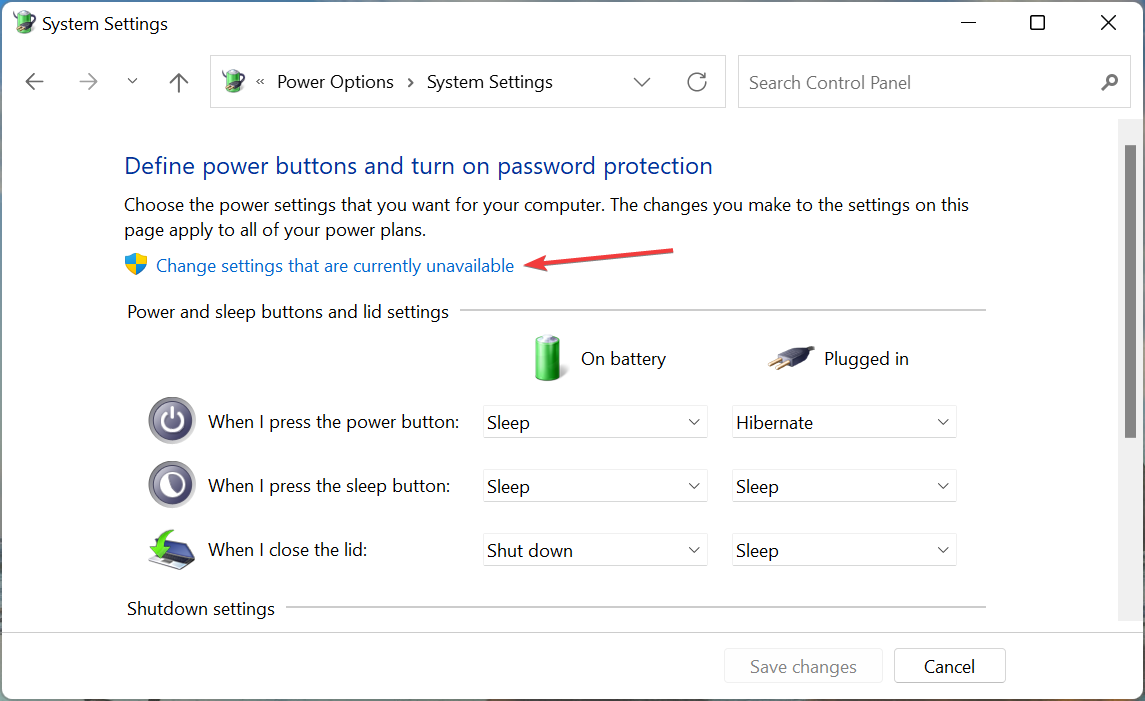
  4. Choose the Change settings that are currently unavailable option.change settings that are currently unavailable
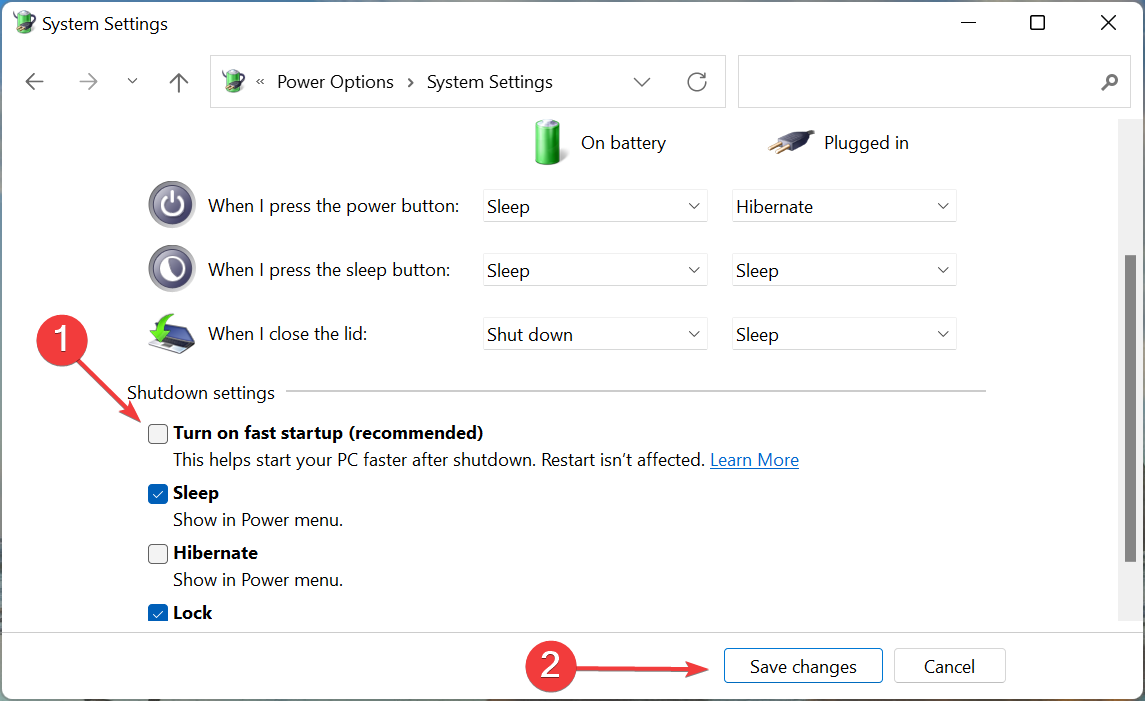
  5. Untick the checkbox for Turn on fast startup (recommended), and click on Save changes.disable fast startup to fix Desktop Window Manager high memory

What is the purpose of DWM?

The (DWM) Desktop Window Manager handles desktop composition. DWM makes visual effects and capabilities like glass window frames, Windows Flip and Windows Flip3D, 3-D window transition animations, and high-resolution support available on the desktop through desktop composition.

That’s it! By now, you should have fixed high memory usage or memory leak for Desktop Windows Manager and would have things up and running.

Problems with this process can appear on any version of Windows, and we covered DWM.exe crashes on Windows 11, as well as DWM.exe crashes on Windows 10.

A few users also reported that Desktop Window Manager stopped working, but we have a guide for that as well. It’s worth mentioning that this service can also use other resources, and many have encountered Desktop Window Manager high GPU usage.

Once done with it, we recommend you check some easy ways to improve the performance of Windows 10.

Leave them in the comments section for other viable solutions, so everybody can benefit from that knowledge.

Windows 11 makes gains with gamers account to latest Steam report

We finally get to know the hardware and software at the top of the list, that is, the most used by PC gamers, thanks to Steam’s annual survey. Based on January’s 2022 results, Windows 11 rose by 3.41% to 13.56% total usage. Windows 10, meanwhile, experienced a 3.92% drop to 77.82% usage on Steam, and Windows 7 rose by 0.49% leading it to take up 3.73% of share on Steam.

On the other hand, Intel has since lost its 69.27% CPU share, which saw it drop down to 68.93%. AMD managed to take up 31.07%. NVIDIA also experienced a slight drop from last year’s 76.83% to 75.4% GPU control.

VR Headset

Oculus Quest 2 remains at the top of the chain taking up 46.02% of Steam’s population headset hardware share, on the other hand, Windows Mixed Reality has dropped since December’s report from 5.69% to 4.99%. Oculus Rift S takes up 13.1% and Valve Index HMD takes 14.36% of the pool.

Meta is deeply rooted in winning a huge chunk of the share, which will allow for the establishment of a Metaverse. In that regard, its Oculus Quest 2 is expected to take up even more of Steam’s population headset hardware pool.

What are your thoughts concerning the released report? Let us know in the comment section below.

29 year Microsoft and Xbox veteran Shannon Loftis to retire

In a post on the Age of Empires blog (via Neowin), Shannon Loftis, VP at World’s Edge Studio, the home of Age of Empires, has announced her retirement. Loftis spent almost her entire career at Microsoft in gaming, working on racing games and then Kinect before becoming the General Manager of Global Games Publishing, and leading the revival of Age of Empires.

Loftis says in the blog post that she planned to leave Microsoft only at a high point, “and there has been no higher point than this,” with the successful launch of Age of Empires IV last October.

Loftis announced that Michael Mann, executive producer of Age of Empires IV, will be taking over as acting head of World’s Edge Studio, and that she will “be around for some time” to assist in the transition.

Loftis also noted that there’s more to come for Age of Empires, with the first major update to Age of Empires IV coming in the spring, with “features that will enhance the Age of Empires IV experience as well as creating new ways to play,” and more work on earlier versions of Age of Empires:

The teams working on Age of Empires II: Definitive Edition and Age of Empires III: Definitive Edition are also hard at work on expanding those titles, with exciting plans they’ll be sharing in the coming months. With Age of Empires’ 25th anniversary this year, the future is bright for the franchise and history is being made!

Are you an Age of Empires player? let us know in the comments below.

Windows Telegram app updates with new video sticker feature

The official Telegram app updated on several platforms today including Windows 10 and Windows 11.

This latest app update adds support for video stickers which anyone can now create from their own video files.

In addition to video stickers, Telegram also made some adjustments to reactions with this update. Going forward, reaction animations will play in real-time which means that the recipient will see the animation when they load the message. Reactions will also now include a read status to inform the sender of when their emoji reaction has been seen.

Here’s the full release notes for the Telegram app update:

VIDEO STICKERS

  • Use a new type of detailed stickers with smooth animations.
  • Create new sets by sending .webm videos to @stickers.
  • Bring your custom animated stickers from other apps.

BETTER REACTIONS

  • See smaller, compact animations when reacting to messages.
  • See real-time animations in chat when a user reacts to your message.
  • React with additional emoji expressing love, appreciation, anger or surprise.

READ STATUS FOR REACTIONS

  • Tap the new button in chats to jump to your messages that have unseen reactions.
  • Watch the animations for unseen reactions play when you hit the button.

AND MORE

  • The app will warn you before closing if you are uploading photos or files to a chat.
  • Enjoy better screencast quality in video chats

Telegram is a popular free communications service that supports text, voice, and video conversations in addition to a number of additional features such as file transfers.

Need more Windows app news? Follow us on Facebook and Twitter.

Telegram Desktop
Telegram Desktop
Price:
Free

Companies should embrace multi-factor authentication

Microsoft is calling on more organizations to add multi-factor authentication (MFA) to Windows 11 in the wake of a series of high-profile account breaches.

Microsoft has warned that strong authentication is a must-have if businesses want to safeguard against the increasing number of cyberattacks, but figures from Microsoft’s own security platform reveal that only a few customers have implemented these measures. 

Multi-factor authentication

Microsoft recommends that organizations use multifactor authentication (MFA) to reduce the threat of account compromise from cyber attacks, advanced persistent threats, and remote phishing tactics.

Do you know if your Office 365 accounts are protected with multi-factor authentication? Find out which of your users are protected, and how to enable MFA for your own account.

Microsoft says if you don’t want to use MFA, plan to disable basic authentication at least a year before Microsoft disables it because the company will not honor requests to turn off basic authentication after they disable it. 

Onslaught on accounts identity

Microsoft blocked tens of billions of phishing attempts, automated password-guessing attacks and similar credential-stealing assaults on its accounts last year, research has revealed. 

The company also analyzed the scale of security attacks on its corporate network outside of the consumer.

Microsoft is focusing its efforts on identifying and targeting attacks that bypass strong account-based security through identity deception.

A Microsoft  report offers a snapshot of these threats in 2021 as well some context to what threat actors are employing these attack techniques. As the report notes, “ransomware thrives on default or compromised credentials”.

Ransomware is one of the most commonly employed attack techniques today, that’s why Microsoft recommends enabling MFA on all end-user accounts.

Have you employed multi-factor authentication in your organization? If not what could be the problem, share in the comments section below.

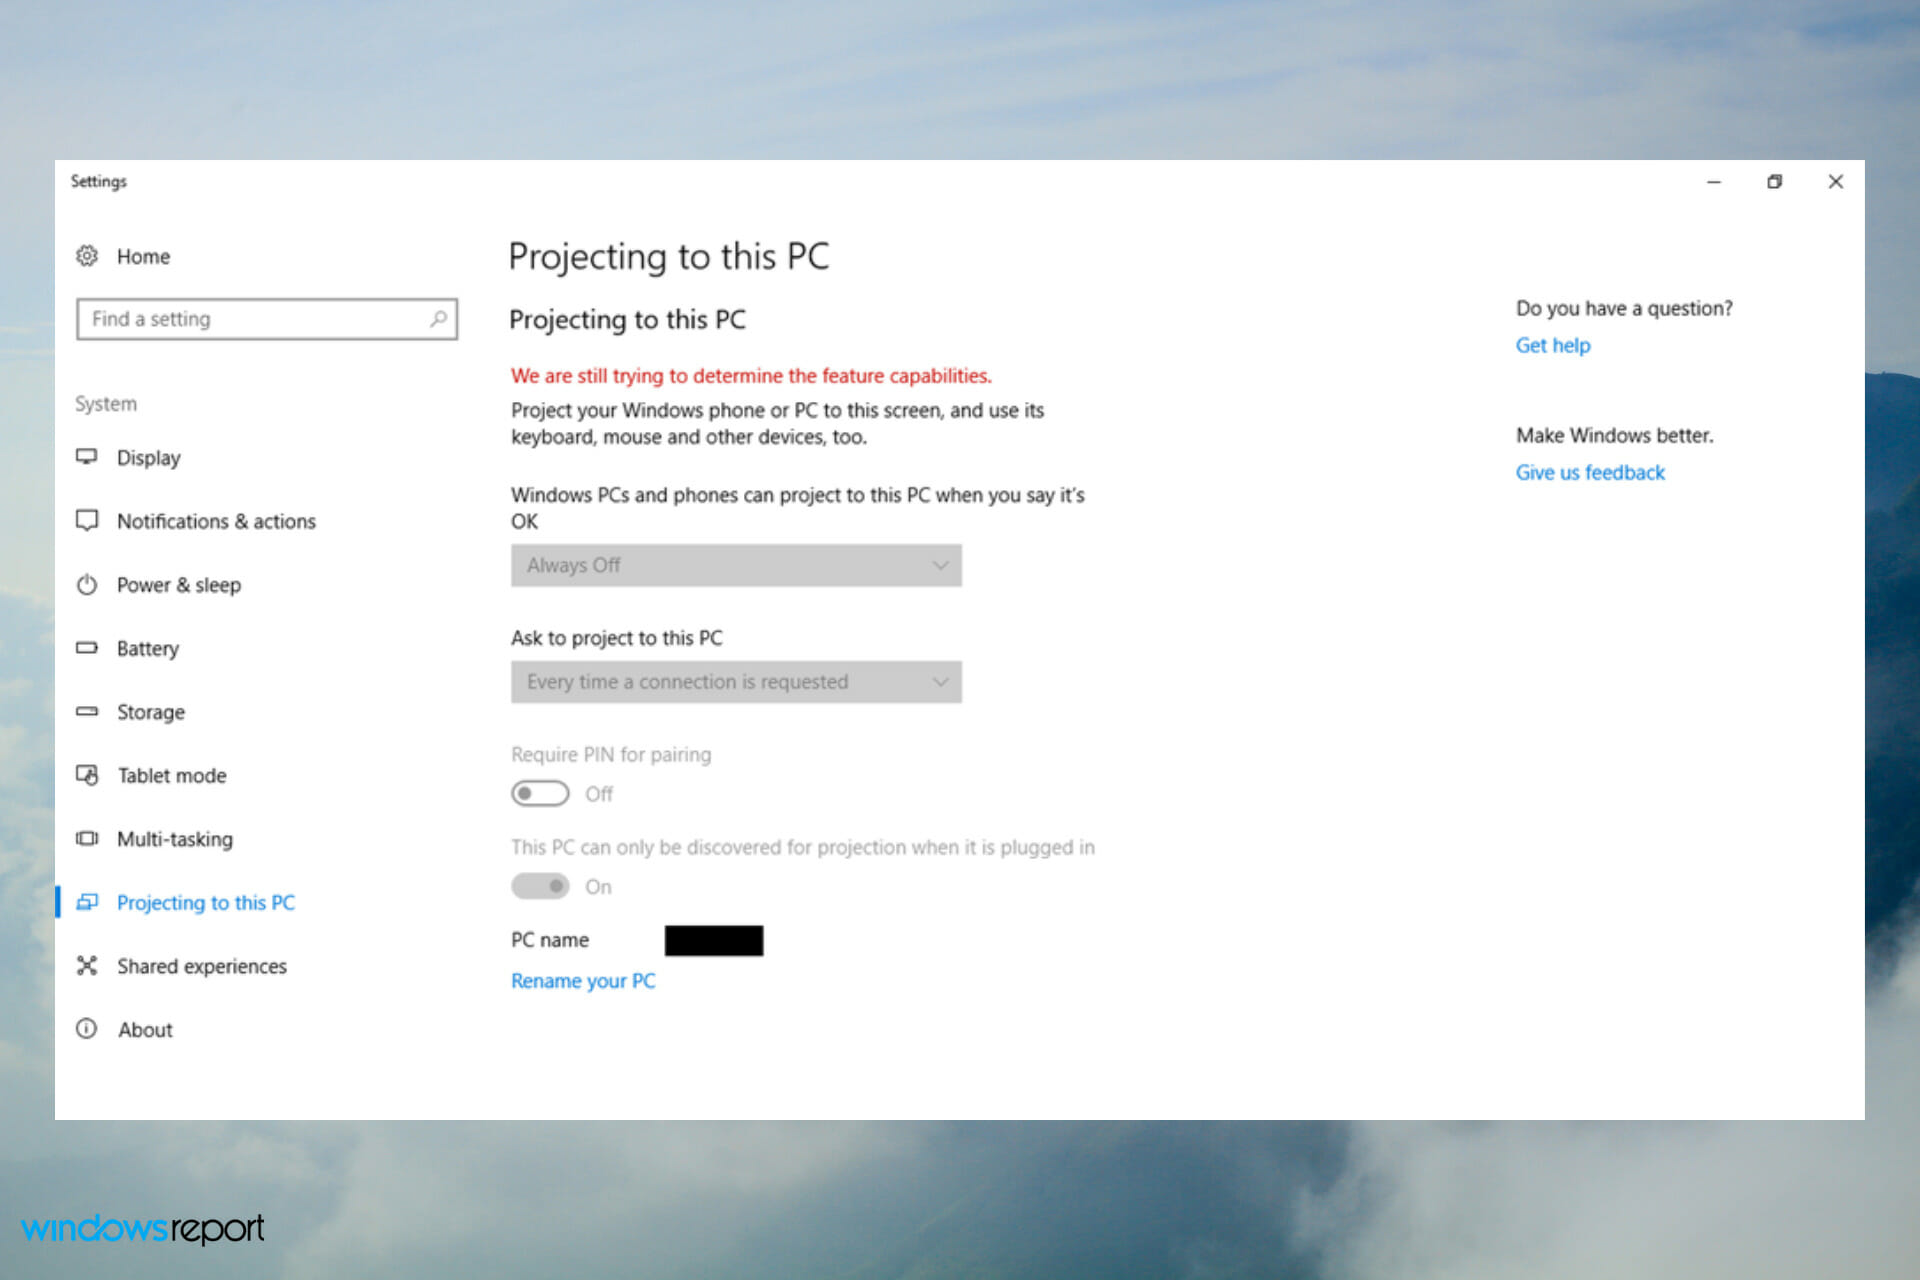
Fix: Projecting to this PC options are greyed out

If the projecting to this PC feature is greyed out, you won’t be able to use wireless displays with your computer. However, this can be easily fixed by following these steps.

How come Windows 10’s Projecting to this PC options are greyed out on my PC?

If you get this message, it means that the Wireless Display feature isn’t installed. An outdated wireless adapter driver can also cause this problem. Devices that don’t support Miracast can also experience this issue.

How can I fix the greyed-out Projecting to this PC options?

Before trying anything else, ensure that your system is up to date.

1. Install the Wireless Display features

  1. Click the Start taskbar button.
  2. Then select Settings on your Start menu.
  3. Click Apps to bring up the Settings tab shown directly below.
     Apps & features tab projecting to this pc greyed out
  4. Then click Optional features to open the window in the screenshot directly below.
    The Add a feature button projecting to this pc greyed out
  5. Press the + Add a feature button on that window.
  6. Type the keyword Wireless Display within the search box that opens as in the snapshot directly below.
     Add an optional feature search projecting to this pc greyed out
  7. Select the Wireless Display checkbox there.
  8. Click Install to add Wireless Display to Windows 10.
  9. Thereafter, wait for the new feature to install. When installed, check that the Installed features list includes Wireless Display.

2. Update your PC’s wireless network adapter driver

  1. Right-click Start to select Device Manager on the Win + X menu.
  2. Double-click the Network adapters category within the Device Manager window.
     Device Manager window projecting to this pc greyed out
  3. Right-click your Wi-Fi network adapter there and select an Update driver option for it.
    The Update Drivers tool projecting to this pc greyed out
  4. Now select the Search automatically for drivers option within the Update Drivers window that opens.

A quick scan with a driver updater utility will tell you if your Wi-Fi network adapter’s driver is faulty or outdated.

Fortect Driver Updater can scan your system and check if your drivers need to be updated. Then you can select to download and install a new network adapter driver with the driver updater utility.

⇒ Fortect Driver Updater

Note: Also, make sure your PC’s wireless network adapter is enabled before trying to update its driver. To do so, right-click the Wi-Fi adapter and select an Enable option on the context menu if it’s disabled. 

3. Reinstall the wireless network adapter’s driver

  1. Open the Device Manager as covered within the first two steps of the previous resolution.
  2. Then expand the Network adapters category.
  3. Right-click your wireless network adapter listed there to select Uninstall device.
  4. Then select the Delete the driver for this device checkbox on the confirmation window that pops up.
  5. Press the Uninstall button.
     Uninstall Device window projecting to this pc greyed out
  6. Thereafter, click Power and choose Restart on the Start menu.
Note icon NOTE
Alternatively, you can click Action > Scan for hardware changes to reinstall the wireless network adapter’s driver.

How to check if your PC’s Wi-Fi supports Miracast

  1. Click the search box on the taskbar (or press the Windows key and S at the same time).
  2. Next, type cmd in the search utility’s text box to find Command Prompt.
  3. Then select the Command Prompt utility within the search results to open it.
  4. Type the following command into the Prompt’s window: netsh wlan show drivers
  5. Press the Enter key to execute the command.
    The netsh wlan command projecting to this pc greyed out
  6. Then look for the Wireless Display Supported detail near the bottom the Command Prompt’s window. The Wireless Display Supported detail will say There’s no wireless interface on the system if this device doesn’t support Miracast.

However, that doesn’t mean there’s no way you can utilize Windows 10’s Wireless Display feature on your PC.

You’ll need to purchase a new USB Wi-Fi adapter that supports Miracast, and then insert it in a USB slot on your PC. Check out our best Wi-Fi adapters guide to choose one.

This isn’t the only problem you can encounter, many reported that projecting to this PC is always off as well as a Your PC can’t project to another screen message.

We also have a guide on what to do if projecting to this PC keeps disconnecting, so don’t miss it for more information.

Windows Failed Fast Startup With Error 0xc00000d4 [Fix]

Windows failed Fast Startup with error status 0xc00000d4 is one that users have complained about recently.

When the issue arises, the Fast Startup mode fails, and the Events Viewer logs the issue with a 0xc00000d4 error code.

You can prevent this if you disable Fast Startup, or you can use other solutions from this guide.

What causes Windows failed fast startup with error status 0xc00000d4?

The error status 0xc00000d4 typically indicates a problem with the hibernation file or the Fast Startup feature in Windows.

Here are some of the likely triggers of the error:

  • Corrupt hibernation file – A PC with a corrupted hibernation file will be likely exposed to failure in Fast Startup mode. Elements like conflicting software or power cuts are often responsible for this.
  • Driver issues – These are a common cause of computer failure and have also been known to trigger errors in fast Startup.
  • Hardware issues – This is the most major factor, sometimes requiring a change in hardware units such as your motherboard.
  • Virus or malware infections – Viruses have a well-documented history of ruining computer processes and are an easy cause of the errors you may encounter in Fast Startup.

Now we know some possible causes, let us explore a few of the best solutions.

How can I fix Windows failed fast startup with error status 0xc00000d4?

Before going into these solutions, disconnect any attached devices, like hard disks or flash drives.

1. Run a system file scan

  1. Press Windows + R, type cmd, and hit Ctrl + Shift + Enter.
  2. Now input the command below and press Enter:
    DISM.exe /Online /Cleanup-image /Restorehealth
  3. Then type in this System File Checker command below and hit Enter:
    sfc /scannow
    sfc scan windows failed fast startup with error status 0xc00000d4
  4. Wait for the scan’s verification to reach 100 percent complete. Then you can read the scan’s outcome in the Command Prompt.

Alternatively, you can use a dedicated repair tool. It will scan your PC and automatically repair any error associated with broken registry files, missing DLLs, or malware.

2. Run the Startup Repair Tool

  1. Hold down Shift and restart your computer.
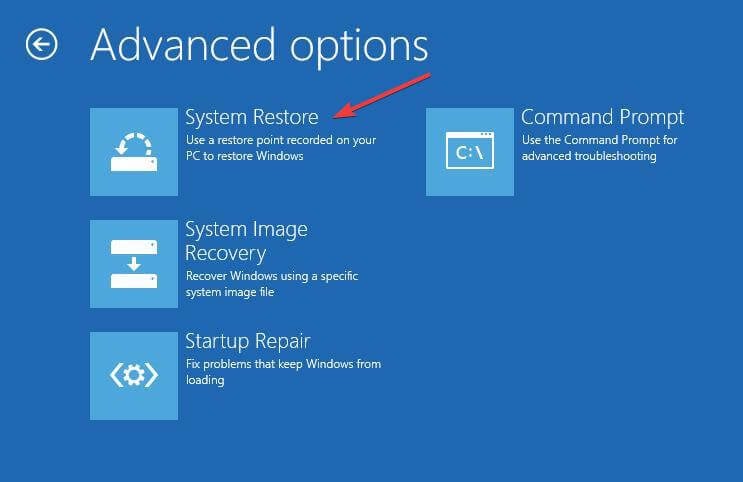
  2. Select Troubleshoot, then Advanced options.
    windows failed fast startup with error status 0xc00000d4
  3. Press the Startup Repair button.
    windows failed fast startup with error status 0xc00000d4
  4. Next, select a user account for which to utilize the Startup Repair tool.
  5. Then input the account password, and click Next to proceed.

3. Roll Windows back to a restore point

  1. Press Windows + R, type Rstrui, and hit Enter.
    windows failed fast startup with error status 0xc00000d4
  2. Select the Choose a different restore point option, and click Next to continue.
  3. Then click the Show more restore points checkbox if available, pick a convenient restore point, then click Next.
  4. Press the Finish button to confirm the chosen restore point.

Restoring Windows 10 to a previous time will remove software installed on your PC after the system restores the point’s date. Thus, you might need to reinstall the software after rolling back Windows 10. To check what software a restore point removes, click Scan for affected programs in System Restore.

It’s important to mention that Failed fast startup with error status 0xC00000D4 can appear on Windows 11, and the same solutions can be used on it as well.

For more solutions like this, we suggest reading out OccidentAcrident.dll startup error guide.

We hope you have found some success using these solutions. Let us know in the comments section below.

Facing the Decentraland not loading issue? Try these fixes

Is Decentraland not loading or responding? This article will give you the exact solutions that will work.

Virtual world games are creating a lot of hype lately. Decentraland is one of the most popular ones. For being browser-based, it has gained a lot of attraction. But, your experience with this metaverse platform may go down if it does not load in your browser.

As it is free to play, anyone can try it without investing anything in it from anywhere worldwide. If someone wants, they can buy various NFTs like plots of land on this platform using MANA cryptocurrency. It has been a fantastic profitable investment in recent years.

As a result, a lot of users are coming into this world. But, many of them are already noticing Decentraland not loading on their device’s browser. If you are one of them, how can you get rid of it?

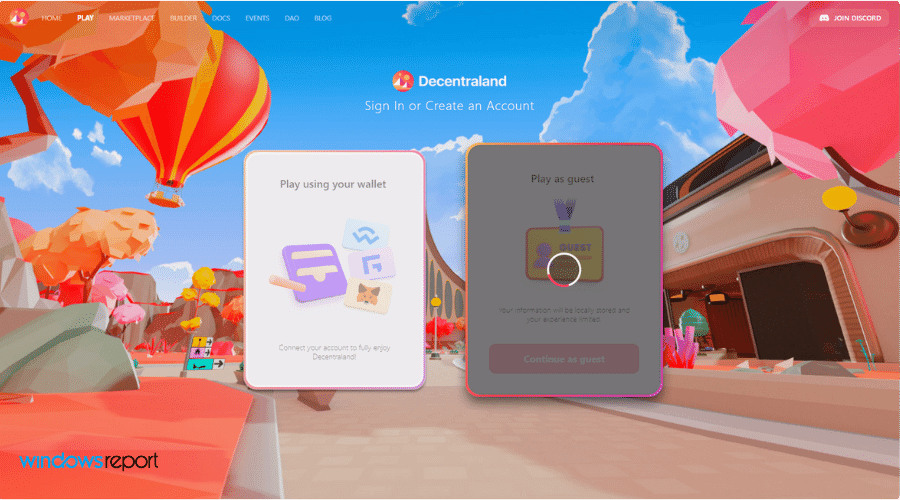
Screenshot: Decentraland not loading in the login page

What causes Decentraland not responding?

Numerous things may hinder Decentraland from loading on your device. As it is browser-based, the problem lies in the browser itself in most cases.

The first problem may be the system requirements. Suppose you don’t have a Core i3 2nd gen or better processor or a recommended 8 GB RAM and a 2 GB NVIDIA GT 730 or better graphics card. In that case, you will most likely to face problems running this virtual world game on your computer.

But, If you encounter the Decentraland not responding or loading problem even after having better specification, it may be something else. It includes the following one.

  • Your computer doesn’t have enough available dedicated graphics memory.
  • The browser is outdated.
  • The browser engine is not compatible.
  • Your browser is taking a lot of system resources.
  • Internet connection is not stable.
  • Problematic browser extensions.
  • Improper Crypto wallet extension settings.

These are the most common things that can cause this Decentraland problem. But, you can easily get rid of the issue if you follow the proper steps.

How can I fix Decentraland not loading?

1. Use a chromium-based browser or Firefox

Not all browsers are properly compatible with Decentraland. So, If you face a problem with this game in a browser, for example, Safari on macOS, try anything else.

Decentraland officially supports any chromium-based browser and Mozilla Firefox. So, We suggest you try Google Chrome, Firefox, Microsoft Edge, Brave, etc., to run this virtual world game.

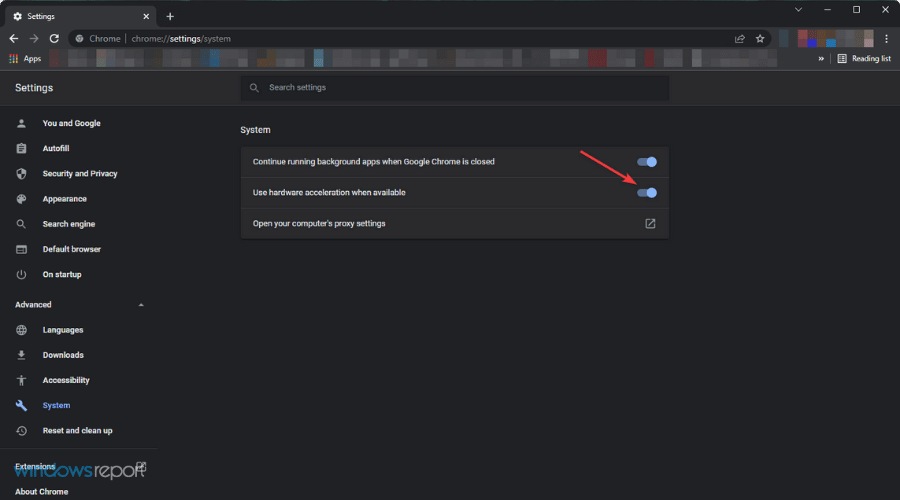
2. Enable hardware acceleration

  1. Open the chromium-based browser.
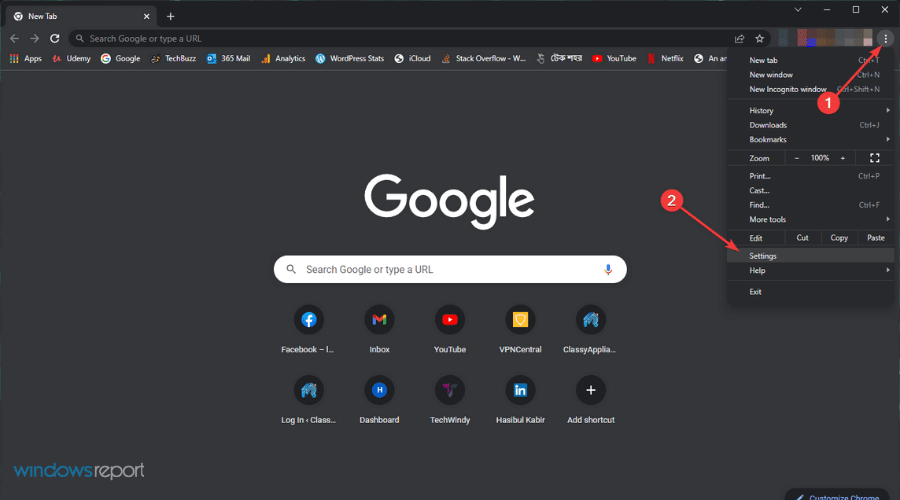
  2. Click on three vertical dots on the top right corner of the browser and click on Settings.going settings chrome
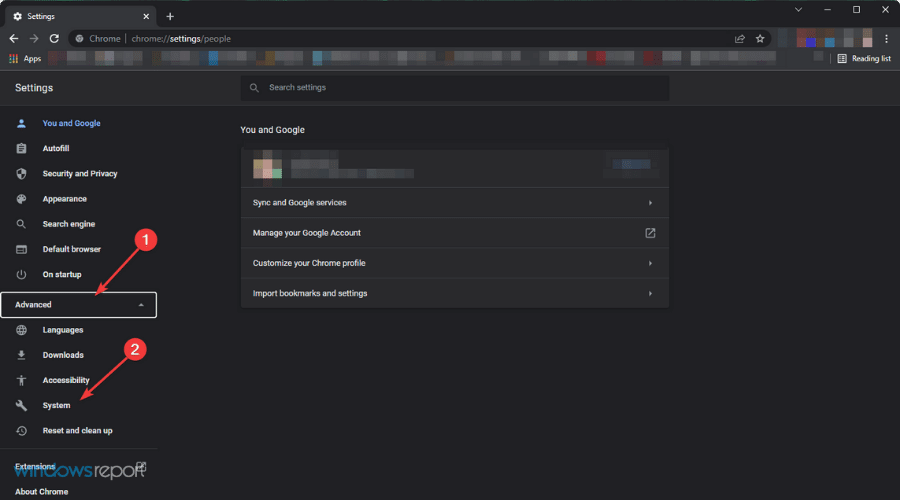
  3. Click on Advanced to expand it and then click on System.going system chrome
  4. Toggle the correct switch to enable Use hardware acceleration when available.enable hardware acceleration chrome
  5. Restart the browser.

The hardware acceleration should be enabled by default in the latest chromium-based browsers. If somehow it is disabled, Decentraland not loading issue may appear. In this case, the above steps will help.

3. Set graphics preferences to high performance

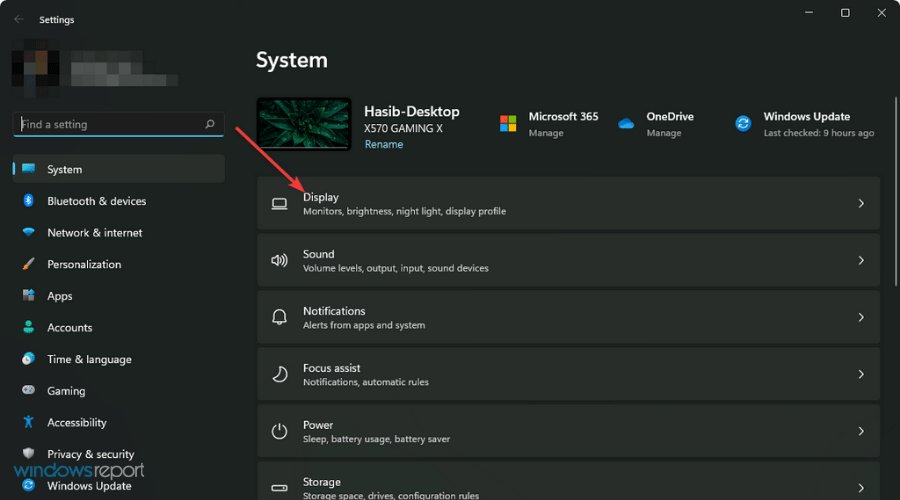
  1. Press Win + I to open Windows Settings.
  2. Go to Display.going display in win 11 settings
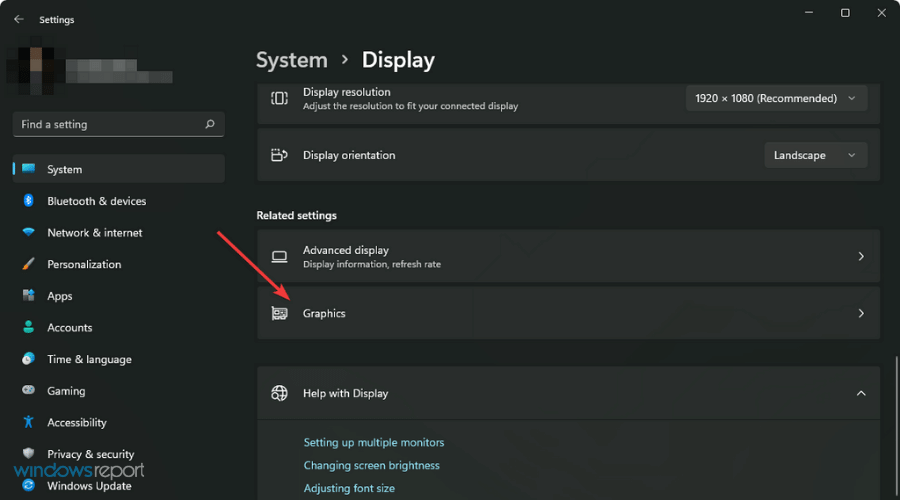
  3. Scroll down and click on Graphics.going graphics in win 11 settings
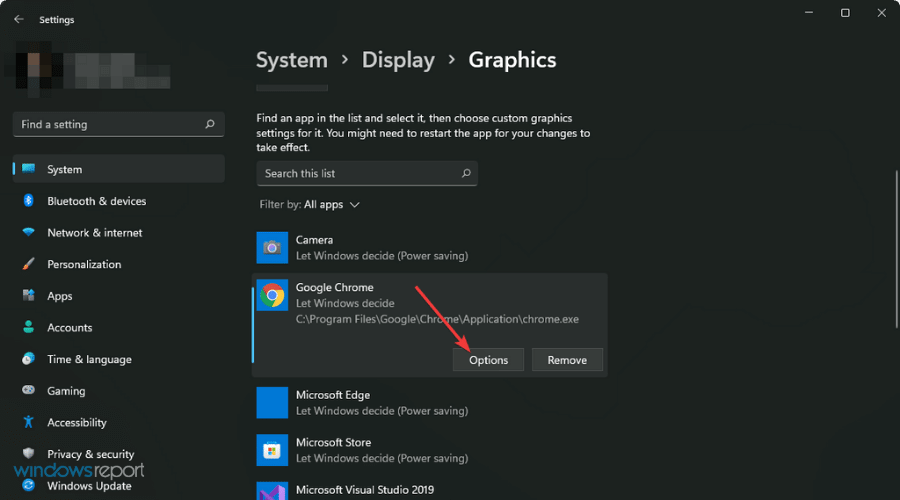
  4. Find and click on the browser that you use to run Decentraland.
  5. Click on Options.going graphics option chrome win11 settings
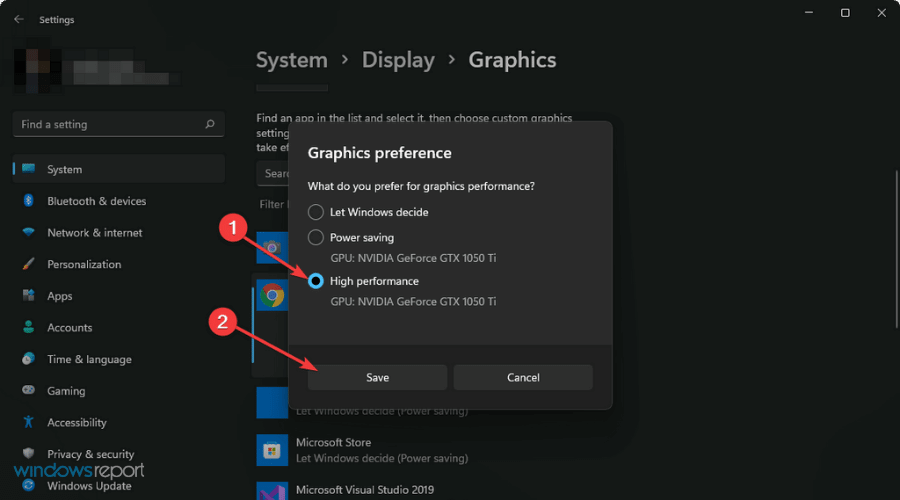
  6. Check High Performance and click on Save.set high performance and save graphic preferences chrome win11

4. Update browser

4.1 Update Chromium-based browsers

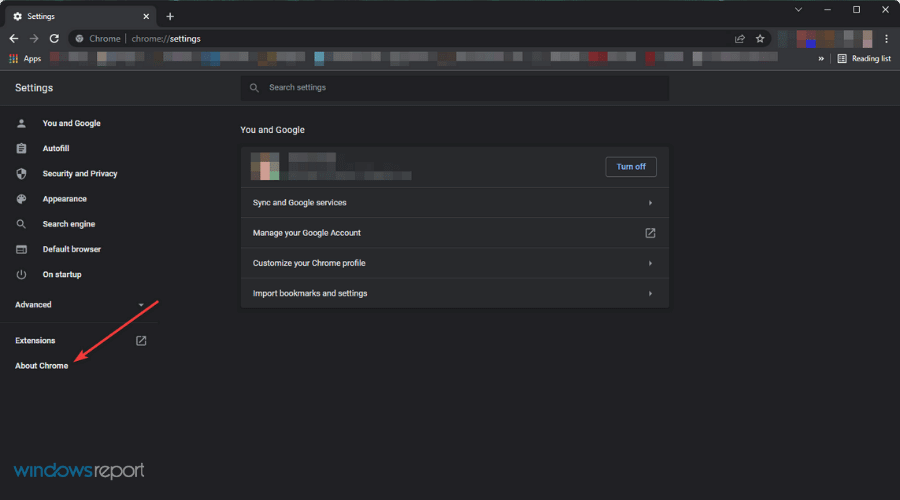
  1. Go to your browser settings page as shown in method 2.
  2. Go to the about page.going about chrome
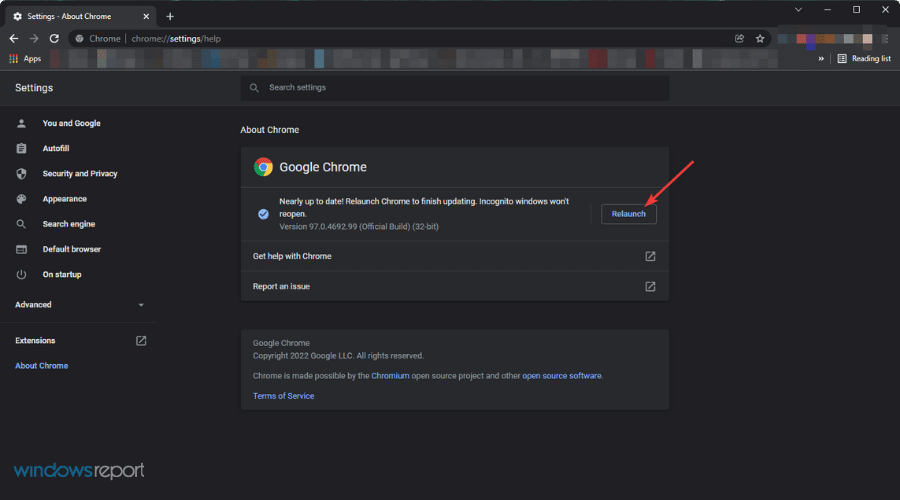
  3. It will automatically check and update the chromium-based browser.
  4. Click on Relaunch after the update.relaunch chrome after update

4.2 Update Firefox

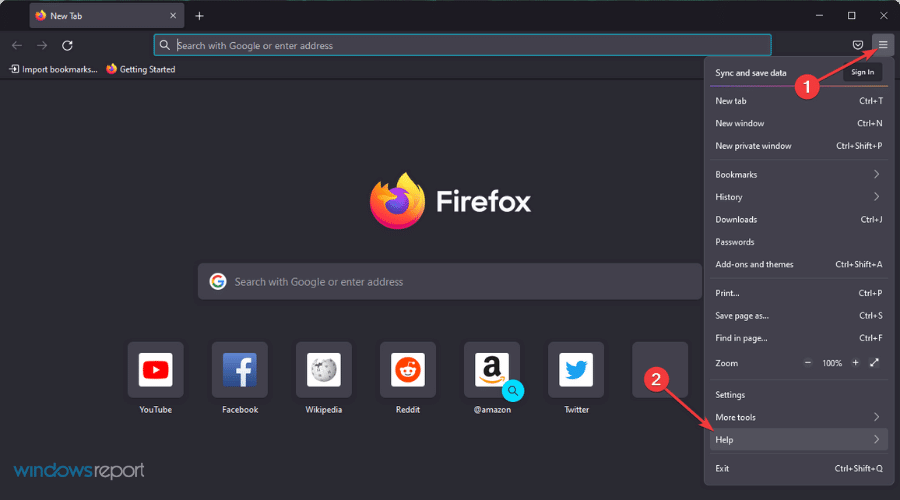
  1. Click on three vertical lines and then on Help.going help firefox
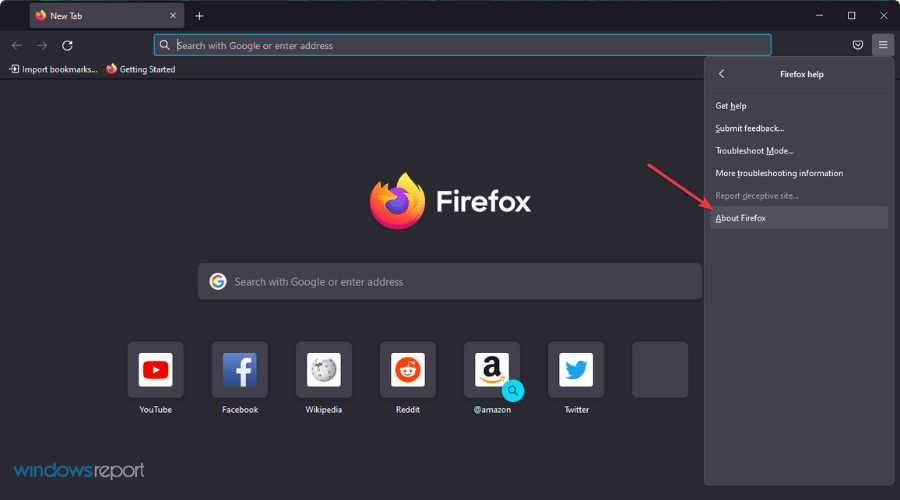
  2. Click on About Firefox.going about firefox
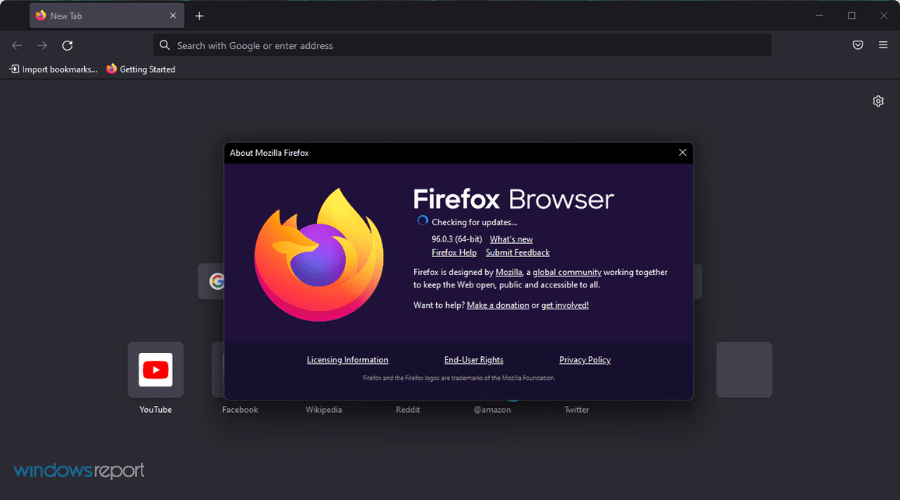
  3. It will open the about page and automatically update Firefox if any new version is available.firefox checking update

5. Disable Adblocker

You may use Adblockers to avoid unwanted, annoying ads. However, any heavy web apps that may require a lot of resources to load, like Decentraland, may have some problems with Adblockers.

In general, this type of extension scans every request on any website, leading to unwanted difficulties for your browser to load some pages.

So, if you see Decentraland is not loading or responding properly, disable Adblocker and try again. It should fix the problem.

6. Disable memory-hungry extensions

Decentraland recommends users have 8GB RAM on their device. However, if your browser has a lot of extensions that use a heavy amount of RAM, it may cause a problem for this virtual world NFT game to run correctly even if you have more RAM.

So, to avoid any errors, particularly not loading issues, disable all of the resource-hungry extensions on your browser.

7. Clear cache and temporary files

  1. Open your browser, particularly Google Chrome.
  2. Press CTRL + Shift + Del on your keyboard to open the appropriate settings page. For Mac, it is Command + Shift + Del.
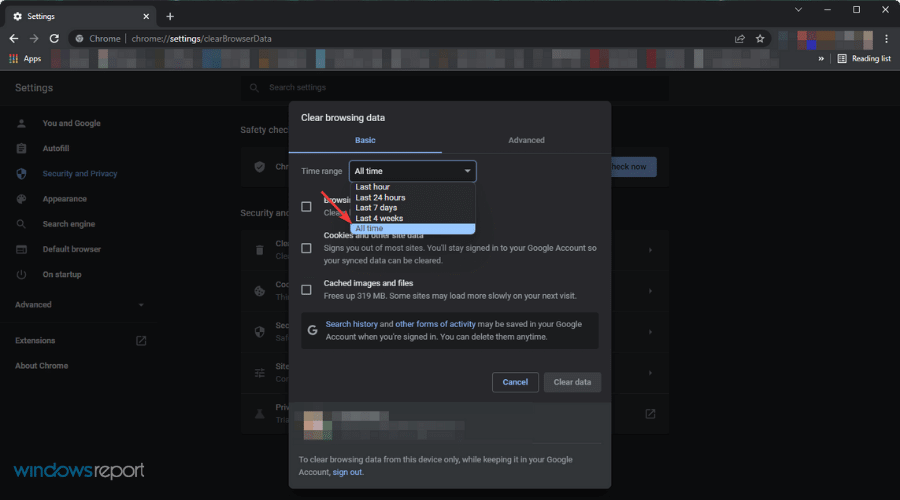
  3. Set All time for the time range.choosing clear data time range chrome all time
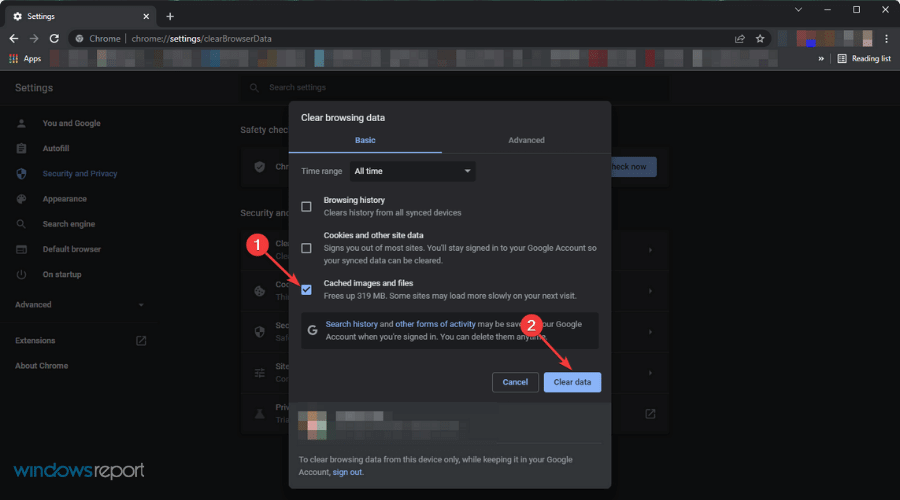
  4. Check Cache images and files and then click on Clear data.clearing cached images chrome

8. Change site access preference for Metamask

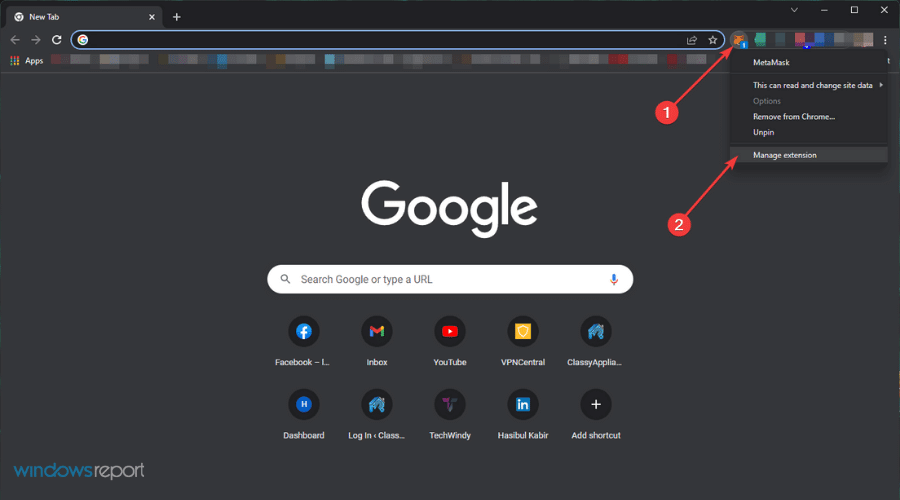
  1. Right-click on the Metamask extension icon on your browser and then click on Manage extension.going manage extension metamask chrome
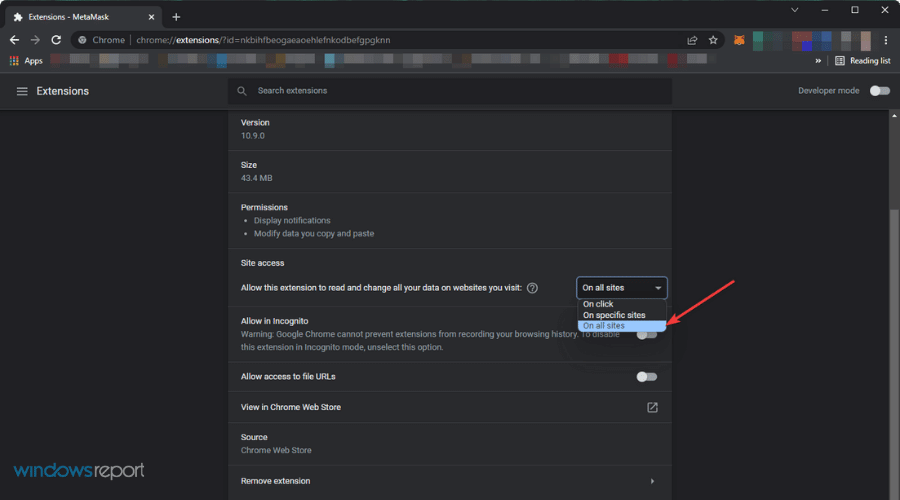
  2. Change site access preference to On all sites.allowing extension all site chrome

A large number of users use the Metamask wallet to login into Decentraland. Many of them have already experienced Decentraland not loading problem. 

However, changing the site access preference of this extension has fixed their problem. So, it also should work if you are in the same situation.

9. Make sure the internet connection is stable

The problem may be a result of your internet connection’s instability. For any reason, if your internet connection is not suitable for Decentraland, you may face not loading problem.

In this case, you should take steps to improve the connection speed and instability. Decentraland recommends having at least 10 Mbps internet speed.

However, if you have a better connection but face this problem, you may try the Private Internet Access (PIA) VPN. If poor internet routing is the reason behind your situation, using the PIA can help.

Else, PIA can help you to unlock various geo-restricted contents and ensure better privacy on the internet. When you do things related to cryptocurrency, privacy and security matter most. In this type of case, this VPN can give you an extra layer of security.

10. Use a dedicated GPU

Decentraland requires 2 GB of available graphics memory to give you the best experience. Though processors like AMD Ryzen 5600g, 5700g, and Intel 12 Generations have decent built-in graphics capability, you still may require a dedicated GPU to run this 3D Metaverse game.

This is not the case for all users. So, you should verify GPU requirements by yourself. For this, you can try to run this virtual world on a computer that has similar specifications and a GPU.

Can you run Decentraland using Metamask without investing anything?

Yes, you can. There is no need to worry about it. Anyone can start exploring the Decentraland as a guest or with a wallet like Metamask.

Players won’t have to invest anything to start with Metamask in the world of Decentraland. As it is also a play-to-earn game, you can earn NFTs and sell them for profit. So, starting with a wallet is a good idea.

However, If you want to explore things and want to learn about Decentraland, the guest mode is sufficient.

How you play this virtual world game is up to you. However, if you face the problem, the methods mentioned above are sufficient to fix Decentraland not loading issue.

If you know any other methods that can help to resolve this problem, you are most welcome to input them in the comment box.

FIX: Adaptive Brightness won’t turn off in Windows 10/11

Adaptive brightness is a power-saving feature available on some machines and it either uses the ambient sensor or the background content to dim or increase the display brightness. However, many users don’t want this option changing erratically the brightness level.

Of course, in theory, you can disable it with no more than a few clicks. However, in practice, numerous users weren’t able to turn off Adaptive brightness on Windows 10.

Because of the problem’s gravity, we enlisted some advanced solutions for the problem below. If you’re unable to turn off adaptive brightness on your Windows 10 PC or laptop, make sure to check them out.

How to turn off Adaptive brightness in Windows 10?

  1. Check the Power settings
  2. Disable related options in GPU settings
  3. Use a command prompt
  4. Update GPU drivers
  5. Disable Adaptive brightness in the Registry
  6. Run Power troubleshooter
  7. Reset your PC to factory settings

Check the Power settings

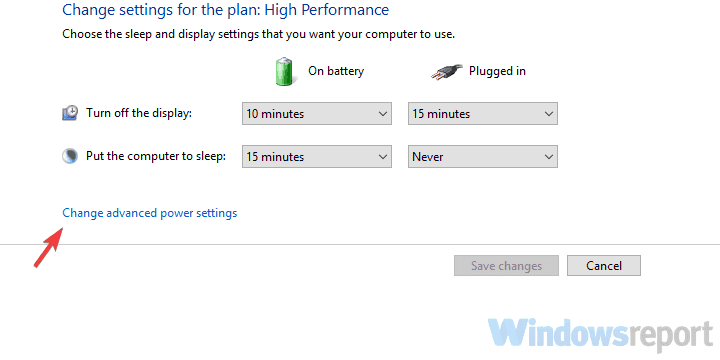
If you’re having this issue for some time, you’ve probably tried disabling Adaptive brightness in Advanced power settings. However, just for the sake of troubleshooting, let’s check this section again. An update might have changed your settings to default values. If you’re sure that it’s disabled, move to additional steps.

On the other hand, if you’re unsure, here’s how to confirm the Adaptive brightness feature is disabled:

  1. Right-click on the Battery icon in the notification area and open Power Options.
  2. Under your current plan, click Change plan settings.adaptive brightness windows 10 won't turn off
  3. Expand the Display.
  4. Expand Enable adaptive brightness.
  5. Turn the setting off.

Disable related options in GPU settings

If native options won’t allow you to turn off the Adaptive brightness feature, there are some options you can turn off in GPU settings. This applies to all GPUs, especially Intel’s Display Power Saving Technology and AMD’s Vari-Bright. Both features seemingly enforce the Adaptive brightness based on the background in order to preserve the battery power.

Here’s where to look and what to disable:

AMD

  1. Right-click on the desktop and open AMD Radeon settings.
  2. Open Preferences.
  3. Choose Radeon Additional settings.
  4. Expand the Power section.
  5. Select Power Play.
  6. Uncheck the “Enable Vari-Bright” box.

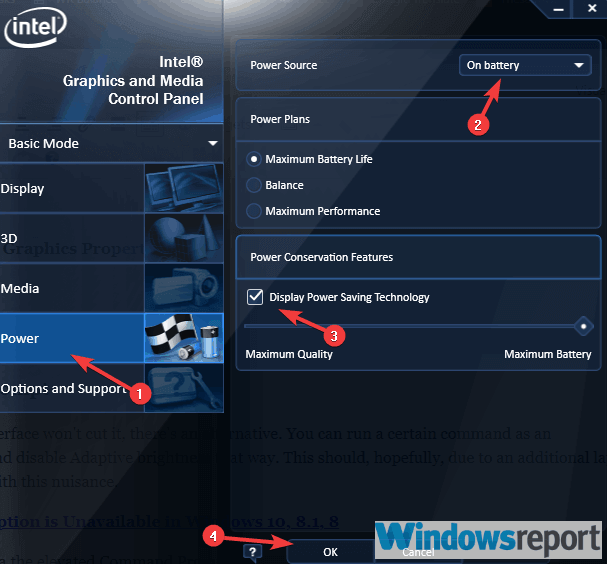
Intel

  1. Right-click on the desktop and open Graphics Properties.
  2. Select the Basic mode.
  3. Choose Power.
  4. Select “On battery“.
  5. Uncheck the “Display Power Saving Technology” box and confirm changes.adaptive brightness windows 10 won't turn off

Use a command prompt

If the standard way through the Users Interface won’t cut it, there’s an alternative. You can run a certain command as an administrator in the Command Prompt and disable Adaptive brightness that way. This should, hopefully, due to an additional layer of administrative access, allow you to deal with this nuisance.

Here’s how to turn Adaptive Brightness via the elevated Command Prompt:

  1. Right-click on Start and open Command Prompt (Admin).
  2. In the command line, copy and paste the following line and press enter:
    • powercfg -restoredefaultschemes
  3. Close Command Prompt and follow the instructions from the first step to disable Adaptive brightness.

Update GPU drivers

Some users have found the resolution in updating GPU drivers. Outdated or generic drivers provided by Windows Update are prone to invoking all kinds of issues. We recommend you use a dedicated updater such as Outbyte Driver Updater because it will safely and automatically update and repair your drivers.

You can also download drivers manually from an official source. You need to look up your model on the official OEM’s website and get them from there. Once you’ve installed them, the issue with the Adaptive brightness should be dealt with for good.

Here’s where to find up-to-date drivers for your GPU:

In addition, consider updating your BIOS as well. Lots of older machines are manufactured and optimized to work with Windows 7, so some features won’t work as intended on Windows 10. For that reason, make sure to flash your BIOS/UEFI and update it with the most recent update. We explained the whole procedure, here.

    Disable Adaptive brightness in the Registry

    Tweaking the Registry can be dangerous but the benefits of a knowledgeable approach are great. Whenever a certain system function won’t comply in a standard manner, disabling it in the Registry should do the job. This should be a permanent solution for your issue and a definite way to disable Adaptive brightness. Follow these instructions to disable Adaptive brightness in Registry:

    • Press Windows key + R to open the Run command line.
    • Type regedit and press Enter.
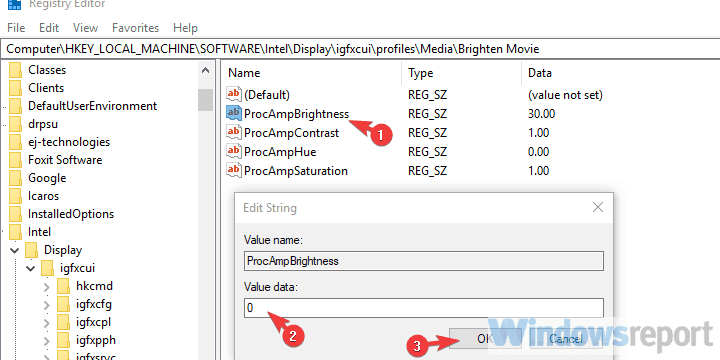
    • Go to HKEY_LOCAL_MACHINE\Software\Intel\Display\igfxcui\profiles\media\Brighten Movie.
    • Right-click on the ProcAmpBrightness input and choose Modify.
    • Change the value to 0 (zero) and confirm changes.
    adaptive brightness windows 10 won't turn off
    • Now, navigate to HKEY_LOCAL_MACHINE\Software\Intel\Display\igfxcui\profiles\media\Darken Movie and do the same for ProcAmpBrightness there (set its value to zero).
    • Exit the Registry Editor and restart your PC.

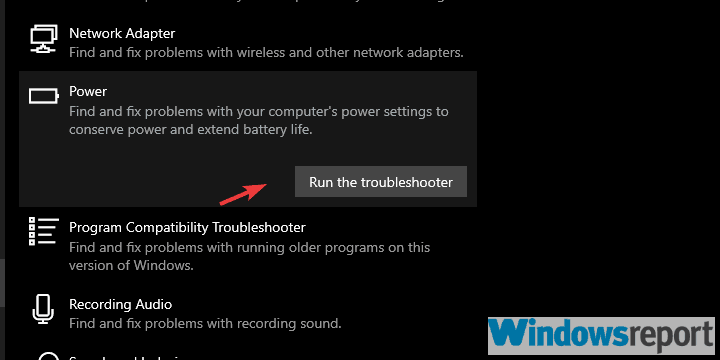
Run Power troubleshooter

This solution is a long shot, but while we’re at it, let’s give it a try. Windows 10 introduced a dedicated troubleshooting menu, covering all kinds of possible system issues. In there, you can find the Power troubleshooter which, as the name itself says, deals with all kinds of power-related issues, including the power-modes like Adaptive brightness.

Here’s how to run the Power troubleshooter:

  1. Right-click Start and open Settings.
  2. Choose Update & Security.adaptive brightness windows 10 won't turn off
  3. Select Troubleshoot from the left pane.
  4. Expand the Power troubleshooter and click Run the troubleshooter.adaptive brightness windows 10 won't turn off

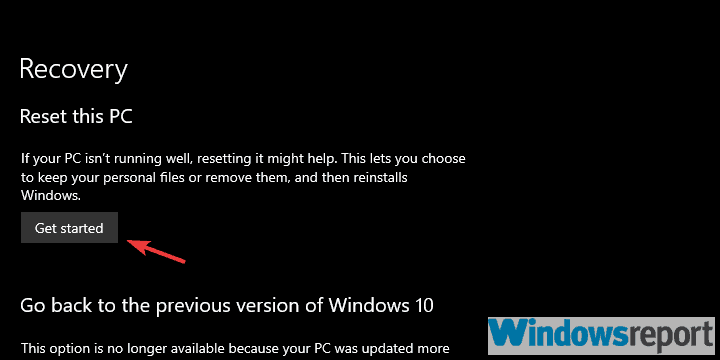
Reset your PC to factory settings

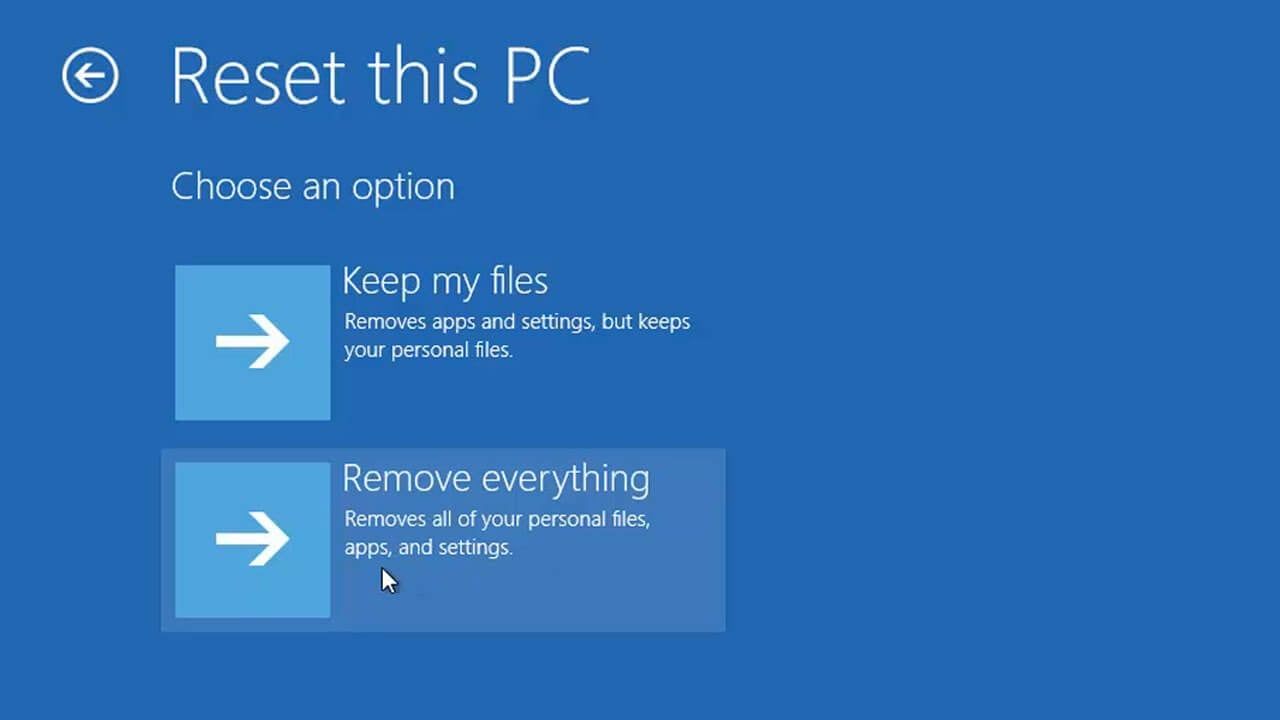
Finally, if the aforementioned steps haven’t helped you turn off Adaptive brightness, we suggest resetting your PC to factory settings. This is a recovery option available in Windows 10, and it allows users to keep their data while restoring the system state to default values. If that doesn’t help, we can only suggest clean reinstallation. Of which you can learn in detail, here.

This is how to reset your PC to factory settings:

  1. Press Windows key + I to open the Settings app.
  2. Choose Update & Security section.
  3. Select the Recovery from the left pane.
  4. Under the “Reset this PC” option, click Get started.adaptive brightness windows 10 won't turn off

That’s it. Don’t forget to share your thought and post questions in the comments section below. We look forward to hearing from you.

Best Antivirus for PlayStation 4 & 5 [2026 Reviewed]

If it runs code, it can just as well run malicious code. It’s not a question of what goes up must come down, but rather a matter of connecting to the Internet.

Experience taught us that whatever goes online can go down and get hacked, infected, or otherwise compromised. Here’s the number one reason for you to get an antivirus for PlayStation 4/5.

You might be skeptical and there is nothing wrong with a healthy dose of parsimony. Here, at Windows Report we also like hard facts and tend to filter every piece of information instead of taking it for granted.

If you’re anything like us, we’re pretty sure you’ll want to find out exactly how your gaming sessions would benefit from deploying an antivirus for PS4 or PS5. And you should.

After all, don’t consoles come with default security measures in place? Do PlayStations get viruses at all? These are just some of the questions we shall try to answer, so keep reading.

Can my PS4 be hacked? / Can PS5 get hacked?

Note icon NOTE
It happened once, it’s only a matter of time before it happens again.

Hypothesis works with our imagination, history works with verifiable facts. What better way to show a PS4 (or a PS5, for that matter) can be hacked than by invoking an event that has already occurred?

A few years ago, a viral PSN notification bricked PS4 consoles on a large scale. Around the same time, a homoglyph attack was launched, causing PS4s to simply crash.

This simple deception technique that exploits similarities between characters in the console’s code obliged users to factory reset their PS4s and this was possible without them ever having opened the contaminated message.

So, can a PS4 get hacked? That’s solid proof that it can and it already was. Who’s to guarantee it will not happen again?

1. Sony’s built-in security

Proactive Sony designed the PS4 OS with as few potential virus entry points as possible. For instance, it does not allow you to transfer corrupted data from a compromised USB flash drive.

What’s more, you cannot land on counterfeit apps or games through pirated disks as Sony strictly controls downloads in an effort to only host legitimate, verified, and authentic sources from its store.

And let’s not forget the limited input devices that prevent viruses from penetrating your console’s system via peripherals.

You’re probably thinking everything’s covered, right? And why wouldn’t you? In theory, your console is unhackable.

But theory and practice don’t always meet eye to eye. While it may not be a computer (not in the conventional way at least), your PS4 or PS5 still has hardware components, performs memory-based tasks, and supports input devices.

And this means it can be just as exposed to viruses like any other machine. It may not allow infected USBs to spread havoc, but what about the controllers?

Does PS5 have antivirus? & Does PS4 have antivirus?

And here’s another interesting fact. Your PlayStation has native support for antivirus features, not to mention the fact that Sony itself recommends using antivirus for PlayStation 4/5 to strengthen your security.

2. The PS4/5 browser, Achilles’ heel

As regulated as software downloads may be, there are still loopholes to exploit and the PlayStation browser is one of them.

It’s generally acknowledged that PCs are prone to widespread virus infections, but we often neglect the fact that these are not the only devices that can go online.

Can a PS4 get a virus from the Internet? Without any doubt. Consoles are just as vulnerable – even though they are less susceptible to be targeted (for now)- simply because they provide online services.

Note icon NOTE
2 major takeaways:

➡ Unlike Sony (which focuses on hardware), Microsoft leverages security.
➡ Unlike the PlayStation, Xbox One has never been hacked to this day.

Even so, Microsoft’s console can still fall prey to Man-in-the-middle attacks, phishing and social engineering-based techniques, catfishing schemes, and so on.

If deploying an antivirus for your Xbox One is important, running antivirus software for PS4 or PS5 is nothing less than crucial.

Now, here’s another concern users typically have when it comes to the PS4/5 browser. Is the PS4 Internet browser safe?

It’s only as safe as you make it. As always, untrustworthy sites, sketchy links, browser-pushed suspicious notifications, and friend requests from strange or fake social media accounts are to be avoided.

If you’re part of an online gaming community, be aware of bots and be extra careful when downloading or streaming gaming content as it can link to infected servers.

3. Hijacking DNS servers

Speaking about servers, you’re (possibly) in for another big surprise. And by surprise we actually mean deception.

Hackers can intercept traffic between your console and your unsecured DNS server and alter its path to get access to your system’s updates.

It’s no more than a (worst case) scenario for now, but you can imagine the appalling implications of such a nefarious event.

4. Elitist viruses and insufficient incentivization

Profitability, specific coding, and a closed platform – here are the 3 main factors that dictate the likeliness of a widespread PlayStation virus infection and also the sentinels that allegedly keep your PS4 or PS5 from being targeted.

Let’s discuss them one by one, shall we?

– Specific coding

Like every other gaming console, PlayStations run their specific OS. While creating custom FreeBSD code is challenging, it’s also not impossible. All it takes is the right combination of technical prowess, time, and motivation.

But it does not always have to be specific OS coding. Many voices claim that viruses are elitists and PS4, respectively PS5 consoles are by default protected just because of that.

Here’s the thing: cross-platform viruses already exist and they are designed to run across multiple operating systems without too much hassle. Who’s to say a determined hacker will not concoct such a vermin to also target FreeBSD-based Orbis OS?

– Profitability

Above anything else, hackers are seasoned entrepreneurs with a keen eye for good business. Targeting devices with a greater potential to generate profit makes sense for these ROI-driven informatics villains.

While gaming consoles are not yet as profitable as broad-spectrum computers, there is still the prospect of a good payoff from compromising PlayStations.

As gaming devices grow more popular, they also attract unwanted attention. With more lucrative perspectives on the horizon and increasing outreach, PS4 and PS5 consoles are on their way to becoming high-profile targets for hackers looking to maximize their profits.

– Closed environment

Another reason for which gaming consoles are theoretically less prone to be hacked is the closed environment they run. Unlike PCs, they are not designed to perform a great array of tasks, hence they provide fewer programming capabilities.

While their rigid ecosystem makes it harder for external software developers to barge in, this does not make the consoles immune to malware, viruses, or hacking.

As shown above, the right incentives will always be enough to lure cybercriminals into uncharted territories.

Is there an antivirus for PlayStation 4?

Since unhackable devices or 100% virus-proof operating systems are no more than utopian concepts, your best bet is to deploy an antivirus for PlayStation 4/5.

If you’re wondering about third-party alternatives that can secure your precious Sony console against all things nasty, you’ve come to the right place.

Our selection includes only thoroughly tested antiviruses that will keep you safe from malware, ransomware attacks, rogues and network-targeted bots, fraud attempts, and more for a full PS4/5 virus scan.

Here’s a quick recap of the things you should hold on to before we dig in:

research trust icon
Can a PS5 get a virus?YES
research trust icon
Can a PS5 get malware?YES
research trust icon
Does PS4 need antivirus?YES
research trust icon
Can the PS4 browser get viruses?YES

TotalAV

  • Real-time protection on the PC and phone you use with your console
  • WebShield blocks phishing and scam sites
  • Ransomware protection for your files and game clips
  • Tune-up tools keep your PC quick
  • Covers Windows, Mac, Android and iOS
  • No dedicated game mode.

TotalAV is a simple, lightweight antivirus with real-time protection, WebShield browsing protection and built-in clean-up tools. One licence covers Windows, Mac, Android and iOS.


Bitdefender Total Security

  • Social network, anti-phishing and anti-ransomware defense
  • Secure browser with anti-tracking capabilities
  • Mic and webcam defense
  • Small system footprint + performance optimizer
  • Dedicated Work, Movie, and Game modes
  • VPN traffic is capped at 200 MB daily usage.

Bitdefender is a giant and we dare say, its popularity is well-deserved. Unlike other security programs, this one has been around for a long time, steadily gaining our trust, and its constant self-actualization along with the innovative technologies they permanently welcome on board proves it’s here to stay.

Now, if we are to search for antivirus software for PS4 (and we are), it’s simply impossible to neglect Bitdefender Total Security’s gaming-oriented features. And there is plenty to look forward to!

Bitdefender has the best detection rates in the industry and there is no secret there. But what does that mean in terms of performance?
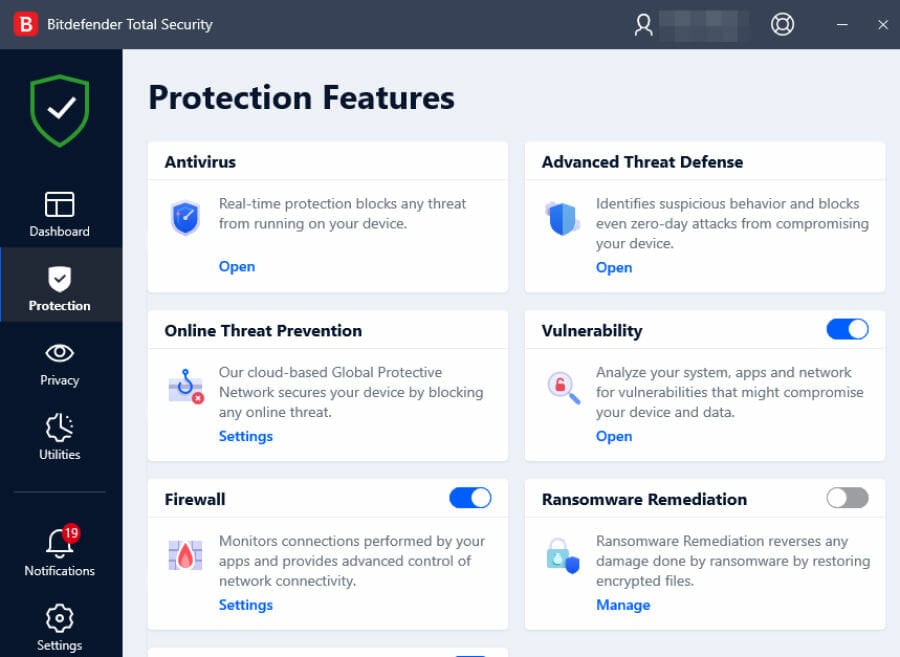
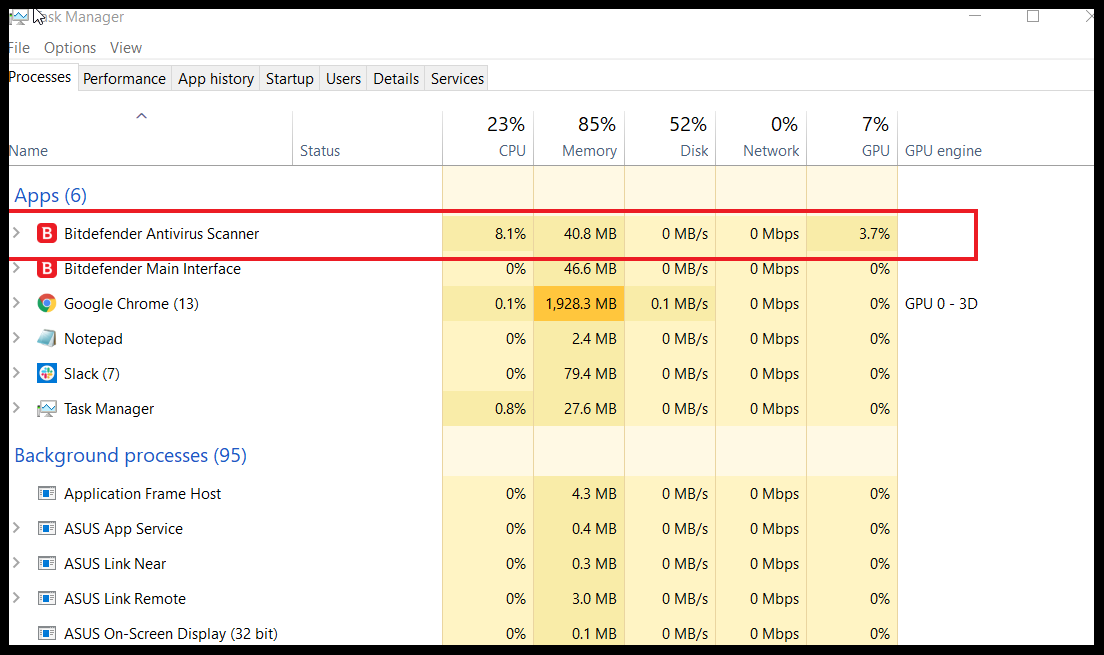
You will be pleased to know that it not only delivers top-notch, impenetrable defense but also the lowest impact on your system even in full scan mode.

Having a hard time taking this statement for granted? So did we! That’s why we checked for ourselves and we can gladly confirm this tool’s small system footprint and overall discreet presence do not monopolize your resources.

Our breezy ASUS SonicMaster with 8.00 GB of RAM and 500 GB HDD (out of which 118 GB worth of files are already occupied) is your reliable witness.
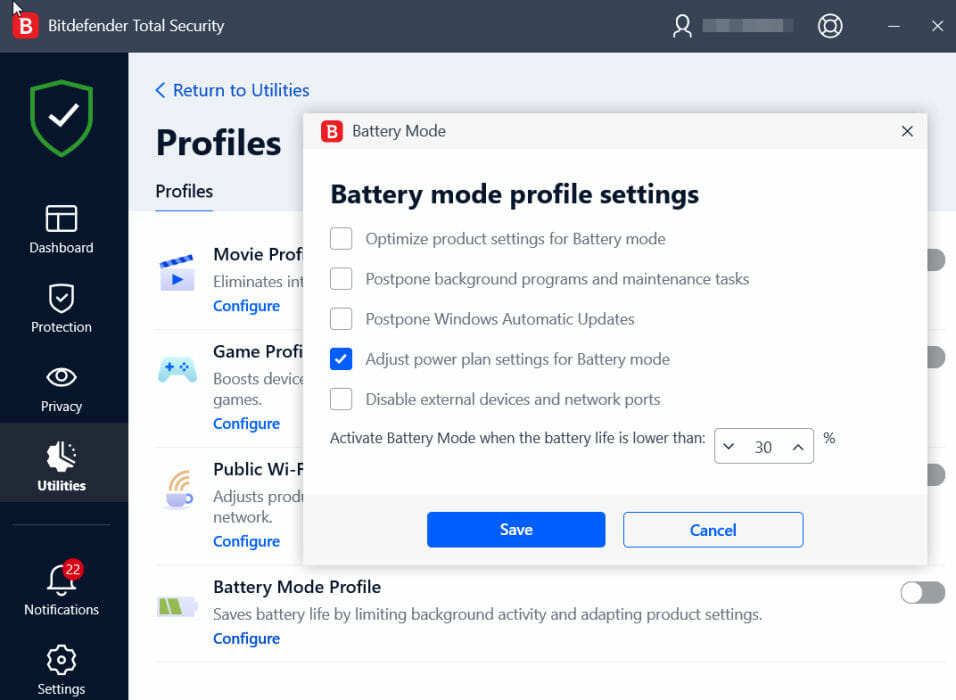
Here are more features you’d probably enjoy, starting with the dedicated profiles that perfectly adapt to your needs. The big trio in our lives gets specialized modes for Game, Movie, and Work.
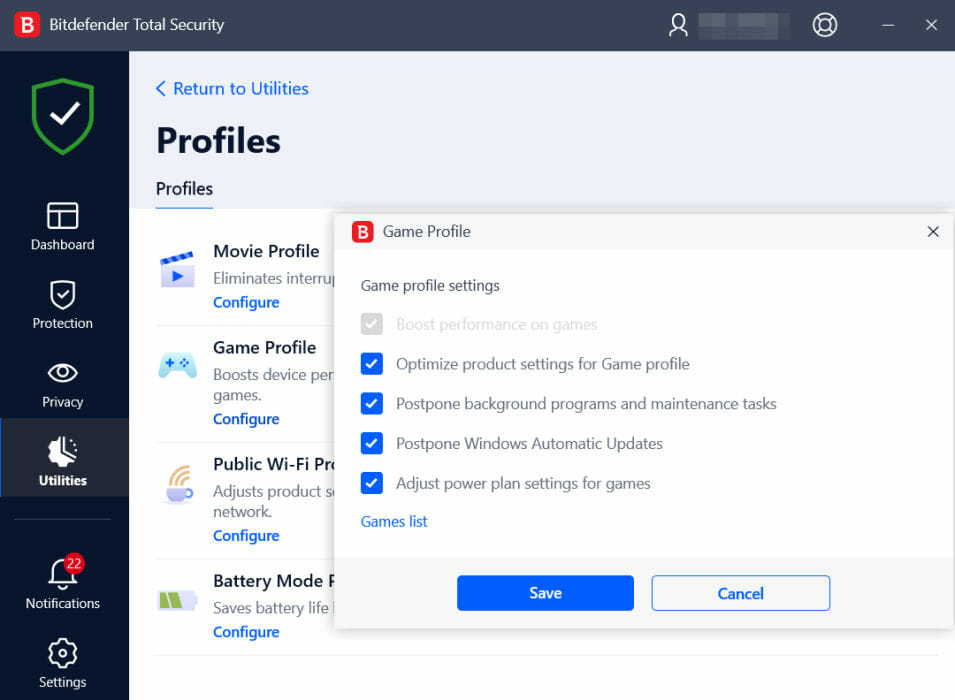
In fact, whenever you use an app on full screen, the silence mode automatically kicks in to halt notifications, tweak visual settings and postpone unessential operations in order to allow you to make the most of your rig uninterrupted.

The smart Battery Mode then comes into play and further adjusts your configuration to save on battery life and allow you to stay unplugged longer. Finally, the OneClick Optimizer will speed up your device and improve its overall performance.
 

Privacy and anti-fraud protection are quintessential to gamers since these are the 2 most vulnerable and most frequently exploited channels, closely followed by network-targeted attacks.

Bitdefender Total Security couldn’t have been the best antivirus for PlayStation 4/5 if it weren’t for some serious privacy-focused features such as video and audio protection, a VPN with anti-tracking capabilities, not to mention the proprietary file shredder and password management systems.
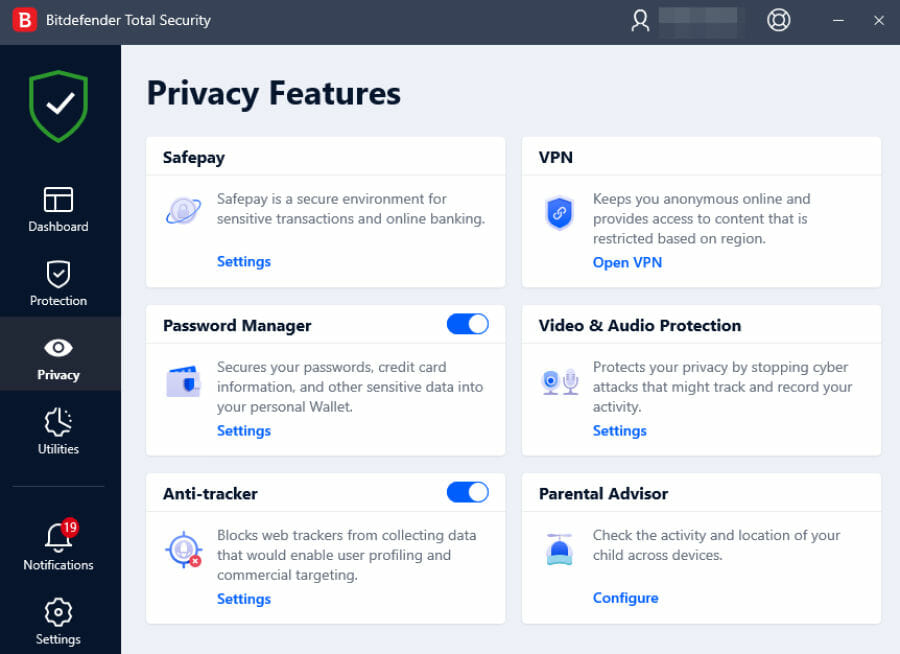
The smart Privacy Firewall filters your network traffic and the Wi-Fi Security Advisor makes sure you won’t ever land on an unsecured connection.

To top it all, you also get a secure browser to deploy financial operations, social network defense, and advanced anti-phishing protection to block out scammers, posers, spoofed websites, and more.


Norton 360 for Gamers

  • Advanced intrusion detection system
  • Multi-layered defense against gaming-related threats
  • Sophisticated protection against gaming-targeted exploits
  • Built-in VPN and firewall for complete privacy
  • Features such as Norton Optimizer, Cloud Backup, and SafeCam are only available on Windows.

Whether you’re looking for an antivirus for PS4, Xbox One, gaming PC, or a security program for Oculus Quest, you simply cannot go wrong with Norton 360 for Gamers.

It’s hard to beat an app that was designed by gamers for gamers and Norton caters exclusively to this special breed of users with very particular protection needs.

Of course, multi-faceted defense is well-represented, but it’s the fine-tuned features that perfectly wrap around gamers’ needs that we’re after.

And we believe Norton’s tailored protection will not only convince you it’s worth a shot but captivate you altogether.

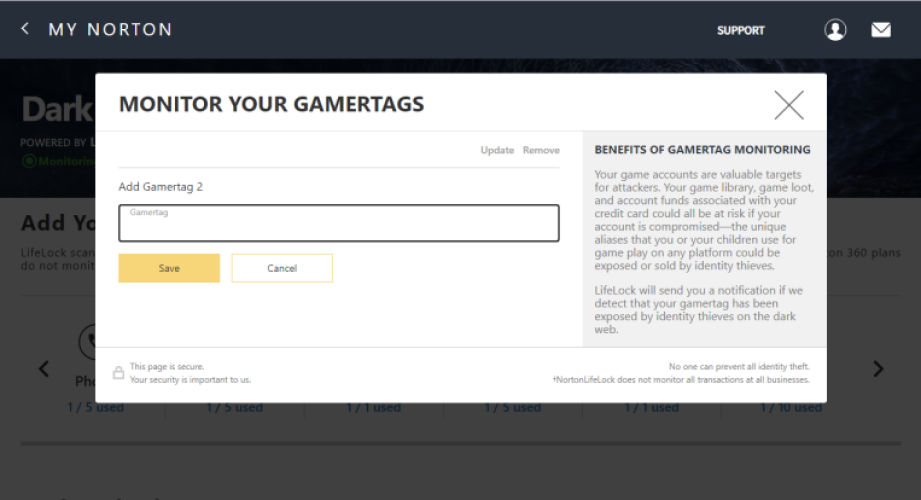
Its specific mechanisms are designed to secure your gaming information, including anything and everything from accounts, devices, tags, and assets.
There is no shortage of antiviruses with gaming modes and boosters on the market and obviously, Norton does not fall short in this department.

But that’s just the beginning of the saga as Norton does more than minimize distractions while you’re gaming or using an app in a full-screen layout.

Here is the truly game-changing part: it adjusts its entire configuration to pump juice into your gameplay.

From optimizing resource-intensive processes and tasks to free up capacity to enhancing your CPU, Norton does it all.
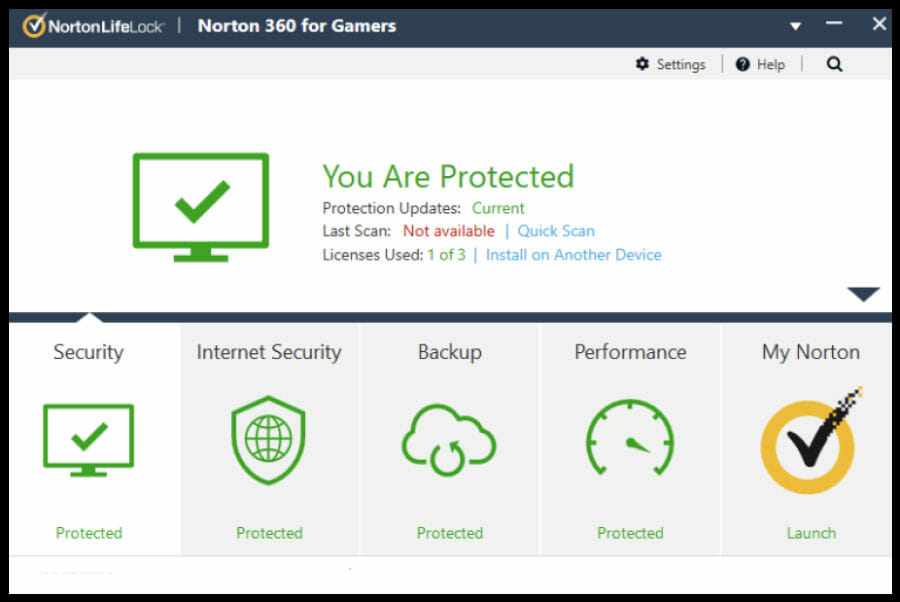
Smooth graphics, boosted speed and top-notch FPS are guaranteed to propel you straight to victory and the awesome part is that you won’t have to sacrifice security or privacy on the shrine of performance.

The Dark Web Monitoring feature will keep an eye on your personal information as well as gamer tags, usernames, and email addresses associated with your gaming accounts.

More privacy-focused tools come to the rescue including a no-log VPN that repels DDoS attacks, webcam defense for safe streaming, anti-phishing, and proactive exploit protection to block fraudulent websites and zero-day attacks.

At this point, it’s only safe to say that Norton 360 for Gamers is up for the challenge and we could not be more impressed with its airtight defense designed to leverage the in-depth comprehension of gamers’ needs.


Avira Prime

  • Advanced privacy-focused suite
  • Unlimited VPN, secure browser and anti-tracker
  • Password management and device cleaner
  • Software, drivers, and privacy options updater
  • Streaming and broadcasting optimizations
  • Money-back guarantee only

Avira Prime may not be designed exclusively for gamers, but it has what it takes to secure your gaming device and allow you to make the most out of it without fussing over performance befalls.

This is one truly cross-platform program that you can use on all your devices. Not impressed yet?

You should know that you can cover up to 25 different gadgets running on different platforms with just one subscription – how about now?

Needless to say, this is a great antivirus for PS4/5 and its smart capabilities will show you exactly why. Here’s a bit of intel on Avira in a nutshell.

Let’s start with the elephant in the room, shall we? Let’s talk performance.

With a dedicated device cleaner, Avira will help you remove clutter to free up both space and memory for your games.

But removing junk also has deeper implications that will be beneficial to your gameplay such as speeding up boot time and cutting down on lag. One goes up, another one must go down, right?

Avira will take it even further to automate your device optimizations and keep both software and drivers up to date.

By optimizing user and system processes, this best antivirus for PlayStation 4/5 will enhance your gameplay and allow you to get more out of your CPU.

Similar to Norton 360 for Gamers, this nifty program will check to see if your sensitive data such as passwords or account information have been leaked online or involved in a security breach.

Speaking about passwords, you’re in for a big treat thanks to the built-in password management system that allows you to generate unhackable codes for your gaming accounts.

It’s true that privacy is often related to confidential credentials, but there is more at stake. Avira gets it all too well and throws in extra privacy-focused tools to guarantee your end-to-end confidentiality.

Here’s what to expect: a truly unlimited VPN (which is a bit of a rare jewel with security bundles), a safe browser with anti-tracking and anti-adware capabilities, dedicated privacy settings optimizer, mic, and webcam shields, and more.


AVG Internet Security

  • Webcam protection and data shredder
  • Fake website shield + safe browsing
  • Advanced anti-hacking tools
  • Dedicated Do Not Disturb and Silent modes
  • Multi-device coverage and cross-platform compatibility
  • VPN feature is only available in the premium (Ultimate) edition.

AVG Internet Security boasts numerous security features designed to appease gamers’ concerns. What’s in it for you specifically?

Here’s a preview: robust ransomware protection, anti-hacking, and privacy-focused tools such as passwords and webcam defense, a customizable firewall, secure payments, and much more.

In fact, the Hacker Attacks Protection and Privacy Protection modules are 2 of the 5 major pillars on which AVG focuses in order to secure your digital experience.
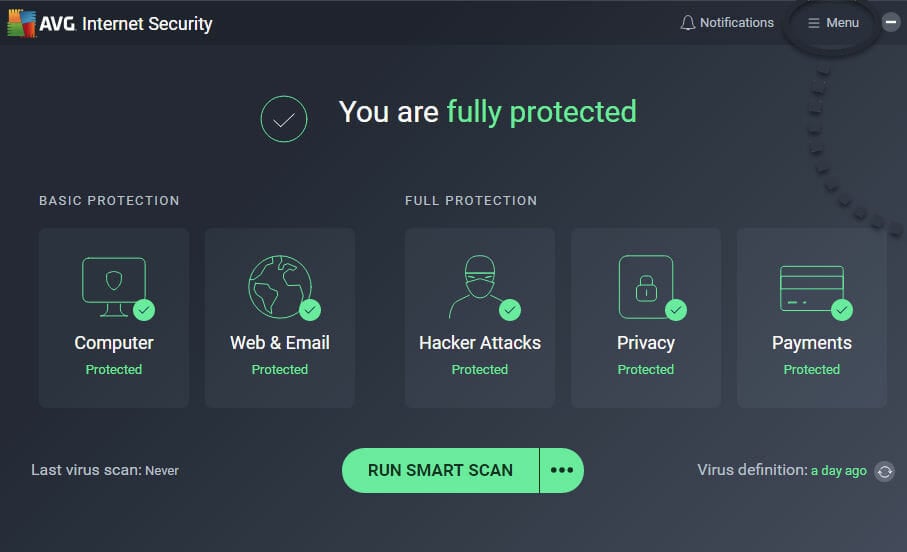
Propelled by a powerful blend of heuristics and AI, this best PlayStation antivirus grants special attention to performance and this reflects throughout its entire infrastructure, all the way to scanning options.

You can trust the dedicated PUA scanner to identify potentially unwanted apps that may hide in gaming software packages while the Turbo Scan feature will skip files already vetted as safe to reduce the impact on your resources.

In some more handy tools to eradicate any distractions and allow you to enjoy your gaming sessions without interruptions.

We’re talking about the specialized Do Not Disturb and Silent modes that postpone notifications, pop-ups, scans, and updates while you engage in immersive gameplay.
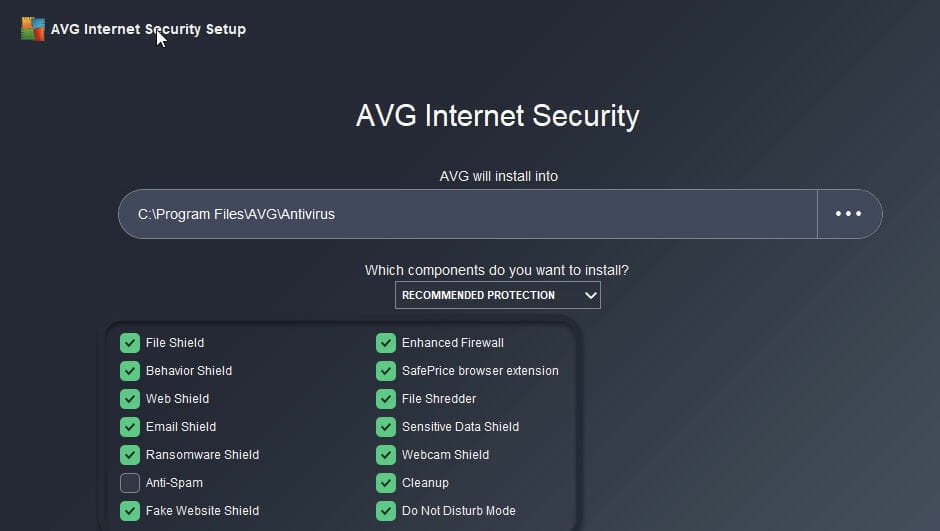
The built-in web shield and link scanner further refine your experience by steering you away from all things suspicious, harmful, or untrustworthy. And here’s the great thing.

These tools only make up for the introductory part of the extensive anti-hacking suite that follows.

An enhanced, highly customizable firewall will stop hackers from accessing your network while the password and anti-ransomware shields safeguard your confidential data from theft, abusive encryption, and more.

Not useful anymore? Don’t let it linger around to tempt intruders. Rely on the native data shredder to permanently remove data you no longer need and prevent unauthorized access for good.


Did you find your antivirus for PlayStation 4/5 in here? We sure hope so. Don’t be shy to share your thoughts on this topic with us. We’re eager to know your point of view.

Fix: Error Occurred While Attempting to Join the Domain

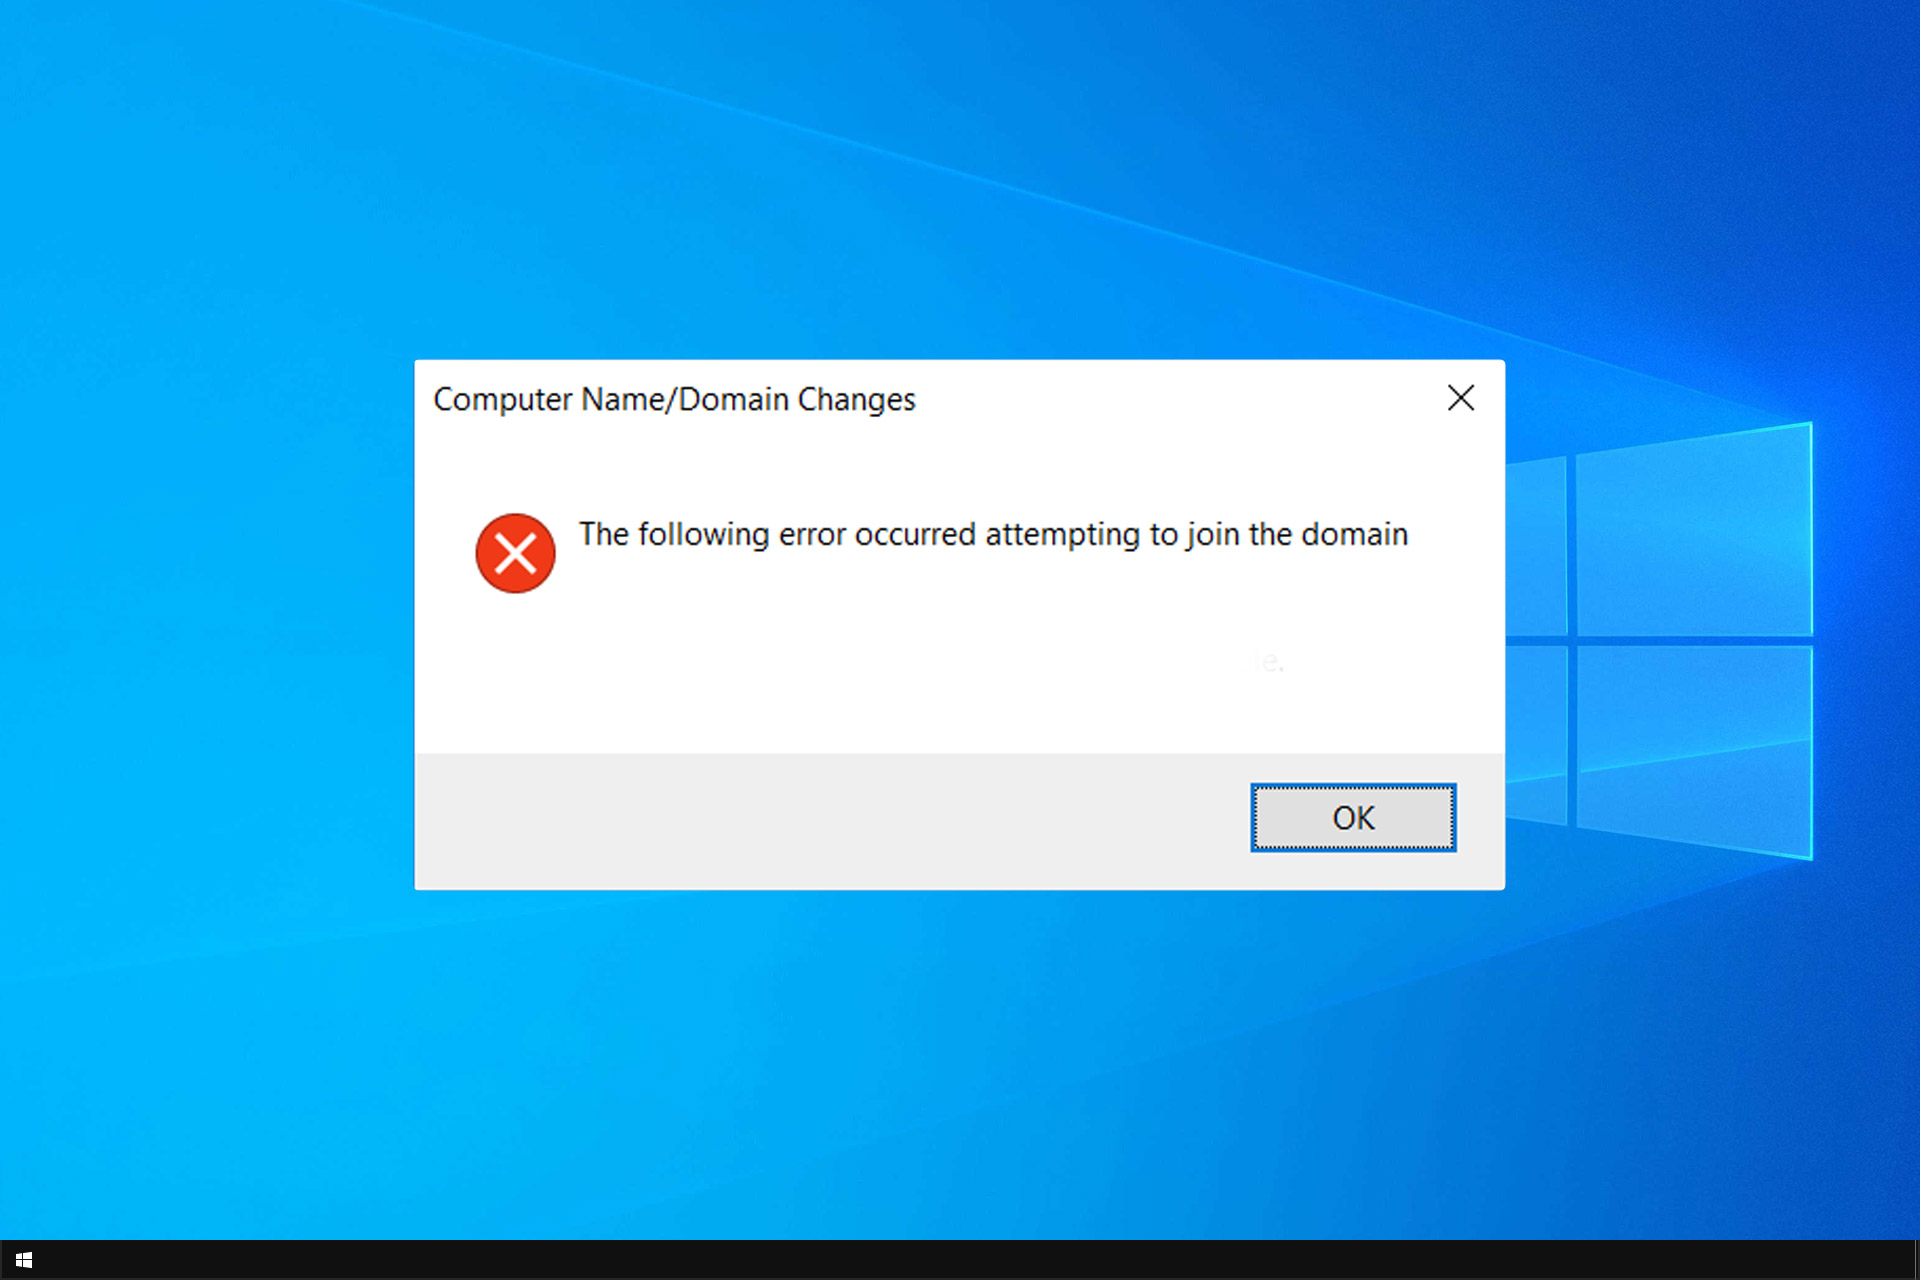
While working on a domain server, you may encounter the following error occurred attempting to join the domain error. It is a network error and occurs when the user tries to join a computer’s domain.

This message is quite related to the specified domain does not exist error, but we covered that one in a separate guide.

If you are also troubled by this error, here are a couple of troubleshooting tips to help you resolve the following error that occurred attempting to join the domain in Windows.

How do I fix The following error occurred attempting to join the domain?

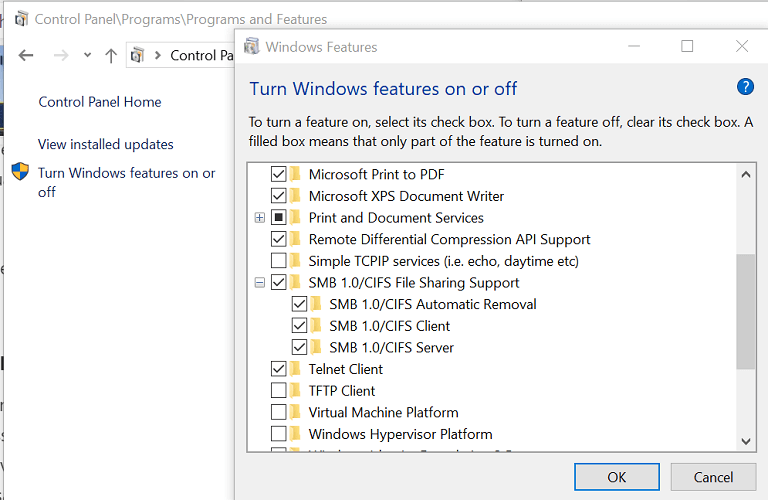
1.  Enable SMB1 Support

error occurred attempting to join the domain
  1. Press Windows Key + R to open Run.
  2. Type control and click OK to open Control Panel.
  3. In Control Panel, go to Programs > Programs and Features.
  4. From the left pane click on Turn Windows Features on or off link.
  5. In the Windows Features window, scroll down to SMB 1.0/ CIFS File Sharing Support.
  6. Check the SMB 1.0/ CIFS File Sharing Support option and all the options in the sub-menu.
  7. Click OK to save the changes.
  8. Close Control Panel and check if the error the following error occurred attempting to join the domain is resolved.

A general network error occurred while joining domain often occurs if SMB (Server Message Block) 1 support is disabled on the client’s machine. 

It is a standard protocol used by the Windows system. Reportedly, enabling the feature has helped several users fix the error.

2. Check third-party antivirus

  1. Third-party antivirus is known to cause the aforementioned error.
  2. Your antivirus may be blocking any attempt to establish a connection resulting in the error.
  3. If you have a third-party antivirus installed, try disabling it temporarily.
  4. Once disabled, try to establish a connection and check for any improvements.
  5. If the error is resolved after disabling the antivirus, you may have to uninstall the antivirus to prevent the program from creating issues in the future.

Uninstall third-party antivirus

  1. Press Windows Key + R to open Run.
  2. Type control and click OK.
  3. Go to Programs > Programs and Features.
  4. Select and uninstall the antivirus.

Note: If your antivirus comes with a built-in firewall, you can disable the firewall from the settings menu.

We recommend this only as a temporary solution. You should install another Windows 10 compatible antivirus software that doesn’t interfere with your system and ensures complete real-time protection.

3. Use System Restore point

error occurred attempting to join the domain
  1. Type system restore in the search bar.
  2. Click on Create a Restore Point option.
  3. In the System Properties window, open System Protection.
  4. Click the System Restore button.
  5. Click Next.
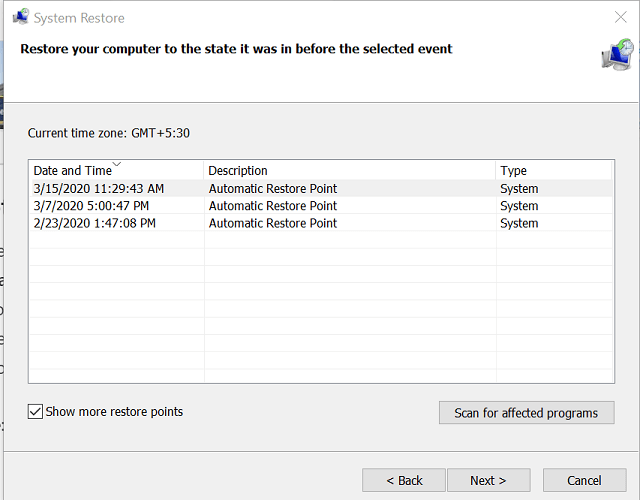
  6. Check the “Show more restore points” box. This will list all the available restore points.
  7. Select the most recent restore point and click Next.
  8. In the Confirm your restore point window, click the Finish button.
  9. It may take a few minutes to restore the PC to an earlier point, so wait till the process is complete.

Using the System Restore Point feature can help you fix the domain server issue that occurred after making a major change to your system. The restore points will revert the computer to a previous point in time, thus undoing any changes that resulted in the error.

The following error occurred when attempting to join the domain error, as discussed, occurs if the SMB1 support is disabled or if there is an issue with the security programs.

We covered similar errors before, such as an error occured while attempting to create a directory when installing programs or an account with the same name exists in Active Directory, so we encourage you to check it out for more information.

Follow all the steps in this article and let us know which method helped you resolve the issue in the comments.

Computer stuck on CTRL+ALT+DELETE screen [FIX]

Are you getting stuck on the login or CTRL+ALT+DEL screen when using your Windows 10 computer?

If so, have you tried unplugging any devices connected to the computer? Or maybe you’ve tried to restart your computer and nothing happens?

At this point, you could try clicking on Ease of Access on the lower-left corner of the login screen if your mouse is working.

Select Type without the keyboard (on-screen keyboard) and use the mouse to press the CTRL+ALT+DEL keyboard shortcut.

Sometimes the issue is with your keyboard, which could be dead or has come loose so you can check the keyboard’s connection to the PC.

If it’s a wireless keyboard, check the batteries. If you don’t get any lights coming on when pressing Caps Lock, or Num Lock, then your keyboard is most likely shot.

Should none of these quick fixes work, you can go ahead and try the suggested solutions here.

What can I do if my PC is stuck on the CTRL+ALT+DEL screen?

  1. Roll back graphics/video card driver
  2. Perform a hard reset
  3. Perform a startup repair
  4. Disable fast boot/startup

1. Roll back graphics/video card driver

  1. Right-click Start.Computer Stuck On Ctrl Alt Delete Screen
  2. Select Device Manager.Computer Stuck On Ctrl Alt Delete Screen
  3. Select Display Adapters and click to expand the list then choose the card.Computer Stuck On Ctrl Alt Delete Screen
  4. Right-click the on the card, and then select Properties.Computer Stuck On Ctrl Alt Delete Screen
  5. In Properties, select the Driver tab.Computer Stuck On Ctrl Alt Delete Screen
  6. Select Roll Back Driver, then follow the prompts.Computer Stuck On Ctrl Alt Delete Screen

Your PC doesn’t natively know how to take advantage of all video card features. It needs a driver to do that and not just any driver – an updated one.

When applying the above procedure, if the button is unavailable, that means there’s no driver to roll back to.

If Windows can’t find a new driver for your graphics/video card, you can visit your computer manufacturer’s website to download the latest driver.

However, there’s an even better option to take into consideration. Instead of wasting time scattering between countless graphics/video card versions, install Outbyte Driver Updater and let it handle this task.

Besides solving the CTRL+ALT+DELETE issue by updating your graphics/video card, this lightweight tool will keep all your drivers updated for your PC to work properly.

And if you’re not a big fan of tech changes, keep in mind that the interface is kept relatively simple, so you’ll get used to it in no time.

2. Perform a hard reset

  1. Remove the battery from its compartment, and then press and hold the Power button on your computer for about 15 seconds to drain any residual electrical charge from its capacitors.
  2. Insert the battery and power adapter back to the computer but don’t connect any other devices just yet.
  3. Press the Power button to turn on your computer. You’ll see the startup menu opening, so use the arrow keys to select Start Windows Normally and press Enter.
  4. You can now reconnect the devices one at a time, and you’re good to go. Remember to run Windows Update and update all device drivers.

This will be different depending on whether your computer has a removable battery or a sealed (non-removable) battery.

For a removable battery computer, switch off the computer and remove any plugged devices, disconnect all externally connected peripherals, and then unplug the power adapter from the computer.

For a computer with a sealed or non-removable battery, don’t try to remove it as this can void your warranty. Do the following instead:

  1. Turn off the computer and remove any plugged devices or peripherals, and unplug the power adapter from the computer.
  2. Most laptops can be reset by pressing and holding the Power button for 15 seconds. So do this, then plug back the power adapter but not any other devices.
  3. Press the Power button and start your computer, then select Start Windows Normally and press Enter.
  4. Reconnect other devices and peripherals, one at a time, and run Windows Update as well as updating all device drivers after the reset.

3. Perform a startup repair

  1. Start your computer from the installation media by inserting the disk or USB drive stick. If you get a message asking you to press any key to boot from DVD, press any key on your laptop or computer’s keyboard. If you don’t see such a message, change the boot order in your BIOS settings so that it starts from the disk or USB.
  2. When you see the Install Windows page, click Repair your computer to start the Windows Recovery (WinRE) environment
  3. Go to Choose an option screen.Computer Stuck On Ctrl Alt Delete Screen
  4. Click Troubleshoot.Computer Stuck On Ctrl Alt Delete Screen
  5. Select Advanced Options.
  6. Click Startup Settings and then click Restart.Computer Stuck On Ctrl Alt Delete Screen
  7. Once this is done, complete the repair and check if you can start your computer again.

You can do this by first downloading the Windows 10 ISO and creating a media creation tool, then performing a startup repair.

Once you have the installation media, do as described above.

4. Disable Fast Boot

  1. Right-click Start.
  2. Select Control Panel.Computer Stuck On Ctrl Alt Delete Screen
  3. Click Hardware and Sound.Computer Stuck On Ctrl Alt Delete Screen
  4. Click Power Options.Computer Stuck On Ctrl Alt Delete Screen
  5. Click Choose what the power buttons do.Computer Stuck On Ctrl Alt Delete Screen
  6. Click Change settings that are currently unavailable.Computer Stuck On Ctrl Alt Delete Screen
  7. Scroll down to Shutdown settings.Computer Stuck On Ctrl Alt Delete Screen
  8. Uncheck Turn on fast startup.Computer Stuck On Ctrl Alt Delete Screen
  9. Click Save changes.

Some users have raised concerns over the Fast Boot setting in BIOS that hinders the booting and fast loading of the desktop, creating many problems in Windows 10.

You could try and disable this in your computer’s BIOS and see if it fixes the problem.

Did any of these solutions help you fix the ‘computer stuck on CTRL+ALT+DELETE screen problem? Let us know by leaving a comment in the section below.
[wl_navigator]

How to fix corrupted Microsoft Access databases

Access is one of the industry’s foremost database applications that’s included within the Microsoft Office suite.
Microsoft Access databases might be essential files for some users as they retain records, so it’s a good idea to keep a database backup as a precaution for file corruption.

Yet, there are probably some users who don’t back up their database files; and they’ll need to repair corrupted Access MDB or ACCDB files.

If your Access database is corrupted, and you don’t have a handy backup, check out some troubleshooting tips below.

How can I solve Microsoft Access database corruption issues?

  1. Use a professional tool – Stellar Repair for Access
  2. Select the Compact and Repair Database tool in Access
  3. Open the Jet Compact utility
  4. Fix Access Database files at OfficeRecovery.com
  5. Fix corrupted access database with Hetman Office Recovery

1. Use a professional tool – Stellar Repair for Access

Developed by the experts at Stellar, Repair for Access is the best choice when it comes to repairing a corrupt Access database and recovering the objects in a new database.

As a potential user, do note from the start that it comes with an exceptionally polished interface that makes both newbies and experienced users feel comfortable while using it.

Moreover, it packs the best-in-class database scanning technology to recover deleted tables, attachment data, and even non-English language details from database tables.

Stellar Repair for Access

Stellar Repair for Access

Looking for a way to fix corrupted Microsoft Access databases? Stellar’s tool is up for the task!
Free trial Visit website

2. Select the Compact and Repair Database tool in Access

  1. Open the Access application.
  2. Select the Database Tools tab.
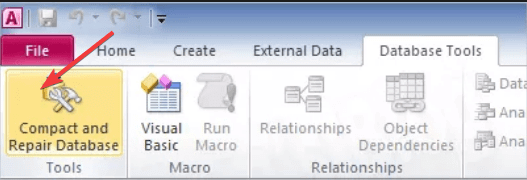
  3. Then click the Compact and Repair Database option on the tab.Compact and Repair Database
  4. A Database to Compact From window will then open from which you can select a database file to repair.
  5. Press the Compact button.
  6. Next, enter a new file title in the Compact Database Into dialog box that opens; and select a folder to save it to.
  7. Click the Save button. Thereafter, you will have a fresh database that you can open in Access.

First, check out the Compact and Repair Database tool included within Access. That tool can repair corrupted Access database files. Use the above steps to fix databases with the Compact and Repair Database tool.

3. Open the Jet Compact utility

  1. You can click Download JETCOMP.EXE now on the official JetComp page to save the utility to a folder.
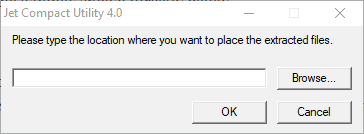
  2. Click JetCU40.exe in the folder you saved it to open the window shown directly below.
  3. Click the Browse button to select a folder to extract Jet Comp to, and click the OK button.
  4. Open the folder that includes the extracted utility, and click JetComp.exe to open the Database Compact Utility 4.0 window.
  5. Click the … button for the Database to Compact From box to select a corrupted database.
  6. Then click the … button for the Database to Compact Into box to choose a path to save the newly compacted database. Add a file title for the database to the end of the path if required.
  7. Press the Compact button.

There’s also a separate Microsoft Jet Compact utility (Jetcomp) that Access users can repair corrupted databases with.

Jetcomp is pretty similar to the built-in Compact and Repair tool in Access as it compacts databases.

However, Jetcomp is certainly worth noting if the Compact and Repair Database utility in Access doesn’t repair your MDB or ACCDB file.

4. Fix Access Database files at OfficeRecovery.com

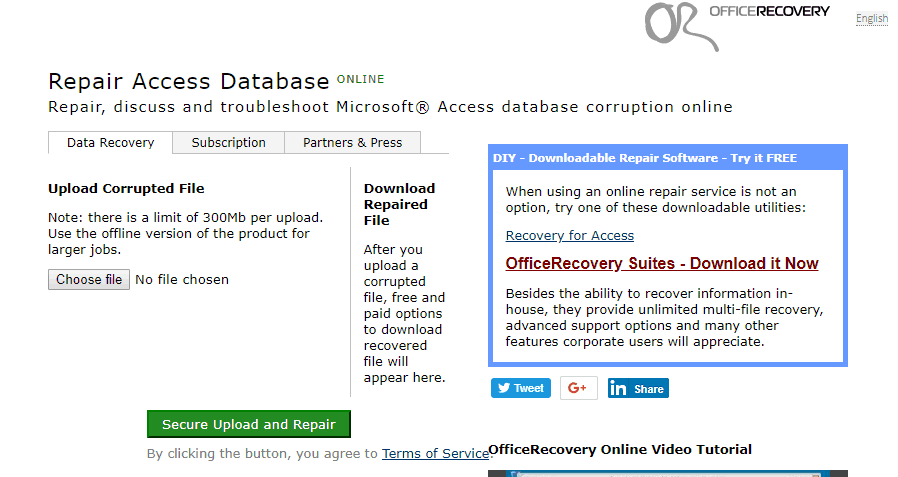
OfficeRecovery.com includes a few web tools that MS Office users can fix files with. You can fix MDB and ACCDB files with the Repair Access Database ONLINE utility at OfficeRecovery.com.

Open the Repair Access Database in your browser. Then press the Choose file button to select a corrupted database, and click the Secure Upload and Repair button to fix it.

5. Fix corrupted access database with Hetman Office Recovery

You can fix corrupted Access files with third-party database repair software such as Hetman Office Recovery. This tool provides native file support for Microsoft’s popular formats and more.

In fact, versatility is a quintessential characteristic of  Hetman Office Recovery and it does justice to its reputation by seamlessly working with all types of platforms, devices, storage media including all SSD, HDD, USB pen drives, NAS, and all versions of FAT and NTFS.

Moreover, not even damaged devices can stand a chance against this powerful recovery tool.

Through sophisticated disk analysis algorithms, Hetman Office Recovery will help you retrieve and access database files (and others) from formatted, repartitioned, corrupted, inaccessible, worn, and physically unstable disks and partitions.

⇒ Get Hetman Office Recovery

So that’s how you can fix corrupted MS Access database files. Check out the built-in repair option and gradually move on or go directly for a third-party tool such as Stellar and skip the troubleshooting process.

If you managed to fix this problem, be sure to check our guide and learn how to convert ACCDB to PDF and take your Access knowledge to a new level.

Whatever is your method of choice, it’s guaranteed to work. Let us know how it went by reaching for the comments section below.

System error 67 has occured? Fix it in 5 easy steps

System error 67 is a Windows Server issue that can occur when users try to map a network drive. The error message states: System error 67 has occurred.

The network name cannot be found. Consequently, users can’t map their network drives when Command Prompt displays that error message.

If you need to fix that issue, check out some of these potential resolutions.

How can I fix the System error 67 on Windows 10?

1. Update the network adapter driver for the domain controller

Updating the network adapter driver on the domain controller server might fix the System error 67 that you are dealing with. That’s why this is our first recommendation for you today.

You can update your drivers by accessing the Device Manager panel from the taskbar. Find the network adapter in the list of hardware, right-click on the driver and select update.

Alternatively, in order to quickly update the network adapter driver for the domain controller, don’t hesitate to use Outbyte Driver Updater.

This tool will literally solve the problem for you by scanning the computer for missing and outdated device drivers.

Once they are identified, choose only the adapter driver to update or download and install all of your out-of-date device drivers at once.

It’s convenient that you can always see the download progress of each of your files, not to mention that you can easily schedule driver scans.

Outbyte Driver Updater

When dealing with the System error 67, chances are to find that it’s driver-related. Use Outbyte Driver Updater right away!
Free Trial Download now

2. Check the command’s syntax

net map command System Error 67

System error 67 can often be due to a syntax error within the net map command. So, double-check you’ve entered the net map command right.

Check whether you’ve entered the slashes for the command right. The basic syntax for the net map command is: net use * *IP Address*sharename.

So, there should be backslashes, not forward slashes, around the command’s IP address.

3. Disable the Network Address Translator

  1. Microsoft’s official fix for System error 67 is to disable the Network Address Translator, so right-click the Start button and select Device Manager to open the window shown directly below.Device Manager System Error 67
  2. Click the View menu.
  3. Select the Show hidden devices option.
    Device Manager window System error 67
  4. Double-click the Non-Plug and Play Drivers category in Device Manager.
  5. Right-click IP Network Address Translator to select the Disable option for it.

4. Turn on Desktop Experience

  1. First of all, click the Start button.
  2. Click Administrative Tools on the Start menu.
    Server Manager option System Error 67
  3. Select the Server Manager option to open that utility.
    Server Manager window System Error 67
  4. Click Features on the left of the Server Manager.
  5. Click Add Features under Features Summary, which opens the window directly below.
    Desktop Experience option System Error 67
  6. Then select the Desktop Experience option.
  7. Click the Add Required Features button.
  8. Click Next to continue.
  9. Press the Install button.

Some users have also confirmed they’ve fixed System error 67 by enabling Desktop Experience in Windows Server. You may try the same by applying the above steps. 

5. Turn off the Hardened UNC Paths policy

  1. Some users might need to turn off the Hardened UNC Paths policy. Press the Windows + R hotkeys.
  2. Input gpedit.msc in Run and click OK to open Group Policy Editor.
    The Group Policy Editor System Error 67
  3. Click Computer Configuration, Administrative Templates, Network, and Network Provider on the left of Group Policy Editor.
  4. Double-click Hardened UNC Paths on the right of Group Policy Editor.
  5. Select the Disabled radio button.
  6. Select the Apply option.
  7. Thereafter, restart Windows.

The resolutions above will probably fix System error 67 for most users. With that issue fixed, users can then map network drives and run Network Discover scans as required.

Here’s How to Fix Status Invalid Image Hash on Chrome

The status invalid image format error can appear in Chrome while trying to run certain applications. As a result, you won’t be able to run the desired programs.

The error mostly affects video games such as Arma 3 and is usually generated by missing components such as DirectX, .NET Framework, and Visual C++ Redistributables.

Besides, it’s often reported that some G-suite modules, such as Word or Excel, won’t run because of this issue. So, in this article, we’ll try to shed some light on the matter and offer a few solutions.

How can I fix the status invalid image format error?

1. Make sure that your drivers are up to date

Sometimes the Status invalid image format message can appear when running certain games, especially if your drivers aren’t up to date.

So update all your important drivers, such as the chipset, sound, network, graphics, etc. Visit your device manufacturer’s website for each component and download the latest drivers.

However, updating drivers manually can be a bit tedious, especially since you need to know the model of each component you’re trying to update. You can use a third-party tool that will help you update all your drivers with the newest versions.

⇒ Get Fortect Driver Updater

2. Make sure that the application isn’t trying to load a 32-bit DLLs

Although a rare occurrence, the Status invalid image format message can appear when the application you’re trying to run tries to load a 32-bit to a 64-bit process.

Users suggest using Dependency Walker in profile mode to determine which DLL is causing the problem.

What you need to do is to download this tool to open the application that displays this error.

This way, you’ll be able to see which DLL file is causing the issue.

Keep in mind that this is an advanced solution, so if you’re a basic user that isn’t familiar with Dependency Walker, perhaps you should skip this solution.

3. Perform an SFC or DISM scan

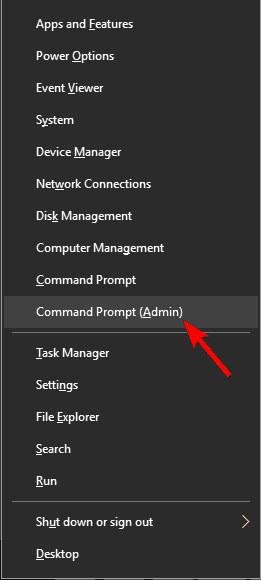
  1. Start Command Prompt as administrator by pressing  Windows Key + X.
    Status invalid image format cmd
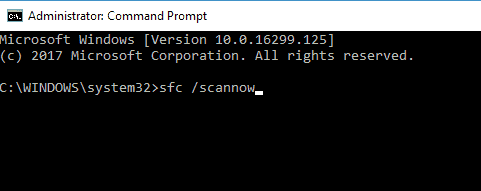
  2. Enter sfc /scannow and press Enter to run it.
    Status invalid image format sfc
  3. The scanning process will now start. The scan can take about 15 minutes or more, so don’t interrupt it.

After the scan is finished, check if the error message still appears.

If the sfc/scannow stops out of the blue, see these easy solutions to fix the issue.

If the issue remains unresolved, or if you couldn’t run SFC scan, be sure to use DISM scan instead.

  1. Run Command Prompt as an administrator.
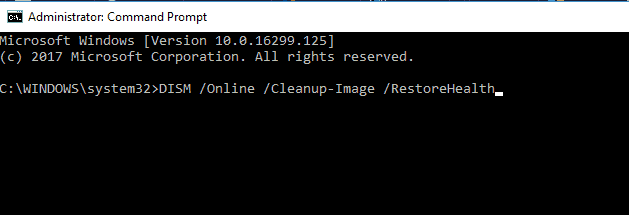
  2. Enter the following command and press Enter DISM /Online /Cleanup-Image /RestoreHealth
    Status invalid image format dism
  3. DISM scan will now start. This scan can take about 20 minutes or even more, so don’t interrupt it.

After the scan is finished, check if the error message is still there. If you were unable to run the SFC scan before, try running it again and check if the problem is still there.

4. Check your antivirus

Your antivirus can sometimes interfere with certain applications and cause the mentioned error.

To fix this problem, it’s important to ensure your antivirus isn’t blocking the application you’re trying to run. More specifically, add the application to the exclusions list.

If that doesn’t help, you may disable certain antivirus features or disable your antivirus altogether.

Another thing to try is to uninstall your antivirus, in which case you’ll be protected on Windows 10 by Windows Defender.

On the other hand, we strongly recommend switching to an antivirus that doesn’t interfere with other processes.

You can find Windows 10 compatible antivirus software that offers top-level protection without causing any errors.

5. Update or reinstall DirectX

According to users, sometimes your DirectX installation can cause the mentioned error .

This usually happens when you try to run certain games on your PC. To fix the problem, it’s advised to update DirectX to the latest version.

If DirectX is already up to date, you might want to try reinstalling it and check if that solves your problem.

6. Download/update .NET Framework and Visual C++ Redistributables

Sometimes the Status invalid image format error appears if you don’t have the necessary components installed.

Namely, certain applications rely on .NET Framework and Visual C++ Redistributables in order to work properly, and if you don’t have them installed, you might encounter various issues.

So just download or update both from Microsoft’s official sources and you’re good to go.

After you update/install .NET Framework and Visual C++, the problem should be completely resolved.

7. Verify the integrity of game cache

  1. Open your game library, and locate the game that displays the error.
  2. Right-click it and choose Properties from the menu.
    integrity Status invalid image format
  3. Head over to the Local files tab and click Verify integrity of game files button.
    integrity game files Status invalid image format
  4. Steam will now verify the integrity of your game cache. (This process can take about 15 minutes, sometimes more depending on the size of the game).

Once the process is finished, check if the error message still appears.

8. Reinstall the application

If Status invalid image format message appears while trying to run a certain application, the issue might be related to that application itself, which might have gotten corrupted.

Reinstalling the application could help. There are several methods that you can use to reinstall the application.

At the same time, it’s very important to also completely uninstall the initial app using a dedicated tool such as IOBit Uninstaller.

If you aren’t familiar with it, uninstaller software will remove the selected application and all associated files and registry entries.

Doing so will prevent any leftover files from interfering with your system, and it will be as if the application had never been installed.

To conclude, the Status invalid image format message can prevent you from running specific applications on your PC. However, we hope you managed to fix this problem using one of our solutions.

If you have other suggestions on this topic, feel free to reach us in the comments below.

Mouse Right Click Not Working in Windows 10 [Fixed]

Is your right-click not working? Without it, none of the context menus can open in Windows. Or, if you are experiencing the issue, it might be limited to the Start menu, desktop or File Explorer.

It could also be a mouse hardware issue, but it will probably be due to corrupted system files, third-party programs or incompatible drivers.

Below are some ways to fix non-working right-click context menus in Windows 10.

What can I do if my right-click isn’t working in Windows 10?

There are various manifestations of this issue. Here are the most common ones:

  • Right-click not working on Windows 7, 8.1 and Windows 10 – Although this troubleshooting guide is aimed at fixing right-click issues on Windows 10, it is worth mentioning that all the other Windows OS versions are also affected by this problem. As a result, you can use the workarounds listed here on other Windows versions as well.
  • Right-click not working in Excel – Judging by user reports, it seems that right-click bugs are more frequent in Excel than in other programs of the Office Suite. Of course, when right-click is not available in Excel this leads to a series of function limitations on spreadsheets.
  • Right-click won’t work on Chrome, Firefox, Edge, Opera and other browsers – If right-click fails on your browser, check for updates and install the latest browser version available. If this solution fails to fix the problem, follow the troubleshooting steps listed below.
  • Right-click won’t work on laptop, desktop, tablet – As you can see, this issue affect all types of devices, although it seems that it occurs more frequently on laptops.

To fix the issues listed above, as well as other right-click mouse problems, follow the instructions below.

1. Update the mouse driver

  1. Press the Cortana button on the taskbar and input Device Manager in its search box.
  2. Select to open the Device Manager shown below.
  3. Click Mice and other pointing devices to expand those peripherals.
  4. Double left-click your mouse (the device might have a yellow exclamation mark indicator) to open its Properties window and click the Driver tab.
  5. Click Update Driver to open the window shown below.
  6. Select the Search automatically for updated driver software option from there.

It might also be worth checking for mouse driver updates. If the mouse doesn’t have the most up-to-date driver, updating it could do the trick.

2. Update drivers automatically using a dedicated tool

An outdated driver can cause many issues, including driver problems. With a specialized driver updater, you can easily scan for and update all your drivers in just a few minutes.

These tools also work great as maintenance software as you can set up automated scans so you never have to worry about driver issues again.

3. Check the mouse

  1. Click the Cortana button on the Windows taskbar and input hardware and devices in the search box.
  2. Select Find and fix problems with devices to open the window below.
  3. Press the Next button to scan.
  4. The troubleshooter will report any detected hardware and device issues back to you with a list from which you can select devices to fix.
  5. Select your mouse if it’s listed, and press the Next button.

The first thing to check is that your mouse is not in any way broken. The best way to do so is to plug the mouse into another laptop or desktop to see if its right-click works.

If you have a wireless mouse, replace its batteries with fresh ones.

3. Switch off the Tablet Mode

The right-click button doesn’t always work in Tablet Mode, so switching it off if it happens to be enabled might do the trick.

The quick way to toggle Tablet Mode on/off is to press the Win key + A, which will open the Action Center sidebar shown below. That includes a Tablet mode button that you can press to toggle Tablet Mode on/off.

Press that button to switch Tablet Mode off.

right click not working mouse

For step-by-step touchpad gestures and settings, see how to right click on a laptop to fix context menu issues on notebook devices.

4. Delete third-party shell extensions

  1. Press the Download button on this website page to add CCleaner to Windows.
  2. Open CCleaner and click Tools > Startup and the Context Menu tab to open a list of shell extensions as shown directly below.
  3. Now, you can either disable or delete the shell extensions. If you want to keep some of them, select all the third-party shell extensions and press the Disable button.
  4. Alternatively, press the Delete button to erase shell extensions.
  5. ShellExView is another utility you can disable shell extensions with which you can add to most Windows platforms from this page.
  6. Open ShellExView as an administrator by selecting its shortcut and pressing the Ctrl + Shift + Enter hotkey.
  7. You can click Options, go to Filter by Extension Type and select Context Menu to open a list of third-party shell extensions.
  8. Select all the pink third-party shell extensions by holding the Ctrl key and clicking the red button to disable them.
  9. Click Options on the ShellExView menu bar again and select Restart Explorer to restart the Windows Shell, which a third-party program might have corrupted.

⇒ Get CCleaner

Third-party programs add their own options to the context menu called shell extensions. As such, it could be that a third-party shell extension is preventing the context menu from opening, and deleting them might fix the right-click context menu.

5. Restart Windows (File) Explorer

  1. If it’s the case that right-click context menus aren’t opening specifically in File Explorer, restarting Explorer with the Task Manager might do the trick.
  2. Open Task Manager by pressing the Ctrl + Alt + Del hotkey and select Task Manager.
  3. Click the Processes tab in Task Manager.
  4. Windows Explorer is listed under Windows processes.
  5. Select Windows Explorer and press its Restart button.
right click not working mouse

6. Check Group Policy’s Remove Windows Explorer’s default context menu

  1. First, press the Win key + R to open Run and input gpedit.msc in the text box to open the Local Group Policy Editor window.
  2. Click User Configuration, go to Administrative Templates, select Windows Components, then File Explorer on the left of the Group Policy Editor window.
  3. Double-click the Remove Windows Explorer’s default context menu option to open its window.
  4. If the option is enabled, click the Disabled radio button.
  5. Press Apply and OK to close the window.
  6. Reboot your laptop or desktop.

The Group Policy Editor has a Remove Windows Explorer’s default context menu option that disables the context menu if selected.

So, if you’re using either Windows 10 Enterprise or Pro, which include the Local Group Policy Editor, check that this option is not selected.

Most Windows 10 users have no idea how to edit the Group Policy. Learn how you can do it by reading this simple article.

7. Run the System File Checker

  1. Press the Win key + X hotkey and select Command Prompt (Admin) to open the window below.
  2. Then input sfc /scannow in the Command Prompt and press Enter.
  3. The scan will probably take about 15 to 20 minutes. If it fixes anything, Command Prompt text will state, Windows Resource Protection found corrupt files and successfully repaired them.
  4. Restart Windows if SFC does fix files.

System File Checker, otherwise known as SFC scannow, is a handy tool that fixes corrupt system files, some of which may be at the root of a non-working right-click.

If you’re having trouble accessing Command Prompt as an admin, then you better take a closer look at this guide.

8. Revert Windows to the previous Restore Point

  1. Enter System Restore in Cortana’s search box.
  2. Select Create a restore point to open the window below.
  3. Press System Restore and click the Next button to open a list of restore points as below.
  4. Click the Show more restore points options to open a full list of restore points.
  5. Select a date to restore Windows to and click Next.
  6. Now press the Finish button to restore Windows.

The System Restore tool will revert Windows to a previous date. Reverting Windows to a restore point one month back could fix this if all the right-click context menus were working fine a few days ago.

If you’re interested in more info on how to create a restore point and how would that help you, take a look at this simple article to find out everything you need to know.

9. Adjust touchpad delay time or disable the touchpad

  1. Press Win+I hotkeys on your computer.
  2. This will bring System Settings; from there click on Devices.fix right-click not working
  3. Next, select Mouse & touchpad tab.
  4. Pick Touchpad from the next window.fix right-click not working
  5. Change the delay time by using the dropdown menu.
  6. Set the delay to different values and test your mouse; if the random jump disappears it means you just found the right fix for your problem.
  7. Disable touchpad

Now, if you don’t want to resort to radical and complex solutions such as using a restore point, continue the troubleshooting process with the workarounds listed below.

In some situations, using both mouse and touchpad might create conflicts between these two hardware components. These issues could also randomly disable the right-click function on your mouse.

For more info on how to disable the touchpad when an external mouse is connected, check out this simple guide.

If the issue persists after having changed the touchpad delay time, try disabling the touchpad completely.

  1. Go to Start, type mouse settings, and hit Enter to select the first result
  2. Select the Touchpad tab, click Stop device or Disable (depending on your Windows version)fix right-click not working pc
  3. Your touchpad is now disabled. Try using the mouse right-click feature is now fully functional.

10. Check for third-party program conflicts

  1. Go to Start > type Control Panel > hit Enter to open Control Panel
  2. Go to Uninstall a programfix right-click not working
  3. Select the mouse tweaking tool that you want to uninstall > uninstall it
  4. Restart your PC > check if you can properly use the right-click function of your mouse.

Some third-party apps and programs might affect your mouse. If you installed dedicated tweaking tools for pointing devices, these may cause various mouse issues, including right-click issues.

Uninstall these tools and use the built-in mouse settings available on your PC.

11. Remove recently installed software

Go to Start, type control panel, and select the program(s) recently added, then click Uninstall.

fix right-click not working

If you recently installed new software on your computer, try uninstalling it. Just like the mouse tweaking tools that we talked about earlier, various other third-party tools may cause right-click to stop working properly.

Then restart your computer, and see if the issue has been solved.

12. Update your NVIDIA drivers

Many users noticed that mouse problems in Creators Update are prevalent for NVIDIA drivers. If right-click is not working after you upgrade to the latest OS version, try installing the latest motherboard driver.

You can manually download the available drivers for your NVIDIA computer from the company’s official website.

13. Change power management settings for USB Root Hub

  1. Start Device Manager.
  2. Go to the Universal Serial Bus Controllers section and expand it.
  3. Double click USB Root Hub to open its properties.
  4. Go to Power Management tab and uncheck Allow the computer to turn off this device to save power.
    right-click not working fix
  5. Click Apply and OK to save changes.

Many users reported that they fixed right-click bugs by changing the power management settings of the USB Root Hub.

Repeat the same steps for all USB Root Hub devices listed in the Device Manager.

14. Run a full system scan

  1. Go to Start, type defender, and double click Windows Defender to launch the tool
  2. In the left hand panel, select the shield iconfix right-click not working
  3. In the new window, click the Advanced scan option
  4. Check the full scan option to launch a full system malware scan.

Malware may cause various issues on your computer, including errors and hardware and software malfunctions. Perform a full system scan in order to detect any malware running on your computer.

You can use Windows’ built-in antivirus, Windows Defender, or third-party antivirus solutions.

15. Update your OS

Make sure that you’re running the latest Windows OS updates on your machine. As a quick reminder, Microsoft constantly rolls out Windows updates in order to improve the system’s stability and fix various issues.

To access the Windows Update section, you can simply type update in the search box. This method works on all Windows versions. Then go to Windows Update, check for updates and install the available updates.

fix right-click not working

Any of the above fixes could feasibly get the right-click context menu working again. This is usually a software error, so you shouldn’t need a new mouse.

When you’ve fixed the context menu, check out this guide to learn how to customize Windows 10 context menu for further customization tips.

In case you’re having additional problems, we have a guide on what to do if the middle mouse button is not working, so don’t hesitate to check it out.

If you have any additional questions or suggestions, feel free to leave them in the comments section below and we’ll be sure to check them out.

Warzone Settings Not Saving: 5 Ways to Save Them Permanently

Released in 2020, Call of Duty: Warzone is a free battle royale game for PlayStation, Xbox, and Windows ecosystems. The game has garnered tremendous reviews from the community, but many reported that their Warzone settings are not saving.

The problem was discovered ever since the title was first launched and continues to affect gamers worldwide, though in most cases, it has to do with an issue at their end. So, let’s find out how you can fix things when Warzone settings reset every time you launch the game.

Why are Warzone settings not saving?

Here are a few reasons you are facing the problem:

  • Controlled folder access is enabled: A critical security feature, Control folder access, was the most common reason users could not save Warzone settings in Windows.
  • PC does not meet the minimum game requirements: When the PC doesn’t meet the minimum requirements for Warzone, you are likely to encounter such issues and poor gaming performance.
  • Missing permissions: In some cases, users found out that missing permissions (folder ownership), even when using an administrator account, could lead to Warzone settings not saving on the PC.

What can I do if Warzone settings are not saving?

Before we start making changes to the game or the PC, try these few quick tricks first:

  • Make sure your PC meets the minimum requirements for Warzone.
  • Press Ctrl + Shift + Esc to launch the Task Manager and terminate all non-critical programs. Now, check whether Warzone saves settings after you close it.
  • After changing the Warzone settings, take the game route (built-in options) to exit the game rather than abruptly terminating it.
  • Check for pending game updates and install them when Warzone is not saving settings. This has helped many fix the problem.

If none work, move to the solutions listed next.

1. Allow Warzone through Controlled folder access

Tip icon Tip
Though disabling Controlled Folder Access helps fix the problem, we recommend against it since this is a vital security feature, and turning it off puts the PC at risk. Instead, you can allow Warzone through it.
  1. Press Windows + S to open Search, type Windows Security, and click on the relevant search result.windows security
  2. Click on Virus & threat protection.virus and threat protection to fix warzone settings not saving
  3. Now, select Manage ransomware protection.manage ransomware protection
  4. Click on Allow an app through Controlled folder access.allow an app to fix warzone settings not saving
  5. Click Yes in the UAC prompt.
  6. Next, click on Add an allowed app and then select Browse all apps.add an allowed app
  7. Navigate to the Warzone installation location, stored in the Program Files or Programs Files (x86) folder by default, select the launcher, and click Open.warzone launcher to fix warzone settings not saving
  8. Similarly, add the other .exe file in the same location as an exception in Controlled folder access.

One of the quickest ways to fix things when Warzone settings are not saving is to add the game and its launcher as an exception to Controlled folder access.

2. Disable the Read-only attributed while changing settings

  1. Press Windows + E to open File Explorer, and navigate the following path where Username is the current user profile:C:\Users\Username\OneDrive\Documents\Call of Duty Modern Warfare\playersfile explorer
  2. Launch the game, navigate to the settings, make the desired changes, and press Alt + Tab to head back to the Players folder.
  3. In the Players folder, press Ctrl + A to select them and then hit Delete to clear the files.
  4. Next, right-click on the Players folder, and choose Properties.properties
  5. Now, untick the checkbox for Read-only, and click Apply.disable read only to fix warzone settings not saving
  6. Press Alt + Tab to get back to the game, change the settings again, and click Apply when prompted.
  7. Finally, move back to the Player’s folder properties, click Apply again, and then OK to save the changes.save changes to fix warzone settings not saving

Another way to get things working when Warzone settings are not saving is to disable the Read-only attribute while modifying the in-game settings temporarily. A user on Reddit shared the workaround, and it has worked for many.

3. Take ownership of the game folder

  1. Press Windows + E to open File Explorer, and head down the following path where Username is the active user profile:C:\Users\Username\Documents\Call of Duty Modern Warfare
  2. Right-click on the Players folder, and then select Properties from the context menu.properties
  3. Head to the Security tab, and click Advanced.advanced settings
  4. Click on Change at the top.change ownership to fix warzone settings not saving
  5. Enter your currently logged-in username, click on Check Names, and then on OK.check names
  6. Tick the checkboxes for Replace owner on subcontainers and objects and Replace all child object permissions with inheritable permission entries from this object, and then click OK.replace owner to fix warzone settings not saving
  7. Again, open the folder Properties, go to the Security tab, and click Edit.edit
  8. Click on Add.add user to fix warzone settings not saving
  9. Enter the same username you entered earlier, click Check Names, and then OK.check names
  10. Select the account from the list, tick all the checkboxes for permissions, and click OK to save the changes.full permissions to fix warzone settings not saving

For some users, taking ownership of the Player’s folder fixed things when Warzone settings were not saving. Make sure to follow the steps and not miss any part.

4. Delete config files in the Battle.net folder

  1. Press Windows + E to open File Explorer, and go to this folder where Username is the current account name:C:\Users\Username\AppData\Roaming\Battle.net
  2. Now, press Ctrl + A to select all config files.
    config files modern warfare not saving settings
  3. Press Delete to erase selected files.

5. Uninstall conflicting programs

  1. Press Windows + R to open Run, type appwiz.cpl in the text field, and hit Enter.appwiz.cpl
  2. Select any recently installed programs after which the problem first appeared, and click Uninstall.uninstall to fix warzone settings not saving
  3. Follow the on-screen instructions to complete the process.

A user reported that uninstalling the Battle.net app helped fix the problem, though others, too, could be responsible for the issue.

That’s it! One of these solutions should have helped fix the Warzone settings not saving issues on a Windows PC. Even for PlayStation 4 and Xbox One, look through the security settings or delete the saved game file to get things up and running.

Unfortunately, this isn’t the only problem you can encounter, and many users have been experiencing Goldflake error in Warzone, but we have a guide that addresses that.

Before you leave, check some quick tips and tricks to boost gaming performance in Windows and get the best experience.

Tell us which fix worked for you in the comments section below. Also, if you know other solutions, drop them below.

7 Best VPNs to Access ITV Hub From Anywhere in the World

If you want to stream ITV outside the UK remotely, you must have encountered an error as your ISP gets throttled around while you get restricted from accessing ITV.

This is because ITV is geo-restricted to the UK. Meanwhile, we have compiled the best VPN for ITV, which you can use to stream ITV irrespective of your geographical location.

ITV used to be a popular terrestrial TV channel in the UK, so it was a free-to-air channel.

However, due to technological advancement, ITV also offers online streaming services meaning it can be watched online.

But, it limits user registration to UK residents online, hence the need for a VPN for ITV.

If you’re looking for the best VPN to watch ITV, you should consider these best VPN providers listed in this post.

These VPNs will enable you to manipulate your IP address location and also make it possible for you to use a UK location to access ITV Hub.

What are the best VPNs for ITV?

Private Internet Access (recommended)

In order to access geo-restricted content, like ITV, you either need to move to the UK or start using Private Internet Access. Option 2 seems more reasonable, doesn’t it?

PIA offers state-of-the-art data encryption and VPN tunneling, making it extremely easy to access such services. PIA works on the TCP/IP level, meaning that all your data will be encrypted, not just your browser, so you can rest assured that no one will be able to decipher it.

If all of this sounds complicated, you need not worry, as PIA has a user-friendly application that allows you easily connect to one of the thousands of servers worldwide. This way, you can be free of geo-restrictions, as you can appear to be accessing websites from any country you want.

The excellent customer service is there to help you should you encounter any issues, and even better, you have a 30-day money-back guarantee should you change your mind.

You won’t change your mind once you see what PIA has to offer:

  • Protect up to 10 devices simultaneously
  • Supports P2P connections
  • Secure and anonymous browsing
  • No traffic logs anywhere (not even PIA knows what you’re browsing or streaming)
  • Blocks ads and trackers and malware
  • Cross-platform support

Private Internet Access

Access any geo-restricted video streaming service from anywhere in the world. Now at a discounted price for a limited time only!
Check price Visit website

NordVPN

NordVPN is a VPN service provider based in Panama with over 60 server locations. It has a user-friendly interface which makes it easy to install and use.

Also, you get unlimited access to geo-restricted streaming sites such as ITV with NordVPN.

NordVPN, as the best VPN for ITV, evades VPN detection systems and gives you access to geo-restricted sites and other streaming sites, especially ITV.

If you want to stream ITV without worries, NordVPN has all the features you need.

Some features of NordVPN include a zero logs policy, strong encryption, a dedicated IP option, and simultaneous connection to up to 6 devices.

It can be used on different operating systems (Windows XP/7/8/10), and Windows Phone, with many options to protect all your devices.

However, NordVPN isn’t quite as fast as its rivals, but it evades ITV’s geo-restriction. Meanwhile, NordVPN is affordable. Also, they have a full 30-day refund policy.

NordVPN

NordVPN is an excellent VPN that can unblock ITV for non-UK users.
Check price Visit website

Surfshark

When you want to connect to ITV, Surfshark provides a quick and easy way to accomplish this. You are allowed both unlimited devices and bandwidth. You’ll also have fast speeds to work with.

Surfshark is serious about ensuring your internet connection is kept private and offers strong encryption, a zero logs policy, and a kill switch feature. It’s available in over 50 countries worldwide and has 800+ servers. If you’re looking to access ITV, Surfshark will provide you with the servers that will allow you to do this.

Features of this VPN include:

  • Unlimited devices allowed
  • P2P file sharing and torrent support
  • AES 256-bit encryption with IKEv2 and OpenVPN protocols
  • Fast speeds
  • Multi-platform capability

This VPN is an excellent choice if you are searching for a service that has unlimited bandwidth as well as fast speeds. You’ll be able to enjoy ITV and not worry about having to deal with any type of annoying buffering.

You’ll find three options when looking at pricing for Surfshark. It has a 30-day money-back guarantee, which frees you up from worrying about joining the service and then changing your mind. The two-year plan comes with the lowest monthly charge.

Surfshark

Need to unblock ITV outside of the UK? Surfshark may be able to help you.
Check price Visit website

CyberGhost VPN

This best VPN for ITV is reliable, fast, and user-friendly due to its graphical user interface.

With CyberGhost, you can be anonymous online and access ITV from restricted countries.

The CyberGhost Pro, a premium tier of its free version – CyberGhost VPN – is a faster, more reliable option, but very useful and beginner-friendly.

The Pro version gives you access to up to 5600 servers in 90 countries, with increased data protection, online anonymity, and support for different operating systems.

Some of its Pro version features include P2P file switch, automatic kill switch, zero logs policy, highest possible speed, unlimited bandwidth, and traffic, access to over 5600 servers worldwide, and simultaneous connections on up to 5 devices.

In addition, CyberGhost Free/Pro makes it easy to access streaming sites, most especially ITV.

However, the free plan has limited locations, but you can upgrade easily to their premium plan which gives you access to more server locations.

CyberGhost VPN

Looking for a VPN that works with ITV? CyberGhost VPN could be the one.
Check price Visit website

ExpressVPN

ExpressVPN running on the background

This VPN provider has been a popular VPN on the market since 2009. ExpressVPN gives you access to over 1500 servers in 94 different countries across the globe.

Also, it is available on all operating systems and Windows XP, Vista, 7, & 10.

If you want to access ITV from anywhere outside the UK, ExpressVPN makes it possible with features like a user-friendly interface and speed test tool to help you find the fastest server.

Other features of ExpressVPN include:

  • Access to over 1500 servers in more than 94 countries.
  • Optimized for speed
  • OpenVPN as standard
  • Network Lock Kill Switch
  • One-click connection
  • Live chat support

In addition, ExpressVPN also has an extension for Mozilla Firefox, Safari, and Google Chrome. If you want unlimited bandwidth and server switches, you can watch ITV at any time of the day with no lags.

ExpressVPN can as well escape VPN detection systems. Also, this VPN provider’s best premium package comes with a yearly subscription.

ExpressVPN

ExpressVPN can easily unblock ITV outside of the UK for you.
Check price Visit website

VyprVPN

This best VPN for ITV has double encryption using Chameleon double encryption. It is widely used in Asia, most especially in strict countries like China.

Meanwhile, you can use VyprVPN to stream ITV, irrespective of where you are based at.

VyprVPN gives you access to up five simultaneous connections, a strict zero-logs policy, and access to over 700 servers in 70 different countries worldwide.

Windows users also reported that they could access any site safely, even sites that block VPNs. Meanwhile, you can access ITV with VyprVPN.

Although the downside of the VPN provider is that it logs connection data, it sure does the job of protecting your identity while online.

In addition, it does not support bitcoin, which is not required as far as ITV is concerned.

VyprVPN

VyprVPN

Need to watch ITV outside of the UK? VyprVPN could help you with that.
Check priceVisit website

IP Vanish

IP Vanish is one of the most used VPN services to connect to UK-based content.

It has a large worldwide server coverage with over a thousand servers in 75 countries.

It uphols a very strict no-logs policy which means that it does not keep or track any information about your online activity.

Along with that, it has DNS leak protection and a kill switch that help protect your privacy even more. These ensure that your ISP or government does not track you. It’s impossible to get any traffic restriction.

It is proven to provide great speed rates and fast connection. Many users report that it is great for streaming content.

Other key features of IP Vanish include:

  • Advanced encryption
  • Compatible with all devices
  • OpenVPN traffic
  • Military-grade encryption

IP Vanish is available via a monthly or yearly subscription plan (charged monthly). It has a 30-day money-back guarantee in case you are not satisfied with its performance.

IP Vanish

Watch your favorite ITV shows from all around the world and keep your identity completely private.
Check price Visit website


Have you used any of the best VPNs for ITV we mentioned above? We’d recommend you check out these VPNs.

Share with us which one you use or have tried before with ITV by leaving a comment in the section below.

FIX: Your device isn’t quite ready for it [Windows 10 v2004]

The Windows 10 May 2020 update brought plenty of new features to the OS, but it also came with its own fair share of issues as well.

For example, plenty of users have reported that they are receiving an error message when trying to get the latest feature update:

Feature update to Windows 10, version 2004

The Windows 10 May 2020 Update is on its way. We’re offering this update to compatible devices, but your device isn’t quite ready for it. Once your device is ready, you’ll see the update available on this page. There’s nothing you need to do at this time.

This being the case, we will be providing you with a step-by-step guide on how to solve this issue, so that you can finally install Windows 10 version 2004 on your PC.

How do I fix the Windows 10 version 2004 update error?

1. Update your display drivers

  1. Type Device Manager in the Search bar 
  2. Right click on Display driver and select Update driver 
  3. Choose Update driver automatically option 
  4. Restart your PC to complete the process 

This particular fix comes as a recommendation straight from Microsoft Support:

The updated drivers might be also available on Windows Update. If you are still receiving the safeguard hold, you will need to check with your device manufacturer for updated display drivers (sometimes called video drivers).

That being said, make sure that your system has all of the latest drivers installed and updated, especially the graphics drivers.

For more information on how to perform these updates, check out our detailed guide.

If you need to update the drivers more easily and without much effort, avoiding risky issues as well, you can opt-in for third-party tools.

⇒ Get Outbyte Driver Updater

2. Turn off Memory Integrity

  1. Press Start
  2. Go to Settings
  3. Select Update & Security
  4. Choose Windows Security > Device Security
  5. Next, click on Core isolation details
  6. Turn the Memory Integrity setting to Off
  7. Reboot your PC

3. Restore your Windows 10 to the last major update

One workaround would be to roll back your Windows 10 PC using a restore point, and it would be advised if it were to a newly-installed Windows 10 version 1909.

Once you’ve performed a rollback, try going through the steps mentioned above and attempt to install Windows 10 version 2004 afterward.

Note: It is important that you have a backup of all of your data before performing a big set of updates or data resets, so make sure you always have a solid restore point at hand at all times.

More so, backing up your Windows 10 PC is far easier when you use dedicated third-party tools, so consider these options as well.

4. Reset your PC

This solution is only to be used as a last resort if you notice all of the other solutions mentioned above have failed. Additionally, keep in mind that before resetting your PC you should also perform a backup of all of your data.

That being said, performing a clean install of your OS might help you finally install the Windows 10 May 2020 update at last.

5. Wait it out

If you’ve tried updating your drivers or disabling Memory Integrity and it didn’t work, but aren’t keen on rollbacks or PC resets either, then your only option is to simply wait until Microsoft manages to fix this issue.

This means that you should keep a sharp eye on their official support pages for any news regarding the matter, and attempt the update again later.

Once that happens, you can finally install the update and take advantage of the abundance of new features that Windows 10 2004 has to offer.

By following these steps, you should be able to finally install Windows 10 2004 and benefit from the latest OS version that Microsoft currently has to offer.

If you know of any other possible solutions for this widespread issue, let other users know by leaving us a message in the comments section below.

If you have other update-related issues, check out our Windows Update Errors Section for more helpful guides.

For other general Windows 10-related issues, check out our Windows 10 Errors Hub.

Latest Windows Terminal Preview brings a clean settings UI that matches Windows 11’s new looks

The first Windows Terminal release of 2022 is here, and for those who like design consistency, it should be a treat. That’s because new in Windows Terminal Preview 1.13 is a fresh settings menu and a lot of other cool features. We have all the details that you need to know about right here.

With the new settings user interface in this release, things now look similar to Windows 11’s own settings app. There’s a clean sidebar with clearly marked sections for Startup, appearance, color, and more. Sub settings, meanwhile, are more cleanly labeled once you click on them. The new settings use WinUI 2.6 principles.

Other than that, another new feature in this release is the new elevate profile setting. This allows you to automatically launch a profile as elevated (as Administrator). You’ll also find a new profile setting for a new text rendering engine, which better draws at the display refresh rate regardless of screen resolution.  See below for other changes.

  • You can now customize your profile’s bell sound using the bellSound setting. This setting accepts a file path as a string, or an array of file path strings
  •  You can now restore recently closed tabs or panes with the new restoreLastClosed action
  • The new exportBuffer action lets you export the text within the buffer into a text file
  • The new adjustOpacity action allows you to change the opacity of the terminal window at runtime.
  • The terminal now supports snap layouts in Windows 11!

You can grab this Windows Terminal Preview update today from the Microsoft Store, or through GitHub. Note that this news on Windows Terminal Preview also means that Windows Terminal 1.12 is now the latest non-preview version. This blog has a recap of what’s new in that release.

6 easy ways to open Windows Settings in Windows 10 or Windows 11

The Settings app is the most used component of the Windows operating system, and perhaps the most underrated as well. It lets you manage your Windows, tweak your computer settings, set preferences, and all in all helps manage almost everything on your computer.

However, what most people aren’t aware of is that there are different ways to open Windows Settings in Windows 10 or Windows 11. We’ve just tried to cover that here. So, without further ado, let’s dive in.

1. Start Menu

The Start menu is a well-known GUI in Windows that lets you access the primary files and folders in Windows. While it is sometimes vulnerable to unresponsiveness and other related errors, you can also use it to launch the Settings menu in Windows. To get started, first click on the Windows icon. This will give you a list of options.

start menu

From there, click on the Settings icon. As soon as you do that, the Settings menu will be launched.

2. Keyboard shortcut

The Windows operating system comes packed with numerous shortcuts to make your life easy. One of those shortcuts for Windows is that of opening Windows Settings.

Simply press the Windows key + I, and the Windows Setting will be launched in your Windows 10 or Windows 11. 

3. Use the Task Manager

The Task Manager is another handy tool in Windows. It is used to monitor the different processes and tasks of your computer and lets you kill them at will.

Interestingly, you can also use it to open Windows Settings in Windows 10 or Windows 11. To get started, go to the Start menu search bar, type in ‘task manager,’ and select the Best match.

In the Task Manager, click on File > Run new task. In the new Create new task window, type ms-settings: and click on OK.

task manager

The Settings app will be launched.

4. Use the Run dialog box

The Run dialog box is a special tool that helps you access different programs with simple commands.

To open the Run tool, press Windows key + R, and the dialog box will be launched. There, type in the following commands and hit Enter:

ms-settings:

run dialog box

The Windows Settings will be opened.

5. Command Prompt

The Command prompt is a command line interface designed to take inputs from the keyboard. It gives users more control over the operating system.

You can also use the Command prompt to open Settings. Here’s how:

Go to the Start menu, type in ‘command prompt,’ and select the Best match. From there, go to the Command prompt, type in the following command, and hit Enter:

start ms-settings:

command prompt

The Command prompt will be successfully launched.

6. System Tray

The System Tray also called the Notification Area, is the place where you can access the frequently used apps and get notifications relevant to your Windows operating system.

It’s located in the bottom-right corner of your Windows. Navigate to the tray and right-click on the date and time shown there. From there, click on Notifications settings. 

open windows settings from system tray

As soon you do that, your Settings apps will be launched.

Open Windows Settings in Windows 10 or Windows 11

And that’s all, folks. These are some of the ways you through which can launch the Settings apps on your Windows computer. We hope you found the method best suited to your needs and the one you’d like to access again and again.

That’s How You Can Use Kik For Windows 11

If you’ve been wondering if it is possible to use Kik on Windows 11, here you’ll find the answer to this question. 

The truth is that tons of apps should be made available on Windows. But since we live in a generation where smartphones are the most used gadgets, every developer focuses on making apps for Android and iOS devices.

One of the many Windows 11 useful integrations is its partnership with the Amazon App Store. This allows users to download apps on their Windows system. However, there is still an issue as the Amazon App Store doesn’t have all the apps that users might need. 

This leaves us with fewer options for getting Kik on our Windows computers. Are you worried about that too? Rest assured that we will help you learn one method that helps you tackle this issue in no time. 

How can I download Android apps on my Windows PC?

There is no direct way that lets you install these kinds of apps on your PC. This is where an Android emulator comes in. 

In computing, an emulator is a hardware or software that allows one computer system (the host) to behave like another computer system (the guest).

In this case, we’re dealing with an Android emulator. This software typically enables your Windows PC (the host) to run software that was developed for this amazing OS (the guest).

It simulates Android devices on your computer, allowing you to test your app on a variety of devices and API levels without needing to have each physical device.

For more details, do not hesitate to check out this list including the best free Android emulators for Windows 10/11.

What are the required minimum specifications to use Kik on Windows 11?

  • Operating System: Windows 7/8/8.1 or macOS 8.0
  • Processor: Intel or AMD (Dual-Core)
  • RAM: 4GB
  • ROM: 5GB HDD

What are the suggested specifications?

  • Operating System: Windows 11/10 & macOS 12/11/10
  • Processor: Intel or AMD Multi-Core
  • RAM: At least 8GB
  • ROM: 5GB SSD

As you can see, there are different emulator options to choose from. In this article, we will be using BlueStacks so don’t hesitate to keep on reading.

How can I download, install, and use Kik on Windows 11?

Note icon NOTE
To enjoy a better experience, your system’s graphic drivers and DirectX should be updated to the latest version.
  1. Download the BlueStacks Android emulator.Download BlueStacks: how to use Kik on Windows 11
  2. Install BlueStacks.Install Bluestacks: Use Kik on Windows 11
  3. Open BlueStacks and search for Kik.Search for Kik: use Kik on Windows 11
  4. Sign in to your Google account.Sign into your Google account: Kik on Windows 11
  5. Search and install Kik.Install Kik on Windows 11
  6. Open Kik and sign up or log in.Open Kik and sign up or sign in

Users who don’t want to experience lags during the emulation process should definitely use BlueStacks App Player.

However, the effectiveness of your OS emulation will be determined by the device specifications. So, you can only enjoy Kik on Windows 11 if your system meets the specifications.

Can I connect my phone and Windows 11 PC with Android apps?

You can link your smartphones to your Windows PC in a variety of ways. In fact, because of this OS’ open nature, there are even more alternatives. This comes in handy as it can get really overwhelming having to deal with more than one device at the same time.

Technology came into our lives to make things easier for us. So far, it has improved the quality of life as we know it. This opportunity to sync your Windows computer to your phone with Android apps is one you should take advantage of.

You can find the finest Apps to connect your smartphone to Windows 11, from mirroring your screen to connecting your devices via the web.

In conclusion, new developments now allow us to sync all our gadgets, ultimately giving us the best experience. You need not hold yourself back anymore. 

You can learn more about how to use Kik in your browser and we can also help you install Android games on Windows 11. 

We sure do hope that this article provided you with all the information you need on running Kik on Windows 11.

Feel free to share with us your experience following the steps that we have provided you above. Do not hesitate to use the comments area below in that regard.

Minecraft teams up with PUMA, releases some super cool swag

Want to show off your Minecraft pride in real life? Well, Minecraft and PUMA just might have what you’re looking for as part of a new retail partnership.

With the new PUMA x Minecraft collection, you can sport designs from the game on sweatshirts, hoodies, and shoes and make your friends quite jealous. There are a lot of designs that you can choose from, like a creeper hoodie, or an icy white logo tee, and even sweatpants. PUMA is offering all the products over on its website and in physical stores. Prices range from $25-$75, depending on the collection.

And that’s not all as there’s also a Sprint Dash DLC and Puma Skinpack that will be available for Minecraft’s Bedrock edition. It’s set to become available on February 8. If you do happen to buy one of these PUMA collections, let us know in the comments below.

Microsoft disables the MSIX ms-appinstaller protocol handler to help stop the spread of malware

Microsoft recently announced that it has disabled the MSIX ms-appinstaller protocol handler to help stop the spread of viruses and other common threats that target Windows users. The change mainly impacts developers who might list MSIX files on their websites and addresses a Windows vulnerability first raised by Microsoft in December of 2021.

For those unfamiliar, the MSIX ms-appinstaller protocol handler is a Windows feature that was intended to allow users to install a Windows app without having to download an entire MSIX package. It was in use by many developers so that folks could install an app directly from a web server, but those with bad intent were also using the feature to their advantage. As an example, Microsoft indicated the AppX installer was being spoofed to inject malware like Emotet, Trickbot, and Bazaloader.

Microsoft is actively working to address the issue, and the first part of that involves disabling the feature. For a bigger solution down the line, Microsoft is looking into creating a Group Policy so that IT admins can re-enable the protocol and control the usage of it within their organization.

As a workaround in the meantime, users will need to first download these kinds of MSIX apps to their device, and then install the package with App Installer. The one caveat to this, though, is that the download size for packages might be increased. Microsoft also recommends that developers update the link to an application by removing ‘ms-appinstaller:?source=’ so that the MSIX package or App Installer file will be downloaded to an end user’s machine.

Grand Theft Auto 5 for Xbox Series X | S and PS5 coming March 15th, features ray-tracing graphics

Rockstar Games recently made an announcement, indicating that GTA 5 will be available on both Xbox Series X and Xbox Series S on March 15th, 2022. Gamers should expect impressive upgrades, both visual and performance-wise.

The new upgrades for PlayStation 5 and Xbox Series X|S series includes:

  • New graphic modes with up to 4K resolution and up to 60 frames-per-second
  • Texture and draw distance upgrades
  • Enhanced 3D audio
  • HDR options and ray-tracing
  • Advanced haptic feedback
  • Faster loading times for the consoles.

Note: GTA V is already available on Xbox Series X|S. These are upgrades that will be made come March 15, 2022.

Grand Theft Auto Online

Moreover, GTA Online for PlayStation 5 and Xbox Series has also not been left out. Players will have the ability to skip the GTAV Story Mode prologue before they even get online. GTA V also comes with a brand new GTA online Tutorial.

Furthermore, GTA Online players will be able to get to the Career Builder with full access to either one of the four illicit businesses comprising of:

  • Executive
  • Gunrunner
  • Nightclub Owner
  • Biker

Other notable features include access to a high-end vehicle, firepower that one would need to start an enterprise, and a sizable $GTA windfall that will help in the selection of a property. Players also have the ability to restart their character, thus, allowing them to capitalize on the Career Builder feature as they please.

Hao’s Special Works

The PlayStation 5 and Xbox Series X|S versions of Grand Theft Auto Online will also feature Hao’s Special Works, a new auto-shop located within the LS Car Meet. Players will be able to upgrade their vehicles here. The auto shop already has 5 new vehicles and 5 existing vehicles at the start of the game.

In the announcement, Rockstar Games also highlighted that they are actively working on a new entry for the Grand Theft Auto series.

What feature are you most excited about? Share your thoughts with us in the comment section below.


Could the internet take a lesson from Minecraft’s digital citizenship course?

Minecraft Education Edition is a popular learning tool built upon the best-selling video game of all time. It features a broad array of lesson plans that use the game in combination with other assets to teach everything from science and mathematics to coding, language arts, lessons on cultural diversity, and so on.

Another subject Minecraft Edu teaches is Digital Citizenship, obviously a very fundamental topic in today’s world.

What is Minecraft Edu’s digital citizenship course?

The course, which is aimed at upper elementary students, is intended to teach kids the basic tenets of being a good and responsible digital citizen. And what are these, you may ask? They are 1) respecting the feelings of others (remember that on the other side of that screen is a human being, just like you); 2) respecting digital copyright, including intellectual property; and 3) leaving a clean digital footprint.

How does it work?

The lesson curriculum goes as follows: students watch a video courtesy of GCFLearnFree.org titled “Being a good digital citizen.” After viewing the video, students are then logged into the Minecraft “Digital Citizenship” world, where they are put into four groups.

These groups explore different aspects of bad digital citizenship e.g., trolling, digital theft, etc. Groups are assigned projects such as building a structure or collecting resources, and so on. However, in each group a character called “The Agent” will sabotage the effort by practicing bad citizenship – in one group, for instance, the Agent will at some point steal the groups resources (representing digital theft), and in another the Agent will destroy part of a structure, an analog to a form of online trolling called “griefing.”

Digital Citizenship has an important role in the classroom.

The point is that the students experience first-hand the effects of bad citizenship. Afterwards, students return to the game world’s campsite, or hub, to discuss their experiences and how it made them feel.

The ultimate objective of the lesson is to instill in students the importance of respecting others in the online sphere just as they would in “real life,” including respecting digital property. The lesson also includes a discussion of lesson keywords, such as an explanation of what a “digital footprint is.”

Conclusion

Now that we know a little about how digital citizenship is taught in schools it begs the question: does teaching it really work? Will tools such as Minecraft Edu’s course really raise a more socially conscious generation of internet users? Only time will tell.

Feature image credit: education.minecraft.net


HP Printer Validation Failed: Fix It With These 4 Solutions

Some HP printer users have posted about a printer validation failed error on Microsoft and HP support forums. Consequently, users can’t print when an error arises.

If you are also encountering this issue, this guide will show you quick ways to fix it.

What is the meaning of printer validation failed?

The printer validation failed error usually denotes issues in the path of your cartridge when you are trying to print. Below are some of the causes of this issue:

  • Faulty drivers: If you started getting the HP printer validation failure issue after updating your drivers, the problem might be due to an incompatible driver. The solution is to uninstall the faulty driver and restart your PC.
  • Power outage: The HP printer certificate error can be caused by an unexpected power outage. You need to reset your printer to overcome this.

How can I fix the validation failed error?

1. Open the Printer troubleshooter

  1. Press the Windows key + I to open the Settings app and select Update & Security.
    update and  printer validation failed
  2. Select Troubleshoot in the left pane and click Additional troubleshooters.
    troubleshoot
  3. Finally, select Printer and click the Run the troubleshooter button.
    run the printer

The first thing to try if your HP Envy 5000 printer says validation failed is to run the printer troubleshooter. This should detect and propose potential solutions to the issue.

2. Reset the Printer

  1. Unplug the printer from the wall and then the back of the printer with the printer turned on.
    unplug
  2. Remove additional USB cables from the printer if there are any.
  3. Wait for about three or four minutes.
  4. Press and hold the printer’s power button for about 30 seconds to discharge it.
  5. After that, plug the printer’s cable back into the wall. Then reconnect that cable with the rear of the printer.
  6. Turn the printer back on.

3. Reinstall the HP Printer

  1. Press the Windows key + R, type appwiz.cpl, and click the OK button.
    appwiz printer validation failed
  2. Right-click the HP printer software and click the Uninstall option.
    uninstall printer
  3. Now, follow the onscreen instruction to complete the process and restart your PC.
  4. Next, press the Windows key, type control, and select Control Panel.
    control panel
  5. Click View devices and printers under Hardware and Sound.
    view devices
  6. Now, right-click the printer to uninstall and select Remove device.
    remove printer validation failed
  7. Finally, follow the onscreen instructions to complete the process.

After completing the process, you can reinstall your printer all over.

4. Run the HP Print and Scan Doctor

  1. Click the Download Now button on HP’s support page to save HPPSdr.exe to a folder.
  2. Click HPPSdr.exe to open HP Print and Scan Doctor.
  3. Press the Start button.
  4. Now, select the printer that the Printer validation failed error arises for, and click the Next button.
  5. Select the Fix Printing option.
    HP Print and Scan Doctor printer validation failed
  6. HP Print and Scan will then display some troubleshooting results. Follow the troubleshooting instructions if the software displays any X crosses, highlighting unresolved printer errors.

With this, we can conclude this detailed guide on how to fix the Printer validation error. All you need to do now is to follow the instructions carefully, and things should be back to normal.

If you are facing a similar issue in missing or failed printhead error or a HP 6830 printhead problem, check our detailed guide to fix it quickly.

Feel free to let us know the solution that helped you fix this issue in the comments below.

Windows news recap: Flutter for Windows announced, Oracle Linux arrives in the Microsoft Store, and more

Welcome back to our Windows news recap, where we go over the top stories of the past week in the world of Microsoft’s flagship operating system.

Google brings its Flutter development tool to Windows

Google has announced that it is bringing Flutter, an open-source framework for developers to develop for and target multiple platforms with a single code base. This announcement will mean that developers will be able to target Windows as a platform, expanding Flutter beyond web and mobile development.

Flutter on Windows

Oracle Linux comes to the Microsoft Store

There’s now a wider variety of flavours of Linux to choose from in the Microsoft Store, as Oracle Linux has made its appearance in the store.

Oracle Linux comes to the Microsoft Store - OnMSFT.com - February 2, 2022

Microsoft designer says Windows 11 3D emoji are still being worked on

All may not be lost with having 3D emojis on Windows 11, as a Microsoft designer says that they are still being worked on. This follows disappointment that Microsoft appeared to imply 3D emojis would be on Windows 11, but then users discovered they were not upon launch of the OS, and Microsoft later clarified that they would only be available in certain apps that support them.

That’s it for this week. We will be back next week with more Windows news.

You have to try out Windows 11 experimental features

The Windows Insider program provides a way for those who want to help shape the future of Windows to get early access to the latest software.  It allows users to preview new features and applications before they are officially released.

As the name suggests, it’s meant for those who are enthusiastic about Windows and have time to test features that may never work well enough for a wider audience.

More recently, the Windows Insider program has evolved into something closer to an early access program that allows Microsoft to test out new features and services before they are ready for widespread use.

Changes to the Insider Program

The Windows Insider program has long provided a way for Microsoft’s most dedicated and optimistic users to test new features and bet on new Windows releases before they are officially released to everyone.

It’s also been a way for Microsoft to gather feedback from its customers on what they actually want and need in their operating systems. Now Windows 11 users will get a seat at the table.

The Windows Insider Program will be refocused as a “place to incubate new ideas” generally with a long lead-in time according to an announcement made by Windows Insider program lead Amand Langowski.

It is important to remember that the builds we release to the Dev Channel should not be seen as matched to any specific release of Windows and the features included may change over time, be removed, or replaced in Insider builds or may never be released beyond Windows Insiders to general customers.

Beta Channel not left behind

Microsoft may be altering its development process to allow more time for testing and less time for shipping.

The company has been moving toward this transition for a while now, with its software updates often pushed out without fanfare in the Windows Insider program.

But now, Microsoft is indicating that it’s willing to accept more risks in order to get features out faster.

The new Beta Channel is designed to let users test out new features that may never make it into a final release. The primary reason for this is that Microsoft wants to gather feedback from their most valuable customers about how things work.

Now’s a good time to start thinking about what Channel is best for you. We will soon be giving Insiders a window in which they will be able to switch from the Dev Channel to the Beta Channel. Stay tuned for details in the coming weeks.

This means that sometimes features will confusingly appear in the Beta Channel first, even though they’re almost ready for showtime.

The most notable changes will undoubtedly be new features that allow you to test out new features before they’re officially released to the public.

’We are energized by all the feedback we’re seeing from Insiders and excited to use those insights to make Windows 11 even better for our customers.

If you want to switch channels, visit our guide on how to migrate from the Dev channel to the Beta channel.

Are you excited to test out experimental features on Windows 11? Share your thoughts in the comment section below.

Browser Doesn’t Support Changing The Volume [QUICK FIX]

Having a good browser is important, but many users reported that their browser doesn’t support changing the volume.

This can be a problem with multimedia playback, and in this article, we will explore the best troubleshooting methods to deal with this issue. Please follow the steps presented closely.

The below-mentioned solutions are also helpful if you are encountering the following issues:

  • Your browser doesn’t support using the computer’s audio device, please upgrade your browser to the latest version – This issue is usually caused by outdated audio drivers
  • Your browser does not support using the computer’s audio device – This is caused by incompatibilities between your browser and your audio device.
  • Your browser doesn’t support changing the volume – This is an error message you receive when trying to change the volume

What can I do if my browser won’t change the audio volume?

1. Try a different browser

Before going through any of the troubleshooting steps below for your current browser, you should first consider changing the browser altogether.

If you do decide to do that, then we recommend you switch to Opera One. This web browser is based o the Chromium engine, just like Microsoft Edge and Google Chrome, making it extremely powerful and lightweight.

The browser is a mode for customization, either through visual tweaking using its inherent tools or via the massive library of extensions that it comes with.

More so, it is optimized for streaming content, both audio and video, so any sound volume issues are less likely to happen. Plus, Opera One also comes with a built-in AI.

Opera One

An excellent web browser that offers many useful tools, including the ability to save and print your web pages.
Free Download Visit website

2. Clear your browser software cookies and cache

Normally, you could clean your browser using built-in tools, but they can be hard to reach, difficult to set, and sometimes they aren’t too efficient at all.

A cookie cleaner software is handy for erasing cookies carefully; you can whitelist the ones you need to keep, such as a login cookie. Then you can erase all undesirable cookies from all browsers in a single process.

It’s far more convenient than opening each browser individually and erasing cookies one by one. Some of these cleaning programs provide a Custom Lists option.

3. Check to see if your computer sound is turned on

  1. Click the sound icon found on the bottom-right side of your Windows Taskbar.
  2. Make sure the appropriate audio source is selected (in our case it’s Speakers – High Definition Audio Device), and move the sound slider to the right to enable audio on your PC. Windows Volume and audio source- Browser doesn't support changing volume
  3. Right-click on the same sound icon, and select Open Volume Mixer.
  4. Make sure that the volume for the browser that you’re trying to use is not set to Mute.Windows sound mixer - Browser doesn't support changing the volume

4. Update your computer’s sound driver

  1. Press the Win + X keys on your keyboard, and select Device Manager.
  2. Click on the Sound, video and game controllers option to activate the drop-down menu.
  3. Right-click on the sound driver, and select Update Driver.Update sound driver - Browser doesn't support changing volume
  4. Select Search automatically for updated driver software.
  5. Wait for the update process to finish and then try to see if your sound issue persists.

5. Make sure that the web-page is not set to Mute from the Internet Properties

  1. Press the Win + R keys on your keyboard.
  2. Type inetcpl.cpl (without quotes), and press Enter.Run window with command - Browser doesn't support changing volume
  3. Select the Advanced tab, and scroll down until you find the Multimedia section.
  4. Check the box next to Play sounds in webpages.internet properties activate sound for webpages - Browser doesn't support changing volume
  5. Click Apply, and then OK.
  6. Restart your browser and check to see if the problem persists.

In this article, we explored some best-proven methods to solve the issue with your browser software not playing any audio.

Please make sure to follow the steps we provided in the order that they were written to avoid any unnecessary complications.

Please feel free to let us know if this guide helped you solve your issue by using the comment section below.

Windows 10 Start Menu Search not working [Complete Guide]

It appears that this OS has a few surprises for Windows 10 users, but not the kind of surprises they were expecting to get.

Many users report that Windows Search often stops working after being used one time. Windows Search is a key part of Windows, but many users reported that Windows Search won’t work on their PC.

That can be a big problem, and speaking of this issue, here are some similar issues reported by the users:

  • Windows 10 Start Menu search not working – Many users reported that the Search option in Start Menu isn’t working. If that’s the case, be sure to check your firewall and ensure that it’s not blocking Cortana.
  • Windows 10 Search bar doesn’t work – This is another problem that can occur with Windows search. If you’re affected by this issue, simply reinstall all Universal applications and check if that helps.
  • Windows Search not working – Sometimes Windows Search won’t work at all on your PC. This is usually caused by a minor system glitch but you can fix it by restarting the Windows Explorer process.
  • Windows 10 Search not finding programs – This is another problem that you can encounter with Windows Search. To fix the issue, make sure that Windows Firewall isn’t disabled in Group Policy Editor.
  • Windows 10 Cortana not working – This issue can occur due to your Group Policy settings. If Cortana doesn’t work, be sure to disable certain settings in your Group Policy.
  • Windows Search won’t let me type, open – In some cases, file corruption can cause this problem to appear. However, you should be able to fix this issue using one of our solutions.

What can I do if Windows Search suddenly stops working?

1. Try out alternative search tools

Unlike Windows built-in search, there are various third-party tools that deliver error-free searching for your desktop.

Even if it may sound strange at first, you can replace Windows Search function using alternative desktop search tools capable of organizing your files flawlessly.

If you store a great amount of files and applications on your PC, then the search button is indispensable. With specialized tools, you will find all your files, documents and programs in one go.

Moreover, it’s advised to consider such software as a replacement for the search button due to the practical capabilities of finding any kind of files or programs from your PC.

2. Check your firewall

Judging by the latest reports, it appears that there is a strong connection between Cortana and Windows search not working. After disabling Cortana, Windows search works again.

Windows search provides 0 results, kill Cortana, try again, get results, click out, try again, 0 results? I have tried re-indexing, running the troubleshooter and lots of other stuff, anyone have any ideas?

Sometimes your firewall can cause issues with Cortana. If Windows Search won’t work, the problem is most likely related to your firewall. To fix the problem, you just need to make a couple of simple changes and you’re good to go.

To do that, follow these steps:

  1. Press Windows Key + S and enter windows firewall. Choose Windows Defender Firewall from the list of results.
    Windows 10 Search bar doesn't work
  2. In the left pane, navigate to Advanced settings.
    Windows Search not working
  3. Now go to Outbound Rules (top left).
  4. Locate the Cortana rule > double click Rule to edit > select Block > Apply/OK.

The most surprising fact is that users haven’t installed any updates or third-party software recently. The hypothesis that an update or an app may be causing these search issues can thus be rejected.

On the other hand, some users believe that Microsoft pushed a background update that nobody was supposed to know about. They simply refuse to believe that a feature that was working flawlessly a few minutes before, suddenly stops working.

I have the same issue that everyone else does. I haven’t installed any software and no updates were installed recently. The search function was literally working one minute and then it stopped for no apparent reason. I’m assuming that a background update that was deployed by Microsoft that nobody was supposed to know about.

3. Reinstall Universal applications

In case you don’t know, Start Menu and Cortana are basically Universal applications, and if Windows Search won’t work on your PC, you might be able to fix the problem simply by reinstalling the Universal applications.

This is quite simple to do, and you can do it by following these steps:

  1. Press Windows Key + S and enter Powershell. Now right-click Windows PowerShell from the list of results and choose Run as administrator from the menu.
    Windows 10 Start Menu search not working
  2. When PowerShell starts, run the following commands:
  •  $manifest = (Get-AppxPackage Microsoft.WindowsStore).InstallLocation + ‘AppxManifest.xml’
  • Add-AppxPackage -DisableDevelopmentMode -Register $manifest
  • Get-AppXPackage -AllUsers |Where-Object {$_.InstallLocation -like “*SystemApps*”}

After running these commands, all Universal applications will be reinstalled and the issue with Windows Search should be completely resolved.

Keep in mind that Powershell can be a potentially dangerous tool, so use extra caution. If you’re worried that something might go wrong after using PowerShell, feel free to create a System Restore point on your PC.

4. Restart File Explorer

If Windows Search won’t work on your Windows 10 PC, you might be able to fix the problem simply by restarting the Windows Explorer process.

Sometimes there might be some glitches on your system, and the best way to fix them is to restart Windows Explorer.

This is quite simple to do, and you can do it by following these steps:

  1. Press Ctrl + Shift + Esc to open Task Manager.
  2. Locate Windows Explorer on the list and right-click it. Choose Restart from the menu.
    Windows 10 Search not finding programs

Windows Explorer will now restart. Once the Windows Explorer restarts, the problem should be completely resolved. Keep in mind that this is just a workaround, so you’ll have to repeat it whenever the issue occurs.

5. Make sure that your Firewall is enabled

In some cases, Windows Search won’t work if you don’t have the necessary components enabled.

Surprisingly, Windows Search is related to Windows Firewall, and if Windows Firewall is disabled, you won’t be able to use Windows Search.

If you remember disabling Windows Search from the Group Policy Settings, be sure to revert the changes and enable Windows Firewall again.

6. Make changes to your Group Policy settings

According to users, Windows Search sometimes won’t due to your Group Policy settings. However, you can fix that problem by making a couple of changes. To do that, follow these steps:

  1. Press Windows Key + R and run enter gpedit.msc. Now press Enter or click OK.
    Windows 10 Search not finding programs
  2. In the left pane, navigate to Computer Configuration > Administrative Templates > Windows Components > Search. In the right pane, navigate to Don’t search the web or display web results in Search.
    Windows 10 Cortana not working
  3. Select Not Configured or Disabled and click Apply and OK to save changes.
    Windows Search won't let me open

After doing that, the problem should be resolved. Several users are also suggesting to run gpupdate /force command in Command Prompt, so you can try that as well.

Alternatively, you can fix this issue by making a few changes in Registry Editor. To do that, just follow these steps:

  1. Press Windows Key + R and enter regedit. Press Enter or click OK.
    Windows 10 Search bar doesn't work
  2. In the left pane, navigate to HKEY_LOCAL_MACHINESOFTWAREPoliciesMicrosoftWindows. In the right pane, double-click ConnectedSearchUseWeb and set its Value data to 1.

Once you make these changes, the issue should be completely resolved and everything will start working again.

7. Repair your Windows installation

If Windows Search won’t work on your PC, the problem might a damaged installation. However, you can fix this problem by running SFC and DISM scans.

This is relatively simple to do, and you can do it by following these steps:

  1. Press Windows Key + X to open Win + X menu. Choose Command Prompt (Admin) or PowerShell (Admin).
    Windows 10 Cortana not working
  2. When Command Prompt opens, run the sfc /scannow command.
    Windows Search not working
  3. The SFC scan will now start. The scan can take about 15 minutes or more, so don’t interfere with it in any way.

After the SFC scan is finished, the problem should be fixed. If this issue is still there, we advise you to perform a DISM scan. You can do that by following these steps:

  1. Start Command Prompt as administrator.
  2. Run DISM /Online /Cleanup-Image /RestoreHealth command.
    Windows 10 Start Menu search not working
  3. Wait for the DISM scan to finish. Keep in mind that this can take about 20 minutes or more.

Once the DISM scan is completed, check if the issue is still there. If the problem persists, you might want to repeat the SFC scan again.

8. Run ctfmon.exe command

According to users, if Windows Search won’t work on your PC, you might be able to fix the problem simply by running the ctfmon.exe command. To do that, follow these simple steps:

  1. Press Windows Key + R to open the Run dialog.
  2. Enter ctfmon.exe and press Enter or click OK.
    Windows Search won't let me type

After running this command, the issue should be completely resolved.

9. Create a new user account

If Windows Search won’t work on your PC, the issue might be your user account. Your account can get corrupted for various reasons, but you can fix the problem by creating a new user account. To do that, follow these steps:

  1. Open the Settings app and go to the Accounts section.
    Windows 10 Cortana not working
  2. Select Family & other people from the left pane. Now choose Add someone else to this PC from the right pane.
    Windows 10 Start Menu search not working
  3. Choose I don’t have this person’s sign-in information.
    Windows 10 Search bar doesn't work
  4. Select Add a user without a Microsoft account.
    Windows Search not working
  5. Enter the desired username and click Next.
    Windows 10 Search not finding programs

After creating a new user account, switch to it and check if the issue still appears. If not, move your personal files to the new account and start using it instead of your old account.

Either way, what matters is that the workaround listed above helps you fix the recent Windows search issues.

FIX: Outlook blocks access to potentially unsafe attachments

The Outlook blocked access to the following potentially unsafe attachments error message appears when the users are trying to open an email with attachments.

This can happen due to many reasons including attachments that did not follow official attachment guidelines, and if the attachment appears to be a malware code.

If you are also troubled by this error, here is how to fix this error message in the Outlook client.

How do I unblock unsafe attachments in Outlook?

1. Receive the file through a third-party file sharing service

file sharing services outlook blocked access to the following potentially unsafe attachments

To make this error message disappear you can ask the sender to upload the attachment to any third-party file-sharing site.

Use Google Drive, OneDrive, or Dropbox and then share the sharable file link via email.

You can then easily download the file to your computer directly from the Cloud hosting services.

This way you don’t need to disable the security feature for Microsoft Outlook and also receive the file without any restrictions.

2. Change the Outlook security

  1. Press the Win key + R hotkey to open Run.
  2. Type regedit in the Run box, and press OK to open the Registry Editor.
  3. Navigate to the following location:
    HKEY_CURRENT_USERSoftwareMicrosoftOffice
  4. Click on the Office version installed on your system (in our example, it is Office 16.0).
  5. Expand the Outlook key, and right-click it.
  6. Go to New, and choose Key.
    new key registry outlook blocked access to the following potentially unsafe attachments
  7. Rename the newly created key as Security, and select it.
  8. In the right-pane, right-click on an empty space.
  9. Go to New, and choose String Value.new string value outlook blocked access to the following potentially unsafe attachments
  10. Rename the new string value as Level1Remove, and press Enter.
  11. Now double-click on Level1Remove.
  12. In the Edit String window, you need to enter the extension format that you want to exclude from the Microsoft Outlook security check.
    value data outlook blocked access to the following potentially unsafe attachments
  13. If you want to receive .js and .exe files in the attachment without any message, then enter .js;.exe; and click OK to save the changes.
  14. Close the registry editor, open Outlook and check if the message still appears.

Another helpful workaround to make this message disappear is to disable the security feature for Microsoft Outlook from the Registry Editor. Many users have reported that this has solved the problem.

3. Receive attachment in compressed format

One way to skip the security check-in Microsoft Outlook is to receive the file in compressed format.

There are a lot of free encrypting tools out there, but the best way is to get premium software. Thus, we strongly recommend the WinZip software.

This is the most popular file encryption and compression tool. It has many more features, and it has priority for developers.

As a matter of fact, the program offers more file management options, including sharing, compressing, and backing up files.

The encryption option allows you to zip your files with certified 128 or 256-bit AES encryption, to safely open attachments in Outlook, as needed.

In addition, with this compression tool, you can create zip files and save them directly from email attachments. From there, you only have to extract the files and view them with no issues.

You should therefore benefit from this practical way to manage all your files using tech-wise support every time you receive attachments in Outlook.

⇒ Get WinZip

As you can see, there are a couple of methods to safely open the attachments, so it’s completely up to you which one you’ll use.

For any more questions or suggestions, don’t hesitate to reach in the comments section below.

Full Fix: This server could not prove where its security certificate is from

This server could not prove that it is [Server Name] its security certificate is from [missing_subjectAltName]. If you get this prompt, do not worry, Windows Report will show you how to work around it.

Many Windows users reported getting the “this server could not prove that it is ….its security certificate is from” prompt on their web browsers most especially on Google Chrome, Mozilla Firefox, and IE web browser. This error prevents users from accessing websites bringing them to a stalemate.

Meanwhile, this error prompt may be caused by several factors such as a hijacker intercepting your internet connection, browser misconfiguration, invalid date and time, and other browser-related errors. Hence, the Windows Report team has compiled the best applicable solutions to fix this problem.

Fix server security certificate problems

  1. Set Date and Time settings
  2. Change your Internet network
  3. Scan PC for malware
  4. Use CCleaner
  5. Reset your web browser
  6. Update your web browser
  7. Manually assign DNS server
  8. Run Windows Update

Solution 1: Set Date and Time settings

Incorrect dates and times can cause the web browser to assume the SSL certificates are expired or outdated. Therefore, you need to set time automatically on your Windows PC. Here’s how to set time automatically:

  • Press Windows key > Select Settings > Select Time and Languagethis server could not prove that it is its security certificate is from
  • Toggle the option “Set Time Automatically” to ensure it is turned on.
  • Close the window and restart your PC.
  • After booting up your PC, launch the web browser, and then attempt to launch the website “again”.

If the prompt persists, proceed to the next solution.

Solution 2: Change your Internet network

Some Windows users were able to bypass the error by simply changing their Internet connection. If you used a public Wi-Fi network, disconnect it, and use another Internet connection such as a modem or private LAN to access the website.

Don’t forget to protect your device when using public Wi-Fi networks. You can use any of the anti-tracking tools to protect your PC as well.

Solution 3: Scan PC for malware

Another reason for this server certificate alert is due to malware infection. Hence, the ideal step afterwards is to use remove the malware from your Windows PC by using MalwarebytesAdwCleaner. This program is a free utility that will scan and remove malware and PUPs from your computer. Here’s how to download, install, and use MalwarebytesAdwCleaner on your Windows PC:

  1. Download MalwarebytesAdwCleaner at the official website.
  2. Double-click on the download exe file and follow the prompts to complete installation.
  3. After installation, right-click on the Malwarebytes AdwCleaner icon, and then select “Run as administrator” to open the program.
  4. In the MalwarebytesAdwCleaner display, click on the “Scan” button to commence the scanning operation.MalwarebytesAdwCleaner
  5. After the completed scan, click on the “Clean” button.
  6. Now, click “OK” when prompted to reboot your PC to complete cleaning.

Note: Another efficient alternative tool can help remove unwanted programs that may affect your system due to malware infection. To eliminate potential risky viruses or intrusive programs, it is better to consider Potentially Unwanted Programs removal tools.

After removing the suspected malware from your Windows PC, we do recommend that you carry out this operation:

Run a full system scan

Run a full system scan on your PC to remove every possible virus corruption. You can try any third-parties antivirus software available for Windows PC.

We do recommend that you use Windows’ built-in antivirus, Windows Defender. Here’s how to run a full system scan on Windows 10:

  1. Go to Start > type ‘defender’ > double click Windows Defender to launch the tool.
  2. In the left hand pane, select the shield icon.be careful with this message
  3. In the new window, click the “Advanced scan” option.run windows defender advanced scan
  4. Check the full scan option to launch a full system malware scan.

Alternatively, we strongly suggest you to check out some of the best antivirus software for your Windows PC and install them on your computer. Some third-party antivirus programs such as BullGuard, BitDefender, etc are ideal for virus removal.

Solution 4: Use CCleaner

Alternatively, you can use CCleaner to scan, fix, and clean bad system files most especially the corrupted files responsible for the error problem. Here’s how to do this:

  • Download CCleaner free version or Download CCleaner Pro version.
  • Install and follow the prompts to complete the installation.
  • After installation, launch CCleaner, and then click on “Analyze” option.CCleaner compatible with Windows 10, 8.1
  • After CCleaner has finished scanning, click on “Run Cleaner”. Follow the prompts to enable CCleaner delete the temporary files.

Moreover, you can best use this advanced program to erase corrupted files associated with your browser or delete cookies and junk files from your system.

CCleaner is totally safe and can also help the users to eliminate browser trackers or free up the storage in a very short time.

Solution 5: Reset your web browser

Also, you may consider resetting your web browser to its default state. This process will get rid of invalid settings, add-ons, or injected browser settings causing “this server could not prove that it is […] its security certificate is from […]” error message. You can reset your Google Chrome web browser by following these steps:

  • Double-click on Google Chrome shortcut to launch the software
  • Locate the “settings button” at the top right corner (3 dots) and click on it.
  • Now, scroll down and select “Show advanced settings”.
  • Hence, scroll down and click “Reset Settings”.
  • A pop up will appear asking for confirmation. Click on “Reset”.
  • Restart your PC afterwards.

Solution 6: Update your web browser

Also, you may be using an older Google Chrome version which could be responsible for “this server could not prove that it is […] its security certificate is from […]” prompt. Therefore, you should update your web browser to resolve this issue. Here’s to update Google Chrome web browser:

  • Double-click on Google Chrome shortcut to launch the software
  • Type “chrome://help/” without quotes in the address bar and hit “Enter”.
  • Wait for Google Chrome to automatically check for and update the browser.
  • Restart your PC.

Solution 7: Manually assign DNS server

Here’s how to manually assign DNS server:

  • Open Network Connections. Or, press Windows + X key.this server could not prove that it is its security certificate is from
  • Right click on your active Network connection and select Propertiesthis server could not prove that it is its security certificate is from
  • When Properties window opens, select Internet Protocol Version 4 (TCP/IPv4) and click the Properties button.this server could not prove that it is its security certificate is from
  • Check the “Use the following DNS server addresses:” radio button
  • Type those DNS server addresses (Google’s public DNS Servers):8.8.8.8, 8.8.4.4this server could not prove that it is its security certificate is from
  • Press OK twice to exit Network properties
  • Restart your computer

Solution 8: Run Windows Update

Finally, you should consider updating your Windows OS. Frequent Microsoft updates contain security patches; this can fix any trending issues and especially “this server could not prove that it is […] its security certificate is from […]” error. Here’s how to update your Windows OS:

  • Go to Start > type “update” in the search box and then click on “Windows Update” to proceed.
  • In the Windows Update window, check for updates and install the available updates.install windows 10 updates
  • After the update process is complete, restart your Windows PC.

In conclusion, we hope you find this post useful in solving “this server could not prove that it is its security certificate is from” prompt on your Windows PC.

However, you may consider using an alternative web browser such as Mozilla Firefox, Microsoft Edge, Opera, Pale Moon, and Internet Explorer. Do you know of any other solution that we didn’t mention? Let us know by commenting below.

Best crypto wallet on PC to keep your cryptocurrency safe

While you might have sufficient or at least some knowledge about which cryptocurrency to invest in, there is not much awareness or very little information about the best crypto wallet on PC.

On one hand, while it is extremely crucial to understand the ins and outs of a cryptocurrency before you invest, it is equally important to select the best crypto wallet, as it is where you will keep all or some of your cryptocurrency.

A quick search would give you a bunch of crypto wallet options available for PC. But it is pretty hard to narrow it down to a list of options that offers the best features among all the wallets available.

As you probably know by now, NFTs come in a variety of types, shapes, and sizes, making them an extremely versatile mode of expression.

You can even play Xbox NFT games at this point, and because of the versatility of this medium, more amazing features are coming for sure.

Some users are still confused about how NFTs work, and why people can’t just screenshot an image they want. The answer is very simple: a screenshot of an NFT doesn’t allow you to have your crypto wallet attached to purchasing that NFT, meaning that you are not the owner of it.

The same principle applies if you screenshot a Van Gogh painting: you have a copy of it, but the original painting is worth millions while the screenshot is worth nothing.

And speaking about art NFTs, if you’re a successful artist, or have a great virtual following, you can also create NFT art by using some specialized software.

This is where this guide comes into the picture. Here, in this post, we will give you all the information you need about crypto wallets along with some of the best crypto wallet options you can use on your PC.

Let us take a look at the best crypto wallets you can store your cryptocurrencies in.

What are the different types of crypto wallets available?

Before we begin with this list of the best crypto wallet options on PC, it would be pretty handy if you had some knowledge about the different types of crypto wallets available.

If you were thinking that there was just one standard type of cryptocurrency wallet to store your cryptocurrencies, then you were wrong. Let us discuss them in simple and easy-to-understand terms.

➡ Hot Wallet

Hot Wallets are the types of wallets that are always connected to the internet. Thus, they are less secure, and always at a risk of being hacked.

Hot Wallets are useful if you are into daily cryptocurrency transactions. These are easy to set up, and funds are easily accessible.

– Desktop Wallets – available to download as an application on the desktop
– Web Wallets – accessible via a web browser
– Mobile Wallets – an app on your smartphone to use a mobile wallet

➡ Cold Wallet

In contrast to Hot Wallets which are always connected to the internet, Cold Wallets are offline. Hence, they are more secure since you do not require internet connectivity to access your wallet.

Such wallets are used for long-term holdings.

– Paper Wallets – pieces of paper that include QR codes and keys that would help you access your cryptocurrencies
– Hardware Wallets – wallets that are physical and save private keys on a device offline (e.g USB drive)

What are the best crypto wallet options on PC?

Exodus Wallet

Exodus crypto wallet

Founded back in 2015, by JP Richardson and Daniel Castagnoli, the Exodus crypto wallet is a type of cold wallet, that is only available purely as a desktop wallet.

It has made its name as a crypto wallet for the public, who aren’t too nerdy about crypto wallets and are looking for a safe place to keep their cryptocurrencies.

You can use this Exodus crypto wallet to send, receive, and exchange more than 100+ cryptocurrencies, including Bitcoin and Ethereum.

The Exodus wallet has a nice and modern user interface. It even allows you to monitor the crypto market’s movements while you’re on the go, right from your desktop app.

It also offers the option to add more functionality using different apps. Although Exodus is a pretty safe crypto wallet, it lacks two-factor authentication and multi-signature features.

Here are some of the key features of Exodus crypto wallet:

  • Available only for desktop and Android
  • Provides security using offline using Trezor hardware
  • Support exchange of over 100 cryptocurrencies
  • Easy to use interface

⇒ Get Exodus

Guarda

Guarda crypto wallet

Guarda is another popular cold crypto wallet that comes with some advanced features. One of the key features of Guarda is that it supports over 50 blockchains and thousands of other crypto assets.

It offers some of the best exchange rates, as well as crypto loans and the ability to earn money by staking. To add that extra layer of security, this crypto wallet comes with the option of multi-signature.

Along with popular cryptocurrencies including Bitcoin, Ethereum, Dogecoin, Shiba Inu, etc., Guarda also supports several altcoins such as Zcash, Ripple, and DASH.

Another good thing about this wallet is that it does not store any information, wallet keys, or personal data in it. Your private key will be stored inside the device’s secure memory. It gets deleted once you log out of the app.

Some of the best features of the Guarda crypto wallet are:

  • It is a hybrid crypto wallet
  • Offers multi-signature security layer
  • Gives you features such as crypto loan
  • Supports more than 50 major blockchains and thousands of assets

⇒ Get Guarda

MetaMask

MetaMask wallet

If you are looking for a browser-based crypto wallet because you indulge in trading crypto every day, then MetaMask could be a solid option for you.

MetaMask is an Ethereum wallet, that can be downloaded as an extension for compatible browsers. The UI of this crypto wallet is brilliant, minimal, and free of clutter.

This web wallet offers Swap technology, which negates the need to go through multiple exchanges to compare crypto prices and then swap.

Yes, MetaMask does come with transaction fees, but that is decided based on the network you use. Notably, if you use Binance Smart Chain, you will be charged based on it.

You can even store crypto collectibles and NFT art in it. Moreover, it is easily accessible under the Collectibles tab.

Here are the highlights of using MetaMask crypto wallet:

  • It is a web wallet, so you don’t need to download an app
  • You can store your crypto collectibles and NFT arts
  • Offers Swap technology for swapping cryptos
  • The user interface is modern and minimal

⇒ Get MetaMask

Freewallet

Freewallet best crypto wallet Windows 11

Another option for crypto users looking for a web-based wallet is Freewallet. This crypto wallet comes with the option to send, store, and manage 100+ cryptocurrencies.

You can avail of the free transfer feature between Freewallet users, so that is a plus. Freewallet supports major credit and debit cards for purchasing different cryptocurrencies.

It has an extra layer of security in the form of multi-signature confirmation for every transaction. You can also set limits per day or week to minimize the risk of theft.

The Freewallet interface can be translated into 13 languages, and all coins in the wallet are stored in cold storage. Moreover, it also has advanced security features such as 2FA, pin-code, and even fingerprint support.

Let us look at some of the best features of Freewallet:

  • Offers a built-in exchange with support for over 100 cryptocurrencies
  • Multiple security features such as 2FA, multi-signature, fingerprint support
  • Easy to understand interface
  • Available in 13 languages

⇒ Get Freewallet

Electrum

Created back in 2011 by Thomas Voegtlin, Electrum is a lightweight and easy-to-use crypto wallet for your PC. It is available across platforms, including Windows, Mac, Linux, and Android.

It offers you the option to encrypt your wallet file to make it extra secure. Furthermore, you can use the Electrum wallet in cold storage wallet mode as well.

The advantage of this is that, although you can receive Bitcoins in your wallet, you won’t be able to spend them. It is helpful if you wish to stay long-term in the game.

It is fast and smooth because it makes use of servers that index the Bitcoin blockchain. It verifies all of your history using SPV for proof checking. You can enhance its feature list by using add-ons.

Here are some of the key highlights of the Electrum crypto wallet:

  • Easy-to-use and lightweight dekstop wallet
  • You can recover your Bitcoin using wallet seed
  • It encrypts your private keys on the PC itself
  • You can export your private keys and use them on other clients
  • Supports add-ons for enhnaced user experience

⇒ Get Electrum

How to choose the best crypto wallet for PC

Cryptocurrencies are seen as the future of money and all transactions. There are multiple platforms to buy and sell cryptos on, and there are lucrative offers as well.

However, now the question arises: what are the things you should look out for before selecting the best crypto wallet for yourself?

To help you in this regard, here is a list of the top points you should keep in mind when choosing a crypto wallet to store your precious crypto holdings.

  • Check the company’s background.
  • Does the crypto wallet offer any advanced security features such as 2FA, biometric authentication, multi-signature, etc.?
  • Understand how your private key will be handled by a particular crypto wallet.
  • Is there active customer support available, that will help you regain access if something happens to your wallet or PC?
  • Is the crypto wallet compatible with the device you will be using it in?
  • Are there any extra charges?
  • Is the UI easy-to-understand?

These are some of the top points you should consider before opting for a crypto wallet. We would advise you to go for a hardware crypto wallet such as the Ledger Nano X or Trezor Model T, as these are more secure and safe.

Another thing that we would suggest is that if trade in cryptocurrencies, then using a VPN makes a lot of sense. For starters, when you make a payment for purchasing cryptos, with a VPN you become anonymous.

If at all hackers try to hack the trading platform, then at least your IP address will remain anonymous. Further, a VPN encrypts your data, and no information such as your physical location is linked with your crypto wallet address.

Based on our recommendations, some of the best VPNs that you can opt for are PIA, NordVPN, and Surfshark.

We’d like to know your thoughts on this topic. Let us know in the comments below which crypto wallet you are using now, or have decided to go for.

Windows 10 Camera app Closes Immediately: 4 Ways to Fix it

Laptop cameras are essential devices today when online communication holds up our professional, educational, and even personal affairs.

But some users reported that they could not use the camera after the upgrade to Windows 10. They said it just shows an error and stops working. So let us start by investigating some causes.

Why is my Camera app not working in Windows 10?

After investigating users who have faced these issues, we gather that it is primarily caused by any of the following:

  • Driver issues – If your computer has outdated or missing drivers, you will have problems with the camera app.
  • App conflicts – Conflicts between third-party software may cause your camera to malfunction. The antivirus may often trigger these if it is incompatible with your device.
  • Wrong settings – Users who have activated incorrect camera settings or do not give the permissions also experience camera malfunctions on Windows 10.
  • Hardware damage – There is also a chance that the camera hardware is damaged, which may need to be replaced or changed in most cases.

Identifying which issues trigger the problem makes knowing what fixes may work easier, and below are some solutions.

What can I do if Windows 10 Camera app closes immediately?

1. Re-gain full access to the Camera roll folder

  1. Press Windows + E to open File Explorer and go to Pictures.
  2. In the Pictures folder, right-click on the Camera roll folder.
    camera app not working in windows 10
  3. Select Properties.
  4. Go to the Security tab, then choose your username, which is listed under Group or user names:
  5. Click on Edit permissions, check Full control, then click OK,
    windows 10 camera app closes immediately

Even in the Technical Preview, and reportedly still after the full version has been released, some people complained that, for some reason, they lost full access to the Camera roll folder in Pictures.

As the Camera roll folder and Microsoft’s camera app are connected, you won’t be able to use the camera (because it won’t save your pictures and recordings in the Camera roll folder) if you don’t have full access to this folder.

2. Change privacy settings for the camera app

  1. Press Windows + I to open Settings.
  2. Go to Privacy.
  3. Go to Camera and enable Let apps use my camera if it isn’t enabled.
    windows 10 camera app closes immediately

This issue may also appear if your camera is disabled from the privacy settings. You have to ensure that your camera is enabled and can connect to the applications on your PC.

So, if the camera isn’t enabled in the Privacy section of the Settings app, an error might appear whenever you try to take a picture or record a video.

After enabling it, it should work without issues and start immediately as you try to record or take a picture. It should also open from third-party apps.

3. Update your device drivers

  1. Press Windows + R, type devmgmt.msc, and hit Enter.
    windows 10 camera app closes immediately
  2. Expand the Cameras category.
  3. Right-click on the device and select Update driver.
    windows 10 camera app closes immediately
  4. Reconnect your device if necessary or perform a restart.

For your system to function correctly, your drivers need to be up to date. If none of those mentioned solutions worked, you should check and update your camera driver.

Without a driver, a computer cannot manage video cards, camera software, sound cards, or other devices. You can update your camera driver with the help of the built-in Device Manager.

Alternatively, you can use a dedicated driver updater tool, like Outbyte Driver Updater. It will save you some time and automatically update your drivers regularly.

By updating your system’s drivers, this program ensures that it runs smoothly. It also examines your system for outdated or corrupt drivers that cause your system to be sluggish.

This tool will keep your system safe as you can manually download and install the wrong driver version.

⇒ Get Outbyte Driver Updater

4. Reinstall the driver

  1. Press Windows + R, type devmgmt.msc, and hit Enter.windows 10 camera app closes immediately
  2. Expand the Camera section, right-click on your driver, and select Uninstall device.
    windows 10 camera app closes immediately
  3. Confirm your choice if prompted.
  4. Finally, restart the device so that the driver is reinstalled.

That is as much as we will cover in this guide. So, if your Windows 10 camera app closes immediately, you should be able to use any of the above-recommended solutions to fix it.

If you already use the latest operating system version and need help with this issue, check our guide on how to fix a Webcam not working in Windows 11.

Lastly, tell us which fixes were most effective in the comments section below.

Microsoft Edge Stable version 98 gets updated with new browsing mode for security

If you’re on the stable version of Microsoft Edge, it’s time to check for updates. Now up to version 98.0.110.8.43, the latest version of Edge Stable is getting some new features, including a browsing mode in Microsoft Edge where security takes priority.

The new security features are all about helping protect against in-the-wild exploits known as 0-days. These features, though, are hidden behind some group policies. One for Security Mode, another for Bypassing List Domains, and a final for Enforcing List Domains. You can visit the links to learn more on how to enable it.

Other than the security stuff, Edge version 98.0.110.8.43 adds the ability to personalize multi-profile experiences. You’ll now be able to create a customized list of sites for automatic profile switching in Microsoft Edge. Under the hood, meanwhile, Microsoft added three-digit version numbers in the user agent string, depreciated WebRTC’s Plan B SDP semantics, and updated scrollbars with an overlay-based design. This feature will be in edge://flags.

As always, this release brings a ton of policy updates, too. These cover the address bar, auto launching, Sync Types, and more. We invite you to read Microsoft’s changelogs for the full technicalities of these. Happy downloading, Edge users!