No more Show desktop option in Taskbar by default, to be replaced by Copilot

After years of being a vital part of Windows, the Show desktop icon won’t be present by default in the Taskbar, starting KB5034765. It will be replaced by Copilot. This is seen as Microsoft’s efforts to push the adoption of the native chatbot.

Microsoft, in its official blog, states that this is a Controlled Feature Rollout (CFR), meaning devices will receive the new feature set at different times.

Remember, the Show desktop option has not been removed altogether. It’s still a part of Windows 11, just not enabled by default!

To get back the Show desktop icon, press Windows + I to open Settings > go to Personalization from the navigation pane > click Taskbar on the right > expand the Taskbar behaviours entry > tick the checkbox for Select the far corner of the taskbar to show the desktop.

Enabling the Show desktop option in Windows 11

Other ways you can directly go to the desktop in Windows 11

  • Use the dedicated keyboard shortcut: Pressing Windows + D will take you straight to the desktop. Pressing it again will open the last-active app.
  • Via Power User menu: Press Windows + X to open the Power User menu, and select Desktop at the bottom.
  • Use the three-finger swipe: A three-finger downward swipe on the touchpad minimizes all active programs and gets you directly to the desktop. Doing the same upwards will re-open the program. For touchscreen devices, you can swipe on the screen as well.

Whether or not you heavily relied on the Show desktop icon in the Taskbar, it is certainly a convenient option. Microsoft did a great (and surprising) job in not removing it altogether!

Also, Microsoft Copilot is getting a lot of upgrades. We recently reported about full-screen Copilot in Windows. Besides, Copilot may soon offer a personalized experience.

Does this change affect you? Let us know in the comments section.

iMessage, Bing, and Edge remain unaffected by EU market regulations

As you know, Microsoft and FTC have a long history, but after legal troubles, it seems that Microsoft and Apple are catching a break in the EU.

It seems that the two companies, or at least some of their services, won’t be affected by the Digital Markets Act.

Only a handful of services are exempt from this law

According to the Business Times, a couple of services from Apple and Microsoft won’t be subjected to the EU’s anti-monopolization law.

After a recent probe, it was determined that their services don’t have enough power for market abuse, so they won’t be affected by the Digital Markets Act.

However, it’s not all good news for these two companies, and the exemption applies only to iMessage, Bing search engine, Edge browser, and advertising services.

Other services, such as Windows, LinkedIn, iOS, App Store, and Safari browser are subject to legal regulations.

This isn’t anything new for the EU, and many tech giants, including Meta, Alphabet, Amazon, and ByteDance are all affected by this law.

If you’re not familiar, the Digital Markets Act prevents companies from favoriting their products thus preventing monopolization of the market.

Overall, this is good news for Microsoft and Apple and they have greeted this decision.

Unsure about upgrading to Windows 11? Microsoft’s new ad may convince you

Windows 11 hasn’t been as big a success as Microsoft would have imagined. As per Statcounter, only 27.83% of Windows PCs are running the latest iteration.

Strict system requirements are a major reason a few of you couldn’t make the upgrade, but even otherwise, so many continued with Windows 10. It still has a higher market share than Windows 11, even three years after the release of the latter.

This year, it looks like Microsoft is keen on getting users to switch to Windows 11, what it calls the best Windows yet.

First, Microsoft sent upgrade alerts to Windows 10 users, and now it has come up with an ad to highlight the benefits of Windows 11.

Microsoft’s new ad dispels apprehension concerning Windows 11

Microsoft’s latest ad titled, Start Fresh Without Starting Over with Windows 11, highlights how upgrading to the latest iteration won’t be as challenging as you would believe. On the contrary, it will be a seamless transition to a more user-friendly OS.

The 54-second ad puts the spotlight on three critical aspects of Windows 11:

  • Faster search: The Windows 11 Search menu allows you to seamlessly find apps and files on the PC.
  • Better organization: The new File Explorer is more user-friendly and facilitates quick file access.
  • Improved security: Windows 11 Security does a better job and delivers all-around protection.

Personally speaking, the flawless upgrade process, easy-to-navigate interface, a redesigned Settings app, improved performance (specifically gaming), better touchscreen functionality, and revamped tablet mode are the primary reasons Windows 11 seems a better choice than the previous iteration.

At the same time, there are a few disadvantages of Windows 11 that act as a deterrent to mass adoption. In recent releases, Microsoft has tried to eliminate many of these!

It will be evident in a few days whether the new Microsoft ad will get people to upgrade. But as we near the End of Support (EoS) for Windows 10, the number of users installing Windows 11 will certainly witness an uptick.

If haven’t yet upgraded to Windows 11, do share your reason for it in the comments section.

Microsoft 365 Insiders get a sneak peek at OneNote’s ink annotation upgrades

Recently, Victoria Chen, the product manager on the Office AI team, made an announcement about an improvement to OneNote on Windows. It allows you to relocate ink annotations alongside the PDF printouts and images they are linked to.

This change was introduced as a lot of users have given feedback that annotating images or PDF printouts in OneNote was challenging. The ink didn’t move with the image, and using the Lasso tool every time was time-consuming and not easy.

However, with this new update, Microsoft 365 users can move both image and annotation together. Moreover, any ink touching and outside of the image will stay on the image or PDF when you move them, ensuring the ink annotations & picture are together.

Let us see how it works

Open OneNote, go to Insert, then click Picture or Insert, then select File Printout to add an image or PDF printout. Ink the image, then tap on the image to select it and ink using a digital pen, touch, or your mouse. Now, move the selected image anywhere you like.

Here are some tips to use the feature:

  • Tap outside the PDF printout or picture to unselect it
  • To choose the underlying PDF printout or image, first tap to select both annotations and image, then tap it again to select the image only.
  • Select the image and drag the corners of the selection box to resize both the image and ink annotations.

The feature is now available for Microsoft Insiders in the Beta Channel who are running version 2402 (Build 17407.15010) or later. Also, this OneNote feature is currently only available on Windows 10, or 11.

What do you think about this new change? Share your thoughts in the comments section below.

Microsoft releases KB5034765 update to address security issues and more

Recently, Microsoft released the Cumulative Update for Windows 11 Version 23H2 & Version 22H2 for x64-based Systems (KB5034765).

This update came out on the second Patch Tuesday and bumped the OS build to 22621.3155 for Version 22H2 and 22631.3155 for Version 23H2.

The update brought new features like Copilot, which will appear in the system tray instead of next to the Search bar. If you have already updated your Windows 11 to KB5034765, but can’t see the change, you might have to wait for a while as new features are rolled out slowly using Controlled feature rollout to consumers.

This cumulative update also introduced the capability to use digital inking in edit boxes, added a backup option for Eye Control, and resolved issues with Start menu search, 7-Zip support, Narrator, networking, File Explorer, device metadata, and more.

Windows 11 build 22631.3155 and 22621.3155 updates, bug fixes & changes:

  • Copilot will appear on the right side of the system tray on the taskbar, and the Show desktop option will be turned off by default
  • Allows you to backup and automatically transfer eye control system settings when setting up a new device
  • Supports digital handwriting in some boxes in several languages with improved recognition & gesture controls
  • Resolves issues that affect Narrator announcements
  • Fixed an issue causing Explorer.exe to stop responding
  • Addresses an issue that affects the download of device metadata
  • Resolves the issue of sorting out search problems
  • Addresses the issue affecting certain types of 7-Zip files, opening them as empty on File Explorer
  • Fixes issues that affect Wi-Fi Protected Access 3 (WPA3) in the Group Policy Editor
  • Windows is now reliable during power transitions to reduce the risk of stop errors
  • Resolves the issue that affects the OpenType font driver, and 3D emojis will be better now
  • Fixes the issues that affect Access Point Name profiles (APN), Trusted Platform Modules (TPM), Unified Extensible Firmware Interface (UEFI) and BitLocker
  • Addresses the issues to improve WMI functionality, video calls, BlueTooth audio connections, and WMI functionality
  • Resolves an issue related to remote direct memory access (RDMA) performance counters
  • Fixes the bug affecting your computer’s time zone
  • Resolves the crashing issue while waking up from sleep mode
  • Improves Windows Management Instrumentation, now managing settings and devices would be easier than before
  • Fixes the Wi-Fi security settings not showing up issue
  • Updated the list of drivers to ensure Windows installation is safe from attacks

To install the latest update, go to Settings, then select Windows Update, and click Check for updates. Once you see the updates, click Download, then Install to update your device.

If you want to download it manually, you need to visit the Microsoft Update Catalog website and follow these steps to install the update.

In case you have any questions or suggestions, feel free to mention them in the comments section below.

Microsoft is preparing a massive update on the Secure Boot keys for UEFI

Microsoft announced that it’s changing the Secure Boot keys database in collaboration with the OEM partners to further prevent malware attacks before boot.

Secure Boot was implemented first on Windows 8 and it’s a prerequisite for Windows 11. This UEFI security feature appeared as an indispensable method of countering any attacks that occur before the boot sequence, when the system is most vulnerable.

It’s not the first time that Microsoft is updating DBX, but according to the Redmond giant, it’s the first DB update on such a large scale.

Why is Microsoft updating the Secure Boot keys?

First, don’t get alarmed. Microsoft is updating the Secure Boot keys because the Key Exchange Key (KEK), the Allowed Signature Database (DB) and the Disallowed Signature Database (DBX), will expire in 2026.

Microsoft is preparing to roll out replacement certificates that will set new UEFI CA trust anchors for the future. Microsoft will be rolling out Secure Boot database updates in phases to add trust for the new DB and KEK certificates. The first DB update will add the Microsoft Windows UEFI CA 2023 to the system DB. The new Microsoft Windows UEFI CA 2023 will be used to sign Windows boot components prior to the expiration of the Windows Production CA 2011.

Furthermore, Microsoft will validate devices and firmware compatibility and the DB update will be optional for the February 2024 servicing and preview updates.

The full DB update’s controlled-rollout process to all Windows customers will begin during the 2024 April servicing and preview updates, ahead of the certificate expiration in 2026. Meanwhile, efforts to update the Microsoft UEFI CA 2011 (aka third-party UEFI CA) and Microsoft Corporation KEK CA 2011 will begin late 2024, and will follow a similar controlled rollout process as this DB update.

To prevent any problems, Microsoft will block updates for the devices that are identified with any issues.

The DB updates can be also performed manually and the Redmond giant also issued a guide on how to do that and the prerequisites to apply before installing them.

What do you think about Microsoft’s Secure Boot update? Let’s talk about that in the comments section below.

Windows 11 now lets you quickly connect to all Bluetooth devices

In the past, we have had issues connecting to not-so-common devices, say a sensor, on Windows, as they were not listed by default when searching. That changes with the Windows 11 build 26052 recently released in the Dev and Canary channels!

Now, users can view all available Bluetooth devices nearby from within the Quick Access menu. Simply press Windows + A, go to the Bluetooth option, let your PC scan for devices, and then click on Show all devices.

This is a significant upgrade to Bluetooth discovery settings and will come in handy, given that we often connect to such devices, and it’s really a pain when they don’t normally show up on a Windows PC.

To view these devices earlier, you would have to head to Devices under Bluetooth & devices and select Advanced for Bluetooth devices discovery.

Earlier Bluetooth devices discovery setting

As for Windows 11 build 26052, things are still far from perfect! Even though it’s still in the testing stage and hasn’t been rolled out for regular Windows users, issues like data loss during rollback or installation problems can’t be overlooked.

But the latest build does promise a host of exciting features, including improving the OS experience for hearing-impaired users and bringing SUDO to Windows.

Do you think this is the Windows build the community had been waiting for? Let us know in the comments section.

Empowering Web Apps: Chrome’s Universal Install and Shortcut Clarity

Google is exploring ways to make websites in Chrome feel more native and app-like (through installation), while also being transparent that shortcuts aren’t true apps but rather fire-and-forget links. This effort is evident in new experimental features currently tested in Chrome Canary. Remember, these features are still under development and subject to change.

Bridging the Gap Between Websites and Apps

We’ve previously seen collaborations between Microsoft and Google to enhance Progressive Web Apps (PWAs) in Chromium browsers like Edge and Chrome. Now, Chrome Canary introduces new interesting features:

Web App Universal Install

Tired of juggling between web apps and native apps? Say goodbye to limitations! This feature empowers any website to be installed on your computer, regardless of the operating system—whether it’s Windows, Mac, or Linux, Imagine accessing your favorite web tools as seamlessly as desktop apps, without the need for multiple browser tabs.

Web App Universal Install
Allows any site to be installable on Windows, Mac, and Linux. – Mac, Windows, Linux, ChromeOS, Fuchsia, Lacros

Shortcuts, not Apps

If you create a shortcut to a website on your desktop using the available menu option, don’t mistake it for a full-fledged app. Google wants users to understand that these shortcuts are fire-and-forget solutions. They ignore web app manifest information and rely solely on details from the current page. When you double-click a shortcut, it opens in a tab within the Chrome browser, lacking typical web app features.

Shortcuts not Apps
Changes the ‘create shortcut’ 3-dot menu option to put a fire-and-forget link on the desktop, instead of an app. – Mac, Windows, Linux, Fuchsia

Manifest independence

Web app manifests are useful, but sometimes a quick shortcut is all you need. This feature lets you bypass the manifest entirely when creating a shortcut. Chrome extracts relevant information directly from the page, ensuring your shortcut reflects exactly what you want.

Create Shortcut ignores manifest
When the ‘Create Shortcut’ menu item is selected, use information from the current page, ignoring any web app manifest information that may be available. – Mac, Windows, Linux, ChromeOS, Fuchsia, Lacros

Both Shortcuts not Apps and Create Shortcut Ignores Manifest features relate to Google’s goal of clear communication: websites, even when installed, are different from native apps. Shortcuts offer ease of access, not full app functionality.

Key Points to Remember:

  • These features are experimental and subject to change.
  • They aim to improve website interaction but don’t guarantee exact PWA-like behavior.
  • Manage expectations – the final implementation might differ from initial impressions.

Recently, we reported that Chrome on Android is testing a universal install UI for Progressive Web Apps (PWAs). This feature aims to create a unified path for both installation and adding to the home screen. If you’re interested, feel free to check it out.

What’s your take on these changes to web apps or Websites in Chrome browser? Let us know your thoughts in the comments below

With Windows 10 KB5034763, Microsoft no longer force some URLs to open in Edge

Microsoft issued KB5034763, the latest cumulative update for Windows 10 version 22H2 and you will reach Build 19045.4046. The new KB doesn’t bring any new features, but it comes with some notable changes to comply with Europe’s Digital Markets Act (DMA).

What is new with Windows 10 KB5034763?

The most important modification is that after you install KB5034763 on Windows 10, the system will finally fully acknowledge your default browser and won’t open some URLs in Microsoft Edge.

Here are some of the new changes as mentioned by Microsoft in the release notes:

  • This update addresses an issue that affects some single-function printers. They might install as a scanner.
  • New! The coming weeks will bring a richer weather experience to your lock screen. This includes dynamic, interactive weather updates. So, as you hover over the weather on your lock screen, you will see more information. When you tap or click on the weather card and sign in, Microsoft Edge opens with the full forecast in MSN weather. If you already use Weather in Settings > Personalization > lock screen > Lock screen status, there is nothing for you to do. Also, this new experience will be on by default if Lock screen status is set to “None.” Like today, lock screen status will be available when you lock your screen no matter which personalization option you select (Windows spotlight, Picture, or Slideshow).

The new KB5034763 also fixes a lot of bugs that have been annoying users for quite a lot of time. For instance, it repairs BitLocker’s issues with Microsoft Intune not getting the right data when using the FixedDrivesEncryptionType or its policy settings in the BitLocker configuration service provider node.

Another problem that was solved was the Internet Explorer shortcut reappearing after applying a policy to remove it.

KB5034763 fixes a lot of bugs on Windows 10

Here are some of the other fixes that KB5034763 addresses on Windows 10:

  • This update addresses an issue that affects Windows Management Instrumentation (WMI). A caching issue occurs. The issue causes CurrentTimeZone to change to the wrong value.
  • This update addresses an issue that affects XPath queries on FileHash and other binary fields. It stops them from matching values in event records.
  • This update addresses an issue that affects the Code Integrity Module (ci.dll). This issue stops your device from responding.
  • This update includes quarterly changes to the Windows Kernel Vulnerable Driver Blocklist file, DriverSiPolicy.p7b. It adds to the list of drivers that are at risk for Bring Your Own Vulnerable Driver (BYOVD) attacks.
  • This update affects Unified Extensible Firmware Interface (UEFI) Secure Boot systems. It adds a renewed signing certificate to the Secure Boot DB variable. You can now opt for this change.
  • This update addresses an issue that stops you from reconnecting to an existing Remote Desktop session. Instead, you get a new one.
  • This update addresses an issue that occurs when you change the keyboard language. The change fails to apply to RemoteApps in some scenarios.
  • This update addresses an issue that affects Windows Local Administrator Password Solution (LAPS) Post Authentication Actions (PAA). The actions occur at restart instead of at the end of the grace period.
  • This update addresses an issue that affects Active Directory. Bind requests to IPv6 addresses fail. This occurs when the requestor is not joined to a domain.
  • This update addresses an issue that affects the LocalUsersAndGroups CSP. It stops processing group memberships if it cannot find a group.
  • This update addresses an issue that affects deleted cloud files. When a cloud provider vetoes a deletion request, the files might still be removed.

You can install the new KB5034763 by going to Settings > Update & Security and clicking the Check for updates button. However, if you didn’t show up yet, it’s because the update will be rolled out gradually by March 6 2024.

However, if you don’t want to wait, you can download KB5034763 straight from the Microsoft Update Calendar.

Did you have any problems after installing KB5034763 on Windows 10? Tell us all about it in the comments below.

Another Copilot bug reported, it retracts responses to inappropriate questions

The use of AI chatbots has witnessed a significant rise over the last few months, and many tech companies have released their product. With that came censorship, and it was the need of the hour. But it seems like Microsoft Copilot hasn’t yet figured a few things out!

As reported in a Reddit post, Copilot, when asked an inappropriate question, first generates a response and then retracts it within seconds.

While not answering the question makes absolute sense, Microsoft’s AI-based chatbot should ideally be able to determine the context beforehand and not generate an answer altogether instead of spelling things out in detail and then retracting it.

When we tried it on Windows 11 with the integrated Microsoft Copilot, the result was the same!

It appears that Microsoft Copilot is unable to determine inappropriate content and only realizes it mid-way through the answer.

However, that’s not the case with offensive, controversial, or sensitive subjects. It can identify these right away and refuses to answer. We tried a few, and Microsoft Copilot did a fine job!

Microsoft Copilot’s response to offensive and controversial questions

ChatGPT answers questions that Copilot deems offensive

Surprisingly, when we asked ChatGPT, the first popular chatbot in recent days, it did answer most of the questions that Microsoft Copilot either refused to or retracted its response. However, in a few cases, it displayed a disclaimer that the answer may violate its content policy.

Disclaimer on ChatGPT

So, it seems like Microsoft is a bit harsh with censorship compared to OpenAI. Whether it’s good or not, we leave it to your able judgment!

But with sensitive information easily accessible and often not in the right form, it’s all the more important that AI-based chatbots find a way to answer them in the best possible way.

What’s your take on it? Let us know in the comments section below.

Wunderlist’s unofficial successor, Superlist, is here and it’s free for personal use

When Microsoft acquired and later replaced Wunderlist with Microsoft To-Do in 2020, many of the 16 million who used the app (in its lifetime) were unhappy. But there’s good news for you all!

Wunderlist’s co-founder, Christian Reber, along with a team that initially worked on the app, developed its unofficial successor, Superlist, which is now available for Web, Mac, iOS, and Android. Funnily, it’s not available on the Microsoft Store or for Windows at present.

In essence, Wunderlist was a simple to-do app that allowed you to create tasks, manage them, and access them across platforms. The primary reason it was a big hit was the wide array of captivating backgrounds.

What’s new in Superlist?

The team started developing the app in 2021, and after extensive testing in the Beta stage, Superlist is now available to download for Mac, iPhone, iPad, and Android users.

Superlist is meant both for personal and professional use, and can be easily employed in organizations with hundreds of members. The interface and usability, though not as seamless as Wunderlist, according to some, make more sense, given the scalable nature of the app.

Image source: Superlist

Superlist offers everything, be it creating a list of tasks, organizing them, attaching files, adding notes, or the AI integration, and yet manages to find the perfect blend between personal and professional use.

Connecting it to the other accounts will help you prioritize things and never miss out on important tasks. But lack of integration for Microsoft 365 may be a problem, at least for a few.

Superlist is offering both free and a paid Pro subscription (priced at $8 per user/month). According to the team, the free plan should work out fine for most, especially those using Superlist for personal tasks. With the Pro subscription, you get your hands on a lot of exciting features, including enhanced integration.

For more information about Superlist, you can visit the project’s official website or download the app from Apple’s App Store or Google’s Play Store.

Remember, Superlist is still new and a lot more will added to it in the coming days. Wunderlist fans surely have their hopes up with the app’s reincarnation.

But based on the initial feedback, Superlist has some sign-in problems. For a few, the app’s UI didn’t load after download. So, the team must address these issues for Superlist to reach where Wunderlist once stood!

If you have already tried Superlist, share your feedback in the comments section.

BloatyNosyAI can remove Copilot AI from Windows 11 and 10

If you want to remove Copilot AI from Windows 11 and 10, you can do it by using an app called BloatyNosyAI. After all, Microsoft is pushing us to accept AI everywhere. On top of that, they added some new features to the Windows 11 preview built powered by artificial intelligence as well. So, it seems that the future of Windows could be AI, even if you might not like it.

What is Bloaty Nosy?

Bloaty Nosy is an app with various settings to remove most Windows 11 features and bloatware, such as Copilot AI. Another option of the BloatyNosyAI is to remove AI from the browser. In addition, the app can disable the special taskbar button. On top of that, the application can also tweak the privacy settings of your Windows.

While BloatyNosyAI might help you free resources, removing Windows features could also lead to issues. Thus, you should be careful and research everything you want to disable. Also, consider twice before installing the Windows 11 preview build. After all, you might need to reinstall your OS if you encounter complex errors.

Another way to remove Copilot AI is to disable it from the registry. However, this might lead to compatibility issues and other problems such as BSOD.

In a nutshell, we don’t recommend BloatyNosyAI unless you know what you are doing. However, if you know the features you want to remove, you could use it instead of other methods. So, in the end, the application might be useful to you. Also, remember that the app works for Windows 10.

What do you think? Will you use BloatyNosyAI or the preinstalled features don’t bother you? Let us know in the comments.

Apple Vision Pro headset is great, according to Microsoft’s World lead

Omar Shahine, the head of Microsoft Word, holds Apple Vision Pro headset in high regards. After all, the headset is similar to a portable home theatre. On top of that, the device has great features and delivers immersive experiences. So, you can use it especially while travelling long distances or during trips.

What is the point of Apple Vision Pro?

The main point of Apple Vision Pro headset is that you can use it as a substitute computer, and you can use it with your voice, eyes, and hands. On top of that, you can play games on it, edit files, watch movies, and more.

From the post made by Omar on Threads, you can see a few of the options available. Also, something that’s right in front of us and a great feature is the multitasking capability of Apple Pro.

Unfortunately, the device is a bit heavy and might put a strain on your eyes. On top of that, another downside is the price, which might vary based on the amount of space you want on the device. On top of that, the sound system is not the best, and you might need some headphones with you. For example, Omar used AirPods Pro.

However, some other users of Apple Vision Pro already did some dangerous things, such as driving with the headset on. So, Apple might add some safety procedures in the near future.

Overall, the future of Apple Vision Pro headset looks promising, and we can’t wait to see the future versions of it. In addition, we are surprised to see the commercial success of Vision Pro. Also, imagine the possibilities it brings to various fields such as medicine, education, and science. For example, children could use it to learn faster in a better environment.

What do you think about Apple Vision Pro headset? Are you going to use it in the future? Let us know in the comments.

Get ready to play Xbox exclusive games on your PS or Switch

Two Xbox exclusive games will soon be available for Play Station and Nintendo Switch. If the migration is a success, we might see more titles such as Starfield and Sea of Thieves on other consoles. After all, the Xbox is considering this the beginning of a new era. However, they know that it is a risky move.

Are Xbox games coming to PS5?

Hi-Fi Rush and Pentiment, two Xbox exclusive games, are coming to PS5 and other consoles. Thus, if they successfully bring more gamers, we might soon get other exclusives as well. Sea of Thieves could be another exclusive going to other consoles as well.

An Xbox podcast will be live on Xbox’s YouTube page this Thursday. In it, Philip Spencer, Sarah Bond, and Matt Booty will share news about the future of Xbox. Hopefully, they will address some of the rumors about the future of the company, such as the fact that the next-gen console lacks a disc drive.

There are other Xbox exclusive games that might be available soon on other consoles, such as Starfield. However, the company might wait to see how the Xbox community reacts to the business podcast. Thus, it’s uncertain if Starfield will remain exclusive.

Ultimately, we need to wait for more about the future of Xbox exclusive games. However, we can’t wait to discover which games are migrating. On top of that, we hope to find out more about the next gen console. In addition, we are eager to hear some news about the future of the Xbox Game Pass.

What are your thoughts? Is there anything you are particularly interested to hear about from this podcast? Let us know in the comments.

Microsoft will bring AI to phones by using AndroidArena

Microsoft researchers are trying to train AI to use Android devices with the help of AndroidArena. However, even with its help, the AI meets various difficulties. After all, navigating through an OS requires multiple actions. Yet, the LLM agents don’t seem capable of performing complex tasks involving multiple actions for now.

What is AndroidArena?

AndroidArena is a simulated training ground for large language models. In addition, researchers use it to generate various situations for the AI to make it learn new functions. However, it is difficult to do so because the LLM agents need more training to deal with vast and dynamic spaces.

AI also lacks understanding, reasoning, exploration, and reflection. Without them, GPT-4 struggles to understand user intent and the logical reasons behind tasks. Furthermore, the AI doesn’t explore alternative routes toward a goal, so it sticks with what it knows. Moreover, you might already know that LLM agents struggle to use past actions in present situations.

Fortunately, researchers came up with a method to increase the accuracy of AI by 27%. Apparently, the solution was to include the number of failures and the previous methods. As a result, the AI gained an artificial reflection system.

Ultimately, by understanding AI, we will take a step forward in helping them work in various environments. In addition, the research shows that there is potential for future applications. Thus, we might be closer to getting a more complex AI with the help of AndroidArena.

For now, we can only think about the potential of future AI. After all, some models like Gemini and Copilot are struggling with newer information. However, AI is here and improves different features, such as super resolution.

Here’s more about the AndroidArena if the system interests you.

What are your thoughts? Do you think that AI should be able to operate an OS? Let us know in the comments.

Microsoft Copilot experience in Teams officially replaces M365 Chat

Earlier this week, Microsoft sacrificed another of its older branded platforms to the alter of its flagship AI platform Copilot.

As of Monday, Microsoft 365 Chat users were introduced to a new Copilot experience in Teams that brings better prompts, the ability to access their Copilot prompt histories, and access to a library of suggested prompts from the Copilot Lab.

According to a press release from the Copilot for Microsoft 365 blog, “It’s better than the current Microsoft 365 Chat in Teams. The new Copilot in Teams is easier to find, to use, and has better functionality for a better experience.  This will give you the same Copilot experience in Teams as you get from microsoft365.com, Bing, and copilot.microsoft.com. “

Understandably, some IT Admins might be hesitant to rollout the update as change usually just means headaches and frivolous support calls, but Microsoft is assuring customers that there is objectively trivial difference between the Copilot app in the Teams app store and the Copilot pinned above chats.

However, Microsoft does recommend unpinning the older version of M365 Chat because after updating, the latest version will automatically get pinned as well.

Customers can go to the Teams Apps store to update to the newest version by opening Teams and selecting “chats.

Monitor Keeps Turning Off and On: 6 Ways to Fix

If your monitor keeps turning on and off randomly, we’re here to help. Driver issues can cause this, as well as HDR settings, FreeSync, and loose cable connections.

Whether the glitch starts right from startup or the monitor turns off repeatedly after you’ve used it for a while, we’ve outlined tried and tested steps for fixing it. Check them out.

How to stop monitor from turning off randomly

1. Update the graphics drivers

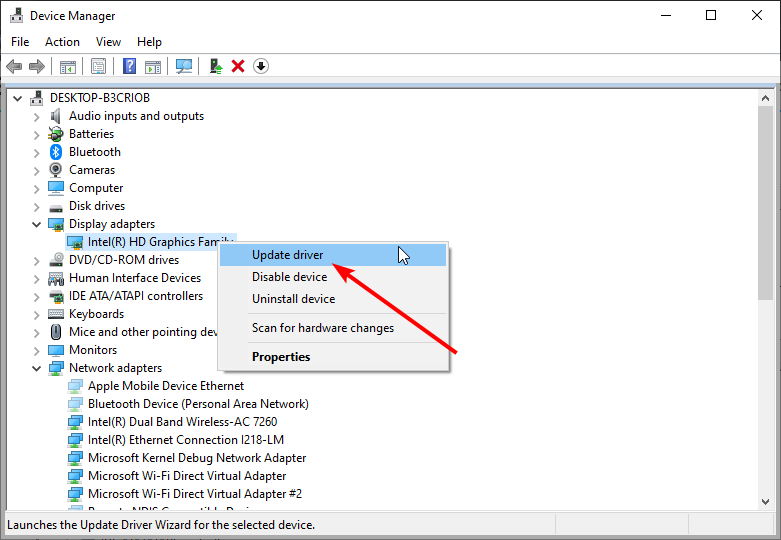
  1. Press the Windows key, type Device Manager in the search box, and click Open.
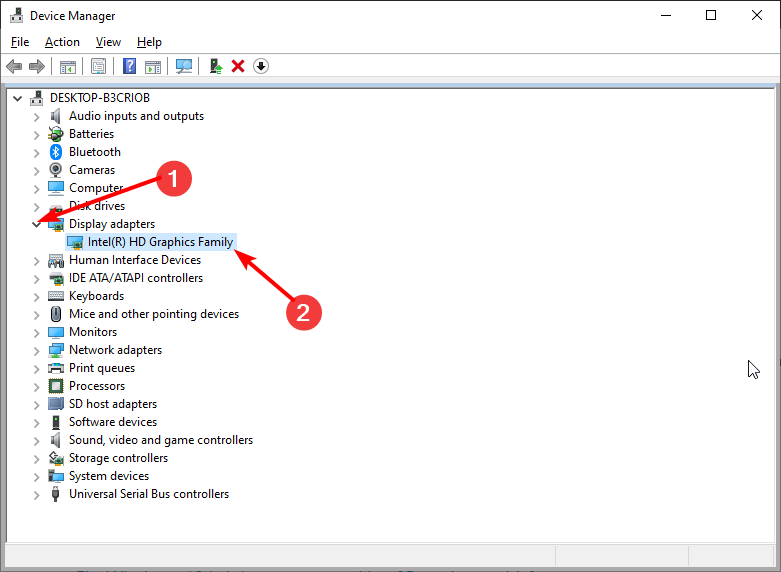
  2. Navigate to Display adapter and expand.
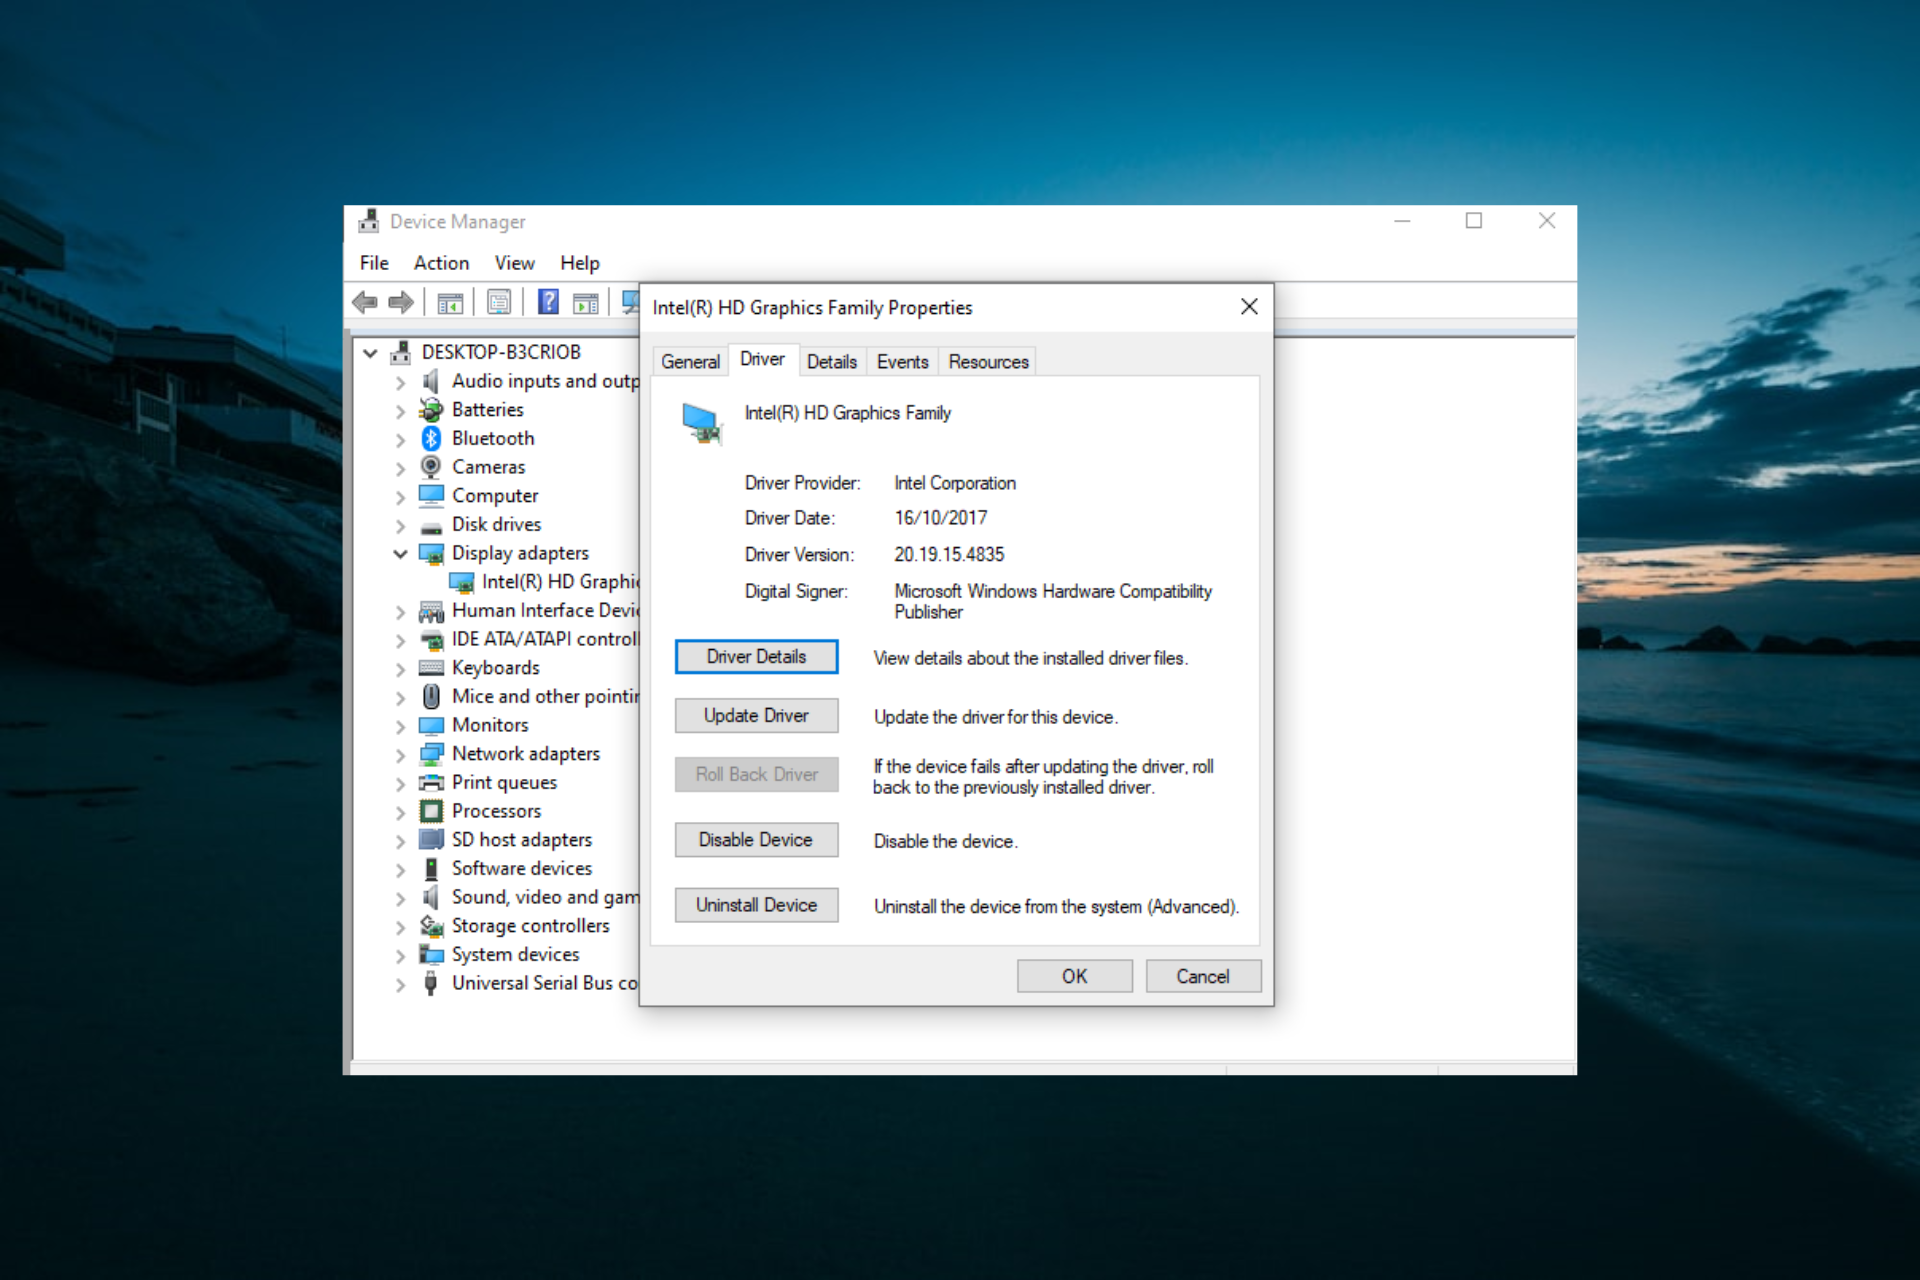
  3. Find your driver (in this case, Intel), right-click, and select Properties.
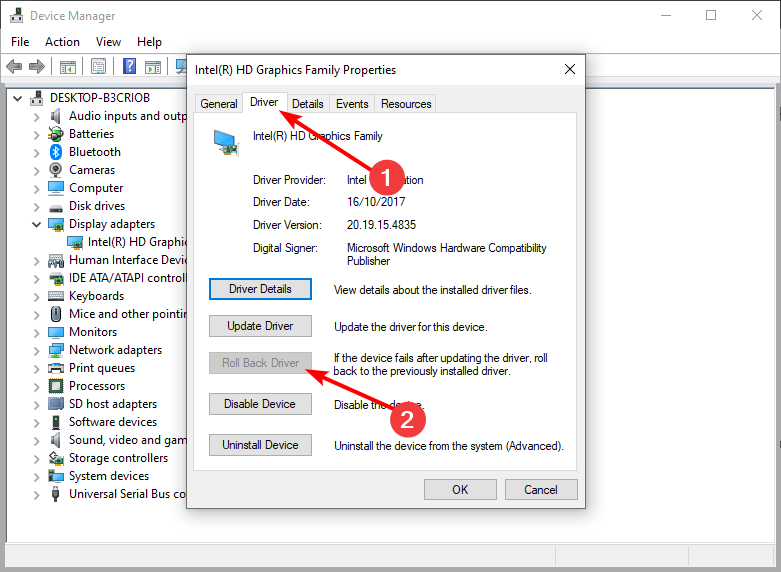
    graphics card properties
  4. On the Driver tab, select Update Driver.
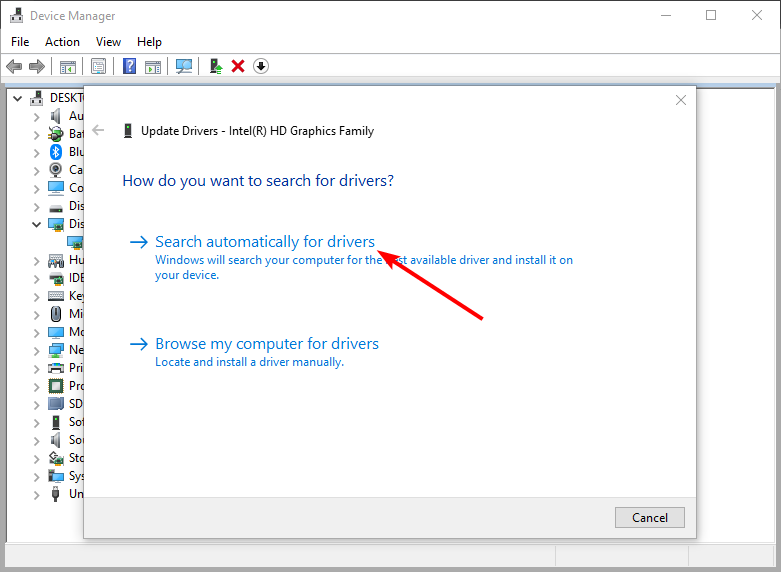
  5. Select Search automatically for drivers.
    Search automatically
  6. Check if the problem persists.

For best results, you might want to use other methods to update your graphics card driver, such as downloading them from the manufacturer’s website.

2. Disable FreeSync

  1. On your monitor press the configuration button.
  2. Next, go to Gaming and then FreeSync.
  3. Disable FreeSync.

If you have a monitor that uses FreeSync and NVIDIA graphics, issues can occur, so it’s advised to disable FreeSync or G-SYNC.

3. Disable HDR

  1. Press the Windows key + I to open settings.
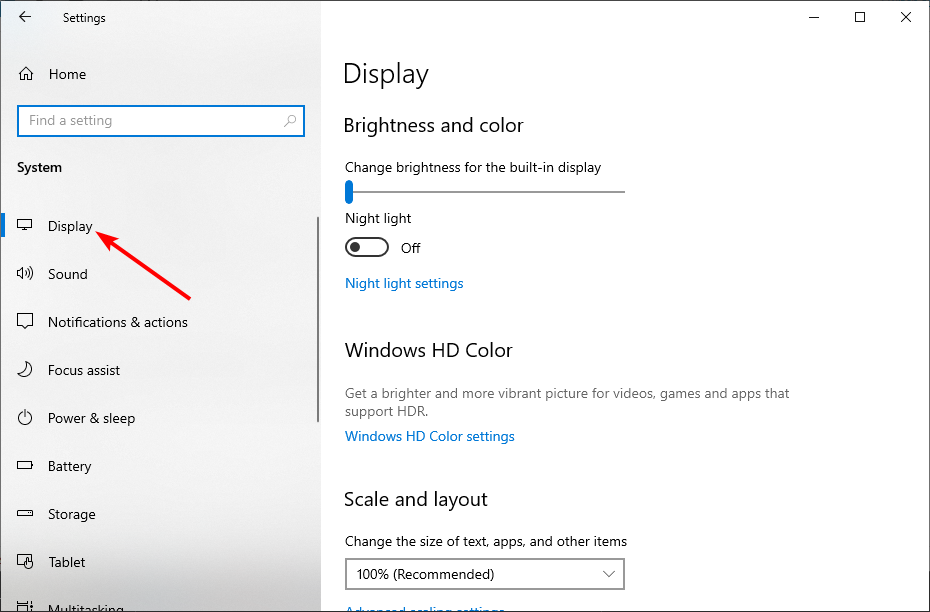
  2. Next, go to System and choose Display.
    display settings
  3. Go to HDR and disable Use HDR.
    hdr settings

4. Disable the C state in BIOS

  1. Restart your PC and keep pressing F2 to boot to BIOS.
  2. Next, navigate to Power Management Options.
  3. Choose Advanced Power Management Options.
  4. Set Minimum Processor Idle Power State to No C-States.

To see how to properly disable this feature on your PC check your motherboard manual.

5. Change monitor frequency

  1. Open Settings.
  2. Navigate to System and choose Display.
  3. Next, select Advanced display.
    advanced display settings
  4. Select the desired refresh rate in the Choose a refresh rate field.
    Choose a refresh rate

Users reported that switching to a lower refresh rate, down to 50Hz fixed the problem for them, so if you’re not using your PC for gaming, try this method.

6. Check your cables and power supply

  1. If possible, try connecting the display to a separate outlet.
  2. Check if cables are tightly connected to the monitor.
  3. Damaged cables can cause this issue, so try replacing your cables.
  4. Connect the monitor directly to the PC without any adapters, if possible.
  5. Check if your graphics card is properly connected to your PSU.
  6. Replace your PSU as it might not have enough power to handle the monitor.

We hope this guide helped you fix the problem with a monitor that keeps turning off and on. We covered a similar issue in our monitor keeps going black for a second and monitor fades to black guides, so you might want to visit them for more solutions.

Other monitor issues can happen on various devices, like when the external monitor isn’t detected after sleep, doesn’t work on a Dell laptop, Surface Pro, or Chromebook, or isn’t detected through a docking station.

Each situation may need a tailored fix, depending on the device and connection method.

We also have a guide on what to do if the screen turns back and fans speed up, so don’t miss it.

What Are L1 and R1 Xbox Controler Buttons: All to Know

In this post, we will talk about all the buttons of your Xbox controller, including R1 and l1.

As you probably know, the controller layout has 4 primary face buttons. It It starts with two shoulder bumpers, two analog triggers, two analog sticks, and an automated D-pad.

Here’s a quick breakdown of the L1 and R2 buttons:

What is R1 on my Xbox controller?

xbox controller buttons

R1 on Xbox is the right bumper that is located on the right side of the controller’s shoulder. It helps you execute an action or make a selection.

At the same time, R2 is the second bumper or the trigger (RT), located at the back right of the Xbox controller.

What is L1 on my Xbox controller?

The L1 button on your Xbox controller is the left bumper that’s located on the left side of the controller’s shoulder. Next, the L2 button is the left trigger (LT) located at the back left of the Xbox controller.

However, some controllers have an L3 button, and to learn how it works, head to our Explore the L3 Button on your Xbox Controller guide.

Nevertheless, there are different buttons on the Xbox One controller. Below we explain the Xbox One controller buttons.

How do you use the buttons on the Xbox One controller?

Here’s a quick overview of the Xbox controller buttons.

1Left stickA mini-joystick, that helps you navigate games, apps, and the Xbox console.
2Left bumperIt’s an oblong-shaped button located on the top left of the controller. It is used to interact with games, apps, and the Xbox console.
3View buttonPlaced at the lower left of the Xbox button, its functioning depends on the app or game.
4USB charge portLocated on the top edge of the controller above the Xbox button, it allows you to connect your wireless controller to the console using a mini-USB cable.
5Xbox buttonIt’s a round-shaped button placed at the top front end of the controller. It supports multiple actions.
6Menu buttonPlaced on the lower right of the Xbox button, it allows you to access the game and app menu, etc.
7Right bumperIt’s an oblong-shaped button located on the top right of the controller. It is used to interact with games, apps, and the Xbox console.
8Directional padThis is a plus sign-shaped button that helps you navigate directions.
9Expansion portAn open port on the bottom-side edge of the controller, it’s used to connect different accessories.
10Right stickA mini-joystick, that helps you to navigate games, apps, and the Xbox console.
163.5mm portLocated next to the expansion port on the bottom side of the controller, it supports 3.5mm audio devices.
A, B X, YA, B, X, and Y buttonsPositioned on the right side of the controller, these buttons allow you to interact with games, apps, and the console interface.

Summary

This is our take on the Xbox controller buttons R1 and L1. We hope this guide helped you figure out how to use it.

Having said that, if you have any more questions related to the Xbox controllers or the gaming console, do leave a message in the comments box below.

Microsoft Designer app faces backlash as AI-powered brush removal tool disappears

Recently, Microsoft removed the AI-powered brush removal tool from the Designer app, an AI-infused platform that is used to create graphic products and designs.

Designer’s Image Creator had an AI-powered brush removal tool, which allowed users to redefine their AI-generated images and eliminate any unwanted element of the image after prompting the AI chat. This surprising move left a lot of users disgruntled as the tool in the Designer app was popular.

At the time of launch in 2023, Microsoft Designer, though released with limited availability, garnered a lot of attention due to its AI capabilities, and users had to sign up for a waitlist to get access.

However, as the company made it available to a wider audience, a lot of users got access to features like Image Creator from Designer and integration of Microsoft Copilot.

Now that Microsoft has removed the AI-powerful brush removal tool, users do not like it and are quite disappointed.

The level of discontent and disappointment is evident from the posts on social media and Reddit as well. One of the users said:

Yes, they did. And yes, I am very disappointed. I, too, often used it to remove unwanted parts in the pictures generated (extra fingers, suspenders that I don’t want, texts describing characters floating on their heads, etc.)

Another one said:


I had noticed before that the Designer app for Android never had it in the first place, I guess they decided to fix the issue by removing it in the desktop version as well? It’s a pity at any rate, I wonder if it’s going to become Copilot Pro feature or what else.

A user also pointed out that the brush removal tool in Microsoft Designer is better than the one available in Canva, which made people speculate that the Redmond tech giant might be working on a paid version of the app.

When we checked the app ourselves, we didn’t find the tool, which confirms that Microsoft has indeed removed the tool. However, the reasons for its removal and the chances of it coming back remain unclear.

Designer

So, if you want to remove the background or unwanted element from an image, you need to use Remove Background and Blur Background to get that done.

This is not the first time Microsoft has added or removed features; recently, it introduced features, including Automatic super-resolution (Auto SR) and Speak for Me for Windows Insiders in Canary and Dev channels.

Microsoft has been actively involved in the AI business for quite some time, and it has joined hands with OpenAI to supersede AI-powered functionalities.

Given OpenAI’s substantial daily expenditure of up to $700,000 to sustain ChatGPT, which is evidently very expensive, it is logical to consider that Microsoft may be contemplating introducing a paid version of the app.

Another reasonable explanation for the tool’s removal could be a proactive stance to reduce the number of deepfakes on the internet.

If we consider this an actual reason, it also makes sense and shows the Redmond tech giant’s strong commitment to preventing potential misuse of its technology.

So, whether it was to prevent misuse, add it to a paid version, or make some improvements and then add them back, users are waiting for clarification from Microsoft to know if they will ever be able to use the AI-powered brush removal tool.

Have you also experienced this change in Microsoft Designer? If yes, share with us your experience using the tool and how the removal has affected you in the comments section below.

Webpage Might be Temporarily Down or it may Have Moved [Fix]

Getting The webpage might be temporarily down or moved permanently error? You’re not alone. Common error codes you might see include ERR_FAILED and ERR_ADDRESS_INVALID. 

It’s likely caused by server issues, outdated URLs, or DNS problems. No matter the cause, here’s how to fix it.

How do I fix The webpage might be temporarily down?

First, make sure to update your browser or try opening the webpage in another one. Disable any proxies or  VPNs to prevent interference. If you’re still struggling, keep reading: 

1. Reset hosts file

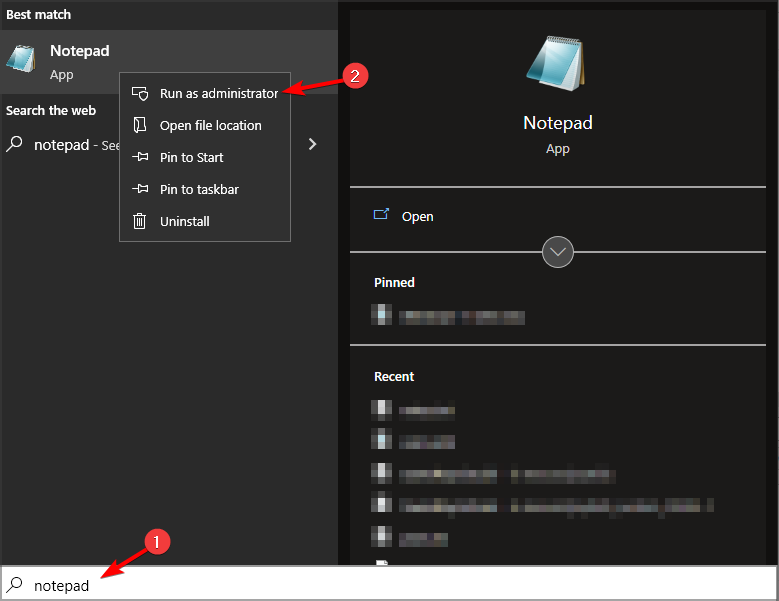
  1. Press the Windows key + S and type notepad. Right-click Notepad and choose Run as administrator.
    notepad run as administrator
  2. Next, click on File and choose Open.
  3. Navigate to C:\Windows\System32\drivers\etc
  4. Change Text files to All Files and select hosts.
    all files show hosts
  5. Make sure the website you’re trying to access isn’t on the list.

A few users reported that resetting hosts file worked for them, so try that as well.

2. Winsock Reset

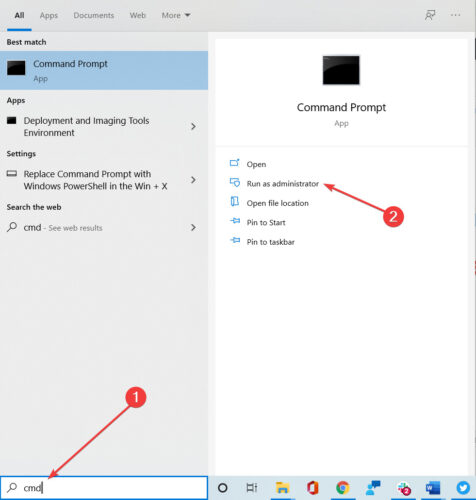
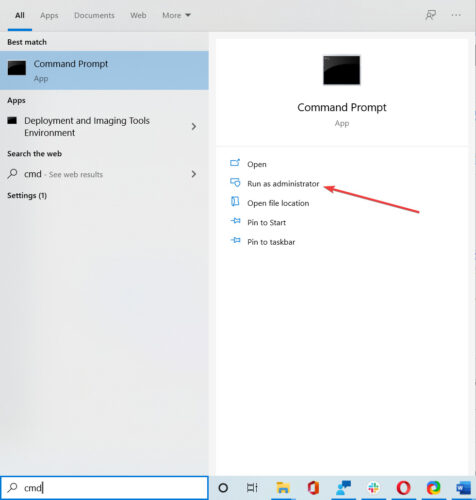
  1. Click the Windows start icon and do a search for cmd.
  2. After that, select Run as administrator.cmd search results run as administrator
  3. Type the following commands and hit Enter after each:
    ipconfig /release
    ipconfig /renew
    ipconfig /flushdns
    netsh int ip set dns
    netsh winsock reset
  4. Restart your computer.

3. Disable Experimental QUIC Protocol

  1. In Chrome, go to chrome://flags/
    chrome://flags address bar
  2. Locate the section headed Experimental QUIC protocol and set it to Disabled.
    Experimental QUIC protocol disabled
  3. Restart Chrome.

4. Remove problematic extensions

  1. Click the Menu icon in the top-right corner and then select More tools. Next, choose Extensions from the menu.
    more tools extensions chrome
  2. After that, the list of installed extensions will appear.
  3. Go ahead and click the switch next to the extension you want to disable. Repeat this for all available extensions.
    chrome disable extension
  4. Once you disable all extensions, check if the problem is still there.

While you’re here, you should also check our guide on how to remove malicious extensions from Chrome.

5. Reinstall Chrome

  1. Press Windows key + X and then select Apps and features.
    apps and features power user menu
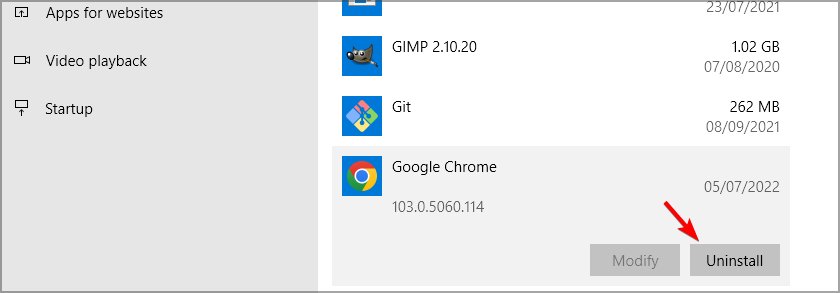
  2. Firstly, Chrome on the list and select it. Now click on Uninstall.
    chrome uninstall button
  3. Follow the instructions on the screen to remove it.
  4. Once you remove Chrome, go ahead and install it again.

6. Make sure that your current time zone is correct

  1. Firstly, right-click the clock icon on your Taskbar.
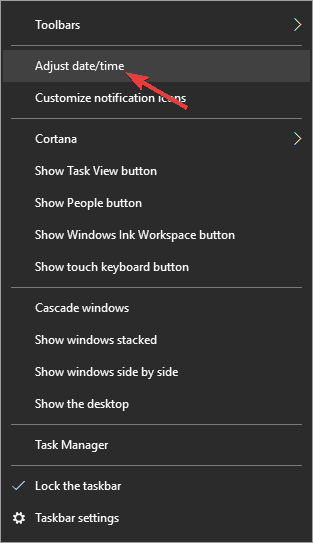
  2. Now select Adjust date/time from the menu.
    adjust date and time menu
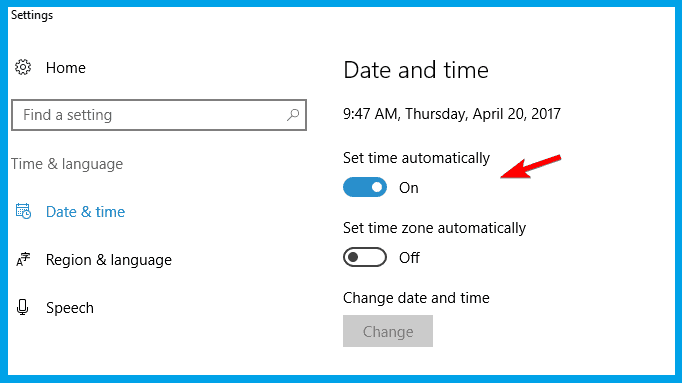
  3. Locate Set time automatically option and disable it. Wait for a few moments and then turn this feature back on again.
    set time automatically settings app

7. Reset your Internet options

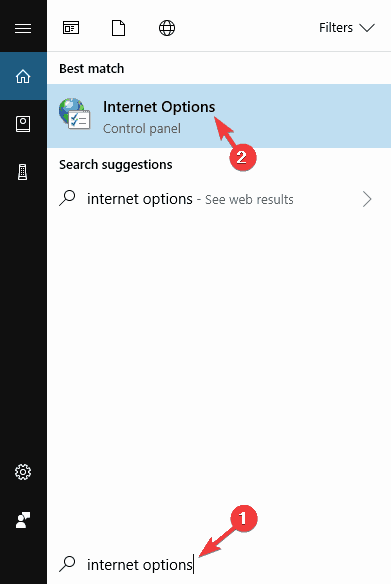
  1. Press Windows key + S and enter Internet options.
  2. Select Internet Options from the menu.
    internet options search
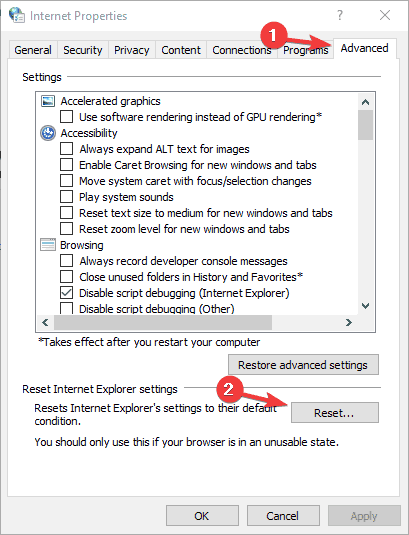
  3. When Internet Properties window opens, go to the Advanced tab. Now click the Reset button.
    internet options advanced tab reset button
  4. Lastly, click the Reset button once again to confirm.

Hopefully, one of the above fixes resolves your The website might be temporarily down or it may have moved permanently to a new web address error. In case the issue is still there, visit our This webpage is not available right now guide for more solutions.

Keep in mind that this issue is similar to This website is not allowed and Can’t reach this page errors, so read about them in separate guides.

Let us know, in the comments below, if any of our fixes have worked.

Fortnite Can’t Join Party: How to Fix It

If you’re unable to join a party in Fortnite, stuck on “Joining Friends Party,” or seeing Error 83 when trying to join, you’re not alone. These connection issues are common, especially during game updates or server hiccups.

Whether it’s a one-time glitch or a recurring bug, we’ll walk you through the most effective ways to fix party join errors in Fortnite so you can squad up without frustration.

Can’t join Friends Parties in Fortnite? Learn how to fix that

1. Change the Skin

As strange as it may sound, users have reported that changing the Skin has fixed the error, and they can join the friend’s party again. Here is how to do it.

  1. Launch Fortnite and sign in.
  2. Click on the Locker tab at the top menu.
    Fortnite locker
  3. Under Account and Equipment section, click on your current Skin.
  4. Now you can see all the Skin collections you have. Click any of the available Skin and Fortnite will apply the Skin to your character.
  5. You can further customize the character if you want to.
  6. Now back to the game and join a random solo game and wait until you are in the lobby.
  7. Accept the invite once your friends send you an invite to join the party.

2. Change Lobby to Public and Join without Invite

Another workaround to fix the unable to join friends party error in Fortnite is to change the lobby to public and then join the party without the invite.

  1. Launch Fortnite and go to Settings Menu.
    Change Lobby Fortnite
  2. In the top right, click on Private and select Public.

The only disadvantage here is that you cannot have only your friends to join the party. After changing the lobby to the public, you should be able to join the party without an invite.

3. Join Friends through the Epic Friends List

Fortnite images 1

Alternatively, you can try to join the friend’s party through the Epic game Friends list. However, first, you need to add your friends to your Epic account using their Epic username or email address. Once added, you can invite them to join the party, here is how to do it.

  1. Launch Fortnite on your Windows system.
  2. From the Fortnite Menu, click on the Friends tab.
  3. Click on the Add Friend Option.
  4. Enter the Epic username or email address and send the friend request.
  5. Once your friend accepts the request, try to join the party again and see if the error is resolved.
  6. If you are an Xbox user you need to use the Xbox Gamertag of your friend to add them on Fortnite.

4. Download Fortnite Save the Word Content

Another user reported solution is to turn on Fortnite Save the Word option in the settings. Here is how to do it.

  1. On your PC, exit the game if it is running.
  2. Relaunch the Fortnite game launcher.
  3. Right-click on the Settings (cog icon) and select Options.
    Fortnite Save the World
  4. Under “Fortnite Installation Options”, check “Fortnite Save the World” option.
  5. Click on Apply to save the changes.

Note: wait for the selected download to complete before you can play the game again.

5. Temporary Server Issue

Fortnite Server status

If none of the troubleshooting tips helped you fix the error, it might be a temporary server issue at Fortnite’s end. Such server issues can throw other errors like error code 6 preventing you from joining a match.

For other errors like 0x80190191 that may also lock you out or prevent the update process, head on over to our article to see how to fix it.

If you’re facing other Fortnite issues like high CPU usage, missing skins, no game audio, Fortnite not working on Xbox One, or payment errors, check out our full guides for quick fixes.

In this case, you can only wait for the Fortnite server to fix the issue on their end and let you join a friend’s party.

3 Best Accurate Bottleneck Calculators for PC to Use in 2026

If you’re looking for the best software to check for performance bottlenecks, a bottleneck calculator can help.

It analyzes the relationship between your CPU and GPU, identifying any compatibility issues or mismatched components. Let’s check out the best options on the market.

What is the best bottleneck checker for PC?

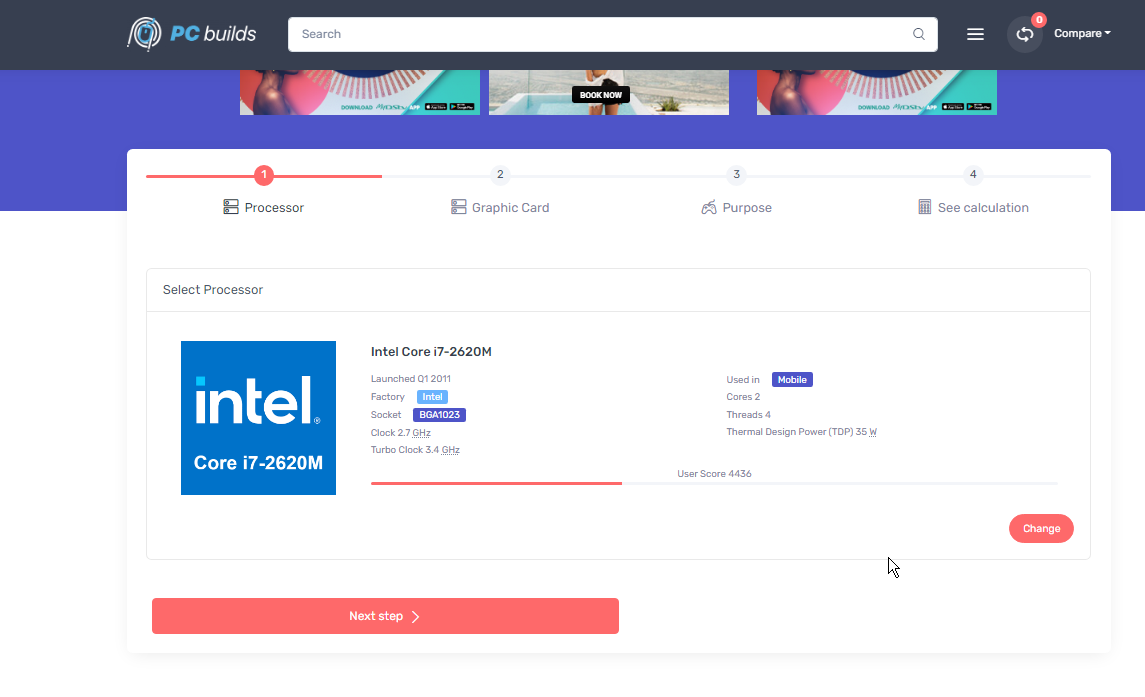
PC Builds Bottleneck Calculator – Best user interface

PC-Build’s bottleneck calculator offers a simple and easy-to-use tool. In addition, using the performance percentage algorithm, this software calculates the CPU and GPU of your device.

It displays the components with the most issues while recommending an upgrade.

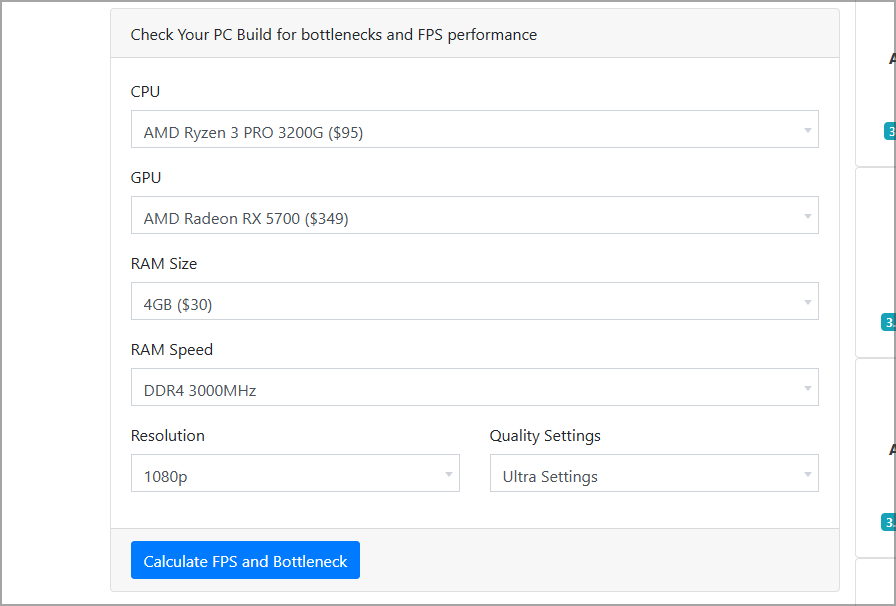
To use this software for a bottleneck test, select the CPU model and choose the GPU series and RAM. Then press calculates for auto-analysis result. Its simplicity makes it a perfect bottleneck calculator for 3060 Ti or any other GPU.

Its detailed result is the major perk of using this software to calculate bottlenecks. It also recommends what to upgrade to improve the system’s performance.

Key features:

  • Great user interface
  • Fps calculator
  • Displays type of bottleneck in an easy-to-understand format
  • Allows you to test your build for different tasks

⇒ Try PC Builds Bottleneck Calculator

CPU Agent Bottleneck Calculator – Offers detailed benchmark results

Another great bottleneck calculator software comes from CPU Agent. Using the service is simple; you need to select your components, RAM speed, display resolution, and the quality settings you expect to use in games.

Once the analysis is finished, you’ll see a detailed comparison of your CPU and a different high-end model. You can see all the differences between them at a glance.

You can also see the RAM bottleneck and gaming bottleneck at specific resolutions. Even though this isn’t the most intuitive service, it offers extensive information, so it’s worth trying out if you need a reliable bottleneck calculator for a laptop or desktop.

Key features:

  • Provides detailed benchmark information
  • Focuses on CPU performance
  • Tests performance in over 80 popular titles
  • Perfect for gamers

⇒ Try CPU Agent Bottleneck Calculator

MSI Afterburner – Easy to use

MSI Afterburner is overclocking software that lets you get the maximum performance out of your hardware. Since overclocking is potentially dangerous, the software comes with a hardware monitoring tool.

With it, you can easily monitor CPU usage by core, clock, and temperature. This also applies to your memory and GPU.

Although the purpose of MSI Afterburner isn’t to work as a bottleneck tester on your PC, advanced users can use it to determine which component is affecting their performance.

Key features:

  • Simple user interface
  • Ability to view detailed hardware specifications
  • Great overclocking features
  • Detailed hardware monitor

⇒ Get MSI Afterburner

How do you manually check what is bottlenecking your computer?

  1. Open a game or any app whose performance you expect to lead to bottlenecking.
  2. Close other apps and background processes.
  3. Now, press the Windows key + X and select the Task Manager option.
    task manager
  4. Click the Performance tab at the top.
    performance bottleneck calculator
  5. From here, check if any of the CPU, GPU, Memory, or Disk hits 100% consistently for a long period of time.
    check

If any of your core PC components hits maximum value for a long time, then it is the cause of bottlenecks on your computer.

What is a bottleneck calculator?

A bottleneck calculator is a tool that estimates the potential impact specific components can have on the performance of a computer.

How to check if CPU is Bottlenecking My GPU?

Normally, the GPU performance should be pegged at 99-100%, with a CPU below 99-100% to be considered a good GPU bottleneck.

However, if the CPU is at 99-100% of full utility while the GPU runs below 99-100%, then the CPU is bottlenecking the GPU.

But this will depend on the game you are playing and your settings and resolution.

How do I interpret bottleneck results?

When it comes to numbers, take them with a grain of salt since they aren’t the most accurate representation of an actual CPU or GPU bottleneck.

Instead, focus on researching the component that is causing the bottleneck. Analyze its performance and bandwidth speed, and make that all other components can match its bandwidth speed.

How do I know if my RAM is bottlenecking?

One way to find out if your RAM is bottlenecking is to check the Task Manager. If your RAM utilization is high or 100%, you don’t have enough RAM for the current task.

Also, check your CPU and motherboard frequencies and ensure that the maximum supported frequency matches your RAM’s working frequency.

Can bottleneck damage your pc?

No, a bottleneck won’t damage your GPU or any other hardware. When a certain component encounters a bottleneck, it won’t give maximum performance.

These are the best calculators for bottleneck analysis available right now. All of them with a similar approach with slight differences in features.

A quick tip to confirm the legitimacy of their result is to examine the Task Manager while actively running the high-end apps that cause your PC to bottleneck.

Our guide on fixing high CPU and low GPU usage may be helpful to you if you want to troubleshoot the problem.

What bottleneck software do you use? Let us know in the comments below.

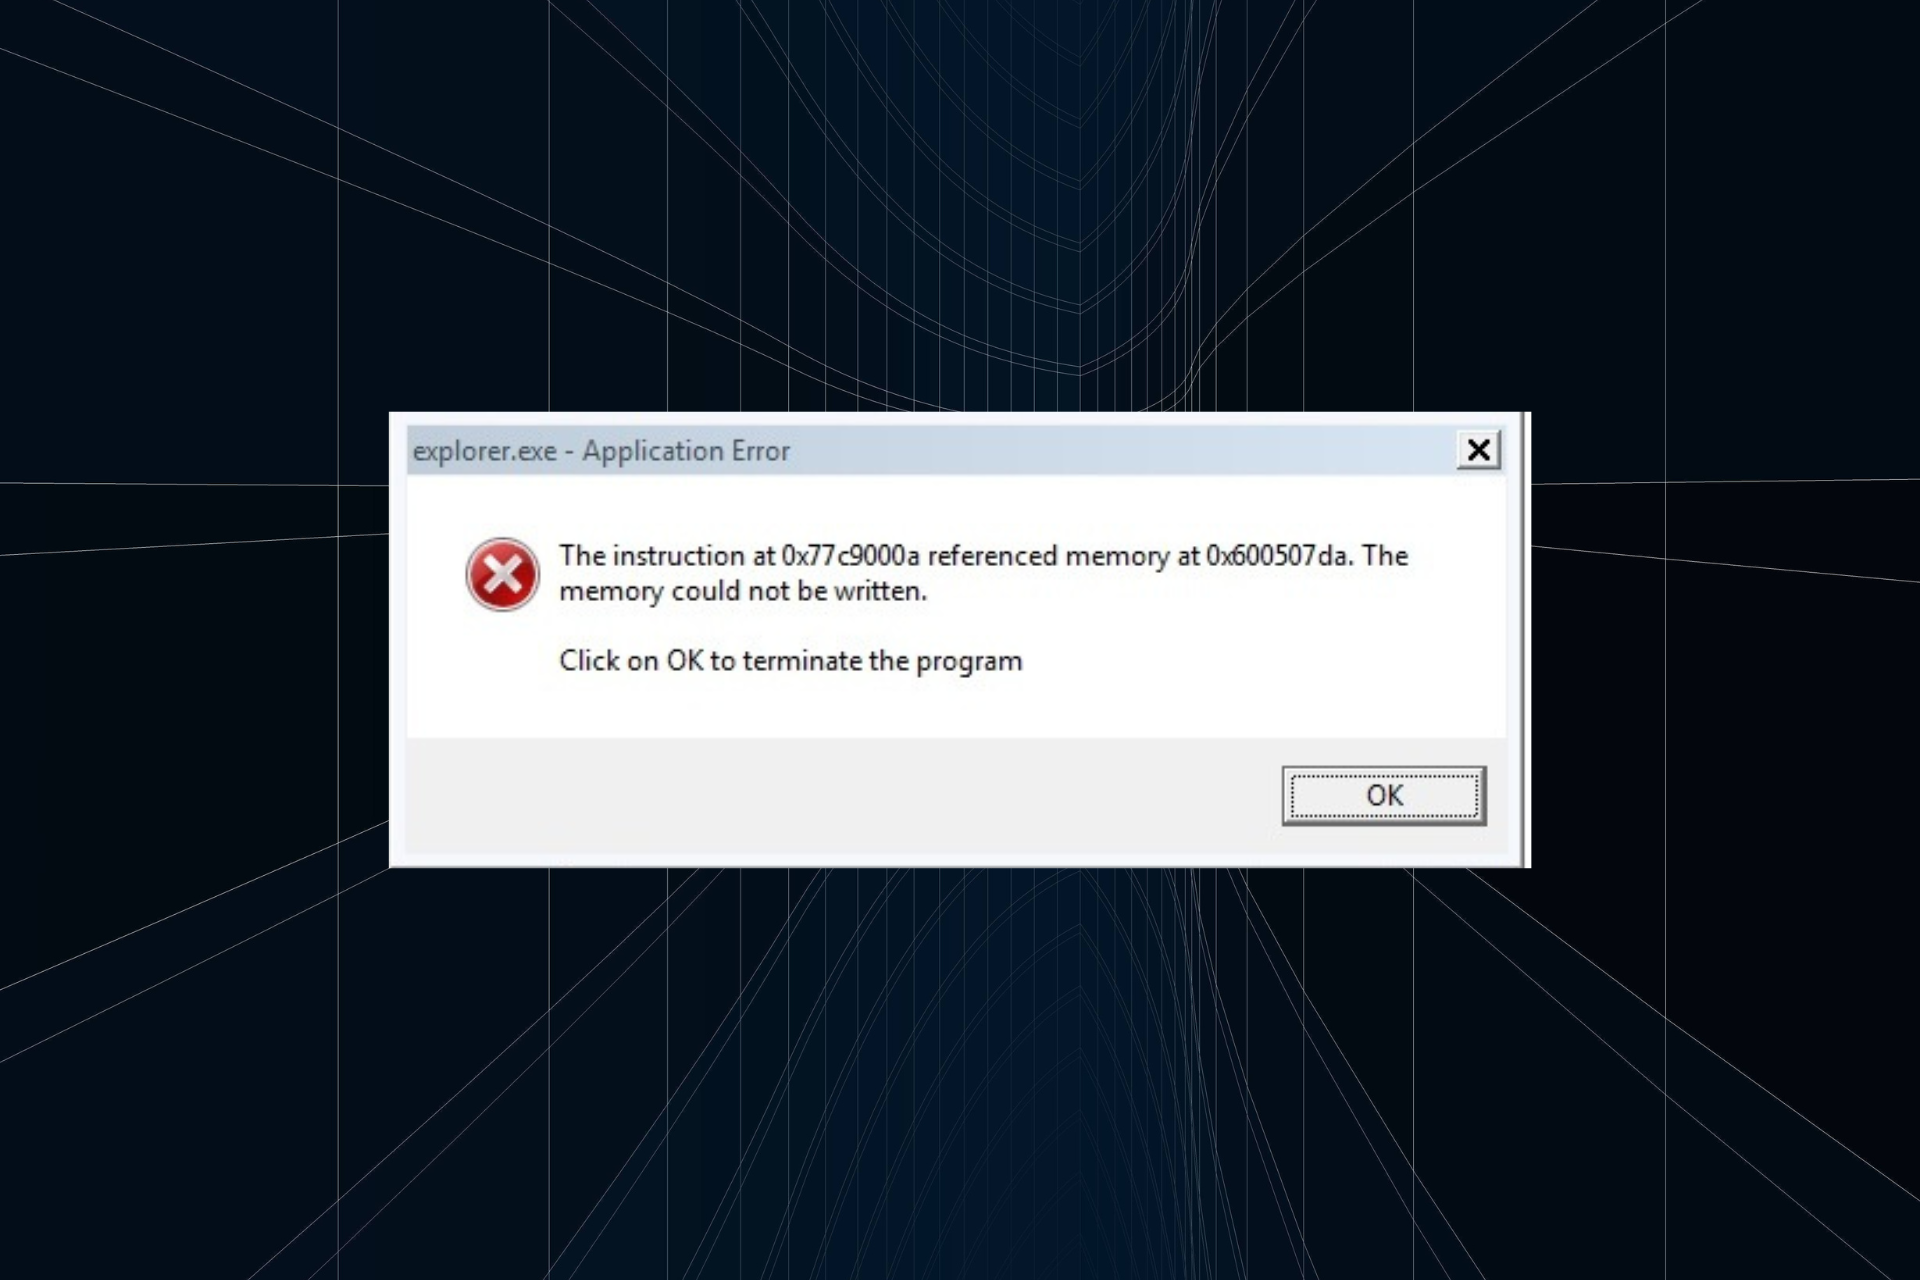
7 Tips to Fix The Instruction at 0x00007ff Referenced Memory Error

The instruction at 0x00007ff usually means that an application couldn’t read the assigned physical memory. Malicious software, corrupted system files, and incompatible third-party programs are often at fault.

Here’s how to fix it:

How to fix instruction at reference memory error

1. Run SFC & DISM scan

  1. Go to Start, type cmd, and then click on Run as administrator to start Command Prompt.
  2. Now, paste the following command and then hit Enter: sfc /scannowsfc cmd the instruction at referenced memory windows 10
  3. Wait for the process to be completed.
  4. Next, execute the following command:DISM /Online /Cleanup-Image /RestoreHealth
  5. Once done with both SFC and DISM, run the Check Disk utility with the following command:Chkdsk /r

Once done, verify if The instruction at 0x00000 referenced memory error with should be gone.

2. Disable the Automatically hide the taskbar feature

  1. Press Windows + I to open Settings, and then select Personalization.personalization
  2. Click on Taskbar on the right.Taskbar
  3. Click to expand the Taskbar behaviors section.taskbar behaviours
  4. Uncheck the Automatically hide the taskbar option.disable to fix the instruction at 0x00000 referenced memory

3. Perform a clean boot and install the .NET framework

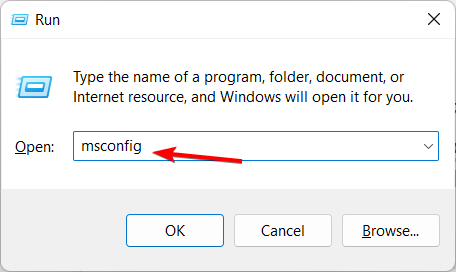
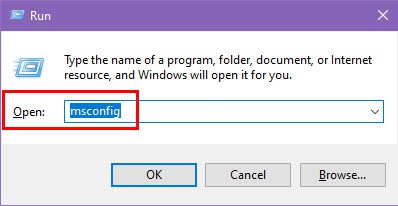
  1. 1.  Press Windows + R to open Run, type msconfig, and hit Enter.

    msconfig mouse jumping around windows 10
  2. 2. Navigate to the Services tab, check the Hide all Microsoft services box, and then click on Disable all.

    disable all
  3. 3. Now, navigate to the Startup tab, and then click on Open Task Manager.

    Open task manager
  4. 4. Locate all the programs where Enabled is listed under the Status column, select them individually, and then click on Disable.

    disable
  5. 5. Click OK in the System Configuration window.

    OK
  6. 6. Click Restart in the prompt that appears.

  7. 7. You can now install the .NET Framework.

A clean boot also helps identify the underlying cause. So, if you are not encountering the instruction at 0x00007ff error anymore, it’s likely a driver, service, or startup app you disabled earlier behind it.

These kinds of problems can also be solved with the help of specialized repair software. These tools perform automatic scans and repairs of your system in just a few minutes.

4. Allocate more virtual memory

  1. In the Search bar, type Advanced, and then open View advanced system settings.view advanced system settings to fix the instruction at 0x00000 referenced memory
  2. Click on Settings under Performance.Settings
  3. Navigate to the Advanced tab, and click on Change under Virtual Memory.change
  4. Uncheck the Automatically manage paging file size for all drives option and then select Custom.custom size to fix the instruction at 0x00000 referenced memory
  5. Now, enter the following values in the two text fields based on the installed RAM in the computer:
    • Initial Size (MB): 1.5 x Total installed RAM
    • Maximum Size (MB): 3 x Total installed RAMenter values
  6. For instance, if your computer has 8 GB RAM, the Initial Size becomes 12,288 (1.5 x 8 x 1024), and the Maximum Size becomes 24,576 (3 x 8 x 1024).
  7. Once done, click on OK at the bottom to save the changes.ok

That’s it! Now, restart the computer for the changes to come into effect, and verify if The instruction at 0x00000 referenced memory error is fixed.

5. Scan for malware

  1. Download Malwarebytes Adwcleaner, and install it on your system.
  2. Open the program by right-clicking the icon and then selecting the Run as administrator option.run as administrator
  3. Select the Scan option to commence the scanning operation.
  4. After the scan, select the Clean & Repair option.scan for pups with malwarebytes the instruction at referenced memory windows 10
  5. After the cleanup, shut down your system and restart it.

⇒ Get Malwarebytes Adwcleaner

6. Reset the system

  1. Press Windows + I to open Settings, and then click on Recovery on the right in the System tab.recovery
  2. Click on the Reset PC button.reset pc to fix the instruction at 0x00000 referenced memory
  3. Choose either of the two options here. We recommend you select Remove everything since that’s a more effective reset.choose
  4. Click on Local reinstall.local reinstall
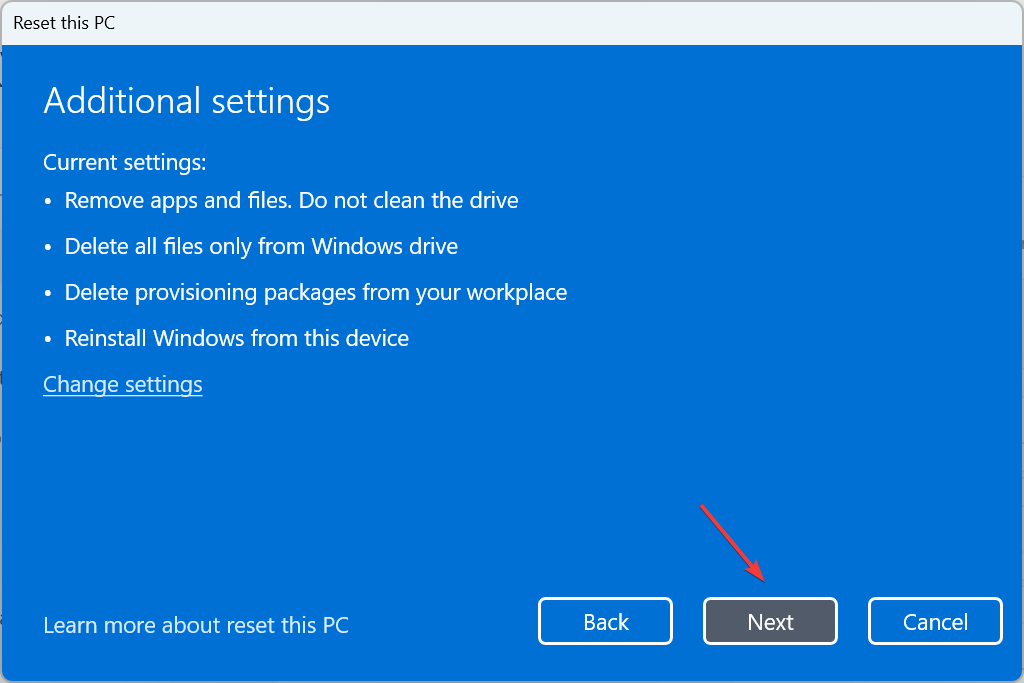
  5. Verify the reset settings and then click on Next.verify details
  6. Finally, click on Reset to start the process.reset

7. Run the Memory Diagnostics Tool

  1. Press Win + R to open the Run dialog.
  2. Type mdsched.exe and press Enter.mdsched
  3. Choose Restart now and check for problems or Check for problems next time.windows memory diagnostic tool choose restart time
  4. Let your PC restart and run the memory test.
  5. After reboot, view results in a pop-up or in Event Viewer.

To manually check, open Event Viewer (Win + X), go to Windows Logs > System, and find MemoryDiagnostics-Results.

What causes the instruction at reference memory error?

The “Instruction at referenced memory could not be read/written” error usually happens when a program tries to access invalid memory.

Common causes include faulty RAM, corrupted system or application files, outdated drivers, buggy or incompatible software, malware, or interference from third-party antivirus tools.

How can I test my RAM?

There are several ways to test the installed RAM on the computer, but the simplest would be to run Windows Memory Diagnostic, a tool that comes bundled with the OS.

Also, several third-party tools perform extensive tests on the RAM, MemTest86 being one of them.

Alternatively, you should scan your RAM for errors and ensure that your PC meets the system requirements for the affected app or game that throws the error.

Windows 10 system requires at least 1 GB of RAM, but ideally, you would go for at least 2 GB, while for Windows 11, it’s 4 GB minimum and 8 GB recommended. You can also opt to use a RAM cleaner so you free up some more space.

If you have any other solutions for the instruction at 0x00007ff error, leave them in the comments section below. They might help your fellow users in trouble.

Download YouTube App on PC Super Fast

If you’re looking to download a YouTube app for PC, you might face certain challenges, but there are a few methods that you can use to bypass them, and this guide will show you how to do it.

You can’t download a YouTube app for a PC from Microsoft Store, since the dedicated app doesn’t exist. But here’s how to make it work anyway in a super easy way

How do I download YouTube app for PC?

To make sure the solutions below work, confirm you have an active internet connection and are logged in with a Microsoft account that has admin rights. Now let’s get to it.

1. Install YouTube web app

  1. Open Chrome or any other Chromium browser.
  2. Visit YouTube.
  3. Click on Install YouTube in the address bar.
     install youtube
  4. Click on Install to confirm.
    install youtube button
  5. Now a new window running YouTube will appear.

We also have a guide on how to download YouTube on Windows 7, so you might want to check it out. There are also YouTube apps for Windows 11 that you can use but they aren’t made by Google.

DirectX 12 for Windows 11: Download the Latest Version

Today, we’ll show you how to download and install DirectX 12 your Windows 11 PC. While DirectX comes built into Windows 11, you may not have the latest version, so use the guidelines below to update Direct X if that’s the case. Let’s get started.

How do I download DirectX 12 for Windows 11?

  1. First, press Windows + I to launch the Settings app.
  2. Select Windows Update from the tabs listed in the navigation pane on the left.Windows Update
  3. Next, click on Check for updates on the right.Check for updates to directx 12 download windows 11
  4. If an update for DirectX 12 is listed after the scan, download and install it in Windows 11.directx 12 download windows 11
  5. Once done, restart the computer for the changes to come into effect.

So, once you have followed the steps to download DirectX 12 in Windows 11 and have it installed, you should have a better gaming experience.

How do I check the version of DirectX installed on the computer?

  1. Press Windows + R to launch the Run command.
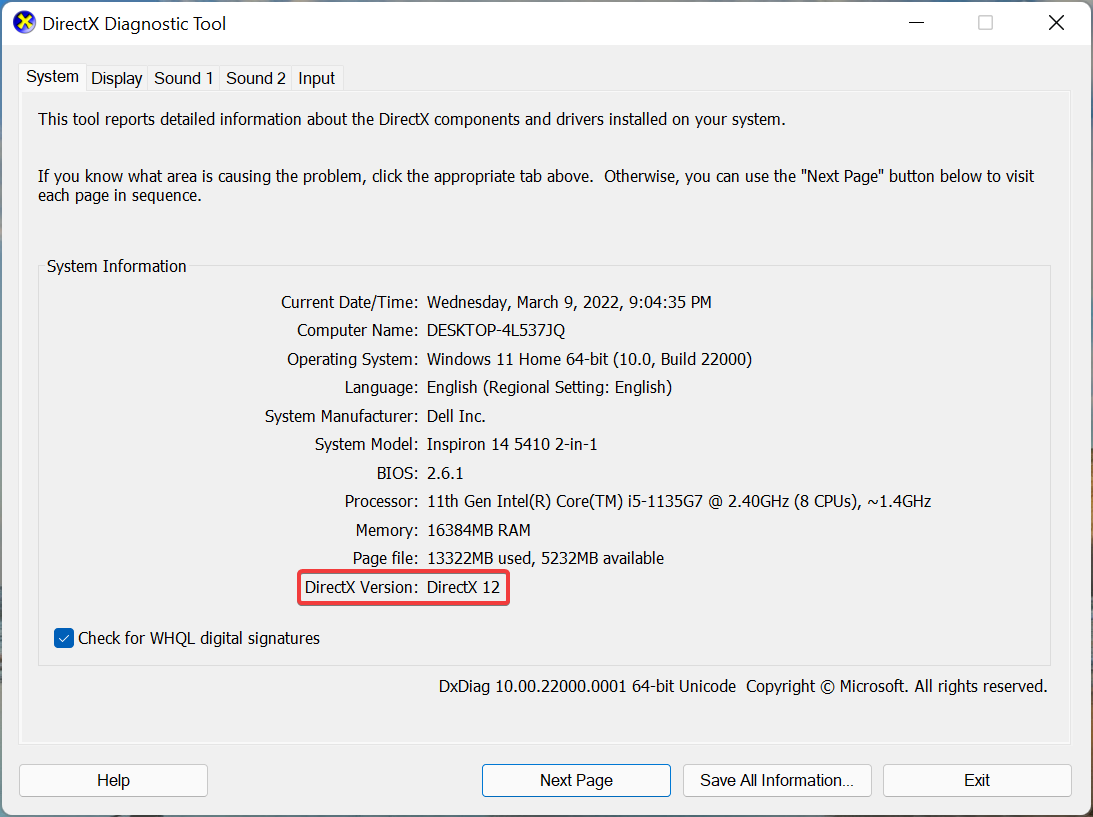
  2. Type dxdiag in the text field, and either hit Enter or click on OK to launch the DirectX Diagnostic Tool.Launch Run to directx 12 download windows 11
  3. Now, locate the DirectX version entry near the bottom, and check the installed version.Check DirectX version

That’s the easiest way to check the installed version of DirectX in Windows 11 and the previous iterations. So, if you already have the latest version installed, there’s no need to go ahead with the download process.

How to fix DirectX 12 not working on Windows 11

If DirectX isn’t working correctly, start by updating your graphics drivers using Device Manager. Press Windows + X, select Device Manager, and update your drivers under Display adapters.

Alternatively, for a quicker and easier solution, you can use specialized third-party software. Not only does it require minimal effort, but it also prevents human errors- always installing the correct driver versions.

After updating, check for errors using the DirectX Diagnostic Tool, as shown above. If problems persist, adjust your power settings to High performance or contact support for further assistance.

Does DirectX 12 improve FPS?

In simple terms, yes. DirectX 12 does bring improvements in your FPS while you play a game. This is because DirectX 12 uses the CPU and other resources more efficiently.

This leads to fewer FPS drops when the game demands the most performance. In addition, with DirectX 12, Microsoft evenly distributed the load across all cores, making the best use of multi-core on a CPU possible.

But this does not mean you will get double FPS with DirectX 12 on your PC because FPS on your game depends on many other vital factors. For example, in a demo presented by Intel, DirectX improved the FPS by 60% and consumed 50% less power.

Is there a standalone package for DirectX 12 in Windows 11?

Unfortunately, the answer is No. DirectX 12 is released through Windows Update, and that’s the only way you can download it on your Windows 11 PC.

Don’t lose hope! Most new computers already come with DirectX 12 installed. So you wouldn’t need to download or install it manually.

Even if your computer has DirectX 11 installed, it should work fine since most applications and games requiring the tool do not specifically ask for the latest version.

But updating DirectX should fix the problem if you are having trouble with the performance or encountering errors. Though if an update is not available, you will have to wait.

How do I upgrade DirectX 11 to 12?

DirectX 12 is included with Windows 11 and cannot be downloaded separately. Ensure your Windows 11 installation is up-to-date by going to Settings > Update & Security > Check for updates. DirectX 12 will be updated through Windows Update.

What version of Windows supports DirectX?

DirectX 12 is supported on Windows 11 and Windows 10. Earlier versions of DirectX, such as DirectX 11, are supported on older versions like Windows 7 and Windows 8.1.

Summary

That’s about it. DirectX should now work perfectly on your PC. If that’s not the case, check our troubleshooting guide for DirectX errors.

If you encounter the DirectX function GetDeviceRemovedReason failing with an error, updating the drivers or modifying the power settings should help. Ultimately, if the issues persist, you can reinstall DirectX.

To learn more about DirectX, we have a great guide on how to enable DirectX 12 Ultimate, so don’t miss it. For legacy Windows, we have a great guide on DirectX 12 on Windows 7.

Tell us whether you were able to update DirectX 12 and if yes, your experience of it in the comments section below.

Error Writing the Value’s New Contents Windows Registry: 4 Ways to Fix

While deleting some registry files through Regedit, you may encounter the Error writing the value’s new contents or Unable to delete all specified values.

Here’s how to fix it:

How do I fix error editing value in the registry?

1. Run Regedit as Administrator

  1. Navigate to Task Manager and kill the application process of a program you are making changes to.
  2. Type regedit in the search bar.
    Run Regedit as Admin Windows 10 registry error writing the value's new contents
  3. Right-click on Registry editor and select Run as administrator.
  4. Now try to make the changes that you were trying to make and check if the error is resolved.

2. Change Permission for Registry Folder

  1. Press Windows Key + R to open Run.
  2. Type regedit and press OK to open the Registry Editor.
  3. In the registry editor navigate to the location of your registry file that is resulted in the error.
  4. Right-click on the folder and select Permissions.
  5. In the Security tab, under “Permission for Application Packages” check the Deny column.
  6. If any of the permissions (Full Control, Read, Special Permissions) is checked under Deny column, uncheck it.
    Windows 10 registry error writing the value's new contents
  7. Click on Apply and click OK to save the changes.
  8. Close and re-open the Registry Editor and check if you are able to make the changes without getting any error.

3. Boot into Safe Mode

  1. Press Windows Key + R to open run.
  2. Type msconfig and press OK to open System Configuration.
  3. Open the Boot tab and check “Safe Boot” under Boot Options.
  4. Click Apply and OK.
    Windows 10 registry error writing the value's new contents
  5. It will ask you to restart the system, click Restart.
  6. After the restart, open the Registry Editor and try to delete the file. This should allow you to make any changes if the error is caused by a third-party app.

4. Run a SFC scan

  1. Press Windows key + X and select Command Prompt (Admin) or Windows Terminal (Admin).
  2. Click Yes if prompted for User Account Control.
  3. Type sfc /scannow and hit Enter.
  4. Wait for the scan to finish.
  5. Restart your PC and see if the error persists.

Following the steps above will help you fix issues like Error writing the value’s new contents.

By running Regedit as an administrator, adjusting permissions, booting into Safe Mode, and performing an SFC scan, you should be able to use the registry again hitch-free.

How to Fix League of Legends Black Screen (Step-by-Step)

Experiencing a League of Legends black screen during launch, loading, or in-game? Whether it’s a LoL black screen in-game, during champion select, or after login, this guide will help you fix the issue using proven methods.

How can I fix the League of Legends black screen?

1. Update your GPU drivers

1.1. Use Device Manager

  1. Press the Windows key + X and select Device Manager.
    device manager league of legends black screen
  2. Double-click on the Display adapters option to expand it.
    display
  3. Right-click on your graphics driver and select Update driver.
    update driver
  4. Choose the Search automatically for drivers option.
    search automatically league of legends black screen
  5. Wait for the scan to complete and install any available update.

1.2. Go to the manufacturer’s website

You can also get the latest GPU drivers from the manufacturer’s website.

For instance, iyou use an NVIDIA graphics card, go to NVIDIA’s site, open the Drivers section, and download the version that matches your model and operating system. This prevents compatibility errors.

If Windows doesn’t find any updates and manual search fails, use automatic driver update tools instead.

1.3. Update drivers automatically

Downloading drivers manually is a process that carries the risk of getting the wrong driver installed. This can lead to severe malfunctions and worse problems than the League of Legends black screen issues.

The safer and easier way to update drivers on a Windows computer is by using an automatic driver updating tool.

2. Clean boot your computer

  1. Press the Windows + R keys to open the run box.
  2. Type msconfig in the run box and hit Enter.run msconfig
  3. Click the Services tab at the top.
  4. Check the Hide all Microsoft services box and select Disable all.
  5. Choose the Startup tab at the top and click Open Task Manager.
  6. Right-click on each startup item and select Disable.
  7. Close the Task Manager, and go back to the Service tab.
  8. Click the Apply button, followed by OK.
  9. Finally, restart your PC.

By clean booting your PC, you force it to use only the minimum set of drivers and programs it needs. Your computer will direct all its resources to power the game in this manner. Follow the necessary steps below. 

3. Update your computer

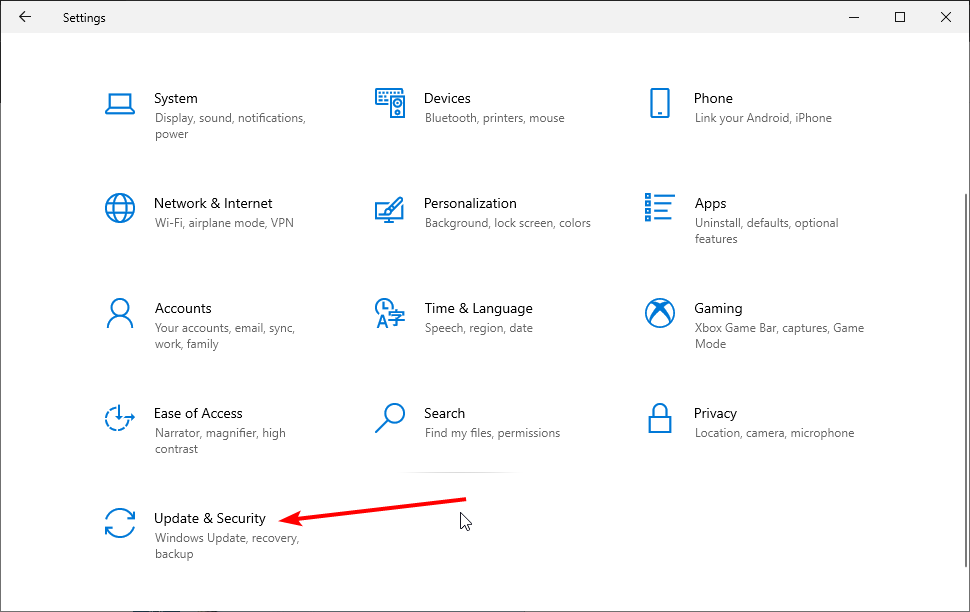
  1. Press the Windows key + I to open the Settings app.
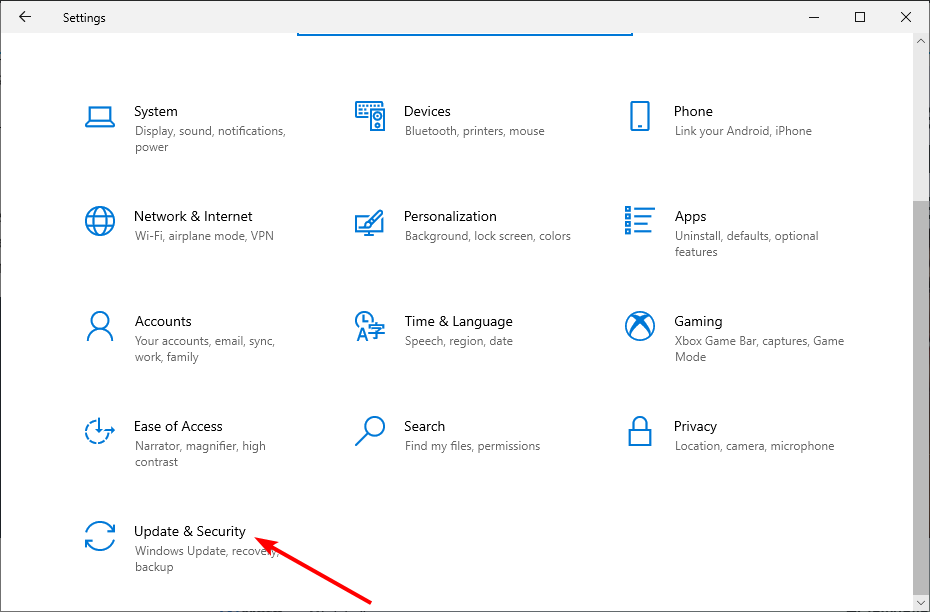
  2. Select the Update & Security option.
    update and security
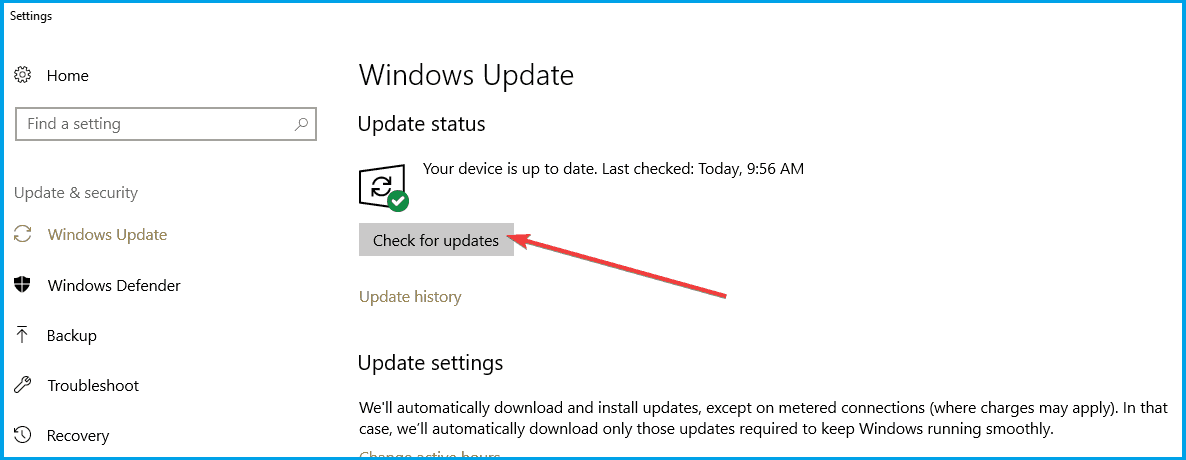
  3. Choose Windows Update in the left pane.
  4. Click on Check for updates.

Many gamers confirmed that the latest updates improved their gaming experience by reducing the occurrence of technical glitches and improving the FPS rate.

4. Disable Display Scaling

  1. Right-click on the League of Legends launcher.
  2. Go to Properties and then to Compatibility.
  3. Check the Disable Display Scaling on high DPI Settings.disable display scaling
  4. Also, check the Run as Administrator option, and uncheck the Compatibility mode.

After performing this minor compatibility fix, the black screen in LoL should be gone. But if you’re still struggling, consider addressing your Internet connection.

5. Use an Ethernet connection

Some gamers confirmed that switching to a cable connection solved this problem. Indeed, wireless Internet connections are less stable than Ethernet connections.

When the Wi-Fi signal is not strong enough, you may experience many game-related problems, including the League of Legends black screen and the inability to connect.

6. Run the Client as Administrator

Right-click on the LeagueClient file and choose Run as administrator. This grants full system access and can resolve client black screen problems.

7. Disable Fullscreen Optimization

This setting can interfere with fullscreen transitions, causing a black screen in LoL.

  • Right-click on the LeagueClient or League of Legends file
  • Open Properties and go to the Compatibility tab
  • Check Disable fullscreen optimizations, then click Apply and OK

8. Repair Game Files

Corrupted files often cause the League of Legends black screen load in error.

  • Launch the League client
  • Click the gear icon in the top-right
  • Select Initiate Full Repair and wait for it to finish

9. Delete Config and Logs Folders

Reset corrupted settings by removing these folders:

  • Navigate to your League of Legends installation directory
  • Delete the Config and Logs folders
  • Restart the client

10. Set Game to Windowed Mode

To fix a black screen in-game, force the game to launch in windowed mode:

  • Go to the Config folder inside your League directory
  • Open the game configuration file using a text editor
  • Find the line for WindowMode and change its value to 1
  • Save and restart the game

11. Disable Overlay Applications

Overlays can conflict with the game and cause screen issues. Close any of the following before launching:

  • Discord Overlay
  • NVIDIA GeForce Experience
  • Razer Cortex

12. Update DirectX and Visual C++

Missing runtime libraries are a known cause of the LoL client black screen:

  • Install the latest DirectX End-User Runtime
  • Download and install the newest Visual C++ Redistributables

13. Change DNS Settings

DNS problems can delay or block the client from loading properly, resulting in a black screen.

  • Open Network Settings and go to Change Adapter Options
  • Right-click your active connection and select Properties
  • Select IPv4, then click Properties
  • Set Preferred DNS to 8.8.8.8 and Alternate DNS to 8.8.4.4
  • Click OK and restart League

Why is my League of Legends a black screen?

Black screen while gaming is usually caused by outdated display drivers. It might happen during the game, after the game ends or you can get a League of Legends black screen when loading into game Damaged files can cause League of Legends crashes.

Wrapping up

Just like users were complaining that League of Legends won’t start, now, many players face strange issues with a black screen.

We hope that these recommendations from our list were helpful. For more suggestions or other questions, please access the comments section below.

FAQs

Why is League of Legends showing a black screen when launching?

It often comes from permissions, overlay apps, or corrupt game config files.

How do I fix the black screen after champ select?

Delete the Config folder, enable windowed mode, and disable fullscreen optimizations to fix post-select loading issues.

Can Discord or GeForce overlays cause black screen in LoL?

Yes, they frequently interfere with the rendering engine and should be disabled.

“ and @ Have Switched: 7 Ways to Fix Swapped Keys in Windows

Here’s how to change your keyboard back to normal when ” and @ have switched. This is most commonly happening when your layout changes from US English to UK English. Drivers may also be at fault. Just follow the steps below to get it fixed.

How to fix “ and @ key have swapped on Windows?

1. Change the keyboard language

To switch between pre-installed language packs on your keyboard, just press the Windows key + Spacebar or click on the language section in the taskbar and pick another option.

change keyboard layout

If you don’t have the language you need or accidentally removed it, follow these steps to add it back:

  1. Press Windows + I to open Settings.
  2. Go to Time & Language > Language & Region.going language and region windows 11 settings
  3. Click Add a language, search, and select your language.Add a language
  4. Click Next, ensure Install language pack is checked, and click Install.

2. Change Language in the Control Panel

  1. Click Start and select Settings.
  2. Click Time and Language.
  3. Click Region and Language.time and language
  4. Under Country or Region, click on English (United States or another version), and if not there, you can add it using Add a Language button.
  5. Click Windows display language.
  6. Select Options.
  7. Check what keyboard is selected under the Keyboards option.
  8. Change the input language to English for your location.

Sometimes when you find “ and @ key have swapped, it may have something to do with your Language settings. Did the solution above solved the problem? If not, try the next one.

3. Try on-screen keyboard

  1. Click Start and select Settings.
  2. Click Ease of Access.
  3. Choose Keyboard.
  4. Toggle the On-Screen keyboard to ON.
  5. The keyboard will be displayed, try and check if “ and @ keys work when using the on-screen keyboard.

Does this fix the problem? If not, go to the next solution.

4. Update keyboard drivers

Option 1: Update from the manufacturer’s website

  1. Go to the Software and Drivers sub-section (depending on the laptop brand this name can change), or search for drivers using Google so you can get a direct link to your device’s manufacturer website.
  2. Once you’re on the website, find and download the necessary driver.
  3. Install the missing drivers from your laptop that can cause the # key not to work.

You can find drivers from the manufacturer’s website’s support section for your laptop type. Check if this fixes the “ and @ key have swapped problem. If not, go to the next solution.

Drivers can also be updated with the help of professional software in just a few minutes after a quick scan of your system.

Option 2: Use Device Manager

  1. Open Device Manager.
  2. Expand the Keyboards section.keyboards drivers device manager
  3. Right-click your keyboard and select Update driver.update keyboard driver
  4. Choose Search automatically for drivers.search automatically for drivers
  5. Follow any on-screen instructions to complete the update.

5. Run Hardware and Devices troubleshooter

  1. Open Control Panel.
  2. Go to the View by option on the top right corner.
  3. Click the drop-down arrow and select Large icons.
  4. Click Troubleshooting.
  5. Click View all option on the left pane.
  6. Click Hardware and Devices.
  7. Click Next to run the troubleshooter.

6. Uninstall and reinstall the keyboard driver from manufacturer’s website

  1. Right-click Start
  2. Select Device Manager.
  3. Search for Keyboards and click on it to expand the list.
  4. Right-click on the Keyboard driver.
  5. Select Uninstall.
  6. Go to the Software and Drivers sub-section (depending on the laptop brand this name can change), or search for drivers using Google so you can get a direct link to your device’s manufacturer website.
  7. Once you’re on the website, find and download the driver.
  8. 2. Use a different keyboard
  9. You can connect a different keyboard to your laptop and check if the “ and @ keys have swapped there too. If not, it might be a problem with the keyboard itself.
  10. Check out this list of the best keyboards to buy to make sure you’ll buy a high-quality peripheral.

7. Use a different keyboard

You can connect a different keyboard to your laptop and check if the “ and @ keys have swapped there too. If not, it might be a problem with the keyboard itself.

Check out this list of the best keyboards to buy to make sure you’ll buy a high-quality peripheral.

Wrapping up

Install the appropriate drivers missing from your laptop that can cause the problem.

Did any of these solutions help you? Do you have any other suggestions? Let us know in the comments section below.

Overwatch isn’t dying…yet. But a couple of new heroes won’t save it

If you heard that Overwatch is dying and will be discontinued, that’s probably not the case! But Overwatch doesn’t command the same position it once did.

Some still believe that Overwatch may make a comeback, given the market share it once enjoyed. But for that, it has to do a lot more than introduce a few new heroes or release minor updates. The game needs a complete overhaul!

Overwatch’s popularity declined over the years

Recent reports suggest that the once top-rated first-person shooter game has had a massive decline in user base over the years. At its peak, Overwatch had more than 40 million users worldwide. As for Overwatch 2, 25 million players played the sequel within the first 10 days.

But Overwatch 2 was never as big a success as the original, Overwatch. During the years before the release of the former, the developers were more focused on it and never introduced any significant changes in the latter. In that period, a large chunk of users switched to other games.

Even with Overwatch 2, things never looked that hopeful. The lack of engaging content, the absence of a new hero, no upgrades to graphics, and the persistent bugs triggered a massive decline in the user base.

The lawsuit for workspace misconduct also acted as a catalyst in driving both players and investors away.

Overwatch 2 (Image source: Steam)

In a bid to retain the existing players and attract new ones, Blizzard introduced PvE in Overwatch 2, but it was never a big hit. The failure can be attributed to the $15 paywall, though it was a measure by Blizzard to recover some of the losses.

Overwatch can still make a comeback

Fast forward to 2024, Microsoft took over Activision Blizzard, and rumours of the game being shelved were put to rest. However, Overwatch 2’s user base continues to decline by the day, and gamers have been highlighting a wide array of flaws in the game.

But it’s still far from dead!

When we talked to a few experts, they were of the opinion that if the developers can come up with a new and engaging story, it might invigorate the seemingly dead Overwatch community.

Now that Microsoft is in charge, things are somewhat hopeful, but not too much!

The recent update to season 9 of Blizzard 2 does look promising. Better matchmaking, introducing the Champion rank, and other changes are a good move. But we have yet to see how the community reacts to it.

Based on the common opinion, the developers need to implement a complete overhaul for Overwatch 2 to command the market share it once enjoyed. Until that’s done, they are not getting back the lost user base!

If such changes are not introduced, Overwatch will remain relevant for another 2-5 years and will then slowly become obsolete before being shelved altogether.

Do you believe Overwatch 2 could make a comeback? Let us know in the comments section.

Windows is in Notification Mode: How to Turn it Off

Sometimes, Windows users are unable to change or customize themes and wallpapers, or even some apps stop working. This is due to your Windows being in Notification mode.

You’ll get a message saying that your license will expire soon. This guide will help you fix the problem.

How do I get rid of Windows Notification mode?

Before trying advanced fixes, try re-entering your activation key. Make sure that the system’s date and time are correct.

If the Windows Notification mode issue persist, keep reading:

1. Activate Windows via Settings 

  1. Click on the Start button and select the Settings option.
  2. Inside the Settings, click on the System tab, scroll down and click on Activation.
  3. Then, click on Change Product Key, enter your product key, and press Activate.

Activating Windows by entering a valid product key is pretty easy; the Notification mode will clear out once you have done it.

However, a lot of people struggle with the product keys not working properly; in that case, you can check this guide for Windows activation keys not working.

While you troubleshoot activation, you can cut down on nag pop-ups by disabling the Notification Center in Windows 11 to keep the desktop clear.

2. Expand the trial version of Windows 

  1. Type cmd in the Search bar and click on Run as administrator.
  2. In the Command Prompt window, type the following command and press Enter: slmgr -rearm
  3. When it is successfully performed, a message will appear on display. Then, restart the computer to make the modifications take effect.

Usually, developers allow users to expand the trial period of Windows thrice before restrictions are put into place.

If you are unable to run the command prompt as administrator, you need our guide to fix the Command Prompt not running as administrator on Windows 11.

Hence, if you can’t seem to activate Windows, simply expand the trial period to clear Windows Notification mode.

3. Disable the Windows License Manager Service

  1. Press Window + R to open the run box and type the following command, and press Enter to open the Services app: services.msc
  2. Scroll and double-click on the Windows License Manager Service to open it.
  3. Click on the Stop button and then click on OK to confirm.

By disabling the Windows License Manager, you can get rid of the Notification mode error. Moreover, if you have an error with the expiring Windows license, you need to check our guidelines for fixing the Windows license will expire soon.

4. Phone activate your Windows

  1. Click on the Search icon at the bottom of your screen, type cmd, and click on Run as administrator.
  2. Type the following command in the command line and press Enter: slmgr /dli
  3. Then you will see the Windows details with Notification Reason: 0xC004F009 (grace time expired).
  4. Then, type the following command and press Enter: slui.exe 4
  5. Follow the on-screen prompts, and then you will receive a call from Microsoft, follow their instructions.
  6. Once you complete the instruction given by Microsoft on the phone call, your Windows will be activated.

Why does the Windows Notification mode show up?

The Notification mode appears when Windows is not properly activated. However, it also means that your product key has not been verified.

There are several reasons why this can happen, including not having genuine software you brought or downloaded:

  • Corrupted Windows Registry – If your Windows registry is corrupt, it can cause various problems with your computer, including the Notification mode error you’re seeing.
  • Incorrect date and time settings – If your date and time settings are incorrect, it can prevent Windows from being able to activate properly.
  • Viruses or malware – It is possible that your computer might be infected with a virus or other type of malware; it can cause all sorts of problems, including the Notification mode error.
  • Pirated Windows – If you’re using a pirated version of Windows, it’s likely the cause of your Notification mode error.

How long does Windows Notification mode usually last?

In case you have just installed Windows 11 recently, you will be able to run it smoothly for one month without activation. 

This is because Windows restrictions aren’t implemented until one month after installation, but you will face several restrictions until you activate Windows.

Once you come across Windows Notification mode on your PC, the best possible fix is simply activating Windows by entering a valid product key.

However, if you are receiving an error of the product key not being used in your country, then you can use our guide for the guidance of the product key that cannot be used in your country.

We hope that this article has solved your problem. If you have any further queries in your mind, then do let us know in the comments section below.

Copilot makes its way to SwiftKey, bringing the power of AI to your fingertips

Copilot celebrated its first anniversary a few days ago, and over the past year, we saw Copilot integration everywhere.

The latest Microsoft service that got Copilot support is SwiftKey, so let’s dive into it and see what it offers.

Microsoft brings Copilot to SwiftKey, here’s what it can do

As you might know, Bing AI was added to SwiftKey last year, and while it was a decent feature, many didn’t find it too useful. According to BetaNews, Bing AI is now gone, and Microsoft replaced it with Copilot.

As soon as you open SwiftKey, you’ll notice a Copilot icon standing in the left corner. From there you can ask Copilot anything and you’ll get an answer.

There’s also a compose feature that can write a couple of paragraphs regarding a certain subject. We also have to mention the option to adjust the tone of your message right from SwiftKey which may come in handy.

This is a decent addition, and while some won’t find it too useful, it will allow users to find any information using Copilot right from SwiftKey.

As for availability, this feature is available to all Android users, while iOS will have to wait a bit longer to use it.

Microsoft is fully devoted to AI, and tools such as  Microsoft Copilot Dashboard will ensure that it’s properly integrated into business environments.

Uihost.exe: Complete Guide to Fix Application Errors

Uihost.exe application error is one of the common issues users complain about when using their computers. The error can be fatal as it is associated with the McAfee WebAdvisor security extension.

However, this leaves users with questions about what to do if the uihost.exe error occurs. This guide will discuss the steps for resolving the error.

What is uihost.exe?

  • Uihost.exe process is a part of McAfee WebAdvisor.
  • It is responsible for the user interface and various functions of the application,
  • Provides security risk ratings for websites based on McAfee’s extensive database of known threats and malicious URLs.
  • The file location is in this file path: C:\Program Files\McAfee\WebAdvisor\UIHost.exe
  • It does browser monitoring to protect you from phishing scams, and sites that may contain malware.
  • Alerts users about websites that might be attempting to steal sensitive information, such as login credentials or personal data.
  • It is a browser extension/add-on, compatible with popular web browsers like Google Chrome, Mozilla Firefox, and Microsoft Edge.

Why do I get uihost.exe application error crashes?

  • A corrupted or incomplete installation of McAfee WebAdvisor could lead to uihost.exe application error crashes.
  • Sometimes, registry errors may be the cause of this issue. 
  • Running an outdated version of McAfee WebAdvisor may result in compatibility issues due to corrupt files.
  • Recent browser updates can install features that make browser extensions, including McAfee WebAdvisor, incompatible, resulting in the uihost.exe error.
  • Insufficient system resources could lead to crashes, especially if it’s included in the autostart entries.
  • Malware infections or other system-related issues can cause unexpected errors and crashes.

Regardless, let’s explore the various uihost.exe troubleshooting below.

How do I fix uihost.exe application errors?

Before attempting any advanced fix for the uihost.exe application errors, go through these preliminary checks;

  • Run a thorough scan with your antivirus software with online scan to check for any malware infections affecting the system’s stability.
  • Turn off background apps and disable other unwanted programs on your computer.
  • Verify the file size is excessively bigger than what the original file ought to be.
  • If McAfee, LLC or McAfee. Inc is not present in the digital signature, then remove it’s dangerous.
  • Temporarily disable other browser extensions to check if there are conflicts with McAfee WebAdvisor.
  • Ensure your web browser is up to date with the latest version, as this can help address compatibility issues.

If the preliminary checks above can’t fix the uihost.exe Application Errors, go ahead with the solutions below:

1. Update McAfee WebAdvisor

  1. Left-click the Start menu, type your web browser into the search box, and launch it (the one with the McAfee WebAdvisor extension installed).
  2. Then, right-click on McAfee WebAdvisor extension icon.
  3. Select Manage Extension. Then, click the cog-wheel icon on top and select Check for updates.
  4. Restart your PC and check if the uihost.exe Application Error persists.

Updating McAfee WebAdvisor will install necessary patches to fix bugs affecting and also resolve compatibility issues.

Outdated antivirus software can sometimes cause msedge.exe application error, so it’s advised to keep it updated at all times.

2. Reinstall McAfee antivirus

  1. Go to the McAfee website and download the MCPR tool file for your specific McAfee product.
  2. Now, open the File Explorer and go to Downloads. Then right-click the file and select Run as administrator.
  3. In the new window, click Next.
  4. Then, accept the End User License Agreement (EULA) and click Next.
  5. Fill out the captcha test and wait for the process to complete.
  6. Then, reinstall a fresh copy of McAfee WebAdvisor.
  7. Restart your computer is complete and check if the uihost.exe error appears.

The McAfee product removal tool will clear all the app components along with uihost.exe & vsmain.exe and safely uninstall the McAfee WebAdvisor software. For detailed information, check our guide on how to remove McAfee from Windows.

You can refer to our article about how to uninstall McAfee if it won’t uninstall for more detailed steps.

In addition, you can prevent the uihost.exe application error message from occurring by keeping an updated version of McAfee Advisor. Also, it is advisable to install security software from trusted sources to avoid issues with your computer.

Alternatively, you may be interested in our article about why you should disable McAfee before updating Windows on your PC.

If your McAfee antivirus is blocking EXE files without a valid reason, this is the perfect reason to disable it or consider switching to a different antivirus software.

Should you have further questions on the safe management of uihost.exe, kindly drop them in the comments section.

The Exchange ActiveSync glitch affecting Outlook users will be fixed, says Microsoft

In a recent development, Microsoft has recognized an issue impacting several users, which stops the desktop apps from connecting to email servers via Exchange ActiveSync.

The Redmond tech giant also confirmed that the issue affects Office 365 customers who installed the update (version 2401), which was released on January 9.

Exchange ActiveSync is an important protocol that enables mobile devices to sync data with Microsoft Exchange Server, ensuring seamless access to emails, contacts, tasks, and calendars, even offline.

Unfortunately, since the beginning of February 2024, according to a Reddit thread, several users have been complaining about broken ActiveSync connections, causing syncing issues and emails to disappear from inboxes after a few days.

According to the post, the users tried various solutions, like deleting the profiles and OST files and regenerating the app passwords, but to no avail.

Thankfully, Microsoft is working on the issues, and we can expect a fix in a few weeks. Microsoft explained:

After updating to Version 2401 Build 17231.20182 Outlook stops connecting when using the Exchange ActiveSync (EAS) protocol. The Outlook Team is investigating this issue. We will update this topic when the fix status is available.

In the meantime, Microsoft asked Office 365 users in the current channel to roll back to Office M365 Click-to-Run installation to version 2312 (Build 17126.20132).

To do that, open Command Prompt with admin rights, and copy & paste the command and hit Enter: "C:\Program Files\Common Files\microsoft shared\ClickToRun\officec2rclient.exe" /update user updatetoversion=16.0.17126.20132

If you don’t want to do that, you can choose to switch to Semi-Annual Channel to fix the ActiveSync connection issues.

In case you haven’t downloaded the update released on Jan 9, 2024, you can open Outlook, go to File, Office Account, click the Update options button, and then choose Disable Updates options to ensure it is not updated until Microsoft releases a fix.

Are you facing this problem? If yes, then share your thoughts in the comments section below.

Edge and Chrome’s Web Monetization might soon make users pay money when they browse the Internet

In a wild turn of events, Chromium-based browsers, such as Microsoft Edge, Google Chrome, and many others, might soon be able to make users pay money every time they browse the Internet. How would they do that, you might ask?

Well, the Chromium team is developing a feature, web monetization, according to a report made by The Register. A deeper investigation reveals that this indeed is true, as the Chromium teams intend to prototype the concept, as seen in a series of emails.

Web monetization would require the user to set up a wallet on Edge, and Chrome (both browsers have this option already), and sites condoning this capability would automatically start a monetization session from the moment users start engaging with their content.

Web Monetization is a web technology that enables website owners to receive micro payments from users as they interact with their content. It provides a way for content creators and website owners to be compensated for their work without relying solely on ads or subscriptions. Notably, Web Monetization offers two unique features—small payments and no user interaction—users are paying/tipping for the content while they consume it. It extends the HTML <link> element by introducing rel=”monetization”. When this element is incorporated into a web page, it signifies the website’s support for web monetization. If a user has their wallet set up for a particular website, their browser will automatically start a web monetization session, enabling direct payments from the user to the website.

Aside from the microtransactions done through the Web monetization capability would also allow Chromium-based browsers to enable optional, or voluntary user contributions, such as tips, directly to the creators of the content.

Alexander Surkov, a software engineer at Igalia, a consultancy community that collaborates with Chromium on this feature, released an extensive document on Web monetization, describing the feature, the ideas behind it, and the way it would work. It can be read in its entirety here.

Web Monetization on Chromium-based browsers: Would it work?

First and foremost, it’s worth mentioning that Web monetization would be somehow optional. Users will have the option to manage this feature from the browser’s settings page, enabling or disabling it for specific sites, or even control the amount the sum to be paid.

Yes, you read that right. Payment would be customized, and users would be able to choose a sum to pay when visiting sites.

On the browser side, Web Monetization is managed through browser settings. The settings allow users to specify their preferred wallet (or web monetization provider) and set per-website preferences, including enabling or disabling automatic monetization for specific websites, as well as a custom payment rate. The users can also configure multiple wallet addresses as desired, just as they store credit card information within a browser.

As the document explains it, Web Monetization existed before in different forms. A previous version, Coil, existed for a while, but it ceased its activity, apparently.

The document goes into detail explaining that while Coil’s limitations were its designs and fixed monetization sum, Web Monetization addressed these limitations by coming up with an integrative design that wouldn’t impact the browser experience while keeping the monetization sum customizable for users.

The idea would work, and it could be a solution for the rising ads appearing on sites everywhere. As users actively pay for the browsing session, there would be no need to run ads on sites again. Its intuitive approach to design and seamless integration with different Chromium-based browsers are also points to take into consideration.

However, on the other hand, the whole concept would open discussions on the openness of the Internet and free access to information. While Web Monetization could somehow keep everything optional, it would become harder to access the Internet for free, and ultimately, a lot of sites could end up implementing it in a mandatory way.

At least ads are still letting us access information for free.

But what’s your take on this? Do you see it working or not? Would you pay to browse the Internet, or should the Internet remain free?

Screen Dark on Full Brightness? Do This!

Many of our readers complain about the screen being dark despite enabling full brightness. It’s usually because of the adaptive brightness settings or an outdated display driver. Here are our tested solutions to fix this problem.

How do I fix a screen that is too dark at full brightness?

1. Disable adaptive brightness

  1. Press the Windows key + I to open the Settings app and select the System option.
    system settings windows
  2. Choose the Display option in the left pane.
    display
  3. Now, uncheck the box next to Change brightness automatically when lighting changes under the Brightness and color section.

Adaptive brightness automatically adjusts the brightness level of your screen based on ambient light sensors. When enabled, it will change your screen’s brightness even though you set it to 100%.

2. Enable high performance mode

  1. Hit Start, type Control Panel, and open it.control panel app in start
  2. Select Power Options.control panel power options
  3. Set it to High Performance.high performance power option in windows

This option prioritizes performance over battery saving and won’t dim your light.

3. Run the Power troubleshooter

  1. Press the Windows key + I and select the Update & Security option.
    update and
  2. Choose Troubleshoot in the left pane and click the Additional troubleshooter’s option.additional troubleshooters windows
  3. Select Power and click the Run the troubleshooter button.
    run power

Minor issues with your PC power setting can affect your screen brightness, causing your screen to become so dark. In this case, you need to run the Power troubleshooter.

4. Enable and disable the display adapter

  1. Press the Windows key + X and select the Device Manager option.
    device manager
  2. Double-click the Display adapters option and right-click the device there.
  3. Choose the Disable device option.
    disable device why is my screen so black
  4. Now, right-click the device again and select the Enable device option.

Some users have pointed out that glitches with the display adapter can cause the dark screen issue. Disabling and enabling the adapter proved to be enough to fix this.

5. Update the display driver

  1. Right-click the Start button and select Device Manager from the list.
    device manager
  2. Expand the Display adapters option and right-click the device there.
  3. Select the Update driver option.
    update driver
  4. Now, choose the Search automatically for drivers option and install the available update.
    search auto why is my screen so black

Alternatively, go to your manufacturer’s website and download the drivers manually. Make sure you get the correct version for your display, otherwise, you may cause more harm than good.

To prevent that, we strongly recommend a dedicated driver updating tool.

6. Roll back the display driver

  1. Launch Device Manager and expand the Display adapters option.
    display adapters
  2. Double-click the driver there to open its properties.
  3. Select the Driver tab at the top and click the Roll Back Driver button.
    roll back

7. Install the latest driver in compatibility mode

  1. Download the latest driver from your manufacturer’s website.
  2. Right-click the installer and select the Properties option.
    properties
  3. Click the Compatibility tab at the top and check the box for Run the program in compatibility mode for:.
  4. Now, click the dropdown and select Windows 8.
    compatibility
  5. From here, click the Apply button followed by OK to save the changes.
    apply ok why is my screen so black
  6. Finally, run the installer and follow the onscreen instruction to complete the installation.

Keeping your operating system and drivers up to date should also help with related issues like screen brightness stuck on high, brightness slider missing, or brightness button not working. 

If you’re dealing with issues like screen shifting to the right, random screen dimming, brief blackouts, or screen flickering, we’ve got dedicated fixes for each: screen shifts to the right, Windows 11 screen dimming, screen goes black for a second, and laptop screen flickering.

The steps above will take you through the process and hopefully fix the screen darkness too dark on full brightness issue.

Feel free to let us know the solution that helped you fix this issue in the comments below.

How to Fix Kindle Not Downloading Books: Something Went Wrong/ Queued Errors

If your Kindle is not downloading books, it’s most likely because of outdated payment information. Temporary glitches or connection issues can also be to blame. That’s when you’ll get a Something went wrong or Queued error message.

This issue with downloading books isn’t limited to one model. It’s been reported on the Basic, Paperwhite, and Oasis alike. The good news is, the fixes are universal. Let’s dive into them.

What can I do if Kindle is not downloading books?

First, make sure your internet is up and running and charge your ebook reader over 25% so it doesn’t restrict bandwidth.

If Kindle still doesn’t download, follow the steps below:

1. Restart your e-book reader

  1. Press and hold the Power button on the device until the Power dialog box shows on your screen. Then tap on Restart.
    kindle power button
  2. If the Power dialog box doesn’t appear, wait until the screen goes blank.
  3. After this, keep holding the Power button for 40 more seconds before releasing it.
  4. After some seconds, the tablet will restart.

After turning off the Kindle device, leave it off for one minute before powering it back on. When you do this, try to download the book again.

2. Toggle the Airplane mode

  1. Tap the Menu icon and then turn on Airplane mode.
  2. Wait for a minute or two.
  3. Repeat the same steps to disable Airplane mode.

3. Delete and download again

If your internet connection fails at any point during the download, it might corrupt the book, and it won’t be able to continue the download afterward.

Deleting the book’s file and downloading it again might solve this issue.

4. Free up storage space

  1. On your Kindle, go to Settings.
  2. Select Device Options, then Advanced Options.
  3. Pick Storage to check available space.
  4. Ensure your Kindle has enough storage space for the new book. If it doesn’t, consider deleting books you’ve already read to free up space for the new one.

5. Check payment method

  1. On a laptop or phone, sign in to your Amazon account at Amazon.com.
  2. Hover over Accounts & Lists and select Your Account.
  3. Scroll down and click on 1-Click settings.1 click settings amazon
  4. Check if the payment method is up to date. If needed, click Change and add or update your card details.change payment method amazon
  5. Ensure 1-Click Ordering is enabled.enable one click purchase amazon
  6. Go back to your Kindle, sync, and try downloading the book again.

How do I manually download books to my Kindle?

  1. Make sure you’re logged in to your Amazon account.
  2. Navigate to Manage Your Content and Devices. Click on Content and then on Books.
  3. Select Deliver to Default Device (or) Others and select your Kindle.

Back to the issue of Kindle books not downloading, we hope the solutions provided were of help. In most cases, you should get your books downloaded by the first solution.

This isn’t the only issue you can encounter, and many reported that Kindle Book is not opening or not connecting to PC. We also covered Kindle Book is not compatible with device error in another guide, so don’t miss it.

Many users have faced issues such as a Kindle registration error or trouble with connecting the Kindle Paperwhite to Wi-Fi, which you can learn more about in our guide on Kindle Paperwhite not connecting to Wi-Fi.

Additionally, if you encounter a Parse Error on Kindle Fire, there are dedicated solutions to resolve that as well.

However, if all the methods fail, reach out to Amazon support and tell them your issue. They’ll surely have a resolution.