2 Ways to Completely Delete Bing Search History [Browser & Microsoft Account]

If you’ve ever used Bing, you might have noticed that it keeps track of your search history. It’s a great feature that allows you to quickly repeat previous searches without remembering them or entering them manually.

However, if you’re uncomfortable with this feature, you can easily disable it and remove all the data from your computer.

How do I completely clear Bing’s search history?

▷ Let’s stop advertisers & other trackers from seeing your personal data ▷

Option 1: Delete Bing history from your Microsoft account

  1. Log into your Microsoft account or go to Bing’s official website to log in.
  2. Click on the Menu tile and select Search history.
  3. Hit the Clear all button.

Option 2: Delete Bing history from your browser’s settings

  1. Open Microsoft Edge, click on the three ellipses in the top right corner, and select Settings from the drop-down menu.
  2. Under Privacy, search, and services, select Choose what to clear.
  3. Select a time range and check the boxes for all the available data.
  4. Click the Clear now button.

If you use Bing as your default search engine, your search history will be included in your browser history settings. By clearing your browser history, you’ll also be clearing your entire search history, including all synced devices.

For more ways to refresh your browsing, check our dedicated guide on how to clear cache on Bing. You can also try the Bing Video Creator to explore Bing’s creative AI features before clearing your search data.

What can I do if Bing’s search history won’t delete?

  • Ensure that your browser and OS are up to date. You may want to restart your computer in Safe Mode for good measure.
  • Log out from all your devices, then log back into your Microsoft account.
  • Clear your cookies and cache, as sometimes, cookies can interfere with the deletion of your search history.
  • Run a system antivirus scan for any corrupt files that may be preventing deletion.
  • Your search history is not deleting, probably because of your browser settings, so try and reset it. 

FAQ

How do I delete my Bing search history?

Open Bing, select the menu icon, choose Search history, sign in if needed, and select Clear all to remove your activity.

Can I delete individual searches instead of everything?

Yes. Go to Search history in your Microsoft account dashboard and select the X next to any item you want to remove.

Does Bing delete my search history automatically?

Bing keeps your history until you remove it or configure your Microsoft Privacy Dashboard to clear activity on a schedule you control.

Will deleting Bing search history affect my recommendations?

Yes. Clearing your history resets personalized results, so Bing will show more general suggestions until it learns your preferences again.

Ultimately, it’s important to remember that people will likely be watching wherever you go on the Internet. Your digital footprint will be available as long as you access the Internet, but you can limit what you share.

And if you find that you’re unable to get rid of your browsing history, there are other ways to keep your activity private and your personal information out of the hands of advertisers, such as using private browsers.

This also goes beyond your browsing too. If you’re using a shared PC, we’d recommend you clear recent files to keep your activity under wraps. If you’re still not using Bing, we have a great guide on how to make Bing your default search engine, so don’t miss it.

Hopefully, this article has shed light on how to delete your Bing search. We’d love your feedback on this and any other tips you use to keep your activities private while browsing. Drop us a comment down below.


How to Remove Common Program Groups From Start Menu

Whenever you install apps in Windows, you’ll often find yourself with more programs than you know what to do with. These apps can be useful if you want an easy way to access certain tasks or settings in your Start Menu. However, they may not be needed for everyone.

If you’re one of those users who like a decluttered Start Menu interface, you can take charge of what appears here, and we show you how to achieve this by removing common program groups.

How do I remove common program groups from the Start Menu?

1. By using the Group Policy Editor

  1. Hit the Windows + R keys to open the Run command.
  2. Type gpedit.msc in the dialog box and hit Enter to open the Group Policy Editor.GPEDiT.msc -Windows Remediation Service Failed to Start?
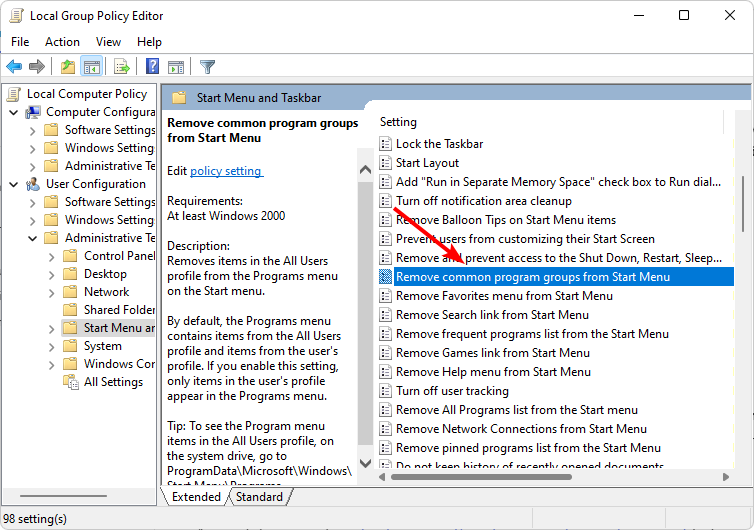
  3. Navigate to the following location: User Configuration/Administrative Templates/Start Menu and Taskbar
  4. Double-click on the Remove common program groups from Start Menu policy setting.
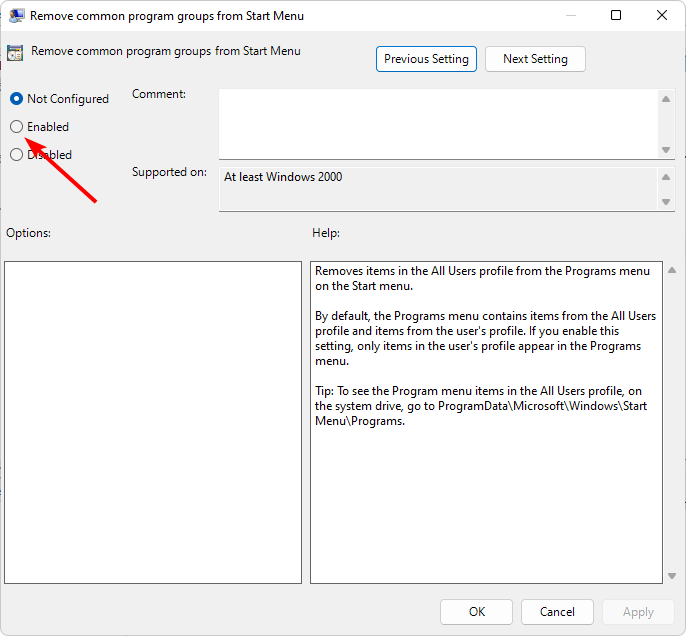
  5. Check the Enabled box.
  6. Hit Apply and OK to save changes, then restart your PC for the changes to take effect.

2. By using the Registry Editor

Note icon NOTE
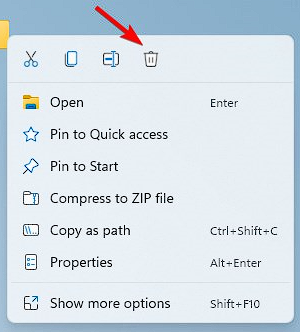
As a safety precaution, backup your Registry or create a restore point before making any changes, given how unpredictable things can be.
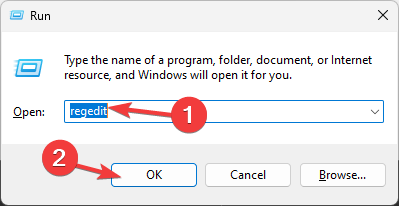
  1. Hit the Windows + R keys to open the Run command.
  2. Type regedit in the dialog box and hit Enter to open the Registry Editor.
  3. Navigate to the following location: HKEY_CURRENT_USER\Software\Microsoft\Windows\CurrentVersion\Policies\Explorer
  4. Double-click on the NoCommonGroups entry, but if unavailable, right-click on an empty space, select New>DWORD (32-bit Value), and name it as so.
  5. In the Value data entry, set it as 0 to disable, then close the Registry Editor.

How do I add common program groups to the Start Menu? 

Simply reverse-engineer the above steps if you wish for the common apps to make a comeback to your Start Menu. For the Group Policy option, set the option to Disabled, and for the Registry Editor, set the Value data to 0.

By removing all common program groups, remember that all the changes apply to all user profiles on that PC. This means that features like Homegroup will be unnecessary because you can’t share files anymore. You might as well go ahead and remove Homegroup, especially if it’s slowing down your device.

Hopefully, you now only have apps you want to see on your Start Menu. Should you encounter any issues with default apps, it is best to uninstall the pre-installed apps, especially if you rarely use them.

And if it’s the Windows 11 interface that is giving you the ick, you can change that too. Most users prefer the classic Start Menu, so don’t hesitate to revert to old ways.

Do you prefer the common program groups or to disable them? Let us know in the comment section below.

How to Create Settings Shortcuts on Windows 11 [For All Pages]

If you rely on the Settings app for even the most trivial of actions or to change the Windows configuration, why not create a Settings shortcut in Windows 11? It doesn’t take more than a minute when using our guide.

The Settings app has changed tremendously over the years, with the functionalities and options being moved around. Even some features that could earlier be accessed via both the Control Panel and Settings are now exclusive to the latter, making shortcut creation all the more important. 

Benefits of creating a Settings shortcut

  • Helps save a lot of time, especially when accessing pages located deep within the app.
  • Ability to create shortcuts for individual pages.
  • Set up a keyboard shortcut to open the dedicated settings.

How do I create a desktop shortcut for Settings in Windows 11?

  1. Open Microsoft’s official document to view the URIs (Unique Resource Identifiers) for individual Settings pages. Here are a few you would commonly need:
    • Home: ms-settings:
    • Family & other people: ms-settings:otherusers
    • Sign-in options: ms-settings:signinoptions
    • Windows Hello setup: ms-settings:signinoptions-launchfaceenrollment
    • Default apps: ms-settings:defaultapps
    • Manage optional features: ms-settings:optionalfeatures
    • Bluetooth: ms-settings:bluetooth
    • Touchpad: ms-settings:devices-touchpad
    • Display: ms-settings:easeofaccess-display
    • Network & Internet: ms-settings:network-status
    • Wi-Fi: ms-settings:network-wifi
    • Ethernet: ms-settings:network-ethernet
    • Background: ms-settings:personalization-background
    • Date & time: ms-settings:dateandtime
    • Windows Update: ms-settings:windowsupdate
    • Windows Security: ms-settings:windowsdefenderSettings URI
  2. Now, right-click on the desktop, hover the cursor over New, and select Shortcut from the flyout menu.
  3. Paste the path for the Settings page you want the shortcut to redirect to, and click Next. For instance, to create a Settings homepage shortcut, use ms-settings:. Or, to create a Windows Update shortcut, type ms-settings:windowsupdate.path to create settings shortcut windows 11
  4. Enter a name for the shortcut, and click Finish to create an Internet Shortcut file.shortcut name
  5. When you double-click the Settings app icon on the desktop in Windows 11, it will automatically open the linked page.

How can I create a keyboard shortcut for Settings in Windows 11?

  1. Right-click the shortcut you created and then select Properties from the context menu. 
  2. Head to the Web Document tab, click the Shortcut key field, press the key you want to add as a shortcut (Windows will automatically add Ctrl + Alt), and then click Apply and OK to save the changes.create settings keyboard shortcut windows 11

To create a Settings shortcut key in Windows 11, first create a desktop shortcut, then add a hotkey for it. And remember, you don’t need to manually add Ctrl + Alt. Windows does it automatically. For instance, to set Ctrl + Alt + K as the dedicated shortcut, simply press the K key. 

Or you could always use a reliable shortcut software for Windows 11.

How do I create a context menu shortcut for Settings in Windows 11?

  1. Press Windows + R to open Run, type regedit in the text field, and hit Enter.regedit
  2. Click Yes in the UAC prompt.
  3. Go to the following path using the navigation pane or paste in the address bar and hit Enter: HKEY_CLASSES_ROOT\Directory\Background\shellpath
  4. Right-click the Shell key, hover the cursor over New, select Key, and name it depending on the page you want to add to the context menu. For instance, we used Windows Update.key to create settings shortcut windows 11
  5. Again, right-click on the entry you just created, select New, then choose Key, and name it command.command key
  6. Select the command key, and double-click the Default string in the right pane.default
  7. Paste the following path in the Value data field, where URI should be replaced with the one for the Settings page you want to open, and then click OK to save the changes: C:\Windows\explorer.exe URIvalue data to create settings shortcut windows 11
  8. Restart the computer, and the shortcut to open Windows Settings will be available.
  9. Now, right-click the desktop, choose Show more options, and you will find the context menu shortcut for Settings.shortcut

How do I access specific Settings pages with keyboard or address bar in Windows 11?

You need the Unique Resource Identifier to access specific settings pages with the keyboard or the File Explorer’s address bar. 

For the latter > press Windows + E to open File Explorer > paste the URI in the address bar > hit Enter.

The dedicated Settings will open up immediately. And if it’s an incorrect URI, one that doesn’t redirect to any page, it will open the Home tab of Settings.

Besides, since the Windows 11 Settings app is integrated so well, individual pages can also be accessed from the Search menu.

Now that you know how to create a shortcut for Settings in Windows 11, save vital time that is otherwise spent navigating through the app. Also, for critical changes, you can directly access the Advanced System Settings. 

For those of you who prefer shortcuts over the GUI method, our curated list of the most common keyboard shortcuts will come in handy.

For any queries or to share which Settings you access the most, drop a comment below.

How to Use Steam Deck’s Keyboard in Desktop Mode

Steam Deck allows you to use the keyboard in Desktop mode, but many users don’t know how to activate it properly.

The device has a built-in virtual keyboard that can work outside of Steam, and in today’s guide, we’ll show you how to use it.

How do I use Steam Deck desktop mode without keyboard and mouse?

  • You can use the trackpad to move the mouse.
  • Tapping the right trackpad works as a primary click while the left trackpad works as a secondary click.
  • As for the virtual keyboard, using methods listed below.

How do I bring up Steam Deck keyboard in desktop mode?

1. Use the keyboard shortcut

  1. Make sure that Steam is running while you’re in Desktop mode.
  2. Next, press Steam + X on the device.
  3. The virtual keyboard will now appear.

2. Install  and use CoreKeyboard

  1. Open the Discover app.
  2. Next, go to Applications and select Accessibility, or just search for CoreKeyboard.
  3. Locate CoreKeyboard and click on Install.
  4. Once installed, open it from the Start menu. You can find it in the All Applications or Utilities section.
  5. After that, the application should be in your taskbar and you’ll be able to access it when needed.

Why is the Steam Deck keyboard not working in Desktop mode?

  • Steam software isn’t running on Steam Deck.
  • You don’t have an active Internet connection and can’t start Steam.

Keep in mind that these only apply to the built-in virtual keyboard.

It’s pretty simple to use the Steam Deck keyboard in Desktop mode, but for this feature to work, you need to have Steam running and an Internet connection, which seems counterintuitive.

Make sure to update your Steam Deck software since Valve may have addressed this limitation.

In case you’re having issues with the virtual keyboard, you can also use your phone as a keyboard for Steam Deck in a pinch.

Did we miss your favorite method of using the virtual keyboard on Steam Deck? If so, feel free to let us know in the comments section.

How to Disable or Enable Power Throttling Windows 11

Power throttling in Windows 11 can help save battery by limiting background app activity. However, it may affect app performance.

In this guide, we’ll cover three simple methods to turn Power throttling on or off, so you can easily choose between energy efficiency and full app performance.

How to disable/enable power throttling in Windows 11

1. Using the Power settings

  1. Press Windows + I to open the Settings.
  2. Go to System, then click Power & battery.Power & battery
  3. Locate Power mode, and you will find three options:
    • Best power efficiency – Enable Power throttling
    • Balanced – Enable Power throttling
    • Best Performance – Disable power throttling
  4. Select Best power efficiency or Balanced to enable Power throttling.Power & battery - Power Throttling on Windows 11

To achieve maximum performance and prevent overheating and damage to your PC, you must also know about CPU throttling.

2. Using the Registry Editor

  1. Press Windows + R to open the Run dialog box.Regedit RUN COMMAND - Power Throttling on Windows 11
  2. Type regedit and click OK to open the Registry Editor.
  3. First, let us create a back of registry entries, go to File, then click Export. Save the .reg file to an accessible location.
  4. Navigate to this path: Computer\HKEY_LOCAL_MACHINE\SYSTEM\CurrentControlSet\Control\Power
  5. Right-click Power, select New, then click Key.Key -Power Throttling on Windows 11
  6. Right-click the new key, click Rename, name it PowerThrottling, and then press Enter.Rename
  7. Select PowerThrottling, right-click, and select New, then DWORD (32-bit) Value.DWORD - Power Throttling on Windows 11
  8. Now, rename the DWORD as PowerThrottlingOff and press Enter. Double-click PowerThrottlingOff, change the Value data to 0, then click OK to save the changes, then restart your computer.Enable or Disable Power Throttling on Windows 11
  9. To disable the feature, change the Value data to 1, then click OK.

3. Using the Group Policy Editor

  1. Press Windows + R to open the Run dialog box.GPEDIT MSC RUN -Disable Power Throttling on Windows 11
  2. Type gpedit.msc and click OK to open Group Policy Editor.
  3. Go to this path: Computer Configuration\Administrative Templates\System\Power Management\Power Throttling SettingsTurn off Power Throttling
  4. Locate and double-click the Turn off Power Throttling policy, select Disabled, and click Apply, then OK.
  5. Restart your PC to save the changes.

How do I disable Power throttling on Windows 11?

You can reverse-engineer the steps from the above-mentioned methods to disable Power throttling on your Windows computer.

To disable the feature for an individual process, press Windows + I to open Settings>System>Power & battery>Battery usage, locate the app, click three dots, and select Manage background activity.

How can I monitor Power throttling on Windows 11?

  1. Press Ctrl + Shift + Esc to open Task Manager.
  2. Right-click anywhere on the columns, and choose Select columns.Select column
  3. On the next page, place a checkmark next to Power throttling and click OK.Taskmgr_ m- Powerthrottling - Disable Power Throttling on Windows 11
  4. A new column will be added, and you can check which Process ID has Power throttling enabled or disabled.

Disabling Power throttling can unleash your CPU’s full potential, delivering peak performance for resource-intensive tasks; however can cost you reduced battery life.

Enabling it can restrict CPU usage for background applications, balancing power consumption and enhancing battery life; however, may cause performance issues.

So as we already mentioned, it totally depends upon your computing requirements. If you have any questions or suggestions about the subject, feel free to mention them in the comments section below.

Touchpad Settings Missing on Windows 11: How to Restore Them

For many users, touchpad settings are missing on Windows 11, and this can be a major problem since you won’t be able to configure your touchpad. Luckily, there are a few ways to fix this issue.

Why don’t I have touchpad settings on Windows 11?

If there are no touchpad settings on Windows 11 this is likely caused by outdated drivers or missing Windows updates.

What can I do if touchpad settings are missing on Windows 11?

Before we start, ensure that you have the latest Windows updates installed.

1. Update the driver

  1. Press Windows + R to open the Run dialog box.
    devmgmt.msc run window
  2. Type devmgmt.msc and click OK to open the Device Manager.
  3. Locate and click Human Interface Devices to expand it.
  4. Right-click the touchpad driver and select Update driver.Update driver device manager
  5. Select Browse my computer for drivers.
    browse my computer for drivers
  6. Next, select Let me pick from a list of drivers on my computer.
    Let me pick from a list of available drivers
  7. Select a compatible driver and install it.

A better method is to visit your laptop manufacturer and download the latest touchpad driver manually, so try that as well.

Keeping your drivers updated can also help you prevent common trackpad issues like the touchpad not working issue.

2. Enter BIOS

  1. Restart your PC.
  2. While it boots keep pressing F2 or Del to enter BIOS.
  3. Once you enter BIOS, check if your touchpad is working.
  4. If it does, exit BIOS.
  5. Start Windows normally and check if the problem is gone.

3. Uninstall the latest Windows update

  1. Press Windows + I to open the Settings app.
  2. Go to Windows Update, and click Update history.update history settings app
  3. Scroll to Related settings, and click Uninstall updates.uninstall updates
  4. Locate the last update and click Uninstall.uninstall update
  5. Follow the onscreen instructions to complete the process, then restart your computer.

If nothing worked for you, then the issue might be due to a hardware problem; therefore, for further assistance, you need to contact the device manufacturer.

In case you are facing other trackpad issues like touchpad click not working on Windows, read this guide to learn the detailed solutions.

Many users reported that Synaptics touchpad isn’t working on their PC, as well as problems with touchpad gestures, but we covered these issues in separate guides, so don’t miss them.

If you have any questions or suggestions about the subject, feel free to mention them in the comments section below.

Fix: Credentials Supplied Are Not Sufficient Error on Windows 11

Printers are known to throw errors, even when everything seems to be in place. Though most arise after a connection is established, a few users reported seeing The credentials supplied are not sufficient to access this printer error in Windows 11 when trying to connect.

The message further asks users to connect to the shared printer with different credentials, but none of the combinations work. More often than not, the issue with shared printers arises due to a trivial misconfiguration at the user’s end.

Common causes of Credentials supplied are not sufficient error on Windows 11

  • Incorrect credentials are provided
  • The stored credentials are corrupt
  • Misconfigured local group policies
  • A bug in the recent Windows update broke things

How do you fix The credentials supplied are not sufficient to access this printer?

Before we head to the slightly complex solutions, try these quick ones first:

  • Make sure the PC and printer are on the same network. Restart both and check for improvement.
  • Disable Windows Defender Firewall or any similar third-party security software installed on the PC.
  • Check whether printer sharing is not working for all printers and across devices.
  • Make sure the active user account is tied to the domain.

If none work, move to the fixes listed next.

1. Run the Printer troubleshooter 

  1. Press Windows + I to open the Settings app, and click on Troubleshoot on the right in the System tab.troubleshoot
  2. Now, click on Other troubleshooters.
  3. Locate the Printer troubleshooter and click the Run button next to it.printer troubleshooter to fix the credentials supplied are not sufficient to access this printer windows 11
  4. Wait for the troubleshooter to identify the problem, follow the on-screen instructions, and apply the recommended fixes.

2. Clear related entries in the Credential Manager

  1. Press Windows + S to open Search, type Control Panel in the search bar, and click the relevant result.
  2. Click on User Accounts.user accounts
  3. Now, click on Credentials Manager. 
  4. Under Windows Credentials, identify any related to the affected printer, expand them, and click on Remove.remove credentials to fix the credentials supplied are not sufficient to access this printer windows 11
  5. Click Yes in the confirmation box.
  6. Now, restart the PC and then try connecting to the printer with the correct set of credentials. 

Clearing the credentials will also help fix a related issue, The credentials supplied conflict with an existing set of credentials error in Windows 11

3. Add a Windows credential

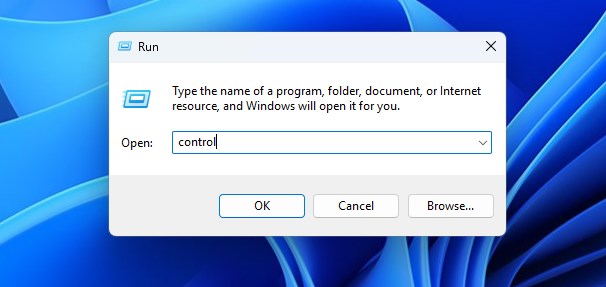
  1. Press Windows + R to open Run, type control in the text field, and click OK.
  2. Click User Accounts and then on Credentials Manager.
  3. Go to Windows Credentials, and click on Add a Windows credential.add a windows credential
  4. Now, add the printer server, username with access to it, a password if required, and click OK to save it.printer details
  5. Connect to the affected printer. 

If the problem persists, open Print Management, select the print server under LocalHost, open its Security settings, and allow both local and domain users full access to the printer.

4. Edit the local policies

  1. Press Windows + S to open Search, type Local Group Policy Editor in the text field, and click the relevant result.
  2. Expand Administrative Templates under Computer Configuration, and then select Printers.local group policy editor
  3. Double-click the Point and Print Restrictions policy on the right.point and print policy 
  4. Select Enabled, then tick the checkbox for Users can only point and print to these servers, and enter the server name (optional) in the text field underneath.enable policy to fix the credentials supplied are not sufficient to access this printer windows 11 
  5. Now, select Do not show warning or elevation prompt from the dropdown menu under both When installing drivers for a new connection and When updating drivers for an existing connection.do not show warning
  6. Once done, click Apply and OK to save the changes, and then connect to the printer.

5. Modify the Registry Editor

  1. Press Windows + R to open Run, type regedit in the text field, and hit Enter.regedit
  2. Click Yes in the UAC prompt.
  3. Go to the following path from the navigation pane or paste it into the address bar and hit Enter: HKEY_LOCAL_MACHINE\SYSTEM\CurrentControlSet\Control\Print
  4. Now, double-click the RpcAuthnLevelPrivacyEnabled DWORD on the right.RpcAuthnLevelPrivacyEnabled to fix the credentials supplied are not sufficient to access this printer windows 11
  5. Enter 0 under Value data and click OK to save the changes.value data
  6. Restart the computer and check if the error message disappears when connecting to the printer.

6. Uninstall recent Windows updates

  1. Press Windows + I to open Settings, go to Windows Update from the left pane, and click on Update history.update history
  2. Now, scroll down to the bottom and click on Uninstall updates under Related settings.
  3. Click the Uninstall option next to the update installed around the same time the error first appeared.uninstall
  4. Again, click Uninstall in the confirmation box.
  5. Once done, establish a connection with the printer.

Several users reported that a recent Windows update broke the advanced network options or led to credential issues, and subsequently, the network printer error appeared. In this case, simply uninstalling the update should do the trick!

 7. Create a new local user account

When nothing else works, you can create a new local user account and allow it to access the printer. This will eliminate any inconsistencies that prevented the previous account from establishing a connection, as well as clear conflicting entries in the built-in Credential Manager.

A few users also found that creating a new user account and then manually adding the Windows credential (Fix 3) helped fix The credentials supplied are not sufficient to access this printer error in Windows 11.

Lastly, you can always contact the printer manufacturer or get in touch with a professional since the problem seems a bit more intricate. Before you do, check some quick fixes for printer issues in Windows 11 and try them all.

For any queries or to share what worked for you, drop a comment below.

How to Copy Files Using Command Prompt on Windows 11

Copying files using Command Prompt on Windows 11 can be a convenient option to manage your files, especially when you want precise control over the process, like preserving file attributes or copying hidden or system files.

This guide will discuss essential commands with step-by-step instructions to guide you through the seamless process.

How do I copy files with Command Prompt on Windows 11?

Before proceeding with any steps to copy a file to a directory, go through the following:

  • Ensure you have logged in via a user account with administrator rights.
  • Note down the file name and location of the file.
  1. Press the Windows key, type cmd, and click Run as administrator to open Command Prompt.CMD elevated - Copy Files Using Command Prompt on Windows 11
  2. Copy & paste the following command after replacing the File-Path with path, FileName with the name of the file, & DriveLetter with the destination drive and hit Enter: Copy "File-Path" DriveLettercmd_copy file from one drive - Command Prompt Windows 11
  3. You can also copy the file from one drive to another in a specific folder, and in that case, use the following command after replacing File-Path with the file’s path & DestinationFolderPath with the path of the folder in a different drive: Copy "File-Path" DestinationFolderPath
  4. You will get 1 file (s) copied message once the command is executed.
  5. If you want to copy multiple files with specific file extensions from one drive to another, you can use wildcards (*).
  6. Type the following command after replacing the .TXT with the file extension & DriverLetter with the destination drive and press Enter: copy *.txt DriveLetter

If you are copying files from the USB drive, and it doesn’t allow you cause it is write-protected, follow this guide to find detailed solutions.

How do I copy multiple files in CMD?

  1. Press Windows>type cmd>Run as administrator.
  2. Copy & paste the following command to copy all folders and subfolders with their content after replacing SourceFolderPath with the current path of the folder & DestinationFolderPath with the new one and hit Enter: Xcopy "SourceFolderPath" DestinationFolderPath /E /H /C /Icmd_COPY FILES IN WINDOWS 11 USING COMMAND PROMPT
    • /E – Copies all the subfolders, even the empty ones.
    • /H – Copies hidden files or files with system file attributes
    • /C – Keeps copying, even if error is encountered
    • /I – Resumes the destination is a directory if it doesn’t exist

Once the command is executed, you will get a confirmation message; however, if you get the XCOPY Access Denied error, read this guide to find solutions.

How can I delete a folder or file in Command Prompt?

  • Press Windows>type cmd>Run as administrator.
  • Type the following command after replacing FolderPath with the path of the folder and hit Enter: del "FolderPath"

Why can’t I copy files in Windows 11?

  • Insufficient file permissions
  • The file is already open or is in use.
  • The file or folder is Read-only.
  • System files are corrupted.

Now that you know what’s causing the problem, check out this super helpful guide to quickly fix the Copy-Paste not working issue on your Windows PC.

You can also review this guide on how to cut copy and paste using keyboard to make file operations easier while working in Windows 11.

Once you’ve got the hang of how copying works, it’s easy to set things up so your PC can automatically copy files from one folder to another—no extra effort needed.

If something still feels off, it’s worth running a quick virus scan using Command Prompt to rule out anything shady messing with your system. You can check which processes block your files by using this guide to Tasklist and Taskkill commands.

Stuck somewhere while trying the steps? Don’t worry—drop your questions in the comments below and we’ll help you out.

How to Remove Windows From a Drive but Keep Your Data

If you’re adding a drive from an old PC that already has an operating system on it, you might be wondering how to remove the OS but keep the files.

This is possible, and in today’s guide, we’re going to show you how to properly do this on your PC and avoid file loss.

Can you uninstall an OS?

No, it’s not possible to uninstall an operating system. You can format your drive and remove the OS, or you can try manually deleting the operating system files from a different operating system.

How do I completely remove an operating system from my computer?

1. Delete the partition that has OS on it

  1. Make sure to boot to the version of Windows you want to keep.
  2. Press the Windows key + X and choose Disk Management.
  3. Next, locate the partition that has the OS that you want to remove.
  4. Right-click and choose Format.
     
  5. Set the volume name and file system and click OK.
  6. Click OK to confirm.

For this method to work, make sure to back up all files from that partition beforehand since they will get removed.

2. Manually delete the Windows folder

  1. Boot to the version of Windows that you want to keep using.
  2. Navigate to the hard drive that has the OS that you want to remove.
  3. Locate the Windows folder, right-click it and choose Delete.
  4. Confirm that you want to remove it.

If you get an error while trying to do this, first you need to take ownership and gain permission over the Windows folder. You can do that by following these steps:

  1. Press the Windows key + X and choose Terminal (Admin).
  2. Run the following command to take ownership. Be sure to replace X with the drive that has the old version of Windows on it: takeown /f x:\windows /r
  3. Next, run this command to gain all privileges.  Once again, be sure to replace X with the correct drive letter: icacls x:\windows /reset /T
  4. After doing that, try to delete the folder again.

While you can remove Windows from a hard drive without formatting, this method might cause potential issues, so keep that in mind.

Does wiping a hard drive remove the OS?

Yes, wiping your hard drive will remove all files from it, including your operating system. However, you can just wipe a selected partition and keep your OS.

What happens if you delete your OS?

If you delete your operating system somehow, the PC won’t have anything to boot to and it won’t be able to start.

This only applies if you don’t have an operating system on another drive or partition on your PC.

Can I use my computer without OS?

No, your PC won’t work without an operating system. Your files will probably remain intact, depending on how your operating system was removed, but you won’t be able to access them until you install an OS again.

As you can see, it’s possible to remove your OS but keep the files only if you’re dual-booting your system. For best results, we recommend formatting the drive that was Windows on it, since it’s the most reliable solution.

These steps from this guide can be useful if you get Choose an operating system at the startup message or if you need to remove an extra Windows installation.

And if in some case you delete your OS by accident, you can check our guide on how to recover a deleted operating system.

What method do you use to remove the OS from the external hard drive? Let us know in the comments below.

How to Quickly Change Wi-Fi Priority on Windows 11

Most people never pay attention to the priority of their network connection as long as their Internet is working. Although it isn’t all that critical of a feature, it is one that can increase your productivity and overall time spent working in your home or office.

It’s one of the few things you may pick up when adopting a new operating that makes your time using the OS much easier and much more convenient for you, and the below guide helps explain how.

Does the PC prioritize Ethernet or Wi-Fi?

In most cases, Windows will automatically choose the best network to connect to. Usually, its priority by default will be Ethernet if it’s available because it’s usually faster than Wi-Fi. If only wireless connections are available, it will select the strongest.

However, sometimes, you may want to force a Wi-Fi connection over an Ethernet connection or use both Ethernet and Wi-Fi simultaneously.

How do I change the priority of my Wi-Fi in Windows 11?

1. By manually selecting a Wi-Fi connection

You can manually prioritize your Wi-Fi by clicking on the Wi-Fi icon on your taskbar. A list of available network connections in order of strength will appear. Here, you can click on your preferred Wi-Fi network and connect to it.

The only downside is that it’s not a reliable method because when you turn off and turn back on your PC, this setting will not hold. It will change to the strongest connection, and you’ll have to keep changing it every time.

2. By using the Settings app

  1. Hit the Windows key and click on Settings.settings windows 11
  2. Select Network & internet and click on Advanced network settings.going advanced network settings win11
  3. Scroll down to Related settings and click on More network adapter options.
  4. Right-click on the Wi-Fi adapter you wish to change priority and select Properties.
  5. Next, click on Internet Protocol Version 4 (TCP/IPv4) or Internet Protocol Version 6 (TCP/IPv6), then select Properties.
  6. Click on the Advanced button in the next window.
  7. Uncheck the Automatic metric box then in the Interface metric box, enter 1 or the level of priority you wish to set it to.
  8. Click on Apply, then OK to save the changes.

3. By using the Control Panel 

  1. Hit the Windows key, type Control Panel in the search bar, and click Open.control-panel-search fallout new vegas runtime error
  2. Click on Network and Internet.
  3. Select Network Sharing Center, then click on Change adapter settings.
  4. Locate the Network adapter you’d like to change network priority, right-click on it, and select Properties.
  5. Next, click on Internet Protocol Version 4 (TCP/IPv4) or Internet Protocol Version 6 (TCP/IPv6), then select Properties.
  6. Click on the Advanced button in the next window.
  7. Uncheck the Automatic metric box then, in the Interface metric box, enter 1 or the level of priority you wish to set it to.
  8. Click on Apply, then OK to save the changes.

4. By using the Command Prompt

  1. Hit the Windows key, type cmd in the search bar, and click Run as administrator.cmd-run-admin-w11 unexpected kernel mode trap windows 11
  2. Type in the following command to list available Wi-Fi connections, then hit Enter: netsh wlan show profiles
  3. Take note of the Wi-Fi name in 3 above, then type the following command. Remember to replace profile name with your actual Wi-Fi name, InterfaceName with Wi-Fi or Ethernet where applicable and # with the priority number: netsh wlan set profileorder name="profile name" interface="InterfaceName" priority=#

5. By using the PowerShell command

  1. Hit the Windows key, type PowerShell in the search bar, and select Run as administrator.
  2. Type the following command and hit Enter to get a list of all network adapters available: Get-NetIPInterface
  3. Note down the corresponding IfIndex value of the connection you wish to prioritize. Next, run the following command and remember to replace IFIndex with the one noted and IFMetric with the priority level you wish to set: Set-NetIPInterface -InterfaceIndex [IFIndex] -InterfaceMetric [IFMetric]

How do I set QoS for gaming?

QoS is a very powerful tool that can be used to optimize gaming performance. You can use it to ensure that important traffic, like gaming, gets priority over other types of data or when there’s a network congestion issue.

The most common method to achieve this is through your router. You can use QoS to tell the router or modem which applications and services are more important than others by setting priorities for each application and/or device connected to it.

The only limitation is that it applies to newer routers, and even then, you may still be unable to prioritize on an application basis.

If you’re not ready to upgrade your router, you’ll be happy to know that there exists bandwidth prioritization software that can help you achieve the same results.

You should now be able to set your Wi-Fi priority in Windows 11 and connect to whatever network you want if you have multiple Wi-Fi connections without any unnecessary drops in connection or interruptions.

If you have any questions, comments, or suggestions, please do not hesitate to leave us a message.

How to Mount, Read, or Format EXT4 on Windows 11 [2026 Guide]

EXT4 is a native Linux file system and until not long ago, you couldn’t access it on Windows. However, thanks to WSL2 (Windows Subsystem for Linux version 2), you can now mount, read, and format EXT4 on Windows 11.

Does Windows 11 support EXT4? Yes, now Windows 11 supports EXT4 through WSL2. However, you need to install it on your device or update the WSL2 kernel on Windows 11.

How do I access EXT4 on Windows 11?

1. Mount the EXT4 partition on Windows 11

  1. Click the Search bar, type powershell, and select Run as administrator from the results.
  2. Type or paste the following command and press Enter to get details about your drives and partitions: wmic diskdrive list brief
  3. Now type the following command and change the path with the actual data of your system: wsl --mount PATH
  4. For instance, in our example it could be wsl –mount \\.\PHYSICALDRIVE0 or wsl –mount \\.\PHYSICALDRIVE0 –partition1.

However, again, make sure that you have WSL2 installed and that the partition you are mounting is a Linux partition. Otherwise, the command won’t work.

Also, if you want to unmount the EXT4 partition, use the wsl –unmount command instead of wsl –mount with the same path.

2. Mount an EXT4 file system as a FAT partition

  1. Click the Search button, type powershell, and open the app as an administrator.
  2. Now, type the following command and replace PATH with the actual path of the Linux partition: wsl --mount PATH -t vfat
  3. This command will mount the EXT4 file system as a FAT file system drive in Windows. However, make sure that it is not used at that moment because you will run into Error code: Wsl/Service/AttachDisk/0x80070020.

Use the wsl –unmount command if you want to unmount the file system in Windows 11.

3. Access EXT4 on Windows 11

  1. Press the Windows key + E to open File Explorer.
  2. Once you have performed one of the first 2 solutions to mount the EXT4 Linux system, you should be able to see it and access the files on your distro.
  3. Furthermore, you should be able to access all the mounted items in the mnt folder.

How do I format an EXT4 partition in Windows 11?

Unfortunately, you can’t format an EXT4 partition in Windows 11 with any built-in tools. For that, you will either boot into Linux and perform the action from there or use a dedicated tool.

From our research, DiskGenius can help you with that, and EaseUS Partition Master has a lot more advanced features for the same purpose.

We also have a list of the best partitioning software for Windows and some of them allow you to format EXT4 partitions.

That’s it! We hope that now you are able to access your Linux EXT4 on Windows 11 and manage your files.

You might also be interested in reading our guide on how to dual-boot Windows 11 and Ubuntu.

If you have any questions or suggestions, feel free to convey them in the comments section below.

Turn On or Off Ease Cursor Movement Between Displays on Windows 11

Often, when using a dual monitor setup, the question of how to seamlessly get the cursor to move from one display to another arises. It can be frustrating when your mouse cursor moves from one display to another without your control.

Wouldn’t it be great if Windows, by default, let you easily switch from one display to the other? Luckily, Windows 11 has a feature that does exactly that and doesn’t require a lot of technical know-how to execute it. 

What does Ease cursor movement between monitors do? 

This feature helps prevent cursor drift when you move your mouse from one monitor to another. The option is disabled by default.

If you turn it on, the mouse pointer will smoothly transition from one monitor to another instead of jumping instantly or getting stuck around the display borders.

How do I enable or disable Ease cursor movement between displays?

1. By using the Settings app

  1. Hit the Windows key and click on Settings.
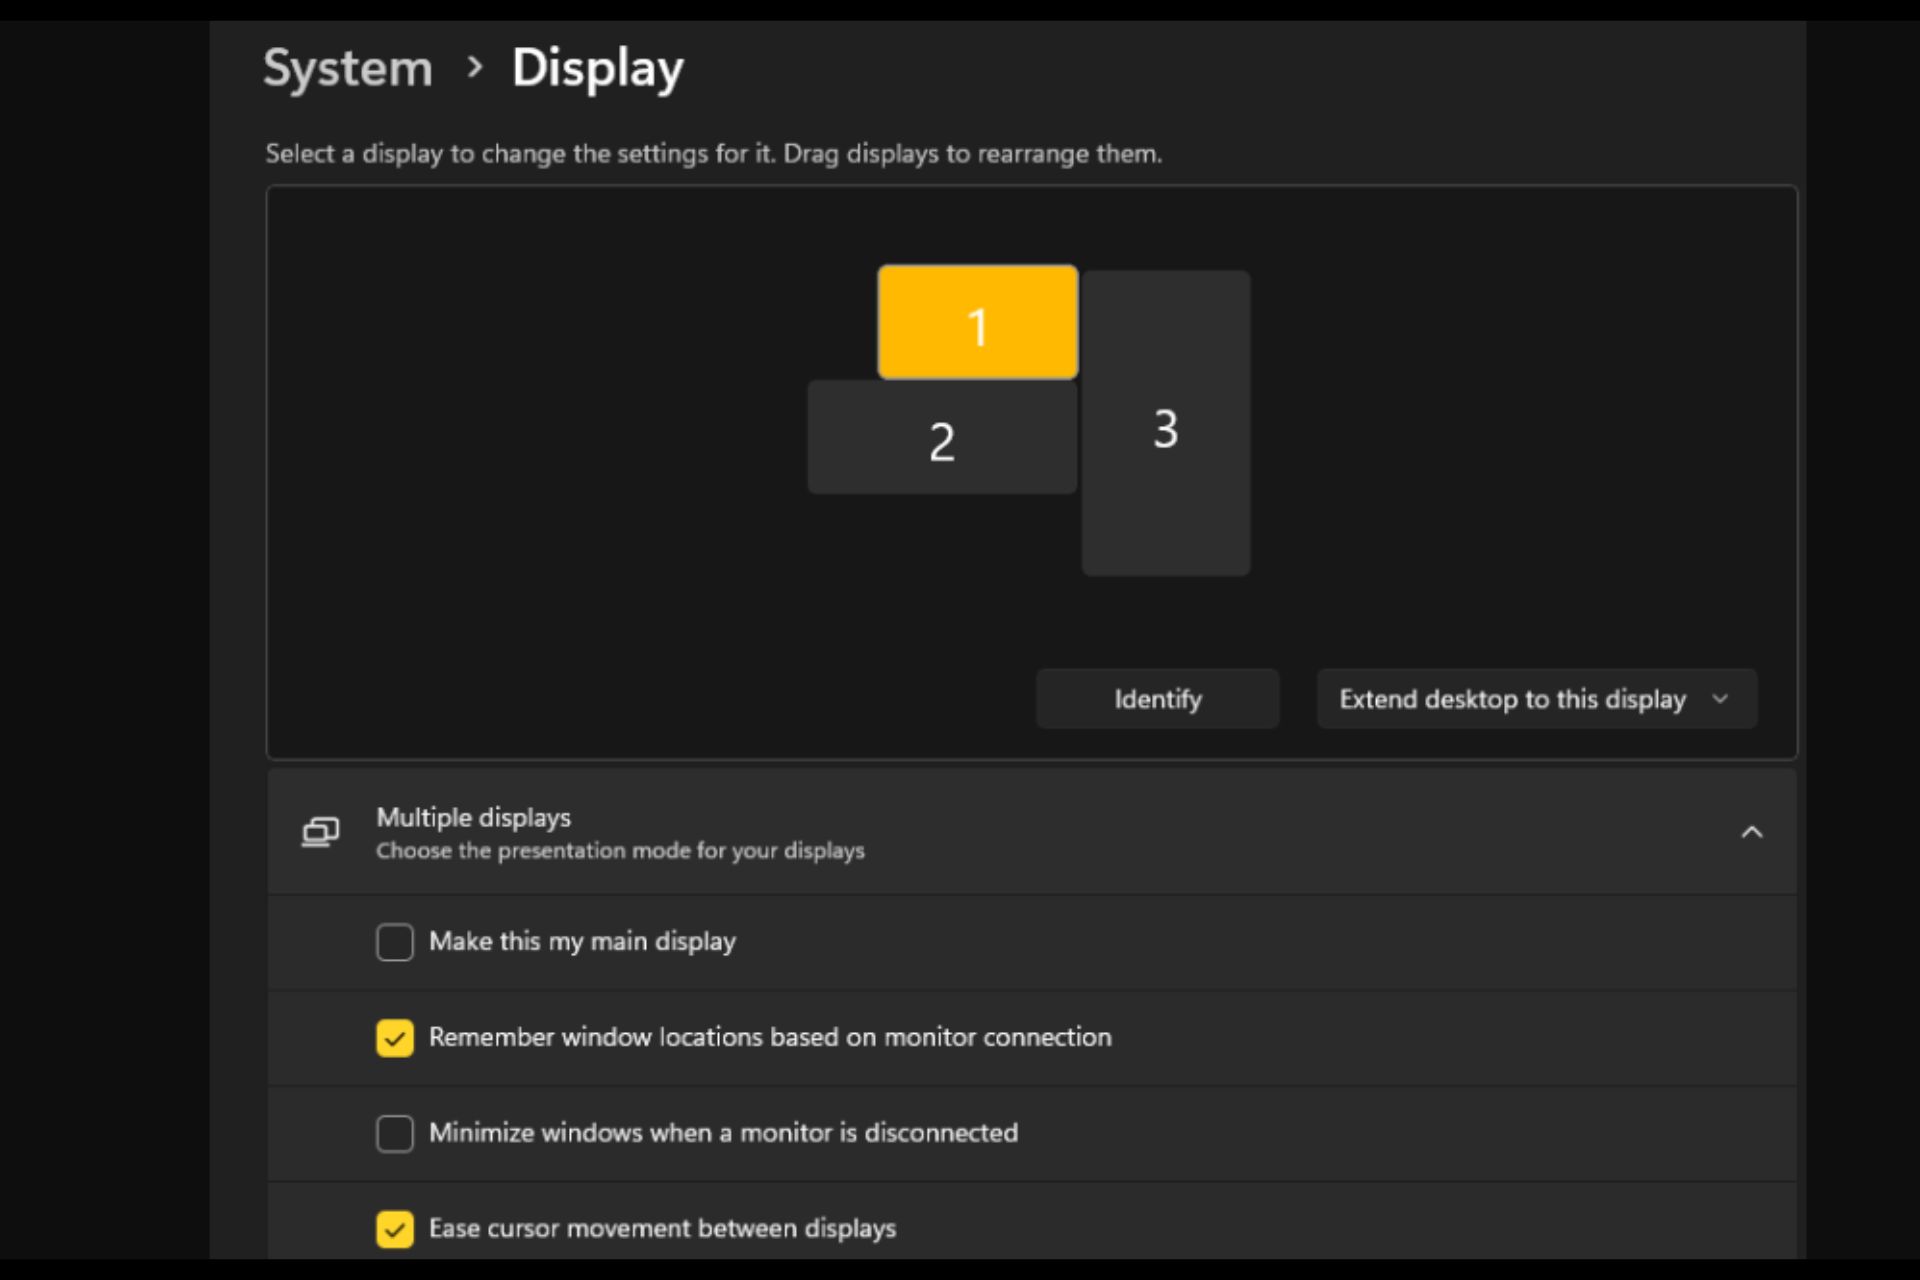
  2. Select System, then click on Display.Settings - System - Display High CPU usage New World
  3. Click on Multiple displays, then check the Ease cursor movement between displays option.

2. By using the Registry Editor

Note icon NOTE
Ensure you back up your Registry or create a restore point before making any changes that could be irrevocable and cause damage to your PC.
  1. Hit the Windows + R keys to open the Run command.
  2. Type regedit in the dialog box and hit Enter.
  3. Navigate to the following location: HKEY_CURRENT_USER\Control Panel\Cursors
  4. Locate the CursorDeadzoneJumpingSetting key, but if unavailable, right-click on an empty space, select New>DWORD (32-bit Value), and name it as so.
  5. Double-click on it, and under Value data, enter 1, then hit OK.
  6. Close the Registry Editor.

If you’d like to disable the settings, simply reverse-engineer the steps in solution 1 and set the Value data to 0 for the Registry option.

How can I fix Ease cursor movement between displays not working?

  • Ensure you’re running the latest version of Windows 11.
  • Consider changing your mouse settings, such as the pointer speed, for faster or slower movement, depending on your preference.
  • Ensure your graphics card and mouse drivers are up-to-date, and check for mouse cursor corruption.
  • Disable your PC’s hardware acceleration settings.

Unfortunately, when your primary monitor is not the same display size as your secondary monitor, you’re bound to experience issues such as your mouse going off screen. Sometimes, you’ll try to move windows between monitors, but the mouse gets stuck in a corner.

Hopefully, the cursor breezing through different displays will work out for you, and if it doesn’t, you can easily do away with it.

Meanwhile, if you have additional information about this process that would be of help to others, don’t hold back. Share your thoughts in the comment box below.

Change the Power Button Action on Windows 11 [5 Tips]

The power button can do a lot more than simply shutting down the PC, though that’s the default action for desktop users. And if you want to change the power button action in Windows 11, it’s easier than you thought!

Remember, the physical power button is different from the one in the Start menu, and the changes below won’t affect the actions of the latter. Besides, you will find slightly different power options depending on whether it’s a desktop or laptop.

Why change the power button action in Windows 11?

If you put the computer to sleep far too often than shut it down, changing how the hardware power button, i.e., the physical one on the PC, behaves will do. The same idea applies to Hibernate mode or simply turning off the display.

Changing the power button setting in Windows 11 will simplify things and make it easier to use your PC in a personalized way as well as prevent issues like a power button lockout.

How do I change what the power button does in Windows 11?

1. Using Control Panel

  1. Press Windows + S to open the Search menu, type Control Panel in the text field, and click the relevant search result.
  2. Click on System and Security.system and security to change power button action windows 11
  3. Click on Change what the power buttons do under Power options in Windows 11.
  4. Now, select from the dropdown menu how you want the computer to behave when the power button is pressed for both On battery and Plugged in. The options usually available are:
    • Do nothing: No action is performed
    • Sleep: The PC is put into sleep mode (default settings on laptops)
    • Hibernate: The PC is put into Hibernate mode
    • Shut down: The PC is shutdown (default setting on desktops)
    • Turn off the display: Powers off all connected displayschange power action
  5. Once done, click on Save changes at the bottom.

The settings here might be different for users. For instance, there will be an additional When I close the lid setting for laptop users. Similarly, some may find the Turn off the display option missing if their PC doesn’t support the S3 standard and has Modern Standby, the latter being the more recent of the two.

Also, the On battery setting will only be available for desktop users if they have a UPS connected. And remember, any changes you make through the Control Panel only apply to the current power plan.

2. Via Settings

Tip icon Tip
These settings are presently available in the preview builds and will soon be rolled out for regular users. Update Windows and check. If you still don’t find them, try the other options.
  1. Press Windows + I to open the Settings app, and click on Power & battery on the right in the System tab.power & battery
  2. Expand the Power button controls entry.
  3. Now, select the desired function from the dropdown menu next to Pressing the power button will make my PC under both Plugged in and On battery. 

3. Through Windows PowerShell

  1. Press Windows + R to open Run, type powershell, and hit Ctrl + Shift + Enter.powershell
  2. Click Yes in the UAC prompt.
  3. Now, paste one of the following commands and hit Enter, depending on the power button action you want to enforce in Windows 11:
    • On battery:

      Do nothing: powercfg -setdcvalueindex SCHEME_CURRENT 4f971e89-eebd-4455-a8de-9e59040e7347 7648efa3-dd9c-4e3e-b566-50f929386280 0 Sleep: powercfg -setdcvalueindex SCHEME_CURRENT 4f971e89-eebd-4455-a8de-9e59040e7347 7648efa3-dd9c-4e3e-b566-50f929386280 1 Hibernate: powercfg -setdcvalueindex SCHEME_CURRENT 4f971e89-eebd-4455-a8de-9e59040e7347 7648efa3-dd9c-4e3e-b566-50f929386280 2 Shut down: powercfg -setdcvalueindex SCHEME_CURRENT 4f971e89-eebd-4455-a8de-9e59040e7347 7648efa3-dd9c-4e3e-b566-50f929386280 3
    • Plugged in:

      Do nothing: powercfg -setacvalueindex SCHEME_CURRENT 4f971e89-eebd-4455-a8de-9e59040e7347 7648efa3-dd9c-4e3e-b566-50f929386280 0 Sleep: powercfg -setacvalueindex SCHEME_CURRENT 4f971e89-eebd-4455-a8de-9e59040e7347 7648efa3-dd9c-4e3e-b566-50f929386280 1 Hibernate: powercfg -setacvalueindex SCHEME_CURRENT 4f971e89-eebd-4455-a8de-9e59040e7347 7648efa3-dd9c-4e3e-b566-50f929386280 2 Shut down: powercfg -setacvalueindex SCHEME_CURRENT 4f971e89-eebd-4455-a8de-9e59040e7347 7648efa3-dd9c-4e3e-b566-50f929386280 3powershell to change power button action windows 11

The changes enforced via PowerShell will only apply to the current power plan. You can select another power plan and then execute the commands to modify it.

4. In Local Group Policy Editor

  1. Press Windows + S to open Search, type Local Group Policy Editor in the search bar, and click the relevant result.
  2. Expand Administrative Templates under Computer Configuration, and then select System.administrative templates
  3. Now, choose Power Management from the left, then select Button Settings under it, and double-click on either Select the Power button action (plugged in) or Select the Power button action (on battery) from the right to configure the two settings. power buttons
  4. Choose Enabled from the top left, select the desired configuration from the Power button action dropdown menu, and click Apply and OK to save the changes.policy to change power button action windows 11

You will also find policies for other settings here, including lid shutdown if it’s a laptop. In case Local Group Policy Editor is not available on your PC, check the OS edition, and if it’s Windows 11 Home, manually install gpedit.msc. Remember, these changes will reflect across all power plans. 

5. With the Registry Editor

  1. Press Windows + R to open Run, type regedit in the text field, and click OK.regedit
  2. Click Yes in the UAC prompt.
  3. Go to the following path from the navigation pane or paste it into the address bar and hit Enter: HKEY_LOCAL_MACHINE\SOFTWARE\Policies\Microsoft\Power\PowerSettings\7648EFA3-DD9C-4E3E-B566-50F929386280path
  4. If you can’t find the key or a DWORD below, right-click on the entry before it in the path, hover the cursor over New, and select DWORD (32-bit) Value or Key as the case may be.
  5. To change the power button function in Windows 11 for On battery, right-click on the DCSettingIndex DWORD, and select Modify.
  6. Replace the Value data with the value provided below for the desired setting:
    • Sleep: 1
    • Hibernate: 2
    • Shut down: 3
    • Do nothing: 0
  7. To change the power button behaviour in Windows 11 for Plugged in, right-click the ACSettingIndex DWORD, and select Modify.
  8. Paste the relevant value in the Value data text field to configure the power button action setting:
    • Sleep: 1
    • Hibernate: 2
    • Shut down: 3
    • Do nothing: 0
  9. Once done, click OK to save the changes, and then restart the computer for the new power button actions to apply.save changes

What else can I do with the power button in Windows 11?

The scope of the power button is limited in Windows and is primarily related to shutting down the PC, putting it to sleep and hibernation mode. 

You could also turn off the display, but the feature is present only in older systems that are compatible with the S3 power state. However, you can manually enable the S3 Sleep State in Windows.

In case you are wondering about the UI changes, removing the power button from the sign-in screen is easy!

Once you understand how to change the action of the soft power button in Windows 11, personalization abilities will go up a notch. For an even more seamless operation, you can create a shutdown shortcut key and quickly turn off the PC.

Lastly, users reported issues with the power modes, especially missing power plans in Windows 11. Running the built-in troubleshooter or updating the driver usually does the trick!

For any queries or to share your preferred power button action, drop a comment below.

What are Delivery Optimization files in Windows 11 & Can you Delete Them?

Delivery Optimization is the feature that helps Windows Update and Windows Store run and deliver updates faster. The cached files from Delivery Optimization are supposed to be deleted after a while, but for some of our readers, they kept piling up and occupying unnecessary space.

Is it safe to delete Delivery Optimization files? Yes, it is safe to delete the Delivery Optimization files and in this article, you will find out that it’s very easy to do so in Windows 11.

Although it isn’t recommended to manually delete Delivery Optimization files, you can do that automatically.

How can I delete the Delivery Optimization files on Windows 11?

  1. Click the Search bar, type disk cleanup, and open the tool from the results.
  2. If you have more than one drive, select the one with the system (Usually the C: drive).
  3. Check the Delivery Optimization Files option from the list and click OK. While you are here, you can also delete the caches, the temporary files, and more to free up additional space.
  4. Click on the Delete Files button to acknowledge the selection.

The Delivery Optimization files are used to update other computers in the network as well. They are harmless but if you need a little extra space on your system drive, this is how you can delete them.

How do I turn off Delivery Optimization on Windows 11?

Although Delivery Optimization helps the computers in your network get updates faster, it may also lead to increased bandwidth usage so if you’re running on a metered connection, you should disable it.

To disable the Delivery Optimization, access Settings, then go to Windows Update and click on Advanced options. From there, click on Delivery Optimization and turn it off.

We also have a complete guide with more methods on how to turn off Delivery Optimization on Windows 11.

Where are the Delivery Optimization files stored? They are usually stored on your system drive. To locate them, you can start File Explorer, change the view so you may see hidden files, and search for delivery optimization.

You might be interested in reading our guide on how to fix Windows Update errors for more information.

For any other questions or suggestions, you can deliver them by using the comments section below.

Bing will be part of Meta AI’s chat experiences

Meta Connect 2023 event is happening on September 27-28, and the tech giant announced some exciting devices and features coming to the Meta apps in the future. Meta Quest 3, the anticipated VR headset, was finally announced, along with the next-generation smart glasses, which are coming soon.

But aside from the devices, which are exciting in their own rights, the most exciting thing about the event was the AI features that Mark Zuckerberg announced. And there are a lot.

We’re talking about Meta AI experiences, interactive AI models with their own personalities and identities. They will be based on popular celebrities, influences, and icons, such as Snoop Dogg, Naomi Osaka, Tom Brady, and many others.

We’re also launching 28 more AIs in beta, with unique interests and personalities. Some are played by cultural icons and influencers, including Snoop Dogg, Tom Brady, Kendall Jenner, and Naomi Osaka. 

Meta

And one of the (un)expected announcements of the evening is that Meta is continuing its AI partnership with Microsoft, and Bing will be integrated into these Meta AI experiences.

In addition to copilots across the portfolio of Microsoft products, we are a platform company that provides the tools and services needed for others to succeed in their AI ambitions. Which is why today, we’re thrilled to announce that we’ve begun to work with Meta to integrate Bing into Meta AI’s chat experiences enabling more timely and up-to-date answers with access to real-time search information.

Microsoft

What are Meta AI experiences?

Meta AI experiences are AI models that will be integrated into Meta’s app, such as Messenger, Instagram, Threads, and WhatsApp, and will be able to interact with you, whenever you need them.

But more than that, Meta AI experiences is a portmanteau for all AI-enhanced and AI-based features coming to Meta’s apps and devices.

For example, Meta will soon launch AI stickers on Facebook and Instagram, allowing users to use AI to edit their posts, images, and so on.

We’re starting to roll out AI stickers across our apps, and soon you’ll be able to edit your images or even co-create them with friends on Instagram using our new AI editing tools, restyle and backdrop. 

Meta

Then there is Meta AI, an assistant similar to Windows Copilot, that can be summoned in Messenger and WhatsApp chats. It will be able to use Bing to give you real-time information and generate art for you, on the spot, and for free. However, for now, Meta AI will be limited to the US region only.bing meta ai

Lastly, Meta is also releasing an AI studio, which will allow customers and businesses, including you, to build and generate their own AI models. The AI studio will be released at a later date, but Meta is giving the tools to the people, and they can come up with their own personalized AI models.

Fix: Control Panel is Not Showing All Programs on Windows 11

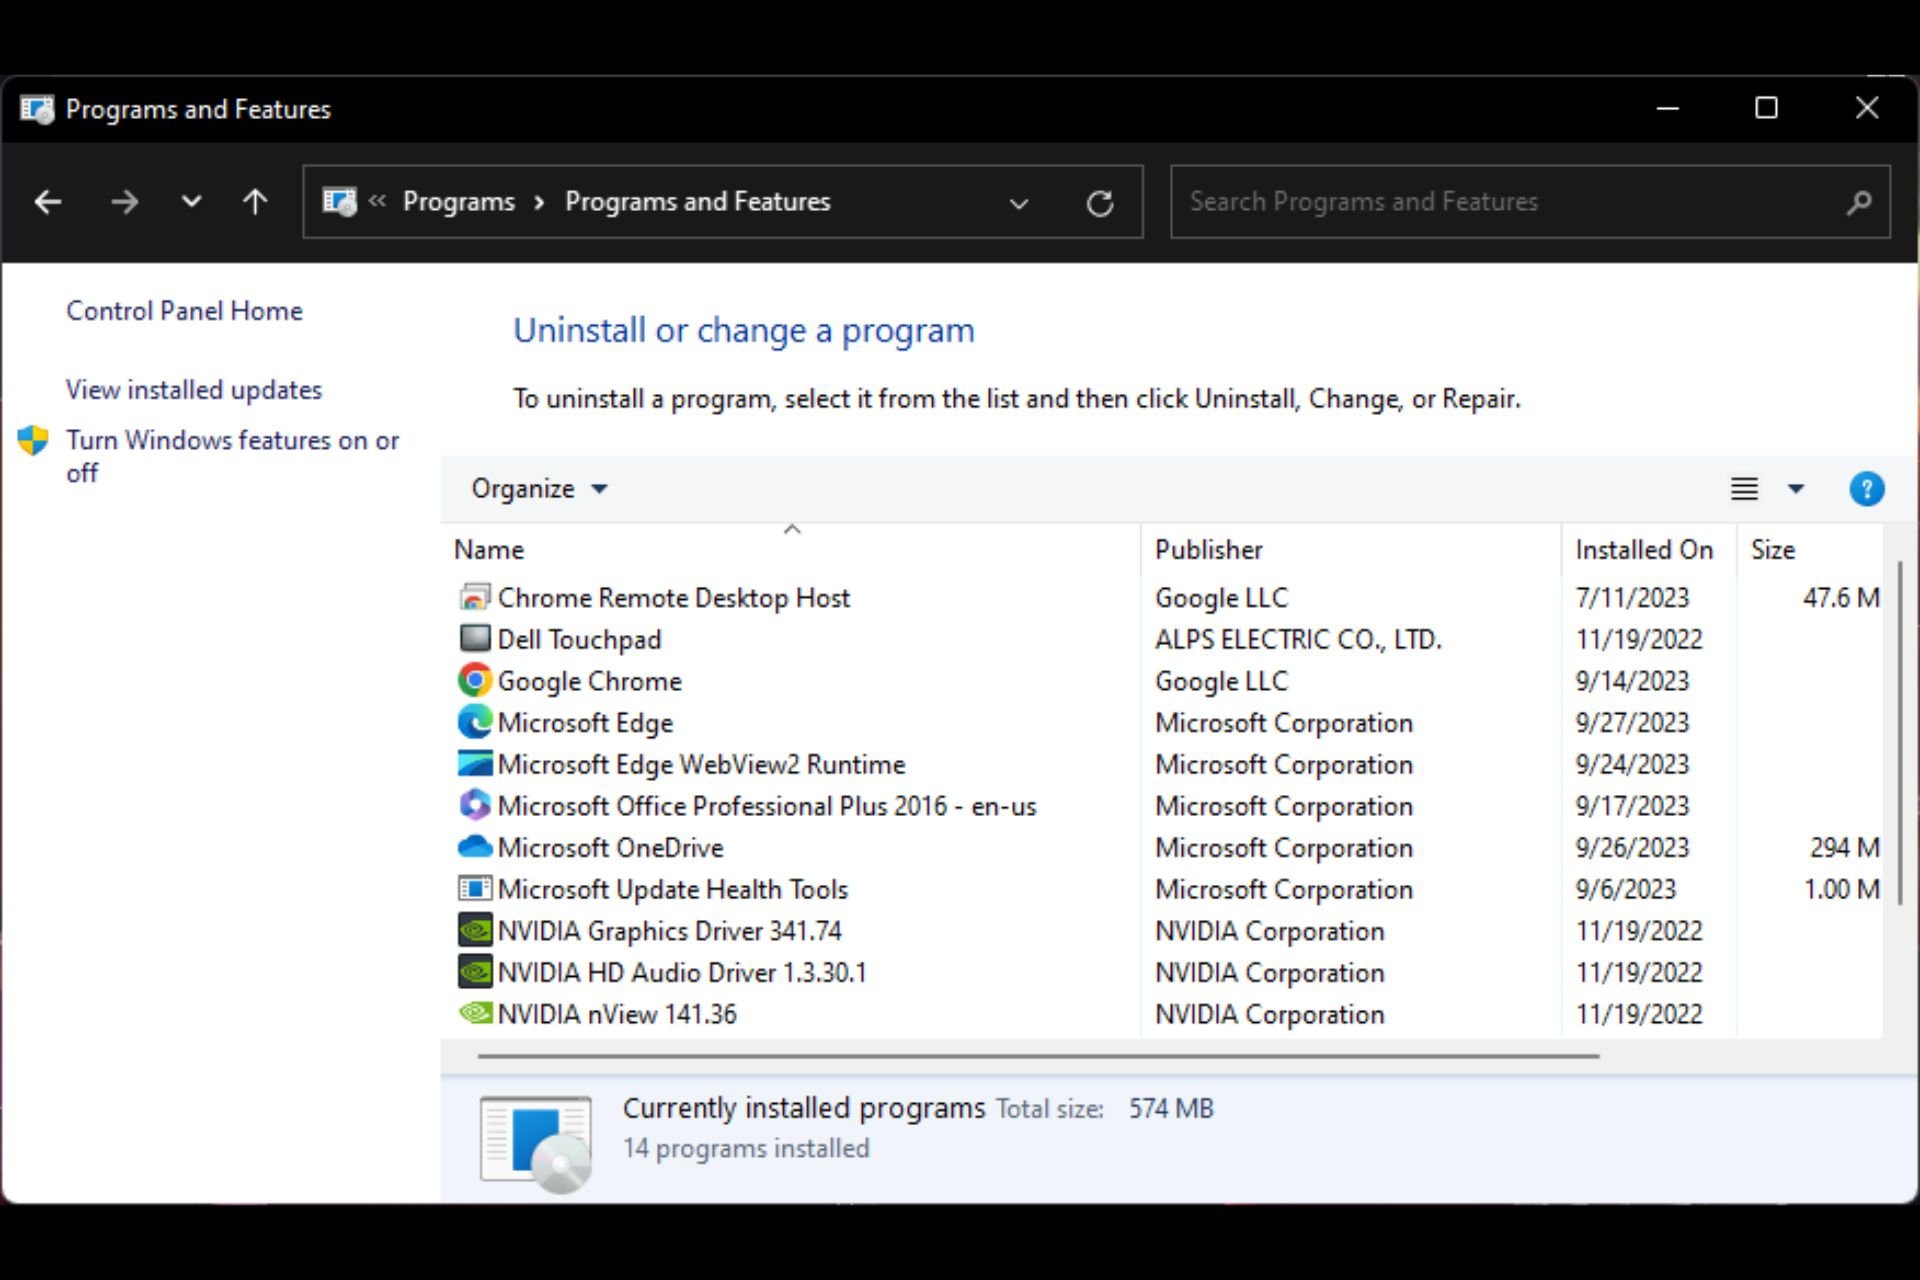
Picture a situation where you want to uninstall an app, and it’s not there when you go to the Control Panel. This is your one-stop shop for managing apps where you can change, repair, uninstall, or adjust related settings so you can imagine how this can be annoying.

In most cases, it’s just a system glitch that can be quickly resolved, but if not, we have some upvoted solutions that are bound to come to your rescue.

Why are some apps not showing in the Control Panel? 

  • It’s possible the application is not installed properly or is corrupted.
  • The application may be installed successfully, but it’s not in the standard location that Windows looks for them.
  • You may have disabled the application.
  • Downloading illegal third-party and pirated software may be incompatible with Windows and hence can’t be recognized. 

How do I see all programs in Windows 11’s Control Panel?

First, check off the following prerequisites before moving on to the somewhat technical solutions below:

1. Run the DISM and SFC scans

  1. Hit the Start Menu icon, type cmd in the search bar, and click Run as administrator.cmd-run-admin-w11 unexpected kernel mode trap windows 11
  2. Type the following commands and press Enter after each one:DISM.exe /Online /Cleanup-Image /Restorehealth sfc /scannow

2. Run the Program Install and Uninstall troubleshooter

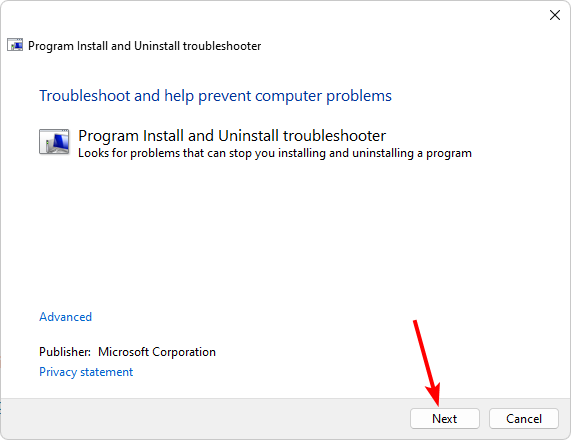
  1. Download the Program Install and Uninstall troubleshooter and install it.
  2. Open it and click on Next.
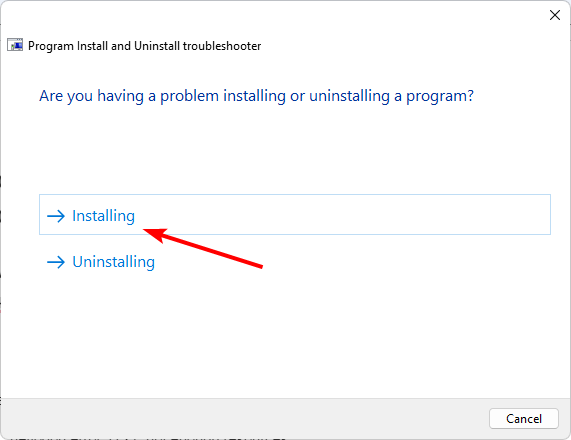
  3. You’ll be asked whether you have a problem installing or uninstalling a program. Select one option.
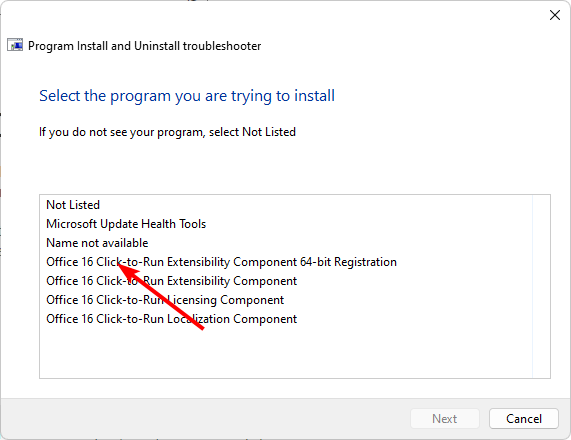
  4. Next, you’ll be asked to select the program that is not installing. Pick the problematic program from the list.
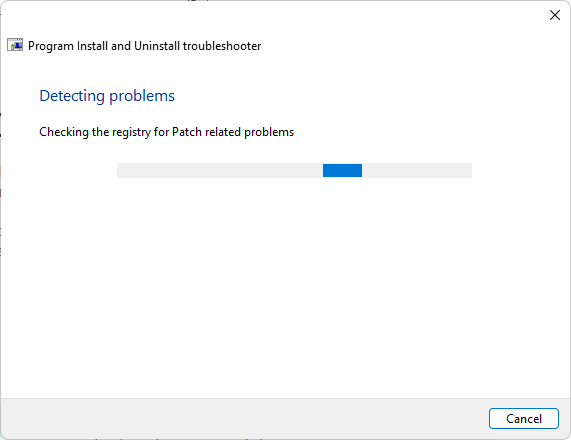
  5. The troubleshooter will start scanning for problems.
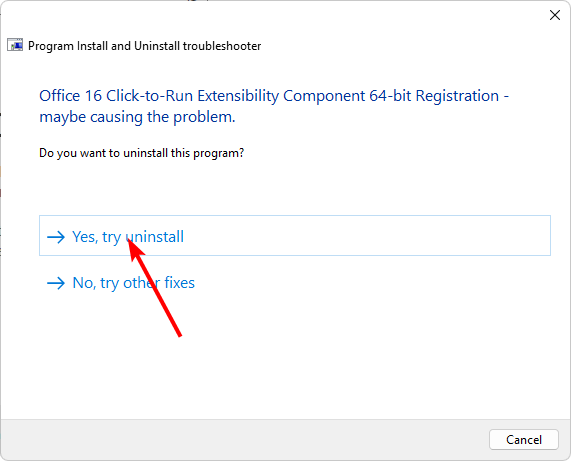
  6. Once it completes, you’ll be presented with two options. Pick either and wait for the troubleshooter to recommend fixes.

3. Install the problematic app in compatibility mode

  1. Locate the .exe file of the problematic problem usually in one of the following paths depending on your version of Windows: C:\Program Files (x86) or C:\Program Files
  2. Scroll down until you find the program you’re looking for. 
  3. Right-click on the .exe file of the program and select Properties.    
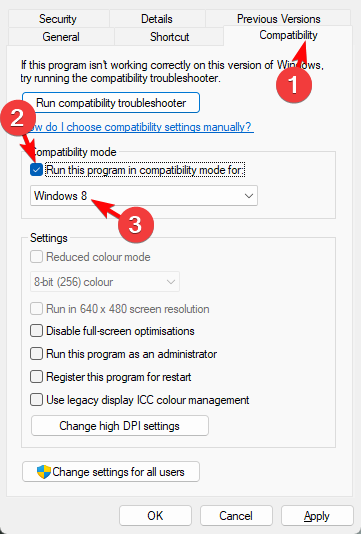
  4. Navigate to the Compatibility tab, check the Run this program in Compatibility mode option, and select Windows 8  from the drop-down menu.   run this program in compatibility for
  5. Allow the program to finish installing, then check whether the error persists.

4. Scan for viruses

  1. Press the Windows key, search Windows Security, and click Open.
  2. Select Virus & threat protection.
  3. Next, press Quick scan under Current threats.
  4. If you don’t find any threats, proceed to perform a full scan by clicking on Scan options just below Quick scan.Scan options
  5. Click on Full scan, then Scan now to perform a deep scan of your PC.Full Scan Scan Now
  6. Wait for the process to finish and restart your system.

5. Create a new user profile 

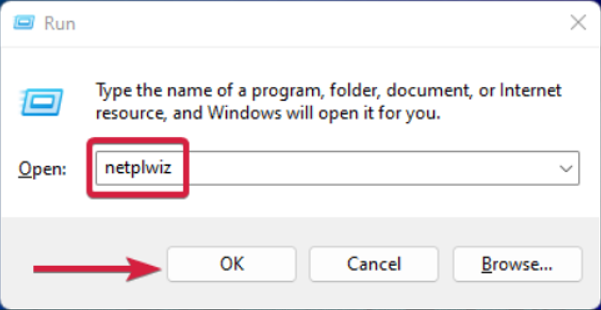
  1. Press Windows + R to launch the Run console, enter netplwiz in the text field, and click OK.
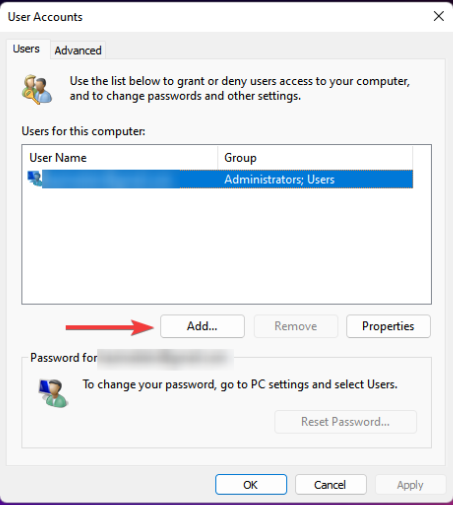
  2. Click Add in the User Accounts window.
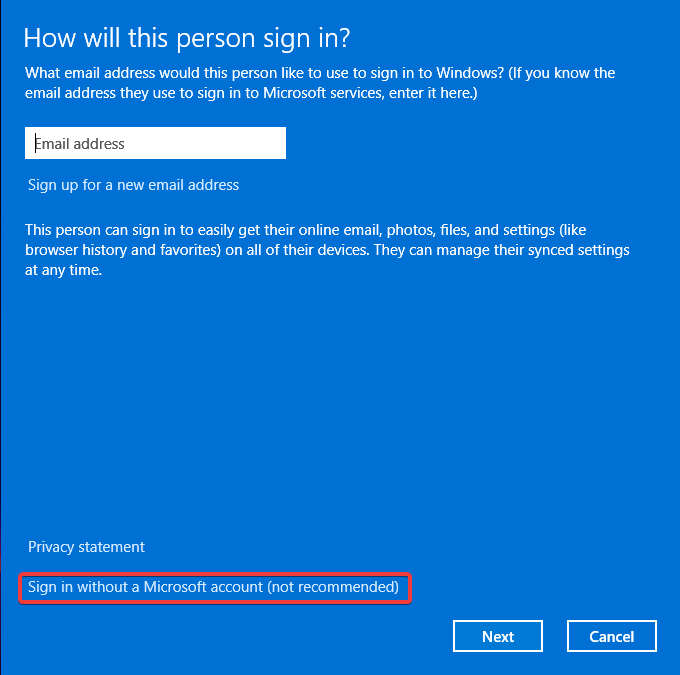
  3. Select Sign in without a Microsoft account (not recommended).
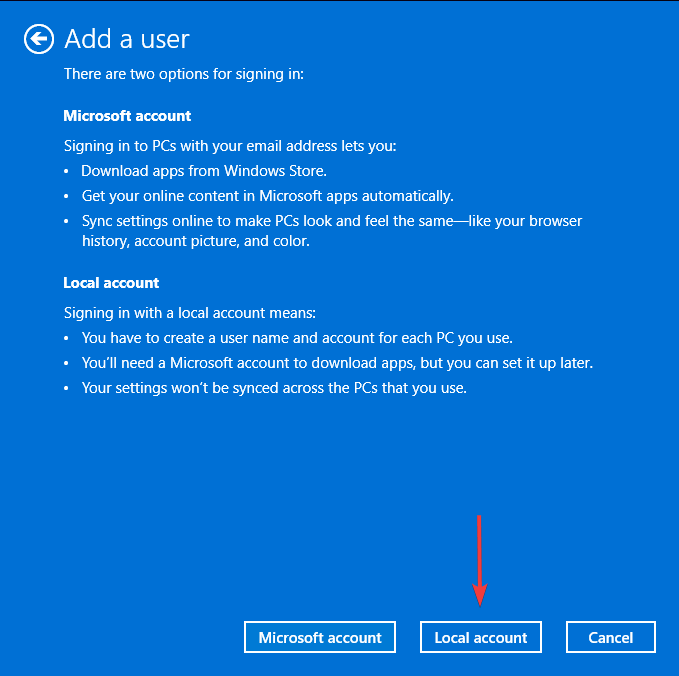
  4. Click on Local account button.
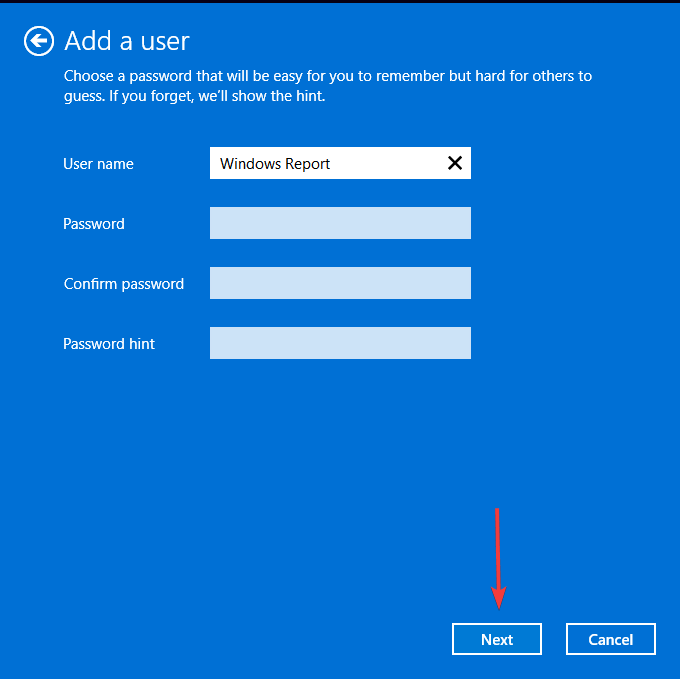
  5. Enter a username and password (optional) for the new user account, and a hint, in case you set a password. Once done, click on Next.
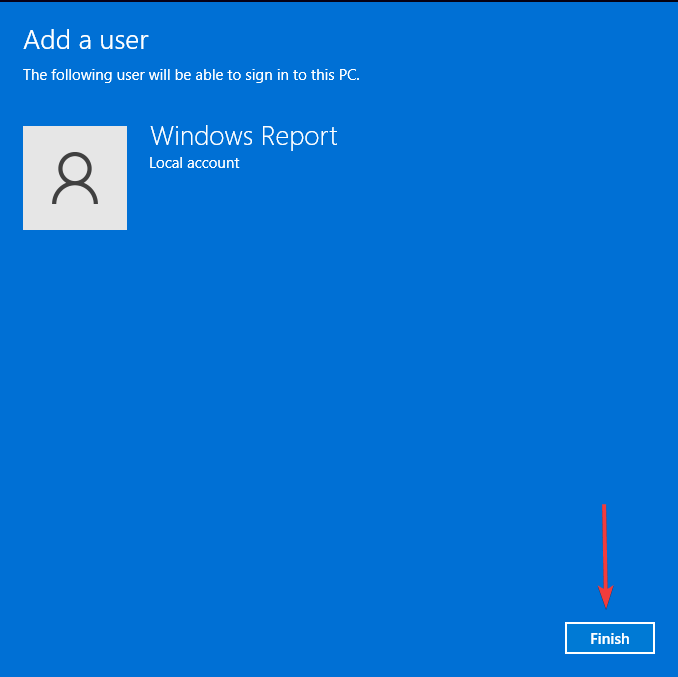
  6. Click on Finish to create the Local account.

Creating a new user profile will not fix the issue, but if programs disappeared in one profile but show up in the new one, you can conclude that you have a corrupt user profile and take steps to repair it.

Such issues can cause apps to act abnormally. You may be running the programs, but your Task Manager shows no instances of active apps.

How to uninstall programs not listed in the Control Panel on Windows 11

  • Use the Settings app – Go to Apps > Apps & features, locate the app, right-click on the three ellipses, and then select Uninstall.
  • Use the app’s uninstaller – Locate the program’s uninstaller. It’s usually in C:\Program Files or C:\Program Files(x86) and run it.
  • Use the Registry Editor – Navigate to the following location, locate the UninstallsString entry, and double-click on it. Copy the Value data entry to a Run command, and hit Enter to uninstall the program. HKEY_LOCAL_MACHINE\SOFTWARE\Microsoft\Windows\CurrentVersion\Uninstall\ProgramName
  • Use uninstaller software – This is one of the most comprehensive methods, as most uninstaller software also gets rid of corrupt remnant files.

We’d recommend you stick to the more straightforward uninstallation methods and only use the Registry Editor if absolutely necessary. This is because editing the registry manually can have dire consequences unless you create a restore point.

Hopefully, this article was able to help you get your list of programs back to your Control Panel as it should be. If you were having issues other than just the programs not showing, such as default apps missing, we have an answer in our detailed article.

Have you encountered this problem before? If so, which method helped you get your programs back? We’d love your feedback so drop us a comment down below.

Edge search suggestions will have thumbnails in the address bar

Edge Canary on Android is getting a feature that Google Chrome has had for years: the ability the see little thumbnails of each search suggestion. According to Windows enthusiast, @Leopeva64, who spotted the feature, whenever you search for something on Edge, the browser will automatically show suggestions with thumbnails attached to them.

For now, the search suggestions’ thumbnails only show up on Edge Canary for Android. The other Edge channels, such as Edge Dev, don’t have the feature yet.

Google Chrome has had this feature for years, and it helps users get a better idea of what they’re looking for. It also enhances the experience of web browsing, as thumbnails often motivate people to spend more time on search engines.

With this update, Edge is finally coming closer and closer to Chrome, and if the Microsoft browser keeps implementing similar features, it might actually have a chance to compete with Chrome in the long run.

If the feature is currently on Edge Canary, then it will be released to the Stable channel at some point in the following weeks. Are you excited about it?

Exclusive images: Lenovo’s upcoming Tab M11 tablet looks very sexy

Excited for a new Lenovo tablet? If the answer is yet, then you should know that Lenovo will release the new Lenovo Tab M11 soon, and we have exclusive images of the device. A hint: it looks absolutely gorgeous. Another hint: it’s not a major improvement over its predecessor, at all.

The new Lenovo Tab M11 will be pretty much perfect for on-the-road situations, as the device only weighs around 466 g (1.03 lbs), and it has a height of 166 mm. Looking for an ultraportable tablet? This might be it.

Lenovo Tab M11 will also sport an 11-inch LCD screen, with a maximum resolution of 1920×1200, thus becoming the perfect device for binge sessions and cinematic experiences. And speaking of binge sessions, don’t worry. You’ll be able to do it, as the Lenovo Tab M11’s battery life will last up to 10 hours playing videos. And if you need to do it all over again, its 5V/2A Charging Adapter will charge the battery in no time.Lenovo Tab M11

The tablet will come in 2 colors, as Lenovo Tab M11 will be available in a Luna Grey shade, and Seafoam Green Version. And, at launch, Lenovo Tab M11 will run on Android 13. But you shouldn’t worry here either, as Lenovo plans to upgrade it to Android 15, with security patches until January 2028. Lenovo Tab M11

Overall, the tablet is more than decent: it has a MediaTek G88 Octa-Core processor, and it will be released with different memory specs. For example, customers will be able to choose between a Lenovo Tab M11 with 4GB RAM and 64/128GB storage, or an 8GB RAM with 128GB storage version. And if that isn’t enough, Lenovo also has an expandable SD card support of up to 1TB.

Lenovo Tab M11 will be released with a lot of pre-installed software including YouTube Music, Pay (Wallet), GBoard, Google News, Lenovo Vantage, and many more.

Plus, if you want to use it for creative purposes, Lenovo will release special accessories for it. We’re talking about the Lenovo Tab Pen and a Folio Case. The Lenovo Tab Pen will allow you to transform it into a canvas, where you can bring your visual ideas to life. Lenovo Tab M11

The device doesn’t have a release date or a price, but considering the price of the other Lenovo tablets, this one should cost around ~$330.

The biggest drawback

Considering the Lenovo Tab M10 tablet, which was released 3 years ago, in 2020, the Tab M11 doesn’t feel as if it changed much.

It offers a bigger screen, sure, and the ability to add more storage through the SD card makes it a useful device to store a lot of pictures, videos, and so on. Adding its ultraportable design to these, the Tab M11 can be taken virtually anywhere.

But if you check the full specifications of the Lenovo Tab M11, you’ll notice that the differences between it and the Tab M10 are small.

And if we are to compare it to the newest Tab M10 version that includes 5G and was released earlier this year, the differences are even smaller. Ironically, on some points, as video playback, Tab M10 5G (12 hours of video playback) performs better than Tab M11 (10 hours of video playback).

So while the newly-leaked Lenovo Tab M11 may have a nice design, and its base specs are good enough to make it a useful device, overall it’s not even a decent improvement from Tab M10 5G. Is it worth it? Well, the specs should speak for themselves. Check them out below.

Lenovo Tab M11: full specifications

Processor

  • MediaTek G88 Octa-Core

Dimensions

  • Height: 166 mm
  • Weight: 255 mm
  • Thickness: 7.5 mm

Weight (for tablet only)

  • ~465 g (1.03 lbs)

Operating System: Android 13 (will upgrade to Android 15 and it will receive security patches until January 2028)

Display

  • Size: 10.95″
  • Screen: LCD
  • Resolution : 1920 x 1200
  • PPI: 207
  • Color Gamut: 72% NTSC
  • Brightness: Up to 400 nits
  • Screen-to-Display Ratio: 85%

Colors

  • Luna Grey
  • Seafoam Green

Card Slot

  • Type: Single Card Slot
  • Slots: TF/TF + Nano

Integrated Camera

  • Rear: 8MP/13MP
  • Front: 8MP

Sensors

  • Accelerometer (G) Sensor
  • Ambient Light Sensor
  • Gyroscope
  • Hall Sensor

Login Security

  • Fingerprint: N/A
  • Face Unlock: Yes

Buttons and Ports

  • USB Type-C 2.0
  • 3.5 mm Audio Jack

Audio

  • 4 Speakers Optimized with Dolby Atmos
  • Single Microphone

Memory

  • RAM + ROM:
    • 4 GB + 64 GB
    • 4 GB + 128 GB
    • 8 GB + 128 GB
  • Card Slot: with Expandable SD Card Support exFAT Up to 1 TB

Battery (for ROW SKU)

  • Type: Li-ion Polymer
  • Capacity: 7040 mAh (Typical)
  • Video Playback: 10 Hours
  • Web Browsing: 10+ Hours
  • Music Playback: 50 Hours

Wireless Connectivity

  • WLAN: 802.11 a/b/g/n/ac with ax features
  • WiFi 2.4 GHz + 5 GHz
  • Bluetooth: 5.1
  • WiFi Direct
  • WiFi Display
  • GLONASS/GALILEO
  • GPS, A-GPS

Lenovo Tab M11’s box:

  • Lenovo Tab M11
  • USB Type-C 2.0 Charging Cable
  • 5V/2A Charging Adapter
  • Quick Start Guide & Safety
  • Warranty
  • SIM Tray Pin

If you already own a Lenovo Tab M10 5G, purchasing its next version wouldn’t make any sense, unless Lenovo comes up with some innovative features to it.

4 Ways to Connect Two Windows 11 Computers

Sometimes it’s necessary to connect two computers running Windows 11 to share your files. This can be done using the wireless connection or via cable.

There are a few different ways regardless of connection type, and today we’ll show you all you need to know about all of them:

How do I connect two computers together on Windows 11?

1. Use the existing network

  1. Press the Windows key + R and enter control.
  2. Navigate to the Network and Sharing Center.
  3. Select Change advanced sharing options.
  4. Make sure that Network discovery is enabled as well as File and printer sharing.

Do this on both devices and you should be able to see other computers in the same network. This method works for both wireless and Ethernet connections.

2. Connect PCs directly with Ethernet cable

  1. Connect both devices with a crossover Ethernet cable.
  2. Make sure that Network discovery and File and printer sharing are enabled.
  3. Open the Control Panel and go to Network and Sharing Center.
  4. In the left pane, Change adapter settings.
  5. Next, double-click your network and then click on Properties.
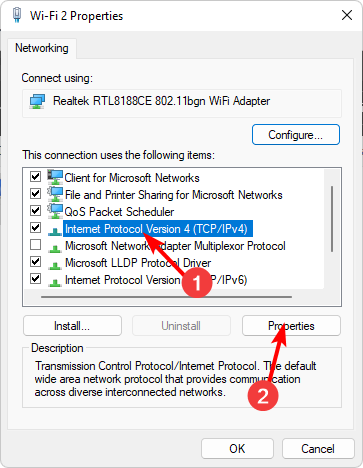
  6. Select Internet Protocol Version 4 (TCP/IPv4) and click on Properties.
    IPV4 Properties
  7. Select Use the following IP address.
  8. Set IP address to: 192.168.1.10 (you can use any other number instead of 10). Set the Subnet mask to 255.255.255.0 and Default gateway to 192.168.1.1 and save changes.
  9. Do the same for the other PC, but be sure to assign it a different IP address, such as 192.168.1.11. The subnet and gateway address must remain the same.

In case you’re not familiar with crossover cables, they look like regular Ethernet cables, but their wiring pattern is different. This allows you to connect two PCs directly and exchange data.

Straight Ethernet cable has its own wiring pattern and it can’t be used to connect PC to a PC directly. This means that it only allows you to connect your PC to a network device such as router or switch.

3. Create an ad-hoc wireless network

  1. Press the Windows key + S and enter powershell. Choose Run as administrator.
  2. Next, run the following command: netsh wlan set hostednetwork mode=allow ssid=WindowsReport key=password123
     
  3. Next, to start the network, run: netsh wlan start hostednetwork
  4. On the other computer, look for the WindowsReport network and connect to it.
  5. To stop the network run on the primary PC: netsh wlan stop hostednetwork

In case you weren’t able to run commands from steps 2 or 3, it means that your PC doesn’t support this feature.

4. Use Bluetooth

  1. Make sure that both devices are in the Bluetooth range.
  2. On both devices, go to Settings and choose Bluetooth & devices. Make sure that Bluetooth is enabled.
     
  3. Next, click on Add device and choose Bluetooth.
  4. Ensure that the other device has pairing mode enabled.
  5. Select it from the list and that’s it.

To learn more, we have an in-depth guide on how to share files over Bluetooth on Windows.

How do I share files between computers in Windows 11?

  • You can do that with network file sharing and share files with other PCs in the same network.
  • Connect two PCs directly via Ethernet cable or USB.
  • Create ad-hoc network on one PC and connect the other to it.
  • Share files over a Bluetooth connection.

Can you directly connect two computers to transfer files?

Yes, you can do that with a crossover Ethernet cable or a USB cable. If you want to use a USB cable, you might need to use additional software to transfer files.

As you can see, it’s pretty simple to connect two computers using Windows 11. We suggest using network sharing since it works in every network with minimal setup.

You can also transfer your files using FTP or you can use file sharing tools to achieve similar results.

Did we miss your favorite method of connecting two computers? If so, don’t hesitate to let us know in the comments.

How to Format an NVMe SSD on Windows 11

To format an NVMe SSD on Windows 11 is similar to formatting any other drive, whether it’s an internal or external one, placed in an enclosure.

NVMe stands for Non-Volatile Memory Express, and it usually uses the M.2 slot for connection. NVMe SSDs are a lot faster than any SATA SSD but have a shorter lifespan.

Can you format an NVMe SSD? Of course, you can, and it’s even recommended to do so, especially if you have used it before on another system or for other purposes. As you will see below, formatting an NVMe SSD is no different then with other SSDs.

How can I format an NVMe SSD on Windows 11?

Note icon NOTE
Formatting the NVMe SSD will erase all data from it so we recommend backing up all the important files and folders from it first.

1. Using Disk Management

  1. Right-click the Start button and select Disk Management from the list.
  2. Right-click on the NVMe SSD and select the Format option.
  3. In the next pop-up window, you can select the name of the drive and change the file system if you want, then click OK.
  4. You may also uncheck the Perform a quick format box if you want the system to permanently delete all the data from the drive. The process, however, will take longer.

This is the easiest way to format an NVMe SSD in Windows 11 and the procedure is identical in Windows 10 as well.

You may also format a drive that is not visible and the highlighted guide will help you with the right instructions to do so.

2. Using Diskpart

  1. Click the Search bar, type cmd, and select Run as administrator from the results to open Command Prompt with full privileges.
  2. Type diskpart and press Enter to launch the app.
  3. Next, type list disk and press Enter to see all available drives and run the following command to select the right one (replace 0 with your actual drive number): select disk 0
  4. Now, run the clean command to clear all the data from the drive.
  5. Type or paste the following command to create a primary partition on the drive: create partition primary
  6. Finally, type the following command to format the partition with NTFS file system: format fs=ntfs
  7. If you want to assign it a drive letter, you may also type assign and press Enter.

Formatting the NVMe SSD using Command Prompt and Diskpart can be a bit more time-consuming but it does the same job.

3. Using Command Prompt

  1. Click the Search bar, type cmd, and select Run as administrator from the results.
  2. Assuming you already know the drive letter of the NVMe SSD, type the following command and press Enter (replace d with the correct drive letter for your system): format d: /fs: NTFS

This is a much quicker way to format the NVMe SSD because Windows also recognizes the format command and it can perform the process without any other tools. However, sometimes, you may get the Windows cannot format this drive error or encounter other related issues.

4. Use a third-party partitioning tool

As you have noticed, you can format an NVMe SSD with Windows built-in tools. However, you may also employ the help of a third party disk management software that will make everything easier.

For example, one of the best disk management tools is AOMEI Partition Assistant because it includes all disk management features like resizing, merging, splitting, moving, or extending partitions.

This app can help you safely create partitions, allocate space, and manage your hard disks without losing any data.

⇒ Get AOMEI Partition Assistant

How to format an NVMe SSD if it’s the system drive?

If the NVMe SSD is your system drive, you won’t be able to format it by using these methods. However, here’s how you do it:

  • Create a bootable Windows 11 media.
  • Enter BIOS and change the boot sequence to boot from the media you have just created (USB).
  • Run the Windows 11 setup and when you are prompted if you want to format the drive, select the option.

Keep in mind that issues with NVMe can occur, and many reported that NVMe is not showing up in BIOS, but we tackled that issue in a separate guide.

You can follow a full walkthrough on how to format a Windows computer when preparing an NVMe system drive for a clean installation.

Our list of the best formatting software for Windows will come in handy if you need more help with that. You can learn more about what an M.2 SSD is and how it works in this detailed guide on M.2 SSDs.

For any questions or suggestions, don’t hesitate to use the comments section below.

Device Encryption vs BitLocker: Which One’s Better on Windows 11?

Ever faced the question of whether you should choose Windows Device Encryption or BitLocker for your Windows 11? While both programs work for encryption, there are some noteworthy differences between them.

Here’s how Device Encryption and BitLocker compare so you can choose which one to use on your devices.

How are Device Encryption and BitLocker Different?

Security Features

Device Encryption Overview

Device Encryption is a Windows 11 Home feature available from the Settings app and encrypts the data on your device. This includes your files, email messages, photos, and other personal information.

It uses mathematical techniques for encryption and helps protect your data if your device is lost or stolen. When you encrypt your device, all files stored on it are protected by a unique key that only you know.

This means that even if someone else manages to get their hands on your device, they won’t be able to access any of your private data without knowing the key.

BitLocker Overview

BitLocker is a disk encryption feature in Windows 10 and Windows 11 Pro editions. It helps protect against unauthorized access to the operating system by encrypting all data stored on the drive.

Unlike Device Encryption, it uses XTS-AES 128-bit encryption. The mathematical techniques use a series of algorithms to encrypt data, and this may not be enough to keep your information safe.

XTS-AES 128-bit encryption is a more secure method. It uses a combination of two different ciphers, XTS and AES, which makes it harder to decrypt.

If a computer with BitLocker enabled is lost or stolen, the thief won’t be able to access any of its content without the required PIN or Recovery key.

Also, BitLocker allows room for customization as you can choose which drive to encrypt, while Device Encryption applies the blanket solution and encrypts the entire drive with no option to exclude secondary drives.

Differences in Security Features

FeatureDevice EncryptionBitLocker Encryption
SecurityMathematical techniquesXTS-AES 128-bit encryption
RequirementsStrict requirementsFairly stringent requirements
CompatibilityLimitedCompatible with most Windows editions
Encryption techniqueRigidCustomizable
Hardware protectionOnly protects UEFI systemsOffers protection for both BIOS and UEFI firmware systems

Requirements for Device Encryption and BitLocker

Requirements for Device Encryption

  • TPM or Secure Boot enabled.
  • UEFI (Unified Extensible Firmware Interface) support
  • Up-to-date Windows 
  • User account with administrative privileges.
  • Modern Standby support
  • Windows 11 Home

Requirements for BitLocker

  • TPM 1.2 or later versions
  • Trusted Computing Group (TCG)-compliant BIOS or UEFI firmware
  • BIOS or UEFI firmware must support the USB mass storage device class
  • Hard disk must be partitioned with at least two drives and formatted in the NTFS file system
  • Windows 10 or 11 Pro 

Most PCs don’t have the Device Encryption feature because Modern Standby is not supported. This is a fairly new power state in Windows 11 that combines features of both sleep and hibernate, giving users the best of both worlds.

When the PC is in this mode, the system is still running and can be resumed quickly. 

What are some unauthorized access prevention techniques between the two technologies?

1. Automatic Device Encryption

When you turn on BitLocker on an operating system volume, the Windows becomes automatically encrypted during system startup, provided you are set up with a Microsoft account and your device meets all the requirements.

You are prompted for a password when you turn on your computer or resume from hibernation mode. However, beware that BitLocker might also fail to encrypt your device, especially when upgrading to a newer Windows version.

The same case applies to Device Encryption. Once you toggle on the feature, your device is automatically protected, but it will not apply if it does not meet the requirements, it will not apply.

2. Automatic Drive Lock with Windows Hello

The advantage of using the BitLocker feature is that it automatically locks the drive when the PC is idle. This way, if you’re away from your PC for a while, you can rest assured your data is safe.

However, if it’s annoying, you can also enable auto-unlock so you don’t have to keep keying in your password in short intervals.

Windows Hello only acts as an additional layer of protection that locks unauthorized users from accessing your PC.

3. Unified Extensible Firmware Interface (UEFI) Support

Bitlocker UEFI support requires that your computer have a Trusted Platform Module (TPM). TPM  provides for secure key storage and generation of random numbers to help protect data confidentiality and integrity.

This helps mitigate the risk of an attacker tampering with the pre-boot environment. And if you experience any other issues with BitLocker, you can always install Windows without BitLocker or try other encryption software.

4. Secure Boot Protection with BIOS Integrity Measurement

When you enable BIOS integrity measurement, BitLocker uses a Trusted Platform Module (TPM) security chip on the computer to check the integrity of BIOS code when you start your computer.

The TPM protects against some advanced attacks, such as those that would try to change or disable the firmware or BIOS. The purpose of this feature is to ensure that only trusted code runs on your computer.

Ultimately, both data encryption methods are viable solutions depending on the situation, with no clear winner. BitLocker seems to stand out for its comprehensive volume encryption technique and additional management tools.

However, we recommend that anyone looking to get started with a new Windows 11 device take advantage of the Device Encryption if available. It is convenient for consumers who just want to encrypt their storage without any added configuration requirements.

The impact on system performance is always important to consider, too. Device Encryption performs much better in this regard, but it’s not quite as secure by default.

Although the two are similar, which one of the encryption techniques would you consider? Let us know in the comment section below.

How to Remove a Theme on Windows 11 (Change or Delete it)

Themes play an integral part for users who wish to modify the Windows experience. It may change the desktop background, animations, lock screen, mouse cursor, sounds, and icons, amongst others. But what if you want to remove a theme in Windows 11?

It’s just as easy, and there are a handful of options available, both for the current user profile and across the system, i.e., all users. Besides, you can even delete custom themes in Windows 11 if they no longer serve the purpose.

How do I find my current theme?

Press Windows + I to open the Settings app > go to Personalization from the navigation pane > click on Themes > the current theme will be listed on the right.

How do I remove/delete themes on Windows 11?

1. Via Themes settings

  1. Press Windows + I to open Settings, select Personalization from the left pane, and click on Themes.themes
  2. Now, right-click on any of the themes listed here, and then select Delete.remove a theme in Windows 11
  3. Click Yes in the confirmation prompt.

If the Delete option is greyed out while removing themes in Windows 11, it’s either currently set as the theme or is the default one provided by Microsoft. In the case of the former, simply change the active theme and then proceed with the removal.

2. From the Control Panel

  1. Press Windows + R to open Run, paste the following path in the text field and hit Enter: shell:::{ED834ED6-4B5A-4bfe-8F11-A626DCB6A921}path
  2. Right-click on any of the entries listed under My Themes, except for the active theme, and select Delete theme from the context menu.delete or remove themes in Windows 11
  3. Click Yes in the confirmation dialog box that appears.

You can’t delete the Windows 11 default theme via the Control Panel or even the built-in theme.

Also, while the Control Panel had a dedicated Personalization section with the list of themes earlier, things have changed, and users are forced to use Settings. But with the shell, you can still access it.

3. Through File Explorer

  1. Press Windows + E to open File Explorer, paste the following path in the address bar and hit Enter: %LocalAppData%\Microsoft\Windows\Themespath
  2. Right-click the theme you want to remove, and select Delete.delete theme
  3. Click Yes in the prompt.

In File Explorer, where the theme backgrounds are stored, the ones that were manually created, including the light theme and High Contrast theme, are listed as files while any that are included in the default OS installation or were downloaded from Microsoft Store are listed under folders.

We recommend you change the theme’s path instead of deleting it. Once moved to a different folder, the theme will not be listed in the Control Panel or Settings.

Deleting the file/folder will remove the theme in Windows 11 for the active user. Besides, if you want to delete the theme for all users, use the following path for the themes folder and clear them: C:\Windows\Resources\Themes

4. Uninstall the app (for themes downloaded from Microsoft Store)

  1. Press Windows + I to open Settings, navigate to Apps from the left, and click on Installed apps.installed apps
  2. Locate the theme you downloaded from the Microsoft Store, click the ellipsis next to it, and select Uninstall.uninstall
  3. Again, click Uninstall in the confirmation box.

How do I change my Windows 11 theme to default?

Press Windows + I to open Settings > go to Personalization > click on Themes on the right > select the theme you want to use in Windows 11.

If the built-in ones don’t do the job, you can always install third-party themes in Windows.

Now that you know how to change and remove themes in Windows 11, we have created a list of the best free themes and skins for the iteration that are a must-have.

Remember, having too many themes can trigger problems and lead to themes changing automatically. This can, in most cases, be fixed by rebuilding the cache.

For any queries or to share your favourite Windows 11 theme, drop a comment below.

Fix: ATA/SATA Hard Drive not Detected in BIOS

If the ATA or SATA hard drive is not detected in BIOS, Windows won’t identify it either but in this article, we will tackle all the possible methods to fix the problem.

Why is my ATA/SATA hard drive not detected in BIOS?

  • The hard drive is not connected properly or it’s not receiving sufficient power.
  • If the BIOS settings are incorrect, the drive will not be detected.
  • The jumpers on the hard drive are incorrectly set.
  • Hard drive incompatibility with your motherboard.
  • Faulty hard drive.

What can I do if the ATA/SATA hard drive is not detected in BIOS?

Before starting to troubleshoot the issue, make sure to perform a few preliminary steps:

  • Check the drive for any physical damages. If it was dropped or suffered any powerful shocks, this might render it useless.
  • Power up the PC and listen if you hear any functioning noise from the drive (applicable for HDD only). If you don’t hear anything from the drive, it’s possible that the HDD is not receiving any power. Check the power cable or replace it to observe any changes. Also, make sure that the power supply has enough power to sustain all the installed components.
  • Temporarily disconnect any optical drive from the motherboard and see if the hard drive is detected.
  • If possible, check the drive on another PC.

1. Check the hard drive jumper configuration (for ATA drives)

  1. Examine the hard drive’s jumper block and verify the guide/manual from the manufacturer. The schematics are from a Seagate drive but yours might be different.
  2. We recommend configuring the jumper positions for the Cable select option. That means the BIOS will identify the drives based on the cable connections on the motherboard.

2. Check all the connections and cables

  1. Make sure that your PC is powered off and disconnected from the mains.
  2. Disconnect the power cable from the drive, then the data ATA (Parallel ATA) or SATA cable.
  3. Now, disconnect the same cables from the motherboard.
  4. Check the cables for any damages, then reconnect them in the right positions on the motherboard and hard drive. Try to replace the cables temporarily if you have spare ones or try with the ones from an optical drive if you have any installed.
  5. Reconnect the PC to the mains, then power it on and enter BIOS to see if the drive is now detected.

3. Change the BIOS settings

  1. Enter BIOS by pressing the F key specified by the manufacturer in the motherboard manual (usually it’s F2 or Del but it might be another key on your system).
  2. Go into the System Setup menu and check if the drive is enabled. Some manufacturers simply disable the port.
  3. Also, some BIOS software have options to force detect the drive or even check its integrity.
  4. If the unrecognized drive is an old ATA, try to enable CSM Support. That will enable the BIOS Legacy mode.
  5. Other options are to update your BIOS or reset it to the default from its menu.

In case your drive is an external one, connected to the USB port, make sure that it’s properly plugged in and update the USB and storage controller drivers in Windows.

If none of these methods worked, the hard drive is either incompatible with your motherboard, or it’s damaged and it’s time to buy a replacement.

However, we also have another useful guide on what to do if a second drive is not recognized in Windows.

You might also be interested in our solutions to fix an internal drive that is not showing up on Windows.

Hoping that our guide helped you fix the ATA/SATA hard drive not detected in BIOS issue, for any questions, use the comments section below.

4 Quick Ways to Open Webp Images on Windows 11

WebP or Web Picture is a modern image format developed by Google and has, of late, been extensively employed by the industry. These images are smaller than JPG, JPEG, or PNG files, thus increasing the page load speed and making them valuable from an SEO standpoint. But how do you open a WebP file in Windows 11?

Given it’s a relatively new image format, first announced in September 2010, compatibility was bound to be an issue. Several photo editing software still don’t support the file extension. But things are changing fast!

Does Windows 11 support WebP?

While the WebP image file wasn’t compatible with Windows 11 earlier, Microsoft introduced support for it in the built-in Photos app in version 2023.11050. 2013.0.

The update was first rolled out in the Dev and Canary channels and was soon available for everyone. We tested it on our PC, and the WebP image file format opened just fine in the Photos app.

How do I open a WebP file on Windows 11?

1. Go with the Photos app

The Photos app, the default image viewer in Windows 11, now supports WebP files. So, you can open WebP with Microsoft Photos without any modifications.

Besides, there are other options you can try if the Photos app doesn’t work as an option to open the WebP files type.

2. Change the file extension

  1. Press Windows + E to open File Explorer, navigate to the folder where the WebP file is stored, click the View menu, hover the cursor over Show, and checkmark the File name extensions entry.file name extensions
  2. Now, right-click on the concerned picture and select Rename.
  3. Remove the current extension (.webp) and replace it with the desired one, be it PNG (.png), JPG (.jpg), or JPEG (.jpeg).
  4. Once done, click Yes in the confirmation prompt.change extension to open webp in windows 11
  5. You should now be able to open the image with any of the built-in or third-party apps. In case the image indeed becomes unusable, revert the changes and try another method.

3. Try a modern browser

Most modern web browsers support WebP file types, especially the ones developed on the Chromium project. This includes Opera One, Google Chrome and Microsoft Edge. You can try opening WebP in Safari with a few tweaks.

So, if you have either of these installed, simply open a new tab and drag and drop the WebP file into it, and the image will show up. You could enable snap layouts and open the two windows side-by-side to easily move files between them. 

However, if you face any issues with compatibility on Microsoft Edge, go to the Microsoft Store and download the WebP Image Extension (WebP codec for Windows).

4. Use a third-party photo viewer

When the other ways don’t work, there’s always the option to use a third-party image viewer software to open WebP pictures in Windows 11. Remember, not all support the new and popular image format.

But a quick search, and you should be able to find one. Besides, the need for it only arises when the default option, Microsoft Photos, doesn’t work and you can’t convert the file.

How do I convert WebP to JPG in Windows 11?

  1. Right-click on the WebP file, hover the cursor over Open with, and choose Paint from the flyout menu.
  2. In the Paint app, click the File menu, choose Save as, and then select JPEG, or the desired format from the list.save as
  3. Choose a location for the new file, and click Save.
  4. Click OK in the confirmation box.OK

While you could manually change its file extension, it’s better to convert WebP to JPG, JPEG, or PNG images using the built-in Microsoft Paint to avoid issues. 

Remember, WebP is still a relatively newer file format, and you may experience problems. But with time, more and more apps and operating systems are adding support for it. At least, you now shouldn’t face issues while opening WebP in Windows 11.

Also, if it’s not just mere conversion, but the file requires editing, you can always download a reliable photo editor for Windows. And after the release of version 23.2, you can open WebP files in PhotoShop, a popular option, without any plug-ins, extensions or tweaks. 

For any queries or to share how you prefer opening WebP files, drop a comment below.

Microsoft introduces Passkeys in Windows 11: A secure and convenient login method

Microsoft has officially announced support for passkey In a significant update to the Windows 11 operating system. The feature enables users to log in to websites and applications without traditional usernames and passwords. Instead, passkeys rely on device PINs or biometric information, such as fingerprint or facial recognition, to streamline the authentication process.

Although passkey management was introduced to the Windows Insider program in June 2023, its general availability is a milestone achievement. As per David Weston, Vice President of Enterprise and OS Security at Microsoft, “Passkeys are the cross-platform future of secure sign-in management. They create unique and unguessable cryptographic credentials, securely stored on your device.”

Initially introduced in May 2022, passkeys were designed to replace conventional passwords, offering a stronger and more resistant defense against phishing attempts.

Passkey Benefits

Passkeys offer numerous benefits over traditional passwords. Firstly, they are unique to each website or application, enhancing security. Furthermore, it eliminates the need to set up complex passwords and the hassle of remembering them.

Additionally, they can be seamlessly synced across devices within the same operating system or ecosystem, simplifying the sign-in process. Passkeys on Windows 11 will be compatible with several web browsers, such as Microsoft Edge, Google Chrome, Firefox, and other supported options.

To create and manage passkeys on Windows 11, users can navigate to Start > Settings > Accounts > Passkeys. This centralized location allows easy access and control over the passkeys associated with different websites and apps.

Surely, passkeys represent a significant step towards a more secure and convenient login experience. Let us know your views on this in the comments section below.

Tip of the Week #4: Calendar sharing using Bookings with Me

M365 Apps menu

If you’re a user of either the paid-for Microsoft 365 services or the free stuff you get with a Microsoft Account (like OneDrive or Outlook.com), you may have seen the App launcher grid icon in the top left of the web UI, which gives you a list of applications to use. Which apps appear in the “Waffle” menu list will depend on the level of your subscription; a solo home user might see stuff about Family Safety or Clipchamp, while a business account user would see things like SharePoint or Viva Engage.

Book ’em

One business oriented tool that has been around for a while is Bookings; it’s a way of organizing meetings with groups of people at mutually convenient times, even when some of them are external (so you won’t ordinarily be able to see their free/busy status). It’s had a few revisions since launching around 7 years ago, and mobile apps have come and gone. Bookings uses a shared mailbox and calendar for creating and managing meetings, or maybe for booking out shared resources (like tables in a restaurant or an appointment with a hair salon).

Bookings on M365

Given Microsoft’s prowess at naming things, it’s worth noting that Bookings with me, a newer service launched last year to commercial Microsoft 365 users is, in fact, related but different.

Bookings with Me

Accessed via a URL somewhat inconsistently spelled /bookwithme, this new service is a way of giving access to your own personal calendar so other people – outside your organization, ideally – can reserve time with you, as defined by rules you set up to govern the kinds of meetings you want to have, and your chosen availability. You could decide to only accept meetings in the afternoons, and if a potential attendee looks at your personal booking page, they’ll only be offered meeting times that are during the window you define and only if your calendar is actually free at that time.

Bookings with Me on the Bookings pageThe key difference between Bookings and Bookings with me is that the former is designed to orchestrate bookings between a group of people, whereas Bookings with me is sharing just a single calendar with anyone who has the booking URL.

This kind of service was essentially defined by Calendly. Their service is cross-platform, so can manage calendars in a variety of mail services, and can also support several online meeting platforms to host virtual appointments. Calendly is free to use if you only want to offer a single type of meeting, and has a Premium subscription model if you’d like to give other options – maybe a 15 minute chat that is available to anyone who knows your Calendly URL, but via a special URL you could let specific people book a private 1hr in-person meeting. Google obviously liked what Calendly was doing, as they built a version that’s was initially paid-for but is now free for Google Calendar users who only offer a single appointment type. Similarly to Calendly, you need money and Google Workspace subscriptions to unlock more advanced features.

Microsoft has had a few tries in the past to solve various booking/scheduling problems, including FindTime – a neat voting based solution to the problem of organizing lots of people to get a common time to meet. Cortana – may she rest in peace – also had a go, and of course there are tools built-into Outlook but are only really useable if you can see other attendees’ availability, so don’t work for external participants.

Clearly, planners in Redmond liked the idea of a Calendly-style offering so went ahead and built one into Microsoft 365, with various admin controls to enable which users get to have it or not. If it’s available to you, get started quickly and you can define public offerings that will be visible to anyone with your Booking page URL, as well as add private online and/or in-person meetings that you need to share a specific URL to allow people to book.

Bookings with meSharing and Customizing

There’s a new type of resource available in Calendar in Outlook, to help set the time window when you’re available, and the Bookings page options are also easily accessible from the Calendar view in both Outlook and Outlook Web App.

Bookable TimeThe URL to set up your own bookings is https://outlook.office.com/bookwithme/me but the shareable link to your overall booking page is long and clumsy as it has a GUID and your email ID within. You’d be better off using a URL shortener like Bit.ly or TinyURL to create something meaningful that you’d actually share with people, though Sharing via the Bookings with me service does offer to append the URL to your email signature.

You can customize the banner image on your booking page, but only by selecting one of a handful of themes. Especially if offering a booking page out to external parties, it would be good to be able to add specific branding to it, as you can do with Calendly, or even to add other text besides “Booking Page”.  Maybe that’s an improvement for later…


Bookings with me public page

Microsoft hasn’t – yet? – decided to make Bookings with me available for anyone other than a paid-for, business level M365 subscription – in other words, if you’re a free Microsoft Account user or have a family M365 plan, they you’re out of luck.

Back to Calendly, then…

How to Boot Straight to Command Prompt on Windows 11

If you are looking for a way to access Command Prompt when your computer boots up, this guide can help!

We will discuss four methods with step-by-step instructions to boot directly to Command Prompt on Windows 11.

How do I boot directly to Command Prompt on Windows 11?

1. Using the Settings app

  1. Press Windows + I to open the Settings app.
  2. Go to System, then click Recovery.System - Recovery Windows 11 = How to Boot Straight to Command Prompt on Windows 11
  3. Locate Advanced startup and click Restart now.Recovery Advanced Startup
  4. On the Choose an option screen, click Troubleshoot.Troubleshoot2 (1)
  5. Next, from the Troubleshoot page, select Advanced options.advanced-programs
  6. Locate the Command Prompt, then click Restart.Command Prompt Advanced Options  - How to Boot Straight to Command Prompt on Windows 11
  7. You will be asked to enter user account credentials or Recovery key (available on your Microsoft account)
  8. Once you enter these, your computer will restart, and you will get Command Prompt at boot.

2. Using the Windows Recovery Environment

  1. Hold down the Power button for 10 seconds to shut down your device, then press the Power button to restart.
  2. When you see the device manufacturer’s logo, hold down the Power button again to turn it off. Repeat the process two times.
  3. The 3rd time it restarts, it will take you to the Automatic Repair page, then click Advanced options.Automatic Repair page, then click Advanced options- How to Boot Straight to Command Prompt on Windows 11
  4. On the Choose an option page, click Troubleshoot.Troubleshoot2 (1)
  5. Select Advanced options.advanced-programs
  6. Now, choose Command Prompt from the next screen.Command Prompt Advanced Options  - How to Boot Straight to Command Prompt on Windows 11
  7. You will be prompted to enter User account credentials; then your computer will restart and boot to cmd.

This method can be used if your Windows 11 is not able to boot and you want to perform advanced troubleshooting using Command Prompt.

3. Using the Windows 11 Installation Media

First, you need to create a Windows 11 installation media via a USB drive; read this guide to know the detailed steps. Once your USB drive is ready, plug it into your affected computer, and restart it.

If your Windows doesn’t boot to the recovery mode, follow these steps to change the boot order:

  1. While the computer is restarting, keep pressing the function key designated to enter BIOS; usually, it is F2 or F10, but you can always check it on the manufacturer’s website to be sure.
  2. Once you are in BIOS, go to the Boot menu and use the arrow keys to shift the USB to the top of the list.Boot-order -How to Boot Straight to Command Prompt on Windows 11
  3. Save the changes and exit.
  4. Now, your computer will boot from the USB device once you get to the Windows setup page.
  5. Press Shift + F10 to open a command prompt at boot.

4. Using the BIOS menu

  1. Restart your computer; when the computer is booting up, press F8 to enter the Advanced startup menu.
  2. On the Advanced options page, select Command Prompt, enter the credentials, and click Restart to open the Command Prompt window after booting up.Command Prompt Advanced Options  - How to Boot Straight to Command Prompt on Windows 11

Why does CMD randomly open and close?

  • Malware infection.
  • Scheduled tasks.
  • Third-party software interference.
  • Corrupted system files.

Now that you know the reasons for the CMD window opens and closes randomly, check out this detailed guide to get quick solutions to fix it.

How can I boot in safe mode with CMD?

  • Press the Windows key, type cmd, and click Run as administrator > on the Command Prompt window, copy & paste the following command and press Enter to get into Safe mode: bcdedit /set {current} safeboot minimalcmd_RHow to Boot Straight to Command Prompt on Windows 11
  • To exit safe mode, open Command Prompt, type the following command, and hit Enter : bcdedit /deletevalue {current} safeboot

Can I boot into BIOS from CMD?

Yes, press the Windows key, type cmd, & click Run as administrator, then type shutdown /r /fw, and hit Enter. Now your system will restart in BIOS mode after a minute or so.

Launching Command Prompt from the advanced options is one of the safest ways to initiate the troubleshooting the common Windows issues involving malware or corrupted system files.

You can also use Command Prompt to open a folder and get into a directory to check the information in it without navigating to the path; read this guide to know how.

If you have any other questions or suggestions, don’t hesitate to mention them in the comments section below.

How to Download & Install New Microsoft Office Fonts

Fonts are said to be the artistic essence of any content, be it a presentation, document, or spreadsheet, as they breathe life into them.

In this comprehensive guide, we will discuss some of the easiest ways to download and install Microsoft Office fonts on your computer.

Can you use custom fonts on Microsoft 365?

Yes, you can use custom fonts on your Microsoft 365 online apps as well, all you need to do is add the font to your font settings locally, and it will appear online. If you don’t know where to start, we’ve lined up a couple of Christmas fonts to get you started.

However, it has some limitations, such as the custom font doesn’t show when you preview a document.

How do I download & install new fonts to Microsoft Office?

Before moving to the various methods to get new fonts on Microsoft Office, ensure you go through these preliminary checks:

  • Ensure you have administrator rights if using a shared computer.
  • Keep your Microsoft account credentials handy, as some fonts require you to sign in.
  • Make sure you have a stable internet connection.

1. Using any Office app

  1. Press the Windows key, type word, and click Open. Windows key, type word, and click Open.- Download & Install New Microsoft Office Fonts
  2. Open an existing or blank document, then go to the Home tab.
  3. Locate and click the drop-down menu of fonts.
  4. Click on any of the fonts with the Cloud or the Download icon to get it locally. Once downloaded, it will be available instantly to use.Word download font from cloud

2. Using the Get more fonts in Microsoft Store option

  1. Press Windows + I to open the Settings app.
  2. Go to Personalization and select Fonts.Personalization - Fonts
  3. Click the Get more fonts in Microsoft Store option.Get more fonts from Microsoft Store - Download & Install New Microsoft Office Fonts
  4. The Microsoft Store app will open; click the font family from the options available.Select the font you like
  5. Click Get to download & install it. Once the process is complete, you can access the custom font from all Microsoft Office apps.Get the font - Download & Install New Microsoft Office Fonts

3. Using the context menu

  1. Choose any font on a reliable website and click Download to get in on your computer.Download font - Download & Install New Microsoft Office Fonts
  2. On your computer, locate the downloaded Zip file, right-click it, and select Extract All to open the Extract Compressed Folder window; click Extract.Extract all
  3. Follow on-screen instructions to complete.

As soon as the fonts are downloaded, you can use them on Microsoft Office apps; you can also make the newly installed font the default choice; read this guide.

How can I uninstall fonts from Microsoft Office?

  1. Press the Windows key, type control panel>, and click Open. Go to Appearance and Personalization>Fonts.explorer_Fonts - Control Panel- Download & Install New Microsoft Office Fonts
  2. Select the font from the list and click Delete to remove it from your computer, thus removing it from Microsoft Office.Delete Font

How do I install missing fonts in Word?

  1. On the Word app, open a document, then go to File, and select Options.WINWORD_File- options - Download & Install New Microsoft Office Fonts
  2. Click Advanced, then locate & click Font substitution under Show document content.WINWORD_Font substitution
  3. Choose the missing font from the list available in the Font Substitution dialog box.Substitution font
  4. Next, choose a font from the Substituted font dropdown, and select Convert Permanently or Convert Temporarily to substitute the font for the current session or all sessions.

All fonts on a Windows computer are stored in  C:\Windows\Fonts (C denotes the system drive). You can also add fonts by dragging the font files to this folder, and Windows will install them.

In case you want to learn about the best fonts for Windows 11 to give your reader a seamless experience, check out our detailed guide to learn about different options.

If you have any questions or suggestions about the subject, feel free to mention them in the comments section below.
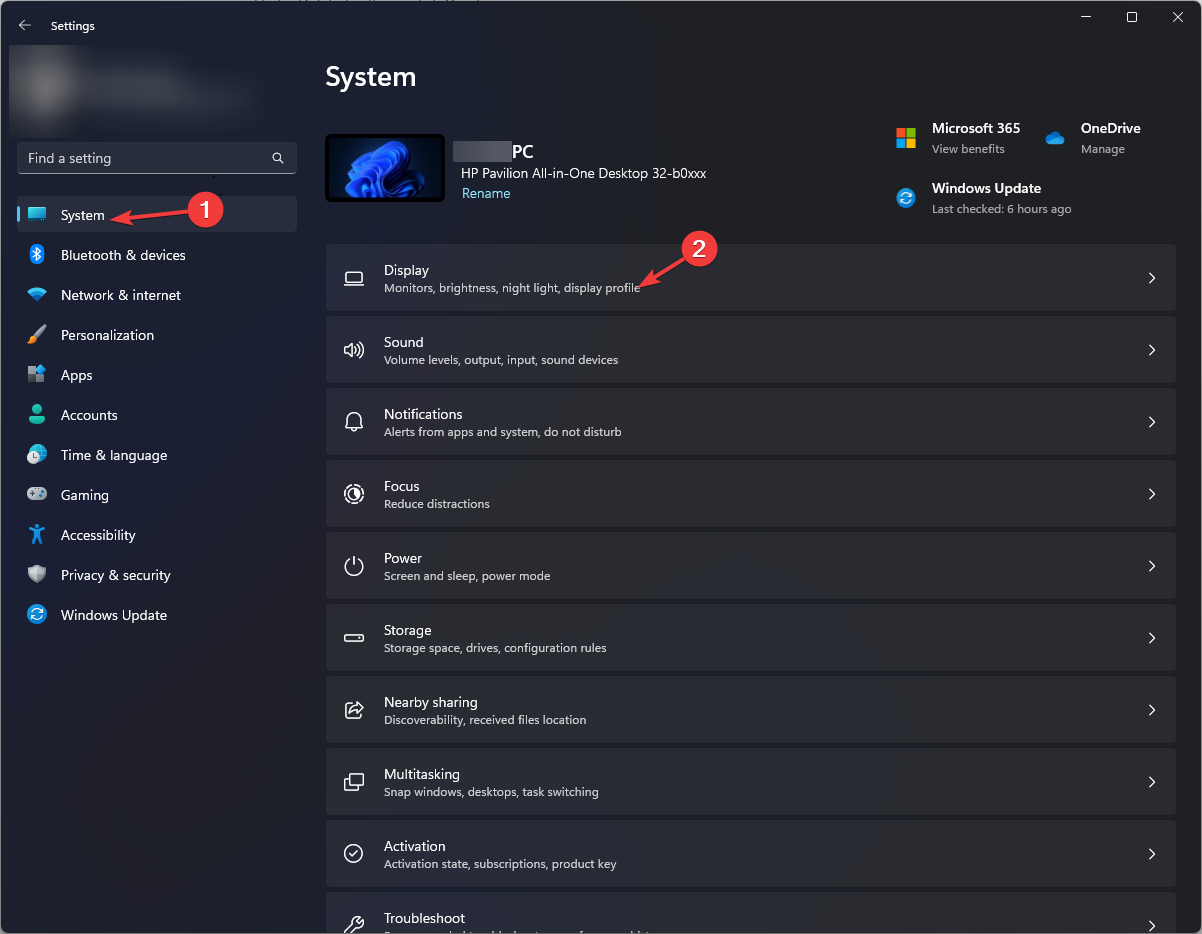
How to Quickly Create a New Library on Windows 11

Libraries are a critical feature in Windows, and users who rely on these can’t go without them for even a day. The problem, there are just six libraries present in the default OS installation. The solution, you can always create a new library in Windows 11 for folder and file management.

Think of a Library as a collection of shortcuts to individual folders. This way, you don’t need to navigate to each individually. The libraries pre-included in Windows 11 are Camera Roll, Documents, Music, Pictures, Saved Pictures, and Videos.

Benefits of using libraries in Windows 11

  • Easier file management
  • Customization and organization options
  • Increased efficiency and productivity
  • Enhanced accessibility
  • Files and folders can be searched for easily.

How do I create a Library in Windows 11?

1. Creating a new library from the navigation pane

  1. Press Windows + E to open File Explorer, right-click on the left pane, and select Show libraries, if the libraries are not showing in this PC running Windows 11.show libraries
  2. Select Libraries from the navigation pane, right-click on the empty portion, hover the cursor over New, and then select Library.context menu to create new library in windows 11 
  3. Enter a name for the library and save it.
  4. The newly created library will now be available in the navigation pane.

2. Creating a new library from the context menu

  1. In the File Explorer, locate the folder that you want to include in the library, right-click on it, and select Show more options.
  2. Hover the cursor over Include in library and then select Create new library from the flyout menu.create new library
  3. You will now find the custom library with the same name as the folder listed in File Explorer. 

How do I manage libraries on Windows 11?

  • Adding folders to the library: Press Windows + E to launch File Explorer > then right-click on the relevant Library in the navigation pane > click the Add button > locate the folder > select it and click Include folder > then click OK to save the changes.add folder
  • Setting default save locations for libraries: To change library location in Windows 11, right-click the library > select Properties > choose a library location from the list > then click on either Set Save location or Set public save location. 
  • Viewing libraries from Advanced settings: Press Windows + E to launch File Explorer > click the ellipsis at the top right > choose Options > go to the View tab > check Show libraries under Navigation pane > then click OK to save the changes.show libaries
  • Hiding a library from the navigation pane: Right-click on the library in the left pane > then select Show more options > choose Don’t show in navigation pane.
  • Restore default for libraries in Windows 11: Right-click the library > select Properties from the context menu > then click the Restore Defaults button at the bottom right.restore defaults
  • Deleting a library in Windows 11: Launch the File Explorer, right-click the library > click the Delete icon > select Yes in the confirmation prompt.

Working with Remote Storage Locations in Windows 11 Libraries

  • Connecting to remote storage services from your PC: Windows employs Offline File Synchronization to add remote folders and storage locations to a library.
  • Accessing cloud-based storage from the library folder structure: Windows automatically creates a local copy of the files stored on the server, adds those to the index, and ensures that both the online and offline copies are in sync. 

You now know how to create a new library in Windows 11 and effectively manage it, in addition to cloud-based storage. Remember, any changes you make to the files or folders in the library will reflect in their actual storage location. The library just creates a link!

If you are still running the previous iteration of the OS, enabling libraries in Windows 10 works pretty much the same way. And for those who love gaming, a missing Steam library can often be a problem, but you can find it from within the client.

For any queries or to share your experience with libraries in Windows 11, drop a comment below.

How to Turn On or Off Filter Keys on Windows 11

Do you ever find your keyboard inadvertently creating gibberish text with keystroke combinations? Well, that could be very annoying. There might be a solution to fix this.

You need to check whether the Filter Keys feature has been disabled and enable it to allow only certain keys to be pressed.

Should Filter Keys be on or off?

Filter Keys can be an accessibility feature for those with physical disabilities. However, it might not be convenient to have them enabled at all times on the PC. It’s a great tool for those with difficultypressing multiple keys simultaneously.

However, for power users, it can cause issues. Disabling this feature will be the best option if you are trying to type quickly and accurately. Better yet, lock your keyboard during periods of inactivity to prevent accidental input.

How do I enable Filter Keys on Windows 11?

1. By using the Sign-in screen

  1. Turn off your PC and back on or lock it to access the sign-in screen.
  2. Click on the Accessibility icon and toggle on the Filter keys option.

2. By using the Windows shortcut keys

  1. Press and hold the right Shift key on your keyboard until the Filter Keys dialog box appears.Press Shift Unlock A Keyboard
  2. Hit Yes to enable.EaseOfAccess

3. By using the Settings app

  1. Hit the Windows key and click on Settings.settings windows 11
  2. Click on Accessibility, then select Keyboard under Interaction.
  3. Toggle on the Filter keys option.

To discover more tools within the Accessibility menu, check this detailed guide on Accessibility settings in Windows 11.

4. By using the Control Panel  

  1. Hit the Windows key, type Control Panel in the search box, and click Open.control-panel-search fallout new vegas runtime error
  2. Select Ease of Access>Ease of Access Center.
  3. Next, click on Make the keyboard easier to use.
  4. Check the Turn on Filter keys option, then hit Apply and OK to save changes.
  5. Close the Control Panel window.

How do I disable Filter Keys on Windows 11?

Simply reverse-engineer the above steps except for the shortcut step. For this one, you’ll have to click on the Disable this keyboard shortcut in Ease of Access keyboard settings option, which will take you to the Control Panel settings, where you can toggle off the feature.

Does Turning On or Off Filter Keys Affect My Computer Performance?

Your computer may take longer to respond to your keyboard commands when Filter Keys are enabled because some keystrokes are held down until they’re recognized.

This can be especially noticeable when playing games or performing other tasks that require quick and precise responses from your computer.

All things considered, it’s great that you can easily change the default settings on Windows to disable or enable this useful feature, especially in situations where your keyboard won’t type double letters.

If you’re still unsatisfied with your settings for making your keyboard easier to use, Microsoft keeps a great section dedicated to providing resources to users with disabilities, such as enabling or disabling the Sticky Keys feature.

Whether you are a power user, disabled, or just using Windows for personal purposes, you can customize your experience to suit what works best for you. Have you tried out the Filter Keys? Do you prefer them on or off? Let us know in the comment section below.

Offline Files on Windows 11: How to Enable or Disable

The Offline files on Windows 11 helps you keep a copy of your files on your network on PC. In this article, you will learn about how to enable or disable Offline files on Windows 11.

What is Offline files? Offline files is a Windows Sync Center feature that allows you to access your network files without an Internet connection. The files from your server will sync with your PC when you connect to the network so when it goes offline or is infected by virus or malware, you will still have the copies stored locally.

How can I enable or disable Offline files on Windows 11?

1. Using Control Panel

  1. Click the Search bar, type control panel, and open the app from the results.
  2. Now, click on Sync Center.
  3. Next, click on Manage offline files, and from the new pop-up window, select Enable offline files.
  4. If you want to see the files synced from your sources, click on View your offline files.

Of course, if you want to disable Offline files on Windows 11 instead, repeat the steps and click on Disable offline files.

If the Windows Sync Settings are not working, the highlighted guide will provide the solutions to fix it.

2. Using the Group Policy Editor

  1. Press the Win + R key combination, type gpedit.msc, and press Enter or click OK to open Group Policy Editor.
  2. Navigate to the following location: Computer Configuration/Administrative Templates/Network/ Offline Files
  3. In the Offline Files, double click the Allow or Disallow use of the Offline Files feature to edit it.
  4. Now, check the Enable box, then click Apply and OK to make the changes.
  5. To disable the Offline files policy, select Disable instead.

3. Using the Registry Editor

Note icon NOTE
Working with Registry Editor is a delicate matter so before making any changes, we recommend backing it up using File > Export.
  1. Press the Windows + R keyboard shortcut to start the Run console, type regedit and press Enter or click OK.
  2. Navigate to the following key in Registry Editor: HKEY_LOCAL_MACHINE\SYSTEM\CurrentControlSet\Services\CSC
  3. If you find the Start DWORD value, double-click on it and set its value to 1.
  4. If it’s not there, right-click on an empty space, select New > DWORD (32-bit) Value, name it Start, and set the value to 1.
  5. Now, go to the following location: HKEY_LOCAL_MACHINE\SYSTEM\CurrentControlSet\Services\CscService
  6. Double-click on Start and set its value to 2.
  7. Same as before, if you don’t find it, create a new DWORD value, name it Start, and set its value to 2.
  8. To disable Offline files in Registry Editor, repeat the steps and set the Start value for CSC and CscService to 4.

4. Use a third-party backup solution

Offline files is actually a solution to back up files from your network. That being said, you can also employ a third-party network backup tool that can do all that and more.

These apps have a lot more features and can store your backup on any other media, not only locally.

How do I make a folder accessible offline?

To set a folder to be always accessible offline, press the Windows + E keys to open File Explorer, and now you will see the Network folder.

Double-click on it, right-click on the folder of your choice, and select Always available offline.

You can also view your offline files and folders in Windows Sync Center accessible from Control Panel.

Also, you don’t need to make anything special to sync offline files in Windows 11. Once you get online, they will be synced automatically.

Of course, for all this to work, some files or folders should be synced on the network. Otherwise, the Offline files folder will be empty.

That’s it from our guide on how to enable and disable Offline files on Windows 11 and we hope that now you can access them quickly and safely.

Although it’s less known, you can also access your Teams files offline and this guide will help you with that.

You might also be interested in reading our guide on what to do if Google Drive is not working offline.

If you have any other questions or suggestions, we will be looking for them in the comments section below.
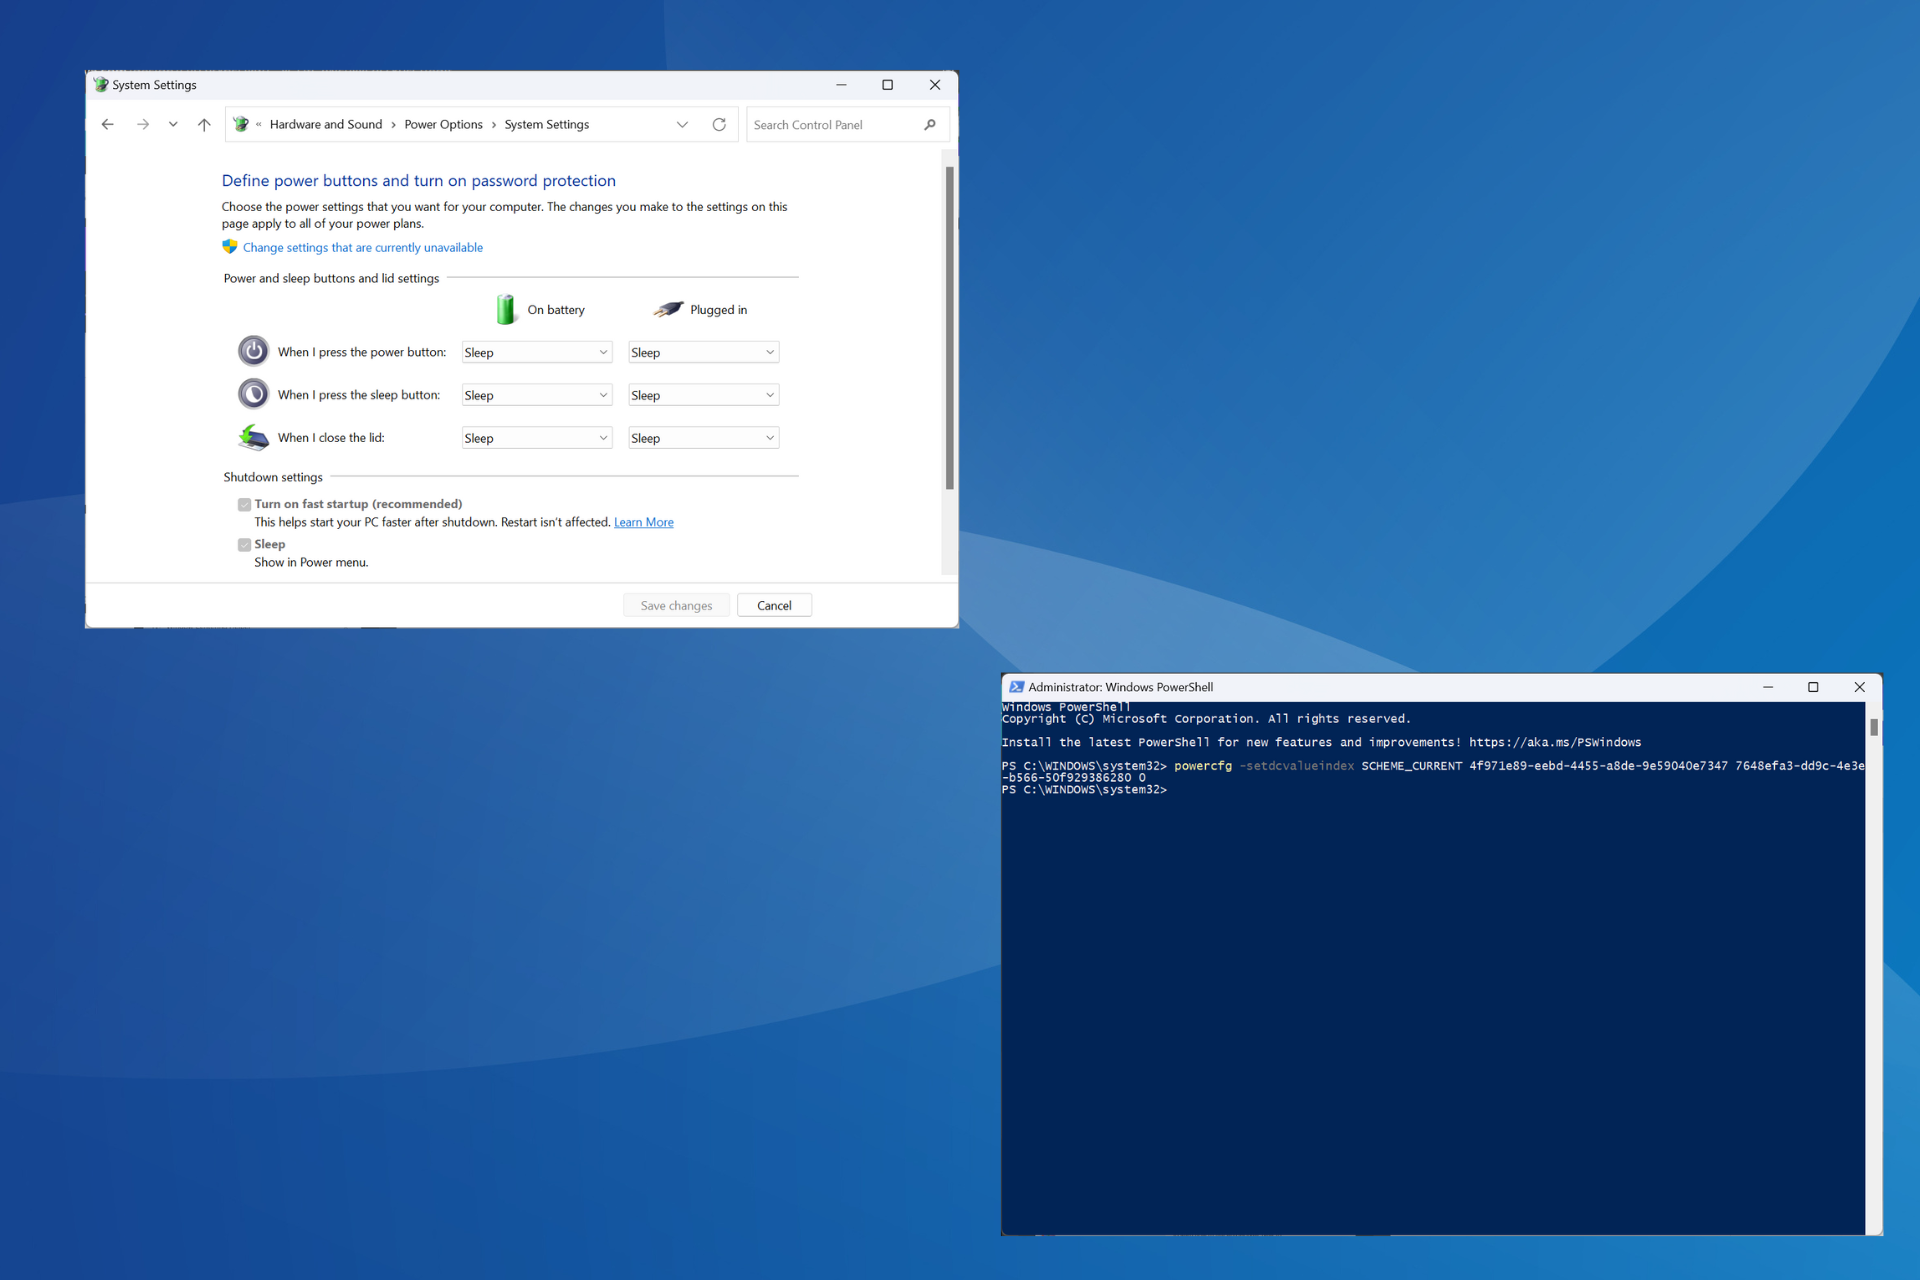
How to Access or Remove a GPT Protective Partition Without Losing Data

Many reported a GPT protective partition on their PC that prevents users from getting to their files. This can be a big problem and today we’ll show you how to access GPT protective partition without losing data.

Even though this sounds like a serious issue, it’s important to mention that your files are still there, and there’s a way to recover them without having to remove anything.

What causes GPT protective partition?

  • Missing AHCI drivers, or outdated firmware can cause this issue.
  • The sector size on your drive doesn’t match the interface.

How do I recover data from a GPT protective partition?

Before we start fixing the issue, be sure to perform these checks:

  • If you’re using a hard disk dock, keep its firmware up to date, especially on Sabrent models.

1. Update the Intel Rapid Storage Technology Control Panel

  1. Navigate to the Rapid Storage Technology download page.
  2. Click on Download SetupRST.exe.
  3. Once the file is downloaded, run it.
  4. Follow the instructions on the screen to install it.

Keep in mind that this solution applies only to devices that use this software, and this is usually Dell or Alienware PCs. If you’re using an AMD CPU, a few users suggested that installing the AMD AHCI driver worked for them, so consider that as well.

2. Convert partition from GPT to MBR

  1. You need to use partition management software, such as AOMEI Partition Assistant.
  2. Select your disk and click on Convert to MBR.
     
  3. Click OK to confirm.
  4. Click on Apply and on OK.
  5. After the conversion is completed, you should see your disk again without having to remove the GPT protective partition.

3. Back up the drive and recreate it

Note icon NOTE
This process will delete all files from the selected drive, so use data recovery software to recover data from GPT protective partition.

Use Disk Management

  1. Press the Windows key + X and select Disk Management.
  2. Next, delete all partitions on the GPT protected partition by right-clicking them and choosing Delete partition or Delete volume.
  3. Right-click the GPT protected disk and choose Convert to MBR.
  4. If this option isn’t available, right-click it and choose Initialize disk and then select MBR.

Use diskpart

  1. Press the Windows key + S and type cmd. Select Run as administrator.
  2. Run this command: diskpart
  3. Enter the following command: list disk
  4. Locate your GPT disk and memorize its number. This is a crucial step since we’ll delete all files from that disk, so double-check the disk number.
  5. Now select the disk, but be sure to use the correct number, we used 0 as an example, with: select disk 0
  6. Next, run clean
  7. Lastly, run convert mbr 

How to convert GPT protective partition to MBR?

  • You can use the Disk Management software to delete the disk and create it again.
  • Using the command line tool and diskpart command you can achieve the same results.
  • Use third-party solutions as mentioned in Solution 2 to convert the partition without file loss.

As you can see, it’s possible to access the GPT protective partition without losing data, but it requires using third-party tools.

Since this process requires you to convert your drive, you might have to convert MBR to GPT using the MBR2GPT tool.

Many have reported that they can’t convert disk to GPT, but we have a guide that details how to convert MBR to GPT disk, so be sure to check it out for step-by-step instructions.

What method did you use to fix this problem? If we haven’t included it, feel free to share it with us.

You’ll be able to control your Teams Chat notifications

Good news for Microsoft Teams users everywhere. Microsoft will soon let you control your Teams Chat notifications, according to the latest entry to the Microsoft 365 Roadmap.

We know what you must be thinking, how? Well, you’ll apparently be able to control Teams Chat notifications through the RSVP section of your meeting, or the meeting you’re attending.

Plus, when you decline a meeting, you won’t receive any notifications, and you won’t see the chats in the chat list. On the other hand, accepting a meeting will prompt you to receive notifications for all the new messages.

Here’s what Microsoft has to say about it:

Microsoft Teams users will be able to control how they get notified in meeting chats through RSVP to their meetings. When you decline a meeting, you will not receive notifications or see the chats in chat list; when you accept a meeting, you will receive notification for all new messages.

Microsoft

The rollout for this feature is scheduled to take place at the end of 2023, in December. Before you go, don’t forget to visit our guide on how to stop Teams notifications on mobile while using the desktop version.

How to Center a Window on Screen in Windows 11

Windows is one of the most popular operating systems, but it’s still far from perfect. It has a few issues, bugs, and even misses critical features. Besides, users find the inability to center a window on the screen in Windows 11 problematic. 

Remember, you can manually position an app, and Windows will remember the configuration the next time you open it. But inconsistencies or conflicts can prevent this from happening. So, let’s take a look at all the ways you can center a window on the screen.

How do I center a window on my computer screen?

1. Center the window manually

The easiest way remains to manually center the active window. More often than not, the OS will remember the positioning, as discussed earlier. Also, you can center a window on the screen in Windows 10 in the same way.

To start with, use the mouse cursor to hold and drag the edges to the desired size, and then reposition the current window by dragging the title bar. 

To verify whether this works, restart the computer, relaunch the application, and check if it’s still centrally aligned on the desktop. 

2. Use AutoHotKey to center a window

  1. Go to the official website and download AutoHotKey v2.0.
  2. Run the setup and follow the on-screen instructions to complete the installation process. autohotkey
  3. Now, open a new Notepad and paste the following script:
    RShift & c::

    global windowName
    global X
    global Y
    global begWidth
    global begHeight

    WinGetTitle, windowName, A

    WinGetPos, X, Y, begWidth, begHeight, %windowName%

    CenterWindow(windowTitleVariable)
    {
    WinGetPos,,, Width, Height, %windowTitleVariable%
    WinMove, %windowTitleVariable%,, (A_ScreenWidth/2)-(Width/2), (A_ScreenHeight/2 )-(Height/2)
    }

    CenterWindow(windowName)

    return

    RShift & b::

    WinMove, %windowName%,, X, Y, begWidth, begHeight

    return
    script
  4. Click the File menu, and select Save.
  5. Enter a file name followed by the .ahk extension, and then click Save. We chose Center Window.ahk as the file name.script to center window on screen windows 11
  6. Once done, run the script you saved. If asked to download v1.0, proceed with the instructions to do that.
  7. Finally, when the script is running, launch any application, and press Right Shift + C to centre it.

AutoHotKey remains a popular automation software in Windows. It allows users to automatically perform operations or even schedule them in advance.

The script we listed was shared by a user in a forum, and it worked fine for us. Remember, you can modify it a bit and use another Windows 11 keyboard shortcut to center the window. Whatever works best!

Just make sure to have the original script handy to revert the changes in case something goes wrong.

3. Try another third-party tool

  1. Open a browser, head to the product’s official website, and download the Installer version of Windows Centering Helper. 
  2. Run the setup and follow the on-screen instructions to complete the process.setup
  3. After the installation is complete, the app will run automatically in the background, and you will receive a pop-up that reads, Press 3 x [LShiftKey] to center a window.windows centering helper to center window on screen windows 11
  4. Now, open any application on the desktop, press Left Shift thrice, and the tool will automatically change the window position to centrally aligned. 

Windows Centering Helper is an easy-to-use tool, much simpler than AutoHotKey when it comes to centring a window on the screen in Windows 11. Besides, you can add the application to the startup folder so Windows automatically loads it at boot.

But with Windows Centering Helper, you can’t change the dedicated key combination to center the active application.

How do I force an app to open centered on the screen?

Some apps offer built-in settings to configure how they are launched, and it may include an option to open it centered on the screen. Besides, you may use a third-party tool for the job!

But the easiest option is to position the active application window in the center before terminating it. If the app is developed well and according to the rules and protocols laid out by Microsoft for Windows 11, it will remain centrally aligned when relaunched. The Task Manager is a prime example. 

Troubleshooting tips for centering a window on screen in Windows 11

Once you understand the various available options to center a window on the screen in Windows 11, remember that all third-party tools don’t work the same way. Some consider the taskbar when positioning the window, while others align the active program based on the display size.

On a related note, a few users found that the Windows 11 taskbar is not centered, a common problem which can be fixed by changing the dedicated settings.

For any queries or to share your favourite tool with us, drop a comment below.
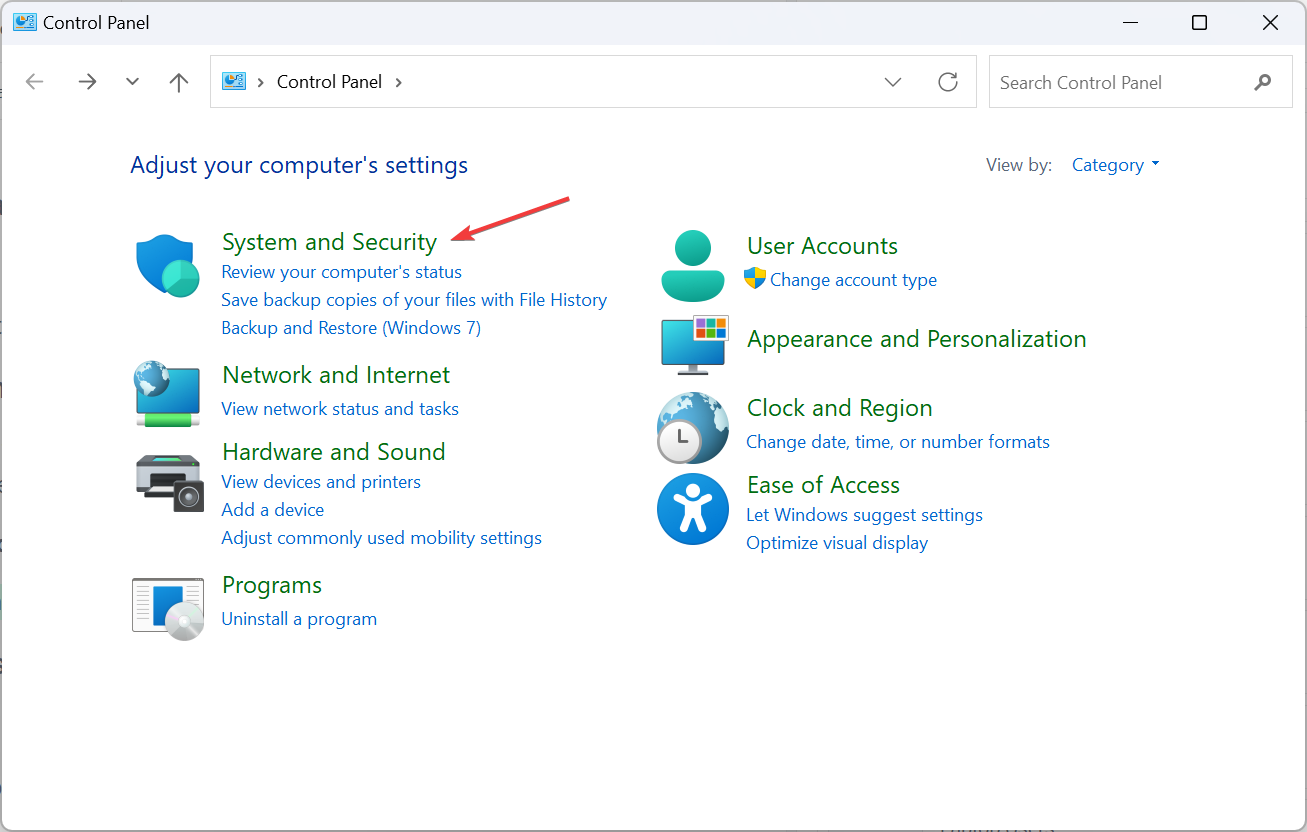
Fix: Find My Device is Not Working on Windows 11

If you’ve ever lost your device, you can rest assured that Windows 11’s Find My Device service could help you locate it. But what happens when this tool fails you?

It’s good practice to test out features regularly to ensure they’re working, so if this particular one is unresponsive, we share tips on how to get it up and running again.

Why is Find My Device not working? 

  • You’ve probably not enabled your location settings, or no devices are linked to your account.
  • You’re using an account without administrative privileges or connected to a work/school account.
  • Your device’s battery is low, or you’re not signed into your Microsoft account.
  • Incompatible software installed recently may be interfering with how the feature works.
  • A malware infection can also change how things work on your PC.

How do I fix Find My Device if it isn’t working on Windows 11?

First off, ensure the following conditions are met before embarking on the slightly technical steps:

  • Check and ensure your device has enough power, then disable and enable the Find My Device feature.
  • Verify that you’re signed in using an administrator account and run Windows Updates.
  • Sign out, then back into your Microsoft account, and ensure your device is not in Airplane mode.
  • Uninstall any suspicious applications.
  • Ensure you have a strong and active internet connection and your router is working properly, then restart your system.

1. Re-enable your location settings

  1. Hit the Windows key and click on Settings.settings windows 11
  2. Select Privacy & security>App permissions>Location.
  3. Toggle on and off Location services and Let apps access your location options.

2. Turn off your VPN

  1. Press the Windows key and select Settings.settings windows 11
  2. Next, select Network & internet and click on VPN in the right-side menu.
  3. Select the VPN connection you want to disable, click on the drop-down menu and select Remove.remove VPN

3. Run a virus scan

  1. Press the Windows key, search Windows Security, and click Open.
  2. Select Virus & threat protection.
  3. Next, press Quick scan under Current threats.
  4. If you don’t find any threats, proceed to perform a full scan by clicking on Scan options just below Quick scan.Scan options
  5. Click on Full scan, then Scan now to perform a deep scan of your PC.Full Scan Scan Now
  6. Wait for the process to finish and restart your system.

What are other tips for tracking, finding, or locking your Windows 11 device?

  • Use tracking software – Find My Device is not always accurate, so you can opt for third-party tracking software with more advanced features like lock device capabilities.
  • Install remote control software – If you’re in need of urgent files, remote control software can help you access those files before you recover your lost device.
  • Track your device using GPS location – PCs have built-in GPS capabilities that record motion data. With the right GPS software that saves frequent locations, you can track your device in no time.
  • Use your IP address to track the device – If the laptop is stolen/lost and is online, you can track it using your IP address. If successful, you’ll have to report to law enforcement to follow due process.

Also, if you have the device manufacturer’s IMEI number, you can contact Microsoft support for further help tracking your device.

Hopefully, this article helped you fix the Find My Device feature not working in Windows 11 problem.

If you have any other solutions that may have helped you restore the functionality of this feature, don’t hesitate to let us know in the comment section below.
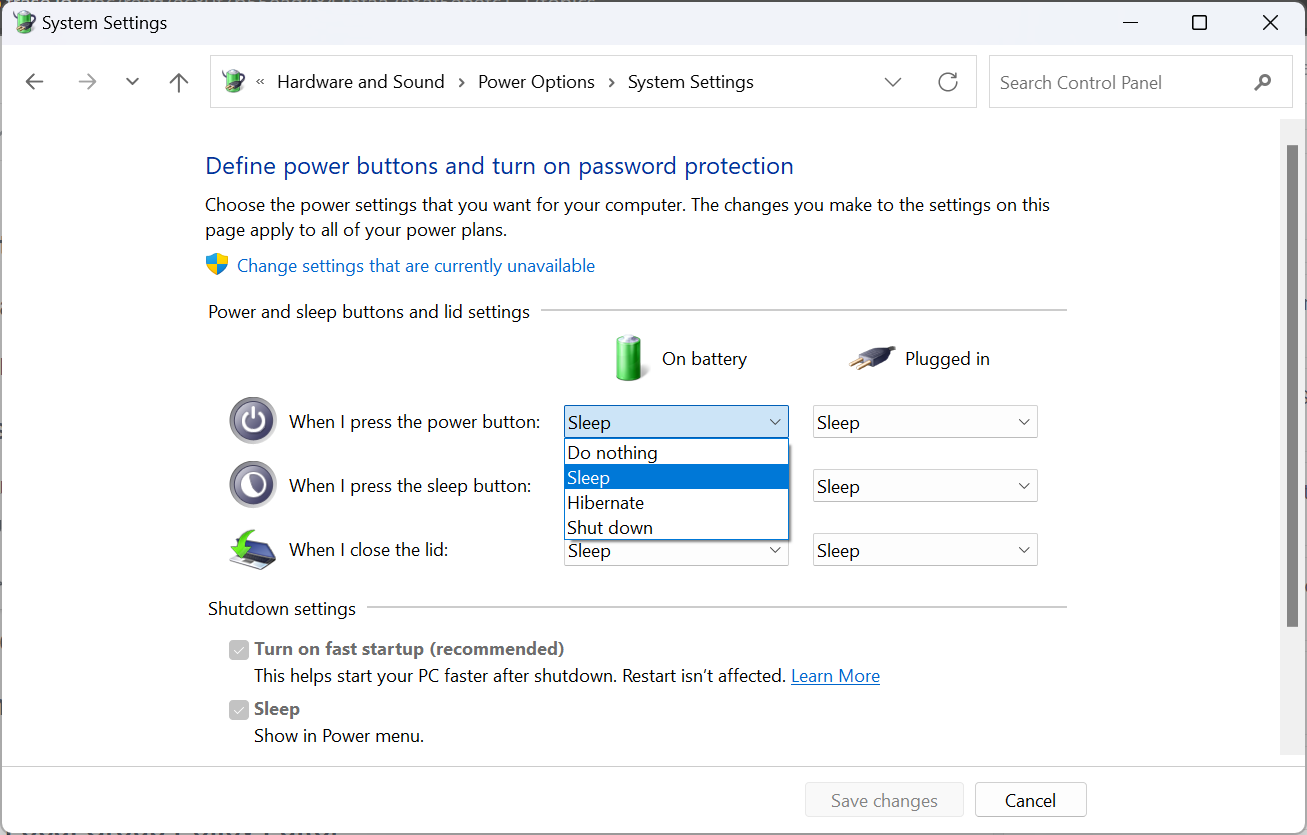
How to Crop an Image on Windows 10 [5 Ways]

There are a lot of tools that may help you crop an image on Windows 10, including Paint, Paint 3D, Snip & Sketch, or Microsoft Photos. In this article, we will cover all the ways on how to crop images on Windows 10.

What is the shortcut key for crop in Windows 10? Windows 10 doesn’t have a shortcut for cropping an image. However, there are individual shortcuts when you’re using a certain software. For instance, the crop shortcut key for Snip & Sketch is Ctrl + R or Alt + R.
How do I crop an image on Windows 10?

1. Crop an image using Paint

  1. Open your image in Microsoft Paint.
  2. Click on the Select tool and draw a rectangle on the area you want to crop the image.
  3. Now, just click the Crop button.
  4. You will immediately see the cropped image that you may now save using the File menu.

Although Microsoft Paint is a pretty old tool, it still has a lot of tricks under its sleeve. For instance, you can fit it with the latest AI-Cocreator tool and generate interesting artwork.

2. Crop an image using Photos

  1. Open your image using Microsoft Photos.
  2. Click on the Edit image icon from the top.
  3. Now, drag the corners or sides of the image with your mouse until you have the right crop selection.
  4. Now, you can save the image as a copy or click on the drop-down menu to overwrite your selection.

When you drag the corners, you will see the exact resulting resolution of the cropped image so you can adjust it as you need.

With Microsoft Photos, you may also retouch your image and change the brightness, contrast, exposure, color saturation and more.

If you have trouble with the app, our guide on how to fix Microsoft Photos issues will come in handy.

3. Crop images using online tools or third-party software

We won’t be able to list here all the software you may use, but you may crop images using Adobe Photoshop, for example.

It is one of the most popular editing apps with which you can crop, edit, erase objects, or even adjust your subject’s features and poses automatically.

⇒ Get Adobe Photoshop

We also have a selection of the best image editing tools that you should check if you want something more than cropping your photos.

4. Crop an image using Snip & Sketch

  1. Open your image using Snip & Sketch.
  2. Click on the Crop icon from the top.
  3. Use the mouse to drag the corners of the image to get your crop selection and hit the checkmark from the top to acknowledge it.
  4. Now, you can save the result in the format you like.

You can do a lot more with this tool. We have a complete article on how to use Snip & Sketch to capture, edit and share images.

5. Crop an image using Paint 3D

  1. Open your image using Paint 3D.
  2. Click the Crop icon from the top left, adjust your selection by dragging the corners with your mouse, and click Done when you’re finished.
  3. Now, you can save the result by using the Menu > Save or Save as options.

As you have probably noticed, Paint 3D also has options to choose from a selection of aspect ratios or simply input the resulting resolution in the Custom setting. Make sure you check the Lock aspect ratio option so that your image doesn’t get distorted when you change the resolution.

You may also be interested in reading our guide on how to add and edit text into a Paint 3D project.

With all the tools above you can crop images for free and we hope that our guide helped you do that quickly.

For any other questions or suggestions, feel free to use the comments section below.