On Acer PCs and laptops, you can usually bring up the boot menu by pressing F12 or Del during the boot process.
However, the specific boot key for an Acer PC may vary depending on the model and the BIOS version installed. Occasionally, the Esc and F9 keys can access the boot menu on Windows Acer PCs.
If you want to enter the BIOS setup, you should usually press the F2 key during startup.
How do I enter the boot menu on Acer PCs?
Use the function key shortcode
Start or restart your Acer PC.
As the computer begins the boot process, press the F12 key multiple times until the boot menu appears.
The boot menu will show a list of available devices or boot options, use the arrow keys on your keyboard to navigate the menu and highlight the desired device or option.
The above steps will provide flexibility in choosing the boot device, allowing you to boot from different sources depending on your needs.
We have a detailed guide on Windows 11 not booting and some steps for force starting it.
Press and hold down the F12 key to access the Acer boot menu.
Press the right arrow key to navigate to the Main tab. Select the F12 Boot Menu by navigating down with the down arrow key,
Press Enter to change from Disabled to Enabled.
Close your BIOS afterward.
Can I boot Acer from a USB?
Yes, Acer PCs can be booted from a USB drive. Booting from a USB allows you to run or install an operating system or perform other tasks using the contents of the USB device.
Alternatively, you can check our article about ways to fix slow boot issues on your Acer PC and make it boot faster.
Dropbox is one of the most used cloud storage due to its ease of use and accessibility. Unfortunately, users can sometimes encounter issues with Dropbox error 429, a prominent one.
This error which is sometimes accompanied by too many requests prompt can be caused by various factors. Irrespective of the cause of this issue, the solutions in this guide will help you fix it quickly.
Also, there is a limit on the frequency a shared link file can be downloaded daily. These limits depend on the plan you are using; when the limit is exceeded, you will get this Dropbox error.
Thankfully, this issue can be easily fixed with the solutions in the next section of this guide.
How can I fix the Dropbox error 429?
Listed below are some basic troubleshooting steps to try before proceeding the more sophisticated solutions:
Restart your PC
Wait till the ban on your account is lifted
Ensure the file does not have any copyright violation
Re-upload the file
If these do not fix the issue, proceed to the fixes below:
1. Check link status
Launch Dropbox and sign into your account.
Select the Share Links option in the left pane.
Now, click the three vertical dots before the link showing the error.
Select the Link Settings option.
Next, toggle the switch for Disable download backward to deactivate it.
Finally, relaunch Dropbox and check if the error persists.
In some cases, the Dropbox error 429 might be because you have deactivated the file link for download. The solution to this is to re-enable the link.
2. Enable restrictions on shared links
Launch the Dropbox app and sign into your account.
Select the All files option.
Now, choose Settings.
Click on the Link for editing tab.
Next, toggle the present option before the Require password and Expiration option.
Finally, click on the Save option to save your changes.
The Dropbox error 429 can sometimes be due to a lack of parameters set for your shared links. You can fix this by selecting an expiry date for your shared links and setting a password for your uploaded files.
With this, you can limit the traffic on your shared links and files.
Open the Dropbox account and sign into your account.
Choose the Share Links option in the left pane.
Now, click the menu button (three vertical dots) before the link giving the error.
Next, select the Remove from Dropbox option.
Finally, you can now generate a new shared link.
In some cases, your shared links might not work if you restarted Dropbox. In this case, you need to generate a new shared link to solve this.
4. Reinstall Dropbox
Press the Windows key + S, type control, and select Control Panel.
Choose Uninstall a program under the Programs section.
Now, right-click the Dropbox option and select Uninstall.
Finally, follow the onscreen instructions to complete the process.
At times, this Dropbox error 429 might be due to glitches with the app. The best thing to do here is to uninstall the app and reinstall it from official sources.
5. Contact Dropbox support
If everything fails to solve the Dropbox error 429, you need to contact the support team for assistance. This is because the issue might be from their end, which you can’t do anything about.
The support team has helped many users to fix this issue, and you can submit a ticket too.
With this, we can conclude this guide on fixing Dropbox error 429. You should now be able to fix this issue effortlessly, provided you follow the steps in this comprehensive guide carefully.
It has been a good week for Windows users, as Windows 11 has finally gotten the first taste of Copilot in Build 23493. Plus, there is a whole new Settings homepage too, with interactive cards to help you set up your device even faster.
However, one of the most useful features has come within the shape of a share. You can now quickly email a file to yourself directly from File Explorer on Windows 11.
The feature is very easy to use, and it just takes seconds. This will most probably be one of the most worthwhile features in a while. Here’s how to do it.
Here’s how to quickly email a file to yourself from File Explorer
Right-click on any file that you want to email to yourself from File Explorer and select the Share icon.
Once you select it, it automatically opens a pane to introduce your email. From there you can easily send it.
As we mentioned earlier this feature is very useful when you’re in a hurry. It actually can save a lot of time, even when you’re not in an urgent situation.
For now, the feature is only in the Windows Insider Program, but it will soon be available to the general public.
Here is the complete list of all the changes and improvements in the new build.
Changes and Improvements in Build 22631.1972
[File Explorer]
Windows Insiders in the Beta Channel on Build 22631 are now previewing the Windows App SDK version of File Explorer. Functionality in File Explorer remains unchanged, it just switches from using WinUI 2 to using WinUI 3.
Fixes in Build 22631.1972
[Settings]
The option to “Hide date and time in the System tray” from the last flight should no longer be backwards (on being off, off being on).
Fixes for BOTH Build 22621.1972 & Build 22631.1972
New! This update improves several simplified Chinese fonts and the Microsoft Pinyin Input Method Editor (IME) to support GB18030-2022. You can enter and display characters from conformance level 1 or 2 using the additions to Microsoft Yahei, Simsun, and Dengxian. This update now supports Unicode Extensions E and F in the Simsun Ext-B font. This meets the requirements for level 3.
New! With this update, you can now authenticate across Microsoft clouds. This feature also satisfies Conditional Access checks if they are needed.
New! This update improves the sharing of a local file in File Explorer with Microsoft Outlook contacts. You now have the option to quickly email the file to yourself. In addition, loading your contacts from Outlook is better. This feature is not available for files stored in Microsoft OneDrive folders. OneDrive has its own sharing functionality.
New! This update expands the roll out of notification badging for Microsoft accounts on the Start menu. A Microsoft account is what connects Windows to your Microsoft apps. The account backs up all your data and helps you to manage your subscriptions. You can also add extra security steps to keep you from being locked out of your account. This feature gives you quick access to important account-related notifications.
New! This update adds many new features and improvements to Microsoft Defender for Endpoint. For more information, see Microsoft Defender for Endpoint.
This update addresses an issue that affects TextInputHost.exe. It stops working.
This update addresses an issue that affects HKCU\Software\Microsoft\Windows\CurrentVersion\Explorer\User Shell Folders. You can now set and maintain the correct default permissions for this directory path. When the permissions are wrong, Start menu, search, and Azure Active Directory (Azure AD) authentication fails.
This update addresses an issue that affects devices that use the Network Protector for BitLocker. The device will not resume after it has been suspended.
This update addresses an issue that affects certain applications that use IDBObjectStore. They do not work in Microsoft Edge and IE mode.
This update addresses an issue that affects a scheduled monthly task. It might not run on time if the next occurrence happens when daylight savings time occurs.
This update addresses an issue that affects Narrator. It reads the wrong state when you cancel the selection of an option button you have selected.
This update gives user accounts the ability to open an elevated Windows Terminal. This only works if they use an admin account that has not signed in before.
This update addresses an issue that affects File Explorer (explorer.exe). It stops working.
This update addresses an issue that affects Narrator. The issue stops Narrator from retaining your scan mode when you switch between browsers.
This update addresses an issue that affects certain apps. It stops working when it tries to scan a barcode.
This update addresses an issue that affects Microsoft Intune push notifications. The issue stops devices that have less than 3.5 GB of RAM from getting them.
This update addresses an issue that affects Teams. The issue stops Teams from alerting you about missed calls or messages.
This update addresses an issue that affects File Explorer windows. They unexpectedly appear in the foreground.
This update affects Active Directory event ID 1644 processing. It now accepts events of greater than 64 KB in length. This change truncates Lightweight Directory Access Protocol (LDAP) queries contained within event 1644 to 20000 characters by default. You can configure the 20K value using the registry key “DEFAULT_DB_EXPENSIVE_SEARCH_FILTER_MAX_LOGGING_LENGTH_IN_CHARS.”
This update addresses an issue that affects Azure Virtual Desktop and Windows 365 users. You might not see the right location for a Remote Desktop session in your virtual machine or Cloud PC.
This update affects the reliability of Windows. It improves after you update the OS.
This update addresses an issue that affects some earbuds. They stop streaming music.
This update addresses an issue that affects .msi files. A minor update is not installed. This occurs when you use the EnterpriseDesktopAppManagement configuration service provider (CSP) to distribute the .msi file.
This update addresses an issue that affects a tib.sys driver. It does not load. This occurs when HyperVisor-protected Code Integrity (HVCI) is enabled.
This update addresses an issue that affects the on-screen keyboard. The issue stops it from opening after you lock the machine.
This update addresses an issue that affects msftconnecttext.net. It gets excessive HTTP traffic.
This update addresses an issue that might affect your computer when you are playing a game. Timeout Detection and Recovery (TDR) errors might occur.
This update addresses an issue that affects those who enable the “Smart Card is Required for Interactive Logon” account option. When RC4 is disabled, you cannot authenticate to Remote Desktop Services farms. The error message is, “An authentication error has occurred. The requested encryption type is not supported by the KDC.”
This update addresses an issue that affects the Recommended section of the Start menu. When you right-click a local file, it does not behave as expected.
This update affects the Desktop Window Manager (DWM). It improves its reliability.
This update addresses an issue that affects all the registry settings under the Policies paths. They might be deleted. This occurs when you do not rename the local temporary user policy file during Group Policy processing.
This update addresses an issue that affects the Spooler service. It stops working. This issue occurs when you print using a certain workspace.
This update addresses an issue that affects certain apps. In some instances, video flickering occurs.
This update addresses an issue that affects File Explorer. It might stop responding indefinitely. This occurs after you try to view the effective access permissions for files in File Explorer.
What do you think about this particular feature? Would you find it useful or not? Let us know your opinion in the comments section below.
Click on the ellipsis beside the current location to open the server list. Then connect to a region close to the Rocket League game server like the US.
Launch rocket league again
Check the ping rate again. It should be lower by now.
Using a VPN has the added advantage of improving your overall online privacy and security. It may also help in managing packet loss in this game.
After a VPN encrypts your data, it travels to and fro between you and the server. So, it is always a good idea to choose a server close to you to minimize the time it takes for the data to reach its destination.
Why does it matter?
Because the longer the distance a VPN travels, the more time the response will take and this would mean a slower gaming experience for you.
ExpressVPN
Connect to ExpressVPN to fix high ping and get a steady connection in Rocket League!
Updating your computer’s BIOS (Basic Input/Output System) can help improve your computer’s performance, including crashing lag spikes in Rocket League.
To update your BIOS:
1. Confirm your BIOS version
Press down the Windows + R keys together.
Type in msinfo32 and enter.
Navigate to where you find the BIOS version/date.
Put down this data and exit the window.
Warning: Ensure to follow this step carefully as this process can cause damage to your device if you don’t know exactly what you’re doing.
2. Get your computer’s serial number
Click on the start menu and search for cmd.
Select the Command prompt app.
Type wmic baseboard, get product, manufacturer, version, and serial number, and press Enter.
Write down any information that appears.
3. Download and update your BIOS
The process of updating BIOS is not the same for all devices. The instructions below are specific to the HP computer, but they’re similar regardless of model.
Choose between a laptop and a desktop based on your type of device.
Enter your device serial number or let HP detect your device. Click Submit.
Select your OS and its version. Select Submit.
Go to All drivers, then expand BIOS to see available updates.
Click the download icon.
Install the .exe file, following the on-screen instructions.
Restart your PC.
When your system boots, select Apply update now.
BIOS updates can include performance optimizations that can improve your PC’s overall speed and responsiveness.
It can equally fix bugs and compatibility issues that may cause system instability or crashes. This can lead to a more reliable and smoother experience when gaming with your PC.
3. Clear your DNS
Flushing your DNS (Domain Name System) cache can help improve your internet connection and reduce ping in Rocket League.
To do that:
Hold down Windows + R at the same time. Then enter cmd. Click OK.
A pop up may appear requesting your permission to allow the Command prompt to make changes to your computer. Choose Yes.
In the CMD window, type ipconfig/flushdns.
Press Enter on your keyboard.
A message verifying a successful DNS flush will appear.
4. Close background apps
Click on the Start button and select the Settings app.
Click Apps, then Apps & features on the left sidebar.
Locate the app, then click the three-dots button to the right of the app’s name and select Advanced options.
Under the section Background app permissions, turn the slider off.
Then go back to the Start bar and search for Task manager.
Select the app you want to close. Then click on End task.
Closing unused background software can free up space, leading to faster performance and smoother gaming.
Another reason Rocket League may lack is when your device network drivers are outdated. Endeavor to get their recent versions.
Follow these steps to get it done faster:
Hold down Windows + X and select Device Manager.
Expand Network adapters > Right-click on your network driver, then select Update driver.
Click Search automatically for drivers, then follow the on-screen instructions to complete the process.
Summary
High ping can be a frustrating issue that can affect gameplay. Fortunately, several potential fixes can help lower your ping on Rocket League and improve your gaming experience.
For example, using a VPN, updating your BIOS, clearing your DNS cache, and closing background apps are all potential solutions.
If you want to improve your gameplay on Rocket League, you must know the best camera settings to get a competitive edge; read this guide for details.
There are several processes that run in the background to make your apps run effortlessly. One of these processes is mctray.exe, which is integral to the operation of the McAfee Common Framework software.
While this process is normally safe, it can sometimes cause problems on the apps that depend on it. If you are encountering issues with mctray.exe, keep reading, as the solutions in this guide will help you fix it for good.
What is mctray.exe?
The mctray.exe process is the main executable file of McAfee’s Agent software. This process runs in the background when you run its parent software and displays its trademark M icon on the Taskbar.
This serves as a shortcut to the McAfee software and allows you to quickly access the app without launching the main interface. Note that this process is completely safe and is digitally signed.
So, you should be rest assured that it poses no threat to your PC. However, if you encounter problems with this process, there are ways to fix it, and we will show you how to go about it in the ensuing sections of this guide.
How can I fix application errors related to mctray.exe?
Before proceeding to the solutions in this section, try the basic troubleshooting steps below:
Update the McAfee app
Restart your PC
If the issue persists, you can now explore the fixes below:
1. End the process
Press the Windows key + X and select Task Manager.
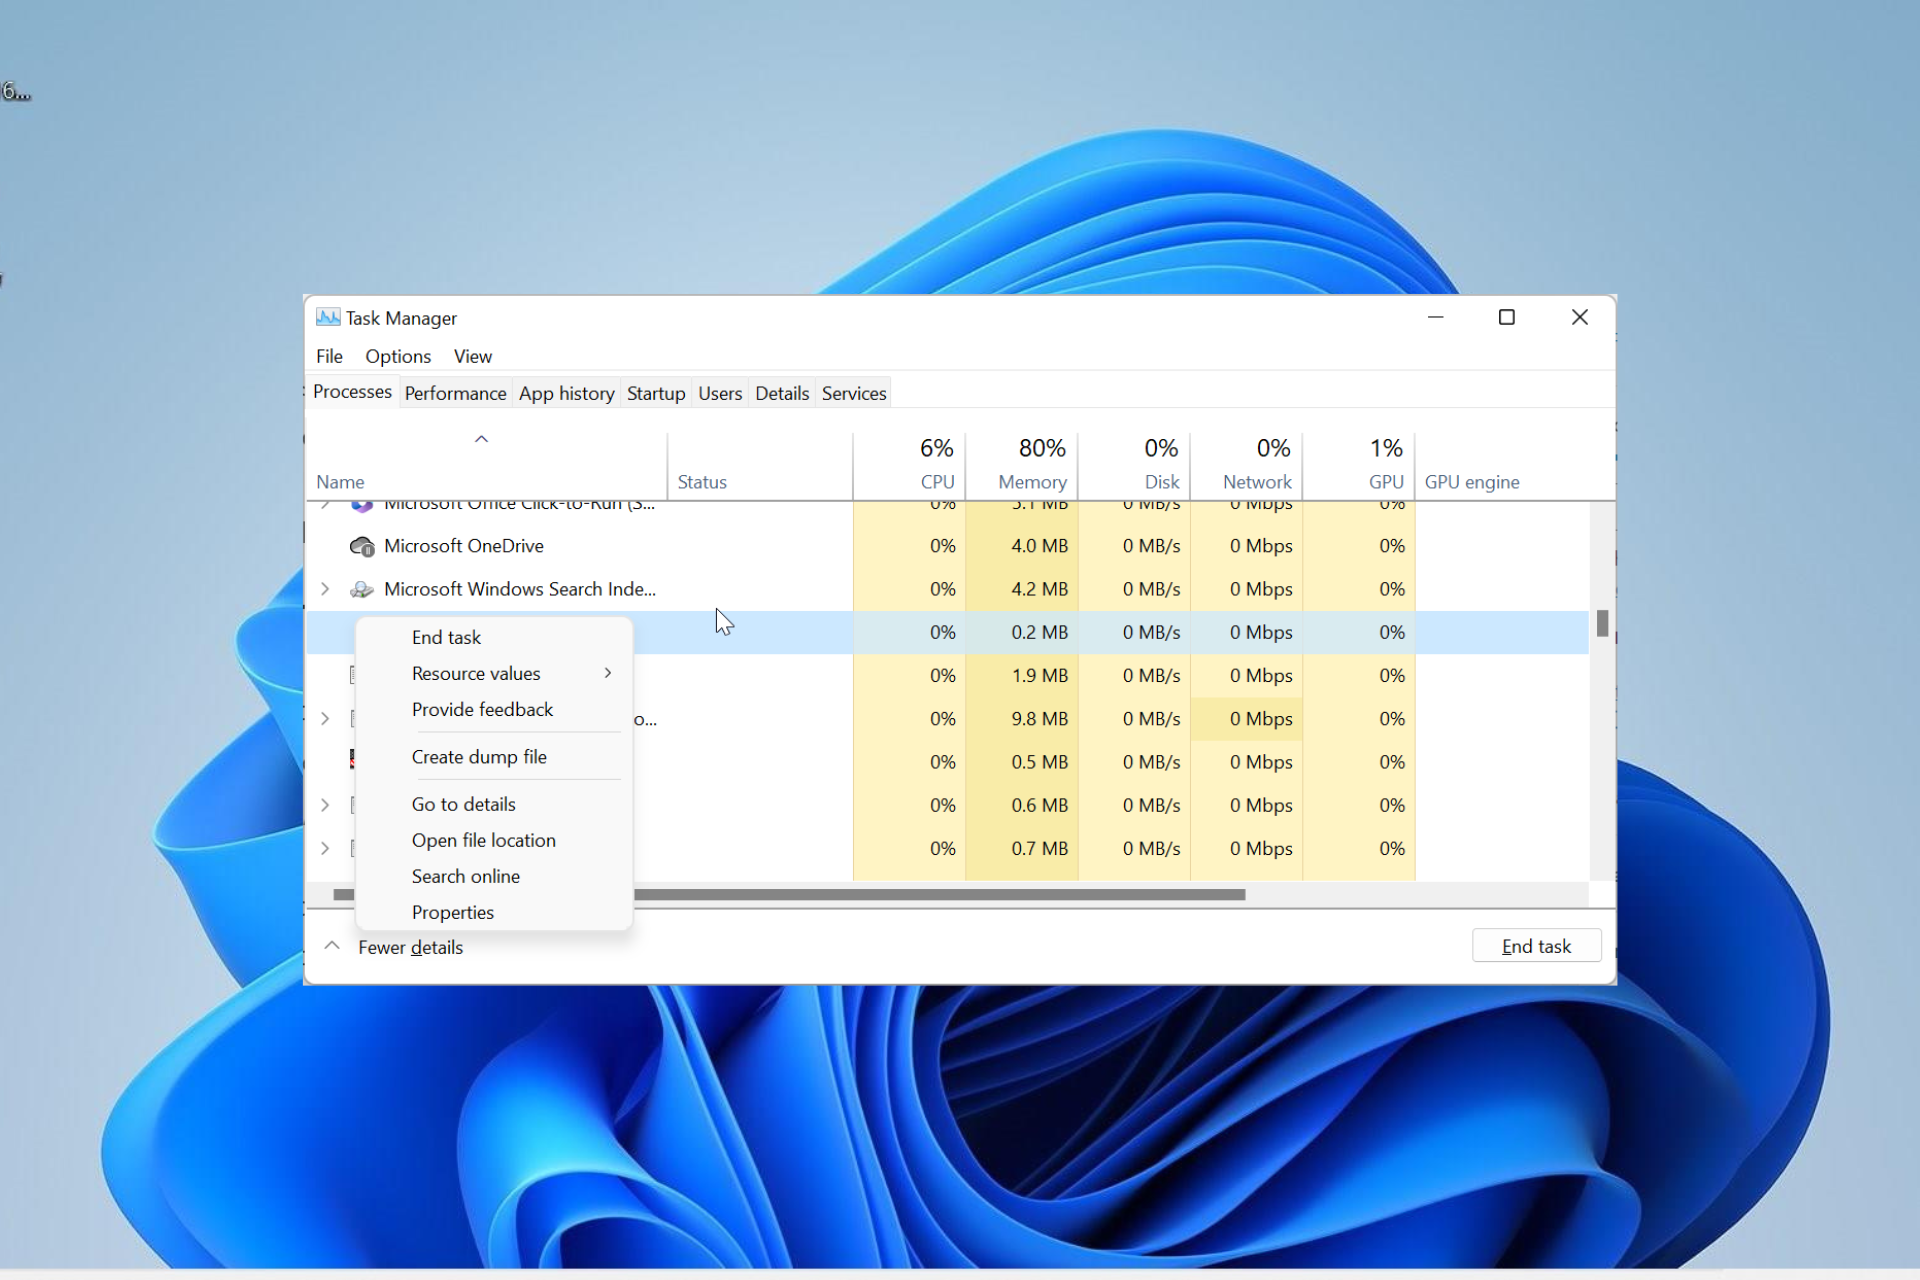
Right-click the McAfee software or mctray.exe process and select End task.
Finally, restart your PC.
If the apps dependent on mctray.exe is causing high resource usage, you need to end the process in Task Manager. This will clear the potential glitches that might be causing the problem.
2. Update your PC
Press the Windows key + I to open the Settings app and click Windows Update in the left pane.
Click the Check for updates button.
Now, download and install all available updates.
An outdated operating system can cause different issues, including the failure of processes like mctray.exe. The fastest way to fix this is to update your PC to the latest version.
Press the Windows key, type cmd, and select Run as administrator under Command Prompt.
Type the command below and hit Enter to run it:DISM /online /cleanup-image /restorehealth
Wait for the command to finish running.
Now, run the command below:sfc /scannow
Finally, wait for the command to finish running and restart your PC.
Sometimes, you might face problems with the mctray.exe process can be due to problems with your system files. You can fix this by using the built-in repair tools on your PC.
Alternatively, you can fix this issue for good by using a dedicated repair tool to save you from the stress of running a series of commands and repairing the files manually.
4. Scan for malware
Press the Windows key, type virus, and click Virus & threat protection.
Click the Scan options link on the new page.
Finally, choose your preferred scan option and click the Scan now button.
Malware can sometimes hijack the mctray.exe process and start causing it to misbehave on your PC. You can fix this by performing a full malware scan to eliminate the virus.
Alternatively, you can a specialized tool in TotalAV to perform the task. This superb tool will remove even the most hidden and stubborn viruses on your PC, including the ones hiding in your system files.
5. Uninstall third-party software
Press the Windows key, type control, and select Control Panel.
Choose Uninstall a program under Programs.
Now, right-click the McAfee software and select Uninstall.
Follow the onscreen instructions to complete the process.
Next, press the Windows key + R, type regedit, and click the OK button.
Now, search for McAfee on your registry and delete all its entries.
Finally, restart your PC.
In a case when everything you have tried to fix this issue with mctray.exe does not work, you need to uninstall the McAfee software and clear its registry entry. But, if you still use the software, you can reinstall it from the official website.
We have now reached the end of this guide. You should now know what the mctray.exe process does on your PC and how to fix its related errors.
If you want to know what the osu.exe process does, check our detailed guide for verified info on it and how to fix its errors.
Feel free to share your experience with this process in the comments below.
There are several third-party processes that are important to the smooth running of your apps, and MoTTY.exe is one of them. This process runs in the background when its parent software is active.
However, it is still one of the lesser-known processes, and you might be wondering if it is worth keeping. In this guide, we explain everything you need to know about the process and help you decide whether to keep it or not.
What is MoTTY.exe?
The MoTTY.exe process is an executable exe file that comes with the MobaXterm terminal software. The parent software that is developed by the Mobatek software developer is pretty safe.
To this effect, the process is also safe and does not normally pose any threat to your PC. However, viruses can sometimes cause problems with this process either by taking it over.
But this can always be fixed, and the process will get back to working normally.
Should I uninstall MoTTY.exe?
The decision to uninstall the MoTTY.exe process or not will depend on the importance of its parent software to you. If you frequently use the MobaXterm terminal software, you definitely need to keep the process.
But if you only use the software occasionally and it causes issues on your PC, you can remove it. However, there are ways to fix issues related to MoTTY.exe, and we will show you how to go about it in the next section of this guide.
How can I fix issues related to MoTTY.exe?
1. End the process
Press the Windows key + X and select Task Manager.
Right-click the MoTTY.exe entry and select End task.
Also, check for the MobaXterm software and terminate it if it is running.
Finally, restart your PC.
If the MoTTY.exe process is causing problems on your PC, especially high CPU or memory usage, you can fix it by terminating it in Task Manager. This can be because the parent software is stuck or performing too many tasks.
So, you need to make sure you need to close all instances of the process and its parent software.
2. Scan for malware
Press the Windows key + S, type virus, and click Virus & threat protection.
Click the Scan options link on the new page.
Finally, choose your preferred scan option and click the Scan now button.
In some cases, this issue can be caused by the activities of viruses on your because. The malware can be disguised as the MoTTY.exe process or hijack it to use your PC resources illegally.
What you need to do here is to perform a malware scan using Windows Defender. If you want to perform a deeper scan and eliminate viruses even from your system files, we recommend using a dedicated antivirus in TotalAV.
This excellent software will scan the hidden parts of your PC to remove even the most stubborn virus.
Press the Windows key + R, type control panel, and click the OK button.
Choose Uninstall a program under the Programs section.
Now, right-click the MobaXterm software and select Uninstall.
Next, press the Windows key + R, type regedit, and click OK.
Search for MobaXterm and delete all its entries.
Finally, follow the onscreen instructions to complete the removal process.
If push comes to shove and you still can’t fix the MoTTY.exe problem, you need to go for broke and delete its parent software for good. If you ever want to use the software again, you can reinstall the software from official sources.
With this, we can conclude this guide. We have provided you with all the information you need on the MoTTY.exe process, and you should now be able to decide whether to keep or remove it.
If you are looking for detailed information about the nxlog.exe process, check our comprehensive guide on the topic.
Feel free to let us know if you could fix issues related to this process in the comments below.
Right at the end of June, Microsoft announced Windows 11 Insider Preview Build 23493, and it’s coming with some exciting features. Windows Copilot is finally here and you can experience it and leave your feedback. Just hop in the Windows Insider Program to use it.
A new volume mixer is also available, and it has a lot of features, including the ability to set up spatial audio. You can access it in Quick Settings, on your Taskbar.
But also there is a big new improvement in this build: a new Settings homepage, looking all fresh and very intuitive to use. It comes with a new design focused on cards.
These cards are the settings that you access the most, and now Windows 11 will put them right on the homepage. This way, you’ll be able to access them in seconds.
Since the new design might make it a bit hard to get around at first, this article will help you understand how to navigate it easier, and how to make the best of it.
Here’s how you can use the new Settings homepage
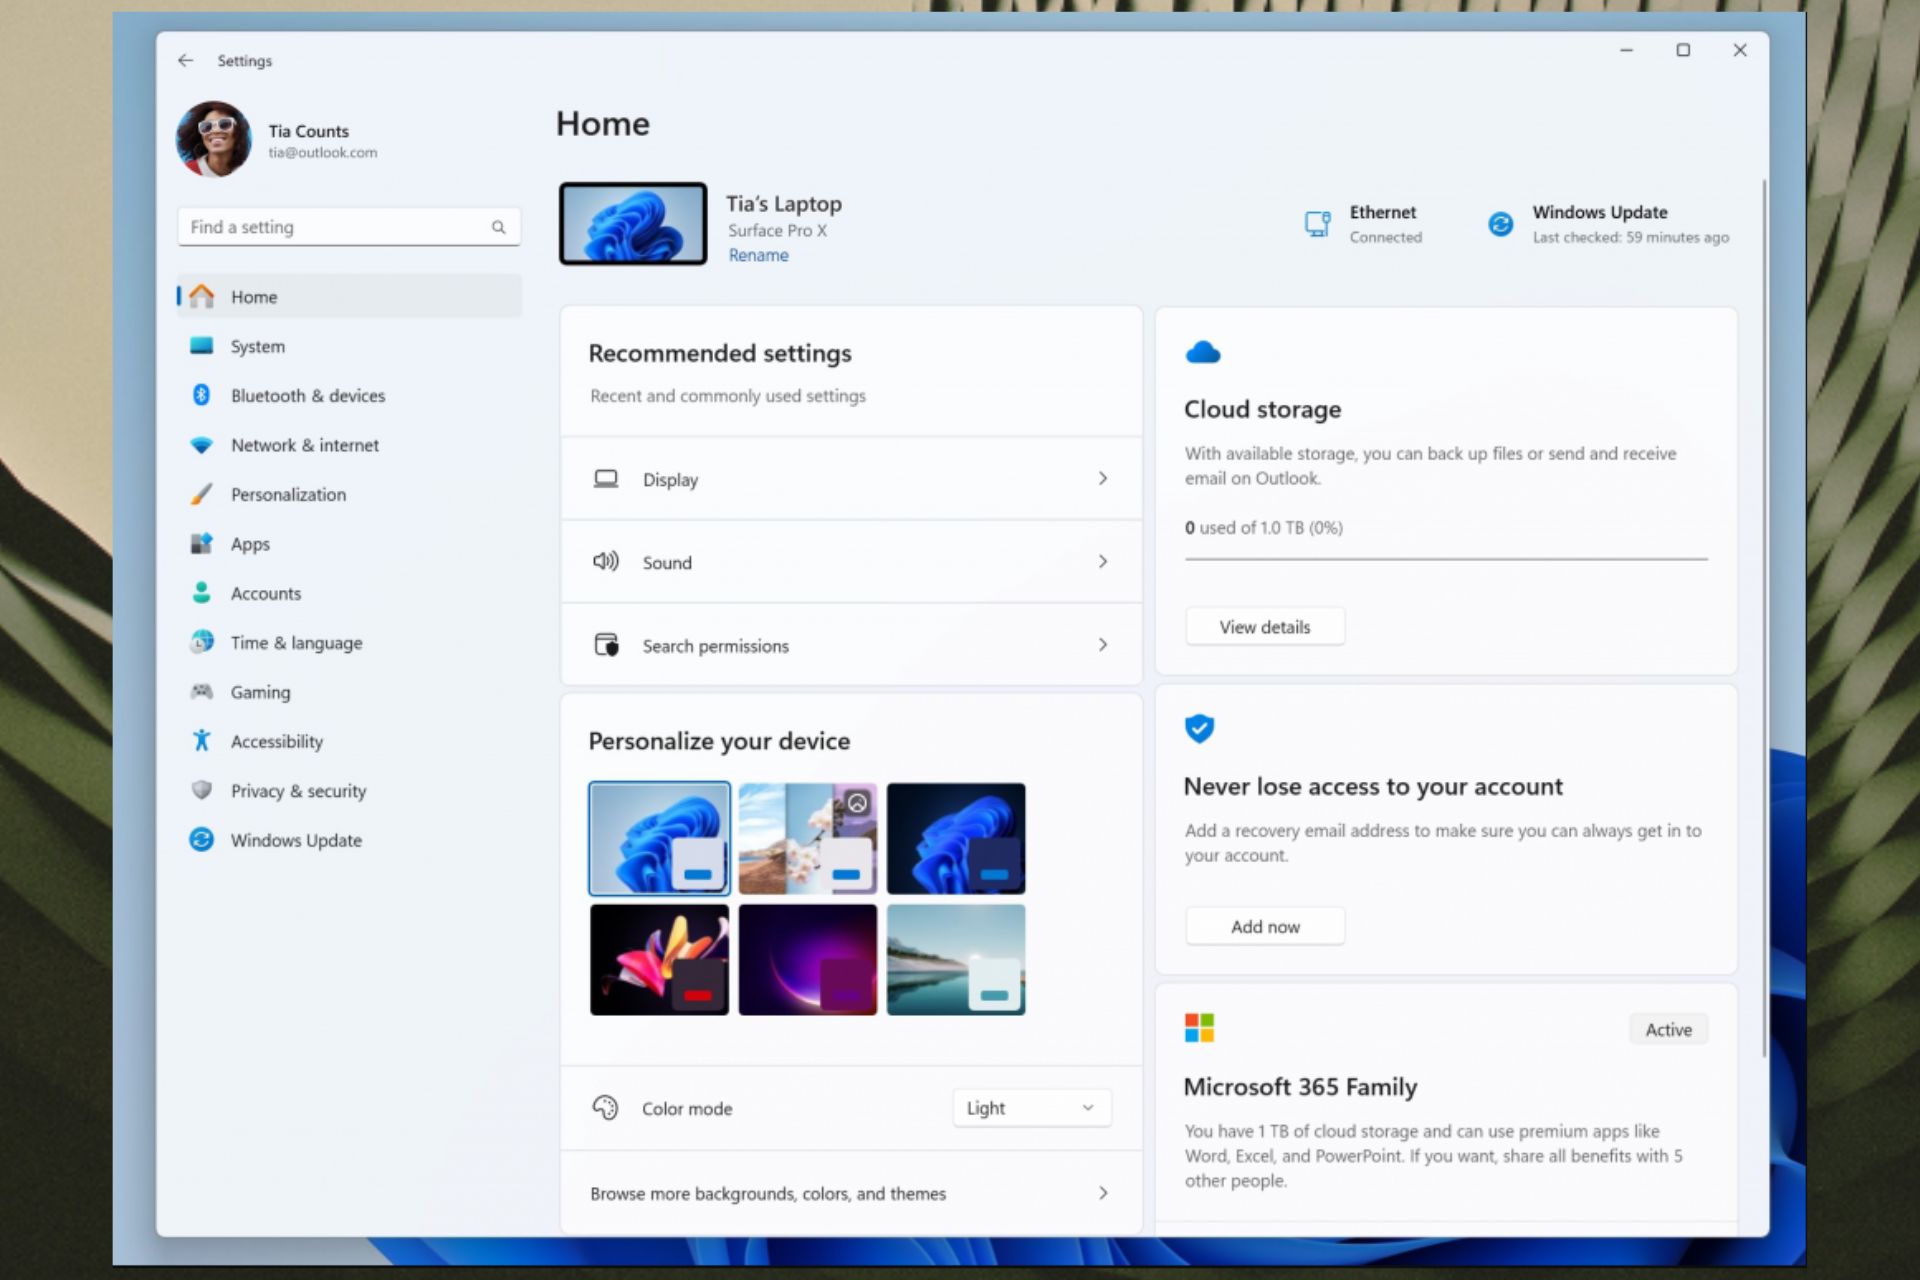
As you can below in the picture, the Settings homepage now has interactive cards. Each of them represents various device and account-related settings. Each card is also optimized to offer the most relevant information and controls at your fingertips in seconds.
Microsoft says Build 23493 comes with 7 cards, but more will be added in the future. These 7 cards are:
Recommended settings: This card adapts to your specific usage patterns, providing timely and relevant settings options. It’s designed to streamline your settings management and save you time.
Cloud storage: Gives you an overview of your cloud storage use and lets you know when you’re nearing capacity.
Account recovery: Helps keep your Microsoft account more secure by helping you add additional recovery info so you never get locked out of your account, even if you forget your password.
Personalization: Brings customization to the forefront by offering one-click access to update your background theme or change your color mode.
Microsoft 365: Provides a quick glimpse of your subscription status and benefits, along with the ability to take some key actions right in Settings instead of going to the web.
Xbox: Similar to the Microsoft 365 card, you’ll be able to view your subscription status and manage the subscription from the Settings app.
Bluetooth Devices: To simplify your Bluetooth device management experience, we’ve brought this to the forefront so you can quickly access and connect to your favorite Bluetooth-enabled devices.
You are able to take swift actions directly from this page with just a click, and the whole experience becomes far more manageable.
As we mentioned earlier, this homepage it’s more than just a landing page. It evolves and learns with you. As you use your device, it’ll adjust to provide the most relevant and useful information based on your usage and preferences, Microsoft says.
You can also check all the features coming to Build 23493 here, but get ready. There are a lot of changes and improvements, and some might surprise you.
What do you think about the new Settings homepage? Let us know in the comments section below.
When it comes to console gaming, there are three big giants: PlayStation, Xbox, and Nintendo. But the real battle is only between the first two. PlayStation and Xbox have had it going for quite a while now, and the two were even charged up in a competition of sales.
Brad Smith, Xbox boss, has even acknowledged that Xbox is losing ground to PlayStation in the console war for supremacy. According to him, Sony’s PlayStation outsold Xbox by 69/31 globally towards the end of 2022. So things have never been looking worse for Xbox. But is it true, though?
Is it Xbox losing ground, or just catering to its audience, who maybe enjoys playing games on Xbox more than playing them on PlayStation?
Well, the sales don’t lie, and according to this Reddit thread, it seems that PlayStation is way ahead of Xbox. When it comes to sales, of course.
Xbox vs PlayStation all-time sales: let’s see the numbers
According to Wikipedia, PlayStation has sold half a billion units since its very existence. That’s a huge number to even think about. But let’s see how numbers look individually:
102.49 million – PlayStation 1
155 million – PlayStation 2
87.4 million – PlayStation 3
117.2 million – PlayStation 4
38.4 million – PlayStation 5
80–82 million – PlayStation Portable
10–15 million – PlayStation Vita
A total number would bring PlayStation beyond the half-billion units, with an estimated number of 506 million units.
The reason: PlayStation has a history. It was launched years before Xbox, and its legacy grew based on the cult games that were exclusive to the console. Franchises such as Resident Evil, or Naughty Dog’s games made the console a must-have.
However, PlayStation 5 sales are not looking good. With only 38.4 million units sold, one would think the console is experiencing a low point.
Now, let’s take a look at Microsoft’s Xbox:
24 million – Xbox
84 million- Xbox 360
51–58.5 million – Xbox One
21+ million – Xbox X/S
The total number brings the Xbox to an estimated number of 180 million units sold, more or less.
The reason: Xbox was only released at the turn of the new millennium, but it has built a reputation ever since. With franchises such as Halo and many more PC games that can be played on this console as well, Xbox has become a versatile console for both the casual and the hardcore gamer.
Xbox 360 was released about the same time as PlayStation 3, and the two of them sold around the same number of units.
Who’s the winner?
Who’s winning? Well, the truth is that both consoles are winning. Each release sells millions of units, and games are abundant on each of them. Only on Xbox, there are currently over 5000 new games in development, with a roadmap that looks incredibly exciting. Both consoles have a legacy and it’s hard to predict who is the actual winner. And according to a Microsoft presentation in Brazil, it seems that Xbox X/S sales are over 21+ million units.
For Microsoft, Xbox is definitely a winner, amongst other great products from them. For Sony, PlayStation is one of their main areas of entertainment. In the long run, however, both consoles will be equally adored by gamers.
The most exciting time of the month is here. Microsoft is back with a new Windows 11 insider build, live on the Dev Channel.
Build 23493 is here and it brings with it a lot of hotly-awaited features. Windows Copilot is finally live for users to experience it. And there is a new Setting homepage waiting for you in this build.
With a new design and some tweaks, you’ll be able to navigate Settings in seconds. You will also be able to restore a lot of apps, which is an improvement of the feature announced in May.
Now, it seems like the volume mixer gets its revamping too. The feature has been living in several select insiders, but with this update, it’s finally and officially out and is close to general availability.
Soon, you will be able to adjust the volumes of any opened programs through your taskbar without the hassle of going through the Settings app.
How to enable the new volume mixer on Windows 11
1. Make sure to join the Windows Insider Program and have the latest Windows 11 Insider Build installed in your system. If not, head over Settings ➜ Windows Update ➜ Install all.
2. Once the latest build is installed, in the Quick Settings in your Taskbar, you should have the new pane.
As you can see, you’ll have several more options in the new Volume Mixer for Windows 11. You are able to set the sound for your device, as well as for Edge. Spatial sound also makes a welcoming entry in this build, and you can control right from this panel.
In the meantime, it’s still worth noting that being an insider-only feature that isn’t out for primetime yet, you may be running into some performance problems here and there, so, patience is a virtue.
Are you excited about this upcoming feature? Let us know in the comments!
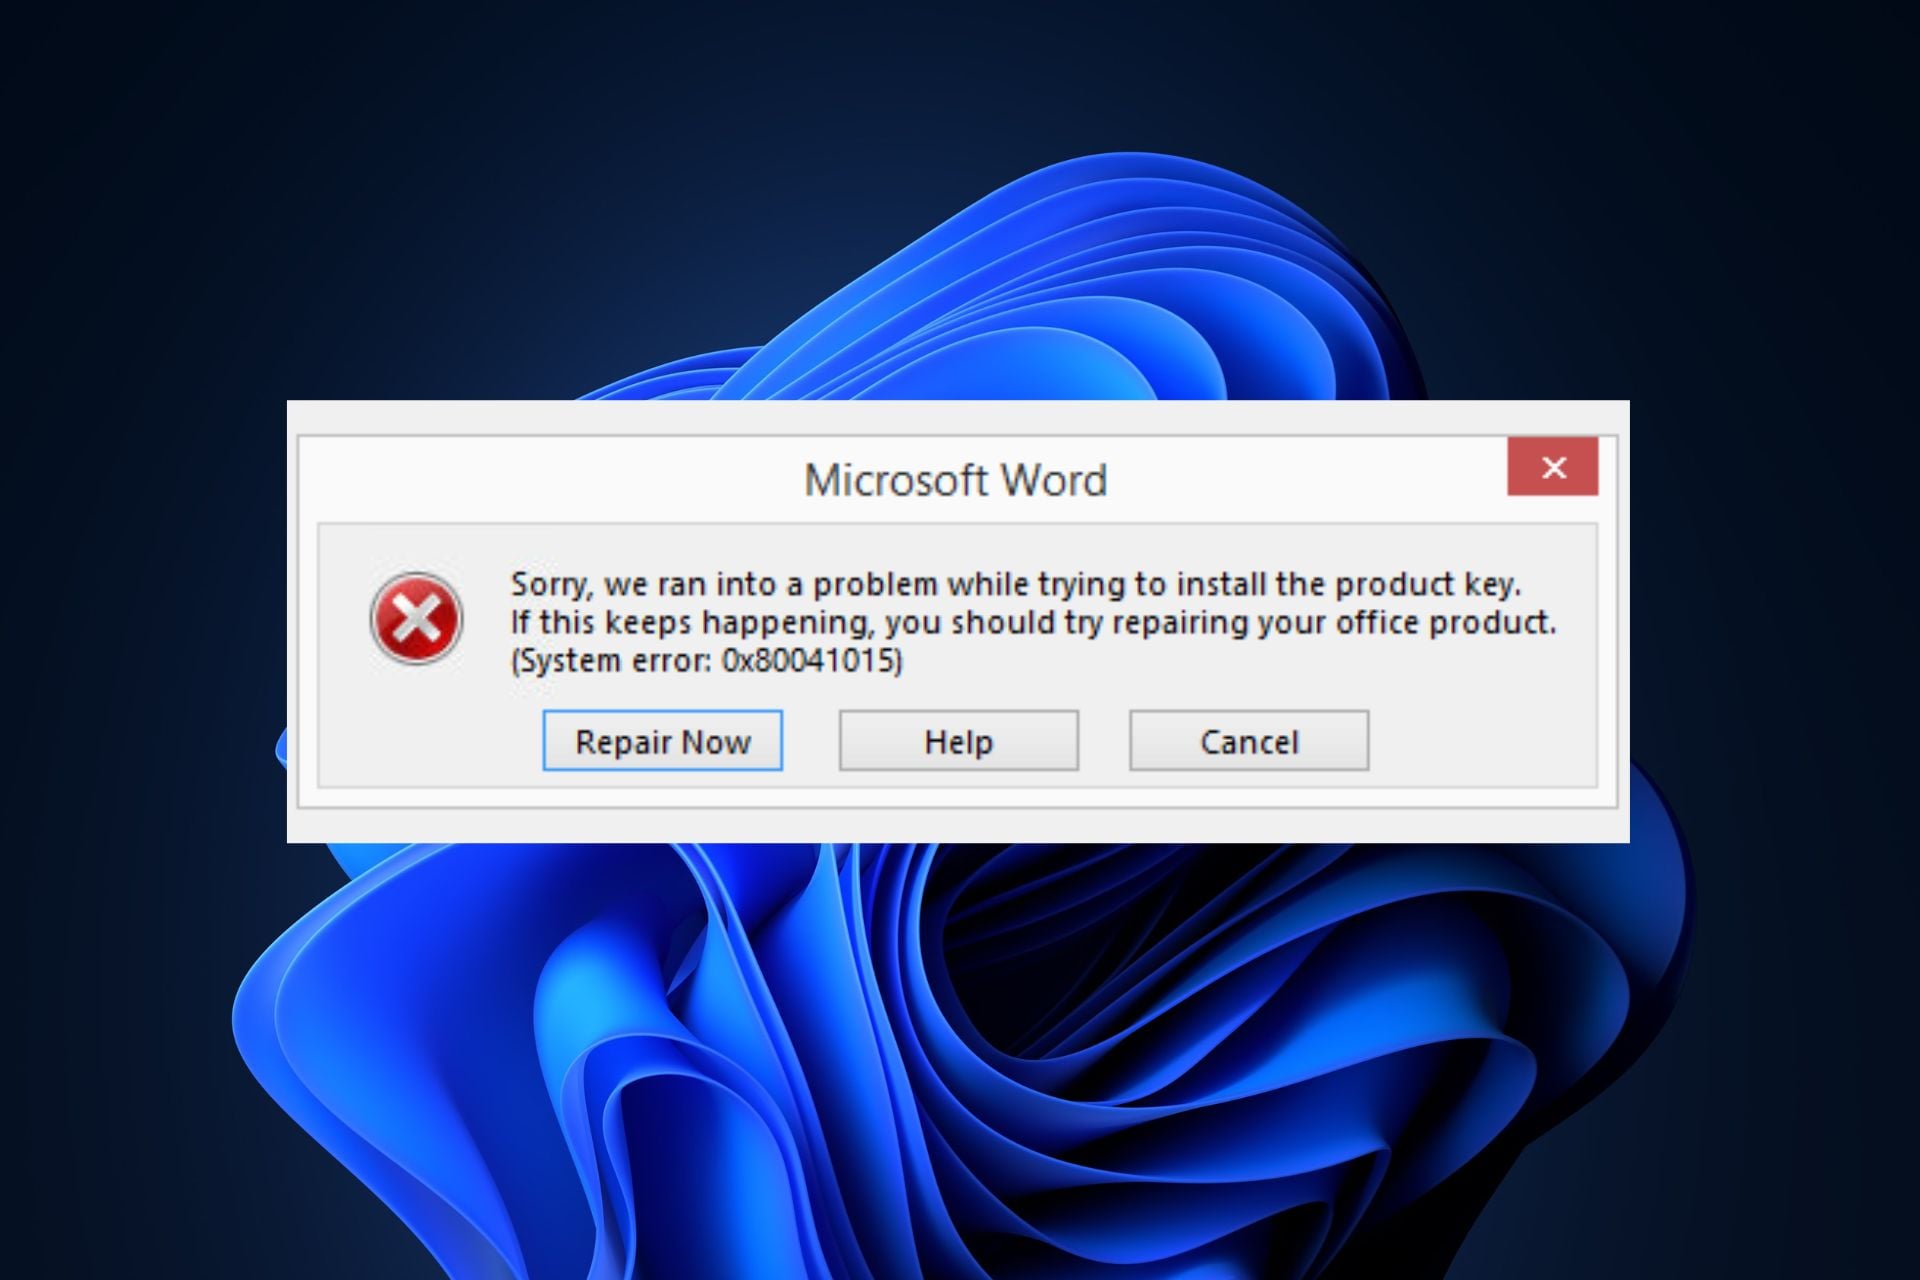
The 0x80041015 error in Microsoft Office is associated with activation or licensing of Office products issues, which may prevent you from using your Office applications. Some of our readers have recently reported encountering this 0x80041015 Microsoft Office error.
Hence, we have compiled some potential ways to troubleshoot the problem in this article.
What causes 0x80041015 Microsoft Office error?
Several reasons may be responsible for the 0x80041015 Microsoft Office error. Some of them are:
Product key validation issues – The 0x80041015 error code may occur when you attempt to activate or use Office applications, and the software cannot verify the validity of your license or product key.
Having multiple Office applications installed on a PC – Another possible reason for this is if you’re trying to add another Office product (such as Microsoft Visio, Microsoft 365, etc.) or if you make any attempt to reinstall an Office product on the same computer.
Windows update issues – At other times, the error may not be related to Office but to your operating system. The Windows OS may be damaged, infected with malware, or outdated, triggering the error code 0x80041015.
Now that you know the potential reasons behind the 0x80041015 Microsoft Office error code, let’s proceed to explore the fixes.
How do I fix the 0x80041015 Microsoft Office error?
Before attempting any of the advanced solutions provided in this guide, you should consider performing the following preliminary checks to clear doubts regarding the issue:
Ensure that your product key is correct and is not already in use.
Check if there are multiple versions of the Office app on your PC.
Having confirmed the above checks, if you require further assistance, work your way through any of the advanced solutions provided below:
1. Update Microsoft Office Click-to-Run
Open any Office application (Word, Excel, or PowerPoint).
Then, click on the File tab in the upper-left corner of the application window, and click on Account.
On the right pane, click the Update Options and select Update Now from the options to initiate checking for available updates.
Once the installation of the update is complete, you will get a prompt to restart your Office applications.
After restarting your applications, the updated version of Microsoft Office Click-to-Run will be installed and ready to use.
Click-to-Run is a critical component of Microsoft Office which updates all the Office apps. However, the exact steps may vary slightly depending on your Office version and configuration.
2. Uninstall multiple copies of Microsoft Office from your PC
Press the Windows + R keys to open the Run command dialog box. Type the control panel in the dialog box and press Enter.
Then, click on Uninstall a program under Programs.
A list of installed programs will appear. Locate all Microsoft Office apps, right-click the versions you aren’t using, and click on Uninstall.
Repeat the above step for each copy of Microsoft Office you want to remove and restart your PC.
Press the Windows + E keys to open the File Explorer.
Now, navigate to the tokens.dat file directory: C:\Windows\System32\spp\store\2.0\
Then, right-click on the tokens.dat file and select Rename from the options.
Enter the new name you wish to assign to the file (Make sure the new name has a file extension (.bak) to remain a valid file), and press Enter.
Tokens.dat is a digitally signed file that stores most Windows or Office installation files. Further, renaming it should help you fix the 0x80041015 Microsoft Office error, as it worked for some users in the Microsoft forum.
And that’s it on how to fix the 0x80041015 Microsoft Office error in Windows 11. Hopefully, one of the methods in this guide will help you fix the issue.
In addition, Winword.exe application error is an issue encountered by several users. You can explore our detailed guide in case you discover a similar problem.
Here’s some good news: native support for additional archive formats has been introduced. With the integration of the open-source project libarchive, Windows 11 will start supporting a wider range of formats, including .tar, .tar.gz, .tar.bz2, .tar.zst, .tar.xz, .tgz, .tbz2, .tzst, .txz, .rar, .7z, and many others.
Speaking in a blog post while also announcing Copilot for Windows 11, Microsoft’s Panos Panay said that by embracing open-source projects like libarchive, Microsoft demonstrates its commitment to providing a comprehensive and user-friendly experience for Windows users.
It’s been a long time coming. After 30 years since the archive file format was launched to the world for the first time, we’re finally seeing the time when we could extract a RAR file on Windows 11 without any third-party tool like WinRAR.
Formats like TAR were added to the native RAR support in Windows Insider Build23493.. The updates are now live.
Will WinRAR become a thing of the past once this update is rolled out?
That’s the question. We’re not sure yet – but one thing we know is that WinRAR can still be useful as it supports multithreaded CPU compression and decompression, and handle files of practically unlimited size.
How to try Windows 11 native RAR support
1. Go to Settings.
2. Click on Windows Update.
3. Make sure it says You’re up to date. If not, click on Download to get the latest update.
Plenty of reasons why Windows had no native support for RAR files, but one of the main factors was related to licensing issues and the proprietary nature of the RAR format.
RAR is a proprietary archive format developed by WinRAR, and its use required licensing agreements to include support for it in operating systems or software.
What do you think about the native RAR support on Windows 11? Let us know in the comments!
As one of the top antivirus programs, Avast has garnered a lot of users. However, this doesn’t mean their experience is always seamless, as they’re bound to encounter the occasional bug or error. Today, you’ll learn what to do if your Avast Behavior Shield keeps turning off.
A common error concerning one of the most useful Avast features. Let’s get right to it!
What is the Behavior Shield in Avast?
A versatile anti-malware app, Avast offers a plethora of top-notch active protection features. Its Behavior Shield is a prime example of such functionality. It checks all running processes in real time for unusual activity that can point to the presence of malicious code.
ABS operates by identifying and blocking suspicious activity (files, processes, etc.) based on their resemblance to threats and malware behavior, even if the former isn’t part of the virus database.
Is Avast Behavior Shield necessary?
The Behavior Shield is a crucial element of the Avast Antivirus software. If you’re an Avast user, you’re probably making the most of the functionality since it’s switched on by default.
The Behavior Shield is always monitoring your computer processes, which allows it to provide real-time protection from malware trying to attack and corrupt your data. It succeeds by effectively blocking any file that shows even a semblance of suspicious patterns.
Tip
If you need even more advanced protection, you can consider upgrading to Avast’s paid version or browsing different anti-malware software to see if there’s one more compatible with your needs and system.
However, many users report they’ve been suffering from the same issue: their Avast Behavior Shield keeps turning off, especially after a system restart. This leaves their devices vulnerable to potential threats until they manage to fix the problem.
If you, too, are part of this group, don’t worry. Scroll below for our tested solutions to help you resolve the issue.
What can I do when Avast Shields won’t turn on?
Before we dive into the advanced troubleshooting, you should:
Restart Avast: Occasionally, a temporary software glitch may result in such an issue. Try restarting the program to see if this will resolve the problem.
Disable conflicting software: Sometimes, conflicts between Avast and other anti-malware apps may arise. In turn, this could lead to the Behavior Shield turning off. Try temporarily disabling any security software and restarting your computer to see if it makes any difference.
1. Update Avast to its latest version
To ensure your software is up-to-date, open it and find the Menu button in the upper right corner.
Choose Settings from the drop-down menu.
Under the General tab, select Update. Avast allows you to update the virus database and the program itself.
First, select Check for updates below to update Avast and then proceed to do the same for its database.
Remember to always keep your software up-to-date. Additionally, you can consider implementing other security measures to protect your information and ensure a safe digital environment.
2. Repair the antivirus
Open the program and click on Menu.
Access its Settings from the drop-down menu.
Locate the Troubleshooting option under the General tab. Scroll down to the green RepairApp button and click on it.
First, you’ll need to uninstall the program. Press Windows + I key to access the Settings app. Choose Apps and then Installed apps.
Locate Avast and click on the three horizontal dots on the right. Choose Uninstall and follow the on-screen instructions.
Alternatively, you can use avastclear.exe to remove the antivirus from your device. Download it from Avast’s official website and follow the on-screen prompts to help you with the uninstall.
If none of the previous steps worked, performing a clean reinstall might be necessary to resolve the issue. Once you’re done, launch the program and check if the Behavior Shield keeps is active.
There you have it! Now you know what to do if your Avast Behavior Shield keeps turning off.
Microsoft Outlook is a personal information manager that integrates the administration of contacts, notes, tasks, calendaring, and email into a single program. It is one of the biggest in this niche, but issues like the 0x800CCC69 error often damper the user experience.
We walk you through resolving the error in this guide, but if you do not already use the tool, you may consider downloading Microsoft 365.
What is error 0x800CCC69 in Outlook?
The error code 0x800CCC69 is a code that indicates that there is a problem with sending or receiving emails. It is triggered by the following:
Corrupted Outlook data files.
Some incorrect email settings.
Problem with your internet connection.
Problem with your email server.
Issues with virus or malware infection.
How do I fix Outlook error 0x800CCC69?
Before trying the solutions in this guide, try the following workarounds:
Verify the email address, login information, and sever parameters.
Change your Internet connection or use a wired connection.
Scan your computer for malware.
If, after the workarounds, the error persists, continue to the solutions below.
1. Repair Outlook
Press Windows + R to open the Run dialog.
Type appwiz.cpl and hit Enter.
Click on Outlook or Microsoft 365 and select the Change option.
Select Online Repair, then click the Repair button.
Now verify if the 0x800CCC69 error is fixed.
2. Reset Microsoft Office 365
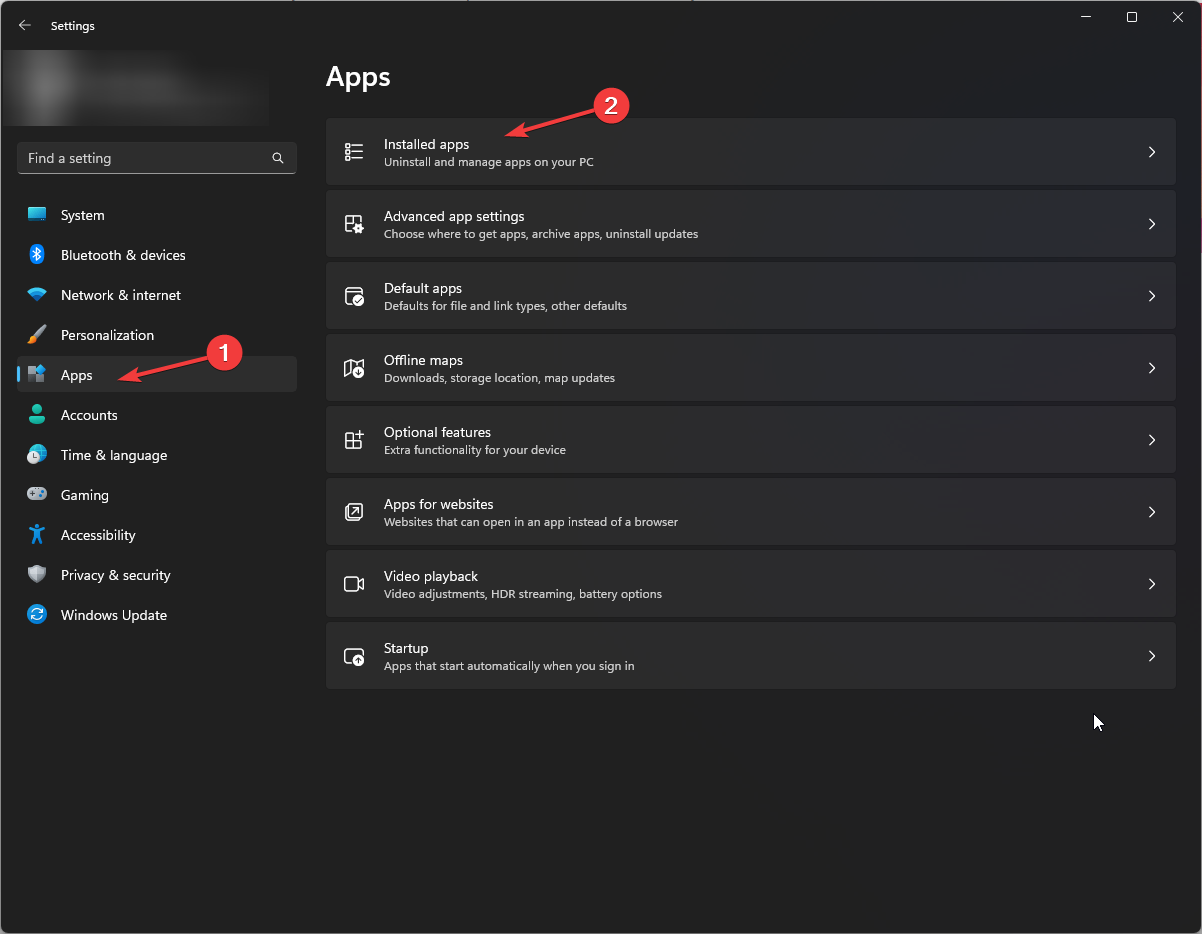
Press Windows + I to open the Settings app.
On the right pane, click on Apps, then on the left, click Installed apps.
Scroll to Microsoft 365, click its three dots, and select Advanced options.
Click Reset under the Reset menu.
Confirm your choice, and once the reset is done, verify it fixes the outlook problem.
After resetting the app, check if the problem is gone.
On the right pane, click on Apps, then on the left, click Installed apps.
Scroll to Microsoft 365, click its three dots, and select Advanced options.
Click Uninstall under the Uninstall menu.
Confirm your choice and follow the wizard to complete the process.
Download a fresh copy of Microsoft 365 and install it.
Once installation is complete, open Outlook and verify the error is fixed.
If you have followed through on these solutions, you should have successfully fixed the 0x800CCC69 Outlook error. You may also consider using any other efficient Windows 11 email client.
We love to hear from you, so please let us know what solution worked in the comment section below.
Whether you’re experiencing issues with your webcam, encountering error messages, or facing camera app crashes with the error code 0xA00F425C, this guide can help!
We will discuss the step-by-step instructions to troubleshoot and resolve the error, ensuring your Camera app functions smoothly.
What causes the Camera app error 0xa00f425c?
There could be various reasons for this Camera app error on your Windows computer; some of the common ones are mentioned here:
Outdated or incompatible camera drivers – If the drivers responsible for your webcam are obsolete, missing, or incompatible with your computer, it can lead to this error. Update the driver.
Software conflicts – Conflicts between the Camera app & other software on your PC may interfere with the proper functioning of the camera app, leading to this issue. Uninstall unwanted apps.
Corrupted system files – System file corruption can disrupt the regular operation of the Camera app, leading to errors. Try repairing the files using an SFC scan.
Privacy settings – If the Camera app is not granted the necessary permissions or if the privacy settings are misconfigured, it can lead to an error.
Now that you know the causes of the issue, let us dive into the solutions to fix it.
How can I fix the Camera app error 0xa00f425c?
Before engaging in advanced troubleshooting steps, you should consider performing the following checks:
Try restarting the computer.
Restart your Camera app.
Ensure your Windows is up to date.
Once you have checked, let us move to the detailed methods to eliminate the issue.
1. Run the Camera troubleshooter
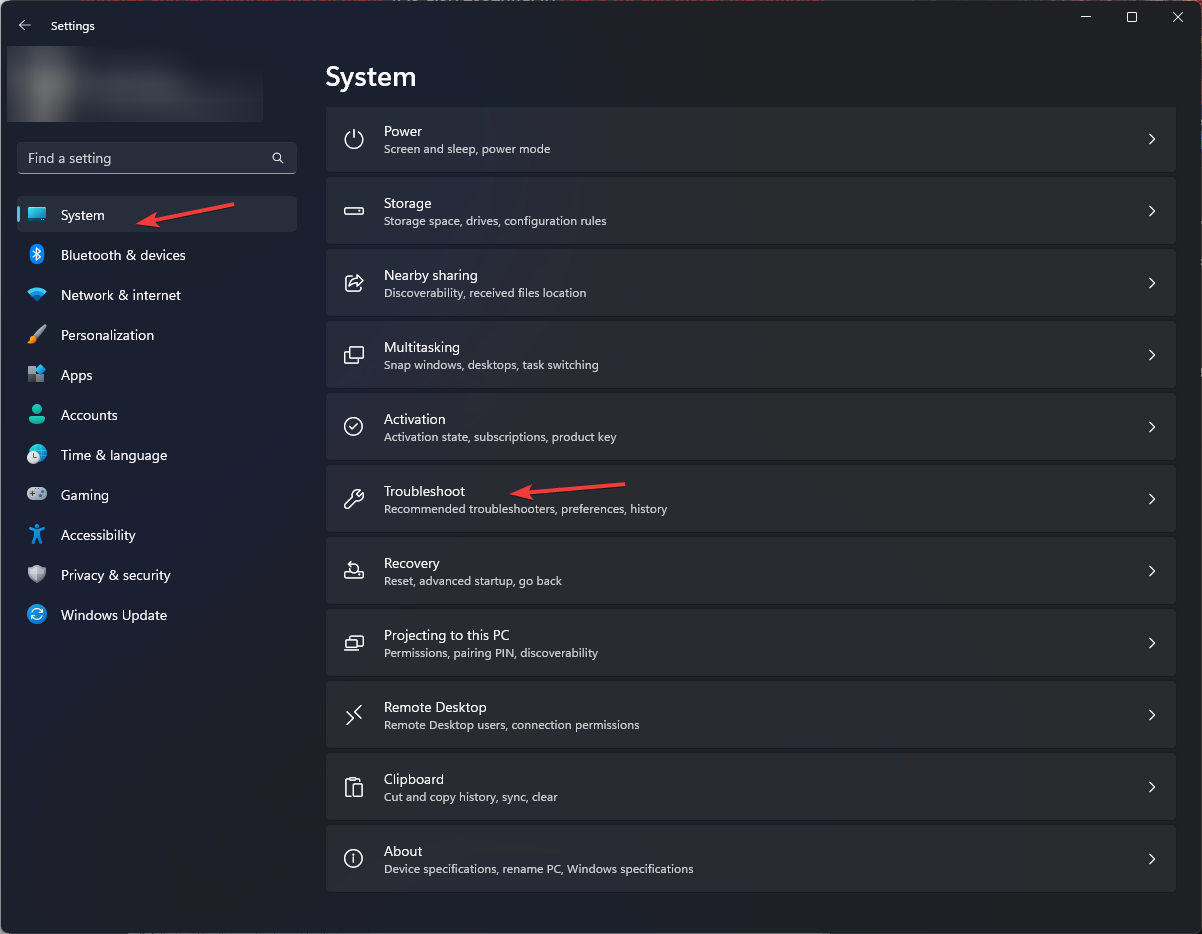
Press Windows + I to open the Settings app.
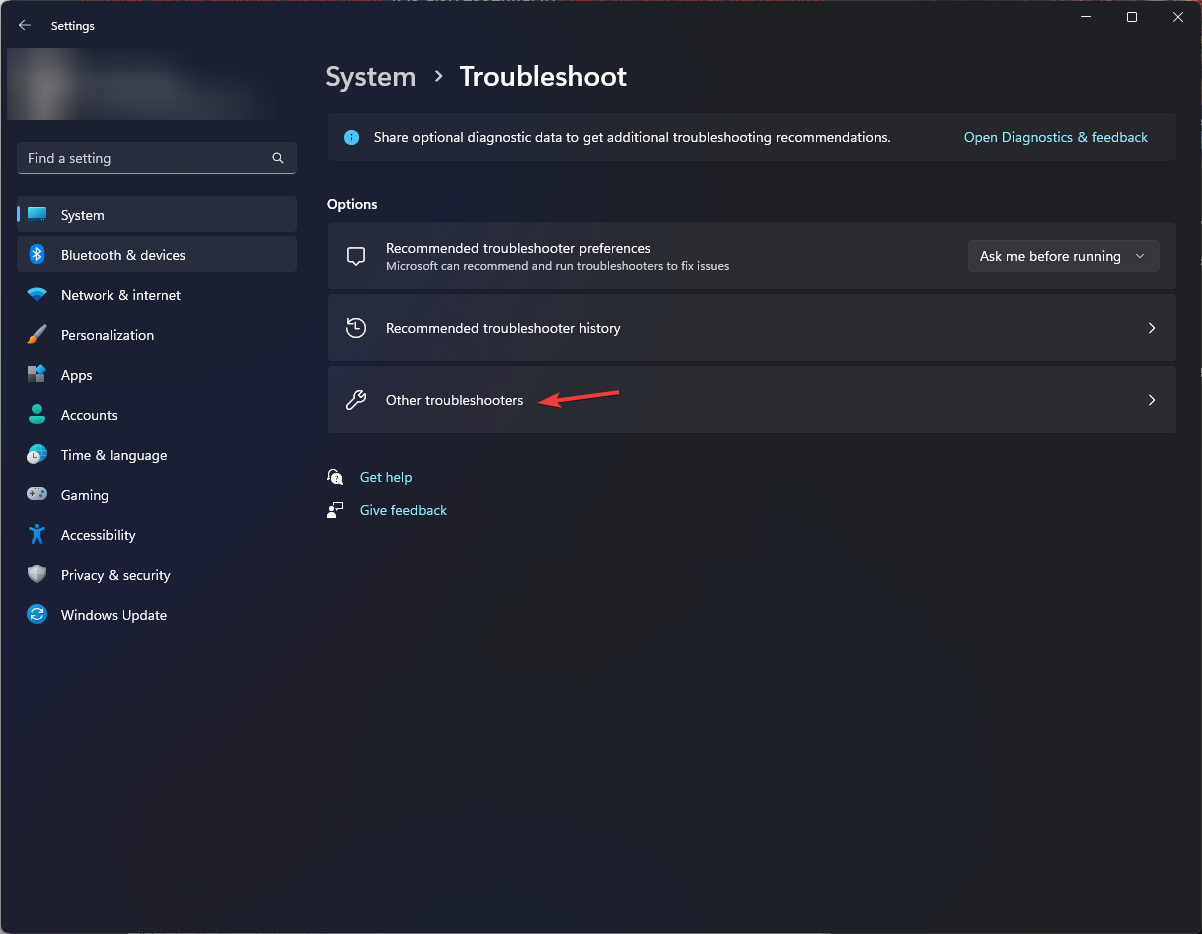
Go to System, then click Troubleshoot.
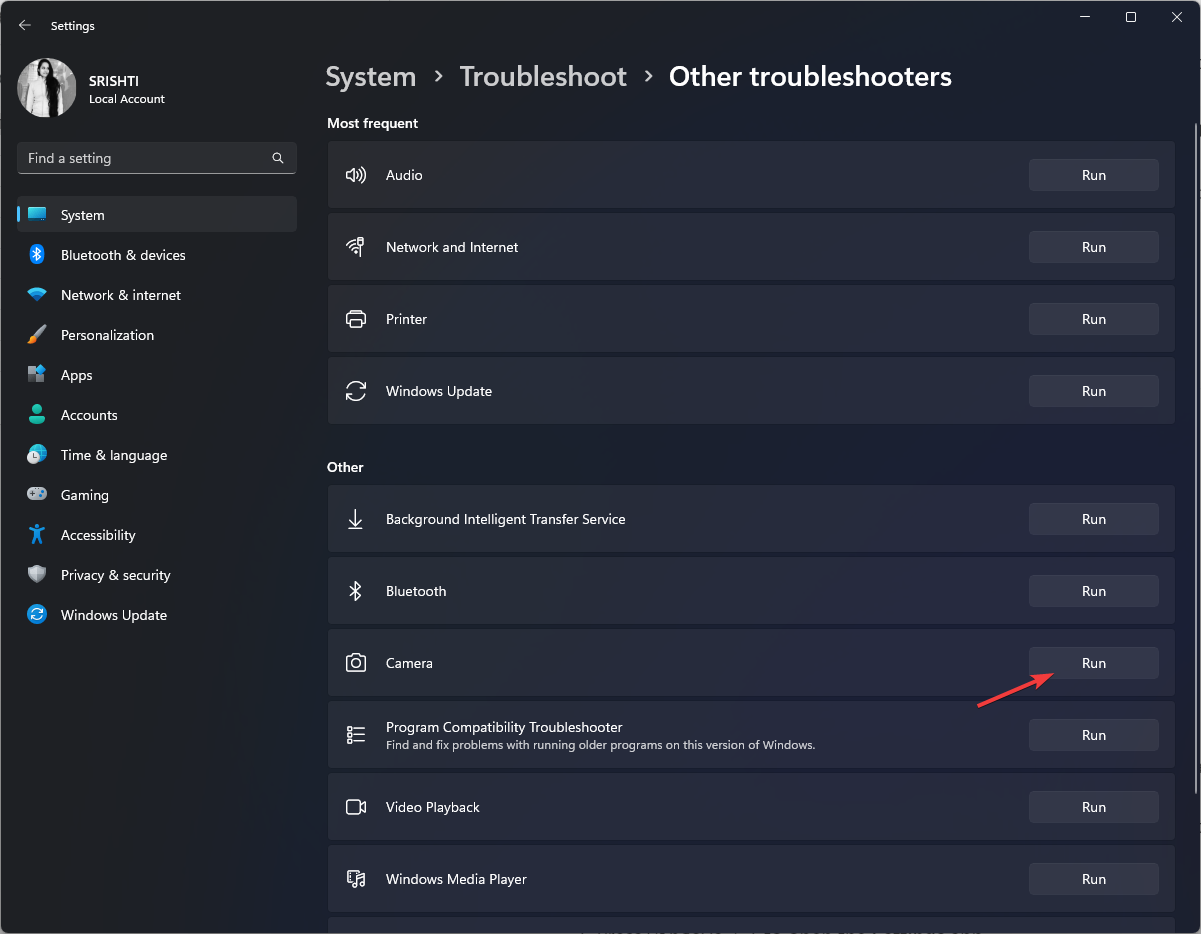
Click Other troubleshooters.
Under Other, locate Camera and click Run.
Follow the onscreen instructions to complete the process.
2. Recreate the Camera Roll folder (if missing)
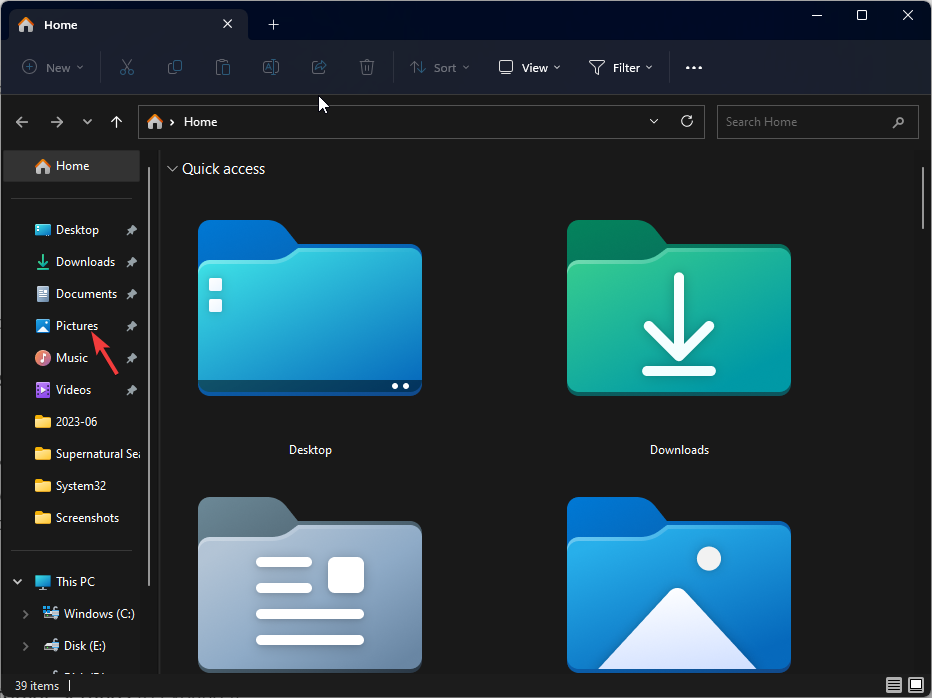
Press Windows + E to open File Explorer.
Locate the Pictures folder from the Quick Access column in the left pane.
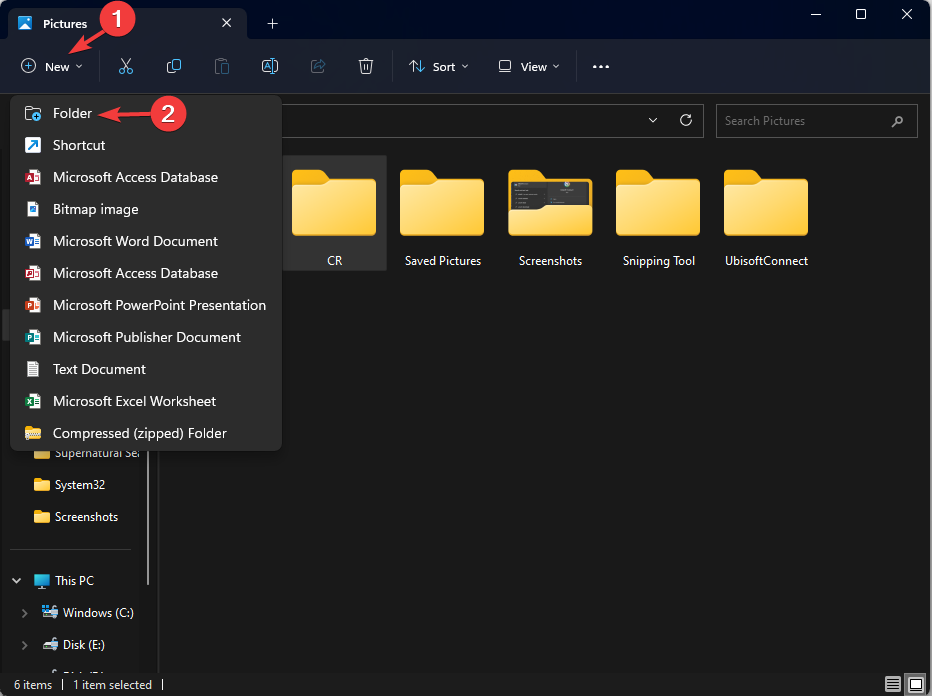
Select New, then choose Folder to create a new folder.
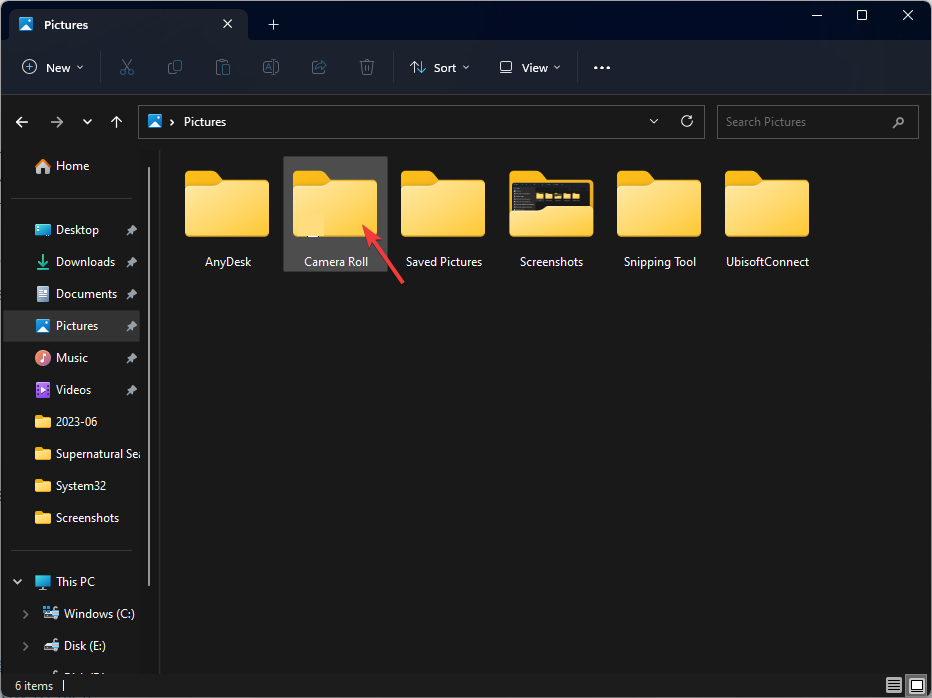
Name the folder Camera Roll and launch the camera app to check if the issue is resolved.
3. Update the webcam driver
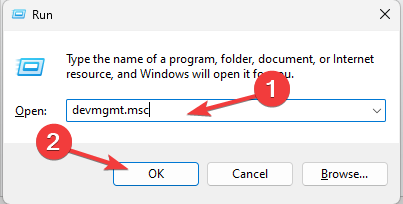
Press Windows + R to open the Run window.
Type devmgmt.msc and click OK to open the Device Manager.
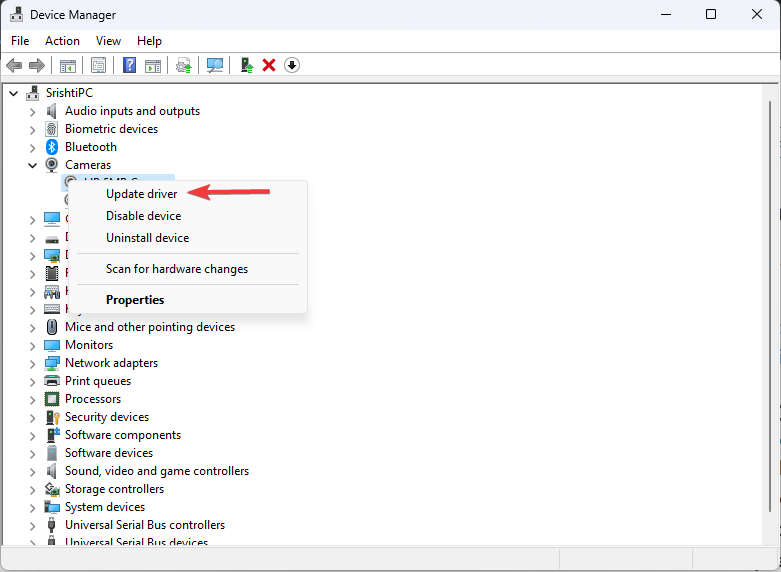
Locate and click Cameras to expand.
Right-click the camera driver and select Update driver.
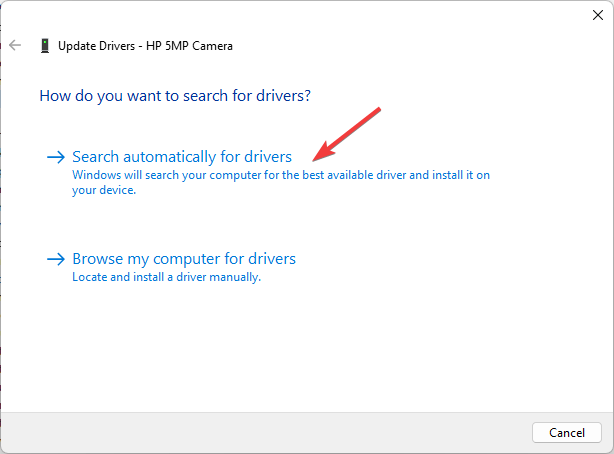
Click Search automatically for drivers.
Follow the onscreen instructions to complete the process. Restart your computer to let the changes take effect.
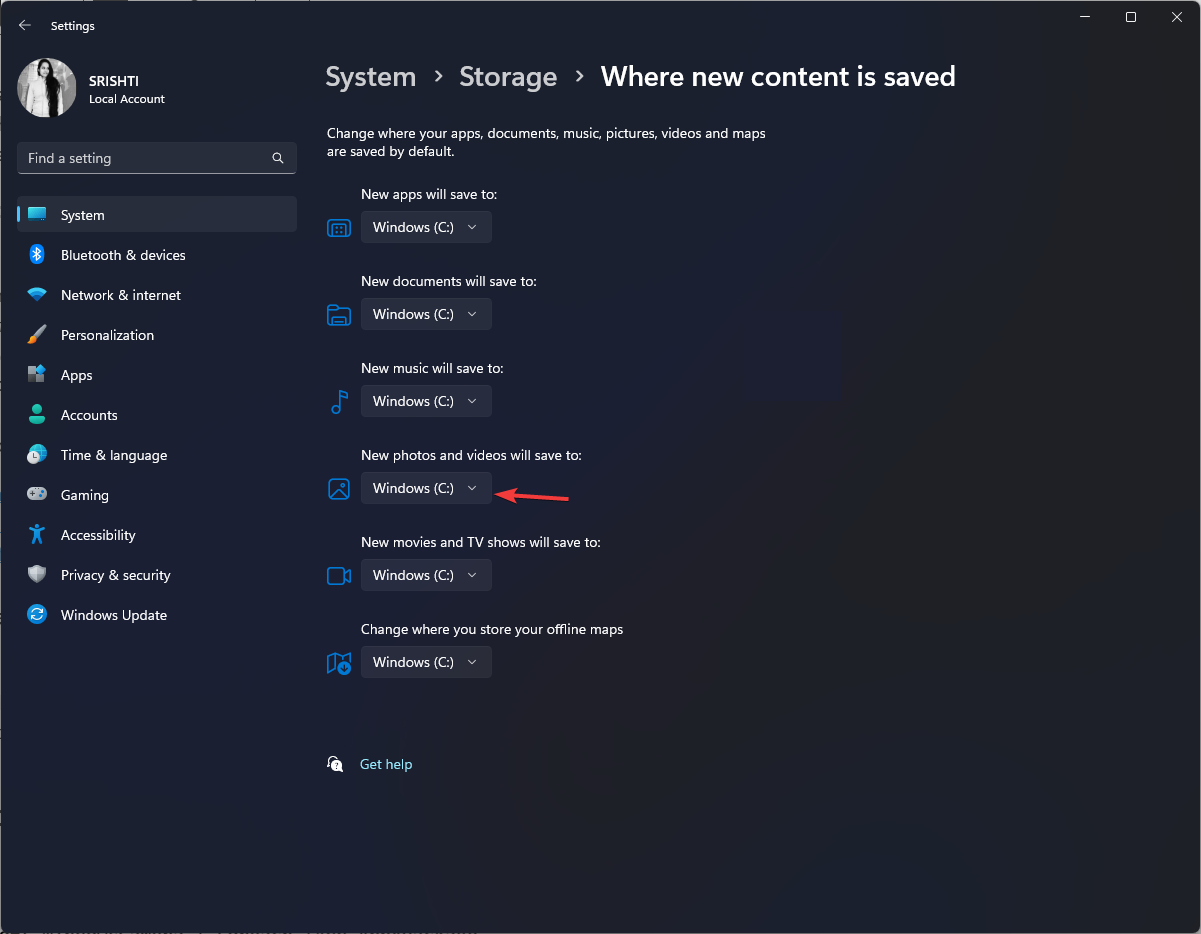
4. Change the location to save media
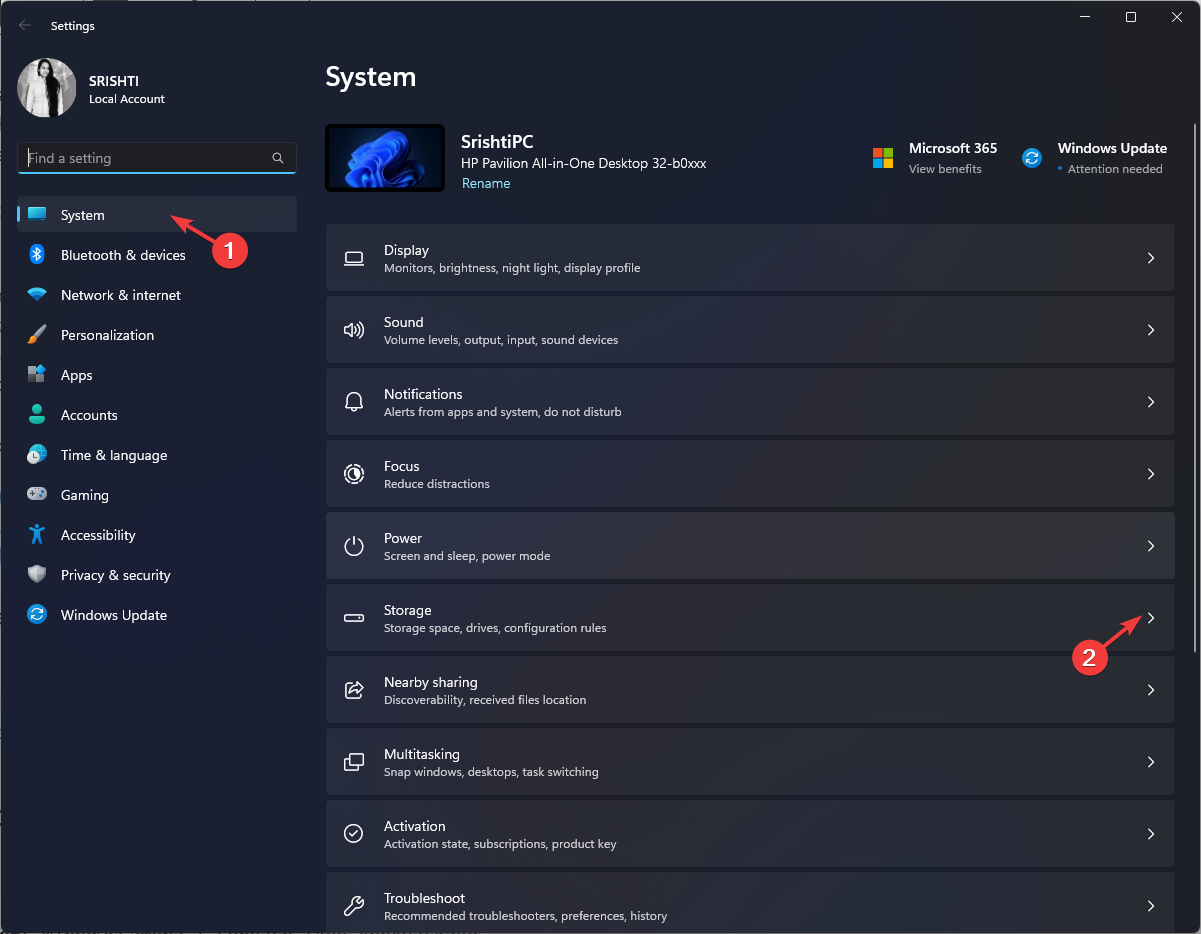
Press Windows + I to open the Settings app.
Go to System, then click Storage.
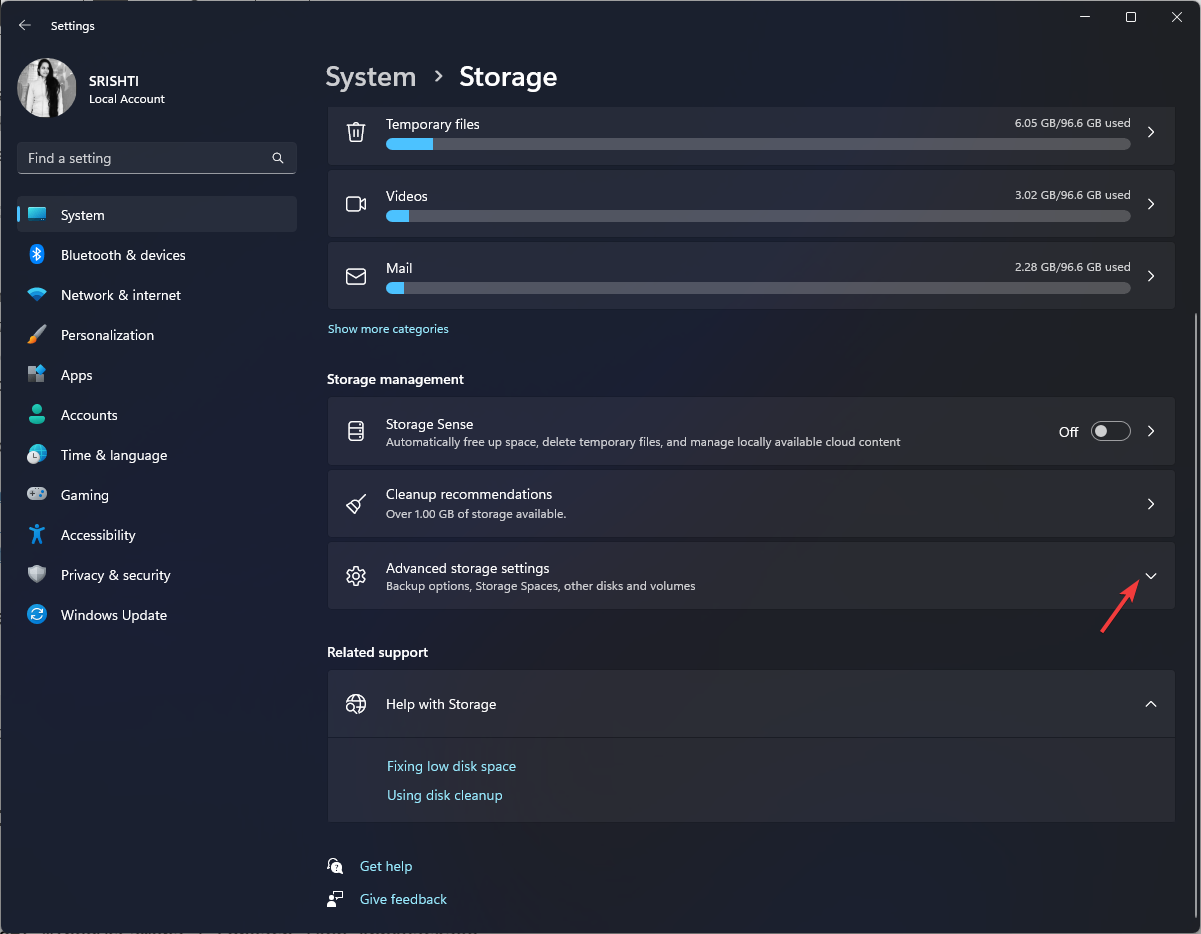
Under Storage management, click Advanced storage settings to expand it.
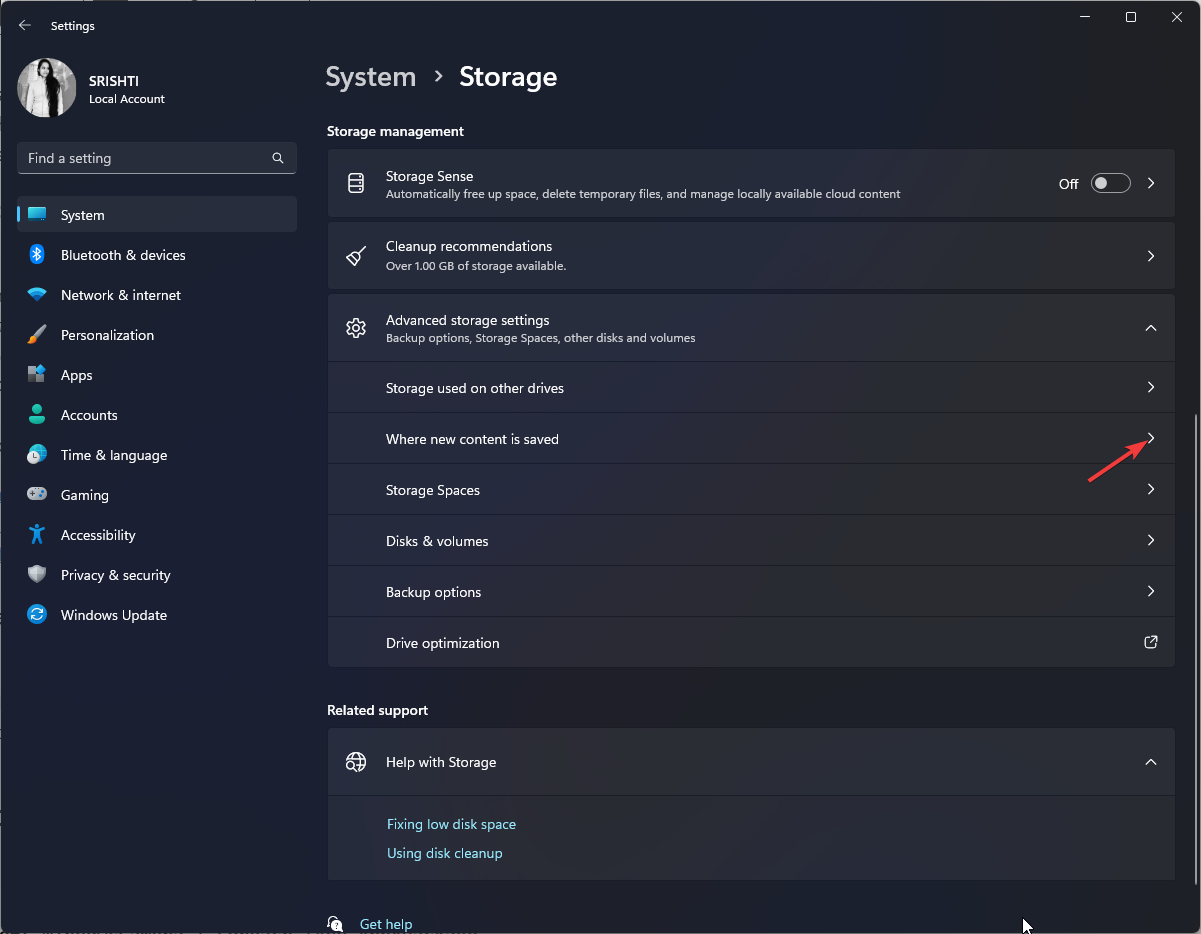
Locate Where new content is saved.
Look for New photos and videos will save to and choose System drive; in our case, it is C:\
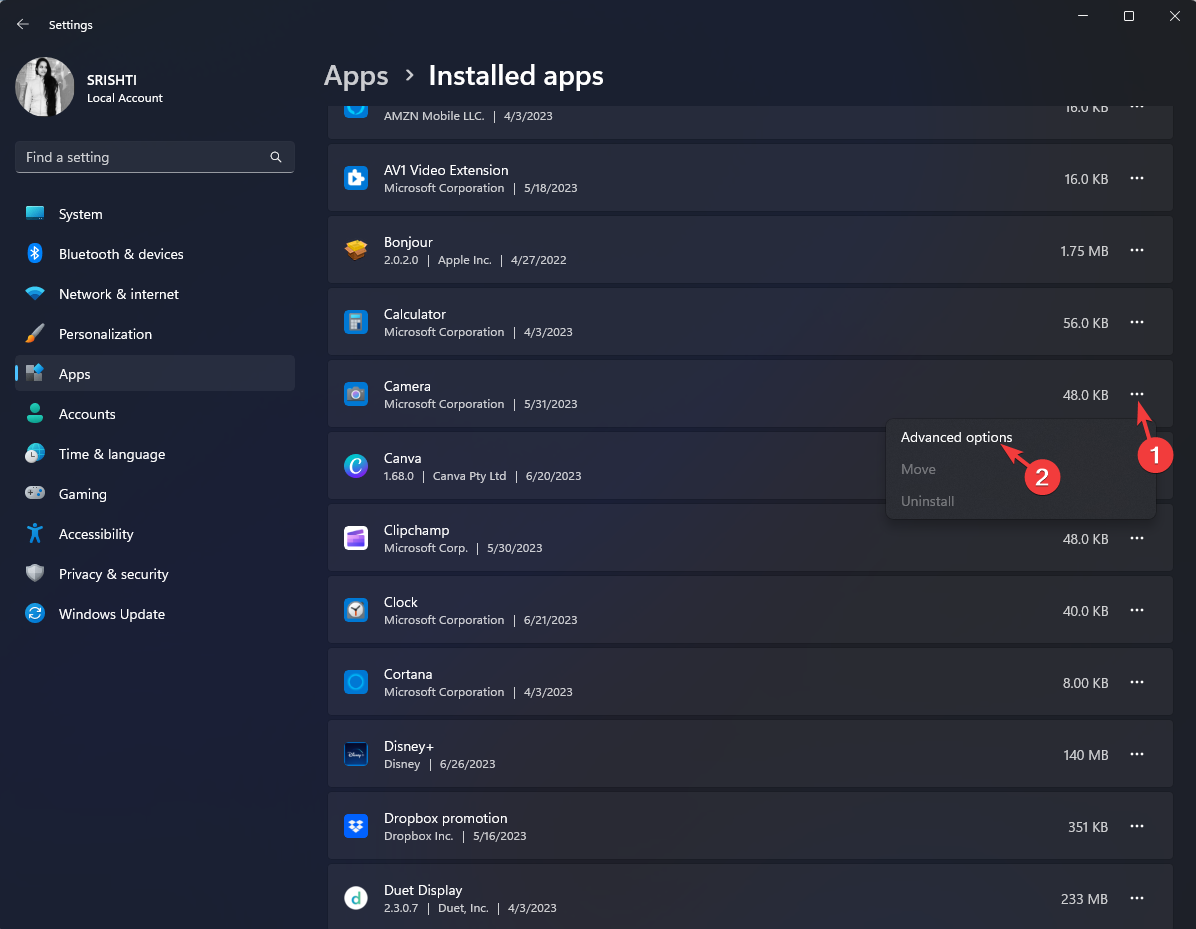
Locate Camera, click three dots, and select Advanced options.
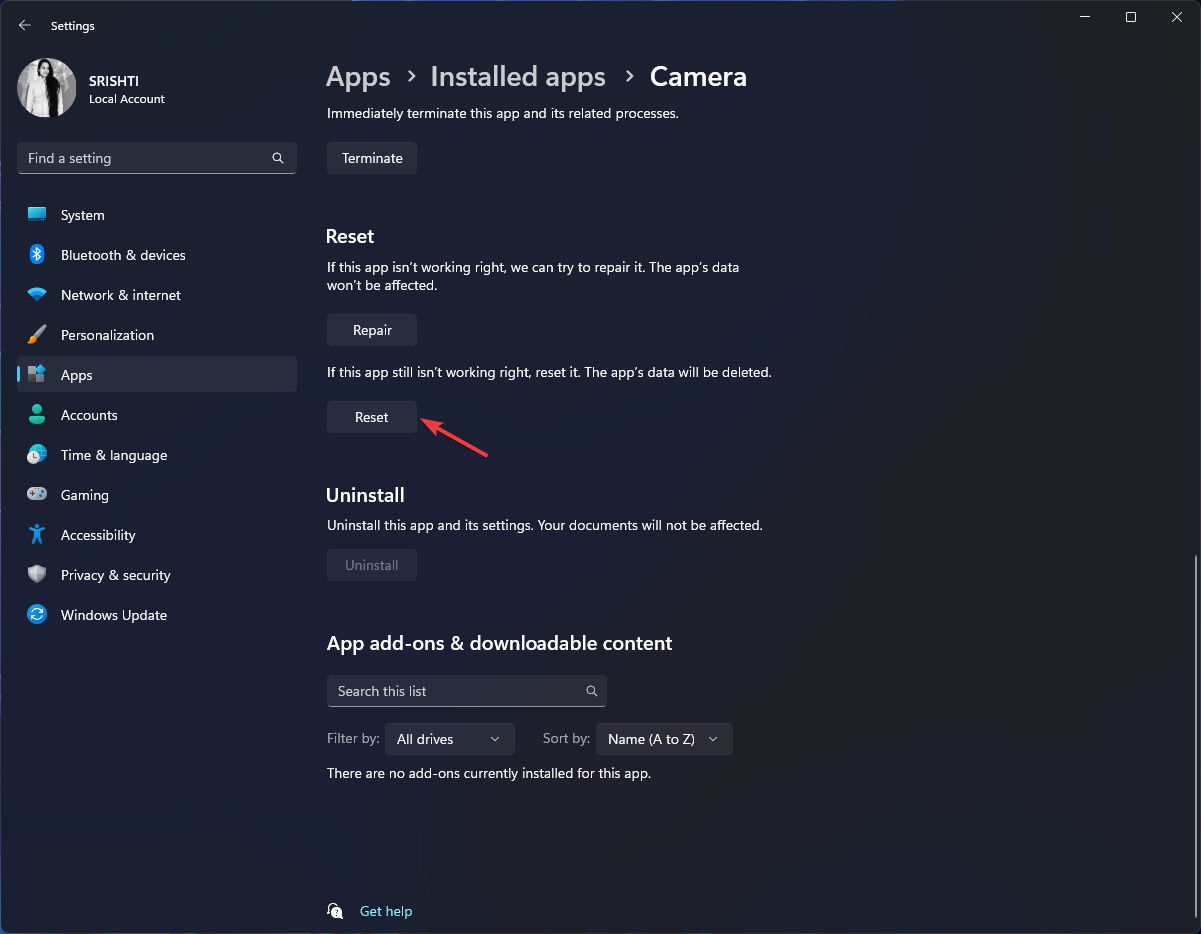
Locate Reset and click the Reset button under it.
6. Re-register the Camera app
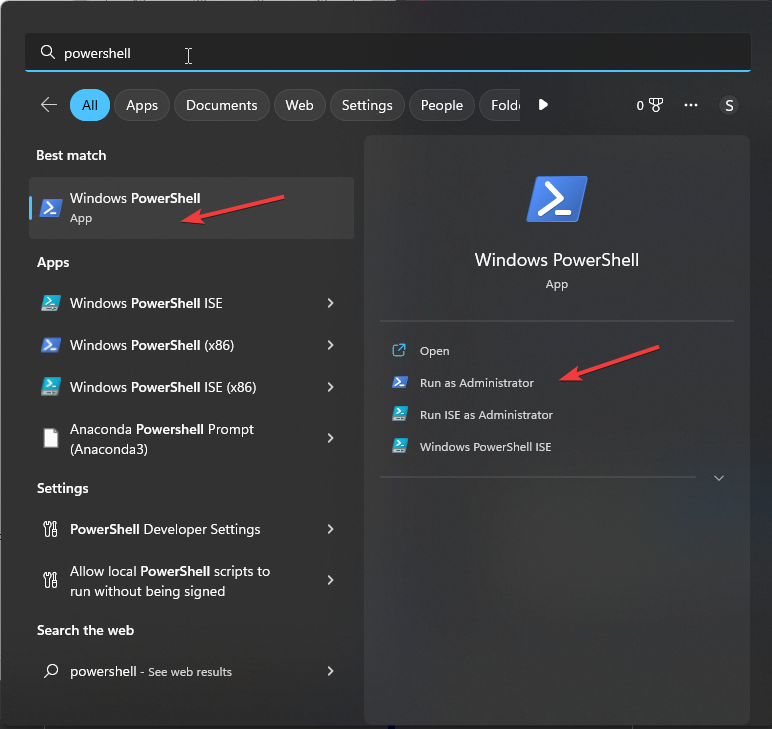
Press the Windows key, type powershell, and click Run as administrator.
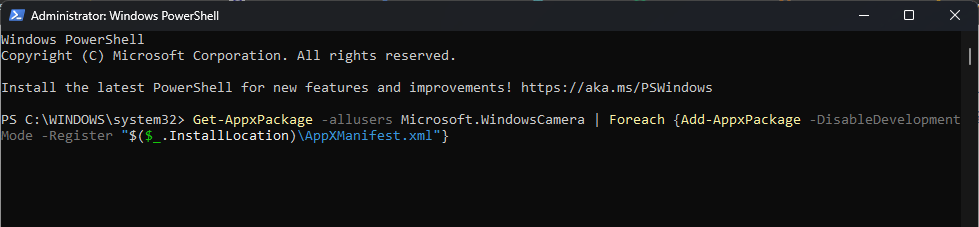
Type the following command to re-register the camera app and hit Enter: Get-AppxPackage -allusers Microsoft.WindowsCamera | Foreach {Add-AppxPackage -DisableDevelopmentMode -Register "$($_.InstallLocation)\AppXManifest.xml"}
Once executed, close the PowerShell window.
So, these are the multiple solutions available to help you fix this problem and regain the full functionality of your camera app.
Microsoft has introduced new shopping tools infused with AI in Bing and Edge, designed to empower users in their shopping endeavors while ensuring the utmost confidence in their purchases.
As per the tech giant, the AI shopping tool will streamline exploring, researching, and finalizing purchases, conveniently consolidating all necessary information from authoritative sources into a single platform.
The ‘Buying Guide’ tool informs users about essential factors to consider in each category, presents recommended product options, and conveniently displays detailed specifications of multiple similar items in a well-organized table. The feature eliminates the need for users to navigate through different websites for comparison purposes, enabling swift and efficient decision-making.
Currently available in the US, this functionality will gradually expand to other markets. Meanwhile, the Buying Guide feature in Edge has commenced its global rollout, extending its reach to users worldwide.
Another tool called ‘Review Summaries’ provides recommendations on important factors to be considered during product shopping. For example, users can rely on Bing Chat or Edge to provide concise summaries of online feedback upon finding a particular product of interest.
Furthermore, the tech giant assures that its Price Match feature remains effective beyond the point of purchase, as it constantly monitors the item’s price and facilitates the process of requesting a price match if it decreases.
The built-in browser features, namely ‘Price Comparison’ and ‘Price History,’ are designed to assist users in making informed purchasing decisions, ensuring that they choose the right place and time to make their transactions.
Moreover, Edge will assist users in seamlessly applying coupons and earning cashback while shopping online via Bing Chat. The ‘Package Tracking’ feature conveniently keeps track of purchases from the Edge sidebar, eliminating the need to search through their inbox for shipping confirmations and tracking numbers. The introduction of ‘Price Match’ in the US is imminent.
The company states that ‘Price History, Price Comparison, Coupons, Cashback, and Package Tracking’ are already accessible in specific markets and seamlessly integrated into Edge.
Certain errors can occur when trying to install updates on Windows 11. The 0x800f0986 error is one such problem we have explored in previous articles. However, this guide focuses on the Windows update 0x80010002 error.
In this guide, we will explain some of its leading causes and practical ways to resolve the update issue.
What is error code 0x80010002?
It suggests an issue with either the Windows Management Instrumentation (WMI), which is necessary for updating, or the Remote Procedure Call (RPC) service. The leading causes include:
Issues with corrupted system files.
Corruption within vital Windows Cache folders.
An incomplete installation of Windows update.
Conflicting software, especially from third-party antivirus programs.
Try this workaround first before moving on to the solutions:
Before the update, momentarily disable your antivirus software.
1. Run the Update troubleshooter
Open the Settings app by pressing Windows + I.
Click the Troubleshoot option on the right pane.
Select the Other troubleshooter option.
Click the Windows Update Run option.
Apply the recommendation the tool may provide, then restart your computer and verify it fixes the 0x80010002 update error.
2. Run the System File Checker
Open the Run dialog by pressing Windows + R.
Type cmd and press Ctrl + Shift + Enter to open the Command Prompt with administrator privileges.
Input the scan script below and hit Enter. sfc /scannow
Finally, follow any prompts given, and restart your computer.
After the scan is finished, check if the problem is resolved. Also, be aware that this process may or may not solve your issue.
Nevertheless, you have perfect alternatives with system repair solutions that can fully diagnose your Windows PC and remove damaged files.
3. Reset Windows update components
Open the Run dialog by pressing Windows + R.
Type cmd and press Ctrl + Shift + Enter to open the Command Prompt with administrator privileges.
Input the scripts below in the Command Prompt and hit Enter after each one to stop vital update components. net stop bits net stop wuauserv net stop appidsvc net stop cryptsvc
Open File Explorer by pressing Windows + E.
Navigate to the path below and rename SoftwareDistribution to SoftwareDistribution.old. C:\Windows
Navigate to the path below and rename Catroot2 to Catroot2.old. C:\Windows\System32\
Once again, open an elevated Command Prompt and restart the vital Windows services by running the scripts below: net start bits net start wuauserv net start appidsvc net start cryptsvc
Finally, restart your computer and verify it fixes the 0x800f8011 update error.
Select the General tab, click Selective startup, and uncheck Load startup items.
Select the Services tab, check Hide all Microsoft services, and select Disable all.
Click the Startup tab and click Open Task Manager.
Click on any enabled program and click the Disable button. Do this for as many programs as you see.
Restart the computer and retry the update.
This is as far as we go in this guide. We have arranged the solutions in order of complexity, but you may start with any that feels the most appropriate to your specific situation.
Microsoft’s ID@Xbox Developer Accelerator Program recently brought forth the latest news about the sales performance of the Xbox Series X|S consoles. According to a slide from the event tweeted by a user, the combined sales of the Xbox Series X|S have impressively surpassed the 21 million unit milestone. Adding to this achievement, Microsoft has also sold a total of 79 million consoles when considering the Xbox One as well.
Xbox Series X|S console sales are at 21M+ according to Microsoft at BIG Festival in Brazil.
Of particular interest is the fact that nearly half of the Xbox Series S owners, specifically 48%, are new to the Xbox ecosystem. This influx of new users highlights the appeal and attractiveness of the Series S, contributing to its growing popularity. Notably, the Xbox platform has experienced a substantial increase in monthly users, with approximately 15.6 million active users per month. This figure represents a noteworthy 20% growth compared to the previous year.
Beyond the console market, Microsoft’s presence in the PC gaming arena is equally significant. Currently, there are an impressive 248.6 million active Windows gaming PCs, demonstrating the strong foothold Microsoft has in this domain. Additionally, the Windows Store attracts a substantial number of visitors, with approximately 168.3 million individuals exploring the store on a monthly basis. Moreover, the number of paid unique users has witnessed a year-on-year growth of 3%, indicating a steady increase in user engagement.
Microsoft’s popular subscription service, Game Pass, continues to enhance the gaming experience for its users. Game Pass boasts an extensive library of over 400 console games and more than 300 PC games. These offerings appeal to a wide international audience, with the majority of the games originating from the United States, Brazil, and Mexico.
In another development, a slide presented during the event hinted at the introduction of in-game advertising on the Xbox platform in the near future. This potential addition suggests that Microsoft is exploring new avenues to enhance the gaming experience and provide additional opportunities for developers and advertisers to connect with the Xbox community.
Updating is an integral part of the Windows OS use. It protects you from bugs and a host of security flaws. However, the process may be hindered by errors like the 0x800f8011 code. This guide shows you how to fix it in easy steps.
Before going into the solutions, try this workaround:
Disable your antivirus temporarily before the update.
1. Run the Windows Update troubleshooter
Press Windows + I to open the Settings app.
On the right pane, scroll down and click Troubleshoot.
Select Other troubleshooters.
Select the Run option for Windows Update.
Apply any recommendation the tool provides, then restart your computer and verify it fixes the 0x800f8011 update error.
2. Run the System File Checker
Press Windows + R to open the Run dialog.
Type cmd and hit Ctrl + Shift + Enter to open an elevated Command Prompt.
Input the script below and hit Enter. sfc /scannow
While the scan last, follow any prompts given, and finally, restart your computer.
After completing the scan, check if the error code is still there.
If you’re searching for a faster method, you can use a highly recommended third-party repair software to automate this process.
3. Reset Windows update components
Press Windows + R to open the Run dialog.
Type cmd and hit Ctrl + Shift + Enter to open an elevated Command Prompt.
Enter the scripts below in the Command Prompt and hit Enter after each one to stop vital update components. net stop bits net stop wuauserv net stop appidsvc net stop cryptsvc
Press Windows + E to open File Explorer.
Navigate to the path below and rename SoftwareDistribution to SoftwareDistribution.old. C:\Windows
Navigate to the path below and rename Catroot2 to Catroot2.old. C:\Windows\System32\
Once again, open an elevated Command Prompt and restart the vital Windows services by running the scripts below: net start bits net start wuauserv net start appidsvc net start cryptsvc
Finally, restart your computer and verify it fixes the 0x800f8011 update error.
NOTE
Resetting your Windows Update components may delete any pending Windows updates. You will need to rerun Windows Update to install any previously pending updates.
Click the General tab, select Selective startup, and untick Load startup items.
Select the Services tab, check Hide all Microsoft services, and select Disable all.
Click the Startup tab and click Open Task Manager.
Click on any enabled program and click the Disable button. Do this for as many programs as you see.
Restart the computer and retry the update.
Any of the solutions discussed above should come in handy, so start with whichever feels the most applicable. You may also read our other guide on Windows 11 Update errors to understand why updates may fail.
Lastly, let us know which solutions were the most effective for you in the comments section.
Microsoft’s Dev Home hopes to be the ultimate hub for developers. Dev Home offers a comprehensive range of tools, resources, and insights to empower developers to create exceptional applications and shape the future of Windows. In this guide, we will delve into the intricacies of Dev Home, exploring its features, benefits, and how it can accelerate your journey as a Windows developer.
Microsoft continues to push boundaries with their latest operating system, Windows 11. One of the most exciting features introduced in this new iteration is the Dev Home, a powerful control center that offers developers an array of tools and functionalities. In this article, we will delve into the depths of Dev Home, exploring its capabilities and highlighting its significance for developers in the Windows ecosystem.
What is Dev Home?
Dev Home serves as the central hub for developers using Windows 11. It provides a unified interface where developers can access a plethora of tools, settings, and resources to streamline their development process. By integrating various features, Dev Home empowers developers with the ability to efficiently create, debug, and optimize applications for the Windows platform.
The Dev Home dashboard offers a range of customizable widgets to effectively monitor your workflows. These widgets provide valuable insights and information. Let’s take a look at some of the default widgets available:
GPU: Keep track of your machine’s GPU performance using this widget.
SSH keychain: Access a list of SSH connections available in your ssh/.config file. Simply select an SSH item to open the corresponding connection in Windows Terminal.
Memory: Monitor the performance of your machine’s memory in real-time.
Network: Stay informed about your machine’s network performance.
CPU: Keep an eye on your machine’s CPU performance.
In addition to these default widgets, the Dev Home GitHub extension (available by default) provides seamless integration with your GitHub credentials. This extension offers customizable widgets and notifications to enhance your experience. However, you may still need to sign in to your GitHub account to access the extension’s integrated features. If you want to add a widget to the dashboard, follow these steps:
To add a widget to the dashboard, click on “Add a widget” located at the top-right corner.
Next, you’ll see a list of widget options, when you find the one you want to use, click “Pin” to pin the widget to your dashboard. Keep in mind, some widgets may require customization before adding them to your dashboard.
If you want to customize the widgets further, you can do so by clicking the three-dot menu in the upper right of the widget, where you will see the self-explanatory options, including Small, Medium, Large, Customize, and Remove Widget.
While the GitHub extension comes pre-installed, you may be able to create and share your own custom-built extensions in a future app update. Discover further details about extensions, including guidance on creating customized GitHub widgets, and configuring GitHub notifications.
Conclusion
Harnessing the power of Dev Home is a vital step towards achieving success in the ever-evolving digital landscape. By leveraging the comprehensive features and resources provided by Dev Home, you can propel your development projects to new heights and position yourself as a frontrunner in the competitive realm of Windows 11 application development.
AI has taken over the world, and you will see new AI websites popping up very frequently. ChatGPT is one of the famous names in the AI world. However, there are several other websites apart from ChatGPT that you should try in 2023.
In this guide, we have created a curated list of some of the best AI websites that you should try and take your productivity to the next level. Let us check out the websites.
What are the best AI websites you should check out?
Well, AI has not only catered to the image or writing department, but you can also create professional-looking videos using AI tools such as Synthesia.
The best part is that all you need to do is have a script ready for your video, select the tone, and you are all done. Synthesia can create videos from any text using AI’s power.
Virtual humans will present your videos and speak on your topic. You can select from a good range of virtual AI presenters or create an AI presenter of yourself using your voice.
Here are the best features of Synthesia:
Create a video from any piece of text.
Use AI presenters to present your video.
Create how-to, explainers, training, and other videos.
The video creation is pretty fast.
Create videos in over 120 languages.
Comes with a powerful built-in video editing tool.
Synthesia
Create professional videos without needing any equipment or editing skills.
Modifying voice is one of the easiest tasks an AI can do. However, doing it ideally is the need, and Altered AI has got you covered on that front.
You can use Altered AI and modify your voice to choose among the best professional voices in the field. The voices sound realistic and are far from robotic.
It gives you access to a complete AI voice studio, where you can select your chosen voice, tweak it as per your needs, and use it for your projects.
Some of the best features of Altered AI are:
You can work from anywhere as it doesn’t need a professional studio.
Choose among 20 professional voices.
Over 800 voices of common people can be used as secondary voices.
Select emotions such as emotional, angry, whisper, shout, etc.
Altered
Get Altered and choose between 20 professional voices and over 800 voices as secondary voices.
If you want to extract data such as app details, businesses, YouTube videos, job postings, etc. from any website, then you can use one of the best AI websites Browse AI.
Using this scrapping tool, users can extract data from any website without knowing code. This is a perfect tool for businesses that are into data management.
You can use this tool to stay ahead of your competitors and gather information regarding marketing campaigns, offers, deals, etc. that they might be offering.
Check out the best features of Browse AI:
Easy and simple data extraction tool.
Lets you extract any data from any website.
You do not need to know coding, and the website uses natural language processing (NLP).
For writing, many prefer ChatGPT as it is the most advanced AI tool available to facilitate writing or use as a conversational tool.
However, Jasper AI infuses AI’s power to create engaging marketing copies, essays on any topic, captions for your social media posts, and much more.
Jasper AI also offers multiple templates for different categories that you can use and uses Natural Languages Generation (NLG) to convert RAW data into meaningful words.
Some of the key features of Jasper AI are listed below:
You can select the tone of the writing.
Use it as a document editor.
Use among the several templates for different categories.
Beautiful.ai – Powerful AI presentation slide maker
AI has also entered the world of making presentations. You can use the powerful Beautiful.ai to make presentations from simple texts. It is one of the best AI websites that you should definitely check out in 2023.
All you are required to do is to input the text on which you wish to create a slide, and then Beautiful.ai will do its magic and prepare a slide based on your input.
The best part is that you can ask it to create a slide on any topic and also add images, videos, or any other media content. It adds images and sources data from authentic sources across the globe.
Some of the best features of Beautiful.ai are:
Offers AI features like automatic layout design, smart resizing, content suggestions, and even data analytics.
Fast and easy presentation-making process.
Plethora of presentation templates to choose from.
Can integrate it with Slack, Monday.com, Dropbox, and PowerPoint
If you are into music and want AI’s help to create some of your masterpieces, then you should check out one of the best AI websites called Soundraw.
With Soundraw AI, you can create original music tracks and use them for your next performance. The best part is that all tracks you create using this AI are customizable so you can have your own tint with it.
All you need to do is select the mood of the music, genre, and length; the website will do its magic and create your track. The creation process is simple and hassle-free, and it is suited for beginners and professionals.
Here are the key features of Soundraw AI:
The user interface is easy to use.
With minimum inputs, you can create your own original track.
Avatar AI – Create interesting avatars of your photo
Avatar AI is another popular AI that helps create mesmerizing AI avatars of your uploaded photo. Using this website, you can create high-quality realistic avatars of yourself.
Notably, you can transform the uploaded image into different styles and scenarios. The best part is that all you need to do is upload your image, and the website will do the rest.
Some of the popular styles include passport, fashion model, medieval, gym, Instagram model, cyberpunk, etc.
Well, AI isn’t just for fun; it does some serious jobs too. You can visit the DoNotPay website and get yourself an AI lawyer.
You can use the DoNotPay AI lawyer to sue anyone, fight corporations, or even governments. It can help find hidden money, help users draft legal documents, report potholes, broken streetlights, and much more.
One of the best things that you can do with DoNotPay is it will generate a virtual credit card that you can use to avail free trials of any software or website. Once the trial ends, the trial is automatically canceled on the virtual card.
Some of the highlights of the DoNotPay AI are:
It can help draft legal documents.
You can use it to fight legal battles.
Avail of free trials with the free virtual card.
Also, solve issues such as incorrect food orders or receiving compensation from an airline.
If you are looking for an AI writing assistant that helps you learn coding, solve mathematical problems, and craft well-structured research papers, then check out Caktus AI and read this guide to learn more about the tool.
And if you find the mathematical problems a bit difficult to understand, SciSpace Copilot can help you explain them in simpler terms.
That is it from us in this guide. Let us know in the comments below which one of the above AI websites you liked and are actually using.
If you prefer using regular apps, we have a great guide on the best AI software for PC, so don’t miss it.
Feel free to let us know if there are any other AI websites that you are using apart from ChatGPT and would like to share with others.
Sihost.exe, also known as the Shell Infrastructure Host process, is a core Windows background process located in the C:\Windows\System32 sub-folder. It is responsible for the proper functioning of various elements of Windows PC, such as the taskbar, action center and Cortana, and context menu.
Even though the process is an innate part of the Windows operating system, it is known to cause a series of issues like high CPU usage, unknown hard drive errors, and even system crashes.
What are the errors caused by sihost.exe?
Although the sihost.exe is a safe executable file and is not a threat to Windows, you are likely to run across several errors related to the process. Some of them are as follows:
Sihost.exe – Bad Image
SiHost.exe- Unknown Hard Error
Cannot find sihost.exe
Sihost.exe could not be installed
Sihost.exe could not be launched. Class not registered
Error starting program: sihost.exe
Sihost.exe could not be started
Sihost.exe failed to initialize properly
Faulting Application Path: sihost.exe
Sihost.exe could not be found
How to fix sihost.exe-related errors?
Before moving on to elaborate methods for fixing the issue, try these workarounds.
Delete the instances of the sihost.exe file other than the one in the System32 sub-folder of the File Explorer window.
1. Check the file authenticity
Right-click the Windows icon and choose Task Manager from the quick links menu.
Look for Shell Infrastructure Host in the Processes tab, right-click it, and choose the Properties option from the context menu.
Switch to the Details tab of the properties window and look for Microsoft Corporation, mentioned next to the Copyright section.
The copyright information will verify that the executable file is authentic. In case the details are missing, it is indicative that the file is infected or is malware disguising itself as a core Windows file.
2. Fix system file errors
Press the Windows key, type cmd in the search box, and click the Run as administrator option from the search result.
Press Yes on the User Action Control prompt to launch the command prompt with elevated permissions.
Type or paste the following command and press the Enter key in the SFC scan. SFC /scannow
After the scan is complete, paste the following command and initiate the DISM scan. DISM /online /cleanup-image /restorehealth
After the DISM (Deployment Image Servicing and Management) scan finishes, boot up your Windows PC and see if the ihost.exe unknown hard error is resolved.
If you don’t want to go through the manual procedure, you can let third-party repair software do the job for you.
3. Fix hard drive errors
Click the Windows icon on the taskbar, type cmd in the search bar on top, and choose the Run as administrator option from the search result.
Press Yes on the User Action Control prompt to launch the Command Prompt with elevated permissions.
Type or paste the following command and press the Enter key to initiate the check disk utility. You can replace the letter C with the hard drive letter containing the operating system. chkdsk C: /f /r
The CHKDSK command will automatically scan your hard disk for errors and detect its bad sectors resolving the sihost.exe error.
Launch the Run dialog box using the Windows + R shortcut. Type the following command in the text box and press the Enter key. Msconfig
In the General tab of the System Configuration window, disable the checkbox for the Load startup items and enable the one for the Load system services option.
Next, go to the Services tab and check the box preceding the Hide all Microsoft services option on the bottom left, and hit the Disable all button.
Click the Apply button to save the changes and OK to exit the System Configuration window.
Once done, boot up your PC in a clean state and note whether the sihost.exe hard drive error shows up. If no, it means the error a program recently installed on your PC is conflicting with the sihost.exe process. Uninstallating those programs should fix the problem.
5. Roll back your system to a previous point in time
Press the Windows key to launch the Start menu, type create a restore point in the search bar, and choose the relevant search result to open the System Properties window.
Hit the System Restore button located in the System Protection tab.
Select that restore point from the list of options where your PC did not encounter the sihost.exe hard drive error and press the Next button on the bottom right.
Press the Finish button on the next page to confirm and initiate the system restoration process.
For the uninitiated, restoring your PC to a previous state is only possible if you have already created a restore point on your system before your PC runs into this pesky issue.
If the issue commenced right after making a significant change on your computer such as installing a new program or drive, rolling back the changes will restore your PC to a healthier state.
A lot of times on Windows 11, you’ll get a lot of automated updates for the devices your PC is connected to. If this happens in an organization, then you have no choice but to agree, since they are sent out by an IT manager.
But sometimes printers, and especially HP printers can automatically download apps and updates on your Windows 11, and if you don’t specifically use them, then there is no point in keeping them around.
However, these updates left some users concerned. Are HP printers pushing boundaries? On Reddit, especially, there is a thread on how this particular way of updating the HP printers is not really the proper way.
If you consider that HP is bugging you with this prompt window, there are some ways to disable the automated downloading and running apps. And you can do it very easily, with a few clicks. Follow along and we’ll show you.
How to stop HP printer automatic updates on Windows 11
In the Search box, type in Manage advanced share settings and click on it.
Once you’re there go to the Private Networks pane and uncheck Set up network connected devices automatically.
That’s it.
Now you should no longer receive the HP printer automatic updates. It’s also good to know that Microsoft Store automatically downloads the updates, so if you want to make sure you won’t get them again you can also just do the following thing.
On the Start box, type in Change device installation settings, and click on it.
Select No, and click on Save Changes.
This will stop Microsoft Store from downloading any updates or apps for your devices, from it.
Have you experienced this issue? Do you consider that HP printers push some boundaries when asking for permission to install and run apps? Let us know your opinion in the comments section below.
Xbox game bar and Task Manager are often showing different status when playing a game. For example, this Reddit user caught the moment the two software apps showed different things.
However, what can you do when the Xbox game bar and the Task Manager show different info, especially when you’re playing a game? Well, as the word say, when two are fighting, the third wins. So, we hate to break it to you, but unfortunately, there is not much you can do about it.
Why are the Xbox game bar and Task Manager showing different info?
Well, an explanation could be that each app focuses on their own processes. In other terms, Windows 11 prioritizes functions. So when you click on the task manager, the percentages will go down. But if you’re going to the game, it will go back up.
One user suggested that you should play your game in a windowed mode, and see how the Task Manager reacts to that.
But other users agree that neither app is reliable and that you should get a third-party app to do the job instead. You can use MSI Afterburner or HWinFO.
Select an option that is fit for your PC, download it, and install it.
Now you can track your PC’s info with HWinFO.
Try this one too and see how it compares to the Xbox game bar and the Task Manager. And be sure to let us know your experience in the comments section below.
So what’s happening here, from a very non-magical perspective? Why is Windows showing files from tomorrow in File Explorer? Well, we’re exploring the possibilities of it happening.
Why is File Explorer showing you files from tomorrow?
If Files Explorer is showing you files from tomorrow, the first thing you’ll need to think about is the site where you’ve downloaded the last file.
The affected files are usually in the Download file, which means you downloaded them from somewhere, and their Date Modified details are slightly delayed from your specific Time Zone.
This means that the files you downloaded already have a date on them. And that date usually refers to the next day. So when you download them, their date automatically changes to the next day. In your File Explorer, it means tomorrow.
It could also mean a lot of things. Downloading files from suspicious sites could be a possibility. You could deal with a virus or malware file. If it’s not a suspicious site, then the site you’re downloading them from is in another time zone. If you’re in the US, and the site’s timezone is set to Australia, then you might get this weird bug.
Another possibility is that your Windows 11 is somehow corrupted. Running a scan sfc /scannow in your Command Prompt with admin rights should do the trick. If it’s not Windows, then it must be the file.
But you should pay attention to File Explorer. If it happens once time, then it’s probably the file. If it happens every time you download something, then your Windows 11 can be corrupted.
But rest assured. Your PC is not a magician or a time traveler. It might just have a tiny problem with recognizing the correct time.
Have you experienced this issue? Let us know how you fix it in the comments section below.
In the latest FTC v Microsoft hearing, Microsoft CEO Satya Nadella said that console exclusive shouldn’t be a thing, as reported by The Verge.
If it was up to me I would love to get rid of the entire exclusives on consoles, but that’s not for me to define especially as a low share player in the console market. The dominant player there [Sony] has defined market competition using exclusives, so that’s the world we live in. I have no love for that world.
He went on to sort of blame Sony for defining market competition using console exclusives. Just a day earlier, PlayStation chief Jim Ryan said that titles like Starfield, an Xbox exclusive, were not anti-competitive.
He also said that the Game Pass is destructive, and Sony will invest in keeping an edge on the competition caused by Game Pass.
At the Xbox Games Showcase 2023 and Starfield Direct event, Microsoft announced that there are over 5000 new games in development for Xbox, a record in the console’s history. So the competition for exclusivity is really going strong.
So what about console-exclusive games?
Should they exist? Should they not exist? Well, console-exclusive games were almost as old as the video games themselves. Important titles such as Resident Evil, or Silent Hill were PlayStation exclusive at first.
The Xbox came with franchises such as HALO, or now Starfield, which, as we mentioned earlier, will be an Xbox exclusive.
Some of the biggest names in gaming are exclusive, and they were built with a console’s engine in mind. Take Legend of Zelda, for example, which is a Nintendo exclusive, and probably Nintendo’s greatest title. If we don’t mention Mario.
The console-exclusive games are forging a competition, that’s for sure. And even though they offer diversity, there is still a lot to discuss, especially in this age and day, on what it means to buy an Xbox or any other console just to play a game that’s bound to that console.
Not long ago, the world has actually experienced a shortage of computer chips, which affected all consoles, as well as the whole technological industry. Wouldnt’t be more sustainable if all these games could be played on just one device, instead of having to buy different devices?
That’s a tough question, especially when we talk about business. But Microsoft is planning to move Windows 11 to the cloud, so maybe cloud gaming, including console-exclusive games, might happen in the future.
What do you think about this? Would you like it if you had access to all games on just one console? Let us know in the comments section below.
Numerous Xbox One users have encountered the 0x80270300 Xbox error code while attempting to update or install games on their console, regardless of whether they use digital or disc-based versions.
The focus of this piece is to delve into 0x80270254 Xbox error code, which has been extensively covered.
However, we will now concentrate on rectifying this troublesome error and offer a comprehensive troubleshooting guide. Come along with us as we uncover the essential steps to fix this exasperating problem.
What is 0x80270300 Xbox error?
This is an Xbox error, and it’s caused by the following:
Due to game updates running in the background or a corrupted game.
System glitches on your console.
How do I fix the 0x80270300 Xbox error?
You can fix this issue sometimes by doing the following:
Restart the Xbox console and check if that solves the problem.
1. Reset Xbox carefully
Press the Xbox button on the console.
Next, choose Profile & System.
Scroll to Settings, then locate System.
Now select Console info.
After that, select Reset console.
Lastly, choose Reset and keep my games & apps on the confirmation page.
2. Delete and reinstall the game
Press the Xbox button to open the guide, then select My games & apps.
Monitor the game, press the Menu button on your controller, and select Uninstall.
Scroll to Ready to install, locate the game, and reinstall it.
3. Check if the Game is updating
On your home screen, go to My games & apps, and choose See All.
Choose Manage.
Now select Queue to see if the game you want to play is getting an update.
We are confident that our guide has equipped you with the necessary tools to tackle your concern. Although it may seem intimidating at first, as demonstrated earlier, addressing this issue isn’t as daunting as it may appear.
However, should you encounter any further obstacles, we suggest referring to our extensive guide on 0x87e50007 Xbox error. This invaluable resource provides solutions that could be precisely what you require.
We eagerly await your feedback on this matter. Please don’t hesitate to leave a comment below and let us know which solution proved most effective for you. Your insights are of utmost importance and greatly appreciated.
You’ll have two options, which feature ads in different designs. According to Microsoft, you can change this feature at any time in Settings. But it is unknown if you can disable it altogether.
The Default layout shows dismissible ads in your mailbox, maximing your screen space. The Banner layout shows ads above your mailbox. You can change this at any time in Settings. Your choice will apply to Outlook across all your devices.
The new Outlook is a pretty good-looking app that you can store your emails. Microsoft recently added a feature for Gmail accounts, and now you can use almost any type of email on it. While the older version keeps a Windows 10 design, you can still use it on Windows 11 as well.
However, you need to know that by using Outlook to open your emails, any link from the emails will be open in Edge by default. You can change this in settings, but if you haven’t used Outlook before, then you should know.
What does the new Outlook ads layout mean for you?
Well, it means that more ads will soon come to your inbox. Or every time you open your Outlook. But fortunately, they are dismissable, per Microsoft’s account. However, this doesn’t mean they will disappear.
You will be able to choose the layout when you first start using Outlook. There might be a possibility of not seeing these layouts at all.
But this option means you should roll back to the old Outlook version. For now, you can easily do that by disabling the old version.
More than that, there is nothing you can do for now, especially if you’re keen on using the new Outlook version.
What do you think about this new feature? Do you agree with it or not? Let us know in the comments section below.
Renaming the user folder can help you maintain an organized file structure and make your user profile more identifiable.
However, renaming the user folder on Windows 10 might initially seem complicated or confusing.
This guide will walk you through the steps to quickly do it, ensuring a seamless transition without impacting your user profile or data.
Is it safe to rename my user folder name?
Changing the user folder name on Windows 10 differs from renaming ordinary folders. It is important to note that the user folder name will remain the same when you change your user account name.
Usually, performing the process is not advised as it might prevent some apps from working as the registered path name for these would be changed from the default.
However, you can change the path of the faulty apps and processes to fix it. If you still want to proceed with the steps, move to the next section.
How can I quickly rename the user folder on Windows 10?
Before we go to the advanced fixes, here are a few preliminary checks you should do:
Make sure you have an extra copy of your important data.
Ensure you are using an administrator account.
Once you have checked these, follow these steps to get it done.
1. Use the Command Prompt
1.1 Create an admin account
Press the Windows key, type cmd, and click Run as administrator.
Type the following command to create a new user account and hit Enter: net user Administrator /active:yes
Now press the Windows key, locate the user account, and choose Logout.
Select the Administrator account you just created to log in. The Windows might take some time to load up.
1.2 Rename the folder (for Windows Pro & Enterprise Users)
Right-click the Windows icon and select Computer Management.
Select Local Users and Groups from the left pane.
Click Users.
Now right-click the user folder and select Rename to change the name.
Press Windows + E to open File Explorer.
In the File Explorer window, navigate to the C:\Users directory.
Right-click on the user folder and select Rename from the top bar menu.
If you are a home user, you can follow Steps 5 to 7 to rename the folder.
1.3 Get the security identifier
Press the Windows key, type cmd, and click Run as administrator.
Copy & paste the following command to get the list of SID numbers for all the user accounts present on your device and hit Enter: wmic useraccount get name,SID
Note down the SID associated with the account for which you want to change the name.
1.4 Modify a registry entry
Press Windows + R on your keyboard to open the Run dialog box.
Type regedit and click OK to open the Registry Editor.
In the Registry Editor, navigate to the following path: Computer\HKEY_LOCAL_MACHINE\SOFTWARE\Microsoft\Windows NT\CurrentVersion\ProfileList
Expand the ProfileList key and look for a subkey matching the SID number you copied.
Once found, locate the ProfileImagePath entry on the right-hand side.
Double-click on ProfileImagePath and modify the old username to the new username you have chosen.
Click OK to save the changes and close the Registry Editor.
Once done, restart your computer to apply the changes. Renaming the user folder may affect some apps or settings associated with the previous username. So, you might have to modify the settings as per your preferences.
1.5 Delete the user account
Press the Windows key, type cmd, and click Run as administrator.
Type the following command to create a new user account and hit Enter: net user Administrator /active:no
2.1 Create a temporary user account via the Settings app
Press Windows + I to open the Settings app.
Go to Accounts.
Select Family & other users from the left pane, then click Add someone else to this PC under Other users.
Follow the prompts to create a new user account with the desired username.
Now, click Change account type, select Administrator, and click OK.
Press the Windows key, right-click the current user account, click Logout, and sign in using the new account.
2.2 Rename the folder
Press Windows + E to open File Explorer.
In the File Explorer window, navigate to the C:\Users directory.
Locate the current user folder that you want to rename. By default, it is named after your previous username. Right-click on the user folder and select Rename from the context menu.
Type in the new desired name for the user folder and press Enter.
You will see a warning dialog asking if you want to proceed with the folder name change. Click Yes to continue.
Once done, follow the instructions in Solution 1.3 to edit registry entries, and once done, you can restart your computer to complete the action.
3. Use a Third-Party Tool
NOTE
If you are not confident making changes to the Registry Editor or using Command Prompt, you can use this method to migrate your profile instead.
Double-click the .msi installer file and follow the onscreen instructions to install the app.
Launch the app. In User Profile Wizard, select the user profile you want to rename from the list of available profiles.
Click on the Next button to proceed.
Enter the desired new username for the user profile and click Next to continue.
Follow the on-screen prompts to complete the renaming process. Once finished, restart your computer to apply the changes.
So, you can follow the methods to get the instructions to quickly rename your user folder and maintain a well-organized file structure on your Windows 10 computer.
Users have recently reported difficulty signing into their OneDrive account through the OneDrive application on Windows, with an error code of 0x8004e4a1 OneDrive error code being displayed. Interestingly, this problem seems to only affect certain accounts, which is quite peculiar.
In this article, we aim to address the vexing issue of how to fix 0x8004de88 OneDrive error code. While this error has been covered extensively, we will now provide a detailed troubleshooting guide.
Join us as we explore the crucial steps that must be taken to rectify this frustrating problem and bid adieu to this pesky error for good.
What is 0x8004e4a1 OneDrive error code?
When it comes to OneDrive, error code 0x8004e4a1 can be caused by a variety of factors including the following:
Network connectivity issues.
Improperly configured Windows Firewall.
Interference from antivirus software.
How can I fix the 0x8004e4a1 OneDrive error code?
Before we start fixing this issue, perform the following checks:
Power cycle your router and check if that helps with the issue.
Check the Internet connection and make sure your network is stable.
1. Uninstall and reinstall OneDrive
Hold the Windows + I keys together to open Settings.
Now select Apps, and click on Apps & Features.
Locate the OneDrive app below, click on the three dots, and Uninstall.
Lastly, try to sign in to see if the issue persists.
2. Disable VPN or proxy
Hold the Windows + R keys together to launch the Run box.
In the command box type the following and press Enter to open Internet Properties:inetcpl.cpl
Click on the Connection tab and select the LAN settings option.
Be certain that the Automatically detect settings option is checked. Then uncheck the Use a proxyserver for your LAN beneath the Proxy server section. Click OK to save the changes.
Lastly, reboot your PC.
After doing that, check if 0x8004e4a1 error in OneDrive is gone.
Hold the Windows + R keys together to launch the Run box, and input cmd inside the box to launch the Command Prompt.
Once the window has opened type the following command and press Enter: netsh winsock reset catalog
Now reboot your system.
We are delighted to assure you that our guide has equipped you with all the necessary skills to tackle your concerns.
However, in case of any further hiccups, we recommend consulting our comprehensive guide on resolving the OneDrive Error Code 0x8004de40.
We eagerly await your feedback on how these solutions worked for you. Do not hesitate to drop a comment below and let us know which method proved most effective for you.
Coming across errors while using your PC is, sadly, inevitable. One such error you may encounter is the 0x8007045a, accompanied by the ERROR_DLL_INIT_FAILED message.
A common one, it can lead to slow running or even PC failure with Blue Screen of Death issues. In this article, we’ll explore the problems that cause it, along with some solutions that will help you resolve them. Let’s get right into it.
What does error code 0x8007045a mean?
The 0x8007045A error code, along with an ERROR_DLL_INIT_FAILED message, can occur while simply browsing your computer, though most users report they see it while using Windows Update.
Typically, the issue emerges when a dynamic-link library, or DLL, can’t initialize while startup or running particular software. A damaged or missing msxml.dll file most commonly triggers it.
What causes the 0x8007045a ERROR_DLL_INIT_FAILED?
Damaged DLL files: DLLs are libraries with code and data that can be used by multiple programs simultaneously. If a DLL is corrupted or misplaced, it most likely will lead to such an error.
Compatibility issues: Occasionally, a mismatch between your OS and the program you’re trying to run can result in the issue.
Infected computer: Malware infections can cause various problems for your device. If your system is targeted by malicious software, it could damage DLL files, which could, in turn, outcome in such an error.
Now that we’ve pointed out some of the most common reasons behind the issue let’s see how to fix it:
How do I fix error 0x8007045a?
Before your try out our tested solutions, you should:
Stop your VPN: Using VPN might hinder the update process. Try switching it off and see if that helps.
Restart your PC: Sometimes, a simple reboot could resolve most of the Windows update errors, but if you’re stuck, proceed to the solutions below:
1. Run the DISM and SFC commands
Hold Windows + S to open the Start menu. Search for Command Prompt and choose Run as administrator.
A UAC (User account control) message should pop up. Click Yes.
Type the following commands into the Command Prompt window and press Enter after each one: dism /online /cleanup-Image /restorehealthsfc /scannow
Restart your PC.
The System File Checker scan is a native Windows component that searches and restores damaged system files. An empty window, as a result, means no corrupted ones have been found.
2. Replace the damaged files and re-register them
Copy these DLL files from a device that is working fine to yours: msxml3.dll, msxml3a.dll, and msxml3r.dll. They should be in the following directory: C:\Windows\System32
Register the files by pressing Windows + R to open the Run dialog.
Start with the first by typing the following in the open box and clicking OK: REGSVR32 C:\WINDOWS\SYSTEM\MSXML.DLL
Re-register the second file by repeating the first two steps, but this time typing the command below, followed by clicking Enter: REGSVR32 C:\WINDOWS\SYSTEM\MSXML2.DLL
Repeat the process for the last file by typing this command and clicking Enter: REGSVR32 C:\WINDOWS\SYSTEM\MSXML3.DLL
Restart your PC.
Malicious software can infect your DLL files and cause various errors, including this one. To ensure your system is protected against such threats, perform regular checks using Virus & threat protection or a trusted anti-malware program.
3. Update the Microsoft XML parser
Check if you have the latest version of the Microsoft XML parser by visiting Microsoft’s official website. If not, follow the instructions there to update it.
Restart your PC and verify whether the error has vanished.
The 0x8007045a error is related to Microsoft’s XML Core Services (MSXML). If everything’s working correctly, MSXML is installed automatically by Windows Update.
The issue can lead to severe PC issues, such as a blue screen or system crashes. Typically, it pops up on your desktop, indicating you need to restart. That is, if it hasn’t restarted automatically already.
If you panic and force a reboot, this could mean you can lose important data in the process. Don’t forget to always back up your important files!
Congrats! This should help you get rid of the frustrating 0x8007045a ERROR_DLL_INIT_FAILED error.
If you want to be safe, you should regularly create restore points. That way, if you accidentally trigger an error, you can go back to a previous state before the issue.
Do you have any questions or comments? Let us know in the section below:
The FTC v Microsoft hearing has been revealing a lot of secrets, from everywhere. It seems Microsoft wanted to buy Sony out of business, just to erase competition for Xbox.
Speaking of Xbox, executives from Microsoft agree that it’s losing the console war. And in a race to not lose it, Microsoft is reportedly eyeing video games development studios for acquisition.
The documents for the hearing also revealed that Microsoft paid $117 million for Ninja Theory, the studio that developed Senua’s Sacrifice. And they also revealed one more important thing. It seems that the next-gen consoles will hit the market in 2028, as reported by IGN.
This gives Xbox developers a lot of time de redesign the next Xbox controller. It seems that users want a new controller, and some of them even have ideas when it comes to it. So what should the next Xbox controller look like?
Here’s what the next Xbox controller should look like
Some of the users would love new buttons, especially ones that include good features, such as automatically muting mics when pushed.
Honestly I feel that next gen controller should come with buttons or paddles on the back that are their own dedicated buttons and push to mute buttons on the controller that work for all mics.
I don’t care about haptic feedback, and I surely don’t want a microphone in the controller to constantly hear other people’s buttons being pressed. What I would like to see: mechanical buttons; trigger stops; hall effect sticks; paddles; I wouldn’t change anything about the shape or design.
Some other users agree that they should do something about the noise it releases when pushed. So the next gen Xbox controller should be as quiet as it can get.
Others would love it if the next-gen Xbox controller would borrow some elements from the PlayStation 5 controller.
I would like to see 3 things: Adaptive triggers. This is my favorite feature on the PS5 controller. 3D rumble. The vibration effect in the joycons and PS5 controllers really brings in a new level of emersion. Magnetic joysticks. Controller drift has become a really large issue in this current gen and it needs to go.
But there are users who think that the current Gen Xbox controller is just fine the way it is now.
Next gen?? Not a feature, but for all I wish, they should already work on improve its internal components, boards, develop a better analog stick internal piece so it has no drift, increasing its lifespan.
All I care about is that it’s comfortable and functional. I could use extra back buttons, more mapping options are always nice, and I’d like Microsoft to remove the clicky noise from the d-pad. Other than that, I’m good.
The perfect Xbox controller would be the current one, but with less noise and with greater durability. If you prefer the classic controller, explore the stunning revival of the classic Xbox Controller S for Xbox S/X in our in-depth review.
Do you agree with them? How do you see the next-gen Xbox controller? What should it have? Let us know in the comments section below.
If your system drive is running low on free space, a huge pagefile.sys might be behind it. The paging file is used as virtual memory and an integral part of your OS.
Though, it can sometimes occupy quite a significant amount of disk space. Today, you’ll learn what you can do about your pagefile.sys size and how to free up valuable storage space on your PC.
Do I need pagefile.sys on my computer?
To answer that you must first understand its role in your OS. When your computer determines the available RAM is insufficient, the paging file steps up, acting as a temporary storage for the data that hasn’t been used recently.
This way, it frees up RAM for other, more important programs. In other words, it helps your computer run smoothly and prevent system crashes even when physical memory is heavily used.
The paging file also acts as a backup to your RAM. The latter keeps data only temporarily and resets itself when the PC is switched off or if there’s a power shortage.
In contrast, pagefile.sys store information about the computer’s state much longer, making it accessible even after a crash or power interruption.
The pagefile.sys file can become too large when:
Running demanding applications: When this happens, your system needs to allocate additional virtual memory to accommodate the increasing demand.
Insufficient disk space: Windows can increase the paging file size to compensate for the low free space. A large pagefile.sys can improve your PC performance; thus, the best way to handle a huge pagefile.sys is to invest in additional storage space.
Is it safe to delete pagefile.sys?
Its large size sometimes makes it a target for those who want to free up some space. However, pagefile.sys is crucial to your system operations, and deleting it could have serious consequences.
If you remove the paging file, you remove your temporary memory storage and RAM backup. This could tank your PC’s stability, slow down its performance, and cause frequent software and system crashes. Delete it at your own risk!
The only scenario in which removing pagefile.sys is maybe safe is when your PC has a much larger amount of RAM (think 32GB and up).
However, that’s not the case with most users, so we’d recommend resizing the file instead or adding more RAM. If anything, you should be thinking about increasing your virtual memory.
Before you can do anything with the paging file, you first need to be able to view it:
How do I view pagefile.sys?
Press Windows + E to launch File Explorer.
Click on the View tab, then on Show, and check the Hidden items box.
Click on the three vertical dots on the right and open Options.
Go to the View tab and uncheck Hide protected operating system files (Recommended) in Advanced settings.
A warning message will appear. Confirm by clicking Yes.
We suggest you skip directly to the resizing part, but if you’ve chosen to ignore our warnings and are determined to remove it, you can learn how below.
How do I fix a huge pagefile.sys?
1. Delete pagefile.sys
Open your computer (This PC icon on your desktop), right-click on an empty area, and choose Properties.
Click on Advanced system settings.
This takes you to the System Properties window. Find the Performance section under the Advanced tab and open its Settings.
Go to the Advanced tab and click on Change in the Virtual memory section.
Uncheck the box next to the Automatically manage paging file size for all drives and enable the No paging file option. Click on Set.
Click OK to confirm.
Reboot your PC.
Even if your pagefile.sys is huge, resize it to a smaller value instead of deleting it. This will free up some disk space and allow you to retain vital virtual memory. Reducing is also a much safer option!
2. Resize pagefile.sys
Press Windows + S to access the Start menu, type View advanced system settings, and open it.
Go to the Advanced tab and find the Performance section. Open its Settings.
Open its Advanced tab, locate the Virtual memory section, and click on Change.
Uncheck Automatically manage paging file size for all drives and enable Custom size. Choose theinitial and maximum size and click on Set.
Click OK and restart your PC for the changes to take effect.
Typically, Windows manages the paging file size. If you’re wondering what to put, you can follow this rule of thumb: the paging file should be from 1.5x to 3x the amount of RAM installed.
This way, it’s big enough to fit your entire RAM if needed but small enough not to occupy a significant amount of your disk space. Keep in mind that reducing the paging file size or deleting it altogether won’t help with a memory leak.
Today, Microsoft has released Windows 11 Dev Channel build 23493, and it’s a big one. The banner news is that Windows Copilot, the generative AI assistant built on Bing Chat for Windows, is making its first appearance, but there’s even more news than that. Let’s dive in:
Windows Copilot
First announced at Build 2023, Windows Copilot promises to bring generative AI directly into Windows. So instead of searching for settings or features, manually summarizing websites, fumbling with creating a screenshot or an image, Windows Copilot will soon be able to all this and a lot more for you just by asking in a sidebar.
Some notable points about this first iteration of Windows Copilot for Windows Insiders in the Dev Channel:
Requires Dev Channel build 23493 or up, and Edge version 115.0.1901.150
Windows Copilot is rolling out, not all Dev Channel Insiders will have access right away
Will launch in a sidebar, by clicking on a new taskbar icon or using the Win Key + C keyboard combo
Will use the same Microsoft Account or AAD account you’re signed in to Windows with
The new Windows Copilot Sidebar “will appear as a side bar docked to the right where it won’t overlap with your desktop content and will run unobstructed alongside your open app windows, allowing you to interact with Windows Copilot anytime you need.”
One final note, and it’s a bit of a doozy (I can hear Paul Thurrott banging his head on the table from here!):
Windows Copilot with Bing Chat generates responses that are contextual and improves your experience in Windows. You may see inline recommendations we think are relevant through ads in Bing. We’ll continue to learn and listen to customer feedback.
New Settings Home Page
As if the introduction of Windows Copilot wasn’t enough, Dev Channel build 23493 also offers a new Settings homepage experience “that offers you a dynamic and personalized experience. It provides an overview of your device, quick access to key settings, and helps manage your Microsoft account.”
This new Settings experience is built using up to seven interactive cards at start (with more on the way) that group settings into device and account related functions. Here’s the initial seven:
Recommended settings
Cloud storage
Account recovery
Personalization
Microsoft 365
Xbox
Bluetooth Devices
You’ll be able to change settings directly from this page without having to dig deeper, and as you use it the page will evolve to personalize the page even more:
As you use your device, it’ll adjust to provide the most relevant and useful information based on your usage and preferences
Expanded App Restore
With Windows 11 Insider build 23466 for the Dev Channel, announced during Build 2023, Microsoft introduced App Restore, the ability to back up and then restore Microsoft Store apps. This is now being expanded to include apps not in the Store, where you’ll be directed to the appropriate website to re-download the app installer.
Expanded native archive file format read support
Build 23493 adds additional file formats the OS will be able to read, including .tar, .tar.gz, .rar, .7z, and more.
New Volume Mixer in Quick Settings
This build is introducing a new enhanced volume mixer into Quick Settings, with “quick customization of audio on a per-app basis, with additional control to swap devices on the fly,” and a new keyboard shortcut, Win Key + CTRL +V, to open the new experience.
Narrator voices for Japanese and Great Britain English
Build 23493 adds new narrator voices (Microsoft Nanami and Microsoft Keita) for Japanese, and Microsoft Sonia and Microsoft Ryan for British English. These voices can be added to your PC for natural sounding Narrator voices that are stored on device and available without an internet connection.
Even more changes and improvements
As usual, there’s a list of changes and improvements, fixes and known issues with this build, including a new suggestions for snap layouts feature. Be sure to check out the blog post for all the details.
What do you think of Windows Copilot? Let us know in the comments below.
Skype was one of the most influential messaging apps in the last decade, but many are wondering how many people use Skype today.
It’s safe to assume that the popularity of Skype has waned over the past few users, and Windows 11 replaced Skype with Microsoft Teams. However, that doesn’t mean that Skype is forgotten.
Join us while we take a closer look at Skype’s user statistics in the current year and see how well the messaging giant holds up after all these years.
Which country has the most Skype users?
United States – 32 million active users (12.23%)
India – 3.1 million active users (7.25%)
Russian Federation – (6.71%)
Brazil – 1.2 million active users (5.29%)
The United Kingdom – 6.7 million active users (3.84%)
This is because many companies, especially in the United States, still use Skype.
Country:
Number of companies:
United States
38,537
United Kingdom
8,004
India
3,994
Canada
3,414
France
2,077
Australia
1,991
Brazil
1936
China
1445
Italy
1244
Germany
1223
The same goes for personal users. Many have friends and other contacts on Skype, so moving them all to a new platform isn’t easy.
The following countries have at least 1 million Skype users:
United States
United Kingdom
India
Canada
Australia
France
China
Brazil
Germany
How many people use Skype?
Skype numbers expected to rise
Although Skype isn’t popular as it used to be, the numbers say otherwise.
Experts estimate that the number of Skype users will rise in the future, and according to Statista, it’s estimated that in 2024, Skype will have 2.27 billion registered users.
According to data, Skype has 300 million active users every month in 2023, and every day 40 million users worldwide use it.
Monthly users
Daily users
300 million
40 million
What age group uses Skype the most?
According to data from SimilarWeb, Skype has 40.53% female and 59.47% users. Regarding the age distribution, Skype is mostly used by people in the 25-34 age bracket.
Age:
Percent:
18 - 24
21.38
25-34
33
35-44
20
45-54
13
55-64
8
65+
5
Here’s a visual representation of the data:
What industries use Skype the most?
Skype is widely used in various industries, and the vast majority of users are in computer software and information technology.
Industry:
Number of users in millions:
Computer Software Industry
8.6
Information Technology and Services Industry
6
Education Management Industry
3
Hospital and Healthcare Industry
3
Higher Education Industry
2
Marketing and Advertising Industry
2
Financial Services Industry
1.67
Retail Industry
1.62
NGO Management Industry
1.5
Construction Industry
1.3
However, Skype is used in various other industries, and you can see its stats in the graph below:
Does anyone still use Skype?
Yes, Skype is still used, mostly by business users, but personal users are moving away from the platform and are switching to alternatives.
We’ll briefly cover some of the alternatives and see how Skype compares to them:
Skype vs Teams
Probably the biggest reason why Skype is losing popularity is Microsoft Teams. It’s intended as a Skype replacement, and it shares many similarities with it. To learn more, we suggest reading our Skype vs Microsoft Teams guide.
Here’s a quick overview of the differences between the two:
Microsoft Teams
Skype
Pricing
$0 to $12.50
per user/month
$0
Cheapest plan
$4
$0
Max number of participants
1,000
100
Live streaming
Yes
No
Meeting length
24h max
60 minutes in free plan
24h
Screen sharing
Yes
Yes
Record meetings
Only on paid plan
Yes
Group and individual messages during calls
Yes
Yes
Whiteboard
Yes
No
Live meeting transcription
Only on paid plans
Yes
Breakout rooms
Yes
No
Joining restrictions
Yes
Yes
Hand rasing
Yes
Yes
Emoji reactions
Yes
Yes
Cloud storage
Starting from 5GB per user
Starting from 5GB per user
Integrations
Over 700
Not supported
Support
24/7 support on paid plans
Limited support
Security
Advanced
Standard
As you can see, Skype is more useful for smaller teams and home users, while Teams offers more collaboration features, and it’s better for larger teams.
Skype vs Zoom
During the pandemic, Zoom emerged as a popular alternative for collaboration and video conferencing, and it took the market by storm.
If you haven’t tried this software, we have a great guide on how to download and install Zoom, so be sure to check it out.
Here’s a quick comparison between Skype and Zoom:
Zoom
Skype
Price
$0-19.99 monthly/per licence
Free
Maximum participants
Up to 1,000
Up to 100
Max call duration
Up to 30h, 40-minute limit on meetings with free plan
Up to 24h
OS compatibility
Mac OS, Windows, iOS, Android, Linux
Windows, Linux, Android, iOS, Mac OS, Xbox, Amazon Alexa devices
Video quality
Up to 1080p
Up to 1080p
Recording meetings
Yes
Yes
Screen sharing
Yes
Yes
Document sharing
Yes
Yes
In-meeting chats
Yes
Yes
Join meetings via phone or video
Yes
Yes
Background blur
Yes
Yes
Background change
Yes
Yes
Breakout session
Yes
No
Whiteboard
Yes
No
Meeting transcripts
Only on Business and Enterprise plans
No
Audience polling
On paid plans
No
Streaming on social media
On paid plans
No
Customer support
Varies by plan
Online help
Account required to attend meetings
No
No
Zoom offers better functionality, and in our opinion, it’s a better choice if you’re planning to hold large meetings, so it’s perfect for larger companies.
Skype vs Discord
Discord is a popular messaging app, but how does it compare to Skype? It’s not easy to compare the two since they have different purposes besides instant messaging.
To learn more, we strongly suggest reading out Skype vs Discord guide for in-depth information.
Here’s a quick overview of the two services:
Discord
Skype
Premium
$4.99/month
No
Audio quality
64 kbps
100 kbps
Max participants
25
100
Ability to call phone numbers
No
Yes
Screen sharing
Yes
Yes
Audio recording
No
Yes
Video recording
No
Yes
Max size for file sharing
Up to 8MB for free users, up to 50MB for Nitro users
300MB
Ability to connect other services
Facebook, Skype, Twitter, Steam, and more
Facebook, Docs, Excel, Powerpoint
Requires account
Yes
No
Live captions
No
Yes
As previously mentioned, these two services are quite different, and Discord is designed to create a community and share content, while Skype is made primarily for video calls and instant messaging.
In that regard, Skype is a better option since it’s free, it offers recording features, better sound quality, and support for more participants.
However, if you want to organize and chat with fellow gamers, Discord is no doubt a better option.
Skype vs WhatsApp
When comparing Skype to WhatsApp, it’s important to mention that WhatsApp is primarily a messaging app for your phone, so it will lack many features that Skype has.
Of course, you can get WhatsApp for Windows 11, but it offers the same features as the web app.
Let’s quickly compare the two:
WhatsApp
Skype
Number of users
1.5+ billion since 2017
1.33+ million users since 2017
Requires a phone number
Yes
No
Uses contacts from the phone's contact list
Yes
No
Audio quality
Decent
Refined HD quality
Call recording
No
Yes
Maximum participants in a call
4
100
End-to-end encryption
Enabled by default
Not enabled by default
Cloud storage sync
No
Yes
Cost
Free
Free
Both services are similar, but if you want to collaborate with others, then Skype might be a better option.
On the other hand, if you just want to chat with friends, WhatsApp is one of the most popular instant messaging apps, which makes it a better choice.
Skype vs Google Meet
Another great Skype alternative is Google Meet. In case you’re not familiar with it, we have a great guide on how to use Google Meet on Windows 11, so be sure to check it out.
Google Meet
Skype
Requires an account
Yes
No
Maximum meeting length
1h for Free users, up to 24h with Workspace account
24h
Maximum number of participants
Up to 100 on Free plan, up to 500 on Business Plan
100
Third-party integrations
Yes
Yes
Ability to call dial-in numbers
Yes
Yes
Available on all major platforms
Yes
Yes, including Xbox
Synchronization with calendar
Yes
No
Screen sharing
Yes
Yes
Meeting recording
Only on Enterprise plan
Yes
YouTube broadcasting
Only in Enterprise or Education plan
No
Google Meet offers simplicity and ease of use, and it’s a great option for free users, as long as you don’t mind the 1h meeting length for free users.
On the other hand, with a built-in recording feature, Skype is a better choice for some businesses.
Skype vs Slack
Slack is one of the most popular collaboration platforms in the world. To learn more about it, we have a great Slack vs Skype guide that you should check out if you want to learn more.
Here’s a quick comparison:
Slack
Skype
Pricing
Free with 3 different premium plans
Free
Max participants in a call
2 for free, 50 for paid
100
Search
Advanced filtered search
Basic text search
File sharing
Free: 90 days of message history, Premium plans start at 10GB per member
Starting from 5GB per user
Screen sharing
Yes
Yes
Record meetings
No
Yes
Transcriptions
No
Yes
Channels and threads
Yes
No
Integrations
Over 2,400 integrations
Very limited
Support
Standard
Limited
Slack is a superior platform for collaboration since it supports threads and channels, but if you’re looking for large video conferencing with screen recording, Skype is a far better option for free users especially because of the international calls.
Skype’s popularity is slowly fading when it comes to home users especially after the Skype phone number option was sunset, but the service is still incredibly popular with many businesses, especially in the United States.
However, we expect this to change in the upcoming years slowly. If you’re not a fan of Skype, then you might want to try some of these Skype alternatives.
Are you still using Skype? Let us know in the comment section below.
Once again, the US Federal Trade Commission’s injunction case against Microsoft has knocked over another handful of confidential information as well as shed some light on how the CEOs of both Activision and Microsoft feel about the gaming industry.
While it’s fair to equate the Xbox business with overall ethos of the Microsoft company, head of Xbox Phil Spencer reiterated several times during his day three testimony that the gaming division works as an almost independent business within Microsoft, similar to Google within Alphabet. With that being said, Microsoft CEO Satya Nadella took the stand yesterday to express his distaste of the exclusivity paradigm in the gaming industry after confirming several SEC disclosures about how well or not well the Xbox division was doing for the company.
FTC lawyers got first crack at Nadella and went over a litany of financial disclosures in regards to the Xbox’s 2022 financial results where there were several instances of the gaming division exceeding performance metrics and briefly overtaking the PlayStation 5 for console sales in 2021.
While the FTC attempted to paint Microsoft’s relative success as precursor to an argument about market dominance, Nadella was quick to point out that the Xbox’s exceeding goals were compared to relatively low internal projections from the company, a sandbagging of sorts.
Having questioned the head of Xbox for a full day, predictably Nadella’s questioning went towards his strong suit of cloud services where the FTC presented a document stating Microsoft “continues to lead in the fast-growing gaming cloud gaming market.”
Nadella, who continues to push Microsoft into the company into the very lucrative cloud services industry, remains bullish on cloud computing but had to admit that its ambition for cloud streaming games hasn’t bore out the results predicted.
I don’t think of it as strictly substitute for the console. I mean, at least the market feedback to date has been people love their consoles, people love their PCs, people love their phones and use cloud gaming as an adjunct.
Nadella also spent his time being questioned to help clarify what cloud gaming could mean in the future while defining what it practically means for gamers today. While the go-to reference is cloud streaming Nadella asserts, “Just to make sure that it’s clear. Whenever I think about the cloud in the context of the Xbox pillars of content, cloud, and community, Xbox Live is part of the cloud. So even when you’re thinking about a console or a PC, the cloud is actually very integral to the experience. So, it’s not just streaming alone when I think about the cloud.”
When questioned by Microsoft lawyers, Nadella admitted that he “would love to get rid of the entire exclusives on consoles” business, but also acknowledged that Microsoft is a low share player in a market defined by Sony’s success.
Nadella also took this time to once again state Microsoft’s official position on keeping Call of Duty on the PlayStation platform and not making it an exclusive for the Xbox. Both the head of Xbox and the CEO of Microsoft have committed to the very argument that Call of Duty will remain a multiplat game for the foreseeable future, “100 percent.”
Call of Duty: Modern Warfare II video game on Xbox and Windows
Prior to Nadella taking the stand, Activision Blizzard’s CEO Bobby Kotick spent time in the hot seat mostly reaffirming known information but opened up about his personal dislike of subscription services and as CEO he has no plans to offer any Activision game licenses to any subscription services if the Microsoft deal falls through.
“I have a general aversion to the idea of multi-game subscription services.”
Following several lines of contentious questioning from the FTC, Kotick acknowledged that there might be a small benefit for offering content to game subscription services for a limited time. With Activision Blizzard having to intentions of offering its games to subscription services, a previous argument used by the UK’s Competition and Markets Authority body is shot out the window as it believed blocking the Microsoft acquisition would force Activision to provide its own licensing infrastructure to support up and coming streaming services.
Kotick confirmed that if he were to walk away from the deal with Microsoft, business would continue as it currently has where Activision can force Microsoft to create parallel revenue sharing deals, limit its access to other platforms and maintain its marketing exclusivity deal with PlayStation.
Kotick’s line of questioning ended with the topic of putting Call of Duty on the next Nintendo console, with the FTC ushering the Activision CEO into “considering” it if the publisher had the specs. Activision Blizzard famously skipped Call of Duty for the Switch and Judge Corley chimed in as well to find out why the company hadn’t done if for the Switch already. Kotick didn’t give a direct answer to the judge’s question but once again reiterated that if could be done, and done well, Activision may consider it, but currently has no plans to bring CoD to Nintendo’s platform.
Day four ended with some more expert testimony from Microsoft’s economist Dr. Elizabeth Bailey who helped to define where Nintendo sits in the rage of console competition.
Bailey used the broadest but most straightforward reasoning that explains that Nintendo’s platforms compete for gamers attention and dollars just as much as consoles or PCs. Bailey’s arguments don’t land as well as other previous Microsoft witnesses with the FTC finding gaps in her logic and results, however, any way Bailey’s data was chopped up, Microsoft came in last place for gaming, distribution, and support.
The day ended with a heat exchange between the FTC and another Microsoft expert by the name of Dr. Dennis Carlton who was brought to testify to Sony’s investment with the Activision deal being squelched.
FTC lawyers brought up citations that included the Verge regarding Microsoft’s deal with NVIDIA, as well as whether or not gamers will automictically become Xbox gamers if the deal closes or if they move onto other platforms such as Nintendo or PC gaming, which highlighted flaws in Dr. Lees share models presented the day before.
After a few intense back and forth’s, Judge Corley hoped into clarify a few things for the court and then ended the day.
Beyond all the verbal court room drama, observers were also privy to some poorly redacted info from both Microsoft and Sony that revealed the list of acquisition targets for Microsoft as well as the development budgets for some of PlayStations highest grossing titles.
Among Microsoft’s consideration for acquisitions included SEGA, Bungie, Hello Games, Team Cherry, Moon Studios, and Striking Distance Studios to name a few.
On the PlayStation side, we learned that Horizon Forbidden West cost $212 million to develop over five years with a team of 300 employees while The Last of US 2 topped $220 million with a team of 200 employees. We also find out how lucrative the Call of Duty alliance between Sony and Activision has been with nearly one million PlayStation players dedicating their time specifically to the game and the title producing $800 million in revenue for PlayStation for 2021 in just the US, while globally accounting for $1.5 billion.
June 29, 2023 marks the last day for oral arguments with Xbox CFO Tim Stuart, Microsoft CFO Amy Hood (written) and Nintendo’s SVP of developer relations (video) leading to the final day of the trial on Friday June 30, 2023, where Judge Corley will make a determination after asking questions of her own.
Microsoft has recently introduced a novel AI training program via LinkedIn’s training platform as a part of its Skills for Jobs initiative. The tech giant aims to offer learners the opportunity to acquire the first Professional Certificate on Generative AI within the online learning market by providing complimentary courses developed by LinkedIn. The curriculum will encompass fundamental AI concepts along with responsible AI frameworks.
In a blog post on LinkedIn, Kate Behncken, Corporate Vice President of Microsoft Philanthropies, highlights the inclusion of several key initiatives within the framework. These include the introduction of the first Professional Certificate on Generative AI in the online learning sphere, a novel open global grant challenge in collaboration with data.org to foster innovative approaches in training personnel on generative AI, and enhanced accessibility to free digital learning events and resources aimed at boosting AI proficiency for all individuals.
The Microsoft AI Skills Initiative includes new, free coursework developed with LinkedIn, including the first Professional Certificate on Generative AI in the online learning market; a new open global grant challenge in coordination with data.org to uncover new ways of training workers on generative AI; and greater access to free digital learning events and resources for everyone to improve their AI fluency, the blog post added.
The Professional Certificate on Generative AI is presently accessible in English and will soon roll out in Spanish, Portuguese, French, German, Simplified Chinese, and Japanese on LinkedIn Learning.
Furthermore, the company is set to introduce a trainer toolkit tailored for educators, encompassing easily downloadable and digestible content for trainers. Additionally, an AI course has been designed for teachers and other trainers.
Microsoft has also revealed an exciting open grant program for AI to elevate historically marginalized communities. The Generative AI Skills Grant Challenge is a collaborative effort between data.org, Microsoft’s AI for Good Lab, and GitHub. The program aims to explore, develop, and implement strategies for training and empowering the workforce in effectively utilizing generative AI, specifically within nonprofit organizations, social enterprises, as well as research and academic institutions.
Beneficiaries of the grant will not only receive financial support but also benefit from group learning opportunities, data training, and guidance, along with access to Microsoft events and cloud-computing resources. Applications for the grant program are currently being accepted, and the deadline for submission is August 15th.