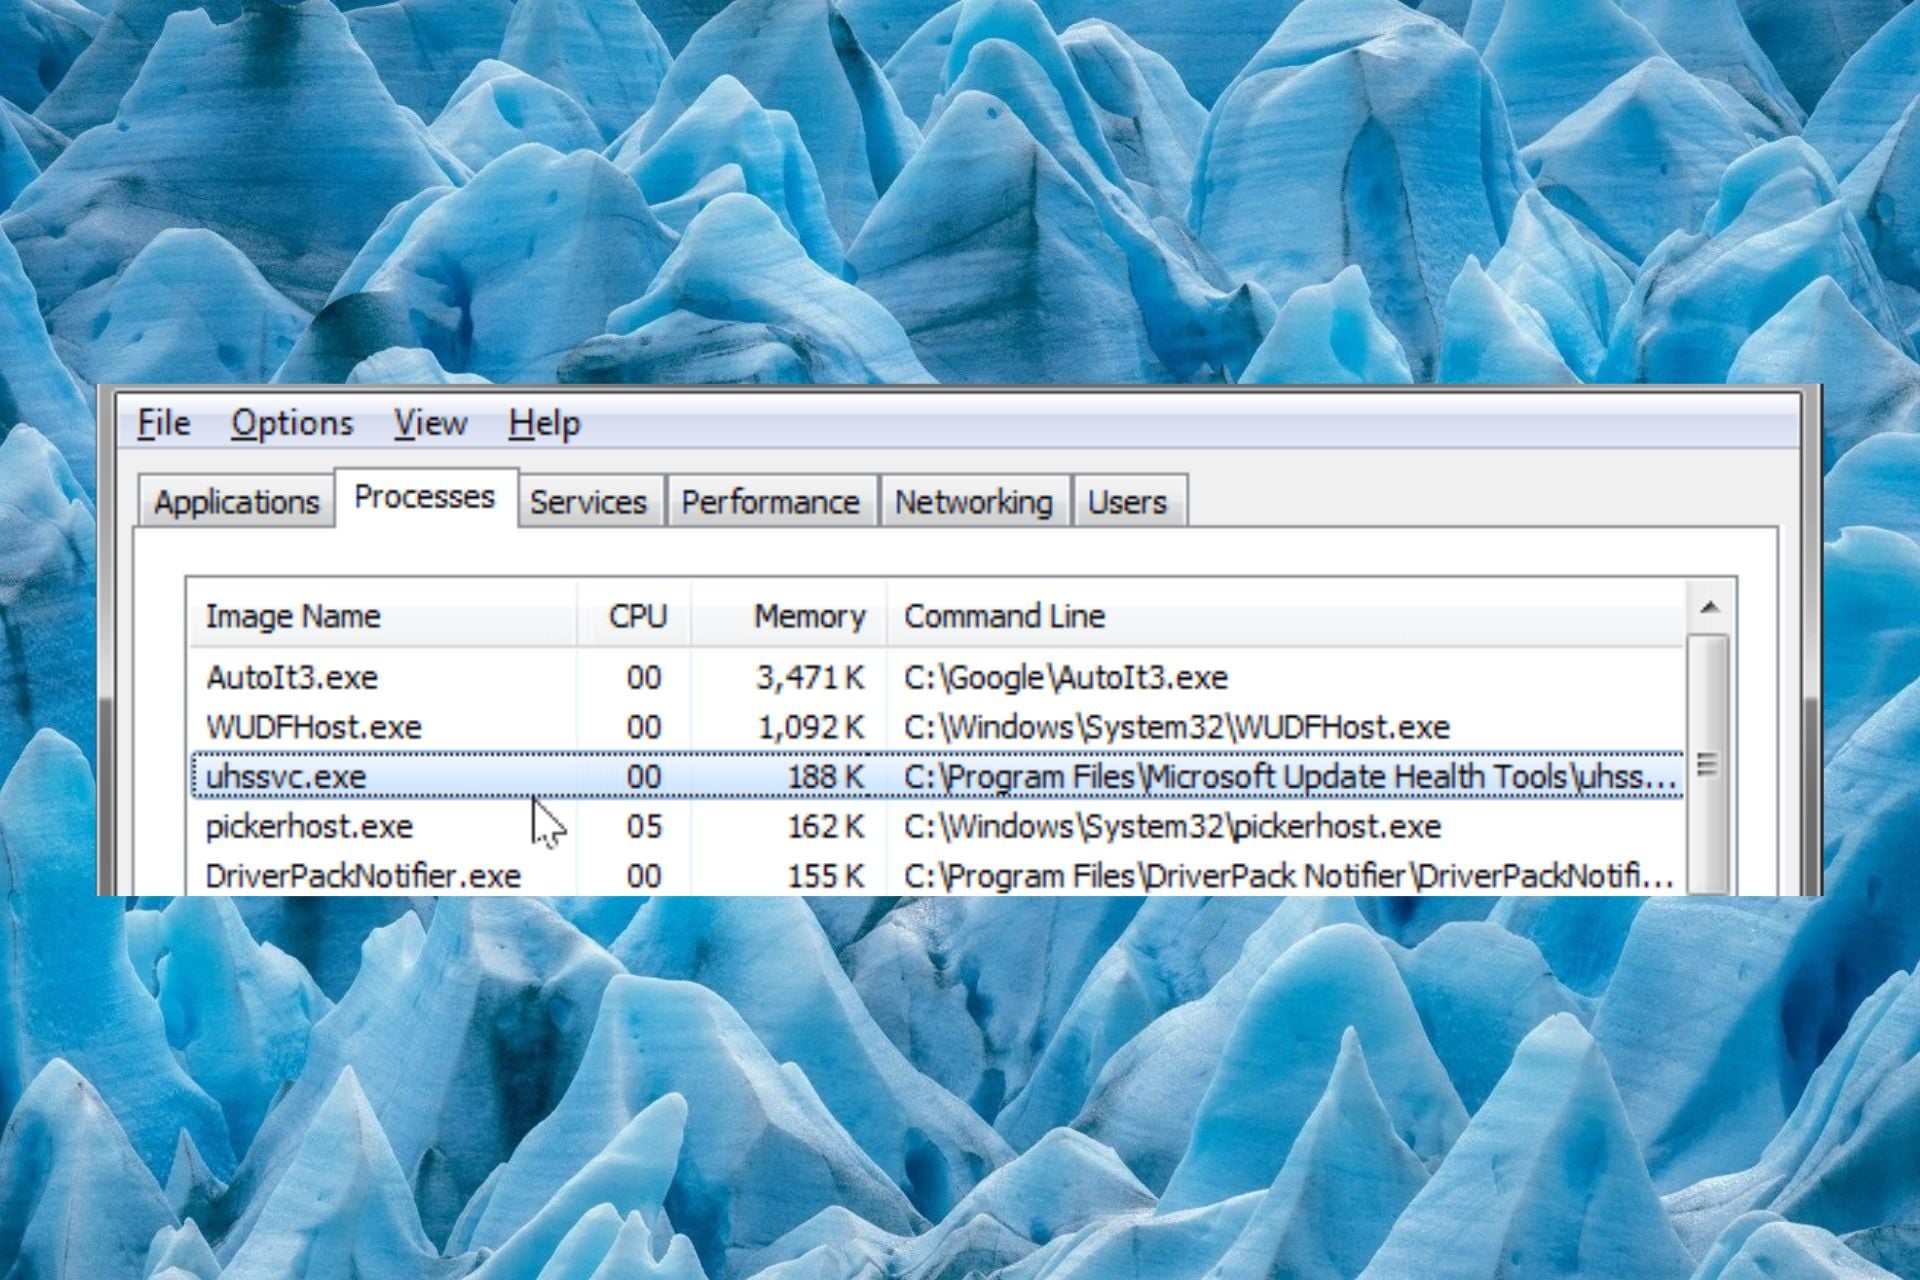
Uhssvc.exe: What Is It & Should You Remove It?

Uhssvc.exe or Microsoft Update Health Service is a background process developed by Microsoft Corporation for the Windows OS.

This Windows process is a part of Microsoft Health Update Tools which is responsible for providing health updates about your PC.

Why should I remove Uhssvc.exe? 

Despite the uhssvc.exe process being an intricate part of the Windows Operating System component, it is several loopholes that make it vulnerable to malware attacks. 

Apart from this, cyber attackers often disguise a malware code in a file with the same name as uhssvc.exe, that implants itself in the the C:\Windows or C:\Windows\System32 folder.

Hence, there is a possibility that you assume it to be a legitimate Windows process, but in reality, it is malware.

What are the common errors associated with Uhssvc.exe? 

An infected Uhssvc.exe file is known to cause an array of issues on your PC. Some of the common ones reported by users are: 

  • Uhssvc.exe Application Error – The error occurs when the Uhssvc.exe system file is either corrupt or missing or if there is any issue with the application using it. 
  • Uhssvc.exe not found – It occurs when the uhssvc.exe file is not found in the program directory or has been accidentally deleted. 
  • High CPU usage by Uhssvc.exe– This error is triggered when the uhssvc.exe file is consuming a high amount of CPU resources, causing performance issues.
  • Uhssvc.exe has stopped working – A memory issue or incompatibility problem may prevent the uhssvc.exe file from running hence the runtime error. 
  • Uhssvc.exe Access Violation – This error indicates that uhssvc.exe is unable to access the memory location it currently requires. 

Hence you need to check whether the uhssvc.exe file is authentic and not infected by malware. 

How to fix the issues related to Uhssvc.exe? 

Try these simple workarounds to fix the issues with the uhssvc.exe file: 

  • Uninstall the recently installed programs to prevent interference. 
  • Keep your operating system and the security software up to date to fix the malware infection.
  • Perform a search on your drive using File Explorer (Ctrl + E) and delete the instances that are not in the System32 folder. 

If system issues still occur because of the uhssvc.exe, the following methods should be implemented. 

1. Verify the legitimacy of the executable file

  1. Use the Windows + E shortcut combination to launch File Explorer. 
  2. Copy and paste the following path in the address bar to navigate to the System32 directory in the C drive. C:\Windows\System32
  3. Scroll down and look for the uhssvc.exe file, right-click it, and select Properties from the context menu. 
  4. Switch to the Digital Signatures tab of the Properties window and check if Microsoft Corporation is the name of the signer. uhssvc.exe

You can verify the authenticity of the uhssvc.exe file by checking its digital signature, which will expose the malware file disguised as a system application. 

2. Run a Windows Defender scan

  1. Press the Windows + I shortcut to launch the Settings app.
  2. Switch to Privacy & security from the left navigation pane and Windows security from the right. uhssvc.exe
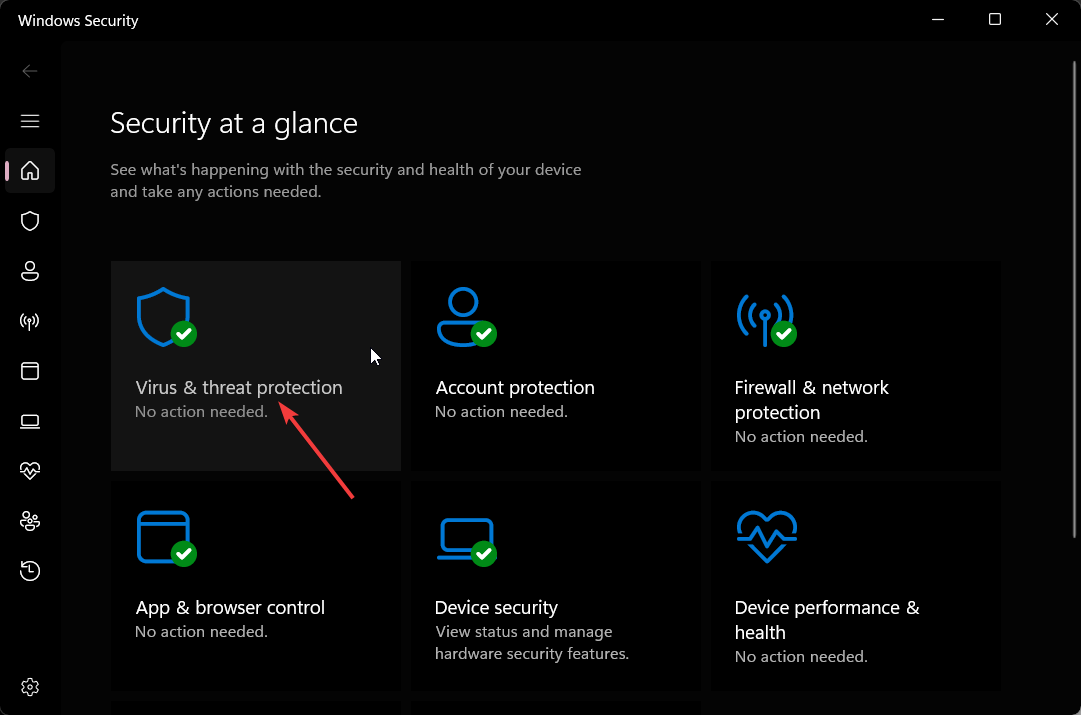
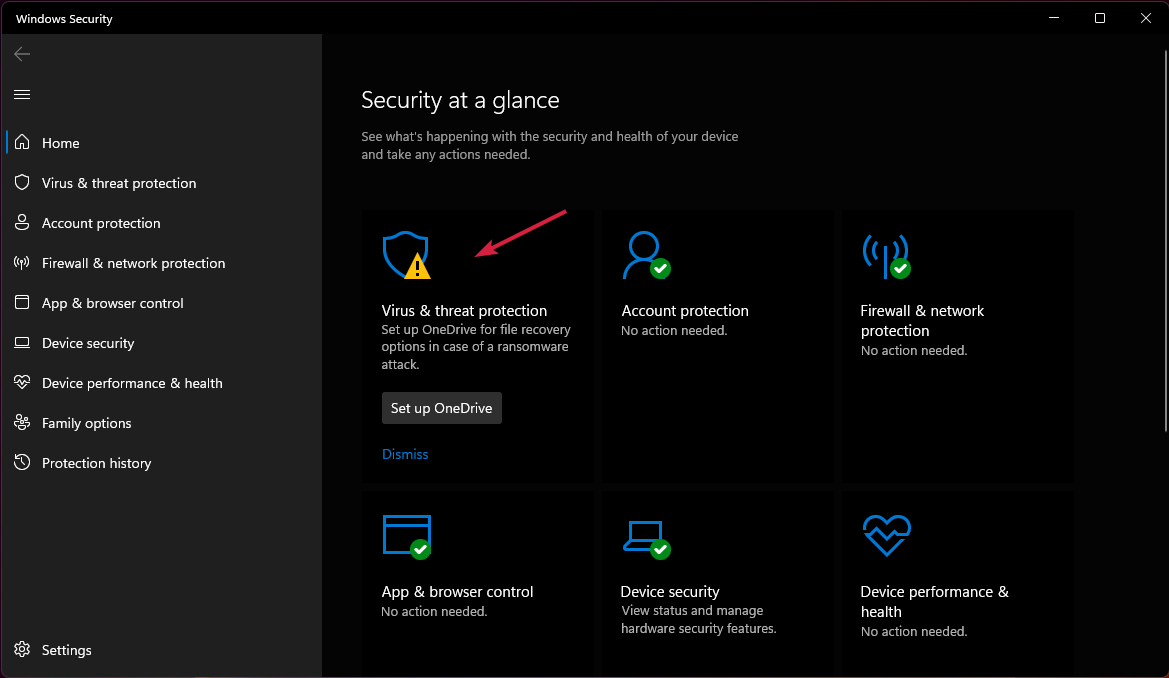
  3. Select Virus & threat protection under Protection areas. uhssvc.exe
  4. Next, click Scan options located under Current threats.
  5. Select Microsoft Defender Antivirus (offline scan) from the list and press the Scan now button.
  6. Wait for the scan to complete and reboot your system.

Of course, if you have a better third-party antivirus, you may scan your system using that instead and it will be even more efficient.

3. Run SFC and DISM scans

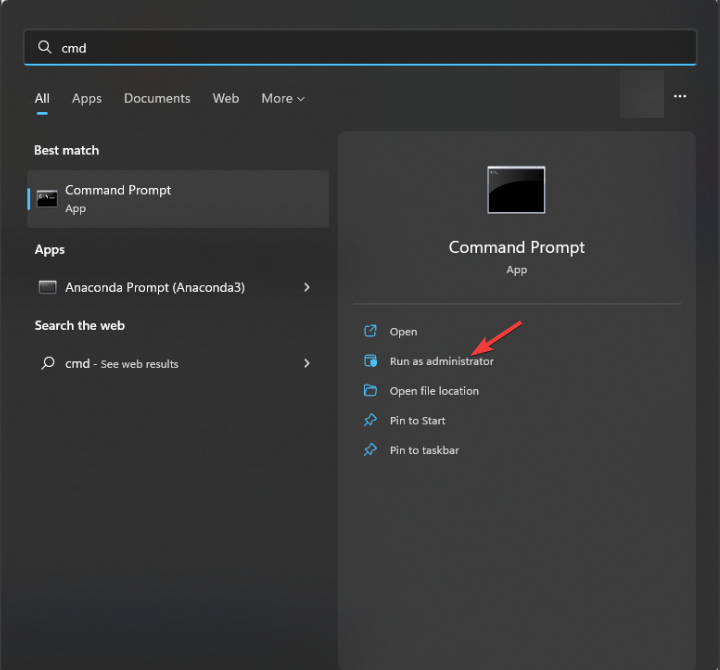
  1. Hit the Windows key, type cmd in the top search bar, and select Run as administrator from the search results. 
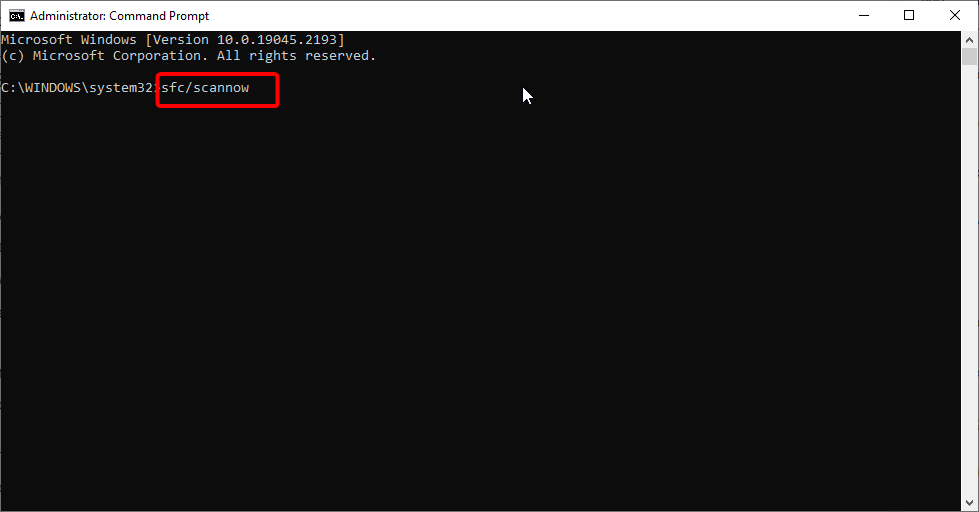
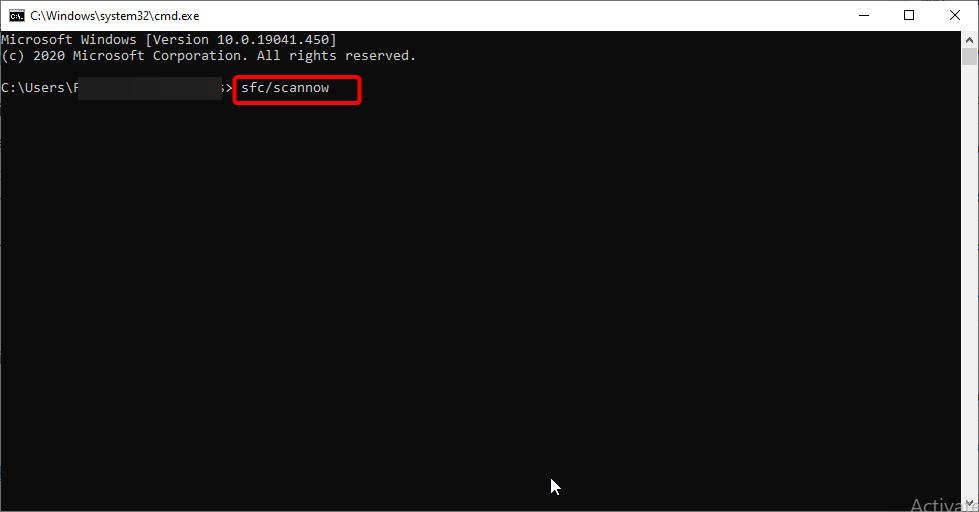
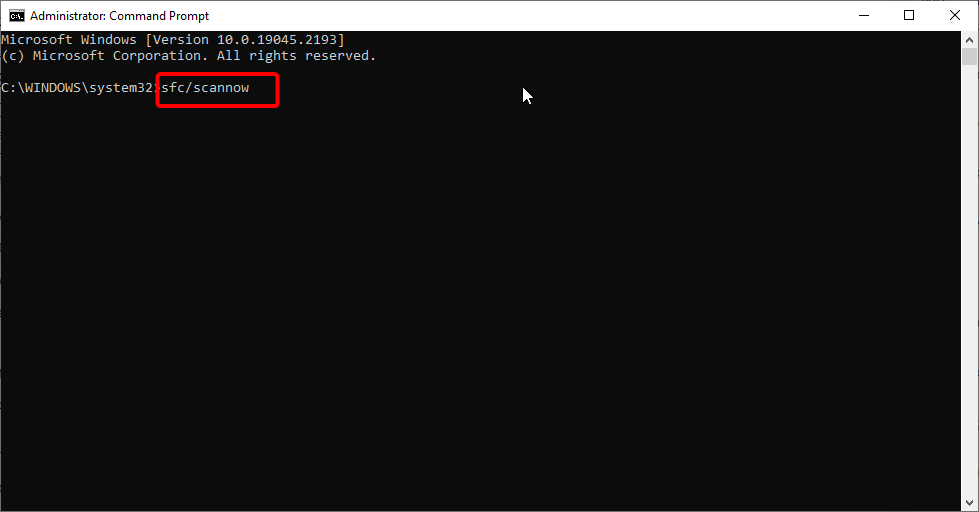
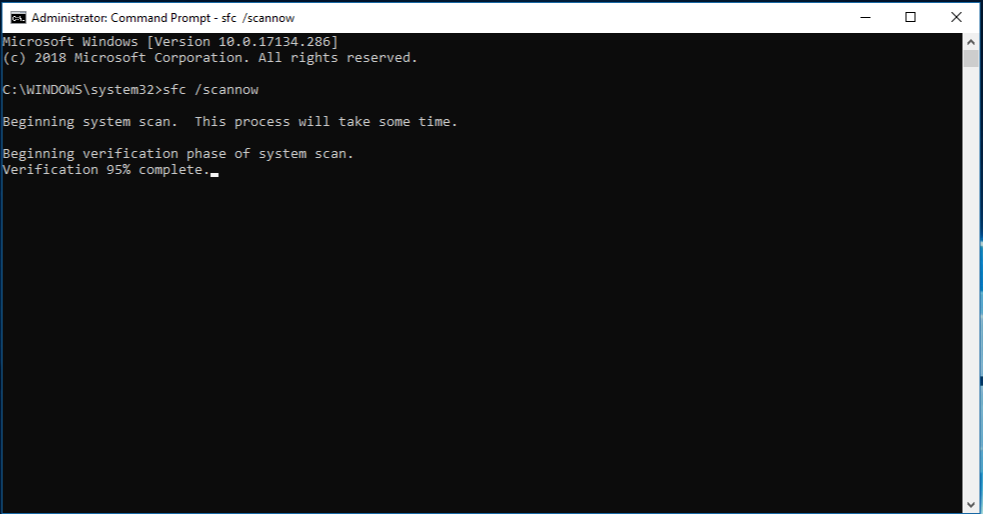
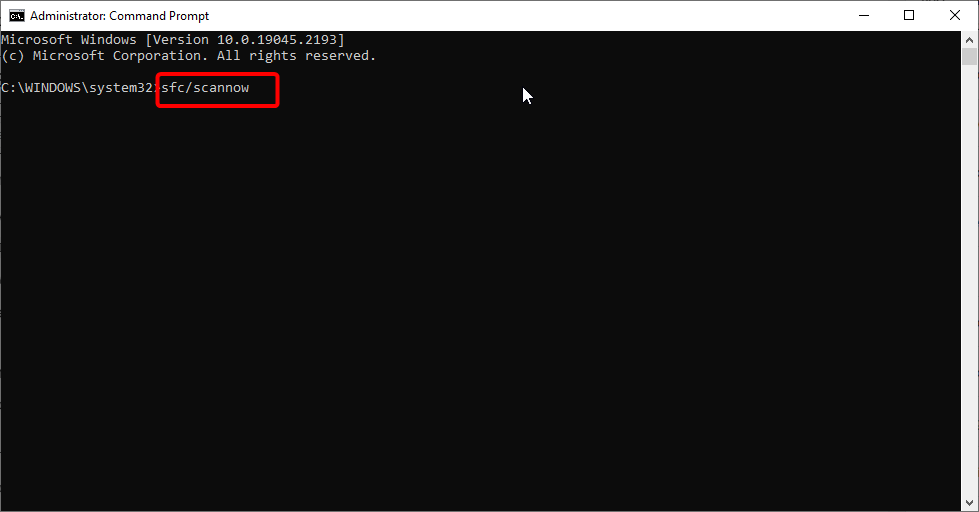
  2. Type or paste the following command and press the Enter key to execute it. sfc /scannow uhssvc.exe
  3. Next, type the following command to run the DISM tool and press Enter after it. DISM.exe /Online /Restorehealth uhssvc.exe

You can run the System File Checker (SFC) scan and Deployment Image Servicing and Management (DISM) command to repair or replace the corrupt system files such as uhssvc.exe. 

Otherwise, it’s most likely to solve this system file issue by using dedicated software for Windows system issues, including repairing broken system files on your PC.

4. Perform a system restore

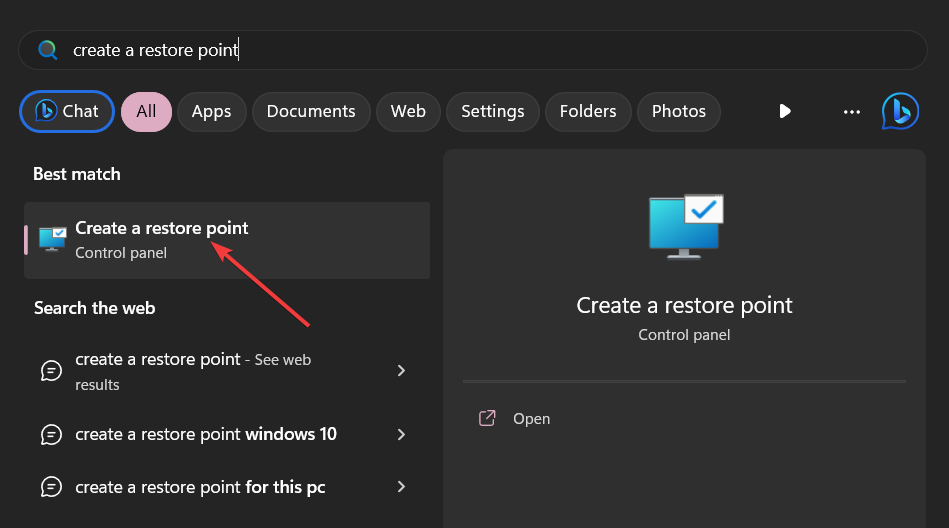
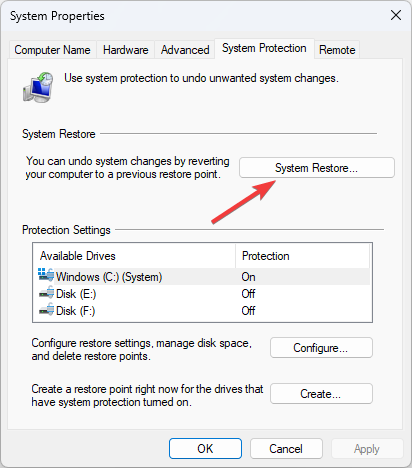
  1. Press the Windows key to launch the Start menu, type create a restore point in the search box, and select the relevant search result.
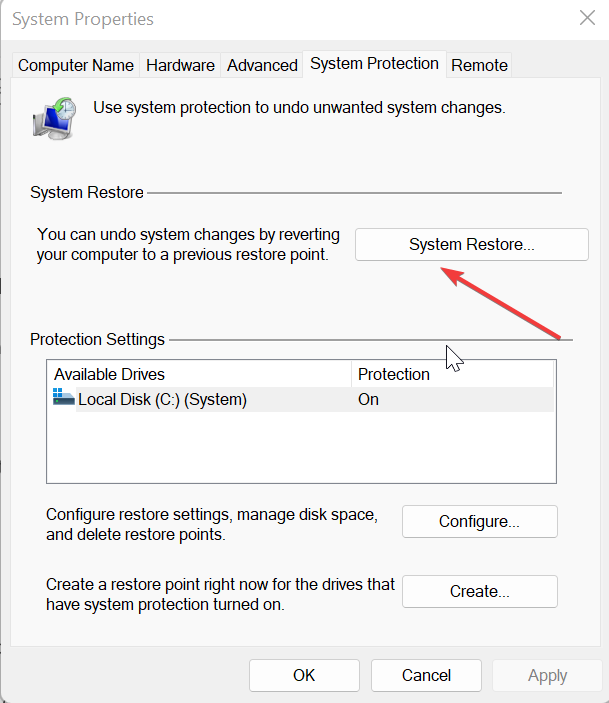
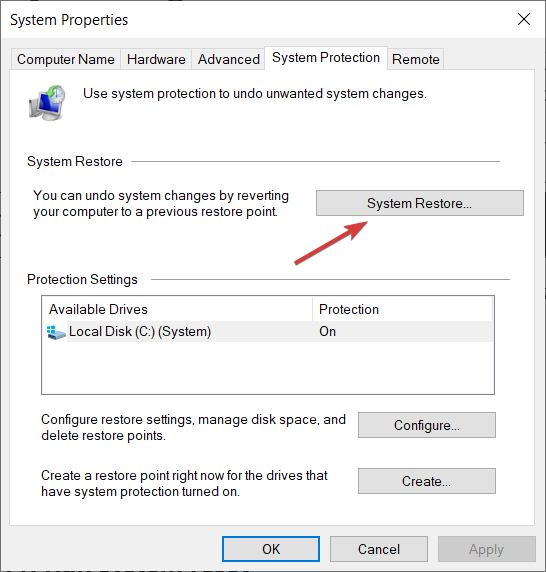
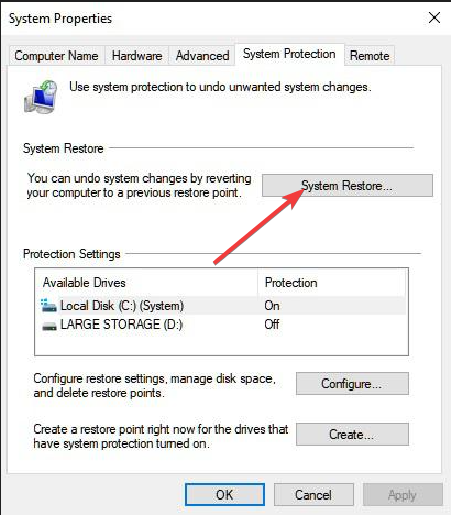
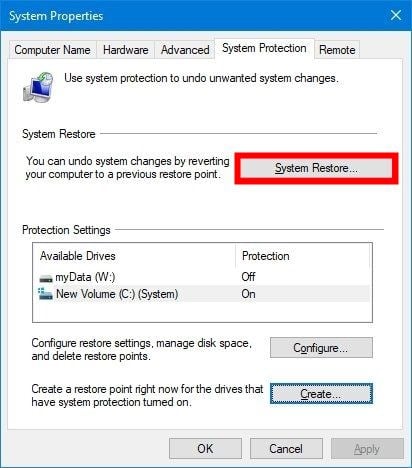
  2. In the System Properties window, click the System Restore button located under the System Protection tab.
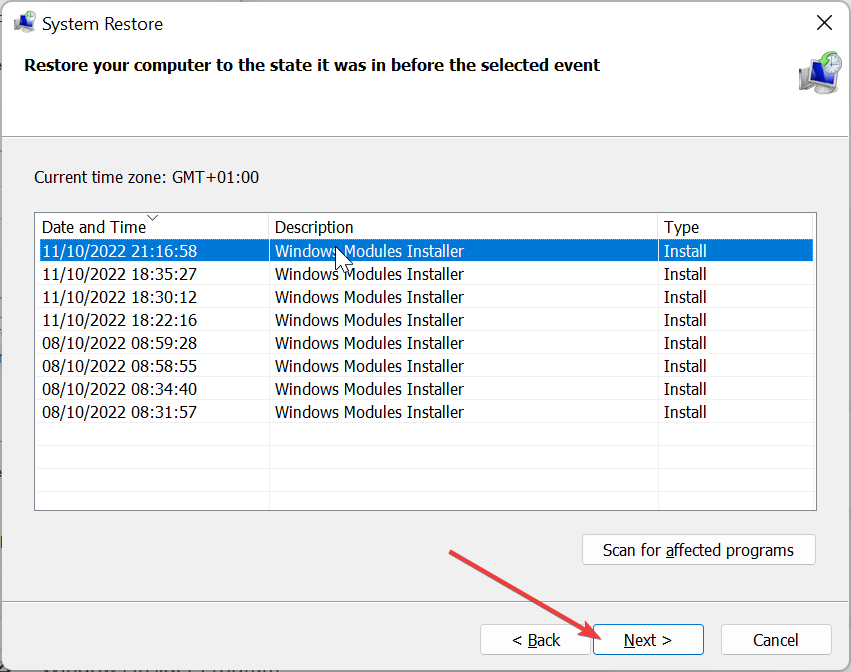
  3. Press the Next button to proceed further. 
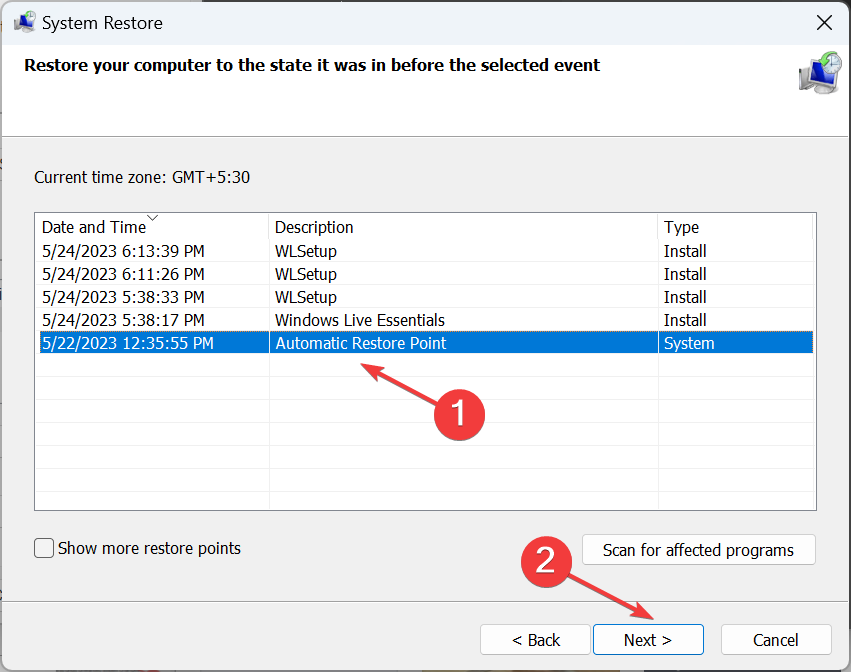
  4. Choose the suitable restore point when there were no issues and press the Next button.
  5. Click Finish on the Confirm your restore point window to initiate the system restoration process.

If you still run into uhssvc.exe-related errors, you may be able to fix them successfully by restoring your system to a previous point in time when the system was error-free. 

In case you still encounter uhssvc.exe-related security issues, performing a clean install of Windows is recommended as your last resort. 

That’s pretty much it! Hopefully, you now have a clear idea about the uhssvc.exe application and how to fix the errors related to it.

So, which of these tricks worked in your case? Do let us know in the comments section. 

Bugcheck 0x0000012B: How to Fix This BSoD

If you have encountered a Blue Screen of Death (BSoD) with a bugcheck code 0x0000012B, then this guide can help!

We will discuss practical solutions to fix this system error and overcome the blue screen error to restore stability to your Windows PC.

What causes the 0x0000012B error code?

  • Corrupted system files – If the critical Windows system files are corrupted, it can trigger this error. To fix it, try running an SFC scan to repair the files.
  • Malware infection – The virus present on your machine can corrupt or delete important files, leading to such errors. Run a deep malware using an antivirus tool.
  • Incompatible drivers – Outdated or incompatible drivers can lead to system errors, including the 0x0000012B BSoD. Try updating drivers to fix it.
  • Problematic Windows update – If you have installed a bad Windows update, you might get this error. To fix it, you need to uninstall the update.
  • Registry issues – The broken or missing registry entries could lead to various problems, including this one. Try running a registry cleaner tool to resolve this error.

How can I fix the 0x0000012B error code?

Before engaging in advanced troubleshooting steps, restart your PC, ensure your Windows computer is up to date, switch to safe mode to check what is causing the issue, ensure your BIOS firmware is updated, and remove all external peripherals.

Once you are through these checks, let us move to the methods to fix the issue.

1. Run SFC & DISM scans

  1. Press the Windows key, type cmd, and click Run as administrator.CMD elevated runsw.exe
  2. Type the following command to replace corrupted files with a cached copy and press Enter: sfc/scannowSFCSCANNOW CMD
  3. Wait for the process to complete, copy & paste the following command to restore Windows OS image files, and hit Enter: Dism /Online /Cleanup-Image /RestoreHealthRestore health
  4. The DISM uses Windows Update to provide the files needed to fix corruption; once done, reboot your computer.

In addition, you should be aware that SFC scans will help you to a certain extent and it may not solve it completely.

Happily, you’re able to fix complex Windows errors with tailored system repair software with real-time monitoring and reliable repairing technology.

2. Check the disk for errors

  1. Press the Windows key, type cmd, and click Run as administrator.CMD elevated runsw.exe
  2. Type the following command to scan your machine for errors and fix issues if found, and press Enter: chkdsk /rcmd_0x0000012b
  3. Wait for the process to complete and reboot your PC to save the changes.

3. Run a memory diagnostic tool

  1. Press the Windows key, type windows memory diagnostic, and click Open.Memory diagnostic tool
  2. Click Restart now and check for problems (recommended).memory-diag-tool 3
  3. The computer will restart, and the tool will scan for errors.memory-diag-tool 0x0000012b

Your PC will boot to the login screen once the test is complete. Once you log in, you could see the test results, or if you can’t, check the Event Viewer.

If there are no errors, move to the next method. However, if there are errors, mostly likely it points to a faulty RAM, ensure it is properly seated.

If this doesn’t fix the issue, you need to replace the RAM to resolve the errors.

4. Update or rollback the drivers

4.1 Update drivers

  1. Press Windows + I to open the Settings app.
  2. Go to Windows Update, and click Advanced options.Windows Update advanced options 0x0000012b
  3. Under Additional options, click Optional updates.Optional updates
  4. Check if there are any updates available. If yes, then click Download and Install.Download and Install

4.2 Rollback driver

  1. Press Windows + I to open the Settings app.
  2. Go to Windows Update, and click Update history.Windows Update Uninstall update 0x0000012b
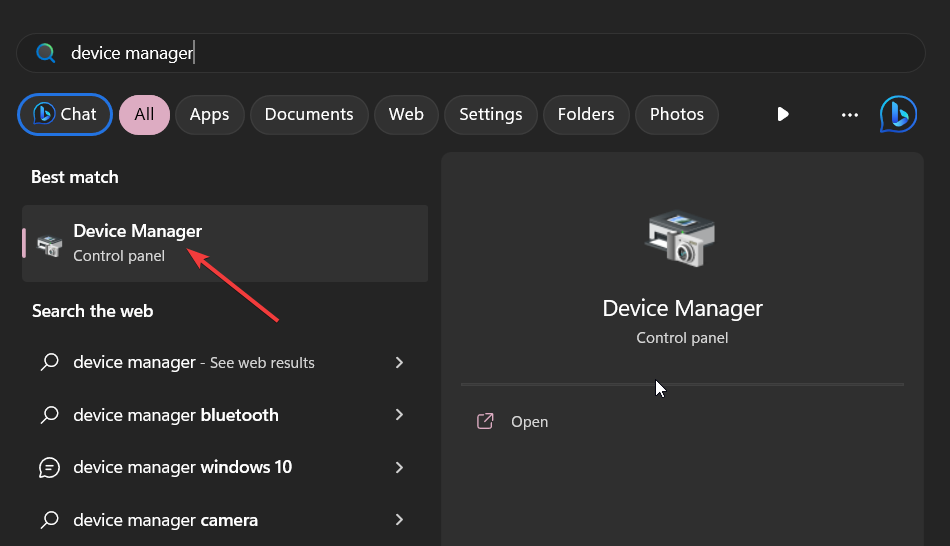
  3. Locate the latest driver update and note it down. Press the Windows key, type device manager, and click Open.Device Manager Startup
  4. Go to the Driver, and select Properties.
  5. Switch to the Driver tab, and click Roll Back Driver.Rollback driver
  6. Select any of the reasons to roll back and click Yes.Rollback driver 0x0000012b

There are also automatic ways of updating your drivers, such as tools like Fortect Driver Updater. It will scan your device for outdated or missing drivers and automatically find the latest versions.

5. Disable Fast startup

  1. Press the Windows key, type control panel, and click Open.Control Panel start menu 0x0000012b
  2. Select View by as Category and click Hardware and Sound.Hardware and Sound
  3. Click Power Options.Power options
  4. Now click Choose what the power button does.Change the power adapter
  5. Click Change settings that are currently unavailable.Change settings 0x0000012b
  6. Remove the checkmark next to Turn on fast startup (recommended).Fast startup
  7. Click Save changes.

The 0x0000012B BSoD error can be disruptive and indicate underlying issues within your Windows system. However, following the methods mentioned above can resolve this error and prevent further system instability.

If you want to know more about Blue Screen of Death errors, we suggest you check out this detailed article to procure more information. And if you’re looking for more solutions, the ones from this guide on fixing BSoD Only on One Game can help.

Please feel free to share any information, tips, or your experience with the subject in the comments section below.

What is davclnt.dll & Should You Delete it?

Many of our readers are confused about a Dynamic Link Library file, davclnt.dll showing up on their Task Manager, and whether they should delete this file or not.

In this guide, we will share with you all the details that will help you understand what is davclnt.dll and if you should keep it or not. Let us check out the solutions.

What is davclnt.dll?

The davclnt.dll is a system-related DLL file. Notably, it is a process associated with Web DAV Client DLL published by Microsoft Corporation.

Usually, the davclnt.dll file is found inside the C:\WINDOWS\System32\ folder. If the davclnt.dll is found outside of this location, then it is probably malware or a virus.

The davclnt.dll file is usually included with the software you install on your computer. So, it may not be available by default on your computer.

Here are some of the common davclnt.dll errors that you will come across.

  • Davclnt.dll is missing
  • Davclnt.dll not found
  • Cannot find davclnt.dll
  • This application failed to start because davclnt.dll was not found. Reinstalling the application may fix this problem

Let us now check out the steps that will help you understand whether or not you should delete the davclnt.dll file or not.

Should I delete the davclnt.dll file or not?

As mentioned, if the file isn’t found inside the C:\WINDOWS\System32\ folder or inside the program’s folder, then it is suspicious, and you should definitely get rid of it.

How can I fix davclnt.dll errors?

Before you go ahead and apply the solutions, make sure you install the latest Windows updates as this will fix most of the glitches present on your computer.

1. Use a dedicated DLL fixing tool

DLL files are required for the functioning of system processes and the programs that you install on them. In case, the files are missing or corrupt then you will come across multiple errors.

While DLL fixing can be a tiring task, you can take the help of a dedicated DLL fixing tool that will help resolve the problem automatically.

2. Fix the corrupt system files

  1. Press the Win key to open the Start menu.
  2. Type command prompt and open it as an administrator.
  3. Type the below command and press Enter: sfc /scannowsfc scan
  4. Let the process complete and fix missing or corrupt system files.
  5. Type the below commands and press Enter after each one:Dism /Online /Cleanup-Image /CheckHealthDism /Online /Cleanup-Image /ScanHealthDism /Online /Cleanup-Image /RestoreHealth
  6. Restart your PC.

Corrupt system files are often associated with various DLL errors including the davclnt.dll error. So, to resolve it, we would recommend you run the SFC Scan and DISM commands to resolve the issue.

3. Scan your PC for viruses

  1. To open the Start menu press the Win key.
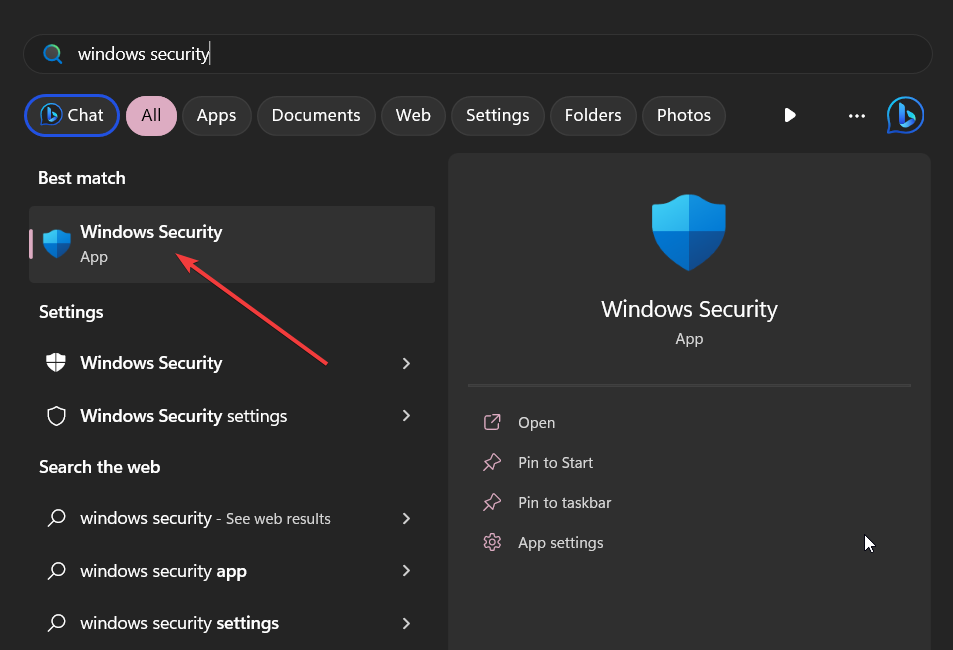
  2. Type Windows Security and open the appropriate result.
  3. Click on Virus & threat protection.
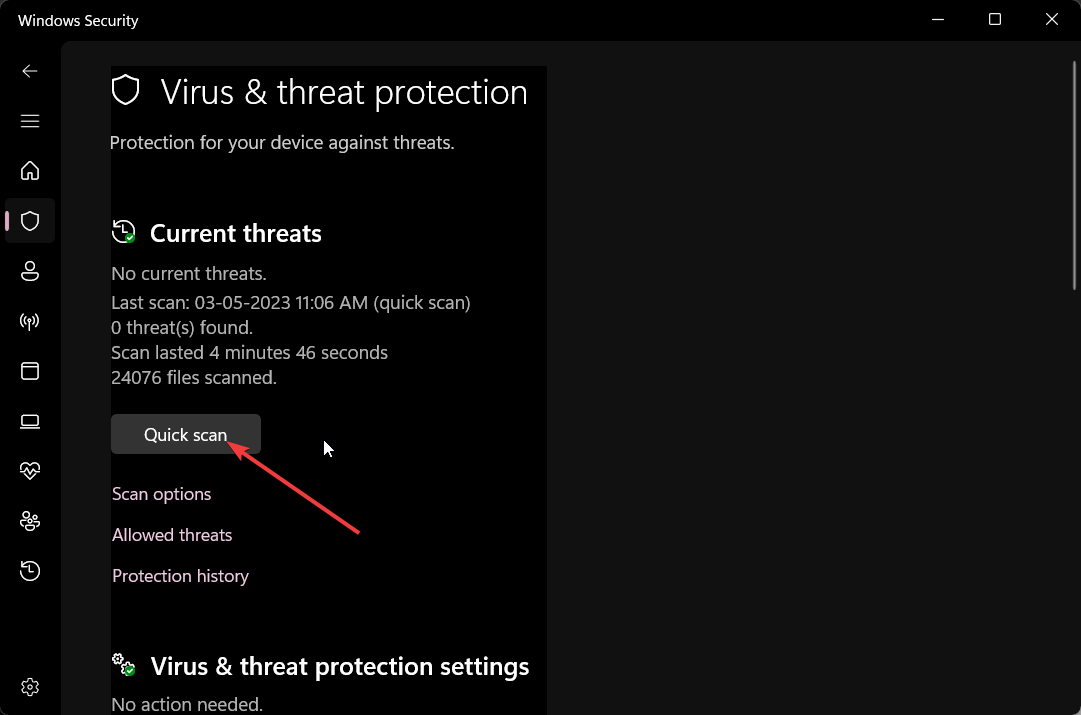
  4. Select Quick Scan.
  5. Let the process complete and apply the fixes.
  6. You can also select Scan options and choose Full scan for in-depth scanning, and after that, restart your PC.

If the file isn’t the usual location then you should run a malware scan on your computer and for that, you can use Windows Security.

However, often this isn’t as effective as a dedicated antivirus tool. In such a case, we would suggest you take a look at our guide that gives a list of antivirus tools that you should you have on your PC.

4. Perform System Restore

  1. Open the Start menu by pressing the Win key.
  2. Type Create a restore point and open the top result.
  3. Select the drive and click on System Restore.system restore
  4. Choose the restore point and click on Next.restore point Surface Pro blue screen
  5. Click Finish to begin the restore process.

If nothing works, then it is better to use the System Restore process and take your computer back to a state when everything was working normally.

However, this process will work only if you have a system restore point already created on your PC. For that, we have a guide that explains how to create a system restore point.

That is it from us in this guide. Let us know in the comments below, which one of the above solutions resolved your problem associated with the davclnt.dll error.

Omnicom Group to introduce a cutting-edge AI solution infused with Microsoft tech

Omnicom Group plans to launch its first Generative AI tool, Omni Assist, in partnership with Microsoft as a first-mover. This partnership has enabled Omnicom to become the first agency holding company to have access to the latest enterprise-level Open AI ChatGPT models, Wall Street Journal reported.

Omni Assist, a digital assistant, could provide valuable assistance to ad agency professionals throughout the advertising process, including gathering audience insights and creating media strategies. The virtual assistant, Omni Assist, offers valuable insights, notifications, and recommendations throughout the entire process of the Omni open operating system, from audience development to planning, activation, measurement, and optimization.

According to John Wren, Chief Executive Officer of Omnicom Group, the impact of AI on digital marketing transformation is expected to be comparable to what was achieved in 15 years but within a shorter period of 36 to 60 months.

Omnicom has positioned its recent move as a means of achieving intelligent outcomes in a shorter period while simultaneously enabling employees to engage in sophisticated data analysis. As per Nelson, this approach has allowed the company to introduce data science to individuals who don’t possess technical expertise, thereby bringing it to the masses. In anticipation of questions surrounding generative AI, Omnicom has established a steering committee to oversee the process.

Omni has leveraged AI technology and associated methodologies, like facial recognition, computer vision, and language modeling, to form the basis of its operational competence ever since its inception in 2018.

Last week, Alphabet issued a warning to its employees regarding the usage of AI chatbots, including its in-house program, Bard, which is concurrently being promoted across the globe. The tech giant has reminded its staff of the established protocol for protecting confidential information and advised its staff not to input sensitive data into AI chatbots.

Via WSJ

Need for Speed Unbound and six more games coming soon to Xbox Game Pass

The future has never looked brighter for Xbox Game Pass subscribers following last week’s Xbox Games Showcase. With the lion’s share of the 25+ games showcased coming to Game Pass, there’s quite a lot to look forward to from the service in 2023 and 2024.

But there’s plenty to get excited about in the short term, too. The following seven games are headed to Game Pass in the next few weeks between June 22 and July 5. Let’s check them out.

Need for Speed Unbound (Cloud, PC and Xbox Series X|S) EA Play – June 22

You may recall Xbox gamers were treated to a free trial of the game when it launched back in October 2022. Now the latest installment of the legendary arcade racing franchise is headed to Game Pass.

The Bookwalker (Console and PC) – June 22

The Bookwalker

This new narrative adventure game will be a day one Game Pass release. “You play as Etienne Quist, a writer-turned-thief with the ability to dive into books.” In the most literal sense.

Bramble: The Mountain King (Cloud, Console, and PC) – June 27

Bramble Screenshot

Bramble: The Mountain King is billed as “a grim adventure set in a world inspired by dark, Nordic fables.” It certainly has a distinct visual style.

F.I.S.T.: Forged In Shadow Torch (Cloud, PC, and Xbox Series X|S) – June 27

Fist Forgedin Shadow Torch Screenshot From Steam

Combat, adventure and more await this tough rabbit trying to make his way in a dieselpunk world. Stay fluffy and stay furious!

Story of Seasons: Friends of Mineral Town (Console and PC) – June 29

Story Of Seasons Screen Shot

Includes the Cow Costume DLC as a special gift!
(Also available separately for free download)

Your farming life begins in Mineral Town, a charming village surrounded by nature. You’ve returned after many years to restore your late grandfather’s farm to its former glory. Care for crops, livestock, and more as your very own story of seasons unfolds.

Arcade Paradise (Console and PC) – July 3

Arcade Paradise Screenshot

In this “90’s-fuelled retro arcade adventure…you decide to turn the family laundromat into the ultimate arcade. Play, profit, and purchase new arcade machines, with over 35 to choose from, to build your very own Arcade Paradise!”

Sword and Fairy: Together Forever (Console and PC) – July 5

Sword and Fairy: Together Forever

Enter a realm that blends ancient mythology with traditional Asian aesthetics in Sword and Fairy: Together Forever!

Three hot new DLCs now available!

As a bonus, three new DLCs are available as of today. See below.

  • Fallout 76: Once in a Blue Moon – Available today
  • Halo Infinite – Season 4: Infection – Available today
  • The Elder Scrolls Online: Necrom – Available today

And finally, as a reminder 6 games will be removed from Xbox Game Pass on June 30.

All in all the second half of June is looking pretty sweet for Xbox fans. What has you excited for Game Pass on this list? Let us know in the comments.

What is QtWebEngineProcess.exe & How to Fix Its Errors

If you have encountered issues related to the QtWebEngineProcess.exe process and wondering what it is, then this guide can help!

In this guide, we will explore what this file is, its purpose, and common error messages associated with it, along with effective solutions to fix these errors and ensure the smooth operation of Qt-based applications.

What is QtWebEngineProcess.exe?

QtWebEngineProcess.exe is a process associated with the Qt WebEngine framework used by applications built with the Qt development platform.

This executable is responsible for rendering web content within Qt-based applications, providing web browsing functionality, and supporting web-related features.

The Qt WebEngine framework uses the Blink rendering engine, developed by the Chromium project, to display web content.

This allows developers to integrate web functionality seamlessly into their applications using the Qt framework.

It runs in the background and communicates with the main application to provide the desired web functionality.

The separate process architecture helps ensure stability and security by isolating the web-related tasks from the main application.

Sometimes, you may encounter errors or issues related to this process, such as crashes or high resource usage due to outdated Qt libraries, conflicting applications, or corrupt installation files.

How can I fix errors related to QtWebEngineProcess.exe?

Before engaging in advanced troubleshooting steps, you should consider performing the following checks:

  • Try rebooting your computer.
  • Reinstall the affected app.
  • Ensure there are no updates pending on your PC.

Once done, move to the detailed methods to deal with the errors related to the process.

1. Run SFC & DISM scans

  1. Press the Windows key, type cmd, and click Run as administrator.CMD elevated runsw.exe
  2. Copy & paste the following command to replace corrupted files with a cached copy and press Enter: sfc/scannowSFCSCANNOW CMD
  3. Wait for the process to complete, type the following command to restore Windows OS image files, and hit Enter: Dism /Online /Cleanup-Image /RestoreHealthRestore health
  4. The DISM uses Windows Update to provide the files needed to fix corruption; once done, restart your computer.

If after performing this process the errors were not fixed, don’t lose any hope because there is a better alternative.

In case you don’t know, there are dedicated PC repair solutions tailored to diagnose your Windows entirely and solve corrupted files in minutes.

2. Reinstall the Microsoft C++ 2015-2022 Redistributable app

2.1 Uninstall the Microsoft Redistributable app

  1. Press Windows + I to open the Settings app.
  2. Go to Apps, and click Installed apps.Apps, installed apps  qtwebengineprocess.exe
  3. Locate Microsoft C++ 2015-2022 Redistributable, click three dots, and click Uninstall.Uninstall C++
  4. Click Uninstall to confirm the changes.Uninstall

2.2 Reinstall the Microsoft Redistributable app

  1. Go to Microsoft C++ 2015-2022 Redistributable official website and click Download.Download qtwebengineprocess.exe
  2. Next, select the version and click Next.Click Next
  3. Double-click on the file and agree to license terms, and click Install.Agreee and Install
  4. Follow the on-screen instructions to complete the process.

Once it is done, check if the issue persists.

3. Run a malware scan

  1. Press the Windows key, type windows security, and click Open.Windows Security open Windows key runsw.exe
  2. Go to Virus & threat protection and click Scan options.V& T Scan options
  3. Select Full scan and click Scan now.Full scan -

Now the security tool will scan your computer for malicious threats, if found, will list them. Select and delete them to resolve the issue.

4. Add QtWebEngineProcess.exe to DEP

  1. Press Windows + I to open Settings.
  2. Go to System, and click About.System About qtwebengineprocess.exe
  3. Click Advanced system settings.Advanced system settings qtwebengineprocess.exe
  4. Go to Advanced, and click Settings under Performance.Performance options Settings
  5. Switch to Data Execution Prevention.
  6. Place a checkmark next to Turn on DEP for all programs and services except those I select.Turn on DEP
  7. Click Add and locate QtWebEngineProcess.exe {usually found in C:\ProgramFiles(x86)} and click Open.
  8. Now click Apply and OK.
  9. Then click OK to confirm the choice.Click OK

So, these are methods to fix the errors related to QtWebEngineProcess.exe and restore stability.

If you are looking for lightweight browsers for PC using QTWeb Engine, we suggest you check out this guide.

Please feel free to give us any information, tips, and your experience with the subject in the comments section below.

Microsoft 365 service faces another outage – Western Europe users affected

Earlier this month, Microsoft faced a significant distributed denial of service (DDoS) attack, resulting in widespread disruptions across its Microsoft 365 services, including Outlook, Teams, and OneDrive. Now two weeks later, Microsoft 365 services have experienced another disruption. 

According to the official Microsoft 365 status Twitter account, the impact of the issue was limited to users in Western Europe. It appears that the root cause of the disruption stemmed from a data center located in Germany, which was not performing optimally.

In response, Microsoft took prompt action by implementing necessary mitigations to alleviate the strain on the affected data center. The problem was swiftly resolved within a few hours. Users could track the incident details under the reference ID MO597504 in the Microsoft 365 admin center.

The recent disruptions serve as a reminder of the ever-evolving nature of cyber threats and the importance of continuous efforts to enhance security measures.

Via: Neowin

Lusrmgr.msc: Enable Local User and Group Management

Microsoft offers a shell application Local Users and Groups Management (lusrmgr.msc) for managing the users on local and remote computers. However, this application is not accessible in the Home edition for Windows using the lusrmgr.msc command. 

If you are looking for ways to enable local user and group management to manage users and groups, this guide will explain the complete method of doing so. 

What is lusrmgr.exe? 

Local Users and Groups Management, just like Local Group Policy Editor, is an advanced feature and is only part of Windows Pro, Education, and Enterprise Edition of the operating system. 

Hence, if you are a Windows Home Edition user, you will find Local Users and Groups missing. Subsequently, you will need a third-party program known as lusrmgr.exe to manage local users and groups via a console similar to Local Users and Groups Management. 

What are the system requirements for lusrmgr.exe? 

The minimum system requirements to be able to install lusrmgr.exe are as follows: 

  • .NET Framework version 4.6 or above
  • Operating system Windows Vista/Windows Server 2008 or above 

How do I download lusrmgr.exe from GitHub? 

  1. Visit the GitHub lusrmgr.exe download page.
  2. Scroll down the Code tab and click the Download link in the Download section to download the latest version. 
  3. Once the download is completed, navigate to the download location of the lusrmgr.exe file in File Explorer and double-click to run the program.
  4. Click Yes on the User Action Control prompt to allow the application to make changes on the computer. 

When the Lusrmgr application launches successfully, you will see that it resembles the Local Users and Groups Management interface that is accessible via the lusrmgr.msc command. 

How do I manage local users on Windows Home edition using lusrmgr.exe? 

1. Create a new user account using Lusrmgr.exe

  1. Press the Windows key, type lusrmgr in the search bar, and click the Run as administrator option in the search results. lusrmgr.msc
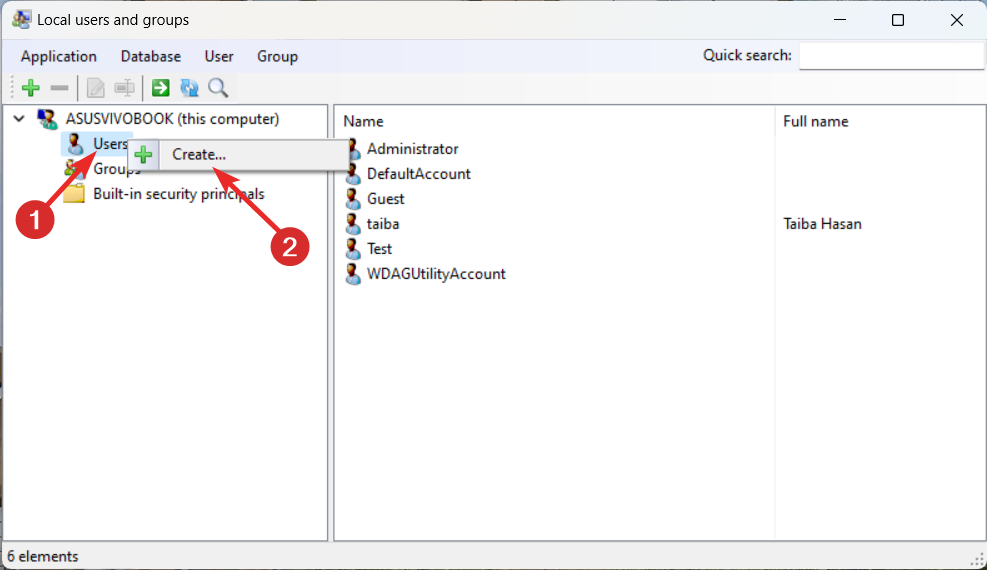
  2. Right-click the Users option in the left sidebar and select Create from the context menu. Lusrmgr.exe
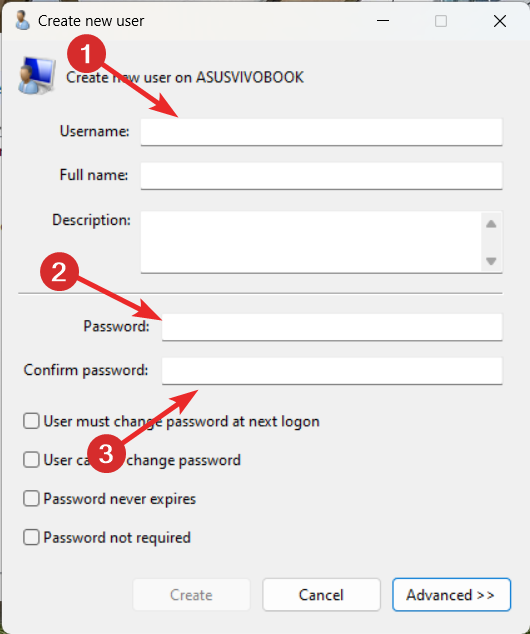
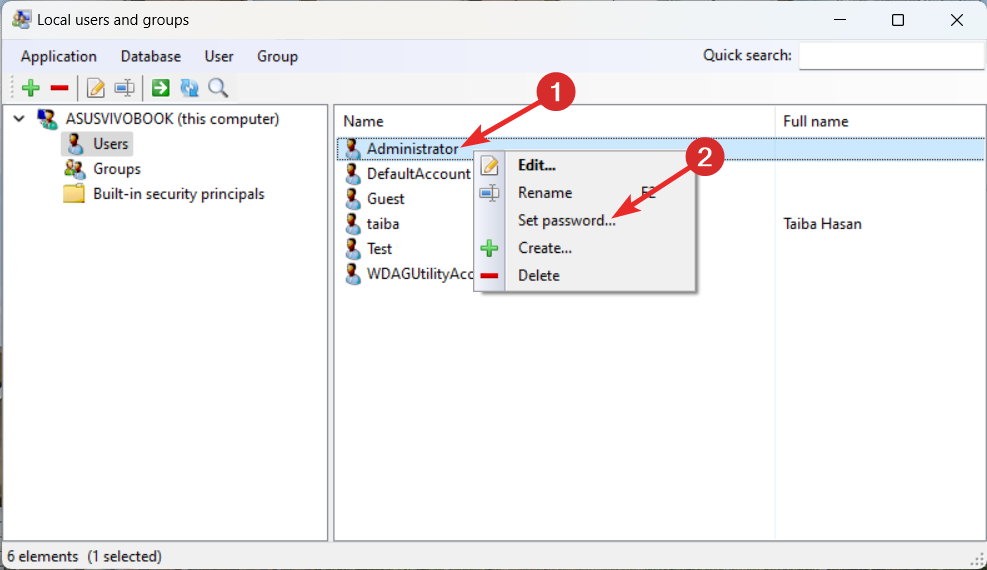
  3. Assign Username, set the Password, and Confirm the password in the relevant fields. lusrmgr.msc
  4. Click the Advanced button to access the advanced settings and configure the local path, remote path, and account expiration date, if necessary. 
  5. Press the Create button after assigning the necessary fields to create a new user account. 

Creating a new user account is a straightforward process using the Lusrmgr.exe tool a replacement for lusrmgr.msc on Windows Home Edition. It’s worth noting you can configure the logon times of the user and account expiration details using this third-party workaround.

2. Manage user accounts using lusrmgr.exe 

1. Change the user password 

  1. Launch the lusrmgr.exe tool on Windows PC and select the User option from the left navigation bar.
  2. Right-click the user name for which you want to change the password, and select Set Password. 
  3. In the popup window that opens, enter the new password twice in the New password and Confirm password fields. 
  4. Press the OK button to save the changes.  

2. Delete the user account

  1. Launch Lusrmgr on your Windows PC and switch to the User from the left navigation bar. 
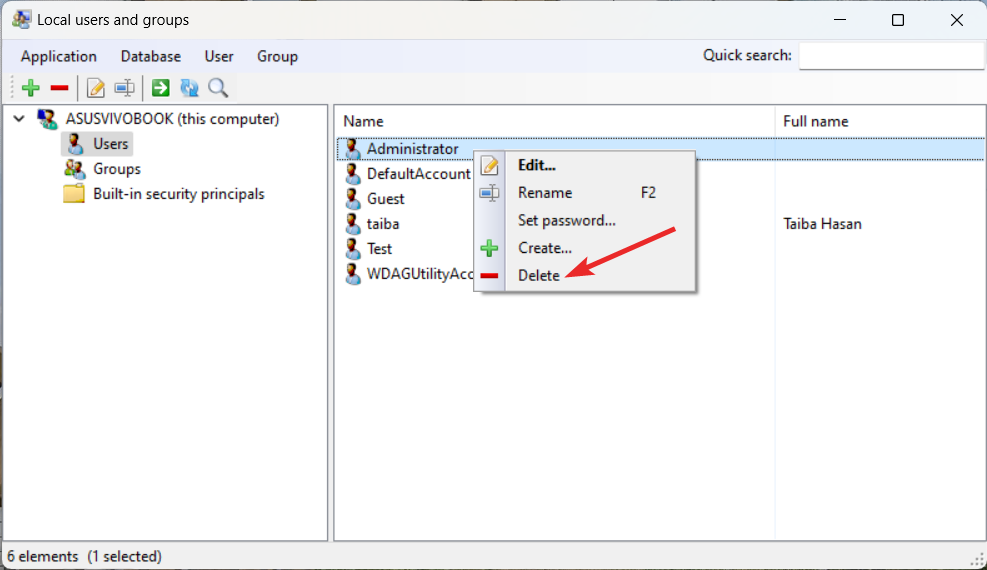
  2. Right-click the user account you want to delete, and select Delete from the context menu. 
  3. Press the Delete button on the confirmation popup to permanently delete the user account. 

Apart from changing the password and deleting the user account, you can also change the user settings like user name and group membership, prevent the user from changing the password, and even set the password expiration date. 

How do I manage groups on Windows Home edition? 

1. Create a new group using lusrmgr

  1. Press the Windows key, type lusrmgr in the search bar, and click Run as administrator from the results section. 
  2. Switch to the Groups section from the left navigation pane, right-click it, and select the Create option. 
  3. Assign a relevant Group name in the new window that opens and click the + icon to add a user to the newly created group. 
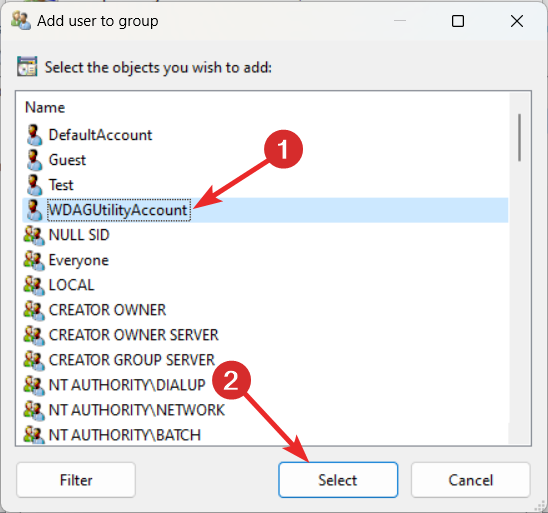
  4. Choose the user you need to add to the group and press the Select button. 
  5. Finally, press the Create group button to create a new user group on your PC. 

2. Add or remove a user from the group

  1. Launch the Lusrmgr tool on Windows PC and select the Groups option from the left navigation pane.
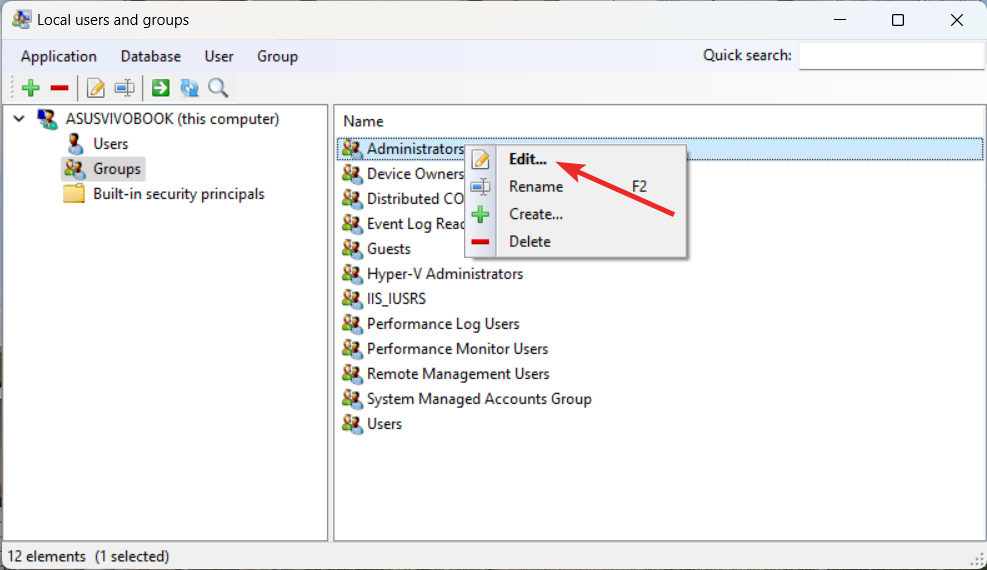
  2. In the right section of the window, right-click the group name from which you want to add or remove a user account and select the Edit option. 
  3. Press the + icon located at the bottom to add a user. 
  4. Choose the user you wish to add from the new popup that opens and press the Select button. Lusrmgr.msc
  5. You can press the Filter button and then choose one out of the two options – Show users or Show built-in security principals based on your preference. 
  6. To delete a user from a specific group, simply select that user account and press the – icon. 

That’s pretty much it! Hopefully, you now have a pretty good idea about how you can enable and use the Local User and Group Management using the lusrmgr tool on a Windows Home edition PC.

Refer to this guide in case you are curious to enable and use the group policy editor on Windows Home edition.

In case you have any queries or feedback for us, feel free to reach out in the comments section. 

Phil Spencer bullish on the future of Xbox following XGS showcase

What a difference a month makes. It was only a few weeks ago that Microsoft Gaming CEO Phil Spencer went on an apology tour of sorts following the disastrous launch of Redfall—a game that supposed to be one of the biggest first-party Xbox releases of recent years.

That news, of course, came on the heels of the CMA’s decision to block the Activision Blizzard deal in the U.K. The move presents a serious obstacle to Microsoft’s endeavor to merge with game publishing giant. Needless to say, it was a rough month of May for Xbox fans as far as the gaming news went.

But now the Xbox Games Showcase 2023 has come and gone. And to the delight of Xbox fans and gamers in general (or at least most of them, anyways) the showcase was the huge hit that Xbox so badly needed. And now that the showcase is in the rearview, Spencer’s renewed optimism regarding the Xbox platform is obvious, Especially when compared to his rather subdued appearance on the Kinda Funny Xcast podcast.

This could be seen when Spencer recently did an interview with The Guardian in which he spoke about the impressive game lineup unveiled at the showcase.

We knew the flow coming out of both Bethesda and Xbox Game Studios was gonna hit. I’ll be honest, I always feel like we have a lot to live up to. The expectation of our customers is high. We know we didn’t hit that bar in 2022 and we wanted to make sure we had a great show.”

Sarah Bond, Phil Spencer and Matt Booty at the Xbox 2023 showcase.

And boy, did they. It’s been the general consensus that this year’s showcase was exceptionally good—one of the best Xbox has put on so far, according to many. What was particularly exciting was the sheer number of the 25 or so games showcased that were coming to Xbox Game Pass. Spencer also touched on this in the interview.

The number of games that are in Game Pass relative to unique videos on Netflix is vastly, vastly different. I think we’re somewhere between 300 and 400 games. It’s still a lot, but we’re not trying to inundate you. When I get negative feedback on Game Pass, it’s when quality isn’t what people expected. But then there’s a marginal cost for them in trying something they would’ve never tried before. If there’s any signal, it’s how are our players feeling – how’s the subscriber number going, and are creators coming back?

Our business right now, from a revenue standpoint, is about twice the size as it was in the Xbox 360 generation. And we’re millions of consoles ahead of where we would’ve been compared to 360. We’ve never had more Xbox players than we have right now.”

The current generation of Xbox.

That last bit of info is especially eye-opening, and is in stark contrast with the commonly held perception that the brand is in trouble. Spencer has also stated elsewhere since the showcase that Xbox will generate $1 billion this year in PC-related sales alone.

No one can say for certain where Xbox will ultimately be by the end of the current hardware cycle. But one thing is for sure: the next few years will be interesting ones for Xbox fans.

What is RunSW.exe & How to Fix Its High Memory Usage

RunSW.exe is an executable file that is associated with software or drivers provided by Realtek for managing and controlling wireless network connections.

Sometimes the file may cause issues like high memory usage, which can cause system slowdowns or performance problems.

In this guide, we will explore what RunSW.exe is, its purpose, and provide effective solutions to fix high memory usage related to it.

What is RunSW.exe?

RunSW.exe is a software component of Realtek Wireless LAN Utility. Realtek wireless network adapters are commonly used in laptops, desktop computers, and other devices to enable wireless connectivity.

The RunSW.exe file is a component of the software package or driver that accompanies the Realtek wireless adapter.

It handles tasks such as scanning for available wireless networks, establishing connections, managing network settings, and monitoring the wireless connection status.

However, the behavior and specific functionalities of RunSW.exe can vary depending on the version of the Realtek software or driver being used, as well as the model of the wireless adapter itself.

The file is usually available in the C:\Windows folder on your computer. However, if found somewhere else could be malware or malicious programs disguising themselves with similar filenames.

If you suspect the file is malicious, you can run a deep scan using reliable antivirus software and delete it when flagged out.

How can I fix the high memory usage due to runsw.exe?

Before engaging in advanced troubleshooting steps, you should consider performing the following checks:

Once done, follow the methods mentioned below to reduce memory usage.

1. Run SFC & DISM scans

  1. Press the Windows key, type cmd, and click Run as administrator.CMD elevated runsw.exe
  2. Type the following command to replace corrupted files with a cached copy and press Enter: sfc/scannow SFCSCANNOW CMD
  3. Wait for the process to complete, copy & paste the following command to restore Windows OS image files, and hit Enter: Dism /Online /Cleanup -Image /RestoreHealthRestore health
  4. The DISM uses Windows Update to provide the files needed to fix corruption; once done, reboot your computer.

This method will detect potential Windows troubles on your PC, but it doesn’t guarantee the fix.

On the other hand, you have the option to employ a dedicated repair solution to diagnose your Windows PC and solve them completely.

2. Run a malware scan

  1. Press the Windows key, type windows security, and click Open.Windows Security open Windows key runsw.exe
  2. Go to Virus & threat protection and click Scan options.V& T Scan options
  3. Place a checkmark next to Full scan and click Scan now.Full scan -

Now the antivirus software will scan your computer for malicious files, if found, will list them. Delete them to resolve the problem.

3. Run the Disk Cleanup tool

  1. Press Windows + R to open the Run box.Cleanmgr Run command
  2. Type cleanmgr and click OK to open the Disk Cleanup tool.
  3. On the Disk Cleanup: Drive Selection window, select C and click OK.DISK C Runsw.exe
  4. Now click Clean up system files.Cleanmgr 3 Runsw.exe
  5. Again, on the Disk Cleanup: Drive Selection window, select C and click OK.
  6. Select all the items under Files to delete field and click OK.Cleanmgr 4
  7. Click Delete Files to confirm the action.Delete Files

This will remove all the unwanted junk and temp files to recover the space on your device.

4. Update the network driver

  1. Press Windows + R to open the Run window.Device Manager Run command Runsw.exe
  2. Type devmgmt.msc and click OK to open Device Manager.
  3. Click Network adapters and expand it.
  4. Go to Wi-Fi driver, right-click it to select Update driver.Update driver Network Adapter
  5. Click Search automatically for drivers.Update driver 2
  6. Follow the onscreen instructions to complete the process.

5. Adjust Power Management settings

  1. Press Windows + R to open the Run window.Device Manager Run command Runsw.exe
  2. Type devmgmt.msc and click OK to open Device Manager.
  3. Click Network adapters and expand it.
  4. Go to Wi-Fi driver, and right-click it to select Properties.DEvice Network Adapter Properties Runsw.exe
  5. Switch to the Power Management tab, and place a checkmark next to Allow the computer to turn off this device to save power.Allow the computer to turn off this device to save power.
  6. Click OK to confirm the action.

By understanding the nature of RunSW.exe and implementing the recommended fixes, you can optimize your computer’s performance and resolve the memory-related problems associated with this executable file.

If you are facing issues like Wireless drivers are missing on PC, we recommend you check out this informative guide to find the tested solutions.

Please feel free to give us any information, tips, and your experience with the subject in the comments section below.

Ghostwire Tokyo reaches 5 million players just two months after Xbox release

Bethesda Softworks’ 2022 first-person action adventure game Ghostwire Tokyo has now been played by more than 5 million gamers. This comes just two months following the game’s release on Xbox Series consoles after a year of PlayStation 5 exclusivity. The announcement was made via the game’s official Twitter account, with a post thanking all those who have played the game.

Interestingly, those 5 million reportedly don’t include those who played the game on Xbox Game Pass and PlayStation Plus Extra. The Series X|S launch included the Spider’s Thread update which added new areas, enemies, mission, challenges and more to the game. It was available day one on Xbox Game Pass.

Ghostwire Tokyo was developed by Tango Gameworks, the same studio that brought us the surprise hit Hi-Fi Rush earlier this year. The game tasks players with unraveling the mystery behind a string of disappearances in “a beautifully haunted Tokyo.”

Ghostwire Tokyo Screen Shot 1

Face the unknown, uncover the truth and save the city

Tokyo is overrun by deadly supernatural forces as a dangerous occultist causes the city’s population to vanish in an instant. Join forces with a powerful spectral entity on their quest for vengeance and master a powerful arsenal of abilities to unravel the dark truth behind the disappearance as you FACE THE UNKNOWN in Ghostwire: Tokyo.

Ghostwire: Tokyo
Ghostwire: Tokyo
Developer:
Bethesda Softworks
Price:
Free

Windows Error 127: How to Fix it in 4 Steps

Many of our readers have reported coming across Windows error 127. This error happens when Windows is running and appears randomly.

In this guide, we will share with you the reasons that cause this problem along with some solutions that will help resolve this issue. Let us get right into it.

What causes Windows error 127?

After some research, we found out some of the most common reasons that could trigger Windows error 127 on your computer:

  • Programs are conflicting – Chances are two programs are conflicting with each other and causing the Windows to randomly crash.
  • Your Windows is not updated – You might have not installed the latest update and the bug present in the previous version is causing the problem.
  • Corrupt system files – Chances are some important system files are missing from your computer which is why you are getting the Windows error 127.
  • Your PC is infected with a virus – Your PC might be infected with a sticky virus that is causing Windows error 127.
  • Outdated graphics driver – Some users have reported this issue popped up because they were running an old version of the graphics driver.

Let us now go through the solutions that will help you resolve Windows error 127.

How can I resolve Windows error 127?

Before jumping ahead with the advanced solutions, we would suggest you apply the below solutions and check if this help fixes the Windows Runtime error 127.

  • Uninstall the conflicting programs and install them from their official website again and check if this help resolve the issue or not.
  • Make sure that you have installed the latest Windows update on your PC and that there isn’t any update pending to be installed.
  • Scan your PC for viruses using Microsoft Windows Security or any third-party antivirus tool. We have a guide that lists some of the best antivirus tools to protect your PC.

1. Reinstall Runtime Libraries

  1. Press the Win key to open the Start menu.
  2. Open Control Panel.
  3. Select Programs and Features.
  4. Locate Microsoft Runtime Libraries and hit the Uninstall button at the top.
  5. Visit the official website and download the latest redistributable package.

Multiple users have resolved the Windows Runtime error 127 by simply reinstalling the Microsoft redistributable package from the official website. Try this solution and check if this fixes the issue or not.

2. Run SFC and DISM scans

  1. Press the Win key to open the Start menu.
  2. Type Command Prompt and open it as an administrator.
  3. Type the below command and press Enter:sfc /scannowsfc scan
  4. The command will fix the corrupt system files.
  5. Type the below commands and press Enter after each one:Dism /Online /Cleanup-Image /CheckHealthDism /Online /Cleanup-Image /ScanHealthDism /Online /Cleanup-Image /RestoreHealth
  6. Reboot your PC.

Running the SFC and DISM commands will help you fix the corrupt or missing system files that are often associated with the reason for Windows error 127.

If SFC Scan is not working on your PC, then you can apply the solutions mentioned in our guide to resolve the problem.

3. Update the graphics driver

  1. Press the Win key to open the Start menu.
  2. Type Device Manager and open it.
  3. Expand the Display adapters section.
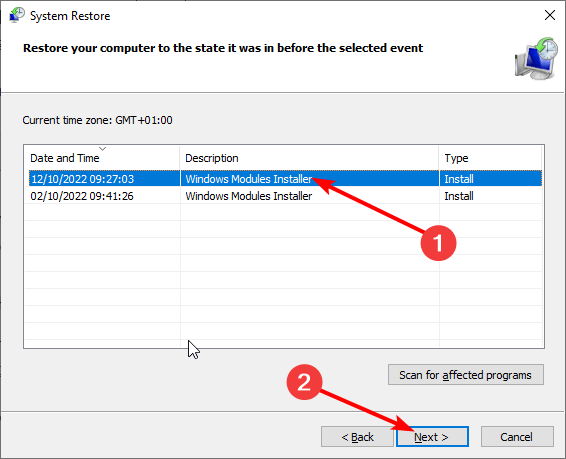
  4. Double-click on your graphics driver to open it.
  5. Switch to the Driver tab.
  6. Select the Update driver option.
  7. Click on Search automatically for drivers option.
  8. Install the update and restart your PC.

Several readers confirmed that updating the graphics driver on their computer helped them get rid of Windows error 127. You should also check out the solution and see if this helps or not.

Our guide explains how you can update graphics drivers on your Windows 10 PC. For Windows 11 users, we have a similar guide for them as well.

However, you can get it done much faster and with effective results using a tailored solution for updating, installing, or repairing drivers on Windows PCs.

Outbyte Driver Updater

Solve any kind of driver issues to restore different Windows issues and prevent stress.
Free trial Visit website

4. Run Disk Cleanup

  1. Press the Win key to open the Start menu.
  2. Type Disk Cleanup and open the appropriate result.
  3. Select the drive from the drop-down.
  4. Hit the Clean up system files option.
  5. Select the drive again.
  6. Select all the options that you wish to delete and hit OK.

That is it from us in this guide. You should check out our guide to resolve the Runtime error 62: Input Past End of File. Also, we have a guide that explains a list of solutions to resolve the Runtime error 3709.

Let us know in the comments below, which one of the above solutions resolved the Windows error 127 for you.

Amazon gift cards from Microsoft Rewards: do they work?

It seems that buying anything using Amazon gift cards from Microsoft Rewards can get your account banned. It happened to this Reddit user who was trying to buy a Best Buy Gift card using Amazon gift cards.

Amazon then sent an e-mail to the user, stating that their account is closed, but there are ways to get it back. As frustrating as this sounds, no one saw it coming, though. Officially, you can buy gift cards on Amazon using Microsoft Rewards points.

However, in situations like these, you need to ask: do Amazon gift cards really work? It is a tricky question considering only last week Microsoft Cashback was having problems. So maybe Microsoft Rewards is going through some problems as well.

Do Amazon gift cards from Microsoft Rewards work?

Well, according to Reddit users, they do work. In the thread we mentioned earlier, there are countless examples of users who managed to spend their points on Amazon gift cards. Some of them bought Amazon gift cards, right after the original Reddit made their post, and it worked.amazon gift card microsoft rewards

Here’s what the users say

I purchased over $200 dollars worth of Xbox gift cards on Amazon this year and had no issues. My most recent Xbox gift card purchase was just a week ago and it went through just fine. And yes I used my Amazon gift card balance.

After reading OP, I just did the same thing last night for a $100 Xbox GC, and so far, no ban. I will continually start draining down my Amazon GC balance to the Xbox GC and redeem them as soon as I earn them just in case it becomes a problem in the future. It’s better to lose $10 than $200.

Update: I went ahead and bought a 10 dollar Xbox gift card code with my Amazon gift card balance and It went through and I got the code instantly and redeemed it no problem. Might just be retail cards that aren’t able to be paid with Amazon gift cards just Xbox/PSN Since they’re sold by Amazon LLC.

You can use the points from Microsoft Rewards to buy Amazon gift cards, Xbox goodies, and many other things. However, some users agree that if you spend too much too fast, the system might deem it suspicious. And you end up automatically flagged.

People been saying that if you reload using too many high value gift card that also could have trigger the flag. Honestly, it’s weird that you can use the balance to pay for things on Amazon, but you have to be careful about it.

And you should know that it’s against Amazon’s terms of service to buy other gift cards with your Amazon gift cards.

Ultimately, the user got their account back, but their Best Buy gift card order was canceled.

Have you experienced something similar? Let us know in the comments section below.

How to train Microsoft Bing to write just like you

We already know that Bing is one powerful AI tool. It can easily offer you input on any images that you upload to it, making it very easy to get information about technical matters. You can also easily add to other browsers if you don’t use Edge.

It’s very useful when you search the Internet and you need additional info. Bing can summarise details for you. And if you are in a creative mood, you can even ask it to write a lot of things for you. Think about short stories based on Windows 11.

Believe it or not, Bing will actually write a short story on this subject if you want to. And sometimes it can get pretty creative as well.train bing to write like you

And, apparently, Bing can also mimic your style of writing. So you can make Bing write just like you. You have to train it, though. According to this Reddit user, the process is fairly easy. It only requires a few steps, and you can have Bing writing for you in your style in a matter of seconds.

Here’s how to train Bing to write like you

According to the Reddit thread, there are 5 steps to do this.

  1. You start by providing the first example. This first example of your writing helps Bing understand your style. Here’s a prompt, as an example.train bing to write like you
  2. When Bing is ready, it will prompt out START. This is the time when you write your sample texts. Copy and paste them into the chatbox.
  3. After processing your sample text, Bing will type in NEXT. This is your cue to continue and give it all the sample texts that you have until you feel that the training is done.train bing to write like you
  4. When you’ve provided all of your sample texts, simply type in DONE. This will let Bing know that the training is complete.
  5. You can test Bing’s creativity, by asking it for an example written in your style.train bing to write like you

According to the Reddit user, you can easily train Bing to write on any subject with your style, if you follow these steps.

Since it’s an AI tool, you can try this method on ChatGPT as well, and see how that tool can get creative. Simply put, you can have texts for your social media posts in seconds. You might have to twitch some words here and there, but overall it looks very promising.

What do you think about it? Will you try it? Let us know in the comments section below.

What is Vrol.exe & Should You Remove it?

The Windows 11 OS comprises many processes, functions, and files. Users may even add to its native functionality by installing new Windows 11 applications. However, this may lead to introducing new files, and Vrol.exe is one many readers have asked about.

In this guide, we explore the executable and give you all the relevant data to help you know if it is safe or should be kept on your computer.

What is Vrol.exe?

The Vrol.exe process is a part of the Chaos License Server program. This system manages and distributes licenses for Chaos Group products like V-Ray and Chaos Cosmos.

It is a 32-bit process that starts automatically when you boot your computer and runs in the background. We have written an extensive guide if you need to learn to manage startup applications on the OS.

Vrol.exe uses ports 5001 and 5002 in communication with other devices. You may find it located in the path below:

C:\Program Files\Chaos Group\Chaos License Server

vrol.exe

What does vrol.exe do?

  • Manages licenses for Chaos Group products including V-Ray, Houdini, and PhoenixFD.
  • It ensures that authorized individuals can only use Chaos Group software.
  • Distributes licenses to users via email, USB dongles, and a central license server.
  • It manages license pools and groups that multiple users share in large organizations.
  • Tracks license usage in order to maintain optimal use of licenses, avoiding overuse or underuse.
  • Monitors license status to help identity which are lost, stolen, or out-of-date.

Should I remove Vrol.exe?

Depending on a few variables, you should uninstall vrol.exe or leave it. First, ensure you are familiar with the file’s purpose and definition.

Vrol.exe is connected to the Chaos License Server, which controls licensing for the software developed by the Chaos Group. Therefore, you must not uninstall vrol.exe if you use any of the software created by the Chaos Group.

However, you may uninstall it without risk if you don’t use any of the Chaos Group’s applications. The file is not a security concern and is not required for Windows to function.

Is Vrol.exe a virus or malware?

Vrol.exe is not malware or a virus. It is a valid procedure and a Chaos License Server program component.

Some malware, however, can mimic the vrol.exe program. So, you may use a virus scanner to check your computer for viruses if you are concerned about this.

That is as much as we share in this guide. Many third-party processes like Vrol.exe work with your computer; an example you may want to read about is the Overseer executable.

Lastly, if you have any questions or believe there is something we have left out, please reach out in the comment section. Our readers will love to hear from you.

Outlook & Onedrive downtime is due to hacking, Microsoft confirms

And the beginning of June, Outlook & Onedrive were down, in what was known then as an internal conflict that provoked the apps to not function.

Well, it turns out, Outlook and Onedrive, as well as other Microsoft hubs and repositories, were the targets of a hacking attack, Microsoft reports.

The threat actor Storm 1359 was identified by Microsoft, as the Redmond-based tech company launched an investigation shortly after the servers were down.

The actor had access to a lot of botnets and tools that allowed it to easily launch DDoS attacks from multiple cloud services and open proxy infrastructures.

Fortunately, no customer data has been accessed or compromised, says Microsoft.

What is causing the Outlook downtime?

Outlook and hotmail downtime

These DDoS attacks were multiple and different. According to Microsoft, they were done in different ways and their systemic attack was strong enough to bypass Microsoft’s security.

  • HTTP(S) flood attack – This attack aims to exhaust the system resources with a high load of SSL/TLS handshakes and HTTP(S) requests processing. In this case, the attacker sends a high load (in the millions) of HTTP(S) requests that are well distributed across the globe from different source IPs. This causes the application backend to run out of compute resources (CPU and memory).
  • Cache bypass – This attack attempts to bypass the CDN layer and can result in overloading the origin servers. In this case, the attacker sends a series of queries against generated URLs that force the frontend layer to forward all the requests to the origin rather serving from cached contents.
  • Slowloris – This attack is where the client opens a connection to a web server, requests a resource (e.g., an image), and then fails to acknowledge the download (or accepts it slowly). This forces the web server to keep the connection open and the requested resource in memory.  
We’re investigating access and service issues for Outlook. More information will be provided in the admin center under EX512238 as it becomes available.
 
We’ve begun our targeted restarts to portions of our infrastructure that are impacted by the recent change. We’ll provide more detailed information via EX512238 in the admin center and portal.office.com/servicestatus.

How did it affected the apps?

Problems with essential email functions, such as send, receive, and search, appeared on Outlook.

These are the error messages showing up when users are trying to send emails using the Outlook web service.

It also impacted users of other services, such as Microsoft Teams. Users mentioned that at times they managed to log in, although extremely slow, but then other functionalities of the service remained unresponsive.

How can I access Outlook if the service is down?

1. Use an alternative email client

use an laternative email client

We are recommending Mailbird as a great freeware alternative to Outlook.

This is a simple, extremely reliable email client that lets you manage several email accounts and contacts from a single console.

It’s conveniently integrated with a huge variety of third-party apps such as Google Calendar, WeChat, WhatsApp, Google Docs, Slack. And set up is extremely easy. 

Mailbird

Mailbird

Don't let service outages put off your email activity. Get back in business with this reliable top email client.

2. Use a VPN

bypass outllok downtime with a VPN

Some users mentioned that despite the outage they managed to connect to the Outlook client using a VPN.

We strongly endorse this workaround, considering that a VPN not only protects your online presence but, as seen, can bypass major technical issues given the possibility to access other servers that are functional.

On this note, we recommend PIA (Private Internet Access) because of the huge server database that you can connect to whenever your email client‘s servers are down.

Private Internet Access

Private Internet Access

Can't log into your email? Choose from the hundreds of servers this VPN offers and smoothly access your Outlook inbox right now.
$2.69/mo. Visit website

Are you still experiencing problems with the Outlook client? Do try one of the solutions mentioned above and tell us if it helped you get back on track with your emails.

[wl_navigator]

What is winexesvc.exe & What is it Used for?

Typically, Windows background processes and exe files don’t need your attention, though users occasionally report encountering unidentified ones, raising an alert for suspicious activity. So, how can you tell whether a file is safe, harmful, or just plain necessary? In this article, we’ll examine winexesvc.exe.

Keep reading to learn more about how it works and whether to keep or toss it.

What is winexesvc.exe?

As prompted by its extension, winexesvc.exe is an executable file. It’s part of the Windows Subsystem for Linux feature that enables the transmission of remote commands across a network.

If you have installed it and its running is crucial to daily operations, it’s probably safe to remain on your device. However, it can be harmful, especially if it uses too much CPU or GPU while running in the background.

You should know that .exe files might occasionally harm your system. Because of their immense malicious potential, malware can disguise itself as such a file.

Therefore, you should exercise caution when running unknown ones on your device. To be always on the safe side, you should always enable the best Windows 11 security settings.

What is winexescv.exe used for?

To put it briefly, winexesvc.exe is used to receive files from a Linux server to a Windows one. In other words, winexesvc.exe is created by a winexe so that commands from a Linux host can be executed on a Windows one. Thus, it can be used by Linux-based apps to control a Windows system.

While it can be legit, as you now know, it can be targeted by hackers to cloak harmful code in the same filename. So, to be protected from malware, it’s crucial to ensure that the winexesvc.exe file on your computer has not been infected and is safe to stay.

Is winexesvc.exe safe?

1. Verify winexesvc.exe location

To determine whether it poses any danger to your device, consider its context. The first thing you can do is check its location. It’s normally located in: C:\Windows\System32

If that’s the case, the risk is much lower. However, this doesn’t mean you’re completely safe because the file is in its standard location. And you will need to verify other aspects as well.

2. Check winexesvc.exe’s behavior

  1. Press the Windows key, search for Task Manager, and click on the app.what-is-winexesvc
  2. Navigate to its Processes tab and find winexesvc.exe.winexesvc-exe-safe
  3. Check if it’s continuously operating in the background and how much computing power it uses.

If its behavior is suspicious, such as slowing down your system, interfering with other processes, or taking up too much of your PC’s CPU, it might be a malicious file, and it’d be best to remove it from your device. Follow this guide for the best uninstaller software to ensure it’s completely gone from your system.

Note: Think about the file’s origins – if you, yourself, have downloaded it from a legitimate source, the risk is minimal. On the other hand, if you have no idea how it ended up on your device or if it comes from an unreliable source, it is much more dangerous.

3. Scan your PC for malware

  1. Hit the Windows key, type Windows Security in the search bar, and click Open.windows-security
  2. Choose Virus & threat protection.virus-winexesvc-exe
  3. Click on Scan options.threat-winexesvc
  4. Choose Full scan and click on Scan now.windows-deep-scan
  5. Restart your PC.

Performing a deep scan will ensure everything is working smoothly. If you need to be more protected, we’d advise installing antivirus software to prevent malicious programs from attacking your system.

To be more specific, we suggest you use a multilayered antivirus tool that can highly secure your PC from advanced malware or PUA threats that may compromise your operating system.

⇒ Get TotalAV

4. Check its digital signature

  1. Right-click winexesvc.exe.winexesvc-exe-legit
  2. Choose Properties and select the Digital Signatures tab.

The legitimate file should have a legitimate company’s digital signature, while a malicious winexesvc.exe probably provided no data about it.

To prevent issues with winexesvc.exe is important to keep an organized workspace. This includes frequent deep scans, freeing up PC space, installing Windows updates, keeping your system and security software up-to-date, and regularly backing up your data.

And that’s all on winexesvc.exe. If you have any questions or suggestions, let us know in the comment section below.

What is a Good Processor Speed for Gaming?

You’ve probably heard someone say that the CPU is the heart of the PC. Well, they were right. You will need a speedy processor for your computer to do its work. The faster it is, the more tasks it can complete in a given time. 

Now, for everyday users, a basic processor that meets the Windows 11 system requirements will do, but other users, such as gamers, would need a high-performing one. If you’ve ever wondered what processor speed is good for gaming, we’re here to help.

Is 2.4 GHz processor speed good for gaming? 

If you’re a gamer, you know that your PC needs to be fast and powerful. But what does it mean when a processor is fast? How much speed do you need?

A good processor speed for gaming is a bit of a subjective question. The best processor for gaming depends on what games you want to play and how much you want to spend on your PC.

Most processors are rated using something called the megahertz (MHz) measurement. The higher this rating is, the faster the processor can process information.

2.4 GHz is considered a good processor speed for everyday use. It’s not the highest you’ll find, but it’s enough for a smooth experience playing simple games on your PC.

If you were to be asked whether a 3.7 GHz processor is good for gaming? It is an upgrade from 2.4 GHz.

A 3.7 GHz processor is very high-end and will perform very well in gaming. However, you need to look at what type of games you will play. 

If they are CPU intensive, then the extra performance will be good. If not, then it is probably not worth the extra money.

The answer lies in knowing what kind of games you want to play on your laptop and how demanding they are. 

What is a good processor speed for gaming?

If you are looking to buy a new gaming laptop, then you have probably noticed that options are abundant out there. However, making sense of the specifications and features can be quite challenging.

One of the most important things to consider when buying a gaming laptop is its processor speed. A processor’s speed determines how quickly it can process data and execute commands.

If your laptop has a powerful CPU, then it will be able to handle heavy tasks such as running demanding games smoothly without slowing down or getting laggy.

However, many other factors determine how well a game runs on your laptop, such as:

1. Processor type

You’ve probably heard of Intel or AMD processors, as they are the most famous in the market. These two types have different characteristics, so knowing which is best for your needs is important. 

AMD processors are often called APUs (Accelerated Processing Units), which means they combine CPU and GPU into one chip. This means you may need a dedicated GPU to play games.

Intel processors come in three basic categories: Core i3, Core i5, and Core i7. The higher-end models have more cores and hyperthreading technology that lets each core perform multiple tasks at once.

This means that if two computers have the same hardware specs but different processors, the faster one will always win in any benchmark test or game. 

2. Clock speed 

Processors are rated by their clock speed, measured in gigahertz (GHz). The clock speed determines how fast data can be processed within a unit of time or how many operations can be performed every second.

It also needs to be strong enough that if you need extra reinforcement to get even more performance than they already offer, you can. This can come in the form of overclocking software, so your processor can be overclocked further.

3. Number of cores

The number of cores in your CPU is another important factor to consider when choosing a good processor for gaming. Multi-core processors tend to be better for gaming because they can handle more tasks simultaneously than single-core processors. 

This means they can easily handle more complex games and have better performance overall. So, having more than one core is recommended if you want to use your computer for more than just playing games. Just make sure you check how many cores your OS supports.

4. Cache memory size

The CPU uses cache memory to store information temporarily so that it can be accessed quickly when required by other components in the system, such as graphics cards or hard drives.

The bigger the cache, the more quickly information can be retrieved from memory. If you have a small amount of cache memory, you’ll probably see some stuttering if you try playing games at high resolutions with many details turned on.

A large cache memory size will help improve performance significantly since it reduces wait times while loading large files such as games and applications on your PC.

All these factors come into play to contribute to a good processor for gaming. For the most part, the processor speed you choose for your gaming laptop will be determined by the kind of games you play and your budget.

If you want to play fast action games, go for a high processor speed, ideally over 4GHz. If you’re an FPS gamer, consider a multi-core processor.

In addition, if you want the fastest frame rate possible, you must be willing to adjust your graphics settings to keep up with all that visuals. Speaking of performance, many believe that changing the number of processors in MSConfig will help with their performance, but that might not be the case.

We’re curious to learn about your processor speed. What processor type do you use, and what’s its speed? Let us know in the comment section, and include your gaming experience.

Auto GPT Not Working? 5 Ways to Quickly Fix it

Is AutoGPT not working? It could be your browser that is not up-to-date. AutoGPT is a ChatGPT alternative which means it also experiences glitches from time to time.

We’ve curated this article to help you address some common issues when it is not working.

What is the problem with AutoGPT?

Just like any other app, AutoGPT cannot be exempted from the usual glitches that plague man-made programs.

When AutoGPT is not working, it  may be due to one of the following reasons:

  • Server overload – Sometimes, when there’s an influx of people on a site simultaneously, it may not be able to handle the traffic and can stop working.
  • Connection issue – If your internet connection keeps dropping or you have enforced bandwidth limits, it is possible for some sites to stop working normally.
  • Browser cache/cookies – Browser cookies help you load pages faster, but if not cleaned regularly, they may cause issues with loading some sites.
  • ISP restrictions – If your ISP provider has blocked some sites, you may not be able to access them.
  • Browser settings – If you’ve recently made changes to your default browser settings, such as installing new extensions, they may interfere with how the AutoGPT site works.
  • Virus attack – If your system does not have a comprehensive antivirus solution, it may have been compromised by a virus. You’ll have trouble accessing some or all sites.
  • Firewall/antivirus settings – Some firewalls and antiviruses block certain sites if they term them as malicious.

Additionally, you can start with a reliable solution to fix the AutoGPT tool. Namely, using an alternative AI browser with integrated tools.

Opera One is a brand-new browser with AI in mind, including ChatGPT sidebar integration and a built-in Opera AI engine called Aria.

Opera One

Try out the new talk in town from Opera with new AI enhancements and fluid navigation.

What can I do if AutoGPT is not working?

A few workarounds that may help you get to the root of this problem include:

  • Verify that you’re connected to the internet with no network issues.
  • Check whether your firewall is blocking the AutoGPT site.
  • Try using a private or incognito tab and see if it helps.
  • Refresh or restart your browser.
  • Confirm with your ISP provider whether there are any restrictions to accessing some sites.
  • Check the AutoGPT server status for any maintenance schedules or downtimes mentioned.
  • Try another browser and see if the problem persists.
  • Restart your router to reset the connection.

1. Clear the browser cache

  1. Launch your browser, and for this step, we shall be using Google Chrome.
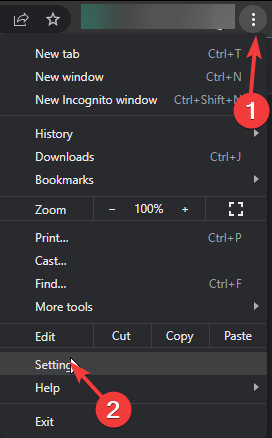
  2. Click the three horizontal dots and select Settings.Settings CHrome
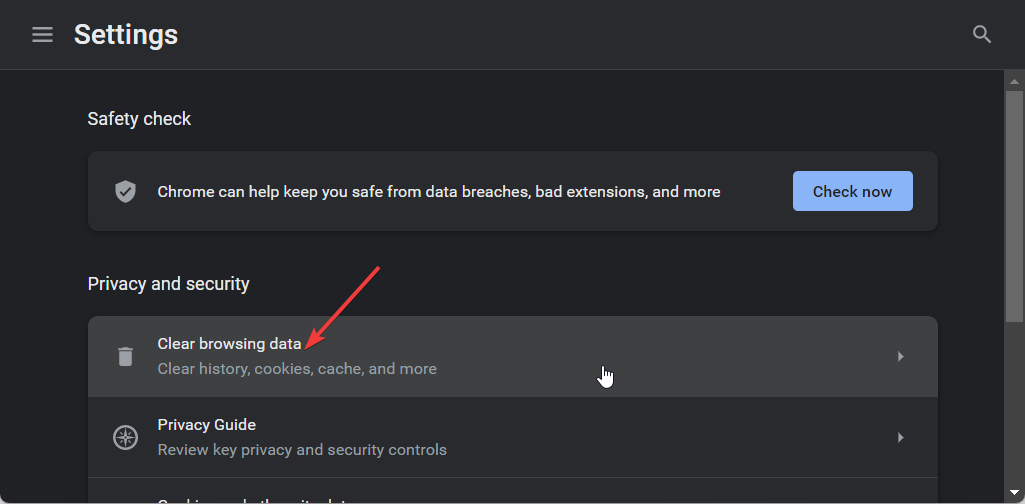
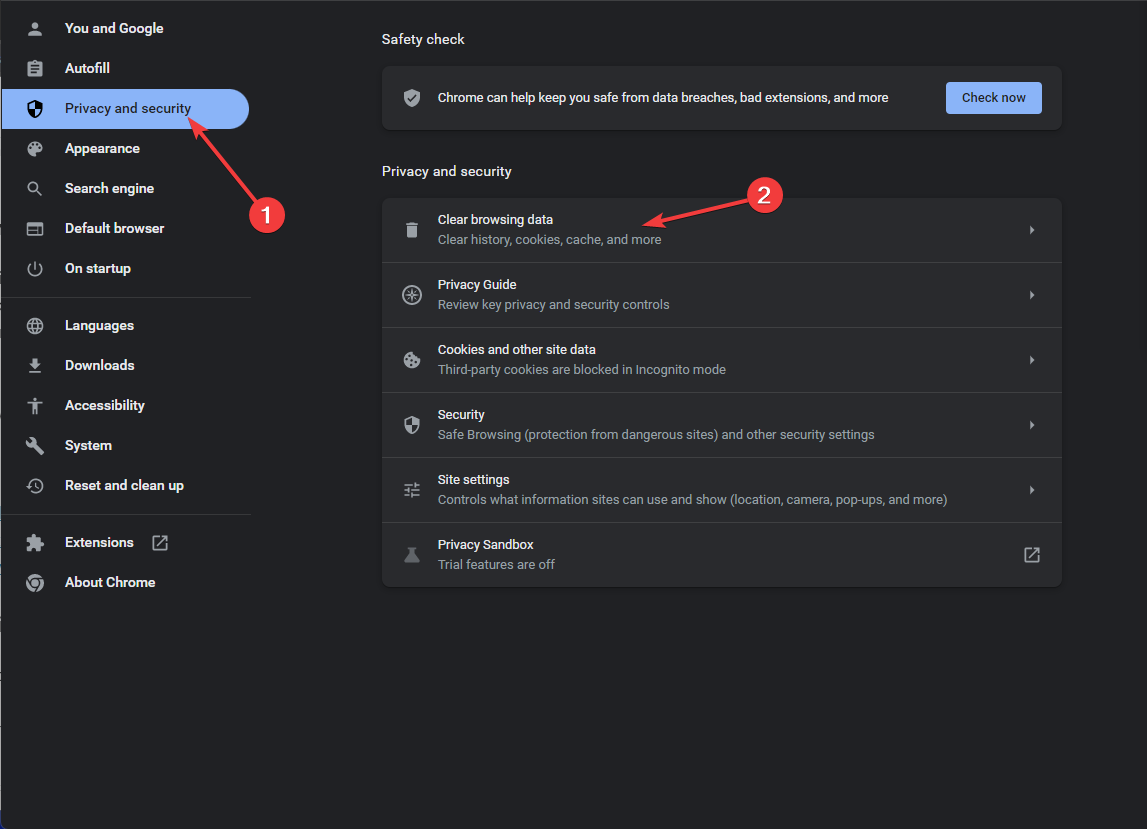
  3. Go to Privacy and security and click Clear browsing data.
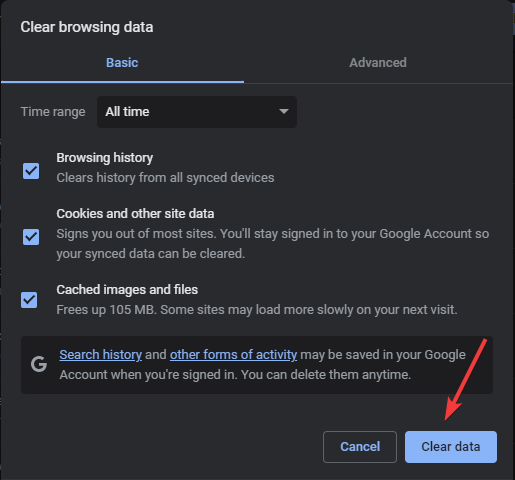
  4. Select Browsing history, Cookies and other site data, & Cached images and files, then click Clear data.

2. Disable the browser extensions

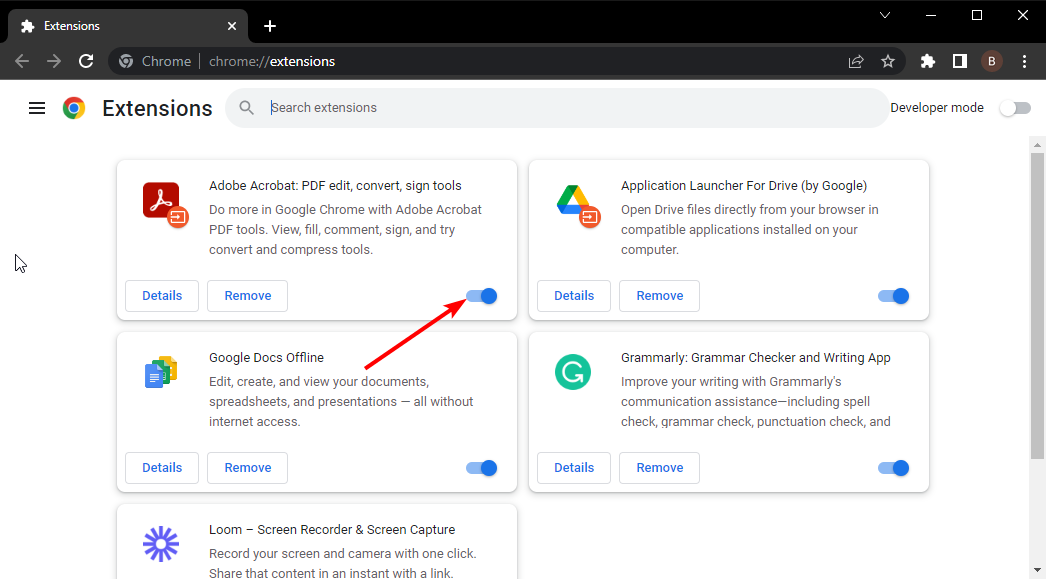
  1. Launch your Chrome browser, and in a new tab, enter the following address:chrome://extensions/
  2. Peruse through your extensions and toggle the Disable button for any suspicious-looking ones.
  3. Repeat this step until you find the culprit.

3. Reset your browser 

  1. Open your Chrome browser and click on the three vertical ellipses at the top right corner.
  2. Select Settings.Settings CHrome
  3. Next, click on Reset and cleanup, then select Restore settings to their original defaults.
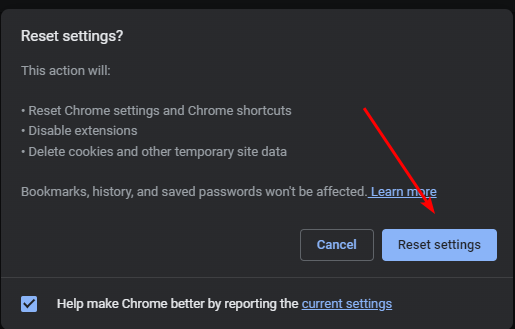
  4. Confirm Reset settings in the next dialog box.

4. Disable your antivirus temporarily 

  1. Hit the Start menu icon, type Windows Security in the search bar and click Open.
  2. Click on Firewall & network protection, then select Public network.league of legends black screen after champion select
  3. Locate Microsoft Defender Firewall and toggle the off button.turning off Microsoft Defender Firewall Windows

5. Scan for viruses

  1. Press the Windows key, search Windows Security, and click Open.
  2. Select Virus & threat protection.
  3. Next, press Quick scan under Current threats.
  4. If you don’t find any threats, proceed to perform a full scan by clicking on Scan options just below Quick scan.Scan options
  5. Click on Full scan, then Scan now to perform a deep scan of your PC.Full Scan Scan Now
  6. Wait for the process to finish and restart your system.

6. Disable VPN 

  1. Press the Windows key and select Settings.settings windows 11
  2. Next, select Network & internet and click on VPN in the right-side menu.
  3. Select the VPN connection you want to disable, click on the drop-down and select Remove.remove VPN

Depending on whether you were using a VPN or not, try setting your location to different places and keep trying. Sometimes, the problem is usually with a server in a specific location or geo-restrictions that prevent you from accessing AutoGPT in your current location.

You can also contact AutoGPT customer care support and give them feedback on the issue of AutoGPT not working. It may be an isolated issue or a problem they are not aware of yet.

That’s it from us, but we have a lot of content on AI software if you’re new to this. Check out our exclusive survey on what users think about the future of AI. We also have an interesting comparison feature of Bard AI vs Bing AI, so be sure to check that out too.

Otherwise, let’s meet in the comment section if you have additional thoughts or suggestions.

Can ChatGPT Generate Windows Activation Keys? [Tested]

There is some exciting news coming from Windows users. It seems that some users tried to trick ChatGPT into generating Windows activation keys, and apparently, it works. The AI tool is giving away a lot of Windows activation keys as if they are nothing.

This Twitter user was one of the first who tried it, and they tried it for almost every Windows version and it works.

It seems that ChatGPT is more capable of disclosing potentially sensitive information than we know it. The information is not exactly fraudulent, as the Windows activation keys follow a pattern that can be easily replicated.

But ChatGPT is capable of giving you Windows activation keys for every Windows version: Windows 7, 8, 8.1, 10, and 11. It’s not giving you just one, but several, and you can try each one until one of them works. If it doesn’t, then you can try again. Basically, it’s an endless river of Windows activation keys.

Is it fair, or is it not? We’re not really sure, but the real question is: do they really work?

Can ChatGPT really generate valid Windows activation keys?

Well, you’ll find it hard to believe, but according to some users, yes, it can. ChatGPT can generate valid Windows activation keys.chatgpt windows keys

On this Reddit thread, a lot of users reported that it worked for them. From 8 keys, one of them worked, and many other users soon shared their screenshots of the result. On Twitter, several users also reported that it worked for them

While another user is sharing the excellent news of Windows activation.

Apparently, it can also provide keys for upgrading Windows. Many users upgraded their Windows 10 and 11 to the Pro edition with ChatGPT-generated Windows activation keys.

The truth is, there is no guarantee this trick will work. It seems to be a game of luck for many. As mentioned earlier, ChatGPT can generate as many Windows activation keys as you want, but in the end, just one will work.

However, no one knows how long will it take for ChatGPT to stop generating activation keys. It’s always nice to give it a shot, true. But you might want to activate it on Microsoft’s terms, you know. Just to be safe.

You should know that upgrading to Windows 11 is free but you may run into the you need to activate windows before you can personalize your pc especially if you make hardware changes. You should only check to see if your PC meets the requirements, but you can actually get it for free.

So while ChatGPT seems fun to try, take it with a pinch of salt. Fun things that won’t hurt anyone include editing images with DALL-E.

What do you think about this? Be sure to let us know in the comments section below.

What is Oinstall.exe & Should you Remove it?

The executable known as oinstall.exe has raised concerns about its legitimacy and security due to some malware detection programs flagging it as potentially hazardous. It has been identified as a Trojan.Gen.2 or Trojan.Smoaler, PUA:Win32/AutoKMS, HackTool:Win32/AutoKMS by Defender, and other similar anti-malware or security software.

In an earlier piece, we delved into the intricacies of Exe files deleting themselves. However, we are now confronted with a comparable predicament.

That being said, it is imperative to pinpoint the root cause before taking on the current obstacle.

What is Oinstall?

The OInstall.exe file is an executable that falls under the Office 2013-2016 process and is associated with the OInstall Software produced by WZTeam, a software development company.

When it comes to the OInstall.exe process in Windows, exercising caution is paramount when considering deleting it. In some cases, this process may be overusing the CPU or GPU. Additionally, if it happens to be a virus or malware, it could be running stealthily in the background.

Can I remove Oinstall?

This malicious Trojan can cause significant harm by installing additional malware, spreading ransomware, or other damaging threats.

It may also utilize machine resources to mine cryptocurrency or steal sensitive data. However, it is important to note that Oinstall.exe is not a necessary component of Windows and can often cause issues.

If you encounter problems with this file, it is safe to remove it from your system without causing any serious damage – aside from any programs that may be associated with it.

Removing this file may alleviate any concerns related to its potential threat level, typically located in either the Windows folder or a subdirectory of the users’ profile folder.

How can I remove Oinstall.exe?

1. Uninstall the application associated with it

  1. Tap your Windows key and click on Settings.
  2. Select Apps and click on Apps & Features.
  3. Now search for application that you suspect is associated with this file.
  4. Once the file is found click on the three dots at the far right corner and select Uninstall.

2. Delete Temporary files

  1. On your home screen search bar, type Disk cleanup and open it.
  2. Once the Disk cleanup Windows opens, select the specific files you want to delete.
  3. Click Ok and the selected files will be deleted.

3. Disable suspicious startup software

  1. Hold Ctrl+Shift+Esc together to open the Task Manager.
  2. Once the Task Manager window opens locate Startup tab.
  3. A list of all the startup software will be displayed. Now find the oinstall and right-click to disable it.

Our intention in creating this manual is to alleviate any concerns you may have and provide you with useful knowledge.

If you encounter any additional issues, we recommend scanning your PC with reliable antivirus software to ensure the threat is removed.

Your feedback is important to us, so we would appreciate it if you could share your thoughts by leaving a comment below and providing your perspective.

What is Perfmon.exe & How to Fix its High CPU Usage?

Have you ever experienced high CPU usage on your Windows PC? If so, Performance Monitor, also known as perfmon.exe, is here to help analyze and monitor your system’s performance.

In a recent piece, we explored the complexities of Intel System high CPU usage. Today, we encounter a similar challenge.

However, we must determine the root cause of this problem before attempting any solutions. This way, we can ensure that our approach effectively tackles the issue at its core.

What is Perfmon exe used for?

Windows Performance Monitor (perfmon.exe) is a powerful in-built tool for Windows users to keep track of and analyze the performance of their system.

It can be used for the following:

  • Real-time monitoring of resource usage.
  • Historical data monitoring.
  • Monitoring disk, CPU, network, and memory usage.

Is Perfmon the same as Task Manager?

No, the two have several major differences. Let’s quickly go over the different features.

Task Manager:

  • Shows all running applications and processes on a single PC.
  • Ability to start or end processes.
  • Shows only general system performance measurements.
  • Doesn’t log any data.

Performance Monitor:

  • Real-time performance monitoring.
  • Support for data logging.
  • Can monitor large sets of process graphs in real-time.
  • Shows detailed information such as thread count, processor time, memory size, etc.
  • Highly customizable.

How can I fix perfmon.exe high CPU usage?

1. Update PC drivers

  1. On your home screen, hold the Windows + X keys to launch the Device Manager.
  2. Once the Device Manager has opened now click on Display adapters and right-click on your graphics card and choose Update drivers.
  3. Once you have concluded updating the Display adapters.
  4. Now click on Network adapters and right-click on your network driver and choose Update driver.

2. Perform a System Maintenance check

  1. On your home screen search bar type Control panel and click Open.
  2. Now inside the search bar type Troubleshooting and open it.
  3.  Now click on View All.
  4. Next locate the System Maintenance and click on it to Troubleshoot it.
  5. Once the next window pops up click on Advanced.
  6. Now untick the Apply repairs automatically and click Next.
  7. Just follow the onscreen instructions to complete the Troubleshooting. The System maintenance troubleshooters are equipped to identify and address any problems that may arise automatically.

After the troubleshooter is finished, check if the issue is resolved.

3. End the perfmon.exe process.

  1. On your home screen, hold the Ctrl+Shift+Esc keys together to launch the Task Manager.
  2. The moment the Task Manger window pops up, locate the perfmon.exe process among the list of running processes.
  3. Now right-click on the perfmon.exe process.
  4. The next window that comes up, choose End Task to discontinue the process.

If you come across the Perfmon.exe problem, there’s no need to panic – usually, there’s an easy fix.

As this relates to performance monitoring, check out our guide on perfmon /report not working.

Our team genuinely hopes that this guide has provided you with some assistance. Nevertheless, if you encounter another solution, please don’t hesitate to share it with us.

What is WSHelper.exe & How to Fix its Errors

WSHelper.exe is one of the many processes that come with third-party software. This process plays an important role in the functioning of its parent software.

However, it is still a lesser-known software and sometimes causes issues on some PCs. In this guide, we will show you everything you need to know about this executable file and how to fix its errors.

How can I fix WSHelper.exe errors?

1. Perform a clean boot

  1. Press the Windows key + X and select Task Manager.
    task manager wshelper-exe
  2. From here, right-click all instances of Wondershare products and choose End task.
  3. Now, press the Windows key + R, type msconfig, and hit Enter.
    msconfig
  4. Choose Services at the top, check the Hide all Microsoft services box, and click the Disable all button.
    hide all
  5. Next, click the Startup tab at the top.
  6. Click the Open Task Manager link.
    open task wshelper-exe
  7. Right-click each of the apps there and select Disable.
    disable
  8. Finally, go back to the System Configuration window and click the Apply button, followed by OK.
    apply ok

If prompts related to WSHelper.exe keeps showing on your PC on startup, there might be a problem with it. What you need to do here is to perform a clean boot.

If this solves the problem, you can enable your apps and processes in batches to see the one causing the problem.

2. Perform a system restore

  1. Press the Windows key + R, type rstrui.exe, and press Enter.
    rstrui wshelper.exe
  2. Click Next on the new page.
    next
  3. Now, choose your ideal restore point and click the Next button.
    restore point
  4. Finally, click Finish and follow the onscreen instructions to complete the process.
    finish wshelper.exe

If you started noticing the irrational behavior of WSHelper.exe after installing an app or making changes to your PC, you need to perform a system restore to a later point.

This is because the changes made might be messing with the process. So, a system restore will help reverse these changes and restore normalcy.

On the other hand, you have the option to employ a dedicated solution to diagnose your Windows PC and solve this completely.

3. Scan for malware

  1. Press the Windows key + S, type virus, and choose Virus & threat protection.
    virus wshelper.exe
  2. Click the Scan options link on the next page.
    scan options
  3. Finally, select your preferred scan option and click the Scan now button.
    scan now

In some cases, malware can disguise as the WSHelper.exe process to use your PC resources. In this case, you might notice an unusual CPU and memory usage.

Also, you might have problems disabling the process. To fix this, you must perform a full malware scan to eliminate the virus.

If Windows Defender can not remove the virus, we advise using dedicated antivirus software for the job. This kind of software will scan every corner of your PC, including your system files, to eliminate even the most hidden malware.

4. Uninstall Wondershare products

  1. Press the Windows key + R, type control, and click the OK button.
    control
  2. Select the Uninstall a program option under Programs.
    uninstall a
  3. Now, right-click all Wondershare products and select Uninstall.
    uninstall
  4. From here, follow the onscreen instructions to complete the removal process.
  5. Next, press the Windows key + R, type regedit, and click OK.
    regedit wshelper.exe
  6. Search for Wondershare on your registry.
  7. Now, right-click each of the instances and select Delete. You can press F3 to go to the next instance.
  8. Finally, restart your PC.

If everything you have tried everything to fix issues related to WSHelper.exe fails, you need to uninstall Wondershare products on your PC completely. This will get rid of the process too.

What is WSHelper.exe?

WSHelper.exe comes with Wondershare products. This process plays an important role in the effortless running of your Wondershare products.

It is capable of interpreting your keyboard strokes on your device, as well as recording mouse and internet activity. This makes it vital, as it can have devastating effects on your PC if taken over by malware.

It is important to note that WSHelper.exe is not in any way crucial to the activities of your computer. So, you can always remove it if it is causing problems.

But if you are using a Wondershare product, you need to weigh its importance, as removing the process can affect the product.

If you still need to product later, you can download it from official sources.

We have reached the end of this detailed guide on the WSHelper.exe process. You need the process if you have a Wondershare product on your PC.

But, if you are not using any related product, you should remove it, especially if it is causing issues. Similarly, if you want to know about the charmap.exe process, we have a detailed guide.

We also have a special Discover WbemCons.exe and how to effectively fix its issues guide that tackles problems with a different process.

Feel free to share your experience with this process with us in the comments below.

What is nahimicservice.exe & Should You Remove it?

The Nahimicservice.exe process is one of the lesser-seen processes on Windows PC, which makes users wonder what it does. To douse any tension, rest assured that this process is harmless.

However, to know what this process does, read on, as this guide will provide the information you need to decide whether to keep or remove it.

What is nahimicservice.exe?

The nahimicservice.exe process is an audio processing app produced by Nahimic. It is usually installed on your PC by the manufacturer, just like Realtek Audio.

This service is completely safe and does not threaten your PC. While some sources can claim that it is a virus because of irregular behavior at times, there is nothing to worry about with it.

Is nahimicservice.exe necessary?

If you are using a gaming PC like an MSI system, this process will likely be your default sound processor. So, it is necessary, and you should not remove it.

To know if Nahimic is your default sound processing software, check the bottom right corner of your Taskbar for a blue N icon. That is its symbol.

Lastly, it is important to mention that you might be considering getting rid of nahimicservice.exe because it sometimes registers high resource usage. This is sometimes normal, especially if you are playing sound.

So, there is no cause for alarm.

How can I fix nahimicservice.exe related issues?

1. Disable the service

  1. Press the Windows key + X and select Task Manager.
    task manager nahimicservice.exe
  2. Click the Services tab at the top.
  3. Finally, right-click nahimiservice.exe and select Stop.
    stop

The first thing to do if you experiencing problems with the nahimicservice.exe service is to disable it temporarily. This is particularly useful in a situation where you experiencing extreme resource usage.

2. Perform a system restore

  1. Press the Windows key + R, type rstrui.exe, and press Enter.
    rstrui
  2. Click Next on the new page.
    next
  3. Now, choose your ideal restore point and click the Next button.
    restore point nahimicservice.exe
  4. Finally, click Finish and follow the onscreen instructions to complete the process.
    finish

Should issues with nahimicservice.exe start after making some changes to your PC, this might be the cause of the problem. The quickest way to return to normal service here is to perform a system restore.

This will restore your PC to a point where everything is working normally.

On the other hand, you have the option to employ a dedicated solution to diagnose your Windows PC and solve this completely.

3. Scan for malware

  1. Press the Windows key + S, type virus, and choose Virus & threat protection.
    virus
  2. Click the Scan options link on the next page.
    scan options nahimicservice.exe
  3. Finally, select your preferred scan option and click the Scan now button.
    scan now

At times, viruses can take over the nahimicservice.exe process to cause issues on your PC. This is usually noticeable in the unusual resource usage by the process.

In this case, you need to scan your PC fully to get rid of the virus.

Aside from using the default antivirus software, we recommend using dedicated antivirus tools to get the job done.

4. Uninstall Nahimic software

  1. Press the Windows key + I and select the Apps option.
  2. Choose Apps & features in the right pane.
    apps and
  3. Now, scroll down and click the vertical dots before the Nahimic software.
  4. Select Uninstall and follow the onscreen instructions to complete the process.
    uninstall nahimicservice.exe
  5. Next, press the Windows key, type task, and select the Task Scheduler option.
    task scheduler
  6. Search for Nahimic or A-Volute and delete all their instances.
  7. Now, press the Windows key + R, type regedit, and click OK.
    regedit
  8. Finally, search for Nahimic or A-Volute and delete all their instances.

If you keep facing issues with the nahimicservice.exe service, you might have no choice but to remove it. This is especially effective if you have other sound processing tools on your PC.

We have reached the end of this detailed guide on the nahimicservice.exe service. It can be deduced that this service is important and should not be tampered with unless in extreme cases.

If you want to know more about the Nahimic Companion software, we have prepared a comprehensive guide with all the information you need.

Feel free to let us know the solution that helped you fix this issue in the comments below.

Microsoft Advertising completes transition to Xandr’s supply-side platform

Microsoft Advertising has successfully completed the transition of its in-house sales and technology teams to leverage and monetize Xandr’s supply-side platform (SSP). This transition allows Microsoft Advertising to consolidate its inventory and streamline the buying process for advertisers. Earlier, in December 2021, Microsoft finalized the deal to acquire Xandr from AT&T.

The integration of Xandr’s SSP will provide Microsoft Advertising with a unified global platform for various ad formats, including display, video, and native ads. Ad inventory on popular Microsoft platforms such as Microsoft Start, MSN, Outlook, and Microsoft Casual Games will now be accessible through a single platform. Notably, a significant portion of the display and native ads has already been transitioned, with the focus now shifting to video ads in the coming month.

Despite this change, advertisers will still maintain the same level of access to Microsoft’s owned-and-operated properties through the open marketplace or their preferred demand-side platforms (DSPs). However, Microsoft aims to simplify the purchasing process by offering advertisers the convenience of buying inventory from one platform and working with a unified team.

The inventory available on the new platform can be purchased through the advertiser’s preferred DSP. Most major DSPs already integrate seamlessly with Monetize SSP. Advertisers using Microsoft’s DSP, in addition to its SSP, can expect even greater efficiencies through enhanced transparency.

The decision to transition to Xandr’s SSP was initially announced by Microsoft in March, and the company has now finalized the process. According to Microsoft, this strategic move offers several benefits to advertisers, including more direct and scalable access to Microsoft’s inventory across different formats, screens, and markets.

By transacting through a single platform, advertisers can achieve greater operational efficiencies. Moreover, Microsoft’s in-house sales teams will provide streamlined support to advertisers, facilitating easier management of full-funnel advertising goals.

In addition to the integration with Xandr, Microsoft is also reportedly merging Xandr with PromoteIQ, a retail ad-tech business that Microsoft acquired in 2019. Two current Microsoft employees and two recently laid-off employees have shared this information, suggesting that Microsoft plans to integrate Xandr with various platforms, including Microsoft Teams, Outlook, Bing, and Xbox. Additionally, Xandr will be utilized to support the Netflix CTV sales account.

Microsoft’s transition to Xandr’s SSP marks a significant step forward in its advertising strategy. With a unified platform, streamlined processes, and expanded integration, Microsoft aims to provide advertisers with enhanced access and efficiency in managing their ad campaigns across multiple formats and screens.

Via: MediaPost

GMKtec NucBox G1: Powerful mini PC at a really affordable price

If you would like mini PC that is unobtrusive – yet powerful, take a look at this budget friendly GMKtec NucBox G1. For an Intel-based mini computer, there is little not to like.

GMKtec has a range of PC’s to suit all budgets. It has a range of AMD Ryzen and Intel-based mini PCs and has also branched out into the laptop market with its 12th gen Intel Core i5-1235U 4k notebook.

Where to buy

Amazon.com $179.99
GMKtec.com $189.89

About this review: This review was written after building and using a NucBox G1 for two months. GMKtec did not have any input in this article.

The GMKtec NubBox G1 mini PC is an Intel based energy efficient PC with a 12th generation Alder Lake N95 processor, UHD graphics and a choice of 8GB DDR4 RAM and 512GB hard drive, or 16GB DDR4 RAM 1TB hard drive models.

Specifications: 

GMKtec NucBox G1

Dimensions 4.48 x 4.17 x 1.67 inches/ 114mm x 106mm x 42.5mm
I/O Ports USB-A 3.2 x4 (Gen1 x1 5Gbps)HDMI (4K@60Hz) x2 1×3.5 mm headphone jack Giga LAN (RJ45) x1 2.5G
Storage Expansion M.2 SATA 2242 max 2TB/ M.2 SATA 2280 max 2TB
Auto Power ON Not by default – but this can be turned on in the BIOS settings
Weight 0.79 lb/ 361g
Colour Anthracite Grey with Black top
Wall Mounting bracket Included in box
Price US$239.89 on 8+512GB / US$279.89 on 16+1TB but discounted on AMazon and GMK tec sites

Pros
• Lightweight
• affordable
• Powerful motor
• Windows 11 Pro installed
• Supports Dual-screen displays
Cons
• Peripherals needed to build PC
• no USB type-C port

GMKtec NucBox G1 mini PC: Price and availability

The GMKtec NucBox G1 is currently on offer at GMKtec’s US Store
It is also available on Amazon, with a discount coupon
The GMKtec NucBox G1 is, priced at under $200 and has regular offers on both the GMKtec and Amazon sites.

Design and hardware: Lightweight mini PC with small form factor

• Intel 12th Generation Alder Lake N95 processor
• Intel UHD graphics running at up to 1.2 Ghz
• 512/1TB ROM
• Supports 2 HDMI displays
• Storage expansion up to 2TB

The GMKtec looks smooth and stylish with an anthracite grey coloured body and a black glossy top. The top is supposed to be fingerprint resistant – but I managed to smudge its shiny surface during handling. However, the cover quicky can be restored to its original glossy look by polishing the case with a soft cloth. The front of the unit has two USB type-A ports and a bright green power button.
At the rear of the GMKtec from left to right there is a DC 12V 4A power jack. there is an HDMI port which supports a resolution of 4k@60Hz and a 2.5G RJ45 port. The there are two USB 3.2 type A ports and finally a second HDMI port that also supports 4k@60Hz Above the ports there are vents for unit cooling. There are also grilles at either side of the unit to further unit cooling.
To use the GMKtec NucBox G1, plug the power adapter into an electricity supply and turn on the green power button at the front of the unit. A white lite appears to indicate that the unit is switched on. You also need to use a wired keyboard and mouse for initial setup although once you have installed Windows 11 you can configure the system to use Wi-Fi or Bluetooth peripherals.

Gmktec Nucbox G1 Mini Pc Onmsft Unit Rear

Software and features: Windows 11 Pro workgroup and domain capability

• Quick and simple windows setup
• Quickly recognises external screens
• No touch screen support

The GMKtec NucBox is a 64-bit system and once Windows 11 has been installed, which takes about 10 minutes, the 8GB model gives 7.73GB of useable RAM before any office apps have been installed. As the NucBox G1 runs Windows 11 Pro you can run this as part of a workgroup or as a member of a domain. THe 22H2 version was updated at the end of May and this NucBox G1 is currently running build 2261.1778.
In use I am surprised at how quiet the NucBox is. I ran it for a couple of weeks on the desk before mounting the unobtrusive mount on the wall behind my monitor. Once I had configured my wireless mouse and keyboard then the only times I needed to go to the NucBox itself is when I powered Windows down.
Currently I could not test the support for touch screens as my external monitors are not touch enabled. I found myself reaching for the display like I do on my laptop, and realising that I was not using my laptop – but my unobtrusive mini PC.
The Ilife 10s must complete a full sweep of the area before you can customise the settings on the app. The maps on the Ilife T10S are detailed and accurate. You can label different rooms and specify how many times you want them to be cleaned during a pass, and how much water you want to deliver to the hard floor.
You can label different areas in the app and clean custom areas in the house at different times of the day or clean heavily trafficked areas more often. You can set schedules to clean the entire space automatically or specify a named area to clean. Voice activation works well and you can invoke the robot to start cleaning or return to its charging station at will.
You can set no go zones and specify different schedules for each room or zone
The app maintains a record of how worn the consumables are and how many hours these can be used before it recommends that they are changed. This is a useful feature if you forget to maintain your appliances regularly.

General performance: Silent running, good performance

• No slow down when working in an office environment
• Fan noise almost undetectable
In use I was impressed with the performance on the GMK tec NucBox. It is far more powerful than my laptop and can run memory hogging applications all day without any issues in performance.
The fan on the NucBoxis fast, but almost silent. I was aware of it running when using it next to my screen, but could ot hear it at all when it was mounted on the wall less than 1m away from my keyboard. It is very impressive and unnoticeable. When the fan does run, it runs for about 15 seconds before stopping.
The light on the power button is not intrusive in low light environments – certainly not as noticeable if you have a fairly bright screen. There are no other lights on the unit to distract you.
The top of the housing does get warm however – but not hot enough to burn you.

Gmktec Nucbox G1 Mini Pc Onmsft Unit Front

Should you buy a GMKtec NucBox G1 mini PC?

You should buy a GMKtec NucBox G1 mini PC if
• You want an unobtrusive PC with low fan noise
• You want a low cost PC with support for dual screens
• You want a pocket-sized domain enabled PC
You should not buy a GMKtec NucBox G1 mini PC if:
• You are a hard-core gamer who prefers AMD processors
• You run several heavy process applications at the same time
All in all, I like the performance of the GMKtec NucBox G1 mini PC. I like that it is compact and quiet, and I love the fact that I can mount it on the wall and forget about it.
The specification of the mini PC means that I can use it as an office workstation, a Media centre in the living room, or a leisure PC for casual games and social activities.
However, I find it a pain to build the PC with a wired keyboard and mouse- but I have an old keyboard and mouse specifically for this purpose. Once I have connected my Bluetooth keyboard and mouse, my desk area looks tidy.
So if you want a low cost Windows Pro pc which has good performance and can cope with small to medium office work – or home activities, then the GMKtec NucBox is a great affordable PC for you if you do not want to spend too much on a PC for your home or small office
The GMKtec NucBox G1 mini PC is an affordable reliable workhorse that will perform well, stay out of the way, and stay within your budget. It is certainly worth a look.

EventID 300 Failed to Parse Element: How to Fix it

Encountering the EventID 300 Failed to parse element error is a frequent obstacle for PC users. This notification usually pops up when there are issues with parsing an element within a piece of software. To tackle this issue head-on, it’s vital to comprehend the root cause behind this error.

In a previous article, we delved into the intricacies of Event Viewer ID Reboot. Today, we face a comparable obstacle.

However, before we jump into potential solutions, it’s paramount to pinpoint the underlying reason for this dilemma. This will allow us to develop a successful approach that tackles the issue at its core.

What is Event ID 300?

As soon as the EventID 300 Failed to parse element error pops up on a computer screen, it indicates the system’s inability to comprehend a particular element within a program or system.

It’s caused by the following:

  • Incompatible software versions can often create various glitches on your PC.
  • Corrupt files inside your Office installation will cause this error to occur.
  • Misconfigured settings will prevent the software from running properly.

How can I fix EventID 300 Failed to parse element?

Before we try anything, you should try the following:

  • Update Windows to the latest version to fix any compatibility issues.

1. Reinstall Office software

  1. Open the Settings app with Windows key + I shortcut.
  2. Navigate to Apps and select Installed apps.
  3. Locate Microsoft Office on the list and click on Uninstall.
  4. Follow the process on the screen.
  5. Once the software is removed, install it again.

After reinstalling Office, check if EventID 300 Failed to parse element is gone.

2. Remove recent updates

  1. On your keyboard tap the Windows key and click on Settings.
  2. Once the Settings have opened click on Windows Update.
  3. Now select Update history to retrieve your previous update.

If you find yourself facing the issue of EventID 300 Failed to parse element error, there’s no need to worry as there is usually a straightforward solution.

To gain more insight into handling this issue, we suggest looking at our comprehensive guide on Event ID 1001 StoreAgentScanForUpdatesFailure0.

Our team sincerely hopes that this guide has provided you with valuable assistance. Nonetheless, if you come across another solution, please do not hesitate to share it with us.

Microsoft confirms recent service disruptions were caused by Russian hacking group

In a recent blog post, Microsoft officially acknowledged that the disruptions to its services earlier this month were the result of deliberate hacks. The tech giant attributed the temporary unavailability of some of its services to ongoing Distributed Denial-of-Service (DDoS) attacks conducted by a threat actor identified as Storm-1359.

On June 5, Microsoft’s 365 software suite, including popular applications like Teams and Outlook, experienced an outage lasting over two hours, affecting thousands of users. A brief recurrence was witnessed the following morning. This incident marked the fourth major outage for Microsoft within the span of a year.

Although Microsoft has assigned a temporary designation to the attackers, indicating their affiliation has not yet been determined, a hacktivist group called Anonymous Sudan has claimed responsibility for the hack on the messaging platform Telegram.

Over the past decade, messaging platform Telegram, code management site GitHub, and network provider Dyn have all faced similar attacks. In Microsoft’s case, the hackers focused on causing disruption and seeking publicity. They utilized rented cloud infrastructure and virtual private networks to overwhelm Microsoft servers using botnets comprised of compromised computers worldwide.

Reassuringly, Microsoft has stated that there is no evidence suggesting that customer data has been accessed or compromised during these incidents. DDoS attacks typically aim to temporarily render targeted servers inaccessible through the influx of substantial internet traffic, employing relatively unsophisticated methods.

The recurrence of service disruptions raises concerns about the vulnerability of technology platforms to malicious attacks. Companies like Microsoft are continuously enhancing their security measures to thwart such incidents. Nevertheless, the sophistication and persistence of threat actors continue to present challenges for ensuring uninterrupted and secure digital services.

Microsoft has not disclosed the motive behind the recent DDoS attacks or whether it has identified the individuals or groups responsible for them. As investigations continue, users and organizations are advised to remain vigilant, adopt robust cybersecurity practices, and promptly install security updates to mitigate potential risks.

It remains to be seen how Microsoft and other technology giants will fortify their defenses against future attacks, working towards a more secure digital landscape for businesses and individuals alike.

Via: Quartz

PlayStation fans launch petition to bring Starfield to PS5

Fans of Sony’s current-gen PlayStation 5 console have started a petition to bring Bethesda’s upcoming AAA action-RPG Starfield to the platform. The petition was launched on Change.org—the world’s largest petition platform with 500 million users—on June 15 by user Benjamin Dickey. At the time of this writing it has over 1037 signatures, although many of the commenters on the petition appear to have voted just to be able to leave a comment saying how much they disagree.

The “Why this petition matters” section begins,

For over a decade Bethesda games have been released on PlayStation. They perform better on PlayStation, run better, and sell better. Xbox and specially (sic) Phill Spencer have NO BUSINESS taking them away.

The appeal not only calls on Bethesda (which was acquired by Microsoft in 2019) to bring Starfield to PS5, but to “Make Starfield a PS5 EXCLUSIVE!!!!” as the petition’s title suggests. It goes yet another step further,

… it is important for Bethesda games to remain available on PlayStation. Not only that but as a punishment to Xbox and its horrendous player base we need to force ANY AND ALL future Bethesda titles to be ONLY PlayStation exclusives. Not just Starfield.

Starfield Screen Shot 3

It ends with “ If youre (sic) a true gamer you will support this and sign.” It’s unclear if perhaps the petition is actually satire, though it appears to be legitimate. Needless to say, the petition has grabbed a fair bit of attention online, including on the Starfield subreddit. You may recall that a similar Change.org petition was launched a year ago when Hideo Kojima’s next game was announced as an Xbox exclusive.

Starfield is slated for release on September 6. Despite getting a negative review score on Metacritic recently, it is one of the most anticipated video games in memory. We got a deep dive showcase of the game just a week ago during the Starfield Direct, and judging from what was shown, Starfield may (hopefully) just live up to the monumental hype surrounding it.

Starfield
Starfield
Developer:
Bethesda Softworks
Price:
Free

How to Easily Bypass Netflix Password Sharing

Netflix has made many changes regarding password sharing recently, and users aren’t pleased. In fact, many are wondering how to bypass Netflix password sharing.

In a previous article, we delved into the intricate details of how to use Hola VPN for Netflix. Today, we face a similar obstacle.

But before we proceed with any remedies, it is crucial to identify the underlying cause of this problem. Only then can we devise an effective strategy to address the issue at its root.

How can Netflix detect password sharing?

This is achieved by monitoring the following:

  • IP address of each user.
  • Device ID of each device that connects to your account.
  • Location of your home.
  • Netflix account activity.

Can a VPN bypass Netflix password sharing?

Yes, some VPNs with Meshnet technology can bypass password-sharing limitations in Netflix. If you’re not familiar, Meshnet technology does the following:

  • It combines multiple wireless and wired networks.
  • The technology uses Internet routers to create a large network.
  • Mesh networks work similarly to LAN.
  • Routing process sends data from one router to another until it reaches the destination.

How can I bypass Netflix password sharing?

Before we start, you might want to try these workarounds:

  • Don’t use smart TVs and streaming devices since they are being monitored for password sharing.
  • Log in to the owner’s Wi-Fi occasionally to keep using Netflix.

Use a VPN with Meshnet feature

  1. Visit the Nord VPN website and download the client on your preferred OS.
  2. Open the NordVPN app.
  3. You can choose to log-In to your existing account or Sign-Up.
  4. On the left-side menu, choose Meshnet.


  5. Turn on the Meshnet toggle.

  6. Click on Link external device at the bottom.
  7. Enter your friend’s email who you want to share your IP with, and he will have to accept the invite.
  8. You and your folks can now enjoy streaming Netflix.

If you encounter a problem with how to easily bypass Netflix password sharing, don’t fret – typically, there’s a simple solution.

For more information on performance monitoring, we recommend checking out our guide on fixing Netflix issues in Windows.

Our team sincerely hopes that this guide has been helpful to you. However, if you stumbled upon another solution, please share it with us.

Fix: The Exception Unknown Software Exception (0xe0000008)

Multiple users have reported that they are coming across The Exception Unknown Software Exception (0xe0000008) error message, where the apps such as Discord or Steam randomly crash.

In this guide, we will give you details on what is The Exception Unknown Software Exception (0xe0000008) error message and how you can easily resolve the problem. Let us check out the solutions.

What is The Exception Unknown Software Exception (0xe0000008) error?

We dug the internet regarding this issue and found out some of the most common reasons that could trigger The Exception Unknown Software Exception (0xe0000008) error.

  • RAM issues – Chances are there is some underlying RAM-related issue that is causing the apps to crash on your PC and throw up the error.
  • Hard Disk issue – There might be some issue with the hard disk or your computer isn’t able to read the HDD properly, because of which you are getting The Exception Unknown Software Exception (0xe0000008) error.
  • Corrupt system files – Programs fail to launch or crash when the system files are corrupt or missing from your computer.
  • Due to 100% usage of Virtual memory – You might need to expand your virtual memory as 100% of the memory is already used.
  • The latest update isn’t installed – You should make sure that the latest Windows update is installed on your computer to fix such bugs.

Let us now check out the solutions that will help you resolve The Exception Unknown Software Exception (0xe0000008) error.

How do I fix The Exception Unknown Software Exception (0xe0000008) error?

1. Run Windows Memory Diagnostic

  1. Press the Win + R keys to open the Run dialogue.
  2. Type mdsched.exe and press OK to launch the program.
  3. Click the Restart now and check for problems (recommended) button to check for the problems and fix them.

2. Perform SFC and DISM scans

  1. Press the Win key to open the Start menu.
  2. Type Command Prompt and run as an administrator.
  3. Type the below command and press Enter. sfc /scannow
  4. Let the process resolve the corrupt or missing system files issue.
  5. Type the below commands and press Enter after each one: Dism /Online /Cleanup-Image /CheckHealth Dism /Online /Cleanup-Image /ScanHealth Dism /Online /Cleanup-Image /RestoreHealth
  6. Restart your computer.

The SFC Scan and DISM tools can help you fix the corrupt system files that will easily resolve other issues including The Exception Unknown Software Exception (0xe0000008) error.

If you’re not sure about proceeding with the manual steps and want to avoid further issues, we recommend a specialized tool.

3. Run the CHKDSK utility

  1. Press the Win key to open the Start menu.
  2. Type Command Prompt and run it as an administrator.
  3. Type the below command and press Enter. chkdsk /f /rCMD CHKDSK ndis.sys
  4. Press the Y key on your keyboard.

The CHKDSK utility will help resolve the issues related to the hard disk. Let the command execute that check if this fixes The Exception Unknown Software Exception (0xe0000008) error or not.

4. Increase the Virtual RAM

  1. Press the Win + I keys to open the Settings menu.
  2. In the search bar, type performance, and press Enter.
  3. Click on Adjust the appearance and performance of Windows.
  4. Switch to the Advanced tab.
  5. Under the Virtual memory section, click on Change.
  6. Unselect the Automatically manage paging file size for all drives box on this window and click on Custom size.

Several users have resolved The Exception Unknown Software Exception (0xe0000008) error simply by increasing the Virtual RAM memory. We have a guide that explains how to resolve the Your computer is low on memory error.

5. Install the latest Windows Update

  1. Press the Win + I keys to open the Settings menu.
  2. Click on the Windows Update option at the left pane.
  3. Click on the Check for updates button.
  4. Install any pending update by clicking Download and Install button.
  5. Restart your computer and check if this fixes the issue or not.

The latest update will help resolve any issues that were presented by the previous version. So, you should make sure that you have installed the latest available update on your computer to avoid any glitches.

That is it from us in this guide. Feel free to let us know in the comments below, which one of the above solutions resolved the problem for you.

What is Mobsync.exe & How to Disable it


Mobsync.exe lets you work on files even when you’re not connected to the network. However, the Sync Center feature is unnecessary if your computer is always connected to the network.

If you encounter the mobsyc.exe process in the Task Manager among the many background processes and are confused about its purpose on your Windows computer, don’t worry! In this article, we will explain what mobsync.exe is and guide you on how to turn it off if needed.

What is Mobsync EXE used for?

Mobsync.exe is an executable file associated with the Microsoft Sync Center in Windows systems. The Sync Center is a feature in Windows that lets users sync files and data between their computer and other devices like mobile devices or network servers. 

It automatically starts when you log in to your computer and runs in the background to keep a copy of your network files and folders for offline access. When you reconnect to the network, the Sync Center will synchronize all the files, folders, and any modifications made to them.

Should I disable mobsync.exe?

Mobsync.exe helps sync files between your computer and network, keeping everything up to date. If you often use sync features and need files synced, it’s best not to disable mobsync.exe.

But if you don’t use sync or it slows down your system, you can disable it to improve your PC performance. Note that disabling mobsync.exe can free up resources, but it will stop syncing your files and folders.

How do I disable mobsync.exe process?

1. Disable Sync Center via Control Panel

  1. Open the Start menu and type Sync Center in the search bar.
  2. Click on Sync Center from the search results.sync center
  3. In the left-hand pane of the Sync Center, click on Manage offline files.manage offline files
  4. Click on the Disable offline files button.Disable offline files
  5. Click Yes in the confirmation dialog box to restart your computer for the changes to take effect.click yes

Disabling offline files will disable mobsync.exe and prevent it from running in the background.

Remember that this will also disable the Sync Center feature and any associated synchronization functionality.

2. Disable Portable Device Enumerator Service

  1. Press Windows + R, type services.msc, and click on OK.services.exe
  2. Find the service named Portable Device Enumerator Service and double-click on it.Portable Device Enumerator Service
  3. Click the Stop button to terminate the process.click Stop
  4. Then, set the Startup type to Disabled and click Apply.select Disable
  5. Restart your computer to stop the mobsync.exe at the start-up.

3. Disable Sync Center using Group Policy Editor

  1. Open the Start menu, search for Edit group policy, and open it. edit policy editor
  2. Under the Computer Configuration section, click on the arrow next to the Administrative Templates option to expand it.Administrative template
  3. Next, double-click the Network folder to expand.Network
  4. Then, select the Offline Files folder on the left and double-click on the Allow or Disallow use of the Offline Files feature setting on the right pane.select setting
  5. Choose the Disabled option, click Apply, and then OK.Select Disabled and apply

If high CPU usage lowers your Windows 11 PC’s performance, following these simple solutions can greatly improve CPU speed.

If you have any questions or other ideas on disabling the process, please share them in the comments section below.

USB Shortcut Virus: How to Permanently Remove It

USBs are external drives that come in handy when transferring files and essential documents to different places. Like other drives, USBs are prone to several sorts of viruses, the shortcut virus being the sneakiest.

If your USB stick gets affected by the shortcut virus, all the files, folders, and icons stored on it become inaccessible and gradually start changing into shortcuts.

How does the shortcut virus spread to your USB? 

There are several ways by which the shortcut virus may have spread to your USB drive:

  • Accidentally connecting your USB drive to a computer infected with a shortcut virus. 
  • Downloading executable files from untrusted online sources with a virus hidden in the bundled programs. 
  • Mistakenly clicking the suspicious pop-ups and banner ads that appear on your screen when surfing the web. 
  • Clicking the links on the suspicious email received from anonymous sources. 
  • If the antivirus is not active on your PC, the chances of your USB catching the shortcut virus are quite high. 

If you are looking for ways to fix the USB shortcut virus, look no further! This guide lists the various ways to do so without affecting your files and documents. 

How do I remove the shortcut virus from USB? 

Note icon NOTE
Keep your USB drive connected to the PC when performing the following workarounds. 

1. Format the USB drive 

  1. Launch the Windows + E shortcut to launch the File Explorer. 
  2. Click This PC located on the left sidebar to view all the available drives. 
  3. Right-click your removable USB drive and select the Format option from the context menu. USB shortcut virus
  4. On the pop-up that appears, set NTFS (Default) in the file system drop-down, enable the checkbox next to Quick Format to get quick formatting results, and press the Start button. USB shortcut virus
  5. Press Yes on the confirmation popup to initiate the USB format process for removing the USB shortcut virus. 
  6. After the format Complete prompt appears, remove the USB drive and insert it again, the shortcut virus won’t be present. 

Formatting the USB drive is the most straightforward way to delete the shortcut virus from a USB drive. However, the process is not entirely successful in every attempt. 

2. Execute the CMD command 

  1. Press the Windows key to launch the Start menu, type cmd in the search bar on top and choose the Run as administrator option. USB shortcut virus
  2. Click the Yes button on the User Action Control prompt that appears. 
  3. Type the following command and hit the Enter key. Replace H with the letter denoting your USB drive or pen drive. H:
  4. Next, type or paste the following command and hit Enter. del autorun.inf USB Shortcut Virus
  5. Finally, paste the following command and press Enter to execute it. Remember to replace H with the USD drive letter. attrib -h - r -s /s /d H:\*.* usb shortcut virus
  6. If the above commands do not work, it may be because the USB is infected with another virus. To delete the suspicious shortcut virus, try replacing autorun.inf with *.exe in the next attempt.

After the shortcut virus is deleted, format your USB drive once to get rid of the hidden files generated after executing the attrib command. 

3. Delete suspicious processes and keys 

3.1 Via Task Manager 

  1. Right-click the Windows icon on the taskbar and click the Task Manager option. 
  2. Locate and right the processes like wscript.exe or wscript.vbs and select End Task option from the context menu. 
  3. Next, switch to the Startup apps tab and look for suspicious programs with .EXE or .VBS extension. Right-click each of them and select Disable option from the context menu. usb shortcut virus
  4. Now exit the Task Manager window and see if the virus shortcut disappears. 

3.2 Edit the registry 

Note icon NOTE
Back up your Windows registry before proceeding and execute the below steps only if you have enough experience with the registry editor to avoid interfering with the registry keys. 
  1. Use the Windows + R shortcut to launch the Run dialog box, type the following command in the text box and press Enter. regedit 
  2. Paste the following address in the top address bar to directly access the Run key. HKEY_CURRENT_USER/Software/Microsoft/Windows/CurrentVersion/Run
  3. Here, look for strange keys such as OUzzckky in the right section, and if you find any, right-click them and choose Delete. usb shortcut virus
  4. After deleting the keys, close the registry editor window and choose restart. 

3.3 Delete the temporary folder 

  1. Bring up the Run dialog box using the Windows + R shortcut key. Type the following command in the text box and hit OK to access the temporary folder of your user account. %temp%
  2. Use the Windows + A shortcut to select everything here and hit the Delete button to delete them. 
  3. Deleting the suspicious registry keys, background processes, and temporary files should help delete the shortcut virus in the USB as well as other drivers. 

4. Execute the BAT File

  1. Right-click the blank space on the desktop, choose New from the context menu followed by Text document from the sub-menu. 
  2. Right-click the new text document and select Open. 
  3. Copy & paste the following code into the text file and replace G with the letter representing your USB drive. 
    • @echo off
      del *.lnk
      attrib -s -r -h G:\*.* /s /d /l
      @echo complete
  4. Click File on the top menu and select Save as option from the drop-down menu. 
  5. Keep a meaningful file name and add the .bat file extension. Change the Save as type to All files and press Save. 
  6. Now exit the notepad window and double-click it on the desktop to execute it. 
  7. After the bat file runs successfully, check your USB drive. The USB shortcut virus will be deleted for good. 

Executing the above commands in a BAT file is the most effective way to remove the shortcut virus from the USD drive without deleting your stored data. 

That’s all about it! Hopefully, you could permanently delete the shortcut virus by implementing the methods discussed in this guide. 

Before you leave, you may be interested in the guide explaining ways to fix the USB drive not recognized issue if it bothers you frequently. 

In case you need further assistance, we are just a comment away! 

How to Enable Windows Update in the Registry [Quick Steps]

Failure to install Windows updates can lead to various issues, so many users wonder how to enable Windows updates through the registry.

In a previous article, we explored the complexities of the Windows 11 update error, and as you know, such errors can occur if Windows Update isn’t enabled.

Therefore, keep reading to learn more about proper ways to enable this essential feature.

What is the registry key for disabling Windows Update?

To disable Windows Update through the registry, you need to modify the following key:

HKEY\LOCAL\MACHINE\SOFTWARE\Policies\Microsoft\Windows\WindowsUpdate\AU

Once you enter this key, you need to make changes to AUOptions DWORD to disable Windows Update through the registry.

How can I enable Windows Update in the registry?

Configuring Windows Updates by altering the registry

  1. On your home screen type in regedit in the search bar and Run as Administrator.

  2. Once the UAC appears, select Yes.
  3. Once the Registry has opened, Navigate the following path: HKEY_LOCAL_MACHINE/SOFTWARE/Policies/Microsoft/Windows

  4. Now right-click on the Windows directory.
  5. Click on the New and select Key, and next create a new folder named Windows Update.
  6. Next right-click on the Windows Update. Choose New and then Key and create a new directory named AU. 
  7. Again right-click on the AU directory.
  8. Next action is to click on the New and select DWORD. 

  9. Now, define your key name as AUOptions and double-click on the AUOptions to edit the DWORD value.
  10. Kindly input a number between 2-5 as value data, and next click OK to save the setting.

An explanation of each number value is shown below:

  • 2 – This setting will alert you before downloading and installing updates on your system.
  • 3 – All the updates will download automatically and notify you before installation.
  • 4 – This setting will automatically download and automatically set the time to install it.
  • 5 – Allow access to the local system admin to choose the update status.

This is how you can enable Windows Update through the registry. As you can see, it’s not complicated, as long as you carefully follow our instructions.

In case you encounter any other problems, we suggest referring to our extensive guide on Windows Update not working or loading. This guide offers similar remedies that can assist you in finding a solution to your issue.

We value your input and would love to hear your views. Kindly share your thoughts by leaving a comment below and giving us your perspective on the matter.

What is Event ID 1026 & How to Quickly Fix it

The Event ID 1026 prompt occurs when the World Wide Web Publishing Service (WWW Service) encounters an error. Like Event ID 5136, this event is not one of the worrisome issues.

Still, if you want to know how to get rid of the event, this guide will take you through the steps to follow.

What is Event ID 1026?

Event ID 1026 denotes that the World Wide Web Publishing Service (WWW Service) faced an error. This happens when it tries to secure the handle of application pool %1 from HTTP.sys.

To know the error number, check the data field. This will give you an insight into what might have caused the error.

How can I fix Event ID 1026?

Below are some preliminary troubleshooting steps to perform before moving to the solutions in this section:

  • Set the application pool identity.
  • Restart the application pool.

Should this fail to fix this issue, you can now delve into the fixes below:

1. Install the latest version of .Net Framework

  1. Visit the official .Net Framework download page and click the latest version available.
    net frame event id 1026
  2. Now, click the link to download the runtime version on the next page.
    download
  3. Finally, double-click the download file and follow the onscreen instructions to complete the process.

Sometimes, the Event ID 1026 prompt can be due to problems with the .Net Framework. Downloading and installing the latest version of the tool fixed this issue for many users, and you should try it too.

2. Perform an in-place upgrade

  1. Visit the official Windows 11 download website and click the Download Now button under the Create Windows 11 Installation Media section.

    download now
  2. Double-click the downloaded file to launch it.
    double-click
  3. Now, wait for Windows to prepare the setup and click the Yes button when prompted.
  4. Next, accept the Licence Agreement and wait for Windows to download the required updates.
  5. Choose Whether to keep your files and apps or not. Since this is an in-place upgrade, leave the recommended settings, i.e., keep your files and apps.
  6. Now, click the Install button to start the in-place upgrade.
    install event id 1026
  7. Finally, wait for Windows to copy the necessary files to upgrade your device and restart your PC.

Another effective method that has worked for many users in eliminating the Event ID 1026 is to perform an in-place upgrade. This will help you install the latest patches on your PC without deleting your files. With this, you can eliminate the potential causes of this prompt.

There you have everything you need to get rid of the Event ID 1026. All you have to do now is to follow the instructions in this guide carefully, and things should be back to normal.

If you are dealing with a similar issue in Event ID 5145, check our comprehensive guide to fix it.

Feel free to let us know the solution that helped you solve this problem in the comments below.

What is Winsat.exe & What Does it do?

If you’re reading this article, chances are you’re curious about Winsat.exe, a Windows process that performs Windows System Assessment Tests. These tests assess the performance of various system components such as CPU, memory, disk, and graphics.

In a previous article, we explored the complexities of Windows experience index on Windows 11. However, we now face a similar situation.

Nevertheless, it is essential to determine the root cause before attempting to resolve the current problem.

What is Windows System Assessment Tool?

The authentic Winsat.exe is a software component that belongs to Microsoft Windows, developed by Microsoft. Windows is an OS that serves as the backbone of various computer systems.

To evaluate the performance of your PC, Windows System Assessment Tool comes into play as a performance evaluation tool that runs through WinSAT.exe. The good news is that it does not harm your computer whatsoever.

To access WinSAT, you can go to the Control Panel under Performance Information in any of these Microsoft OS: Windows Vista, Windows 7, Windows 8, Windows 10, and Windows 11.

What is the purpose of the Windows System Assessment Tool?

Its primary function is to measure different performance characteristics and capabilities of your hardware system and report them through the Windows Experience Index (WEI) score. The WEI score comprises five sub-scores: memory, processor speed, 2D graphics capability, 3D graphics capability, and disk speed.

WinSAT executes this process flawlessly by assigning scores on a scale ranging from 1.0 to 6.0 on various versions of the Windows OS without causing any damage or disruption to your PC’s functioning.

What does Windows System Assessment Tool do?

The WEI score is a tool that helps individuals align their computer’s hardware capabilities with the software they are utilizing.

The WEI, or Windows Experience Index, empowers users to align their computer’s hardware capabilities with the performance demands of various software applications.

Is Windows System Assessment Tool a Virus?

The Windows System Assessment Tool serves as an instrument for assessing the performance of your computer. WinSAT.exe executes this tool and poses no threat to your device.

There exists a legitimate application on Windows operating system known as Windows System Assessment Tool (WinSAT). If Windows Defender flagged it, it is most likely a false positive.

Should I disable Windows System Assessment Tool?

  • Pros – If you were to disable the WinSAT application, it would have no impact on your computer’s performance or functionality. Your Windows Experience Index score will remain stagnant, and certain programs that use this score as an input may not update their status accordingly.
  • Cons – The moment the Winsat app runs in the background, Perhaps you’ve noticed that this software is using up a significant amount of CPU resources, or maybe you’d prefer to disable it to prevent any updates to the WEI score altogether.

Does Windows System Assessment Tool slows down PC?

If your computer is running slow, it could be due to the Windows System Assessment Tool process. Disabling this feature can improve performance and give your PC the necessary boost it requires.

The process involves evaluating the different parts of your computer and gauging their effectiveness. Remarkably, this does not cause any lag or deterioration in your system’s speed.

How can I check my Windows Experience Index Score?

  1. On your home screen type in PowerShell in your search bar and click Run as Administrator.
  2. Now copy and paste the following command to start the benchmarking operation and press Enter: get-wmiobject -class win32_winsat
  3. You will obtain the scores. DiskScore is for Primary Hard Disk, GraphicsScore is for Graphics, MemoryScore is for Memory and D3DScore is for Gaming Graphics.

Our guide aims to ease your worries and equip you with valuable knowledge. We hope that our manual has furnished you with some useful insights.

If you encounter any other issues, we recommend consulting our comprehensive guide on Windows Experience Index freezes your PC. It presents comparable solutions to help you resolve your problem.

We truly appreciate your feedback and would be delighted to hear your thoughts. Please don’t hesitate to comment below and share your perspective with us.