Spoolsv.exe: What is it & What Does it do?

Sometimes, malware can get into the system without notice by disguising it as a legitimate system file like spoolsv.exe. So, it is important to know whether the executable is genuine when you notice any issues. This guide will discuss this file and explore what it does

Also, you may be interested in our article about exe files deleting themselves on Windows 11 and some steps for fixing the problem.

What is spoolsv.exe?

Spoolsv.exe is a legitimate Windows system file responsible for managing the printing and spooling services on the Windows OS computer. The spoolsv part of the file name stands for spooler service, and the .exe extension indicates that it is an executable file.

Furthermore, the spooler service is an essential component of the Windows printing system. It handles print jobs by managing the print queue, sending print jobs to the printer or print server, and handling communication between the computer and the printing devices.

Is it safe to disable spoolsv.exe?

Generally, disabling this process is not recommended, as it is an integral part of the Windows printing system. Disabling it could result in issues with printing functionality on your computer.

However, like any other system file, malware can target and use this file as a disguise for malicious activities.

Furthermore, some malware may attempt to replace or modify the legitimate file to gain unauthorized access to a computer.

To determine if the spoolsv.exe file on your computer should be disabled, you can perform the following checks:

  • Location check – The legitimate file resides in the C:\Windows\System32 If you find it in any other directory, especially in temporary or user folders, it could be a sign of malware.
  • File properties – Following the above steps, right-click on the spoolsv.exe file and select Properties. In the Properties window, check the details such as the file description, company name, and digital signature. Microsoft digitally signs the genuine file.
  • File size – The legitimate file has a specific file size that can vary depending on the Windows version. You can compare your file size with the known sizes for your particular Windows version. If the file size significantly differs, it may indicate a potential issue.
  • System behavior – If you notice any unusual or suspicious activity, such as frequent crashes, high CPU or memory usage, or unexpected network traffic associated with the spoolsv.exe process, it could be malware.

Disabling the executable in any of the scenarios outlined above may be advisable and considered safe.

How can I disable or remove the spoolsv.exe?

1. Via the Services Manager

  1. Press Windows + R key to open the Run dialog box and type services.msc in the text bar, then press Enter to open Services.
  2. Scroll down and double-click the Print Spooler service on the list.
  3. Go to the Startup type tab and select Disabled from the drop-down menu.
  4. Click the Stop button, Apply, and then tap OK.

Stopping the Print Spooler prevents this file from running on your computer.

2. End task for spoolsv.exe

  1. Right-click the Start button and select Task Manager from the menu.
  2. Go to the Details tab. Select the spoolsv.exe from the list, right-click on it, then click End Task from the drop-down menu.
  3. Restart your PC.

Ending this process will disable its activities on your computer.

Check our article for more shortcuts to open Task Manager on your PC.

In conclusion, read our guide on ways to fix the Print Spooler service not running on Windows 11. Also, you can check what is Splwow64.exe and how to easily disable it.

If you have any questions or suggestions, kindly drop them in the comments section.

Error Communicating With Plugin Service on ChatGPT [Fix]

Plugins on ChatGPT extend its functionality, allowing it to interact with external services and provide extra features. However, users report an error message Error communicating with plugin service, indicating a problem with a software plugin on the app. Hence, this guide will discuss how to fix the issue.

Also, you can check our article about what to do if ChatGPT is stuck in verification on your device.

What causes the error communicating with the plugin service?

The error message occurs when the ChatGPT model and the underlying plugin service responsible for executing some tasks don’t communicate properly. However, some common causes include:

  • Network connectivity issues – If there are problems with the network connection between the ChatGPT model and the plugin service, it can result in communication errors. It could be due to network congestion, firewall restrictions, or other network configuration problems.
  • Plugin service unavailability – The plugin service might be experiencing issues or is temporarily down. In such cases, ChatGPT and the service cannot establish communication, resulting in the error.
  • Plugin service compatibility – If the plugin service is not compatible with the version of ChatGPT you are using, it can lead to communication errors.
  • Plugin service configuration – Incorrect configuration settings or misalignment between the plugin service and ChatGPT can cause communication errors.

The exact cause of this error can vary depending on the specific circumstances and setup. Regardless, we’ll take you through the basic steps for resolving the error.

How can I fix the error communicating with plugin service?

Before trying any advanced fixes, we recommend you observe the following preliminary checks:

  • Check your network connection – Power cycle your router or modem to ensure a stable and working network connection. Test other network-dependent services to verify if the error is specific to the plugin service, or a ChatGPT network error.
  • Refresh the page – Refreshing the page can resolve temporary communication issues. Refresh the page or restart your application that is running ChatGPT and attempt to use the plugin service again.
  • Verify plugin service availability – Check if the plugin service is operational and accessible. You can visit the service provider’s website or contact their support for any information regarding service status or known issues.
  • Contact support – If the issue persists, contact the support channels provided by the plugin service or the platform hosting ChatGPT. They can provide specific guidance and further assistance to help resolve the issue.

If you still can’t get around the ChatGPT plugin service error, proceed with the solutions below:

1. Uninstall and reinstall the ChatGPT plugin

  1. Go to OpenAI official site from your browser and log in to your account using your email and password.
  2. Click on the plugin button beneath the GPT mode toggle.
  3. Click on Plugin store.
  4. In the store, go to the Installed tab. Find the plugin you want to activate, and click the Uninstall button.
  5. Reload ChatGPT and install the plugin to see if it works correctly.

Reinstalling the plugin will resolve configuration issues and conflict with other plugins on the platform. Read our guide on what to do if ChatGPT is not working on your device.

2. Clear your browser’s cache and cookies

  1. Launch the Google Chrome browser on your PC, then click three dots to open the Menu. Navigate to More tools and select Clear browsing data.
  2. Choose a time range for the data to be cleared, then select All time to delete everything.
  3. Check the boxes for Cookies and other site data, Cached images & files, then click Clear data.
  4. Restart your browser and reload the ChatGPT interface to check if the error persists in ChatGPT.

Clearing your browser caches and cookies resolves conflicts or outdated information affecting the communication between ChatGPT and the plugin service.

Check our article about quick ways to clear the computer cache on your Windows PC.

In addition, you may be interested in our article about the steps for downloading the ChatGPT mobile app on your PC.

Also, read about what to do if you encounter The email you provided is not supported error message on ChatGPT.

RFCOMM Protocol TDI: What is it?

When it comes to Bluetooth, we turn on the feature, connect to the device, and have things up and running.

But, most remain unaware of what happens in the background and the required components. RFCOMM Protocol TDI is one we should know about.

You will find the protocol listed under Bluetooth in the Device Manager as an individual device. Many also ask whether disabling RFCOMM Protocol TDI poses any harm. Keep reading to find out the answers to all these questions and fixes for related errors.

What is RFCOMM Protocol TDI?

RFCOMM Protocol TDI, where TDI stands for Transport Driver Interface, ensures the deployment of the RFCOMM protocol. The protocol allows connections with up to 60 devices simultaneously. The device, in itself, provides the TDI transport driver.

And there are no services associated with or relying on the component, as per the information available on Microsoft’s official website. Quite frankly, regular users don’t need to figure out the intricacies of the component, and just a basic understanding should do.

Disabling RFCOMM Protocol TDI shouldn’t act as an impediment when connecting to devices or affect the core functioning of the adapter.

Though, for enhanced capabilities, we recommend keeping it enabled as long as the device or the associated driver doesn’t throw any errors. And even if it does, you can always rectify the problem rather than disabling the device or uninstalling the RFCOMM Protocol TDI driver.

How do I fix RFCOMM Protocol TDI driver issues?

Before we proceed to the slightly complex solutions, here are a few quick tricks to try:

  • Make sure the adapter is plugged in properly if you are using an external one.
  • Check for pending Windows updates and install any available ones.
  • Uninstall recent Windows updates, in case the RFCOMM Protocol TDI issue started appearing after updating the OS.

If none work, move to the fixes listed next.

1. Reinstall the driver

  1. Press Windows + R to open Run, type devmgmt.msc in the text field, and hit Enter.device manager
  2. Expand the Bluetooth entry.
  3. Now, right-click on Bluetooth Device (RFCOMM Protocol TDI), and select Uninstall device.uninstall device to fix RFCOMM Protocol TDI
  4. Click on Uninstall in the confirmation prompt.
  5. Once done, restart the computer, and Windows will automatically install the best driver.

Often when you are facing issues, particularly the Bluetooth Device RFCOMM Protocol TDI code 10 error, a quick fix is to reinstall the driver. It removes the corrupt driver and installs a fresh copy available on the PC.

2. Update the driver

  1. Press Windows + X to open the Power User menu, and select Device Manager from the list.
  2. Double-click the Bluetooth entry, right-click on Bluetooth Device (RFCOMM Protocol TDI), and select Update driver.update driver to fix RFCOMM Protocol TDI
  3. Choose Search automatically for drivers and let Windows identify and install the best one available locally.driver
  4. Finally, restart the computer for the changes to come into effect.

Running an outdated version of the RFCOMM Protocol TDI driver often leads to trouble, and it’s best that you update the driver.

Also, if Windows is unable to find a newer version, you could always head to the manufacturer’s website to install the driver manually.

All in all, the best alternative to update problematic drivers is to use a standalone PC driver manager. This software will scan and detect any driver, updating them accordingly in minutes.

3. Roll back driver update

  1. Press Windows + S to open Search, type Device Manager in the text field, and click on the relevant search result.
  2. Locate the Bluetooth Device (RFCOMM Protocol TDI) entry, right-click on it, and select Properties.properties
  3. Go to the Drivers tab, and click on Roll Back Driver.roll back driver to fix RFCOMM Protocol TDI
  4. Choose a reason for the roll back and click on Yes to confirm.roll back
  5. Finally, restart the computer.

In case the problem appeared after you updated the RFCOMM Protocol TDI driver, uninstalling the latest version could fix things. And even if you didn’t manually do it, there’s a likelihood that a newer version was pushed through Windows Update.

4. Run the Bluetooth service

  1. Press Windows + S to open Run, type services.msc in the text field, and click OK.services.msc
  2. Locate the Bluetooth Support Service, right-click on it, and select Properties.properties
  3. Now, select Automatic from the Startup type dropdown menu, and click on Start if the service is not running.run service to fix RFCOMM Protocol TDI
  4. Next, click on Apply and OK to save the changes.

When having problems with Bluetooth connectivity, it’s imperative to verify that the Bluetooth Support Service is running and is configured to start automatically when you turn on the PC.

5. Perform a system restore

  1. Press Windows + S to open Search, type Create a restore point, and click on the relevant search result.create a different restore pioint
  2. Click on System Restore.system restore to fix RFCOMM Protocol TDI
  3. Select the Choose a different restore point option, and click Next.different point
  4. Now, pick another restore point from the list, one created before the error first appeared, and click Next.pick restore point
  5. Finally, verify the details, and click Finish to start the restore process.

If you found that Bluetooth Device (RFCOMM Protocol TDI) has a driver problem and none of the presented solutions helped, a system restore is often a quick way to get things up and running. It will revert recent changes on the PC, though you could find some apps missing after the restore.

And before you leave, do check some quick tips to make Windows faster than ever.

For any queries or to share what worked for you, drop a comment below.

VS code looks blurry on Windows 11? Fix it in 4 steps

If you’re a software developer using Visual Studio on Windows 11 you might have noticed this issue: your code looks blurry on this operating system, and you have no idea why.

Rest assured, you’re not the only one. A lot of users have been dealing with this issue, and this Reddit thread proves it.

It seems that this issue on PCs with NVIDIA video cards, and it happens when a special feature in the NVIDIA Control Center is on. So the only way to fix is to disable the feature, and the blurry code should not be blurry anymore.

You should know that sometimes, NVIDIA video cards run into all sorts of problems, especially on Windows 11, but that’s because Windows 11 might not be stable due to a lack of updates.

If that’s the case, then you should always keep your Windows 11 updated with the latest features. It’s also very important to keep your video card updated with the latest features as well. Make sure your video drivers are up to date and don’t skip any updates.

You can easily fix this issue in 4 steps, and if you’re dealing with VS blurry code on your screen, you should be able to code all good, if you follow the steps.

Here’s how to fix the VS blurry code on Windows 11

  1. Right-click on your Desktop, and click NVIDIA Control Panel.vs code blurry windows 11
  2. Once you’re there, go to the Manage 3D settings pane.
  3. Click on the Restore button.
  4. Select Antialiasing FXAA and turn it off.

You should then restart your computer, and open your Visual Studio. By now, the code should not be blurry anymore and you can resume your work on your coding projects.

This is how you fix the VS blurry code issue on Windows 11.

Have you experienced this bug? Be sure to let us know your experience in the comments section below.

Why is the Call of Duty update so big? [Download bug]

A lot of users have been complaining that the Call of Duty updates are too big for their systems. In a Reddit thread, a lot of users said that tried to download the latest Call of Duty updates only to find themselves with a much larger file on their shoulders. And computers.

Call of Duty updates are known for being big files, but this time, even veteran players were taken by surprise. It seems that instead of the regular 32GB, which is a lot, the download ended up being around 136 GB, which is way too much for their storage drives.

Needless to say, a lot of users were and still are confused about it. Some of them even got a 140 GB download, so it is definitely a bug. But why does it happen?

Why is the Call of Duty update so big?

Many users tried to find an answer and some of them even know why, It’s a download bug, after all. But it ends up affecting the systems, and their capacity to store any more files.

It’s a bug that happens. I’ve had it do that before something messes up, and it decides it needs to redownload the entire game. It’s happened to me on multiple games, I think something gets corrupt and that’s how it fixes it.

So it seems, every time one of the game’s files gets corrupted, the app decides that the only way it can repair the game is by downloading it again, in its entirety. According to some users, the bug doesn’t happen only once, but every time it encounters a corrupt file.call of duty updates too big

So players end up having to wait for a whole download, which is, as you can see, very big. Some users even tried to uninstall the game, properly, and install it again. But it was in vain, as the bug happened all over again.

While there is not a definitive answer on why that happens, it seems that installing it in another hard drive did the trick of fixing it.

So far, neither Xbox nor Microsoft released anything related to the bug, as it might be considered an official bug. The game does a full download all over again if encounters a corrupted file. So that it repairs itself. You just have to wait in between.

Have you experienced this bug? Let us know your thoughts in the comments section below.

Xbox Studios roadmap: what games to expect in 2023 & 2026

Good news for gamers everywhere: a lot of new games are coming to Xbox in 2023 and 2024, according to a roadmap shared on Twitter.

The roadmap focuses on games that will be released in 2023, including Starfield, which is probably one of the most expected titles of the year. And if you didn’t know, the game will eat a lot of your storage, even if the system requirements are not that high.

The roadmap for Xbox definitely looks exciting. And to make it even better, Microsoft announced that over 5000 new games are in development for Xbox. Not to mention the fact that the Game Pass will come to NVIDIA GeForce Now. It will let you play all the games that GeForce Now streams.

This means you’ll be able to play the games on low-spec PCs, laptops, Macs, Chromebooks, TVs, or even mobile devices. Including these games that are in the roadmap for Xbox. Exciting news.

Xbox Studios roadmap: what games to expect in a couple of years

According to the roadmap, there are some important titles coming to Xbox in 2023:

They are:

  • Age of Empires 2, Xbox console version
  • Ghostwire, Xbox version
  • Minecraft Legends
  • RedFall
  • Starfield
  • Forza Horizon
  • ARA: History Untold
  • Age of Empires 4, Xbox console version

Starfield is of course one of the most anticipated titles, on this list. But Forza Horizon is another beloved video game that will arrive this year. And let’s not forget about the classic Age of Empires 4, which will find a new audience on Xbox.

The roadmap for 2023 definitely seems exciting, at least.

Let’s take a look at the roadmap for 2024. The titles are:

  • Avowed
  • Senua’s Saga: Hellblade 2
  • TowerBorne
  • Flight Simulator 2024

These are the confirmed titles for 2024, and Senua’s Saga: Hellblade 2 might be the most awaited from them all. But let’s not forget that titles such as TowerBorne and Avowed are also coming to Xbox.

Upcoming video games in the roadmap

A lot of new exciting games are coming to Xbox in the future, according to the Xbox studios roadmap including Everwild, a Kojima Productions project, and the much beloved Age of Mythology: Retold, which for many of us, it is the video game of our childhoods. xbox studios roadmap

Here is a complete list:

  • Everwild
  • The Outer Worlds 2
  • Project Mara
  • Fable
  • Age of Mythology: Retold
  • Perfect Dark
  • State of Decay
  • South Midnight
  • Clockwork Revolution
  • Contraband
  • Indiana Jones
  • Gears
  • The Elder Scrolls

Plus it seems that they will be focusing on ongoing projects too, such as Halo Multiplayers. We do wonder if a new Halo is in sight at Microsoft, but who knows? Microsoft said there’s a big roadmap for the franchise so we’re eager for news.

Even more, CES 2024 took place last week on January 9-12, and Microsoft had quite a few surprises for us as well.

What do you think about this roadmap? Are you excited about the new titles coming to Xbox? Let us know in the comments section below.

WordPad Not Opening? 4 Ways to Fix it

Even though most journeyman users won’t mind missing WordPad, it’s still a valuable asset for small text processing needs. There are various documents and formats WordPad can’t open (partly because Microsoft wants you to download Office), but it still does fairly well and can come in handy.

Since it’s been a built-in part of the Windows platform for a long time, it barely has any issues. Nonetheless, some users experienced some, as they were seemingly unable to open WordPad in Windows 10.

We made sure to find a few solutions to the problem at hand. If you can’t open text files with WordPad, you can try out our suggestions and, hopefully, resolve this.

What can I do if WordPad is not opening?

1. Scan for malware

  1. Close all applications you were working on.
  2. Open Windows Defender from the notification area.
  3. Choose Virus & threat protection.wordpad won't open windows 10
  4. Click Scan options.
  5. Choose Windows Defender Offline Scan and click on Scan now.wordpad won't open windows 10

As we already said, the WordPad text processor is a built-in desktop application. A reminiscence of the past Windows iterations. It’s stored with other installed programs in the WindowsNT folder.

That means that it’s, to some extent and in comparison to system files, vulnerable to malware infections or misuse. Even some applications for cleaning the system can delete one of its files, and that’s rarely the case. A virus, on the other hand, can affect it.

That’s why we need you to perform a deep scan and look for possible malware presence. This can be done with the built-in Windows Defender or any reliable third-party antivirus.

2. Repair corrupt system files

  1. Press Windows + S to open Search, type Command Prompt, and click on Run as administrator.
  2. In the command line, paste this and press Enter:sfc /scannowwordpad won't open windows 10

Also, we recommend running the System File Checker utility in Command Prompt. This tool replaces the corrupt system files with the cached copy stored on the PC.
Even better, you can try specialized third-party repair software to handle corrupt files with just a few clicks.

3. Try starting WordPad from the installation folder

If the WordPad won’t start or open files when chosen from the contextual menu, you can try running it directly from where default installation path. If you open WordPad, it might get repaired (in case some registry inputs got misconfigured).

The executable we’re looking for is found by following this path:C:\Program Files (x86)\Windows NT\Accessories\

Simply double-click on the WordPad.exe and run it, or you could launch it as an administrator. Then, locate the files you want to open with WordPad and start with the editing.

4. Use an alternative

Now, we know this isn’t a solution but a mere workaround. But, if you’re in dire need of a text processor but are not willing to reset your system to factory values, we recommend looking up alternatives.

Check our curated list of the best writing apps and pick one that meets your requirements. You can also try an open-source free text editor like Open Office or even use Microsoft Office online.

If you have any alternative solution or recommendation, feel free to tell us in the comments section below.

How to Create & Set up a Group Email in Gmail

Gmail remains one of the most used email services worldwide, with over 1.8 billion active users. And most users often send emails to several users, particularly in organizations and even social groups. As a result, they create a group email in Gmail.

Even for other apps, for instance, Windows Mail, users can create a group. But is it all that relevant? Does creating email groups in Gmail help? Let’s find out and learn how to create an email group in Gmail.

What is the purpose of creating a group email?

Creating a group list of email addresses presents several benefits. Here are the most significant ones:

  • Saves time: The primary benefit of creating email groups is that users don’t have to individually add a large number of addresses, which helps save significant time.
  • Simplifies the process: When adding individual addresses, there is a chance of missing out on a few. But creating an email group eliminates the possibility and ensures a seamless process. And when coupled with an effective email client, you get an even better experience.
  • Ensures better management: With email groups, you can have the required members of the organization in a loop for vital information, which results in better management.

How do I create a group email list in Gmail?

  1. Open Gmail, click on the Google apps icon near the top right, and then select Contacts.contacts
  2. Now, tick the checkboxes before the contacts you want to add to the group, click on the Manage labels icon, and select Create label.new label to create group email in gmail
  3. Enter a name for the label in the text field, and click Save.label
  4. Once you have created a label, head back to Gmail, start composing an email, then in the To field, enter the label name, and select it from the menu.send email
  5. The present email will now be sent to all the email addresses added to the group/label.

That’s all! This is how users can create a group in Gmail and simultaneously send emails to multiple addresses. Once you start employing the feature, it will certainly enhance productivity and minimize mistakes.

If you’re using groups in Outlook, you should check our guide on how to delete Outlook group, in case you don’t want to use it anymore. You can stop syncing emails across different devices as well.

Before you leave, check some quick tips to speed up Gmail if it’s running slow or is stuck. Moreover, if you want to know how to highlight text in your emails, we can help out! You can also send multiple pictures at once.

For any queries or to share your feedback on Gmail, drop a comment below.

How to Create a Group Email in Outlook [Desktop, Windows & Mac]

Whether you’re organizing a team at work, setting up a family mailing list, or creating a study group, learning how to create a group email in Outlook is important.

In fact, Outlook makes it surprisingly easy. The process does vary depending on whether you’re using Outlook on the web, Windows, or Mac. But once you’ve set it up, you can send emails to everyone in your group with just one click. Without further ado, let’s jump into the methods.

How do I create a group email in my Outlook?

  1. Launch Outlook on your Windows PC, and navigate to the People tab from the left pane.people
  2. Click on New Contact Group.new contact group to create group email in outlook
  3. Add a name for the group in the text field, click on Add Members, and select an option to add these from the dropdown menu.add members
  4. We choose New E-mail Contact, entered the email address, and clicked on OK to add the user. You can similarly add others as well.
  5. Once done, click on Save & Close to create the contact group.create group email in outlook

That’s all! It’s this simple to create a contact group email in Outlook, and you can add as many as you would like in no time. Besides, you can similarly create a group in the Outlook web app and its Mac version.

How Do I Create an Email Group in Outlook on the Web

If you’re using Outlook.com, here’s the easiest way to create a group:

  1. First, sign in to Outlook.com.
  2. Next, click the People icon in the left sidebar.
  3. Then, select the dropdown arrow next to New Contact and choose New Group.
  4. After that, enter your group’s name and, if you’d like, add a description so people know what the group is for.
  5. Now, hit Create, then start typing names or email addresses to add members.
  6. Finally, click Add to confirm.

That’s it, your group is ready. Outlook even sends members a welcome email so they kno

How to Set Up an Email Group in Outlook for Mac

On Mac, creating an email group is as easy as creating it on Windows and the desktop app for Outlook. Here’s how it’s done:

  1. First, open Outlook for Mac.
  2. Then, go to File > New > Group.
  3. Now, enter your group’s name (and add a description if you want).
  4. Finally, click Create to finish.

NOTE: If you don’t see the option for “Group,” it may be disabled by your IT department.

How do I send an email to a group on Outlook?

  1. Open the Outlook application, and click on New Email.new email
  2. In the To text field, enter the group name, and select it from the list of options in the menu that appears.send email to created group email in outlook
  3. Draft the email, be it the subject or the content, and finally, click Send.
How do I create a distribution group mailbox in Outlook

A distribution group mailbox is created by making a contact group in Outlook. On Windows, click New Contact Group in the Home tab, add members, and save. On Outlook.com, use New Group under contacts. If you’re using Outlook through your workplace, your IT admin may need to enable distribution groups in Exchange.

How do I remove someone from an Outlook group

Open Outlook and go to People. Select the group you want to edit, then click Edit (pencil icon). From the member list, select the person you want to remove and click Remove. Save your changes, and that contact will no longer be part of the group.

How do I edit an email group name in Outlook

To change the name of a group, go to People, then find your group under Groups you own. Click the Edit (pencil) icon, update the group name (and description if needed), then click Save. The new name will appear for all members.

How do I create a group email list in Outlook

You can create a group email list in Outlook by going to the People section. On the web, click New Group under the contacts menu. On Windows, use New Contact Group in the Home tab. On Mac, go to File > New > Group. Add members, give your group a name, and save it, your email list is ready.

How do I send an email to a new group in Outlook

Open Outlook and click New Email. In the “To” field, type the name of your contact group, and Outlook will auto-fill the group address. Write your email as usual, then click Send. Your message will be delivered to all group members automatically.

And that completes all the information you need on the subject! By now, you already know how to create an email group on Outlook and should have one or multiple groups set up. You can also send multiple pictures at once.

If you don’t want to use the group anymore, we have a great guide on how to delete an Outlook group, so be sure not to miss it.

Before you leave, check some quick tips to speed up Outlook’s indexing and improve Outlook’s performance on the PC. You may also check our article on how to recall & resend an email in Outlook. And lastly, find out how to import vCards in Outlook.

All users will be able to uninstall Microsoft Teams Chat

There’s no denying the fact that, despite its huge popularity, not everyone is a Microsoft Teams fan and many don’t want anything to do with the software.

On that note, Microsoft may let you uninstall Chat, which is a Microsoft Teams for consumer feature, and remove it from Windows Settings.

Speaking of teams, we can show you how to create easy visuals, or maybe how to use the AI-based intelligent recap, if that is something you need.

We will be able to remove Teams Chat

In truth, this strategic move could be done in order to avoid the threat of antitrust investigation by European Union regulators.

Even though it’s already possible to unpin Teams Chat from the taskbar, you cannot remove it from the operating system entirely.

It is also pretty important to understand that unpinning Chat from the taskbar does not remove the feature, as it still lives inside the taskbar and settings but is hidden.

The Redmond-based tech giant is letting you remove the feature entirely, including from the Settings app.

In fact, Microsoft is removing the integrated Teams Chat menu, in Windows 11, and replaces it with a pinned app shortcut.

Microsoft has released the Build 23481 for Windows Insiders and it features the new option to unpin it, and remove it.

  • Starting with his build, Chat is now Microsoft Teams – Free. Microsoft Teams – Free is pinned by default to the taskbar and can be unpinned like other apps on the taskbar. Stay tuned for more enhancements as we continue to enhance Microsoft Teams – Free with more features and improvements.

In case you weren’t aware, Teams Chat was announced with much hype at Windows 11’s October 2021 event.

The feature was integrated into Windows 11 Shell/taskbar and offers a user-friendly experience, allowing anyone to connect with friends and family outside of work for free.

You should know that Teams isn’t popular in the consumer space as people prefer Meta products such as WhatsApp and Facebook to communicate with friends or families.

Teams Chat, which failed to gain traction in the consumer market, was part of a broader effort by Microsoft to remain relevant with consumers.

So, instead of rebranding Teams, Microsoft changed the Teams app and added features for people looking to chat.

We’ll keep a close eye on the matter and report back once new details are available. Be sure to leave a comment below with your thoughts and opinions.

0xc03F300D Microsoft Store Error: How to Fix It

Microsoft Store is a valuable resource for downloading and updating applications for Windows. However, one common issue that users encounter is the 0xc03F300D Microsoft Store error, which can prevent you from installing or updating apps.

In this guide, we will delve into the causes of the error and provide you with step-by-step instructions on how to fix it.

What causes the 0xc03f300d Microsoft Store error?

The 0xc03F300D Microsoft Store error can occur due to various reasons. Here are a few:

  • Connectivity issues – If your internet connection is unstable, you may see this error. Try to troubleshoot your internet or contact your ISP to fix it.
  • Cache corruption – The cache files used by the Microsoft Store can become corrupted or outdated, triggering the issue. Try to clear the app cache to fix the problem.
  • Windows Store issues – If the Microsoft Store is facing the issue locally, you may not be able to access it, hence the error. You can repair the app to resolve this.
  • System files corruption – The system files related to the app can get damaged and cause this problem. Try repairing the system files to get rid of the problem.
  • Account-related issues – If there are problems with your Microsoft account or if it is not properly linked or authenticated within the Microsoft Store, it can lead to the 0xc03F300D error.

These are some of the common causes of the error; let us check out the solutions to eliminate the problem.

How can I fix the 0xc03f300d Microsoft Store error?

Before engaging in advanced troubleshooting steps, you should consider performing the following checks:

Once you have conducted these checks, let us move on to the solutions to fix this problem.

1. Run the Windows Apps troubleshooter

  1. Press Windows + I to open the Settings app.
  2. Go to System, then click Troubleshoot.System troubleshoot
  3. Click Other troubleshooters.Other Troubleshooters 0xc03F300D
  4. Locate Windows Store Apps and click Run.Windows store app
  5. Follow the onscreen instructions to complete the process.

This troubleshooter tool may help you identify the issues, yet it doesn’t ensure the fix for the specific errors.

Hence, you can make great use of a professional system repair tool that will diagnose Windows issues and find reliable ways to properly fix this.

2. Change Startup type for related services

  1. Press Windows + R to open the Run dialog box.Run services.msc command 0xc03F300D
  2. Type services.msc and click OK to open the Services app.
  3. Locate and double-click Windows Update to open Properties.Windows Update service
  4. On the Properties window, for Startup, select Automatic.Startup type Automatic
  5. Click Apply, then OK.

3. Clear the Microsoft Store cache

  1. Press the Windows key, type cmd, and click Run as administrator.CMD elevated
  2. Type the following command to reset the app along with all dependencies: and hit Enter: wsreset.exeWSreset clear cache 0xc03F300D
  3. Microsoft Store will reopen.
  4. To save the changes, reboot your computer.

Clearing the store cache can help you fix other Windows Store app issues like Microsoft Store error 0x00000005; read this guide to learn more.

4. Run SFC & DISM scans

  1. Press the Windows key, type cmd, and click Run as administrator.CMD elevated
  2. Type the following command to repair system files and press Enter: sfc /scannowSFCSCANNOW CMD 0xc03F300D
  3. Wait for the command to complete, then copy & paste the following command one by one to repair Windows OS image files and hit Enter after every command:
    • Dism /Online /Cleanup-Image /CheckHealth
      Dism /Online /Cleanup-Image /ScanHealth
      Dism /Online /Cleanup-Image /RestoreHealth
  4. Wait for the scan to complete and restart your computer.

5. Repair/reset the Microsoft Store app

  1. Press Windows + I to open the Settings app.
  2. Go to Apps, then click Installed apps.Apps, installed apps 0xc03F300D
  3. Locate Microsoft Store, click three dots, and then Advanced options.Advanced options
  4. Click Repair.Repair
  5. If the issue persists, open Advanced options again and click Reset.Reset

6. Reinstall the Microsoft Store app

  1. Press the Windows key, type powershell, and click Run as administrator.Powershell 2 0xc03F300D
  2. Type the following command and press Enter: get-appxpackage –alluserspowershell_Ja1sDcLIKP
  3. You will get the list of apps; locate Microsoft.WindowsStore and copy the entry for PackageFullName.powershell_mZvxATPm8x
  4. Once done, copy & paste the following command to remove Microsoft Store app after replacing PackageFullName with the name displayed in the PowerShell window and hit Enter: remove-appxpackage PackageFullName
  5. Restart your computer. Open PowerShell again with admin rights.
  6. To reinstall Microsoft Store, type the following command and press Enter: Add-AppxPackage -register "C:\Program Files\WindowsApps\Microsoft.WindowsStore_11804.1001.8.0_x64__8wekyb3d8bbwe\AppxManifest.xml" –DisableDevelopmentMode

So, these are methods to fix the 0xc03F300D Microsoft Store error and regain full access. If nothing has worked for you, we suggest you contact Microsoft Support for further assistance.

If you are not able to find Microsoft Store in Apps and features, then we suggest you check out this detailed guide to fix the problem

Please feel free to give us any information, tips, and your experience with the subject in the comments section below.

Bad Request: Header Field Too Long [Error Fix]

Have you ever encountered the frustrating Bad request header field too long error message while browsing a website on Google Chrome, Firefox, or Microsoft Edge? If so, fret not!

The matter at hand bears resemblance to the HTTP error 400 that we previously addressed in our guide.

Before addressing the issue at hand, we must examine its underlying cause.

Why does my PC keep saying Bad request: header field too long?

This is mostly a cookie issue, and the following might be the reasons:

  • This issue typically arises when using the Nginx web server.
  • In some cases, websites utilizing this software may restrict browser cookies of a specific size.
  • It might experience corruption in the cookie stored in the browser.

Fortunately, there are ways to rectify this cookie problem. Let’s explore some solutions.

How can I fix Bad request: header field too long?

1. For Google Chrome

  1. Open Google Chrome, click the three dots at the top far right, and click the History section.
  2. Next, click Clear browsing data

  3. Now set the time range to All Time. Select Cookies and other site data & Cached images and files and lastly choose Clear Data.

2. For Mozilla Firefox

  1. Open Mozilla Firefox, click on the Tools bar at the top right corner and choose History.

  2. Next, choose Clear Recent History.

  3. In the Clear recent history menu, choose the time range to Everything.

  4. Check the options, Cookies, Active Logins, Cache, Site settings, and Offline website data, lastly click Clear now.
  5. Restart Firefox to check if the bad request: header field is too long has been fixed.

After doing that, the problem should be gone in Firefox.

3. Microsoft Edge

  1. Click the three horizontal dots in the upper right-hand corner and click Settings.

  2. Now, click the Privacy, search, and Services tab. Go to the Choose what to clear part and click Choose what to clear option. 

  3. Now check the Cookies and saved website data option and click Clear. Then, restart the browser and check to see if the issue has been fixed.

We hope this guide has provided you with the necessary assistance in resolving your concern. As you have witnessed, rectifying this problem is not as daunting as it may seem at first glance.

If you encounter any more obstacles, we suggest looking into our guide on Website is not accessible error. This resource may offer comparable solutions to your issue.

Your feedback would be greatly appreciated, so please leave a comment below and inform us of the most effective solution you found.

ReviOS: is it really faster than Windows 11?

While Windows 11 becomes more stable with each update, it doesn’t necessarily mean that it’s not consuming a lot of CPU power.

In fact, Windows 11 can only be installed in systems that meet its requirements, so you might want to stick around on Windows 10 if you haven’t upgraded your PC yet.

Either way, if you’re still on Windows 10, there is still time to think about it. And if not, then Microsoft can automatically label your system as eligible for Windows 11. So that way, you’ll know for sure that you can install it.

But if you’re already on Windows 11, and you find it laggy sometimes, you still have a very unconventional method to experience a smooth Windows 11. How? Well, you can try ReviOS Windows 11.

Some users actually agree that ReviOS Windows 11 is faster than Windows 11, and you can install it on your PC as well.

Is ReviOS Windows 11 faster than Windows 11?

Let’s start with the basics. What is ReviOS? Well, ReviOS, or Revision, is a custom ISO made with gamers and power users in mind.

It removes a lot of the deemed unnecessary apps and software from Windows 11 and throws them to the wayside. In short, your Windows 11 will keep the must-have apps, considerably reducing CPU power usage.revios windows 11

You’ll no longer have features like Notifications, Account Control, or updates to Edge. But you’ll still have the Xbox app and Windows Security, so you’re not going to be completely unprotected from malware.

However, Defender is not ReviOS, so you should know that. If you plan to install it, then consider installing an Anti-Virus right after, so you can be protected.

On the other hand, ReviOS Windows 11 is pretty light: the ISO file has around 3.56GB. The system requirements are also very convenient. ReviOS Windows 11 requires you to have 4GB of RAM, instead of the 8GB of RAM that Windows 11 is asking.

The users on the Reddit thread said that they feel a huge difference in computer behavior, before and after installing ReviOS.

You’ll have the liberty to choose which apps you can install. Plus, after installation, you can visit Revision’s Workspace. It will let you customize your Windows 11 the way you want it to be.

So will it make Windows 11 faster? Definitely. Is it faster than the standard Windows 11? Also, yes. It gets rid of unnecessary apps to make room for more performance.

And if you’re a gamer, or content creator, who daily pushes its system to the limit, then ReviOS Windows 11 might just be for you.

Check out the Reddit thread, to see the other users’ input on it. Make an idea about it, and try it for yourself if you want.

And be sure to let us know your experience with it in the comments section below.

Runtime Error 32809: How to Quickly Fix it

When it comes to Microsoft Excel, runtime errors or bugs are not uncommon, and Error 32809 is one such example. To ensure a smooth user experience, software developers like Microsoft Corporation put the application through rigorous debugging processes before releasing it to the public.

In our previous article, we explored the Runtime error 13: type mismatch, but now we face a comparable predicament.

However, it is imperative to determine the root cause before tackling the matter.

What is Runtime error 32809?

Encountering Excel Error 32809 is a common issue during Microsoft Excel startup or runtime. The origin of these runtime errors can be identified by analyzing the error code.

The Excel VBA error 32809 can be a headache as it seems to occur without any clear explanation. It’s interesting to note that the error may only happen on one computer in an office setting, while another computer running the same macro may not encounter the problem.

How can I fix Runtime error 32809?

  • Missing files – If your system is missing files like mscomctl.ocx and comctl32.ocx, you might encounter this error.
  • Alter the Trust Settings – Deactivating certain security measures in the Trust Settings, will resolve the issue, and the system will begin to function properly.
  • Change the controls –  It is recommended that you replace all ActiveX Controls with Form controls. 

1. Delete recently installed updates

  1. Select Start, click on Settings now choose Windows Update, and tap Update History.
  2. Now click on Uninstall updates. 
  3. On the list that pops up, find the update you want to remove, and then choose Uninstall next to it.

2. Alter the file format

  1. You can save the file as .xlsx (macro-free).
  2. Now open the source file with macros and copy modules to the .xlsx file.
  3. Lastly, save the file as .xlsm.

Our comprehensive manual aims to ease your worries and provide useful information. We genuinely hope that our guide has given you some valuable insight.

If you encounter any further problems, we recommend referring to our extensive guide on Runtime error 429. This guide offers comparable solutions to help you overcome your issue.

We truly appreciate your input on this matter and would love to hear your thoughts. Please feel free to leave a comment below and share your perspective with us.

How to use the Focus Sessions widget on Windows 11

Good news for Windows 11 users this week: it seems that you can use the Focus Sessions widget on the operating system sooner than expected.

Microsoft released Windows 11 Insider Preview Build 23481 to the Dev Channel and you can download the ISO file as well if you find it more convenient this way.

The release brings some important improvements to Windows Ink, which is a very useful tool for organizations. But among the new features, the Focus Sessions widget steals the show.

The Focus Session feature is already on Windows 11, but not as a widget, though. You can find it in the taskbar, below your calendar, and it’s very useful for when you have to focus at work. However, you can easily forget about it, because it’s simply not in your glance.

Here’s how you can use the Focus Sessions widget on Windows 11

Because it’s not in your glance, you can easily forget about using the Focus Sessions option, however, Microsoft is putting it in a widget, so that way, you can use it when you check for the weather. Or when you’re using the other widgets.

The new Focus Sessions Widget will be part of the Clock app update, and currently, it’s available in Microsoft Store in Windows Insiders in the Canary and Dev Channels.

You’ll be able to access it by clicking on the Widgets button > Focus Sessions Widget. focus sessions windows 11

As you can see, accessing it will be very easy, but if you find it annoying, you can also disable focus sessions to revert to the old clock style.

What other features and improvements are coming to Windows 11, you may ask?

Here’s the complete list:

Changes and Improvements

[Taskbar & System Tray]

  • Never combined mode, which enables you to see each window of your applications on the taskbar individually, and which began rolling out with Build 23466, is now available to all Windows Insiders in the Dev Channel.
Taskbar in never combined mode.
  • Starting with his build, Chat is now Microsoft Teams – Free. Microsoft Teams – Free is pinned by default to the taskbar and can be unpinned like other apps on the taskbar. Stay tuned for more enhancements as we continue to enhance Microsoft Teams – Free with more features and improvements.

[File Explorer]

  • The ability to tear out and merge tabs in File Explorer, which began rolling out with Build 23471, is now available to all Windows Insiders in the Dev Channel.

[Voice access]

  • The new text authoring experiences in voice access that began rolling out with Build 23466 is now available to all Windows Insiders in the Dev Channel.

Fixes

[Dev Drive]

  • Fixed an issue where filters beyond AV might be attached to your Dev Drive on reboot.
  • Fixed an issue which could cause a bugcheck when using Dev Drive.

[File Explorer]

  • Fixed an issue where the icons in the File Explorer context menu could be blurry.
  • Fixed an issue where sync status icons for files backing up to a storage provider were not reliably displayed.
  • Fixed an issue for authentication errors on File Explorer Home where the ‘Please Sign-in’ button appeared but clicking on it did not pop-up the authentication dialog.
  • Updated “Show files from Office.com” text in folder options to “Include account-based insights, recent, favorite, and recommended files”.
  • Using CTRL + V to paste an image in Gallery will now paste the image into your default pictures folder (the default folder can be configured under Collection > Manage Collection in Gallery).
  • If you hover your mouse over the details button in File Explorer, the tooltip should no longer block the close button for the window.

We fixed the following issues for Insiders with the modernized address bar in File Explorer:

  • Fixed the direction of the search icon within the tab when doing a search in File Explorer.
  • Fixed an issue where tabbing or Shift + tabbing from the command bar wouldn’t land focus inside the current folder.
  • Fixed an issue where if you set focus into the address bar (to edit the path), you wouldn’t be able to use the tab to move focus out of it.
  • If the current path is longer than the available space in the address bar, a bit of room now has been added so you can still click and go into edit mode.

We fixed the following issues for Insiders who have the modernized File Explorer Home:

  • Fixed an issue where hovering over folders in the Quick Access section of Home was causing the name to disappear and the icon to slide to the side if you had checkboxes enabled.
  • Dragging and dropping into the Favorites or Quick Access sections should work again now.

[Search on the Taskbar]

  • Fixed an issue where navigating the search flyout on the taskbar with the keyboard arrow keys did not work as expected.

NOTE: Some fixes noted here in Insider Preview builds from the Dev Channel may make their way into the servicing updates for the released version of Windows 11.

Known issues

[Dev Drive]

  • There might be variable performance on different hardware. If you notice slower performance on your machine, please file feedback!

[Search on the Taskbar]

  • Text scaling may not work in the search flyout.

[File Explorer]

  • Insiders may experience a File Explorer crash when dragging the scroll bar or attempting to close the window during an extended file-loading process.
  • Thumbnail loading performance in Gallery for dehydrated cloud files and memory usage in large collections are known issues we are focused on improving. Please capture Performance traces in Feedback Hub for any performance-related issues. Rebuilding your Indexer can help if thumbnails are missing for cloud files; Search for “Indexing Options” and look in Advanced settings to find the rebuild tool.
  • [NEW] The count shown for selected files in the details pane may be extremely large.

Insiders who have the modernized File Explorer Home that began rolling out with Build 23475:

  • File Type icons are displayed in place of file thumbnails for the ‘Recommended’ section (applicable to Enterprise users).
  • Insiders signed in with an AAD account and tried to navigate the Recommended section on File Explorer Home with the tab key on the keyboard may experience an explorer.exe crash.
  • When navigating from another group to the Recommended section using a keyboard, focus does not appear on the group header or files appropriately.
  • Files display file extensions with the Show file extensions setting disabled.

Insiders who have the modernized File Explorer address bar that began rolling out with Build 23475:

  • Windows Insiders may notice missing craftmanship polish with the modernized address bar and search box. The team greatly appreciates the use of Feedback Hub to help call out important details to address.
  • Users might experience lost keyboard focus and missing keyboard shortcuts. The team implemented improved tabbing with keyboard shortcuts that will be available soon.
  • [NEW] If “…” shows in the address bar path, selecting it will crash explorer.exe.

Insiders will have issues with the following commands on recommended files in File Explorer that began rolling out with Build 23403:

  • Clicking on the Share command will currently bring up the Windows share sheet (non-OneDrive).

[Notifications]

  • The copy button for quickly copying two-factor authentication (2FA) codes in notification toasts (first introduced in Build 23403) is currently not working in this build. A fix is coming in a future flight.

[Dynamic Lighting]

  • On the first boot after installing this build and connecting a device, the “Use Dynamic Lighting on my devices” toggle is off in Settings. Device LEDs may not turn on automatically. Turning this toggle on in the all-device Settings page and in the per-device page(s) should turn on your device’s LEDs. If this doesn’t work, try restarting your Windows PC again.
  • All-device settings changes are not propagating to per-device Settings.
  • Device icons are missing from the device cards in Settings.
  • Switching user accounts can turn off device LEDs.

[Windows Ink]

  • [NEW] Users can’t use handwriting to erase text in Microsoft Edge.
  • [NEW] The address box in Microsoft Edge might not work correctly.
  • [NEW] Windows Ink does not convert handwriting to text into the main content (e.g., Word documents and Excel spreadsheets) in Microsoft 365 applications.
  • [NEW] Search boxes in Microsoft 365 applications (e.g., Microsoft Word) might not work correctly.
  • [NEW] Comment fields in Microsoft 365 applications (e.g., Microsoft Word) might not work correctly.

What are your thoughts and opinions about the new Focus Sessions Widgets? Be sure to let us know in the comments section below.

Wuauclt.exe Not Working? Fix It in 4 Simple Steps

If wuauclt.exe is not working, the Windows Update Automatic Updates client will fail as well, so you won’t be able to install any OS updates.

In this guide, we will explore the causes behind the issue and provide simple steps to fix it, ensuring smooth Windows updates and system maintenance.

What causes the wuauclt.exe not working issue?

There could be various reasons for this error; some of the common ones are mentioned here:

  • Incorrect configurations or settings – Improper configurations or settings within the Windows Update service can cause wuauclt.exe to encounter issues or fail to function correctly.
  • Corrupted or missing system files – The wuauclt.exe or related system files may become corrupted or go missing, leading to malfunctions and errors.
  • Software conflicts – Conflicts with other software, such as security programs or third-party utilities, can interfere with the file’s functionality.
  • Malware infection – If your computer is infected with viruses, it can corrupt the wuauclt.exe file, leading to malfunctions or disabling its proper operation. Run a malware scan to fix it.

Now that you know the causes of the error, let us move to the troubleshooting steps to resolve the problem.

How can I fix the wuauclt.exe not working issue?

Before engaging in advanced troubleshooting steps, you should consider performing the following checks:

Once you are through these, move to the troubleshooting solutions.

1. Run the Windows Update troubleshooter

  1. Press Windows + I to open Settings.
  2. Go to System, then click Troubleshoot.troubleshoot Wuauclt.exe Not Working
  3. Click Other troubleshooters.Other Troubleshooters
  4. Go to Windows Update and click Run. Follow the onscreen instructions to complete the process.Windows Update Troubleshopoer

2. Run SFC & DISM scans

  1. Press the Windows key, type cmd, and click Run as administrator.CMD elevated Wuauclt.exe Not Working
  2.  Copy & paste the following command to restore Windows OS image files and press Enter: Dism /Online /Cleanup-Image /RestoreHealthRestore health Wuauclt.exe Not Working
  3. Once the command is run, the DISM uses Windows Update to provide the files needed to fix corruption; once done, type the following command to replace corrupted files with a cached copy  and hit Enter: sfc/scannowSFCSCANNOW CMD
  4. It may take several minutes for the command operation to complete; once done, restart your computer.

You can also automate this process by using a reliable tool with advanced scanning and repairing capabilities.

3. Run your PC in a clean boot environment

  1. Press Windows +R to open the Run dialog box.msconfig Wuauclt.exe Not Working
  2. Type msconfig and click OK to open the System Configuration box.
  3. Go to the Services tab, place a checkmark next to Hide all Microsoft services, and then click Disable all.Clean boot Disable all
  4. Next, switch to the Startup tab, and click Open Task Manager.CLEAN BOOT 5
  5. Select the Enabled items individually and click Disable, then close Task Manager and go back to the System Configuration window.Disable Startup
  6. Click Apply, then OK to complete the process.CLEAN BOOT 5
  7. Click Restart now to save the changes.Restart clean boot

Now your computer will restart in the clean boot with minimal services; try to install the update and check if you get the error. If yes, you can isolate the error causing the issue and resolve it accordingly. To restart your computer in normal mode, follow the above steps and undo all the changes made.

4. Reset the Windows Update components

  1. Press the Windows key, type cmd, and click Run as administrator.CMD elevated Wuauclt.exe Not Working
  2. Copy & paste the following commands to stop Windows Update, BITS & cryptographic services, and hit Enter after every command:Stop the services Wuauclt.exe Not Working
    • net stop bits
      net stop wuauserv
      net stop appidsvc
      net stop cryptsvc
  3. To delete the qmgr*.dat files, type the following command and press Enter:Del "%ALLUSERSPROFILE%\Application Data\Microsoft\Network\Downloader\qmgr*.dat"
  4. To clear the Windows Update cache to allow Windows 10 to re-download the updates, copy & paste the following commands one by one and hit Enter after every command:
    • rmdir %systemroot%\SoftwareDistribution /S /Q
      rmdir %systemroot%\system32\catroot2 /S /Q
  5. Type the following commands to reset the BITS and Windows Update service to the default security descriptor and press Enter:
    • sc.exe sdset bits D:(A;;CCLCSWRPWPDTLOCRRC;;;SY)(A;;CCDCLCSWRPWPDTLOCRSDRCWDWO;;;BA)(A;;CCLCSWLOCRRC;;;AU)(A;;CCLCSWRPWPDTLOCRRC;;;PU)
      sc.exe sdset wuauserv D:(A;;CCLCSWRPWPDTLOCRRC;;;SY)(A;;CCDCLCSWRPWPDTLOCRSDRCWDWO;;;BA)(A;;CCLCSWLOCRRC;;;AU)(A;;CCLCSWRPWPDTLOCRRC;;;PU)
  6. Copy & paste the following command and hit Enter:cd /d %windir%\system32
  7. To re-register the BITS files & the Windows Update-related dll files, type the following commands one after the other and press Enter after every command:
    • regsvr32.exe /s atl.dll
      regsvr32.exe /s urlmon.dll
      regsvr32.exe /s mshtml.dll
      regsvr32.exe /s shdocvw.dll
      regsvr32.exe /s browseui.dll
      regsvr32.exe /s jscript.dll
      regsvr32.exe /s vbscript.dll
      regsvr32.exe /s scrrun.dll
      regsvr32.exe /s msxml.dll
      regsvr32.exe /s msxml3.dll
      regsvr32.exe /s msxml6.dll
      regsvr32.exe /s actxprxy.dll
      regsvr32.exe /s softpub.dll
      regsvr32.exe /s wintrust.dll
      regsvr32.exe /s dssenh.dll
      regsvr32.exe /s rsaenh.dll
      regsvr32.exe /s gpkcsp.dll
      regsvr32.exe /s sccbase.dll
      regsvr32.exe /s slbcsp.dll
      regsvr32.exe /s cryptdlg.dll
      regsvr32.exe /s oleaut32.dll
      regsvr32.exe /s ole32.dll
      regsvr32.exe /s shell32.dll
      regsvr32.exe /s initpki.dll
      regsvr32.exe /s wuapi.dll
      regsvr32.exe /s wuaueng.dll
      regsvr32.exe /s wuaueng1.dll
      regsvr32.exe /s wucltui.dll
      regsvr32.exe /s wups.dll
      regsvr32.exe /s wups2.dll
      regsvr32.exe /s wuweb.dll
      regsvr32.exe /s qmgr.dll
      regsvr32.exe /s qmgrprxy.dll
      regsvr32.exe /s wucltux.dll
      regsvr32.exe /s muweb.dll
      regsvr32.exe /s wuwebv.dll
  8. Copy & paste the following command to reset Winsock and hit Enter:
    • netsh winsock reset
      netsh winsock reset proxy
  9. Type the following commands to start Windows Update, BITS & cryptographic services, and press Enter after every command:Start the services  Wuauclt.exe Not Working
    • net start bits
      net start wuauserv
      net start appidsvc
      net start cryptsvc
  10. Reboot your PC to confirm the changes.

By following these simple steps, you can effectively fix issues with wuauclt.exe and ensure the smooth functioning of Windows updates. If nothing worked for you, we suggest you perform a system restore to revert to the last known good configuration of Windows.

To avoid these errors and issues, you must focus on regular system maintenance, such as performing scheduled antivirus scans and keeping software up to date.

Please feel free to give us any information, tips, and your experience with the subject in the comments section below.

Event ID 5137: A Directory Service Object Was Created [Fix]

If you have encountered Event ID 5137 on your computer and wondering what it is, this guide can help! In this guide, we will explore the causes of the event and provide solutions to address any potential issues or misconfiguration.

What is Event ID 5137?

Event ID 5137 is a specific event log entry in the Windows Event Viewer related to the Active Directory service in a Windows environment.

When an object is created in Active Directory, such as a user account, group, or organizational unit, the event is logged with this event.

It provides information about the object that was created, including its name, unique identifier (GUID), and location within the directory structure.

The Event ID helps administrators monitor and track object creations, ensuring accountability and compliance with administrative policies.

You must remember that this event alone does not indicate an error or problem, as it is a normal event that occurs during routine administrative tasks.

However, in some cases, it may indicate unauthorized object creations that require further investigation to ensure the security and integrity of the Active Directory environment.

Why do I get the Event ID 5137?

There could be several reasons for this event to occur; some of the common ones are:

  • Legitimate object creation – It may occur due to routine administrative activities, such as creating a new user account, group, or organizational units.
  • Misconfigurations or errors – This event may occur due to improper configurations or errors in Active Directory settings, including issues with permissions and synchronization processes.
  • Unauthorized object creation – Event ID 5137 may indicate unauthorized or suspicious object creation, which could be a sign of a security breach or malicious activity.

Now that you know the reasons, let us move to the next section to understand what needs to do

How can I fix the Event ID 5137 issues?

1. Review the event details & verify the legitimacy

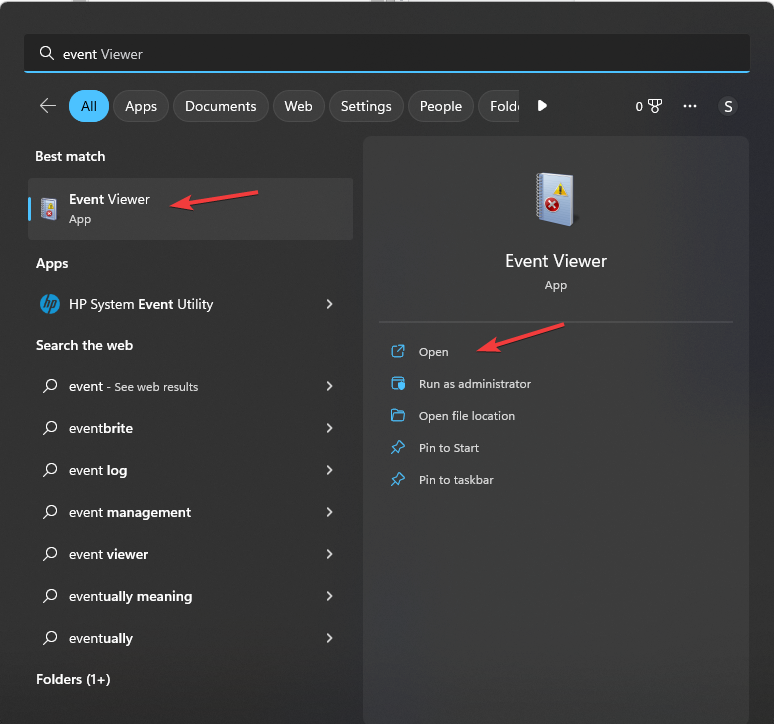
  1. Press the Windows key, type event viewer, and click Open.Event Viewer event id 5137
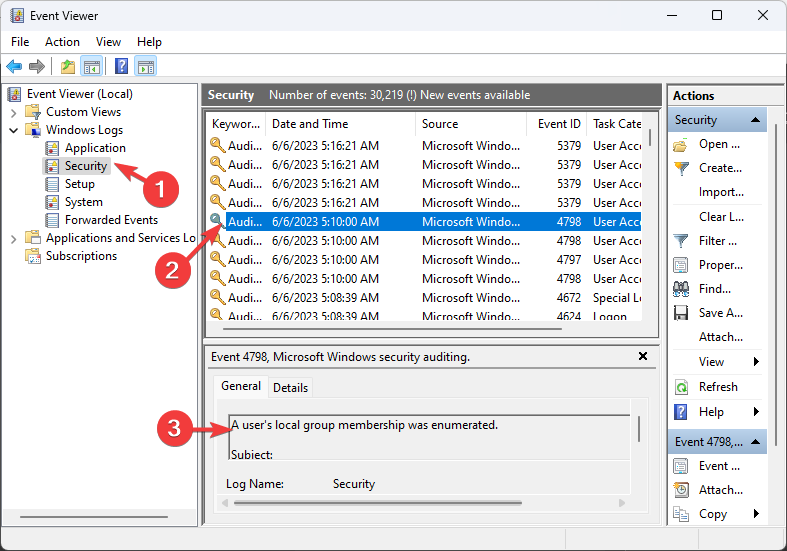
  2. Go to Windows Logs, then Security.
  3. On the right pane, you will get the list of events logged.event id 5137 evetn viwer
  4. Locate Event ID 5137, select, and go to General. Check the security change and other modifications made for the file or folder.

If you think the change was legit, you don’t have to take an action. However, if you feel otherwise, then you must move to the next step.

2. Audit Active Directory changes

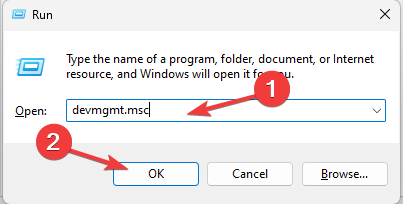
  1. Press Windows + R to open the Run box.Device Manager Run command Event IS 5137
  2. Type gpedit.msc and click OK to open Group Policy Editor.
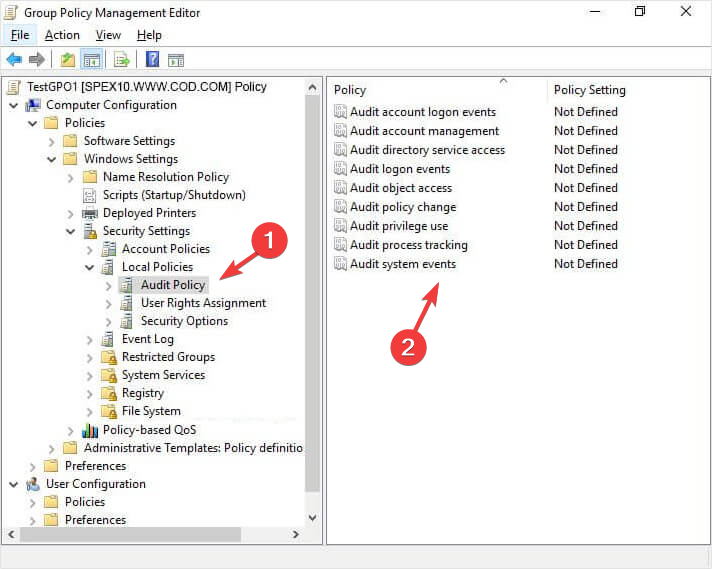
  3. Navigate to this path: Computer Configuration\Policies\Windows Settings\Security Settings\Local Policies\Audit PolicyAudit policy
  4. Click Audit Policy and check all the policies listed in the right pane to ensure the settings are appropriate.

To keep an eye on changes made to the Active Directory, you can enable auditing of Active Directory. It must be configured to log relevant events, including object creations.

You must implement a centralized log management solution to consolidate and analyze the audit logs for prompt detection of suspicious activities.

If you already have the audit policy in place, review and update the permissions and access controls within Active Directory to ensure they are aligned with your organization’s security policies.

3. Use security assessment tools

To perform periodic security assessments and audits of your Active Directory infrastructure, we suggest using security assessment tools to scan for vulnerabilities in the environment in real time.

This will help you address any identified security gaps to reduce the likelihood of unauthorized object creation.

So, these are solutions that you can use to address Event ID 5137 effectively and ensure the integrity and security of your Active Directory environment.

To maintain a healthy and secure directory service, regular monitoring, proper configurations, and proactive security measures are critical.

If you are looking for the best practices for Active Directory, we suggest you check out this guide for solutions.

Please feel free to give us any information, tips, and your experience with the subject in the comments section below.

Lenovo Yoga 7i 16 Gen 8 Review: More screen for less

Starting at $799.99

Despite Apple hijacking the narrative this year with their bump in screen size for the MacBook Air, Windows OEMs have known for some time that bigger screens sell, and the Lenovo Yoga 7i 16-inch Gen 8 is among the best deals around.

Starting with a price tag several hundred bucks fewer than a new premium smartphone, the Lenovo Yoga 7i Gen 8 offers a new 13th generation Intel Core processor, 16GB of memory, up to 512GB of solid-state storage, and a vibrant 1920 x 1200 16-inch IPS touchscreen in a convenient foldable form factor.

Specs
Lenovo Yoga 7i 16-inch
Processor Up to Intel 12thGen Corei7-1260P
Operating System Up to Windows 11Pro
Display 16″ 2.5K LCD (2560 x 1600) IPS, 400 nits, 100% sRGB, 60 Hz, 16:10, Low Blue Light
Storage Up to 1TB PCIe NVMe
Graphics Intel Iris XeGraphics
Camera 720p HD f2.0 camera (front-facing)
Memory Up to 16GB LPDDR5
Dimensions 12.47″ x 8.67″ x 0.68″(361.51mm x 249.65mm x 19.20mm)1.9kg / 4.19lbs
Audio 2 x 2W user-facing tweeters and 2 x 3W woofers Dolby Atmos Speaker System
Weight 2.44 lbs (1,110 g)
Color Colors: ArcticGrey or StormGreyDisplay cover: AluminumBottom: Aluminum
Ports/Slots 1 x USB-A (USB 3.2 Gen 14)2 x USB-C (Thunderbolt™ 4.0 / PD /DisplayPort™ / USB 4.0)1 x HDMI™ 2.01 x Full-size SD Card Reader (UHS-1(104) PCIe Gen 1)1 x USB-A (USB 3.2 Gen 1)1 x Audio Combo Jack1 x Power Button
Battery 71Whwith Rapid Charge Express (3 hours battery life in 15 min)
What’s in the box 6-row, multimedia Fn keys, LED backlight
Precision Touchpad

Look and Feel

Aside from the sheer footprint of the Yoga 7i 16, the first thing customers are greeted with is Lenovo’s new consumer facing hardware redesign its labeled Comfort Edge, which rounds all the adorns all the corners and sides of the laptop with a polished rounded profile. Lenovo’s Comfort Edge design is now in its third year of being rolled out to the company’s consumer-facing laptops and still feels very modern and somewhat aspirational in a sea of harder-edge laptops such as the XPS line up or the HP Spectre devices.

Lenovo Yoga 7i 16 Gen - Yoga Tent Mode

The intent of the design is presumably to make Lenovo’s laptops easier to hold in hand, and while the Yoga 7i 16 is technically a folding 2-in-1 meant to be held as tablet in some instances, the 4.5lbs or 2.04kg brick won’t get much extended use in the Yoga’s coveted Tablet-Mode.

Never the less, the design of the aluminum alloy chassis is just as sturdy as its predecessor and cousin devices that utilize the same Comfort Edge design, however, the 2023 model does tweak the area around the bottom of the screen connected keyboard to reduce thickness ever so slightly as well as Lenovo omitting the speaker grilles that were present on the 2022 models.

In both the Artic and Storm Grey color options, fingerprint-smudge management is relatively easy. Fingerprints are rarely shown in most lighting conditions and can be easily wiped away with a napkin or microfiber cloth.

As for the port selection, the 7i 16 offers the same great selection as its 2022 model minus a full-sized SD reader. In 2023, 7i 16 owners get a 1.4b full HDMI port, 2 Thunderbolt 4 USB-C slots, a MicroSD reader and 2 USB-A 3.2 ports, along with a 3.5mm headset/mic combo.

Lenovo Yoga 7i 16 Gen 8 - Ports

Despite only offering a microSD solution, the 7i 16 still provides similar reads and writes with 60 to 90MB/s.

Unfortunately, Lenovo continues to put vents directly under the keyboard which tends to heat up knees and thighs when using the 7i 16 out and about as well as pushes hot air on to the top of the laptop in tablet mode. I would love for the Comfort Edge design 2.0 to try circulating the air through the back and sides of the device which could prevent the vents from being blocked in position the Yoga adopts, but that’s a gripe for another time.

When the lid is open, customers are greeted with a large 16-inch, 1200p, 10-point touch screen which offers a slightly lower resolution than last year’s at 1600p. Lenovo also skimped on the sRGB calibration as well as brightness, perhaps to reach its new budget-friendly pricing. While notebook reviewers alike will keenly point out the slightly perceptible changes to the monitor, most laptop buyers will notice little difference between models while lauding the price difference between it and competing products such as the Galaxy Book 3 Pro 360, Dell Inspirion 16 of Dell XPS 15.

Lenovo Yoga 7i 16 Gen - Yoga Screen

Another nitpick about the display some privileged customers may complain about is the standard 60hz refresh rate in a growing sea of adaptive 90, 120, 165, and 225Hz panels.

The webcam is still a non-starter for seasoned video conferencing individuals as its capabilities remained capped at 2M. The webcam does capture 1080p resolution which is up from its previous 720p ceiling, but there is notable noise in most lighting conditions. Lenovo offers software dubbed Lenovo Smart Appearance which offers a limited selection of tweaks and filters to help enhance the captures but most customers are better off buying a $20 webcam from Amazon for future video conferencing efforts.

Lastly, the backlit keyboard on the 7i 16 is just soft as its 2022 model as it lifts the same design and key travel as the U-shaped chiclet-style keyboard from most Yoga and IdeaPads in the company lineup. The feel of typing on a Level ThinkPad is different than on its consumer Yoga and IdeaPad, minus the full-sized number pad (which I hate).

Performance

Screenshot 2023 06 15 110534 2

Putting these benchmarks into context, the Lenovo 7i 16, performs as well as the previous 2022 model with a few exceptions in regards to battery life and sustained performance.

In day-to-day use for most customers who live in data processing workflows that include email triaging, Excel (or Sheets) reviews, or presentation creation, web browsing, organizing meeting data and marketing material, data analysis or visualization, and more, the 7i performs without a hitch.

Fan noise is relatively low but can kick up when doing a resource intensive task for more than 40 minutes straight such as data cleansing, any type of SQL projects or using multi-tabbed Chrome windows.

For the budget-friendly creatives, while Intel’s integrated 3rd generation Iris Xe graphics aren’t going to turn heads when rendering video edited projects, they tend to hold up on basic to medium level Adobe projects such as single-image multi layered editing in Photoshop with limited filtering, 4 minutes to 45-minute-long video edits with a handful or tracks and Essential graphics applied. Again, the export times will crawl on this device but as for real-time scrubbing and editing, the system holds up well. Anyone looking to get into some After Effects fun will need to look elsewhere.

During most workflows, the heat pushed out from the 7i 16 is noticed to the left side of the device which is where the cooling system is housed. The Yoga 7i 16 remained a few degrees cooler than competitors under sustained loads.

Lenovo Yoga 7i 16 Gen - Yoga Heat

Speaking of sustained loads, Lenovo manages power and performance well when the Yoga 7i is on battery power where performance dips were only perceptible in benchmarks by a handful of points. The Yoga 7i 16 typically shoots to about 4.1GHz and 58W outputs on the start of large tasks and proceeds to stabilize downwards after the laptops core temperature hits about 95 C, which triggers Lenovo’s power management software and ramps down to around 2.6 GHz and 25 W boosts.

While much of the initial software included on the Yoga 7i 16 is bloat and taxed the CPU at startup (uninstall most of it), Lenovo’s power management software has gotten a bit better in 2023 and helps to extend the life of the batter on charge for this device. Battery consumption on the 7i 16 this year has been reduced by about 8 percent and the device runs about an hour and ten minutes longer under similar stress than its 2022 model and even longer than competitors such as the HP Spectre x360 2-in-1 or the Dell XPS 15 which use more resource intensive displays.

Lenovo Yoga 7i 16 Gen - Yoga Keyboard

Charging speeds varied on the Yoga 7i 16 due to Lenovo’s Vantage software which presumably utilizes some sort of dynamic charging depending on current battery levels and tasks being performed during the charging cycle. Customers should expect normal slow charging to be triggered which can take up to two hours while rapid charge, when triggered, can shorten that cycle by about 30 to 45 minutes.

As for gaming, customers should look to the Lenovo Legion Slim 7i, as this device can handle only a few titles with major resolution tweaks. For the streamers from cloud platforms such as xCloud, the bigger screen will be much appreciated.

Summary

At the end of the day, the 7i is barely considered a spec bump upgrade with performance remaining relatively similar to its previous model and only in certain situations, slightly better than some of its competitors. Lenovo skimped on screen specs to reach a price point many customers will appreciate in the midst of an inflationary economy.

When compared to other devices in the same category, the 7i 16 tends to come in $200 to 300 dollars cheaper in most configurations and offer up a decently calibrated, and wide 16:10 aspect ratio screen that can double as consumption device on the go. If weight, and bleeding edge screen tech aren’t on your shopping bingo card, the Lenovo 7i 16 could serve as your next big screen workstation.

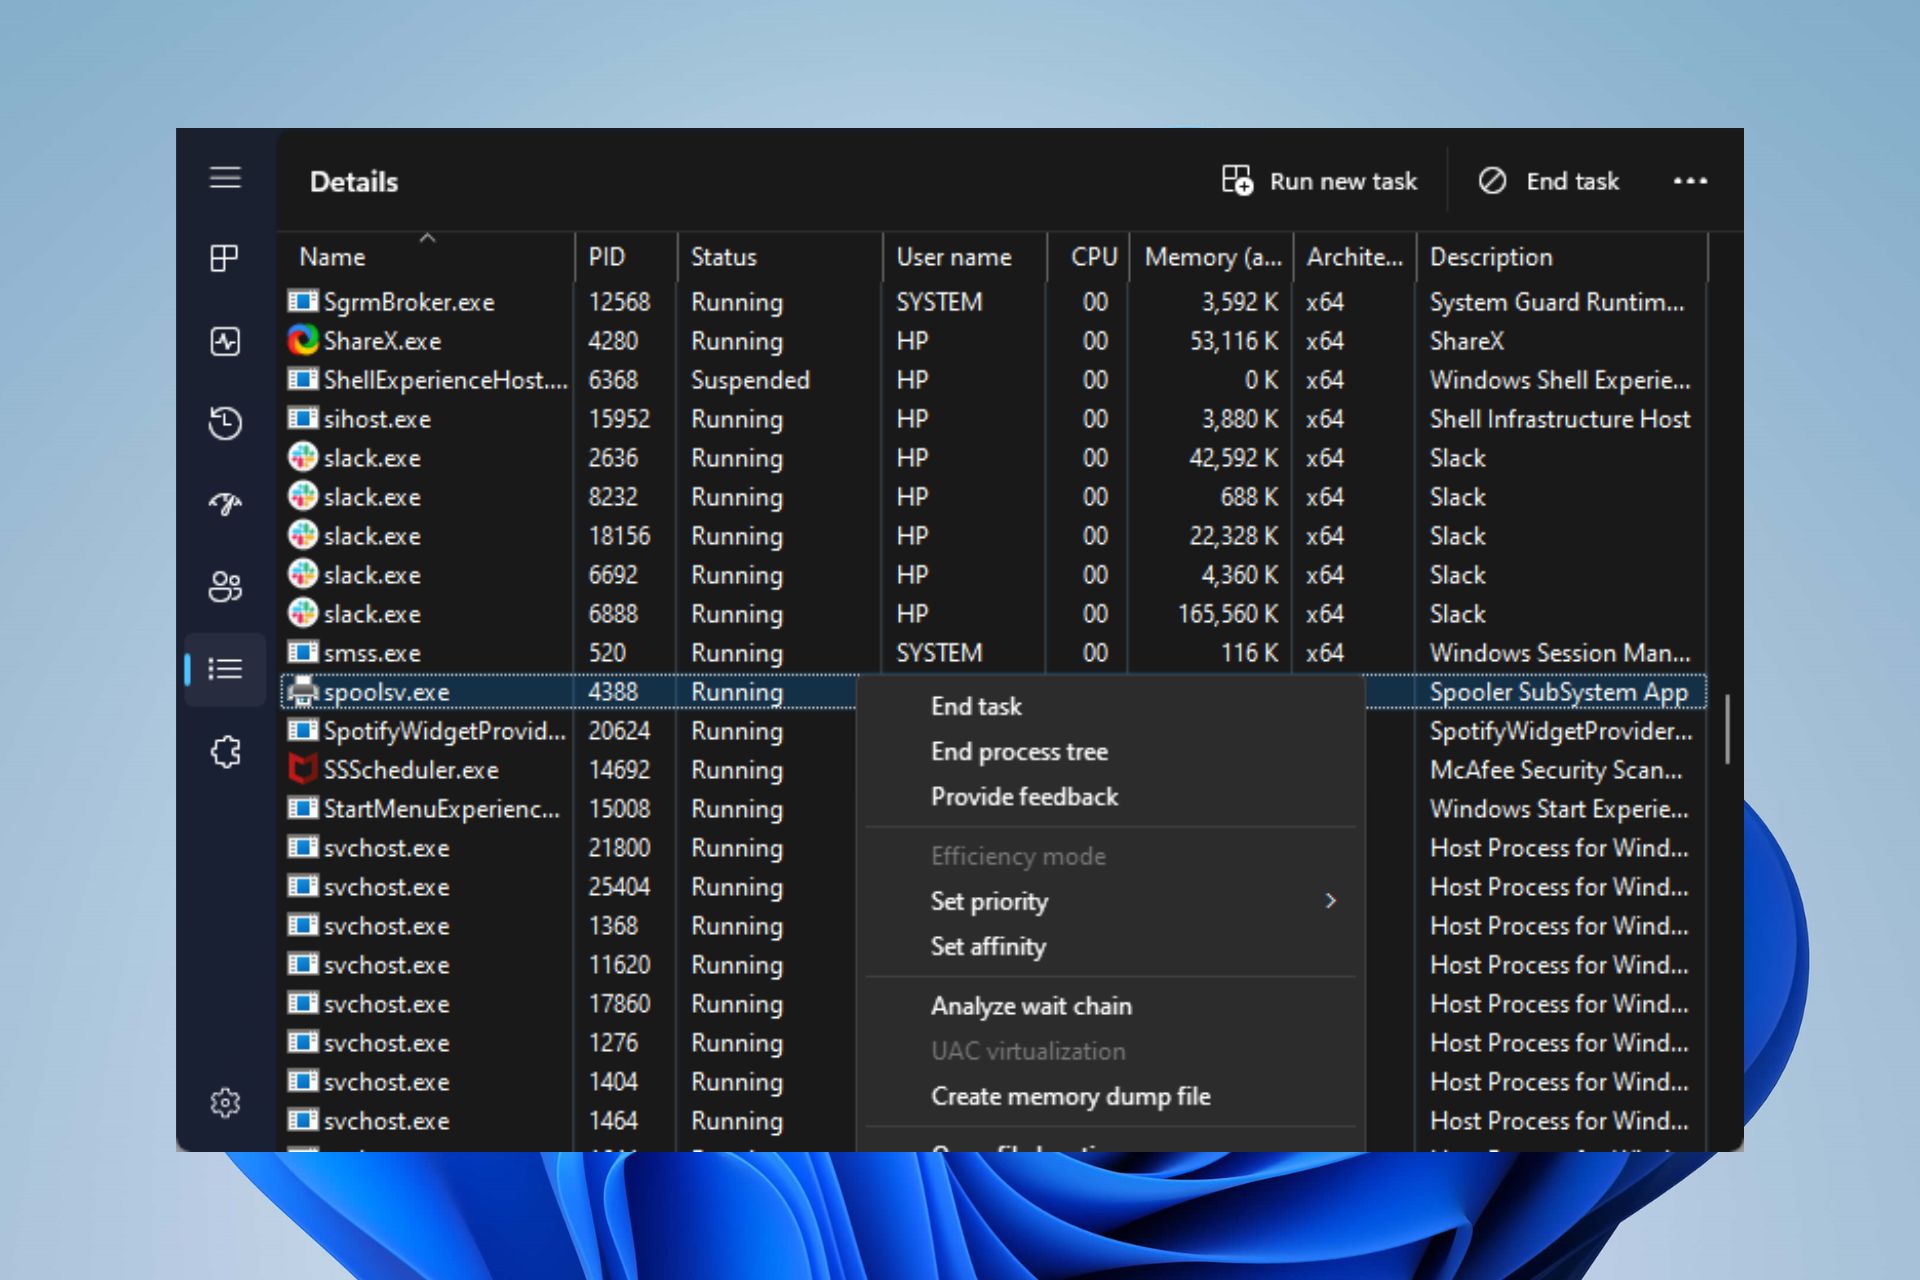
Fix: This Action Won’t Work on Multiple Selections Excel Error

The This action won’t work on multiple selections error typically appears when you try to execute an action that is not supported or incompatible with multiple selections in Excel.

In this guide, we will explore the causes behind this error and provide solutions to help you overcome this issue. Let’s get started.

What can I do if this action won’t work on multiple selections?

Before we go to the advanced fixes, here are a few preliminary checks you should do:

  • Restart the computer.
  • Save and exit the Workbook and open it again to perform the action.

Once done, follow the methods mentioned below to fix and avoid the issue.

1. Make the selections properly

  1. Select the data you want to copy on the other sheet.Copy the fields this action won't work on multiple selections
  2. Go to the destination sheet, right-click, and select Paste Special.Paste special
  3. Now choose All to paste the values with formulas.this action won't work on multiple selections paste special
  4. Click OK to confirm the choice.

To avoid this multiple selections error, you need to ensure the selections should be from the same columns or rows.

Check all the sheets on the Workbook to ensure that the data on all the sheets apart from the one you want is unselected.

Also, while pasting the values from multiple regions, and want to copy & paste the formulas as well.

2. Use the Clipboard to paste the data

  1. Click Clipboard.Open Clipboard
  2. Select the data from the desired columns and rows. If the rows and columns are not intersecting, we suggest you repeat the action to add all of them to the Clipboard.
  3. Once all the values are on the Clipboard, go to the sheet where you want to paste the values. You can either click Paste all to them or click on them one by one and paste them on the sheet.paste them all

3. Ungroup the sheets

  1. Right-click a sheet tab and click Select All Sheets on the Excel workbook.Select all this action won't work on multiple selections
  2. Now right-click any sheet tab, and choose Ungroup Sheets.Select all sheets

3. Create a new copy

  1. Right-click a sheet tab and click Select All Sheets on the Excel workbook.Select all this action won't work on multiple selections
  2. Now right-click any sheet tab, and choose the Move or Copy action.Move or Copy this action won't work on multiple selections
  3. You will receive a prompt; select (new book), then place a checkmark next to Create a copy box and click OK.New book

In Excel, an action might fail on multiple selections because some operations only work on single cells or ranges.

If the selected cells have different data types, like numbers and text, it can confuse Excel. Certain features also have limits that prevent them from applying to multiple selections, and mixed formula references can cause conflicts.

So, these are the causes and the solutions that can help you address This action won’t work on multiple selections error message in Excel, allowing you to work efficiently with numerous cells or ranges and accomplish your tasks effectively.

If you are facing issues like Excel not opening on Windows 11, we suggest you check out this informative guide to fix it.

Please feel free to give us any information, tips, and your experience with the subject in the comments section below.

Play EA Sports PGA Tour and 3 more games with Xbox Free Play Days

Xbox Free Play Days has a stacked lineup once again this week with four games for subscribers of Xbox Live Gold and Xbox Game Pass Ultimate to try out. These games will be available as part of Xbox Free Play Days from Thursday, June 15 through Sunday, June 18. Check out the lineup for this week below.

EA SPORTS™ PGA TOUR™

Take on the greatest challenge in golf, the U.S. Open, at The Los Angeles Country Club, only in EA SPORTS™ PGA TOUR™.
– Play unique challenges and complete quests inspired by the U.S Open.
– Access exciting new content, golf gear drops to customize your golfer, and online tournaments to test your skills on the course.

The exclusive home of the Majors, EA SPORTS™ PGA TOUR™ features Pure Strike for superior golf gameplay powered by ShotLink®, and unrivaled access to the world’s most exclusive golf courses.

Bomber Crew Deluxe Edition

Bomber Crew is a World-war 2 strategic bombing sim, where completing the objective is just as important as keeping your crew alive, as death is permanent!

Take to the skies in this immersive flight simulation where each mission is a high-risk expedition. Manage everything from fuel, ammo, hydraulics and more in your very own physics based Bomber, which can be customized with an array of liveries and paint jobs!

Danger comes from every angle when the wheels are up Enemy fighters, flak guns, poor weather and an array of other perilous dangers await, so ensure your Crew are prepared for each mission correctly, and come back victorious!

OddBallers™

Use brutally unfair tactics to mess with your opponents in this wacky multiplayer party game!

• Play a new type of hard-hitting dodgeball
Dodge, block, and grab whatever you can to throw at the faces of your frenemies. And use the environment to crush opponents with electrical fences, explosive gas tanks, or tennis ball launchers.

• Embrace the absurd
Every arena comes with its own rules and features various frantic mini-games where anything can happen! From last-one-standing games to team-based battles to running for your life wearing a rooster costume, or knocking opponents out with fresh fish.

• Challenge your friends
Test your skills (and friendships) online or locally! Play with up to four players in your living room, or take the matches online and compete against five other contenders.

• Switch up your playing field
From rustic farms to waterfront towns to paradise islands, each environment features more than 20 different arenas and unique mini-games for even more fun.

• Customize your character
Customize your character from head to toe with hundreds of hilarious outfits, haircuts, and more to be the best-looking in the arena. You can even pick your favorite dance move to taunt your fallen foes, and tailor each mini-game to your taste!

Greak: Memories of Azur

Greak: Memories of Azur is a side scrolling single-player game with hand-drawn animations. You will take the role of three siblings: Greak, Adara and Raydel to guide them through the lands of Azur. Alternate control between them and use their unique abilities to escape from the Urlag invasion.

Greak is the name of the main character, and the smallest brother of three. He belongs to a magical race called the Courines, which are currently under the attack of an enemy invasion from a faction called the Urlags.

This battle has been going on for a long time, and the Courines are starting to flee their own lands. Greak’s goal is to reunite with his brother (Raydel) and his sister (Adara) and then escape the lands of Azur by Building an Airship piece by piece.

Throughout the game, you will find each sibling in different scenarios, and once you do, they will join the adventure and help you progress through the game.

Don’t miss this week’s Xbox Free Play Days event

With four eclectic games on the roster there is bound to be something for everyone here. To learn more head over to the Xbox Free Play Days FAQ page.

Featured image via Xbox.com. 

Starfield gets a negative review on Metacritic…months before its release

Bethesda’s upcoming sci-fi RPG Starfield has been in the news quite a lot this week following Sunday’s Starfield Direct. Expectations for the game have soared to stratospheric heights after the 45-minute deep dive showcase, and Xbox has a lot riding on the game’s success when it releases on September 6.

Unfortunately the game’s first review is a negative one. As reported by @PeterOvo5 over on Twitter, a user review has appeared on Metacritic giving Starfield a negative score.

The review comes just shy of three months before the game’s actual release. The user review begins,

Bethesda – because making games that work out of the box is less important than figuring out all the ways to extract as much money form your bank account as possible.”

The user is likely referencing Bethesda Game Studios’ most recent release, Redfall, which launched to a spectacularly poor reception after months of anticipation. Also, the second part of the review’s opening alludes to the possibility of microtransactions in the game. While this has not been confirmed (or ruled out), some have pointed to Starfield’s ESRB rating, which notes “In-game Purchases,” as proof.

Starfield Screen Shot 2

The user goes on to disparage Bethesda Game Studios director Todd Howard. The review seems to be no longer viewable on Metacritic at the time of this writing, although the negative review is still noted on the user review page in the user score distribution field. The info box displays a message saying,

There are no user reviews yet – It is not possible to submit a review prior to this game’s official release.”

Starfield
Starfield
Developer:
Bethesda Softworks
Price:
Free

Via Gamerficial. 

How to Disable Check Boxes in File Explorer

Many of our readers have been annoyed by check boxes that appear on each file or folder icon in File Explorer. Check boxes help you select multiple files and folders, especially on touchscreen devices. 

However, this feature is running the user experience of most Windows users who prefer using the Shift and Ctrl shortcut to select multiple files/folders at a time.  

If you are one of those users who want to remove the checkboxes in File Explorer, walk through this guide to find out the proven solutions. 

How to disable folder check boxes in File Explorer? 

1. Disable item checkboxes

  1. Launch the File Explorer using the Windows + E shortcut key. 
  2. Click the View option located on the top menu bar to reveal the related settings drop-down. remove check box in file explorer
  3. Select Show from the dropdown menu and then click the Item check boxes option from the sub-menu if it was checked previously. remove check box in file explorer

Now exit the File Explorer window and upon re-launch, the check boxes next to folders will not appear anymore. 

2. Modify the Folder Options settings

  1. Launch the File Explorer using the Windows + E shortcut. 
  2. Click on the More icon (three horizontal dots) located at the top menu bar and select Options from the drop-down menu. Launch the File Explorer using the Windows + E shortcut key.  Click the View option located on the top menu bar to reveal the related settings drop-down. remove check box in file explorer Select Show from the dropdown menu and then click the Item check boxes option from the sub-menu if it was checked previously. remove check box in file explorer
  3. Switch to the View tab of the Folder Options windows and scroll down the Advanced settings section. 
  4. Uncheck the box preceding the Use check boxes to select items and click Apply to save the changes and OK to exit the window. Launch the File Explorer using the Windows + E shortcut key.  Click the View option located on the top menu bar to reveal the related settings drop-down. remove check box in file explorer Select Show from the dropdown menu and then click the Item check boxes option from the sub-menu if it was checked previously. remove check box in file explorer

3. Modify the registry 

Note icon NOTE
Editing the registry is a risky task which is not done carefully can render your PC broken. As a precautionary step, it is recommended to back up your registry before you perform the following steps.
  1. Use the Windows + R shortcut to launch the Run dialog box, type the following command in the text box and hit the Enter key. regedit remove check box in File Explorer
  2. Expand the keys in the registry editor window to navigate to the following path. Computer\HKEY_CURRENT_USER\Software\Microsoft\Windows\CurrentVersion\Explorer\Advanced
  3. Find AutoCheckSelect in the right section and if not found, right-click anywhere, and choose New followed by DWORD (32-bit) from the context menu. 
  4. Rename the DWORD as AutoCheckSelect. 
  5. Now right-click AutoCheckSelect and choose Modify from the context menu. remove check box in file explorer
  6. Assign 0 to the Value data field and press OK to save the changes. remove check box in file explorer

If the previous two methods did not sort out the issue, you can explicitly edit the registry to remove the check box from File Explorer.

4. Create a new administrator account

  1. Log into your administrator account and use the Windows + I shortcut to launch the Settings app. 
  2. Switch to Accounts from the left sidebar and then select Other users (Family & other users in some versions) from the right section.
  3. Next, press the Add account button located next to Add other user option. 
  4. Click I don’t have this person’s sign-in information on the new pop-up window. 
  5. Next, select the Add a user without a Microsoft account option. 
  6. Finally, on the next page, provide the username and confirm the password by entering it twice.
  7. After the new user account is created, access the Other Users section once again and click the newly created account name. 
  8. Click the Change account type button located under the revealed settings and select the Administrator option on the popup that appears. 
  9. Now log out of the current account you’re logged into and sign in to your newly created administrative account. Hopefully, the problem would be resolved.

Creating a new user account with administrative rights will remove the check box in File Explorer if it persisted because of a corrupt user account. 

How to disable checkboxes in File Explorer on a convertible laptop? 

  1. Switch to the laptop mode on the 2 in 1 laptop. 
  2. Use the Windows + R shortcut to launch the Run dialog box, type the following in the text box and press OK to access the Registry Editor. regedit remove check box in file explorer
  3. Navigate to the ImmersiveShell key in the registry editor window by pasting the following path. Computer\HKEY_CURRENT_USER\Software\Microsoft\Windows\CurrentVersion\ImmersiveShell
  4. Here, right-click DeviceConvertible in the right section and choose Modify from the context menu. 
  5. Assign 0 in the Value data field and press OK to save the changes. 
  6. Now exit the registry editor window and sign out of your account. Wait for some time and sign back into Windows. You will see that the check boxes no longer appear near files and folders in File Explorer. 

Disabling the tablet mode or touchscreen feature on your dual laptop will successfully remove the check box from File Explorer.

That’s all in this quick guide to disable the check boxes in File Explorer on Windows PC.

Before you leave, you may want to fix the file explorer search feature if it runs into issues from time to time. 

In case of any comments or feedback, do reach out to us in the comments section. 

The European launch of Google’s AI chatbot, Bard, has been postponed due to privacy concerns

According to a recent report from Politico, the launch of Google’s generative AI chatbot, Bard, in the European Union has been delayed due to privacy concerns. The chatbot was previously expanded to over 180 countries worldwide but did not include the EU.

Irish Data Protection Commission Deputy Commissioner Graham Doyle noted that Google had been preparing to introduce Bard in the region, but this plan has been postponed for the time being.

We said in May that we wanted to make Bard more widely available, including in the European Union, and that we would do so responsibly, after engagement with experts, regulators, and policymakers., a Google spokesperson said, as reported by Politico.

The Commission has stated that Google did not furnish sufficient information concerning the measures it would undertake to safeguard the privacy of EU citizens. This lack of transparency has reportedly caused a delay in the launch of Google’s Bard in the region. The Irish regulator is conducting an ongoing examination of Bard and has announced that the launch will no longer happen this week.

The regulatory body in Ireland has sought clarification from the company on its adherence to the EU’s data protection regulations and is currently awaiting a comprehensive assessment and response.

In a similar vein, OpenAI’s ChatGPT also faced challenges in the EU, causing the CEO to consider withdrawing the product. Additionally, Microsoft’s Bing AI, powered by OpenAI’s GPT-4, is accessible in Europe, but the EU is examining ChatGPT and other AI products through a dedicated task force.

In March, Google Bard attracted criticism due to claims that it was trained using users’ data from Gmail, posing potential privacy risks. The chatbot was developed to compete with the rising popularity of ChatGPT and Bing Chat and offers similar features. However, since Artificial Intelligence relies on data sets, there are some major privacy concerns surrounding its use.

Via Verge

GTA 5 gets a huge update with visual improvements for Xbox Series X|S

Grand Theft Auto V is now nearly a decade old, but that hasn’t stopped Rockstar Games from giving the open-world action adventure a massive update which is now live.

Update 1.67, also known as the San Andreas Mercenaries Update, brings a whole gamut of improvements in addition to some new content. As per the patch notes page on Rockstar’s website,

The San Andreas Mercenaries update adds new Story Missions, Freemode content, updates to the Smuggler Hangar business, a PlayStation 5 and Xbox Series X|S exclusive Career Progress feature, as well as a range of experience improvements and creator updates. 


Gta 5 Screenshot1

Many of the new features pertain specifically to the online aspect of the game. As stated in the patch notes, a current-gen Career Progress feature has been added for PlayStation 5 and Xbox Series X|S. Career Progress has 4 challenge tiers that “gives access to a range of challenges across GTA Online and provides exclusive rewards for players to earn.”

There are also new vehicles (7 of them all-new the game), new cosmetics and more. There are also some visual upgrades for the current-gen consoles, including raytracing performance improvements. Specific to the Xbox Series X|S version is a fix that “Improved the lighting fidelity seen through the windows during the Story Mode Mission Dead Man Walking on Xbox Series X|S.”

Rumors of the next installment of the franchise—Grand Theft Auto 6—have been hot lately. It has been reported that it will be the most expensive video game ever made.

Via Gaming Bible.

Featured image via Xbox.com. 

What is Microsoft Windows Desktop Runtime?

Several Windows 11 users have asked us that when they head over to Programs and Features inside Control Panel, they see the Microsoft Windows Desktop Runtime listed.

They are confused as to what this does on their PC and whether they should keep it or remove it. In this guide, we will give you all the details you need to know about Microsoft Windows Desktop Runtime. Let us get right into it.

What does Microsoft Windows Desktop Runtime do?

Chances are that you might have heard about Microsoft .NET Framework and use it on your computer. .Net library contains shared codes for developers.

Using these codes, developers can infuse functions without the need to write codes from scratch. Moreover, any program written in .Net needs to have .Net Runtime installed.

You should also make sure to keep the Microsoft Windows Desktop Runtime up to date to ensure all associated apps run smoothly. The Desktop Runtime basically helps you to run the existing Windows desktop applications.

Using the Desktop Runtime, a program interacts with the computing resources it needs to work. They aren’t required to be installed separately on your PC.

Runtime also works when you start a program on your PC. This means, when a program is running on your PC, it is a runtime for that program. The .NET Core is utilized to build command-line modern websites, applications, and other services.

It was also known as a redistributable package or end-user runtime, however, with version 5.0 it is listed as Microsoft Windows Desktop Runtime within the Programs and Features section on Control Panel.

Which version should you download?

Another confusing aspect of the .Net is which version should you download. End users need to only download the Microsoft Windows Desktop Runtime.

So, to clarify this doubt, if you need .Net 3.5 or older, you should go for .Net 3.5. And in case, you want .Net 3.5 or higher, you should go for .Net 5.0.

How to check which Microsoft Windows Desktop Runtime version is installed?

1. Use Command Prompt

  1. Press the Win key to open the Start menu.
  2. Type Command Prompt and open it as an administrator.
  3. Type the below command and press Enter: reg query "HKLM\SOFTWARE\Microsoft\Net Framework Setup\NDP" /s
  4. Check the version.

This is the easiest way to know which version of the Microsoft Windows Desktop Runtime you have currently installed on your computer.

2. Use Windows PowerShell

  1. Press the Win key to open the Start menu.
  2. Type Windows PowerShell and open it as an administrator.
  3. Type the below command and press Enter.reg query "HKLM\SOFTWARE\Microsoft\Net Framework Setup\NDP" /s
  4. Check the version.

Apart from using Command Prompt, you can also use Windows PowerShell to check the version of the Microsoft Windows Desktop Runtime on your computer.

3. Check the version in Registry

  1. Press the Win + R keys to open the Run dialogue.
  2. Type regedit and press Enter.
  3. Navigate to the below path and press Enter. Computer\HKEY_LOCAL_MACHINE\SOFTWARE\Microsoft.NETFramework
  4. Expand the NET Framework Setup folder.
  5. Expand the NDP folder.
  6. Click on any of the versions and then click on the Client folder.
  7. Click on the Version registry entry to know the installed version.

Using the Registry editor to know about the currently installed version of the Microsoft Windows Desktop Runtime could be a lengthy task, but it gets the job done.

How can I uninstall Windows Desktop Runtime?

  1. Press the Win key to open the Start menu.
  2. Open Control Panel.
  3. Select Programs and Features.
  4. Select Microsoft Windows Desktop Runtime version that you wish to uninstall and click the Uninstall button at the top.
  5. Follow the on-screen process to remove the program from your computer.
  6. Reboot your PC.

Our guide explains how you can fix the corrupt registry on your PC. You should also check out our guide that gives you 4 methods to restore a registry without a backup.

That is it from us in this guide. You should check out our dedicated guide that explains how you can easily resolve the Runtime error 217 on your Windows computer.

We also have a guide that lists some solutions that will help you resolve the Runtime error 3709 on your Windows PC.

Feel free to let us know in the comments below if this guide helped you in understanding what Windows Desktop Runtime is and how to check the version installed on your PC.

Unable to Load Library dbdata.dll: 5 Ways to Fix It

Dbdata.dll is a Dynamic link library (DLL) file, which is generally a part of Ubisoft games such as Assassin’s Creed Odyssey and Tom Clancy’s Rainbow Six Siege, Watch Dogs, and others.

This DLL ensures that is used to ensure that the game works properly and the system resources are shared concurrently. Lately, Many PC gamers have been encountering the Unable to load library dbdata.dll error when trying to launch any Ubisoft game on their PC. 

Why do I encounter unable to load library dbdata.dll error? 

The dbdata.dll error can show up for several reasons. Let’s check out the most probable ones:

  • Corrupt system files – Essential system field can become corrupt for several reasons, like incomplete Windows updation.  
  • Malware infection – Viruses and malware infections mess up the system and modify the files, which can no longer be retrieved by Windows. 
  • Incomplete installation – If the game installation was interrupted somehow, the dbdata.dll file might have become corrupt, so it cannot be loaded. 
  • App interference – Third-party antivirus software or Windows Defender Firewall may flag the DLL as malicious and block it for security reasons.  

Now that we know what is causing this problem, let’s apply the solutions below to fix it.

How do I fix the Unable to load library dbdata.dll error? 

Trying the following workarounds is recommended before you proceed with the complex methods listed after that.  

If the Unable to load library dbdata.dll still shows up during the game launch, try the solutions listed below in the given order.

1. Use a DLL fixer tool

The dbdata.dll library could not be loaded error primarily arises due to incompatibility between the Ubisoft game and Windows operating system. 

DLL-related errors are hard to get around in general, especially if you are a novice user and don’t have an idea about system-level errors. In this situation, it’s advisable to seek help from a robust DLL fixer tool, available in the market.

2. Repair the system files

  1. Press the Windows key to bring up the Start menu, type cmd on top, and select the Run as administrator option from the result section. Unable to Load Library dbdata.dll
  2. Now type or paste the following command and press the Enter key to initiate the SFC scan. sfc /scannow Unable to Load Library dbdata.dll
  3. Wait patiently until the SFC scan repairs the affected system files. After this, type or paste the following command and press the Enter key to run the DISM scan: DISM.exe /Online /Cleanup-Image /Restorehealth Unable to Load Library dbdata.dll
  4. When the scanning process is complete, reboot your PC and see if the unable to load library dbdata.dll error persists. 

The SFC and DISM utilities diagnose and repair the protected system files, which might fix the missing DLL error on Windows. 

3. Verify the integrity of the game 

Note icon NOTE
Before proceeding with the given steps, exit the game and disable the real-time protection feature of antivirus software to avoid it from restricting the verification process. 
  1. Launch the Ubisoft Connect app on your Windows PC and log into your gaming account. 
  2. Navigate to the Games tab from the top to view the gaming library. Unable to Load Library dbdata.dll
  3. Locate the game affected by the issue and click the downward arrow icon. 
  4. Click the View game details option present in the listed options. 
  5. Click the Properties section present under the game’s title and click Verify files button on the right of the window. Unable to Load Library dbdata.dll
  6. Once the verification process is completed, you will receive a notification about it. Then launch the affected game and see if the unable to load library dbdata.dll still restricts the game launch. 

4. Allow the game through the firewall 

  1. Launch the Start menu by pressing the Windows key, type control panel in the search bar, and press Enter to quickly access the Contol Panel. Unable to load library dbdata.dll
  2. Change View by drop-down to Category and select System and Security option. Unable to load library dbdata.dll
  3. Click the Windows Defender Firewall option. 
  4. Click the Allow an app or feature through Windows Defender Firewall located on the left pane. Unable to load library dbdata.dll
  5. Press the Change settings button. Unable to load library dbdata.dll
  6. Scroll down the list of apps to locate your game. If the game is missing, click the Allow another app button. 
  7. On the next window that pops up, browse to the location of its installation folder, select its .EXE file, and press the Add button. 
  8. Enable the checkbox listed under the Private and Public section and press the OK button to save the changes. Unable to load library dbdata.dll

Firewalls often block certain games and apps from launching on the PC, so explicitly allowing the game should help. 

5. Manually install the DLL

If none of these methods help, you should consider downloading the dbdata.dll file from online sources as your last resort. Avoid downloading the DLLs from shady sources and go for trusted websites like DLL Files, which offer verified downloads. 

After the download is complete, you need to paste the DLL into the installation directory of the affected game. You can also place it in the following folder to make the DLL file universally accessible. C:\Windows\System32

Now restart your PC to make the new DLL file detectable by your system. Then, launch the game and see if the dbdata.dll file is successfully loaded by the game you intend to play. 

That’s all in this guide! Hope the issue you were facing while playing the game is resolved completely. 

If you run into several DLL missing errors on your computer, refer to this guide to check out the possible solutions. As for a specific issue encountered by several users lately, our guide on the DevIl.dll library error: Effective solutions to resolve it is what you are looking for.

Which of the following methods did the trick? Do let us know in the comments section. 

Microsoft releases Viva Pulse in public preview

Last year, Microsoft expanded Viva Goals with new apps and services to mitigate some issues. The company further highlighted that the tools were designed to help boost morale and ultimately enhance the employee performance index. Some of the applications that debuted included Viva Amplify and Viva Pulse.

And now, Microsoft has announced that Viva Pulse is now shipping to public preview. For those not conversant with the application, it’s designed to enhance communication between managers and team leads. It uses both smart templates and research-backed questions to help businesses identify their strengths and weaknesses. In turn, they will get recommendations on how to address the issues.

According to Microsoft:

With Viva Pulse, managers and project leads can request ad-hoc feedback on topics to better understand their team’s needs and address them in the moment. Pre-populated, research-validated survey templates help zero in on important topics such as change management or work situations. Managers and leads can also customize templates to meet their unique team needs.

Additionally, users will be able to leverage the tool’s capabilities to provide team leaders and managers with swift responses highlighting their sentiments on certain matters, This will, in turn, help with the decision-making process and ultimately play a major role in determining the success of the project. “Survey senders can leverage automatic sentiment analysis which saves time and helps them focus on areas of opportunity for the team. To ensure employee confidentiality, managers and project leads receive an aggregated view of survey results,” says Microsoft in the blog post.

thumbnail image 3 of blog post titled Microsoft Viva Pulse available for public preview

Once the feedback is given to the team leader, Viva Pulse will also suggest the next steps that should be followed based on the feedback results. This way, employees will get a sense of belonging and that the issues they raised are being heard. Microsoft is set to ship VIva Pulse to general availability next month.

Mscomm32.ocx is Missing: How to Fix or Download it Again

When your computer fails to access or locate mscomm32.ocx file, then you may see the mscomm32.ocx is missing error.

In this guide, we will walk you through each step, providing clear instructions and best practices to fix the error.

What is mscomm32.ocx?

The mscomm32.ocx file is a component of Microsoft’s ActiveX controls, specifically the Microsoft Communications Control.

This file is used by several applications to enable communication and interaction with external devices, such as barcode scanners, modems, electronic scales, and other equipment connected via serial ports.

It provides programming interfaces that allow developers to implement serial communication functionality within their software.

Most recent versions of Windows have deprecated the use of ActiveX controls and replaced it with .NET. However, there are some legacy apps that rely on mscomm32.ocx file, which may encounter issues if the file is missing.

Why is mscomm32.ocx missing?

There could be various reasons for this issue; some of the common ones are listed here:

  • Corrupted file – If the mscomm32.ocx file is corrupted or damaged due to malware infection, improper shutdown, or hardware issues; you may see this error.
  • Improperly registered – The file may not be registered correctly in the Windows system registry, leading to this error. You need to re-register the file to fix it.
  • Compatibility issues – The software that relies on Mscomm32.ocx may not be compatible with the version of the file installed on the computer, causing the error.
  • Registry issues – If your computer has registry issues, including broken entries, it may lead to this error. Run a registry cleaner to resolve the problem.

Now that you know the causes, let us check the solutions to fix them.

How can I fix the mscomm32.ocx missing error?

Before engaging in advanced troubleshooting steps, you should consider performing the following checks:

  • Make sure you have the admin rights to perform the methods mentioned below.
  • Try restarting your computer.
  • Ensure your Windows is up to date.
  • Run a registry cleaner.
  • Restart or reinstall the program that is throwing the error.

Once you are done with these steps, move to the methods mentioned.

1. Re-register the file

  1. Press the Windows key, type cmd, and click Run as administrator.CMD elevated mscomm32.ocx
  2. Type the following command to unregister the mscomm32.ocx file and hit Enter:  regsvr32 /u MSCOMM32.OCXcmd_qlptbm8IEz
  3. Once the process is complete, copy & paste the following command and press Enter: regsvr32 /i MSCOMM32.OCXcmd_pnXWZG2a5b
  4. Close the Command Prompt and restart the app associated with the problem.

Once your PC is up, check if the issue persists.

2. Run SFC & DISM scans

  1. Press the Windows key, type cmd, and click Run as administrator.CMD elevated mscomm32.ocx
  2.  Copy & paste the following command to restore Windows OS image files and press Enter: DISM /Online /Cleanup-Image /RestoreHealthRestore health mscomm32.ocx
  3. Once the command is run, the DISM uses Windows Update to provide the files that are required to fix corruption; once done, type the following command to replace corrupted files with a cached copy  and hit Enter: sfc/scannowSFCSCANNOW CMD
  4. It may take several minutes for the command operation to complete; once done, restart your computer.

To make this process easier and prevent other errors from occurring by doing this manually, we suggest using a specialized repair software.

3. Download the file manually

  1. Go to the OCXMe website and click Download.Download OCX File
  2. Once the file is downloaded, right-click it and select Show in folder.Download mscomm32.ocx Show in folder
  3. Copy the file and navigate to the former path for 32-bit and the latte path for 64-bit:
    • C:\Windows\System32\ folder
      C:\Windows\SysWOW64\ folder
  4. Paste the file once you are in the folder to restore the missing file.

So, these are steps that you can take to resolve the mscomm32.ocx missing error and ensure the smooth operation of your applications.

If you are wondering how to fix other corrupt or missing files on your computer, we suggest you check out this guide to find the solutions.

Please feel free to give us any information, tips, and your experience with the subject in the comments section below.

How to deploy Windows 11 to multiple computers at once

If you’re an admin in an organization, chances are you needed to install Windows 11 on the organization’s PCs.

You can, of course, use a lot of tools to sync the devices of your organization. But is there a solution to deploy Windows 11 to multiple computers at once?

In a Reddit thread, a user is asking the same thing, and the answers are varied, but definitely yes. You can deploy Windows 11 to multiple computers at once.

The thing is, which solution would be the best in this case? There are quite a lot of ways you can do that. However, every solution takes a certain time to complete, and what if you need to do it quickly? Follow our guide, and we’ll tell you what are your options when thinking about deploying Windows 11 to multiple computers at once.

Here’s how to deploy Windows 11 to multiple computers at once

Before we start, you should know that these solutions will take time, depending on what apps you have available, how much time, how many USB drives, and so on.

Deploy Windows 11 to multiple computers with Microsoft Intune

The most obvious way to deploy Windows 11 to multiple computers at once is through Microsoft Intune. The app should make it very easy for you to update your entire organization’s PCs at once, in an automated way.deploy windows 11 to multiple computers

That means you won’t really have to check every system, the updating will happen automatically after the restart, and you won’t need to worry.

However, there are prerequisites that you need to be aware of before trying Microsoft Intune.

First, your organization must have one of the following subscriptions for deploying feature updates in Intune:

  • Windows 10/11 Enterprise E3 or E5 (included in Microsoft 365 F3, E3, or E5)
  • Windows 10/11 Education A3 or A5 (included in Microsoft 365 A3 or A5)
  • Microsoft 365 Business Premium
  • Windows 10/11 Virtual Desktop Access (VDA) per user

Second, the devices in Intune should be running a supported version of Windows 10. They also must be enrolled in Intune MDM and be Hybrid AD joined or Azure AD joined.

Third, and most important of all, the device should meet the Windows 11 minimum requirements to upgrade to Windows 11 in Intune.

If your organization already uses Microsoft Intune, then you’re in luck. You will be able de deploy Windows 11 very easily.

The steps to deploy Windows 11 with Microsoft Intune

  1. Sign in to the Microsoft Endpoint Admin center (Intune Portal).
  2. In the portal, go to Devices > Features Updates for Windows 10 and later.
  3. Select Create Profile and define the required Windows 11 upgrade settings in the policy.
  4. In the Deployment Settings tab, enter the name of the policy as Upgrade to Windows 11 using Feature update deployment.
  5. Under Feature Deployment settings, select Windows 11 as a feature update to deploy.
  6. In the Assignments tab, add the AAD groups to which you want to target the Windows 11 upgrade policy.
  7. Click the +Add Groups button and select the ADD group.
  8. Click Next.
  9. Finally, on the Review + Create tab, click Create.
  10. Under Feature Updates for Windows 10 and later, you can see the new profile that you created for Windows 11 upgrade.
  11. You must restart the computer to install the latest Windows feature update. Select Restart Now, and click it.

Deploy Windows 11 to multiple computers with Microsoft Deployment Toolkit (MDT)

You can also try to deploy Windows 11 with Microsoft Deployment Toolkit, which is a free tool that you can download from Microsoft.Microsoft Deployment Toolkit

  1. You need to create a Windows 11 operating system folder in the Deployment Workbench.
  2. Once you’re done, you will import the Windows 11 files.
  3. You will then create a Windows 11 task sequence similar to Intune.
  4. Using the Windows 11 task, you will build and capture the image file.
  5. You deploy the Windows 11 image captured with Microsoft Deployment Toolkit.

You can also try the classic way of using multiple USB tools at once, but you will have to move a lot between computers, and it will take a lot of time.

If you’re dealing with 50 computers at once, as in the Reddit thread, the best solution is by far Microsoft Intune. Your organization should already run on it if it has Windows PCs already. MDT can be useful, but it can become very tiring, as the process is not entirely automated.

You can also check the Reddit thread for more unconventional solutions. You can use all sorts of third-party apps to clone images quickly. But if they’re not connected to a shared network, it will be very time-consuming to deploy Windows 11 on all of them.

How to upgrade your HoloLens 2 to Windows 11

It seems that the era of augmented reality is upon us, once again. Recently, Apple announced its Apple Vision Pro, a headset set to revolutionize all headsets. In light of this news, Microsoft has also released Windows Holographic, version 23H1, the June 2023 Update for its HoloLens 2.

You will be able to upgrade your HoloLens 2 to Windows 11. And if you haven’t done it already, then you should do it. You’ll have a seamless experience with it, and exciting new features are coming to it as well.

Version 23H1 is now available to your HoloLens 2, and Microsoft will also discontinue the support for the Windows Holographic version 20H2, so there is another reason to update it.

Here’s how to upgrade your HoloLens 2 to Windows 11

HoloLens 2 will move to Windows 11 with the 23H1 release.

To upgrade your HoloLens 2 devices they must be currently running the 21H1 May 2021 update (build 20346.1002) or newer.

If the 23H1 feature update is not available, Microsoft advises you to update your device and try again, as the newer updates will be automatically suggested to you.

You should know that, if you are on a version that is older than Windows Holographic version 20H2 (Build 19041.1136), you first need to update to the February 2021 update (build 19041.1136 or newer). Then you will be able to update to the 21H1 May 2021 update (build 20346.1002) or newer.

But let’s stick to the exciting things. Here are all the features coming to HoloLens 2 on Windows 11 with the new update.

These features are coming to HoloLens 2 with the new update on Windows 11

FeatureDescriptionUser or scenario
Store app update from Settings featureIntroduces the option to manually check for app updates from the Settings app.All
WebView2 control now availableThe Microsoft Edge WebView2 control allows you to embed web technologies (HTML, CSS, and JavaScript) in your native apps and is now available for the HoloLens 2.Developer
Device reset requirements in the Settings ApplicationDevices must have sufficient battery and free disk space to perform a device reset.All
Removing placements of an app in the mixed worldAn option to close one or all placements of an app is now available in the context menu.All
Automatic update of Dynamics 365 Remote Assist and Dynamics 365 Guides during Autopilot flowWhen provisioning a HoloLens 2 device using Autopilot, Dynamics 365 applications will update automatically.IT Admin
Reboot CSP enabled and related changesHololens now supports weekly scheduled reboots and other options.IT Admin
Update available notificationShows user that update is available when looking at the start menu.End User
Autopilot reset experienceImprovements in Autopilot reset experience to enable users to reset HoloLens 2 and restart Autopilot without requiring manual flashing.IT Admin
Biometrics disclosure screenDisplays information to all new users on what biometrics the device uses.All
Remove users on deviceNew policies to manage when to remove users from the device to prevent hitting the maximum limit.IT Admin
Fixes improvementsFixes and improvements for HoloLens.All

As you can see, every professional can enjoy the new HoloLens 2 features, as they can be used for work, school projects and so many more.

Are you excited about the new HoloLens 2 features? Let us know in the comments section below.

How to Fix Your Arrow Keys if They’re Not Working in Teams

Several of our readers have reported that for them the left and right arrow keys are not working in Microsoft Teams. There can be multiple reasons behind this issue.

And that is exactly what we are going to discuss in this guide along with the solutions to fix the problem. Let us get right into it.

Why are my arrow keys not working in Microsoft Teams?

We dug into the internet and found out a few common reasons that are possibly causing the arrow keys to not work in Microsoft Teams.

  • Microsoft Teams is outdated – Chances are the version of Microsoft Teams that you are running is outdated and causing a problem because of some internal bug or glitch.
  • Keyboard driver is problematic – The keyboard driver might be missing some important files or the files are corrupt because of which the arrow keys are not working in Microsoft Teams.
  • Microsoft Teams cache is the culprit – Corrupt cache files for any program can always cause multiple issues on your PC, one of which is the problem at hand.
  • Some files are missing from your PC – There could be chances that some third-party programs have replaced files related to Microsoft Teams on your PC.

Let us now check out the solutions that will help you to resolve the arrow keys not working in Microsoft Teams problem.

What can I do if the arrow keys are not working in Microsoft Teams?

Before applying the solutions let us perform some quick checks and check if this fixes the issue or not.

  • Restart your computer and check if this fixes the issue. If it does, then it was a temporary glitch.
  • Restart Microsoft Teams and check if the problem is resolved or not.
  • Make sure you have the latest version of Microsoft Teams. You can check that in the About Teams menu from its settings.
  • Clean the arrow keys with a brush or a cloth and check if this works.
  • Check if the arrow keys are working on other programs or not. If not, then there is some issue with your keyboard.

Now let us jump to the advanced solutions and resolve the problem. You can also check this guide on fixing arrow keys not working on your keyboard to rule out system level problems before focusing only on Microsoft Teams.

1. Reinstall Microsoft Teams

  1. Press the Win + I key to open the Settings menu.
  2. Click on Apps from the left pane.
  3. Select Installed apps.
  4. Locate Microsoft Teams and click on the 3-dot menu.
  5. Select Uninstall.
  6. Visit the official website and download the program.
  7. Install and launch the program and check if the issue exists or not.

Reinstalling Microsoft Teams will help replace the files that are problematic or are causing problems. Simply follow the above steps and reinstall the program and check if this fixes the issue or not.

2. Clear the Microsoft Teams cache

  1. Close all instances of Microsoft Teams.
  2. Press the Win + R keys to open the Run dialogue.
  3. Type the below command and press Enter:%appdata%\Microsoft\Teams
  4. Press Ctrl + A to select all files and press the Del button to delete all selected files.
  5. Restart Microsoft Teams.

The above two ways will help you get rid of the Microsoft Teams cache files that could be causing the arrow keys to not work with the program.

3. Update the keyboard driver

  1. Press the Win key to open the Start menu.
  2. Type Device Manager and open it.
  3. Expand the Keyboards section.
  4. Double-click on your keyboard to open it.
  5. Switch to the Driver tab.
  6. Click on Update driver.
  7. Select Search automatically for drivers option.
  8. Restart your computer.

4. Repair/reset the Microsoft Teams app

  1. Press Win + I keys to open the Settings menu.
  2. Click on Apps on the left pane.
  3. Select Installed apps.
  4. Hit the 3-dot menu icon and select Advanced options.
  5. Scroll down and hit the Repair button and after the process, check if the arrow keys are working.
  6. If they still don’t, repeat the steps and click on the Reset button instead.

That is it from us in this guide. If you want to know how you can use Microsoft Teams Organization Chart, then refer to our dedicated guide and learn the steps.

Feel free to let us know in the comments below, which one of the above solutions resolved the problem for you.

Google Docs offline might be coming to Microsoft Edge

Good news for Windows users this week. Patch Tuesday updates are here and they brought with them a lot of Security updates for your PC. Among other features, Bluetooth Low Energy Audio is also on all Windows 11 PCs right now, so your wireless devices will last longer than ever.

On another hand, it seems that Edge users might be getting some exciting features as well. As spotted by Windows enthusiast @Leopeva64, Google Docs offline might be coming to Microsoft Edge very soon.

The “Google Docs Offline” extension has been automatically installed on one of my devices on Edge Canary, I checked on Dev, Beta and Stable and the extension is not installed on any of those versions, so it looks like this is another experiment on Canary.

@leopeva64

While we don’t know if this feature is going to make it in the final release, or if it’s going to be released soon, it is an exciting feature. Especially if your work day by day requires you to use Google Docs, Edge might be the best way to use them. So Microsoft could have a winning feature here.

How to enable Google Docs offline in Microsoft Edge

It looks like you can enable the feature very easily.

  1. Open your Microsoft Edge, go to Settings and more, and select Extensions.edge google docs offline
  2. Once you’re there, go to From other sources, and turn on Google Docs Offline.edge google docs offline

As per @Leopeva64, the feature is only available on Microsoft Edge Canary, so it’s not available to the general public yet, but these steps should come in handy for when it will be.

Edge has been getting a lot of improvements lately. For example, in Edge, you can now get Bing’s input on images, in a feature that is absolutely amazing.

You can just upload images in Bing Chat, and the AI tool will give you its input on them, as well as recommend suggestions and ideas.

And it’s also good to know that Copilot is coming to Windows 11 soon. So it might be possible that Edge will also benefit from it. Slowly, but surely, Edge lives up to its potential, so it’s exciting to be an Edge user right now.

What do you think about it? Are you using Edge? Are you excited about this new feature coming to it soon? Be sure to let us know your opinions and ideas in the comment sections below.

LongMem is Microsoft’s answer for unlimited context length

Microsoft has been at the forefront of AI education, and AI tools, in general. Copilot is coming to Windows 11 very soon, as part of Windows updates. AI is making its way into Microsoft Teams, with an intelligent recap helping people work easier.

Bing is also one of the most exciting AI tools around, and its features allow you to optimize both your work and the way you navigate the Internet.

But earlier this week, Microsoft also unveiled that Orca 13B will soon become open source. Orca 13B is a small AI model that performs at the same quality and speed as the other AI models, such as ChatGPT.

Now, in the battle of AIs and AI research, Microsoft is coming up with LongMem, a hypothetical framework and AI language model.

According to this Reddit thread, LongMem allows for unlimited context length at a reduced GPU, and CPU memory usage. All of these are done at a faster speed.

Is LongMem the Microsoft answer for unlimited context length?

Well, to understand what it means to have an unlimited context length, we first need to understand what does context length mean?

Context length refers to the number of tokens (words, signs, etc) permitted by a model, its input and output, and yours as well.microsoft longmem

For example, ChatGPT has a limited number of tokens which means its context length is limited as well. As soon as ChatGPT passes that limit, then all the continuous interaction that you had with it up to that point, will lose all significance. Or better said, it will reset.

So if you’re starting a conversation with ChatGPT on the subject of Windows, and that conversation lasts more than the limited context length, then the AI tool will lose the context, and will either start to deviate from the subject, or the whole conversation will reset.

An unlimited context length will make sure that won’t happen, and the AI model will continue to answer you on the subject, while also learning and adapting information as you talk to it about Windows.

That means the AI model will also personalize the conversation according to your input, hence the need for the context to have an unlimited length.

How does LongMem work?

Microsoft promises just that with their new research on the framework, LongMem. LongMem would enable large language models to memorize long-term contexts and utilize long-term memory at the reduced CPU power.

The framework consists of a frozen large language model as the memory encoder, a residual side network as the memory retriever and reader, and a cached memory bank that stores key-value pairs from past contexts.

In the research done by Microsoft, experiments show that LongMem outperforms baselines on long-text language modeling, long-context understanding, and memory-augmented in-context learning tasks. Plus, long-term memory allows it to utilize more demonstration examples for better learning.

And the good news is that LongMem will be open-source. So you will be able to study it and learn how to implement the framework in your own AI model. You can check its GitHub profile here.

And if you’re interested to read the whole research paper on the framework, head over here and check it out.

What do you think about this new technological breakthrough? Will it revolutionize the way AI models work? Be sure to let us know your thoughts and opinions below.

Msdt.exe: What is it & How to Fix its Errors

It’s not uncommon to encounter msdt.exe errors upon starting up MSDN Disc 3712. These errors are typically the result of a damaged, infected, or absent executable file. To remedy this issue, consider replacing the problematic EXE file with a new one.

In our prior guide, we delved into the reasons behind how to remove Msdtc.exe. Today, we find ourselves in a similar situation.

However, it is crucial to identify its underlying cause before we can address the issue at hand.

What is msdt.exe?

The msdt.exe file is an essential software component of the Windows OS, which can be found in the System32 folder. If you spot it elsewhere, it might be a red flag for malware, and you should have your security software scan it.

The Diagnostics Troubleshooting Wizard process is one of the crucial components of Windows files that trigger the Microsoft Distributed Transaction Service.

How can I fix msdt.exe errors?

1. Use Windows Update

  1. On your home screen search bar type update Windows and click Open.
  2. Now click on Check for updates.
  3. Wait patiently as the update process is ongoing.

2. Run System File Checker

  1. On your home screen type in cmd inside the search bar and Run as administrator.
  2. Next if the UAC screen pops up click Yes.
  3. Type the following command and press Enter: sfc /scannow
  4. While the SFC will scan for msdt.exe issues, follow the on-screen commands and kindly wait until the process is done.
  5. Lastly, if the following commands didn’t work, run the following commands one by one:
    DISM /Online /Cleanup-Image /CheckHealth
    DISM /Online /Cleanup-Image /ScanHealth
    DISM /Online /Cleanup-Image /RestoreHealth

After both SFC and DISM scans are finished, check if the problem is still there.

If the Windows scan didn’t solve your file error, we suggest you use a forecast repair tool and solve any damaged files in your PC.

3. Perform System Restore

  1. Hold down the Windows + R keys to open it, input this rstrui in the Run text box and click OK.
  2. The System Restore Window might include Choose a different restore point. Choose it and click Next. 
  3. Check the Show more restore points checkbox to see a complete list of dates.
  4. Click the Next button and then click Finish to confirm your restore point. 

At this point, your computer will restart normally and boot up with a restored version of Windows, and the msdt.exe error should be handled.

We sincerely hope that our all-inclusive guide has provided you with valuable insights to alleviate your concerns. Dealing with this issue may not be as daunting as it initially appears.

If you encounter any additional issues, we suggest consulting our comprehensive manual on MSDTC encountered an error. This handbook provides comparable solutions to resolve your predicament.

Your input on this matter is greatly valued, and we are eager to hear your perspective. Feel free to leave a comment below and share your thoughts with us.

What is Musallat.exe & How to Quickly Get Rid of It

The MusaLLaT.exe file is classified as a Trojan virus, malicious software that can carry out numerous harmful activities on a compromised computer.

These nefarious deeds can range from stealing confidential data to deploying other types of malware and even granting unauthorized access and control of the targeted system to cyber criminals.

In our previous guide, we explored how to remove filerepmalware. Presently, we face a comparable predicament again.

Nevertheless, before tackling the problem at hand, it is imperative first to recognize its root cause.

What is Musallat.exe?

The MusaLLaT.exe file has been identified as a noxious program commonly employed by Trojan malware to execute an array of malicious activities.

If you don’t delete this file, your computer may be at risk of remote access and various other security threats.

How can I get rid of musallat.exe?

1. Uninstall malicious software

  1. On your home screen, click on the Start icon and select Settings.
  2. Now select Apps and next choose Apps & Features.
  3. Locate the malicious apps under the Apps list at the far right, click on the three dots and Uninstall them.
  4. Lastly, reboot your system.

2. Scan your PC with Windows Defender

  1. Select Start on your home screen and click on Settings.
  2. Now click on Privacy & Security, then select Windows Security.

  3. Next click Virus & threat protection.

  4. Lastly, click on Quick scan to perform a scan on your PC.

We trust that our comprehensive manual has been of great help in addressing your worries. It’s quite apparent that tackling this problem is not as overwhelming as one might think at first glance.

If you face any further complications, we recommend referring to our extensive handbook on how to get rid of DismHost.exe. This guide presents similar remedies to tackle your problem.

We highly appreciate your contribution regarding this matter and are keenly interested in knowing your viewpoint. Feel free to leave a comment below and express your feedback with us.

WindowsApps Folder: How to Find & Access It

The WindowsApps folder is hidden in the C:\Program Files directory on Windows OS. It contains the installation files for apps installed from the Microsoft Store.

However, users encounter issues finding the WindowsApps folder. This article will show you how to access the WindowsApps folder on Windows 11.

How do I find and access the WindowsApps folder?

1. Access the WindowsApps folder via File Explorer

  1. Press the Windows + E key to open File Explorer.
  2. Go to the C:\Program Files directory and click the View tab on the File Explorer ribbon.
  3. Navigate to the Show/hide section, and click on the box in front of the Hidden items to show hidden folders.
  4. Navigate to the WindowsApps folder, right-click on the folder, and select Properties from the drop-down.
  5. Click on the Security tab at the top of the newly opened window. Tap on the Advanced button in the bottom right corner of the window.
  6. Select the Change option on the Advanced Security Setting for WindowsApps.
  7. Click on the Enter Name to select bar, type in your Windows Username, select the Check Name button, and then click OK.
  8. Your username will appear next to the Owner. Check the box next to Replace owner sub-containers and object, then click OK to apply the changes.
  9. Now you will have permission to open and edit the WindowsApps folder.

Using the above-stated steps will require the use of a Microsoft account to be able to change the folder ownership.

You can check our guide on why Windows File Explorer keeps crashing and how to fix it if it occurs on your PC.

2. Access the WindowsApps folder via a PowerShell Command

  1. Left-click the Start button, type powershell, and click Run as administrator.
  2. Click Yes on the User Account Control prompt.
  3. Copy and paste the following lines and press Enter: takeown /f “C:\Program Files\WindowsApps” /r

The PowerShell command to find and access the WindowsApps folder is direct, advanced, and useful when other methods fail. This will provide Windows apps folder permissions.

However, if you experience issues using PowerShell, read on how to fix PowerShell not opening on your PC.

3. Access the WindowsApps folder via Registry

  1. Download the Take ownership registry file from Revo.
  2. Unzip the File and open the Add Take Ownership to Context menu registry file.
  3. On the following page, select Yes to add it to the registry.
  4. Click OK to close the popup and go to the C:\Program Files directory.
  5. Right-click on the WindowsApps folder and click on Take Ownership from the drop-down menu.
  6. You must give Account Control Administrator permission for the Registry file to work.

After trying the above steps, utilizing the Registry Hack may be the last resort. You can also learn how to use the Registry Hack to customize your Windows OS.

You should know that this guide will also help you access the WindowsApps folder on Windows 10 as well because the methods are identical.

Can I move the WindowsApps folder to another drive?

You can move the WindowsApps folder to another drive using File Explorer. Just cut and paste it to the desired drive on the other drive.

Ensure you have permission to move the folder and that you are not moving it to a read-only location.

Remember that if the folder contains any applications or programs, those applications or programs may no longer function once you move the WindowsApps folder to a new drive.

Alternatively, you can read about how to perform a Windows app cleanup to create more space on your device.

Also, you may our guide on ways to get back the missing WindowsApps folder on Windows 11 for more information.

Use the comments section below if you have any questions or other solutions to this problem.