Want to donate through Microsoft Rewards? We’ve got a news

Just like what they did by revamping thumbnails for Favorites on Edge, Microsoft is also reportedly working on a feature that lets you donate easier on Edge through Microsoft Rewards. 

According to a recent discovery by Windows insider @Leopeva64 on Twitter, Microsoft aims to provide users with an effortless way to support charitable causes using their accumulated rewards points. You can find the toggle for this donation feature within the Privacy, search, and Services tab in the Settings app. 

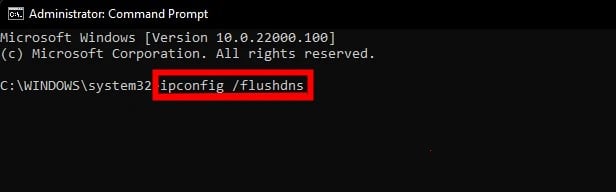
We will automatically identify when nonprofit sites you visit can be supported with Microsoft Rewards points or cash donations.

This suggests that Microsoft is taking steps to seamlessly integrate the donation process into users’ online experiences.

Microsoft Rewards is a loyalty program that allows users to earn points by using various Microsoft services and products. You can redeem these points for a range of rewards, including gift cards, discounts, and now potential donations.

While Microsoft is yet to unveil details about the specific nonprofit sites and organizations that will be eligible for donations through the Rewards points, this development signifies Microsoft’s commitment to corporate social responsibility and fostering a culture of giving back.

Microsoft Rewards: Redmond’s ongoing efforts to simplify donations

Microsoft has made previous efforts to encourage donations through its Rewards program, demonstrating a commitment to charitable initiatives. This small update on Edge wasn’t the first attempt. 

Back in 2020, Microsoft introduced the Give with Bing initiative, allowing users to donate their Microsoft Rewards points to over a million non-profit organizations. The initiative was available in several countries, including the US, UK, Canada, and Australia.

According to Microsoft, the Give with Bing initiative successfully raised over $12 million for these organizations during that time. By facilitating the donation of rewards points, the tech giant offers users an opportunity to support charitable causes seamlessly.

What do you think about Microsoft’s latest venture in helping you donate through Rewards on Edge? Please share your thoughts in the comments section below!

Vulkan-1.dll Missing: How to Fix It or Download It Again

Vulkan-1.dll missing error appears on the computer when apps and services needing the file can’t access it. It can occur for many reasons and can be tricky to fix. Nonetheless, this guide will provide some helpful steps for resolving the issue.

Alternatively, you can review our article about installing and fixing missing DLL files on Windows PCs.

What is Vulkan-1.dll?

The processes of the Vulkan-1.dll file are associated with the Runtime Loader used for rendering 3D graphics.

It is part of your graphics card driver and associated software installation. Though not a Microsoft product, it is an essential file for the system’s graphic performance.

Why is Vulkan-1.dll missing?

Some factors liable to be responsible for the Vulkan-1.dll missing error are:

  • Corrupt Vulkan-1.dll file – It is common for DLL files to be inaccessible or deleted by antivirus software when corrupt. So, the file may be missing due to its corrupted status.
  • Omitted from the driver pack – Sometimes, the Vulkan driver may not be installed alongside the driver pack. Hence, it will be missing because it has been omitted. Also, it could be in a different directory from where the other drivers are.
  • Outdated drivers for hardware – If graphics drivers and other hardware related to vulkan-1.dll or an app using it are outdated, their bugs can impede the file’s ability to run.

These factors can vary on different computers. Regardless, as we go further, we’ll take you through some detailed steps to help fix the Vulkan-1.dll missing error.

How can I fix the missing Vulkan-1.dll file?

Before trying any advanced troubleshooting steps, go through the following preliminary checks:

  • Restart your computer – Restarting the computer helps refresh its processes and fix temporary errors caused by malfunctioning system components.
  • Temporarily disable the antivirus – Sometimes, the antivirus might have flagged the DLL file and, as such, exclude it from installation. So, try disabling the antivirus and retry.
  • Add an exception for VulkanRT-Installer in Windows Defender Security Center – By doing this, the Force randomization for images (Mandatory ASLR) will be disabled. Hence, the installer will work.
  • Reinstall the app prompting the error – Reinstalling the software might download the DLL file alongside its app package.

If the Vulkan-1.dll missing error persists, proceed with the fixes highlighted below:

1. Use a dedicated DLL repair tool

DLL errors are challenging to resolve and can prevent you from using some apps. So, repairing the file is important to make apps run properly. Sadly, it is not easy to repair these files if you’re not tech-savvy.

However, you can use dedicated DLL fixing tools to repair the missing DLL file. They will resolve incompatibility issues due to third-party DLLs and the operating system.

2. Download and reinstall the Vulkan driver

  1. After disabling your antivirus, Right-click the Start menu and click on Device Manager.
  2. Expand the display adapter, right-click the Nvidia / AMD driver, and click Uninstall device.
  3. Click Uninstall to confirm and restart your PC.
  4. Go to Vulkan official page, then download the Vulkan Runtime Installer. (Depending on your PC)
  5. Once the download is complete, double-click on the installer to open the Vulkan Runtime.
  6. Click on I Agree to start the installation. Follow the on-screen instructions to complete it.
  7. Restart your PC and check if the error persists.

Further, some users claim they were able to run the installer through the following paths in File Explorer:

  • C:\NVIDIA\DisplayDriver\388.59\Win10_64\International\Display.Driver\VulkanRT-Installer.exe
  • C:\NVIDIA\DisplayDriver\390.65\Win10_64\International\Display.Driver\VulkanRT-Installer.exe
  • C:\AMD\Win10-Radeon-Software-Adrenalin-2020-Edition-20.2.2-Mar5\Packages\Drivers\Display\

Irrespective, if you don’t want to download online, you can try any of the above paths depending on your Windows version or graphics card manufacturer.

Downloading the Vulkan Runtime Installer will install the DLL file and other essential files needed for the system apps.

In conclusion, you may be interested in our review of the best corrupt file repair software for Windows PC. Also, we have a detailed guide about missing .dll files after Windows 10/11 Update and ways to fix it.

Should you have further questions or suggestions, kindly drop them in the comments section.

Failed to Process Your Command [Midjourney Error Fix]

Midjourney is one of the most popular AI software that generates high-quality images by simply typing in commands or an image description. However, not all users can utilize this software as many have encountered the failed to process your command error.

This error prevents users from executing commands on the prompt and renders the software useless. In this article, we’ll briefly outline some of the reasons why you’re experiencing this error and provide steps to help you fix it.

What causes failed to process your command midjourney error?

The following are some of the most common reasons why you’re experiencing the Failed to process your command midjourney error:

  • Server Issues: Most of the time, the error Failed to process your command is caused by technical issues with the Midjourney server. Also, the server might be undergoing an upgrade or a cyberattack, which prevents users from accessing the service. If it’s a Midjourney internal server error, you’ll likely trigger the failed to process your command error. 
  • Location Restrictions: This is a rare case, but sometimes, users can trigger the failed to process your command error on Midjourney if their country of residence is banned from accessing Midjourney’s services. If you reside in any of the countries currently blocked from accessing Midjourney, you’ll trigger the Midjourney error.

How can I fix failed to process your command Midjourney error?

1. Access Midjourney with a VPN

In rare cases, the Midjourney error can be triggered due to the location or residence of the user. Most service providers usually have location restrictions based on their peculiar terms and conditions. You may have a location block if you’re experiencing problems while accessing Midjourney.

However, you can easily get around location blocks by employing the services of a Virtual Private Network (VPN). Professional VPN software usually offers many servers, with different IP addresses that you can use, for example, ExpressVPN has multiple servers located in 105 countries.

ExpressVPN is perfect for spoofing your local IP address and bypassing geo-blocks. You can do that with a press of a button and if your connection is poor or you still face any issues when trying to use Midjourney, you can just pick another server from the thousands this software provides.

ExpressVPN

Never worry about geo-blocks and network errors with this powerful VPN solution
Check Price Visit Website

2. Rejoin the Midjourney Server

  1. Firstly, press the Windows key, type Discord in the search bar, and hit Enter to open the app.
  2. In the Discord window, locate and open the Midjourney bot. Click the Downward arrow next to Midjourney, and click Leave Server.
  3. Then, press the Windows key, enter the name of your browser, and hit Enter.
  4. In your browser window, navigate to Midjourney’s official website to locate the Discord invite link.
  5. On the Midjourney webpage, click Join the Beta, and click Accept Invite to rejoin the Midjourney server.
  6. Check to see if the error is fixed by running a few commands.

3. Restart your Discord App

  1. Launch the Discord app by clicking on the app icon on your Desktop screen.
  2. In the Discord window, navigate to Settings.
  3. Scroll through the Windows/Mac Settings tab, and check if the minimize to tray option is turned off. Then, click on the toggle button next to minimize to tray to disable the option.
  4. Now, press the X button at the top of the window to close the Discord app.
  5. Then, relaunch the Discord app from the Desktop to check if the error is fixed.

Sometimes, the Discord app might experience issues that prevent it from functioning properly.

Further, errors like Failed to process your command, can be triggered if the app isn’t functioning properly. Restarting the Discord app could fix the Midjourney error and make the app function properly.

Midjourney is a very useful software that is used by tons of people worldwide. If you’ve been unable to utilize the service due to the failed to process your command error, we hope the steps highlighted in this article will help you resolve the error.

DaVinci Resolve High CPU Usage: How to Reduce It

DaVinci Resolve is one of the most popular video editing software available today. However, users have experienced high CPU usage while using the app which can affect your PC’s health and performance.

If your experiencing high CPU usage in DaVinci Resolve, this article will provide you with steps to help you fix the error.

What causes DaVinci Resolve high CPU usage?

The following are some of the most common causes of high CPU usage in DaVinci Resolve:

  • PC Doesn’t Meet Requirements: Most modern applications and programs have a specific minimum system requirements PC’s must possess before they can run the software. If your PC doesn’t meet the minimum system requirements for DaVinci Resolve, you’ll experience high CPU usage.
  • Outdated Software: Developers usually release updates to fix errors and bugs. If your version of DaVinci Resolve is outdated, you’ll likely experience errors like high CPU usage.
  • Corrupt Application Files: Sometimes, you can trigger app errors if the software has corrupt system files. The files can get corrupted by viruses, forced system shutdowns, and more.

How can I fix DaVinci Resolve high CPU usage?

Before we proceed with more advanced solutions, here are a couple of quick fixes you can attempt:

  • Restart your PC.
  • Close the DaVinci Resolve app and relaunch it.
  • Scan for viruses and malware.

If the error persists after applying those quick fixes, here are a couple of advanced solutions you can attempt:

1. Check if your PC meets the Software Requirements

Like most modern software, DaVinci Resolve has a minimum system requirement that all PCs must meet to run the software efficiently. If your PC doesn’t meet the minimum system requirements for DaVinci Resolve, it can cause high CPU usage. 

The minimum requirements for DaVinci Resolve to run smoothly on your PC are:

  • 16 GB of system memory. 32 GB when using Fusion.
  • Blackmagic Design Desktop Video 10.4.1 or later.
  • Integrated GPU or discrete GPU with at least 2 GB of VRAM.
  • GPU which supports OpenCL 1.2 or CUDA 11.
  • NVIDIA/AMD/Intel GPU Driver version – as required by your GPU.

If your PC falls short in any of the above requirements, you’ll experience high CPU usage while using DaVinci Resolve.

2. Update DaVinci Resolve

  1. Double-click on the DaVinci Resolve shortcut on your Desktop window to open the app.
  2. In the popup window, click on the DaVinci Resolve menu bar, and select Check for Updates.
  3. If there are available updates, click on it to download and install it on your PC.

Sometimes, you can experience high CPU usage due to bugs in the previous updates. In such a case, you’ll need to update DaVinci Resolve to fix the error. 

You can update DaVinci Resolve by navigating to the BlackMagic Design website, and check for the latest version of the program.

3. Close unnecessary background programs

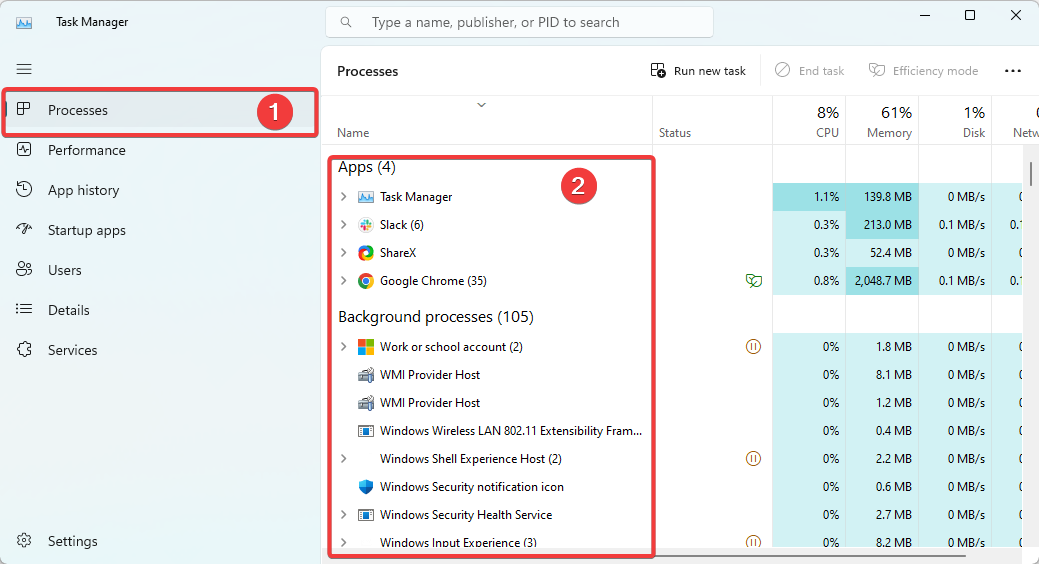
  1. Right-click on the Start menu, and click Task Manager.
  2. In the Task Manager window, Click on any of the apps/services draining your memory, and CPU. , and select End Task.
  3. Repeat the process until you’ve closed all memory draining tasks.

4. Adjust GPU Settings

  1. Launch the DaVinci Resolve app by double-clicking the icon on the Desktop window.
  2. In the next window, click on the DaVinci Resolve menu bar, and select Preferences.
  3. Navigate to the Memory and GPU tab, and uncheck the button next to GPU processing mode under the GPU configuration section.
  4. Click the drop-down menu next to it, and select OpenCL or Metal. Click Save to confirm your changes.
  5. Restart the DaVinci Resolve app to see if the error is fixed.

If your Graphics card isn’t as powerful as the ones needed to run maximum resolution, you’ll need to adjust your GPU settings to fix high CPU usage with DaVinci Resolve.

5. Reduce Playback resolution

  1. Launch the DaVinci Resolve app and click on the Playback option in the menu bar.
  2. Hover over the Timeline Proxy Resolution, and select Proxy Mode.
  3. Select Half or Quarter resolution to optimize the performance of the app.

In some cases, the Playback Resolution is set to High by default. For high-end PCs, this doesn’t affect the PC’s performance, but for lower PCs, you’ll need to reduce the Playback Resolution to fix high CPU usage.

6. Adjust the settings to Optimized Media

  1. Launch the DaVinci Resolve app and press Shift + 9 to open Project Settings.
  2. Navigate to Master Settings, and locate the Optimized Media and Render Cache section.
  3. Select DNxHR from the drop-down menu or choose DNxHR LB for smaller size and faster media generation.
  4. Navigate to the Media page in the Media pool, right-click on the clip you wish to optimize, and select Optimize Media.
  5. Click Playback at the top of the window, and select Use Optimized Media if available.
  6. Close the app and relaunch it to see if the error is fixed.

The media you import into DaVinci Resolve must support your PC’s specs and resources. Full HD is the recommended resolution for running DaVinci Resolve, but if you opt for 4K or higher resolutions, you’ll experience high CPU usage.

Therefore, you’ll need to convert the media to an optimized resolution that doesn’t affect your PC’s performance.

High CPU usage in most applications is triggered when your PC doesn’t meet the minimum system requirements. However, as we’ve seen in this article, it can also be triggered by other factors.

Nevertheless, you can fix the error by using the steps outlined in this article. If you’ve previously resolved the error using alternative methods, you can let us know in the comments below.

ChatGPT Error Fix: The Email You Provided is Not Supported

ChatGPT is one of the trendiest AI software available today. The AI model is also integrated into a lot of recent software. However, while trying to sign up for the service, users can trigger the error which reads the email you provided is not supported.

The ChatGPT email error is pretty frustrating, if you’re currently facing the error, this article will provide the steps needed to help you fix the error.

What causes the email you provided is not supported on ChatGPT?

The following are some of the most common causes of the error the email you provided is not supported:

  • Invalid Email Address: ChatGPT like most services that use emails for sign-ups requires a valid email address to sign up for the service. If the email address is invalid, incorrectly typed, you’ll trigger the ChatGPT error.
  • Unsupported Email Provider: ChatGPT has a list of supported email providers that can access its service. If you’re attempting to sign up using an email address from an unsupported email provider, you’ll trigger the error the email you provided is not supported.
  • Connection Issues: Sometimes, you can trigger this error if your internet connection is faulty. Your IP might be blocked or your router is faulty. In such cases, ChatGPT tends to act abnormally which can lead to the error.
  • Unregistered Email Address: If you’ve never signed up to ChatGPT before, and you try logging in to the service, you can trigger the error the email you provided is not supported. 
  • Suspended Account: If you’ve violated any of ChatGPT’s terms and conditions, your account might be suspended. In this case, you’ll trigger the error because your email address remains invalid until the suspension is cleared.

How can I fix the ChatGPT email error?

Before we proceed with more advanced solutions, here are a couple of quick fixes you can attempt:

  • Fix Network Congestion.
  • Close and Restart your Browser.
  • Access ChatGPT using a different browser.
  • Ensure the Email address you entered is correct

If you’re experiencing the ChatGPT email error, here are a couple of ways you can fix it:

Note icon NOTE
Note: For this step, we’re going to be taking Google Chrome as our default browser, although the steps are pretty similar to other browsers.

1. Clear browser cache and cookies

  1. Press the Windows key, enter the name of your Browser, and hit Enter.
  2. Then, click the three vertical dots at the top right corner, select More Tools, and click Clear Browsing data.
  3. Select the data you wish to delete and click the Clear data button once you’ve selected the data to be deleted. 
  4. Once you’re done, your browser cache and cookies will be cleared.

2. Open ChatGPT in Incognito window

  1. Press the Windows key, type your browser name, and hit Enter.
  2. In the Browser window, click on the three vertical dots at the top right corner of the window, and select New Incognito Window.
  3. In the Incognito window, navigate to the OpenAI website, and try signing up using your email address to see if the error is fixed.

Incognito mode keeps your browser history, helps you log into multiple accounts at the same time, delete browser cookies, and many more.

If the Chrome Incognito fails to load any pages, then follow the steps outlined in this guide to troubleshoot it.

3. Disable browser Extension 

  1. Press the Windows key, type your Browser’s name, and hit Enter.
  2. In the Browser window, click the three vertical dots at the top right corner, click on More Tools, and select Extensions.
  3. Then, disable all the extensions installed on your browser.

Browser extensions provide users with helpful features and functionality to help improve their browsing experience. However, some extensions are notorious for triggering errors on web browsers. In such cases, you’ll have to disable them to check if it’ll fix the ChatGPT email error.

Resolving the ChatGPT email error is not a complex task and can be completed in a couple of minutes. If you followed our guide, you should be able to resolve the error in no time.

However, if the error persists after attempting all the steps above, you can contact the ChatGPT customer support so they can help you fix the error.

CE-33643-0 Playstation Error: How to Fix Your Connection

The CE-33643-0 error is a PlayStation error that prevents users from accessing the PlayStation server. It is mainly triggered on PlayStation 4 consoles but can also appear on other of Sony’s consoles.

If you’re currently experiencing the CE-33643-0 PlayStation Error, this article will briefly discuss some common causes of the error and provide you with the necessary steps to help fix it. 

What causes the CE-33643-0 PlayStation error?

Here are some of the most common causes of the CE-33643-0 PlayStation error:

  • Network connectivity issues: PlayStation requires a stable and fast internet connection to operate properly. If your router or modem has poor connectivity, you’ll trigger errors like the CE-33643-0. 
  • Server downtime: PlayStation updates its servers occasionally. If the servers are down or under maintenance, you’ll likely run into errors such as this one.
  • DNS error: Before the PlayStation console can connect to the internet, it needs to resolve the IP address from the server. If the console fails to resolve the IP address, it can lead to several errors. 

Now that we know why this error is occurring, let’s apply the solutions below to fix it.

How can I fix the CE-33643-0 PlayStation error?

Before we proceed with more advanced troubleshooting techniques, here are a couple of quick fixes you can attempt to help you resolve the CE-33643-0 PlayStation error:

If the error persists after attempting the above steps, the following are the best troubleshooting techniques you can apply to fix the error:

1. Check your console’s Internet connection

  1. On your console Home menu, select Settings.
  2. In the Settings page, click on Network from the dropdown window.
  3. On the next window, select Test Internet Connection, and wait till the test completes.
  4. Follow the onscreen instructions after the test is completed to check if the error persists.

Testing the internet connection of your console will help you determine if the error is due to a local issue or insufficient bandwidth. Additionally, it can help resolve any glitch between the console’s communication modules and the server.

2. Change Console DNS Settings

  1. From your Playstation Home menu, launch the PlayStation Settings.
  2. Click on the Network tab from the dropdown window.
  3. In the next window, select Setup Internet Connection, and choose either a LAN or Wifi connection.
  4. Click the Custom button in the next window and select Automatic in the IP Field.
  5. In the DHCP hostname field, select Do Not Specify.
  6. At the DNS Settings Screen, choose Manual and set the Primary and Secondary DNS to 8.8.8.8 and 8.8.4.4, respectively.
  7. Save the adjustments and restart your console. 

In some cases, the CE-33643-0 PlayStation error can be caused by an inconsistent DNS range on your console, which makes it extremely difficult to connect to the Playstation server.

However, if you change your console’s DNS to a custom DNS provided by Google, you can resolve the error. 

3. Reset your console

  1. From your console Home menu, navigate to the Settings tab.
  2. On the Settings tab, click on Initialization, tap Initialize the PS4, and press the X button.
  3. In the next window, click on Full to fully reset your console apps and data.
  4. Press the X button to confirm the reset process.
  5. After the console resets, reinstall your game to check if the error is fixed.

Factory resetting the console will restore it to default settings, removing corrupt files and configurations that can trigger the CE-33643-0 PlayStation error. 

If you have further questions or suggestions, kindly drop them in the comments section.

How to Delete Google Bard History and Activity Data

Google Bard is an improved AI chatbot alternative to ChatGPT. However, it does not store your conversation history like ChatGPT, but it does store your prompts, the result, and the feedback you provide.

In this article, we will discuss how Google Bard uses data and ways to delete the history and activity data logs.

How does Google Bard use data?

Google Bard uses Google’s internet data, rather than internet pages, to provide instant text responses to users’ search queries. Below are some of the major ways by which Google Bard uses data:

  • Improving Google Bard – Google says that the stored data is used to provide more accurate search results that match the user’s intent.
  • Analyzing relationships – Google also uses the data to analyze the relationships between words in a sentence. It can identify correlations between words to understand the sentence accordingly.
  • Identifying entities – Bard uses data is used to identify named entities in a sentence, such as people, places, and organizations which will later lead to more accurate search results for such entities.

Now that you know some of the ways Google Bard uses data, let’s proceed to how to delete its history and activity data.

How can I delete Google Bard history and activity data?

1. Delete history for a particular day

  1. Visit Bard’s official website. From the left pane, click on Bard Activity.
  2. Under the Your Bard Activity section, you will see your prompts divided into the days you entered them.
  3. Now, click on the Delete (X) button next to each entry for a particular day to remove it.

In case you want to clear the Google Bard History and activity based on Specific days, you can follow the steps above.

2. Delete Bard’s history based on a specific activity

  1. Visit Bard’s official website. From the left pane, click on Bard activity.
  2. Under the Your Bard Activity section, you will see your prompts divided into the days you entered them
  3. Next to the activity, select the Delete (X) button.

Simply follow the above steps to delete your Google Bard history based on Specific Activity.

3. Delete the activity based on the Time Range

  1. Click the Delete button above the activity.
  2. Select the time range you want to delete from the available options: Last Hour, Last Day, All Time, and Custom Range.
  3. If you select the Custom Range option, enter the After and Before dates and click on the Next button.
  4. A confirmation prompt will appear with a preview of the activity that will be deleted.
  5. Click the Delete button to confirm the activity for the chosen time range.

Once you’ve completed the steps, the chat history will be removed from your Google account.

4. Turn off the Google Bard AI activity history

  1. Navigate to the Bard website. From the left pane, click on Bard activity.
  2. Under the Your Bard Activity section, click on Bard activity.
  3. Click on the Bard Activity toggle switch to turn it off (if it was on).

Disabling the Google Bard AI activity history will no longer allow the Google chatbot to connect data about your activities using the service.

And that’s it on how to delete Google Bard history and activity data. Clearing the data is an excellent way to protect your privacy.

If storing the Bard activity data for your Google account makes you feel uncomfortable, you can follow the methods provided in this article to delete it anytime.

For further reading on AI software, you can explore our detailed guide about the best AI software for Windows 11 to use on your PC.

If you have any questions or suggestions, do not hesitate to use the comments section below.

How to set working hours in Outlook

In the rising age of remote and hybrid workforces, Microsoft has prepared an answer to establish fluid working hours and locations. One of the solutions is now, you can set your working hours in Outlook, so you and your workmates can connect and collaborate better. 

Whether you’re an office worker, freelancer, or remote professional, understanding how to define and customize your working hours in Outlook can help you stay organized and focused. It helps you receive timely notifications, avoid unnecessary interruptions, and maintain a clear boundary between your professional and personal life.

With that said, however, there’s still a certain limitation that comes with this. This option is currently only available on the web version, but Microsoft is working closely to bring it to Teams and Outlook for Windows, iOS, Android, and Mac. We will keep you updated once the feature has been rolled out for everyone. 

In this step-by-step guide, we’ll show you how to set up and share your work location and schedule in Microsoft Outlook.

How to set working hours in Outlook

1. Open your Outlook app.

2. Go to Settings ➜ View all Outlook settings ➜ Calendar.

3. On Work hours and location, choose whichever time you’d prefer on each day. You can also select between working in the office or remotely from the dropdown. 

Speaking of which, Microsoft’s highly anticipated assistance tool, Copilot, is generating buzz as it prepares to make its way to all Microsoft 365 (Office) applications. 

Among these applications, Outlook is set to receive some exciting features. Powered by GPT-4, one such a feature will allow users to create a draft from a lengthy email, streamlining the process of composing responses or messages. 

Additionally, Copilot will offer the capability to generate a summary based on the content of the email, providing a concise overview of the message.

While these features sound promising, it’s important to note that Copilot is currently undergoing rigorous testing with a select group of insiders. 

Do you often use Outlook for work? If so, have you set your working hours? Let us know in the comments!

How to Add a Watermark in Word [2 Great Tips]

The watermark feature in Microsoft Word allows you to add a light and faded image of text, picture, and logo that appears behind the main content. Sadly, many users have complained about not knowing how to use it. Hence, this guide will discuss how to add watermarks in Word.

Also, we have a detailed guide on fixing Word experiencing an error when opening the file error on Windows 11.

Why add a watermark to a file?

There is one primary reason for adding watermarks to files, and it is to prevent counterfeiting. It protects the documents shared from being counterfeited and altered by other users downloading them. So, adding a watermark to a file helps you retain ownership regardless of who has the file.

Also, file owners use watermarks to indicate the purpose of a document like CONFIDENTIAL, DO NOT COPY, DRAFT, SAMPLE, etc.

They cannot be removed except by the original owner and can’t be copied by others or used without permission. This document protective method has proven to be effective against counterfeiting.

How can I add a watermark in Word?

1. Use a preconfigured watermark

  1. Open the document you want to add a watermark to in Word.
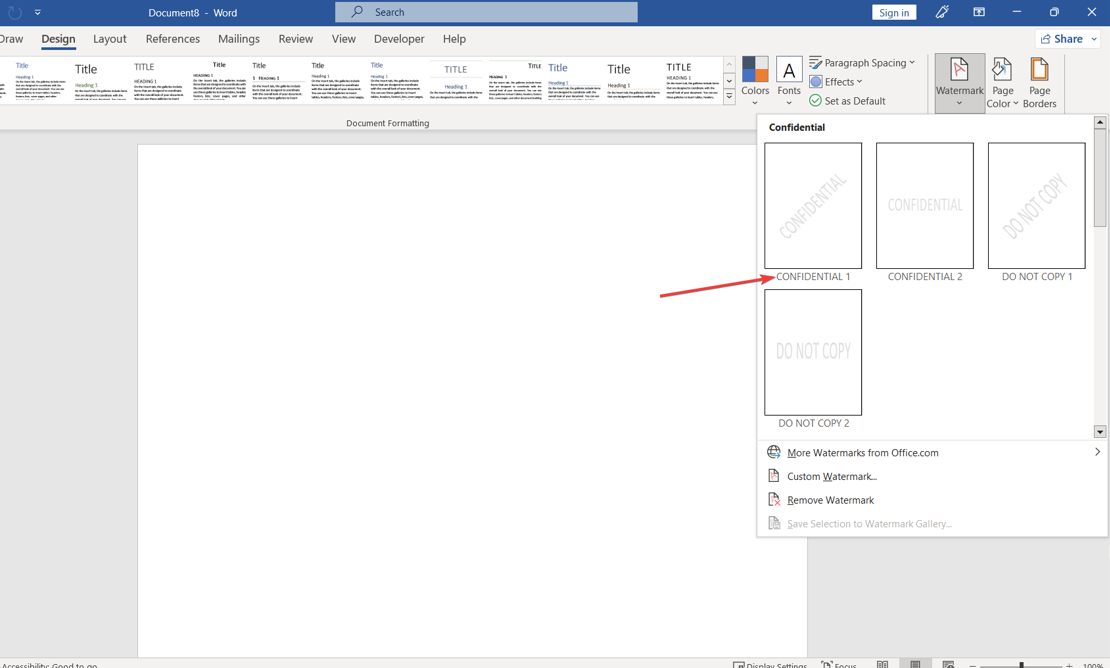
  2. On the top taskbar, select the Design tab. Click on the Watermark option on the top bar menu’s right side.
  3. Choose the watermark you want to insert by clicking on it from the preconfigured images, then it will reflect on all the pages.

Check our guide on what to do if Microsoft Word has stopped working on your PC.

2. Use the Custom watermark option

  1. Repeat steps 1-2 above, then click on Watermark.
  2. Go to the bottom of the page and select Custom Watermark from the available options.
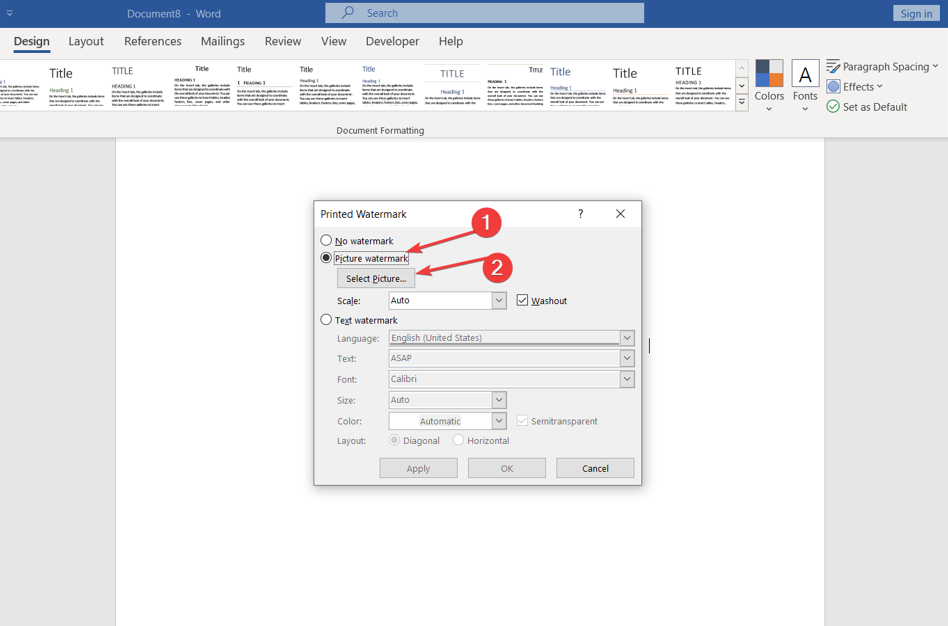
  3. Click the Picture watermark on the new page, then tap the Select Picture button. The picture will reflect behind the document.
  4. Go to Texts, input your watermark’s text in the text box, and select a desired font from the Font tab.
  5. Go to the Size and Color tab and select the size and color of your watermark, then select the Layout option of your choice.
  6. Click on Apply and then OK to add the watermark.

Conversely, some of our readers may be interested in our detailed article about how to remove watermarks in Word in a few steps.

Conclusively, you can check our review of the best batch watermark software for protecting your images online.

Should you have further questions or suggestions regarding this guide, kindly drop them in the comments section below.

3 Fastest Ways to Fix Excel Found Unreadable Content

Many Microsoft Excel users have encountered an Excel found unreadable content error when trying to open files. The error affects some files in some cases, while some users complain that it affects all files. However, this guide will discuss some fixes for the issue.

Also, you can read our guide on why Excel file format and extension do not match and how to fix the problem.  

What causes Excel Found Unreadable Content error?

Below are some of the factors that can cause Excel found unreadable content errors:

  • Excel cache is full – Sometimes, Excel may experience difficulties opening new files if its cache folder is full, causing it to be unable to write new cache files. Also, the cache files may be corrupted, affecting the files you are trying to access.
  • File access issues – If you recently downloaded the file from the Internet or got it from a mail, it is possible that the sender blocked it. Likewise, Microsoft Excel may not open the file if the security system on the PC flags the file as a threat, prompting Excel found unreadable content error.
  • Excel lacks administrator privileges – The error can occur if the user account running Excel doesn’t have administrative rights. Also, it can mean you don’t have administrative access to the file, making it unreadable when Excel tries to open it.
  • The conflict between Excel and the XLS file – Excel can sometimes disrupt the .XLS file, making it either unusable or triggering an error message when you try to open it. It can be due to the file format being incompatible.

The causes listed above are liable to vary on different computers depending on the circumstances. Going further into this article, we will take you through some basic steps for resolving the error.

Now, let’s dive into some actual solutions to fix the “Excel found unreadable content” error. 

How can I fix Excel Found Unreadable Content error?

Try the following before proceeding with any advanced steps:

  • Close all files and restart the Excel app – It will refresh the app and stop every background activity liable to affect its performance.
  • Download the file again – If you have recently downloaded the file prompting the error, redownload it and see if Excel opens it without any error.
  • Check the file format – Ensuring the file you’re trying to access is compatible with the file formats Microsoft Excel can open might help. Check our article about what file formats Microsoft Excel can open for more details.
  • Run Excel as an administrator – It will assign administrative privileges to help resolve permission problems.
  • Update Microsoft Excel – Updating the Excel app will fix bugs and outdated files causing problems with how it works.

Proceed with the steps below if you still can’t get around the error:

1. Unblock the Security option for the Excel file

  1. Right-click on the Excel file and select Properties from the drop-down menu.
  2. Go to the General window, select the Security tab at the bottom, then click on Unblock.
  3. Launch the Excel app and check if you can open the file.

This solution works best because it removes potential security restrictions that may be preventing Excel from accessing your files. Unblocking the Security option for the Excel file removes any restrictions preventing it from being accessible.

2. Install the Visual Basic component

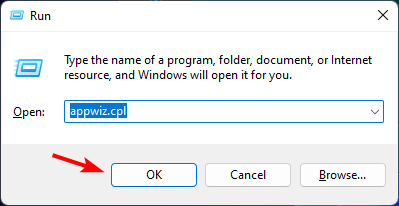
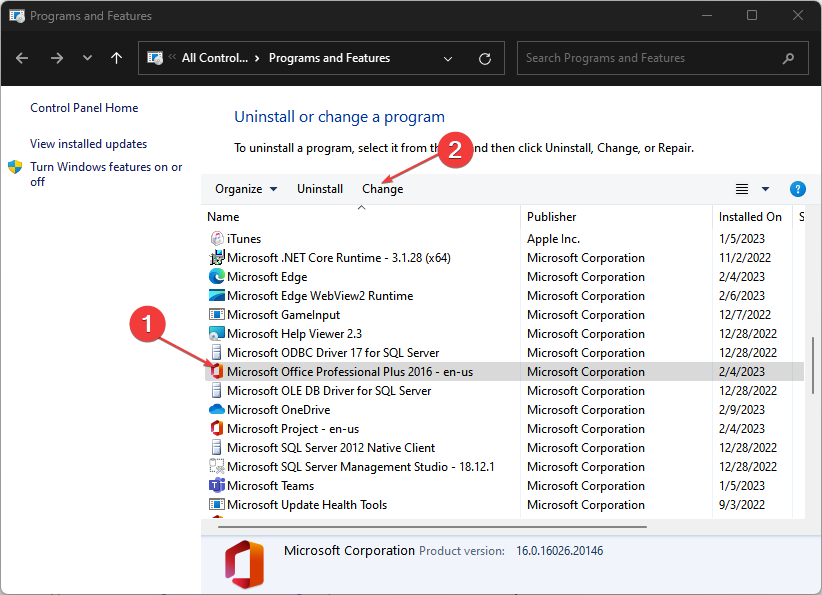
  1. Press Windows + R key to open the Run dialog box, type appwiz.cpl, and press Enter to open the Programs and Features menu.
  2. Locate Microsoft Office, right-click on it, then click on Change from the drop-down.
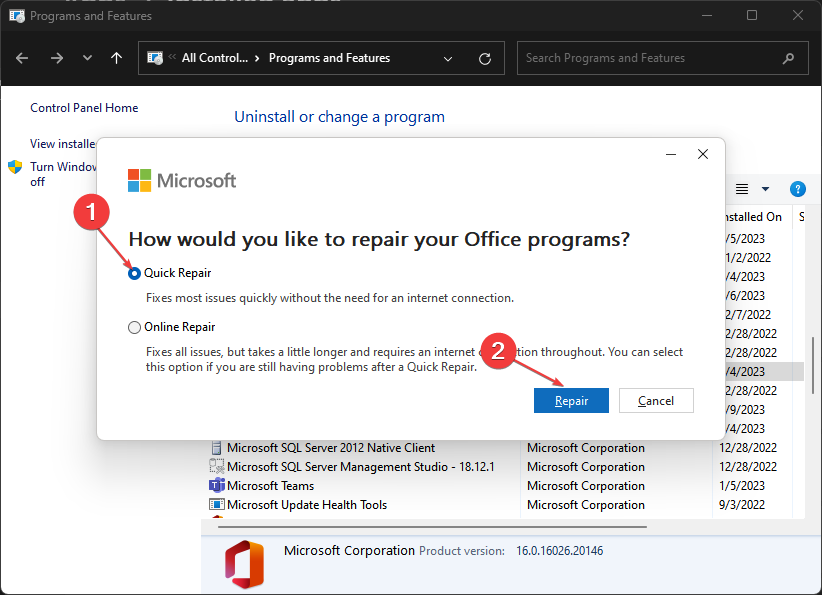
  3. Click Quick Repair and select Repair.
  4. Then, go to the official Microsoft download page for Visual Basic for Application Update and click Download.
  5. Double-click the file and follow the installation prompts.
  6. Follow the on-screen prompts to complete the Microsoft Upgrade, then restart your PC./

The above steps will force install the Visual Basic components which ensures that the prerequisites required by Excel are present and can fix the error. 

3. Disable the hardware graphics acceleration

  1. Launch Excel by clicking the icon on your desktop or by searching for “Excel” in your computer’s search bar. Once open, look for File in the menu bar at the top of the Excel window
  2. Click the Advanced option.
  3. Select Display, check the box for Disable hardware graphics acceleration, and click OK to save the changes.
  4. Restart Excel to see if there are any changes in how fast it runs.

Disabling the hardware graphics acceleration will fix graphics settings preventing Excel from opening the file.

In conclusion, you can check ways to fix the Excel file that could not be found error on Windows 11. Also, read about fixing the errors that were detected while saving Excel errors in a few steps.

What is Edge for Gamers option and what can you do with it?

Microsoft is reportedly working on bringing a new feature that could enhance your gaming experience while browsing Windows 11’s natively built-in browser, Edge. The feature, called Edge for Gamers, is currently living inside the system of the Edge Canary channel. 

The feature, as spotted by Windows enthusiast @Leopeva64, is a toggle on the Appearance page on Settings.

If you still remember, Microsoft unleashed a plethora of new powers to Edge for gamers back in 2022. The Xbox Cloud Gaming integration, the Clarity Boost to make games look crispier, the free access to Microsoft’s popular games through the browser, and the efficiency mode are just a few things to name. 

Being an insider-only feature, however, means we may need a little more time before this option arrives for general users. Its competitor in the gaming browser landscape, Opera GX, is also something you don’t want to miss. 

What can you do with the Edge for Gamers option?

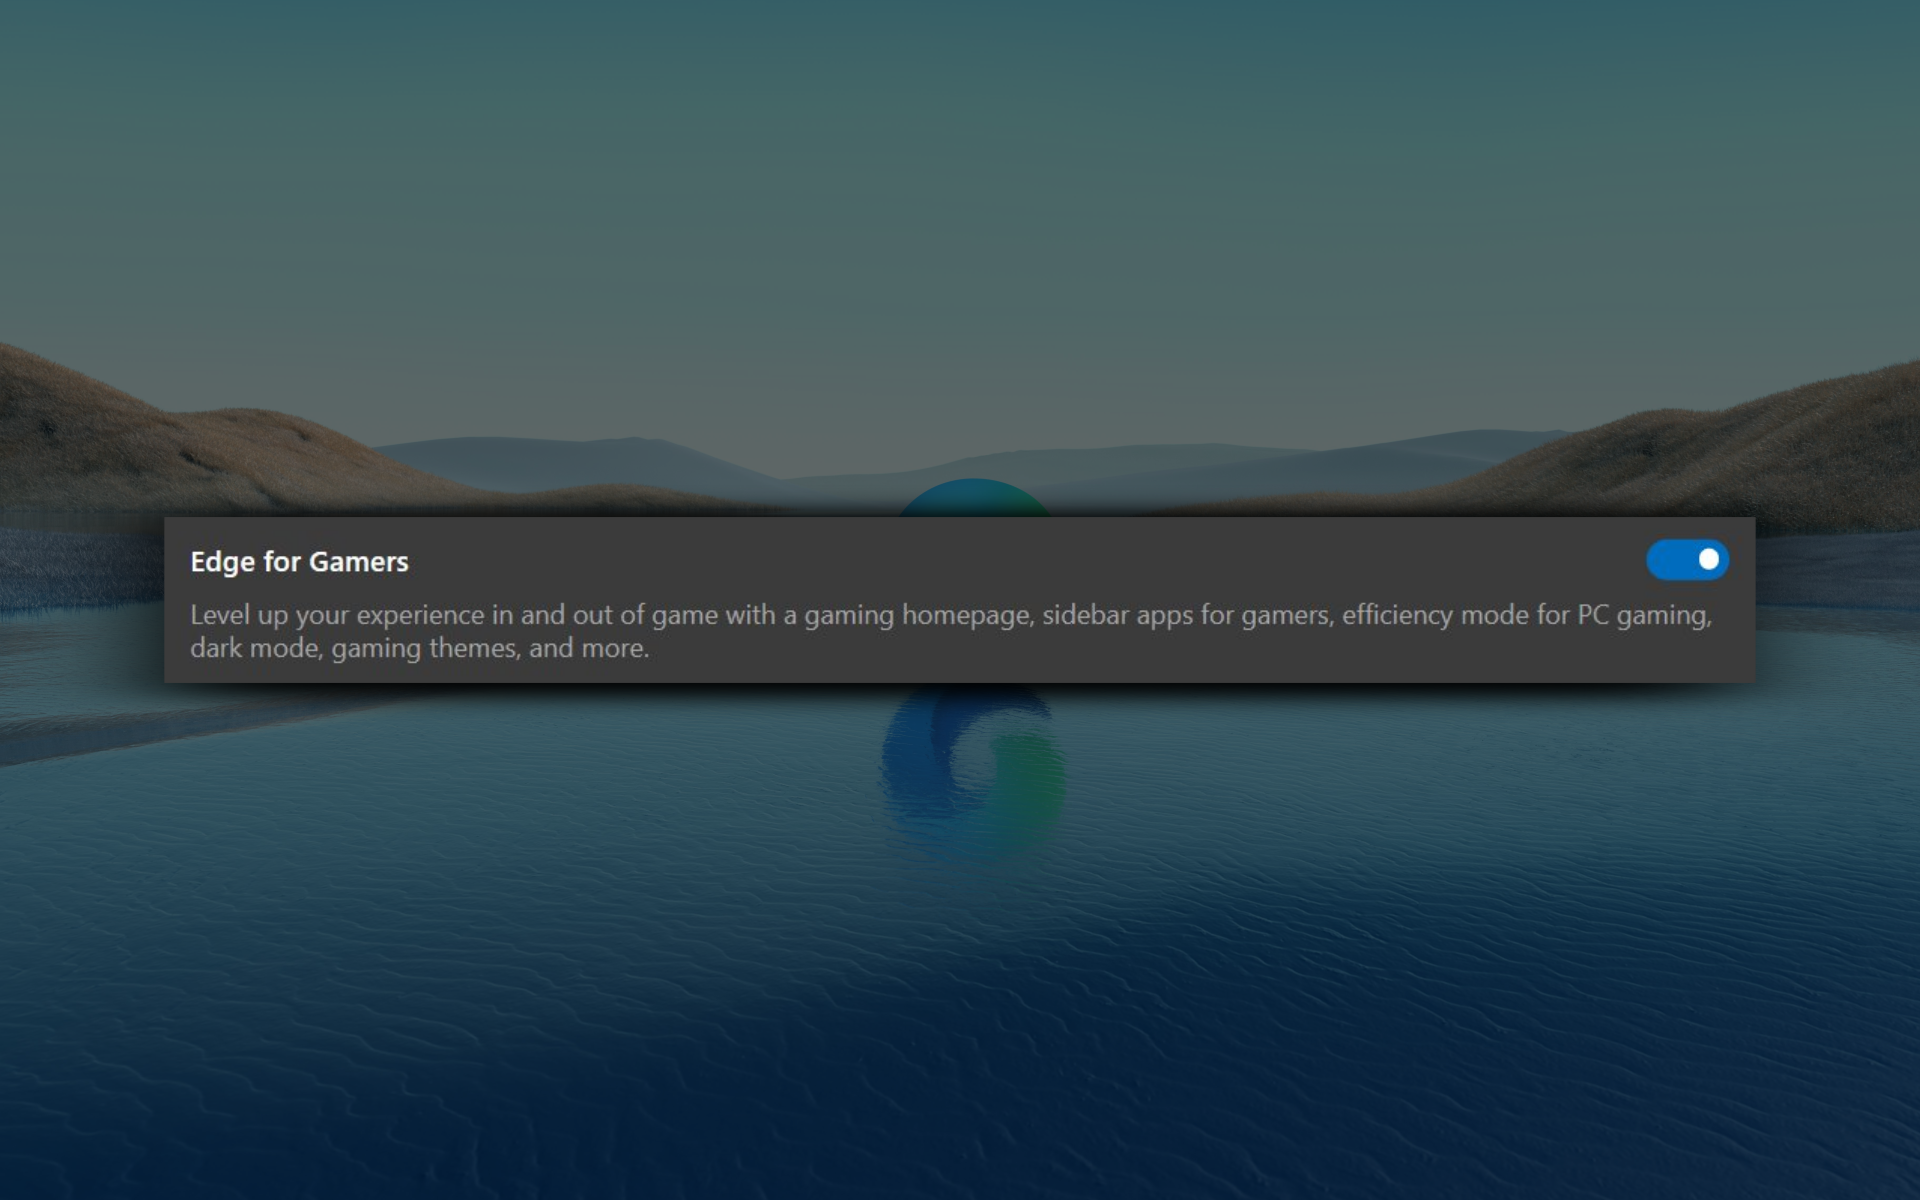
As you can see on the screenshot, the toggle says Level up your experience in and out of the game with a gaming homepage, sidebar apps for gamers, efficiency mode for PC gaming, dark mode, gaming themes, and more. 

But wait, there’s more! The Sidebar receives an upgrade too. As if by magic, the Discord and Twitch apps are seamlessly added, allowing you to access these popular platforms without any extra effort easily.

That’s not all. The Edge for Gamers toggle also takes care of some additional settings for you. The dark mode is enabled automatically, creating a sleek and immersive interface perfectly suited for gaming. 

Furthermore, the toggle to improve the PC gaming experience is turned on, ensuring that your gaming sessions are optimized for the best performance possible. And we also have a dedicated article including DualSense Edge settings for gaming, so make sure to take a closer look.

What do you think about Microsoft’s plan to bring Edge for Gamers toggle? Let us know in the comments!

Windows 10 21H2 reaches EOS; here’s how to update it

If your system is running Windows 10 version 21H2, we’ve got some bad news for you. Microsoft has released a reminder about the end of service for this version and it will happen very soon. More accurately, on June 13th, less than a month from now.

The Windows 10 21H2 version, which was released more than a year and a half ago, will no longer receive quality updates or critical security updates, like the ones from the regular Patch Tuesday. This means your system will be far more sensitive to bugs, viruses, or malware attacks.

Following June 13th, Microsoft will begin to push updates on your Windows 10 21H2 system. These updates will keep your system in check, providing all the critical and security updates your system needs.

On June 13, 2023, Home, Pro, Pro Education, and Pro for Workstations editions of Windows 10, version 21H2 will reach end of servicing. The upcoming June 2023 security update, to be released on June 13, 2023, will be the last update available for these versions. After this date, devices running these version will no longer receive monthly security and preview updates containing protections from the latest security threats.

Microsoft

The Redmond tech giant also recommends you should upgrade your devices to Windows 11, especially if they are eligible and meet the requirements to do so.

If you don’t want to take the big step of upgrading to Windows 11, then make sure you update to the latest Windows 10 version for all the reasons we’ve mentioned earlier.

Here’s how to update your system to Windows 10 22H2

  1. Type in Settings in your search barwindows update
  2. Click on the Settings app
  3. Once you are there, select Update & Securitywindows 10 update
  4. Select Check for updates to see if there are any updates available for your systemcheck for updates
  5. If there are, Windows will then automatically download them and you can select a time to install them

Optionally, you can also check to see if your system is eligible for Windows 11, as in the picture below.windows 11 eligible

As you can see, this message will automatically pop up in the same window where you check for updates. If your computer is eligible, there you have multiple options. You can check device specifications and you can also see if Windows 11 is ready for you.

That said, Windows 10 21H2 reaching EOS is not a huge problem, yet. Windows 10 22H2 still has more than 2 years before it reaches EOS, so you’re not in any hurry to upgrade to Windows 11, if you don’t feel like it.

But it’s always good to know you have options. And Windows 11 seems to be pretty good so far, so why not?

What do you think? Will you update your Windows 10? Or upgrade to Windows 11? Let us know in the comments.

UDMA CRC Error Count: Meaning & How to Fix It

Many Windows users have reported that they encounter a warning message saying Ultra DMA CRC Error Count on their PCs. The warning occurs when analyzing a new or an existing HDD. However, this article will discuss what the warning means and how to fix it.

Likewise, we have an article about how to fix external drives not showing up on Windows PCs.

What is UDMA CRC Error Count?

UDMA is an acronym that stands for Ultra Direct Memory Access. It is a hard drive technology that aids direct communication between the hard drives and memory without relying on the CPU.

Further, CRC is an acronym that stands for Cyclic Memory Check. It is a checksum (sequence of numbers and letters used to check data for errors) that can detect high-level data corruption.

UDMA CRC error count indicates issues that occurred during data transfer between the host and the disk. That is, it reads the cumulative quantity of CRC errors during UltraDMA mode.

What causes UDMA CRC Error Count?

Various underlying factors may be responsible for the error. Some are:

  • Incompatibe SSD/HDD and SATA Controller – You can encounter the error due to a conflict between your SSD and the Microsoft / AMD SATA controller driver. It causes CRC errors to occur recurrently.
  • Faulty SATA Cable or SATA port – The error may occur if there is any issue with the Serial ATA (Serial Advanced Technology Attachment or SATA). This is responsible for how data is transferred between a computer’s motherboard and mass storage devices. Also, a faulty SATA port could trigger UDMA CRC Error Count.
  • Outdated SATA controller drivers – Running outdated SATA controller drivers on your PC can cause the UDMA CRC Error Count warning message to occur due to the bugs affecting it.

Nevertheless, you can fix the error by following the fixes we will discuss as we go further into this guide.

How can I fix the UDMA CRC Error Count?

Try the following before proceeding with any advanced troubleshooting steps:

  • Run the brand-specific diagnostic tool – Depending on your HDD manufacturer, download and install the dedicated diagnostic tool and scan your hard drive.
  • Replace the power and SATA cable – Try replacing the power and SATA cable to resolve hardware issues and see if the error count occurs again.
  • Run the CHKDSK utility command line – Running the Check Disk command will find underlying issues affecting the HDD and resolve them.
  • Update your device drivers – You can install updates for your drivers via Windows Update to fix bugs and compatibility issues affecting them.
  • Update your BIOS – Installing the latest updates for your BIOS will resolve compatibility issues liable to cause the UDMA CRC Error Count warning and improve your drive performance.

If you can get around the problem, go ahead with the solutions below:

1. Disabling NCQ (Native Command Queue) in your SATA driver

  1. Press the Windows + R button to open the Run dialog box. Type in regedit, and press Ctrl + Shift + Enter to open the Registry Editor with admin access.
  2. Click Yes when the User Account Control (UAC) is prompted.
  3. Navigate to the following location:
    • For Microsoft SATA Controller location: HKEY_LOCAL_MACHINE\SYSTEM\CurrentControlSet\Services\storahci\Parameters\Device
    • For AMD SATA Controller driver location: HKEY_LOCAL_MACHINE\SYSTEM\CurrentControlSet\services\amd_sata\Parameters\Device
  4. On the left side of the screen, right-click on Device, select New from the drop-down, then Dword (32-bit) Value
  5. Name the new DWORD NcqDisabled if you’re using the Microsoft SATA Controller driver. And name it AmdSataNCQDisabled if you’re using the AMD SATA Controller driver.
  6. Double-click on the newly created DWORD, then set the Base to Hexadecimal and the value to 1.
  7. Restart your PC and check if the error persists.

Tweaking the Registry Editor allows you to disable NCQ. Hence, preventing incompatibility issues from creating the UDMA CRC Error Count error. Check how to fix a corrupt registry if you encounter issues with it.

In addition, you can check our article on fixing the request failed due to a fatal device hardware error message on Windows 11.

For further questions or suggestions, kindly drop them in the comments section.

Is Microsoft slapping thumbnails to your Favorites on Edge?

Good news for Edge users. Microsoft is actively enhancing the user experience of its native browser by introducing thumbnail options to the Favorites hub. 

This development, initially discovered by Windows enthusiast @Leopeva64, is currently limited to Edge Canary, an insider channel, suggesting that it may take some time before it becomes available to the general user base.

The screenshots reveal the availability of small, medium, and large thumbnail sizes. 

What options of thumbnails do Edge offer, and how do they work?

Interestingly, the Small thumbnail view offers two options: Treeview, which provides a dropdown appearance, and Breadcrumb, which presents a cleaner and more organized view, with bookmarks categorized in folders.

In contrast, the Medium thumbnail view offers slightly larger images of favorite websites, enabling users to easily identify their preferred sites visually.

Although specific details regarding the Large thumbnail view are not yet fully disclosed, it is anticipated to provide greater visual prominence to favorite websites, resulting in a more immersive and visually appealing browsing experience.

The bad news is, however, the new thumbnail options are currently being tested on Edge Canary, the experimental version of the browser. That means it may take a while for these thumbnails to arrive on general users. 

This allows Microsoft to gather user feedback and make any necessary refinements before rolling out the feature to the wider user base. 

If you want a convenient method to create thumbnails for your websites or YouTube videos so users can easily add them to their Favorites hub in Edge, we also have you covered.

What do you think about Microsoft’s plan to introduce thumbnails to the Favorites tab on Edge? Let us know in the comments!

Data Supplied is of Wrong Type: 2 Ways to Fix This Error

Our readers report the data supplied is of wrong type error that occurs when they try to transfer files from Android or iOS devices to Windows. It prevents the copy/move/cut options from working, making it impossible to exchange files.

Before trying more complicated solutions, try connecting the USB cable into another port to fix USB 2.0 and 3.0 issues. Also, check if your phone supports MTP (Media Transfer Protocol). Some older phones might not be fully compatible with your PC because they don’t support .

What can I do if I get the data supplied is of the wrong type error?

1. Use the appropriate transfer protocol

  1. Unplug the USB cable from the PC and reconnect it to another USB port.
  2. Click the USB preferences on your mobile, then select File transfer / Android Auto. (This may change depending on the phone’s manufacturer.)
  3. Wait for the Device options prompt to appear, check the box for the Always do this for this device option, and then select the Open device to view files option from the drop-down menu.
  4. Alternatively, you can set the tethering settings to transferring images rather than files on your phone.
  5. Try transferring the files and check if the data supplied is of the wrong type error persists.

Choosing the appropriate transfer protocol allows the system to read your files in a transferable format.

2. Update the USB hub drivers

  1. Right-click the Start button and open the Device Manager.
  2. Click the drop-down button for Universal Serial Bus Controllers entry. Right-click on the USB Root Hub (USB 3.0) and select Update driver from the drop-down.
  3. Select Search automatically for updated driver software.
  4. Repeat the above steps for other USB Root Hub drivers.

Updating the USB drivers will fix bugs impeding the activities of the device connected to its port and resolve corrupt drivers.

Also, go through our detailed guide on updating drivers on Windows PC if you have any issues with the steps above.

What causes the data supplied is of Wrong type error?

Some notable factors that may be causing the data supplied is of the wrong type error are:

  • Faulty device or USB driver – The USB driver can affect your file transfer if it is outdated or faulty. Hence, check out the ways to update the drivers on your PC.
  • Corrupted or unspecified file type – It’s likely that the data supplied is of the wrong type error occurred due to an unspecified file type or the device doesn’t support the file format you’re trying to transfer. Likewise, it can be because the file is corrupt, causing it to malfunction.
  • Large file size – You can also experience difficulties when copying photos, video documents, or any other type of file simultaneously. It can be that the file size exceeds the limit the device can handle at a time, resulting in the error.
  • Issues with the transfer protocol or device option – The data supplied is of the wrong type error may occur if the Device option you selected after connecting the device doesn’t support the data type you’re trying to transfer.

If that doesn’t help your case, it’s most likely to update any device drivers using reliable support from a standalone driver application like the one displayed below.

Also, you may be interested in our article about the best apps for PC-to-iPhone file transfer in 2023.

In addition, you can check our guide about fixing USB drives detected but not accessible on your PC. Likewise, we have a comprehensive article on quick ways to transfer files from Windows to Mac without problems.

Recently, we wrote about Error updating the NVD data message, so you might want to check it out.

If you have further questions or suggestions, kindly drop them in the comments section.

Voice Sounds Robotic on Xbox Game Bar? Here’s What to do

Many players have reported issues with their sound when recording games on their PCs. They complain about Xbox Game Bar sounding like a robot which can be annoying. However, this guide will discuss fixing the problem in a few steps.

Alternatively, you can read through our detailed guide about how to fix a microphone not working in Windows 11.

Why does the Xbox Game Bar sound like a robot?

Numerous factors may be responsible for the Xbox Game Bar tuning your voice to sound like a robot. Some notable ones are:

  • Sound sample rate configuration – Wrong configuration in the number of samples per second rate can cause sound distortion in the waveform, preventing it from creating a discrete digital signal.
  • Microphone not connected or faulty – The issue could also be due to an improper connection of the microphone or audio device you’re using, or the device is physically damaged, causing it to alter your sound.

The above-listed factors are liable to vary in different computers depending on the circumstances. Nonetheless, we’ll take you through the basic steps to fix it.

What can I do if the Xbox Game Bar sounds like a robot?

Try the following preliminary checks before proceeding with any advanced steps:

  • Reconnect your audio devices – Reconnecting the audio device will fix improper connections between the device and the computer.
  • End task for background apps – This will reduce the high CPU usage affecting the Xbox Game Bar.

If the error persists, proceed with the advanced troubleshooting steps below:

1. Check the microphone configuration

  1. Press Windows + I key to open the Settings app.
  2. Click System from the left pane of the screen, then select Sound from the right side.
  3. Then, click your Microphone Array under the Input tab.
  4. Click the drop-down menu and ensure the format is set to Channel 2.

Alternatively, if you have channel 1 as the second option, then you can switch to it because it has worked for some users.

Tweaking your microphone settings helps resolve configuration problems affecting the Xbox Game Bar audio recording.

2. Configure sound sample rate

  1. Left-click the Start button, type Control Panel, then select it from the result.
  2. Navigate to the Hardware and Sound option, then click on Sound.
  3. Go to the Recording tab, then double-click on your Microphone to open the properties.
  4. Select the Advanced tab.
  5. Under the Default Format window, click the drop-down button, then select the 2 Channel, 16-bit 48000 Hz option or try different options to discover which one works the best for you.

The above steps will configure the sound sample rate in the sound control panel, resetting the number of samples per second rate.

3. Configure microphone settings in Xbox app

  1. Left-click the Start menu, type Xbox, and launch the Xbox app.
  2. Select the gamer tag at the top left corner and select Settings from the options.
  3. Then, click on the Audio tab, select the drop-down under the Input devices, and change from Default to Microphone Array (Realtek(R) Audio) or anyone that your device uses.
  4. Close your app and check if the robotic voice is fixed.

Since the Xbox app is a central hub, settings corrected here will immediately affect the game and should fix all issues related to robotic voice.

In conclusion, we have an article about how to fix Xbox Game Bar not working on your PC. Also, you may be interested in our detailed guide on the best screen recorders for Windows PCs in 2023.

If you have further questions, kindly drop them in the comments section.

Microsoft quietly pulls the plug on ads featured in the Weather app on Windows 11

Microsoft placing ads across its ecosystem isn’t a new phenomenon. Just last week, the company was found featuring Microsoft 365 products related ads on the Settings Home page in Windows 11. The bid behind this move usually is to get more people to try out its services and products, ultimately increasing its revenue.

The company took up a similar approach with its MSN Weather app last month. The company released a new version of the app that completely overhauled its functionality. The app that was once ad-free and pretty simple to use started featuring MSN news bundled with ads.

The move left a bad taste in the users’ mouths which led them to quickly express their concerns as well as dissatisfaction across social media platforms. Several users also indicated that this was Microsoft’s bid to push MSN news and ads to yet another app.

However, it now seems that Microsoft has given in to the pressure. The latest version of the Weather app on Windows 11 no longer features the MSN news feed or ads as spotted by Deskmodder. Though ads are still a part of the experience, they are less in your face now.

And as it happens, the ad banner that was previously lodged on the Weather app’s main page has now been swapped with a new section that will provide the user with information regarding when the sun will rise and set etc.

To this end, it’s not yet clear the motive behind Microsoft incorporating ads and the MSN news feed into the Weather app on Windows 11 and then retracting. The negative feedback from users could have played a role but Microsoft is yet to comment on why it moved to scrap them from the platform.

The latest version of the Weather app (4.53.51253.0) is currently rolling out Windows Insiders and is likely to hit general availability in the coming weeks. What are your thoughts on Microsoft injecting ads into the Weather app? Let us know in the comments.

Omadmclient.exe: What Is It & How to Fix Its High CPU Usage

In Windows systems, there is almost always a process causing high CPU usage. One such process is the omadmclient.exe. Below, we’ll explain what this process does and what to do to reduce its resource usage.

Let’s get started:

How can I fix Omadmclient.exe’s high CPU usage?

Start by making sure your PC meets the system requirements to run Windows 11. Then, check your startup items and disable any non-essential apps or services.

If you’re still having issues, keep reading:

1. Check for Windows updates

  1. Hit the Windows key and click on Settings.settings windows 11
  2. Click on Windows Update, then select Check for updates.check-updates-w11 windows 11 blue screen
  3. Download and install if available.

2. Update your PC’s drivers

  1. Click the Search icon, type Device Manager in the search bar, and click Open.device manager w11
  2. Navigate to Display adapters to expand, right-click on your graphics card and select Update driver.Graphic Driver Update
  3. Select Search automatically for drivers.

While this step highlights how to update your graphic drivers, these are not the only drivers on your PC that may require an update. As you can see, the list is extremely long, and getting through all of them can be tiring and time-consuming.

To help you get the job done faster, automating the process is your best bet. If you would like an easy way out, driver updater tools can make it easier. They scan, detect, download, and install the drivers automatically for you.

⇒ Get Fortect Driver Updater

3. Scan for viruses

  1. Press the Windows key, search Windows Security, and click Open.
  2. Select Virus & threat protection.
  3. Next, press Quick scan under Current threats.
  4. If you don’t find any threats, proceed to perform a full scan by clicking on Scan options just below Quick scan.Scan options
  5. Click on Full scan, then Scan now to perform a deep scan of your PC.Full Scan Scan Now
  6. Wait for the process to finish and restart your system.

4. Disable antivirus temporarily

  1. Hit the Start menu icon, type Windows Security in the search bar and click Open.
  2. Click on Firewall & network protection, then select Public network.league of legends black screen after champion select
  3. Locate Microsoft Defender Firewall and toggle the off button.turning off Microsoft Defender Firewall Windows

5. Run an SFC scan

  1. Hit the Start Menu icon, type cmd in the search bar, and click Run as administrator.cmd-run-admin-w11 unexpected kernel mode trap windows 11
  2. Type the following command and press Enter: sfc /scannow

What is OMA DM client Windows 11?

OMA DM Client or the omadmclient.exe is a Windows system file that allows users to synchronize their mobile device with their desktop computer and access data from their mobile device on their desktop computer.

The OMA DM client enables Intune to communicate with devices using the secure communication channel provided by Microsoft Azure. This channel enables Intune to deliver policies and settings to manage the devices enrolled in Intune.

Through the OMA DM client, organizations can manage the devices on the server by updating firmware, installing applications, and enforcing security policies, among other tasks.

There are a few reasons why the OMA DM client software could use too much CPU. Outdated version of the app is the main culprit. Too many apps running in the background could also be alt fault, not to mention an outdated OS and virus infection.

Given that the omadmclient.exe is a process designed to take advantage of a multicore processor, you should consider upgrading your CPU to a more powerful one that will handle all that work efficiently.

While talking about powerful PCs, it is also essential to keep it at peak performance at all times. This can be achieved by installing PC maintenance software. Such tools are important in monitoring, diagnosing, and fixing common PC problems before they escalate.

Let us know whether you have come across the omadmclient.exe process and if you had any CPU issues in the comment section below.

The Best Web3 Search Engine: Is It Out There? Find Out ?

Web3 is the new talk in town regarding browsers and search engine evolution. Mainly, this concept entails new network protocols and a fresh infrastructure that will shape a new phase of the web.

Alongside this new Internet project, users can already choose different ways of browsing that include web3 online infrastructure arrangements. So, what does this mean exactly? Well, it means you can start searching on a dedicated Web3 browser right away and not share your personal data with the big tech industry.

Speaking of which, it’s ideal to choose a user-oriented browser to access Web3 search engines and services. For instance, if you need to access your financial information 100% privately, you can switch to Opera Crypto Browser.

? This is a dedicated solution provided by Opera that allows for customized search engines in a decentralized environment that is tailored for web3.

It’s also significant to mention that you can set these ultra-secure browsers for MetaMask to work with various new-age search engines.

How do I access Web3 in my browser?

You can simply access the Web3 results using specific search engines that exclusively use such technology. Check out our top picks:

  • Humbl – Decentralized search engine with private Web3 search results
  • Brave – Anonymous privacy mode
  • Neeva.xyz – Blockchain search engine with AI Search extension

To do so, you can just access the web address on your browser and start searching. Plus, it is also likely to access common services on Web3 like social media websites, games, or other so-called dApps.

? How will Web3 impact search engines?

Simply put, the decentralized Internet can certainly change the game. That happens because the information belongs to the user and not Google or any other media company.

The ranking system also differs as the highest rank blue links are calculated with tokens given to the users that provide the most valuable content.

? Is Google using Web3?

Yes, you can access Web3 services while using the Google search engine because they developed the products in the past. For example, the Blockchain Node Engine web utility.

Is there a Web3 search engine?

1. Humbl – Decentralized search engine (Private results)

Web3 search engine

This is a complete solution for Web3 navigation and a highly private search engine that only offers decentralized services.

First of all, Humbl is a financial service that combines multiple benefits including blockchain assets such as NFT galleries or artisans’ support.

Not only this, you can use their platform as a search engine and look for web results, crypto assets, social networks, or other dApps for your browser.

It’s possible as well to send limitless queries without being tracked and thus send data to giant tech companies for personalized branding.

Besides that, you have a cryptocurrency platform that can show you descriptive data of your coins and historical analytics of other currencies.

⇒ Get Humbl

2. Brave – Anonymous privacy mode

Brave is among the most trusted browser and search engines due to its highest privacy and user-focused performance. Plus, Web3 technology is also beneficial.

To begin with, you may consider Brave Search due to its countless features and privacy improvements meant to stop any form of data collection.

This solution also comes with independent search queries that are never tracked by other parties. More so, there are products like multi-chain crypto wallets, a native VPN and firewall, or mobile search.

In addition to this, you can use the Brave Shield as a built-in ad and cookie blocker that stops other websites from stealing your data.

Also, it’s worth knowing that you can navigate on this browser with increased speed and freedom due to zero tracking scripts and simple UI.

⇒ Get Brave

3. Neeva.xyz – Blockchain search engine with AI extension

Web3 search engine

Neeva is not just another conventional browser. It gives you customizable search results with zero tracking.

Firstly, this new search experience is a real competitor for other browsers thanks to its personalized search results and focus on user requests.

The product is suitable and simple to use for anyone, returning relevant web content for the user’s interests. That being the case, you have 40% fewer ads and complete organic content.

As a matter of fact, you can search for various queries and get the needed content due to its limited blockchain technology that confirms fast and trustworthy results.

In addition, this solution changes web algorithms and parameters in order to transfer the information peer-to-peer instead of giving it to a third party.

⇒ Get Neeva.xyz

Coming to an end, there are plenty of search engines that offer Web3 services for any users, companies, or external clients.

So, the Web3 search engine picks described in this guide should help you start navigating the web differently, without being tracked by any brand or big tech actor.

What is Error Code 0x80004001 & How to Fix It

The error 0x80004001 is a strange one as it happens under different circumstances. Some users can’t get by to opening a video, while others are having issues with their Outlook application.

Whatever your situation, it indicates that there is a problem that is preventing normal operations on your PC and needs immediate intervention. Have a look at how others were able to resolve this issue.

What is error 0x80004001? 

The error 0x80004001 is a generic code that can appear under different circumstances. Some users have seen it appear while trying to open a video, others were trying to import files, but a majority were trying to create a PST file in Outlook.

When it appears during boot, it’s because the Windows system fails to start a specific service or program required for the computer to work properly.

The most common causes of this error include:

  • Corrupted system files – Error 0x80004001 occurs when the system tries to access a file that has been damaged or deleted, which causes Windows to stop working properly.
  • Missing registry entries –  The registry stores important information about your computer’s hardware and software, and when it becomes damaged, it can cause errors like this one.
  • Corrupted startup items – A corrupted item in the Startup folder prevents Windows from loading properly. Corrupt items can be from viruses or malware or as simple as accidentally deleting a required file while cleaning out your computer.
  • Hardware failure – If any part of your PC’s hardware malfunctions, it may lead to several problems in your computer, one of which could be this error.
  • Malware infection – Malware can disable programs on your computer to prevent them from running correctly in the absence of a reliable antivirus.
  • Software corruption – There might be software issues with your operating system or other software applications installed. In this case, Outlook is the main culprit.

How do I fix error code 0x80004001?

Depending on the root cause of the issue, attempt the following basic checks to resolve the issue:

  • Ensure your Outlook app is up-to-date.
  • Perform a CHKDSK scan.
  • Reinstall the associated software throwing the error.
  • Run a hardware diagnostic test to check for any hardware failure.

1. Perform DISM and SFC scans

  1. Hit the Start Menu icon, type cmd in the search bar, and click Run as administrator.cmd-run-admin-w11 unexpected kernel mode trap windows 11
  2. Type the following commands and press Enter after each one: DISM.exe /Online /Cleanup-Image /Restorehealth sfc /scannow

If you applied this Windows command and it didn’t solve the issue, don’t sweat it. You can also fix it using dedicated repair tools.

A system repair application can diagnose the overall system and find corrupted system files that can be repaired instantly.

2. Disable antivirus temporarily

  1. Hit the Windows key, type Windows Security in the search bar, and click Open.
  2. Click on Firewall & network protection, then select Public network.league of legends black screen after champion select
  3. Locate Microsoft Defender Firewall and toggle the off button.turning off Microsoft Defender Firewall Windows

3. Run a virus scan

  1. Press the Start Menu icon, search Windows Security, and click Open.
  2. Select Virus & threat protection.
  3. Next, press Quick scan under Current threats.
  4. If you don’t find any threats, proceed to perform a full scan by clicking on Scan options just below Quick scan.Scan options
  5. Click on Full scan, then Scan now to perform a deep scan of your PC.Full Scan Scan Now
  6. Wait for the process to finish and restart your system.

4. Start Outlook in Safe Mode

  1. Hit the Windows Search icon, type outlook.exe /safe in the search bar, and click Open.
  2. Try creating the PST file and check whether the problem persists.

5. Repair Microsoft Office

  1. Hit the Windows + R keys to open the Run command.
  2. Type appwiz.cpl in the dialog box and press Enter.
  3. Select your Microsoft Office suite software. Then, click the Change button to open a repair utility for MS Office.
  4. Select the Online Repair option and click the Repair button.

6. Repair the PST file

  1. Press the Windows + E key to open File Explorer.
  2. Navigate to the following path depending on where your Outlook files are located: C:\Program Files\Microsoft Office\ OfficeXX 
  3. Double-click on the SCANPST key to launch the SCANPST.EXE utility.
  4. On the Microsoft Outlook Inbox Repair utility page, click Browse, and choose the PST file.
  5. Click the Start button to scan the PST file and check for errors.
  6. If the scan detects any error, click the Repair button.

Doing this manually can be time-consuming, so if you’re looking to get this done faster, you can opt for a third-party tool that can repair the PST file for you.

⇒ Get Stellar Repair for Outlook

7. Perform a System Restore

  1. Press the Windows + R keys, type rstui, and hit Enter.
  2. The System Restore window will open. Click on Next.
  3. Select the restore point you wish to revert to and click on Next.
  4. Now click on Finish.

If none of these work, you may have to reset your PC or perform a clean install of Windows as a last resort. Unfortunately, with such errors, it’s a matter of trial and error until you get a solution.

Onto other related errors, check out how to deal with memory leaks in Outlook in our detailed article.

Given how broad this error is, we are keen to hear other circumstances in which you came across it and successful solutions that helped you out of it.

Microsoft introduces game changing AI solutions for Microsoft Cloud for Nonprofit

Microsoft has unveiled a suite of innovative AI solutions and enhancements to its Cloud for Nonprofit, aimed at bringing about an industry-wide transformation and revolutionizing the way fundraisers engage with donors, manage campaigns, and optimize operations. Furthermore, the company has announced a limited private preview program for nonprofits to experience a new AI-powered fundraising propensity model.

Participants of the preview program will have the opportunity to gain practical experience with new AI tools, allowing them to predict fundraising goals with data modeling and identify donors who are most likely to contribute to a campaign, cause, or major gift.

“Simply put, AI can and will be a game-changer for nonprofits and fundraisers. With these new AI solutions, we aim to empower nonprofits and fundraisers to achieve more and to create a more positive and rewarding experience for donors,” said Justin Spelhaug, Vice President and Global Head, Tech for Social Impact at Microsoft.

Aside from the enhanced AI capabilities in Microsoft Cloud for Nonprofit, the tech giant is currently working on an AI-driven model that gauges the likelihood of constituents donating or participating in a cause, dependent on their predictive donor behavior. Nonprofits keen to test the tool can register for the private preview. The feature will become generally available later this year, as reported by Microsoft.

Microsoft has introduced new tools for nonprofit organizations to optimize fundraising efforts and enhance donor engagement. Among these, the Fundraising Performance Dashboard is designed to provide real-time data and interactive views of campaign performance, donor conversion, and other fundraising analytics using Power BI’s data visualization platform.

Additionally, Dynamics 365 Marketing has been integrated with Microsoft Cloud for nonprofits, allowing for streamlined communication with donors and volunteers through personalized engagement. The use of the Nonprofit Common Data Model further facilitates the integration of data to drive effective communication strategies.

Microsoft Viva Sales AI Copilot and Microsoft Teams Premium now feature AI capabilities as part of the Fundraising and Engagement tools in Microsoft Cloud for Nonprofits. With Viva Sales, nonprofits can personalize communications and deepen engagement with donors through AI-powered features such as assistance in creating email responses based on CRM data, updating CRM records, and summarizing Teams calls.

Additionally, AI capabilities of Teams Premium have been integrated into Fundraising and Engagement, helping nonprofits increase productivity and maximize the value of meetings for donors, constituents, and staff.

Via Microsoft

High Contrast Mode on Xbox Series X|S: Enhance your gaming experience in only 5 simple steps

Are you an avid gamer looking to take your gaming experience to the next level? The Xbox Series X|S offers a range of accessibility features to cater to diverse needs, and one such feature is the “High Contrast Mode.” In this guide, we will delve into the world of High Contrast Mode on Xbox Series X|S consoles and explore its benefits, customization options, and answers to frequently asked questions. So, grab your controller and let’s dive in!

High Contrast Mode on Xbox Series X|S

Gaming is a visual experience that immerses players in captivating visual worlds. However, not all gamers have the same visual capabilities, and that’s where High Contrast Mode comes into play. This feature allows players to adjust the colors and contrast on their screens, enhancing visibility and making it easier to distinguish between different elements in games. Whether you have visual impairments, prefer a more vibrant display, or simply want to personalize your gaming experience, High Contrast Mode can be a valuable addition to your Xbox gaming arsenal.

How to activate High Contrast Mode

Activating the high contrast mode on your Xbox Series X|S is a breeze. Simply follow these steps:

  1. From the Xbox dashboard, press the Xbox button on your controller to open the guide.
  2. Navigate to the “Profile & system” tab and select Settings.
  3. From the options listed under Accessibility, choose High Contrast. high contrast mode on xbox
  4. Select the drop-down menu for High contrast.
  5. Toggle the switch to enable High Contrast Mode for either dark or light mode. high contrast mod eon xbox

Once activated, you’ll immediately notice the difference in colors and contrast on your screen. High Contrast Mode on Xbox Series X|S can be a game-changer, especially for gamers with specific visual needs or those seeking a more visually striking experience.

High Contrast Mode Accessibility options

High Contrast Mode on Xbox Series X|S offers several customization options, allowing you to tailor the visual display to your preferences. Here are some of the key customization features you can explore:

  1. Color Filters: High Contrast Mode provides a variety of color filters to choose from, catering to different color sensitivities and preferences. You can experiment with filters such as inverted colors, grayscale, and more, until you find the one that suits your needs best. This flexibility ensures that you can optimize your gaming experience according to your unique visual requirements.high contrast mode on xbox
  2. Contrast and Brightness: Fine-tuning the contrast and brightness levels is crucial to achieve the desired visual clarity. The high contrast mode enables you to adjust these settings to your liking, ensuring that the on-screen elements are easily distinguishable. Whether you prefer a sharp and vivid display or a more subdued ambiance, you have the freedom to tweak the contrast and brightness until it’s exactly right. high contrast mode on xbox
  3. Cursor Size and Color: Navigating menus and UI elements is an integral part of gaming, and the high contrast mode lets you customize the cursor size and color. By increasing the cursor size, you can improve visibility and make it easier to locate the cursor on the screen. Additionally, choosing a contrasting color for the cursor can further enhance its visibility, allowing you to interact with the game effortlessly.


  4. Text and Display Size: Reading text in games can sometimes be challenging, especially for gamers with visual impairments. Xbox Series X|S addresses this concern by offering options to adjust the text size and display zoom. You can increase the text size to ensure legibility or zoom in on the display for a more immersive experience. This customization feature ensures that you can comfortably read in-game text and have a clear view of all the details on your screen.
  5. Audio cues and notifications: In addition to visual enhancements, High Contrast Mode on Xbox Series X|S also provides options for audio cues and notifications. This is particularly beneficial for gamers who may have difficulty relying solely on visual cues. By enabling audio notifications, you can receive auditory feedback for various in-game events, such as receiving messages or unlocking achievements. These audio cues add an extra layer of accessibility and ensure that you never miss important updates while immersed in gameplay.
  6. Dimming and Brightening effects: To further enhance the visual experience, High Contrast Mode offers dimming and brightening effects. These effects adjust the overall luminosity of your display, allowing you to create a more comfortable gaming environment. Whether you prefer a darker ambiance for intense gaming sessions or a brighter setting for vibrant gameplay, the dimming and brightening effects give you the flexibility to set the mood according to your preferences.

High Contrast Mode on Xbox Series X|S opens new possibilities for gamers with diverse visual needs. By adjusting colors, contrast, and various display settings, this feature enhances visibility and personalizes the gaming experience. Whether you have visual impairments, seek a more vibrant display, or simply want to customize your gameplay, the high contrast mode provides a valuable accessibility tool.

high contrast mode on xbox
Xbox Store dark theme

From activating the high contrast mode to customizing color filters, contrast levels, cursor size, and more, Xbox Series X|S offers a range of options for tailoring the visual experience to your preferences. Additionally, the feature seamlessly integrates with audio cues, notifications, and dimming effects to create a fully immersive gaming environment.

Remember, you can enjoy the high contrast mode across various games, and you can switch between different settings on the fly. Xbox Series X|S ensures that accessibility is not limited to a single game or console model, providing a consistent experience across both Xbox Series X and Xbox Series S.

So, the next time you power up your Xbox Series X|S, don’t forget to explore High Contrast Mode and unlock a whole new level of visual enhancement and accessibility in your gaming journey!

0x80005000 Unknown Error: 3 Ways to Fix It

Creating a new user in Active Directory is a fairly straightforward process. However, in some instances, users are hit with the error code 0x8000500. 

You may already be following the best practices for AD, but even so, you’re bound to encounter issues from time to time. This error prevents you from creating or updating any users on Active Directory, so let’s have a look at how you can bypass this issue.

What is error 0x80005000 in Active Directory?

The first step when creating or updating a new user account is to customize the user account properties using several parameters.

Once you have created a new user account, you will need to assign it a password that the user can log into their computer or network resources.

With the error 0x80005000, you will not get past the customization phase. To get to the root of the problem, below are some possible causes of why this happens:

  • Server workload – The server requires that the client sends a username and password to authenticate the user. When an authentication server is under a high workload, processing a request may take a long time.
  • Timeout – Just like we’ve mentioned, creating a user account requires authentication from the server. Sometimes, it processes these requests even when the server has a high workload. However, this doesn’t always happen, and there is a chance that it might not be able to respond to your request in time.
  • Unresponsive AD – Sometimes, your Active Directory and users are not responsive because of issues that may have accumulated over time. It’s important to keep Active Directory healthy so that you can continue to use its many features. You need to perform a health check on your AD regularly.
  • Windows server version mismatch – It’s possible that you are using an earlier version of Windows Server than what is required by the domain controller. 
  • Security restrictions – It’s possible that there are restrictive security settings that could be preventing your ability to add new users or update existing ones.

How can I fix error 0x80005000?

Check off the following prerequisites before moving on to the more complex solutions:

  • Ensure Active Directory Users and Computers is enabled.
  • Check for network connectivity issues. 
  • Verify whether any special characters in your usernames or passwords could bring up the error.
  • Check that all prerequisites are met before attempting to create or update a user account in Active Directory.
  • Make sure that you have permission to perform this operation.
  • Check your Windows Server version and update where necessary.
  • Leave and rejoin the domain.

1. Clear DNS cache

  1. Hit the Windows key, type cmd in the search bar, and click Run as administrator.cmd-run-admin-w11 unexpected kernel mode trap windows 11
  2. Type the below command and press Enter: ipconfig /flushdns
  3. You will get a confirmation message that the DNS cache has been flushed.

Flushing your DNS resets the cache and gets rid of any old entries. This is particularly helpful, especially if the error 0x80005000 was due to network issues.

2. Repair Active Directory

  1. Hit the Windows + R keys to open the Run command.
  2. Type msconfig in the dialog box and hit Enter.
  3. Navigate to the Boot tab, check Safe boot, click on Active Directory repair, then hit OK to save.

When your repair the Active Directory, all domain controllers will go through a rebuilding process and resynchronize with each other as part of the repair process. This can take quite some time, depending on how many DCs are involved in the enterprise environment.

3. Update Active Directory

  1. Hit the Windows key, type cmd in the search bar, and click Run as administrator.cmd-run-admin-w11 unexpected kernel mode trap windows 11
  2. Type in the following command and press Enter: gpupdate/force
  3. Restart your PC to apply all settings.

You must be careful when forcing an update on Active Directory, as you risk losing other settings and data. This should only be used as a last resort.

Elsewhere, users reported of the Active Directory Users and Computers is missing, so check out our article on how to get them back.

Be sure to pass by our recommended list of the best Active Directory Security tools to keep you safe from internal and external threats.

That brings us to the end of this article, but keep us informed on any other solutions that may have helped you fix this error in the comment section below.

Xbox congratulates Nintendo on new Legend of Zelda game release

The Xbox team has taken to social media recently to congratulate rival Nintendo on the release of The Legend of Zelda: Tears of the Kingdom. If you follow gaming at all—and likely even if you don’t—you’ve probably heard about this newest entry in the iconic action-RPG series.

Larry Hryb, better known as “Major Nelson,” reached out on Twitter to offer congratulations to Nintendo on the Tears of the Kingdom launch. In his post Hyrb stated “I look forward to the mystery and challenges that await in Hyrule.”

Following up that sentiment, the official Xbox Twitter account posted a tweet saying “It’s good to be back in Hyrule.”

The official Sea of Thieves account provided a funny post on the Tears of the Kingdom launch as well.

Sea of Thieves is developed by British studio Rare, which of course was long associated with Nintendo before being acquired by Microsoft in 2002. Rare’s partnership with Nintendo produced a string of games that have since become classics, so its no surprise to see the team at Rare give a nod to its former publishing partner.

The Legend of Zelda: Tears of the Kingdom is the follow up to 2017’s Breath of the Wild. The sequel has garnered a tremendous amount of praise from critics, with many outlets giving the game perfect review scores.

Featured image via Nintendo Life. 

Xbox Series X|S reaches 2 million units sold in the U.K.

The Xbox Series X|S has reached a significant milestone in the U.K., having sold 2 million of Microsoft’s current-gen consoles there. The 2 million units sold mark comes 128 weeks after the Series X|S launched there.

The feat is all the more impressive when one considers that it took the Nintendo Switch (which has gone on to become one of the best-selling game systems ever) 12 weeks longer to accomplish the same. Comparatively, the Xbox 360 took 110 weeks to sell 2 million in the U.K., while the Xbox One reached the mark in 104 weeks.

Via Gameindustry.biz.

Sony’s PlayStation 5 hit 2 million units sold in the U.K. back in October last year.

Late last year we reported that the Xbox Series X|S was one of the most popular consoles in the U.K. last year. The more affordable (and then more available) Series S was responsible for much of that success. But it’s good to see the Xbox’s success carry over there into 2023.

Libstdc++-6.dll Not Found: How to Fix or Download It Again

The libstdc++-6.dll not found error can occur when a program or application cannot locate the libstdc++-6.dll file in your system.

It is an essential component for certain Windows applications. When the error message appears, it indicates that the DLL file is either corrupt or missing, which in turn impacts the program’s functioning.

What is libstdc++-6.dll?

The libstdc++-6.dll file is a dynamic link library file created as part of the GNU Compiler Collection (GCC). This library provides the standard C++ functionality, including classes, functions, and templates, necessary for compiling and running C++ programs.

The libstdc++-6.dll missing error can happen due to several reasons:

  • Missing or deleted DLL file: The Libstdc++-6.dll file may be missing or accidentally deleted from its intended location.
  • Corrupted DLL file: The Libstdc++-6.dll file may become corrupted for various reasons, such as malware infection, hardware issues, or software conflicts.
  • Outdated software or incompatible version: If the software you are running requires a specific version of the Libstdc++-6.dll file and you have an outdated version or a conflicting version installed, it can result in the DLL not being found.
  • Software dependency issues: If a program or its dependencies are not correctly installed or configured, it can prevent other programs from finding the Libstdc++-6.dll file, as it is often a shared dependency.

How do I fix the libstdc++-6.dll not found error?

Before trying any advanced troubleshooting steps, follow these steps first:

  • Restore the DLL file from the Recycle Bin: If you accidentally deleted the DLL file, check your Recycle Bin. If you find it there, restore it to its original location.
  • Run a malware scan: Malware infections can corrupt the libstdc++-6.dll file. Running a thorough scan with reliable antivirus or anti-malware software can help detect and remove any malicious programs, potentially resolving the issue.
  • Reinstall the affected program: Most programs and games have necessary DLL files. If the libstdc++-6.dll file is missing or damaged, reinstalling the program that requires it may resolve the error.

1. Manually download the DLL file

  1. Go to official software websites or trusted DLL file repositories like DLL-Files.com.download the Dll file
  2. Download the DLL file that is compatible with your operating system version (32-bit or 64-bit).
  3. Scan the downloaded DLL file with a reliable antivirus or anti-malware to ensure it is safe.
  4. Copy the DLL file to the correct folder. 
  5. For 32-bit DLL, place them in the following folder:C:\Windows\System32System32
  6. For 64-bit DLL, paste in the following location: C:\Windows\SysWOW64\SysWOW64
  7. Restart your computer and check if the issue is resolved.

Possibly, you don’t want to perform such action manually and need more support to restore broken DLL files.

We encourage you to utilize tailored system repair software that can detect damaged files on your PC and replace them with new DLL files.

2. Re-register the DLL file manually

  1. Press Windows + R to open the Run dialog box, type cmd, and press Ctrl + Shift + Enter to open the Command prompt in administrator mode.cmd
  2. Click on Yes on the User Account Control (UAC) prompt window. 
  3. Type the following command and press Enter:regsvr32 libstdc++-6.dllregv32
  4. Restart your computer to save the changes.

3. Run the System Checker

  1. Open Windows Search, type cmd, and select Run as administrator.cmd
  2. Click Yes to the UAC prompt.
  3. Type the following command and press Enter:sfc /scannowsfc /scannow
  4. After the scan is complete, then restart your computer.

4. Update your Windows

  1. Press Windows + I to open Windows Settings.
  2. Go to the Windows Update tab on the left pane and click the Check for updates button.check for updates
  3. If you have any pending updates, download and install them.install updates
  4. Then, restart your computer to apply the changes.

Make sure your operating system is up to date with the latest patches and updates. System updates often include fixes for DLL-related issues, including libstdc++-6.dll errors.

5. Restore your PC

  1. Press the Windows key, type restore, and click Create a restore point.create restore porint
  2. In the System Properties window and click the System Restore button.system restore
  3. Then, select Choose a different restore point, and click Next.choose a different restore point
  4. In the following window, select the restore point, and click Next.select the restore point
  5. Then, click Finish to complete the system restore.click Finish

Creating a system restore point is a highly effective method for resolving Windows errors. This is because it allows you to restore your operating system to its precise state when the restore point was created.

If you’re having trouble with missing DLL files on your Windows system, you can check out our helpful article that provides solutions to this common problem.

If you have any questions or suggestions, feel free to leave them in the comments section below.

A First Look at the Asus ROG Ally—What are people saying about this Steam Deck challenger?

The latest contender in the mobile PC gaming device market, the Asus ROG Ally brings something to the mix that others don’t: Windows OS, native Xbox (and Game Pass) support and a direct partnership with Microsoft.

While the Steam Deck is a great option for those who gravitate toward the Steam platform (which can also run Windows and access the Xbox app, or even do so via Steam OS albeit with a workaround that some might find troublesome), those who’ve been longing for a dedicated Xbox handheld device with native Xbox Cloud Gaming and Game Pass will find the closest thing on the market in the Asus ROG Ally.

But how does the Asus ROG Ally measure up as a gaming device, especially against the Steam Deck? Find out what these reviewers had to say in this first impressions roundup.

The Verge Asus ROG Ally review

Windows handheld gaming PCs existed before the Deck, and there’s been a parade of them in the 15 months afterward. Some are more powerful. Many boast premium build quality. Almost all have higher-resolution screens. Yet none have offered the combination of battery life, portability, and price as Valve’s portable. I won’t bury the lede: the new Asus ROG Ally, officially shipping June 13th for $699.99, doesn’t change that as of today…I fundamentally believe a portable gaming PC isn’t truly portable if the battery life and user interface aren’t built for the road. If you really want a portable, maybe save a couple hundred bucks by buying a $400 Steam Deck and adding your own small SSD.

Wired Asus ROG Ally review

No matter what I did, there was a weight hanging around the neck of the Ally’s battery life. Even under the best of circumstances—which takes no small amount of effort to configure—I never reached even three hours of battery life.

Given the $700 price tag for the Ryzen Z1 Extreme version of the handheld, I expected a lot of power from the Asus ROG Ally. I just didn’t realize how much of it I would have to provide myself. While plugged into a wall, the handheld performed adequately, but as a portable console, it required so much work to get many games working that I burned through a substantial amount of my extremely limited battery life just to get started.

Polygon Asus ROG Ally review

I figured that after the review, I would inevitably return to the Steam Deck out of habit. But for now, it’s tucked into my bedside table. I’ve swapped my Octopath Traveler 2 playthrough, the Ally’s lighter build and brighter screen making this device an ideal match for long, late-night tours of fantastical worlds.

For you, dear reader: There’s no slam-dunk choice. But there’s no air ball, either. In fact, both handhelds are fantastic. Whether I carry around the Steam Deck or the ROG Ally on the regular, I’ll be happy with my choice. And I think you will be too. Having decades of video games on a device I can keep in my backpack and still have room for my laptop and water bottle — that feels like magic.

Digital Trends Asus ROG Ally review

But the main question: should you buy the ROG Ally? If you’re going up against the Steam Deck, yes. It’s not free of problems, and it’s not a strict Steam Deck killer, but it provides broader support for games, more power, and acceptable battery life. It feels like the Steam Deck 2 so many have been waiting for.
For me, at least, I haven’t touched my Steam Deck since the ROG Ally arrived. And I don’t plan on pulling it out of the drawer any time soon.

Is it finally time to jump on the handheld PC train, though? No, at least not for everyone. If the bugs turned you off from the Steam Deck, the ROG Ally isn’t any better. For as many issues as it fixes, it introduces new problems of its own. This isn’t a Nintendo Switch that can run Steam games. Still, it delivers on the promise of playing your library of PC games on the go, despite the usability hurdles it has.

What does the Asus ROG Ally mean for Xbox Game Pass?

Is the Asus ROG Ally the dedicated portable Xbox device so many have been clamoring for from Microsoft? Well…it’s the closest thing so far, the lower-priced (and lower performance) Logitech G Cloud notwithstanding. Is it a Steam Deck killer? Likely the answer for most will be a definitive ‘no.’ But what the Asus Rog Ally does have is the support of Microsoft. What does this mean? In the short term, it means buyers will receive a generous three-month subscription to Xbox Game Pass Ultimate.

In the longer term, Microsoft has been experimenting with a Windows 11 handheld mode. A device like the Asus ROG Ally would be the perfect place to debut it, if indeed the project ever comes to fruition. And let’s not forget that Microsoft hopes to launch a “next-generation” mobile Xbox store to compete with Apple and Google as early as 2024. All of which ties in to the Redmond company’s commitment to bring the Xbox brand to more platforms and more players, as it has repeatedly stated.

The Asus ROG Ally releases on June 13, and will retail at $699 USD (with a slightly less-powerful $599 edition coming later). It will be available through Best Buy and other retailers.

Featured image via Xbox Wire. 

0xc00d36b4 Error Code: How to Fix It

0xc00d36b4 Error is one of the common errors users encounter when they try to play certain music or video files in the built-in media player on Windows. This error usually indicates a problem with the codec needed to play the file.

If you encounter this problem, it is often due to a format issue. According to some users, the error appears when attempting to play files from an external device such as a USB drive or DVD.

What is error 0xc00d36b4?

Error 0xc00d36b4 is a specific error code associated with Windows Media Player and media playback issues. The error message associated with this error code may vary slightly depending on the media player you are using.

The 0xc00d36b4 error in Windows Media Player can be caused by several factors. Here are some of the most common causes:

  • Missing codecs: One of the most common causes of this error is missing codecs. If your computer does not have the necessary codecs to play the media file, Windows Media Player cannot play it.
  • Corrupted media files: If the media file you are trying to play is corrupted or damaged, Windows Media Player may not be able to play it.
  • Outdated display or audio drivers: If you are using outdated drivers, they may not be able to properly decode the media file, which can result in an error message.
  • Codec conflicts: Some third-party codecs are known to interfere with the Windows Media Player, which can trigger the 0xc00d36b4 error.
  • Windows Media Player stuck into limbo state: Another occurrence of this problem is when Windows Media Player becomes stuck in a limbo state.

How do I fix error 0xc00d36b4?

Before going into the main suggested solutions, it is recommended to give these straightforward workarounds a try:

  • Check the File Format: The 0xc00d36b4 error is often due to unsupported file formats. While Windows Media Player and Movies & TV support many popular file types, they may not support all formats. To determine if the error is caused by an unsupported file, check the list of supported file types for Windows built-in players.
  • Convert the file format: If the media player doesn’t support the file, you can convert it to a compatible format using an online or offline converter. There are many free converters available online that can do this.

1. Re-enable Windows Media Player

  1. Press the Windows key, type windows features in the search bar, and select Turn Windows features on or off.windows features
  2. On the Windows Features window, scroll down and expand the Media Features option.expand media features
  3. Then, uncheck the Windows Media Player option.Uncheck Windows media player
  4. Click Yes to confirm.click Yes
  5. Then, click OK to save the changes.click OK
  6. After disabling the feature, reboot your PC to complete the changes.
  7. Upon reboot, follow the same instructions and check the Windows Media Player option.
  8. Then, click OK and restart your computer to re-enable the Windows Media Player.

2. Change the default Audio format

  1. Press Windows + R, type mmsys.cpl in the Run command, and click OK.mmsys.cpl
  2. In the Sound control panel, go to the Playback tab, select the active sound device, and click Properties. Sound properties
  3. In the Sound Properties window, go to the Advanced tab and change the value under Default Format.
  4. Then, click Apply.change default value
  5. Click Yes in the confirmation box.click Yes
  6. Try playing the media file once more using the same media player and see if the 0xc00d36b4 error is fixed.

3. Run Windows Troubleshooter

  1. Press Windows + I to Windows Settings, go to System and select Troubleshoot.select troubleshoot
  2. Under Troubleshoot options, select Other troubleshooters.other troubleshooter
  3. Then, click the Run button next to Windows Media Player.Run Windows media player
  4. Follow the on-screen instructions to troubleshoot the player.

If that doesn’t work, you could try running the Audio and Video Playback troubleshooters.

4. Update audio and display drivers

  1. Open the Start menu, type device manager, and select Device Manager.device manager
  2. From the list of drivers, expand Display adaptors, right-click the driver, and select Update driver.Update display driver
  3. Then, follow the on-screen instructions to update the driver.
  4. After that, expand the Sound, video and game controllers, right-click the audio device, and select Update driver.audio driver

5. Play the media file in a different media player

If none of the above methods had been able to fix the 0xc00d36b4 error, you can consider using a third-party media player. Several third-party media players can handle a wide range of media formats, such as VLC Media Player, KM Player, and so on.

If Nero Codecs are installed on your computer, they may interfere with the built-in Windows player. In such cases, completely uninstalling Nero Codecs may help resolve the issue.

In case you can’t find one, do check our curated list of the best media players for Windows.

If you have more questions or suggestions, leave them in the comments section below.

0x80300001 Installation Error: 5 Ways to Fix It

The process to install Windows is usually seamless, with no error messages popping up, given your PC is configured correctly. But that’s not always the case. Many have reported the 0x80300001 Windows installation error.

The complete message reads, We couldn’t install Windows in the location you chose. Please check your media drive. Here’s more info about what happened: 0x80300001. The problem has been faced in all iterations of the OS with no effective solutions available. So, let’s find out about it!

What is the 0x80300001 installation error?

The error can be encountered when installing Windows on a PC and usually has to do with a trivial issue at the user’s end. It appears when choosing a partition and proceeding with the installation.

Here are a few reasons you encounter 0x80300001 error in Windows 10:

  • Issues with the installation media: Oftentimes, the installation media was missing certain critical files, which led to the error, and creating the bootable USB again works.
  • Problems with port: In some cases, it was a problem with the port the bootable USB was connected to, which could be malfunctioning or not offer support for the flash drive.
  • Drivers not loaded: You need several drivers on the PC to be able to install Windows, and for many users, this was the underlying cause.
  • Misconfigured BIOS settings: The BIOS settings, often overlooked, play a critical role in the effective functioning of the PC as well as the OS installation, and any unwanted changes here could trigger the 0x80300001 Windows 7 error.

How do I fix error code 0x80300001?

Before we head to the slightly tricky solutions, try these quick ones first:

  • Disconnect any additional storage devices from the PC, including disk drives, USB drives, and SD cards.
  • For those using a CD, put the Windows installation CD instead of the driver CD in the drive and proceed with the installation.
  • In case you are using a bootable USB to install Windows, connect it to another port on the PC. Say, if you are using a USB 2.0 port, switch to USB 3.0, and vice-versa.

If none work, move to the fixes listed next.

1. Update the SATA controller driver

  1. Press Windows + X to open the Power User menu, and select Device Manager from the list.device manager
  2. Expand the IDE ATA/ATAPI controllers entry, right-click on the Standard SATA ACHI Controller, and select Update driver.
  3. Now, choose Search automatically for drivers and wait for Windows to install the best one.update driver to fix 0x80300001

Often the quickest solution to fixing 0x80300001 in Windows 11 is updating the driver that’s triggering the error. And in case the OS is unable to find one, you can always look it up on the manufacturer’s website and manually install the latest driver.

If Windows is not presently installed, load the drivers from the installation disc or add them to the bootable USB. This also helps with 0x80300001 in VMware.

2. Change BIOS settings

Tip icon Tip
While in the BIOS, do not make any changes other than the one listed here, as it could result in system instability or even cause the PC to abruptly crash.
  1. Turn off the computer, then hold the power button to turn it on, and as soon as the display lights, hit the F1, F10, F12, Esc, or Del key, depending on the manufacturer, to access the BIOS.
  2. Now, look through the various available options to find the SATA settings, and make sure AHCI is selected.ahci to fix 0x80300001

3. Create another installation media

  1. Go to Microsoft’s official website and download the Media Creation Tool for Windows 11. For users running the previous iteration, the Windows 10 media creation tool also be downloaded from the official page.media creation tool to fix 0x80300001
  2. Now, run the downloaded setup and wait for it to initialize things.setup
  3. Click on Accept to agree to Microsoft’s license terms.accept
  4. Don’t change the recommended settings, and click on Next to proceed.installation media to fix 0x80300001
  5. Select USB flash drive from the options, and then click Next.bootable USB to fix 0x80300001
  6. Choose the connected USB drive where you want to download the installation files, and click on Next.bootable USB to fix 0x80300001
  7. Wait for the setup to create a bootable USB.
  8. Once done, plug the USB drive into the computer throwing the error, and try installing Windows again.

Oftentimes, it’s an issue with the installation media you created. This usually happens when using a third-party utility. So, this time around, use the Windows Media Creation Tool to create a bootable USB drive, and you shouldn’t get the 0x80300001 install error.

4. Format the partition

  1. Run the installation setup and proceed until you reach the Where do you want to install Windows section.
  2. Select the partition you want to install Windows on and click Format.format to fix 0x80300001
  3. Choose the appropriate response in case a confirmation prompt appears.
  4. Once done with the format, proceed with the installation.

In case it’s the partition that’s to blame for the 0x80300001 error, formatting the partition should do the trick. Remember, any stored data will be lost, so make sure to create a backup beforehand if Windows is already installed on the device.

5. Delete the existing partitions

  1. Run the setup, and proceed with it until you get to the Where do you want to install Windows section.
  2. Now, select any partition and click on Delete.delete partition to fix 0x80300001
  3. Similarly, remove the other partitions on the disk, and it should now be listed as unallocated.delete partition
  4. Now, select the disk, click on New, enter the desired partition size in the text field, and click on Apply. You can also create multiple partitions this way or split the disk later on.new partition to fix 0x80300001
  5. Click OK in the confirmation prompt.ok
  6. Once done, proceed with the installation.

If none of the solutions worked, the last option is to delete all the partitions on the drive and then create new ones to install Windows. Here, too, you will lose the stored files, so it’s recommended that you transfer them to an external storage device or use a cloud backup service.

After you have fixed the 0x80300001 error, check the best security settings to configure and some quick tips to make Windows faster than ever.

For any queries or to share what worked for you, drop a comment below.

0x80190193 Xbox Party Chat Error: How to Fix It

It can be quite vexing when you encounter an error code while trying to play your Xbox. Fortunately, this article aims to help you resolve the Xbox error 0x80190193.

We will show a few things to try and explore some possible causes to help you avoid a repeat occurrence of the error.

What is the Xbox 0x80190193 party chat error?

If you encounter the party chat error with the code 0x80190193 on your Xbox, it could be due to several reasons, including the following:

  • Network-related issues – Your network connection may be experiencing issues such as weak or unstable signals, router problems, or network congestion.
  • Xbox Live service disruption – There may be temporary disruptions or maintenance for Xbox Live services, which could cause party chat errors.
  • NAT settings – Sometimes, the party chat function can be disrupted by your router or network configuration’s Network Address Translation (NAT) settings. If you have a strict NAT type, it may lead to communication issues.

You may try the resolutions below.

How do I fix the Xbox 0x80190193 error?

We recommend the following workarounds before trying anything complex:

  • Restart the Xbox – A restart is often a good way to end all running processes and may be able to resolve minor bugs.
  • Restart your router or internet source – A simple modem or router restart may fix slow internet.
  • Change your internet connection – You may want to try a wired or more stable internet to eliminate any chance of the error due to a bad connection.
  • Wait it out – Giving it time may be the only way out, mainly if a server outage or update triggers the error.

If none of the above work, proceed to more elaborate solutions below.

1. Do a hard reset

  1. Turn off the Xbox.
  2. Unplug it from the wall outlet.
    0x80190193
  3. Wait about 60 seconds, plug it back in, and restart.

2. Factory reset the Xbox

Note icon NOTE
Please note that performing this procedure will result in the deletion of all accounts, saved games, settings, and home Xbox associations. You will be required to reinstall your games, however, once the specific game is installed, your saved data will be restored.
  1. To access the menu, press the Xbox button on your console.
    0x80190193
  2. Navigate to Profile & System.
    0x80190193
  3. Click Settings.
    0x80190193
  4. From the left pane, select System.
  5. Pick the Console info option and hit Reset console.
    0x80190193

3. Delete the alternate MAC address

  1. Press the Guide button located on your controller and select Settings.
    0x80190193
  2. On the left pane, click the General tab, and click Network Settings on the right.
  3. Select the Advanced Settings option.
  4. Select the Alternate MAC Address option.
    0x80190193
  5. Finally, choose the Clear option and follow the prompt to restart the console.
  6. Verify that this fixes the 0x80190193 Xbox error.

We hope you found this article helpful; if it was, do not forget to drop us a comment below and let us know which of the fixes worked.

Also, we have arranged these solutions in order of difficulty, so we recommend starting from the workarounds and walking your way down.

Device Cannot Work Properly (Code 14): How to Fix this Error

You must have stumbled upon the error message this device cannot work properly until you restart your computer (code 14) on your Windows device.

This usually indicates a conflict between the device drivers and another software component or hardware device, and we will explore the best fixes in this guide.

What causes error code 14 on the PC?

The primary causes are usually any of the following:

  • Hardware conflicts – When users have conflicts between the hardware devices on a computer, it can lead to the error.
  • Faulty hardware – If the device is defective or damaged, users may experience the error.
  • Driver-related issues – When the device drivers become outdated or incompatible with the system, they can cause conflicts leading to the code 14 error.
  • Malware or virus infections – Device drivers may be corrupted or damaged by malware, which can result in a code 14 error. Always use robust antivirus software.
  • Conflicting software – A conflict between the software installed on your system and the device driver can lead to a code 14 error.

How do I fix this device cannot work properly until you restart your computer (code 14)?

Before trying anything complex, try the following:

  • Restart the computer – The error message comes with a note to reboot, so it only makes sense to try this before any other fix.
  • Remove peripherals – If you have attached an external hard drive, USB flash, or any peripheral, you should detach them and see if that helps.

If none of the above worked, continue to the solutions below.

1. Reinstall your graphics driver

  1. Right-click on the Start menu, and select Device Manager.
    this device cannot work properly until you restart your computer. (code 14)
  2. Expand the Display adapter category, right-click on the driver, and select Uninstall device.
    this device cannot work properly until you restart your computer. (code 14)
  3. Confirm your choice, restart the computer, and relaunch the Device Manager.
  4. Click on the Scan for hardware changes icon.
    this device cannot work properly until you restart your computer. (code 14)
  5. Verify if this device cannot work properly until you restart your computer (code 14) error is resolved.

Alternatively, you may use an automatic software maintenance tool to avoid the stress of manually reinstalling or updating drivers.

⇒ Get Outbyte Driver Updater

2. Update the graphics driver

  1. Right-click on the Start menu, and select Device Manager.this device cannot work properly until you restart your computer. (code 14)
  2. Expand the Display adapter category, right-click on the driver, and select Update driver.
    this device cannot work properly until you restart your computer. (code 14)
  3. Select Search automatically for updates.
  4. When the update is complete, confirm that the error is resolved.

3. Run the Device and hardware troubleshooter

  1. Press Windows + R to open the Run dialog.
  2. Type control and hit Enter to open the Control Panel.
    this device cannot work properly until you restart your computer. (code 14)
  3. Change the View by option to Small icons and select Troubleshooting.
    this device cannot work properly until you restart your computer. (code 14)
  4. Select View all on the left pane.
  5. Select Video playback.
  6. Follow any suggestions, then return to run the troubleshooter for any other problematic hardware component.

4. Modify the Registry

  1. Press Windows + R to open the Run dialog.
  2. Type regedit and hit Enter to open the Registry.
    this device cannot work properly until you restart your computer. (code 14)
  3. Navigate to the path below:
    Computer\HKEY_LOCAL_MACHINE\SYSTEM\CurrentControlSet\Control\Class{36fc9e60-c465-11cf-8056-444553540000}
    this device cannot work properly until you restart your computer. (code 14)
  4. On the left pane, delete the UpperFilters and LowerFilters options if they exist (In the image below, they do not exist).
  5. Lastly, verify that this device cannot work properly until you restart your computer (code 14) error is fixed.

The solutions above are all you need to fix this problem. Not all of them will work in every situation, so you should start with any that feels more applicable to your situation.

You may go through our guide on opening the Registry if you face any difficulty.

In the comments section below, let us know if you have successfully resolved the error.

[Fix] Code 19 – Windows Cannot Start This Hardware Device

You must have gotten the code 19 error message Windows cannot start this hardware device because its configuration information (in the registry) is incomplete or damaged.

This is mainly a hardware-triggered error. So, in this guide, we explore the best solutions as well as possible causes so that you may avoid a repeat occurrence.

What are the causes of hardware device code 19?

  • Hardware conflicts – If there are conflicts between hardware devices in your system, it could lead to code 19 errors.
  • Incompatible or outdated drivers – If your system is experiencing code 19 errors, it could be due to an outdated or incompatible device driver.
  • Faulty hardware – If Windows cannot start a hardware device, it may be caused by a faulty or damaged hardware device.

How do I fix Windows cannot start this hardware device (code 19)?

We recommend you try the following easy workarounds first:

  • Restart the computer – A restart is often strong enough to kill problematic processes that may spark the code 19 error.
  • Scan for viruses – A simple virus scan with a robust antivirus may eliminate the chances of the error due to malware.
  • Test for hardware damage – You may try the hardware on a different computer to ascertain that it is not faulty.

After these workarounds, you may proceed to the solutions below if the error remains unresolved.

1. Run the specific hardware troubleshooter

  1. Press Windows + I to open the Settings app.
  2. On the right pane, click on Troubleshoot.
    windows cannot start this hardware device code 19
  3. Select Other troubleshooters.
    windows cannot start this hardware device code 19
  4. Search for the hardware component that triggers the error and click on its Run button.
    windows cannot start this hardware device code 19
  5. Verify if Windows cannot start this hardware device with error code 19 is fixed.

2. Update drivers

  1. Right-click on the Start menu, and select Device Manager.windows cannot start this hardware device code 19
  2. Expand any category where you have an outdated driver (they usually will have a yellow badge).
  3. Right-click on the driver and select Update driver.
  4. Select the Search automatically for updates option.
  5. Finally, verify that Windows cannot start this hardware device with device code 19 error is fixed.

If you need a quicker and more reliable method to update any drivers on the PC, there’s no better option than a dedicated app.

It helps you scan the system for outdated drivers and fix them with their official manufacturer version.

⇒ Get Outbyte Driver Updater

3. Reinstall drivers

  1. Right-click on the Start menu, and select Device Manager.
    windows cannot start this hardware device code 19
  2. Expand any category where you have an outdated driver (they usually will have a yellow badge).
  3. Right-click on the driver and select Uninstall device.
    windows cannot start this hardware device code 19
  4. Confirm your choice.
  5. Restart your computer and relaunch the Device Manager.
  6. Click on the Scan for hardware changes.
  7. Finally, verify that the error is resolved.

4. Perform a System Restore

  1. Press Windows + R, type rstrui, and hit Enter.
  2. Click the Next button.
  3. Lastly, select a restore point and hit the Next button.
    windows cannot start this hardware device code 19

That is as far as we share in this guide. As a last resort, you may reset your computer, but this is not recommended as you may lose valuable information. We have written a comprehensive guide on how to reset a Windows 11 device.

So, if you encounter Windows cannot start this hardware device code 19, try the above solutions starting from whichever you feel is most applicable.

Lastly, let us know in the comments section what fix was most effective.

Video.ui.exe: What Is It & Should You Remove It?

If you are a gamer and are familiar with Xbox Live, you may have encountered the video.ui.exe process or file. A few of our readers are confused about what this process is.

So in this article, we cover everything you may need to know about it and also explain some of the best ways to get rid of it if you want to.

What is video.ui.exe?

The Video.ui.exe is a component of Microsoft’s Xbox Live video app, which grants users access to live or recorded TV. This application was previously called Zune and can be downloaded onto a 64-bit Windows operating system from the Microsoft Store.

The program is configured to launch at startup and run continuously, but it can be terminated through the task list.

Is Video.ui.exe a virus, and should I remove it?

This file is legitimate, and you do not need to remove it. However, certain viruses may mimic genuine applications. So, you may consider doing the following to ascertain if it should be removed:

  • Scan video.ui.exe – A simple virus scan of video.ui.exe will show if it’s genuine. The built-in Windows Security or any robust antivirus will do.
  • Check for signature – It’s recommended to check the publisher of the video.ui.exe file and if it’s been signed or not. Interestingly, the authentic application should not be unsigned.
  • Monitor network activity – Based on our analysis, it appears that video.ui.exe utilizes a very small amount of data. So, if your file is consuming a large amount, it could be a virus.

How do I remove Video.ui.exe?

1. Uninstalling it from apps and features

  1. Press Windows + R, type appwiz.cpl, and hit Enter.
    video.ui.exe
  2. Here, click on video.ui.exe from the installed apps and select the Uninstall button.
    video.ui.exe
  3. Follow the wizard to complete the process.

2. Stoping video.ui.exe with the Task Manager

  1. Press Ctrl + Shift + Esc to open the Task Manager.
  2. To locate the running process of Video.ui.exe, navigate to the Processes tab in the Task Manager window and scroll down until you find it.
  3. Right-click the process and click Open file location to open the file in Windows Explorer.
    video.ui.exe
  4. Go back to the Task Manager, select the process, and hit the End task option.
  5. Now return to the open Windows Explorer and delete the file.

That is about as much as there is to know about the video.ui.exe file on Windows.

Remember we advise against removing it. You should get rid of it only if you are sure it is a virus program.

If you have any additional questions, please get in touch with us in the comments section below.

D3dcompiler_47.dll is Missing? 5 Quick Ways to Fix It

The file D3dcompiler_47.dll is a crucial part of DirectX, a Microsoft platform designed to handle multimedia tasks like gaming on Windows operating systems.

A few of our readers have complained the DLL is missing on their computers. So, this guide will introduce the best ways to fix this problem.

Why is d3dcompiler_47.dll missing?

There are several reasons why the Dynamic Link Library might be missing on your device. The most common causes are as follows:

  • Software conflicts – Conflict could come from 3rd-part installations or result from outdated drivers, conflicting system settings, or other software-related problems.
  • Corrupted or missing file – There are various reasons for a missing or corrupted file, such as a virus or malware infection, incorrect installation, program removal, or other system errors.
  • Outdated Windows OS – If you use an older version of Windows, you might encounter an error as the d3dcompiler_47.dll file is only present in the newer versions of the Windows operating system.
  • DirectX not installed – It’s possible that the issue could be due to the absence or outdated version of the DirectX runtime library on your computer.

How do I fix a missing d3dcompiler_47.dll?

Before attempting any intricate solutions, consider trying the following simple workarounds:

  • Restart your device – Small bugs can cause errors. Restarting your system may be enough to eliminate them and prevent the need for further troubleshooting.
  • Uninstall recent applications – To resolve the issue, it may be helpful to uninstall any applications that are causing conflicts with the software.
  • Scan for viruses – If your computer experiences a missing DLL error caused by a virus, running a scan with a robust antivirus can effectively clean the system.

If the preliminary solutions do not work, then proceeding with the following fixes is recommended.

1. Use specialized DLL repair tools

If you are experiencing DLL errors, there are a number of DLL fixers available that can assist in resolving these issues.

We highly recommend using such tools, as they guarantee the functionality of Microsoft native DLLs like d3dcompiler_47.dll with a 100% success rate.

2. Update the OS

  1. Press Windows + I to open the Settings app.
  2. On the left pane, click Windows update, then on the right click the Check for updates button.
    d3dcompiler_47.dll
  3. If any updates are found click on Download & Install.
    d3dcompiler_47.dll
  4. Finally, restart your computer for all the updates to take effect.

3. Download the DLL manually

You can manually download the d3dcompiler_47.dll file from trustworthy sources.

Remember to place it in the same directory as the affected application. Once done, you can launch the app smoothly without encountering any further issues.

Also, it’s important to exercise caution when downloading DLLs and only to use reputable sources, as malicious programs can easily gain access to your system through a DLL.

4. Install DirectX

  1. Navigate to the download page for the runtime.
  2. Click on the Download button.
  3. To start the installation, simply click on the downloaded setup. Once the installation is finished, restart your computer for the changes to take effect.
    d3dcompiler_47.dll

5. Restore your system

  1. Press Windows + R, type rstrui, and hit Enter.
    d3dcompiler_47.dll
  2. Click the Next button.
  3. Select a restore point and hit the Next button.

That is as far as we will discuss in this guide. Use any of the five solutions to fix the missing DLL problem. We recommend selecting the option that is most appropriate for your unique situation.

Finally, kindly let us know in the comments section below which approach yielded the best results for you.

What is Unifairy.sys & How to Properly Remove It?

You must have encountered an issue with one of your app files on a Windows device. In particular, you may just have gotten the error message unifairy.sys incompatible driver.

Windows users are then left wondering what this specific file is. So, we will explore what it is and show you the correct way of removing it.

What is Unifairy.sys?

The unifairy.sys is an anti-cheat file mainly associated with game applications, especially Honkai 3rd Impact game. However, it may also be bundled with Genshin Impac, and it often triggers many problems.

Disabling memory integrity core isolation is necessary to prevent related issues and errors when an incompatible driver tries to operate while memory integrity is enabled.

Regrettably, the default driver support on certain devices has locked this setting, preventing you from disabling it through regular methods. So, below is how to disable unifairy.sys and prevent further errors.

How do I remove unifairy.sys from my computer?

1. Delete the file

1.1 Uninstall the program/game using unifairy.sys

  1. Press Windows + R, type appwiz.cpl, and hit Enter.
    unifairy.sys
  2. Search through the program list for the program that uses the file (In most cases, the app you would need to uninstall is Honkai Impact 3rd).
  3. Click on it and select the Uninstall button.
  4. Follow the wizard to complete the uninstallation.

1.2 Delete the file

  1. Press Windows + E to open File Explorer.
  2. Navigate to the path below and locate the unifairy.sys file.
    C:\Windows\System32
  3. Right-click on the file and select the delete icon.

2. Using the Registry

  1. Press Windows + R to open the Run dialog.
  2. Type in regedit and hit Enter.
    unifairy.sys
  3. Navigate to the path below:
    Computer\HKEY_LOCAL_MACHINE\SYSTEM\CurrentControlSet\Control\DeviceGuard\Scenarios\HypervisorEnforcedCodeIntegrity
    unifairy.sys
  4. Double-click Enabled and change the Value to 0.
    unifairy.sys
  5. Restart the computer, and you should no longer have unifairy.sys.

While this method does not remove it from your computer, it disables the file and its ability to affect programs.

The process of getting rid of this game cheat file is quite easy. We recommend solution one as it is the most efficient, but using the second solution will also work, and both will resolve any issues of unifairy.sys incompatible driver.

We recommend reading our guide on uninstalling software on Windows 11 if you have any problems completing the first solution.

And that is it for this guide. Please let us know what worked in the comments section below.

How to Fix Transmit Error Code 1231: 5 Tested Solutions

Several readers have reported experiencing the Transmit error: code 1231 message while attempting to trace or ping a machine absent from a network location or local workgroup.

The error message appears when a Windows computer fails to connect to a network. This issue can be caused by incorrect network settings, a malfunctioning network adapter, network congestion or outdated or corrupt drivers.

How do I fix transmit error code 1231?

1. Reset the TCP/IP stack

  1. Press Windows + R, type cmd, and hit Ctrl + Shift + Enter to open an elevated Command Prompt.
    transmit error code 1231
  2. Type the script below and hit Enter.
    netsh int ip reset
    transmit error code 1231
  3. Restart your computer, and once it has booted up, open an elevated Command Prompt again, then type the scripts below hitting Enter after each one.
    netsh winsock reset
    netsh int ipv4 reset
    netsh int ipv6 reset
  4. Once you have executed these commands, proceed to restart your computer.

2. Reinstall your Network adapter

  1. Search Network on Windows search, then click on View network connections.
    transmit error code 1231
  2. Take note of the Adapter name.
  3. Right-click on the Start menu and select Device Manager.
    transmit error code 1231
  4. Expand the Network adapters category, right-click on your driver (it should be the one with the same name as found in Step 2), and select Uninstall device.
    transmit error code 1231
  5. Restart your computer and reopen the Device Manager.
  6. Click on the Scan for hardware changes icon.
    transmit error code 1231
  7. The uninstalled driver should be reinstalled, and you may finally verify that the transmit error code 1231 is resolved.

The steps above are indeed practical but it may take lots of time to reinstall the network or any other drivers.

For this purpose, dedicated driver software is the ideal way to detect problematic drivers and install the right version automatically.

⇒ Get Outbyte Driver Updater

3. Enable network discovery

  1. Press Windows + R, type control.exe /name Microsoft.NetworkAndSharingCenter and hit Enter.
    transmit error code 1231
  2. On the left pane of the Network and Sharing Center window, click Change Advanced sharing settings.
    transmit error code 1231
  3. Expand Private networks and Public networks, then toggle on the Network discovery option.
  4. Expand the All networks section and toggle off Password protected sharing.
    Password
  5. Finally, verify the transmit error code 1231 is resolved.

4. Rename the workstation

  1. Press Windows + R, type ms-settings:about, and hit Enter.
    transmit error code 1231
  2. Click on the Rename this PC button.
  3. Type in a name and click Next.
  4. After the operation finishes, restart the computer and verify transmit error code 1231 is fixed.

5. Use the System Restore

  1. Press Windows + R, type rstrui, and hit Enter.
  2. Select Choose a different restore point and click Next.
    transmit error code 1231
  3. Select a restore point from the available options and click the Next button.
  4. Click the Finish button, then wait while the restore process begins.

This process aims to take the computer to its state a few days before you noticed the error. However, you should know that some tools or apps installed after that date may be removed.

To conclude, remember that we have not made this list in any particular order. We recommend starting with any solution that seems the most applicable.

Lastly, we like to hear your feedback in the comments section below so that we will watch out for your questions or remarks.