How to use wireless hotspots in Windows 10

You can use your Windows 10 PC to host a wireless hotspot for your other devices. Windows has built-in support for both Wi-Fi and Bluetooth hotspots (provided your PC has hardware for both), so you’re able to connect a wide selection of phones and tablets.

To configure your hotspot, first open the Settings app and click the “Network & Internet” category. Select the “Mobile hotspot” page from the navigation menu at the side.

The settings should be fairly self-explanatory. First, you need to select the network adapter whose Internet connection you want to share. On a desktop PC, this may be an Ethernet port. If you’re using a tablet with mobile connectivity, you might want to share its LTE connection. Select the relevant adapter from the list using the dropdown menu.

Screenshot of setting up a Wi-Fi hotspot in Windows 10

Next, decide whether to host the hotspot using Wi-Fi or Bluetooth. You should generally choose Bluetooth unless the device you’ll be connecting does not support Wi-Fi. Wi-Fi offers transfer speeds far in excess of Bluetooth, making it better suited to Internet traffic.

You should now take the time to customise the name and password for your hotspot. Click the Edit button to change these options. The network name is what devices will display when scanning for available connections. Make sure you use a strong password to prevent any unwanted intrusions.

Screenshot of setting up a Wi-Fi hotspot in Windows 10

The final button on the page, “Turn on remotely,” can be used to make Windows enable your hotspot on-demand. Client devices can request the hotspot is turned on, even if it’s disabled in Windows settings. This only works if the device is already paired with your PC over Bluetooth, so it has a way of communicating with Windows. Only some devices, such as Windows 10 Mobile phones, are compatible.

Finally, toggle the “Share my Internet connection with other devices” button at the top of the page to the “On” position. This will activate your hotspot. After a few moments, it should show up as a Wi-Fi or Bluetooth network on your other devices. Connect using the password you configured above.

Screenshot of Windows 10's networking menu

When you’re connecting with another Windows 10 device, your hotspot will show up in the networking menu in the system tray. Click the Wi-Fi icon in the bottom-right and wait for the networks list to populate. After a few moments, your hotspot should appear, named with the label you assigned back on the Settings page. Click the network to enter the password and connect.

Screenshot of setting up a Wi-Fi hotspot in Windows 10

Once your hotspot is active, you get access to a new option, “Power saving.” This allows Windows to automatically turn off the hotspot if no devices have been connected for a period of time. This saves power and lowers the security risk of your device publicising an available hotspot.

You can disable the hotspot at any time to disconnect all the devices. You don’t need to open the Settings app as there’s a Quick Action tile available in Windows 10’s Action Centre – press Win+A to open Action Centre and then click the “Mobile hotspot” tile to turn off the feature.

How to fix Nikon Camera Battery Exhausted Message

If you’re getting a message on your Nikon camera saying that the battery is exhausted, the problem might be caused by your battery or by your settings.

However, there’s a way to fix this problem, and today we’re going to show you how to do it properly.

How to fix Battery exhausted error on my Nikon camera?

1. Make sure that your battery settings are correct

battery settings Nikon camera battery exhausted

You may get Battery exhausted message on your Nikon camera if your battery settings aren’t correct. However, you can fix that by doing the following:

  1. Turn on your camera and press the Menu
  2. Navigate to the Setup section and choose Battery type from the menu.
  3. Now select the appropriate battery type that you’re using and press the OK
  4. After doing that, the issue should be resolved.

2. Replace the batteries

replace the batteries Nikon camera battery exhausted

Sometimes this error can appear if your batteries are actually depleted. To fix that, you need to replace the batteries.

Several users reported that they replaced their batteries with alkaline batteries and then inserted the rechargeable batteries to fix the problem.

Several users reported that the issue was switched after switching to Lithium batteries, so you can try that as well.

3. Make sure that the batteries are properly charged

charge batteries properly Nikon camera battery exhausted

Charging batteries takes time, and in order to make sure that your batteries are properly charged, you need to charge them for several hours.

According to users, 6 to 8 hours of charging should be enough, but you might need more depending on your battery capacity.

4. Connect the charger in the correct order

properly charge the batteries Nikon camera battery exhausted

In order to charge your camera, you need to connect the charger in the right order. The correct order is the following:

  1. Connect the USB cable to the charging adapter.
  2. Now connect the adapter to the wall outlet.
  3. Make sure that your camera is turned off.
  4. Now connect the USB cable to your camera.

5. Check your battery door cap

check the battery cap Nikon camera battery exhausted

Sometimes Battery exhausted error can appear if your battery door cap is damaged. To fix it, it would be best to take it to the Nikon’s repair center for replacement.

Alternatively, you can try using a wall charger to charge your batteries.

These are our solutions for Battery exhausted error on Nikon cameras. If you found our solutions useful, let us know in the comments section below.

Nikon Camera Taking Black Pictures? 5 Solutions to Fix

If your Nikon camera is taking black pictures, there’s probably an issue with your shutter.

This is a major problem, but in today’s article, we’ll show you how to fix this issue on your own.

What to do if the Nikon camera is taking black pictures?

1. Set the exposure to 30 seconds

change exposure nikon camera taking black pictures

This method might be potentially dangerous if you’re not careful, and we’re not responsible for any damage that might occur.

  1. Take the lens off and turn the camera on.
  2. Now set the camera to work in Manual mode.
  3. Change the exposure to 30 seconds.
  4. Take a photo and check if your shutter curtain is stuck.
  5. Hold the camera in one hand and gently thump the base of the camera with your other hand.
  6. Do this a couple of times and your camera should start working again.

2. Use the Clean Image Sensor option

clean image sensor nikon camera taking black pictures

To fix this problem, some users are suggesting using the Clean Image Sensor option. This option should be available from the menu.

According to users, using a Clean Image Sensor option a few times should fix the problem with your camera.

3. Try removing the battery

remove the battery nikon camera takes dark pictures
  1. Turn your camera off.
  2. Once the camera is off, remove the battery.
  3. Replace the battery.
  4. Not turn the camera back on again.
  5. Check if the issue is still there.

4. Change the ISO value

change iso value nikon camera taking black pictures

According to users, changing the ISO setting fixed this problem for them.

It appears that the issue was caused only when ISO was set to 100.

After changing the ISO to a higher value, the problem was gone.

5. Take your camera to the repair center

contant the repair center nikon camera taking black pictures

If you’re still having this issue, there might be a hardware problem with your camera.

To fix it, it would be best to take it to the Nikon’s repair center and have a professional fix it for you.

There you go, we hope that our solutions helped you fix the problem with Nikon cameras and black pictures. If our solutions were helpful, feel free to let us know in the comment section below.

Run command doesn’t save history in Windows 10/11 [EASY FIX]

The auto-complete feature is probably one of the biggest time-saving features ever invented in terms of PC functionality.

This ranges from account and password auto-complete to the history-based autocomplete in various functions and programs.

However, some users have reported that their Run command is not saving history in Windows 10.

I have several virtual machines with different builds of Windows 10 which I am using for testing purposes. One of my machines suddenly stopped saving the Run history. This was unexpected and very inconvenient, because I use the Run dialog a lot. Here is how you can fix it.

Now, normally all the latest commands you’ve typed in  Run should still be present in the form of a drop-down list.

Additionally, the latest command you used should already be typed in the box as a suggestion, as you can see in the picture below:

run command not saving history

However, this doesn’t seem to be the case with some.

How do I save my Run history in Windows 10?

The steps are pretty straightforward, in that all you need to do is tweak a few Windows 10 Settings.

  1. Press Windows
  2. Click on Settings (the cogwheel-shaped button from the Start menu)
  3. Go to System
  4. Select Personalization
  5. Click Start
  6. Turn on the option Show most used apps

run command not saving history windows 10

There is a chance the Show most used apps feature may be greyed-out. If that is the case, proceed with the following steps:

  1. Press Windows
  2. Click on Settings
  3. Select System
  4. Go to Privacy
  5. Click General
  6. Turn on the Let Windows track app launches to improve Start and search results switch

Let Windows track app launches to improve Start and search results

The Show most used apps feature will no longer be greyed-out now

If Let Windows track app launches to improve Start and search results is greyed out for you, then you need to change one key in the Registry:

  1. Press Windows + R
  2. Type in Regedit
  3. Navigate to the following address:
    • HKEY_CURRENT_USER\Software\Microsoft\Windows\CurrentVersion\Explorer\Advanced
  4. Find the Start_TrackProgs DWORD
  5. Double-click to open and set the value to 1
    • If the DWORD doesn’t exist, create one and set its value to 1

run command not saving history windows 10 DWORD


Can’t access Registry Editor on your Windows 10 PC? Check out this useful guide.


While this issue overall isn’t much of a performance breaker, it does make you spend more time remembering what commands you used in the past.

As such, following these steps will indeed lead to faster commands in the long run.

RELATED ARTICLES YOU SHOULD CHECK OUT:

This Item Name or Type Isn’t Allowed on OneDrive [Fix]

OneDrive is one of the most renowned cloud backup solutions out there for both enterprise and home users. However, there are certain limitations when uploading files on OneDrive. Some keep getting the This item name or type isn’t allowed OneDrive error.

The error appears when uploading files, be it manually or automatically in the background. The entire message reads, This item name or type isn’t allowed. Please rename the item or remove it from your OneDrive. Keep reading to find the solutions!

How do I fix This item name or type isn’t allowed OneDrive error?

1. Make sure that the file name and type are supported

There are certain limitations OneDrive imposes on users, so not every file type or even name is supported. These limitations include:

  • Characters that are not allowed in the file names are “, *, :, <, >, ?, /, and |. File names must contain less than 400 characters.
  • Folder names that are not allowed are .lock, CON, PRN, AUX, NUL, COM0 – COM9, LPT0 – LPT9, _vti_, desktop.ini, and any filename starting with ~$.
  • Usual file types that are not supported are executable files, but this can vary depending on your server administrator’s decisions.

2. Re-link OneDrive to the PC

  1. Right-click on the OneDrive icon in the notification area and then open Settings.
  2. Go to the Account tab.
  3. Click on Unlink this PC and then close the application. OneDrive The name or type isn't allowed
  4. Again open OneDrive settings and then go to the Account tab.
  5. Select the location of the OneDrive folder.
  6. Sign in with your credentials, and you should be good to go.

If you are sure that the file or folder you are trying to upload meets the requirements, but the item name or file type still isn’t allowed, try resetting your OneDrive and re-linking it to your PC.

3. Use OneDrive on the web

Finally, the limitations that are present on the local client won’t affect file uploads on the web-based client. That’s why we suggest logging into your OneDrive account via browser and uploading files that way.

Also, while we are there, allow us to recommend a browser that is probably the best contemporary alternative to Chrome and Firefox.

 OneDrive The name or type isn't allowed

UR Browser is super-private and won’t eat up all your resources while performing simple tasks in a few tabs. It comes with enhanced encryption and quite an intuitive design that closely resembles Google Chrome.

Check it out and see what are the benefits of using UR Browser over others firsthand.

That’s it! By now, you should have fixed the This item name or type isn’t allowed error in OneDrive, by renaming the file, relinking OneDrive, or using the web version of Microsoft’s cloud storage service through a more reliable browser.

In case the problem persists and you intend to switch, check the best cloud storage services for seamless uploads and to access files on the go!

For any queries or to share more solutions with us, drop a comment below.

The Sync Could Not be Initiated: 3 Ways to Force it

Microsoft Intune enables users to sync enrolled devices with their organizations. However, sometimes Intune doesn’t sync user devices, and you get The sync could not be initiated (0x82ac019e) error.

In case you’re not familiar with syncing, we have a great guide on how to sync devices with MS Intune, so we recommend checking it out.

In today’s guide, we will focus on syncing issues, so let’s get started, shall we?

What causes The sync could not be initiated error?

  • Closed ports, such as port 444, can cause sync issues on your PC.
  • Device is registered with other organizations and that’s causing a conflict.
  • Enterprise Mobility and Security E3 aren’t enabled.

How do I force a device to sync with Intune?

1. Open Port 444

  1. Press the Windows key + S keyboard shortcut.
  2. Input Windows Defender Firewall as the search keyword.
  3. Click Windows Defender Firewall with Advanced Security to open the window in the snapshot directly below.
    Windows Defender Firewall window microsoft intune not syncing
  4. Right-click Inbound Rules on the left of the window to select New Rules.The New Inbound Rule Wizard microsoft intune not syncing
  5. Select Ports and click Next.
  6. Select the TCP or UDP protocol option for your port.
  7. Then enter the port number 444 in the Specific local ports box.The Specific local ports box microsoft intune not syncing
  8. Select the Allow the connection option.
  9. Click the Next button to open Profile options.
  10. Click Next again, and then enter a title for the firewall rule.
  11. Press the Finish button.

Speaking of Firewall interference, it could also cause issues like error code 80180006; read this guide to learn the solutions.

2. Unregister the Device From Other Organizations

  1. Click the Start button.
  2. Click the Settings button on Windows 10’s Start menu.The Settings app microsoft intune not syncing
  3. Select Accounts in Settings.
  4. Click Access work or school on the left of the Settings window.The Access tab microsoft intune not syncing
  5. If the device is connected with another organization, select the listed account for it.
  6. Then click Disconnect button for the selected account. Then users should have one organization account for Intune listed there.

After doing that, check if the error message is gone.

3. Check Enterprise Mobility + Security E3 is enabled

  1. Log in to Office 365 portal as administrator.The Office 365 portal microsoft intune not syncing
  2. Select the user account the syncing error arises.
  3. Click the Edit button for Product licenses.
  4. Then turn on Enterprise Mobility + Security E3 if it’s not enabled.
  5. Thereafter, users will need to restart the affected device to resync it. Open the Settings app in Windows 10.
  6. Then click Access work or school and resync the device from there.

Those are some of the resolutions users have fixed Intune’s syncing with. Remember that the service has additional problems, and we wrote about Intune app failed to install error in one of our older guides.

Keep in mind that you can encounter various issues in Intune, and we also covered error code 0x87d1fde8 in our previous guides.

Users who have resolved the sync could not be initiated error with other resolutions are welcome to share their fixes below.

How to terminate Language typing features notifications

Some users have posted on Windows support forums about a Language typing features pop-up notification. That’s a Windows 10 Action Center notification that might pop up about every 30 minutes for some users.

Users have queried support forums in search of a resolution that will get rid of the Language typing features notification. B

elow are some of the resolutions that have disabled the typing features notification for users.

How can Users Disable the Typing Notification?

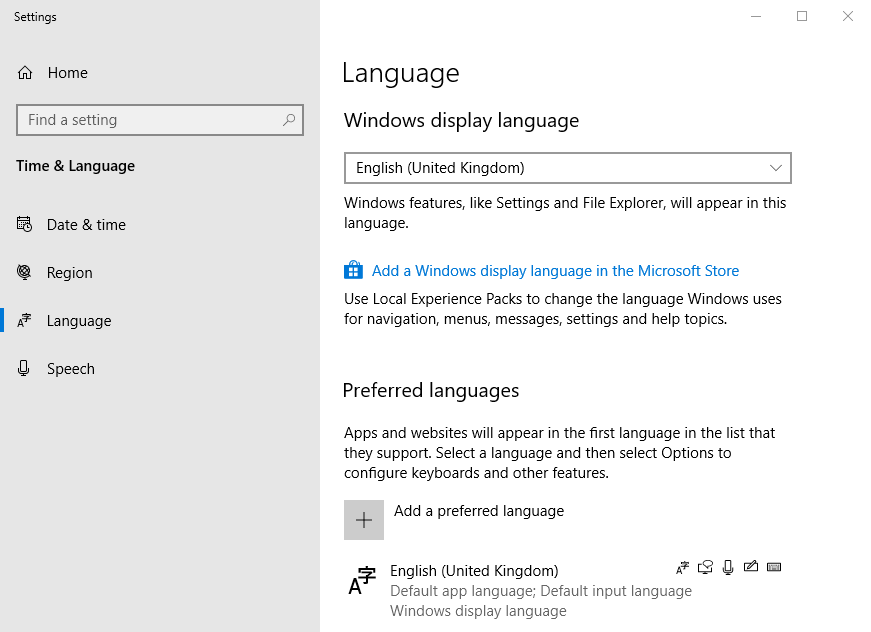
1. Uninstall Secondary Language Packs

  1. Users have confirmed that uninstalling additional Windows 10 language packs got rid of the typing features notification for them. Click the Type here to search button to open the search utility.
  2. Enter ‘language’ in the search utility’s text box.
  3. Then click Language Settings to open the window shown directly below.Language options language typing features disable notification windows 10
  4. Select the secondary language pack listed under the default one.
  5. Press the Remove button to uninstall the pack.
  6. Most users will have just one additional language pack, but users who have installed other packs might also need to uninstall those to get rid of the typing feature notification.

2. Turn Off Action Center’s Notifications

  1. Alternatively, users can try turning off the Action Center’s notifications. To do that, open the search box in Windows 10.
  2. Input ‘notifications’ as the search keyword.
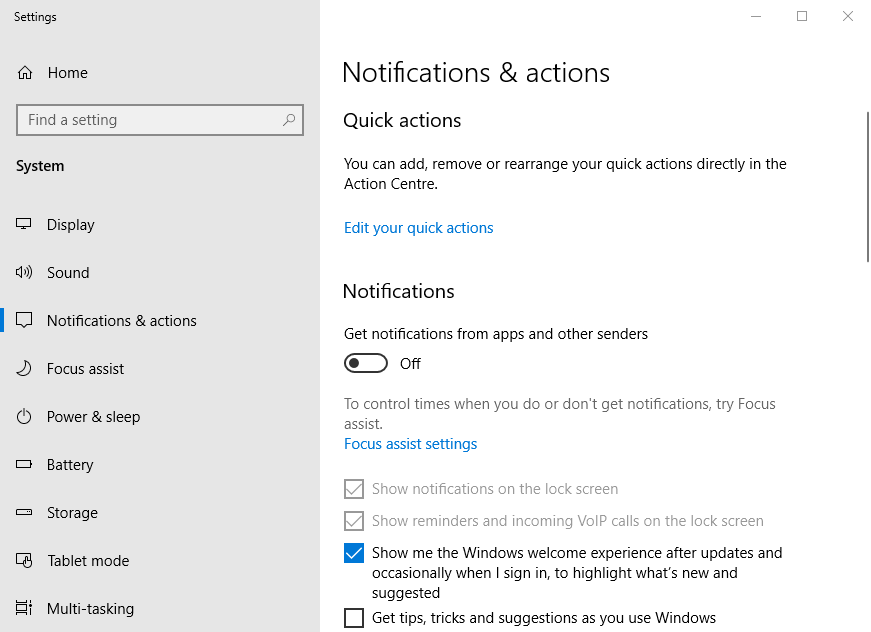
  3. Click Notifications & actions settings, which opens the Settings app as shown directly below.Notifications & actions options language typing features disable notification windows 10
  4. Turn off the Get notifications from apps and other senders option.
  5. In addition, deselect the Get tips, tricks, and suggestions option.

3. Edit the Registry to Disable Action Center

  1. If turning Action Center notifications off doesn’t do the trick, try editing the registry to disable the Action Center. Before doing so, some users might prefer to set up a System Restore point.
  2. Open Run by pressing the Windows key and R hotkey.
  3. Input ‘regedit’ in Run and click OK to open the Registry Editor.
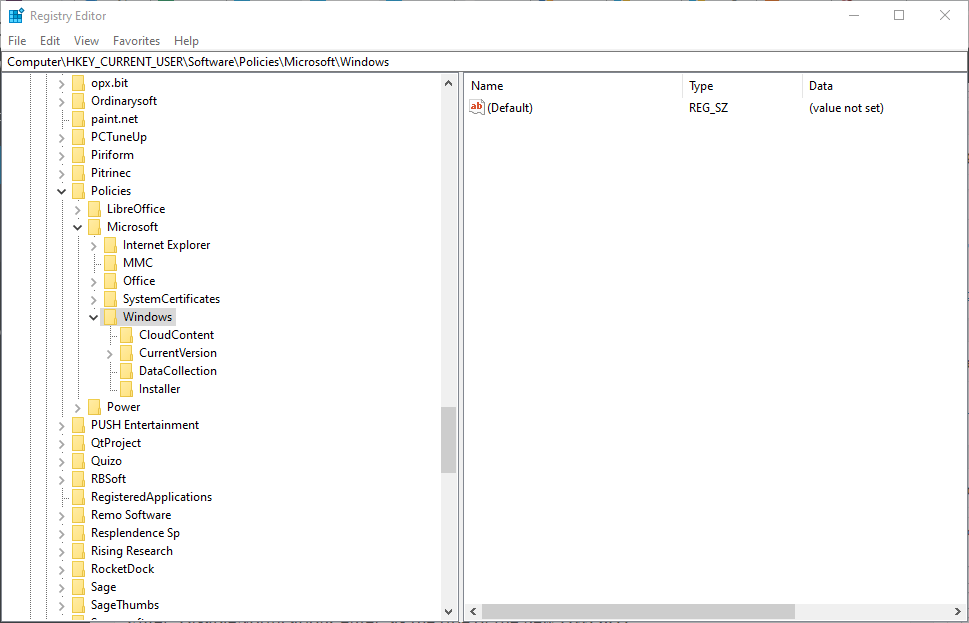
  4. Next, open this key in the Registry Editor’s window: HKEY_CURRENT_USER\SOFTWARE\Policies\Microsoft\Windows\Explorer.Windows registry key language typing features disable notification windows 10
  5. If there’s isn’t an Explorer key in the registry, add one by right-clicking the Windows key and selecting New > Key. Then enter ‘Explorer’ as the key’s title.
  6. Select the new Explorer key.
  7. Right-click an empty space on the right of the Registry Editor to select New > DWORD (32-bit).
  8. Enter ‘DisableNotificationCenter’ as the title of the new DWORD.
  9. Double-click DisableNotificationCenter to open the window directly below.The Edit DWORD window language typing features disable notification windows 10
  10. Then delete the zero, and enter ‘1’ in the Value data box.
  11. Click the OK button.

4. Turn Off the Autocorrect Misspelled Words Settings

  1. Some users have also confirmed that turning off the Autocorrect misspelled words option can disable the typing features notification. Open the search tool by pressing the Windows key (with the Microsoft logo on it) and S simultaneously.
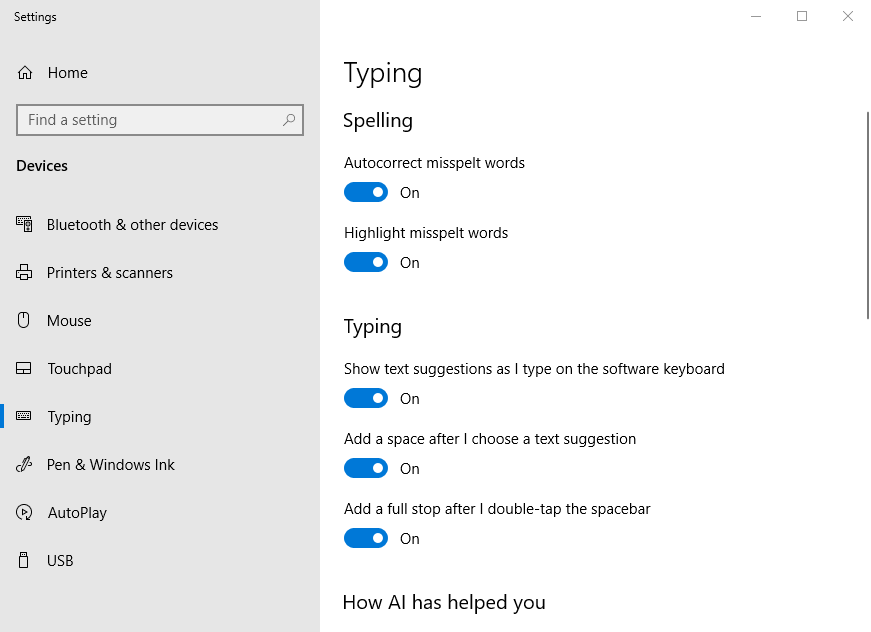
  2. Then enter ‘typing’ and click Typing settings to open the window in the snapshot below.Typing settings language typing features disable notification windows 10
  3. Turn off the Autocorrect misspelt words setting.
  4. In addition, turn off the Highlight misspelt words option.

So, that’s how players can fix the Language typing notification. Then that notification won’t pop up in Windows 10.

RELATED ARTICLES TO CHECK OUT: 

Posted in Fix

How to fix common Amazon Fire Stick errors

For those of you that want to buy a new Smart TV but are lacking the budget, you should first hear about the Amazon Fire Stick.

This neat little device is basically like a USB stick which you insert into a TV‘s HDMI port, turning it into a Smart TV. This means you can install apps on the TV, go on the Internet and access a variety of streaming services.

Of course, like any piece of electronic equipment, the Amazon Fire Stick is prone to the occasional bug and error.

This article compiles some of the most common Amazon Fire Stick issues encountered, and solutions on how to fix most of them.

What are the most common Amazon Fire Stick issues?

The list of issues that a Fire Stick can encounter is quite large, but thankfully all of them are easy to solve.

  • Wi-Fi connection doesn’t work
  • Issues with the physical connection
  • Fire TV remote problems
  • Bugs with the Firestick’s Audio
  • The image is lacking quality
  • Can’t turn on the Fire TV Stick

How can I fix common Amazon Fire Stick issues?

1. Wi-Fi connection doesn’t work

how to fix common amazon fire stick errors wifi

This is probably the most commonly encountered issue with the Fire Stick, especially since it needs a stable Internet connection t do pretty much anything.

These issues can usually be countered by doing the following:

  • Make sure your modem or router is compatible with the Fire Stick
    • Your modem or router should have the following specifications: B, G, and N routers on 2.4 GHz or A and N routers on 5GHz
  • Remove any obstacles between the Fire Stick and your router
  • Use the Fire Stick’s Network usage tool to diagnose any problem if you think it is related to your network settings
  • Lastly, consider performing a Fire Stick restart or even a router restart, as that may fix your problems

For more details on this particular issue, check out this guide.

2. Issues with the physical connection

how to fix common amazon fire stick errors physical connection

As mentioned above, the Fire Stick is something that you add to your TV. As such, make sure all connections are stable and firm for proper functionality.

Any problems with the physical connection can usually be countered by doing the following:

  • Make sure the Fire Stick is fully inserted in the TV‘s HDMI port, otherwise it may not be recognized
  • Make sure both the Fire Stick remote and the Fire Stick itself are fully charged and receiving enough power
    • You can do this by changing the remote’s batteries, and making sure the Fire Stick is inserted in the USB power block or charger (which is included)
  • If your Fire Stick gets overheated too many times, its motherboard can fry. If that happens all you can do is simply buy a new Fire Stick

3. Fire TV remote problems

how to fix common amazon fire stick errors remote

If your Fire Stick remote is unresponsive, it can be due to lack of power (see above), of the Fire Stick and the remote aren’t paired properly.

As such you can try the following:

  • Reboot both the Fire Stick and the Fire Stick remote and perform another pairing
  • Make sure the batteries in the remote are charged and in full contact
  • Make sure the buttons on the remote function properly

For more details on this particular issue, check out this guide.

4. Bugs with the Firestick’s Audio

how to fix common amazon fire stick errors audio

When it comes to the audio, the problems and solutions alternate between incredibly easy and incredibly complicated.

As such, you should start off by doing the following:

  • First, check if the TV is accidentally set to Mute
  • You may have external speakers which are not compatible with your Fire Stick, so try switching your audio settings to Default Mode
  • If you think you have the wrong audio settings, go to the Fire Stick settings menu and disable the Dolby Digital Output option
  • Try plugging the Fire Stick in another HDMI port
  • Check the connection of all of your cables going to and from the Fire Stick, TV and audio system to see that they are properly plugged in
  • If you’re trying to use Bluetooth speakers or headphones, make sure they are properly paired

For more details on this particular issue, check out this guide.

5. The image is lacking quality

how to fix common amazon fire stick errors image

When it comes to the image, there are many reasons why your Fire Stick may be having issues.

Try some of the following steps to fix any image-related issues:

  • Try plugging the Fire Stick in another HDMI port
  • Check the connection of all of your cables going to and from the Fire Stick, TV and audio system to see that they are properly plugged in
  • Change the image resolution by holding the Up and Rewind buttons pressed for five seconds
  • Replace your Fire Stick
  • Adjust the scaling of the screen by going to Settings and changing the image format

For more details on this particular issue, check out this guide.

6. Can’t turn on the Fire TV Stick

When these types of problems occur, it is most likely caused by insufficient power reaching the Fire Stick.

Because of that, you should start off by trying these steps:

  • Check the connection of all of your cables going to and from the Fire Stick, TV and audio system to see that they are properly plugged in
  • Repair or replace the power cord (any damages or scratches will prevent proper functioning

For more details on this particular issue, check out this guide.

By following this comprehensive guide, you should be able to troubleshoot pretty much any Amazon Fire Stick-related issue you may encounter.

If you know of any other major issues, let us know in the comments section below.

RELATED ARTICLES YOU SHOULD CHECK OUT:

How to change payment method in Payoneer with ease

Payoneer becomes a force to be reckoned with when it comes to online payments. A lot of professionals, mainly freelancers, rely on it to get the funds and distribute them further to their bank accounts. It offers a variety of options and payment methods at fair fees so it might be a better professional option than PayPal. Today, we’ll show you how to change the payment method on Payoneer.

How do I change the payment method on my Payoneer account?

Changing the payment method on your Payoneer account is a rather simple procedure. However, it depends on what way payment services you use. Payoneer offers a variety of options, and they are as follows:

  • Global Payment Service – available in certain countries
  • Billing Service – allows for billing directly from Payoneer
  • Mass Payout company – receive the funds from a different platform
  • and Make a payment service – receive the funds from Payoneer users.

For example, some freelancing platforms don’t support changing the payment option through the standards ways so have that in mind. The procedure is, therefore, different.


Learn how to transfer money using Payoneer in just a couple of easy steps.


However, if you want to change the payment method in the company environment, just log into your account and select the Activity tab. From there, choose Funding sources and select the paying method for a particular company.

How to change payment method Payoneer

Finally, you get to choose whether you’ll get the funds faster with a small additional fee or get them in a standard way. With that, your payment method should be changed and this is applicable to the majority of services.

However, in order to avoid issues with the changes you made or make some things clearer, we highly suggest contacting the Payoneer support. That way you’ll not only learn in-detail how to change the payment method on Payoneer but also additional information regarding your business and transaction.

You can reach them on the official support website, here.

RELATED STORIES YOU SHOULD CHECK OUT:

Xbox adds new safety settings to text messaging

Microsoft has just announced new content safety settings to messages you receive on Xbox Live through the Xbox app on Windows 10 or Android. As noted in a post on Xbox Wire, the new messaging feature is available only to Xbox Insiders and will be generally available in a future Xbox One console update.

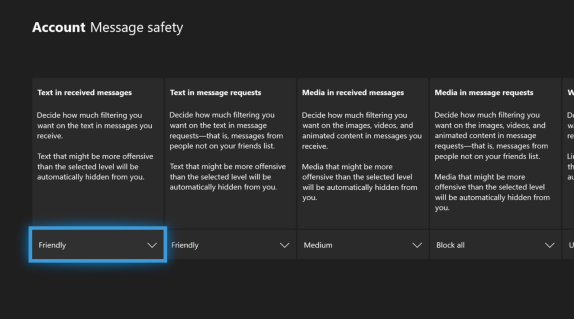
Xbox Text Filters help shield adult language content from younger players and allow you what kinds of message content you want to see. Xbox Text Filters have four levels of messaging content settings, including Friendly, Medium, Mature, and Unfiltered.

“We want to give you, the gamer, the control over what messages you want to see when you are engaged in the Xbox community, so we’re enabling new ways to filter content, specifically text. These new automated text filtration capabilities will start rolling out across the Xbox ecosystem soon, starting first with private messages and expanding over time to profiles, LFG, Clubs and your Activity Feed.

With this update, you will set your own specific levels of automated filtration so you can decide what’s acceptable and what isn’t in the text-based messages you receive across Xbox Live. And as always, if you receive a message that violates our Community Standards for Xbox, even with filters in place, you can still report this conduct to Xbox Enforcement for follow up.”

Here’s a video look at Major Nelson describing the new Xbox Text Filters on Xbox One.

On your Xbox One console, you can access your message safety by going to Settings > General > Online safety & family >Message safety. Xbox Insiders will receive the Xbox Text Filters update today, will a future update rolling out later in the fall for everyone else. By default, child accounts are automatically set to Friendly. The adult account holders can choose which text filter level works best for them.

Microsoft Launcher 5.9 goes out of beta, brings “live date” calendar icon and more

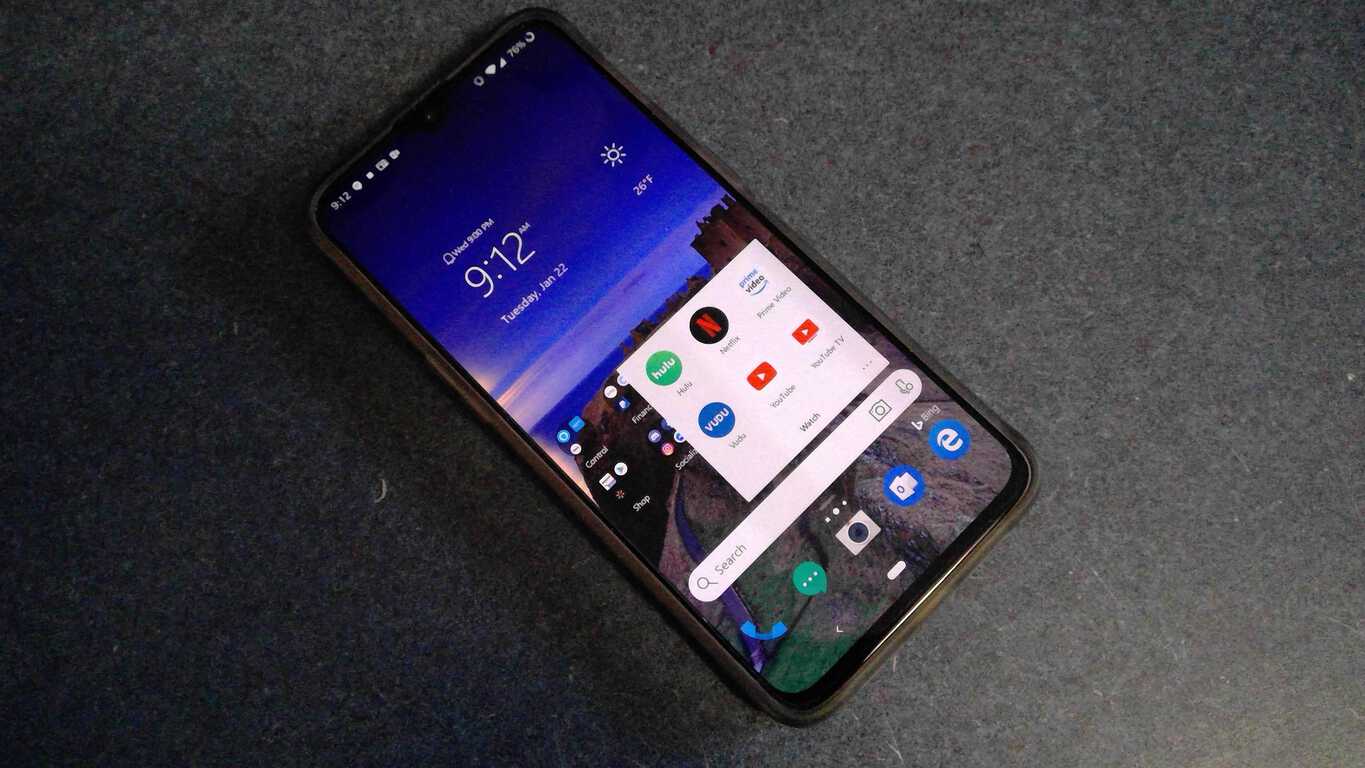
If you’re using the Microsoft Launcher on your Android phone, the latest version 5.9 is now out of beta for all users. The main change is that the Calendar icon will now always show the right date, and the icon itself has also been updated with a more simplistic look.

This update also brings a couple of bug fixes and performance improvements. You can check out the full changelog for the version 5.9.0.54736 below:

  • Live date update is now available on your original calendar app icon, and Microsoft Launcher calendar icon is also updated with a cleaner look.
  • General bug fixes on dock, wallpaper, calendar card, and performance improvements.

Along with Microsoft Edge and Your Phone Companion, the Microsoft Launcher is an essential app for Windows 10 users rocking Android phones. The app is getting new features at a regular pace, and you can also sign up for the beta version to get early access to new features.

Microsoft Launcher
Microsoft Launcher
Price:
Free

What is Microsoft Graph? And why does it matter for Surface Neo and Duo?

Microsoft is known for many things: Windows, Office 365, and Microsoft 365 among them. But, in 2019, things are much different than they used to be. Some of Microsoft’s apps and services don’t just cover Windows. You’ll find apps like Microsoft Launcher dedicated to Android, and apps like Microsoft Edge or OneNote that span across both the Windows, MacOS, Android, and iOS worlds.

Well, Microsoft developers don’t just build apps for one device anymore, either. The same app you have on your Windows 10 PC, you typically will find on your Android or iPhone. So, have you ever wondered what empowers developers and holds together to sync up your data? The answer is the Microsoft Graph.

In this little guide, we’ll give you a quick look at Microsoft Graph, and why it’s important to understand as a Microsoft fan, especially with the recent announcement of both Surface Duo and Neo.

What is the Microsoft Graph?

Originally announced back in 2015, the Microsoft Graph has nothing to do with charts or mathematics. Instead, it is an API, part of the Microsoft 365 developer platform that connects and allows developers to build various Microsoft integrations into their apps. At the same time, it also includes APIs for some of the cloud data you’re feeding Microsoft’s services. In more recent times, this has become important for syncing things up across all your different types of devices, be it Android, iOS, or Windows. Think, multi-device, multi-sense, or what Microsoft calls cross-device experiences. Services covered by the Microsoft Graph API include the following, which Microsoft considers a “Microsoft Identity.”

  • Office 365 services: Delve, Excel, Microsoft Bookings, Microsoft Teams, OneDrive, OneNote, Outlook/Exchange, Planner, and SharePoint
  • Enterprise Mobility and Security services: Advanced Threat Analytics, Advanced Threat Protection, Azure Active Directory, Identity Manager, and Intune
  • Windows 10 services: activities, devices, notifications, timeline
  • Dynamics 365 Business Central

Specifically, in technical terms, Microsoft calls  the Microsoft Graph a “unified programmability model” that developers can use to “access the tremendous amount of data in Office 365, Windows 10, and Enterprise Mobility + Security.” For you, as a Microsoft fan and consumer, this essentially means that if developers opt to come on board and integrate with the Microsoft Graph, you’ll be able to have an app or service that is designed around the Microsoft data you already own, across the different devices you own. For instance, as Microsoft describes, envision an app that pulls your Microsoft cloud data for the following situations.

  • Scans your calendar to suggest meetings
  • Subscribes to changes in your calendar, and sends you alerts when you’re spending way too much times in meetings
  • Sort out your work and personal information on your phone

We’ll spare you the technical details and save those for later, but there are various REST API requests which work with Microsoft Graph and can be built into a developer’s apps. Examples include API requests for your profile, files, photos, mail, calendar events, manager, Office 365 groups, members in your organization, trending items around you, and notes. Again, when developers integrate Microsoft Graph APIs with an app or service, you’ll no longer be tied to your one device. You’ll have everything Microsoft you need in an app, no matter where you go.

Why does it matter for Surface Neo and Duo?

So, why does Microsoft Graph matter for Surface Neo and Duo? Well, as we highlighted above, the Microsoft Graph is multi-device, multi-sense. It syncs up everything Microsoft related, across apps and different devices, regardless of the operating system, all through the data shared in the Microsoft cloud.

This is what Microsoft calls cross-device experiences, and it is looking to be the next big bet for Surface Neo and Surface Duo. In fact, this is something that Microsoft CEO Satya Nadella specifically mentioned in an interview with Wired, pointing to the fact that Microsoft doesn’t see a devices’ operating system as important anymore, mainly due to the Microsoft Graph, and the power of the cloud.

“The operating system is no longer the most important layer for us … What is most important for us is the app model and the experience. How people are going to write apps for Duo and Neo will have a lot more to do with each other than just writing a Windows app or an Android app, because it’s going to be about the Microsoft graph.”

Essentially, Microsoft now understands that consumers, and you, the Microsoft fan are no longer just use one device. You’re on different devices, throughout the day, and Microsoft wants to reduce the friction and have its developers build apps that can sync up your activities across devices. That’s exactly why we saw the reveal of two dual-screen products revealed during the Microsoft Event on October 2.

The Surface Neo is a Windows PC, where you can be productive in the traditional sense. Then, Surface Duo is an Android/mobile extension of Surface Neo in a smaller form factor. That’s why Panos Panay stopped short of calling Duo a phone because he knows that developers will want to build apps and services that work across both devices. You’ll have Android on Duo, and Windows on Neo, with Microsoft Graph to connect them together. For Microsoft, connected services and experiences will only become more important, especially in a world where Android and iOS are first class players.

HoloLens Not Connecting to WiFi: 3 Ways to Fix it

HoloLens is a very popular device; however, issues such as HoloLens not connecting to WiFi have been reported by many.

Speaking of issues, we already wrote about HoloLens not updating in one of our previous guides.

Fortunately, we have solutions for this major problem, and today we will show you what to do if HoloLens has connectivity issues.

Why is HoloLens not connecting to WiFi?

  • Network issues can prevent HoloLens from working properly.
  • Windows Firewall can block the device and prevent it from connecting to Wi-Fi.
  • Other networks can sometimes interfere with HoloLens on your PC.

What can I do if HoloLens is not connecting to WiFi?

1. Make sure your Internet connection is working properly

  1. Make sure everything is OK with your Wi-Fi router.
  2. Restart the device by turning it off and on after 30 seconds.
  3. Check if other devices (such as PC and mobile phones) can connect to Wi-Fi.

If everything looks fine with your Wi-Fi connection, go to the next solution below.

2. Disable the firewall

  1. Open Windows Firewall.
  2. Select Turn Windows Defender Firewall on or off.
     
  3. Select Turn off Windows Defender Firewall.
  4. Restart HoloLens.
  5. Clear all your floating application windows (tiles).
  6. Restart your PC.
  7. Make sure your HoloLens and PC are on the same Wi-Fi network.
  8. Relaunch the Fologram app and attempt to connect.

After doing that, check if the problem is gone.

3. Disable any supplementary network

  1. Go to Control Panel, then select Network and Internet, and then Network Connections.
  2. Click on Change Adapter Settings.
  3. Disable any network that is not connected to the same network as your HoloLens.
  4. Restart HoloLens and your PC.

If the solution above didn’t work, try disabling other networks that aren’t connected to HoloLens.

If HoloLens is not connecting to WiFi, try all the solutions from this guide.

In case you’re having additional problems, check our guide on HoloLens 2 not turning on for additional solutions.

Did our solutions help you solve the problem? Did you find another way to connect your HoloLens to Wi-Fi? Do let us know in the comments section below!

HoloLens voice commands not working? Here’s what you can do

HoloLens is a mixed reality device developed by Microsoft. It is extremely popular among users for creating environments where virtual items interact with physical objects.

Unfortunately, HoloLens is plagued by many issues. Many users reported that HoloLens’ voice commands are not working.

Today we will show you what to do if you encounter this problem. Also, it is worth mentioning that “Hey Cortana” works for quite a few people with this issue. So, it might not be a microphone malfunction.

In any case, you should check your microphone for any physical damage or wear.

How can I recover the voice commands in HoloLens?

1. Start Debugging

To make the voice commands work, you should deploy by Start Debugging. Alternatively, you can click on the play button from the Remote Machine.

Starting the app in the debug mode will show you in a console what’s causing the issue.

2. Restart the app

Sometimes, restarting the app would solve this issue. Developers reported that they encounter this problem in the earlier days. They solved it by simply restarting the application.

If these two simple solutions didn’t work, try our solution below.


Looking for the best HoloLens apps? Here are our top picks.


3. Make sure the microphone is enabled

If you still encounter the issue, check if your microphone is connected.

  1. Select Edit > Project Settings > Player.
  2. Go to the green Windows Store icon and select it.
  3. Expand Publishing Settings.
  4. In the Capabilities section, make sure you checked Microphone.
  5. Select the Package.appxmanifest file for checking the capabilities in VS.
  6. Again, make sure the Microphone is enabled.
  7. Reboot HoloLens for a fresh start.

Once you start HoloLens, the voice commands should work properly.

Conclusion

Not getting voice commands in HoloLens is a frustrating problem, but you shouldn’t worry about this. Check out our methods to solve the issue in no time.

So, as you can see, you can fix this problem in no time with some easy solutions. Start the app in the debug mode or restart the app. If these solutions don’t work, make sure your microphone is enabled.

Did our solutions work for you? Did you find another way to recover voice commands in HoloLens? Do let us know in the comments section below!

RELATED ARTICLES YOU NEED TO CHECK OUT:

Resolve Power BI tables won’t join issue with these steps

Power Bi is a powerful data visualization BI tool from Microsoft. This business analytics service enables you to see your data through a single interface. Sometime, Power bi table won’t join issue can occur while relating two tables as reported in Power Bi community.

As can be noted in both tables I have the LocOrgTrab_CD and Entidade_ID fields, and through them, I need to somehow relate these two tables to set into one, in the end, I wanted to have a table with the following fields:

If you are also troubled by this issue, here are a couple of troubleshooting tips to help you resolve “Power Bi tables won’t join” issue in Windows.

What can I do if Power BI tables won’t join?

1. Use Merge Query

  1. If you are trying to match the table information with another table and not succeeding, try Merge Query option.
    Power bi tables won't join
  2. The Merge Query feature in Power Bi desktop allows you to match tables without any error.
  3. From the Power Bi editor, select columns you need to match.
  4. Choose “Inner” in Join Kind.
  5. It will join only the matching rows.

The way it works is that you choose a column that is related to each other from each table and merges them based on the relationships.


Power BI total doesn’t add up? Try these solutions


2. Check the table for empty spaces

Power bi tables won't join

  1. One of the common causes of Power Bi errors is invalid syntax as well as empty spaces.
  2. Make sure you check the tables for empty spaces. At times the spaces skip your attention. You may also want to use the error reporting to find any issues.
  3. Apart from empty spaces, check for an invalid character that you may have used with the table data.

3. Use UNION function

  1. Depending on the tables you want to join, you can use the UNION function as a workaround.
  2. However, using the UNION function can result in slow performance and show more rows. Also, you need to change the formula manually if the level filter is changed.
  3. If you are not aware of the UNION function, refer to tthe guide. It is an official Microsoft guide.

The Power bi tables won’t join issues can get complicated if you are new to Power Bi service. However, by following the steps in this article, you should be able to fix Power Bi join tables issue.

If the issue persists, make sure you ask for assistance in the Power BI community for problem-specific solutions. Don’t forget to leave your solution in the comments to help other users.

RELATED STORIES YOU MAY LIKE:

HoloLens 2 Not Turning on: 4 Ways to Start it by Force

HoloLens is a pair of smart glasses developed by Microsoft. Despite being a great device, many reported that HoloLens 2 is not turning on.

We already wrote about this device in our guide on how to upgrade HoloLens 2 to Windows 11, so be sure not to miss it.

As for powering on issues, keep reading to learn how to fix them.

Why is my HoloLens not turning on?

  • Battery level is low, and your device can’t start because of it.
  • Software glitches with the device.
  • Problem with the settings on the device.

What can I do if HoloLens 2 is not turning on?

1. Check the battery level

  1. Locate the LED next to the Power button.
  2. Start the charging process.
  3. Notice how many lights are on.
  4. If only one light is on, it means your device is at 20% so you should charge it.

2. Restart HoloLens

  1. Hold the Power button for 4 seconds and wait for all the battery indicators to turn off.
  2. Wait for one minute.
  3. After that, press the Power button.

If this method doesn’t work, try force restarting HoloLens.

  1. Hold the Power button for at least 10 seconds.
  2. Wait for at least 30 seconds.
  3. After that press the Power button again.

After doing that, check if HoloLens 2 is still not turning on.

3. Reset the device

  1. Go to Settings, and then go to Update, and Reset.
  2. Select Reset device.
  3. Follow the instructions on the screen.

4. Recover with the Windows Recovery Tool

  1. Download and install the Windows Device Recovery Tool on your Windows 10 PC.
  2. Connect the device to your computer via the Micro USB cable.
  3. Run the Windows Device Recovery Tool.
  4. Follow the instructions from the tool.

Hopefully, this guide helped you fix all your HoloLens issues. However, this isn’t the only issue, and many reported that HoloLens is not updating, but we covered that in a different guide.

Did you find a different solution for this problem? If so, share it with us in the comments section below.

How to get rid of the name matching error in Outlook?

Microsoft Outlook is an email client and acts as the delegated email client of the Microsoft Office Suite.

While not as popular as other email clients, it is definitely useful in work environments. As a mail client, you need to work using contacts in your address lists.

Unfortunately, users have been reporting on the official forums that they are encountering an error message when trying to add a new user mailbox.

I am trying do add a new user mailbox to the exchange server 2010 from the outlook client autodiscovery. It gives me the follow error message: name could not be matched to a name in the address list

According to Microsoft:

This issue typically occurs when the user account is not associated with a mailbox or when it has been manually configured to be hidden from the Global Address List. Lack of Active Directory permissions to certain objects or issues with the Exchange Recipient Update Service are also common causes. In addition to the error above, end users may be unable to successfully perform a check name, create a MAPI profile, or connect to an Exchange server.

How do I get rid of the name matching error in Outlook?

Make sure the user is not hidden from the address lists and that the user’s mailbox exists.

  1. Go to the Exchange Admin Center
  2. Select Recipients 
  3. Go to Mailboxes
  4. Locate the user
  5. Double-click the user account so you can clear the box Hide from address lists

Now that you’ve done that, it is time to test out whether this works:

  1. Go to  Outlook and create the user profile
  2. Log in as the user
  3. Go back to Exchange Admin Center
  4. Select Recipients 
  5. Go to Mailboxes
  6. Locate the user
  7. Double-click the user account so you can check the box Hide from address lists
outlook the name cannot be matched to a name in the address list Hidden User

The account should now function normally without the error appearing anymore.

Do you receive a name matching error in Outlook when trying to add new contacts? Are you currently aware of any other solutions we may have missed?

If so, please do not hesitate to share with the other users in the comments section below.

Firestick Not Playing 4K Content? 4 Ways to Force it

Many users reported that Firestick is not playing 4K resolution. This can be a problem, especially if you want to enjoy 4K content.

This isn’t the only issue, many reported that the Amazon Fire Stick settings menu not loading. However, that can be easily fixed.

Join us while we show how to access hidden resolution options on the Fire TV and unlock the 4K resolution.

Why isn’t my Firestick playing 4K?

  • Your TV, Firestick, or Internet connection might not meet hardware requirements.
  • The Ultra HD Deep Color feature is interfering with 4K.

What can I do if Firestick is not playing 4K?

1. Make sure that you meet hardware requirements

Here are some requirements for 4K content:

  • Internet connection of at least 15Mbps
  • Ultra HD TV with HDMI port and support for HDCP 2.2 content protection standard

To check if your TV supports HDCP 2.2 standard, do the following from the Fire TV menu:

  1. Go to Settings > Display & Sounds > Display.
  2. Head over to the Video Resolution
  3. Set your video resolution to Auto. You should now see a notification saying if HDCP 2.2 standard is supported.

Not all ports on your TV may support HDCP 2.2 standards. If you want to watch 4K content, connect Amazon Fire TV to a port labeled as Mobile High-Definition Link (MHL), HDCP 2.2, UHD, or 4K.

2. Make sure that your TV supports 2160p 60Hz video playback

  1. Check the instruction manual to see if the TV supports 2160p 60Hz playback.
  2. Alternatively, visit the TV manufacturer’s website.
  3. Locate your model and check its hardware specifications.

Ensuring that your TV can handle 4K is crucial in preventing this issue from appearing.

3. Toggle Ultra HD Deep Color option on your TV

  1. Open your settings.
  2. Locate Ultra HD Deep Color.
  3. Disable it and save changes.

4. Use the hidden resolution options to select 4K resolution

  1. Press and hold Back + Reverse + Right + Select buttons on your remote for 10 seconds. On the Fire OS 5, this combination is changed to Reverse + Up.
  2. Your device will start cycling through various resolutions.
  3. Once you see 4K resolution on your screen, press Select on the remote to select it.

This will change the native resolution to 4K, and 4K content should play without any problems. Remember that enabling this option might make your menus a bit sluggish.

Keep in mind that this isn’t the only issue you can encounter, and many reported that Amazon Fire Stick is stuck on Amazon logo.

There you go, several quick and easy solutions that can help you if Amazon Fire TV won’t play 4K video. If you found our solutions helpful, let us know in the comments section below.

Uninstall Language Pack on Windows 10 [How to]

If you no longer use a specific language, it’s always a good idea to uninstall the language pack on Windows 10 so it doesn’t interfere with your work.

Today’s guide will show you how to quickly and easily do that on your PC.

How do I uninstall the Microsoft Language pack?

1. Use language settings

  1. Press the Windows key + S and type the language. Select Language settings from the list of results.
  2. Then select a listed language pack to uninstall.The Remove button windows 10 language pack how to install/change/uninstall
  3. After that, click the Remove button.

2. Use PowerShell

  1. Press the Windows key + X and choose PowerShell (Admin).
  2. Run the following command Get-WinUserLanguageList 
  3. Get the LanguageTag value of the language you want to remove.
  4. Next, run the following command, but be sure to replace LanguageTag with the actual value:  Uninstall-Language LanguageTag

As you can see, this is a pretty simple process that can be done from settings, but more advanced users can just as easily remove a language pack from the command line.

You can use these methods if the language pack doesn’t work on Windows. We also have a guide on how to remove display language on Windows 11, so don’t miss it.

If you don’t want to remove a language, we have a guide on changing the system language on Windows 11, so don’t miss it.

Download CloudBerry Backup and you’ll never lose your files

Over the past few years, cloud storage services gained an enormous popularity. Many users use cloud services for backup, but managing your backups manually can become a problem.

There are many great tools that can help you to back up your files to cloud storage. If you’re looking for a cross-platform cloud backup software that can work with all major cloud services, you might want to consider CloudBerry Backup.

CloudBerry Backup: A great multi-platform cloud backup solution

Five different backup types available

CloudBerry Backup comes with a friendly and tabbed user interface that hides many advanced features.

Regarding the file backup, this software for Windows cloud backup supports the following backup types:

  • Local backup
  • Cloud backup
  • Hybrid backup
  • Cloud to Cloud backup
  • Cloud to Local backup

Download CloudBerry Backup for Windows


Local backup allows you to backup your files to the desired directory or drive on your PC. This feature is useful if you have an external hard drive that you use for file backup.

If you’re not a fan of local backup, you can always back up your files to one of many available cloud storage services using the Cloud backup feature.

cloudberry backup review configuration

It’s worth mentioning that the application also has a Hybrid backup feature that combines previous backup types into one. Using the Hybrid backup feature you’ll be sure that you have your backup available on both local drive and cloud storage.

CloudBerry Backup also allows you to migrate your files from one cloud storage to another using the Cloud to Cloud feature. To migrate your files, simply select the directories that you want to back up and select the desired cloud storage.

Lastly, there’s a Cloud to Local feature that will back up your files from the cloud storage to your local drive.

Speaking of your local drive, check out these backup software for external hard drives. They’ll come in handy in case anything goes wrong and you lose your files and folders.


Scheduled backups, encryption, email notifications and more

As previously mentioned, CloudBerry Backup offers five different backup types, and each backup type can be customized. After you select the directory you want to back up, you can customize a wide array of options.

For example, you can choose the file types and directories you want to back up or skip.

You can also choose to backup files that are modified during a certain time period. Since all cloud storage services have limitations, you can choose not to back up files that exceed certain size. Of course, you can skip system and hidden files if you wish.

cloudberry backup review configuration 2

Another feature that we have to mention is Retention policy that allows you to delete outdated data from the cloud storage. This feature is rather useful if you want to save space and delete older versions of your files.

It’s worth mentioning that CloudBerry Backup supports 256-bit AES encryption, so your files will be automatically encrypted prior and during their upload to the cloud. Although file encryption is a great feature, keep in mind that encryption isn’t available for all cloud services.

The application also supports scheduling so you can easily schedule a one-time backup or create a recurring backup. This is useful if you want to create monthly, weekly, daily or hourly backups.

cloudberry backup review configuration 3

In case you miss a scheduled backup for some reason, the application can perform a backup as soon as your PC starts. If you want to keep your files backed up at all times, there’s also a Real-time Backup feature that will upload the files to the cloud as soon as you modify them.

CloudBerry Backup also supports email notifications, so you can receive a notification message after a successful or failed backup. If needed, you can also add entries to Event Log if your backup is successful or if it fails.

cloudberry backup review configuration 4


Compatibility with over 50 different cloud storage services

As we previously mentioned, CloudBerry Backup supports more than 50 different cloud storage services. Regarding the supported cloud storage services, the application works with major services such as:

  • Amazon S3
  • Amazon Glacier
  • Microsoft Azure
  • Google Cloud Storage
  • Backblaze B2

Many other less-known cloud storage services are supported as well, and with support for more than 50 cloud storage services you won’t have any problems backing up your files.

cloudberry backup review services


Block level backup, compression, and other advanced features

CloudBerry Backup offers simple to use interface that allows you to easily see and edit your backup plans. You can also check all backup storage locations, your backup history as well as disk capacity from the main screen.

The application also has some advanced features such as:

  • Block level backup
  • Compression
  • Command line interface
  • Ransomware protection

Thanks to block level backup, you’ll only upload modified or new pieces of data reducing the used bandwidth and storage space. Speaking of which, with built-in compression feature you can easily compress your files and speed up the backup process.

If you’re an advanced user and you prefer using a command line over a graphic interface, you’ll be pleased to know that CloudBerry Backup fully supports command line interface.


CloudBerry Backup Pro vs Free edition

CloudBerry Backup for Desktop comes in two versions, Free and Pro, and there are some differences between the two. Both versions offer the following features:

  • Support for more than 50 different cloud storage services
  • Five different backup types
  • Backup scheduling and advanced backup customization
  • Availability on Windows, MacOS, and Linux

As for limitations, the Free version doesn’t offer encryption or compression. Another thing missing from the Free version is the email support, however, there’s a community support available.

We also have to mention that CloudBerry Backup for Desktop has data limits in both Free and Pro version. For example, in the Free version, you’re limited to 200GB of data which should be enough for home or basic users. On the other hand, the Pro version has a data limit of 5TB. It’s also worth mentioning that you can upgrade the data limit for both Free and Pro plans.

If you’re a server administrator, you might be interested in CloudBerry Backup Windows Server edition. This version offers several unique features including the following:

  • File-System Backup
  • Image-Based Backup
  • System State Backup
  • Bare Metal Restore
  • Restore to Cloud VM

It’s worth mentioning that CloudBerry Backup for MSPs and IT Service Providers version is available as well. This version is perfect for corporate use and IT professionals since it provides central management and monitoring for all your backups as well as cross-platform cloud backup.


Conclusion

CloudBerry Backup Desktop is a great application for file backup, and with support for more than 50 different cloud storage services and advanced backup features, it’s a great choice for both basic and advanced users alike.

The Free version doesn’t come with drastic limitations, but if you want to reduce bandwidth usage, improve the backup speed and protect and encrypt your files, you might want to consider purchasing the Pro version.

You can use CloudBerry to back up data on your Windows Desktop, Windows Server, MS SQL Server and MS Exchange accounts. This is a reliable all-in-one solution.

Download Wickr: An encrypted collaboration tool for teams

Wickr is an American software company best known for its instant messenger app, Wickr, which lets its users exchange content-expiring messages like that of Snapchat whether it is photos, videos and file attachments.

Like WhatsApp messaging service, Wickr allows users to exchange end-to-end encrypted messages too, and is available on Windows and other top operating systems as well as iOS and Android.

Meet Wickr Messenger and Wickr Pro

Founded in 2012, Wickr has grown over the years with apps such as Wickr Messenger and Wickr Pro.

Wickr Messenger, initially an iOS app, but later unveiled on Android, lets users set expiration times for their encrypted messages, and it also has a desktop version of its secure platform. It was released together with the ability to sync messages across many devices.

Wickr Pro is a secure collaboration platform created for teams and enterprises that lets them launch private networks in minutes and immediately, they can start communicating internally, and join with third parties.


Download Wickr for Windows 10/ 7


Wickr privacy software

Users can message one on one, create secure rooms, set expiration times for messages that last from as low as one second to about five days, and send encrypted files (max 5GB), plus make secure conference calls.

Wickr Pro features and benefits

The chief point of difference that sets Wickr apart from other apps is its security. Its founder insist that it is the closest thing to a private platform and no information is saved to a server, plus there’s no data on its users.

Its growth was experienced after it was discovered that the personal information of over 4.6 million Snapchatters had been stolen from the cloud.

All its messages and transactions are tightly secured what with the AES 256 military grade encryption, which makes it perfect for anyone looking for the highest levels of privacy, whether you’re in politics, business, or just for your personal reasons.


In case you want to be secure while surfing the internet, you will need to get a full-dedicated tool to secure your network.  Install now Cyberghost VPN and secure yourself. It protects your PC from attacks while browsing, masks your IP address and blocks all unwanted access.


The benefits of using Wickr obviously include data security as they’re always protected with multilayered P2P security. You also own your conversations as Wickr doesn’t collect or access your data, plus they don’t monetize your trust.

You’re always in control of your privacy, and you get to stay connected across all platforms and devices, anytime and anywhere you go.

On Wickr, every message, file and call is encrypted with a new random key, and breaking just one would take eons to decipher. Even in the event of a breach, the servers have no user communications as they cannot be deciphered while in transit, and deleted on delivery.

Wickr also gives users key verification (produced using ECDHE) so you get to exchange keys with your contact, and you can verify the identity of that person using the keys. Business owners also enjoy the advantage of controlling their networks and centrally manage user security policies.

Calling on Wickr is end-to-end encrypted and protected with forward security whether it is a one on one or conference call.

Wickr pros and cons

wickr

Pros:

  • Users can find each other securely

Instead of having to use emails, phone numbers or usernames to search for and find other users, Wickr software uses hashes from the phone numbers or email addresses, but only for finding friends.

Hashes are derived from one-way cryptography which means it is difficult to reconstruct the original phone numbers and emails from them.

Wickr’s hashes are generated from the client user’s end such that there’s no personal information sent to Wickr servers. The app locates the users on your contact list who are also on Wickr by comparing hashes generated from them to those stored on Wickr servers.

  • User-defined lifespan on messages

As mentioned earlier, the messages or pieces of communication on Wickr have a lifespan of as little as a second or three, up to six days, and these arrive locked.

Once the message recipient opens it, a timer will count down until the message gets deleted, but the recipient still has the leeway to copy or screenshot for record purposes.

  • Wickr has a content shredder that erases all messages, and overwrites these messages with junk data.
  • Screenshot taking isn’t enabled by default.

This feature is disabled when the app is open, but users with rooted phones and installed apps that override this block can work their way around this, or even take the screenshot via their computer when the screen is projected.

  • Group messaging and basic photo editor
  • Doesn’t need a phone number to register, you can add contacts via email alone or phone number

Cons:

  • As much as the company says they have more than one million users who have downloaded the app, there’s no solid information about the active users, but one million still is a small user base if you compare it with other apps like WhatsApp.

Wickr has four product plans available. You can use this collaboration platform for free as an individual user or a small team. Alternatively, the premium plan gives you access to all the features and options available on the platform.

RELATED STORIES TO CHECK OUT:

Download Icecream Password Manager on all Windows versions

One thing I have learnt from my life is to jot down things I consider important. Well until last couple of years I used to use a daily diary but later I found that a digital medium is not only convenient but it’s also seamless to use.

Then came the mixture of Evernote and Google Keep, however all of the note taking apps had a glaring disadvantage, the absence of a Password management feature.

Fast forward to today and I have used nearly all of the major Password Management programs including the LastKeep and Kaspersky.

However, in the recent past, I have been hooked to Icecream Password Manager, a simplistic Password manager tool that scores high on the utilitarian front.

Why do you Need a Password Manager?

Many of us don’t realise the need of a Password Manager until its too late. Password Manager helps you generate and save strong passwords for any number of services on the Internet.

The problem of Password confusion is sorted out since all the Passwords are encrypted and stored in the Icecream Password Manager. Additionally, it is tools like this that will safeguard your credentials from breaches or malware.

The best part of it all is that Icecream password manager is a free tool for Windows and is capable of managing multiple accounts across different platforms.


Download Icecream Password Manager for Windows PCs


The Best Features of Icecream Password Manager

Icecream Password manager is apparently built keeping in mind the complexity of financial transactions that take place in the online space. Thanks to the AES-256 encryption, Icecream Password Manager helps in securing your sensitive data like online bank accounts, website logins, credit cards and other identities safe from intruders and hackers.

Thankfully multiple users will be able to use the Icecream Password Manager from the same computer.

The Icecream Password Manager adds another layer of security by offering a vault feature. Basically, the vault is just like a real life safe that stores all your valuable things.

The program allows users to create multiple tools and manages all of them with a master password.

How to install Icecream Password Manager

Installation is pretty straight forward. One needs to download the software here. In the initiation page, the software will ask users to setup a vault and also name the same. Along with the name of the vault one also needs to enter a password and a hint for easy recovery.

The installation will not proceed until and unless you create at least one vault. Thanks to the import option you will also be able to import the .ipm files from other password managers.

In the next step of installation, you will be given a choice to install a plugin for Chrome or Firefox. I personally recommend selecting the plugin for all your browsers so that the Icecream Password manager will be available on both of your browsers.


We’ve covered additional password manager tools in this guide. Do check it out.


In the vault home screen, you can click on the ‘safe key’ icon and add more vaults.

Adding Password details for every site is pretty simple, just click on the “Add Item button” and then choose login. The Icecream Password Manager will also display a save prompt whenever you log in to a service like Facebook or Twitter from the browser.

Under the settings tab, one will find General, Backup and Browsers. The Backup options include the way you want to fine tune your backups followed by the Browsers tab that allows you to manage passwords on the browsers.

Other features include Secure Note, a vault to protect your ideas, Master Password and Dropbox sync. Moreover, the other functionalities like the auto lock are set to make your vault more secure.


Icecream Password Manager is compatible with all the Windows versions out there, including OS versions that are no longer supported by Microsoft.

Whether you are using Windows 10, Windows 8.1, Windows 8, Windows 7, Windows 2003, Windows 2000, Windows Vista, Windows XP, or Windows Server 2008, this password manager tool has got you covered.

The Bottomline

After having used other Password Managers like Avira and LastPass, one thing is for sure the Icecream Password Manager strikes the right balance between features and security.

Moreover, the software is intuitive and easy to use. While most of the other Password Managers focus on only web plugin the Icecream Password manager also helps you maintain a copy of Passport, Drivers licenses and also Software licenses!

Download Khan Academy App: Education at Your Fingertips

Khan Academy is one of the best Windows Store education apps. I’ve always been a supporter of educational apps, be it on iOS, Android or even on bigger machines.

In my publishing career, I always loved it when I had to write about educational apps. Therefore, it is with great pleasure that I review today Khan Academy app for Windows 10.

Along with Wikipedia, Khan Academy makes for one of the best educational apps that are currently available in the Windows Store.


Download Khan Academy for Windows 10


Khan Academy has been founded by Salman Khan (hence the name), American educator, with Bangladeshi origins. Salman has managed to create an awesome project and until now, Khan Academy has delivered more than 200 million lessons for people all over the world.

Khan Academy application for Windows 8, Windows 10 follows the mission and is here to help you with lits of videos on various subjects. Let’s dig in deeper.

khan academy windows 8

Review of Khan Academy app for Windows 8, Windows 10

Probably the biggest drawback with Khan Academy is that all its content is available only in English, so when they manage to cover even more languages, then I think they’ll be launching a real learning revolution.

For, now, you can discover videos on the following subjects/modules:

  • Mathematics
  • History
  • Healthcare and medicine
  • Finance
  • Physics
  • Chemistry
  • Biology
  • Astronomy
  • Economics
  • Cosmology
  • Organic chemistry
  • American civics
  • Art history
  • Macroeconomics
  • Microeconomics
  • Computer science

The Windows 8, Windows 10 Khan Academy application is, however, slightly different, as you’ll see when trying it out. Categories are differently arranged and you have the following on the front page when opening the application: “Math”, “Finance and Economics”, “Test Prep”, “Science”, “Humanities”, “Talks and Interviews”.

All those categories come under the Learn tab. There is also “New and Noteworthy” tab where you can see some featured videos, probably sorted by popularity.

In order to get a better experience from the Khan Academy application, you should sign in. You don’t even need to create an account, as you can log in with your Google or Facebook acount.

If you choose to sign up with your Facebook account (which I did), don’t forget to set notifications from this app to be seen only by you and not by your friends or your audience on Facebook.

I always though that the best way to learn things is to “see them”, as that is the most detailed interaction that you can have with the learning material. That’s why I like the concept behind Khan Academy so much.

However, the application in Windows 8, Windows 10 for now, fails to match the quality of sister-apps for iOS and Android. Especially bothering were those videos without too many details in them, only a voice and some amateurish drawings.


Since we’re talking education apps, do check out these dictionary software for PC.


Awesome concept, but not quite there yet

Reason for why that’s happening is obvious – Khan Academy is no Discovery Channel and they just don’t have currently the necessary funds for too much video editing. But users might not be aware and they just simply won’t care.

So, I really hope Salman Khan manages to find a way in order to bring up to the community more well-crafted videos, instead of mediocre editing.

But there are 3,500 videos there, right at your fingertips, so I’m sure you’ll find plenty of interesting videos that will help you get better grades or just to increase your personal knowledge on different matters.

“How to browse that huge library of videos?”, one might ask. Well, nothing is easier than that. As with any other application, open the Charms bar while you are inside the application (move the mouse to top right corner or press Windows logo + W) and just start searching for the things that you’re interested in.

The application isn’t lagging behind and one should be satisfied with the speed that it opens the video, albeit those that are obsessed with instant responses, will say that it is not that great.

I praise Khan Academy for their idea and for what it means on other platforms, but they just need to put a little more work into their Windows Store version. Right now, it just doesn’t look “polished” enough for me to be ecstatic about it. However, we praise their slogan:

It is our mission to accelerate learning for students of all ages

Khan Academy abandoned [2018 update]

For all of you that wanted to play a bit with the newest Khan Academy feature, we have sad news: the project has been abandoned. It all started in 2016 when the project claimed to have low funds.

Later, the project has been closed because of the low user base. If you have the app installed it will continue to work, but if you reinstall it, it will not. If you check out the review section of Khan Academy on the Microsoft Store, you’ll see plenty of complaints about the app crashing or freezing all of the sudden.

If you want to use an education software, here is a list of alternatives to Khan Academy.

Download Audials Radio: Free internet radio for Windows 10

With the development of internet and music on demand services, the once-high popularity of radio stations has faded, with most radio stations now available online.

If listening to radio stations is your thing, you might be interested in the Audials Radio app for your Windows 10 device.

Get Audials Radio for Windows 10

Audials Radio is a free internet radio app available on the Windows Store. Alternatively, you can also download it from Audials official webpage.


Download Audials Radio for Windows 10/7


The first thing that you’ll notice when you open Audials Radio is its clean and simple interface with several options to choose from.

What immediately caught our attention was the Local Radio section. In this section, you can choose between many local radio stations as long as they are currently broadcasting online.

We were pleasantly surprised by the number of the local radio stations available, but some of our favorites were missing from the app despite the fact they’re available online.

audalis-radio-1

If you want to tune into some of the most popular radio stations being listened to by other users, the Top Hits option is what you need. This option will always show you different radio stations — great if you’re looking for new music.

Match My Taste analyzes your listening history and creates a list of suggested radio stations based on your preferences.

This feature might not be the most accurate representation of your music taste, but it’s great to use if you’re looking for new radio stations to listen to.

audalis-radio-genres

If you’re looking for a specific genre, the Genre section will be perfect for you. It allows you to choose from many popular genres and subgenres.

Once you select a certain genre, you’ll see an expandable list of the top five most popular radio stations.

It’s worth mentioning that you can also sort radio stations by popular subgenres to make your search process faster.

Users can also sort radio stations based on genre and country. For example, if you’re looking for a radio station in your country or in any other country that plays jazz, you can easily find it in Audials Radio.


Need more options? We got an additional list of feature-rich radio software for you.


In addition, you can also search for radio stations by artists that are played frequently. The Top Artists section allows you to listen to radio stations that are frequently or currently playing one of the top artists.

This is an interesting feature, but you’re limited to only the 25 top artists.

audalis-radio-top-artist

Audials Radio allows you to choose radio stations by countries, with the option to choose radio stations from your country or from any other country in the world. In addition, there’s an option to choose the best radio stations from all countries.

If you don’t know which radio station to choose, the app‘s Suggestion section will suggest some radio stations that you might enjoy. In addition to the wide array of radio stations, Audials Radio allows you to listen to various podcasts.

You can choose between different podcast topics or sort podcasts by languages.

Audials Radio comes with recording feature, allowing you to record several radio stations at the same time. Just press the record button, and the recording process will run in the background while you listen to something else.

It is worth mentioning that the radio recorder extracts only the songs from the radio stream leaving out commercials or any interventions from the presenters.

While this is an interesting feature, we had a few problems with it. For example, certain radio stations would stop recording for some unknown reason, but we assume the problem was related to the availability of the audio stream.

In addition, we were unable to play saved recordings from the app despite the recordings being listed. This is a unusual issue but one that can be avoided by using a third-party multimedia player.

audalis-radio-recording

Audials Radio comes with a simple search feature that allows you to easily find your favorite artist or music genre. In order to quickly access your favorite radio stations or artists, you can pin them to the application‘s main menu for quick access.

Audials Radio comes with some great features, such as simultaneous background recording and advanced sorting that allows you to easily sort radio stations based on genre or country.

Despite these features, we had minor problems with recording and random crashes every now and then. For the most part, though, the app was pretty stable.

audalis-radio-2

Audials Radio is a great application with a wide range of different radio stations to choose from. If you’re looking for a free internet radio application, we recommend you give Audials Radio a try.

You can download Audials from the Windows Store right now and start listening to your favorite radio stations online.

Bitdefender Internet Security 2019: The best antivirus for Windows

Bitdefender recently released its new set of security products, and we already reviewed Bitdefender Total Security 2019 software.

However, if you don’t plan to use certain features from Total Security 2019, or if you just want protection for a single Windows device, you might be interested in Internet Security 2019.

What does Bitdefender Internet Security 2019 have to offer?

Complete real-time protection

Bitdefender Internet Security 2019 main screen
Just like Total Security 2019, the Internet Security 2019 offers real-time protection against all sorts of online threats. There’s also a built-in ransomware protection that will protect your files.

Safe Files feature is also available, so you can easily select which directories you want to protect.

Before we dig into the features packed by Bitdefender Internet Security 2019, it is worth mentioning that Bitdefender already rolled out a new edition of its Internet Security software solution. You can download it on your Windows PC using the link below.


The new Bitdefender Internet Security 2020 is here. Get it now!


And now, let’s get back to Total Security 2019. Many of the features listed in this guide are also available in 2020 version of the tool.

Advanced Threat Defense feature is also present, and it will analyze the behavior of your applications and alert you if they try to perform anything suspicious.

Rescue Mode is also available, so if your PC is infected by a rootkit, you can use this feature to remove it.

Just like any other antivirus, this software also has its own firewall, so you can easily create rules and prevent certain applications from accessing the Internet.

Bitdefender Internet Security 2019 firewall


Protection from malicious websites

Bitdefender Internet Security 2019 will install its own extension in your browser and inform you about any malicious websites. Thanks to the Web Attack Prevention feature, all malicious search results will be labeled, so you won’t access them by accident.

The application also has anti-phishing and anti-fraud detection features that will inform you if you visit a phishing website. If you’re using social networks frequently, you’ll be pleased to hear that there’s a Social Network Protection feature that can protect you from malicious links on social networks

Safe Banking feature is also available allowing you to make payments in Bitdefender’s secure browser and ensure that your personal or banking information isn’t stolen.

Another useful feature is Webcam protection, and thanks to it, only the approved applications will be able to access your webcam.


File encryption, password manager, Parental Control and Vulnerability Assessment

Bitdefender Internet Security 2019 vault
Bitdefender Internet Security 2019 has file encryption feature, so you can easily protect important files. Simply create a file vault, protect it with a password and it will encrypt and protect all your files in it.

This is an incredibly useful feature if you’re sharing your PC with a coworker or a roommate.

Another great feature for users that are sharing their PC is File Shredder. Using this feature, you can permanently remove files from your PC and prevent other users from recovering them.

Bitdefender Internet Security 2019 file shredder
Internet Security 2019 also has its own password manager, and you can store important data, such as your personal information or website credentials in it.

This feature might not be as advanced as other password managers, but it might come in handy if you’re not using a password manager already.

Bitdefender Internet Security 2019 password manager
There are Vulnerability Assessment and Wi-Fi Security features available, so you’ll be notified if your PC or your Wi-Fi network is vulnerable. Just like the Total Security version, this one also has a Parental Control support, so you can limit which applications and websites your kids can use.


Bitdefender VPN

Bitdefender Internet Security 2019 VPN
Bitdefender VPN is also available if you want an extra layer of protection online. If you want to keep your online activity hidden from your ISP or from malicious users, then Bitdefender VPN is the right choice for you.

Bear in mind that the Free version is limited to 200MB per day and a random server. However, you can remove both these limitations by subscribing to the monthly or yearly Premium plan.


A couple of differences

As you probably noticed, both Bitdefender Total Security and Internet Security share a lot of features. They both have advanced system protection, and both will protect your PC from malicious websites and applications.

However, the two have a couple of small but important differences. The Internet Security version doesn’t have the OneClick Optimizer feature, so you won’t be able to optimize your devices for maximum performance. This isn’t a major drawback, but some users might miss this feature.

Another missing feature is Anti-Theft. This feature is incredibly useful since it allows you to track your device even if it gets stolen.

It’s important to mention that this feature is available for all platforms, so you can use it to track your laptop, smartphone or tablet.

Unfortunately, this feature is available only in Total Security version.


No multi-platform support

Unlike Total Security 2019, Internet Security version is a Windows exclusive, so it’s not available on other platforms. Although the antivirus and its security features aren’t available, the Parental Control feature will still work, regardless of the platform you’re using, which is a major plus.


Conclusion

Bitdefender Internet Security 2019 offers almost the same features as the Total Security version, so it will protect your Windows device completely.

OneClick Optimizer isn’t a feature that most users will miss, but the lack of Anti-Theft feature can be noticeable.

The lack of multi-platform support can be a problem for some users, especially if you have Mac OS, iOS, and Android device.

Regarding the license, you can get a license for one, three, five or ten devices, which makes Internet Security perfect for home and business users alike.

If you’re strictly a Windows user, Bitdefender Internet Security will offer complete protection for your PC, so you should definitely consider it.

Download Luminar 3 for Windows 10: AI-powered photo editor

Adobe Photoshop has been the go to solution when it comes to photo editing but despite being the most sought after photo editing tools, it suffers from one major drawback.

Yes, it’s the complexity, one needs to spend hours and days to master the Photoshop tool. This is something that not all prefer to do or have the time to do.

It’s this very void that photography tools like Luminar (formerly known as Macphun Luminar) try to fill with their easy to use professional photo editor.

Luminar is now available for Windows and we decided to try out the latest version.

What makes Luminar 3 one of the best photo editor for PC?

The Luminar has been offering most of the advanced RAW editing tools to the users across skill levels.

In the meanwhile, the UI has been designed in such a way that the new users don’t feel intimidated by the same.


Download Luminar 3 for Windows 10


I personally love the plethora of basic editing options the Luminar has to offer since I am a novice in every sense when it comes to photo editing.

Luminar apparently offers 300 different tools for editing your photos and this includes more than 50 one-click presets, 40 photo editing filters and non-destructive editing.

Starting up

Once you fire up the Luminar, a new window opens up with two options, Load Image or Batch Processing. The batch processing is particularly useful when you want to apply the same set of edits to multiple photos. The Image edit is useful for custom editing a single image.

In the case of Batch Processing ( the feature is not yet available in beta), users should be able to drag and drop multiple images and apply the common settings.

In the future, Luminar will also allow you to use the batch processing feature by accessing the Batch processing option from the File Menu in the application.


Try these photo montage software to glam your digital photos with


The Edit Screen

Well, this is the menu most of us will be spending time on. The Editing screen comes with an amalgamation of options, some of them are elementary while others are pretty advanced in nature.

The preset panel at the bottom displays the presets that can be applied to your images. Furthermore, the presets are separated on the basis of Outdoors, Portrait, Street, Dramatic, basic and Travel.

Thankfully one can also head over to the selection of preset packs on the Macphun website and download the same.

The right pane is dominated by the Layers section. Needless to say, this pane shows the various layers that are applied to the current image much like the Adobe Photoshop. One can adjust the opacity and also make use of the Transform tool.

All of the 40 presets we talked about earlier can be customised by adjusting the sliders and each of the customised presets can also be saved separately.

Toolbars

Tools are often quintessential when it comes to photo editing software and Luminar has managed to include a majority of them. Transform, Clone, Radial Mask, Gradient Mask, Masking Brush, Move, Stamp and Crop.

Luminar also has a pretty neat sharing option wherein one could share across social media sites including Facebook, Twitter, Flickr, Messages and also Mails.

AI power

Luminar relies on Accent AI 2.0, a new human-aware technology that automatically recognizes people and different environment types. The tool then uses this information to adjust the images in a realistic manner.

Luminar Looks

There are over 70 Luminar Looks for you to choose from. All these photo settings have been hand-crafted by pro photographers. Use them to take your artistic vision to the next level.

Wrapping it up

Luminar for Windows is indeed a formidable Photo Editing tool that requires basic editing skills. I have fiddled around with the Luminar for last few days and have been impressed with its performance. The interface is well designed and the simplicity lies at its core.

I would recommend the Luminar for novices who don’t like to get their hands dirty with an advanced Photo editing tool.

That being said the Luminar still misses out on some of the tool Photoshop tools like the text editor and advanced print layout options. Since its just the beta I am pretty sure that Macphun will add more features as we move on.

RELATED STORIES YOU NEED TO CHECK OUT:

Download Nook App for Windows 11 & 10 PCs

The Barnes & Noble Nook app for Windows 10 is one of the best to use when it comes to managing your books, magazine subscriptions and anything else that is related to reading!

Barnes & Noble released their Nook application for Windows 10 operating system quite a long time ago.

Back in 2012 when the app first landed in the Microsoft Store, many users were expecting it to be released earlier, especially because rival reading apps were already lurking in the Store.

One such application is the Kindle Fire. But rest assured, Barnes & Noble didn’t disappoint anybody with their Nook release, not even Microsoft, who invested more than $300 million in the Nook Media subsidiary for a 17.6 percent stake.

But you’ll find plenty of goodies inside the Nook application from Barnes & Noble. Everything is very well organized and you will be able to browse books, comics, magazines, and newspapers. The fresh Nook application works for Windows 10 and Windows 8.1 devices.

With more than 3 million titles available in their database, Nook wants to keep its loyal fans and also to attract new ones. So far, they successfully manage to achieve that.

Download NOOK – The perfect app for reading Books, Magazines, Newspapers, and Comics

For more information about this awesome app, check out our review below.

Nook for Windows Windows 10 review

download nook app windows 10

Update

Nook has been updated with new features. Now you can :

  • Highlight and share your favorite quotes from Nook via social media
  • Voice search: Tap on microphone and tell the app what you’re looking for
  • Multi-select : You can move multiple items on a storage device
  • ArticleView option so that you can quickly move between magazine articles
  • Add notes and highlight words using various colors
  • Import ePub and PDF files.

It also received fixes for various bugs and support for the latest Android versions

Right from the beginning, you’ll be asked to sign up in order to use the app at its fullest. Which is being done properly – you don’t have to leave the application and the sign up is performed right “on stage”.

Also, I’m not sure if you’ll find too many free books around (besides the Windows 8, Windows 10 teaching book on the My Daily Shelf tab), so you should also input your credit card credentials.

Only residents of United States and Canada will be able to buy from the app.

Here are the sections of the app and what they do:

  • My Daily Shelf – here, you will find recently read items. When opening for the first time, it will be populated with sample items provided by the application. When you hover the mouse over the books or you touch them, there’s a slight movement which is quite a pleasant visual aspect. So, on your Daily Shelf will go the books, magazines, newspapers and even comics. All under the same place.
nook for windows 8 review
  • Just For You – my guess is that this category is made according to what you’re currently reading. So, if you bought a book by Aldous Huxley, you’re likely to see more from him. If you’re bought history books, you’re likely to see more history books there.  In order to get more of what you like, head over there.
  • Library – in your library you will find Books and Comics that you have purchased. It looks very nice once it’s filled up with the books and comics that you have bought. Also, it’s a very useful feature and it’s assuring to know that the books and comics you’ve bought aren’t lost and safely stored in a single place.
  • Shop – here’s where you buy your books, obviously. There are more than 3 million titles there to suit your needs, so don’t worry – you’ll find what you’re looking for. Searching for titles is done with the same universal Charms bar. Press Windows logo + W or move the cursor, hand at the right corner and just type in what you’re searching for. From my experience, the app responds to my query pretty fast. There are books that offer free samples, so you can have a “look inside” before bying the book. You can also buy magazines, newspapers, comics and kids’ books which are available in the near tabs.
  • Popular lists – this is the place for those that are looking for something interesting to read. If your pending lists with books to read has been cleared, then you might be interested in the tops that are there. Also in that category, you’ll find Nook books under $5, which is something that budget-conscious buyers will find useful.
  • Nook Channels – this is Barnes & Noble’s own way of seeing how books should be categorized. The Nook Channels section is a mixture of trending topics and well-picked monikers for books that share common specifications. For example, one of the most interesting channels for me have been “Survival Stories”, “Paranormal Love”, “History by Plot”, “Help Yourself” and many others. A very inventive way to discover new reads.
  • Magazines, Newspapers – you’ll find magazines and newspapers for almost every type of readers: geeks, sports lovers, moms, teens, gardening amateurs, cookers, film fans and many, many others. The amount of magazines and newspapers in the Nook aplication for Windows 8, Windows 10 is astonishing. I’m sure you’ll find your favorite one amongst them.
  • Kids, Comics – if you’ve taught your kid how to play around on your computer or touch device, then a good way to keep his imagination entertained is to “feed” him with books for kids and comics. The Nook application contains that, as well, and you’ll be surprised to find how easily it is to browse around.

Reading tools

What I liked the most about the Nook app for Windows 10 was how easy it is to get back to your reading. Doesn’t matter where you are in the app, just right-click and you’ll be offered the button to go back to your reading.

But what we’re interested now is this: how useful are the tools when you’re reading? While you’re reading a book or browsing a magazine/newspaper, just right click and you’ll be showed the reading tools.

There you have the following buttons: Text, Add Bookmark, Go to Page, Size, View Details and Pin. The Text reading tool allows you to change the Font, Line Spacing, Margins and even Theme.

If you’re not interested in those changes and want to keep the official version of the title, just set Publisher defaults to Off.

You can add Bookmarks that are stored in the Bookmarks tab found in the upper bar of the in-app screen. You can also pin your item to the start screen, so you want have to open the Nook app, but you’ll go straight to the application.

I hope you’ll enjoy the Nook application for Windows 8, Windows 10 and Windows RT as much as I did. If you’re a loyal fan of Barnes & Noble, then you should be convinces by this app not to switch sides to another company.

Let us know how does Nook for Windows 8, Windows 10 perform for you.

Install Windows ADB USB drivers on Nook Color

If you need to install Nook drivers on your Windows computer, here’s what you need to do:

  • Disconnect your NookColor from computer
  • Download ADB USB driver from developer’s page
  • Run the file
  • Set as destination folder:  “c:android-sdk-windows” and install
  • Go to Disk-C and open “android-sdk-windows” folder –> “usb_driver” and run the file “install.exe”
  • Connect NookColor to your PC
  • Windows will request the permission to find drivers automatically. Choose to install manually. Driver package will get installed

After finishing driver installation, open Command prompt and type : adb devices . Now you will see NookColor as a device.

As a side note, it might be interesting for you to know that you can now read eBooks inside Edge directly.

Download Bitdefender Total Security Multi-Platform Antivirus

Online security has become a crucial topic for many users, and with a growing number of malware, data thefts, and ransomware, it’s crucial that you keep your PC protected at all times.

In order to keep up with the latest threats, antivirus companies are constantly improving their software, and the same goes for Bitdefender.

Bitdefender recently released the latest version of their Total Security software, so let’s see what Bitdefender Total Security offers and how it compares to other security tools.

What you get if you install Bitdefender Total Security

Advanced protection and scanning

Bitdefender Internet Security 2019 main screen


Bitdefender Total Security has a straightforward interface, allowing you to quickly access both advanced and basic features alike.

Just like the previous versions, Total Security offers complete real-time protection against all malware.

The software also has a behavioral detection feature that analyzes your active applications in real-time. In case the application tries to perform anything suspicious, you’ll be informed and asked to choose the course of action.

Bitdefender Internet Security 2019 scanning


Just like any other antivirus software, Bitdefender Total Security offers both quick and full system scans, but you can also create your own custom tasks. As for configuration, you can change various advanced options and choose how detailed your scan should be.

You can choose between three different levels, but you can also fine-tune your scan settings and choose which type of files you want to scan.

Bitdefender Internet Security 2019 scan options


We also have to mention that Total Security has a Rescue Mode feature that allows you to remove any viruses and rootkits before your system starts. There’s also a multi-layer ransomware protection that will protect your PC and your files.

Another feature that users might appreciate is Safe Files, and with this feature, you can protect specific files from malicious applications. To ensure that your files are protected, you can allow only certain applications to edit these files.

Surf safely with Web Attack Prevention

Total Security also has a Web Attack Prevention feature that marks the potentially dangerous search results and warns you before you access them.

In addition, there’s an anti-fraud feature, so you’ll be informed if you enter a scam website. Phishing protection is also available, so your personal information, such as passwords or credit card numbers will remain safe.

Bitdefender Total Security has a new Network Threat Prevention feature that will analyze suspicious network activities and block various attacks.

Control the network access with the built-in firewall

Bitdefender Internet Security 2019 firewall


Just like many other antivirus tools, Bitdefender Total Security offers a built-in firewall that provides an additional layer of protection.

Thanks to the built-in firewall you can easily control which application can access the Internet.

There are also advanced settings available, so you can edit each rule individually if you want. The firewall also has a port scan protection, as well as a Stealth Mode that will hide your PC outside and inside your network.

Keep your passwords safe with built-in Password Manager

Bitdefender Internet Security 2019 password manager


Remembering all your passwords can be hard, but if you want to neatly organize all your passwords and personal information in one place, the built-in password manager might be just what you need.

Thanks to this feature you can sign-in to any website in just a couple of clicks, without entering your password. All your data is password protected, so other users won’t be able to access it without entering the master password.

Speaking of passwords, you may want to get one of these password manager solutions to make sure hackers don’t get their hands on your passwords.

Protect and encrypt your files

Bitdefender Internet Security 2019 vault


If you’re concerned that someone might gain access to your PC and view your personal files, you can always encrypt them using Bitdefender Total Security. To do that, you just need to create a File Vault on your PC and protect it with a password.

Simply choose the location of the vault directory, enter its size, set the password and you’re good to go. The vault will act as another partition on your system, but unlike with other partitions, all your files will be encrypted and the only way to access them is to enter the correct password.

If you’re interested in a third-party file encryption solution, we have the best of the best listed in this guide.

Parental control, Safepay, Webcam protection, and Vulnerability assessment

Just like the previous versions, Total Security has a Parental Control feature, so you can limit your children’s computer usage or block harmful applications and websites from running on their device.

There’s also a webcam protection available that will prevent malicious users from spying on you. If you want a certain application to be able to access your webcam, you’ll have to manually approve them.

The application also has a Safepay feature that allows you to make payments in a secure browser. If you’re worried that malicious users might obtain your personal or banking information, this feature is perfect for you.

To ensure that your system is secured, there’s the Vulnerability Assessment feature. This feature will scan your system for vulnerabilities, such as missing updates or outdated applications and inform you about any potential risks.

Protect your online privacy with Bitdefender VPN

Bitdefender Internet Security 2019 VPN


Nowadays it’s not only malicious users that you have to worry about. Many services will sell your personal information to the advertisers, and your ISP can also keep track of your browsing history, or even prohibit you from accessing certain websites.

In order to provide maximum privacy protection to its users, Bitdefender has developed its own VPN. The VPN comes in several versions, and the Free version has certain restrictions.

The first restriction is the data cap, and you’re limited to only 200MB per day. In addition, you won’t be able to choose the desired server, and instead, you’ll be connected automatically to a random server.

On the other hand, there are both Monthly and Yearly subscriptions, and both subscriptions allow you to choose your server, so you can easily unlock any region-restricted content.

In addition, both subscriptions offer unlimited traffic, so if you’re looking for a good VPN, Bitdefender VPN is the right choice for you.

No impact on system performance

Bitdefender Total Security doesn’t compromise your system’s performance, nor will it slow down your PC.

The tool comes with six predefined modes, each suitable for different activities:

  • Autopilot — let Bitdefender take over
  • Bitdefender Photon
  • Global Protective Network
  • Game, Movie & Work modes — have fun playing your favorite games or watching your favorite movies without worrying about cyber threats.
  • One-click optimizer
  • Battery mode — use this mode to reduce battery consumption.

Get Bitdefender Total Security

Bitdefender Total Security offers some amazing features, and almost all of its security features have been improved. The application also has some new features such as Network Threat Prevention and VPN.

Bitdefender Total Security is available on all major platforms including Windows, macOS, iOS, and Android. A single license can be used on up to 5 different devices, which is great if you need security software for your entire home or a small company.

Of course, you can also get a license for 10 PCs if you need to protect more devices.

The latest antivirus from Bitdefender improves everything that was great about the previous version while adding some fresh features that will protect your privacy.

If you’re looking for a complete multi-platform security solution, Bitdefender Total Security is the right choice for you.

Download Bitdefender Internet Security for Windows PCs

There are many great security applications on the market, but if you’re looking to protect your Windows 10 PC from online threats, you might be interested in Bitdefender Internet Security 2020.

Bitdefender recently released the latest version of Internet Security software, and today we’re going to try it out and see what does it have to offer.

Download and install Bitdefender Internet Security 2020

Unlike Bitdefender Total Security, Internet Security lacks certain features, but that doesn’t make it less useful in any way.

In fact, this application is optimized for Internet threats, so if you don’t need all advanced features from Total Security, this version will be perfect for you.

Click here to get a copy of BitDefender

It is worth mentioning that Bitdefender Internet Security 2020 already won the Outstanding Product award from AV-Comparatives. Not only that, but this security solution got the Best Protection, Best Performance and Best Repair labels from AV-TEST.

If you want to learn more about it, keep on reading our in-depth review below.

Bitdefender Internet Security 2020 review

download bitdefender internet security2020

The application has a friendly and simple user interface that is welcoming to new users. All features are grouped into different categories, and you can access them easily from the menu on the left. In the Protection section there are a Quick Scan and Vulnerability Scan options.

The Quick Scan option will perform a brief scan of your system and find any potential threats. As for Vulnerability Scan, it can scan your system and check if you have critical Windows updates installed.

In addition, it will also check if your applications are up to date. This feature can also check for weak Windows account passwords and check your Wi-Fi network for vulnerabilities.

It’s worth mentioning that you can view brief information regarding blocked apps, detected threats and web attacks from the Protection section. As for additional features, Internet Security 2020 allows you to perform a system-wide scan.

Of course, you can create custom scans and choose which directories or drives you wish to scan. In addition, you can schedule your custom scan and set it to run periodically or at system startup. If needed, you can also change the scanning method or adjust it so it can better fit your needs.

There’s also a Rescue Environment feature that you can use to remove the most serious infections. It’s worth mentioning that antivirus feature supports exclusions and you can even set default actions for optical media, USB devices and network drives.

Bitdefender Internet Security also has an antispam feature that you can use to filter unwanted emails. Using this feature you can create friends or spammers list by adding an email address or domain name.

If needed, you can automatically block emails that contain Asian or Cyrillic characters.

To enhance your online security, there’s a Web Protection feature that scans your web traffic for malware. This feature comes with a Search Advisor that can detect potentially malicious links.

The application can scan SSL connections and it also offers protection against online frauds and phishing. There’s also a social network protection feature that will scan all links on social networks and warn you about malicious content.

Overall, this is a great feature, and it even comes with a whitelist option that lets you exclude certain URLs from scanning.

There’s also firewall feature available that you can use to prevent applications from accessing the Internet. You can set rules for all applications, or switch between Home and Public presets.

There is also a Paranoid mode that allows you on the fly control over application access. Speaking of advanced features, thanks to the Stealth mode you can make your device invisible in your network.

Bitdefender Internet Security can also scan your system for vulnerabilities, and there’s a useful Wi-Fi Security Advisor feature available. Thanks to this feature you can easily enhance your security while using wireless connections.

In order to provide you with maximum security, this application has Advanced Threat Defense feature. This feature uses behavioral detection to monitor active applications.

In case anything suspicious occurs, the responsible application will be blocked and prevented from causing any harm to the PC. As you can see, this feature is rather useful since it can easily detect any advanced threat.

This feature can sometimes cause false alarms, but you can easily prevent them thanks to the whitelist option.

There’s also Ransomware Protection feature with multi-layer protection. Thanks to this feature you can rest assured your files are safe from malicious encryption programs.

Another feature that can protect your files is Safe Files. This feature lets you create a list of secure folders that applications won’t be able to access. As a result, your sensitive information will remain protected from unauthorized changes and apps.

Of course, you can set a list of trusted applications and allow them to make changes to the protected directories. However, all other applications will be prevented from accessing the selected directories by default.

In the Privacy section, you can find many useful features that can help you protect your privacy online. For example, there’s a File Vault feature that allows you to encrypt your files and protect them from unauthorized access.

Simply select the directory that you want to turn into file vault, set the size of the vault and you’re good to go.


In addition to file encryption, there’s a Safepay feature that will protect your sensitive information during online transactions. This feature will start a new dedicated browser that will keep you safe during online payments and protect you from frauds.

Speaking of which, the application also has a Wallet feature that works as a password manager. Thanks to this feature, you can store your passwords, credit card information and other sensitive data in a secure vault.

If needed, you can automatically fill input fields during online purchases to make the process more straightforward. This feature is available in Safepay browser by default, but you can also enable it in third-party browsers thanks to the dedicated plug-in.

The application also has a Parental Advisor feature that works as a parental control software. Thanks to this feature you can supervise your children’s online activity with ease.

In addition, you can block harmful content and keep a close eye on time spent online. This feature works with Bitdefender Central so you can access it from any device or platform.

If you’re concerned that malicious users can access your camera, you’ll be happy to hear that Bitdefender Internet Security 2020 has a Webcam Protection feature. Thanks to this feature you can set a list of trusted applications that can access your webcam.

As a result, unknown third-party applications won’t be able to access your webcam without your knowledge. In addition, you can block all access to the webcam if you want to ensure maximum security.

If you want to keep a close eye on webcam usage, you can even get notifications when trusted apps connect to the webcam.

Another useful feature is File Shredder and thanks to it you can permanently delete your files. After using this feature, the deleted files won’t leave any trace on your PC.

The application also has an Activity section that allows you to see all recent events such as threats, attacks, and blocked applications. In addition, you can also view a detailed security report. There’s also a notifications section available that allows you to see critical notifications, warnings, and information. You can even filter the notifications in order to organize them better.

If you’re not a security expert, you’ll be pleased to hear that Bitdefender Internet Security 2018 comes with Autopilot feature. Thanks to this feature, the application will automatically make security decisions in the background, so you won’t even know that it’s running.

There’s also a Photon feature that allows Internet Security 2018 to adapt to your system configuration in order to achieve the best performance. Another notable feature is Cloud Integration that allows you to scan files in the cloud without affecting your system performance.

The application offers Game, Movie and Work profiles, and each of these profiles comes with different settings. You can switch between the profiles with a single click or you can customize each profile according to your needs.

There’s also a Battery Mode available that is perfect for laptops. Thanks to this feature your system settings will be optimized in order to reduce battery usage.

Bitdefender Internet Security 2020 offers great protection and performance which makes it one of the best antivirus tools on the market.

Unlike Bitdefender Total Security 2020, this version is missing some features such as Anti-Theft. Despite the lack of certain features, this is still an amazing antivirus software, and it’s available for a 30-day free trial.

As for licensing, you can install this application on up to 10 devices depending on your license.

Bitdefender Total Security 2020 is compatible with the following Windows versions:

  • Windows 7 with Service Pack 1 (32-bit & 64-bit)
  • • Windows 8 (32-bit & 64-bit)
  • • Windows 8.1 (32-bit & 64-bit)
  • • All Windows 10 versions (32-bit & 64-bit)

Star Wars Jedi: Fallen Order Limited Edition Xbox controller goes up for pre-order ahead of the game’s release

Star Wars Jedi: Fallen Order, the latest game from Titanfall 2 developer Respawn Entertainment, is expected to be the last blockbuster game to launch this year. Ahead of the game’s release on November 15, a Limited Edition Xbox controller with matching charging stand is now available for pre-order on Amazon (via 9to5Toys).

The Limited Edition Gears 5 Xbox controller raised the bar pretty high a couple of weeks ago, but this new Star Wars Jedi: Fallen Order Limited Edition Controller isn’t too shabby either, and features “distressed black Imperial purge Trooper design highlighted with red accents,” according to the store listing description.

If you’re interested, this limited edition Star Wars Jedi: Fallen Order controller with its charging stand can be yours for $139.99. You can pre-order it today and it will start shipping on November 15, along with the much-anticipated game.

It’s been two years since the controversial release of EA DICE’s Star Wars Battlefront II, but Respawn Entertainment’s new game should be a really different beast. Indeed, Star Wars Jedi: Fallen Order is single-player action-adventure game, with no risk of another lootbox controversy. The game looks really good from what we’ve seen so far, and we hope it will make good use of the power of the Xbox One X.

Is Surface Duo the mobile device Windows Phone fans have been looking for?

In just two months, Microsoft will finally drop support for Windows 10 Mobile, leaving the remaining users on the side of the road. Windows Phone actually died some time ago when Microsoft stopped bringing new features to the OS, while phone manufacturers stopped releasing new models following the HP Elite x3.

We do know that there are still fanatics planning to keep using their Windows phones until their handsets eventually stop functioning, looking for used handsets and spare batteries on the Internet. There’s also some impressive community work that has been done to make Windows 10 on ARM run on the Lumia 950 and 950XL, though that’s hardly a solution for breathing new life into these ageing handsets.

After rewatching the Highlander movie recently, I couldn’t help but think about the last Windows Phone user on Earth some time in 2025 or later. “There can only be one,” say the immortal warriors in that movie forced to kill each other until there’s only one left. This inspired me to do a Twitter poll yesterday to ask our readers about their state of mind regarding the death of Windows Phone.

The last Windows Phone user on Earth, sometime in the next decade after all the other handsets have died.

In the poll, 20% of respondents said they were planning to keep using Windows Phone until the very end. 68% have already switched to iOS or Android, and the rest of them (13%) are waiting for Microsoft’s recently-announced Surface Duo.
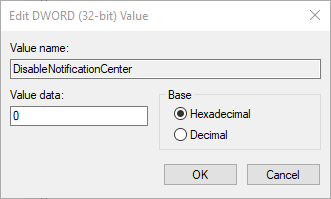
After many rumors suggested that Microsoft has stopped working on its “Andromeda” pocketable device to focus on a bigger dual-screen tablet, it was really surprising to see Microsoft announce Surface Duo earlier this month. Unlike the Windows 10X-powered Surface Neo, the Surface Duo will be running Android, which apparently shocked some Windows Phone users: As you may know, there has been a petition calling Microsoft to release a Windows 10X version of the Duo, but this is unlikely to happen.

After we’ve seen Blackberry successfully abandon its BB10 platform in favor on Android a couple of years ago, it shouldn’t be that surprising to see Microsoft doing the same and leveraging the most popular mobile platform worldwide. In some way, Android really is the mobile version of Windows these days: it’s certainly not a walled garden like iOS, and there are a lot of synergies with Windows 10 thanks to Your Phone and the Microsoft Launcher.

Still, some users may not find it comfortable to have to use a Google account to make the best of Android, and as seen in our poll, more people apparently want to stay on Windows Phone than switch to a Surface Duo with Android next year. If Android may make the Surface Duo a non-starter for some Windows Phone fans, we guess that the dual-screen form factor may also be problematic for some. Over the years, Microsoft has dedicated the Surface brand to new form factors (except for the Surface Laptop), but perhaps a traditional smartphone with a premium Surface design and a great camera would make the Android pill easier to swallow for Windows Phone fanatics.

Panos Panay and his team didn’t really disappoint with the Surface Duo hardware, and the use of a 360° hinge to connect the two screens is probably a much safer bet compared to the fragile foldable screen we’ve seen on the Samsung Galaxy Fold. Microsoft demoing apps spanning across the two screens also looked promising, though it remains to be seen if developers will update their Android apps to leverage these capabilities.

If the Surface Duo definitely looks promising, it seems that its camera may be one of the device’s weaknesses. The Surface Duo prototypes Microsoft showed to the press didn’t have a rear-facing camera, and if that one isn’t as convenient and consistent as the old Lumia cameras or the top-of-the-line sensors found on the latest iPhones or Galaxy smartphones, this may be really problematic. I doubt many consumers are going to carry both a Surface Duo and a “regular” smartphone because the Duo’s camera is lacking, or just awkward to use.

Despite Panos Panay stating that the hardware for the Surface Duo is locked, a black version of the dual screen device has been spotted with what looks like an emplacement for a rear camera module. Microsoft still has plenty of time to tweak the Surface Duo’s design before the devices launch in holiday 2020, and we really hope the company is going to nail the camera part. After all these years, we still have enthusiasts comparing the Lumia 950/950XL camera to the sensors on the latest flagship phones (Steve Litchfield on AAWP does a great job with that), and it would be great to see Microsoft make good use of its Nokia Lumia sensor technologies in what will be its first pocketable device in years.

A Surface Duo prototype with an emplacement for a rear camera module.

In a way, it’s too bad Microsoft hasn’t been able to ship the Surface Duo this year in preparation for the bigger Windows 10 X version, the Surface Neo, next year. Samsung recently started shipping its Galaxy Fold device which received a polarized reception. Microsoft obviously has some work to do to tweak Android for the Surface Duo, while also courting developers to update their apps for this new device. Samsung had to do the same thing and wasted no time, showing a prototype for the Galaxy Fold to developers back in November 2018. It’s still early days for dual screen and foldable devices, and we hope Microsoft will share more details about its Android and Windows 10X plans at Build 2019 next year.

I hope the Surface Duo will meet our expectations and those of technology enthusiasts, but I’m still not completely convinced the Duo is mobile device Microsoft fans have been waiting for for all these years. I’m afraid an average camera which is unintuitive to use could make this device a no-go for many consumers, and I also fear that having two similar devices running different operating systems and apps is going to confuse consumers. We’ll see what happens, but Microsoft really deserves credit for pushing boundaries, even at the risk of alienating some of its fans.

Do you think Surface Duo is the device Microsoft and Windows Phone fans have been waiting for? Let us know your thoughts in the comments below.

FIX: Amazon Fire TV doesn’t go into sleep mode

Amazon Fire TV is a great device, but many users reported that Amazon Fire TV does not go into sleep mode.

This can be a problem, and in today’s article, we’ll show you how to fix this issue once and for all.

What to do if Amazon Fire TV won’t go into sleep mode?

1. Turn off Netflix app

netflix app amazon fire tv does not go into sleep mode

Several users reported that this issue is possibly caused by the Netflix app.

To avoid it, be sure to close Netflix app if you want your Amazon Fire TV to go to sleep.

Alternatively, update the Netflix app to the latest version and check if that helps.


Want to use Netflix on your Sony Smart TV? It’s easy to set up with this guide!


2. Check your Ethernet cable and power supply

ethernet cable amazon fire tv does not go into sleep mode

In some cases, Amazon Fire TV might not go to sleep mode due to your Ethernet cable.

Few users reported that they had issues with CAT5 Ethernet cable, but after switching to the CAT6 Ethernet cable, the issue was resolved.

In addition, you can also try replacing Amazon Fire TV power supply since several users reported that replacing the power supply fixed the problem.


3. Enter Sleep Mode manually

reset fire TV amazon fire tv does not go into sleep mode

If the previous solutions didn’t work for you, we suggest entering the sleep mode manually as a workaround.

To do that, follow these steps:

  1. Press and hold the Home button on your remote for three seconds.
  2. Now select Sleep from the Quick Access menu.
  3. After doing that, your device will enter into sleep mode.

Note: This is just a workaround, but you’ll have to use it until you find a working solution.

There you go, several quick and easy solutions that might help you if Amazon Fire TV does not go into sleep mode.

If you found our article helpful, feel free to let us know by leaving a comment in the comments section below.

READ ALSO:

Can’t Remove Bank Account From PayPal: How to Unlink it

PayPal is probably the largest and most renowned service for online payments. However, many reported that they can’t remove their bank account from PayPal.

This can be a problem, especially if you’re changing banks. This isn’t the only issue, and some users reported Your account access is temporary limited on PayPal as well.

Fixing this issue is crucial, and in today’s guide, we will show you how to do that properly.

Why can’t I remove my bank account from PayPal?

  • You have payments that are pending or still processing on your account.
  • Issues with your PayPal account might prevent bank removal.

How do I unlink my bank account from PayPal?

1. Make sure that all payments are already processed, and there are no pending transactions

  1. Log in to PayPal.
  2. Select Settings (cog), choose Payments and then select Manage automatic payments.
  3. There, under the Active payments, you should cancel all subscriptions.
    paypal won't remove bank

Make sure to check all the pending transactions and, if the problem persists, you should contact the support.

2. Contact the support

  1. Log in to your PayPal account.
  2. Visit the Resolution Center.
    paypal won't remove bank
  3. Fill in the necessary information, and hopefully, PayPal support will get back to you.

Can I have two bank accounts linked to my PayPal account?

Yes, you can have two or more bank accounts linked to your PayPal account. You can have up to 8 accounts connected if you’d like.

It’s important to mention that a specific bank account can only be connected to a single account, so you can’t have two or more accounts connected to a single bank account.

If you can’t remove your bank account from PayPal, we hope that reading this guide has helped you resolve the issue in one way or another.

In case you’re having further issues, our Something went wrong on our end article should be able to help you.

Hopefully, this will help you address the issue. If you found a way to resolve this, it would be nice to share it with other readers in the comments section below.

Fire TV & Firestick Not in Full Screen: 3 Ways to Force it

If Fire TV is not in full screen mode, you might not be able to enjoy your favorite shows properly.

This is a small but rather inconvenient issue, and in today’s guide, we will show you a few methods to help you fix this problem.

How do I make Fire TV full screen?

Before trying to fix this problem, there are a couple of preliminary checks to perform:

  • Open Playback Settings while playing videos and change the Display Mode.
  • Use your TV remote, and try using a different Aspect ratio or picture size for your TV or disable the Overscan feature.
  • Make sure to connect Fire TV directly to your TV. Many users reported this issue while using the AV amp.

1. Use the Settings menu from the Fire TV remote

  1. Go to the Settings menu by pressing and holding the Home button.
  2. Choose the Display & Sounds from the options.
  3. Select Display.
  4. Choose Calibrate Display from the Display options. This way you can calibrate to view the display in full screen.
  5. Press the UP and DOWN buttons from the remote to adjust the display.
  6. Press the Accept button when you change the screen size.

So, with these easy steps, you can fix the Amazon Fire Stick screen calibration issue. If the method didn’t work, try the next one.

2. Use the Screen Magnifier

  1. Hold Back and Fast Forward buttons at the same time.
  2. Turn the Zoom feature on by holding the Menu and Play/Pause buttons.
  3. Zoom in or out by holding the Menu button and Fast Forward or Rewind buttons respectively.

3. Adjust aspect ratio

  1. Go to Inputs and select the input you’re not currently using.
  2. Press Settings and go down to the Picture.
  3. Next, locate Screen Settings.
  4. Set it to Native, 16:9, or any other value that works for you.

How do I reset my Firestick screen?

It’s not possible just to reset the Firestick screen. If you want to reset its settings, you must reset the entire device. You can do that by holding the Back button and the right side of the navigation circle for 10 seconds.

To learn more, we have a great guide on how to factory reset the Amazon Firestick, so don’t miss it.

If Fire TV is not in full screen, these simple solutions will help you fix it in no time. Sadly, this isn’t the only issue, many reported that Firestick is not connecting to the TV and No signal message on their Fire TV stick.

Did our solutions help you? Do let us know in the comments section below!

The Cloud File Provider is Not Running [Fix]

OneDrive is an excellent example of what cloud storage can do when handled appropriately. However, many reported The cloud file provider is not running messages error 0x8007016A while using it, os let’s see how to fix it.

Specialized repair tools can help you quickly identify and repair any issues that might come from the Windows system files and cause this OneDriver error.

How do I prevent error 0x8007016A from happening anymore?

1. Keep your Windows Updated to the latest version

  1. Press Windows.
  2. Click on Settings (the cogwheel-shaped button in the Start Menu).
  3. Select Update & Security.
  4. Click Check for Updates.
    Windows 10 Check for Updates

  5. Let the Updates unfold and restart your PC.

If this doesn’t fix the OneDrive error 0x8007016A, move on to the next solution.

2. Disable Files on Demand

  1. Go to the Taskbar and right-click the OneDrive icon.
  2. Select More.
  3. A new window will open where you have to click on the Settings tab.
  4. Uncheck the Files on Demand service.
    onedrive not showing photo thumbnails files on demand
  5. Restart your PC.

3. Resume file syncing

  1. Access OneDrive from the taskbar by clicking it.
  2. Select More.
  3. Click on Resume Syncing.
    0x8007016A resume syncing

After doing that, check if The cloud file provider is not running message is still there.

4. Modify your PC’s power plan

  1. Press Windows + R.
  2. Type in powercfg.cpl.
  3. Change your power plan to High Performance.
    Change Power Plans

  4. Restart your PC.

5. Reset OneDrive

The solution to end all solutions would be to reset your OneDrive.

  1. Press Windows + R.
  2. Type in %localappdata%\Microsoft\OneDrive\onedrive.exe /reset
    Reset OneDrive

  3. Click OK.

In a matter of seconds, your OneDrive will be reset, and you will lose all user preferences stored, but not the files and folders saved on it and the error 0x8007016A should be gone.

6. Remove the glitched folder by force using PowerShell

  1. Press Windows + R.
  2. Type in powershell, and press Ctrl + Shift + Enter to open a PowerShell window.
  3. Type in Remove-Item "OneDrive folder name" -Recurse -Force
    Remove the glitched folder by force using Powershell
  4. Replace “OneDrive folder name” with the name of the file or folder you wish to delete.
  5. Restart your PC

Why does The cloud provider is not running message appear?

  • Missing Windows updates can cause issues with OneDrive and result in error 0x8007016A.
  • Files on Demand feature in OneDrive can cause issues such as this one to appear.
  • If the file syncing is disabled, you’ll get this error message.
  • Certain power-saving plans can cause this issue on laptops.
  • Glitches with OneDrive can cause this error to appear on your PC.

What is a cloud provider?

  • The cloud service provider is a company that offers a cloud-based platform.
  • The platform offers infrastructure, application, or storage services.
  • Cloud providers offer great scalability and flexibility since they aren’t limited by physical hardware.

We hope this guide helped you fix the problem: The cloud file provider is not running error message on your PC.

Error 0x8007016a FAQs

What is error 0x8007016a in Windows?

Error 0x8007016a commonly appears when accessing or syncing files with OneDrive. It often points to Files On-Demand being disabled or to items removed from the cloud but still referenced locally.

How do I fix OneDrive error 0x8007016a?

Enable Files On-Demand (OneDrive Settings > Sync and backup), then restart OneDrive and check for updates. If needed, unlink and re-link your account or run a OneDrive reset.

Can Windows updates cause error 0x8007016a?

Yes. Certain updates can disrupt OneDrive syncing. Install the latest cumulative updates or roll back a recent problematic update to restore normal operation.

What if enabling Files On-Demand does not fix the error?

Pause and resume sync, ensure the file exists on OneDrive web, and reinstall OneDrive if necessary. You can also restore missing items from the Recycle Bin on the OneDrive website.

This isn’t the only issue, and many reported error 0x80071129 in OneDrive, but we tackled that one in a different guide.

We also wrote about This item might not exist error in OneDrive in one of our earlier guides. If you still encounter problems while using Microsoft’s cloud service, such as unexpected messages when trying to open or sync your files, you can follow this step-by-step guide on how to fix the OneDrive “Sorry, an error has occurred” issue for quick solutions and troubleshooting tips.

Did the solutions listed above help you get rid of OneDrive error 0x8007016A? Please let us know in the comments section below.