List of Mortal Kombat 11 PC bugs reported by gamers

Choose your destiny! The newest installment of the Mortal Kombat series is out. Brought to us by NetherRealm Studios and published by Warner Bros. Interactive.

Test your skills out on the platform of your choice, warrior, the game is available on Microsoft Windows, Xbox One and other platforms.

To fans already familiar with the previous games, the X-Ray Mode is making a comeback in the form of Fatal Blows. The catch being that it can be performed once an opponent’s health drops to 30%, and it can be performed once per round.

Also, if you’re a fan of variety in your gameplay experience, you can ramp it up by using the Custom Variation feature, which allows you to customize your character’s moves.

As we’ve learned across the years, no game launch can be truly flawless, except some player victories. But there are instances of players reporting various bugs and glitches in the game. With threads dedicated to this on official game forums.

So here is a list of common bugs discovered so far by the player base.

Frequent Mortal Kombat 11 game issues

  1. Kollector infinite combo bug
  2. Server errors
  3. Game freezing
  4. Bonus features unlockable
  5. Save progression

1. Kollector infinite combo bug

There have been instances where players have reported that the new character, Kollector, is a bit overpowered, being able to spam attacks and gain easy victories with its combo attacks

Character is pretty awesome, just has a little broken exploit that SHOULD BE FIXED NOT REMOVED!.

2. Mortal Kombat 11 servers errors

Saving your progress is essential to your gaming experience. With modern day games requiring a constant internet connection with your game account.

Your account is basically your calling card where your results and achievements are stored and displayed for your friends to see. But there are reports of some players losing their whole progression in the game.

I had a server error deleted EVERYTHING from my Scorpion’s kustom options. he’s got nothing not even moves left.. all locked erased and gone…

3. Mortal Kombat 11 freezes at certain points

Progression is key to climbing the combat ladder in the Mortal Kombat franchise. But the ocassional freeze up of the game is not the most ideal of circumstances to be in.

With reports stating that the game freezes up at certain points in the game, and the Story Mode being close to unplayable.

Same thing happens when I try the Fatality practice mode. And if I wait long enough, it’ll just take me back to the home screen.Hell I can’t even play the Story Mode because it freezes up.

4. Bonus features unlockable

Bonus features are the core of any game, with custom outfits for your character of choice. It’s the details that count too. But in some cases, not everything can be unlocked.

At the moment, only Kitana seems to have features that can’t be unlocked in-game.

I’ve done all the characters tutorials, and unlocked all their skins for completion – except Kitanas. For some reason, it will not unlock her skin. I’ve gotten the completion message multiple times, but she is the only one that didn’t unlock. Weird…

5. Save progression

Fortune favors the bold and the skilled, and progression through the game offers rewards. But not everytime, with reports stating that they can play all the game modes but their progress won’t be saved or get rewards.

Same with Classic Towers. It allows me to play but warns that my progress won’t be saved and I won’t get any rewards.I’ve been able to play story mode, tutorials, and AI battle no problem.

We hope the you’ve enjoyed our little list of bugs encountered so far in Mortal Kombat 11. Let us know in the comment section down below, on what other issues have you encountered so far while playing the game.

RELATED STORIES TO CHECK OUT:

Revisiting the Lenovo Smart Tab P10: A versatile Smart Display

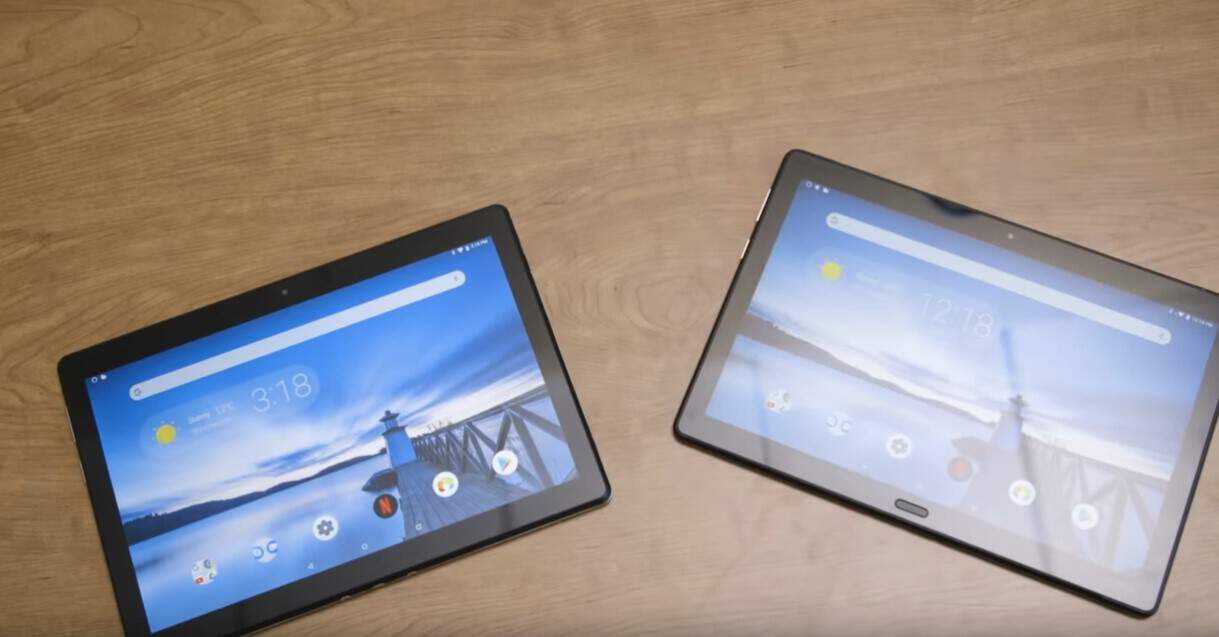
I recently reviewed the Lenovo Smart Tab P10 and came away thinking it was a device on a trajectory similar to Microsoft’s Surface Pro. In what I considered the early awkward phases of its future proposition, I saw the P10 and its less-premium M10 version as a tablet and separate connected speaker experience attempting to leapfrog the current model of ambient computing known to buyers today and similar to the Surface Pro, I overlooked perhaps one of its biggest selling points, choice.

While the Surface Pro was clunky in its early execution, one of its biggest selling points and what is proving to be its greatest staying power is that it’s a consolidation of financial resources that I often feel tech reviewers take for granted when reviewing expensive and even seemingly inexpensive tech; these devices come with shelf lives much longer than the 30-60 day window we as reviewers become accustomed to. Much like the Surface Pro, the Lenovo Smart Tab P10 and M10 empower their buyers to choose how they use the device.

Where the Surface Pro can make for an awkward dedicated tablet at times, a buyer is also free to use it in tablet mode for as long or as little as they may actually use a dedicated tablet and the same goes for its productivity experience. The Smart Tab P10 and M10 allow buyers the freedom to use it as a tablet or docked Smart Display in a myriad of configurations that more traditional Smart displays are limited by their dedicated construction.

With that being said, much of my earlier review that still holds, however, I took some extra time to play around with the P10 before sending it back to Lenovo and now feel compelled to amend my initial review. The P10, for some, will still be a tablet posing as Smart Speaker/Home Hub-like device, but others might just see what I saw in my late-phase testing of the device, a Smart Speaker/Home-hub-like device that can also offer all the productivity and consumption benefits of a tablet, for roughly the same price as a traditional smart speaker.

Off the top, Lenovo already offers a more traditional smart display experience in its Smart Display powered by Google. The Lenovo Smart Display was first unveiled at CES 2018 and it comes with all the accouterment customary for this type of device, including 10W full range speakers, 8 or 10-inch FHD display and voice assistant for hands-free operations all for the starting price of $199. Other Smart Speakers/Display in this category range from Google’s Home Hub at $149 to Amazon’s pricier Echo Show at $229 and this is where I had to reevaluate the way I reviewed the P10 in that it’s a device that offers all of the features of Smart Display experience while also offering customary benefits of a tablet for a $199.99 starting price.

Being able to dock and undock the display from the premium speaker portion of the P10 and M10 enables a wider range of use cases that move beyond the single room uses often showcased during demos of other Smart Displays. The P10 and M10 can definitely hold their own in a kitchen, living room, bedside table, but they can also do all three at once without having to be moved or the addition of extra hardware.

Once I was able to figure out the Bluetooth issues I was initially having with the dock, I unlocked a whole new world of Alexa Assistant commands and skills used when the tablet was in my bedroom but was gonna later be used in the kitchen or began playing music and video content from different rooms. The P10 and M10 aren’t the only devices that can utilize this sort of Bluetooth magic, but a Sonos set up is arguably more expensive, Chromecast requires the purchase of several pieces of hardware and other Smart Displays are fundamentally limited by their single-use design.

Beyond the Smart Display of the P10 and M10, using the tablet for my more consumption-oriented task led to a better free-flowing of data transfer in the entire experience. When I couldn’t shout out queries for recipes from other rooms due to sleeping children, I was able to un-dock the tablet and take my time to curate a recipe book for lunches and dinners for the week, peacefully and quietly on my couch, that I could later have read to me when cooking.

I also took the time to review the unit as a true Amazon stand, by linking my Amazon Prime music collection the device which made jumping in and out of lists much easier than what I had originally tried doing, which consisted of starting a song in Spotify and having it amplified when docked, thus bypassing the selling points of the Alexa mode.

When initially reviewing the P10 there were two sticking points that I kept running into when using the device, and I was reminded that one of them can be resolved by simply buying the M10. Perhaps, in an attempt to offer a familiar premium smartphone experience in a home hub device, Lenovo opted for glass on glass design for the P10, which for anyone who uses a glass on glass phone without a case knows how unsettling it can be to hold anywhere that isn’t a cushioned couch flanked by tons of soft pillows. However, the M10 offers the same functional experience of the P10 for around $30 less and with a soft-touch back for better grip when the device is being used undocked. The other sticking point was the processing power of the tablet, to which I am still hung up on, but have come to live with. The processing power of the tablet only becomes apparent when compared to my use-case on my Galaxy Note 8 which seems to be quicker at completing tasks.

I use my Note 8 for everything from revising PowerPoint presentations to catching up on Game of Thrones via the Showtime app, but when using any dedicated tablet, I tend to limit my use case scenarios thanks to the proximity of either my smartphone or computer, and I would venture to say a lot of people are in the same boat. While I would like to see the P10 and M10 at least make use of a more powerful Snapdragon processor, I’ve come to acknowledge my actual uses of the tablet were already limited before reviewing the device.

In the end, the M10/P10 are still two devices attempting to offer an experience that’s some might find best served by dedicated hardware, but the reality of spending $199 to $249 to get everything from a tablet, smart assistant, home and kitchen display, Bluetooth speaker and potential home hub is something that more industry manufacturers should look to embrace in the near future.

Here’s how to fix Windows was unable to find a certificate error

If you have set up a new wireless router or Internet connection, the possibility is that you may end up with the Windows was unable to find a certificate to log onto to the network error while trying to connect to the network.

This error can be problematic, but there’s a way to fix it.

How can I fix WiFi certificate error on Windows 10?

  1. Disable FIPS for your network
  2. Check for disabled startup services
  3. Manually add a wireless network
  4. Connect to another PC
  5. Flush DNS and reset Winsock catalog
  6. Restore Windows to an earlier point

1. Disable FIPS for your network

If you’re getting Windows was unable to find a certificate error on your PC, you might fix it by disabling FIPS for your network.

  1. Open Control Panel from the search/Cortana bar.
  2. Open Network and Internet > View Network Status and tasks.
  3. Under Active Networks, click on the problematic WiFi network.
  4. Click on Wireless Properties button.
    FIPS Wireless Properties Windows can't find certificate
  5. Next, click on Security tab and click Advanced Settings.
    FIPS Advanced Settings Windows was unable to find a certificate
  6. Uncheck Enable Federal Information Processing Standards (FIPS) compliance for this network option.
    FIPS compliance disable Windows can't find certificate
  7. Click OK on all the open windows to save the changes.

2. Check for disabled startup services

Windows was unable to find a certificate can sometimes appear if you have disabled important startup services. To fix that, follow these steps:

  1. Press Windows Key + R.
  2. Type msconfig and hit Enter.
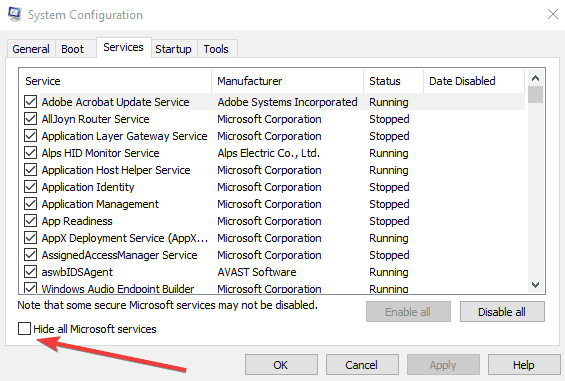
  3. In the System Configuration window, go to Services tab.System configuration Windows can't find certificate
  4. Go through all the services. If you see any service that is disabled (unchecked), simply check the box to enable it again.
  5. Click Apply > OK button to save the changes.
  6. Restart your PC and check for any improvements.

3. Manually add a wireless network

To fix this error you can create or add a wireless network profile manually to your Windows computer. Follow these steps to create a wireless network manually. The steps work across all the version of Windows since Vista.

  1. Open Control from the Cortana/search bar.
  2. Click on Network and Internet.
  3. Open Network and Sharing Center.
  4. Click on Set up a new connection or network option.
    Setup a new network connection Windows certificate
  5. A new dialogue box will open. Select the Manually connect to a wireless network option and click Next.
    Manually connect to a network place Windows can't find certificate
  6. Here you need to enter information for the wireless network you want to add. So, enter, Network Name, select the type of security from the drop-down menu and enter the security key (password for the network).
    enter information for the wireless network Windows can't find certificate
  7. Select Start this connection automatically and Connect even if the network is not broadcasting option. Click Next and close the window.
  8. Go to Network and Sharing Center > Manage network connections. And try to connect using the newly created network.

Now try to access the Internet to see if the issue is resolved.


4. Connect to another PC

To make sure the problem is with your computer and not related to your Wireless router, try to connect another laptop or PC to the same network. If connected, the problem is mostly with your computer and not the router.

In addition, you might want to check your wireless card. Sometimes certain Wi-Fi adapters aren’t fully compatible with certain routers or versions of Windows, so be sure to check your adapter as well.


5. Flush DNS and reset Winsock catalog

In some cases, Windows was unable to find a certificate error can appear due to problems with DNS cache. To fix that, do the following:

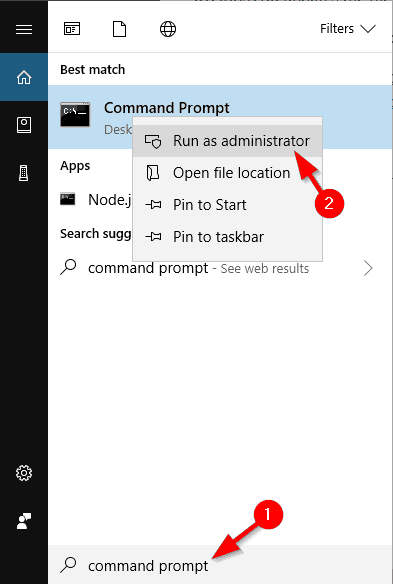
  1. Type cmd in the search /Cortana bar. Right-click on Command Prompt from the results and select Run as administrator.
    command prompt administrator Windows can't find certificate
  2. In the Command Prompt, type the following command and hit enter:
    • ipconfig /flushdns

Next, you need to reset the Winsock catalog. Here is how to do it.

  1. Open the Command Prompt as administrator.
  2. In the Command Prompt window, type the following command and hit enter:

    • Winsock reset
  3. Once it’s complete, you will see a Winsock reset completed successfully message.
  4. Restart the PC and check if the network is resolved.

6. Restore Windows to an earlier point

Windows OS by default creates a System Restore point in your local hard drive. If you’re getting Windows was unable to find a certificate error, you might be able to fix it by doing the following:

  1. Type Restore Point in the search/Cortana bar and Create a Restore Point option.
  2. Click on System Restore. Click Next when the new dialogue box appears.
    System Restore Point Select Windows can't find certificate
  3. Check Show more restore points option.
  4. Go through all the system restore points and select the recently created restore point.Confirm your System Restore point certificate wireless network
  5. Click on Finish. Wait for the Windows to restore the PC to an earlier point.
  6. After the restart check for any improvements.

There you go, these are a couple of solutions that might fix the Windows was unable to find a certificate error on your PC.

RELATED ARTICLES YOU MAY LIKE:

Life is Strange 2 Episode 2 is now playable for free with Xbox Game Pass

The second episode of Life is Strange 2 is now available to play for free for all Xbox Game Pass subscribers on Xbox One.
This latest episode follows the events of the first one and also features a tie-in with the Captain Spirit spin-off.

Here’s the official description and trailer:

The two brothers continue their journey on the road into the winter months & struggle against the cold. As Daniel gradually falls ill, Sean’s concern for his younger brother increases and decides the pair of them must make their way to their distant grandparent’s house to recover and seek shelter. During their stay, they encounter next-door neighbour Chris, a young boy the same age as Daniel who believes he is a super-hero by the name of Captain Spirit. As Daniel and Chris begin to form a friendship, Sean insists on Daniel following a set of rules around his power. Will Daniel keep his power concealed or break the rules in a time of need?

Xbox Game Pass is a Netflix-like subscription service for Xbox video games. Every month new game content is added while older games are removed. Subscribers can play the current games in the Xbox Game Pass library in full as if they owned them outright.

Are you an Xbox Game Pass subscriber and are you playing Life is Strange 2? Let us know if you’re enjoying it in the comments below and then follow us on Pinterest for more Xbox gaming content.

The app was not found in the store. ?

Intel drivers are ready for Windows 10 May 2019 Update

Intel recently rolled out new graphics driver updates for the 64-bit version of Windows 10 v1903. The company released these updates in order to avoid another October 2018 Update bug episode.

Last year, many Windows 10 users who tried to install the latest OS version update experienced some really nasty issues with Intel drivers.

Intel DCH Drivers version 26.20.100.6709

The latest Intel driver update addresses some major problems introduced by the previous release. Users reported they experienced graphics anomalies while playing various game titles.

Intel addressed the issue for three popular games including Arma 3, Dreamfall the Longest Journey, and Re-Legion.

Secondly, the company also fixed a bug with Devil May Cry 5. The bug was causing crashes and hangs for gamers while playing the title with DX11.

Last but not least, some users reported an error message while playing Rise of the Tomb Raider with DX12. 

As always, the update came with some issues of its own. Intel acknowledged that gamers who play Apex Legends, Generation Zero, Devil May Cry 5 (DX12) and Tom Clancy’s The Division 2 (DX12) may experience some minor graphics anomalies.

Furthermore, World War Z (Vulkan) and Anno 1800 (DX12) may cause hangs or crashes. Your videos may get corrupted if you are using Cyberlink screen recorder.

Intel upgrade block in place

The majority of Windows 10 users reported audio issues because of the Intel Smart Sound Technology driver version 09.21.00.3755. Furthermore, Microsoft avoided some major problems caused by the graphics drivers by putting an upgrade block in place.

Microsoft has yet to remove the upgrade block for systems that are running 24.20.100.6344/24.20.100.6345 versions of Intel display drivers. According to Microsoft, some OEMs accidentally received these drivers.

Microsoft warned users to expect audio playback issues after installing these drivers. The bug affected Windows 10 users who connected their PC to a television or monitor with the help of a DisplayPort, HDMI or USB-C cable.

Intel released the new drivers to address audio playback issues. However, the tech giant will not release an update for PCs running the October update.

Download Intel Graphics Driver 26.20.100.6709

You can visit Intel’s website if you want to download the latest driver versions. Unlike previous versions, this time Intel launched both the .zip and .exe formats at the same time.

RELATED ARTICLES YOU NEED TO CHECK OUT:

Block Windows 10 v1903 install with Windows Update Blocker 1.2

Windows Update Blocker version 1.2 just got released with added support for Windows 10 2019 May Update. This is a handy tool that you can use to enable/disable the Windows Update service with a single click. 

There is no built-in option in the Windows 10 Control panel or Settings app that allows users to permanently turn off Windows updates.

Windows 10 May 2019 Update includes a feature that allows you to defer or delay updates for up to 30 days.

Microsoft has a bad record of releasing bug-ridden Windows 10 updates. That is why more and more users are looking for new options to delay or completely block Windows 10 updates. Others want to sit back and wait until a stable version is released.

Windows Update Blocker 1.2 changelog

Today. most of the users are using third-party tools to block automatic system updates.

Microsoft is preparing to release a new OS version in May. You must be worrying about the possibility of facing a series of new bugs all over again.

However, Windows Update Blocker 1.2 comes as a lifesaver for all of you. The latest version now supports the Windows 10 2019 May Update.

You can use this program to completely disable the Windows Update service on your PC. The tool prevents your system from downloading or installing the latest updates. 

Furthermore, now you can also block other services that are associated with the Microsoft Upgrade Server. However, there is a twist in it. You will be required to manually edit the wub.ini file. 

Notably, the software also comes with a special setting that prevents any unauthorized changes. 

Microsoft is all set to release Windows 10 May 2019 Update next month. Insiders who are currently enrolled in the Windows Insider Preview Preview Ring can access the RTM version of the upcoming update.

How to download Windows Update Blocker 1.2

You can visit Sordum.org download the latest version of Windows Update Blocker on your Windows 10 PC. This version brings newly added support for the May 2019 Update.

Are you excited about to use this new tool?  Let us know in the comments section below.

RELATED ARTICLES YOU NEED TO CHECK OUT:

SyncToy for Windows 11 & 10: Download & Install Guide

Here’s how to download and install SyncToy. This freeware syncing app is written using Microsoft’s .NET framework and it utilizes Microsoft Sync Framework.

To get started, select a source folder on the left and a destination folder on the right. Also, any folder can be used as the source or destination.

Hence, just follow the steps to set it up and start syncing your data easily.

How can I install Microsoft SyncToy on Windows 10?

Download from Microsoft Download Center

  1. Visit Microsoft Download Center.
  2. Click the Download button.
    synctoy-download
  3. Select the version you wish to download. If you use 32-bit version of Windows 10 select the x86 version, but if you use 64-bit Windows, be sure to select 64-bit version of SyncToy. Click the Next button to start the download.
    synctoy-version-select
  4. Once the download is completed, locate the file you just downloaded and double click it to start the setup.
    synctoy-setup-file
  5. The first thing you’ll notice is the Microsoft Sync Framework 2.0 Core Components agreement. Read it, and click the Accept button.
    synctoy-agree
  6. Wait until setup installs Microsoft Sync Components.
    synctoy-microsoft sync
  7. Setup will now give you a warning message. Read it, check I have read and understand the warning above and click the Next button.
    synctoy-warning
  8. Now you’ll see License agreement. Read it, select the I Agree option and click the Next button.
    synctoy-liscense-terms
  9. Select the destination directory where you want to install SyncToy. If you want, you can install the application just for the current user or for all users on this computer. Once you’re done, click the Next button.
    synctoy-directory
  10. Click Next button once again to start the installation process.
    synctoy-confirm-installation
  11. Once the setup is completed click the Close button.
    synctoy-close-install

After the SyncToy is installed, you can start it by double clicking the SyncToy 2.1 shortcut.

synctoy-synctory-application

Start synchronizing your folders

  1. When the application starts click the Create New Folder Pair.
    synctoy-create-new-folder-pair
  2. Now you need to select left folder and right folder. Click Browse and select the two folders that you want to synchronize. After you’re done click the Next button.
    synctoy-left-right-next
  3. At this point you need to select which method of synchronization you want to use. There are three methods available: Synchronize, Echo and Contribute. If you’re not sure which to pick, we have a quick explanation of what each does below.
    synctoy-sychronize-options
  4. Enter the name of the folder pair and click the Finish button.
    synctoy-backup

After creating the folder pair, you can see its properties. Afterwards, you can change the Synchronization settings at any time and you can even exclude certain files from synchronization. 

synctoy-run-sync
synctoy-results

Now you should see a detailed report.

Types of synchronizing methods

There are three methods: Synchronize, Echo, and Contribute.

  • Synchronize: syncs any new, deleted, or renamed files between both folders, meaning changes in one folder are mirrored in the other.
  • Echo: similar to Synchronize, but only applies changes from the left to the right folder, so changes in the right folder won’t affect the left.
  • Contribute: the safest option, allowing the renaming of files in the left folder to update the right, without deleting any files.

Wrapping up

That’s about it when it comes to setting up and using the SyncToy app.

Bear in mind that you can have as many folder pairs as you like, and you can sync them all with just a single click, or you can sync them individually.

What is Telnet and how to use it in Windows 10?

If you’re not familiar with it, today we’re going to explain you how Telnet works and can you use it on Windows 10.

The development of Internet saw the invention of many protocols that allowed us to use it better. One of these protocols was Telnet.

What is Telnet and how does it work?

Telnet is an Internet protocol that allows you to connect to a different computer on your local network or on the Internet.

Telnet was invented in 1969, and it’s often considered an ancestor of modern Internet.

Today most users use a graphical user interface, but when Telnet was invented there were no browsers or graphical operating systems. Therefore, users had to rely solely on command line interface.

It’s worth mentioning that Telnet still works like it did decades ago, and Telnet clients are available for almost any platform.

Telnet changed the way how people use Internet because in the time before Telnet users had to manually use the server in order to get certain data.

With Telnet, users could access the server remotely from the comfort of their home for the first time.

In addition to remote access, multiple users were able to connect to the server over Telnet. Therefore, it’s not hard to see how Telnet influenced the development of the Internet.

We have to mention that there are two different terms when it comes to Telnet: Telnet server and Telnet client. The former is a computer designed to run as a Telnet server.

You can easily turn your Windows PC into a Telnet server and you should be able to access it over Telnet.

Bear in mind that having a public IP address leaves your computer open for access by any computer on the Internet, so be sure to use a firewall in order to protect your PC from unauthorized remote access.

The same principles apply to running Telnet on Windows 11, so make sure to check it out if you’re running the latest OS from Microsoft.

Telnet client is a PC that uses a Telnet connection to connect to a Telnet server. In fact, you can use Telnet from Windows 10 by following these steps:

  1. Press Windows Key + S on your keyboard and enter features. Select Turn Windows Features on or off.
    telnet-windows-features
  2. When Windows Features opens, scroll down and check Telnet Client. Click OK to install Telnet.
    telnet-client-enable
  3. Wait until Windows installs the necessary components.
    telnet-searching-required-files
  4. Once the installation is completed click the Close button.
    telnet-completed

After you install Telnet, you can start it by doing the following:

  1. Press Windows Key + S and enter telnet. Select Telnet from the list of results.
    telnet-search
  2. Command line will now open, and you should be able to use Telnet without any problems.
    telnet-line

Why is Telnet obsolete?

Although running Telnet on Windows 10 is fairly simple, the question remains why would you use Telnet for? Telnet is an outdated protocol, and most people don’t use it anymore.

This protocol is great if you are a computer geek, and you want to access Internet by using command line. Unfortunately, there aren’t many Telnet servers available nowadays, so you might have to do some research before you find one.

One of the biggest flaws of Telnet is its lack of security. Telnet transmits all the data between the client and the server without any encryption which means that almost anyone can intercept your data.

This is especially important if you’re sending sensitive information over Telnet, such as your username or password. Due to lack of encryption, malicious users can easily steal your password and see all the data between the Telnet client and server.

Also, Telnet doesn’t have authentication, which means that malicious users can easily intercept your traffic. Lastly, Telnet has several additional security vulnerabilities which make it quite unsafe to use.

Even though Telnet in Windows 10 might not be the safest Internet protocol, newer protocols, such as SSH for example, were inspired by Telnet. They are designed to fix many flaws that original Telnet had.

Telnet might not be as popular as it was a few decades ago. Stll, it’s certain that Telnet changed the way how Internet works forever.

READ ALSO:

How to take and save screenshots on Windows 10 [STEP-BY-STEP GUIDE]

Sometimes you need to quickly share a screenshot with someone online. Creating and sharing them is relatively simple, and today we’re going to show you where your screenshots go on Windows 10.

How do I take screenshots on PC?

  1. Use Print Screen key
  2. Use Windows Key + PrtScn shortcut
  3. Use the Snipping tool
  4. Use Game Bar in Windows 10

Creating screenshots on Windows 10 is fairly simple, and it doesn’t even require you to use a complex software application.

You can easily create screenshots on Windows 10 with built-in tools or with dedicated tools, and today we’re going to show you where your screenshots are saved by default on Windows 10.

Where does Windows 10 save my screenshots?

If you haven’t changed your default settings, you should be able to find your screenshots under the following path: C: Users[User]My PicturesScreenshots.

Of course, you can also create a dedicated folder where you can save your screenshots. You can create the folder on your desktop or use a location of your choice.

Furthermore, you can also upload your screenshots if you need to share them with someone. Follow this article to find out more about how to upload screenshots and what tools to use.

Editor’s choice: Use a dedicated tool for screenshots

By using a simple yet with enough features to accomplish what you want but not confuse you. Keep your screenshots organized, ready to be used right away with innovative software.

With screen recording software you can save your screenshots straight to your hard drive to the destination of your choosing. And, you will be able to store the screenshots in various file formats.

You may quickly capture an image to highlight key areas or sections, capture videos, schedule a screen recording, keep a history of your work, and even edit using a drawing panel.

4 quick methods to take screenshots on PC

Method 1 – Use Print Screen key

This is probably one of the oldest methods of creating screenshots. To create a screenshot simply press the Print Screen or PrtScn key on your keyboard. By pressing this key you’ll create a screenshot of your entire screen.

If you want to create just a screenshot of your current window, you can do so by using Alt + PrtScn shortcut.

By using these shortcuts your screenshot will be saved to your Clipboard. In order to save it to your hard drive, you need to start Paint or any other image editing software and paste the screenshot from the Clipboard by pressing Ctrl + V shortcut.

Although this method is rather simple, we have to warn you that you won’t be able to view any previously made screenshots. Clipboard saves only one entry at a time, and if you accidentally copy something else into Clipboard you’ll remove your screenshot.

If you use this method, it’s recommended to paste the screenshot to your image editor as soon as you can in order not to lose it. By using any image editing tool you can save the screenshot to any folder that you want.

We have to mention that you can somewhat avoid the problem with Clipboard simply by using a clipboard manager tool. These types of tools allow you to view all items that were copied to your Clipboard so you won’t ever lose your unsaved screenshots again.

If you’re having trouble with copy-pasting on Windows 10, this complete guide will help you solve any issues with it.

Method 2 – Use Windows Key + PrtScn shortcut

Print Screen shortcut was available in previous versions of Windows, but with Windows 8 Microsoft introduced a new shortcut. In Windows 8 we got Windows Key + PrtScn shortcut, and this one made its way to Windows 10.

We have to mention that some laptops might use a slightly different shortcut, so be sure to check your laptop’s instruction manual for details.

By using this shortcut your screen will become dim for a half second and you’ll hear the shutter sound. This means that you successfully created a screenshot.

Keep in mind that this method will create a screenshot of an entire screen.

By using this method all your screenshots are saved to C:UsersYour_usernamePicturesScreenshots directory.

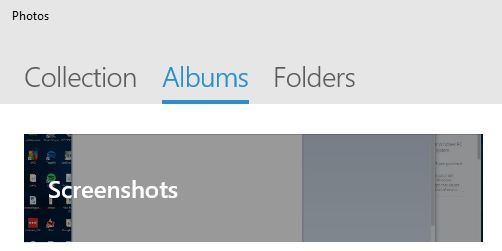
You can also access your Screenshots by opening Photos app and going to Albums > Screenshots section.

where-do-my-screenshots-go-alumbs-1

We have to mention that you can change the default screenshot directory if you wish to do so. To do that follow these steps:

  1. Open your current screenshot directory. By default it should be C:UsersYour_usernamePicturesScreenshots.
  2. Right click the empty space and choose Properties from the menu.
    where-do-my-screenshots-go-properties-1
  3. Go to Location tab and click the Move button.
    where-do-my-screenshots-go-properties-2
  4. Select a new directory for your screenshots. You’ll see a message asking you to move all the files from the old location to the new one. Choose Yes.
  5. After doing that, your screenshot folder will change. Regarding new screenshots, they will be saved to the new screenshots folder.

Although this method is rather simple, it has its flaws. By using this method you can’t create screenshot of a single window, which can be an issue for some users.

If you want to keep all your screenshots nicely organized in a single folder, we suggest that you try this method.

Method 3 – Use the Snipping tool

Windows 10 comes with built-in Snipping tool that allows you to easily create screenshots. This is a simple yet powerful tool, and in order to run it, do the following:

  1. Press Windows Key + S and enter snipping.
  2. Select Snipping Tool from the list.
    where-do-my-screenshots-go-snipping-1

Snipping tool allows you to create window snips so you can easily create a screenshot of a currently opened window. If you want, you can create full-screen screenshots as well.

This application supports free-form and rectangular screenshots so you can easily screenshot only the specific parts of the screen.

The application also has a delay function which can be rather useful especially if you want to screenshot open menus.

After you create a screenshot, you can edit it with a pen tool or highlight certain items. If you require any advanced editing, you can copy the screenshot to the Clipboard and paste it to any photo editing tool.

Regarding saving, you need to save each screenshot manually while using the Snipping Tool.

Also, we have to mention that there’s no dedicated screenshot folder, so you’ll have to manually choose the save location for each screenshot.

This is probably one of the most advanced methods to take and save screenshots on Windows 10.

Using this method you can screenshot certain parts of your screen and perform basic editing operations which can be extremely useful.

If you can’t find the snipping tool in Windows 10, take a look at this easy to follow guide to help you get back on track immediately.

Method 4 – Use Game Bar in Windows 10

Windows 10 comes with useful feature called Game Bar. This feature allows you to record videos and take screenshots while in game. Of course, you can use this feature to create screenshots from any application as well.

To create a screenshot with Game Bar, simply press Windows Key + Alt + PrtScn. Keep in mind that in order to use this feature you need to enable Game DVR option from Xbox app.

When you press the keyboard shortcut a small window might appear. If that happens, be sure to select Yes, this is a game option. After doing so, you’ll be able to create screenshots without any problems.

Regarding your screenshots, they will be saved to C:UsersYour_usernameVideosCaptures directory.

Also, you can see your saved screenshots from the Xbox app. To do that, follow these steps:

  1. Press Windows Key + S and enter xbox. Choose Xbox from the menu.
    where-do-my-screenshots-go-xbox-1
  2. When Xbox app opens, from the menu on the left choose Game DVR.
  3. Select On this PC and you’ll see all created screenshots.
    where-do-my-screenshots-go-xbox-2
  4. If you want, you can click individual screenshots and choose Open Folder option to open the save directory.

As you can see, creating screenshots on Windows 10 is rather simple, and depending on the method that you use your screenshots will be stored in a different location.

In conclusion, now that you know how to create screenshots and where to find them, feel free to try any of our methods. If you have any more questions, feel free to drop them in the comments section below.

Microsoft starts rolling out File Restore for SharePoint and Microsoft Teams

Microsoft has started rolling File Restore for SharePoint and Microsoft Teams, a feature that will allow Office 365 admins to restore any files or folders deleted from the two services within the last 30 days. File Restore was initially announced back at Microsoft’s Ignite conference last Fall, and it should be an important selling point for Microsoft 365 going forward.

“Files Restore is now available for SharePoint document libraries, protecting your shared files in SharePoint, Teams, Outlook groups, and Yammer groups connected to Office 365 groups and uses the same recovery capabilities that protect your individual files in OneDrive for Business,” the company explained in a blog post. Files shared on Microsoft Teams also leverage SharePoint Document libraries, which means that IT admins don’t have to deal with separate storage containers.

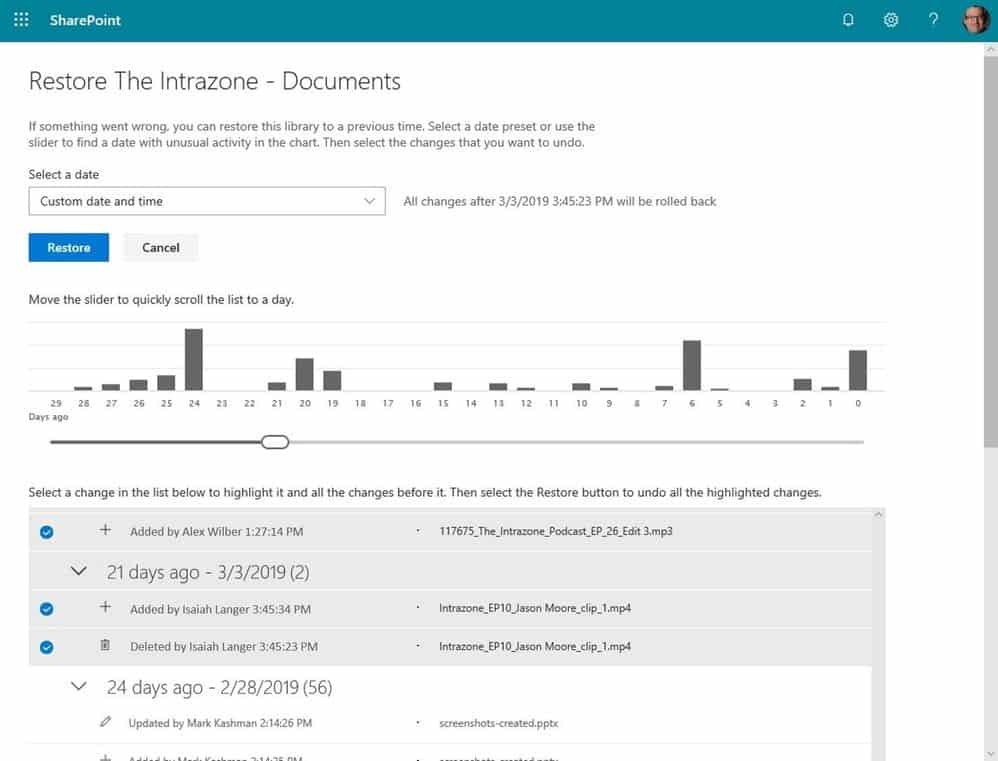
To access the new feature, Office 365 admins will need to click the gear icon in SharePoint, select Restore this library, then select a date range and the files that need to be restored. Microsoft is currently rolling out Files Restore to Targeted Release organizations, and the company expect the new feature to be available for all Office 365 customers by the end of next month.

Fix: Only One Instance of Wusa.exe is Allowed to Run

Let’s say you’re trying to get the latest update for your Windows, and you’re greeted by the following error Only one instance of wusa.exe is allowed to run.

What now? This error mostly occurs when you’re trying to install a Windows Standalone Update package, and it can be responsible for Windows Update not working.

Let’s take a closer look at the following solutions and see if they help you.

What is the use of WUSA EXE?

Wuse.exe does the following:

  • Uses Windows Update metadata to search for applicable updates.
  • Copies the contents of the applicable updates to the Windows Update sandbox.
  • Calls the appropriate function in the Windows Update Agent API.
  • Returns the status after Windows Update finishes the installation.

How do I fix one instance of WUSA EXE is allowed to run?

1. Windows Installer check-up

  1. Click Start, type services.msc and press Enter.
  2. Double-click Windows Installer.
    windows installer Only one instance of Wusa.exe is allowed to run
  3. Set the Startup type of your Windows Installer to Manual.
    windows installer properties Wusa.exe problems

  4. Click Start to start the service.
  5. Click OK.

2. View your Event Log

  1. Select your Search box, and then click Event Viewer in the Programs list.
  2. In Event Viewer, expand your Windows Logs, and then click Setup.
  3. In the Actions sections, click Filter Current Log.
    filter current log Only one instance of Wusa.exe is allowed to run
  4. In the Event sources list, click to select the wusa check box, and then click OK.
  5. Now you can switch between instances of wusa and identify the cause of the problem.

3. Run Task Manager

  1. Start Task Manager.
    task manager Only one instance of Wusa.exe is allowed to run
  2. Go to start task.
  3. Start wusa.exe.
  4. When wusa.exe is running, go into the Task Manager, simply end the process tree for any process under the name wusa.exe.
  5. Close the Task Manager.

4. Re-register Windows Installer

  1. Open Command Prompt as admin and run the following commands:
    %windir%system32msiexec /unregserver
    %windir%system32msiexec /regserver
  2. If you are prompted for an administrator password or for a confirmation, type your password.
  3. Check if the problem is resolved.

After running these commands, Only one instance of wusa.exe is allowed to run message should be gone.

5. Reinstall Windows Installer in Safe Mode

  1. Boot your machine into Safe Mode. We have a guide on how to start Windows in Safe Mode, so check it out.
  2. Once you enter it, try to perform the update.
  3. Wait for the process to finish.

If this issue persists,  you may want to reset the Windows Update Components and see if that solves the issue.

For additional troubleshooting when updates fail or stall, learn how to fix WUSA install errors from a network share.

When running an update, momentarily disable any anti-virus software running in the background, for it may interfere with your connection.

We hope that these fixes were able to help you fix the Only one instance of wusa.exe is allowed to run error. In the meantime, let us know what other errors you have stumbled upon recently.

Tune in to the Windows Insider webcast at 10AM PDT for news about 19H1 release and Edge Insider browser

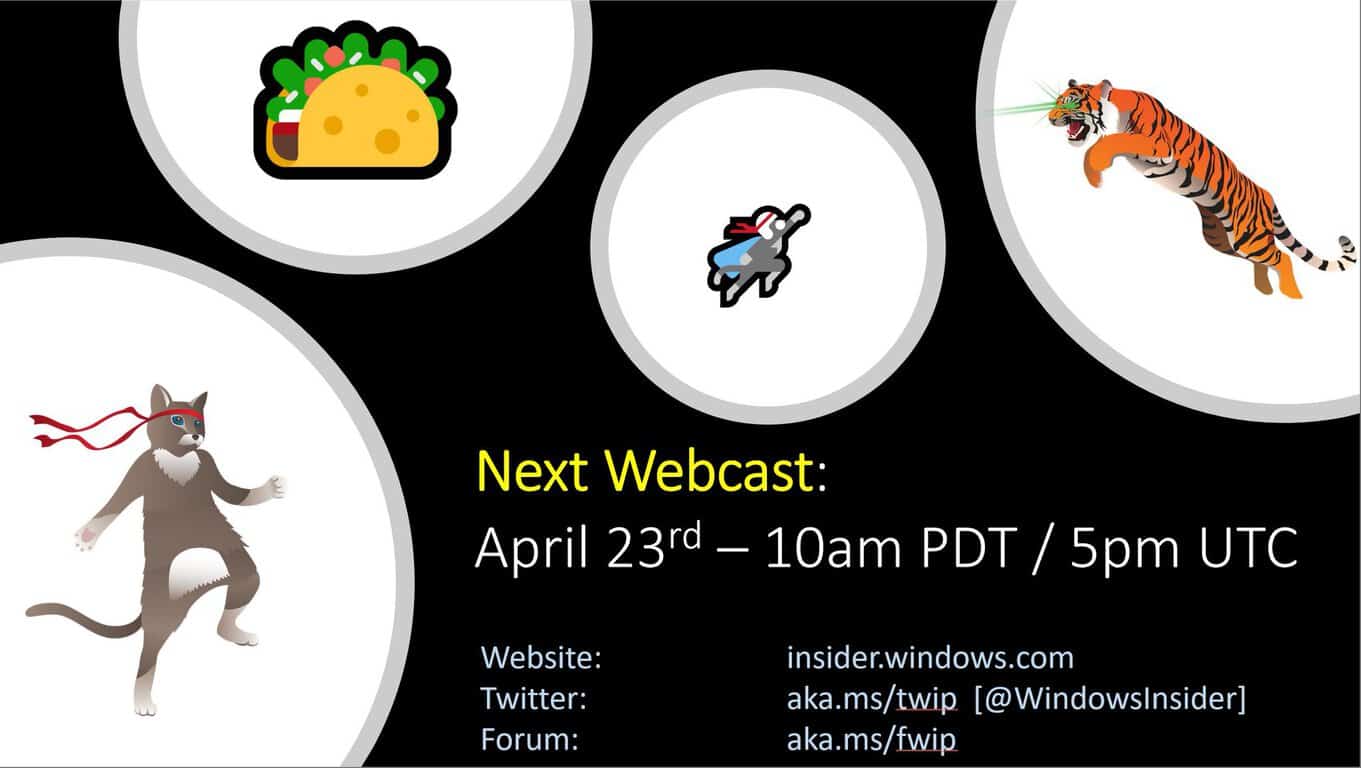
The Windows Insider webcast is coming back at 10AM PDT this morning, and this episode should dive deep into the upcoming May 2019 update for Windows 10 as well as Microsoft’s new Edge Insider browser. Indeed, Kyle Pflug and William Devereux from the Edge team will make a special appearance at 11AM PST, and we hope to learn more about new features coming soon to the new Chromium-based Edge.

After some internal builds leaked in March, Microsoft’s new Edge Insider browser finally became officially available earlier this month with the Dev and Canary public channels. Since then, Microsoft has already introduced new features such as the ability to sync favorites with Edge on Android, as well as support for Windows Mixed Reality headsets. There are many other features currently hidden in the “Edge://flags” menu, but Microsoft is already iterating fast with daily updates in the Canary channel.

There are still many things we’d like to learn about the new Edge Insider browser, including when the Beta channel and macOS version are coming, and we may well get more information more during the podcast this morning. As usual, you’ll be able to watch it live on mixer.com/windowsinsider.

Intel launches new 9th Gen Core laptop processors

Intel announced today the launch of new 9th Gen Core H-Series mobile processors designed for gamers and content creators. The company is promising desktop-grade performance for complex tasks such as video editing, with up to 33% overall performance leap compared to a 3-year old PC.

The lineup of new 45W H-series chips include Core i5, i7 processors and the top of the line Core i9-9980HK CPU with eight cores that can reach up to 5 GHz with Intel Thermal Velocity Boost. This new Core i9 processor is pretty much a mobile version of Intel’s Core i9-9900K processor that launched last Fall, a chip that could also reach 5Ghz.

All of Intel’s new 9th gen laptop CPUs also support the latest Wi-Fi 6 standard, Thunderbolt 3, as well as Intel Optane memory technology. The new chips will start shipping first in laptops from Acer, ASUS, Dell, HP, Lenovo and MSI.

In addition to the new mobile CPUs, Intel also announced today a pretty big extension of its family of 9th Gen Core desktop processors. The 25 new chips include affordable Pentium Gold and Celeron products starting at $42, as well as new Core i3, i5, i7 and i9 CPUs with prices going from $122 to $439 for the new Core i9-9900 CPU. You can find more details about all the new SKUs on this page.

Microsoft to expand Azure Western Region, build two new data centers in Goodyear, Arizona

Microsoft is continuing to build out its already massive array of Azure datacenters, and the latest plans include building two new centers in Goodyear, Arizona. According to AZCentral, a USA Today news site (via DataCenterKnowledge), Microsoft purchased one parcel of land near the Phoenix Goodyear Airport last year for $48 million, and just purchased another 147 acres about 10 miles south of the first one for another $37 million. The city of Goodyear had been secretive about plans for the land, providing The Arizona Republic with a largely redacted site plan, but last Friday allowed the news operation to inspect a fully unredacted plan, revealing plans for the Microsoft datacenters.

In addition, Microsoft provided a statement on the acquisitions:

“As part of our plans to support the growing demand for cloud and internet services in Arizona and across the Western United States, Microsoft recently purchased land at two locations in Goodyear, Arizona where we intend to develop world-class data center facilities.”

Microsoft promises that its data center designs “are more energy and water efficient than traditional enterprise data centers,” as water cooling in arid Arizona is a big concern, and AZCentral also raised concerns that datacenters would not bring as many jobs into the area as a manufacturing facility would.

One phase of construction at the airport site is scheduled for a first phase of development for the first of a potential five massive 250,000 square foot buildings.

There’s no word as of yet on when these datacenters will come online, but Microsoft continues to aggressively build out its Azure services.


Slack app updates on Windows 10 with loads of bug fixes

The official Slack app has updated for Windows 10 devices with a massive load of bug fixes both large and small.

A lot of visual glitches have been fixes in this update as have some more technical problems such as buggy cursor issue.

Here’s the full release notes:

Bug Fixes

  • Interactions with network drives are now handled with grace and panache. Or, at the very least, “better”.
  • If you want to launch slack minimized, you now can. We will no longer stand in your way.
  • We’ve changed the look, feel and texture of our new HTML notifications. Give them a try! They’re delicious.
  • Sometimes on Windows 10, moving the window, say, up would cause a white bar to appear. We raised the bar.
  • Also, moving the window would sometimes change the size of the window. Your aim was true; we no longer move the goalposts on you.
  • In the Apps and Features and Uninstall a Program window, the icon showing up was not the right one. It now is.
  • The notification and unread indicators on the taskbar are now more readable.
  • Blurry icons were an issue for some users with multiple displays. Now all is clear.
  • The Slack icon, previously appearing with an opaque background color on Windows 10 is now all the clearer for being less clear.
  • Some people were seeing sidebar icons for teams other than the one they were in. This was confusing, and has now stopped.
  • And finally, if you have been having issues with keyboard or cursor issues, you should no longer be having them.

Slack is a communications and collaboration tool that supports text messaging and voice calls, file sharing, and integration with a variety of other services such as Outlook and OneDrive.

Do you use Slack? Let us know why or why not in the comments below and then follow us on Twitter for more tech news.

Slack
Slack
Price:
Free

How to fix Something went wrong with the projection error

So you’re on your machine and plug-in your TV, the devices seem to recognize each other and appear to be connected, but suddenly you get Something went wrong with the projection error.

Sometimes, your device will simply display the Unable to connect error, without rhyme or reason. Where do we go from here? We have a couple of solutions to aid you in this struggle. So let’s get to fixing, shall we?

How can I fix screen mirroring Something went wrong error?

  1. Wireless signal fix
  2. Screen flash fix
  3. Reset your Firewall settings
  4. Update your drivers

1. Wireless signal fix

Something went wrong with the projection wi-fi

To fix Something went wrong with the projection error, try to minimize any interference from other wireless equipment such as routers or access points, by distancing them away from the device you wish to project to.

  1. Ensure your Windows device is visible to your projection device.
  2. Disconnect your Windows device from the Wi-Fi network.
  3. Connect to the screen.
  4. Reconnect to your Wi-Fi network.
  5. You may need to set your Wi-Fi router to a different channel.

2. Screen flash fix

To avoid Something went wrong with the projection error, make sure that the display resolution is set to a resolution such as 1080, 1024, or 720.

  1. Open your Device Manager.
  2. Click on View and select Show hidden devices.

    Something went wrong with the projection show hidden devices
  3. Locate your Display Driver.
  4. Right-click on it and select Uninstall device.

    uninstall device

  5. Reboot your machine.

3. Reset your Firewall settings

It’s not always the case, but sometimes your connection might be blocked by the Windows Firewall. In some cases, that can lead to Something went wrong with the projection error.

To fix it, go to Windows Defender Security Center, and select Firewall & network protection. Next you’re going to select Restore firewalls to default.

restore firewall to default projection problems

This should reset all outbound or inbound rules. And lastly, don’t forget to whitelist the device you wish to project to.

Tip

When you’re projecting to a Tv, try these steps to connect to it:

  1. Press the SOURCE button on your remote.
  2. Select the Screen Mirroring source.
  3. A screen will inform you that it is awaiting connection. This screen will be displayed until your device is connected.

If streaming can’t be done via Miracast, we suggest you opting to use Intel WiDi, and see if that works for you.

For Samsung users, they can use Samsung Link, but they’ll experience some issues with subtitles. For LG users, SmartShare is a good option, but the subtitle department is hit or miss like with the Samsung Link.

The best option would be the usage of Plex Media Player, which can be downloaded from their official website.

4. Update your drivers

Don’t forget to keep your Windows machine up to date, and using the latest display drivers when attempting to project on another device. To update your drivers, download them from the manufacturer’s website. Alternatively, you can use third-party tools to automatically download the necessary drivers.

⇒ Get Fortect Driver Updater

We hope these fixes and tips could help you out. In the meantime, let us know what shows are you streaming at the moment, in the comment section down below.

RELATED STORIES TO CHECK OUT:

iCloud Attention Required: Quick Guide to Fix this Error on PC

Many users encountered various iCloud issues when trying to get their iCloud accounts to sync with their Windows 10 accounts.

The error message Attention required prompts when users try to set their iCloud accounts to sync with the People or Mail and Calendar apps.

In his guide, we will provide you with a series of steps that you can follow to fix this problem. But first of all, we need to mention that you will be required to use a two-factor authentication method.

Basically, all you need to do is generate a new iCloud password and then use it on your Windows PC.

4 simple steps to fix iCloud attention required errors on Windows 10

  1. Turn on two-factor authentication
  2. Generate password
  3. Create a label for each app
  4. Use the Fix account option

1. Turn on two-factor authentication

manage apple id icloud

To turn on the two-factor authentication requires you to go to appleid.apple.com.

Then you have to go to the Security tab, where you are able to turn the two-factor authentication on or off. Enable two-factor authentication and then go to the next step.

2. Generate your password

To generate a password in the Security tab, go to App-Specific Passwords and select Generate Password.

3. Create a label for each app

Creating a label for each app you want to fix, will make an easier job for you later on.

Type in the box the name of the app you want to fix (e.g: Calendar) and then select Create. This will generate your app password.

Make sure you only click Done after you re-entered the password, as you will not be able to see it again.

4. Use the Fix account option

Now that you followed all the steps listed above, you need to launch the problematic app on your PC first. You should now get an error message informing you the sync process failed.

Then you need to click the Fix account option located next to the error message.

You can now enter the password generated for the specific app.

After you added the password into the password box click Save, then wait for the app to sync with iCloud.

This quick solution should work for most users as this Surface owner confirmed on Microsoft’s forum:

Was able to set up two factor authentication today, generated a app specific password that I could use for both my Windows Phone and my Surface Pro and all is well with the world. Problem solved (until the next time Apple or MS decide to change something 😉

We hope that this simple to follow tutorial was of help to  you. Use the comment section below and let us know if this solution worked for you.

RELATED STORIES TO CHECK OUT:

Candy Crush Saga removed in Windows 10 May 2019 Update

Microsoft finally listened to Windows 10 users and removed Candy Crush Saga from the upcoming May 2019 Update.

And there is more to this story: the same applies to other unwanted apps and bloatware that are usually included in the Windows 10 install package.

The change was spotted by Tero Alhonen who shared the news to Windows 10 users on Twitter.

https://twitter.com/teroalhonen/status/1119661298592165889

These unwanted apps got many users angry — although they have the option to uninstall all of them. Windows 10 is first and foremost a productivity-focused platform. That is why many users were surprised to see Candy Crush Saga automatically installed on their PCs.

It seems that Microsoft noticed the frustration and decided to get rid of the unwanted load on Windows 10 Home.

Good news indeed but hold your horses

So, Microsoft removed Candy Crush Saga from the Windows 10 May 2019 Update. However, keep in mind that the change is not going to affect all the systems.

The tech giant has not yet shared the eligibility criteria for picking those lucky systems. Insiders already confirmed they no longer have this popular game installed on their computers.

However, one user noticed that these unwanted apps were no longer available when he used an offline Microsoft Account during the installation process.

So, instead of getting bloatware and unwanted games, he got various productivity apps including Photoshop.

The experience is kinda same with Windows 10 Pro. If you choose to use online Microsoft Account during installation you get Candy Crush etc games but with offline local account you get “productivity apps” like Photoshop etc instead.

Previously, regardless of the account type users would use, some unwanted apps were an inherent part of the Windows 10 Home or Pro OS.

So, if you use your online Microsoft Account when upgrading to Windows 10 v1903, Cand Crush Saga might still install on your PC.

You might be wondering why Microsoft offered these apps and games alongside Windows 10. Well, the company aimed to get a financial advantage by collaborating with the app developers.

The Redmond giant gets a percentage of the revenue earned on each subscription.

It is important to understand that your region might play an important role when it comes to getting Candy Crush automatically installed or not.

As you can see, it’s still unclear what criteria Microsoft uses when deciding who gets Candy Crush and who doesn’t.

We do hope the company applies these changes to all the upcoming Windows 10 versions.

RELATED ARTICLES YOU NEED TO CHECK OUT:

Taskeng.exe Popup: What is it And How to Remove it

The frequent issue regarding taskeng.exe popup has been giving trouble to many Windows users.

The pop-up message goes in front of other active windows interrupting user activity.

This file is associated with Task Scheduler, and if you want to learn more, we have a great guide on how to schedule tasks that you should check out.

Why does taskeng.exe keep popping up?

  • Malware infection can be responsible for this issue on your PC.
  • Third-party startup applications can sometimes cause this error.
  • Certain scheduled tasks will cause this issue to appear.

Is taskeng.exe a virus?

No, this file isn’t malware, and it’s associated with Task Scheduler Engine, but it can get infected by it. You can check the file by doing the following:

  • Check the location of the file. The correct location should be C:\Windows\System32
  • Look for a message that says that a file can’t be found. This can be related to malware.
  • In case a blank window appear on your PC, it’s possible that the file is infected.

How do I stop taskeng.exe popup?

1. Start your PC in Safe Mode and perform a virus scan

  1. Start Windows in Safe Mode.
  2. Download Microsoft Safety Scanner.
  3. Run the file to complete the scan.

2. Perform a clean boot

  1. Right click on the Start button, then click Search.
  2. Type msconfig in the search bar and press Enter.
  3. Select Services and then check the box next to Hide all Microsoft services, then click Disable all.hide all microsoft services
  4. Go to the Startup section and click Open Task Manager.
  5. Select each program that you suspect of being corrupted, and then select Disable.
  6. Exit the Task Manager and click OK on the System Configuration window.
  7. After completing all these tasks, restart the computer and check if anything changed..

If this does not work, go back to the Services tab and enable all the disabled programs.

3. Block User_Feed_Synchronization

  1. Press R + Windows buttons on your keyboard, type taskschd.msc and press Enter.
  2. Find the Task Scheduler Library in the newly opened window, right click on it, expand View and select Show Hidden Tasks.

  3. Now you can find User_Feed_synchronization in the center pane, followed by a series of digits and letters.
  4. Check the History section. If you can find a series of events, press the Disable button in the right pane.

If taskeng.exe keeps popping up, removing the problematic tasks should help with the problem.

4. Block OfficeBackgroundTaskHandlerRegistration

  1. Press R + Windows button on your keyboard, type taskschd.msc and press the Enter button.
  2. Find the Task Scheduler Library in the newly opened window, right click on it, expand View and select Show Hidden Tasks.
  3. Double click on the Microsoft folder, then double click the Office folder.
  4. Select OfficeBackgroundTaskHandlerRegistration and disable it from the right paneOfficeBackgroundTaskHandlerRegistration
  5. Then select OfficeBackgroundTaskHandlerLogin and disable it from the right pane

We hope that these methods were of help with taskeng.exe popup. In most cases, this file isn’t dangerous, but malware can sometimes use it.

To learn more about scheduling tasks, we have a great guide on Task Scheduler won’t turn on PC, so you might want to check it out.

Did we miss a solution that worked for you? Let us know in the comments section below.

There was a problem connecting to Microsoft support server [Fix]

You’re done setting up your machine, now you’re trying to start the connection, but you receive the following error There was a problem connecting to Microsoft support server.

This can be caused by an unstable network connection. But most of the time it’s related to recent software changes that have left your machine in a restart pending state. And restarting doesn’t seem to quite do the trick.

How to fix There was a problem connecting to Microsoft support server error?

  1. Registry editing
  2. Remote desktop solution
  3. Change the port number
  4. Disable 802.1 mode of your network adapter

1. Registry editing

To fix There was a problem connecting to Microsoft support server error, you might have to make a couple of changes to your registry by doing the following:

  1. Firstly, click Start and click Run, type regedit, and then click OK.
    regedit There was a problem connecting to Microsoft support server
  2. Locate and then click to select the following registry subkey:
    • HKEY_LOCAL_MACHINE\SYSTEM\CurrentControlSet\Control\Session Manager.
  3. After you select the subkey right-click on PendingFileRenameOperations, and then click Delete.
  4. Locate following registry subkey and click on it:
    • HKEY_LOCAL_MACHINE\SOFTWARE\Microsoft\Windows\CurrentVersion\WindowsUpdate\Auto Update.
  5. After you select this key, right-click RebootRequired, and then click Delete.
  6. In the File menu section, click on Exit to exit the Registry Editor.
  7. Restart your machine.

2. Remote desktop solution

This fix works in the event that you’re using a remote desktop server, and you’re facing There was a problem connecting to Microsoft support server error.

  1. Click Start, then go to Administrative Tools and Open Computer Management.
  2. In the console section, click the Local Users and Groups tab.
  3. In the details tab, open the Groups.
  4. Click on Remote Desktop Users, and then click Add.
    remote desktop users can't connect to Microsoft support server
  5. In the Select Users dialog box, click Locations to specify the search location.
  6. Click on Object Types to specify the types of objects you want to search for.
  7. Type the name you want to add in the Enter the object names to select box.
  8. Click on Check Names.
  9. When you locate the name, click OK.

Want to enable hidden Administrator account? Do that with this simple trick!


3. Change the port number

change the port number There was a problem connecting to Microsoft support server

In order to change your port number, you’ll first need to choose a free port on your server.

  1. Type regedit in the Search box, and press Enter.
  2. Navigate to the following registry subkey:
    • HKEY_LOCAL_MACHINE\System\CurrentControlSet\Control\Terminal Server\WinStations\RDP-Tcp\PortNumber
  3. Click on Edit and select Modify, and then click Decimal.
  4. Type in the new port number, and then click OK.
  5. Close the editor, and restart your machine.

4. Disable 802.1 mode of your network adapter

  1. On your keyboard, press the Windows logo key + X key, then select Device Manager.
    device manager There was a problem connecting to Microsoft support server
  2. Click on Network adapters, then right-click on your network adapter and select Properties.
  3. Click the Advanced section, then click 802.1 1n Mode and set the Value to Disabled.
  4. Click OK, and you’re all set.

There you go, these are just some solutions that you can try in order to fix There was a problem connecting to Microsoft support server error. If these solutions worked for you, feel free to let us know in the comment section below.

RELATED STORIES TO CHECK OUT:

Microsoft is still working on a tabbed experience for Windows, even though Microsoft Sets is “no more”

Microsoft first introduced a way to bring tabs to File Explorer and other parts of the Windows with Sets, a Windows Insider feature that first appeared in RS5 build 17618. It then disappeared in build 17704, with the company taking it “offline” to improve the user experience while “continuing to better integrate Office and Microsoft Edge into Sets.” At that time, Microsoft promised that “Sets will return in a future WIP flight,” but we haven’t heard much if anything about Sets since.

In the meantime, of course, Microsoft subsequently announced that it was rebuilding Edge using Chromium, which as it turns out affects a lot more than just the browser. We haven’t heard anything definitive as to how or when Microsoft will remove EdgeHTML, which runs lots of OS shell level experiences in Windows 10, including Sets, or what will replace it. Users, however, are still clamoring for a tabbed experience, and one of them asked Rich Turner from Microsoft about it last Friday:

One interesting note to Turner’s response is in calling Sets etc. a “shell-provided” experience, perhaps hinting that the future of OS level tabs will work differently, which it almost by definition will have to as Microsoft eventually removes EdgeHTML from Windows.

For now, if you’re waiting for tabs in File Explorer, you’re going to have to continue to wait. How Microsoft replaces EdgeHTML in Windows 10 is a much bigger issue than replacing EdgeHTML with Chromium in a browser, and we haven’t heard specifics of how that is going to work. At least now we have some indication that tabs will be returning, so that’s good news.

4 steps to fix Windows 10/11 error 0x87af000b for good

Windows 10 error 0x87af000b usually affects the Microsoft Store. This annoying error occurs more frequently than you might think.

Whenever users try to download an app, a message pops up that contains the error code 0x87af000b, which hinders the download.

Don’t worry about it, we can help you to fix this error. We compiled a list of several solutions that we think are worth trying out.

4 simple ways of fixing Windows 10 error 0x87af000b

  1. Create another admin account
  2. Clear the Windows Store cache
  3. Sign out from your account and reinstall Microsoft Store
  4. Resetting your computer to factory settings

1. Create another administrator account

To create another administrator account, you need to follow these steps:

  • Select the Start button and go to Settings > Accounts
  • Go to Family and other users > Add someone else on this PCadd someone else to this PC limited access
  • Select I don’t have this person’s sign-in information > Add a user without a Microsoft account
  • Then choose a user name and a password and click Next
  • After you created the account, you need to set it as an administrator. To do so you must do the following steps:
  • Go to Settings > Accounts > Family and other users
  • Choose the newly created account and select Change account type. Under the account type select Administrator and OK
  • Now you can sign in as the new administrator and try downloading apps and games from the Windows Store again.

2. Clear the Windows Store cache

Resetting your Windows Store cache is another solution that is worth trying out. To do this:

  • Press the Windows button and R at the same time to open the run command box
  • Type WSReset.exe in the command box and press the Enter button on your keyboardwsreset run dialog

3. Sign out from your account and reinstall Microsoft Store

Another simple method to fix the error would be signing out from your Microsoft account. To do this, you need to:

  • Open the Windows Store
  • Click on the account button on the upper right corner
  • Choose the account and select Sign Out

After you’ve signed out of your Microsoft account, you’ll need to uninstall the Microsoft Store app.

Reinstall the app back, without signing in again. Then what you need to do is search for an app on the Store, and click Download.

At this point, you’ll need to sign in to your account. After signing in, your app should start downloading.

4. Reset your computer to factory settings

If nothing worked for you, then the last option that you could use is to reset your computer to factory settings.

To do so, you’ll need to follow these instructions:

  • Click on the Start button and then click Settings
  • Click on Updates & Security > Recovery then click on Get started
  • You now have the option to choose between Keep my files and Remove everything
  • After choosing the reset option, click on Next and Reset

There you have 4 simple solutions to fix this error code. We hope this helps.

If you have your own fixes that worked for you, feel free to list the steps to follow in the comment section below.

RELATED STORIES TO CHECK OUT:

How to fix common Supraland bugs on Windows PCs

Supraland is an adventure game that has been getting rave reviews on Steam. However, that doesn’t mean the game is entirely bug free.

These are some of the common Supraland bugs and how players can fix them.

1. Supraland Doesn’t Launch or Crashes

Run Steam as an Administrator

Supraland might not launch or stop running for some players with a “Supraland has stopped working” error . To fix that, try running Steam as an administrator by right-clicking Steam and selecting its Run as administrator option. Then launch the game from Steam.

Read also: Want to run Steam as an administrator? Here’s how to do that

Verify Supraland’s Game Files

  1. Verifying game files can often fix Steam games that don’t start. To do that, select Library in Steam.
  2. Right-click Supraland to select Properties.
  3. Click the Local files tab.
  4. Then press the Verify Integrity Of Game Files button.

Turn Off Firewalls and Third-Party Antivirus Utilities

Windows Defender Firewall and third-party antivirus software can block Supraland from running. So, turning WDF and antivirus utilities off might fix a Supraland game that doesn’t start. Users can turn off the WDF in Windows 10 as follows.

  1. Open Cortana by pressing the Windows key + S, and enter the keyword ‘firewall’ in the search box.
  2. Then click Windows Defender Firewall to open the Control Panel applet shown directly below.
  3. Click Turn Windows Defender Firewall on or off to open the options shown below.
  4. Select the Turn off Windows Defender Firewall settings.
  5. Users can usually temporarily disable third-party antivirus utilities by selecting a disable or turn off option on their context menus. Right-click the antivirus utility’s system tray icon and select to temporarily disable it for a few hours before launching Supraland.

— RELATED: 10 best emulators to play multiplayer games on PC

Reinstall Supraland

  1. Reinstalling Supraland might also fix the game not starting. To do that, click Library in Steam.
  2. Then users can right-click Supraland and select Delete Local Content.
  3. Select the Delete option to confirm.
  4. Close Steam and restart Windows before reinstalling.
  5. Thereafter, right-click Supraland on Steam’s Library tab and select Install Game.

2. Supraland Games Don’t Save

Turn Off Controlled Folder Access

Games not saving is another Supraland bug. That can be due to Controlled folder access blocking Supraland. Therefore, users will need to either turn Controlled folder access off or allow Supraland through it.

  1. Users can turn off Controlled folder access via the Settings app. To open the Controlled folder access option, press the Windows key + S.
  2. Enter ‘Controlled folder access’ in Cortana.
  3. Click Controlled folder access to open Settings as shown directly below.
  4. Then toggle the Controlled folder access option off.

3. Game Runs With Low FPS

Turn Off G-Sync

Supraland might run at a low frame rate for some players. Low frame rates can be due to G-Sync frame rate synchronization for G-Sync monitors. Users can turn off G-Sync as follows.

  1. Right-click the Windows desktop and select NVIDIA Control Panel.
  2. Click Display on the left of the control panel.
  3. Then click Set up G-Sync.
  4. Deselect the Enable G-Sync, G-Sync Compatible option.
  5. Press the Apply button.
  6. In addition, players should close any background programs before launching Supraland. To do so, right-click the taskbar and select Task Manager.
  7. Select programs listed under Apps on the Processes tab and click End task to close them.

— RELATED: The best Windows 10 RPG games to play in 2019

4. Camera and Mouse Don’t Work When Playing Supraland

Erase the GameSettingsSave.sav File

This is a Supraland bug in which players can’t control the game’s camera with mouse. To fix that bug, try deleting Suprland’s GameSettingsSave.sav file. Players can do that in Windows 10 as follows.

  1. First, close Supraland and Steam.
  2. Press the Windows key + E keyboard shortcut.
  3. Enter this path in File Explorer: C:Users<your name>AppDataLocalSupralandSavedSaveGames. Replace ‘<your name>’ with your actual user account name.
  4. Select the GameSettingsSave.sav file, and press the Delete button.
  5. Note that this bug can also be due to Comodo Internet Security that runs some software within a virtual container. Uninstalling that Comodo software, or at least turning off its auto-containment feature, might resolve Supraland’s camera and mouse bug.

The above resolutions can potentially fix four Supraland bugs or issues. Players can also further optimize Supraland with game booster software that will maximize system resources for the game.

RELATED ARTICLES TO CHECK OUT: 

This is how you can fix Dangerous Driving game issues

Here we have it folks, Dangerous Driving is out now. Brought to you by Three Fields Entertainment, a team formed with former members of Criterion Games, popular with their Burnout series.

The racing formula of crash and burn is back, the game being hailed as the spiritual successor of the Burnout games. Takedowns are back, just ram your opponents at full speed and watch them hit the rails. Full Nitro meters favor the bold, and the speedy. Just watch out for that left turn, it’s a doozy.

The game is being released without a multiplayer feature, but it will be added a short time after the original release date. With the game launching on Microsoft Windows and Xbox One, we can expect more from Three Fields.

As we’re familiar, no launch can be truly considered flawless, each having its ups and downs. And Dangerous Driving is no exception.

With instances of traffic glitching out, cars flying into the air, the ocassional crashes here and there.

Low frames per second have been observed as well, not to mention some issues with the game freezing up. We have a list of fixes that can help you out.

Dangerous Driving bugs and errors

  1. Installation issues
  2. Graphic bugs
  3. Audio issues
  4. Out of memory error
  5. Missing exe.
  6. Epic Games Launcher fix
  7. Connection issue with the launcher

1. Installation issues

In the event that this happens, exit Epic Games Launcher and restart your machine. Restart the installation, and see if that works.

Alternately, you can head on over to the Epic Games Launcher and click on Library options on the left side of the window.

Select Settings and click on the game icon and select Verify. This will attempt to fix any corrupted files you might be encountering.

2. Graphics issues

A good solution to start with, would be disabling vertical sync, since it can reduce graphical tearing. If after this, you are facing tearing while playing Dangerous Driving, we suggest you toggle vertical sync to back on in your game settings.

Another solution to this, is to open your Nvidia Control Panel and select Manage 3D Settings. And now select the game from the Program Settings and set the Power Management to Prefer Maximum Power.

Always keep in mind to use the latest drivers for your graphics card.

3. Audio issues

Firstly, try changing your audio from surround sound to stereo. On your desktop, just right click on the speaker icon on the bottom right corner of your screen and select Sounds.

hidden devices playback settings HDMI not showing

Head on over to Playback and disable all the sound devices except the internal speaker or the speaker which you wish to use.

If this didn’t work, head on over to your Nvidia Control Panel.

  1. Open Nvidia Control Panel and select Manage 3D Settings;
  2. Click on Program Settings and select the game from the list;
  3. Set Vertical Sync to “Fast” and save your settings.

4. Out of memory errors
virtual memory set speed up windows 10

Go to your Control Panel and select System and Security and then click on System. Now you’re going to click on Advanced System Settings, select the Virtual Memory window, uncheck automatically manage paging file size for all drives. Select a value that would help you in running the game smoothly.

5. Missing .exe file

To do this, simply Verify the integrity of the game files in Epic Games Launcher. Repeat the steps shown above, in the installation issue section.

6. Fix Epic Games Launcher

Go to your Control Panel, select Uninstall a Program, click on Epic Games Launcher, and select  Repair.

7. Connection issues with the Launcher

It’s more common than you think that your Firewall, which may not let the launcher work is the main suspect.

Add the game launcher to a whitelist in your Windows Firewall, and in the event that the antivirus is the culprit. Add an exception rule to Epic Games Launcher.

Tip

Always remember, when running a game, to check the minimum system requirements first.

  • Operating System: Windows 7 64 bit
  • Direct X: 11
  • System Memory: 4GB
  • Processor: Intel i5 3.2GHz / AMD FX 8350
  • Graphics Card: nVidia GTX 750ti / AMD Radeon R7 265
  • Storage: 12 GB available space

We hope that these fixes were of help to you. Let us know in the comment section down below, on how you’re enjoying the game so far.

RELATED STORIES TO CHECK OUT:

Windows 10 news recap: AdDuplex to shut down Windows 10 ratings app AppRaisin, Microsoft Edge will switch its user agent string depending on the website being visited, and more

Welcome back to our Windows 10 news recap, where we go over the top stories of the past week in the world of Microsoft’s flagship operating system.

AdDuplex owner to shut down his Windows 10 Apps ratings app AppRaisin, last day to be May 6th

As users continue to leave Microsoft’s mobile platform, and Microsoft’s app strategy remains in a confused state, the development company behind AppRaisin, an app for discovering and rating Windows 10 apps, has announced it is shutting the service down. It will shut down on May 6th.

New Edge Insider browser can change user agent strings based on what website you’re visiting

To alleviate issues on some websites where they’re checking for the browser’s user agent string to change the experience, Microsoft looks to be adding a feature into its new Microsoft Edge browser that will change the user agent string depending on the website you’re visiting. This could help improve performance and reduce issues on some websites.

Microsoft Edge app on ios

Microsoft’s Surface Hub 2S to start shipping in June, new 85-inch version coming in 2020

The latest iteration of Microsoft’s enterprise-focused device, the Surface Hub 2S, will start shipping in June. It brings a host of improvements, particularly in the specs of the device. It will come with an Intel 8th gen Core i5 processor inside with 8GB of DDR4 RAM and a 128GB SSD, but there’s also a 4K+ 50-inch multi-touch display that is 60 percent thinner.

Microsoft stops selling midrange Surface Go with 4GB of RAM and 128GB of storage

Microsoft’s more affordable Surface device, the Surface Go, has had its midrange option removed by the company. The option that included 4GB of RAM and 128GB of storage is no longer available to purchase from the Microsoft Store, leaving only 3 options.

That’s it for this week. We’ll be back next week with more Windows 10 news!

Microsoft news recap: Xbox One S All-Digital Edition gets a launch date, Minecraft Movie gets a release date, and more

Microsoft news recap is a weekly feature highlighting the top Microsoft news stories of the past week. Sit back, grab some coffee, and enjoy the read!

“Monumental” Minecraft Movie gets a release date – March 4, 2022

After much anticipation, the long-awaited Minecraft Movie has finally been given a release date. Launching on March 4, 2022, Mojang noted that the long wait is due to “making a live-action, full-length feature film is really complicated.”

Microsoft’s Xbox Game Pass Ultimate subscription is official and launching later this year

Microsoft’s new subscription that bundles Xbox Live Gold and Xbox Game Pass into one subscription has been confirmed. The new subscription will launch later this year, coming first for Xbox Insiders.

Xbox One S All-Digital Edition is launching on May 7 and will cost $249.99

Microsoft’s disk-less Xbox One has been officially announced. Dubbed the Xbox One S All-Digital Edition, it will cost $249.99 and launches on May 7. But some have raised concerns at how the price difference between this version and the standard Xbox One S is, well, not much of a discount.

Cortana ends support for Wunderlist

Wunderlist, a task management app acquired by Microsoft in 2015, has had its integration with Cortana removed. It looks as though this move is due to the new integration between Microsoft’s To-Do app and Cortana.

That’s it for this week. We’ll be back next week with more Microsoft news!

How to fix common Anno 1800 bugs and errors

The industrial revolution is out in Anno 1800, the newest instalment in the city builder/realt time strategy game franchise, Anno.

As with the pursuit of progress, no game launch is perfect. Anno 1800 has had its fair share of bugs and glitches, with framerate drops, game client issues and some quest bugs. B

ut we have a list of solutions that could work for you, so let’s get to building.

How can I fix Anno 1800 bugs?

This is the list of bugs that we’re going to cover in this troubleshooting guide:

  1. Framerate fix
  2. Game crashing fix
  3. Quest bugs fix
  4. Game not downloading fix
  5. Graphical bugs fix
  6. Uplay DLC bug fix
  7. Uplay friend request bug fix
  8. Steam and Uplay activation issues fix

1. Framerate fix

There have been reports on numerous issues related to low framerates, but there’s a fix for that. In order to do so, follow these steps:

  1. Open your Nvidia Control Panel.
  2. Select Manage 3D Settings and select Anno 1800 from the Program Settings and set the Power Management to Prefer Maximum Power.
  3. Save your changes and exit.

2. Game crashing fix

If you experience lock up or the occasional freeze, you may try to force the game in running in DirectX 11. To do this, follow these steps:

  1. Go to your Steam Library.
  2. Find the game and right-click it, then select Properties.
  3. Under the General Tab, click Set Launch Options and a dialog box will appear.
  4. Type in the dialox box at the end of the target string -force-d3d11 and click OK.
  5. Close the Properties window.
  6. Run the game.

3. Quest bugs fix

Some aspects of the game haven’t been ironed out, but a quick verification of your game files to ensure you don’t have corrupted files can do the trick. Simply follow these steps:

  1. Open up the Steam window.
  2. Click Library to open the game collection.
  3. Then right-click on Anno 1800 and select Properties.
  4. Press the Verify integrity of game files button.verify integrity of game files steam games not working

4. Game not downloading fix

For your Steam client you should repeat the same steps in verifying your game files, in the previous solution. In the case of Uplay, open the client and click on the Games option, right click on Anno 1800 and select Verify files.

5. Graphical bugs fix

Make sure to keep your graphic card up to date. A solution would be disabling vertical sync, since it can reduce graphical tearing. If after this, you are facing tearing while playing Anno 1800, we suggest you toggle vertical sync to back on in your game settings.

Alternately, you can try going into Windowed Mode if the game is acting up, it works to solve black screen issues aswell:

  1. Start your game.
  2. Press “ALT + ENTER” to make the game go into windowed mode.
  3. Access video settings in the game and adjust its resolution to your screen’s resolution.
  4. Save changes, you can now play the game in fullscreen mode.

6. Uplay DLC bug fix

In order to fix this issue, we recommend you go to offline mode in Steam. On the top left corner on Steam , click on Steam and select Go Offline. Now try your Uplay client.

7. Uplay friend request bug fix

You might be facing some connectivity issues here. Add an exception to your antivirus for Anno 1800 game, and whitelist your game in Windows Firewall. In order to do so, follow these steps:

  1. Open your Start Menu.
  2. Now select Control Panel.
  3. Then click on Windows Firewall.
  4. Now, click on Allow an app or feature through Windows Firewall.
  5. Now, the Allowed App windows will open.
  6. Click on the Change Settings
  7. Check the boxes next to the apps or programs you want to allow through Windows Firewall, or network connections.
  8. Click OK to save your new settings.

8. Steam and Uplay activation issues fix

In order to do this, simply restart your Steam and click on Play. Next.  Uplay will ask you to link to your Steam account.

Additional tips to fix Anno 1800

If you experience that your characters are warping around the map or getting stuck on the map, you might be experiencing connection issues. Check your internet connection and troubleshoot it.

Always remember to take a look at the minimum system requirements when running any game. The requirements for Anno 1800 are the following:

  • Operating System: Windows 7, Windows 8.1, Windows 10
  • RAM: 8GB
  • Processor: Intel i5 3470, AMD FX 6350
  • Graphics Card: NVIDIA GeForce 670 GTX or AMD Radeon R9 285 (2 GB of VRAM, Shader Model 5.0)
  • DirectX: Version 11
  • Hard drive space: 60 GB

We hope that these solutions were of help to you. In the meantime, let us know what other issues you have stumbled upon playing Anno 1800. Comment below.

RELATED STORIES TO CHECK OUT:

What to do if Windows standalone updater got stuck

For a while now, Windows 10 has been allowing its users to download and install individual update packs.

Even though this is a great feature that many users like, sometimes using it can get a bit tricky.

Windows standalone updater is stuck: How can I fix it?

We compiled a list of several steps that you can follow to fix this problem. We hope that after you use one, or more of these methods, you will be able to freely make any change you like regarding your updates.

  1. Run the Windows Update Troubleshooter
  2. Reset BITS
  3. Reset other update services
  4. Antivirus interference

1. Run the Windows Update Troubleshooter

Sometimes, the most obvious solution is the correct one. If your Windows Update Service seems to be hanging at some point, just try and run the Windows Update Troubleshooter.

In order to do so, you can follow a few simple steps:

  1. Open  Windows Update Settingswindows update settings
  2. From the left side, open the Update Troubleshootercheck for udpates troubleshooter
  3. Select Windows Update and wait to see if it finds your problem.

2. Reset BITS

Sometimes, old updates can prevent you from installing new updates. Resetting the update services could help you to solve this issue.

For you to do this, you can try following the next steps:

  1. Press Windows key+R, type in services.msc and press Enter
  2. Search for Background Intelligent Transfer Service and see if the status is set to running
  3. If it’s blank, right click it and press Startstart BITS windows 10
  4. Right-click once again but this time select Properties
  5. Under the Recovery section verify that First and Second failure are set to Restart device.BITS Recovery Restart Device

After you follow these steps, you can be sure that the service is working and you can try to install the update again.

3. Reset other update services

If restarting the BITS service did not work for you, there might be another update service that interferes with  your update.

We know that it can be frustrating to encounter unexpected errors in your work, so we have a fix that will hopefully fix the update problem:

  1. Press Windows key, then type command prompt
  2. Right click the icon and select run as administratorstandalone windows update stuck
  3. In the window that will follow, you will need to paste all the following commands at once:

net stop wuauservnet stop cryptSvcnet stop bitsnet stop msiserver

ren C:WindowsSoftwareDistribution SoftwareDistribution.old

ren C:WindowsSystem32catroot2 catroot2.old

net start wuauserv

net start cryptSvc

net start bits

net start msiserver

After the process ends, close the Comand Prompt by typing Exit then pressing Enter.

Now, test to see if the Windows Standalone Update is fully functional now.

4. Antivirus interference

Sometimes your security software might be preventing you from running certain updates. Although there are no pop-ups or alerts displayed, certain antivirus solutions may still interrupt the update process.

In order to make sure this is not the case, disable any third party antivirus software.

It is advisable that you turn back on your antivirus as soon as you are sure that it is not the culprot, or as soon as you manage to install the problematic update.

READ ALSO:

WordPad doesn’t support all features of this document’s format [Fix]

WordPad is a Windows application that you can easily use to create a variety of documents, but sometimes you might encounter WordPad does not support all of the features of this document’s format error.

The computer may proceed to add that it’s unable to show all the file contents or may display it improperly. As you can see, this can be a major problem, so in today’s article, we’ll show you how you can fix it for good.

How to fix the WordPad does not support all of the features of this document’s format error?

  1. Open the file from Inside Word
  2. Open the doc with Microsoft Word
  3. Resave the document
  4. Reinstall Microsoft Office

1. Open the file from Inside Word

Opening docs from within Word program can sometimes help with WordPad does not support all of the features of this document’s format error.

  1. Start Microsoft Word.
  2. Go to File then Open.
  3. Navigate to the file that you’re to open, select it and then click Open.open file WordPad does not support all of the features of this document's format

2. Open the doc with Microsoft Word

Another super easy way to solve WordPad that does not support all of the features of this document’s format error is by using the built-in Microsoft word inter-platform tools which allows you to open files created using other apps.

  1. Navigate to where you have saved your document.
  2. Then right-click on the file.
  3. Scroll down the menu options that appear and click Open with Microsoft Word.open with can you open a wordpad document in microsoft word
  4. Voila, your file should open.

3. Resave the document

If WordPad does not support all of the features of this document’s format error is still there, try to re-save the document but in a different format. For instance, if it’s in Office 2013 format, you could open it but this time you save it under a different file name and use a format such as Word 97-2003.

  1. Go to your current document location and right-click to open it (as Word document).
  2. Ignore the warning that WordPad does not support all of the features of this document’s format and click File (or the office button), then Save As.save as wordpad does not support all of the features of this document's format
  3. Choose another folder to save in such as Documents. Type an alternative file name, and finally choose Word 97-2003 under Save as type:
  4. Now attempt to reopen this freshly saved version and check if everything is showing properly.

4. Reinstall Microsoft Office

If you can’t open .doc files, and you’re getting WordPad does not support all of the features of this document’s format error, perhaps it’s your Office suite that’s causing the complications.

Reinstalling it could hence be the only way to recover the software’s full features. Grab your installation disk or download the Office 365 trial and install a new Office copy.

You can even consider downloading Office alternatives such as WPS Office and see how they work for you.

There you go, these are some of the solutions that can help you fix WordPad that does not support all of the features of this document’s format error, so be sure to try them all.

MORE GUIDES SELECTED JUST FOR YOU:

Windows 10 Chromium ARM64 vs. X86: Which one is better?

Recent reports suggest that there is a huge difference in processor usage between Windows 10 on ARM and the emulated x86 version. 

It seems like we are getting some fruitful results due to the recent collaboration between Microsoft and Google. An unofficial version of the Chromium rendering engine for Windows 10 on ARM is already available online.

Now we can see that this unofficial version is worth downloading.The ARM64 Chromium browser for Windows 10 ARM was recently compared to its x86 version. We’ll list the results below.

Huge difference in CPU usage

The experiment proved that the native ARM version used around 10% processor resources. However, the x86 version on Asus Snapdragon-powered Windows 10 system consumes more than 60% CPU.

There is a significant difference between both versions of Chromium. The ARM64 version of Chromium starts faster as compared to the native Microsoft Edge and ARM64 beta of the Firefox browser. The browser also provides faster browsing in its first release. 

You must be eager to use the ARM browser but we can not deny the fact that the ARM version crashes a lot more as compared to the other version.
Furthermore, users are also experiencing problems while signing in to their Google account. That is the reason you should not rely on the ARM browser just yet.
Microsoft has not shared an ETA for the official Chromium release. There are various speculations regarding the features that are going to be part of the final version. 
Are you are still interested in testing Chromium ARM64? It is recommended that you use a virtual machine to try it out.

Dependency Service Failed to Start: 3 Ways to Fix it Quickly

Our lives have become so dependent on the Internet that we literally live there. And if something cuts off the Internet connection, our work is severely affected, and it is likely that error The dependency service or group failed to start error is the culprit.

So, it can be that your Windows PC’s connection to the Internet has indeed been cut off. Pointless to say you need to get it fixed as soon as possible.

What does the dependency service or group failed to start mean?

The dependency service or group failed to start error means there is an issue with a Windows service. This error occurs when you are troubleshooting your internet connection, and it makes your network limited.

This error can be caused by not using the normal startup to load your services and drivers, among other potential factors.

What do I do if the dependency service or group failed to start?

1. Use Normal Startup to load all the services and drivers

  1. Click the Windows start icon, type msconfig, and hit Enter to bring up the System Configuration folder.
    dependency service failed to start
  2. In the window that comes up, tick the Normal startup radio button and click OK.
  3. After the PC restarts, check to see if the error still comes up. If it does, proceed to this next fix.

Using the normal start-up to restart your PC will force load all drivers and services and hopefully resolve the connection error.

The other startup types – diagnostic and selective startups will only load the basic services and, with the selective startup, only those you will have pre-selected.

2. Add localservice and networkservice to your administrator group

  1. Press the Windows key, type cmd, and click Run as administrator under Command Prompt.
  2. Type the command below and hit Enter to run it: net localgroup administrators localservice /add
  3. Now, type the command below and press Enter: net localgroup administrators networkservice /add
    dependency service failed to start
  4. Type exit to close the command prompt.

In the majority of cases where this error crops up, restoring the local and networkservice back under your administrator privileges is usually all you need to do.

Restart your PC after applying the fix, and try connecting to the internet again. You should be good to go. If the error still comes up, try this next fix.

3. Enable all network-related services to start automatically

  1. Click the Windows start icon, type services.msc, and hit Enter,
    dependency service failed to start
  2. Double-click the Application Layer Gateway Service to open its properties.
  3. Now, set its Startup type to Automatic and click the Start button.
    dependency service failed to start
  4. Click OK to save the changes.
  5. Finally, repeat the steps above for the following services:
    • Network Location Awareness (NLA)
    • Network Connections,
    • Plug and Play
    • Remote Access Connection Manager
    • Remote Procedure Call (RPC)
    • Telephony
    • Remote Access Auto Connection Manager

There are cases where some of your PC’s services will need to be enabled and set to automatically run on startup for you to restore your internet connection.

This is important, as setting the Startup type to Automatic helps the services run from when you start the PC, while setting it as Manual requires you to enable the services every time you face connection issues, which is exhausting.

Failing to connect to the internet is rough. You can’t work, or play, which is an absolute disaster for some people.

The fixes we have discussed here should help solve The dependency service or group failed to start error. Remember, though, to scan and clean your PC of viruses if you notice it behaving strangely or suffering more bugs than usual.

Feel free to let us know the solution that helped you fix this issue in the comments below.

Svchost.exe (netsvcs -p) High RAM or CPU Usage [Fix]

Svchost.exe (netsvcs -p), otherwise Service Host, is a shared service process in Windows. It is a subprocess of Svchost.exe that loads numerous services within the netsvcs group.

For those wondering what is netsvcs group, it includes User Manager, Task Scheduler, Windows Update, BITS, Themes, Remote Desktop Configuration, and a few more that are fairly essential to Windows 10.

The big idea behind Svchost.exe is that a group of services share a single process to preserve system resources. However, some users have found that Svchost.exe (netsvcs -p) has excessively high CPU, RAM, or bandwidth usage. Keep reading to find out the solutions!

How do I fix high resource consumption by netsvcs -p?

Before we move to the slightly complex solutions, try these quick ones:

If none work, head to the fixes listed next.

1. Clear the Event Viewer logs

  1. Press the Windows + R to open Run, type eventvwr, and click OK.
  2. Now, double-click Windows Logs.
  3. Next, you should right-click Application and select Clear Log from its context menu.
    clear log to fix netsvcs -p
  4. In addition, clear the logs for Setup, System, and Security, and finally, restart the device.

The Svchost.exe (netsvcs -p) high CPU or RAM usage issue can also be due to an overly full Event Viewer log. Thus, clearing the Event Viewer’s log is another potential fix.

2. Run the Windows Update Troubleshooter

  1. Press Windows + R to open Run, type the following command, and hit Enter: msdt.exe /id WindowsUpdate
    troubleshooter to fix netsvcs -p
  2. Now, follow the on-screen instructions and make the recommended changes to complete the process.
  3. Alternatively, you can run the troubleshooter from the Settings app.

When faced with high bandwidth usage or RAM consumption by netsvcs -p, the Windows Update troubleshooter comes to the aid. Run the troubleshooter and let it make the required changes.

3. Delete the SoftwareDistribution Folder

  1. Press Windows + E to open File Explorer, paste the following path in the address bar, and hit Enter:C:\Windows\SoftwareDistribution
  2. Press Ctrl + A to select all the files here and hit Delete.
    software distribution folder
  3. Then restart your desktop or laptop, and check for Windows updates.

SoftwareDistribution is a folder that stores updates, and clearing that out can also help fix Windows Update.

4. Switch off the Windows Update service

  1. Press Windows + R to open Run, type services.msc, and click OK.
  2. Double-click the Windows Update service.
  3. Select Disabled from the Startup type dropdown menu, and click on Stop.
    stop service
  4. Click the Apply and OK buttons.

Switching Windows Update off should be the last potential fix. Windows Update is not exactly an essential service, but you’ll miss out on updates with it turned off. Update patches fix bugs in Windows, and the major updates add new options and apps to the OS.

After that, you can manually check for updates by temporarily switching wuauserv back on every few months.

Those fixes can ensure that Svchost.exe (netsvcs) doesn’t drain system resources so much. You can also try switching off other services in the netsvcs -p group, much the same as Windows Update, but some of those might be essential to the OS.

Before you leave, find out to make Windows run faster than ever. You can also learn the fundamentals of Service Host in this clear svchost.exe overview to better understand netsvcs -p and its resource usage.

Tell us which fix worked for you in the comments section below.

New Edge Insider browser can change user agent strings based on what website you’re visiting

One of Microsoft’s biggest reasons for making the switch from EdgeHTML as a rendering engine to Chromium has been that certain sites just don’t work well in Edge. Other sites, however, especially video focused properties like Netflix and HBONow, because of the way the old Edge handles PlayReady DRM video content, work better in Edge.
In order to get the best of both worlds, according to BleepingComputer.com, the New Edge can change user agent strings, the bits of code that tell a website what browser a visitor is using, based on a .json file that the new browser downloads from Microsoft when the new Edge fires up. A section of that json file, which you can see by visiting

https://config.edge.skype.com/config/v1/Edge/75.0.131.0?osname=win&channel=dev&clientId=[id]&osver=10.0.18875&osarch=x86_64&osring=WIF&osedition=professional&ostelemetrylevel=full

from a new Edge session (BleepingComputer says this is for the Canary Channel, but we were able to return the .json using Edge Dev), contains a section called EdgeDomainActions. There, the file will identify certain websites, and set the user agent string based on preset domain names. For example, once the user agent string policies are set, applications can be named and the user agent changed from ChromeUA to EdgeUA:

{  
   "EdgeDomainActions":{  
      "user_agent_override":{  
         "version":1,
         "policies":[  
            {  
               "name":"EdgeUA",
               "type":"partialReplacement",
               "value":"AppleWebKit/537.36 (KHTML, like Gecko) Chrome/64.0.3282.140 Safari/537.36 Edge/18.17763"
            },
            {  
               "name":"ChromeUA",
               "type":"edgeTokenReplacement",
               "value":""
            }
         ],
         "applications":[  
            {  
               "domain":"netflix.com",
               "applied_policy":"EdgeUA"
            },
            {  
               "domain":"facebook.com",
               "applied_policy":"ChromeUA"
            },

and so on. This way, the new Edge can serve up PlayReady DRM features to sites like Netflix using the Edge user agent string, and perhaps better performance and fewer glitches for other sites, like Facebook.com, by mimicing the Chrome user agent string.

Microsoft as of yet hasn’t released a lot of documentation on how the new Edge will work, or in fact even gotten around to posting changelogs for Dev and Canary builds, but we expect to hear lots more about exactly how Edge/Chromium will work, beginning at Build in just a couple of weeks.


Here’s how to fix Windows 10/11 Language Pack error 0x800f0954

Windows 10 Language packs are useful, but some users reported Language Pack error 0x800f0954 on their PC. This error can keep popping up, for example, when adding language features, and cause many issues on your PC, so let’s see how to fix it.

Causes of the Windows 10 Language Pack error 0x800f0954

The error is thought to be brought about by some of the following factors:

  • Windows update: Depending on your settings, some update files seem to impede the proper functioning of the services required to install language packs triggering the hiccup.
  • Corrupt/erased files: Critical Windows system files may have become impaired or erased. Windows 10 language packs won’t work properly if an important program file is missing/wrongly configured.
  • Internet connection: Another trigger of this error is a weak/limited Internet connection.

Features affected by the Windows 10 Language Pack Error 0x800f0954

The 0x800f0954 matter in Windows 10 tends to affect the English Optical Character Recognition, English AU Speech Recognition utilities, and handwriting recognition tools.

Incidentally, they’re some of the most essential features in localizing PC languages input.

How to fix Windows 10 Language Pack error 0x800f0954?

  1. Change Wi-Fi settings
  2. Edit your Wuauserv settings
  3. Manually add the pack

1. Change Wi-Fi settings

If you have a metered connection, turn it off until you finish installing chosen language packs.

  1. Go to your Windows 10 Search box and type Wi-Fi settings to access your wireless network.change wi-fi settings error code 0x800f0954
  2. Select the name of the appropriate connection.wi-fi network 0x800f0954 windows 10
  3. Toggle off your metered connection by toggling the button off.metered connection error code 0x800f0954 windows 10 language
  4. Be patient until the message We’re installing new features pops up then click on it.
  5. Continue waiting until everything installs.
  6. Now you can turn your metered Internet connection back on.

2. Edit your Wuauserv settings

Wuauserv is a service that provides the wuauserv.dll library, a tool vital for the Windows 10 Update. If there’s an issue with this service, you might encounter Language pack error 0x800f0954.

If the issue is due to this service and its configuration, modifying the configuration will remove the error.

Steps:

  1. Press the Win+R keys on your keyboard to open the run dialog.
  2. Type regedit and press  Enter. This will start the Registry Editor (click Yes if prompted by UAC-User account control).regedit Language Pack error 0x800f0954
  3. Navigate to this location:
    • HKEY_LOCAL_MACHINE\SOFTWARE\
      Policies\Microsoft\Windows\WindowsUpdate\AU
  4. Find the registry key UseWUServer and change its value to 0.error 0x800f0954 dword
  1. Close your registry.
  2. Click the Start Menu and go to the Search box. Type cmd.
  3. Locate and right-click the cmd option from the results and choose Run as administrator.cmd run as administrator Windows 10 Language Pack Error 0x800f0954
  4. Now type these commands (press Enter after each entry):
    • net stop wuauserv
    • net stop bits
    • net stop appidsvc
    • net stop cryptsvc
    • ren C:\Windows\SoftwareDistribution\ SoftwareDistribution.old
    • ren C:\Windows\System32\catroot2 catroot2.old
    • net start bits
    • net start wuauserv
    • net start appidsvc
    • net start cryptsvc
      windows 10 language pack download command prompt
  5. Go back to your PCs Region and Language settings and retry downloading the packs that have been failing to install.

 Alternatively:

For some Windows 10 versions including the enterprise edition, just type the following commands to eliminate the windows 10 language pack error 0x800f0954.

  1. Repeat steps 1-3 as above.
  2. Find the UseWUServer Click and edit the DWORD value to be more than 0.error code 0x800f0954 UseWUServer
  3. From cmd type (launch it as listed above) the following commands:
    • Net stop wuauserv
    • Net start wuauserv
      Windows 10 Language Pack Error 0x800f0954 command prompt 2
  4. Close cmd and then restart the installation process.

3. Manually add the pack

If you’re still getting Language Pack error 0x800f0954, you can manually add the required Language pack via the settings instead of going through the features as follows:

  1. Click Start then click Settings.start settings app error code 0x800f0954
  2. Choose Time and Language.time and language error code 0x800f0954
  3. Go to Region and Language settings.
  4. Tap on Add a Language, then choose your preferred language.error code 0x800f0954 language pack add a language
  5. Follow the remaining on-screen instructions.

Windows 10 Language Pack error 0x800f0954 can be problematic, but we hope you managed to solve it using one of our solutions.

RELATED ARTICLES SELECTED JUST FOR YOU:

NES, SuperNES, and Game Boy Castlevania games will soon be playable on Xbox One

The complete list of all eight games for the Castlevania Anniversary Collection have been announced (via Polygon). Konami, the publisher of the series, announced back in March the first four titles to join the collection: Castlevania (NES), Castlevania II: Belmont’s Revenge(Game Boy), Castlevania III: Dracula’s Curse (NES), and Super Castlevania IV (Super NES).

Now it appears the last four titles to join the collection have been officially revealed—Castlevania: The Adventure (Game Boy), Castlevania II: Simon’s Quest (NES), Castlevania: Bloodlines (Sega Genesis), and Kid Dracula (Game Boy). So those who have enjoyed the classic games from the ‘90s will soon be able to enjoy them again not just on the Xbox One console on May 16, but also for the PS4, PC (Steam), and the Nintendo Switch.

In other news, the Arcade Classics Anniversary Collection has been released today. As we have already reported, the bundle comes with 8 classics from the 80s—Haunted Castle, Typhoon (A-Jax), Nemesis (Gradius), Vulcan Venture (Gradius II), Life Force (Salamander), Thunder Cross, Scramble and TwinBee.

As of now, we’re still waiting on the Contra Anniversary Collection, of which only eight titles have been revealed: Contra, Super Contra, Super C, and Contra III: The Alien Wars. This bundle will be released in the summer, and like the previous two collections will only be available digitally.

Konami brings 8 retro 80s video games to Microsoft’s Xbox One consoles

Konami is bringing eight of their classic 80s video games to the Xbox One today with the release of the Arcade Classics Anniversary Collection.
Arcade Classics Anniversary Collection comes with the full versions of Scramble, TwinBee, Nemesis (also known as Gradius), Salamander (also known as Life Force), Typhoon (also known as A-Jax), Haunted Castle, Vulcan Venture (also known as Gradius II), and Thunder Cross which are all presented in their original retro styles.

Each game also features new functionality such as game saves, difficulty levels, visual settings, and an ebook containing artwork and interviews on the creation of each title.

Here’s the official description or Arcade Classics Anniversary Collection:

KONAMI starts its 50th anniversary celebration with this first installment of the Anniversary Collection series of the all-time classics! This collection includes 8 arcade masterpieces of the 80s, from Nemesis to Haunted Castle. Experience these KONAMI classics in all their retro glory, now enhanced with modern features.

  • New Features: For the first time, these classic titles support mid-game saves, difficulty levels, and display options which provide a fresh experience to longtime fans.
  • Bonus Book: Also includes a bonus eBook packed with new information about the titles, including interviews with the development staff, behind-the-scenes insights, and sketches and design documents never before revealed to the public!

Are you a fan of 80s video games and will you be picking this bundle up? Let us know in the comments below and then follow us on Pinterest for more Xbox gaming content.

The app was not found in the store. ?