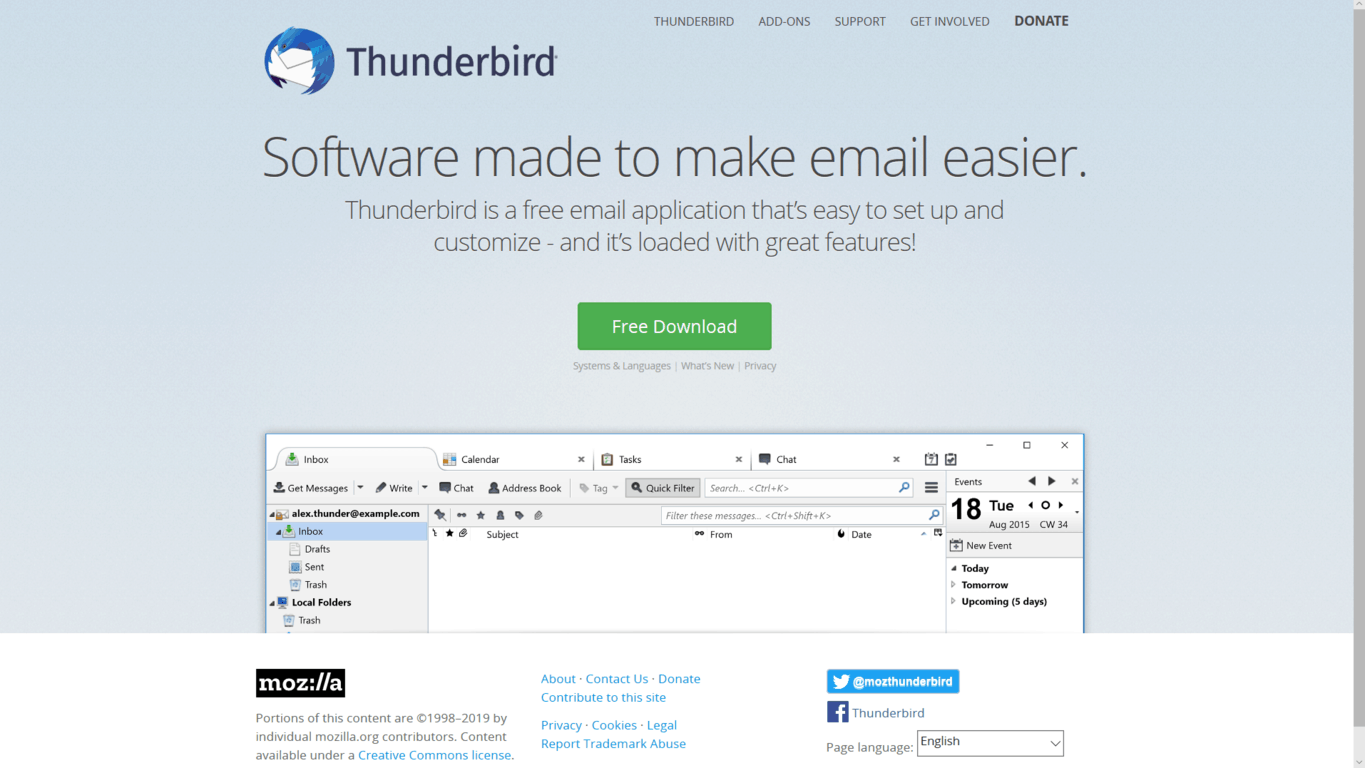
Mozilla’s Thunderbird email client is expected to get support for notifications natively in Windows 10, meaning that they will be logged into the Action Center for later viewing should they appear while the user is away. This also gives the user greater control over these notifications as well, as native support in Windows 10 also means they can be disabled automatically when Focus Assist is turned on.
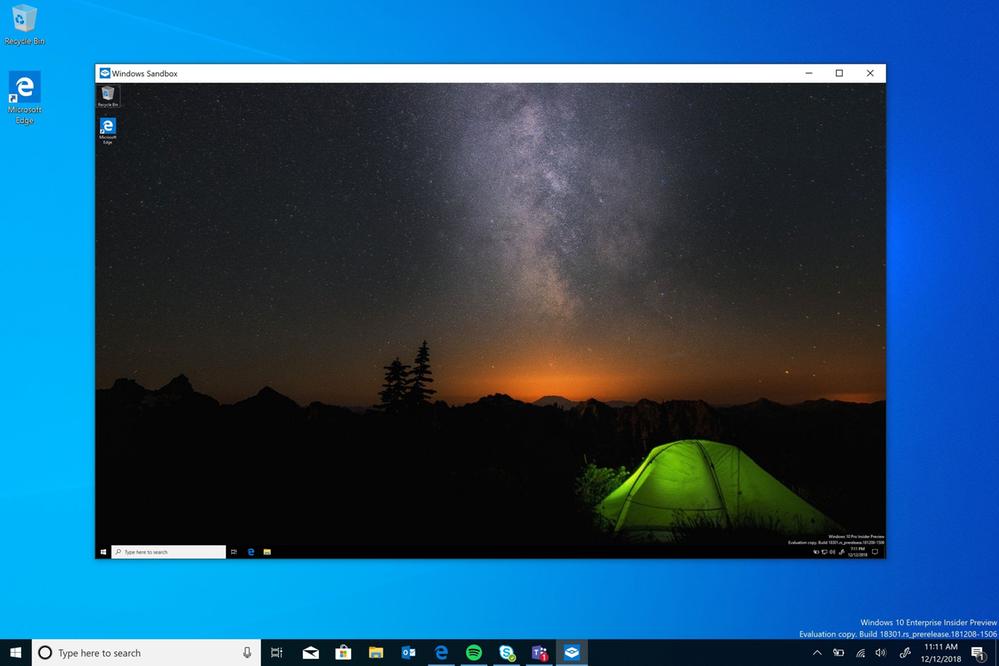
Notifications in Windows 10 from the Access Center, accessible from the notification icon on the far right of the taskbar.
Thunderbird is Mozilla’s email client. It can serve as a great alternative to the Mail application pre-installed on Windows 10 devices, especially as it uses Mozilla’s reputable Gecko layout engine, which renders emails much better than what Word does in Mail.
Mozilla hasn’t given an timeline of when support for the Action Center be available, but the organization is also working on other ways to improve the email client, such as enhancing support for Gmail, overhauling UI elements such the application settings, and improving email encryption. Perhaps with enough improvement, Thunderbird could potentially regain the attention it once had before Google popularized webmail.
A lot of users are just unplugging the USB without disabling it first. Others will use this option to prevent possible USB drive or external HDD issues. However, some reported that Windows is unable to stop the device prompt appeared.
The error message states that the device is still in use and users should terminate programs that might be employing the USB. But this is easier said than done! Identifying the program and terminating it takes a great deal of effort.
So, we made sure to provide you with some solutions to the problem at hand.
What to do if Windows is unable to stop the device?
1. Check the background applications
When the error appears, close the dialog box.
In the Windows Search bar, type System Event, and open View event logs.
Under Summary of Administrative Events, expand Errors and Warnings, respectively, and check for EventID 225.
There you should find what exact application is using the USB Mass Storage and kill its process in the Task Manager.
As the Windows is unable to stop the device prompt itself points out, there seems to be a background process using the USB Mass Storage as you try to eject it.
Now, even though you’re quite sure that there are no background processes preventing ejection, it’s still advised to double-check in the Task Manager. Some applications will work in the background, even if they are seemingly closed.
In addition, if you’re a Windows 10 user, you can easily determine which process is using the USB Mass Storage with the System Event Log. System Event Log keeps track of all errors and prompts and provides a user with in-detail reports about errors.
2. Restart Explorer.exe
Right-click on the Taskbar and open Task Manager from the context menu.
In the Processes tab, scroll to the bottom, and you’ll find Windows Explorer.
Select it and then click on Restart.
If the issue is persistent even after you’ve killed the process, the problem might lie in the Explorer. Explorer.exe tends to prevent the USB Mass Storage from ejecting, as well.
3. Check for storage errors
Open either File Explorer or This PC.
Right-click on the affected USB Mass Storage drive and select Properties.
Go to Tools.
Under Error checking, click Check. The scanning process might take some time, based on the data size.
Another thing worth checking in order to avoid future issues is disc corruption. The system should offer you repairs the moment you plug the USB Mass Storage into a USB port.
If you’ve ignored it until now, we suggest using it to get rid of the Windows is unable to stop the device error. On the other hand, even if the system doesn’t recognize drive errors, you can scan for errors on your own or even use a disk repair tool.
In the Windows Search bar, type msconfig and openSystem Configuration.
Under the Services tab, check the Hide all Microsoft services box, and click Disable all to prevent all active third-party services from running.
Click OK to save the changes and try safely removing the USB Mass Media drive.
With the System Event Log, you should be able to identify the exact application which is using the USB Mass Storage. However, the easiest way (although a bit too restrictive for some) to resolve inflictions of background applications is by the Clean Boot sequence.
This procedure kills off all non-system services and it should resolve the Windows is unable to stop the device error so you can unplug your USB Mass Storage.
5. Format USB Mass Storage and start from a scratch
Finally, if you’re unable to resolve this issue with any of the previous steps, we suggest using a reliable backup tool to save the data and formatting your USB Mass Storage.
This might be a drag, especially if you have a ton of data to back up. However, this is the safest way to avoid further issues with that particular drive.
Despite the fact that digital assistants like Cortana and Alexa are more ubiquitous than ever, there are certain situations when talking to a machine can feel weird. This is especially true in public spaces, when you just want to fit in and avoid having strangers hear any personal information.
We’re now seeing connected speakers and PCs with far-field microphones that can catch your voice in very noisy environments, but these mics still don’t allow you to use voice commands without being noticed. Microsoft is apparently aware of this, a new patent spotted by Windows Central describes a “silent voice input” apparatus that could push voice recognition technology to the next level.
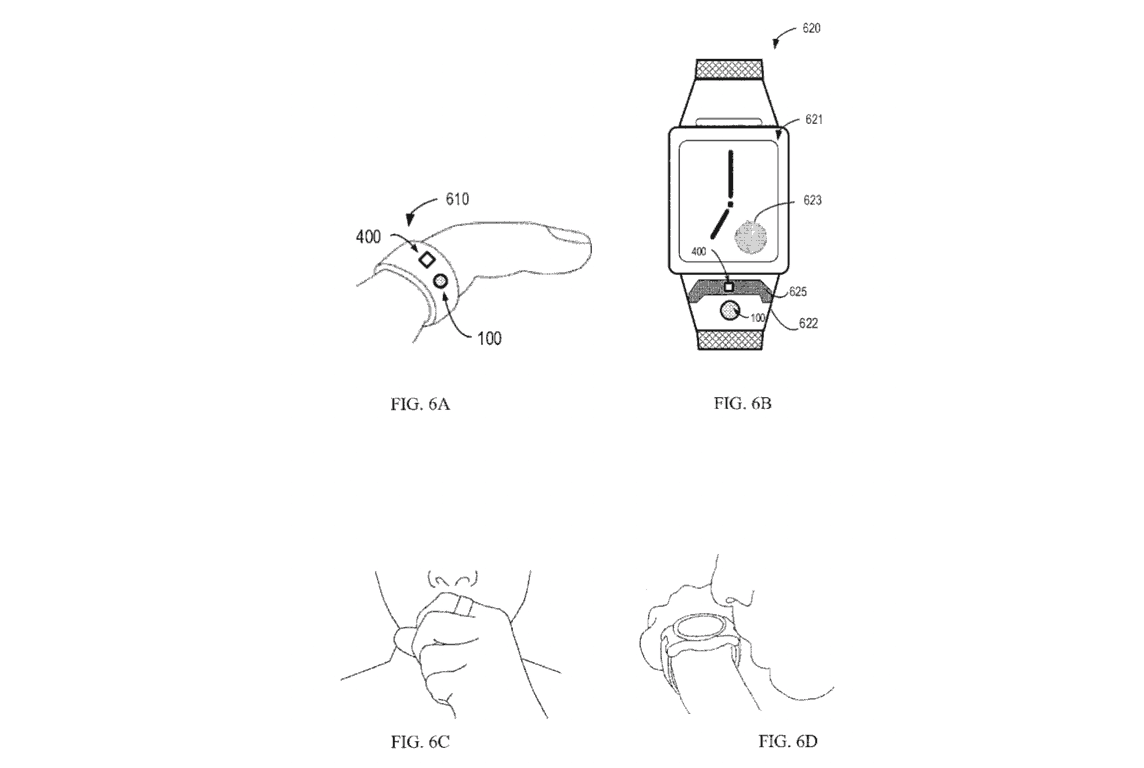
According to the patent description, the silent voice input module could be integrated into a cellphone or any other type of electronic device, including wearables. It would require users to put the module very close to the mouse before issuing voice commands, and Microsoft explains that users would also need to utter words with ingressive airflow instead of whispering.
Implementations of the subject matter described herein provide a silent voice input solution without being noticed by surroundings. Compared with conventional voice input solutions which are based on normal speech or whispering that use egressive (breathing-out) airflow while speaking, the proposed “silent” voice input method is performed by using opposite (ingressive or breathing-in) airflow while speaking. By placing the apparatus (e.g. microphone) of the apparatus very close to the user’s mouth with an small gap formed between the mouth and the apparatus, the proposed silent voice input solution can capture stable utterance signal with a very small voice leakage, and thereby allowing the user to use ultra-low volume speech input in public and mobile situations, without disturbing surrounding people. Besides of air flow direction (ingressive and egressive), all other utterance manners are same as our whispering, so that proposed method can be used without special practice.
It’s not clear is this “silent voice input” technology could really change how we interact with digital assistants, but as with most patents, it may not end in an actual product anytime soon. In the meantime, most users will probably continue to behave in public and continue to do things the old-school way. And as of today, it still often faster to use touch input than voice commands that don’t always get understood properly.
Deleted files in the Recycle Bin tend to pile up fast, especially if you’re not emptying it frequently. Restoring deleted files to their original location is rather simple, but what happens if you accidentally restore hundreds of files?
Can you undo restored files and delete them in batch or you’ll need to do it by hand, one-by-one? We answer below.
How to undo Restore All in Recycle Bin
Let’s say you want your files to stick in the Recycle Bin for some time in case you’ll need to keep them. And, when the need arises, you would want to restore deleted (or archived) files from the Recycle Bin. However, if you have tons of deleted files in the Recycle Bin, the last thing you want to do is restore them all.
And no, you won’t be able to undo the Restore All action and the only way to delete files again is one-by-one. Which is a ludicrous concept if you have hundreds or even thousands of files to deal with.
That’s the deal with this feature, it just doesn’t allow you to undo your error. Relying on system restore or File History won’t do you any favor, as the files restoration won’t be undone that way. This, sadly, means that you better start deleting those files manually as there’s no an easy way around it.
After you’ve done that, make sure to be more attentive next time you’re meddling with the Recycle Bin. Deleting files regularly (on weekly basis) would help you a lot next time this happens.
To learn more about this feature, we have a whole guide dedicated to Recycle Bin on Windows 10, so feel free to check it out.
We hope this was an informative read and make sure to leave your feedback in the comments section below.
HDD or SSD encryption is of utmost importance, especially for enterprises and professional users. Most people will go for the software solutions as they allow a better insight and additional layers of control over encrypted data and used protocols.
However, some users don’t deem it necessary and decided to use their SSD with built-in encryption. We explain how to do it below.
How to utilize built-in SSD encryption on PC
Some SSD drives come with the built-in hardware AES-256 encryption. Now, this built-in feature has a variety of software counterparts and, due to a few advantages, a lot of people will prioritize it over hardware encryption.
The problem is, although a lot of SSDs come with it, the fact that it’s not as simple to utilize it on an older motherboard. That in addition to lack of some features will push users to software-based solutions.
Now, even though hardware-based full-disk encryption (commonly referred to as FDE) is limiting in some regards, you still can take its full potential. And that’s full-disk AES-256 encryption. To activate this built-in function, you’ll only need to have a supported SSD ( OCZ, SanDisk, Samsung, Micron or Integral Memory) and a supported motherboard.
The procedure can also differ. Some devices will utilize software while others require for you to set up a BIOS password. Just boot into BIOS/UEFI and set a password. This will automatically trigger the hardware encryption.
HP users have had a hard time using the hardware encryption on Windows 10. Allegedly, the HP Client Security client doesn’t support Windows 10. If that’s the case with you, we’re afraid you’ll either need to use BitLocker or third-party encryption software in order to encrypt your SSD.
With that said, we can conclude this article. Make sure to tell us whether this was a helpful read in the comments section below. We look forward to your feedback.
Corrupt Default Domain Policy is something no one wants to see on the Windows Server. And most people are not stressed about it as they have made timely backups. But, if that’s not the case and you’re in dire need of a solution, we can recommend following the steps we listed below. Using this guide, you should be able to fix the corrupt Default Domain Policy.
How to repair corrupt Default Domain Policy
There are so many variables which might or might not invoke the corruption of the default Domain Policies. Most of the time, users change default policies directly instead of creating new ones.
This might lead to issues and the only two reliable ways we can suggest are either to restore a backup of the GPO or, in the absence of backups, use the Dcgpofix tool.
This tool should restore all settings to their default values, so make sure to inspect them and change them based on your needs later on. That’s of utmost importance, as this is the last-resort tool and it’s to be used in the disaster scenarios where you’re unable to fix the GPO. So, don’t forget to back up even the corrupt GPO as there’s always a chance something will go wrong.
If you’re not sure how to run this tool, here’s the step-by-step explanation you need to follow:
Open Command Prompt.
Run the following command and press Enter:
Dcgpofix /target:domain
Confirm selection and run the tool.
That should do it. In case you have any questions or suggestions, feel free to tell us in the comments section below.
Crystal Reports is a widely-acknowledged business intelligence application which uses data analysis to create in-depth reports. After that, users are able to access those files and compare them in order to improve productivity and efficiency.
However, some users were having a hard time accessing RPT files (Crystal Reportsextension) for various reasons. The most common reason is the corruption of Crystal Reports files. If you’re not sure how to fix corrupt Crystal Reports file, check out the solutions listed below.
Solutions to fix corrupted Crystal Reports files
Instead of wasting your time in trying to restore the rpt file, we rather suggest re-creating it again. There are, indeed, a few things you can try. Firstly, make sure that you have the current or newer Crystal Reports version based on the version you’ve used to create the RPT file.
Also, if you have used a third-party backup tool or the built-in File History tool, chances are you’ll be able to restore the original file without corruption.
Some users even suggest trying with an older version, if the report file is quite old. We can’t say with certainty whether this can fix a corrupt Crystal Reports RPT file, but it’s worth giving it a try. At least, if you can get your hands on an older iteration of the program. Furthermore, some users suggested reinstalling all associated software, which seemingly addressed the problem for some of them.
We can’t say with certainty whether this is the case or not, but it’s worth a try. Finally, you can also send an inquiry to the official support team and ask for a better insight. There are so many things which may lead to the file corruption, and it’s hard to determine what’s exactly the issue-starter.
Either way, don’t forget to try some of these instructions and tell us whether they helped you in the comments section below.
Happy New Year everyone! Hope all of you are enjoying all that the new year brings. For us here at OnMSFT.com, that’s quite a bit, as it turns out.
First, a bit of backstory: WinBeta.org, our predecessor until we changed our name some two years ago, for most of its tenure, and most of OnMSFT’s, was run by our Editor Emeritus Ron, who was passionate about both Microsoft and this site. In the past year or so, though, his available time to devote to OnMSFT diminished, and a few months ago he turned the reins over to me. In that time, though, the site didn’t get the attention it needed, and market forces have changed the landscape for consumer-centric Microsoft blogs.
So for the past month or so I’ve been preparing a cleanup of the site, including the WordPress code it runs on, the database that runs everything, and the services we use to get the results of our Microsoft enthusiasm out to you. Last night, I flipped the switch and moved our site from Rackspace, a premium host provider that was maybe a bit too rich for our needs, to a Virtual Machine running on Azure. As it turns out, the Azure VM boasts about the same specs as our old host, for about half the cost. I’ll be writing some more about Azure and the little guy as we move forward, but for now, it’s enough to say that we’re eating the dogfood.
Our next project will be to complete a new WordPress theme, as you may notice there are a few immediate changes, but most of the work was done on the back end to fix some problems, clean up some code, and make a new theme possible. You can think of this as a placeholder for now: we’ve stripped down the car, cut out the rust, sanded things down, and applied a coat of primer. A shiny new paint job is in the works, but all that prep work had to be done first, and here we are.
Luckily, we were able to accomplish this over the holiday break, when Redmond becomes a ghost town, and our readers spend more time setting up their new Surface or their new Xbox than they do reading about what’s coming next. But as soon as next week with CES, the news cycle is going to be ramping up again, and we can’t wait! It is going to be a big year for Microsoft, and by this time next year we’ll know a lot more about HoloLens, about Surface, about Windows and Cortana and Edge and, yes, about Azure.
Thanks for reading OnMSFT.com. Please be patient over the next couple of days as I work through some known issues, but feel free to leave a comment below on what you see, and especially what you’d like to see.
There has been some speculation that Microsoft is planning to launch a HoloLens 2 in 2019. That would be a successor to the current HoloLens mixed realityheadset. The Windows tipster WalkingCat has now spotted references in a HologramCompositor.dll DLL that highlights the next Windows 10 build version (19H1 update) will support HoloLens 2.
WalkingCat posted what he has spotted in HologramCompositor.dlls on his Twitter page. There WalkingCat states: “Now this in HologramCompositor.dll in 19H1: Output: Dummy, Output: Indirect, Output: Hololens and Output: Sydney.” Thus, that DLL contains a reference to Sydney, which is reputedly the codename for the upcoming HoloLens 2.
When is HoloLens 2 coming out?
Microsoft HoloLens 2 is slated for release in April 2019. So that might mean Windows 10 build version 1903 will support HoloLens 2 after Microsoft rolls out the 19H1 update. The Windows 10 19H1 Update will roll out sometime in spring 2019. April is the usual starting month for Microsoft’s springtime build updates.
Microsoft launched the original HoloLens headset in 2016. In April 2018, Microsoft stated that the headset had shifted about 50,000 units. That may not sound a lot, but the HoloLens was more of an experimental device for a niche VR market. Microsoft more recently received a $480 million contract from the Department of Defence for HoloLens headsets.
The software giant reaffirmed its commitment to mixed reality by stating: “Mixed reality is the future of computing, and Microsoft HoloLens is the future and present of mixed reality. Our commitment requires no roadmap.”
Now Microsoft is expected to release a HoloLens 2 in 2019. The rumor mill suggests that the HoloLens 2 might be based on a Qualcomm Snapdragon CPU. In addition, Microsoft’s next mixed realityheadset could incorporate an enhanced Kinect depth camera and holographic display. Although it will be the second HoloLens released, it is reputedly a third version of the headset as Microsoft skipped the release for version two.
If Windows 10 version 1903 does indeed support HoloLens 2 as the HologramCompositor.dll highlights, Microsoft might release its next mixed reality headset in quarter one of 2019. As such, the software giant could unveil the HoloLens 2 at its Build conference in May 2019.
RELATED STORIES TO CHECK OUT:
Snapdragon 1000 to power HoloLens v2 and Surface Phone
As 2018 is coming to a close, today is the perfect time to look back at everything Microsoft achieved and missed over the past 12 months. This year has been a very good one for Microsoft, and as of this writing the company remains the most valuable US company ahead of Apple. And even though Steve Ballmer’s Microsoft allowed Apple and Google to dominate the mobile market, Satya Nadella’s Microsoft is a completely different beast that managed to find a lot of other sources of growth.
Despite great financial results quarter after quarter, there has been some less shiny areas this year. I’ll do my best to highlight the good, the bad and the ugly for Microsoft in 2018.
If Office 365 remains a very important business for Microsoft, the company has continued to heavily promote its “Microsoft 365” offering this year. Microsoft 365 is a complete enterprise package that includes Windows 10, Office 365, and Enterprise Mobility + Security, and we should continue to hear a lot about it in 2019.
Microsoft Teams, the company’s Slack competitor, also reached new milestones this year. 329,000 organizations are now using Teams worldwide, including 87 of the Fortune 100 companies. According to a recent study from SpiceWorks, Microsoft Teams is expected to experience the biggest growth collaborative chat apps over the next two years.
Surface
Microsoft released several new Surface models this year including the affordable Surface Go, the Surface Pro 6 and the Surface Laptop 2. Since its launch back in August, the 10-inch Surface has already become the fourth most popular Surface device according to AdDuplex, right ahead of the Surface Pro 6.
Surface is now a billion dollar business for Microsoft, and the company also became one of the top five manufacturers of PCs in the US market this year. With the launch of new accessories like the Surface Headphones, Surface is slowly but surely becoming a lifestyle brand with premium products that can easily rival with Apple’s. When you remember that the first Surface device was launched only six years ago, that’s quite a big achievement.
Even though there is a lot to like about Surface devices, they also received criticism for being hard to repair, and the lack of USB-C ports on the Surface Pro 6 and Surface Laptop 2 is really hard to justify in 2018. Hopefully, this is something that Microsoft will finally address with the next generation.
Some great mobile apps
Windows Phone is still dead in 2018, but that’s not really a problem since Microsoft is now fully supporting iOS and Android devices. Android has obviously become Microsoft’s mobile OS of choice these days, and the company managed to create great synergies between Windows 10 PCs and Android phones thanks to apps like Your Phone and the Microsoft Launcher.
Microsoft Edge is another app that gets frequent updates on iOS and Android, and it has become a key part of the Microsoft ecosystem thanks to new features like Timeline integration. We’ll have more on Microsoft Edge below, but if you have yet to try Microsoft’s web browser on iOS and Android, you really should.
There are more and more synergies between Windows 10 PCs and Android phones.
Xbox
It will likely take years for Microsoft to fix the Xbox’s exclusive games problem, but the company proved this year that they’re finally ready to address this issue. The Redmond giant acquired several game studios this year including Playground Games (Forza Horizon 4), Undead Labs (State of Decay 2), Ninja Theory (Hellblade: Senua’s Sacrifice) and Obsidian Entertainment (Fallout: New Vegas). Let’s not forget about The Initiative, a brand new studio led by former Tomb Raider boss Darrell Gallagher who has been hiring top talent this year.
A lot of new exclusive games are hopefully in the pipeline, but in the meantime Xbox continues to lead on the services front. All first-party Microsoft Studios games are now available on day one on Xbox Game Pass, and the subscription service has also welcomed many great games from Bethesda, Square Enix, Capcom and more this year.
Whether you’ve been with us since the beginning or just joined, thanks for playing with us this year. Find your next favorite game in January! pic.twitter.com/Rm6kZRvFYM
Microsoft also pushed hard to make gaming more inclusive in 2018, starting with the Xbox Adaptive controller. Inspired by an internal hackathon, the accessible controller has been ranked one of the top inventions of 2018, and we hope that the video games industry will follow Microsoft’s lead in the near future
The botched releases of the Windows 10 April 2018 and October 2018 updates will definitely leave a mark. Microsoft having to pause the release of the October 2018 Update due to a file deletion bug was a quite PR disaster for the company, and hopefully a learning moment as well.
Despite having millions of beta testers in the Windows Insider program, there’s an ongoing feeling that the quality of major Windows 10 updates has been decreasing over the years. This has forced Microsoft to be more cautious during the rollout of the October 2018 Update, which as of this month may be running on less than 10% of Windows 10 PCs according to AdDuplex.
Microsoft Edge was supposed to be the company’s modern, lightweight browser that can finally replace Internet Explorer, but so far Windows 10 users have continued to prefer Google Chrome, Firefox, and other alternatives. The slow pace of updates has always been a big issue, but websites not being optimized for the EdgeHTML engine was an even bigger problem. Well, Microsoft has finally given up on EdgeHTML, and the company plans to launch a Chromium-based version of Edge next year that will also run on macOS and older versions of Windows.
This should be good news for Edge users, who will get a better browser that is compatible with all Chrome extensions, but it’s definitely not great news for the web. It was pretty bad when all websites were optimized for Internet Explorer, and we could soon end up in the same situation where Chromium and Google Chrome become the de-facto standard. Microsoft’s decision will leave Mozilla and its Quantum engine remain the last alternative to Chromium-based browsers and Apple’s Webkit-based Safari, and that’s not a great look for the web in general.
Always connected PCs
We’ve seen Microsoft’s OEM partners launch the first Windows 10 on ARM PCs this year, and the first generation has been quite disappointing. All these Qualcomm Snapdragon 835-powered (a smartphone chip) have been overpriced, offering disappointing performance when running emulated Win32 apps.
Things got slightly better with the second generation devices using the more powerful Qualcomm Snapdragon 845 chip, but Windows 10 on ARM PCs still don’t offer a good enough price/performance ratio for most consumers. Things should change once developers start to compile their apps for the ARM64 architecture, and hopefully we’ll see Google Chrome and other browsers run natively on Windows 10 on ARM next year. In the meantime, you should probably keep your money and wait for new models powered by Qualcomm’s upcoming 8cx chip.
Microsoft let its OEM partners lead the charge this year, but we’re waiting to see the company launch its first Windows 10 on ARM Surface device. Intel reportedly blocked an ARM-based Surface Go this year, but it’s probably a good thing that Microsoft avoided another Surface RT situation with a compromised product.
The first generation Windows 10 on ARM PCs have been a real disappointment.
The ugly
The Microsoft Store and UWP/PWA Apps
After all these years, the Microsoft Store is still in pretty bad shape. Quality apps and games are still hard to find, and the overall experience hasn’t really improved since 2015. As of today, the Microsoft Store app often struggles to download big apps and games, and like many other UWP apps, it can feel pretty slow to use.
With app developers neglecting Microsoft’s UWP platform, the company was expected to fill the app gap on the Microsoft Store by automatically adding Progressive Web Apps (PWAs) using the Bing crawler. However, this didn’t really happen this year: So far, Twitter seems to be the only developer that cares about PWAs, though the Twitter PWA probably isn’t as good as other third-party clients.
Ironically, the best apps you can find on the Microsoft Store today are bridged desktop apps like iTunes, Spotify or Microsoft’s own Office desktop apps. Earlier this year, the company announced that it was halting work on its Office Mobile UWP apps, which probably tells a lot about the general disinterest for the UWP platform.
Cortana
At this point, Cortana has pretty become the new Windows Phone. The digital assistant still has its fans, but it’s being ignored by most consumers, developers, and Microsoft. Despite launching in 2014, Cortana is currently only available in 13 regions worldwide, and the Cortana mobile app is still pretty much a US/UK affair. This is a big missed opportunity for Microsoft, and it’s almost like the digital assistant has been PC-focused for too long.
While Amazon and Google have released many smart appliances over the years, we’ve only seen Cortana show up on the Harman Kardon Invoke speaker and the GLAS smart thermostat. We doubt that other manufacturers will consider integrating Cortana into their products in the future, and they really don’t have to: Microsoft teamed up with Amazon to integrate Cortana with Alexa, and Amazon’s digital assistant is now available on Windows 10 PCs as well as Xbox One consoles.
Microsoft really accomplished a lot this year overall, even though from a consumer point of view, it can look like Windows 10, Cortana and other products are fading in the background. It’s true that Windows isn’t as important as it was 10 years ago, but the company still cares a lot about software. Because Redmond now makes its own hardware, the company can’t afford to stop innovating on the software front.
2019 should be an even more interesting year for Microsoft fans thanks to new Surface and Xbox hardware, a new Hololens headset, and maybe a Windows-based foldable mobile device. There’s also Project xCloud, the company’s new game streaming service that will work on all devices, including phones and tablets. Last but not least, after the company acquired LinkedIn and GitHub, we can’t wait to see what will be Microsoft’s next big acquisition. See you in 2019 for even more Microsoft news!
Corrupted user profiles are quite an issue for all IT administrators. Citrix profile corruption issues require advanced troubleshooting skills. And all system servers come with so many variables it’s hard to find a universal solution for every affected user.
We noted below some excerpts from the official support forum in order to help you. Albeit, the best way to find your way around the constant corruption of Citrix profiles is to send your logs to a support.
How to fix corrupt Citrix profile
A corrupted profile is never a good news for a digital workspace administrator. And not that common even, considering Citrix is quite a reliable service. However, that doesn’t mean that it’s not a possibility.
If that happens, we suggest inspecting the group policy and the netuser.dat file. The most prominent reason for issues like these is a corruption of the said file, especially occurring if the user’s PC shuts down before the DAT file is written.
If the file is only partially written over UPM, the profile will get corrupted and issues will emerge. The problem mostly appears to bother users with UPM (Universal Password Manager). When that happens, whether you’re using XenDesktop or VM, you’ll need to look into logs to find out what’s causing the problem at hand.
The problem is seemingly also connected to a Windows version discrepancy when using roaming and UPM profiles. In all regards, we suggest obtaining logs and sharing them with the support officials. This might require some advanced knowledge in order to determine why some profiles work fine while others get corruption on daily basis.
In case you’re unable to fix the issue, deleting the profile and re-establishing it again might resolve all issues. With that said, we can conclude this article.
Hopefully, we shed some light to this. The problem consists of so many variables that there’s no such thing as a universal solution.
Bitdefender has always been a top service for when it comes to protection against the various threats that surface online, but offline as well. As we advance and technology gets a more center stage role in our lives, so do the methods through which we can be attacked increase in potency.
What this all means is that hackers and antivirus developers step up their game concomitantly, so it’s always a very sensitive battle. That’s why it’s important to have the newest and most powerful security solution and for Bitdefender fans and users, that’s Bitdefender 2019.
Interested in what the 2019 version has in store for users that want to know why they should upgrade? Let’s take a look and see what’s cooking over at Bitdefender. It sure smells like high-end security.
The top features taking the spotlight in Bitdefender 2019:
Advanced Threat Defense
This feature allows the antivirus to scan your computer but also to keep a watchful eye on any services and processes going on that just seem fishy. If something is suspicious or out of place, Bitdefender will bust that intruder and debunk any scheme that a wishful thinking hacker might have thought up.
Webcam Protection
One of the nastiest ways in which your personal information can leak is through webcams. Wrongdoers have learned how to manipulate unsuspecting victim’s webcams from a distance a long time ago. With the new webcam protection feature, however, your webcam is as safe as ever.
If you’re worried about webcam protection, you can buy the Huawei Matebook X Pro laptop that features a pop-up webcam for extra security.
Safe files (for Mac or Windows)
The feature is available on both Mac and Windows and it allows the user to protect their data. The mode allows data only to be accessed by trusted software. This is great against security threats like ransomware, which is becoming a very concern factor.
Firewall and Parental control
The new Bitdefender is ideal for both keeping threats out and keeping kids from accessing things they shouldn’t. Children are the most vulnerable in the online space, and keeping them safe is a tricky business. That’s why this highly efficient software is needed.
Download BitDefender 2019 for free
If you would like to download BitDefender 2019 for free, you have to be aware that the single way to do this is through a free trial offer. If you like the product, you will keep using it, if now, you’re free to find something else. But since this is considered to be the best antivirus in 2019 that you can get, I doubt that you’ll find something better. So here are the download links:
There’s nothing worse for a Minecraft player than for his long-developed world to have corrupted chunks. This is, luckily, not as common, especially if you stick to the vanilla version.
Though chunk corruption happens more often, and it’s usually followed by game crashing. So, here we are with the ways to find and fix corrupted chunks in Minecraft.
How do I fix a corrupted chunk in Minecraft?
1. Erase the corrupted chunks
If you don’t have any saves, you can erase the corrupted chunks and allow Minecraft to regenerate them. This would be instant in most cases.
Of course, if you’ve built something there, we’re afraid it will be gone afterward. So, you might want to consider the next option in this case.
2. Use a dedicated tool
For users who get a corrupted region chunk in the Minecraft world, the best way to deal with it is by using one of the numerous third-party tools. You can either load the previous backed-up version and fix those affected chunks in no time.
The best tools you can use to fix corrupted chunks in Minecraft are:
Another thing you should consider is disabling mods, as some of them might be the reason for the corruption in the first place. Remember, this helps prevent future corruption of chunks in Minecraft, but won’t fix the current ones.
In addition, if you’re loading a newer world with an outdated client, corruption is almost imminent.
While you can delete the chunk manually by using the correct coordinates, and it just re-explores him later, the most reliable way is to stick with the MCEdit tool. Just run it, and you’ll see all modded blocks causing the chunk corruption.
Working with any file, including the HTML, requires timely backups. Some users got themselves in a tricky position as the files got corrupted for some reason. If the HTML file is corrupted, you must repair it.
If we’re not looking at the encoding error, there’s hardly anything you can do. However, if the encoding made the text all scrambled, we have a quick solution to get things up and running.
How do I fix a corrupt HTML file?
Tip
The chances that your HTML file will get corrupted are pretty low. Still, it’s always suggested to create multiple backups of all your projects and save them in different locations. There’s only a slight chance you’ll be able to recover corrupted HTML files if they’re not properly saved.
Using Notepad
Open the document and cycle through all available encoding schemes until you find the one which fits the current scheme.
If that doesn’t help, you can use (if available) the File History feature. This way, you can restore an older version of the HTML file before the corruption occurs.
When facing the problem, you can utilize some tools within the editing tools (Notepad ++ or Microsoft Word) to try and fix the corruption. Though, we won’t hold our hopes high!
In addition, sometimes the tool won’t be able to decode the character if you’ve copy-pasted special characters or concatenated (linked) two different encoding schemes.
If that doesn’t help, start over, and don’t forget to back up your files timely to avoid data loss in the future and eliminate the need to repair a corrupt HTML file.
Different needs require different approaches. For example, some users fancy using two USBheadphones at the same time instead of sticking with one. However, this isn’t as simple as it sounds.
There’s a way to use a standard 3,5mm jack headphones and a USB, but using two USBheadphones at once on Windows 10 requires some tweaking. We made sure to explain 3 possible ways to achieve that below.
How to set up and use two USB headphones at the same time on PC
This might or might not work depending on a variety of things, but some users managed to replace the input device for a playback device. That way, in theory, you should be able to use two playback devices simultaneously without any issues.
However, have in mind that headphones won’t perfectly sync and you’ll experience a slight delay on the second playback device (headphones in this case).
Here’s how to use system settings to enable two USBheadphones at once on Windows 10:
Right-click on the Sound icon in the notification area and open Sounds.
Choose the Playback tab and select the first headphones as your default playback device.
Now, move to the Recording tab.
Right-click on the empty area and enable “Show disabled devices“.
Right-click on Stereo Mix and enable it. If you can’t find it, just install the latest Realtek sound drivers and codecs.
Double-click on the Stereo Mix to open Properties.
Choose the Listen tab in Properties.
Check the “Listen to this device” box and select your second headphones from the drop-down menu.
Now, open Advanced tab and uncheck the “Allow applications to take exclusive control of this device” and confirm changes.
There are tons of software tools for both professionals and casual users out there. Some of them allow you a lot of freedom when it comes to tweaking audio output or input on your PC. In addition, they allow you to use multiple output devices, like headphones, and this seemingly worked for many users.
The application we run into the most is Audio VoiceMeeter Banana. This is a free-to-use virtual audio device mixer and it grants users with a myriad of features. Also, it includes an option to create multiple output devices and use, like in this scenario, two USB headphones at the same time on Windows 10.
Finally, if the software leaves a lot to be desired, the hardware should address this. There’s a variety of USB splitter, both for audio jack and USB devices. They are mostly inexpensive and can mean a lot in the right circumstances. We suggest going for the more-affordable solutions if you’re a casual user who just wants some dual-headphone action on their Windows 10 PC.
Of course, if you want to use two USB headsets on PC without a splitter, then use one of the two solutions listed above and skip the third one.
And, on that note, we can conclude this article. In case you have anything to add or take, do tell us in the comments section below. We always look forward to your feedback.
Time to welcome in the New Year and what better way than for a bunch of scambags to try and con us out of our hard-earned Christmas money with a Chromebug. Fortunately, you need not worry… all is not lost.
This is pretty much your run-of-the-mill Chromebug tech support scam; although, as support scams go, it’s a pretty good one.
Here is what happens
If your browser gets infected, here’s what happens. You’ll get a pop-up saying something along the lines of:
—————————————————————–
Confirm Navigation
YOUR ISP HAS BLOCKED YOUR PC
ERROR # 258D3
Call Microsoft immediately at (a big telephone number)
Do not ignore this critical alert.
If you close this page, your PC access will be disabled to
prevent further damage to our network.
—————————————————————-
There is more but you get the gist, I think. It then goes on to say a load of other nonsense about how your credit card details, your ISP account login details, and photos stored on your PC are being stolen.
Your Christmas photos may be at risk
I like that last bit about the photos. I’m guessing that works well on people who have got dodgy pics of horrible Christmas photos of jumpers or hook-ups at the office party. Personally speaking, if anyone was stealing my photos, they’d probably pay me to take them back. But as usual, I am digressing.
Basically, this entire Chromebug works in a loop. This means that every time you close your browser, it immediately opens up again, displaying the same message. While this is happening, the malware uses more of your CPU, giving you the impression that your PC has indeed been hacked.
How to fix this
Of course, this is all rubbish, so before you go spending a fortune on nothing, here are a few steps you can do to fix it.
Press ctrl + alt + delete to bring up the Task Manager. The ‘Processes’ tab should be showing (click on it if it isn’t). Then select Google Chrome and right click your mouse. Click ‘End task’ (or click ‘End task’ in the bottom right-hand corner of the window) and Chrome will close down.
When you open your Chromebrowser again, you may get a notification asking you whether you would like to restore your tabs. Don’t say yes or you will just open the same Chromebug, which means that you will have to go through the whole process again.
How to avoid these types of scams
In case you want to be secure while surfing the internet, you will need to get a full-dedicated tool to secure your network. Install now Cyberghost VPN and secure yourself. It protects your PC from attacks while browsing, masks your IP address and blocks all unwanted access.
For those of you who are wondering how to avoid these kind of scams, the answer is easy. You will never get a pop-up like this from Microsoft (or anyone else) demanding money. If you ever get something like this, just follow the steps above to end the task.
If you are still nervous as to what to do, go on another computer, and search for the information about the attack. Or just head over directly to Windows Report as I am sure we will have written something about it.
Wrapping it all up
At the end of the day, these types of attacks look pretty scary, but they are pretty primitive. A few simple steps usually gets rid of them, and as long as you are running anti-scambag software, the chances that you will have to pay to sort things out are pretty much nil.
Anyone been hit by this particular Chrome bug (or anything else similar)? Let us know what it was in the comment box below, and if it was a stubborn son-of-a-gun to get rid of, what you did. Thanks.
If you are having the issue of CtHelper.exe high CPU on your computer, this article is for you. CtHelper.exe is an executable computer file, installed alongside Creative Sound Blaster (a sound card) which is a product of Creative Technologies, a renowned digital solution company that specializes in the production of computer sound and video boards.
What is CtHelper.exe?
The file is an essential third-party component of computer’s audio system, especially on Mac and a host of Windows versions. It is also an automated process that runs in the background.
Is CtHelper.exe a virus?
CtHelper.exe is often misconceived by many as a virus. However, the file is not a virus; rather, it is an utility file. Nevertheless, various forms of malicious contents are known to attack computers, ranging from malware to trojan to spyware. These files often adopt similar name and file size as CtHelper.exe on your computer system (especially on Windows). As such, it could cause significant damage to your computer, in the guise of being a CtHelper.exe file.
In light of the foregoing, malicious files can result in the “Cthelper.exe high CPU” issue, by building up irrelevant entries on the file, which use more CPU space.
While CtHelper.exe file is normally harmless, it exposes computer systems to a host of errors and external attacks, ranging from malware attack to the more significant high CPU error, which can affect the overall performance of a computer system.
In this article, we have compiled some solutions, which can be adopted to fix the issue of “CtHelper.exe high CPU” and other related errors on your computer.
Aside the more significant CtHelper.exe high CPU issue, there are other CtHelper.exe errors, which can disrupt the overall performance and functionality of your system. Some of these errors include:
CtHelper.exe failed
CtHelper.exe application error
CtHelper.exe Not found
CtHelper.exe is not running
Cannot find CtHelper.exe
Some of the above outlined errors are caused by corrupt CtHelper.exe Windows affiliate programs, incomplete installation of Sound Blaster, malware or trojan attack and more.
However, as emphasized above, the most notorious of these errors is the CtHelper.exe high CPU issue. You can try the methods listed below to fix it.
How to fix CtHelper.exe high CPU issues
Method 1: Disable CtHelper.exe auto-start function
Cthelper. exe is notorious for dominating a computer’s CPU space. It basically utilizes CPU in excess, and most times, it runs your CPU up to full capacity (100%), thereby inundating your system. To fix this issue and reduce CPU usage, you need to remove the automation capability of the file by disabling it from starting on boot. To do this, follow the steps below:
Boot up your computer system, navigate to the “Start” menu and open it.
Under the menu, select “Run”.
Type in “msconfig” (system configuration utility) in the space provided and click enter.
Navigate to the “Startup” bar and click on it.
Under the options brought forth, locate the CtHelper.exe checkbox.
Clear the checkbox
Press “OK” and exit the utility configuration program.
Restart your system and you are all set.
Upon restart, the CtHelper.exe will not start with your computer and you can rest assure that there will be no unnecessary build up on your CPU.
MalwarebytesAdwcleaner is one of the most reliable malware cleaning tools for Windows. It can be adopted to detect and remove malwares disguising as CtHelper.exe from your system.
Follow the steps outlined below to run the program on your computer system.
Open the program by right-clicking the icon and selecting the “Run as Administrator” option.
Select the “Scan” option to commence the scanning operation.
After the scan, select the “Clean” option
After the clean up, shut down your system and restart it.
The above outlined process should clear any malware on your system, including the one affecting your CtHelper.exe file. Nevertheless, you can try a host of other malware clearing tools like Emsisoft, CCleaner, and others.
Clearing malicious contents on your computer system would normally increase the operability of your system. However, accumulated non-malicious junk files and programs would still be present and this could, in a way or another, result in the CtHelper high CPU issue. Hence, it is recommended you clean up your system.
Method 3: Clean up computer with “cleanmgr” (Disk Cleanup)
Accumulated files and programs could be a pain in the ass. Most of these are usually retained or left over files from web browsers, system or installed apps. If this log of unsolicited files is left to build up, it can disrupt the operability of CtHelper.exe.
With this, the file uses more CPU space than normal, thereby resulting in CtHelper.exe high CPU issue. The in-built tool for cleaning up system log is “Disk Cleanup“.
Follow the steps below to run the Disk Cleanup (cleanmgr) program.
Boot up your Windows device and click on the “Start” button.
Type “cleanmgr” in the displayed box.
On the pop up checkbox options, check the boxes of files you want to clear
If the CtHelper.exe file on your device is occupying excessive CPU space or it encounters other errors, you can easily restore your computer system to an earlier settings.
This will clear recent files and modifications, and restore your system to when everything was working perfectly. This is essentially a Windows function, and you can run it on all Windows devices, ranging from Windows XP to Windows 10.
Follow the steps below to execute the system restore process on your computer system.
Open your computer.
Navigate to the “Start” button and click on it.
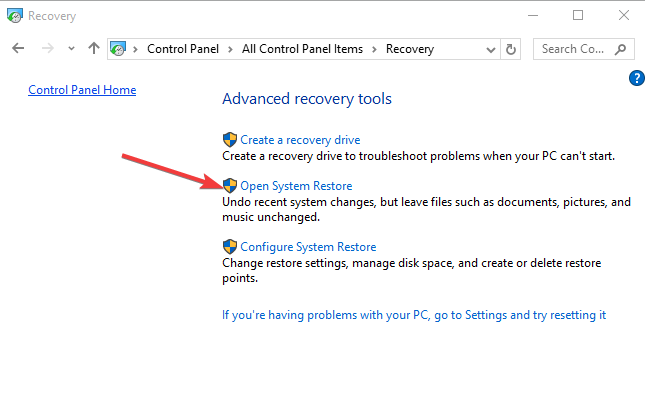
Enter “System Restore” in the search box.
Select “System Restore” on the pop up results.
Input your password
Follow the guidelines in the “Wizard”
Select “Restore”
This action will set your system back to an earlier time, and every unwanted latest files would be cleared. This would, no doubt, reduce your computer’s CPU space.
Method 5: Run SFC scan
SFC is a Windows tool, designed to assist you in scanning corrupt files on your system. As such, SFC is able to check for CtHelper.exe errors, including excess CPU usage.
Follow the steps below to run a system file check.
Power up your system and click “Start”.
Input “command” in the provided space. Don’t press enter yet.
Press Ctrl+Shift and Enter, simultaneously
Select “Yes” in the pop up dialog
Type “sfc/scannow” in the open box and click “Enter”.
Wait (the scan often takes a few minutes).
Follow the command prompt after the scan
Restart your system.
The system checker will scan your computer’s CtHelper.exe file and other programs for errors. Any detected error is fixed and automatically restored by the SFC tool.
You can also try the next method, if this one doesn’t work for you.
Windows is regularly updated by Microsoft, and the primary function of these updates is to improve the overall performance of computers. In this case, installing the latest update could be the ultimate solution to the CtHelper.exe high CPU issue and other related errors.
Follow the steps below to check for updates and install them on your Windows computer systems.
Open your computer and locate “Start”.
Click on the “Start” button and locate “Windows Update” or you can simply search for the keyword – Windows Update.
This will reveal to you if there is any available update. If update is available, select “Install Updates” and wait for it (it takes a few minutes).
Your computer would automically restart upon successful installation.
If the above method is unable to fix CtHelper.exe error and reduce the file’s CPU usage, you can then adopt the next (last) solution.
If, after exhausting all available options, you are still battling with the issue of CtHelper.exe high CPU and other related errors, you can try uninstalling & reinstalling the CtHelper.exe-affiliated program.
Note: Procedures for uninstalling programs differ across Windows boards. As such, each Windows version has its specific means of running this operation. For convenience, we’ll stick with Windows 7.
To uninstall the Sound Blaster on Windows 7, follow the steps below.
Open computer and click “Start”
Tap on “Control Panel”
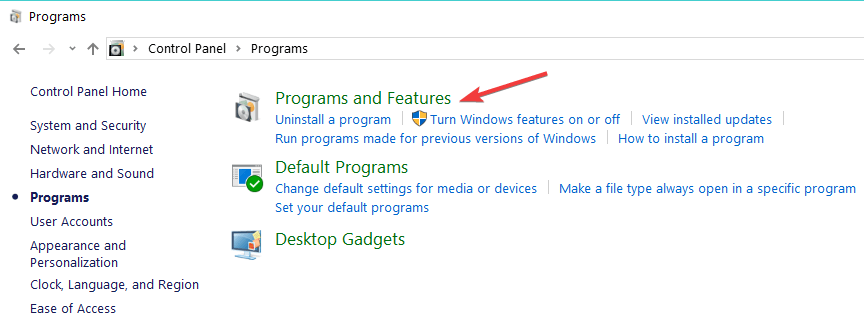
Select “Programs”
Select “Programs and Features”
Locate the CtHelper.exe file proprietary program (Sound Blaster).
Click on the program and select “Uninstall”.
Follow the command prompt to complete installation
Reinstall the program
Conclusion
CtHelper.exe is a utility file, which is an associated function of Sound Blaster; an essential component of a computer’s audio system. The file is known to occupy significant CPU space, which could run up to 100%. This is the basis for the CtHelper.exe high CPU issue.
This post has provided a total of eight solutions, which can be adopted to solve the CtHelper.exe high CPU issue and other related errors on your computer. Depending on your system specs, one or more of the solutions should work for you.
Microsoft hotfixes were meant to provide swift solutions to small but teething issues in various programs to enable users and administrators to restore software’s functionality soonest. As a result, hotfixes have been pretty popular among Microsoft products users.
But now Microsoft has killed this service and users are met by the message “This hotfix is no longer available” when attempting to access any recommended Hotfix.
Now, if you have been left scratching your head looking for a solution, then you are in luck:
There are multiple ways of resolving issues that previously needed a hotfix.
Here I will show you how to overcome the “this hotfix is no longer available” matter and solve any program mishap that traditionally needs a hotfix. Let’s go.
Fix 1: Search for the specific hotfix on the Microsoft Update Catalog
Thankfully, it seems that Microsoft hasn’t removed most of the actual hotfix files from the Microsoft update catalog page. You can thus simply search for the specific hotfix from there and download it.
Here is what I would do it assuming I am looking for the hotfix KB2980746 (for Windows 8.1).
Well, while that’s pretty easy, not all the hotfixes will be available through the update catalog page. But it’s not really a big bother since there are several hacks that are known to help. Here they are.
Fix 2: Upgrade To The Latest Available Updates For Your Microsoft Product
Even though they take a little longer than hotfixes because they are larger, the latest product updates contain almost all the required fixes for the known issues and is an assured way of eliminating common bugs.
Here is how to get the Windows operating system updates:
Windows 7
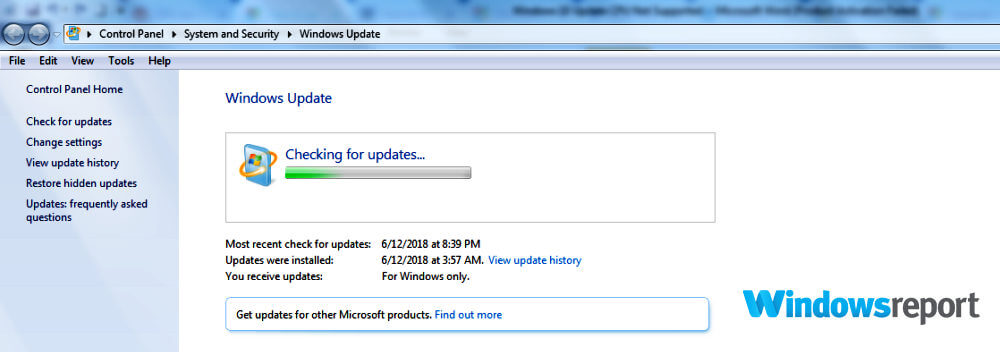
Click Start then go to the provided search box and type “update”.
Click Windows Update.
Click Check for updates. Microsoft Windows will now look for the latest updates for your Windows. Wait until it finishes.
Click Install updates.
Windows 8/8.1
Move the mouse pointer to the bottom-right corner of the screen then click Search.
Click Settings.
Look for the search box area and type Windows Update.
Choose the relevant application (Here I choose browsers assuming I wanted an Internet Explorer hotfix).
The current and previous updates will all be shown. Try to locate the updates you are yet to add and proceed to download and install. Click view more to access everything.
It’s a bit cumbersome but it helps.
Fix 3: Upgrade to Windows 10
Windows 10 includes the most up-to-date patches and many other essential features and you can once and for all eliminate the “This hotfix is no longer available” difficulty by upgrading to it. Price starts at $139 for Windows 10 home edition.
Similarly, you may have to upgrade your office suite to a latter office version to get the best experience. The same applies to every other Microsoft product needing a hotfix.
Conclusion
You can circumvent the “this hotfix is no longer available” challenge by either searching for the applicable hotfix from the Microsoft catalog center or by updating the concerned programs.
Of course, the best solution is by ensuring that your Microsoft software are up to date and that you’re working with the latest editions of your favorite apps.
You’ve received a new Surface for Christmas – or you’ve put one on your wish list and want to be ready for the big day – and now you want to get started with Surface Pen. Surface Pen is Microsoft’s digital stylus accessory for the Surface range which provides an extremely accurate digital inking experience using dedicated internal hardware.
With Surface Pen, you can create digital drawings and take notes with a level of fidelity akin to that of a real pen. The latest Surface Pen has 4,096 levels of pressure sensitivity, so the only thing stopping you from reaching a true like-for-like experience is the smooth feel of the glass touchscreen itself. With use, you’ll soon get used to it though – it’s similar to writing on a whiteboard.
Before following this guide, make sure you read our “How to set up your new Surface” tutorial if you’re only just arriving in the Surface ecosystem.
Pairing your pen
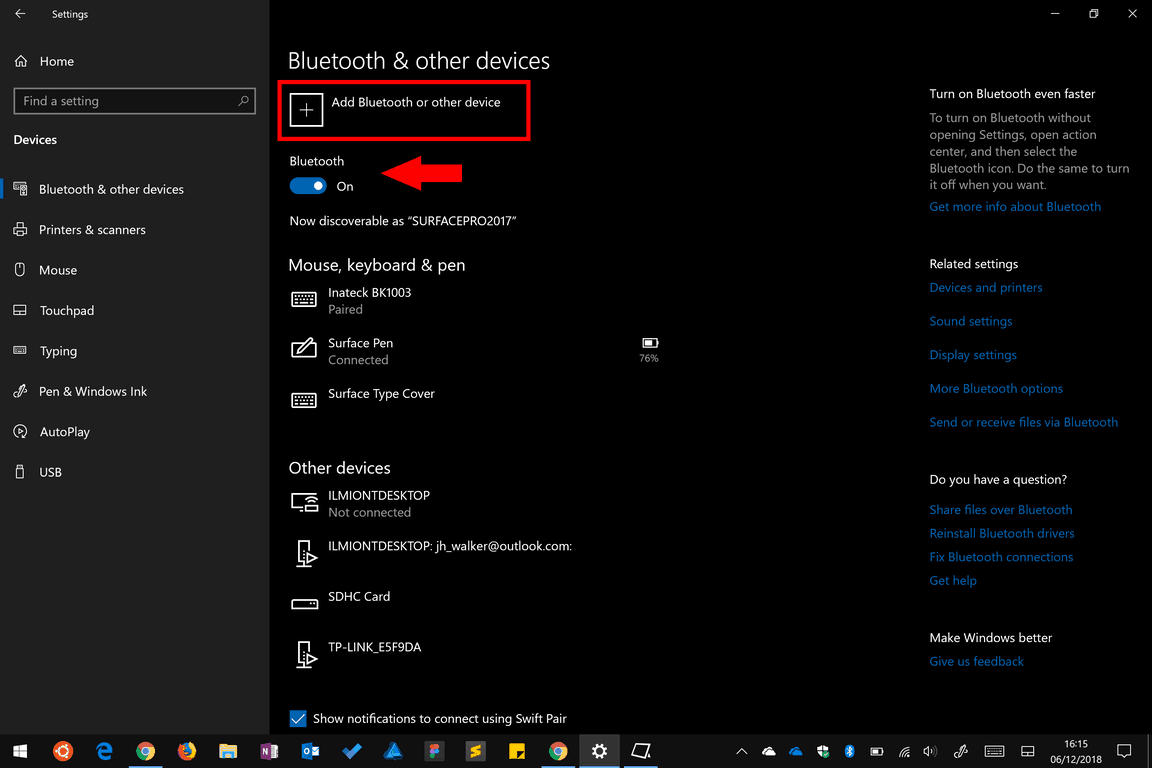
First, the basics. You need to get your pen connected to your Surface. Check Bluetooth is turned on by heading to the Settings app (open the Start menu, type Settings, press enter) and opening the “Devices” category from the main menu.
On the first page that appears, toggle the “Bluetooth” switch to “On.” Now, click the “Add Bluetooth or other device” button at the top of the display. On your Surface Pen, press and hold the top button on the end of the pen until the pen’s indicator light starts flashing green.
Back on your Surface, you should see “Surface Pen” appear in the devices list of your open Bluetooth pairing window. Tap its name to complete pairing.
Get inking
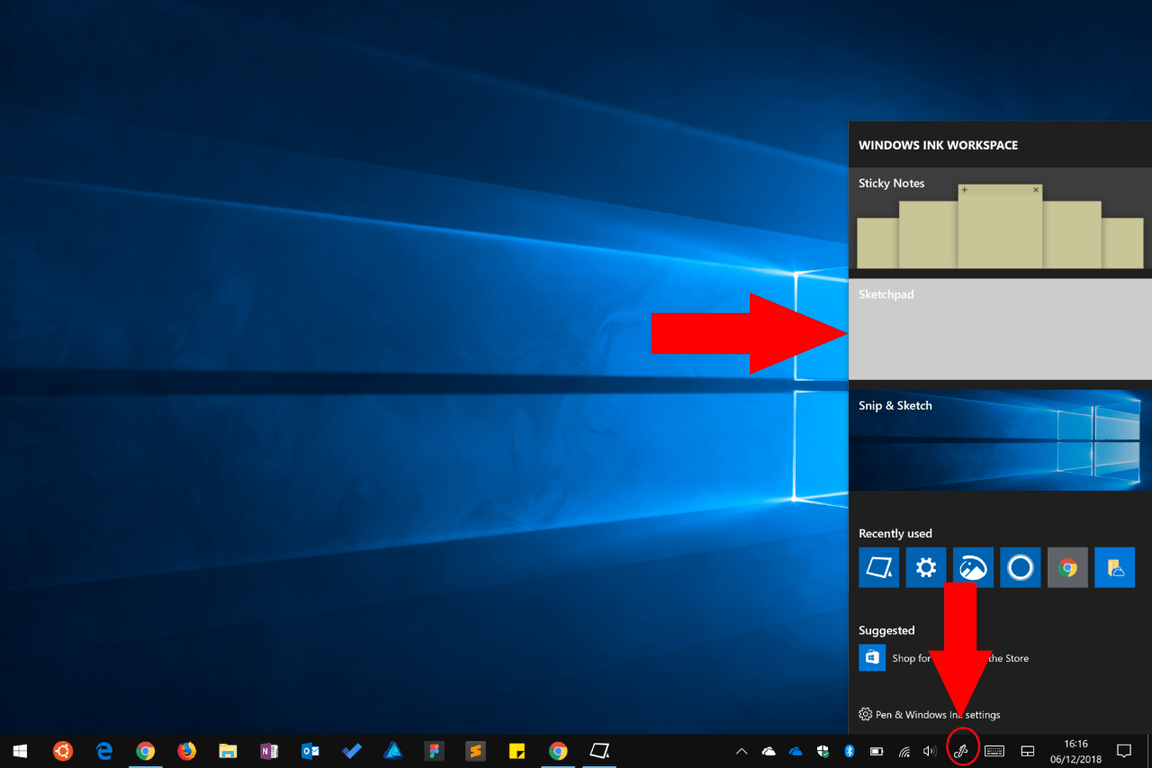
Your pen is now ready to use and you can try it out immediately. Press the button on the end of the pen and you should see Windows Ink Workspace open after a few seconds. This can also be accessed from the icon on the taskbar.
Here, you can select from several built-in experiences. Choose Sketchpad to open a blank canvas where you can immediately start scribbling down your thoughts. If you need to erase anything, just flip the pen and rub out your pen strokes by holding the end button against the display – it’s as natural and seamless as the eraser on the end of a real pencil.
Sketchpad includes the ink toolbar, which is common to all Windows 10 apps using Windows Ink and lets you change the ink colour, pen type and stroke width. Experiment with the options to get familiar with using your pen. Notice how responsive the pen is to different pressure levels and tilt angles.
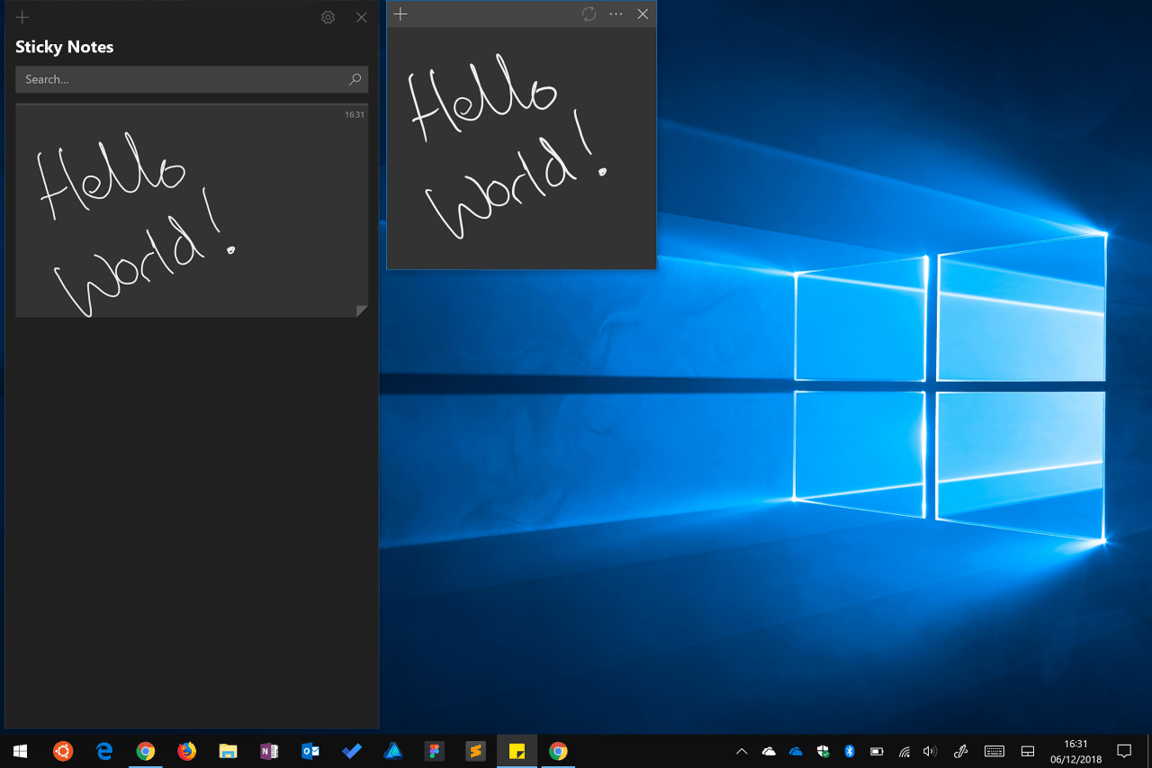
The other Windows Ink Workspace apps include Snip & Sketch, so you can annotate screenshots, and Sticky Notes. This allows you to scribble virtual sticky notes on your desktop, using your pen. With the recent Sticky Notes 3.0 release, they’ll be available across all your devices.
There are many other inking apps available, including Microsoft’s OneNote for note-taking, and Windows Photos and Maps which both support inking experiences. In the Windows Store, you can find more apps which fully support Windows Ink. Your pen will also work with most industry-standard professional graphics packages which support stylus input.
Finally, the pen will work as a mouse cursor in almost all Windows apps – whenever you see a button, you can click it by tapping the pen against it. Holding the barrel button on the pen while tapping will usually display the right-click menu.
Configure your pen
Once you’ve finished your initial experimentation, head back to the Settings app to configure how your pen works. You can customise what happens when you press the end button, as well as the behaviour for different pen features.
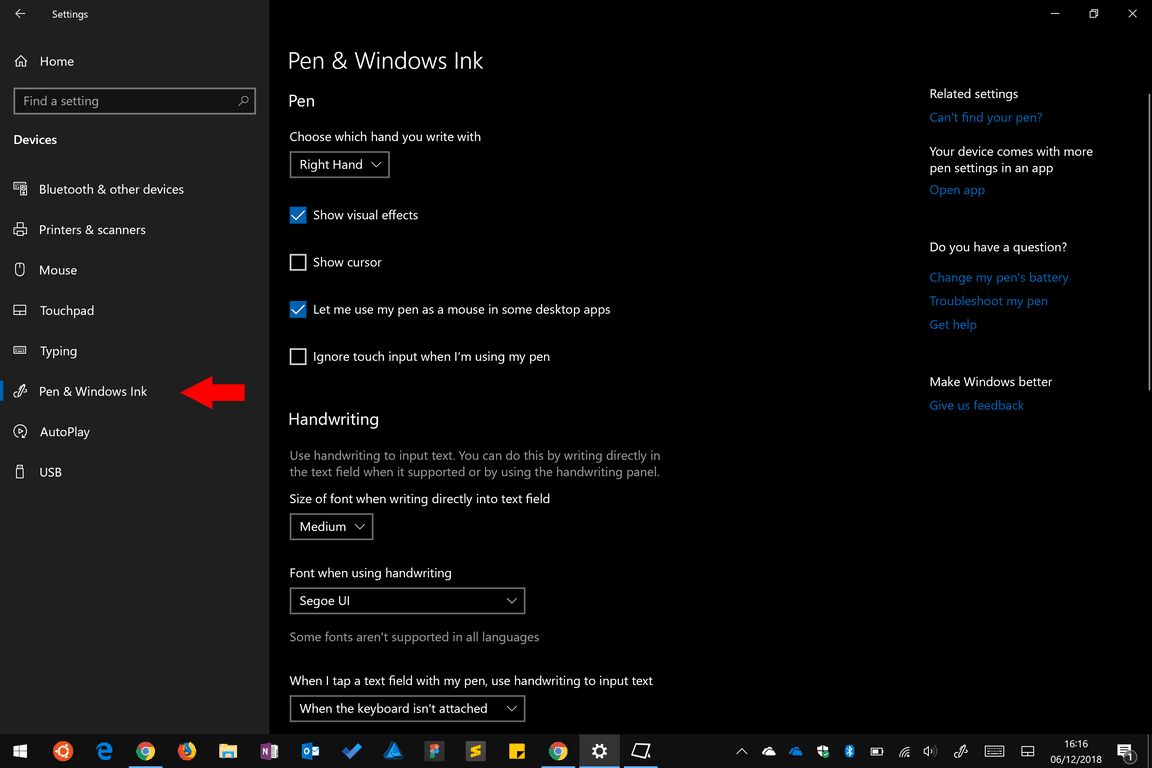
You’ll find the options on the “Pen & Windows Ink” page back in the Devices category. At the top of the page, you’ll first see a dropdown menu that lets you select whether you’re left- or right-handed – this alters how ink flows relative to the direction of the pen.
Next, there’s a series of checkboxes to control the visual experience. You can choose to hide or show visual effects and the pen cursor (we recommend disabling the latter for a more natural experience), as well as whether the pen can act as a mouse in desktop apps. The final checkbox lets you disable the touchscreen when using the pen, but this shouldn’t normally be necessary – the Surface has built-in palm rejection to automatically block touch inputs caused by you leaning on the screen to write.
The next section of the page controls the handwriting experience when you use your pen in regular form fields. Windows 10 now lets you use your pen in any textbox, so you can tap to reveal a handwriting panel you can write in. You can change the panel’s font and choose when it appears – by default, it’s whenever you’re using the Surface without a keyboard, but you can restrict it to only when Tablet Mode is enabled in Windows.
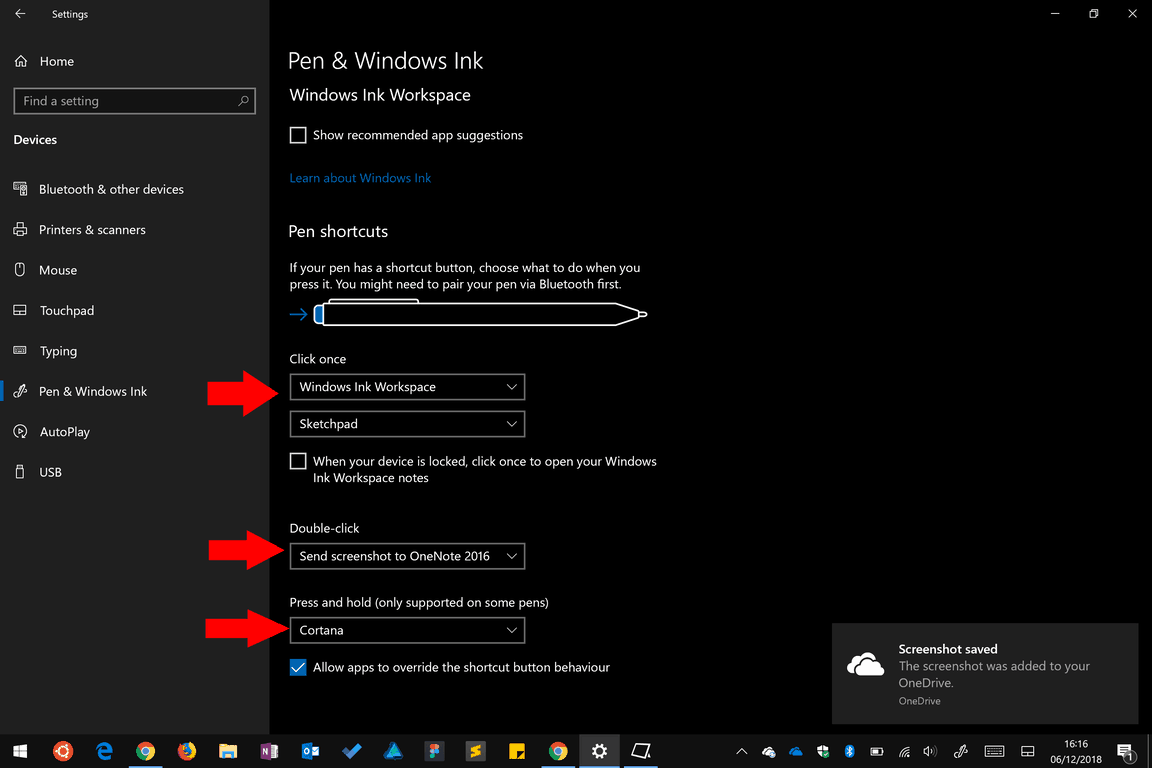
At the bottom of the screen, you can customise what happens when you click, double click or hold the button at the end of your pen. Use the dropdown menus to configure each individual behaviour. The options are launch an app, open the Windows Ink Workspace, open OneNote (Windows Store or 2016) or take a screenshot. Press and hold can also be used to launch Cortana voice assistance.
Advanced pen configuration
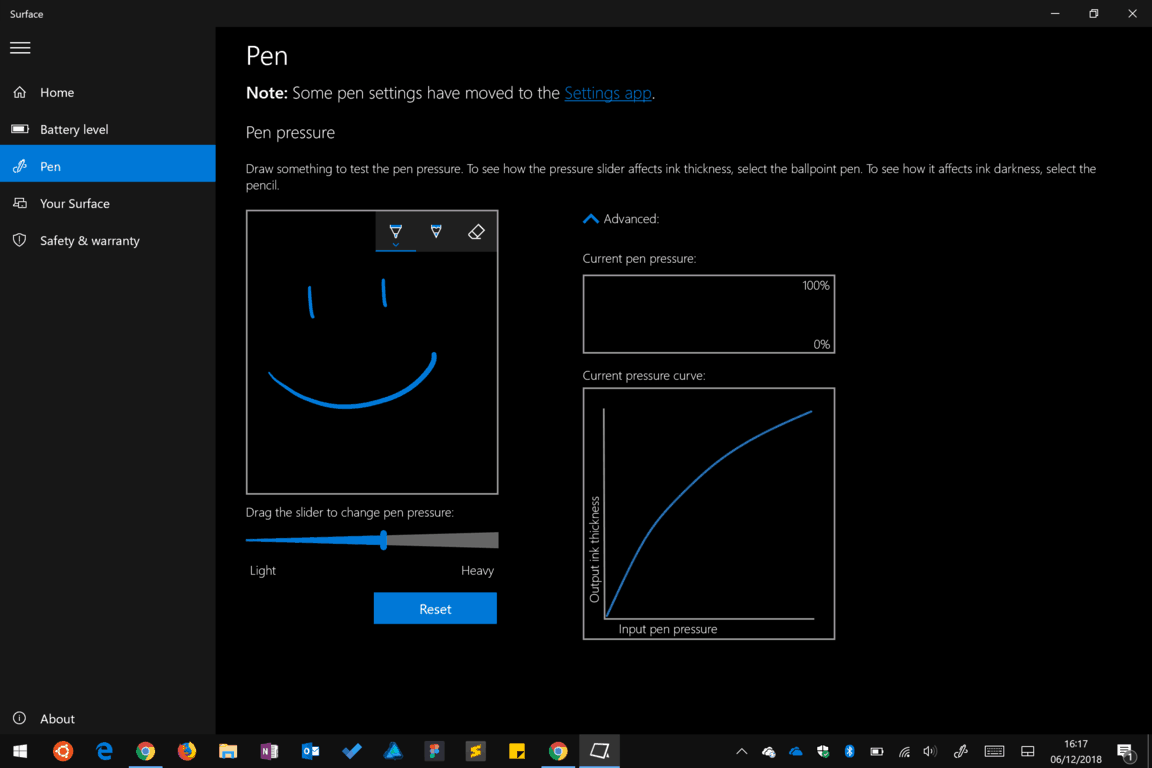
You can customise more pen options using the Surface app which should be preinstalled on your device. Open it up from the Start menu and switch to the Pen page from the navigation menu on the left. Here, you can customise the pen sensitivity to change how “light” or “heavy” it feels. Use the slider and test area to adjust the sensitivity to your liking. If you tap the “Advanced” link, you can view a realtime pen pressure graph to visualise how hard you’re pressing against the display.
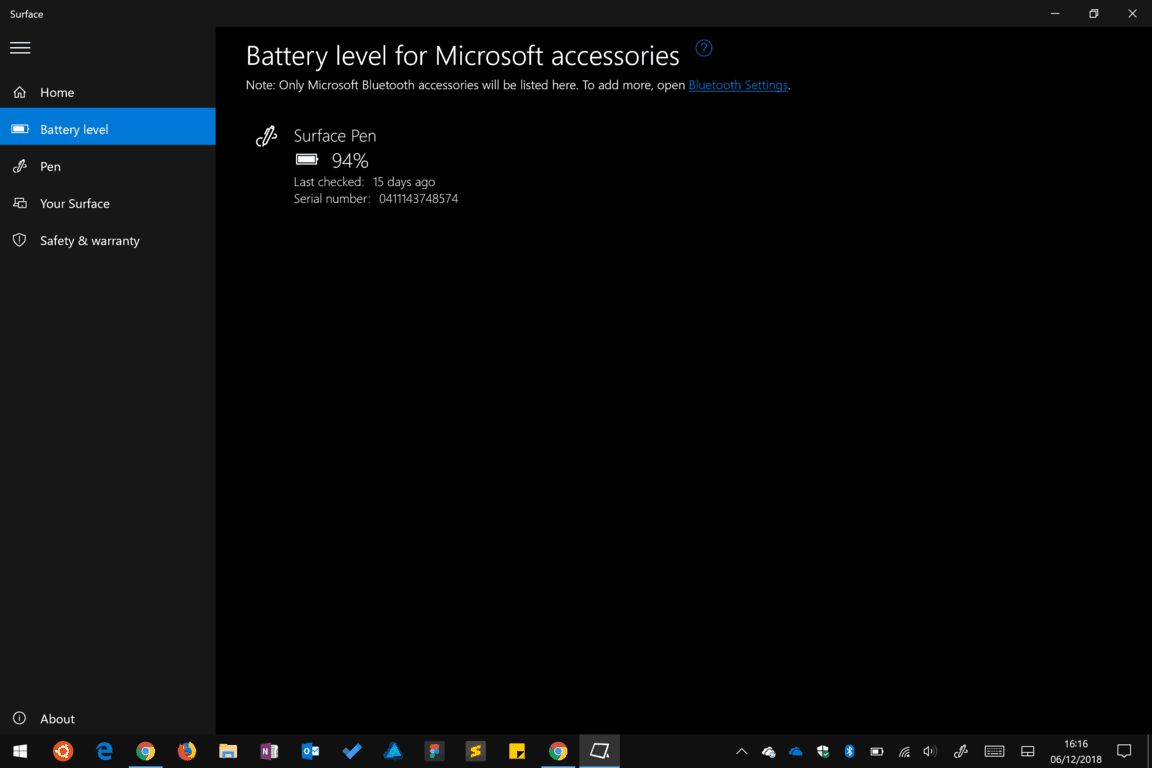
The Surface app also lets you check the battery level of your pen. Open the “Battery level” page to check its current status and view its serial number. Your battery life will vary depending on how often you use the pen, but you can expect to go months or even a couple of years without recharging.
With that, your Surface Pen should now be ready to use. Keep on experimenting using Sketchpad or your favourite app to get familiar with the pen and how it feels. Microsoft is continuing to work on inking technologies and more apps are adding support, so you can expect the experience to get even better with time.
Windows Fax and Scan is an integrated faxing and scanning application. If you have a computer that has a fax modem, you can send and receive faxes and you can also scan documents. If you don’t have a fax modem, you can email scanned documents and forward faxes as email attachments from your computer.
Windows Fax and Scan is included in Windows Vista Ultimate and as an optional component in Windows Vista Enterprise, as well as in all the versions of Windows 7, Windows 8, and Windows 10.
Keep in mind that Windows Fax and Scan is not available on Vista Home or Vista Home Premium.
Fatal error when sending faxes on Windows 10
Sometimes Windows users encountered the “fatal error” while trying to use Windows Fax and Scan and they usually describe it like that: Windows Fax and Scan keeps showing “Fatal error” when trying to scan my documents.
For a fax transmission to succeed, there are some conditions: the fax line should not be busy, in order to transmit the fax there should be a dial tone. Moreover, a fax device should answer the call and, of course, a fatal error should not occur during the transmission of the fax.
What to do if Windows 10 Fax and Scan displays fatal errors
If you are also facing this problem and you are searching for a solution to fix this error, here are a few solutions that may help you fix your problem:
Method 1: Review the activity log
You can find further details and potential solutions. Here are the steps to follow in order to access the fax activity log:
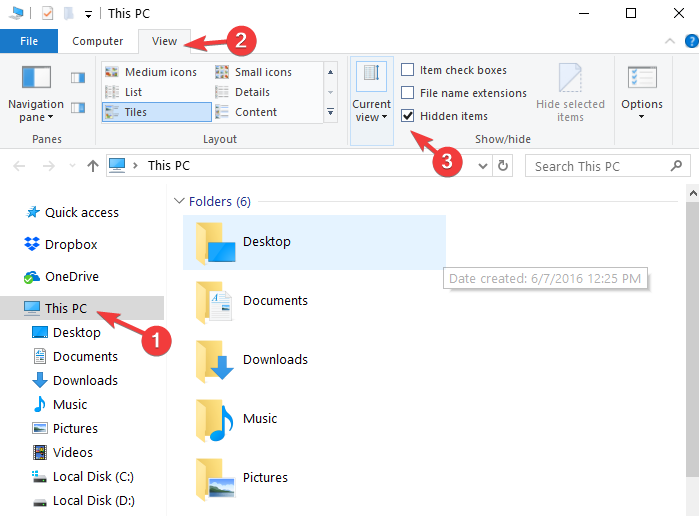
Open Windows Explorer and click on the disk that contains the operating system.
Click the View tab to
Click “Show Hidden Files and Folders”
Close the dialog box.
In Windows Explorer, navigate to %systemdrive%ProgramDataMicrosoftWindows NTMSFaxActivityLog
Check the file InboxLog.txt. Each row in InboxLog.txt is an incoming fax job.
In the row for a given failed incoming fax transmission, review the Status and Extended Status fields and you could find information about the failure.
Method 2: Update your drivers
Download and reinstall the latest device driver updates like the modem and the chipset drivers. If you don’t know how to do that, you can find all the information on the manufacturer’s site.
To automatically install the latest drivers on Windows 10, we recommend using a dedicated third-party tool that scans your device and finds the right drivers within seconds. With a simple click, you can set it to install the drivers and bring your OS to optimal condition.
Most of the time, the generic drivers for your PC’s hardware and peripherals are not properly updated by the system. There are key differences between a generic driver and a manufacturer’s driver.
Searching for the right driver version for each of your hardware components can become tedious. That’s why an automated assistant can help you find and update your system with the correct drivers every time, and we strongly recommend Outbyte Driver Updater.
Method 3: Re-enable Windows Fax and Scan from Windows Features
Some users said that disabling and then re-enabling Fax and Scan helped them fix fatal errors. Here are the steps to follow:
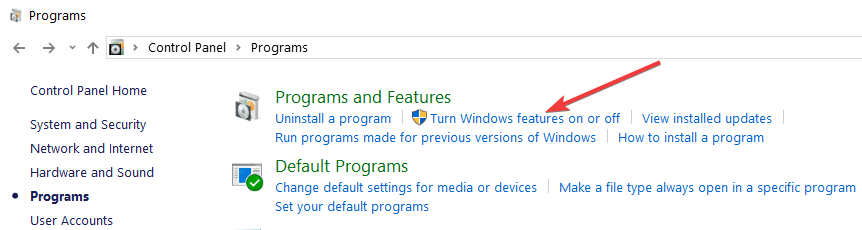
Click the Start button, Control Panel, and then Programs
Turn Windows features on or off
To turn Windows Fax and Scan feature off, you need to:
Expand Print and Document Services
Uncheck Windows Fax and Scan
Click OK and restart the computer
To turn Windows Fax and Scan feature on:
Select the check box next to Print and Document Services
Check Windows Fax and Scan
Hit OK and reboot your computer
Method 4: Verify that the fax server is correctly configured
There are two ways of sending a fax using the Windows Fax and Scan feature: you can use a fax device attached locally or use a fax server.
For using a fax server you need to use a computer running Windows Vista Enterprise, Windows Vista Ultimate, Windows Vista Business, or Windows Server 2008.
To confirm that the fax server is configured correctly and it can send faxes, you need to:
Send a test fax.
Be sure that the server is configured to send. Here are the exact steps to follow:
Open Fax Service Manager > hit Start
Point to Administrative Tools > click Fax Service Manager
In the left pane, right-click Fax > hit Properties
On the General tab, confirm that the Disable transmission of outgoing faxes check box is cleared so that faxes can be sent.
Confirm that the device is correctly configured:
Open Fax Service Manager > click Start
Go to Administrative Tools > Fax Service Manager.
In the left panel, double-click Fax and then ouble-click Devices and Providers > click Devices.
Confirm that there are devices listed under Devices.
In the right pane, right-click the device and then do the following:
Click Properties, and then confirm that the values for Description, Transmitting Subscriber Identification (TSID), and Called Subscriber Identification (CSID) are correct.
Confirm that Send is enabled.
Confirm that outgoing routing is configured correctly:
Open Fax Service Manager > click Start
Navigate to Administrative Tools > Fax Service Manager
In the left pane, double-click Fax > go to Outgoing Routing
In the left pane, click Groups, and then in the right pane, verify the device or devices listed.
In the left pane, click Rules, and then in the right pane, verify that the country/region code and area code are correct, and that the rule is being applied to the correct device or routing group
Confirm that the Fax service is running. You can manage the Fax service using Fax Service Manager or the Services snap-in. To confirm that the Fax service is running using Fax Service Manager you should follow the steps:
Open Fax Service Manager > click Start
Go to Administrative Tools
Click Fax Service Manager
In the right pane, right-click Fax, and then view the menu.
Confirm that Start is grayed out and that Stop is active on the menu.
Remember that you cannot install or configure fax components unless you are a member of the Administrators group or you have been given the authority.
Hopefully, one of the four methods listed in this article helped you solve this annoying problem affecting Windows fax and scanning. Let us know in the comments section below if you managed to solve this fatal error and which of the solutions listed here worked in your case.
As Murphy’s Law suggests, if something might go wrong, it will. And Windows occasionally has a mind of its own, with all those critical errors, BSODs, and crashes. Now, the only reliable way to find out what’s causing those is with the Windows Event Log.
If a critical error strikes, the culprit is to be found in the log files with the EVTX extension. However, there is not a lot use of those if they get corrupted.
How to fix corrupt Windows Event Log (EVTX file)
The Windows Event Log is the primary and only diagnostic tool a knowledgeable user needs to find out about system issues. Inspecting the log thoroughly will lead to determining the culprit for a variety of critical system issues.
However, if your PC shuts down before the logs are written, the Windows Event Log file will get corrupted. And, thus, unusable.
You can always delete the corrupted file and wait again for the error to appear. On the other hand, you can try and repair the corrupted EVTX file or export it as a CSV file, but that can take some expert knowledge. There are a few tools which allow to extract the binary values from the corrupted file and allow you to access it. They require Python, which might be an issue for an uninformed user.
So, the best way to deal with the corrupted files is to just remove them and allow the system to make new logs. These can be manually deleted, so we recommend a batch file (script) to clear all of them. You can also try with the Disk Cleanup built-in utility, but the batch has proven to be a more reliable way.
You can download the batch file, here. Extract the file to your desktop, right-click on it, and run it as an administrator. Once you run it, the script will erase all logs from the Windows Event Log. Next time you run into a problem, the EVTX log file won’t be corrupted.
With that said, we can conclude this article. If you have any questions or alternative ways of retrieving data from corrupted Windows Event Log files, do tell us in the comments section below.
Pop ups are relatively common features of Windows computers today. More often than not, a pop up serves as a notification or short cut on a computer’s screen, and this would normally go away on its own or simply by clicking exit. However, at times, due to a host of individual or combined factors, a pop up window won’t go away.
If you are having this problem, you are in the right place. This article is developed to proffer solution(s) to the pop window won’t go away problem.
Basically, pop ups are some kind of unsolicited messages or notifications from computer programs (system and installed programs). This is inclusive of web browsers like Chrome, Firefox and others programs that use the Internet. Most times, these pop ups request your approval or decline, and at times, it could constitute a lot of nuisance.
This becomes worse when a pop up window won’t go away, and no matter how hard you try, it just stares right back at you on your computer screen.
While there are many factors that could make a pop up window not to go away, the most significant of these factors is malware or virus attack, which disrupts computer system’s performance.
Other factors, which could be responsible for the pop up window error include incomplete installation of program(s), high CPU (frozen system), apps running in background, corrupt .exe files and more.
Nevertheless, this article has provided some of the best, proven, solutions to resolve this issue.
This is the basic method for shutting down a program, and it can also be employed to close a pop up window. To force-close a pop up window on your computer, simply press the Alt + F4 keys.
If a pop up window won’t go away as a result of a minor technical issue, then force-closing it should ensure it doesn’t show up again. However, if the error is caused by more severe factors like file corruption, system malfunction or malware attack, this method might be ineffective. In this case, you can try the next solution.
Solution 2: End background process
A program running in the background might become infected, thereby resulting in a pop up window that won’t go away.
To end such infected process, follow the steps outlined below.
Press Ctrl + Alt + Delete
Click the “Task Manager” icon.
Select “Processes”.
Right-click on an infected process and select “End process”.
If the pop up window won’t go away, try the next solution.
At times, a pop up window won’t go away from your home screen simply because of a minor system malfunction, which could range from clogged up files to a technical glitch. In this case, a simple reboot is usually the ultimate solution. System reboot automatically clears off temporary files from your computer, and this, most times, fixes the pop up window won’t go away error.
To reboot your computer system, simply restart it or outrightly power it down and power it up again. If this action fails to remove the pop up window, you can try the next solution.
Solution 4: Use Windows’ built-in maintenance function
This solution is specific to Windows users, who are having the issue of pop up notifications that won’t go away. Windows maintenance function should clear the notification pop ups from your screen.
Follow the steps below to execute this function:
Click on the “Start” button.
In the search box, input the keyword – Control Panel and press “Enter”
Navigate to the top right of your computer screen and locate “View by”.
Change the default “View by” option from “Category” to either “Large Icons” or “Small Icons”.
Click on “Security and Maintenance”.
Select “Change Security and Maintenance Settings”.
Navigate to “Maintenance Messages” and locate the “Windows Backup” checkbox.
Uncheck the box.
Save your changes by selecting “OK”.
Reboot your computer system.
After your computer has restarted, repeat the steps up to the sixth step.
At the seventh step, under “Windows Backup” checkbox, check the box.
Select “OK” and restart your computer.
Note: This process is specifically recommended on Windows 10. If, after trying this method, your pop up window still won’t go away, you can try the next solution.
Solution 5: Restore your system to an earlier time
System restore could be the ultimate solution to the pop up window won’t go away error. This is because; it restores your system to an earlier time, before the error.
To run a system restore, follow the steps outlined below.
Click the “Start” button.
Input the keyword “restore or system restore” in the space provided.
On the pop up options, select “System Restore“.
Click on “Next”
Select “Next” again.
On the displayed window, click “Finish”.
This action will automatically restart your system, and your computer will be restored to an earlier time; a day, two days or more. If the system restore process fails to permanently remove the pop up window, proceed to the next solution.
If a pop up window won’t go away, the most likely problem is virus or malware attack. Hence, the way to go is to run a scan and clear off malware, and viruses from your system. Two recommended tools in this regard are Malwarebytes and Adwcleaner. These tools will free up your system and remove the malignant pop up window from your screen.
You can try the next solution, in case the problem is not related to malware or virus attack.
Solution 7: Install Windows Updates
Installation of latest Windows update will improve the operability of your computer. As such, it will repair some corruptions on your computer system (even the pop up window won’t go away error).
Basically, Microsoft occasionally notifies users of new updates. However, you can check for updates and install them directly. To do this, follow the steps outlined below.
Click “Start”.
Type “Windows Update” in the searchbox and click Enter.
Install all available updates (if any), by clicking on Select “Install Updates”.
Wait for a couple of minutes for all the updates to install.
After successful installation, Windows will automatically restart.
Installing all available updates on your Windows computer should remove the pop up window from your screen. If this process is ineffective against the pop up window error, you can try the next method.
Solution 8: Uninstall & reinstall programs
If a pop up window is associated with a corrupt or damaged app, the ultimate solution might be to uninstall the app (and reinstall it), provided all other options have been exhausted.
You can uninstall any program on your computer by following the steps below.
Click the “Start” button.
Tap on “Control Panel”.
Select “Programs”.
Under “Programs, click “Programs and Features“.
Locate the affected app and click on it.
Select “Uninstall” and let the process run.
After uninstalling the program, you can download it again and reinstall it.
To uninstall a program on Windows 10, you can also follow the simple steps outlined below:
Click on “Settings” and select “Apps”.
Under “Apps”, click “Apps & Features“.
Click on the affected/desired app or program.
Click the “Uninstall” button
Confirm the uninstall by clicking on the pop up “Uninstall” key.
Follow the prompt command to complete installation
Download & reinstall the program.
Conclusion
Pop ups are common occurrences on computer systems today, and they are especially common on systems with web browsers and internet connections. At times, a pop up window won’t go away no matter how hard you try to close it. This is caused by many factors.
In this article, we have compiled some of the best solutions to fix the pop up window won’t go away error on your computer system. Essentially, at least one of the above outlined solutions should permanently remove a stubborn pop up window from your computer screen.
Imagine all your in-game progress lost in a matter of seconds. Hours of playthrough lost due to a game save corruption! Though not that common, corrupted game save files is still a possibility, and you will need to fix them.
And if that’s not a good enough reason to act with caution, we don’t know what it is. Either way, if that happens and you can’t play games, you can still (sometimes) fix a corrupted game save file in Windows.
What causes a save file to corrupt?
Here are a few reasons the saved files corrupt:
Abrupt shutdown: Abrupt shutdown is the primary reason behind the problem because it affects the process, and some vital piece of data goes missing.
Malware infection: Malware or virus can also affect the game saves, and render them unreadable. You could use a reliable third-party antivirus to scan for these.
Missing or corrupt app files: When vital app files are missing, it would affect the app’s functioning and process of saving the progress.
How do I fix corrupted game saves?
1. Scan for malware
Press Windows + S to open Search, type Windows Security, and click on the relevant search result.
Click on Virus & threat protection.
Click on Scan options.
Choose the Full scan option and then click on Scan now.
Often malware or virus affects the game files and leads to a corrupted state. To fix things, your primary approach should be eliminating or quarantining the threat. Remember, this will not fix the file but will prevent further issues.
To perform this, you most probably need an effective antivirus with strong detection tools. Hence, it’s advised to use professional antivirus technology like the one below.
Launch Steam, navigate to the game Library, right-click on the affected game, and select Properties.
Go to the Installed files tab, then click on Verify integrity of game files, and wait for the process to complete.
When facing corrupted game save files on Steam, a quick solution is to verify their integrity. It will help restore any critical files triggering the issue and should get things running.
3. Re-establishing mods
The other reason falls to mods. Many games have an active community that puts out tons of mods. This makes it harder for the game to configure a save file. Much harder than the vanilla version.
So, removing and re-establishing mods might help. This also helps fix a broken save file in Sims 4.
Press Windows + R to open Run, type cmd, and hit Ctrl + Shift + Enter.
Click Yes in the UAC prompt.
Now, paste the following commands individually and hit Enter after each for the DISM tool:DISM /Online /Cleanup-Image /CheckHealthDISM /Online /Cleanup-Image /ScanHealthDISM /Online /Cleanup-Image /RestoreHealth
Next, execute the following command for the SFC scan:sfc /scannow
Once done, restart the computer.
Corrupt system files may also lead to issues with game saves by either conflicting with the process or preventing it altogether. A quick solution here is to run the DISM tool and the SFC (System File Checker) scan.
5. Save game data locally
A slow Internet connection or intermittent loss of network connectivity can affect the game saves done on the cloud. When you lose connectivity, some files may not be uploaded, corrupting the entire game save.
So, if you don’t have a reliable Internet connection, we recommend saving the game data locally on the PC. This will also help load things quickly, though it takes up significant disk space.
To avoid this problem in the future, make sure not to pile up saves for a single game (20 should be the top limit). Furthermore, backup saves regularly and avoid relying on the autosave feature. Creating game saves manually is the way to go!
Don’t forget to tell us about the exact game that is bothering you with the corrupted save, and we’ll do our best to help you. The comments section is just below.
The most used Network troubleshooting tool for IT professionals is provided by a first-party. Yeah, Microsoft Message Analyzer is commonly used to monitor and resolve network errors. If you fall into that group, you must have run into occasional errors.
In this guide, we listed some common solutions, but for the thorough and in-depth explanation, check Technet and elaborate on your problem. They usually help users in need.
Steps to fix Microsoft Message Analyzer errors
Solution 1 – Load Windows Parser
Let’s start by loading Windows Parser from the News menu in the Message Analyzer. For some reason, the automatic update of the Windows Parser isn’t enabled by default.
Here’s what you need to do:
Open Microsoft Message Analyzer.
Choose the News.
Select Asset Manager under Tools.
Click Sync all displayed items.
Solution 2 – Increase the number of filter drivers
Some users managed to resolve certain errors by increasing the value of filter drivers you can load. By default, this value stands at 8 and we recommend increasing it to 14.
Here’s how to increase the number of filter drivers via Registry Editor:
Open Registry Editor.
Navigate to HKEY_LOCAL_MACHINE\SYSTEM\CurrentControlSet\Control\Network
Change the MaxNumFilter value from 8 to 14. If there’s no dword MaxNumFilter, create it manually.
Solution 3 – Reinstall Message Analyzer
Finally, the usual troubleshooting step is to reinstall and re-configure the Message Analyzer. Don’t forget to clear all locally-stored configuration files and start from scratch. Some users had better luck with an older Windows iteration and downgraded from Windows 10/8 to Windows 7.
With that said, we can conclude this article. The best way to resolve any Microsoft Message Analyzer errors is to ask good folks at Technet as there’s a lot of IT professionals there, always willing to offer a helping hand in need. Don’t forget to share your experience with Message Analyzer errors in the comments section below.
If you are getting blank dialog boxes on your Windows 10 computer, this article will provide you with methods to fix it. Normally, a dialog box is designed to facilitate decision making on your computer system. It comes up like a pop up window, either to request your approval/decline on a task or to simply present you with options on the execution of a task (or tasks).
At times, a dialog box comes up empty, with no option or information whatsoever; just blank.
Various reasons could be responsible for this error. However, the most notorious ones are those associated with Windows updates. Some of these include:
Incompatible graphics driver after Windows update
Outdated driver(s)
Incompatible Antivirus or other security programs
Bug attack after a system update
Corrupted system file after an update
Typically, a dialog box might come up empty as a result of one or a combination of some of the above outlined technical and security errors. In this post, Windows Report team has compiled various levels of solutions to help you resolve the Windows 10 empty dialog boxes error.
5+ solutions to fix Windows 10 empty dialog boxes
Solution 1: Use a third-party system optimizer
This type of program has built-in functions designed to fix Windows errors and improve the performance of your device. Moreover, it frees up space on your disk, removes malware, and restores the registry values to their default settings.
Corrupted system files are often the cause of Windows errors such as empty dialog boxes. With the help of professional repair software, you can simply replace broken files with healthy ones within just a few minutes.
Solution 2: Restart your PC
Restarting a computer system is a basic troubleshooting method (probably the most basic) used to fix various forms of system errors. This method can be used to fix the Windows 10 empty dialog boxes error.
Rebooting (or restarting) a system clears off temporary files from such computer. It also closes running tasks, which could be the reason for the empty dialog boxes error. However, simply restarting a computer system to fix this error is usually ineffective; therefore, it is a necessity to use a repair tool.
Solution 3: Use Windows 10 built-in repair tool
This tool serves as the first line of defence, to combat all forms of corruptions, damages and errors on your system. The error of empty dialog boxes is no different. If, while operating your computer system or using a program, a dialog box comes up blank, then you should try the system Repair option.
Provided the error is only a minor technical issue and not caused by any serious corruption or incompatible driver, the repair tool should effectively fix the error.
To execute the Windows Repair function, follow the steps outlined below:
Note: The guideline below entails steps for repairing an error or corruption associated with MS Office.
Close the empty dialog box by clicking Alt + F4.
Navigate to the “Start” button and click on it.
Select “Control Panel”.
On the displayed window, select “Programs”
Under “Programs”, click on “Programs and Features”.
On the displayed window, locate “Microsoft Office” and click on it.
Select “Change” > “Repair”.
Complete repair by following the command prompt on your screen.
Close the window and navigate to MS Office’s location.
Open it and execute a command to bring up the dialog box.
Check if the problem is resolved.
This process can be applied to all programs (system and installed) on your Windows 10 computer. To run the repair function on any program, follow the steps outlined below:
Under “Programs and Features”, locate the program you want to repair and right-click on it.
Click “Change” > “Repair”.
Complete repair by following the on-screen command.
Close the window.
Navigate to the repaired program’s location and click on it.
Execute a command to bring up the dialog box and check if it is no longer empty.
If there is no form of severe corruption, outdated system driver or acute bug attack, this simple repair should resolve the empty dialog boxes error. In case the problem persists, try the more advanced process in the next method.
Solution 4: Uninstall & reinstall affected program
As far-fetched as this method may sound, it might be the ultimate solution to the empty dialog boxes issue. This method is, however, only applicable if the error is specific to a particular program.
To uninstall a program on your Windows 10 computer, follow the steps below:
Close the empty dialog box by clicking Alt + F4.
Click on “Start” and type “settings” in the searchbox.
Select “Settings” from the displayed options.
On the displayed window, select “Apps“
Under “Apps“, click on “Apps & Features”.
Locate the program you want to uninstall and click on it.
Click the “Uninstall” button
On the pop up window, select “Uninstall” to confirm uninstallation.
Follow the on-screen command to complete the process.
After the process, you can then navigate to Microsoft Store (or the program’s official download site) to download and install a new app afresh. If this doesn’t fix the issue, you can try the next solution.
Restoring your system to an earlier time will remove recently installed updates, apps, drivers and others. This makes a system restore more effective than ordinary reinstallation, in fixing errors on computers.
To run a system restore process, follow the steps below.
Click on “Start” > “Control Panel”.
Locate “Recovery” and click on it.
Select “Configure System Restore” and click on “Configure”.
Select “Turn on system protection” (if not already on) to display restore points.
Navigate back to “Recovery” under “Control Panel”.
Select “Open System Restore” and click “Next”.
Select the recent apps, drivers, files and updates on the displayed list.
Click on “Scan for affected programs” and modify the date/restore point (back or forth), if needed.
Click “Next” and select “Finish”. This action should auto-restart your system.
After your system has restarted, reinstall any affected app. The dialog boxes should now come up just fine. However, in case your dialog boxes are still coming up empty, you can go for the last straw; the ultimate solution.
Solution 6: Clean install Windows 10
This process is the last resort and it should only be executed after all available options have been exhausted. Clean installation of Windows 10 might look too advanced for an issue as trivial as empty dialog boxes.
However, this the ultimate solution for resolving the background cause(s) of such error, as well as other inherent errors on your system.
To run a clean installation of Windows 10 using Media Creation, follow the steps outlined below:
Note: This action will clear off every app, driver, setting and all other installed programs, with the exception of system apps and personal files. Hence, it is strongly recommended that you back up every essential program and setting on an external storage medium.
Ensure you have a stable internet connection; preferably to a Wi-Fi network. This is to facilitate the downloading of the Media Creation tool.
Download the tool from Microsoft Website.
Open the tool and “Accept” the licence terms (upon review).
On the displayed window, select “Keep personal files”.
Select “OK” to commence the clean installation.
After clicking “OK”, the rest of the process is automated.
After the new Windows 10 installation, install missing drivers manually under “Settings”.
Reinstall apps from Microsoft Store or other official download sites (for utility and social apps).
With the successful implementation of the clean installation, you can rest assured that your “Windows 10 empty dialog boxes” error (and other errors) would be resolved and your system will come up clean.
We recommend using a reliable program that installs Windows drivers automatically and prepares driver backups. Blank dialog boxes can be caused by outdated drivers too. The chances to experience these errors again with driver updater software will be minimal.
Windows 10 empty dialog boxes could be the aftereffects of an isolated error (corruption or incompatibility of a driver), which affects only a specific program. Conversely, it could be a general issue that affects the whole system. Either way, it has the propensity for causing further damage if left unfixed.
This post has provided several solutions, ranging from the basic troubleshooting method (rebooting) to the most advanced method (clean installation of Windows 10). One of these solutions should be ideal for you, in fixing the Windows 10 empty dialog boxes error.
If you have been receiving the error “Windows 10 update CPU not supported” when attempting to upgrade to Windows 10, don’t fret because you are not alone.
Well, the problem has been a bother since the earliest days of Windows 10 but now there are multiple solutions. And there is a good chance that one of them will work for you.
In this guide, we will take you through the foolproof solutions that work for the Windows 10 Update CPU not supported issue when updating from Windows 8/8.1. Let’s delve right into this.
Steps to fix Windows 10 Update CPU not supported
Fix 1: Check Windows 10 hardware requirements
Like every other Windows, Windows 10 may not install on machines which doesn’t meet its least hardware requirements (or may install but run inefficiently) so you may have to reconfirm your machine’s hardware specifications before anything else.
Specifically, your CPU should have a minimum speed of 1 GHz. You should thus start by going to your windows properties windows to verify this.
Steps to follow:
Windows 7
Click Start then type “system” in the provided search box from the menu.
Click System (near the top of the results)
The system specifications are displayed.
Windows 8
Press the WIN key and the pause break key simultaneously on the keyboard.
The system specifications are displayed.
You will, of course, need to upgrade the CPU before restarting the update. Otherwise, skip to the rest of the suggested fixes if your CPU turns out okay.
One of the causes of this error is a bug in the compatibility appraiser that comes with Windows 10 update files. Microsoft has since released the relevant updates to upgrade the tool and the error should disappear as soon as you run the updates.
Here are the required updates depending on the Windows you are currently running:
Click Start then type “update” in the provided search box from the menu.
Click Windows Update (near the top of the results)
In the subsequent pane click on the Check for updates. Windows will look for the recent applicable updates for your PC. Wait as it may take some moments.
To progress, click the message that pops up alerting you that some optional/ important updates are available, or requiring you to review optional/ important updates.
In the displayed list (important updates), select the check box next to KB/2952664 then click OK (important updates).
Lastly, click Install updates.
Windows 8/8.1
Point to the bottom-right corner of your screen with your mouse then click Search. You can also swipe into Windows from the right end of your screen then tap Search.
Click/ tap Settings.
Type Windows Update in the search dialog box area.
Click/ tap install optional updates.
Click Check for updates and wait.
The various updates will again be shown. Click/tap the message to access all the updates.
In the displayed list (important updates), select the check box next to KB/2976978 then click/tap OK. Finally, click Install updates
Wait for the update to run then reboot your computer. You can now turn on the PC and make a fresh attempt to update to Windows 10.
If all went well, the system should no longer report this error.
The NX technology allows the processor to segregate areas in the memory where program code including Windows can or cannot run and can cause the annoying Windows 10 update CPU not supported error.
The solution is to disable the technology either via the settings or the BIOS.
Turn Off The NX Bits from the Windows settings
On Windows 7:
Click start then type “control panel” in the provided search box from the menu.
Click control panel (near the top of the results).
Click system and security.
Click system in the next window.
Click advanced system settings.
Click the advanced tab.
Now select performance.
Click data execution prevention option.
Choose turn on DEP for all programs and services except those I select.
Click ok now to close.
Retry the Windows 10 installer.
On Windows 8 or 8.1:
Pressthe WIN key and the pause break key simultaneously on the keyboard.
Click the advanced system settings tab on the left-hand side.
Click the advanced
Now select performance.
Click data execution prevention
Choose turn on DEP for all programs and services except those i select.
Turn Off The NX BitsFrom BIOS
For most machines, changing the setting from the BIOS works like a charm. Here are the steps to boot to the BIOS:
Turn off your computer.
Press the power button to bring the computer on. Start pressing the correct key immediately the manufacturer logo has appeared and until the BIOS screen appears. For example, for HP/Compaq computers, pressing F10 takes you to BIOS. For others, it’s the F2/Esc keys.
Locate for the NX settings under the BIOS advanced configuration
Enable this setting by pressing the indicated key to change.
Save the changes as you exit BIOS.
Proceed to boot the computer and try to update.
TIP: NX can also be labeled EDB (execute disabled bit), Execute Disabled Memory Protection, EVP (enhanced virus protection), or even No Execute Memory Protect so enable whatever option your system provides. Some laptops/desktops don’t provide the enable NX settings BIOS option so you may have to retry the earlier method or raise a ticket with the manufacturer.
Hopefully, the Windows 10 update program will be happy with your CPU so restart the upgrade.
Sometimes the windows update program will refuse to work because of an overclocked CPU.
To maneuver this problem, you will need to reverse the overclocking.
Here are the steps:
Turn off your computer.
Press the power button to bring the computer on and then repeatedly press the correct key immediately the manufacturer logo has appeared (Until the BIOS screen comes up). The right keys are still as aforementioned.
Look for the option to reset the BIOS back to the factory settings.
Save the changes as you exit.
Restart the Windows 10 upgrade process.
Wrapping It Up
The Windows 10 update CPU not supported error can be caused by an unsatisfactory CPU (below 1.0GHz) so start there. Other causes include an outdated Windows 7/8.0/8.1 so try to install the highlighted updates.
Other triggers include overclocking your CPU or disabled NX bits so also try the specified solutions if the first ideas fail.
Raspberry Pi community was often struck by the lack of proper troubleshooting steps for certain issues. Of course, there’s a good probability the OEM puts all users in the same experienced journeyman category. One issue which isn’t quite common but it happens from time to time is the SD card failure. Corrupted SD card on Raspberry Pi can be quite infuriating, especially if you haven’t backed up your work. Even though they’re scarce, there are a few ways to deal with this.
How to fix corrupted SD card on Raspberry Pi
The only thing making this worse is the absence of backups for the affected SD card. If you don’t have backups, you have low chances of retrieving the content of the corrupted SD card.
There are various reasons why an SD card will get corrupted on your Raspberry Pi, but the most common one is powering off without the ”halt” command. In addition, if you’ve meddled with the CPU clocks, power problems might break SD cards, as well.
So what you can do when this happens? You can format the SD and use backups to restore Raspbian on your SD card. However, if you’ve made a mistake to work without timely backups, there are only two things you can try. There’s the “fsck” command, which will unlikely fix your corrupted SD card.
On the other hand, the second and a more reliable way is to use an alternative SD card and build a fresh copy of Raspbian. After that, use the USB adapter and attach the affected card. Once it’s there, you might be able to fix it within the new system.
At the end of the day, you should be able to scavenge at least some of the data. Once you’ve got what you can, and fancy using the SD card again, use any third-party formatting tool (or digital camera) to format it.
With that said, we can conclude this article. If you have any questions or suggestions, feel free to tell us in the comments section below.
Activity history is a new feature introduced in the April update, and although this feature can be helpful, many users have privacy concerns. This feature can send your information, such as applications you use, as well as documents and websites you view to Microsoft, and many users don’t want that. If you’re one of the users concerned about their privacy, today we’ll show you how to disable Activity history feature on Windows 10.
What is Activity history and how to disable it?
As previously mentioned, Activity history feature was introduced in April update along with Timeline. By using Timeline and Activity history, you can easily see all the documents or web pages that you visited on a certain date and switch back to them with just a single click.
This feature stores all this data locally, but if you want, you can enable synchronization and sync your data with Microsoft’s servers. By doing so, you can sync your activity with other devices and continue working on documents or visit the websites on other devices. Although this sounds quite useful, many users have privacy concerns, so today we’ll show you how to disable activity history on your PC.
Here are some methods that you can use to disable Activity history on your PC:
According to users, the best and easiest way to disable Activity history is to disable it from the Settings app. This is quite simple, and you can do it by following these steps:
Open the Settings app. You can do that quickly by using Windows Key + I
One the Settings app opens, navigate to the Privacy section.
From the left pane select Activity history. In the right pane uncheck Let Windows collect my activities from this PC and Let Windows sync my activities from this PC to the cloud options.
After disabling these options, Windows won’t collect any activity history on your PC. If you still want to use the Timeline feature but you don’t want to share your history with Microsoft, you can use Let Windows collect my activities from this PC option.
Solution 2 – Change your Group policy
According to users, you can also disable Activity history feature right from Group policy settings. This is quite useful if you’re managing multiple PCs or you simply want to enforce this rule on the entire PC. To disable Activity history, you just need to do the following:
Press Windows Key + R and enter msc. Now press Enter or click OK.
When Group Policy Editor opens, in the left pane navigate to the Computer Configuration\Administrative Templates\System\OS Policies In the right pane, double-click the Allow publishing of User Activities policy.
Now select the Disabled option and click Apply and OK to save changes.
Optional: You can also set Enable Activity Feed and Allow upload of User Activities policies to disabled. This isn’t mandatory, but it might help you out.
After making these changes, your PC won’t gather activity history and your data won’t be uploaded to Microsoft’s servers.
Using a Group Policy Editor to disable Activity history on your PC is a great method, but some versions of Windows don’t have Group Policy Editor available. If you don’t have Group Policy Editor, you can disable this feature from Registry Editor. To do that, just follow these steps:
Press Windows Key + R and enter regedit. Press Enter or click OK.
When Registry Editor opens, navigate to the HKEY_LOCAL_MACHINE\SOFTWARE\Policies\Microsoft\Windows\System key in the left pane.
Right-click anywhere in the right pane and choose New > DWORD (32-bit) Value.
Enter PublishUserActivities as the name of the new DWORD. Double-click the new DWORD and set its Value data to 0.
After doing that, restart your PC or simply log out of your account and log back in again. After doing that, the activity history feature will be disabled.
Solution 4 – Clear your activity history
If you’ve already disabled Activity history on your PC, you should know that your data is still stored online on Microsoft’s servers. However, you can fix that easily simply by clearing your history from the Settings app. To do that, follow these steps:
Open the Settings app and navigate to the Privacy > Activity history.
In the right pane navigate to the Clear activity history section and click the Clear button.
A confirmation dialog will now appear. Click OK.
Windows will start clearing your activity history. This can take a minute or two, so be patient.
After doing that, your history will be cleared and all your data removed from Microsoft’s servers.
Solution 5 – Clear your history from your Microsoft account
If you’re worried that your information is still available on Microsoft’s servers, you can remove it right from your Microsoft account. This is useful if you don’t have the access to your PC but you want to ensure that your activity history isn’t available online.
Select from the menu on the left Apps and services. Now click Clear activity in the right pane.
A confirmation dialog will now appear. Click the Clear
After a couple of moments, your activity history will be removed from Microsoft’s servers.
Activity history can be a useful feature, especially if you want to quickly hop back to a certain project that you were working on earlier. However, if you’re concerned about your privacy, feel free to try some of our solutions and use them to disable activity history on your PC.
News from Microsoft tech department. Soon we will be able to run applications that we are not sure about in an “isolated, temporary desktop environment” called Windows Sandbox.
What is Windows Sandbox?
The idea is that when a user installs any software in Windows Sandbox, it will stay in the sandbox, keeping whatever is outside sandbox safe.
When you have finished testing the software, you can either install it on your machine in the normal way if you like it and if you don’t, you just close down Windows Sandbox and the software, with all its files, will be permanently deleted.
We have a nifty looking screenshot that I got from the Microsoft blog. This shows how Windows Sandbox will look on your desktop. Basically, it will look just like your desktop.
Here is a quick rundown of the properties of Windows Sandbox:
Part of Windows – everything required for this feature ships with Windows 10 Pro and Enterprise. No need to download a VHD!
Pristine – every time Windows Sandbox runs, it’s as clean as a brand-new installation of Windows
Disposable – nothing persists on the device; everything is discarded after you close the application
Secure – uses hardware-based virtualization for kernel isolation, which relies on the Microsoft’s hypervisor to run a separate kernel which isolates Windows Sandbox from the host
And here are the prerequisites you will need if you want to use Windows Sandbox:
Windows 10 Pro or Enterprise Insider build 18305 or later
AMD64 architecture
Virtualization capabilities enabled in BIOS
And you will need at least:
4GB of RAM (8GB recommended)
1 GB of free disk space (SSD recommended)
2 CPU cores (4 cores with hyperthreading recommended)
I’m not going to include all the instructions that you can find on the Windows blog itself. Just head over here if you are interested.
The wrap-up
Gotta say. It’s a shame we can’t use Windows Sandbox for Windows Updates. Yes, I know that doesn’t make sense, I was only joking.
Sadly, I can’t ask any of you about your experiences as Windows Sandbox will not be available until Windows 10 Pro or Enterprise, build 18305 or newer next spring, so please feel free to talk amongst yourselves.
There is no doubt that data corruption of any file can be a hardship. FIT files, which are important for sports enthusiasts who fancy tracking their running or cycling routes with the faithful Garmin navigation, are often corrupt, and you will need to fix them.
Once they get corrupted (usually due to GPS readings), users can’t access them with Garmin Connect or similar services for tracking the routes, which provide map display. Luckily, this is far from being unrepairable, and we have two ways to fix corrupt FIT files on your PC.
Upload your FIT file and let the auto-fix tool work its magic.
Additionally, you can choose to convert it to the CSV format.
If you’re trying to access the file with the FIT extension to no avail, don’t worry. A few tools might come in handy when it comes to repairing corrupted FIT files.
One of those is the free Garmin online FIT repair tool that allows you to upload a corrupted FIT file to download the uncorrupted version afterward.
For users who are dealing with numerous FIT files daily, a premium tool is probably the best solution.
Fit File Repair Tool is a utility that allows you to access and restore corrupted FIT files with small or no effort. However, it’s a paid solution, so you’ll need to purchase the license after a free trial period ends.
There are some other options, like FIT SDK, which allows you to deconstruct and convert FIT files to CSV format. That way, you can edit them or restore their integrity. On the other hand, the two tools mentioned above should be enough for an inexperienced user.
Many people use Windows on a daily basis for their computing needs. They use it because of their work, because they write about it, I have even heard that some people use Windows because they like it. What I don’t understand is why you would want to use Windows on a Chromebook.
Advantages of Chrome OS
Correct me if I am wrong (in the comments below, please), but I thought that the entire point of people owning a Chromebook was because they were fed up of spending their money on over-priced, bloated software that is pretty much guaranteed to screw up your machine at some future point due to a dodgy update that wasn’t checked before release.
Before I continue, I should point out that in the interests of openness, I am not a Chromebook user, but I have been toying with the idea of making the move for more than a year now. However, since I have not used one, forgive any mistakes I make.
Chromebooks will lose security
Google promotes Chromebooks and the OS that goes with it as being highly secure. Of course, when Google says ‘highly secure’ it means from hacking. Giving any information to Google means you are pretty much agreed that your life is compromised from that moment on, but that’s for another post.
By Google letting Windows onto its machines, even if it is ‘just’ as a alternative OS, means that your Chromebook is now more likely to be compromised. It doesn’t even need to mean that Windows is less secure. If you are running two OS’s on one machine, there are more ways it can be compromised.
Chromebooks are inexpensive
Additionally, Chromebooks have dinky little hard drives, don’t they. There is no way you are going to get Windows OS onto a 32 GB hard drive. So presumably, Chromebooks are going to come with bigger drives making them more expensive. Of course, I am assuming that whatever Windows OS is being used will come pre-installed, since why would anyone download it voluntarily.
I am a bit confused about the whole ‘Dual-Boot‘ thing as well. I used to run a laptop with dual operating systems, Windows 7 (I think it was) and Ubuntu. One thing I remember was that changing between OS‘s was a pain in the neck. So much so that if I booted up in Windows, I stayed in Windows for the rest of the day. If I booted up in Ubuntu, I’d stay in Ubuntu.
Why would Google want to give people an OS that if they booted up using it, would probably just stick with it? Google might as well just take out a full-page ad saying they are giving up, and all Chromebooks will be Windowsbooks in the future.
Everything will end up the same
Why would you want to allow Microsoft any access at all to anything that has an OS on it that isn’t Windows? Perhaps Google feels that it is big enough and strong enough that if Microsoft starts putting in demands, Google will be able to stand up to Microsoft. Well, that may be true but I wouldn’t bet my Chromebook on it.
Wrapping it all up
I am not an over-cynical person, I don’t think, but I really don’t see how this has any advantages for Google and any disadvantages for Microsoft. I think this is a bad move for Google, and will end up making it a junior partner in something that it started in the first place.
Earlier this year, we learned that Microsoft was working on an “InPrivate Desktop” feature for Windows. In the Windows 10 Feedback Hub, Microsoft described InPrivate Desktop as “a throaway sandbox for secure, one-time execution of untrusted software.
This handy VM solution has apparently been rechristened as “Windows Sandbox,” and Microsoft has provided more details about this feature on the Windows Kernel blog yesterday. Just like the previous “InPrivate Desktop” feature, Windows Sandbox will provide Windows admins a temporary desktop environment where they can safely test untrusted software. “Any software installed in Windows Sandbox stays only in the sandbox and cannot affect your host. Once Windows Sandbox is closed, all the software with all its files and state are permanently deleted,” Microsoft explained in the blog post.
Compared to traditional VM solutions, the company highlighted the following advantages for Windows Sandbox:
Part of Windows – everything required for this feature ships with Windows 10 Pro and Enterprise. No need to download a VHD!
Pristine – every time Windows Sandbox runs, it’s as clean as a brand-new installation of Windows
Disposable – nothing persists on the device; everything is discarded after you close the application
Secure – uses hardware-based virtualization for kernel isolation, which relies on the Microsoft’s hypervisor to run a separate kernel which isolates Windows Sandbox from the host
The timing for the announcement is quite interesting as this same blog post mentions that Windows Sandbox requires Windows 10 Pro or Enterprise build 18305 or later. Microsoft released the 19H1 build 18298 last week for Fast Ring Insiders, and we hope the build 18305 will be released this week, right before the holidays. FYI, Microsoft mentioned that Windows Sandbox will require at least 4GB of RAM, 1 GB of free disk space and at least 2 CPU cores. We’re looking forward to test this new feature, sound off in the comments if you think this could become a new killer feature for Windows 10 Pro.
Over the last few days, the Twitter app gained a new emoji picker within the compose box (see above image). When clicked on, this emoji picker opens and users can now scroll through and select an emoji to use.
In addition to the emoji picker, the Windows 10 Twitter app now displays whether a user has already been added to a list by displaying a blue checkmark next to list names during the “Add to list” process. Previously, there was no way to tell if a user had already been added to a list without manually scrolling through all list members one-by-one-beforehand. Other Twitter apps have had this basic feature for a while now so it’s good to see it finally come to Windows 10 users.
A new and very nasty phishing attack has been doing the rounds, and it is extremely difficult to spot. Here is what you need to look out for.
First of all, we should thank Xavier Mertens for being the first to spot it. If you want to see the code that the phishing attack uses, pop over to this website.
How does this attack work?
A recipient gets a Non Delivery Receipt (NDR) from what looks like a trusted account. It tells the recipient that “Microsoft found several undelivered messages”.
The next step that the phisherman wants you to do is click the ‘Send Again’ button. This will take you to a page that looks very much like the Office 365 page.
Fake phishing attack login page
Check out the website address in the image above. It is obviously not the address of Office 365, Microsoft, Windows, or anything remotely linked to Microsoft, and yet I am sure many people entered their login information.
When you do enter your login info, you get sent to Outlook, so it looks very much like you have not been phished. Unfortunately, your Office 365login details have just been sent to the bad guys, and they now have access to your Office Account and everything that goes with it.
Now, you all know how much I love to rant against Microsoft (in a constructive way, of course), but I really don’t think we can blame Microsoft for this. While the email address for the original phishing attack looks like it is ‘sort of’ official, there is no way that anyone should fall for the login address.
In case you want to be secure while surfing the internet, you will need to get a full-dedicated tool to secure your network. Install now Cyberghost VPN and secure yourself. It protects your PC from attacks while browsing, masks your IP address and blocks all unwanted access.
Guys, always check the web addresses and if you are in any doubt, do NOT login from a link. Go into your browser and type in the address you want in the normal way, and then login. It ain’t rocket surgery, guys, just basic online safety rules.
Have you received this phishing attack. Did you spot it as phishing immediately, or did you have to double check? Or did you fall for it? Don’t worry if you did; I fell for a PayPal phishing scam once. The address was PayPel. In my defence, it was about 10 years ago. Let us know in the comments below.
For some of us, “computing” means reading Twitter, checking email, and playing games. On the other end of the spectrum are the IT professionals who spend their work life building websites, business apps, and even Internet of Things solutions and next generation Artificial Intelligence and Machine Learning applications. Still, there are some who are somewhere in the middle, interested in what’s going on in a computing world beyond Twitter, but not quite sure what all the fuss about IoT, AI, Machine Learning, and containers really means.
One of the members of the Windows Insider team, Brandon LeBlanc, has started an occasional series called “Windows Internals,” where he highlights Microsoft posts on subjects that aren’t quite mainstream, but still could be interesting to Windows Insiders looking to learn more about the computing world around them. In the latest in his series, LeBlanc focuses on containers, which he defines as “virtualized “boxes” that allow app developers to easily port their apps to different platforms.” These containers, well, contain everything an app needs to run, including dependencies, libraries, binaries, etc., making it easier to develop and maintain apps. LeBlanc then links to a couple of Microsoft posts on how to learn more.
The internet is great at throwing phrases around, kind of just assuming that everyone knows what they mean, and it’s difficult sometimes to “crack the code.” We applaud the Windows Insider team for giving computer novices a place to go to begin to learn more. Check out Windows Internals, and keep up the good work, Brandon!
Microsoft has been expanding its popular Windows 10 app Sticky Notes, adding a slew of useful new features. In recent months, the app has gained cross-device syncing and some initial integrations into Microsoft’s other products.
As a consequence of these changes, you can now view your Sticky Notes on the web when you’re away from your PC. Likewise, you can create notes online and see them appear within Windows 10’s Sticky Notes app when you get back to your desk.
First, create a new test note on your PC by opening the Sticky Notes app and writing some content. You will see your new note show up in the app’s notes list. It will immediately sync to the cloud using your Microsoft account.
Now, you’re ready to view your note online. To do so, just visit onenote.com/stickynotes. You’ll see a simple interface that displays all your notes in a list on the left. You can click each note to show its full content on the right. Editing tools and note background colour options are available in the same manner as Sticky Notes for Windows 10.
To create a new note, click the “+” button next to the search bar. Type your content and then wait a moment to see the note show up in the notes list in your Windows 10 Sticky Notes app.
Needless to say, this is a simple but extremely useful experience. With Sticky Notes now syncing across devices and to the web, you’ve got a much better chance of keeping track of your thoughts. If you’ve got a Surface, or another device with an active stylus, you can scribble down thoughts on sticky notes using Windows Ink and then consume them wherever you happen to be.
It’s worth noting it’s still quite early days for Sticky Notes on the web. The current experience is exceedingly basic and may well be expanded over time. Microsoft has chosen to put Sticky Notes under the OneNote umbrella but, so far, the two seem to be completely separate except for the domain. Unless you already know the URL, you won’t find Sticky Notes easily either – there’s no links to it from any of the other Office 365 apps.
Still, the core functionality is there and is ready for you to use today. Microsoft’s also testing Sticky Notes integration in the OneNote apps for Android and iOS, giving you even more options when you need to note something down.