How to Add Search Bar To Slicer In Power BI

Many Power BI users encountered an issue with the search box in Slicer. This is a very serious problem that puts people in difficulty.

One user said the following on the official forum:

For some reason I can’t figure out how to enable the search box in a Slicer. I’ve tried data that had more that 80k record and as little as 50. Nothing seems to work. Am I missing something? Is there a flag or switch I need to flip?

So, the OP encountered the problem regardless of the amount of data used. It’s safe to say this is a general problem for this user, but fortunately, the search box is there.

Read on to find out how to add search to slicer in Power BI.

How can I add search to slicer in Power BI?

  1. Select the Slicer icon from the Visualizations.
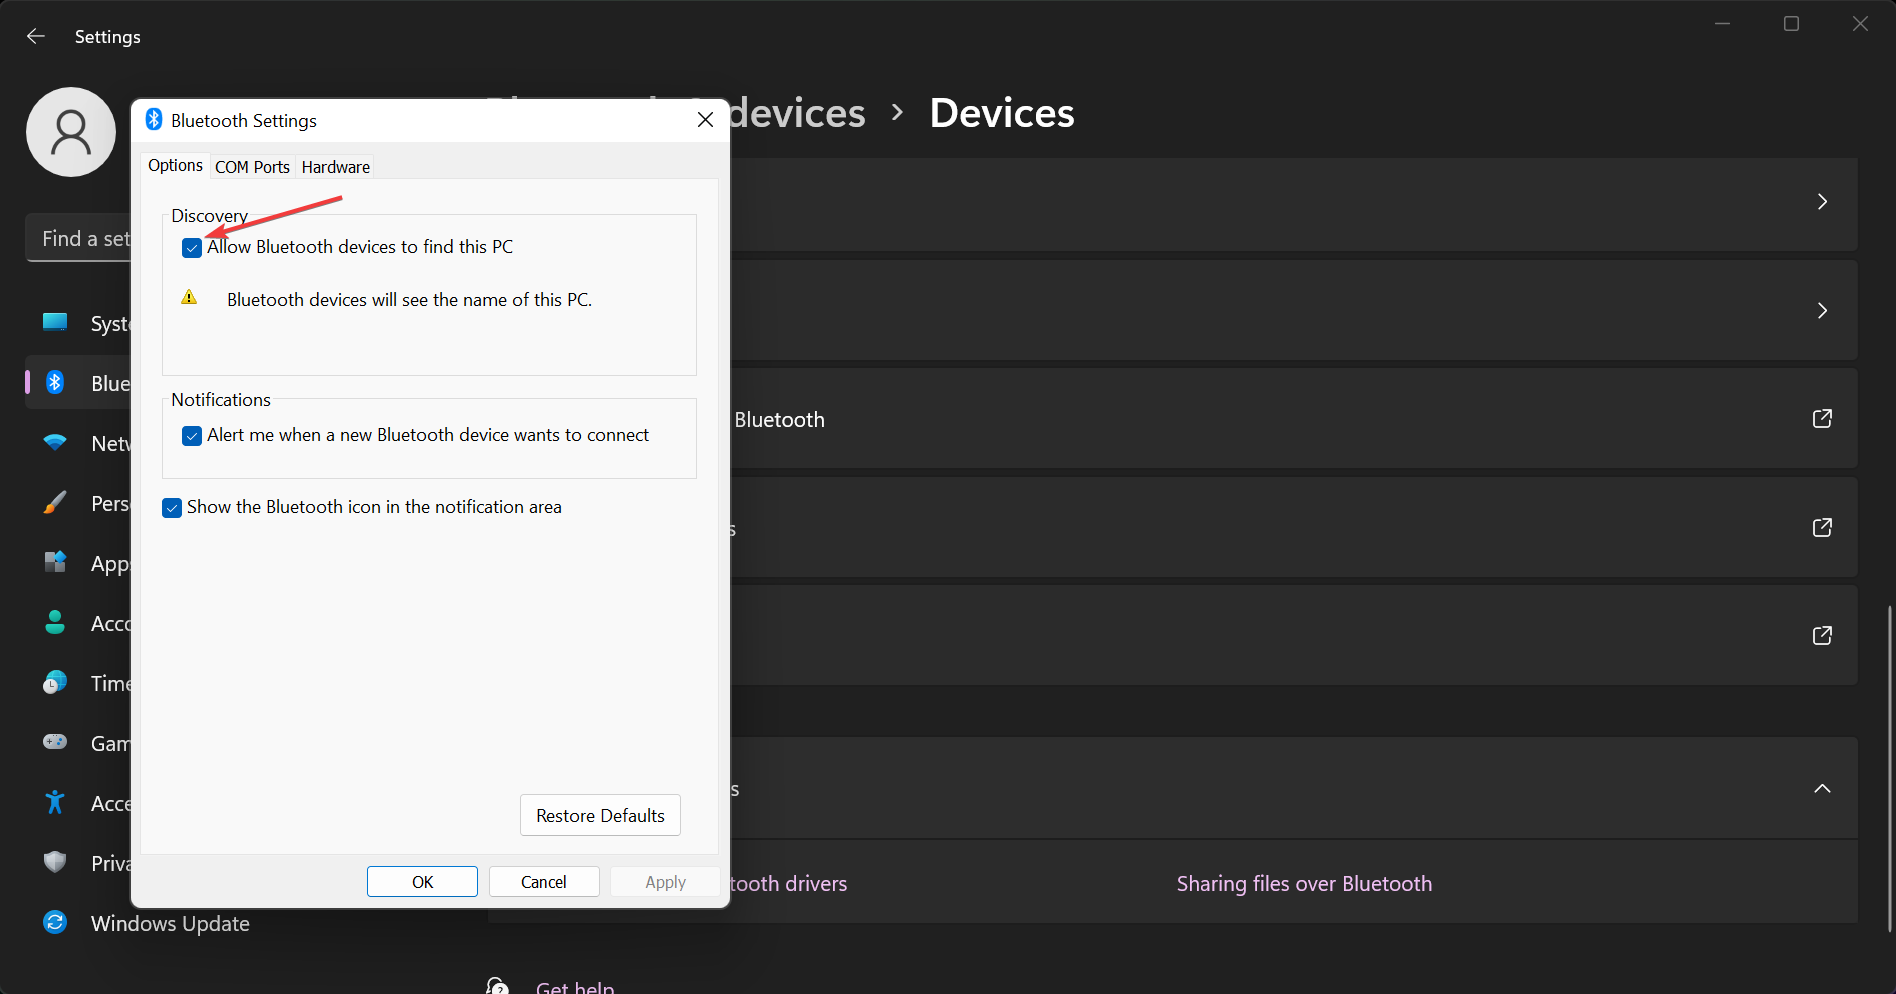
  2. Click the three dots (…) from the upper-right corner of the Slicer.power bi slicer search box
  3. There, you should find the option Enable search.
  4. Click on it.

So, the search box is not so obvious at first sight, but also this feature is not hard to find.

Did you find this solution useful? How do you use slicers in Power BI? Let us know in the comments section below.

Microsoft is set to offer unlimited paid time off – is that a bad thing?

In a memo sent out to Microsoft’s US employees earlier today, the company announced that it’s switching to a new “Discretionary Time Off” policy for salaried US workers. Beginning January 16th, these workers won’t have to wait until they accrue vacation benefits, and they’ll still be offered 10 corporate holidays, leaves of absence, sick days or mental health time off, and jury duty and bereavement leaves.

Instead of accruing vacation days, which in the event an employee were to leave the company could be cashed in, salaried Microsoft employees will now be able to take days off at their own discretion. Workers with vacation days accrued will be awarded a one-time payout this April, according to the memo.

While “all the vacation days you want” seems like something of a dream come true, a number of companies, among them Salesforce, Oracle, Netflix, and the Microsoft-owned LinkedIn all offer “unlimited vacation” plans, and there are valid reasons for doing so. Companies no longer have to account for workers’ vacation days accrued, how many have been used, how many are left, and get into squabbles if an employee needs an extra day here or there. Less bookwork for the company, less micro-management of employee behavior, which has taken a hard turn since the pre-pandemic days of “you must show up in the office,” and evidence to show that employees won’t take significant more time off than they do under current policies. In fact, they may take off less.

Christina Warren, a former Microsoft Corp. employee who now works at GitHub, isn’t a big fan of “unlimited vacation.” She took to Twitter today to explain why:

Her tweet is gaining a lot of attention (with 153K views so far, thanks Elon Musk!), and it’s an interesting and well read thread. Basically, Warren says that Unlimited PTO is a “scam” because “it is designed to benefit the company, not employee. In the US (the only place you can get away with it), the reason companies do this is so they don’t have to pay out PTO when you leave or are laid off.” She goes on to say “I’m terrible at vacation,” but says that companies offer unlimited PTO because “the numbers have shown it will save them money,” and that it eliminates what used to be a “real tangible value” (accrued vacation time).

A number of replies to the thread seem to quite like PTO at their companies, but Warren’s point remains:

For hourly workers at Microsoft, and well, everywhere, the situation is different, and the company won’t be providing unlimited PTO to hourly workers, US based or not. Microsoft says “federal and state wage and hour laws make it difficult to offer unlimited time off to hourly workers,” but of course you can’t have the cooks in the kitchen or the janitorial staff just deciding to take a week off.

Do you have unlimited PTO where you work? Would you want it, or do you too feel like it’s a “scam?” Let us know in the comments below.

(via The Verge)

Google Doc Won’t Open: How to Fix It & Main Reasons

Part of the popular Google Office Suite (G Suite), Google Docs has rapidly won over users because of its ease of use, online collaboration abilities, and flexibility.

But like other software, it occasionally has frustrating problems that make it difficult for you to work.

One of the quite common ones concerns access to G suite documents and here, users sometimes get the Google Docs won’t open message when attempting to open their Google Docs.

Why can’t I open a Google Doc?

If a doc won’t open, a couple of things may be wrong. Here is a highlight of the most common causes:

  • The file owner may not have assigned you permission to view the doc.
  • You’re accessing the file from another Google Account but your usual account.
  • Someone has removed your right to open the file.
  • An unstable internet connection will mess file loading and opening depending on the size of the doc.
  • Browser issues such as the cache being full, an outdated browser, and more could make it difficult to load and open g drive files.
  • Your antivirus software could be mistaking the document for a malicious file.
  • A fault resulting from a recent upgrade to Google Drive’s Backup and Sync facility.

What can I do if Google Docs won’t open?

1. Request permission to open the Document

Where the issue arose because of lacking permission, ask the file owner to allocate you opening rights.

Steps:

  1. Log in to Google drive.
  2. Open the concerned doc.
  3. On the page “You need permission“, click on Request access.Google docs won't open
  4. The original owner of the document will receive an automated email requesting for approval.
  5. You’ll get a reply email as soon as your request is approved allowing you to open the file.

Retry. The file should now open without hitches.

2. Contact the owner Directly and Ask for immediate access

You can also write to the owner directly asking them to modify the file sharing options from their side and permit you to view the file.

3. Switch Your Google Account

It’s also possible that the document was set to be opened from a Google Account different from the one you’re using.

This is especially common when you have more than one account so you need to switch to the original account to open the doc in question.

Steps:

  1. Click to open the relevant document.
  2. On the page “You need permission“, click on Switch accounts.google drive unable to open file
  3. Now Sign in with your other Gmail Account.
  4. Try to open the document and verify that it’s accessible.

4. Use a third-party Word processor

You can first save the doc to your PC and then open it using a different word processor such as Microsoft Word or Zoho Writer.

Steps:

  1. Download/save the doc to a folder of choice like the downloads folder, without opening it.
  2. Now open that folder.
  3. Right-click on the problematic doc file then click on the Propertiescant open google drive
  4. Click on Change…unable to access document google drive
  5. Select Microsoft Office Word or a similar program.google docs wont open in chrome
  6. Click OK, and OK again.
  7. Open the doc file now to see if all is well.

5. Wait and try to open it later

In some cases, documents are unavailable temporarily perhaps due to internet connectivity challenges, outages for Google Drive, or Google servers, or even synchronization hiccups.

You can give your Google Drive the benefit of the doubt and assume that the document is just temporarily inaccessible.

And so you wait a bit then try to reopen the document. It does work sometimes!

6. Try another browser

In certain instances, Google documents which have all along been failing to open on one browser do open when accessed from other browsers.

Can you then move to Edge, Google Chrome, or Mozilla Firefox depending on your current browsing software, and see how it goes?

It also helps if whatever browser you are using is up to date and you are on the latest version.

7. Clear your Browser’s Cache/Cookies

Cookies are files are typically created by the sites you visit to make your internet experience better through saving your browsing data.

The cache, on other hand, remembers parts of various pages, like loaded images, to help these open faster on your next visit.

Some tools including G Suite, however, load slower because of this content. You, therefore, need to clean these details before opening your Drive files.

Steps:

Google Chrome

  1. Open Chrome.
  2. Click More(it’s on the top right).
  3. Click More tools
  4. Now select Clear browsing data.
  5. Choose a relevant time range or select All time (At the top) to clear everything.
  6. Select the check boxes next to Cached images and files and Cookies and other site data.google drive not loading on chrome
  7. Finally, Click Clear browsing data (as highlighted above).

Edge

  1. Click on the three dots the button is on the upper-right corner on your screen.
  2. Select Settings on the drop-down menu.
  3. Go to the Clear browser data
  4. Select Choose what to clear.
  5. Check on the boxes marked Cached data and files and Cookies and saved website data.how to approve access on google drive
  6. Click on the Clear tab.

 Mozilla Firefox

  1. Click on the menu button (the three horizontal lines)
  2. Choose Options.
  3. Click Privacy & Security.
  4. Go to the Cookies and Site Data area and click Clear Data.
  5. Mark the check box next to the Cookies and Site Data as well the one near Cached Web ContentGoogle docs won't open
  6. Click Clear. 

8. Check your Internet connectivity

A weak internet connection common causes document opening issues.
Try your luck by connecting to another network and see if your doc file will load and open correctly.

9. Check your Antivirus Software

Adblockers and Virus scanning software on your PC on occasion interfere with Drive files, including Google Docs.

You can disable it briefly or check to make sure that your antivirus software is not restricting G Suite.

10. Try another device

The glitch could have something to do with the hardware you’re using so on occasion the file that was refusing to open on your laptop successfully opens from your smartphone or desktop.

Log in to G drive from your other devices and try to open the doc.

11. Share it with a friend

If you are yet to cut it, share the doc with another person and see if he/she can open it.

Where possible, request them to re-share the file with you afresh.

You should then make another attempt at opening it from your Google account. And if you run into the issue of Google Docs refusing to connect, check out our article on how to bypass it.

How to Connect an Amazon FireStick to Any Bluetooth Device

The Amazon FireStick then enables any TV to stream content over Wi-Fi such as Netflix, YouTube, Hulu, Pandora, HBO go, and more. Also, your Amazon FireStick is compatible with Bluetooth headphones or speakers.

Check out this step-by-step guide on how to connect the two devices together for an amazing streaming experience.

How do I connect my Amazon FireStick to Bluetooth devices?

The process is pretty straightforward actually, as all you have to do is pair the devices once. Afterward, all you need to do is turn the Bluetooth devices on.

Once you do that, they will automatically be detected by the Amazon FireStick, as long as they are within an effective range of each other.

  1. Switch on your Bluetooth speaker or headphones
    • Also, make sure the device is visible publicly
  2. Navigate in the Fire Stick menu and go to Setting
  3. Select Controller & Bluetooth Device
  4. Choose Other Bluetooth Device
  5. Select Add Bluetooth Device
  6. Confirm the process by pressing Ok

Your Amazon FireStick will automatically start searching for your Bluetooth device, so give it a few seconds.

Remember to make sure your Bluetooth device is not paired with any other devices.

If they are connected to a mobile or a PC laptop at the same time, they will be deemed unavailable and won’t be detectable.

Once the Amazon FireStick finishes searching, you may pair the two devices.

Now you can fully take advantage of the Smart TV capabilities of an Amazon FireStick.

This, paired with the wireless capabilities of a Bluetooth speaker or set of headphones will truly make your multimedia experience a whole lot more enjoyable.

RELATED ARTICLES YOU SHOULD CHECK OUT:

PC Audit Software: 7 Best Tools to Analyze Your System Performance

If you want to audit your PCs, you will need the right tools to successfully accomplish this task. You can get system information with wmic, but that’s not always effective, especially if you’re managing multiple PCs.

You may be a tiny company with just one or two PCs, so gathering the data will not be such a huge challenge.

But if you are looking at ten or even more machines that have to be audited, then things usually get a bit more complicated, and you will definitely use a hand during this process of collecting data.

This is the reason why we picked out some of the best PC auditing tools that you can currently find on today’s market, and we’re presenting a few essential features that are included in this program below, to help you with your final choice.

What is PC audit software?

PC auditing software can be used for the following:

  • Inspecting hardware – With this type of software, you can easily check the hardware specifications of all network computers.
  • Software analysis – Using auditing software you can information such as operating system version, as well as the versions of all installed applications.

What are the best PC audit tools to use?

ADAudit Plus – Best professional auditing tool

ManageEngine’s ADAudit Plus is by far the best network auditing tool on our list, and as you will read further, it will become clear why.

With this solution, you will be able to track all the changes within your network and devices, including groups, GPOs, and more, and use over 200 predefined reports and email alerts.

You will have access to any movement inside the organization, including logon and logoff times, their duration, history, terminal service activities, and any system events or errors.

Moving forward, it’s possible to monitor file creation, modification, and permission changes to any documents made by authorized or unauthorized users.

All the activity is tracked by using machine learning technology that can detect any potential threats on your network.

With ADAudit Plus, you will secure Active Directory, Azure AD, file servers, and workstations with real-time AD change auditing.

And all that, by meeting all compliance requirements of SOX, PCI, HIPAA, GDPR, and a lot more.

You can start using the solution for free and test it before committing to any charges so you will see exactly if it caters to your needs.

Let’s see the most important features of ADAudit Plus:

  • Over 200 predefined reports and email alerts
  • Track and monitor any document changes within your organization
  • Detailed overview of login and logoff activity of all users
  • SOX, PCI, HIPAA, GDPR compliances, and more
  • Simple and fast implementation

ADAudit Plus

Get the best network audit tool that offers complete monitoring and over 200 predefined reports.
Free trial Visit website

Netwrix – Great network auditing tool

Netwrix is the best tool for auditing PCs of different size PC networks. The program will help you to improve the security of these networks and optimize IT operations.

Speaking about security and IT, Netwrix will let you find the security gaps and take care of them before some of your important data might be exposed to serious risk.

These are just some of the most important features that you will absolutely need for an exhausting PC audit as you will discover more of them while using this solution.

You will be able to adjust the use of this tool according to your needs and priorities.

Let’s get straight to the most important features that Netwrix covers:

  • Detects, classifies, and protects your most sensitive data
  • Quick audit reports save time
  • Quick threat alerts
  • Prevention behavior – detects all strange activities
  • Internal search engine for all your question

Netwrix

Netwrix will help you to improve the security of your network and optimize your IT operations.
Check price Get it now

AIDA64 – Reliable tool for local resource monitoring

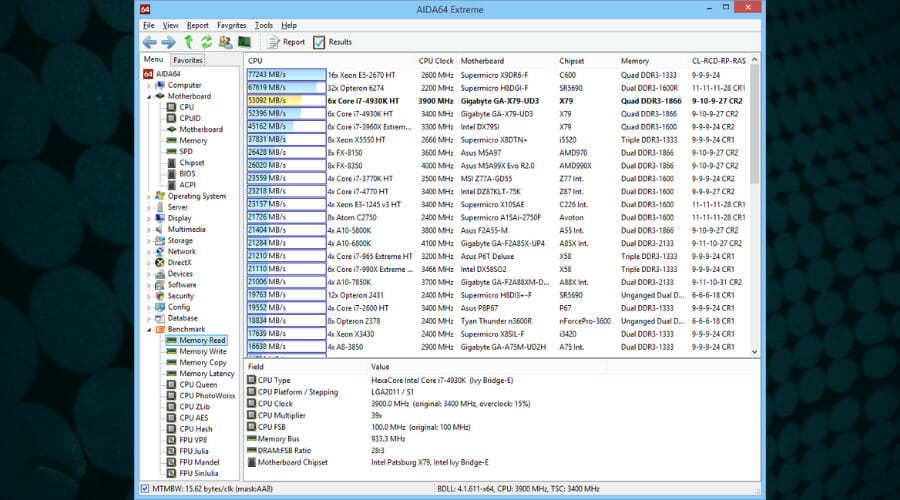
AIDA64 is the global leader when it comes to PC audit and benchmarking. The detailed system analysis was designed to spot any issues with your computer.

AIDA Extreme focuses on enthusiasts and performance computing providing data on CPU, hard disk, and memory performance.

The interface is segmented into two panels, one is for selecting the desired analysis parameter, and the left one is for showing the results of the specific query.

AIDA64 compares the gathered data against other systems and gives context based on the results.

The real benefit of using it is the flexible system stability tool that will show you the temperature, fan speed, and voltage in real-time.

Check out AIDA64’s key features:

  • Provides data on CPU, hard disk, and memory performance
  • Comprehensive, two-panel interface
  • System data comparison with other machines
  • Detailed information about system stability
  • Simple usage

AIDA64

If you need professional benchmarking and auditing software you can’t get past AIDA64.
Check price Visit website

Total Network Inventory – Best simple network auditing

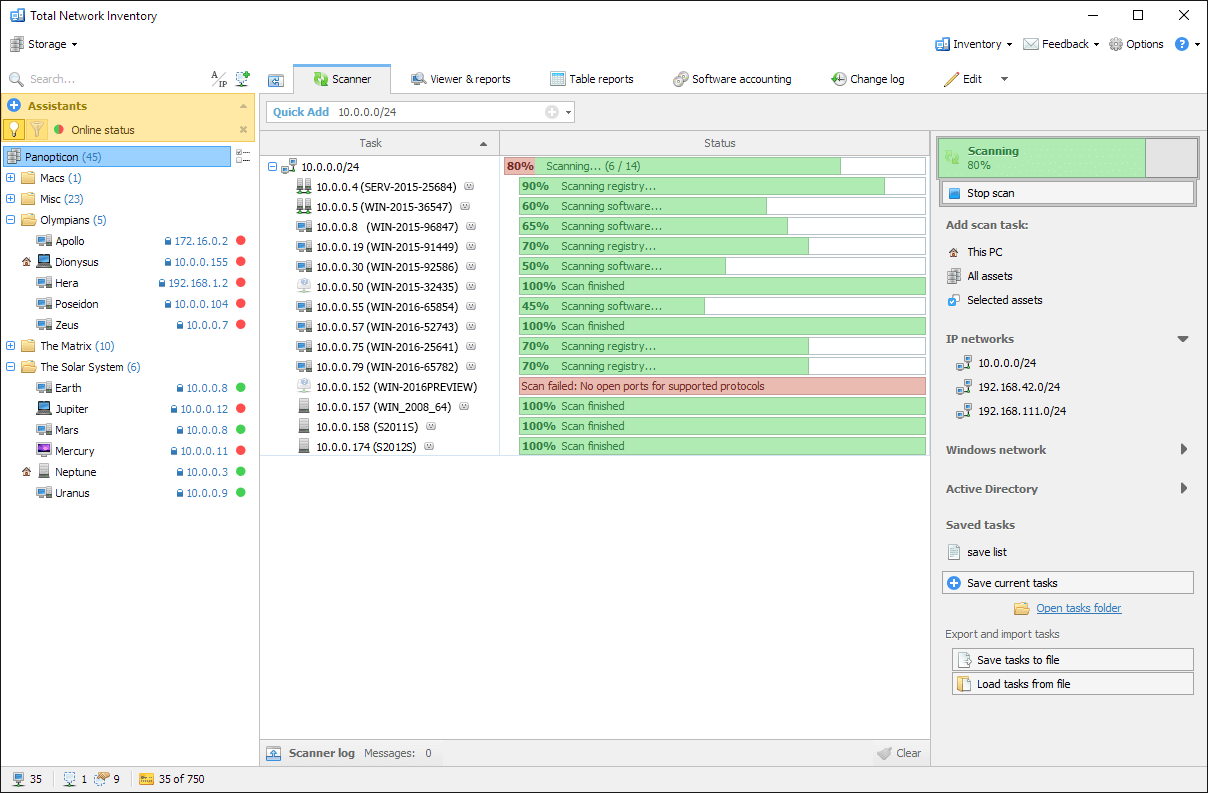
Softinventive’s Total Network Inventory is a tool that comes with everything you will possibly need to perform a complex system audit.

This PC auditing system comes packed with all the necessary functions that you may need to build and maintain a comprehensive database about the software and hardware that is installed on all the PCs and workstations in your business’ network.

The system audit software will list the software titles along with the number of active installations, purchase details and license keys.

If you head over to Total Network Inventory’s official website, you will see that you purchase this tool and you can also download it to try it for free for 60 days as well.

Take a look at the main features that are included in Total Network Inventory:

  • Doesn’t require any preinstalled clients or agents
  • Automatically gathers details about the installed software
  • Maintains a comprehensive software inventory in a single centralized location
  • Comprehensive changelogs and software updates
  • Create customizable reports during each system audit process

⇒ Get Softinventive Total Network Inventory

Open-AudIT – Most comprehensive auditing tool

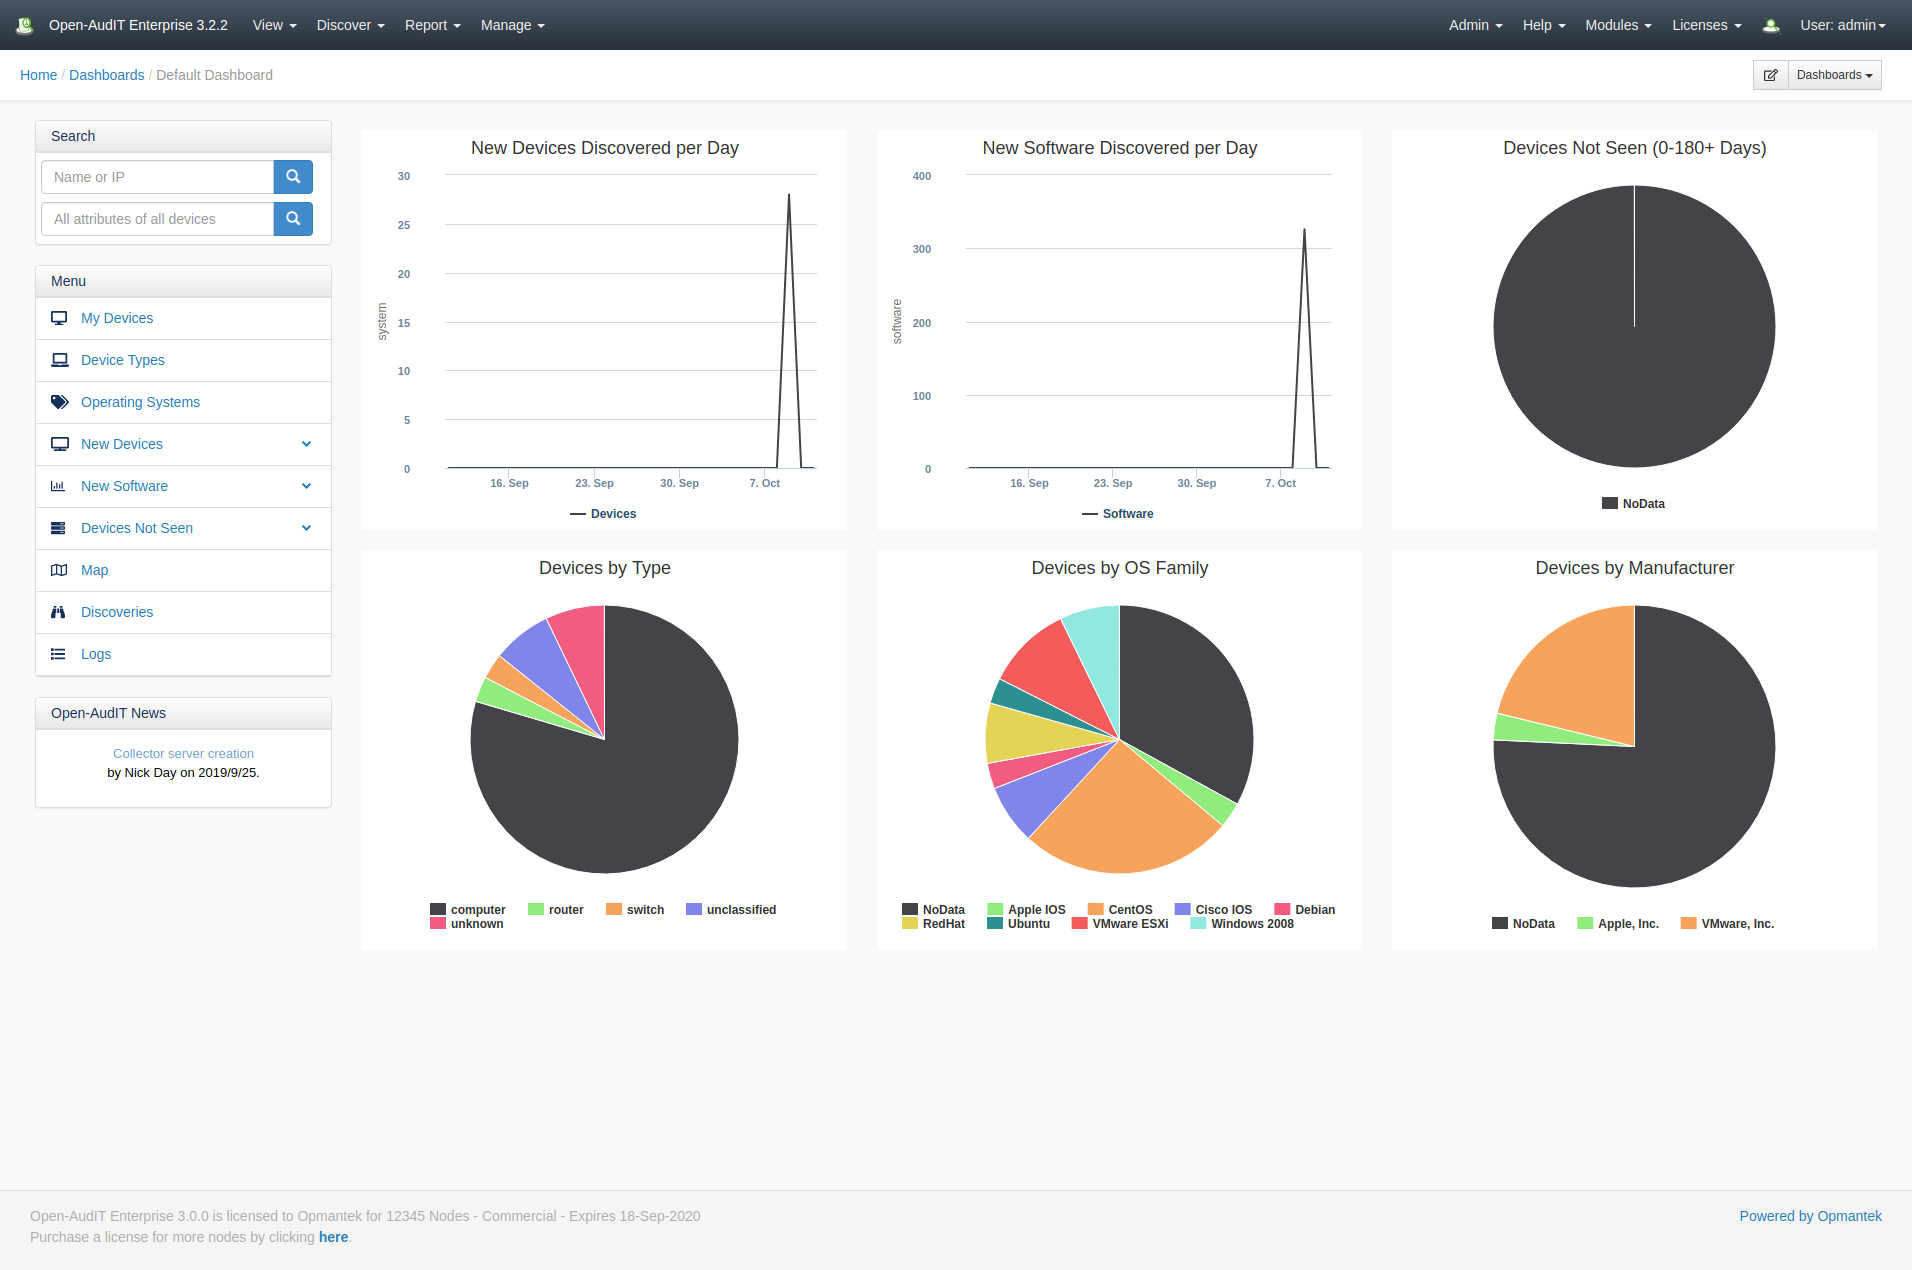
Open-AudIT is another excellent option for auditing your PCs that is able to tell users precisely what is in their networks, how things are configured, and when the networks change.

This tool runs on Windows systems. Open-AudIT is basically a database that can be queried through a web interface.

The data about the user’s network is inserted via Windows, and the entire app is written in PHP, bash, and VBScript.

These scripting languages will allow users to make changes and customizations effortlessly.

You can find out more about Open-AudIT by heading over to its official website and taking a look at the complete set of features that are packed in this auditing tool for Windows PCs and more.

Take a look at the key features that are included in Open-AudIT:

  • Scans for software, hardware, operating system settings, security-related settings, services, IIS settings, users, groups, and more
  • Automatic scanning
  • Written in PHP, bash, and VBScript
  • Great reporting tools
  • Comprehensive and friendly interface

⇒ Get Open-AudIT

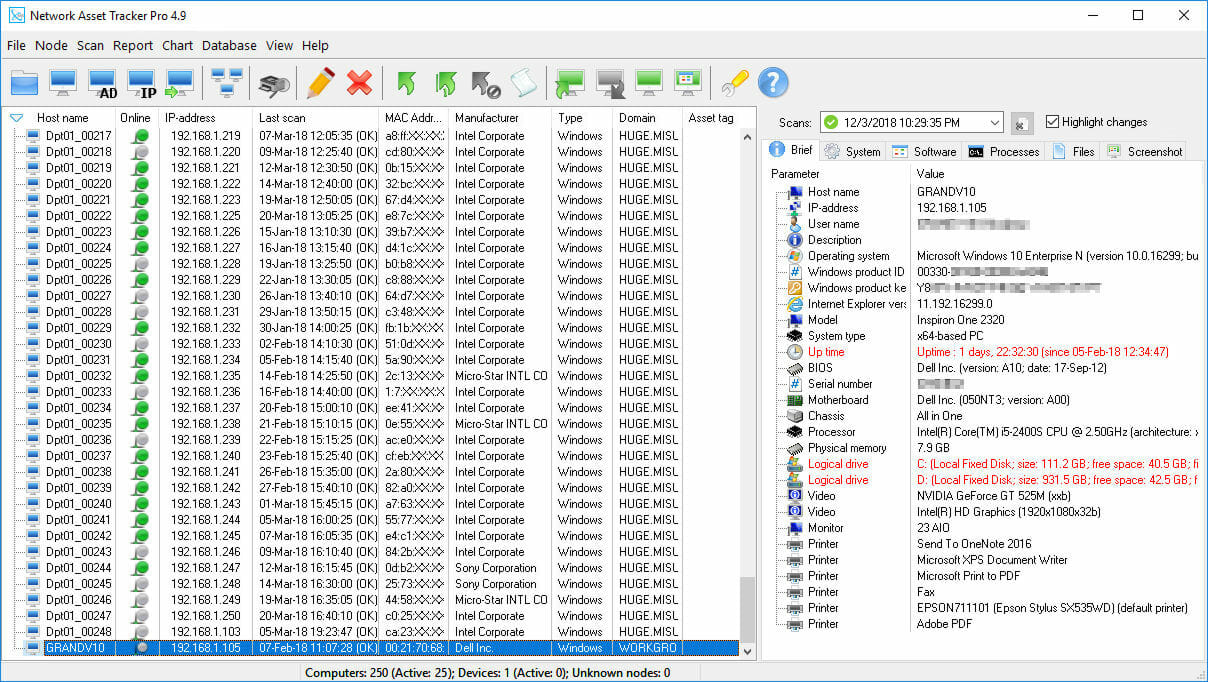
Network Asset Tracker Pro – Best tool for network tracking

Network Asset Tracker Pro is another excellent option that you have available for auditing your PCs running Windows.

This tool does not require installation, and it can be used as a portable application. You will get the chance to run the tool from a removable storage device such as a USB flash drive, a CD-ROM drive, a flashcard, and more.

You can find out more about Network Asset Tracker Pro and get this tool just to see how it works for your machines running Windows.

Take a look at the most important features that are included in Network Asset Tracker Pro:

  • This professional program is designed to collect and present the maximum amount of data possible about your PC’s hardware and software.
  • Free PC Audit 4.9 is perfect for users who are searching for computer manufacturers, driver updates, system integrators, and also tech experts.
  • This freeware is a great tool for scanning and collecting data about your PCs and keeping your network safe and free of threats.

⇒ Get Network Asset Tracker Pro

E-Z Audit – Most simple automatic auditing tool

E-Z Audit is another tool that can audit PCs and servers quickly and accurately. This portable audit tool provides an audit for PC hardware and software as well.

When you are using this tool, you can enjoy total privacy, and no audit data will ever come to the creators of this tool, unlike lots of other free software and paid competition these days.

In order to be able to use this tool, you will have to install it on the PC or server you want to audit..

E-Z Audit already has more than 18,000 customers throughout the world, and it has managed to make millions of PC audits easily since back in 2001.

Many more interesting features and functionalities are included in this tool, so make sure to check it out.

It’s worthwhile checking out a few of its most important features below, so take a look:

  • Automatic and on-demand auditing
  • Clean and very intuitive user interface
  • Create point-and-click reports throughout the whole program
  • Set-it-and-forget-it type of configuration, ideal for beginners
  • Easy to implement in only a few minutes

⇒ Get E-Z Audit

These five picks for the best Windows PC auditing software are the best ones on the market these days.

No matter which one of these great tools you decide to purchase, total success is guaranteed by their extended sets of unique and handy features.

You might also be interested in our selection of the best event log monitoring software for Windows.

If you have any suggestions, don’t hesitate to let us know about them in the comments section below.

Selected Boot Image did not Authenticate: How We Fixed It

The selected boot image did not authenticate the error message is linked with updates, upgrades, and driver updates and is likely common on HP computers.

Note that this error is not the same as the bootmngr missing error that displays when you attempt to load an operating system from a directory that it wasn’t installed in.

Causes of Selected boot image did not authenticate error

This error indicates that a security protocol has been breached or the device you are loading the OS from is not able to offer the information required in other to boot.

Secure Boot is a technology that uses the system firmware to confirm that the system boot loader is signed in with a cryptographic key authorized by a database contained in the firmware. So, to secure your computer from system changes that can trigger any harm, the boot sequence is saved in the database.

Getting this error message can also indicate that your bootloader credentials are missing, thus making it difficult to load your OS. Nevertheless, no matter the cause of the Selected boot image did not authenticate error below are some solutions that can help you resolve it.

How can I fix the Selected boot image did not authenticate error?

1. Switch to legacy boot in your BIOS settings

Switching to legacy boot will help bypass the OS and hardware changes and proceed with the booting. If you know that your computer can’t boot due to a malware attack, this solution is not for you. Below are a few steps to resolve this issue.

  1. Restart your PC and enter BIOS.
  2. Choose the System Configuration menu with the right arrow key. Now select the Boot Option and press Enter.
  3. With the down arrow key, select Legacy Support and hit the Enter button. If it is disabled, select Enabled and hit Enter.
  4. Select Secure Boot and hit Enter. Now disable Secure Boot.
  5. Press the F10 and accept the changes. Use the left arrow key to choose Yes and press Enter. Save changes and exit.
  6. After this, the computer will automatically restart to Windows with Legacy support enabled and Secured Boot disabled.

2. Hard reset your PC

hard reset selected boot image did not authenticate

A hard reset on your PC will reset all the configurations on your BIOS and hopefully fix the Selected boot image did not authenticate error. By doing so, all incompatible configurations will be wiped out.

Use these steps to reset your computer

  1. Switch off your PC.
  2. Unplug the AC adapter cord.
  3. Take out the battery.
  4. Hold down the power key for 20 to 25 seconds to reset the hardware.
  5. Now try to power it up and hit the F2 button. This command will load the hardware diagnostics.
  6. Run a startup test to test all the hardware components.
  7. Restart the PC and let it boot normally only if the test is clean. If it doesn’t boot then you have to do a system repair.

3. Use system recovery to repair your computer

Making a repair on your system can fix the Selected boot image did not authenticate error. These are simple steps of how you can make a system repair.

  1. Turn off the system and wait for a few seconds before you turn it back on by pressing the power key. Just as it is coming up, press ESC repeatedly until the Startup menu comes up.
  2. Now, hit the F11 button which will navigate you to the recovery console.
  3. Hit Troubleshoot, then Advanced Options and press Startup Repair.
    startup repair selected boot image did not authenticate
  4. Follow the steps on the screen to repair your PC.

There you go, you should be able to fix the Selected boot image did not authenticate error using these solutions.

READ ALSO:

Windows 11 Best Performance Settings: Storage, Background Apps & More

What if I told you that you can increase the performance of your Windows by tweaking some settings without the need for third-party software?

The default Windows 11 settings are optimal for all-around enjoyable performance, but you can take advantage of some factors to speed up and optimize your system.

What are the best Windows 11 performance settings?

1. Adjust performance settings

  1. Click the Search icon in the Taskbar.
  2. Type in advanced and select View advanced system settings.
  3. Then, select Settings in the Performance section.
  4. Select Adjust for best performance then click OK.

2. Clean the startup

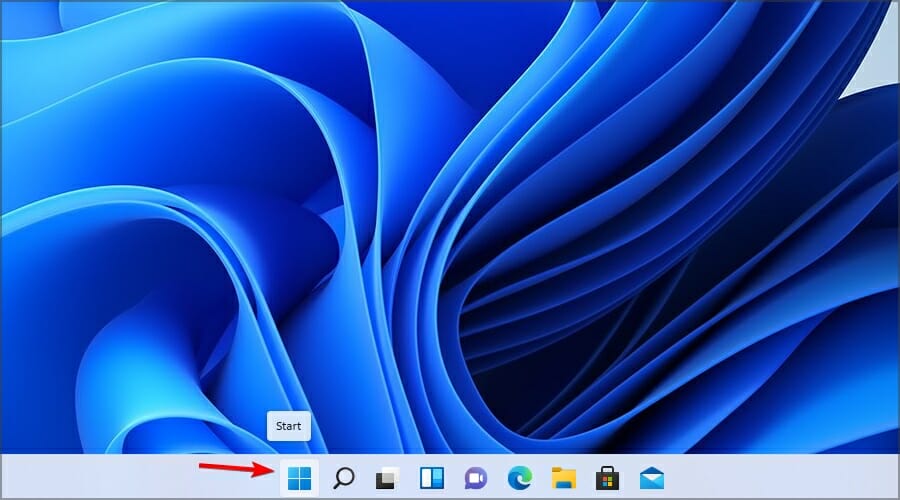
  1. Click the Start button in the Taskbar.
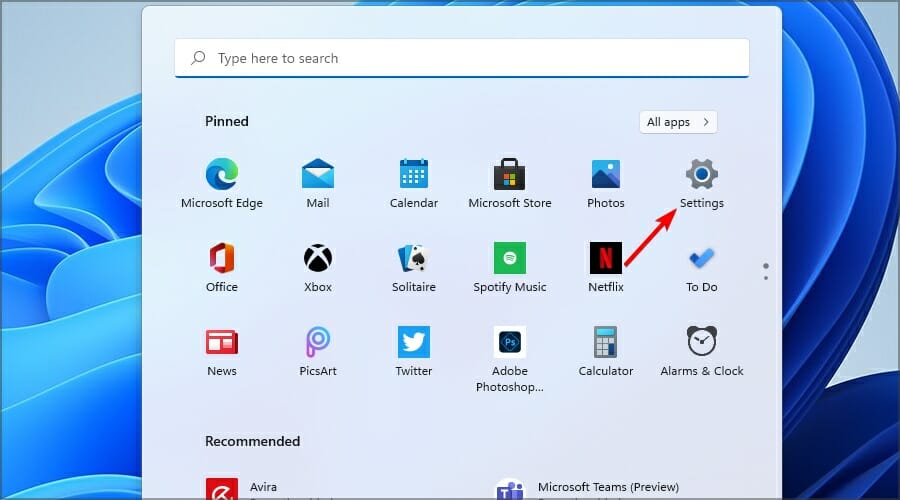
  2. Select Settings.
  3. Go to Apps, then Startup.
  4. Toggle off the apps you no longer wish to start with your PC.

3. Disable background apps

  1. Click the Start icon in the Taskbar.
  2. Now select Settings.
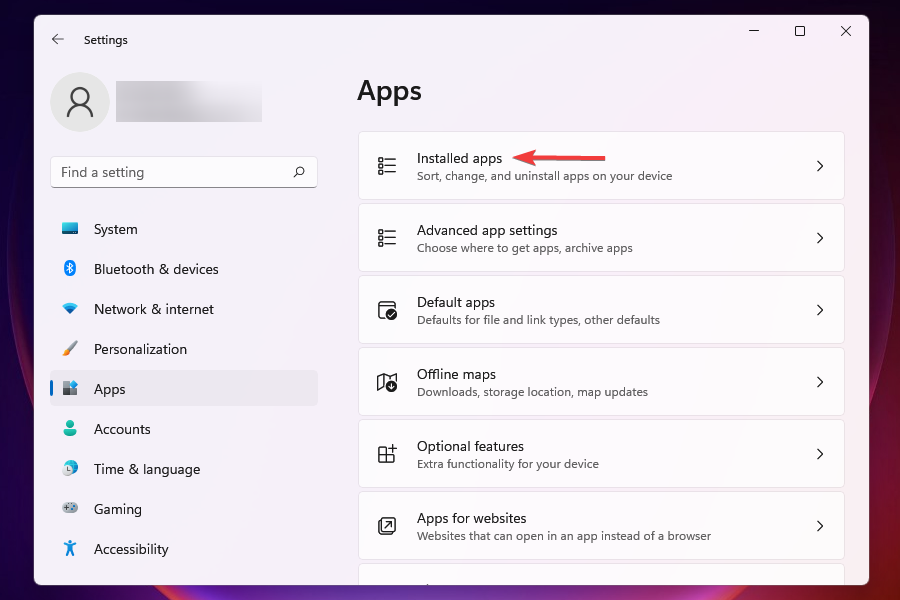
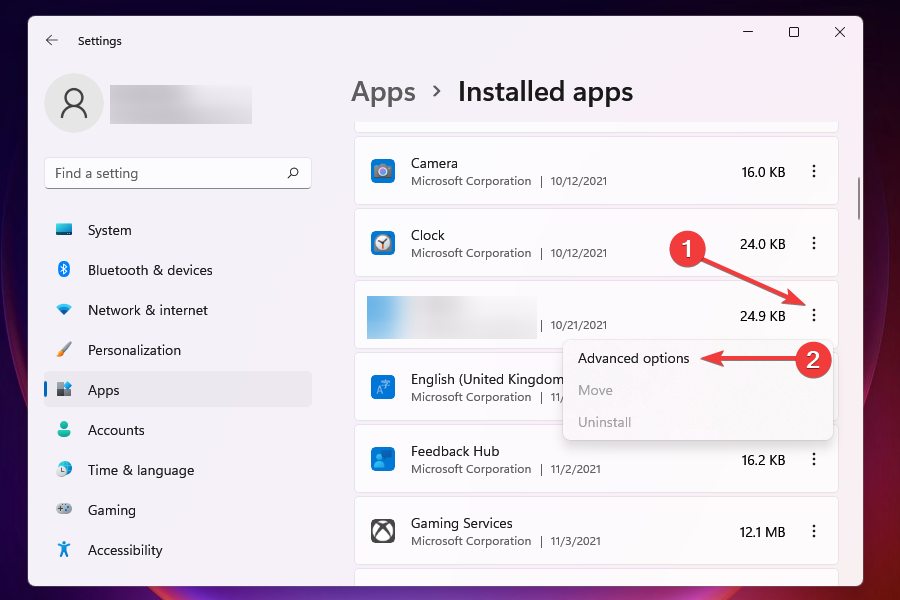
  3. Navigate to Apps section in the left pane. In the right one, click the three dots icon next to the application that you want to disable.
  4. Select Advanced options.
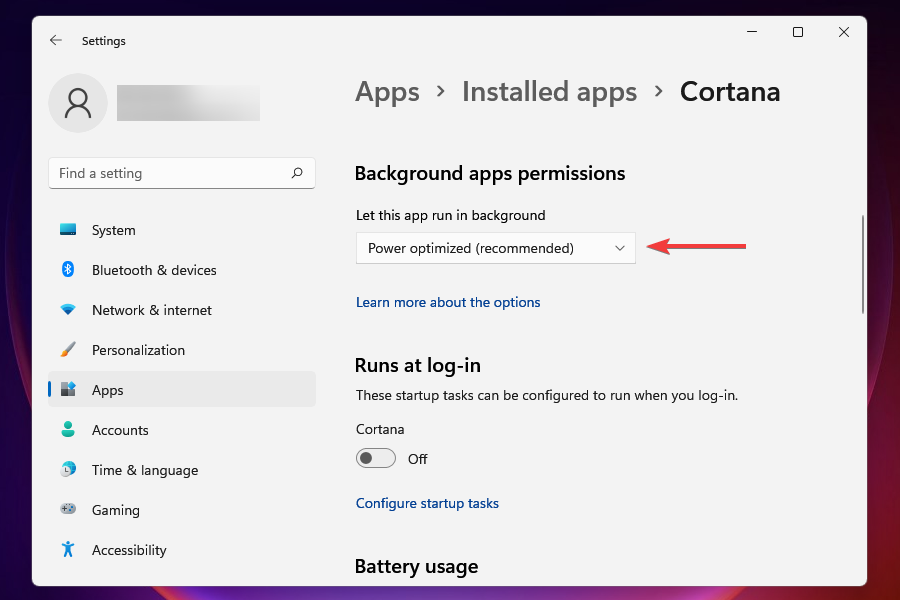
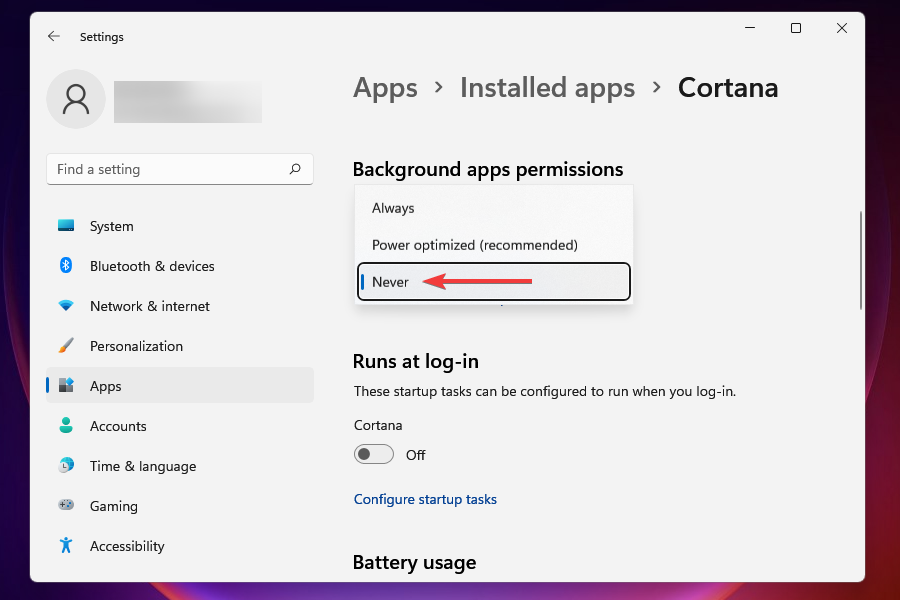
  5. Set the Background app permission to Never.
  6. Repeat this step for all apps that you want to disable.
Note icon NOTE
Keep in mind that this method only works for apps that are downloaded from the Microsoft Store.

4. Enable Storage Sense and clear the temporary files

  1. Press Windows Key + I to open the Settings app.
  2. Now select Storage.
  3. Turn Storage Sense on.
  4. You can also schedule and adjust your settings by click on Storage Sense.

While you’re here, you can also clear the temporary files by doing the following:

  1. In Storage section, click on Temporary files.
  2. Select the files that you want to remove and click on Remove files button.
  3. When the confirmation dialog appears, click on Continue.
  4. Wait while Windows completes the process.

5. Change power settings

  1. Press Windows Key + S and enter power plan. Select Choose a power plan from the list of results.

  2. Then, select High Performance. You might have to expand Show additional plans section in order to see the option.

6. Disable transparency effects

  1. Press Windows Key + I to open the Settings app.
  2. In the left pane, select Personalization. Now select Colors.
  3. Now, toggle Transparency effects off. 
Note icon NOTE
Note that you need to activate Windows to change this setting and other ones related to themes and colors or the overall aspect.

Is Windows 11 more demanding than Windows 10?

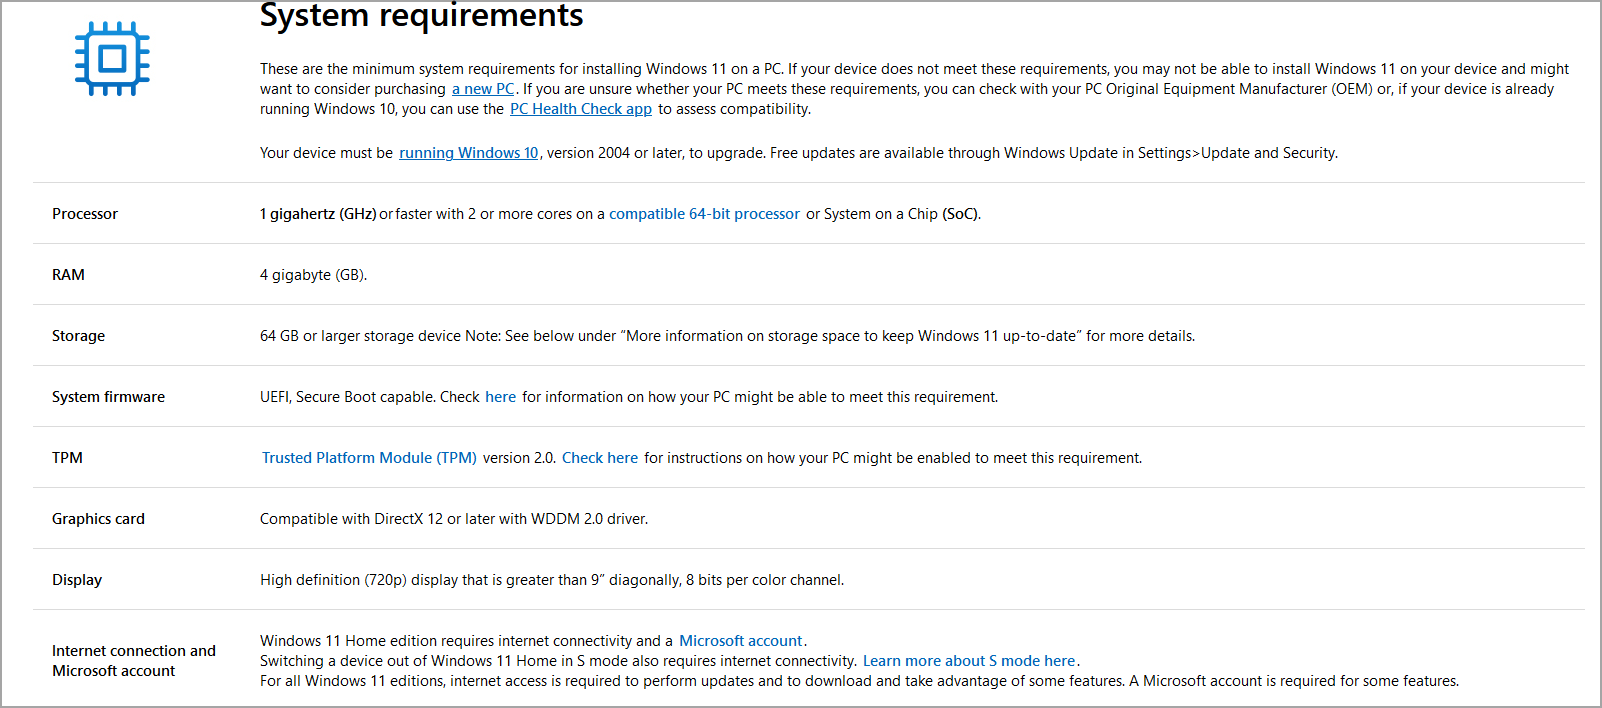
Yes, the new version is slightly more demanding than its predecessor. To run Windows 11, you’ll need at least 4GB RAM, 64GB of storage space, and a dual-core 64-bit CPU.

This isn’t a significant change compared to Windows 10. However, not all processors will work with the latest release, so if you want to upgrade, make sure you don’t use hardware over four years old.

We suggest checking the list of supported CPUs on Microsoft’s website for detailed information.

Can third-party apps affect my performance?

Yes, third-party apps can negatively impact performance. They take up space and may require lots of resources to run. That’s not to say you should only run Windows apps. Just make sure to clean up your PC regularly and get rid of apps you no longer need.

Can defragmentation speed up my PC?

Defragmentation can improve your performance if you’re using a hard drive and not an SSD. If you’re unfamiliar, this process will rearrange data, allowing you to access it faster.

This process is usually performed automatically by Windows, and if you want to learn more about it, we suggest reading our how to defrag drives on Windows 11 guide.

Can using High performance power plan cause problems?

In most cases, High performance won’t cause any issues. By using this plan, your CPU speed won’t be reduced at all, so you should get better results in apps and games.

However, this power plan will use more power and cause more heat in some cases, so if you use it on your laptop, ensure you have a good cooling system and that your device is connected to the wall outlet.

That’s about it for this article. We’ve included all the ways you can optimize your device and make Windows 11 faster in a matter of moments.

All these settings are incredibly easy to access and perfectly safe to use, so try them on your PC and check if they work for you.

Once you have configured your PC, you can use Windows 11 performance overlay and check for improvements. After applying these tweaks, run a computer performance test to verify gains and track CPU, GPU, RAM, and disk improvements.

Users with older PCs can also enable ReadyBoost on Windows 11 for a small performance boost.

If you have any suggestions or know about other settings that could improve Windows 11, don’t hesitate to tell us in the comment section below.

PgAdmin Utility File Not Found PostgreSQL: 3 Confirmed Fixes

Computer errors can cause various problems, and one error that many users reported is the Utility file not found, please correct the binary path in the preferences dialog.

This error can cause all sorts of problems, such as SQL Server error 18456, and in today’s guide, we’re going to show you the best methods you can use to fix it.

What causes the Utility file not found in PostgreSQL?

There are two reasons for this error message:

  • Improper configuration – If the application isn’t configured properly, you won’t be able to use it at all. You might even encounter errors such as SQL Server query execution failed.
  • Missing files – In some instances, the necessary files might not be located in the proper location, thus causing issues to appear. If you’re working with databases, you should consider SQL backup software to prevent any file loss.

How can I fix the Utility file not found, please correct the binary path in the preferences dialog error?

1. Restore the database

  1. Open pgAdmin. Click on File and select Preferences.
     
  2. Next, choose Binary path and set ProgresSQL Binary path to C:\Program Files\PosgresSQL\13\bin

  3. Lastly, select your database from the menu on the left, right-click it and choose Restore.

Once you perform these steps, the pgAdmin 4 utility file not found, please correct the binary path in the preferences dialog should be gone.

2. Edit the config_distro file

Note icon NOTE
This method will achieve the same results as the previous one, but instead of using the graphical interface, you’ll directly edit the settings.
  1. Navigate to C:\Program Files\PostgreSQL\13\pgAdmin 4\web
  2. Open the config_distro in your code editor.
     
  3. Now change the pg value so it matches the location of the ProgresSQL bin directory.
  4. Save changes.

As you can see, this is a simple solution that will help you fix Please configure the PostgreSQL binary path in the preferences dialog in PostgreSQL 14 error.

3. Copy the necessary files

  1. Look for the pg_restore.exe file. It should be located in C:\Program Files\PostgreSQL\13\bin
  2. Navigate to the following path: C:\Program Files\PostgreSQL\13\pgAdmin 4\
  3. Navigate to the runtime directory. If it’s not available, right-click the empty space and expand the New menu and then select Folder. Name it runtime and navigate to it.
  4. Now paste all the files from the bin directory inside the runtime folder.

As you can see, the Utility file not found, please correct the binary path in the preferences dialog is a minor error that can be easily fixed in a matter of minutes.

Fixing this error is important, and speaking of database errors, be sure to check our guide on how to repair a corrupted database in SQL Server.

Did you find a different solution for this problem? If so, let us know in the comments section below.

Forza Horizon 4 Not Launching On Windows 11: Fix

Forza Horizon 4 is an enthralling Windows and Xbox racing game. Now players can enjoy it on Windows 11 too. However, Horizon 4 doesn’t always work as expected in Microsoft’s latest desktop platform.

Some players have posted on Microsoft’s support forum about Forza Horizon 4 not running. For them, the game is not launching in Windows 11 or keeps crashing when they start it at least.

Do you need to fix Forza Horizon not running on Windows 11 as well? If so, you might be able to do that with the potential resolutions below.

How come Forza Horizon 4 isn’t working in Windows 11?

First, remember that your PC must meet Forza Horizon 4’s minimum system requirements to play the game on it.

If Forza Horizon 4 doesn’t work after purchasing and downloading it, double-check the game’s system requirements. The screenshot below shows the game’s system requirements:

Horizon 4's system requirements forza horizon 4 not working windows 11

Does your computer meet those system requirements? If not, you’ll need to upgrade your PC’s hardware so that it meets the stated specifications. Alternatively, request a Microsoft Store or Steam refund for Forza Horizon 4.

If you’re sure it does meet the minimum system requirements for Horizon 4, you’ll need to do some troubleshooting. It might be the case that your Forza Horizon 4 installation is corrupted in some way. In which case, resetting or reinstalling the game might be your best bet.

Forza Horizon 4 has pretty advanced 3D graphics. Thus, your PC must have a reasonably update graphics card driver for that game. If your desktop or laptop has a somewhat outdated GPU driver, that might be why the game doesn’t work for you.

Conflicting programs are also a common cause for Forza Horizon 4 crashing on Windows 11. There are quite a few software applications known to conflict with the game.

Some third-party antivirus utilities can stop Forza Horizon 4 from launching when it’s not in their exclusion lists.

How can I fix Forza Horizon 4 not launching on Windows 11?

1. Run Forza Horizon 4 as an administrator

  1. Right-click the desktop shortcut for Forza Horizon 4 and select Properties. If you don’t have one, add a shortcut for it to the desktop by dragging the Horizon 4 app from the Start menu.
    The Properties option forza horizon 4 not working windows 11
  2. Click the Compatibility tab on the game’s properties window.
  3. Select the Run as administrator checkbox.
    The Run this program as an administrator option forza horizon 4 not working windows 11
  4. Press the Apply button, and click OK to exit.

2. Reset the Forza Horizon 4 game app

  1. First, click the magnifying glass taskbar icon.
    The magnifying glass button forza horizon 4 not working windows 11
  2. Type in apps and features within the search box.
  3. Click the Apps & features search result to open that Settings tab.
  4. Then click the three-dot button on the right side of the listed Forza Horizon 4 app.
    The three-dot button
  5. Select Advanced options to view them.
  6. Press the Reset button for the game.
    The Reset button forza horizon 4 not working windows 11
  7. Click Reset again.

3. Verify game files (Steam fix)

  1. Open the Steam game client software.
  2. Select the Library tab in Steam.
    The Library tab forza horizon 4 not working windows 11
  3. Right-click Forza Horizon 4 to select its Properties option.
  4. Click the Local Files tab on the properties window.
  5. Press the Verify Integrity of Game Files button for the verification process.
    Verify Integrity of Game Files button forza horizon 4 not working windows 11
  6. Wait for validating Steam files to reach 100 percent, and then click the Close button.

4. Disable the microphone for Horizon 4

  1. Click the Windows taskbar icon to open the Start menu.
  2. Select the Settings app shortcut.
  3. Click the Privacy & security tab.
  4. Next, select the Microphone navigation option.
    The Microphone option forza horizon 4 not working windows 11
  5. Then disable the microphone for the listed Forza 4 app by clicking its toggle button.Microphone settings forza horizon 4 not working windows 11

5. Undo PC overclocking

Overclocking your PC can cause Horizon 4 to crash or not to launch at all. Have you been overclocking your computer’s processor or graphics card?

If so, now you should undo the overclocking you’ve applied by resetting the CPU and GPU to their default settings. You might be able to restore defaults by selecting certain options within your overclocking software.

For example, you can click a Reset button to revert GPU changes. However, some users might need to enter BIOS (Basic Input Output System) settings to undo overclocking.

After doing these changes, check whether the Forza Horizon 4 not launching on Windows 11 issue is gone.

6. Select high-performance power settings

  1. Open Windows 11’s search tool by pressing the Windows + S keyboard shortcut.
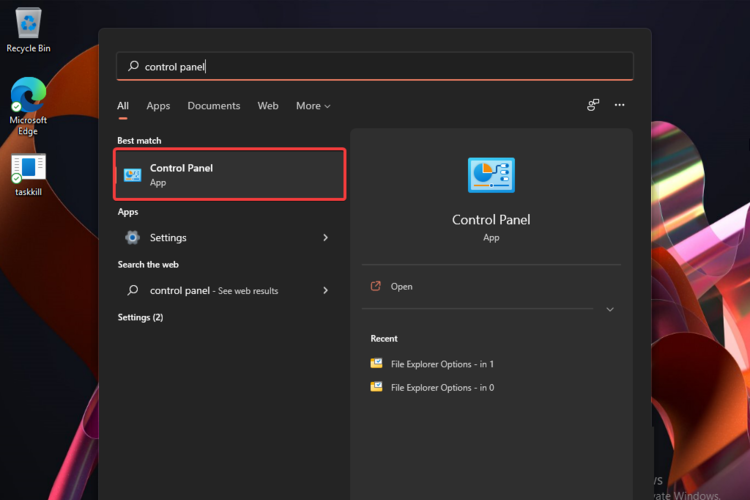
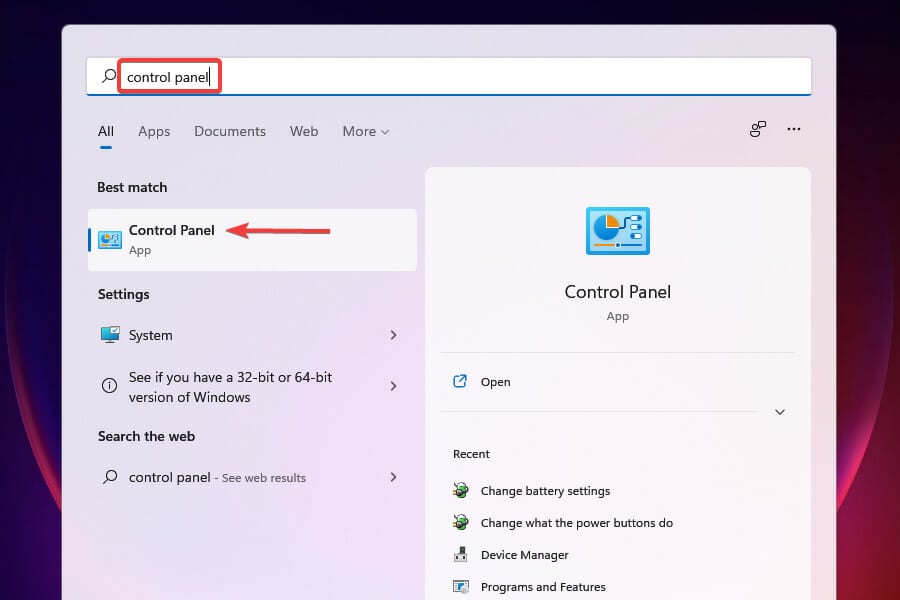
  2. Input Control Panel in the search text box to find it.
  3. Then click Control Panel in the search tool.
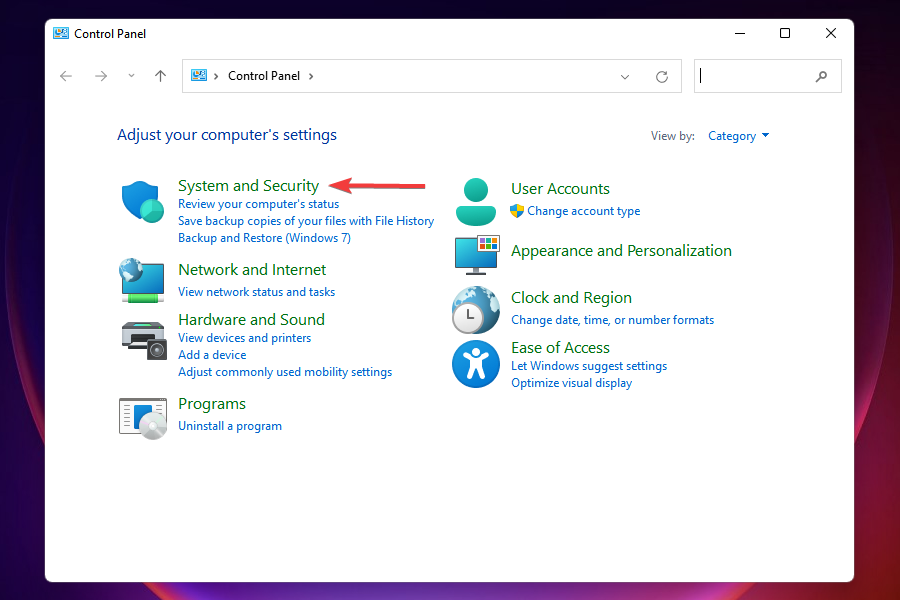
  4. Select the Hardware and Sound category.
    The Hardware and Sound category forza horizon 4 not working windows 11
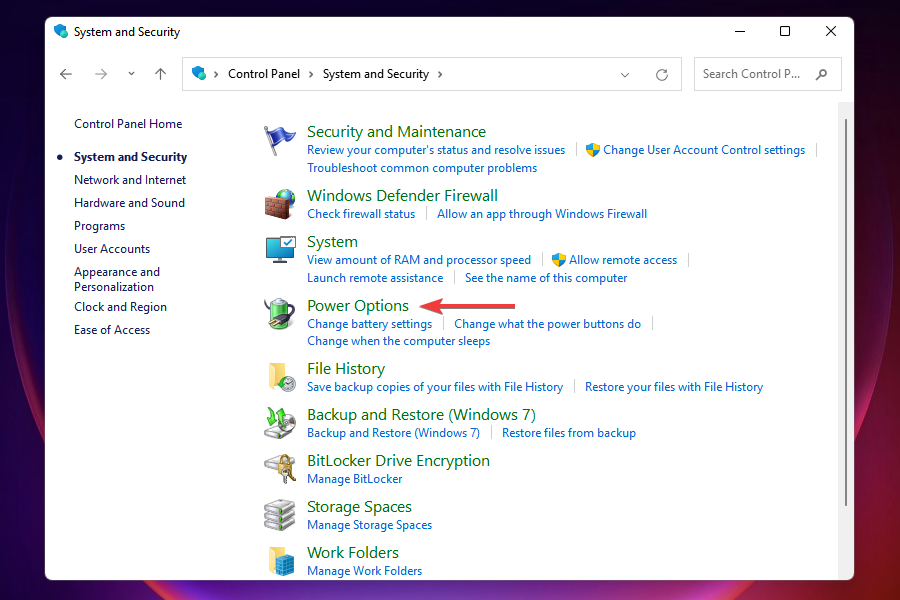
  5. Click Power Options to view those settings.
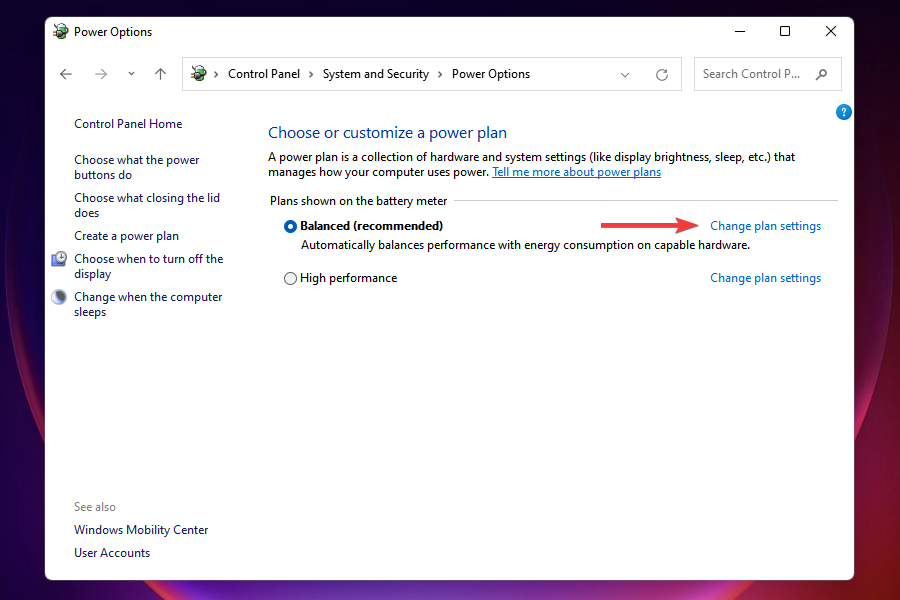
  6. Then select the High performance radio button.
    High performance option forza horizon 4 not working windows 11
  7. Close the Control Panel, and click Power, then Shut Down on the Start menu to restart.

7. Update your PC’s graphics card driver

  1. Open the AMD or NVIDIA driver download webpage in a browser depending on what graphics card your PC has.
  2. Select your graphics card model and Windows platform on the menus.
    NVIDIA graphics card selection menus forza horizon 4 not working windows 11
  3. Click the Submit or Search button.
  4. Then click the Download button for the latest compatible graphics card driver with your PC.
    NVIDIA Download button forza horizon 4 not working windows 11
  5. After downloading the driver package, press the Windows key + E hotkey.
  6. Open the folder you saved the driver package in.
  7. Click the driver package file to open its setup wizard.
  8. Then go through the setup wizard to install the graphics driver.

You can also check if you need to update your graphics card’s driver with third-party driver updater software. Scanning your PC with a third-party driver updater tool such as Outbyte Driver Updater will show you what devices on it have old and outdated drivers.

8. Disable third-party antivirus software

There are quite a few anti-virus utilities that don’t mix well with Forza Horizon 4. AVG, Avast, Avira, Comodo Antivirus, and Emisoft Anti-Malware are among those confirmed to conflict with the game. So, it’s recommended to at least disable antivirus software before playing the game.

You can usually disable third-party antivirus utilities from their context menus. Right-click a system tray icon for your antivirus software and look for a disable or turn off option on it. Select the disable option to turn off its shield for a few hours at least.

Alternatively, you could try adding Forza 4 to your antivirus utility’s exceptions list. Check the instructions on your antivirus utility’s website for further details about how to set up software exclusions for it.

9. Clean-boot Windows 11

  1. Press the Windows key + X at the same time, which is the keyboard shortcut.
  2. Select the Run shortcut on the Win + X menu.
  3. Input the following MSConfig command and click OK: msconfig
  4. Click Selective startup within the General tab.
  5. Uncheck the Load startup items option to deselect that checkbox.
    The Load startup items checkbox forza horizon 4 not working windows 11
  6. If they’re not already selected, select the Load system services and Use original boot configuration settings.
  7. Then select the Services tab.
  8. Click Hide all Microsoft services to select that option’s checkbox.
    The Hide all Microsoft services checkbox forza horizon 4 not working windows 11
  9. Select the Disable all option.
  10. Press the Apply button to save settings.
  11. Click OK to exit the System Configuration tool.
  12. Thereafter, select the Restart option.
  13. Try playing Forza Horizon 4 after the restart.

If this resolution works, a third-party program or service was probably crashing the game before you clean-booted Windows 11.

Sonic Audio, Discord, OBS, MSI Afterburner, Logitech G Hub, Nahimic Audio, Xsplit, and EVGA Precision are some of the apps confirmed to conflict with Forza 4.

You can restore the original boot configuration by selecting the Load startup items and Enable all options within the System Configuration window. If you do that, you’ll need to identify what app is conflicting with the game to manually remove it from the startup.

10. Reinstall Forza Horizon 4

Note icon NOTE
These instructions are for reinstalling the Forza Horizon 4 MS Store app. Steam players can uninstall and reinstall the game with the Steam client software.
  1. Open the Apps & features tab in Settings as outlined within the first three steps of the second resolution.
  2. Click the three dots button for the Forza Horizon 4 app to select Uninstall.
    Uninstall option forza horizon 4 not working windows 11
  3. Select Uninstall again to confirm.
  4. Before reinstalling the game, click Power and Restart on the Start menu.
  5. Next, select Microsoft Store on the Start menu.
  6. Enter Forza Horizon 4 in the Microsoft Store search box.
  7. Select the Forza Horizon 4 app page in the search results.
    Forza Horizon 4's MS Store page forza horizon 4 not working windows 11
  8. Then download the game from its MS Store page to reinstall it.

How can I optimize gaming in Windows 11?

Windows 11 includes a Game Mode setting you can turn on to optimize gaming. That setting optimizes system resources for games by disabling superfluous background processes and Windows updates while you play them. You can enable Game Mode as follows:

  1. Press the Windows key + I keyboard shortcut.
  2. Select Gaming on the left of Settings.
  3. Click the Game Mode navigation option.
    The Game Mode navigation option forza horizon 4 not working windows 11
  4. Then click the Game Mode option on.
    Game Mode option forza horizon 4 not working windows 11

If you ever need to fix Forza Horizon 4 lag in Windows 11, consider playing the game with VPN software installed. You can choose a less crowded server when utilizing such a service.

Overall, there are various potential resolutions for fixing Forza Horizon 4 not running on Windows 11. The ones mentioned above will resolve some of the most likely causes for the game crashing.

However, there are probably plenty more potential fixes for Horizon 4 not working. You can also check out the Forza Support website. That’s a dedicated support site for Forza racing games from which you can submit support tickets.

To do so, sign in to that website and open its submit a request page. Even more, don’t hesitate to take action if you can’t play Forza Horizon 4 online on your PC.

And there are some Windows 11 gaming settings that you need to enable in order to ensure top graphics performance and a smooth gameplay.

The potential Windows 11 fixes in our guide could kick-start your Forza Horizon 4 game. So, make sure you try applying most of them before seeking further troubleshooting guidance on the Forza Horizon 4 not launching on Windows 11 issue.

Feel free to discuss Forza Horizon 4 not working on Windows 11 in our comments section below.

5 Best Malayalam Typing Software for PC in 2026

While Windows comes with built-in support for thousands of languages already, there are still some added functions people look for. Those who are looking for advanced features of a specific language, often have to find different software altogether.

Malayalam is one of the commonly spoken languages that users often find software for. That’s when they need a third-party Malayalam typing software for Windows to speed things up.

English to Malayalam typing software for Windows comes with advanced features like special characters, more fonts, font conversion, and more. We shortlisted some of the best Malayalam typing software programs out of the many that are available online.

What is the best Malayalam typing software for Windows?

Malayalam Typing

Nowadays many of our typing activities take place on our mobile phones, instead of our computers. Being able to use your device with your language of choice should be a given. Technology companies are putting work in providing the necessary tools so users around the world get the full experience of their products.

This is where the Malayalam Typing app provided by Microsoft comes into play. It comes with all necessary keyboard-app features that make for a seamless typing experience.

Malayalam Typing is a very small app, it won’t take up much space and it will certainly not have a negative impact on your device’s performance.

The app’s main focus is providing a Malayalam keyboard and also giving support for manglish typing with real-time transliteration. Its easy and modern UI allows you to easily switch between these modes.

Other key features of Malayalam Typing include:

  • 4 different keyboard styles
  • fully customizable
  • one hand keypad
  • dedicated keys
  • integration to popular social-media and messaging apps

Malayalam Typing is a free app. With one Microsoft account, you can install it on up to 10 different devices.

⇒ Get Malayalam Typing

Keymagic

Those looking for high-performance software can easily trust Keymagic as one of the best Malayalam typing software for Windows. It’s an exclusive keyboard with Unicode fonts.

It comes with a variety of Unicode keyboard layouts that can be changed to and from by the users. They can also map or edit the keyboard layout as their custom selected keyboard typing layout setting.

In addition, the program also allows users to administer their completely organized or created keyboard layout. It also enables users to create different types of keyboard layout files with the help of the kEditor.

Keymagic is free software and it is available on Windows, macOS, Ubuntu, Linux as well as on the mobile operating systems iOS and Android. 

⇒ Get Keymagic

Varamozhi

An English to Malayalam transcription library, Varamozhi can convert Malayalam text between Malayalam and English writings for free.

As an input, it takes the mapping between a Malayalam font and output functions of the transcription system. It’s basically a group of applications that help the system to read and write Malayalam.

Those who want to write these programs must use transcription and they should be able to type in Manglish that will eventually convert to Malayalam.

It comes with two Malayalam fonts that are installed with the actual program further enhancing your font library. It’s a simple program that allows users to write Manglish on the left side and view the Malayalam translation on the right.

It’s also available the other way around. However, a Malayalam keyboard is required to view what is being typed or find out by trying and testing. Additionally, it also features a debug console.

⇒ Get Varamozhi

Typeit!

Typeit! is a free Malayalam typing software or an editor where the users can type and edit documents in Malayalam.

It provides support for six different Malayalam keyboards that are Inscript (ISM), GIST, Malayalam Typewriter, Panchami, Panchari, and Varityper Phonetic keyboard Layout. It features a simple and easy-to-use interface and is perfect even for beginners.

It allows you to change between Malayalam and English fonts by clicking the Caps lock. Users can also change the keyboard layouts conveniently by simply hitting the F4 key for the Malayalam keyboard.

Hyphenation is one of its other features that automatically hyphenate documents. This helps the documents to be exported to other programs, in the right manner.

Those who do not want to use the hyphenation feature can turn it off from the tools menu. Moreover, users can easily export the completed text to other applications in two ways.

They can either copy the typed content and paste it into other applications like Word, PageMaker, etc., or they can save it in RTF format and import the documents to other applications. The Malayalam font is automatically set to ML-TTRevathi.

Additionally, the font size can be modified with the help of the SetFont Command from the Format Menu. Best of all, the documents can be converted to Unicode, which is very valuable for those using the internet.

Typeit! is free software that can be used on a Windows operating system.

⇒ Get Typeit!

Inkey

Inkey is a responsive and easy-to-use Malayalam typing software that’s based on Mozhi scheme. Once it’s downloaded and installed, users can simply hit the CTRL key twice to switch between Malayalam and English.

The first version of the program was launched in 2008, however, it was available through only a handful of distribution mediums. The second version was released in the year 2015.

Due to a concern raised in the Facebook community in 2015 related to typing issues on Windows 7 and up versions, the Mozhi version came into existence. The Mozhi keyboard is written in Tinker keyboard description language.

In fact, users can get the source code for the program online at GitHub. Users can also create their custom keyboard by downloading and transforming the Inkey-Mozhi keyboard.

Inkey is open-source software that can be downloaded for free for Windows OS.

⇒ Get Inkey

Final Words

Writing in your preferred language can get more than convenient with efficient typing software.

Just make sure that it’s a trusted software that offers all the necessary tools to help you write Malayalam text in different fonts, offers auto-correction based on saved spellings, or the documents are convertible to Unicode.

Check the above list, make your choice, and create amazing content using the best Malayalam typing software for Windows.

Mouse Settings on Windows 11: Change Speed & Sensitivity

The latest OS is pretty impressive and it seems like users are more and more excited about its new capabilities. Convince yourself by checking the Windows 11 new features and our related update tips.

However, it comes with some predefined settings, which do not always fit people’s necessities. So, Microsoft fans are wondering what are the best ways to customize Windows 11’s mouse settings.

There are lots of ways to make your device interact better with your PC, and this article will present the best ones.

If you want to increase your level of productivity even more besides tweaking settings, you can always invest in a great mouse designed for multitasking.

Also, they are straightforward to use, so do not worry about not being prepared.

What mouse settings can I change?

1. The pointer speed

This one refers to the Windows option that scales individual counts from the mouse to on-screen cursor movement. Also known as Mouse Sensitivity, the pointer speed’s level can be changed whenever you need it.

Each Windows OS has multiple mouse sensitivity levels, so you’ll always be able to adjust them according to your needs. 

2. Scrolling design

The mouse scroll wheel powers the scrolling design, and this is one of the most used features. It allows you to move from side to side for horizontal scrolling.

Along with the regular left and right buttons, each device should have such a button, and you can adjust its settings just as needed.

3. Visibility

The visibility of your mouse is how it’s shown on your screen. With Windows 11 improvements, you have a few exciting and easily adjustable options.

You can choose how to display pointer trails (short way or long way), whether or not you want to hide the pointer while typing, or whether or not you want to show the location of the pointer when pressing the CTRL-key.

How can I easily change Mouse Settings in Windows 11?

1. Adjust Mouse Sensitivity through the Settings Menu

  1. Press simultaneously Windows + I.
  2. Go to Bluetooth & devices, then navigate to Mouse.
  3. Look at the Mouse pointer speed option, then adjust the slider according to your needs.

2. Customize Scrolling Options

  1. Open again the Settings menu by pressing simultaneously Windows + I.
  2. Click on Bluetooth & devices section, then navigate to Mouse.
  3. From this page, you can also choose to adjust the Scrolling settings.
  4. In these terms, consider the following options: Roll the mouse wheel to scroll (where you can choose from Multiple lines at a time or One screen at a time), adjust the Lines to scroll at a time slider, enabe or disable the Scroll inactive windows when hovering over them option.

3. Adjust Pointer Options through Control Panel

  1. Hit the Windows key, then type Control Panel, and open it.
  2. Navigate to the Hardware and Sound section.
  3. Look at the Devices and Printers section, then click on Mouse.
  4. Click on the Pointer Options tab.
  5. Here, you can adjust certain specifications, such as Motion or Visibility.
  6. Click on the Apply button, then on OK.

4. Personalize Mouse Buttons with Control Panel

  1. Follow the first 3 steps as in the previous solution.
  2. In the Mouse Properties window, instead of Pointer Options tab, select the Buttons one.
  3. Here, you’ll find three more options: The Button configuration (which allows you to switch the primary and secondary buttons), the Double-click speed and the ClickLock.
  4. After you made the changes, click on Apply, then on Ok.

5. Use a third-party software

While most products support their mice with default software, some others are more generic or might come from a manufacturer that hasn’t made its own software.

If you have a device like this, you’ll need another way to change and customize your Windows 11 mouse settings. And why is that? Because Windows doesn’t have any built-in options to do it.

There are plenty of available tools that will help you to easily adjust these options. However, producers are now preparing the latest versions, so you’ll have to wait a bit more to get one of these.

Make sure you constantly keep an eye on our content to find the latest news in this regard.

What are the most common mouse problems?

  • Too slow or fast movement cursor – This can occur due to improper settings or random bugs. It can be easily solved with the Control Panel support or updating the related drivers. If you’re not sure how to keep them up to date, we recommend using a dedicated driver updating tool.
  • Mouse cursor gets freezed – Your mouse cursor could also totally stop working. This usually happens due to an extra load of PCs.
  • Double-click issue – This issue refers to too quick or slow mouse double-clicking. You can quickly adjust it using the Double-click speed option (from the Control Panel) listed above.
  • Uncommon behaviour of Mouse Pointer – Another common issue in mice is the malfunction of the cursor like failing to lock to the game. The main reasons that can explain this issue are unsuitable mousepad or sensor area filled with dirt.

So here you are, having an easy guide that will help to change your Windows 11 mouse settings. Rest assured that the above options are the best you can find.

In addition, to get a more unique workplace, check out how to change the mouse cursor model on Windows 11. And if you’re more into multiple displays, you can enable the ease cursor movement between displays option for a seamless transition.

Your questions and opinions are the most important, so do not forget to share them with us in the comments section below.

How to Fix Terraria Stuck on Joining To Server: 10 Ways

A lot of users complaining about Terraria stuck on joining when trying to connect to a server. The server connectivity issues on Terraria are usually due to service issues or poor local network connection. To eliminate the first issue, check the Terraria server status on on dedicated websites.

What can I do if I can’t connect to Terraria server?

1. Increase Player Spots/Reserve

  1. Open the TerrariaServer.exe to host the game. It usually exists in the game installation folder.
  2. Type the map number you want to play and press enter.configuring terraria server ss 1
  3. Now, Type the number of allowed players. Usually the actual number of players+one. Example: For 2 players, press 3 and hit enter.configuring terraria server ss 2
  4. Next, enter the port and press enter. Usually 7777.configuring terraria server ss 3
  5. Then, Type Y and press enter for automatic port forward.configuring terraria server ss 4
  6. At last, give a server password and hit enter. configuring terraria server ss 5

It will prepare your server for one extra player. It is a proven technique to fix can’t connect to the Terraria server.

2. Update the game’s server

Your friends can’t connect to the Terraria server, maybe because it is outdated. Steam usually updates the game automatically along with the game server. 

If you use a third-party dedicated game server, visit their official website to download the latest software and install it.

3. Use a VPN software

Using a good gaming VPN to fix can’t connect to the Terraria server is a great solution. In some cases, your internet connection can be the root of the problem. Using a different connection may help.

But, Using a VPN usually solves this type of problem.

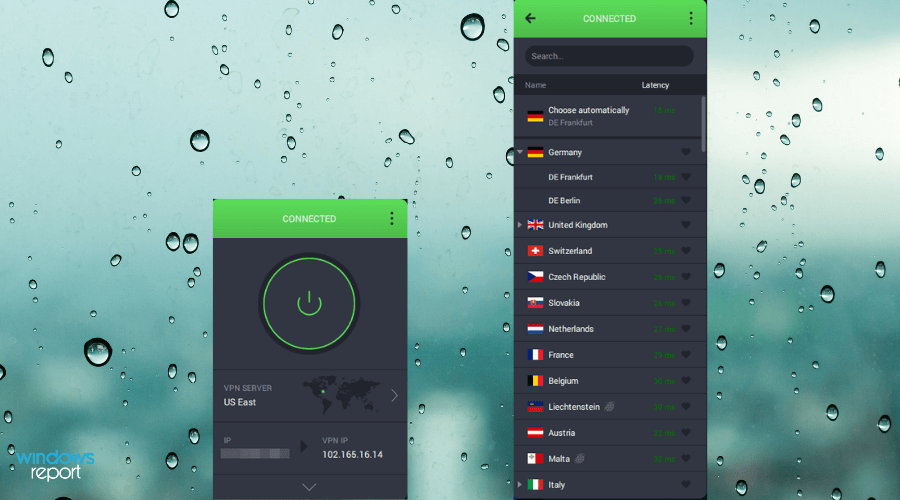
private internet access (PIA) VPN desktop app

Private Internet Access (PIA) is an excellent choice for gamers. It offers a port forwarding feature that most other VPNs lack.

Else, You can have a look at the best VPNs for the Terraria game. Using one of these also can help to overcome this problem. 

4. Use Steam Invite

  1. Open Steam.
  2. Launch the Terraria Game.
  3. Go to Multiplayer.terraria multiplayer
  4. Click on Host & Play.terraria multiplayer host & play
  5. Select Player.select player mp terraria
  6. Then, Select World.select world terraria
  7. Click on Invites Only.click invite only terraria
  8. Give a server password (optional) and click on Accept.click accept server terraria
  9. Now, Click on Settings.click ingame settings terraria
  10. Go to Invite Friends.click invite friends terraria
  11. Then, choose the friends you want to invite to play with you.invite friends terraria steam
  12. Enjoy the game.

The steam invite method helps to bypass the cannot connect Terraria server problem and play multiplayer.

5. Allow the process through the Firewall

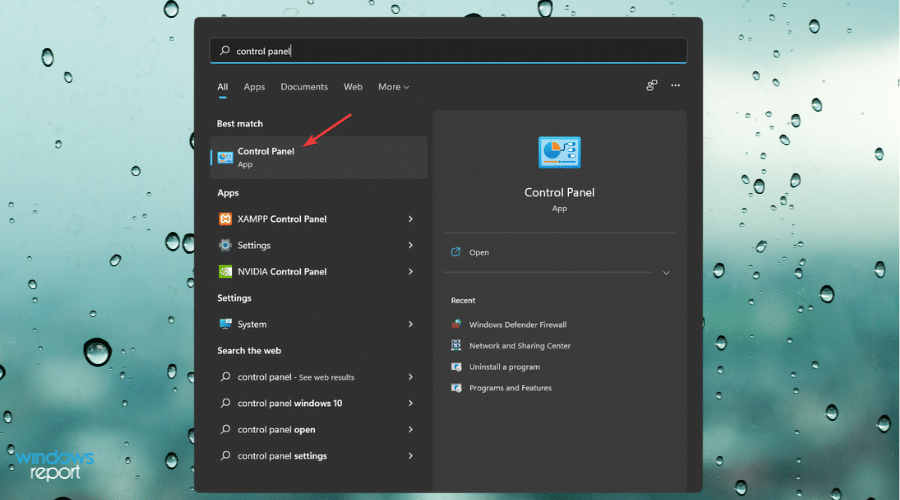
  1. Open start menu.
  2. Type control panel, when the control panel appears, hit enter.opening control panel
  3. Click on System & Security. clicking on system & security
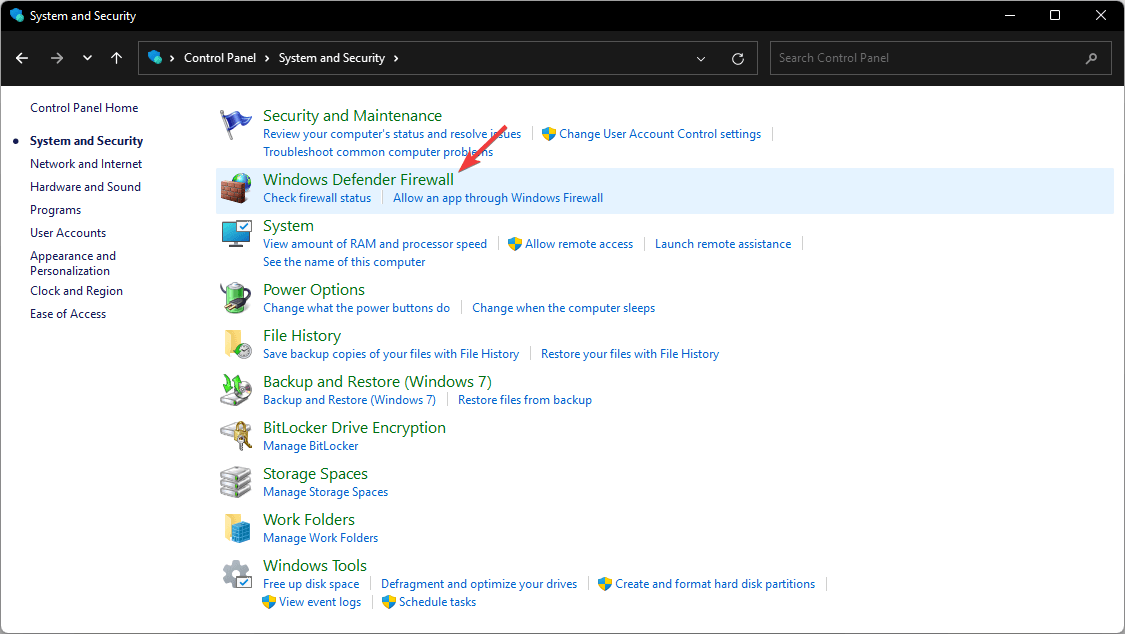
  4. Go to Windows Defender Firewall.clicking on windows defender firewall
  5. Then, Click on Allow an app or feature through Windows Defender Firewall.click allow app windows firewall
  6. Click on Change Settings.clicking change settings windows firewall
  7. Now, Find the Steam, Terraria, TerrariaServer and check private and public next to them.allowing private public windows firewall
  8. Click on OK.saving windows firewall change
  9. Restart Windows.

6. Verify integrity of game files

  1. Open Steam.
  2. Right-click on Terraria and go to Properties.going terraria properties steam
  3. Click on Local Files.local files tab terraria
  4. Click on Verify integrity of game files.verify integrity terraria game files

It will tell you if all the game files are OK or not. Steam will repair any corrupted game files if necessary. If there is any problem, update or uninstall the game and re-install again. It will fix the can’t connect to Terraria server error.

7. Enable Port Forwarding on your router settings

  1. Visit your router’s login page. Usually, the address is https://192.168.0.1.tplink router login page
  2. Click on Advanced.click advanced tp link
  3. Find an option like NAT Forwarding and click on that.clicking nat forwarding
  4. Then, Go to Virtual Servers.clicking virtual servers
  5. Click on Add.
  6. Fill the form using your local Lan address, the port as 7777, protocol as All or TCP.
  7. Check Enable this entry.checking enable this entry tp link virtual server
  8. Click on Save.saving virtual server settings tp link
  9. Restart Your Router.

The above steps are for the modern TP-Link routers. However, Suppose you have any other router. In that case, you can figure it out by yourself or visit the manufacturer’s website for details.

8. Update the network adapter

  1. Open start menu.
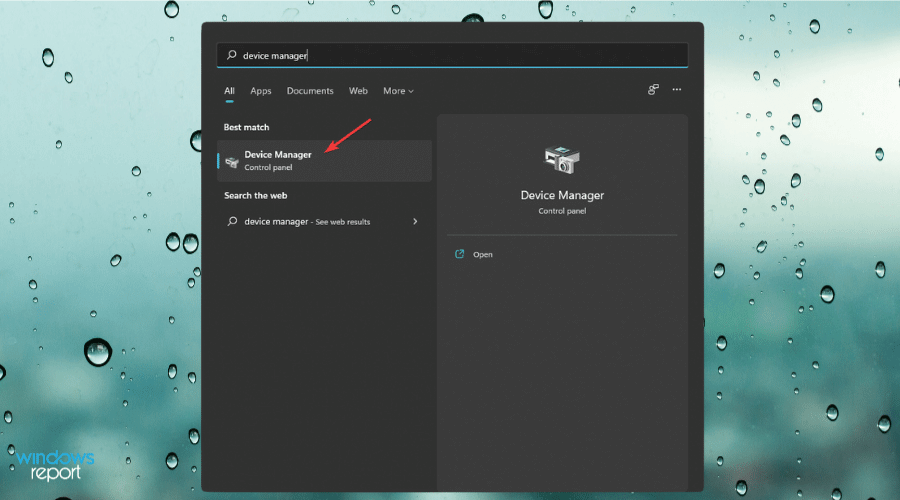
  2. Type device manager and hit enter.opening device manager
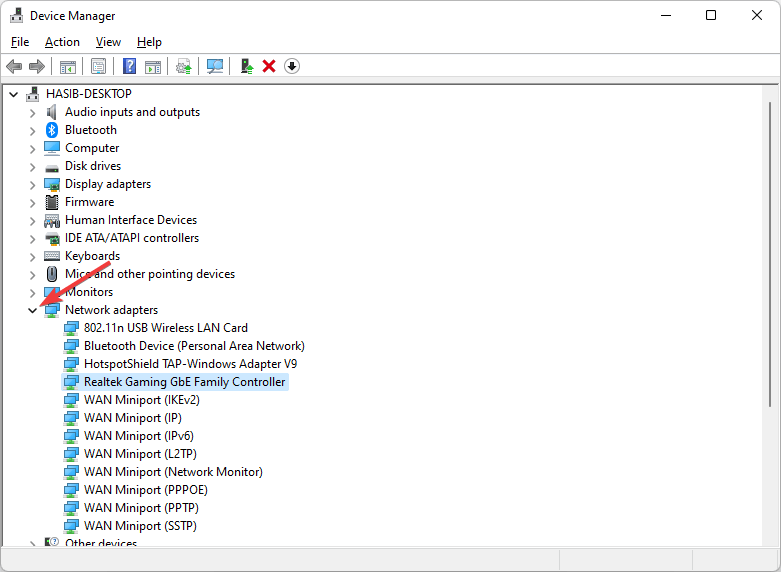
  3. Expand Network adapters.expand network adapters
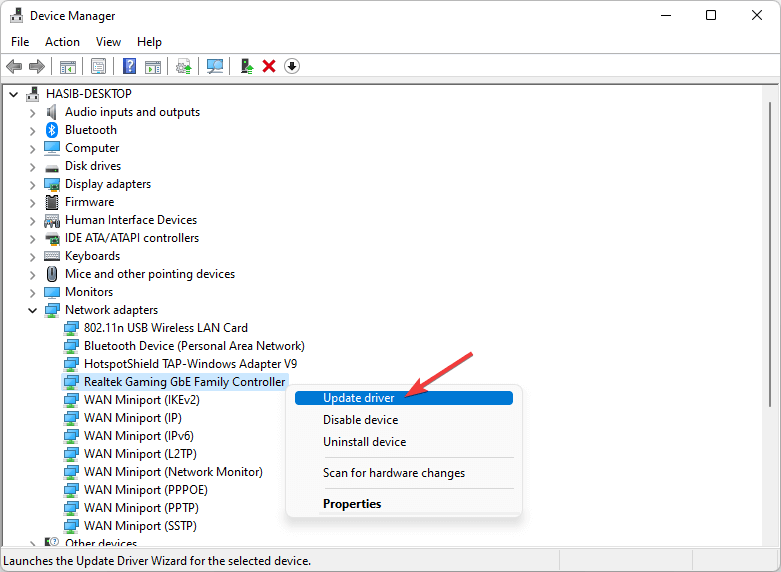
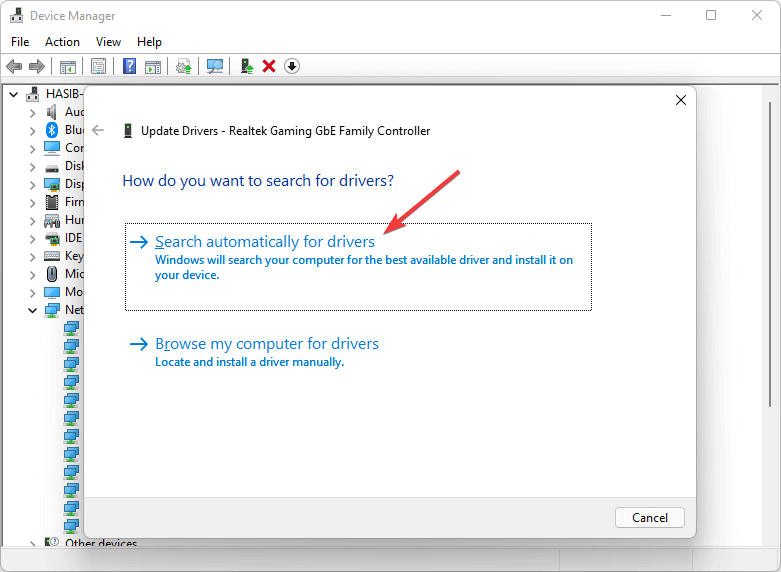
  4. Now, Right-click on the network driver you want to update and choose Update Driver.choose update driver network driver
  5. Click on Search Automatically for drivers.search automatically for drivers
  6. If it finds an updated driver version, Windows will install automatically.

In this way, you may not find the latest driver sometimes. It will be more effective if you use a third-party driver updater like Outbyte Driver Updater.

9. Disable the Firewall

  1. Open Control Panel like method 4.
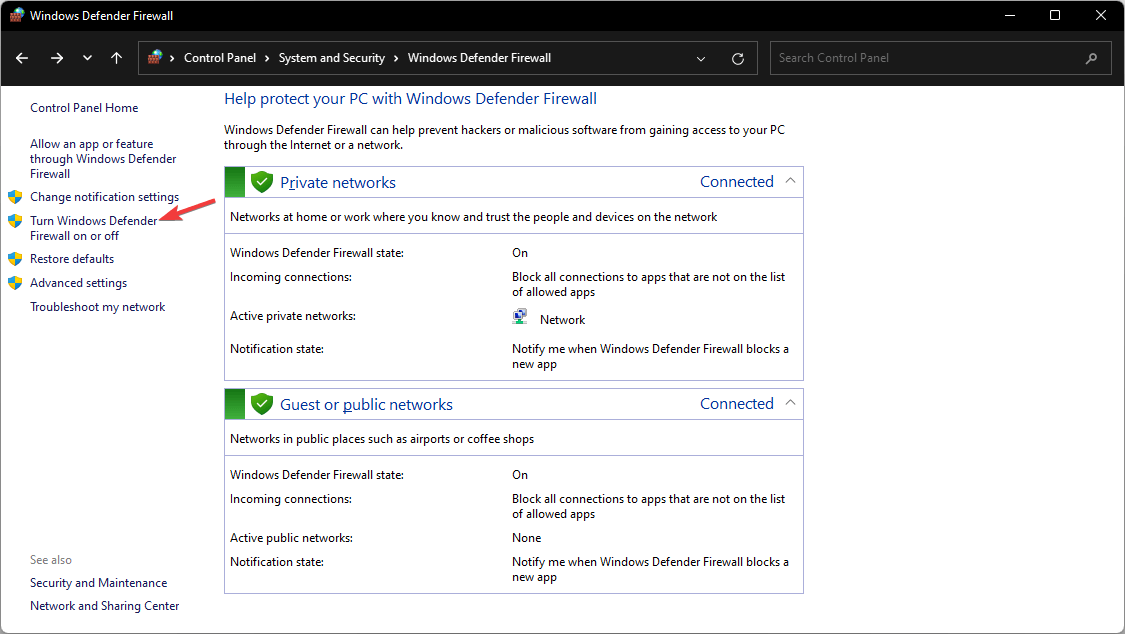
  2. Click on System & Security and then Windows Defender Firewall.
  3. Then, Click on Windows Defender Firewall on or off.click turn off windows firewall
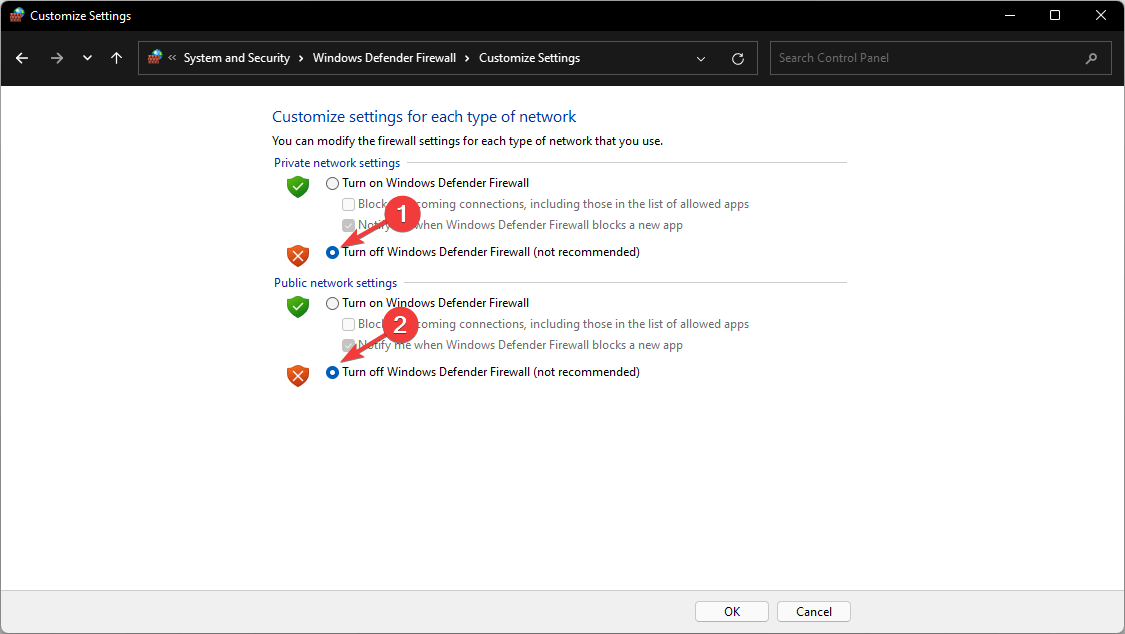
  4. Now, Check Turn off Windows Defender Firewall for both Private and Public networks.turning off windows firewall
  5. Then, Click on OK.
  6. Next, Lunch the Terraria game and try to connect to the game server.

It is risky to leave the firewall disabled. You should only disable it while playing the game. After that, you should turn it on.

10. Change DNS Server

10.1 Change DNS Server for Ethernet connections

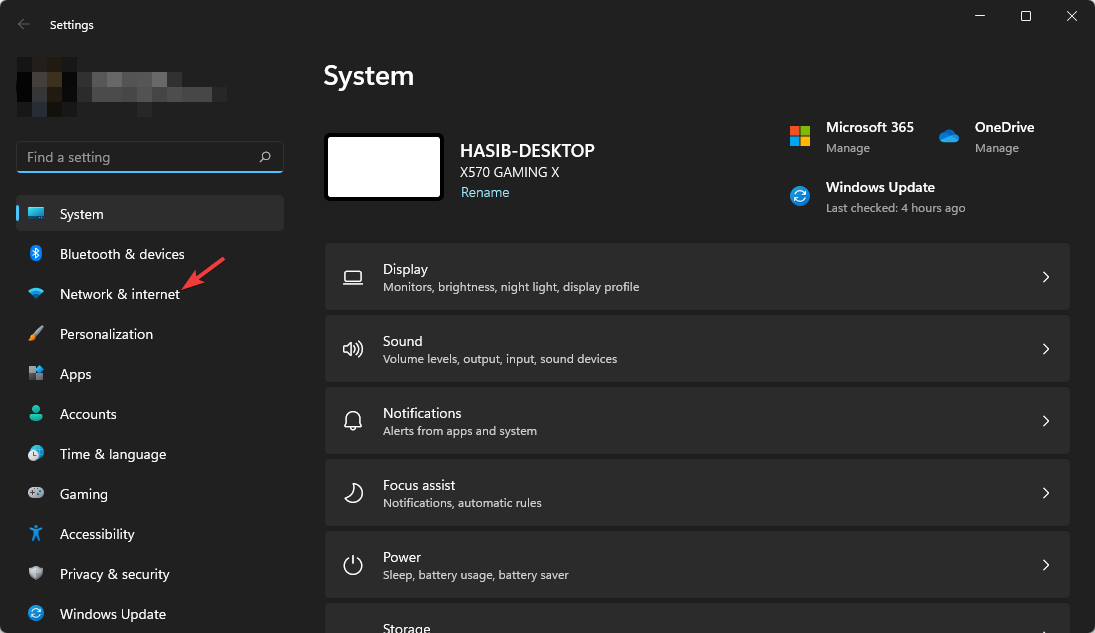
  1. Press Win + I on the keyboard to open Windows 11/10 settings.
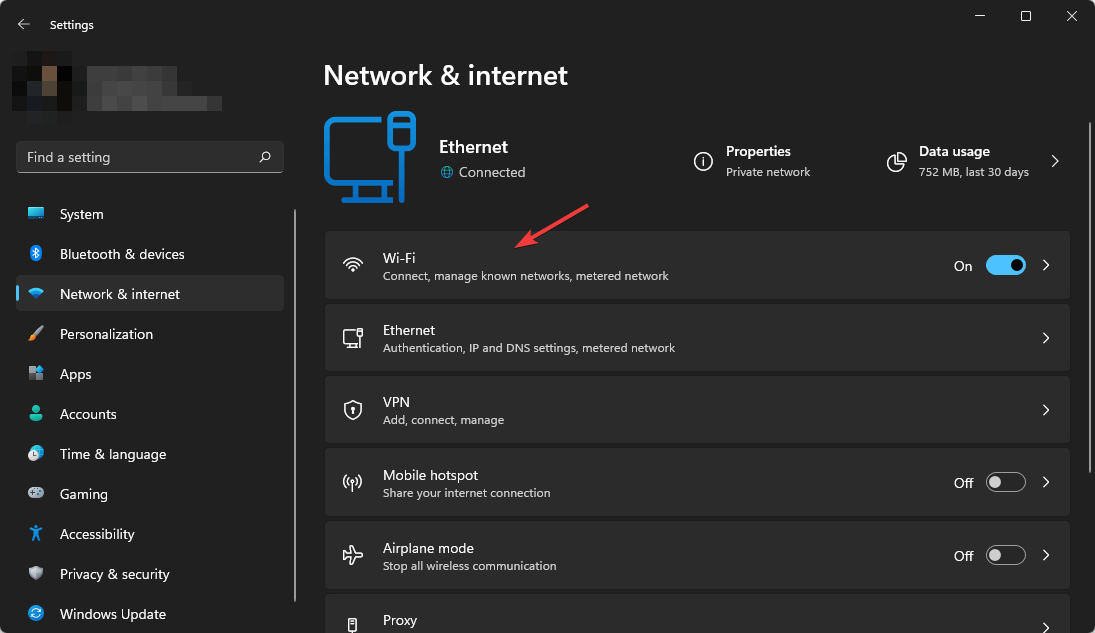
  2. Click on Network & Internet.clicking network internet win11 settings
  3. Now, Click on Ethernet.
  4. Click on the Edit button next to the DNS server assignment.clicking edit dns win11
  5. Next, Type your preferred DNS server addresses for a better multiplayer gaming experience. Usually, 8.8.8.8 and 8.8.4.4 (Google DNS) is best for all-purpose.
  6. Then, Click on Save.saving dns settings win11
  7. Now, relaunch Terraria and see if it fixes the problem.

10.2 Change DNS Server for Wi-Fi

  1. Open Windows 11/10 settings like before.
  2. Go to Network & Internet as shown before.
  3. Then, Click on Wi-Fi.clicking wifi settings win11
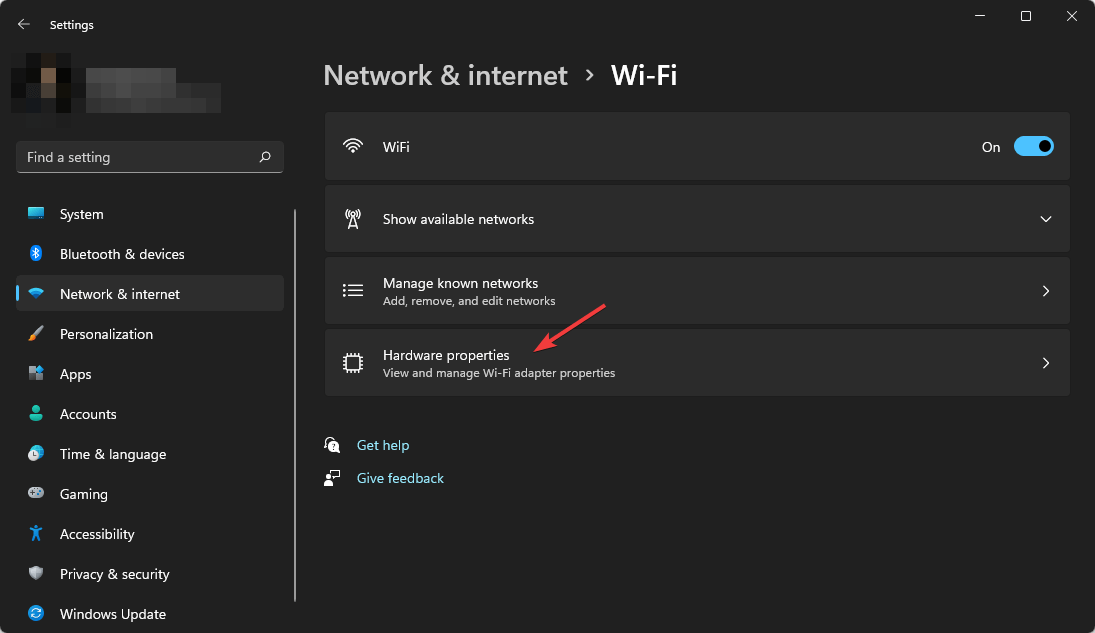
  4. Next, Click on Hardware Properties.clicking hardware properties
  5. Click on Edit next to the DNS server assignment.clicking edit dns assignment
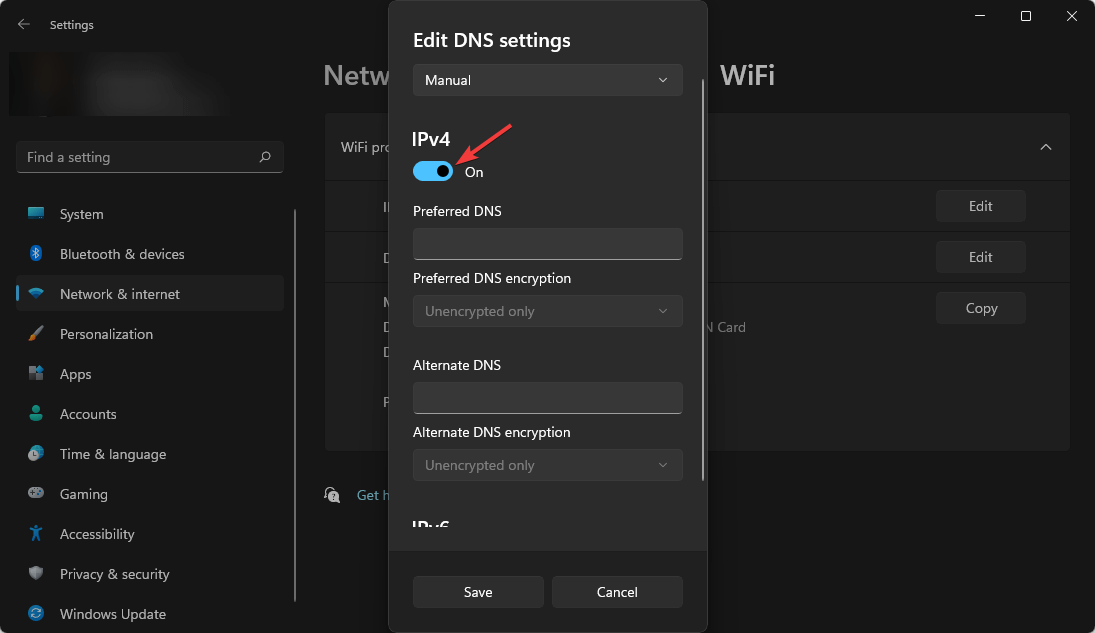
  6. Change DNS Settings from Automatic to Mannual.setting dns menual win11
  7. Enable IPv4 or IPv6 depending on your preference.enabling ipv4 dns win11
  8. Give your preffered DNS addresses.
  9. At last, Click on Save.

10.3 Flush the DNS

  1. Now, Open Start Menu, type cmd, and hit enter to open the command prompt. opening command prompt windows 11
  2. Type the following command and press enter to execute it. ipconfig /flushdnsipconfig flushdns cmd

While local multiplayer won’t require the DNS modification, but if the Invite via Steam method fails, it is one of the ways to fix this Terraria multiplayer problem.

How can I avoid this problem in the future?

There is no exclusive method or idea that can help someone to avoid this problem in the future entirely. But, there is something you can maintain to reduce the chance of getting Terraria server connectivity problems.

Usually, Having a very stable internet connection with a dedicated public IP address can ensure a better gaming experience. In fact, you will rarely face connectivity problems with the Terraria server with this type of connection.

Always use a better DNS server. ISP’s own DNS server often may go through problems.

Also, Having a good VPN connection unlocks a new way. Even though the internet speed seems stable, a good gaming VPN can help when you get a connectivity issue.

Use Terraria from a genuine source. According to our research, a pirated version of the Terraria game is more likely to go through a multiplayer server connectivity problem.

The last but the most important thing is, you should always keep the game, game components, and game servers(if you have any installed) up to that.

Basically, these are the best way to solve the can’t connect to Terraria server error. You may also be interested in how to fix packet loss issues in Terraria.

If you know any other methods that may help, you can share them in the comment box.

OBS Studio for Windows 11: How to Download, Install & Use

Now that Microsoft has officially released Windows 11, more users are embracing the latest desktop platform. Note that it retains the same built-in recording feature as its predecessor, namely Game Bar DVR.

Yet, some users might be disappointed it doesn’t have an enhanced recording utility. For starters, you can’t record the Windows 11 desktop or File Explorer with Game Bar DVR, which has primarily been designed for game recording.

Game Bar is restricted to recording one full-screen app at a time. Furthermore, the built-in recorder’s configuration settings are somewhat limited.

Therefore, some users will no doubt prefer to find a better alternative to Windows 11’s Game Bar DVR. If you’re among them, look no further than OBS Studio. This is one of the best open-source recording software for Windows.

What do I need OBS Studio for?

To put it simply, you need OBS Studio for recording anything on your PC’s monitor. Aside from its video and audio capturing, the software enables users to mix audio, set up scenes with custom transitions, and broadcast live streams to different servers.

As mentioned, the Game Bar DVR isn’t much good for recording the Windows desktop. So, you’ll need OBS Studio for recording videos that include some desktop activity.

Live game streaming is prevalent on the likes of YouTube and Twitch. OBS Studio is the software of choice for many players who stream their gaming. With the software, players can switch between cams and games and even incorporate comments in their streams.

Those who want more options to pick from can also take a look at this list including the best game recording software for low-end PCs. Even if this is a Windows 10 guide, the options presented work without problems on Windows 11 too.

So, OBS Studio is a pretty cool piece of kit for recording software on your PC live or not. You can run that software on Windows 11 if you need something more advanced than the Game Bar DVR and find the best OBS settings for recording.

This is how you can download and install OBS Studio in Windows 11.

How can I download and install OBS Studio in Windows 11?

1. Download OBS Studio

  1. First, open the OBS Studio homepage.
  2. Click the Download link on that website.
    The Download link obs studio windows 11
  3. Select the Windows logo on the download page if it’s not selected.
  4. Then press the Download Installer button (for the 64-bit version installer).
    Download Installer button obs studio windows 11
  5. Next, choose a folder to download the OBS Studio installer in.
  6. Press the Save button to download OBS Studio’s installer to the chosen folder.

2. Install OBS Studio

  1. To open File Explorer’s window, click its folder taskbar button.
    The File Explorer button obs studio windows 11
  2. Next, open the folder you downloaded OBS Studio’s installer to.
  3. Click Next on OBS Studio’s setup window to bring up the license info.
  4. Select Next again to proceed to the directory selection options.
  5. To choose a folder to install the software, click the Browse button. Then select a directory for the software on the Browse for Folder window, and click the OK option.
  6. Press the Install button.
    Install button obs studio windows 11
  7. Thereafter, select the Launch OBS Studio checkbox.
  8. Click Finish to confirm.
  9. When OBS Studios starts, an Auto-Configuration Wizard window will also open. Select either Optimize for streaming or Optimize just for recording depending on your user requirements.
    Auto-Configuration Wizard obs studio windows 11
  10. Select the Next option.
  11. Then choose your preferred video settings on the window that you can see below, and click the Next button.
    video settings obs studio windows 11
  12. Finally, select the Apply Settings option.

How can I record my PC’s screen with OBS Studio?

When you’ve installed OBS Studio as outlined above, you can start recording to your heart’s content! The standard recording for non-live videos is relatively straightforward in OBS Studios. This is how you can record the Windows 11 desktop with that software:

  1. Click the + button for sources in OBS Studios.
    The + button obs studio windows 11
  2. Select the Display Capture option on the menu.
    Display Capture options obs studio windows 11
  3. Enter a source name in the Create source window that pops up, and press the OK button.
  4. Press the OK button on the Properties window that opens. Users with multiple monitors can also select alternative displays with the Display setting on that window.
    The Display setting obs studio windows 11
  5. Then press the Start Recording button to begin.
    Start Recording button obs studio windows 11
  6. Minimize the OBS Studio window, and record everything you need to.
  7. When you’re done, press the Stop Recording button in OBS Studio.
    The Stop Recording option obs studio windows 11
  8. To find where you’re recorded output is saved, click the Settings button.
  9. Select the Output tab on the Settings window. Your video will be saved in the recording path specified on that tab.
    Output tab obs studio windows 11

Where can I get plugins for OBS Studio?

As its open-source software, there are plenty of useful plugins for OBS Studio. Those plugins add additional features and options to take advantage of.

The Resources section on the OBS Studio website is the best place to find plug-ins for the software. The OBS Studio Plugins section there includes several pages of plug-ins for the software. Click a link for a listed plugin there to read further details for it.

To download a plugin, click the Go to download button for it on its details page. Then either a Save As window or a GitHub download page will open. If a GitHub page opens, select to download an EXE installer file from there if you can.

Go to download button obs studio windows 11

However, you’ll have to download some plugins as ZIP archives, which you’ll need to extract within File Explorer. Then you’ll need to drag and drop the plugin’s obs-plugins folder into your OBS Studio installation folder. Make sure it merges with the obs-plugins folder there.

Overall, the installation for OBS Studio is a very quick and straightforward process. You can have it up and running in Windows 11 in just a few minutes. As it takes up about 261 megabytes of drive storage space, you probably won’t need to make any space for it.

OBS Studio has all the tools you’ll need to record appealing software videos on your desktop or laptop. You probably won’t find any better freely available recording tools for Windows 11 at the moment. So, it’s certainly worth installing OBS Studio if you need to record something on your PC.

Worried about OBS crashing issues? They are often caused by the graphics card app or outdated versions so don’t hesitate to apply the tips found in this guide on how to fix OBS crashing issues in Windows 10. Rest assured that all of them may be taken into consideration by Windows 11 users too.

Things are no different when it comes to OBS not recording game audio. We’ve got a few confirmed solutions to start resolving this annying problem.

What do you think about OBS Studio? Feel free to use the comments section below and tell us your opinion.

This is How You Can Crop a Circle in Paint 3D

Cropping is a basic feature in image editing tools. Users rely on this option to remove certain parts of photos or adjust the image size.

However, this is not easy in Paint 3D. Cropping a circle is even harder. This is surprising because Paint 3D is a rather new image editing tool.

Microsoft should have been aware of this basic need of users. Still, we’re in luck! A workaround exists, so, you can use Paint 3D to crop a circle.

Steps to crop a circle in Paint 3D

1. Crop a circle on a white background

  1. Click on 2D Shapes and select the circle.
  2. Draw the circle on the portion of the image you want to crop. The color of the circle should be something other than white.
  3. Make sure Fill is selected as None and Line type as Solid.
  4. Increase the thickness of the circle to the desired value. The higher the value, the thicker the circle.
  5. Click on the checkmark icon outside the circle.
  6. Crop the image in a square shape, using the Crop function from the toolbar. The cropping should touch the outer edges of the circle.
  7. Click on Done.

Now you have a circle on a white background. To make the background transparent, check out the next steps.

2. Make the background transparent

  1. Click on Magic select and then Next.
  2. Select Canvas and enable Transparent canvas.
  3. If certain areas remain with a white background, click on the image to increase the size of the square by holding Shift and left-click.
  4. Go to Menu and select Save as.
  5. Under the Save as type, select PNG (image) and check the Transparency box.
  6. Click on Save.

Saving the image in PNG is crucial because it retains the transparency you see it in Paint 3D.

So, here you go. Now you can crop a circle in Paint 3D. However, the process is pretty complicated and takes time.

Most users don’t want to complicate their work with a function that should have been a lot easier to use.

Also, there are great image editing tools that you can use. We selected the best on this fresh list!

Did our workaround help you? Do let us know in the comments section below!

Skype Crashing On Windows 11 / Not Working: Fix

No introduction is necessary for Skype, which is one of the most popular video conferencing applications available that comes pre-installed on all Windows systems.

Skype can be accessed from a computer, phone, or tablet device. It is completely free to use and quite simple to install. However, it does have its advantages and disadvantages, just like any other application.

People all across the world are using it to stay connected and make video chats at a higher rate than ever, but, lately, it seems that Skype has been crashing unexpectedly for many of its users.

For others, Skype is closing automatically on Windows 11.

When you are in the middle of an urgent call, this problem becomes even more serious, but don’t worry, we’ve put together a list of solutions that you can follow to fix Skype and get it back up and running. Allow us to first explain what causes app crashes before moving on to the fixes themselves.

Why does Skype keep crashing on Windows 11?

A large number of customers have reported frequent crashes when attempting to use the Microsoft Skype app as well as other communication apps, touch keyboards, settings, or other popular applications, making it difficult to operate the computer.
troubleshoot-scan-option windows 11 skype crashing

Microsoft-developed applications, such as Snipping Tool or Skype, are prone to crashing. In particular for Skype, which has been updated for Windows 11 with a new look and approach, simply collapses after Microsoft’s digital certificate expires.

A flaw associated with an expired digital certificate appears to be the source of the problem. As a result, any software that is relying on that unknown digital certificate is likely to crash as a result.

In addition to compatibility issues, corrupted data, and potentially dangerous software that has been downloaded, there are several other reasons for Skype to crash on a frequent basis.

Although there is no official patch available at this time, Microsoft has validated users’ reports in an update made to the Feedback Hub, noting that they are aware of a problem with Windows 11 and will be working to fix it.

It’s always a good idea to check out the Skype Blogs page for additional information on bugs, new features, and potential fixes to unknown errors.

How can I fix Skype crashing on Windows 11?

1. Reset the app

  1. Press the Windows key + I to open the Settings app then click on Apps followed by Apps & features from the right side.
    apps-apps-and-feature windows 11 skype crashing
  2. As soon as you’re inside the Apps & features box, look for the Skype application by typing its name into the search field and selecting it from the three-dot menu, followed by the Advanced options option.
    skype-three-dot windows 11 skype crashing
  3. Scroll down until you find the Reset section, then click on the Reset option.
    reset-app windows 11 skype crashing

When you reset the Skype application, you will lose all of the data that was previously stored in the program. As a result, we recommend that you create a backup of any important data before beginning the process of resetting your device.

2. Run Windows troubleshooter

  1. Press the Windows key + I to open the Settings app, and navigate to System in the left panel followed by Troubleshoot from the right side.
    troubleshoot-menu windows 11 skype crashing
  2. Once you are inside the Troubleshoot menu, click on the Other trouble-shooters option.
    other-troubleshooters-option windows 11 skype crashing
  3. Now scroll down until you meet the Windows Store Apps troubleshooter and click Run next to it.
    windows-store-app-run windows 11 skype crashing

Once the troubleshooter ends searching for errors, it will display you the exact bug that occurred and how to fix it.

Make sure to follow the instructions displayed, step by step. In case that does not help, using specialized repair software is recommended as it can repair damaged system files and replace missing DLLs.

3. Install the Media Feature Pack for Windows 11 N

  1. Press the Windows key + I to open the Settings app, and navigate to Apps in the left panel followed by Optional features from the right side.
    apps-optional-features windows 11 skype crashing
  2. Now click on View features next to the Add an optional feature option.
    view-feature-optional windows 11 skype crashing
  3. Search for Media Feature Pack in the search bar, select it and click on Next, followed by Install.
    media-feature-pack windows 11 skype crashing

Note that the feature is only available for the Windows 11 N version, as the other versions already have it installed by default along with other media applications.

4. Reinstall Skype

  1. Press the Windows key + I to open the Settings window and click on Apps followed by Apps & features.apps-apps-and-feature windows 11 skype crashing
  2. Once you’re inside the Apps & features window, search for the Skype app by typing it in the search bar and click on the three-dot menu, followed by the Uninstall button.
    uninstall-skype windows 11 skype crashing

Now head back to your browser and search for the Skype application, then download it back and follow the instructions you are presented.

Is Microsoft Teams better than Skype?

Essentially the same as Skype for Business Online, Microsoft Teams adds a number of new and improved capabilities to make organizations more collaborative and productive.
install-teams windows 11 skype crashing

Microsoft has invested significant resources in ensuring that Teams is feature-parity with Skype for Business Online. The app provides the same video, and chat features as before, but goes above and beyond by facilitating more effective group interactions, including social networking elements.

Users can get notifications, mentions, and comments, as well as incorporate rich media content, GIFs, and emojis in their chats. They may also send messages to other users.

Furthermore, tight integration with Office 365 programs such as Word, Excel, and Yammer is another significant benefit that Teams has over Skype for Business Online.

Consequently, users can have quick access to the files, people, and apps that they require to perform work inside their groups in an efficient manner. This strong working relationship streamlines procedures and saves time for staff.

If you’re using Skype, it can be difficult to find the information you’re looking for because the service lacks sophisticated archive or search options. Microsoft Teams provides sophisticated search features, persistent chats, and bookmarks to make life easier for team members and administrators.

For more information and details about how Teams compares next to Skype, check out our article with a full comparison between the two relative to Windows 11.

Alternatively, if you are interested in knowing what other features have been replaced or sent to oblivion altogether, take a look at our post on apps removed by Microsoft in Windows 11.

And finally, to complete your expertise on the operating system, you will want to read what the performance differences are between Windows 10 and Windows 11 as well as what the best features are in the latter.

Let us know in the comments section below which solution worked best for you as well as whether you will switch to Microsoft Teams or stick with Skype. Thanks for reading!

Best Password Manager for Families: 7 Best to Stay Safe

Online privacy and security are a must in an era where information can be easily attainable via the Internet, so keeping everything locked behind credentials and passwords has become the new norm.

The only real problem is that there are just too many login-based services, and remembering the password for each of them becomes impossible at one point. That’s where a reliable third-party password manager comes into play and saves you from a lot of worries.

How can a password manager help me?

There are numerous benefits of using a password manager:

  • Enhanced security – With a password manager, all your online accounts will use a strong and unique password that can’t be easily hacked.
  • Simplicity – A password manager allows you to forget about multiple passwords. Simply use a single master password to gain access to all your other passwords.
  • Availability on multiple devices – Many password managers are available on multiple devices, allowing you to have your passwords available on your phone, PC, and other devices for quick and easy access.

We also have an article with interesting password statistics that might draw a better picture of related issues.

Which are the best password managers for families?

NordPass – Best features for family password managing

We tested the NordPass password manager for families. We studied each feature, including the master password, browser extension, and encrypted note, to determine the pros and cons of using this password manager.

NordPass’s primary features are its simple design, app speed, encryption technology, and user experience.

You may securely share passwords with other NordPass family members through an encrypted connection using the Trusted Contacts option.

Your family members may easily communicate credit card information, login information, or secure notes with each other safely.

NordPass’s main key features are:

  • Unlimited number of stored passwords
  • Autosave new passwords and autofill for all web pages
  • Can store private notes and credit card info
  • Finds weak, reused, and old passwords and recommends a new one
  • Trusted contacts for an easy share of info
  • Amazing family plan with great features
  • Checks the web for data leaks

It’s a great way for family members to share membership details like streaming platforms’ passwords.

NordPass

Share digital subscriptions with the rest of your family in a secure environment with a lot of flexibility.
Free Download Visit Website

ADSelfService Plus – Extenssive password management tool

ManageEngine’s ADSelfService Plus is a holistic and flexible self-service password management tool that will help you protect your family’s online accounts.

So, it’s essentially a business-oriented solution, but you can use it very efficiently for all the members of your family.

Its main feature is to enable users to access multiple enterprise applications, including Office 365, G Suite, and Salesforce, with single sign-on (SSO).

However, they will also be able to securely reset passwords and unlock their Windows Active Directory (AD), Office, and other accounts.

Not only that, but it also secures password resets with additional layers of authentication, including Google Authenticator and biometrics, so hackers won’t be able to steal your family members’ accounts.

With this tool, it’s possible to synchronize password resets and changes from AD to cloud and on-premises applications in real time for all the members of your family.

In short, all the passwords will be safe and sound so that your family will be out of trouble when it comes to any data or identity theft.

Take a look at its key features below:

  • Enables remote users to force an update of their cached AD credentials
  • Secures every remote and local access to Windows with 2FA
  • Generate reports on users’ password self-service activities
  • Send instant password reset alerts to users
  • Access the password reset/account unlock portal from users’ mobile devices

ADSelfService Plus

Secure your family by providing reliable password protection for all members.
Free trial Visit Website

The next software on our list is another well-known password manager called Dashlane, and it too is a solid choice for anyone that wants to keep their passwords safe and secure.

The reason it’s number 3 on our list is that, despite offering pretty much all the tools of our first entry, their free subscription plan is far more limited, but other than that, Dashlane will do just fine.

Keep your passwords safe and secure, auto-complete your credentials on all the websites that you enter, gain access to encrypted file storage, a solid password generator, and more.

As for the family features, Dashlane offers the ability to share passwords with up to 5 users on their free plan, and unlimited users on all of their paid plans, so whichever plan you choose, you’ll still be able to keep others safe too.

1Password – Best dedicated family password manager

Similar to our first entry, 1Password has a dedicated family-oriented plan called 1Password Families, and through it, you can share passwords, credit cards, and anything else that’s too important to email.

Up to five people can join in and have individual accounts on your single subscription, and the best part is that they don’t even have to live within the same house.

Thanks to these tools, 1Password helps your family practice smart online security by generating unbreakable, unique passwords for all accounts covered by your subscription.

However, 1Password understands the importance of privacy, so personal vaults for each account do exist, and not even the account owner can access them without permission from the designated owners.

Passware Kit Basic – Ideal tool for password recovery

Our second suggestion is a powerful password recovery tool that works for multiple file types such as MS Office & OpenOffice documents, PDFs, and Windows Password Reset.

Passware Kit Basic is suitable for family use because it has the capacity to recover or reset passwords from the most common, daily-use apps.

It can recover and reset passwords from over 80 file types and over 300 document types. On top of that, all recovered passwords are automatically stored in a password history report, so you can easily access and use them.

The software is very powerful in detecting encrypted files within your machine. An additional benefit of this feature is that it can also decrypt hard disk images.

Passware Kit Basic is compatible with Windows 10 & 11, Windows 8, and Windows Vista SP1. It is a paid software, but it offers a free trial, so you can try and see how it suits your needs.

Additional features of Passware Kit Basic Include:

  • Burns password-reset CDs
  • Displays account properties
  • Resets Local Admin passwords, including Live ID Accounts

Passware Kit Basic

Recover and store all your family’s passwords with one powerful tool.
Check price Visit Website

LastPass – Best tool for family password management

LastPass password manager

LastPass started off as a browser extension that allowed easier password management and has since evolved into one of the top password managers on the market today, thus deserving a spot on our list.

Available on all major platforms, including Windows, macOS, Android, and iOS, this tool will allow you to access all of your services regardless of where you are.

Besides, PC users don’t need to worry about installing bulky software, since their browser extensions (yes, they still have that), will more than suffice.

Online shopping will be simplified thanks to the automatic form completion, and you can even create accounts where you yourself don’t know the passwords since LastPass will remember them for you.

LastPass

Manage, generate and secure your passwords for the whole family with LastPass!
Check price Visit Website

RoboForm Password Manager – Best friendly password manager

Next on our list is none other than RoboForm Password Manager. It is one of the top password managers on the market not only because it makes keeping tabs on passwords easier, but also because it automates the entire process of form completion and password generation as well.

More so, it seems that RoboForm makes for an excellent family-oriented password manager since they even have a dedicated subscription called a Family Plan.

More so, RoboForm even has a feature that allows you to grant a trusted contact emergency access to your RoboForm data in the event of death, incapacitation, or simply as a method of account recovery, so even if something happens to you, your family will be taken care of.

As for security, RoboForm has successfully completed a security audit and penetration test conducted by Secfault Security which furthermore adds a new level of credibility to this tool.

Family-oriented features aside, RoboForm makes for a solid password manager when it comes to general use as well, providing much-needed features such as:

  • Access from any location at any time
  • Password capturing while browsing
  • Automatic password sync
  • One-click logins
  • Offline access
  • Extensions for all major browsers

Therefore, fully secure your online activity for the entire family using this unbeatable password manager with useful plans.

RoboForm Password Manager

You, friends, and family are as safe as possible with the world’s best password manager.
Free trial Visit Website

This concludes our list of best password managers that families can use, and we hope that you agree with the entries in this article.

Additionally, you might be interested in our best password sync software list, or maybe combine a password manager with a VPN for maximum security.

If you know of any other password managers that would have deserved a spot on our list, leave us a message in the comments section below with their names, and we’ll decide whether to add them or not.

Halo Infinite Not Working or Crashing on Windows 11 [Fix]

After a six-year run of Halo 5 (mostly known as Guardian), which was a bit of a disappointment, the game has now been scheduled to launch not only on consoles but also on PC.

Halo Infinite flight tests have been going on and the fans have had the chance to see a preview of what the game will offer when it is officially released on December 8th.

Players have had their fair share of bugs and problems while testing out the game, and installation was one of the problems.

As gamers need to have a dependable and immersive experience while testing out any game, this could not be reported about the latest release of Halo, and Windows 11 doesn’t do well with it either.

If you’re playing Halo Infinite on Windows 11 and encounter the same issues, this guide will provide some help.

Why is Halo Infinite not working on Windows 11?

Many PC players, especially those on Windows 11 have reported numerous issues while playing the game. Some players have complained about the game not working while others have had issues while tying it out.

The game modes available to players (both PC and Xbox) right now are technically in the beta stage of development and have not been fine-tuned, so some issues are to be expected.

However, this doesn’t mean that all the issues are arising from the developer’s side. Some of these problems players have reported can also arise from the players’ end.

How can I fix Halo Infinite issues on Windows 11?

1. Close apps that use your network

  1. Press the Ctrl + Shift + ESC to launch the task manager.taskmanager
  2. Select the Processes tab.processes-tab
  3. Click on the Network tab.networks
  4. Close apps such as video streaming and torrents apps that consume your bandwidth.

2. Disable the delivery optimization feature

  1. Press the Windows button then click on Settings.open-settings
  2. On the window that appears, select Windows Update.windows-update
  3. On the Windows update page, select Advanced options.advanced-options
  4. Click Delivery Optimization under additional options.delivery-optimization
  5. Turn off the Allow downloads from other PCs option.turn-off
  6. Click on Advanced Options.advanced-options-network
  7. Adjust how much bandwidth is used for download and upload.set-upload-download-limits

3. Turn off Metered connections

  1. Press the Windows key then click on Settings.open-settings
  2. Select Network and Internet.network&internet
  3. Under Network and Internet, click on Properties.network-properties in halo infinite windows 11
  4. On the next page, turn off Metered connection.turn-off-metered-connections in halo infinite windows 11

4. Disable antivirus software

4.1 Prevent Windows Defender from scanning specific files

  1. Press the Windows button then type Windows Security. Click Open.open-windows-security in halo infinite windows 11
  2. On the Windows Security window that appears, click on Virus and threat protection.visrus&threat_-protection in halo infinite windows 11
  3. On the next page, click on Manage settings.manage-settings in halo infinite windows 11
  4. Scroll down Exclusions then click on Add or remove exclusions. Click yes if prompted to.add-or-remove-exclusions
  5. On the next page, click on Add an exclusion.add-exclusion
  6. On the drop-down list, select folder.add-folder
  7. On the window that appears, locate and add your game installation folder then click okay.select-folder
Note icon NOTE
After trying the above step, make sure to check if the game is running optimally. If it doesn’t, try the following Windows Defender step.

4.2 Disable Windows Defender

  1. Press the Windows button then type Windows Security. Click Open.open-windows-security in halo infinite windows 11
  2. On the Windows Security window that appears, click on Virus and threat protection.visrus&threat_-protection in halo infinite windows 11
  3. On the next page, click on Manage settings.manage-settings in halo infinite windows 11
  4. On the next page, turn off Real-time protection.turn-off-realtime-protection

5. Download and install a beta release of Windows 11

  1. Visit the Windows Insider site.windows-insider-page in halo infinite windows 11
  2. Click on the user icon on the top-right corner of the page to sign-in.sign-in - halo infinite windows 11
  3. On the next page, enter your Microsoft Account Details to finish the sign-in process.sign-in-page in halo infinite windows 11
  4. On the next page, scroll down to the Select Edition section.select-edition-section in halo infinite windows 11
  5. On the select edition dropdown menu, select Windows 11 Insider Preview (Beta Channel) Build 22000.194. Click Confirm after the selection.select-win11-beta-preview in halo infinite windows 11
  6. On the next page, select your preferred language from the select the product language dropdown. Click Confirm after the selection.select-product-lang
  7. Finally on the last page, click 64-bit download.select-edition-section in halo infinite windows 11
  8. Check out our article on how to install Windows 11 from an ISO to continue with the installation process of the Windows 11 Insider Preview you’ve just downloaded. 

6. Upgrade your PC to meet Halo Infinite system requirements

The most likely cause of Halo Infinite not working is the pc requirements. Make sure that your pc meets at least the minimum requirements.

The game is pretty big so first confirm that you have enough space on your storage before you begin the installation process. In addition, confirm that you have enough RAM to get a stable installation process. 

Halo infinite minimum and recommended system requirements are as follows;

Minimum requirementsRecommended requirements
OS: Windows 10 RS3 x64CPU: Intel i5-4440 or AMD FX-8370GPU: NVIDIA GTX 1050 Ti or AMD RX 570RAM: 8GBStorage: 50GBOS: Windows 10 19H2 x64CPU: Intel i7-9700K or AMD Ryzen 7 3700XGPU: NVIDIA RTX 2070 or AMD Radeon RX 5700 XTRAM: 16 GBStorage: 50GB

The above system requirements should allow you to install and run the game comfortably without any issue. Be sure to check your pc specs and upgrade where necessary.


Those are some of the solutions you can use to fix Halo Infinite not working. As mentioned earlier, some of the issues arise from the player’s end so it is best you first fix your end before dealing with other issues. 

According to John Junyszek, the community manager of 343 Industries, most of the issues PC players are experiencing while trying out the technical previews have been addressed.

I spoke with the PC team, and they confirmed that the improvements to performance, hitching, latency, aiming, and more that we’ve already made internally will give you, and all PC players, a first-class experience at launch.

John Junyszek – Community Manager at 343 Industries

The technical previews are beta versions of the game. It still needs fine-tuning before it’s officially released and I believe 343 are doing just that.

With its release date set for December 8th, players won’t have to wait for long before they can run the game smoothly.

Feel free to share your experience with this game by using the comment section found below.

Windows 10 Lean, the Smallest Windows for Minimal Install

You probably heard that there’s a Windows 10 version on a diet and the latest reports say that the slimmed-down OS was available for download.

Windows 10 Lean is the minimum viable version of Windows 10 and it obviously runs on low specs devices.

Compared to the Windows 10 Pro, the Windows 10 Lean download is 2GB smaller and it occupies half of what Windows 10 would normally do after installation.

How can I download and install Windows 10 Lean?

1. What is Windows 10 Lean all about?

In this OS version, 175 MB is destined for apps and games, and drivers, programs, and wallpapers are missing from this small version of Windows 10.

If you compare the OS with Windows 10 Pro, over 55,500 files are missing. Another feature of Windows Lean is low resource usage. The 64-bit OS is using 1.5GB RAM and it’s great for a virtual machine.

It’s safe to say that Windows 10 is basically a legacy-free version of Windows 10. For instance, the Control Panel is empty instead of being flooded with items.

You can still install Win32 apps on it, unlike Windows RT which doesn’t allow it.

2. What is Windows 10 Lean’s purpose?

Windows 10 Lean reportedly targets tablets with 16GB of storage space but isn’t limited to those.

The OS would also make a perfect base for an operating system that is based on C-Shell. But the cut-down version of Windows 10 would have to offer a desktop.

3. How can I download and install Windows 10 Lean

Update: In the meantime, Windows 10 Lean has become obsolete and it’s not available for installation anymore.

The Windows 10 Lean ISO is still available on WindowslogItalia, but Microsoft doesn’t offer any support for it so we wouldn’t advise you to use it.

However, we have to thank Microsoft for another instance of the Windows 10 OS for low-memory devices: Windows 10 S.

You can find Windows 10 S on a lot of devices nowadays and mostly on laptops and 2-in-1 devices. This OS is not actually a distinct OS but only an iteration of Windows 10.

The S-mode of Windows 10 was created for educational purposes and it’s usually preinstalled by OEM or system builders, not by end-users.

If you have a device with Windows 10 S, you can disable the S mode although there have been problems with that process before.

However, you shouldn’t disable the S mode unless you are absolutely sure that your device can run Windows 10 because this is an irreversible process.

How do you feel about the short lifespan of this Windows 10 version? Leave us your thoughts in the comments section below.

WiFi Slower Than Ethernet: Tested Ways to Boost Speed

If your Wi-Fi speed is slower than Ethernet, it’s because Ethernet provides faster speeds, fewer interruptions, and a more stable connection.

Wi-Fi can be slower due to several factors: limited data rates (check why Wi-Fi doesn’t work but Ethernet does), too many devices connected to your router, Wi-Fi packet loss from network congestion, outdated drivers, or too many background processes affecting your connection (learn more about background processes).

Wi-Fi works great for mobile devices but is more prone to interference. If you notice that Wi-Fi is slow on your laptop, we have an expert guide to help you fix it.

How do I make my Wi-Fi faster than Ethernet?

Try these preliminary checks to see if they help boost your Wi-Fi speed:

If none of the above steps work, here we have a quick rundown of some fixes that can help you fix the issue when Wi-Fi is slower than Ethernet.

1. Run the Windows troubleshooter

  1. Open the Settings app by pressing the Win + I keys together. Click on System on the left and then click on Troubleshoot on the right. system troubleshooter
  2. Next, on the right, click on Other trouble-shooters. Other trouble-shooters
  3. On the next screen, go to Internet Connections, and click on Run. run internet connections troubleshooter
  4. Now, wait for the troubleshooter to look up any issues, and if any are found, it will apply the repairs automatically.

2. Update network drivers

  1. Press the Win + R keys together to launch the Run console. Type devmgmt.msc and hit Enter to open the Device Manager. run dev mgmt.msc command
  2. Expand the Network Adapters section, right-click on the device, and select Update driver. update network driver
  3. In the Update Drivers window, click on Search automatically for drivers. Now, wait for Windows to detect the latest drivers. Once found, the updates will be applied automatically. Search automatically for drivers

Once you have successfully updated the network driver, check if the Wi-Fi speed has increased. Updating the network driver will fix bugs and resolve issues like slow internet issues while using wired access points, along with installing the latest features to improve your internet experience.

If you’re looking for another method of updating your network drivers, then we recommend you use specialized software to perform this action automatically.

Fortect Driver Updater is a great choice here because it scans your computer for outdated or missing drivers and quickly finds the latest updates from its massive database.

3. Disable apps from running in the background

  1. Press the Win + I keys simultaneously to launch the Windows Settings app. Here, click on Apps on the left and then, click on Apps & features on the right. Click on Apps & features in App settings
  2. On the next screen, go to the right and under the App list, look for the problem app. Click on the three dots next to it and select Advanced options. App advanced options
  3. Next, on the right side of the screen, scroll down and go to Background apps permissions. Select Never from the drop-down below. change background apps permissions to never

If Windows 11 still has slow Internet speed, refer to our detailed guide for more expert-tested fixes.

At the same time, you may also change the Wi-Fi frequency channel using dedicated Wi-Fi channel scanners if the Wi-Fi speed is slower than Ethernet or you experience isolated cases such as video calls being slower even with high-speed internet.

If you’re wondering why your internet is slow on one computer but fast on another, this detailed guide on fixing slow internet on one device while another stays fast explains the common causes and solutions.

Alternatively, you may disconnect any unused devices and make sure only the essential devices are connected.

For any other queries on Wi-Fi or Ethernet speed, do let us know in the comments section below.

Go Back Option is no Longer Available: How to Get it Back

For some, the Windows 11 experience only lasted a few days, for others a few weeks, while the rest are still enjoying and testing the upcoming OS, through the various preview builds released by Microsoft.

But what happens when you simply had enough of Windows 11 and would like to go back to the previous operating system? Know that there are certain rigorous steps you need to follow in order to do so.

There is also a deadline that, if crossed, changing back to Windows 10 will prove a bit trickier and time-consuming than you initially thought.

Why is the go back option no longer available?

There are many users that now turned to the internet for answers to how they would be able to revert the OS change and go back to the good old Windows 10.

What many people did not understand is that you can only do so while within the first 10 days of installing the first preview build for the new operating system.

After these 10 initial days, which can be considered as a trial, you will not be able to roll back anymore.

What should I do if the Windows 11 go back option is not working or no longer available?

We have a dedicated guide on this topic that will showcase workarounds for you to force a Windows 11 rollback after the 10 days period. You can check it out for more information on the topic.

How can I rollback to Windows 10?

If you are still within the boundaries of this grace period, here’s what you need to do:

  1. Access the Settings menu and select System.

2. Click on the Recovery button.

3. Click on the Restart now button, in the Advanced Startup section.

Once you have completed these steps, you will be taken to the Windows Recovery Environment.

4. Now that you are in the Windows Recovery area, choose Troubleshoot.

5. Choose Reset this PC to perform a reset.

6. Choose Advanced options, then Uninstall Updates, followed by Uninstall latest feature update to perform a rollback.

After performing all the above-mentioned steps, you will be able to roll back to Windows 10 and enjoy your favorite OS. Remember that you can only do so within the first 10 days of installing the first Windows 11 preview build.

Have you already switched back to Windows 10 or are you still testing the upcoming OS? Let us know in the comments section below.

How to Reinstall the Snipping Tool on Windows 11: 3 Easy Ways

The Snipping Tool is a screen-capturing utility with which many users take screenshots. If you ever encounter issues with the Snipping Tool, reinstalling that app may be the best way to fix it. You can reinstall the Snipping Tool with the three alternative methods below.

How do I reinstall Snipping Tool in Windows 11?

1. Use Settings

  1. Press Start to access the Windows 11 app menu.
  2. Click the pinned Settings app shortcut you’ll see at the front of the Start menu.
    Settings shortcut reinstall snipping tool windows 11
  3. Select Apps to view that tab’s navigation options.
  4. Click Apps & features to access options for uninstalling apps.
    Apps & features option reinstall snipping tool windows 11
  5. Scroll down to the Snipping Tool, and click the three-dot button for that app.
  6. Select Uninstall twice to remove the Snipping Tool.
    Uninstall option reinstall snipping tool windows 11
  7. Click Microsoft Store on the Start menu to access that app.
    Microsoft Store shortcut reinstall snipping tool windows 11
  8. Type Snipping Tool inside MS Store’s search box.
  9. Next, click Snipping Tool in the search results.
    Snipping Tool search result reinstall snipping tool windows 11
  10. Select the Install (or Get) option for the Snipping Tool.

2. Use Winget

  1. Click Search (or a magnifying glass icon) on your Windows 11 taskbar.
  2. Input the search phrase cmd inside the text box.
    Search box reinstall snipping tool windows 11
  3. Select the Command Prompt result inside the search tool to access that app.
    Command Prompt search result reinstall snipping tool windows 11
  4. Uninstall Snipping Tool by inputting the following Winget command and pressing Return:
    winget uninstall Microsoft.ScreenSketch_8wekyb3d8bbwe
    winget command reinstall snipping tool windows 11
  5. Then open Microsoft Store and install Snipping Tool from there as outlined in steps seven to 10 of the first method.

3. Use PowerShell

  1. First, open up the Windows 11 file and app search tool.
  2. Enter a PowerShell keyword inside the Type here to search text box.
    Windows PowerShell search result reinstall snipping tool windows 11
  3. Click Run as administrator to open the PowerShell app found by the search tool.
  4. To uninstall the Snipping Tool, execute this command: Remove-AppxPackage Microsoft.ScreenSketch_11.2209.2.0_x64__8wekyb3d8bbwe
    remove app package reinstall snipping tool windows 11
  5. You can reinstall Snipping Tool by entering the following command text and pressing Enter: Add-AppxPackage -register "C:\Program Files\WindowsApps\Microsoft.ScreenSketch_11.2209.2.0_x64__8wekyb3d8bbwe\appxmanifest.xml" -DisableDevelopmentMode

Or you can reinstall the Snipping Tool and all other default Windows 11 apps that come with the platform with a different command. However, that command will take longer to finish. To reinstall Snipping Tool in that way, execute this PowerShell command:

Get-AppxPackage -allusers | foreach {Add-AppxPackage -register “$($_.InstallLocation)\appxmanifest.xml” -DisableDevelopmentMode}

If the above command for reinstalling Snipping Tool doesn’t work, check the Snipping Tool’s ID. Make sure your command includes the full and exact Snipping Tool ID specified in the app list. You can view that list by executing this command: Get-Appxpackage –Allusers

Reinstalling Snipping Tool using PowerShell will likely resolve many issues, such as the screen record video feature not working, and ensure you’re utilizing the most up-to-date version. So, that’s one of the best ways to troubleshoot the Snipping Tool.

However, there are also alternative troubleshooting options for resetting and repairing Snipping Tool you can try before reinstalling. Check out our guide about how to reset an app for further details.

9 Best Multi-Factor Authentication Software to Secure Data

In the 21st century, we use our PCs to access all sorts of accounts. However, it’s necessary to protect your accounts, and you can do that with MFA software for windows.

Cybercrime is increasing constantly, and both normal users and organizations need to have a powerful security system that will prevent any third-party organizations from gaining access to your data.

This is especially important for companies that have big databases. A security breach can make you lose customers, and their trust and can seriously affect your image on the market.

How can a multi-factor authentication app help me?

  • Enhances your security – Unlike with password managers, with multi-factor authentication apps, you just need to enter the uniquely generated code to sign in. This means that you don’t have to worry that anyone else will steal your password.
  • Easier access – Access all your services quickly and easily, without having to enter additional passwords.

Which are the best multi-factor authentication tools?

ADSelfService Plus – Best business 2FA authentification solution

ManageEngine’s ADSelfService Plus is a password management tool that comes with advanced 2FA authentication features.

It’s a business-oriented solution, and its main feature is to help users from your organization access multiple applications, including Office 365, G Suite, and Salesforce, with single sign-on (SSO).

However, it also secures passwords with added layers of authentication, including Google Authenticator and biometrics for 2FA access.

The solution provides a lot more features like synchronizing password resets throughout the entire network in real time. This way, you can be sure that your business is secure from breaches at all times even if the users are working remotely.

Plus, the network management team will be notified about any of the users’ password self-service activities. The tool also comes with advanced reporting features for all the activity within the network and devices within.

ADSelfService Plus is available for a free trial, so you can check it out because it’s one of the best MFA software for Windows.

Take a look at its key features below:

  • Enables remote users to force an update of their cached AD credentials
  • Secures every remote and local access to Windows with 2FA
  • Generate reports on users’ password self-service activities
  • Send instant password reset alerts to users
  • Access the password reset/account unlock portal from users’ mobile devices

ADSelfService Plus

Secure your business by providing reliable 2FA authentification for all users.
Free trial Visit website

NordPass Business – Powerful encryption for all data

NordPass Business is an amazing password manager for business, it comes with many features that will help increase security, including multi-factor authentication.

This tool is great for managing passwords, passkeys, and any other sensitive information. You can encrypt all data in your business computers with it.

Its zero-knowledge architecture ensures that only you have access to what is stored in the encrypted NordPass vault.

Passwords can be saved with just one click and it is just as easy to import them also. Plus, you can sync all the passwords across all your devices, as this software is available on all major platforms.

NordPass Business allows you to store an unlimited number of passwords and you can even store files along with them, so you can always have access to what you need for your business.

Here are some more features of NordPass Business:

  • Detection for weak, old, and reused passwords
  • Effective data breach monitoring
  • Secure access sharing between teams
  • Company-wide settings
  • Quick and smooth account recovery

NordPass Business

Safely store your passwords and take advantage of highly secure multi-factor authentication with NordPass Business.
Check Price Visit Website

LoginRadius – Seamless two-factor authentification

Two-factor authentification has to be simple and easy to use but also provide extra security and LoginRadius does that in an elegant way.

The solution integrates with the Google Authenticator app by producing time-based security codes for web and mobile applications.

In other words, it generates a code for the client to login into its app during a certain period of time.

So, this way, a possible wrongdoer needs access to the account owner’s mobile device and has to log into the account in a limited time.

LoginRadius also works with a social ID as the second method of authentication.

The solution offers plenty of flexibility because it can send the code through SMS, automated phone calls, and email, implement security questions and use different authenticator apps.

That means the customer has plenty of options to choose from, increasing satisfaction which is important when choosing an MFA software for Windows.

Take a look at its best features:

  • Sens validation codes through SMS, phone call, email, and dedicated apps
  • Google Authenticator integration
  • Two-way authentification through social ID
  • Easy to implement
  • Advanced automation features

LoginRadius

Get a smart two-factor authentification solution that integrates Google Authenticator and SMS codes!
Free trial Visit website

Microsoft Azure Active Directory – Best Microsoft authentification tool

Microsoft Azure Active Directory - Multi-factor authentication

Microsoft Azure Active Directory is a powerful IDaaS software that allows you to easily manage your company’s authentication process.

This app is used by both corporations and governments across the globe and has a wide range of very useful features that makes it one of the best MFA software for Windows.

One of the best features of Active Directory is the fact that it can be easily integrated with Microsoft’s wide range of cloud services, including Office 365.

You can bridge connections between the on-premises active directory and Azure AD by using AD Connect.

This software allows you to synchronize your passwords, store them in the cloud, and set up custom authentication processes to fit your company’s needs. The synchronization process of your password data is done automatically.

Azure AD can be used with ADFS (Active Directory Federation Services), which was used in the past to authenticate external apps.

ADFS ensures that your authentication is done by using the active local directory, providing additional security.

Notable features of Microsoft Azure Active Directory include:

  • SSO (single sing-on) – the ability to sync passwords between Azure AD and SaaS app
  • Azure AD B2C – allows users to authenticate using existing Google or Facebook information
  • Ability to automatically or manually create groups based on different attributes
  • Multi-factor-authentication – allows users to log-in by using separate hardware to generate tokens

⇒ Get Azure Advanced Directory

Okta Identity Cloud – Best cloud-integrated platform

Okta Identity Cloud - multi-factor authentication

Okta Identity Cloud is a great cloud-integrated application that allows you and your company to connect to your services securely, and it can also resize itself to fit any company size.

This pack from Okta, includes 2 different apps with specific features. One of the products included in Okta Identity Cloud is called Okta API Products.

This app allows you to connect with your customers and partners securely, and customer CIAM (Customer Identity and Access Management).

The second app found in Okta Identity Cloud is Okta for IT. This software offers your employees and contractors a secure way to engage in password data recovery and, among many other features, also secure authentication features.

We will now focus our attention on the Adaptive Authentication feature found in Okta Identity Cloud.

This feature allows your users two-factor authentication via Okta Verify OTP, even though it has many other useful options.

If you need MFA software for Windows, then be sure to give Okta a try.

Key features include:

  • API access management
  • Universal directory
  • Lifecycle management
  • Contextual access management – allows you to create new authentication policies based on
  • the login information of the client – location, device recognition, network context, etc.
  • Self-service MFA
  • Flexible authentication – includes a variety of login options including 1-click authentication
  • Can create detailed reports with easy integration with security tools

⇒ Try Okta Identity Cloud

PingID from Ping Identity – Best 2FA cross-platform authentification

PingID - multi-factor authentication

Ping ID is a great IDaaS software that has a wide range of capabilities when it comes to securing your company using multi-factor authentication.

This software can either work by authenticating you against an already existing Active Directory environment or get support from Google Apps.

Even though PingID is not as powerful as other software presented in this article, like Azure Active Directory or Okta Identity Management, this software still has a good range of helpful features.

Also, PingID might seem more useful to some, because of the fact that all the data is not stored in the cloud.

We will now focus on the MFA features of PingID. MFA can be activated in relation to specific applications or groups of users, allowing you to streamline the authentication process.

PingID doesn’t have the ability to filter your data by both group and IP address, making it less productive than other software options presented in this article.

The MFA features of PingID can be used with another device, like a phone or tablet. This second device will allow you to use the multi-authentication features of PingID by confirming your identity using different ways.

You can confirm your identity through the app itself, can request an SMS or voice message to be sent to your phone, or by using a YubiKey USB security device.

PingID offers amazing features, so it’s a perfect MFA software for Windows.

The key features include:

  • User provisioning – no names or attributes are stored, and it also allows you to maintain a list of groups
  • SAML authentication standard
  • MFA – multi-factor-authentication capabilities
  • Federated Identity Management and Federated Access Management
  • Single sign-on anywhere
  • Manage millions of identities
  • Can capture & manage customer profiles easily

⇒ Get PingID

Authy – Best lightweight 2FA authentification app

Authy - multi-factor authentication

Authy is a really lightweight multi-factor authentication software that doesn’t have the same power as the above-mentioned options do.

It still offers good protection from different online scammers using 2FA (two-factor authentication), and it’s free.

This app is designed to work seamlessly with QR codes from Facebook, Amazon, Google, Microsoft, etc., and it can also provide access to tokens on any device – phone, tablet, or desktop.

You can also use Authy to authenticate any new devices with SMS, voice, or approval of an already confirmed device.

Authy provides different security features that come in very handy, like TouchID, PIN protection, and passwords.

You have the ability to generate tokens directly to the device you’re using, without the need to be connected to the internet.

In Authy, backup features are also designed to protect you from locking yourself out of the account if you lose your phone. In this unfortunate case, you can use Authy’s backup feature to encrypt your data remotely.

The backups created in this app are encrypted and stored in the cloud. You can find a wide range of guides to help you get started using Authy, on the official Authy site.

⇒ Get Authy

RSA SecurID Access – Best access management tool

RSA SecurID Access is a great multi-factor authentication software that has some very powerful features under the hood.

This software can be used as a SaaS application both in the cloud and within your company.

SecurID Access also offers protection using different authentication methods and risk-driven decisions, to both software-as-a-service applications and also for traditional means.

The multi-factor authentication can be ensured through push notifications, SMS, biometric data, and more.

With this tool, you can be sure that your business will be free from any breaches or any other related attacks.

Key features of RSA SecurID Access include:

  • Multi-factor authentication – push notifications, SMS, biometric data, etc.
  • Support for multiple platforms – Windows, Android, iOS, etc.
  • Secure access and single sign-on for SaaS apps using SAML, password vaulting, etc.
  • Can add REST-based authentication API
  • Identity assurance – examines a wide range of factors before considering access

⇒ Try RSA SecurID Access

Cisco Duo – Great for small and large business

If you want to secure your entire organization then Cisco Duo might be a great MFA software for Windows users. The software is easy to use, and it can protect any device and work with any application.

With Duo, you’ll get Multi-factor authentication, and you can use the Duo Mobile app to authenticate yourself. For an extra layer of security, you can also use the Verified Duo Push feature that requires you to enter the code on the app before you can use it.

The service also works with WebAuthn and Biometrics, so you can use it with security keys. Lastly, there’s an option for tokens and passcodes if you prefer more traditional methods.

The service also provides secure remote access that provides secure access without a VPN. With it, you can set per-app access policies and provide a secure web application, SSH, and RDP access.

For maximum security, there’s a Device Trust feature that lets you verify the trust of any device. With it, you can see the health of any device in your network and ensure that it matches your security policy.

These are just a few features that Cisco Duo offers, but if you’re looking for a professional solution, this is the way to go.

Other great Cisco Duo features:

  • Adaptive access feature for granular control
  • Single sign-on for simple logon
  • Secure remote access with or without VPN
  • Device trust for maximum security
  • Multi-factor authentication

⇒ Try Cisco Duo

In this article, we took a look at some of the best multi-factor authentication software options on the market that allow you peace of mind regarding possible online cyber threats.

You can also find more details in our article on two-factor authentification in Windows and how to prevent hijacking.

Home users, companies, and corporations, all benefit from the use of multi-factor security software, and in this top, you can find surely find the perfect match for your needs.

Use the comment section below to tell us which software option you chose and why.

Windows 11 Overheating Issues: How To Reduce Heat

Windows 11, the recent OS upgrade from Microsoft, is also prone to errors as was the case with the previous ones. While most of them don’t pose much of a risk, the Windows 11 overheating problem can be a big turn off.

When your PC starts to overheat, it’s not only detrimental to the performance but may also damage the hardware components, likely to the ones that are fragile.

Hence, it becomes imperative to understand the various problems that cause the overheating problem in Windows 11, and their subsequent fixes.

Which issues cause Windows 11 overheating issues?

There are a bunch of problems that are responsible for overheating in a Windows 11 system. Some pertain to issues with the hardware or simply lack of maintenance, while others have to do with the software aspect. Let’s have a look at the issues:

  • Lack of ventilation
  • Dust build-up
  • Issues with the hardware
  • Running incompatible software
  • Outdated version of Windows
  • Using multiple high-end applications simultaneously

If you are able to identify the problem, head to the relevant fix. Or, simply execute them in the listed sequence for a quick troubleshooting experience.

How can I fix the Windows 11 heating issue?

1. Restart the Windows 11 PC

  1. Navigate to the desktop and press Alt + F4 to launch the Shut Down Windows box.
  2. Click on the dropdown menu and select Restart from the list of options.Restart Windows 11 to fix overheating
  3. Click on OK to restart the computer.Restart computer

In many instances, it’s a particular process or program running in the background which is overloading the CPU and causing the system to overheat. A quick solution would be to restart the computer to eliminate any such process.

However, you must understand that rebooting Windows 11 is only a temporary fix that will help execute the others listed here. So, do go through the ones mentioned in the following sections for a permanent resolution.

2. Make sure the computer is properly positioned

An improperly positioned computer is also likely to cause the overheating problem in Windows 11. If the CPU is positioned such that the hot air from the fan cannot freely exit due to obstructions or lack of free space, the computer is bound to overheat.

In the case of a laptop, avoid resting it on beds or similar surfaces since the hot air is released from the bottom surface. Also, you can use cooling pads to keep the overheating in check and enhance the computer’s performance.

3. Check the computer fan

If the computer fan is functioning at reduced speeds or ceases to work altogether, the system will overheat. This could be due to dust build-up inside the fan, wires causing obstructions, or a faulty motor, in case the fan does not work.

Issues with the computer fan are easily fixable, but you must understand the various components and the connections. In case you are not acquainted with these, it’s best to get in touch with a professional to get things up and running.

After the laptop is cleaned and serviced, check if the overheating problem in Windows 11 is resolved.

4. Update Windows 11

  1. Press Windows + I to launch the Settings app.
  2. Select Windows Update from the list of tabs in the navigation pane on the left.Update Windows 11 to fix overheating
  3. Click on Windows Update on the right.Windwos update
  4. Click on Check for updates to scan for any available newer versions.Check for updates
  5. Download and install the updates that show up after the scan.

Running an older or outdated version of Windows 11 is also likely to cause overheating. With each update, new features, patches for bugs, and other enhancements in terms of performance are introduced.

Hence, it’s recommended that you keep the Windows 11 up-to-date to prevent the PC from overheating.

5. Disable startup apps

  1. Press Ctrl + Shift + Esc to launch Task Manager.
  2. Navigate to the Startup tab to view application that load when you boot Windows.Startup tab in Task Manager
  3. Select the individual application to remove and click on Disable. Alternatively, you can right-click on it and select Disable from the context menu.Disable Startup app to fix overheating in Windows 11
  4. Similarly remove the other apps as well.

There are a bunch of apps on the PC that load when you turn it on. Apart from unnecessarily hogging the system resources and leading to overheating, these also increase the time taken by Windows to boot. A simple solution here is to disable these apps.

Do remember not to remove all of the apps that appear in the startup tab since some perform critical functions. After done with it, restart the computer and check if the overheating problem in Windows 11 is resolved.

In case you want to use any of the apps that you disabled from loading at startup, just manually launch them.

6. Terminate apps and processes

  1. Press Ctrl + Shift + Esc to launch Task Manager.
  2. in the Performance tab, scroll through the list of programs and identify the ones that are hogging the system resources.
  3. Select the one that you want to terminate and click on the End task button at the bottom.Terminate programs to fix overheating issue in Windows 11
  4. You can similalry disable the other apps and processes listed here, in case you don’t need them.

There are a bunch of non-critical apps and processes running in the background that hog the system resources. If you are facing issues with overheating in Windows 11, eliminating these tasks will come in handy and resolve the problem.

As was the case before, not all processes should be terminated. Some may consume considerable resources but are critical to the functioning of Windows.

Also, you might find a momentary spike in consumption of resources, for instance, while you update the Windows. And, these processes should be allowed to run.

7. Disable apps from running in the background

  1. Press Windows + I to launch the Settings app.
  2. Select the Apps tab from the navigation pane on the left.Apps
  3. Next, click on Installed apps on the right.Installed apps in Windows 11
  4. Locate the app that you don’t want running in the background, click on the ellipsis next to it, and select Advanced options from the menu that appears.Disable apps from running in the background
  5. Now, scroll down to Background app permissions and click on the menu under it Let this app run in the background.Change background permissions
  6. Select Never from the list of options that appear.Disable background apps to fix overheating in Windows 11
  7. Similarly disable the other apps from running in the background.

When you change the background app permissions to Never, the app won’t run at all in the background, thereby clearing considerable resources and resolving the overheating problem in Windows 11.

It’s actually recommended that you disable most of the non-critical ones anyway, since these consume resources and lead to overheating. Nevertheless, you can always manually launch them, whenever required.

8. Change power plan settings

  1. Press Windows + S to launch the Search menu.
  2. Enter Control Panel in the text field at the top, and click on relevant search result that appears.Launch Control Panel to fix overheating in Windows 11
  3. Click on System and Security from the options that appear.System and Security
  4. Click on Power options.Power options
  5. Next, click on Change plan settings next to the current power plan.Change plan settings
  6. Click on Change advanced power settings near the bottom.Change advanced power options
  7. In the Power Options window, scroll down and double-click on Multimedia settings.Multimedia Settings
  8. Now double-click on Video playback quality bias, and then on the menu next to On battery.Change Video playback quality bias
  9. Select Video playback power-saving bias from the list of options that appear.Change settings to fix overheating in Windows 11
  10. Similarly, select the same setting for Plugged in as well.Set same the same setting for both
  11. Next, double-click on When playing video to expand and view the settings under it.Change when playing video settings to fix overheating in Windows 11
  12. Set both On battery and Plugged in as Optimize power savings, and click on OK to save the changes.Set optimize power savings for both

Another effective way of optimizing performance and eliminating overheating in Windows 11 is to modify the power plan settings. With these settings in place, Windows will optimize things such that your computer bears the minimum pressure, thereby eliminating the chances of overheating.

9. Update the graphics driver

  1. Press Windows + S to launch the Search menu.
  2. Enter Device Manager in the text field at the top and click on the relevant search result that appears.Launch Device Manager to fix overheating in Windows 11
  3. Locate and double-click on the Display adapters entry.Display Adapters
  4. Right-click on the graphics adapter and select Update driver from the context menu.Update graphics driver to fix overheating in Windows 11
  5. Next, select Search automatically for drivers in the Update Drivers window, to let Windows look for the best available driver on the system and install it.Search automatically for drivers

The graphics driver is one the most critical ones on the computer, and running an outdated version can cause a bunch of problems including overheating in Windows 11. To fix the problem, simply update the graphics driver.

When updating drivers via the Device Manager, you can only install the updates that have already been downloaded on the computer. In case you are unable to find a newer version, try updating the driver via other methods.

Also, we recommend using a dedicated tool such as Outbyte Driver Updater in that regard. After the driver is updated, the overheating problem in Windows 11 should be fixed.

How can I manually control the computer fan to avoid overheating?

Although it’s not recommended, you can still manually control the computer fan and set it to run at the desired speed to avoid overheating. Most manufacturers generally offer software that helps you modify the fan speed and you should first look out for these.

In case your manufacturer doesn’t offer one, there are a bunch of third-party tools to control the fan speed. But before you start using any of those, a thorough understanding of the optimal speed and certain settings is a must.

Also, never set the fan speed too low such that the temperature begins to rise. If the inside temperature reaches more than 95° C, the chances of damage to internal components are high. Though your PC, in all likelihood, should shut down before reaching that temperature.

These are all the ways you can avoid overheating in a Windows 11 PC along with boosting the system’s performance. In case these don’t work, reset Windows to its factory settings.

Apart from that, you can also look for the best computer fan models available in the market, in case the current one ceases to function.

Let’s know which fix worked for you in the comments section below or whether replacing the fan solved the overheating issue in Windows 11.

How to Add Windows 11 to GRUB in Just a Few Quick Steps

GRUB (GRand Unified Bootloader) is the bootloader that allows you to choose between different operating systems installed on your computer when you start it up. It provides a menu that lists all the available operating systems, and you can select the one you want to boot into.

However, when you install a new operating system, it may not appear in the GRUB menu. This can happen if the new operating system wasn’t set up to work with GRUB during installation or the bootloader was overwritten.

This article will explain why GRUB may not show Windows 11 and how you can add it to the GRUB menu in just a few steps.

Why is GRUB not showing Windows 11?

There are a few different reasons why Windows 11 may not be showing up in the GRUB menu.

  • Incomplete installation – One possibility is that the installation or boot process did not correctly set up Windows 11 to work with GRUB. This can happen if the installer does not detect the other operating systems on the computer.
  • Overwriting during installation – This can happen if the user chooses to install Windows 11 in the same partition as an existing operating system or if the user chooses to install Windows 11 to the same drive as the bootloader.

If Windows 11 is not showing up in the GRUB menu, you can add it by editing the GRUB configuration file and adding an entry for Windows 11. Below we outline the steps you must take.

How can I add Windows 11 to the GRUB menu?

1. Update GRUB

  1. Boot into an operating system that is already listed in the GRUB menu.
  2. Press Ctrl + Alt + T to launch the Terminal.
  3. Lastly, enter the script below:
    sudo update-grub
    add windows 11 to grub

This will update the GRUB configuration file and scan all partitions on your hard drive to detect operating systems that aren’t listed in the GRUB menu.

2. Manually add a GRUB entry

  1. Press Ctrl + Alt + T to launch the Terminal.
  2. Enter the script below to open the GRUB configuration file:
    sudo nano /etc/grub.d/40_custom
    add windows 11 to grub
  3. Now, paste the below lines of code at the end of the file (ensure to replace hdx,y with the partition where Windows 11 is installed):
    menuentry "Windows 11" {
    set root=(hdx,y)
    chainloader +1
    ntldr /bootmgr
    }
  4. Press Ctrl + X, then Y to save the changes made.
  5. Again, the script below to apply your changes:
    sudo update-grub
  6. Finally, restart the computer.

It is important to note that some details may vary depending on your specific system configuration. However, back up your current GRUB configuration before making any changes. Also, select the proper partition and drive to avoid boot problems.

Note that there are different related issues users have faced, including GRUB rescue as well as deleted GRUB, but we covered them in other guides.

Let us know in the comments below what worked for you.

9 Best Hindi Typing Software for Windows 11

In this article, we will explore some of the best options that allow you to write in Hindi on your Windows PC.

We listed everything from software that simplifies typing with transliteration to comprehensive typing tutors and professional-grade applications.

Best Hindi typing software for PC

1. Indic Input – best for multi-language typing

indic input

Indic Input is a tool developed by Microsoft that supports 12 keyboard layouts and is also used by the government in India.

Hindi Indic Input is a free program that gives users a convenient way of entering text in the Hindi and Indian languages using the English QWERTY keyboard.

It features multiple keyboard layouts and toggling between Languages. You can enter Lingual text in WordPad, Notepad, and Office applications.

→ Download Indic Input

2. India Typing Software – best for compatibility

India Typing Software Hindi

This is another free option that allows you to type Hindi by using your QWERTY English keyboard.

This software is compatible with all keyboards like – Hindi, Remington, Remington Gail, Inscript, Krutidev 010, Devlys 010, Mangal font Hindi, etc.

We find the auto-conversion between English and Hindi particularly useful for speed and convenience. It works offline, making it dependable in any setting.

→ Download India Typing Software

3. Hindi Indic IME 1 – best for advanced typing features

Mindi Indic ime1 - Hindi typing

Hindi Indic IME allows you to enter texts in Indian languages into compatible applications with the English QWERTY keyboard.

This app supports auto-text, selecting words from a customized list after partial typing, bilingual composing, transliteration, spellchecking, etc.

→ Download Hindi Indic IME

4. Anop – Hindi typing tutor

Anop hindi typing

Anop Hindi Typing Tutor is a freeware desktop application tool that allows you tto learn typing in Hindi and it doesn’t even require internet access to use it.

We like its straightforward approach; no fancy extras, just effective learning tools. It’s especially useful for those preparing for government typing exams.

→ Download Anop Hindi Typing Tutor

5. Soni Typing Software – best for government exams

Soni Typing Tutor - Hindi

Soni Hindi Typing Master is one of the well-known software for Hindi Typing. Mangal font is the most used in government typing exams and government offices.

Its focus on Mangal font compatibility ensures accuracy and reliability. We find it a solid choice for those targeting official Hindi typing tasks.

→ Download Soni Typing Software

6. Google Input Tool – best for occasional typing

GoogleInput - Hindi typing

Google Input tool is free software from Google. It supports all major Indian languages, including Hindi.

This is transliteration software, which means you have to type in English, and the software will automatically convert it into Hindi.

There is no need to learn Hindi typing at all. If you are working in any office and want to type Hindi only occasionally, then it is the easiest solution.

Many people who use this tool do not know Hindi typing.

→ Try Google Input Tool

7. Aasaan Hindi Typing Tutor – best for quick learning

AASAAN Hindi typing

The Aasaan – Hindi Typing Tutor software is a very simple guide that you can use to learn typing in Hindi in no time.

Some users have reported feeling more confident about their Hindi skills after just 10 hours of using this app.

It allows you to learn the basics very quickly, and depending on your typing speed, it also provides advanced lessons. This app also teaches lessons in dual languages – English and Hindi.

→ Download Aasaan Hindi Typing Tutor

8. JR Hindi Typing Software – best for skill assessment

jr hindi type tutor

JR Hindi Typing Software is another good option of software that allows you to type in Hindi. This app will help you learn the fastest and easiest way.

You can use over 100 typing tests to assess various writing skills.

This app is shareware and can be used as a free trial.

→ Download JR Hindi Typing Software

9. Hindi Typing Master – best offline Hindi typing tool

Hindy typing master

Hindi Typing Master is another good software option for typing in Hindi on your PC. It is compatible with all keyboards like – JR Hindi English, Typing Tutor, Azhagi+, HindiTrans, VedicVidya, etc.

This app doesn’t require an active internet connection after being installed on your PC.

→ Download Hindi Typing Master

In this article, we explored some of the best tools that allow you to write in Hindi on your Windows 10 PC.

If you want to know how to install the Marathi language pack on your Windows computer, read this guide to learn the steps.

Let us know which software you chose to use from this list, and give us any suggestions in the comment section below.

The January 2023 Patch Tuesday comes with a whopping 98 updates

The holidays are over and here we are, kicking off a new year of prosperity and possibilities. We hope you feel refreshed after your vacation because there’s a lot to catch up on.

As you know, it’s the second Tuesday of the month, which means that Windows users are looking towards Microsoft in hopes that some of the flaws they’ve been struggling with will finally get fixed.

We’ve taken the liberty of providing the direct download links for the cumulative updates released today for Windows 7, 8.1, 10, and 11, but now it’s time to talk CVEs again.

For January, Microsoft released 98 new patches, which is a lot more than some people were expecting right at the start of 2023.

These software updates address CVEs in:

  • Microsoft Windows and Windows Components
  • Office and Office Components
  • .NET Core and Visual Studio Code
  • 3D Builder, Azure Service Fabric Container
  • Windows BitLocker
  • Windows Defender
  • Windows Print Spooler Components
  • Microsoft Exchange Server

Microsoft released 98 new important security patches

Seeing how December 2022 was a pretty light month in terms of security patches, developers had to pick up the slack in January, which is exactly what happened.

You might like to know that, out of the 98 new CVEs released, 11 are rated Critical and 87 are rated Important in severity.

Also, keep in mind that this volume is the largest we’ve seen from Microsoft for a January release in quite some time.

Out of all these vulnerabilities addressed this month, only one is listed as publicly known, and one is listed as being in the wild at the time of release.

Note that these types of bugs are often wrapped into some form of social engineering attack, such as convincing someone to open a file or click a link.

Let’s take a closer look at the full list of CVEs released by Microsoft for January 2023:

CVETitleSeverityCVSSPublicExploitedType
CVE-2023-21674Windows Advanced Local Procedure Call (ALPC) Elevation of Privilege VulnerabilityImportant8.8NoYesEoP
CVE-2023-21549Windows Workstation Service Elevation of Privilege VulnerabilityImportant8.8YesNoEoP
CVE-2023-21561Microsoft Cryptographic Services Elevation of Privilege VulnerabilityCritical8.8NoNoEoP
CVE-2023-21551Microsoft Cryptographic Services Elevation of Privilege VulnerabilityCritical7.8NoNoEoP
CVE-2023-21743Microsoft SharePoint Server Security Feature Bypass VulnerabilityCritical8.2NoNoSFB
CVE-2023-21730Windows Cryptographic Services Remote Code Execution VulnerabilityCritical7.8NoNoEoP
CVE-2023-21543Windows Layer 2 Tunneling Protocol (L2TP) Remote Code Execution VulnerabilityCritical8.1NoNoRCE
CVE-2023-21546Windows Layer 2 Tunneling Protocol (L2TP) Remote Code Execution VulnerabilityCritical8.1NoNoRCE
CVE-2023-21555Windows Layer 2 Tunneling Protocol (L2TP) Remote Code Execution VulnerabilityCritical8.1NoNoRCE
CVE-2023-21556Windows Layer 2 Tunneling Protocol (L2TP) Remote Code Execution VulnerabilityCritical8.1NoNoRCE
CVE-2023-21679Windows Layer 2 Tunneling Protocol (L2TP) Remote Code Execution VulnerabilityCritical8.1NoNoRCE
CVE-2023-21535Windows Secure Socket Tunneling Protocol (SSTP) Remote Code Execution VulnerabilityCritical8.1NoNoRCE
CVE-2023-21548Windows Secure Socket Tunneling Protocol (SSTP) Remote Code Execution VulnerabilityCritical8.1NoNoRCE
CVE-2023-21538.NET Denial of Service VulnerabilityImportant7.5NoNoDoS
CVE-2023-217803D Builder Remote Code Execution VulnerabilityImportant7.8NoNoRCE
CVE-2023-217813D Builder Remote Code Execution VulnerabilityImportant7.8NoNoRCE
CVE-2023-217823D Builder Remote Code Execution VulnerabilityImportant7.8NoNoRCE
CVE-2023-217843D Builder Remote Code Execution VulnerabilityImportant7.8NoNoRCE
CVE-2023-217863D Builder Remote Code Execution VulnerabilityImportant7.8NoNoRCE
CVE-2023-217913D Builder Remote Code Execution VulnerabilityImportant7.8NoNoRCE
CVE-2023-217933D Builder Remote Code Execution VulnerabilityImportant7.8NoNoRCE
CVE-2023-217833D Builder Remote Code Execution VulnerabilityImportant7.8NoNoRCE
CVE-2023-217853D Builder Remote Code Execution VulnerabilityImportant7.8NoNoRCE
CVE-2023-217873D Builder Remote Code Execution VulnerabilityImportant7.8NoNoRCE
CVE-2023-217883D Builder Remote Code Execution VulnerabilityImportant7.8NoNoRCE
CVE-2023-217893D Builder Remote Code Execution VulnerabilityImportant7.8NoNoRCE
CVE-2023-217903D Builder Remote Code Execution VulnerabilityImportant7.8NoNoRCE
CVE-2023-217923D Builder Remote Code Execution VulnerabilityImportant7.8NoNoRCE
CVE-2023-21531Azure Service Fabric Container Elevation of Privilege VulnerabilityImportant7NoNoEoP
CVE-2023-21563BitLocker Security Feature Bypass VulnerabilityImportant6.8NoNoSFB
CVE-2023-21536Event Tracing for Windows Information Disclosure VulnerabilityImportant4.7NoNoInfo
CVE-2023-21753Event Tracing for Windows Information Disclosure VulnerabilityImportant5.5NoNoInfo
CVE-2023-21547Internet Key Exchange (IKE) Protocol Denial of Service VulnerabilityImportant7.5NoNoDoS
CVE-2023-21724Microsoft DWM Core Library Elevation of Privilege VulnerabilityImportant7.8NoNoEoP
CVE-2023-21764Microsoft Exchange Server Elevation of Privilege VulnerabilityImportant7.8NoNoEoP
CVE-2023-21763Microsoft Exchange Server Elevation of Privilege VulnerabilityImportant7.8NoNoEoP
CVE-2023-21761Microsoft Exchange Server Information Disclosure VulnerabilityImportant7.5NoNoInfo
CVE-2023-21762Microsoft Exchange Server Spoofing VulnerabilityImportant8NoNoSpoofing
CVE-2023-21745Microsoft Exchange Server Spoofing VulnerabilityImportant8NoNoSpoofing
CVE-2023-21537Microsoft Message Queuing (MSMQ) Elevation of Privilege VulnerabilityImportant7.8NoNoEoP
CVE-2023-21732Microsoft ODBC Driver Remote Code Execution VulnerabilityImportant8.8NoNoRCE
CVE-2023-21734Microsoft Office Remote Code Execution VulnerabilityImportant7.8NoNoRCE
CVE-2023-21735Microsoft Office Remote Code Execution VulnerabilityImportant7.8NoNoRCE
CVE-2023-21741Microsoft Office Visio Information Disclosure VulnerabilityImportant7.1NoNoInfo
CVE-2023-21736Microsoft Office Visio Remote Code Execution VulnerabilityImportant7.8NoNoRCE
CVE-2023-21737Microsoft Office Visio Remote Code Execution VulnerabilityImportant7.8NoNoRCE
CVE-2023-21738Microsoft Office Visio Remote Code Execution VulnerabilityImportant7.1NoNoRCE
CVE-2023-21744Microsoft SharePoint Server Remote Code Execution VulnerabilityImportant8.8NoNoRCE
CVE-2023-21742Microsoft SharePoint Server Remote Code Execution VulnerabilityImportant8.8NoNoRCE
CVE-2023-21681Microsoft WDAC OLE DB provider for SQL Server Remote Code Execution VulnerabilityImportant8.8NoNoRCE
CVE-2023-21725Microsoft Windows Defender Elevation of Privilege VulnerabilityImportant6.3NoNoEoP
CVE-2023-21779Visual Studio Code Remote Code Execution VulnerabilityImportant7.3NoNoRCE
CVE-2023-21768Windows Ancillary Function Driver for WinSock Elevation of Privilege VulnerabilityImportant7.8NoNoEoP
CVE-2023-21539Windows Authentication Remote Code Execution VulnerabilityImportant7.5NoNoRCE
CVE-2023-21752Windows Backup Service Elevation of Privilege VulnerabilityImportant7.1NoNoEoP
CVE-2023-21733Windows Bind Filter Driver Elevation of Privilege VulnerabilityImportant7NoNoEoP
CVE-2023-21739Windows Bluetooth Driver Elevation of Privilege VulnerabilityImportant7NoNoEoP
CVE-2023-21560Windows Boot Manager Security Feature Bypass VulnerabilityImportant6.6NoNoSFB
CVE-2023-21726Windows Credential Manager User Interface Elevation of Privilege VulnerabilityImportant7.8NoNoEoP
CVE-2023-21540Windows Cryptographic Information Disclosure VulnerabilityImportant5.5NoNoInfo
CVE-2023-21550Windows Cryptographic Information Disclosure VulnerabilityImportant5.5NoNoInfo
CVE-2023-21559Windows Cryptographic Services Information Disclosure VulnerabilityImportant6.2NoNoInfo
CVE-2023-21525Windows Encrypting File System (EFS) Denial of Service VulnerabilityImportant5.9NoNoDoS
CVE-2023-21558Windows Error Reporting Service Elevation of Privilege VulnerabilityImportant7.8NoNoEoP
CVE-2023-21552Windows GDI Elevation of Privilege VulnerabilityImportant7.8NoNoEoP
CVE-2023-21532Windows GDI Elevation of Privilege VulnerabilityImportant7NoNoEoP
CVE-2023-21542Windows Installer Elevation of Privilege VulnerabilityImportant7NoNoEoP
CVE-2023-21683Windows Internet Key Exchange (IKE) Extension Denial of Service VulnerabilityImportant7.5NoNoDoS
CVE-2023-21677Windows Internet Key Exchange (IKE) Extension Denial of Service VulnerabilityImportant7.5NoNoDoS
CVE-2023-21758Windows Internet Key Exchange (IKE) Extension Denial of Service VulnerabilityImportant7.5NoNoDoS
CVE-2023-21527Windows iSCSI Service Denial of Service VulnerabilityImportant7.5NoNoDoS
CVE-2023-21755Windows Kernel Elevation of Privilege VulnerabilityImportant7.8NoNoEoP
CVE-2023-21754Windows Kernel Elevation of Privilege VulnerabilityImportant7.8NoNoEoP
CVE-2023-21747Windows Kernel Elevation of Privilege VulnerabilityImportant7.8NoNoEoP
CVE-2023-21748Windows Kernel Elevation of Privilege VulnerabilityImportant7.8NoNoEoP
CVE-2023-21749Windows Kernel Elevation of Privilege VulnerabilityImportant7.8NoNoEoP
CVE-2023-21772Windows Kernel Elevation of Privilege VulnerabilityImportant7.8NoNoEoP
CVE-2023-21773Windows Kernel Elevation of Privilege VulnerabilityImportant7.8NoNoEoP
CVE-2023-21774Windows Kernel Elevation of Privilege VulnerabilityImportant7.8NoNoEoP
CVE-2023-21675Windows Kernel Elevation of Privilege VulnerabilityImportant7.8NoNoEoP
CVE-2023-21750Windows Kernel Elevation of Privilege VulnerabilityImportant7.1NoNoEoP
CVE-2023-21776Windows Kernel Information Disclosure VulnerabilityImportant5.5NoNoInfo
CVE-2023-21757Windows Layer 2 Tunneling Protocol (L2TP) Denial of Service VulnerabilityImportant7.5NoNoDoS
CVE-2023-21557Windows Lightweight Directory Access Protocol (LDAP) Denial of Service VulnerabilityImportant7.5NoNoDoS
CVE-2023-21676Windows Lightweight Directory Access Protocol (LDAP) Remote Code Execution VulnerabilityImportant8.8NoNoRCE
CVE-2023-21524Windows Local Security Authority (LSA) Elevation of Privilege VulnerabilityImportant7.8NoNoEoP
CVE-2023-21771Windows Local Session Manager (LSM) Elevation of Privilege VulnerabilityImportant7NoNoEoP
CVE-2023-21728Windows Netlogon Denial of Service VulnerabilityImportant7.5NoNoDoS
CVE-2023-21746Windows NTLM Elevation of Privilege VulnerabilityImportant7.8NoNoEoP
CVE-2023-21767Windows Overlay Filter Elevation of Privilege VulnerabilityImportant7.8NoNoEoP
CVE-2023-21766Windows Overlay Filter Information Disclosure VulnerabilityImportant4.7NoNoInfo
CVE-2023-21682Windows Point-to-Point Protocol (PPP) Information Disclosure VulnerabilityImportant5.3NoNoInfo
CVE-2023-21760Windows Print Spooler Elevation of Privilege VulnerabilityImportant7.1NoNoEoP
CVE-2023-21765Windows Print Spooler Elevation of Privilege VulnerabilityImportant7.8NoNoEoP
CVE-2023-21678Windows Print Spooler Elevation of Privilege VulnerabilityImportant7.8NoNoEoP
CVE-2023-21759Windows Smart Card Resource Management Server Security Feature Bypass VulnerabilityImportant3.3NoNoSFB
CVE-2023-21541Windows Task Scheduler Elevation of Privilege VulnerabilityImportant7.8NoNoEoP
CVE-2023-21680Windows Win32k Elevation of Privilege VulnerabilityImportant7.8NoNoEoP

Taking a closer look at the remaining Critical-rated fixes, there are two patches for Cryptographic Services, but we can classify them as more of privilege escalations rather than RCEs.

Furthermore, there are five patches for the Layer 2 Tunneling Protocol (L2TP), which was introduced back in Windows 2000.

Looking at the 25 code execution bugs fixed in this Patch Tuesday rollout, there are 14 fixes for the 3D Builder component.

There are also two fixes for SharePoint for RCE bugs that require authentication. However, every user by default has the permissions required to exploit these bugs.

We’re also looking at a couple of SQL-related fixes. Know that an attacker can execute code if they can convince an authenticated user into attempting to connect to a malicious SQL server via ODBC.

We also have to mention the fixes for 11 different information disclosure bugs this month, and seven of these merely result in info leaks consisting of unspecified memory contents.

This January release fixes 10 different Denial-of-Service (DoS) bugs, but Microsoft provides no real detail about these bugs, so it isn’t clear if successful exploitation results in the service stopping or the system crashing.

Two spoofing bugs in the Exchange server also received critical fixes, although the descriptions imply a different impact.

While one notes that successful exploitation could disclose NTLM hashes, the other is about an authenticated attacker could achieve exploitation given a Powershell remoting session to the server.

Nonetheless, make sure you update your Exchange server to ensure you remediate the multiple bugs being fixed this month.

Have you found any other issues after installing this month’s security updates? Share your experience with us in the comments section below.

2 Easy Ways To Remove Weather From Taskbar On Windows 11

The new Windows 11 promises to bring people a lot of exciting changes to improve the overall user experience.

So far, a lot of users have been looking to make small changes to the new OS to get a more personalized experience out of it.

From making the taskbar transparent to getting Windows 11 to look like Windows 10 again, we covered every inquiry about the new OS.

Today, we’ll take a look at the weather feature from the News and Interest widget and show you how to easily remove weather from taskbar on Windows 11.

What is the News and Interests widget?

The News and Interest Widget was presented to Windows users before the announcement of a new operating system ever hit the Internet.

According to a blog post from Windows, the widget offers you quick access not only the latest news but also personalized content based on your interests:

It should be easy to catch up on the things we care about. Yet, we’re often stuck juggling devices, jumping between websites and looking across sources before finally getting what we’re looking for: relevant and high-quality content. News and interests on the Windows taskbar simplifies this process with a convenient and personalized experience centered around you.

Source: Windows Experience Blog

Besides the weather forecast for your location, the widget also displays the latest news, finance headlines, traffic, and sports updates.

Still, if you are not interested in seeing the weather in your widget panel, here’s how to disable it.

How do I remove the Windows 11 weather from taskbar?

1. Via Settings

    For those who are searching for a quick solution to removing Weather from the taskbar, but don’t want to disable the entire News and Interests Widget, there is an easy workaround. You can turn the Weather widget off:

  1. 1. Click on the Widgets icon to open it.

    Widget icon taskbar
  2. 2. On the weather card, click on the three dots from the top right corner to open the Settings window.

    weather card settings
  3. 3. Multiple options will now appear on the screen.

  4. 4. Select Remove widget.

    remove widget
  5. 5. Now you have fully removed the weather widget from News and Interests.

2. Via Widgets

  1. Right-click on the widgets icon from the taskbar.Widget icon taskbar
  2. Click on Hide from taskbar.hide from taskbar
  3. This will remove News & Interests from your taskbar.

Can I customize the content on the News and Interests Widget?

Every widget is customizable, and this one is no different. The News and Interests Widget enables you to modify its size and placement, giving you the freedom to make it your own.

To change the size, open the widget from the taskbar and click on the three dots in the right corner to choose whether you want the card to be small, medium, or large.

You can also choose which information cards are included in the News and Interest widget to guarantee you are only seeing the content that matters to you.

Just open the widget feature, click on the picture or icon from the top right corner to open the settings. In this panel, you can choose to manage your news and interests.

You can add your outlook calendar, your to-do list, your sport and entertainment interests, and more. You can also choose in what order you want the cards to appear, according to your priorities.

Now, Windows 11 doesn’t display the weather information on the taskbar as it does on Windows 10. You can view the weather forecast by clicking on the widget icon on the taskbar.

What other features can you customize on Windows 11?

Everybody prefers that their OSs look and behave a certain way, so having the option to personalize your OS has become a requirement.

When designing the new Windows 11, Microsoft has taken its users’ needs into account thus offering a lot of ways to customize the OS and make it feel more like their own.

And so, if you simply want to modify a few items rather than deleting everything, Windows offers a variety of customization possibilities.

As with Windows 10, you can activate Dark Mode on your Windows 11 PC if you prefer it instead of the default light mode.

The new OS also lets you move the taskbar icons from the center to the left side, giving you a more familiar feeling as on the previous OS’s.

You can also change Windows 11 settings menu to the classic view if the new design isn’t your cup of tea.

Take a look at all the differences between Windows 11 and Windows 10 and decide for yourself which features you want to keep and what you want to change.

And if you want to know more about how to change certain UI elements to your liking, you might want to give these registry hacks a try.

Personalizing your operating system has never been easier. You can download and use apps from the new Microsoft Store, change registry settings, add or remove features to get the final result you are looking for.

As for the weather widget, you now know how to get rid of it in just a few steps. If you have any questions, just use the comment section below and we’ll get back to you as always.

Windows Bluetooth Auto Connect: How to do it in 4 Steps

Technology advancement has made it easy for almost everyone to access a Bluetooth device today. It might be a headset, speaker, mouse, keyboard, or any other device.

Windows 11, on the other hand, comes with amazing features that make it easy for users to connect their devices. Unfortunately, some users have had issues with Windows 11’s Bluetooth Auto Connect.

Oftentimes, the connection is lost when using the device. Other times, users are not able to automatically connect their devices to Windows 11 machines, even though they were previously connected.

Why won’t my Bluetooth connect automatically in Windows 11?

Since the release of Windows 11, many people have been upgrading their PCs from Windows 10 to 11.

One of the problems is that Bluetooth devices don’t connect automatically to Windows 11 PCs. Let’s see why this happens:

  • Device compatibility – It can happen that the Bluetooth device and your PC are not compatible because the Bluetooth version or standards are different and the PC can’t recognize it.
  • Corrupted or obsolete drivers – If the Bluetooth drivers are old or broken, this may be the cause of why the device is not connected automatically.
  • Incorrect Bluetooth settings – Did you turn the Bluetooth connectivity On to both devices? This is the main cause of the devices’ communication issues.

If you have upgraded your PC, you need to make sure that all drivers are compatible with the new operating system.

You can easily fix all these problems by using the solutions provided below.

How do I make my Bluetooth device connect automatically to Windows 11?

1. Set the Bluetooth service startup type to automatic

  1. 1. Press the Windows + R key combination on your keyboard. The Run dialog window will open.

  2. 2. Type services.msc and press Enter or select OK.

    Windows Run - windows 11 auto connect bluetooth
  3. 3. In the list that appears, scroll down to Bluetooth Support Service.

  4. 4. Right-click on Bluetooth Support Service and select Properties.

    Bluetooth Support Service
  5. 5. Select the Startup type dropdown menu and select Automatic.

  6. 6. Click Apply and then OK.

    Automatic Bluetooth Support Service - windows 11 auto connect bluetooth
  7. The first recommended method to set your Bluetooth to auto-connect on your Windows 11 device is to tweak the Bluetooth startup type settings. What you need to do is set the service startup type to automatic.

2. Uninstall and reinstall Bluetooth drivers

  1. Press the Windows + R key combination.
  2. Type devmgmt.msc and select OK or press Enter.
    windows run dialog
  3. On the Device Manager list, expand the Bluetooth option.
    Bluetooth Driver
  4. Right-click on the Bluetooth driver and then select Uninstall device.
    Uninstall Driver - windows 11 auto connect bluetooth
  5. Click Uninstall to confirm that you want to uninstall the device driver.
    Uninstall Confirmation
  6. Restart your computer and Windows 11 will automatically reinstall the driver.

Also, to make sure that you don’t need to do this again for every problem you will encounter, you can use a faster way to update or repair any driver on your PC.

In this case, this is the tool you seek. It will automatically scan, find, and update all outdated drivers. The installation will be safe and fast, so you got nothing to worry about.

Outbyte Driver Updater

Update your old drivers to optimize every aspect of your system.
Free Trial Download Now

3. Enable discovery for your Bluetooth devices

  1. Press the Windows Start key and then select Settings.
    windows settings
  2. Select Bluetooth & devices on the left-hand side menu and click on Devices from the right.
    Bluetooth click
  3. Now, select More Bluetooth settings.
    more Bluetooth settings
  4. Under the Options tab, look for Discovery and then make sure that Allow Bluetooth devices to find this PC checkbox is enabled.
    allow Bluetooth devices to find this pc
  5. Click Apply and then OK to save your settings.

4. Restart Bluetooth services

  1. Press the Windows + R key combination.
  2. Type services.msc and press Enter or select OK.
    services msc
  3. In the list that appears, scroll down and look for three related Bluetooth services, the Bluetooth Audio Gateway Service, Bluetooth Support Service, and Bluetooth User Support Service.
    Bluetooth services - windows 11 auto connect bluetooth
  4. Right-click on one of them and then select Properties.
    Bluetooth Support Service
  5. Under the General tab, click on Stop and then Start.
    Stop and Run Services - windows 11 auto connect bluetooth
  6. Click on Apply and then OK to restart the Bluetooth service.
    Save Settings
  7. Repeat steps 4, 5, and 6 for the other two services.

How does Bluetooth Auto Connect work?

Bluetooth Auto Connect, sometimes referred to as auto pairing, allows a Bluetooth device to automatically connect to another device as long as the two devices are in range.

However, the two devices must have been connected and paired before otherwise, you’ll be prompted for a Bluetooth password.

For instance, let us assume that you have connected your PC to a Bluetooth speaker in your home. When you carry your PC to work, the two devices are disconnected because you are out of range.

Assuming that your speaker remains on and the Bluetooth is also turned on, the two devices connect automatically when you come back home and start your PC. The PC’s Bluetooth should also be turned on.

You should also check our guide on what to do if Bluetooth is not detecting devices on Windows 10 & 11. To learn how to pair your wireless audio gear properly, see our guide on how to connect Bluetooth headphones in Windows 11. It walks you through quick pairing and troubleshooting steps for a seamless connection.

As you can see, you can easily fix the issue with Windows 11’s Bluetooth Auto Connect. Let us know in the comment section below if you have any questions.

Windows 11 Old Icons: How To Get Them Back [Guide]

Windows 11 changed a lot from the old Windows 10, at least in terms of interface and graphics. For some, it’s awesome, but others don’t get used to it.

Whether you’re nostalgic or you just can’t cope with it, we will show you how to change the icons on the desktop back to how they used to look or with others.

Our guide will also help you if you have lost some icons and you want to bring them back and even how to see the icons if all have disappeared.

As you will see further on, the Desktop Icon Settings are located in the Personalization option and if your Windows 11 is not activated, you will not be able to access them through the menu.

We also have a great guide on how to activate your Windows 11 on your virtual machine that will help you with this problem.

However, we have an excellent workaround that will circumvent this issue. The procedure is not very different from that in Windows 10 so everything should seem a little bit familiar.

The problem at hand in this article is restoring the old desktop icons or simply changing them in Windows 11.

How can I get back the old Windows 11 icons?

1. Use the Personalization option

  1. Right-click on a free space on your desktop and select Personalize.
  2. Next, click on the Themes option.
  3. Now select Desktop icon settings.
  4. It’s time to check the boxes for the icons you want to see on your desktop, then click on Apply and OK to validate the changes.
  5. This is the time where you can also change the icons appearance. Just click on one of the icons, then select the Change icon option.
  6. Now you can select any icon from the selection and click the OK button to make the change.
  7. However, if you want to change it with an icon from Windows 10, you will have to get the imageres.dll from the old OS and copy it in your Windows 11.
  8. If you have access to a Windows 10 system, press the Windows key + E to start File Manager and go to the following path: C:\Windows\System32
  9. Now find the imageres.dll file, and copy it by using the Ctrl + C key combination.
  10. Next, you will have to paste the file in the same System32 folder from your Windows 11 and overwrite the file or rename it as imageres1.dll and select the resource in the Desktop Icon Settings window.
  11. For that, just click the Browse option in the Change Icon window and select the new imageres1.dll from the System32 folder where you copied it.

If you don’t have access to a Windows 10 system, you can find the imageres.dll file online, but be careful to use a trusted source for the file, otherwise you will risk malware infection.

To learn more, we have a whole guide dedicated to imageres.dll, so don’t miss it.

2. Use the Run app

  1. Press the Windows key + R to start the Run app.
  2. Type the following command and press Enter or click OK to run it: desk.cpl ,,
  3. This will open the Desktop Icon Setings window so you can tweak the icons. Now follow the same procedure from the first solution, starting with step 4.

Basically, this solution circumvents the fact that your copy of Windows 11 is not activated and you can’t use the Personalization settings.

How to show Windows 11 icons on the desktop?

First of all, if you cannot see any desktop icons, the option might be deactivated so we will take care of that really quickly.

  1. Right-click on a free space on your desktop and hover your mouse cursor over the View option on top of the list.
  2. Now go over to the right and make sure that the Show desktop icons option is checked. If not, click on it to enable the feature.

If the option is not checked, you won’t see any icons on your desktop. Of course, you can follow the same procedure if you want to hide them back.

How can I add icons on the desktop in Windows 11?

Use the Shortcut option

  1. Right-click on a free space on your desktop, hover the mouse cursor over the New option, then select Shortcut.
  2. Now you can either type the location of the app or file you want to add to the desktop or hit the Browse button and indicate the location of the file.
  3. For instance, we browsed for the Music folder, we selected it from the list and clicked OK.
  4. The location was completed in to the path field and we hit the Next button.
  5. Now you can even rename the shortcut to your liking and click Finish.
  6. There you go! The Music folder shortcut appeared on the desktop as it should.

This is just an example but you can do the same with any other app, file, and folder. Remember that a shortcut is not the file or folder itself but just a redirect to your actual content.

In other words, if you create a shortcut of a file on your desktop, you will be able to open or execute it, but if you will try to insert it in an e-mail, for instance, you will just get the shortcut, not the file itself.

If you find that the newly created shortcuts are unappealing from the arrows, you can proceed to remove the shortcut arrows to achieve a cleaner look.

Use drag-and-drop

  1. Press the Windows key + E to start File Manager.
  2. Left-click and hold the file, folder or app, drag it outside the window on the desktop and release the mouse button.
  3. As you can see from our screenshot, the Music shortcut icon was added on the desktop.
  4. If you want to rename it, go ahead and right-click the icon, then select the Rename option from the menu.

You need to know that using the drag-and-drop method will actually copy the file or folder that you are dragging on your desktop.

It’s important because if you copy a large folder on the desktop, you’re going to use additional space on your drive.

If you want to create a shortcut instead, just press and hold the Alt key before performing the drag-and-drop procedure.

Of course, you can add as many shortcuts as you want but filling your desktop with files and shortcuts will not help you very much with organizing your PC.

However, we have a great guide on how to pin apps to Start menu and Taskbar that you might find useful in this situation.

We hope that our article helped you bring the old desktop icons in Windows 11 and find out how to add more icons and shortcuts if needed.

If you have any questions or suggestions, don’t hesitate to drop us a line in the comments section below and we will get back to you as soon as possible.

16 Best NES Emulators to Download in 2026 [Free]

Looking for the best NES emulator in 2025? Whether you’re chasing childhood nostalgia or diving into retro gaming, NES emulators let you play your favorite Nintendo titles on PC, Android, or macOS, for free.

Below, we’ll cover the most accurate NES emulators, which ones support modern OS like Windows 10/11, and which tools deliver the best experience on each platform.

Top NES Emulators to Try Right Now

1. Mesen – Best NES Emulator Overall ✅

Platform: Windows, macOS
Key Feature: Most accurate emulation + multiple ROM support

Mesen supports every licensed NES game and even remembers your last played ROMs with screenshots and timestamps. You get features like auto-save, netplay, cheat finder, and video/audio recording—all in a clean UI. It’s the most accurate NES emulator available today.

If you’re experiencing lag or performance issues, try these tips to improve PC performance.

⇒ Download Mesen

2. FCEUX – NES Emulator for PC with Controller Support 🎮

Platform: Windows, Linux
Key Feature: Great for ROM-hacking and speedruns

FCEUX is a longtime favorite in the NES community. It’s simple to use and offers advanced tools like debugging, speedrun creation, and joystick support. Despite its outdated palette (which can be manually fixed), it’s one of the most flexible emulators out there.

If you’re gaming on older hardware, pair FCEUX with one of these lightweight PC benchmarking tools.

⇒ Download FCEUX

3. RetroArch – All-in-One Emulator with No Lag 💻

Platform: Windows, macOS, Android
Key Feature: Multi-core support including Nestopia core

RetroArch is a powerful frontend that can emulate nearly every retro console using cores like Nestopia UE. Features include shaders, rewind, netplay, and highly customizable settings. While its interface can be daunting, it’s incredibly powerful once configured.

If you’re interested in platforms like RetroArch, here’s a full list of the best all-in-one emulators for PC.

⇒ Download RetroArch

4. Nestopia UE – Simple Yet Effective Emulator 🧩

Platform: Windows, macOS, Linux
Key Feature: Easy install + great compatibility

Nestopia Undead Edition continues the legacy of Nestopia with excellent performance and accuracy. It’s beginner-friendly, though you’ll need to choose between minor screen tearing or slight input lag depending on vsync settings.

⇒ Download Nestopia UE

5. VirtuaNES – Lightweight with Full-Screen Mode 🔲

Platform: Windows
Key Feature: Runs flawlessly on Windows 10/11

VirtuaNES is no longer updated but still works beautifully. It features joystick support, full-screen mode, and cheat tools. Perfect for older machines or quick plug-and-play sessions.

For on-the-go retro play, check out these top Windows 10 tablets that pair well with VirtuaNES.

⇒ Download VirtuaNES

6. jNES – Beginner-Friendly Emulator 🕹️

Platform: Windows
Key Feature: Plug-and-play with NES & NSF ROMs

jNES is a simple NES emulator that doesn’t require complex setup. It supports gamepads, screen resizing, and basic audio options—ideal for quick play without technical hassle.

⇒ Download jNES

7. Nintendulator – Realistic Gameplay & USB Support 🧠

Platform: Windows
Key Feature: Authentic features like soft/hard reset

Built in C++, Nintendulator offers realistic gameplay with USB controller support, Game Genie codes, and soft/hard reset functionality just like the original console.

⇒ Download Nintendulator

8. RockNES – Stable with Game Genie & Graphics Boost 🎨

Platform: Windows
Key Feature: Eagle mode enhances visuals

RockNES improves your graphics with Eagle mode and offers editable config files for sound, video, and controller settings. Game Genie support is built-in.

⇒ Download RockNES

9. Nesbox / Universal Emulator – Play NES Games in Your Browser 🌐

Platform: Web, Windows 10
Key Feature: Instant browser gameplay + UWP app

No install needed, just upload a ROM to the Nesbox online emulator and start playing. You can also download the Universal Emulator app for Windows 10 to support NES, SNES, Sega, and GBA games.

⇒ Visit Nesbox / Universal Emulator

10. BizHawk – Speedrun-Optimized Multi-System Emulator 🏁

Platform: Windows
Key Feature: Tool-assisted runs + debugging tools

BizHawk is popular with the speedrun community due to its frame-accurate input and multi-console support. It offers TAS features, auto-saves, and precise state control.

⇒ Download BizHawk

11. OpenEmu – macOS Favorite for NES Gaming 🍏

Platform: macOS
Key Feature: Library-style layout + plugin-based cores

Designed for macOS, OpenEmu supports NES and other consoles using a polished iTunes-style interface. It’s easy to set up and ideal for casual retro fans.

If you’re looking for similar SNES support, see our picks for the best SNES emulators online and for PC.

⇒ Download OpenEmu

12. EmuBox – Multi-System Emulator for Android 📱

Platform: Android
Key Feature: Supports NES, SNES, PSX & GBA

EmuBox delivers a modern emulator experience with support for multiple consoles. It includes save states, fast-forward, and controller support.

⇒ Download EmuBox

13. John NESS – Dedicated Android Emulator for NES & SNES 🔄

Platform: Android
Key Feature: Dropbox sync + rich customization

John NESS is a mobile-friendly emulator with support for cheat codes, Bluetooth gamepads, and cloud saves. It’s one of the smoothest ways to emulate NES on Android.

Even as modern hardware shines, Switch 2’s explosive sales show retro gaming is hotter than ever.

⇒ Download John NESS

14. LoopyNES – Lightweight and Clean Emulator 🧽

Platform: Windows
Key Feature: Minimal design + accurate performance

LoopyNES is great for homebrew testing or minimalist retro gaming. It’s lightweight and stable with a focus on simplicity.

⇒ Download LoopyNES

15. JAVASNES – Play NES Games in Your Browser Instantly 🌍

Platform: Web
Key Feature: No install, just load and play

JAVASNES lets you play NES games online in-browser via JavaScript. No installation needed—just load your .NES ROM and go.

⇒ Try JAVASNES

16. My Nes – .NET-Based Emulator with Modern Features 💡

Platform: Windows
Key Feature: Game Genie support + portable version

Built with .NET, My Nes provides a portable, modern UI for playing NES games. Great for users who want an emulator that works smoothly on touchscreen devices.

Perfect companion for Windows 10 tablets used for retro gaming.

⇒ Download My Nes

While today’s blockbuster titles dominate headlines, retro gaming continues to thrive. The NES, in particular, remains a favorite for gamers seeking nostalgia, simplicity, and 8-bit charm.

Whether you’re using a browser-based emulator like Nesbox, managing ROMs with LaunchBox, or benchmarking your gaming rig for performance, NES emulators let you revisit the classics from any device.

FAQs

Can I play NES games on Windows 10 or Windows 11?

Yes. Most NES emulators listed above support both operating systems flawlessly.

Which NES emulator is the most accurate?

Mesen is currently the most cycle-accurate NES emulator for PC.

What’s the best NES emulator for Android?

John NESS and EmuBox are top choices for mobile users.

Are NES emulators legal to use?

Yes, but make sure to own the original games before using ROMs.

Final Thoughts

If you’re ready to dive into the NES emulator PC scene or revisit your childhood favorites, these tools are the best way to do it. With support across PC, Android, and macOS, and integration options like LaunchBox, the world of retro gaming is at your fingertips in 2025.

7 Best Windows 11 Migration Tools For Easy Data Transfer

A data migration tool is a piece of software that moves data from one storage space to another. The software does this by preparing, extracting, and transforming data and ensuring that it will be compatible in the new location.

There’s a variety of reasons why you would need to migrate data. You might want to consolidate data from different sources into one to save space or perhaps the storage equipment needs to be upgraded.

Some migration tools offer the ability to recover from a damaged or dead computer.

Other times it’s not that serious. You might want to keep your data, settings, and apps from one Windows computer and keep it all intact as it’s moved over to the new Windows 11 machine.

Whatever the case may be, a data migration tool is handy to have.

Does Windows 11 have a built-in migration tool?

Windows 11 does not have a data migration tool installed, which is strange because Microsoft made a lot of apps found on previous operating systems native to this new system.

The last migration tool on Windows was Windows Easy Transfer, but that was way back on Windows Vista and 8.1.

Nowadays, the closest approximation would be to upload files onto your OneDrive account and download them to your new computer.

However, you won’t be able to upload apps or your computer’s settings onto OneDrive which is something migration cools can do.

Without a dedicated migration tool, you’ll be forced to manually download every single app that was on your old computer and change all the settings to what you had before. It’s a tedious job that will take forever to do.

Save yourself the hassle and get yourself a migration tool. This list will showcase some of the best migration tools on the market today.

What are the best Windows 11 migration tools?

Zinstall – Easy to use migration tools

Zinstall products are known for combining powerful migration capabilities with incredible ease of use and there are a few to choose from.

They allow even users with no technical knowledge to transfer their applications, profiles, settings, accounts, and all files, to a new computer.

Zinstall products fully support Windows 11 and can easily transfer from one Windows to another, such as from Windows 10 to Windows 11, or from Windows 8.1 to Windows 11 (or other combinations).

For example, Zinstall can migrate from a Windows 10 HP desktop to a Windows 11 Dell laptop.

Zinstall WinWin is the most popular Zinstall product and performs the migration almost completely automatically. You only need to specify which computer is the new one, and which is the old one. It does not require any special cables.

All you need to do is have both computers online, and even a Wi-Fi connection is fine. Or, you can use a wired / cable connection as well.

Zinstall Migration Kit Pro is the more advanced version. One of its more interesting features is the ability to transfer directly from a broken computer’s hard drive directly, even if it won’t turn on.

It also supports several other, more advanced, transfer scenarios, such as corporate migrations to a new domain or to Azure.

Here are some of their best features to consider:

  • Migrates programs as configurations, not only files
  • Very easy to use, with friendly interfaces
  • Migrate full computers even on Wi-Fi networks
  • Transfer directly from a broken computer’s hard drive directly (on Zinstall Migration Kit Pro)
  • Support for many transfer scenarios, even for corporate usage

Zinstall

Easy to use, powerful transfer software that will migrate your programs and files to a new computer / Windows 11.
Free trial Visit website

LapLink PCmover is one of the most premiere migration tools on the market and holds the distinct honor of being highly recommended by both Intel and Microsoft.

You’ll be able to migrate everything you choose (including apps and cloud directories) with lightning speed. It also comes with an undo feature to fix any missteps.

There are some exceptions to what it can move. Antivirus and anti-spyware apps will not be moved and neither will trial software. Files with DRM (Digital Right Management) like music may need to be deactivated on the old PC before being moved.

If you want to try out PCMover, you can download the Windows Store Edition straight from the Microsoft Store. It involves a step-by-step setup that’s easy to follow and the ability to choose which file you want to transfer over. The Store Edition has even free 24/7 support.

However, if you want the ability to migrate apps, you’ll have to purchase one of the many enhanced versions of PCMover from LapLink.

If you get stuck, you can connect with one of Laplink’s PC migration experts, available 24 hours a day, for help. Alternatively, you can purchase a physical copy that includes a high-speed transfer cable and free SafeErase software.

Look at some of its best features:

  • Recommended by Microsoft and Intel
  • Full instruction for installation and setting up
  • Can migrate apps with PCMover
  • Professional assistance available
  • The physical copy includes a transfer cable and SafeErase software

Laplink PCmover

The PCmover app from Laplink offers you all the tools you need to order to successfully and efficiently migrate your data.
Check price Visit website

AOMEI Backupper Professional – For private and professional usage

A great alternative to PCMover is AOMEI Backupper Professional It comes with great features like Universal Restore, which can fully restore the original system onto the new PC, even if the hardware is different.

The tool also allows you to choose multiple endpoints where you can store your files and create file backups to your Google Drive, external hard drives, or some other kind of cloud storage destination.

AOMEI Backupper supports many older versions of Windows operating systems, going as far back as Windows XP, so if you have old files that you want to restore from many years ago, this migration tool can do it.

It’s also easier to operate than PCMover and you don’t even have to pay for the ability to move apps. The ability to migrate apps comes with the free trial version.

AOMEI Backupper has other useful capabilities like encrypting and compressing images as well as wiping out a disk drive after it’s done migrating everything for that extra layer of protection.

Paid versions of AOMEI add even more features, a PXE boot tool for booting multiple computers from a microsystem, and a lifetime of free upgrades.

Let’s review some of its key features:

  • Image encryption and compression
  • Automatic backup functions
  • Simple interface that can be used by professionals and regular users as well
  • Choose multiple endpoints where you can store your files

AOMEI Backupper Professional

This software ensures that your data migration process goes smoothly and quickly, so don’t hesitate to try it out today!
Check price Visit website

FastMove

As a moving app, FastMove comes with six distinct features that make it a great choice. For one, it has fast and lossless data migration for PCs. To facilitate this speed, you’ll need a USB drive to move the files, settings, and drivers from one computer to the next.

And because it’s done through the USB driver, all your customized files, folders, and browser change go along with it. You won’t have to upload to a cloud server and take up space.

FastMove also supports moving programs and user accounts/settings. This will free up a massive amount of time as it’s all done seamlessly. It can even transfer device drivers so you’ll be able to use your device straight from the box with no conflicts at all.

You can purchase a plan that will give you a certain amount of copies to use across multiple computers. Or you can also try out the free trial. See for yourself just how fast the app is and how easy it is to migrate data.

FastMove

FastMove is another versatile and powerful software that covers all your needs when going through a data migration process.
Check price Visit website

Paragon Hard Disk Manager Advanced

The Paragon Hard Disk Manager is a pretty robust app with tons of features. For starters, it’s a top-of-the-line partitioning function for efficient storage usage.

This is particularly useful if your internal drive is low on available space and is a common problem for people who have different systems and data types.

It can merge or restore partitions as well as edit sections in the hex editor. Paragon can also perform a test to locate and point out any bad areas in the partitions. The app can also change data stored in hardware and have it be compatible with an SSD.

Its Drive Copy feature even creates an exact and uncompressed replica of your system’s hard drive. While transferring, the Hard Disk Manager wipes any personal data left behind on the hard drive to ensure total privacy. The app can also restore any files if the need arises.

Hard Disk Manager also supports numerous bus interfaces and file systems. It must be pointed out that there is no free trial available, but you can try out the Product Tour which allows you to see the app in action on a web browser.

Paragon Hard Disk Manager

Use this app today to easily perform data transfers from a PC to another device without worrying about wasting time.
Check price Visit website

Acronis Cyber Protect Home Office

Acronis Cyber Protect Home Office is less of a dedicated migration tool and more of a software suite. So if you’re looking for a migration tool that can do more, Acronis is among the best. It’s a great tool for students and professionals who work remotely from their home office.

It can back up folders and files and place copies in cloud storage. The app has a great UI with tabs on the left-hand side that are clearly labeled so you see all the features and tools the suite can perform.

Acronis’ Archive tab analyzes your folders for unused or particularly large files and offloads them to an external drive or cloud storage destination. This deletes the file from local storage. You can set it to run through your files automatically or select files individually.

Acronis comes with a powerful cyber protection feature – protecting you from data threats and cyber attacks. It’s integrated with advanced anti-malware technology that offers real-time protection, active ant-virus scans, web filtering, and video conference app protection to stop bad actors from hacking into your Zoom meeting.

As great of a migration tool as it is, there are some negatives. Unsurprisingly, Acronis is a pretty expensive app and has been known for being somewhat slow to upload files. But keep in mind that you get a lot for your buck.

Acronis Cyber Protect Home Office

Use this amazing suite today to cover all your data migration needs and more!
Check price Visit website

EaseUS Todo PC Trans

Like AOMEI Backupper, Ease US Todo PCTrans works with old Windows systems and can transfer those files onto a Windows 11 computer.

The free version alone is pretty extensive. PCTrans offers a single click solution to automatically migrate files from one computer to another without losing any data.

The tool supports common apps like Microsoft Office, Photoshop, Google Chrome, and more.  It can move data, files, different kinds of apps, and accounts between computers, recover forgotten files from a dead computer and transfer them between local disks.

The free version can only transfer up to 500MB of data and two programs before you need to upgrade to a paid version. If you decide to upgrade, the Home version allows you to transfer an unlimited amount of data, programs, and user accounts.

The Business version adds the dead computer feature which allows you to migrate data from a seemingly non-functioning to a working machine. Each of the paid versions has a free trial so you can try out all the features before purchase and 24-hour support.

The company also offers Todo Backup and a tool called Migrate OS to SSD/HDD that lets you copy a system drive to an SSD or HDD. Alternatively, Migrate OS can clone an HDD to an SSD without needing Windows to be installed.

Ease US Todo PCTrans

Simplify data migration processes with this intuitive and effective application.
Check price Visit website

How else can I better my Windows 11 experience?

There are an insurmountable amount of third-party apps for Windows 11. The vast majority of what’s already on Windows 11 is outclassed by a third-party app.

And even if you’re happy with the apps native on Windows 11, you can still create a better experience with yourself by changing the settings on your machine.

Windows 11 has some pretty strict requirements as to which computers will be able to run it. If you ever want to try out Windows 11 on an old PC without having to install Windows 10 first, it’s recommended that you download the Windows 11 ISO file straight from Microsoft so you can try it out.

Also, be mindful of Microsoft’s ever-increasing efforts to block certain apps. The company doesn’t want you to download apps that are not verified by Microsoft. Either that or the still buggy nature of Windows 11.

Feel free to leave a comment below if you have any questions on other Windows 11 apps. Also, leave comments about reviews that you’d like to see or information on other Windows 11 features.

5 Best Sound and Volume Boosters For Windows 11 [Free & Paid]

Looking for the best volume booster for Windows 11? If your laptop or PC still sounds too quiet at 100%, the right sound booster can help you raise the volume, improve clarity, and enhance your overall audio experience.

Whether you’re watching movies, listening to music, or gaming, the tools below will help you turn up the volume in just a few clicks.

What are the best sound boosters for a Windows 11 PC?

Here’s a quick look at the best options (more details below):

Boom 3D– Immersive 3D surround sound
– 31-band equalizer
– Noise filtering
– Ambience effect
– Advanced audio player
– Genre-based presets
Ashampoo Music Studio– Audio recording
– Sound optimization
– Volume adjustments
– CD ripping & burning
– Wide file format support
– Integrated library
FxSound Enhancer– Parametric EQ
– Customizable effects & presets
– Enhances volume and clarity
– Supports HD formats (FLAC, ALAC, DSF)
Letasoft Sound Booster– Amplifies system-wide volume
– Supports most apps
– Sound normalization
– Hotkey support
– Simple and clean interface
DeskFX– 20-band equalizer
– Real-time audio enhancement
– Customizable presets
– Numerous audio effects
– Free home version available

Boom 3D – Immersive 3D surround sound

boom 3d user interface

With Boom 3D you can play media with outstanding 3D effects such as virtual surround sound. Plus, it has a wide range of presets to match different genres and listening types.

It also lets you adjust music pitch by 5 semi-tones, reduce harsh sounds, and more.

Some features that we like:

  • Ambience effect
  • Intensify 3D soundscape
  • Noise filtering
  • 31 band equalizer
  • Advanced audio player
  • Volume booster

Boom 3D

Boost your audio and bring your movie or game experience to a mind-blowing level.
Free Trial Visit Website

Ashampoo Music Studio – Comprehensive audio editor

volume booster Windows 11

Originally designed for audio editing and conversion, Ashampoo Music Studio stands strong when it comes to its volume booster capabilities.

It supports various file formats, and has an integrated media library that lets you manage your music collection and make volume adjustments as you go.

Some features that we like:

  • Audio recording
  • Sound optimization
  • Audio CD Ripping and Burning
  • Audio Conversion

⇒ Get Ashampoo Music Studio

FxSound Enhancer – Robust premium audio enhancer

fx sound enhancer user interface

FxSound Enhance is designed to improve the overall audio experience on your PC. It lets you adjust the balance of bass, treble, and other frequencies. It also simulates a surround sound environment.

We like it because it enhances the overall volume and clarity of the audio by applying dynamic compression and amplification. Furthermore, FxSound Enhancer supports high-definition audio formats, such as FLAC, ALAC, and DSF.

Some features that we like:

  • Parametric EQ
  • New Sound Quality Improvements
  • Customizable Effects
  • Customizable Presets

⇒ Get FxSound Enhancer

Letasoft Sound Booster – Clean and simple interface

volume booster Windows 11

Letasoft Sound Booster lets you amplify the volume of the whole system or individual apps on your Windows PC. It helps you even out the volume of different audio files. 

We also love it because it works with most media players, instant messengers, games, and other applications and can also boost the volume of online videos and games.

Some features that we like:

  • Volume boost
  • System-wide hotkeys
  • Easy-to-Use Interface
  • Sound normalization

⇒ Get Letasoft Sound Booster

DeskFX – Tons of audio effects

deskfx user interface

DeskFX is an audio equalize that helps you adjust the levels of different frequency bands in an audio signal. It boosts or cuts the level of specific frequencies to achieve a tonal balance or to compensate for deficiencies in the sound.

One key feature is its ability to enhance audio playback in real time. DeskFX also comes with several preset settings, which can be used to achieve a desired tonal balance quickly.

Some features that we like:

  • Numerous audio effects
  • 20-band equalizer
  • Customizable presets
  • Free home version

⇒ Get DeskFX

How do I make my volume louder on Windows 11?

There are several ways to make the volume louder on Windows 11:

  • Use the Volume Mixer – The volume mixer of Windows 11 gives some additional options for increasing your audio volume.
  • Use the keyboard volume controls – Many keyboards have volume controls built in. Usually, there will be a volume up, down, and mute button. These can be used to adjust the volume on your computer.
  • Use the Action Center – If you click the speech bubble icon on the Taskbar at the bottom right, you’ll find quick controls for your volume and other settings.
  • Use the Settings app – While this may be a long way, you will have more volume options under the sound settings.
  • Using third-party apps – Specialized audio tools may give augmented volume. These may be video-playing apps or standalone equalizers. A few of these will increase the volume beyond 100%.

It’s worth noting that depending on the audio output device you are using, some of these methods may not work or work differently. You, however, will have the option of setting audio independently for different apps.

Summary

And that is as much as we will discuss in this guide. With these volume booster tools for Windows 11, you’ll be able to increase volume if it’s too low and also adjust sound settings for perfect ambience.

It’s important to note that increasing the volume on your PC beyond a certain level can cause distortion or damage to your speakers or audio equipment.

It’s also essential to adjust the volume carefully and avoid prolonged exposure to loud volumes to avoid hearing damage.

The Windows 7 and 8.1 Patch Tuesday updates for January 2023 are live

Even though the main focus right now is on Windows 11, the majority of Windows users still don’t feel like abandoning its predecessor (Windows 10).

That being said, be sure to check out the latest versions of Windows 10, which is 22H2, and also Windows 11, which has also reached version 22H2.

And, as you surely know by now, the Redmond-based tech colossus also releases security updates for some of the obsolete operating systems, during Patch Tuesday.

That means that not only Windows 10 and 11 users will receive updates during this time. We’re also looking at Windows 7, Windows 8, and various Server versions as well.

We’ve already presented the 98 new updates that became available, along with the official download links, so all that remains is going a bit more in-depth.

Without any further ado, let’s take a closer look at what Windows 7 and Windows 8 users were given to work with on the January 2023 Patch Tuesday.

What’s new in the January 2023 Patch Tuesday?

The Redmond-based tech colossus has just released Patch Tuesday updates for Windows 8.1, in the form of KB5022352, and Windows 7, in the form of KB5022339.

Keep in mind that they each come with a whole host of improvements and known issues with some pretty neat workarounds.

Also, remember that Microsoft, as of yesterday, terminated all ESU for both Windows 8.1 and Windows 7 operating systems.

Windows 7

KB5022339 

Improvements

  • Authentication might fail after you set the higher 16-bits of the msds-SupportedEncryptionTypes attribute. This issue might occur if encryption types are not set or if RC4 Encryption type is disabled on the domain.
  • Resolves a known issue that affects apps that use Microsoft Open Database Connectivity (ODBC) SQL Server Driver (sqlsrv32.dll) to connect to databases. The connection might fail. You might also receive an error in the app, or you might receive an error from the SQL Server.

Known issues

  • After installing this update and restarting your device, you might receive the error, Failure to configure Windows updates. Reverting Changes. Do not turn off your computer, and the update might show as Failed in Update History.
  • After this update or a later Windows update is installed, domain join operations might be unsuccessful and error 0xaac (2732): NERR_AccountReuseBlockedByPolicy occurs. Additionally, text stating An account with the same name exists in Active Directory. Re-using the account was blocked by security policy might be displayed.

Windows 8.1

KB5022352 

Improvements

  • Authentication might fail after you set the higher 16-bits of the msds-SupportedEncryptionTypes attribute. This issue might occur if encryption types are not set or if RC4 Encryption type is disabled on the domain.
  • Starting in this release, we are displaying a modal dialog box to remind users about the End of Support for Windows 8.1 in January 2023. This reminder does not appear on managed devices that run Windows 8.1 Pro or Windows 8.1 Enterprise.
  • Resolves a known issue that affects apps that use Microsoft Open Database Connectivity (ODBC) SQL Server Driver (sqlsrv32.dll) to connect to databases. The connection might fail. You might also receive an error in the app, or you might receive an error from the SQL Server.

Known issues

  • After this update or a later Windows update is installed, domain join operations might be unsuccessful and error 0xaac (2732): NERR_AccountReuseBlockedByPolicy occurs. Additionally, text stating An account with the same name exists in Active Directory. Re-using the account was blocked by security policy might be displayed.

These older, now obsolete versions of the Windows operating system are no longer safe for use, and it is highly recommended you upgrade to a supported version.

And, since the time has come to say goodbye, it is about time you figure out the next steps you will need to take.

Have you encountered any issues after downloading and installing these new security updates for Windows 7 and 8.1?

Share your experience with us in the dedicated comments section located below.

Microsoft 365 Basic set to launch featuring 100 GB of storage and more at $1.99 per month

Microsoft has announced that it will be launching a new Microsoft 365 subscription dubbed Microsoft 365 Basic. The company is set to make this release on January 30. To access this new offering you either need to make a monthly payment of either $1.99 or $19.99 annually. What’s in store for you once you subscribe to this plan?

First off, the free option will still be available even after Microsoft launches this new basic subscription The only difference is that it will have more features in comparison, that is, 100 GB of storage, an Outlook email as well as improved security features.

That said, you can still make use of the free Microsoft 365 tier which will feature all the benefits that it has been providing throughout. However, if you are looking for a little bit more, you can subscribe to the Microsoft 365 Personal option at $6.99 per month. Here’s a closer look at the Microsoft 365 plans and the benefits each one comes with:

Microsoft

When comparing the new Basic plan to the Personal one, you’ll notice that besides the obvious difference in storage, the Basic plan won’t grant users access to the desktop versions of Word, Excel, and PowerPoint apps. However, you can access these apps both on the web and from your mobile phone.

In related news, the much anticipated Microsoft 365 app (previously the Office app) is set to launch later this month on mobile and Windows. Share your thoughts with us regarding this new consumer tier in the comment section.

Via: Techcrunch

Equalizer APO Not Working on Windows 11: 4 Quick Solutions

Equalizer APO is a popular open-source equalizer software that allows users to customize the sound of their computer’s audio output. However, some users have reported issues getting Equalizer APO to work correctly on Windows 11.

In this article, we’ll explore why Equalizer APO may not work on Windows 11 and provide some quick solutions.

Does Equalizer APO support Windows 11?

The short answer is that Equalizer APO is not officially supported on Windows 11. The software was last updated in 2020 and has not been updated to include support for Windows 11.

However, there are a few merits of using this tool. Some of which include:

  • Customizable sound – With Equalizer APO, users can create custom equalization settings to enhance the sound of their music, movies, and games. Users can create their equalization presets, or use presets created by other users.
  • Global audio equalization – Equalizer APO is a system-wide audio equalizer that can equalize the sound of all audio played on your computer, including music, movies, and games. This eliminates the need for different equalization settings for different programs or files.
  • Open-source software – Equalizer APO is open-source software that is free to use, distribute and modify.
  • Customizable interface – Equalizer APO has a graphical user interface (GUI), allowing users to create their visual representation of the equalizer settings.

Since users may face APO and sound drivers errors, let us explore fixing and making it work on the newest Microsoft client OS.

How do I fix Equalizer APO on Windows 11?

Tip icon Tip
Before going into the solutions, you must note that although Equalizer APO is a popular choice for many users, there is other equalizer software that you can use on Windows 11. Some of them have excellent compatibility with the system.

1. Enable Audio Enhancements in System sounds

  1. Press Windows + I to open the Settings app.
  2. Navigate to Sound.
  3. Scroll down and select All sound devices.
    equalizer apo not working windows 11
  4. Click on any of your Output or input devices.
    equalizer apo not working windows 11
  5. Lastly, under Audio Enhancement, select Device Default Effects.
    equalizer apo not working windows 11

2. Use compatibility mode

  1. Right-click on the Equalizer APO executable file and select Properties.
  2. Click the Compatibility tab, tick Run this program in compatibility mode for, then select Windows 10 from the dropdown menu.
  3. Click on Apply and OK.

3. Reinstall audio drivers

  1. Right-click on the Start menu and select Device Manager.
    equalizer apo not working windows 11
  2. Expand Sound, video and game controllers, right-click on your audio driver, and select Uninstall device.
  3. When prompted, confirm your choice.
  4. Restart your computer, and the driver will reinstall.

If you want other options than following the manual method, you can try specialized driver updating software to execute this process automatically.

4. Disable Hardware Acceleration

  1. Press Windows + I to open the Settings app.
  2. Navigate to Sound.
  3. Scroll down and click More sound settings.
  4. Right-click on one of your devices and select Properties.
    equalizer apo not working windows 11
  5. Go to the Advanced tab, then untick Allow hardware acceleration of audio with this device, click Apply, and OK.

Since this app is not officially compatible with Windows 11, you may need a few extra steps to get it working well.

Hence, the solutions above should be effective enough if Equalizer APO is not working on your Windows 11 device.

Finally, let us know in the comments section which of the fixes worked for you.