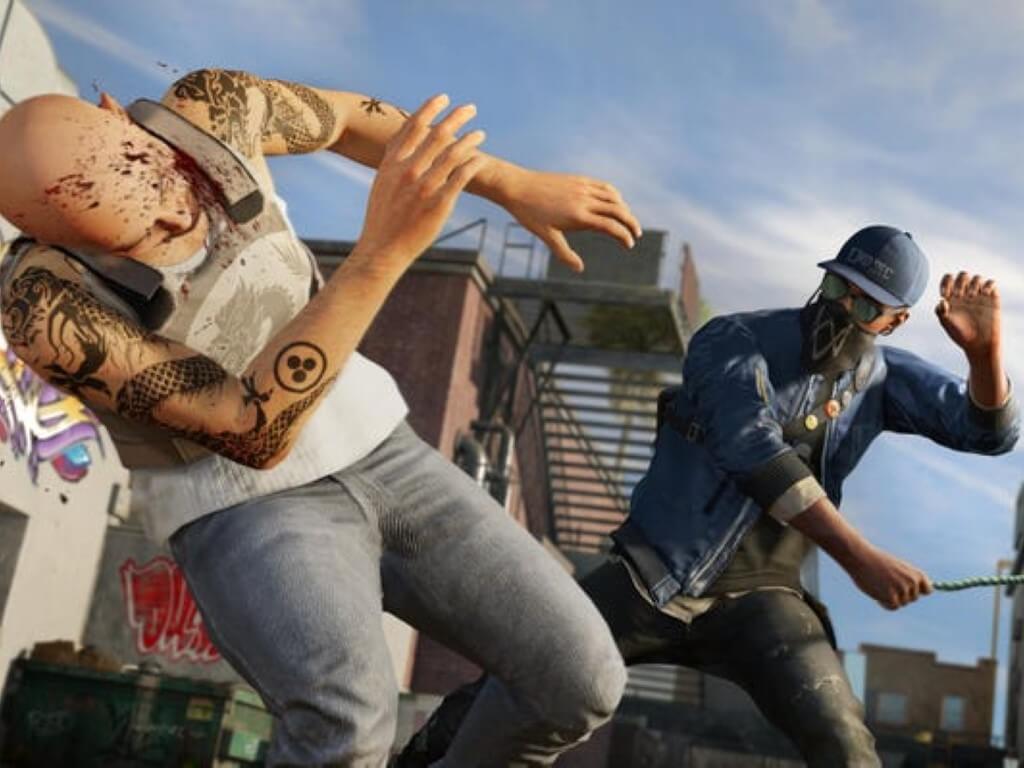
Xbox Free Play Days is back for the last weekend of September. This week’s offerings feature only one game, but it’s a doozy: WRC 10. The long-running (pun not intended) rally sim is available during this Xbox Free Play Days event—running from Thursday, September 19 through Sunday, October 2— in both its Xbox One and Xbox Series X|S incarnations.
Xbox Free Play Days is a perk for subscribers of Xbox Game Pass Ultimate and Xbox Live Gold. The game will be available for purchase at a discount of as much as 70% off depending on which edition of the game you go for.
Install the game and find out why WRC sets the standard for off-road racing simulation.
The Thunderbolt port is a versatile feature that allows you to connect USB devices to your laptop, as well as other devices. Ethernet is another important feature of the Thunderbolt port that allows you to connect to a wired network.
One of the most common issues with the Thunderbolt port is Ethernet not working properly. When this happens, it can make connecting to the internet or other devices impossible, which can be very frustrating.
Here are some of the most common reasons why your Thunderbolt cable may not be working:
The cable isn’t plugged in properly – Make sure that all ends of the cable are firmly plugged into their proper ports. The plug itself should fit snugly, but not too tightly, as that can cause damage to the pins.
Damaged or faulty cable – If the ends won’t connect with each other at all, it may be because one side has been damaged or has a short circuit. If you’re using a new cable and it still doesn’t work, try replacing it with another one to see if that works better. If so, your original cable was faulty and needs to be replaced.
The device you’re using doesn’t have Thunderbolt capability – Not all computers support Thunderbolt technology, so check with your computer manufacturer before purchasing cables for it; if your computer does support Thunderbolt, then make sure you get compatible cables for it as well.
You are using an incorrect cable – Cables that don’t conform to standards can cause problems too. If you are using a third-party cable, it might be a counterfeit or a knock-off.
Why won’t my Mac recognize my Ethernet cable?
Mac users can connect two Macs by creating a Thunderbolt bridge. This way, they can transfer files faster. However, the network sharing isn’t always smooth and some problems may occur.
If your Mac has trouble recognizing your Ethernet cable or the Thunderbolt is not connected to your Macbook Air, below are some possible reasons:
Problems with your router – If everything seems okay with your Mac but not with your router, there could be something wrong with it. You should try resetting it. This will reset any changes that may have been made to its settings.
Indirect connections – If you’re using a USB-to-Ethernet adapter, make sure that it is connected properly to your computer. The adapter should be connected directly to your Mac through one of its USB ports and not through a hub or extension cord.
Loose connections – Ensure that the Ethernet cable is securely connected to both ends—the wall jack and the back of your computer—and that there are no bends in the cable anywhere along its length.
Now let’s look at some of the ways you can troubleshoot such issues.
How can I fix my Thunderbolt if Ethernet is not working?
1. Check your cable connection
Make sure the cable is securely inserted into both devices. If you’re using a USB-C to USB-C cable, make sure it’s the right type of cable. Also, ensure you’re using a compatible cable. Not all cables are created equal, so be sure to use only certified cables with your devices.
Try another port on your computer or use another device that uses the same type of cable. If it works with this other device, then your USB port may not be working or something is wrong with your computer.
2. Remove any unnecessary devices
Remove any extra devices that aren’t being used from the system’s ports or slots before checking whether they are causing issues with connectivity.
This includes USB hubs or other accessories that may interfere with communication between your computer and another device connected via a Thunderbolt cable.
3. Update your drivers
If you are getting a Thunderbolt error, it is likely because of an outdated driver. This can happen when you install drivers on your own or if you have a new computer that comes with an older version of an OS pre-installed.
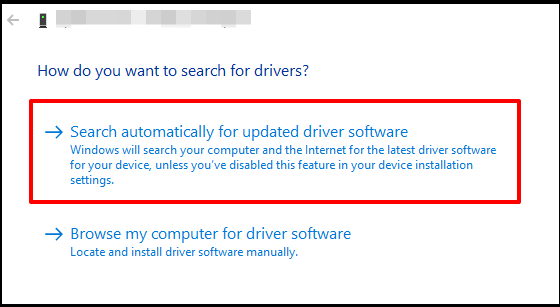
You can download and install the necessary drivers from the manufacturer’s website. This includes both Thunderbolt drivers and network drivers. Once you have updated all of your drivers, try connecting again to see if anything has changed.
In case you don’t know exactly which update is right for your driver, we recommend you use a third-party software. It scans your PC and finds straight away the most suitable update for your old drivers.
4. Restore factory settings
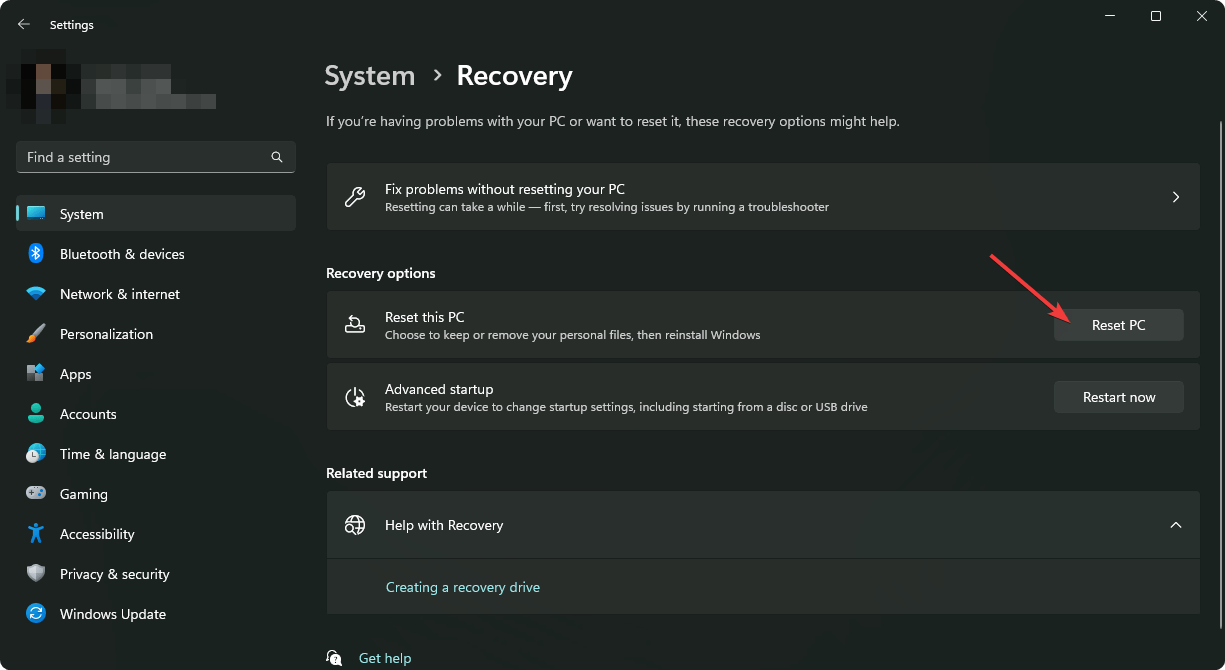
Restoring factory settings is a good way to troubleshoot any problems with your Thunderbolt ethernet. It will erase all data on your device and return it to the state it was in when you first bought it.
This includes apps and files, but also any changes you might have made to system settings or preferences. While this process clears away all of your personal information, it also eliminates any software bugs that may be causing the problem with the Ethernet connection.
If there’s no need for that information anymore, restoring factory settings is a great way to reset your device and get it working properly again.
Resetting network settings resets all configurations related to networking including Wi-Fi connections which might help solve this problem easily.
This will clear out any problems with the settings that may be causing a poor connection. It can also help resolve unstable connections.
6. Update your OS
Make sure that you have the latest version of your operating system installed. Updates can fix bugs, vulnerabilities and other issues that could cause problems with your Ethernet connectivity.
Newer versions also tend to support the latest firmware and are more stable. You should also scan for viruses and malware when updating your OS.
7. Restart your PC
If you have not restarted your computer recently or if it has been running for hours without, it may be time to restart both your PC and router.
Sometimes it’s all about rebooting your computer. This will remove any programs that may be interfering with the connection between your Ethernet adapter and router or switch. Rebooting clears out any memory issues that could be causing problems with the device.
Can you run Ethernet through Thunderbolt?
Yes, you can run Ethernet through Thunderbolt. However, this is not a standard feature and requires an adapter to convert the signal.
Thunderbolt is a high-speed data connection that can be used for both external storage and internal communication. It’s a good idea to run Ethernet through Thunderbolt but it’s not an easy task.
To start with, you’ll need an active Thunderbolt-to-Ethernet adapter. This adapter will allow you to connect your computer directly to an Ethernet cable or switch.
If you are in the market for USB-C adapter hubs, we have an expert list that works with most modern ports.
Should you experience any other issues such as Ethernet keeps disconnecting, we have a detailed guide on how to solve this problem.
Let us know which solution worked for you in the comments section below.
PowerToys has been on the receiving end as far as features and updates are concerned, with the latest version 0.62.0 adding a screen ruler, quick accent tool, and text extractor. In August, the tool also got a new feature, PowerOCR which lets users copy text from any image opened in Windows.
And now, there’s yet another new feature in the works for Microsoft’s PowerToys app on Windows dubbed “File Locksmith.” The tool is designed to help users easily identify processes holding a file open, showing why they cannot erase certain files, for example.
The feature will list the processes, their IDs, blocked files and finally have a button which is in place to help users end the processes that are currently running, thus preventing deletion of the file. Share your thoughts with us regarding this feature below.
Is your Steam Overlay not working on Windows 10? Do not worry! Because it comes with several solutions for this problem, today’s guide is perfect for you.
For many reasons, Steam is the most prominent digital platform and much more than a simple game digital distribution service. It offers a bag of valuable features and makes the gaming experience so much more enjoyable.
One of those features is Steam Overlay which works in the background and allows players to communicate with their fellow gamers, coordinate, and share the mutual enjoyment of the playtime.
However, this feature isn’t as steady as one would assume. Many users reported that Steam Overlay is not working on Windows 10.
For that reason, we enlisted a hefty list of solutions. Remember that some of these apply to other Windows iterations, but our goal was to focus on Windows 10.
So if you’re stuck with Steam Overlay not working, check the solutions and workarounds below.
Why isn’t my Steam Overlay working?
Steam Overlay is a piece of the Steam user interface that can be activated over the top of almost any game launched through Steam. In addition, it lets you access the friend list, web browser, chat, and in-game DLC purchasing.
Because it is essential to be aware of the most important causes that can get your Steam Overlay unable to work, we’ve compiled a list you should verify:
Wrong privileges – To get the best out of the Steam experience, running the app with admin privileges is always essential. So if your Steam Overlay is not working on Windows 10, we recommend ensuring you’ve accessed it as an administrator.
Outdated app – Like any other soft or PC component, Steam needs to be constantly updated, so it will let you use any of its features without any problem. In addition, you should also update your OS.
Temporary glitches – In this case, we suggest disabling and re-enabling Steam Overlay for individual games. If this seems like not working, try reinstalling the app.
Antivirus or third-party app is blocking Steam Overlay – Antivirus software might sometimes be too protective, so it may stop you from performing specific actions in Steam. The same might happen when a third-party app is running in the background. To solve this quickly, you’ll probably need to disable them temporarily.
Although there are a few causes you should consider if Steam Overlay is not working, you’ll discover solutions for each of the above issues.
How does Steam overlay work?
While playing games, players can access various Steam Community features through the community overlay, an in-game interface. Any game that supports and has the overlay enabled will open it when Shift + Tab is used as the default hotkey.
Many games use the overlay in the background to enable in-game elements that need Steam, in addition to granting access to Steam community services. You might not even know that a game utilizes the overlay in certain situations.
Games will utilize the Steam overlay differently depending on whatever features they support and how the developer integrated it because it is a customizable Steamworks feature. In-depth details can be discovered in the Steam community or by getting in touch with particular game developers.
How can I fix Steam Overlay if it’s not working on Windows 10?
1. Run the Steam client as an administrator
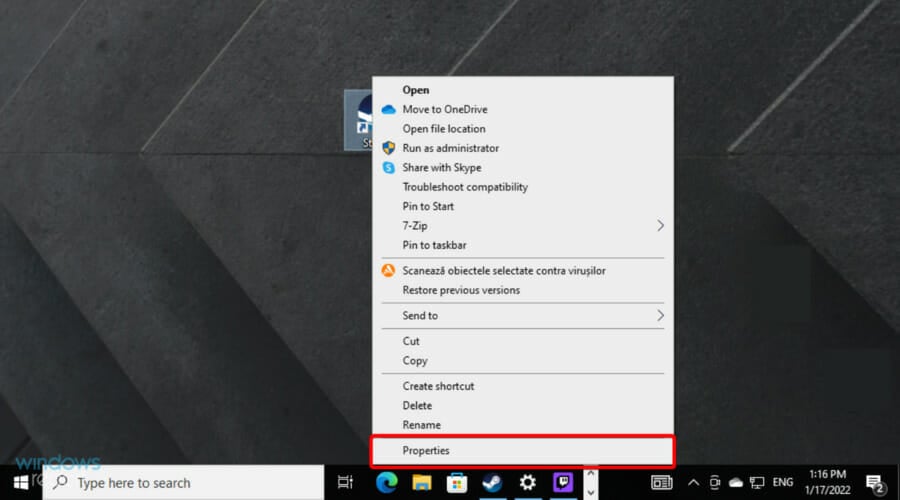
Right-click on the Steam client’s desktop shortcut and open Properties.
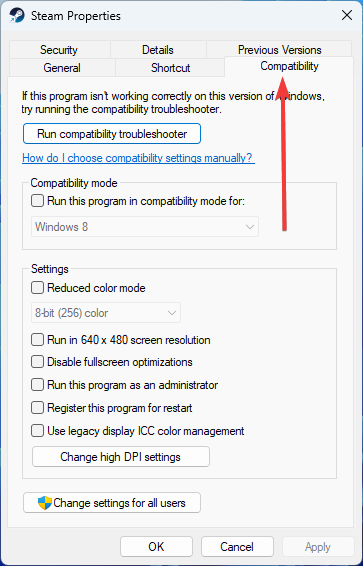
Choose the Compatibility tab.
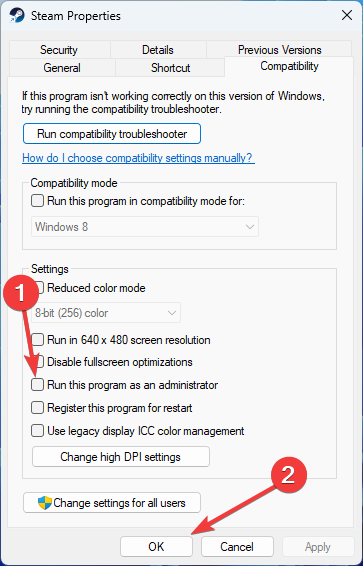
Check the Run this program as an administrator box and confirm changes.
This is a frequent suggestion on various forums, and we advise you to follow it through if Steam Overlay is not working on Windows 10.
Even though most users who run the Steam client on Windows 10 do so with an administrative account, it’s still worth a try.
Also, we advise running the game through the Steam client instead of doing it directly from its shortcut.
2. Make sure you’re running the latest version
Press on the Windows key, type Steam, then open the app.
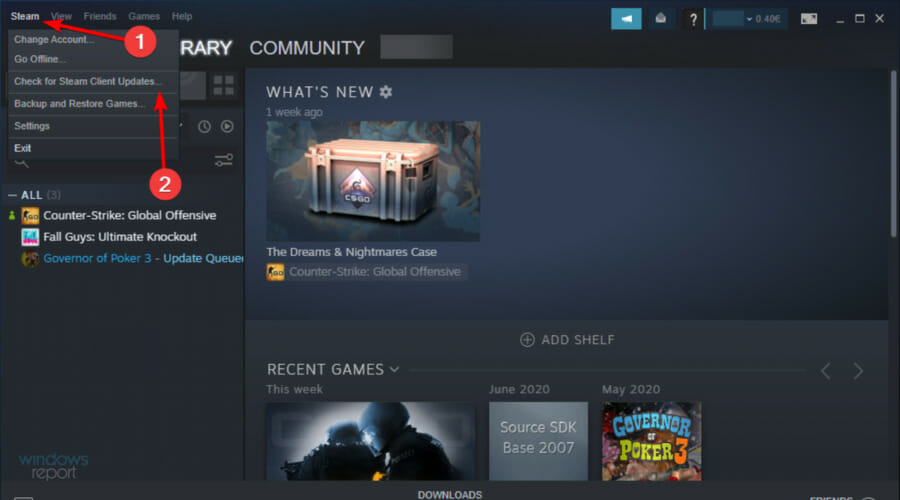
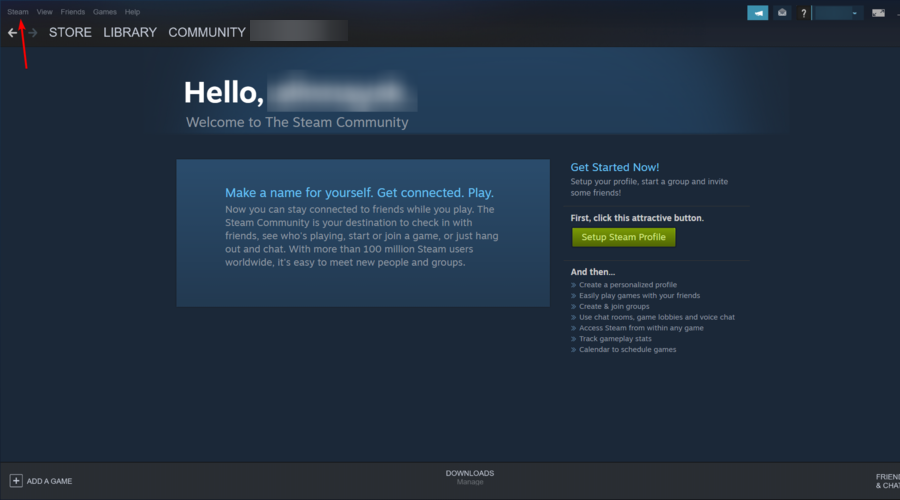
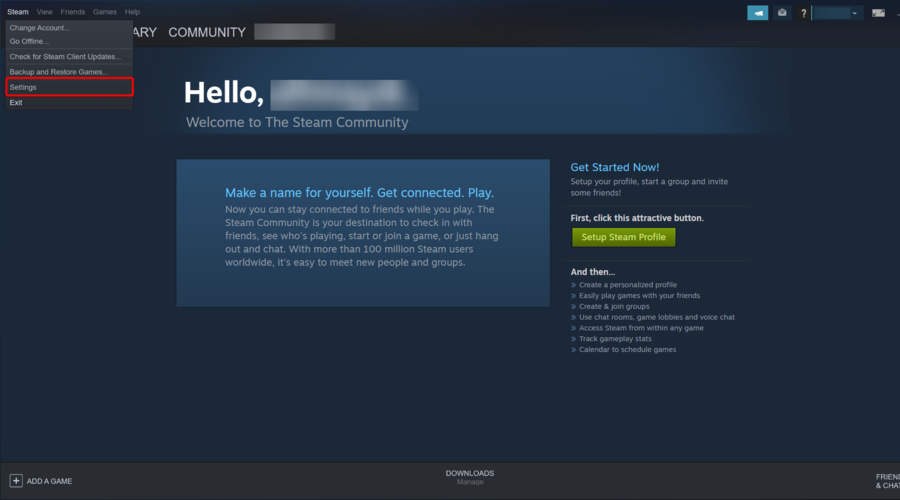
From the app’s top-left corner, click on Steam, then choose to Check for Steam Client Updates.
Wait until updates are installed and restart Steam.
Issues with Steam Overlay have been present for over a few years, especially on the older Windows iterations.
Although the client updates on its own once you start it, you can always check for updates manually, just in case something goes wrong with the automatic updates.
3. Update Windows 10
Press simultaneously on the following keys: Windows + I.
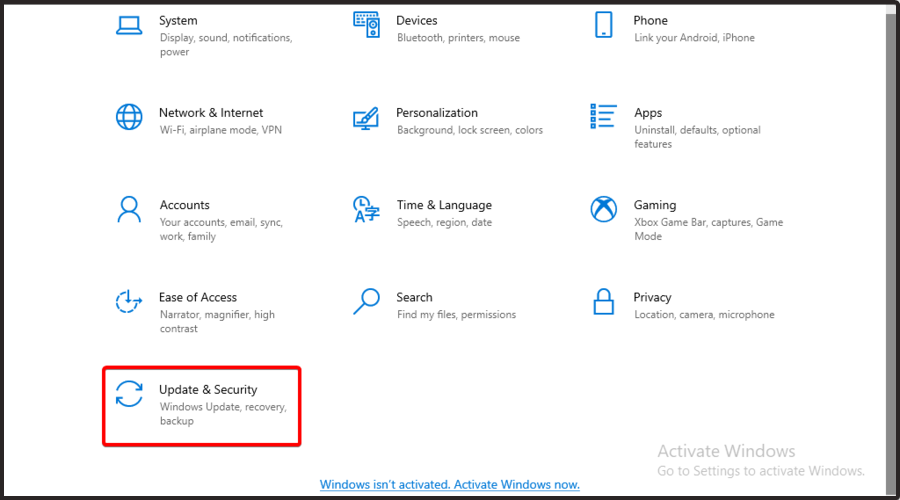
Go to Update & Security.
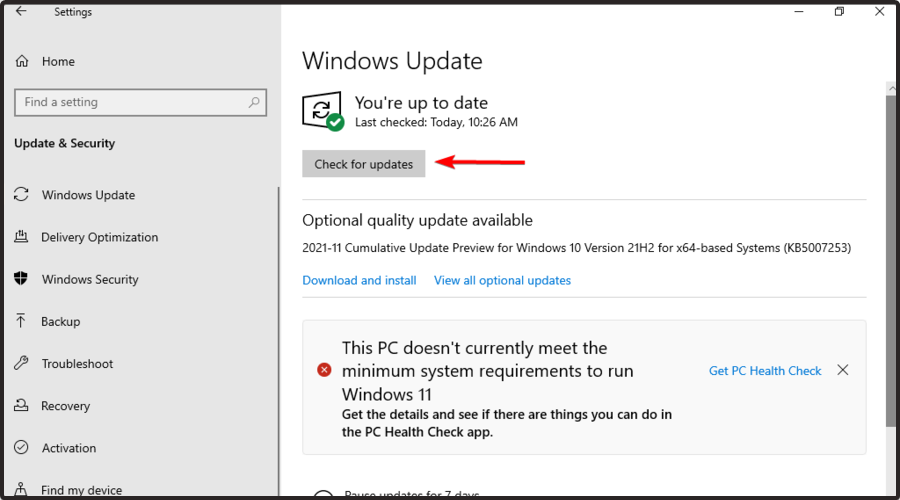
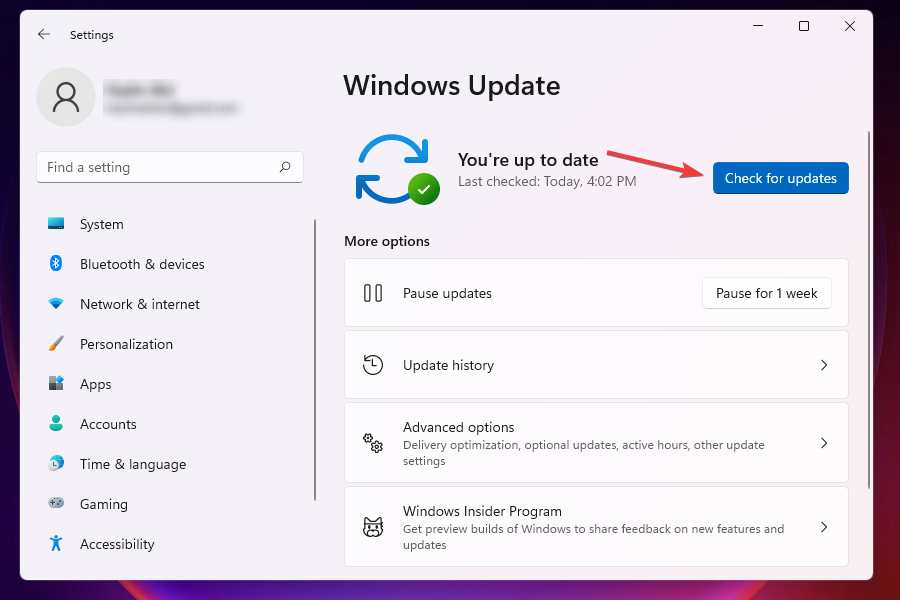
Stay on the Windows Update page, then click on Check for updates from the right window pane.
Wait until the process is done.
Another reason for Steam Overlay issues might lie in Windows 10, so ensuring you have the latest update is of utmost importance.
And, of course, we suggest avoiding the insider versions of Windows 10 and Steam. Beta programs are not stable and thus might result in stability and performance issues.
In addition, you can even roll back Windows 10 if the problem started after a major Windows Update.
Use the following keyboard shortcut: Windows + I.
Navigate to Update & Security.
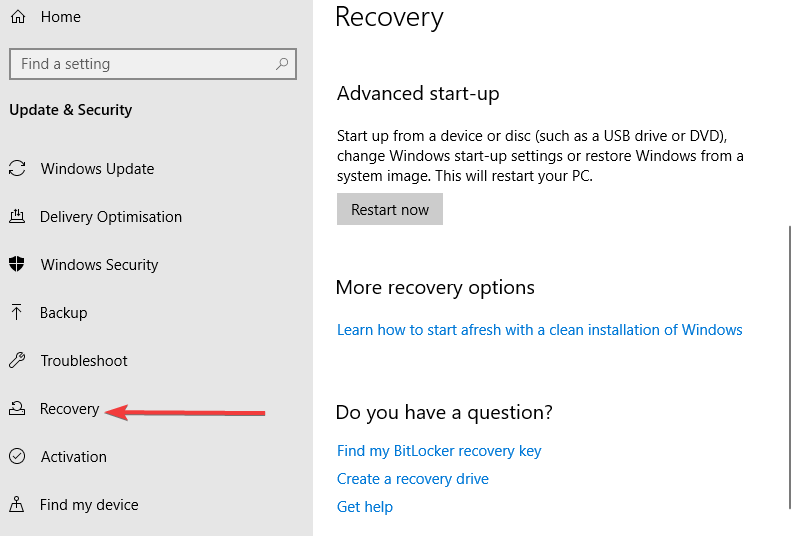
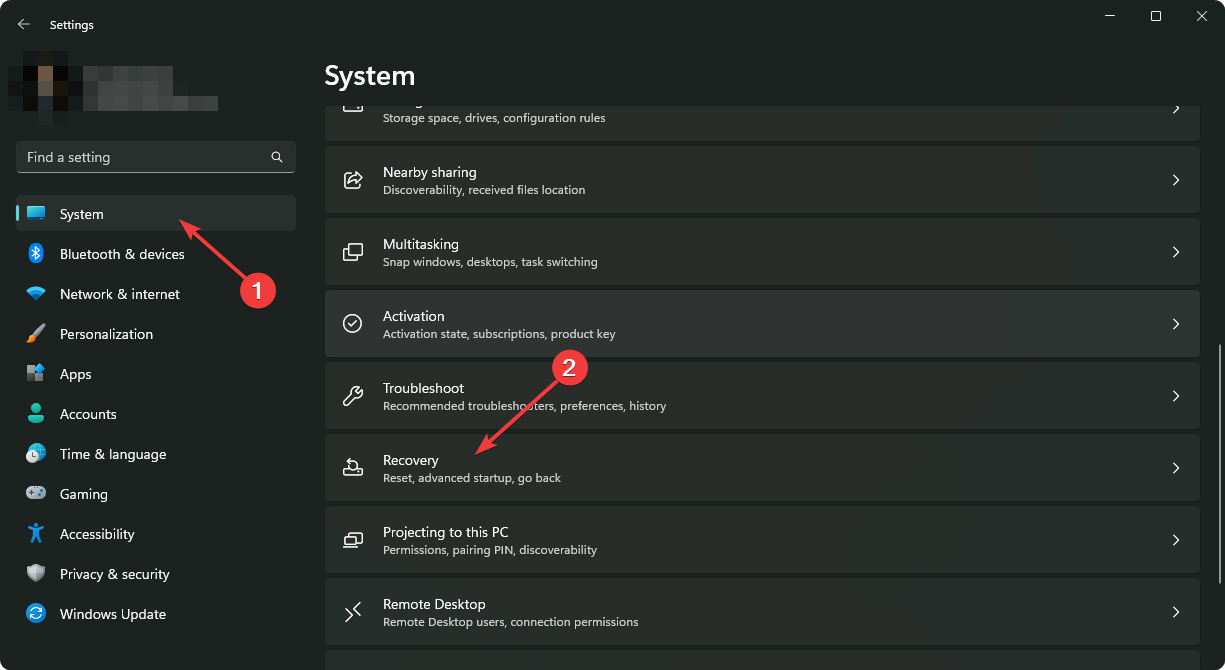
From the left window pane, click on Recovery.
Choose to roll back Windows 10 to previous versions.
4. Disable and re-enable the Steam Overlay for individual games
Hit the Windows key from your keyboard.
Now, search for Steam, and open it.
Look at the top-left corner of the window and click on Steam.
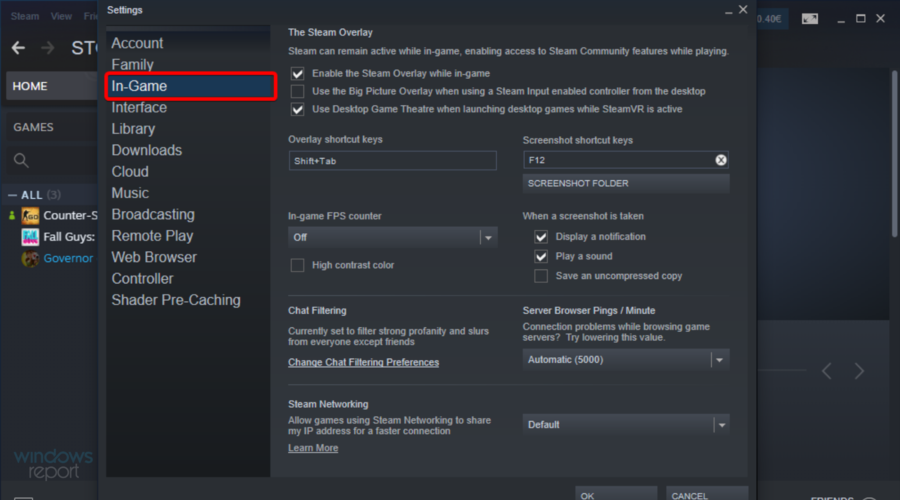
Navigate to Settings.
Choose In-game from the left pane.
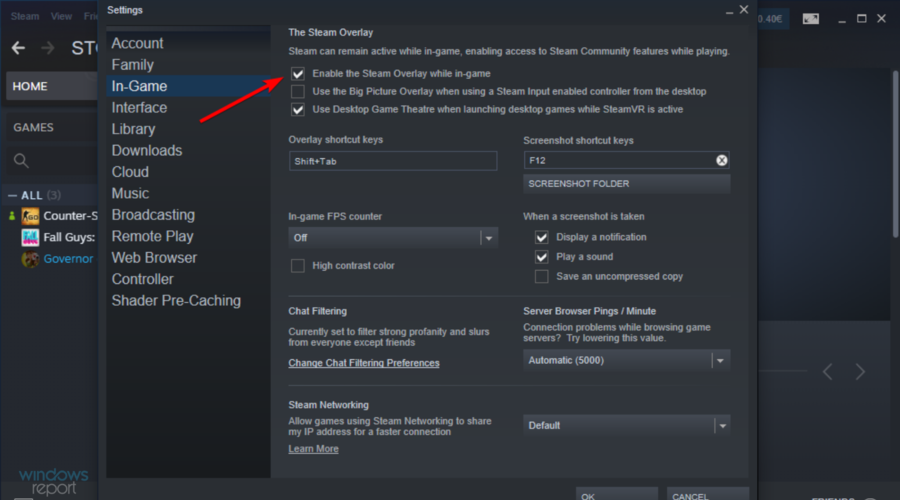
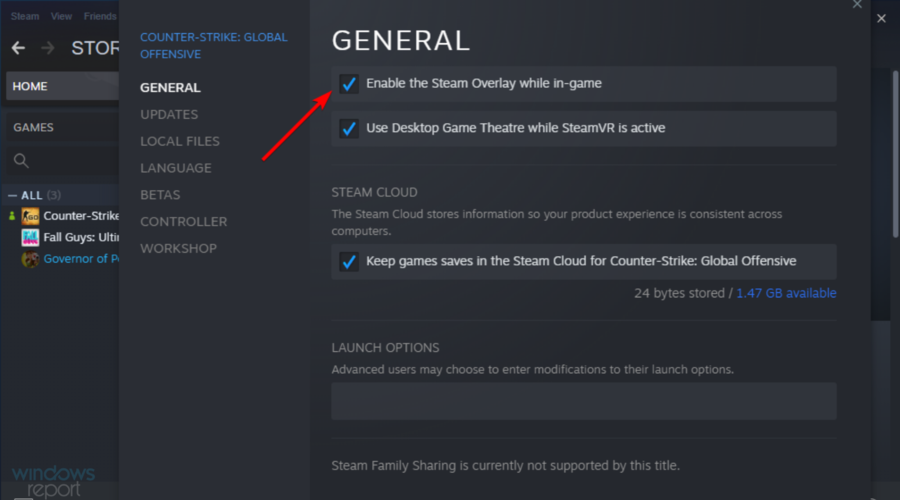
Check the Enable the Steam Overlay while in-game box and confirm changes.
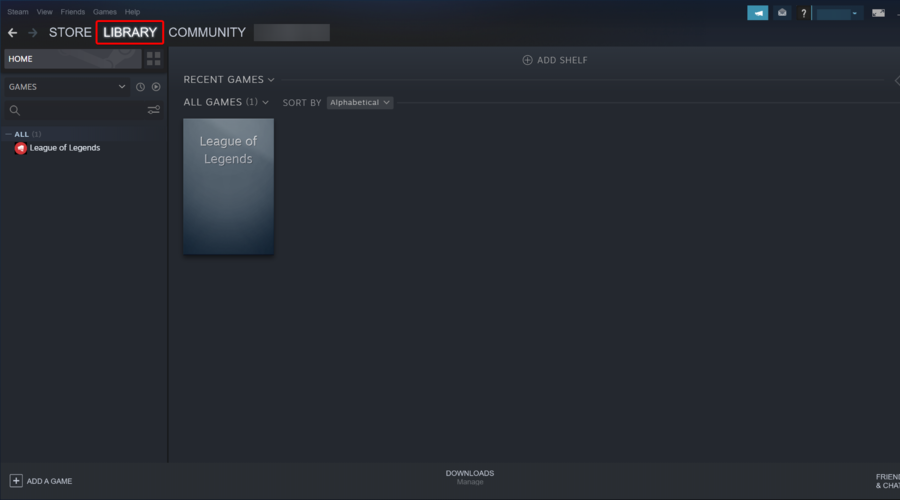
Now, open the Library from the top menu of the window.
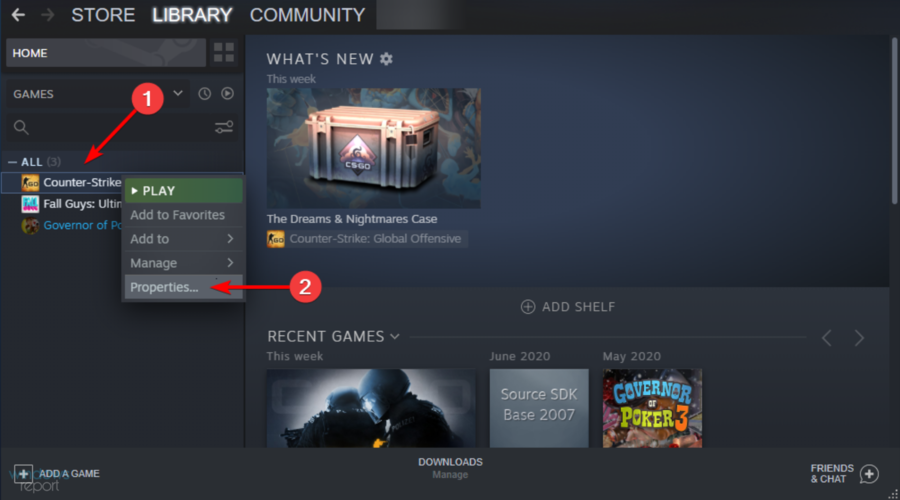
From the All section, right-click on the affected game and open Properties.
Check the Enable the Steam Overlay while in-game box and save changes.
Restart Steam and start the game.
4. Kill the gameoverlayui.exe process
Press on the Windows key, type Steam, then open it.
Run the game you want.
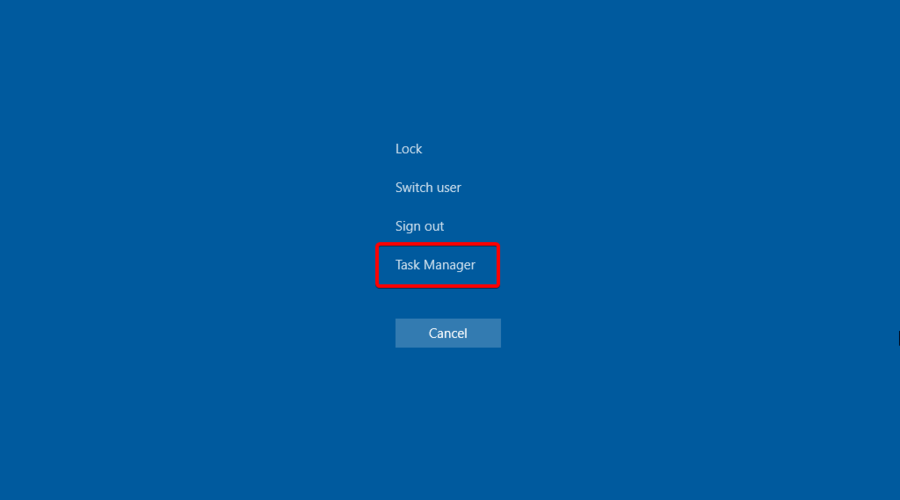
Use the following keyboard shortcut: Ctrl + Alt + Delete.
Choose Task Manager.
Under Processes, find gameoverlayui.exe and terminate it.
Get back to the game and press the Shift + Tab hotkey to access the Steam Overlay.
5. Add an exception to the antivirus firewall
Once installed, the Steam client should be able to communicate through your antivirus firewall freely. However, that doesn’t need to be the case at all times.
In addition, a third-party firewall might block Steam from network access, which also can be a problem starter. Now, you can either disable all firewalls while playing or create an exception in both the native and third-party firewalls.
However, completely disabling the firewall can expose your system to online threats. Instead, we suggest you use a more robust antivirus solution with a reliable firewall.
6. Disable other third-party applications while gaming
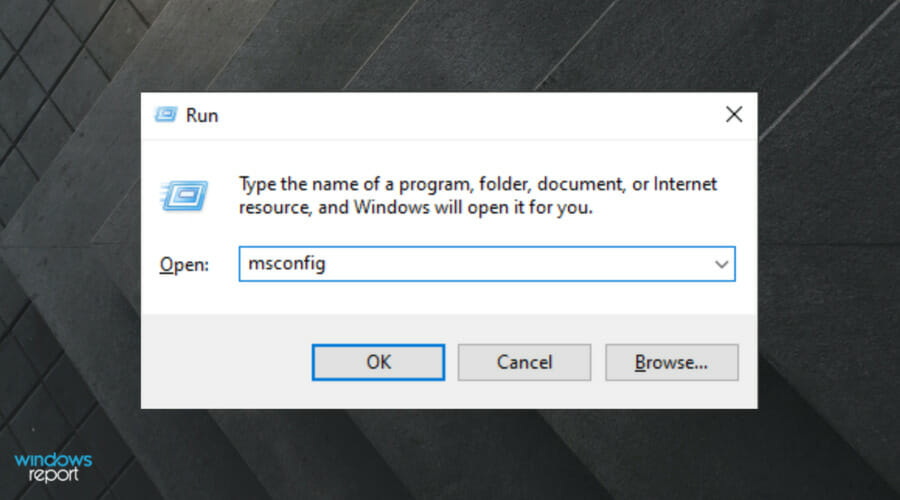
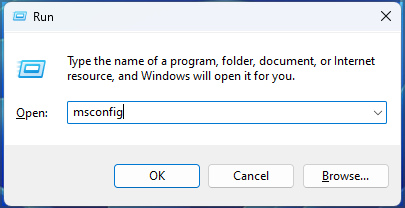
Use the following keyboard shortcut: Windows + R.
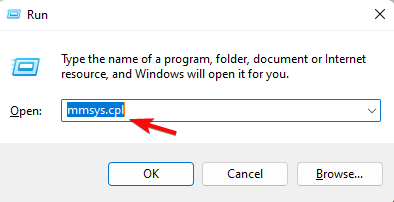
Type msconfig, then hit the Enter key.
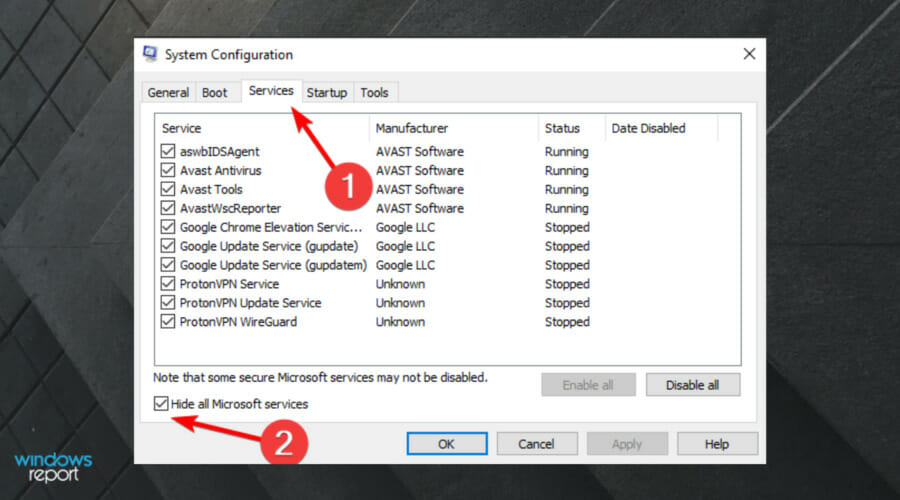
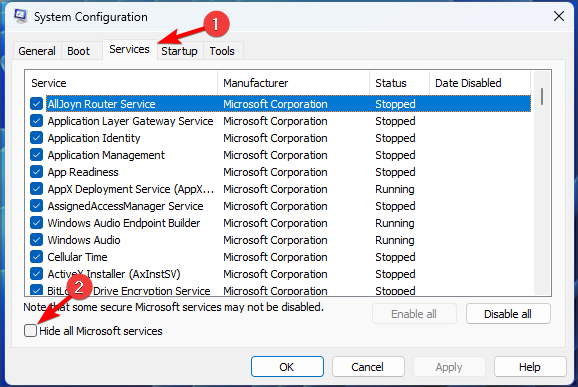
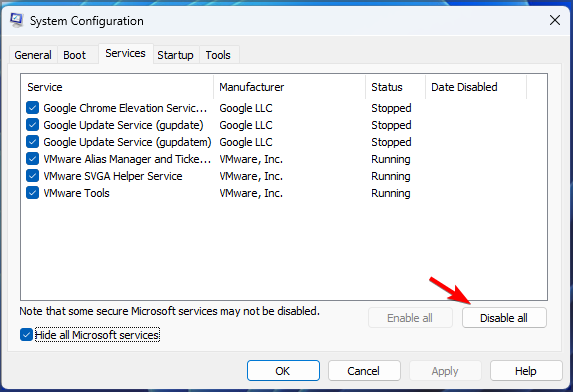
Under the Services tab, check the Hide all Microsoft services box.
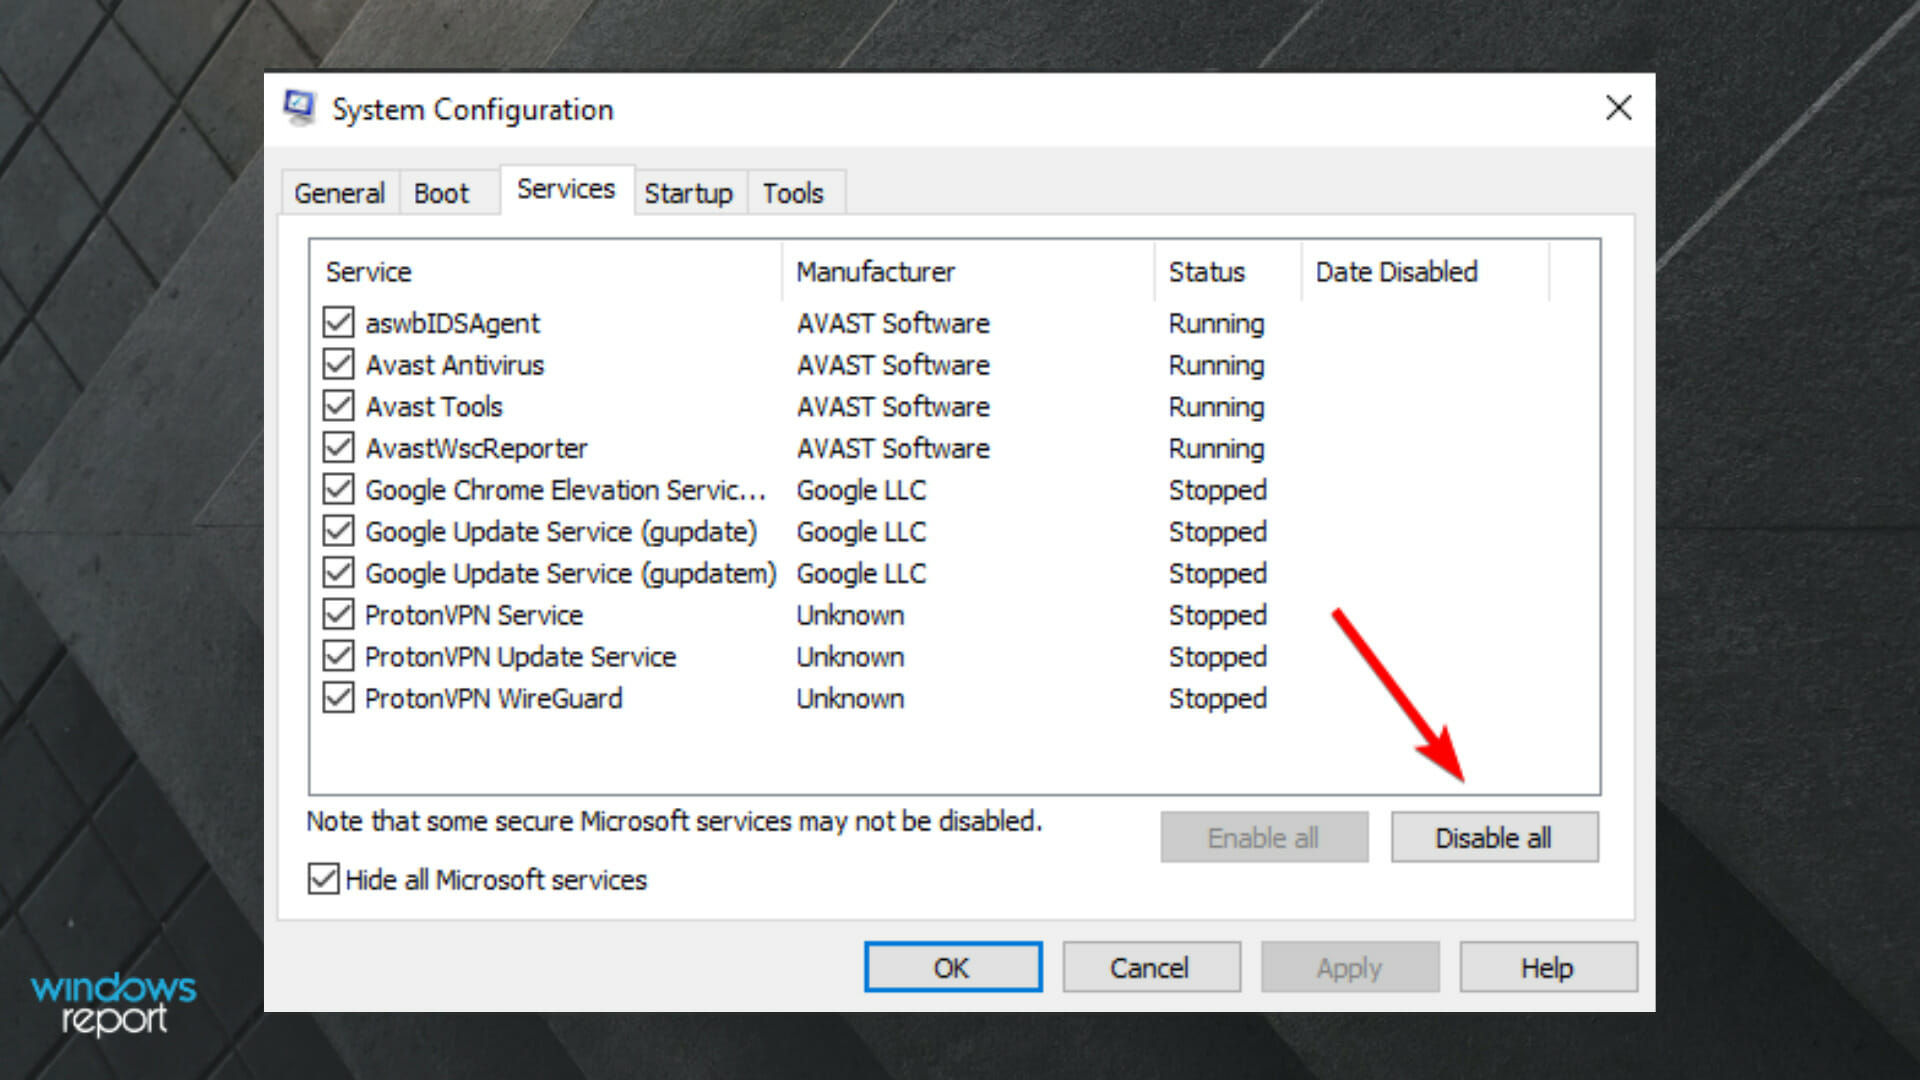
Click Disable all to disable all active third-party services.
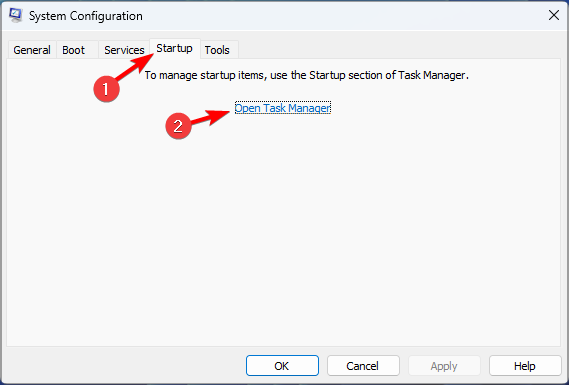
Now, select theStartup tab and go toTask Manager.
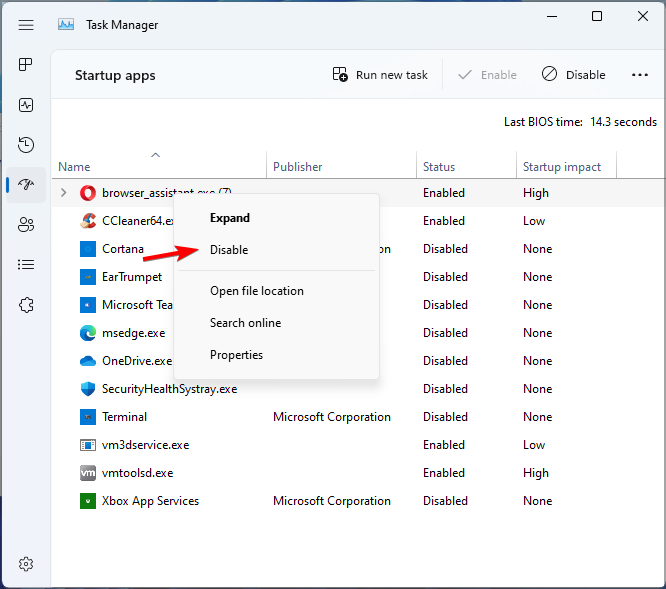
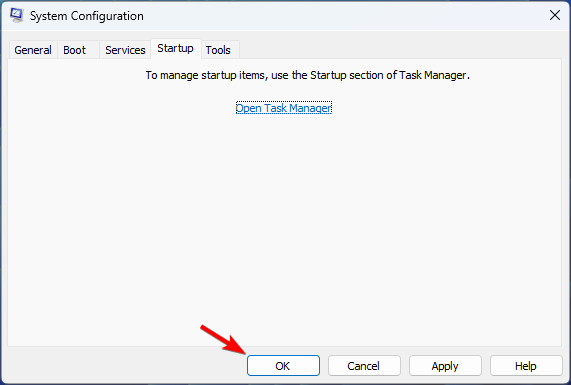
Prevent all programs from starting with the system and confirm changes.
Restart your PC.
As you can imagine, the Steam app is an exception, as it needs to run in the background for the Overlay to work in the first place.
But many users discovered that specific third-party applications that work in the background could block the Steam Overlay.
Also, some of them might be triggered by the Shift + Tab shortcut, which is the default for Steam’s feature.
However, if Steam Overlay is still not working on your Windows 10 PC, make sure you keep on reading.
7. Check the game integrity
Press on the Windows key, type Steam, and open the app.
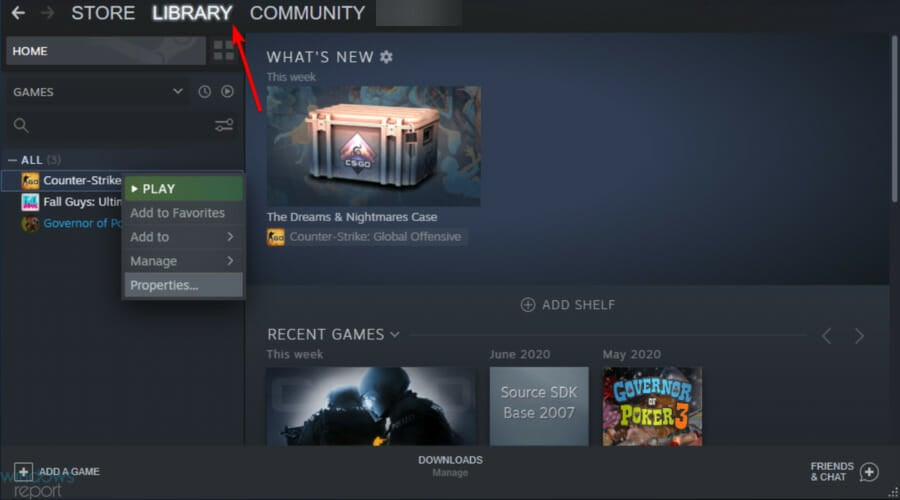
From the app’s main menu, choose Library.
Right-click on the affected game and open Properties.
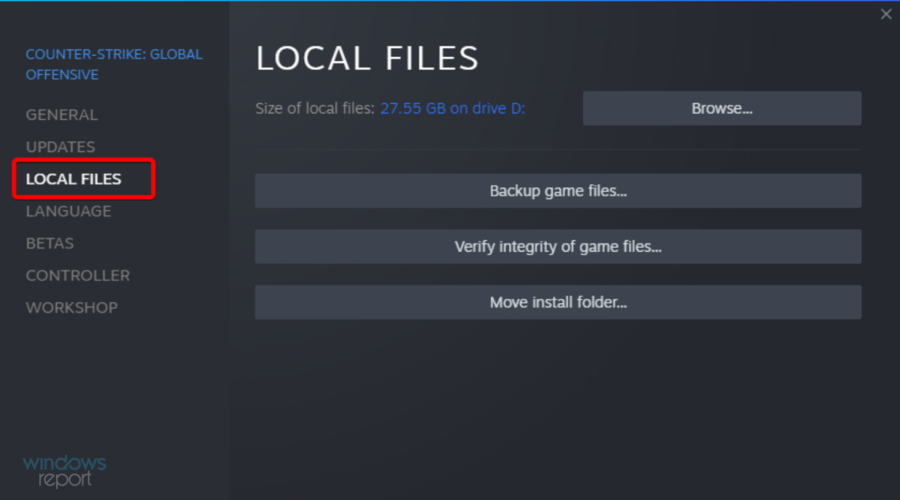
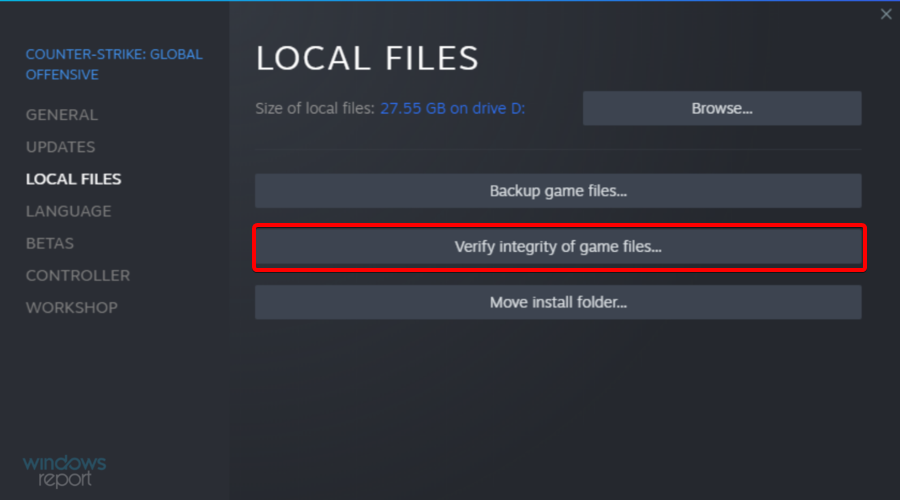
Select the LOCAL FILES tab.
Finally, click on the VERIFY INTEGRITY OF GAME FILES…button.
This ensures that the game isn’t corrupted or includes incomplete files. However, if Steam Overlay is still not working, we have a couple more options you can try.
9. Reinstall the Steam client
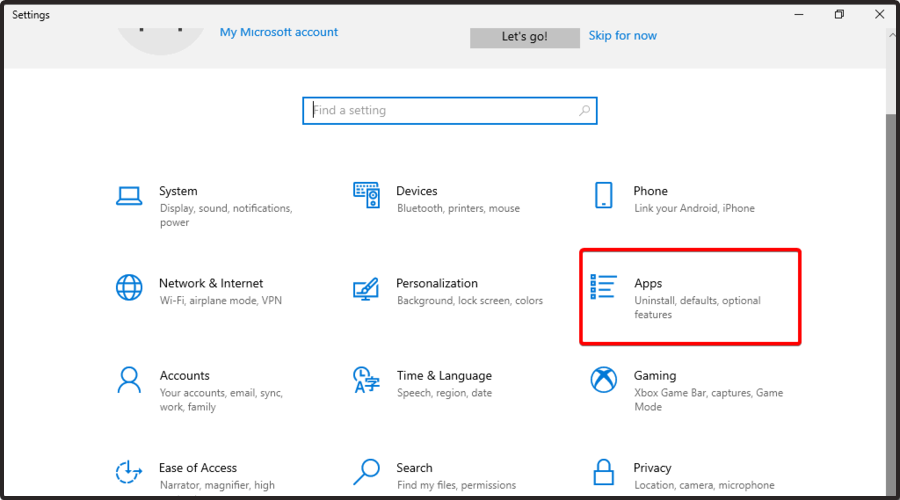
Use the following keyboard shortcut: Windows + I.
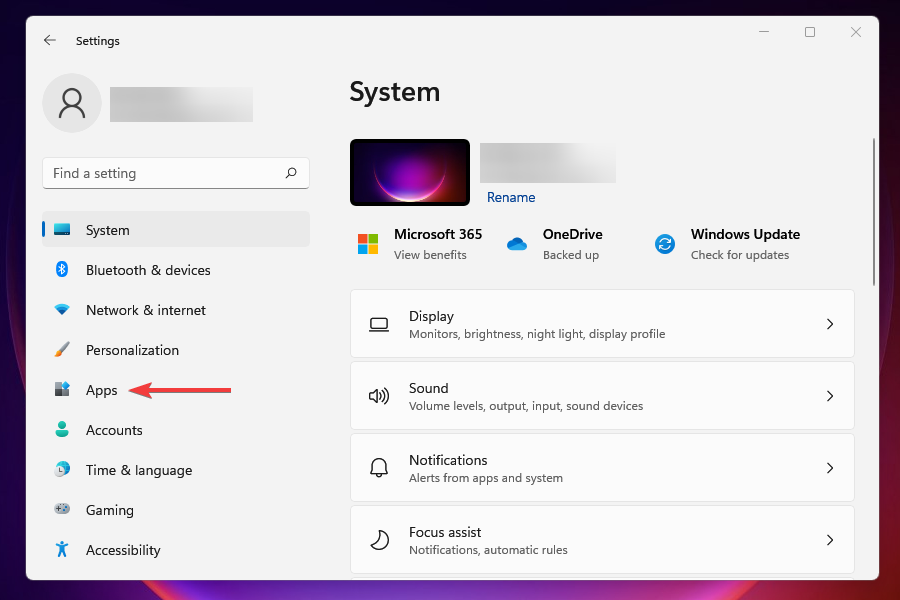
Go to Apps.
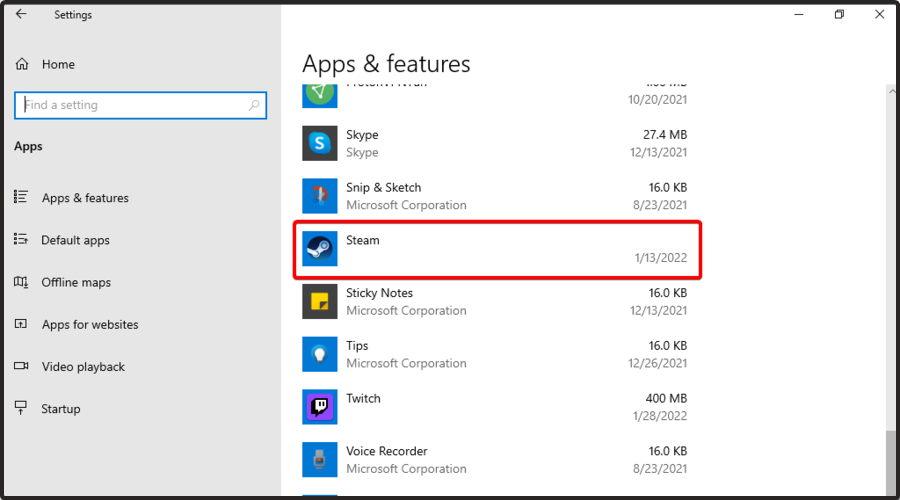
From the right side of the window, search for Steam.
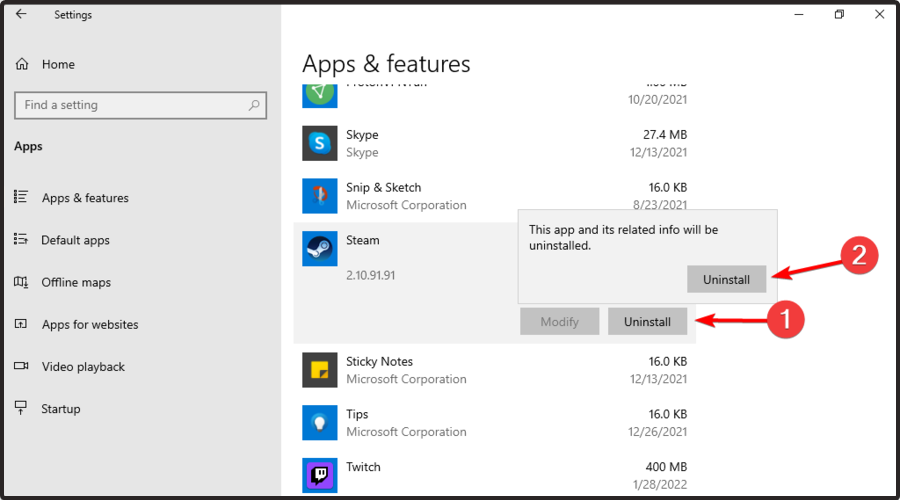
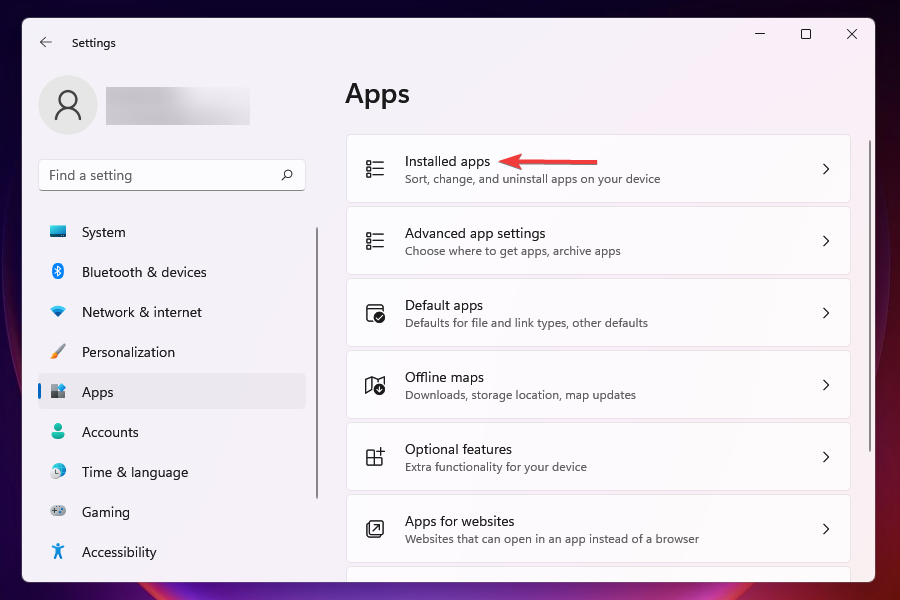
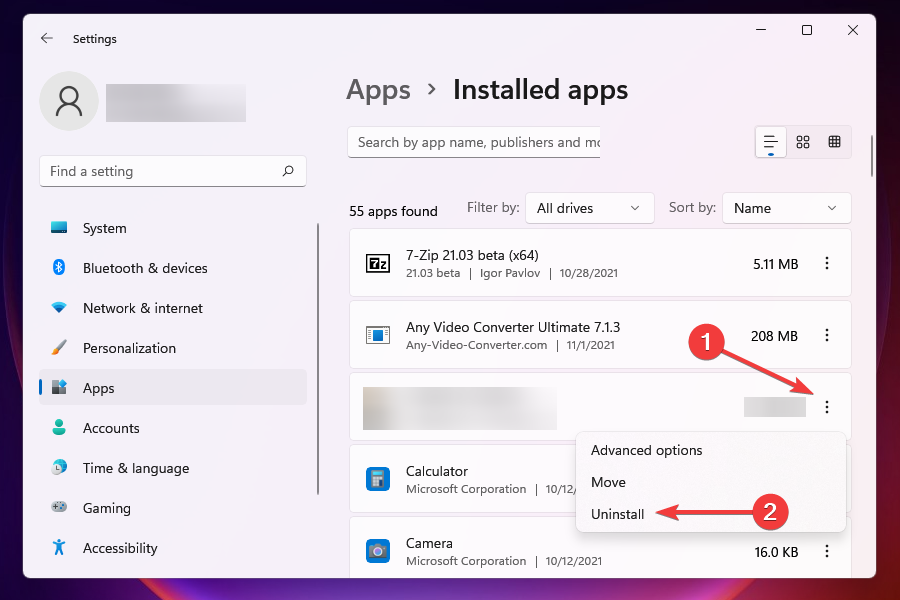
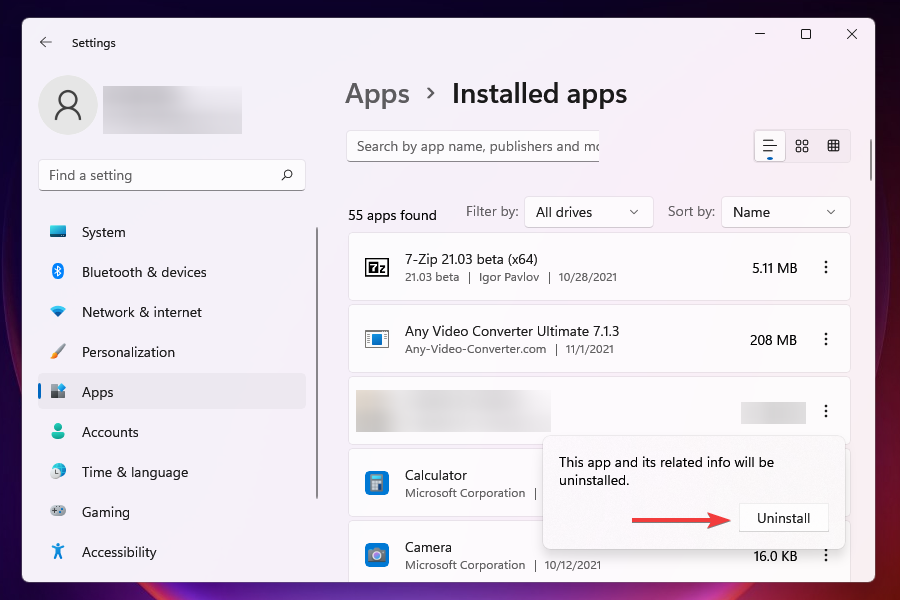
Click on it, then select Uninstall, and click again on Uninstall.
Wait until the process is completed, and navigate to the Steam download page.
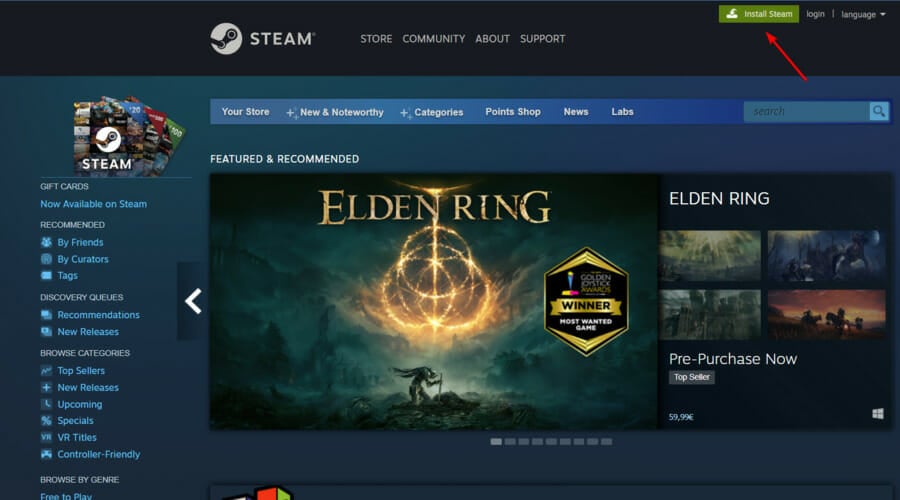
From the top-right corner of the window, click on Install Steam.
Follow the on-screen instructions to reinstall the app.
Open it, then input your credentials and log in.
Now that we’ve covered all (or a large majority) of possible issues and the last workaround we might suggest is to try and reinstall the Steam client.
This is a hail-mary attempt, but it just might work. However, don’t forget that the corruption of the installation files is a possibility.
In addition, we suggest removing all configuration files and keeping only the installed games, as re-downloading them can take a lot of time.
Once you’ve done that, give Steam another go. If the problem is persistent, there’s only so much you can do.
10. Try an alternative app
The final option is to move to another third-party application that offers similar features.
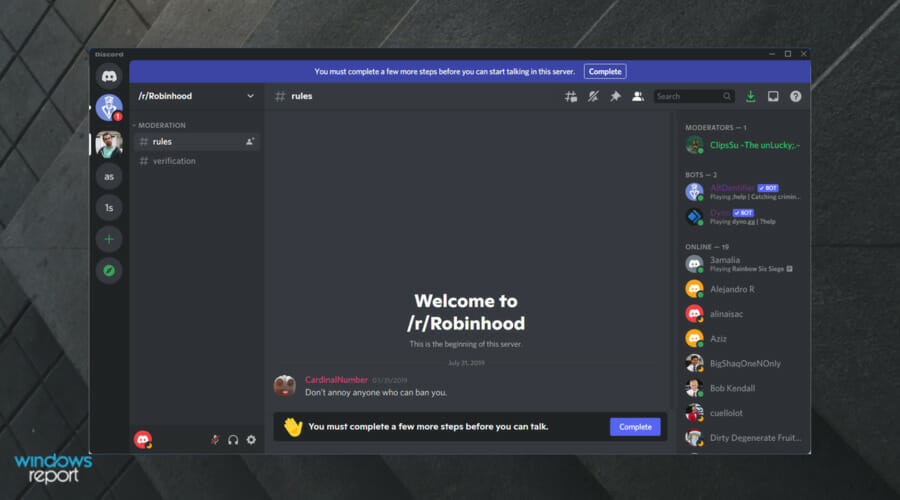
For the time being, Discord is holding its ground quite well, and many gamers use it to communicate with fellow gamers.
How can I fix the Steam overlay not working in Windows 11?
Here is the good news – if you have read this guide so far, you can fix the Steam overlay not working in Windows 11. This is because Windows 10 and the latest Microsoft OS share a lot.
Except for very minor and rare UI differences, you will find the identical steps on Windows 11.
So we recommend you pick whatever solution seems right for you and try it on your Windows 10 PC.
Does disabling Steam overlay affect FPS?
You can increase your average FPS by disabling Steam Overlay. Several users have recorded a reasonably consistent 299 fps after recording at 230–260 fps.
Even while it could be a bother, if you’re using a subpar PC, it could mean the difference between 40–50 frames per second and 60–70 frames per second.
There are some other alternatives, but in our opinion, Discord is more than worth a try.
Note that these solutions will be helpful if the Steam overlay is not working on Terraria, r6, Smite, Lost Ark, Rocket League, Rust, Apex Legends, and even non Steam game.
With that said, we can conclude this article. If Steam Overlay is not working in Windows 10, follow the above steps carefully, and you’ll get rid of this error in less than a few minutes.
This feature is closely related to the WebHelper service, and we have a whole guide dedicated to Steam Client WebHelper High CPU usage, so don’t miss it.
If you have any additional questions or suggestions, feel free to tell us in the comments below.
Microsoft introduced the sidebar in the Edge browser this summer to allow users to open apps easily without having to leave the page that they are on. In August, Microsoft Edge 104 shipped to the stable channel and later on received a build update upping it to version 104.0.1293.63. This update unpacked a couple of new features to the Edge’s sidebar, among them, Outlook, Office, and Gaming.
While this tool has proven to be quite effective when it comes to accessibility and time conservation, there is still room for improvement. For instance, Outlook for web, which has been available in the Edge sidebar has not yet been optimized to fit in the Edge sidebar. The page that you would normally have on full display in a window is displayed in the Sidebar pane. In turn, this distorts viewing of the page and would call for the user to scroll through the whole page. Here’s a glimpse:
But this is about to change as Microsoft is currently testing out an optimized version of Outlook for web that now fits “perfectly” in the sidebar, thus enhancing visibility and readability.
However, you should note that you will not be able to add multiple accounts when using Outlook for web in the sidebar. What’s more, it also seems that it does not support dark mode.
If you are not familiar with the Edge sidebar, then you should check out our post that highlights how to make the most out of the tool and what it’s all about. You will however need to have the latest Edge version to access the feature.
We have often heard how important it is to keep the graphics driver up-to-date. And, with the Age of Empires 4 running unsupported drivers error, the point has been again validated.
Many users reported that the Age of Empires 4 kept crashing each time they launched the game due to outdated drivers. However, it’s primarily the graphics driver that causes the problem.
In the following sections, we will walk you through the fixes as to how the running unsupported drivers error in Age of Empires 4 can be fixed. But before we head to the solution, let’s first check if you can run the game in the first place.
What does the Age of Empires 4 unsupported drivers message mean?
When the GPU drivers are outdated, this error frequently occurs.
Although the problem can be ignored, it might come up again when the game is launched later. Therefore, we advise using the procedures in this post if you are seeing this pop-up and are having problems with gaming, crashes, or want to get rid of it.
From user experiences, we have gathered that the most frequent cause include the following:
Outdated or corrupted drivers – You should either reinstall or update the driver to the newest versions.
An outdated OS – Updating the operating system will solve the problem if this is the case.
Corrupted Age of Empire 4 files – In this case, you will need to download a fresh copy of the game and install it.
The error is known to occur as Age of Empires 4 unsupported drivers with Nvidia, or sometimes Age of Empires 4 not launching game pass. Whichever is the case, you should consult our solutions below.
What are Age of Empires 4 system requirements?
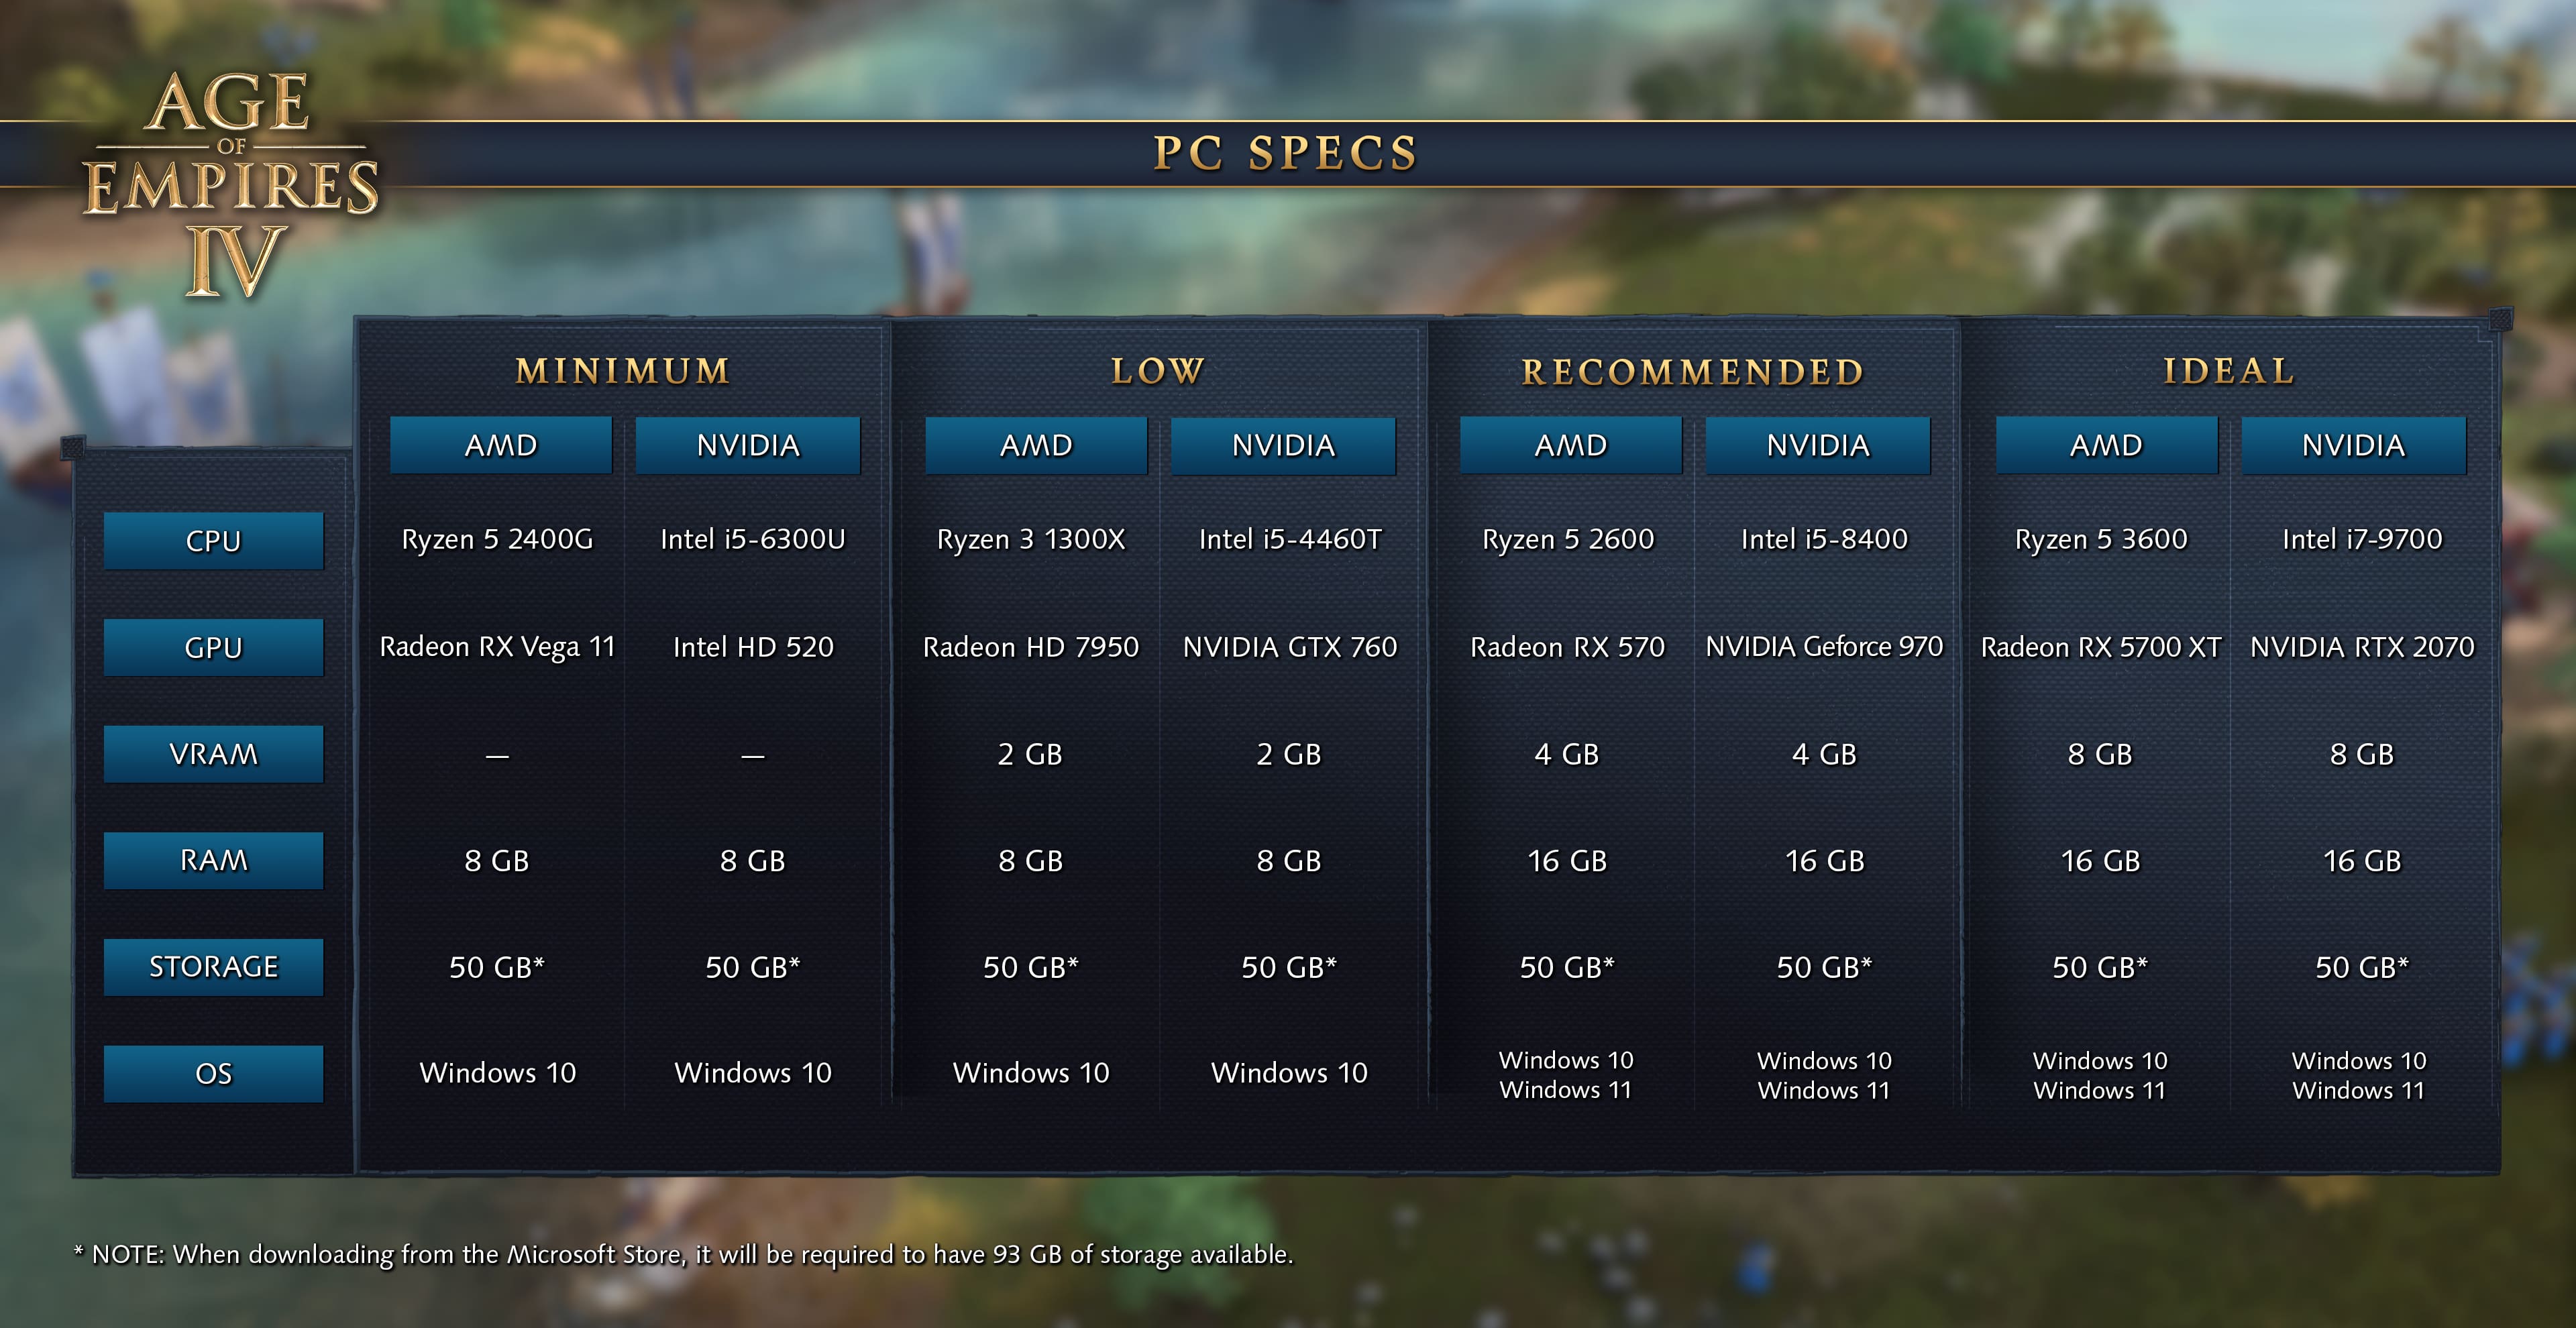
Since Age of Empires 4 was launched, many users have asked this question. We believe it’s imperative that you first check if your PC meets the minimum system requirements and then proceed to the Download.
As seen on the Age of Empire support website
Apart from manually checking each parameter, you can use tools that automatically do the job and save considerable time. One such tool is Can You Run it. After you download it, rest assured that it will scan the computer to identify whether it can run Age of Empires 4.
The support team for Age of Empires 4 has confirmed that the running unsupported drivers error can also be triggered if the GPU doesn’t meet the minimum requirements. So, do verify that your PC is compatible before downloading the game.
How can I fix the Age of Empires 4 unsupported drivers error?
1. Update the drivers
As expected, your primary approach should be to update the drivers when dealing with issues about it.
You can update a driver installed on the system: the Device Manager, Windows Update, or manually download it from the manufacturer’s official website. Let’s go through each of them.
1.1 Via Device Manager
NOTE
The Device Manager only searches for driver updates on the system, not the Internet. If you haven’t already downloaded a newer version, directly head to the following method.
Press Windows + S to launch the Search menu.
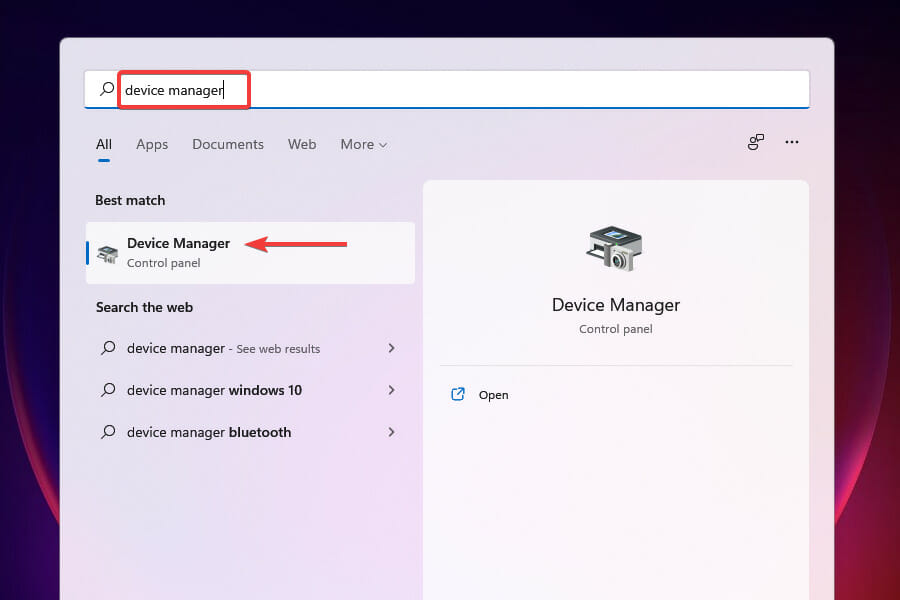
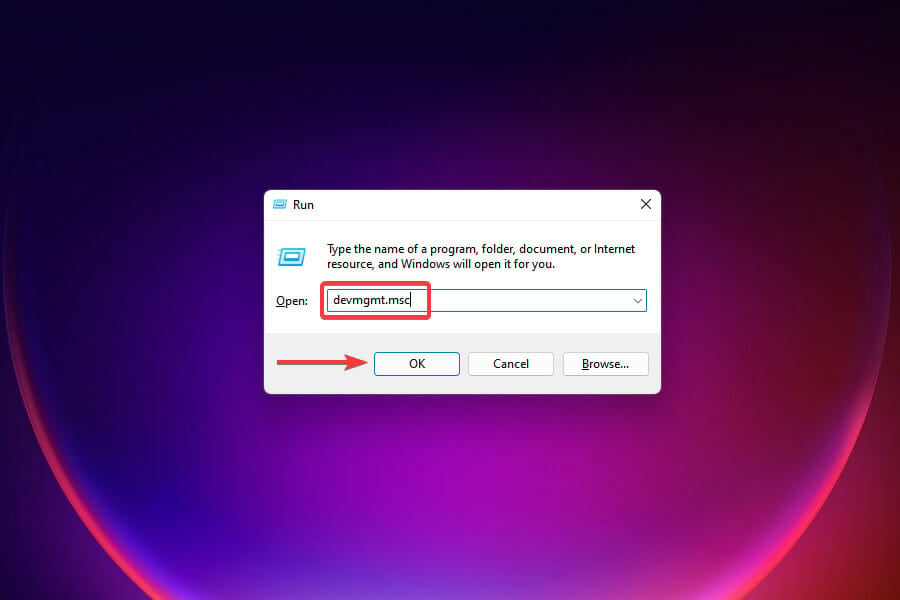
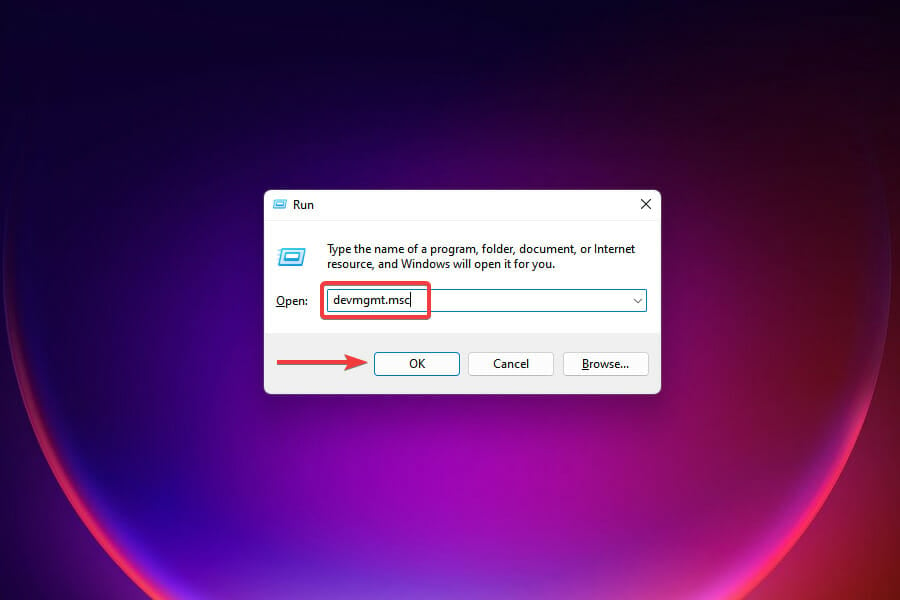
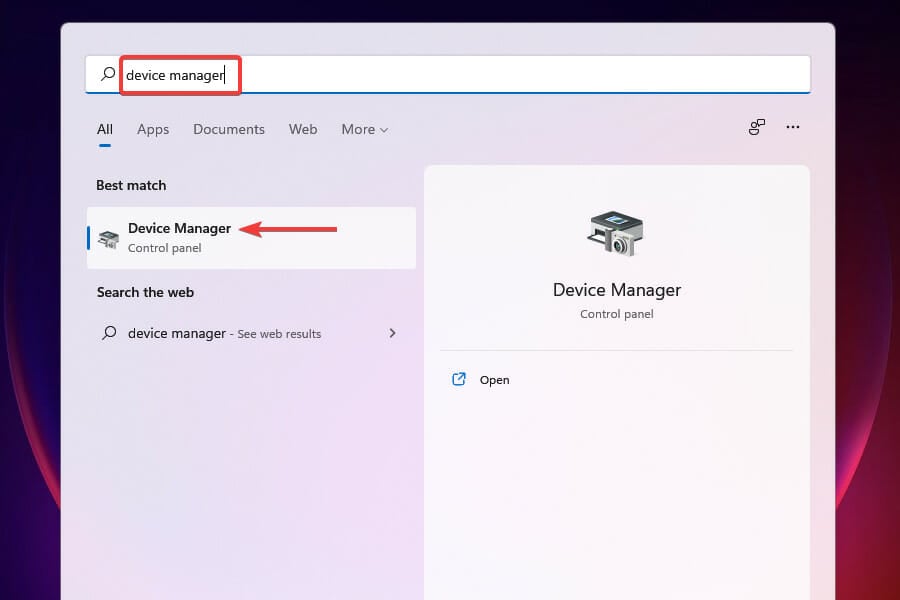
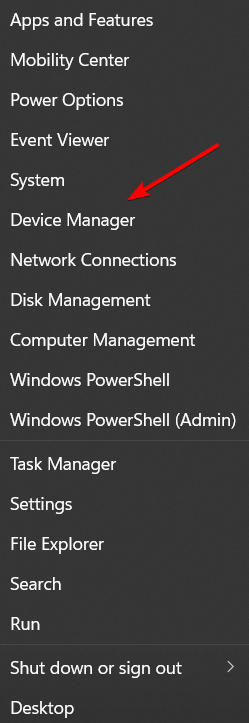
Enter Device Manager in the text field at the top and click on the relevant search result that appears.
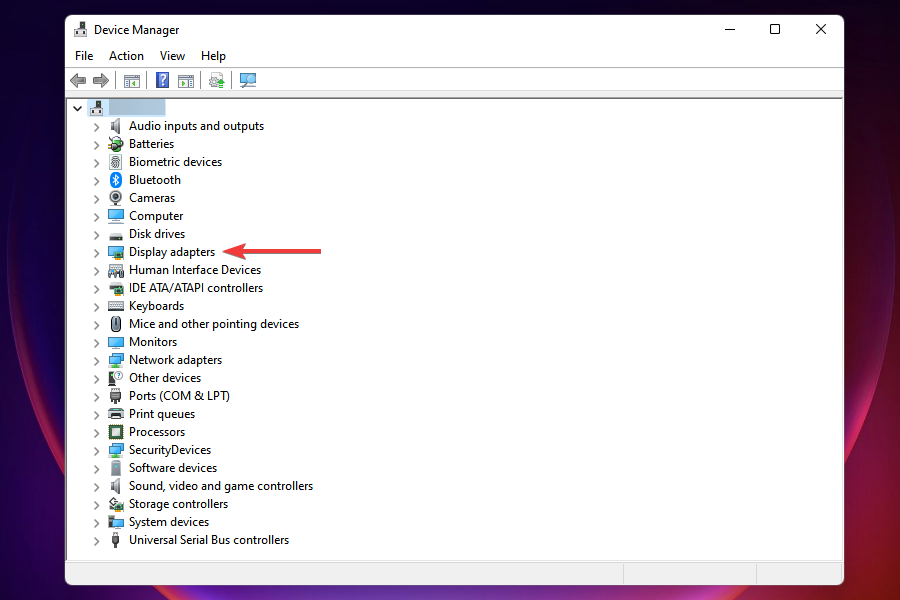
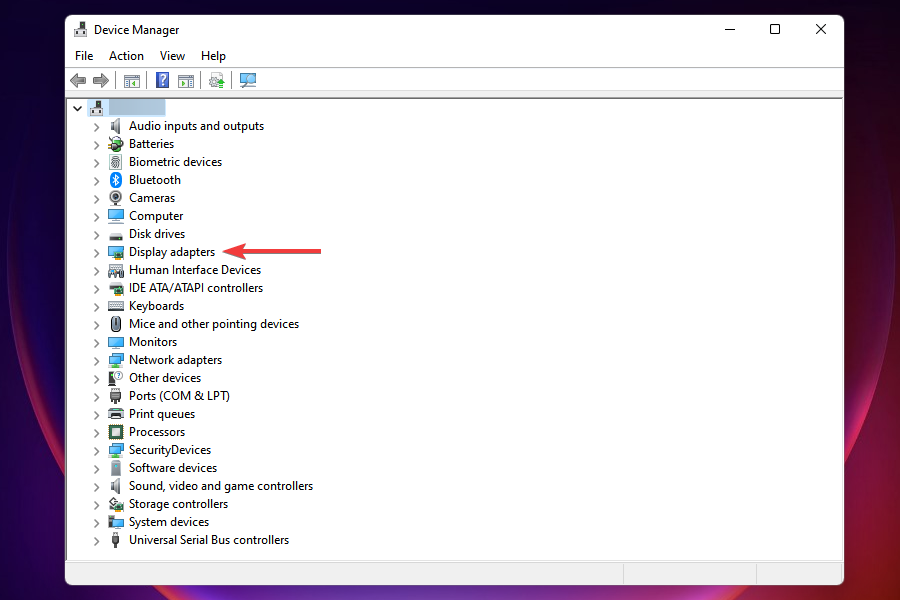
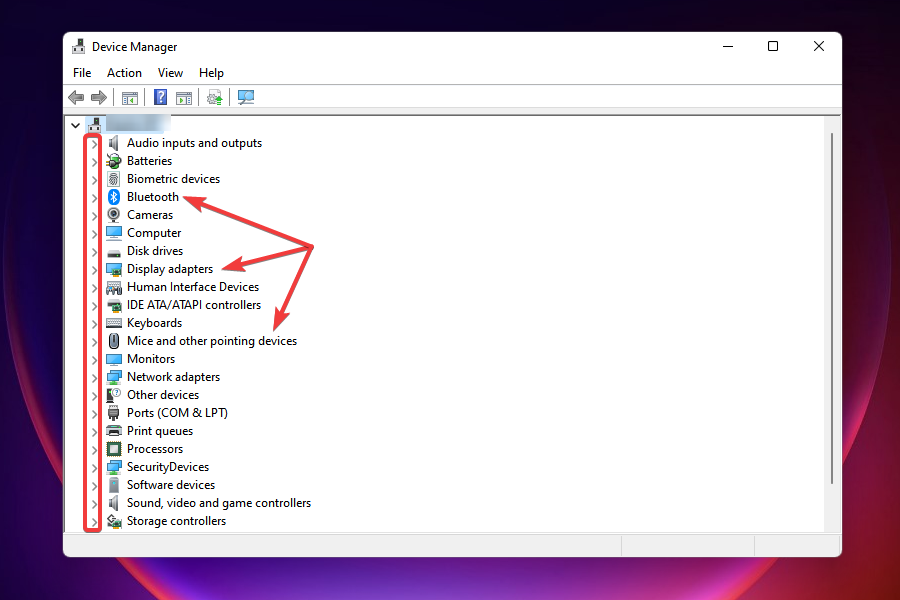
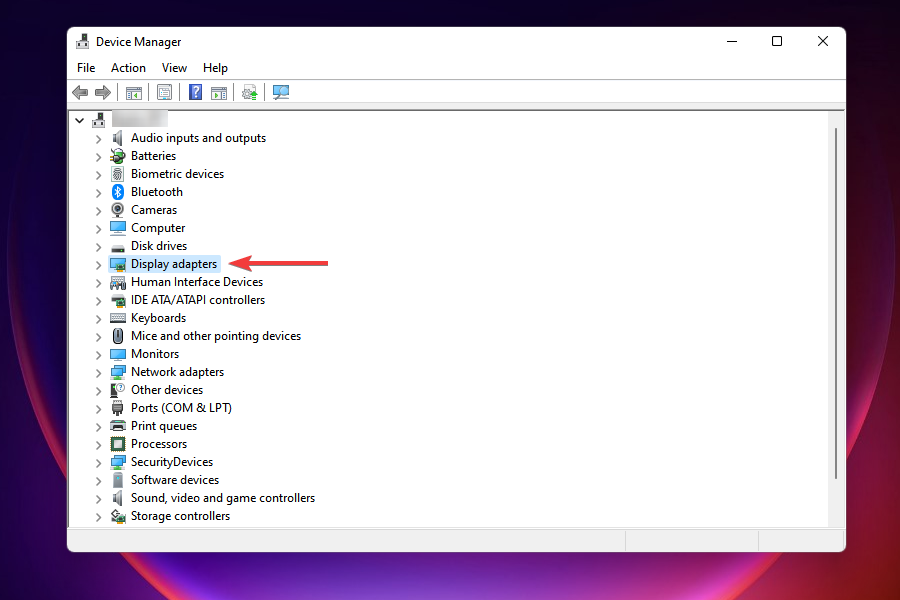
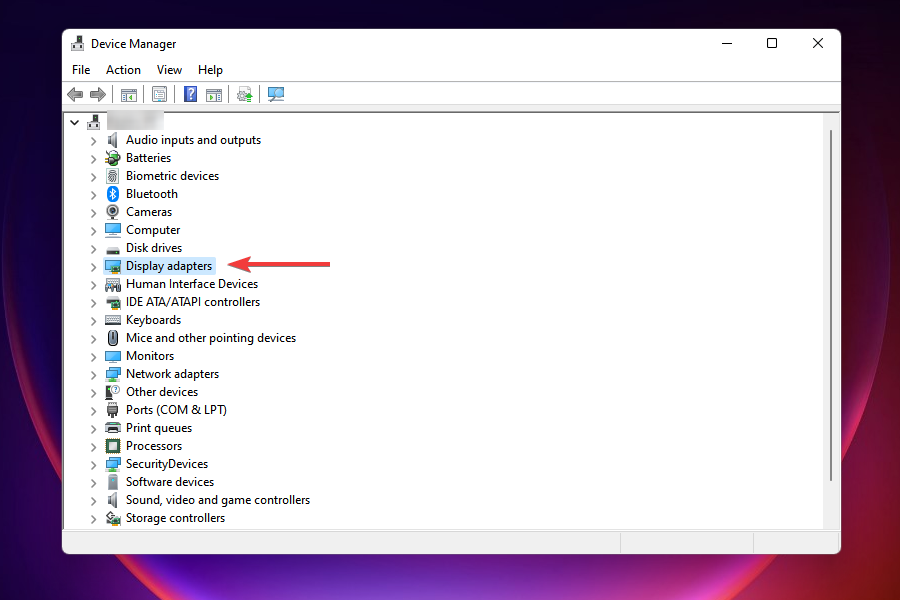
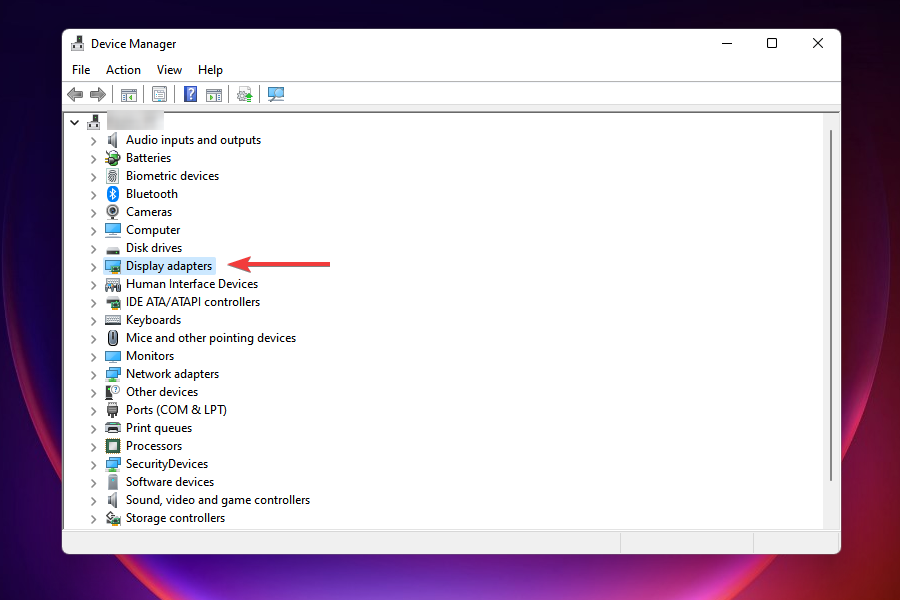
Locate and double-click on the Display adapters entry.
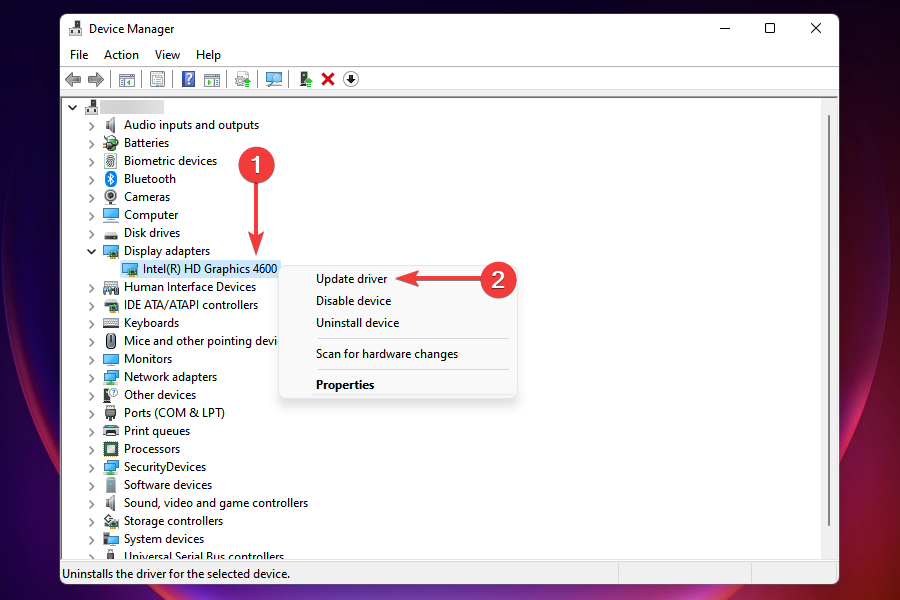
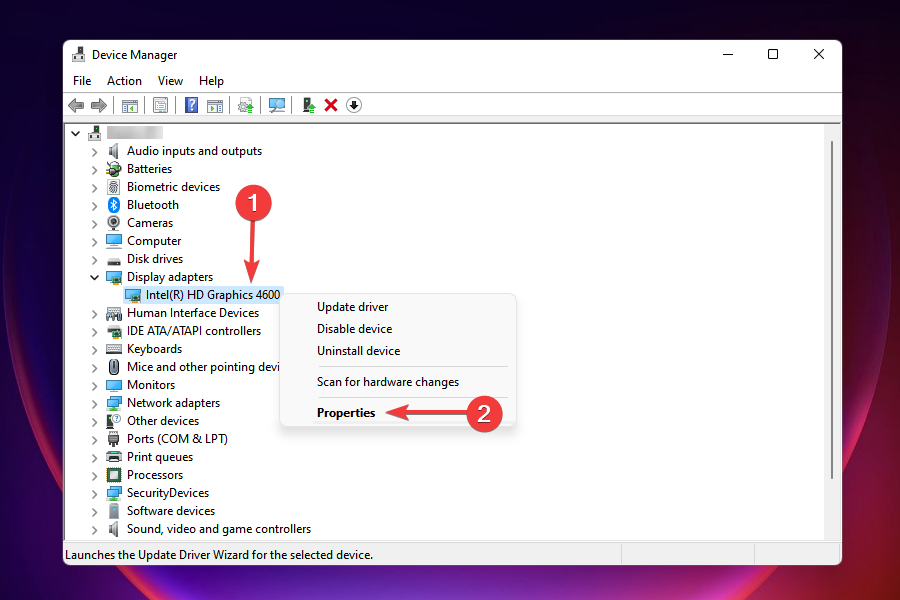
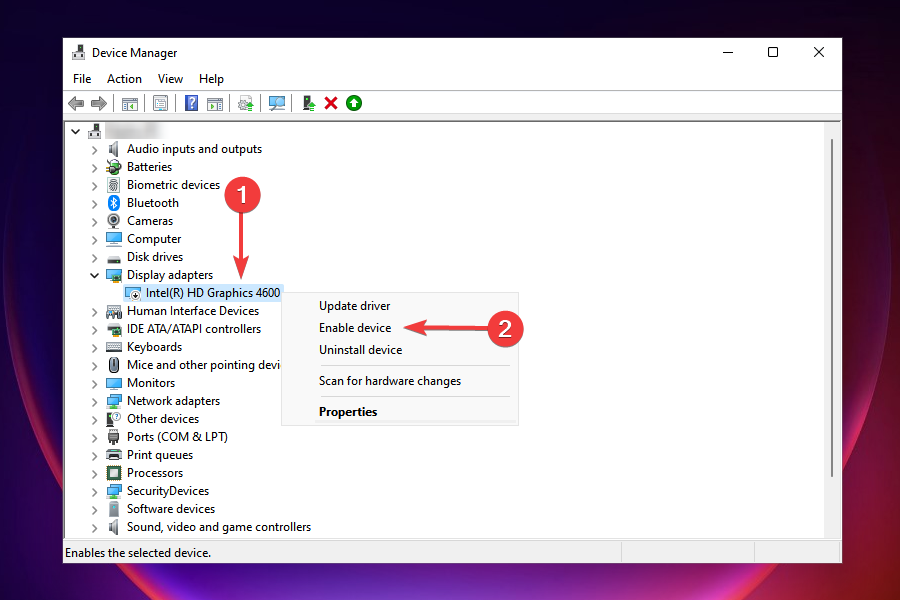
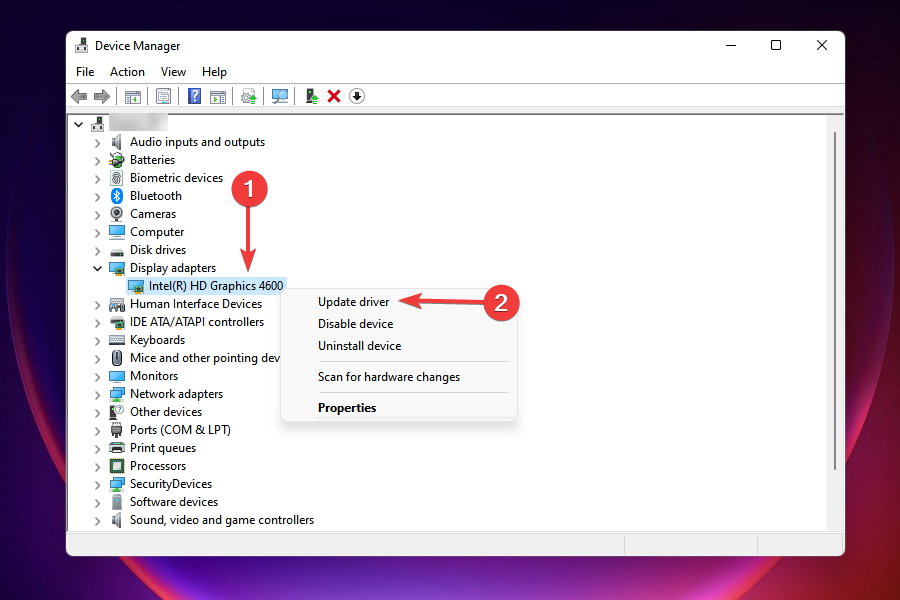
Right-click on the graphics adapter and select Update driver from the context menu.
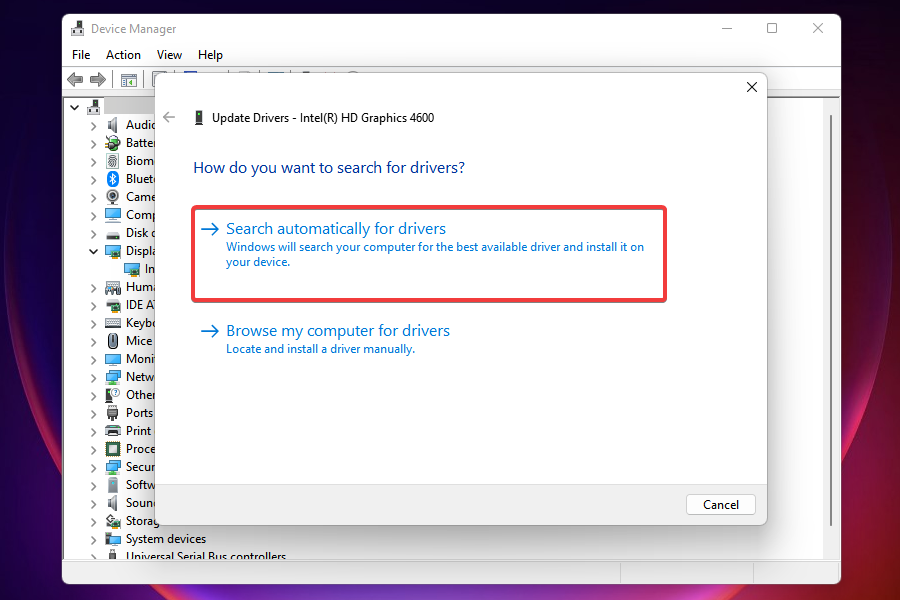
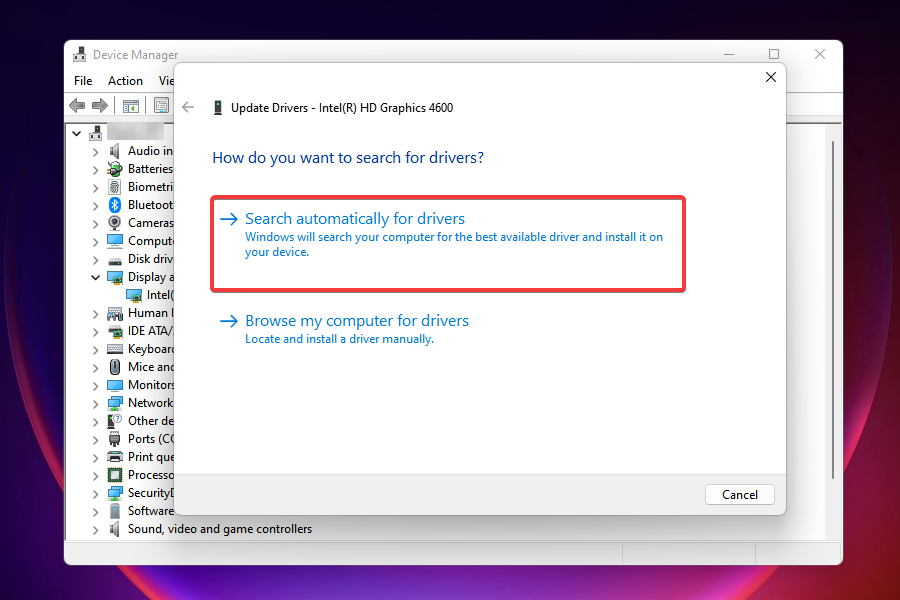
Select Search automatically for drivers in the Update Drivers window to let the system automatically scan for the best available drivers on the computer and install them.
If a newer graphics driver version is installed, check if the error in Age of Empires 4 is fixed. But, the Device Manager would rarely find an updated version on the computer, so if you cannot update the graphics driver with the method, head to the next one.
1.2 Via Windows Update
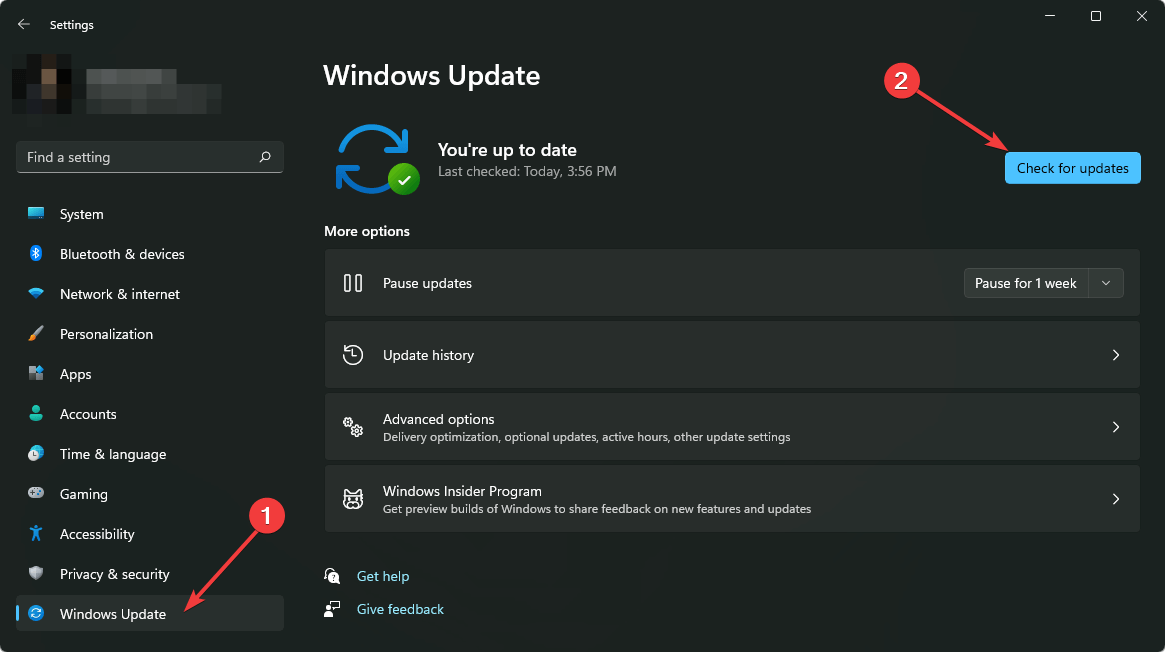
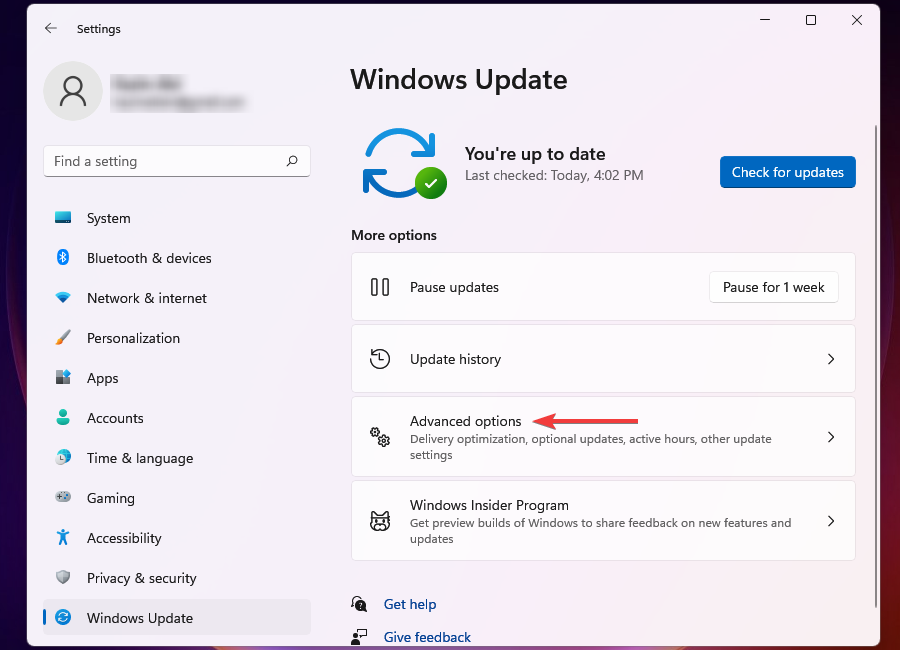
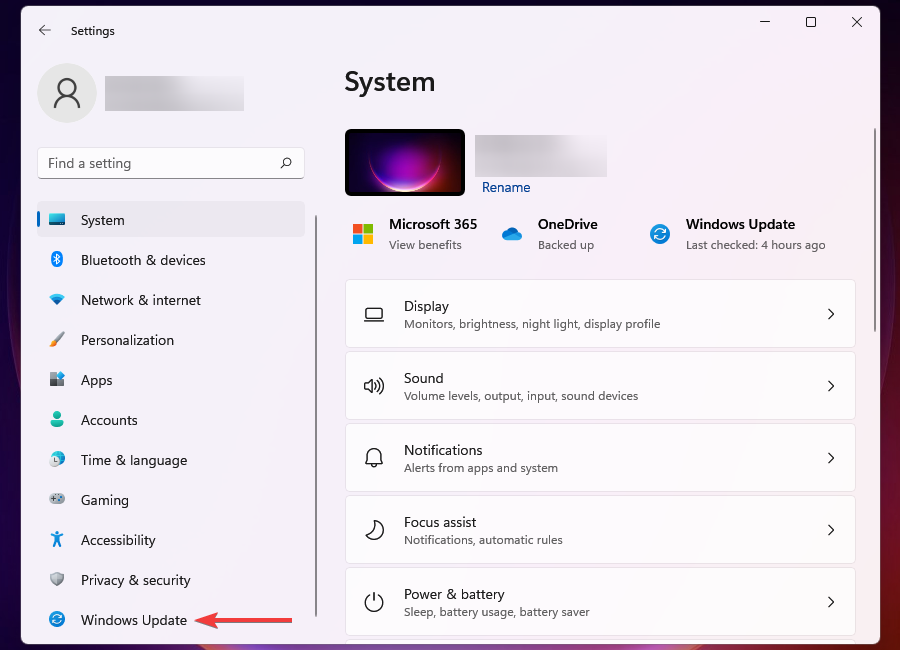
Press Windows + I to launch the Settings app.
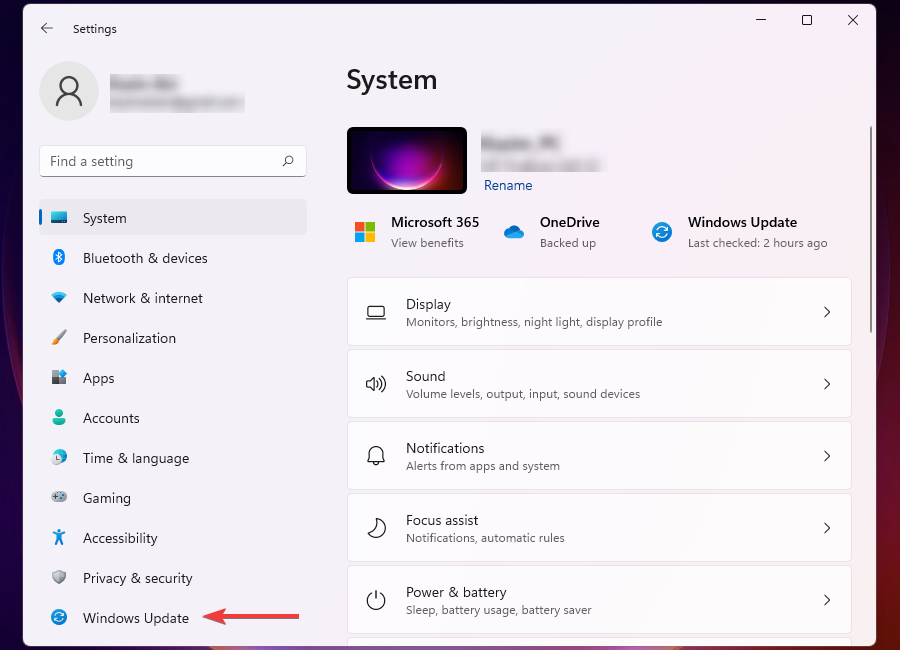
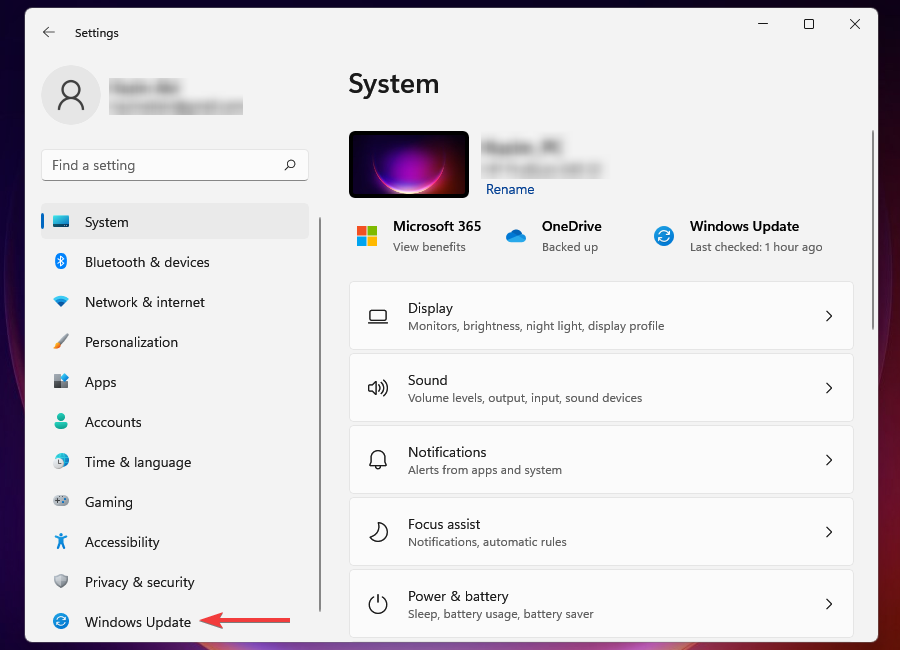
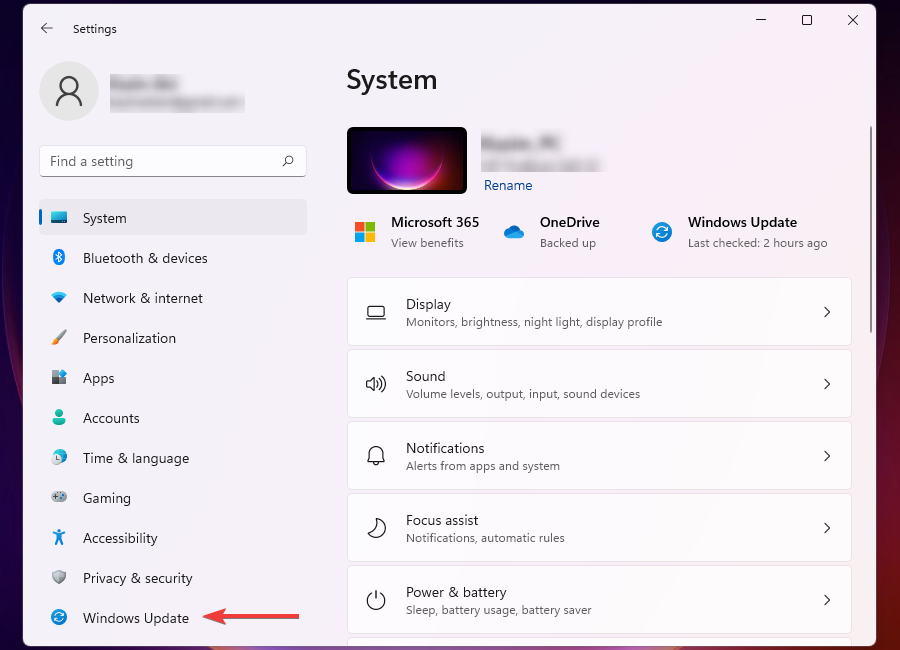
Select the Windows Update tab from the ones listed in the navigation pane on the left.
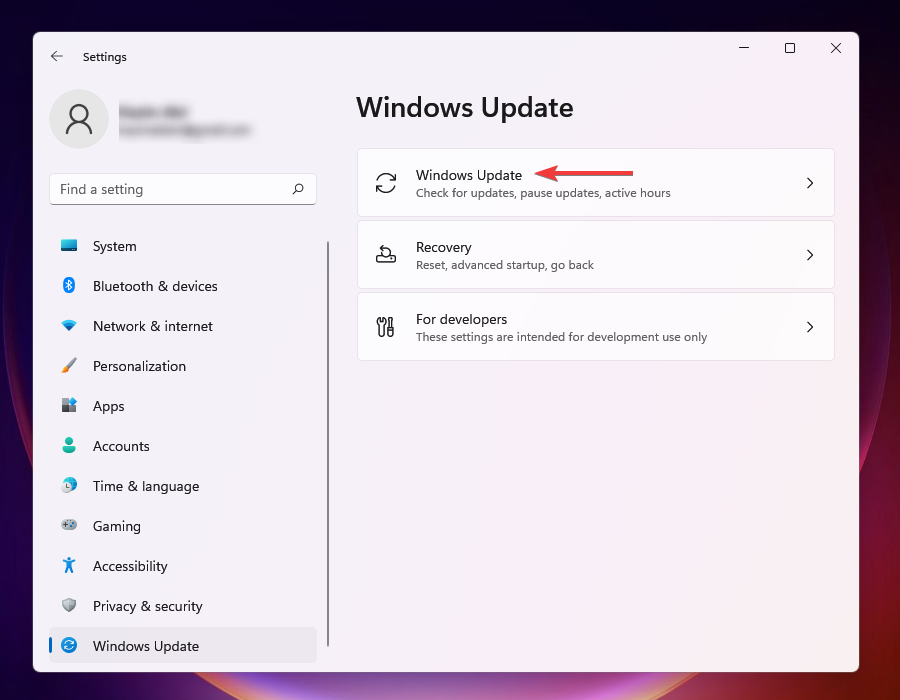
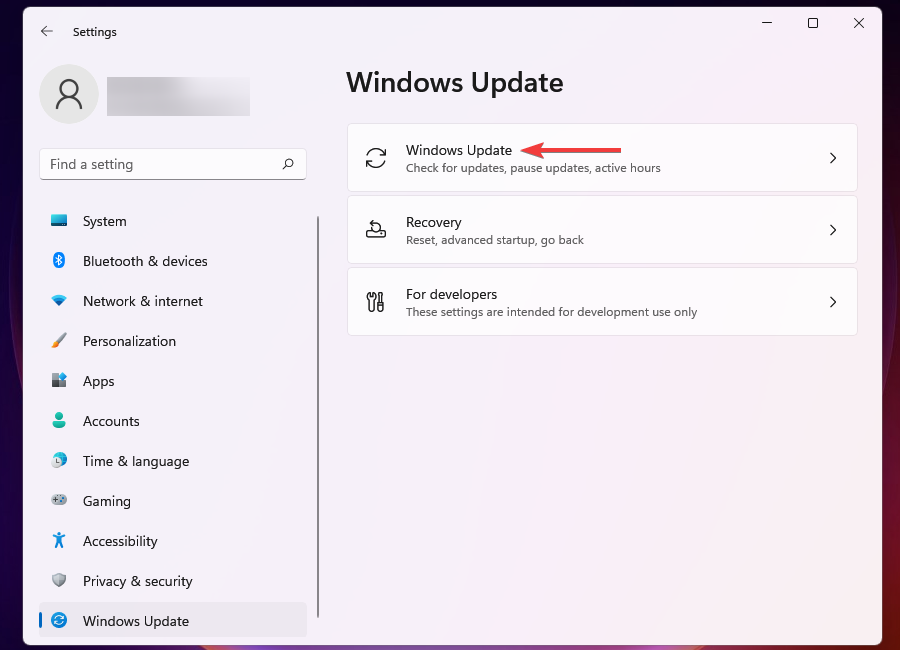
Again, click on Windows Update on the right.
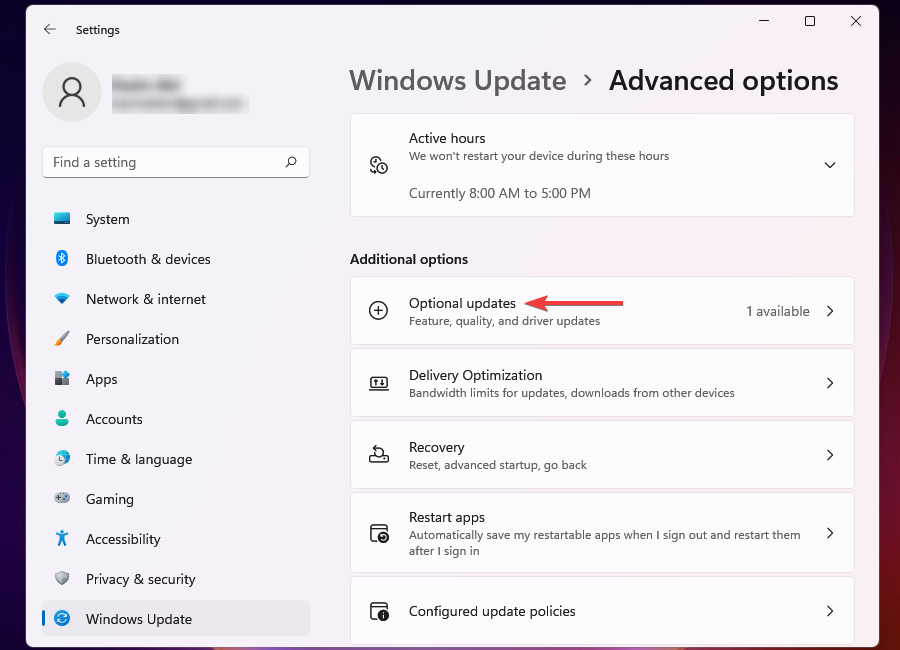
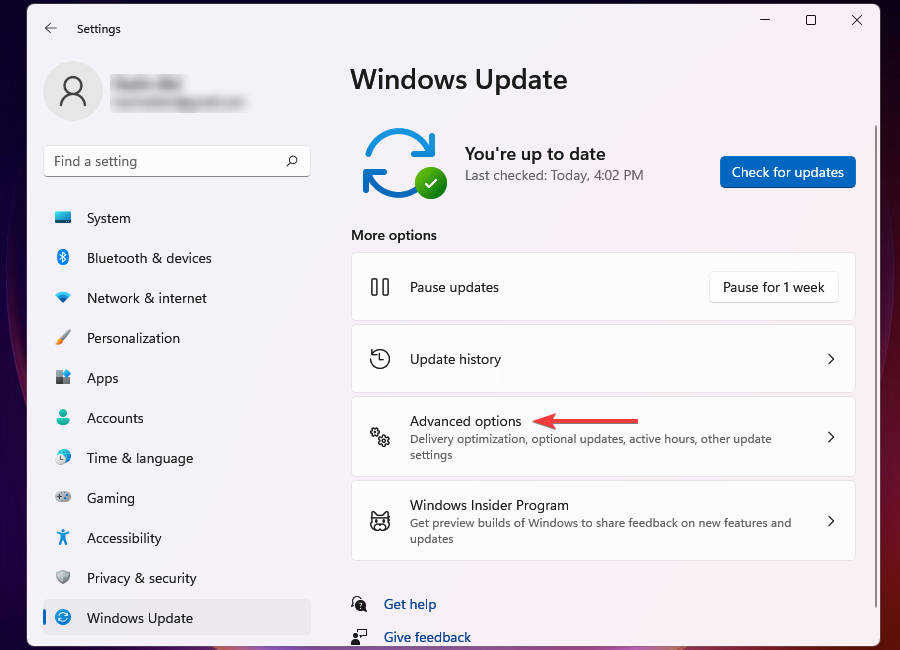
Select Advanced options.
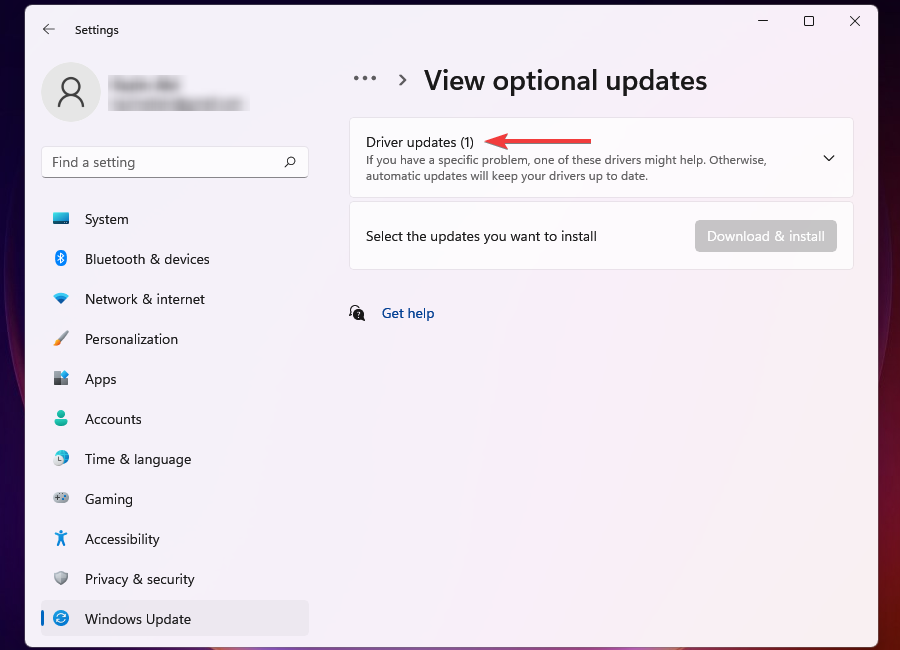
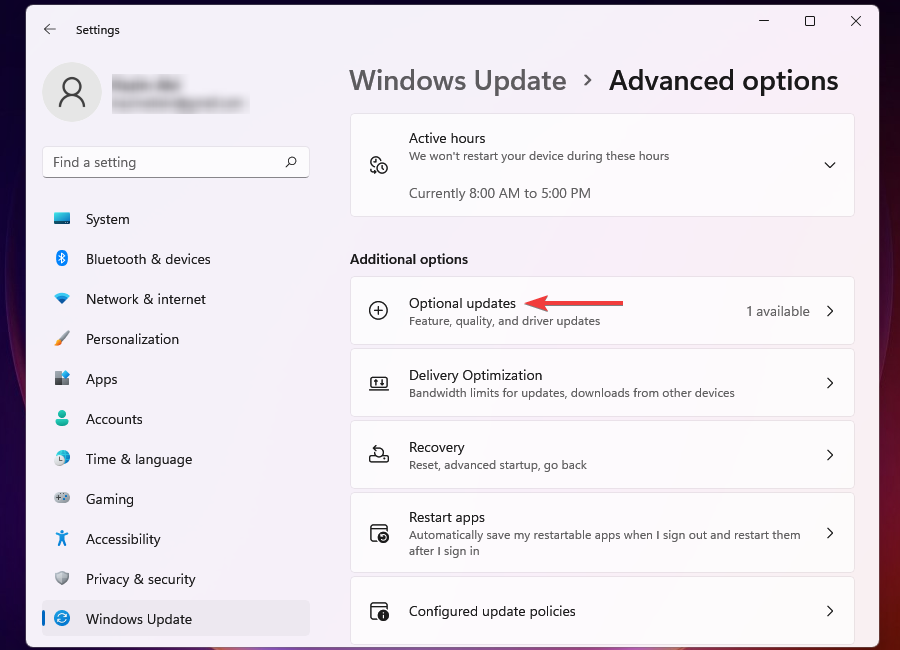
Click on Optional updates under Additional options. You will also find the number of updates available mentioned next to the option. If it says none (0), you can skip the following steps and head to the following method.
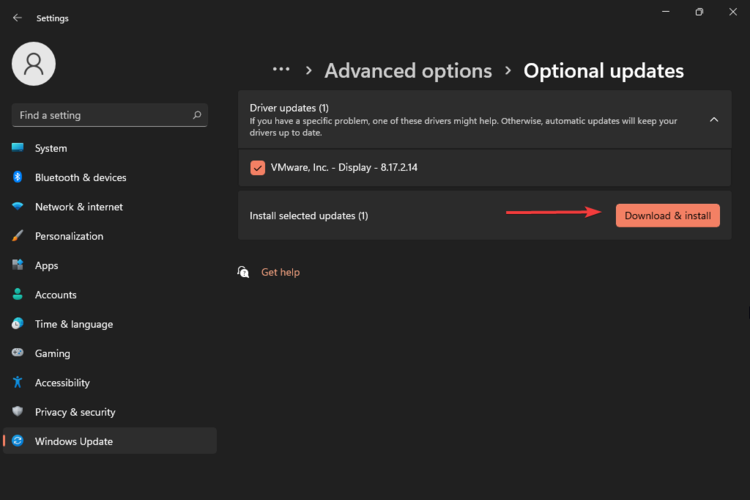
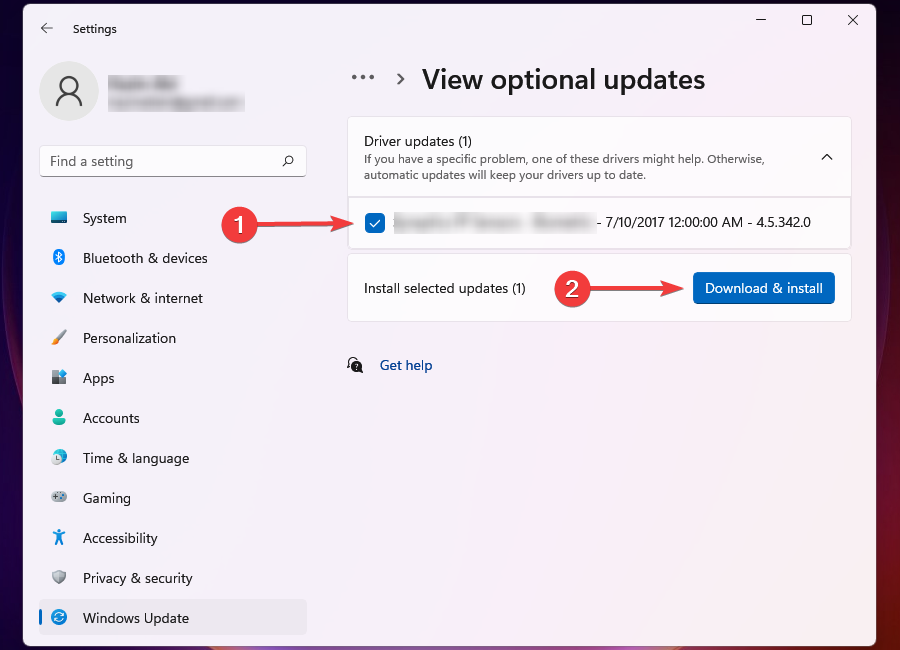
Click on Driver updates to view the ones that are available for Download.
Locate the update for the graphics driver, tick the checkbox for it, and click on Download & install.
If you could update the graphics driver, check if the running unsupported driver’s error in Age of Empires 4 is fixed.
Windows Update is one of the best ways to keep the installed drivers up-to-date. However, not all driver updates released by the manufacturers appear here. This is because Microsoft must first verify and certify these, which takes considerable time.
If you encounter an error, you can visit the manufacturer’s official website to check if an update is available.
1.3 Manually update from manufacturer’s website
NOTE
When looking up the manufacturer’s website for a driver update, you will first need to find out the currently installed version to identify if an updated version is available.
Launch the Device Manager as discussed earlier.
Double-click on Display adapters.
Right-click on the graphics adapter and select Properties from the context menu. Alternatively, you can double-click on it, and the result will be the same.
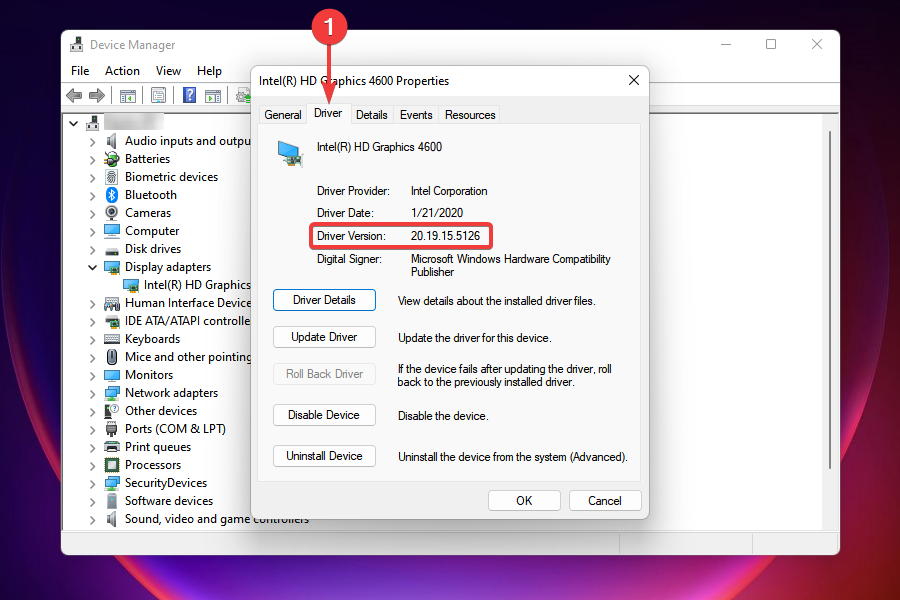
Navigate to the Drivers tab and note the Driver Version.
After you have the version of the currently installed driver, go to Google and search using Device Name and OS as the keywords, followed by Update Driver.
Now, locate and open the manufacturer’s official website from the search results.
Check if a newer version of the graphics driver is available for Download. You can identify an update based on the driver version you checked earlier.
If an update is available, download it. The file would most likely be in the .exe (executable) format.
Next, open the folder where the downloaded file is stored and double-click on it to launch the installer.
Click Yes if a UAC (User Account Control) prompt appears.
Follow the on-screen instructions to complete the installation process.
After the driver update is installed, restart the computer for the changes to effect.
Check if updating the driver fixed the running unsupported drivers error in Age of Empires 4.
If you cannot find an updated version on the manufacturer’s website, check if any are available with third-party providers. Many websites offer driver updates for Download, but not all are reliable and safe. Hence, you will have to do a thorough background check before proceeding.
To avoid all the trouble, you can also rely on third-party tools. We recommend using Outbyte Driver Updater, a reliable solution that scans for available driver updates and automatically installs them.
Also, given below are the links to the download pages for major manufacturers, from where you can directly download the update:
Some manufacturers also offer built-in tools that automatically identify the currently installed driver version and then list the available updates.
2. Update Windows
Press Windows + I to launch the Settings app.
Select Windows Update from the navigation pane on the left.
Click on Windows Update on the right.
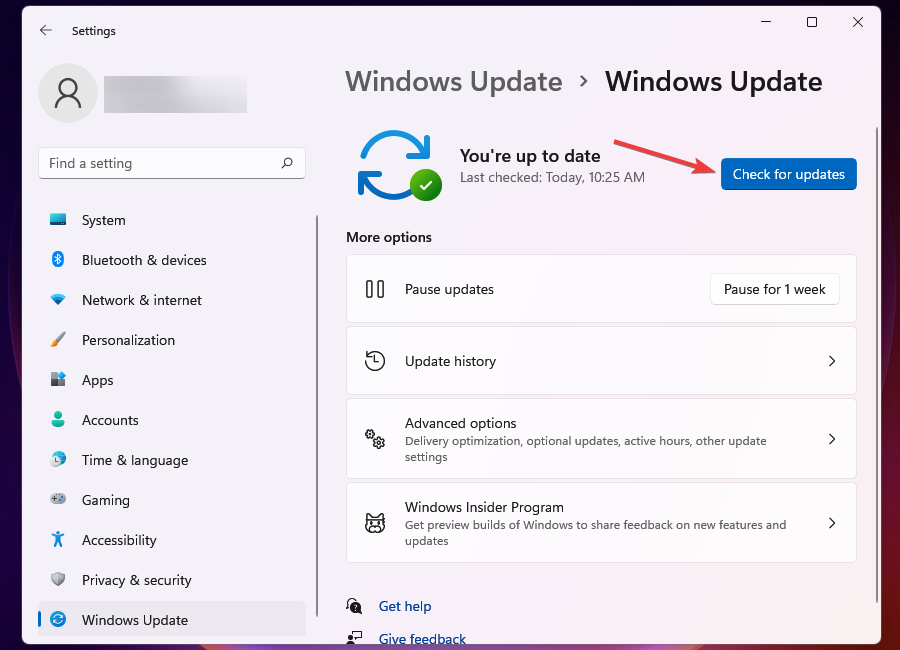
Click on Check for updates.
Windows will now scan for available updates and download and install them to your PC.
Restart the computer after installing the updates.
Using an older version of Windows is also likely to cause the running unsupported drivers error in Age of Empires 4. Hence, it’s recommended that you update the OS to fix this and other errors.
Depending on your PC, there could be various reasons why Age of Empire 4 won’t launch. However, after going through numerous forums, we can tell that these are the typical reasons why Age of Empire won’t launch on PC can be problematic.
Damaged game files
The device lacks the minimal system requirements
Possibility of conflicting software on your computer
Outdated graphics driver
Issues with overlay programs and antivirus software preventing the game from launching
Undesirable background activities
Sometimes, you may encounter the error due to problems with the installation itself. To fix that, you can reinstall the game, eliminating the error.
The above methods will resolve the You are running unsupported drivers error in Age of Empires 4. You are good to go by executing them in the sequence that they are listed.
Although it is uncommon, Xbox Game Pass Quest occasionally doesn’t work and leaves gamers stuck.
Xbox Game Pass Quests is a Microsoft Rewards branch that enables you to gain redeemable points.
It is possible to gain these points by completing different Xbox and Game Pass goals. The good news is that these points are beneficial.
You can utilize the points to purchase various gift cards, such as currency from Xbox and Microsoft, and entries for tournaments and donations from charities.
Follow the steps below and bookmark this page if you get stuck in this situation again.
Why is Xbox Game Pass Quest not working properly?
Sometimes, Xbox Game Pass Quests may have technical problems, as it is at times reported by some players attempting to claim their Microsoft Rewards points.
According to reports, distinctive public quests that haven’t been tracked accurately contain Play a Game and Log in to the Game Pass Mobile App quests.
As these are daily quests, users miss out on valuable rewards despite completing the challenges.
Unfortunately, any logical information on the reason for this problem has not been shared. Although, it seems that the problem can be with the app’s cache or the unavailability of the Game Quest in your country.
What can I do if the Xbox Game Pass Quest is not working?
1. Clear the cache of the app
First, click the Xbox One button on your controller, then select Settings.
Navigate to Devices & connections and chooseBlu-rayon the right side.
Then, choose Persistent Storage.
Select Clear Persistent Storage.
Check to see if the problem has been resolved; if not, move on to the next step.
2. Turn the device off and on again
Press and hold the Xbox button on your Xbox controller until the Power Center menu appears.
Now, choose the Restart Console option.
If your Xbox appears to be frozen, rebooting it is the easiest way to resolve the problem.
However, if you’re a new Xbox player and you discover that the Xbox Game Pass is not available in your country, you may be living in one of Xbox’s unsupported countries.
After assuring that the app is not supported in your country, follow the instructions given in the next method.
Also, read below to find out what to do if the game pass is not available in your country.
3. Use VPN to bypass geo-blocking
Router method:
Download and install the NordVPNapp. Once you have it, connect to the server of your choice.
Check if your router is VPN compatible. Most modern routers support VPN connections, however, some may require manual configurations.
Log in to your router. Read the router’s manuals if you don’t know how.
In the Advanced menu, look for VPN Service.
Select Enable VPN and follow the manufacturer’s manual or website’s instructions.
After completing the process, simply connect your Xbox to your Wi-Fi network.
Several VPN services bypass geo-restrictions, but to ensure the security of your data, always go with the most trustworthy one available.
NordVPN is a well-known service that provides these features at a reasonable price. Other features include a strict no-logs policy, malware blocking, and more.
NordVPN
Gain access to all content safely and increase privacy by using an amazing VPN.
Connect to one of the NordVPN servers after downloading and installing the app on your Windows PC.
Use an ethernet wire to connect your console to your computer.
Click on the Start menu, type Control Panel and then click on it.
Select Large icons from the View by dropdown menu, and click on Network and Sharing Center.
Click on your VPN connection and then select Properties.
Go to Sharing tab and then enable Allow other network users to connect through this computer’s Internet connection.
Choose your Xbox’s Ethernet connection, then pressOK.
Following that, press the Xbox button on your Xbox controller.
Press the RB button three times and select Settings.
Choose the Network tab and then select Network Settings.
Select the Test network connection tile. Your console should connect to the internet.
To circumvent geoblocking on Xbox, you can use this solution, which involves installing a VPN on your PC and then sharing it with any connected devices.
Note that your Windows PC must keep running with an active VPN connection to use your VPN on Xbox.
Furthermore, some of these issues can occur due to the technical problems of Xbox servers.
You can confirm this by checking Xbox news or asking your Xbox gamer friends if they are experiencing the same issue.
Hopefully, no Xbox gamers will be left without the rewards, and there won’t be anymore more issues with Xbox Game Pass Quests in the future.
Windows Spotlight is a terrific lock screen tool that downloads and installs a new picture for Windows 11 PCs in seconds, but many reported that it’s not working.
Though this feature is usually flawless, the images in Windows Spotlight can sometimes become frozen. And fixing it is not as complicated as it appears.
However, before we delve into the actual solutions, let’s first understand what causes the error, which is important when troubleshooting.
Does Windows 11 have Windows Spotlight?
Yes, Windows Spotlight is a built-in feature in the recent iterations of the OS and is available on Windows 11. The feature automatically downloads and displays images of landscapes, historic locations, and similar kinds on the lock screen and comes with a desktop icon.
You can use it to brighten the lock screen while taking in the breathtaking sights of the world’s most beautiful and distinctive locations.
On top of that, you can mark whether you like a particular image or not. Then, depending on your preferences, Windows Spotlight will show you more or fewer images of that kind.
Why is Windows Spotlight not working in Windows 11?
The fact is that seeing the same picture every time the screen is locked might become monotonous after some time. In addition, depending on how severe the problem with Windows 11 Spotlight is, you may not be able to see any images on the locked screen.
Common reasons for experiencing troubles with Spotlight include a bad Internet connection, faulty image or system files, driver problems, or an outdated Windows update (amongst other things).
The photos displayed on the Windows 11 lock screen or login screen while using the Spotlight function are typically obtained from Bing daily. Therefore, your screen will remain frozen on that exact image without an active Internet connection.
Windows Spotlight and other critical processes must be activated to run in the background of the Windows 11 computer for it to function correctly. This includes Microsoft Store, Microsoft Edge, and the Settings apps.
If essential programs are not running, it is possible that Windows Spotlight images will not be working in Windows 11.
Microsoft’s servers must be able to access your location from the regional language settings to provide you with tailored background images.
If the regional language settings on your Windows 11 computer are incorrect, Spotlight cannot download the proper background photographs for the lock screen.
How do I fix Windows Spotlight if it’s not working on Windows 11?
1. Check your network connection
The photos displayed on the Windows 11 lock screen or login screen while using the Spotlight function are typically obtained from Bing daily.
Your screen will remain frozen on that exact image without an active Internet connection.
Check to see if Spotlight has begun altering the photos on the lock screen once you are sure the Internet connection is fast and steady.
If the problem continues after this, you should attempt a different solution.
2. Make sure the metered connection is off
Click on the Search button, type in Settings, and click on the most relevant result.
Now, go to Network & internet, then click on WiFi.
Now, click on your Network properties.
Next, turn off the Metered connection.
3. Make sure the date, time, time zone, and region are correct
If your date or time isn’t set correctly, right-click on them in the bottom-right corner, then select Adjust date and time.
Make sure the Set the time automatically option is turned on, then select your correct Time zone from the dropdown menu.
Next, click on Language & region.
Under the Regionsection, check whether the Country or region is set to your current location.
4. Disable and enable Spotlight
Click on the Search button, type in Settings, and click on the most relevant result.
Select Personalisation from the left panel, and then click on the Lock screen on the right.
Next, choose Picture from the Personalize your lock screenmenu.
Once done, again click on the menu, and this time, select Windows spotlight.
If Windows Spotlight is not working and there’s a blue screen instead, re-enabling the feature should do the trick. This also helps if Windows Spotlight is in another language.
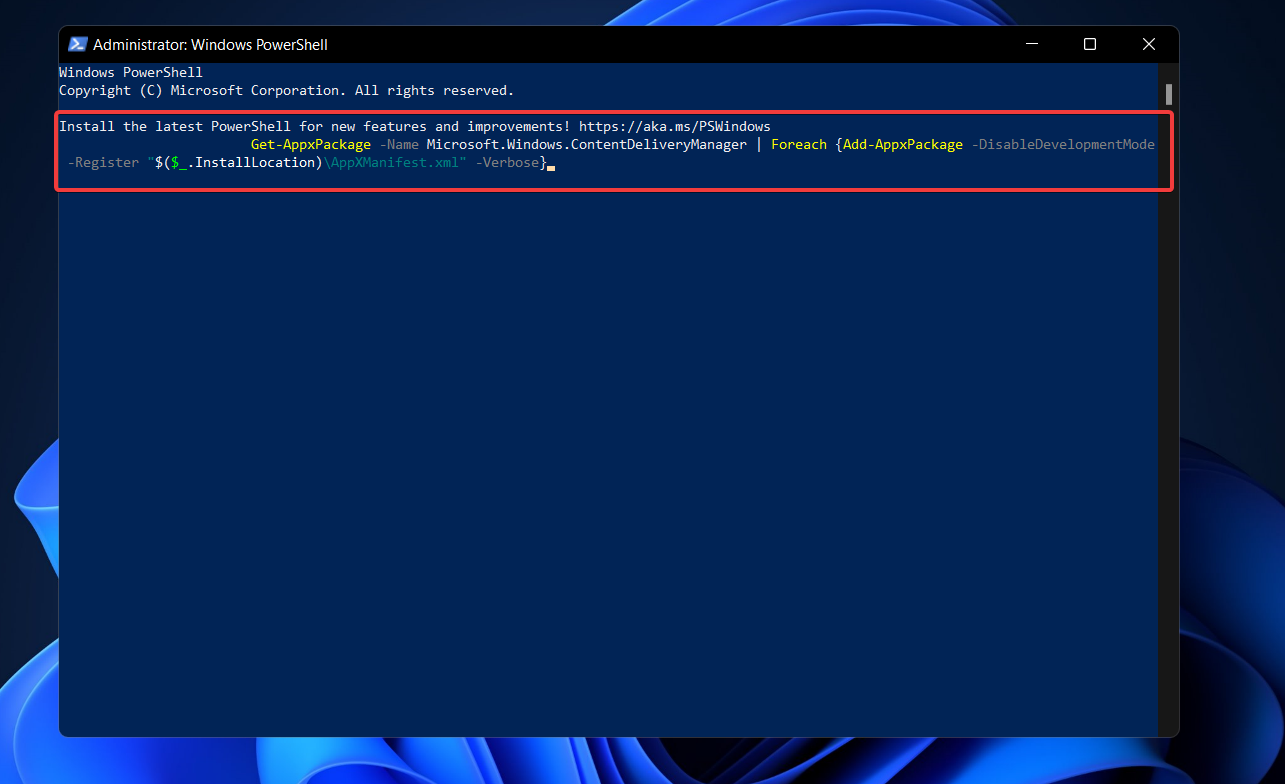
5. Re-register Spotlight using PowerShell
Click the Search icon, type powershell, right-click on the relevant result, and select Run as administrator.
Click Yes in the UAC prompt that appears.
Type or paste in the following command, then press Enter: Get-AppxPackage -Name Microsoft.Windows.ContentDeliveryManager | Foreach {Add-AppxPackage -DisableDevelopmentMode -Register "$($_.InstallLocation)\AppXManifest.xml" -Verbose}
Once you have finished the steps outlined above, you must restart your computer to complete the process. And it should fix things if Windows 11 lock screen wallpaper is not changing. This will also help when the lock screen background reverts to blue.
How do I turn off Windows Spotlight?
If you want to restrict the use of Windows Spotlight, you can do so in four different ways:
Manually turn off Windows Spotlight locally
Turn the feature off using Registry
Disable Windows Spotlight features using Group Policy
Deactivate it using Intune
The first two approaches outlined above are labor-intensive and need you to work on a local computer at your leisure. Therefore, it is not recommended to have many PCs in your setup.
To disable Windows Spotlight on business-managed devices, you must use either group policy or Intune (MEM) to accomplish your goal.
Windows Spotlight is activated by default on Windows 11 operating system devices. On the other hand, it may be turned off manually on each computer. However, the manual way may be inconvenient if you have many machines.
Using the Mobile Device Management (MDM) policy, enterprise administrators can block users from accessing the Windows Spotlight background when using their handsets.
How do I reset Windows Spotlight on Windows 11?
Press Windows + I to open Settings, select Personalization from the navigation pane, and click on the Lock screen on the right.
Now, choose Picture from the Personalize your lock screen menu.
Next, press Windows + R to open Run, paste the following path in the text field, and click OK:%LocalAppData%\Packages\Microsoft.Windows.ContentDeliveryManager_cw5n1h2txyewy\Settings
Rename the roaming.lock file as roaming.dat.back, and the settings.dat file as settings.dat.back.
Once done, restart the computer.
Now, head back to the Lock screen setting and select Windows spotlight from the Personalize your lock screen menu.
This will reset the feature and fix things if you see a Windows 11 Spotlight black screen.
Our readers reported issues with the lock screen slideshow as well. If you think you might be experiencing the same problem, find out how to fix Windows 11’s lock screen slideshow.
Although we’ve all had time to familiarize ourselves with Microsoft’s latest operating system, users discover new features daily. The Windows 11 3D parallax effects are one feature, so check them out.
That should be the end of it. As you can see, there are some straightforward and more complex solutions. Try them in the above sequence to find the best for you.
Leave a comment below to tell us about your experience, including which strategy you applied and which Windows 11 feature you found the most useful.
The Mineral Camo Xbox Wireless Controller is based on the latest generation of Xbox video game controllers with a dedicated Share button and support for Xbox One and Xbox Series X console families, Windows PCs, and smartphones and tablets.
Xbox Wireless Controller Mineral Camo Special Edition. Image: Microsoft
“Experience the Xbox Wireless Controller Mineral Camo Special Edition,” the official product description reads. “Featuring a bold mineral blue, bright purple, aqua, and dark purple camouflage pattern. Quickly pair with, play on, and switch between devices including console, PC, and mobile.”
Many gamers complained that ALT+TAB became very slow on their computers after installing the Windows 10 April Update.
This is a very annoying problem as it can severely limit your gaming experience, and sometimes, it can take up to 10-15 seconds to get back to the game.
Thankfully, in this guide, we will share a bunch of solutions to help you resolve the problem at your end.
Why are ALT and TAB so slow?
This issue is related to a Windows 10 update, apparently fixed with a new update.
Some users have noted that this issue is related to the News and Interests feed in Windows 10, which, when disabled, fixes the ALT and TAB are slow issues.
There are a few other reasons that could trigger this problem.
Your GPU drivers are outdated.
You haven’t installed the latest Windows update that carries the bug fix.
Your keyboard driver isn’t updated.
The programs you are trying to switch are blocking or are not supported.
How can I fix slow ALT+TAB in Windows 10?
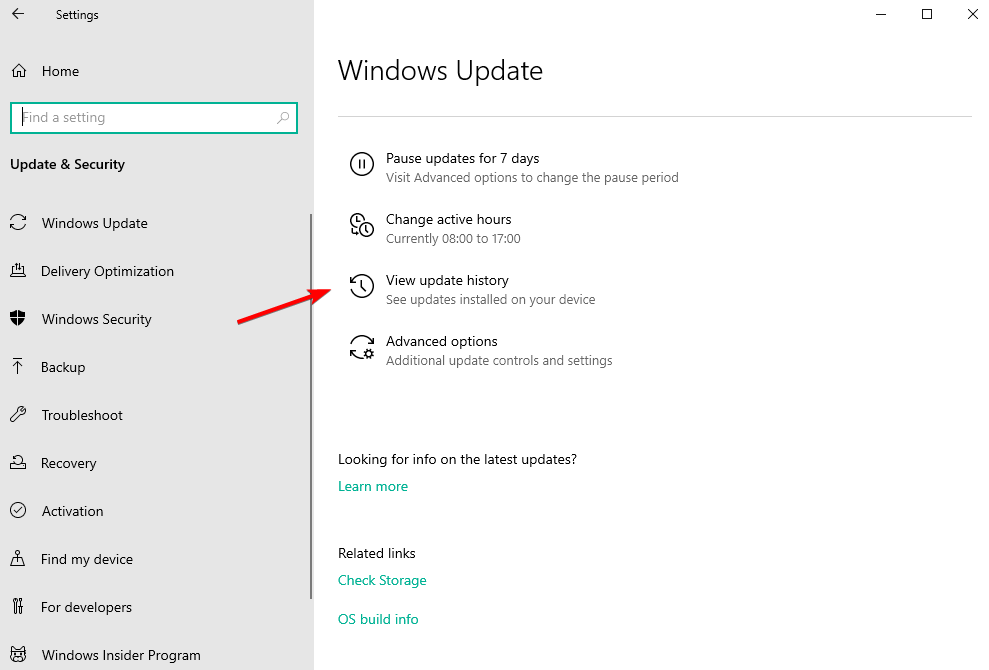
1. Uninstall the latest update
Open the Settings menu.
Select Windows Update from the left menu.
Click on View update history.
Click Uninstall Updates.
Locate the update in question and uninstall it.
If the problem persists after you have recently updated your PC, then it is advised that you should uninstall the update, as it could contain a bug that is causing the problem.
Several users have fixed the ALT + TAB buttons working slowly on Windows 10 by disabling the News and interests feed on the Taskbar. You can do that by following the above steps and checking if this resolves the problem or not.
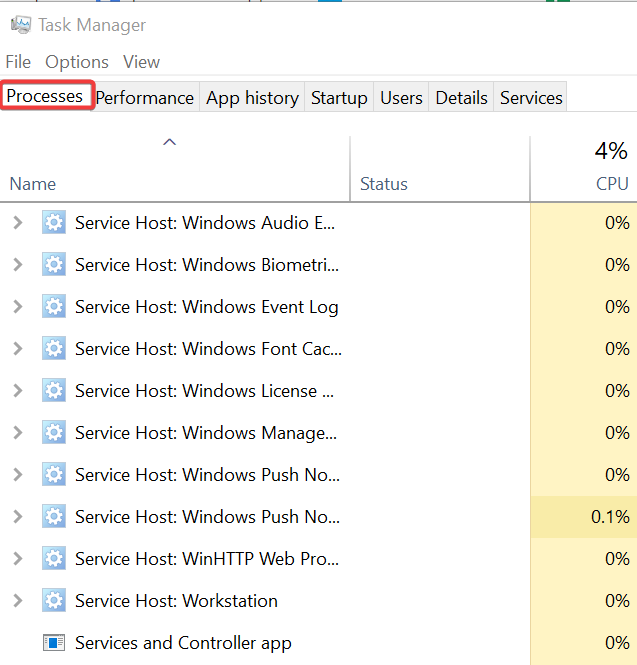
3. End Lenovo.Modern.ImController.PluginHost.exe process (Lenovo specific)
Right-click on the Start menu.
Select Task Manager.
Switch to the Processes tab.
Locate Lenovo.Modern.ImController.PluginHost.exe.
Select it and hit the End task button.
How do I fix the ALT + TAB delay on Windows 11?
Here are a few quick solutions that have helped several Windows 11 users fix the ALT+TAB delay issue.
Close or quit the Discord app.
Disable Hardware-accelerated GPU scheduling under Display settings.
Run SFC Scan and DISM command to fix corrupt or missing system files.
Check for the latest Windows update and install it.
Reset Windows 11.
Is there another way to Alt-Tab?
Two alternatives to ALT+TAB buttons let you switch between opened windows.
You can pin one program on your Taskbar and press Win + 1 or 2, etc., to open the program.
Also, you can press Win + TAB to switch between programs.
That is it from us in this guide. Let us know in the comments below which one of the above solutions helped you resolve the ALT+TAB working slowly in Windows 10 issue.
Grounded and Moonscars both launched today on Windows PC and Microsoft’s Xbox One and Xbox Series X console families.
Each video game is also now available to play for free for Xbox Game Pass subscribers on console and PC. Xbox Cloud Gaming support has also been enabled for both which means that those with a fast enough internet connection can also play Moonscars and Grounded on their smartphones and tablets if they wanted to.
Grounded is a fairly big launch for Microsoft though the excitement around its official debut is softened somewhat by the fact that the game has been playable via early access for well over a year now. Basically, most gamers who were looking forward to Grounded likely would have already started playing it by now.
Here’s the official game description for Grounded:
The world is a vast, beautiful, and dangerous place – especially when you have been shrunken to the size of an ant. Explore, build, and survive together in this cooperative survival-adventure. Can you thrive alongside the hordes of giant insects, fighting to survive the perils of the backyard?
Uncover the mysteries while playing through the story! How did you wind up so small? Who did this to you? How do you go home? These are all answers you will uncover as you play through the story.
Moonscars is an action-adventure platformer featuring traditional 2D level design. Here’s its official description:
Under grim moonlight, the fierce clayborne warrior Grey Irma battles, driven by a lonesome purpose: Find the Sculptor, and unravel the mystery of her existence. Push the limits of your combat skills, and master new abilities to progress through an unforgiving nonlinear 2D world. Face off against the relentless darkness that seeks to destroy you. In Moonscars, every death is a lesson learnt—and as you overcome each challenge, new truths will be revealed.
If you’re looking for the best VPN with no data limit, you’ve certainly come to the right place. There’s something about having unlimited data that rallies everyone, and the VPN industry makes no exception in this regard.
Luckily for us, regular consumers, most premium VPNs, such as PIA, don’t come with data caps in the first place. It makes sense, considering that premium VPNs are services that you have to pay for.
How ridiculous would it be to invest in a VPN only to discover that there’s a 50 GBs/month limit?
Well, considering that premium VPNs are uncapped as far as data usage is concerned, we’re going to dedicate this guide to free VPNs. More precisely, we’re going to help you choose the best VPN without a data limit.
Why do free VPNs have data caps?
Free VPNs are not exactly designed to be free forever. They’re free just enough so you can get a taste of their capabilities. In that regard, most VPNs impose various limits on how you can use their services.
For instance, you may be able to access only a small portion of their servers or use their whole suite of features for only a few days before the offer expires.
Some other VPNs have this necessary data cap, which resets every month. This scenario caters to the needs of regular VPN users who are not exactly huge data consumers.
Occasional users may not be willing to purchase a VPN subscription just so they can perform a quick check on geo-restricted data, and data-capped VPNs are the perfect compromise.
Long story short, the reason why free VPNs have data caps is funding. These providers are ready to provide you with a free service indefinitely, but they also need some sort of revenue to keep said services up.
What is the best VPN with unlimited data?
ProtonVPN may just be the only VPN that comes with a free version and doesn’t have a data cap. Yes, you heard that right, you can install ProtonVPN on your device, and enjoy it for as long as you want.
Furthermore, there are no advertisements, either, in case you were wondering. But we’ll get to that in a few.
However, note that the free version of ProtonVPN has the following limitations:
No torrenting/P2P supported
Limited to a single VPN connection (one device per account)
There is no Secure Core VPN (multiple-server traffic routing for better security)
You can connect to servers in only 3 countries
Doesn’t support TOR over VPN
Speed is throttled (medium speed, according to the official website)
You can’t access geo-restricted content
The upside is that even the free version of this service enforces a strict no logs/no ads policy. In our opinion, the free version is more than enough to catch a glimpse of what ProtonVPN’s premium plans have to offer.
The bad news is that ProtonVPN seems to be the only trustworthy free VPN that doesn’t have a data cap. Other services might display aggressive ad placement behavior or have looser policies on data monitoring and logging.
Thus, we can’t recommend you try any other service that sells itself as completely free if you don’t know what you’re getting into.
If you’ve already tried ProtonVPN and want some alternatives, check out our list below. However, bear in mind that the free alternatives do have limited data plans.
Another reliable premium-level VPN service that places no limits on data and bandwidth is the well-established Express VPN.
This service fights against data caps placed by your ISP with the help of a well-implemented privacy policy.
Express VPN uses a 256-bit encrypted SSL-secured tunnel so your provider will not be able to track you down and place limits on your traffic even if you exceed a certain amount.
The service itself does not keep any logs about your traffic or identity either. Shared IP addresses prevent anyone from tracking or identifying you.
Plus, when it comes to downloading safety, you should also know that ExpressVPN hides your IP and location so you will be able to download large amounts of data at high speeds without restrictions or leak risks.
ExpressVPN has over 160 VPN locations in 94 countries, so users can access geo-restricted content and increase speed rates regardless of their actual location.
Even though some streaming services try to identify and block VPNs, ExpressVPN is able to hide the fact that you are connected through a virtual network in the first place.
Other key features of ExpressVPN include:
Compatible with all major platforms, including game consoles and smart TVs
24/hour live chat support
Split tunneling
Threat Manager to block trackers
ExpressVPN can be used on up to 5 devices with one subscription. It has three plans available, each with a 30-day money-back guarantee.
ExpressVPN
Secure your connection and surf without worrying about data or bandwidth limitations.
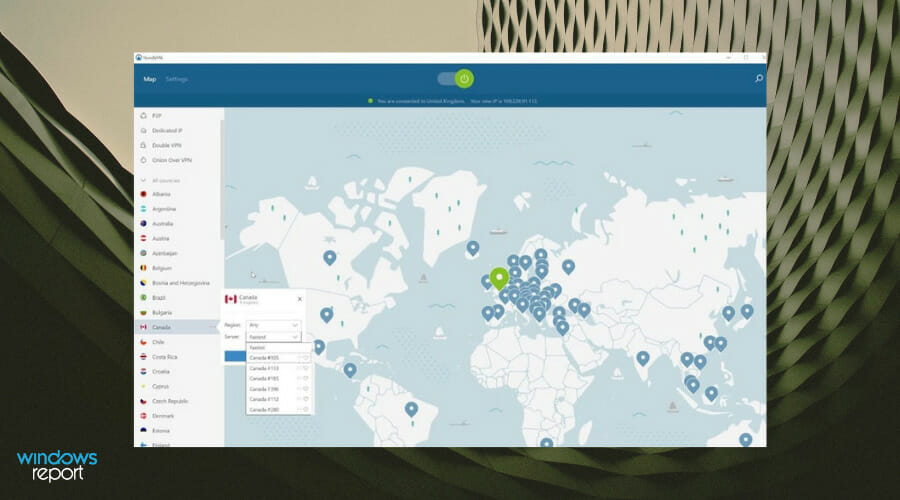
NordVPN is an outstanding VPN source that has multiple layers of protection to keep your device safeguarded and offers an unlimited amount of data from which you can benefit.
It uses an advanced threat protection feature to maintain your device safe from any cyber threats, such as viruses, trackers, and infected websites.
You can get a dedicated IP address that is allocated exclusively to you to prevent unjustified access to your sensitive systems.
Protect your data with the no-logs policy of NordVPN which doesn’t collect, track, or even share your personal information.
Furthermore, this program has a feature called obfuscated servers which are specialized VPN servers that hide the certainty that you’re using a VPN source and ultimately reroute your traffic.
Besides the above-mentioned features, you can also connect to any remote device directly over encrypted private tunnels, no matter where they are located.
Take a look at other key features of NordVPN:
Privacy on the go
Split tunneling support
Proactively data protection
IP masking
Uninterrupted streaming
NordVPN
Get unlimited data and protect your device from online threats with the NordVPN service.
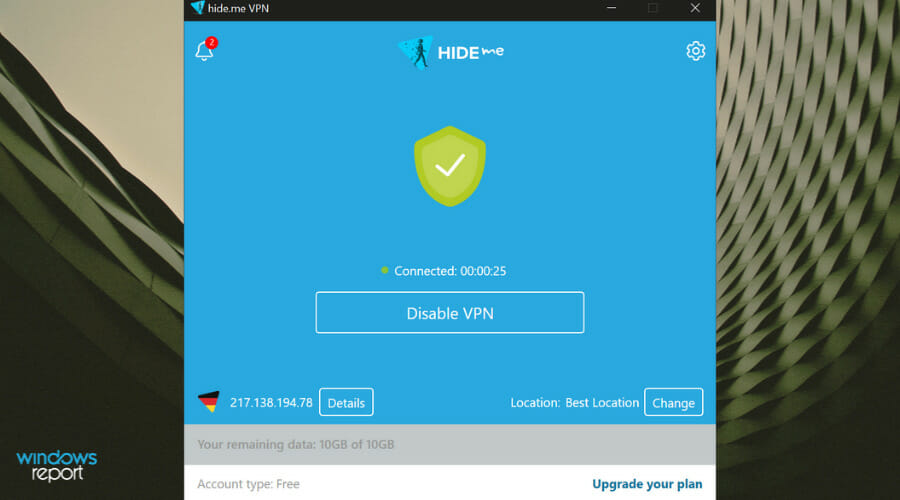
Hide.me VPN is an awesome VPN service from eVenture Ltd you can use for free if you’re not ready to commit to purchasing a premium VPN plan. The free plan is quite great, actually, compared to other similar services.
Like Windscribe, it has a 10 GBs/month data limit, so you’ll need monk-like discipline not to burn through the whole stack in one sitting. Furthermore, there’s absolutely no speed limit, even for free users.
However, the unlimited speed deal is often a double-edged sword, as it also means that you’ll reach your data cap even faster than if you had a limit in the first place.
Check out Hide.me VPN’s free version’s features:
Zero-logging VPN that doesn’t store any Internet traffic data
Grants you access to five server locations (US East, US West, Germany, Netherlands, Canada)
You can use Hide.me VPN on a single device on the same account
Works great with torrenting clients
Can’t unblock geo-restricted content such as Netflix, Hulu
There’s no speed limit, even for free users
No credit card information required during sign-up
On the premium plan, users benefit from unlimited data traffic and get access to over 2 000 servers in 75 locations.
The premium plan also lets you connect to multiple devices at the same time, you can secure your traffic on up to 10 platforms.
Hide.me premium also supports dynamic port forwarding, a fixed IP address, and streaming support.
Hide.me
In need of a free, efficient VPN? Why not give Hide.me VPN a try?
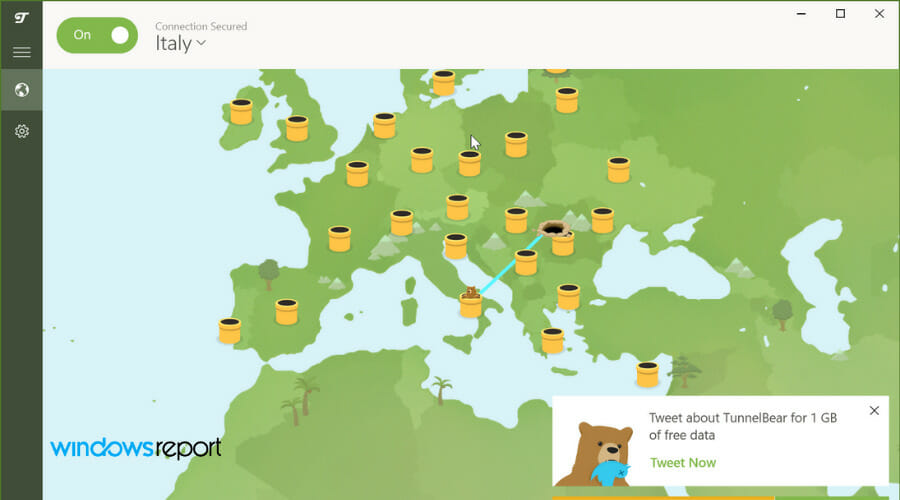
TunnelBear is a great VPN brought to you by McAfee, LLC, that has a free version on top of its paid subscription plans. Although the VPN service is actually nice (and witty, we might add), there’s a huge drawback.
There’s a 500 MBs/month data limit, which is an extremely low amount. Sure, it may be enough for checking your emails, for instance, but you’ll definitely need more than just 500 MBs/month if you plan on using it on a daily basis.
The good news is that you can reach a 1.5 GB/month data cap if you Tweet about TunnelBear.
Check out TunnelBear’s free version’s features here:
Connect up to five devices simultaneously on the same account
Access up to 20 server locations
No speed cap, but that also means you’ll reach your data cap faster
There’s no credit card information required during sign-up
Can unblock various geo-restricted services (BBC iPlayer and Hulu)
Can’t unblock US Netflix
Doesn’t work with torrents/P2P
As mentioned, the premium plan offers unlimited browsing data. The app uses the GhostBear feature that will mask the fact that you use a VPN.
This prevents your ISP from tracking your traffic data and placing any restrictions on your bandwidth.
Another benefit of the premium version is that it lets you secure up to 5 devices. You can connect both mobile and desktop and access servers from 49 different countries.
Tunnel Bear
Want a free VPN that won’t log your data? Try TunnelBear for a change
Surfshark – Best to use for the extensive server network
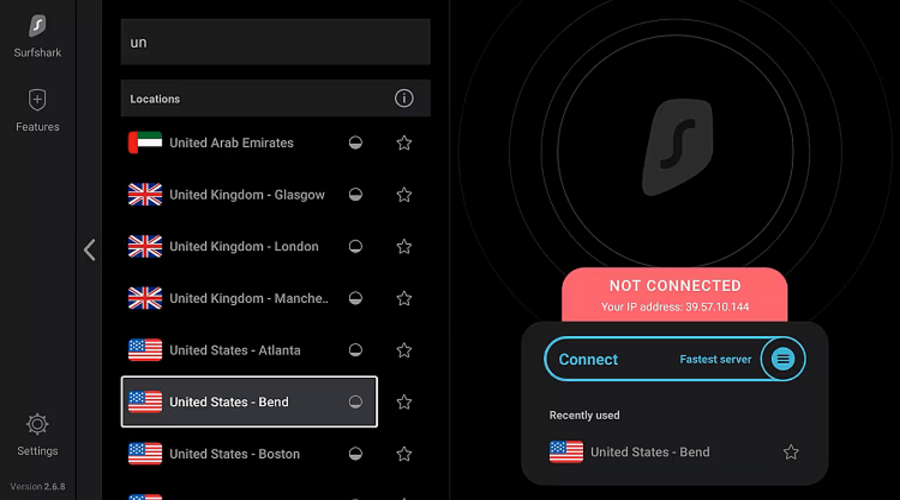
Surfshark is another great option when it comes to VPNs with unlimited data and bandwidth. It is, however, a paid service, although on the cheaper side.
This VPN provider allows users to connect an unlimited number of devices with one subscription plan. Due to the fact that they place no speed or bandwidth limitations, the number of devices you connect will not affect your speed.
It is however important to note that, depending on your location and the server you want to access, you may experience slower speeds than you would without a VPN.
But when it comes to latency issues caused by ISP limitations, Surfshark is equipped to hide your activity and fight against them.
The Camouflage Mode feature masks your traffic and ensures that your ISP won’t be able to tell that you use a VPN in the first place.
When it comes to privacy and security, Surfshark combines a set of features to ensure your data stays private. It uses private DNS on each server and protects your traffic with military-grade encryption.
You can also change your IP address and protect your identity when you access game platforms, for example.
Surfshark is fairly easy to use and set up and it is compatible with all major device types. You can also install it directly on your router.
Other key features of Surfshark include:
Kill switch to protect data when the connection drops
Strict no-logs policy
Adblocker and anti-malware
Split tunneling
Surfshark also blocks trackers when you surf, so no third parties will be able to access your data. You can try it out for free for 7 days.
Surfshark
Connect to Surfshark and surf the web securely, with no limitations or restrictions.
Windscribe is an excellent VPN service from Windscribe Limited that works on several operating systems, and you can try it for free.
There’s no credit card information required during the signup process, so you don’t need to worry about that.
However, like the free version of ProtonVPN, Windscribe has some limitations of its own. Unfortunately, there’s a data limit you can’t get over if you stick with the free plan.
On the bright side, the limit is quite high, compared to other free VPNs. Namely:
2 GBs/month if you don’t want to register and verify via email
10 GBs/month if you register and verify your Windscribe account via email
15 GBs/month if you register via email and tweet about Windscribe
The free version of Windscribe comes with a basic set of features. It is not as reliable as the premium version, but it places no limits on speed.
Windscribe works great with torrents and P2P ensuring secure and fast downloads.
It is generally able to surpass geo-restrictions on streaming services such as Netflix and Hulu. Sometimes they detect the VPN and block it, but if you connect to a different server, you may unblock the restriction.
With the free version you can use up 11 server locations and it does not require any credentials such as credit card information.
The premium version comes with truly unlimited data and it lets you access servers in over 60 countries. It is easy to use and has plenty of security features that help you block ads, trackers, and malware.
Windscribe
Looking for a trustworthy free VPN? Windscribe’s got your back.
To wrap it up, if you’re looking for a free VPN service that has no data limit, your safest bet would be ProtonVPN. We had to mention free since most premium VPNs already have unlimited data plans.
However, if you’re not exactly satisfied with the fact that ProtonVPN imposes a limit on speed and only provides 3 servers you can connect to, there are other free VPN alternatives with different limitations you could try out.
Being an online game that requires a connection to the hoster Microsoft Flight Simulator leverages control simulation to offer different angles of balance to intrigue the player.
The game is a veteran at this point and continues to release intriguing versions and expansion packs, such as the Top Gun: Maverick release from this year.
There’s more, but it’s quite ugly. Microsoft Flight Simulator high ping can change the whole story, and quite negatively. Online games are prone to connection issues and this video game doesn’t have it differently.
If you are experiencing lags and glitches in connection to the server, there are luckily several things you can do.
Why do I get a high ping in Microsoft Flight Simulator?
You can experience high ping in this video because of various reasons. There are preliminary causes and in-depth technical ones. The most common ones are below:
➡️Internet Connection Issue: from ISP throttling to insufficient bandwidth, having a bad connection leads to high ping and latency problems.
➡️ Outdated Game Version: if you run an older version of the game, it’s possible that it’s not able to perform as it should, so make sure you check and update it if necessary.
➡️ Firewall or security software blocking the game is not uncommon, many games and apps are flagged by security software which prevents them from functioning properly.
➡️ Suboptimal graphics settings: high ping can also be a result of your hardware not being able to support the game. If your GPU isn’t the exactly best, lower the settings a bit.
How to fix high ping in Microsoft Flight Simulator?
The good news is there are solutions to fixing the issue of this flight game lagging. A High ping can cause poor traffic flow or totally ruin the game’s pleasure.
From the preliminary checks to the in-depth and more promising, we look at some fixes to Microsoft Flight Simulator high ping.
These solutions don’t all apply to all scenarios, make sure you check them all and see which one fits your needs best to fix Microsoft Flight simulator issues.
1. Check Internet connection speed
A speed test is the first diagnosis that can help understand why this issue exists. Internet connection is essential for online games and having a sluggish one can cause a high ping in the game flow.
If you trust your ISP to be functioning effectively at this particular period, then you can try to check the internet speed. If you find the speed below average or unimpressive, then the issue might be from there.
It also helps to check the router configuration, if you are using one. Proximity matters as well, and you don’t want to overlook your distance to it. Get closer and let’s see if the issue is resolved.
2. Update the game
Open Microsoft Store.
Search for Microsoft Flight Simulator and open the result for your game version.
If any new updates are available, you’ll have an Update button in the right corner of the screen. Click on it.
Wait for the updates to complete downloading. Make sure Microsoft Flight Simulator is closed ruing this process.
Game updates can be a headache, but developers insist it is essential to update game versions as the gaming software grows.
You should check your Microsoft Flight Simulator version to ensure it is the right one. Outdated game versions often result in high ping, as the game will most likely not perform as it should.
A game version upgrade means security, connection interaction, and other technical elements have been upgraded to allow for a new improved experience for players.
3. Check system firewall and permissions
You need to give the game a green light in the system firewalls section.
Basic system security can be quite serious as well, and not granting the necessary permission for certain applications can cause connection glitches.
On your Windows PC, go to Settings.
Select System and Security.
Open Windows Defender Firewall.
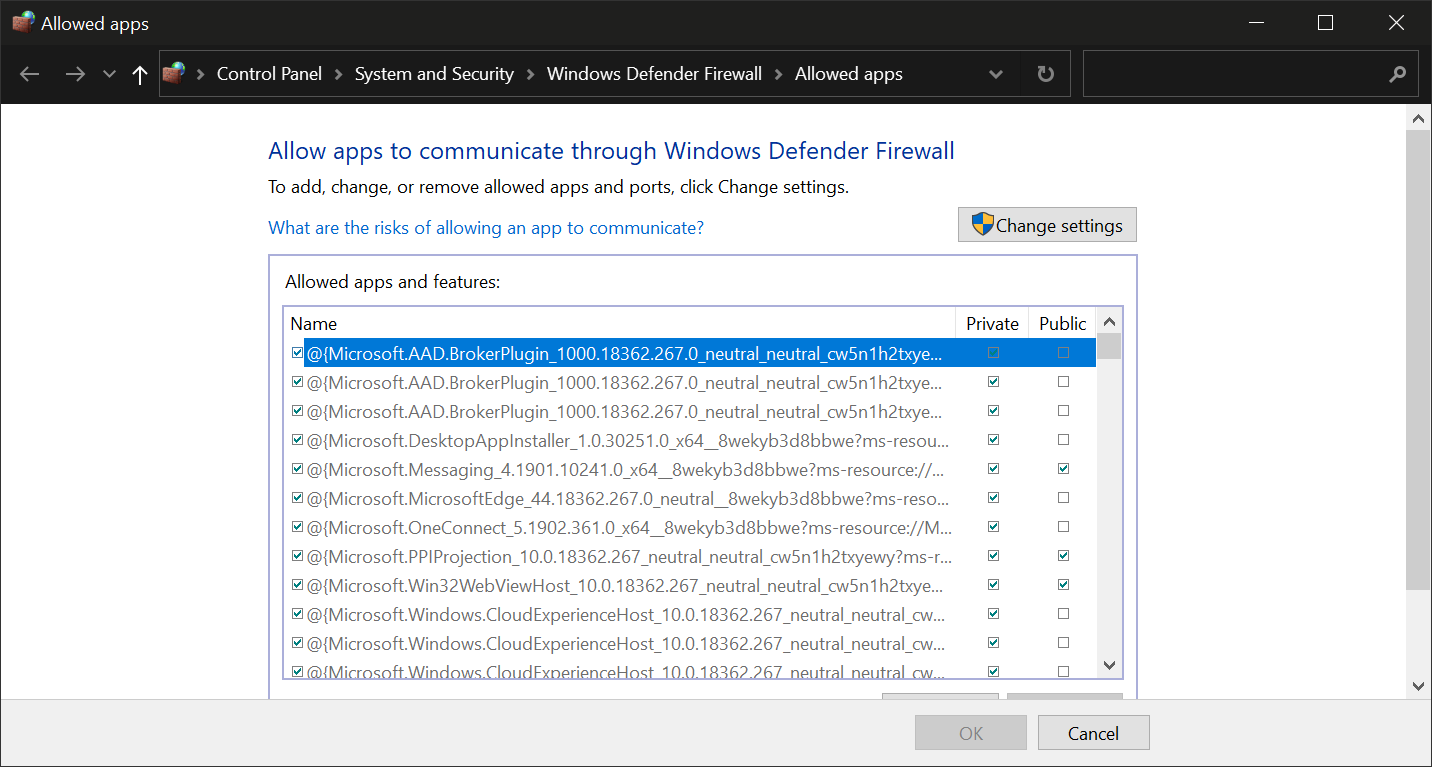
Select Allow anapp through Windows Defender Firewall.
Select the Allow another app option.
Add Microsoft Flight Simulator to the list and click Ok to confirm changes.
Online games can experience glitches or total loss of functionality when the system firewall is set to deny permission for a particular app or website.
This can happen to anybody. It helps to check your app permission and ensure every box is ticked and the green light is given to the Microsoft Flight Simulator to access the network and function properly.
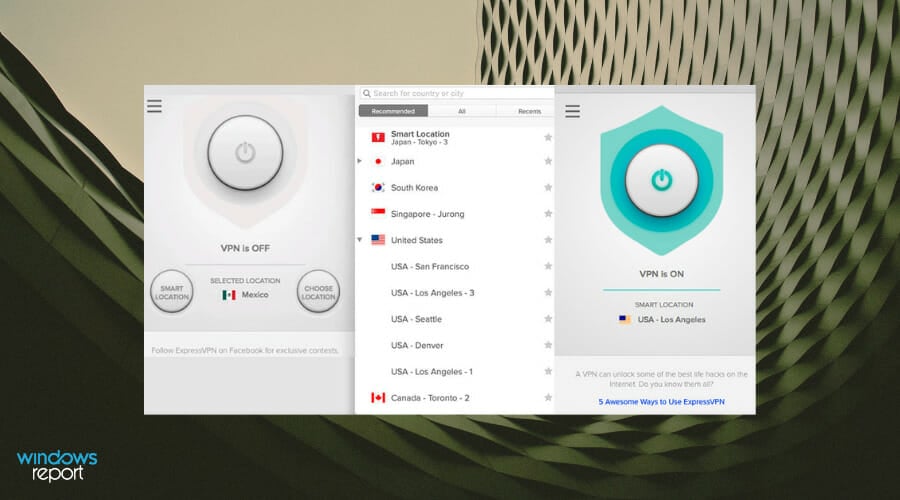
4. Use a gaming-optimized VPN
Consider using a good VPN for Flight Simulator. We recommend ExpressVPN because of its zero-lag policy and wide range of strong servers.
Connect to a server by simply clicking on the big power button in the main UI.
Open Microsoft Flight Simulator.
A Virtual Private Network comes as an alternative to fixing Microsoft Flight Simulator high ping – how? VPNs offer thousands of servers that allow for fast, seamless, and secure connection to virtual servers.
Many users report fixing the high ping issue using this tool, and it’s proven to also overcome the Microsoft Flight Simulator not connecting to server problem.
When connected to one of these servers, players can maintain a unique IP address, which means they do not have to rely on ISPs’ publicly hosted servers.
Private servers mean connection throttling is not in the story and data load speed on games is high. You can also bypass geo-restrictions with a VPN and enjoy some other advanced security and privacy features.
ExpressVPN
Get unlimited bandwidth and find the best and fastest servers for reduced ping and latency in Microsoft Flight Simulator!
Type device in the taskbar and open Device Manager.
Head to the Display Adapters section and expand it.
Right-click on your graphics card driver.
Select Updatedriver.
Wait for the process to complete.
You also have the possibility to go to your graphic card manufacturer’s website and download the drivers from there.
Make sure that you download the exact corresponding drivers, otherwise, you may cause more harm than good. If you want to keep track of drivers all the time, you can use automated driver updater software, likeOutbyte DriverUpdater.
6. Free Up Bandwidth
You may find that the high ping in Microsoft’s space simulator game may be due to excess running applications on your computer.
Launch Task Manager.
Go to the Apps and Background Processes sections.
Select any app and process that is not necessary and pick End Task.
Disconnect any devices that you’re not currently using from your Internet network (phones, tablets, etc).
When you have applications open in the background, competition for system operation gets high, and there come bandwidth issues that may result in the game performing unimpressively.
Go to Global settings and restore them as default.
Now go to the Programsettings tab.
Select Microsoft Flight Simulator.
For Power Management, select Prefer for maximum performance.
Set Threaded optimization to Off.
For maximum frame rate, select a lower setting than your current one and see if it works better. You can switch it back if the performance isn’t increased.
Lowering graphics settings can really improve the game’s performance, allowing it to run smoother and
What are the system requirements for Microsoft Flight Simulator?
New to the game? Or recently updated to a new version? Then this approach may be the solution to fixing high ping in Microsoft Flight Simulator.
Games have requirements for computers and this is why Windows, Linux, and Mac have different product models to suit various game specs.
For Microsoft Flight Simulator, the following are some key system requirements:
CPU: Intel Core i5-4460 or AMD Ryzen 3 1200 or better.
RAM: 8 GB.
OS: Windows 10 64-bit.
VIDEO CARD: Radeon RX 570 or GeForce GTX 770 or better.
PIXEL SHADER: 5.0.
VERTEX SHADER: 5.0.
FREE DISK SPACE: 150 GB.
DEDICATED VIDEO RAM: 2048 MB.
Fixing high ping in the Microsoft Flight Simulator game can be as easy as cheese for you. Take any of our solutions seriously and see if it works.
We particularly believe VPNs to be one of the lasting solutions, with a sprinkle of advanced security and privacy specs.
If you don’t find the high ping in Microsoft’s space game resolved, then you may want to reach out to your ISP or contact the game support team for assistance.
Opera VPN is a free VPN service that comes bundled with the famous web browser, but can Opera VPN be trusted? Today we’ll see if it is safe to pick it and use it as your regular consumer-grade, premium VPN.
We all like a bargain, and Opera seems to be one of the best and most convenient choices on the market when it comes to free VPNs. On the downside, many users still refuse to give it proper recognition.
Does the fact that Opera VPN comes for free make it less secure than its premium counterparts? Is Opera VPN less responsible for its users’ privacy?
Can this service provide you with the same degree of circumventing geo-restrictions? Let’s find out together if Opera VPN is safe or not, or if it’s just a flashy addition to the popular web browser.
Is Opera VPN safe?
We have no reason to believe that Opera VPN is not a safe service. As we mentioned above, you should keep in mind that this is not exactly a fully-fledged VPN service.
Opera VPN only protects traffic transmitted through the Opera web browser. This, in turn, makes it more similar to a proxy.
Tip
To protect your device system-wide, so not just at the browser level, use VPN software like ExpressVPN which can easily keep every bit of traffic on your device private and secured.
However, as long as you keep in mind that Opera VPN isn’t able to protect your entire device’s traffic from prying eyes, this service should be entirely safe to use. In case you wonder if Opera VPN is safe from ISP, note that no VPN service can hide you from your ISP.
Can we trust free VPN services?
This subject has been debated for quite a while now. The importance of having a trustworthy service seems to overcome the need for free services. At least the numbers say so, with an uprise of customers who prefer paid, but secure services, instead of free, but less secure ones.
A common response to this dilemma is that certain free VPNs can be trusted, while others are in the industry just for the money. You can easily spot the latter from their sketchy privacy policies that leave their customers exposed.
For instance, you may stumble upon a service that offers a lot of features but says nothing about collecting data, or even state that they do, in fact, collect a lot of unnecessary personal data.
In this case, make a swift, full turn and go the other way. If you don’t plan on using the VPN occasionally and privacy is among your main concerns, such a service might be putting you at risk.
Can Opera VPN be trusted?
In our opinion, trust is one of the most valuable resources that a VPN provider could hold, since it’s so fragile. Even a seemingly unimportant event such as handing over personal data during an official investigation could ruin VPN trust.
That’s why we believe that the foundation of VPN trust consists of the providers’ policies. If the provider vows not to monitor your personal data or share it with various third parties, half the battle is already one.
If they can somehow prove this to be true, then trust stocks should be rising by the minute.
We’ve given Opera VPN’s privacy policy a full, thorough rundown. It seems that it doesn’t log any browsing activity information and data regarding your original IP address. Thus, it makes Opera VPN safe for banking, torrenting, and streaming.
Finally, we believe that Opera VPN can be trusted. A VPN that doesn’t interfere with your online business is a good VPN.
Opera VPN
A reliable source for private browsing passing our tests with great results.
Opera VPN uses industry-standard 256-bit encryption. Therefore, it’s safe to say that this free VPN service is, in fact, secure, even comparable to other premium services.
It can protect your browsing activity from the prying eyes of your ISP or any other third party that might be interested in your online whereabouts.
However, there is a downside to using Opera VPN as your default VPN. It will only protect your Opera-related activity. Not a single drop of traffic that goes outside your web browser will be hidden.
While many customers deem this as a less-than-ideal situation and judge Opera VPN for its inability to protect any other type of traffic, we’re quite content with how things are.
As long as you remember that Opera VPN is embedded within the Opera web browser, let alone that it’s a free service, you should be able to cope with this situation much more easily.
Long story short, Opera VPN is secure, but won’t protect traffic that runs outside the Opera web browser.
What’s the catch with Opera VPN?
Well, it’s already been a while since Opera introduced us to its free, web-browser-embedded VPN. However, people still take it with a grain of salt and a fully-raised eyebrow. And who can blame them, really?
There’s a widely spread saying that with free services, you become the product. Meaning that if you don’t pay for something such as a VPN with money, the provider might find another way to generate revenue.
This generally applies to free VPN services that offer no guarantee that your data won’t be collected and sold to the highest bidder. You might even see ads, which can be full of malware or trackers.
However, Opera’s free VPN doesn’t seem to interfere with your day-to-day browsing, and can even spare you from seeing a lot of ads. So, what’s the catch?
Well, although customer skepticism is totally understandable and even justified, the most obvious explanation is that there’s no catch.
Opera VPN has no advanced features, their server network is not that big, and not even the speeds are impressive.
Does Opera VPN encrypt data?
Yes. Opera VPN uses a military-grade AES-256-bit encryption algorithm.
Your traffic information is not readable by trackers, so your activity online is private.
On the downside, it doesn’t use VPN protocols which are essentially a set of rules based on which VPN connections operate.
They can increase security and privacy even more, so if you want to make sure you are completely untraceable online, you may be better off using a dedicated VPN.
Does Opera VPN keep logs?
No, according to Opera’s website, the built-in VPN doesn’t log user activity, DNS address, or other traffic information.
The browser claims to not log or sell any user information. Your browsing activity and original IP are not stored by Opera.
Opera VPN is secure, but not that bright otherwise
To sum it up, you can trust Opera VPN with your privacy and security. Just remember that it won’t mask any activity that happens outside its web browser.
Furthermore, its privacy policy assures you that no private data or any browsing activity information.
However, you shouldn’t expect it to run like the wind, provide you with a lot of servers, or be able to circumvent geo-restricted websites like premium VPNs can do.
Let us know in the comments section below whether this guide proved to be helpful to you. Thanks for reading!
Blade and Soul is a martial arts MMORPG developed by NCSoft, the same video game developer that brought us Lineage II and Guild Wars 2.
Blade and Soul lets you create a character and use it to explore the world, battle NPCs, and complete quests.
Being an MMORPG, it means you’ll never play alone, as there will always be at least a few other players online on the same server as you.
Depending on your gameplay style, you can team up and enjoy the game together, or be a lone wolf.
However, regardless of your playstyle, Blade and Soul can experience a bunch of unpleasant connectivity issues every now and then. For instance, you might notice high ping, jitter, or even packet loss while playing the game.
What is packet loss in Blade and Soul?
Packet loss is the same no matter where you encounter it. It’s described by the packets’ inability to reach their destination point. Upon its occurrence, the server artificially creates a delay, expecting the data packets to arrive.
However, it’s called packet loss for a reason. The data bundles never make it, and as a result, you may experience some issues that are far more noticeable.
For instance, your Blade and Soul menus may become irresponsive, and your character’s movements might slow down.
One of the most interesting things about Blade and Soul is that it embraces a real-time battle system in which you have to pull powerful combos.
Well, not to be the bearer of bad news, but packet loss means that you’ll often miss combo opportunities.
What causes packet loss in Blade and Soul?
Many MMORPGs face packet loss situations, so this issue is not Blade and Soul-specific. Usually, the more players a server hosts, the higher chance for packet loss to occur. Thus, it’s safe to assume that MMORPGs have it the worst.
But let’s get back to what causes packet loss. Unfortunately, there’s no single answer to this question, given that a lot of factors can weigh in to determine the occurrence of this phenomenon.
Ranging from outdated drivers on your PC and bad Ethernet cables to network congestion and artificial bandwidth limitation, these could all be a cause of packet loss in Blade and Soul.
This is what makes it even more frustrating; the fact that there’s no single surefire cause for packet loss makes it nearly impossible to find an effective fix in a timely manner.
How to detect packet loss in Blade and Soul?
First of all, you’ll want to find the IP address of the Blade and Soul server you’re experiencing packet loss on. Use whatever method works best for you: ask tech support, use CMD, run a WireShark analysis, you get the point.
Once you successfully identify the server’s IP address, do the following:
Type pathping x.x.x.x (replace x.x.x.x with the IP address you got earlier)
Wait for the test to come to an end
Analyze each hop for ping and packet loss values
Granted, you’ll only be interested in the packet loss values, which should be as close to 0% as possible. If you notice any anomaly (increased packet loss value), it means that somewhere along with your connection you’re leaking packets.
As a rule of thumb, the first hop (0) is your originating device (i.e. your PC), and the last hop is the game server. As the hop number increases, the connection strays further away from your PC and gets closer to the game server.
How to fix Blade and Soul packet loss?
1. Try using a VPN with fast servers
Decide on a good VPN. For packet loss, we use Expr
essVPN.
Get an ExpressVPN subscription and download the VPN client installer executable.
Install ExpressVPN.
Launch the VPN client and log into your account.
Connect to a fast server of your choice (nearby servers are faster).
Launch Blade and Soul.
Check if you’re still experiencing packet loss.
Optionally: run the pathping test once more.
ExpressVPN is Kape Technologies’ solution for boosting your privacy and connection security. It’s one of the few VPN providers that offer 24/7 live chat support.
Note that using a VPN to solve packet loss issues will only work if the issue is caused by your ISP. If your Internet provider limits your bandwidth or has improper network routing, it could lead to packet loss.
A VPN will circumvent your ISP’s default, limited connection, which will result in fewer packets being leaked. However, if the problem is on your side or caused by the game server, using a VPN won’t fix it.
ExpressVPN
Getting packet loss in Blade and Soul? Why not try ExpressVPN for a change?
If the Blade and Soul server is experiencing heavy packet loss, you might consider switching it, if possible. We understand that switching servers might mean that your favorite character will be temporarily unplayable.
However, if you’ve just started playing the game, didn’t advance too much, and your friends don’t mind joining you on another less-troublesome server, you might consider switching. At least for the time being.
3. Troubleshoot your connection manually
Restart the game, your PC, router, and/or modem
Force-close any bandwidth-heavy background apps or processes
Flush your DNS
Reduce Blade and Soul’s quality settings (resolution, rendering, shadows)
Avoid peak hours, if possible, in order to dodge network congestion (or use a VPN)
Check every part of your home connection for any malfunctioning component and fix/replace it
Update your PC’s drivers to their latest version, especially network drivers
Make sure your router’s firmware has been updated to its latest version
Replace any old or worn Ethernet cables
Upgrade your old Ethernet cables, if necessary (buy higher CAT models)
Try using wired connections instead of wireless ones (WiFi packet loss occurs more frequently)
Call your ISP and ask them if they can do something about your packet loss situation
Contact NCSoft and inform them about their servers leaking packets (if that’s the case)
Final thoughts on fixing Blade and Soul packet loss ?
To wrap it up, it’s not the end of the world if you experience packet loss in Blade and Soul. Most of the time it will be barely noticeable and will pass before you even realize it.
However, if you notice a pattern is developing and the issue starts occurring more frequently, you could try some of our suggested fixes.
Using a VPN such as ExpressVPN can prove to be the most effective way to get rid of packet loss. However, it will only work if it’s your ISP that’s been restricting your bandwidth, thus causing packet loss.
If a VPN doesn’t seem to work, you could try performing the manual troubleshooting suggestions we’ve mentioned.
Note that these won’t necessarily fix your packet leaks altogether, but they could seriously improve the quality of your connection.
If you’re using a VPN on your mobile device, you’ve probably wondered at least once whether VPN can hide tethering or not.
Sharing your Internet connection from your mobile device seems like a dream come true, but things aren’t so simple.
For once, you might think that once you turn your device into a router, it will actually act like one.
So, for instance, if you use the best VPN for mobile data and your PC accesses the Internet through your phone, your PC should be protected by the VPN, and even hide the fact that you’re tethering, right? Wrong.
But don’t worry, as we have the answer to this problem and many more closely-related ones.
What is tethering?
Tethering is a quite simple procedure where you connect a device that can’t access the Internet to one that can. The most popular duo, in this case, is your PC and your phone.
You can use it, for instance, if your desktop computer doesn’t have WiFi capabilities. In this case, you can tether it to your phone using a USB cable or even PC Bluetooth on Windows 10 to access the Internet.
However, you can also use wireless tethering by creating a mobile hotspot, which is technically the same thing.
Currently, there are three tethering types:
WiFi tethering – you create a virtual hotspot on your phone that other wireless-ready devices can connect to
Bluetooth tethering – you share your phone’s Internet connection with other Bluetooth-enabled devices
USB tethering – you connect your phone to the device you want to share the Internet with
There are subtle differences between these types of tethering, but the most important ones are battery saving and speed. You can set Windows 11 to auto-connect via Bluetooth and share internet connection on Bluetooth-enabled devices.
For more detailed instructions on setting up wired connections, visit our USB tethering guide and learn how to configure it on Windows devices.
Tethering types explained
The WiFi tethering is the easiest one to configure but eats up a lot of your phone’s battery. However, you can share your connection with multiple devices at the same time.
Bluetooth tethering is not really popular, given that it’s very slow and somewhat difficult to set up.
USB tethering is essentially the fastest one and takes the smallest toll on your phone’s battery. However, it might be a tad more difficult to set up than WiFi Tethering (which requires some drivers on the PC).
Furthermore, USB tethering can only grant Internet access to one device at a time. And before you ask, no, you can’t use a USB hub to share your Internet with multiple devices via USB. USB hubs are generally not OTG-enabled.
You can set up a Windows 11 mobile hotspot if you want to make a PC a Wi-Fi hotspot via USB or Bluetooth as well.
Mobile carriers don’t really like tethering
If you didn’t know it yet, tethering is somewhat frowned upon by mobile carriers. Mostly because you’re attempting to access the Internet from a device that shouldn’t be able to get online, to begin with.
More so, when you’re using the mobile data option on your phone, you use a certain amount of bandwidth. Consider using a browser with the least data consumption for mobile devices and desktops.
Tethering increases the bandwidth, and let me tell you, carriers are not that thrilled about bandwidth-hogging customers.
So, instead of blocking the practice altogether, they started to limit how much tethering you can do. Some of them even started to sell special plans for customers who plan on tethering.
As a result, most phones have different APNs that can be used for mobile data and tethering data.
Can a VPN hide tethering?
To put it simply, no VPN can hide the fact that you’re tethering on your phone. Nor can a VPN protect your PC’s privacy if it’s only installed on your phone while tethering.
It’s worth mentioning that a VPN will encrypt the traffic on your phone, so your carrier will have no access to your traffic data. However, VPNs can’t hide your hotspot usage.
ExpressVPN, for instance, is a service that provides you with clients for both your PC and various other devices, portable or otherwise.
If you plan on protecting your PC’s privacy while tethering, we’d suggest installing VPN clients on both your PC and the phone you’re using.
You can use ExpressVPN on your router as well to protect every device in your home at all times when you want to use tethering. No matter how many phones, computers, or streaming consoles you connect to the router, it only counts as one device.
ExpressVPN
Flexible, reliable, and fast is the definition of the most suited VPN for mobile tethering.
How can I hide tethering from the carrier on my phone?
1. On iPhone
1. Unlock your iPhone.
2. Go to the Settings app.
3. Tap the Cellular section.
4. Head to Cellular Data Options.
5. Select the Cellular Network option.
6. Tap the fields you want to edit.
7. Make the modifications as needed.
In order to hide tethering on iPhone, you need to modify its APN settings. iPhones generally allow you to mess with the APN settings natively. However, it must be allowed by your carrier, otherwise, you won’t be able to perform it.
More so, you shouldn’t change the APN settings unless you know what you’re doing. Misconfiguring them could lead to losing mobile data connectivity altogether or even getting extra charges on your bill.
Note that sometimes, Cellular, Cellular Data Options, and Cellular Network are available as Mobile Data, Mobile Data Options, respectively Mobile Network.
If this method fails, you could jailbreak your device and install a third-party tool such as TetherMe to modify APN settings.
However, note that jailbreaking your device will void the warranty and could leave you vulnerable to various security threats.
Install the app on your Android phone and your PC.
Launch the PdaNet+ app.
For USB tethering:
Go to your phone’s Settings app.
Head to the About phone section.
Tap the Build number button 7 times.
Type your password if necessary.
You should have enabled developer options.
Go back to the System& Updates (or System, on some Devices) section.
Click the Developer options button.
Scroll down until you see USB debugging.
Enable USB debugging and confirm it.
Go back to the PdaNet+ app.
Tap the USB Tether button.
Enable the Hide Tether Usage option if needed.
For WiFi tethering:
On your Android phone:
Launch the PdaNet+ app.
Select WiFi Direct Hotspot.
Define a password.
Choose the band.
Click OK.
On your PC:
Open the WiFi connection menu.
Select the newly created hotspot.
Type your password.
That’s it. If done right, your PC should be tethered to your phone. Most importantly, your carrier will have no clue that you’re using the tether on your iPhone or Android phone since the app basically acts like a proxy for your computer.
We won’t get into more boring details, as we’re sure you’re overburdened by the sheer amount of steps you need to take to hide Android tethering from your carrier.
But it’s worth not having to pay extra for a tethering plan.
You can hide tethering from a carrier, but not with a VPN
All things considered, it’s not exactly difficult to hide tethering from your mobile carrier. However, depending on the device you want to use as a source of Internet, things might get a bit more complicated or not.
iPhones enable you to change APNs natively, but your carrier must allow it beforehand. However, if you’re feeling rebellious, you could jailbreak your iPhone and try tackling it with third-party apps.
Android phones can handle this without rooting your phone, but you also need to rely on third-party apps to succeed.
PdaNet+ is such an app, but you must purchase the full version if you don’t want to restart the demo version every 30 minutes.
Let us know if you found this article helpful and write down any comments you have in the section below.
Group Policy Editor is a console in Windows that allows users to seamlessly change the security settings. However, many reported getting the You don’t have permission to perform this operation message when opening Group Policy.
So, when the Group Policy Editor fails to launch, you are unable to manage permissions and configure what’s accessible and what’s not to the user accounts, along with a bunch of other critical settings.
But, you usually come across the You don’t have permission to perform this operation error due to a trivial issue with the Group Policy Editor or the system itself. So, let’s find out how you can get things up and running in this case.
Why do I see You don’t have permission to perform this operation?
The error message, as clearly evident, suggests that you don’t have the required permissions to access Local Group Policy Editor. And this is usually the case when you are logged in with a non-administrator account.
Also, for many, it turned out that the current user account was corrupt, which led to the You don’t have permission to perform this operation error message while opening Group Policy settings.
Besides, the underlying cause may very well be the misconfigured Registry. Certain apps modify the Registry keys, which can lead to the error message. So, you will have to check that as well.
How do I fix You don’t have permission to perform this operation for Group Policy?
1. Verify that you logged in with an administrator account
As stated earlier, the You don’t have permission to perform this operation error with Group Policy is usually encountered when you are not signed in with an administrator account.
So, check that, and if you are indeed signed in as a standard user, either log out and use an administrator account, or change the account type, as detailed in the next solution.
2. Change the account type to administrator
NOTE
To change the account type for a standard user, you first need to sign in with an administrator account on the PC.
Press Windows + R to open Run, type netplwiz in the text field, and click OK.
Now, select the standard user account throwing the error, and click on Properties.
Head to the Advanced tab, select Administrator, and click on OK to save the changes.
After changing the account type to Administrator, verify if the You don’t have permission to perform this operation error when opening Group Policy goes away. If not, head to the next method.
3. Try opening Group Policy with Command Prompt
Press Windows + S to open the Search menu, enter Command Prompt in the text field, and click on Run as administrator.
Click Yes in the UAC prompt.
Now, paste the following and hit Enter:gpedit
For some users who came across the You don’t have permission to perform this operation error earlier with Group Policy, opening it via Command Prompt turned out to be an effective solution.
4. Modify the Registry
Press Windows + R to open Run, type regedit, and hit click OK.
Click Yes in the UAC prompt.
Now, paste the following path in the address bar and hit Enter:Computer\HKEY_CLASSES_ROOT\CLSID{8FC0B734-A0E1-11D1-A7D3-0000F87571E3}\InProcServer32
Double-click on the (Default) string on the right.
Next, paste %SystemRoot%/System32/GPEdit.dll in the Value data text field, and click OK.
Once done, restart the computer for the changes to come into effect.
This will work in case of a corrupt user account and get things up and running right away. Now on, you wouldn’t see the You don’t have permission to perform this operation message when accessing Group Policy.
And, you can always fix a corrupt user account, but since that takes time, creating a new one is often the easier solution. Though the linked guide is for Windows 10, the solutions work on the latest iteration as well.
How do I reset GPEdit.msc (Local Group Policy Editor)?
Press Windows + R to launch Run, type cmd, and press Ctrl + Shift + Enter.
Click Yes in the UAC prompt.
Now, paste the following command and hit Enter:RD /S /Q "%WinDir%\System32\GroupPolicyUsers" && RD /S /Q "%WinDir%\System32\GroupPolicy"
Once done, execute this command to apply the changes:gpupdate /force
That’s it! Now, all you have to do is restart the computer, and Windows will automatically switch to the default settings for the Group Policy.
By now, you would have the You don’t have permission to perform this operation error with Group Policy fixed, and in case it started after you made some inadvertent changes, there’s the option to reset it.
The Createprocess Failed Code 740 error in Windows 10 indicates that the process cannot be completed without elevated privileges, that is, being an administrator. Don’t worry, we have included all the solutions to fix this problem.
How do I fix Createprocess failed code 740?
1. Check your antivirus
Having a good antivirus is essential if you want to protect your PC from online threats. However, your antivirus can sometimes interfere with your system and cause various errors. Sometimes your antivirus can interfere with your applications and cause Createprocess Failed Code 740 to appear.
To fix this issue, it’s advised that you open your antivirus settings and disable certain antivirus features. If that doesn’t help, you might have to disable your entire antivirus or, in some cases, even remove your antivirus altogether.
Use a dedicated removal tool if you’re usingyou’rentivirus solution and want to remove it from your PC.
When you use the Windows uninstaller to remove a program, it does not permanently delete everything related to the application. It leaves directories in the program files, icons, and registry files behind.
An uninstaller utility will remove the program and any associated files and directories.
If you have this error on your PC, use an administrator account on Windows 10.
In addition, you can always run the desired app as an administrator to resolve this issue. Therefore, your application should now start without any problems.
As you can see, this is a simple workaround, but the only downside is that you’ll have to go through this process every time you want to run that specific app.
Press Windows and enter user account control. Select Change User Account Control settings from the list.
Move the slider down and click the OK button.
User Account Control is designed to inform you if you’re making changes to your computer that might require administrator privileges.
These changes include installing new software or changing system settings.
Some users would say that disabling User Account Control comes with slight security risk because you won’t get notifications if you install new software or make any system-related changes.
Once you disable User Account Control, the issue should be resolved, and you won’t see Crwon’trocess Failed Code 740 error anymore.
Locate the application giving you this error, right-click it and choose Properties from the menu.
When the Properties window opens, go to the Compatibility tab. Now check Run this program in compatibility mode and select the desired version of Windows. Finally, click OK to save changes.
Sometimes Createprocess Failed Code 740 errors can appear if the application you’re trying to run isn’t fully compatible with Windows 10.
However, you might be able to circumvent this issue by using the Compatibility mode feature.
In case you don’t know, the Compatibility mode is a feature of Windows that allows you to run older software that isn’t usually compatible with Windows 10.
After making these changes, try to rerun the application. If the problem still occurs, you might want to try using different compatibility settings.
5. Create a new administrator account
Open the Settings app. You can do that by using Windows + I shortcut.
When the Settings app starts, go to the Accounts section.
Now go to Family & other people in the left pane. In the right pane, click Add someone else to this PC button.
Choose I don’t have this person’s sign-in information.
Select Add a user without a Microsoft account.
Enter the username for the new account and click Next.
According to users, Createprocess Failed Code 740 error can appear if you don’t have administrative privileges while trying to run a particular application.
However, you can fix that issue simply by creating a new administrative account. This is quite simple, and you can do it by following the above steps.
After doing this, you’ll create a new user account. Remember that this new account doesn’t have administrator privileges yet, so you need to convert it to the administrator account.
To do that, follow these steps:
Go to the Settings app by pressing Windows + I, followed by Accounts, Family & other people.
Locate the account you just created, select it, and choose Change account type.
Set Account type to Administrator and click OK.
Now you have a new administrative account ready. Switch to this new account and try to run the application from there.
If this method works, you might have to move all your files to the new account and start using it instead of your old account.
Moreover, we recommend that you access our guide to learn everything there is to know about the administrator account and how you can enable/disable it.
If the previous method seems tedious, you should know that you can easily create a new administrator account using Command Prompt. To do that, follow these simple steps:
Press Windows, then input cmd and open the Command Prompt result as an administrator.
When Command Prompt opens, run the following commands. First, of course, be sure to replace WindowsReport with the desired account name that you want to use: net user /add WindowsReportnew localgroup administrators WindowsReport /add
After running these two commands, you’ll successfully create a new administrator account on your PC. This method is designed for advanced users with at least some command line experience.
If you want, you can still use the first and more extended method; but if you’re in a beginner you might want to try the second method.
6. Install the latest updates
Open the Settings by pressing Windows + I. When the Settings app opens, navigate to the Update & Security section.
Now click the Check for updates button.
If you keep getting the Createprocess Failed Code 740 error on your PC, you might be able to fix it simply by installing the latest updates.
Microsoft is frequently releasing new updates for Windows, and if you keep having this issue, you might be able to fix it with a Windows update.
By default, Windows installs the missing updates automatically, but you can check for updates on your own by following the above steps.
Windows will now download the available updates and install them automatically in the background. Once the updates are installed, the issue should be permanently resolved.
How do you bypass the This operation requires elevation message?
According to the information provided by the error notice, the only way for you to acquire access to the file or folder in question or assume ownership of it is to obtain the authorization of a local administrator who has elevated privileges.
Therefore, you will need to transfer ownership of the drive to address the issue. Unfortunately, because the system is set up, there is no alternative way to get around this restriction.
The Createprocess Failed Code 740 error affects many applications, and users have reported Createprocess Code 740 while trying to launch games such as Sleeping Dogs or CrossFire. But, with the help of the above solutions, you can get rid of this nuisance.
Similar Createprocess Failed Code 740 issues
Here are some similar issues that users reported related to Createprocess Failed Code 740 failed message:
Unable to execute file Createprocess failed code 740 – This message can appear if your antivirus interferes with your system. Simply disable your antivirus or reinstall it and the problem will be resolved.
Error 740 The requested operation requires elevation Windows 10 – It can occur if you don’t have the necessary privileges to run certain applications. To fix that, simply run the application as an administrator.
Createprocess failed code 740 Windows 10, 8, 7 – This problem can occur on any version of Windows, but you should be able to fix it using one of our solutions.
Setup unable to execute file Createprocess failed code 740 – In some cases, the application you’re trying to run might not be compatible with Windows 10, but you can fix that using the Compatibility Mode.
Createprocess failed code 740 MapleStory – Users have reported that the Createprocess Failed Code 740 error message might occur when you try to launch a program that requires administrator rights but for which you do not have permission.
Createprocess failed code 740 Tarkov – The message Error 740 will appear on your screen if the User Account Control (UAC) portion of your computer determines that your profile is that of a “user” rather than an “administrator.”
Error 740 DISM – You might also try running the command prompt in administrator mode.
Createprocess failed code 740 The requested operation requires elevation – If you get the message The requested action needs elevation, it means that WinZip is set up to run with administrative privileges.
Code 740 requires elevation – Creating a brand new administrator account is all that is required to solve the problem.
Relaunch using Createprocess, Createprocess failed –Using the CreateProcess function, a new process may be generated, which operates separately from the process that created it.
As you can see, this error can affect almost any installed application on your computer, and we hope our solutions will help you fix this problem.
As always, for more suggestions and questions, reach out to the comments section below.
Many Windows 10 users enjoy multimedia daily. Drivers play an essential role in this as they serve as the link between the hardware and software components.
However, you might experience specific issues with multimedia if your graphic card driver crashes. For example, many users reported Nvidia driver crashes on Windows 10.
In this guide, we will show you quick ways to solve this issue for good and continue enjoying your driver again.
Why does the Nvidia driver keep crashing?
There are various reasons your Nvidia driver might be crashing on Windows 10. Below are some of the variations of this issue and the causes:
Nvidia graphics driver keeps crashing Windows 10 laptop: This issue might be because of outdated drivers. Updating your driver to the latest version should solve the problem.
Nvidia driver problems Windows 10: Crashing isn’t the only problem you can experience with Nvidia drivers in Windows 10. However, the solutions presented below will help you in most cases.
Windows 10 Nvidia driver black screen: Black screen is, along with crashing, one of the most common issues one can experience with Nvidia drivers. You should be able to fix it with one of our solutions.
Nvidia driver install crashes windows 10: If you are getting this error, it means the driver you are trying to install is not compatible with the version of OS. So you might need to install an older version of the driver.
How do I fix the Nvidia driver crashing on Windows 10?
1. Uninstall and reinstall your driver
Press the Windows key + X and select Device Manager.
Double-click the Display adapters option to expand it.
Right-click your Nvidia driver and select Uninstall device.
Now, click the Uninstall button to confirm the action.
Finally, click the Scan for hardware changes icon at the top.
If the Nvidia driver keeps crashing on Windows 10, removing the problematic driver and installing the latest version entirely is the best solution. Unfortunately, there is also a possibility that the NVIDIA driver is not compatible with your Windows version.
You can download the latest driver version from your manufacturer’s website if you don’t want to use the built-in tool.
Alternatively, you can use a third-party driver updater to do all the work for you in seconds. Outbyte Driver Updater is a professional tool not only updates any driver on your PC but also fixes those that are either broken or missing altogether.
All you need is a stable Internet connection and a few minutes of your time since the entire update and fix process is pretty much automated from the moment you launch the program.
Outbyte Driver Updater
Keep your GPU drivers updated and avoid any issues that might show up.
Press the Windows key + S, type System, and select System from the menu.
Click Advanced system settings under Related settings.
Go to the Hardware tab and click on Device Installation Settings.
Select No (your device might not work as expected).
Click Save Changes.
Finally, go to your PC manufacturer’s website to download an older version of your driver.
In some instances, older drivers can work better than the latest version. So, if the Nvidia GPU driver keeps crashing on Windows 10, you should try downloading an older Nvidia driver, maybe even the version for Windows 8.
Before you download the older version of the Nvidia driver, you should stop automatic driver updates.
After you’ve disabled automatic driver updates, you can remove your current driver and install an older Nvidia driver. For more information on how to uninstall graphic card drivers, have a look at our previous solution.
3. Uninstall your antivirus
Press the Windows key + I to open the Settings app.
Choose the Apps option.
Locate your antivirus app and click on it.
Finally, click the Uninstall button and follow the onscreen instruction to complete the process.
Sometimes, your antivirus software might cause your Nvidia driver to keep crashing on Windows 10. So, if you’re having any problems with Nvidia drivers, you might want to disable or uninstall your antivirus software.
Users report that Avast 2016 causes Nvidia drivers to crash, but feel free to try this solution even if you’re using different antivirus software.
On the other hand, if you value digital security, then instead of removing your antivirus, you should try changing it with one less prone to errors.
There are many Windows 10 compatible antivirus software options that offer excellent protection without negatively impacting your user experience. But only a few can match the safety and efficiency of ESET NOD32.
This software protects your digital life effectively without affecting the other processes that make your PC run smoothly. Lastly, it is not just limited to online protection but also offline safety from apps and other services.
4. Deactivate iGPU in BIOS
While your computer boots, keep pressing Del or F2 to access BIOS. Sometimes it might be a different key, so you’ll have to repeat this step a few times.
When BIOS opens, you need to locate iGPU, or integrated graphic card, option and disable it.
Save changes and restart.
Sometimes, the Nvidia driver crashing on Windows 10 issue can be caused by your integrated graphic card; therefore, make sure to disable it from BIOS.
When Nvidia Control Panel opens, click on Manage 3D settings.
Set Power Settings to Maximum Performance and turn off Vertical sync.
Click Apply to save changes.
Users reported that the Nvidia driver crashing on Windows 10 could be solved by changing a few options in Nvidia Control Panel. It’s also advised that you set your power options to High Performance by following these steps:
First, press the Windows key + S and enter control.
Next, select Control Panel from the list.
Choose the Hardware and Sound option.
Now, select Power Options.
Choose to Create a power plan in the left pane.
Select the High-performance option.
Now, click the Next button.
Finally, click the Create button after making the necessary tweaks.
After this, check if the Nvidia driver is still crashing on Windows 10.
6. Disable ATKFUSService
According to users, ATKFUSService can sometimes cause Nvidia drivers to crash, therefore, it might be best for you to disable this service.
Press Windows key + R, type services.msc, and click OK.
When the Services window opens, locate ATKFUSService and double-click it.
Click the dropdown before the Startup type and select Manual or Disabled.
7. Use MSI Afterburner to underclock your graphic card
Users reported that sometimes your GPU memory frequency doesn’t match your RAM frequency, and that can cause the Nvidia driver to keep crashing on Windows 10.
Some users suggest underclocking your graphic card by lowering its memory frequency to fix this issue. Unfortunately, this is an advanced process, and if you’re not careful, you can cause permanent damage to your computer.
Remember that you’re underclocking your graphic card at your own risk.
8. Clean your graphic card
Sometimes, the Nvidia driver crashing on Windows 10 issue can be caused if your graphic card overheating. To fix this, it’s advised to open your computer case, remove your graphic card and clean it from dust.
We have to mention that by doing this you might break your computer’s warranty. To avoid that, you can install software that cools your computer, thus solving many possible issues from one installation.
How do I know if my graphics card is faulty?
There are various signs that your graphics card gives when it is faulty. At the same time, not all the symbols mean that your graphics card is undoubtedly faulty; a combination points in that direction.
Below are some of the signs to look out for:
Stuttering display
Consistent crashes
Noticeable frame drop
Glitches on the screen
Motherboard-related error codes
The dreaded BSOD (Blue Screen of Death) accompanied by an error code
Nvidia driver crashes are usually related to driver incompatibility, and if you have any issues with Nvidia drivers, feel free to try some of our solutions.
Your account is not authorized to play Halo Infinite is one of the rampant issues users have reported, and it’s been plaguing the game for a while. It prevents users from accessing some game properties, like the latest beta flight test.
Halo Infinite is a first-person shooter video game by 343 industries. It is one of the entries of the Halo series.
The game is available for a few platforms: Windows, Xbox One, and Xbox Series X/S. Like every other game, Halo Infinite has many issues affecting the user’s gaming experience.
However, for many reasons, you can see the Halo Infinite error verifying account authorization messages.
Some users encounter the error message because of login errors, applying for beta access via the wrong email address.
Nonetheless, the Halo Infinite account not authorized error message is not that much of an issue and can be solved in several ways. However, the fix appropriate for the problems may differ in some cases, so we’ll recommend you try only some fixes until you can fix the issue.
Why does Halo Infinite say my account is not authorized?
Halo Infinite error message that your account is not authorized to play is encountered when users try to access the game’s beta version. It is one of those errors that doesn’t have a definite cause, but we can go around some reasons why you can experience it.
However, there are network connection issues affecting Halo Infinite’s interactions with its servers that can cause the game to say the account isn’t authorized.
Likewise, you can see the error message due to login errors that may occur during the game startup. So, many bugs affect the game and can be responsible for the error you are experiencing.
Nonetheless, the error message prevents you from accessing the game. Regardless of the problem’s causes, users can fix it by toggling some parts of their game and gaming systems.
One of the solutions that can help you fix this error is using a reliable VPN source. ExpressVPN has a network of high-speed servers across 90+ countries and you can easily connect from everywhere.
You can choose a VPN server and benefit from unlimited bandwidth and minimize ping to boost your connectivity. Moreover, your data is secure in an encrypted tunnel that can prevent ISP throttling from slowing down your connection.
Log into the account using the same login credentials to get into the game.
Go to the Xbox Support page and log into the site (here, you will be able to change your login password).
Change your current password to a new password.
Restart Steam or Xbox console and try logging into the game again (check if your Halo Infinite account status has changed).
5. Report the issue on the Halo Waypoint support page
A more effective solution for the account authorization issues in Halo Infinite is to visit the Halo Waypoint support page and complain about the issue to customer service. They’ll be able to help you resolve the problem from their end.
Also, your account may be banned, resulting in you not being allowed to access the game for the ban period. So, communicating with customer service will help you better understand what’s happening.
However, we recommend that users read our guide on information about Halo Infinite’s beta version download from the Xbox insider app and the features to look out for.
How long does a Halo Infinite ban last?
Halo infinite ban duration can vary depending on the offense and how many times you’ve committed it.
However, the minimum time of the ban is 5 minutes. Also, you can be banned for 15 minutes to 3 hours for violating the terms of the game.
Alternatively, you can check our articles about some other Halo Infinite errors you are likely to encounter. Read how to fix Halo Infinite crashing on PC in a few steps.
If this guide has been helpful, you can leave suggestions and questions in the comments section. We’d like to hear feedback from you.
Amazon offers a streaming video service called Prime Video. This is an amazing service, but sometimes error code 8056 on Prime Video can appear.
On your preferred devices, you can access hundreds of TV shows and movies with your membership. However, this error message can prevent you from viewing the desired content.
In this article, we will focus on error code 8056, what it means, and how to fix it.
What does error code 8056 mean on Prime Video?
When there is a problem with the updating of the Prime Video app, error code 8056 is shown. The list below includes a few of the typical causes:
Insufficient storage
Weak Wi-Fi signal strength
Corrupt cache data
Outdated Fire TV OS
The Prime video server is down.
Enabled debloat tools that prevent updating
How do I fix error code 8056 on Prime Video?
1. Reset the router
Unplug the Power supply for your modem and/or router for roughly a minute.
Reconnect the power cord and observe the flashing lights to see if the modem and/or router has fully restarted.
Check on another device to ensure your internet connection is operational (smartphone, computer, tablet, etc.).
2. Restart your device
Close the prime video app.
Click the Power button on your device to switch it off.
Unplug the device from the power source for a minute, and then plug it back.
Launch the Prime Video app.
3. Check your Internet speed
Open your favorite internet browser and navigate to the search engine.
Simply type speed test into the search bar if you’re using Bing or Google as your search engine.
Select an option to instantly test your internet speed in the browser or click on a speed test website in your search results for a quick test of your ping, download, and upload rates.
Get another provider if the speed is slow.
4. Check if the problem also occurs in other online services
Open another online video service such as Netflix.
Check to see if you encounter any errors.
If you do not, then the issue is with the Prime Video app. Try again to open it at a later time.
5. Have the correct date and time settings in your device
On Google TV/Android TV
On your remote, select the Quick Settings button then choose Settings.
If the remote control lacks a Quick Settings button, choose the Home button then Settings.
Choose Date and Time or Set date and time and ensure that they are correctly set.
Other TV models
Press the Home button on the remote control.
Go to the Settings section then choose System Settings.
Choose Time, then Clock Set, and then select whether to set it manually or automatically.
There are different ways of force quitting the Prime Video app depending on the device you are using. On your Android device:
Open your device.
Go to the Settings app.
Navigate to app management.
Choose the Prime Video app.
Tap on Force Stop.
On your Windows device:
Right-click on the Taskbar and select Task Manager.
Select the Processes tab and then right-click Prime Video under applications.
Click on End task.
The Prime Video app is one of the most used streaming applications today. You can, however, encounter errors such as the error code 8056.
Fortunately, this error can be solved easily without too much hassle. If you having issues with Prime and your browser, then our Amazon Prime Video not working in Firefox guide should be able to help you.
Let us know about your experience handling this error in the comments section below.
A driver is a critical piece of software that facilitates the relay of commands between the OS and the device. Every hardware connected to the PC has a separate drive installed. But what happens when you encounter an outdated driver’s error in Windows 11?
And there may be a few other questions you have always wanted to answer. For instance, when you encounter an outdated driver’s error, why should you update them, what the benefits of it are, and which are the ones to be updated frequently?
In the following sections, we will try and answer as many queries users generally have and list the best fixes for the error.
When do I encounter the outdated driver’s error in Windows 11?
Errors with an outdated driver can be encountered while running an application/tool or performing a task. For example, users generally encounter this issue with the graphics driver when playing games on Windows. For instance, Battlefield 2042 recently displayed this error.
Apart from these, you may also encounter issues while performing everyday tasks and notice poor computer performance when on an outdated driver.
Moreover, there are multiple devices that you can encounter such errors on. Some of them are the following:
AMD outdated drivers in Windows 11 – The solutions below are easy to follow on AMD laptops/computers.
Asus outdated drivers in Windows 11 – Asus users are no exception from driver issues. Drivers need to updated regardless of what computer brand you are using.
Lenovo outdated drivers in Windows 11 – Outdated drivers can cause a multiplicity of errors that can be avoided.
HP outdated drivers in Windows 11 – By updating your drivers regularly, you won’t have to bother with troubleshooting driver errors in the future.
Where can I find the devices listed on the computer?
All the devices connected to the computer, external and internal, can be listed in Device Manager. They are sorted based on the category they fall under. Here’s how you can view the various devices.
Press Windows + R to launch the Run command. Type devmgmt.msc in the text field and either click on OK or hit Enter to launch the Device Manager.
You will now find various categories listed here, just double-click on an individual entry or click on the caret icon to expand and view the devices under it.
How can I find the currently installed driver’s version?
When updating drivers, it’s imperative that you first identify the currently installed version to determine if an update is available. The process is simple, straightforward, and wouldn’t take more than a minute.
NOTE
We will take up the Graphics driver for all examples in this article since it’s one of the most critical. However, after understanding the process conceptually, you should be able to update any driver on the computer.
Launch Device Manager by right-clicking the Start icon from your Taskbar and selecting it from the options.
Double-click on the entry under which the device is listed to expand and view it.
Right-click on the device and select Properties from the context menu.
Navigate to the Driver tab and jot down the Driver Version.
Once you have the version of the currently installed driver, it would be easy to identify if the version you are about to install is newer.
Do I need to update drivers for Windows 11?
It should come as no surprise that maintaining an up-to-date set of system drivers is essential to achieving peak performance from your personal computer and a distraction-free work environment.
Even though more recent versions of Windows, such as Windows 10 and 11, automatically update drivers via OS updates, many drivers may remain out of date.
Without further ado, let’s see what you can do specifically to solve driver issues in Windows 11. Follow along!
How can I fix the outdated drivers error in Windows 11?
1. Enable the graphics card
Press Windows + R to launch the Run command.
Type or paste devmgmt.msc in the text field, and click on OK or hit Enter to launch Device Manager.
Locate and double-click on the Display adapters option.
Right-click on the graphics adapter and select Enable device from the context menu.
Close Device Manager and check if you can perform the action that was restricted earlier.
Many users reported the outdated driver error on Minecraft and efficiently fixed it by enabling the graphics card. However, if the display adapter is disabled, your computer will switch to the generic version, which may lead to issues when high-end graphics are required.
2. Update the driver
2.1 Via Device Manager
Press Windows + S to launch the Search menu.
Enter Device Manager in the text field at the top and click on the relevant search result that appears.
Double-click on the entry under which the device is placed.
Right-click on the device and select Update driver from the context menu.
Select Search automatically for drivers from the two options in the Update Drivers window. This is how to update outdated drivers in Windows 11.
You would have noticed earlier that Windows only scans your system for any available updates in this method. So, in simple terms, only the updates that have already been downloaded to the computer can be installed this way.
If Windows was able to find a newer version and install it, go ahead and check if the error is fixed.
2.2 Via Windows Update
Press Windows + I to launch the Settings app.
Select Windows Update from the tabs listed in the navigation pane on the left.
Click on Advanced Options on the right.
Select Optional Updates under Additional Options.
Click on Driver updates if there are any available. The figure in the bracket next to it depicts the number of updates available for download.
Tick the checkbox for the driver and click on Download & install to begin the process.
Wait for the installation process to complete, and then restart the computer for the changes to effect. The Windows 11 driver error will be fixed afterward.
You should download driver updates through Windows Update since these are all checked and tested by Microsoft. Also, the installation is automatic, so you haven’t much to do after downloading the driver.
After the update is done, check if the outdated drivers error on Windows 11 is fixed.
If you couldn’t find a newer version offline (Device Manager) and in the Windows Update section, look for it on the manufacturer’s website. Here’s how you can do that.
Search for the update using the Driver Name and OS (Windows 11) as the keywords.
Locate and open the manufacturer’s website from the search results.
Since you already have the version of the currently installed driver, it would be easy to identify if there’s a newer version available. If you find one, download it.
If the downloaded file is in .exe format, double-click on it to launch the installer and follow the on-screen instructions to complete the process.
After installing the latest driver version, restart the computer for the changes to effect.
You can easily find all the recent updates on the manufacturer’s website and install them.
You had to go through so much trouble because many manufacturers, instead of submitting the driver update to Microsoft, upload it on their official website. These drivers may later be accessible through Windows Update, but going the extra mile will get you the latest driver sooner than others.
Below, we have listed the links to the driver support pages of some of the manufacturers:
On many of these websites, you will find a tool that automatically detects drivers installed on your computer and lists available updates.
NOTE
If you can’t find the concerned driver on the manufacturer’s website, other third-party sources are available. However, it’s recommended that you do thorough research before downloading from one of these since there’s a high possibility of it being malware disguised as a driver update.
The above three methods, although practical, consume a lot of time and can be tricky for some users. To them, we recommend downloading Outbyte Driver Updater, a reliable tool that will keep the installed drivers up-to-date.
It will scan for available updates and download them to your computer. You will find other similar third-party tools available, but we recommend being extra cautious when using those.
Outbyte Driver Updater
Automatically find and install all updates and keep all your drivers up to date.
Enter change device installation settings in the text field and click on the relevant search result to launch Device installation settings.
Select Yes (recommended) and click on Save Changes.
You can also set driver updates to automatic and let Windows take care of all future downloads. Once the setting is enabled, your system will install any available new versions and keep your drivers up-to-date.
Select Windows Update from the tabs listed in the navigation pane on the left.
Click on Check for updates to scan and download, if any are available.
After updating, check if the outdated drivers error is fixed.
When you update Windows, patches, driver updates, and new features or changes are added to the computer. This ensures that your system remains up-to-date, including the installed drivers, thus offering both high performance and higher levels of security and privacy.
Should I update all drivers installed on the PC?
It may come as a surprise to a lot of users, but the answer is No. If the currently installed drivers are working fine, there’s no need for you to meddle.
However, if you start encountering errors frequently or notice poor system performance, it could be due to an outdated driver. In such cases, you must update them.
Which driver should I update on the PC?
Regarding updating, it’s recommended that you keep the critical ones up-to-date: the graphics driver, those for the network adapter, and disks.
While drivers for peripherals, namely the keyboard, mice, and speakers, are just fine and don’t need to be updated very often. Even if there’s an update available, you won’t notice any considerable change in performance after upgrading to the latest version.
So the bottom line here is not to update a driver until it starts throwing errors or affects the system performance.
How do I reinstall drivers on Windows 11?
Right-click the Start icon from your Taskbar, then select Device Manager.
Expand the section with the driver you want to uninstall, then right-click and select Uninstall device.
Reboot your computer to reinstall that driver automatically. That’s it!
The above fixes will likely resolve the outdated drivers error on Windows 11. All you have to do is identify the one responsible for the problem and then update it.
You also now know when to update a driver and which ones. Get done with the troubleshooting and have your system up and running like new.
Speaking of driver errors, we also have a guide on how to fix Error Not Safe Mode Driver, so don’t miss it.
Let us know which fix worked for you in the comments section below.
If the remote desktop is not asking for credentials while connecting, you can follow this guide to solve this issue.
To use another computer from your PC or vice versa, a remote desktop on Windows is an excellent feature. It works very smoothly without any problem. Particularly for business users, it is an essential feature.
However, sometimes, it may not work correctly. Usually, the remote desktop client asks for passwords every time you want to connect. You can enable or disable it. If disabled, it won’t ask but will connect using the saved credentials.
But, the problem occurs when the remote desktop doesn’t ask for credentials and also doesn’t connect. This problem can be very annoying and may prevent you from using RD completely.
Why is the remote desktop not asking for passwords?
There are several reasons your RD is not asking for credentials. After analysis, our team has found these as the most common ones:
The feature is disabled
Misconfiguration or a software bug
Corrupted registry
Fortunately, you can easily overcome these things and solve this problem. You will just need to follow some methods that you can find in the next part of this post.
How do I fix the remote desktop not asking for credentials on Windows?
1. Add or delete credentials manually
Open the Start Menu, type Credential Manager, and hit Enter.
Go to Windows Credentials.
Click on Add a Windows credential.
Add the username, password, and remote computer’s name or IP address.
Click on Save.
After adding the details, try to connect the remote desktop and see if it helps. If it doesn’t work or fails by showing some errors, you can delete the credential you have just created.
2. Tweak in Group Policy
Open the Start Menu, type gpedit.msc, and hit Enter.
Under Computer Configuration, expand Administrative Templates.
Go to Windows Components and expand Remote Desktop Services.
Click on Remote Desktop Session Host and then go to Security.
Double-click on the Always prompt for password upon connection.
Enable it and save the settings.
After enabling, you should restart your computer and verify if it is working or not.
3. Tweak Registry
In the Start Menu search, type regedit and hit Enter.
Go to the following location on Windows Registry Editor: HKEY_LOCAL_MACHINE\SOFTWARE\Policies\Microsoft\Windows NT\Terminal Services
Right-click on the right-side in blank space and add a new DWORD (32-bit) value and name it as fPromptForPassword, and hit Enter.
Double-click on it and set the hexadecimal value to 1.
If you already see the registry with the same name, you won’t have to create one. You will just change its value to 1. Then, see if it has fixed the remote desktop not asking for credentials or not.
4. Fix registry
Sometimes, corrupted registry keys can be another reason you are facing this problem. For this, you should fix the registry keys. It will be very technical if you attempt to do it manually. So, we recommend you use a tool like CCleaner.
This type of tool can repair the registry and do other optimization that will boost your PC performance and give you a smooth computing experience.
CCleaner
CCleaner is an excellent PC optimization tool with a lot of features, including a registry fixer that can help you to fix many errors on Windows.
Press Win + I on the keyboard to go to Windows Settings.
Go to System and click on Recovery.
Click on Reset PC.
Choose the option between removing everything or keeping files according to your preference.
After resetting, you will no longer face the remote desktop not asking for a password and username. It will also solve other Windows-related problems as well.
What can I do if Always ask for credentials remote desktop is greyed out?
Some users may find out that the Always ask for credentials option is greyed out on Windows. Especially Windows 10 users get this error more. On the latest Windows 11, there is no such option. Instead, you will find Allow me to save credentials.
If either of them is greyed out, it means there is something wrong. You will need to enable them from the group policy or registry, as shown in methods 3 and 4.
If not, resetting the PC will solve everything.
This article has featured the ways to fix remote desktop not asking for credentials. If you have any helpful suggestions on this that may help others, feel free to input them in the comment box.
Remote desktop connections allow users to view and transfer files from one local machine to another.
The inability to use copy and paste in RDP is one of the most annoying Windows issues.
Users of RDP often report that they are unable to copy text or files from their local computer and paste them on the remote computer, or vice versa.
This is one of the most prevalent issues that users have with RDP software.
This guide will provide you with a number of different solutions for the issue of copy and paste not functioning while using a remote desktop connection.
Why does Remote Desktop not allow copy and paste?
Troubleshooting must be performed when a Windows desktop’s connection to its host through the remote desktop protocol fails.
This may include examining firewall settings, security certificates, and other such items.
Network outages, difficulties with SSL certificates, authentication challenges, and storage constraints are just a few of the obstacles. These issues are faced by administrators while using remote desktop connections.
Other common reasons why you cannot copy paste in Remote Desktop are:
Issues with the Credential Security Support Provider (CredSSP) protocol
Connectivity issues due to exceeded infrastructure capacity
Remote desktop connectivity issues
After knowing the common reasons for this problem, let’s head toward the solutions to fix it.
What can I do if remote desktop computer is not allowing copy-paste?
1. Run the RDP from Task Manager
Turn off the RDP, click the File tab in the Task Manager, and select Run New Task.
Now type rdpclip.exe (your RDP name) and click OK.
Now, you will probably face no trouble in copying and pasting the text from a remote computer.
2. Enable copy-paste functions from RDP connection properties
Click on Show Options on the RDP connection window.
Click on the option labeled Local Resources.
Make sure the Clipboard option is selected and click More.
Select the Drives option. Click OK.
Now click Connect.
By making these adjustments, you have successfully enabled the ability to copy and paste between the local and remote computers.
3. Enable Remote Desktop Clipboard Redirection on the client’s computer
To open a Run dialogue box on the client computer, simultaneously press the Windows + R.
Type regedit in the text box of the dialogue box and click OK to open the Registry Editor.
In Registry, go to the following path: HKEY_LOCAL_MACHINE\Software\Microsoft\Terminal Server Client
Now, Ensure that the value data of the DisableClipboardRedirectionis set to 0. If the value is 1, change it to 0, then close the Registry Editor.
Restart your PC and then see if the copy/paste function in RDP is working or not.
4. Fix Remote Desktop copy-paste not working in Registry
Open the command box by pressing Window + R, type regedit, and press Enter.
In the Registry Editor, go to the two places below and change the value of the fDisableClip REG DWORD to 0. HKEY_LOCAL_MACHINE\SYSTEM\CurrentControlSet\Control\Terminal Server\Wds\rdpwd and HKEY_LOCAL_MACHINE\SYSTEM\CurrentControlSet\Control\Terminal Server\WinStations\RDP-Tc
Restart after making the change, and then check the copy-and-paste function in the Remote Desktop.
5. Enable copy-paste in Remote Desktop through Group Policy
To launch the Run dialogue box, press both the Windows and R keys simultaneously on your keyboard.
Type gpedit.msc into the text field of the dialogue box and click OK open the Group Policy Editor.
In the Local Group Policy Editor, go to the following path: Computer Configuration\Administrative Templates\Windows Components\Remote Desktop Services\Remote Desktop Session Host\Device and Resource Redirection
Open the Do not allow Clipboard redirection on the right.
Select the Disabled option and then click OK.
Close the Group Policy Editor application.
Open Command Prompt as Administrator and enter the following command to change the group policy or restart the machine and you are good to go. gpupdate /force
Copy-pasting problem is very common in RDP, but obviously, if there is a problem then there is a solution too.
We hope that the above solutions helped you in fixing the Remote Desktop copy-paste not working problem.
Do let us know using the comments section below which of the above methods worked for you. Also, feel free to ask any related questions that you may have.
The WMI Provider Host process plays a crucial role in Windows 11. It makes it possible for other applications to request information about your computer.
Processes associated with the WMI Provider Host typically run in the background; as such, they usually don’t consume many system resources.
However, it has been reported that this service can sometimes use more than 50% of the CPU power because of other applications.
Today’s guide will examine why WMI Provider Host has high CPU usage on Windows 11 and how you can fix this problem.
Why does WMI take up so much CPU?
As stated earlier, the WMI Provider Host process should not register high CPU usage usually. However, some factors, like the activities of third-party apps, can make it deviate from the norms.
Also, the high CPU usage might be due to problems with the associated services. Restarting these services should help fix this issue.
Why is WMI Provider Host causing high memory usage?
In most cases, this is caused by third-party applications or services associated with the WMI Provider Host, so you need to find the cause of the problem and remove it.
Sometimes a quick restart of associated services can help; you make sure you try that as well.
How can I fix the WMI Provider Host’s high CPU usage on Windows 11?
1. Initiate a Clean Boot
Launch the Run menu by pressing Windows key + R and entering msconfig. Once done, press Enter.
Upon opening the System Configuration window, navigate to the Services tab and select Hide all Microsoft services.
Next, click on Disable all.
Next, click on the Startup tab and select Open Task Manager.
An overview of all startup applications will appear. Disable the first application in the list using the right-click menu and click Disable.
Repeat this process for all applications.
Once all applications have been disabled, close the Task Manager and return to the System Configuration window.
Save the changes by clicking OK and Apply.
Restart your PC.
2. Launch System Maintenance Troubleshooter
Open the Run dialog box by pressing the Windows key + R.
Type msdt.exe -id MaintenanceDiagnostic and click OK.
The System Maintenance window will appear. Click on Next and follow the on-screen instructions.
After running the System Maintenance tool, verify that the problem has been fixed.
Once Task Manager is launched, click the Services tab and check each service’s PID.
Once you find a service that corresponds to the value from Step 5, you need to uninstall the application related to that service or stop the service.
4. Restart associated services
Press the Windows key + X and select Windows Terminal (Admin).
Run the following commands: net stop iphlpsvcnet stop wscsvcnet stop winmgmnet start winmgmtnet start wscsvcnet start iphlpsvc
After the commands are completed, restart your PC.
Can I disable WMI Provider Host?
The WMI Provider Host process is a critical system service that ensures your Windows 11 PC runs smoothly. In addition, it serves as the link that allows other applications to request the necessary information from your PC.
So, it can not be disabled, nor can it be stopped from running. You can only try to fix things that might be causing issues with it, as shown in this guide.
Is WMI Provider Host a virus?
WMI Provider Host is a core Windows component that provides management information and control, making it an essential part of Windows.
You can rest assured that the service is entirely safe and malware-free. However, in some rare instances, malware can cause issues with it, most notably high CPU usage.
If you are a member of the Office Insiders community and you are on the Current Channel(Preview) then you will have access to the new Outlook for Windows starting today. Windows Insiders will gain access in a few weeks via a toggle in the Windows Mail app.
Accessing the new Outlook for Windows is easy if you’re an Office Insider and running the Beta Channel or Current Channel(Preview just slide the Try the New Outlook toggle located in the top right corner of your existing Outlook. From there just follow the onscreen instructions. You can always switch back to your previous Outlook by sliding the toggle back and relaunching the app without any data loss.
What’s new in Outlook for Windows?
The ability to add Microsoft Accounts
Now you can add your personal outlook.com, hotmail.com and Windows Live personal email accounts to the new Outlook for Windows.
Quick Steps
Got a task you do often in Outlook? You can save time with the Quick Steps feature which is a personalized list of actions used frequently such as cleaning and organizing your inbox or keeping important files within reach.
Dynamic calendar column widths
Now you can adjust the width of your calendar to make sure you see all the information about your day. You can customize how much space you give each day and see your weekly schedule.
Simplified Ribbon options
Now you can see a sleeker ribbon, making common daily tasks easier to see and access.
Tips in Outlook
Now you can take advantage of tips to let you know when new features roll out and how to take advantage of them right away. You can see tips in the calendar board view and be able to plan everything in one place.
These updates are in addition to the updates previously announced. To take advantage of the new Outlook for Windows you must have at least Windows 10 Version 1809 (Build 17763) and a Microsoft work, school, or personal account at this time. These features are rolling out to Office Insiders running Beta Channel or Current Channel (Preview) Version 2209 (Build 15629.20058) or later of Outlook for Windows.
Is Logitech G Hub not detecting your headset? You’re not alone. While G Hub allows you to customize your experience for Logitech G Gaming devices, for example, G Pro X, G 432, etc., it is prone to hardware issues.
It might also not be connected properly. Regardless, here’s how to fix it:
How to Fix Logitech G Hub if it’s not detecting the headset?
1. Update/reinstall the device drivers
1.1 Update the device drivers
Press the Win + R keys simultaneously to launch the Run console.
In the search field, type devmgmt.msc and hit Enter.
Expand the Universal Serial Bus Controllers section, right-click on the device, and select Updatedriver.
Now, in the Update Drivers window, click on Search automatically for drivers.
Windows will start looking for any latest driver versions and if available, will finish installing automatically.
Once done, close Device Manager, reboot your PC, and check if G Hub can detect your headset now.
Alternatively, you can also visit the headset manufacturer’s website, and download the latest driver version, and install it manually.
1.2 Reinstall the device drivers
Open the Run console by pressing the Win + R shortcut keys.
Type devmgmt.msc in the search bar and hit Enter.
Click to expand Universal Serial Bus Controllers, right-click on the device and select Uninstall device.
In the Uninstall Device prompt, press Uninstall again to confirm.
Once the device is completely uninstalled, click on the Action tab, and select Scan for hardware changes.
This should reinstall the latest device version.
Now check if the issue is resolved or if you are still facing the Logitech G Hub not detecting headset problem.
Otherwise, you can use a tool specialized in driver updates that will scan your PC for all outdated drivers and automatically update each one of them. Plus you can use this software for the long-term maintenance of your system.
3. Disable & enable the device in Sound properties
Press the Win + R hotkeys to open the Run console.
Type mmsys.cpl in the search box and hit Enter to open the Sound window.
Here, select the Recording tab, right-click on Microphone (one that shows your headset name), and select Disable.
Now, wait for a while, right-click on the same Microphone once again, and select Enable.
Once again, select the same Microphone and click on Set Default at the bottom. Press OK.
Now, go to G Hub and check if you can now see your headset and if it’s connected.
4. Run G HUB with the default settings
Close G Hub from the system tray, and press the Win + E hotkey to open the File Explorer.
Here, go to the below location: C:\Users\%UserProfile%\AppData\Local\LGHUB.
Locate settings.json/settings.db, copy this file and save it on your desktop.
Now, delete the settings.json file in the LGHUB folder.
Now, run G HUB, where all the settings will be set back to default, and you should not face any issues with the headset.
5. Revert to previous settings
Exit G Hub and press the Win + E keys together to open File Explorer.
Now, navigate to the below location: C:\Users\%UserProfile%\AppData\Local\LGHUB
Find settings.json/settings.db, copy the file, and save it on your preferred location, for example, desktop.
Next, go back to the G Hub folder and delete settings.json/settings.db.
Now, return to the desktop, copy the settings.json/settings.db file that you saved in step 3, and paste it back into the G Hub folder in the location mentioned in step 2.
Now, launch and run G HUB, and your previous settings should be restored.
How do I connect my headset to my G hub?
To connect your headset to Logitech G Hub on Windows, you can follow the below instructions:
Boot your PC and connect your headset to one of the USB ports.
Wait for a while till the device is installed automatically.
Now, click on the Sound icon located on the right side of the taskbar and click on the arrow next to the volume bar.
Select the connected Logitech USB headset in the Volume menu.
The Logitech headset should now work with your G Hub application and you should not encounter any more issues.
At the same time, make sure you plug in the microphone securely and also press your PC connectivity cable into the correct jack harder until you feel two firm clicks.
You can also connect your headset to another computer to test. But, if it fails to work, chances are the headset is physically damaged, and you should contact Logitech for further assistance.
Why is G Hub not detecting my headset?
Most commonly, G Hub may not detected devices when your drivers are outdated or corupted, when you have compatibility issues, using an older version of the device or you have pending updates. Improper set up can also be at fault.
With the steps outlined above you should be able to make it detect devices.
Don’t act surprised, as we were all expecting the first major update for Windows 11 to have some problems right at the start.
As you surely remember, last week, the Redmond tech giant released version 22H2 for Windows 11, with a lot of new features and improvements.
However, right when users were trying to install this update, they were greeted by error message 0x800f0806 when the setup process failed time and time again.
Back then, Microsoft provided a temporary workaround, but there is no need for that anymore, as the tech company fixed the issue via KB5019311 (build 22621.525).
What is new with Windows 11 build 22621.525?
We are not looking at a long changelog for this cumulative update, as we got accustomed to, as this update was only designed for the installation issue.
Right after the release of version 22H2, when users were trying to do an in-place upgrade via Windows Update in Settings, the whole process would fail with error 0x800f0806.
Judging from early reports, manually downloading and installing the update seems to bypass this problem caused by trying to do an upgrade via Windows Update.
Another user affected by this Windows 11 installation error said that running the Windows 11 Installation Assistant also resolves the problem.
However, you don’t need to worry about this issue anymore, as Microsoft’s latest cumulative update is said to completely eliminate it.
Keep in mind that, since we aren’t talking about Patch Tuesday, this non-security update includes quality improvements only.
So, through this cumulative update, Microsoft addresses localization issues for some setup files, which might stop you from creating installation media for non-English languages.
Also, please keep in mind that, since it is an OOB update, it can be downloaded manually on Microsoft’s Update Catalog website.
That being said, only install it in case you are facing issues with creating installation media for Windows 11 22H2 on non-English languages.
Needless to say, for other users that have nothing to do with the above-mentioned problem, this cumulative update is completely non-essential.
As a reminder, lately, we’ve also been looking at KB5017389 (Release Preview Channel), and build 25206 (Dev Channel).
And, since we’re talking about Windows 11 version 22H2, Microsoft also released a fix for Nvidia graphics card errors associated with the new OS version.
Also, please note that the Windows 10 equivalent for this version, 22H2, is officially coming to all users in October, according to Microsoft.
What can I do if I can’t install KB5019311?
Press Win+ I to access Settings.
Select the System category and click on Troubleshoot.
Press the Other troubleshooters button.
Press the Run button next to Windows Update.
Also, make sure to report any other issues you might come across, in order for Microsoft to address and improve the overall OS experience for us all.
This is everything you can expect if you are a Windows Insider. Leave a comment below if you found any issues since installing this build.
The hardware and devices troubleshooter missing issue on Windows is a problem users may encounter on their PC. It indicates that the Windows in-built troubleshooting tool is not available or working on the computer.
Windows hardware and devices troubleshooter is a built-in tool for detecting and analyzing hardware and device issues on the PC. It comes in handy when you have difficulties with your computer’s hardware and devices, such as Bluetooth, keyboard, audio, printer, Internet connection, battery, etc.
However, the troubleshooter used to be a single app running diagnostics on all hardware and devices on the computer.
The advancement of Windows 10 resulted in the split of its functionality, making the tool inaccessible directly from the Settings app.
Furthermore, the hardware and devices troubleshooter in Windows 11 can be missing for reasons we’ll discuss in this article.
Also, we’ll take you through how you can fix the Windows 10 hardware troubleshooter missing problem on your PC.
Why is the hardware and devices troubleshooter missing on my PC?
The hardware and devices troubleshooter in Windows was accessible in settings for end-users as a single tool for troubleshooting hardware components of the device.
However, the tool may be missing on your computer due to the decision of Microsoft to hide the hardware and device diagnostics tool in Windows 10 1809.
Because most users are using Windows 10, the troubleshooter may not be accessible to the end-user. Instead, deeper toggling needs to be done to access the tool.
Likewise, issues like the Windows update troubleshooter is missing may occur due to update errors encountered during installation.
Nonetheless, Microsoft’s decision to remove the hardware and devices troubleshooter or other factors doesn’t mean users can invoke the troubleshooting tool on their computers.
What can I do to fix the hardware and devices troubleshooter when it is missing?
1. Access the troubleshooter via the command line
Click on the Start button.
Type cmd in the search box, then press Enter.
Select the Command Prompt from the search results.
Type the following in the Command Prompt: msdt.exe -id DeviceDiagnostic
Press Enter to invoke the Hardware and Devices Troubleshooter.
Once the troubleshooter appears, you’ll be able to troubleshoot various hardware issues on your computer.
You can learn more about how the Hardware And Devices Troubleshooter works and what it can repair when this tool opens through command line access.
2. Use the hardware troubleshooter command
Click on the Start button.
Type cmd in the search box, then press Enter.
Select the Command Prompt from the search results.
Type the following in the command prompt: mysdt.auxiliary diagnostic device
Press Enter to prompt the Windows Hardware and Device Troubleshooter.
Click Next to proceed with the analysis and troubleshooting process.
Accessing the troubleshooter via CMD is an alternative if the Windows 10 hardware troubleshooter is missing.
3. Uninstall recent Windows updates
Press Windows + I to open Settings.
Go to Windows Update and select Update history.
Click Uninstall updates and select the most recent update.
Click on Uninstall.
Uninstalling the recent Windows update should help fix any issue with the Windows troubleshooter.
4. Use an alternative troubleshooting tool
Sometimes, you may require the aid of an external tool to help diagnose and troubleshoot issues like this.
You may use a multi-purpose tool designed to solve most problems that users cannot solve. A system repair tool focuses on damaged registries, system files, and DLL files. It also offers malware scanning and other security features.
Scanning your PC will detect and fix all these errors. If the file is corrupted, it will be replaced with the original Windows version.
Using such a troubleshooter will save you the hassle of fixing the problem.
5. Restart Windows in Safe Mode
On the sign-in screen, press Shift while clicking the Power button.
Press shift to prompt the Advanced Recovery Options window.
Click on Troubleshoot and select Advanced options.
It works much the same way that gamer handles do on other platforms; users can create a unique public username that is ubiquitous across all games, and is separate from a user’s Netflix username and profile picture. The gamer handle is also what will display in online leaderboards and in multiplayer games.
As Mobile Games Product Manager for Netflix Sophia Yang said,
(The launch of Netflix gamertags) Is only the beginning in building a tailored game experience for our members around the world. We’ll continue to adapt and evolve our service to meet the needs of our members…”
Does this suggest the forthcoming arrival of other features like the ability for users to show online status and invite others into the games they are playing? As has already been reported by TechCrunch, the code for such implementation is present within the app.
It is needless to talk about the importance of a computer’s microphone. Just think about all your video chat sessions on Skype or Zoom and the like, and you already realize how much you depend on a functional microphone in your Windows 11 device.
As such, it may be tough to think of a situation where your microphone is not working. However, issues with the microphone can occur for various reasons. One common issue is when updates are improperly installed; this can cause inconveniences like yours.
Another possible cause of your problem could be hardware-related, and in such cases, it’s best to consult a technician as soon as possible.
It is also worth noting that when you upgrade your device to Windows 11, it might affect the functionality of your microphone.
What causes a microphone to stop working?
It may fail to work because of a variety of issues with its settings, configuration, and even conflicts with other hardware.
To fix the laptop’s microphone, you’ll have to troubleshoot problems in each of these categories.
Here are the most common issues that may be behind the microphone not working on your laptop:
Poor microphone hardware: Defective or aging microphone hardware or problems with internal wiring may be to blame
Outdated drivers: If your computer’s driver is out of date, you may still be able to use it but with degraded performance, or it may not work at all
Other issues: Simple problems, such as a muted microphone or an incorrectly configured device, often cause this problem.
Why is my mic not working but I can hear?
It’s possible that your microphone is working just fine, but the volume of your microphone may be turned down too low, and people cannot hear you.
Check the volume of your microphone (sometimes referred to on your computer as the recording or input device) to be sure that you are audible enough and able to pass the information you want to put across.
What can I do if the Intel SST microphone isn’t working in Windows 11?
1. Unplug then plug in the mic
Laptops have the ability to switch automatically between the built-in microphone and external hardware when an external microphone is plugged in.
If you’re listening to sound through your speakers and not through a headset and can’t get any sound from your audio device, try unplugging and plugging your audio device back in.
Or you may try plugging an external input into the device and then unplugging it if you need to change the input. Doing so may cause the software to switch to the correct input.
If you still cannot enable your microphone, it may be due to a hardware or driver conflict.
In either case, running the troubleshooter or updating the device driver may allow you to enable your microphone. We recommend Outbyte Driver Updater as a reliable option that has a huge database of drivers that are scanned and safe to use.
Outbyte Driver Updater
A reliable solution that helps you scan your PC drivers and maintain them up-to-date to prevent this kind of issue.
If the microphone isn’t working, check to ensure it’s securely connected to your PC. If the connection feels a little loose though it appears to be plugged in all the way, it will not work correctly. Pull out the cable and plug it back in.
Internal or external microphones require a separate audio cable; ensure you purchase a cable that’s at least three meters long. Outgoing audio jacks are often green, while microphone input jacks are often pink; but sometimes they’re the same dull color.
Some microphones have a mute switch that can be enabled. For example, PC headsets often include a mute switch on the cable leading to the microphone.
If the microphone uses a mute switch, it won’t function unless you enable the wire-mounted switch. Therefore, be sure to check that out before trying any of these fixes.
3. Ensure it is compatible with your device
If you can use both the audio and microphone jacks on your headset, and they are separate jacks (one is not simply a combination of the other), then your computer should also have audio and microphone ports.
However, if you have only one jack on your computer, you will need to either purchase a headset with a single jack or purchase a converter that converts the double 3.5mm jacks found on most headsets into a single 3.5mm jack.
If your headphones only have a single 3.5mm jack, and you are using it with a computer or laptop that only has one port for audio input and output, you will need an adapter to capture both the audio signal (into the computer) and the microphone signal (for use with programs like Skype).
Here is a list of some of the common microphones available:
A headset with 2 separate 3.5mm jacks: one for the microphone, one for the audio
Potentially, a headset or earphones with only one jack: 2 in 1 (microphone and audio in the same 3.5mm jack)
A USB headset with a microphone
Bluetooth headphones with a microphone
4. Make sure the app you are using has access
On your keyboard, press the Windows logo key and type microphone, then click on Microphone privacy settings.
Under the Let desktop apps to access your microphone section, make sure the toggle is On so that you can allow apps access to your microphone.
Scroll down to the Choose which apps can access your microphone section and make sure the toggle for the app you’re using the microphone with is turned On.
Check the mic and see if the microphone not working on the laptop issue has been resolved.
Apps you install on your device might request permissions to access the microphone. If you have not granted that permission, the microphone will not be working.
5. Troubleshoot audio recordings
Press Windows + R, type Control Panel, then click on OK.
Select Large icons from the View by dropdown menu, and click on Troubleshooting.
Then, click on Troubleshoot audio recording.
Wait for the system to resolve the problem.
If you’re still having trouble after trying the solutions here, it’s time to check the computer for hardware problems. And it’s best that you let an expert handle things with the hardware.
Moreover, if the microphone works on another computer, you should contact the vendor of your laptop for advice.
6. Check your device for malware
If you find that your microphone’s volume level is reset to 0, you might have malware on your PC. Certain malware can interfere with the way your computer handles your microphone, and this could cause the volume level to drop.
This problem, however, can be fixed by scanning your machine using an antivirus. Although there are many great antivirus applications on the market, if your current antivirus can’t fix this problem, you might want to consider making a switch to the best solution available.
You can install any of the most reliable antiviruses for Windows 11 and fix things with the microphone and along with other malware-related problems.
If you are a music lover or passionate gamer, chances are you would be interested in a system-wide sound equalizer. Find out how to add a sound equalizer for Windows 10 since the steps may also be applied in Windows 11.
Were you able to restore the functionality of your Intel SST microphone? Share your thoughts with us in the comment section below.
Using a Chromebook allows you to get your tasks done faster and easier, but you can experience many difficulties with the device. The Chromebook microphone not working is one of the problems users complain about when using the tablet.
Many people are imbibing the idea of using Chromebook for work and school purposes, making it more sorted. It is a laptop that runs on the Linux-based Chrome OS as its operating system.
It uses web apps like Google Chrome browser for performing tasks and also can install & run Android and full-fledged Linux apps.
However, running into issues with the Chromebook is not surprising as users complain about numerous problems plaguing the device. Some are the Chromebook camera and microphone not working.
Furthermore, you may experience the microphone not working on the Chromebook in several instances.
The Chromebook microphone can stop working in apps Zoom and Chrome that use the microphone. However, the issues can occur for many reasons, and we’ll discuss how to fix them in this article.
Where is the microphone on Chromebook?
The Chromebook’s microphone is beside the camera at the top of the screen. It looks like a small hole, protecting the device from being damaged.
Why is the microphone not working on Chromebook?
Startup errors on the Chromebook: Chromebook users may experience issues with devices on their Chromebook, like microphones and cameras, because of startup issues. The device can encounter numerous difficulties during boot that may affect how it interacts with its components and peripherals. Likewise, shutting down the Chromebook suddenly causes malfunctions and can impede its performance.
Issues with the app using the microphone on Chromebook: There is a chance that the app you’re trying to use the microphone on is not running correctly. It can result in the Chromebook microphone not working on apps like Zoom and Meet. Also, the microphone may not work on Chrome if it’s not working correctly.
Outdated Chromebook: An outdated Chromebook can cause many issues with its functionality and performance. It can result in bug infestations that affect the device. The Chrome OS updates and patches help you fix bugs that may be affecting the Chromebook. So, if the Chromebook is not up-to-date, it won’t have access to such patches.
Issues with audio input settings on Chromebook: You may experience problems using the microphone on Chromebook if the audio input is disabled. It prevents your device from using the audio input feature in the microphone. So, the HP Chromebook microphone not working can be due to audio input settings issues.
Low microphone sensitivity: Low sensitivity can also make your Chromebook microphone not work. If the microphone sensitivity on your Chromebook is low, it’ll be hard to pick up sounds, making it seem like the microphone isn’t working.
The problem you’re experiencing may be limited to only the app you’re currently using. So, we recommend you try using the microphone in another app to check if the issue persists.
Although this is not always the case, this can not be ruled out as an option. If you try the microphone on a different app and it works fine, you may need to reinstall or troubleshoot the previous app.
7. Disable interfering extensions
On the Chrome browser, click the menu button.
Select More tools from the menu and click on Extensions.
Disable an extension and try if your microphone works.
If it doesn’t, enable the disabled extension and repeat the process for other extensions.
Don’t know what to play on Game Pass? With literally hundreds of games available on the service across just about every genre imaginable, it can be tough figuring out where to start. Lucky for you, we have you covered with these Game Pass recommendations for those who love a great hidden gem. These games are some of the most underappreciated titles not only on Game Pass, but in all gaming. But here we give them a chance to shine. Read on and discover your next all-time favorite that’s just waiting for you down below.
Alice: Madness Returns
Eleven years ago Alice lost her family to a horrific fire. Afterwards Alice struggled to face her demons by escaping to Wonderland.
Based on the immensely influential classic poem, Dante’s Inferno takes you on an epic quest of vengeance and redemption through the Nine Circles of Hell.
Go big or never go home! The game’s full release has finally arrived!
Paradise Killer
Paradise Island, a world outside reality. There’s been a murder that only “investigation freak” Lady Love Dies can solve. You can accuse anyone, but you’ll have to prove your case in trial to convict.
In Prey, you are the subject of an experiment but things have gone terribly wrong. Your ability to survive a hostile alien onslaught will depend on your wits, weapons, and newfound abilities.
A 2D Metroidvania-style game developed under the supervision of Ryo Mizuno, depicting the story of Deedlit and the events leading up to Record of Lodoss War: Diadem of the Covenant.
Welcome to San Francisco. Play as Marcus, a brilliant young hacker, and join the most notorious hacker group, DedSec. Your objective: execute the biggest hack in history.
Now that you’ve scoured our list of the most overlooked hidden gems on the Xbox Game Pass library, which are you most excited to try out? Have you already discovered any of these underrated games on your own? Tell us about your experiences in the comments section.
And if you don’t already have an Xbox Game Pass subscription, you can sign up here. Learn more about the service over on the Xbox Game Pass FAQ page. Don’t forget to check out our other “What to play on Game Pass” posts for other Xbox Game Pass recommendations. And thanks for reading.
During the pandemic, most companies shifted their focus and resources towards developing and improving their web conferencing tools.
Because social distancing became the norm, everyone had to adapt. People started working and attending school from their bedrooms.
Corporate giants such as Google invested in their conferencing platforms. Google Meet is the go-to choice of institutions most of the time, so you can imagine that there are countless meetings taking place as we speak.
However, even the most used app on the market can encounter some issues from time to time.
People have reported that, when their meeting includes a substantial amount of people, their microphones get automatically turned off/disabled.
How can I fix sound issues on Google Meet?
1. Unmute yourself manually
Click on the microphone icon at the bottom.
Your microphone should now be unmuted.
While this is an obvious solution, sometimes all you need to do to fix an issue is right in front of you.
Even if the app muted you due to the increased number of participants, you can simply mute yourself and it should fix the issue most of the time.
2. Troubleshoot the microphone
Press Windows + I to open Settings, and click on System.
Select Sound from the navigation pane on the left.
Scroll down to the Input section, and select the device you want to troubleshoot from the dropdown menu.
Click on Troubleshoot.
Follow the steps that pop up on the screen.
Fortunately, Microsoft has already implemented a solution to detect and potentially solve your microphone problems.
Following these steps should ensure that your microphone is working properly. This setup will identify any possible problems with your device.
If it does not encounter anything unusual, it means your problem is probably software-related because your input device is not malfunctioning.
3. Restart the browser
It’s not unusual for the browser or the meeting itself to act up. Make sure you close and open them again. Also, make sure you save your unsaved progress before closing any open tab.
You can also try using a different browser. Sometimes applications work better on different browsers, so don’t hesitate to give a try to this tip as well.
One of the browsers with the best response rates on the market is Opera. It is stable and secure, and it has a very minimalistic, but resourceful user interface.
Opera ensure a great browsing experience with integrated social-media add-ons, free VPN, and tons of other free add-ons that you can install to enhance your experience.
Opera
Enjoy browsing the internet without any impediments by giving Opera a try.
If simply restarting your browser won’t fix the problem, try restarting your device.
Sometimes the plugged chords of your different input/output devices can get their signals messed up, resulting in malfunctioning. A fresh start should settle everything.
There you go. These easy and simple solutions should cover up all the possible issues you could have with your microphone during Google Meet calls.
Most of them do not require elaborate fixes since the problem usually solves itself after restarting your system. In case the problem lies with the OS itself, find out how to fix microphone issues in Windows.
Do not hesitate to give us feedback about the solutions written above. Also, feel free to leave a comment if you have any questions.
Printers are a staple device in many households, and it can be frustrating when they don’t work properly. Users report that they are unable to install the driver for their Canon printer. Here are five solutions on how to easily fix this issue.
Many users reported receiving an error that the driver for their Canon printer was unavailable and unable to install on their PC. If you’re having issues with the Bluetooth not working on your Canon printer, we offer solutions for that as well.
Printer problems can be extremely frustrating and inconvenient. Keep reading to find out how to quickly fix your Canon printer and install the driver.
Why is my Canon printer driver not installing?
One of the main reasons why the driver for a Canon printer might not install or is unavailable is because the driver is outdated. The driver might be unavailable because it’s not compatible with your laptop and your computer doesn’t recognize it.
There could also be an issue with the Setup CD-ROM disk that came with your Canon printer. If it’s not installing properly, you can find the driver you need for your printer on Canon’s website.
How do I fix my Canon printer driver if it’s not installing?
1. Temporarily turn off firewall and antivirus
Click on Start and search Windows Security, then hit Enter.
Select Firewall & network protection then click on Private network.
Toggle Microsoft Defender Firewall to off.
Try installing the Canon printer driver after temporarily disabling the Microsoft Defender Firewall. Also, disable any third-party anti-viruses you may have on your PC. These security features may be interfering with the installation process.
Remember to turn the firewall and antivirus back on once you install the driver.
2. Update Windows
Click on Start and open Settings (or press Windows + I).
Select Windows Update and check for updates.
Perform any available updates.
Click on Advanced options.
Under Additional options, click on Optional updates.
Perform any additional updates.
If your PC is out of date then the Canon printer driver may not install. Try updating your computer and performing any optional updates and then try installing the driver.
3. Restart Print Spooler
Right-click on Start and select Run.
Type services.msc and then click OK.
Scroll until you find the Print Spooler and right-click on it.
Select Restart.
The Print Spooler handles interactions with your printer. If you’re having issues with Canon not being able to install drivers, then restarting the spooler may help fix this problem.
4. Remove other printers
Click on Start and search for Control Panel then hit Enter.
Under Hardware and Sound click View devices and printers.
Right-click on a printer that isn’t the Canon and select Remove device.
Repeat step 3 on all other printers that aren’t the Canon printer.
Other printers may be interfering with the Canon printer and may not allow the driver to install. Try removing other printers and then install the driver.
Scroll down to Software & Drivers and enter your operating system and version.
Download the Full Driver & Software Package.
If you were trying to install the Canon driver using the Setup CD-ROM and it’s having installation issues, try downloading the driver directly from Canon’s website. That way you get the latest version of the driver and don’t have to deal with the disk.
If you own the Canon G3110 model, you can skip the manual search and go straight to this Canon G3110 driver download guide for the correct package and installation instructions.
How do I manually update my printer driver?
Click on Start and search Control Panel then hit Enter.
Select Hardware and Sound then click on Device Manager.
Scroll down and open the dropdown menu for Printers.
Right-click on your printer and select Update driver.
Click Search automatically for drivers.
Regularly update your drivers to avoid any issues like download driver failed. You can also update drivers through regular Windows updates if you don’t want to individually go through and check for updates for each driver.
Windows updates won’t update every driver you have since it’s only focused on Windows apps. If you want to automatically update all your drivers regularly, you should use a specialized tool.
Hopefully, one of the above solutions helped you fix your Canon printer if the driver wasn’t installing on your PC. If you’re having issues with your Canon printer not scanning in Windows 10 or 11, we offer a guide for that as well.
According to a write up by TechCrunch, Space and Time managed a $20 million round of funding recently with Microsoft’s M12 venture fund leading the investment pile.
Among M12’s investment parties for the Time and Space’s vision of automated business logics are Framework Ventures, HashKy, SevenX Ventures, Foresight Ventures, Polygon and Avalanche’s Blizzard ecosystem fund.
As CEO and co-founder of Space and Time Nate Holiday puts it, M12 is investing in “…a world where smart contracts will operate the business logic of the world through advance automation.” Holiday and co hopes to achieve its goals by using its “Proof-of-SQL” cryptography, which would automate the business logic used in traditional centralized systems and applying that directly to smart contracts and eventually into Microsoft Azure to give users access to its blockchain data.
Ultimately, Space and Time’s technology is intended to give blockchain developers the tools needed to build multi-chain decentralized apps (dApps) at lower cost and scale Web3 into a more robust and safer platform.
Space and Time will roll out a limited preview for DeFi and gaming protocols at the end of the year with an eye on a test net phase scheduled for Spring 2023 and a possible production launch at the end of next year.