Slim Rancher 2 and more added to Xbox Game Pass today

Three new video games launched today on Xbox consoles and Windows PC. All three are also now available to play for free via Xbox Game Pass on each platform for those with an active subscription. Each title also has support for Xbox Cloud Play.

Slime Rancher 2 launches today on Windows PC and Microsoft’s Xbox Series X family of consoles in Game Preview. Game Preview is essentially an open beta testing version of the game that’s playable though not as complete as most would like.

Slime Rancher 2 is a sequel to the award-winning, smash-hit original that has been enjoyed by over 10 million fans worldwide. Continue the adventures of Beatrix LeBeau as she journeys to Rainbow Island, a mysterious land brimming with ancient technology, unknown natural resources, and an avalanche of wiggling, jiggling, new slimes to discover. As Beatrix attempts to unravel the island’s secrets and uncover its true purpose, she’ll build, ranch, and farm within a beautiful conservatory, whose sparkling glass walls give her full view of the prismatic paradise she now calls home.

Beacon Pines is now live on Windows PC and both Xbox One and Xbox Series X console families. It’s an action adventure title targeted at kids and families.

Beacon Pines is a cute and creepy adventure set within a mysterious book. You play as both the reader of the book and its main character, Luka.

  • UNCOVER THE TRUTH: Something strange is happening at the old warehouse, and Luka and his friends seem to be the only ones taking notice. Sneak out late, make new friends, uncover hidden truths, and collect words that will change the course of fate!
  • REWRITE PAST EVENTS WITH CHARMS: While helping Luka investigate the strange goings-on in Beacon Pines, you’ll collect special golden charms, each with a word engraved on it. These charms can be used at certain turning points in the story to fill in a blank word and drastically change everything that follows.
  • DISCOVER NEW STORY PATHS: As the book’s reader, you’ll navigate the story’s turning points using The Chronicle: an interactive story tree that branches and grows along with your choices. Exploring one set of events can unlock new charms to use on another branch, leading you to jump back and forth between entirely different versions of the story in order to unravel the mysteries at the heart of Beacon Pines.

SpiderHeck also launched on Windows PC and both current and last gen Xbox consoles today. SpiderHeck is a platform brawler with support for up to four players.

Spiders With Laser Swords! SpiderHeck is a fast-paced couch co-op brawler where spiders dance to the death in the grip of chaotic battles using laser swords, grenades and even rocket launchers to defeat their foes.

Challenge yourself by fighting wave after wave of vicious enemies in endless hours of single-player fun, or let the mayhem begin in a dazzling fight against your friends taking on the enemies in PvE; stab, sling, and scramble your way to victory in this silly spider showdown.

In other Xbox Game Pass news, yesterday say the announcement of the Logitech G CLOUD, a handheld device for playing video games purely via the cloud with support for Xbox Cloud Gaming.

Slime Rancher 2
Slime Rancher 2
Developer:
Monomi Park
Price:
Free


Beacon Pines
Beacon Pines
Developer:
Fellow Traveller
Price:
$19.99


SpiderHeck
SpiderHeck
Developer:
tinyBuild
Price:
Free

3 Quick Ways to Fix Microsoft Bingo Server Connection Error

If you’re a fan of Bingo and have been playing on your Windows computer, you might’ve received a Server Connection Error at some point. In fact, you might even be experiencing this issue as we talk.

If that’s the case, you’ll probably feel less alone to find out that there are many other players getting the error.

Although it doesn’t help your case much, at least you can rest assured knowing that it’s not you, it’s them. And by them we mean Microsoft.

That is most of the time the root of the problem, but it can also be caused by your Internet connection, in which case you can try to improve it.

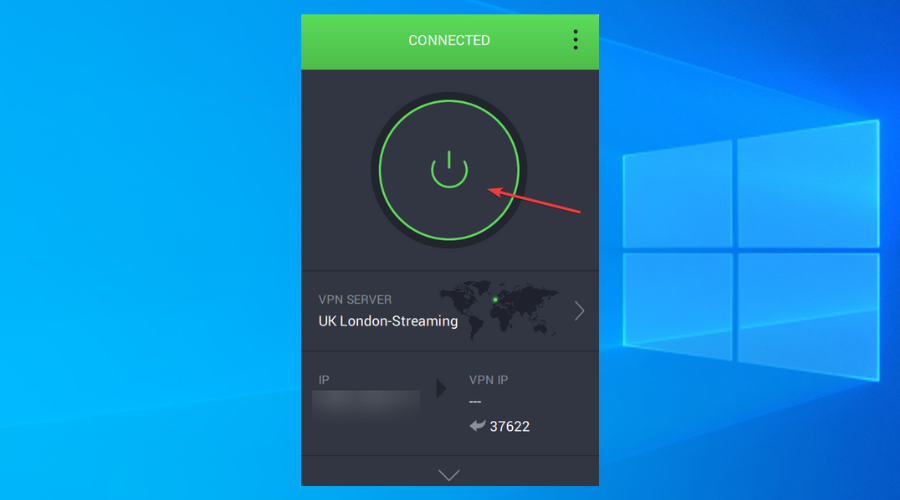
A quick and easy method to fix network problems and increase speed is to use a suitable VPN (Virtual Private Network). It will connect you to a virtual server that can be faster than your ISP’s servers.

What is Microsoft Bingo?

Microsoft Bingo is exactly what it sounds like. Much like other games in the Microsoft games suite, it’s a playable title that can help you waste a few good hours and have fun while at it.

Long story short, it’s a Bingo game developed and published by Microsoft. You watch numbers (balls) get announced, mark them off your Bingo cards, and win some virtual prizes.

You win points called Luggage, which you can redeem for rewards later on. Microsoft Bingo also has special power-ups to help you enhance your game, which makes it even more appealing.

Last, but not least, you can either play as a guest or log in to your Xbox account to unlock extra features.

How to fix Microsoft Bingo Server Connection Error?

1. Wait it out

Given the current global pandemic situation, a lot of people are more or less stuck at home. Therefore, it’s not ridiculous to assume that many of these home users are just discovering the wonders of spending hours in front of your PC.

As a result, many services may be crippled by the sudden increase of requests. No, Microsoft Bingo doesn’t make an exception.

Just like video streaming platforms, games had an incredibly hard time keeping up with the unusual increase in their player count.

So, if you’re feeling like filling some virtual Bingo cards and get that error we’ve talked about, maybe just wait it out.

If the game server is overcrowded, there’s absolutely nothing you can do about it except contact customer support.

However, chances are somebody already complained before you, so things might not get fixed until they do. Patience is key in this case.

2. Use a VPN

  1. Purchase a premium VPN subscription (we recommend ExpressVPN).
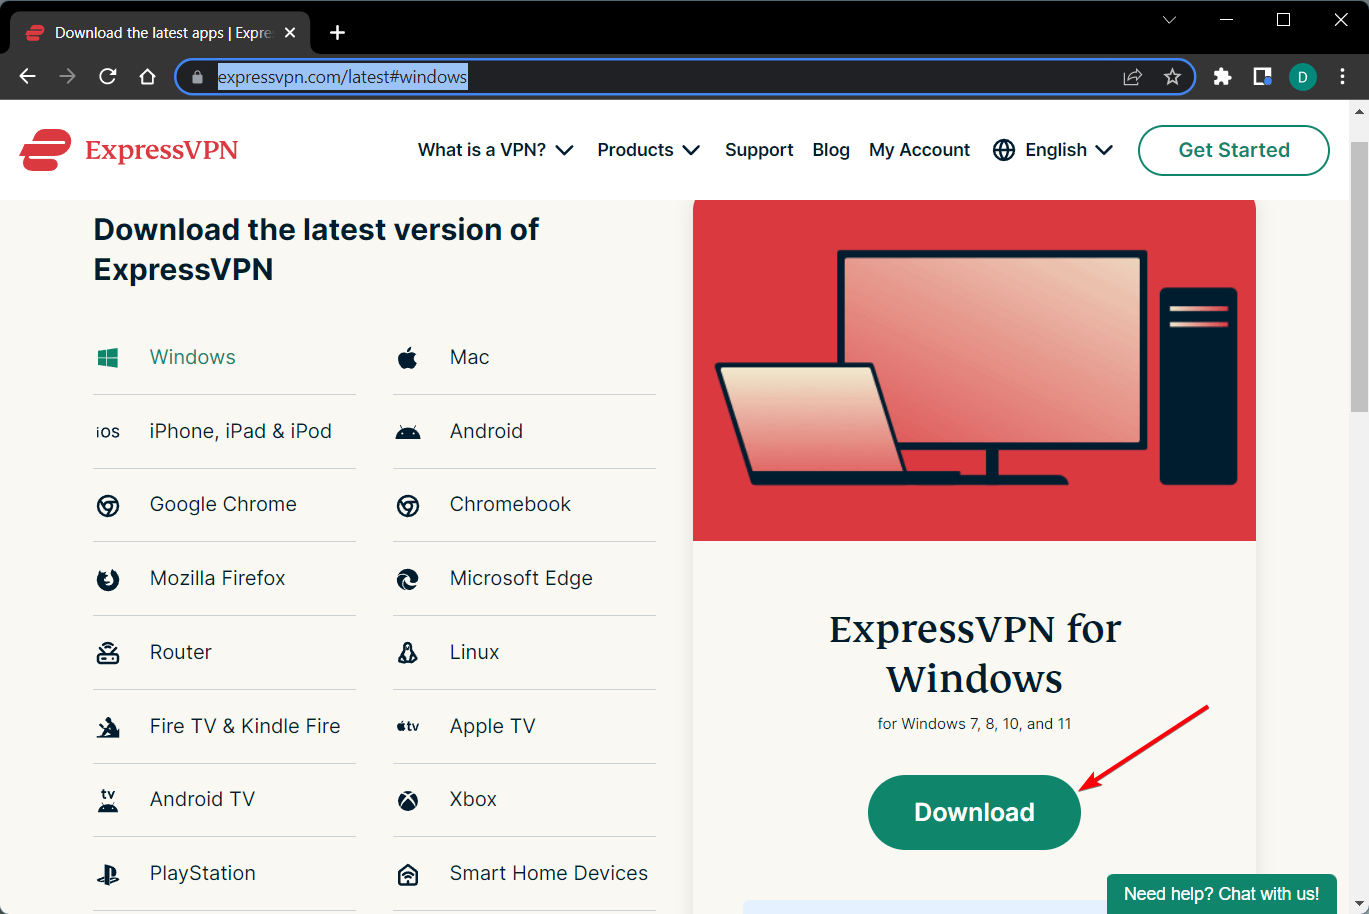
  2. Download the VPN installer.
  3. Deploy the VPN on your computer and launch it.
  4. Connect to your VPN account using your credentials.
  5. Choose a fast server (nearby servers are usually faster).
  6. Launch Microsoft Bingo.
  7. Check if you still receive the Server Connection Error.

Note that a VPN will work if the connectivity issue is triggered by your ISP. Your Internet provider could be throttling your connection, which can definitely affect your connectivity and render you unable to use certain services.

Furthermore, using a VPN can also have a positive effect if you’re experiencing network congestion.

A lot of users on your network combined with improper traffic management (also your ISP’s fault) may trigger server connectivity issues.

Yes, you may even get the dreaded Server Connection Error in Microsoft Bingo because of network congestion.

ExpressVPN

Fix connection fluctuations and get better speed to get back on Microsoft Bingo as soon as possible!
Free trial Visit website

3. Keep trying

Usually, this error spawns for players who are yet to log into the game. It’s less likely to get the Server Connection Error in Microsoft Bingo if you’re already in the game.

Just keep trying to connect, and if you’re lucky enough to snatch an open slot on the Microsoft Bingo server, you’re probably there to stay.

However, you might want to try another game instead of potentially wasting precious minutes of your time trying to log in.

After all, games are supposed to be fun and not a source of frustration. Especially free games such as Microsoft Bingo.

Final thoughts on fixing Microsoft Bingo Server Connection Error

To wrap it up, if you’re experiencing the Server Connection Error while trying to log into Microsoft Bingo, a wise thing to do would be to wait it out. It’s highly likely that game server congestion caused the issue.

If that’s the case, there’s little you can do about it other than create a thread on Microsoft’s Community website, which we guarantee somebody else already did.

You could try using a VPN, but you should keep in mind that this fix will only work if your network is the one suffering from congestion.

It could also work if your ISP triggers the server connection error by throttling your bandwidth.

Last, but not least, don’t give up. Even if Microsoft Bingo didn’t work for you today, tomorrow the problem might get fixed.

Keep it positive and don’t turn a trivial issue such as a game error into something bigger than it is.

FIX: ESET Blocked VPN on Windows Computers [10 Easy Methods]

ESET is very strong security software, in fact, one of the best for Windows 10, with its comprehensive protection for your everyday home or business online activities.

Among its advantages and benefits include multi-layered security against any online or offline threats, privacy protection, safer connection and browsing, password management, data, and folder encryption, all backed by three decades of innovation built and run by security enthusiasts.

With such strong security, you can imagine what would happen when you try using your VPN with ESET and it gets blocked.

However, this doesn’t mean that it cannot be fixed. There are solutions to resolve the blockage and get back to enjoying the VPN services as soon as possible. Check out some of the fixes listed below.

Why is ESET blocking my VPN?

ESET antivirus blocks suspicious activity and connections. It can sometimes block certain DNS requests and connections, which can happen to be your VPN’s.

Another possible issue is that you mistakenly blocked the connection. When you access a new network, ESET asks you if you trust it, and if you picked No (by mistake) for your VPN, it will not let you connect.

This can be easily fixed by using a trusted VPN service. Additionally, you can remove all custom rules and manually add trusted addresses to ESET’s firewall.

How can I fix VPN blocked by ESET?

1. Allow VPN access

  1. Remove all custom rules
  2. Ensure all the subnets 192.168.1.0/24 and 10.1.1.0/24 are marked as Home or Office networks in the known networks setup

If this doesn’t help, run the Firewall troubleshooting wizard which shows a list of recently blocked communications and lets you create the appropriate allow rule with a few clicks.

2. Pause the ESET firewall

  1. Launch ESET to open the main program window
  2. Click Setup
  3. Select Network protection
  4. Click the slider bar next to Firewall
  5. Select Pause until reboot and click Apply. This will pause the ESET firewall till you restart your computer

VPN blocked by ESET can be resolved by pausing the ESET firewall until a system restart is performed. With the firewall paused, you can try to reconnect the VPN that is blocked.

While the ESET firewall is paused, the protection status will turn RED to indicate that the maximum protection isn’t ensured, and your PC is now vulnerable to threats.

If you are diagnosing potential firewall problems, connect the VPN that is blocked. If successful, then the problem is related to the firewall. Re-enable the firewall and complete the steps below to resolve connection issues. To do this:

  1. Launch ESET to open the main program window
  2. Click Setup and select Network protection
  3. Click the slider bar next to Firewall to enable the firewall status
  4. Try connecting your VPN again.

3. Use another VPN

If your current VPN client is being blocked by ESET, then the easiest solution is to switch to a different provider.

Private Internet Access is a reliable and ESET-compatible VPN service that works in conjunction with antivirus software to give you the maximum level of protection.

Whilst ESET will safeguard your PC from being infected with malware, PIA will create a secure tunnel between your machine and the target server.

This way, you reduce the likelihood of your PC being infected and you have the added benefit of having all your data encrypted and safe.

Signing up for PIA takes only a few minutes: just register an account, download the client, and select a server to connect to.

Moreover, once you start using Private Internet Access, you will benefit from all the other features offered:

  • Protection for up to 10 devices simultaneously
  • Blocks ads, trackers and malware
  • Unlimited bandwidth for streaming content from all over the world
  • Over 3300 servers in more than 45 countries
  • Cross-platform support (Windows, Linux, macOS, Android, iOS)
  • Support for Wireguard, PPTP, OpenVPN and L2TP/IPSec protocols
  • P2P support
  • Out-of-the-box compatibility with other software, including ESET

Private Internet Access

Private Internet Access will work alongside any software, including ESET and other antivirus solutions.
Check price Visit website

4. Stop the ESET firewall from interrupting web browsing

  1. Launch ESET to open the main program window
  2. Press F5 to access Advanced setup
  3. Click Firewall and expand Advanced
  4. In the Filtering mode drop-down menu, select Interactive mode
  5. Next to Rules, click Edit
  6. Click Add
  7. In the Name field, type a name for your rule.
  8. In the Direction drop-down menu, select Both
  9. In the Action drop-down menu, select Allow and click OK
  10. Select the checkbox next to Show built-in (predefined) rules and select the rule you created in the Name field
  11. Click the UP arrow to move your rule to the top and ensure it is enforced
  12. Click OK to save changes

You can do this without exposing your system to security risks. If an intrusion is detected, the system will still be protected using this method. You can create a rule to permanently allow all network traffic.

5. Disable the firewall until re-enabled by you

  1. Launch ESET to open the main program window
  2. Click Setup
  3. Select Network protection
  4. Click the slider bar next to Firewall
  5. Select Disable permanently and click Apply.

This can potentially expose your system to an attack and isn’t recommended unless advised by ESET’s technical support to entirely disable the firewall. To disable HTTP, POP3 and IMAP scanning, follow the steps above.

Once you’re done, re-enable the firewall. The protection status won’t change to RED, though your PC will be at risk when the firewall is disabled.

6. Add a firewall exception

  1. Launch ESET to open the main program window
  2. Click Setup
  3. Select Network protection
  4. Click Troubleshooting wizard
  5. Locate your VPN in the list and click Unblock. If it isn’t in the list, check the temporary IP address blacklist. You may see other blocked communications unrelated to your problem, which is normal, and not related to your system security
  6. Click Done. Alternatively, click Unblock another and repeat these steps to unblock another communication.

The troubleshooting wizard helps resolve home network connectivity issues caused by ESET firewall with a VPN blocked by ESET. This fix will allow your VPN to work on your home network.

Check if the VPN can connect after doing the above.

7. Check temporary IP address blacklist and allow communication directly

  1. Launch ESET to open the main program window
  2. Click Setup
  3. Select Network protection
  4. Click Temporary IP address blacklist
  5. Select the blocked IP address you want to allow and click Add exception
  6. The IP address is removed from the Temporary IP address blacklist and is now on the IDS exceptions list. The IP address you allowed can now connect to your home network

The IP address of your VPN may have been added to the temporary IP address blacklist, and if it has, allow the communication directly from the list.

8. Use Firewall interactive mode

This mode helps you create personalized firewall rules to ensure your devices can connect to your home network. Network communication is handled based on predefined rules.

If there are no pre-existing rules applying to a detected communication, you will be prompted to allow or deny the connection. You can make this decision by saving it as a new rule for the firewall.

When the new rule is created, all future connections of this type will be allowed or blocked based on the rule.

Interactive mode will let you create a customized group of rules. This mode, however, isn’t intended for prolonged use. Disable it once you establish a set of rules for use in your environment.

Use it with caution especially in a corporate environment because inattentive users can create rules accidentally that may expose them to risks or hinder their ability to communicate over the network.

To create a firewall exclusion in Interactive mode, here’s what to do:

  1. Launch ESET to open the main program window
  2. Press F5 to access Advanced setup
  3. Click Firewall and expand Advanced
  4. In Filtering mode drop-down menu, select Interactive mode and click OK
  5. Run the VPN that was blocked. You will be prompted to allow or deny each connection that isn’t affected by an existing rule. To create the rules you need to unblock your VPN or device, select Create rule and remember permanently and then click Allow
  6. Press F5 on your keyboard to access Advanced setup
  7. Click Firewall, expand Advanced
  8. Click IDS and advanced options
  9. Expand Allowed Services and ensure the slider bars are all enabled. Don’t change settings in the Intrusion Detection or Packet Inspection sections. Click OK when you’re done.
  10. Once you finish creating rules, reset the filtering mode to automatic. Click Firewall, expand Advanced and select Automatic mode (from filtering mode drop-down menu)
  11. Click OK

9. Create a Firewall rule to permit specific connections

  1. Launch ESET to open the main program window
  2. Press F5 to access Advanced setup
  3. Click Firewall and expand Advanced
  4. Click Edit (next to Rules)
  5. Click Add
  6. Type a name for the rule in the Name field and select your desired options from the Direction and Action drop-down menus
  7. Click the Local tab and select Browse (…)
  8. Go to your VPN and click Open
  9. Click OK>OK>OK to save changes

10. Create a rule to allow/deny a connection from a remote IP address

  1. Launch ESET to open the main program window
  2. Press F5 to access Advanced setup
  3. Click Personal Firewall and expand Advanced
  4. Click Edit (next to Rules)
  5. Click Add
  6. Type a name for the rule in the Name field and select Both from the Direction and then select Allow or Deny from the Action drop-down menus depending on if you want to block or allow the specific IP address, or not
  7. Click Remote tab and type the IP address, range or subnet you want to allow/deny in the IP field and click OK
  8. Select the checkbox next to Show built-in (predefined) rules
  9. Scroll down and select the new rule you added and click the Top icon to move the rule up to the top
  10. Click OK twice to save changes and exit

These solutions should help you secure your traffic with the VPN whilst using ESET to protect against malware.

For those of you wondering wether ESET has a built-in VPN solution, they don’t, but it works great alongside most third-party VPNs if you configure it correctly.

Did any of these solutions help? Let us know in the comments section below.

Fortnite Upload Packet Loss: How to Get Rid of it?

Fortnite upload packet loss can cause issues and negatively impact your online experience, so it’s important to fix it, and this guide will show you how to do it.

What causes packet loss Fortnite?

Issues with your network connection or ISP can cause this problem. Sometimes server problems can lead to this as well.

How to fix upload packet loss in Fortnite?

1. Use a VPN

  1. Download Private Internet Access.
  2. Install PIA on your PC.
  3. Launch it and log into it.
  4. Connect to your favorite server.
  5. Launch Fortnite and see if the packet loss issue persists.

Private Internet Access is a Kape Technologies owned VPN service that passed our tests with flying colors, being able to get rid of packet loss in Fortnite.

It’s a well-balanced, feature-rich VPN that can help you get rid of several issues.

For instance, you can use it to secure your connection, keep your traffic data private, and even unblock geo-restricted content.

It’s worth mentioning that if the packet loss issue is server-side or occurs on your home network, using a VPN won’t work. The packets must leak on your ISP’s side for VPNs such as PIA to be of any help.

Private Internet Access

Having trouble with packet loss in Fortnite? Team up with PIA VPN to bypass any obstacle!
Check price Visit website

2. Manually troubleshoot the connection

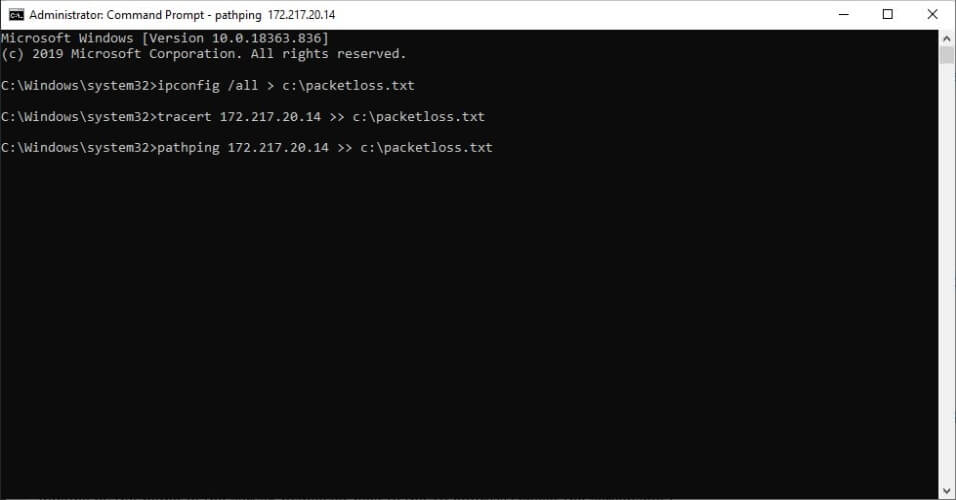
  1. Use our guide to help you run a packet loss test.Packet loss analysis Windows with tracert and pathping
  2. Identify and isolate the troublesome hop on your connection.
  3. Take the necessary measures to fix packet loss as explained below.
  • Check/repair/update/upgrade/replace components in your home network (PC, router, cables)
  • Ask your ISP to contact the network distribution company
  • Contact Fortnite’s support team if the problem’s on their side
  • Check Fortnite ping to ensure that the problem is gone.

How to fix packet loss for Fortnite on PS4?

PS4 packet loss spikes in Fortnite are no different from PC packet loss, both being most likely caused by your ISP.

You can set up a VPN connection directly through your router and connect your PS4 to this network.

Another option is to disconnect any device that’s using up the network unnecessarily (like an idle mobile phone, for example).

If you’re having packet loss issues in Fortnite, don’t fret. It usually passes by itself without your assistance. However, if you notice a pattern in these leaks’ occurrence, you might want to step in.

With a VPN you’ll be able to fix Fortnite server packet loss and get better and more stable gaming sessions in return.

Note that this method’s efficiency depends on the location of the leak inside your connection.

However, it’s good having a VPN on your PC, as it can keep a lot of things at bay, such as prying eyes, or even hackers.

Minecraft Packet Loss: What is It & How to Fix It? [Tested]

Minecraft is an awesome building/survival game that’s taken the world by storm 9 years ago. Yeah, that’s right, Minecraft was released in 2011, and it still doesn’t cease to amaze us.

It’s heavily based on procedural generation to create the environment around you automatically, as you advance. You get to gather materials, and craft tools and build intricate shelters for when the night comes.

If you’re not familiar with Minecraft, nightfall brings along various mobs that are out to get you. They’ll bite you, scratch you, and even fire arrows at you or explode nearby. The hissers are the most annoying ones, by the way.

Aside from damaging your characters really well, they also ruin your constructions and the terrain. Awful.

But let’s get back to our sheep. Although you can play Minecraft in single-player, many players prefer teaming up with their friends. It’s only fair considering that mobs never end spawning each night.

Here’s where things get hairy: playing Minecraft in multiplayer might make you face some technical challenges that simply aren’t there in the single-player version. Some of them include high latency, jitter, and even packet loss.

What is packet loss in Minecraft?

As with any online game or service, packet loss in Minecraft happens whenever packets you send or are sent to you never reach their destination.

If you are unable to send a packet to the server while not in-game, just logged in to the main menu, then the issue is most likely caused by ISP throttling.

As a result, you might experience some more visible issues such as rubberbanding, sluggish movement, desyncs, or disconnections.

However, with Minecraft, things are a bit different. For starters, most of the servers are player-hosted. So losing packets might take some team effort to fix if the other party (client, host) is up for the task.

Nevertheless, if you choose to play on Minecraft Realms, the servers are hosted by Mojang. So everything you previously knew about packet loss still applies.

How to fix Minecraft packet loss?

1. Use a VPN

  1. Get a fast and reliable VPN like ExpressVPN to get the best Internet speed and fix packet loss.
  2. Download and install the dedicated ExpressVPN app on your PC.
  3. Log into your account using your ExpressVPn credentials or activation code.
  4. Connect to a server of your choice.
  5. Launch Minecraft.
  6. Try joining the server where you experience packet loss.
  7. Check if the problem still persists.

ExpressVPNi s a great all-around VPN that’s brought to you by Kape Technologies.

It can help you tackle all sorts of challenges, ranging from packet loss to high ping, and even privacy concerns, connection security, and geoblocking.

It’s worth mentioning that using a VPN won’t work every time, except if your ISP is the one throttling your bandwidth and causing packet loss.

The VPN is capable to fix packet loss in many instances, especially when your ISP is the one throttling your bandwidth and causing packet loss.

It can also offer more network stability and speed which also helps a lot with packet loss.

However, it’s still wise to invest in a trustworthy VPN for security/privacy concerns.

If you want to keep your privacy safe and secure your connection while playing the game, ExpressVPN is one of the best VPNs for Minecraft.

ExpressVPN

Are you leaking packets in Minecraft? Use ExpressVPN to fix it!
Free trial Visit website

2. Troubleshoot your connection

  1. Launch CMD
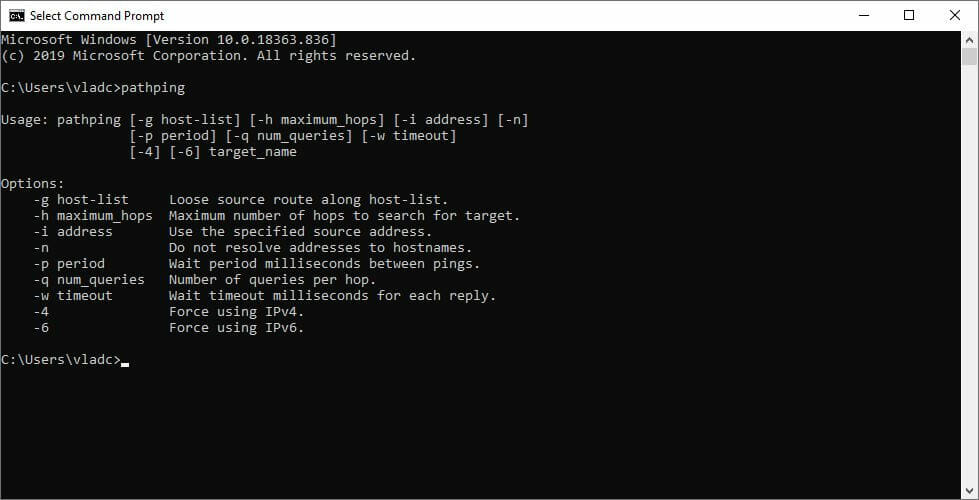
  2. Run a packet loss test using pathping x.x.x.x (x.x.x.x = IP address of the Minecraft server)CMD pathping
  3. Depending on your findings, take any of the following actions:
  • Check/repair/upgrade/update any faulty component on your network
  • Ask the host to perform a packet loss test and see where the leak is
  • Use wired connections instead of wireless (WiFi leaks packets more often)
  • Contact your ISP and ask them to look into the matter
  • Ask your ISP to contact the network company and inform them of any potential leaks

You can fix Minecraft packet loss

To wrap it up, even if you’re leaking packets in Minecraft, it’s not such a big deal. More often than not, it’s caused by network congestion and passes without your assistance.

However, sometimes the leak follows a pattern or keeps recurring, in which case stepping in can be a great idea.

You can even use a VPN for Minecraft, but note that sometimes you might not be able to log into Minecraft with a VPN.

Even if VPNs don’t seem to patch things up, investing in one isn’t such a bad idea.

For starters, it can greatly improve privacy, offer your connection a much-needed security boost, and even get you around geo-restrictions.

3 Quick Ways to Fix Outlook if Verification is Not Working

Using Microsoft’s Outlook has become second nature for some of us and it is beyond annoying when the platform malfunctions and won’t work.

So is the case of users that can’t log into the service because of the Outlook verify process not working. There have been a lot of reports, actually.

We are about to tackle this issue today and show you how to resolve it within a few minutes. Also, if you can’t delete a folder in Outlook, we got you covered with that as well.

Or, maybe your Outlook folders have disappeared. Either way, you will find all the fixes you might need right here.

Why is my outlook verification not working?

Well, even though it doesn’t happen often, Microsoft might experience some trouble on their end, resulting in some server issues. You can check that on the Service Health page.

The more plausible explanation is that your cache and cookies, as well as outdated software, might get in the way of your verification.

However, there’s no need to worry, as we are about to solve the Outlook verify account not working problem right now.

How do I fix Outlook when verification is not working?

1. Try a different PC

As a first troubleshooting step, we recommend trying to log in and verify your account using a different PC than the one initially used.

If the Outlook verification code is not working, or Outlook keeps asking to verify your account, the problem is not local and you will have to contact customer support.

That being said, if you can verify your account on the other PC, it means that problem is on your end and we will fix it in the next steps.

2. Delete browser cache & cookies

  1. Click on the Customize and control Google Chrome button. customize and control google chrome
  2. Select History, then click on History again.history chrome
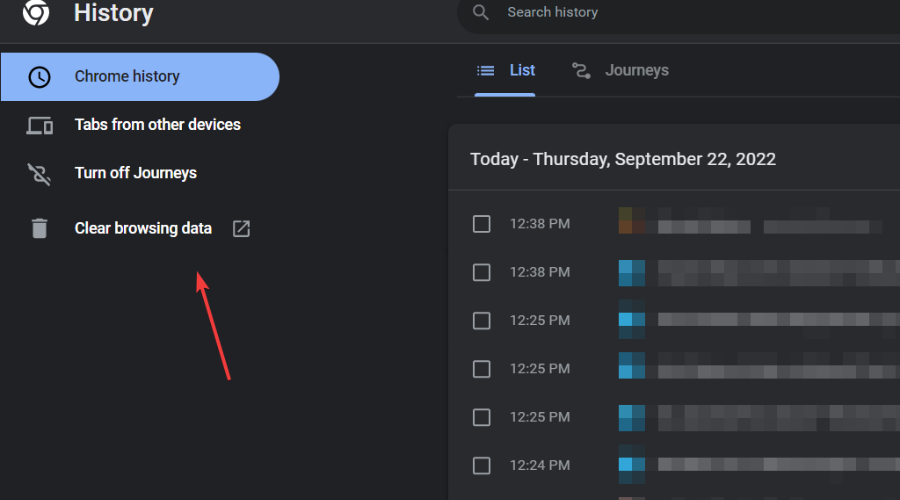
  3. Click on the Clear browsing data button.clear browsing data chrome
  4. Select Cookies and other site data and Cached images and files, then select All time and click on Clear data.clear cookies and cache chrome

3. Update Windows

  1. Press Windows + I to access Settings.
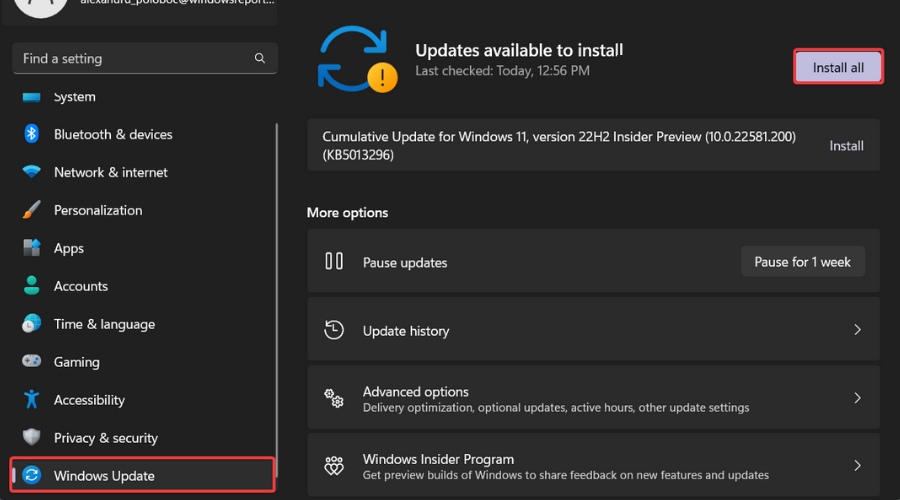
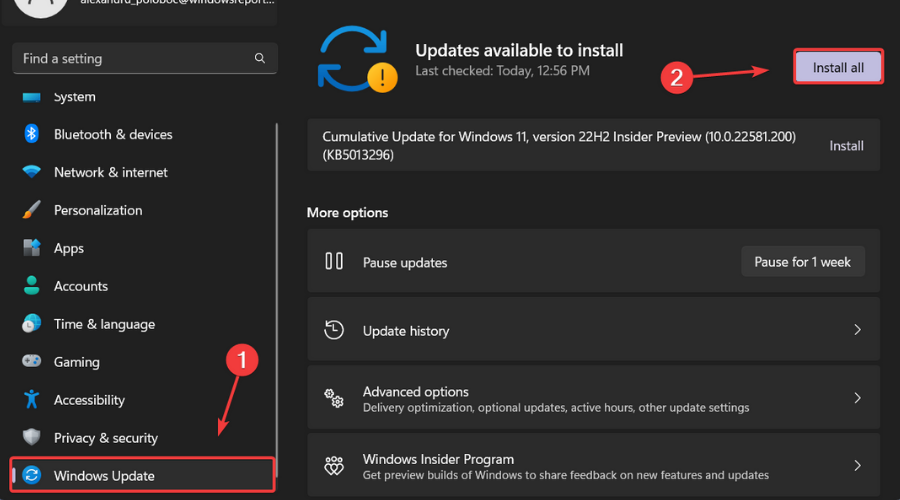
  2. Select the Windows updates tab and click Install all.install-Windows-updates-1
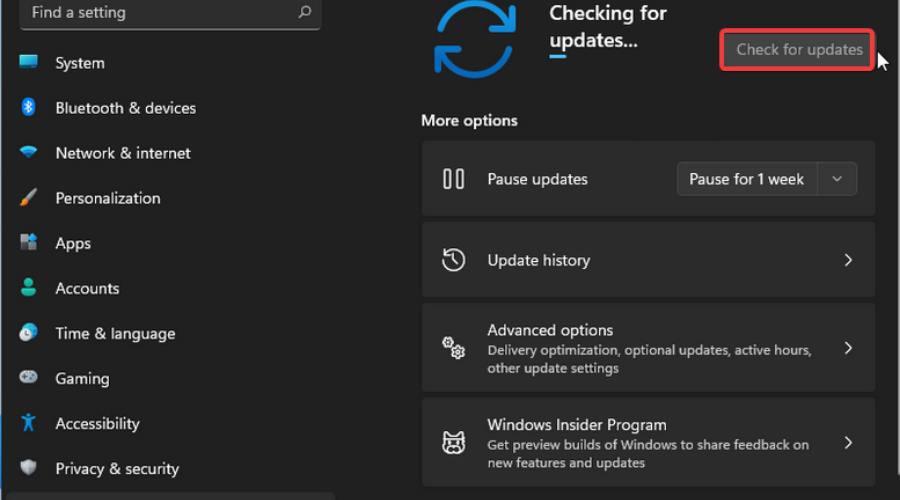
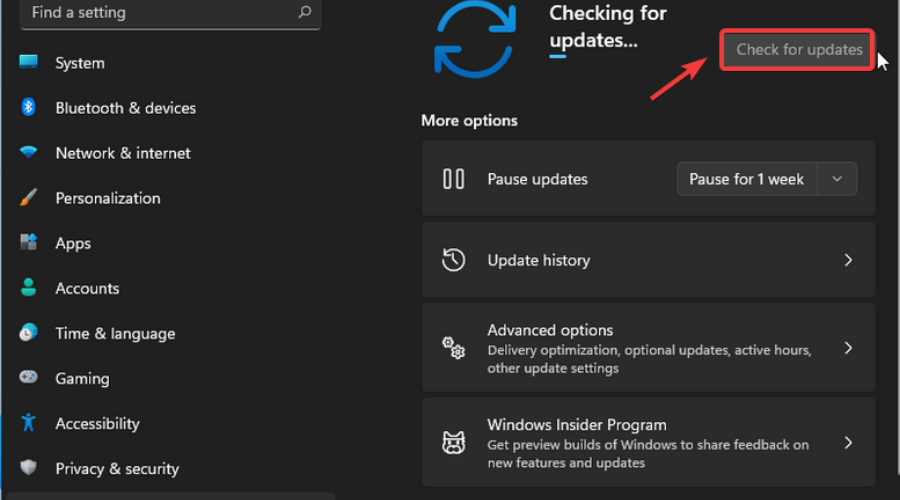
  3. If no updates are queued for installation, press the Check for updates button.check-for-updates-1

We hope this guide has proven useful for your Outlook problem. Be sure to leave a comment below with your thoughts and opinions.

How to Download and Install Dolby Atmos on a Windows 11 PC

Want immersive surround sound on your PC? This step-by-step guide shows you how to download and install Dolby Atmos on Windows 11, so you can upgrade your audio experience with 3D spatial sound.

How can I install the Dolby Atmos app on Windows 11?

1. Download Dolby Atmos from the Microsoft Store

  1. Press Windows + S to launch the Search menu. Enter Microsoft Store in the text field at the top, and click on the relevant search result.Launch Microsoft Store to install dolby atmos windows 11
  2. Next, enter Dolby Access in the search box at the top, and click on the relevant search result.Dolby Access app
  3. Click on the Get button to download the app.Get to install dolby atmos windows 11
  4. Once the app is downloaded and installed, click on Open to launch it. Alternatively, you can launch it from the Search menu.Open app
  5. Click on Next.Next to install dolby atmos windows 11
  6. Click on Get started.Get Started to install dolby atmos windows 11
  7. Now, choose whether you want to make a purchase or take the 7-day free trial.Choose subcription
  8. Complete the authentication process and click on Get.Authenticate to completely install dolby atmos windows 11
  9. The default device will be listed here. Click on Continue to proceed with it, or select Audio devices to choose another.Verify selection
  10. Click on Experience now.Experience surround sound after you install dolby atmos windows 11

2. Activate Dolby Atmos from Sound Settings

  1. Press Windows + S to open the Search menu, enter Change system sounds, and click on the relevant search result.change system sounds
  2. Go to the Playback tab, right-click on the default device, and select Properties.properties
  3. Now, head to the Spatial Sounds tab, select Dolby Atmos for Headphones from the dropdown menu and click OK to save the changes.activate dolby atmos

3. Set up Dolby Atmos for home theater in Windows 11?

  1. After you have set up the app, select the Dolby Atmos for home theater option in the Products tab and click on Setup.Set up Dolby Atmos for Home Theater
  2. Connect a compatible audio device and follow the on-screen instructions to complete the setup.Complete setup to install dolby atmos windows 11

The Dolby Atmos for home theater will help you connect the system and enjoy surround sound on your Windows 11 PC.

For a deeper walkthrough on turning the feature on, read this guide on how to enable Dolby Atmos on Windows 11.

4. Download Dolby Atmos drivers for your device

You can find the drivers for Dolby Atmos in the following locations:

After downloading the Dolby Atmos driver in Windows 11, double-click on the file to launch the setup and follow the on-screen instructions to complete the installation process.

Alternatively, you can try using dedicated driver updating software to scan your PC and replace any missing or outdated drivers. This can help prevent errors like unable to start the Dolby Audio driver.

Downloading and installing Dolby Atmos on Windows 11 is an easy process. You should have no Dolby Atmos errors in Windows 11 or Windows 10 if you follow the steps above.

Tell us your experience with Dolby Atmos in the comments section below.

3 Ways to Fix the BEX64 Error on Windows 10/11

The BEX64 error is related to an app crash. According to some users, the error occurs randomly, while others encounter it after they perform a demanding activity.

This is often the result of a conflict between two processes. For example, users reported applications such as Teamviewer, MacType, or Razer Synapse that caused interference and launched BEX64.

Regarding Windows, you should know that the Data Execution Prevention (DEP) will sometimes block the application that crashes. This may as well trigger the error and crash named BEX64.

Here’s what one concerned user claims on Microsoft’s forum:

While playing Call of Duty: Black OPS 4, the game stopped working, and I received the Problem Event Name BEX64. I have tried so many solutions to get this to work (clean boot, startups disabled, dep off – which doesn’t work for a 64bit application, turned WIndows Firewall exceptions to all for bo4, nVIDIA control panel add program).

How can this problem be solved?

Assuming that’s your question, take your time to read through this article and learn about three efficient solutions that will help you solve the BEX64 error for good.


What is BEX64?

BEX 64 is an error usually appears when File Explorer, a third-party app, or a game has crashed. This can be caused by conflicting processes or a problematic app on your PC.

Also, it can be due to activating some wrong settings on your PC. No matter the cause, we have a detailed solution to help you fix it in this guide.

How can I fix the BEX64 error?

1. Disable the amBX service

  1. Press Windows key + R, type services.msc in the run box, and hit Enter.
    services.msc bex64
  2. Navigate through the list and Right-click on amBX
  3. Choose Properties from the new menu.
    properties
  4. Click the dropdown before Startup type and select Disabled.
  5. Finally, click Apply to save the changes.
    disabled

After you have passed through each of these steps, restart your computer. Launch the game, causing the BEX64 error after the startup is complete.

Some games, such as GTA V, will have issues with the amBX service. So, disabling the amBX feature should prevent the error.


2. Eliminate third-party interfering apps

2.1. Perform a clean boot

  1. Press Windows + R, type msconfig, and click the OK button.
    msconfig bex64
  2. Click the Services tab at the top.
    services
  3. Check the box for Hide all Microsoft devices
  4. Now, click the Disable All button.
    hide all
  5. Click the Startup tab at the top and select Open Task Manager.
    open task bex64
  6. Right-click each of the processes in the Startup tab and select Disable.
    disable bex64
  7. Now, go back to the Services tab and click the Apply button, followed by OK.
    apply and ok

The clean boot will start up the system using only the Windows services loaded and the default programs necessary to function.

Using clean boot will also free up computer memory from your system and stop any process that can cause the BEX64 error.


2.2. Uninstall faulty programs

  1. Press the Windows key + I to open Settings.
  2. Select the Apps option.
    apps
  3. Select the problematic app and click the Uninstall button.
    uninstall button
  4. Finally, follow the onscreen instruction to complete the process.

If the BEX64 error stopped after the clean boot, you could enable the disabled programs again. However, it would help if you also restarted your PC several times to identify the problematic program.

This second phase of our solution allows you to eliminate that program.


3. Disable the Data Execution Prevention (DEP)

  1. Press Windows key + S and type cmd in the search box.
  2. Click the Run as administrator option under Command Prompt.
    cmd
  3. Press Yes to grant admin access to User Account Control (UAC).
  4. Type the following command, and press Enter: bcdedit.exe /set {current} nx AlwaysOffbcedit
  5. Restart the computer and wait until Windows has loaded.

After following these steps, you can relaunch the app causing this BEX64 error and see if it is still there.

This solution is essential because Data Execution Prevention ensures no malicious codes run in your operating system by performing additional checks on the computer memory.

Unfortunately, certain games will interact with the DEP environment because of how they were built. As a consequence, this will launch the BEX64 error on your computer. 


How do I fix the BEX64 error on Windows 11?

The BEX64 error is a general issue on all Windows systems with similar causes. If you are getting the error on Windows 11, it can be down to faulty apps or conflicting programs.

You can effectively fix the issue using the solutions provided in this guide.

If you have encountered the BEX64 error in Windows 10, you should know how frustrating it is. But with the fixes in this guide, it should now be history.

If you are facing other issues like your device ran into a problem and needs to restart, check our detailed guide on how to fix it quickly.

Test out our recommended solutions and leave a message to tell us if they have proven helpful to you.

5 Ways to Fix Your Canon Printer if It’s Not Printing Black

Canon is beyond a doubt one of the most popular brands when it comes to printers, and there are literally millions of people that use them.

But, even though they are efficient and do a great job, they can sometimes malfunction and refuse to work properly, just like any other machine.

Luckily, you have us to show you exactly what actions you can take to try and remedy the issue because buying a new printer every now and then just won’t cut it.

Speaking of Canon printers issues, we prepared a guide for you in case your Canon printer won’t scan on Windows 10 or Windows 11.

Also, if you are looking for some quality cables for your printer, we compiled a list of products that we recommend.

However, if your Canon g3010 printer is not printing black, or any other model as a matter of fact, here’s what you can do about it.

Why is my Canon printer not printing black?

There are multiple reasons for it. For example, if you are not using your printer daily, then your printer might dry out.

Sometimes, if there is a problem with the ink cartridge, you can face the same problem, so it’s not just the printer’s fault.

Obsolete drivers can also contribute, but as you are about to see, we have solutions for every possible scenario, so don’t worry about anything.

Let’s look into why your Canon printer is not printing black properly, on models like G3000, or any other from the Canon family.

Why is my printer not printing even with new ink?

Putting new ink in your printer won’t always solve the problem, as it might not even be cartridge related, to begin with.

It could be the drivers, it could be the software, or other causes, but rest assured that if your Canon IP7250 is not printing black, we’ll take care of it.

In fact, here are the models that users are facing these problems on:

  • Canon G3010
  • Canon G3000
  • Canon G2010
  • Canon IP7250
  • Canon Pixma MX700
  • Canon MX922

How do I fix my printer not printing black ink?

1. Perform a deep cleaning

  1. Power on your Canon printer.
  2. Put 5 or more A4 size papers in the printer’s tray.
  3. Open the paper output tray and the output tray extension.
  4. On the printer’s panel, select setup, then press the tools/wrench icon.
  5. Use the arrow keys to select the Maintenance menu, then press OK.canon deep clean
  6. Select Deep Cleaning and press the OK button.

2. Only use genuine ink cartridges

This is a fact that a lot of printer users will advise you to do if you want years of stress-free, problems-free printing.

You might not know, but if you are not using a genuine cartridge then you can pretty much face this problem in your printer.

You should only use genuine ink or toner supplies because Canon does not guarantee the quality of duplicate cartridges.

3. Update the printer driver

  1. Search for Device Manager and open the app.device manager
  2. Expand Print queues, select your Canon printer, right-click it, and select Update driver.update printer driver
  3. Choose Search automatically for drivers.drivers

If you want a simpler and more reliable option to check for your drivers and update them, you can always employ the help of specialized tools.

4. Replace the faulty cartridge

Sometimes, cartridges can become faulty and no longer do their job. So, if your Canon printer refuses to print black, this is something you should definitely check.

More so, if the printer prints every other color except black, then something must be wrong with the cartridge itself.

Many users facing this problem have explained that it all went back to normal after replacing the black ink cartridge with a new one.

5. Update Windows

  1. Press Windows + I to access Settings.
  2. Select the Windows updates tab and click Install all.install Windows updates
  3. If no updates are queued for installation, press the Check for updates button.check for updates

How can you tell if a printhead is clogged?

Excellent question. If your PC or the printer’s LCD screen is telling you that your ink cartridges are full but no ink is passing through to the paper, it’s most likely due to a clogged printhead.

Also, blurry documents and images that appear faded are also signs that it’s time to remove the excess ink, so keep that in mind.

How do you unclog a Canon ink cartridge?

After removing the cartridge, moisten a soft, lint-free cloth with water and wipe the print head area gently, a couple of times.

That being said, if you have hard water or are concerned about mineral deposits from your tap water, better use distilled water.

Also, if your cartridge has a gold, silver, or copper nozzle plate, try not to get it wet. Use a wet cotton swab to only clean the print head. Now put the cartridge back and try again.

We hope this guide has helped you fix the problem. Be sure to leave a comment below regarding your experience.

5 Ways to Fix FPS Drops, Lag & Stuttering in Minecraft

There are thousands of games users can play on their PCs. Every game has requirements that help determine the systems that can work with them efficiently.

However, many things may go wrong when playing games like Minecraft on your computer. Users report FPS drops in Minecraft, resulting in lag or stuttering on the PC.

The FPS drop issue on the computer affects its performance and t the programs running on it. Numerous factors may cause the Minecraft FPS drops, even on a good PC.

fminHowever, low computer RAM, outdated drivers, Windows issues, and others can cause the FPS drop issue when playing Minecraft on your computer.

Furthermore, the FPS drop issue in Minecraft can occur in several ways. Some users complain that the Minecraft FPS drops when moving, some complain that modded Minecraft FPS drops, and Minecraft FPS drops when loading chunks.

Nonetheless, you can fix any FPS drop problem in Minecraft with the solutions we’ll discuss as we go further in the article.

You may be interested in the methods to fix FPS drop issues in Rocket League on your PC.

Why does my FPS drop in Minecraft?

  • Outdated graphics driver: If you have obsolete graphics drivers on your computer, they can affect the graphics settings and performance, decreasing FPS. Likewise, it impedes how the game interacts with your graphics drivers to perform smoothly. Also, it can cause difficulties when you perform special effects on your game.
  • Many applications running on your computer: Many applications running on your PC simultaneously can consume most of your computer’s resources and cause game issues.
  • Outdated Windows: Outdated Windows can cause many problems with your gaming experience. It makes the computer malfunction because it cannot update patches for fixing bugs. Also, not updating your operating system leaves your computer with no improvements.
  • Requirements issues: Minecraft has some minimum PC requirements for you to enjoy your game on it. However, you may encounter problems with your game if your computer doesn’t have the required features. Likewise, not updating your apps and drivers can make it not fit for the current game version.

How do I fix Minecraft if FPS drops or lags?

1. Reboot your PC

  1. Click Start on your computer.
  2. Select the Power option.
  3. Click on Restart.

Restarting the PC is the simple fix for boot errors that may cause FPS to drop in the game.

2. Update graphics drivers

  1. Press Windows + R keys to prompt the Run window.
  2. Type devmgmt.msc into the search space and click OK.
  3. In the search results, click on Display adapters, then select the driver from the drop-down menu.
  4. Click the Update driver software option, and select Search automatically for drivers.

Restart your computer after the updating process is complete.

Alternatively, you can use third-party software to automatically update your GPU driver and all other outdated drivers to their latest versions.

3. Disable Game DVR

  1. Press Windows + R keys to prompt the Run window.
  2. Type Regedit in the search space.
  3. Alternatively, press the Ctrl + Shift + Enter keys to prompt the Registry Editor.
  4. Double-click Game DVR on the AppCaptureEnabled option, then select the Modify option.
  5. In the Edit DWORD (32-bit) Value tab, change the Value data to 0, then Click OK.

4. Update Windows

  1. Click the Start button.
  2. Select Setting and click on Windows update.
  3. On the Windows update page, select Check for updates. If there’s an update available, Windows will automatically search for it and install it.

Restart your computer. Check if the FPS drop issue persists.

5. End tasks for unimportant programs

  1. Click the Start button, input Task Manager, and launch it.
  2. Select the CPU and Memory usage in the Task Manager tab.
  3. Click on the applications consuming lots of CPU and memory space on your PC.
  4. Choose the End Task from the drop-down that pops up.

Restart your computer after making the changes for them to take effect. It’ll create more resources for the game on your PC. Hence, it will fix the FPS drops or lags in Minecraft.

What are the minimum PC requirements to run Minecraft smoothly?

The minimum PC requirements to run Minecraft are:

  • 2 GB RAM space on your PC
  • A DX 11.0 GPU (Intel HD Graphics 4000, GeForce 400 series card, or Radeon HD 7000)
  • Core i3-3210 / A8-7600

These are the best options for fixing Minecraft’s FPS drops or stuttering issues. Ensure to follow the steps strictly for optimal results.

Nonetheless, we recommend you read another article about FPS drop issues in games, like how to fix FPS drop and stuttering issues in Team Fortress and ways to improve FPS issues in PUBG.

For mod users, remember to keep them at a minimum to avoid loading issues while playing Minecraft.

Leave your comments and suggestions in the section below. We’d like to hear from you.

5 Ways to Fix FPS Drops, Lag & Stuttering in Overwatch

Overwatch is a team-based multiplayer shooter game that allows users to play in teams of six against each other. It is one of the best first-person shooter games on the market.

However, many users complain about encountering some issues with the game on their PC. FPS drops in Overwatch issues are dominant. They make the game stutter and lag when playing it.

Furthermore, you may encounter FPS drops in Overwatch for many reasons and may occur in various situations.

Some instances are Overwatch frame drops after an update, Overwatch low FPS in high-end pc, and Overwatch low FPS in the menu.

However, the factors causing the FPS drop issue in Overwatch may differ on various computers. Hence, we’ll guide you through some solutions that can generally fix FPS issues.

Check our comprehensive guide on how to download and play Steam games on your PC at the same time.

Why is my FPS dropping in Overwatch?

  • Outdated graphics driver: The first on the list is outdated graphics drivers. It is the most common factor responsible for the Overwatch FPS drop. An outdated graphics driver indicates that your device lacks the updates and patches required for fixing bugs and errors in your version. Hence, the FPS rate may drop in Overwatch if you don’t keep the graphics driver up to date.
  • Many applications running on your computer: Games like Overwatch require enough system resources to function. Hence, having many apps running simultaneously on your PC can affect the performance of your game. Likewise, it limits the RAM available on your computer and can prompt FPS to drop in Overwatch.
  • Outdated Windows: Outdated Windows is a common cause of the problems you encounter on your computer. It prevents your PC from improving its performance and impedes its ability to self-fix bugs. So, it can make Overwatch drop to 30 FPS.

How do I fix Overwatch if FPS drops or lags?

1. End tasks for unnecessary applications

  1. Click the Start button, input Task Manager, and launch it.
  2. Select the CPU and Memory usage in the Task Manager tab.
  3. Click on the applications consuming lots of CPU and memory space on your PC.
  4. Choose the End Task from the drop-down that pops up.

Restart your computer to implement the changes properly. Closing unused applications create more resources for Overwatch on your PC.

2. Update graphics drivers

  1. Press Windows + R keys to prompt the Run window.
  2. Type devmgmt.msc into the search space and click OK.
  3. In the search results, click on Display adapters, then select the driver from the drop-down menu.
  4. Click the Update driver software option, and select Search automatically for drivers.

Restart your computer after the updating process is complete. Fixing your graphics driver is a good fix for Overwatch having a low FPS high-end PC.

Alternatively, you can automatically update your graphics drivers alongside all other outdated or corrupt files on your PC using third-party software.

3. Disable Game DVR

  1. Press Windows + R keys to prompt the Run window.
  2. Type Regedit in the search space.
  3. Alternatively, press the Ctrl + Shift + Enter keys to prompt the Registry Editor.
  4. Double-click Game DVR on the AppCaptureEnabled option, then select the Modify option.
  5. In the Edit DWORD (32-bit) Value tab, change the Value data to 0, then Click OK.

4. Update your operating system

  1. Click the Start button.
  2. Select Setting and click on Windows update.
  3. On the Windows update page, select Check for updates. If there’s an update available, Windows will automatically search for it and install it.

Restart your computer and check if the FPS drop issue in Overwatch persists.

5. Disable Intel’s overclocking Technology

  1. Click on Start and select the Control Panel.
  2. Select the Hardware and Sound option and click on Power Options.
  3. Click on Change plan settings.
  4. Choose Change advanced power settings to prompt the Power Options window, then expand the Processor power management option.
  5. Click on Maximum processor state and set the values of both On battery and Plugged in as 99%.
  6. Click on Apply, then OK.

If you encounter any, you may be interested in knowing how to fix FPS drop and stuttering issues in Rocket League.

What are the minimum PC requirements to run Overwatch smoothly?

The minimum requirements for the PCs that are not high-end PCs are:

  • Operating systems: Windows 7/8/10 64-bit
  • Processor: Intel Core i3 or equivalent
  • Memory: minimum of 4GB RAM
  • Hard Drive: minimum of 5GB space on a 7,200 RPM drive
  • Graphics: GeForce GTX 460

Ensure that your computer fulfills the system specifications. It’ll help you enjoy a conducive and smooth gaming experience.

Recommended articles users should read through for solutions to FPS issues on other games include the one on how to fix low FPS in Red Dead Redemption 2. Also, it would be best to read about the methods for solving FPS issues and boosting frames in RuneScape.

Alternatively, you can check the methods to fix your GPU memory if it is full to create enough system resources for apps and games.

Kindly leave a message in the comments section if this guide has been helpful to you. We’d like to hear a response from you.

Airpods Keep Disconnecting from Windows 10: 6 Easy Fixes

Apple AirPods are Bluetooth earbuds users can pair with Windows 10. However, on Microsoft’s support forum, some users said that their AirPods keep disconnecting in Windows 10. One user stated:

I’m using my computer, and it (an AirPod) randomly disconnects and reconnects. It’s very annoying. I’ve tried updating drivers, and forgetting the AirPods and repairing, but no avail.

Let’s dive deeper into this subject and discuss the intricacies of this circumstance.

Why do AirPods keep disconnecting from Windows 10?

AirPod Bluetooth connections with Windows 10 aren’t always entirely stable for some users. One of the most common causes is Windows 10’s power management settings that turn off AirPod devices. In addition, Windows 10 can disconnect seemingly unused AirPods when song playback is paused.

Another potential cause lies in certain Bluetooth services required by AirPods. When those services aren’t correctly configured, AirPods disconnect from Windows 10. The required services need to be configured to automatic startup type.

The good news is that there are a few confirmed resolutions for fixing AirPods that frequently disconnect from Windows 10. Try applying these potential resolutions if you need to fix an AirPod that keeps disconnecting from your PC.

How can I fix an AirPod that frequently disconnects and reconnects?

1. Run the Bluetooth troubleshooter

  1. Press Windows + I to open Settings, and click on Update & Security.update & security
  2. Select Troubleshoot from the navigation pane, and click on Additional troubleshooters on the right.troubleshoot
  3. Select the Bluetooth entry, and click on Run the troubleshooter button under it.
  4. After that, the troubleshooter will open, identify the issues, and automatically apply fixes if possible.

2. Update the Bluetooth driver for your AirPods device

  1. Type Device Manager in the Search bar, and the click on the relevant search result.device manager
  2. Next, expand the Bluetooth category.
  3. Right-click the AirPods device the issue arises for and then select Update driver.
    Search automatically for drivers option airpods keep disconnecting from windows 10
  4. Select the Search automatically for drivers option in the Update Drivers window.

Alternatively, you can update device drivers for AirPods with third-party driver updater software that will do this automatically.

3. Adjust power management settings for AirPods

  1. First, right-click the Start button to select the Device Manager option.device manager
  2. Click the View menu, and then select Devices by type.
  3. Double-click the Human Interface Devices category.Device Manager window airpods keep disconnecting from windows 10
  4. Right-click the AirPods Audio/Video Remote Control HID device and select Properties.
  5. Select the Power Management tab in the screenshot directly below.
    Power Management tab airpods keep disconnecting from windows 10
  6. Deselect the selected Allow this computer to turn off this device to save power checkbox, and click the OK button to save the changes.
  7. Next, right-click AirPods Hands-Free Call Control HID in Device Manager and select the Properties option.
  8. After that, repeat steps six to eight to deselect the Allow this computer to turn off this device to save power setting for the AirPods Hands-Free Call Control HID device.

4. Adjust settings for required Bluetooth services

  1. Press Windows + R to open Run, type services.msc in the text field, and click OK.services.msc
  2. Double-click Bluetooth Support Service to open the window directly below.
    Bluetooth Support Service airpods keep disconnecting from windows 10
  3. Click Automatic on the Startup type drop-down menu.
  4. Select the Apply option, and click OK to exit.
  5. Next, double-click the Bluetooth Audio Gateway Service to bring up its properties window.
    Bluetooth Audio Gateway Service airpods keep disconnecting from windows 10
  6. Select the Automatic startup option.
  7. Press the Apply button to save the new service settings.
  8. Click OK to close the properties window.

5. Edit the registry

  1. Press Windows + R to open the Run command, enter regedit, and then click OK.services.msc
  2. Click Yes in UAC prompt.
  3. Now open the following key in the Registry Editor: HKEY_LOCAL_MACHINE\SYSTEM\ControlSet001\Control\Class\{e0cbf06c-cd8b-4647-bb8a-263b43f0f974}\0000
    Registry Editor airpods keep disconnecting from windows 10
  4. Right-click the 0000 key, hover the cursor over New, and then select String Value.
  5. Input PnPCapabilities as the new string value’s name.
  6. Double-click PnPCapabilities to open an Edit String window.
    Edit String window airpods keep disconnecting from windows 10
  7. Enter 24 within the Value data field, and then click OK to save the changes.

6. Uninstall all Bluetooth devices

  1. Press Windows + R to open Run, enter devmgmt.msc in the text field, and then click OK.devmgmt.msc
  2. Next, double-click the Bluetooth category.
    Bluetooth category airpods keep disconnecting from windows 10
  3. Right-click all the Bluetooth devices listed there and then select the Uninstall device options for them.
  4. Then, click the Uninstall option to confirm.
  5. Once you have uninstalled all the Bluetooth devices, restart the computer.

What can I do if I need more potential fixes?

Microsoft’s support service is probably the best for fixing Windows 10 Bluetooth issues. You can chat with a support agent by clicking Contact us on the Microsoft Support page.

Then enter a description for the problem, select an appropriate product and category, and click the Confirm button.

But most of you wouldn’t need to consult the Microsoft support team since the solutions listed here will fix things if AirPods keep disconnecting in Windows 10 and 11.

Also, find out what to do if the AirPods volume is low.

If you have any other queries, please drop a comment below, and we will get back to you.

Fix: No Internet, There Is Something Wrong With Proxy Server

Applying Murphy’s Law to all kinds of technology and computing is easy. For example, Internet connection failures are common in the web browser. And the No Internet, There is something wrong with the proxy error that has troubled users for quite a while.

By default, you’re prompted with a message that informs you about issues caused by the proxy server. So even though you’re not using one, you’re stuck watching your screen showing your favorite content just a second ago.

The complete error message reads, No Internet, There is something wrong with the proxy server, or the address is incorrect. Luckily, there’s a way to address this issue, and we prepared some probable solutions. Check the list below if you have problems with the web browser and a ghost proxy server.

Why can’t I connect to the proxy server?

The primary reason behind the error is an unstable Internet connection. If that’s the case with you, try solving issues causing the interruption, and things should be fine.

Misconfigured network settings have often been found to be an underlying cause. Besides, the problem may be limited to a particular browser. To verify this, check if the other browsers work fine. If they do, we have also listed a solution for that.

How do I fix No Internet, there is something wrong with the proxy server?

1. Check your internet connection or proxy settings

  1. Click on the Start menu, type Internet Options, and then open it from the search results.
    no internet there is something wrong with the proxy server
  2. Select the Connections tab, and click LAN settings.
    no internet there is something wrong with the proxy server
  3. Uncheck Use a proxy server for your LAN box, and check the Automatically detect settings option.
    no internet there is something wrong with the proxy server
  4. Click OK to save the changes.

If There is something wrong with the proxy server error in Opera One or another browser keeps arising every now and then, the above solution should help.

2. Check if the connection is stable

Firstly, a stable connection via LAN should be used instead of wireless. Even if it isn’t the underlying cause, switching to a stable connection will ease further troubleshooting steps. Moreover, you can check alternative browsers for the same issue.

Remember that Firefox may work fine since it can override Proxy settings. However, since that’s not the case for Chrome and others, you’ll need to turn to a manual approach and tweak settings yourself.

3. Check your antivirus or firewall

  1. Click on the Start menu, type Windows security, and then click on the relevant search result.
    no internet there is something wrong with the proxy server
  2. Click on Virus & threat protection here.virus & threat protection
  3. Now, click on Manage settings.manage settings to fix no internet there is something wrong with the proxy
  4. Turn off the toggle for Real-time protection.real-time protection

Having an excellent third-party antivirus is essential for protecting your PC from online threats. However, this error is often triggered by users of third-party antivirus software.

Your antivirus can sometimes interfere with your browser, triggering the error message – There is no internet connection; there is something wrong with the proxy server.

To fix this problem, try disabling certain features of your antivirus. In the worst-case scenario, you might even have to temporarily uninstall it.

If removing the antivirus fixes your issue, you might want to switch to a different antivirus solution and check if that solves the problem.

The market is full of good antivirus options that are reported to protect users’ devices well without impacting their functionality.

Look for tools with an extensive threat database because these are the antivirus software with the highest detection rate. Updating your threat database in real-time is key in creating shields and blocking intruders.

4. Tweak the Registry

  1. Press Windows + R to open the Run command, type regedit, and hit Enter or click the OK button.
    Err_proxy_connection_failed Windows 10
  2. Back up the Registry by clicking Export under the File menu.
  3. Once done, navigate to this path or paste it into the address bar and hit Enter:ComputerHKEY_CURRENT_USERSoftwareMicrosoftWindowsCurrentVersionInternet Settings
  4. Delete these three DWORD on the right:
    • ProxyOverride
    • MigrateProxy
    • ProxyEnable
  5. Restart your PC and look for changes within a browser.

Deleting the proxy server registry key can also help you fix the err_proxy_connection_failed Windows error; read this guide to learn more.

There are multiple ways to disable Windows features. The most used one is through the system’s interface.

However, the Registry should be the next logical solution if something can’t be resolved with the simple box unchecking procedure.

The same goes for ghost proxy, which will continue blocking your connection and, thus, cause errors within the browser. Consider acting cautiously with the Registry because mistakes can be costly.

5. Reset Google Chrome

  1. Click the Menu icon in the top-right corner and choose Settings from the menu.
  2. Select Reset and clean up from the left, and then click on Restore settings to their original defaults.
  3. Click the Reset settings button to confirm.reset settings

According to users, one cause for the No Internet, There is something wrong with the proxy server message might be your Chrome settings.

If you have this problem, reset Google Chrome to default. Remember that this process will remove your cache and extensions, so you might want to back up important data.

The issue should be resolved after resetting Chrome to the default, and everything will start working again.

6. Remove any problematic or suspicious applications

Sometimes third-party applications can interfere with your system and cause the No Internet, There is something wrong with the proxy server error. To fix it, finding and uninstalling any applications that be creating conflicts in Windows is advised.

Any application that changes your Internet settings can cause this issue. Many users reported that the Browser Security application caused this issue on their PC, so if you have this or any other similar application installed, be sure to remove it.

The best way to remove an application is to use uninstaller software.

One optimal software to completely uninstall any unwanted app with all its files and leftovers is IOBit Uninstaller. It’s easy to use, and the guide from the software will assist you in doing it correctly.

⇒ Get IOBit Uninstaller

7. Reinstall Chrome

  1. Click on the Start menu, type Control Panel, and click on the relevant search result.
    no internet there is something wrong with the proxy server
  2. Select Uninstall a program.
  3. Click on your browser and select Uninstall, then follow the wizard to complete the uninstallation.
  4. Navigate to Chrome’s official website and click the Download Chrome button if you use the browser. For other browsers, head to their official website to download the installer.
    no internet there is something wrong with the proxy server
  5. Double-click on the downloaded file and follow the wizard to complete the installation.

If the No Internet, There is no internet connection, there is something wrong with the proxy server message keeps appearing; the issue might be related to the browser’s installation.

To fix the problem, you need to reinstall the browser. The steps above are easy, but if you want to obliterate the browser, we advise you to use an uninstaller software mentioned in a few solutions earlier.

If Chrome is your primary browser, other versions are available, and using one might help eliminate the error.

The Beta version usually brings new fixes, and if you think a Chrome bug is causing the problem, feel free to try the Beta version.

On the other hand, the Canary version offers the latest fixes, but these fixes might not be thoroughly tested, so you might encounter different issues.

There is something wrong with the proxy server message in Chrome can cause several issues and here are some similar problems reported by users:

  • There is something wrong with the proxy server, or the address is incorrect (Windows 10 and 11) – Your proxy settings can sometimes cause this issue, and to fix it, you need to disable them in Windows.
  • Can’t connect to proxy server (Windows 10 and 11) – This is a variation of this error, and if you encounter it, perhaps you should try using a VPN instead of a proxy.
  • Err_proxy_connection_failed (Windows 10) – Sometimes, you might get this error message in your browser. If that happens, reset the browser to the default or try switching to a different browser.
  • There is no internet connection Opera One, Kaspersky, Chrome, VPN – Your antivirus can cause this issue, affecting any browser. To fix this problem, disable or uninstall the antivirus, and the case should be resolved.

How do I find my proxy address?

  1. Press Windows + S to open the Search menu, enter Internet Options in the text field, and click on the relevant search result.internet options
  2. Navigate to the Connections tab and click on the LAN settings button.lan settings
  3. You will find the proxy address and other information listed under the Proxy server.proxy address

You can also find your proxy settings and tweak them for enhanced performance.

How do I check my proxy settings?

We have covered this in our first solution. It is independent of your browser and should be carried out on the Internet options application of your Windows OS.

Once you have wrongly configured your proxy settings, you can expect a host of connectivity issues while using any browser on your computer. In this case, browser changes will not be sufficient to fix the error.

How do I reset my Internet proxy settings?

  1. Press Windows + S to open the Search menu, enter Command Prompt in the text field, and click on Run as administrator.command prompt
  2. Click Yes in the UAC prompt.
  3. Now, paste the following command and hit Enter to reset the proxy settings:netsh winhttp reset proxyreset proxy

The proxy settings will now be reset, and if any issues arise, those shall be eliminated.

With these eight solutions, you should have successfully resolved the proxy server error message. However, remember that the issue may not be from your PC often, and you will have to wait for server admins to address it.

Also, if you come across Please check your Internet connection, Most likely you use a proxy server error, the solutions here should help resolve that as well.

Besides, find out how to fix slow Internet speed in Windows.

If you have questions or suggestions, let us know in the comments.

5 Ways to Fix Your Chromebook if It’s Not Recognizing Headphones

Not everyone is comfortable with using Windows as their main operating system, so choices such as Linux or Chrome OS will always be appealing to some people.

However, just like Windows, other operating systems come with their own set of problems, so don’t be quick to judge Microsoft’s creation.

No software is perfect, and we are still going to get the occasional glitches and unknown errors, so we just need to focus on how to remedy these problems.

By the way, we can show you how to download and install Chrome Enterprise, among others, if that is what you need.

Also, downloading and installing Chrome OS Flex on Windows 10 or Windows 11 is totally possible and we can show you that as well.

And, speaking of unexpected errors, we also have a guide for when you get An unexpected error during Chromebook Recovery.

Circling back, if you are trying to use your headphones on your Chromebook but can’t, we will show you what you need to do.

Why won’t my Chromebook recognize my headphones?

It could be because you haven’t inserted your headphones properly into the Chromebook, or maybe the headphones or the laptop’s jack are defective.

Or maybe you are using a wireless headset and you simply haven’t paired it properly. Another reason might be the headphones aren’t selected as the main output source.

Whichever reason it is, we will show you how to overcome this problem and listen to your favorite tunes or podcasts in your headphones.

How do I fix my Chromebook not recognizing my headphones?

1. Restart your Chromebook

Even though many might see this as a complex problem, we are going to kick off this troubleshooting guide with one of the simplest solutions.

More than often, users have found themselves in this situation and claim that a simple system restart has fixed the problem for them.

So, if you too are affected by the above-mentioned issue, perform a quick restart and check if you can now use your headphones on your Chromebook.

2. Make sure the headphones are plugged all the way in

An apparent simple, yet easily overlooked reason, why your headphones aren’t being recognized by your Chrome OS, is because they aren’t properly plugged in.

When inserting the headphone jack into your laptop, be sure to push it all the way in until you hear the click, and not just partially.

Not inserting the jack properly will not trigger your Chromebook to recognize a new device, as the sensor hasn’t been activated.

3. Perform jiggle test

You might find this silly, but a simple way to find out if its even worth going through the last troubleshooting steps is doing the so-called jiggle test.

How? Push your headphone connector into the jack slot and give it a slight jiggle, but be very careful as this is sensitive hardware.

When doing this, the jack should remain stable without any jiggling. However, if it jiggles, you may have a defective Chromebook and you should contact customer support of your manufacturer, or get a refund from wherever you bought it from.

It should go without saying that you also need to inspect the headphone cable for damage. If you find any, replace the headphones.

Also, try using a different headset and see if that works. If it does, you will, again, need to purchase a new pair and replace them.

4. Select the correct sound output

  1. Click on Quick Settings located in the bottom right corner.chromebook system tray
  2. Click on the little arrow next to the Audio control.chromebook audio
  3. Select Headphones as the output method.headphones chrome os

5. Enable Bluetooth and sync headphones

This step is only for users that are trying to connect their wireless headphones to their Chromebook and failing.

Firstly, you have to make sure that the Bluetooth feature is turned on. After doing so, follow the same steps as in the previous solution.

Select the headphones as the main output source and you should be able to use them without any type of problems.

How do I enable Bluetooth on my Chromebook?

  1. Click on the Quick Settings button.
  2. Press the Bluetooth button.chrome OS bluetooth

No seriously, it is that easy to activate the Bluetooth feature on your Chromebook. And, now that you know, you will be better prepared for the future.

Has this guide helped you remedy the headphone situation? Share your experience with us in the comments section below.

8 Easy Ways to Fix Error Code 0x80090016 on Windows 10/11

Error 0x80090016 can arise for users when they try to set up Windows 10 PINs or log in with them. The error message states:

We weren’t able to set up your PIN. Sometimes it helps to try again or you can skip for now and do this later.

If you need to fix that to set up a PIN in Windows 10, check out these potential resolutions for error 0x80090016.

The main reason for this error to occur is a specific system folder that can get corrupted and block the PIN setup on your device.

If this happens, you might get the PIN isn’t available message. However, we wrote about this issue in a separate guide.

Many users reported related error messages when they tried to access or set up a password for their Microsoft accounts, so today we’ll show you how to fix the 0x80090016 open key error.

What is error code 0x80090016?

The 0x80090016 error message occurs on Windows devices when you’re trying to set up a security PIN and lock your device.

This particular issue can also happen while using Microsoft Store and trying to login into your account.

You can experience this type of issue after you perform system updates on your PC and get the NGC folder corrupted.

This problem can leave your computer unprotected from any user that gets close to your device and thus compromise your personal data.

What is the NGC folder in Windows 10?

NGC directory holds all your PIN data. In case data in this directory gets corrupted, you won’t be able to sign in with your PIN code anymore.

To fix this, you’ll have to create a new PIN.

How do I fix Windows error 0x80090016?

1. Run a System File Checker scan

  1. First, try scanning with the System File Checker. Press the Windows key + R to launch Run.
  2. Enter cmd in Run’s Open box.
    cmd windows key not working
  3. Press the Ctrl + Shift + Enter key combination to open an elevated Command Prompt.
  4. Although not always essential, it’s a good idea to run a Deployment Image scan first. To do that, input: DISM.exe /Online /Cleanup-image /Restorehealth
  5. Press Enter.
  6. Then run the following command: sfc /scannow
    sfc /scannow command error 0x80090016 on Windows 10
  7. Wait for the SFC scan to do its stuff, and then restart Windows if it repairs files.

Scanning your system can help you with Windows Hello error code 80090016, so be sure to try it.

If Windows doesn’t find any issues, you can opt for a more thorough scan by using a specialized tool. With these tools, you can scan for and replace any broken system files in just a few moments.

2. Clear the NGC folder

  1. First, press the Windows key + E key combination, which opens File Explorer.
  2. Select the Hidden Items checkbox option on the View tab.
    Hidden items option error 0x80090016 on Windows 10
  3. Then open this folder path in Explorer: C:\Windows\ServiceProfiles\LocalService\AppData\Local\Microsoft
  4. Next, right-click the NGC folder to select Properties.
  5. Select the Security tab on the window that opens.
    Security tab Error 0x80090016 on Windows 10
  6. Click Advanced to open the window shown in the snapshot directly below.
    Advanced Security Settings window Error 0x80090016 on Windows 10
  7. Then click Change to open the Select User or Group window.
    Select User or Group window Error 0x80090016 on Windows 10
  8. Enter the user account name for the one you’re currently logged in to.
  9. Click the Check Names button.
  10. Press the OK button.
  11. Select the Replace owner on subcontainers and objects option.
  12. Select the Apply option.
  13. Click OK to close the window.
  14. Open the NGC subfolder.
  15. Press Ctrl + A to select all its content.
  16. Press the Delete button on the Home tab.

Clearing the NGC folder, which you’ll need to take ownership of, is one of the most confirmed fixes for the error 0x80090016.

3. Enable Turn on convenience PIN Sign-in

  1. Press Windows key + R, enter gpedit.msc in Run; and press the OK button.
    gpedit windows 11 optional features empty
  2. Expand Computer Configuration on Group Policy Editor’s navigation pane.
  3. Then click Administrative Templates, System, and Logon on the left of the window.
  4. Double-click Turn on convenience PIN sign-in on the right panel within Group Policy Editor.
  5. Select the Enabled radio button.
    Turn on convenience PIN sign-in policy window Error 0x80090016 on Windows 10
  6. Click the Apply button to save the setting.
  7. Press the OK button to exit the window.

Users can fix 0x80090016 keyset does not exist error with Group Policy Editor in Windows 10 Pro and Enterprise.

4. Use System Restore

  1. Press Windows key + R and type rstrui. Click OK.
  2. Click Next.
  3. Select the desired restore point and click Next.
  4. Follow the instructions on the screen to complete the process.

Error 0x80090016 might also be due to recently installed third-party software, which you remove by restoring Windows to a restore point.

Selecting a restore point that goes further back will more likely resolve the error as it will remove more software.

Those are some of the confirmed resolutions users have fixed PIN error 0x80090016 with. So, the above resolutions will usually fix the issue.

How do I fix error 0x80090016 on Windows 11?

Clear NGC directory

  1. Open File Explorer.
  2. Go to View. Next, expand Show and select Hidden items.
     
  3. Naviage to: C:\Windows\ServiceProfiles\LocalService\AppData\Local\Microsoft
  4. Right-click the NGC directory and select Properties.
  5. Go to Security and click Advanced.
  6. Now click on Change in the owner section.
  7. Now enter your user name and click Check names. Next, click on OK.
  8. Select Replace owner on subcontainers and objects and click on Apply.
  9. Now go to the NGC directory and delete its contents.

How do I fix Microsoft Store error 0x80090016?

1. Date and Time syncing

  1. Open Start Menu search.
  2. Type in Date & Time and press Enter.
  3. Click on the Sync now button.
  4. Wait to automatically sync your device date and time.

2. Reset the Microsoft Store app

  1. Go to the Start Menu
  2. Search for Apps and press Enter.
  3. Type in Microsoft Store in the search box.
  4. Click on the three dots and select Advanced options.
  5. Drop down in the list to find the Reset section.
  6. Press the Reset button.
  7. Wait until the process is completed.

3. Use the Windows Store Apps Troubleshooter

  1. Press Windows key + S and enter troubleshooter. Select Troubleshooter settings.
  2. Next, select Other troubleshooters.
  3. Now select Microsoft Store Apps troubleshooter and run it.

It’s also possible to employ a dedicated repairing tool for Microsoft Store to detect the precise cause of the 0x80090016 error code.

Therefore, you can open the Windows Store Apps troubleshooter and automatically fix detected issues in order to solve this error message and access Microsoft Store without sign-in issues.

As you can see, fixing this issue is simple and you can resolve it in a matter of minutes. If you have additional problems, visit our PIN not working guide for more solutions.

Note that the above resolutions are not for the Microsoft Store error that shares the same 0x80090016 code.

Let us know which ones worked best for you by leaving us a message in the comments section below.

6 Ways to Fix Windows Explorer if File Names Are Not Showing

You may experience difficulties identifying the files in your Windows Files Explorer if the file names are not showing. It makes it hard to tell the content of a file. However, Windows Explorer file names not showing is recurrent issue users complain about on Windows computers.

Furthermore, you can encounter various problems with the Windows File Explorer as Windows 11 folder names disappear in File Explorer.

Likewise, file and folder names are not showing in File Explorer and Windows Explorer only shows icons.

However, Windows Explorer file names may not show for various reasons like outdated operating systems, file history issues, etc.

Fortunately, you can fix File Explorer issues by troubleshooting some settings on your computer.

Why is Windows File Explorer not showing file names?

  • Startup errors on your PC: Many things may go wrong with your system apps if there is a startup error. However, your computer may run into errors if you don’t shut it down properly or if there is any issue on boot. It affects how your app functions and may prompt File Explorer problems like file and folder names not showing.
  • Outdated Windows: An outdated Windows operating system can be responsible for the numerous issues on your computer. Windows releases updates and patches to improve performance and fix bugs in current versions of its operating system.
  • File Explorer history: Windows File Explorer keeps a record of your modified files and folders. Likewise, it has an icon cache. However, this history file may become corrupt or stocked up and cause problems with how File Explorer works.
  • File Explorer issues: The Windows File Explorer may encounter issues that can affect how it functions. It may prevent you from accessing your files or folders.

Read how to enable the dark theme in File Explorer for a more enjoyable experience.

How do I fix Windows Explorer if it’s not displaying file names?

1. Restart Windows Explorer

  1. Right-click on Start to prompt the Startup Menu.
  2. Select the Task Manager.
  3. Navigate to the Windows Explorer process option and right-click on it.
  4. Click on Restart.

Restarting Windows Explorer will clear any irregularities in the program and fix any errors prompted during launch.

2. Update your Windows OS

  1. Click the Start button.
  2. Select Setting and click on Windows update.
  3. On the Windows update page, select Check for updates.

If there’s an update available, Windows will automatically search and install it. Hence, restart your computer to sync the update with your PC. It can fix Windows 11 if folder names disappear.

3. Use a repair tool

Sometimes, the safest way to repair damaged files on your PC is by using a specialized program. This kind of software is easy to use and can run an automatic diagnosis of your device.

It has various built-in options that help you protect your computer and also improve its performance. It is a faster and more secure process than following manual steps.

4. Restart your PC

  1. Click on Start.
  2. Select Power from the drop-down and click on Restart.

Restarting your PC can fix startup issues that may cause File Explorer issues on your computer.

5. Clean File Explorer history

  1. Open File Explorer and click on the file menu tab.
  2. Select Options and click the General tab.
  3. Click on the Change folder and search options.
  4. Go to Privacy and tap the Clear button.
  5. Press OK.

Clearing the File Explorer’s history will clear corrupt cache files and the history of the modified folders. It can fix file names if they disappear in Windows 10.

6. Reboot the computer in Safe Mode

  1. On the sign-in screen, press the shift key while holding the Power button.
  2. Hold the shift key to prompt the Advanced Recovery Options window.
  3. Click on Troubleshoot and select the Advanced options.
  4. Click on Startup Settings and select Restart.
  5. Press 4 to Enable Safe Mode. 

The computer will restart in safe mode. Rebooting the computer in safe mode will fix issues that may cause the system error affecting your programs.

What should I do if I can see folders but not files?

The answer in the case of folders with no files even when they aren’t empty is that you have hidden the files. It keeps the files on the folder out of sight but is present as part of the file properties like size and numbers. So, you may see the folder but not the files if they are hidden.

However, you can read our article about how to fix Windows Explorer if it keeps crashing on your computer.

Likewise, you can learn how to take ownership of a folder or file Windows 10 in a few easy steps.

Please leave a suggestion or question in the comments section if this guide has been helpful. We’d like to hear from you.

What to play on Game Pass: shooters (part 1)

Don’t know what to play on Game Pass? With literally hundreds of games to choose from on the service across just about every genre you can think of, it can be quite a task just figuring out where to start. Lucky for you, we have you covered with these Game Pass recommendations for those of you with an itchy trigger finger. That’s right: this time we will be taking a look at the best shooters on Xbox Game Pass Right now. And believe it or not, there are so many worthy mentions that we have to do this list in two parts to do it justice. This, of course, is part one. So without further ado let’s get started.

Battlefield 1943

The fight for the Pacific has begun! Pick your path – be it as a rifleman, fighter pilot or tank driver. Play as a lone wolf or with your friends, coordinating to turn the tide of battle.

Watch the trailer here!


Also check out on Game Pass:

  • Battlefield 3
  • Battlefield 4
  • Battlefield bad company
  • Battlefield bad company 2
  • Battlefield 1 revolution
  • Battlefield hardline
  • Battlefield v

Crysis

What begins as a simple rescue mission becomes the battleground of a new war as alien invaders swarm over a North Korean island chain.

Watch the trailer here!


Also check out on Game Pass:

Crysis 2

Crysis 3

Doom Eternal Standard Edition

Hell’s armies have invaded Earth. Become the Slayer in an epic single-player campaign to conquer demons across dimensions and stop the final destruction of humanity.

Watch the trailer here!


Also check out on Game Pass:

  • Doom
  • Doom (1993)
  • Doom 64
  • Doom II

Far Cry 5

Far Cry comes to America in the latest installment of the award-winning franchise.

Watch the trailer here!


Gears 5 Game of the Year Edition

The complete Gears 5 experience in one bundle. Get the celebrated campaign, recharged multiplayer and Hivebusters campaign expansion as part of the Game of the Year Edition.

Watch the trailer here!


Also check out on Game Pass:

  • Gears of war
  • Gears of war 2
  • Gears of war 3
  • Gears of war 4
  • Gears of war judgement
  • Gears of war ultimate edition

Halo Infinite (Campaign)

The legendary Halo series returns with the most expansive Master Chief campaign yet and a ground-breaking free-to-play multiplayer experience.

Watch the trailer here!


Also check out on Game Pass:

  • Halo 5 guardians
  • Halo: spartan assault
  • Halo the master chief collection

Just Cause 4: Reloaded

Just Cause 4 Reloaded delivers an expansive and explosive gameplay experience in an all-new package! Just Cause 4 Reloaded includes additional premium content as well as all previously released improvements.

Watch the trailer here!


Metal: Hellsinger 

Strike terror into the hearts of demons and devils as you fight your way through eight Hells. Metal: Hellsinger is a rhythm FPS, brimming with diabolical enemies, powerful weapons, and metal music.

Watch the trailer here!


Wrap up

So what do you think of part one of our list of Xbox Game Pass shooters? Did you find your personal favorite here? Remember, there is still part two to come. The abundance of awesome shooters–both first and third person varieties–on Xbox Game Pass is just one of the things that make it the best gaming service out there. If you don’t already have a subscription you can sign up here. Learn more over the Xbox Game Pass FAQ page. And don’t forget to check out our other “What to play on Game Pass” posts for other Game Pass recommendations.

5 Ways to Fix File Explorer if the File Count Is Not Working

Windows File Explorer helps you access your folders and important files. In cases where you have a large number of files in one folder, it becomes important to keep track of the file count. However, sometimes, the file count may not be working.

If you are copying files from one folder to the other or just trying to organize your files and folders by size, it can be frustrating when File Explorer is not keeping count. Sometimes the issue is so severe that File Explorer keeps crashing.

In such a situation, most people might give up and opt for a third-party file manager. However, with some quick and easy tweaks, you can get the file count to show up without too much hassle.

How do I show file count in Windows Explorer?

The file count in File Explorer is a useful feature that allows you to see how many files are in a folder and its subfolders. 

Usually, when you open a folder on File Explorer, the number of files will be displayed at the bottom left corner. However, if this isn’t the case, there are two ways to do this. 

The first one is to open the folder and select all files by pressing Ctrl + A and the file count will be displayed at the bottom left corner. However, if you have too many files, File Explorer may not be able to display the file count at the bottom.

Here’s where the second method comes in. You can right-click on the folder you want to reveal the file count and select Properties.

The Properties dialog box under the General tab will list all the details pertaining to that folder including the file count. 

For the more tech-savvy users who would like to count the number of files in a folder and subfolders in Windows, you can do so with PowerShell. Powershell is a powerful tool for managing Windows environments.

All you have to do is copy the path of the folder location and paste it as a command on Powershell. Powershell will list the folders and file count.

How many files can be in a Windows folder?

The total number of files that can be in a folder is limited by the amount of space available on the drive and the system file type. If there’s not enough space for new files, Windows will display an error message when you try to create or open another file in that folder.

In most cases, this means you need to free up some disk space. You can use Disk Cleanup to delete temporary files and other unnecessary data from your computer.

What can I do if the file count is not working in File Explorer?

1. Restart File Explorer

This is probably one of the easiest solutions for fixing the issue. If you have recently opened File Explorer and then closed it, this could be enough to trigger a bug where it stops updating the file count and causing it not to work. 

restart file explorer

You will need to restart it again. This means closing all open instances of File Explorer on your computer and then opening them again from your Start menu or taskbar. 

2. Run SFC and DISM commands

  1. Press the Windows key, type cmd in the search bar and click Run as administrator.cmd-admin hp printer won't scan
  2. Enter the following command: DISM /Online /Cleanup-Image /RestoreHealthdism-restore steam.exe bad image
  3. Wait for the command to be executed then run the next one: sfc /scannowsfc scan
  4. Once complete, reboot your PC and try again.

SFC (System File Checker) scan checks and verifies all protected system files and replaces incorrect versions with correct versions. The DISM command can repair corrupt Windows images and restore missing or damaged files from those images.
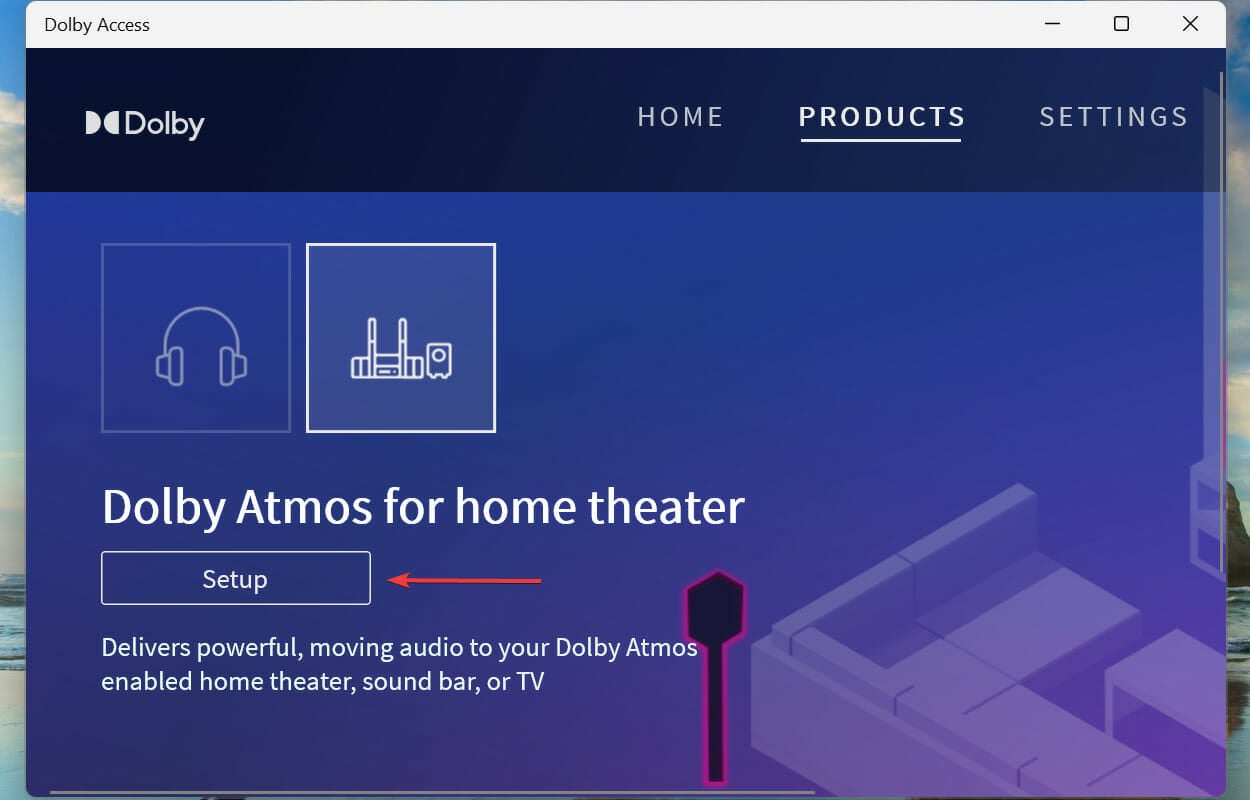
3. Scan for viruses

  1. Press the Windows key, search Windows Security and click Open.
  2. Select Virus & threat protection.
  3. Next, press Quick scan under Current threats.
  4. Wait for the process to finish and restart your system.

4. Check for Windows updates

  1. Press the Windows key and click on Settings.settings windows 11
  2. Click on Windows Update on the left-hand pane.windows-update-w11 amd driver not installing
  3. Select Check for updates then install if available.check for updates windows 11 settings

5. Restart your PC

Restarting your PC forces all programs and processes to close down so that they can be restarted again.

In this case, restarting will refresh all the processes running on your computer and clear out any temporary files that may be causing issues in your computer’s operating system.

If none of these work, it could be an issue with recently installed third-party software onto your computer that may be interfering with File Explorer and its ability to display file counts properly in Windows. You can try to uninstall these programs and see if the issue persists.

While you are still here, check out our article on the fixes you need to apply if File Explorer is not displaying the correct file or folder size.

Also, if the Windows File Explorer search tab is not working, we have an expert guide on how to solve this issue.

For any additional thoughts on this topic, leave us a comment down below.

Play Dead Island Definitive Edition and Hunting Simulator 2 free this weekend with Xbox Free Play Days

Another weekend approaches, and with it comes another round of Free Play Days games for subscribers of Xbox Live Gold and Xbox Game Pass Ultimate. Two titles are available to play this weekend from September 22-25.

Dead Island Definitive Edition

Dead Island Definitive Edition

The game that re-defined the Zombie genre – fully remastered.

Hunting Simulator 2

Hunting Simulator 2 Xbox Series X|S
Developer:
Nacon
Price:
$49.99

It’s open season! In stunning natural environments, choose your gear from the best official weapons and accessories and set off with your dog in search of a variety of animal species in this hunting simulation.

(Note that the Xbox One and Xbox Series X|S versions of this game are playable separately). Both the Xbox One and Xbox Series X|S versions of Hunting Simulator 2 are on sale this weekend.

Xbox Free Play Days is just one of the many great benefits of an Xbox Live Gold or Game Pass Ultimate subscription. Learn more over on the Xbox Free Play Days FAQ page.

Featured image via medium.com. 


Using LinkedIn for successful video meetings with your network

As LinkedIn moves towards providing services for the business community, it has launched a raft of features designed to help small businesses use its collaborative tools on the platform. One such feature is its Video Meetings. However, this cool feature is very well hidden in LinkedIn’s UI so it is certainly worth a mention if you have never heard of it.

The LinkedIn Video Meetings feature will enable you to generate and share video meeting links so you can host meetings directly on the business networking platform, using LinkedIn messages. You can initiate an individual meeting with one other LinkedIn member at the moment, however, LinkedIn does note that the ability to host group meetings will be added later.

The Video Meetings feature uses Microsoft Teams and Zoom APIs to create the meeting links. Alternatively, you can use the app add-in on Zoom to use the LinkedIn video meetings feature.

Using LinkedIn for video meetings eileen brown onmsft

Once you have seen how to start a video meeting, it is difficult to understand why you never noticed it before. It is very well hidden in plain sight.

Starting a LinkedIn Video Meeting

To create a video meeting all you need to do is click the Messaging icon at the top of the homepage and select who you want to talk to.

Click the video meeting icon at the top of the messaging window (the video camera with a plus sign). The ‘create a video meeting’ pop-up will appear so you can either hold an instant meeting or schedule the meeting for later.

Using LinkedIn for video meetings eileen brown onmsft

By default, the video meeting uses LinkedIn video meetings, but you can opt to use a third-party video provider such as Microsoft Teams or Zoom if you want to use extra features, such as the ability to have multi-person video meetings.

Using LinkedIn for video meetings eileen brown onmsft

You do need to sign into the chosen provider to use the other third-party’s video software. If you are already signed in, you will see the account you used to sign into under the provider’s name.

You can elect to use instant video, or schedule a meeting for later. A meeting link with a unique meeting ID is automatically generated. If you have signed in with Zoom, this will not be your personal meeting link but a unique link for each video. This makes sure that no one misuses your personal number.

If you have the third-party video meeting provider installed on your device, click on the meeting link to invoke the app.

Using LinkedIn for video meetings eileen brown onmsft

There are basic settings you can change before you join the meeting itself – such as changing the audio device or muting your audio feed.

Using LinkedIn for video meetings eileen brown onmsft

Once in a video meeting, there is limited functionality. You can turn on the video or audio, share the screen, a window, or a tab, or change your video or audio device. There is no opportunity to use the chat function to share links. You can change the screen from speaker layout to gallery layout.

If you elect to use a third-party provider such as Microsoft Teams when you start the meeting you are presented with a link to join either from the app if this is installed, or join from your browser if not.

Using LinkedIn for video meetings eileen brown onmsft

Annoyingly, your profile bio is displayed at the bottom of the screen along with your name. Surely the person you are speaking with knows all of this information anyway – as you are both already connected? I find this irritating and unnecessary.

Another annoyance is that if you schedule a meeting, you need to note the date and time. LinkedIn does not seem to integrate with any calendar app such as Outlook, Teams, or Gmail. Perhaps this is in the pipeline – perhaps LinkedIn expects you to use another way to remind you when the meeting is about to start. I didn’t get any reminders for any of the meetings I scheduled.

However, the Video Meeting service is a handy tool if you tend to keep LinkedIn open on your desktop throughout your working day, and if you want to have a quick call with someone you’re messaging through the LinkedIn messenger service.

LinkedIn Video Meetings are very useful if you do not have Microsoft Teams or Zoom on your device and need to make a quick face-to-face call. Do give it a try.

Other LinkedIn tips in this series:

6 reasons why LinkedIn is important for your business

Make your LinkedIn profile more dynamic with a cover story video

How to stop connection harvesting within LinkedIn

Microsoft launches new VIva tools to enhance hybrid work

Back in June, Microsoft launched Microsoft Viva Sales, a tool designed to incorporate CRM technology into and from both Microsoft 365 and Microsoft Teams. With AI support, the tool personalizes recommendations for sellers and assists them to connect with their clientele.

And now, Microsoft just announced that Microsoft Viva Sales is set to reach general availability on October, 3. Microsoft will be partnering up with Seismic, an enablement platform that provides businesses with the tools and skills to run a profitable venture.

Through this partnership, our joint customers can streamline the meeting and buyer engagement experience for sales teams and improve productivity through preparation, automation, and intelligence in their daily flow of work. As the first step in this journey, Seismic Enablement Cloud uses Viva Sales’AI-powered insights to recommend content, training lessons, andpre-built digital sales room as post-meeting follow-up actions in Viva Sales.

In turn, users will now have access to real-time business context from a sellers’ CRM system in Outlook and Teams, What’s more, it will also promote efficiency and effectiveness in the business by enhancing connectivity, knowledge sharing, and collaboration.

With more than 270 million monthly active Teams and Microsoft 365 users, Viva Sales acts as a bridge connecting the data and insights sellers need to sell effectively and close deals faster with the productivity and collaboration tools, they use every day.

In other Microsoft Viva news, Microsoft is expanding Viva Goals with new applications and services in an attempt to mitigate the three business imperatives from their latest Work Trend Index Pulse Report. That is, end productivity paranoia, embrace the fact that people come in for each other, and re-recruitment of employees. In turn, this will help enhance the employees’ morale and in turn boost their performance index.

First up is Viva Pulse, an application that will provide a platform designed to enhance communication between managers and team leads. It makes use of both smart templates and research-backed questions that will help businesses identify their strengths and weaknesses. In turn, they will get recommendations on how to address the issues.

Viva Amplify is also coming to Viva Goals, a tool that will help leaders put their points across to employees with an impact as it centralizes communication campaigns. Ultimately enhancing the information’s resonance. What’s more, it cuts across the board on Microsoft 365 which means you can publish important information on multiple channels and distribution groups easily.

Users will also get two new capabilities, Answers in Viva and People in Viva. The former comes with AI support which matches employee questions to answers and experts across the organization, availing all relevant information while the latter curates rich profile cards with information regarding the employee’s interests, knowledge, and team goals which makes it easier for colleagues to network and connect. These insights will
be available through Microsoft 365 profile cards and as a new app.

Leadership Corner will also be incorporated into the recently launched Viva Engage to serve as a platform where employees get to interact with leadership directly, share ideas and perspectives, and take part in organization initiatives. It will appear on top of the Storyline feature that recently reached general availability, which allows users to real-time updates and experiences.

These incorporations in Viva Goals “will bring goals into the flow of work including a richer integration with Microsoft Teams to check in on OKRs, an extension in Azure DevOps to complete work items, a connection to Power BI datasets to track KPIs and Key Results, and integrations with Microsoft Planner and Microsoft Project for automatic project management updates.”

And finally, there will be enhancements between Viva Learning and LinkedIn Learning, which will in turn make it easier for users to access content from LinkedIn Learning Hub directly from Teams. What’s more, learners will now be able to view custom content, curated learning paths, and complete courses within Viva. It is worth noting that, this integration can be set up directly from the settings on LinkedIn Learning Hub by admins, canceling out the need for APIs.

All these new applications and services coming to Microsoft Viva will be available in one convenient location, the new Viva Connections home experience. Users will also be provided with a tailored and personalized summary highlighting their productivity insights, recommendations, and employee experience information directly in their Outlook inbox every day.


Windows 11 builds 22621.601 and 22622.601 are live on the Beta Channel

Yes, you guessed it. It’s that time of the week when Windows 11 Insiders on the Dev and Beta Channels receive new software to play with.

And, just like in July, when Microsoft began flighting two separate of Windows 11 Preview builds for Insiders on the Beta channel for a staggered release, we get the same this month

This is a really important day for <ocrpspft, as the tech giant has started rolling out Windows 11 version 22H2, or Windows 11 2022.

One of the most notable changes is that the Windows Update tool will leave a smaller carbon footprint, as updates will be downloaded when more clean energy sources will be available.

Now, however, let’s take a closer look at these Beta Channel builds and see what Microsoft has prepared for us today.

What changes does KB5017384 bring to Windows 11?

The Redmond-based tech company has just released an update with new builds 22621.601 and 22622.601 (KB5017384) to the Beta Channel for Windows 11 Insiders.

There isn’t much to see here, as this isn’t a massive release, but we are going to check out everything that is happening with these two builds.

Fixes (build 22621.601 & build 22622.601)

  • Fixed the issue where clicking the network icon on the Lock screen would not work and would crash the Lock screen.
  • Updated the start date for daylight saving time in Chile. It will start on September 11, 2022 instead of on September 4, 2022.
  • Reduced the power that the Dynamic Host Configuration Protocol uses on some devices when they are in Sleep mode.
  • Fixed an issue that affects Dual SIM calling. If you select no SIM on your phone and initiate a call on your device, Dual SIM functionality does not work.

Known issues

  • Microsoft is looking into reports that audio stopped working for some Insiders in recent Beta Channel builds.

That’s pretty much all there is for the Beta Channel Insiders this week, with only a few fixes and a single known issue.

This isn’t necessarily bad, as we are looking at fewer and fewer issues each month, which means that the OS is much more stable and reliable now.

What can I do if KB5017383 fails to install?

  1. Press Win+ I to access Settings.
  2. Select the System category and click on Troubleshoot.w11 troubleshoot
  3. Press the Other troubleshooters button.other troubleshooters windows 11
  4. Press the Run button next to Windows Update.windows update troubleshooter

Be sure to report any other issues you might come across, in order for Microsoft to address and improve the overall OS experience for us all.

There you have it, folks! Everything you can expect if you are a Windows Insider. Leave a comment below if you found any issues since installing this build.

Fix PoE Packet Loss, High Ping & Lag Spikes [Easiest Method]

Path of Exile is a free multiplayer role-playing game that has gained a lot of popularity. Players all around the world argue that it’s better than Diablo III. Others even dare to say that PoE is what Diablo III was supposed to be.

Either way, it’s a breath of fresh air, especially since it embraced the F2P culture quite tightly. Yes, PoE has some micro-transactions, but most of them are cosmetics.

However, that’s not why we gathered here. As you probably know, there’s no way to play Path of Exile offline. Therefore, you can imagine that this awesome game faces the same challenges as any other similar service.

Especially during new releases, patches, or updates, players complain about certain issues including but not limited to high ping, connection timeouts, jitter, and even the dreaded packet loss.

Although most of the time these problems arise as a consequence of network congestion, sometimes they might have something to do with underlying issues on your end. More so, you might even be able to fix them.

Why is Path of Exile so laggy?

Packet loss in Path of Exile can and will trigger nasty lag spikes. But what exactly is this issue you keep hearing about? Packet loss, or packet leak, is the inability of data packets to reach their destination.

  • PoE latency issues / high latency
  • Path of Exile high ping
  • Path of Exile lag spikes and lag on ps4, ps5, xbox, PC
  • Path of Exile connection issues, losing connection
  • PoE rubberbanding and stuttering
  • PoE servers packet loss
  • Path of Exile frame drops 2022

None of these are ideal with Path of Exile, considering that you can lose experience points if you die.

However inconvenient it might be, packet loss can happen for various reasons. For instance, you might have bad cables, improperly configured hardware, or ISP issues.

Most of the time, packet loss occurs because of network congestion. Given that PoE is free-to-play, its servers are more often than not heavily populated. In this case, your safest bet would be changing the server or waiting it out.

How do you fix packet loss in Path of Exile?

1. Use a VPN against PoE lag spikes

  1. Download ExpressVPN and install it on your PC.
  2. Launch it and log into it using your credentials.
  3. Connect to the server of your choice, preferably the one ExpressVPN recommends.
  4. Launch Path of Exile.
  5. Check if you still leak packets.

ExpressVPN is an excellent all-around VPN service from Kape Technologies. Not only it can help you bypass packet loss with just about any service, but you can also use it to circumvent geo-restrictions, secure your connection, improve your privacy, and eliminate ISP throttling.

It’s worth mentioning that using a VPN won’t work if packet loss occurs on your side. The same applies to packets lost by the Path of Exile server you connect to. Using a VPN will only work if the packet loss occurs on your ISP’s side (intermediary).

ExpressVPN

The optimal solution is to change servers whenever you have lag spikes and to get up and shoot again.
Check price Visit website

2. Test packet loss in PoE

  1. Use our guide to help you run a complete packet loss testPacket loss analysis Windows with tracert and pathping
  2. Identify the location of the packet leak (the hop number)
  3. Take the necessary measures to minimize the packet loss

3. Troubleshoot your connection

We’ve mentioned in our guide that packet loss can occur in the following locations:

  • Your PC/home network/router
  • Your ISP’s network
  • The servers of the network distribution company (above ISP)
  • The destination server
test packet loss

Thus, depending on the location of the packet loss, you can take one of the following actions:

  • Perform a thorough check of your PC, cables, router, and home line
  • Call your ISP to fix the issue
  • Ask your ISP to talk to the distribution company
  • Contact the support team in charge of the server you’re having problems with

How do I make PoE run better?

The sound may be one of the main causes of lag in your game, and it is becoming more popular in the community how completely disabling some sound settings can result in much better and more stable gameplay. To do so, you must first complete the following steps:

  1. You must locate your Path of Exile Config file, which is normally located in your
    User folder > Documents > My Games > Path of Exile. The exact name of the file is production Config.
  2. When you’ve found the file, right-click it and choose Open With NotePad.
  3. Then look for the Sound settings, which should be around 60-70% of the way down the file. Then change the following numeric lines to “false”:

ambient sound volume2=false

music volume2=false

sound effects volume2=false

While doing so, make sure your game is closed. Simply save and close the file after completing the following steps, then relaunch Path of Exile. You’ll notice that the game is much quieter now.

All of the action sounds, such as shattering and volatiles, are muted. Applying these settings to “false” instead of “0” tells your PC that it must not process all of the extra sounds, resulting in a smoother gaming experience, especially on slower computers.

If you’re experiencing packet loss, don’t despair. Most of the time this issue fixes itself without any assistance. However, if the problem is recurrent, you might want to try using some of the fixes we’ve mentioned above.

Visit our Gaming Hub to discover more guides, reviews, and tips & tricks.

We can’t stress this enough, but using a VPN doesn’t automatically care take of everything. Do your research thoroughly before investing in such a service. Although VPNs can help you in many other ways, fixing packet loss only works in certain cases.

FIX: NordVPN Obfuscated Servers Not Working [4 Easy Methods]

If you notice NordVPN’s obfuscated servers stopped working, don’t fret. It’s quite a common issue, especially among novices, that can be fixed easily.

NordVPN’s obfuscated servers are an important component since they enable you to further decrease your chance of being detected.

Obfuscated servers, also called stealth servers, cloak VPN traffic and make it appear as regular traffic.

Therefore, any online service that might apply restrictions to VPN users won’t be able to detect that you’re using a VPN.

They are crucial for users who try to access geo-restricted content in certain countries that ban VPN usage (such as China).

What does obfuscated mean on NordVPN?

The obfuscated servers have an extra layer of protection, making it appear as if you are on regular traffic and not on a VPN.

Web monitoring has advanced over time and services that forbid or restrict VPNs are able to detect and block you, even when you use a fully encrypted VPN.

Obfuscated servers hide data packets with additional SSL/SSh encryption so the information that links you to a VPN is hidden.

This means that with NordVPN’s obfuscated servers you’ll be able to bypass even the strictest web blocks.

NordVPN obfuscated servers are greyed out

If you are unable to use the obfuscated servers, make sure to check your protocol.

OpenVPN is the recommended protocol for obfuscation, and it’s possible you can’t turn on obfuscated servers on NordVPN because you use a different protocol.

NordVPN users also report getting rid of this issue by simply updating the NordVPN app, so make sure you try that as well.

How can I fix NordVPN’s obfuscated servers not working?

1. Switch to the OpenVPN protocol

  1. Launch NordVPN
  2. Click the gear-shaped button
  3. Go to the Auto-connect category
  4. Disable auto server & protocol selection
  5. Open the VPN protocol context menu
  6. Select OpenVPN (TCP or UDP)
  7. Go to the Advanced section
  8. Enable Obfuscated servers (OpenVPN)
  9. Go back to NordVPN’s main screen
  10. Click the Obfuscated Servers folder

That’s it, you just restored NordVPN’s Obfuscated servers functionality.

NordVPN makes you use its proprietary NordLynx protocol by default, and switching it is not exactly a piece of cake, especially for beginners.

Although NordLynx looks promising in terms of both speed and security, it’s not compatible with NordVPN’s obfuscated servers.

If you want to be more specific about which server should NordVPN connect you to, here’s what you need to do after enabling the feature:

  1. Go to NordVPN’s main screen
  2. Hover your mouse cursor over the Obfuscated Servers folder
  3. Locate the three dots button that appeared upon hovering
  4. Click the three dots button
  5. Make your pick from the Country menu
  6. Choose a server from the Server menu (it’s easier to leave this one on Auto)

2. Update NordVPN

  1. Uninstall NordVPN completely from your PC.
  2. Download the last version of NordVPN.
  3. Right-click the installer executable.
  4. Select Run as administrator.
  5. Proceed through the installation.
  6. Once it’s done, launch NordVPN.
  7. Make sure you’re using the OpenVPN protocol (check the first method above).
  8. Click the Obfuscated servers folder or select a specific server.

NordVPN usually performs version checks and applies updates automatically.

However, if you didn’t launch the app in a long time, you may be running an outdated version.

There’s a good reason why developers can’t stress enough that we keep programs and drivers up-to-date.

3. Restart the NordVPN service

  1. Disconnect from NordVPN’s server, if necessary
  2. Right-click the NordVPN tray icon
  3. Select Quit App
  4. Press the Win key on your keyboard
  5. Type services and select the Services app
  6. Locate nordvpn-service in the large section of the window
  7. Right-click it and select Properties
  8. Make sure that Startup type is set to Automatic
  9. Close the Properties window
  10. While nordvpn-service is highlighted click the Restart hyperlink (check screenshot below)
  11. Close the Services window
  12. Re-launch NordVPN
  13. Make sure you’ve enabled obfuscated servers (check Method 1)
  14. Click the Obfuscated servers folder or choose a specific country/server combo

Services can sometimes affect the functionality of certain apps on your PC.

Although NordVPN’s service is there to make sure that the app runs as intended, it doesn’t hurt to give it the old restart treatment.

It might kickstart the Obfuscated server’s functionality back to life.

4. Use another VPN

  1. Buy another VPN subscription plan. We recommend Private internet Access.
  2. Download and install Private Internet Access VPN on your PC.
  3. Launch the VPN client.
  4. Log in to your account.
  5. Access the Settings Menu.
  6. Go to the Protocols section.
  7. Choose OpenVPN.
  8. Go to the Multi-Hop section and tick the box next to Multi-Hop and Obfuscation.
  9. Connect to any Private Internet Access Server.

If nothing seems to do the trick, you may want to try another VPN.

However, it’s of utmost importance that this other VPN you may try also has obfuscated servers.

One such VPN that we wholeheartedly recommend is Private Internet Access.

Not only can it mask VPN traffic with its Multi-Hop (which is essentially the same thing as obfuscated servers), but it also has GPS spoofing.

Check out PIA’s main features:

  • More than 32000 servers in 65 countries
  • Native Multi Hope on all servers while using OpenVPN
  • Zero-logging policy
  • 10 simultaneous connections
  • Private DNS and DNS leak protection
  • GPS location spoofing
  • MultiHop (connect via multiple countries)
  • NoBorders mode to help you bypass firewalls and geo-restrictions

Private Internet Access

Use PIA’s obfuscated servers for total online anonymity and freedom!
Check price Visit website

All in all, if your NordVPN obfuscated servers don’t seem to work, it’s usually caused by the NordLynx protocol.

Simply switching to OpenVPN should let you enable obfuscated servers once more and use them without significant effort.

Ultimately, if nothing works, you can try switching to another VPN service that has obfuscation support, such as Private Internet Access.

Start Your VPN Free Trial with PIA [+More VPNs Risk-free]

If you’re here looking for a free trial for for a trustworthy VPN that is truly private, that’s exactly what you’re going to get by the end of this article.

We’ll show you how to sign up for a VPN account without having to commit financially. Keep in mind however, that in the case of many VPNs, even premium ones, there’s always a catch.

Despite being well received a trustworthy, many VPNs do require credit card info before allowing you to use a free trial, or they don’t offer it at all but include a money-back guarantee instead.

Is there a VPN that has a free trial?

Many VPNs come with a free trial or trial versions, but not all of them are worth using, because they’re not completely private, which kind of defeats the whole purpose of using a VPN.

Here’s our top picks in terms of VPNs that come with a free trial and offer great performance and a well rounded set of features:

VPN NameTrial length
ExpressVPN7-day free trial (Android and iOS)
30-day money-back guarantee (all plans)
CyberGhost VPN1- day free trial
30- day money-back guarantee (all plans)
Surfshark VPN7- day free trial (Android, iOS, and macOS)
30-day money-back guarantee (all plans)
VyprVPN3 – day free trial (iOS and Android devices)
30-day money-back guarantee (all plans)
PureVPN7 – day free trial (Android and iOS)
31-day money-back guarantee (all plans)

As you can see, you’ll most frequently get a 7-day trial. You can however test the VPN for longer, and use the money-back guarantee as your VPN’s 30-day trial period if you don’t mind entering card info.

How can I get a free trial of VPN without a credit card?

There are some VPNs that don’t ask for card info to offer a trial period. CyberGhost and PrivateVPN are great examples, as shown above.

Other good VPNs with a free trial, no credit card needed include:

Given that they’re free, you can try all of them and see which one is the best for your configuration in terms of speed, privacy, and the features you need most.

How to get a free trial for Private Internet Access VPN

  1. Go to the official PIA website.
  2. Choose one of the available plans.
  3. Select a payment option.
  4. Enter your payment details in the fields.
  5. Checkout the plan you chose.
  6. Enjoy PIA for 30 days.
  7. Cancel your subscription before the 30 days are up.

Now we know what you’re thinking, that this is not a free trial at all, since you had to pay for it.

Well, you’d be only half right thinking that. Because PIA has a 30-day money-back guarantee.

Private Internet Access

PIA offers a 30-day money-back guarantee on all of its plans. Use it to test PIA risk-free for up to 30 days!
Check price Visit website

This means that if you choose not to stick with PIA before the 30-day trial period passes, you can just cancel your subscription and you’ll get a full refund. No questions asked, either.

We understand that it might be a bit inconvenient to share your credit card details with PIA.

On the other hand, a one-month subscription for PIA is worth $10.69 and you can test it for free.

But, is there a free trial for PIA VPN without a credit card? No, you can’t get Private Internet Access for free without using your credit card.

However, you can ask for your money back within the first month. That shouldn’t be a problem since PIA is one of the few VPN services with 24/7 live chat support.

Can you get unlimited free trials with VPN?

There is no unlimited free trial, but you can find free VPNs altogether. Make sure you read your Terms of Use because some free VPNs tend to log user data and try getting the best free VPNs on the market , for optimal experience.

Which VPN does not need a subscription? – There are some free VPNs that don’t require any registration information, not even your email address. However, they are more limited than premium VPNs.

Can I get a VPN for 1 month? – Most VPNs come with the 30-day money-back guarantee included, so you can use them for free for a month. Also, there are a lot of good VPNs with one-month subcriptions .

If you’re serious about getting a VPN for the long haul, you may want to purchase a larger subscription plan from our PIA deals page.

Fix Packet Loss in Rainbow Six Siege: 7 Solutions for R6 Issues

Packet loss in Rainbow Six Siege causes issues like rubberbanding, high ping, and disconnects, often due to network congestion.

High ping and jitter result from unstable connections, sometimes caused by ISP throttling. Follow the steps below to fix these connection issues and make R6 Siege run smooth:

How to fix packet loss in Rainbow Six Siege?

First, check the server status on Ubisoft’s official Rainbow Six Siege Status Page. Also, consider switching from WiFi to Ethernet.

Still having issues? Keep reading.

1. Update Network Drivers

  1. Press Windows + X and select Device Manager.open device manager
  2. Expand the Network adapters section.
  3. Right-click your active network adapter and select Update driver.update network adapter driver
  4. Choose Search automatically for drivers.search automatically for network drivers
  5. Restart your computer.

2. End Network-Intensive Processes

  1. Press Ctrl + Shift + Esc to open Task Manager.
  2. Click on the Network column to sort processes by network usage.network processes task manager
  3. Right-click on any high-usage processes and select End task.end network consuming task
  4. Close unnecessary background applications.

3. Verify the Integrity of Game Files

  1. Open your game client (e.g., Steam, Uplay).
  2. Navigate to your game library.
  3. Right-click on Rainbow Six Siege and select Properties.
  4. In Steam: Go to Local Files and click Verify integrity of game files.verify integrity of game files steam
  5. In Uplay: Go to Games, select Rainbow Six Siege, click Properties, then Verify Files.

4. Flush DNS

  1. Press Windows + R, type cmd, and press Enter.
  2. Type ipconfig /flushdns and press Enter.ipconfig flush dns
  3. Wait for the confirmation message.
  4. Restart your computer.

5. Change the DNS Server Address

  1. Press Windows + I to open Settings.
  2. Go to Network & Internet.
  3. Click on Change adapter options under Status.click on change adapter options
  4. Right-click your active network connection and select Properties.
  5. Select Internet Protocol Version 4 (TCP/IPv4) and click Properties.ipv4 properties
  6. Select Use the following DNS server addresses.Enter DNS server addresses in Properties
    • Enter 8.8.8.8 as the Preferred DNS server and 8.8.4.4 as the Alternate DNS server.
  7. Click OK to save changes.

6. Use a zero-lag proven VPN

  1. Download and install ExpressVPN. (We tested the packet loss with it)
  2. Launch it and login with your credentials.
  3. Connect to a Recommended Location offered by ExpressVPN.
  4. Run Rainbow Six Siege.
  5. Check if the problem still persists.

A VPN can reduce packet loss in Rainbow Six Siege by bypassing ISP throttling, reducing network congestion, optimizing routing paths, and enabling port forwarding for more efficient data flow.

ExpressVPN

Choose your server to play on and bypass network congestion in multiplayer mode for Rainbow Six Siege.
Check price Visit website

7. Run a packetloss test in Command Prompt

Packet loss analysis Windows with tracert and pathping
  1. Open Command Prompt.
  2. Type ping [target] -t > packetloss.txt (replace [target] with the IP address or domain) and press Enter.
  3. Let the test run for several minutes.
  4. Press Ctrl + C to stop the test.
  5. Open packetloss.txt with a text editor.
  6. Look for “Request timed out” or high latency in the file.

If you see packet loss, check and fix your network equipment; if the issue persists, contact your ISP with the results or report the problem to game support.

Wrapping up

Bottom line is, if you’re experiencing packet loss in Rainbow Six Siege, don’t sweat it. If you can afford the luxury of waiting it out, then do so. More often than not, the issue is caused by network congestion, which comes and goes. Also, a VPN works for the Rainbow Six Siege error code 10-0x00000.

Last but not least, try using a wired connection. Wi-Fi leaks packets more often than wired connections since it’s subject to a few additional factors that can cause it.

5 Best VPNs for Left 4 Dead 2 to Reduce Lag & High Ping

If you’re experiencing Left 4 Dead 2 lag, you can reduce it with a VPN to improve your multiplayer sessions.

Left 4 Dead 2 (L4D2) is a survival horror first-person shooter that takes place in the zombie apocalypse.

Although it has a single-player mode, the game is more popular due to its multiplayer version, where players can team up to fight off the zombie horde. It has PvP mode, too. You can play it on Windows, Mac, Linux, and Xbox 360. It’s available on Steam.

Unfortunately, many users have Left 4 Dead 2 lag and high ping, which interrupts their gameplay and may even lead to desynced actions, like accidentally getting killed.

If you’re one of these players, you can use a VPN to improve your ping.

A virtual private network solution is great for not only encrypting your network traffic and protecting your online privacy, but also for optimizing your Internet connection for gaming if you get a high ping. Plus, you can fix packet loss issues with a VPN.

How do I lower my ping in L4D2?

High ping happens, mostly, when your Internet network is not strong enough to support all the requirements of the game.

There are some things you can improve and tweak in order to maximize your connection’s potential.

➡️ Close background apps- especially those that use up the network and aren’t currently in use

➡️ Try using a wired connection – using Ethernet instead of Wi-Fi is a fix many gamers swear by, increasing network stability and speed

➡️ Tweak graphics settings – disabling unnecessary animations and transitions in your game and reducing the quality of your graphics, can really improve latency issues

These are some of the most common things you can do that are simple and do not require a lot of time and can be tried by pretty much any PC user.

➡️ Using a VPN is obviously a great choice because it gets rid of ISP throttling, bandwidth limitations, and server restrictions.

What are the best VPNs to fix Left 4 Dead 2 lag & ping?

NordVPN – Best to stay completely anonymous

Another way to fix Left 4 Dead 2 laggy issues online in multiplayer mode is by using NordVPN.

Developed by Tefincom & Co., this service is ideal for bypassing geoblocks, especially since you can connect to obfuscated VPN servers that make it look like a regular HTTPS connection (in case your VPN connection is refused).

NordVPN gives you the possibility to access a wide range of VPN servers spread across the globe. You can also set up custom DNS servers to speed up your Internet connection and fix Left 4 Dead 2 high ping, as well as eliminate network congestion.

The tool uses the OpenVPN protocol to encrypt your network traffic and optimize your connection for gameplay. Plus, it has an integrated lock that turns off your VPN in case of connection drops.

What else you should know about NordVPN:

  • +5,400 VPN servers in 59 countries
  • Up to 6 device connections at the same time
  • Compatible with Windows, Mac, Linux, and Xbox 360
  • An excellent VPN for fixing Left 4 Dead 2 lag
  • 30-day money-back guarantee (no free trial)

NordVPN

Don’t exit Left 4 Dead 2 because of high ping when you can easily fix it with this trustworthy VPN.
Check price Visit website

ExpressVPN – Gaming-optimized VPN

It’s no secret that ExpressVPN is many gamers’ VPN of choice, and that has solid reasoning. It’s very fast, secure, easy to set up, and can run in the background without interfering with your game.

ExpressVPN has thousands of speedy servers and if you get a plan, you’ll be able to connect to all of them without limitations. Data and bandwidth on ExpressVPN servers are unlimited.

It has servers in 94+ countries so you can get a fast connection on Left 4 Dead 2 regardless of your actual location. You can manually pick a server close to your game’s server, or let ExpressVPN auto-connect.

Other ways ExpressVPN can help online gaming and privacy include:

  • Compatible with all major operating systems
  • IP address masking
  • Unlocks geo-blocked content
  • Military-grade Encryption
  • Lightway protocol for fast speed
  • Split tunneling

ExpressVPN

Fix latency issues and get unlimited fast traffic with ExpressVPN!
Free trial Visit website

Private Internet Access – Largest server network

To quickly eliminate Left 4 Dead 2 lag spikes, you can use Private Internet Access (PIA).

Made by Kape Technologies, PIA gives you access to a wide range of network servers so that you can reduce high ping in L4D2 and other games. It’s also a great solution for fixing packet loss.

PIA has static and dynamic IP addresses, port forwarding mode to open ports and host game servers, and private DNS servers to ensure your online privacy. It’s the best VPN for Left 4 Dead 2.

Besides redirecting your network traffic through VPN servers, Private Internet Access is one of the few virtual private network solutions that offer 24/7 live chat support.

What else you should know about PIA:

  • +3,300 VPN servers in 47 countries
  • 10 simultaneous connections
  • Works with Windows, Mac, Linux, and Xbox 360
  • Great for fixing Left 4 Dead 2 lagging issues
  • 30-day money-back guarantee (no free trial)

Private Internet Access

Eliminate Left 4 Dead 2 lag and reduce high ping using this fast and secure VPN.
Check price Visit website

CyberGhost VPN – Most user-friendly VPN

If you’re looking for a quick and easy Left 4 Dead 2 lag fix for PC, you can’t go wrong with CyberGhost VPN. Also owned by Kape Technologies, this tool comes with an extensive network of VPN servers optimized for gaming. And you can use it to fix Wi-Fi packet loss.

You can easily reduce Left 4 Dead 2 high ping using CyberGhost VPN, thanks to its high-speed VPN servers and security features tailor-made for gaming. For instance, you can create a whitelist or blacklist of games to route through the VPN while you can still directly access the web using other apps.

CyberGhost VPN has exclusive DNS servers and DNS leak protection. It can protect your Wi-Fi router from hackers as well as repair Xbox packet loss fast and easy.

What else you should know about CyberGhost VPN:

  • +6,400 VPN servers in 89 countries
  • Up to 7 connections at once
  • Can be installed on Windows, Mac, Linux, and Xbox 360
  • Works great against Left 4 Dead 2 multiplayer lag
  • Up to 45-day money-back guarantee (1-day free trial)

CyberGhost

Quickly fix Left 4 Dead 2 lag on your laptop, desktop or console using this reliable VPN.
Free trial Visit website

VyprVPN – Worldwide server coverage

Another great choice to increase Internet speed and fix latency issues in Left 4 Dead 2 is VyprVPN.

With 100+ server locations all around the globe, you’ll certainly be able to find at least some great matches for Left 4 Dead 2.

This VPN has a proven zero logs policy, along with unbreakable encryption. Your data stays completely anonymous and you get unlimited bandwidth without the risk of getting throttled.

Other impressive features of VyprVPN include:

  • DNS Leak protection
  • Split tunneling
  • Public Wi-Fi protection 
  • Emergency killswitch
  • 24/7 customer support
  • 10 simultaneous connections

VyprVPN

Connect to VyprVPN to reduce ping and have seamless gaming sessions on L4D2!
Check price Visit website

In conclusion, if you’re experiencing high ping and lag issues while playing Left 4 Dead 2 with your friends in multiplayer mode, you can download and install a powerful VPN to minimize jitter and optimize your Internet connection for gaming.

Besides, you can also use a VPN to host game servers for you and your friends.

File Explorer Not Showing Folder Size? Here’s What to do

Users complain about several issues with the Windows File Explorer on their computers. These errors appear to be of minor concern, but they can sometimes cause significant difficulties. Hence, users need to find practical solutions to the problems.

However, Windows File Explorer not showing folder size is one of the issues users complain about when using File Explorer. This problem prevents you from seeing the content size in your file or folders.

Furthermore, File Explorer problems like this may occur due to many reasons. Some causative factors are outdated operating systems, system startup issues, system errors, etc. The cause of the error may differ on different computers.

Nonetheless, some other errors you may encounter are File Explorer not opening in Windows 10 and fixing File Explorer crashes in Windows 10, among others.

Fortunately, we have a list of efficient solutions you can use to fix the Windows File Explorer if it’s not showing folder size.

Why is the folder size not showing on Windows Explorer?

  • Outdated Windows: The effect of running an outdated operating system on your computer can’t be overstated. It impedes the performance of the applications running on your computer. However, outdated Windows means your PC does not have the updates and patches required to fix bugs and improve its performance. Hence, it can impact the way the Windows File Explorer works.
  • Disabling the Display file size information in the folder tips option: The Display file size information in the folder tip toggle is an option in File Explorer’s advanced settings. It prompts File Explorer to display file size whenever you check the folder information. However, not allowing this option can prevent Windows File Explorer from showing folder size.
  • File Explorer app issues: Many things can cause problems with File Explorer. A common factor affecting how File Explorer works is boot errors occurring while the PC is booting. It may prevent the Windows File Explorer from working.

Users may be interested in how to enable the dark theme in File Explorer for a more enjoyable experience.

How do I see the folder size on Windows File Explorer?

1. Restart your PC

  1. Click on Start.
  2. Select Power from the drop-down and click on Restart.

Restarting your PC will fix any startup errors that may prompt the Windows File Explorer not to show folder size or other issues on your computer.

2. Update your Windows OS

  1. Click the Start button.
  2. Select Setting and click on Windows update.
  3. On the Windows update page, select Check for updates.

If there’s an update available, Windows will automatically search for it and install it. Then, restart your PC to check if the issue persists.

Updating Windows will help fix the bugs affecting your computer and add new features to improve your computer’s performance.

3. Check the folder size from folder properties

  1. Open File Explorer on your computer and navigate to the folder you want to check.
  2. Right-click on the folder and click Properties to prompt its properties window.
  3. Go to the General tab; you’ll see the folder size and other folder properties (location, creation date, attributes, etc.).

Doing this allows you to check the folder size without stressing.

4. View folder size in File Explorer

  1. Open File Explorer and click on a folder directory.
  2. Click the View tab at the top toolbar and select Options.
  3. Click the View tab in Folder Options.
  4. Navigate to Advanced settings and ensure that the Display file size information in the folder tips option is checked.
  5. Click OK to save the changes.

Following the above steps will prompt File Explorer to display the file size. Read about how to fix the folder that keeps reverting to read only on your File Explorer.

Can I sort folders by size?

The Windows’ sort folders by size option will help you sort your files according to their size. Hence, you’ll be able to see the file size. Follow the steps below to sort your folders by size:

  1. Right-clicking on the body of the folder.
  2. Click on Sort by from the drop-down, then select Size.

Likewise, users browse through File Explorer using the Windows search folders by size feature.

Conclusively, it may be beneficial for users to read about other File Explorer issues they may encounter.

Hence, read our articles about Windows 11’s File Explorer lagging and how to add tabs on your Windows 11 File Explorer for guidelines on how to solve the problems.

Even if you’re having this problem, you can still sort files by size in Windows 11, and we have a great article that shows you how to do that.

If this article has been helpful, you can leave a suggestion or question in the comments section. We’d like to hear from you.

Windows Explorer Not Refreshing: How to Force it

Windows File Explorer not refreshing is an annoying problem users may experience when using File Explorer. However, File Explorer is expected to automatically detect and update files whenever you download or make changes on your computer.

The auto refresh process allows the File Explorer to update changes such as creating a new folder, deleting, renaming, or moving a file or folder on your computer.

So, if the File Explorer stops auto-refresh, it’ll prevent it from incorporating the changes you make in the app.

Furthermore, there are other issues relating to the File Explorer, such as the File Explorer freezing after creating a new folder and the File Explorer crashing after right-clicking on your computer.

These issues may affect the entire app and cause Windows Explorer to stop refreshing automatically.

Moreover, the Windows File Explorer not refreshing issue is expected in almost all versions of Windows computers.

Hence, this article will discuss the best solutions for the problem that’ll work across all Windows computers.

Users also complain that File Explorer may become extremely slow on Windows for various reasons. You can read through our article for a guide on how to fix the problem.

Why is the File Explorer not refreshing?

  • Outdated Windows: Users must understand that not keeping their computer’s operating system up-to-date makes it prone to many problems. It prevents your computer from accessing the patches and updates for fixing bugs that may affect it. So, outdated Windows affects how the system works and can impede the smooth functioning of your computer.
  • Issues with the PC: The PC may encounter numerous problems if a component isn’t functioning correctly. Sometimes, the computer develops faults that can’t be detected on the surface of operations but need troubleshooting. Issues like these can result in Windows 11 auto-refresh problems.
  • Boot/startup errors on your computer: How you power up your computer can determine how it functions. However, it may encounter errors during boot, preventing it from working as expected. Likewise, boot errors can cause the software to load halfway. It means it won’t be able to perform fully as it should.
  • File Explorer history: Windows File Explorer records previously modified files and folders. However, this history may become corrupt or stocked up, thus causing some problems with the way File Explorer works. So, File Explorer history can cause the Windows 11 auto refresh problem.

What can I do if File Explorer does not refresh automatically?

1. Update your Windows OS

  1. Click the Start button.
  2. Select Setting and click on Windows update.
  3. On the Windows update page, select Check for updates.

If there’s an update available, Windows will automatically search for it and install it. We recommend you restart your PC to check if the issue persists.

You can also read how to enable the dark theme in file explorer for a more enjoyable experience.

2. Restart your PC

  1. Click on Start.
  2. Select Power from the drop-down and click on Restart.

Restarting your PC can fix any startup issues that may prompt the Windows 11 auto refresh problem or other issues affecting your computer.

3. Reboot the computer in Safe Mode

  1. On the sign-in screen, press Shift while clicking the Power button.
  2. Hold the shift key to prompt the Advanced Recovery Options window.
  3. Click on Troubleshoot and select the Advanced options.
  4. Click on Startup Settings and select Restart.
  5. Press 4 to Enable Safe Mode. 

The computer will restart in safe mode. Rebooting your PC safely will help you fix issues deep-rooted into the system that may affect it.

4. Update drivers

  1. Press on Windows + R simultaneously to launch the Run window.
  2. Type the following into the search space: devmgmt.msc, and click the OK button.
  3. Click on Display adapters from the search results and select the driver from the drop-down.
  4. Right-click and choose Update driver software and select Search automatically for drivers.

Restart your computer after the updating process is complete.

5. Create a new user profile

  1. Press and hold down the Windows + X keys to open the quick menu.
  2. Select File Explorer from the quick menu and click on the View tab.
  3. Click on Options in the top-right corner of the screen and click the View option, then select Show hidden files, folders, and drives.
  4. Uncheck the box for the Hide protected operating system files option, then click Yes to confirm the action.
  5. Click OK.
  6. Navigate to the following folder and click on the Old_Username profile: C: UsersOld_Username folder
  7. Select all the files and folders in the Old_Username folder (except Ntuser.dat, Ntuser.dat.log, and Ntuser.ini) and press Ctrl + C to copy the selected folders.
  8. Navigate to this folder and click on New_Username: C: UsersNew_Username
  9. Press Ctrl + V to paste the files that you copied.
  10. Restart your PC and log in with your default profile.

6. Clean File Explorer history

  1. Open File Explorer and click on the three horizontal dots.
  2. Click on the Options from the list.
  3. Go to Privacy under the General tab.
  4. Tap Clear and press OK.

This solution is also useful if the Windows 11 desktop is not refreshing but the highlighted guide will provide more solutions.

7. Run netsh and winsock reset

  1. Click Start and input cmd in the search space.
  2. Right-click on Command Prompt and select Run as administrator.
  3. Type the following and press Enter: netsh
  4. Input the following in Command Prompt and hit Enter: winsock
  5. Finally, type this and press Enter: reset

Why do I need to refresh Windows Explorer?

Refreshing the Window File Explorer allows you to verify the new changes in your files and folders. It updates and incorporates the changes you make into the computer.

Nonetheless, if you’re interested in how to fix the no permissions to save in this location error in File Explorer, our detailed guide is what you’re looking for.

Likewise, we recommend you check our article on how to recover missing tabs in Windows 11 File Explorer for solutions.

If this guide has been helpful, kindly leave suggestions or feedback in the comments section. We’d like to hear from you.

6 Quick Ways to Fix Silhouette Studio Running Slow

Many users have reported that Silhouette Studio software is running slow on their Windows operating system.

This issue can be very frustrating, especially if you’re using many fonts and extensions, as this will slow down your PC even further.

This is how one Reddit user described the problem:

I was experiencing slow loading of  files on my Silhouette Studio designer edition. Sometimes taking up to 1 hour or never loading the file. Even with a fresh windows installation.

In this article, we will explore some of the best-proven methods to deal with a slow Silhouette Studio and avoid encountering this problem in the future. Read on to find out more.

Why is Silhouette Studio so slow?

If you find Silhouette Studio lagging, the problem probably lies with the lack of free system resources. When there isn’t enough free storage or the RAM consumption is high, the software wouldn’t deliver the best performance.

Also, using an outdated graphics driver is a common underlying cause behind Silhouette Studio 4.4 problems. Besides, if the software has not been updated in a while or you are using it with misconfigured settings, Silhouette Studio would be running slow.

What can I do if Silhouette Studio software is running slow?

1. Update your graphics card drivers

  1. Press Windows + X to open the Power User menu and select Device Manager.device manager
  2. Double-click on the Display adapters entry.
  3. Right-click on the graphics adapter and select Update driver.Device manager updating graphics driver - Silhouette running slow
  4. Choose the option Search automatically for drivers.search automatically for drivers
  5. After the update process is complete, verify if the issue persists with Silhouette.

Outdated drivers can be a significant reason why Silhouette Studio is running slow, and we highly advise you to update all the relevant drivers to prevent that.

Although you can do that manually, it’s usually best to use fully automated solutions such as Outbyte Driver Updater to keep all your drivers up to date.

⇒ Get Outbyte Driver Updater

2. Move downloaded fonts and library items to local storage

  1. Launch Silhouette Studio, navigate the Library, and then scroll to your Cloud folder.
  2. Find the designs/files you want to move to local storage, and select one.
  3. Now, click on the File menu, hover the cursor over Save Selection, and then click on Save to Library.save to library
  4. Navigate to the folder where you want to save the file, give a name to it if required, and then click on OK.save
  5. Repeat the same process for all your files saved on the cloud.

After you have moved the files to local storage, it should boost the software’s performance and prevent Silhouette Studio from running slowly.

3. Deactivate the Cut Data option

  1. Open Silhouette Studio.
  2. Click on the Edit menu, and then select Preferences.Silhouette preferences - Silhouette running slow
  3. Navigate to the Advanced tab.Silhouette preferences Advanced options - Silhouette running slow
  4. Uncheck the Include Cut Data option and then click OK to save the changes.include cut data

Deactivating this feature can sometimes help with things if Silhouette Studio is running slow, so be sure to try it out.

4. Use a better alternative (Adobe Illustrator)

Adobe Illustrator is a long-established leader when it comes to anything vector-related. So is the case for silhouettes; it allows you to create precise down to pixels vector files.

Like other products from Adobe, this tool is one the most reliable and stable regarding the performance and features available. Besides silhouettes, hundreds of features and plugins can be used to achieve any desired effect.

With the help of layers, pen, and anchor point tool, you can connect multiple points to form the desired shape, which you can then use to create things such as logos, and banners or integrate them into photos.

If you’re experiencing problems with Silhouette Studio 4.4 or newer, we suggest you consider Adobe Illustrator as an alternative.

⇒ Get Adobe Illustrator

5. Update to the latest stable version of Silhouette Studio

  1. Visit the official Silhouette Studio website and download the newest version of the software.silhouette studio
  2. Run the setup for Silhouette Studio, and then follow the on-screen instructions to complete the process.setup

After the installation process is completed, try rerunning the software and check to see if the issue persists.

6. Clean the clutter off your PC’s hard-drive

  1. Open up CCleaner.
  2. Navigate to the Custom Clean tab, select the items you want to check under both Windows and Applications, and then click on Analyze.analyze to fix silhouette studio running slow
  3. After the scan is complete, click on Run Cleaner.run ccleaner
  4. Open Silhouette Studio and check to see if the issue persists.

If you’re wondering why Silhouette Studio is so slow, your cache is usually the answer, and cleaning it should resolve the problem.

How do I reset my Silhouette Studio?

  1. Click on the Edit menu at the top, and select Preferences.preferences
  2. Now, head to the Advanced tab, and click on Restore Factory Defaults.restore factory defaults
  3. Click Continue in the confirmation prompt that pops up.continue

That’s it! Within a few seconds, Silhouette Studio will reset to the factory defaults. All the settings and preferences will revert to the state where the software was first installed.

This article explored some of the best-proven methods to deal with your Silhouette Studio running slow on your Windows PC.

Also, find out what to do if the downloaded fonts do not appear in Silhouette Studio.

Please let us know if this article helped you fix your speed issue with Silhouette by using the comment section below.

3 Ways to Hide the Mouse Cursor in Windows 11 Apps & Games

Using apps on your computer may require you to hide the cursor for better concentration and a clearer view. Likewise, a mouse cursor may block some part of the screen while playing games on your computer. Hence, most users want to know how to hide the mouse cursor on Windows 11.

Windows 11 has proven to be more advanced and intelligent than other versions of Windows. This is so because of some inbuilt features that help it perform tasks smoothly.

Hiding the mouse cursor on Windows 11 is possible, although many users don’t know how to hide it on their computers.

There are several ways to hide the mouse cursor on Windows 11 on your computer. Likewise, there are shortcuts that users can use to hide the mouse cursor.

Fortunately, this article will take you through all you need to know about hiding how to hide mouse cursors in games and apps. Also, we’ll teach you the Hide mouse cursor shortcut.

Why is my mouse cursor visible in some games?

  • Display driver issues: The outdated display driver is a common issue that can prompt the mouse cursor and make it visible in games. This issue will arise whenever the display driver doesn’t have the essential patches to help it fix bugs and run smoothly. Likewise, if the display driver isn’t working well, it can make it difficult for you to hide the mouse cursor on your computer.
  • Game loading in borderless Window display mode: The mouse cursor may appear in your game if the game is running in a borderless Window display mode. It indicates that the mouse cursor considers the games running on full screen but is not. Hence, the mouse cursor appears on the screen because it perceives it as a background process. Furthermore, the borderless window display mode causes the mouse to function in reverse.
  • Outdated mouse driver: There is a possibility that the mouse cursor appearing in your games is due to outdated mouse drivers. It prevents the mouse components that depend on it from performing smoothly.
  • Outdated Windows: Though it doesn’t seem like the culprit, in this case, outdated Windows can cause the mouse cursor to appear in some games. Generally, it impedes the performance of the computer.

How do I hide the mouse cursor in Windows 11?

1. Adjus pointer settings

  1. Click on the Start button and type in Pointer in the search space.
  2. Select the Change the mouse pointer display or speed option from the search results.
  3. Go to the Pointer Options window and check the Hide pointer while typing option.
  4. Click on OK to save the changes.

Hiding the pointer while typing helps you glance at your full screen clearly without the mouse cursor interrupting your view.

2. Uncheck the box for display pointer trails

  1. Press the Windows + X keys simultaneously to open the Quick link menu.
  2. Select the Control Panel and click on Mouse.
  3. Navigate to the Pointer options tab.
  4. In the Visibility tab, uncheck the box for the display pointer trails option.
  5. Click on OK to save the changes.

3. Manually shift the cursor

The best way to hide the mouse cursor while playing games on your computer is by moving it to the top corner of your screen to keep it hidden. That way, it won’t interrupt or disturb your gaming activities. Likewise, the mouse cursor will remain hidden unless you move your mouse.

Nevertheless, users can read through our article about how to update the graphics display drivers on their computers. It can help fix any other mouse display issues.

Can I make the mouse pointer transparent?

Users can make mouse pointers transparent by toggling the On the hide pointer option in their computer settings. Also, users can do this by troubleshooting the Mouse properties in the Control Panel.

However, there are different modes you can set for your mouse cursor. It allows you to adjust the mouse cursor display to your taste. Hence, users can read through our article about how to set their cursor to dark mode in Windows 11.

Nonetheless, users can use an external mouse for their computer. Hence, we have a guide you can read through about how to disable the touchpad when the mouse is connected to Windows.

If you have questions and suggestions on this article, kindly leave them in the comments below. We’d like to hear from you.

Fix: An Unknown Error Has Occurred in Adobe Illustrator

There are a lot of us that use Adobe software, mostly because it offers a wide range of applications, for multiple purposes, and it’s pretty much reliable.

But don’t go thinking that adobe software never malfunctions or drives users crazy. In fact, there isn’t a day that goes by without someone pointing out yet another Adobe flaw.

In fact, apps such as Photoshop, Reade, or Illustrator display a lot of errors, and you came to the right website to fix them.

Before we get into this troubleshooting guide, find out how to find the Adobe serial number to activate your new product.

Also, if you are into design, discover which are the best brochure design software solutions. Now, let’s fix the Adobe Illustrator An unknown error has occurred when opening file situation.

Why does Adobe Illustrator keep saying an unknown error has occurred?

Users start seeing this error when they are trying to save the file they’ve been working on in the classic Ai format, which is specific for the Illustrator app.

After you finish your work and you are trying to save your work, the app will show the file as corrupted and display the above-mentioned error.

This happens even with the latest version of the app and was not listed as a known issue during the Patch Tuesday rollouts.

How do I fix an unknown error has occurred in Illustrator?

1. Unclutter the file

We are talking about Illustrator, a memory-depleting application, which means that the unessential elements present in your document can increase the size, which in turn will lead to file corruption.

So, we advise you to try to delete all the trash that is present in your current projects, such as the duplicated elements, sketches, and many others.

Doing so will significantly reduce the size of your file, making it less likely to be prone to errors when saving it to your device.

2. Save the file using a new name

Another easy solution for fixing your saving issue in Illustrator is to actually save the document with a fresh new name which will generate the same file with non-corrupted patterns, gradients, and fonts.

Why? Because using this process is the same as rebooting your system, which you can try since we’ve brought it into the discussion.

Remember how we keep saying that the simplest solutions work for what appear to be the most complicated problems?

Many Illustrator users said that, after they tried saving the file with a new name, the problem went away and they were able to continue work.

3. Transfer the file to a new document

You can also try transferring the file in question to a new document, which is yet another proven solution for this issue.

Initially, you have to copy all the elements that you have inserted or used in your project, then paste them into a fresh new document.

Now, all you have to do is simply save the document and check if you can open and edit it again. That’s pretty much it.

How do I reset Illustrator preferences?

Really simple. Once you have opened Adobe Illustrator, all you need to do is press the Alt + Ctrl + Shift keys and the Preferences will be automatically reset.

Or, you can just go into the Illustrator app, choose Preferences from the menu, then hit the Reset preferences button.

Remember that, in case of unknown error in Illustrator, users also mentioned that other helpful tips can consist of turning off all layer visibility, or saving the file as an EPS.

Fix this problem quickly using the solutions above, because it’s a shame to spend so many hours on a project and, suddenly, Adobe Illustrator can’t save because of an unknown error.

So, next time you get the An unknown error has occurred message in Illustrator CC, you will know what to do.

Leave a comment below if this article has helped you fix this annoying Adobe Illustrator problem.

5 Ways to Fix FPS Drops, Lag & Stuttering in For Honor

There’s no doubt that For Honor has amassed a huge army of fans, so having problems while playing this game is a huge no-no.

So, if you are experiencing FPS drops or any type of lag or stuttering, you definitely came to the right place to say goodbye to all that.

Since the game came out, users reported connection issues, as well as memory leaks and high CPU usage, but we can show you how to deal with both.

We can also help with changing languages in For Honor, just in case you need it. However, now, let’s fix the lag and stuttering, and show you how to increase FPS in For Honor.

Why does my FPS keep dropping suddenly in For Honor?

First of all, you will experience FPS issues when you are trying to run the game using visual/graphics settings that are above the recommended specs.

Also, you will see frequent FPS drops if your FPS is very close to the refresh rate, or even half of it when VSync is disabled.

Other factors that can contribute are:

  • Incorrect Power Plan
  • Xbox Game Bar
  • Non-essential Background Processes
  • Missing/Corrupted Game Files
  • Antivirus/Firewall Interference
  • Lack of Free Disk Space
  • Outdated Graphics Card Drivers

So, in order to avoid For Honor frame drops while cross-playing, or For Fonor stuttering, follow the guide below.

How do I turn on FPS in For Honor?

While playing For Honor, simply access Settings and click on the In-Game tab, where you will look for the In-game FPS counter, and click on the arrow.

Doing so will display a list of options that you can choose in which corner you prefer that your FPS counter will be displayed.

Why is my FPS capped?

If FPS is capped at 30, VSync is most likely set to double buffered, so please try to turn it off or switch to triple buffered. 

FPS being capped at 60 means that VSync is most likely set to double or triple buffering. Again, try to turn VSync off to unlock your FPS. 

And, if you notice that FPS is unstable and that your game is stuttering, VSync is most likely set to double buffered. Turn it off or switch to triple buffering. 

User-added image

How do I fix FPS drops in For Honor?

1. Check system requirements

It should go without saying, but you should really do this for every game out there that you’ve decided to buy, download, and install.

There’s no point in spending money on a title your PC isn’t strong enough to run. Of course, you can decide to upgrade your rig, but until then, make sure you look at the requirements.

Let’s have a closer look at the game’s requirements and you can decide for yourself if you can run it properly or not.

Making sure everything is as it should be can be considered a For Honor FPS boost, if done correctly.

2. Update your GPU

  1. Search for Device Manager and open the app.device manager
  2. Expand Display adapters, right-click the one you are using, and select Update driver.device manager display
  3. Select Search automatically for drivers.drivers

If it didn’t find any updates, you might want to use a specialized tool to search online automatically. It’s safer and faster, and if you aren’t used to manual updates, this is a perfect solution.

3. Verify game files integrity

  1. Open Steam.
  2. Right-click Naraka Bladepoint and select Properties.dying light steam properties
  3. Select the Local Files tab and click on the Verify integrity of game files.game file integrity

4. Disable Xbox Game Bar overlay

  1. Press Win + I to access Settings.
  2. Select the Gaming tab, then click on Xbox Game Bar.xbox game bar
  3. Disable the Xbox Game Bar overlay.xbox game bar overlay

5. Allow For Honor through the Windows Firewall

  1. Press the Windows key, search for Firewall and select Open.

    open firewall windows
  2. Click on Allow an app through Firewall.

    allow app through firewall windows
  3. If For Honor isn’t in the list, select Change Settings, then Allow another app.

    Allow another app windows firewall
  4. Click the Browse button, locate your game and press the Add button.

    browse firewall games add
  5. Now the game is allowed through the Firewall.

  6. Launch it to see if it works properly now.

How can I make For Honor run better?

Be sure to keep your operating system up to date, just like the graphics card driver. Updated software will significantly improve the experience.

Also, any other programs running in the background can hinder gameplay, so think about that as well. But, most importantly, make sure your rig is strong enough for this game.

Overall, make sure not to put too much strain on your PC by running ten apps at the same time and prioritizing For Honor.

If you are experiencing For Honor FPS drops while using the controller, this guide is made for you. Don’t misunderstand, the For Honor PC FPS drops are a serious thing, and we will fix it.

We’ve also pointed out how to show FPS on For Honor, so you can keep count. Many users have also reported For Honor low FPS after patch, so keep that in mind as well.

5 Ways to Fix Restart Computer to Install Important Updates

Keeping your Windows up to date is one of the essential tasks you should do, but sometimes you might get stuck with Restart your computer to install important updates messages.

It turns out that important updates have never been installed in the first place, and you’re stuck with this message. But we have a few fixes to help you out.

How can I fix the Restart your computer to install important updates error? It’s possible that this issue occurs due to other applications so you might want to try performing a Clean Boot. If that doesn’t work, we have got a bunch of different solutions that will possibly help you resolve the error.

Why do I keep getting Restart your computer to install important updates message?

Here are some of the most common reasons that would trigger the Restart your computer to install important updates message.

  • The Windows registry key called RebootRequired might be corrupted.
  • The Windows Update tool itself is experiencing some issues.
  • There are some important system files missing.
  • Your PC is infected with viruses or malware.
  • Your Firewall is blocking the Windows Update service.

How do I fix Restart your computer to install important updates?

  1. Registry fix
  2. Clean boot fix
  3. Run Windows Update Troubleshooter
  4. Run Deployment Image Servicing and Management Tool
  5. Check your Firewall

1. Registry fix

  1. Press Windows + R and type regedit. Click OK or press Enter.
  2. In the Registry Editor navigate this path.
    • HKEY_LOCAL_MACHINE\SOFTWARE\Microsoft\Windows\CurrentVersion\WindowsUpdate\Auto Update
      registry delete Restart your computer to install important updates
  3. Open up Auto Update, and delete RebootRequired.
  4. Close the Registry Editor and restart your machine.

2. Clean boot fix

  1. Press both the Windows + R and type msconfig in the dialog box and press Enter.
  2. In System Configuration, select the General tab, now in the Selective Startup section uncheck Load startup items.
    system configuration Restart your computer to install important updates
  3. Next, you’re going to head on over to the Service tab, and click on Disable all.
  4. Restart your machine.

3. Run Windows Update Troubleshooter

  1. Press Windows + I button to open the Settings menu.
  2. Select the System tab from the left pane.
  3. Click on Troubleshoot.
  4. Select Other troubleshooters.
  5. Hit the Run button next to Windows Update.
  6. The troubleshooter will fix any problems with the Update tool.

4. Run Deployment Image Servicing and Management Tool

  1. From the Start Menu, open Command Prompt.
  2. Execute the below command. DISM /Online /Cleanup-Image /RestoreHealth
  3. Now, execute the below command. DISM /image:C: /cleanup-image /revertpendingactions
  4. Restart your machine.

5. Check your Firewall

  1. Open your Start Menu.
  2. Type Windows Defender Firewall and open it.
  3. Now, click on Allow an app or feature through Windows Firewall.
  4. Click on the Change Settings.
    allow apps to communicate through firewall Restart your computer to install important updates
  5. Check the boxes next to the apps or programs you want to allow through the Windows Firewall.
  6. Click OK to save your new settings.

How do you stop your computer from restarting to finish installing important updates?

1. Disable automatic reboot

  1. Open the Start menu.
  2. Type Task Scheduler and open it.
  3. Locate Reboot in the Active Tasks section.
  4. Double-click on it and select Disable.

2. Tweak Local Group Policy Editor

  1. Open the Run dialogue by pressing Win + R keys.
  2. Type gpedit.msc and open it.
  3. Click on Computer Configuration.
  4. Expand Administrative Templates.
  5. Click on Windows Component.
  6. Hit the Windows Update.
  7. Double-click on No auto-restart with automatic installations of scheduled updates.
  8. Select Enabled.
  9. Click OK.

We hope that these solutions were of help to you and that you managed to fix Restart your computer to install important updates error. Feel free to let us know if any of our solutions were helpful to you.

GeForce Experience Not Detecting Games: 3 Ways to Show Them

Many reported that GeForce Experience is not detecting games, and this can be a major issue, so today we’re going to show you a couple of solutions that can fix this.

Why is my GeForce Experience not detecting games?

If the game isn’t showing, it’s probably not supported. Outdated drivers or issues with the app can also cause this.

What can I do if GeForce Experience is not finding games?

Before we start check the list of GeForce Experience supported games, and ensure that your game is compatible. Having all games on the same drive can also help.

1. Verify that the install directory of the game is checked

  1. Open the GeForce Experience app.
  2. Navigate to Preferences.
  3. Click on Games.
  4. See what folders are set to be checked by GeForce Experience and where your games are installed.
  5. If there is any discrepancy between the two options, add the link to the folder in which you installed the games (ex., D:/Games).
  6. After you’ve completed this task, restart your GeForce Experience app and check to see if the issue is resolved.

After doing this, check if GeForce Experience is still not seeing games.

2. Update your GeForce Experience GPU drivers

  1. Launch the GeForce Experience application.
  2. Select the DRIVERS tab from the top menu.
  3. Click the CHECK FOR UPDATES button.
    check driver geforce experience not detecting games
  4. If there is any available update, the option to install it will appear in the window.
  5. Install the drivers, and check to see if the issue is resolved. If you can’t find any new drivers, try the following method.

If GeForce Experience can’t find a game, sometimes a quick update is all that it takes to fix the problem.

3. Use the latest GeForce Experience application

3.1. Uninstall the app

  1. Press the Windows key + X and choose Apps and Features.
    Apps and features - GeForce Experience not finding games
  2. Please search for the GeForce Experience app in the list and select it.
  3. Click the Uninstall button and follow the simple onscreen instructions to complete the process.
    uninstall

The first step is to uninstall the GeForce Experience app and all its components.

3.2. To reinstall the app

  1. Download the latest version of GeForce Experience.Download GeForce Experience - Download page
  2. Run the installer on your PC, and then log into your account.
  3. Check to see if the app is finding your games.

Many recommend using the Beta version of the NVIDIA app, so you can do that as well. In some cases, using an older version can work better.

How do I manually add a game to GeForce Experience?

  1. Launch GeForce Experience.
  2. Click the menu button (three vertical dots) in the top right corner.
  3. Choose the Optimize all games option.
    optimize
  4. Now, select the cogwheel icon at the top.cogwheel icon geforce experience not detecting games
  5. Choose the GAMES tab in the left panel.
    games
  6. Click ADD under the SCAN LOCATION section.
    add geforce experience not detecting games
  7. Choose the folder where you have the game.
  8. Select SCAN NOW and wait for the scan to complete.
    scan now
  9. Finally, go to the Home tab, and the newly added game should be there.

This can be incredibly useful if GeForce Experience not recognizing or detecting Steam games, so be sure to give it a try.

As we understand how frustrating it can be to want to play the latest version of your favorite game, the list above should help you fix this issue.

Don’t hesitate to let us know if you’ve succeeded in fixing the GeForce Experience not detecting games issue, and if so, by using what method.

Keep in mind that there are other issues with this app, and many reported that Something went wrong in GeForce Experience. For others, GeForce Experience is not working at all, but we have guides that address those issues.

The Windows 11 update tool is going full green

You maybe thought that this was only a myth, but the big day has finally come for all the Windows 11 fans out there.

Microsoft’s new OS is receiving its first major update in the form of the Windows 11 2022 Update, also known as Windows 11 version 22H2.

And, one of the most impactful changes of this version of the operating system is the fact that the Windows Update tool will finally go green.

Windows updates will consume energy smarter

Microsoft has recently detailed how it is making the Windows Update process a lot better and highlighted two key improvements that apply both to feature updates and monthly updates following the release of the Windows 11 2022 Update.

The company has emphasized that it has reduced significantly reduced the size of Windows updates which, in return, has resulted in faster installs.

Indeed, Microsoft claims that for some users, it actually reduced update sizes by up to 450MB in feature updates, which is great.

However, on the monthly cumulative update side, it says it reclaimed approximately 3x the update size (100s of MB) given back to the user.

The other improvement that Microsoft is making to Windows 11 updates is related to carbon footprints, since this should be our main focus.

Thus, Windows will attempt to update during times when there are a greater number of clean energy sources such as wind, solar, and hydro available.

This action should result in reduced carbon emissions as Windows PCs around the globe move away from energy sources based on fossil fuels, at least during the update process.

Windows 11 users can look for this update normally, by pressing Win + I to access Settings, and checking the Windows Update tab for it.

Windows 10 users, however, will have to first upgrade to the latest operating system first. To do so, use the PC Health Check app to check eligibility.

The Redmond-based tech company has once again emphasized that if your existing device is not eligible for Windows 11, you should stay on Windows 10 since it is supported until October 14, 2025.

You should know that the next feature update to Windows 10 is arriving next month in the form of version 22H2 as well.

Also, keep in mind that IT admins in commercial and education markets are advised to begin targeted deployments of Windows 11.

The Windows 11 2022 Update is available through regular commercial channels such as Windows Server Update Services (WSUS), Windows Update for Business (WUfB), and the Volume Licensing Service Center (VLSC).

Have you already installed this version of Windows 11? Share your experience with us in the comments section below.