How to disable LinkedIn integration on Teams and Microsoft 365

This Teams guide will show you how to enable and disable LinkedIn integration in Teams and Microsoft 365. This feature quietly rolled out in March 2022. When the feature is rolled out to your organization, it is enabled by default.

If enabled, LinkedIn integration allows users to connect their Microsoft account to their LinkedIn account so they can connect with LinkedIn profile connections in Teams and other Microsoft apps like Outlook.

Unfortunately, the LinkedIn tabs in Outlook and Teams cannot be disabled. However, one enterprising redditor found a way for administrators to disable it.

Microsoft Azure AD (Active Directory) administrators can disable the ability for users to be able to connect their Microsoft and LinkedIn profiles.

Disable LinkedIn integration

Please note: If you don’t have administrator privileges, you will not be able to disable LinkedIn integration on Teams and Microsoft 365! If you need extra help, there is a YouTube video explaining what to do.

If you are an administrator, here’s what you need to do to disable LinkedIn integration from Teams and Microsoft Office 365.

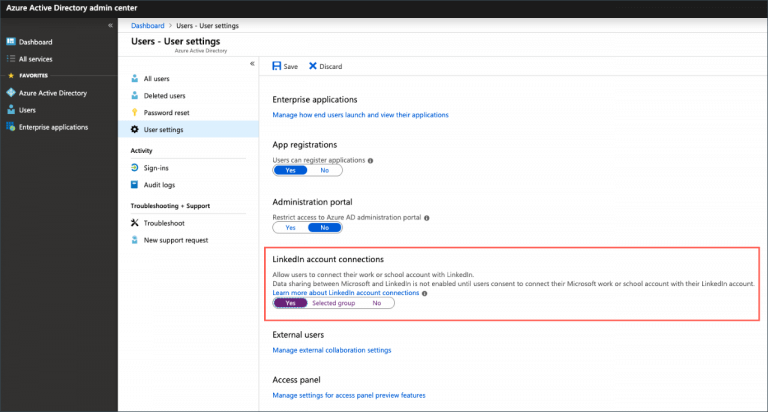
1. Log into the Azure AD admin center with an account that’s a global administrator for your organization.
2. Select Users.
3. On the Users page, select User settings.
4. Under LinkedIn account connections, allow users to connect their accounts to access their LinkedIn connections within some Microsoft apps.

4a. Choose Yes to enable the LinkedIn integration service for all users in your organization.

4b. Choose Selected group to enable the service for only a group of selected users in your organization.

linkedin integration

4c. Choose No to withdraw consent from all users in your organization.

5. Click Save to save your settings when finished.

You can see what data is collected between Microsoft and LinkedIn accounts and profiles when the feature is enabled.

To learn more about LinkedIn, you can check out this dedicated guide to LinkedIn Games and stay informed.

Do you like the LinkedIn integration on Teams and other Microsoft apps? Let us know in the comments!

How to Turn Off Focused Inbox in Outlook

Outlook‘s Focused Inbox helps you focus on the emails that matter most to you. This feature divides your inbox into two tabs – Focused and Other. Your most important emails are on the Focused tab.

These are selected based on the content of the email and the frequency you interact with the sender.

However, some users don’t like this inbox hierarchy and want to turn off Outlook Focused.

All of a sudden I have Focused and Other Inbox. I don’t want it. I want my regular Inbox with just one-mail instead of two. How can I get rid of it?

In this article, we’re going to show you how to disable Outlook‘s Focused Inbox feature.

How can I remove Focused Inbox?

1. From the PC app

  1. 1. Launch Microsoft Outlook on your PC.

  2. 2. Navigate to the View tab from the top-menu.

  3. 3. Click on Show Focused Inbox to toggle the feature off.

    disable focused inbox outlook feature
  4. 4. The Focused and Other tabs will no longer be visible at the top of your mailbox.

  5. 5. After, collapse the tab on the left.

  6. 6. Go to Settings > Display settings > Focused Inbox.

  7. 7. Navigate to the When email is received section.

  8. 8. Select Don’t sort messages.

  9. 9. Click OK to apply and save the changes.

  10. The Focused Inbox can be easily turned off via the app’s built-in settings. All you need to do is toggle the feature off with a simple click. Moreover, you can also configure Outlook to stop sorting your messages.


2. On Outlook.com/Hotmail.com

  1. Select the Settings icon > go to Display settings > Focused Inbox.
  2. Under When email is received, simply select Don’t sort messages > click OK.

3. On Outlook for Mac

Go to the Organize tab > select Focused inbox. This simple action disables the feature.


4. On Mail for Windows 10

  1. Go to Settings > select Reading.
  2. Use the Focused Inbox slider to disable the feature.

5. On Outlook Mobile

  1. Click the Settings button in Outlook Mobile.
  2. Use the Focused Inbox slider to turn Focused Inbox off.

The Focused Inbox feature is a very useful mail functionality. It can help you to keep your inbox organized and make sure that you don’t miss any important new emails.

For more information about Focused Inbox and how you can get the most out of it, you can check out Microsoft’s support page.

What do you think about Outlook‘s Focused Inbox feature? It is helpful for you?

3 Quick Ways to Fix Error Saving Photo on Facebook [PC, Mobile]

Facebook is one of the biggest social networks in the world with millions of active users. But there are some users who face issues while uploading or saving photos from their desktop or mobile devices. 

This is a common error that happens on Facebook. The error usually occurs when you are trying to save a photo but are unsuccessful.

If you don’t have enough room for the photo to save, it will fail. You can fix this by deleting photos or videos that are no longer needed. Sometimes, it could be the browser you are using so you can switch to a Facebook-approved browser for a better response.

Why can’t Facebook save my photo on Windows 10/11? 

Some of the reasons why you can’t save Facebook photos on your PC include:

  • Unstable internet connection – Your internet connection may be down or unstable. If your internet connection is very slow then it will take more time to upload a single photo on Facebook.
  • Unsupported file format – While Windows 10/11 does support a wide range of file formats, not all of them are compatible with Facebook. 
  • Insufficient storage – You may not have enough disk space available on your computer which leads to storage errors while saving any content on it.
  • Copyright issues – Some files cannot be saved on Facebook due to its policy on copyright issues. So if you try to save any image with copyrights issues, it will not be able to do so. 

Other possible reasons include an outdated browser or virus-infected OS so be sure to update both for best results.

Quick tip:

Opera One Browser is a great choice for social media platforms because it has a built-in support for them, including Facebook. After you choose your social media platform, it always remains at hand directly in the sidebar.

This feature is called Integrated Messengers where you can chat and browse at the same time with your favorite messengers built into Opera One. Also, this browser features it’s own built-in AI.

Opera One

Chat and browse at the same time with the Integrated Messengers smart feature built into Opera One Browser.
Free Download Visit website

How do I fix error saving photo on Facebook?

1. Check your internet connection

If you’re getting an error saving a photo on Facebook, it could be because of your internet connection. Try turning off your computer, router, and modem, and then turn them back on.

Should the issue persist, run a speed test using an internet speed tester to determine whether you have sufficient bandwidth.

2. Clear storage space

Make sure you don’t have too much storage space taken up by other apps or unnecessary files. If there isn’t enough room for the file, it won’t be able to save.

Try deleting or disabling some apps on your phone or PC. This will free up hard disk space so that the Facebook app can save photos without any issues.

3. Clear browser cache and cookies

A cached copy of a website is saved on your computer so that it can load more quickly when you visit that site again. If there are any issues with the cached version of a website (like broken links), these errors will interfere with some functions.

clearing cookies and cached files chrome

Clearing your browser cache and cookies will remove any temporary files that might be causing problems when you try to save images.

How do I save pictures on Facebook to my phone? 

Saving Facebook photos on your phone can be done whether you are using the app or browser. 

  1. Open the Facebook app on your phone or PC and navigate to the photo you want to save.
  2. Tap on the three dots at the top right-corner and select Save to phone.
  3. You can locate the picture in your Downloads folder.

If you are using your browser, tap the photo to view it full screen then hold and click on Save as.

Hopefully, you have been able to resolve the issue and can now save Facebook photos without a hassle. If you have tried all methods above and still can’t save photos, your system may be infected by a virus.

Sometimes viruses and malware are hidden and undetectable but still have the potential to cause damage. You can install a reliable antivirus to help you weed out any viruses that could expose your device to risks.

Let us know of any other solutions you may have tried that worked out for you in the comment section below.

Fix: This File Does Not Have a Program Associated With It

Windows 10 might be a great operating system, but it also has some of the same problems that its predecessors had.

Users reported This file does not have a program associated with it for performing this action error message on Windows 10 while trying to run certain applications, so let’s see how to fix this problem.

What are the variations of this error message?

This file does not have a program associated with it is a common error message that can appear, and speaking of this error, here are some similar issues that users reported:

  • This file does not have a program associated with it for performing this action USB drive – This problem can occur due to your AutoPlay settings. However, you can fix the problem simply by disabling the AutoPlay feature.
  • This file does not have a program associated with it Excel, Explorer.exe – This problem can affect various system applications, and if that happens, be sure to perform SFC and DISM scans.
  • This file does not have a program associated with it for performing this action OneDrive – If you encounter this problem with OneDrive or other system features, simply reset the file associations to the default and check if that solves the problem.
  • This file does not have a program associated with it Windows 10, 8.1, 7 – This error can appear on almost any version of Windows, and even if you don’t use Windows 10, you should be able to apply most of our solutions to your PC.

How to fix the this file does not have an app associated with it error?

1. Create a new Windows user account

According to users, one of the simplest ways to fix this problem is to create a new Windows user account. To do that follow these steps:

  1. Open the Settings app and go to the Accounts section.
    This file does not have a program associated with it Windows 7
  2. Go to the Family & other users tab and click Add someone else to this PC.
    This file does not have a program associated with it for performing this action USB drive
  3. Click I don’t have this person’s sign-in information.
    This file does not have a program associated with it Excel
  4. Select Add a user without a Microsoft account.
    This file does not have a program associated with it for performing this action OneDrive
  5. Enter the user name and password for the new account and click Next.
    This file does not have a program associated with it Windows 10

2. Add your user account to the Administrators group

    Another solution to this problem is to add your user account to the Administrators group. Users reported that after adding their user account to the Administrators the issue was resolved. This is because you might not be able to open certain files due to lacking admin rights.

  1. 1. Press Windows Key + R to open the Run dialog.

  2. 2. Enter lusrmgr.msc in it and then press Enter or click OK.

    this file does not have an app associated with it run dialog
  3. 3. Navigate to the Groups folder in the left pane .

    program asscociated performing action run as admin
  4. 4. Double-click the Administrators group in the right pane.

  5. 5. When the Properties window opens, click the Add button.

    this file does not have an app associated with it add administrator account
  6. 6. In the Enter the object names to select field, enter your user name and click Check Names. 

  7. 7. If everything is in order click OK. Alternatively, you can click the Advanced button and Find Now button to manually search for your user name.

    this file does not have an app associated add admin
  8. 8. After doing that your user account should be added to Administrators group.

  9. 9. Click Apply and OK to save the changes.

  10. 10. Some users also advised to log out and log back in to Windows 10 in order for changes to take effect.

3. Change your registry

Changing your registry can lead to system instability, therefore before doing any changes to registry, we advise you to create a backup of your registry in case anything goes wrong. To edit the registry do the following:

  1. Press Windows Key + R and enter regedit. Click OK or press Enter.
    This file does not have a program associated with it for performing this action USB drive
  2. In the left pane navigate to HKEY_CLASSES_ROOTlnkfile key.
  3. Check if the IsShortcut value is available. If this value is missing right click the empty space in the right pane and choose New > String Value. Be sure to enter IsShortcut as the name of the new String Value.
    This file does not have a program associated with it Excel
  4. After you’re done, close Registry Editor.

Sometimes this String Value can be deleted from your registry, and if it’s missing be sure to recreate it by following the aforementioned steps.

Several users are suggesting to perform the following steps as well:

  1. Go to the HKEY_CLASSES_ROOTCLSID{20D04FE0-3AEA-1069-A2D8-08002B30309D}shellManagecommand key in the left pane. Double-click (Default) in the right pane.
    This file does not have a program associated with it Explorer.exe
  2. Set the Value data to %SystemRoot%system32CompMgmtLauncher.exe and click OK to save changes.
    This file does not have a program associated with it for performing this action OneDrive

4. Delete certain keys from the Registry

This solution only applies if you can’t open any folder on your PC. If you can open folders on your PC there’s no need to perform this solution. To delete registry entries do the following:

  1. Open Registry Editor.
  2. In the left pane navigate to HKEY_CLASSES_ROOTDirectoryshell.
  3. Expand the shell key and delete both find and cmd keys.
    This file does not have a program associated with it for performing this action OneDrive
  4. After you’re done, close Registry Editor.

5. Run DISM and SFC scans

Sometimes you might get This file does not have a program associated with it message because your system files are corrupted.

This can occur for various reasons, and in order to fix this problem, it’s advised to perform both SFC and DISM scans. To do that, just follow these simple steps:

  1. Press Windows Key + X to open Win + X menu and choose Command Prompt (Admin) or PowerShell (Admin).
    This file does not have a program associated with it for performing this action OneDrive
  2. When Command Prompt opens, enter sfc /scannow and press Enter.
    This file does not have a program associated with it Excel
  3. The SFC scan will now start. The scanning process can take about 15 minutes, so don’t interrupt it.

After the SFC scan is completed, check if the problem is still there. If this issue is still present, you need to run DISM scan. You can do that by following these steps:

  1. Start Command Prompt as administrator.
  2. Run DISM /Online /Cleanup-Image /RestoreHealth command.
    This file does not have a program associated with it Windows 10
  3. DISM scan will now start. The scanning can take about 20 minutes, so don’t interrupt it.

Once the DISM scan is finished, check if the problem is still there. If you were unable to run the SFC scan before, try running it now and check if that solves the issue.

If the SFC scan stops or you’re getting the DISM error 2 on your Windows 10 device, check out our dedicated articles.

Moreover, if your WinX menu is not working, we have yet another article you can read.

6. Disable Autoplay for all devices

  1. Open the Settings app and go to Devices section.
    This file does not have a program associated with it for performing this action USB drive
  2. Select AutoPlay from the menu on the left. In the right pane disable Use AutoPlay for all media devices. Set Removable drive and Memory card to Take no action.
    This file does not have a program associated with it Explorer.exe

If you’re getting This file does not have a program associated with it message, the issue might be because of AutoPlay feature. However, you can fix the problem simply by disabling Autoplay completely.

After doing that, AutoPlay should be completely disabled and the issue will be resolved.

7. Reset file association

  1. Open the Settings app and go to the Apps section.
    This file does not have a program associated with it for performing this action OneDrive
  2. From the menu on the left select Default apps. Scroll down and in the Reset to the Microsoft recommended defaults section click the Reset button.
  3. This file does not have a program associated with it Windows 7

By default, Windows 10 is configured to open files with its default applications, but most users usually change these settings. Sometimes there might be an issue with your configuration and that can lead to This file does not have a program associated with it message to appear.

To fix the problem, you just need to reset file associations to default. This is quite simple as described in the steps above.

After doing that, the problem with file associations should be completely resolved.

8. Run Powershell

According to users, sometimes you might be able to fix This file does not have a program associated with it error by reinstalling all Universal apps. This is quite simple to do, and you can do it by following these steps:

  1. Press Windows Key + S and enter powershell. Right-click Windows PowerShell from the list of results and choose Run as administrator.
    This file does not have a program associated with it Windows 8.1
  2. Now run the following command: Get-AppXPackage -AllUsers |Where-Object {$_.InstallLocation -like “*SystemApps*”} | Foreach {Add-AppxPackage -DisableDevelopmentMode -Register “$($_.InstallLocation)AppXManifest.xml”}.
    This file does not have a program associated with it for performing this action USB drive

After the command is executed, the issue should be resolved completely.

If Powershell stops working, we have an article on how to fix it.

9. Perform a System Restore

According to users, sometimes the best way to fix This file does not have a program associated with it error is to perform a System Restore. To perform a System Restore, just do the following:

  1. Press Windows Key + S and enter system restore. Choose Create a restore point from the list of results.
    This file does not have a program associated with it Explorer.exe
  2. When System Properties window opens, click the System Restore button.
    This file does not have a program associated with it for performing this action OneDrive
  3. System Restore window will now appear. Click Next to proceed.
    This file does not have a program associated with it Windows 8.1
  4. If available, check Show more restore points option. Choose the restore point you want to go back to and click Next.
    This file does not have a program associated with it for performing this action USB drive
  5. Follow the instructions on the screen to complete the restoration process.

Once your system is restored, check if the problem is still there.

This file does not have a program associated with it for performing this action can be a problematic error, but we hope that you managed to fix it after using one of our solutions.

Chrome is Slow on Windows 11: How to Get Rid of the Lag

Google Chrome is the leading Internet browser, and six out of ten users use it to browse the Internet. One of the overwhelming reasons for this high adoption level is its speed, reliability, and performance.

However, many of our readers reported that Chrome is slow in Windows 11, and their browsing experience is altered.

There are a variety of different reasons that can impact its speed and performance. Some possible reasons include high disk usage, too many open tabs, some extensions, a high volume of caches, and more. 

Before fixing it, let’s take a more in-depth look at the possible causes of why Chrome is slow in Windows 11.

Why is Chrome suddenly so slow?

Chrome can slow down for many reasons, ranging from intense memory usage to an outdated version.

➡ Cache

Chrome can slow down when you have too many tabs open as it holds the cache or temp files in its memory for a long time.

While this can speed up your browsing experience, storing too much browsing history can also slow it down.

➡ Outdated browser

An outdated browser can slow your browsing experience as it may not have the latest patches/fixes.

The updates often happen automatically, but for some reason, if it doesn’t happen in your system due to the existing settings, you may have to do it manually.

➡ Resource Usage

Another probable reason is excess resource usage. Chrome uses multiple threads to improve your browsing and user experience, which can sometimes take up many resources.

While it is hard to pinpoint the exact reason, some of the other possible causes may be:

  • Extensive use of Chrome add-ons and extensions
  • Opening too many tabs
  • Large browser history
  • Poor Internet connection

Fortunately, there are many simple ways to fix this Chrome slow Windows 11 issue, and you will have to follow our guide below.

Quick Tip:

While Chrome can become slow and laggy due to cache or history data, you can try a faster and more reliable browser like Opera One.

Using this browser instead will give you enhanced security online with its free VPN or integrated ad-blocker. Hence, you’ll get improved speed to navigate freely on your PC.

Opera One

Benefit from faster navigation with this browser and light resource usage on your Windows 11 PC.

How do I make Chrome run faster on Windows 11?

1. Restart your browser

  1. Click on the X button from the top right corner to close the browser and try restarting it again. If it doesn’t work, try the next step to close the browser completely.
  2. Right-click the Start button and select Task Manager from the list.
  3. Click on Google Chrome from the list of processes and hit the End task option from the bottom right corner.
  4. Now try to start Chrome again and see if you have the same problem.

The simplest solution is often the most effective, at least in the world of computers! That is to close Chrome and start it again. Once done, the Google Chrome lagging issue in Windows is fixed.

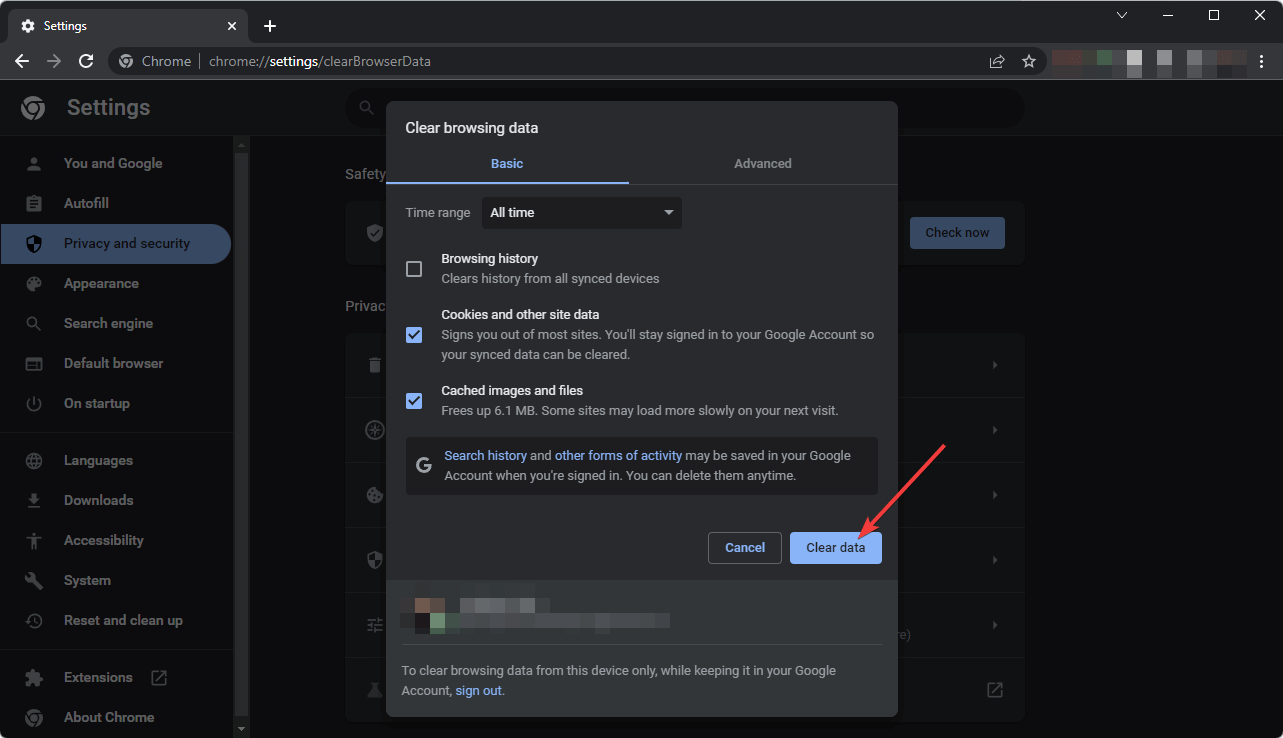
2. Clear the browsing data

  1. At the top right-hand corner, look for three vertically-lined dots and click them.
  2. Navigate to More Tools, then click on Clear Browsing History.
  3. Click on Privacy and security from the left pane, then select the Clear browsing data option.
  4. Click on the Time range tab and select All time from the list of options.
  5. Now, decide what data you want to remove (preferably all of them) and then choose Clear data.
  6. Restart Chrome and see if it now works faster than before. 

Another possible reason for a slow Chrome in Windows 11 is excess stored data. Chrome stores all your data, including the sites you visit, websites’ cookies, cached images, files, etc.

These data levels can quickly add up, depending on how much time you spend browsing the Internet. 

Since Chrome has to load all the data at startup, it can be slow. So, consider deleting unwanted data and browsing history so your Chrome loads faster. 

3. Use Chrome’s Task Manager

  1. Click on the three vertical dots button from the top right corner to access Chrome’s menu.
  2. Select More tools and choose Task manager from the list. You can also open Chrome’s Task manager using the Shift + Esc key combination.
  3. Look for unuseful processes that consume more CPU resources, click on them, then hit the End Process button from the bottom right corner. Chrome can’t work with some methods; if you end them, Chrome will restart them immediately.

Chrome runs multiple processes in the background, which can take up many of your CPU resources, leading to a slow Windows 11.

An excellent way to fix this is to open Chrome’s Task Manager to look through the processes and end the unwanted ones.

4. Disable the preload option

  1. Click on the three vertically-aligned dots from the top right corner and select Settings from the list.
  2. Navigate to the Privacy and Security option on the left-hand pane, then select Cookies and other site data.
  3. Look for an option called Preload pages for faster browsing and searching, and disable it.
  4. Restart Chrome and see if it is faster now.

Chrome uses your browsing history to predict what pages you will likely open and preloads them for you.

While this can be convenient, it is often a waste of your resources and can cause Chrome to slow down in Windows 11.

To avoid this bottleneck, disable the preload option using the steps above. This option will significantly increase your Chrome speed and performance and is a proper fix for Chrome working slowly in Windows 11.

5. Remove Chrome extensions

  1. Click on the three vertically-aligned dots on the right-hand top corner.
  2. Navigate to More tools and click on Extensions. 
  3. Go through this list and remove the ones you don’t need by clicking the Remove button in each extension. You can also deactivate them by toggling off the switch to their lower right corner, so they don’t load.

Using many extensions can cause Chrome to be slow in Windows 11. First, check the installed browser extensions and remove the ones you don’t need. Finally, restart Chrome and check if it is faster.

6. Update Chrome

  1. Click the three vertically-lined dots on the top right-hand corner and select Settings.
  2. On the Settings page, select About Chrome on the left-hand pane.
  3. If your browser is up-to-date, you can see it; otherwise, Google will auto-update when you open this page. 

Google releases regular updates in the form of Chromium builds that address its existing issues and vulnerabilities.

It’s a good idea to install these updates monthly to ensure that your browser is up-to-date with the latest version. 

You should reset the browser if Chrome is still slow after a Windows 11 update.

7. Reset Google Chrome

  1. Click the three vertical dots on the top right corner and select Settings.
  2. Select the Advanced option from the left, and after it expands, click on Reset and clean up.
  3. Choose Restore settings to their original defaults.
  4. Now you only have to click on Reset settings.

Thus, these are some ways to address the slow Chrome issues in Windows 11. So, it would help if you tried all these options to see which works for you.

Does clearing history make Chrome faster?

To make your browser faster, you need to rid it of as much data as possible.

Your browser history is some data even though, in some cases, it may be so small and insignificant. However, clearing it will reduce the amount of data the browser holds and may make the browser generally faster.

However, in reality, the difference may be minute and negligible.

To conclude, Chrome being slow to open in Windows 11 can be due to many reasons, and we strongly suggest you run through each of the above options, as one of them is sure to fix your problem, depending on the underlying cause.

Note that if all browsers are slow in Windows 11, you may consider a malware scan of the entire system. Also, some Windows 11 Chrome users have said disabling hardware acceleration has also helped.

However, if you can’t make Chrome work as it should, we have a list of the best browsers for Windows 11, and you may choose a better one.

Contact us through the comments section if you have questions regarding a slow Chrome in Windows 11.

You can also read about fixing high CPU usage in Windows 11, which can make Chrome and other apps run faster on Windows 11. 

How to Schedule Tasks in Windows 10 via Task Scheduler

Task Scheduler is one of the most practical preset Windows applications because it can streamline your work.

The main idea of this application is to trigger the running of different scripts and programs at a specific time or a certain event.

It has a library where all the tasks loaded are indexed, and it organizes them according to the time that must be done and their importance.

Let’s discover together in the lines below what Task Scheduler contains and how we can use this useful application.

How do I schedule tasks in Windows 10 using Task Scheduler?

  1. Types of triggers
  2. Types of actions
  3. Types of Task Conditions
  4. Task settings
  5. Task security context
  6. How to use the Task Scheduler

1. Types of triggers

The first step of creating a task is to determine what will cause it to run, so the trigger is a set of conditions that when fulfilled, starts the task.

The triggers can be found in the Trigger tab from the Task Properties and the Create Task menu. From the Create Task menu, you can create new triggers for your needs.
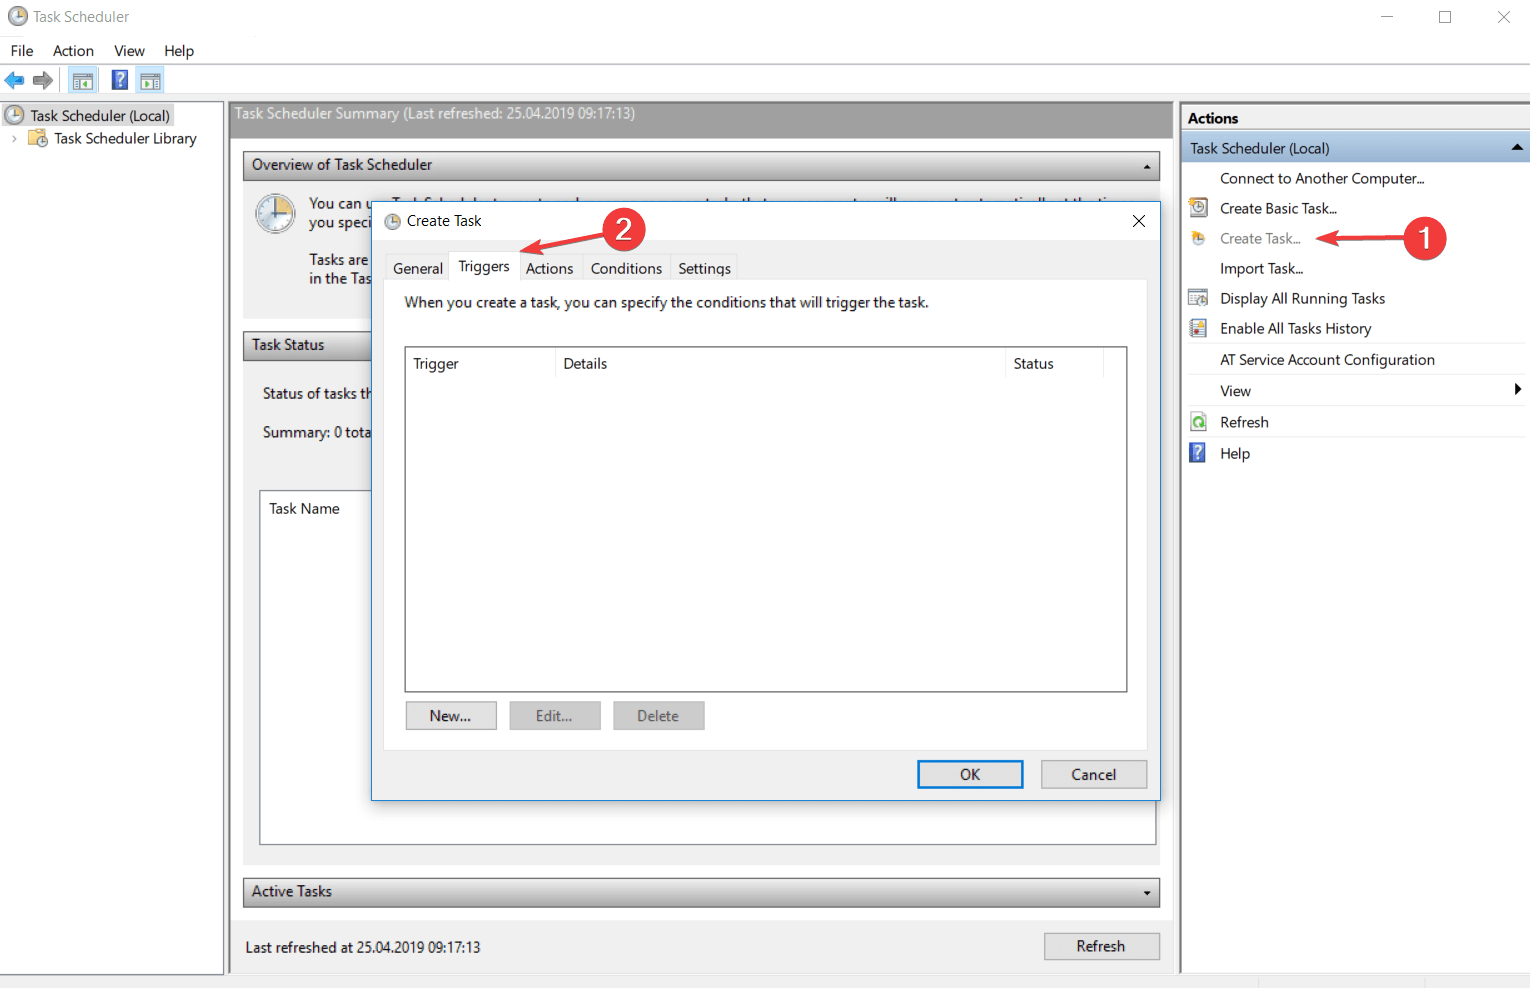
There are two types of triggers: the time-based trigger and the event-based trigger.

  • The time-based trigger is used for tasks that start at a certain time or tasks that starts periodically, depending on your schedule.
  • The event-based trigger is used for actions that start at a specific system event.

For example, let’s suppose that on this day you want to recover a few hours of work, and you want to have the same productivity, even though you know you will work more than usual.

You can set a task to be triggered every time your computer is entering an idle state.

Note icon NOTE

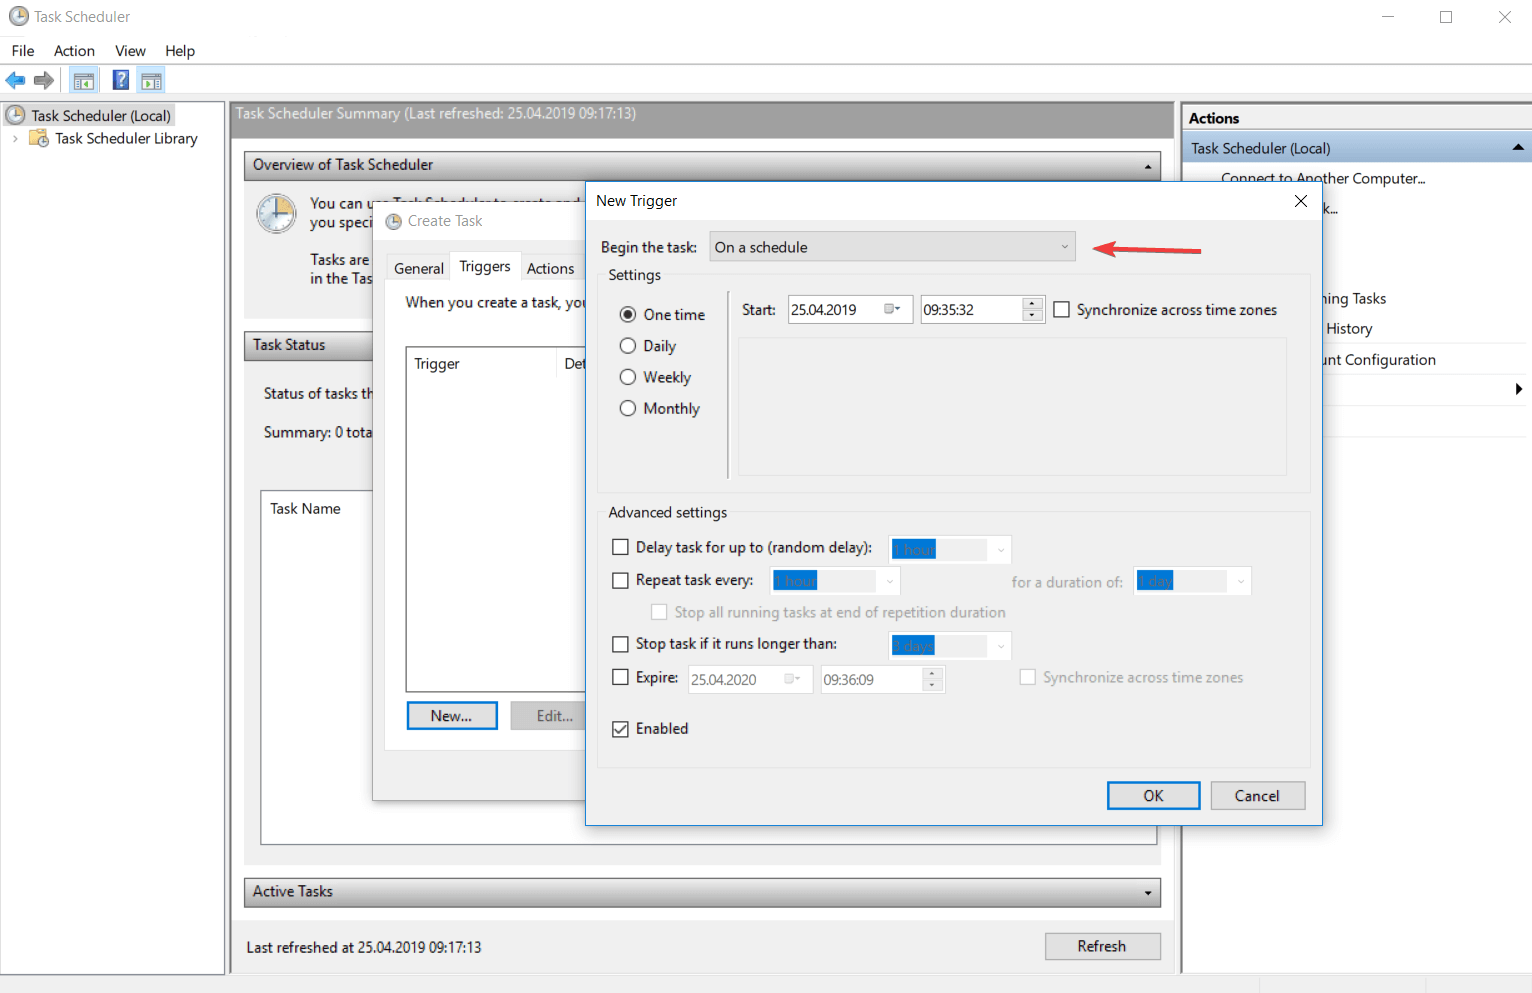
1.1. Triggers for a schedule

This kind of trigger causes the task to run after a well-determined schedule configured by you. From the trigger settings, you can choose if the task will be repeated once, daily, weekly, or monthly.

new trigger windows 10

This time interval is guided by the computer’s date and time. You can check the Universal box for making the time interval relative and synchronize it with UTC (Coordinated Universal Time).

This feature allows you to coordinate multiple tasks to run independently in different time zones.

  • The One time trigger is the easiest to set up. All you have to do is enter the day and time you want the action to take place.
  • The Daily trigger is based on a recurrent system and the date and time you want to start using this kind of trigger.

The interval of 1 is producing a daily schedule, the interval of 2 is producing an every other day schedule, and so on.

  • If you opt for a Weekly trigger you must enter the date and time you want to start this schedule, the days when you want to take place and how often to repeat. Recursion of this trigger is similar to the daily one.

For the interval of 1, the task will be repeated weekly, for the interval of 2, the task will be repeated every two weeks, and so on.

  • The Monthly trigger does not have many differences from the others, you only need to select the week and the day that you want to activate your task.

The recursion system is the same, the only difference being that the minimum interval of repetition is one month.

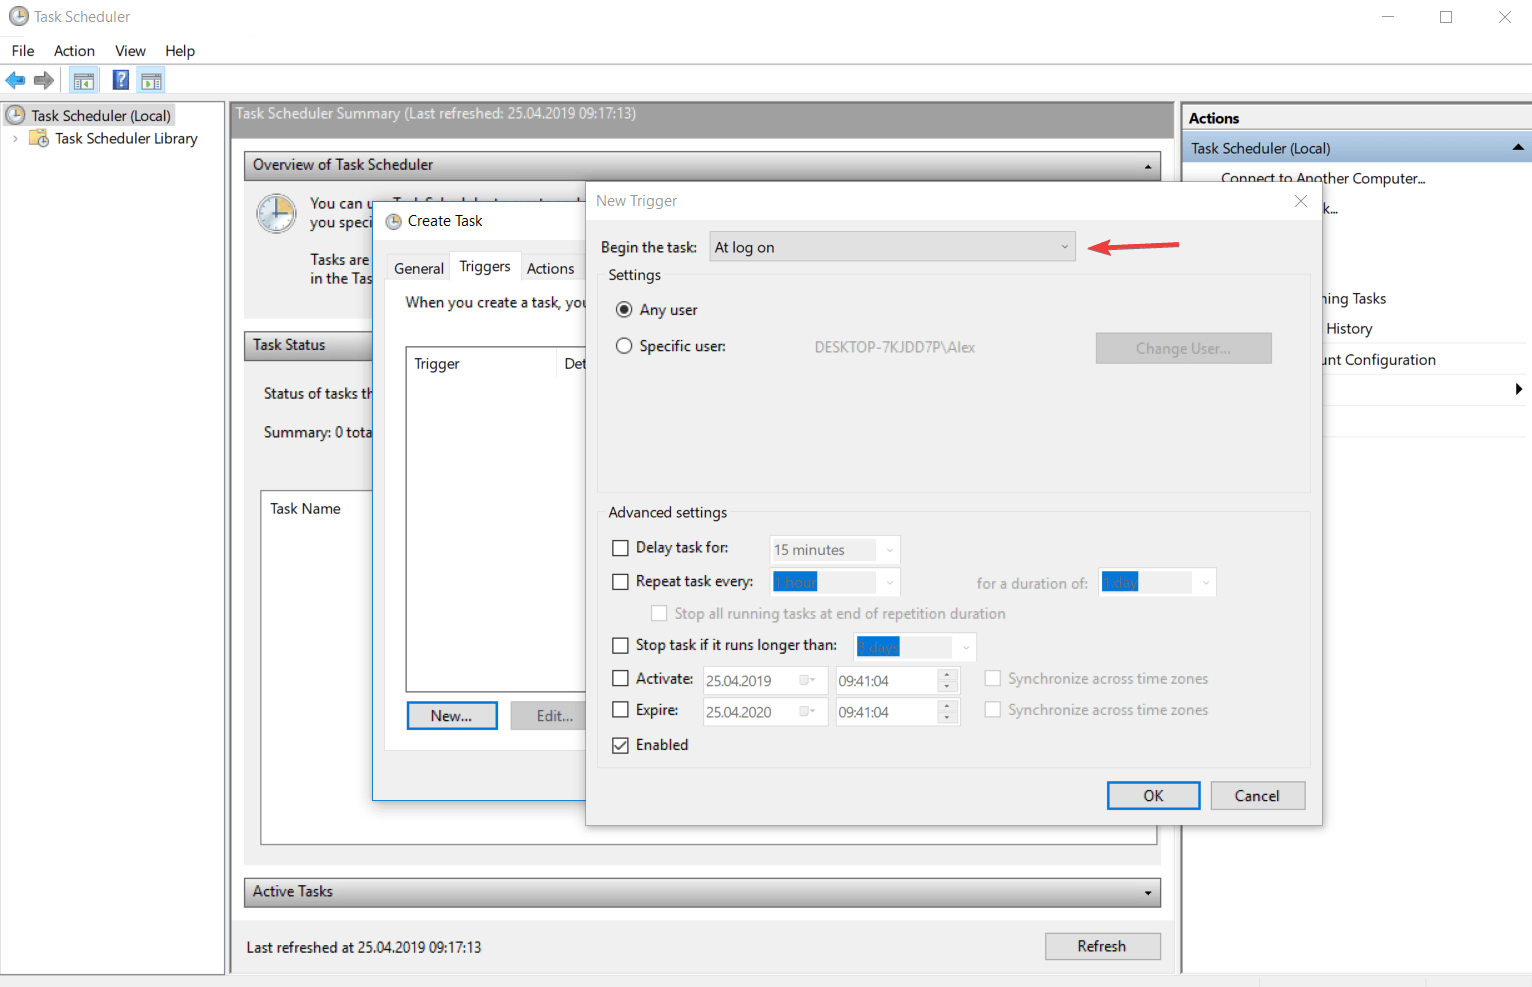
1.2. Triggers for logging on

trigger log on windows 10

This type of trigger runs an action when a user logs onto the computer. It has a customization feature that allows you to set the action to occur for all users or only for certain users.

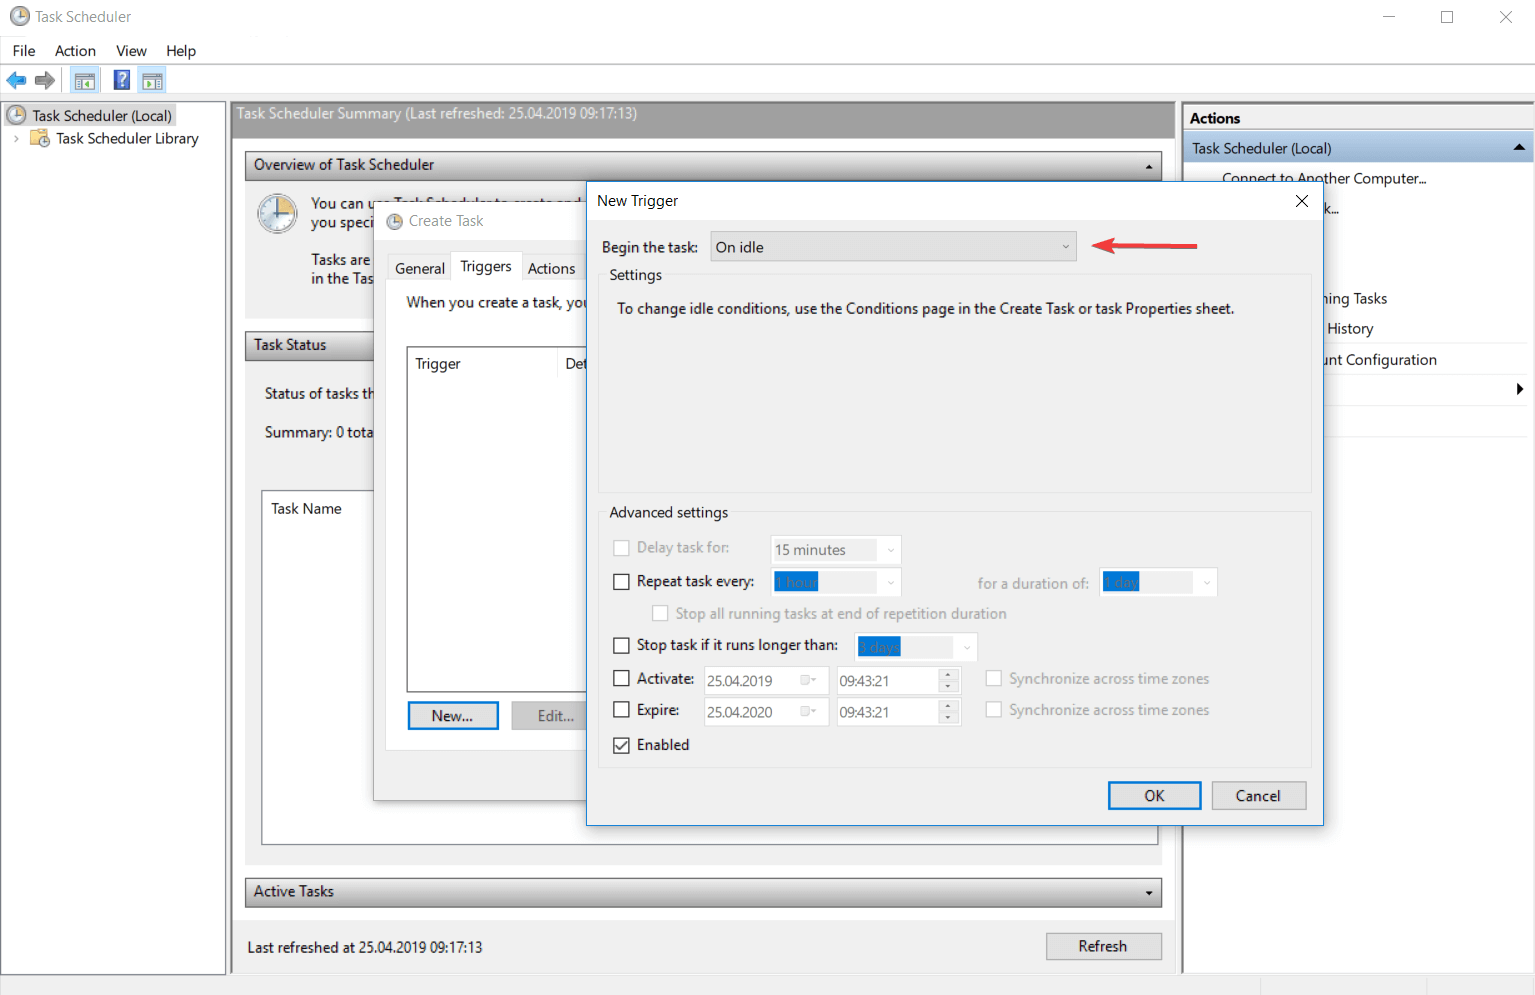
1.3. Triggers for idle state

trigger on idle windows 10

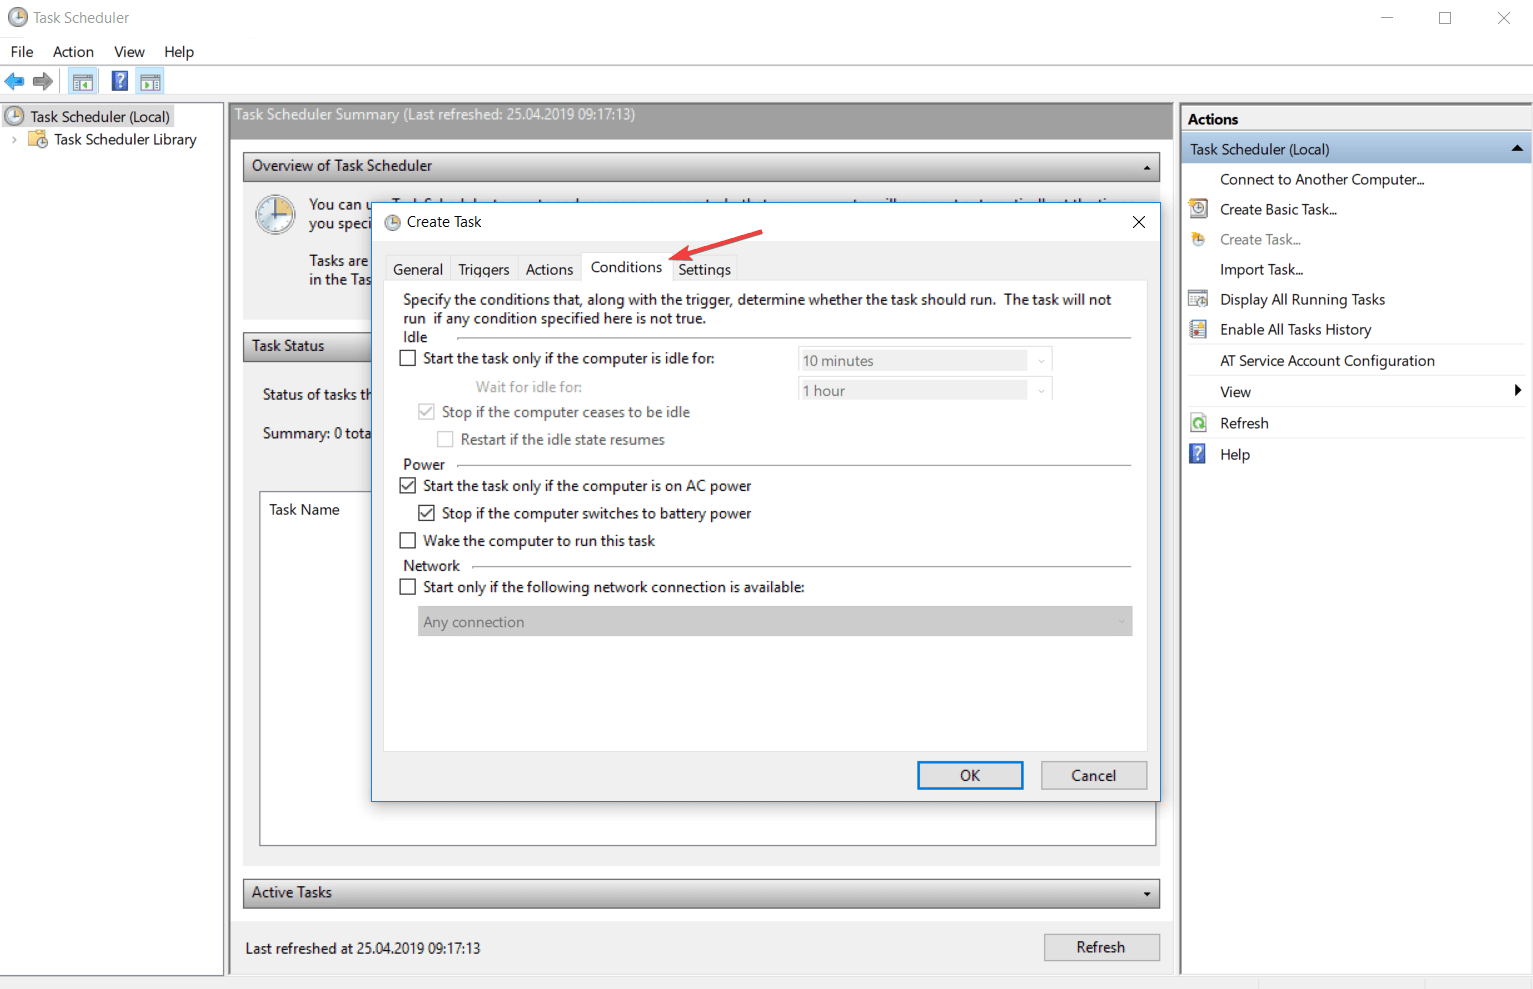
This trigger determines the action to run after entering the computer in the idle state. The trigger conditions can be configured from the Conditions tab of the Create Task menu or from the Task Properties window.

conditions task schedule windows 10

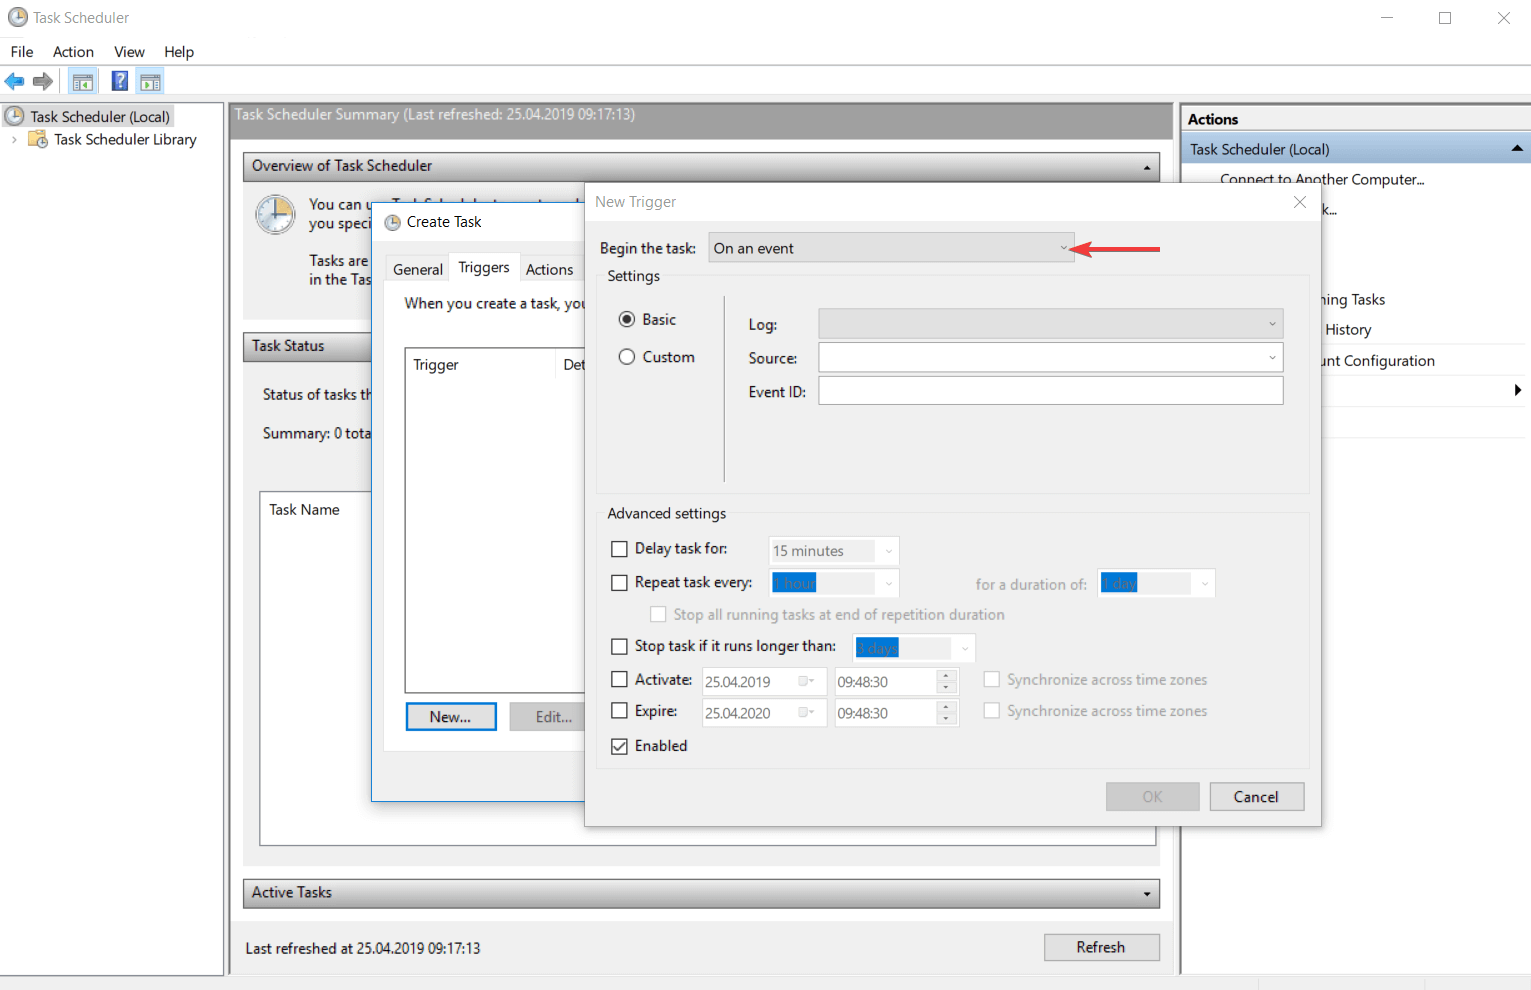
1.4. Triggers for an event

The event-based trigger determines the action to run after an event occurs. You can choose from a predefined list of events but you can also set a specific event.

trigger on an event windows 10

If you are choosing the Basic trigger settings, only one event from the specific event log will run the task.

If you choose the Custom trigger settings you can enter the XML event query or a custom filter for the events that can run the task.

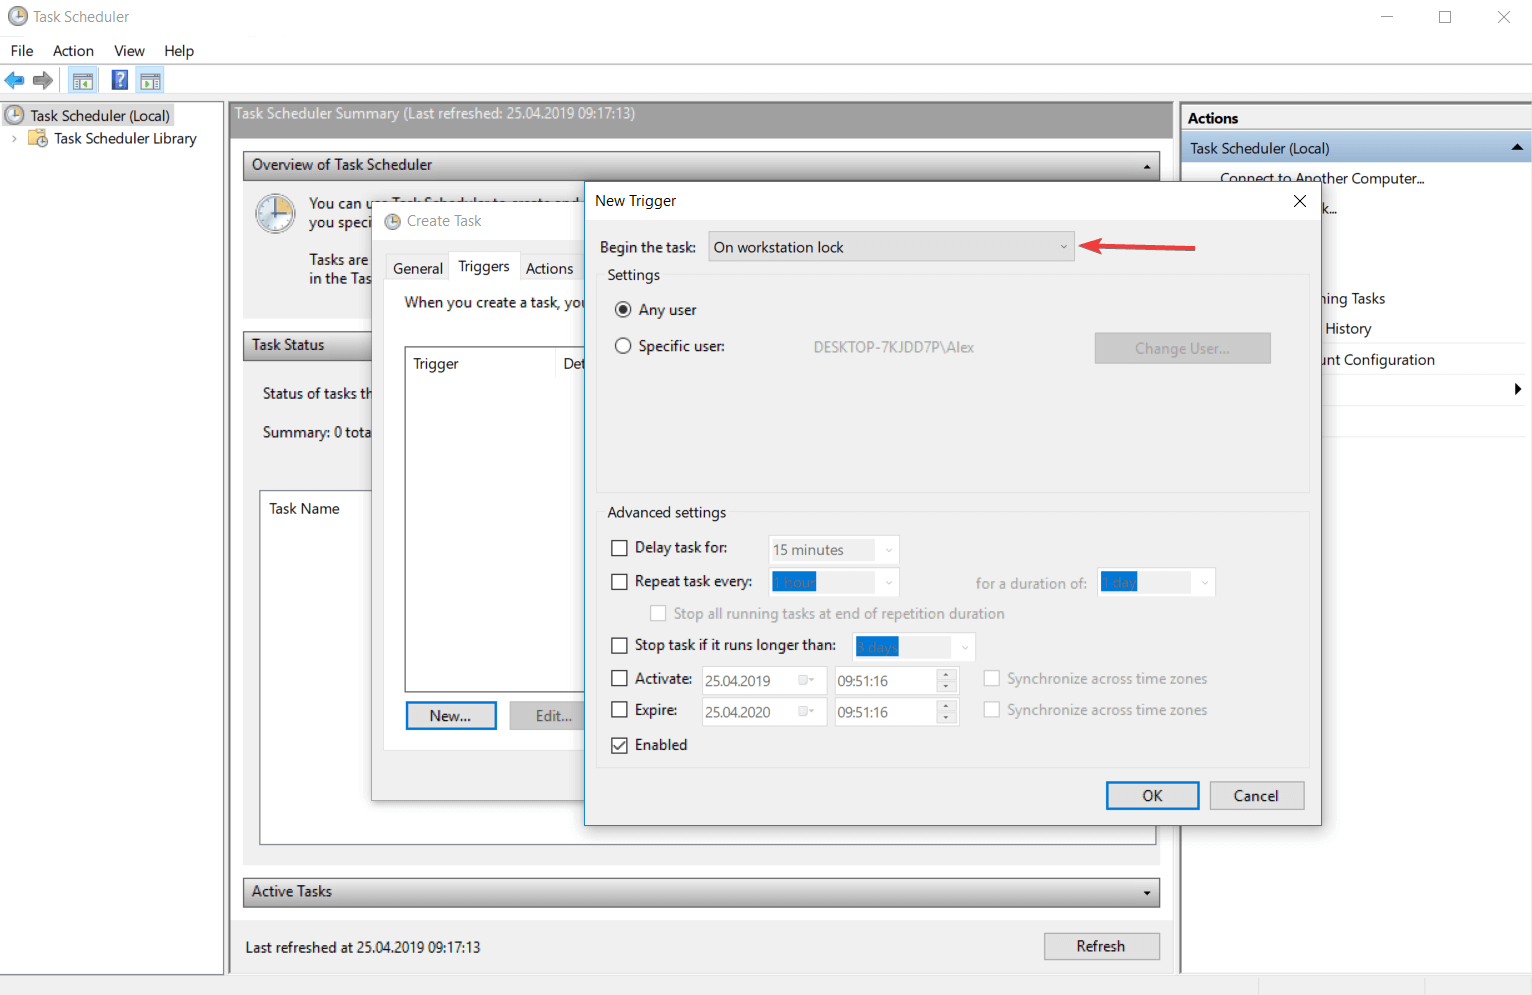
1.5. Triggers on workstation lock

trigger on workstation lock windows 10

This type of trigger runs the task when the computer is locked. You can configure from the settings if this action will be available for any user or for a specific user. You can do the same thing for the unlocking station process.

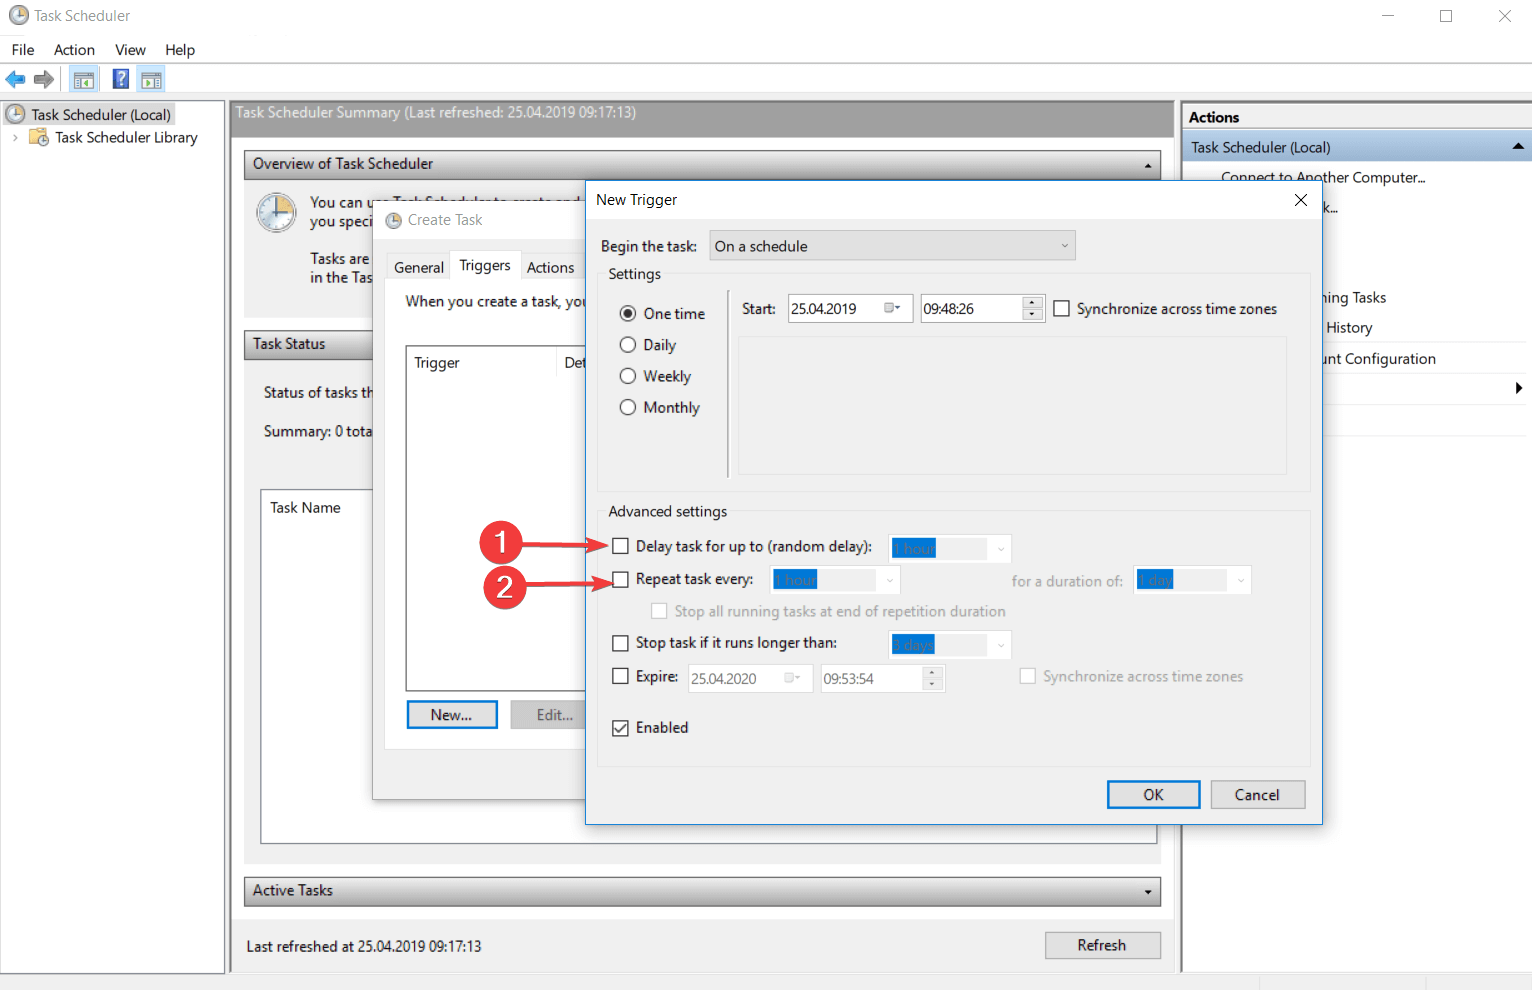
1.6. Advanced settings of triggers

trigger advanced settings windows 10
  • Delay task for up to (random delay)

This feature allows you to insert a delay between the moment when the task was triggered and the moment when the task will take place.

For example, if you have a time based trigger, the task is scheduled to be triggered at 3:00 PM and you set the Delay task for up to (random delay) to 30 minutes, your task will be triggered in between 3:00 PM and 3:30 PM.

  • Repeat task every:

Here you can set a repeating time for your task. So, after the task will be triggered, it will wait the amount of time specified and after that, it will be triggered again. This entire process will continue until the period allocated is done.

2. Types of actions

The action is the process or a part of the process that is performed when the task is running. A task can have up to 32 actions. Every action has some settings that determine how the task is performed.

task scheduler actions windows 10

You can find and edit the task‘s actions from the Actions tab of the Task Properties menu or from Create Task window.

When the list contains more than one action, they will be executed consecutively starting with the action from the top of the Actions tab and ending with the action from the bottom of the list.

If you want to change the actions order all you have to do is to click on the action that you want to move and then use the arrow keys to move it above or below.

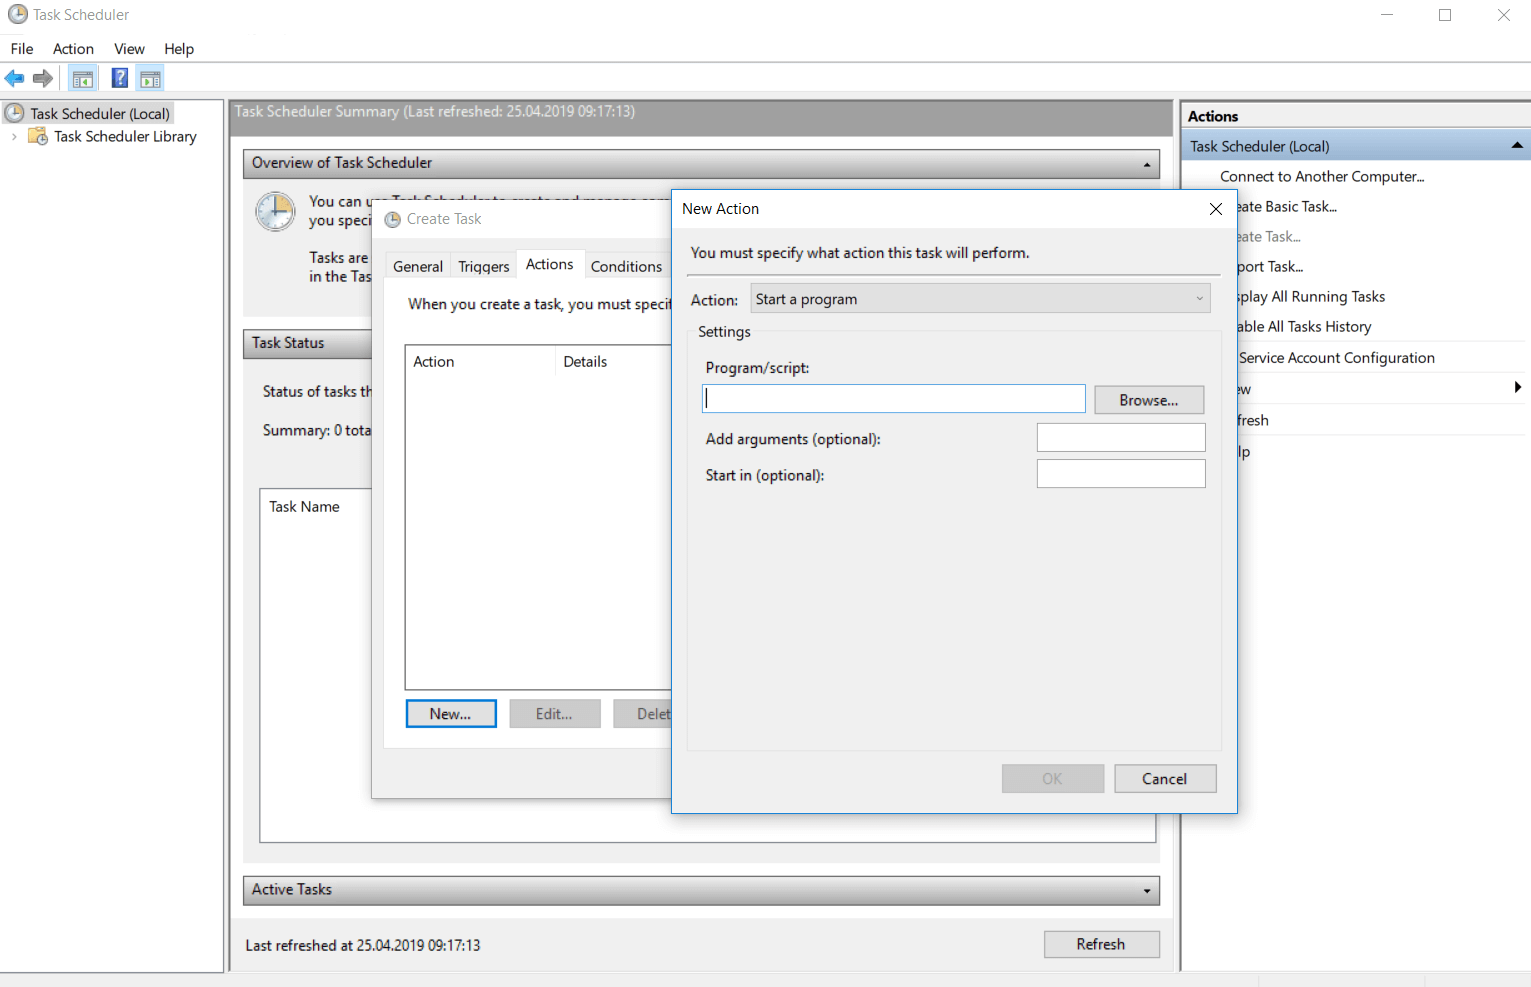
2.1. Action that activates a program

This kind of action is used for starting a program or a script.

action task scheduler windows 10

In the Settings menu of the Actions tab, you enter the name of the script or the program you want to start.

If one of those sequences takes command line arguments you can add, delete and edit them in the Add arguments (optional) text box.

The Start In (optional) is the place where you can specify the directory for the command line that will execute your script or your program.

This should be either the path to the program or the script file that leads to the files that are used by the executable file.

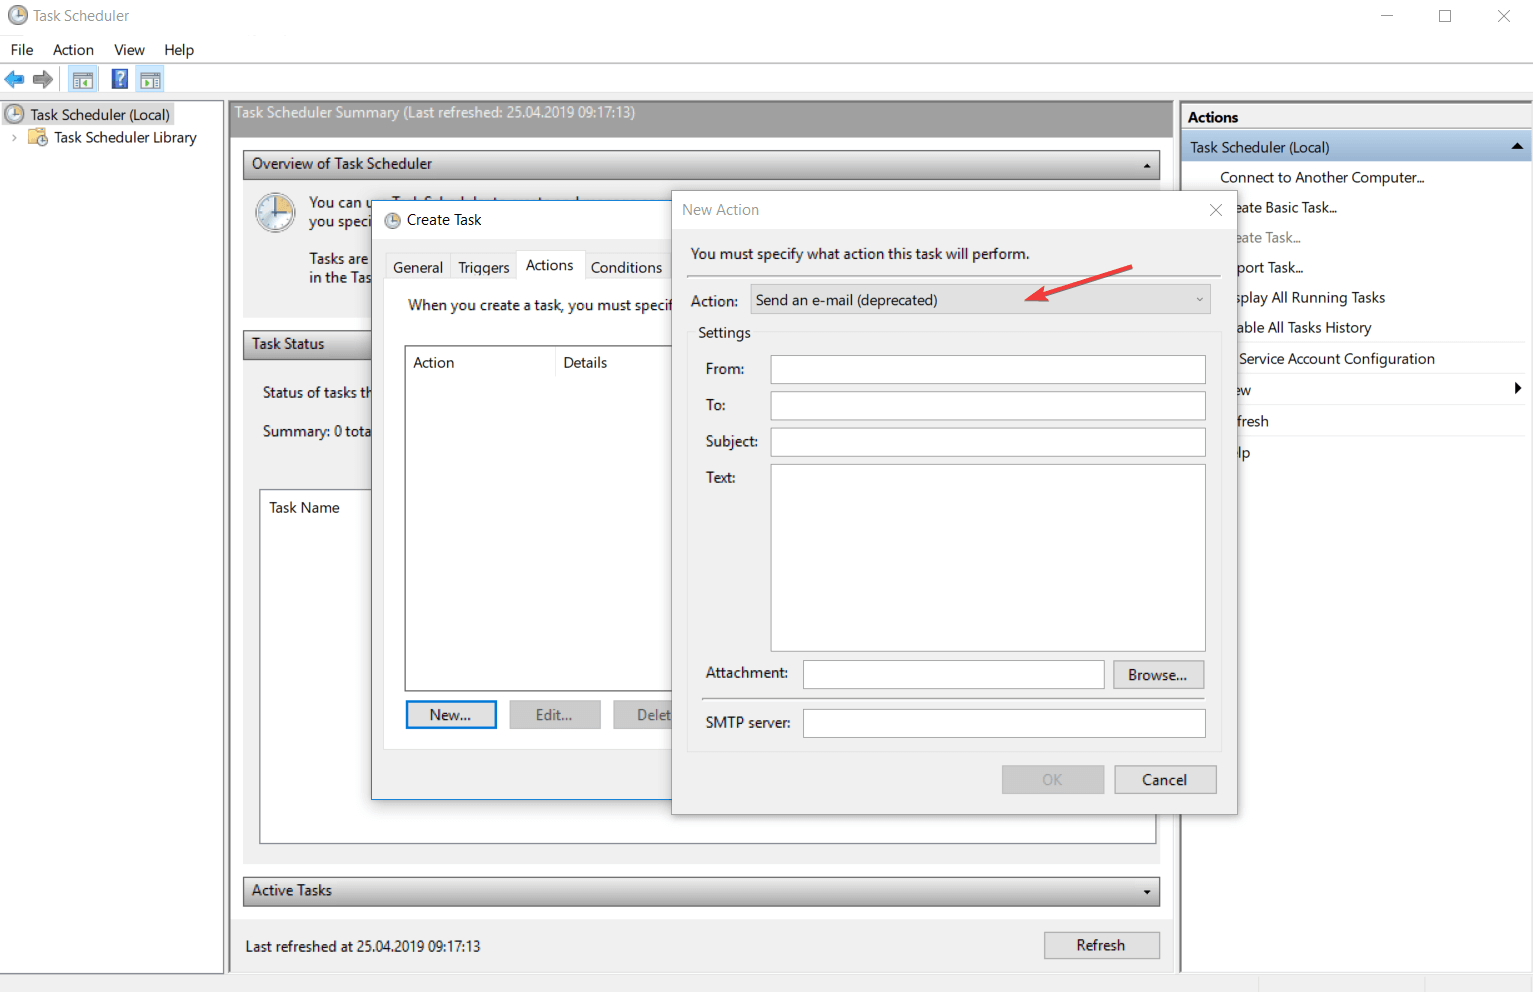
2.2. Action that sends an e-mail

This action is particularly useful for people who communicate a lot via email.

action send email task scheduler

In the settings of this action, you have to enter your e-mail address, the e-mail address of the person who will receive the mail, the title of the e-mail, the message you want to be sent, and you have also an optional feature to attach different files to the mail.

You must also specify the SMTP server of your e-mail.

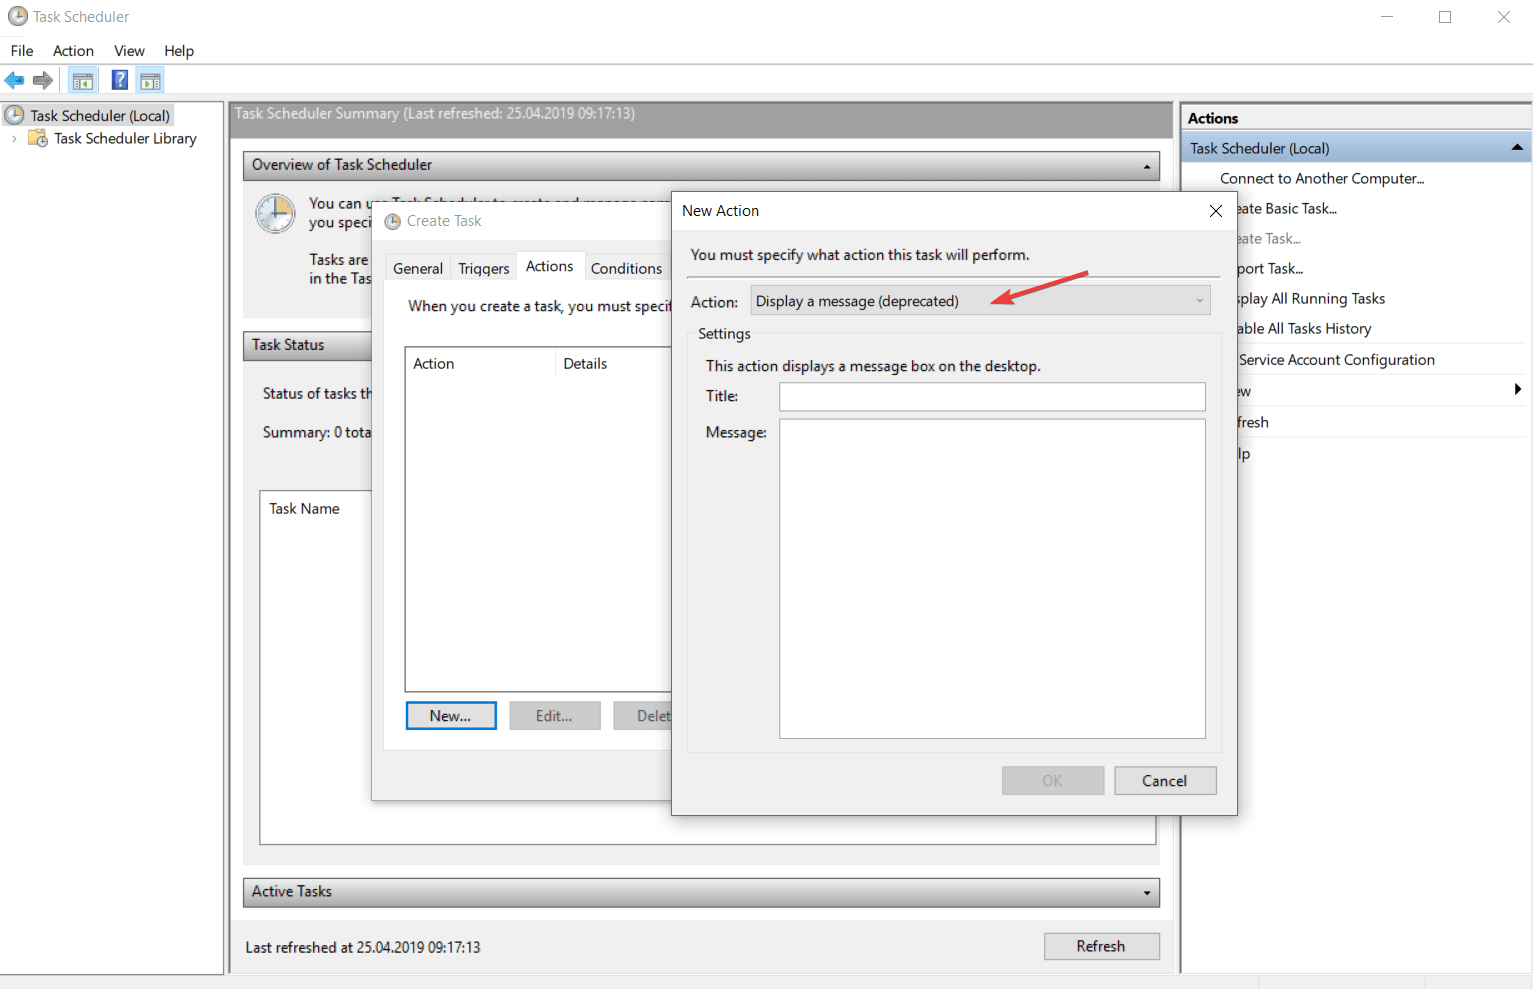
2.3. Action that displays a message

action display a message windows 10

This action is used more like a reminder because it displays on your screen a text with a title. Select the Display a message category from the Actions menu and type the title and the message of the reminder.

If you are facing Task Scheduler failed to launch an action issue, we recommend you check out this detailed guide for solutions.

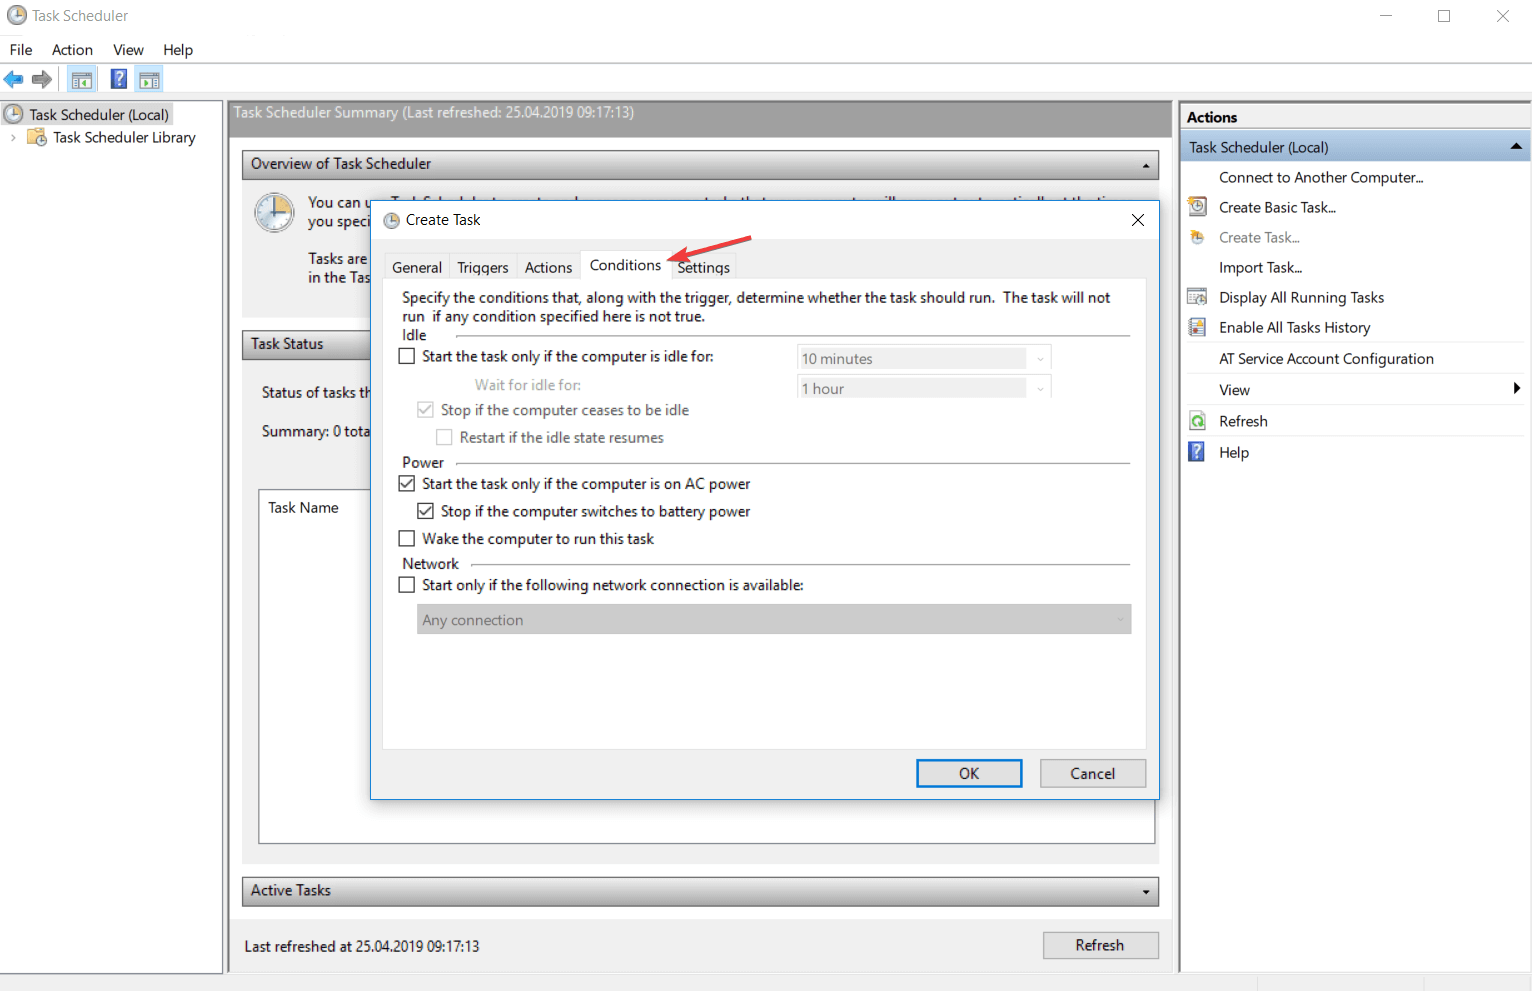
3. Types of Task Conditions

Task conditions decide if a task can run after it was triggered. Conditions are optional and their main role is to help you accomplish a more accurate task reported to the operating situation.

task scheduler conditions windows 10

You can find them in the Conditions tab of the Task Properties or Create Task menu. Conditions are divided into 3 categories: idle conditions, network conditions, and network conditions.

3.1. Idle conditions

With this condition, you can tell the task to run only if your computer is an idle for a certain amount of time. Every 15 minutes, Task Scheduler is checking your activity to find out if your PC has entered into an idle state.

It is considered that your computer is in an idle state if the screensaver is on or if the percentage of CPU and memory operation is 0%.

As soon as the Task Scheduler has detected that your computer is in an idle state, it will begin the countdown of the length of time that has been set.

If you come back at this time and continue your work, the application will reset the task.

You can also set the time condition to 0 and in this case, the task will run when the application will detect that your computer has entered the idle state.

If the Stop if the computer ceases to be the idle condition is on, the task will stop running after the computer gets out from the idle state. Normally, this task will run just one time.

To run every time the computer remains inactive you have to check the Restart if the idle state resumes.

3.2. Power conditions

This condition is dedicated to laptop users because it follows the power method of the device.

While a computer receives a current flow of energy from a source, the laptop can run on a battery when you do not have a stable source of power.

With this condition, you can set a task to run when the computer is connected to a stable and continuous source of energy after the trigger was activated. You can also set a condition.

You can also configure the condition so as not to allow the task to run if the device goes on the battery power.

From these conditions, you can also create a task that will tell the computer to start from sleep mode and run the actions after it was triggered. Consider that this can happen during hours of rest and may create trouble.

To avoid this, make sure the device is at a distance where it cannot bother you or turn it off when you rest.

Note icon NOTE

3.3. Network conditions

With this condition, you can configure a task to run if a specific named network is available or if any connection is available when the task is triggered.

If you consider that your task will need network conditions to run, you can also set this in the conditions.

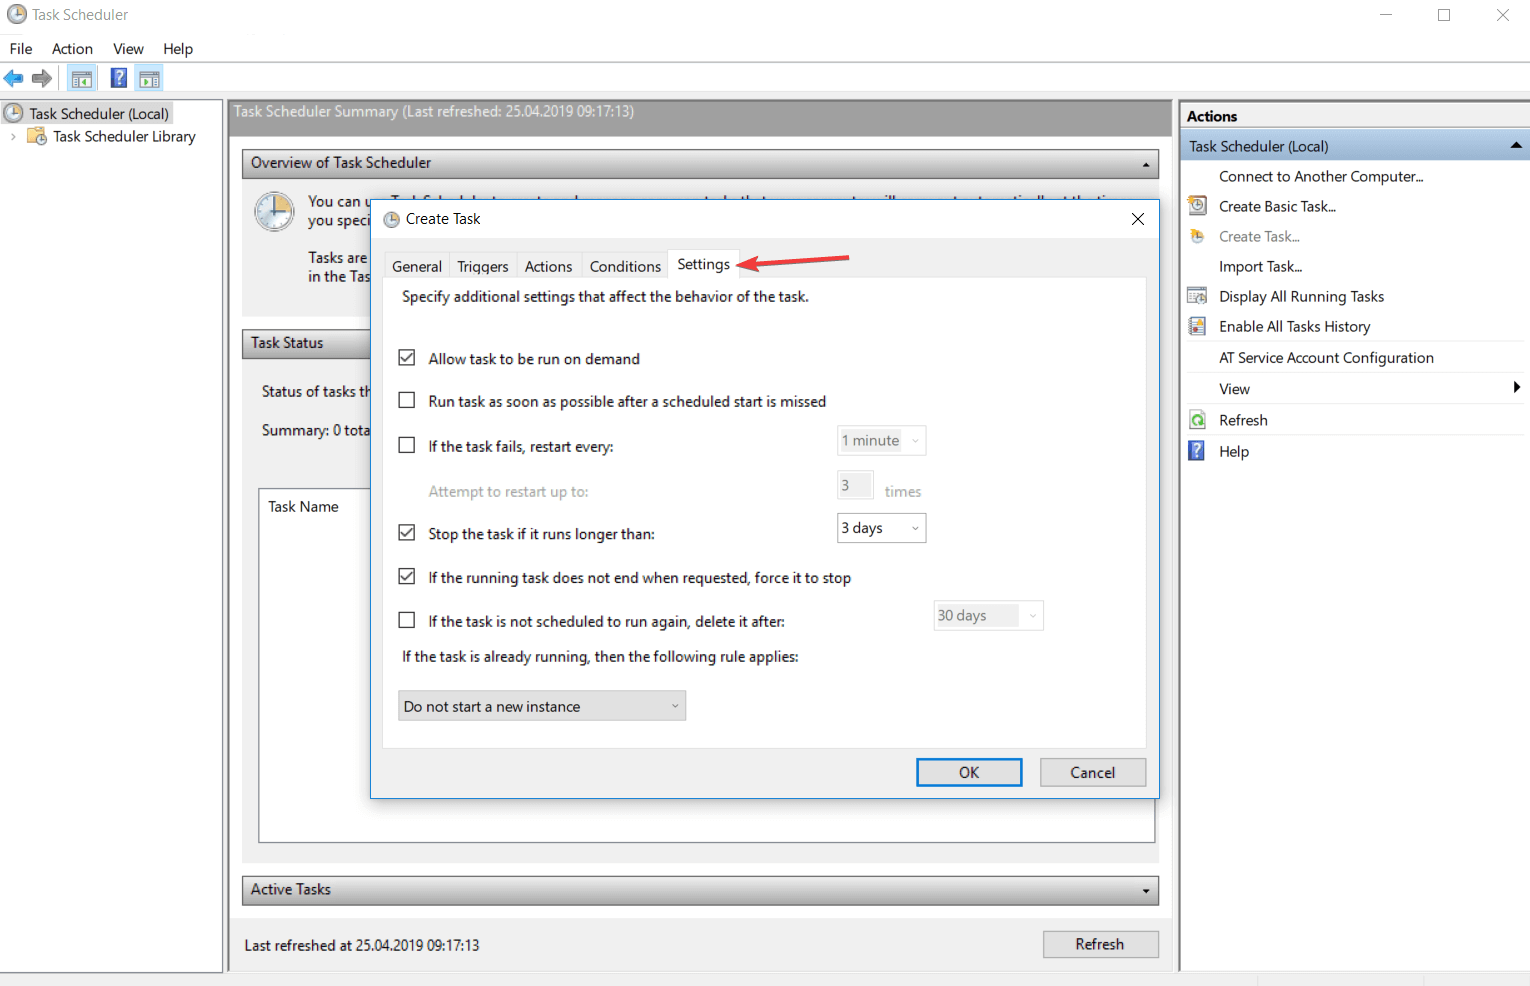
4. Task settings

Task settings are indicating how a task run, is deleted, or is stopped. You can find the panel with all the available settings in the Settings tab from the Task Properties or from the Create Task menu.

task scheduler settings windows 10

The following list contains a description of all the available settings.

4.1. Allow tasks to run on demand

Here you can specify if the task can be run manually before or after it is scheduled by allowing it to run on demand. You can set a task to run at any time on demand.

You find more information about the demand configuration in the How to run a task on demand topic of this article.

4.2. Run a task as soon as possible after a scheduled start is missed

This setting will assure you that a task will start running even if it could not run when it was scheduled from different reasons (the device was turned off, Task Scheduler was busy).

In the default settings, the Task Scheduler will not start the task immediately when the service is available. It will wait 10 minutes and then immediately start the process.

4.3. If the task fails, restart every time period

This setting will force the Task Scheduler to restart the task if the previous attempt was thwarted by an error.

You have to add the time interval between the running attempts and the number of attempts to achieve.

4.4. Stop a task if it runs longer than the time period

With this setting you can establish a time limit in which the task can run.

This setting is used for limiting the number of tasks that need a long period of time to execute and in this way you can save resources for your computer.

4.5. If the task is not scheduled to run again, delete if after a time period

This feature replaces an action that you should do it manually.

If you schedule a task to run only once means that you will not need it in the future and not unnecessarily load the list of tasks you should delete after you have used it.

This setting will delete automatically the task after a period of time set by the user after it was activated.

Remember, your task must include at least one trigger with an expiration date in order to select this setting.

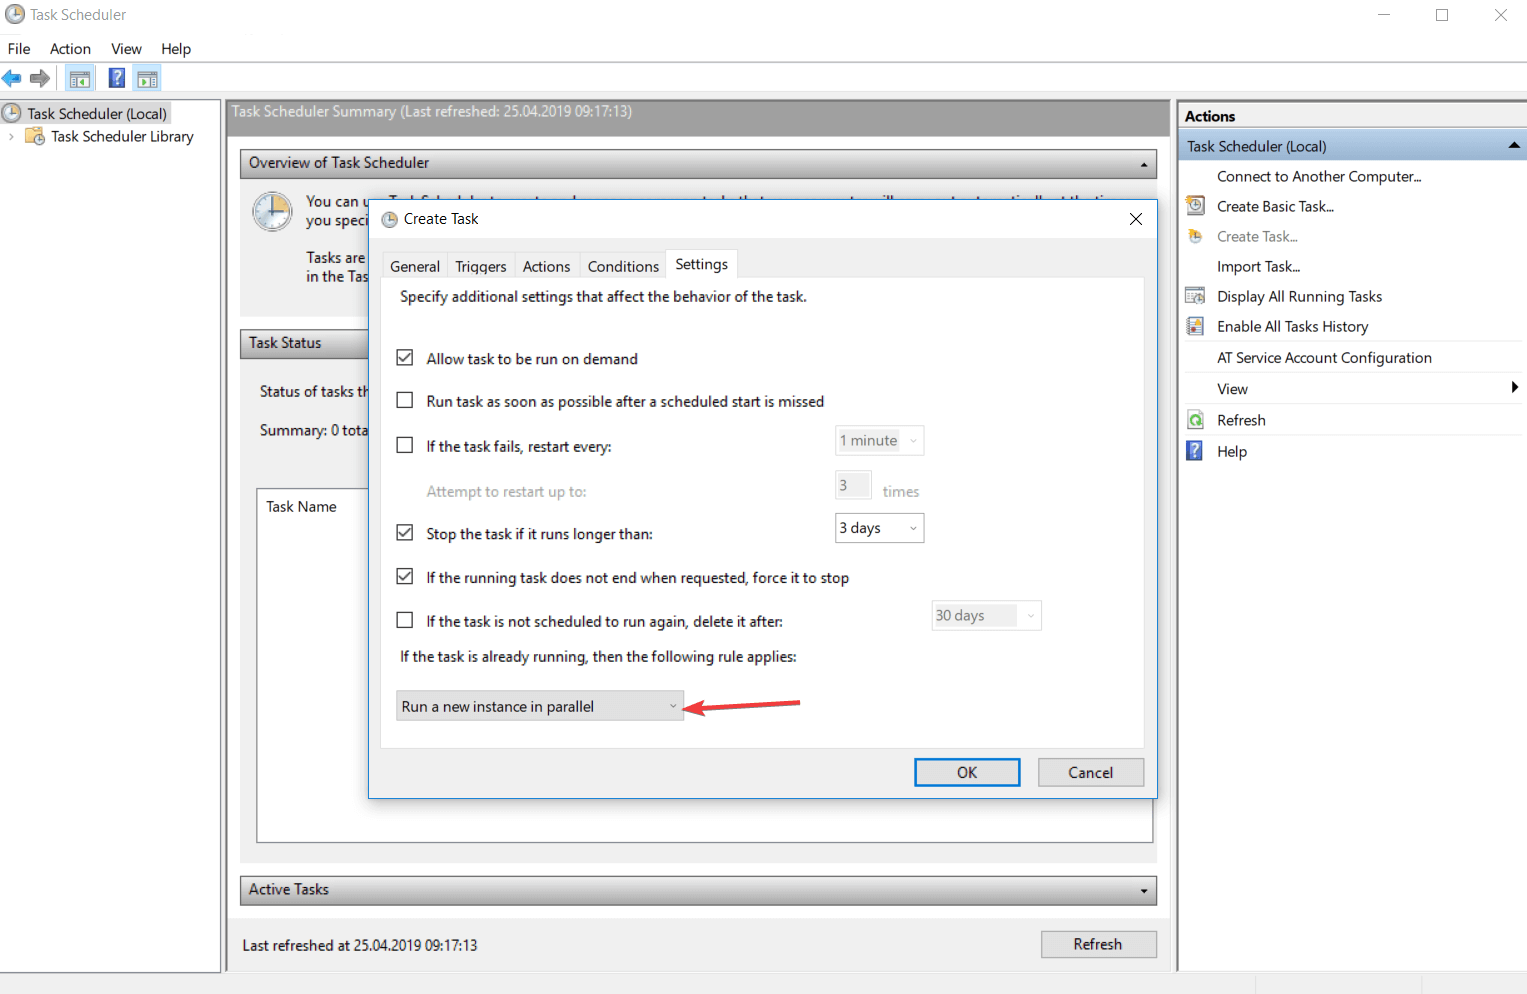
4.6. If a task is already running you must know a few things

You must configure the Task Scheduler to know how to run the task in case another instance of the current task is already running.

  • Do not try to start a new instance because the application will not run the new instance and either stop the current instance from running.
  • You can run a new instance in parallel. Task Scheduler is able to run different instances in parallel, so if you want to run a new instance, it will run it at the same time as the instance that is already running.
  • You can queue a new instance. You can set an instance to start as soon as the current task ends the activity. The Task Scheduler will add your add the new instance in a queue and the service will not stop the current task from running.
  • Stop the current instance. After you stop the current instance, the service will try to run on the next one.
  • You can run a new instance in parallel. Task Scheduler is able to run different instances in parallel, so if you want to run a new instance, it will run at the same time as the instance that is already running.
run a new instance task scheduler
  • You can queue a new instance. You can set an instance to start as soon as the current task ends the activity. The Task Scheduler will add your add the new instance in a queue and the service will not stop the current task from running.
  • Stop the current instance. After you stop the current instance, the service will try to run on the next one.
  • You can run a new instance in parallel. Task Scheduler is able to run different instances in parallel, so if you want to run a new instance, it will run it at the same time as the instance that is already running.
  • You can queue a new instance. You can set an instance to start as soon as the current task ends the activity. The Task Scheduler will add your add the new instance in a queue and the service will not stop the current task from running.
  • Stop the current instance. After you stop the current instance, the service will try to run on the next one.

If you are looking for ways to enable Task Scheduler History, check out this guide.

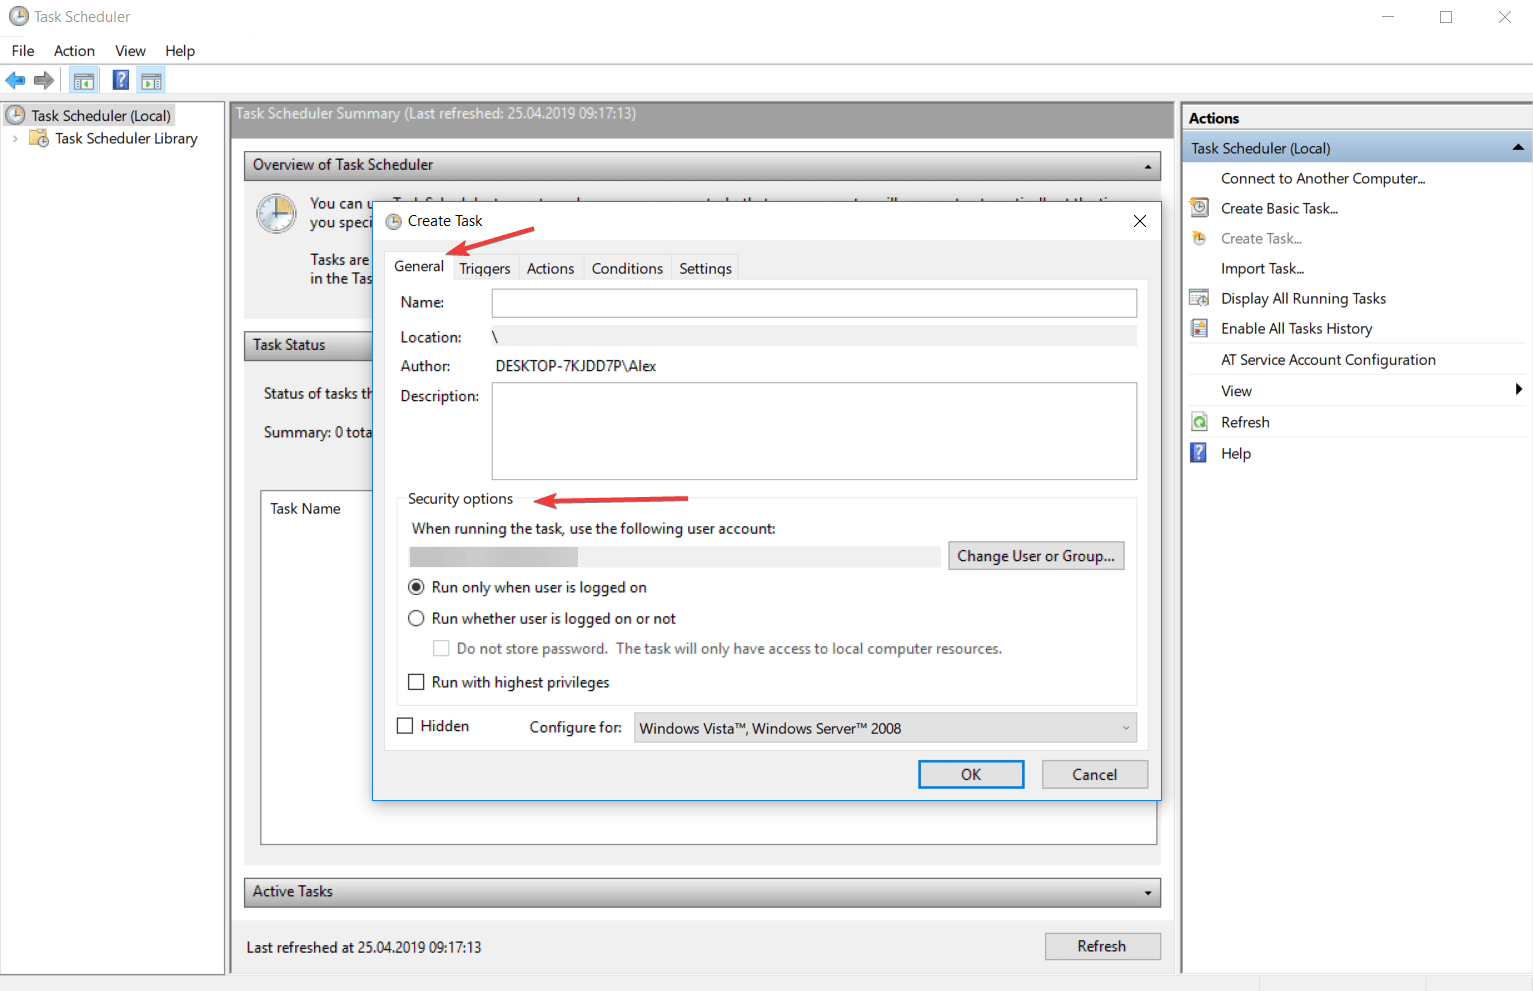
5. Task security context

By default, the Task Scheduler runs the tasks in order with the security context of every user logged on when the task is triggered.

You can modify these settings from the Security options sections of the General tab after you have selected the task that you want to modify.

task scheduler general windows 10

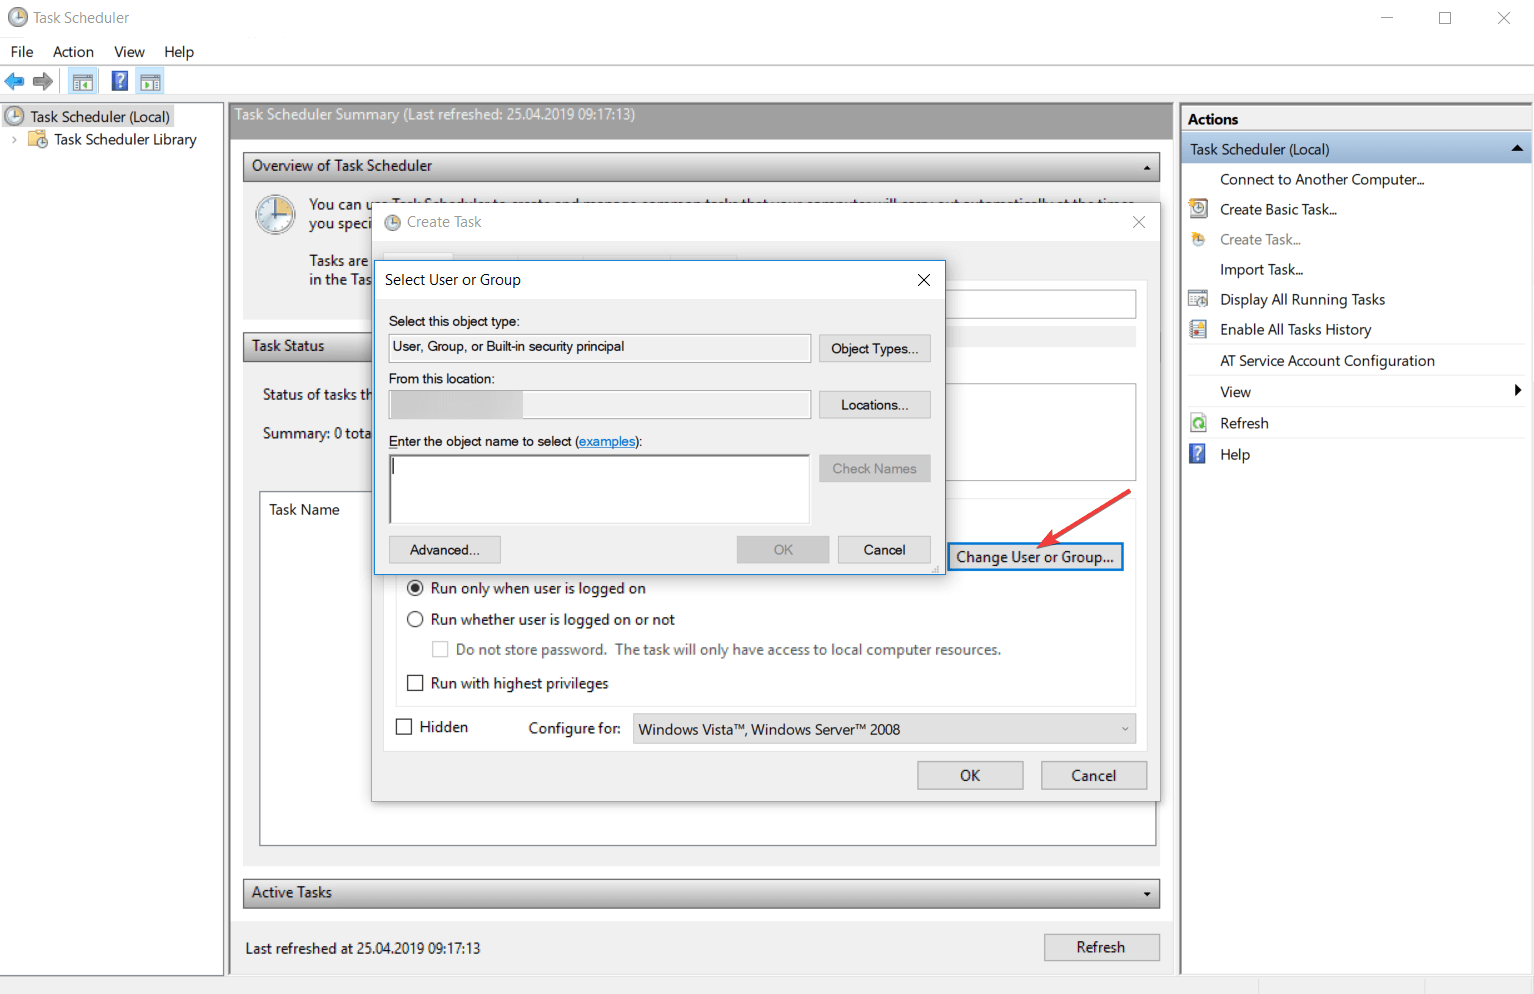
For a better organization of your tasks, you can group them on users or on groups of users by clicking on the Change User or Group category.

If your user does not have administrator rights the button will be called Change User and your account will not be able to enter the Administrators group.

task scheduler change user windows 10

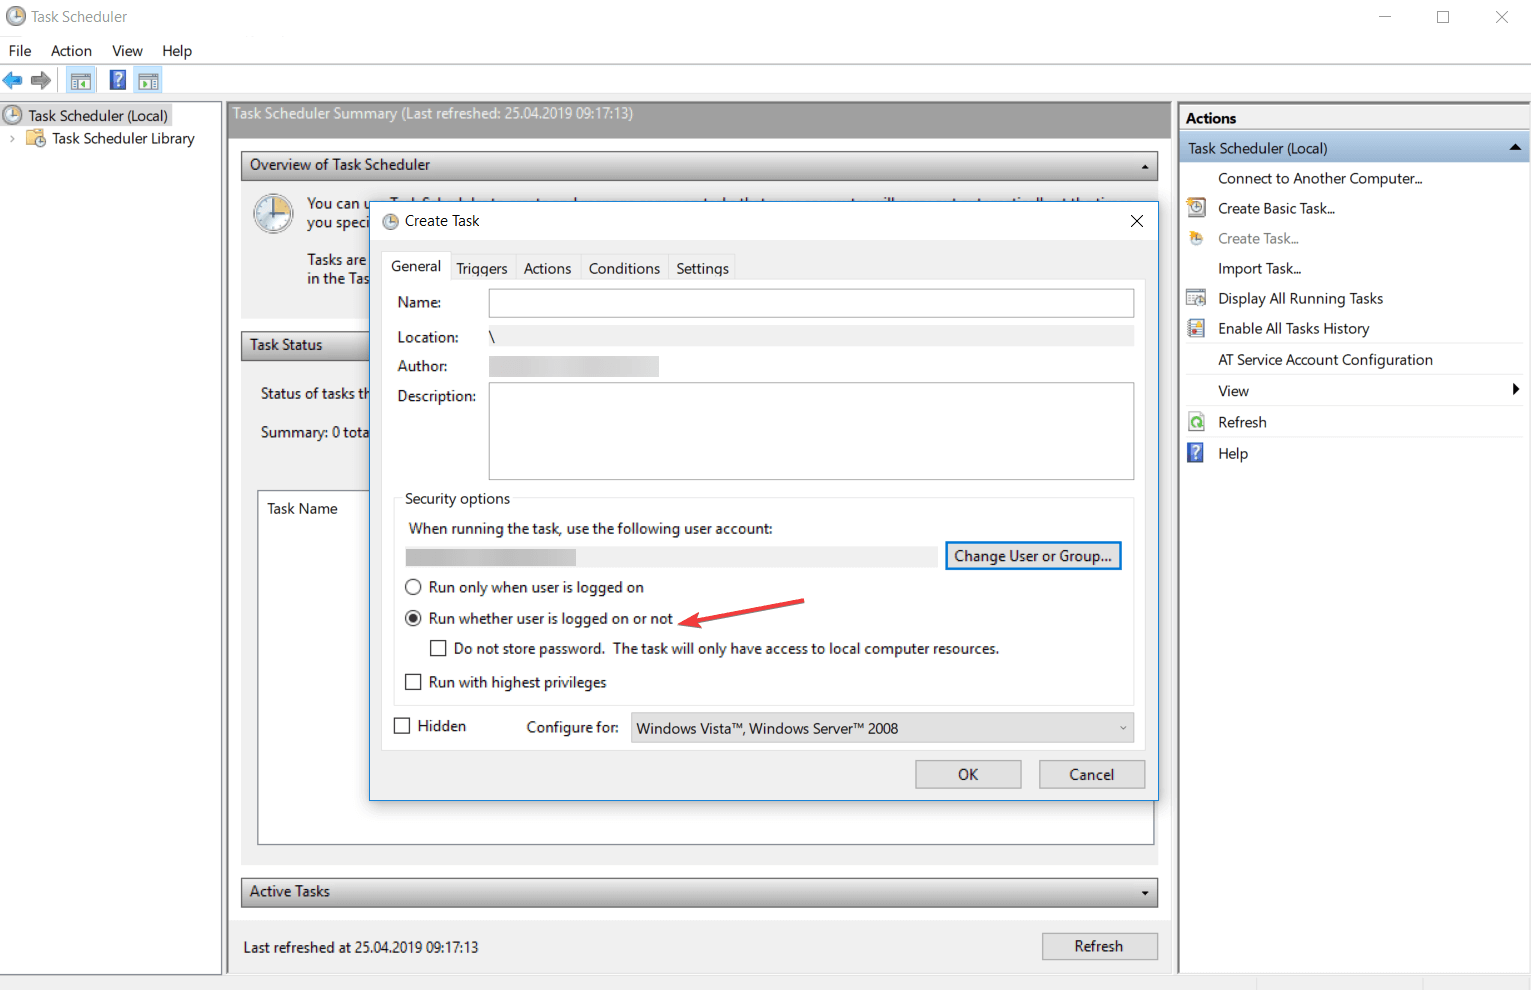
The Run whether the user is logged on or not feature allows you to run tasks even if the specific user is not logged on.

The feature is used for tasks that need to be run on any user of the system. If this setting is checked, the tasks will not run interactively.

To make a task run only when a user is logged on, select the Run only when the user is logged on radio button.

If the Run whether the user is logged on or not feature is used, you should supply the credentials of the account no matter if you check the Do not store password or not.

task scheduler do not store password windows 10

In the account is not logged on, the Task Scheduler will use the saved credentials in order to run the task.

When you select the Do not store password, the application will not save the credentials when you are creating a task but will discard them after the user properly authenticates.

When the service requires running a task, it will use the Service-for-user (S4U) extensions to the logging protocol to retrieve the user’s token.

In other words, the main purpose of the Service-for-user is to secure the context of the account.

6. How to use the Task Scheduler

6.1. Start Task Scheduler

  • Using Windows interface
  1. Type Control Panel in the search bar from the bottom left corner of your screen.
  2. Click on the System and Security, and select Administrative Tools.
  3. This will open you a list with different applications and in that list, you will find Task Scheduler.
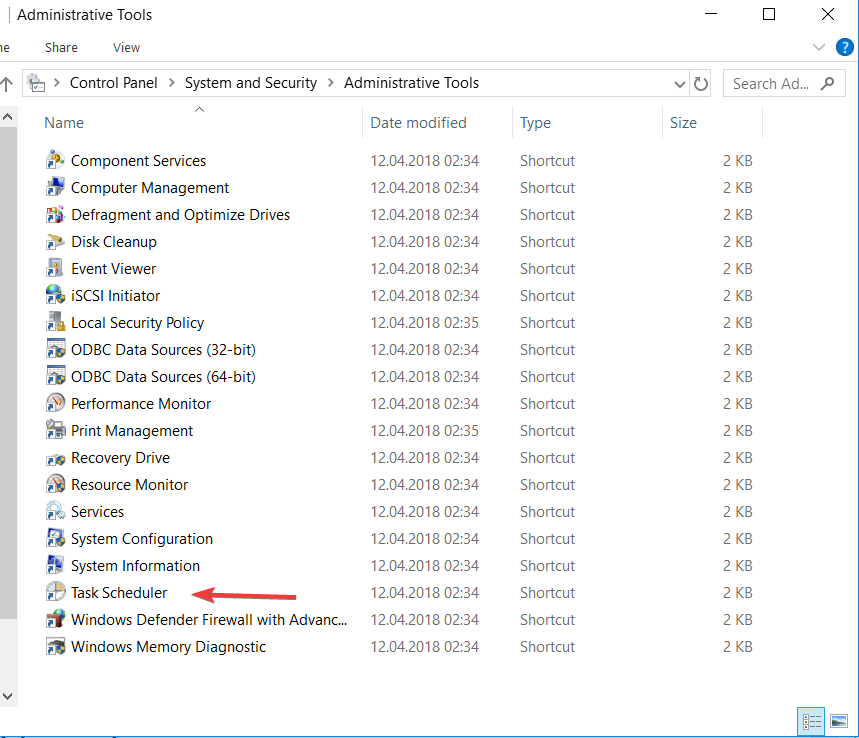
  4. Double-click on it and the application will open.
  • Using Command Prompt
  1. Type cmd in the search bar from the bottom left corner of your screen, and select Command Prompt.
  2. Type msd command in the console, and you will open the application.

There are several ways you can get to access this application. You find above two of them that will work on any version of Windows that you have.

6.2. Create a task

  1. 1. Press the Start button on your taskbar.

  2. 2. Type task scheduler in the search box that opens and click on the first result.

  3. 3. When the Task Scheduler app opens, navigate to the Library section from the left pane.

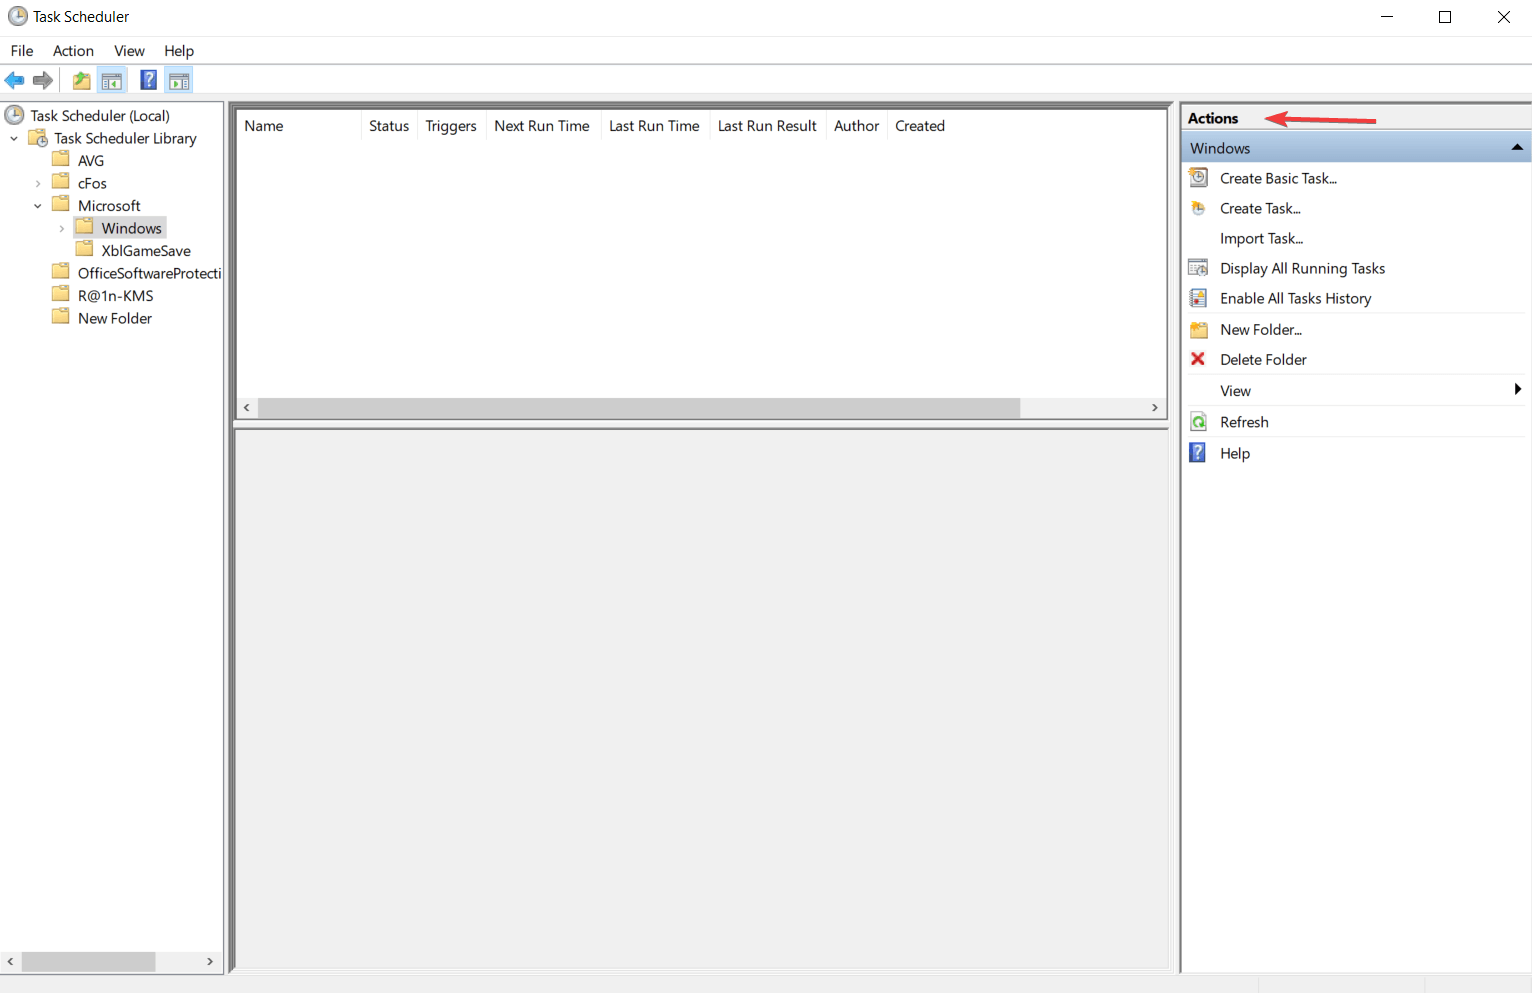
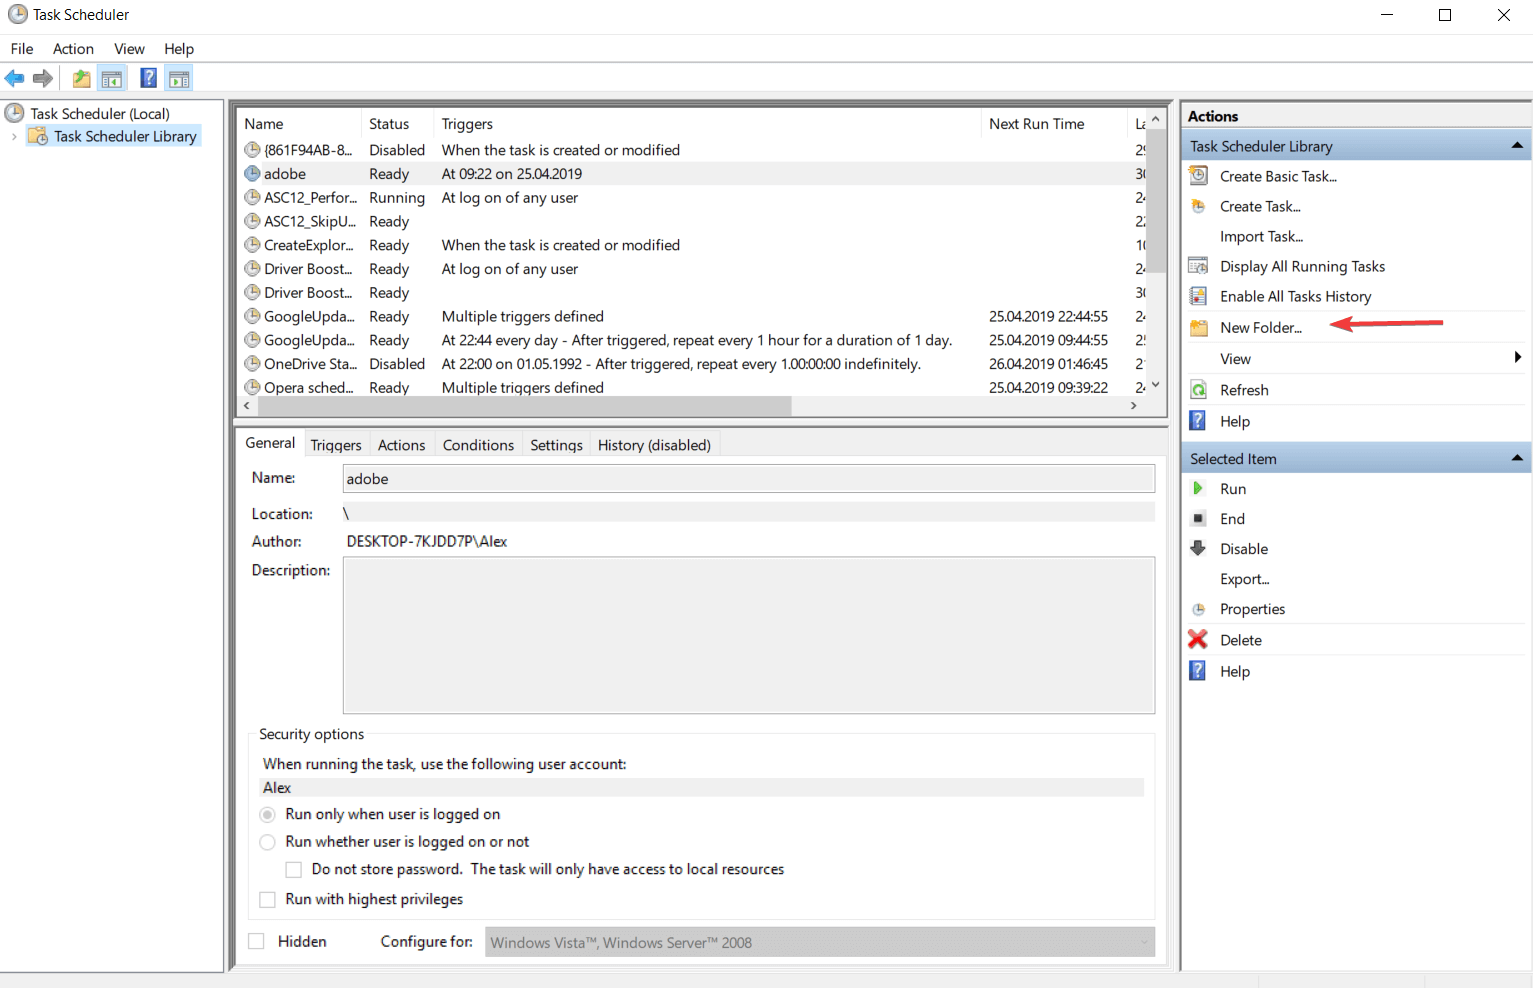
  4. 4. Select the folder where you want to create a task. If you have not already a created folder, from the Actions tab, click on the New folder… button and name your new folder.

    task scheduler new folder windows 10
  5. 5. Click on the Create Task button from the Actions section.

  6. 6. You must enter a name for your task in the General tab of the Create Task dialog box.

  7. 7. Select what type of trigger you want to be attached to this action. To do this, open the Triggers tab, and click on the … button.

  8. 8. Choose the action or the set of actions which will be found in the task. Enter the Actions menu of the Create Task, and click on the .. button and configure your action settings.

  9. 9. Take a look at the Conditions and Settings tab to better customize the task for your needs.

  10. 10. Click on the OK button from the Create Task dialog box to finish the task creation process.

  11. The process of creating an automated task via Task Scheduler in Windows 10 is simple and fast. The app allows you to configure every setting, such as the task’s name, its triggers and conditions.

6.3. How to change an already created task

  1. Open Task Scheduler, and select the task that you want to change.
  2. Click on the Properties tab from the Action menu to open the Task Properties dialog box.
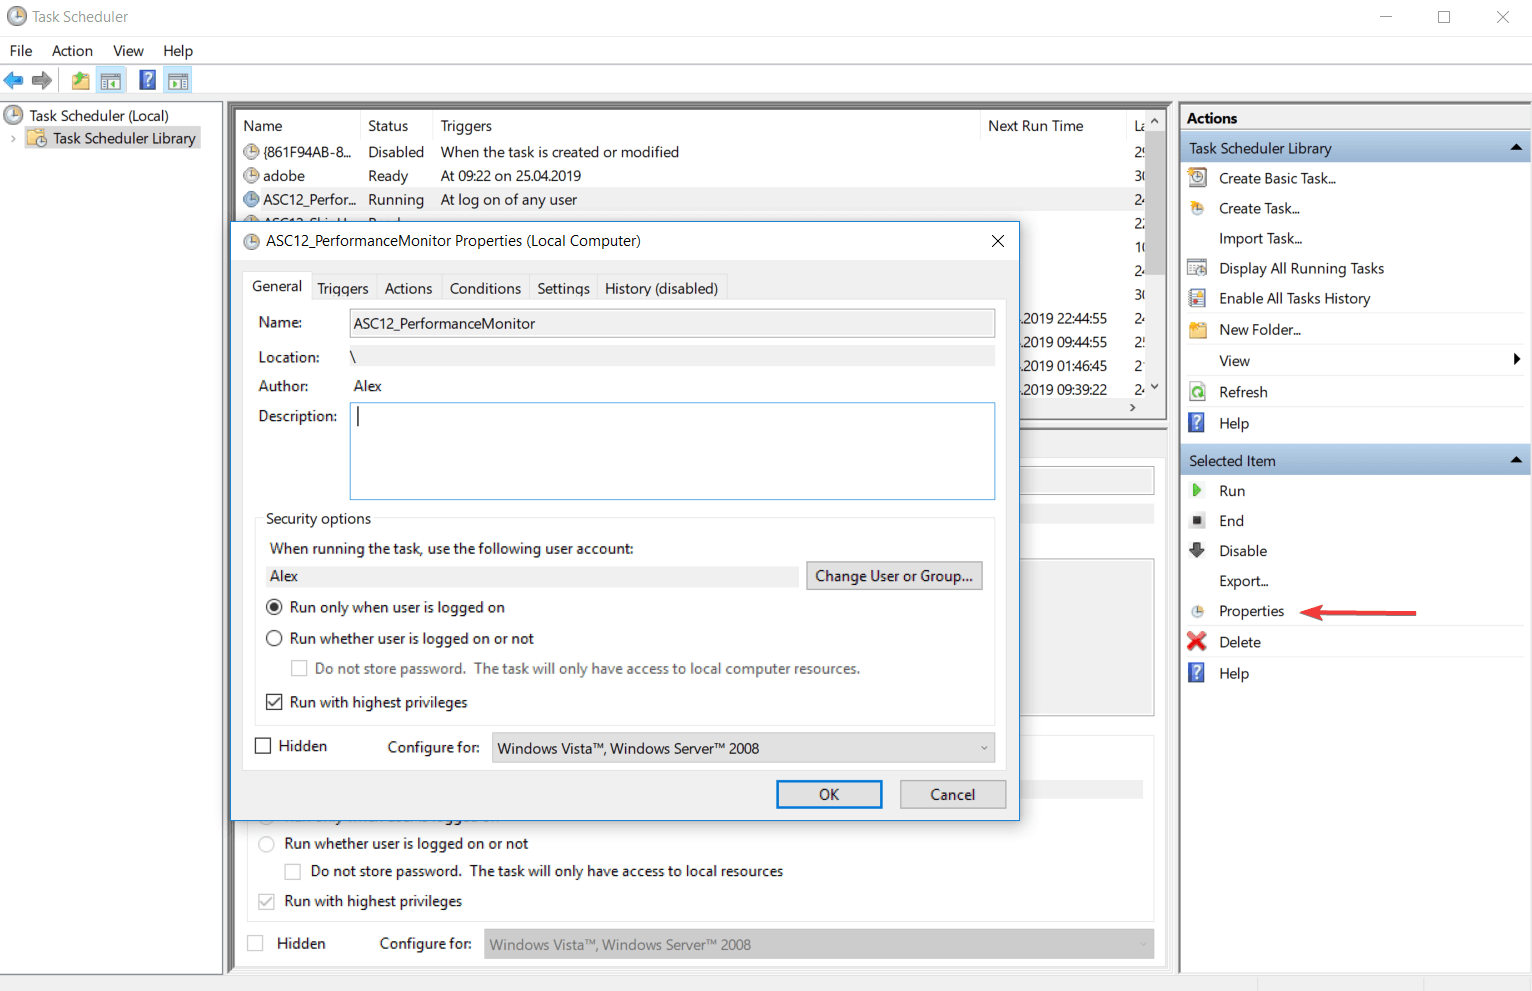
  3. Click on the General tab to view the task‘s general settings that you can modify.
  4. To finish the process click on the OK button of the Task Properties dialog box, and the new task will be registered.
  5. If you have already created a task that activates when you register another task, it will enable it.

6.4. How to delete a task

  • Using Windows interface
  1. Open Task Scheduler, and click on the Task Scheduler Library folder.
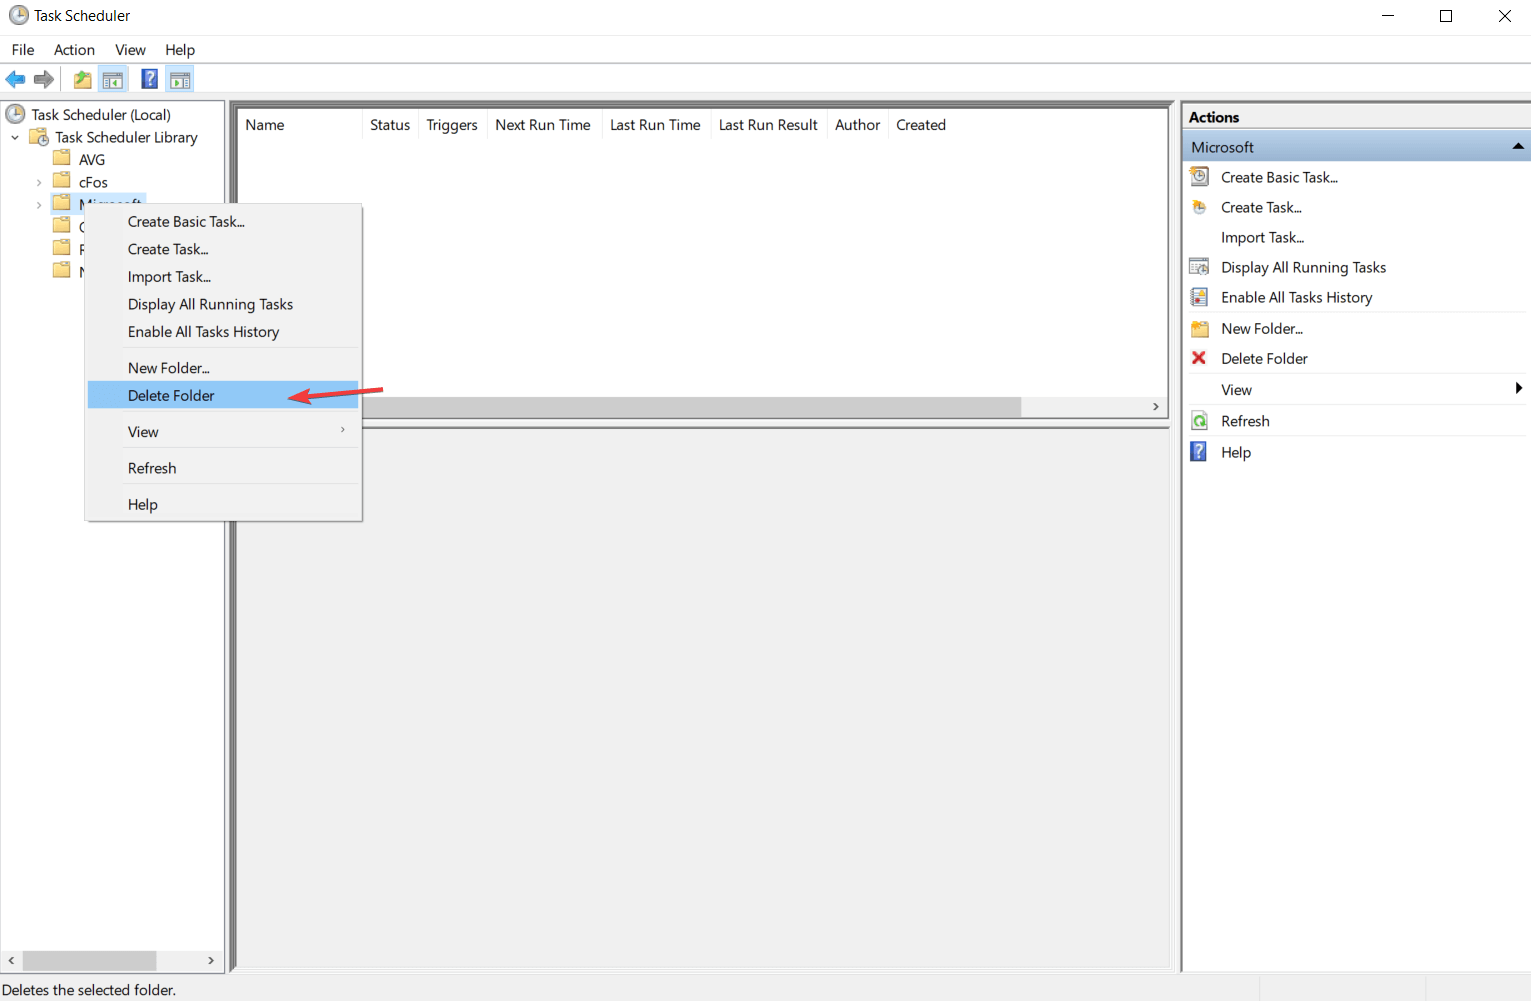
  2. Right-click on the task that you want to remove and select Delete Folder.
task scheduler delete folder windows 10
  • Using Command Prompt
  1. Type Command Prompt in the search bar, and open it.
  2. Paste the following command: schtasks /Delete [/S <system> [/U <username> [/P [<password>]]]] /TN <taskname> [/F]
  3. To find more information about the command from above, type: schtasks /Delete /?

6.5. How to create a Task Folder

  1. Open Task Scheduler, and select the task folder under which you want to create a new task folder.
  2. Press on the New Folder button from the Actions, and enter the name of the new folder.
  3. Click on the OK button to finish the process.

To organize better the scheduled tasks we recommend you to share them in different folders depending on their role.

Note icon NOTE

6.6. How to delete a Task Folder

  1. Start Task Scheduler, and select the task folder from the left table of the application interface.
  2. You will notice that in the Action panel you have the Delete folder.
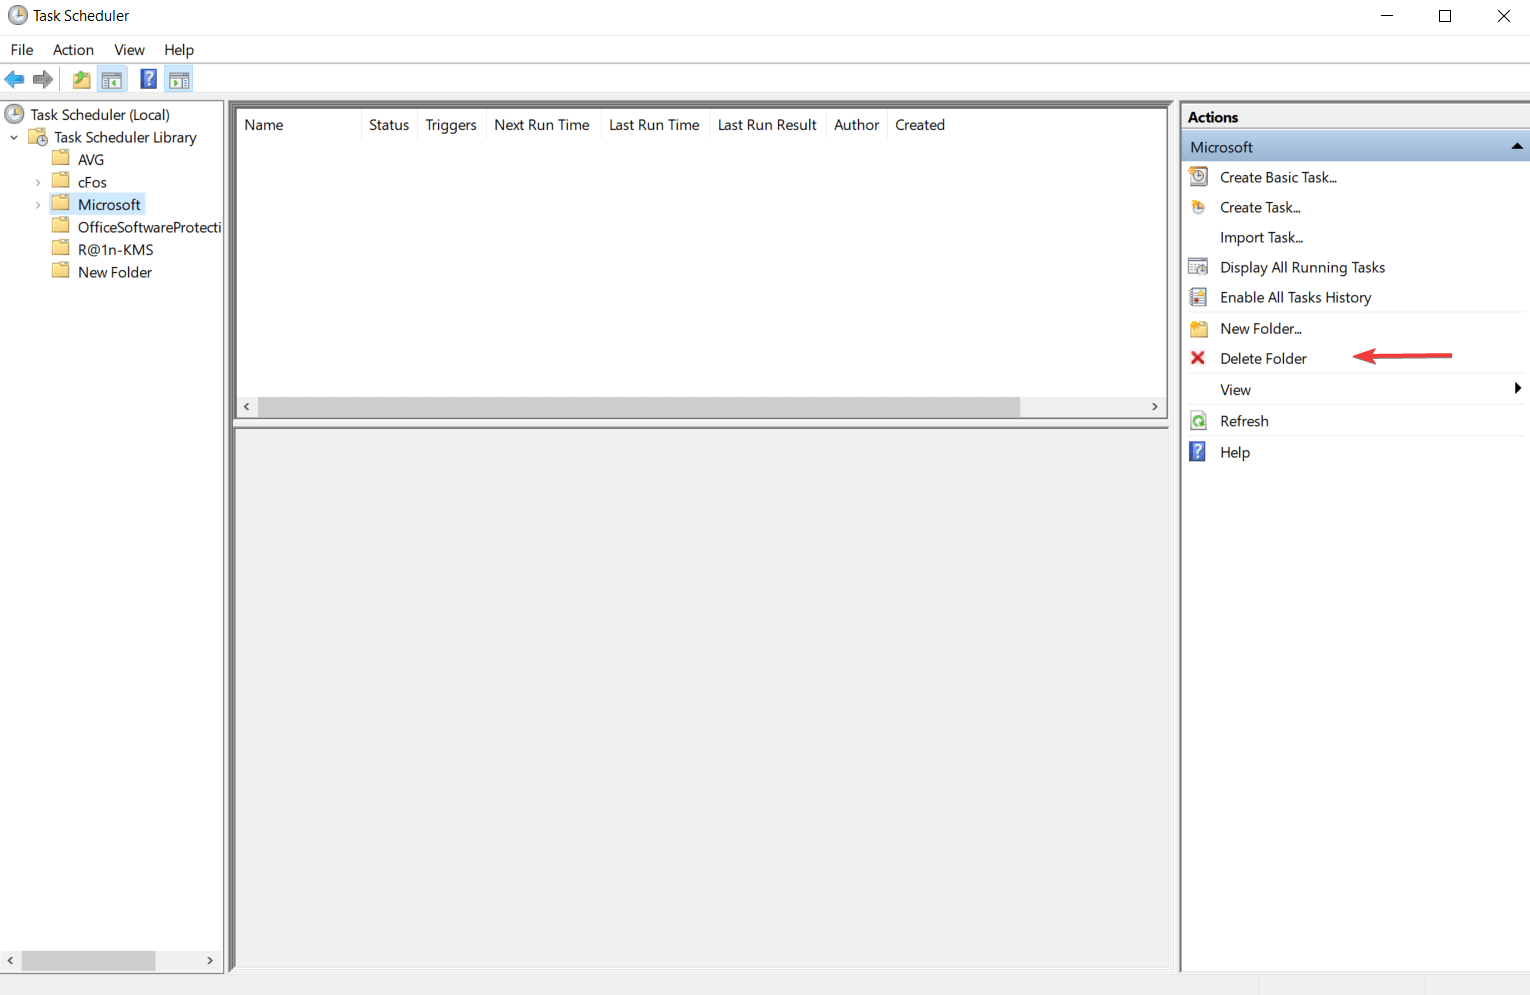
  3. Click on that option and choose the Yes option to complete the process.

If you want to delete a folder to better organize your tasks, you must ensure that it is empty, so be sure to delete all the tasks and the subfolder tasks before you delete the task folder.

Note icon NOTE

6.7. How to import a task

  • Using Windows interface
  1. Open Task Scheduler, and select the folder where you want to import the new task.
  2. Click on the Import Task button from the Action, and select the path to the XML file of the task.
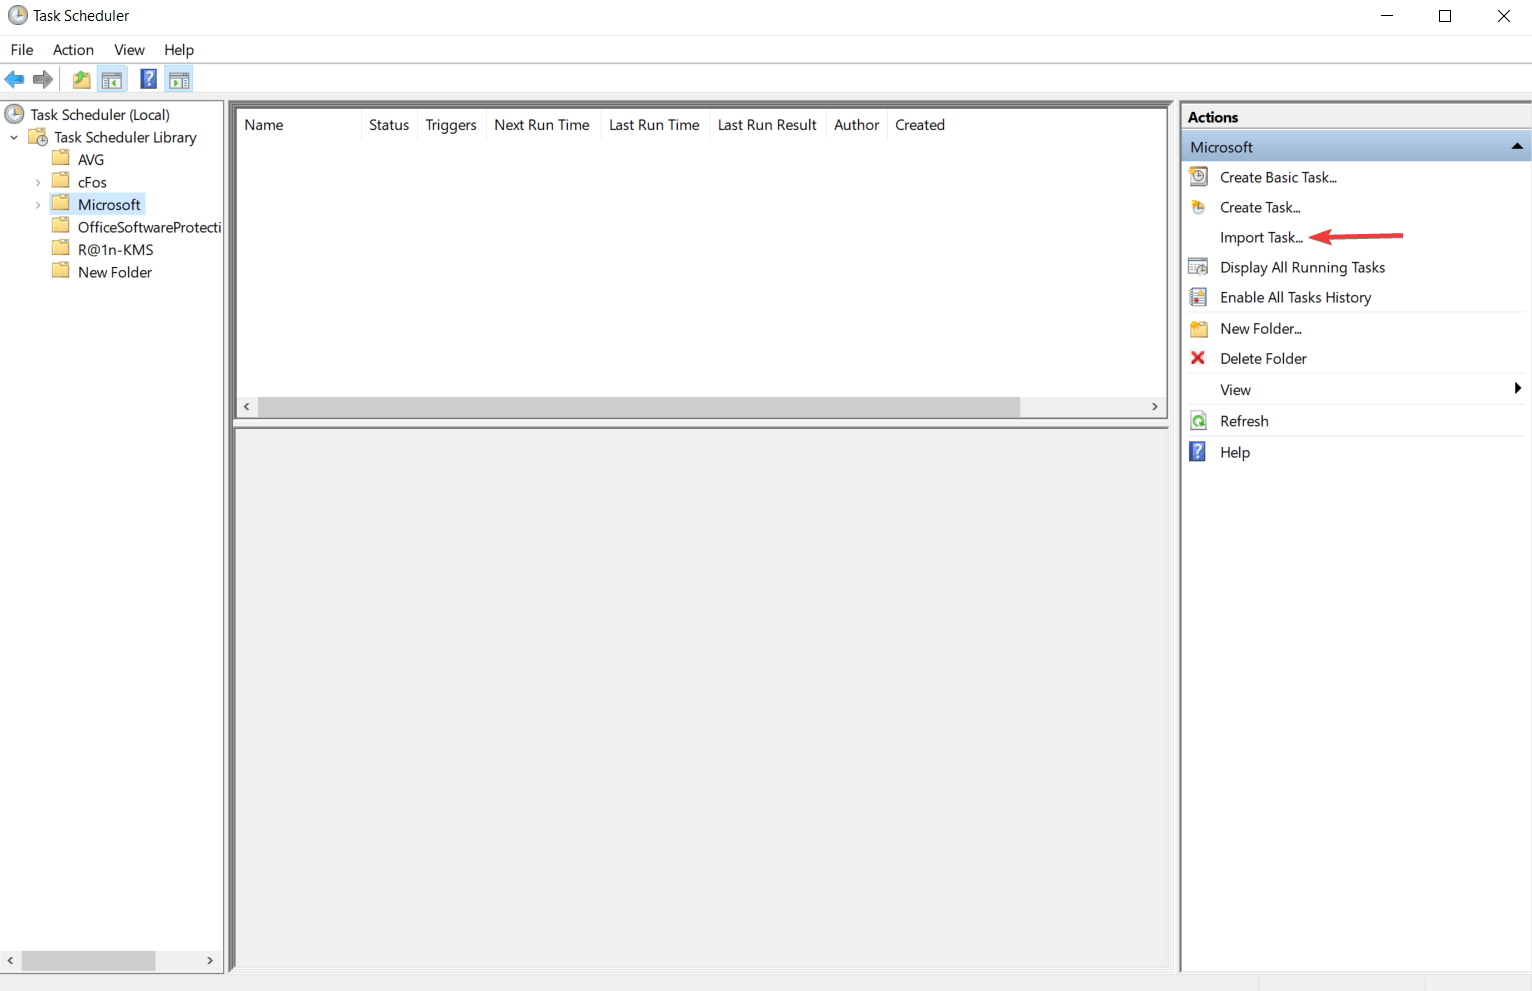
  3. After you entered the path to the task, the app will open the Create Task dialog box where you can find all the information about the imported task.
  4. Click on the OK button to finish the importing process.
  • Using Command Prompt
  1. Open Command Prompt. To do that, type cmd in the Windows search bar.
  2. Edit and paste the following command: schtasks /Create [/S <system> [/U <username> [/P [<password>]]]] /XML <xmlfile> /TN <taskname>
  3. For more information about the command from above, type the following command: schtasks /Create /?

Task Scheduler has a feature that allows you to import tasks, which will be added to a folder chosen by you. All the task characteristics can be found in an XML file.

6.8. How to export a task

  • Export a task using Windows interface
  1. Open Task Scheduler, and select the task folder which contains the task that you want to export.
  2. Right-click on the task that you want to export and select the Export option.
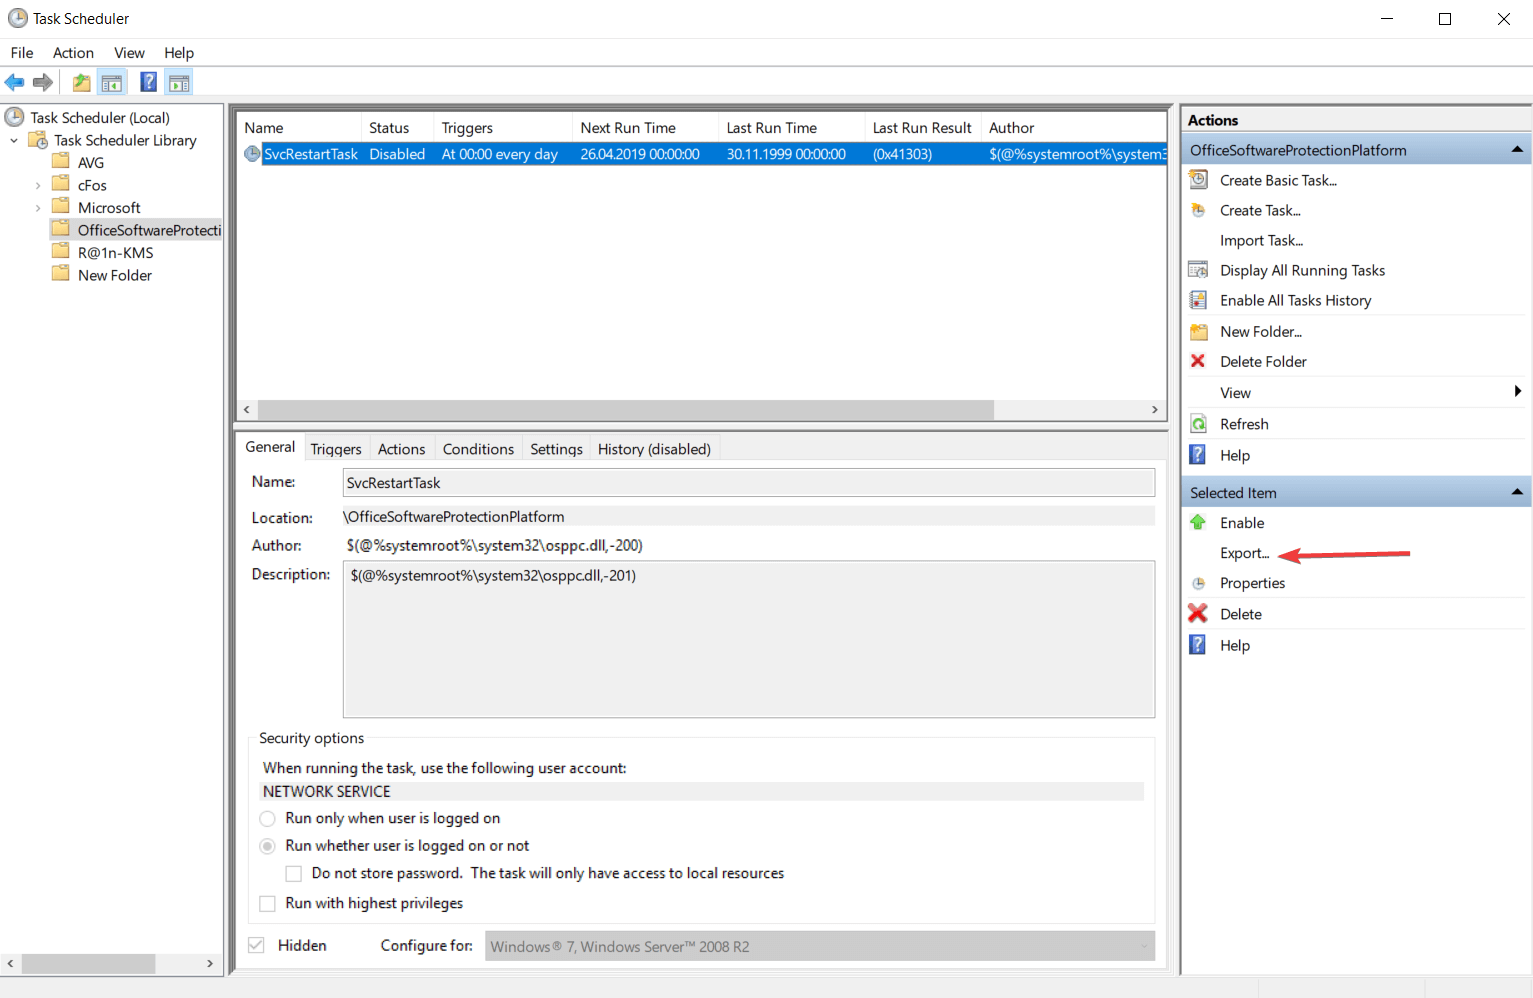
  3. If you select the task, you can find this option in the Action panel.
  4. This action will open a dialog box where you must browse the location where you want to save the task.
  • Using Command Prompt
  1. Open Command Prompt by typing cmd in the Windows search bar.
  2. Edit and paste the following command: schtasks /Query [/S <system> [/P <password>]]]] /XML /TN <taskname>
  3. To find more information about the command tag, type the following command: schtasks /Query /?
  4. Your XML file is shown in the console. Copy the task XML and paste it into a blank XML file.
  5. After the XML file is saved, it will contain all the characteristics of your task.

Task Scheduler has also an integrated feature that allows you to export your task to different users. The task will be saved in an XML format that can be shared like a usual file.

6.9. How to run a task on demand

  • Using Windows interface
  1. Open the Task Scheduler, and select the folder that contains the task you want to run.
  2. Right-click on your task and select Run.
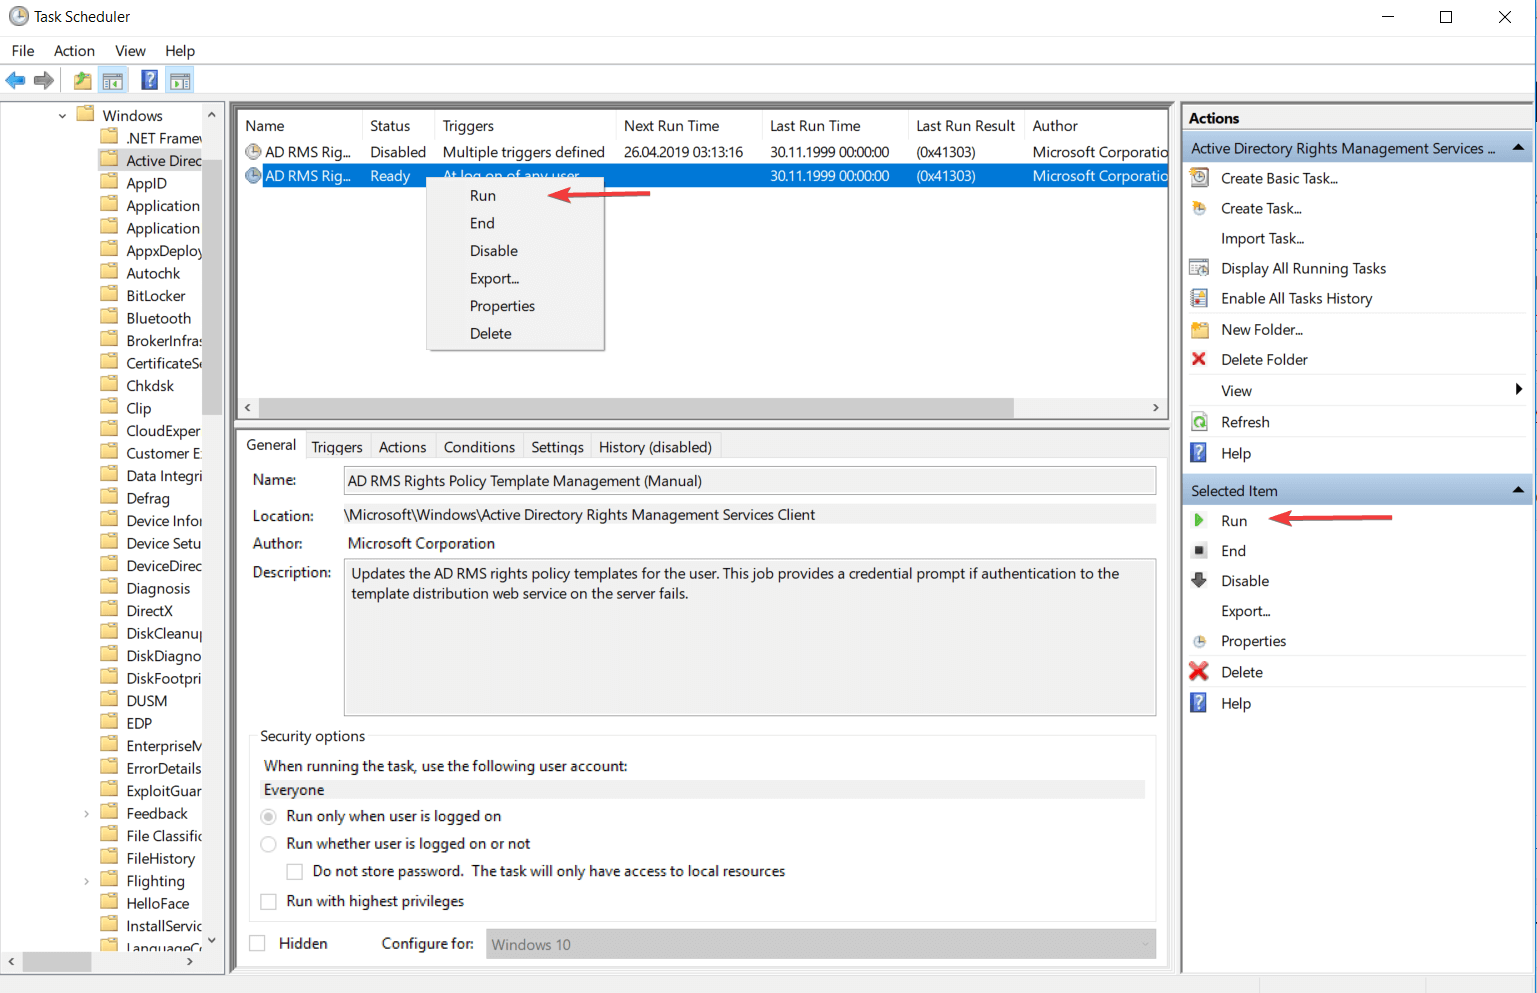
  3. If you select the task you can find this option in the Action panel.
  • Using Command Prompt
  1. Right-click on the Windows icon from the bottom left corner of your screen, and select the Command Prompt (Admin) section.
  2. Edit and type this command: schtasks /Run [/S <system> [/U <username> [/P [<password>]]]] /TN <taskname>
  3. For more information about the command lines from above, type in the console schtasks /Run /?

This feature helps you to run a task after or before it was scheduled to run. This is possible only if the task is not disabled and the Allow task to be run on demand setting is selected for your task.

6.10. How to stop a running task

  • Using Windows interface
  1. Open Task Scheduler, and select the folder which contains the task that you want to close.
  2. Right-click on your task, and select the End If you select the task.
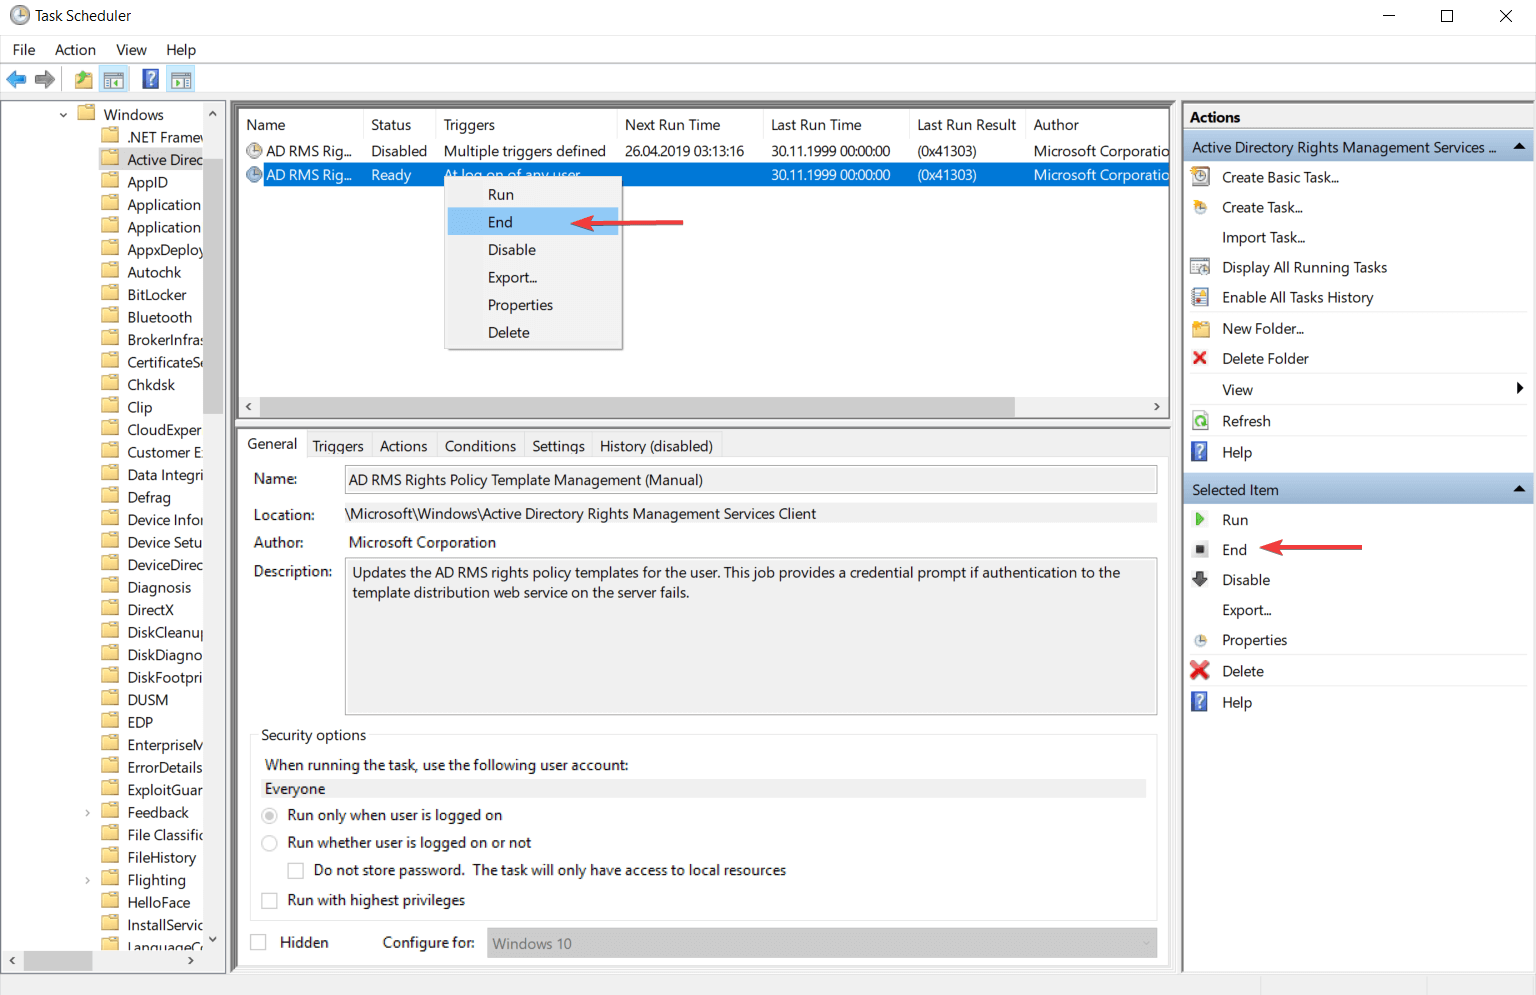
  3. It will be displayed a dialog box where you will be asked if you want to end all instances of this task. Click on the Yes button to end stop the task.
  • Using Command Prompt
  1. Use the Windows Key + R combination to open the Command Prompt.
  2. Edit and type this command to end the activity of your task: schtasks /End [/S <system> [/U <username> [/P [<password>]]]] /TN taskname
  3. To see the role of each sequence you can enter the following command in the console to get all the information you need: schtasks /End /?

Task Scheduler is offering a feature that allows you to end the activity of a task even if it is already running.

To do that, the running task must have the If the running task does not stop when requested, force it to stop setting activated.

This feature is commonly used when a task does not finish its activity when you finish the ending process.

6.11. How to enable a task to run

  • Using Windows interface
  1. Open Task Scheduler, and select the task folder which contains the task you want to enable.
  2. Right-click on your task, and select the Enable option.
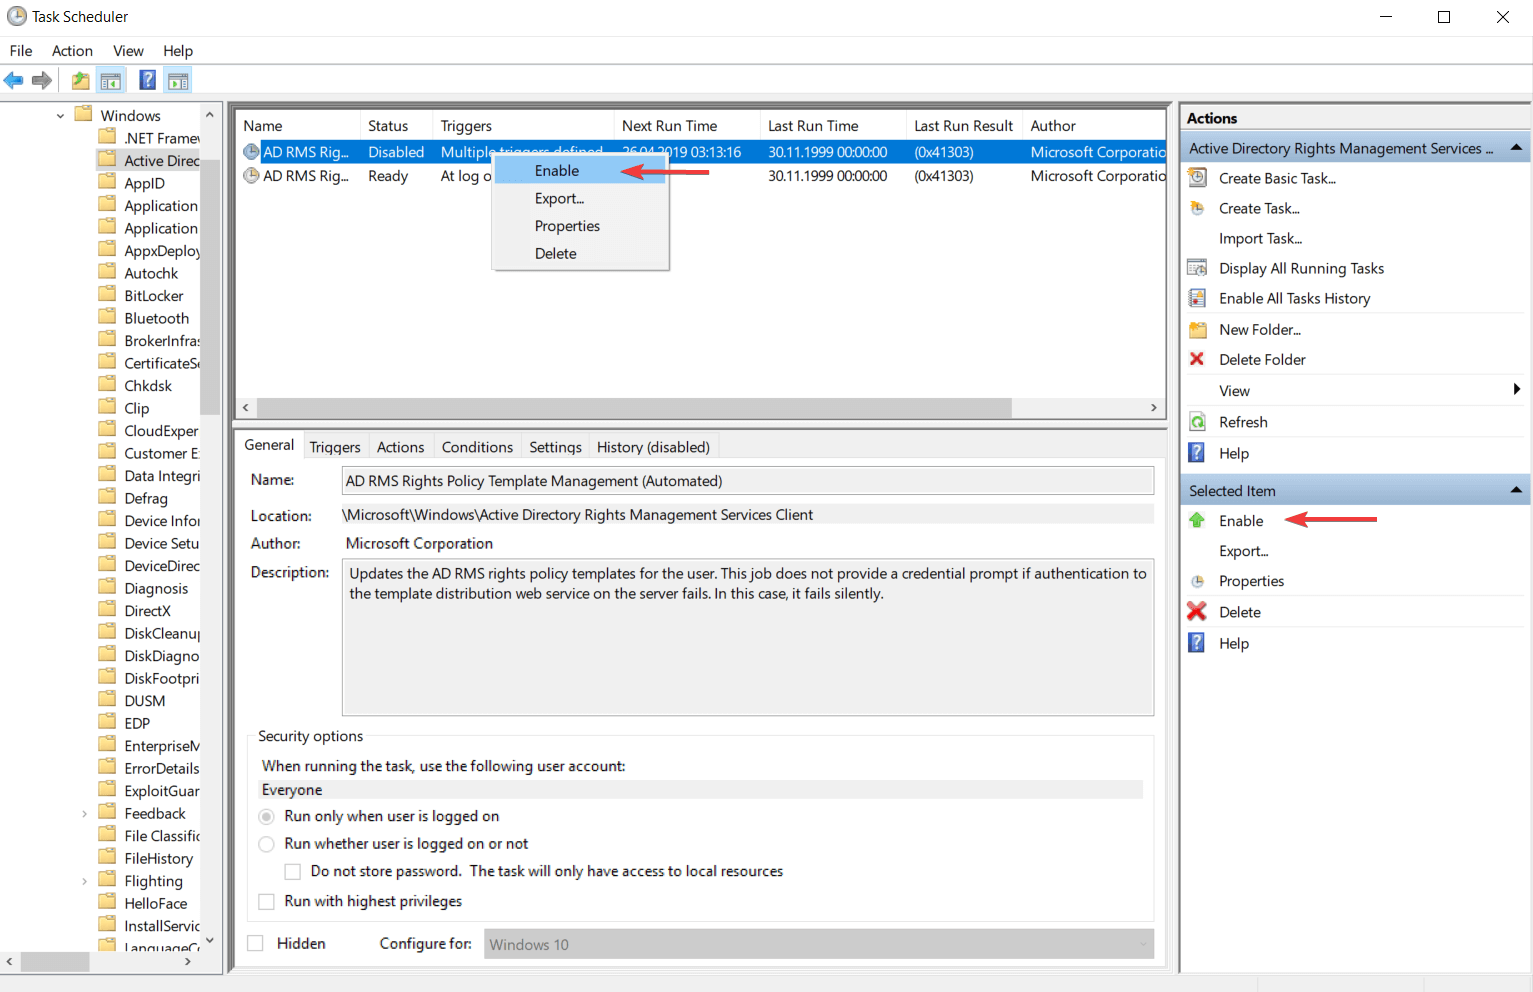
  3. You can also select your task and run it from the Actions panel.
  • Using Command Prompt
  1. Use the Windows Key + R key combination to open Command Prompt.
  2. Edit the following command and paste it in the console dialog box: schtasks /Change [/S <system> [/U <username> [/P [<password>]]]] /TN <taskname> [/ENABLE]
  3. Enter this command to obtain more information about the command from above: schtasks /Change /?

When a task is disabled it can execute the actions. You can create a task and leave it off until the moment you want to use it. Here are two ways to activate a task that any kind of user can implement.

6.12. How to disable a task for running

  • Using Windows interface
  1. Open the Task Scheduler, and select the folder where you have the task.
  2. This action will display in the console panel all tasks from that folder.
  3. Search the task that you want to disable and then right-click on it.
  4. It will display a list with some actions, but in this case, we are only interested in one. Click on the Disable option to stop your task activity.
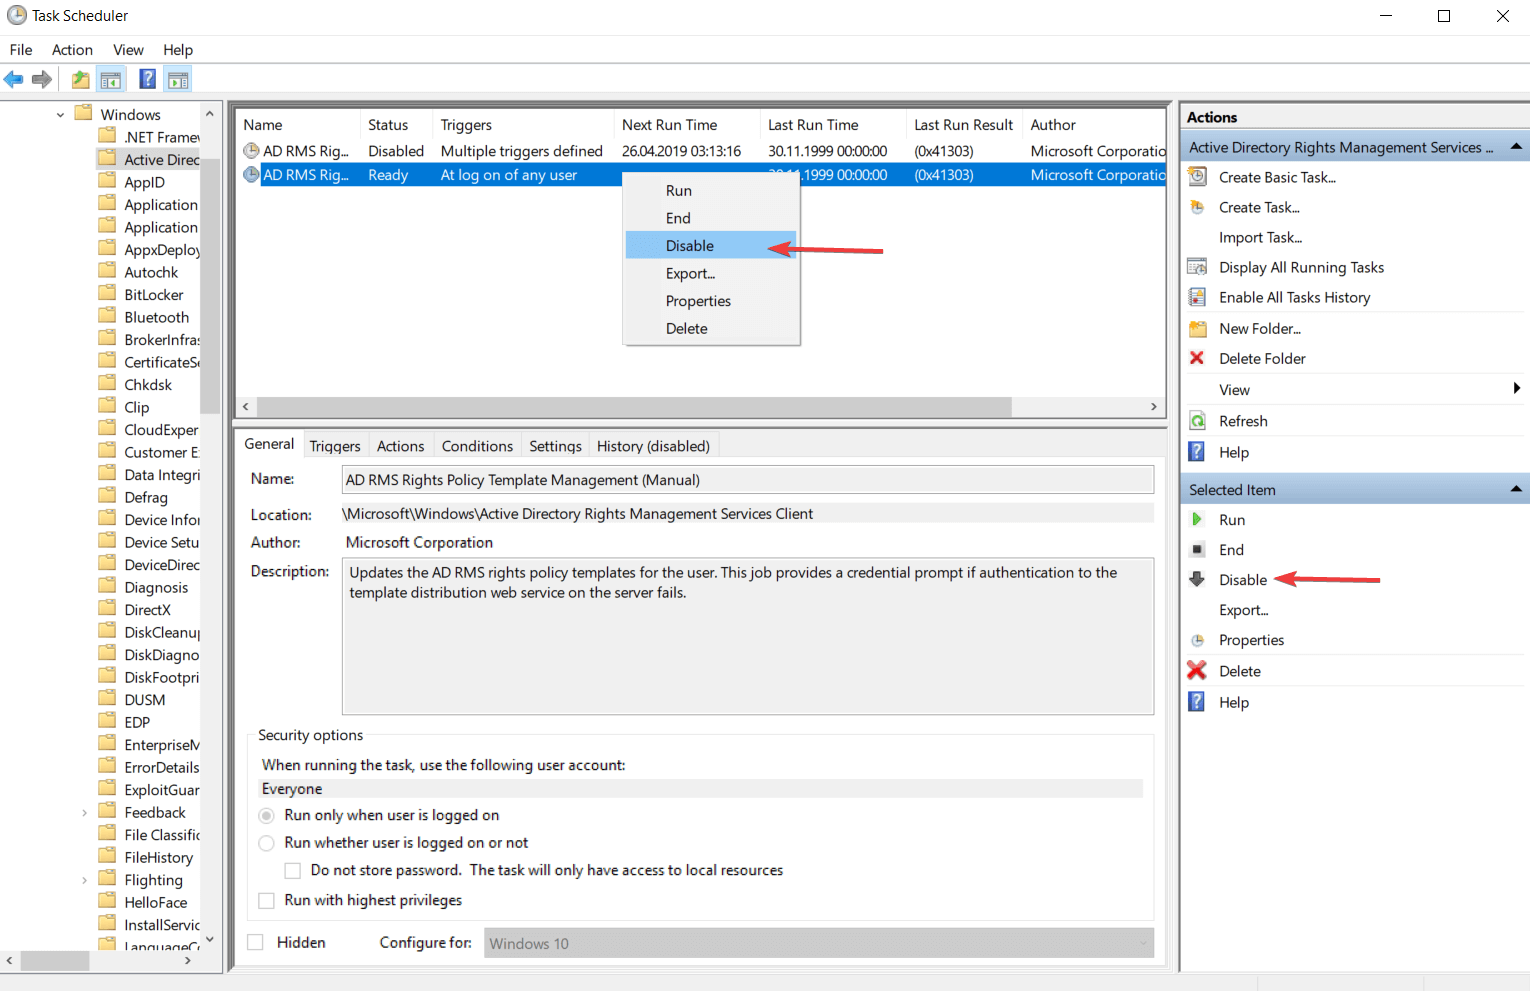
  • Using Command Prompt
  1. To open Command Prompt, right-click on the Windows icon from the bottom left corner of your screen.
  2. Click on the Command Prompt (Admin) to open the console as an administrator.
  3. Edit with your information the following command and paste it in the Command Prompt dialog box: schtasks /Change [/S <system> [/U <username> [/P [<password>]]]] /TN <taskname> /DISABLE
  4. You can find more information about this command line by pasting the following command in the console: schtasks /Change /?

Task Scheduler has a feature that allows you to disable the activity of a task for a certain period of time. You can enable the task again at any time when you will need it.

6.13. How to view task properties and history

  • Using Windows interface
  1. Open Task Scheduler, and select the folder that contains the task you want to view.
  2. Right-click your task and select Properties.
  3. In the Task Properties dialog box, you will find the General, Triggers, Actions, Conditions, and Settings.
  4. Click on any of these tabs to see the properties.
  5. Click on the History tab to view the task‘s history.

The task history option can be enabled and also disabled from the Action panel. There you will find the Disable All Task History / Enable All Task History buttons, and depending on your wish, you can configure the task’s history.

Also, you can view the description of an event from the events list by clicking on the History tab.

  • Using Command Prompt
  1. Right-click on the Windows icon next to the Windows search bar, and select Command prompt (Admin).
  2. Paste the following command: Schtasks /Query /FO LIST /V
  3. For more information about the command line from above, type: schtasks /Query /?

The task properties contain everything we must know about every task (name, description, actions, triggers, security options, conditions, and settings).

The task history is a list with all the tasks created until that moment and can be viewed along with the properties. This list is based on the events tracked by Microsoft Windows Task Scheduler event log.

Every action related to a task is considered an event, so every time when a task runs is building a line in the event log.

We hope that our detailed guide to Tasks Scheduler has given you a broad overview of this application and that you will be able to successfully schedule your tasks in Windows going forward.

Also, if you own a business and want to make sure you have everything under control, then check out our list of the best scheduling software for employees.

For any questions and more suggestions, please access the comments section below.

Ventoy for Windows 10: How to Download & Install [64 Bit]

If you want to create multiple bootable USB drives, Ventoy is the tool that can help you. Bootable USB drives are an easy way to carry around an operating system on a thumb drive. 

They’re also great for troubleshooting computers, as they can allow you to boot up a machine and access the files on your hard drive without affecting the existing OS. 

The main reason for creating multiple bootable USB drives is to have a backup that you can use in case your primary computer breaks down. 

Another option is to have a bootable USB drive for each OS that you use and switch between them, or even just keep one of them as a backup in case something goes wrong with one of your computers. 

Does Ventoy support Windows 10 & 11? 

Yes, Ventoy is compatible with Windows 10 & 11. For Windows 10, since there is no Ventoy directory, you will have to create one. Windows 11 is a bit tricky with the system requirements but you can still bypass them during installation.

It supports both 32-bit and 64-bit processors so when downloading be sure to select an option that is compatible with your device.

Is Ventoy software safe?

The Ventoy software is free and open source. It doesn’t require any special permission or administrator rights to install and run on your computer, which means it won’t affect your system’s performance at all. 

Also, it doesn’t require you to make any changes or tweaks in the settings of your computer or operating system.

Some programs that you install on your computer may contain malware or viruses that could harm your device if they are not updated regularly.

This is why you should always install an antivirus program and keep it up to date to remove any suspicious applications from your system as soon as possible after discovering them. 

How do I download and install Ventoy? 

  1. Head over to GitHub and download Ventoy for your OS.
  2. Unzip the file, locate Ventoy2Disk and Run it.
  3. Now select the USB drive you wish it to be installed.
  4. Click the Install button.
  5. You are now ready to copy any ISO image files you may have to the USB drive.

Remember to back up all your files before installation as all data will be lost.

Which is better Ventoy or Rufus?

The answer is: It depends. For most people, Rufus will be the better choice. Rufus is a free utility that can create bootable Windows USB drives and other USBs from an ISO file. 

It’s faster than the Microsoft tool, works on more systems, and supports UEFI booting too. Rufus does not need any installation process or additional DLLs. In addition, its portable version can be run directly from a USB flash drive without leaving a trace on the host computer.

For Ventoy, users can copy and paste files directly on the USB drive without extraction. It allows you to create multiple bootable OS images from a single ISO file on your PC. 

The main advantage of using Ventoy is that it can save your time as well as money because you don’t have to spend money on buying another USB stick every time when you want to create multiple bootable drives from a single ISO file.

While you are still here, you can also explore other tools to create multiboot USB drives. Also, having an antivirus program for your USB will help keep your system safe from external storage sources.

Have you installed Ventoy? We’d love to hear your experience so far in the comment section below.

KB5016688 for Windows 10 addresses 0x1E kernel BSOD issue

We know that Windows 10 users were expecting another cumulative update from Microsoft, so we’re going to take a closer look at the latest one.

Know that this recent Microsoft update release addresses some pretty nasty issues that Windows 10 users were struggling with recently.

Since we’re talking about this operating system, don’t forget to also check out KB5016690, and information on how to fix Windows 10 broken audio after installing KB5015878.

Circling back to today’s rollout, let’s focus on KB5016688 and discover exactly what the tech giant managed to deal with.

KB5016688 comes with important fixes

Indeed, the Redmond-based tech giant released KB5016688 recently, an update that addresses several major issues in the operating system.

Keep in mind that this preview update is an optional one, but administrators on affected devices may want to install it to resolve these issues before the official rollout on the September 2022 Patch Tuesday if experienced issues are major.

This update actually fixes several annoying bugs which include issues related to game installations due to a licensing bug, a 0x1E kernel error during shut down or restarts, an issue related to the IE mode in Microsoft Edge, and more.

To get a better idea of what exactly we are dealing with, this is the information that Microsoft shared:

  • IT admins have the ability to remotely add languages and language-related features. Additionally, they can now manage language scenarios across several endpoint managers.
  • Enhances Microsoft Defender for Endpoint’s ability to identify and intercept ransomware and advanced attacks.
  • Addresses an issue that causes ServerAssignedConfigurations to be null in a few full configuration scenarios.
  • Addresses a known issue that causes Microsoft Edge to stop responding when you use IE mode. This issue also prevents you from interacting with a dialog.
  • Addresses an issue that affects transparency in layered windows when you are in High Definition remote applications integrated locally (RAIL) mode.
  • Addresses an issue that might generate error 0x1E when you shut down or restart a device.
  • Addresses an issue that causes a subscription activation to fail under certain conditions.
  • Addresses an issue that might cause some game installations to fail because of a licensing issue.
  • Addresses an issue that prevents virtualized App-V Microsoft Office applications from opening or causes them to stop working.
  • Addresses an issue that might cause the deployment of the Windows Hello for Business certificate to fail in certain circumstances after you reset a device.
  • Addresses an issue that degrades BitLocker performance.
  • Addresses an issue that causes the Resultant Set of Policy tool (Rsop.msc) to stop working when it processes 1,000 or more “File System” security settings.
  • Addresses an issue that continues to trust a revoked Attestation Identity Key (AIK) certificate and fails to generate a new certificate.
  • Addresses an issue that causes the Take a Test app to remove all policies related to lockdown enforcement when you close the app.
  • Addresses an issue that affects the jump list icon colors in the Search app.
  • Addresses an issue that affects Focus Assist functionality for applications that run in full screen.
  • Addresses an issue that prevents devices from receiving an offer from Windows Update for the same extension driver when that extension driver is already installed without the base driver.
  • Addresses a race condition that causes the Local Security Authority Subsystem Service (LSASS) to stop working on Active Directory domain controllers. This issue occurs when LSASS processes simultaneous Lightweight Directory Access Protocol (LDAP) over Transport Layer Security (TLS) requests that fail to decrypt. The exception code is 0xc0000409 (STATUS_STACK_BUFFER_OVERRUN).
  • Addresses an issue that affects a lookup for a nonexistent security ID (SID) from the local domain using read-only domain controller (RODC). The lookup unexpectedly returns the STATUS_TRUSTED_DOMAIN_FAILURE error instead of STATUS_NONE_MAPPED or STATUS_SOME_MAPPED.
  • Addresses an issue that might cause cldflt.sys to reference invalid memory in race conditions.
  • Addresses an issue that affects input and output in the Storport driver and might cause your system to stop responding.

Known issues

  • Devices with Windows installations created from custom offline media or custom ISO image might have Microsoft Edge Legacy removed by this update, but not automatically replaced by the new Microsoft Edge. This issue is only encountered when custom offline media or ISO images are created by slipstreaming this update into the image without having first installed the standalone servicing stack update (SSU) released March 29, 2021 or later.
  • After installing this update, XPS Viewer might be unable to open XML Paper Specification (XPS) documents in some non-English languages, including some Japanese and Chinese character encodings. This issue affects both XML Paper Specification (XPS) and Open XML Paper Specification (OXPS) files. When encountering this issue, you may receive an error, “This page cannot be displayed” within XPS Viewer or it might stop responding and have high CPU usage with continually increasing memory usage. When the error is encountered, if XPS Viewer is not closed it might reach up to 2.5GB of memory usage before closing unexpectedly.
  • After installing this update, some Windows devices might have issues with audio not working. Some affected Windows devices might have no audio, but other affected Windows devices might only have issues on certain ports, certain audio devices or only within certain applications. Most affected audio devices drivers have the “audio enhancements” setting disabled before installing this update or the sound device driver has issues with the “audio enhancements” feature.
Release ChannelAvailableNext Step
Windows Update or Microsoft UpdateYesGo to Settings > Update & Security > Windows Update. In the Optional updates available area, you’ll find the link to download and install the update.
Windows Update for BusinessNoNone. These changes will be included in the next security update to this channel.
Microsoft Update CatalogYesTo get the standalone package for this update, go to the Microsoft Update Catalog website.
Windows Server Update Services (WSUS)NoYou can import this update into WSUS manually. See the Microsoft Update Catalog for instructions.

Don’t forget that you can also download the update manually from the Microsoft Update Catalog, just in case it doesn’t pop up for you in the Windows Update interface.

Also, keep in mind that this update is only available for:

  • Windows 10 Enterprise Multi-Session, version 20H2
  • Windows 10 Enterprise and Education, version 20H2
  • Windows 10 IoT Enterprise, version 20H2
  • Windows 10 on Surface Hub Windows 10, version 21H1, all editions
  • Windows 10, version 21H2, all editions

Have you experienced other issues after installing KB5016688 on your device? Share your experience with us in the comments section below.

How to Schedule a Batch File in Windows using Task Scheduler

Batch files usually contain several Command Prompt commands, and they are extremely useful for advanced users. Speaking of batch files, today we’re going to show you how to schedule batch file in Windows.

Scheduling batch files is as simple as creating one, and to do it, we’re going to use a built-in Task Scheduler application.

Even if you’re unfamiliar with Windows 11’s Task Scheduler, the instructions are simple and straightforward, so you can’t do anything wrong. So, without further ado, let’s get started.

How can I schedule a .bat file to run daily?

  1. 1. Press the Windows key on your keyboard to open the Windows Search box.

  2. 2. Type task scheduler in the Windows Search box and click on the search result in order to open the Task Scheduler app.

    task scheduler windows search
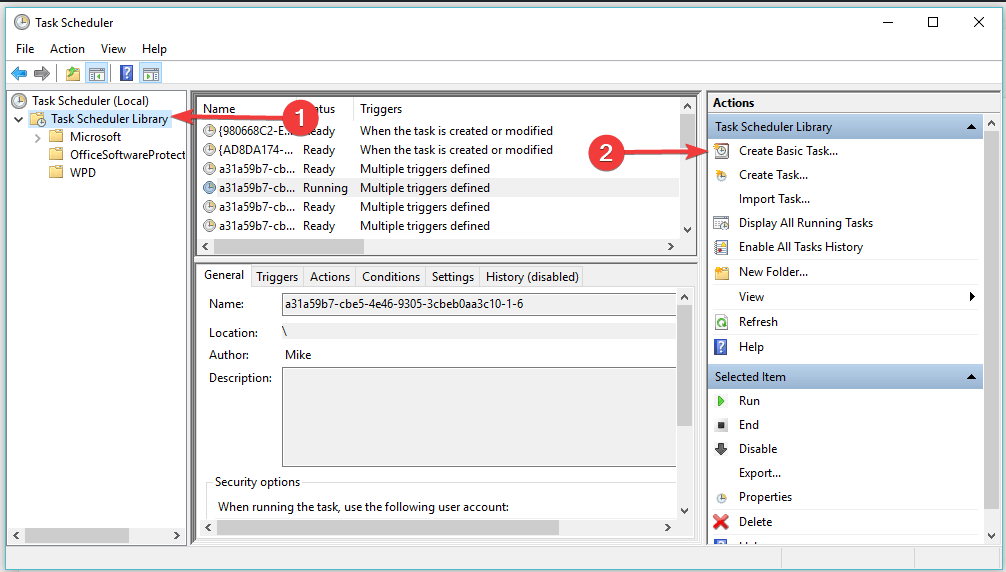
  3. 3. Navigate to Task Scheduler Library in the left pane.

    task scheduler create basic task
  4. 4. Select Create Basic Task in the right pane.

  5. 5. In the Create Basic Task Wizard windows that has opened, enter a name for the task and a description (optional), then click Next.

    enter task name task scheduler
  6. 6. Select Daily in the Trigger section, then click Next.

    schedule .bat file to run daily setting
  7. 7. Choose a date and time you’d like the task to trigger: set to Recur every 1 day > click Next.

    schedule .bat file to run daily reoccur time
  8. 8. In the Action section, choose the Start a program option > click Next.

  9. 9. Browse the .bat type file of the program you want to run daily > click Next.

  10. 10. Finally, click Finish.

  11. Scheduling tasks via Task Scheduler is very simple and can be done by anyone, without needing to be tech-savy. All you need to do is open the app and start setting up the batch file to run at the specific time and days you want.

There you go, now you know how to schedule batch file in Windows systems. As you can see, the process is pretty simple, and it will take you five minutes tops to schedule a batch file.

Scheduling a site to open automatically takes a little less time, so you may also want to check our article on the same.

If you found this helpful guide, leave us a comment in the comment section below.

How to Open Multiple Folders at Once in Windows 10

File Explorer doesn’t include an option that groups multiple folders into a single shortcut. That would then enable you to open multiple folders simultaneously by clicking a File Explorer or desktop shortcut.

However, you can still set up batch files that open multiple folders in Windows 10. So this is how you can add handy folder batch files to the desktop.

We also have a guide on how to batch rename files on your Windows 10 device that you can check out.

How can I open multiple folders in Windows 10 at the same time?

1. Create a batch file to open multiple folders in Notepad

  1. 1. First, open Notepad on your device.

  2. 2. Then enter @echo off into the top line of the app.

  3. 3. Type start, followed by the path of a folder to open as in the snapshot directly below.

    multiple folders file explorer
  4. 4. You can enter as many alternative folder paths as needed into the batch file much the same. Enter each folder path directly below the others without any spacing as shown below.

    notepad multiple folders file explorer
  5. 5. Click File > Save As, to open the Save As window.

  6. 6. Select All Files from the Save as type drop-down menu.

  7. 7. Enter a suitable title for the file followed by .bat. For example, you could enter folder.bat into the text box.

    how to save multiple files at once windows 10 bat file
  8. 8. Choose a folder to save the batch in and press the Save button.

  9. 9. Next, open the folder that you saved the batch file to.

  10. 10. Double-click the batch file to try it out. It will open all the folders you included in it.

  11. 11. To add more folders to the batch, you can right-click it and select Edit.

  12. 12. If you want to add the batch file to desktop, you should right-click it and select Send to and Desktop.

  13. Although there isn’t a dedicated built-in feature that allows you to open multiple files at once in Windows 10, there is a workaround. You can use Notepad as a file manager and configure it to open all the folders you assign to it in a simple click.

2. Add Hotkeys to the batch file

Now you can quickly open multiple folders at once by clicking batch file shortcuts on the desktop. However, wouldn’t it be great if you could open a group of folders by pressing a hotkey instead?

You can do exactly that by configuring the batch file shortcuts as follows.

  1. First, right-click the batch file on the desktop and select Properties to open the window in the snapshot directly below.folder shortcut
  2. Click inside the Shortcut key text box and press a key. The hotkey will then be Ctrl + Alt + the key you pressed. For example, if you entered 9, there the keyboard shortcut would be Ctrl + Alt + 9.
  3. Press Apply and OK to close the window.
  4. Now press the new hotkey to open the folders entered into the batch file.

The desktop will get cluttered if you add many batch files to it. So we suggest you move the batch files into one desktop folder.

You can do that by right-clicking the desktop and selecting New and Folder.

Then drag and drop the batch files into the folder.

3. Open Multiple Folders at Windows Startup

You could also configure multiple folders to open when Windows starts.

This can be done by adding folder shortcuts to the Startup folder. Alternatively, you could add your folder batch files to the startup so they automatically open a group of folders.

  1. Press the Win key + R to open Run.
  2. Enter shell:startup into the Run text box and click OK to open the Startup folder below.new shortcut folder
  3. Next, you should right-click an empty space on the right of the File Explorer window and select New> Shortcut from the context menu.create shortcut multiple folders
  4. Click the Browse button to select a folder or batch file to add to the startup.
  5. Press Next and Finish to close the Create Shortcut window and add the folder or batch file to the Windows startup.
  6. Now all the folders you add to the Windows startup will automatically open when you boot up.

If you don’t know where the Windows 10 startup folder is, read our dedicated article to find out about it.

So that’s how you can simultaneously open multiple folders in Windows 10. With the batch files and their hotkeys, you can now open multiple folders more quickly.

Note that the batch shortcuts will also work on most Windows platforms.

Let us know in the comments section below whether you succeeded in opening multiple folders at once on your Windows 10 device.

How to backup emails on Outlook

So you want to back up all your emails Outlook emails? We’d understand. In the age of rising security threats and accidental data losses, taking precautions beforehand can never harm anyone.

In fact, as per the research by Verizon in 2020, 17% of all data breaches and losses were caused by human errors. It, therefore, makes perfect sense to keep all your files backed up regularly.

How to backup all your emails on Outlook

By backing up your data, you protect it against accidental data loss, corruption, random deletion, and all other forms of loss. You can do something similar for Outlook emails by performing regular backups.

Let’s learn how:

  1. Launch the Outlook app and select File > Open & Export > Import/Export.
  2. Click on Export to a file and select Next.
  3. Then select Outlook Data File (.pst) and click on Next.
  4. Pick a folder in which you’d like to keep your backup and select Next.
  5. Select the location of your file or folder and click on Finish.

A new backup of all your Outlook emails will be created in a few seconds. After the backup is complete, you can also set up a password for the .pst email files; this will protect your data against unauthorized access.

Back up your emails on Outlook Web

The method above is only one of the many ways to back up your files on Outlook; it only backs up Outlook desktop emails. To back up your emails on Outlook Web, however, you’ll have to rely on an email client.

There are a host of email clients available online. For this example, we’ll use Thunderbird—the open-source, cross-platform email client available for free.

Download and launch the Thunderbird email client, and log in with your Outlook account. Enter the email address and password; select the IMAP configuration, and click Done. Thunderbird will then verify your login information and set up your configuration—ideally, this shouldn’t take more than a few seconds. Finally, click on Finish.

thunderbird setup

Your Outlook account will be successfully mapped on the Thunderbird app as soon as you do this. You can then download all the emails from here on. If you want to save all emails in your inbox, head to the Inbox tab.

Then select all the emails by clicking on Ctrl + A, and click on Save As…

Now choose the location you’d like to save your emails at, and click on Select Folder. All the emails from your inbox will then get saved in EML format in the selected location.

saving email back ups

Backing up your emails on Outlook

As our lives and work become more and more entwined with tech, it’s an undisputed fact that users will have to keep up with different privacy and troubleshooting practices; regularly backing up your data—be it from the hard drive, cloud, or your emails—is one such healthy practice.

In the case of Outlook, creating an email backup doesn’t have to be a headache. And we hope this was exactly your experience when you saved your emails from the methods laid out above.

How to Download and Install Multiple Games at Once on Steam

The Steam client is an application that provides all gamers an opportunity to play their favorite games on their system.

This is the platform where it has got a huge collection of games from different categories. You can download and install any game on your device.

The games are divided into a wide range of genres, like strategic, horror, survival, card and board games, etc. Some games have different versions of themselves.

Some games are free to play, whereas most games are supposed to be bought before playing. There are about 20 games in the Steam which are the most expensive ones.

Can you queue downloads on Steam?

Yes, you can queue downloads on the Steam app. When you select many games at once and try to download and install them, those games will get queued in the Steam Downloads.

They will download a bit slower that way because your download band will divide between the titles.

How do I download multiple games at once on Steam?

  1. Open the Steam app on your system and login with your Steam account credentials.
  2. Click on STORE at the top of the Steam app.
  3. Now search for your game and open the game page.
  4. Scroll down the game page and click Add to Library.
  5. Repeat the same steps to add other games to your Steam library.
  6. Once you are done adding the games, click LIBRARY at the top of the Steam app.
  7. Select GAMES from the dropdown option under Home on Top.
  8. This will display all the games added to the Steam library from the Store.
  9. To download and install multiple games at once on Steam, you need to select those games first.
  10. To select multiple games, press and hold the Ctrl key and select those games one by one by clicking on them.
  11. After selecting many games, right-click on any one of the selected games and click Install selected from its context menu.
  12. This will pop up a window called Install – Multiple Games. Click Next to proceed.
  13. You need to click I Agree in the upcoming Agreement and Terms & Conditions window of the selected games.
  14. You can check if those games are queued for download in the downloads by clicking on Downloads at the bottom of the Steam app.
  15. Once the games are downloaded and installed, you can start playing.

How do I install multiple copies of a game on Steam?

  1. Open the Run console by pressing the Windows and R keys together.
  2. Type the following path and press Enter: C:\Program Files (x86)\Steam\steamapps\common
  3. Now the folder named common gets opened on the system.
  4. Now rename the game folder to something else like gamename no version if this game installed has no beta version.
  5. Open the Steam app and go to the LIBRARY by clicking on it on top.
  6. Right-click on the game and select Properties from the context menu.
  7. Click the BETAS option on the left-side menu and select the beta version of the game you want on the right-hand side.
  8. After that, go to the LOCAL FILES option in the Properties window.
  9. Click Verify integrity of game files, which will start downloading and installing the game of the beta version you selected.
  10. Now if you go to the folder called common, you can see there are two folders for the game.
  11. One with no beta version and another with the selected beta version.

This is it! We hope that our guide helped you learn how to download and install multiple games on Steam.

Many of our readers also faced an issue with Steam not recognizing the installed games, so this guide will be helpful if you’re in the same situation.

Hope you found this article informative. Please let us know about it by commenting below!

7 Ways to Fix Steam When Downloads Are Not Showing Progress

If your Steam download isn’t showing any progress, chances are you’re stuck staring at a screen that says “Starting Download” with no clue if anything’s actually happening.

That can be a real headache, especially if you’ve queued up a few big games or updates. This common glitch usually comes down to a few things, like a buggy client, network hiccups, or Steam being busy patching in the background.

In this guide, we’ll break down why this happens and walk you through some quick fixes to get the progress bar moving again.

Why does my Steam download not show progress?

Many gamers who play various games on Steam notice that the progress status of any game download is not shown, and it is probably caused by one of these reasons:

  • Outdated Steam client app – When the Steam app is not updated, it might cause many problems, and the game download not showing progress might be one of them.
  • Corrupted game files – When the game files get corrupted, it might create some problems while using the Steam app. So verifying the integrity of game files could be the solution.
  • Download cache – These problems occur when Steam’s cache memory gets corrupted. So, clearing the download cache on Steam can fix this issue.
  • Internet connection – If the internet connection on your system is weak or not stable, this problem might appear on Steam.
  • Steam server issue – Sometimes, the server gets too many requests from gamers, and this causes the server to shut down for a while. Also, Steam shuts down its server for routine maintenance.

How do I fix Steam if downloads are not showing progress?

1. Verify the integrity of game files in the Steam app

  1. Press the Windows key and type Steam.
  2. Select the Steam app from the results by clicking on it.


  3. Once the Steam app opens, sign in using your Steam account credentials.
  4. After you log in to your Steam app, go to the LIBRARY on top.
  5. Right-click on the game which you think might be causing this problem.
  6. Select the Properties from the context menu.


  7. In the Properties window, click LOCAL FILES on the left menu and then click Verify integrity of game files.


  8. Once it is verified, close the Properties window.
  9. Now go to the Steam option on the top menu bar of the Steam app and select Settings from the list.


  10. This opens the Settings window on the app.
  11. Click Downloads on the left panel and clear the download cache by clicking on CLEAR DOWNLOAD CACHE.
  12. After that, click OK to close the Settings window.


  13. Restart the Steam app and see if the problem got resolved or not.

Sometimes the issue isn’t just stalled progress, but the download stopping completely, which can also be solved with the steps above.

2. Update the Steam app

  1. Firstly, to open the Steam app on your system, click the Start button on the taskbar and then browse the Start menu.
  2. After the Steam app opens, sign in with your account details.
  3. Once signed in, click the Steam option on top and select the Check for Steam Client updates option from the list.


  4. This starts checking for any updates available for the Steam app.
  5. If there are any, please download and install them to update the Steam client app to its latest version.
  6. After updating, restart the Steam app once and see if this works.

3. Check server status

When there are loads of requests received by Steam’s server from many gamers worldwide, it starts getting slower and slower.

After it exceeds its threshold, the server shuts down, and such problems tend to occur on the Steam client app. This happens quite rarely, but there is a chance of this happening.

Also, while the routine maintenance of Steam’s server is going on, it goes down temporarily. So if this is the case, users can wait for a few hours and then check Steam’s server status again.

Frequent Steam download on/off cycles are another symptom of server or network instability during peak times.

4. Clear Download Cache

  1. Open Steam and click Steam in the top-left corner.
  2. Select Settings.
  3. Click Downloads.
  4. Click Clear Download Cache.steam clear download cache
  5. Confirm when prompted.
  6. Steam will restart, and you’ll need to log in again.
  7. Check if the download progress is now visible.

5. Restart Steam Completely

  1. Click the Steam icon in your system tray and select Exit.
  2. Press Ctrl + Shift + Esc to open Task Manager.
  3. Find any Steam processes and click End Task for each.
  4. Relaunch Steam from your desktop or Start menu.
  5. Check if the download progress bar appears.

6. Pause and Resume the Download

  1. Open Steam and go to your Library.
  2. Find the game that’s downloading.
  3. Click Pause.
  4. Wait a few seconds.
  5. Click Resume.
  6. Check if the progress bar starts moving.

If pausing and resuming doesn’t help and your Steam download keeps restarting, it might be time to clear caches or change download servers.

7. Switch Download Region

  1. Open Steam and click Steam in the top-left corner.
  2. Select Settings.
  3. Click Downloads.
  4. Click the drop-down under Download Region.
  5. Choose a nearby region different from the current one.change download region on steam
  6. Click OK and restart Steam.
  7. Check if your download progress shows up.

If you notice that your Steam download limit is not working correctly, or downloads keep restarting, adjusting settings and checking for client updates can help stabilize things.

Does Steam have a download manager?

Well, there is a download manager inside the Steam app which handles all the download requests from the users, tracks the status of the download progress, etc. There is no separate download manager profile application for this purpose.

You can easily access the download manager of the Steam app by clicking the Downloads link at the bottom of the Steam app or by navigating through Library > Downloads on the top sub-menu.

To keep track of your achievements while playing games on Steam, you need to download and install the Steam Achievement Manager on your system.

Did you find this article interesting and informative? Let us know in the comments area below.

5 Ways to Fix Steam if the Download Queue Keeps Changing

Steam is among the most used video game distribution platforms around the world. In addition, it offers communities that allow players and developers to trade video games online.

The platform is free to download and use, but you’ll need to purchase some video games. The Steam application can be downloaded from its official website, and different versions are available for Windows and Mac devices.

But recently, many users have complained about the Steam download queue changing error. Usually, Steam’s cache data is known to cause this error. However, other factors may be responsible.

If you are also facing this issue on your device, keep reading this post to learn how you can fix it.

Why is my Steam download queue changing?

There are multiple reasons why the steam download queue remains changing. The most common one is corrupt game files blocking incoming connections.

Below are some more reasons why this issue may occur:

  • Unstable Internet connection
  • Misconfigured Steam settings
  • Steam servers facing a downtime
  • Steam cache data is full

How do I fix Steam if the download queue keeps changing?

1. Restart Steam

Before getting started with complex troubleshooting methods to fix this issue, try restarting Steam. Sometimes, Steam runs into temporary bugs and errors that make it misbehave.

Close Steam and wait for a few minutes. Then restart it and check if the Steam update queued but not downloading is fixed.

2. Delete Steam download cache

  1. Click on Steam in the top left corner and select Settings.
    steam download queue keeps changing
  2. On the Settings page, navigate to Downloads, and click on Clear Download Cache.
    clr dnload cache

The download cache data of Steam includes files for the Steam app and not only the games. Therefore, clear the download cache of Steam and check if the Steam download queue keeps changing error still exists.

3. Flush Steam Configuration

  1. Press Windows + R to open the Run dialogue box.
  2. Type the following command and hit Enter:
    steam://flushconfig
    steam download queue keeps changing
  3. A pop-up from Steam will appear saying that doing this will clear the download cat, and you will have to log in again.
  4. Now click on OK.
    clear steam cache data

This method also deletes the cache data of Steam. Users have reported they could not delete this file using the Steam app. In that case, you can do so by running the above command.

4. Verify integrity of game files

  1. Open Steam and right-click on the game you’re facing the error with.
  2. Click on Properties > Local Files.
  3. Then click on Verify Integrity of Game Files.
    Verify Integrity of Steam Files
  4. Restart your device once the process is complete and check if the issue is fixed.

Corrupted game files are also one of the reasons why the Steam download queue keeps changing. Verify and repair game files on your PC using the Steam client. 

5. Reinstall Steam

  1. Press Windows + I to open Settings.
  2. Navigate to Apps and click on Apps & Features.
  3. Search for Steam and click on the three dots beside it.
  4. Click on Uninstall and follow the on-screen instructions.
    steam download queue keeps changing
  5. Once the app is uninstalled, download and install the latest version of Steam.

If none of those mentioned above workarounds were able to help you, Steam’s core files might be corrupted. So first, reinstall Steam and check if the Steam download button is not working and is fixed.

Why are my Steam updates automatically queued?

The queue system in Steam can activate anytime if one or more downloads are pending. You can also enable these downloads manually. In addition, you can clear your download queue on Steam by clearing its download cache.

Many users have complained about Steam Download button missing. Rest assured, our guide can help you fix it.

This was how you could fix the Steam download queue that keeps changing. We hope that the steps mentioned above able to help you.

If you still have any problems, feel free to comment below. We will be eager to hear from you.

How to Safely Underclock Your GPU [Nvidia, AMD]

Underclocking your GPU may seem like a random thing to do, some might say it’s counterintuitive, but in fact, there are benefits to doing this. Underclocking can actually reduce the amount of electricity your computers use and ultimately lower that electric bill.

It can also extend the lifespan of your GPU by lowering the amount of work it has to do. GPUs house cores that run at a certain clock speed. The higher the clock speed, the better the performance.

Manufacturers set a factory clock speed as the default, but you can push the speed past the limiter to get even better performance. This is known as overclocking but can result in damaged parts.

The opposite can also be done, and you can do it with the help of a special piece of software.

Is underclocking safe for GPU?

Yes, it is. There are no direct dangers associated with underclocking a GPU, but that doesn’t mean everything will the same.

Underclocking a GPU will result in lower performance across the board. So video games that are particularly taxing on the graphic card will noticeably suffer. The game may lag or outright crash. The same can be said for all GPU-intensive apps.

However, there is one small danger that should be mentioned even if it’s very unlikely. Even if you underclock the GPU, your power supply will still give the same amount of electricity to your computer.

This means your GPU will be getting extra electricity that it doesn’t need and may be overloaded. When this happens, the GPU can get damaged. Again, this is very unlikely but still a possibility.

How do you underclock GPU?

1. Use MSI Afterburner

  1. In order to underclock your GPU, you will need to download the MSI Afterburner app. Instructions for this guide work for both NVIDIA and AMD GPUs.
  2. Go to the MSI Afterburner website and download the app.
  3. Go to the downloaded file’s location and double-click it to begin the installation.
  4. A window may appear asking you if you want to make changes. Select Yes.
  5. The installer will appear. Click OK.
  6. Click Next in the Afterburner setup window.
  7. Accept the terms of the agreement and then click Next.
  8. You can choose which components to add. Click Next.
  9. Choose an installation location if you want. Otherwise, click Next.
  10. Click Install on the final page and wait for the app to appear.
  11. MSI Afterburner pops up after installation. You can see which GPU will be underclocked by looking near the bottom of the app. This means the GPU has been detected by Afterburner.
  12. Click the arrow right below that and you can choose which GPU you’d like to underclock.
  13. Hover over the knob in the Core Clock section and lower it. This will lower the GPU’s clock speed and underclock it.
  14. Click the checkmark at the bottom. This will apply the settings.
  15. Then click the icon in the middle to save the changes.

2. Use NZXT CAM

  1. Start by going to the NZXT Cam website and download the app.
  2. Like Afterburner, go to the downloaded file’s location and double-click it to begin the installation.
  3. Installation is smoother with NZXT CAM as you don’t have to choose a file location or configure anything
  4. When it opens, you have the option to sign up, log in, or continue in Guest Mode.
  5. After signing in, click the Overclocking tab on the left hand side.
  6. Under the Overclock Settings, you will see the two bars where you can adjust the Core Clock speed and Memory Clock speed.
  7. By default, it’s at 0 Mhz for both. You can lower the speeds down to your preferred level.
  8. Click Apply and your GPU will now be underclocked.

3. Use ASUS GPU Tweak III

  1. Go to the ASUS GPU Tweak III page and download the app.
  2. On the following page, select the OS then click Download.
  3. Go to the downloaded file’s location and double-click it to begin the installation.
  4. Click Install when the window appears. Follow the installation wizard.
  5. After restarting, GPU Tweak III will appear. In the middle of the app, you will see the Clock section.
  6. Lower the GPU clock speed and memory clock speed to your preferred quantity.
  7. Click Apply on the right hand side.

Is undervolting the same as underclocking?

No, they are not the same thing but they are related to each other. Earlier, it was mentioned that it’s possible to damage your GPU if it continues to receive the same amount of voltage when underclocked.

You can get around this by undervolting your GPU. This decreases the amount of power your GPU receives so it doesn’t get damaged when underclocked.

Feel free to leave a comment below if you have any questions on other apps or if you have some that you recommend. Also, feel free to leave comments about guides you’d like to see or information on other web browsers.

5 Tested Ways to Fix a Steam Download Stuck at 100%

A lot of times, Steam users come across a situation when the download bar is stuck at 100 percent.

This can be annoying, and you wonder if the download is complete, and you can move on to play the game.

But if you are facing an issue like the Steam download is stopping, you can refer to our detailed post here for some quick solutions.

This is usually the case with large updates or downloads. Instead of following the Download bar at the bottom, you must go to Library and check the actual progress.

Why is my Steam download stuck at 100?

The primary reason why the download is stuck at 100% is that while the download is complete, the game is yet to be installed which can take a while based on the update. 

However, sometimes, the Steam download may pause at 100 due to poor network connection, download region, corrupted game files, or a glitch with the Steam app itself.

Fortunately, we have some workarounds that may help you fix the issue when your Steam download stops at 100.

How do I fix my Steam download stuck at 100%?

1. Change the download region

  1. Launch Steam, go to the Steam menu, and click on Settings.steam settings
  2. Next, click on the Downloads tab on the left.Steam download settings
  3. Go to the Download region on the right, and select your current region or the closest one from the drop-down. select Steam download region
  4. You can also try different other regions closer to your location to check if that helps resolve the issue.

You can now check if the download is still stuck at 100% on Steam or if it has moved to install the files.

2. Repair Library Folder

  1. Open Steam and click on Settings in the Steam menu on the upper left. steam settings
  2. In the Settings window, click on Downloads on the left. Steam download settings
  3. Now, go to the right and under Content Libraries, click on the Steam Library Folders button.Steam Library Folders
  4. It will now open a new window called Storage Manager.
  5. Here, click on the three dots next to the folder following folder and select Repair Folder: C:\Program Files (X86)\Steam repair library folder

The Steam library folder is the location where all your installed games are saved. For this folder to update properly, they need to be writable.

However, at times, the user’s permission is corrupt and needs to be repaired. So, once it’s repaired, you can check if the issue is resolved.

3. Verify integrity of game files

  1. Launch Steam and click on Library at the top. steam library
  2. Go to the game that’s stuck at 100 while downloading, right-click and select Properties. steam game properties
  3. In the new window that opens, click on Local Files on the left. steam local files
  4. Now, go to the right and click on Verify integrity of game files. Verify integrity of game files

Once the local files are verified, the issue where the Steam download is paused at 100 should be resolved.

4. Move Game Folder

  1. Open the Steam app, click on the menu, and select Settings. steam settings
  2. Next, click on Downloads on the left side. Steam download settings
  3. Now, on the right, click on Steam Library Folders under Content Libraries. Steam Library Folders
  4. In the Storage Manager window, click on the plus (+) symbol next to the library folder. add new library folder
  5. You will now see a new prompt, Add a New Steam Library Folder.
  6. Here, select the location from the drop-down and click on the Add button. Add a New Steam Library Folder
  7. Now, back in the main window, select the game you want to move, and click on the Move button below. move game file
  8. In the Move Content prompt, select the newly created location and press Move. move content

Now that you have successfully moved the game to the new folder location, the Steam download stuck at 100% issue should be fixed.

5. Reinstall Steam

  1. Press the Win + I keys simultaneously to launch Windows Settings.
  2. Click on Apps on the left side of the Settings app. app settings
  3. On the right, click on Apps & features. Click on Apps & features in the Settings app
  4. Next, on the right, under the App list, look for Steam.
  5. Click on the three dots on its right and select Uninstall. uninstall steam

Once the app is uninstalled completely, check if the Steam download still stops at 100.

What is a normal download speed on Steam?

To enjoy a seamless gaming experience on Steam, you need to have a minimum download speed of 10Mbps.

While you may be able to play certain games on Steam even at slower speeds, it is advised to have a connection speed of at least up to 10Mbps. 

How do I fix my download speed on Steam?

When experiencing a slow download speed on Steam, you should check your internet connection speed using a trusted speed testing site like Speedtest or DSLReports.

If changing the region does not help and you still experience a slow download speed on Steam, you can follow our detailed guide to fix it permanently.

Additionally, you can also install any pending Windows update, or update the graphics drivers to the latest version to fix the issue.

You can also try pausing and then resume the game download to check if this helps fix the steam download stuck at 100 but still downloading issue.

Alternatively, refresh the internet connection, restart the router/modem, or simply reboot the PC or the Steam app to check if the download game bar moves.

Disabling the antivirus software can also help fix a lot of Steam game/update download issues sometimes.

You can also refer to our comprehensive post on the Steam update stuck or not downloading issue for more solutions.

Errors such as Steam manifest unavailable can also impact your download, so fix them as soon as possible.

If you have any other queries related to Steam, you can leave a message in the comments box below.

5 Ways to Fix Your Laptop if It’s Not Using The Headset Mic

Discovering that your laptop is not using the headset mic as expected can be very annoying. Especially if the laptop’s mic is faulty and you must communicate via the laptop. This issue is rampant amongst gamers who use high-end techy headsets to improve their gaming experience.

The question that usually follows this is, why is my laptop not using my headset microphone? Hence, this article will detail the causes of this issue and the possible fixes that have worked for other users.

Before proceeding, it is worth noting that Windows 11 users are more prone to encountering this headset mic not detected issue.

So, if you have Windows 11 OS, you should consider adding this to your arsenal of fixes.

Why won’t my laptop use the headset mic?

  • The audio is muted: The audio may have been muted for both the laptop and some headsets with the mute button. If your laptop or headset mic is muted, it will likely not work.
  • Connectivity Issues: If your headset is not well-connected to the computer properly, either by using the audio port or via a Bluetooth connection, you won’t be able to use the microphone.
  • Disabled microphone: When you check the Audio inputs and outputs section of your laptop, likely, that the microphone is not enabled.

How do I use my headset mic instead of my laptop mic?

1. Enable access to headset mic

  1. Click the Start icon on your screen, then click the Settings.
  2. Go to Privacy and click Microphone.
  3. Click the Change button, and then a dialog box will pop up; turn on Microphone for this device.
  4. Click Allow apps to access your microphone and toggle on.

If you follow the above steps right, we believe you should be able to fix your headset microphone issue.

2. Set your mic headset as the default

  1. Press the Start icon, input Control Panel in the search box, and launch it.
  2. Select Hardware and Sound.
  3. Choose Manage Audio Devices under the Sound tab.
  4. Then, select the Playback tab, choose your headset, and click the Set Default button.
  5. Repeat the same process for the Recording tab and click OK.

Having set your microphone headset as default, we believe this should fix the problem.

3. Use the Audio Troubleshooter

  1. Click on the Start icon on the screen and input the Audio troubleshooter.
  2. Select Find and fix problems with playing sounds.
  3. Click Advanced.
  4. Then, check to Apply repairs automatically and select Next.
  5. Choose the audio device to troubleshoot and click Next.
  6. Select Yes, Open Audio Enhancement.

Troubleshooting the audio device should fix the mic headset not being used. This fix is more effective for Realtek not detecting the headset mic issue.

4. Update your Audio Drivers

  1. Click on the Start button, input Device Manager, and launch it.
  2. Locate your audio inputs and outputs and expand them.
  3. Then, right-click the driver and click on Update driver.
  4. Choose Search automatically for drivers.

This is another viable solution if your laptop is not detecting the microphone. Also, If the outdated drivers have been updated, your selected headset mic should be active.

However, if you want to download and update all the outdated drivers on your device rather than installing them individually, you can use Outbyte Driver Updater.

⇒ Get Outbyte Driver Updater

5. Reset Windows Audio Service

  1. Press the Windows + R keys to launch the Run dialogue box.
  2. Type services.MSC and press Enter to launch the Services page.
  3. Then, locate the Windows Audio service.
  4. Right-click on it and select Start if the service is not enabled. (if it’s enabled, then select Restart)
  5. Wait for a few seconds, then restart your computer.

How do I use my headset mic on a PC with one jack?

-Use a Y connector cable

  1. Purchase a headset/mic Y connector cable and connect to your PC’s headphone jack.
  2. Then connect headphone plug to the headphone space and the microphone jack to the other space.

These are the best fixes for your laptop it’s not using a headset mic. The fixes have been tailored to suit variations of this problem, such as the single jack headset mic not working and others. Hence, keep trying till one of them works for you.

Further, If your headphone is not detected on Windows 10/11, we have a detailed guide. Also, you can check out this article on solving Windows 11 not recognizing wired headphones.

In conclusion, for users encountering no sound from their headphones in Windows 10/11, the fixes in this article might be helpful to correct the problem.

If you have any questions or suggestions regarding this article, kindly leave your comments below. We’d like to hear from you.

3 Quick Ways to Fix Error Code 91 and 92 on Disney Plus

Disney Plus is an OTT video streaming service with a wide range of content for all ages. The Disney media and entertainment company 2019 introduced the Disney Plus service.

The Disney Plus headquarters is located in Los Angeles, California. This service is not only available for the audience in the United States of America. It is also available in most countries like Australia, New Zealand, France, Japan, etc.

Users need to take a subscription to watch the premium content. All the essential contents are free of cost for all audiences. Some users also got a few issues, like Disney Plus stopped working in the Chrome app.

Why does Disney Plus keep giving me an error 92?

Sometimes, when Disney Plus users try to watch some videos on the Disney Plus app, they cannot do so. They get an error code of 92, and the app crashes.

A few users also got the error 91 along with error 92. The potential reasons for these error codes are listed below:

  • Unstable internet connection – If the internet connection is not stable on the system, it creates many issues like the ones mentioned in this article.
  • DNS Server settings – The changes made in the DNS Server addresses of the network connection can be the reason for such errors while using Disney Plus or other applications.
  • Disney Plus server down – Due to loads of requests from the users at a time, causing the server to shut down temporarily or for maintenance, Disney Plus shuts down the server for some time.

We researched a lot of data, tried a few workarounds, and got three quick fixes for resolving these errors.

How do I fix error 92 on Disney Plus?

1. Perform a power cycle

  1. To turn the system off, close all the applications, folders, and files currently open.
  2. After closing everything, right-click the Start button on the taskbar and select Shut down or Sign out from the context menu.
  3. Then click Shut down from the list.


  4. This will start shutting down the system.
  5. It would help if you waited for some time after the system was turned off, about 5-10 minutes.
  6. Turn on the system by pressing the Power button.
  7. Once the system has started, check if the problem has been resolved. If not, repeat the power cycle.

2. Modify the DNS Server Settings

  1. Open the run command box by pressing the Windows and R keys on the keyboard together.
  2. When the run box appears, type ncpa.cpl and press the Enter key.


  3. This opens the Network Connections page on the system.
  4. Right-click on the network connection like Local Area Connection or Wi-Fi.
  5. Click Properties from the context menu.


  6. In the Network Properties window, select Internet Protocol Version 4 (TCP/IPv4) and click Properties.


  7. Click on the Use the following DNS server addresses option.
  8. Enter the Preferred DNS server and Alternate DNS server addresses, which you can obtain from your service provider, and then click OK.


  9. Then close the Network Properties window by clicking OK.
  10. Restart the system and check if the error code is fixed.

This also helps with Disney Plus Error Code 43.

3. Disney Plus server issues

Sometimes, we believe the problem is with the system, device, or application we are using for the errors caused while watching the videos on the Disney Plus application.

The actual problem might be with the server of Disney Plus, which is temporarily down due to high server requests or maintenance.

You can always check the status of the Disney Plus server to know whether this is the reason behind those errors.

Also, here is the guide for the best browsers to watch the best quality videos on Disney Plus.

Were you able to resolve these error codes on the Disney Plus app? Please let us know in the comments section below.

HTTP Error 429: Too Many Requests [Fix Guide]

HTTP or Hypertext Transfer Protocol is essentially the very foundation of the internet. It’s the method of how websites transfer information from the servers that house them to your computer.

To simplify the process, your computer sends out an HTTP request so it can get the information to load a website, and in return, the page gives you an HTTP response.

However, sometimes errors can arise with HTTP. One of the most famous of these is HTTP 404 Page Not Found. This error appears whenever a page on a website is missing or has been moved.

For the purposes of this guide, we’ll be focusing on HTTP Error 429.

What is HTTP Error 429 Too Many Requests?

HTTP Error 429 is actually less of an error and more of a response to overactivity. This particular error appears when your computer sends out way too many requests to access the website.

A common place where this happens is in high-security portions of a website. If you try to log in over and over again, the website will deny you access. Fortunately, fixing this error is very easy to do.

This guide will go over the simplest ways to fix HTTP Error 429.

Quick tip:

A solution to this request can be to use a different browser such as Opera One that is not only safer but also has a built-in VPN in order to change you IP address.

Apart from the fact that is does not put you through a hard setup process, this browser lets you directly and precisely achieve your goal and it comes with a free integrated AI.

Opera One

Use this browser for productivity, safety and let it accompany you in your day to day tasks.
Free Download Visit website

How do I fix Error 429?

1. Just wait

Honestly, one of the best things that you can do to get past an Error 429 is to simply wait. Try again at a later time. A lot of the times when a browser gives you the error, there will be a message informing you to try again later.

After waiting several minutes, try to log in again and see if that works. If that didn’t help, try out one of the following methods.

A 429 error usually appears when a server blocks you for sending too many requests in a short time. To learn more about this issue and how to handle it, check out this detailed Proxy Error 429 guide.

2. Clear browser cache and history

  1. On Microsoft Edge, click the three dots in the upper hand to bring down the menu.
  2. Click Settings in the menu.
  3. In Settings, click Privacy, search, and services on the left hand side.
  4. Scroll down to Clear browsing data.
  5. Click Choose what to clear.
  6. Select Cached images and files.
  7. Set the preferred Time Range and click Clear now.
  8. On Google Chrome, enter chrome://settings/clearBrowserData into the address bar. Hit Enter on your keyboard.
  9. In the following window, select Cached images and files.
  10. Set the Time Range at the top of the small window, then click Clear data.
  11. On Firefox, type about:preferences#privacy into the address bar.
  12. Scroll down to Cookies and Site Data.
  13. Click Clear Data.
  14. Select Cached Web content, then click the Clear button.

Clearing out the browser cache is highly recommended. The above section showed you how to do it on Microsoft Edge, Google Chrome, and Mozilla Firefox, which are some of the most popular browsers on Windows.

How do I avoid 429 requests?

Stop sending so any requests. Again, HTTP 429 isn’t necessarily an error. It’s a message from the server asking you to stop spamming requests and asking for access.

Granted, it’s possible that the server hasn’t been configured correctly and has a rather high rate limiter. If you feel that’s the case, then we recommend contacting the server admin to see if you can get that fixed.

Feel free to leave a comment below if you have any questions on other errors or if you have some other fixes that you recommend. Also, feel free to leave comments about guides you’d like to see or information on other web browsers.

4 Ways to Fix No Message Button on Facebook Profile [Easy!]

Want to DM someone but there’s no message button on the Facebook profiles or is it missing from your own? You’re not alone. Many users complain about this Facebook Messenger issue.

Luckily, the underlying causes are nothing major and they’re easy to fix. And to save you time and hassle, we outlined the whole process, step-by-step. Bear with us.

How do I get the message button back on Facebook?

1. Enable message requests

  1. Sign in to your Facebook account on your browser.
  2. Click on your profile picture and select Settings & privacy.
  3. Now, scroll down on the left and click on How people find and contact you, then scroll down on the right and click on each box listed in the How you get message requests section.
  4. Now, make sure that the box with Don’t receive requests is not checked.

If you disable Message requests, people outside your friend list won’t see the Message button.

2. Change your date of birth

Note icon NOTE
Only follow these steps if you are over the age of 14 and have mistakenly changed your date of birth. For security reasons, Facebook restricts messaging for users 14 years old and below.
  1. Click your profile picture in the top right corner.
    profile picture facebook message button missing
  2. Click the Edit profile button under your cover photo.
    edit profile
  3. Scroll down and click the Edit your about info button.
    edit
  4. Select Contact and basic info on the left pane.
    contact and basic facebook message button missing
  5. Click on the pencil icon before your birth date and change it accordingly.
    pencil icon

3. Check privacy settings

  1. On the Facebook homepage, click on your profile picture and select Settings and Privacy.facebook settings and privacy
  2. Select Privacy Center.select privacy center facebook settings
  3. Select Common privacy settings, then scroll down and click on Facebook.facebook privacy settings
  4. This will open a new tab where you can set how people can contact you. If you want anyone to be able to message you, change the settings as follows:
    • For friends of friends of friends on Facebook, deliver requests to: Chats
    • For others on Messenger or Facebook, deliver requests to: Message requests.who can contact you facebook

4. Check restricted contacts

  1. Log in to Facebook in your browser.
  2. Select Friends from the menu on the right.friends option in facebook
  3. Select Custom Lists.custom friends lists facebook
  4. Select Restricted.restricted friends facebook
  5. Click on the X next to the name of the friend removed from Restricted.remove restricted friends facebook

If others can’t message you, you might have flagged them or mistakenly restricted the permissions they have to interact with you/your profile. Adjusting these settings will fix the problem.

Feel free to let us know if the solutions above helped you get the message button back in the comments below.

Fix: Second Monitor not Working After Nvidia Driver Update

Second monitor not working after Nvidia driver update is a common issue that many Windows 11 users face. Dual monitors are great for boosting productivity and creating extra workspace, but this problem can cause major frustration when only one display is detected.

In most cases, the issue is tied to a faulty or incomplete driver update, which can be fixed with a few simple adjustments. This guide will walk you through several reliable solutions to get your second monitor working again.

Why did my second display stop working after Nvidia driver update?

  • Not connected to a power supply: You first want to check if your second monitor is connected to a power source and if your monitor is turned on. Next, you can locate the power button on the bottom right-hand side.
  • Using the wrong cable: You could be using older cables that do not support UHD/4K resolutions. Also, ensure that the line is connected firmly on both ends. You may also want to disconnect the HDMI or DisplayPort cable, wait for a few seconds, and reconnect.
  • Input/output port malfunction: It could be that your input/output port is malfunctioning. If your System has multiple ports, you can change and connect to different ports to see if there’s any difference.
  • Faulty Monitor: Your second monitor could also be the problem. Try to connect your monitor to another computer to confirm if your monitor is in good working condition.
  • Outdated video driver: The video driver you installed may be outdated, resulting in incompatibility. For this, your second monitor may not be detected in windows 11

How do I get my second monitor to work after an Nvidia driver update?

1. Reinstall your video drivers

  1. Press the Windows key, search for Device Manager and launch it,
  2. Right-click on your adapter driver and select Update driver.
  3. Wait for the process to complete.
  4. Then, you can go to Action and select Scan for hardware changes.

The issue regarding your second monitor display could be incompatibility, hence the need to uninstall and reinstall recent and compatible drivers.

However, if you are not computer-savvy, you need to be careful not to download the wrong driver. Dedicated tools can automatically update all your drivers with just a single click.

2. Check your cables/hardware

As established above that, your cable could be the issue. Hence, you need to check the cables you are using to develop your connection with your external monitor.

3. Run the Hardware and Devices troubleshooter

  1. To open the Settings app, press the Windows key + I.
  2. Go to the Update & Security section, and select Troubleshoot.
  3. Locate and run the troubleshooter.
  4. Follow the on-screen instructions to complete the process.

You can also run the computer hardware and Devices troubleshooter. If you find it challenging to locate the Settings app, this guide will help.

4. Uninstall your driver and use the default driver

  1. Open your System’s Device Manager and go to Display adapters.
  2. Right-click on your adapter driver and select Uninstall.
  3. Wait for the process to complete.
  4. After the uninstall process is complete, restart your computer, and you’ll have your default driver installed automatically.

After that, you should be able to use your second monitor as it now has to run using the default driver. However, a new graphics card may sometimes not detect the second monitor. Hence, this fix should solve the problem.

Why is my monitor being detected but not displaying?

You may have changed or yet to enable your dual monitor display settings. Should this be the case, you can follow the steps below:

  1. First, on your PC, go to Settings and click on System.
  2. Under the Display Settings section, you will find the option to Rearrange your displays.
  3. Click on it, and then click on the Detect button.

With this, your monitor should be able to display your projection. Should you still want to learn further, check out our guide on Windows 11 not detecting the second monitor?

Also, we have a guide on fixing the third monitor not detected in Windows 10/11. Kindly leave your comments and suggestions below. We’d like to hear from you.

Fix: Files Getting Deleted Automatically on Windows 11

Windows 11 has some fantastic features, one of them being automatic storage detection. This feature is designed to reduce storage usage and keep your system safe.

But as we know, the OS is prone to bugs and errors; there have been some incidents where the system starts deleting files without the user’s knowledge. This could be frustrating as sometimes it may delete an important presentation or file.

However, any Windows error can be fixed by following some troubleshooting methods. If you’re also facing this error, keep reading this post to learn how you can fix it.

Why are my files getting deleted automatically?

Storage Sense is a new Windows feature that scans and removes old and temporary files. For example, it will delete all unused and obsolete files when your device runs low on disk space.

For instance, Windows 11 can automatically delete files older than 30-60 days from Recycle Bin and deletes temporary files per the requirement.

Some common reasons why Windows 11 automatically deleting files errors might occur on your device are:

  • Corrupt system files
  • Issues with the hard drive
  • Pending system updates
  • Third-party application

How do I stop Windows 11 from automatically deleting files?

1. Run DISM Scan

  1. Click on Start and search for Command Prompt.
  2. Click on Run as Administrator.
    Windows 11 automatically deleting files
  3. Type the following command one by one and press Enter:
    DISM /Online /Cleanup-Image /CheckHealth
    DISM /Online /Cleanup-Image /ScanHealth
    DISM /Online /Cleanup-Image /RestoreHealth
    CheckHealth-1
  4. Restart your device and check if the error message still appears.

System image corruptions are also known to cause Windows 11 to automatically delete files. Running a DISM Scan will find and repair system image corruptions.

Windows and other critical issues may occur if your Windows operating system becomes corrupted. Opening programs becomes slower and response times increase. If you are running multiple applications, you may experience crashes and freezes. There can be numerous causes for this problem, including excessive startup entries, registry entries, hardware or RAM decline, fragmented files, and so on.

2. Run CHKDSK Scan

  1. Click on Start, search for Command Prompt, and select Run as Administrator.
  2. Type the following command and press Enter:
    CHKDSK C:/f/r/x
  3. The command won’t start running as your device’s root drive is already in use. Instead, it will ask you to begin scanning when you restart your PC.
    Windows 11 automatically deleting files
  4. Type Y, press Enter, and then reboot Windows.

CHKDSK is a Windows program that checks and resolves system problems. For example, it verifies that the file’s size, location, and other details match the data on the hard disk. It also checks to see if any areas of the hard disk are corrupted, which might be the source of the problem.

3. Clean boot your PC

  1. Click on Start, search for system configuration and open it from the search results.
  2. Navigate to the General tab and check the Selective Startup and Load System Services options.
    Clean boot General
  3. Now navigate to the Services tab and check the option Hide all Microsoft services.
  4. Now click on Disable all at the bottom right corner and click on OK to save the changes.
    Clean Boot

Windows will start with a minimum set of required drivers and programs by performing a clean boot. In addition, it will ensure that a third-party or background program is causing Windows 11 automatically delete files.

Many users have also complained about Netio.sys BSOD Windows 10. If you’re among those, read our post to fix it.

4. Run System Restore in Safe Mode

  1. Long press the Power button until the Automatic Repair message appears.
  2. Navigate to Troubleshoot, followed by Advanced options, and select Open System Restore.
    Windows 11 automatically deleting files
  3. Now, select your username and enter your password.
  4. Click on Next, and select a restore point before the Netio.sys BSoD error started. 
  5. Now follow the instructions on the screen to restore your PC.
    sys-restore-next

Changing your computer’s settings or switching on a function can be why Windows deleting files automatically virus occurs. You’ll have to restore these settings to default to fix files getting deleted automatically when clicked.

5. Disable Storage Sense

  1. Press Windows + I to open Settings.
  2. Navigate to System and select Storage.
  3. Click on the Toggle Switch to turn off Storage Sense.
    turn off

If none of the abovementioned steps solved your problem, disable Storage Sense. Sometimes there is a problem with Windows core files that you cannot verify manually. Once you’ve disabled the feature, check if Windows 11 automatically deleting files is fixed.

How do I prevent accidental deletion in Windows?

  1. Right-click on the file or folder you want to hide and click on Properties.
  2. In the Properties window, navigate to the General tab.
  3. Select Hidden and click on OK.
    Windows 11 automatically deleting files

You can protect your files and folders by hiding them. By doing so, the hidden files won’t be accessible unless you hide them. This ensures the file doesn’t get deleted by mistake.

This was how you could fix Windows 11 automatically deleting files. We hope that the steps mentioned above were able to help you.

If you still have any issues, feel free to comment below.

Dell XPS 13 Battery Not Detected/Recognized: 5 Ways to Fix It

The Dell XPS 13 is considered by many to be the holy grail of highly portable laptops, boasting a battery life of up to 14 hours on a single charge. 

As with any other laptop component, if a driver or hardware error occurs you may find that the Dell XPS 13 battery is not detected by the device any longer.

This issue doesn’t necessarily mean that the battery is malfunctioning, which means that you can fix the device without taking it to a specialist. 

We’ll show you five methods that you can use to solve the problem, but first, you have to determine what caused the error.

Why is my laptop not detecting the battery?

There are several issues that may cause the Dell XPS 13 battery to not be recognized, with the most prevalent being excessive heat. Charging or discharging the battery generates a lot of heat. 

If the chassis cannot cool down your device fast enough, the temperature will increase and damage the other components.

All modern laptops are designed to automatically disconnect the battery if its temperature gets dangerously high.

Other than an internal malfunction of the battery, the only other cause for issues is software related.

The motherboard of the XPS 13 interfaces with the battery to determine how much charge it has stored and how much power is drained at a given time.

If the drivers or the operating system’s files contain errors, the battery won’t be recognized.

It is also possible for the battery to completely lose its ability to hold an electrical charge, or for its protection circuits to malfunction.

The Dell XPS 13 battery is not removable and owners should not try to open up the laptop without technical knowledge.

A faulty battery can only be replaced at an authorized laptop repair shop.

How do I fix my Dell laptop battery not being detected in Windows 10/11?

1. Restart the laptop and allow it to cool

  1. From the taskbar, click on Start, click on the Power symbol in the lower right-hand corner to open the power menu, and choose Restart.Restart the laptop and allow it to cool
  1. Wait for the laptop to reboot and avoid using it until it is cool to the touch.

2. Restart or reinstall the drivers

  1. From the taskbar, open the Start menu and type Device Manager in the search box located at the top.
  1. Press Enter to open the application and navigate to Batteries.
  2. Expand the category and then double-click the Microsoft AC adapter device.
  1. From the top list, select Driver and click on Uninstall Device to remove the driver.
  1. Repeat steps 3 and 4, but select Microsoft ACPI compliant control method battery instead of the Microsoft AC adapter device.
  2. Open the Start menu again and type check for updates in the Search bar.
  1. Press Enter to open the application and then click on the Check for updates button to redownload the uninstalled driver.

If Windows didn’t manage to find any update for you, you should try using a third-party software. These tools provide you with powerful features that allow you to scan your computer and download all outdated drivers in just a few moments.

3. Perform a power cycle to restore a flatlined battery

  1. Unplug all USB devices from the laptop.
  1. Unplug the charger and allow the device to run out of battery and shut down your PC.
  1. While the laptop is turned off, reconnect the power supply and wait for 15 minutes.
  2. Power up the laptop and check to see that the battery is now detected.

4. Update Windows

  1. Click the Windows icon, type Check for updates in the search bar and press Enter on your keyboard to open the Windows Update menu.
  1. Click on Check for updates and wait until the operating system installs all the updates.
  1. Restart the laptop.

5. Use the Power troubleshooter

  1. Click the Windows icon, type troubleshoot in the search bar of the menu, and click on Troubleshoot settings once it appears as a result.
  1. Click on Other troubleshooters.
  1. Scroll down through the troubleshooter list and press the Run button that’s next to the Power troubleshooter.

How do I reset my Dell XPS battery?

The Dell XPS does not have a dedicated battery reset button like other laptop models, which makes the process more difficult. To perform a battery reset you will have to use a combination of methods 2 and 3 presented above.

You will have to first remove and reinstall the battery drivers. This will ensure that all the data related to the battery will be removed from the device.

Next, perform a power cycle to allow the operating system to detect the capacity and performance of the battery.

This process will also help fix errors that make the operating system incorrectly approximate the amount of time your laptop can run on a single charge. It will also fix situations in which the Dell XPS 13 battery is not charging.

If you have any other questions or suggestions, feel free to let us know in the comments section below.

3 Easy Ways to Fix Error Fetching Data On Facebook

Facebook is a widely used social media application that allows users to connect and access different content. But, some users have recently reported that they experience different Facebook error fetching data issues.

Some claim that when they want to watch Facebook video content, view pages, invite friends or use the Facebook business suite, and so forth, they encounter errors like this, all for which they find no reason. Do not worry. There are various reasons for these errors, and they are also fixed.

We have provided three Facebook error fetching data fixes for these frustrating issues. You can follow any of the answers below to fix the problem correctly.

What does error fetching data on Facebook mean?

Error fetching data on Facebook can mean several things, such as the inability to provide users with their requests due to a faulty network, corruption in system files, or problematic app services.

Whenever this happens, users will not be able to view images, video clips, view pages, and explore other features available on Facebook, depending on the error.

The error fetching data does not just occur; some of the causes are:

  • Privacy settings of a particular content: In this case, the owner of a particular data (video, image, page, etc.) has restricted or set some personal rules for users on particular content. Hence, you may encounter Facebook invite friends error fetching data.
  • Deleted Facebook profile: Sometimes, when users encounter Facebook watch error fetching data, it could be that the Facebook account that uploaded the content no longer exists. When this happens, Facebook often removes all content peculiar to a deleted account.
  • Blocked by a user: It could mean that you blocked or another user has blocked you. When this happens, both the blocked and blocker will no longer be able to receive or send data from and to each other.

Quick tip:

A quick and useful approach to this error can be to try and change the browser and access Facebook from a different one. By loading the page into another browser you can find out if the issues itself was related to that main root cause.

We recommend a great and stable browser, Opera One, which has a lot of intuitive and enhanced features, it is very friendly for users, allows for a bunch of customization features, and has enhanced speed and privacy.

Opera One

Check out this full-of-features and productive-oriented browser for your day-to-day needs.

How do I fix the error fetching data problem on Facebook?

1. Check your network connection

  1. Click F5 or left-click on space and select Refresh to reload the browser page.
  2. Switch to a different computer or router and test if there’s any improvement.

If you keep experiencing a Facebook business suite error fetching data, we believe you should be able to fix it by following the above steps.

2. Clear cache and cookies

  1. Open Google Chrome, then click on the Menu button.
  2. Select Settings, and under Security and Privacy, click on Clear browser data.
  3. Choose the time range you want the data to be deleted.
  4. Confirm with Clear data.

If data is stored incorrectly in the cache, it can cause Facebook to invite friends error fetching data. To solve this problem, you must clear your cache or cookies.

3. Restart the application

Whenever you encounter a Facebook fetching data error, one of the easiest things to do is restart the Facebook application.

If you are using the web browser, you should close and restart it. An entire PC restart is what you do in dire need of a solution.

What happens if I clear data on Facebook?

Whenever you clear data on Facebook, anything stored on your PC related to your account will disappear. Although, your primary account info, and anything else stored on Facebook’s servers, remains accessible.

For instance, you only lose all your files, and it erases all your chats, but you still have your Facebook account intact and active.

These are the best fixes for the Facebook error fetching data. Ensure to follow all these steps for optimal results.

However, if you encounter this content is not available right now on Facebook, you can check out our guide to fix the error. Also, if your Facebook app is not working on Windows 10, our guide should help you fix it.

In conclusion, our article on the 7 ways to fix Facebook when it’s not working can also be helpful if you encounter a similar issue.

Please leave your comments below. We’d like to hear from you.

Paradox Launcher: How to Download & Install

This article is for you if you want to download Paradox Launcher and install it on your PC or Mac.

The Paradox Launcher is a game launcher that is also known as PDX Launcher. Paradox Interactive has developed it.

If you want to learn more about this application, you can read our Paradox Launcher review.

To explore this app, you will need to download and install it on your computer. The following parts of this article will guide you on how to do it.

Paradox Launcher requirements:

The PDX Launcher doesn’t need much CPU power to run. You can use this app if your computer meets the following system requirements:

  • Operating System: Windows 11, 10, 8.1, 8, 7, macOS, Linux
  • CPU: 64 Bit Intel/AMD, Apple Silicon
  • RAM: 2 GB
  • Disk Space: 200 MB

You can run PDX Launcher on any modern computer without any problem because of the very simple system requirements.

Does Paradox Launcher work with Windows 11?

Yes. Paradox Launcher works without any issues on Windows 11. We have tested this application on our Windows 11 computer and found no problem at all.

Why do I need Paradox Launcher?

If you have purchased games developed and published by Paradox Interactive on any platform like Steam or Epic Games, etc., you will probably need Paradox Launcher.

Paradox Launcher updating

Most modern games from this company require you to have the PDX Launcher. Though, while installing the game, the launcher should be installed automatically without any effort.

But, if you want to manage all of the games from this company in a single place, you will need a dedicated application.

How do I download & install Paradox Launcher?

1. Download and Install on Windows and Linux

  1. Go to this launcher download page and download the installer file.downloading paradox launcher v2
  2. Open the downloaded file.double click paradox launcher installer
  3. Click on Next.
    clicking next pdx launcher installer
  4. Choose the installation location or leave it as it is and click on Next.
  5. At last, click on Install.
    click install pdx launcher installer
  6. After installation, click on Finish.

By default, you will get version 2. You cannot download the Paradox Launcher V1 from the official source.

2. Download and install on macOS

Unfortunately, unlike Windows and Linux, there is no dedicated PDX Launcher for Mac. But, with some games from Paradox Interactive, the launcher is included.

So, you will get the launcher with specific games if necessary. Otherwise, all other games will work without this app.

How to update Paradox Launcher V2?

Are you currently using the first version of this launcher? If you want to know how to upgrade or install Paradox Launcher V2, you should not worry. This process is straightforward.

Paradox Launcher checks for its update automatically. So, you should not think a lot about any technical steps.

However, if you want to get beta updates, you can do the following things:

  1. Go to Launcher Settings.going launcher settings pdx launcher
  2. Toggle the switch on next to the Recieve Beta versions of the launcher.enabling beta version launcher pdx
  3. Confirm it.

Now, you will get the beta versions with the next update. After every update, you may need to relaunch the launcher.

If you see any issues updating this app, you can uninstall it and download the latest Paradox Launcher V2 and install it manually.

This article has explained how you can download, install and update Paradox Launcher easily on any supported platform. If you have any questions or opinions, feel free to let us know in the comments box.

How to open PY files on a Windows 10/11 PC

Python is an interpreted programming language that some programmers develop software with. PY is the file format for Python scripts.

PY scripts can also have alternative file extensions, which include PYC, PYD, and PWC. The scripts are text files, but you’ll need a Python interpreter to run a PY script in Windows.

What can I use to open PY files?

open PY files on PC example

Programmers can edit Python scripts with numerous software. In fact, you can even edit a PY script in Notepad.

There are also various Python editors that you can open scripts with. Those are otherwise IDE editors designed for Python scripting.

PyScripter, PyDev, and PyCharm are three open-source IDE software you can open your PY files with.

Before opening or editing, it’s often useful to confirm which Python version is installed on your system. You can easily do that by following this guide on how to check Python version in Windows CMD.

IDEs are probably better software for Python coding than Notepad++ as they also include debug tools and integrated interpreters.

We will show you in the guides below what and how to use to open PY files using different methods.

How can I open .py files on Windows 10?

1. Open Python Scripts with File Viewer Plus

You can open PY and many other source code files with File Viewer Plus. This is a universal file viewer for Windows that can open and display over 300 different file types, view, and edit source code files.

On top of that, you’re about to download a reliable editor and converter tool as well. Long story short, that’s also your chance to modify photos using the advanced image editor and convert your latest audio and video formats into different multimedia file types. 

Is your budget limited? Then, the limited-time offer that includes a 30-day money-back guarantee will most likely sound like music to your ears.

file viewer plus logo

File Viewer Plus

File Viewer Plus is the best tool to quickly open PY files on your Windows 10 computer. Ready to give it a try?
Check price Visit website

2. Open PY files with CPhyton Interpreter

  1. Download a CPython interpreter. Press the Download Python 3.6.2 button to save one of the more updated interpreters to Windows.
  2. Open the Win + X menu by pressing the Win key + X hotkey.
  3. Select Command Prompt (Admin) to open the CP’s window.
  4. Open the folder that includes your Python script in the Command Prompt by entering ‘Cd’ followed by the path of the file.
  5. Next, enter the full path of the CPython interpreter followed by the full location of the PY file in the Command Prompt, which must include the Python interpreter exe and PY file title. For example, you might enter something like this: C:Python27python.exe C:User FolderPY Files SubfolderPy file title.PY
  6. Press Enter to open and run the PY script.

Text editors are fine for editing files, but you’ll need a Python interpreter to open and run the PY scripts. Some interpreters come bundled with IDE Python software.

However, CPython, otherwise the reference implementation, is the default interpreter for the programming language. Use the above steps to open PY scripts with that interpreter.

3. Open PY file in Notepad ++

     You can easily open PY files in Notepad ++. It is a third-party text editor that supports the PY file format. You can add Notepad++ to most Windows platforms.

    Note that this software has 32 and 64-bit versions. The 64-bit versions don’t work on 32-bit systems.

  1. 1. Right click the Start button and select System to open the window in the snapshot directly below. Check what System type you have.

    py system windows
  2. 2. Download Notepad +++. You need to choose the correct version for your System (Notepad++ Installer 32-bit x86 (32-bit) or Notepad++ Installer 64-bit x64 (64-bit)).

  3. 3. After you download the setup wizard with which you can install the software, double-click on it to start the installation.

  4. 4. When Notepad +++ finished installing, open the application.

  5. 5. Go to File > Open.

  6. 6. Select the PY file that you want to open from your computer.

  7. 7. Notepad +++ will open the file.

    open py files notepad +++

So, you can edit and run PY files with text editors, IDE software, and Python interpreters.

You can also convert PY script files to Portable Document Format with the freeware PDF24 Creator software. Chances are to find PDF24 as being simply perfect for what you need.

If you have any other suggestions or questions, don’t hesitate to leave them in the comments section below.

5 Ways to Fix Your Laptop VGA Signal When It’s Not Working

Connecting your laptop to a monitor for a second screen should be easy, right? However, many things can go wrong while connecting your PC to your monitor with a VGA.

VGA not working issues are something most users have complained about. It signifies a difficulty with the VGA signal on your laptop, which means it can’t share the display with the monitor.

The VGA (Video Graphics Adapter) is a connector for computer video output. It creates an analog interface between the laptop and the monitor.

However, you need a VGA signal on your laptop to be able to transmit your graphics to the monitor. Another graphic adapter is the HDMI. Moreso, users complain about VGA not working while the HDMI is.

Furthermore, several conditions may be responsible for the laptop VGA to HDMI not working. Hardware or connection issues are the dominant cause of this issue.

Why does my VGA have no signal?

  • Hardware/connection issues: One of the reasons why users encounter VGA no signal issues is a connection error. When the VGA cable is not inserted into the appropriate port, it will prompt issues like HP laptop VGA output not working. Also, if the connector is not plugged in completely into the VGA port, it may affect the signal connection with the laptop.
  • Outdated graphic drivers: Running outdated drivers on your computer can cause many issues with your display connections. Since obsolete graphics drivers lack essential updates to help them run graphics smoothly, they can encounter difficulties like no VGA signal. Also, the laptop to TV VGA not working issue can occur due to outdated graphics drivers.
  • Computer in hibernation mode: The monitor can’t receive a VGA signal from your laptop if the laptop is in sleep or hibernation mode. The laptop disconnects from every device while in hibernation, as it applies to the Virtual Graphics Adapter.
  • Outdated Windows: Outdated Windows indicates that the version running on your computer is old and needs to be updated. Hence, it can block the VGA signal or impede graphic transmission, resulting in these VGA issues on Windows 10/11.

How do I know if my VGA is broken?

The best way to test if your VGA has a problem is to switch the VGA connector to a new one and see if the issue persists. Also, using your VGA connector with another laptop can help you know if your VGA is faulty.

How do I fix my laptop VGA if it’s not working?

1. Restart your PC

  1. Click Start on your screen.
  2. Select Power from the drop-down.
  3. Click on Restart, then OK.

Restarting your device can fix the Dell laptop VGA output not working issue.

2. Check your VGA connection

Make sure that the VGA is inserted into the appropriate port. Also, check if it is plugged all the way in by pushing it lightly into the port.

3. Update graphics drivers

  1. Press the Windows + R keys to prompt the Run dialogue box.
  2. Type devmgmt.MSC, then click the OK button.
  3. Click on Display adapters.
  4. Select the driver and right-click on it.
  5. Click the Update Driver option and select Search automatically for drivers.

Updating graphics drivers will fix the laptop VGA port not working on Windows 10/11.

The quickest and most efficient way that saves time and does the job for you is to choose software that automatically updates the drivers for you.

4. Update Windows

  1. Click the Start button on the Desktop.
  2. Select Settings from the options and choose Update & Security.
  3. Click on Windows Update, then select Check for updates.

Windows will automatically download updates if there are any available.

5. Switch to HDMI

A simple way to fix the laptop VGA not working issue is by switching to another connector which is the HDMI. The High-Definition Multimedia Interface is another way that users can transfer audio & video from a laptop to a monitor.

Switch to an HDMI to save yourself the stress of troubleshooting your settings. It can help fix the laptop VGA to HDMI not working issue.

How do I enable VGA on my laptop?

  1. Right-click on your screen and select the Display settings.
  2. Select Connect to a wireless Display and select Detect.
  3. Choose VGA monitor and click on OK.

Doing this allows you to switch to a VGA display on your laptop.

These are the most effective troubleshooting fixes we could come up with. If your problem falls within these categories, then any of the above fixes should help solve the laptop VGA not working issue.

Nonetheless, we recommend users read through our article on how to fix DisplayPort to VGA Adapter not working / no signal.

Conclusively, users can read about what to do if VGA stops Working After Windows 10/11 Update.

If any of these have worked for you, kindly leave your feedback and suggestions in the comments below. We’d like to hear from you.

Epson Event Manager: How to Download And Use it to Scan

We will show you the best ways to download, install an use the Epson Event Manager. This software lets you access various features, including:

  • The software brings various scanner features.
  • It allows you to manage scanning right from the Control Panel.
  • Thanks to the preset support, you can make scanning faster and simpler than ever.

Sound good? Keep reading to learn more.

How do I download & install Epson Event Manager?

Use the official download page

  1. Launch a browser on your computer and go to Epson Event Manager’s download page.
  2. Scroll down and click on the Download for Windows button.
  3. Choose a location for the software download and wait while the .exe file downloads.
  4. After the file is downloaded, click on Open file.
  5. On the prompt, click OK and extract the files setup.
  6. Accept the License Agreement, then click Next.
  7. Click on Install and follow the prompts that follow.
  8. After the installation process is complete, click on Finish.

The Epson Event Manager will automatically start running. Sometimes, it will also create a shortcut menu on the Desktop.

How do I scan to my computer with Epson Event Manager?

1. Configure the Event Manager

  1. Click Start on your computer and select Programs.
  2. Select Epson software, then click on Event Manager.
  3. Click on Button settings and allow all buttons to use Epson Scan.
  4. Click on Close to save the changes.
  5. On your Home Screen, click on Start, and select the Control Panel.
  6. Select Scanners and Cameras or Devices and Printers.
  7. Right-click on the product and select Properties.
  8. Go to Events, and select the Scan button for the Select an event option.
  9. Then, choose Epson Event Manager for the Start this program option.
  10. Click OK.

2. Perform the scanning process

  1. Place the original copy you want to scan on the product for scanning.
  2. Click on the Home button, then select Scan.
  3. Select a computer and choose your preferred option.
  4. Press the Scan button on your scanner.

Do I need an Epson Event Manager at startup?

No, you don’t need to have this application in startup. However, if you’re scanning documents daily, then you might need to add this application to startup.

Do I need the Epson Event Manager to scan?

This depends on the model of your scanner. Some models won’t work without this software, while others don’t require it to scan documents.

Is an Epson Event Manager necessary?

The Epson Event Manager is useful but not essential for everyone. It’s designed to help you scan documents, create PDFs, and manage scan settings. If you regularly use your Epson scanner for these tasks, having Event Manager can streamline your workflow.

Can I delete the Epson Event Manager?

Yes, you can delete the Epson Event Manager if you you don’t need it. This won’t affect your printer or scanner’s core functionality, but you’ll lose the convenience of quick scan management features.

Wrapping up

After reading this guide, We hope you understand how Epson Event Manager works. users can also read through our article about Epson scanner software. It will give you more insight into Epson scanner software and how to download it for Windows devices.

Moreover, not properly downloading and installing the Epson Event Manager on Windows can result in some difficulties. Hence, it is essential to know what to do if the Epson scan is not working on Windows 11.

Lastly, to ensure that your device is properly working, check our guide on how to install the Epson scanner driver on your PC.

Have you ever used this tool? Share your experience with us in the comments section.

7 Ways to Fix Steam when It’s Unable to Sync Your Files

Steam is the world’s biggest and best game client software. Steam Cloud is one of that game client’s good features that syncs game saves. However, some technical issues can arise with Steam’s syncing.

A Steam unable to sync files error is among that game client’s more widely cited syncing issues. Those Steam users who need to resolve that syncing error see this message when trying to launch games:

Steam – Warning: Steam was unable to sync your files for with the Steam Cloud.

Here’s the good news: there are numerous confirmed fixes for that syncing error! You can resolve the Steam unable to sync files error with the solutions below.

Why isn’t my Steam syncing?

Your Steam may not be syncing because of a server issue. Although server issues are rare, they can and do arise now and then. Steam can sometimes be down because of server maintenance.

You can check the Steam server status for your region at SteamDB. Alternatively, open the Downdetector page for Steam. Select your region in the drop-down menu there to view regional server status details.

A more common cause for Steam not syncing is corrupted cloud configuration data. One fix for that is to delete Steam’s userdata folder, which contains cloud configuration files.

Corrupted game data is another reason Steam is unable to sync files error arises for some users. Therefore, verifying the integrity of game files with Steam’s built-in tool is another potential fix.

Security (firewall & antivirus) software and tools can also sometimes get in the way of Steam’s cloud syncing. Such software can block Steam’s connection and processes, which causes the unable to sync files issue.

Does Steam Cloud sync automatically?

Yes, for that is the beauty of Steam Cloud syncing—when it works right. That feature automatically syncs saved games so you can load them on different PCs with the same games installed.

However, note that cloud syncing needs to be manually enabled in Steam. To turn it on, select the Enable Steam Cloud Sync for applications that support it option on the Cloud tab in Steam’s Settings window.

How do I access Steam Cloud storage?

You can access your Steam Cloud storage from the View Cloud Storage page. When you sign in to that page (with a Steam account), you can view and reload Steam cloud saves for your games from there.

Select a game title in your could storage page to view files stored for it. You can download files from there by clicking their Download options.

How do I fix Steam unable to sync files?

1. Erase Steam’s userdata folder

  1. Firstly, press the Windows key along with S; and then open Steam installation folder inside Explorer.
  2. Select the userdata subfolder within the Steam directory.
    userdata folder steam unable to sync files
  3. Press Explorer’s Delete button (trash can icon in Windows 11).
    The Delete icon steam unable to sync files
  4. Bring up Steam and launch the game to see if the syncing issue remains.

2. Repair the Steam library folders

  1. Open up the Steam gaming client software.
  2. Click Steam’s View menu.
  3. Then select the Downloads option.
    The Downloads option steam unable to sync files
  4. Press the Open Download Settings button with the cog icon.
    The Open Download Settings button steam unable to sync files
  5. Click the Steam Library Folder button.
  6. Right-click your Steam library folder to select a Repair Folder option.Repair Folder steam unable to sync files

3. Verify files for games the syncing issue occurs

  1. Bring up the Steam window.
  2. Click Library at the top of Steam’s window.
  3. Right-click whatever game title you need to fix Steam’s syncing error and select Properties.
  4. Select Local Files within the Steam game’s Properties window.
  5. Click the Verify integrity button to initiate a validation process for the game.
    The Verify integrity of game files option steam unable to sync files
  6. The validation process may take up to 10 minutes to complete depending on the game’s size. Make sure you wait for Steam’s game validation to reach 100 percent.
    Validating Steam files window steam unable to sync files
  7. Select Close when the validation is done.

4. Erase Steam’s clientregistry.blob file

  1. Open Windows Task Manager (press Ctrl + Shift + Esc).
  2. Disable any Steam processes by selecting them and clicking End task.
    End task button steam unable to sync files
  3. Bring up your Steam folder (it will probably be in a Program Files directory).
  4. Right-click the clientregistry.blob file and select Delete (or a trash can icon).
    The context menu's delete option steam unable to sync files

5. Disable Windows Defender Firewall

  1. To access the Power User menu, press Windows + X. Select the shortcut for the Run dialog on that menu.
  2. Open Windows Defender Firewall by typing in this WDF Run command and clicking OK: firewall.cpl
  3. In the WDF applet, click Turn Windows Defender Firewall on or off.
    The Turn Windows Defender on or off option steam unable to sync files
  4. Select both the Turn off settings there for Windows Defender Firewall.
    Turn off firewall option steam unable to sync files
  5. Press OK to apply the firewall options you’ve selected.
  6. Open Steam and launch games with the firewall off.

Users with third-party firewalls installed should disable them as well via their settings or by simply uninstalling them. Some firewalls are incorporated within antivirus software.

Note icon NOTE
If this works, the firewall was likely blocking Steam when enabled. You can remove a WDF block for Steam as outlined in our guide for allowing apps through the firewall.

6. Turn off third-party antivirus protection or shields

If you’ve installed an antivirus suite, it may be conflicting with Steam’s syncing. One way to find out is to right-click a system tray icon for your antivirus package and select to turn off its shield.

We don’t advise permanently disabling an antivirus utility. Select an option to temporarily disable it for a few hours if you can. Then check if the syncing issue continues for your Steam games.

You can also add Steam to antivirus utilities’ exclusion lists. Have a look through your antivirus tool’s settings to see if it includes such a feature. If so it does, add Steam to its software exception list.

7. Reinstall Steam’s client configuration files

  1. Check that there aren’t any Steam background processes running in Task Manager as outlined within steps one and two of resolution four.
  2. Open the Steam directory in the Explorer file manager.
  3. Select everything in that folder by pressing the Ctrl + A hotkey.
  4. Hold Ctrl to deselect the steamapps folder and primary Steam.exe app file.steamapps folder steam unable to sync files
  5. Press Delete to erase all other selected folder content.
  6. Right-click the Steam.exe file to select a Run as administrator option. Then Steam will start to update itself.
    Run as administrator option steam unable to sync files

How do I force a Steam game to sync?

Steam doesn’t have a troubleshooting option for forcing games to sync. If Steam detects a sync conflict, you can select sync options to upload and download files to and from Steam Cloud.

What’s the Steam cloud unable to sync Steam Deck error?

The Steam cloud unable to sync error is another cloud issue that can arise on the Steam Deck portable and in Windows. Check out our Steam Cloud error guide for details about how to fix that.

Those troubleshooting methods have resolved the Steam unable to sync files error for users across the world. So, it’s more than likely one or more of them will fix Steam’s cloud syncing on your PC.

Yet, you can still contact Steam’s support service about that syncing issue if need be. Open Steam’s Help page and select Steam Client > Cloud from there. Then press the Contact Steam Support button.

If you have any questions about fixing the Steam unable to sync files error, feel free to drop it in the comments section below.

How to Add Games & Mods to Paradox Launcher

Many players have been conflicted since the introduction of the Paradox launcher. The central question in most Paradox forums is how to add games to the Paradox Launcher.

The Paradox Launcher is centralized for Paradox games. Its purpose is similar to a hub where users can implement certain features into their games. Also, it helps to advertise other Paradox games easily to players.

Although the launcher was developed to reduce Paradox games stress, most still find it challenging. Hence, this article will detail the process involved in adding games and mods to the Paradox Launcher.

Why do I need Paradox Launcher?

The Paradox Launcher obviates the developers’ stress of developing a launcher for each game. In addition, it helps you to install, mod, and patch games for users who don’t use steam directly.

Also, the platform is more like a centralized space for an interactive community of Paradox gamers. You adjust game settings, resume the last session, and do other game-related activities.

However, you can also link the Paradox and Steam accounts to access games directly on Steam via the launcher. Also, you can use it for multiplayer functions.

Furthermore, it has other features like the Mods Playsets that allow players to add mods to favorites. Also, it aids easy navigation through your mods.

Quick Tip:

While gaming is a big part of our free time, we also browse the internet while we’re at it. For an authentic gaming experience, we recommend you the Opera GX gaming browser.

Apart from other browsers, it comes with unique built-in features and apps, Discord, WhatsApp, as well as Twitter, and Instagram to keep you connected. Furthermore, the user can limit its memory usage, CPU and RAM for improved PC performances while gaming.

Opera GX

Gaming features that provide the smoothest experience for the user.

How do I add games to the Paradox launcher? (steam, epic)

  1. Launch a suitable browser on your device and go to accounts.paradoxplaza.com.
  2. Input your login parameters and click login.
  3. At the top of the screen, click on Settings.
  4. Scroll down and select Accounts linking.
  5. Click on the Link account option. (Linking your Steam account with Paradox will help you access the owned items in your steam account. Also, it allows you to access mods and multiplayer forums.)
  6. Input your details on the steam login page and click on sign in.
  7. Go to the official Paradox forum to see your Owned items list.
  8. On the Forum and Support Manager page, click on Owned Items.
  9. At the top-left of the screen, select Sync OwnedItems.

The sync option will fetch the games you own on your Steam account and add them to your owned Items list. This approach can be used to add different game accounts. It supports Steam, Epic, Microsoft, Play Station, and Twitch.

How do you add mods to Paradox launcher?

Use existing mods

  1. Log into your Paradox account.
  2. Go to Mods Manager at the bottom of the screen and double-click on it.
  3. On the Mods catalog interface, select the mods you want to play.
  4. Select the mod and click on download to save it.

Upload a mod

  1. Open the launcher and log in to your account.
  2. Go to Mods and click on mod tools.
  3. Select the Upload a mod button at the top.
  4. Fill in the information requested about the mod you are uploading, then proceed.
  5. Select the mod you want to upload and drop it into the space provided.
  6. Preview the details and upload.

The selected mods will be downloaded automatically and added to your playing experience. Hence, they’ll be in the Paradox launcher mods library.

Nonetheless, joining a multiplayer game session on Steam can be difficult. Hence, you can read through the easy fixes for Steam errors joining multiplayer sessions.

Also, our guide on fixing Steam games not working can be pretty helpful if you have a Steam account.

Please leave your questions and suggestions in the comments section. We’d like to hear from you.

How to Resize a Non-Resizable Window in Windows 10

In most cases, you have the possibility in Windows 10 operating systems to resize a window of your choosing from either a new app you have installed or perhaps some window in a browser you are using.

Unfortunately, there are some cases where you probably stumbled upon a window that you cannot resize in Windows 10.

This usually happens to the pop-ups that appear either from errors or notifications.

Read our guide to find out a workaround for this issue.

How can I resize non-resizable windows in Windows 10?

    There is a free program called ResizeEnable that allow you to resize any window on your device. Fortunately, although this app was made for the previous versions of Windows like Windows 7 or Windows Vista, it still works just as good in Windows 10.

    This app is pretty easy to use and, basically, all it does is allow you to resize a window that is normally non-resizable in your Windows operating system.

    Read below in detail the explication of how to install this app into your Windows 10 operating system and how to use it properly.

  1. 1. Access the download page for ResizeEnable.

  2. 2. Click on the download button.

    resizeenable download app
  3. 3. You will be prompted by Windows with a message from which you will need to choose Save As, and select a download location.

    It is recommended to download the executable to your Desktop for an easy access.

  4. 4. After you make your choice, you need to left click on the OK button. It is situated on the lower side of that window.

  5. 4. After the download is finished just double left click on the icon and it will start the installation of this app.

  6. 6. Wait for the installation to finish.

  7. 7. The executable file for ResizeEnable will be created on your device. Run it.

  8. 8. Now, you can navigate to any window of your choosing and use the mouse to resize it. You will notice that it can be stretched in any way you want.

In many cases, you might want to resize not only error message windows, but also some elements of your desktop.

Customizing such things as taskbars and menus might increase your productivity.

For all of you that are interested, here is a method on how to resize the Start Menu in Windows.

Read Also: Hard Drive not Showing in Windows 8, 8.1 [Fix]

You might find more tips and tricks on how to customize your desktop by searching in our site’s Search bar.

From our article, you were able to find out that only by downloading the ResizeEnable app are you able to resize all of your windows at will and make your use of the Windows 10 system a little bit easier from now on.

Write to us below your opinions on this subject and if this app worked for your operating system.

How to Use Multiple One Drives on One Computer

Microsoft’s OneDrive is one of the most popular cloud storage services out there, with millions of users worldwide.

However, OneDrive has its downsides, which makes a lot of people complain about Microsoft’s policies for its service.

One of the most requested features for OneDrive is the ability to use multiple accounts in the same folder.

Many users have two or more OneDrive accounts and having everything in one place would definitely save them a lot of time.

This also applies to users who want to have more OneDrive space, since Microsoft recently cut it down to 5GB per account.

Can you actually use two or more accounts at once?

Despite the high amount of requests, the OneDrive folder is still not capable of managing multiple accounts, and according to Microsoft, it probably never will be.

But don’t panic, there’s actually a way to use multiple OneDrive accounts in one folder, so you can have content from everywhere in one place. Here’s what you need to do.

How can I set up multiple OneDrive accounts on one computer?

1. Use multiple OneDrive accounts in one folder

  1. 1. Launch OneDrive on your PC.

  2. 2. Log in to your secondary OneDrive account on the website.

  3. 3. Create a new folder and name it Shared.

  4. 4. Move all content from your OneDrive account to the new folder you just created.

  5. 5. Select that folder, and go to the Share option.

  6. 6. Choose Email, and send the folder to your primary Microsoft Account.

    shared onedrive folder
  7. 7. You shared the folder with yourself, so you need to log in to your primary Microsoft Account, and accept the shared folder from your email client.

  8. 8. Once you accept the shared folder, it will appear in the OneDrive folder on your computer, as well as in the web version.

    You’ll be able to access all content from your secondary OneDrive account from one place.

    multiple one drives on one computer windows
  9. 9. In case you want to sync more than two accounts, just repeat the steps from above for each account individually.

  10. To be able to use multiple OneDrive accounts on one computer you don’t need any hacks or tricks. All you need to do is to take advantage of OneDrive’s capabilities. The app allows you to import your account data from one account to another through a workaround.

Sometimes, some connection issues can ruin your experience. Furthermore, you won’t even be able to set up multiple accounts.

If you experience this, we’ve written extensively about OneDrive connection problems and how to easily solve them.

2. Use a different cloud storage

  1. Log in with your first Windows account user as an Administrator.
  2. Download and install Sync.
  3. Check that you see the Sync app on the Start menu.
  4. Switch Windows accounts now: log in with your second Windows account.
  5. Install Sync on the second Windows user account.
  6. Double-check that you see the Sync app in the second user’s Start menu.

Developers confirmed that it is possible to use two different Sync accounts on the same computer as long as each account is on a different user on your computer.

Switching user accounts on your computer will allow you to access each Sync account. Thus you will need to use unique user logins on the same computer.

This method will allow you to easily switch back and forth between the two accounts. Even more, Sync is safe and 100% secure, protecting your privacy with end-to-end encryption.

⇒ Sign up for free on Sync 

If you want to learn how to share OneDrive files, check out our dedicated article.

Looking for more cloud storage services? We’ve prepared a list with the best ones available right now.

If you experience issues like two copies of the same file, you can follow the steps in our quick tutorial to solve them.

In the particular case that your OneDrive folder can’t be found, you may want to take a look at our guide that will help you get it back again.

Check it out and tell us your opinion about what is the best cloud service and why. If you have any more questions, don’t hesitate to leave them below.

How to Delete System Error Memory Dump Files in Windows

Memory dump files, otherwise crash dumps, are system files saved during blue screen crashes. When a BSOD error message appears, Windows saves a copy of the system memory.

Those crash dump files can then assist developers to fix BSOD system crashes. Users can send the crash dumps to developers when they file support tickets.

Memory dump files can waste a lot of hard drive space. They can hog gigabytes of hard drive storage. Windows only automatically delete crash dump files when HDD space is limited.

However, users can also erase crash dumps with cleanup utilities.

How do I delete crash dump files in Windows?

1. Delete Crash Dumps Via the Command Prompt

  1. Users can erase crash dumps with a series of Command Prompt commands. To do so, open the Run accessory.
  2. Enter cmd in Run, and press the Ctrl + Shift + Enter keys.
  3. Then enter the following separate commands in the Prompt, and press Enter after entering each one.

fsutil usn deletejournal /d /n c:

del “%temp%*” /s /f /q

del “C:$Recycle.bin*” /s /f /q

del “%systemroot%temp*” /s /f /q

vssadmin delete shadows /for=c: /all /quiet

Dism /Online /Cleanup-Image /StartComponentCleanup /ResetBase

2. Turn Off Crash Dumps

  1. Users can turn off crash dumps to ensure they don’t hog any more HDD storage space. Enter Control Panel in Run’s Open text box and press Return.
  2. Then click System to open the Control Panel applet shown directly below.
  3. Click Advanced system settings on the left of the window to open an Advanced tab.
  4. Then press the Settings button under Startup and Recovery.startup and recovery
  5. Select the (none) option on the drop-down menu shown directly below to turn off crash dumps.
  6. Then click the OK button.

    3. Delete system error memory dump files in Disk Cleanup

    Users can erase crash dumps with Windows’ built-in Disk Cleanup. This tool allows you to perform a clean and safe cleanup on your PC.

  1. 1. Launch Run with the Windows key + R keyboard shortcut.

  2. 2. Enter cleanmgr in Run’s Open text box.

  3. 3. Press Ctrl + Shift + Enter to open Disk Cleanup as administrator.

  4. 4. Select the C: drive on the Drive selection window, and click the OK button.

    disk cleanup
  5. 5. Select the System error memory dump files check box.

  6. 6. Then click the OK button.

  7. 7. Users who can’t find a System error memory dump files option in Disk Clean-up should open that utility via an elevated Command Prompt. To do that, enter the following line in cmd: %SystemRoot%System32Cmd.exe /c Cleanmgr /sageset:16 & Cleanmgr /sagerun:16

    cmd disk cleanup
  8. 8. Press the Return key. Disk Cleanup  will open with more checkbox options. Navigate to the System error memory dump files option and click to delete the files.

So, there are a few ways users can erase crash dumps in Windows. Deleting the crash dumps might free up quite a bit of hard drive storage space so make sure to do so.

Let us know which was your method of choice in the comments section below.

How to Install a Wireless Printer on Windows 11 [3 Ways]

Microsoft’s latest desktop platform is now upon us. Since October 2021, users across the world have been upgrading to Windows 11. After that, the first thing you will need to do is add your printer and other external devices to Windows 11.

There are a few ways you can do so – both automatically and manually via Settings. Or you can utilize the Control Panel’s built-in tool for adding new devices.

Many users will no doubt need to add printers of the wireless variety to Windows 11. You can easily add wireless and non-wireless printers with the same built-in options and tools.

Thus, there isn’t much difference between adding wireless and non-wireless ones.

Will my wireless printer be compatible with Windows 11?

Some users might wonder if their printers are compatible with Microsoft’s latest desktop platform. Most Windows 10 device drivers are compatible with 11. If you have utilized your printer with Windows 10, it will probably work ok on the latest platform.

However, if you were utilizing your printer on an older Windows platform, like Vista or 7, you can’t be so sure. Older printers are less likely to be compatible with the latest desktop platforms.

This article on how to install the latest Windows 11 printer driver might help you. This is mandatory if you want to enjoy all the features of your printer.

To check if your printer is compatible with the latest platform, look for Windows 11 compatibility details on the manufacturer’s website.

For example, the Dell and HP websites both include Windows 11 printer compatibility pages that list supported models for that platform.

If your wireless printer is Windows 11 compatible, you can add it to the latest platform with the three methods below.

First, make sure your printer is fully set up with reasonably full cartridges installed as outlined within its manual.

The wireless printer also needs to be turned on and connected to your PC’s Wi-Fi network to add it to Windows 11. Your printer’s manual will provide specific details on how you can connect it to local networks.

How can I add a wireless printer to Windows 11?

1. Add it automatically

  1. First, click Start on your taskbar to bring up that menu.
  2. Select Settings on the Start menu.
    Pinned Settings app wireless printer windows 11
  3. Click the Bluetooth & devices tab in Settings.
  4. Then select Printers & scanners on that tab.
  5. Press the Add device button.
  6. Click the Add device button for your detected wireless printer.

For additional guidance on setting up your printer, check out this guide on installing a local printer on Windows 11. It provides a detailed walkthrough for connecting local printers to your device using built-in options.

Note icon NOTE
Some users might also need to enter a password or PIN authentication for their wireless printers after clicking Add device.

2. Add it via the Control Panel

  1. Click the taskbar’s magnifying glass icon.
    The magnifying glass button wireless printer windows 11
  2. Type Control Panel within the search tool that opens.
  3. Select Control Panel to open that window.
  4. Next, select Large Icons on the View by drop-down menu.
    Large icons option wireless printer windows 11
  5. Click Devices and Printers in the Control Panel.
  6. Then press the Add a printer button.
    Add a printer option wireless printer windows 11
  7. Choose a printer on the Add a device window, and press the Next button to install it.
  8. Press the Finish button after the printer has been added.

3. Manually add a wireless printer to Windows 11

  1. 1. Press the Windows key on your taskbar.

  2. 2. Type settings in the search bar and click on the first result to open the Settings app.

  3. 3. Navigate to the Bluetooth & devices tab.

  4. 4. Go to Printers & scanners.

    printers and scanners control panel
  5. 5. Press the Add device button.

    add a device printers and scanners
  6. 6. Then click the Add manually option.

    control panel add manually printer
  7. 7. Select the Add a Bluetooth, wireless or network discoverable printer option.

    add a wireless printer to windows 11 control panel
  8. 8. Then choose your wireless printer on the Add a device window.

  9. 9. Click the Next button.

    add a wireless printer to windows 11 next button
  10. 10. Thereafter, follow additional instructions in the Add Printer wizard to finish the installation.

  11. If the automatic installation does not work because your device is not detected, you can try a manual installation of your wireless printer.

    This can be easily done through Control Panel’s Bluetooth & Devices menu.

How can I set a printer to be the default one?

After adding a printer, make sure it’s the default one for your PC. Then it will be selected by default to print all your documents. You can set a printer to be the default one via the Control Panel:

  1. Press the Windows key + R hotkey.
  2. Type this Run command in the Open box: control printers
  3. Click Run’s OK button.
  4. Next, right-click the wireless printer you’ve added to Windows 11 to select the Set as default printer option for it.
    The Set as default printer option wireless printer windows 11
  5. Press the OK button on the confirmation prompt. Now your default wireless printer will have a green checkmark by it in the Control Panel.

How can I remove a printer in Windows 11?

When you get a new printer, you should remove the old one from Windows 11. You can remove added printers via Settings as follows:

  1. Press the Windows key + I keyboard shortcut for opening Settings.
  2. Click Bluetooth & devices on the left of Settings.
  3. Select Printers & Scanners to view your added printers.
  4. Double-click the added printer you want to remove to open settings for it.
  5. Then press the Remove button.
    The Remove option wireless printer windows 11
  6. Click Yes to confirm you want to remove the printer.

How come my wireless printer isn’t detected when I try to add it?

Network discovery needs to be enabled for Windows 11 to detect it. If your wireless printer isn’t detected, it might be because that feature is disabled on your PC. This is how you can enable network discovery on your computer:

  1. Open the Control Panel as specified in the first three steps of the third method.
  2. Select the Network & Internet category.
  3. Click Network & Sharing Center to open that applet.
    The Network and Sharing Centre option wireless printer windows 11
  4. Next, click Change advanced sharing settings on the left of the window.
    The Change advanced sharing settings option wireless printer windows 11
  5. Select the Turn on network discovery radio button for your private profile if that option is disabled.
    The Turn on network discovery radio button wireless printer windows 11
  6. Also, click the Turn on automatic setup of network connected devices checkbox to select that option.
  7. Press the Save changes button to apply the setting.

HP users can quickly diagnose connection and printing errors with the HP Print and Scan Doctor, which automates checks and fixes for Windows 11.

Some printers from the bigger manufacturers have supporting software. So, you might also be able to add your printer to Windows 11 with its supporting app instead. If your printer model has supporting software, you’ll probably be able to download it from Microsoft Store.

However, you can always add a wireless printer or non-wireless one to Windows 11 with its built-in options. Adding wireless printers to that platform with the above three methods is usually quick and straightforward.

Check out this guide if the printer is not working on Windows 11. Most commonly, it is recognized by the OS, but an error appears every time you try to print.

As for those times when your Brother printer won’t connect via USB on Windows 11, you need to take action as well since you can’t change printer settings or plug in more than one printer through USB.

If you have any other thoughts or opinions regarding this subject, do not hesitate to leave a comment in the section below.

How to Completely Remove Teams From Windows 11

When you install Windows 11 for the first time, you will see that there is a new icon on your taskbar, or it will be new if you haven’t been using Microsoft’s Teams collaboration app lately.

When you hover your cursor above the icon, which looks like a camera inside of a cartoon speech balloon, it will say Chat. If you click on it, you’ll be invited to Meet and chat with friends and family using the application.

But, of course, the obvious question arises: What if you’re not interested in using Teams at all?

How can I remove Teams on Windows 11?

Rest assured that there are several things you can do if you find the push to Teams to be a bit irritating. You can stop the app from automatically loading every time you start your machine.

You can remove the Chat icon from the Taskbar, or, if you really want to go all the way, you can even uninstall it.

1. Stop Teams from loading at startup

  1. Press Windows key + I to open the Settings app.
  2. Select the Apps category, and then press on the Startup button. apps startup
  3. Locate the Teams app and turn it off.turn off teams startup

Also, while you’re in the Startup menu, you can take a look at some of the other apps that automatically start up with your computer that you would like to disable.

2. Remove Microsoft Teams from the taskbar

  1. Right-click on the taskbar and access Taskbar settings.taskbar settings
  2. Under Taskbar items, locate the Chat option and turn it off.turn off chat

3. Uninstall the app via Settings

  1. 1. Press Windows key + I to open the Settings app.

  2. 2. Select the Apps category, and then click on Apps & features.

    windows 11 teams apps
  3. 3. Locate the Microsoft Teams app in the list and click on the three vertical dots next to it.

    uninstall teams 1
  4. 4. Click on Uninstall.

    uninstall microsoft teams
  5. If you want to completely remove Teams from your Windows 11 PC, then you should uninstall it using the built-in Apps and Features settings. In just a few clicks, Teams will be gone forever from your PC.

4. Uninstall Teams using PowerShell

  1. Use the Search option on your taskbar, search for PowerShell and open the application.teams powershell 1
  2. Run the following script in PowerShell.teams powershell 2
$Teams = Get-Team

for ($i = 0; $i -lt $Teams.Count; $i++)
{
    "{0}: {1}" -f $i, $Teams[$i].DisplayName
}

# multiple can be selected if comman seperated
$Selection = (Read-Host -Prompt "Select Team(s) to remove").Split(',').Trim()

foreach ($number in $Selection) 
{
    $Teams[$number]
    #Remove-Team -GroupId $Teams[$number].GroupID 
}

<# Output
0: TeamsOne
1: TeamsTwo
#>

All that’s left to do is prompt for the number of teams to remove and re-select it using the index number.

  • Used the -f string format operator as it should allow you to assign the current iteration of $i to the choice number, and the Display Name of the teams; giving it a feel of choice selection.
  • Using the .Split() method let’s you make a multiple choice selection given that it’s separated by a comma.
  • Finally, use a foreach loop to iterate through the numbers input into our Read-Host assigned to $selection. Which gives you the same index number that will be used to select our choice from $Teams.

That’s pretty much the entire process, depending on which step you choose to take. Pretty simple, right?

Things are also quite simple if you want to remove OneDrive in Windows 11.

So, whether you just don’t want Microsoft’s Teams app to also start when your device does, remove it from your taskbar, or completely uninstall it, now you know how to do so in under two minutes.

To learn more about Teams, we have a great guide on how to update Microsoft Teams on Windows 11, so don’t miss it.

Was this guide helpful to you? Let us know in the comments section below.

Windows 11 High CPU Usage: How to Stop or Reduce it

Facing high rates of CPU usage while using Windows 11 can make the entire experience sluggish and annoying and thus will impede your capability to work, browse the web, and even play games.

That said, it can only be considered a problem if your system constantly reaches high CPU usage scores, even when no system-heavy applications are running, like antivirus scans or games.

If you find yourself included in the statement above, an essential factor to consider when dealing with this issue is the Windows 11 system requirements.

Even though compared to the latest improvements in technology the OS requirements by themselves shouldn’t pose an issue, there might be situations in which your system is so close to them that it can’t run optimally.

No matter if you’re close to the minimum system requirements or not, some amazing solutions can help optimize the overall Windows 11 experience to a great degree.

In today’s guide, we will cover every option available, including settings-related changes that will help enable you to get the most out of your system without requiring you to upgrade your PC.

Unfortunately, we can’t all afford to invest in a powerful PC simply to run the latest OS released by Microsoft, and opinions vary among users if it’s even worth it at all to consider that option.

As you can see from the statements above, this guide was created to encompass a wide range of elements that can be changed, tweaked, or simply optimized to resolve this issue once and for all.

Why is my CPU usage so high on Windows 11?

Now that we understood how to find out if the PC has a CPU problem or simply has a harder time dealing with some tasks temporarily, we can cover the most common reasons for this problem occurring.

➡ Lacking system resources

There are a few ways in which you can find out if your system configuration is capable of dealing with the demands of the new OS from Microsoft.

Below, you can see an image of the official system requirements for this OS.

Note that any values that are above these minimum requirements will ensure a smoother experience.

system requirements pc windows 11
Windows 11 system requirements – Source: Microsoft

Even though this method will require that you have basic knowledge of what system components are, some of the most important elements to take into consideration are the processor speed and the amount of RAM available.

It is also worth noting that the system requirements mentioned in the image above deal only with that factor, and do not include the Windows 11 feature-specific requirements, which are also worth considering.

➡ Having too many applications running simultaneously

If you forget to close applications you’re not using or simply run apps that take a lot of resources to keep open, your CPU usage will show the results.

Of course, this element will vary from user to user, depending on the system configuration and the burden of the previously mentioned applications.

➡ Extra system services that affect your CPU

In the same way, not all apps require the same amount of resources to run, system services are no different.

Even though it is risky to disable some services, at the same time, we have chosen some of them which should not affect the stability of your system, but will improve the efficiency of your OS.

➡ Infection with adware and/or malware

This is a common occurrence, especially if you’re using free antivirus software that either hasn’t been updated recently or has an outdated virus library and can’t effectively identify the latest threats.

➡ Antivirus processes having a high impact on the CPU usage

As in the case of any software, some antiviruses will have a very high demand on your CPU and thus cause your system to run sub-optimally.

We will discuss some great options that affect your system minimally and provide a great set of security and privacy features.

How can I fix High CPU usage in Windows 11?

1. Restart your PC

Even though this step might seem obvious to some users, restarting your PC can solve this issue instantly.

This works as a restart of your system and also re-initiates all the elements that make your OS run optimally, thus impacting the number of resources required and their level of optimization.

  1. Click the Start button from the taskbar.
  2. Select the Power button.
  3. Choose Restart from the pop-up that appears.

2. Optimize startup applications

  1. Press the Win + R keys to open the Run dialog.
  2. Type msconfig inside the Run dialog box.
  3. Press Enter or click OK to run the command.
  4. Click the Startup tab.
  5. Click the Open task manager link.
  6. Click on the Status row title twice to group tasks based on that element.
  7. Identify any applications with an Enabled value that you don’t want starting at Windows startup, and click Disable.

3. Disable background apps

    High CPU usage is likely to be caused by a multitude of apps that run in the background at all times. Thus, disabling unused background apps and programs can greatly improve CPU speed.

  1. 1. Click the Windows icon from the taskbar.

    windows taskbar button
  2. 2. Choose the Settings cog wheel from the list.

    settings windows 11
  3. 3. Select Apps from the left hand side menu.

    settings system apps
  4. 4. Click on Apps & features.

    control panel apps and features w11
  5. 5. Identify any app that you don’t need and click the 3 dots option on it.

    apps and features control panel remove apps background
  6. 6. Choose Advanced options.

    advanced options apps and features
  7. 7. Click the drop-down menu for Background app permissions and choose Never.

    disable background apps to fix high cpu usage on windows 11
  8. 8. Repeat the same process for all apps you want to disable.

4. Check the Windows 11 power options

➡ If you’re using the Balanced power plan:

  1. Click on the Search icon from your taskbar.
  2. Type power plan and click on the Choose power plan option from the results.
  3. Tick the High performance option.

➡ If you’re already using the High-performance power plan:

  1. Click the Change plan settings link next to the option.
  2. Select the Change advanced power settings link.
  3. Double click the Processor power management option from the list.
  4. Open the Minimum processor state option and choose a good value for both elements (battery and plugged in).
  5. Choose the Maximum processor state option, and make sure both values are set to 100%.
  6. Click OK or Apply.
Note icon NOTE
The same power management customization process mentioned above can be applied to the Balanced power plan setting as well.

5. Scan your system for malware and adware to fix high CPU usage

  1. Click on the Start menu button from the taskbar.
  2. Search for Windows Security, and open it.
  3. Choose the Virus & threat protection option.
  4. Click the Scan options link.
  5. Tick the bubble next to Full scan.
  6. Click Scan now and wait for the process to complete.

Even though the built-in security system can identify a large number of threats, the scan will most likely not be as efficient as other malware identification software on the market.

If you want to ensure that any malware and adware will be not only identified, but completely removed, a better option would be specialized software like Malwarebytes.

6. Update your PCs drivers to fix high CPU usage on Windows 11

  1. Press the Win + X key combination and choose Device Manager from the pop-up menu.
  2. Identify drivers that need to be updated.
  3. Select the hardware entry you want to update.
  4. Right-click it, and choose Update Driver.
  5. Choose Search automatically for drivers.
  6. Wait for the process to complete and repeat these actions for all drivers.
Note icon NOTE
If that specific hardware has the latest driver installed, a message confirming this will appear on the screen.

On the other hand, if the device doesn’t have the latest driver release, Windows will install it automatically.

7. Temporarily turn off third-party antivirus and VPN services

Even though this action is not recommended in the long term, temporarily disabling your antivirus and VPN services will allow you to eliminate the possibility of that software interfering with your CPU too much, and thus possibly causing the issue.

Tip icon Tip
The exact steps to follow for this method will depend entirely on what software you have installed.

If you have another software installed, simply follow the guidance from the respective software’s website guide.

➡ Antivirus

We will first discuss and exemplify the steps required to temporarily disable our antivirus software – Bitdefender Total Security:

  1. Double-click the antivirus icon from the taskbar to open it.
  2. Click Protection from the left-side menu.
  3. Select Open from the Antivirus pane.
  4. Click the Advanced tab.
  5. Use the toggle button to turn off the Bitdefender Shield.
  6. Click Yes in the User Account Control pop-up.
  7. Use the drop-down menu to choose the time in which the antivirus will be stopped, and then click OK.
  8. Try checking your CPU usage and see if there is any significant change.

➡ VPN

When it comes to the VPN service, simply disconnect from any servers and turn off the software.

In our case, these are the steps that need to be followed for Private Internet Access:

  1. Click the VPN icon from the taskbar to open it.
  2. Toggle the big power button appearing on the interface.
  3. The VPN will now be disabled until you choose to re-activate it.

8. Update your computer’s policy to speed up the CPU

Even though your PC’s policy should be updated by default when performing Windows updates, there have been cases in which the CPU over-usage was caused by this small yet important detail.

Here are the steps required to perform this action manually:

  1. Press the Win + X keys and choose Windows Terminal (Admin).
  2. Inside the newly opened window, type the following command: gpupdate
  3. Press Enter to run it.
  4. Wait for the process to complete.
  5. Type Exit and press Enter to close the window.

9. Check for Windows updates

  1. Press the Win + X key combination, and choose Settings.
  2. Scroll down in the left side panel, and choose Windows Update.
  3. Click the Check for updates button.
  4. Wait for Windows to check, and install any available updates.
Tip icon Tip
If Windows installed updates, be sure to test out if your CPU usage is still showing high values by using the method described at the start of this guide. If it still does, follow the next steps.

10. Check the Windows 11 installation partition for bad sectors

  1. Press the Win + X keys and select Windows Terminal (Admin) from the list.
  2. Inside the command prompt window, type the following command: chkdsk c: /f
  3. Press Enter to run it.
  4. A message will appear on the screen.
  5. Type Y and press Enter to accept.
  6. A message saying that the process will take place at the next restart will appear.
  7. Type Exit and press Enter to close the window.
  8. Restart your PC.
Tip icon Tip
During the restart process, the C: partition (the location on which your Windows 11 OS is installed) will be checked for any bad sectors, and if any issues are found, they will be fixed automatically.

11. Fix high CPU usage in Windows 11 by cleaning your PCs components

pc components windows 11

As dust and dirt can act as an insulator, and thus cause internal temperatures to rise considerably, the insides of your PC must be cleaned regularly.

Tip icon Tip
What you will need:

– A soft brush
– Can of compressed air (optional)
– Tools to open the device (eg. screwdrivers)
– Knowledge of how to open your device without damaging it

Make sure to only attempt this step if you’re sure that you will not cause damage to your system.

If you don’t have experience, we recommend that you take your device to an authorized computer service and ask for a cleanup.

The preponderance of this issue is also closely related to the way your system is built, depending on where the heatsink or fan is placed on the CPU, and if the device is a laptop or a desktop.

  • Desktop PC

A tower design will always build up more dust or dirt over time when compared to a design in which the heatsink sits flats on the surface of the CPU.

In either of these cases, using a can of compressed air will clear up any impurities from the fan and thus considerably help you with your CPU issues.

As a bonus, after considering the information presented on the CPU’s manual, try removing the CPU from the motherboard and also clean the connector (CPU interface) using the same compressed air can.

This last step will ensure that nothing is bothering your CPU while trying to cope with tasks, and the connection to the motherboard is optimal.

  • Laptop

Even though a lot more portable than a desktop PC, the downside when owning a laptop is that the process of opening it up is a bit more complicated. This happens especially if you have a notebook, as some gaming laptops feature systems that enable you to open them easily.

That being said, make sure to check the producer’s website for any guidance in this matter, and after successfully opening the device up, use a can of compressed air to blow away any dirt or dust from the components.

12. Check the PCs power supply

If your PC is not getting enough power, or if the power fluctuates considerably, then the system will not work optimally, and thus will cause your CPU to reach high values even for everyday tasks.

  1. Check along the length of the power cable ensuring that not cuts are present.
  2. Ensure that both ends of the power cable are connected properly (both in the wall socket, and the end that connects to the PC).
  3. If you can’t find any obvious issues, and suspect that this might be causing problems, we recommend you seek professional help (local PC repair shop).

If you’re not sure that the power supply is the issue, you can also try out the next solutions from this guide before taking it to an authorized computer repair shop.

13. Disable non-Microsoft services with MSConfig

Tip icon Tip
Perform this action at your own risk!

Even though no Microsoft services will be turned off, disabling services can cause system instability.
  1. Press the Win + R keys on your keyboard.
  2. Type MSconfig in the Run dialog box, and press Enter.
  3. Open the Services tab.
  4. Tick the box next to Hide all Microsoft services.
  5. Go through the list and un-tick the boxes next to the services that you don’t need.
  6. After disabling a service, restart your PC and check if the CPU situation has improved.
  7. Repeat steps 4, 5, and 6 until you find the service/services causing issues.
  8. After identifying the service/services that cause your CPU to work extra, enable all the other services one by one.

If you want to disable all the non-Microsoft services, simply click the Disable all button after ticking the box mentioned above.

system configuration disable all

After you’re done testing which services are causing your CPU to work extensively, restart your system for the update to take effect.

14. Stop/disable specific Microsoft system services (last resort) to fix high CPU usage

Tip icon Tip
Perform this action at your own risk!

Even though only some selected Microsoft services will be turned off, disabling services can cause system instability.

As running system services your PC doesn’t need to operate will cause the CPU to work overtime without any useful results, deactivating some Microsoft services will prove helpful.

The services which can be disabled without risking system instability are the following:

  • SysMain – preloads RAM usage for apps
  • Windows Search – indexes data stored on your system for fast search results
  • Windows Update – service that automatically scans for Windows updates

You should first try stopping these services and testing out the results.

If the CPU works better after disabling one or more of these services, you can consider disabling them entirely.

Stopping services:

  1. Click on the Search button from the taskbar.
  2. Type service and click on the Services option presented in the results.
  3. Search the services list for SysMain, Windows Search, and Windows Update.
  4. After selecting each of these services, click the Stop link from the side panel.
  5. Test out your CPU usage and how stopping the services has impacted your Windows 11 experience.
  6. If you find that CPU usage is better, and also don’t mind not having the services enabled, follow the next method to disable them.

Disabling services:

  1. Follow step 1, 2, and 3 to open the Services app and search for the respective entries.
  2. Right-click each of the 3 services mentioned above and choose Properties.
  3. Click the drop-down list under the Startup type section.
  4. Choose Disabled.
  5. Click Apply.

If at any point you want to re-activate these services, simply follow the same steps presented here, but choose Enabled from the drop-down menu inside the Properties window.

How can I check for high CPU usage?

Even though some third-party task managers can be used to achieve the same results, the most accessible option will be the built-in Windows 11 Task Manager feature.

  1. Press the Ctrl + Shift + Esc key combination.
  2. Click the Processes tab.
  3. Close any resource-intensive apps like games and image processing apps by selecting it-them and hitting the End task button.
  4. Check the % of CPU usage in the respective section.
  5. Monitor this value across a few hours to check if it constantly reaches high levels while using your PC normally.
Note icon NOTE
If you find that your PC reaches values of up to 100% across longer periods, then it is safe to assume that your Windows 11 system needs some tweaking.

In case your system reaches 100% CPU usage only occasionally (depending on the apps that you’re running), then we can conclude that your system doesn’t have a real problem but would benefit from a components upgrade and the following tricks nonetheless.

As you can see, there are a variety of ways in which you can resolve issues with your CPU values going overboard.

If you are facing high CPU usage due to processes like Microsoft Common Language Runtime Native Compiler High CPU Usage, we recommend you check this guide for solutions.

We presented you with options starting from the least intrusive to the ones that could pose a risk to your system, so make sure to try them out in the order that they were presented.

If you find yourself in the camp that thinks that investing in a new PC is a doable option, you can explore our thorough list of the best Windows 11 desktop PCs.

If you’re more inclined to appreciate the portability of your new PC, then investing in a great laptop that can run this OS is the best choice.

Added to that, we will also discuss how to make Windows 11 more responsive by ensuring that every aspect of your system is ready to confront the tasks you throw at it.

Other applications can cause this issue as well, and we wrote about WavesSvc64.exe high CPU usage and COM Surrogate High CPU and Memory Usage in our other guides.

Feel free to share what solution worked for you in the comments section below this guide.