You might’ve noticed a strange Kaspersky notification prior to logging into Windows 10. The popup says Application databases not updated. Error resolving network name.
The message is loud and clear, yet trying to run an update doesn’t usually make any difference. It just gets stuck at 0 KB downloaded with a blank update-source waiting for an immediate fix.
The network name issue is common in antivirus software tools like yours and can be easily fixed by following the troubleshooting steps provided on this page.
What can I do when getting Error resolving network name in Kaspersky?
1. Reboot your computer
Firstly, you can fix this problem by rebooting your PC. This procedure is often necessary to recover from an error, so don’t hesitate to press and hold down the Power button on the computer. After 10 seconds or so, the computer should turn off.
Once it is off, wait a few more seconds and then turn the computer back on. You could also enter this command to reboot it: shutdown /r. This will set a time out of 30 seconds to close the applications. After that, the windows reboot will start.
Then, wait around 15 minutes after the system boots up to see if the Error resolving network name will occur again.
2. Disable and re-enable wireless card
Another potential solution that users found is to disable the wireless card, then re-enable it. For that, go to the Start Menu, look for Control Panel in the search box on your desktop, and click Control Panel to open it.
Click the Network and Internet category and then select the Networking and Sharing Center. From the options on the left-hand side, select Change adapter settings. Right-click on the icon for Wireless Connection and click Disable.
If you find it from the start as Disabled, it’s possible that you may have accidentally used a certain keyboard combination (like Fn+F5). Finally, return to the same path and click Enable this time. Don’t forget to also restart your computer.
Like any other program, Kaspersky creates temporary files on the computer while it is running. These files are supposed to be deleted once the program ends. However, sometimes there are exceptions and these temp files lead to an error in the program.
To correct that, open the Run window by pressing Win + R on the keyboard, enter %TEMP% and click OK. You may now press Ctrl + A on the keyboard to select all the files in the folder. Press Delete to get rid of the files.
4. Check system date/time
A quick and easy way to fix the resolving network name error could also be to check system date/time. To do that, click on the date and time in the notification area of the taskbar and compare the date to the current one.
If you notice even the slightest difference, right-click the clock and select Adjust date/time. Put the switch Set time automatically in an off position, then click Change and feel free to select the right date now.
If the recommendations above did not help, reconfigure the client device to not use the proxy server for connections. To make it happen, enter into Settings > Additional > Network > Proxy server. While here, select Do Not use proxy server.
It’s also worthwhile checking that you’re not in Gaming Profile or taking a closer look at the Update Source. You can find it under Settings > Additional > Update > Select Update Sources.
Could you find this post as useful in getting rid of the network name error? Leave a comment below to let us know if this tutorial helped you fix the issue or if you need further assistance.
The error invalid data system error code is also known as error 13 0xD. It usually occurs when users install new apps, updates, or a new OS version on their PCs.
It indicates that particular files and folders are broken or corrupted. Irrespective of the cause of this issue, the solutions in this guide will help you fix it quickly.
What does it mean the data is invalid?
The invalid data means a faulty system file or something is wrong with some processes. Below are some of the causes of this error message:
Antivirus interference: Your antivirus software might block your Windows update, leading to this error message. The solution to this is to disable your antivirus software temporarily.
Corrupt system file: Sometimes, error 13, the data is invalid, can be caused by broken or missing system files on your PC. You need to repair these corrupt system files to solve the problem.
Interference from third-party apps: In some cases, third-party apps might run a counter-program preventing your update. You need to perform a clean boot to solve this issue.
How can I fix the data is invalid error on Windows 10?
1. Run the Windows Update troubleshooter
Press the Windows key + I to open the Settings app, and select Update & Security.
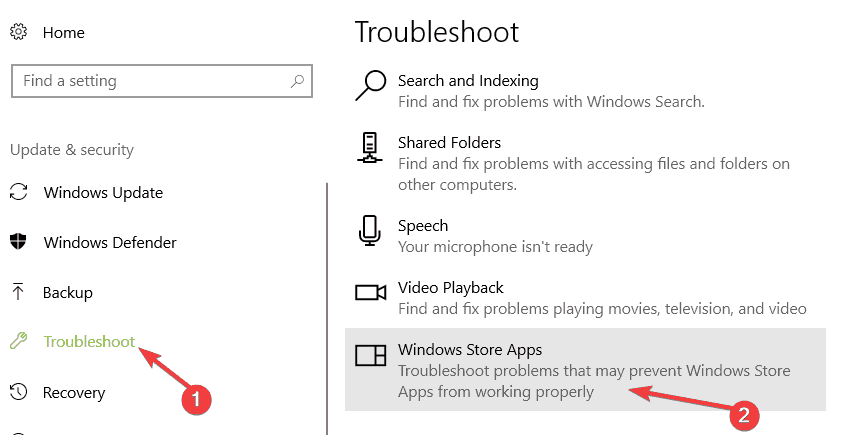
Choose Troubleshoot in the left pane and click Additional troubleshooters.
Now, select Windows Update and click Run the troubleshooter.
All Windows versions feature a dedicated Windows Update Troubleshooter that automatically detects and fixes update issues. So if you are dealing with invalid data error, the first thing to do is to run the troubleshooter.
2. Repair your registry
Press the Windows key, type cmd, and select Run as administrator under Command Prompt.
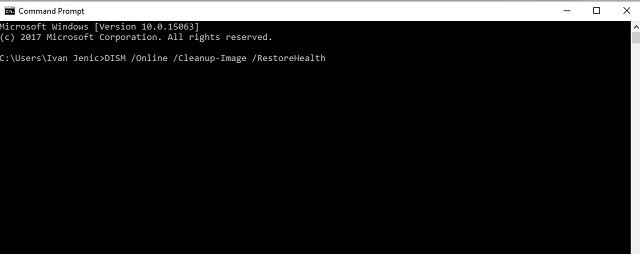
Type the command below and hit Enter to run it: DISM.exe /Online /Cleanup-image /Restorehealth
Now, wait for the command to finish running.
Next, type the command below and press Enter: sfc /scannow
Finally, wait for the command to finish running and restart your PC.
In some cases, the data is faulty system files can cause invalid error. Thankfully, Windows has a couple of tools you can use to repair these files.
Alternatively, you can use specialized softwareto repair and restore your registry. This tool will replace any broken file with the original version while repairing the corrupt ones.
3. Rename the Software Distribution folder
Press the Windows key + R, type services.msc, and click OK.
Right-click the Windows Update service and select Stop.
Now, press the Windows key + E to open File Explorer and navigate to the path below: C:/ Windows/SoftwareDistribution
Next, rename the SoftwareDistribution folder to SoftwareDistribution.old.
Finally, repeat step 1 and select Start instead of Stop in step 2 to restart the Windows Update service.
The SoftwareDistribution folder contains your download history. If this folder is corrupt, it might cause problems, including invalid data error.
The best thing to do here is to rename the folder and allow your PC to build another one.
4. Use Microsoft’s Update Catalog website
If you can’t install particular Windows updates, you can download them directly from the Windows Update Catalog website. All you need to do is type the KB number in the search box, hit Enter, and then click the download button.
5. Perform a clean boot
Press the Windows key + R, type msconfig, and click OK.
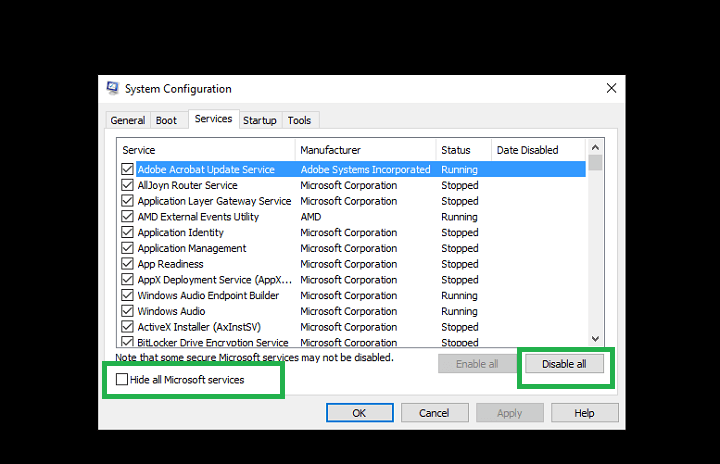
Select Services, check the Hide all Microsoft services box, and click the Disable all button.
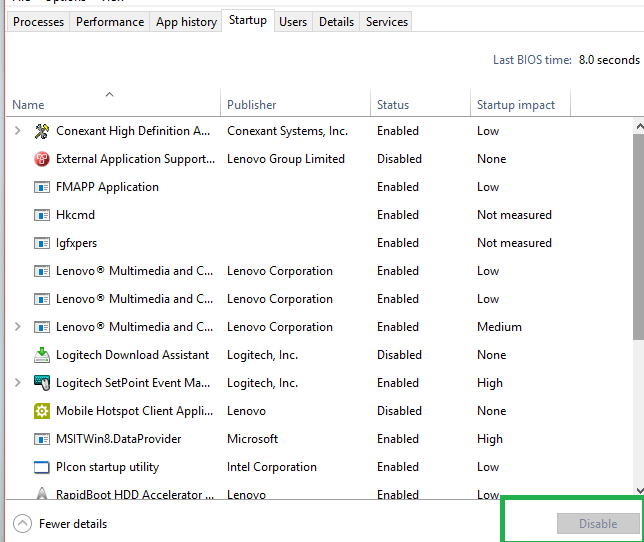
Now, click the Startup tab and select Open Task Manager.
Right-click each of the apps there and select Disable.
Next, go back to the System Configuration window and click Apply, followed by OK.
Finally, restart your PC and try installing the update.
Clean Boot eliminates software conflicts that may sometimes occur when installing various apps, programs, or updates. It works by starting Windows using a minimal set of drivers and startup programs.
This should disable any app or process that might be causing the data is invalid error.
6. Reset Windows Update components
Launch Command Prompt as an admin.
Type the following commands and hit Enter after each one: net stop bitsnet stop wuauservnet stop appidsvcnet stop cryptsvc
Now, type the following command to delete the qmgr*.dat files and press Enter: Del “%ALLUSERSPROFILE%Application DataMicrosoftNetworkDownloaderqmgr*.dat”
Next, run the command below to repair the corrupted repository: cd /d %windir%system32
Then, type the following commands and press Enter after each: regsvr32.exe atl.dllregsvr32.exe urlmon.dllregsvr32.exe mshtml.dllregsvr32.exe shdocvw.dllregsvr32.exe browseui.dllregsvr32.exe jscript.dllregsvr32.exe vbscript.dllregsvr32.exe scrrun.dllregsvr32.exe msxml.dllregsvr32.exe msxml3.dllregsvr32.exe msxml6.dllregsvr32.exe actxprxy.dllregsvr32.exe softpub.dllregsvr32.exe wintrust.dllregsvr32.exe dssenh.dllregsvr32.exe rsaenh.dllregsvr32.exe gpkcsp.dllregsvr32.exe sccbase.dllregsvr32.exe slbcsp.dllregsvr32.exe cryptdlg.dllregsvr32.exe oleaut32.dllregsvr32.exe ole32.dllregsvr32.exe shell32.dllregsvr32.exe initpki.dllregsvr32.exe wuapi.dllregsvr32.exe wuaueng.dllregsvr32.exe wuaueng1.dllregsvr32.exe wucltui.dllregsvr32.exe wups.dllregsvr32.exe wups2.dllregsvr32.exe wuweb.dllregsvr32.exe qmgr.dllregsvr32.exe qmgrprxy.dllregsvr32.exe wucltux.dllregsvr32.exe muweb.dllregsvr32.exe wuwebv.dll
Now, reset Winsock by typing this command: netsh winsock reset
Type the following commands and press Enter to run it: net start bitsnet start wuauservnet start appidsvcnet start cryptsvc
Finally, try to install the updates again and restart your PC.
Press the Windows key, type windows defender, and select the Windows Defender Firewall option.
On the left pane, find and click on Turn Windows Firewall on or off.
In the Customize Settings window, select the Turn off Windows Firewall radio buttons for both the Private and Public network settings.
Click OK to disable Windows Firewall.
Next, press the Windows key, type virus, and select Virus & threat protection.
Click the Manage settings link.
Finally, toggle the switch under Real-time protection backward to disable it.
If you still can’t install the latest updates on your computer, try disabling your antivirus and firewall. Then, turn off these tools temporarily while downloading and installing the updates.
As soon as the updates have been installed, enable your security solutions again.
We have reached the end of this detailed guide on how to fix the invalid data issue. We believe you should now be able to solve the problem by following the solutions in this guide carefully.
If you’re getting the ERROR_TOO_MANY_SEM_REQUESTS error code with The semaphore cannot be set again description, check the troubleshooting instructions listed in this article to fix it.
This system error, as same as all semaphore system errors, mainly relates to the critical malfunction of certain Windows services.
It may occur in various scenarios, including the system startup, due to program crashes or even during the system installation. These are the main reasons for this error:
In addition, this individual error can appear on all Windows systems, so the troubleshooting procedure may slightly differ. Moreover, it’s important to remember the exact activity which caused the error. That should help you with further troubleshooting.
Either way, we prepared some of the most common solutions that should help you to address this problem, and hopefully, resolve it completely. The detailed instructions can be found below.
How do I fix The semaphore cannot be set again error?
1. Repair or reinstall a program
Right-click the Start menu and open Control Panel.
While in the Category view, choose to Uninstall a program in the bottom left corner.
Navigate to troubled, Windows-relatedprogram that inflicted the error dialog box.
Right-click and Uninstall it.
Delete remaining folders and clean the registry
Make sure to back it up before you run the cleanup tool.
Restart your PC.
Install the program and look for changes.
The first thing that you should do when a certain program crashes followed by the system error code 103, is to reinstall it. Certain applications allow you to restore them, and that’s a preferred solution.
With that procedure, you might retain complete settings and configuration of the program, while retrieving essential files.
However, if uninstallation is the only available solution, we advise you to use a third-party tool to clean up registry inputs of the given program.
In addition, make sure to delete all of the remaining files after the uninstallation is complete. That way you can start from a scratch, and hopefully, avoid a future occurrence of the system errors.
If the program at hand isn’t solved after the reinstallation, you should turn to additional steps. Maybe the gravity of the error is above a corrupted installation file of a single program.
2. Use SFC command-line tool
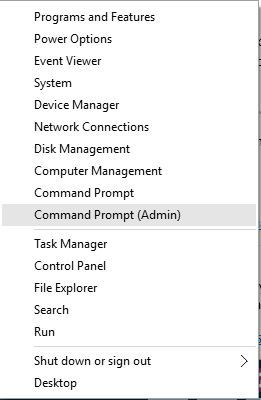
Right-click Start and, from the contextual menu, open Command Prompt (Admin).
In the command line, type or copy-paste the following command and press Enter:
sfc/scannow
After the procedure is finished, restart your PC.
System errors are, as the name itself says, related to critical system processes. Those processes are, obviously, related to files, and those files can and will occasionally get corrupted.
Albeit, sometimes the registry, which takes care of system processes commands and commands, is the culprit, but the corrupted file can cause just as much trouble to users.
In order to resolve the corruption of the system files, you should turn to the elevated Command Prompt and one exact command. SFC tool is an essential part of the system troubleshooting and it covers most errors you’ll ever encounter.
So, if the malware or an unrestricted program caused problems with system files, these instructions should help you resolve it.
3. Check drivers
Right-click Start and open Device Manager.
If you locate any driver with the yellow exclamation sign, right-click and click Update Driver Software.
In addition, you can navigate to the OEM’s site and download the drivers for various devices.
If Windows Update can’t obtain the latest driver, you should follow the instructions below in order to identify the troubled device and find the proper driver on the manufacturer’s site.
Right-click Start and, in the contextual menu, choose Device Manager.
Right-click the troubled device and open Properties.
Under the Details tab, from the drop-down menu choose HardwareId.
Copy the values from the box and paste them into the preferred browser.
You should see the exact name of your device and act accordingly.
With the introduction of forced updates in Windows 10, drivers suddenly become a problem. But, we don’t want to neglect the fact that Windows has always been prone to driver issues.
Those problems may seem insignificant at first sight, but that’s not the case. In order to have the optimal system performance, you need to obtain, install, and timely update drivers.
This goes especially for the main drivers’ list, which includes GPU, sound, network adapters, etc. The system error‘ERROR_TOO_MANY_SEM_REQUESTS 103’ can be occasionally inflicted by the faulty driver that somehow relates to a troubled program.
As we already stated so many times, it’s essential to download and install only trusted drivers from official sites.
4. Use system recovery options
In the Windows Search box, type system properties and open System Properties.
In the System Properties dialog box, open System Protection.
Click on System Restore.
Click Next and, from the next window, choose the preferred restore point.
You can inform of applicable changes that will occur after the restore by clicking on Scan for affected programs.
Once you’re certain to which date you want to restore your PC, highlight the restore point and click Next.
Finally, click Finish.
Your PC will restart and the restoring procedure will start.
After the procedure is finished, you can check for changes in the system and programs‘ behavior. If the problem is still there, and the above-mentioned error still bothers you, the clean reinstallation might be the only solution.
In addition, if you’re a Windows 10 user, there’s the Reset this PC recovery option. Follow the instructions below to use it to reset your PC to default settings and, hopefully, resolve the problem at hand.
Press Window key + I to open Settings.
Open Update & Security section.
Click on Recovery under the left pane.
Click on Get Started under Reset this PC.
Choose to Keep your files.
Follow the instructions until the reset is completed.
If you’re running any previous Windows OS versions, you can always turn to System Restore and restore the previous well-performing system configuration without losing any files, except the installed programs and certain customizable features and settings.
So, if the error 103 is still there, even though you’ve performed previous steps, you should start System Restore and give it a try. It proved helpful on various occasions, and it might be just enough to relieve you of the error at hand.
Of course, if System Restore is enabled, and it should be by default. If it’s not, you can try other recovery options in Windows 10, while Windows 7/XP users, should turn to a reinstallation as an only viable option.
However, in Windows 10, users are able to use a few advanced recovery modes before they eventually turn to a clean reinstallation.
5. Perform a clean reinstallation
In the end, a fresh start from a scratch might be the only viable solution. It can indeed be a time-consuming and complex procedure, but you have to read the clues that your system grants you with.
After some time, with the extensive use and various changes within the system, possible malware infections and registry errors, your system should be renewed.
However, we strongly advise you to backup your data and license key before you move to reinstallation. And no, it’s not wise to use an upgrade over clean reinstall.
You may preserve your data and installed apps and settings, but there’s a chance that the same error will occur again. You can read the detailed description of various reinstalling options on our site. So make sure to inform properly before you move to a procedure itself.
By following these steps you should no longer see any The semaphore cannot be set again error when using Windows 10.
If you have any questions or suggestions, we’ll be glad to hear from you in the comments section below.
As you already know, Microsoft Teams allows multiple users to access and edit shared files from their client. However, to protect multiple simultaneous edits, Microsoft Teams may lock the file for other users when it is in use by one of the team members.
However, several users have reported Microsoft Teams error file is locked appears even when no one is using the file. You can read more such complaints in the Microsoft Teams forum.
I’ve been testing files in Teams. It appears it’s keeping files locked open after they’re closed in Teams. For example – edit a file in the Teams window, close it, then go try to delete the file 5 minutes later on the SP side, it says it’s locked for editing. Has anyone else experienced this?
Follow the steps in this article to fix Microsoft Teams error file is locked on Windows computers.
How to fix Microsoft Teams error file is locked
1. Clear Microsoft Office Cache
A bad cache can create issues with file editing in Microsoft Team client. Try to clear the cache to resolve the error.
Open File Explorer by pressing Windows Key + 2.
From the File Explorer, navigate to the following location:
C:Users[USER NAME]AppDataLocalMicrosoftOffice16.0
Open the OfficeFileCache folder and delete all the files that begin with FSD and FSF inside the folder.
Relaunch Microsoft Teams from Office admin and check if the issue is resolved.
2. Reset Office Upload Center
Type Office Upload in the search bar.
From the search result, click on the Office Upload Center.
In the Upload Center window, click the Settings option.
Under the Cache Settings section, click the Delete Cache Files button.
After that, check the “Delete files from the Office Document Cache when they are closed” option.
Click OK and close the Office Upload Center.
Now try to launch Microsoft Teams and sign out.
Close and relaunch Microsoft Teams and log in. Try to edit the file with Microsoft Teams error file is Locked.
3. Update Microsoft Teams
If you are running an older version of Microsoft Teams, try to update the client to the latest available version.
Some users have reported that updating to Version 1808 or above has resolved the issues for them.
To check for any available update, launch Microsoft Teams and click your Profile icon.
Click on Check for updates option.
Microsoft Teams will now look for any pending updates and install it.
Reboot the computer and check for any improvement.
4. Make Edits from SharePoint
If the issue persists, as a workaround you can delete or move the concerned file from the SharePoint.
Open the file in SharePoint.
Select it from the list and click on Show Actions > More > Check Out > Check-Out is Done.
Now try to open the file in Microsoft Teams.
The error Sorry we ran into a problem, the file filename.docs is locked doesn’t seem to have any conclusive solutions. However, you can follow the steps in this article to resolve the error to an extent.
Slack is probably, the most popular team organization tool out there. The abundance of features and overall usability provides users with a great workspace tool.
Albeit the issues are rather scarce, users will run into a few of them from time to time. One distinct error we ran into is that Slack couldn’t send this messageerror.
It appears when a user tries to send a message and is met with a halt. We provided the solutions below to help you force your message through.
Why won’t Slack send my message?
Below are some of the reasons Slack is not sending your messages:
Corrupt app cache: If Slack cache is corrupt, it might be the reason for this error. You can fix this by clearing the app cache and trying again.
Firewall interference: At times, your firewall might be blocking your connection, causing the Slack message to be greyed out. You can fix this by adding an exception for Slack in your firewall.
What do I do if Slack couldn’t send this message?
Before proceeding to the solutions below, try the following troubleshooting steps:
Clear the browser’s cache (for a web-based client).
Restart your router.
Try with the wired connection.
Disable VPN or Proxy temporarily
If the issue persists, you can now delve into the following fixes:
1. Check whether the servers are up
Even though our first focus is usually on individual cases, a service like Slack occasionally has general issues plaguing a multitude of users.
To check whether this is the case and identify possible server issues, navigate to the Slack Status website. There, you can find whether the problem is on your side or something which bothers others, as well.
Navigate to Slack Status here to find out which is the case. The Messaging section should give you enough insight concerning the Slack couldn’t send this message error you’re getting.
2. Check the internet connection
Making sure that you’re using a stable connection is another thing you’ll need to worry about. This, of course, is simple to determine and rather simple to troubleshoot in general. Moreover, the best way to start when it comes to Slack troubleshooting is the official web-based connection-testing tool.
This tool checks your connection to Slack and provides you with valuable insight. Just sign in and run the test.
Click on the hamburger menu in the top left corner, choose Help, and select Troubleshooting.
Now, click Clear Cache and Restart.
You can repeat the action and clear the app‘s data as well.
If we go beyond the usual connection issues, the next stop is the app itself. The pilled-up cache might be the reason for all kinds of errors.
Now, we can’t say with certainty whether that’s the case with the Slack couldn’t send this message error, but it won’t cost you a thing to clear the cache from Slack.
Based on what app you’re using (standard or UWP version), you can reset the cache by following the steps above.
If you are using Slack UWP from Microsoft Store, try the steps below:
Open Start.
Right-click on the Slack app and choose More > App settings from the contextual menu.
Try firstly with the Repair and, if it doesn’t work, go for the Reset option.
4. Allow Slack in Windows Firewall
In the Windows Search bar, type allow, and open Allow an app through Windows Firewall.
Click the Change settings button.
Now, check both the Private and Public boxes before the Slack option.
If you can’t find Slack on the list, click the Allow another app option.
Next, click the Browse button.
Select the Slack option and click the Open button.
Click the Add button.
Finally, ensure that the Private and Public boxes are checked for it, click the OK button, and restart your PC.
For any and all connection-dependent apps to work successfully, you’ll need to allow them through the Windows Firewall. Slack is not an exception.
This is usually done automatically as long as you install the client or the Microsoft Store app. However, it might change, and we’ll need you to confirm Slack is able to communicate through Public and Private networks.
In addition, if you run third-party antimalware software with a built-in firewall, we suggest whitelisting Slack, too.
5. Reinstall the app
Finally, if the Slack couldn’t send this message error persists, you can try reinstalling the app. In addition, consider using alternatives for the time being, whether that’s a web-based app, UWP, or a standard desktop app.
With that said, we can conclude this article. Don’t forget to tell us in the comments section below about alternative solutions you’re aware of or post questions. We look forward to hearing from you.
Windows Update issues are probably the most common problem for most Windows users, especially when Redmond decided to apply mandatory updates in Windows 10, a move that ultimately amplified emerging issues.
One issue that’s common is related to an error related to failed update services. Users that experience this problem are prompted with this message:
Windows Update cannot currently check for updates because the service is not running’
This may occur due to system components failure or update files corruption. For that purpose, we conducted a list with a few possible workarounds that should resolve your update issues.
Therefore, if you have experienced the exact update error, make sure to check the steps below. How do I restart the stopped Windows Update processes?
How do I fix common issues with Windows Update?
1. Rename the Software Distribution folder
Right-click the Start Menu and run the Command Prompt (Admin).
In the command line, type the following commands and press Enter after each:
Now, try to run Windows Update and check for changes.
The first step you should take when addressing this and similar update errors is to rename or delete the Software Distribution folder hidden on your system partition.
For security reasons, it’s better to just rename it, since the Windows Update will create a new one immediately after the update process starts. You can do it in a standard way, but due to limitations, there’s a chance the system will prevent you from doing so.
Another basic procedure used for Update troubleshooting is related to Update Services. There’s a variety of Windows Update services that should run in the background in order for the Update process to function as intended.
However, sometimes due to a 3rd-party antivirus or even the native Windows Firewall, they suddenly stop working. To address this, check and confirm that each of them is enabled and running.
That can be done by following the instructions below:
With the downloadable official troubleshooter that can be found here.
With the special batch file. You can inform about it here.
Manually, by using the Command Prompt to reset BITS services.
That can be done by following the instructions below:
Right-click Start and open Command Prompt (Admin).
In the command line, type the following lines and press Enter after each:
net stop bits
net stop wuauserv
net stop appidsvc
net stop cryptsvc
Del “%ALLUSERSPROFILE%Application DataMicrosoftNetworkDownloaderqmgr*.dat”
After that, we’ll need to start all of the services again.
That can be done by typing these commands and pressing Enter after each:
net start bits
net start wuauserv
net start appidsvc
net start cryptsvc
That should, hopefully, lead to resolution of your problem and you’ll be able to run Windows Update again.
However, on some occasions, the problem isn’t exclusively related to Update components. Because of that, make sure to check additional steps if the problem is persistent and your nervous breakdown is coming closer.
3. Run DISM
Right-click Start and open the Command Prompt (Admin).
In the command line, type the following command and press Enter:
DISM /Online /Cleanup-Image /RestoreHealth
Wait for approximately 10 minutes until the process is finished and restart your PC.
And now, the second way for which you’ll need installation media of Windows 10:
Mount your Windows 10 installation media (USB or DVD).
Right-click the Start menu and, under the Administrative tools, open Command Prompt (Admin).
Under the command line, type the following commands and press Enter after each:
dism /online /cleanup-image /scanhealth
dism /online /cleanup-image /checkhealth
dism /online /cleanup-image /restorehealth
After everything is finished, type the following command and press Enter:
Change X value with the letter of the mounted drive with Windows 10 installation.
After the procedure is finished, restart your PC and look for changes.
The DISM (Deployment Image Servicing and Management) is a tool that should help you with all kinds of system file issues. It kind of resembles SFC, but it’s more powerful and advanced due to its alternative usage.
For instance, if the update client is down, DISM can use the system installation setup mounted via USB/DVD to apply the fixes. Because of that, you can use it to a greater extent and resolve issues without the system update.
Moreover, if the issue is reaching over the DISM tool’s capabilities, your best bet is to, sadly, perform a complete reinstallation. We’re aware that this isn’t exactly a best-suited solution, but it will most certainly resolve various issues.
4. Perform a clean reinstall
Users who decided to upgrade to Windows 10 rather than perform a clean installation are the ones most affected by these problems.
On paper, everything sounds good: you’ll preserve your data and settings from the previous version of the OS to preserve time and effort. But, sadly, that’s not always the case.
We advise you to start from scratch and perform a clean reinstallation in order to resolve most of these issues. And, in this case, update issues that are quite hard to resolve with the standard troubleshooting measures.
If you’re unsure how to do that, check out this article.
By following the methods written above, you should be able to address all of the most common issues with Windows Update.
However, we would like to know which of the methods worked best for you, so do not hesitate to leave us a message in the comments section below.
Team workspace applications are an amazing asset for professionals who like getting things done. Microsoft Teams and Slack are probably the most popular, and the latter ticks all the right boxes, in our opinion.
There are some minutiae issues from time to time, and most of them concern advanced users who try to integrate various applications and maximally automatize the workflow.
One error like that is the channel_not_founderror which prevents bot integration in private channels.
What is Channel_not_found error in Slack?
The channel_not_found error occurs on Slack if your app does not have permission to start a DM with the intended user for some reason.
Also, if the value you passed for a particular channel is invalid.
What can I do if Slack can’t find a channel?
The channel_not_found error seemingly appears only with bots in the private channels when using the Slack API for third-party integration. For example, some users have had a hard time configuring Slack to work with Python and were met with the error at hand.
Some of them managed to resolve this by simply unlocking the private channel, while others made sure that the app had permission to access Slack.
In addition, if you’re still bothered by the same error, you can replace the channel ID with the encoded ID. You can easily find out the ID of your channel by simply navigating to it in the browser.
The usual name tag is replaced with an alphanumeric set of characters. This you can use to reconfigure settings. In addition, primarily set the bot to work with the general channel.
Afterward, you’ll get prompted to allow it in the private channel of your choice. This is a common solution, as well. Furthermore and in regard to permissions, make sure you allow a third-party app to access Slack channels and your workspace.
After that, you shouldn’t have issues with the channel_not_found error. If you’re, on the other hand, still stuck with the error, contacting support is another thing you can try. However, keep in mind that some actions (like Slacker integration) are not Slack‘s responsibility.
With that said, we can conclude this article. If you need a list of cloud collaboration software you can use as an alternative to Slack, check our guide for the top picks available.
Don’t forget to post your feedback below or suggest alternative solutions. We look forward to hearing from you.
One of the oddest errors that you may encounter when using Windows 10 is an error message stating that the operation you were undergoing was completed successfully.
Error_success usually occurs in the following situations:
When upgrading your PC to Windows 10
While installing the latest Windows updates
When downloading apps from the Windows Store
During Windows startup and shutdown
When performing various tasks, such as printing, etc.
Error_success variations
At the same time, this error may also occur under the following forms:
Error Code 0x00000000 : The operation completed successfully
Error Success: The operation completed successfully
Error success 0 (0x0)
The operation completed successfully win32exception
If you’re getting the error success 0 (0x0) or Error success: the operation completed error codes, follow the troubleshooting steps listed in this article to fix them.
How do I fix the ERROR_SUCCESS issue?
1. Run a full system scan
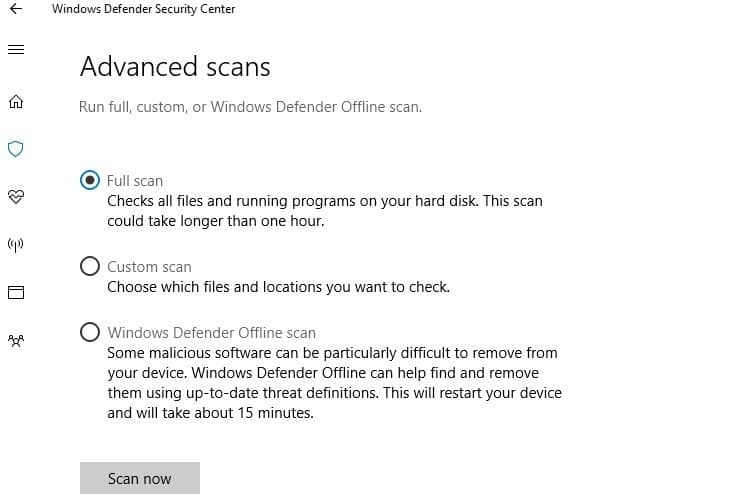
Malware may cause various issues on your computer, including errors. Perform a full system scan in order to detect any malware running on your computer. You can use Windows’ built-in antivirus, Windows Defender, or third-party antivirus solutions.
2. Repair your registry
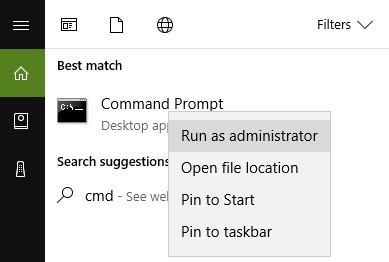
1. Go to Start > type cmd > right-click Command Prompt > select Run as Administrator
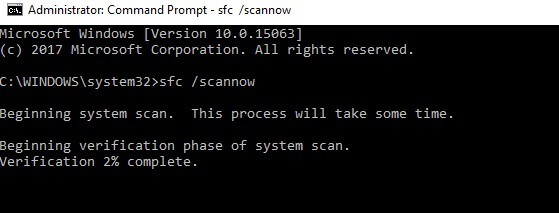
2. Now type the sfc /scannow command
3. Wait for the scanning process to complete and then restart your computer. All corrupted files will be replaced on reboot.
The simplest way to repair your registry is to use a dedicated tool, and if you haven’t installed any registry cleaner on your computer, check out our article on the best registry cleaners to use on Windows 10 PCs.
If that doesn’t work, simply use Microsoft’s System File Checker to check for system file corruption by using the methods listed above.
3. Use a reliable tool for Windows errors
An easy and efficient solution would be to use a trustworthy third-party tool with features that aim to keep your Windows OS in an optimal and stable condition.
Compromised system settings and damaged registry files can lead to bigger problems and affect your PC’s health significantly. It’s important to keep your OS healthy and updated.
This is only one of the many reasons why you should keep your registry clean and healthy, removing any obsolete, corrupted, or useless entries.
The best part is that you won’t have to go seeking a needle in a haystack; all of this and more can be accomplished with an automated solution.
4. Update your OS
Make sure that you’re running the latest Windows OS updates on your machine. As a quick reminder, Microsoft constantly rolls out Windows updates in order to improve the system’s stability and fix various issues.
Go to Windows Update, check for updates and install the available updates. To access the Windows Update section, you can simply type update in the search box. This method works on all Windows versions.
If you’re looking for a particular update, go to Microsoft’s Update Catalog website. Simply type the KB number of the respective update, hit Enter and then click on the download button.
Windows updates are meant to improve the operating system‘s stability and reliability, but sometimes they bring issues of their own. For this reason, it’s possible that some updates cause various error_success errors.
5. Update your PC drivers
Outdated drivers may also trigger error_success errors. As a result, install the latest driver updates on your PC and see if this action solves the problem. Here’s how to update computer drivers for various Windows versions.
5.1 How to update drivers on Windows 10
You can fix the most common driver issues by installing the latest Windows updates. Simply type “update” in the Search box, and click Check for Updates to download and install the latest updates.
If you want to install particular drivers, launch Device Manager. Expand the available categories and select the device that you wish to update the driver for. To install the latest driver updates for that device, right-click on it and select Update Driver.
A third option is to download the available driver updates directly from the manufacturer’s website.
5.2 How to update drivers on Windows 7
You can set Windows 7 to automatically install the latest driver updates on your computer.
Go to Start > click Devices and Printers.
Right-click the name of your computer > select Device installation settings.
Click Yes, do this automatically (recommended), and then click Save changes.
If you’re prompted for an administrator password or confirmation, type the password or provide confirmation.
You can also use Windows Update to install the latest driver updates on your machine. If Windows can’t find a driver for your device, you can download the available driver updates directly from the manufacturer’s website.
6. Perform a clean boot
A clean boot starts Windows using a minimal set of drivers and startup programs. This action eliminates software conflicts and helps you determine what conflict is causing the annoying error_success errors.
6.1 How to perform a clean boot on Windows 10:
Type System Configuration in the search box > hit Enter
On the Servicestab > select the Hide all Microsoft services check box > click Disable all.
3. On the Startuptab > click on Open Task Manager.
4. On the Startuptab in Task Manager > select all items > click Disable.
5. Close the Task Manager.
6. On the Startuptab of the System Configurationdialog box >click OK > restart your computer.
6.2 How to perform a clean boot on Windows 7
1. Go to Start > type msconfig.exe > select the System Configuration utility. 2. On the General tab, click the Selective startup option > uncheck the Load startup items check box.
3. On the Services tab, check the Hide all Microsoft services check box > click Disable all > click OK > Restart.
For more information on how to perform a clean boot on other Windows versions, check out Microsoft’s support page.
7. Uninstall and reinstall the apps and programs affected by error_success
If the error_success error occurs when using a particular app or program, try uninstalling and reinstalling the respective programs. Also, if this error occurs shortly after installing a new app or program, try uninstalling the respective app or program.
8. Disable the proxy server
This workaround is particularly useful if you encounter error_success when downloading app from the Windows Store or when updating them.
1. Go to Search > type Internet Options > go to Connections tab > go to LAN Settings
2. Uncheck the option Use a proxy server for your LAN > click Apply.
By following our listed steps you should no longer see any successful errors when using your Windows 10 PC.
The good news is that The operation completed successfully error occurs quite rarely. If you’ve come across other workarounds to fix error_success, feel free to list the troubleshooting steps in the comment section below.
Internet Connection Sharing (ICS) enables Windows users to share a connection on a single PC with other devices on local area networks. However, this doesn’t always work as it should as some users have had ICS errors. A Network Connections window opens stating, An error occurred while internet connection sharing was being enabled.
So are you getting that error? If so, these are a few fixes for it.
How do I fix the Internet connection sharing issue?
1. Check the Internet Connection Sharing Setting and Service
There is an Internet Connection Sharing setting that must be selected. If that option isn’t selected, ICS isn’t going to work. You can check that option as follows.
Press the Win key + R hotkey to open Run.
Enter ncpa.cpl in the text box and press OK to open the Network Connections tab directly below.
Now you can right-click your connection and select Properties.
Click Sharing to open the tab in the snapshot below.
That tab includes an Allow other network users to connect through this computer’s Internet connection option.
Click that setting’s check box if it’s not already selected.
Press the OK button to close the window.
There’s also an ICS service that might be switched off.
You can check that by pressing the Win key + R hotkey to open Run.
Enter services.msc in the Run text box and press the OK button to open the window below.
Now double-click the Internet Connection Sharing (ICS) service.
Select Automatic (Delayed Start) from the Startup type drop-down menu.
Press the Apply button and click OK.
2. Check that all required services for Internet Connection Sharing are enabled
Now you’ve opened the Services window, check that a few other services are enabled. In fact, there are nine services required for ICS to work. These are the services that should be switched on:
Plug And Play
Application Layer Gateway Service
Remote Procedure Call (RPC)
Network Connections
Network Location Awareness (NLA)
Telephony
Remote Access Connection Manager
Remote Access Auto Connection Manager
Windows Firewall
Once that is done, follow these steps:
Double-click those features listed in the Services window.
Switch their Startup type to Automatic if they’re configured to Disabled.
Then restart Windows before you enable ICS again.
3. Close Anti-Virus Software
Press the Win key + X hotkey and select Task Manager from the menu.
You can also right-click the taskbar and selectTask Manager.
Then click the Processes tab, and select your anti-virus software.
Press the End task button to close it.
Alternatively, you can usually temporarily disable anti-virus software with its system tray context menu options.
You can right-click the software’s system tray icon to open its context menu.
Select a setting on the context menu that disables the anti-virus software.
It is a common sight to see all sorts of error messages in Kaspersky. There have been multiple reports coming from users who claim that the Kaspersky Password Manager is not able to start or stops with an error.
This can be found in different forms – Kaspersky Password Manager installation failed. All changes made on your computer will be rolled back automatically or Kaspersky Password Manager Service is not responding, to name but a few.
Antivirus solutions are complex and fixing some issues may require the help of a professional. However, there are some things users may try before submitting their request to Kaspersky Lab technical support.
Do you also want to fix this issue? Today, we’ll help you make some changes and hopefully resolve any problems with the Kaspersky Password Manager.
What can I do if getting Kaspersky Password Manager error?
1. Uninstall and install the application once again
To uninstall the current version of Kaspersky Password Manager, first, open the Control Panel.
Go to Programs and Features.
Select your Kaspersky application and click Uninstall/Change.
If the application is password-protected, enter the password. Click Continue.
Click Next.
Select the checkboxes beside the data you want to save and click Next again.
Download the installer for Kaspersky Password Manager.
Click Remove.
Reboot the computer.
It’s time to install the application once again. Start by downloading the installer from the official Kaspersky website.
Run the .exe file.
Select the appropriate language and click Install.
Read the Kaspersky Lab End User License Agreement and the Privacy Policy notifications. Select the checkboxes if you agree to their terms.
Click Accept.
Also, read the Statement regarding data processing for marketing purposes. If you agree with the terms, click Accept.
You may also click Cancel if you don’t want your data to be used for marketing purposes.
Enter your Kaspersky account details and click Sign In.
Perform the given instructions to complete the Kaspersky antivirus software installation.
Click the menu button at the top right of the Firefox window.
Click on Options.
Select the Privacy & Security panel.
Then, scroll down to the Firefox Data Collection and Use section.
Make sure the box next to Allow Firefox to install and run studies is checked.
If it isn’t, click it to checkmark the setting.
Do you get the following message with add-on signing in Firefox: Kaspersky Password Manager could not be verified for use in Firefox and has been disabled? It isn’t the first time when Firefox prevents existing and new add-ons from running or being installed.
The solution, in this case, is to make sure you have studies enabled as described above. When a study becomes available, you will be enrolled if you meet the criteria. This might not be music to your ears, but you can obviously disable studies again after your add-ons have been re-enabled.
As tempting as it may be, don’t delete your add-ons as this means that you are willing to lose any data related to the add-on too.
3. Run Kaspersky as an Administrator
Some Kaspersky users describe another attempt to fix the Kaspersky Password Manager error. When the software fails to automatically open on startup, they tried running it as an Administrator.
You may give it a go as well, so right-click the program distributive and in the context menu select Run as administrator.
We hope that you found this guide useful. In case you have any questions or suggestions, feel free to tell us in the comments area below. We look forward to hearing from you.
Microsoft Teams and Slack aren’t the only names when it comes to remote teleconferencing solutions. Along with many others, there’s also Zoom, which apparently experienced recent growth to 13 million monthly active users.
With a recent internal video leaking online, some have gone as far as to say that Microsoft at one point felt that Zoom video conferencing was as an ‘emerging threat.” So, what does Microsoft have to be afraid of? And how does Zoom stack up against Teams? In this guide, we’ll pit the two against each other and help you see the difference.
Price
To begin, we’ll touch on the price. Just like Microsoft Teams, Zoom has a free plan and other paid options. However, it’s important to note that, unlike paid Teams plans with Office 365, paid Zoom plans do not come bundled with extra software. Zoom is mainly just a teleconferencing solution and not meant to be the Office 365 collaboration hub like Teams is.
There are, however, extra features in paid Zoom plans that help enhance the experience, which we describe more in-depth in the next section. These are divided into a $14.99 “Pro” plan, a $19.99 “Business” plan with a minimum of 10 hosts, and a $19.99 “Enterprise” plan, that has a minimum of 50 hosts. you can read more about the plans here.
Keep in mind that in Zoom terms, these prices are per “host.” This is someone who schedules, starts and controls the settings in a meeting. A standard Zoom free plan also allows you to invite up to 100 participants in a meeting. However, you can buy more as an add-on for $50 per month or choose a paid “Business” or “Enterprise” plan which has access to 300 or 500 participants.
On the Microsoft Teams front, you can always go with a Free plan, but there are multiple paid Office 365 plans which include Teams at no added cost, depending on the size of your company or business. These cover Office 365 Business Essentials, Office 365 Business Premium, and Office 365 Business. For larger corporations, there is also Office 365 Enterprise plans.
Under Office 365 Business Essentials, Microsoft Teams will start at $5.00 per user, per month. This is best for small businesses as it has the bare essentials. Then, there’s Office 365 Business Premium, which is $12.50, per user, per month. Finally, there is Office 365 Business, which is $8.25 per user per month.
For larger organizations, Microsoft takes things a bit further as it has special Office 365 Enterprise plans (with Teams included.) Office 365 E1 plans include Teams for $8.00 per user, per month. Then, Office 365 E3 plans include Teams for $20.00 per user per month. Again, the differences in these plans boil down between access to email, Office apps, and a few other things, which we’ve explained here. There’s a lot of extra value in Teams if you need it for more than just video conferencing.
We’ve explained the differences in these plans in a separate post, but it boils down to access to other Microsoft services, Office apps, and the Outlook email service. Again, you might not need these features, but it’s still great to have for day-to-day operations.
Base features and different plans
When it comes to features included, Zoom makes it pretty easy. The base plan of Zoom includes hosts of up to 100 participants. There’s also unlimited 1 to 1 meeting, but a 40 minute limit on group meetings. As for features of meetings, you can create an unlimited amount of meetings and even online support if things are to go wrong and you need help.
All Zoom Free plans also include HD video and voice calls, active speaker view, full-screen gallery view, screen sharing, and the ability to join by phone. Other features included in Zoom’s free plans can be seen below. These all carry over into the other tiers as well. However, please be aware that under the free plan if 3 or more participants join a meeting, the meeting will time out after 40 minutes. Other features covered in all Zoom plans can be seen in the chart below.
As we said under the pricing section, the biggest difference paid versions of Teams is that it gets you bonus features of Office 365. However, Teams mainly shares the same features across free and paid plans. Essentially, the differences between the free and paid versions of Microsoft Teams comes down to maximum members, file storage sizes, extra features in recording meetings as well as phone calls.
Free versions of Teams have a limit of up to 300 members (users) per organization. You also can enjoy up to 250 people on a meeting in Teams which is different from Zoom’s 100 person limit for the free plan.
Elsewhere, Free Microsoft Teams plans limit storage to 2GB per user, with 10GB shared storage. Paid plans, meanwhile, bump the storage up to 1TB per user. Paid Teams plans can also upgrade you to more maximum members and users per organization. All of the following features are included in both Free and paid versions of Teams.
Guest access
1:1 and group online audio and video calls
Channel meetings
Screen Sharing
Background and screen blur
Just like Zoom, Paid versions of Teams offer up Admin tools for managing users and apps, usage reporting for Office 365 services, 99.9% financially-backed SLA uptime, and Configurable user settings and policies. Compared to Zoom, Teams might work better as a phone solution, though, as paid versions of the plan let you include phone calling for $12-$20 per month. Zoom is a $15 per month add on.
Security and Privacy
Finally, you might be wondering where Teams and Zoom stands when it comes to security and privacy. Recently, a Twitter thread revealed that Zoom could be monitoring the activity on your computer. Some have also worried that it could collect data on the programs running. Prontonmail gives a good insight into all the privacy flaws of Zoom, so you give it a read.
The concerns, though, are in fact true, though Zoom seemed to dismiss it in a Tweet. Zoom’s Privacy’s page notes the following: “Whether you have Zoom account or not, we may collect Personal Data from or about you when you use or otherwise interact with our Products. ” Zoom also claims that its Communications are established using 256-bit TLS encryption and all shared content can be encrypted using AES-256 encryption. Chats are also encrypted end-to-end by TLS 1.2 with the Advanced Encryption Standard (AES) 256-bit algorithm.
When it comes to Microsoft Teams, the story is different. Microsoft explains that it “does not use your data for anything other than providing you with the service that you have subscribed to.” The company claims it does not scan your email, documents, or teams for advertising or for purposes that are not service-related. Microsoft also doesn’t have access to your uploaded content.
As far as encryption goes in Teams, it has one disadvantage to Zoom. Microsoft is using the lesser secure type of encryption policy. According to this support page, Microsoft Teams data is encrypted in transit and at rest. Unlike with end-to-end encryption, the data is not encrypted on a sender’s system or device, and not only the recipient is able to decrypt it. Teams is also Tier D-compliant. This includes the following standards: ISO 27001, ISO 27018, SSAE16 SOC 1 and SOC 2, HIPAA. More information on that is available here.
It depends on your needs
In choosing either Teams or Zoom, everything comes down to your needs as a business. Zoom is a great alternative for Teams when it comes to just video conferencing. It gives you access to calling without all the extra stuff. Teams, though, again has the most value for businesses. It’s paid plans not only include audio and video calling under Teams, but you also get access to other Office 365 apps and Microsoft 365 services. This isn’t something that everyone will need, but it sure might be useful for smaller organizations.
But it’s not to say that Zoom is just for small companies. Zoom is currently used by 21st Century Fox, Delta, Dropbox, Logitech, Rakuten, Salesforce, and many more. That’s just as Microsoft Teams, too, which is currently being used by BP, GE, NASCAR, Northwhell Health, Toshiba and many Fortune 500 companies, too.
Networking is a huge part of the Windows 10 experience, and one of the most annoying network problems is the one where Network Protocols are missing. This error sounds serious, so let’s see if there’s a way to fix it.
Users report that they are unable to share files between network computers, and some are even unable to access the internet. As you can see, this problem can cause a lot of inconveniences, but there are a few solutions available.
How can I fix Network Protocol missing error in Windows 10?
Besides the Network protocol missing error, there are a few other issues that could be caused by the same culprits. For example:
Windows sockets registry entries required for network connectivity are missing
One or more network protocols are missing on this computer
Could not add the requested feature
Network protocols missing errorWindows 10
One or more network protocols are missing on this computer WiFi
So, no matter the error code, you can apply the solutions from below, and (hopefully), you’ll solve the problem.
Solution 1 – Temporarily disable your antivirus software
Although it’s not a good idea to disable your antivirus software, some users report that after disabling Kaspersky Internet Security their issues have been resolved.
So if you are using Kaspersky Internet Security, you might consider disabling it temporarily or switching to a different antivirus software. In addition, reinstalling antivirus software could also be helpful.
Solution 2 – Restore network protocols to default settings
Another thing we’re going to try is resetting network protocols to default settings. We’re going to do this by resetting the TCP/IP stack. In case you’re not sure how to do that, just follow the instructions:
Open Command Prompt as administrator.
When Command Prompt opens enter the following lines:
netsh int ip set dns
netsh winsock reset
Close Command Prompt and check if the issue is resolved.
Go to Control Panel > Network and Internet > Network Connections.
Right click your network adapter and select Properties.
Highlight IP v4 (TCP/IP) and choose Properties.
Click Advanced.
Next go to the WINS tab, and in NetBIOS settings section select Disable NetBIOS over TCP/IP.
Click OK to save your settings.
Some users also claim that this issue is resolved by using obtaining IP address automatically instead of using a static IP. To change this setting just follow the first three steps from this solution.
As soon as you open IPv4(TCP/IP) Properties you should see the option that allows you select whether you want to use static IP address or to obtain one automatically.
You can’t open Control Panel? Take a look at this step-by-step guide to find a solution.
Run Command Prompt as administrator. To do so, in the search bar type Command Prompt, right click Command Prompt from list of results and choose Run as administrator.
When Command Prompt starts, type netcfg -d and press Enter to run it.
Wait for the process to complete. After the process has been completed your computer should restart and the issue should be resolved.
In addition, some users suggest using the netsh int ipv4 install command. Just start the Command Prompt as administrator like in Step 1, type netsh int ipv4 install into Command Prompt and press Enter to run it.
After that, restart your computer and see if the issue is fixed.
Solution 5 – Use Command Prompt and sc.exe
This is a temporary solution, and you might have to revert the changes after a new Windows 10 update, if the problems start occurring. Here’s what you need to do:
Open Command Prompt as administrator.
Type the following lines, and after each line press Enter to execute it:
After entering these lines into Command Prompt, the issue should be resolved. If you start to have troubles after a Windows 10 update, you might want to restore the default settings. To do so, follow these instructions:
Open Command Prompt as administrator.
Enter these lines and after each line press Enter to run it:
Solution 6 – Import Winsock keys from a different computer
We have to mention that this is an advanced solution, and if you’re not careful, or you don’t know how to modify a registry, don’t do it, because you can cause damage to your operating system.
However, should you decide to proceed, you’ll need a different computer that doesn’t have problems with Network Protocols. You don’t necessarily have to use a Windows 10 computer. Here’s what you need to do:
On the working Windows open Registry Editor and find the following keys:
And finally, reset your router to factory settings by pressing the small button on the back (actually, the position of the reset button depends on your router).
Solution 8 – Reinstall your Network Adapter
After completing the steps from above, you might as well want to reinstall your Network Adapters. Here’s how to do that:
Hold the Windows Key and press R.
Type hdwwiz.cpl in the input field and click OK.
Expand the Network Adapters, right click on your Ethernet card, and choose Uninstall device.
When the confirmation dialog appears, click on Uninstall.
Reinstall your network adapter using the driver accompanying the hardware.
If you’re running Windows 10 Creators Update (or later), you have a new troubleshooting tool, provided by Microsoft. This troubleshooting tool is designed to deal with various issues within the Windows operating system, including various network errors.
If you don’t know how to run this troubleshooter, just follow these instructions:
Go to Settings
Now, head over to Updates & security > Troubleshoot
ChooseInternet Connections
Follow further on-screen instructions, and wait for the wizard to finish the process
Restart your computer
If the problem remains unresolved, you can try with the Network Adapter option, instead of Internet Connections.
If you’re having trouble opening the Setting app, take a look atthis article to solve the issue.
You can also try with resetting the following network components:
Open Command Prompt as administrator.
When Command Prompt starts, enter the following commands, and press Enter after typing each command:
IPconfig /release
IPconfig /flushdns
IPconfig /renew
If you can’t flush the DNS, take a look at this step-by-step guide to solve the problem quickly.
Solution 11 – Update BIOS
And finally, some users reported that updating BIOS actually solves the problem. But before you go all in and flash your BIOS, we have to warn you that it could be a risky action, as one wrong move can render your motherboard unusable.
That’s about it, at least one of these solutions should solve your problem with Network Protocols in Windows 10. If you have any questions, or comments, just reach for the comment section below.
Installation issues are quite common not just for major updates for Windows 10, but also for regular ones. Definitely the most annoying problem you could encounter while installing the update is BSOD, which was exactly the case with some Windows 10 users.
Judging by the number of complaints, the issue with BSODs appears to bother a lot of users who tried to update their systems to Windows 10.
Even though the issue is quite serious and very annoying, Microsoft still hasn’t said anything about it, so users will have to find a solution on their own.
If you encountered a BSOD while trying to install Windows 10, we prepared a few solutions that might actually be helpful to you, so check them out below.
How can I fix BSOD during Windows 10 updates?
1. Turn off your antivirus
We know this is a universal, basic solution for most Windows 10 problems, that actually isn’t that helpful. However, this is so far the only confirmed solution for the problem with BSODs during updating.
One of the most popular antivirus software out there, Avast Antivirus actually causes BSODs for those who try to install Windows 10.
Avast acknowledged the issue, mostly because of the high number of complaints on its forums, and it released a fixing update for this problem.
So, what you need to do is to uninstall Avast Antivirus (if you’re not able to uninstall it normally, download Avastclear), update your computer to the latest version, and then install Avast once again, but make sure you download the latest, updated version.
Even if you’re not using Avast, but still receive BSODs while trying to update your computer, do the same thing with your current antivirus software.
Note: There are several more software apps that can create similar problems (Daemon Tools, Alcohol 120, PowerIso, etc). If the above solution does not fix your issue, you might want to uninstall some of these mentioned apps.
2. Run the SFC scanner
Enter the following command and press Enter
Right-click on the Start Menu button, and choose Command Prompt (Admin)
sfc/scannow
Wait for the process to finish (it may take a while because it will scan your whole system for errors)
Restart your PC
SFC scanner is Windows 10’s own diagnostic tool which is usually recommended when users face various system problems, so it could be helpful in this case.
3. Disable Bluetooth devices
In previous versions of Windows 10, Bluetooth devices usually caused this problem to users. So, that could also be the case with the latest Windows 10, as well.
To make sure that everything is OK with your PC, try to disable all your Bluetooth devices. Don’t forget to check your peripherals, also.
4. Update your drivers
Although drivers are probably not the cause of this problem, it won’t hurt if you make sure all your drivers are updated. Actually, the problem can only occur if some of your drivers are not compatible with Windows 10 and prevents it from installing.
Go to the Device Manager, make sure all your drivers are up to date, and update every driver that needs it.
We also recommend a third-party tool (100% safe and tested by us) to automatically download all the outdated drivers on your PC.
This tool can save you a lot of time and also eliminate the stress and extra work that comes with installing a mismatched driver.
This can cause major errors in your system, but this automatic tool uses its own driver database and detects the exact version you need for your specific hardware.
The software is light and easy to use. It can also repair damaged drivers and detect if there are any missing drivers and install them right away.
If you want to forget about this issue for good, you can set it up to regularly scan your PC for outdated, damaged or missing drivers and let it install them whenever it is necessary.
If none of the solutions listed above helped, maybe the best solution is to perform a clean install or install the update manually.
Microsoft released ISO files on the same day it started rolling out the latest update, so you won’t have any problems creating a bootable media with Windows 10.
That should be all. As we said at the beginning of the article, most of the BSOD problems are caused by Avast antivirus.
However, even if you don’t have Avast installed on your PC, other solutions might solve the problem, all depending on your situation and cause of the problem.
If you have any questions or suggestions, please let us know in the comments below.
The Command prompt can help when dealing with these types of issues. We comprised an informative guide on everything you need to know about the Command prompt. It may be helpful in this type of situation.
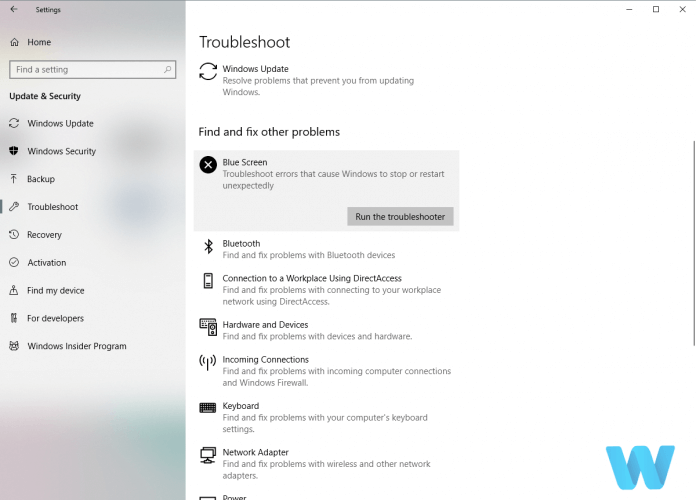
Blue Screen of Death (BSOD) errors are very troublesome, this is why we recommend visiting our dedicated hub to find a solution.
If you cannot fix it with Windows Troubleshooter, or you want to check out other alternatives, you can try one of these troubleshooting tools.
Homeschooling involves the education and tutoring of children at home. Many parents view homeschooling as a great alternative to public and private schooling with a surge in home tutoring seen in the past few years.
Although, homeschooling is legal in many developed countries, parents still need to get special permissions from government educational agencies to be homeschooler.
Many engaging homeschooling software have been developed over the years geared towards homeschooled students. These programs encourage students to discover, excel and discover new things while developing a strong educational foundation which will lead the students to academic success in the long run.
There are many homeschooling software options available; this post highlights some of the best homeschooling programs around.
Best homeschooling tools for PC
HomeHighschoolHelp
HomeHighschoolHelp is a premier online homeschooling high school solution ready to provide the aid of a great selling author, conference speaker, and homeschool consultant.
As its name suggests, HomeHighschoolHelp is a great platform that helps parents to homeschool their high school teenagers. If you’re new to homeschooling, you can go to the parent training section of the website and get the resources you need to guide your child through high school years.
The platform offers valuable free and premium solutions that accompany high school students from start to finish and prepare them for success. There is no tool to take the homeschooling responsibility off parents’ shoulders, yet HomeSchoolar can help you feel more confident and capable of the task as it is packed with a huge amount of content.
Obviously, everybody wants to go to college but competition is fierce. HomeHighschoolHelp has the right sets of tools you need to create homeschool transcripts that colleges will love and high school records that will open doors. The College Launch Solution will help to understand this process perfectly and offers you the winning tips you need to succeed.
Lee Binz, the person behind this platform, successfully homeschooled her two children guiding them from elementary through high school graduation. They both got full-tuition scholarships to university. Lee really knows what she’s talking about and she can help you too to successfully homeschool your children.
Homeschooling is no longer an overwhelming choice, especially when parents have tools such as Rocket Languages at their disposal.
Rocket Languages is an all-ages program that happens to have clever options to make audio lessons interactive for children.
More precisely, it is explicitly designed for children who intend to get conversational straight away or even master a target language in no time. The same goes for parents tutoring children in a foreign language.
For English speakers, the tool provides no less than 12 languages: American Sign Language, Arabic (Egyptian), Chinese, French, German, Hindi, Italian, Japanese, Korean, Portuguese (Brazilian), Russian, as well as Spanish.
Rocket Languages also includes programs for learning English with instructions in Japanese or Spanish. Children may first get familiar with key verbs and basic sentences regarding greetings, how to ask for directions or order their favorite food in a restaurant.
These are the basics, yet keep in mind that Rocket Languages is a kid-friendly program too. It will entice children to really grasp their meanings, create associations, learn more, and encourage speaking fluently.
Before you know it, your high school children or younger ones will be well on their way to being bilingual.
Variety’s the very spice of life, so you’ll surely get impressed by the course’s quality and the interactive exercises. On top of all, there’s just a unique fee for lifetime access.
Yabla is a great foreign language learning platform for homeschool students. This tool exposes students to real-life language contexts with support from native speakers.
Students can improve their foreign language skills with the help of dual-language subtitles from video content such as documentaries, TV shows, interviews, and other such resources. Yabla always partners with the world’s best commercial, public, and independent broadcasters to provide authentic content.
The whole learning process is very efficient. Videos come with interactive tasks that include grammar exercises, listening tasks, vocabulary challenges, and many language games.
Educators also find Yabla as a resource for fun and educational activities for kids of all ages, from preschoolers to elementary-age students. Students have their own login, and educators can assign activities, set goals, and monitor their performance.
Playing these games grants you various points and an overall score that will give you a place on the leaderboards. If you want to climb higher on the leaderboards, you need to work consistently so as to improve your score. This gamification challenge is extremely useful for those students that have a competitive nature.
Yabla currently supports six languages: Spanish, French, Italian, Chinese, German and English.
This homeschooling software has been around for a long time and is known for its simple and easy interface.This tool is designed for children between the ages of three and twelve and is an excellent choice for kids to learn artwork.
The child is presented with a blank canvas with a well-arranged menu of drawing tools, brushes, and other text tools.
In addition, children are given fun sound effect and cartoon mascots which guides the student on how to use the program effectively. The program is free to download and is available on Windows OS devices.
Splash Math is a popular and comprehensive math practice program which tests your child skill and ability to solve math problems. The program is used by over 10 million students and incorporates beautiful graphics with interactive games which are developed to increase the ability of children in math.
Tutors can also choose any of the curriculums available to suit your child needs and adjust them as they advance in class. With over 5 skill grades, the program highlights areas where the student has difficulties which allowing parents and tutors to work in such areas in the child curriculum.
Splash Maths is available on Windows and other OS.
This best homeschooling software is developed and maintained by the renowned Khan Academy. The software has a complete curriculum from different fields of science, economics, and arts. Academy has been developed to entail homeschooling from kindergarten up to high school.
Parents and tutors can select curriculum based on the child’s grade and follow the well-planned syllabus which usually ends with a prep test. The program enables you to track the progress of your child from kindergarten to college.
Academy is also a handy software for preparing your kids for popular exams like SAT or GMAT exams. The program incorporates GMAT, SAT and other prep tests to ensure your child is adequately prepared to write the exams.
This homeschooling software helps students understand the basics and actual application of algebraic formulas. The software is appealing and easy to use as it enables you understand more on vectors, conic sections, and algebraic formulas.
Geogebra is a useful tool for both elementary and high school grade homeschooling children as the program has diverse topics and tools for learning math. The program also uses colorful visual appealing graphics which enable the student to understand the formulas better.
C-Organizer is a must-have homeschooling tool that will help you stay organized. This can be quite a challenge, especially if you’re new to homeschooling. Indeed, homeschooling high school students or younger children can be a daunting challenge without the appropriate planning.
You can use C-Organizer too keep track of all calendar events, tasks, notes and passwords in a single place. In this manner, you won’t forget about that deadline when you need to submit that essay you kept on postponing writing.
C-Organizer includes pretty much everything that you need in order to plan your homeschooling schedule effectively every day, remind you of important tasks and, eventually, maximize your productivity.
All these coupled with an advanced notification system make homeschooling easily digestible for all ages, fun and effective.
Having an eBook reader is a must for every homeschooling student and it is advisable to go for an eBook program which enables for multiple formats such as Adobe Acrobat Reader, Amazon Kindle, and several others. These eBook programs enable you to import eBook files and usually have access to a library of books such as Project Gunterberg. Many of these eBook readers are available to download for free on Windows PC.
In conclusion, share with us your experience in using any of the homeschooling we mentioned in this post. Feel free to comment below.
If you got the error message Can’t open files in this folder because it contains system files, you have come to the right place. Sometimes it comes with the error code ERROR_TOO_MANY_OPEN_FILES.
Our team has dug into the file encryption error, and we will show you the best way to resolve the stubborn file error. We also will present potential causes so that you may avoid future occurrences.
What does Can’t open files in this folder because it contains system files message mean?
The message means that you may be trying to gain access to files from outside your privilege level. Sometimes this is intentional, as the OS uses it to keep system files safe; other times, it may be a bug. The following are the most likely triggers:
File encryption – The Windows Installer package folder or the folder in which you want to install the Windows Installer package is encrypted.
Wrong OS version – The temp folder (%TEMP%) is encrypted on a version of Windows other than Windows Vista. Tools like the Microsoft Encrypting File System Assistant may have encrypted the temp folder, triggering this error code.
Antivirus conflicts – If you use an antivirus incompatible with your OS, you may encounter a file encryption error.
Corrupted files – When certain system files become corrupted, it is hard to gain access and may trigger the error.
With the possible causes out of the way, let us explore solutions.
How can I fix Can’t open files in this folder because it contains system files?
1. Remove folder encryption
Press Windows + E to open File Explorer, then navigate to the encrypted folder.
Right-click on it and select Properties.
Click the Advanced button.
If checked, uncheck Encrypt contents to secure data.
Click OK, then in the Properties windows, click Apply and OK.
Note that while performing the steps above, it is recommended you disconnect all peripherals from your computer. Sometimes, peripherals may cause various install issues; unplugging them is the best way to prevent this problem.
If you’re still experiencing The system cannot open the file error after performing the above steps, continue with the following troubleshooting steps.
2. Repair your registry
Press Windows + R, type cmd, and hit Ctrl + Shift + Enter.
Type the script below and hit Enter. sfc /scannow
Wait for the scanning process to complete, and then restart your computer. All corrupted files will be replaced on reboot.
If you haven’t installed any registry cleaner on your computer, check out our article on the best registry cleaners for Windows 10 PCs.
Otherwise, the simplest way to repair your registry is to use a dedicated repair tool. Remember to back up your registry first in case anything goes wrong.
3. Update your OS
Press Windows + I to open the system Settings.
Click on Update & Security.
Select Windows update from the left pane and choose Check for updates.
Ensure you’re running the latest Windows OS updates on your machine. As a quick reminder, Microsoft constantly rolls out Windows updates to improve the system’s stability and fix issues like Can’t open files in this folder because it contains system files.
Click on your antivirus icon, hover over Avast shields Control and select Disable for 10 minutes (This step varies for different antivirus software).
Sometimes, your antivirus may prevent you from installing new or upgrading software on your PC.
Temporarily disable your antivirus and then try to complete the installation process. Don’t forget to enable your antivirus after you finish installing the package.
If you’ve come across other solutions to fix The system cannot open the file error, feel free to list them in the comments section below.
Windows Installer also secures new accounts, files, folders, and registry keys by specifying a security descriptor that denies or allows permissions.
If you’re getting the ERROR_FILE_NOT_FOUND 2 (0x2) or The system cannot find the file specifiederror messages, follow the troubleshooting steps listed in this article to fix them.
The ERROR_FILE_NOT_FOUND issue occurs when users try to open a file in a particular app using the Open File dialog box. This error is prevalent for Windows 10 OS.
There are multiple causes to take into consideration: power failures, the folder name of the file was changed by mistake, registry keys were changed, the install process of various files didn’t complete correctly, and more.
To fix this on your Windows 10 PC, follow the steps listed below.
How can I fix ERROR_FILE_NOT_FOUND error message?
1. Repair your registry
Go to Start > type cmd > right-click Command Prompt > select Run as Administrator.
Now type the sfc /scannow command.
Wait for the scanning process to complete and then restart your computer. All corrupted files will be replaced on reboot.
The simplest way to repair your registry is to use a dedicated tool, such as CCleaner. Don’t forget to first backup your registry in case anything goes wrong.
If you haven’t installed any registry cleaner on your computer, check out our article on the best registry cleaners to use on Windows 10 PCs.
You can also use Microsoft’s System File Checker to check for system file corruption. Use the above steps to run an SFC scan.
Make sure that you’re running the latest Windows OS updates on your machine. As a quick reminder, Microsoft constantly rolls out Windows updates in order to improve the system’s stability and fix various issues.
Go to Windows Update, check for updates and install the available updates. To access the Windows Update section, you can simply type update in the search box. This method works on all Windows versions.
3. Clean your temporary files and folders
Go to Start.
Type Disk Cleanup and launch the tool.
Select the disk that you want to clean. The tool will then tell you how much space you can free up.
Select Clean up system files.
The simplest and quickest manner to delete your temporary files and folders is to use Disk Cleanup. As you use your computer or browse the Internet, your PC accumulates various unnecessary files.
These so-called junk files may affect your computer’s processing speed, causing apps to respond slowly and may also trigger various error codes, including the ERROR_FILE_NOT_FOUND error message.
4. Run the chkdsk command
Go to Start > type cmd.
Right-click the first results and launch Command Prompt as Administrator.
Enter the chkdsk /f X: command. Replace X with the appropriate letter of your partition and hit Enter.
Wait for chkdsk to repair your files.
The chkdsk command helps you detect and repair various disk issues, including corrupted files and folders.
This error also occurs while installing downloaded apps and programs. Sometimes your download can become damaged or corrupted, which may trigger the ‘file not found’ error.
In this case, try to download the respective file or the entire app again. You can also use a dedicated download manager for this task.
6. Remove the Windows.old folder
The Windows.old folder may also cause various errors. As a quick reminder, the Windows.old folder appears when you upgrade your Windows version or perform a clean install of Windows 10.
The role of this folder is to keep your previous Windows installation files, allowing you to restore it. Here’s how to remove the Windows.old folder with ease.
7. Change the location of the file
Moving the file affected by the file not found error to a different folder may fix the problem. Try moving the file to a different folder on the same drive. If this doesn’t work, try moving it on a different drive.
8. Remove conflicting software
If you received the file not found error shortly after you installed a new app or program on your computer, try uninstalling the respective app or program.
Sometimes, various third-party apps may interfere with the file that you’re trying to open. To remove a program, go to Start and type Control Panel.
Launch the tool and click Uninstall a program. Locate the application that you think it’s the culprit and uninstall it. You can’t open Control Panel? Take a look at this step-by-step guide to find a solution.
9. Disable your antivirus
Sometimes, your antivirus may block the file that you are trying to open. Temporarily disable your antivirus and then try to open the file again. If this doesn’t work, try downloading the file again.
Open it and see if this works now. Don’t forget to enable your antivirus after you finish downloading the file.
Are you still experiencing the FILE_NOT_FOUND error message after following the troubleshooting steps listed above? Use the comments section below to tell us all.
If you’ve come across other workarounds to this error, feel free to list the troubleshooting steps in the comments section below as well.
If you see that Microsoft Teams won’t connect to a meeting, you have to know you are not the only one experiencing this issue.
This error occurs on a variety of system configurations, so that implies that the issue is not with the capabilities of the system itself.
Here is what one user had to say about this issue on the Microsoft forums:
When we schedule a meeting in a channel and then attempt to join we’re having issues. Clicking the main “Join online” button within this panel launches the meeting, but immediately kicks users out with no error message (just says “leaving” on screen). Has anyone experience this issue, and found a fix for this?
Even though Microsoft has not released an official fix for this issue, some users have had success in temporarily bypassing it. Here is what you can try as well.
What to do if Microsoft Teams doesn’t connect to a meeting
1. Make sure you have a stable internet connection
Even though this step might seem obvious, it is very important that your internet connection has no errors. This will ensure that the connections through your MS Teams app will not be affected.
Follow these steps:
Press Win+X keys -> choose Settings.
Choose Update and Security from the Settings menu.
Select Troubleshoot from the left-side menu.
Scroll down in the list and click on the Internet Connections option.
Click Run the troubleshooter.
Follow the on-screen instructions to complete the steps.
2. Allow the app through firewall and antivirus software
Depending on the specific antivirus software you’re using on your PC, these steps will vary.
You will need to open up your antivirus software, navigate to the whitelist, and make sure Microsoft Teams is allowed connections.
If your antivirus contains a firewall service as well, please make sure to allow all permissions for the MS Teams app.
If you’re using Windows Defender firewall follow these steps:
Click the Cortana search box -> type Windows Defender Firewall -> select the first option.
From the left side of your screen -> click Allow an app or feature through the firewall.
Find MS Teams in the list.
Select it > allow both outgoing and incoming connections.
There’s a large variety of pop-up notifications you may encounter in Windows 10. One of the errors that are uncommon, but still occurs from time to time will inform you to close programs in order to prevent information loss.
Basically, this occurs due to substantially reduced RAM or Virtual Memory. As you probably know, RAM is, among other things, responsible for real-time progress saving within apps.
So, the system informs you that you may lose sensitive data because RAM can’t cover some of the active applications. For that purpose, we prepared the most common solutions for the issues at hand.
How can I fix Close programs to prevent information loss error?
1. Restart your PC
On some occasions, due to extensive use without restart, your PC can get into resource problems. Namely, the entire Virtual Memory may get relocated between active and recently closed programs.
That will cause a lack of available memory and you’ll be prompted with the above-mentioned message. Basically, memory allocation get’s maxed and that might slow down the system or cause errors.
So, the first obvious step is to restart your PC and let it completely reshuffle resources. After that, you should be able to continue with the seamless use.
2. Check available RAM
Yes, you might have 32GB of RAM and still have this problem. Firstly, even though RAM is physically present, it doesn’t always mean that the system can read it.
So, navigate to System Properties and make sure that your PC has enough RAM available. Sometimes you may need to remove and place RAM sticks again or change slots.
It’s not advised to run Windows 10 without at least 1GB or 2GB of RAM depending on the system architecture.
3. Check startup programs and RAM-hogging processes
Disable non-essential programs from starting with the system.
Confirm changes and restart your PC.
Even though you pack more than enough RAM to multitask immensely, there’s always a limit. Especially if your system is overwhelmed with resource-hogging programs.
So make sure to navigate to Task Manager and kill processes that aren’t used at the moment or the ones that use too much RAM. Just make sure not to kill any system-related process and you should be fine.
Moreover, a startup can heavily impact all-around system performance. If it takes too much for a PC to start, there’s a chance that it will affect later usage and substantially reduce available RAM.
In Windows 10, we get startup preferences within Task Manager, so it’s easy to regulate startup programs. If you’re still seeing the warning message, make sure to try out the final step below.
4. Change Virtual Memory relocation
Virtual memory is an essential part of your system even though you can’t track its usage like RAM or HDD.
It utilizes both hardware and software and without it, even the standard computing procedures would be barely usable and their respective progress lost.
So, it’s imperative to have enough relocated virtual memory in order for your system to function as intended. In addition, if there’s not enough virtual memory, you can get prompted with the pop-up notification just like the one we’re addressing today.
For that purpose, we advise you to set memory relocation to Automatic manage paging file size for all drives. How do you change your virtual memory?
You need to open Control Panel > System Properties and under the Advanced tab > Performance, click Settings. Under the Advanced tab > Virtual memory, click Change.
Check the Automatic manage paging file size for all drives box. Then, confirm changes and restart your PC.
That should resolve your problems and relieve you of frequent warnings. If you have any questions or an alternative solution for this problem, make sure to tell us in the comments.
Anyone who has worked a a Windows server administrator on previous versions of Windows (Win2003, 7, 8, 8.1), will find that handling Remote Server Administration Tools (RSAT) package is not a problem.
And it is very likely that such a user must have experienced RSAT Windows 10 crashes.
For those who are new to RSAT or never heard of it, an introduction might just be necessary.
What is RSAT?
Remote Server Administration Tools (rsat) is a component of Windows Server that offers remote management for Windows client Operating Systems.
This software offers Feature Administration Tools (Group Policy management tools and Cluster-Aware updating tool).
In addition, there is the benefit of Server Administration Tools (Server Manager) and Role Administration Tools (Active Directory Administrative Center (ADAC).
Other highlights include Active Directory Certificate Services (ADCS), IP Address Management (IPMA) Client and Hyper-V tools).
RSAT is OS specific (client OS must match Server OS), and it was first embedded in Windows Server 2008 R2. It is available on Windows 10, 8, 8.1, 7, Windows Server 2012, 2008 and 2008 R2.
What causes RSAT Windows 10 crashes?
RSAT could crash on Windows 10 for a few reasons which include failed update installation (error: 0x80070011) or a corrupt iso or msu installation file, Client/Server Operating System incompatibility.
A failed Remote Server Administration Tools update could be caused by using a corrupted flash media during initial installation.
An upgrade to a newer version of Windows 10 build could as well be responsible for RSAT crashes on windows 10. Remote Server Administration Tools crashing may occur whenever a Server Administrator attempts to alter/modify any attribute of its featured administration tools (ADAC, ADCS or IPMA).
The most reported case of crashing is the Active Directory Administrative Center component of the RSAT software.
This article provides handy tips that will help resolve RSAT Windows 10 crashes.
How to fix RSAT crashes
1. Ensure Client-Server compatibility
First, users should note that RSAT tools do not function across upgrades (Operating System specificity) because there are different versions for different Operating System upgrades.
For RSAT components to operate correctly on Windows 10, a Windows Server operating system update is required. A computer running the Windows 10 Operating system will most likely support the latest version of RSAT software available.
In most cases, the system administrator is able to discover that the latest version of Remote Server Administration Tools that is incompatible with the Windows 10 build in place. If this is the case, and whenever if launching the RSAT leads to a crash, you may have to follow the next step.
Uninstall the previous RSAT version and Install the compatible version
rsat Installed updates display
In some cases, completely uninstalling the previous version and setting up a new compatible version resolves the crash issues.
It is noteworthy that RSAT package is available in Windows 10 build 1607 client machines(Education SKUs, Professional as well Enterprise) and a few other builds.
Users can research which Windows 10 build has a supported version of RSAT package.
To remove the existing software version of RSAT installed on your computer, take the following actions:
Press WinKey + R to bring up the Run dialog box, then type in control panel and Click OK
Click Uninstall a program under Programs menu
Select View Installed Updates
Click on Update for Microsoft Windows (KB2693643) once, and select Uninstall a program to remove the software and its features
Click Yes to confirm the action and the existing version of RSAT on the Windows 10 computer should be completely uninstalled
Note: It is needed to have the US English installed as a language and set as the primary language on the Windows 10 computer before launching the RSAT installer file.
If the language is not installed, the installation process will most definitely fail. After completing the Remote Server Administration Tools installation, the language settings can then be altered to whatever it was initially.
In previous versions of windows, the administrative tools included in the RSAT package were enabled manually, but in Win 10, these tools are readily enabled after installation.
To confirm the status of the administrative tools, follow these steps:
Press WinKey + R to bring up the Windows Run dialog box, then type in control panel and Click OK to confirm.
Click Uninstall a program under Programs menu
Click on View Installed Updates
Click on Turn Windows features on or off
The RSAT tools must have been checked automatically. If not, check all of the three administrative tool boxes and click OK to save the selection made.
After completely uninstalling the previous version of Remote Server Administration Tools package and installing a new version for Windows 10, it will be possible to experience a smooth operation when using the RSAT software.
An Internet connection is fairly essential for the Cortana virtual assistant app in Windows 10. You can’t do so much with that app when your Internet connection is down.
However, some Windows 10 users have found Cortana doesn’t always connect to the Internet even when their connections are fine. Then the virtual assistant app might state, I wasn’t able to connect to get you set up.
If you’re getting a connection error along those lines, this is how you can reconnect Cortana.
What can I do if Cortana isn’t connecting to the Internet?
1. Close the SearchUI.exe Process
Press the Windows key + X hotkey, which opens the Win + X menu.
Select Task Manager on the Win + X menu to open its window.
Click the Processes tab in Task Manager, and then scroll down to Cortana.
Right-click Cortana and select Go to details to open the Details tab below.
Select SearchUI.exe and press the End task button to close it. The SearchUI.exe process will then restart.
This is more of a temporary fix than a lasting one. Some Windows 10 users have reconnected Cortana by closing, or restarting, its SearchUI.exe process in Task Manager.
2. Disable the Proxy Server
First, open the Win + X menu.
Select Run on the menu, and then enter inetcpl.cpl in the text box.
Press the OK button to open the Internet Properties window shown below.
Click the Connections tab and press the LAN settings to open the window directly below.
That window includes a Use a proxy server for your LAN option. Deselect the Use proxy server for you LAN setting if it’s currently selected.
Click OK to close the LAN Settings window.
Your network settings might be severing Cortana’s connection. Some connection issues can be due to the proxy settings in Windows. Deselecting the proxy server, if it’s selected, is another way to reconnect Cortana.
3. Run the Internet Connections Troubleshooter
Open the Settings app from the Win + X menu.
Click Update & security to open further options.
Click Troubleshoot on the left of the window to open a list of troubleshooters.
Select the Internet Connections troubleshooter listed there.
Press the Run the troubleshooter button to open the window directly below.
Press the Troubleshoot my connection to the internet button to run the troubleshooter.
Windows has a variety of troubleshooters you can fix things with. Internet Connections is a troubleshooter that can fix net connections and perhaps also reconnect apps or Windows services that aren’t connecting.
Click Accounts and select Your Info to check that you’re logged in with Microsoft account.
If so, you can click a Sign in with a local account option.
Enter the Microsoft account password in the text box to verify it.
Input a new user name and password for the local account.
Press the Sign out and finish button.
Restart Windows, or sign out, and log back in with your new local account.
Microsoft accounts can cause unexpected errors in Windows 10. Thus, Cortana not connecting might have something to do with a Microsoft account setup. As such, logging in with a local account instead of a Microsoft one is another potential fix.
5. Restore the Windows Firewall to its Default Settings
Open Run and enter firewall.cpl in its text box.
Click OK to open the Control Panel tab shown directly below.
Click Allow an app or feature through the firewall to open the tab below.
Press the Change settings button, and then scroll to the Cortana app.
Select all the Cortana check boxes if they’re not currently selected, and press the OK button.
If Cortana still doesn’t connect, click Restore defaults on the left of the Windows Firewall tab.
Press the Restore defaults button to reset the firewall back to its original settings.
The Windows Firewall might be interfering with Cortana’s connection. As such, it’s worth checking if your firewall is blocking Cortana. Restoring the Windows Firewall to its default settings will help with that.
6. Disable Third-Party Anti-Virus Software
Third-party anti-virus utilities also have firewalls. A third-party firewall can block Cortana connecting to internet. As such, temporarily closing antivirus software might also fix Cortana.
You can disable anti-virus software by right-clicking its system tray icon. Most anti-virus utilities include disable or turn off options on their system tray context menus.
If Cortana connects after switching the anti-virus utility off, reconfigure your software’s firewall settings for blocked outgoing logs. Alternatively, switch the third-party firewall off if you can.
Overall, there are various potential fixes for Cortana not connecting to the internet. Disabling the proxy server, adjusting firewall settings and reverting back to a local user account are few of the more effective remedies that will probably reconnect the virtual assistant.
Check out this article for some more general tips that might also fix Cortana’s net connection.
Although computer errors are relatively common and harmless, certain errors such as CONFIG LIST FAILED BSoD error can be a major problem on Windows 10.
These types of errors can be rather troublesome, therefore it’s crucial that you know how to fix them. We have prepared the most efficient solutions, so read the next section.
Blue Screen of Death errors can be caused by faulty hardware or a certain software that isn’t fully compatible with Windows 10.
Therefore sometimes it can be hard to find and fix the cause of CONFIG LIST FAILED error.
In order to avoid getting BSoD errors, it’s important to download and install the latest Windows 10 updates.
By using Windows Update you’ll download the latest security patches, and many of these patches will also fix various hardware and software issues.
By installing the latest patches, you’ll make sure that your computer is stable and safe from BSoD errors.
2. Update your drivers
Drivers are an integral part of every operating system since they allow your PC to recognize and use your hardware.
If a certain driver isn’t compatible with Windows 10, you’ll encounter a BSoD error such as CONFIG LIST FAILED and your computer will crash.
Fortunately, updating drivers is rather simple, and in order to do it, you just need to visit your hardware manufacturer’s website, locate your device and download the latest drivers for it.
Bear in mind that in order to fix the CONFIG LIST FAILED error, you’ll have to update all major components.
Update drivers automatically
Searching for drivers on your own can be time-consuming. So, we advise you to use a tool that will do this for you automatically. Download, install and set it to scan your operating system.
This software detects all outdated, missing, or damaged drivers from your computer. Once the scanning is done, you receive a detailed report with all your drivers.
In addition, the tool allows you to create a backup for the updated drivers, and ensure the restore point in case you encounter some issues.
The last step you have to take is to choose what are the drivers you wish to download and install using Fortect Driver Updater.
3. Run the BSOD Troubleshooter
Open the Settings app and go to the Update & Security section.
Go to Troubleshoot.
Select BSOD from the right pane and click Run the troubleshooter.
Follow the on-screen instructions to complete the process.
The next thing we’re going to try is running Windows 10’s built-in troubleshooter. This tool can be used for addressing all kinds of different problems, including BSOD issues.
So, it could also resolve the CONFIG LIST FAILED error.
4. Run the SFC scan
Go to Search, type cmd, and open Command Prompt as Administrator.
Enter the following line and press Enter:sfc/scannow
Wait until the process finishes (it’s a long one).
If the tool finds a corrupt system file, it will automatically repair it.
Close the Command Prompt and restart your computer.
Another troubleshooting tool we’re going to try here is the SFC scan.
The system file checker is a command-line tool that basically scans through your system searching for potential issues.
If a corrupted system file is a problem, this tool will automatically repair it, and the problem will be resolved.
5. Run DISM
And the third troubleshooting tool we’re going to try is DISM. Deployment Image Servicing and Management (DISM) is a tool that re-deploys the system image and resolves potential issues along the way.
So, it could be helpful when addressing the CONFIG_LIST_FAILED error, as well.
We’ll walk you through both standard and the procedure that utilizes the installation media.
Standard way
Right-click Start and open Command Prompt (Admin).
Paste the following command and press Enter:
DISM /Online /Cleanup-Image /RestoreHealth
Wait until the scan is finished.
Restart your computer and try updating again.
With the Windows installation media
Insert your Windows installation media.
Right-click the Start menu and, from the menu, choose the Command Prompt (Admin).
In the command line, type the following commands and press Enter after each:
Make sure to change an X value with the letter of the mounted drive with Windows 10 installation.
After the procedure is finished, restart your computer.
And the third troubleshooting tool we’re going to try is DISM. Deployment Image Servicing and Management (DISM) is a tool that re-deploys the system image and resolves potential issues along the way.
So, it could be helpful when addressing the CONFIG_LIST_FAILED error, as well.
We have shown you both procedures: standard and the one that utilizes the installation media.
6. Run chkdsk
Press Windows Key + X to open Power User Menu, and select Command Prompt (Admin).
Once Command Prompt starts enter chkdsk /f /r C: and press Enter.
To successfully fix this problem you’ll need to scan all hard drive partitions, so replace C with the corresponding letter.
You won’t be able to scan C drive while in Windows. Therefore you’ll have to restart your computer in order to scan it.
If you cannot access Windows 10 due to CONFIG LIST FAILED error, you can run the chkdsk by following these steps:
Restart your computer while it boots. Repeat this step couple of times in order to start Automatic Repair.
Repeat chkdsk scan for all hard drive partitions by replacing C with the appropriate letter.
After you’re done, close Command Prompt andrestart your PC.
BSoD errors can be caused by corrupted files on your hard drive.
In order to fix this issue, it’s advised to run chkdsk scan. To run a chkdsk scan, you need to apply this solution.
7. Uninstall problematic software
Certain software can cause a CONFIG_LIST_FAILED error to appear, and in order to fix it, you’ll need to find and remove the problematic software.
If you installed or updated any new software recently, be sure to remove it and check if that fixes the problem.
Another common cause for BSoD errors can be your antivirus, therefore it’s advised to remove any third-party antivirus programs and leave only Windows Defender.
It’s worth mentioning that when you uninstall an antivirus, it can sometimes leave certain files and registry entries, and it’s crucial to remove them as well.
Many antivirus companies have dedicated uninstaller tools for their software, so be sure to download one of these tools and use it to completely remove your antivirus program.
8. Change your hard drive mode from AHCI to ATA
While your computer boots, keep pressing F2 or Del. It might be a different F key on your computer, so you’ll have to repeat this process a few times until you find the correct key.
In BIOS, find hard drive settings and change the hard drive mode from AHCI to ATA.
After you’re done, save changes and restart your computer.
According to users, CONFIG LIST FAILED can appear if your hard drive mode is set to AHCI. In order to fix this error, you need to enter BIOS and change it just like we have shown above.
9. Run Automatic Repair / Reset Windows 10
Restart your computer a few times while it boots to start the Automatic Repair process.
Now you just need to select your username and enter your password and Windows 10 will try to repair itself.
If the problem still persists, you might want to perform Automatic Repair.
If Automatic Repair doesn’t fix the problem, you might have to perform a Windows 10 reset.
By performing Windows 10 reset you’ll delete all files from your C drive, so be sure to back them up. After you create your backup, do the following:
Start Automatic Repair by restarting your computer a few times.
Select Troubleshoot > Reset this PC. You might need Windows 10 installation media to complete this procedure, and you can easily create one from any USB flash drive.
Select Remove everything > Only the drive where Windows is installed > Just remove my files.
Click the Reset button and follow the instructions.
When the reset process is completed, you’ll have a freshly installed Windows 10 without any applications that can cause the BSOD error.
If the problem still persists, it means that it’s caused by your hardware.
10. Check your hardware
A relatively common cause for CONFIG LIST FAILED BSOD error can be your hardware, so be sure that your hardware is working properly.
A most common cause can be your RAM, but almost any major component can cause this error to appear.
In addition, if you installed any new hardware recently, be sure to remove it or replace it, since it might not be fully compatible with your PC.
CONFIG LIST FAILED BSoD error can be problematic, but users reported that they managed to fix the error by updating their drivers or by changing the hard drive mode.
If these solutions don’t work for you, feel free to try other solutions from this article.
Certain Windows 10 apps will sometimes try to use your location in order to provide you with correct information.
Users reported Your location is currently in use message on their PCs, and many are concerned about their privacy. Even though location tracking is useful, many users don’t want to use it, and today we’re going to show you how to disable it.
This message appears when Universal application is using your location. Many applications such as Maps or Mail and Calendar might use your location. If that happens, you’ll get this message in your Taskbar.
Many users aren’t comfortable with sharing their location, and today we’re going to show you how to disable Your location is currently in use message.
How do I remove the Your location is currently in use message?
1. Disable location feature
Press Windows Key + I to open the Settings app.
Once the Settings app opens, navigate to Privacy section.
Now go to Location tab in the left pane.
In the right pane, click on Change button in the Location section.
Set the Location for this device to Off.
In addition, be sure to turn off Location service.
The Location feature can be rather useful for certain applications, but if you don’t feel comfortable sharing your location with Windows apps, you might want to disable this feature.
To do that, you just have to disable this feature from the Settings app. After doing that, location service will be disabled and applications won’t be able to use your location.
2. Set which applications are allowed to access your location
Open the Settings app and go to Privacy section.
Navigate to Locationsection
Scroll all the way down to the Choose apps that can use your precise location section.
Here you’ll see a list of apps that can access your location.
Simply turn off this feature for desired applications and they won’t be able to use it anymore.
Some users prefer to have this feature enabled since they use applications that require it. However, some users might want better control over applications that can access your location.
Keep in mind that not all applications are on this list, and if other third-party applications are using this feature you’ll have to check settings for each individual application.
3. Set your time zone manually
Open the Settings app and go to Time & language section.
Locate Set time zone automatically option and turn it off.
Now set the correct time zone from the Time zone menu.
Many users tend to set their time zone automatically. Thanks to this feature, Windows will detect your location and automatically assign you the correct time zone.
This is extremely useful if you’re traveling, but for desktop PCs there’s no need to use automatic time zone. To set your time zone manually, follow the steps written above.
After doing that, Your location is currently in use message will stop appearing.
4. Make sure to download the latest updates
Open the Settings app and go to Update & security section.
Now click on Check for updates button. Windows will now check for updates and download available updates in the background.
According to users, sometimes you might see Your location is currently in use message due to certain bugs in Windows. Several users reported that this message appears randomly on their PC even after disabling all location features.
The issue is most likely caused by a Windows bug, and it should be fixed by downloading the latest updates. Windows 10 automatically downloads updates in the background, but sometimes you might miss an important update.
After updating Windows to the latest version check if the problem still appears. If the issue is still present Microsoft will most likely fix it in one of the upcoming updates.
5. Use O&O ShutUp10
Several users reported they fixed the problem with a third-party solution called O&O ShutUp10. This is a freeware application and it allows you to configure your privacy settings.
The application is completely free and portable, and it doesn’t require you to install it in order to use it. The application has a simple interface and it allows you to configure a wide array of advanced options.
Since this application allows you to work with advanced options, we advise you to be extra cautious if you want to avoid any additional problems with your system.
Note: This is a powerful tool, so keep in mind that you’re using it at your own risk.
Set the Value data to 0 and click OK to save changes.
Optional:
Go to File > Export.
Now select All as Export range, enter the desired name, choose a safe location and click on Save.
After doing that you’ll export your registry to a file, and you’ll be able to restore it simply by running that file.
This is rather useful especially if any problems occur after modifying your registry.
If you’re getting this message, you might be able to remove it by editing your registry. Keep in mind that editing the registry is an advanced process, so be extra cautious in order to avoid causing damage.
You can also disable location service by doing the following:
In the left pane, navigate to the following location:
Keep in mind that issues can occur if you don’t modify your registry properly. If any problems occur, you should be able to restore your registry to the previous state by running the file you created in Step 2.
If you already tried all previous solutions, you might want to hide the location icon. This won’t fix the core problem, but it will remove that pesky message from your Taskbar. To hide the location icon, do the following:
Go to the Settings app > Personalization.
Go to the Taskbar section in the left pane and choose Select which icons appear on the taskbar.
Look for Location option and disable it.
After doing that go back to the Taskbar section.
Select Turn system icons on or off.
Look for Location option and turn it off.
After doing that you won’t see the Location icon or any messages related to your location. Keep in mind that this won’t fix the core problem instead, it will just remove the message from your Taskbar.
If you’re worried that an application is actually using your location, you might want to try some other solution from our article.
Your location is currently in use message isn’t an error, and in most cases, you can fix this problem simply by disabling the location feature from the Settings app. If that doesn’t work, feel free to try any other solution from this article.
Speaking of which, if you know of any other solution that we may have missed out on, let us know by leaving a message in the comments section below.
If you love playing Ubisoft games, then you surely use Uplay as a launcher.
Besides the ability to buy and download games, DLCs, and read news, you can also chat with friends.
This is thanks to Uplay’s built-in messenger, where you can choose a nickname and an avatar to stand out.
The problem is that some users are reporting that their avatars aren’t updating when in-game.
I noticed recently that some people have actual pictures for their profile pic now, instead of that silly Uplay avatar. I went to change mine yesterday and it still shows my avatar in game instead of the pic I chose.
Apparently, the problem persisted more than 24h after the avatar was changed as well.
What to do if my Uplay avatar isn’t updating?
1. How to empty Uplay’s cache?
Press Ctrl + Shift + Esc, which will open the Task Manager
Select the Uplay entry
Press the End Task button, in the bottom-right corner
Right-click the Uplay icon from either your desktop or Start Menu
Select Open file location
The default location is: C:/Program Files(x86)/Ubisoft/Ubisoft Game Launcher
Yep it may take some time. I have changed mine two days ago and it only show up yesterday. Hope it won’t be too long for you
At first glance, it just seems to be a matter of waiting it off, so you’ll just have to be extra patient.
However, if you are the impatient type, some users suggest that clearing your cache may help speed up the avatar change.
Wow I’m glad I found this thread! My cache was over 2gb lol. Was wondering why I was having storage issues
Other users reported that even when they cleared their cache they were still having problems with their avatars.
Mine too is not showing after clearing cache and its been more than 24 hours
If you also tried clearing your Uplay cache and the new avatar doesn’t load, you could try one more thing.
2. Change your Ubisoft avatar from within the browser as well
You could also visit your official Ubisoft profile account, and change the avatar from there as well. For this purpose, we’d recommend using UR Browser.
UR Browser is similar to Chrome in terms of functionality, but it focuses heavily on user privacy and security.
UR browser already has a built-in malware scanner for downloaded files, and there is both tracking and phishing protection available.
If you need an additional layer of security, there’s a built-in VPN as well.
If neither of the solutions listed above work, do not hesitate to contact official Ubisoft support.
Having some other problems with Uplay? Sound off in the comments section below.
Many users have complained about Digital signature missing message in Kaspersky. This is an activation error, and unless you fix it, you won’t be able to use the software properly. This isn’t the only issue, and many reported high CPU usage in Kaspersky.
Luckily, there are some quick ways to address this problem. It can be easily fixed by following the troubleshooting steps on this page, so don’t postpone reading the lines below.
Why am I getting a digital signature missing message in Kaspersky?
Your firewall settings are interfering with the activation process.
There might be issues with your Internet connection.
The date and time aren’t correct on your computer.
How do I fix my missing Kaspersky license?
1. Configure firewall settings
Open your firewall settings.
Make sure that Kaspersky and its components aren’t blocked.
Save the changes.
This could also be the case, so it’s time to make sure that an allowing rule is created for the avp.exe process in the Firewall settings.
2. Check your Internet connection
Make sure that your Internet connection is working.
If needed, restart your router and modem.
Check if the Internet is working on other devices in your home.
After ensuring that your connection is working, check if the Digital signature missing message in Kaspersky is gone.
3. Make sure that the system date is set correctly
In the lower right corner of the screen, you need to click on the date and time in the taskbar’s notification area. Quickly compare that date to the current one.
If the date is wrong, right-click the clock and select Adjust date/time.
Put the switch Set time automatically in an off position.
Then, click Change.
Set the right date.
Click Change once more.
Sometimes this signature missing error appears due to a harmless wrong date. Therefore, the next method we recommend is checking and adjusting your system date. After applying the steps detailed above, retry to activate the Kaspersky software on your computer.
In case your clock falls behind on your PC, we have a great guide that can help you with that.
4. Retry the activation procedure
Return to the Activation window.
Once again, enter the activation code you received during your purchase.
Click Install.
The Activation Wizard will connect to the Kaspersky Lab server and download the license key file.
You may finally click Finish.
Finally, if no solution worked up to now, the next logical move should be this one – try one more to activate the Kaspersky application.
Give it a rest time of at least 15 minutes before that, and keep your fingers crossed to get to the Activation completed successfully screen message next.
Unfortunately, this isn’t the only issue you can encounter, and we already wrote about error loading application in Kaspersky in one of our earlier guides.
We hope that our quick guide could be of help to you. Having any questions or facing some issues while applying the procedures described above? Feel free to reach for the comments section below.
ERROR_NO_DATA is a system error and it usually comes followed by The pipe is being closed error message. This error can affect various applications, but today we’re going to show you how to fix it on Windows 10.
How do I fix The pipe is being closed error?
1. Change your registry
Note: To fix this issue, you need to open Registry Editor and make few changes.
Press Windows Key + R and enter regedit.
Press Enter or click OK.
Optional: Since modifying the registry can be potentially dangerous, we strongly suggest you export your registry before making any changes. By doing so, you can restore your registry to the previous state in case any problems occur.
Exporting registry is easy, and to do that you need to click on File > Export.
Set Export range to All and enter the desired file name.
Choose a safe location for your backup and click the Save button to save it.
In case anything goes wrong after modifying your registry, you can simply run this file in order to restore it to the original state.
Look for CNGAlgid entry in the right pane and set it to SHA256.
If this value isn’t available, you’ll need to create it and set it manually.
After making changes to the registry, restart your PC and check if the problem still persists.
Several users reported that they had issues while installing Visual Studio on their PC due to The pipe is closed error message. According to users, this problem is caused by Entrust Entelligence Security Provider for Windows.
This app makes changes to your registry and it can prevent you from installing Visual Studio. It’s worth mentioning that you might have to create the same value in the following key as well:
2. Tweak the Registry automatically with the REGEDIT file
If you’re not comfortable modifying the registry on your own, you can fix the problem simply by running a single file. Download Fix_it.reg and run it, and it will automatically make the necessary changes in your registry.
Once again, we advise you to create a backup of your registry just in case anything goes wrong.
In addition, some users recommend to temporarily uninstall Entrust Entelligence Security Provider for Windows in order to fix this problem. After uninstalling this application, restart your PC and try to install Visual Studio again.
3. Disable your antivirus software
Antivirus software is important because it can protect your PC from online threats, but sometimes third-party antivirus tools can interfere with your apps.
As a result, you might encounter The pipe is being closed error message while installing apps. To fix the problem, be sure to disable all third-party antivirus tools and check if that solves the problem.
If you don’t use third-party antivirus software, disable Windows Defender temporarily and check if that helps. After disabling your antivirus, try to run the setup file again. If the installation is successful, be sure to turn your antivirus back on again.
If running the application as an administrator fixes the problem, you’ll have to repeat this process every time you want to start that application.
To make this process more straightforward, you can set the application to always run with administrative rights.
Right-click the problematic file and choose Properties from the menu.
Go to the Compatibility tab and check Run this program as an administrator option.
Click Apply and OK to save changes.
After doing that, the application will always run with administrator privileges and the problem should be fixed.
5. Update the problematic application
This issue can sometimes appear if the problematic application is out of date. Outdated applications can have few bugs and glitches that can cause this error to appear.
To fix the problem, we suggest updating the problematic application to the latest version and check if that solves it. Several users reported this problem with Google Chrome, but after updating it to the latest version the issue was resolved.
If updating Chrome to the latest version doesn’t fix the problem, you might want to try installing the Beta version instead.
We have to mention that this error can affect almost any application, so to avoid it in the future try to update your installed applications as often as you can.
6. Change eConnect config file
This solution applies only to eConnect users, so if you’re not using this tool you can skip this solution entirely.
To fix the problem with eConnect, you just have to navigate to C:Program FilesMicrosoft DynamicseConnect 11.0Service and open its configuration file with Notepad or any other text editor.
After you open the config file, add receiveTimeout=”infinite” to it and restart the service.
Solution 7 – Reinstall your network card drivers
If you have problems accessing the Internet due to this error, you might want to try reinstalling your network card. To do that on Windows 10, follow these steps:
System Properties window will appear. Click on System Restore button.
When System Restore starts, click on Next.
Check Show more restore points option, select the desired restore point and click on Next.
Follow the instructions on the screen to complete the process.
If none of the previous solutions fixed your problem, you might want to try performing a System Restore. This feature allows you to fix any problem on your PC by restoring it to an earlier state.
After restoring your PC, check if the problem still persists.
ERROR NO DATA and The pipe is being closed error message can prevent you from installing certain applications, but you should be able to fix this problem by using one of our solutions.
Before you leave, visit our Error_Pipe_Busy guide which covers a similar issue.
Speaking of which, let us know which of them worked best for you by leaving your feedback in the comments section below.
STOP errors, also known as Blue Screen of Death errors, are probably one of the most problematic errors on Windows 10.
These types of errors are often caused by faulty hardware or a software issue, and since these errors restart your PC whenever they appear they can be rather troublesome.
There is a wide range of these errors available, and since these types of errors are so problematic, today we’re going to show you how to fix the PROCESS1_INITIALIZATION_FAILED BSoD error.
How can I fix PROCESS1 INITIALIZATION FAILED error?
Windows 10 is constantly getting better with new improvements and features.
In order to get the latest features, it’s important to run Windows Update on a regular basis and download all pending updates.
In addition to new features, there are many security improvements and various bug fixes related to both hardware and software.
Since BSoD errors such as PROCESS1 INITIALIZATION FAILED can be caused by hardware or software incompatibility, be sure to download Windows updates as often as you can to prevent these types of issues.
Downloading Windows updates is an important step for system security and stability, but it’s just as important to keep your drivers up to date.
Outdated or incompatible drivers won’t be able to work with your hardware and that can cause a BSoD error.
In order to avoid these types of issues, it’s recommended that you download and install the latest drivers for your hardware.
In order to update a certain driver, you just need to head over to your hardware manufacturer’s website and download the latest drivers. We also recommend you an alternative: an automatic driver update.
Using an automatic driver updater will certainly save you from the hassle of searching for drivers manually, and it will always keep your system up to date with the latest drivers.
Make your computer’s hardware perform at its maximum capacity. With Fortect Driver Updater, you can update all your drivers with just one click and enjoy optimum gaming performance.
This professional software scans your computer and offers you a detailed report with updated, outdated, and damaged drivers. After that, it is up to you to download and install one or all the newest drivers available.
Head over to Updates & Security, and select Troubleshootfrom the menu on the left.
Select BSOD from the right pane and click Run the troubleshooter.
Follow further on-screen instructions to complete the troubleshooting process.
If updating your drivers didn’t get the job done, let’s try and run Windows 10’s built-in troubleshooting tool. This tool is designed to address all kinds of system errors.
So, trying to resolve the PROCESS1_INITIALIZATION_FAILED error is a logical next step.
3. Run the SFC scan
Right-click on the Start Menu button, and open Command Prompt (Admin).
Enter the following line and press Enter:sfc/scannow
Wait until the process is done (it may take a while).
If the solution is found, it will automatically be applied.
Now, close the Command Prompt and restart your computer.
The next troubleshooting tool we’re going to try here is the SFC scan. This is a command-line tool that scans your system for corrupt files and repairs them.
So, if a corrupt system file is a reason you’re getting the ROCESS1_INITIALIZATION_FAILED, the SFC scan will likely resolve the problem.
4. Run DISM
Standard way
Right-click Start and open Command Prompt (Admin).
Paste the following command and press Enter:
DISM /Online /Cleanup-Image /RestoreHealth
Wait until the scan is finished.
Restart your computer and try updating again.
And the third troubleshooter we’re going to use here is DISM. This tool re-deploys the system image, which usually leads to resolving various problems.
In that manner, DISM could also be helpful when dealing with the PROCESS1_INITIALIZATION_FAILED error.
We’ll walk you through both standard and the procedure that utilizes the installation media.
With the Windows installation media
Insert your Windows installation media.
Right-click the Start menu and, from the menu, choose the Command Prompt (Admin).
In the command line, type the following commands and press Enter after each:
Make sure to change an X value with the letter of the mounted drive with Windows 10 installation.
After the procedure is finished, restart your computer.
5. Delete your antivirus
Antivirus software can often cause PROCESS1_INITIALIZATION_FAILED and many other types of BSoD errors, so in order to fix this issue, you’ll have to uninstall your antivirus software.
It’s worth mentioning that any third-party antivirus program can cause this error, so be sure to uninstall every antivirus software from your PC.
Bear in mind that uninstalling the antivirus software might not fix the problem, therefore you’ll have to use a dedicated uninstaller tool.
Many security companies offer these tools for their software, so be sure to download one for your antivirus program.
If removing your antivirus fixes the Blue Screen of Death error, you can now download and install the latest version of the antivirus software that you were previously using.
Restart your computer few times while it boots in order to start Automatic Repair. Alternatively you can just press and hold Shift and click the Restart button.
Bear in mind that you might need to scan all hard drive partitions, so be sure to repeat the scan and replace C with a letter that matches a certain partition.
BSoD errors such as PROCESS1_INITIALIZATION_FAILED can sometimes be caused by corrupted files on your hard drive.
In order to fix this problem, you have to run chkdsk scan.
7. Delete the Bootcat.cache
Start Automatic Repair, choose Troubleshoot > Advanced options > Command Prompt. For detailed instructions check the previous solution.
When Command Prompt starts, enter the following lines and press Enter after each line in order to run it:
C:
cd windows/system32/codeintegrity
del bootcat.cache
Enter exit and press Enter to close Command Prompt.
After you delete the Bootcat.cache file, Windows 10 will recreate it and the PROCESS1_INITIALIZATION_FAILED error should be fixed.
Sometimes Bootcat.cache file can get corrupted and that will give you PROCESS1_INITIALIZATION_FAILED BSoD error.
This error can prevent Windows 10 from starting, so you’ll have to delete the problematic file using Command Prompt.
If you don’t feel comfortable using Command Prompt you can always use Linux from a USB flash drive to locate and delete the file manually.
It’s worth mentioning that some users managed to fix this problem by copying Bootcat.cache files from another identical operating system, so you should try that as well.
8. Disable Secure Boot
Many users reported that disabling Secure Boot fixed the PROCESS1_INITIALIZATION_FAILED errors for them. To disable Secure Boot you’ll have to enter BIOS and disable this feature.
For detailed instructions on how to do that, check your motherboard manual.
9. Check your hardware
PROCESS1_INITIALIZATION_FAILED and many other BSoD errors are often caused by hardware.
Therefore be sure to remove and replace any recently installed hardware since it might not be compatible with your PC.
If new hardware isn’t causing the problem, be sure to check other hardware components.
A common cause for BSoD errors is RAM, and in order to test your RAM, you can just remove all but one RAM module and try them one by one.
It’s also recommended to download and run MemTest86+ in order to thoroughly test your RAM.
Users also reported that a hard drive can be the often cause for this error, so be sure to check it as well.
If none of these components are faulty be sure to check all other remaining components.
PROCESS1_INITIALIZATION_FAILED BSoD error can be problematic, but users reported that they managed to fix this problem mostly by replacing or deleting the corrupt Bootcat.cache file or by disabling Secure Boot.
If these solutions don’t work for you, feel free to try other solutions from this article.
System errors, such as ERROR_MORE_DATA can cause some problems on your Windows 10PC. This error comes with More data is available message, and today we’re going to show you how to fix it properly.
How do I fix ERROR_MORE_DATA?
1. Edit your registry
Press Windows Key + R and enter regedit.
Press Enter or click OK.
Optional: Modifying the registry can be potentially dangerous, especially if you don’t do it properly. This can cause system instability issues, therefore it’s highly recommended to back up your registry before making any changes.
To do that, click on File > Export. In Export range select All. Now enter the desired name, choose a secure location and click the Save button. After doing that, you can use the newly created registry file to restore your registry to the previous state.
Navigate to the following location in the left pane.:
In the right pane, locate PublisherPolicyChangeTime entry.
According to users, it should be changed to REG_SZ format during the install.
Delete that entry before building the MSI file and the problem should be fixed.
Several users reported this problem while trying to create MSIs for imaging. It seems that certain registry values are changed, and that is causing this problem to appear.
To fix the issue, you need to manually edit your registry by following the steps mentioned above.
This is a specific solution, so it won’t work for most users. However, if you’re trying to create MSIs for imaging, we suggest you try this solution out. If you can’t find the aforementioned registry key, this solution doesn’t apply to your PC so you can just skip it.
2. Update .NET Framework
Many applications require .NET Framework to work properly, and if your .NET Framework is outdated, you might experience this and many other errors.
If you’re getting this error frequently, you might be able to fix it by installing the latest version of the .NET Framework. Simply download .NET Framework, install it, and check if that solves your problem.
3. Run the applications directly
Users reported No more data is available error message while trying to run certain applications. This error can appear while trying to run Backup Exec License Assessment Tool using Remote Desktop Protocol.
To fix this problem, you need to run the application directly by logging into the machine. After doing that, the problem should be resolved.
4. Use third-party repairing software
Windows errors are often caused by corrupted files or compatibility problems with certain programs. A thorough diagnosis of your OS can identify the exact issues and help you fix them.
Locate Bonjour on the list, select it and click the Uninstall button.
If you don’t want to use Settings app, you can remove Bonjour by doing the following:
Press Windows Key + X to open Win + X menu and choose Programs and Features.
Once the Programs and Features window opens, locate Bonjour on the list, double click it and follow the onscreen instructions to remove it.
6. Use Safe Mode
Open Start Menu, click the Power button, press and hold the Shift key and choose Restart from the menu.
List of options will appear. Click on Troubleshoot > Advanced options > Startup Settings. Click the Restart button.
After your PC restarts, you’ll see a list of options.
Press the appropriate keyboard key to select any version of Safe Mode.
In most cases it’s best to select Safe Mode with Networking by pressing 5 or F5 key.
If this problem keeps appearing, you can try using Safe Mode. This is a special segment of Windows that runs with default applications and drivers, so it’s perfect for troubleshooting. To enter Safe Mode, you need to follow the steps mentioned above.
Once you enter Safe Mode, check if the same problem appears. If not, it’s possible that the issue is caused by your configuration or by third-party applications. If that’s the case, you need to go back to regular Windows 10 and find and remove the problematic app.
7. Use System Restore
Press Windows Key + S and enter system restore.
Select Create a restore point from the menu.
System Properties window will appear.
Click on System Restore button.
When System Restore starts, click on Next.
Check Show more restore points option and select the desired restore point.
Now click on Next button to continue.
Follow the instructions on the screen to complete the restoration process.
If this problem started appearing recently, you might be able to fix it simply by using System Restore. This is a useful feature that allows you to restore your system to a previous state.
To use System Restore, follow the steps written above. After your PC is restored, check if the problem still persists.
8. Create a new user account
In some cases, this problem can occur if your user account is corrupted. To fix that problem, you need to create a new user account from scratch. This is rather simple and you can do it by following these steps:
Press Windows Key + I to open the Settings app.
Go to Accounts section.
Navigate to Family & other people in the left pane.
In the right pane click on Add someone else to this PC.
Select I don’t have this person’s sign-in information.
After you create a new user account, you need to switch to it. Check if the problem appears on a new user account. If not, it means that your account is corrupted, so you might want to switch permanently to a new user account.
Open the Start Menu, click the Power button, press and hold the Shift key and choose Restart from the menu.
Select Troubleshoot > Reset this PC > Remove everything.
You might be asked to insert Windows 10 installation media.
Select your version of Windows and choose Only the drive where Windows is installed > Just remove my files.
Keep in mind that this process will remove all files from your system drive, so be sure to back them up beforehand.
Once you’re ready to start, click the Reset button.
Follow the instructions on the screen and wait for the reset process to finish.
If the error message still occurs, you might want to try resetting Windows 10. This is a drastic solution and it will remove all files from your system drive, so we urge you to create a backup.
After the reset is complete, you’ll have a clean installation of Windows 10. Keep in mind that you’ll need to install all your applications again.
After you do that, check if the problem still persists. We have to mention that this is a drastic solution that will remove all your files from the system drive, so use it as a last resort.
By following all of the steps mentioned above, you should be able to bypass this particular Windows error, and you will have your system running optimally in no time.
While there are plenty of solutions to try, we would like to know which ones worked best for you, so do not hesitate to let us know by leaving us a message in the comments section below.
If you are trying to upload your photos from the smartphone or from a tablet to the photo library in Windows 10 there are some cases where instead of the normal process you will get the error Error 0x80004005.
But following the tutorial posted below will show you the necessary procedures that you need to take and fix your Error 0x80004005 in Windows 8.1 or Windows 10.
In the message alongside Error 0x80004005 you will also have the buttons to Skip, Try again or Cancel the process of uploading the photos to the photo library.
Unfortunately, every time you choose “Try again” it will bring you to the same window with no other outcome than to cancel the upload process.
How do I solve Error 0x80004005 photo upload error in Windows 10?
When the operating system starts you will need to log on with your administrator account.
Try again to copy your photos to the device and see if it works now.
Note: Most of the users are having difficulties when uploading photos to the Windows device and they don’t have the right permissions to do so.
2. Check Windows Firewall
In this step, you will need to temporarily disable your Antivirus application.
After you disabled it try and upload a photo to the photo library and check if you have the same error code.
If you have the same error then we will disable the Windows Firewall as well for a short period just to see if the Firewall is blocking the upload process.
Move the mouse cursor over to the upper right side of the screen.
Left-click or tap on the “Search” feature present in the Charms bar.
In the search box write the following: “firewall” but without the quotes.
Left-click or tap on the “Windows Firewall” icon after the search is finished.
Left-click or tap on the “Turn off Windows Firewall (not recommended)”.
Now try to upload your photos to the photo library and see if the process is working as expected.
3. Disable startup apps
Move the mouse cursor over to the upper right side of the screen.
Left-click or tap on the Search button.
Write in the search box the following: MSConfig.
After the search is finished left click or tap on the MSConfig icon.
Left-click or tap on the Services tab.
Check the box next to Hide all Microsoft services and then left-click on the Disable all button.
Left-click on the Startup tab.
Left-click on Open task manager.
In the Task Manager window left click on the Startup tab.
Now left-click on one app at a time in that list and select the “Disable” button.
You will need to close the Task Manager window.
Left-click on the OK button inside the System Configuration window.
Reboot the Windows 10 device and see if a third party application was preventing you to upload your photos to the device.
If this step worked you will need to find out exactly which app is causing the issues by disabling one app at a time following this tutorial posted above.
From the primary device to another device, and then, try on your second device
Try to transfer images on the phone and from there to the library
Change your devices, try another Windows PC in order to upload photos on library
Change the device for the memory card
In many cases, the problem may occur only between your devices. We strongly recommend you to check if they are in good functionality before changing/resetting-reinstalling the OS.
That is pretty much it, applying the steps above you will manage to upload your photos to the photo library and get rid of Error 0x80004005 in Windows 10.
You can write to us below any other thoughts or questions on this article and we will help you further.
After you upgraded to Windows 10, Windows 8 or Windows 8.1, you might get the message Destination folder access denied when you are trying tocopy a file or folder either from a USB stick, from an external hard drive or just from a simple CD or DVD to your C: partition in your Windows.
The message Destination folder access denied usually appears when you don’t have the necessaryadministrator rights to copy a file or folder to the C: partition or to the partition your Windows 10, operating system is installed in.
In some cases however it will let you copy and paste any file or folder but only in specific paths in your C: drive.
How do I fix the Destination folder access denied error?
Check your administrator rights
Check your program permissions
Use Command Prompt
If you get this error message in your Windows 10 operating system it is usually followed by the message You’ll need to provide administrator permission to copy to this folder but if you click(left click) on the Continue box it will paste your data to that specific place.
Seeing that it is quite annoying to click on Continue every time you copy/paste your data to the C: partition we will see below how to do a permanent fix on this.
1. Check your administrator rights
If you are the only one using the Windows 10 PC or laptop and you know you are on the administrator account then press and hold the buttons Windows and E .
Click (right click) on the C: drive or the partition you are having issues with and select from that menu Properties .
Click (left click) on the Security tab presented in the upper side of the window.
Click (left click) on the Administrators (computer name and administrators)section.
First you will need to verify if you have a check mark for every entry and it is on Allowed .
If you don’t have every entry on Allowed then click(left click) on Edit and change the entry to Allowed .
Click (left click) on OK button after you changed all the entries to allowed
Click (left click) again on OK in the other window you had opened.
Reboot the Windows 10 PC.
See if you have the same message appearing after the reboot
2. Check your program permissions
Click (right click) on the C: drive or the partition you are having issues with and select from that menu Properties .
Click (left click) on the Security tab presented in the upper side of the window.
Click (left click) on the Advanced button presented in the window.
You will have there a Permissions tab in the upper side of the window you opened, open it.
Click on Administrators in the Permissions tab and choose from there the feature called Change Permissions .
You have there a Basicpermissions area, verify that all of them are checked.
You have there a drop down menu that says Applies to, in this drop down menu you will have to make sure that the feature This folder, subfolder and files is selected.
Click (left click) on OK .
Click (left click) on OK again in the other window.
Click (left click) on Apply in the last window.
Reboot the Windows 10 PC or laptop and verify if you can copy or paste the files or folders now.
3. Use Command Prompt to take ownership of the drive
You can also use a quick CMD command to take ownership of the problematic files, folder or even drive.
For example, here’s how you can take ownership of computer drives so that you can freely copy, move and change any files located on the respective drive:
Go to Start > type cmd > double-click on the first result to launch Command Prompt
Type the takeown /f C:Music command to take ownership of all the files stored in the Music folder
So there you have it, these three methods will help you fix the Destination folder access denied issue on Windows 10, 8 or 8.1. Now you can use your device freely without any limitations.
Most people using Windows 10 usually create a user profile when they first install the operating system or they log in from the administratoraccount if they are the only ones using the PC.
Having a user profile on Windows 10 helps you customize your own settings when you login like the desktop theme, the installed programs you need only on that user profile or modify the sound settings of the system to your liking.
These are just a few features you might find useful that you can customize on your own user profile. Seeing that a lot of Windows 10 users are having trouble relating to corrupt user profiles I have decided to show you in a short tutorial below how exactly we can fix this issue.
How do I fix a corrupt user profile in Windows 10?
There are two ways we can fix corrupt user profile issues on Windows 10. The first method is to try and fix the corrupt user profile. This involves creating a new user profile from your administratoraccount.
1. Fix corrupt user profile using Regedit
We need to sign into the Administrator account at the start of the PC
If you do not have an administrator account active do the following: Boot into Safe mode, enable option built-in administrator, sign out and sign into administrator
Press Window button plus the R button (Windows + R)
In the Run dialog window you opened type in there regedit.
Click (left click) on OK
If you get a message by User account control (UAC) click (left click) Yes.
On the right of the Window you opened Registry Editor, double click (left click) on HKEY_LOCAL_MACHINE
In the HKEY_LOCAL_MACHINE” folder double click (left click) on Software.
In the Software window you need to double click(left click) on Microsoft.
In the Microsoft window you need to double click (left click) on Windows NT.
In the Windows NT window you need to double click (left click) on CurrentVersion.
Double click (left click) on ProfileList
On the left under ProfileList folder double click (left click) on S-1-5-21-273154420-267531419-3735073706-1014 or simply click on the longest key available
On the right side of the window you should have there ProfileImagePath, look at the value on the right of that name to see if you have the same user profile name you cannot access.
Now navigate to C:Users in File explorer and see if the name of the account you have there matches the name you have in the ProfileImagePath presented above.
If it doesn’t match , click (right click) on the folder in C:Users with the name of the user profile that doesn’t work and click (left click) on Rename
Write the name you have in C:Users exactly as you have it in the ProfileList folder.
Now in the left panel of the Registry Editor Window, click (right click) on S-1-5-21-273154420-267531419-3735073706-1014 with .bak extension at the end of the numbers and click on Rename .
Delete the .bak you have in the name and press Enter on the keyboard.
If you have two folders with the same number, click (right click) on the S-1-5-21-273154420-267531419-3735073706-1014 without the .bak extension and select Rename .
Add .bk at the end of S-1-5-21-273154420-267531419-3735073706-1014 and press Enter on the keyboard.
Go to S-1-5-21-273154420-267531419-3735073706-1014 with the .bak extension and click (right click) on it.
Click(left click) Rename and delete the .bak extension.
Press Enter on the keyboard.
Now click(right click) on the S-1-5-21-273154420-267531419-3735073706-1014 with the .bk extension and replace .bk with .bak at the end of the numbers.
Press Enter on the keyboard.
Double click (left click) on the S-1-5-21-273154420-267531419-3735073706-1014 without .bak extension.
On the right side of the Registry Editor window , double click(left click) on RefCount DWORD to modify it.
In the Edit DWORD window under Value data write zero 0
Click (left click) on OK on the lower side of that window.
Do the last four steps above for the S-1-5-21-273154420-267531419-3735073706-1014 with .bak extension.
After you are finish close the Registry Editor window and reboot the PC.
Try to log into the account that you were having troubles with and see if it works.
Note: The S-1-5-21-273154420-267531419-3735073706-1014 key used in this guide may not be available on your computer. In this case, locate the key with the largest number of characters and operate all the changes listed above on that key.
2. Create a new user profile
Log in with your administrator account (the steps are presented in the first tutorial).
Back up everything you don’t want to lose in the C:Users the user account you want to delete by copying it to another location on the hard drive.
Press and hold Windows button and the R button.
In the Run dialog box you opened type regedit
Click (left click) on OK
If you get a message from User Account ControlsUAC select Yes .
In the Registry Editor window on the right navigate to HKEY_LOCAL_MACHINE/SOFTWARE/Microsoft/Windows NT/CurrentVersion/ProfileList .
In the right panel under ProfileList double click (left click) on S-1-5-21-273154420-267531419-3735073706-1014.bak .
On the right panel look next to ProfileImagePath on the Data tab to see if there is the same user profile with problems.
If not , select the other S-1-5-21-273154420-267531419-3735073706-1014 without the bak extension.
Click (right click) on S-1-5-21-273154420-267531419-3735073706-1014 on the left of the Registry Editor window and click(left click) on Delete
Click(left click) Yes to confirm the action.
After you deleted the folder exit the Registry Editor window.
Restart the PC and try to sign into the user profile you had problems with, if successful you will need to copy back the files you had moved to another location (step 2).
On Windows 10, you can also create a new user profile from the Settings Page. Navigate to Accounts > Family & Other people > select Add someone else to this PC.
There you have it, here are two ways you can try to sign in to your problematic user profile on Windows 10. If you’ve come across other solutions to fix this problem, feel free to list them below.
Kaspersky is one of the most used antivirus software tools since it provides enhanced security for the computer system. If you’re seeing the error Activation code is invalid for this region during the activation process, don’t panic.
Trying to activate the software using an activation code in one country while it was intended for another region seems like a long shot. Getting the same error message is frustrating, yet you may overcome it.
To fix this activation code problem, you are clearly supposed to activate your Kaspersky product in the country where you have purchased the application. Assuming that’s not an option for you, we discuss a few working solutions in this article.
What is invalid activation code?
This error message occurs when trying to activate Kaspersky software on your PC.
It appears that the entered activation code isn’t correct.
Errors can manifest if the server doesn’t process the license.
If you try activating the product using a license from a different region, you might get this error.
How can I fix the activation code is invalid for this region error in Kaspersky?
1. Use a new license that you can easily activate
In the Activation window, enter the new activation code you received during your latest purchase.
Click Install and the Activation wizard will connect to the Kaspersky Lab server.
It will then download the license key file.
At that point, click Finish and enjoy the product!
This solution comes with its share of disappointment, but it is consistent with the copyright policy of Kaspersky Lab.
2. Change your IP address
Start your VPN.
Select the country that matches your license region.
3. Put a specific proxy: port on Kaspersky Network Setting
First of all, click on Pause Protection.
Follow this path Settings and then Additional. Lastly, pick Self-Defense.
Disable the option.
You may now exit Kaspersky from Taskbar.
Kaspersky will start automatically, giving you the chance to enter the new activation code.
It’s time to set up a proxy: port in Kaspersky Network Setting. For that, you need to enter into Setting and then Additional. After that, go to Network and choose Proxy server.
Put a tick on the box that says Use specified proxy server settings.
Put the desired proxy: port: MEDIUM 1 209.239.112.104 : 3128 69.63.114.3 : 3128 185.54.4.198 : 80 MEDIUM 2 187.217.191.162 : 3128 187.189.45.128 : 3128 200.33.27.33 : 80
Click Save.
Enter your License code in the Kaspersky activation window.
Click on Activate next.
Your Kaspersky antivirus will be activated successfully with the licensed validity.
If you still face a problem with the activation code, putting a specific proxy: port on the Kaspersky network setting could also help.
With the Kaspersky product installed on your system, you need to activate the trial license with KRT by applying the above steps.
This isn’t the only issue you can encounter, and many reported a corrupted Kaspersky database, but that can be fixed with steps from a different guide.
Let us know if you found this guide helpful or if you have any extra tips. You can do so by using the comments section found below.
Borderlands 3 was recently released, but some PC gamers reported that it is not available in their native language.
The reports suggest that they are forced to play with the default language settings.
The players are finding it difficult to play Borderlands 3 and they want to change the default language. By the look of things, the problem affects all users irrespective of their geographical regions.
Even though there is no option available by default, you can still fix the language issue with the help of some settings tweaks.
One player asked about the same in a Reddit thread.
Hi there, is there a way to change the game‘s language?
In this article, you are going to find out how you can change the language in Borderlands 3.
Steps to change the default language in Borderlands 3
Open the Epic Games Launcher.
Select the Settings icon > go to Borderlands 3.
Open the drop-down menu and check the Additional Command Line Arguments option.
To select English as a default language, type -culture=en in the text box available below.
Note: You can replace en with the codes for other languages. If you want to change the language to Spanish type -culter=es. The list of codes is available below.
(English) -culture=en
(French) -culture=fr
(Italian) -culture=it
(German) -culture=de
(Spanish) -culture=es
(Russian (text only)) -culture=ru
(Japanese) -culture=ja
(Brazilian Portuguese (text only)) -culture=pt-BR
(Korean) -culture=ko
(Simplified Chinese) -culture=zh-Hans-CN
(Traditional Chinese) -culture=zh-Hant-TW
It remains to be seen when the developers provide a built-in option to fix this major problem in Borderlands 3. They need to work on this feature on a priority basis because it affects the overall user experience.
Moreover, there are a large number of reports about other problems related to Borderlands 3.
Speaking of issues, you should consider running an FPS software if you are frequently encountering some major game issues. It will help PC gamers to identify the root cause of the bugs.
If you have any questions about Borderlands 3 or the Epic Launcher, don’t hesitate to let us know in the comments section below.
As well as many other users, you might have stumbled upon some Store issues. Sometimes, the download process remains at 0 MB downloaded or you just get the error message that you do not have the proper internet connection for the apps to be downloaded.
In this guide, we’ll show you what to do in order to properly install the apps you need from the Store feature after you installed the latest Windows 10 build.
We will first have to check what type of internet connection you have. If you are using a wired interned connection to your device, apps should install properly from the Store even if your internet connection is slow. If you use a wireless connection and it keeps interrupting, then this might be a possible cause of the errors you get in the Microsoft Store.
How can I fix Microsoft Store download issues?
1. Use a different Wi-Fi connection
The first step you need to take is to try connecting to another Wireless network if you have access to it.
Go on the Store and try downloading your app again.
If it gives you the same issues, then the wireless internet connection should work fine and the issue you have in the Store feature is caused by something else.
If you do not get these issues while using another Wireless internet connection, then it means that your wireless router is not sustaining your internet connection correctly. As a side step, you will need to unplug the router from the power socket, wait one minute, then plug in the wireless router again.
Try using Microsoft Store again to download your preferred app and see how it goes.
2. Reset the Microsoft Store App
Press and hold the Windows button and the R button on the keyboard.
This should bring up the Run window you have in Windows 10.
In the run dialog box, you will need to write the following: WSReset.exe
Press the Enter button on the keyboard.
Reboot your Windows 10 system and check the Microsoft Store now to see if it is going through with the download and installation of the desires application.
3. Disable your antivirus
Turn off the Antivirus you have installed on your Windows 10 device.
After the Antivirus is turned off, reboot the Windows 10 system.
Go on Microsoft Store and check to see if the apps are downloading properly. If the download and install work properly, then your antivirus might be blocking the download process from the Microsoft store feature.
You can disable your firewall as well. Sometimes, the Windows Firewall or third-party firewall tools may label Store apps as threats, thus blocking the download process.
Don’t forget to enable your antivirus and firewall protection as soon as you downloaded the respective apps to protect your PC against cyber threats.
It seems that if the steps above did not solve your issue you can try rebooting your device two or three times and check to see if the apps are downloading. This is not a conventional method of fixing the application downloads from the Microsoft Store but it is known to work.
5. Run the built-in Microsoft Store Apps troubleshooter
If the problem persists and you still can’t download Microsoft Store apps on your machine, try running the built-in Store Apps troubleshooter. This tool automatically checks all the components involved in the app download process and then repairs the issues it detected.
Go to Settings > Update & Security > Troubleshooter > scroll down to the bottom of the page > select and run the troubleshooter as shown in the screenshot below.
6. Additional solutions to fix Windows 10 app download problems
Apply pending Windows 10 updates: If you’re not running the latest Windows 10 OS version, you may encounter various technical issues If you recently installed the latest Windows 10 built, do check for updates once again to make sure you’ve installed absolutely all the pending updates.
Create a new Microsoft account: Some users confirmed that creating a new user account fixed the problem and they can download apps using the new account without any issues.
Uninstall and reinstall the Microsoft Store app: If nothing worked, you can simply uninstall the Store App and then reinstall it from scratch.
Of course, if nothing worked, you can leave the Insider Program and enroll back when there’s a new build in town.
There you have a few methods to fix your Microsoft Store download issues if you’re an Insider running the latest Windows 10 Technical Preview build. These solutions should help you to get your apps up and running in no time.
If you need further help with this subject, let us know in the comments section below.
If you have been experiencing the error Impactor.exe Bad Image problem on your Windows PC after you launched a certain application, we have come up with the right solutions for you.
Some applications such as VLC media player, games, and other software produce the error Impactor .exe Bad Image involving the zdengine.dll. This error is due to corrupted files or libraries that are required to run the intended application.
The good news is that you can quickly fix the Impactor .exe Bad Image error. The solutions that will enable you to fix the error on your PC are listed below.
How can I fix Impactor .exe Bad Image error?
1) Run the Windows 10 Troubleshooter
Since this error usually occurs when users try to launch Microsoft Store apps, try running Microsoft’s dedicated troubleshooter.
Go to Settings > Update & Security > select Troubleshoot in the left-hand pane
Under Find and fix other problems > select Microsoft Store Apps > Run the troubleshooter
2) Reinstall the program
You should consider reinstalling the application which produced the error. This will replace the corrupted program files including its libraries with a new one.
A new copy of the application will be run on your PC without the Impactor .exe Bad Image error. In order to reinstall your program, follow these steps:
Go to the Start menu, type control panel, and press the enter button.
In the Control Panel, go to the Programs and Features menu to uninstall a program.
Here, go through the list of installed applications and double-click on the application producing the error so as to uninstall it. Click Yes when required in the uninstall prompts until the application is uninstalled.
Download the application from its official download site. If you installed using a CD, insert the CD and install it consequently.
Launch the installer and follow the prompts until the installation is complete.
Run the application again
By following these steps listed above, the error bad Impactor .exe Bad Image will be fixed ensuring that the application runs flawlessly.
3) Run the program in compatibility mode
Some applications during development are not optimized for newer operating systems making it difficult to adapt hence the bad Impactor.exe Bad Image error.
By running your program in the compatibility mode, the current Windows OS will enable the application to run in an older version of Windows. To run the said program in compatibility mode, follow these steps:
On the desktop or where the actual application is, right-click application shortcut and click Properties.
Here, select the Compatibility tab, and check the box Run this program in compatibility mode for:
From the drop-down list, select any older edition of Windows to run the program with.
Lastly, click OK to run the program.
Note: It is advisable to check the applications’ system requirement to determine which older Windows OS and model you intend to run the application with. This method will enable you to bypass the Impactor .exe Bad Image error.
4) Run System File Check Scan
The Impactor .exe Bad Image error is due to the corrupt zdengine.dll, hence, running a system file check can repair any error which is connected to the .dll (dynamic link library) file.
SFC scans, checks, and fixes any corrupted files. To run an SFC scan on your Windows PC, follow these steps:
Go to the Start menu and type cmd. Right-click on the Command Prompt icon and click on Run as Administrator. Click yes to accept the UAC prompt.
In the cmd prompt, type sfc and hit the Enter key.
Type /scannow and hit the Enter key.
Finally, restart your Windows PC and try launching the application again.
This method will run a system file check and repair all corrupt system files most especially related to the Impactor .exe Bad Image on your computer. You can run the application again after this procedure and it will run flawlessly.
5) Use CCleaner
CCleaner is a utility program that is Windows compliant. You may need to download CCleaner on your Windows PC so as to scan, fix and clean bad system files especially the corrupted files responsible for the Impactor .exe Bad Image error.
Install and follow the prompts to complete the installation
After installation, launch CCleaner
Here, go to the Registry menu, click Scan for issues option
After CCleaner has finished the scan, select the Fix selected issues, follow the prompts and click on the Fix all option
Wait for the CCleaner to clean the registry
This program will clean the registry and fix any corrupt system files such as the Impactor .exe Bad Image file. It is recommended that you backup your registry in case you intend to revert back.
There are many registry cleaning software that you can use. Check out our list of the best registry cleaners to use on Windows 10.
Malware may cause various issues on your computer, including bad image errors. Perform a full system scan in order to detect any malware running on your computer.
You can use Windows’ built-in antivirus, Windows Defender, or third-party antivirus solutions.
Here’s how to run a full system scan on Windows 10:
Go to Start > type defender > double click Windows Defender to launch the tool
In the left-hand pane, select the shield icon
In the new window, click the Advanced scan option
Check the full scan option to launch a full system malware scan.
7) Update your OS
Make sure that you’re running the latest Windows OS updates on your machine. As a quick reminder, Microsoft constantly rolls out Windows updates in order to improve the system’s stability and fix various issues.
To access the Windows Update section, you can simply type update in the search box. This method works on all Windows versions. Then go to Windows Update, check for updates and install the available updates.
Consequently, the methods above should fix the Impactor .exe Bad Image error on your Windows PC.
However, if the problem persists, which is rare, this may be due to corrupt software installation CD or corrupt executable file of the application that was downloaded.
If you have further questions, feel free to comment below.
Are you also facing the Error in graphics drivers occurred message in the Kaspersky antivirus? The same lines keep coming back and are preventing your antivirus from launching in the first place.
There are also Kaspersky users reporting the same error as appearing every time they change the desktop background or when attempting a fresh install of the software application.
One way or another, below we’ll list the most useful solutions you can apply in these cases. Therefore, take immediate measures to remove the graphics driver error at the earliest.
How can I fix Error in graphics driver occurred?
1. Rename the nvd3d9wrap.dll file
This is a quick solution for all users, regardless of the 32-bit or 64-bit system version your PC is on. You just need to enter into C:Program files (x86)NVIDIA Corporationcoprocmanager.
After finding the file nvd3d9wrap.dll, just rename it to something different. In most cases, the antivirus will open error-free and no reset is requited this time. Post this, if you play video games which need nvd3d9wrap.dll to load, disable Kaspersky self-defense.
The nvd3d9wrap.dll file injects itself to all Nonsystematic processes, including avpui.exe and you risk coming back to the same error in a short while.
2. Correct faulty registry entry
In the search box on the taskbar, type regedit.
Then, select the top result for Registry Editor.
You may also right-click the Start button, select Run, and enter regedit in the Open: box.
Navigate to HKEY_LOCAL_MACHINESOFTWAREWow6432NodeMicrosoftWindows NTCurrentVersionWindows.
Double-click on the key AppInit_DLLs.
Check the value and make sure the string looks like this: C:WindowsSysWOW64nvinit.dll,C:windowsSysWOW64nvinit.dll
If there’s a comma between …nvinit.dll and C:Windows…, replace it with space and save the value.
That’s how the code should look now: C:WindowsSysWOW64nvinit.dll C:windowsSysWOW64nvinit.dll
When your PC is equipped with a graphics processor from Nvidia, suspect a faulty registry entry as the culprit. Note that careless changes to the registry can make your computer unstable.
3. Disable one of the two graphics cards from your PC
When getting this graphics driver error, chances are your computer is equipped with two graphics cards. To solve it right away, you need to give up on using one of the two graphics cards on your PC.
To do this, enter into Windows Device Manager > Graphics Cards. Right-click on the video card you wish to deactivate – the Intel one or the Nvidia card. Finally, click on Deactivate.
4. Remove current Kaspersky application and return to the 2019 version
Close all running applications.
Select the Start button.
Type Control Panel.
Select Control Panel from the list.
Up next, select Programs and Features.
Select your Kaspersky application on the list.
Then, click Uninstall/Change.
Click Next.
If the application is password-protected, you need to enter the password before clicking Next.
Don’t hesitate to select the checkboxes beside the data you want to save. Ticking the box next to License information is recommended.
Click Next.
Click Remove.
Finally, click Yes to reboot the computer.
After the reboot, the application will be deleted from your computer. Wait until this happens before installing Kaspersky Antivirus 19.
We recommend using professional third-party software to ensure all the unnecessary files will be removed from your registry and OS once you uninstall the app.
A dedicated PC cleaning program performs a deep scan and applies advanced deletion techniques that will keep your PC clean and in a stable condition. It only removes the leftover, unnecessary files left behind by the uninstallation wizard.
Since this is a known bug exclusive to the latest 2020 version of the Kaspersky tool, this solution needs no further explanations.
No similar error is displayed in the 2019 version of the program, so consider returning to the 2019 version which works perfectly fine. Apply the above steps to uninstall Kaspersky from Windows 10.
Users have also reported doing an update of their NVIDIA driver or looking for extra details in the Window Event Manager.
We can only hope that our solutions helped you fix this graphics driver problem. As always, for more questions, reach for the comments section below.
The full version of ARK: Survival Evolved came as a treat for all action-survival games fans. However, there still are a lot of rough edges and optimization issues. So, to give you the best possible playing experience, we’ve prepared a guide for the best graphics settings for the best gameplay.
How to set ARK: Survival Evolved graphics for seamless gameplay?
1. Minimum and recommended system requirements
First and foremost, you’ll have to be sure your PC can run the game. These are the game’s system requirements:
ARK: Survival Evolved minimum system requirements:
OS: 64-bit Windows 10/7
CPU: AMD FX-8350 or Intel i5-3570
RAM: 6 GB
GPU: AMD Radeon HD 7970 or nVidia GeForce GTX 680 2 GB
DX 11
Space: 75 GB
ARK: Survival Evolved recommended system requirements:
As you can see, the game’s minimum requirements are not hard to achieve. However, remember that with these specs, the game will run at 15-20 FPS — not exactly the most desired experience with an open-world game.
Because of that, we advise you to upgrade your PC in order to play the game with at least 60 FPS. The stronger your gaming rig is, the better the experience you can expect.
Developers should optimize the game for DX12 before the full release, which is one reason to acquire the DX12-compatible card. Until then, you can use your old GPUs to optimize the game performance/graphics.
If you’re not sure what your exact system specs are, you can use Steam to check them out.
Go to the Steam client.
Open Help.
Choose System Information.
2. DirectX 10 improves performance but impacts graphics
As developers said, users with older PCs can run the game in DX10 for better performance. You can change the DX version ARK is running on by following these instructions:
Open your Steam client.
Highlight the ARK in the Library.
Right-click and open Properties.
In the General tab, open Set Launch Options…
Type next line -USEALLAVAILABLECORES -sm4 -d3d10
The game will run in DX10 mode.
Keep in mind that even though this command can give you some extra FPS, it can cause various issues. Some users reported GPU crashes and glitches. If you experience some of those, try disabling it.
3. Standard Graphics Setup for Best Quality/Performance
Once you make sure your computer can run the game without FPS issues, move on to its in-game settings. We’ll walk you through every option as many of them can impact FPS or boost/lower overall game performance:
Resolution – Can decrease FPS.
Windowed mode – Windowed and Windowed Fullscreen cause lags and FPS drops. Use Fullscreen mode only.
Resolution scale – Reducing Resolution scale will affect graphics but improve FPS. However, we advise you to always use max settings. Otherwise, the game is unplayable.
World Tile Buffer – This feature is related to VRAM. So, if you have less than 4GB of GPU VRAM, set World Tile Buffer to ”Low”.
View distance – Can destroy the game performance in low-spec PCs.
Anti-Aliasing – This feature smoothes the edges of in-game objects and is a resource hogging.
Post Processing – Affects graphic detail and rendering. However, if you set it to ”Low”, it can increase FPS a bit.
General Shadows – Shadows are known to hog resources. If you can live without them, set them to ”Low”.
Terrain Shadows – Just the same as the General Shadows. You won’t notice any changes in graphics, but FPS will go up.
Textures – Textures don’t affect FPS so much. Nevertheless, setting High/Epic preferences with less than 3 GB of VRAM is not advisable.
Sky Quality – Sky Quality is not important for FPS, and lowering it can net you small FPS improvements.
Ground Clutter – By decreasing this slider, you’ll get fewer flowers and grass but increase FPS by a small margin.
4. Advanced Graphic Setup for Best Quality/Performance
This options menu is enabled only for users that play with DX11. It offers many advanced features that let you improve the game looks and immersive nature. These are the options and tips for their use:
High-Quality Anisotropic Filtering – This feature creates smoother-looking objects from various points of view. It mildly affects FPS.
Motion Blur – An unimportant aesthetic. We advise you to turn it off.
Film Grain – Another unimportant feature. Turn it off.
Distance Field Ambient Occlusion – Triggers soft shadows for distant objects. It consumes resources so we advise you to disable it.
Screen Space Ambient Occlusion (SSAO) – Triggers soft shadows for nearby objects. It is a resource hogging feature. Disabling it is advisable.
Dynamic Tessellation – Disabled by default until the upcoming DX12 patch.
Distance Field Shadowing – Another shadows-related feature. Disable it for more stable performance.
High-Quality Materials – This option improves textures of in-game materials. It consumes RAM, so turn it off.
Sub Surface Scattering – It affects light behaviour and makes foliage more realistic. You can turn it On.
High-Quality VFX – It affects all in-game water effects. Turn it off for more FPS.
Simple Distance Character Movement – This should stay enabled. It relieves CPU from animations of distant characters.
High-Quality LODs – Improves the level of details. You can leave it ON since details won’t affect overall game performance.
Extra Level Streaming Distance – This will make map loading faster while moving fast. However, it takes a lot of RAM.
Color Grading – Slightly improves colours. It won’t affect FPS.
Light Bloom – Won’t affect performance.
Light Shafts – It doesn’t affect performance.
Mesh Level of Detail (LOD) – Again. you can choose to disable/enable it by your own preferences. It affects GPU VRAM marginally.
Additionally, have in mind that, with the powerful PC you can use any of the features to your liking. On the other hand, for the ones with the older machines, this can be a helpful read.
In order to use Advanced Settings, you’ll have to use the default Launch option without command inputs.
If you’re looking to increase your FPS, take a look at this step-by-step guide that will help you do just that.
5. Additional tweaks to improve in-game graphics
There are several additional tweaks you can employ to improve FPS and all-around performance. However, there are few drawbacks reported by users.
On some occasions, those tweaks can lead to crashes. So, we advise you to try them out and look for yourself:
Open your Steam client.
Highlight the ARK in the Library.
Right-click and open Properties.
In the General tab, open Set Launch Options…
Type following line -USEALLAVAILABLECORES -nomansky -lowmemory -high
Save and run the game.
This should speed up the game, especially with older PCs.
You can also try to optimize your PC. This way, you’ll make sure that you get the best chance at a good gaming experience. To do that, take a look at this article with the best optimizer software for Windows 10.
That’s our guide for setting up the ARK: Survival Evolved graphics settings. We hope you’ll find them helpful and manage to improve gameplay while maintaining a decent visual experience at the same time.
These tips can also help with Ark Survival Ascended, the game’s newest version, and help you prevent issues like servers not showing up; read this guide to learn more.
If you have any suggestions or questions regarding the subject, please tell us in the comments.


 Firstly, you can fix this problem by rebooting your PC. This procedure is often necessary to recover from an error, so don’t hesitate to press and hold down the Power button on the computer. After 10 seconds or so, the computer should turn off.
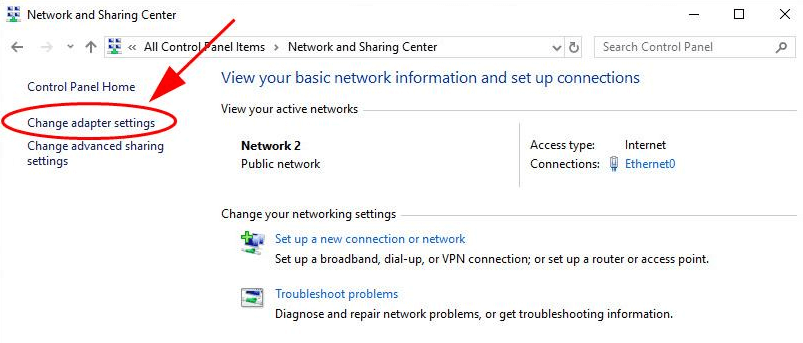

 A quick and easy way to fix the resolving network name error could also be to check system date/time. To do that, click on the date and time in the notification area of the taskbar and compare the date to the current one.