How to stop printing going to OneNote [SIMPLE GUIDE]

Sometimes your printing can go to OneNote for some reason, and this can be a bit inconvenient at times. This isn’t a major issue, but more of a hindrance, and in this article we’ll show you how to fix this problem once and for all.

Every time I want to print something one note pops up. The biggest problem is that it prints one page that says nothing, but has one note printed on it. Waste of paper. How can I stop one note from coming up. I want to go straight to my printer as it used to.

What to do if default printer keeps changing to OneNote?

1. Change Default Printer

  1. Open the Start Menu, locate Control Panel and click on it.control panel how to stop printing going to onenote
  2. In the Control Panel window, locate and click on Devices and Printers.devices and printers how to stop printing going to onenote
  3. Locate the icon of your printer and right-click on it.
  4. Select Set as default printer.set as default printer how to stop printing going to onenote
  5. Exit program and restart PC.

2. Disable Microsoft OneNote Automatic Startup

  1. Start Control Panel.
  2. Under Control Panel, click on System and Security.system and security how to stop printing going to onenote
  3. Select Administrative Tools.administrative tools how to stop printing going to onenote
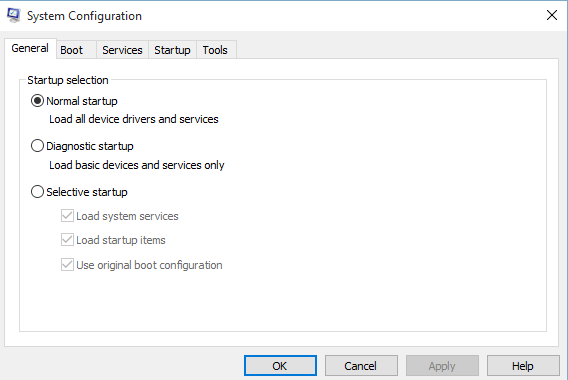
  4. In the next window, locate and click on System Configuration.system configuration how to stop printing going to onenote
  5. Go to the Startup tab, and select OneNote.
  6. Locate the OneNote‘s checkbox and uncheck it.
  7. Click OK to apply the changes.
  8. Exit program and restart computer.

3. Remove OneNote

  1. Open Control Panel > Programs and Features.
    programs and features how to stop printing going to onenote
  2. In the next window, locate the Microsoft OneNote program, and then click on the Change.
  3. Select Add or Remove Features > Continue.
  4. Locate Microsoft OneNote and click on the drop-down.
  5. In the drop-down menu, select Not Available.
  6. Select Continue and follow on-screen commands to finish the process.
  7. Restart computer.

Note: This procedure is exclusive to Windows 7 PCs.

There you go, three simple and fast solutions that can help you if your printing is going to printing going to OneNote. The first two solutions are universal, but the third one can be applied only to Windows 7 since newer versions of Windows come with OneNote built-in.

If you found our solutions helpful, feel free to let us know in the comments section below.

READ ALSO:

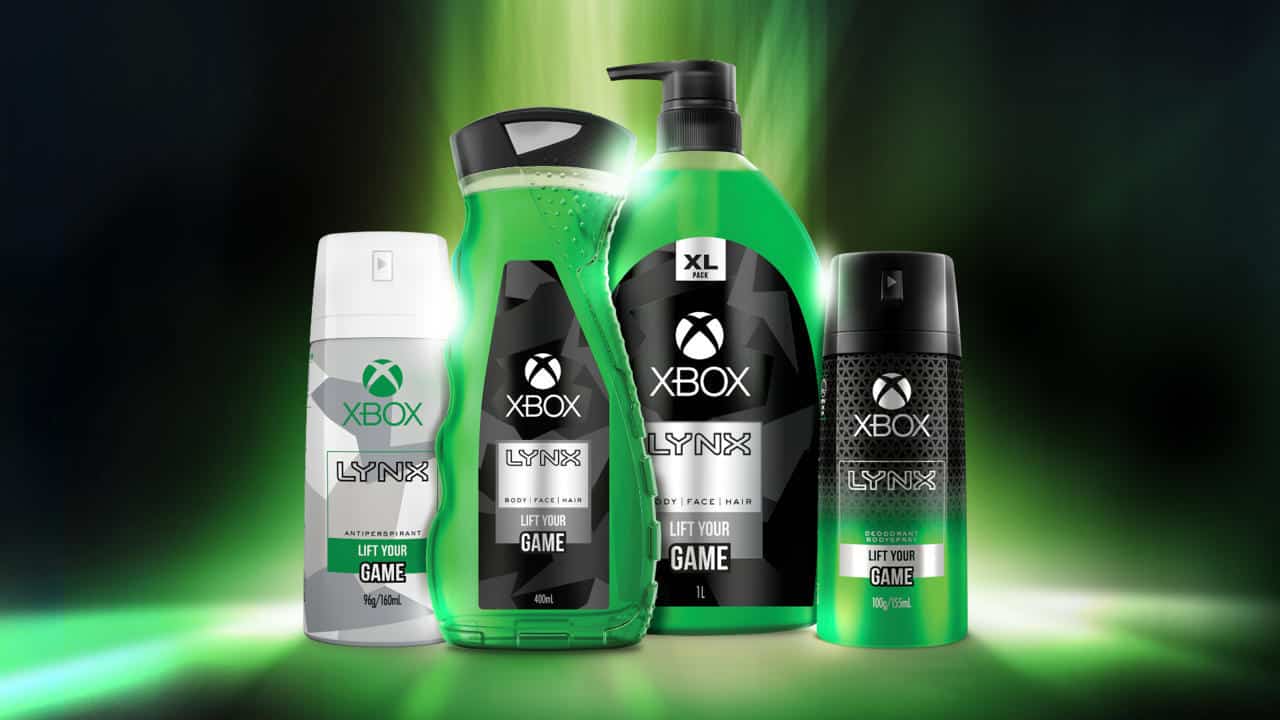
Xbox ANZ teams up with Lynx to create Xbox-branded body spray, deodorant and shower gel

If Microsoft launched its Xbox Gear Store ahead of E3 last year, the Xbox Australia team just made a pretty surprising announcement for Xbox fans looking to show off their passion in a more subtle way. Lynx, the brand of male grooming products, will launch a range Xbox-branded body spray, deodorant and shower gel this July, exclusively in Australia and New Zealand.

“We see Xbox fans achieve incredible things every day, and we wanted to celebrate that elevated skill, passion and determination by creating something truly special. Now, powering up can be as simple as a quick spray before you head out the door,” said Tania Chee, Business Group Lead for Xbox ANZ in a statement . If you’re wondering what these Xbox-branded Lynx products smell like, the official announcement mentioned “a fresh scent of pulsing green citrus, featuring top notes of kaffir lime and winter lemon, aromatic herbal middle notes of mint and sage, and woody bottom notes of patchouli and clearwood.”

The Xbox ANZ team seems to be pretty interested in Xbox merchandise, and you may remember that them coming up with the Xbox Onesie a couple years ago. We don’t have pricing details about the Lynx Xbox range yet, and for now it doesn’t look like the products will be released in other markets.

The update source location does not support your system model [FIX]

The update source location does not support your system model error can be problematic and it can lead to various issues on your PC. However, there’s a way to fix this problem, and in this article, we’re going to show you how to do it properly.

How to fix The update source location does not support your system model error?

1. Clean boot

  1. Press both the Windows Key and R and type msconfig in the dialog box and press Enter.
  2. Now, in the System Configuration window, select the General tab. Select Selective Startup section uncheck Load startup items.
    system configuration The update source location does not support your system model
  3. Next, you’re going to head on over to the Service tab, and click on Disable all.
  4. Restart your machine.

2. Modify the registry

  1. Open the Run window, type regedit and press Enter.
    regedit The update source location does not support your system model
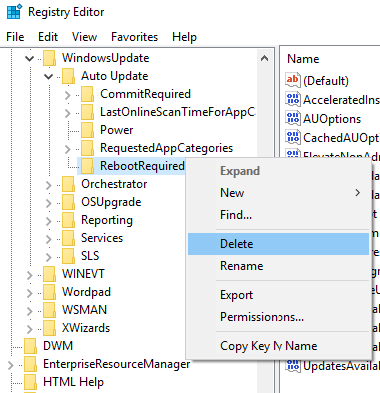
  2. In the Registry Editor navigate this path
    HKEY_LOCAL_MACHINE\SOFTWARE\Microsoft\Windows\
    CurrentVersion\WindowsUpdate\Auto Update.
    registry editor
  3. Open up Auto Update, and delete RebootRequired.
  4. Close the editor and restart your machine. Hopefully, The update-source location does not support your system model error won’t bother you anymore.

3. Run DISM

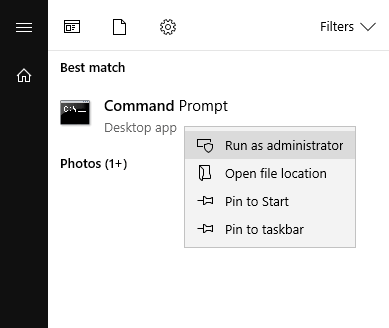
  1. From the Start Menu, open your Command Prompt as administrator.
    command prompt The update source location does not support your system model
  2. Type DISM /Online /Cleanup-Image /RestoreHealth and press Enter.
  3. When it’s done, type in DISM /image:C: /cleanup-image /revertpendingactions and press Enter.
  4. Restart your machine.

4. Run Windows Update Troubleshooter

  1. Download the program from the official Microsoft website.
  2. Run the Windows Update Troubleshooter.
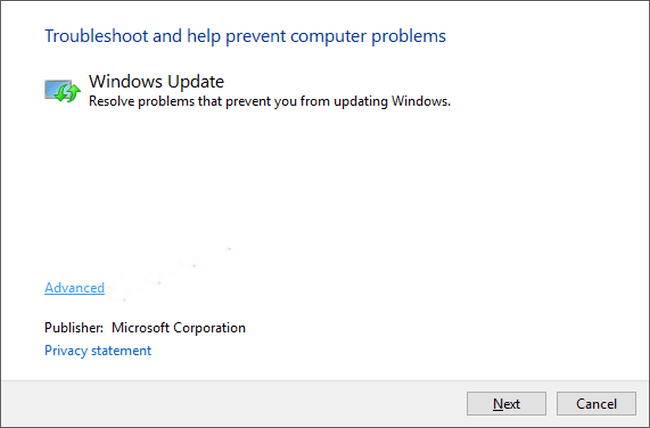
  3. Now select Windows Update and click Next.
    windows update troubleshooter
  4. Click on Try troubleshooting as an administrator option, and click on Next.
  5. Wait until the troubleshooter fixes the problem and click Close.

5. Check your firewall

  1. Open Windows Firewall.
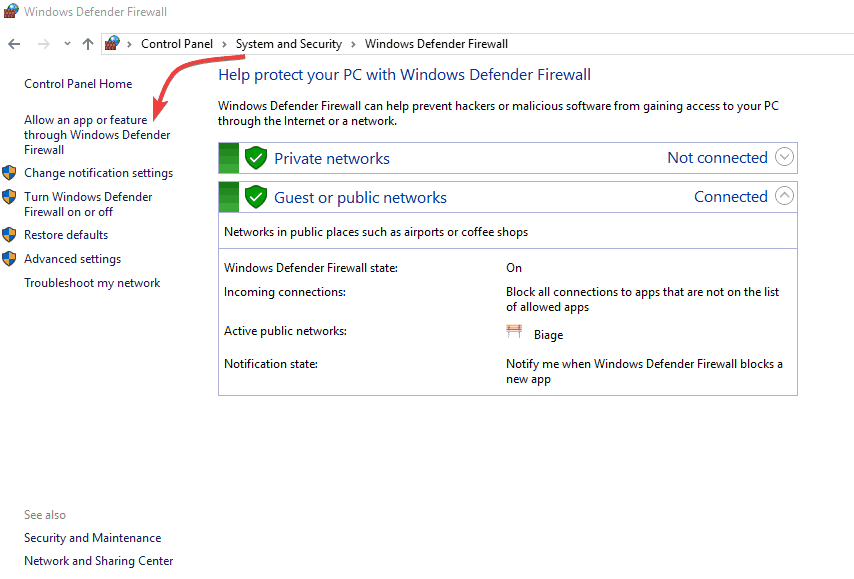
  2. Now, click on Allow an app or feature through Windows Firewall.
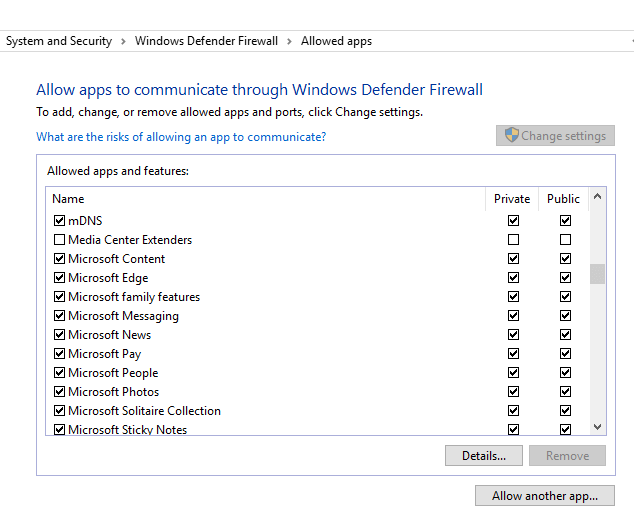
  3. Now, the Allowed App windows will open.
    allows apps windows firewall The update source location does not support your system model
  4. Click on the Change Settings button.
  5. Check the Private and Public checkboxes for the applications you want to allow through the firewall.
  6. Click OK to save your new settings.

The update source location does not support your system model error can be problematic, but we hope that you managed to fix it using our solutions. If our solutions worked for you, feel free to let us know in the comments section.

RELATED STORIES TO CHECK OUT:

Disable OneDrive pop-ups in Windows 10/11 [QUICK WAYS]

Even though it’s one of the most reliable services of its kind, you can easily say that OneDrive is Microsoft’s forced cloud solution. With Windows 10 you get OneDrive, like it or not.

The fact that you don’t use it won’t stop OneDrive from working in the background or popping out from time to time.

Even though the application offers 5GB of free storage space upon sign-up, there’s a large number of users that are more keen to use alternatives like Dropbox or GoogleDrive.

On the other hand, there’s a group of users who are satisfied with the browser version and find the integrated desktop client unnecessary.

For all of you having a hard time with OneDrive pop-ups and resource hogging, we’ve listed five workarounds that should help.

What can I do to stop OneDrive pop-ups in Windows 10? The simplest solution is to stop the OneDrive process from starting with the OS. By default, OneDrive starts automatically when you sign in to Windows 10. If that doesn’t work, you can disable it or reset it.

If you want to know how to do that, check the solutions below.

How to put a leash on your OneDrive

  1. Prevent OneDrive from starting with the system
  2. Hide OneDrive
  3. Disable OneDrive completely
  4. Reset OneDrive

Solution 1 – Prevent OneDrive from starting with the system

If you’re not using OneDrive and have an issue with pop-ups, the first thing you could do is preventing its startup. Once stopped, the OneDrive process won’t start with the system so you can use Windows in an uninterrupted manner.

To do so, follow these steps:

  1. Right-click the taskbar (or Start) and open Task Manager.disable onedrive pop-ups on windows 10
  2.  Open Startup tab.
  3. Right-click on OneDrive and click Disable in the pop-up menu.
  4. Close the Task Manager and restart the PC.

That should prevent OneDrive from starting with your system. Hopefully, this will also speed up your startup a bit, as OneDrive will no longer have to try to sync with the server.

Solution 2 – Hide OneDrive

If you’re bothered by the program’s File Explorer integration, you can hide it. Keep in mind that OneDrive can’t be uninstalled in a standard way so this is your best bet to remove it from the user interface. This is how:
  1. Right-click OneDrive icon in the Notification area.disable onedrive in windows 10
  2. Open Settings and uncheck all boxes under General.prevent onedrive from starting with windows 10
  3. Open the Backup tab.
  4. Make sure that Photos and videos and Screenshot options are un-checked. stop onedrive sync on win 10
  5. Open the Account tab and click Choose folders.
  6. Under Sync your OneDrive files to this PC, uncheck all boxes and click OK to confirm.prevent onedrive from syncing on windows 10
  7. Now, right-click OneDrive icon in the Notification area again and open Settings.
  8. Open the Account tab and click Unlink this PC.onedrive unlink pc from Windows 10
  9. You should be prompted with Welcome to OneDrive box. Close it.
  10. Now, open File Explorer and right-click OneDrive.
  11. Open Properties.
  12. On the General tab, check Hidden box.hide onedrive popups in windows 10
  13. Hit Apply and OK.

That should completely hide OneDrive from your interface.

Solution 3 – Disable OneDrive completely

Since OneDrive is an integrated piece of system software, Hero and Microsoft occasionally likes to do things the hard way, so disabling OneDrive isn’t exactly the simplest procedure.

A non-tech-savvy user may have troubles sorting things out. However, we listed the detailed step-by-step, so you can do it in less than a minute:

  1. Press Windows key + R to open a Run dialog box.
  2. In the Run command line type gpedit.msc and press Enter.
  3. Navigate to OneDrive in the by following this path:¤Local Computer Policy > Computer Configuration > Administrative Templates > Windows Components > OneDrive.
  4. In OneDrive screen open Settings.
  5. Open Prevent the usage of OneDrive for file storage.
  6. Under Prevent the usage of OneDrive for file storage, click Enabled.
  7. Confirm with OK and close the window.

That will prevent OneDrive from syncing to the cloud and remove it from the File Explorer navigation panel.

We have to mention that this solution applies to Windows 10 PRO/Enterprise versions, as Local Group Policy Editor is not present in Windows 10 Home. If you want to install Group Policy on Windows 10 Home, check the link below.

Solution 4 – Reset OneDrive

If you are keen to use OneDrive but have issues with the desktop client, you can reset it and try again. After certain updates, users reported numerous OneDrive issues like bugs, faulty syncing and other, similar errors.

In case you have any issues, you can resolve them this way by using Windows Power Shell:

  1. In Windows Search type Windows Power Shell, right-click the first result and choose to Run as Administrator.
  2. In the command line type the following command and press Enter:

    Stop-Process -processname “OneDrive” -ErrorAction SilentlyContinueStart-Process “$env:LOCALAPPDATAMicrosoftOneDriveOneDrive.exe” /reset -ErrorAction SilentlyContinue

  3. After the OneDrive process is stopped, lets move on to the next command.

    Remove-Item -Path “HKCU:SoftwareMicrosoftOneDrive” -Force -RecurseRemove-Item -Path “$env:LOCALAPPDATAMicrosoftOneDrive” -Force -Recurse

  4. This command deleted registry entries. Enter the next command.

    Move-Item -Path “$env:ONEDRIVE” -Destination “$env:ONEDRIVE Backup”

  5. And finally, we can finalize reset with the last command.

    try {Start-Process “$env:SYSTEMROOTSystem32OneDriveSetup.exe”} catch {Start-Process “$env:SYSTEMROOTSysWOW64OneDriveSetup.exe”}

  6. A new installation process should start and, after it’s done, you only need to log in with your Microsoft Account.

That should resolve any bugs, glitches or stalls with syncing processes.

Sign up for OneDrive

At the end, if you can’t beat them, join them. If your issue is solely related to annoying pop-ups, you may as well sign up and resolve it completely.

Microsoft decided to present OneDrive as a built-in app in Windows 10 and there’s only so much you can do to get it out of your sight. The answer to ‘Why?’ is beyond our power.

If it bothers you as well, hope that one of these solutions helped you get rid of it. It can be a little tricky to keep OneDrive in check, but if you follow the steps correctly, you shouldn’t have much of a problem.

For any other questions or working solutions that you found, please post in the comments section below and we’ll be sure to take a look.

[wl_navigator]

How to download an archive of your Microsoft account data

Microsoft lets you download an archive of all the data you’ve created across its services, such as search, browsing and location history. This allows you to backup and store your Microsoft activities, or use the data to extract information about how you use Microsoft services. It could also assist you as you migrate to another technology provider.

To begin, head to your Microsoft Account page at account.microsoft.com. You may be prompted to login to your account; enter your password or acknowledge a Microsoft Authenticator confirmation on your phone.

Screenshot of Microsoft account page with arrow pointing to privacy link

You’ll land on your account homepage, which gives you an overview of everything associated with your Microsoft account. Click “Privacy” in the top navigation menu. You’ll be prompted to enter your password – or use Microsoft Authenticator – again, due to the sensitivity of these settings.

Screenshot of downloading Microsoft data

The Microsoft Privacy dashboard will display, which lets you control how Microsoft uses your data. The relevant link here is the “Download your data” tab underneath the main banner.

Screenshot of downloading Microsoft data

On the “Download your data” screen, click the “Create new archive” button. You’ll see a popup which lets you choose which data types to include in the archive. Available data sources include your browsing history, search history, location history and all spoken voice commands, as well as usage information for apps, services, films and music delivered through the Microsoft Store.

Screenshot of downloading Microsoft data

Tick the checkbox for each data type you’d like to archive and then press the “Create archive” button. The process may take a few minutes to complete, while Microsoft collates all the relevant information. Your download will then begin in your browser.

If you leave the page while your archive is still being created, you’ll be able to return to the “Download your data” screen to access it later. It will display under the “Archives” heading once it’s ready to download. Archives are automatically removed after “a few days” to help protect your privacy.

You should remember that the data archive isn’t intended for direct consumption. The data is delivered as a set of JSON files, which is a structured format for key/value pairs. Although the files are essentially plain text and can be opened in any text editor, some of the values may appear meaningless or be difficult to interpret without some understanding of what they represent and how they’re stored.

The data archive does not include any data you create within Microsoft apps and services. Think of it as an archive of everything directly associated with your Microsoft account, not the files you’ve created with the account. You can usually export data from apps using the apps themselves – for example, to get an archive of your Outlook emails, you can visit outlook.live.com/mail/options/general/export and click the blue “Export mailbox” button.

Screenshot of exporting email from Outlook.com

The ability to create an account data archive ensures Microsoft’s services remain GDPR complaint. It allows you to move away from Microsoft’s ecosystem, or scrape your own Microsoft data for any insights you’re looking for. The data could be used to create custom spreadsheets, databases or applications which help visualise your Microsoft activities, giving you a record of how you used Microsoft services which exists long after the apps themselves are gone.

iTunes will stay on Windows despite Apple killing off the macOS version

One of the big announcements from Apple made during its WWDC 2019 keynote yesterday is that iTunes will soon go away on Macs. Later this Fall, the next version of macOS called Catalina will introduce new Music, Podcasts and TV apps for macOS users. Apple now thinks that having dedicated apps on the desktop is better than an all-in-one app like iTunes, but for now this change will only affect Mac users.

Indeed, iTunes for Windows is here to stay, for now at least. Apple didn’t mention what would happen to the Windows app during yesterday’s keynote, but the company did inform the press later on that iTunes on Windows would continue to function, without specifying if the app would continue to get new features. Here’s what Ars Technica reported yesterday:

Apple says users of iTunes under Microsoft Windows will not see any changes. It won’t be broken up into several apps; it will work just like it does now. However, Apple did not provide any clarification about what support will be like for future features. The company simply says that Windows users will continue to have the same experience as before and that it is not announcing any plans to end support for iTunes in Windows.

Because Apple has yet to launch web apps for the iTunes Store and Apple Music, iTunes remains a very important piece of software on Windows. Apple mentioned yesterday that there are now 100 million active Mac users worldwide, which is a drop in the water compared to the 1.5 billion Windows PCs out there. Most iTunes users are probably on Windows, where the app also provides access to podcasts, audiobooks, movies and TV shows. The app also launched on the Windows 10 Microsoft Store last year, where it remains one of the top free apps along with Spotify and Netflix.

DNS Server Not Authoritative for Zone: 3 Ways to Fix

Many users reported DNS server not authoritative for zone message in Command Prompt, which can be a problem.

If you want to learn more about DNS servers, we have a great guide on how to check and change the DNS server on your PC, so you should read it. Learn how to solve this error by following the steps below.

What does DNS server not authoritative for zone mean?

This error means that non-authoritative name servers don’t have original source files of the domain’s zone.

Instead, the name server has a cache file for the domains made from previous lookups.

How do I fix the DNS server not authoritative for Zone error?

You can try this quick workaround before using our other solutions:

1. Run a System File Checker scan

  1. Some users have confirmed that running a System File Checker scan within the Command Prompt fixed the error for them. To do that in Win 10, press the Windows key + X hotkey.
  2. Click Command Prompt (Admin) to open the CP window.
  3. Before running an SFC scan, run the following command: DISM.exe /Online /Cleanup-image /Restorehealth
  4. Then run this command: sfc /scannowsfc scannow cmd
  5. Wait for the SFC scan to finish, which might take about 30 minutes or longer. If the scan results say Windows Resource Protection fixed something, restart the desktop or laptop.

After doing that, check if the DNS server not authoritative for zone error 9009 is gone.

In any case, you have another valuable dedicated repair solution that may support you in solving this issue. Namely, it will diagnose your PC system and detect broken system files, corrupted Registry files, or junk files.

2. Open the Command Prompt from its folder

  1. Press Windows key + S hotkey.
  2. Enter cmd in the search box that opens.
  3. Right-click the Command Prompt to select Open file location, which opens the folder shown directly below.command prompt windows system
  4. Right-click Command Prompt in the Windows System folder and select Run as administrator.

After doing this, check if DNS server not authoritative for zone SCCM error is gone.

3. Set up a new Command Prompt shortcut

  1. Right-click the desktop and select New and then Shortcut.
  2. Then enter %COMSPEC% in the Type the location text box.create a shortcut for command prompt
  3. Press the Next button.
  4. Enter Command Prompt in the Type a name text box.name the shortcut command prompt
  5. Select the Finish option to add the shortcut to the desktop as in the shot below.cmd.exe desktop shortcut

As you can see, fixing DNS server not authoritative for zone DHCP issue is pretty simple, and we hope that our solutions helped you fix this problem on your computer.

In case you have additional problems, we have a great guide on DNS issues that can help you fix them.

What method did you use to fix this issue? Let us know in the comments below.

How to Get Rid of Lines When Printing Pictures

Instances of printed images having fine lines aren’t too uncommon. That likely results from low ink levels or issues with the ink toner or cartridge itself that might cause fine lines to appear. So, let’s find out how to get rid of lines when printing pictures.

Some also reported printer nozzles getting clogged, being another possible reason why printer photos have lines. Many affected users shared their problems, hoping for applicable solutions.

“My printer is Deskjet 6940.  When printing photos I get striations (thin, dim straight lines) in areas of solid color, especially in black areas.  Has anyone esperienced this?  What is the remedy?”

Read the instructions below and fix the problem with printed photos having lines now.

How do I remove lines from a picture when printing?

1. Check photo resolution

Typically, images of low resolution don’t look great when printed on plain paper, even though those might look marginally better on glossy or photographic print papers. Print size matters too, as a small image, when stretched leads to the appearance of fine lines in the printed image.

So, it would be best to refrain from printing low-resolution images. Also, this does not point to any issues with the printer itself. However, if it is a high-resolution image that you are trying to print, try out the following recommendations.

2. Check cartridges

See if there is enough ink in the cartridges, as low ink levels are often a sure-shot reason for vertical lines to appear in a print.

estimated ink levels

If the ink levels are low, you can still print a page or two by gently shaking the cartridge, even though the best thing to do here will be to replace the same altogether.

3. Clean printer nozzles

Printer nozzles tend to pick up dirt or other foreign particles over time, which in turn, obstruct the normal flow of ink. This is particularly true if the printer has been lying idle for some time. Thankfully, cleaning the nozzles is no big deal, as all printers come with a self-cleaning mechanism for the same.

That, again, can be accessed in the maintenance section and requires printing a page for the cleaning to be done. Sometimes, you might be required to perform the cleaning act multiple times until you get rid of lines when printing pictures.

4. Printer resolution

Oftentimes, the improper resolution setting too can lead to lines appearing in printed photos. The best thing to do here is to set your printer to print at the recommended DPI settings.

With DPI set at an acceptable limit, the printer will have adequate room to adjust the dot pitch to allow for best-quality prints devoid of interrupting lines in between.

So, this should make for a comprehensive tutorial on how to get rid of lines appearing in printed pictures. However, if the lines still appear, contact the support service and have your printer checked.

Before you leave, check the best printer management software and get one today for a seamless printing experience!

For any queries or to share more solutions with us, drop a comment below.

Xbox Game Pass for PC gives you unlimited access to over 100 titles

Microsoft announced the launch of a new Xbox Game Pass for PCs. The company plans to offer a subscription-based model to PC gamers allowing them to enjoy over 100 games.

They upcoming Game Pass PC version will work on a similar pattern to the Xbox console. You can download, install and play games on your PC.

However, you need to have a compatible gaming PC to enjoy the new subscription-based Game Pass service. 

The new service is going to expand the existing gaming capabilities of your PC.

Currently, the Xbox Game Pass only supports some titles released by Microsoft on Windows PCs. Microsoft already started to work on this project.

The company is working to include Sega, Deep Silver, Bethesda, Paradox Interactive and Devolver Digital in a collaboration with more than 75 developers.

Xbox Game pass for PC coming soon

Microsoft promised that the PC Game Pass will offer titles on the same day of their official release day. Surprising, you will get a discount of 10 percent on the purchase of some specific games with DLC. You will also get a discount of 20 percent on purchase from Microsoft Store. 

And just as we committed on the console, it is our intent to include new games from Xbox Game Studios in Xbox Game Pass for PC the same day as their global release, including titles from newly acquired studios like Obsidian and inXile. We’re working with over 75 developers and publishers to bring PC content to the service and we’ll ensure the library remains curated and full of great PC titles across a variety of genres, with new games added every month.

No subscription plans announced yet

However, Microsoft has not shared some important details regarding the project. We don’t have any idea about the pricing.

We already know that Xbox offers a monthly subscription of $10 with a limited set of titles. Therefore, we can expect Microsoft to set a price range of $15-20 to offer more than 100 games on the PC.

Additionally, it remains to be seen if Xbox One Game Pass users can use their existing subscription to access the games on their PC. There is a slight possibility that Microsoft may force them to purchase two different subscriptions. 

Microsoft has yet to announce the complete list of games available on the new game pass.

RELATED ARTICLES YOU NEED TO CHECK OUT:

Skype for Web now offers screen sharing options on Chrome

Microsoft recently released a new preview version of Skype for Web. Microsoft announced that the preview version brings screen sharing capabilities on Chrome. The update takes the tool to version 8.46.76.59.

A lot of new applications emerged giving tough competition to Microsoft’s VOIP tool. As a result, the big M decided to add more features to Skype.

This update eliminates the need for any third party tools or plug-ins to get the screen sharing feature in your web client. The new feature allows users to share their screens during Skype calls in Chrome.

As you already know, the screen sharing feature was previously restricted only to the Desktop application. Microsoft recently brought this feature to additional platforms.

The company offered the screen sharing feature to mobile users in April this year. Now, with the release for the web client, this feature is available on each and every platform running Skype v8.

Currently, support is only limited to Google Chrome version 72 or later. However, we expect this feature to be available in the new Chromium-based Edge as well.

For the time being, there is no official confirmation from the company in this regard.

Skype for Web screen sharing issues

However, not everything went smootly for all users.

For example, one Skype user took it to Microsoft’s forum to report an issue affecting the release:

Screen Sharing indeed works now in the Chrome browser, but a significant limitation should be mentioned: Screen sharing with sending video is not yet enabled. This feature is available with the installable Skype client.

Skype for web bug

We hope that Microsoft releases a patch to fix this issue soon.

The availability of the screen sharing feature on the web client comes in handy in business environments for collaboration purposes.

Users can log in to their accounts to share presentations, documents, and spreadsheets with their colleagues or friends. You can even borrow your friend’s system to engage in an online meeting on the go.

Try screen sharing now

If you are interested in testing the screen sharing feature, you can simply try the Skype for Web preview.

The feature should be available on the official Skype for Web version in the coming months.

RELATED ARTICLES YOU NEED TO CHECK OUT:

Antivirus tests confirm Windows Defender offers 100% malware protection

Due to the increasing number of malware attacks worldwide, using a reliable antivirus solution is extremely important. An outdated antivirus solution can expose your system to millions of security threats out there.

The security experts at AV-TESTS conducted a new series of tests on the antivirus programs currently available on the market.

Generally speaking, major security products including McAfee, Bitdefender, Symantec, F-Secure, Kaspersky Lab got a good score in the March/April 2019 test results.

The company revealed that all of them scored 6 points in the performance, protection, and usability test.

The second batch of antivirus solutions included: Windows Defender, AhnLab, VIPRE Security, AVG, Avira, and Avast.


Most Windows 10 users underestimate the capabilities of their built-in security product. This native security solution comes pre-installed on all Windows devices.

Windows Defender gets a high AV-TESTS score

windows defender AV TESTS results

The research conducted by AV-TESTS proved that Windows Defender is one of the best security solutions out there.

Surprisingly, Windows Defender scored a total of 17.5 points. The individual scores for usability, protection, and performance are 6, 6 and 5.5 points respectively.

As a matter of fact, the test results for the month of March and April show that Windows Defender provided 100% protection against 0-day malware attacks.

When browsing the web, the built-in security solution didn’t generate any false alarms. However, the research firm performed a security scan and says that a legit application was mistakenly considered to be malware.

This is not an alarming condition because AV-TEST considers 3 warnings as an industry average.

Make sure you use a top-notch antivirus solution and install the latest patches as soon as they’re out to keep your computer protected.

RELATED ARTICLES YOU NEED TO CHECK OUT:

There was a problem connecting to the wireless display [EXPERT FIX]

There is a lot of reports from users facing problems connecting to a wireless display. This, however, shouldn’t be too big of an issue considering that it’s just a few simple steps that can effectively resolve the error.

Users were not satisfied with wireless monitor connection issues.

I’m using an Asus X99 Deluxe motherboard that has built in wifi.  The wireless display I’m trying to connect to is a Samsung UA65JS9000 Smart SUHD.  The router I’m using to connect the two is a Linksys AC1900 EA6900. I put both the TV and computer on the same wifi network and I see that they detect each other.  I enabled network sharing and made sure my TV was not blocked in the sharing options.

Read about the solutions below.

Why my PC won’t connect to a wireless monitor?

1. Reinstall the network driver

  1. Launch Device Manager. Simply type Device Manager in the Cortana search box and select from the search results shown.
  2. Search Network adaptor and expand the same.
  3. Right-click on the device and select Uninstall.device manager drivers
  4. When it’s done, close all open windows and restart your PC.
  5. Windows will automatically install the Network adapter driver once it reboots.
  6. Check if this solves the problem.

Additionally, if you need to manage your drivers smoothly and without other faults, it is a better idea to try dedicated driver updater software.

2. Update Windows

  1. Click on Start > Setting > Update & Security.
  2. In the Windows Update section, there should be a Check Now button to check if there is any new update available.check for updates
  3. Or if you have opted for the auto download option, the updates should already have downloaded and might be awaiting your confirmation for installation. In that case, click on the Install Now button and restart your PC when prompted.
  4. Check if you are able to connect to the wireless display now.

3. Run in Compatibility Mode

  1. Type Run programs in Cortana search box and select Run programs made for the previous version of Windows.
  2. This will launch the Program Compatibility Troubleshooter.compatibility troubleshooter
  3. Click on Next for the troubleshooter process to begin.
  4. From the list of programs shown, select the one that applies to your Display Adapter.
  5. Follow on-screen instructions.

In the end, what can be said is that your inability to connect to a wireless display is mostly due to driver issues. As such, updating the respective drivers should be the most logical solution to your problem. Also, you can try rolling back to the previous version of Windows 10.

FIX: Origin failed to load webpage

Some users reported experiencing an issue with Origin where the platform fails to load certain webpages.

In order to install Origin, you first need to download the installer from EA‘s website.

Unexpected issues sometimes do occur, and users receive the error message Error Loading Webpage on Origin. This error message prevents users from completing the Origin setup properly.

This sudden stop of the Origin installation process could be triggered by incorrect internet connectivity settings, app permission issues and more.

Read on to learn how you can fix this problem.

7 steps to fix Origin webpage loading errors

  1. Turn off the Windows Firewall
  2. Disable your third-party anti-malware software
  3. Run as administrator
  4. Remove proxy
  5. Remove ad blockers from your browser
  6. Allow the app permission through Windows Firewall
  7. Clear browser cache

1. Turn off the Windows Firewall

Sometimes, Windows Firewall may block certain app permissions from making changes to the system.

Disable Windows Defender Firewall following these steps:

  • Open the Control Panel
  • Click System and Security

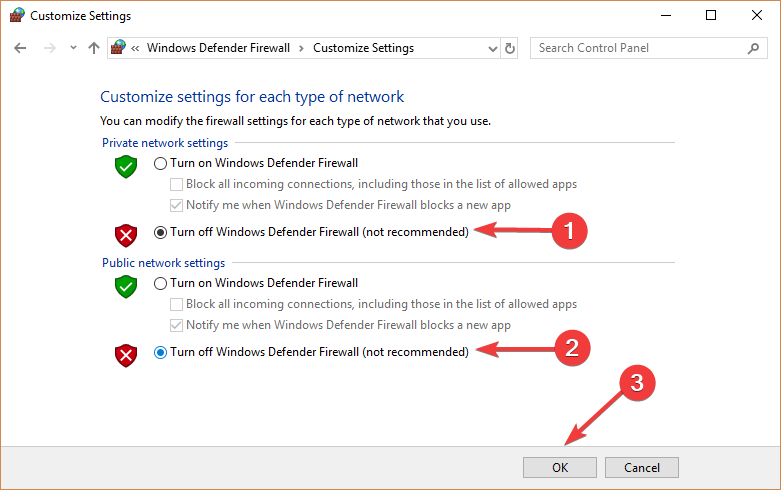
  • Select Windows Defender Firewall > select Turn Windows Firewall on or off
  • Select Turn Windows Defender Firewall off (not recommended)
  • Click OK to make sure the changes were saved.

2. Disable third-party anti-malware software

Origin permission could be blocked by your antivirus or anti-malware solution as well.

Open your antivirus and find the option allowing you to disable it.

Try installing Origin, if it still does not work, make sure to turn your antivirus back on afterward.

3. Run as administrator

Make sure to run the Origin installer as an administrator.

Running the installer as administrator offers it higher priority when it comes to making system changes.

Right click on the Origin installer and select Run as administrator in order to go through with the process.

4. Remove proxy

Removing proxy servers seemed to have helped many users with this specific issue.

To remove proxy servers in Google Chrome, follow these steps:

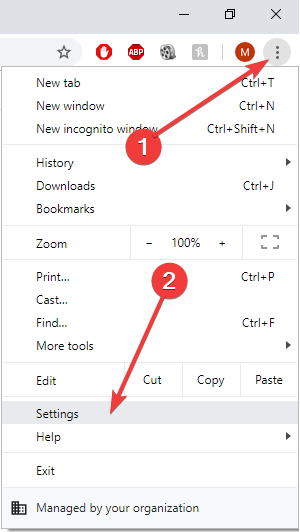
  • Select the Three dots icon in the top right corner of Chrome > open Settings

  • Scroll down and click Advanced > go to System > open Proxy Settings

  • In the Connections tab > click LAN Settings

  • Under Proxy Servers, make sure to have Use a proxy server for your LAN box unticked > press OK

  • Check to see if this made any change.

— RELATED: 8 of the best PC offline games

5. Remove ad blockers from your browser

Ad blocking plug-ins are usually used to stop ads from popping up on websites.

Sometimes, these ad blockers could interfere with certain app or software activities.

Disable your ad blocker through Google Chrome by following these steps:

  • Click the three dots icon in the top right corner of Chrome > expand More tools > select Extensions

  • Click the toggle next to your ad blocker – turning gray means it is disabled

  • Check to see if this had any impact.

6. Allow Origin through Windows Firewall

Manually allow permission for the Origin setup to run through Windows Firewall.

In order to perform this task, follow these steps:

  • First you need to download the Origin installer from the official website
  • Try running the installer – you will receive the same error message
  • Press the Windows logo key + R on your keyboard > type %appdata% in the Run box and hit Enter

  • Open the Origin folder > open Thinsetup folder and then the folder it contains – having the version of your setup
  • Copy the address link located in the address bar
  • Open Control Panel > select System and Security

  • Select Windows Defender Firewall > choose Allow an app or feature through Windows Defender Firewall

  • In the Search box, paste the link of the setup location and hit Enter
  • Select OriginThinSetupInternal > click Open > select Add
  • Check the boxes next to Private and Public > click OK
  • Go to the file location, right click OriginThinSetupInternal and select Run as administrator.

7. Clear browser cache

Having too much data stored in your browser could cause Origin to stop working.

Clear your browser‘s cache in order to fix this problem.

To clear the cache in Google Chrome, follow these steps:

  • Click the Three dots icon on the top right corner of Google Chrome
  • Select More tools > click Clear browsing data

  • Choose a time range to delete the data, selecting All time is recommended in order to make Chrome work better
  • Select what kind of information you’d want to delete
  • Click Clear data.

Hopefully, at least one of our solutions helped you to fix this Origin install issue.

If you found this article helpful, leave us a comment in the comment section below.

[wl_navigator]

Windows 10 PWA Twitter app updated with multi-account setting

As Microsoft begins to pin part of its app platform on developers investing in Progressive Webs Apps, Twitter is providing the company with a reassuring example of how beneficial PWA development can be for both businesses and users.

Twitter introduced its multi-user account support setting to iOS and Android a few months back but the development time between its dedicated app and PWA engineering continues to shrink as the company is now rolling that setting out to its PWA offering on Windows 10.

In true PWA fashion, multi-user support is being applied on the backend of the app and will be pushed to all PWA supported platforms such as Twitter Lite, mobile.twitter.com, the Microsoft Store and Chrome Web Store as an extension.

The implementation may leave some questioning the discoverability of the new setting but it’s available nonetheless in the under the original account icon in the top right corner of the app. Once the account icon is selected, a new “+” icon should be visible to the top left allowing users to then add an additional account to the same app and allow for easy switching between the two.

While Twitter represents a resource heavy company that can apply broad sweeping changes to the various platforms its product is available to, it’s PWA offering on the web and Windows 10 continues to highlight why Google and Microsoft are so keen to the idea of PWA’s being the future of experiences. The write-once dream is within grasps if developers should choose to take it and companies such as Google and Microsoft continue to build up platforms that put those experiences at the center.

Twitter
Twitter
Developer:
Twitter Inc.
Price:
Free

Xbox Events app launches on iOS and Android just in time for E3

In preparation of a litany of Xbox news, Microsoft is rolling out an Xbox Events app for mobile with a section specifically dedicated for E3 2019 news.

As of now, anyone downloading the app will give users a placeholder display as the app carries a beta tag and much of the content that is supposed to be in there is still under embargo from Microsoft. Presumably, the app will receive one more update prior to E3 2019 that removes the beta tag as well as populates the app with some content by this weekend that includes streams, trailers, and press briefs.

Windows Central is currently reporting that the Xbox Events app will live beyond E3 2019 convention and find some use during Gamescom and XO fan events later this year.

Microsoft has a lot to talk about in the way of Xbox news at the upcoming E3 2019 convention and the new Xbox Events app should be buzzing with notifications most of the week with announcements ranging from cloud gaming to the potential specs and design of the new slate of Xbox consoles coming to gamers in the coming years.

‎Xbox Events
‎Xbox Events
Price:
Free


Xbox Events
Xbox Events
Price:
Free

[Updated] Support for the Xbox One Wireless controller is coming to iOS 13 and tvOS later this year

Apple just kicked off its WWDC developer conference a couple of minutes ago, and the company announced some big news for tvOS, the software platforms that powers the company’s Apple TV devices. Indeed, the next major update to tvOS will introduce support for the Xbox One and PlayStation 4 controllers, which are the two most popular Bluetooth controllers in the market.

Until now, tvOS only supported controllers that are part of Apple’s Made for iPhone (MFi) program. Gaming on the Apple TV never really took over the years because the set top boxes don’t ship with a built-in controller, and many tvOS games are also optimized for the Apple TV remote and not MFi controllers. This could all change with Apple TV owners now being able to connect Xbox One and PS4 controllers via Bluetooth.

This wasn’t mentioned during Apple’s WWDC opening keynote, but iOS 13 will also bring support for the Xbox One Wireless controller on iPhones and iPads later this year.

Apple is also gearing up to launch its Arcade game subscription service later this Fall, which will be available on tvOS, iOS, and macOS. Obviously, Apple really needed to support the most popular wireless controllers on its Apple TV if it ever wants to be taken seriously as a gaming company, and we’re glad the company finally did it. That’s still a bit late, and we reported last year that Microsoft had to remove Minecraft on the Apple TV due to low usage.

Updated June 4: Microsoft has since confirmed that iOS13 will also bring support for the Xbox Wireless controller on iOS devices, and we’ve updated our post to reflect that.

Customise your World of Warcraft user interface [TIPS & TRICKS]

World of Warcraft is an amazing adventure that is more of a lifestyle than a passing, forgettable gaming experience. You invest a formidable part of your life to enjoy every instance of it.

While the newbies are more concentrated about learning elementary features, advanced players look for ways to actually improve the game.

The vanilla game interface is, to some instincts, cluttered. So, many users prefer a more informative UI. It’s a thing of taste and play style.

There are so many different addons, and novices to UI modding can get confused. So, we’ve found some tips for customising your WoW UI on Reddit, in case you want to bring some freshness to your surroundings.

How can I change WOW’s UI? The easiest way to change how UI works is through the game’s settings. Some pro gamers shared their settings and how they work. For even more customisation, download and use addons like OPie, Aura Frames or Prat 3.0.

To download and learn how to use these addons, check the guide below. change wow's ui in windows 10

Useful tips for customising your WoW user interface on Windows 10

Limit Action Bars

Reduce the number of bars. Use static or modifier paging instead:

  1. Get OPie to reduce more stuff off your bars (professions, mounts, raid marking, etc)
  2.  Set bars to hide until mouse-over, or hide in combat if you don’t like OPie.
  3. Consolidate your action bars. Use something like TellMeWhen or Watcher to manage rotations/CDs.
  4. Additionally, you can hide hotkeys.

Remove buff/debuff prompts

Use an addon to remove clustering buff/debuffs prompts:

  1. Use an aura addon, like Aura Frames, and set up the buff filtering to only show long duration buffs on the edge of your screen. Short duration (less than 60 seconds) buffs and all debuffs should be showed in the middle.
  2. Remove duplicate auras. Each buff/debuff should only appear in once place at a time.

Chat Window

You should make it simple and stick to the essentials:

  1. Use Prat 3.0 to optimise your chat window. Remove all unnecessary features like fonts modifier, buttons and other.

Cooldowns

  1. Your cooldowns are very important, so place them in a visible place.
  2. Best-suited for the job are WeakAuras, TellMeWhen, or a well placed/tweaked Bartender4 action bar.

Damage Per Second Meter

  1. Get Skada with Skada Chat Frame Integrator and have it hidden.
  2. The other possibilities are:
    – Change DPS Meter colours to 0 opacity title/background.
    – Shrink Damage Meter. Reduce it to yourself, raid DPS and top 3 DPS.
    – Get rid of the healing meter.

Frames

  1. Don’t use both frames and Personal Resource Display. Either use PRD and KUI nameplates or hide PRD and use unit frames like HealBot Continued or Shadowed Unit Frames.
  2. Remove portraits, as they add distraction to a frame.
  3. Get rid of Combat Text from frames.
  4. Remove Raid Leader/Masterlooter/Assist (unless you are the raid leader).
  5. Customize your raid frames. For Tank/DPS place frames to on side of the screen and show the less possible info (only HP, name, buffs/debuffs). For Healer place frames in the middle as they are important for your tasks.
  6.  The target of target frame only needs to display the unit name (and health bar), remove all the other text from it.

Mini-map

  1. Make sure you set all mini-map icons to hide unless you point the mouse.
  2. Remove the sub-zone on your mini-map.
  3. Get rid of bag bars and micro menu. You can bind keys.

Miscellaneous

  1. Use eAlign to create alignment grid and create order.
  2. When aligning, be sure to leave screen edges empty for better orientation.
  3. Hide/remove EXP bar.
  4. Always use same fonts.

Scrolling Combat Text

  1. Remove Scrolling Combat Text, as it is expendable.
  2. On the other hand, if you want to keep it, use matching fonts and limit its output. We don’t want inputs on every hit.

ToolTip

  1. Use TipTac to move your ToolTip, hide auras and set font and bars.

As we already mentioned, UI tweaks are better suited for advanced users. However, the newcomers can customise UI, as well. But keep in mind that there are a lot of addons and thing can get confusing fast.

For starters, we advise using an addon pack, like ElvUI. Later, when you get accustomed, you can pick individual mods.

Other addons and addon packs that might interest you are: Deadly Boss Mods, Move Anything, Dynamic Cam, Omen Threat Meter, and Details ! Damage Meter.

If you want to clean up you interface, add new things, or change the way that WoW feels on Windows 10, feel free to try any of theses addons to take your gaming to the next level.

For more information on WoW issues and how to solve them, check these awesome Windows 10 guides:

We hope you’ll find these tips helpful. What are your favourite UI addons for World of Warcraft? Leave the answer along with any other question you may have in the comments section below.

[wl_navigator]
Your computer exceeds the power rating [STEP-BY-STEP GUIDE]

There are various errors that can appear on your PC, and many users reported Your computer exceeds the power rating message. In today’s article, we’ll show you how to fix this error once and for all on your Windows 10 PC.

How can I fix Your computer exceeds the power rating error?

1. Reinstall Microsoft ACPI

  1. From your Start Menu, select Device Manager.
  2. Now expand Batteries, right-click the desired batter and choose Uninstall device.
    uninstall device Your computer exceeds the power rating message
  3. Once it’s complete, Windows will attempt to reinstall the drivers for you.
  4. Now you can restart your machine.

2. Change Power Settings

  1. Open Control Panel.
  2. Now head on over to Hardware and Sound, and select Power Options.
    Your computer exceeds the power rating choose a power plan
  3. Choose the appropriate power plan for your PC.

3. Unplug your device

charger disconnect Your computer exceeds the power rating

  1. Disconnect the power cord until the battery drops down to 15%.
  2. Now you’re gonna turn off your machine and power it back up after half an hour. But do keep in mind to unplug all USB devices you might have plugged into your laptop.

4. Perform UEFI tests

PC power button Your computer exceeds the power rating

  1. Keep your machine connected to the power cord.
  2. Now, you’re going to press and hold the Power button until the laptop turns off.
  3. Now turn on the laptop.
  4. As your system boots up, press the F2 key repeatedly, until the UEFI Diagnostics screen is displayed.
  5. At the UEFI menu, select Component Tests, and then select Power.
  6. Now select AC Adapter test, and run the tests.
  7. Follow the onscreen instructions.
  8. Depending on the results, you’re good to go, or you should follow up with the last solution.

5. Replace your power output

power output Your computer exceeds the power rating

  1. Check your power adapter.
  2. If you suspect that your adapter is faulty, be sure to replace it and the problem will be resolved.

There you go, these are our solutions for Your computer exceeds the power rating message error.

RELATED STORIES TO CHECK OUT:

New Xbox One S Fortnite Special Edition bundle to launch on June 7th, along with Xbox “greatest deals of the year” sale

The new Xbox One S Fortnite Special Edition bundle leaked a couple of weeks ago, but Microsoft has finally made it official. The purple-colored console and matching controller will launch on June 7, along with the just-announced Greatest Xbox Deals of the Year sale.

“The new Xbox One S Fortnite Battle Royale Special Edition bundle includes a Special Edition purple 1TB Xbox One S, the Dark Vertex cosmetic set featuring Legendary Outfit, Epic Glider, and Rare Pickaxe (available in free Battle Royale and Creative modes only), 2000 v-bucks, and one month Xbox Live Gold subscription and Xbox Game Pass trial,” the blog post reads.

Just ahead of E3, this massive sale will offer big discounts on Xbox bundles, including $100 off Xbox One X and $50 off the aforementioned Xbox One S Fortnite Special Edition Bundle. The $249 Xbox One S All-Digital Edition that Microsoft launched last month will also be $50 off, along with other Xbox One S bundles. All these console discounts will be available at the Microsoft and participating retailers from June Friday, June 7 to June 17.

Microsoft has continued to launch cool-looking new Xbox Wireless controllers over the past couple months, and for a limited time you’ll be able to Save $10 on black, white, special edition and limited-edition Xbox Wireless Controllers. If you prefer to design your own Xbox Controller, be aware that Xbox Design Lab controller will also be available starting at $64.99.

As you can expect, the Greatest Xbox Deals of the Year will also offer lots of Xbox games at a discounted price. We don’t have the full list yet, but Microsoft mentioned up to 75% discounts on a list of games that will include recent titles such as such as Mortal Kombat 11, Sekiro: Shadows Die Twice, and Tom Clancy’s The Division 2. We’ll share more details about the Xbox game sale once Microsoft publishes the full list of discounted games.

You don’t have account privileges on 2K19 for Xbox [FIX THIS]

NBA2K19 is a fun game with realistic graphics and innovative basketball gameplay. However, Xbox users have reported that they are unable to play the game online due to an error. The full error reads This feature is unavailable. You don’t have the required account privileges error while trying to play the game in online mode.

Some of them shared their experience with the error.

I get this message any time I try to enter my park or pro am. I played my park the day I got the game so I don’t know what happened today as to why I’m getting this message. Is this a glitch and happening to other people or did something happen to my account? I am playing on xbox one btw.

Solve the error with ease with the solutions we provided below.

How to solve You don’t have account privileges error on 2K19 for Xbox?

1. Check for Live Account Subscription Status

  1. On the Xbox menu, Go to Settings and select All Settings.
  2. On the Account tab, click on Subscriptions.
  3. Wait for the Subscription details to load.xbox subscription
  4. Under Subscription check the status of your Xbox Live Account.

If your Xbox Live subscription is expired, you need to renew the subscription to resolve the error and play the game online.


2. Check Xbox Live Gold Share Content Setting

  1. From the Xbox home screen, press the Xbox button on the controller.
  2. Scroll left from Home to open the guide.
  3. Select Settings and then click on Account.
  4. Go to Privacy and Online Safety.
  5. Next, select View details and customize tab.
    Xbox Privacy Setting
  6. Make sure “Share Content using Kinect“, “Others can communicate with vice” and “You can see and share content” options are set to “Allow/Everybody”.

Try to play the NBA 2K19 and check if the error is resolved.


3.  Clear Cache

  1. Press the Guide button your controller.
  2. Go to Settings and select Restart Console. When prompted, select Restart.Restart xbox
  3. Check again after the reboot for any improvements.

In case you are unable to access the Guide or settings Menu, you can force restart the Console. To do this, press and hold the Power button for 10 seconds until the console turns off.

Press the Xbox button on the console again to restart the device and check for any improvements.


4. Re-download your Xbox Live Gamertag

  1. From the Xbox Home screen, press the Menu button on the Controller.
  2. Select Settings.
  3. Scroll to the right and under Other People, select Remove Accounts.
    Sign in security and passkey xbox
  4. Select the account that you want to remove. Select Choose this person to remove it.
  5. Again select “Remove from this Xbox” to confirm.
  6. Select Close, restart the Console.
  7. After the restart, select Sign in.
  8. Sing into your Gamertag by entering the account credentials.
  9. Allow your profile to download.

RELATED STORIES YOU MAY LIKE:

Microsoft news recap: flagship store opening in London next month, Xbox Game Pass coming to PC, and more

Microsoft news recap is a weekly feature highlighting the top Microsoft news stories of the past week. Sit back, grab some coffee, and enjoy the read!

It’s official, Xbox Game Pass is coming to PC and will offer over 100 “high-quality PC games” at launch

This week it has been confirmed that Microsoft’s game subscription service, Xbox Game Pass, is coming to PC and that it will have over 100 games at launch.

Microsoft’s flagship London Store to open on July 11

Microsoft’s first store in London is opening soon. Its new flagship store in London is set to open on 11th July.

Microsoft to build two new 100% sustainable, zero waste datacenters in Sweden

Microsoft’s commitment to caring for the environment continues to show as it plans to build 2 new datacenters in Sweden that are 100% sustainable and have zero waste.

Microsoft ready to show off 14 new Xbox Game Studios at its E3 briefing on June 9

With E3 nearing, it has become known that Microsoft plans to show off 14 new Xbox Game Studios at its briefing, continuing to bolster the number of studios under the Xbox brand.

That’s it for this week. We’ll be back next week with more Microsoft news.

Windows Face Recognition Not Working: 4 Ways to Fix it

Face recognition is a security technology to protect your PC, but many users reported that Windows 10 face recognition isn’t working for them.

This can be a problem and leave your PC vulnerable. So in today’s article, we’ll show you how to fix things when facial recognition is not working.

How do I get Windows Hello face to work?

1. Reset Face Recognition Settings

  1. Press Windows + I to open the Settings app.
  2. Click on Accounts and then the Sign In option.
    accounts windows 10 face recognition not working
  3. Go to the Face Recognition option, then select Remove.
  4. Click on Get Started and follow the onscreen instruction to set up face recognition again.
  5. Restart your computer.

2. Reinstall drivers

  1. Press Windows + X, and select Device Manager.
    device manager facial recognition not working
  2. Locate Biometric Devices in Device Manager.
  3. Right-click on the device, then select the Uninstall option.
    uninstall device face recognition problems
  4. Next, click on Scan for hardware changes. This will reinstall the drivers.
    scan for hardware changes windows 10 face recognition not working

When Windows face recognition is not working, the problem may lie with the driver, and reinstalling it should do the trick!

3. Restore older driver

  1. Open the Device Manager.
  2. Click on System Devices and then Surface Camera Windows Hello.
  3. Click on the Driver tab and then click on the Roll Back Driver button.
    driver rollback face recognition problems
  4. Choose the reason for rolling back, click Yes to proceed, and then restart the computer.

4. Turn on/Enable Biometrics

  1. Press Windows + R to open Run, type gpedit.msc, and press the Enter key.
    gpedit run window windows 10 face recognition not working
  2. Click on Computer Configuration and then on Administrative Templates.
    administrative templates windows 10 face recognition not working
  3. Also, click on Windows Components, then Biometrics.
    biometrics windows 10 face recognition not working
  4. Now, double-click on Allow the use of biometrics option in the setting.
    allow the use of biometrics windows 10 face recognition problems
  5. Select the Enabled option.
  6. Now, click on Apply, and then on OK.
    enable allow use of biometrics windows 10 face recognition not working
  7. Similarly, enable the Allow users to log on using biometrics policy.
  8. Restart your computer and see if the problem persists.

There you go! These simple solutions can help if Windows 10 face recognition isn’t working.

Before you leave, check some quick tips to enhance security in Windows. We also have a great guide on Microsoft Azure Face API alternatives, so don’t miss it. Let us know in the comments section if our solutions were helpful to you.

Check if an Update is Installed in Windows: How to Do It

Windows OS is a complex piece of software, and the regular Windows 10 updates make it a reliable system to use. Installing service packs and minor or major updates is an ongoing process, and it is important to check which updates are installed in Windows.

Windows updates usually solve bugs and glitches, introduce security updates to protect the system from external threats, and add new features. Knowing which updates you have installed in Windows can help diagnose issues. Keep reading to find out!

How do I know if Windows Update is installed?

1. Check Windows OS Build

  1. Click on Start and select Settings.
  2. Go to System.
  3. Click on the About tab.
  4. Under About, go to Windows Specification section.
    about section to check installed updates in Windows
  5. You can check the Windows OS information, such as OS build, installation date, and version.
  6. Compare your OS build with the official Windows 10 release doc from Microsoft.

The easiest way to check if you have a specific Windows update installed or if the Windows OS was upgraded is to check the Windows OS build info.

2. Check installed updates

  1. Click on Start and select Settings.
  2. Go to Updates and Security.
  3. Click on Windows updates.
  4. Click on View Update History.
  5. You can now view all the updates that were installed in the recent past.
    view update history
  6. To remove a version, click on Uninstall Updates.
  7. You will now see all the recently installed Windows updates with dates and other details. 
    Uninstall Windows Updates- Check History
  8. If you want to uninstall any update, select Update and click on Uninstall, and confirm the change.

For a full breakdown of past releases, you can also check the Windows 10 update history page.

When unsure if you have installed the latest Windows update on your system, you can check it from the Windows History. Later, you can easily manually download and install updates based on your update history via the Microsoft Update Catalog.

3. Via Command Prompt or PowerShell

  1. Press Windows + R to open Run, type cmd, and hit Ctrl + Shift + Enter.
  2. Click Yes in the UAC prompt.
  3. Paste the following command and hit Enter: wmic qfe list full /format: table
    wmic command
  4. You will now see a list of all recent updates in a tabular format for easy understanding.

Need more PowerShell-focused methods to list, filter, and export update history? Open this step-by-step guide: Windows Update History with PowerShell.

For any action that can be performed via GUI, there is a dedicated command. In the same way, you can check if a KB or Windows patch is installed via the command line. The wmic command works both in Command Prompt and PowerShell.

You now know how to check and view installed updates in Windows 10 and the latest iteration. Before you leave, find out how to configure the Windows Update settings for the best performance.

For any queries or to share which update you were concerned about, drop a comment below.

BitLocker Asks for Password Every Time: 3 Ways to Stop it

BitLocker is a Microsoft-developed full volume control encryption tool built into Windows OS. While this tool is useful, many reported that BitLocker can ask for passwords every time.

This can get tedious, especially if you use a long and secure password. In some cases, you might be having issues with Bitlocker password prompt screen, but we covered those in a separate guide.

Join us while we tackle this issue and show you the best ways to fix it.

Why do I have to enter a BitLocker password every time?

  • Minor glitches with BitLocker can cause this issue to appear on your PC.
  • Auto lock feature in BitLocker will lead to Bitlocker asking constantly for a password.
  • In some cases, missing updates or new hardware can cause this problem to occur.

How can I stop BitLocker from asking for password on boot?

1. Suspend and resume BitLocker

  1. Press Windows Key + R, to open Run.
  2. Type control and press OK to open Control Panel.
  3. Go to BitLocker Drive Encryption.
  4. On the C drive, select Suspend Protection option.
    Suspend BitLocker Protection
  5. If asked to confirm the decision, click on, Yes.
  6. Now reboot the computer.
  7. After the reboot, open BitLocker Drive Encryption again and make sure that the BitLocker is resumed. If not, select Resume Protection option.
  8. Exit the Control Panel.

Note that whenever you want to make any changes to the BIOS and Disk, make sure you suspend protection and resume the Protection after making the changes. This will avoid any conflict with the BitLocker and the disk drive.

2. Turn off Auto-lock for BitLocker

  1. Press Windows Key + R, to open Run.
  2. Type Control and click OK open the Control Panel.
  3. In the Control Panel, go to Bit Locker Encryptions.
    Turn Off Auto Unlock BitLocker 
  4. Select the driver and click on Turn off Auto Bit Lock.

Now reboot the system. Since you have disabled the Auto-lock feature, BitLocker should avoid asking for the recovery repeatedly.

3. Other fixes to try

  1. Uninstall newly installed hardware – If you have installed new hardware such as docking station, it may create issues with the BitLocker. You need to make sure no unnecessary peripheral devices are connected to the computer when the machine is booting.
  2. Update Windows OS – If the issue is due to a bug with the Windows OS, try to update the OS. Microsoft usually releases an update fixing known issues with the OS and the tools. Go to Start > Setting > Update and Security > Windows Updates. Check for any pending update.Windows Update check for updates button

We hope these solutions helped you solve the issue with Bitlocker asking for a password every time.

Remember to keep your BitLocker password safe, but if you lose it, you can always find Bitlocker recovery key without too much hassle.

What method worked for you? Share it with us in the comments section below.

What to do if Thunderbird Keeps Asking for Password [SOLVED]

Thunderbird is among the most popular email clients available for Windows computers. Recently some users have reported that Thunderbird keeps asking for a password while trying to access their email accounts.

However, the matter itself is not with the Thunderbird client but occurs due to an issue with the email service provider or bad Thunderbird configuration.

Some users are quite bothered by the regular password prompts.

Every time i ask mozila to “get messages” or to “send” a message it asks for my password when using my laptop but this doesn’t happen when using my desktop, as far as I can see the settings are the same on both machines, am I missing something ? If anybody can help I would appreciate it.

Read the step-by-step solutions below.

How to fix Thunderbird keeps asking for password?

1. Ask Thunderbird to remember your password

  1. Launch Thunderbird and log in to your email account.
    Thunderbird Password Remember
  2. In the login screen, make sure to select “Remember password” option and click Continue.
  3. Exit and relaunch Thunderbird and check for any improvements.

2. Use a file cleanup tool

You can as well utilize an efficient method that will erase any temporary files or browsing data that can generate such Thunderbird issues on your device. By using a professional system optimizer you can do that quickly and without having to worry about anything going wrong.

3. Remove and Re-add the Account

Remove and Re-add the Password

  1. Launch Thunderbird.
  2. Click on Tools and select Options.
    Thunderbird Password Remove
  3. Now, go to the Security tab and then to the Passwords tab.
    Remove Thunderbird password
  4. Click on the “Saved Passwords” button.
  5. Select your email account with the issue and click on the Remove button.

Exit and relaunch Thunderbird. Enter the password to log in and make sure you check the “Remember password” option.

If the issue persists, try to remove and re-add the account.

  1. In Thunderbird, go to Tools and select “Account Settings”.
  2. From the right-pane, select the problematic email account.
  3. At the bottom, click on Account Actions and select Remove Account.
  4. Click Yes to continue.
    Thunderbird Remove account
  5. Exit and relaunch Thunderbird.
  6. Again go to Tools > Account Settings.
  7. Click on Account Actions and select “Add Mail Account”.
  8. Enter the email credentials and make sure to check the “Remember password option”.

4. Temporary Issues

Thunderbird

If nothing seems working, it could well be just a network-related issue. In the meantime contact your email service provider just in case to know if the issue is from their end.

How to fix common Pagan Online bugs [FULL GUIDE]

Pagan Online is an early access hack and slash multiplayer game, but many users reported various Pagan Online bugs. These bugs will prevent you from enjoying your game, and today we’re going to show you how to fix them.

How can I fix Pagan Online bugs?

1. Game not launching

  1. Open Windows Firewall.
  2. From the menu on the left select Allow a Program through Windows Firewall.
  3. Click on Change settings and make sure to check both Private and Public for Pagan Online. If the game isn’t on the list, be sure to add it and make the aforementioned changes.
    allow apps through windows firewall Pagan Online bugs

2. Display bug fix

  1. Right-click on the Desktop and click on the Display Settings.
  2. Now you’re going to select Advanced Settings. Next click on Adjust Resolution.
    display settings Pagan Online errors
  3. Select which one suits your screen, keeping in mind the refresh rate of your screen. Also, you can disable V-sync in your in-game menu.

3. Frame rate drops fix

  1. Open your Nvidia Control Panel.
  2. Select Manage 3D Settings and select Pagan Online from the Program Settings.
  3. Set Power Management to Prefer Maximum Power.
    power management mode prefer maximum performance
  4. Save your changes and exit.

4. Network issues fix

  1. From your Start Menu, select Device Manager.
    device manager Pagan Online bugs
  2. Select a category to see names of devices, then right-click on the one you’d like to update.
    update driver Pagan Online bugs
  3. Select Update Driver, and click on Search automatically for updated driver software.
  4. Once it’s done updating you’re all set.

Alternatively, you can try using a driver updater tool to automatically update all your drivers.

⇒ Get Fortect Driver Updater

If the driver update didn’t help, reinstall the driver by doing the following:

  1. Repeat the first step from the previous workaround.
  2. Right-click on the name of the device, and select Uninstall.
  3. Restart your machine.
  4. Windows will attempt to reinstall the driver at start-up.

5. No audio fix

  1. Right-click on the volume icon on the bottom right corner of your screen and click on Sounds.
  2. Now head on over to the Playback section and disable all the sound devices except the internal speaker or the speaker you wish you want to use. Also, keep in mind that changing your audio from surround sound to stereo can do the trick too.
    disabled devices playback Pagan Online bugs

6. Save game fix

  1. Launch your Steam client.
  2. From your Library section, right-click on Pagan Online and choose Properties from the menu.
  3. Now select the Local files tab and click on the Verify integrity of game files.
    verify integrity of game files Pagan Online bugs
  4. After this is done, try running the game again.

There you go, several quick and easy solutions that will help you fix Pagan Online bugs on your PC.

Xbox Live Keeps Asking for Password [Guaranteed Fix]

Every time you turn on your Xbox, it wants you to sign in. You most likely put in your email and password. After hitting the check box to remember the password, an error message says your email or password is incorrect. However, it still allows you to connect and play online; it does not remember the information each time.

What to do if Xbox Live keeps asking for a password?

1. Restart Xbox One

  1. Hold press the Xbox button right in the middle of the controller. This will open the Power Center on Xbox One.
  2. Then, select the Restart Console and then select Restart to confirm.
  3. After Xbox One restarts, try signing in once more.

2. Clear the cache

clear xbox one cache Xbox live keeps asking for password
  1. On your controller, press the Guide button. Then, navigate to Settings.
  2. Select System Settings.
  3. Choose the Memory or Storage Option.
  4. Highlight a storage device of your choice and Press Y on your controller.
  5. Choose the Clear System Cache option.
  6. Restart your Xbox One Console using the steps in the solution above.

3. Restore all Factory Settings

factory settings Xbox live keeps asking for password
  1. Press the Xbox button, this will open the guide.
  2. Select Settings and navigate to System Settings then Console Info.
  3. Select the Reset Console option.
  4. After step 3, two options will pop up on your screen.
    • Reset but keep my apps and games: this option will reset the OS and will help you delete any corrupt data but it will keep your apps and games
    • Reset and remove all: this option resets all the settings back to default and removes everything including saved games, games, apps, and user data

4. Delete your Profile on the Xbox One Console

delete xbox profile Xbox live keeps asking for password
  1. Delete your Profile.
  2. Clear your System Cache by following the steps in Solution 2.
  3. Restart your Xbox as it is done in Solution 1.
  4. Download your Profile again then check if the issue persists.

5. Remove your account and add again to your Console

remove xbox one account Xbox live keeps asking for password
  1. Remove account from Console.
    • Press the Xbox button, this will open the guide.
    • Select Settings and navigate to System Settings then Select Remove accounts.
    • Select your account and confirm.
  2. Restart Xbox One
    • Hold press the Xbox button right in the middle of the controller, this will open the Power Center of Xbox One.
    • Select the Restart Console and then select Restart also.
  3. Add your account to Console again.
    • Press the Xbox button, this will open the guide.
    • Select the Sign In option and then Select Add New.
    • Input the email address and password of your Microsoft account.
    • Follow the onscreen instruction to personalize your settings.

With these solutions, you should be able to resolve the Xbox Live keeps asking for password issue. You can also try switching Xbox accounts on Windows and see if the issue persists.

For more password-related problems, don’t hesitate to check our Fix: Windows Command Line Generates Random Password [Solved] guide.

FIX: Gears of War 4 installation interrupted [Windows 10/11]

Gears of War 4 is a third-person shooter video game developed by the Coalition and published by Microsoft Studios.  You can play this awesome game on both Microsoft Windows and Xbox One.

The shooter game benefits of high popularity between gamers. Many users reported experiencing a frustrating issue during the game installation process.

The error message Couldn’t install, we’ll retry shortly”. The error code is 0x80070015 often blocks the install process.

Some of the issues that cause this error could be related to: setup files being corrupted, software conflicts or outdated Windows versions.

In order to fix this issue, we managed to come up with a series of tested solutions that you can follow.

What to do if GOW 4 failed to install

  1. Corrupted installation files
  2. Run the troubleshooter
  3. Update Windows
  4. Reset the Microsoft Store cache
  5. Fix the error through Power Shell

1. Corrupted installation files

Having a damaged installation setup could cause this specific issue to occur while trying to install the game.

Downloading the setup from different untrustworthy websites could cause serious damage to your system as well.

These setups might contain infected files that will be installed your computer.

We recommend that you only try downloading a clean setup through the Windows Store.

2. Run the troubleshooter

The Windows troubleshooter detects and fixes eventual issues within the system.

Try running the troubleshooter and see if it fixes the installation issue.

In order to run the troubleshooter, follow these steps:

  • Open the Control Panel > select System & Security

  • Under the Security and Maintenance section, select the Troubleshoot common computer problems

  • Choose the Program compatibility troubleshooter > click Run the troubleshooter.

3. Update Windows

Sometimes errors occur when having an outdated Windows version. Certain programs might not be compatible with your version of Windows.

Perform a system update in order to make sure that the error isn’t occurring on the OS side.

Performing a Windows update requires you to follow these steps:

  • Press the Start button > open Settings

  • Click Update & Security

  • Select Windows Update > click Check for updates
  • If it finds any updates, let it complete the process and restart your computer
  • After rebooting your PC, check if updating Windows fixed the issue.

— RELATED: The best Windows 10 RPG games to play in 2019

4. Reset the Microsoft Store cache

Corrupted Store cache might cause this installation issue to occur. Some users reported that performing a Microsoft Store reset fixed the issue.

In order to reset the Microsoft Store cache, follow these steps:

  • Click the Start button > open Settings

  • Find in the search box the Apps & Features section

  • In the Apps & Features section, find Microsoft Store and select it > click Advanced options

  • Click Reset

  • Try installing Gears of War 4 again and see if it fixed the issue.

5. Fix the error through Power Shell

Sometimes the installation is interrupted by previous installations that you performed on your computer. Old GOW4 install files could trigger system conflicts.

Removing these old installation bits is required in order to fix the issue.

Follow the next steps, allowing you to go through with the process:

  • Press the Windows logo key + X on your keyboard > click Windows Power Shell (Admin)
  • Input the following command into Power Shell and press Enter

get-appxpackage -all |% {if ($_.packageuserinformation.installstate -eq “Staged”) {$_.packagefullname}}

  • Find the following package name and copy it in Notepad

Microsoft.SpartaUWP.8174f199b5_12.0.0.2_x64__8wekyb3d8bbwe

  • Remove this specific package by inputting the following command

remove-appxpackage Microsoft.SpartaUWP.8174f199b5_12.0.0.2_x64__8wekyb3d8bbwe

  • Close Power Shell and see if it fixed the issue

We hope that you managed to fix your Gears of War 4 issues using the solutions from our guide.

If you found this article helpful, leave a comment in the comment section below.

READ ALSO:

How to remove Amazon Script error on Internet Explorer [Super Guide]

At times, users get a script error message that reads A script on this page is causing your web browser to run slowly. This error is often accompanied by a web address, which reads https://ubp-common-uk-prod.s3.amazonaws.com/require/require.js. With the contents in the web address, it is evident that the error is associated with an Amazon program, specifically the Amazon Assistant program. Moreover, the error occurs on Internet Explorer exclusively.

The problem isn’t common, but there are multiple reports.

“I have recently started to see a ‘script error‘ message appear on my desk top. I searched the topic and only found errors that affect IE. This error occurs before I launch my browser. There is a URL in the message box (https://ubp-common-uk-prod.s3.amazonaws.com/require/require.js). The ‘error‘ doesn’t seem to cause any problems and is a pain to have to clear it. Any thoughts?“

Deal with the problem at hand by reading our step-by-step instructions below.

How to fix the Script Error Amazon on Internet Explorer

1. Uninstall the primary program

  1. Click on the ‘Windows‘ icon (on your desktop window) to open the Start menu.
  2. Now, type apps and features and then click on it.apps & features
  3. Click on Uninstall a program option.uninstall a program control panel
  4. From the list of installed programs, locate Amazon Assistant and then uninstall it.
  5. Confirm the action in the confirmation window.

2. Run the Autoruns64 program under Sysinternals

  1. Once you’ve download Sysinternals, from here, unpack and extract the ZIP file and save it in a separate folder.extract compressed folder
  2. Locate the program named “Autoruns64”, and launch it.
  3. In the program‘s window, type”amazon” in the filter board and hit the Enter key.
  4. In the results, locate all programs related to Amazon Assistant; notably “Amazon1buttonservice64.exe” and “Amazon1buttonApp”.
  5. Navigate to the login tab and uncheck the boxes next to each of the programs/processes.
  6. Save changes and exit program.

3. Restart computer

  1. Navigate to your desktop window.
  2. Click on the Windows icon to open the Start menu.
  3. In the menu, locate the Power icon and click on it.
  4. From the displayed options, select Restart.restart PC
  5. Wait for the system to restart.

After restarting your system, you can proceed to the next and final step.


4. Remove Amazon1buttonservice64.exe & Amazon1ButtonApp

  1. Open Windows Explorer: click Windows + E
  2. Select This PC.
  3. Select C:drive (local disk).system drive partition C:
  4. In the C: drive, locate and double-click on the Program Files (x86) folder.program files
  5. In the folder, find the Amazon1ButtonApp subfolder and right-click on it.
  6. Delete the folder.delete folder program files

After going through this procedure from step 1 to 5, you should encounter the script error no more, and your browser should now load fine.

Hope you find this helpful in fixing “script error Amazon” problem?

RELATED STORIES YOU SHOULD CHECK OUT:

Windows 10/11 Won’t Enter Recovery Mode [Troubleshoot]

Windows Recovery Environment not booting? You’re not alone. Some PCs fail to boot or get stuck during startup, and sometimes Windows won’t even load the recovery tools when it should.

In this guide, we’ll show you what to do when recovery mode won’t start—no matter how many times you restart.

What should I do if Windows 10 won’t enter recovery mode?

1. Hard Reboot PC

  1. Disconnect all external devices from your PC.
    usb cable
  2. Disconnect the charger from the power source.
  3. Press & hold down the power button (hold for up 25 seconds).
  4. Remove the battery and reinsert it.
  5. Reconnect the charger and press the power button again (to power it up).

2. Force-Enter Safe Mode

  1. Disrupt the boot process as many times as you can. This should bring up the recovery window.
  2. If the recovery window comes up, you can proceed; otherwise, abort.
  3. In the recovery window (Advanced Startup Options), select Troubleshoot.
  4. Select Advanced options.
  5. On the list of options, click on Startup Repair.
    advanced options - startup repair
  6. Follow on-screen commands to repair startup and restart the system in safe mode.

If you cannot boot up in safe mode using this method, you can try the next solution.

3. Use a Recovery Drive

Step 1: Create a recovery drive

  1. Get another Windows 10 PC and a flash drive (>512 MB storage capacity).
  2. Slot in the flash drive.
  3. Go to Start > Control Panel, type Create a recovery drive and then click on it.
    create a recovery drive
  4. Follow the prompt commands to finish the process.

Step 2:  Boot up PC

  1. Enable the flash drive as “bootable”. This can be done in the BIOS settings.
  2. Slot the drive in your PC.
  3. Open Advanced Startup Options.
    advanced startup restart now
  4. Click on Continue to restart PC. Alternatively, select the Use a device option, and use the recovery drive (flash drive) to restart the system.

4. Repair startup

  1. Go to Troubleshoot.
  2. Select Advanced options
  3. Click on Startup Repair, and follow the prompt instructions to the process.
    advanced options

5. Restore system

  1. In the ‘Advanced Startup Options’ window, click on Troubleshoot.
  2. Select Advanced options > System Restore.
    advanced options system recovery
  3. Follow on-screen instructions to finish the restore process.

One of the troubleshooting techniques here (using the recovery drive) should fix the problem. However, if the problem persists, you can try and enter the recovery mode via an installation media.

If you’ve tried all the troubleshooting techniques in this tutorial without making any headway, there is the likelihood of system corruption and/or hardware damage. Hopefully, that’s not the case, and the Windows 10 won’t enter Recovery mode error won’t appear again.

Now that you’ve fixed this issue, why not look at our guide on how to exit Windows Recovery Mode?

Still stuck? You might want to double-check that you’re following the correct method for your version of Windows. Here’s how to enter recovery mode in Windows 10 and Windows 11, step by step.

If you can access the screen but your keyboard isn’t responding, see our fix for Windows 10 recovery mode keyboard not working.

In the event of corruption, you can use an antivirus program to scan and fix the error.

Still Setting up Class Configuration: Fix Code 56

Did you get Windows is still setting up the class configuration for this device error message? Don’t panic! We will show you how to resolve this error message.

The error message occurs when the PC doesn’t have network connectivity or the Internet speed is slow. Problems may also arise due to a VPN conflict with your network adapter. Let’s find out how you can fix things!

How do I fix Setting up the class configuration for this device error?

1. Use the Network Adapter troubleshooter

  1. Press the Windows key to launch the Start Menu.
  2. Now, type troubleshoot and hit the Enter key.troubleshoot windows 10
  3. Go to the Network Adapter option and click on it.troubleshoot network adapter windows 10
  4. Select Run the troubleshooter.run the network adapter troubleshooter
  5. Follow the prompts to finish up the process.
  6. Restart PC.

After restarting your PC, you can then start your Internet connection to see if it works.

2. Disable your VPN connection

  1. Press Windows + R to open Run, type ncpa.cpl, and then hit Enter.run ncpa.cpl
  2. Right-click on your VPN and then select Disable from the list of options.disable network
  3. Now, launch your web browser and check if the Internet is working or not.

Once done, verify whether the Windows is still setting up the class configuration for this device error is resolved.

Note icon NOTE
Some recommended VPN programs, such as BullGuard VPN, NordVPN, and CyberGhost are notable for working effectively with any type of Internet connection. Therefore, you should migrate to such a VPN to prevent errors with your Internet connection.

3. Reset network settings

  1. Press Windows + I to launch Settings.
  2. Go to Network and Internet.network & internet settings
  3. Scroll down to locate the Network reset option, then click on it.reset network settings windows 10
  4. Click on Reset now and wait for the process to be complete.Network reset Reset now

4. Run Windows Update

  1. Go to Start, type Windows Update in the search box, and then click on the relevant search result.
  2. Now, click on Check for updates and install the available updates.windows update check for updates
  3. After the update is complete, restart your Windows PC.

We do hope that you are able to fix the Windows is still setting up the class configuration for this device error by applying any of the aforementioned solutions above.

Before you leave, do check the best driver update tools to prevent such issues from arising.

For any queries or to share more solutions with us, drop a comment below.

NBA 2K17 My Career file missing/corrupted on Xbox One [EASY GUIDE]

NBA 2K17 is the go-to game when it comes to basketball simulations. For the past few years, 2k Sports developers are doing an amazing job.

It is hard to make something already great even better. But, with online modes and realistic gameplay, this game passed its predecessor. Nevertheless, its predecessors are the only competition.

Statistics say that for the previous few years, the NBA 2K has been one of the most popular console games. Besides some minor bugs, the game functions solidly.

However, there are some issues that can prove challenging from time to time. One of those is data corruption.

Namely, some Xbox One users reported corrupted save files that are unable to load. One of the most common issues affects the game‘s My Career file.

More specifically, My Career file is missing or got corrupted. We have prepared some workarounds to fix this issue.

How do I get My Career back in NBA 2K17? The simplest method is to load your backup files from the cloud. Usually, My Career is missing because of data corruption. If that doesn’t work, restart your network and then reinstall the game.

To learn how to do that, check the guide below.my career is missing/corrupted in NBA 2k17

What can I do if NBA2k17 My Career file is missing/ got corrupted?

  1. Load backup files from cloud
  2. Restart the network
  3. Reinstall the game

Solution 1 – Load backup files from cloud

If you are prompted with the ”File is corrupted” or “File is missing” errors, this workaround can help you. For starters, for no apparent reason, your files get corrupted and all you can do is delete them.

However, since the Xbox One saves your data, you can retrieve it from cloud easily. Be aware that you are deleting only the files stored on your console, not the ones from the cloud storage.

  1. Go to your Dashboard and select NBA2k17.career file is missing/corrupted xbox one nba 2k17
  2. Choose Manage game.
  3. Go to Saved data > Clear Reserved Space file.
  4. Exit and go to Settings > All Settings.
  5. Open System.xbox one system settings nba 2k17 career file corrupted
  6. Then open Storage.
  7. Select Clear local saved games.
  8. Restart your Xbox One.
  9. Start Nba2k17 and wait for files to be synced.

Once the files are synced, you should be able to continue your My Career or any other corrupted mode.

Solution 2 – Restart the network

An alternative workaround is manually switching your network. It seems that some online modes can occasionally cause file corruption. This can cause a small breakdown and we were all there. So, follow these instructions in order to resolve this issue:

  1. Go to Settings > Network Settings.
  2. Choose to Forget your network or Go Offline.xbox Network settings nba 2k17 career file missing
  3. Shut down the console and unplug your Power Source.
  4. Start Xbox One again.
  5. Enable your Network.
  6. Start the Game.

-READ ALSO: NBA 2K17 errors 49730116, a21468b6 prevent gamers from loading the Career mode

Solution 3 – Reinstall the game

If you didn’t manage to fix the game with the previously-listed solutions, the re-installation is your best bet. On some occasions, the corrupted or missing files can affect the all-around game, and there so, lead to crashes or lags.

You can reinstall the game by following these instructions.

  1. Highlight NBA2k17 and press the menu button on your controller.
  2. Select Manage Game.
  3. Choose the stored device where the game is installed.
  4. Select Uninstall.
  5. Once the game has uninstalled, return to My Games & Apps.
  6. Scroll right to the Ready to Install section under Games.nba 2k17 career file is missing on xbox one
  7. Highlight the NBA2k17.
  8. Press A to select.
  9. Choose Install.

After the installation is completed, start the game. In addition, the saved files should be automatically synced from the cloud.

Also, check your account. Sometimes this issue can be triggered by an expired account or a wrong one. Log in with the right account and check if it’s expired or not.

We hope you managed to resolve your issues and keep on progressing in your favourite mode. Moreover, if you have any questions or suggestions, be sure to tell us in the comments section below.

[wl_navigator]
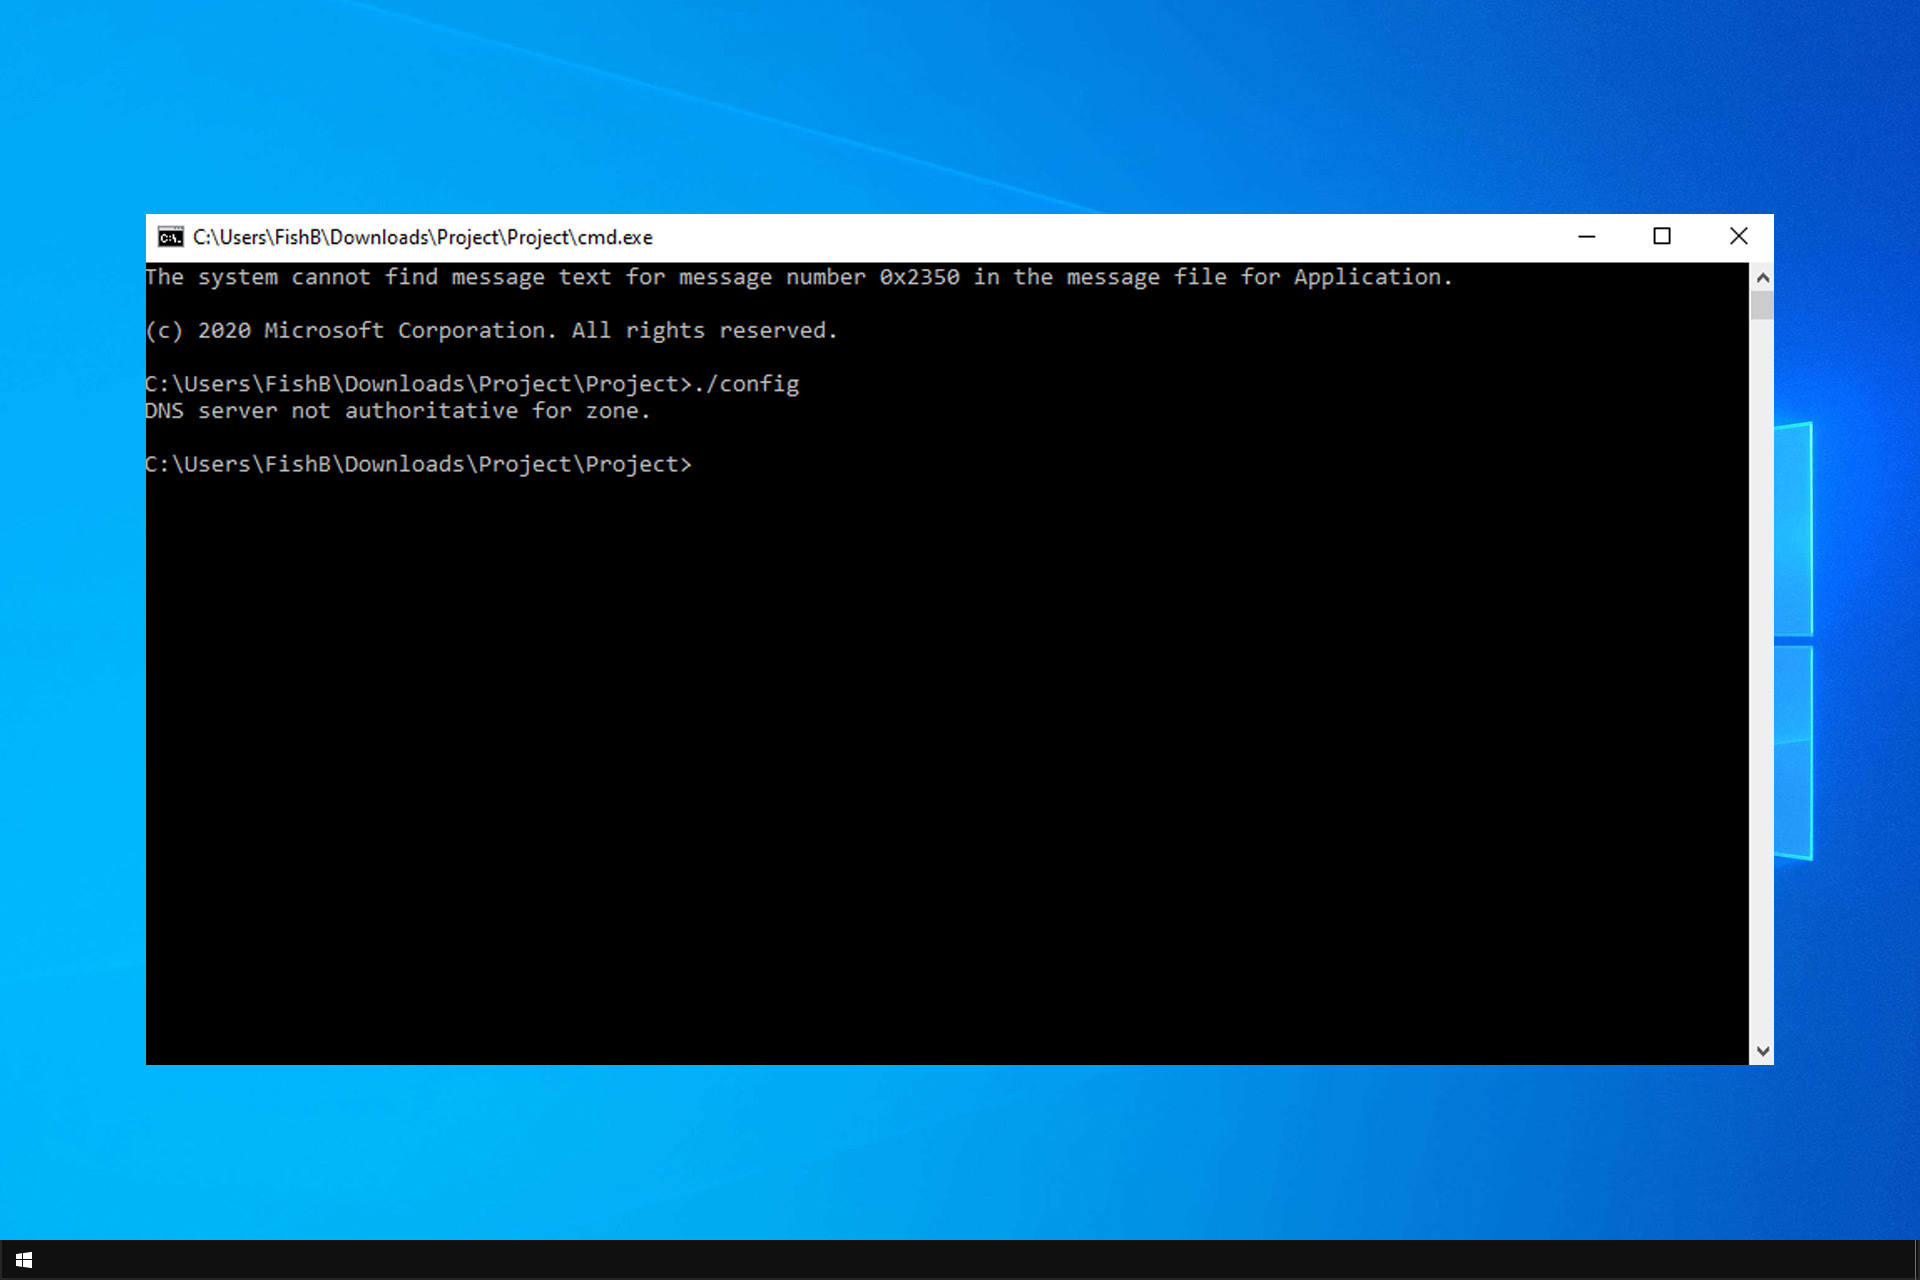
Microsoft ready to show off 14 new Xbox Game Studios at its E3 briefing on June 9

With E3 2019 now just a couple of days away, the Xbox team is getting ready to “go big” at the annual trade show where Microsoft plans to have its biggest presence ever. Of course, what everyone will be looking at is the Xbox press briefing on June 9, and Xbox head Phil Spencer teased us about what to expect yesterday.

According to the Xbox exec, Microsoft will showcase 14 upcoming Xbox Game Studios titles during the event, including “more first party games than we’ve ever had in the show.”

Gears 5 and Halo: Infinite are among the new first-party games that will undoubtedly make an appearance, but we may also see the rumored Fable 4 game that Forza Horizon 4 developer is rumoured to be working on. Microsoft also acquired several new studios since last year, and we also don’t know yet what the company’s brand new studio named The Initiative is currently working on.

Xbox Game Studios also acts as a publisher for some high-profile third party games. You may remember Microsoft’s timed-exclusivity deals on Rise of the Tomb Raider, Dead Rising 4, or PUBG in recent years, though it remains to be seen if Microsoft is willing to pursue this strategy. Otherwise, the much-anticipated Ori and the Will of the Wisps will also be published by Xbox Game Studios this year, and we should finally learn its release date on Xbox One and Windows at E3.

In addition to all these new Xbox Game Studios titles, Microsoft will share more details about its new Xbox Game Pass for PC offering that was announced yesterday. After Sony shared the first hardware details about the PlayStation 5, we also expect Microsoft to announce its next-gen “Scarlett” consoles at E3.

Microsoft’s E3 press briefing will kick off at 1PM PST on June 9, and the Xbox Mixer channel will be the only place where you can watch it in 4K. Even better, Microsoft will once again offer some “MixPot” digital rewards to Xbox fans who watch the event on Mixer.

Fix: Keyboard Lights not Working on Windows [5 Ways]

Keyboard lights are extremely useful when working in dark environments, but many users reported that laptop keyboard lights won’t turn on their PCs.

This can be an issue because you won’t be able to see your keys in the dark, but you’ll be pleased that there’s a way to fix this problem.

Since the last windows 10 update I have lost the keyboard backlight on my Toshiba Satellite laptop. I have checked for updated drivers and my keyboard function light is set for ON. What is up with this?

Why is my keyboard not lighting up?

There are reasons your keyboard is not lighting up within a close circle. Below are the two popular ones:

  • Reduced backlight: The first thing to consider if your keyboard light is not working is whether you have mistakenly reduced it. If it is, you need to increase it appropriately.
  • Glitches with the hardware: Sometimes, this problem might be due to a minor issue with your keyboard. In this case, you need to run the Keyboard troubleshooter to diagnose and fix the issue.
  • Outdated driver: Some users have found outdated keyboard drivers to cause this issue. To fix this, you need to update your driver to the latest version.

Now that you know the causes of the issue, below are some of the variations of this issue you can fix with this guide:

  • Keyboard light not working Dell
  • Keyboard light not working Asus
  • Keyboard light not working Lenovo
  • Keyboard light not working HP

How do I get my keyboard to light up again?

1. Press the keyboard shortcut

keyboard shortcut laptop keyboard lights won't turn on
  1. In the case that the Spacebar on your keyboard has a keyboard icon on its left side, hold the function Fn key and hit the Spacebar once.
  2. Hit the F12 key.
  3. Then, press the F5 key.
  4. Also, press the key with the backlight sign on it.

2. Increase the lighting of the backlit keyboard

  1. Press the Windows key, type control, and select Control Panel.
    control keyboard light not working
  2. Click the dropdown next to View by and select Large icons.
    large icons keyboard light not working
  3. Now, select Windows Mobility Center.
    mobility
  4. Navigate to the Keyboard backlit icon and click on it.
  5. A Keyboard backlit window will come up. Choose On under Keyboard lighting. To adjust the keyboard brightness, choose either the Bright or Dim option.  
  6. Click on OK to save changes.

Once your keyboard backlight is working again, you can personalize it to your liking. Learn how to change your keyboard backlight color using built-in tools or RGB control software.


3. Check if the keyboard application exists

  1. Press the Windows key.
  2. Type Keyboard backlit in the search box, there you will find the settings.
    backlit
  3. You can confirm if the keyboard backlit is enabled or not.

4. Troubleshoot your keyboard

  1. Press the Windows key + I and select the Update & Security option.
    update and
  2. Click Troubleshoot in the left pane and select Additional troubleshooters.
    troubleshoot keyboard light not working
  3. Finally, select the Keyboard option and click Run the troubleshooter.
    run keyboard

Sometimes, the keyboard light not working might be minor issues with your hardware. The built-in troubleshooter is perfectly placed in this case to fix this.

5. Update the keyboard driver

  1. Press the Windows key + X and select Device Manager.
    device manager
  2. Double-click the Keyboard option to expand it and right-click the device there.
  3. Now, choose Update driver.
    update driver keyboard light not working
  4. Finally, select the Search automatically for drivers option and install any available updates.
    search auto

If the fixes above fail to fix the keyboard light not working issue, you need to update your drivers. You can go to the manufacturer’s website to download and install the latest driver if Windows can’t find them.

That is everything you need to fix the keyboard not working issue. You only need to follow the steps carefully, and things should be back to normal.

If your keyboard is typing the wrong characters and letters, check this detailed guide to fix it quickly.

So these are the steps to carry out when your laptop keyboard lights won’t turn on. If you found this article helpful, let us know in the comments below.

Digital pre-orders for Call of Duty: Modern Warfare’s 3 versions are now open Xbox One

The new Call of Duty: Modern Warfare video game is now available to pre-order digitally on Xbox One.

The game is being released in three different digital versions; a Digital Standard Edition (which comes with the base game, a Digital Edition bonus item, and a Prestige Token for Call of Duty: Black Ops 4), an Operator Edition (that comes with everything in the Digital Standard Edition plus Operator Edition premium digital items), and the Operator Enhanced Edition (which has everything from the previous two versions and 3,000 Call of Duty Points).

Here’s the official game description and trailer:

Prepare to go dark, Modern Warfare is back! The stakes have never been higher as players take on the role of lethal Tier One operators in a heart-racing saga that will affect the global balance of power. Call of Duty: Modern Warfare engulfs fans in an incredibly raw, gritty, provocative narrative that brings unrivaled intensity and shines a light on the changing nature of modern war. Developed by the studio that started it all, Infinity Ward delivers an epic reimagining of the iconic Modern Warfare series from the ground up.

In the visceral and dramatic single-player story campaign, Call of Duty: Modern Warfare pushes boundaries and breaks rules the way only Modern Warfare can. Players will engage in breathtaking covert operations alongside a diverse cast of international special forces throughout iconic European cities and volatile expanses of the Middle East. And the story doesn’t end there. In Call of Duty: Modern Warfare, players will be thrust into an immersive narrative spanning the entire game. Experience the ultimate online playground with classic multiplayer, or squad-up and play cooperatively in a collection of elite operations accessible to all skill levels.

Call of Duty: Modern Warfare made headlines earlier today when it was announced that the game would be the first in the franchise to support crossplay between Xbox One, PlayStation 4, and PC. Console to PC crossplay is expected at launch in October with Xbox and PlayStation crossplay planned soon after.

Call of Duty: Modern Warfare will also see the removal of the Season Pass DLC system.

Are you excited for Call of Duty: Modern Warfare? Let us know which version you’re planning to pre-order in the comments below and then follow us on Pinterest for more Xbox gaming content.