According to the announcement post on Xbox Wire, Xbox will be giving away “a limited number of exclusive ooze green, pizza-scented Xbox Wireless Controllers that pair perfectly with game content that immerses fans in the Turtles’ latest adventures.”
Apparently this is the world’s first-ever pizza-scented video game controller. And while it may seem like a very…creative marketing gesture, one is inclined to believe the claim. To enter for a chance to win one of these you’ll need to follow the official Xbox Game Pass Twitter account and retweet the sweepstakes tweet.
After years of being sheltered from the human world, the Turtle brothers set out to win the hearts of New Yorkers and be accepted as normal teenagers. Their new friend, April O’Neil, helps them take on a mysterious crime syndicate, but they soon get in over their heads when an army of mutants is unleashed upon them
Teenage Mutant Ninja Turtles: Mutant Mayhem premieres in movie theaters around the world throughout August 2023.
We often wonder why resource consumption in Windows is high. One look at the Task Manager and a list of the processes and background tasks hogging the CPU and RAM will be available. When we talk of these, mfevtps.exe is one of the executable files that bother many.
While some reported that the process led to error messages, others were concerned about security and privacy. And you have every reason to, given that there’s not much detail available on the security risk rating. Keep reading to find out all about mfevtps.exe!
What is the function of mfevtps.exe on your computer?
The mfevtps.exe process, linked to McAfee, Inc., stands for McAfee For Enterprise Validation Trust Protection Service. It is a core part of the antivirus and runs as soon as you boot the PC.
The primary job of the McAfee Process Validation Service, as the name suggests, is to examine the processes, programs, and DLLs on the PCs interacting with the McAfee, Inc. antivirus and verify whether these are safe.
While verifying the processes, McAfee creates a cache for the results. So, the next time a validation check is initiated, the McAfee Process Validation Service first inspects the cache for previous results, thereby reducing time and boosting the overall performance.
The file size is roughly 0.2 MB, and the file location is:C:\Windows\System32\mfevtps.exe
For those wondering if the presence of the process can be due to malware infection. That’s not the case. It’s a legit McAfee Total Protection file.
What causes mfevtps.exe to use high CPU resources?
Here are the primary reasons you are facing high CPU usage due to the process:
Corrupt cache: You may come across common mfevtps.exe errors when the cache created by the service is corrupt, often leading to high CPU usage, which will slow down the PC.
Conflicts with Windows services: A few users discovered that the McAfee Antivirus process conflicted with Windows services, resulting in error messages.
Third-party programs triggering the issue: Often, another third-party antivirus, security software, or the configured firewall may not work too well with the McAfee, Inc. software program, triggering such errors.
Running an outdated version of the antivirus: Though unlikely, there’s the possibility that the McAfee, Inc. antivirus installed is outdated, which will affect its processes, as well as the performance of Windows.
How can I fix the high CPU usage caused by mfevtps.exe?
Tip
You shouldn’t disable or delete the mfevtps.exe process as long as McAfee is the primary antivirus, as it will affect the basic functioning of the software.
Before we move to the slightly tricky solutions, try these quick ones first:
Restart the computer in case the CPU usage is extremely high, and you can’t perform any operation.
Verify the file path and make sure you have the original file. In case of doubt, scan your PC for malware.
Update both Windows and the McAfee LLC antivirus software.
Press Windows + S to open Search, type Allow an app through Windows Firewall, and click on the relevant search result.
Click on Change settings.
Click the Allow another app button.
Now, click on Browse.
Navigate the following path:C:\Windows\System32
Locate and select the mfevtps.exe file, then click on Open.
Next, click on Add.
Make sure both the Private and Public checkboxes are ticked for the process, and click on OK to save the changes.
Since the built-in Windows Defender Firewall is likely to trigger high CPU usage with mfevtps.exe, it’s recommended that you whitelist the process.
Do the same for third-party firewalls installed on the PC. Though the steps vary, you can find these on the program’s official website.
2. Make sure the relevant services are running
Press Windows + R to open Run, type services.msc in the search box, and hit Enter.
Locate the Cryptographic Services entry, right-click on it, and select Properties.
Choose Automatic from the Startup type dropdown menu, click on the Start button to run the service, and then on OK.
Once done, restart the computer.
That’s it! After starting the Cryptographic Service, things should be up and running, and you shouldn’t come across more instances of mfevtps.exe crash.
After uninstalling McAfee, you can either switch to the built-in Windows Security or use another popular antivirus solution.
How can I prevent mfevtps.exe from causing high CPU usage in the future?
To prevent any issues, follow these tips:
Make sure all the program files work fine and none are corrupt. Corrupted files are often a source of errors and could lead to high CPU usage and RAM consumption.
Verify that both the Windows operating system and the McAfee antivirus are updated.
Are there other system processes that might cause similar high CPU usage issues?
Yes, several processes are known to consume a fair amount of resources in Windows. Some apps even do that under ideal conditions. So you shouldn’t be bothered, especially if it’s a game or editing software. The processes triggered by browsers also tend to hog the system resources.
Besides, a PC infected with malicious software, having too many autostart programs, or running a corrupt exe file extension, are all reasons behind increased CPU consumption.
That’s all! By now, you should have fixed any problems with the McAfee software package and the mfevtps.exe process.
Before you leave, read about McAfee spam emails, an emerging trend that has already affected many.
For any queries or to share solutions with us, drop a comment below.
At a conference in Riyadh held in February, major tech companies’ representatives gathered to discuss their involvement in Crown Prince Mohammed bin Salman’s ambitious “Vision 2030” plan. The plan aims to transform Saudi Arabia into a global hub for technology and innovation, shifting away from its traditional reliance on oil reserves and conservative ideologies. The highlight of the conference was the development of Neom, a futuristic $1 trillion megacity in the northwest of the kingdom, envisioned as a data-driven metropolis and central to the crown prince’s vision.
During the event, Saudi officials announced securing a significant $9 billion investment from various firms, including a $2 billion plan by tech giant Microsoft to build a cloud storage facility in the kingdom. Google had already announced a similar project the previous year, solidifying the rush of tech firms eager to secure lucrative contracts in the region.
However, human rights activists are now raising concerns about the potential misuse of digital information stored in Saudi Arabia. They fear that the country’s vague security laws could enable authorities to use this vast data trove to intensify their crackdown on dissidents. Activists warn companies like Microsoft and Google that they may be compelled to hand over private citizen data to Saudi authorities, potentially endangering individuals’ safety.
Under Saudi law, security services possess sweeping powers to access data and force companies to disclose private information deemed to have violated broadly defined national security laws. The lack of transparency and refusal by Google and Microsoft to disclose their data protection strategies in the kingdom have added to the concerns.
The dismal human rights record in Saudi Arabia, as highlighted by human rights organizations, raises further red flags. The authorities have aggressively pursued government critics on social media, employing spyware to track exiled dissidents and allegedly infiltrating Twitter’s headquarters to obtain user data.
Notably, the development of Neom presents an even more significant cause for concern. The city’s services will be powered by user data accessed through smartphones, potentially creating a vast surveillance system that could track and monitor residents in real time. This has led activists to urge Western firms involved in Neom’s digital infrastructure to address these privacy and human rights concerns.
While Microsoft and Google have expressed commitments to human rights, they have not provided concrete details on how they plan to safeguard data privacy while operating in a country with a poor human rights record. Calls for them to publish “due diligence” reports to assess ethical operations in such regions have been met with resistance.
As tech giants continue to invest billions in Saudi Arabia’s tech and innovation plans, the concerns surrounding data privacy and human rights remain at the forefront of the global conversation. The world will be closely watching how these companies navigate their operations in a country with a chequered human rights record.
Over a dozen new games are headed to Xbox consoles this week, from July 24 – 28. While there aren’t any high-profile AAA blockbusters in this week’s lineup, there’s a good variety of genres represented here, so there ought to be something new for everyone. See the full list below.
All in all it’s a pretty solid lineup of summer releases. Remnant II will likely be the highlight for many, and it’s good to see the classic beat ’em up franchise Double Dragon make a return with an all-new title. Indie games are also well-represented. Is there anything here that has you excited to play on Xbox this week? Let us know down in the comments.
As reported by BleepingComputer, Microsoft has announced the retirement of Windows Mail and Calendar applications on Windows 10 and Windows 11 by the end of the year. Users will be automatically migrated to the new Outlook for Windows app starting in August. Initially developed for Windows 10, Windows Mail and Calendar were built-in applications for email retrieval and event scheduling.
Though bundled with Windows 11, the Mail and Calendar apps were not considered modern email applications. To address this, Microsoft has decided to retire both apps and transition users to the new Outlook for Windows app, which is already available for testing.
Microsoft has informed consumers and enterprise customers about the retirement plan, recommending they start testing the new Outlook app. Users can activate a toggle in the upper right-hand corner of Windows Mail to automatically install the new Outlook app and import their settings.
Initially scheduled for September 2024, the automatic replacement of Mail and Calendar with the Outlook app received some backlash from users, prompting Microsoft to reevaluate the timing of the change. However, in a new advisory, Microsoft has confirmed that they are moving forward with the migration.
According to the updated advisory, Microsoft will begin auto-migrating Mail and Calendar app users to the new Outlook for Windows in August 2023. Users can revert to the current Mail and Calendar apps by using a toggle in the new Outlook for Windows.
Regardless of when users decide to test the new Outlook app, everyone will be automatically migrated to it by the end of the year. After that, Windows Mail and Calendar will no longer be supported or downloadable. New Windows 11 devices will come with Outlook for Windows as the default mailbox application.
These changes will not affect regular Outlook desktop application users; the retirement applies only to Windows Mail and Calendar users. The new Outlook app offers additional features, including improved integration with other email providers, a personalized interface, new calendar features, and automatic package delivery and airplane reservation tracking support.
Microsoft, one of the largest tech corporations, is exploring new avenues and releasing products and services that disrupt the market. While the company has mostly been successful, not all of its products were well received. And today, we will review Microsoft Loop.
Microsoft Loop marks Microsoft’s entry into the collaboration and productivity suite space, and ever since the preview was released, we have noticed both positive and negative reviews. Whether the app will be a success, only time will tell! But let’s find out how people see it initially.
What does Microsoft Loop do?
Microsoft Loop is a collaborative app meant for both individuals and teams intends to simplify co-working. It’s a direct competitor to Notion, a platform that has so far ruled the space. But, as you would expect, both platforms share many similarities.
In addition to the collaboration aspect, Microsoft Loop also serves as a one-stop destination for taking notes and enhancing personal productivity.
Microsoft Loop, as detailed in the official blog, has three vital parts:
Components: Editable and shareable entities on a page that can be repositioned.
Workspaces: Helps organize tasks, files, and projects. It’s expected to get more user-friendly with time.
Pages: Created after a workspace, offers several templates, and allows tagging other users.
Components in Microsoft Loop
Each is critical to Loop and helps deliver a superior experience to the end user. But are these any different from Notion or the other available options? What’s the general take of the public on Loop vs Notion or Microsoft Loop vs Planner? Keep reading to find out!
Will Microsoft Loop be free?
Yes, Microsoft Loop is free, and there are no additional charges. Though one needs to be part of the Microsoft 365 (Office) subscription.
Things will likely remain the same since Microsoft has integrated Loop with the Office suite, allowing seamless connectivity between the two. This simplifies the workflow and makes it relatively easier to use Loop.
Besides, individuals and organizations using the other Microsoft offerings will find Loop a great addition.
Is Microsoft Loop good?
Tip
We will cover a few key aspects necessary for collaboration software and identify where Microsoft Loop stands compared to the other available options.
1. User interface
The success of any platform largely depends on the user interface and how the different options and settings are positioned. They have to be optimally arranged, besides being easily accessible.
The user interface for Loop is similar to Notion, in case you have used the latter. The left panel lists the workspaces, pages, settings, and more. The menu is collapsible, so that’s certainly a plus point. Also, the items in the pane are properly spaced, making navigation easier.
Welcome page in Microsoft Loop
Text formatting options, as expected, are available. You can access them either by highlighting the text or right-clicking on it.
In all, Loop is user-friendly, but a few changes would certainly enhance the platform’s usability. And you can expect some in the coming days as updates are rolled!
Made an edit you want to reverse? Follow this guide on how to undo in Microsoft Loop and quickly restore your content.
2. Ease of work
What made Notion the market leader for so long? It was the ease of work and how it allowed users to make a variety of changes efficiently.
Template Gallery in Microsoft Loop
With Loop, it’s pretty much the same. The collaboration software lets users organize a wide array of components and every piece of detail into a single workspace.
Also, it does the initial search for you and lists the various files and documents that should be a part of the workspace. And the pre-set templates save time and provide a meaningful context to the project.
The best part is the seamless integration with other Microsoft apps. Share components with members on Microsoft Teams, assign tasks or add a note to the Outlook calendar. Do it all in seconds and eliminate the need to toggle between apps altogether!
You can use the Search option to find items or even Loop components. And with the integration in place, users can set custom filters.
3. Shareability and Notifications
Microsoft has introduced the concept of Loops, an editable entity that includes tables, task lists, notes, or even entire pages that can be shared via Teams, Word, and Outlook, amongst others. And changes made to it will reflect throughout. That’s certainly the USP of Microsoft Loop!
Also, there’s the option to configure the sharing settings and decide whether the other person only has viewing privileges or can edit the file.
Sharing settings in Microsoft Loop
Besides, to enhance security and privacy, one can create links that automatically expire or even prompt for passwords that was set when the link was created.
Some users did report that links could not be shared or that the password-protected links were not working in Loops, but this should be fixed in the coming days.
Notification pane in Microsoft Loop
When discussing shareability, it’s also important to highlight how well Loop notifies other users. The Notifications panel in Microsoft Loop lists all the mentions (@), replies, and assigned tasks. It will certainly improve the workflow and save significant time.
4. AI integration
Microsoft recently rolled out the AI-based Copilot, and while it has been in the news for its high pricing, the project might turn out to be the game changer in Loop. Already embedded in Microsoft 365, Copilot is now also available in Loop. As Microsoft puts it, Copilot in Loop was built for co-creation.
Copilot will change the way you create and collaborate! In Loop, it allows you to use prompts to generate responses. And these responses can be further fine-tuned. You can add language or modify the response for personalized results.
Copilot also lets users summarize the content in Loop. It can be applied to both the content of a page and one linked to it. The summary so created can be further edited, keeping the useful part, adding more information, and removing the rest.
Though the summarization feature is not fully available now and will be introduced in the days to come, whether the AI integration with Copilot in Loops turns out to be a game changer or a dud, we will have to wait to find out!
5. Mobile app
When we collaborate or even work on individual projects, the platform must be accessible when on the move. And to ensure that users don’t miss out, Microsoft Loop has released an app on both Apple’s App Store and Google’s Play Store.
The user interface of the app is similar to the web version. It provides easy navigation and pretty much the same bunch of features. As per a few Microsoft Loop reviews we checked, users found the mobile app, in some ways, better than the web version. But that’s certainly an individual opinion!
Nevertheless, you can access Microsoft Loop on Android and iOS devices. So both the workflow and productivity won’t take a hit when you step away from the desktop.
Remember, other platforms, too, offer an app. So it’s not that big a deal but it all boils down to usability, and Loop has got that right to an extent.
At the moment, Notion seems to have a comfortable lead over Microsoft Loop regarding both user base and experience. Future updates to the latter may change things, but unless Microsoft introduces unique user-friendly features, there isn’t much to attract users already on Notion.
As we said earlier, Loop may be the perfect companion for those already a part of the ecosystem of apps and products created by Microsoft, but it, in its present state, is not alluring.
Once Copilot is fully integrated and the summarizing feature is introduced, we may see an uptick in the user base.
But other aspects, like adding images, need a massive overhaul. While Loop currently allows adding images only from the device in use, Notion even offers the option to embed images from links. These are a few aspects Microsoft Loop needs to work on!
That brings us to the end of the Microsoft Loop review! Microsoft Loop is undoubtedly a great platform for collaboration and co-creation, but it’s still missing that spark. Though, given that preview builds have these many features, its future does look promising.
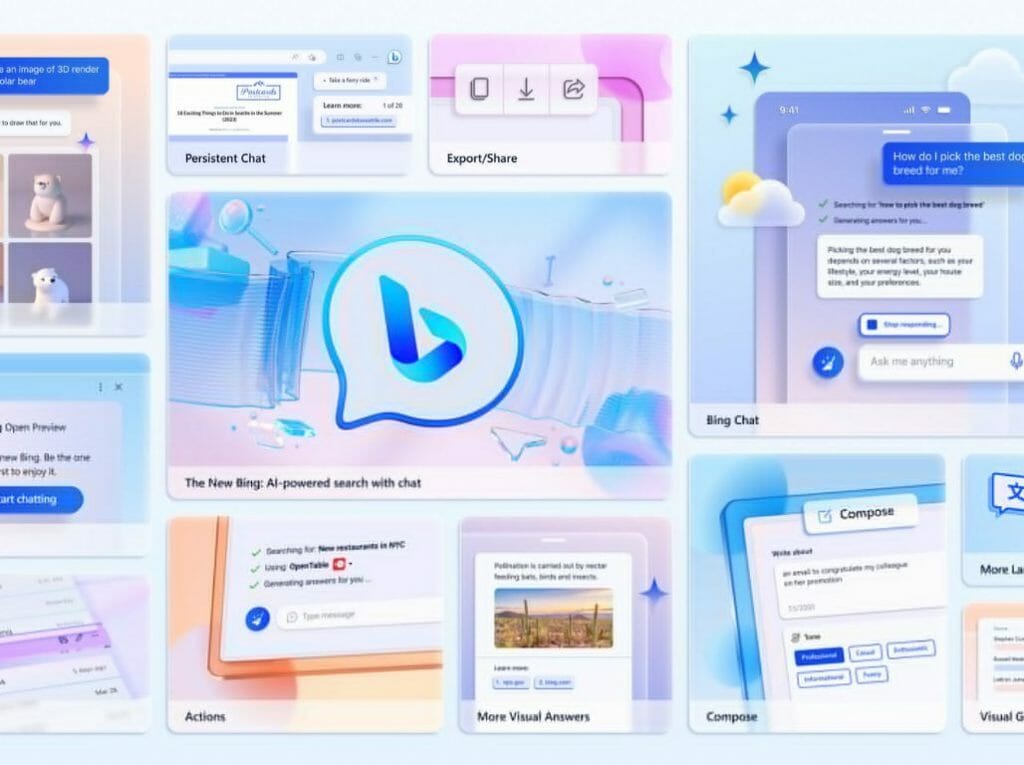
Our lives are increasingly becoming driven by technology-aide efficiency, making it important more than ever to stay on top of new tech features. One such platform that has come a long way is Bing Chat.
Here’s a closer look at these features that you can try right now.
Reading Images through Bing Chat
Bing Chat has now been equipped with the mind-bending ability to understand and interpret images. Simply ask a question about an image you see, and Bing Chat, blurring the line between reality and the realm of artificial intelligence, will provide you with the answer. It’s as if the bots have trained their eyes to perceive images, much like humans, adding a futuristic flavor to our everyday conversation.
Coding From an Image
But the cool stuff doesn’t stop there. Bing Chat takes a leap in the world of coding helping the users to generate code from an image. Hand over an interface image to Bing and ask it to reproduce what it sees. Like an intellectual, Bing Chat will grasp the details of the image and craft a code, replicating the result.
Microsoft’s Bing doesn’t limit this feature to desktop interfaces either. You can even leverage this capability directly from your camera using the Bing app on both iOS and Android platforms.
The History Feature: More Than Meets the Eye
Not exactly a new addition, Bing Chat’s history feature continues to be an incredibly useful tool for recalling past conversations. However, with the advent of recent updates, even this trusty feature has seen a refresh. Now, Bing Chat can narrate previous chats in audio form.
Simply navigate to your chat history, select the conversation you want to hear, and click the microphone option. Within moments, Bing Chat will begin audibly reciting your selected conversation. It’s a handy tool for those who prefer to consume information audibly than visually.
In essence, Bing Chat’s latest updates imbue an old tool with new, unseen possibilities. The suggestions by Paul Couvert have proven that Bing Chat, when utilized to its full potential, can shift paradigms in how we interact with and make use of technology in our everyday lives.
On GitHub, Microsoft has unveiled a new tool called TypeChat to bridge the gap between apps and natural language communication. We all love how chat assistants can understand what we say, but now Microsoft wants to make it possible for other apps to do the same!
Do you know those big language models that have been making headlines lately? They’re like super-smart AI systems that can understand human language. TypeChat is like a special library that helps apps use these language models better.
Imagine you’re talking to a chatbot, and you ask it to order a blueberry muffin and a grande latte. Instead of just giving you a plain text response, TypeChat helps the chatbot reply in a structured format, like a neat list in JSON (JavaScript Object Notation). The app can easily understand the order and work with the information.
But how does TypeChat make sure the responses are accurate and trustworthy? That’s where TypeScript types come in. They act like a set of rules or instructions for the language model. With these types, the app can tell the AI exactly how it should respond. So, when you ask for a muffin and a latte, the chatbot knows to reply with the correct details, like the number of items and their names.
TypeChat is not just limited to one specific AI model; it’s designed to work with different ones. Microsoft has made it open-source, meaning it’s a gift to all developers. They can use TypeChat to make their apps communicate with users more human-like and user-friendly.
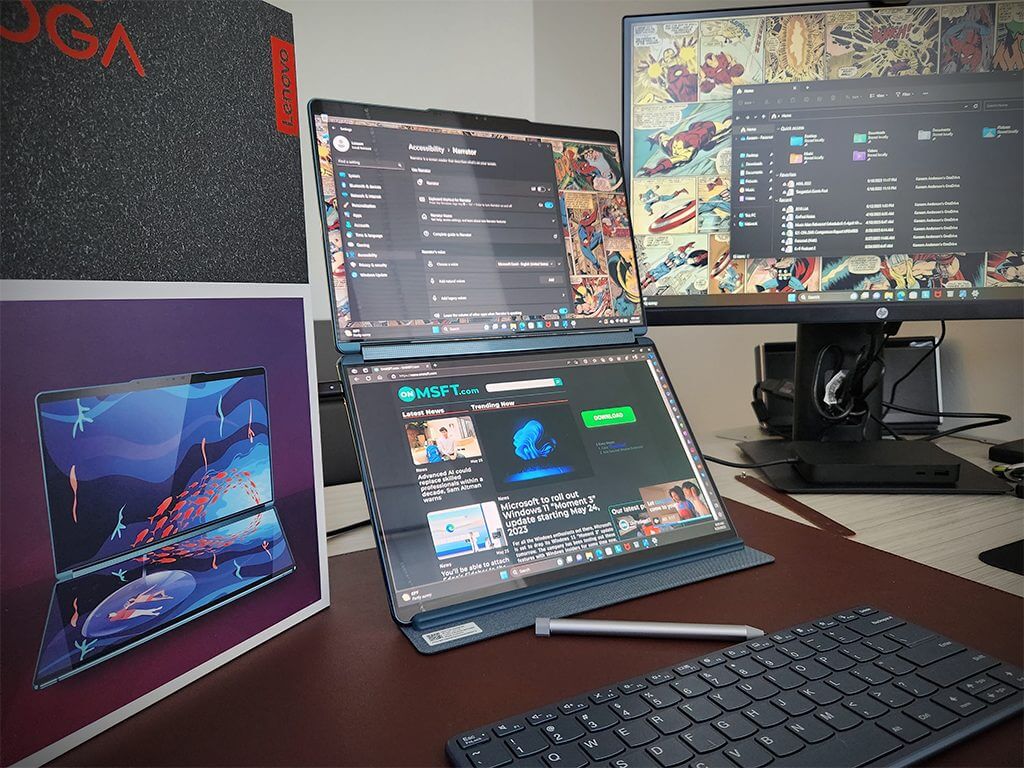
In 2023, Lenovo has seemingly pulled a reverse Microsoft move of going from a single folding laptop concept to a dual full-screen design that offers two 13.3-inch OLED panels on display.
While it’s rumored that Microsoft is working its way back to a more traditional single screen folding phone from its overly ambitious dual screen Surface Duo and Duo 2 offerings, which both saw abysmal adoption, it seems a dual screen concept may work better for Lenovo than its previous single screen folding X1 Fold project.
Yoga Book 9i (13″ Intel)
Processor
13th Generation Intel® Core™ i7-1355U Processor (E-Core Max 3.70 GHz, P-Core Max 5.00 GHz with Turbo Boost, 10 Cores, 12 Threads, 12 MB Cache)
Operating System
Windows 11 Home
Windows 11 Pro – Lenovo recommends Windows 11 Pro for business.
Graphics
Integrated Intel® Iris® Xe Graphics
Memory
16 GB LPDDR5X 6400MHz
Storage
Up to 1 TB PCIe SSD Gen 4
Battery
Up to 7.3 hours* (MM18)
Up to 14 hours (single-screen video playback)
Up to 10 hours (dual-screen video playback)
Rapid Charge support
Audio
2 x 2W + 2 x 1W Bowers & Wilkins speakers
Dolby Atmos®
Camera
5MP IR webcam with e-privacy shutter
Ports/Slots
Left:
Intel® Thunderbolt™ 4
Right:
2 x Intel® Thunderbolt™ 4 (AOU BC 1.2 support)
USB port transfer speeds are approximate and depend on many factors, such as processing capability of host/peripheral devices, file attributes, system configuration and operating environments; actual speeds will vary and may be less than expected.
Bluetooth
Bluetooth® 5.1
WiFi
WiFi 6E* 802.11AX (2 x 2)
* 6GHz WiFi 6E operation is dependent on the support of the operating system, routers/APs/gateways that support WiFi 6E, along with the regional regulatory certifications and spectrum allocation.
Display
2 x 13.3″ 2.8K (2880 x 1800) OLED, 400 nits, 16:10 aspect ratio, 100% DCI-P3, PureSight, touchscreen
Dimensions (H x W x D)
15.95mm x 299.1mm x 203.9mm / 0.63″ x 11.78″ x 8.03″
Weight
Starting at 1.34kg / 3.15lbs
Pen
Lenovo Digital Pen 3
Keyboard
Bluetooth® keyboard
Color
Tidal Teal
Certifications
CarbonNeutral®
ENERGY STAR®
EPEAT™ Gold
TÜV Rheinland Eyesafe
Security
Webcam privacy shutter
Windows Hello via IR Camera
Preloaded Software
Dolby® Access
Lenovo Vantage
McAfee® LiveSafe™ (trial)
Microsoft Office 365 (trial)
Yoga Book User Center
What’s in the Box
Yoga Book 9i 13” Intel
Lenovo Digital Pen 3
Folio Stand
Bluetooth® Keyboard
Bluetooth® Mouse
Quick Start Guide
AC adapter
Look and Feel
Unopened the Lenovo Yoga Book 9i is almost identical to the company’s other Yoga 9i efforts with the new rounded-Comfort Edge polished corners and minimalist luxury design.
Dimensions wise, the Yoga Book 9i has a similar footprint to Yoga 9, MacBook Pro 13-inch, or a Surface Laptop while weighing just a tad lighter than all of them.
The iconic multipoint Rotating Sound Bar supporting Bowers & Wilkins speaker technology is present towards the back of the Yoga Book 9i as it is with the more traditional Yoga 9 line up.
The Yoga Book 9i noticeably comes in a bespoke new blue aluminum color that departs from the more traditional greys, silvers and even Oatmeal beige options Lenovo has offered in the past.
Around the sides of the device resides Lenovo’s commitment to minimalism when it comes to port selections with only three Thunderbolt 4 USB-C options. Once again, Lenovo has omitted the headphone jack from its latest PC offering.
While the Yoga Book 9i does present often as a tableted computing experience, Lenovo has opted not to offer physical volume buttons on the outer chassis.
The Yoga Book continues its visible divergence once the lid is lifted, and users are presented with two glass displays instead of a single display accompanied by a physical keyboard. Where a keyboard normally sits for most laptops, an additional 13.3-inch OLED 16:10 panel awaits with support for pen, multitouch, and 2.8K resolution.
However, true to its Yoga branding and 2-in-1 nature the dual screens can be folded back 360 degrees from either starting point which still enables users to prop up the device in tent, tablet, laptop, and now book mode.
Both displays present a low-bezel profile allowing most of the 13.3-inch display to shine in all of its 400-nit brightness as well as offering practical sized keyboard experience for anyone who can master touch typing.
Unlike other laptops, the Lenovo Yoga Book 9i computing experience comprises of a full set of accessories that include a 4.5 x 11.6-inch Bluetooth keyboard and folding travel cover incased in fabric.
The keyboard is reminiscent of Microsoft’s Designer Compact Keyboard and is designed to work both on the physical screen of the Yoga Book 9i as well as from a distance. The typing experience on the included Bluetooth keyboard is decent but a bit shallow due to the slim profile. The most frustrating part of the keyboard is the up and down arrows being squat and practically flush with the edge of the board, which takes some getting used to.
When traveling with the Yoga Book 9i and all accessories included, users should be prepared for an almost 4lb footprint in any bag.
Experience
Unlike more traditional clamshell laptops, the Yoga Book 9i’s experience comes with a bit of a learning curve that extends beyond simply opening the lid and typing.
There is a bit of a ritualistic set up process to get the full benefit out of the Yoga Book 9i’s experience that includes setting up the keyboard, the stand, and finding the right posture for the situation.
For most basic situations, users can simply open the Yoga Book 9i and make use of the virtual keyboard without having to worry about dragging along a travel case and Bluetooth keyboard. In instances where the virtual keyboard is the go-to option for the typing experience, users will need to know that an eight finger swipe up from the bottom of the second screen will summon the keyboard.
To its credit, Lenovo provides prompts to walk users through the initial setup and gestures to get the cursory computing experience of this new device.
The virtual keyboard is passable for most circumstances with great palm rejection and decent accuracy if the user is proficient at touch-typing.
Lenovo added support for three-levels of haptic feedback to assist users in navigating the virtual keyboard more like a physical one. The virtual keyboard
The more impressive aspect of the virtual keyboard is the touch pad, it is resizable and accurate, providing an enjoyably similar experience to that of a physical touchpad that includes multi-fingered gesturing, optional clicking sounds, and dedicated left and right buttons.
However, for a more traditional typing experience, users will need to load the second screen with the Bluetooth keyboard that attaches to the display with magnets that are aligned along the side of the laptop.
The Bluetooth keyboard can be shifted from top of the display to the bottom relatively easy. The position of the Bluetooth keyboard can unlock a secondary use case with the screen that includes a widget pane that appears at the top of the screen.
There are only a handful of supported widgets that appear in the area visible above the keyboard, but the functionality is useful for checking items like schedules in the calendar as well as news from MSN.
As for typing on the Bluetooth keyboard. key travel is decent the keys themselves are firm and responsive.
Moving beyond typing, the dual screen functionality of the Yoga Book will most likely remain understated by lots of users because its flexibility is entirely situational.
Similar to a Yoga PC, there is the tent mode for watching entertainment or presenting content, there is portrait mode that’s achieved by making use of the fabric travel cover that can fold into a stand allowing users such as day traders to have portable workstation. There is always tablet mode, but Lenovo still hasn’t managed to make a folding laptop that’s enjoyable as a tablet so far, and lastly, there is book mode, which is great for anyone who handles PDFs, Word Docs, eBooks, digital comics, and more.
The most practical use case of the Yoga Book 9i’s is in portrait mode where users get a compact dual screen workstation, as well as for anyone dealing with graphic and photo editing as well as for artists and photographers when the device is laid flat.
Performance
The Lenovo Yoga Book 9i is more than a handful of folding gimmicks and dual screens, with performance on par with more traditional clamshell laptops such as Asus Zenbook S13, HP Dragonfly Pro, and the LG Gram 2023.
Due to its thermal construction, Lenovo opted for a U-Series chip with support for core i5 and i7 options which has a lower peak performance ceiling than other in-class laptops but for daily data processing there shouldn’t be any noticeable difference with the competition.
Workflows with some mixture of web browsing, office productivity, video/tele conferencing, email triage, and light graphics editing will find the Yoga Book 9i adequate, while extensive content creators, CAD users, and engineers may have look for another device for daily use.
In my day-to-day use of the Lenovo Yoga Book 9i serviced most of my needs while never getting too hot or too loud. Performance on the Yoga Book 9i was snappy, and the only slowdown was user-based as I got used to snapping windows between displays.
As for battery life, the Yoga Book 9i holds up surprisingly well considering its powering two OLED screens. During a moderate day of work, I was able to squeeze out around seven hours, and on more robust days I got around 5hrs before needing to charge.
Summary
The Lenovo Yoga Book 9i is a very interesting and compelling new form-factor for situational use-cases. While it can be used in a more clamshell orientation and without all of the accessories it really shines when users can find their ideal posture and accessory set up.
The Yoga Book 9i doesn’t beat an all-around traditional clamshell laptop or even a 2-in-1 detachable, but it improves upon the 2-in-1 convertible concept while also offering additional use-cases for niche experiences. As I mentioned, day traders, engineers, artists, C-suite level executives who deal in docs all day, lawyers, and others may find the trade off in price and traditional convenience worth a hyper-focused experience.
There is a lot that Lenovo can do to improve the adaptive software for the managing two screens and ideally Microsoft will work with them to enhance the concepts of Windows 10 X and bring them to the next version of Windows to help support devices like the Yoga Book 9i in the future.
As it stands, the Yoga Book 9i may be hamstrung by its touch-typing learning as its attempts to bridge utility over convenience.
Since the pandemic, Microsoft Teams has become one of the most used communications application globally. Indeed, by some estimates, it grew a whopping 90% in 2020-2021 alone.
While it’s primary use was for online text communication, people have been using Teams for quite many more things. We’ve rounded up it’s best uses as well. So, let’s look at all the ways and how you, too, can make the most out of Teams.
1. Audio and Video Calls
While written communication works in most cases, at times, it’s simply not enough. For all your complex discussions that need something more than a few messages, you need something more. Here, you can use the calling feature from the Teams app. To access Calls, head to the chat in the Teams app as you usually would.
Once you’re inside an individual chat, tap either the Video or Audio icon to start the call. Similarly, you can also do a group call as well only with the condition that if you start the call from a group chat, you will be asked to confirm if you want to call everyone from the group.
2. Schedule Meetings
Nothing is simultaneously more annoying and a time killer than an unplanned meeting. You’ve to pause whatever you were doing before, there wasn’t any time to prepare for the meeting, and in most cases, you end up changing your plans you’d prepared earlier.
So scheduling a meeting with your teammates well in advance is tantamount to saving yourself from trouble later on. Microsoft Teams lets you do just that through its in-built calendar. To create a meeting, head to Calendar and select New Meeting.
Give your team a title, pick a date and time, and add any additional details later on. Finally, select all the members you’d like to add and create the meeting.
3. Screen Sharing
Sharing screens and giving presentations are an integral part of any successful meeting. On Teams, you can share your desktop, app, whiteboard, or even a presentation at the meeting and make the most out of your presentation.
To share a meeting, click Share content and select what you want to share. Teams lets you share the following:
PowerPoint Live: It lets you share your PowerPoint presentation.
Windows: Helps you open windows like a specific app.
Microsoft Whiteboard: Lets you share a whiteboard with all, so you can all draw on a board together.
Another important part of remote and online work is resource sharing. It could be anything: a creative image, an important document, and so on. To share a file, follow the steps below:
Head to chat from the left side and select a Chat.
Now drag and drop the file you’d like to share and select Send.
If you’re in a group chat, the steps will be slightly different. Here’s how:
Go to the group chat and select Attach from the message box.
Depending on where the file is located, select OneDrive or Upload from my computer.
That’s it—Teams will upload your files with ease from there.
Using Microsoft Teams for Remote Work
You can use Microsoft Teams for far more than your regular text communication. We’ve laid down some of the most popular uses above. File sharing, meetings, video or audio calls—you can do it all. But don’t take our word for it. Go ahead and try out Teams, and experience the best it has to for yourself. And if you have some other hand uses in mind, remember to mention them in the comments section below.
Suppose you’ve ever encountered the tedious task of manually transcribing information from images or faced difficulties in converting scanned documents into editable text. In that case, this article is precisely what you need. In the following sections, we will guide you through a comprehensive step-by-step process of how to use Microsoft Word to extract text from images. The best part is that you won’t need extra plug-ins or software. So without wasting any more time, let’s dive right in.
Step 1: Use Microsoft Word to insert a picture or image
To use Microsoft Word to extract text from images, start by inserting your image into the document. You can follow two convenient methods for this purpose.
The first option is to drag and drop the image directly into your Word document.
Alternatively, you can access the Insert tab, click Pictures, and choose This Device. This will let you browse your computer and select the desired image for insertion.
Within the opened file explorer, locate the desired image from its location on your computer, and then click on it to select it. Finally, press the Insert button to add the image to your document. You’re now one step closer to convert your images to editable text in Microsoft Word.
Step 2: Save Your Document as a PDF
To save your document as a PDF, navigate to the File tab. Next, click “Save As” and choose to browse for a suitable location to save your document.
Select a location where you want to save your document, then enter a fitting file name. Make sure to choose PDF as the file type. Once completed, click the Save button to finalize the process.
Step 3: Open Your PDF Document in Microsoft Word
Once you have saved your image as a PDF file, you can convert it to editable text by opening it in Microsoft Word.
To proceed, navigate to the File tab and click Open in the left navigation pane. From there, select the Browse option.
Locate your PDF file from its designated location, then click on the Open button to select and open it.
Within the dialog box that appears, proceed by clicking the OK button.
Your image will now appear as editable text in Microsoft Word.
Step 4 (Optional): Ways to Optimize Your Images for Best Results
While this step is optional, it can significantly enhance the quality of your final editable text, depending on your document.
First, consider cropping your image to eliminate undesired elements and retain only the pertinent content. Right-click on your image and choose the “Crop” option.
Fine-tune the crop region to solely encompass your image’s content (as exemplified below). Once satisfied, click outside the cropped area to save the modifications.
After selecting your image, locate and click on the Layout Options button. Choose the “In Front of Text” option from the options presented. This selection allows you to move the image within the document and adjust its size as needed.
Please make the necessary adjustments to your image to ensure it fits the width of the page, as demonstrated in the image below.
Microsoft Word’s PDF conversion feature ensures high accuracy, reducing the requirement for extensive edits. In most cases, you will only need to make minor adjustments, if any at all. Your primary focus will involve formatting the document to align with your specific requirements and applying basic design principles to enhance its professional appearance.
Use Microsoft Word to extract text from images
In conclusion, this comprehensive guide has provided you with the necessary steps to use Microsoft Word to extract text from images. By following these steps, you can efficiently convert images into editable text without the need for additional software or plugins. Remember, alternative methods such as free OCR (Optical Character Recognition) software apps can also be utilized for this purpose. Microsoft Word is now part of the Microsoft 365 package; you can get it here. There is also an Insider program for it; more about it here.
Imagine yourself with a large data set in Microsoft Excel, and you need to find a particular value. If you don’t know the exact row and column it is in, it would take forever to find it. However, with Xlookup and Vlookup, your search is made easy.
You’re probably asking why not just use the good old CTRL + F combo to find your values, but these two provide more refined searches. Stay with us as we unpack the differences between these two.
When would you use Xlookup?
As the name suggests, Xlookup is a lookup function that returns the value of a specified cell or a range of cells. It is a relatively new function popularly known as the modern replacement of Vlookup and Hlookup.
So, when was Xlookup introduced? Xlookup was introduced in 2019 after years of trial and error to correct the mistakes of its predecessors.
For clarity, the x and v in the names are not related to the alphabet. Instead, they refer to the position of the column being searched on a spreadsheet.
A Vlookup searches down the leftmost column, while an Xlookup searches down the rightmost column.
The two functions are similar in that they both search a list for a value and return another value based on whether or not the value is found. Their main difference is that their target columns are located in different positions within your spreadsheet.
They’re basically the same, only that Xlookup came with more improvements. Xlookup is a great way to get data from your data sources. It can be used in various ways, so it’s important to understand how it works and why it might be useful for you.
The choice of Xlookup vs Vlookup depends largely on how your data is arranged in Excel. If you have more than one column in your data table and only need to search from left to right like most people, then using Vlookup will probably be easier for you than Xlookup.
However, if you need to search across multiple columns and your data isn’t arranged this way by default, Xlookup will be easier for you than Vlookup.
What are the main differences between Xlookup and Vlookup?
1. Syntax
Vlookup
The syntax formula for Vlookup is: (lookup_value,table_array,col_index_num,[range_lookup])
Lookup_value – This is the value to look up in the search column. It can be a number, text string, or reference that matches the lookup value exactly.
Table_array – The table array consists of values you want to search through.
Col_index_num – The column number within the lookup table that contains the reference value. If your lookup table has multiple columns, specify which column you want to use.
Range_lookup – This is an optional feature you can include depending on your desired results. If you want an exact match, you can include FALSE. This means that if there’s no match, the result will return an error instead of bringing the closest match.
For example, let’s say we have an Excel table of Windows Report employees and their phone numbers. The first column lists names and the second column has the person’s phone number.
We want to look up a person’s phone number based on their name. For example, if we enter Claire Moraa into cell A1, Excel should find Claire’s phone number in B1.
In this case, we’re using Vlookup because our data is organized in two columns, one containing names and one containing phone numbers.
Xlookup
The Xlookup syntax formula is: (lookup_value,lookup_array,return_array,[if_not_found],[match_mode],[search_mode])
Lookup_array – This is where the first element of the array will be searched.
Return_array – This is an optional argument specifying whether to return the original value if it was not found in the array.
If_not_found – Another optional parameter that determines what happens if there are no matches for your lookup query.
Match_mode – An optional parameter. It can be one of two values: 0 (default) or 1. A 0 match implies that all characters must match exactly, and 1 implies that characters only match approximately.
Search_mode – Another optional parameter to specify the search mode whether from top or bottom.
As you can see, both syntaxes have different ways of handling searches. In an Xlookup function, if the search text is not found in the first column of your table, Excel will move down through each subsequent column until it finds a match or reaches the end of your table.
On the other hand, Vlookup checks only one column at a time. The leftmost one when searching for matches. If it finds no matches in that column, it will stop searching and return no results.
Perhaps the greatest advantage of using Xlookup is multiple criteria for searches.
2. Error handling
From the syntaxes above, you can see that Xlookup has a lot of parameters that allow for built-in error handling. It’s not uncommon for the searches to return no results. In such cases, you’ll need to customize the syntax to find what you want.
The If_not_found parameter in Xlookup allows you to refine your search. For instance, in our example above, if we wanted to find another employee, but they are not on the list, the Vlookup syntax would return a N/A result.
However, using Xlookup, you can add an optional parameter using if_not_found and include Not on the list if the specified name cannot be found.
The Vlookup syntax is simple but limited. For the Xlookup, you can define where your search will begin. If you have a large data set and have an idea of where what you’re looking for, you can do a reverse search.
This basically means that you can start from the top or bottom to save time. Say we have a list of over 1000 employees, and you’re looking for a phone number, Vlookup only allows you to search starting from the left.
With Xlookup, you can start from the top or bottom.
In summary in tabulated form:
Xlookup
Vlookup
Compatibility
Excel 2021 and later
All versions
Exact match
Yes
No
Optional parameters
Yes
No
Vertical/horizontal lookup
Yes
No
What is the disadvantage of Xlookup?
After reigning praises on Xlookup, you probably think it is too good to be true. Well, you’re not wrong. Xlookup is not without its faults, but hopefully, it won’t be significant enough to make you discard it.
Some of its known cons include:
Compatibility – This is by far its ugliest con. Xlookup is only compatible with later versions of Excel starting from Excel 2021. Therefore, some users still on previous versions may be locked out of utilizing this function.
Requires more resources – Any application performing such refined searches would require more than the usual system resources. In fact, one user is quick to point out that while using the Xlookup syntax, the results returned a N/A response.
On my work machine with 16 GB of RAM, I am getting XLOOKUPs that return ‘#N/A’ on values that exist. These same XLOOKUPs will update with the correct value as soon as I go to my dataset and ‘CTRL-F
While this is yet to be proven, there’s a slight chance it could be true. If this is the case, modern-day problems require modern-day solutions. You can always upgrade your RAM or use RAM cleaners.
Overall, it’s really up to you to decide which works best for your needs. In the end, both are valuable tools for Excel power users. While Vlookup may be more useful overall, it’s not as flexible or customizable as Xlookup.
If we were to decide, from where we sit, Xlookup looks like the function you should be using. Now that you know the difference, you can use the knowledge to get data from another Excel sheet with ease.
Twitter remains a force to reckon with regarding social media platforms, and with countless users, it has become the platform of choice for many. However, some of our readers who use Twitter, especially on iOS devices, have complained of the notification Uh oh, an error was encountered.
Before giving up, consider the easy solutions in this guide to help you through the error in this guide. You may also check out our related guide if Twitter does not open.
Why does my Twitter keep saying error encountered?
From interaction with users, it may be difficult to ascertain the cause of the error. However, it may be linked to the following:
Hopefully, this helps you resolve the error. However, remember, there is no official solution from Twitter for this error. In most cases, it will be solved without you needing to do anything, just like when Twitter is over capacity.
Please let us know if this guide has been helpful. If you find any other solutions, please share them in the comment section below; our readers will love to read them.
Our readers often complain that they cannot uninstall the Adobe Creative Cloud program from their Windows devices. Others have problems with Creative Cloud running in the background.
If you are one of those troubled users looking for the correct way to uninstall the Adobe Creative Cloud app, the methods listed in this guide will help you install the app forcefully.
Why am I unable to uninstall the Adobe Creative Cloud app?
Unlike other apps installed on your Windows PC, it is not possible to completely uninstall the Adobe Creative Cloud app using the built-in uninstallation module of the Windows operating system.
Fortunately, Adobe has configured some exclusive programs with the sole purpose of uninstalling the Adobe Creative Cloud apps.
To help you out, in this guide, we have described the comprehensive procedure for uninstalling the Adobe Creative Cloud app.
How do I forcefully uninstall the Adobe Creative Cloud app?
1. Use the Adobe Creative Cloud Desktop App
Launch Adobe Creative Cloud Desktop on your Windows PC and sign into the app with your Creative Cloud credentials.
Switch to the All Apps section from the left sidebar and then move to the Installed section on the right.
Click the three dots for each of these apps and select Uninstall from the drop-down menu.
Adobe has configured the Adobe Creative Cloud Desktop app such that it facilitates you to completely uninstall the Adobe Creative Cloud from your Windows PC. However, after uninstalling all the Adobe CC software like Photoshop and Lightroom, you need to uninstall the Adobe CC Desktop App software itself.
Unfortunately, it is not possible to uninstall the Adobe Creative Cloud Desktop App using the Uninstall a program feature of a Windows PC. To uninstall the desktop app and other bloatware, you need the help of Adobe CC uninstaller.
Scroll down and follow the download link to start downloading the CC Uninstaller compatible with your device.
Navigate to the download location of the Adobe CC Uninstaller and extract the contents of the ZIP files.
Now right-click the Adobe CC Uninstaller and choose Run from the context menu.
Press Uninstall button on the popup that appears and wait for the program to uninstall the Adobe Creative Cloud and related apps.
After you see the Adobe Creative Cloud Uninstall Successful prompt, exit the uninstaller and reboot your PC.
Adobe CC Uninstaller is the official uninstaller for the Adobe CC app, which uninstalls the Adobe apps that cannot be uninstalled using the normal uninstallation method of Windows.
Scroll down the webpage, choose Windows in the Filter by drop-down, and press the Download button.
After the download is completed, use the Windows + E shortcut to launch the File Explorer.
Now navigate to the download location, right-click Adobe CC Cleaner, and choose the Run as administrator option.
In the Adobe Creative Cloud Cleaner tool you will see two languages – English and Japanese, type e and hit Enter to switch to the English language.
Next, you need to review the Adobe End-User License Agreement. Type y and press the Enter key to accept the license agreement.
On the next screen, you will see the list of Adobe bloatware still hogging your PC despite uninstalling the software. Type the number preceding the option you wish to choose and press the Enter key. For instance, you need to uninstall the CC Apps so press the 4 key.
Adobe Creative Cloud Cleaner tool is an advanced software program by Adobe that is capable of fixing problems with the software and uninstalling outdated or corrupt program installations. The tool comes in handy to uninstall a bunch of bloatware programs that get installed on your PC without your knowledge and do not get uninstalled easily.
While editing the Windows registry is a very critical process so you should proceed with caution when making changes or deleting the registry keys to avoid damaging your computer.
Press the Windows keys to launch the Start menu, type registry editor in the search bar on top, and choose Run as administrator from the right search results section.
Navigate to the following location in the Windows Registry by pasting the following path: Computer/HKEY_LOCAL_MACHINE/SOFTWARE/Microsoft/Windows/CurrentVersion/Run
Look for the AdobeGCInvoker-1.0 key in the given location.
Now right-click the AdobeGCInvoker-1.0 key and choose Delete from the context menu.
Now exit the registry editor and reboot your PC to apply the changes.
Adobe GC Invoker Utility is bloatware that automatically runs in the background upon startup without your permission, and it does not get uninstalled with the normal uninstall process or using the Adobe Cleaner tool; modifying the registry is the only way to get rid of it.
5. Manually uninstall the Adobe Folders
Launch the File Explorer using the Windows + E shortcut key.
Navigate to the following location one by one and press the Windows key to delete the contents of these folders. C:\Program Files\AdobeC:\Program Files\Common Files\AdobeC:\Program Files (x86)\AdobeC:\Program Files (x86)\Common Files\Adobe
Deleting the temporary Adobe folders in the Program Files folder will be the last step to ensure that no trace of Adobe Creative Cloud remains on your PC. Now restart your PC, and you would have completely uninstalled Adobe Creative Cloud from your computer.
So that the complete step-by-step procedure to uninstall Adobe Creative Cloud from your Windows PC.
The Microsoft spreadsheet needs no introduction. However, all software comes with some baggage, and Excel stock data not updating is an error some of our readers have pointed out.
Let us get into some practical solutions to address this Excel issue. Remember, you may opt to use many other spreadsheet software.
Why is my Excel stock data not updating?
From what we gather, a few things may trigger this problem, including the following:
Problems with the data source used on your spreadsheet.
You may be facing internet connection problems.
You may be using an outdated app that does not allow automatic updates.
Look through your spreadsheet for cells with a tiny green triangle on the upper left.
Click on them, expand the caution triangle, and fix the error.
Finally, verify if this solves Excel stock data not updating.
4. Run the file in Safe Mode
Search for the Excel application shortcut. In our case, it is in the path below: C:\ProgramData\Microsoft\Windows\Start Menu\Programs
Hold down the Ctrl key and double-click the icon.
Click Yes to open in Safe Mode.
Verify the Stock data is properly updating. If so, you may need to turn off or uninstall your most recently installed applications that may conflict with Excel.
You should be able to use any of the solutions above to easily fix the error. Since they are not written in any particular order, we suggest beginning with the ones that seem more relevant to your situation.
Using the Windows Task Scheduler utility, you may plan tasks to execute on your computer at a certain time or interval. It allows you to execute scripts and applications and even send yourself emails. However, you may get an error message: the selected task no longer exists.
In this guide, we will help you troubleshoot this problem. In our other related guide, you may learn more about the Task Scheduler on Windows 11.
Why do I get the error the selected task does not exist?
You may get this error for any of the following reasons:
You may have accidentally deleted the task or got it deleted by a virus.
The tasks you need to run are corrupted.
You have conflicting tasks on your computer.
The task faces compatibility issues with the current version of Windows.
If, after the scan, the error continues, proceed to the fixes below.
1. Re-enable Disk Defrag Schedule
Press the Start menu, type Scheduler, and select the Task Scheduler utility.
Navigate to the path below: Task Scheduler Library/Microsoft/Windows/Defag
In the middle pane, right-click ScheduledDefrag and select Disable.
Close the Task Scheduler and relaunch it.
Navigate to the same path as in step 2, then re-enable ScheduledDefrag.
Restart the computer and see if the error of the scheduled tasks no longer exists persists.
2. Delete the corrupted task’s folder
Press the Start menu, type Scheduler, and select the Task Scheduler utility. Click OK when prompted with the error.
Note the number of times you are prompted with the error (This number indicates how many files you have that are not synced with the registry).
Navigate to and expand the folder below: Task Scheduler Library/Microsoft/Windows
Open your File Explorer by pressing Windows + E and navigate to the path below: %SystemFolder%\Tasks\Microsoft\Windows
Return to the Task Scheduler and open the first folder in the Windows directory. If you get the error notification the selected task no longer exists, return to File Explorer and delete the corresponding files.
Repeat till you have deleted all files with no synced schedules. The number of iterations should tally with the times you had to click OK when you initially opened the Task Scheduler.
Sometimes, you may consider creating a new user profile, but this is a long shot. However, if you have followed the solutions above, you should no longer get the selected task no longer exists error on your Task Scheduler.
Please let us know what worked for you, and also tell us if you discovered other new solutions. We love to hear from you in the comment section below.
Users may encounter playback errors when trying to play audio or video files or even during stream sessions. Recently, we have had users complaining about a certain Plex multimedia error with the message an error occurred loading items to play.
We will show you how to resolve it in this guide. You may, however, consider using some advanced media center tools that will limit the chances of these errors.
Why do I keep getting an error occurred loading items to play?
You will get playback errors like the loading items to play error for any of the following reasons:
The file may be corrupt right from the download or upload process.
You may be accessing files in an unsupported format.
The requested files may use a codec your computer does not have.
There may be a problem with your network connection.
What do I do if I encounter an error occurred loading items to play?
Before proceeding, try these workarounds:
Restart your Plex client.
Check the server status for Plex, which may require you to wait it out.
Move your media to a new device.
Change your ISP or use a wired internet connection.
If the error continues, proceed to the solutions below.
1. Repair a Corrupt Database
NOTE
Due to customizations in the Plex database engine, the standard SQLite interpreter cannot repair the Plex Media Server database. You can invoke the interpreter by running the Plex SQLite executable in the Media Server installation folder to open an SQLite Shell.
Close or exit your Plex Media Server.
Press Windows + R to open the Run dialog.
Type cmd and hit Ctrl + Shift + Enter to open an elevated Command Prompt.
Change the directory to the path with your server using the script below: cd "%LOCALAPPDATA%\Plex Media Server\Plug-in Support\Databases"
Make a database copy using the script below: copy com.plexapp.plugins.library.db com.plexapp.plugins.library.db.original
Open the database using Plex SQLite tool with the script below. Replace Plex SQLite with your platform’s actual path: "Plex SQLite" com.plexapp.plugins.library.db
Now run the following command within the sqlite shell to check for corruption and rebuild the database structure: PRAGMA integrity_check; VACUUM;
2. Disable the Audio Passthrough option
Click on Settings and select Advanced.
Click the Player option.
Select Audio passthrough and choose Disabled.
Lastly, confirm if fixes an error occurred loading items to play.
Click on Settings and navigate Server and Transcoder.
Under the Transcoder quality dropdown, select Prefer high-speed encoding.
Finally, verify it fixes an error occurred loading items to play.
That is as much as we cover in this guide. We are confident that you should fix the Plex playback error with any of the solutions discussed. Also, remember that many users may get errors if their connection is not fast enough for Plex.
Lastly, please let us know which fixes worked for you in the comment section below.
Dotnetfx.exe is a type of IExpress Setup File developed by Microsoft which is a part of the Microsoft Windows .Net Updater process.
In this guide, we will explain everything about dotnetfx.exe and complete a step-by-step procedure to download and install it.
What is Dotnetfx.exe?
Dotnetfx.exe is an operating system core component update that serves the purpose of updating the .NET technology interface.
This Win32 EXE (Executable Application) or dotnetfx module is located in the subfolder located in the operating system directory and is required for the proper functioning of some of the native Windows programs.
If this executable file gets corrupt or goes missing, you may encounter a series of problems in the normal functioning of Windows. Fortunately, you can manually download and install the dotnet.fx file by following the method explained below.
How do I download and install Dotnetfx.exe?
1. Download and install Microsoft .NET Framework
Visit the official download page of the Microsoft .NET Framework 4.6.1 offline installer.
Choose the relevant language in the drop-down and press the Download button to initiate the dotnet.exe Web Installer download.
After the installer gets downloaded successfully, disconnect your PC from your internet.
Now restart your computer and sign in to your computer.
Use the Windows + E shortcut to launch File Explorer and navigate to the download location of the offline web installer.
Double-click to run the installer and follow the on-screen instructions to install the .NET framework.
Restart your PC if prompted to complete the installation of the .NET framework.
2. Install Windows updates
After your PC gets restarted, sign in to your Windows PC.
Use the Windows + I shortcut to launch the Settings app.
Select Windows Update from the left navigational panel.
Press the Check for updates button on the top right and if any updates for available for download, press the Download and Install button to proceed.
Once again, restart your PC to complete the updation process.
Since dotnetfx.exe is a part of the Microsoft .NET framework, downloading and installing the framework will do. Additionally, you should also check and install all the available updates for your PC.
Select the preferred language in the dropdown and hit the Download button to start downloading the repair tool for Microsoft .NET Framework.
After the download is complete, use the Windows + E shortcut to access the File Explorer window.
Access the NetFxRepairTool in the download location, right-click it, and choose Run from the context menu.
Click Yes on the User Action Control prompt to allow the repair tool to make changes to your computer.
Check the box for I have read and accept the license terms option and press the Next button to proceed.
Wait for the tool to detect the problem and recommend some effective solutions.
Microsoft offers a repair tool for the .NET Framework that is capable of diagnosing and detecting some common problems with the setup of the Microsoft .NET Framework and its related files like dotnetfx.exe.
That’s all in this guide! Hope the step-by-step procedure to download and install dotnetfx.exe on your Windows PC.
Before you leave, you are recommended to check out the solutions effective in resolving the corrupt .Net framework issues.
In case you have any comments or feedback for us, do let us know in the comments section below.
A few of our readers have complained of an error, especially when adding an email account. This error often comes with the code 0x8007042E, so we will walk you through some practical solutions in this guide.
This error is often considered a mail app error, so you may consider using alternative Windows mail applications as they may help you avoid a future occurrence of the error.
What causes the 0x8007042E Windows error code?
You may get this error for any of the following reasons:
Type cmd and hit Ctrl + Shift + Enter to open an elevated Command Prompt.
Input the scripts below and hit Enter after each one. DISM /Online /Cleanup-Image /CheckHealth DISM /Online /Cleanup-Image /ScanHealth DISM /Online /Cleanup-Image /RestoreHealth
Once all the scans have been completed, you may restart the computer, then verify if it fixes the 0x8007042E error.
There you have it. You will find out that any of the solutions above may work. Simply start with whichever feels the most applicable.
If you face the related 0x80048830 mail app error, you may find some solutions in this guide applicable.
Lastly, we always love to hear from you. So drop us a message in the comment section below and let us know which fixes were most efficient.
The MKV (Matroska video) format is one of the most used video formats, thanks to being open-source, making it available to just about anyone for use and modification.
However, things are not always straightforward, as MKV videos can also get damaged. When this happens, the video will not play, irrespective of the player you use.
This video file corruption can be caused by an incomplete file transfer and bad sectors on your storage device, among other potential. Irrespective of what caused the corrupt MKV files, the solution in this guide will help you fix it effortlessly.
How can I repair a damaged MKV video file?
1. Run a CHKDSK scan
Press the Windows key + S, type cmd, and select Run as administrator under Command Prompt.
Type the command below and hit Enter to run it: chkdsk c: /f /r
Now, press Y when prompted.
Finally, wait for your PC to restart, and the command will check for errors on the specified disk.
If damaged or corrupted MKV video files are located on an external hard drive, the problem might be due to bad sectors on the disk. This is also true if the video files are saved on your PC.
What you need to do here is to run the CHKDSK command to repair the bad sectors, and things will be back to normal.
2. Use third-party video repair tools
As you probably know, Windows doesn’t have a dedicated video repairing tool but there are dedicated apps for that.
Press the Windows key + X and select the Device Manager option.
Double-click the Display adapters option to expand it and right-click the driver under it.
Now, select the Properties option.
Click the Driver tab at the top.
Finally, click the Roll Back Driver button and follow the onscreen instructions to complete the process.
If your MKV files got damaged after installing a Windows or driver update, the problem might be caused by issues with the updated video driver.
This is noticeable if you get a black screen with audio while playing the corrupt MKV video files on your video player. The solution to this is to roll back the driver to one compatible with the video file format.
4. Use VLC Media Player
Launch the VLC Player and click the Media tab at the top.
Select the Convert/Save option.
Now, click the Add button.
Next, navigate to the location of the broken MKV files and select the one video to repair and click Open.
Click the Convert/Save button.
From here, click the Profile dropdown at the top and choose the input codecs to use.
Finally, click the Start button and wait for the process to complete.
VLC Media Player has a built-in video converter tool that can fix damaged corrupted MKV files.
Whether you are having a video playback issue or unplayable MKV video files, converting it to another format should help you regain access to it.
5. Download the compatible video codecs
Your video player has some codes (codecs) that allow you to play compatible videos. So, if your media player does not have MKV codecs, you might experience issues while trying to play videos in this format.
To prevent these issues in MKV files, you need to download and install the compatible codecs on your video player. You can go for a general and reliable option like the K-Lite Codec pack.
What should I do if the damaged MKV video file is essential and cannot be replaced?
If the damaged MKV video file is important and cannot be downloaded from another source, you might need to employ the services of a professional MKV video repair tool.
Most of these software fix video corruption and other related problems, including unplayable MKV video files. Another option is to convert the video to another format.
This is because your player might have the video codecs needed for the format but not for the MKV files. With these, you should be able to regain access to your video.
Can the quality of an MKV video be affected after repair?
Depending on the method used to repair the MKV video file, the quality is likely to reduce. Also, if you converted video content to another format of lower quality, it will have an effect after repair.
So, this is how you prepare damaged MKV video files. While the fixes in this guide should help recover the corrupted MKV files, the best solution is prevention through proper management.
By preventing abrupt system shutdowns due to power outages, installing the required codecs, scanning for malware infection, and downloading videos from trusted sources, this issue should never surface.
Facebook is one of the most popular social media apps available today. One of its features is birthday notifications which remind you of upcoming birthdays of your friends and families.
Sometimes, you might stop receiving birthday notifications on Facebook. This article will show you the best ways to get back the birthday notifications on your Facebook account.
Why is Facebook not showing birthdays?
Hidden Birthdays – Some Facebook users have several privacy restrictions on their accounts; if their birthdays are private, you might not get notifications on their birthdays.
Facebook server issues – In some cases, you’ll be unable to receive birthday notifications if the Facebook app is experiencing server issues.
Notification Settings – If you’ve disabled Facebook birthday notifications in your Facebook app or the website, you won’t receive notifications on anything birthday related.
Outdated browser – If your browser is outdated, it can lead to errors due to underlying bugs and prevent you from receiving birthday notifications on Facebook.
Corrupt browser cookies – Browser cookies are stored on your PC to improve your browsing experience on websites but can also lead to errors if they are corrupt.
Poor internet connection – Facebook requires a stable internet connection to operate correctly; if your internet connection is limited or unstable, you might not receive Facebook notifications on your friends’ birthdays.
How do I get Facebook to show birthdays?
Before we proceed to troubleshoot the error, here are a couple of quick fixes you can attempt:
If these simple workarounds didn’t fix the problem, let’s apply the solutions below.
1. Enable birthday notifications
Press the Windows key, enter the name of your browser, and hit Enter.
In the browser window, navigate to the Facebook webpage, and enter your credentials if prompted to sign in.
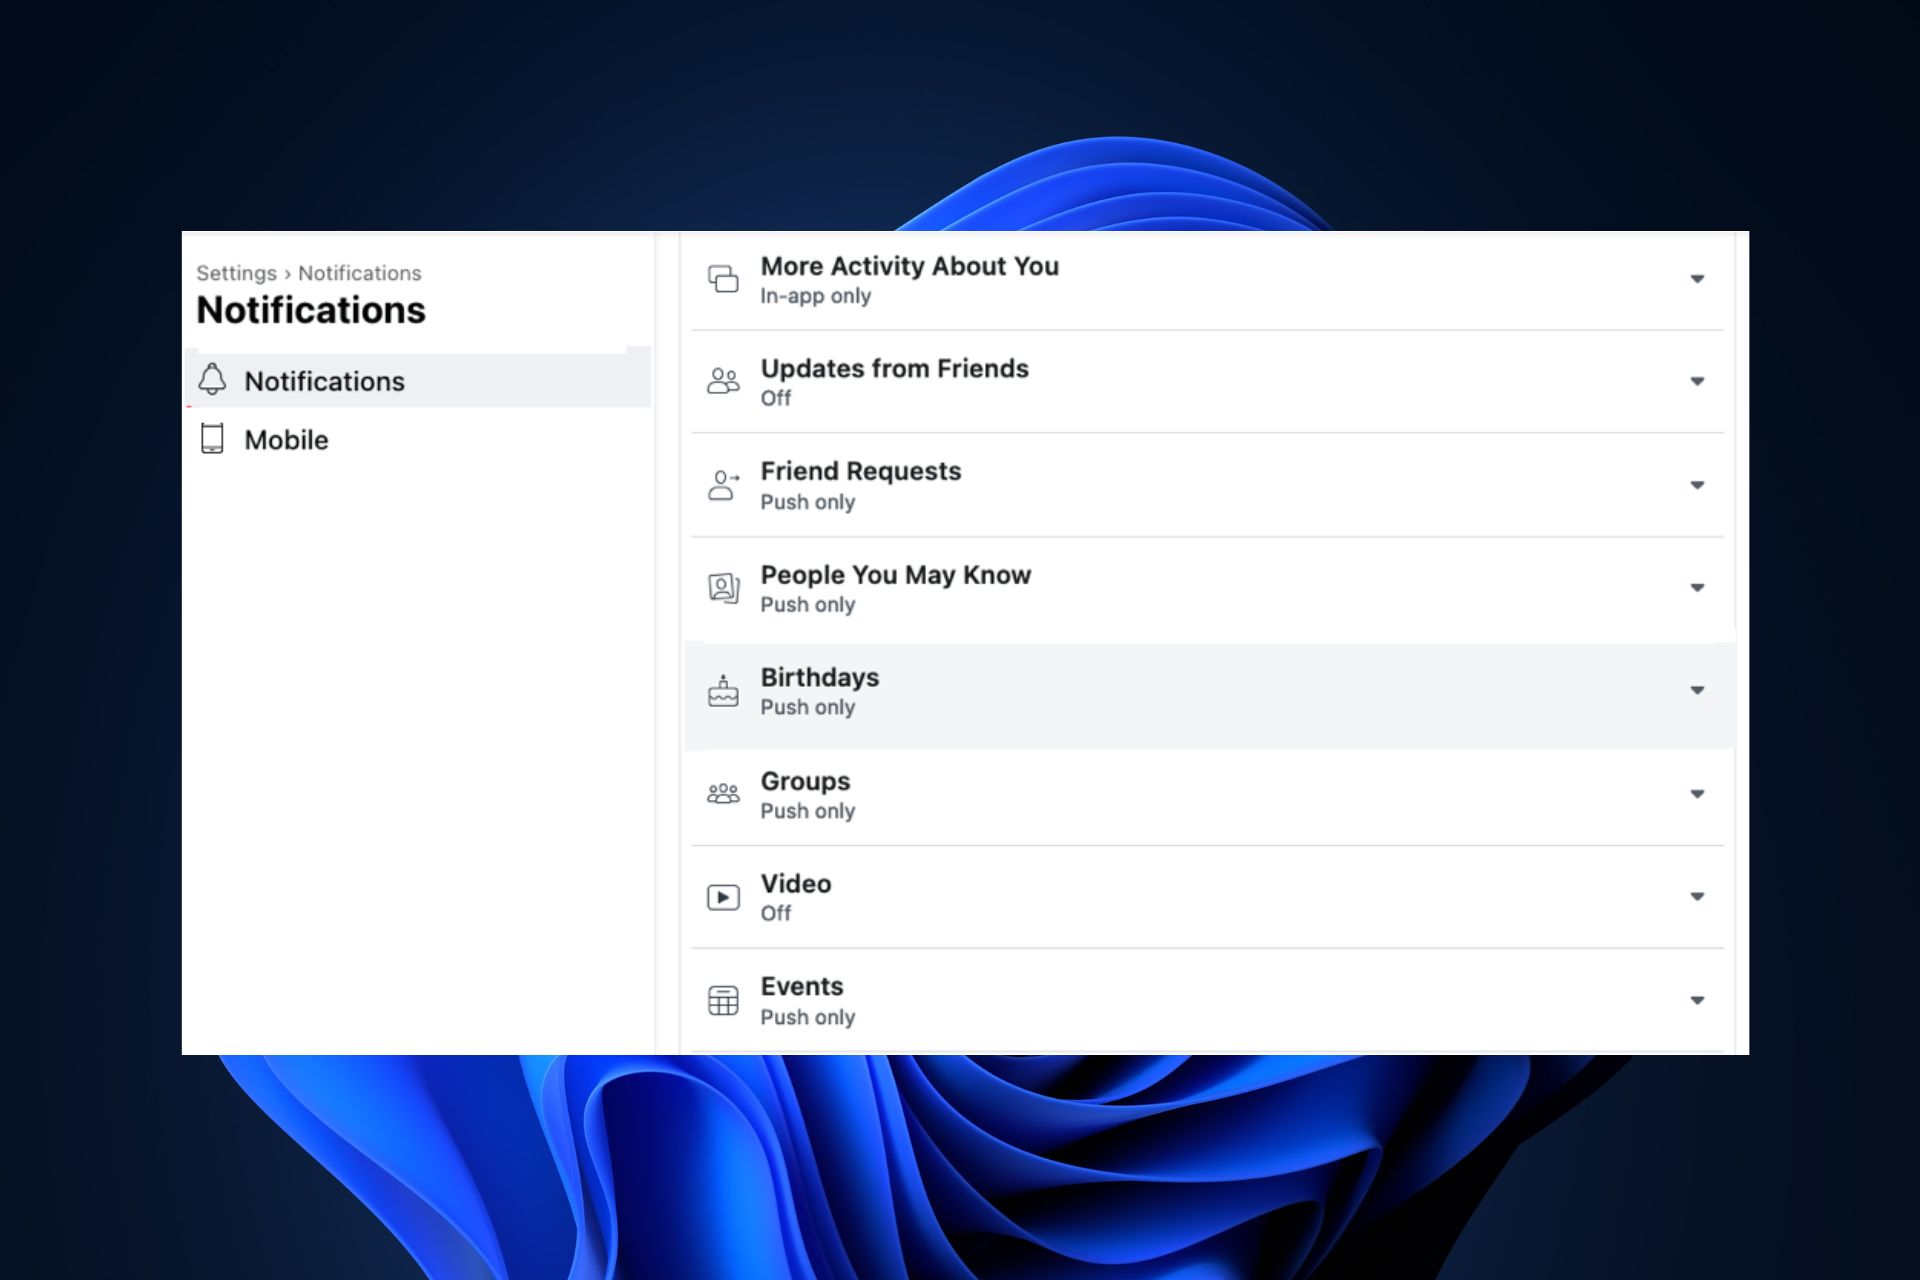
Once logged in, click on your profile picture at the window’s top corner, and click on Settings and Privacy.
Click on Settings in the next window and click Notifications on the left pane.
Scroll down the Notifications window, and click on Birthdays.
Click the toggle button next to these notifications about your friend’s birthdays and toggle the option to Allow notifications on Facebook.
The option should turn blue instead of grey. Once it’s blue, reload the Facebook webpage, and see if the notification error is fixed.
If birthday notifications are not enabled on Facebook, you’ll not receive notifications on your friend’s birthdays.
2. See all birthdays in Events
Log into your Facebook account and visit your Newsfeed page.
Click the Events link over in the left-hand column.
Then, click the Birthdays link.
You will see the options: Today’s Birthdays, Recent Birthdays, and Upcoming Birthdays.
3. Update the browser
Press the Windows key, type in Google Chrome, and hit Enter.
Click on the dotted icon in the Chrome app, and click on the Help option.
Then, click About Google Chrome to open the Chrome update tool.
An outdated browser tends to trigger errors while navigating web pages. Updating your browser can help fix the error if birthdays are not showing on Facebook. Here is a guide showing you how to fix browser not working on Windows 11.
Press the Windows key, type in Google Chrome, and hit Enter.
Click the Menu icon, select More Tools, and click on Clear Browsing Data.
Further, check all the boxes and click on Clear data in the next window.
Then, restart your PC and check if the error persists.
Browser cookies help improve your experience on a webpage but can also cause errors if they become corrupt. Clearing your browser data is one way to fix the Facebook birthday not showing errors.
If you’ve not received birthday notifications on your Facebook account, you can fix it by following the steps in this article.
If you encounter the error code 0x8007232A, you face a DNS Server Failure. This Windows error code indicates your computer cannot resolve the name of a Key Management Service server. It will not be able to find the server’s IP address and will not activate Windows.
We will show you how to fix it in this guide. You may read our other guide to learn troubleshooting steps when the connection to the KMS server fails.
What is error code 0x8007232A?
This is a network error that is caused by the following factors:
Incorrect DNS settings on the computer.
Problems with the DNS server.
Issues with the KMS host server.
Other network issues on the computer.
You may consider using the best network adapter driver to limit the possibility of error due to network complications.
How do I fix error code 0x8007232A?
Before any solutions, try this workaround:
Connect your computer to a different ISP or a wired internet connection.
If the error persists, you should try the solutions below.
1. Run the Network troubleshooter
Press Windows + I to open the Settings app.
On the right pane, click on Troubleshoot.
Select Other troubleshooters.
Click the Run button for Network and Internet.
Finally, apply any recommendations and, if required, restart your computer, then verify it fixes the 0x8007232A error.
2. Allow Key Management Service through Firewall
Press the Start menu, type Firewall, and click Allow an app through Windows Firewall.
Click the Change settings button, and below, click Allow another app.
Click the Browse button, then navigate to the path below and select sppsvc.exe (It is responsible for managing software licenses for Microsoft products). C:\Windows\System32\
Finally, click Add, then click OK.
Alternatively, you may create a new port for KMS with the steps below:
Press the Start menu, type Firewall, and click Windows Firewall with Advanced Security.
In the left pane, select Inbound Rules and click New Rule on the right.
Select Port and click Next.
Under Specific Local Ports box, type 1688, then click Next.
Select Allow the connection and click Next.
Click Next again, then in the Name box, type TCP-1688 and click Finish.
Type cmd and press Ctrl + Shift + Enter to open the Command Prompt with administrator privileges.
Type the script below and hit Enter. nslookup kms.windows.com
You should see an IP address; however, if you do not see one, the KMS host server is not connected to the internet, and you may contact Microsoft support.
You should find success using any of the solutions above. We have not written them in any particular order, so you should try whichever seems the most applicable.
In extreme situations, you may consider factory resetting your computer. However, this may lead to the loss of some important files.
That is all in this guide. Please let us know what solutions resolved the 0x8007232A error.
Windows update errors are quite common, and I’m sure they happen to many Windows users ever since the operating system has been receiving more regular updates.
There are many types of errors, and each comes with its unique error code, such as the 0x80070539 error.
This particular error mostly occurs during the installation process, when a Windows update system is broken, or due to network glitches when installing the updates
In this guide, I will try to help you resolve this update error with some practical and easy-to-apply solutions.
What is the 0x80070539 Windows update error?
This error means that Windows fails to install or update a program, and any of the following causes it:
Corrupted Windows update service files.
While rare, hardware problems may trigger the update error.
We recommend you take the following steps before trying other solutions:
Temporarily disable your anti-virus software, then try the update.
If this does not work, proceed to the solutions we recommend below.
1. Run the Windows update troubleshooter
Press Windows + I to open the Settings app.
On the right pane, click on Troubleshoot.
Select Other troubleshooters.
Click the Run button for Windows update.
Finally, apply any recommendations and, if required, restart your computer, then verify it fixes the 0x80070539 error.
2. Run the System File Checker
Open the Run dialog by pressing Windows + R.
Type cmd and press Ctrl + Shift + Enter to open the Command Prompt with administrator privileges.
Input the scan script below and hit Enter. sfc /scannow
Finally, follow any prompts given, and restart your computer.
3. Reset update components
Open the Run dialog by pressing Windows + R.
Type cmd and press Ctrl + Shift + Enter to open the Command Prompt with administrator privileges.
Input the scripts below in the Command Prompt and hit Enter after each one to stop vital update components. net stop bits net stop wuauserv net stop appidsvc net stop cryptsvc
Open File Explorer by pressing Windows + E.
Navigate to the path below and rename SoftwareDistribution to SoftwareDistribution.old. C:\Windows
Navigate to the path below and rename Catroot2 to Catroot2.old. C:\Windows\System32\
Once again, open an elevated Command Prompt and restart the vital Windows services by running the scripts below: net start bits net start wuauserv net start appidsvc net start cryptsvc
Finally, restart your computer and verify it fixes the 0x80070539 update error.
4. Clean the Windows Update temporary cache
Open the Run dialog by pressing Windows + R.
Type the path below and hit Enter. %windir%\SoftwareDistribution\DataStore
Delete the content of the directory.
Finally, restart your computer and verify it fixes the 0x80070539 update error.
There you have it; some of the most practical ways of troubleshooting the Windows update error. In rare cases, you may consider a system restore, making you lose some of your recently installed applications.
Please let us know if you have found this article helpful, and tell us the solutions that worked for you.
Bing is undoubtedly a popular search engine and is just behind Google and YouTube if we put the latter in the same category. Recent upgrades have increased Bing’s user base, but a few issues remain. Many users report that Bing search result is automatically scrolling.
The problem isn’t new, but its instances have certainly risen recently. There are several reasons why the Bing page is scrolling automatically, each with a dedicated solution. Keep reading to find out both!
Why are Bing search results automatically scrolling?
Here are the reasons users reported as to why Bing is automatically scrolling:
Issues with the browsing data: In most cases, the corrupt cookies triggered the issue. And they were also responsible when Bing’s search page was jumping to the top.
Misconfigured browser settings: Certain browser settings affect the way websites perform. And when these are not configured correctly, you will likely encounter the problem.
Problematic extensions: A few users discovered that an extension installed on the browser triggered the issue when they set Bing as the default search engine. Even otherwise, extensions from unreliable parties are known to cause issues.
What can I do if the Bing search result is automatically scrolling?
Tip
Since Bing is the default search engine in Microsoft Edge, our solutions will be based on the latter. In case you are using another browser, head to the official website for the exact steps or to find the equivalent setting, if one exists.
Before we move to the slightly complex solutions, here are a few quick ones:
Use https://.bing.com/ to access Bing instead of https://www.bing.com/.
Press Ctrl + Shift + N to switch to the InPrivate browsing mode when Bing search results are scrolling automatically.
Update the browser you are using for Bing.
Disable all the installed extensions and then enable them individually. As soon as the error appears, the one enabled last is the culprit. Remove that extension from the browser.
Launch the browser, and press Ctrl + Shift + Delete the open the Clear browsing data window.
Tick the checkboxes for Browsing history, Cookies and other site data, and Cached images and files, then click on Clear now.
Once done, relaunch the browser.
Often, when it’s the corrupt cookies behind Bing’s search results automatically scrolling, a quick solution is to clear the browsing data. This has worked for several users, so do give it a try!
2. Reconfigure the browser settings
Launch Microsoft Edge, click on the ellipsis near the top right, and then select Settings.
Go to Privacy, search, and services from the navigation pane, and click on Address bar and search.
Disable the toggle for Show me search and site suggestions using my typed characters.
While it ideally shouldn’t, the search setting in Edge was found to affect Bing and lead to automatic scrolling. Disabling it should do the trick!
Open Bing Chat, and click on the hamburger icon near the top right.
Expand the Labs entry, and select the Auto option under it.
That’s it! This should most likely fix things when the Bing search result is automatically scrolling to the top or bottom of the page.
4. Reset the browser settings
Open Microsoft Edge, paste the following path in the address bar, and hit Enter: edge://settings/reset
Now, click on Restore settings to their default values.
Click Reset in the confirmation prompt that appears.
When the previous solutions fail to eliminate the problem, another option is to restore the browser settings to their default values. This may also make Edge run faster.
If nothing works, switch to Google or a secure search engine for the time being until Bing addresses the problem. Since it’s reported by many, the Dev team will, in all likelihood, soon release a fix.
If you’re a gamer, you can appreciate that the true beauty of playing a game, aside from the graphic settings, uninterrupted gameplay comes a close second. Well, a VAC cannot verify the integrity of your game session data error message while playing on Steam does exactly that.
It could be a false alarm, or you’re using cheat codes, and Steam has finally caught up with you. Whatever the case, we provide you with various ways to get out of this mess below.
Why is VAC unable to verify my game session?
It’s not uncommon for gamers to explore various ways to get ahead of some games by modifying game files or using cheat codes.
However, to ensure fairness, Steam works closely with VAC or Valve Anti Cheat to keep tabs on players who try these tricks. VAC is a background anti-cheat software that monitors the state of games and their players.
If you’re caught using any software that could give you an unfair advantage, you may get the VAC cannot verify the integrity of your game session data message or, worse, get banned from the platform. However, this is not the only reason.
This may have happened because:
You’ve been hacked – If the game you’re playing has been hacked, VAC will be unable to verify your game session, and you may receive a notice when trying to connect.
Outdated game – If your game client is not up-to-date with the latest security standards, you may not be eligible to play.
Game files modification – If you have changed some files in your copy of the game that Valve did not authorize, you may get the VAC was unable to verify your game session error.
Using an unauthorized server – Steam explicitly prohibits using other servers, but some players use VPNs to access blocked sites or connect to other servers.
False positive – It is also possible for the VAC software to make a fake positive. These software are man-made, and sometimes, they, too, make mistakes.
Unsupported operating system – The latest version of VAC supports all modern versions of Windows, so if you’re seeing this message, it’s possible you’re on an unsupported platform.
Hit the Start menu icon, type Windows Security in the search bar, and click Open.
Click on Firewall & network protection, then select Public network.
Locate Microsoft Defender Firewall and toggle the off button.
2. Disable VPN
Press the Windows key and select Settings.
Next, select Network & internet and click on VPN in the right-side menu.
Select the VPN connection you want to disable, click on the drop-down and select Remove.
3. Scan for viruses
Press the Windows key, search Windows Security, and click Open.
Select Virus & threat protection.
Next, press Quick scan under Current threats.
If you don’t find any threats, proceed to perform a full scan by clicking on Scan options just below Quick scan.
Click on Full scan, then Scan now to perform a deep scan of your PC.
Wait for the process to finish and restart your system.
Sometimes, Windows Defender won’t detect and erase all of the digital threats, and for that, we suggest trying a reliable antivirus solution.
TotalAV, for instance, has high threat detection scores and advanced antivirus technology that will help you delete any trace of cyber threats and prevent them from affecting your PC system in the future.
Hit the Windows key, type Steam, then open the first result.
From the top-left corner of the window, click on Steam.
Go to Settings.
Now, click on the Downloads tab.
In the right pane, click on SteamLibrary Folder.
Right-click on the folder that is giving the error and select Repair Folder.
Steam will run the troubleshooter and fix any problem with the folder.
If nothing works, you may have to reinstall the problematic games and see if the error persists. Still, there are an array of unorthodox solutions that some users claim helped resolve the VAC was unable to verify your game session issue.
For instance, a handful of users say changing their profile pictures and usernames resolved this issue. While there’s no correlation between the two, it certainly won’t hurt to try it out, especially if all the above have proved futile.
That brings us to the end of this article, but we’re keen to hear any other solutions that may have worked for you, so get interactive in the comment section.
Spotify is one of the most popular music streaming services and an excellent place for music aficionados. However, like other streaming services, it is also not free from errors; one of the most common is auth 74 error code. If you are facing this issue, this guide can help!
What is Spotify Error Auth 74?
Spotify error code auth 74 or the firewall might be blocking Spotify occurs when the firewall or your antivirus software interferes with the app. This could cause the Spotify services to stop running, hence the error.
However, this is not the only reason, as it is referred to as an error that appears due to user mistakes; it could be a sign-in or proxy setting error. We will discuss them in the next section to understand better.
What might cause the Spotify Error Auth 74 error?
The Spotify Error auth 74 error could occur due to several reasons; some of the common ones are mentioned here:
Firewall or antivirus software interference – If the firewall or security tool is not configured correctly, you might see this error. Add the Spotify app to the firewall to fix the issue.
Server outage – Checking the server status should determine whether the issue is out of hand. If the server is down, you need to wait a few minutes, then try to use Spotify.
Multiple accounts – If you have multiple accounts on Spotify and keep jumping from one account to another, an issue could be causing this error.
App cache -Over time, the app collects cache on the device it is running, and if it is corrupted, the app might crash or throw you such errors. Try clearing the app cache using the Settings app.
Different regions – If you have selected countries that impose restrictions on Spotify, you can get this error. You need to change the region of the app.
So, these are the causes of this problem; let us move to the troubleshooting solutions.
How can I fix Spotify Error Auth 74 on Windows 11?
Before proceeding with any steps to fix this Spotify error, go through the following preliminary checks:
Restart Spotify and, if possible, your computer as well.
Now double-click the installation file and follow the on-screen instructions to complete the process.
This method will freshly install the app, removing the corrupted data, if any, and fixing the issue caused by an outdated version.
How can I fix Spotify Error Auth 74 on Windows 10?
To fix the Spotify error auth 74 issues on Windows 10, you need to have a user account with admin rights on your PC, then follow the methods mentioned above for Windows 11.
Can I prevent Spotify Error Auth 74 from happening again?
To prevent errors like Auth 74 in the future, you must keep a few things in mind:
Always keep the Spotify app updated.
Keep clearing the app cache or browser cache if using the browser version.
Ensure you have stable internet, as poor internet connectivity could cause several issues.
Disable VPN as it could cause problems.
Make sure your PC’s firewall does not restrict the Spotify app.
So, these are methods you can use to fix the Spotify error auth 74 and enjoy music on the beloved app without interruption.
If you are looking for ways to fix Spotify if it’s not responding, we recommend you check out this informative guide to find solutions.
Please feel free to give us any information, tips, and your experience with the subject in the comments section below.
Once you’re done being productive on your PC, it’s time to wind down and catch up on your favorite show. With so many streaming apps, you may be spoilt for choice. Showtime is a fan favorite, but you might find it’s not working just when you launch it.
This is not uncommon as you may experience similar issues on other apps like Hulu not working. Nevertheless, here are some things you can do to continue enjoying your shows.
Why doesn’t Showtime Anytime work?
If you’re trying to access Showtime, but your efforts are futile, below is what may be causing the issue:
You’re outside its subscription area – Showtime only shows in select countries. If you’re trying to watch it in a geo-restricted area, it will not work.
Unsupported device – Another reason Showtime is not working is that you might be using an unsupported device. This can happen when you don’t have the latest version of the app or if your device doesn’t meet the minimum hardware requirements for streaming.
Poor Internet connection – If you have a poor Internet connection, you may experience issues while launching the app, or your playback will keep getting interrupted by buffering and freezing while you’re watching.
Server issues – There might be a temporary disruption in service due to scheduled maintenance work or a glitch causing these issues.
You do not have a valid subscription – To use the Showtime app, you need to have a valid subscription allowing you to access their content library.
Your firewall settings are blocking access – Some firewalls might block access to Showtime’s website or resources used by Showtime while streaming content from its servers.
Malware infection – Malware can infect your computer system and cause a number of issues with your applications, including Showtime.
You’re behind a proxy server – If you are behind a proxy server or any other kind of firewall, you might face issues watching videos on the Showtime website or app, as most websites use geo-blocking technology.
What can I do if the Showtime Anytime app is not working?
A few tricks that could resolve this error in a jiffy include:
Make sure you have the most up-to-date version of the Showtime app.
If you are using a Wi-Fi connection, switch to an Ethernet cable to stabilize your connection.
Verify your account status to see if you have any active subscriptions and are not on a free trial.
Try closing and reopening the Showtime app.
Check for service outages.
Restart your router or modem.
Try using the browser version and see if it works.
Restart your device.
1. Check for any connection issues
Hit the Start menu icon and select Settings.
Click on System, then select Troubleshoot.
Navigate to Other troubleshooters.
Find Internet connections and click the Run button next to it.
2. Disable antivirus temporarily
Hit the Start menu icon, type Windows Security in the search bar and click Open.
Click on Firewall & network protection, then select Public network.
Locate Microsoft Defender Firewall and toggle the off button.
3. Update your display drivers
Hit the Windows key, type Device Manager in the search bar, and click Open.
Navigate to Display adapters to expand, right-click on your graphics card and select Update driver.
Select Search automatically for drivers.
In case you have already done this update, you may have the wrong drivers installed. As such, you will need a more comprehensive tool to match you with the right drivers.
Outbyte Driver Updater is a simple and reliable tool to update your display drivers. It will scan your computer for outdated, missing, and corrupted drivers, then download and install the latest drivers from its libraries.
VLC is a powerful media player popularly used on various platforms, including mobile phones. It can play a wide range of audio and video formats without any issues.
However, like any other software, it is not free from errors. One such common error is VLC could not open the MP4A audio encoder.
In this guide, we will talk about the common causes along with the potential solutions to fix the issue and reclaim the audio experience with VLC.
Does VLC support MP4A?
VLC media player is renowned for its versatility and supports almost all popular audio and video file formats, including M4A, MP3, AAC, FLAC, WAV, MP4, AVI, MOV, WebM, FLV, and more.
M4A comes with advanced audio coding and has a high bitrate which ensures better sound quality; therefore, it might require additional plugins in some media players.
However, with VLC, you can play M4A without additional codecs or plugins. All you need to do is launch VLC and choose the file to play.
What might cause the VLC MP4A audio encoder error?
There could be various reasons for the VLC could not open the MP4A audio encoder error; some of the common ones are:
Incompatible codecs – To play MP4A on VLC, you need to get specific codecs to encode audio; if they are missing or outdated, you may get this error. Update VLC to fix it.
Outdated VLC app – If the VLC player files are corrupted or missing, it may cause various issues, including this one. Reinstall the VLC player from the official website.
Corrupted media file – The media file you are trying to encode if damaged, might result in this error. Try to encode a different audio file to check if the file is the culprit.
Third-party software interference – Other software running on your computer could conflict with VLC, causing it to fail to perform certain operations. Close all unwanted apps.
Now that you know the causes of the issue, move to the detailed methods to fix it.
How can I fix the VLC MP4A audio encoder error?
Before proceeding with any steps for resolving the VLC could not open the MP4A audio encoder issue, go through the following preliminary checks:
Restart your computer, launch VLC, and try to play the audio file again.
Close all background applications.
Try to play your audio file in a different media player or play a different media file in VLC to check what is causing the problem.
Once done, check out the troubleshooting methods to get your VLC working again on Windows 11 PC.
1. Edit the Strict standard compliance value
Press the Windows key, type vlc, and click Open.
Go to Tools, then select Preferences.
Under Show settings, click the radio button for All.
Next, locate and click Video codecs.
Select FFmpeg, and locate Encoding.
Locate Strict standard compliance and input -2 as the value.
Click Save to confirm the changes.
Now restart the VLC media player, play the M4A file, and check if the issue persists.
2. Modify the video & audio codec settings
Press the Windows key, type vlc, and click Open.
Go to Media, then click Convert/Save.
Click Add and select the file.
Next, click Convert/Save.
Under Settings, select Convert, and choose a suitable option for Profile.
Next, click on the Wrench icon to open the Profile edition.
On the Profile edition window, go to the Video codec tab and choose Codec or place a checkmark next to Keep original video track.
Next, switch to the Audio codec tab, choose Codec, or put a checkmark next to Keep original audio track and click Save.
This will ensure that the original file is not lost in the process. Now restart your VLC media player and check if the issue is resolved.
On the Interface tab, locate and click Reset Preferences.
Now, click OK to confirm the action.
Resetting preferences will revert the media player’s settings to default, removing any misconfiguration issues leading to the error.
4. Update the VLC player
Launch the VLC player, click Help, and then Check for updates.
If the update is available, follow the onscreen instructions to install the newest version.
You can follow the same methods to fix VLC mpga audio encoder errors and other errors related to similar audio formats.
What should I do if I still can’t fix the MP4A Audio Encoder error?
If nothing has worked for you so far and VLC still throws the error or has lagging issues, you need to reinstall the VLC media player. To do so, follow these steps:
Press the Windows key, type control panel, and click Open.
Select View by as Category, and choose Uninstall a program.
On the Programs and Features window, locate VLC and select Uninstall.
Follow the onscreen prompts to complete the action.
Trying to use Discord but it is not sending a verification code? We’ll help you fix it in just a few minutes.
Unless you want to lose your Discord account to hackers, you’ve enabled its built-in two-factor authentication security protocol. To troubleshoot issues with this protocol, keep reading:
How to fix Discord not sending a verification code
First, check Discord’s down detector page to out rule server errors on their end. Also, remember you can’t verify your account with a VoIP. If you use one, switch to a regular mobile carrier’s number.
Still having problems? Check the steps below.
1. Check your blocked messages
Make sure to check your spam messages/email. Both email clients and phone manufacturers can automatically send your code to a spam folder without any notifications.
Make sure yours doesn’t flag Discord as an automated sender.
2. Check with your carrier for downtime
Your mobile carrier may be having issues and delaying messages. With such issues, Discord may have sent out the verification code, but your carrier cannot transmit these messages because of internal issues.
In that case, you can wait it out, or ask Discord to send your code via e-mail.
3. Run the Internet troubleshooter
Hit the Start menu icon and select Settings.
Click on System, then select Troubleshoot.
Navigate to Other troubleshooters.
Find Internet connections and click the Run button next to it.
Troubleshooting your Internet connection will help you verify whether a problem is preventing you from receiving emails. Should any problems arise, you can switch to another connection, such as a mobile hotspot, and refresh your email.
Discord usually issues users with backup authentication codes if they can’t send them. This seems like an good time to use these backup codes.
The trick is you must have saved them somewhere, and it’s time to retrieve them right now. If you can’t locate them, proceed to the next step.
5. Contact Discord support
If none of these steps work, contact support and ask them to help fix any problems you’re having with verification codes.
You will need to submit a ticket detailing the issue, and customer support will respond as soon as possible.
The most common reason why you don’t receive a verification code from Discord is because your email is unverified, you entered an invalid phone number, or the Discord servers are down. Too many accounts logged, a wrong country code could also be at fault.
Usually, Discord sends verification codes instantly. You should receive your code within a few seconds. Press the resend button if you have not received your code after 10 minutes.
While this may seem annoying, do not disable the two-factor authentication feature on Discord. It’s a common problem with most apps, so there’s no reason to be freaked out about it.
Microsoft news recap is a weekly feature highlighting the top Microsoft news stories of the past week. Sit back, grab some coffee, and enjoy the read!
Microsoft layoffs: Over 1,000 axed as sales and customer service division undergo transformation
Microsoft has reportedly laid off over 1,000 employees, mostly in its sales and customer service divisions. These layoffs are part of a broader transformation of Microsoft’s sales and customer service operations. The company is shifting its focus to cloud computing and other high-growth areas, and is consolidating its sales and customer service teams.
The layoffs come at a time when Microsoft is facing increasing competition from rivals like Amazon and Google. Microsoft has not released any specific details about the layoffs, but sources say that they affected employees across all levels and functions. The company has said that it is providing severance packages and outplacement assistance to the affected employees.
Microsoft’s Activision acquisition nears conclusion as the FTC suspend in-house complaint
The suspension of the FTC complaint is a major victory for Microsoft. The deal is still subject to approval by the UKs Competition and Markets Authority, but it is expected to close later this year, as the two sides are in discussion on a solution to concerns raised by the agency.
Xbox 360 Call of Duty titles get new life after broken servers were restored
The restoration of the servers has been met with a lot of excitement from fans. Many gamers have fond memories of playing these games online, and they are happy to be able to experience them again. The servers have also been a boon for the Call of Duty community, as it has given players a chance to reconnect with old friends and make new ones. Clasic Call of Duty titles have hit the top charts for paid games on Xbox in the last week, showing a large increase in popularity since the fix.
Sales of the Xbox Series X have also seemingly increased, perhaps coincidentally, since the fix. The Xbox Series X is backward compatible with Xbox 360 games, and the restoration of the servers means that gamers can now play these games online on the newer console.
Xbox Live Gold to become Xbox Game Pass Core starting in September
Xbox Game Pass Core will offer slightly different perks to Xbox Live Gold. Whilst online multiplayer will remain a feature, the new subscription will do away with the monthly Games with Gold, instead being replaced by access to 25+ games from the Game Pass library.
Current Xbox Live Gold subscribers will automatically be converted to Xbox Game Pass Core members on September 14. They will not have to pay any additional fees.
That’s it for this week. We wil be back next week with more Microsoft news.
There are times when you need to change the default location where you save your apps and games. This might be because of insufficient space in your current default location or for other reasons.
However, things can get a bit awry when you get the error saying: We couldn’t set your default save location. This problem is usually caused by the presence of corrupt files in crucial folders and a lack of permission.
If you have tried just about anything to fix this problem with no success, rest assured that the fixes in this guide provide that breakthrough for you.
Why couldn’t Windows set my default save location?
Below are some of the potential causes of the We couldn’t set your default save location error:
Corrupt WindowsApps and Spsystem folders – One of the major causes of this error is the presence of corrupt files in the WindowsApps or Spsystem folders.
Lack of proper permission – If you don’t have the required permission over the WindowsApps folder, you can also experience this issue.
Now that we know the origin of this problem, let’s fix it by using the solutions outlined below.
How can I fix the default save location error in Windows?
Below are some basic troubleshooting steps to perform before proceeding to the more complex solutions:
Login to your PC with an admin account before making the change.
Check the external hard drive condition if you are using one.
If these do not work, you now explore the fixes below:
1. Rename the WindowsApps and Spsystem folders
Press the Windows key + E to open File Explorer and click the View tab at the top.
Select the Show option, then click Hidden items.
Now, click This PC in the left pane.
Double-click the drive you want to change the default location to.
Next, locate WindowsApps. If you want to change to your C drive, follow the path below to locate the WindowsApps folder: C:/Program Files
Right-click the WindowsApp folder and select Rename.
Change the name of the folder to WindowsApps.old.
If you get the error message again, go to the drive you want to change to, as shown above, and rename the Spsystem and Wpsystem folders to Spsystem.old and Wpsystem.old, respectively.
If you are getting the We couldn’t set your default save location error message, it might be due to issues with the WindowsApps folder, which is the location where apps and games caches are saved.
Launch File Explorer and navigate to the path below: C:/Program Files
Right-click the WindowsApps folder and select Properties.
Now, select the Security tab at the top and click the Advanced button.
If TrustedInstaller is listed as the owner of the folder, click the Change link before the Owner section.
Next, enter your user account name in the object name box and click the Check names button.
Click the OK button to confirm the action.
From here, check the box before the Replace owner on subcontainers and object option and click Apply.
Click the Add button in the bottom left corner and choose Select a principal.
Now, enter your user account name, click the Check names button, followed by OK.
Mark the box next to Full Control on the principal page and click OK.
Click the Apply button followed by OK.
Next, go back to the Advanced Security settings window and click the Enable inheritance option.
Click the Apply button, followed by OK, and restart your PC.
Finally, if the issue persists, navigate to the path below and repeat the steps above for the Packages folder in the location (replace <username> with your user account name): C:/Users/<username>/AppData/Local
Sometimes, the We couldn’t set your default save location error with code 0x80070005 might be due to a lack of permission and ownership of the required folders.
3. Delete some folders in WpSystem old game download folders
Launch File Explorer and double-click the drive you want to set your default location to.
If it is the C drive, navigate to: C/Program Files
Now, double-click the WpSystem folder in the Program Files folder.
Finally, right-click all folders named S-XXXXXXXXXXXXXXXXX with some random numbers at the end and click the Delete icon.
Sometimes, we couldn’t set your default save location error can be due to problems with some remnant game files on your PC.
You need to move the affected folders to the recycle bin to fix the error, as shown above. If you get an access denied prompt while doing this, ensure you are logged in as an admin.
The we couldn’t set your default save location issue is usually caused by permission issues and faulty folders.
You can rectify this majorly accessing the concerned folders via File Explorer and changing permission for the concerned folders, and deleting the affected ones.
We have detailed how to do this clearly in this guide, and the issue should be history, provided you follow the steps above. On a final note, if you are dealing with a similar issue, like the 0x80007005 access is denied error, we have a guide to fix that too.
So, you just bought or upgraded your Xbox controller to play games on your PC, but there’s one problem. You can’t get the two to connect. The error 0x800708CA displays on your screen, and even a PC restart doesn’t seem to resolve the issue.
Most users reported that the Xbox App Accessories failed to recognize their controllers, so let’s get to the bottom of this issue.
Why am I getting error 0x800708CA when connecting my controller to my PC?
If your Xbox One controller is not connecting to your PC, it’s usually a software issue. You’ve probably not updated a required app. However, this is not the only issue that could trigger the error 0x800708CA.
Other possible causes include:
Network connection issues – Most users report that the pairing between their Xbox controllers and Windows PC failed. If so, your internet could be dropping randomly hence unable to maintain a stable connection.
Not logged in – You need to be logged into your Xbox account and other associated accounts for a successful pairing.
Unsupported connections – As you may know, when connected to the Xbox App Accessories, you cannot use the Bluetooth connection as it is unsupported. Therefore, if you were pairing via a Bluetooth connection, this is why the error 0x800708CA is making an appearance.
Incorrect pairing – Another reason could be that your controller has already been paired with another device and is stuck in pairing mode.
Damaged USB port – You probably plugged your controller into a USB port that is not working. Sometimes it just takes longer than expected for your PC to recognize the controller, especially if it has been a while since you’ve used that port.
Outdated firmware – Your Xbox could also be giving you trouble because its firmware is outdated. This can make it incompatible with Windows’ latest version and hence unable to pair correctly.
How can I fix the error code 0x800708CA?
Attempt the following basic workarounds before moving on to the complex solutions:
If you’re using a wired controller, ensure it’s securely connected to the ports.
Try changing the USB port on your computer or using a different cable.
Sign out, then sign in back again to your Xbox account.
Ensure you have updated your console to the latest version.
Click on Get for each one and ensure they’re successfully installed.
Once downloaded, launch and sign in to your Xbox account.
The Xbox Identity Provider is a service that provides authentication and authorization for Xbox Live while the Xbox Accessories App allows you to have an immersive gaming experience by allowing you to customize your headset and controller.
These are not standalone apps and must be used in liaison with the Xbox app for proper functioning. When you sign in with an Xbox Live account, you’ll get access to all the features of that website or app.
A reddit user admits that only after installing the 3 apps was the pairing successful.
Once I had all 3 apps installed and signed into the Xbox app, I was able to plug my controller into the USB port and open the Xbox Accessories app, and it automatically found the controller.
2. Troubleshoot your Internet connection
Hit the Start menu icon and select Settings.
Click on System, then select Troubleshoot.
Navigate to Other troubleshooters.
Find Internet connections and click the Run button next to it.
3. Check for Windows updates
Hit the Windows key and select Settings.
Click on Windows Update then hit Check for updates.
On your controller, press the Xbox button, and on the menu, click the System tab to open Settings.
Select System, then click on Console info and hit Reset console.
Choose Reset and keep my games & apps.
We hope these recommendations help you resolve any connectivity issues you might have been experiencing.
The steps in this article should work to resolve the error 0x800708CA, and you should be able to use your controller just fine. To reiterate, internet speed is essential for a proper connection with Xbox, so ensure your internet speeds are optimal.
Make sure you check out other articles related to your Xbox, such as the 0x87e50007 error, and see how we managed to solve it.
As always, we welcome your feedback, so be sure to let us know in the comments if this fix worked for you.
Disk Management is the go-to Windows tool for drive partitioning and related functions. However, you can get errors, like Disk Management could not start Virtual Disk service once in a while trying to launch the tool.
Different factors like disabled service and firewall interference can cause this issue. To help you regain access to Disk Management, we have gathered tested and proven solutions to help you fix this issue, irrespective of the cause.
Why is Disk Management not starting the Virtual Disk service?
Listed below are some of the potential causes of the Disk Management could not start virtual disk service error message:
Disabled service – While you can disable some Windows services, the Virtual Disk service is not one of them. So, you need to keep it enabled.
Corrupt system files – If some crucial system files are missing or broken, you will likely get this error. The solution is to run a couple of simple CMD commands to repair and restore the files.
Interference from security software – At times, Windows Defender or Firewall might be preventing the Virtual Disk Service from starting. You need to disable your anti-virus application temporarily to fix this.
Taking these common causes for the Disk Management could not start Virtual Disk service error into account, let’s fix the problem using the solutions below.
How can I fix Disk Management to start the Virtual Disk service?
1. Enable the Virtual Disk Service on both local and remote computers
Press the Windows key + R to open the Run dialog box, type services.msc, and click the OK button.
Double-click the Virtual Disk service to open its properties.
Now, set its Startup type to Automatic and click the Start button.
Next, click the Log On tab at the top.
Check the box for Allow service to interact with desktop.
Finally, click the Apply button, followed by OK.
The first thing to do if you are getting the Disk Management could not start Virtual Disk service error is to check if the service is disabled. If it is, you need to enable it.
2. Enable the Remote Volume Management through Windows Firewall
Press the Windows key + S to open the search box, type powershell, and click Run as administrator under Windows PowerShell.
Now, type the command below and hit Enter on your local and remote systems to enable Remote Volume Management: netsh advfirewall firewall set rule group="Remote Volume Management" new enable=yes
Finally, wait for the process to finish running.
If the Windows Firewall is blocking Remote Volume Management, you are likely to get the Disk Management could not start Virtual Disk service error.
The only way to prevent and fix this is to allow the tool through your built-in firewall on both the local and remote systems.
Press the Windows key + R, type gpedit.msc, and click OK.
Navigate to the path below in the left pane: Computer Configuration > Administrative Templates > Windows Components > Microsoft Defender Antivirus > Turn off Microsoft Defender Antivirus
Now, double-click the Turn off Windows Defender Antivirus option.
Tick the Enabled radio button.
Finally, click Apply and OK to save the changes.
If you are still getting the Disk Management could not start Virtual Disk service error after allowing the Remote Volume Management, it means your antivirus software is blocking the service.
4. Run the SFC and DISM scans
Press the Windows key, type cmd, and select the Run as administrator option under Command Prompt.
Type the DISM command below and hit the Enter key to run it: DISM /online /cleanup-image /restorehealth
Wait for the command to finish running. Now, run the command below: sfc /scannow
Finally, wait for the scanning process to complete and restart your PC.
Sometimes, this error is simply caused by corrupted system files. This can also cause the Disk Management not loading issue.
You can restore normalcy here by running the SFC and DISM scans.
How do I fix Disk Management stuck on connecting to virtual disk service?
If Disk Management is stuck on connecting to the Virtual disk service, the effect is the same, and the service won’t start.
The Disk Management could not start Virtual Disk service issue is one of the common issues users encounter, and you have nothing to worry about.
The problem is often caused by interference from your antivirus and firewall or a disabled service. But with the list of solutions in this guide, fixing it should be effortless.
If you’re building a PC for the first time, it can feel daunting and time-consuming to find PC parts compatible with each other, fit your budget, and meet all your needs.
Fortunately, finding the right components and planning the ideal PC build for your budget has become easier than ever. With PCPartPicker, anyone can plan their own PC builds and easily purchase the necessary parts.
PCPartPicker simplifies the process of building your own PC by letting you select the best compatible PC parts, check specifications, compare pricing across several different retailers, and make informed purchases.
What is the PCPartPicker?
PCPartPicker is a popular online platform that can help you select compatible components and plan your PC build.
PCPartPicker has a database of all the different components, like the processors, graphics cards, motherboards, and memory, and it tells you which parts are compatible.
It also shows you the prices and reviews of the parts so you can make an informed decision. It also allows you to create a parts list, add custom notes, and estimate the total cost of the build.
You can save your build and share it with others and see what other people have built for inspiration.
How can I build my PC on PCPartPicker?
1. Create an account
NOTE
Although creating an account on PCPartPicker is unnecessary, registering allows you to save your computer builds for later and compare different builds to find the best one that fits your budget.
Fill in the details, such as username, email, and password, and then click Register.
After that, open the email account that you used to create the PCPartPicker account and click the link to activate your account.
Now, go back to PCPartPicker and log in to your account.
Once you are logged in, select your country from the drop-down menu at the top right.
Before you start using the PCPartPicker, it’s essential to have some knowledge about building a PC. This means understanding the different parts like the CPU, GPU, motherboard, RAM, and storage that make up a computer.
It’s also important to have a clear idea of what you want to do with your PC (like work, gaming, etc.), as it will help determine the specific components you’ll need.
2. Get started
Tip
If you’re unsure where to begin, the PCPartPicker site offers two great sections – Build Guides and Completed Builds. Each guide provides component recommendations and explanations for their selection for the build.
To get recommendations and instructions for building a custom PC, go to the Build Guides section on the site. These guides, designed by the PCPartPicker team, cover different types of PC builds, ranging from budget-friendly computers to high-end gaming PCs.
To explore the builds created by other users like you, head to the Completed Builds page. You can see the included parts, pricing breakdowns, and even post comments and questions.
You can also edit and save these builds in your account as your own builds. To do that, open a particular completed build page, and click the View full price breakdown link on the left panel.
Then, click the Edit This Part List button and edit the parts as you desire.
Click Save As to save that build in your account.
3. Select the parts
3.1 From the selection
To create your PC build, go to the Builder section on PCPartPicker’s website.
PCPartPicker organizes components into categories. To select a specific component, such as a CPU, navigate to the category and click on the + Choose A CPU button next to it.
Then, click the Add button next to the product you want to include.
To add multiple items, select the products and click Add From Selection.
Make use of the Merchat/Pricing and Filters sections on the left panel to narrow down your search.
To view only compatible parts with the components you’ve already selected, enable the Compatibility Filter option. This will filter out the incompatible parts and show you the one that will work well with your existing selections.
To compare multiple products side-by-side, select the products and click the Compare Selected option at the top.
As you select parts, the site will show you Compatibility: Warning if any component you select is incompatible with your build.
Scroll down to the Potential Issues / Incompatibilities section to check for compatibility issues between components. This section will highlight which parts are incompatible and explain the specific compatibility problems.
You can then choose to remove the incompatible parts by clicking the X button beside it and replacing it with a suitable alternative.
3.2 Add additional parts
Alternatively, click the + Add Additional… button to additional parts.
You can add additional parts, peripherals, and accessories using the links below.
If the particular product is not available on the site, click the + Add Custom Part button.
Then, enter the URL of the manufacturer or retailer product page and click the Create Part button. PCPartPicker will try to automatically create the part and add it to the database.
Alternatively, click the Manually Create Part to manually add the product to the list.
The site will automatically choose the cheapest option for each component when selecting parts.
To view current prices from different retailers, product reviews, product images, and price history, simply click on the product name on PCPartPicker.
Here, you can compare prices from different retailers, review price history, read product reviews, and set price alerts for your products.
As you add components to your list, it’s important to keep an eye on the Estimated Wattage displayed at the top. When selecting a power supply, make sure to choose one with a wattage that’s higher than the estimated power usage.
It’s also good to have some extra power for future upgrades.
Similarly, keep an eye on the Total price at the bottom to ensure that your PC build stays within your budget.
Ensure that you add all the essential components for your PC build, such as a compatible CPU, a matching motherboard, sufficient RAM, storage options, a graphics card, power supply, a compatible PC case, and any additional components based on your specific needs and budget.
Once you’ve added all the components, you can purchase your parts or save your build for later by clicking Save As at the top of the page.
Then, select Create A New Saved Part List Named option, enter a name for the list, and click Save. If you wish to save the part list as a public list, uncheck the Private option before saving.
Alternatively, select Overwrite and choose an existing list from the account and click Save to overwrite an existing list.
To view all your saved lists, click the Saved Parts Lists link at the top of the page.
If you wish to edit a saved part list, select a list from the left pane and click Edit Part List.
To add or edit build details, click on Edit Details.
If you want to remove a part list entirely, click Delete to remove it from your saved builds.
You can copy the unique URL from the Choose Your Parts page to share your build with others for feedback or reference. You can also export the parts page to Reddit or PCPartPicker forums for additional opinions.
5. Buy your parts
Tip
Once you’ve finalized your build, it’s time to make your purchase. You can either choose the cheapest retailer option for each component or buy from a single retailer that has all the parts you need.
As mentioned earlier, PCPartPicker automatically selects the merchant with the lowest price available. If you wish to purchase from a different merchant, you can click on the Settings icon next to the price on the Choose Your Parts page.
Next, choose the Use Current Price From Specific Merchant option and select the merchant from the drop-down menu.
Then, click Save Part Price Settings to save the price settings.
Click on Prices By Merchant to check the availability and prices offered by various retailers.
To purchase a specific part, simply click on the Buy button next to it, and you will be redirected to the retailer’s website where you can complete the purchase of the item.
To make bulk purchases through the Amazon retailer, click Buy From Amazon button located below the total price. If a part is not available on Amazon, you can buy it from other retailers.
If a certain part is not currently available or out of stock at any retailer, the Buy button will be grayed out. In that case, you can save the part list and wait until the part becomes available again or consider buying it from a physical store.
That’s it! You now know how to build a PC from scratch using PCPartPicker. Try the website once and understand the various options and features before you finally get down to the task.
If you’re looking to buy a new graphics card for gaming, here are some of the best options available.
Should you have further questions or suggestions regarding building a PC, please drop them in the comments section.
Trust Wallet stands out as a prominent and highly reliable mobile cryptocurrency wallet accessible on both Android and iOS devices. While it prioritizes security exceptionally, it can be susceptible to hacking risks. Hence, we’ll answer the following question: can someone hack Trust Wallet?
However, you may be interested in our detailed guide on how to run Trust Wallet on a PC without any compatibility issues.
Can someone steal your Trust Wallet?
Here are a few ways a Trust Wallet can be compromised:
Exposing your Trust Wallet secret recovery phrase to a third party.
Hackers may attempt to deceive you through phishing.
Inadvertently downloading fraudulent applications posing as Trust Wallet from unofficial sources can lead to compromise.
Physical exposure or access to the device on which Trust Wallet is may aid the attempt to extract wallet data or manipulate transactions.
Including solid passwords, enabling two-factor authentication, updating the wallet software, and being cautious of phishing attempts or suspicious links may help prevent the issue.
Is there a fake Trust Wallet?
Yes, hackers and scammers have created a fake version of Trust Wallet. This fake wallet tricks users into entering their private keys or seed phrases, allowing the attackers to gain unauthorized access to their funds.
It is crucial to exercise caution and follow these guidelines to avoid falling victim to a fake Trust Wallet:
Only download wallets from trusted and official sources such as the official website or app stores.
Only download the app with this name: Trust Crypto Wallet: Bitcoin Ethereum Tron XRP PAX.
Verify the authenticity of the wallet by checking the developer’s information, reviews, ratings, and user feedback.
Ensure the download website has secure connections (https://) and displays genuine contact information and support channels.
Be cautious of phishing attempts and double-check the URL to avoid visiting fake websites that mimic the official wallet’s site.
Exercising caution, verifying the source, and staying informed about the latest security practices can reduce the risk of falling victim.
What can I do if my Trust Wallet gets hacked?
It’s important to understand that cryptocurrency transactions are typically irreversible. If the coins or tokens have already been transferred to an external wallet address, your options for recovery may be extremely limited or non-existent.
However, take immediate action to mitigate potential losses and salvage any remaining funds if you can still access your wallet. Here are some steps you can consider:
Transfer the remaining funds or tokens into another wallet to prevent further loss.
If you can still access your Trust Wallet, change your password immediately. Ensure you use a strong and unique password.
Enable 2FA on your Trust Wallet to add an extra layer of security by requiring a second verification step.
Run a comprehensive antivirus scan to ensure your device is free from malware or other security threats.
You can trace the transactions if they use centralized exchanges like Binance, Kucoin, and Coinbase.
Contact the exchange’s customer support and inform them that the stolen crypto is in the account.
Report the incident to your local law enforcement authorities and provide all the relevant information and any evidence you have.
The above steps will prevent further threats to your Trust Wallet and mitigate the hacker’s reach. Nonetheless, users should understand that prevention is essential to maintaining the security of their wallets.
Crypto assets are not insured or covered by government-sponsored programs that protect consumers and investors.
Cryptocurrencies feature no built-in consumer protection.
If your crypto assets are hacked or stolen, there is usually no way to recover them.
Cryptocurrency uses blockchain transactions, and the likelihood of recovery is low.
Trust Wallet is a non-custodial wallet, meaning it does not store users’ private keys and lacks access to their funds.
When considering all these factors, it’s highly unlikely that you’ll be able to recover stolen assets.
Is Trust Wallet secure or not?
Yes, Trust Wallet is secure if you take your security seriously and follow good security practices. The service had a security vulnerability, which resulted in a $170,000 loss for some users. The vulnerability was fixed for a few months, and damaged parties were compensated.
So yes, the Trust Wallet is secure, but there were those incidents that you should be aware of before using the service. For instance, an authentication error with Venmo could mean there’s a corrupt app cache that needs to be cleared.
We hope that you found this guide informative and that you understand better how to protect your Trust Wallet account from hackers.
Instagram accounts can get hacked and compromised like other social media platforms, locking users out of access. However, recovering such an account can be difficult and requires much work and time. Hence, we’ll discuss ways to delete hacked Instagram accounts and mitigate potential threats.
The answer is yes, but it depends on the following:
Level of access you still have. If you still have your recovery methods, you might be able to do so.
Also, Instagram can’t delete an account you don’t wish to recover, which can be tricky.
Can I contact Instagram about a hacked account?
Yes, you can contact Instagram about a hacked account. Follow these steps:
Open Instagram on mobile, go to your profile, and select Settings.
Go to Report a Problem.
Write the option best describes your issue, such as Hacked Accounts or Report Something Isn’t Working, and click on Send Report.
Provide all the necessary details and submit the report.
Further, you can visit the Instagram Help Center. It is the official support website for Instagram.
Also, Instagram has official accounts on platforms like Twitter and Facebook. You can send a direct message or tweet to their official support accounts, explaining the situation and requesting assistance.
How do I delete a compromised Instagram account?
1. Report your account from other Instagram accounts
Log into your other Instagram accounts (if you have any) or use your friends/family accounts.
Go to the search bar, click on it, and search for your username.
Click on your profile to open it, then tap on the three dots available at the top right corner of the screen.
Tap on Report and then choose Something about this post.
Click on Pretending to be someone else and select Me.
Then, click on Block this user from the context menu.
Repeat these steps by asking your other friends and followers to do the same via their accounts. More traffic and reports toward the account might raise suspicions and alert Instagram security operators. Hence, they’ll take down the account.
Input your username, phone number, or email ID into the sign-in page, then click Forgot password on your browser.
If you have the login credentials, tap on the Next button. If not, then tap on Can’t reset the password available below the Next button.
Follow the on-screen instructions to continue the process.
In the instance where you click Next in step 2, it will ask you to complete the captcha.
Choose the phone number or email address option, and click the Next button.
You will receive the login link via your text message or email. Click on it and follow the instructions provided.
Once you can log into your account, go to the Delete your Instagram page (you have to log in to your Insta on the web).
Select one of the reasons from the drop-down menu when asked to choose a reason for deleting your account.
Choose Delete (username), and your account will be deleted.
If your Instagram account is compromised, your password will likely be changed. If you cannot regain access to your email address associated with the account, you can request a login link from Instagram.