ATI display drivers are crucial software components that facilitate the operations of ATI graphics cards. Many Windows users have difficulty getting the driver running on their computers. Hence, this guide will discuss the steps for downloading and installing the ATI display driver for Windows 10 & 11.
What does ATI display drivers do? The ATI (now known as AMD Radeon) display drivers are software components that enable your computer’s OS to communicate with, control, and optimize ATI graphics cards or GPUs.
Here are some functions and responsibilities of ATI display drivers:
Hardware communication between OS and the graphics card.
Managing screen resolution, refresh rate, color depth, and other settings.
2D and 3D rendering.
Video playback and acceleration.
Adjusting display via the dedicated control panel.
How do I download my ATI graphics driver?
1.1 Identify your graphics card
Right-click on the desktop, and select Display settings or Screen resolution.
Then, click on Advanced display settings.
Look for the Display adapter properties or Advanced settings option to find the graphics card model.
The graphics card model will help you determine the specific model of your ATI/AMD Radeon graphics card.
1. 2 Download and install the ATI driver
Open a web browser and visit the official AMD Support website to see the latest drivers and support for AMD Radeon graphics cards.
Then, choose the appropriate options based on your graphics card model and the version of your Windows.
Look for the latest version and click on the Download button next to it.
Now, locate the downloaded driver file on your computer (usually in your Downloads folder) and double-click on it to start the installation process.
Follow the on-screen instructions provided by the installer.
Finally, after the installation is complete, restart your computer.
The above steps will download and install the appropriate ATI display driver for your Windows PC. Further, check our guide on what to do if AMD drivers are not installing on Windows 11.
Most of you surely remember the 2023 May Build conference, an annual event hosted by the Redmond-based tech company.
During this event, Microsoft launched the first preview version of the Dev Home app, and that’s what we’re going to talk about today.
This app is designed for developers to get several features, including the new Dev Drive, WinGet configuration, and GitHub codespaces together in one place.
We’re about to take a much closer look at it, the bug fixes, and all of the new features that are coming with the new version.
Check out the new and improved Dev Home Preview app
Indeed, today Microsoft announced the release of the 0.2 preview version of the Dev Home app, and it includes quite a few improvements, along with some bug fixes.
Just as a reminder, this app features a streamlined setup tool that enables you to install apps and packages in a centralized location.
It also allows extensions that make it easier for you to connect to your developer accounts and a customizable dashboard with a variety of developer-focused widgets.
As far as this release is concerned, let’s take a more in-depth look at the changelog and see what’s new:
Miscellaneous improvements
A WinGet YAML configuration file for NodeJS has been added to the repository.
The dashboard now displays a loading progress ring while loading widgets.
System widget graphs now use antialiasing for a smoother appearance.
Core widgets now work on Arm64 devices.
The repository cloning tool now shows you repositories you’ve previously cloned.
Bug fixes
Switching the theme doesn’t get into a broken state anymore (we’re pretty sure).
Installing apps through the end-to-end setup tool shouldn’t crash anymore.
Background contrast should be much better now.
The add widget dialogs now dynamically size with the window, ensuring all buttons are clickable.
Note that if you are a developer, you can get more info on the Dev Home app on Microsoft’s documents site.
Microsoft is really taking a big step into AI development. Last month, AI was at the forefront of the Microsoft Build conference, and the Redmond-based tech even announced that Copilot is coming to Windows 11. As a native built-in app, for everything you need,
AI is coming to Microsoft Teams as well, in its Recap Ai tool. And a lot of other tools from Microsoft will use AI, including Microsoft Fabric.
And now there is time for another big breakthrough in AI research, coming from Microsoft, of course. The new 1.3B-parameter model coding LLM, called phi-1, is reportedly outperforming GPT 3.5, in only 4 days of training.
What is phi-1 and how does it outperform GPT already?
Phi-1 is a new 1.3B-parameter language model for code, with a significantly smaller size than competing models. The language model was trained for 4 days, over 7B tokens (slightly over 50B total tokens seen) followed by finetuning on less than 200M tokens.
Despite being a lot smaller than the competing models, phi-1 attained 50.6% pass@1 accuracy on HumanEval and 55.5% pass@1 accuracy on MBPP (Mostly Basic Python Programs), which are one of the best self-reported numbers using only one LLM generation.
Moreover, despite being trained on much fewer tokens compared to existing models, phi-1 still has a lot of potentials.
The improvements on HumanEval are the phi-1 greatest achievements, as a language model. After tuning, phi-1 managed to execute tasks that were not featured in the finetuning dataset. This means the model adapted and improved the fine-tuning process.
And the most remarkable thing is that phi-1 reorganized and consolidated the knowledge acquired during pretraining, even though the knowledge was not explicitly present there in the first place.
In shorter words, phi-1 not only learns during training but also expands the knowledge on its own. It managed to outperform GPT 3.5 on every level, and it’s just a matter of time until the small model takes on the big ones, like GPT 4.
What do you think about this new AI model? Where do you think AI research is heading? Be sure to let us know your opinions in the comments section below.
Many Windows users have reported an error message No audio output device installed appearing randomly on their computers. The error occurs when the operating system can’t detect or communicate with an audio device. However, this guide will discuss how to fix the issue.
Check hardware connections and ensure that everything is properly connected.
Run the Windows audio troubleshooter to fix the common errors.
Check for Windows updates to prevent any audio bugs.
1. Update your audio Output driver with the Generic device
Right-click the Start button and select the Device Manager from the drop-down.
Now, expand the Audio inputs and outputs category. Right-click on your audio output driver and select Update driver from the drop-down menu.
Click the Browse my computer for drivers option.
Then, click on Let me pick from a list of available drivers on my computer.
Check the box for the Show compatible hardware option. Further, select Generic software device and click Next.
Wait for Windows to finish installing the drivers for the device.
Close the Device Manager and check if the error persists.
The above steps will help reinstall the audio output driver with a generic device driver and resolve the error.
At the same time, you can update any drivers from your PC using one of the greatest open-source driver updaters and get the latest sound drivers 100% automatically.
2. Enable the audio device
Right-click on the volume icon on the taskbar and select Playback devices from the context menu.
In the Sound window, check if the audio device is disabled.
If your audio device is not listed, right-click and check the box for the Show Disabled devices option.
Then, right-click on the disabled device and select Enable.
Set the enabled device as the default playback device. Click Apply and then OK.
Enabling the disabled audio device will make it recognizable to the computer and allow the device to use it when needed.
We all know what the Dark Mode feature is for most of the browsers or other apps we use, so there’s no need of going further into that.
And, if your favorite browser is Microsoft’s Edge, then you will be pleased to know that Dark Mode will be greatly improved.
By the way, if you need any help activating Dark Mode on Edge, we got you covered. Now, let’s see what all the fuss is about today.
Are we getting an improved Dark Mode for Edge?
The Redmond tech giant began working on dark mode or dark theme for Edge somewhere around 2018, maybe even 2019.
In fact, Microsoft started testing some of the elements in June 2019 in the Canary Preview Channel, and about four months later, it rolled out a feature that would allow users to enable dark mode on websites they would visit.
Now, fast forward a few years to 2022, an Edge Dev channel update made the transition from darker themes to lighter themes and vice versa much smoother when toggled between the two.
Not to mention that, later on in that same year, Microsoft added a dark theme to window mode context menus.
It’s time to move on, however, and the company will soon be adding more darker Dark theme option to the Edge browser.
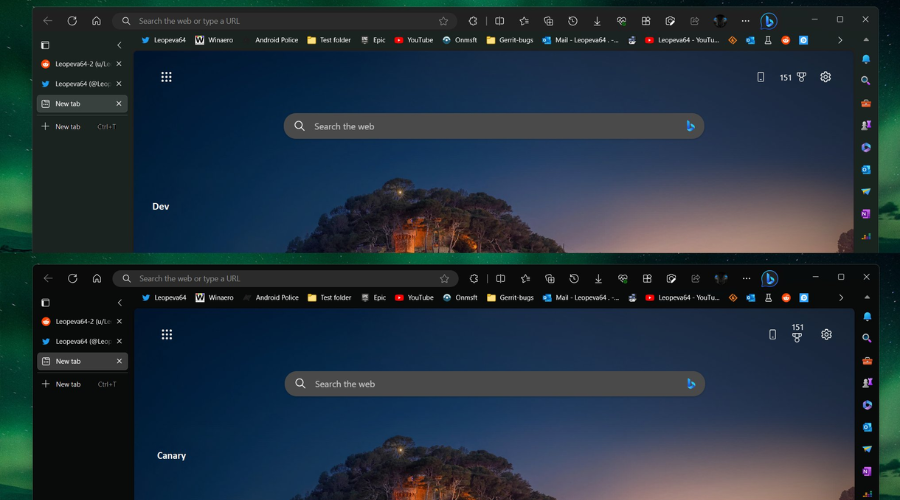
As a matter of fact, a recent Twitter post has revealed that the Redmond giant is now testing a new Dark theme on the Canary channel.
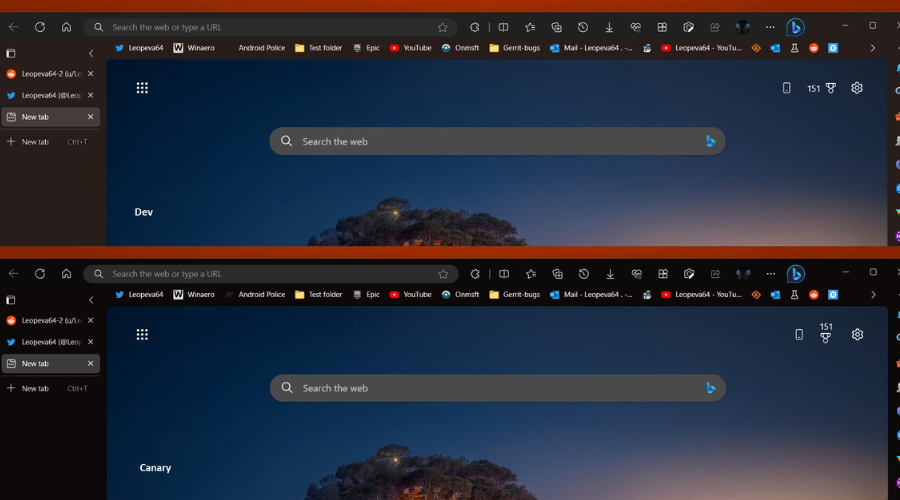
Apparently, in Edge Canary Microsoft is testing a full black background for the tab strip, toolbar, favorites bar, vertical tabs, and sidebar.
This leak also comes with screenshots of the new theme. The Dev and the Beta channels still possess the current Dark theme. The Canary screenshots are below while the Dev and Beta are on top.
One might think that Microsoft will offer both options simultaneously so users who prefer the darker tone can choose it, though this is entirely speculation for now.
Most likely, the Edge development team could completely replace the current Dark theme with the upcoming darker one.
What are your thoughts on this new Microsoft initiative involving Edge? Share your opinions with us in the comments section below.
At the Xbox Games Showcase 2023 and Starfield Direct event, a lot of important Xbox news was unveiled. A lot of new games are coming, and a new 1 TB Series S console is also making its way into your home, but the most important news is exciting. You’ll be able to stream select PC games from the library through NVIDIA GeForce Now.
What does that mean? It means you’ll be pretty much able to play any games from the PC game pass catalog on any device that GeForce Now streams to. This includes low-spec PCs, Macs, Chromebooks, mobile devices, TVs, and more.
This is not all, though. This feature is coming very soon, with Microsoft rolling it out in a few months. And, to make things even better, the PC game pass catalog will add new games more frequently. So you’ll be able to enjoy your favorite games everywhere you go.
What else is coming for Xbox besides the Game Pass on NVIDIA GeForce Now?
There are a lot of exciting new things coming for Xbox in the following months. Besides the Game Pass, Microsoft announced that there are currently over 5000 games in development for the platform. A record in the Xbox’s history. The 5000 games are being created by developers across 100 countries, in a roadmap that focuses on inclusivity and diversity.
And speaking of diversity, Microsoft promises that there’s a video game for each one of us. The tiles will be focusing on multiple genres, with stories that will be inclusive and memorable. You’ll never know when you’re going to stumble upon your next favorite game, Microsoft says.
With this wellspring of games to come, our vision is to enable Xbox to offer the most diverse, easy-to-access line-up in the industry – you’re never far from finding your next favorite game.
Microsoft
At the event, Starfield was the main character, with a release on Xbox, PC, and Steam. Hoping to become Besheda’s most-played title, Starfield will be added to Game Pass right from the start. You’ll be able to play it on Xbox, PC, and Cloud.
However, there are many other interesting titles coming to Xbox as well. Dungeons of Hinterberg, Forza Motorsport, and South of Midnight are just a few games that will benefit from the power of the Xbox Series X.
While other games, such as Fable, Clockwork Revolution, and Senua’s Saga: Hellblade II, hotly awaited by fans, will make their way to the Xbox as well.
Here, the acquisition would benefit consumers by making Call of Duty available on Microsoft’s Game Pass on the day it is released on console (with no price increase for the service based on the acquisition), on Nintendo, and on other services that allow cloud streaming.
This is some good news, considering games like Call of Duty and Diablo 4 are making their way to the service. It would help boost the GamePass signups. You can read the court filing document here, the statement is on page 25.
Update: it seems Microsoft will rise the prices of subscriptions for Game Pass and Xbox Series X, according to The Verge. In the US, Japan, Chile, Brazil, and Colombia, the price of Xbox Series X will remain the same, while in the rest of the countries, the prices will spike in the following months.
The Xbox Game Pass price also increases everywhere, except Norway, Chile, Denmark, Switzerland, and Saudi Arabia. The new prices are expected to be implemented from August 13th onwards.
Here are all the details:
New Xbox Game Pass pricing
Country
Currency
Xbox Game Pass Ultimate current
Xbox Game Pass Ultimate new
Game Pass for Console current
Game Pass for Console new
Argentina
ARS
899
1449
599
1199
Australia
AUD
15.95
18.95
10.95
11.95
Austria
EUR
12.99
14.99
9.99
10.99
Belgium
EUR
12.99
14.99
9.99
10.99
Brazil
BRL
44.99
49.99
29.99
32.99
Canada
CAD
16.99
18.99
11.99
12.99
Chile
CLP
7990
8990
5990
5990
Colombia
COP
29900
33900
19900
21900
Czech Republic
CZK
339
389
259
269
Denmark
DKK
99
109
79
79
Finland
EUR
12.99
14.99
9.99
10.99
France
EUR
12.99
14.99
9.99
10.99
Germany
EUR
12.99
14.99
9.99
10.99
Greece
EUR
12.99
14.99
9.99
10.99
Hong Kong SAR
HKD
79
85
59
65
Hungary
HUF
4190
4790
3000
3190
India
INR
499
549
349
379
Ireland
EUR
12.99
14.99
9.99
10.99
Israel
ILS
39.99
44.99
27.99
30.99
Italy
EUR
12.99
14.99
9.99
10.99
Japan
JPY
1100
1210
850
935
Korea
KRW
11900
13500
7900
8500
Mexico
MXN
229
249
149
159
The Netherlands
EUR
12.99
14.99
9.99
10.99
New Zealand
NZD
19.95
21.95
12.95
13.95
Norway
NOK
125
139
99
99
Poland
PLN
54.99
62.99
40
42.99
Portugal
EEUR
12.99
14.99
9.99
10.99
Saudi Arabia
SAR
39.99
44.99
29.99
29.99
Singapore
SGD
13.99
15.9
9.99
10.9
Slovakia
EUR
12.99
14.99
9.99
10.99
South Africa
ZAR
119
129
79
85
Spain
EUR
12.99
14.99
9.99
10.99
Sweden
SEK
135
155
99
105
Switzerland
CHF
14.99
16.99
12
12
Taiwan
TWD
299
338
199
219
Turkey
TRY
44.99
120.99
29.99
79.99
UAE
USD
9.99
11.99
6.99
7.99
UK
GBP
10.99
12.99
7.99
8.99
US
USD
14.99
16.99
9.99
10.99
What do you think about the new prices? Be sure to let us know in the comments section below.
Zoom is one of the most popular video conferencing software available today. Some of its users have reported that they cannot access the service due to connection errors.
If you’re unable to access Zoom due to the unable to establish a secure connection to Zoom error, this article will cover the necessary steps needed to fix it.
What causes unable to establish a secure connection to Zoom?
The following are some of the most common causes of the unable to establish a secure connection to Zoom error:
Poor Internet Connection – If your PC’s internet connection is weak or unstable, Zoom will have difficulties connecting to the server which can trigger the unable to establish a secure connection to Zoom.
Outdated Software – If you’re running an outdated version of the Zoom app, you’ll run into occasional errors which can prevent you from accessing the service.
Corrupt app data – If the existing calendar or contact data of the Zoom client is corrupt, it can lead to errors like the unable to establish a secure connection to Zoom.
Incorrect System date & time – Apps like Zoom work in sync with international dates & time zones; if your PC’s date or time is incorrect, it can trigger errors on the Zoom client.
What can I do if I get unable to establish a secure connection to Zoom?
Before we proceed with more advanced solutions, here are a couple of quick fixes you can try:
If the error remains unfixed, the following are advanced troubleshooting solutions to help you resolve the error:
1. Delete the Existing Data and Contact Integration Settings
Press the Windows key, enter your browser’s name in the search bar, and hit Enter.
Navigate to the Zoom website and sign in to your Zoom account using your credentials.
Click on the Navigation menu at the top right corner, and click Profile.
Then, click Others in the Calendar and Contact Integration section, and locate the existing integration.
Click the Delete button next to the Existing Calendar and contact integration.
If a verification prompt pops up, click Delete again to confirm.
Once the configuration and contact data are deleted, you can reconfigure the Zoom app’s calendar and Contacts settings.
While using the Zoom Client, files can get corrupted due to storage patterns, disk failure, viruses, etc. If the app data is corrupt, it can lead to errors; deleting it is one way to fix the error.
2. Update the Zoom app
Press the Windows key, type Zoom in the search bar, and hit Enter to launch the app.
Once you’re signed in, click on the profile icon at the window’s top right corner to open a drop-down menu. Click Check for Updates in the drop-down menu to update the app.
You’ll receive the You are up-to-date prompt if there are no available updates.
However, click on Install to initiate the process, and follow the onscreen instructions to complete the update.
Once the update is complete, restart your PC and check if the error is fixed.
Developers release occasional updates to fix bugs and errors; if the Zoom connection error is triggered by a bug, updating the app can fix it.
3. Reinstall Zoom
Press the Windows key, type Zoom in the Windows search bar, and select Uninstall from the drop-down menu.
Restart your PC, and navigate to the Zoom download page to download and install the app
Reinstalling the Zoom Client reverts the app to its default settings; this can help fix the connection error.
Right-click the time and date on your taskbar and select Adjust Date/Time.
If the date or time is incorrect, toggle the switch to set them automatically.
Alternatively, click Change to set it manually.
Then, adjust the date and time and click the Change button.
Now, launch the Zoom app to see if the error is fixed.
Applications like Zoom require your PC’s date and time to set calendars, meetings, etc. accurately; if your PC’s date and time are incorrect, it can lead to connection errors. Here is a detailed guide on how to set your PC date and time.
Zoom error messages are usually triggered due to poor internet connection. However, it can also be triggered by secondary causes.
With the steps in this article, you should be able to fix the unable to establish connection error.
Excel is one of Office 365 most popular applications. However, the apps are prone to occasional errors. Users sometimes experience automatic file closure while using the app.
This can be very frustrating if you’re unable to resolve the error. Luckily, this article has assembled a list of the most effective ways to fix the automatic file closing in Excel.
Why are Excel files closing automatically? The following are the major reasons why Excel files close automatically:
Outdated MS App – If you’re running an outdated version of Office 365, you’re bound to run into a series of errors, including automatic file closure in Excel.
Poor Network Connection – If your PC has an unstable internet connection, it’ll be unable to connect to the Microsoft server, causing files to close automatically.
Incompatible Add-Ins – MS Excel utilizes Add-Ins to improve the app’s functionality. However, such Add-Ins can interfere with the app’s operations and cause automatic closing of files.
Insufficient Memory – MS Office apps require sufficient memory to operate; if your PC is overloaded with running background apps, it causes a memory shortage, leading to crashes during app launch.
Corrupt Software or App Data – If the MS Excel app is corrupt or has corrupt files in the application folder, it can lead to occasional crashes and errors.
How can I fix Excel files if it’s closing automatically?
Apply the following checks before anything else:
Start Excel in Safe Mode – Running Excel in Safe Mode launches the app without loading Excel Add-Ins; this will help you determine if any Add-Ins trigger the error.
Update Excel – Errors and bugs are fixed in each update released by Developers; if the error is triggered by a bug, updating the Excel app can help fix it.
If the issue persists, kindly follow our recommendations below:
1. Disable Excel Add-Ins
Close the Excel app, and relaunch it by double-clicking the app icon on your desktop.
In the Excel window, click File and select Options.
Click on Add-ins in the next window, select COM Add-ins, and click on Go.
Ensure all the checkboxes are unchecked, and click OK.
Close Microsoft Excel and restart the application to see if the error persists.
Excel Add-Ins help improve the UI and functionality of the app. However, they can conflict with the app’s functionality, leading to errors and crashes. Disabling them can help you fix the file closure error on Excel.
2. Repair MS Office
Press the Windows key + R, type appwiz.cpl in the dialogue box, and hit Enter.
In the Programs and Features window, right-click on Microsoft 365, and select Change.
Now, select Quick Repair and click the Repair button.
Launch the Excel app to see if the error is fixed.
While using the Excel app, it can get corrupted by viruses or malware; performing a repair can fix the automatic file closure.
3. Disable hardware graphics acceleration
Press the Windows key, type Microsoft Excel in the search bar, and hit Enter.
In the Excel window, click on File and select Options.
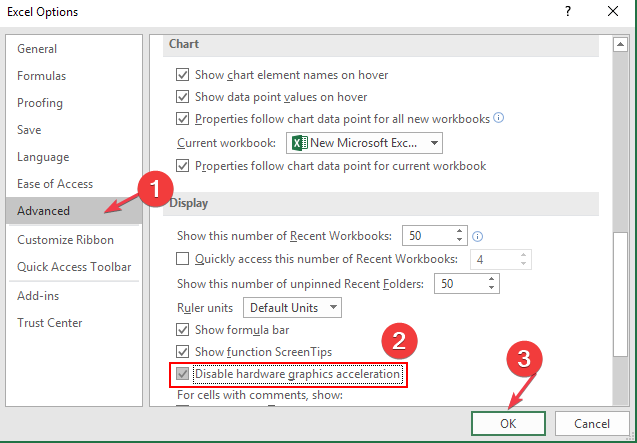
Then, click Advanced, check the box next to Disable hardware graphics acceleration, and click OK.
Close the Excel app and restart it to see if the error is fixed.
MS Animation is an excellent feature of Office 365 but usually takes up a lot of resources; if low memory is triggering the error, disabling the feature can help resolve it.
If your files are closing automatically while using Excel, it can get pretty annoying, especially when you have no clue how to fix it. Luckily, this article has provided a comprehensive guide on the best ways to fix the Excel file closing error. You can also learn how to turn off AutoSave.
If you’ve successfully resolved the error, feel free to let us know which solution did the trick by dropping a comment below.
The error message Telnet could not open a connection to the host occurs when users attempt to use Telnet. When using the Telnet protocol, it indicates a problem establishing a network connection between the local machine and the target host. Hence, we’ll discuss how to fix the problem.
If a Telnet service is not running it can result in a connection error.
DNS resolution failure can prevent you from connecting to a host.
What can I do if Telnet could not open connection to the host?
Before proceeding with any advanced troubleshooting steps, we recommend you try the following preliminary checks:
Restart your computer and check if that fixes the temporary glitch.
Perform a clean boot and ensure that nothing interferes with the connection.
Verify network connectivity and make sure your connection is stable.
Troubleshoot DNS and make sure that everything is working properly.
1. Configure Firewall to allow Telnet connections
Left-click the Start button, type Windows Firewall in the search box, then select it from the results.
Select Advanced Settings.
Click on Inbound Rules from the left-hand pane, then select the New Rule option.
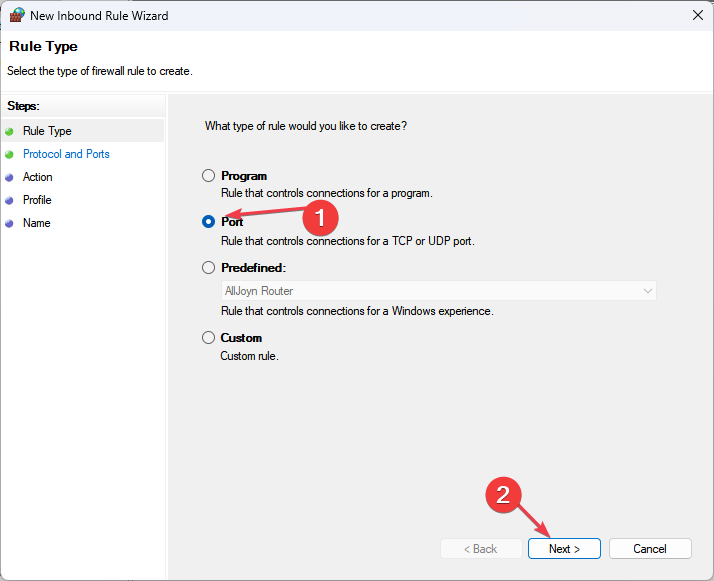
Under the Rule Type, select Port, then click Next.
Select TCP and Specific Local Ports. Enter 23 in the port number bar and click the Next button.
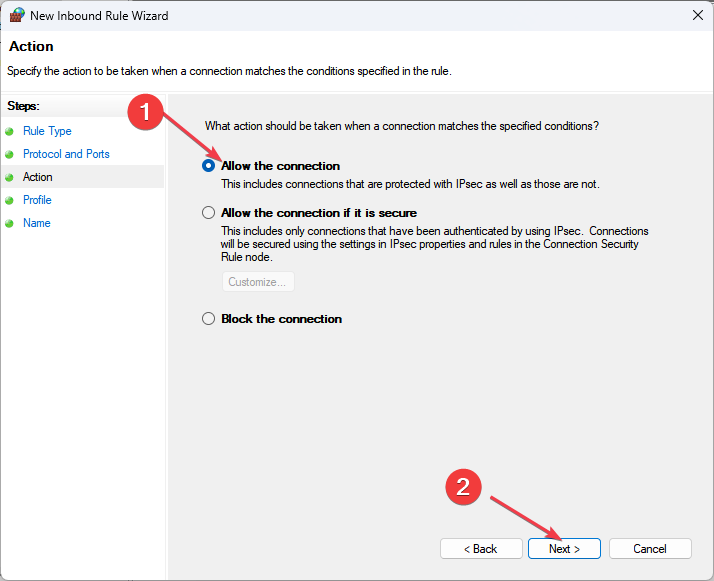
Click the Allow Connection option and Next.
Specify when the new rule can be applied. (Domain, Private, and Public)
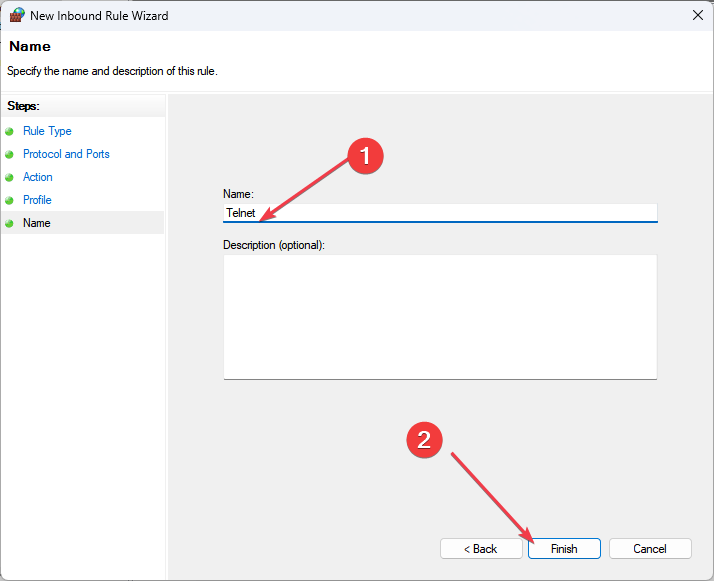
Rename the Inbound Rule to Telnet, then click the Finish button.
Restart your PC and test Telnet functionality again to see if the error persists.
Creating the new rule prevents Windows Firewall from blocking the Telnet inbound connection and resolves the access to the host error. Adding an inbound rule also fixes the 443 error code.
2. Enable the Telnet client feature
Press the Windows + I key to open the Windows Settings app.
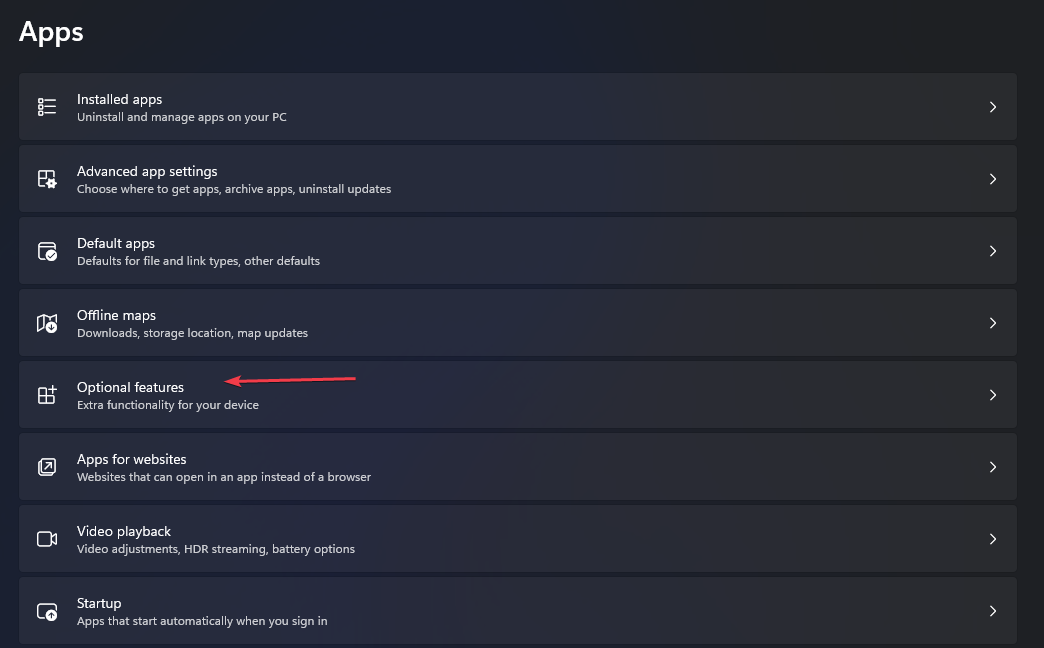
Click on Apps and then choose Optional Features from the left sidebar.
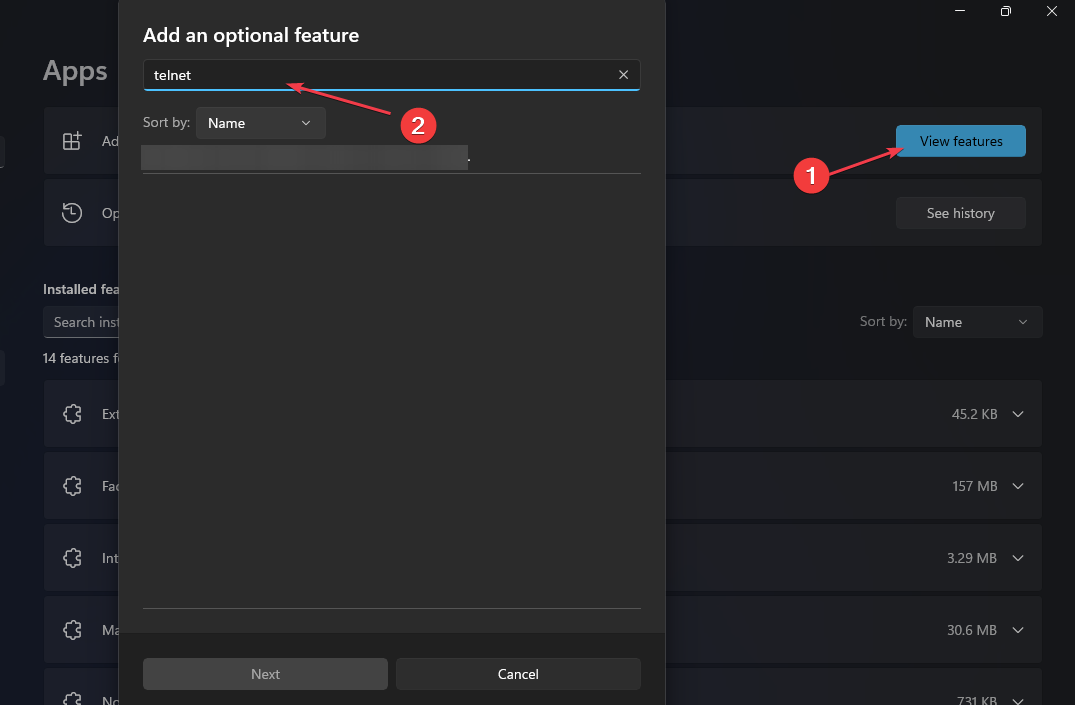
Click on View features button beside Add a feature and search for Telnet Client.
Select Telnet Client from the list and click the Install button to enable it.
The Telnet Client feature might not be running or enabled on the host device because Windows 11 does not activate it by default.
MS Office plays host to a couple of errors that prevent users from accessing the service, one of which is the Microsoft Access Error 7731.
If you’re experiencing Microsoft Access Error 7731, this article briefly discusses some of the most common causes of the error and provides you with steps to fix it.
What causes Microsoft Access Error 7731?
Here are the common causes of Microsoft Access Error 7731:
Virus and Malware – A PC infected with a virus tends to function abnormally; if your PC is infected, it can trigger the Microsoft Access Error 7731.
Poor Internet Connection – Microsoft Access requires a stable internet connection to function properly; if your internet connection is unstable, it can lead to Error 7731.
Outdated MS Office – If you’re running an outdated version of MS Office, you’ll experience errors while using the MS apps.
Incompatible Drivers – Windows utilizes drivers to function correctly; installing incompatible Drivers can lead to errors like the Microsoft Access Error 7731.
Insufficient Memory – Running too many applications simultaneously drains your PC’s memory; once your PC runs out of memory, you’ll experience frequent crashes, which can cause Error 7731.
How can I fix Microsoft Access Error 7731?
Before we proceed with more advanced solutions, here are a few quick fixes you can attempt:
If the error persists after attempting the above fixes, here are more advanced solutions you can try:
1. Close high-end background programs
Press the Ctrl + Alt + Del keys simultaneously to open the Task Manager.
Navigate to the Processes tab, and scroll through the list of applications to locate the Programs using up memory.
Click on each of the Programs, and click the End task button to end each task.
Once you end a process, launch Microsoft Access to see if it fixes the error.
Repeat the steps till you find the process triggering the error, and close the Task Manager.
If you’ve got too many running background apps, it leads to memory shortage, crashes, and application errors. Closing such programs frees space and can help fix the Microsoft Access Error 7731.
2. Update MS Access
Press the Windows key, type Microsoft Access in the search bar, and hit Enter.
In the Access app, click on File and click Account. In the next window, click on Update Options next to Office Updates.
Click on Update Now from the list of options to initiate the update process.
Microsoft will immediately start searching for updates; if updates are found, they’re downloaded and installed automatically.
Once the updates are installed, close the MS Access app and restart it to see if the error is fixed.
3. Scan for viruses
Press the Windows key, type in Windows Security, and hit Enter.
In the next window, click on Virus & Threat Protection, and click Scan Options under the Current Threats option.
Select Full Scan and click the Scan Now button to initiate the virus scan.
Wait for the scan to complete, restart your PC and check if the error is fixed.
Windows errors can usually be traced to the presence of viruses or malware; running a full scan with a dedicated antivirus tool can help fix errors with Microsoft Access.
Press the Windows key, type in CMD, right-click on the displayed result, and select Run as Administrator.
Click Yes to grant the app administrative access in the User Account Control window.
Once the command prompt opens, typethe following, and hit Enter: sfc /scannow
Wait till the scan is complete, and restart your PC to check if the error persists.
An SFC scan helps to identify and repair corrupt system files; if the Microsoft Access Error 7731 is a result of corrupt files, an SFC scan will fix it.
The Microsoft Access Error 7731 prevents you from accessing the MS Access app, so resolving it is compulsory; if you’ve successfully resolved the error, please comment below which solutions fixed the error.
The 0xc0000102 error had been reported by Windows users as it is often encountered while booting your PC or launching an application.
If you’re experiencing the 0xc0000102 error while booting up your PC or launching an application, this article will provide the best ways to fix the error on Windows.
What causes the 0xc0000102 error?
Here are some of the most common causes of the 0xc0000102 error:
Insufficient Memory – Too many opened background apps can lead to insufficient memory; the 0xc0000102 can pop up if you attempt to launch applications with limited memory or RAM.
Corrupt System Files – Some specific system files affect the startup process; if these files are corrupted, you’ll run into bootup errors like the 0xc0000102.
Corrupt BCD Data – If you encounter the 0xc0000102 error while booting up Windows, your PC’s BCD data may be corrupt.
Admin Restrictions on MMC Apps – If you triggered the 0xc0000102 error while attempting to launch an MMC app, your local administrator likely prohibits this type of action, thus leading to the error.
How can I fix error 0xc0000102 on Windows?
Before we proceed with more advanced solutions, here are a couple of quick fixes you can attempt:
Restart your PC.
Close background applications.
Update Windows.
Contact your admin to check if a restriction policy causes the error.
If the error persists after applying the above fixes, here are advanced solutions you can attempt:
1. Run the System File Checker
Press the Windows key, type in CMD, right-click on the displayed result, and select Run as Administrator.
Click Yes to grant the app administrative access in the User Account Control window.
Once the command prompt opens, type the following, and hit Enter: sfc /scannow
Wait till the scan is complete, and restart your PC to check if the error persists.
Corrupt system files are one of the common causes of the 0xc0000102 error; running an SFC scan identifies and repairs corrupt files; this can help fix the error.
On the other hand, you can actually utilize a proficient system repair tool that will fully diagnose your Windows PC and repair damaged system files.
2. Reinstall the newly installed apps or programs
Press the Windows key + I to open the Settings app.
Click Apps in the Settings window, and select Installed Apps.
In the next window, scroll through the list of applications to locate the app, click on it and select Uninstall.
Click Uninstall again in the popup to confirm the uninstallation, and close the Settings app.
Visit the Microsoft Store or the official developer’s website to download the Program, and run the installer to complete the installation.
Launch the program and check if the error is fixed.
If the 0xc0000102 error is triggered when you launch an app, reinstalling the app would restore it to its default state, this can help resolve the error.
3. Perform a System Restore
Left-click the Start menu, type restore and click Create a restore point.
Select System Properties and choose System Restore button.
In the Restore Files and Settings box, click Next.
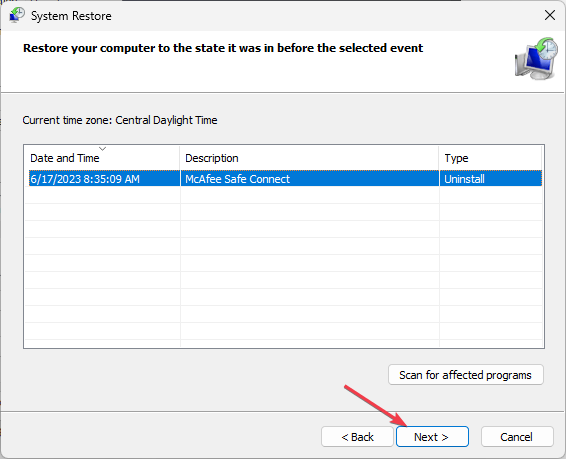
In the next window, select the Restore Point to which you wish to restore your PC, and click Next.
Then, click Finish to complete the system restore.
This can trigger the Windows errors after a change in the PC’s configuration; if you’ve made recent changes that triggered the error, you can fix it by running a system restore.
It’s also advisable to back up your PC before running a system restore because you’ll lose files and applications during a restore.
Press the Windows key, type cmd, right-click the displayed option, and select Run as Administrator.
Click Yes in the User Account Control window to grant administrative privileges.
Type the following in the command prompt, and hit Enter: chkdsk /r or chkdsk /f /r
Wait till the repair is complete and close the command prompt.
If your hard drive is corrupted, it can lead to bootup errors in Windows; running the chkdsk command scans and repairs irregularities on your hard drive to help fix the 0xc0000102 error.
The 0xc0000102 error is often triggered while booting up your PC or attempting to launch an app; whatever the case, applying the steps in this article should fix the error.
While attempting to view content on specific sites, you might encounter a DRM error on Google Chrome. This technology restricts actions you can take on the Site and is usually common among streaming platforms.
In this article, we’ll walk you through the 7 steps needed to enable DRM on Google Chrome to allow you to play DRM-protected content on all sites.
What does it mean to enable DRM?
Enable DRM (Digital Rights Management) means that digital content providers can control how users access their content. With the feature enabled, content providers can limit how users can copy, share, or distribute their content.
With this in place, their intellectual property remains protected, preventing it from being shared without authorization.
How can I enable DRM on Google Chrome?
The following are the steps to enable DRM on Google Chrome:
Press the Windows key, type Google Chrome in the search bar, and hit Enter to open the browser.
In the Chrome window, type the following and hit Enter to navigate to the settings window: Chrome://settings
Then, click Security and Privacy on the left pane in the Settings window, and select Site Settings.
Now, scroll down to locate the Additional Content Settings button, and click on it to expand the selection.
Further, click on Protected Content IDs and locate the Default Behavior section.
Under the Default Behavior section, click the checkbox next to Site can play protected content to enable DRM on Chrome.
Revisit the page triggering the protected site’s error and reload it to check if the error is fixed.
Once the feature is enabled, you should be able to access the content that was previously protected.
Are you wondering what Duet Display is on Windows 11? While using your PC, you might notice the feature. It’s been reported by a couple of users, and it’s got them worried because the feature didn’t come preloaded with Windows but just appeared suddenly.
In this article, we’ll briefly discuss what Duet Display is, why it was installed on your PC, and steps to help you remove the feature from your PC.
What is Duet Display?
Duet Display is an app that allows Windows users to mirror their desktop screen onto their iPads or iPhones. It allows you to utilize your mobile devices as a second monitor.
Why did Duet Display auto-install on my PC?
There are a couple of reasons why Duet Display was installed automatically on your PC; here are some of the most common causes:
Third-party App – Some third-party applications include Duet Display as an optional feature while installing the app; if you install such software, Duet Display will be installed automatically.
Virus or Malware – Sometimes, the Duet Display feature can be used by hackers to mirror your screen to a remote desktop to spy on things like your password, credit card details, and more.
Application Update – If you noticed the Duet Display auto-install on your PC after updating an app or software, the developer likely included the feature to increase the app’s functionality.
How do I remove the Duet Display from my PC?
1. Delete the Duet app from Windows Settings
Press the Windows key + I to open the Settings app.
In the Settings window, click on Apps and select Installed Apps.
Then, locate the Duet app, click the options icon, and click Uninstall button.
Then, select Uninstall again to confirm the uninstallation.
Wait till the uninstallation process is complete, and close the Settings app.
Check your PC to see if the Duet Display feature is still functional.
This is one of the safest ways to delete and remove the app folders of the Duet app. Simply follow the steps outlined above.
2. Remove it from the Control Panel
Press the Windows key, type Control Panel and hit Enter.
In the Control Panel window, click on Programs, and select Programs and Features.
Scroll through the list of installed applications to locate the Duet Display app, right-click on it, and select Uninstall.
Follow the onscreen instructions to complete the uninstallation process, and close the Control Panel once it’s complete.
So if you have wondered what Duet Diplay is on Windows 11, on the surface, it sounds like a pretty neat feature, but if you didn’t consent to install the app, it’s advisable to delete it instantly to avoid losing your privacy to hackers.
With the steps listed in this guide, you should be able to remove the Duet Display from your PC
The $WinREAgent folder is a system folder created by the Windows Recovery Environment (WinRE). It is typically found on the system drive (usually the C: drive) and the Dollar $ sign indicates that the folder is hidden and they are used to create during the installation phase.
You can delete the WinREAgent folder manually, especially if you encounter difficulties with system updates. In fact, the $WinREAgent folder may self-remove after uninstalling the Windows 11/10 Update Assistant, or after a successful Windows update within 10 days.
Therefore, if you complete the upgrade through Windows Update, you can safely delete the $WinREAgent folder. So, before applying the solutions below, make sure that any update has been completed and check for any other updates. Also, before deleting the folder, carefully examine its size and ensure that it ideally reads 0 KB and create a backup of your important files and data.
How can I remove $WinREAgent folder?
1. Manually delete the $WinREAgent folder
Press the Windows + E keys to open the File Explorer.
Navigate to your C: drive and locate the $WinREAgent folder. (You need to enable the viewing of hidden items to see the folder).
Now, right-click on the $WinREAgent folder and select Delete from the options.
If you encounter any errors or permissions issues, double-check that you have administrative privileges and that WinRE is disabled.
And that’s it on how to delete the folder and whether it is safe. In case you want to know how to enter (boot) into recovery mode on Windows 11, you can explore our detailed guide for that.
If you have been bothered about Roku screen mirroring not working while trying to cast your PC or other devices to your TV, don’t worry; you’re not the only one facing this issue. Some users have also reported similar issues in the Microsoft Community forum.
Fortunately, we have gathered some potential fixes to troubleshoot the issue seamlessly. You can work through any of the solutions in this article to fix the issue.
Why is Roku screen mirroring not working?
The Roku screen mirroring error has been discussed on various platforms, and from several user’s views, there can be several reasons behind this error. Below are some of them:
Incompatible devices – Roku screen mirroring is compatible with specific devices and operating systems. Ensure that the device you’re trying to mirror is on the list of supported devices.
Network connectivity – Screen mirroring requires both devices to be connected to the same Wi-Fi network. If the network connection is weak or unstable, it can lead to issues with screen mirroring.
Software or firmware issues – Outdated software or firmware on either your Roku device or the mirroring device can cause compatibility problems or Roku error 014.30. Ensure that both devices are running the latest software versions.
Application or system errors – Occasionally, the screen mirroring feature or the applications involved may encounter bugs or errors that prevent proper functioning. In such cases, updating the apps or performing a system restart can help resolve the issue.
Firewall or antivirus settings – If some of your PC’s firewall or antivirus settings are activated, it can block the necessary connections for screen mirroring, triggering the error.
Now that you know some of the potential reasons behind the Roku screen mirroring error, let’s proceed to how to fix the issue.
What can I do if Roku screen mirroring is not working?
Before trying any of the advanced solutions provided in this guide, ensure that you perform the following preparatory checks:
Restart both your PC and the Roku device before trying again.
Check if your device is compatible with the Roku screen mirroring on the official Roku website.
Having confirmed the above checks, try any of the solutions provided below if the issue persists.
1. Update your Windows
Press the Windows key + I to open the Settings app.
Click on the Windows Update in the left sidebar and click on the Check for Updates button. Windows will now search for available updates for your PC.
Now restart your PC.
After restarting your PC, it will be up to date and Roku should be able to mirror now if this was the cause of the error. If not, try to unpair Roku from your PC and pair it again.
2. Reconnect the Roku device to your PC
Click on the Start button in the taskbar and click on the Settings gear icon.
In the left sidebar, click on Bluetooth & devices and navigate to Devices.
Locate your Roku device and select it. Then click on the Remove Device button.
Now, go back to Bluetooth & devices and click on Add device.
Select the Roku device when it appears to pair it with your computer.
Unpairing the Roku device and pairing it again should have refreshed the connection between the two devices. Now try the Roku screen mirroring again.
Sometimes the default software can be at fault for such issues, we all know that in some cases using a dedicated third-party software can help us save time.
A dedicated mirroring tool will help you bypass this issue because it will simply ignore or overwrite the default app that is causing the problem, hence you don’t need to worry about it anymore.
ApowerMirror is a powerful mirroring software that can mirror live and run on Android, iOS, Mac, and Windows. Besides mirroring, you can get extra functions such as controlling your phone from the PC, taking screenshots, mirroring multiple devices simultaneously, and many more.
ApowerMirror
Do not let errors consume your time and ruin your experience with this powerful software.
Press the Windows key + X to open Quick Settings and select Device Manager.
Now, expand the Network adapters category, right-click on your wireless network adapter, and select Update driver from the context menu.
Then, click on Search automatically for drivers.
Follow any on-screen prompts to complete the driver update process and restart your PC.
Sometimes, your PC may require the latest network driver to accept new devices. So, follow the steps above to update your Network Driver; otherwise, it can cause hindrances in making the Roku device work.
And that’s it on how to fix the Roku screen mirroring not working error. If none of the above steps resolves the issue, you may want to contact Roku’s customer support.
GoToMyPC is a remote desktop software that allows users to access their computers from remote locations. Some of our readers have requested to know why they encountered the GoToMyPC waiting for the host computer to connect error while trying to access their host PC.
In this article, we will discuss what causes the error and provide detailed steps on how to fix the issue easily.
What causes GoToMyPC waiting for the host computer to connect?
The waiting for the host computer to connect error in GoToMyPC can occur due to several reasons. Here are some common causes:
Host computer offline or not running GoToMyPC – The error message appears mostly when the client device is unable to establish a connection with the host computer. This can happen if the host computer is turned off, in sleep, or if the GoToMyPC software is not running on the host computer.
Network connectivity issues – Stable and active internet connectivity is essential for GoToMyPC to function properly. If the host computer’s internet connection is weak, the client device will be unable to connect.
Firewall or antivirus software blocking the connection – Sometimes, the Firewall or antivirus software considers GoToMyPC as a security risk. Adjusting the firewall or antivirus settings to allow GoToMyPC can resolve the issue.
Multiple users already connected to the host computer – GoToMyPC allows only one user to access the host computer at a time. If someone else is already connected to the host computer using GoToMyPC, you’ll need to wait until their session ends before you can establish your connections.
There are several other reasons, however, the above are common reasons behind the GoToMyPC waiting for the host computer to connect. The next section will provide you with simplified steps on how to fix the issue.
How can I fix GoToMyPC waiting for the host computer to connect?
Before engaging in any advanced troubleshooting or settings tweaks, users should ensure they perform the following preparatory checks:
Press the Windows Start menu, type Windows Security, and open it.
Click on Firewall & network protection on the left sidebar.
Next, identify and click on the network type your computer is connected to, typically a Private network for home or office use.
Scroll down and click on Allow an app through firewall.
Now, click on the Change settings button. Administrative privileges may be required at this point.
Further, scroll through the list of apps and locate GoToMyPC. Check both the checkboxes (Private and Public) next to GoToMyPC to allow it through the Windows Firewall.
Restart your PC.
After completing these steps, GoToMyPC should be allowed through the Windows Firewall, reducing the chances of it being blocked and enabling successful connections.
Open the file and follow the on-screen prompts to complete the installation process.
Launch the Connection Wizard program and select Run the Connection Wizard.
Then, click OK in the following window.
Now, click on Next after the Wizard has finished testing connectivity.
The Wizard will display the results when it is finished. If you require further assistance, select I still have problems or select Finish to end the process.
The Connection Wizard can help you find and save the best connection settings in data servers, which will help to ensure a better connection between your host computer and the client device.
And that’s it on how to fix the GoToMyPC waiting for the host computer to connect error. Hopefully one of the methods provided in this guide has helped you to fix the issue.
Several users in the Microsoft Community forum have recently requested to know what the wins.exe is after getting an error message with the executable file while trying to launch an application or boot up their Windows PC.
In case you have been wondering what the wins.exe is and whether to remove the executable file from your computer, we will explore it and how to remove it.
What is wins.exe?
The WINS software component, represented by the wins.exe file, was developed by Microsoft as an abbreviation for Windows Internet Name Service.
Initially, it functioned as a background process in early iterations of Microsoft Windows. The following are points to note about wins.exe:
Initially served as an IP address – Its primary purpose was to enable the resolution of IP addresses for domain names. Although wins.exe served as the precursor to the current DNS system, it is no longer actively supported.
Wins.exe is an unknown file in Windows – Due to its discontinued support and potential to cause issues, wins.exe is an unfamiliar file found within the Windows folder. Specifically, it can be located in a subdirectory of C:\Windows\System32.
Wins.exe has no file description – This application lacks a file description and does not appear visibly to users. It operates by either sending or receiving data on open ports within a Local Area Network (LAN) or the Internet.
Furthermore, wins.exe possesses the capability to monitor applications. As a result, 73% of experts classify wins.exe as a potential threat, carrying a high likelihood of causing harm to a computer.
Is it safe to remove wins.exe?
It is generally not recommended to remove or delete the wins.exe file. As aforementioned, in earlier versions of Windows, wins.exe is the Windows Internet Name Service (WINS), which provided IP address resolution for domain names.
However, with the evolution of technology, WINS has been largely replaced by the Domain Name System (DNS).
While wins.exe is no longer actively supported by Microsoft and may not be necessary for modern systems, it is still an integral part of the operating system. Removing wins.exe could potentially disrupt network services or cause compatibility issues with certain applications that rely on it.
If you suspect that the wins.exe file is causing problems or exhibiting suspicious behavior, we recommend you run a reputable antivirus or antimalware scan to ensure your system’s security.
How can I remove wins.exe?
Before anything else, try this step:
Run a malware scanner – Before taking any action, run a thorough scan with a reputable antivirus or antimalware software to ensure that wins.exe is not a malicious file masquerading as a legitimate component.
If the scan detects any issues related to wins.exe, follow the steps below to remove them.
1. Disable the wins.exe service
Press the Windows + R keys to open the Run dialog box. Type services.msc in the dialog box and press Enter to open the Services window.
Scroll down to locate the Windows Internet Name Service (WINS) entry. Right-click on it and select Properties from the context menu.
In the Properties window, change the Startup type to Disabled.
Click on the Apply button and then OK to save the changes.
Disabling the wins.exe service will prevent it from running and potentially resolve any associated problems. In case the dialog box does not have text, check here to fix it.
2. Run the SFC Scan
Press the Windows key and type cmd in the Search box, and click Run as administrator.
In the CMD window, type the following command in the text field and press Enter: sfc /scannow
The scanning process may take up to 15 minutes, so wait till the verification reaches 100%.
Restart your PC.
Running the System File Checker tool should repair the wins.exe file. However, this process may or may not work for this issue.
In order to ensure the file integrity and scan your Windows OS, we suggest you use multi-layered antivirus software to detect any kind of malware threats.
However, if after attempting the above methods, wins.exe remains, it is best to seek help from Microsoft support.
Wins.exe is not the only exe problem that users have reported. There have been several cases of other exe issues such as winword.exe application error, consent.exe, and so forth.
If you have any questions or know other workable methods to remove wins.exe, please let us know by using the comments section below.
Recently, many users have reported seeing a SwUSB.exe process running in the Task Manager on their Windows PCs. It sprouted some concerns about its safety to the computer. Hence, this guide will take you through what SwUSB.exe does and what to do if it causes any errors.
SwUSB.exe is an executable file belonging to the Switch USB2.0/USB3.0 for the WinXP process. The executable comes as a component of the Realtek Wireless LAN Utility by Realtek. The executable does the following:
Configure and facilitates compatibility between Realtek Wireless LAN cards and the operating system.
The Realtek Wireless LAN Utility starts running when the SwUSB.exe process starts in Task Manager.
SwUSB.exe process enables data transmission from Wireless LAN cards through a USB connection.
Is SwUSB.exe safe or a virus?
To verify whether the SwUSB.exe file on your computer is safe, observe the following checks:
Check the file location and make sure the file is in the Windows folder.
Check if the SwUSB.exe file is digitally signed and Copyrighted by Realtek.
Right-click the Start button and select Task Manager from the menu.
Go to the Processes or Details tab. Select the SwUSB.exe from the list, right-click on it, then click End Task from the drop-down menu.
Then, click OK to confirm that you want to end the task for the program.
Restart your PC.
The above steps will stop the SwUSB.exe process on your PC and prevent it from harming the computer. You can check our article on what to do if the Task Manager is slow to open or respond on your PC.
2. Remove the file via File Explorer
Right-click the Start button and select Task Manager from the menu.
Locate the SwUSB.exe in the Processes or Details tab, right-click on it, and click on Open File Location from the drop-down menu.
Right-click on the SwUSB.exe file and delete it.
Restart your computer and check if its process still runs.
Removing the executable file in File Explorer will disable the program running on it.
Several users in diverse forums have recently reported that they encountered the osk.exe error message on their Windows PC.
The osk.exe is a built-in Windows utility known as Onscreen Keyboard. In case you are experiencing similar issues and you don’t know how to fix the Onscreen Keyboard if it keeps popping up, don’t worry. We will take you through how to fix the issue in this article.
What is osk.exe?
The osk.exe is a component of the Microsoft Windows Operating System by Microsoft Corporation. The osk part of the filename refers to the On-Screen Keyboard (OSK) utility in Windows which allows users to input text without a physical keyboard.
The executable code of this file is located on the hard drive of your computer. When you initiate the OnScreen Keyboard software on your PC, the commands within the osk.exe file will be carried out on your PC, helping the On-Screen Keyboard to run.
Since osk.exe is a system process it should not be disabled because it is required for your PC to work properly.
However, there are a few instances where some virus or malware would disguise itself as osk.exe. For this reason, you can read the instructions below to decide for yourself whether to disable osk.exe or not:
Check the location – Verify the location of the osk.exe file in your Windows Task Manager to know whether it is legit or not. The original file should be situated in the following directory: C:\Windows\System32 folder
Verify the file size – There is a possibility that the osk.exe has been compromised, hence the need to verify the legitimacy of the file by checking the size. If it exceeds 1MB, then it could be considered malicious.
Verify the publisher/ digital signature – The original file will bear the signature of Microsoft in the properties. If it doesn’t, then it may be a compromised file.
The above factors should help you determine whether to disable the osk.exe file on your PC.
How can I disable osk.exe?
1. End the osk.exe process in Task Manager
Right-click on the Start button and select Task Manager from the options.
Navigate to the Processes tab. Select the osk.exe from the list, right-click on it, and then click on End Task from the context menu.
2. Disable the Touch Keyboard and Handwriting panel service
Press the Windows + R keys to open the Run command dialog. Type services.msc in the text field and press Enter.
In the Services window, locate the Touch Keyboard and Handwriting Panel Service, right-click on it and select Properties from the context menu.
In the Properties window, under the General tab, locate the Startup type section. Select Disabled to prevent the service from starting automatically.
Now, click on the Apply button to save the changes, and then OK to close the Properties window.
Some users complained that the osk.exe starts automatically whenever they start their PC and you can try the steps above to fix the issue.
In conclusion, exe files can at any time trigger confounding errors, such is the case with Wininit.exe. You can explore our detailed guide on how to fix exe files deleting themselves in Windows 10/11 for a further read into this issue.
The Activision Blizzard deal drama never ends, does it? One of the new bits of info to come out today ahead of Microsoft’s meeting with the American FTC over the deal pertains to Activision’s future with Sony should the deal finalize.
In an FTC v MS/ABK deposition, PlayStation chief Jim Ryan said that, if deal closes, Sony couldn't tell Activision about its next console
Is then asked about Sony working with Mojang (Minecraft) after MS bought them. Discussion is redacted but Ryan says it supports this concern pic.twitter.com/M86CBm3CcY
Q: “Why could [Sony] no longer share confidential details about its next console and development once Microsoft acquired Activision?”
Ryan: “We simply could not run the risk of a company that was owned by a direct competitor having access to that information.”
Curiously, no such concerns seemed to have been expressed in regards to Minecraft developer Mojang, which Sony continued to work with following the former’s acquisition by Microsoft. Same with Bethesda.
PlayStation CEO Jim Ryan.
Ryan also said that Activision’s incentives would shift post-acquisition to “optimize its overall Xbox business, not the business of Activision.” The remark seems to suggest that by giving Activision info on unique PlayStation features, it would thereby be giving said info to Microsoft (and Xbox).
Of course, by withholding this information Sony could be inadvertently sabotaging any games that Activision might publish on PlayStation in a post-acquisition scenario.
The error message FileType selected not supported by this app occurs when opening a file with an application that does not support that file type. Many users claim the error is incorrectly displayed. Hence, this article will discuss its meaning and how to fix it.
Why is FileType selected not supported by this app?
Users report that the error appears in different file-opening apps like Excel, Word, and Microsoft Teams. Some notable factors that may be responsible for the error are:
Incompatible file format often causes issues like these.
Outdated software might have certain bugs which lead to these problems.
File corruption is a common problem when opening files.
Incorrect file extensions will prevent files from opening and lead to this error.
Third-party plugins or codecs can cause issues in some cases.
How can I fix FileType selected not supported by this app?
We recommend you go through the following preliminary checks before anything else:
Restart the app to fix any temporary issues.
Check the file extension and make sure that it’s correct.
Use a different application to open the file and check if that helps.
Update the application to the latest version to remove any bugs.
Check file integrity and make sure that it’s not damaged.
1. Clear Teams app cache
Right-click the Teams app icon and select Quit to close the app process.
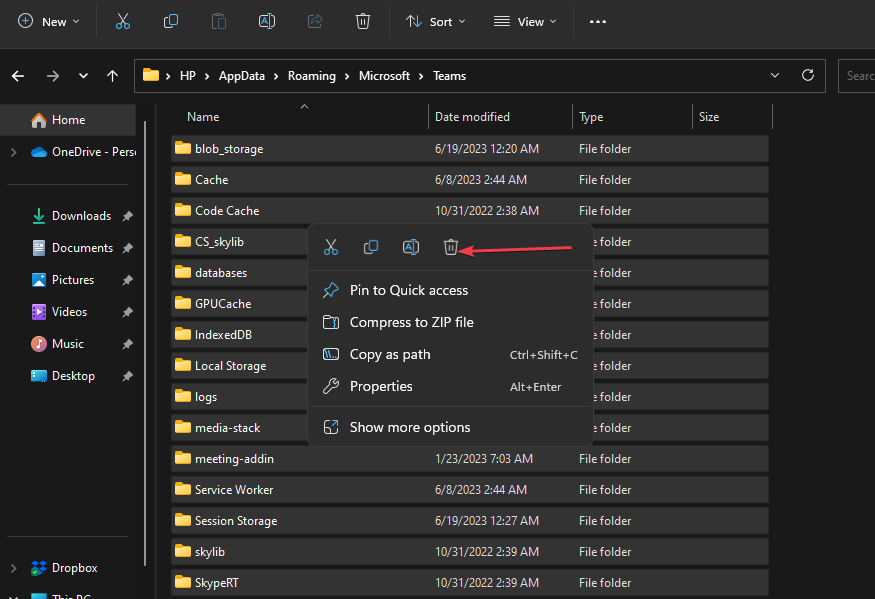
Press the Windows + E keys to open File Explorer, then cut and paste the following into the search box to open the directory: %appdata%\Microsoft\Teams
In the Teams folder, press Ctrl + A to highlight all the contents of the folder, then press Delete.
Restart Microsoft Teams and check if the error persists.
Clearing the app cache can help with Filetype selected not supported by this app in the Microsoft Teams channel or tab.
In section 3A of the document Microsoft states, rather bluntly, that “Xbox has lost the console wars,” noting that Xbox “has consistently ranked third in consoles behind PlayStation and Nintendo.”
Microsoft says Xbox has "lost the console wars." Ahead of the FTC case today, Microsoft is keen to show Xbox is in third place. Microsoft reveals Xbox had 16 percent share of console sales in 2021 and 21 percent of the console install base https://t.co/4PrN7uQwvSpic.twitter.com/KKyQcTXZqp
The statement is likely to grab attention, and seems to echo a recent comment made by Microsoft Gaming CEO Phil Spencer, who said “We’re not in the business of out-consoling Sony or Nintendo.” That remark was widely misconstrued (often deliberately), and Spencer’s point about Sony and Nintendo exclusives was largely missed.
As also pointed out in the document, PlayStation has an exponentially larger gamer base worldwide compared to that of Xbox, though the exact ratio was redacted. And as we pointed out in our Xbox Series X|S vs. PS5 comparison earlier this year, Sony’s current-gen console has outperformed Xbox by a wide margin in spite of being more affected by component shortages.
Activision Blizzard King’s portfolio includes several blockbuster franchises.
Microsoft also points out that “its rivals are positioned to continue to dominate, including by leveraging exclusive content.” And therein likely lies the crux of Microsoft’s argument in favor of merging with Activision Blizzard. The strength of the PlayStation brand has always been exclusives, and if Xbox is ever to make any headway in catching up with Sony and Nintendo, it will need big exclusives of its own that excite.
Unsurprisingly, many users find themselves perplexed by the cleanmgr.exe feature. However, fear not! In this article, we’ll delve into its definition and guide how to utilize cleanmgr.exe properly.
In a recent piece, we delved into the intricacies of disk cleanup in Windows 11. Yet, we are now confronted with a comparable scenario.
Nevertheless, it is essential to determine the root cause before attempting to resolve the current problem.
What does Cleanmgr stand for?
Microsoft’s cleanmgr.exe is an automated tool for disk cleanup in Windows, designed to liberate space on your hard drive.
Its primary objective is to scan and evaluate your hard drive for unnecessary files, eliminating them without manual intervention.
What is the use of Cleanmgr?
Cleanmgr does the following:
You can use cleanmgr to remove temporary files from your PC.
It can also be used to free up space on your device.
Easier management of file storage.
How can I use Cleanmgr properly?
Launch Cleanmgr via Run command
Hold Windows + R keys together, type the following command, and tap OK: cleanmgr.exe
Once the disk cleanup window pops up.
Now you can tick the box of your choice you want to clean and click OK.
How to run cleanmgr.exe from the command line
On your home screen type in cmd in the search bar and select Run as Administrator, once the UAC pops up click Yes.
Copy and paste this command and click Enter: cleanmgr.exe /D C
Now you can tick the box of your choice you want to clean and click OK.
What cleanmgr.exe options can I use?
/d <driveletter> – It specifies drives letter.
/sageset:n – Stores settings in the registry.
/sagerun:n – Runs specific task assigned to n value.
/tuneup:n – Run /sageset and /sagerun for the same n.
/lowdisk – Run with the default settings.
/verylowdisk – Run with the default settings, no user prompts.
/? – Displays help at the command line.
As you can see, using cleanmgr.exe from the Run dialog is incredibly simple.
In general, this software is relatively safe to utilize. However, it is important to exercise caution as there is a possibility of losing certain files if one fails to take appropriate measures.
We have created this guide to alleviate any concerns you may have and provide you with valuable information.
We trust that our manual has provided you with some insightful tips on how to use cleanmgr.exe. If you encounter any other problems, we suggest referring to our extensive guide on Disk Cleanup missing. It offers comparable solutions that can assist you in resolving the issue at hand.
Your feedback is highly appreciated, and we would be thrilled to hear your thoughts. Please feel free to leave a comment below and share your perspective with us.
LinkedIn has revolutionized the way professionals connect, network, and build personal brands. But let’s face it, with a sea of users vying for attention, it takes more than just a run-of-the-mill profile to make a lasting impression.
In this guide, I’ll spill the beans on creating engaging content that not only grabs attention but also catapults your profile to new heights of growth on LinkedIn.
#1. Understand Your Audience: Unleash the Power of Knowing Who You’re Talking To
Imagine delivering a mind-blowing presentation to an empty room. Frustrating, right? The key to successful content creation on LinkedIn is understanding your audience. It’s like having a secret weapon that allows you to speak directly to their needs and interests.
Take the time to research and define your target audience on LinkedIn. Who are they? What are their professional goals? What challenges do they face? Knowing your audience inside out empowers you to tailor your content to their specific needs, making it more relevant, valuable, and engaging.
#2. Define Your Brand and Message: Stand Out in the Crowded LinkedIn Universe
LinkedIn is a bustling metropolis filled with professionals striving to make their mark. In this digital sea of profiles, it’s crucial to define your personal brand and showcase what sets you apart. Consider your unique value proposition—the qualities, skills, and experiences that make you stand out from the crowd.
Craft a clear and compelling message that resonates with your target audience. What do you want to be known for? What impact do you want to make? Your brand and message should shine through in your LinkedIn profile, content, and interactions, consistently reflecting your authentic self.
#3. Choose the Right Content Formats: Paint Your LinkedIn Canvas with Creativity
LinkedIn offers a treasure trove of content formats to showcase your brilliance. Each format has its own strengths and advantages, and it’s essential to choose the ones that align with your audience and goals. Articles are perfect for in-depth discussions, sharing industry insights, and establishing yourself as a thought leader.
Videos can bring your ideas to life, capturing attention and making a lasting impact. Images are great for quick and visually appealing content, conveying messages in an instant. Consider your audience’s preferences and your content objectives when selecting the most appropriate formats for your LinkedIn strategy.
#4. Craft Compelling Headlines and Introductions: Make Them Stop, Read, and Say Wow!
In the fast-paced world of LinkedIn, attention is a precious commodity. To capture the attention of your audience, your headlines must be irresistible. Go beyond the mundane and craft attention-grabbing headlines that make people stop scrolling and take notice. Pose intriguing questions, promise valuable insights, or create a sense of urgency.
Your introduction is equally important—it’s the gateway to your content. Hook your readers from the first sentence, sparking their curiosity and leaving them hungry for more. By mastering the art of compelling headlines and introductions, you’ll entice readers to dive deeper into your content.
#5. Leverage Visuals and Multimedia: Let Your Content Speak Louder Than Words
In a visually driven world, images and multimedia elements have the power to captivate your LinkedIn audience. Use striking images, compelling videos, and eye-catching infographics to make your content visually appealing. Visuals not only grab attention but also convey messages more effectively. They evoke emotions, tell stories, and create a connection with your audience.
Don’t forget to optimize your visuals with engaging captions and descriptions that provide context and encourage further engagement. Let your content speak louder than words by incorporating visuals that leave a lasting impression.
#6. Encourage Engagement and Conversation: Turn Followers into Fans
LinkedIn is more than just a platform for self-promotion—it’s a thriving community of professionals looking to connect, learn, and collaborate. Encourage engagement by initiating conversations, asking thought-provoking questions, and seeking opinions from your audience. When people comment on your posts, respond with genuine interest and appreciation. Create a sense of community by supporting and engaging with other professionals’ content as well.
LinkedIn is all about building bridges and fostering genuine connections. By embracing collaboration and partnership, you not only expand your network but also enhance your credibility and visibility on the platform
#7. Create Valuable and Relevant Content: Be the Pied Piper of LinkedIn
LinkedIn users are hungry for valuable and relevant content that helps them grow professionally. Be the Pied Piper of LinkedIn by offering insights, practical tips, and expert advice. Solve their pain points, address their challenges, and provide tangible value they can apply to their careers. Research trending topics in your industry and explore different content ideas and formats.
Share case studies, industry news analysis, interviews with experts, or success stories that inspire and educate your audience. Focus on content that sparks conversations, encourages sharing, and positions you as a trusted resource in your field.
#8. Consistency and Timing: Be the LinkedIn MVP
Consistency is the backbone of success on LinkedIn. Be the Most Valuable Poster (MVP) by showing up consistently and delivering high-quality content. Create a content calendar that outlines your posting schedule and topics in advance.
Consistency shows your dedication, builds trust with your audience, and keeps them coming back for more. However, timing is equally important. Pay attention to when your audience is most active and adjust your posting schedule accordingly. Experiment with different days and times to find the sweet spot that maximizes engagement and visibility.
#9. Measure Results and Optimize: Unleash the Power of Data
To fine-tune your LinkedIn content strategy, you need to measure, analyze, and optimize. Leverage LinkedIn analytics and other tools to track key metrics such as reach, engagement, and click-through rates. Dive deep into the data to identify patterns and trends in your content performance. Which posts generated the most engagement? Which topics resonated with your audience? Use these insights to optimize your content strategy.
Refine your approach based on data-driven insights, focus on what works, and experiment with new ideas. Continuous optimization is the key to achieving sustainable growth on LinkedIn.
#10. Add Value through Thought Leadership: Become a Trusted Authority
To truly stand out on LinkedIn, strive to become a thought leader in your industry. Thought leadership is all about providing valuable insights, industry expertise, and innovative ideas that establish you as a trusted authority. Share your unique perspectives on industry trends, offer practical advice, and contribute to meaningful discussions. By positioning yourself as a thought leader, you attract a loyal following who sees you as a go-to resource for valuable information.
Share your expertise through thought-provoking articles, in-depth analyses, and thought leadership pieces. Be bold and offer fresh perspectives that challenge conventional wisdom. Remember to support your opinions with data, research, and real-life examples.
Summing Up
LinkedIn is a powerful platform where content reigns supreme. By understanding your audience, defining your brand, and choosing the right content formats, you can craft engaging content that resonates with your target audience. Compelling headlines, valuable content, and eye-catching visuals will set you apart, while fostering engagement, consistency, and data-driven optimization will take your profile to new heights. So, go forth and conquer LinkedIn with your captivating content!
Intelligo 100.1.4.1273 installing error is a type of Windows Update error that has the error code 0x80070103. This error code tells the user that the drivers that Windows Update is trying to install are either already installed or incompatible with the system.
The Intelligo 100.1.4.1273 installation issue typically occurs when there’s a problem with the Windows Update cache. In this article, we explain what causes this error and how you can fix it.
What causes Intelligo 100.1.4.1273 error?
Error code 0x80070103 can be caused by:
Updating a drive alongside a Windows Update: Attempting to perform an existing driver update alongside a Windows update can cause the Intelligo 100.1.4.1273 error.
Driver update compatibility issues: You might also encounter this error when the driver being installed by Windows Update is incompatible with the existing Windowsversion installed on your PC.
The driver is under use: If the system is using the drive while Windows Update tries to update it, you could end up with error code 0x80070103.
Corrupt system files: Installing updates when system files have become corrupt because of hardware or software failures, viruses, or malware.
How do I fix Intelligo 100.1.4.1273 error?
Before you start working on the fixes explained below:
Make sure Windows Update isn’t currently running on your computer. If it is, let the update complete.
Alternatively, you can also stop the update if you want to proceed right away.
1. Run the Windows Update troubleshooter
Search for the Settings app from the Start Menu and click Open.
Click on the System section on the left menu and select the Troubleshoot option.
Under the Troubleshoot options, click on Other Troubleshooters.
In the next window, find the Windows Update option and click Run.
Sit back while the troubleshooter scans for issues and resolves them for you. Restart your system once you finish troubleshooting. Now try updating Windows and see if the error is fixed.
In case it didn’t work for you, there is another way to detect Windows update errors using specialized support from a PC repair and optimizer solution.
2. Clear Windows Update cache
2.1 Using Command Prompt
Run the command prompt as an admin. You can do this by pressing Win + R, typing cmd, and pressing Ctrl + Shift + Enter.
Execute the following commands (i.e., type them and press Enter) one by one:
Search for services in the Start Menu and press Enter.
Manually search for the following services in the list, right-click on them, and select Stop:
Windows Update
Cryptographic Services
Background Intelligent Transfer Service
Navigate to the following path (assuming Windows is installed on drive C) and rename the folder called SoftwareDistributionto SoftwareDistribution.old: C:\Windows
Navigate to the following path and rename the folder called catroot2 to catroot2.old: C:\Windows\System32
Restart the services you disabled in step 2 by right-clicking on them and selecting Start.
Launch an elevated Command Prompt by pressing Win + R, typing cmd, and pressing Ctrl + Shift + Enter.
Go to the General tab and click on the Selective Startupoption. Make sure to check the Load system services checkbox and uncheck the Load startup itemsentry.
Next, go to the Services tab and check the box on the bottom left that says Hide all Microsoft services. Click on the Disable all button.
Go to the Startuptab and click on Open Task Manager.
In the Task Manager, select each enabled startup app and click Disable on the top right.
Close the Task Manager window and click Apply > OK.
Restart your system.
Clean boot is where you start your computer with the minimum required drivers. All the startup programs are disabled to determine if any of those are causing issues with your installation process.
After performing a clean boot, if the Intelligo 100.1.4.1273 installing error is resolved, re-enable the Microsoft services and the start-up apps from System Configuration.
When you’re done, see if your error has been resolved. In most cases, the Intelligo 100.1.4.1273 installation error is easy to resolve. In fact, most common Windows Update errors are easy to fix.
Were you able to solve the error as well? Let us know in the comments below.
Google has lodged an official grievance with the Federal Trade Commission alleging that its adversary, Microsoft, employs deceptive tactics to secure deals with its Azure cloud server services, CNBC reports.
Google submitted a letter to the Federal Trade Commission on Wednesday, in which they have raised concerns regarding Microsoft’s licensing practices which they consider biased and detrimental to healthy competition. The company has accused Microsoft of attempting to influence the cloud computing market by restricting clients’ freedom to switch services.
The letter has been sent in response to a broader inquiry by the FTC to receive opinions on possible activities that could be deemed anti-competitive within the cloud industry.
It is worth noting that this is not the first time that Google has taken action against Microsoft with antitrust agencies. As reported by Reuters, the search giant urged European regulators to closely scrutinize Microsoft’s “anti-competitive posture” earlier this year.
Over the past six months, Microsoft has been beset by a string of antitrust grievances, with the Competition and Markets Authority in Europe taking issue with its bid to obtain gaming corporation Activision Blizzard, ultimately blocking the acquisition. Additionally, the FTC brought legal action to thwart the proposed merger.
In the complaint, Google targeted Microsoft by asserting that its dominance in the market through the deployment of Windows Server and Microsoft Offices makes it challenging for its extensive client base to opt for anything other than Azure cloud infrastructure. The search giant further described the restrictions imposed by Microsoft’s complicated licensing framework as a hindrance to companies seeking to diversify their enterprise software vendors.
In addition to this, Google went on to bring forth the issue of significant national security and cybersecurity risks arising from such a level of control by Microsoft. It outlined a series of cyberattacks, including the SolarWinds breach, linked to Microsoft products as a matter of concern.
Steamwebhelper.exe is a Steam-related process that runs in the background when you use the app. However, it is not always smooth sailing, as some users complain of a spike in CPU usage.
Fortunately, there is a way to fix this issue, and we will show you how to do it in this guide. But first, let’s look at what the process offers.
What does Steam Web Helper do?
The steamwebhelper.exe process is Steam’s built-in web browser. This process starts with a series of processes on your PC when you launch the Steam client.
These processes are important for the display of the Steam Store, Community, and the game library tab. Hence, it is a good process but not integral to running the Steam app.
Normally, this process does not use much of your PC resources. But if you are faced with high CPU usage, you can fix it with the solutions in the next section.
Why does Steam Web Helper use so much CPU?
Below are some of the reasons steamwebhelper.exe uses a high CPU on your PC:
Issues with Animated Avatars: This problem is usually down to problems with the Animated Avatars on Steam. You need to disable them to fix the issue.
Faulty Windows update: Some users have found this problem due to issues with a Windows update. The solution to this is to delete the last Windows update on your PC.
Problems with Steam Overlay: Most high CPU usage issues related to Steam are usually caused by the Overlay feature. You need to disable the feature to restore normalcy.
How can I fix steamwebhelper.exe if it is using a high CPU?
1. Disable Animated Avatars
Launch Steam and click the gear (settings) icon next to the Friends List option.
Check the bottom of the page and click OFF next to Enable Animated Avatars & Animated Avatar Frames in your Friends List and Chat.
Finally, save your settings and restart Steam.
Animated Avatars are moving avatars that can be used to customize your profile. However, some users have found them responsible for the steamwebhelper.exe high CPU usage.
So, you need to disable the feature to reduce the resource usage.
2. Disable Steam Overlay
Launch Steam and select the Settings option.
Click the In-Game option in the left pane.
Now, uncheck the box next to Enable the Steam Overlay while in-game.
To further reduce your CPU usage, select Interface in the left pane.
Next, uncheck the box next to the following options:
Smooth scrolling in web views
GPU accelerated rendering in web views
Hardware video decoding
Finally, save your changes and relaunch Steam.
Steam Overlay is one of the many features that help to improve user experience. However, it can also cause steamwebhelper.exe to register high resource usage.
What you need to do here is to disable the feature and some other interface-enhancing features.
Press the Windows key + I to open the Settings app and select Windows Update in the left pane.
Select Update history in the right pane.
Now, choose Uninstall updates.
Finally, right-click the update to remove on the new Control Panel window, select Uninstall, and wait for the process to complete.
In some cases, the steamwebhelper.exe high CPU issue can be caused by an incompatible Windows update. Uninstalling this update till another patch is available is the solution to this.
4. Open Steam without Web Helper
Close Steam and launch File Explorer.
Now, navigate to the location of the steam.exe file and note it.
Next, press Windows + R and type the command (replace File location with the path of steam.exe noted above) below: (File location)\\Steam\\steam.exe” -no-browser +open steam://open/minigameslist
An example of a valid path for the above command is shown below: C:\\Program Files (x86)\\Steam\\steam.exe” -no-browser +open steam://open/minigameslist
Finally, click the OK button.
After running the command above, Steam will start in Small Mode. This will disable the web browser components, which should fix the steamwebhelper.exe high CPU usage issue.
With this, we can now conclude this guide on everything you need to know about the steamwebhelper.exe process. If you are also facing high CPU usage issue, the solutions in this guide will help you fix it.
If you also want to know about the WSHelper.exe process, check our detailed guide for verified information.
Windows 11 updates are mandatory if you want your PC to run properly. Just last week, Microsoft released the Patch Tuesday updates that managed to solve a lot of security issues.
A lot of updates are coming next week too, with Build KB5027303 being released on June 27th and bringing with it a lot of new and exciting features.
But sometimes, these updates are causing conflicts with third-party apps, and drivers. Take for example iCUE from Corsair, which has been experiencing issues since the latest Windows 11 update. But it seems that you can finally make it work.
As you can see on this Reddit thread, a lot of people have been affected by this annoying bug, but you can fix it now.
If your iCUE is not working after an update, you can fix it now
Corsair has released the latest patch, which will fix iCUE’s issues on Windows 11. The patch is version 5.3.102, and if you can’t find it on your native app, then you can download it from Corsair’s official site.
But to make it work even more efficiently, you should perform a clean install.
Uninstall your current iCUE. You can find it in Setting > Apps > Installed Apps.
For more information, we have a great guide on how to download iCUE for Windows 11 so feel free to check it out.
Users agree that a clean installation of the app solves the issue altogether. And if the problem persists in the future, especially after updating your Windows 11, you can repeat the process.
Always perform a clean installation with the latest patches from the site. The iCUE native app might not be able to always receive the latest patches on it, so make sure to check out the official site as well.
And if you’re in doubt, better to update it by downloading it from the site, rather than the app.
Have you experienced this problem with iCUE not working after a Windows update? Let us know in the comments section below.
The makecab.exe process is one of the many processes that keep your PC running smoothly. It helps with some crucial operations and gets a lot of things done.
However, you can sometimes encounter issues with this process. If you want to know what this process does and how to fix its high resource usage, this contains all the information you need.
What is the use of makecab.exe?
The makecab.exe is an integral process that helps compress Component-Based Servicing log files (CBS log files). These are usually large files that would have taken up large spaces if not compressed.
Hence, this process is pretty important in saving system space. Usually, this process does not consume high resources.
However, there are times when multiple instances of makecab.exe might be running on your PC. If you are experiencing this unusual CPU usage, we will show you how to resolve it in the ensuing sections of this guide.
How can I fix makecab.exe if it is causing high CPU usage?
1. Delete CBS Log Files
1.1. Use File Explorer
Press the Windows key + E to launch File Explorer and navigate to the path below: C:\Windows\Logs\CBS
Right-click each of the CBS log files here.
Finally, select Delete and restart your PC.
If the makecab.exe process is registering high CPU usage on your PC, it might be because it encountered issues while trying to compress your CBS files.
The quickest way to fix this is to delete the files manually. You can either do this via File Explorer or CMD, as shown below.
1.2 Using Command Prompt
Press the Windows key + S, type cmd, and click Run as administrator under Command Prompt.
Type the command below and hit Enter to run it: del /f %windir%\logs\cbs\*.log
Finally, wait for the command to finish running and restart your PC to effect the changes.
This option is another effective one to delete your CBS files manually. This method is faster and should fix the makecab.exe high CPU issue.
Press the Windows key, type cmd, and select Run as administrator under Command Prompt.
Type the command below and hit Enter to run it: DISM /online /cleanup-image /restorehealth
Wait for the command to finish running. Now, run the command below:sfc /scannow
Finally, wait for the command to finish running and restart your PC.
In some cases, the makecab.exe high CPU usage issue can be due to problems with your system files. Fortunately, you can fix this by running some commands, as shown above.
Alternatively, you can fix this issue for good by using a PC repair tool to save you from the stress of running a series of commands and repairing the files manually.
3. Scan for malware
Press the Windows key + S, type virus, and choose Virus & threat protection.
Click the Scan options link on the next page.
Finally, select your preferred scan option and click the Scan now button.
Viruses can disguise as different processes on your PC, including the makecab.exe process. So, if you are still experiencing high CPU usage after applying the solutions above, you need to perform a full malware scan.
Alternatively, if Windows Defender cannot find and eliminate the virus, we recommend using TotalAV for the job. This excellent software will pull out the most hidden virus on your PC with just a few clicks of the mouse.
4. Run Disk Cleanup
Press the Windows key, type cleanmgr, and select the Disk Cleanup option.
Click the Clean System files button.
Now, select the drive you want to scan and click the OK button.
Finally, check the boxes for the files you want to clean and click the OK button to begin the process.
Manually cleaning the junk files on your PC can sometimes not fix the makecab.exe high CPU usage issue. You need to take advantage of the Disk Cleanup tool to get rid of these files, including the leftover CBS log.
5. Uninstall any faulty software
Press the Windows key + S, type control, and click Control Panel.
Choose Uninstall a program under the Programs option.
Now, right-click the app and select Uninstall.
Finally, follow the onscreen instructions to complete the process.
In cases where you started noticing this issue after launching a particular app, the problem might be related to the software. To fix this, you need to reinstall the faulty software.
There you have everything you need to know about the makecab.exe process. This process is important on your PC and does not hog your resources.
In rare cases, you notice unusual CPU usage, the solutions in this guide should help you solve the problem.
Microsoft Teams might be the most popular app for working. The app now has a lot of excellent AI-based features that allow you to work efficiently. You can use AI recap, to quickly summarize a meeting. You can create organizational charts, and use them to build a better workflow. All these are in Microsoft Teams.
If you can log in, of course. Why we’re saying this? Well, there is a particularly stressful bug that you can run into sometimes on Teams. We’re talking about the AADSTS51004 error.
The AADSTS51004 Teams error happens in various forms. But they all have the same issue. There is a problem while trying to sign up to Microsoft website, a Microsoft app, such as Teams, or even a Microsoft could, such as OneDrive.
When the signing up fails, there are a lot of times when this particular error shows up. It can appear like this AADSTS51004: The user account 4ZtVnLfa9UfSXjKe/32NLQ== does not exist in the 4842004-47b3-4aso-8f12-797e13d1-y823 directory. To sign into this application, the account must be added to the directory. And it can appear simply like this AADSTS51004: The user account ….
How to fix the AADSTS51004 Teams error
First, this error means that the user account doesn’t exist in the Microsoft account directory. A Microsoft application, in our case Teams, likely chose the wrong tenant to sign into. And now, the currently logged-in user was prevented from doing so since it doesn’t have a tenancy.
What to do then? Well, if this user should be able to log in, add them as a guest.
To add B2B collaboration users to the directory, you need to follow these steps.
Sign in to the Azure portal in the User Administrator role. A role with Guest Inviter privileges can also invite external users.
Navigate to Azure Active Directory, then go to the Users panel.
Select Invite external user from the menu.
From there you can add the existing profile and customize it. Ultimately you can add a tenancy to it, and then it will be all good.
However, the simplest solution to this would be to check if your account still has a Microsoft 365 tenancy, and if not, then renew it.
We hope you found these solutions useful. Be sure to let us know if it worked in the comments section below.
Whether you’re a tech enthusiast, a system administrator, or simply curious about the inner workings of Windows scripting, this guide will provide valuable insights into the power and potential of cscript.exe.
In this guide, we will learn about this file’s functionality, features, and purpose & benefits.
What is cscript.exe?
Cscript.exe is the main executable that serves as the Windows Script Host (WSH) engine in Windows and provides a platform for running scripts and automating various tasks.
It acts as an interpreter for scripting languages such as VBScript (Visual Basic Script) and JScript (JavaScript), allowing users to run and execute scripts written in these languages.
This file provides a platform for automation and customization by executing scripts that can interact with the operating system, perform various tasks, and manipulate system components.
It serves as a vital tool for system administrators, developers, and power users who want to streamline their workflows, create powerful automation scripts, and perform advanced tasks efficiently.
The default location of this executable file is: C\Windows\WinSxS\wow64_microsoft-windows-scripting_31bf3856ad364e35_10.0.22621.1635_none_328fa8d3b05f8ca5
What is the purpose of Cscript?
1. Script execution, automation & customization
Cscript.exe interprets and runs scripts written in scripting languages such as VBScript and JScript, enabling users to automate tasks and perform various operations.
This enables users to automate repetitive tasks like file operations, system configuration, data manipulation, and more.
You can also execute scripts to customize system behavior and modify system settings, preferences, and configurations.
This, in turn, is a flexible way to tailor the operating system to specific needs, creating personalized computing environments.
2. Logon scripts & error handling
Cscript.exe can be used for creating logon scripts in Windows environments. These scripts run automatically when a user logs into the system, allowing administrators to set up personalized user environments, map network drives, configure network connections, and perform other tasks during the login process.
It comes with built-in error handling and debugging capabilities, which allow you to identify and resolve issues in their scripts.
It provides error messages, line numbers, and debugging options, making it easier to troubleshoot and correct script errors.
Cscript.exe enables administrators to manage and maintain systems by executing scripts that automate administrative tasks such as user management, network configuration, software installation, security settings, and more.
It can be integrated with the Windows Task Scheduler, allowing users to schedule script execution at specific times or intervals.
This integration enables the automation of script execution without manual intervention, providing enhanced productivity and efficiency.
4. Command line control & script security
Cscript.exe can be accessed through the command line interface, offering users precise control over script execution.
It provides various command line options that allow users to specify script parameters, control script behavior, and gather script output.
It also provides security configurations and restrictions to prevent malicious scripts from compromising system integrity and protecting against unauthorized access or actions.
5. Integration with Other Applications
Cscript.exe can be integrated with other applications and software systems, allowing scripts to interact with external programs, databases, APIs, and more.
This integration expands the capabilities of scripts, enabling seamless communication and data exchange with external resources.
How I can run Cscript from the command line?
Press the Windows key, type cmd, and click Open.
To navigate to the directory containing the script, we will use the cd command. Type the following command by replacing the path with C:\Scripts and press Enter: cd C:\Scripts
To run the script using cscript.exe, type Cscript followed by the name of your script file, including the file extension. For example, if the script name is myscript.vbs, type the following command and hit Enter: cscript myscript.vbs
The script will be executed, and you can see the output in the Command Prompt window.
From automating repetitive actions to performing advanced system administration tasks, cscript.exe is a versatile tool that empowers users to automate processes, customize system behavior, streamline their computing experience, and accomplish more with efficiency.
Microsoft Teams is one of the most popular apps for working organizations. In fact, it might be the most popular. Microsoft has enhanced it with a lot of excellent AI-based features that allow you to work efficiently. We’re talking about AI recap, creating organizational charts, and using it to build a better workflow.
However, there are times when Microsoft Teams just doesn’t work the way we want it to work. For instance, sometimes in Teams Chat, URL previews are not working properly. They do not show the content they’re linked to, and instead, an old URL seems to pop up every time a new URL is introduced.
There are many reasons why this happens. Your Microsoft Teams might be out of date, but usually, the app is updating itself automatically, so a simple restart would fix it.
Other times, there is an internal conflict, in which case you should always restart your device. But you can also try to log off and log back on, and this should also fix the issue. Most times, you need to delete the cache data which enables Teams’ internal conflicts. But don’t worry, you can do that very easily.
Here’s how to fix the Teams URL previews not properly showing error
As we said earlier there are some standard solutions. But if they don’t work, then the solution we recommend is to clear your Microsoft Teams’ cache data.
Here’s how to do it.
Quit Microsoft Teams. Right-click the icon and select Close window.
Cut and paste %appdata%\Microsoft\Teams into File Explorer.
Delete the contents of the entire folder.
Restart Microsoft Teams.
Optionally, you can also perform a restart of your device, right after you’ve done deleting the entire folder. Don’t worry about deleting it. It won’t hurt your device in any shape.
Sometimes, the cache data enables internal conflicts to happen, especially when it comes to previewing URLs. Deleting the data would delete everything associated with links in Teams, including previews.
So go ahead, delete the data, and see if your URLs’ previews are working now.
And be sure to let us know in the comments section below if these solutions worked for you.
Installation and update errors are part of the norms for Windows users on their PCs. One of the prominent error codes for these issues is 0x80073cf6, as reported by many users.
This error can be frustrating as it prevents you from installing apps on your PC. Fortunately, there are ways to fix it, and we will show you how to go about it in this detailed guide.
What is error code 0x80073cf6?
The 0x80073cf6 error shows up when users try to update a UWP program on their Windows PC. Also, some users get this error when they try to install or uninstall a program.
This error is usually accompanied by a prompt that reads: Application can not be installed, or This operation failed with this error. Below are some of its major causes:
Issues with Windows Store: If you are getting this error while trying to update UWP apps, it might be due to issues with Windows Store. The solution to this is to run the dedicated troubleshooter and reset the app.
Outdated PC: This error can sometimes show up because your OS is outdated. Updating your PC to the latest version should do the trick here.
Corrupt system files: Sometimes, you might get this error because your system files are corrupt. You need to repair and restore these files to eliminate the error.
How do I fix error code 0x80073cf6?
Try the following preliminary troubleshooting steps before exploring the sophisticated solutions:
Restart computer.
Update your PC.
1. Run the Windows Store App troubleshooter
Press the Windows key + I to open the Settings app and select the Troubleshoot option in the right pane.
Select Other troubleshooters.
Finally, click the Run button before the Windows Store Apps option and follow the onscreen instructions.
In some cases, the error code 0x80073cf6 can be due to issues with Windows Store processes. To fix this, you need to run the Windows Store Apps troubleshooter.
2. Reset the Windows Store cache
Press the Windows key, type cmd, and select the Run as administrator option under Command Prompt.
Type the command below and hit Enter to run it: wsreset.exe
Finally, wait for a Command Prompt window to open, and the Windows Store app will open automatically.
If the Store app cache is corrupt, you are likely to get the error code 0x80073cf6 while trying to update UWP apps. You can fix this by resetting the Store cache.
Press the Windows key, type cmd, and select Run as administrator under Command Prompt.
Type the command below and hit Enter to run it: DISM /online /cleanup-image /restorehealth
Wait for the command to finish running. Now, run the command below: sfc /scannow
Finally, wait for the command to finish running and restart your PC.
Sometimes, this error code 0x80073cf6 might be due to broken or missing system files. To fix this, you need to run the SFC and DISM scans.
Alternatively, you can optimize and protect your Windows PC from file corruption or other online threats out there with an automatic PC repair tool.
4. Create a new user account
Press the Windows key + I key to open the Settings app. Then, click on Accounts.
Click on Family & other users in the right pane.
Scroll down the page till you see Other users. Then, click the Add account button.
Now, select I don’t have this person’s sign-in information.
Then, click on Add a user without a Microsoft account.
Enter all the information required, then click on the Next button once you are done.
At times, installation error 0x80073cf6 can be peculiar to just a particular user account. To confirm if this is the case, you need to create a new local account and log in.
Now, wait for Windows to prepare the setup and click the Yes button when prompted.
Next, accept the Licence Agreement and wait for Windows to download the required updates.
Choose Whether to keep your files and apps or not. Since this is an in-place upgrade, leave the recommended settings, i.e., keep your files and apps.
Now, click the Install button to start the in-place upgrade.
Finally, wait for Windows to copy the necessary files to upgrade your device and restart your PC.
If push comes to shove, you might need to perform a repair upgrade to fix the error code 0x80073cf6. This will help you update your PC and eliminate the potential causes of the error.
The error code 0x80073cf6 can be frustrating, as it prevents you from installing, updating, and uninstalling apps. However, you should be able to fix it by following the instructions in this guide carefully.
This is a very good week for Windows lovers. Build KB5027303, and brought with it a lot of new and exciting features. The VPN status icon is finally here, a new and redesigned Voice Access help page made its way into this build, as well.
You’ll find more about the new features on the official Microsoft blog if you want to see all the goodies, changes, and improvements that are coming with it.
Looks like KB5027303 for Windows 11 22H2 (available June 27th) will introduce website recommendations from browsing history, you'll be able to turn this off from Start menu settings. pic.twitter.com/c66xeBUUcy
The feature will access your browsing history on any browser that you use, and based on what you look for, and the pages you visit, it will make suggestions. Of course, this feature can come in handy, but it can also reveal a lot of sensitive information, especially if you’re not up for it.
Here’s how to disable website recommendation from browsing history
According to @PhantomOfEarth, you will be able to easily disable the feature. If it’s truly going to stay disabled, that’s something we’ll see. But it’s good Microsoft allows us to disable it.
You need to access Settings.
From there, you’ll go to Personalization, and then Start.
When you get to the Start panel, turn off Show websites from your browsing history.
Build KB5027303 will be avaialble to the general public next week, on June 27th. So if you’re updating your Windows 11, make sure to come back to this article and remember to disable the feature. This is just in case you don’t want any recommendations when it comes to your browsing history.
This build has a lot of new features, and they’re live in Windows Insiders. So get ready next week for a good wave of new updates.
And let us know your thoughts and opinions on this feature. Do you like it or not? Do you find it useful? Tell us in the comments section below.
The Windows operating system comprises many background files and processes. Winserv.exe belongs in this category. We have a guide that explains how many processes run in the background, so you can learn more about the subject.
If you are wondering what this executable is and its use on the OS, this guide will give you all the necessary information.
What is Winserv.exe?
This executable was released in 2004 by Sw4me Programmers Group; it is typically 34,304 bytes and performs these functions:
Create an NT service running any application.
Configure, control, and view the status of any NT service.
These NT services are applications that operate in the background and give the operating system some crucial functionality. Remember that it is possible to disable background applications, so you can always stop this file from running.
What is Winserv.exe location?
Once downloaded, you will be able to find the file in a subdirectory of the Program Data folder, as shown below:
C:\ProgramData\Windows Tasks Service\
Is Winserv.exe a virus?
From what we gather, this file is not necessarily malicious and may be integral to creating and managing NT services, monitoring NT services, and logging NT service events.
However, since a few users have indicated some concerns, we recommend running a scan with a trusted antivirus program to be on the safe side.
Should I disable Winserv.exe?
This is entirely up to you. You may, however, perform a winserv.exe uninstall or disable the executable if you observe the following:
If you are experiencing problems with NT services.
If your use a third-party service manager.
Also, be mindful that you may experience the following if you disable the process:
You may become more open to malware attacks since the process manages some of Windows’ security features.
You may be unable to use certain Windows features like the Update and Firewall features.
Lastly, certain NT services may not start or stop properly.
How do I disable Windserv.exe?
Use the Task Manager
Hold Ctrl + Shift + Esc to open the Task Manager window.
Locate the Winserv.exe process and right-click on it.
We hope this guide is valuable to you, as our ultimate goal is to enlighten your knowledge on this executable.
We discuss some other executable files like Pacjsworker-exe so that you may read and expand your knowledge.
Lastly, we value your feedback and would love to hear from you. Please feel free to share your thoughts and leave a comment below with your perspective.
Buckle up everybody, because there is that time of the week again when new features are coming to Windows Insider. And there are a lot of new features coming in the build KB5027303.
A lot of the new updates started rolling out last month, and some of them have been announced for a while. Let’s take a look at the VPN status icon, which was announced last month, but it’s finally here, now.
And probably one of the most important features coming with this build are the new and improved in-app voice access commands help page and the cloud sync across Microsoft clouds.
Basically, you’ll be able to easily access and authenticate across Microsoft clouds. This particular feature also satisfies Conditional Access checks if they are needed. Regarding the in-app voice access commands, this build re-designs them completely.
Here’s how to use voice commands in Windows 11 now
As we mentioned earlier, this update redesigns the in-app voice access command help page. Every command now has a list of descriptions and examples of further variables that you can use.
The search bar will allow you to quickly find commands, and you can find the command help page from Help > View all commands. But you can also access it with your voice by saying the command What can I say?
For now, this feature is different dialects in English, and Microsoft has added all versions, including those spoken in:
United Kingdom – English
India – English
New Zealand – English
Canada – English
Australia – English
You need to know that turning voice access on for the first time will prompt Windows to ask you to download a speech model. If you don’t find a speech model that matches your display language, you can access it in English.
You’ll always be able to choose another language from Settings > Language on the voice access bar.
What other updates are coming with KB5027303
You can read all about the other updates on Microsoft’s official blog about it, but here are some of the most exciting updates coming with this build.
New! This update expands the roll out of notification badging for Microsoft accounts on the Start menu. A Microsoft account is what connects Windows to your Microsoft apps. The account backs up all your data and helps you to manage your subscriptions. You can also add extra security steps to keep you from being locked out of your account. This feature gives you quick access to important account-related notifications.
New! This update improves the sharing of a local file in File Explorer with Microsoft Outlook contacts. You now have the option to quickly email the file to yourself. In addition, loading your contacts from Outlook is better. This feature is not available for files stored in Microsoft OneDrive folders. OneDrive has its own sharing functionality.
This update provides a copy button for you to quickly copy two-factor authentication (2FA) codes. These are in notification toasts you get from apps installed on your PC or from phones linked to your PC. Note that this feature only works for English.
New! This update adds multi-app kiosk mode, which is a lockdown feature. If you are an administrator, you can specify the apps that can run on a device. Other apps will not run. You can also block certain functionalities. You can configure distinct types of access and apps to run for different users on one device. Multi-app kiosk mode is ideal for scenarios in which multiple people use the same device. Some examples are frontline workers, retail, education, and test taking.
Microsoft has added a feature where you can set up your Windows 11 much easier, by easing the access to Settings.
Do you like these new features? Let us know your opinions in the comments section below.