Xbox Free Play Days April 13-16: Payday 2, ESO and more

Another week of Xbox Free Play Days starts today with three more games for subscribers of Xbox Live Gold and Xbox Game Pass Ultimate. These games will be available from Thursday through Sunday, April 16. And you’ll be pleased to know that its another solid, not to mention eclectic, lineup for this week. Have a look below for the lineup.

Payday 2

PAYDAY is an action-packed, four-player co-op shooter where you rob banks and get paid. Up to four friends co-operate on the hits and as the crew progresses the jobs become bigger, better and more rewarding. Along with earning more money and becoming a legendary criminal Crime does pay – use your funds to customize your character with new skillsets that change the way you play and kit them out with their own guns and gear.

The Elder Scrolls Online

Join over 21 million players in the award-winning online multiplayer RPG and experience limitless adventure in a persistent Elder Scrolls world. Battle, craft, steal, or explore, and combine different types of equipment and abilities to create your own style of play. No game subscription required.

Them’s Fightin’ Herds

Them’s Fightin’ Herds is a 2D fighting game featuring a cast of adorable animals designed by acclaimed cartoon producer Lauren Faust. Beneath the cute and cuddly surface, a serious fighter awaits!

Wrap up

So which of these games will you be taking for a spin this weekend? Granted, two of them are already available on Game Pass. And the other, Them’s Fightin’ Herds, is now purchasable at half off. If you would like to learn more, head on over to the Xbox Free Play Days FAQ page.

Featured image via Vooks.net. 

Microsoft brings major improvements to the new Bing across Swiftkey, Microsoft Start, and Skype

The new Bing has become popular across the globe since its debut, with millions of users signing up and joining the waitlist to access it. And while it’s still in preview, Microsoft continues to approve tons of requests allowing more people to have a go at it.

Back in March, the tech giant announced that Bing had surpassed 100 million daily active users and attributed that the launch of the new Bing played a significant role in helping it achieve this feat. Since then, Microsoft has integrated AI capabilities across most of its products and services to enhance the user experience.

Today, the company has announced new ways through which users can access and interact with the new Bing as well as new updates to existing app integrations such as Bing, Skype, Microsoft Start, Microsoft Edge Mobile apps, and Swiftkey. Here’s everything you need to know:

Swiftkey

First up, is Microsoft’s Swiftkey which already ships with AI-powered predictive text technology to make texting much easier for users, but this time Microsoft is taking things a notch higher. The company has announced the availability of a new update for the app that ships with new AI capabilities.

Microsoft has integrated Bing into Swiftkey in three major ways, that is, Search, Chat, and Tone. Once you download and install the update to your device, the Bing icon will pop up above the keyboard. From this point, you’ll be able to select how you want to interact with it.

The Chat functionality is in place to help make things easier for the user, whether you are looking up new schools for your kids to attend in a new area after a big move, a nice restaurant within the area, and so on.

As for the Tone feature, you can use it to communicate efficiently and effectively as it lets you customize your text to align with any situation and tone you’d like. This way you get to save a lot of time in case you’re in a slump and unable to send real-time responses.

Additionally, with Bing making its way to Swiftkey, users don’t need to transition between multiple apps when they need to search for something from the web. This functionality is now available within the keyboard thus saving you time and helping you remain focused.

According to Microsoft:

These new features in SwiftKey are accessible in all markets where the new Bing is available; anyone can use Search now, while accessing Tone and Chat requires that you sign into your Microsoft Account that has been approved to access the new Bing preview.

Bing App

Moving on to the translator functionality in the mobile Bing app it now features both masculine and feminine translations to promote gender equality while making translations from English to Spanish, French, or Italian.

Bing_SwiftKey_GenderDe-Bias_Still.jpg

Skype

Microsoft has also announced that it’s expanding access for the new Bing in Skype group chats. And while the new Bing has been available to Skype users, this new capability will allow users in Skype group chat to access and interact with the new Bing despite them not being part of the preview.

Bing_SwiftKey_SkypeGroupChat_Still.png

The company has highlighted only one person in the group needs access. However, you’ll need to add the new Bing to the group chat first by searching for Bing in Skype in your Skype contacts and then adding it to the group.

Microsoft Start

And finally, the new Bing has made its way to the Microsoft Start app. Through the app, users will receive relevant information that resonates with them in one convenient location. This includes a “personalized news feed, including premium content from hundreds of global publishers, keeps you informed and entertained, and the sports scores, weather forecasts, stock prices, shopping deals.”

Let us know which integration you’re looking to make the most out of in the comments below.

Fix DirectDraw Error While Playing Legacy Games

DirectDraw is a crucial part of DirectX that is used by Windows PC when performing graphics-intensive activities. Unfortunately, some users now report a DirectDraw error while playing legacy games on their PCs.

This issue is also affecting artists using high-level software. Fortunately, it is not the most difficult issue to fix and only requires the right information.

What is a DirectDraw error on Windows 10?

The DirectDraw error occurs when the crucial component of DirectX encounters an issue. Below are some of the causes of this error:

  • Faulty video card driver: If you are facing the DirectDraw error on games like Age of Empires and Yume 2kki, it might be because of an outdated video card driver. What you need to do is to update your driver to the latest version.
  • Outdated version of DirectX: Sometimes, this problem might be due to an outdated or incompatible version of DirectX. To fix this issue with DirectDraw, you need to download and install the latest Windows update to get the latest DirectX version.

How do I fix the DirectDraw error?

1. Enable DirectDraw and Direct3D

  1. Press the Windows key + R, type dxdiag, and click OK.
    dxdiag directdraw error
  2. Click the No button when prompted to check if you want to check if your driver is signed.
  3. Now, click the Display tab at the top.
  4. Check if DirectDraw Acceleration and Direct3D Acceleration are enabled.
    enabled
  5. Next, press the Windows key, type turn windows, and select Turn Windows features on or off.
    turn windows
  6. Check the Legacy Components box and press the + sign next to it to expand it.
  7. Finally, check the box next to Direct3D and click the OK button.
    legacy directdraw error

The first thing to the if you are encountering the DirectDraw DDERR_UNSUPPORTED error, is to enable DirectDraw and Direct3D. This will eliminate the error message after restarting your PC.

2. Change screen resolution for legacy games

  1. Right-click the game or app causing the error and select Properties.
    properties
  2. Now, click the Compatibility tab at the top.
  3. Check the box for Run in 640 x 480 screen resolution box and click OK.
    compatibility directdraw error

Another potential cause of the DirectDraw error on Windows 10 and 11 is an unreasonably high screen resolution. To fix this, you have to limit the screen resolution your legacy game is using.

3. Update video card driver

  1. Press the Windows key + X and select Device Manager.
    device manager
  2. Double-click the Display adapters option to expand it and right-click the device there.
  3. Now, select Update driver.
    update driver
  4. Finally, click Search automatically for drivers and install any available updates.
    search auto

Sometimes, the DirectDraw error might be due to issues with your graphics drivers. Hence, you should update them too.

If the Windows updater can not find the latest drivers for you, you can go to the manufacturer’s website to download and install them.

Alternatively, you can save yourself from unnecessary stress using an automatic driver updater like Outbyte Driver Updater. This top-notch tool scans your PC for outdated, faulty, and missing drivers and restores them to top shape.

With this, you overcome the risk of installing the wrong driver manually, which can lead to big problems.

Outbyte Driver Updater

Have a go with this tailored software to update any drivers smoothly.
Check price Visit website

4. Check if you are using the latest DirectX

  1. Press the Windows key + R, type dxdiag, and click OK.
  2. Click No when prompted.
  3. Now, click the System tab at the top and check the DirectX version.
    version directdraw error
  4. If you are using the old version, you need to install all available updates for your PC, as there is no standalone program for updating DirectX.

If you still can’t get past the DirectDraw error, it might be because you are running an outdated version of DirectX. The solution is to check for Windows updates and install them to get the latest version.

With this, we can conclude this guide on how to fix the DirectDraw error. All you have to do now is to follow the instructions carefully, and things should be back to normal.

If you can’t install DirectX on Windows 10, check our detailed guide to force the installation through.

Feel to let us know the solution that helped you fix this issue in the comments below.

Microsoft is experimenting with a Windows 11 handheld gaming mode

Microsoft, or at least some “hackers” within Microsoft, has been considering developing a gaming handheld mode version of its Windows 11 UI for devices like the Steam Deck. A video posted on Twitter on Wednesday by user @_h0x0d_ seems to be from a Microsoft Hackathon project from September 2022.

The video explains a Windows Handheld Mode that would optimize Windows 11 for such devices. Windows 11 is already available on Steam Deck in place of the Steam OS, but the experience is poorly optimized for handheld devices in its current state. This Windows Handheld Mode project would aim to fix that. It should be noted that the project may or may not see the light of day.

Instead of rolling out its own Xbox gaming handheld device, as some have long been calling for, it seems Microsoft is content to spread its Xbox brand on existing hardware like the Steam Deck and Logitech Gaming Handheld. Not to mention Microsoft’s plans to introduce an Xbox mobile games store and platform as early as next year.

Via Tom’s Hardware. 

Featured image via VideoCardz.com. 

7-Zip.dll Won’t Delete? 3 Ways to Get Rid of It

7-Zip is a nifty archiving tool, but many of our readers realized that after uninstalling the app, they are left with a 7-Zip.dll file that won’t delete. The DLL file is located in the C:\Program Files\7-Zip folder, and although you uninstall the tool, when you try to delete it, you receive the message that it’s still in use.

Why is 7-Zip.dll not deleting?

It’s frustrating because when you try to delete the 7-Zip.dll, you get the message This action can’t be completed because the file is currently in use by (or open in) File Explorer. So, here is why you can’t delete 7-Zip.dll:

  • File Explorer is still using it – If you didn’t close File Explorer before uninstalling 7-Zip, the Windows app was still using it, and that’s why it refuses deletion.
  • Associated processes are using it – Even if you closed File Explorer, its processes might work in the background preventing you from deleting the 7-Zip.dll file.

Now that we know the cause of this issue, let’s see how we can get rid of the 7-Zip.dll file safely.

What can I do if 7-Zip.dll won’t delete?

Before getting into more complicated troubleshooting, let’s perform a few workarounds that may fix the problem:

  • Restart your PC and try deleting the file again.
  • Boot your PC in Safe Mode and try deleting the 7-Zip.dll.
  • Try using a file deleter software.

If you still can’t delete the DLL file, perform the solutions below to remove the 7-Zip.dll file for good.

1. Use a DLL fixer app

If a program refuses to uninstall or has a DLL problem, it’s better to engage a DLL fixer app that has full databases of DLL files to replace the damaged or missing files. However, the third-party software can have a junk removal tool that will scrape the remnants of 7-Zip, including the stubborn DLL file.

2. End all related processes

  1. Right-click the Start button and select Task Manager from the list.
  2. Now, look through the processes and find the ones related to 7-Zip, then right-click on them and select End task.
  3. Now, try to delete 7-Zip.dll again.

3. Remove 7-Zip from the Registry

  1. Press the Windows key + R to start Run, type regedit and press Enter or click OK to start the Registry Editor.
  2. Now, navigate to the 7-Zip app key: HKEY_CURRENT_USER\Software\7-Zip
  3. Right-click the key and delete it from the Registry.

Usually, this issue is fixed by restarting your PC and deleting the DLL file, but we included all the options so that we make sure you get rid of this problem.

If you have other issues, you can read our guide on how to fix missing DLL files on Windows 11.

And if you didn’t upgrade to the latest OS yet, we also have a comprehensive article on fixing DLL issues on Windows 10.

For any other questions or suggestions, don’t hesitate to write them in the comments section below.

Redfall to launch without a performance mode, Starfield may follow suit

It looks like Bethesda’s upcoming shooter Redfall is going to launch without a 60FPS option. This was announced on Wednesday on Redfall’s official Twitter account. Apparently the game will run at up to 4K resolution at 30FPS on Xbox Series X; on Series S it will run at 1440p at 30FPS.

No doubt many will be disappointed to hear this. However, the team states in the post that a 60FPS performance mode will be added in a future update.

It wouldn’t be too surprising if other upcoming Bethesda games like Starfield also launch with 30FPS only. Bethesda Game Studios director Todd Howard said late last year that

We don’t have a problem with 30 frames per second as long as it looks really good and the simulation is running and all that stuff.”

Analysis of Starfield game trailer footage has indicated that the game was running 30FPS at 4K. Other recent AAA games that launched at 30FPS mode only include A Plague Tale: Requiem and Assassin’s Creed Valhalla.

Nonetheless, many gamers might left feeling a bit galled, seeing as how a “60FPS standard” was often touted during the leadup to the release of the current-gen consoles, with 120 FPS supposedly being not uncommon for the next generation of games. Thus far, these lofty ambitions have mostly yet to materialize.

Redfall releases on May 2 for Xbox Series X|S and Windows PC. It will be available on Game Pass day one.

Redfall
Redfall
Developer:
Bethesda Softworks
Price:
Free

Fix: 0x87d00324 SCCM Application Install Error

If you have encountered the 0x87d00324 SCCM application install error, this guide can help! This error indicates that the application is installed but couldn’t be detected by the configuration manager. We will cover all the available methods to fix the issue right after discussing the causes of the occurrence.

What causes the 0x87d00324 SCCM application install error?

There could be various reasons for this application install error to occur; some of the common ones are mentioned here:

  • Invalid detection method – If the detection method used to detect the app’s installation on SCCM is not correct, you might see this error. To avoid this, use the correct detection method for the app.
  • Network connectivity issues – If there are issues with the network connection, including network latency, between the client & the SCCM server, the installation may not be detected.
  • Invalid command-line parameters – If the installation command-line parameters are incorrect, the installation will not be detected. It could be due to a mistake during the deployment configuration.

Now that you know the potential causes of the error, let us check out the available fixes.

How do I fix the 0x87d00324 SCCM application install error?

Before engaging in advanced troubleshooting steps, you should consider performing the following checks:

  • While installing an app, look closely at the product code to ensure no discrepancies.
  • Check if the account or the machine you are using has network access.
  • The account must have access to the app.

If none of the above worked for you, you must move to the advanced fixes.

1. Verify the detection method

  1. Launch the Configuration Manager.
  2. Navigate to this path: Software Library\Overview\Application Management\Applicationsapp-list-cmpivot 0x87d00324
  3. Choose an app and click Deployment Types.
  4. Now right-click the app and select Properties.
  5. Go to the Detection Method tab from the field, select a detection method, and click Edit Clause.
  6. In the Detection Rule window, for Setting Type, type Windows Installer.Product code in the Detection rule 0x87d00324
  7. Check if the product code mentioned is the same as in the registry entry on the client machine.
  8. To do that, press Windows + R to open the Run window.
  9. Type regedit and hit Enter to open Registry Editor.
  10. Now navigate to either of these paths; the former is for 32-bit, and the latter is for 64-bit: HKEY_LOCAL_MACHINE\SOFTWARE\Wow6432Node\Microsoft\Windows\CurrentVersion\Uninstall\ HKEY_LOCAL_MACHINE\SOFTWARE\Microsoft\Windows\CurrentVersion\Uninstall\
  11. Locate the list of keys enclosed in curly brackets and cross-check the value for the program you are trying to install or detect.
  12. If it matches the one mentioned as the Product code in the Detection rule, proceed to the next step.
  13. If it doesn’t, click Browse to point on your MSI file.

If the Product code matches, but you still encounter this error, you need to refresh the deployment. For that, move to the next method.

2. Edit the Configuration Managemer Properties

  1. Open Configuration Management Properties in Control Panel on the client computer.Run now 0x87d00324
  2. Go to the Actions tab, select Machine Policy Request and Evaluation Cycle, and click Run Now.
  3. Click OK. OK 0x87d00324
  4. Once the new policy is received, the deployment will work, and you can install the app without issues.

We recommend you check out SCCM Application Error 0x87d00607 solutions as well, as it is a similar problem.

So, these are methods you can use to fix the 0x87d00324 SCCM application install error on your Windows server. The right detection method and correct values are important to avoid this error.

Try these methods and let us know what worked for you in the comments section below.

Surface Pro 9 Review: Perfecting a 10-year-old formula

Starting at $999.99

Microsoft’s Surface Pro 9 could be easily mistaken for the Pro 8 when the company’s flagship computer adopted a refined aesthetic with the Surface Pro X back in 2019. Since 2019, Microsoft has made a few tweaks to the Surface Pro line, such as omitting the audio jack, updating the panels refresh rate, adding USB-C ports, and adding upgradable memory options, but the biggest change came when the company consolidated its branding and marketing efforts last year.

Instead of forging forward with both a separate ARM-based Pro X line and an Intel-powered Pro line, the company combined the two lines under a unified design and name creating the Surface Pro 9. Customers can purchase either an Intel or ARM based version of the Surface Pro 9, and both come with different feature sets and their own set of compromises.

OnMSFT got its hands on the Intel based model for this review.

Specs
Surface Pro 8 Surface Pro 9
Processor Quad-core 11th Gen Intel® Core™ i5-1135G7 Processor
Quad-core 11th Gen Intel® Core™ i7-1185G7 Processor
i5 and i7 options with storage 256GB and above built on the Intel® Evo™ platform
Surface Pro 9:
12th Gen Intel® Core™ i5-1235U processor
12th Gen Intel® Core™ i7-1255U processor
Options with storage 256 GB and above built on the Intel® Evo™ platformSurface Pro 9 with 5G:
Microsoft SQ® 3 processor
Neural Processing Unit (NPU)
Operating System Windows 10 Home in S mode²
Microsoft 365 Family 30-day trial
Windows 11 Home
Preloaded Microsoft 365 Apps5
Microsoft 365 Family 1- month trial6
Preloaded Xbox App
Xbox Game Pass Ultimate 1-month trial7
Display Screen: 13” PixelSense™ Flow Display
Resolution: 2880 x 1920 (267 PPI)
Up to 120Hz refresh rate (60Hz default)
Aspect ratio: 3:2
Adaptive Color
Touch: 10-point multi-touch
GPU Ink Acceleration
Dolby Vision® support3
Surface Pro 9 (Intel/Wifi):
Screen: 13” PixelSense™ Flow Display
Resolution: 2880 X 1920 (267 PPI)
Color profile: sRGB and Vivid Refresh rate up to 120Hz (Dynamic refresh rate supported)
Aspect ratio: 3:2
Contrast ratio: 1200:1
Adaptive Color
Auto Color Management supported
Touch: 10-point multi-touch
Dolby Vision IQ™ support17
Gorilla® Glass 5Surface Pro 9 (SQ® 3/5G):
Screen: 13” PixelSense™ Flow Display
Resolution: 2880 X 1920 (267 PPI)
Color profile: sRGB and Vivid
Dynamic refresh rate up to 120Hz
Aspect ratio: 3:2
Contrast ratio: 1200:1
Adaptive Color
Touch: 10-point multi-touch
Gorilla® Glass 5
Storage Removable solid-state drive (SSD) options: 128GB or 256GB
512GB or 1TB
Surface Pro 9: 8GB, 16GB, 32GB (LPDDR5 RAM)
Surface Pro 9 with 5G: 8GB or 16GB LPDDR4x RAM
Surface Pro 9 (Intel/Wifi): Removable7 drive (SSD) options: 128GB, 256GB, 512GB, 1TB
Surface Pro 9 (SQ® 3/5G): Removable7 drive (SSD) options: 128GB, 256GB, 512GB
Graphics Intel® Iris® Xe Graphics (i5, i7) Surface Pro 9: Intel® Iris® Xe Graphics
Surface Pro 9 with 5G: Microsoft SQ® 3 Adreno™ 8CX Gen 3
Camera, Video
& Audio
Windows Hello face authentication camera (front-facing)
5.0MP front-facing camera with 1080p full HD video
10.0MP rear-facing autofocus camera with 1080p HD and 4k video
Dual far-field Studio Mics
2W stereo speakers with Dolby Atmos®
Surface Pro 9 (Intel/Wifi):
Windows Hello face authentication camera (front-facing)
Front-facing camera with 1080p full HD video
10.0MP rear-facing autofocus camera with 1080p HD and 4k videoSurface Pro 9 (SQ® 3/5G):
Windows Hello face authentication camera (front-facing)
Front-facing camera with 1080p full HD video
10.0 MP rear-facing autofocus camera with 1080p HD and 4k video
Windows Studio Effects with Eye Contact, Portrait Background Blur and Automatic Framing
Surface Pro 9 (Intel/Wifi):
Windows Hello face authentication camera (front-facing)
Front-facing camera with 1080p full HD video
10.0MP rear-facing autofocus camera with 1080p HD and 4k videoSurface Pro 9 (SQ® 3/5G):
Windows Hello face authentication camera (front-facing)
Front-facing camera with 1080p full HD video
10.0 MP rear-facing autofocus camera with 1080p HD and 4k video
Windows Studio Effects with Eye Contact, Portrait Background Blur and Automatic Framing
Memory 8GB, 16GB, 32GB (LPDDR4x RAM) Surface Pro 9: 8GB, 16GB, 32GB (LPDDR5 RAM)
Surface Pro 9 with 5G: 8GB or 16GB LPDDR4x RAM
Surface Pro 9 (Intel/Wifi): Removable7 drive (SSD) options: 128GB, 256GB, 512GB, 1TB
Surface Pro 9 (SQ® 3/5G): Removable7 drive (SSD) options: 128GB, 256GB, 512GB
Dimensions 11.3 in x 8.2 in x 0.37 in (287mm x 208mm x 9.3mm) Surface Pro 9 (Intel/Wifi):
Length: 11.3”(287 mm)
Width: 8.2” (209 mm)
Height: 0.37” (9.3 mm)
Surface Pro 9 (SQ® 3/5G):
Length: 11.3” (287 mm)
Width: 8.2” (209 mm)
Height: 0.37” (9.3 mm)
Security Firmware TPM chip for enterprise-grade security and BitLocker support
Enterprise-grade protection with Windows Hello face sign-in
Surface Pro 9 (Intel/Wifi):
Firmware TPM 2.0 is a security processor that is designed to give you peace of mind
Windows Hello face sign-inSurface Pro 9 (SQ® 3/5G):
Enhanced security with Microsoft Pluton
Windows Hello face sign-in
Weight 891 g (1.96lb) Surface Pro 9 (Intel/Wifi):
Weight1: 1.94 lb (879 g) Surface Pro 9 (SQ® 3/5G):
Weight1: 1.95 lb (883 g) (mmWave)
Color Casing: Signature anodized aluminum
Colors: Graphite, Platinum4
Surface Pro 9 (Intel/Wifi):
Casing: Aluminum
Colors:13 Sapphire, Forest, Platinum, GraphiteSurface Pro 9 (SQ® 3/5G):
Casing: Aluminum
Colors:13 Platinum
Ports/Slots 2 x USB-C® with USB 4.0/Thunderbolt™ 4
3.5mm headphone jack
1 x Surface Connect port
Surface Type Cover port
Compatible with Surface Dial off-screen interaction*
Surface Pro 9 (Intel/Wifi):
2 x USB-C® with USB 4.0/ Thunderbolt™ 4
1 x Surface Connect port
1 x Surface Type Cover portSurface Pro 9 (SQ® 3/5G):
2 x USB-C® 3.2
1 x Surface Connect port
Surface Keyboard port
1 x nano SIM
Battery Battery Capacity Nominal (WH) 51.5Wh
Battery Capacity Min (WH) 50.2Wh
Up to 16 hours of typical device usage
Surface Pro 9 (Intel/Wifi): Up to 15.5 hours of typical device usage
Surface Pro 9 (SQ®3/5G): Up to 19 hours of typical device usage
Surface Pro 9 (Intel/Wifi):
Battery Capacity Nominal (WH) 47.7 Wh
Battery Capacity Min (WH) 46.5 WhSurface Pro 9 (SQ® 3/5G):
Battery Capacity Nominal (WH) 47.7 Wh
Battery Capacity Min (WH) 46.5Wh
What’s in the box
Surface Pro 8
Power Supply
Quick Start Guide
Safety and warranty documents
Surface Pro 9 (Intel/Wifi):
Surface Pro 9 (Intel/Wifi)
Power supply
Quick Start Guide Safety and warranty documentsSurface Pro 9 (SQ® 3/5G):
Surface Pro 9 (SQ® 3/5G)
Power supply
Quick Start Guide Safety and warranty documents
SIM Card access tool

Look and Feel

The Surface Pro 9 looks eerily similar to the Surface Pro 8. as it maintains the recently upgraded rounded body type from the previous generation. The screen tech in the Pro 9 is roughly equivelent to the Pro which covers the same color gamut, level of power efficiency and resolution as last year’s model. While Microsoft may have played it conservative with the Surface Pro 9’s display panel for this model to balance resolution versus power consumption, there are a couple of tweaks the company could have made to improve upon the screen that would have added convenience for the customer while maintaining its battery life such as oleophobic coating and the use of anti-glare screen layer.

Surface Pro 8 and Pro Display

Once again, the Surace Pro 9 keeps a relatively glossy panel for its 13-inch screen, which becomes a detriment for customers who use their devices outside of the soft luminescent glow of office lights. Presumably, Microsoft keeps the glossy panel as a staple to help highlight its LCD’s “PixelSense Flow”

Whatever the case, the Surface Pro 9’s screen is every bit as remarkable as the Pro 8’s as it maintains deep blacks very well, contrasting HRD color from an LCD-power display. I tend to put matte screen protectors on my Pro devices for better pen grip when writing and as a thin layer of protection, and even with that applied, the display on the Pro 9 remains stunning.

Microsoft took some liberties with the Pro 9 from the Pro is with the rearranging of buttons on the device. The Pro 9 now has its power and volume buttons sitting flushed atop of the device in the same area as opposed to Pro 8 which splits them down both sides of the device. The new placement of the buttons reduces the likelyhood of accidental power and volume presses when holding the PC in horizontal tablet mode.

Surface Pro 9 buttons

In addition, the 2 USB-C Thunderbolt ports are now aligned to the right of the device instead of the left which could take some getting used to depending on how a customer’s home or work docking setup is arranged. As Apple brings back the SD card reader for its MacBook lineup, Microsoft moves away from having any variation of the port on its Surface Pro devices. Fortunately, most dongles and docking stations are maintaining the port and single cord solution via the Thunderbolt ports will still get the job done.

Few reviewers still talk about the hinges on the Surface Pro’s as they have been a well-earned staple on the device and the Surface Pro 9 maintains that standard. The Pro 9’s rigidity when flexed at any position is modest but notable convenience, especially when attempting some close-knee lap work.

Surface Pro 9 hinges

The last few notable things to mention about the Surface Pro 9 is the weight of the device, which feels ever-so lighter than last year’s model. The weight change may only become perceptible when holding the device for more than a couple of minutes at a time.

The keyboard and trackpad are the same as last year’s models with the Slim Pen 2 support maintaining its over 4K pressure sensitivity mark. Ideally, Microsoft will work out a solution that will bring over its haptic technology to create a single solid attachment which could offer a much larger surface area in the future. One can hope.

The only other mentions for look and feel of the Pro 9 when compared to the Pro 8 or any other 2-in-1 maybe the color pallet options for this model that include a new Saphire blue and Forest green which helps any Surface Pro 9 owner stand out from older model owners in a crowd. Yes, there are now crowds of Surface Pro users out and about.

Surface Pro 9 Saphire Blue

Performance

It should be noted that in most day-to-day usage for anyone who traffics in data processing or writing, the performance between the Surface Pro 8 and 9 is negligible, however, with that said for power users and benchmark junkies, Intel’s 12th Gen chips offer a noticeable increase in performance but at the detriment of heat and fan noise for the Surface Pro 9.

Surface Pro 9 benchmarkingWhile Microsoft has yet to incorporate a dedicated GPU architecture into the slim profile of the Surface Pro 9, its partnership with Intel this year does a decent job of counter balancing that omission with raw CPU performance with the Pro 9 coming in second to the Asus ROG Flow Z13 in both single core and multi-core threaded testing. When testing it against the MacBook Air architecture, the Pro 9 beats it, but does so with less power efficiency.

Unfortunately, when the Pro 9 is unplugged, some of that CPU performance gain takes about a 5 percent hit due to the 45/30-watt ceiling in place by the device to keep it cool enough to handle in hand and on a lap, but on the upside, that 5 percent hit is still miles ahead of the Pro 8, Dell XPS 13 2-in-1, ThinkPad X12 and slightly ahead of an M2 powered MacBook Air.

Surface Pro 9 CPU performance

Where the Surface Pro 9 takes a significant dip in direct GPU usage is where the Intel Iris Xe Graphics G7 does a modest job of keeping heavily GPU reliant windows and activities stable but sinks about 70 percent of that stability when on battery power. Activities such as rendering video, 3D, graphic design or heavy photo processing can all get bogged down on the Surface Pro 9 when on battery, if the device can keep it juice long enough.

Surface Pro 9 battery performance

Now there are some workarounds that include using web-based clients for video editing, photo manipulation, 3D and graphic design such as Canva, Flixier, Clipchamp, Frame.io and more. Again, the Surface Pro 9’s CPU can power out video editing if users are using Adobe Premiere at 1/2 or a 1/4 of resolution, but when it comes time to render edits over 10 minutes at 1080p resolution, they should factor in a brisk walking break.

Surface Pro 9 recording

I’m not going to delve into gaming as the last 10 years have proven Microsoft isn’t interested in the Surface Pro lineup being capable of console or PC level gaming. The Pro 9 served me well when paired with xCloud gaming, and the convenience of being able to tote the slim convertible around is sorely understated in reviews. While on a cruise, I was able to wrap up Halo Infinite and Hi-Fi Rush, both in and out of my cabin.

Summary

In real world use, the less than 2lb computer is great. While reviewers cover the minutia of the Surface Pro 9, at the end of the day, it still remains the gold standard of 2-in-1’s. While there are other 2-in-1’s cropping up that offer better specs in some areas, or more appealing price differentials, the Surface Pro 9 continues to deliver one of the nicest overall convertible packages.

While the new aesthetic is a relatively young design, I would hope that Microsoft improves up some of the chassis underlying tech such as reintroducing an SD card reader, upgrading the hardware and software (Windows 11) display tech for more optimized battery consumption, adding haptic feedback to its separately sold keyboard, and overhauling the camera array in both software and hardware.

Until then, the Surface Pro 9 stands as the best refinement of the lineup since Microsoft jumped from the 10.6-inch chunky Pro and Pro 2 design to the thinner 12-inch Surface Pro 3. After a decade, Microsoft has gotten about as close as Intel will let them in actualizing their vision for a portable PC experience, the question that remains is what’s coming in the next 10 years?

AMDRSServ.exe: What Is It & How to Fix It in 7 Easy Steps

If you are experiencing issues with AMDRSServ.exe, such as high CPU usage or crashes, this guide can help! We will explain what AMDRSServ.exe is, followed by step-by-step solutions to fix the issues related to this software component.

What is AMDRSServ.exe?

AMDRSServ.exe is a process related to the AMD Radeon software package. It is responsible for managing the Radeon ReLive feature, which enables users to capture and stream gameplay footage. Usually, the file is located in the following folder: C:/Program Files/AMD/Cnext/Cnext

The process runs in the background of your computer and starts automatically when you install AMD Radeon software. If you are facing issues related to this process, you need to follow the series of steps to fix the problem.

How do I fix the AMDRSServ.exe system error on Windows?

1. Disable the AMD startup services

  1. Press Windows + R to open the Run dialog box.MS CONFIG RUN COMMAND AMDRSServ.exe
  2. Type msconfig and press Enter to open System Configuration.
  3. Switch to the Services tab on the System Configuration window.
  4. Scroll through the list and uncheck services related to AMD.disable SERVICES AMDRSServ.exe
  5. Click Apply, then OK, and restart your computer to let the changes take effect.
  6. Once the PC is back online, press Windows + E to open File Explorer.
  7. Navigate to this path: C:/Program Files/AMD/Cnext/Cnext
  8. Select AMDRSServ.exe and click Rename button and change the name by adding any alphabet or number to it.Rename AMDRSServ.exe
  9. Open the System Configuration window again and place the checkmark next to all AMD services.msconfig_AMDRSServ.exe
  10. Click Apply, and OK. Now restart your computer to save the changes.

2. Check for app updates

  1. Right-click on the desktop to bring up the context menu and choose AMD Radeon Settings.AMD RADEON SETTINGS AMDRSServ.exe
  2. Go to the Updates tab and click on Check for Updates.Updates AMDRSServ.exe
  3. If an update is available, click Download and Install.
  4. Please wait till the process is complete and check if the issue persists.

3. Rollback the AMD driver

  1. Press Windows + R to open the Run window.Device Manager Run command
  2. Type devmgmt.msc and click OK to open Device Manager.
  3. Go to Display adapters, expand it, right-click the AMD driver, and click Properties.Properties Display adapters AMDRSServ.exe
  4. Switch to the Driver tab and click the Roll Back Driver button.Roll backRoll back AMDRSServ.exe
  5. On the Driver Package rollback page, select an option and click Yes.Roll back driver
  6. Follow the onscreen instructions to complete the process.

If the Rollback option is greyed out for you, it means your computer has not had a previous driver installed for the AMD device. We also have a complete guide on how to roll back the AMD driver for more information.

Also, check our comprehensive guide on how to update AMD drivers on your PC with just a few steps.

4. Disable the ReLive option

  1. Right-click on the desktop to open the context menu and select AMD Radeon Settings.AMD RADEON SETTINGS AMDRSServ.exe
  2. Click on the ReLive tab. Toggle the ReLive switch to Off.Relive OFF AMDRSServ.exe

5. Run an SFC scan

  1. Press the Windows key, type cmd, and click Run as administrator.CMD elevated AMDRSServ.exe
  2. Click Yes on the UAC prompt.
  3. Copy and paste the following command to repair system files and press Enter: sfc/scannowSFCSCANNOW CMD
  4. The scan will take some time. Please wait till it is successfully completed, then restart your computer to save the changes.

6. Run a malware scan

  1. Press the Windows key, type windows security, and click Open.Windows Security open Windows key AMDRSServ.exe
  2. Go to Virus & threat protection, and click Scan options.V& T Scan options
  3. Select Full scan and click Scan now.Full scan - AMDRSServ.exe
  4. Now the security tool will run a deep scan, scouring each file on your computer to find malicious files. Once completed, it will show you the list of infected files and delete them to resolve the issue.

7. Reinstall the AMD Radeon software

  1. Press the Windows key, type control panel, and click Open.Control Panel start menu
  2. Select Category for View by option and click Programs.Programs AMDRSServ.exe
  3. Next, click Uninstall a program.Uninstall a program
  4. Locate and select AMD Radeon from the list of installed programs and click Uninstall button.AMD uninstall
  5. The uninstall process will be initiated, and the drivers and software components will be removed.
  6. To download the AMD Radeon software, go to the AMD website.AMD RADEON
  7. Download the software and double-click the installation file to initiate the process.
  8. Follow the onscreen instructions to complete the process.

If you are facing other performance issues related to your AMD drivers, we recommend you check this guide.

So, these are the steps you need to take to fix the AMDRSServ.exe system error on Windows. Try these methods and let us know what worked for you in the comments section below.

What’s the page colors feature on Edge and how does it work?

Microsoft always continues to upgrade users’ experience while browsing on Edge. After rolling out Bing AI’s image creation tool not too long ago, Redmond officials are reportedly working on an accessibility feature called page colors.

As spotted by Windows enthusiast @Leopeva64, several select insiders on Edge’s canary channel have begun seeing a toggle option to activate page colors sitting on Edge’s Settings ➜ Accessibility. 

However, as you can see, the accessibility option isn’t quite working properly, so it may need a little longer for us to test it.

Other than that, you can also make the text larger, have the web read aloud to you, have high visibility outline, and use high contrast on Edge’s accessibility setting to ensure the best browsing experience. 

So how does it work, you may ask? And will it ever be rolling out for general users who aren’t in the insider channel?

How will page colors on Edge work?

microsoft edge

As you can see, the page colors on Edge will allow you to modify the colors you see on the browser. For example, if you’re initially reading from a website with a white background and black text, you can adjust how it’ll look on your screen. There’s a dropdown of colors you can choose between Dusk, Desert, Black, and White.

There’s also an option to apply page colors only when high-contrast themes are on. You can also apply these changes to specific, frequently-visited websites. 

Speaking of Edge, we’ve previously reported that the browser is getting a new feature called Workspace. After months of waiting, the hotly-anticipated feature finally arrived on the limited public preview and several select insiders can create tab groups and organize them while opening them all at the same time. 

What do you think about this page colors accessibility feature on Edge? Let us know in the comments!

How to filter profanity out of Teams

The long wait is finally over, as Microsoft just rolled out the feature for users to filter out profanity on Teams.

As noted on the Microsoft 365 Roadmap site, the feature could ship as soon as May 2023 although no exact date has been confirmed yet. When the optional feature is out for general availability, both Windows and macOS users will be able to benefit from this toggle.

With the newly introduced toggle for turn on/off profanity filtering, user will now be able to control whether they want to continue to leverage the profanity filtering capability provided out of box, or, if they want to see every word as-is.

Same time in 2022, the tech giant rolled out the same feature to detect violations, threats, harassment, and profanity in English, French, Spanish, German, Portuguese, Italian, Japanese, Chinese, Arabic, Dutch, and Korean on Microsoft Purview, its multi-cloud unified data governance platform, built with privacy by design.

Now, in an April 2023 blog post, the feature is out for limited public preview.

That means, you’ll first need to be a member of the Teams Public Preview on Windows or macOS, at least until the feature rolls out for general availability. Once it does, we will keep you updated.

If you already are, read along to find out how you can try to filter profanity out of Teams.

How to filter profanity out of Teams

1. Open your Teams app.

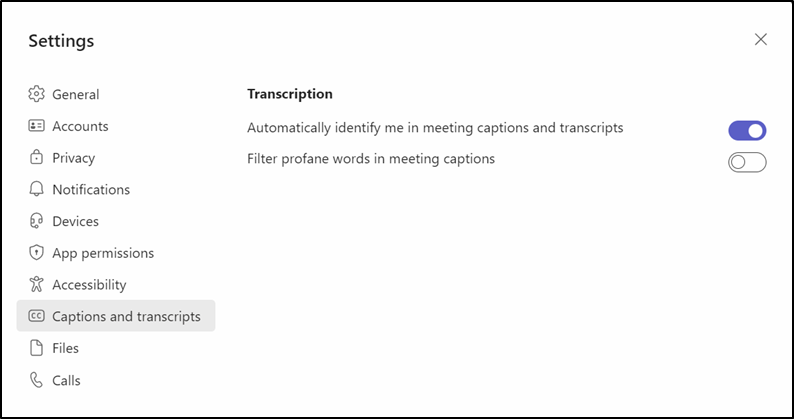
2. On the upper right of your screen, go to Settings and more ➜ Settings ➜ Captions and transcripts.

3. Slide the Filter profane words in meeting captions toggle off/on.

4. In the meantime, you can also turn live captions by selecting More options ➜ Language and speech ➜ Turn on live captions.

And if it’s just one particular person using these profanities, you can always block a user on Teams as an alternative.

Speaking of Teams, Microsoft has also been closely working with a newer generation of the teleconferencing app. Collectively dubbed as Teams 2.0, at least from rumors before it hit primetime, the new Teams will load faster while consuming less energy at the same time.

What do you think about this feature? Let us know in the comments!

Netwtw10.sys Blue Screen Error: 4 Ways to Fix It

The Blue Screen of Death may appear accompanied by a Netwtw10.sys error randomly. It means an error occurred due to network-related issues and can cause the system to crash. However, we’ll discuss resolving it and getting your system working.

Also, our readers may be interested in how to fix rtf64x64.sys Blue Screen of Death error on Windows 11.

What causes the Netwtw10.sys Blue Screen error?

Some factors that may be responsible for the error are:

  • Faulty Network driver – The error may occur if the network device drivers running on the system are not intact. Also, defective or incompatible drivers can cause errors if they impede the Netwtw10.sys file.
  • Third-party programs interference – The activities of other apps running on the system can cause the error to occur. Programs such as antivirus software with Firewall features can cause the network driver to be unresponsive, resulting in the BSoD crash.
  • Corrupt system files – The error may occur if the system files responsible for the network process are corrupt. Files such as Netwtw08.sys, Netwtw06.sys, Netwtw10.sys running on the PC are essential for the Windows operating system. So, you can encounter this error if the system files are corrupt.

Fortunately, we have provided some solutions below to help you fix the Blue Screen error.

How can I fix the Netwtw10.sys blue screen error?

Before proceeding with any advanced troubleshooting steps, apply the following checks:

If you can’t resolve the error, try the steps below:

1. Update your Device drivers via Windows Update

  1. Press the Windows + I key to open the Settings app.
  2. Click on Windows Update and select the Advanced options.
  3. Then, click on the Optional Update button.
  4. Click the drop-down button on the Driver Update and checkmark the list of updates available.
  5. Select the Update and Install button and wait for the drivers to install.

Updating the network driver allows it to fix errors or bugs impeding its performance. You can read about what to do if Windows Update is not loading on Windows 11.

There is also a better alternative to update any drivers from your PC and that is a tailored software like Outbyte Driver Updater. It will scan your system and automatically update old drivers with their latest version.

⇒ Get Outbyte Driver Updater

2. Rollback recent driver updates

  1. Press Windows + R key to open the Run dialog box, and type devmgmt.msc, then press Enter to open the Device Manager.
  2. Open the Network adapters entry, right-click on the driver, and select Properties from the drop-down menu.
  3. Go to the Driver tab, select the Roll Back Driver option, and click OK.
  4. Restart your PC and check if the Netwtw10.sys error persists.

Rolling back the recent network device update will remove faulty updates causing the error and resolve compatibility issues.

Alternatively, you can check for how to uninstall updates on Windows 11 for more detailed steps.

3. Run the SFC and DISM to repair damaged system files

  1. Left-click the Start button, type Command Prompt, then click Run as administrator.

  2. Click Yes on the User Account Control (UAC) prompt.
  3. Input this command and press Enter: sfc /scannow
  4. Type the following commands and press Enter: DISM /Online /Cleanup-Image /RestoreHealth
  5. Restart your PC and check if the error appears.

Running SFC and DISM scans will detect and repair corrupt system files causing the Netwtw10.sys BSoD error. Read about ways to fix the run as administrator option if it’s not working on Windows PC.

4. Run System Restore

  1. Press Windows + R key to open the Run dialog box, type control, then press Enter.
  2. Type recovery in the search bar and select Recovery.
  3. Then click Open System Restore.
  4. Click Next in the Restore system files and Settings window.
  5. Choose the restore point you want to restore from and click Next.
  6. Then, click on Finish after the process.

A System Restore will remove recent activities, recovering the system to the previous point.

You can reach our guide on how to fix Restore Point if it’s not working on your PC.

Alternatively, you can check the causes of BSOD errors. Also, do not hesitate to read about the Brusbsib.sys incompatible driver error on Windows PCs.

If there are further questions or suggestions on other fixes that worked for you, kindly drop them in the comment section.

Bing Fix: Sorry, Network Settings Prevent Access to Feature

Several of our readers have been getting the Sorry, looks like your network settings are preventing access to this feature error while trying to access the Bing AI chatbot. This error indicates network-related issues that are restricting you from conversing with the chatbot.

Why am I getting the network settings prevent access to the feature error?

After conducting our extensive research, we are listing the potential causes of this network error below:

  • Incompatible extensions – Sometimes the extensions installed on your browser, negatively affect the performance leading to various errors and issues.
  • Slow internet – Poor internet connection can be another reason why you are facing the network settings prevent access to this feature in Bing AI.
  • Geographical restrictions – Certain chatbot features are region-centric and may not be available in your location, giving you the network settings prevent access to the feature error.
  • Server issues – Since Bing AI is extremely popular, it can be bombarded with tons of requests at a time and may crash.
  • Corrupt browser cache or cookies – Corrupt cache and browser cookies are known to trigger several errors and restrict several websites, including Bing AI from operating.

Now that you know about the potential causes of this issue, let’s explore the possible fixes to resolve the network issue in New Bing AI.

How do I fix error network settings prevent access to this feature?

Before you move on to the software-related fixes, implement the tricks recommended here:

  • Restart your router and then perform the intended action.
  • Switch to a different network if the connection is unstable. You can switch to a wireless network or set up Wi-Fi hotspot to access Bing AI.
  • Enable VPN to access the geographically restricted feature, and if you are already using one, we will recommend you disable the VPN for time being.
  • As BIng AI is getting exceptionally high demand, you can wait for a few hours and try accessing the feature once again.

If none of these methods could help you resolve the problem, try the ones listed next.

1. Clear browsing history and cached data

  1. Launch the Microsoft Edge browser on your computer and click the Menu icon (three dots) on the top right.
  2. Select the Settings option from the drop-down menu.network settings prevent access to feature
  3. From the left sidebar, navigate to the Cookies and site permissions.network settings prevent access to feature
  4. Choose the Manage and delete cookies and site data option from the right side.network settings prevent access to feature
  5. Click the See all cookies and site data option.network settings prevent access to feature
  6. Press the Remove All button on the top.
  7. Now choose the Privacy, search, and services options from the left sidebar.network settings prevent access to feature
  8. Scroll down and press the Choose what to clear button next to Clear Browsing Data Now option.network settings prevent access to feature
  9. In the next window that pops up, select all the categories you wish to delete and press the Clear Now button.

There is another method to avoid the manual steps above and that is to automatically clean up browsing data with a reliable tool like CCleaner.

That’s it! All the browser cookies and browsing history will now be deleted for good. And hopefully, the looks like your network settings are preventing access to this feature error message will no longer bother you.

2. Disable the metered connection

  1. Use the Windows + I shortcut to bring up the Settings app.
  2. Select Network & internet from the left navigation panel and choose Wi-Fi or Ethernet, depending on the network type you are currently using.network settings prevent access to feature
  3. Next, select Wi-Fi properties.
  4. Look for the Metered connection option and turn the toggle next to it in the Off position.network settings prevent access to feature

When the network connection is metered, Windows imposes a data limit over it. As a result, certain features are not available as a measure to conserve data and reduce data usage. Disabling metered connection ensures that you can utilize the internet with maximum available bandwidth.

3. Disable or uninstall extensions

  1. Launch the Edge browser, click the Menu icon (three dots) located in the top right corner, and choose Extensions from the drop-down menu.network settings prevent access to feature
  2. Choose Manage extensions from the prompt window. network settings prevent access to feature
  3. In the extension tab, look for the extension you wish to remove and toggle off the switch next to it.network settings prevent access to feature
  4. To uninstall the extension completely, press the Remove button present below the extension description.
  5. Click the Remove button on the confirmation popup to confirm the action.network settings prevent access to feature

Several of our readers have reported that an extension named Header Editor is causing issues when using Bing AI. You can disable it and other similar extensions temporarily to see if the issue is resolved. If it does the trick, you can consider uninstalling them completely.

4. Reset the network settings

  1. Use the Windows + I keyboard shortcut to launch the Settings window.
  2. Choose Network & internet from the left pane, followed by Advanced network settings from the right section.network settings prevent access to feature
  3. Click the Network reset option listed under the More settings section.network settings prevent access to feature
  4. Press the Reset now button to reset the network settings. Select Yes on the confirmation pop-up if it appears, and then restart your Windows PC.network settings prevent access to feature

Misconfigured network settings can also be the reason why you are unable to access certain features in the Bing AI chatbot. You can reset the network configuration of Windows to the initial state and then try using Bing once again.

5. Change the DNS settings

  1. Use the Windows + I shortcut key to launch the Settings app.
  2. Select Network & Internet from the left sidebar, and depending on the current network you are connected to, choose Wi-Fi or Ethernet from the right section.network settings prevent access to feature
  3. Scroll down and select Hardware properties.network settings prevent access to feature
  4. Look for the DNS server assignment option and click the Edit button next to it.network settings prevent access to feature
  5. Expand the drop-down on the top and choose Manual instead of Automatic (DHCP) from the Edit DNS settings popup.
  6. Next, enable the toggle for either IPv4 or IPv6, based on the IP connection type.
  7. Now provide the primary DNS server address in the Preferred DNS field followed by a secondary DNS server address in the Alternate DNS field. (Here, 8.8.8.8 and 8.8.4.4 are the preferred and alternative DNS addresses for Google’s DNS server respectively)network settings prevent access to feature
  8. Select Encrypted only (DNS over HTTPS) for both Preferred DNS Encryption and Alternate DNS Encryption dropdowns to apply the DNS over HTTPS feature for encrypting DNS requests.
  9. After making the changes, press the Save button.

Incorrect DNS settings can also create issues when you access Bing AI. You can try changing DNS settings on your PC to resolve the recurring error message for good.

That’s pretty much it! You can implement these tips to resolve network-related issues in Bing AI and carry on your conversations.

In case you are also facing the daily limit reached error on Bing AI, you can refer to the guide above for relevant tricks to bypass the restriction.

If you have any queries or have some solutions handy, mention them in the comments below.

Get the Windows 7 & 8.1 Patch Tuesday updates for April

As everyone expected, and as is normal, the main focus right now is on Windows 11, but the majority of Windows users still don’t feel like abandoning its predecessor (Windows 10).

Be sure to check out the latest versions of Windows 10, which is 22H2, and also Windows 11, which has also reached version 22H2.

And, as you surely know by now, the Redmond-based tech colossus also releases security updates for some of the obsolete operating systems, during Patch Tuesday.

What this means is that not only Windows 10 and 11 users will receive updates during this time. We’re also looking at Windows 7, Windows 8, and various Server versions as well.

We’ve already presented the 97 new updates that became available, along with the official  download links, so all that remains is going a bit more in-depth.

Without any further ado, let’s take a closer look at what Windows 7 and Windows 8 users were given to work with on the April 2023 Patch Tuesday.

Anything to look forward to in this month’s update rollout?

The Redmond-based tech colossus has just released Patch Tuesday updates for Windows 8.1, in the form of KB5025285, and Windows 7, in the form of KB5025279.

Remember that they each come with a whole host of improvements and known issues with some pretty neat workarounds.

Also, remember that Microsoft has recently terminated all ESU for both Windows 8.1 and Windows 7 operating systems.

Windows 7

KB5025279

Improvements

  • By the March 1, 2023, order of the Arab Republic of Egypt, daylight savings time (DST) will resume on April 28, 2023, and end on October 27, 2023. This update applies to Egypt Standard Time – (UTC+02:00) Cairo.
  • Known compatibility issues exist with certain printer models which feature GDI printer drivers that do not completely adhere to GDI specifications.

Known issues

  • After installing this update and restarting your device, you might receive the error, Failure to configure Windows updates. Reverting Changes. Do not turn off your computer, and the update might show as Failed in Update History.

Windows 8.1

KB5025285

Improvements

  • By the March 1, 2023, order of the Arab Republic of Egypt, daylight savings time (DST) will resume on April 28, 2023, and end on October 27, 2023. This update applies to Egypt Standard Time – (UTC+02:00) Cairo.
  • Known compatibility issues exist with certain printer models which feature GDI printer drivers that do not completely adhere to GDI specifications.

These older, now obsolete versions of the Windows operating system are no longer safe for use, and it is highly recommended you upgrade to a supported version.

And, since the time has come to say goodbye, it is about time you figure out the next steps you will need to take.

Have you encountered any issues after downloading and installing these new security updates for Windows 7 and 8.1?

Share your experience with us in the dedicated comments section located below.

What is Lsalso.exe & How to Fix Its High CPU Usage?

Some of our readers have recently reported that they encounter some problems with a process in the Task Manager known as lsalso.exe in Windows which results in high CPU usage.

In case you’re also experiencing the Lsalso.exe high CPU usage issue, don’t worry as we have compiled some steps to fix it in this article.

What is Lsalso.exe?

Lsalso.exe is a Microsoft-developed executable file related to Credential Guard and KeyGuard, which runs in Virtual Secure Mode (VSM) as an Isolated User Mode (IUM) process.

LSAISO.exe runs in Virtual Trust Level (VTL) 1, while other processes run in VTL0, ensuring the protection of sensitive data such as hashed passwords and Kerberos keys.

The Local Security Authority Subsystem Service (LSASS) process is responsible for managing security policy, user authentication, and auditing, and was modified in Windows 10 and Windows Server 2016.

Although generally considered safe, LSASS can cause high CPU usage issues when certain drivers and applications attempt to load DLL files into the IUM process, destabilizing the system.

What causes Lsalso.exe high CPU usage?

There can be several reasons why you are experiencing the Lsalso.exe high CPU usage error on your Windows PC. Below are some of the possible reasons:

  • Malware infection – Lsalso.exe is a commonly targeted process by malware that may cause high CPU usage. Malware can disguise itself as Lsalso.exe and run malicious code, resulting in increased CPU usage. Constantly run the Windows Defender or use any of the best antivirus software to fix the issue.
  • Damaged or corrupted system files – Corrupted system files may also cause the Lsalso.exe process to malfunction and consume high CPU usage. This may occur due to a hardware failure or a software bug. Try using some of the dedicated tools to fix the issue.
  • Outdated drivers – Outdated drivers can cause various system processes to malfunction, including Lsalso.exe. This can lead to high CPU usage as the process tries to perform its tasks with limited resources. Try to update your drivers to eliminate the possibility.
  • Multiple concurrent processes – Running multiple processes at the same time can also cause Lsalso.exe to consume high CPU usage. This may happen due to an overloaded system or conflicting software applications. Try to head to your Task Manager to end some processes.

The above causes are just a few possible reasons why Lsalso.exe consumes high CPU usage. Let’s proceed to how to fix the issue in the next section.

How can I fix the Lsalso.exe high CPU usage?

Before trying any of the advanced troubleshooting or settings tweaks provided in this article, users should ensure they perform the following preparatory checks.

  • Remove some unnecessary processes from the Task Manager.
  • Contact Microsoft Support
  • Restore Windows to its default state.

 Having confirmed the above checks and if you still require further assistance, work your way through any of the steps provided below to fix the issue.

1. Use the Process of Elimination

  1. Press the Windows Start button and type Task Manager in the search area of the taskbar and click Open.
  2. Navigate to the Processes tab and locate the targeted application. Then, right-click on it and select End task. (Do the same with other potentially problematic applications.
  3. Next, launch Device Manager and locate the targeted drivers.
  4. Right-click on them and choose Uninstall driver from the context menu and see if that makes any difference in the high CPU usage caused by lsalso.exe.

Eliminating the processes of these problematic applications and drivers should help fix the issue since certain applications and drivers can load DLL into the IUM process, resulting in a spike in CPU usage associated with lsalso.exe.

2. Check for APCs in the Queue

  1. Install the Windows Debugging (WinDbg) tool from the Windows driver kit.
  2. Then, use NotMyFault.exe from the Sysinternals website to generate a kernel memory dump during the spike.
    • To enable kernel memory, press the Windows + R keys to launch the Run dialog box.
    • Next, type control system in the text field of the dialog box and press Enter.
    • Click Advanced system settings on the left pane.
  3. Navigate to the Advanced tab in the System Properties dialog box. Click on the Settings button under Startup and Recovery.
  4. Next, expand the drop-down menu for Write debugging information and choose Kernel memory dump. Then, press OK.
  5. Now navigate to the Start menu and click on the Windows Kits entry. Choose WinDbg(x64/x86) to proceed.
  6. Click on File and select Symbol File Path.
  7. Now, type https://msdl.microsoft.com/download/symbols for the Microsoft Symbol Server in the Symbol path section.
  8. Click OK and access the File menu again.
  9. Choose Open Crash Dump and browse the location you noted in the 9th step.
  10. Next, Click Open.
  11. Then, type in the command window and press Enter.
  12. Once the command is executed, look for <ProblemDriver>.sys under LsaIso.exe.
  13. Contact your driver vendor now and then refer them to this Microsoft document for mitigation recommendations for Isolated User Mode (IUM).

If the first step mentioned above did not work for you, then you can take the help of these free tools to check for problematic drivers.

3. Update your drivers

  1. Left-click the Start button and select Settings.
  2. Then, click on Windows Update and select Advanced options.
  3. Choose Optional updates in the next window.
  4. Click on Driver Updates, mark the available updates, and click the Download and Install button.

This is a quick alternative to update all the outdated drivers on your device that may prompt this error.

And that’s it on how to fix the Lsalso.exe high CPU usage issue.

For further information on to fix the .exe file if it’s not opening in Windows, you can explore our dedicated guide. If you have any questions or suggestions, do not hesitate to use the comments section below.

Error Code 0x8007001e: How to Fix This Windows Update Issue

The 0x8007001e error code is one of many Windows’ Update error codes. This error indicates that the update failed to install due to insufficient space.

The error prevents Windows Update from running and can lead to BSOD crashes. In this article, we’ll discuss some of the causes of the 0x8007001e error and provide you with steps to fix it.

What causes the Windows Update error 0x8007001e?

The following are some of the common causes of the error code 0x8007001e:

  • Insufficient Storage – Before Windows can download and install updates on your PC, you must have sufficient space on your local disk. If Windows doesn’t have enough space to install the update, it can lead to the 0x8007001e error code.
  • Corrupt System Files – Corrupt System files can also force your PC to display the 0x8007001e error code. System files can be corrupted by viruses, forced shutdowns, failed Windows Updates, etc.
  • Virus and Malware – Unsurprisingly, viruses, and malware are some of the most common causes of Windows error codes. If your PC is infected with a malicious file or program, it can affect certain Windows functionalities like the Windows Update, causing the 0x8007001e error code.

How can I fix the Windows Update error 0x8007001e?

Before we proceed with more advanced solutions, here are a couple of quick fixes you can attempt:

  • Restart your PC. 
  • Close all unnecessary background applications.
  • Fix Network Congestion.
  • Free Up Space on your Drive – If your System is running low on space, consider deleting unused files, applications, etc. Alternatively, you can read our guide on how to free up space on Windows.

If the error remains unfixed after applying the above fixes, the following is a list of advanced solutions you can apply to help resolve the 0x8007001e error code:

1. Run the Windows Update Troubleshooter

  1. Press the Windows key + R, type ms-settings:troubleshoot in the run box, and hit Enter to open up the Troubleshoot section.
  2. Select Other troubleshooters.
  3. Then, click on Windows Update, and click on Run button. If Windows finds any problem, click on Apply this fix to repair the error using that fix.
  4. After applying the fix, close the Windows Update Troubleshooter, and reboot your PC to see if the error is resolved.

In case you need an alternative method to scan your Windows PC for corrupted files, you can always rely on dedicated repair tools.

2. Run a DISM Scan

  1. Press the Windows key + S, type in CMD, right-click on the displayed result, and select Run as Administrator.
  2. Click Yes to grant the app administrative access in the User Account Control window.
  3. Once the command prompt opens, type the following, and hit Enter: DISM.exe /Online /Cleanup-Image / Restorehealth
  4. Wait for the scan to be completed, and reboot your PC.

Corrupt system files can lead to a string of Windows errors. If you’re experiencing the 0x8007001e error code, running a DISM scan can help resolve errors triggered by corrupt system files. 

3. Run the System File Checker Utility

  1. Press the Windows key + S, type in CMD, right-click on the displayed result, and select Run as Administrator.
  2. Click Yes to grant the app administrative access in the User Account Control window.
  3. Once the command prompt opens, type the following, and hit Enter: sfc /scannow
  4. Wait till the scan is complete, and restart your PC to check if the error persists.

While running the System File Checker utility, you might run into the Windows Resource error. The error prevents the file checker from functioning properly. Ensure to read our guide on how to resolve the error. 

4. Apply a System Restore Point

  1. Press the Windows key + R, type rstrui in the dialog box, and hit Enter to open the System Restore window.
  2. In the pop-up window, click Next, then check the box next to Show more Restore points, and click Next again.
  3. Select the last restore point that was created before the occurrence of the 0x8007001e error, and press Next.
  4. Click on Finish, and then click Yes to confirm the System Restore process. 
  5. Once you click Yes, your PC will restart automatically and on bootup, your PC will be reverted to an earlier version of Windows before the 0x8007001e error was triggered. 

While on the System Restore page, some users might notice that the System Restore button is greyed out. This indicates that you have not created any restore points, and you’ll be unable to apply this fix.

However, here is a detailed guide showing you how to create a system restore point in Windows.

If you’re experiencing the 0x8007001e error code, your first point of action is to free up space. However, the error isn’t always related to memory or storage, as seen in the article.

However, irrespective of the cause of the error, you can return your PC to normal by applying the fixes listed above.

How to Enable & Disable Fingertip Writing in Windows 11

Using the Fingertip Writing in Handwriting Panel in Windows 11 requires enabling the feature. Enabling the fingertip writing feature is a simple process that can be achieved in a few steps.

In this article, we’ll walk you through two of the best steps you can apply to enable and disable fingerprint writing in Windows 11.

What is Fingertip Writing in Windows?

Fingertip Writing is a feature that enables users to operate their PC’s screen using their fingers or a stylus pen.

Further, the feature is one of Windows’ latest releases that enables users to write on the screen with their fingers without using a stylus or pen.

With the feature enabled, you can scribble a character or an alphabet on the screen, and the fingertip writing feature will recognize and convert it to its correct form.

Also, this feature makes writing more straightforward and pretty intuitive. 

How can I enable and disable Fingertip Writing in Windows 11?

1. Using the Settings app

  1. Press the Windows key + I to open the Settings app.
  2. Click on Bluetooth & devices on the left pane. Then, locate the Pen and Windows Ink tab and click on it to expand the option.
  3. In the next window, click the Use your handwriting to enter text option under the Handwriting section. 
  4. To enable the Fingertip writing option, check the box next to the option of Write with your fingertip.
  5. To disable the feature, uncheck the Write with your fingertip option. 

2. Using the Registry Editor

  1. Press the Windows key + R, type in regedit in the Run box, and hit Enter to open the Registry Editor.
  2. In the Registry Editor window, browse and navigate to the following path: Computer\HKEY_CURRENT_USER\Software\Microsoft\TabletTip
  3. While in the TableTib folder, right-click on the folder and select New, then click the Key option.
  4. Name the newly created folder EmbeddedInkControl.
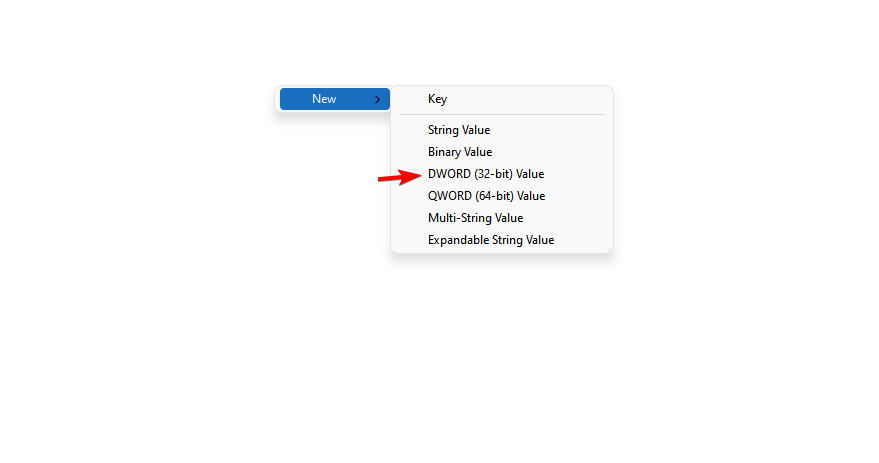
  5. After renaming the folder, right-click on the EmbeddedInkControl, select New, and choose DWORD (32-bit) Value.
  6. Rename the new REG_DWORD EnableInkingWithTouch.
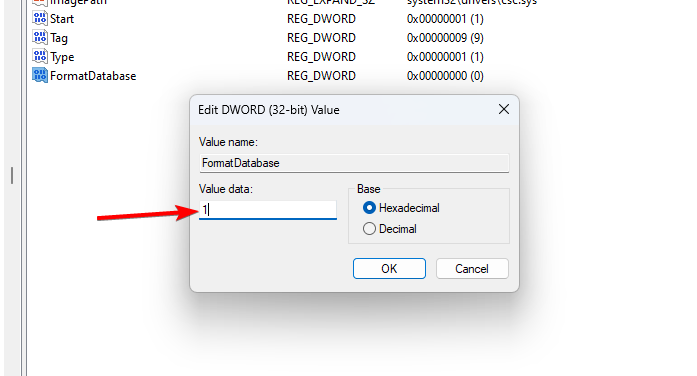
  7. Now, double-click on the EnableInkingWithTouch REG_DWORD and set its Value data to the following:
    • 1 = To enable writing with your fingertip.
    • 0 = To disable writing with your fingertip.
  8. Click OK to save the changes.
  9. Close the Registry Editor, Restart your PC, and check if the error persists. 

Enabling or Disabling Fingertip writing using the Registry editor is a pretty complicated task. Editing the registry on its own can prove difficult; if done incorrectly, it could lead to many system errors. 

Ensure you backup your system and create a restore point on your local disk. With a backup and a restore point in place, you don’t have to worry about crashing your PC and losing all your files. 

Enabling or disabling the fingertip writing feature in Windows can be achieved using varying steps. Whatever method you choose to apply, you’ll get the same results.

However, it’s important to note that making changes to the Registry is pretty complicated and can cause many errors if not correctly done.

In case you’re having issues with this feature, be sure to properly enable the Touch Keyboard and Handwriting Panel service beforehand.

Nevertheless, following the steps outlined in the above guide, you can enable and disable the Fingertip Writing in Handwriting Panel in Windows 11.

How to Set Logon Hours for Multiple Remote Users

Logon hours is a Windows Active Directory feature that allows administrators to restrict network access at specific times. When Logon hours are set, all remote users will be able to access the network for the preset time frame.

In this article, we’ll briefly discuss what Logon hours are, and we’ll provide you with detailed steps to help you set them for multiple remote users.

What are Logon hours?

As the name implies, Logon hours are time frames when a user is permitted to Logon to a particular service or network.

For Windows users, Logon hours is a feature in Active Directory that stipulates the dates and times on which users can access a network.

Further, Logon hours are usually applied in the network infrastructure of big companies and corporations to enhance security by ensuring that employees can access the company’s network at the stipulated time.

How can I set Logon hours for multiple Remote Users?

1. Set for multiple users

  1. Press the Windows key + S, type in Server Manager, and hit Enter.
  2. In the Server Manager window, click on Tools on the right pane, and select Active Directory Users and Computers.
  3. In the next window, right-click on 4sysops.local, click on New, and select Create an organizational unit.
  4. Then, press Ctrl + A to highlight all the users in the Organizational Unit, right-click the highlighted users, and select Properties.
  5. On the Properties window, navigate to the Account tab.
  6. Click on the checkbox next to Logon hours, and click the Logon hours button to open the page. (By default, the Logon hours of most users are permitted at all times. However, you’ll need to change the hours according to your preference.)
  7. On the Logon hours page, click on Logon Denied to remove the default logon hours. 

The Logon Hours page is sectioned into two; morning to afternoon (9 am to 12 pm) and afternoon to midnight (2 pm to 12 am).

  1. To set your preferred Logon hours, hover over the mini-boxes, click on your preferred Day & Time, and drag the cursor across or downwards depending on the specific time you want to set.
  2. Once you’re done setting the Logon hours,  Click on OK.
  3. In the next window, click Apply, and click on OK.

Aside from restricting Logon hours for a group of users, you can also choose to set it for a specific user. This rule will only apply to the singular user and won’t affect the logon hours of other users.

2. Set for Single user

  1. Follow steps 1 and 2 above to open the Active Directory Users window.
  2. Then, click on Users to display the list of users on the network. 
  3. Alternatively, you can create a new user by: Right-click the Users button and select New.
  4. On the Users page, scroll to locate the user you wish to set logon hours, right-click the option, and select Properties.
  5. Then, navigate to the Account tab, and click the Logon hours button.
  6. Follow steps 8 to 11 to set the logon hours for the specific user.

In some cases, users have reported that they’re unable to locate Active Directory Users and Computers on their PCs.

This error prevents them from accessing the service and its functionalities. Here is a detailed guide showing you how to enable active directory on windows. 

Restricting Logon Hours for users in an organization is advisable if you have official confirmation from the management.

However, if you’re testing the feature on your local machines, you can apply the steps listed above to help you restrict logon hours for users.

Microsoft to bring Windows 11 to its HoloLens 2 headset in June

At the beginning of the year, there was a bit of uncertainty pertaining to Microsoft’s commitment to HoloLens 2 and its Mixed Reality program amid the massive layoffs across the company, which also affected the division behind the headset. The division had already suffered a significant blow after Alex Kipman’s departure last year.

Microsoft confirmed that it was still committed, and true to its words, the company has announced its plans to release a new update for HoloLens 2. The new update will bring Windows 11 to the headset.

At the moment, the update is in the testing phase and is only available for Windows Insiders. The optional update is set to hit general availability later this year towards the end of June.

While the update isn’t significantly major, it does ship with some notable improvements. Here’s everything you need to know:

First, developers will now be able to better manage their web-based app experiences through the WebView2 control in Edge. Next up, the update also ships with a new Dynamics 365 Guides mode that’s designed to help users scribble and get creative anywhere while on video calls.

Additionally, the update features a new “Restricted Mode” that’s designed to help users establish more control over which mixed reality apps can be accessed via the HoloLens 2 headset.

With the new update, HoloLens’ OS build will transition to 22621 to align with the latest version of Windows 11. What are your thoughts on Windows 11 coming to HoloLens 2? Let us know in the comments.

via: Windows Central

Edge Efficiency Mode: What is it & How to Enable it

Do you use Microsoft’s browser Edge and are looking for ways to optimize your power usage? If so, you’re in for a treat because the browser has an Efficiency Mode built-in feature.

Toggling this function to ON will cause the inactive tabs to sleep after 5 minutes of inactivity. That will save resources, especially memory and CPU load. However, it will also cause a lack of video streaming and animation performance. The option will also save battery life, so it’s perfect if you’re on a laptop far from an outlet.

Even if there are quite a few great browsers for the new OS, that are highly customizable, it is up to you to quickly learn how to fix Microsoft Edge problems on Windows 11.

And now, it seems like we’re going somewhere with this. In an April 2023 update of Edge, Microsoft revved up the Efficiency Mode, which now includes two options called balanced savings or maximum savings. 

For those looking to enable this new feature and speed up your Windows 11 PC while browsing the web, here’s how you can turn on the new Efficiency mode in Microsoft Edge.

If you’re not an Insider, we still have some tips and a solution to speed up your Edge browser as it is, so read on.

How do I optimize Microsoft Edge in Windows 11?

1. Turn on the Efficiency mode

  1. Click on the Menu button (the three horizontal dots) and select Settings.
  2. Now click on System and performance from the left pane and toggle on the Efficiency mode.

If you’re an insider running the latest Edge Canary build, you can also include the Efficiency mode button in the taskbar.

All you need to do is enter Settings, then select the Appearance option from the left, then scroll down and toggle on the Show performance button option.

The button will instantly appear in the toolbar so you can activate and deactivate the function quickly, without going through the Settings menu ever again.

Note icon NOTE
This solution is available only for the Insiders running the Edge Canary build 93.0.956.0 and up, so if you’re an insider, update your browser now.

2. Modify the System and Performance settings

  1. Open Edge and click on the horizontal three-dots menu at the top right corner to open Settings.
  2. From the left sidebar, select System.
  3. Now, make sure you toggle the Startup boost and Continue running background apps when Microsoft Edge is closed to off, and turn on the hardware acceleration the Save resources with sleeping tabs and Fade sleeping tabs.
  4. You can also toggle the sleep time for the inactive tabs below to a lower time, let’s say 15 minutes, after which they will be set to sleep and save the resources in the process.

We recommend setting up the System and Performance settings for those running the stable build. This way. you can rest assured that you have the best configuration for your browser.

As you can see, the steps above are easy to follow, and your browser can sometimes speed up visibly after such a task. Clearing cache and cookies can also help optimize your Edge browser.

Best tips on how to increase browsing efficiency:

No matter what browser you’re using, we’ve gathered a few valuable tricks that will help you achieve improved browsing results:

  • Keep a minimum of tabs open at all times. They will consume resources; even if you’re not using them, they will stay active.
  • The fewer add-ons and extensions, the better because they use up your RAM memory, which will lead to a slower browser.
  • Delete cache and browser data regularly because they clutter your browser and system.
  • If possible, don’t use a proxy or a VPN. Although they will protect your privacy, they can sometimes slow down your connection speed.

Hope you found what you were looking for and that you can finally take advantage of the highest efficiency settings in Windows 11. Even more, you can check out our guide on best DualSense Edge settings for FPS and remap all the buttons on your controller.

After all, you know how Windows 11 compares to Windows 10, and it’s only natural to be eager to enjoy the latest improvements in terms of design, performance, and more.

What’s your way of optimizing Edge?

The 2023 April Patch Tuesday comes with fixes for 97 CVEs

Easter is almost upon us, but not everything comes down to flowers, colored eggs, and baby rabbits. There are those who eagerly await Microsoft’s Patch Tuesday rollout.

And, as you know, it’s the second Tuesday of the month, which means that Windows users are looking towards the tech giant in hopes that some of the flaws they’ve been struggling with will finally get fixed.

We have already taken the liberty of providing the direct download links for the cumulative updates released today for Windows 7, 8.1, 10, and 11, but now it’s time to talk CVEs again.

For April, Microsoft released 97 new patches, which is still more than some people were expecting for the third month of 2023.

These software updates address CVEs in:

  • Windows and Windows components
  • Office and Office Components
  • Windows Defender
  • SharePoint Server
  • Windows Hyper-V
  • PostScript Printer
  • Microsoft Dynamic

You probably want to know more on the matter, so let’s dive right into it and see what all the fuss is about this month.

Almost 100 security fixes for the Windows OS in April 2023

Let’s just say that March was far from being a busy month for Microsoft, and still, they managed to release a total of 97 updates.

Even though some might see this as a high number, Microsoft released a total of 128 security patches in April of 2022, so this number is actually lower.

Please keep in mind that, out of all the patches released today, seven are rated Critical and 90 are rated Important in severity.

Even though this high volume does seem to be in line with past years, the number of remote code execution (RCE) bugs makes up nearly half the release.

Experts say it is a bit peculiar to see that many RCE fixes in a single month. Keep in mind that none of the bugs disclosed over Teams during Pwn2Own Vancouver are being addressed by Microsoft this month.

Furthermore, one of the new CVEs is listed as under active attack at the time of release. Let’s take a closer look at some of the more interesting updates for this month.

CVETitleSeverityCVSSPublicExploitedType
CVE-2023-28252Windows Common Log File System Driver Elevation of Privilege VulnerabilityImportant7.8NoYesEoP
CVE-2023-28231DHCP Server Service Remote Code Execution VulnerabilityCritical8.8NoNoRCE
CVE-2023-28219Layer 2 Tunneling Protocol Remote Code Execution VulnerabilityCritical8.1NoNoRCE
CVE-2023-28220Layer 2 Tunneling Protocol Remote Code Execution VulnerabilityCritical8.1NoNoRCE
CVE-2023-21554Microsoft Message Queuing Remote Code Execution VulnerabilityCritical9.8NoNoRCE
CVE-2023-28291Raw Image Extension Remote Code Execution VulnerabilityCritical8.4NoNoRCE
CVE-2023-28232Windows Point-to-Point Tunneling Protocol Remote Code Execution VulnerabilityCritical7.5NoNoRCE
CVE-2023-28250Windows Pragmatic General Multicast (PGM) Remote Code Execution VulnerabilityCritical9.8NoNoRCE
CVE-2023-28260.NET DLL Hijacking Remote Code Execution VulnerabilityImportant7.8NoNoRCE
CVE-2023-28312Azure Machine Learning Information Disclosure VulnerabilityImportant6.5NoNoInfo
CVE-2023-28300Azure Service Connector Security Feature Bypass VulnerabilityImportant7.5NoNoSFB
CVE-2023-24860Microsoft Defender Denial of Service VulnerabilityImportant7.5NoNoDoS
CVE-2023-28309Microsoft Dynamics 365 (on-premises) Cross-site Scripting VulnerabilityImportant7.6NoNoXSS
CVE-2023-28314Microsoft Dynamics 365 (on-premises) Cross-site Scripting VulnerabilityImportant6.1NoNoXSS
CVE-2023-28313Microsoft Dynamics 365 Customer Voice Cross-Site Scripting VulnerabilityImportant6.1NoNoXSS
CVE-2023-21769Microsoft Message Queuing Denial of Service VulnerabilityImportant7.5NoNoDoS
CVE-2023-28302Microsoft Message Queuing Denial of Service VulnerabilityImportant7.5NoNoDoS
CVE-2023-28285Microsoft Office Graphics Remote Code Execution VulnerabilityImportant7.8NoNoRCE
CVE-2023-24883Microsoft PostScript and PCL6 Class Printer Driver Information Disclosure VulnerabilityImportant6.5NoNoInfo
CVE-2023-24884Microsoft PostScript and PCL6 Class Printer Driver Remote Code Execution VulnerabilityImportant8.8NoNoRCE
CVE-2023-24885Microsoft PostScript and PCL6 Class Printer Driver Remote Code Execution VulnerabilityImportant8.8NoNoRCE
CVE-2023-24886Microsoft PostScript and PCL6 Class Printer Driver Remote Code Execution VulnerabilityImportant8.8NoNoRCE
CVE-2023-24887Microsoft PostScript and PCL6 Class Printer Driver Remote Code Execution VulnerabilityImportant8.8NoNoRCE
CVE-2023-24924Microsoft PostScript and PCL6 Class Printer Driver Remote Code Execution VulnerabilityImportant8.8NoNoRCE
CVE-2023-24925Microsoft PostScript and PCL6 Class Printer Driver Remote Code Execution VulnerabilityImportant8.8NoNoRCE
CVE-2023-24926Microsoft PostScript and PCL6 Class Printer Driver Remote Code Execution VulnerabilityImportant8.8NoNoRCE
CVE-2023-24927Microsoft PostScript and PCL6 Class Printer Driver Remote Code Execution VulnerabilityImportant8.8NoNoRCE
CVE-2023-24928Microsoft PostScript and PCL6 Class Printer Driver Remote Code Execution VulnerabilityImportant8.8NoNoRCE
CVE-2023-24929Microsoft PostScript and PCL6 Class Printer Driver Remote Code Execution VulnerabilityImportant8.8NoNoRCE
CVE-2023-28243Microsoft PostScript and PCL6 Class Printer Driver Remote Code Execution VulnerabilityImportant8.8NoNoRCE
CVE-2023-28287Microsoft Publisher Remote Code Execution VulnerabilityImportant7.8NoNoRCE
CVE-2023-28295Microsoft Publisher Remote Code Execution VulnerabilityImportant7.8NoNoRCE
CVE-2023-28288Microsoft SharePoint Server Spoofing VulnerabilityImportant6.5NoNoSpoofing
CVE-2023-23375Microsoft SQL Server Remote Code Execution VulnerabilityImportant7.8NoNoRCE
CVE-2023-23384Microsoft SQL Server Remote Code Execution VulnerabilityImportant7.3NoNoRCE
CVE-2023-28304Microsoft SQL Server Remote Code Execution VulnerabilityImportant7.8NoNoRCE
CVE-2023-28275Microsoft WDAC OLE DB provider for SQL Server Remote Code Execution VulnerabilityImportant8.8NoNoRCE
CVE-2023-28311Microsoft Word Remote Code Execution VulnerabilityImportant7.8NoNoRCE
CVE-2023-28268Netlogon RPC Elevation of Privilege VulnerabilityImportant8.1NoNoEoP
CVE-2023-28292Raw Image Extension Remote Code Execution VulnerabilityImportant7.8NoNoRCE
CVE-2023-28267Remote Desktop Protocol Client Information Disclosure VulnerabilityImportant6.5NoNoInfo
CVE-2023-21729Remote Procedure Call Runtime Information Disclosure VulnerabilityImportant4.3NoNoInfo
CVE-2023-21727Remote Procedure Call Runtime Remote Code Execution VulnerabilityImportant8.8NoNoRCE
CVE-2023-24893Visual Studio Code Remote Code Execution VulnerabilityImportant7.8NoNoRCE
CVE-2023-28262Visual Studio Elevation of Privilege VulnerabilityImportant7.8NoNoEoP
CVE-2023-28263Visual Studio Information Disclosure VulnerabilityImportant5.5NoNoInfo
CVE-2023-28296Visual Studio Remote Code Execution VulnerabilityImportant8.4NoNoRCE
CVE-2023-28299Visual Studio Spoofing VulnerabilityImportant5.5NoNoSpoofing
CVE-2023-24914Win32k Elevation of Privilege VulnerabilityImportant7NoNoEoP
CVE-2023-28223Windows Domain Name Service Remote Code Execution VulnerabilityImportant6.6NoNoRCE
CVE-2023-28216Windows Advanced Local Procedure Call (ALPC) Elevation of Privilege VulnerabilityImportant7NoNoEoP
CVE-2023-28218Windows Ancillary Function Driver for WinSock Elevation of Privilege VulnerabilityImportant7NoNoEoP
CVE-2023-28227Windows Bluetooth Driver Remote Code Execution VulnerabilityImportant7.5NoNoRCE
CVE-2023-28249Windows Boot Manager Security Feature Bypass VulnerabilityImportant6.6NoNoSFB
CVE-2023-28269Windows Boot Manager Security Feature Bypass VulnerabilityImportant6.8NoNoSFB
CVE-2023-28273Windows Clip Service Elevation of Privilege VulnerabilityImportant7NoNoEoP
CVE-2023-28229Windows CNG Key Isolation Service Elevation of Privilege VulnerabilityImportant7NoNoEoP
CVE-2023-28266Windows Common Log File System Driver Information Disclosure VulnerabilityImportant5.5NoNoInfo
CVE-2023-28277Windows DNS Server Information Disclosure VulnerabilityImportant4.9NoNoInfo
CVE-2023-28254Windows DNS Server Remote Code Execution VulnerabilityImportant7.2NoNoRCE
CVE-2023-28255Windows DNS Server Remote Code Execution VulnerabilityImportant6.6NoNoRCE
CVE-2023-28256Windows DNS Server Remote Code Execution VulnerabilityImportant6.6NoNoRCE
CVE-2023-28278Windows DNS Server Remote Code Execution VulnerabilityImportant6.6NoNoRCE
CVE-2023-28305Windows DNS Server Remote Code Execution VulnerabilityImportant6.6NoNoRCE
CVE-2023-28306Windows DNS Server Remote Code Execution VulnerabilityImportant6.6NoNoRCE
CVE-2023-28307Windows DNS Server Remote Code Execution VulnerabilityImportant6.6NoNoRCE
CVE-2023-28308Windows DNS Server Remote Code Execution VulnerabilityImportant6.6NoNoRCE
CVE-2023-28226Windows Enroll Engine Security Feature Bypass VulnerabilityImportant5.3NoNoSFB
CVE-2023-28221Windows Error Reporting Service Elevation of Privilege VulnerabilityImportant7NoNoEoP
CVE-2023-24912Windows Graphics Component Elevation of Privilege VulnerabilityImportant7.8NoNoEoP
CVE-2023-28276Windows Group Policy Security Feature Bypass VulnerabilityImportant4.4NoNoSFB
CVE-2023-28238Windows Internet Key Exchange (IKE) Protocol Extensions Remote Code Execution VulnerabilityImportant7.5NoNoRCE
CVE-2023-28244Windows Kerberos Elevation of Privilege VulnerabilityImportant8.1NoNoEoP
CVE-2023-28298Windows Kernel Denial of Service VulnerabilityImportant5.5NoNoDoS
CVE-2023-28222Windows Kernel Elevation of Privilege VulnerabilityImportant7.1NoNoEoP
CVE-2023-28236Windows Kernel Elevation of Privilege VulnerabilityImportant7.8NoNoEoP
CVE-2023-28248Windows Kernel Elevation of Privilege VulnerabilityImportant7.8NoNoEoP
CVE-2023-28272Windows Kernel Elevation of Privilege VulnerabilityImportant7.8NoNoEoP
CVE-2023-28293Windows Kernel Elevation of Privilege VulnerabilityImportant7.8NoNoEoP
CVE-2023-28253Windows Kernel Information Disclosure VulnerabilityImportant5.5NoNoInfo
CVE-2023-28271Windows Kernel Memory Information Disclosure VulnerabilityImportant5.5NoNoInfo
CVE-2023-28237Windows Kernel Remote Code Execution VulnerabilityImportant7.8NoNoRCE
CVE-2023-28235Windows Lock Screen Security Feature Bypass VulnerabilityImportant6.8NoNoSFB
CVE-2023-28270Windows Lock Screen Security Feature Bypass VulnerabilityImportant6.8NoNoSFB
CVE-2023-28217Windows Network Address Translation (NAT) Denial of Service VulnerabilityImportant7.5NoNoDoS
CVE-2023-28247Windows Network File System Information Disclosure VulnerabilityImportant7.5NoNoInfo
CVE-2023-28240Windows Network Load Balancing Remote Code Execution VulnerabilityImportant8.8NoNoRCE
CVE-2023-28225Windows NTLM Elevation of Privilege VulnerabilityImportant7.8NoNoEoP
CVE-2023-28224Windows Point-to-Point Protocol over Ethernet (PPPoE) Remote Code Execution VulnerabilityImportant7.1NoNoRCE
CVE-2023-28246Windows Registry Elevation of Privilege VulnerabilityImportant7.8NoNoEoP
CVE-2023-28297Windows Remote Procedure Call Service (RPCSS) Elevation of Privilege VulnerabilityImportant8.8NoNoEoP
CVE-2023-24931Windows Secure Channel Denial of Service VulnerabilityImportant7.5NoNoDoS
CVE-2023-28233Windows Secure Channel Denial of Service VulnerabilityImportant7.5NoNoDoS
CVE-2023-28234Windows Secure Channel Denial of Service VulnerabilityImportant7.5NoNoDoS
CVE-2023-28241Windows Secure Socket Tunneling Protocol (SSTP) Denial of Service VulnerabilityImportant7.5NoNoDoS
CVE-2023-28228Windows Spoofing VulnerabilityImportant5.5NoNoSpoofing
CVE-2023-28274Windows Win32k Elevation of Privilege VulnerabilityImportant7.8NoNoEoP
CVE-2023-28284 *Microsoft Edge (Chromium-based) Security Feature Bypass VulnerabilityModerate4.3NoNoSFB
CVE-2023-24935 *Microsoft Edge (Chromium-based) Spoofing VulnerabilityLowN/ANoNoSpoofing
CVE-2023-28301 *Microsoft Edge (Chromium-based) Tampering VulnerabilityLow4.2NoNoTampering

Let’s look at CVE-2023-2825 for one second. This is the one bug under active attack this month, and you might know it because there was a similar 0-day patched in the same component just two months ago.

Apparently, the original fix was insufficient and attackers have found a method to bypass that fix. There is still no information about how widespread these attacks may be.

Please note that this type of exploit is typically paired with a code execution bug to spread malware or ransomware.

On the other hand, CVE-2023-21554 receives Microsoft’s highest exploitability rating. This one allows a remote, unauthenticated attacker to run their code with elevated privileges on affected servers with the Message Queuing service enabled.

Know that this service is disabled by default but is commonly used by many contact center applications, as it listens to TCP port 1801 by default, so blocking this at the perimeter would prevent external attacks.

CVE-2013-3900 is a 10-year-old patch being reissued. You might find this one a bit familiar, and it’s because it was used by a threat actor in the recent 3CX attacks.

Back in the day, this was an opt-in fix, meaning admins had to opt in to get this fix. With this revision, add fixes for additional platforms and adds further recommendations for enterprises.

Looking at the remaining Critical-rated patches, there’s another dangerous bug in Pragmatic General Multicast (PGM) that’s similar to the MSMQ bug already discussed.

That being said, this bug is listed as not exploitable as the Messaging Queue vulnerability. There’s also a bug in the DHCP server, but it may not be as severe as it initially seems.

In fact, it requires a network-adjacent attacker to send an affected DHCP server a specially crafted RPC call. DHCP is not a routable protocol (or a secure one), so external threat actors can’t take advantage of this vulnerability.

Moving on, there are a couple of Critical-rated bugs in the Layer 2 Tunneling Protocol and the Point-to-Point Tunneling Protocol.

There have been plenty of similar bugs that received fixes over the last few months, but none have ever been reported as being exploited in the wild.

This final Critical-rated bug impacts the Raw Image Extension, and viewing a specially-crafted file could actually lead to code execution.

Let’s also mention the three cross-site scripting (XSS) bugs in Dynamics 365, which break the streak of five XSS bugs in Dynamics seen in the last two months.

Feel free to check each individual CVE and find out more about what it means, how it manifests, and what scenarios can malicious third parties use to exploit them.

Have you found any other issues after installing this month’s security updates? Share your experience with us in the comments section below.

NET HELPMSG 3774: How to Fix this Error in 5 Steps

Many of our readers have encountered an error code NET HELPMSG 3774 when trying to create a new user account via Command Prompt. The error states that The user was successfully created but could not be added to the USERS local group.

Why do I get the NET HELPMSG 3774 error code?

If you receive the error code NET HELPMSG 3774 when trying to create a user account on your Windows PC, one or more of the following may be the reason for it.

  • Incomplete Windows installation – If Windows has not been installed correctly, or the installation process was interrupted, a NET HELPMSG 3774 error can occur during the user account creation.
  • Corrupt user profile – If the current user account becomes corrupt, you will run into NET HELPMSG 3774 error when creating a new user account.
  • Corrupt or missing system files – Missing or corrupt component store files and system images also prevent you from creating a new user.
  • Buggy Windows update – A bug in the current Windows version may create various issues on your Windows PC, including errors during user account creation.
  • Virus or malware attack – A malware infection can cause your system to malfunction when you attempt to create a new user account using the net user command.

Now that you are aware of what causes the NET HELPMSG 3774 error, let’s proceed to check out the potential solutions to resolve the error.

How do I fix the error NET HELPMSG 3774 in Windows?

1. Run SFC and DISM scans

  1. Click the Windows icon on the taskbar, type cmd in the search bar, and select Run as Administrator from the right section.
  2. Execute the following command by pressing the Enter key to run the System File Checker scan. sfc /scannownet helpmsg 3774
  3. After the SFC scan is completed, type or copy-paste the following command and press Enter. DISM /Online /Cleanup-Image /RestoreHealthnet helpmsg 3774

The SFC and DISM (Deployment Image Servicing and Management) will scan all the protected files and system images and replace them with the cached copy stored in the compressed folder.

Once the scan is complete, you can create the new user account without encountering the NET HELPMSG 3774 error.

Regardless, you can also use a dedicated repair tool to scan your PC and repair broken system files automatically. Plus, you don’t need any technical tasks as required in the next solution, the clean boot of your PC.

2. Clean Boot your Windows PC

  1. Bring up the Start menu by pressing the Windows key, type system configuration in the search bar, and choose the relevant search result.net helpmsg 3774
  2. Ensure Selective Startup is enabled in the System Configuration property window. Now uncheck the checkbox for Load startup items but keep the box for the Load system services option enabled. net helpmsg 3774
  3. Switch to the Services tab, enable the checkbox for the Hide all Microsoft services, and click the Disable all button.net helpmsg 3774
  4. After making the changes, press the Apply button followed by OK to exit the System Configuration window. After this, reboot your PC like you normally do to enter the clean boot mode.

In the clean boot state, the startup services and startup items will be disabled. Try creating the user account via the command prompt once again.

If you no longer get the NET HELPMSG 3774 message, the third-party apps were preventing the new user account creation. If these apps create further problems on your system, you can uninstall these apps for good.

3. Try alternative methods to create a user account

3.1 Via the Settings app

  1. Use the Windows + I shortcut to launch the Settings app.
  2. Choose Accounts from the left sidebar and then Family & other users.net helpmsg 3774
  3. Next, press the Add account button under the Other users section.Net helpmsg 3774
  4. Select I don’t have this person’s sign-in information on the sign-in window.net helpmsg 3774
  5. Next, choose the Add a user without a Microsoft account option and provide the necessary details to create a new user account.
  6. After the user account is successfully created, click it to reveal the related settings and press the Change account type button.net helpmsg 3774
  7. Select the Account type from the drop-down and press the OK button to save the changes.net helpmsg 3774

3.2 Use the Netplwiz command

  1. Use the Windows + R shortcut to launch the Run dialog box, type the following command in the text box and press the OK button. netplwiznet helpmsg 3774
  2. Press the Add button on the User Accounts window to create a new user account on your computer.net helpmsg 3774
  3. Choose Sign in without a Microsoft Account option on the signup window.
  4. Press the Local account button and provide the required details in the next window.
  5. After the local account is created, select the username and press the Properties button.net helpmsg 3774
  6. Switch to the Group Membership tab and select the level of access you want to provide to the user account.

4. Perform System Restore

  1. Use the Windows key to launch the Start menu, type create a restore point in the search bar on top, and select the relevant search result to access the System Properties window.
  2. Click the System Restore button under the System Protection tab.net helpmsg 3774
  3. Press the Next button on the System Restore wizard.
  4. Select the restore point from the list and click the Next button.net helpmsg 3774
  5. Finally, press the Finish button to begin the system restoration process.

Performing a system restore will revert all the changes in your PC that are causing the error code NET HELPMSG 3774 error when creating a new user account on your computer.

5. Reset Windows

  1. Use the Windows + I shortcut to launch the Settings app.
  2. Scroll down the System settings and choose Recovery from the right section of the Settings app.Net helpmsg 3774
  3. Press the Reset PC button, located in the Recovery options section to reinstall Windows.Net helpmsg 3774
  4. A Reset this PC window will appear on the screen with two options- Keep my files and Remove everything. Choose the first option to reset the Windows settings while keeping your data intact.net helpmsg 3774
  5. On the next window, specify the method you would like to opt for reinstalling Windows. We recommend you choose the Local reinstall option to quickly re-install Windows from your device.

Now follow the step-by-step process to complete the Windows setup process. Performing the Windows reset removes the misconfigured settings and restores their default values. You can then start afresh to create a new user account using Command Prompt, and you will no longer get the NET HELPMSG 3774 error.

That’s it! These are the workarounds you can implement to fix the NET HELPMSG 3774 error when creating a user account on your PC.

While you are here, you might be interested to know how to fix temporary profile errors in Windows.

Which of the methods mentioned in this guide fixed the NET HELPMSG 3774 error code? Let us know in the comments section below.

Nvidia’s new RTX 4070 GPU launches April 13 at $599

Nvidia has announced its newest graphics card, the RTX 4070. The GPU was well-leaked over recent weeks, and we now know that consumers can get their hands on the new RTX 4070 starting tomorrow, April 13 starting at $599 for the Founders Edition variant.

The RTX 4070 will feature the Ada Lovelace architecture which “lets you max out your favorite games at 1440p.” DLSS 3 is another Nvidia feature the new GPU will take advantage of, allowing an ever-growing list of supported games to run at 100FPS or more according to the announcement post. DLSS 3 utilizes some of the latest AI technology to upscale game resolution while improving framerate.

A photo of Nvidia’s new RTX 4070 GPU on a table

The mid-range card is essentially an update of the RTX 3060 and features 12GB GDDR6X RAM. The RTX 4070 is also designed to fit inside smaller form factor cases.

Via The Verge. 

Featured image via Polygon. 

0xc8000444 Windows Update Error: How to Fix it

Windows updates are crucial to the smooth running of a PC, but the process is not usually straightforward. Users encounter various errors with different codes, and 0xc8000444 is a prominent one.

This error code stops users from installing the latest updates on their PC. Thankfully, it is an issue that can be fixed, as shown in this guide.

Why does my Windows update keep failing?

Below are some of the potential factors that can cause the Windows update error 0xc8000444:

  • Corrupt system files: One of the major causes of this error message is the accumulation of faulty system files. The solution to this is to repair these files and restart your PC.
  • Accumulation of junk files: According to some users, this error code can be due to the accumulation of junk files on your PC. You can fix this using the Disk Cleanup tool.

How do I fix the Windows update error 0xc8000444?

Before proceeding to the fixes in this section, below are some basic troubleshooting steps to try:

  • Restart your PC.
  • Disable third-party antivirus.

If this can’t solve the problem, you can now delve into the detailed solutions below:

1. Run the Windows update troubleshooter

  1. Press the Windows key + I to open the Settings app and select Update & Security.
    update and 0xc8000444
  2. Click Troubleshoot in the left pane and select Additional troubleshooters.
    troubleshoot
  3. Finally, select Windows Update and click Run the troubleshooter.
    run the update

In some cases, the error 0xc8000444 might be due to minor glitches with some update processes. Running the built-in troubleshooter should solve the problem here.

2. Clear the Software Distribution folder

  1. Press the Windows key + E and follow the path below: C:\Windows\SoftwareDistributionsoftware distribution 0xc8000444
  2. Press the Windows key + A to select the contents of the folder.
  3. Finally, click the Delete icon at the top and try to install the updates.

Sometimes, the error code 0xc8000444 can be caused by the accumulation of incomplete update files. The solution to this is to delete the content of the Software Distribution folder.

3. Run an SFC scan

  1. Press the Windows key + S, type cmd, and click Run as administrator under Command Prompt.
    cmd admin
  2. Type the command below and hit Enter to run it: sfc /scannowsfc scan
  3. Finally, wait for the command to finish running and restart your PC.

If some system files are missing or faulty on your PC, you can get the Windows update 0xc8000444 error. To fix this, you need to perform an SFC scan.

Alternatively, you can restore system files using a dedicated repair tool. These tools will replace the missing files with the original version built from your PC cache.

4. Run Disk Cleanup

  1. Press the Windows key, type cleanmgr, and select Disk Cleanup.
    cleanmgr 0xc8000444
  2. Choose the drive you want to clean and click OK.
    select disk
  3. Now, select the junk files to eliminate and select Clean up system files.
    clean up system files 0xc8000444
  4. Next, select the drive you want to clean again and click OK.
  5. Finally, choose any additional file to get rid of and click OK.
    file ok

Some users have found the 0xc8000444 error code to be due to a lack of enough space and an accumulation of junk files. The quickest way to fix this is to use the Disk Cleanup tool.

Another option is to use a top PC cleaner in CCleaner. This tool will scan deep into your PC and eliminate any file taking up valuable space.

With this, we can conclude this detailed guide on fixing the Windows update error 0xc8000444. You should now be able to fix the issue provided you follow the steps.

If you are facing a similar issue in Windows update error 0xc1900223, check our detailed guide to fix it.

Feel free to let us know the solution that helped you fix this issue in the comments below.

Windows 10 & 11 April Patch Tuesday [DIRECT DOWNLOAD LINKS]

Indeed, you guessed it! The fourth round of the monthly Patch Tuesday updates of 2023 have arrived, and they bring an entire array of changes for both Windows 10 and Windows 11.

Regardless of whether you are running a newer or an older version of the Windows OS, Microsoft has got a little bit of everything for pretty much everyone.

The April 2023 Patch Tuesday updates are expected to fix some of the issues that were still pending, and in the article below we will be looking to see exactly what we get.

We’ve included detailed changelogs for each cumulative update, and we will also be providing you with direct download links from Microsoft’s Windows Update Catalog, so you know that they are secure.

Alternatively, you can always use other methods to get the latest updates, including:

  • The Windows Update menu on your OS
  • The WSUS (Windows Server Update Service)
  • Group Policies set up by your admins if you’re part of a larger network.

Changes included in the April 2003 Patch Tuesday Updates

This image has an empty alt attribute; its file name is Windows-10-Banner.jpg

Windows 11

As most of you know by now, Microsoft released its latest operating system, Windows 11, on the 5th of October, 2021.

Five months after the general rollout, the new OS seems to become increasingly stable and far less buggy than we’ve gotten used to.

You might also like to know that the 22H2 version of Windows 11, the operating system’s first major update, is out now and you can already install it.

It will, most likely, come in the first half of the year, so we might just get it until the summer. Of course, there is a possibility that the Redmond tech giant could postpone to the third, or fourth quarter.

Cumulative update name

KB5023774

Improvements and fixes

  • This update resolves an issue affecting the command line. This fails when you set the system setting to Japanese and cmd.exe is configured in legacy mode.  
  • The update fixes an issue that affects the remote procedure call service ( rpcss.exe ). The issue could lead to a race condition between the Distributed Component Object Model (DCOM) and the Microsoft Remote Procedure Call (RPC) endpoint mapping.
  • This update affects the ms-appinstaller URI . It now works with the DesktopAppInstaller policy.
  • This update resolves an issue that affects Microsoft PowerPoint. It stops responding to the Azure Virtual Desktop (AVD). This happens when you use Visual Basic for Applications (VBA).
  • This update resolves an issue that affects Windows Search. Windows Search fails in Windows container images.
  • This update resolves an issue that affects the Microsoft HTML Application Host (HTA). This issue blocks the execution of code that uses Microsoft HTA. This occurs when you enable Windows Defender Application Control (WDAC) User Mode Code Integrity (UMCI) enforced mode.
  • This update resolves an issue that affects Desired State Configuration. The previously configured options will be lost. This happens if metaconfig.mof is missing.
  • This update resolves compatibility issues affecting some printers. These printers use windows graphical device interface (GDI) printer drivers. These drivers are not fully compliant with GDI specifications.
  • This update resolves an issue that affects the Simple Certificate Enrollment Protocol (SCEP) certificate. The system reports some SCEP certificate installations as failed. Instead, the system should report them as pending.
  • This update resolves an issue affecting the new Windows Runtime (WinRT) API. This issue prevents an application from querying location data using MBIM2.0+.
  • This update resolves an issue that affects the Fast Identity Online 2.0 (FIDO2) PIN icon. It is not displayed on the reference screen of an external monitor. This happens when that monitor is connected to a closed laptop.
  • This update affects the configuration file for setting default Group Policy Object (GPO) links. You can now use it to create an extension for specific applications.
  • This update resolves an issue affecting the SharedPC account manager. Multiple accounts cannot be deleted during the cleanup.
  • This update resolves an issue that may affect lsass.exe. It may stop responding. This occurs when an LDAP (Lightweight Directory Access Protocol) query is sent to a domain controller that has a very large LDAP filter.

Known issues

  • After installing updates released on January 10, 2023 and later, kiosk device profiles that have auto-login enabled may not be able to auto-login. After Autopilot completes provisioning, the affected devices remain on the login screen requesting credentials.
  • After installing this or later updates, Windows devices with some third-party ui customization apps may fail to boot. These third party apps can cause explorer.exe errors that may repeat multiple times in a loop. The known affected third party ui customization apps are ExplorerPatcher and StartAllBack. These types of apps often use unsupported methods to accomplish their customization and as a result may produce unintended results on your Windows device.
  • After installing this or later updates, Red Dead Redemption 2 may not open. Attempting to open the game from the Rockstar Games Launcher by selecting the Play button switches to Load, but Red Dead Redemption 2 may not open and the button reverts to Play.

[DIRECT DOWNLOAD LINK]

Windows 10 versions 21H2, 21H1, and 20H2

Windows 10 v21H2 is the latest major version of Windows 10, and as such has the most experimental features on it.

Fortunately, most bugs that were first present when it was first made available have been weeded out, and this version of Windows 10 is far more stable.

Cumulative update name

KB5025221 

Improvements and fixes

  • This update implements the new Windows Local Administrator Password Solution (LAPS) as a Windows inbox feature. For more information, see By popular demand: Windows LAPS available now!
  • This update affects the Arab Republic of Egypt. The update supports the government’s daylight saving time change order for 2023.
  • This update addresses a compatibility issue. The issue occurs because of unsupported use of the registry.
  • This update addresses a known issue that affects kiosk device profiles. If you have enabled automatic logon, it might not work. After Autopilot completes provisioning, these devices stay on the credential screen. This issue occurs after you install updates dated January 10, 2023, and later.

Known issues

  • Devices with Windows installations created from custom offline media or custom ISO image might have Microsoft Edge Legacy removed by this update, but not automatically replaced by the new Microsoft Edge. This issue is only encountered when custom offline media or ISO images are created by slipstreaming this update into the image without having first installed the standalone servicing stack update (SSU) released March 29, 2021 or later.

Windows 10, version 1809

This version of the OS is outdated and will no longer receive any updates from the tech company. Users that are still running this old version on their devices are strongly advised to choose a more recent one to update to.

If you still want to use Windows 10 and are not willing to upgrade to 11, you don’t have to do so right away. After all, Microsoft announced that the support for Windows 10 will go on until 2025.

Cumulative update name

KB5025229 

Improvements and fixes:

  • This update adds many new features and improvements to Microsoft Defender for Endpoint. For more information, see Microsoft Defender for Endpoint.
  • This update implements the new Windows Local Administrator Password Solution (LAPS) as a Windows inbox feature. For more information, see By popular demand: Windows LAPS available now!
  • This update affects the Arab Republic of Egypt. The update supports the government’s daylight saving time change order for 2023.
  • This update enables onunload events to create pop-up windows in IE Mode.
  • This update addresses an issue that affects Microsoft Edge IE mode and pages that use predictive prerendering. Edge IE mode does not support predictive prerendering. Because of this, a page that uses prerendering will load as if it was not in use.
  • This update addresses an issue that affects Desired State Configuration. It loses its previously configured options. This occurs if metaconfig.mof is missing.
  • This update addresses compatibility issues that affect some printers. These printers use Windows Graphical Device Interface (GDI) printer drivers. These drivers do not completely adhere to GDI specifications.
  • This update addresses an issue that affects the Host Networking Service. The service stops working. Because of this, there are traffic interruptions.
  • This update addresses an issue that affects Administrator Account Lockout policies. GPResult and Resultant Set of Policy did not report them.
  • This update addresses an issue that affects MySQL commands. The commands fail on Windows Xenon containers.
  • This update addresses an issue that affects repair storage jobs. The jobs are suspended. This occurs after two physical disks in two different rack-level fault domains (three fault domain in total) lose communication.

Known Issues:

  • After installing KB5001342 or later, the Cluster Service might fail to start because a Cluster Network Driver is not found.
  • After installing updates released January 10, 2023, and later, kiosk device profiles that have auto log on enabled might not sign in automatically. After Autopilot completes provisioning, affected devices will stay on the sign-in screen prompting for credentials.

Windows 10, version 1607

Windows 10, version 1607 has reached the end of service for all of its available editions. Update to the latest version of Windows 10 in order to keep your system protected.

Cumulative update name

KB5025228 

Improvements and fixes

  • This update affects the Arab Republic of Egypt. The update supports the government’s daylight saving time change order for 2023.
  • This update addresses an issue that affects Microsoft Edge IE mode and pages that use predictive prerendering. Edge IE mode does not support predictive prerendering. Because of this, a page that uses prerendering will load as if it was not in use.
  • This update addresses compatibility issues that affect some printers. These printers use Windows Graphical Device Interface (GDI) printer drivers. These drivers do not completely adhere to GDI specifications.

[DIRECT DOWNLOAD LINK]

This wraps up our brief overview of this month’s Patch Tuesday updates, and we hope that by reading the changelogs above, you will make a more informed decision regarding whether to update or not.

However, keep in mind that if you choose not to update for too long, you will risk exposing yourself to subsequent malware attacks that usually follow the Patch Tuesday updates, called Exploit Wednesday.

On that note, if you do prefer to wait out until Microsoft fixes the issues detected in this month’s updates, know that you can always choose to delay the Update notification that you get for up to 35 days.

All in all, it is important to remember that the Patch Tuesday updates are released for a reason, so installing them, eventually, is something that you should do.

Was this article helpful to you? Let us know in the comments section below.

0x80180014 Autopilot Error: 5 Ways to Quickly Fix It

Various reports online have indicated different issues using Windows Autopilot. The error code 0x80180014 is one of them, occurring during the Autopilot deployment process. Hence, we will explore the causes of this error and how to fix it.

Likewise, you can check our guide on fixing the Autopilot.dll WIL error that was reported on your PC.

What causes the Autopilot error 0x80180014?

The following are some likely reasons for the error:

  • Microsoft Endpoint manager error – the MEM reconfigures the settings applied to the Windows Autopilot self-deployment mode can prevent the Autopilot deployment process from completing successfully and result in the error code 0x80180014.
  • Disabled Windows MDM – Disabling Windows MDM enrollment can impede the interaction between the Autopilot deployment process and the system.
  • Outdated device firmware – Your computer firmware may be obsolete or incompatible with the Autopilot deployment process, causing the deployment to fail and result in an error code.
  • User error – Human errors such as entering the incorrect device ID, missing necessary configurations, or not having the correct permissions may cause the Autopilot deployment to fail, leading to the error code.

The factors above vary on different PCs. We will discuss resolving the error code as we go further into this article.

How can I fix the autopilot error 0x80180014?

Before trying advanced troubleshooting steps:

If you can’t resolve it, proceed with the following steps:

1. Delete PCs record from Intune admin

  1. Open your browser and sign in to the Microsoft Intune admin center on their official website.
  2. Select the Devices option and go to All devices.
  3. Select the devices you choose to delete and click the Delete button.

The above will check the MEM logs for errors that might negatively impact the Autopilot deployment process.

Read our detailed guide on how to fix Intune app installation errors on Windows.

2. Enable Windows MDM

  1. Go to the Microsoft Intune admin on your browser and sign in to your Microsoft account.
  2. Select the Devices option and click on Enrollment Restrictions.
  3. Select the device restriction type and click on Properties.
  4. Click the Edit button beside the Platform settings and select Allow for Windows (MDM).
  5. Select the Review option and Save your selection.

Enabling Windows MDM enrollment will adequately configure it to ensure that Autopilot deployments are successful.

3. Uninstall third-party antivirus app

  1. Left-click the Windows button and select Settings.
  2. Click the Apps category and select the Installed apps.
  3. Find the third-party antivirus app, select the options button, and click Uninstall.
  4. Click on Uninstall again to confirm your selection, then follow the on-screen command to uninstall it.

Having multiple antivirus software on a computer can cause the antivirus software to malfunction. Therefore, we recommend having one trusted antivirus software.

You can read about how to disable Windows Defender if you encounter issues with it.

4. Run an SFC/DISM scan

  1. Left-click the Windows icon, type Command Prompt, and choose Run as administrator.
  2. Left-click the Yes button if the UAC Windows prompt appears.
  3. Input the following command and press Enter: sfc /scannow
  4. Then input the following and press Enter: Dism/Online/Cleanup-Image/RestoreHealth
  5. Wait for the process to complete, restart your PC and check if the error is solved.

The SFC/DISM scan command will find and resolve all corrupt system files that can affect the deployment. Alternatively, you can read more about running an SFC scan on Windows.

If you require more support to fix damaged files on your PC, there is an efficient system repair software that will scan the system all around and solve all the issues within a few clicks.

5. Reset Windows

  1. Left-click the Windows icon, and click on Settings.
  2. Select System and click on Recovery.
  3. Then, select the Reset PC button from the right side pane.
  4. Select the Keep My Files option from the new Windows to keep your data, delete apps, and reset settings to default after reinstalling.
  5. Select the Remove Everything option, to perform a full Windows reset.

The method above will restore Windows operating settings to factory default and delete third-party as a last resort to fix the error. We have a step-by-step guide on reinstalling Windows 11 OS on your computer.

Further, you can read how to fix error code 0xc1900223: this Windows Update Issue on your PC.

Also, check our guide about fixing there were some problems installing updates on your Windows devices.

If you have further questions or suggestions, kindly drop them in the comments section.

Error Fix: The File is Currently Unavailable (0x800710fe)

The computer processes raw data, stores and makes them available as a file in the desired format. However, error codes like 0x800710fe can sometimes appear while accessing files.

0x800710fe: The file is currently unavailable can occur when accessing files on your PC. Thus, we will examine how to fix this error on Windows.

Also, you can read about how to fix Windows file system errors on your PC.

What causes the error 0x800710fe?

The error can occur for a variety of reasons, including:

  • File in use by another program – If a file you are trying to access is currently open or used by another program, you may receive this error message.
  • Antivirus or security software is blocking access – Sometimes, antivirus or other security software can prevent access to files on your computer, resulting in this error message.
  • Corrupt files – A corrupt system file on your computer can make the file inaccessible and could cause this error message.
  • Disk errors –  If the file on the disk segment where there are errors can cause the file unavailable error message 0x800710fe.

The following factors listed above may vary in different circumstances or PCs. Nonetheless, we will discuss how to resolve the issue.

How can I fix the error 0x800710fe?

1. Run SFC/DISM scan

  1. Press the Windows button, type cmd, and click on Run as administrator to open it.
  2. Click Yes if the Windows User Account Control prompt appears.
  3. Type the following and press Enter: sfc /scannow
  4. Then type the following command and press Enter: Dism/Online/Cleanup-Image/RestoreHealth
  5. Restart your PC and check if the error persists.

Performing an SFC/DISM scan will troubleshoot the storage device and repair corrupt storage. Check our guide about SFC scannow not working on Windows if you’re having any issues with SFC.

Alternatively, you can utilize a software application tailored for scanning your PC and repairing corrupted system files.

2. Perform a Check Disk command

  1. Open the Start Menu, type cmd and click on Run as administrator.
  2. Type in the following command prompt and press Enter. chkdsk c:/f/r/x (The letter C refers to the drive letter you want to repair)
  3. Close the Command Prompt and check if the error persists.

Using the chkdsk command on your PC will help find and repair issues with the faulty file. Read our guide on how to fix the chkdsk command taking forever to run on Windows.

3. Disable Offline File Synchronization

  1. Left-click the Windows icon, type Control Panel, and press Enter to open it.
  2. Click on the search address bar, type Sync Center and press Enter key.
  3. Select Sync Center from the search result and click on Manage offline files from the left pane.
  4. Select the Disable offline file button from the offline window and click Yes on the UAC prompt to complete the process.

Disabling the offline sync will troubleshoot errors generated by offline-dependent files.

4. Format the CSC database using Registry Editor

  1. Press Windows key + R, type regedit, and press Enter to open the Registry Editor.
  2. Copy and paste the following directory in the Registry Editor address bar and press Enter: Computer\HKEY_LOCAL_MACHINE\SYSTEM\CurrentControlSet\Services\CSC
     
  3. Right-click the right side pane, select New, and click the DWORD (32-bit) value from the side context menu.
  4. Name the new value as FormatDatabase.
  5. Double-click the FormatDatabase, select Hexadecimal from the Base category, and the Value data to 1.

  6. Click the OK button to save the modified value and restart your PC.

Formatting the CSC folder will clear all cluster data that can cause the file unavailable error. Read about how to fix Windows Registry Editing has been disabled by Administrator on Windows OS.

5. Reset your PC

  1. Press the Windows + I key to open the Windows Settings.
  2. Select the System and click on Recovery.
  3. Click on the Reset PC button from the right side pane.
  4. Select the Keep My Files option from the new Windows to keep your data, delete apps, and reset settings to default after reinstalling.
  5. Alternatively, select the Remove Everything option, to perform a full Windows reset.

Resetting your PC may be the last resort to fix the error code 0x800710fe, as it will restore everything to default. We have a guide on how to factory reset Windows devices.

Further, do not hesitate to check our detailed guide about how to fix Windows that cannot recognize micro SD cards. Also, you can read about the best software to repair corrupted SD cards for Windows OS.

If you have further questions or suggestions, kindly drop them in the comments section.

Print screen button opens Snipping Tool? Here’s how the fix

It’s that time of the month as Microsoft is back with another build for insiders. For those in the Beta channel, we’re getting Build 22621.1546 and 22624.1546 (KB5025310) with dozens of small fixes and improvements here and there. That includes the print screen button that automatically opens Snipping Tool by default. 

Back then, at least since the Windows 10 era, you’d have to go manually to Settings ➜ Ease of Access to toggle the feature off and on. Now, it seems like Microsoft is getting handy in promoting its built-in apps; hence they automatically set Snipping Tool as its screen-capturing app. 

While this may be good news for some, as you won’t need to manually search for Snipping Tool to open it, this can be a little bit annoying if you use third-party apps for taking screenshots like ShareX. Or, some can also accidentally hit on the print screen button as it’s often located near the left Ctrl on the keyboard.

If you’re looking to toggle this feature down, look no further. Here’s how you can turn off automatic Snipping Tool summoning, via Settings. 

How to fix the print screen button opening the Snipping Tool

1. Go to Settings.

2. Go to Accessibility ➜ Keyboard.

3. On the On-screen keyboard, access keys, and Print screen, toggle off Use print screen to open Snipping Tool.

Speaking of Snipping Tool, the app just welcomed a feature to record screen capture video not too long ago. Although it’s still far from perfect, there’s nothing wrong with trying it. 

What do you think about this addition? Let us know in the comments!

How to use Snapchat filters in Teams

After rolling out what seemingly to be a faster, more energy-efficient Teams 2.0, Microsoft announced that its pearl of teleconferencing app, Teams, is teaming up with Snapchat to integrate its filters with the app.

Over 20 of Snapchat’s most popular lenses will be available on Teams “in the coming weeks,” and you can activate them before joining a meeting.

Lenses allow users to add augmented reality (AR) effects to video calls, bringing livelier human interaction to meetings. AR captures and processes information about our physical environment and then overlays it with virtual objects and information, allowing us to see and experience the world in a different way.

Not too long ago, Microsoft brought Camera Kit, Snap Inc’s cross-platform SDK that lets you deliver augmented reality experiences on mobile apps, to the tech giant’s video learning platform Flip, so this won’t be the first time and probably won’t be the last.

Since AR uses cameras, sensors, and displays, which are already built into video conferencing, it is a perfect and seamless fit with Teams.

So, how do Snapchat filters work on Teams, you may ask? Below, you’ll find a guide how to use Snapchat filters in Teams, which we hope will be available in weeks, as Redmond officials promised.

How to use Snapchat filters in Teams

1. Before joining the meeting, click Video Effects ➜ More Video Effects.

2. Scroll down in the right pane and select Snapchat under the Filters category

3. Scroll down to view all and select your favorite Lens.

4. Click Join now.

5. You can still put a Snapchat filter during a meeting. Click More at the top of your screen ➜ Video Effects.

6. Scroll down in the right pane and select Snapchat under the Filters category.

7 Scroll down to view all and select your favorite Lens

8 Click Apply if you’re happy with your Snapchat filter, then get back to your Teams meeting.

We’ve previously reported that in-app avatars and animated background features are also coming to Teams, so it’s safe to say that this is a good move for both Microsoft and Snap Inc.

What do you think about Snapchat filters’ integration within Microsoft Teams? Let us know in the comments!

0x800b010a Error Code: 5 Ways to Fix It

If there’s one thing that Windows users can attest to, it is the fact that Microsoft has consistently released regular updates. These updates are crucial in keeping your system in a top-notch state, especially with the security vulnerabilities present in this modern day.

What’s worrying is that you may get a slap in the face when you run a Windows update. You might get an error code 0x800b010a that lets you know that Windows could not search for new updates. If you’re in the same predicament, here are a few solutions I’ve tried on my own.

What causes the error 0x800b010a?

Windows Update is a Microsoft Windows operating system feature that allows for the easy installation of critical updates and security patches to keep your PC safe, secure, and running smoothly.

In some cases, Windows Update may be unable to search for updates, so you can’t install them. Here are some reasons why this happens:

  • Connection issues – Windows Update may be unable to search for updates because of an issue with your Internet connection. This problem can be caused by a bad cable or modem.
  • Antivirus settings – Your antivirus software might be blocking Windows Update from working properly 
  • Virus/malware – Viruses and malware can interfere with how Windows works and prevent it from updating properly.
  • Windows Update Services are not running – If the Windows Update service isn’t running, your computer won’t be able to check for or install any updates. 
  • Corrupt update files – Another possibility is that one or more of the update files have become corrupted somehow and are no longer usable by Windows Update. 
  • Proxy server – If your computer is behind a proxy server, Windows Update will not be able to detect or download updates from Microsoft hence the error code 0x800b010a. 

How do I fix error code 0x800b010a?

Start with the preliminary steps:

1. Run the Windows Update troubleshooter 

  1. Hit the Windows key and click on Settings.settings windows 11
  2. Click on System and select Troubleshoot.Open system troubleshooter
  3. Navigate to Other troubleshooters.other troubleshooters
  4. Click the Run option for the Windows Update troubleshooter.windows-update-run-troubleshooter runtimebroker.exe error

2. Restart the Windows update service 

  1. Hit the Windows + R keys to open the Run command.
  2. Type services.msc and hit Enter.run services.msc command
  3. Locate the Windows Update service, double-click on it, and select Properties.
  4. Navigate to the General tab, under Startup type, select Automatic from the drop-down options, and click on the Start button.
  5. Next, click Apply and then OK.

3. Restart the Background Intelligent Transfer Service

  1. Hit the Windows + R keys to open the Run command.
  2. Type services.msc and hit Enter.run services.msc command
  3. Locate the Background Intelligent Transfer Service, double-click on it and select Properties.
  4. Navigate to the General tab, under Startup type, select Automatic from the drop-down options, and click on the Start button.
  5. Next, click Apply and then OK.

4. Reset Windows update components 

  1. Hit the Windows key, type cmd in the search bar, and click Run as administrator.cmd-run-admin-w11 unexpected kernel mode trap windows 11
  2. Type the following commands and press Enter after each one: net stop bits net stop wuauserv net stop appidsvc net stop cryptsvc Del "%ALLUSERSPROFILE%\Application Data\Microsoft\Network\Downloader\*.*" rmdir %systemroot%\SoftwareDistribution /S /Q rmdir %systemroot%\system32\catroot2 /S /Q regsvr32.exe /s atl.dll regsvr32.exe /s urlmon.dll regsvr32.exe /s mshtml.dll netsh winsock reset netsh winsock reset proxy net start bits net start wuauserv net start appidsvc net start cryptsv

5. Disable proxy server

  1. Press the Start Menu icon and select Settings.settings windows 11
  2. Click on Network & Internet on the left pane, then scroll down and click Proxy on the right pane.Network proxy settings
  3. Select Edit next to Use a proxy server option in the Manual proxy setup section, toggle off Use a proxy server and click on Save.Disable proxy server

If, at this point, you have tried every step above, but the error 0x800b010a is still persistent, you may need to perform a System Restore. This will take your PC to its last known good position before any errors.

The catch, however, is that you must have created a restore point prior otherwise, there will be no point to go back to.

Should you encounter any other Windows update-related issues, check out our extensive article on how to bypass them.

We appreciate your feedback, so don’t hesitate to let us know of any other solutions that may have worked for you but were not mentioned here.

Obs.dll Missing: How to Quickly Fix the Error

Obs.dll is a DLL (Dynamic Link Library) file that is an integral part of the Windows OS. Needless to say, if Obs.dll is missing, or any other DLL file for that matter, your system will not function properly. If you’re in this unfortunate situation, our solutions below will help restore everything to normal.

Why is Obs.dll missing on my PC?

There are plenty of reasons for that mishap, but we will highlight here the most important ones:

  • Malware or virus infection – A viral infection on your PC messes with the whole system, and deleting a DLL is just one of the manifestations. Scanning your system with a third-party antivirus is a must!
  • App incompatibility – If you recently updated your system, an app might become incompatible, and the missing DLL is now a requirement to run it.
  • Accidental deletion – However unlikely, you might have deleted the Obs.dll file by mistake while trying to free some space on your drive.

Now that we know why Obs.dll is missing on your PC, let’s try to fix this problem with the solutions below.

What can I do if Obs.dll is missing in Windows?

But before we get to more complicated solutions, make sure you perform the following workarounds:

  • Although it seems odd, restarting your PC may restore things to normal.
  • Make sure you installed all the latest system updates.
  • If the problem occurred right after you installed an app, try uninstalling it and see if that makes a difference.

If the Obs.dll error still persists, try performing the steps below to fix the problem quickly.

1. Use a dedicated DLL fixer

Getting the DLL file from a shady website is always a bad idea, so the best thing to do in this case is to recover it using a DLL fixer tool, that will have access to extensive libraries of DLL files and can replace or add the missing Obs.dll in an instant.

As Obs.dll is a Windows DLL file, you can rest assured that the DLL fixer will 100% fix this problem with one click.

2. Perform SFC and DISM scans

  1. Click the Start button, type cmd, and select the Run as administrator option from the results.
  2. Now, type or paste the following command and press Enter to run it: sfc /scannow
  3. Wait patiently for the scan to finish, then type or paste the following command to run the DISM scan: DISM.exe /Online /Cleanup-Image /Restorehealth
  4. Wait for the scanning process to finish, then restart your PC and check if the error persists.

Performing the SFC and DISM scans will fix the system issues and the Obs.dll file should be restored.

3. Perform an antivirus scan

  1. Click the Start button, type security, and click on Windows Security.
  2. Now, choose Virus & threat protection.
  3. Next, click on Scan options.
  4. Check the Full scan option and hit the Scan now button.
  5. Wait for the scan process to complete and restart your PC.

Windows Defender antivirus is quite efficient, but it doesn’t compare to other third-party antiviruses. If you have one, we recommend using it to perform a full scan.

4. Perform a System Restore

  1. Click the Start button, type system restore, and click on Create a restore point from the results.
  2. Now, click on the System Restore button.
  3. Next, you may either go with the recommended restore point or choose a different one.
  4. Select a restore point prior to the Obs.dll error and click Next.
  5. Wait for the restoration of the system to end. You will also be prompted to restart your PC.

If you have problems with this solution, read our guide on what to do if the System Restore is taking too long to complete.

5. Download Obs.dll from a trusted source

As mentioned in the first solution, downloading DLL files from some untrusted source may lead to virus and malware infections.

However, there are a few websites, such as DLL-Files.com, that scan their DLL files and are safe for you to download.

Another option is to look for a healthy PC and copy the Obs.dll from that one. By default, you should find it in the following folder: C:\Windows\System32

We hope our solutions helped you fix the Obs.dll missing error, and now everything is back to normal.

For any other questions or solutions, feel free to use the comments section below.

0x8007010b: How to Fix This Windows Update Error in 4 Steps

Updating Windows can sometimes be annoying because you can run into numerous errors. A recent Update error is the 0x8007010b that appears when Windows can’t complete the process.

However, this guide will discuss basic fixes you can follow to fix the error. Alternatively, you can check out our article on ways to fix Windows Update error 0x80d02002 on your PC.

What causes the Windows Update error 0x8007010b?

Some notable factors that can cause the Window update error 0x8007010b on your PC are:

  • Windows Update Temporary Cache folder – Old update files are stored in the Temp cache folder. Removing them can fix this error.
  • Issues with Windows Update components – You can encounter the update error if these services are not running correctly or intact.
  • Corrupt system files – Corrupt files become inaccessible or damaged when invoked by the system for the Windows Update process. Hence, the Windows Update error 0x8007010b will appear.
  • Virus and Malware – Virus and malware infections may cause Windows Update errors like 0x8007010b. They impede the connections between the PC and Windows Update servers.
  • Windows Firewall interference – The Windows Defender Firewall might detect or pick the process as a threat to the system.

Nevertheless, you can resolve the error by following the troubleshooting steps below.

How can I fix the Windows Update error 0×8007010b?

Before trying any troubleshooting steps, go through the following:

If you can’t resolve the error, go ahead with the solutions below:

1. Run Windows Update Troubleshooter

  1. Press Windows + I key to open Settings.
  2. Select System, click on Troubleshoot, then Other troubleshooters button.
  3. Select Most Frequent, locate Windows Update, and click the Run button.
  4. Follow the on-screen instructions to complete, restart your PC, then check if you can update Windows.

The Windows Update troubleshooter will resolve underlying problems impeding the installation process. Do not hesitate to check for ways to run the Windows Update troubleshooter on Windows 11.

2. Clear Windows Update cache

  1. Press Windows + E to open File Explorer.
  2. Go to Local Disk (C) and right-click, then click on Properties from the drop-down.
  3. Select Disk Clean-up, then click the Cleanup system files button.
  4. Check the boxes for Windows upgrade log files and Temporary Windows Installation files, then click OK.
  5. Exit the File Explorer and restart your PC to check if the error persists.

Deleting the Windows update cache files will clear the corrupt update files affecting the update process and allow the system to write new files.

Read our article on what to do if File Explorer keeps crashing your PC.

3. Reset the Windows Update components

  1. Left-click the Start button, type Command Prompt and select the Run as administrator option.
  2. Click Yes on the User Account Control prompt.
  3. Copy and paste the following commands and press Enter after each one: net stop wuauserv   net stop cryptSvc   net stop bits    net stop msiserver
  4. Then, input the following and press Enter after each command: ren C:\Windows\SoftwareDistribution SoftwareDistribution.old    ren C:\Windows\System32\catroot2 Catroot2.old
  5. Copy and paste the following commands and press Enter after each:net start wuauserv   net start cryptSvc   net start bits    net start msiserver
  6. Exit the Command Prompt and restart your PC.

Resetting the Windows Update components will fix the issues affecting its performance and resolve the 0x8007010b update error.

Read our article if you encounter issues running the Command Prompt as an administrator on Windows 11.

4. Disable Windows Firewall

  1. Left-click the Start button, type control panel, then press Enter.
  2. Select Windows Defender Firewall.
  3. Click the Turn Windows Defender Firewall on or off option.
  4. Go to Private network settings and Public network settings, then click the radio buttons for the Turn off Windows Defender Firewall (not recommended) option.
  5. Restart your PC to see if you can install the Windows Update.

The above steps will resolve any interference the Firewall feature is causing in the Windows update process. You can also check other ways to disable the Windows Defender Firewall.

Additionally, we have an article about fixing slow Windows Updates on Windows 11. Likewise, you can check how to fix the 0x800f0900 Windows Update error.

For further queries or questions regarding this topic, kindly drop them in the comments section.

Error Code 0xc0000001 on Windows 11: How to Restore Your PC

If you encounter error code 0xc0000001 on Windows 11, you won’t be able to access Windows at all.

So, what causes this issue? It could be triggered due to damaged RAM, corrupted system files, or faulty software. Luckily, there are ways to fix this issue, and this guide will show you how to do it.

How do I fix error code 0xc0000001 on Windows 11?

1. Perform a startup repair in Recovery mode

  1. To begin with, create a bootable media for Windows 11 and boot the PC using the media.
  2. On the next screen, click on Repair your computer. Install ow - Repair your computer
  3. You will now reach the System Recovery Options screen.
  4. Under Choose an option, click on Troubleshoot. Windows failed to start. A recent hardware or software change might be the cause
  5. Next, click on Advanced options. Under Troubleshoot, select Advanced options
  6. On the next screen, click on Startup Repair.Startup Repair
  7. Here, select an account with administrator rights, enter the password and click on Continue. Enter account password in Startup Repair and press Continue
  8. Now, wait till the Windows Startup Repair process is over.

Once the process is over, restart your PC and it should boot normally without the blue screen error code – 0xc0000001.

2. Use Command Prompt to repair error code 0xc0000001

2.1. Rebuild BCD on Windows 11

  1. Create a Windows 11 bootable media and boot the PC using the media.
  2. Next, select Repair your computer. Install ow - Repair your computer
  3. On the Choose an option screen, select Troubleshoot. Windows failed to start. A recent hardware or software change might be the cause
  4. Now, under Troubleshoot, click on Advanced options.Under Troubleshoot, select Advanced options
  5. On the Advanced options screen, click on Command Prompt.Command Prompt in Advanced options
  6. Now run the below commands one by one and hit Enter after each command: BOOTREC /FIXMBR
    BOOTREC /FIXBOOT
    BOOTREC /scanos
    BOOTREC /rebuildbcd
    run command in cmd to rebuild bcd

2.2. Run SFC scan and CHKDSK utility

  1. In the same Command Prompt window, execute the below command to run the system file checker utility and hit Enter: sfc /scannowrun sfc scan command in cmd
  2. The scan takes a while, so wait till it’s over. Once done, follow the below steps.
  3. Next, run the below command to check the hardware drive and press Enter (replace the C drive with the actual system drive if needed): chkdsk C: /f /r /x Command chkdsk
  4. Press Y if you are prompted for confirmation and hit Enter.

3. Remove the interfering software in Safe Mode

  1. You can create a Windows 11 bootable media and use it to boot your PC into Recovery mode.
  2. On the Choose an options screen, select Troubleshoot. Windows failed to start. A recent hardware or software change might be the cause
  3. Next, click on Advanced options. Under Troubleshoot, select Advanced options
  4. On the next screen, click on Startup Settings. Select Startup settings to address computer shuts down during virus scan
  5. Select F4 from the list and press the key on your keyboard to boot your PC into Safe Mode as it restarts.
  6. Now, press the Win + I keys simultaneously to launch Windows Settings.
  7. Click on Apps on the left and select Apps & features on the right. Click on Apps & features in App settings
  8. Here, go to the Apps list and select the program that was recently installed.
  9. Click on the three dots next to it and select Uninstall. Select app from the apps list in apps & features and select Uninstall
  10. Click on Uninstall again in the pop-up window to confirm. Click Uninstall again in the confirmation prompt

Once uninstalled, close the Settings app and restart your PC. The error code 0xc0000001 Windows 11 should be fixed now.

At this point, you can also check your Windows files for errors and corruption by using a dedicated repair tool.

4. Reset your PC

  1. Boot your PC with the Windows 11 bootable media.
  2. Press the Win + I keys together to open the Settings app.
  3. Click on System on the left and then click on Recovery on the right. Click on recovery in system settings
  4. Next, on the right side, under Recovery options, go to Reset this PC and click on Reset PC. Reset this PC, reset PC
  5. Now, on the Reset this PC screen, select Keep my files or Remove everything. choose Keep my files or Remove everything
  6. As you see the warnings, click Next.
  7. Then, click Reset again and press Continue.

Once you complete the factory reset of Windows 11, the issue should be gone, and help you if your PC is stuck in the boot loop.

Additionally, you can also try to perform a system restore to revert to a previous working state, or you can perform a custom installation of Windows 11 to fix the error code 0xc0000001.

You can also encounter the error code 0xc0000001 on Windows 10, and to fix this issue, do not hesitate to refer to our detailed guide.

We also have guides on 0xc00000ba boot error and error code 0xc0000428, so don’t miss it.

If you found this article helpful, let us know in the comments box below.

Fix: Software Update Failed SSCM Error Code 0x87d00664

Some of our readers complain about encountering the error code 0x87d00664 during an update process. It signals the system can get updates.

Might be due to runtime issues, corrupt update files, interference or interference from other apps. Nevertheless, you can fix the error by following the troubleshooting steps below.

How to fix the Software update failed error 0x87d00664?

Start by turning off background apps running on your PC, temporarily disabling your software and restart Windows in Safe Mode and check if the update error 0x87D00664 persists.

If you can’t resolve the error, go ahead with the solutions below:

1. Perform a Clean boot

  1. Press Windows + R key to open the Run dialog box, type msconfig, and click OK.
  2. Click the Services tab, check the box for the Hide all Microsoft services option, then click the Disable all button.
  3. Go to the Startup tab and click Task Manager.
  4. Right-click the startup programs and click the Disable button.
  5. Restart your PC and check if the software update error persists.

A Clean boot will prevent services interfering with the update from running when you boot the system. Check our guide on how to disable startup apps on Windows 11.

2. Redistribute package content to Distribution Point

  1. Left-click the Start button, type Configuration Manager console, then press Enter to open the SCCM console.
  2. Navigate to the Software Library tab.
  3. Select Software Update under the content types for redistribution.
  4. On the Taskbar at the top of the ribbon, in the Properties tab, select Properties. Click on the Content Locations tab. Select the distribution point (or distribution point group) to redistribute the content.
  5. Click on the Redistribute button.
  6. Click OK to initiate the redistribution of the content.
  7. Restart your computer and check if the error persists.

Repairing content distribution of the particular package or application you want to update will fix the redistribution, allowing it to overwrite the existing files.

3. Change the Maximum Run Time

  1. Left-click the Start button, type Configuration Manager console, then press Enter to open the SCCM console.
  2. Go to the Software Library tab.
  3. Select Software Update under the content types for redistribution.
  4. Search for the update, then select the Properties for the update.
  5. Select the Maximum Run Time tab, then change the time to 60 minutes.
  6. Restart your PC and retry the installation of the update.

Extending the Run Time allows the update installation enough time to complete.

4. End task for other apps

  1. Right-click the Start button and select Task Manager from the menu.
  2. Go to the Processes tab. Select a program from the list, right-click on it, and then click End task from the drop-down menu.
  3. Restart your PC to see if the error persists.

Ending the processes on your PC will annihilate background activities affecting the software updates. Check our article for more shortcuts to open Task Manager on your PC.

Likewise, you can check our guide about 0x8007000f: SCCM Task Sequence error and ways to fix it.

In addition, you can read our comprehensive article about Update error 0x80d02002 and ways to fix it.

Should you have further questions or suggestions, kindly drop them in the comments section.

Get the April 2023 Patch Tuesday updates today

It’s April 11th, and for those of you that like keeping your PC updated with the latest and greatest changes, this means only one thing: Patch Tuesday is here!

Like all other Patch Tuesday updates since the beginning of the Windows OS, they aim to improve your PC’s performance by tweaking the system, fixing any errors, adding new features, and providing better security against digital threats.

That’s what everyone is expecting this month, and we will be looking over what might arrive this week.

What was last month’s Patch Tuesday all about?

The Redmond-based tech giant has been hard at work on security improvements in almost everything that has to do with software security.

Remember to check out Microsoft’s new Security Copilot, an AI that creates custom alerts, and is based on OpenAI’s GPT-4 AI.

Last month, the 74 new updates that were deployed during the Patch Tuesday rollout addressed CVEs in:

  • Windows and Windows components
  • Office and Office Components
  • Exchange Server
  • .NET Core and Visual Studio Code
  • 3D Builder and Print 3D
  • Microsoft Azure and Dynamics 365
  • Defender for IoT and the Malware Protection Engine
  • Microsoft Edge (Chromium-based)

What’s also important to mention is that, out of the 74 CVEs, six are rated Critical, 67 were rated Important, and only one was rated Moderate in severity.

What can we expect from this month’s Patch Tuesday rollout?

Experts consider that we should plan for more critical updates this month, surely uncovering some major vulnerabilities that have or have not been exploited yet.

The Redmond-based tech giant has seriously stepped up the security fixes in their operating systems so we should see that trend continue.

Furthermore, we’ve also seen a lot more updates to the Office suite, so plan for your on-premise and click-to-run versions to have major updates.

In March, there was a CVSS 9.8 bug in RPC Runtime that also has some wormable potential. We’re pretty curious to see how Microsoft has handled that situation.

We also cover Adobe’s Patch Tuesday launch, as we’re sure we know by now. On that note, don’t expect a major path for Acrobat and Reader, as they should have a major quarterly update next week.

Stay tuned, and we will keep you posted as soon as Microsoft releases these security patches to the general public in a few hours.

We will also provide download links for each individual cumulative update and present the changes, improvements, fixes, and known issues that come as a package.

What is your opinion on this month’s rollout so far? Share your opinion with us in the comments section below.