Microsoft has just released an update for PowerToys bumping it to version 0.69. The new update features a new utility, the long-awaited Registry Preview tool that’s designed to help advanced users preview the impact of importing a .reg file into the registry, along with registry editing options.
Thanks to this new addition to the platform, users will no longer have to rely on external software like Notepad to make edits and adjustments through .reg files. The update also features a fix for the crashing issue caused by thumbnail image loading as well as support for per-user scope installation.
Additionally, the update also features a ton of fixes as well as improvements. Be sure to check out the full changelog over at GitHub’s repository.
If you already have PowerToys running on your device, it should automatically notify you of this update. Alternatively, you can get this update today by launching your app, then clicking on General followed by the Check for Updates, and then the Install Now button.
Microsoft just rolled out a nice update for Edge users. Now live on the Canary channel for select insiders, a feature to strictly block autoplay videos from playing is now available.
We have heard your requests for strict blocking of media autoplay, and we are excited to share it is now available! Edge Canary now has a new autoplay setting, Block, this allows you to stop all media on a site from automatically playing.
With that said, however, being an insider-only feature means that Redmond officials only roll it out for several select insiders. Even if you’re in the Canary channel, that doesn’t always mean that your PC gets this update.
However, there’s still an option to limit it that’s been living in Edge’s settings for ages. It may not be as strict as what Microsoft is testing among insiders, but it still counts for something.
If you’re still curious, here’s how you can block autoplay videos on Microsoft Edge.
How to block autoplay videos on Microsoft Edge
1. Open your Edge browser.
2. Type edge://settings/content/mediaAutoplay in the address bar.
3. Make sure the option stays on Limit.
As noted from their blog post, Microsoft promises that the feature will be rolling out for general users in the coming weeks, but we will keep you updated once it’s out.
In the meantime, if you’re having a problem with the black screen on Edge, we’ve prepared a simple guide you can try.
What do you think about this feature to block autoplay videos on Edge? Let us know in the comments!
The taskbar allows you to easily access minimized programs and bring them back to the screen. Sadly, our readers complain about programs not maximizing from the taskbar on Windows 11 for some reason.
Why won’t the program maximize from the taskbar on Windows 11?
Some notable factors that can cause the program not to maximize from the taskbar are:
Display resolution issues – If your display resolution is beyond the PC’s original screen dimensions, the taskbar may be unable to resolve maximizing programs.
Corrupt system files – The issue may occur if important taskbar-related system files are missing, causing problems with their interactions with your programs. Also, corrupt system files can cause the taskbar not to work.
Viruses and malware – You can experience difficulty maximizing apps from your taskbar due to the impact of viruses and malware on the computer.
Faulty File Explorer – Programs not maximizing from the taskbar on Windows 11 can also occur if File Explorer isn’t working correctly. It affects the processes and tasks running in the taskbar and can cause it to be unresponsive.
As we go further into this article, we’ll discuss steps to fix the issue and get your taskbar working again.
What can I do if programs won’t maximize from the taskbar?
Left-click the Start button, type the command prompt, and select Run as administrator.
Click Yes on the User Account Control prompt.
Type the following and press Enter: sfc /scannow
Restart your PC and check if it can maximize from the taskbar.
The System File Checker scan will check and remove corrupt system files affecting performance. Check our article about what to do if you have corrupt system files on Windows 11.
4. End tasks for File Explorer processes on your PC
Press Windows + R key to open the Run dialog box, type taskmgr.exe, and click OK to open Task Manager.
Find File Explorer, right-click it, then select End Task from the drop-down menu.
Click on File from the taskbar and select Run new task from the menu.
Type explorer.exe and click OK to restart the File Explorer process on your PC.
Check if you can maximize your program from the taskbar.
Restarting the File Explorer processes will stop background activities affecting the taskbar.
For a clearer understanding of how window controls work and how to restore or resize apps properly, see our complete guide on how to minimize and maximize windows in Windows.
The best USB block software tools cut access to your USB ports to ensure that you will be protected from USB flash drives infected with malware.
Considering the risks of external drives that may come in contact with your computer, securing USB activity it’s a conscious decision. Not to say you can benefit from data leakage prevention right away.
Plus, it’s not enough to take into consideration only USB drives, but use blocking services too for external hard drives or CD/DVD drives. Thus any removable device won’t be a risk for the system.
Some software solutions also come with password protection for USB port block settings. Others provide the opportunity of keeping the USB port read-only.
It’s useful to have such a tool because USB Flash drives are one of the most significant potential threats to your system.
Unsafe and unchecked USB drives could carry all kinds of malware and viruses that could have a severe impact on your system. USB port block programs offer enhanced protection from undesired data transfer as well.
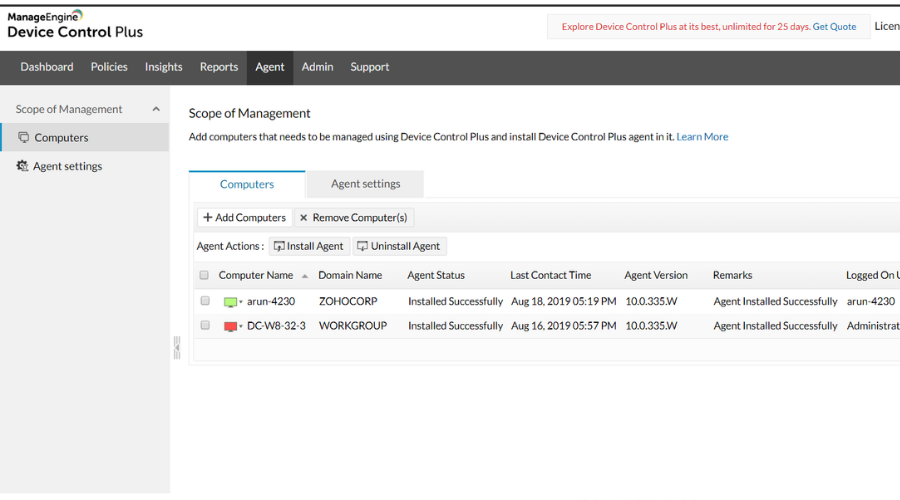
Blocking your USB ports is best done via USB control software, and few are as efficient as Device Control Plus since it offers you all the tools you may ever need to gain better control over your USB-based removable media.
Besides being able to scan and limit the access of USB devices to your content thanks to the zero-trust approach, Device Control Plus can also block them entirely, so you don’t have to block a USB port.
However, if that is unavoidable, Device Control Plus can fully or partially block access to a USB port, with this being changeable later on without much headaches on the user’s part.
Other important points include data loss in case of undesirable attacks. With this solution, its likely to monitor and block dangerous attempts using removable devices like USB.
Therefore, you can set read-only access for new devices, block copying of files, limit data transfer, and more to go.
Above all, large-scale industries and companies are at risk regarding data leakage, thus anyone should take action to prevent malware or cyberattacks through transferable devices.
Focus features:
Identifies devices that attempt to access your PC
Facilitates access to authorized devices
Limits USB-based malware attacks
Monitors device behavior
Device Control Plus
USB ports can be fully blocked to limit access to unauthorized removable media. Get Device Control Plus today!
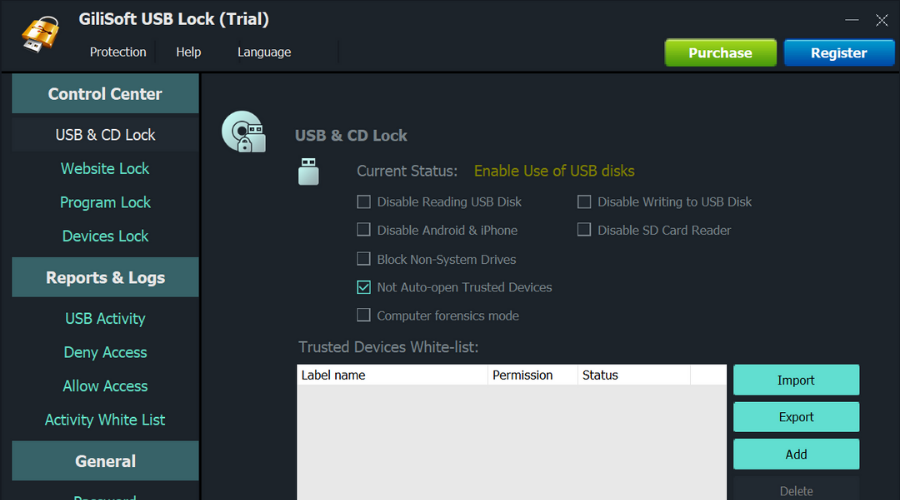
GiliSoft USB Lock is the top USB block software solution for Windows PC. It’s feature-rich and incredibly intuitive.
With this solution, you can be relaxed regarding your confidential files and protect PC data from USB drives to avoid any information theft.
If you experienced data theft with USB flash drives you know how badly can be regarding your privacy. Thereby in these situations, anybody needs a solution like a USB drives block that prevents data leaks.
So, this software provides complex protection against data loss with USB drives, external drives, CD/DVD drives, and other portable devices. It can also hinder websites and applications to see and steal your online data.
However, you can create a whitelist option that allows you to copy files only to approved devices, in case of certain USB pen drives usage.
Gilisoft USB lock can block both USB and SD discs and includes copy protection features that prevent the copying of important files.
You can secure optical discs and prevent them from being read or getting burned by anyone without permission.
You can easily install it on any removable media device and protect it with a password. This way, if somebody would like to delete the application, they would have to provide a password.
Moreover, for increased protection of highly sensitive data, you can set up email alerts and get notified in real-time if someone tries to access the software with the wrong password.
Here are its highlights:
Invisible Mode lets the software run in the background without detection
Ability to see USB activity history
Can monitor all file operations on removable storage
Ability to view access history and the activity of whitelisted devices
Therefore, try this USB blocker software to safely protect your Windows 10 PC from external unwanted devices.
Gilisoft USB Lock
Prevent any information crime from your PC using this leading USB lock software.
By choosing this practical solution, you get to protect your PC against data loss by removable device attacks. So, it’s recommended to set up usernames and passcodes for devices that require access to your system.
More so, it’s necessary to use a single password to block and unblock USB ports every time, in that way improving the security of crucial data. It also works with all versions of Windows so any user can afford it.
Another essential feature allows you to protect more devices at once, and therefore block more USB ports. So you only have to install it on each PC to secure your data all over.
This program comes with a user-friendly interface, and even beginners can easily get the hang of it.
The tool can lock your ports so no one without permission is able to carry out any data on removable media.
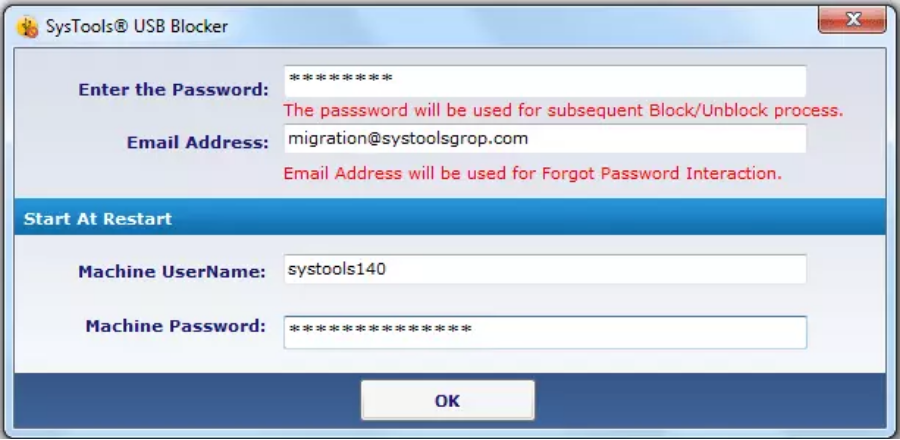
You have to set up a password and enter it whenever you want to unblock and use your USB port.
The tool can block and unblock an unlimited number of USB ports, on multiple machines.
Other key features of Systools USB Blocker include:
Interactive User interface
Online usage guide
Lightweight
This tool is compatible with all Windows versions. You can get SysTools USB Blocker from the official website and see how it works. It has a free, limited version, and a premium version.
Systools USB Blocker
Provide effective protection for vulnerable systems using Systools software to block USB drives now.
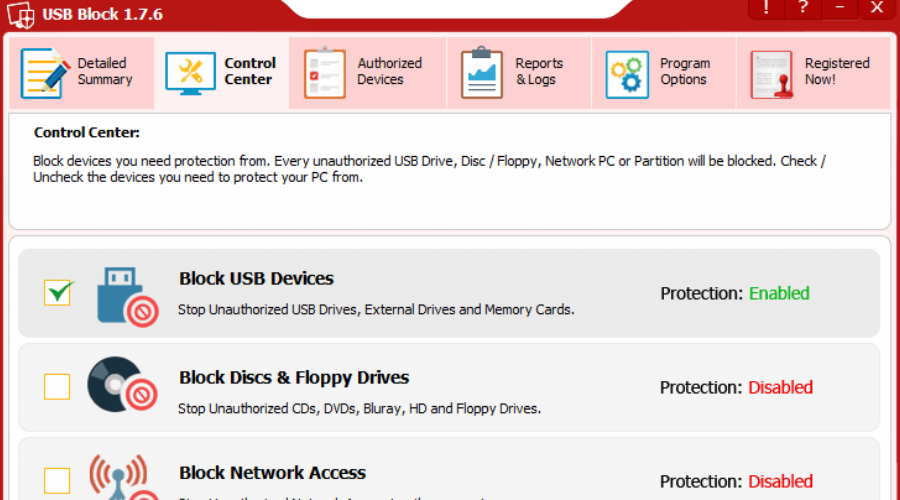
NewSoftwares USB Block is one of the top USB block software tools. It prevents data leaks by restricting USB drives, external devices, and ports on your computer. You will be able to whitelist only your portable drives while blocking all the others.
So it’s highly required to secure confidential information from any devices, considering various data theft used to hack so many systems in order to crack high-value intel.
Using this theft-proof solution it’s incredibly simple to secure your data from removable devices able to infect the system.
Plus, it’s possible to monitor hacking attempts on your PC by checking when someone tries to access data on a USB Block. Hence, you could prevent such attacks from the very beginning.
Using this program, you can authorize trusted USB drives and devices. If an unauthorized device is detected, there’s a password prompt that comes up asking you to either whitelist the device or cancel the access.
Netsoftwares USB Block is able to secure and protect all your confidential files.
You can set up real-time notifications and be informed whenever someone attempts to access your USB with the wrong password.
The tool can also monitor hack attempts and prevent data leaks in companies and offices.
Other key features of Netsoftwares USB Block include:
Trusted USB drives and devices
Intuitive UI
Stealth mode
In conclusion, the lightweight program helps to manage and protect your PC in an intuitive manner by locking USB ports with ease.
This software is a premium-level tool, but you can try it out for free as it offers a limited free trial version.
If you’re looking for a USB block-free tool, try USB Disk Manager. It might be free and lightweight, but it’s still one of the best USB block software solutions ever made.
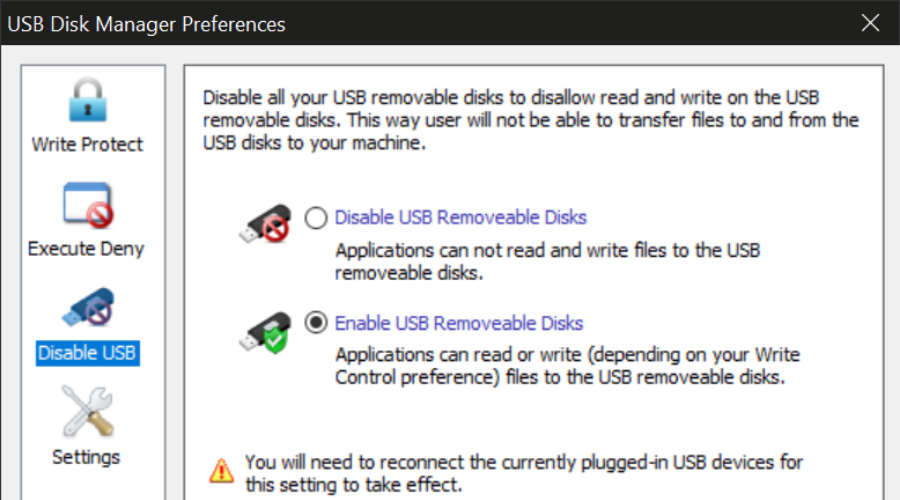
This utility offers a portable and very easy configurable solution to control USB disks more accurately on your PC. You’re able to disable USB drives anytime your need.
In terms of protection, this program can offer valuable features capable of high USB security and therefore prevent malicious attacks or spreading viruses between systems.
More exactly, you can write-protect USB drives, deny execution access from other devices, disable USB disks, and more to go.
USB Disk Manager can completely hide USB devices from your PC, and it also prevents any third-party applications from opening or making any changes to the USB drive.
The tool has USB write protection, so no unauthorized person is able to add data to the device.
On top of that, the tool prevents anyone without permission from copying files to your PC.
Not only that, but no third party can access or run the applications on the USB drive.
Other key features of USB Disk Manager include:
Disable autorun feature
Portable application (AutoCopy)
Minimalistic and intuitive interface
Hence you shouldn’t have second thoughts about data privacy measures and use this beneficial USB data safety tool.
USBDeview is also a free tool and one of the top USB block software programs that deserve your attention. Made by NirSoft, it allows you to enable and disable the USB port lock.
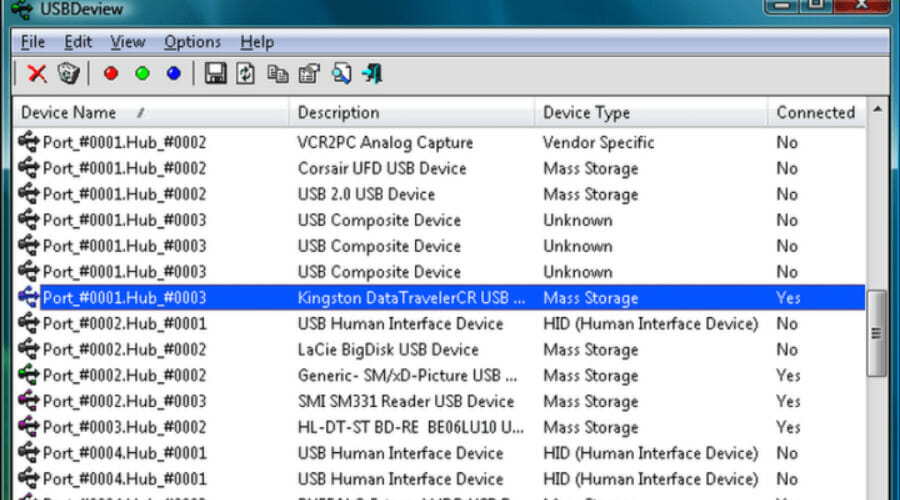
With the help of this freeware, you will be able to view the list of USB ports and also the devices that are connected to them.
For each of the USB devices, you will see displayed extended information including the following: device’s name and description, type, serial number, the date and time that it was added to your system, VendorID, ProductID, and more.
Thus you have full knowledge about all removable USB drives connected to your system, plus a historical view of technical data that might be helpful.
Another functionality allows the user to uninstall previously used USB devices or disconnect USB drives currently in use.
USB DeView displays a list of all the USB devices that are connected to your system. It also keeps track of all devices that were previously used.
To enable or disable access to your ports, you will have to select the port in question and click the red button if you want to disable it, and the green button to enable it.
The tool also supports remote connections. You can use USBDeview on a different computer as long as you provide your user credentials and password.
You can also uninstall USB devices that you have previously used and disconnect the USB devices that are currently connected to your system.
Other key features include:
You can change up and organize port names
Sort by column
Lets you save reports and data as text files
All in all, this small but resourceful program is suitable for any PC in order to monitor USB drives connections over periods of time.
Yes, a USB data blocker can rescue all your private data from your PC from potential hacking or digital snooping.
It’s possible that blackhat hackers or viruses can infect your device through your USB flash drive, hence a port USB blocker should be a must.
How do I know if my USB is blocked?
The most valid proof that your USB device is blocked should be when the PC asks for access permission every time a USB drive it’s detected.
More so, the USB block software will allow you to block specific ports for public usage and restrict any unknown removable media.
These were our top USB block software solutions. With their help, you can prevent unauthorized access to your PC and stop malware from spreading to your PC through USB ports.
After you take a look at their extended sets of features, you’ll definitely be able to make an informed decision that will provide enhanced safety for your system.
While there are many password managers out there, very few meet the acceptable industry standard. Among these are RoboForm and NordPass, undoubtedly two of the biggest names.
In this RoboForm vs. NordPass comparison, we will show how these tools stack against each other and their suitability to different use cases.
Is RoboForm better than NordPass?
In all fairness, a RoboForm vs. NordPass comparison usually shows two excellent password managers with more in common than differences. However, they still have a lot of differences that set them apart.
We will analyze them in the next section of this guide and decide which is better.
RoboForm vs NordPass: The comparison
1. Security and Privacy
1.1. Encryption
Regarding encryption, NordPass has a significant edge over RoboForm and most other password managers. This is thanks to its employment of the ChaCha20 encryption algorithm, variant XChaCha technology.
This technology is far more secure and faster than the 256-bit encryption found in most tools.
However, it should be noted that RoboForm is no slouch, either. It employs the industry-standard 256-bit AES encryption, one of the safest.
Lastly, both password managers employ a zero-knowledge encryption policy. With this, you are sure that both encryption and hashing are done locally on your device.
1.2. Multi-factor authentication
RoboForm has multiple multi-factor authentication options, including email, SMS, and third-party authenticators like Microsoft Authenticator and Authy. The only downside is that you must be on the paid plan to use them.
With NordPass, however, you cannot use it with two-factor authentication. It makes the option available for free and paid users.
Also, it supports all options available on RoboForm with the addition of third-party security keys. So, NordPass triumphs in this aspect of the RoboForm vs. NordPass comparison.
1.3. Third-party security audit
NordPass has undergone a well-publicized security audit by a notable third-party firm called Cure53. The results show a password manager that is reliable but also secure and trustworthy.
Also, the few vulnerabilities found were quickly attended to by the developers to ensure you can always trust the tool.
Recently, RoboForm has undergone a security audit and penetration test conducted by Secfault Security, which levels the playing field for this particular aspect.
1.4. Privacy policy
The last aspect of this RoboForm vs. NordPass security comparison is the privacy policy of the two tools. RoboForm’s privacy policy claims that they collect little data, which can include some of your personal information from the license page and PC.
However, you can control how the company uses some of your data and prevent it from collecting some.
On the other hand, NordPass collects only basic statistical data. These include less personal information, like the strength of your password. You can check out the full privacy policy to know what you are signing up for.
2. Ease of use
2.1. Password importing
RoboForm and NordPass rank equally in the password importing and exporting aspect. You can import your data from various sources, like browsers and password managers, such as 1Password and Keeper, and use CSV files for other platforms.
Finally, both password managers can import bulk passwords, which is pretty straightforward.
2.2. Password sharing
NordPass, like RoboForm, allows you to share your password via email with just a few clicks of the mouse. Also, the two apps give you control over who can access the shared password, and you can revoke the access at any time.
However, with RoboForm, the recipient needs to have a RoboForm account, which shouldn’t be a problem as they can always use the free version.
So, we can call this section of our RoboForm vs. NordPass comparison a tie.
2.3. Autofill
This is another area where RoboForm and NordPass rank equally. They both provide an icon on any site you log into, which you can use to save your login information.
Once you visit the same site again, you only need to click the icon, and the required fields will be filled out automatically.
3. Affordability
RoboForm and NordPass provide some of the best free password managers you can get. However, RoboForm’s free version offers more features.
You can enjoy password generation, auto-filling, auditing, and unlimited logins. To enjoy everything RoboForm offers, upgrade to RoboForm Everywhere or the Family plan.
The Everywhere plan is available for just $1.99/month for 1 user, while the Family plan goes for $3.98/month for 5 users. It also has a Business plan where you can customize the number of users. However, if you go for a 1-year plan, you only pay $16.68.
NordPass, on the other hand, is a bit cheaper. To upgrade to the Premium plan, you only need to pay $1.49/month for 1 user, but the Family plan is $2.79/month for 6 users. If you go for a yearly plan, you pay $23.88 for the first year, then it’s $35.88 for the next ones.
Hence, if you go for monthly payments, NordPass is a bit cheaper, but if you commit to a longer plan, RoboForm has the edge.
RoboForm’s interface is refreshingly easy to use. Also, it is easy to navigate, and you get a short YouTube video after the installation and registration to ease your acclimatization.
The same thing can be said about NordPass too, as it boasts a modern and user-friendly interface. Moreover, the two tools have an excellent dark mode that makes them easy on the eyes.
5. Platforms
RoboForm and NordPass are available on all major platforms, like Windows, Linux, iOS, macOS, Chrome OS, and Android. Also, they have extensions for major browsers, including Chrome, Edge, Safari, Firefox, and Opera.
The exception here is that NordPass has an extension for Brave browser, which RoboForm lacks.
So, you are not short of options, irrespective of your device, and you can call this aspect of the RoboForm vs. NordPass comparison a tie.
6. Customer support
NordPass provides virtually the same amount of support for free and paid users. This includes live chat and 24/7/365 support. However, premium users are given higher priorities and are attended to promptly.
RoboForm also provides both live chat and 24/7 ticket support. However, this is for only premium users.
Also, RoboForm’s live chat support is available from 9 AM to 5 PM (EST), Monday to Friday. The major support option for free users is emailing the support staff.
RoboForm vs Bitwarden: Final words
This RoboForm vs NordPass comparison has shown that the two of the best password managers available have a lot in common. So, it’s pretty much down to what works best for you when choosing one or the other.
Here are some points on each side that may help you decide:
NordPass
24/7/365 support, whether you’re a paying customer or using the free version
Brave browser extension
Slightly cheaper
RoboForm
Simple and easy-to-navigate interface
Several two-factor authentication options
Recent successful security audits and penetration test
So, we recommend testing both of them to see which fits your requirements better.
Feel free to share your experience using the two password managers in the comments below.
If you use Visual Studio for coding, you will be glad to know that in this guide, we will share with you the 15 best productivity Visual Studio extensions that will help boost your efficiency in implementing applications.
Visual Studio is the best code editor available and has a vast ecosystem of tools responsible for its popularity. To develop its software, Visual Studio uses Windows API, Windows Forms, Windows Presentation Foundation, and Windows Store platforms. Let us check out the best Visual Studio extensions.
What are the best Visual Studio extensions to improve productivity?
Live Server – Loads your code directly onto the browser
Using the Live Server Visual Studio extension, you will be able to view your code directly onto a web browser.
This is a nice tool for developers as it automatically reloads and views the code on the web page without reloading manually.
The best part is that the Live Server Visual Studio extension negates the need to frequently save your work in the editor, reload the browser, and see the changes.
It also comes with hotkey control, a single click to start/stop a server, support for any web browser, remote WLAN connection, SVG support, HTTP support, and much more.
Here are some of the highlighting features of Live Server:
Auto-reload the web browser to view the code.
Support any web browser.
Comes with HTTP and SVG support.
Proxy support.
Lets you start or stop a server with just a single click.
When someone reads something, cautiously or uncautiously, they will find errors in your spelling. If you write comments then this could be pretty embarrassing.
The Visual Studio Spell Checker extension can easily resolve such petty issues. The main feature of this extension is to check for spelling mistakes on comments, strings, and plain text within an interactive window.
One feature that makes it a must-have extension is that you can customize its spell-checking ability to perform a spell check over an entire solution, a project, or selected items.
Of course, it can wrongly highlight a correct word not in its database, which you can easily add to ignore specific words.
Here are some of the best features of Visual Studio Spell Checker:
Lets you add words that you wish to ignore checking.
Gives you the option to replace all occurrences of a misspelling.
You can use Ignore Once to ignore one instance of a specific word.
Can help spell check the inner text of XML.
Can spell check any WPF text box within Visual Studio.
Settings Sync – Easily sync all snippets, themes, and other settings
Developers will find the Settings Sync Visual Studio extension very helpful. The main reason is that it will help you sync all of your snippets, theme, settings, key binding, etc., across various machines in one go.
It uses GitHub Gists to facilitate these services and offer the sync service. It will give you a detailed summary of the affected configurations and extensions due to the sync process.
Moreover, it automatically updates the settings across all machines as soon as they boot up. This negates the need to sync each setting again and again.
Some of the best features of the Settings Sync extension are:
You can use your GitHub account and Gist.
Shows a summary of the affected configurations and extensions.
Loads all the configurations across machines when the PC boots up.
Lets you sync any file across your machines.
Easy to use single click upload and download features.
Lets you sync keybindings, settings, themes, workspaces folder, etc.
Peacock – Helps you change the color of your workspace
When working on a project, viewing the same color while coding could get boring. You can easily change that with the help of the Peacock Visual Studio extension.
After enabling Peacock, it will change the color of all the active code editors opened. The best part of using this extension is that it will help you differentiate between different code editors and projects you are working on.
You can use this tool to create any color of your choice and give it to the editor open. Also, you can customize the different parts of the VS code with various colors.
Some of the notable features of the Peacock extension are:
Let’s you change the color of the editors.
You can customize the editor with any color of your choice.
Lets you tweak the color of the different parts of the code.
You can use the contrast adjuster to give a different tone.
Prettier – Follow the same standard style guide across the team
Working on a coding project can not only be tiring but less colorful. This is why we suggest you use the Prettier Visual Studio extension.
It lets you apply and make your development team follow the same style guide. This helps make all of your codes look consistent.
The Prettier Visual Studio extension supports JavaScript, TypeScript, JSON, CSS, and more. It takes into account the maximum line and length of the code and wraps the code whenever necessary to give it a clean look.
Here are the best features of the Prettier extension:
Stylelint – Highlight various constructs of your code
When you come across syntax errors, bugs, duplicates, etc, when you code, it can be difficult to find them because it can be a headache when working on a big project.
Stylelint defines a particular set of style rules that will help you highlight the dubious errors in your code. It has more than 170 built-in rules for modern CSS features.
You can create your own personalized rule and apply Stylelint to your development team for them to follow suit. It is easy to install on Virusl Studio and use.
Here are some of the notable features of the Stylelint extension:
Won’t that be great that in today’s advanced world, you have the power of AI to help you when you are coding? Well, Visual Studio IntelliCode brings that to you.
With the Visual Studio IntelliCode, you can enhance your accuracy using the whole-line autocompletion feature. The AI detects the code you are writing and fills in with the best suggestions.
The AI is trained by analyzing thousands of open-source contributions on GitHub, which helps it accurately suggest recommendations. With the Visual Studio IntelliCode, you can even define your custom code base properties.
Here are the best features of the Visual Studio IntelliCode extension:
When you write code, especially a lengthy one, it becomes pretty exhausting to check all the errors and remove all the whitespace from your code.
Using the Trailing Whitespace Visualizer Visual Studio extension, you can easily remove any trailing whitespace on any line of the Visual Studio editor.
When the Trailing Whitespace Visualizer Visual Studio extension is enabled, it will highlight the whitespace and help you eliminate them. You can change the color of the highlight.
Here are some of the best features of the Trailing Whitespace Visualizer extension:
SonarLint – Highlights issues even before they arise
Isn’t it better to have a tool that will help you fix your code even before the error occurs? Yes, with SonarLint, that is possible.
It works like a spellchecker, but it checks for bugs and security vulnerabilities in your code instead of spelling.
The SonarLint Visual Studio extension gives suggestions on how to improve and correct your mistakes, even before they are committed. This helps you stay on the right path instead of going back and correcting them once you are done.
Here are some of the best features of SonarLint:
It checks and rectifies the codes even before they occur.
One of the essential extensions for any developer to have in their arsenal would be the ReSharper Visual Studio extension.
You can use this extension to automate your coding routines. Notably, you can use the ReSharper to highlight and rectify compiler mistakes, runtime errors, and redundancies as you code.
You can jump straight to the exact file and line instead of reviewing your entire solution and fixing it. You can create code formats and cleanup features and apply them across your development team to ensure consistency.
You can use ReSharper with multiple coding languages, and also lets you decompile library code if required.
Some of the best features of ReSharper are:
Lets you automate your coding routines for better consistency.
Using the File Icons Visual Studio extension, coders can add icons to the files that Solution Explorer doesn’t recognize.
This simple extension can help you recognize your files better and quickly. The File Icons extension lets you find the missing icons for the known file types.
You can also report missing icons for a file type simply by right-clicking on the file and hitting the option. The File Icons extension supports different languages and can be expanded for more using the Syntax Highlighting Pack.
Some of the best features of File Icons Visual Studio extension are:
Project Manager – This lets you organize and find projects easily
Do you find it difficult to organize or locate your projects? If so, you can use the Project Manager Visual Studio extension.
You will be able to open any project regardless of the location they saved in. It allows you to save workspaces or folders as projects. You can even give a tag to your project to organize them easily.
Project Manager automatically detects Git, Mercurial, or SVN repositories. You can view the projects in the same or a new window, and it even offers a dedicated sidebar.
Here are some of the notable features of the Project Manager:
Lets you save your folders or workspace as projects.
You can give tags to your projects for easier identification.
As a developer, the most important thing you are bound to provide is a great feasible experience for your customers.
The pages should load faster; the most important thing is that the images should load faster. To do that, you can use the Image Optimizer Visual Studio extension.
It uses efficient tools to improve and optimize the quality of images of various formats. This includes any JPEG, PNG, GIF, and GIFs.
Some of the best features of this Image Optimizer are:
Another open-source Visual Studio extension you can use to enhance your productivity is the GitLens extension.
Using the GitLens extension, you will get important information related to your codes. Notably, you can know who, why, and when a change was made to your code line.
This process takes just a few seconds, and you can easily navigate the codes through the file revision history.
Some of the best features of GitLens include:
Know who, when, and why changed the codes.
Displays the most recent modification at the end of your code line.
Offers a sidebar for better tracking.
Can be integrated with GitHub, GitLab, Gitea, Gerrit, and more.
Last but not least, we have the Remote – SSH extension. Using this extension, you will be able to execute a command and run other Visual Studio extensions from a remote PC.
The best part about this extension is that it does not require you to have the source code installed on your local machine.
It supports different operating systems, including Windows, macOS, Ubuntu, Debian, and CentOS. You can use this extension to create apps and software remotely.
Here are the best features of Visual Studio Code Remote:
If you have encountered that the operation was canceled by the user (0x4C7) while launching a game on Steam, it could be due to corrupt installation files. In this guide, we will discuss some of the methods to fix the issue right after explaining the potential causes. Let’s start!
What causes the operation was canceled by the user (0x4C7) error on Steam?
There could be various reasons for this error to appear; some of the common ones are mentioned here:
Corrupt add-on files – If your game add-on files or the installation files are missing, not downloaded correctly, or corrupted, you may face this error. You need to verify the integrity of the files to be sure.
Network connectivity issues – If you have a flaky internet connection, there is a chance that it interrupted the Steam server while downloading the add-on or game files, hence the error. Check your internet connection and try to install the files again.
Steam server is under maintenance – If the Steam server is facing an outage or is under maintenance, then you could see this error. Check the server status; if down, wait until it is up and try again.
What can I do to fix the operation was canceled by the user (0x4C7) error on Steam?
Before engaging in advanced troubleshooting steps, you should consider performing the following checks:
Locate the game’s installation file. You may find the file inside the Steam folder: C:\Program Files (x86)\Steam
Go to the .exe file of the game, right-click it, and select Run as administrator.
2. Troubleshoot the network
Press the Windows key, type Control Panel, and click Open.
Select View by as Category and click Network and Internet.
Click Network and Sharing Center.
From the left side, locate and click Change adapter settings.
Select the connection that you are using and click Change settings of this connection.
On the Properties window, switch to Sharing tab.
Under the Internet Connection Sharing option, place a checkmark next to Allow other network users to connect through this computer’s Internet connection.
Click OK.
3. Check the integrity of game files
Launch Steam. Click on the Library option.
Select the game, right-click it, and click Properties.
Go to the Local Files tab and click Verify integrity of game files.
Launch Steam. Click Steam from the top left corner.
Select Settings.
On the Settings page, click Downloads.
Now select Clear Download Cache and click OK.
5. Disable antivirus temporarily
Press the Windows key, type Windows Security, and click Open.
Go to Virus & threat protection and click Manage settings.
Now toggle off the switch under Real-time protection.
Click Yes on the UAC prompt to confirm the change.
6. Update device drivers
Press Windows + R to open the Run console.
Type devmgmt.msc and click OK to open Device Manager.
Go to each category, expand it, right-click the driver listed one by one, and select Update driver.
On the next window, click Search automatically for drivers.
Follow the onscreen instructions to complete the process.
Otherwise, you have an alternative solution that will help you update device drivers or any other ones in minutes. Namely, Outbyte Driver Updater is the ideal software for this job that can also fix this error code.
So, these are methods you can use to fix the operation that was canceled by the user (0x4C7) error on Steam. If nothing worked for you so far, reinstall the affected game and ensure the installation process is not interrupted.
If you have any questions about the Steam error, please mention them in the comments section below. We will be happy to help!
After months of living in insiders’ devices, Microsoft Edge’s Drop feature is here for general users.
As explained by Redmond officials, the tool offers a simple way to send files and notes across all your signed-in mobile and desktop devices. You can even write a note to yourself to help you describe what’s inside the file so you don’t lose track.
In some ways, it works as cloud storage that you can access anywhere on any device as long as you’re signed in.
However, it still comes with a few limitations. On a free storage plan, Microsoft only gives you 5 GB of free storage, but you can upgrade it to 1 TB for $69.99/year or 6 TB for multiple users at $99.99/year.
Read along to find out how you can do that.
How to send files using Microsoft Edge’s Drop feature
1 With your Edge browser open, click on the airplane logo on your right ➔ Start.
2 Click on + to upload your files.
3 Select your files then click Open.
4 You’ll be able to see them if you have Edge on other devices signed in, whether it’s desktop or mobile.
This is an exceptional feature that most other browsers don’t have unless you’d be willing to install a third-party extension or send those files outside the app.
If you also have problems connecting to the internet with Edge, we’ve prepared a simple guide here.
Do you find Microsoft Edge’s Drop feature helpful? Let us know in the comments.
If you are a freelancer, you probably know how Upwork works. Having the right skill set is the first step but you also need to find out those Upwork supported browsers that will allow you to browse jobs and get the best freelancing experience overall. No lag, no Upwork complaints, right?
Upwork is one of the most popular freelancing websites. With hundreds of gigs created daily, the platform is constantly a beehive of activity.
Once you join, you can create a profile, access an Upwork work list and browse jobs, you can even work on your projects, all for free. However, upgrading to Freelancer Plus would help promote your work more effectively, make bids, and beat the competition.
And speaking of that, Upwork is a very competitive marketplace, that does not always favor newcomers. So, is Upwork good for beginners? With a painstakingly created profile, beginners will be able to land jobs as well.
Freelancing platforms such as Upwork or headless eCommerce platforms are growing more popular by the day, so staying flexible and being able to work online is quintessential.
Can I use Upwork without the app?
You can! As a matter of fact, you don’t need to download the desktop or mobile application as you can browse Upwork, search for jobs and even work on projects or find talent directly in your browser.
If you’re wondering which browser is the quickest for Upwork, we’ve made the test for you:
Firefox – Best for Upwork browse jobs with privacy
In this article, we focus on Upwork freelancing and share with you a well-researched list of Upwork supported browsers.
The website has become highly dynamic and robust and will only be adequately navigated with an equally powerful browser. Thus, getting the best browser is vital for a positive freelancing experience.
After being leap-flogged by Chrome, the Opera browser has been returning strong in recent years. It is a feature-rich, fast, and reliable browser and an excellent option for exploring all your gigs and progress on Upwork.
Of its many features, we love the built-in VPN that guarantees all your connection and IP locations are hidden and safe.
And finally, it integrates social platforms to allow you to get all your work done without leaving the tab. Experience one of the best Upwork supported browsers today and never look back.
Additional features:
Secure private mode
Anti-tracking settings
Broad add-ons library
Opera
Use this professional browser with smooth navigation to promote yourself on Upwork safely.
2. UR Browser – Fastest for Upwork skills showcasing
Of the web navigators that make the list of best Upwork supported browsers, UR is the least known and least used, but not necessarily a bad option. We love it because it has the fastest rendering speed for freelance services.
Even though it sheds on a few features, it compensates by being very lightweight, making it adaptable to most new or old devices. Plus, it’s lightweight, fast, and reliable, slightly edging the rest.
Google Chrome is the biggest name in the browser niche. Even though it is often tagged as a resource hogger, it is very robust, which over-compensates its seemingly insatiable appetite.
No matter how dynamic the pages are, they will be perfectly rendered on Chrome. What’s more, you have the possibility to further personalize your freelancing gigs with an Upwork Chrome extension.
For instance, you can go for an Upwork time tracker Chrome extension or a plugin that enables quicker job alerts. Here are 2 popular options you might want to explore closer:
Of course, we love it because it has a vast extension library, meaning you will be able to implement new features. There are also fewer Upwork complaints by users on this browser.
4. Edge – Best for Windows | Upwork supported browsers
Edge browser is relatively a newcomer to the browser market, but it has grown quickly; this also is because it is adopted as the default Windows browser.
There is, however, so much to the browser. It is also very expandable since it uses Chromium, and it is robust enough to render all sorts of dynamic webpages, including Upwork.
5. Firefox – Best for Upwork browse jobs with privacy
If you need a private and secure browser for Upwork, then you should turn to Firefox. The browser is integrated with many privacy and security-centered features like anti-phishing and anti-tracking.
In addition, it includes a private mode for elevated privacy.
Finally, just like other browsers on this list, it is robust and can render almost every media type.
Upwork Alternative ? What’s better Fiverr vs Upwork?
There are many criteria to consider, but out of the box, both offer free plans; however, Fiverr takes commissions of 20%, while Upwork is flexible, and commissions range between 5 and 20%.
Both marketplaces offer 24/7 customer services and pay promptly. While many other factors may be considered, Upwork has a slight advantage.
We have not made this list in any particular order and are curious to hear which is your favorite to use on Upwork. Note that these browsers also fit as the best browsers for Upwork in the Philippines.
If you have encountered a blue screen of death error caused by usbstor.sys, this guide can help! This usually occurs if the computer has outdated drivers or system files are corrupted. We will discuss some expert-tested solutions to fix this BSOD error in no time. Let’s start!
What is USBSTOR.SYS?
USBSTOR.SYS, a Windows system driver file, manages USB mass storage devices, such as flash drives and external hard drives. When you connect any USB mass storage device to your computer, this file takes over and manages the device.
What causes the usbstor.sys blue screen error?
There could be various reasons for this BSOD error; some of the common ones are listed here:
Hardware issues – If your USB storage device, external hard drive, or hardware component has any problems, you might face this issue. You need to check if the flash drive is working or not.
Corrupt system files – If your computer’s important system files related to the USB storage devices are corrupt or missing, it may lead to this BSOD error. You need to repair the system files using Command Prompt.
Virus or malware infection – If your computer is infected with a virus, it could damage important files on your computer, including this file, causing the blue screen of death error. You need to run a malware scan to fix the problem.
What can I do to fix the usbstor.sys blue screen error?
1. Run the SFC scan
Press the Windows key, type CMD, and click Run as administrator.
Type the following command to repair system files and hit Enter: sfc/scannow
Wait for the command to be executed. Once done, restart your computer.
If you want a more in-depth repair solution, we suggest you try a specialized app with an extensive repository that repairs all your device’s corrupt system files.
2. Check Windows updates
Press Windows + I to open the Settings app.
Go to Windows Update and click Check for updates.
If available, click Download and Install to start the process.
3. Manually Register the USBSTOR.SYS file
Press the Windows key, type CMD, and click Run as administrator.
Copy and paste the following command to unregister the file and hit Enter: regsvr32 /u USBSTOR.SYS
Type the following command to re-register the file again and hit Enter: regsvr32 /i USBSTOR.SYS
On the Disk Cleanup: Drive Selection window, select C drive and click OK.
Now, click Clean up system files.
Again on the Disk Cleanup: Drive Selection window, select C drive and click OK.
Select all files under Files to delete and click OK.
Click Delete Files on the next prompt.
5. Run a malware scan
Press the Windows key, type Windows Security, and click Open.
Go to Virus & threat protection and click Scan options.
Now select Full scan and click Scan now.
The tool will scan your computer to find infectious files. Once found, delete them when prompted.
6. Perform a System Restore
Press the Windows key, type Control Panel, and click Open.
Select View by as Large icons and click Recovery.
Click Open System Restore.
On the System Restore window, select Choose a different restore point and click Next.
Select the restore point and click Next.
Click Finish, and your system will be restarted and it will be restored to the previous version.
So, these are methods that you need to follow to fix the usbstor.sys Blue screen of death error. If nothing has worked for you so far, it is advised to perform a clean installation of Windows to fix the error.
If you have any questions about the BSOD error, please mention them in the comments section below.
It’s another stacked week for Xbox Free Play Days with another 4 games available from Thursday through Sunday, April 9. Note that Xbox Free Play Days is a perk for subscribers of Xbox Live Gold and Xbox Game Pass Ultimate. See the lineup below.
Black Desert
Black Desert is a living-world MMORPG. Experience fast-paced, action-packed combat, hunt monsters and huge bosses, fight with friends in a guild to siege nodes and region castles, train your life skills such as fishing, trading, crafting, cooking, and much more!
Players will enjoy jaw-dropping graphics,
intuitive skill-based combat, and an immersive story encased in our expansive
world that’s just waiting to be explored. Accompanied by a Black Spirit, a
companion whose destiny is intertwined with their own, players will discover
the secret of the Black Stones and the history of their corrupting effects.
Bravery and Greed
Bravery and Greed is a beat ’em up, roguelite, dungeon brawler for up to four players. Choose from four classic fantasy classes, engage in a deep robust combat system, and play a variety of co-operative and competitive game modes with friends via local, online or both. Get rich, or die trying!
PGA Tour 2K23 (Xbox One, Xbox Series X|S)
Hit the links with more swagger in PGA TOUR 2K23. Take your skills, and your swag, on the PGA TOUR and become the next FedExCup Champion. Compete against other TOUR pros with your MyPLAYER and establish new rivalries.
The Elder Scrolls Online: Tamriel Unlimited
Join over 18 million players in the award-winning online multiplayer RPG and experience an ever-expanding story in a persistent Elder Scrolls world.
• ESO COMES TO Xbox Series X|S – Experience the award-winning RPG like never before with game-changing features/enhancements such as 60-fps performance mode, advanced lighting and shadows, improved reflections, shorter loading times and more! • BEGIN YOUR ADVENTURE – Discover Tamriel’s Second Era and enjoy all the epic quests, memorable characters, and dangerous enemies you expect in an Elder Scrolls game. • PLAY YOUR WAY – Battle, craft, steal, siege, or explore. Combine different types of weapons, armor, and abilities to create your own style of play. • TELL YOUR OWN STORY – Experience any story in any part of the world, in whichever order you choose – alone or with friends.
Wrap up
Xbox Free Play Days has been on something of a roll lately, and this week’s lineup is pretty sweet with a couple of big MMOs thrown into the mix. Which of these will you be playing this weekend? Let us know down in the comments. If you would like to learn more, head on over to the Xbox Free Play Days FAQ page.
Steam is one of the most popular video game distribution platforms used worldwide. Still, it is prone to errors. One of the most common errors is the Steam error code E8. This guide will discuss what this error means and how we can fix it. Let’s get started!
What is Steam Error Code E8?
Steam Error Code E8 is an error that occurs if Steam cannot connect to its servers. This happens generally when you try to launch a game. This could occur due to an unstable internet connection or problems with the Steam network.
What causes the Steam Error code E8?
There could be several possible reasons for this Steam code error; some of the common ones are mentioned here:
Network connectivity issues – If your Internet connection is weak or unstable, you might have connectivity issues which can lead to this Steam error. Check your internet connection and try another network to fix the issue.
Firewall/antivirus settings – Sometimes, antivirus software or firewall conflicts with Steam and doesn’t let the Steam client connect to the internet. This might cause an error.
Server maintenance – If the Steam servers are under maintenance or are down, this could prevent you from playing games on Steam, hence the error. You need to wait for a while and try to connect again later.
Steam app outdated – If the Steam app has updates pending, it could prevent the client or Steam app from connecting to the internet, hence the error. To fix this issue, check for the Steam client app update, and download it if available.
What can I do to fix the Steam error code E8?
Before moving to the troubleshooting methods, you must go through:
Restart Steam and your computer.
Check your internet connection.
Restart your router.
Verify that you are using the correct credentials to log in.
Once the .exe file will be downloaded, double-click the file and follow the onscreen prompts to complete the process.
So, these are methods you need to follow to fix Steam Error code E8 on your computer. Try them and let us know what worked for you in the comments section below.
Wednesday’s ID@Xbox showcase gave us another glimpse at some of the best indie games coming to Xbox in 2023 and beyond, with 11 games featured in total. Check out the everything revealed below.
Cassette Beasts
Omega Strikers
The Karters 2: Turbo Charged
Coffee Talk Episode 2
Homestead Arcana
Closer The Distance
The Explorator
Lil’ Guardsman
Kabaret
The Last Case of Benedict Fox
Vampire Survivors
There’s plenty for indie game fans to get excited about here. What was your favorite showcase from the ID@Xbox Showcase April 2023 event? Let us know in the comments.
ID@Xbox is Microsoft’s program that helps independent game developers to publish their games on Windows, Xbox One and Xbox Series X|S platforms. At present over 2000 games have been published through ID@Xbox, totaling more than $2.5 billion in revenue for independent developers.
There is a series of top-notch and secure password management tools, with RoboForm and Bitwarden among the leading ones. These tools have some features in common with a RoboForm vs. Bitwarden comparison but many differences, too.
In this guide, we will put these two excellent tools at loggerheads and decide on the better one.
What is the very best password manager?
There are different password managers for different purposes. There are top-notch tools with emergency access that you can access from just about any location.
So, it is hard to choose one as the very best. However, if you want the ideal tool that ranks well in all parameters, you should consider RoboForm.
Is RoboForm better than Bitwarden?
1. Security and Privacy
1.1. Encryption
Regarding security, a RoboForm vs. Bitwarden comparison is closer than expected. The two software use 256-bit AES encryption, the most secure encryption mode.
Also, they employ a zero-knowledge encryption policy. This means that both encryption and hashing are done locally on your device.
1.2. Multi-factor authentication
Another important security feature is the use of multi-factor authentication. RoboForm supports all major multi-factor authentication, including Google Authenticator and Authy. But you must be on the paid plan to enjoy all the MFA options.
Bitwarden also supports emails and other authentication apps on its free version, while premium users can enjoy additional two-factor authentications like Yubikey and Duo.
So, both RoboForm and Bitwarden are adequately set up to secure your data. The only aspect RoboForm tips this comparison is its user-friendly privacy.
2. Ease of use
2.1. Password importing
RoboForm is the go-to option when it comes to ease of use. It has a password-importing feature allows you to import your data from various sources like CSV files, browsers, and other password managers.
Also, you can import bulk passwords, which is pretty straightforward.
Bitwarden, on the other hand, also boasts impressive options you can import passwords from – more than what is available on RoboForm. However, it does not support bulk importation.
2.2. Password sharing
Another ease-of-use feature is password sharing, which is a stronghold of RoboForm. It allows you to share your password via email with just a mouse click.
However, Bitwarden is pretty limited in this area and requires you to be on the premium plan to use it. Also, you can only share your password with one user unless you are on the family plan.
The family plan lets you share your data with as many as 6 users.
2.3. Autofill
In terms of autofill, RoboForm comes out on top. You only need to click its icon to fill in the required fields.
There is also an autofill feature on Bitwarden, but most users prefer not to use it. This is because it requires you to go through a long process to select the data you want to fill in before the app does the needful.
3. Affordability
Both RoboForm and Bitwarden are pretty affordable. However, RoboForm’s free version offers more features than Bitwarden.
You get to enjoy most of the core features of the app. But to enjoy the complete package, you need to upgrade to RoboForm Everywhere or the Family plan.
The Everywhere plan is available for just $1.99/month for 1 user, while the Family plan goes for $3.98/month for 5 users.
With Bitwarden, most of its features are only available in the premium version, with just a few left for a free trial. To upgrade to the Everywhere plan, you only need to pay $0.83/month for 1 user, but the Family plan is $3.33/month for 6 users.
RoboForm is pretty easy to use on the interface front and boasts a user-friendly interface. The good thing about it is that all its apps on different platforms look similar.
So, you need some minutes to get used to it, and you are good to go. Bitwarden, on the other hand, needs some getting used to.
This is because some of its features are hidden and require one to find them. Fortunately, the interface is clean and not complex.
5. Platforms
RoboForm and Bitwarden are available on all major platforms, like Windows, Linux, iOS, macOS, and Android. Also, they have browser extensions for major browsers, including Chrome, Edge, Safari, Firefox, and Opera.
So, you are not short of options, irrespective of your device.
6. Customer support
RoboForm provides more customer support options than Bitwarden. It provides both live chat and 24/7 ticket support. However, only premium users can access priority online and live chat support during business hours.
Bitwarden, on the other hand, is limited to just online support via email, community forums, and the Q&A session.
RoboForm vs Bitwarden: Verdict
RoboForm and Bitwarden are, without a doubt, among the leading password managers available. While they rank equally regarding security, RoboForm edges its counterpart in just about other parameters that matter.
Moreover, recently, RoboForm completed a security audit and penetration test conducted by Secfault Security. That proves it’s a trustworthy tool you should definitely consider.
So, we can conclude that RoboForm is the better option on the balance of things and overall suitability. However, you won’t regret using either of the two tools.
Feel free to share your experience using the two tools in the comments below.
Microsoft and Banco Santander are teaming up together with Oxentia Foundation to launch a new challenge for entrepreneurs across 11 different countries. The challenge will mainly focus on finding innovative AI solutions that aim to mitigate issues affecting society.
The challenge is open to entrepreneurs from the US, Germany, Chile, Mexico, Argentina, Poland, Uruguay, the UK, Portugal, Mexico as well as Brazil. You can apply to take part in the challenge from now through to April 27.
What’s in store for you once you win the challenge? Aside from getting the chance to attend the award ceremony in Silicon Valley which is set to take place later this year on June 29, the top six projects will also get 120,000 euros in prize money.
The 120,000 euros will be split into two categories, with the first category getting 30,000 euros. The share will be split among the top three startups, and each of them will receive 10,000 euros.
As for the remaining 90,000 euros, it will be split among the top three scaleups. Each of them will receive 30,000 euros. Additionally, the winners will get the opportunity to become Santander X 100 members. Santander X 100 is essentially designed to provide its members with all the necessary resources to elevate their businesses to the next level.
What’s more, the winners will also get the opportunity to work side by side with Microsoft experts in artificial intelligence and get mentorship. They’ll also be able to leverage this opportunity and get to present projects to M12.
Microsoft’s General Manager EMEA – Data & AI, Jens Hansen has indicated that:
At Microsoft, we have always viewed technology as a catalyst for progress, and we believe that AI will have a positive and transformational impact on our lives if used responsibly. We are committed to democratizing the use of AI, which is why we are delighted to join Banco Santander in the Santander X Global Challenge | The AI Revolution.
In addition, winners will be mentored by Microsoft experts in artificial intelligence to present projects to M12, Microsoft’s venture capital initiative.
The graphics drivers are among the most critical on the PC and amongst the few that experts recommend you regularly update. So, let’s learn about the Intel HD Graphics 4600 driver and how to download and update it.
You may find Intel HD Graphics 4600 driver in Lenovo or other computers, which was good for the time. There are periodic updates for the graphics driver, and some reinstalling may need to download the setup for Intel HD Graphics 4600 driver. Here’s all you need to know!
Why should I update the Intel HD 4600 driver?
Here are a few reasons you should update the driver:
Better Windows performance: One of the most important reasons users update the graphics driver is improved performance, not just that of Windows but also the installed applications that heavily rely on the graphics adapter.
Enhanced gaming experience: Games are closely linked to the graphics driver, and any upgrades, even in terms of software, to the latter, will enhance the gameplay and user experience.
Offers more resolutions: Sometimes, updating the graphics driver can open up a few more resolutions, thus ensuring a better display.
How do I download the Intel HD Graphics 4600 driver?
Tip
The steps here are to download the graphics driver. If you already have the Intel HD Graphics 4600 driver installed on the PC, head to the next section with the steps to update the driver.
Now, scroll down and click the Download button next to the option that matches the installed OS iteration, version, and architecture.
Once done, run the setup and follow the on-screen instructions to complete the installation.
Finally, restart the computer for the changes to come into effect.
2. From the PC manufacturer’s website
Tip
Downloading the driver from the manufacturer’s website also becomes imperative when the currently installed driver from the OEM doesn’t allow the generic Intel driver to install.
For those running the Intel HD Graphics 4600 driver on Dell or other devices and facing issues downloading it from Intel’s website, the manufacturer’s website, too, has an option. Here are the links for two of the major manufacturers:
The installation process remains the same here. Simply download the setup, run the installer, and once done with it, restart the computer.
How do I update my Intel HD 4600 graphics driver?
1. From Device Manager
Press Windows + X to open the Power User menu, and select Device Manager from the list.
Now, expand the Display adapters entry, right-click on the Intel HD Graphics 4600, and select Update driver from the context menu.
Select Search automatically for drivers and wait for Windows to install the best available one.
If a new driver is installed, restart the computer for the changes to apply.
The easiest method to update a driver is via the Device Manager. But a couple of years ago, Microsoft made changes, and Device Manager is now used just for offline updates, i.e., it only checks the PC for a better version, not the web.
Press Windows + I to open Settings, and then choose Update & Security.
Click on Check for updates on the right.
Now, click on View optional updates if an option appears.
Expand Driver updates, select the Intel Graphics 4600 entry, and then click Download and install.
Wait for the process to complete, and then restart the computer.
That’s how you can install the latest Intel Graphics 4600 driver via the Windows Update, a safe, reliable, and stable way to update drivers.
2. Via specialized software
There is a much more effective solution for updating graphics driver from multiple manufacturers, without manually installing them.
Namely, you can utilize a dedicated driver updating tool that scans your PC in less than 5 minutes and updates old driver versions without any compatibility issues.
3. Through the manufacturer’s website
The process to download (detailed in the previous section) and update the drivers from the website remains identical. You will have to head to the manufacturer’s website, download the setup for the latest version, and run it to install the driver.
Driver Version for Intel Graphics HD 4600
While updating, you have to make sure that the version being downloaded is newer than the one currently installed. For that, head to the driver’s Properties and check the Driver Version.
That’s all for now! You know all the ways to download and update the Intel HD Graphics 4600 driver in Windows. You can also follow a complete step by step guide on how to update Intel graphics driver by checking our dedicated guide.
We now know when we will finally get to see the much-delayed “Minecraft Movie.” Warner Bros. has announced the release date for film: April 4, 2025. While that’s still almost exactly two years away, at least it’s something solid for those looking forward to seeing their favorite block-building game on the big screen.
How the finished product may ultimately turn out when it finally releases is another thing. The project has had a troubled development, with a director swap and an entirely new script following the departure of writer Jason Fuchs. The 2025 release puts the Minecraft movie a full six years out from its originally planned 2019 release.
Jason Momoa has been cast in the lead role of the Minecraft movie. Image via IMDB.
Other than the release date, details are pretty scant as to what the movie will actually be like. Aquaman actor Jason Momoa will star in the live-action film, presumably in the role of Minecraft protagonist Steve. Jared Hess of Nacho Libre and Napoleon Dynamite fame will serve as director.
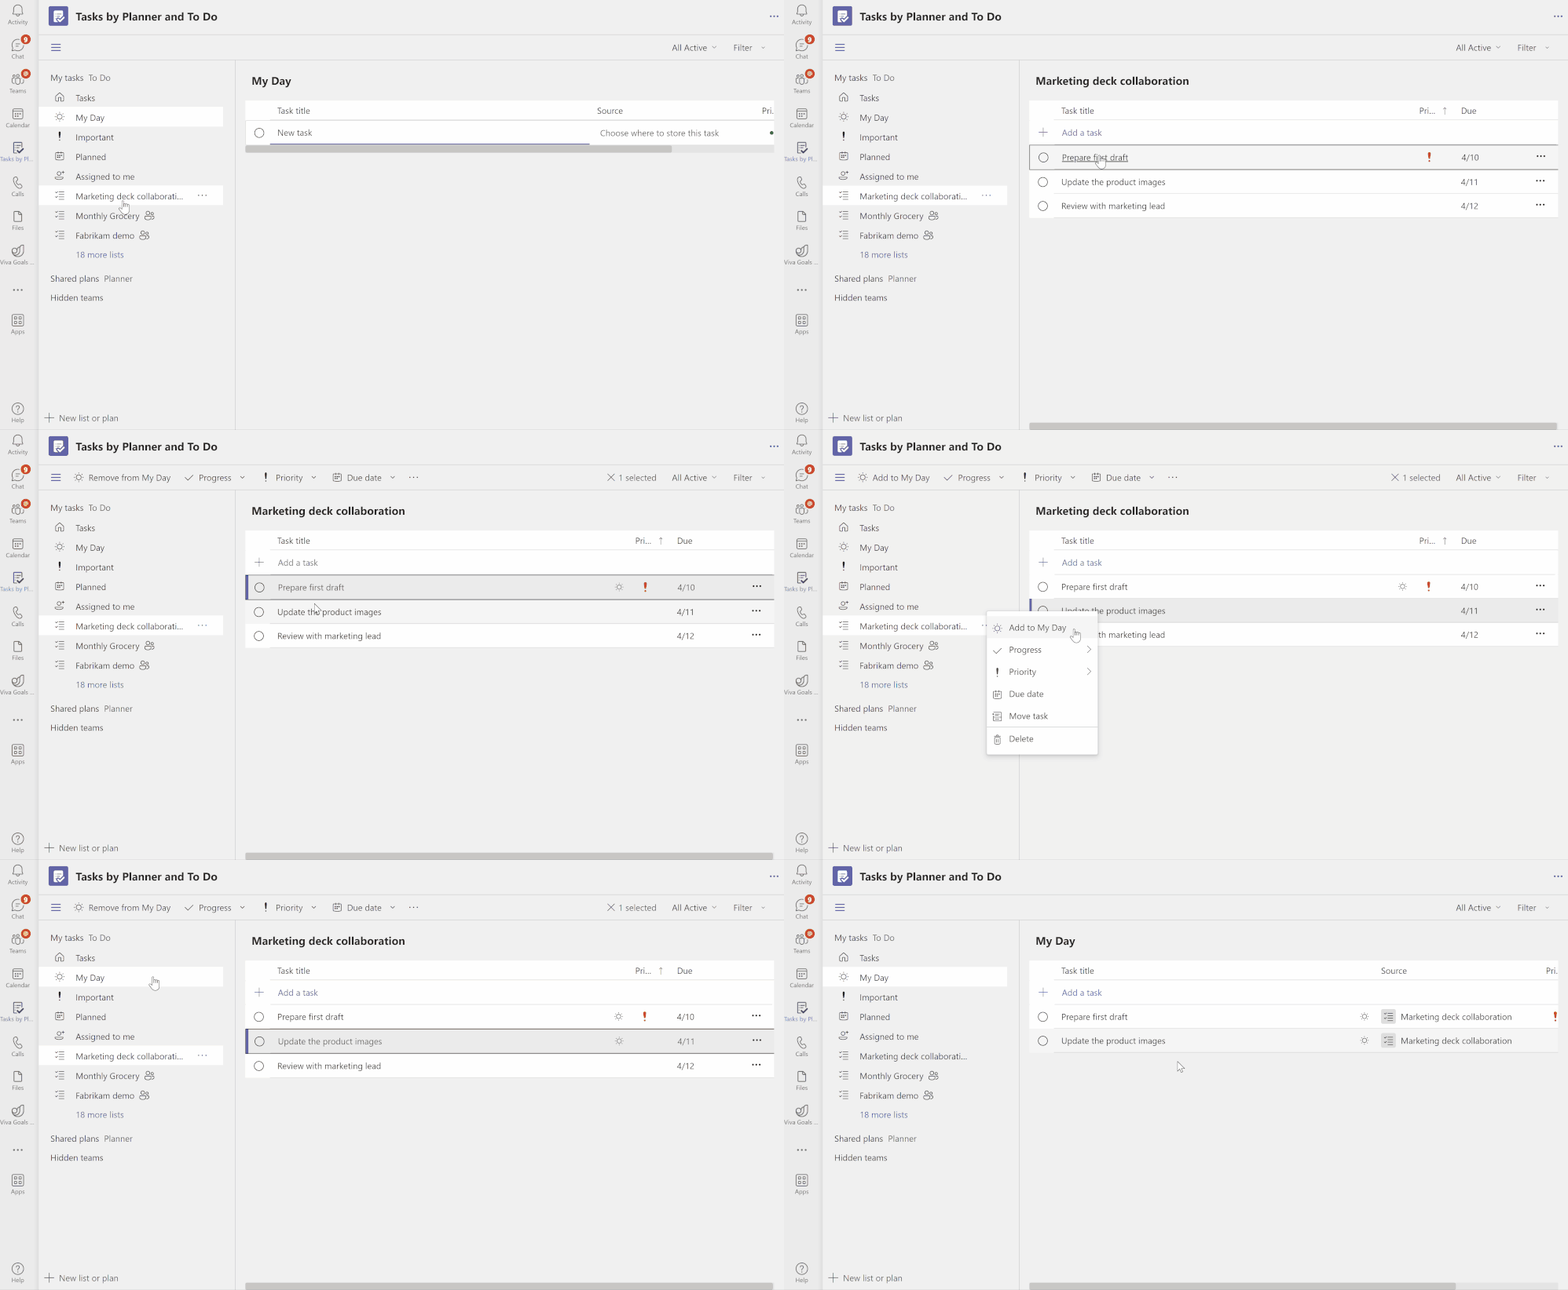
Microsoft has announced the launch of the new ‘My Day’ view in the ‘Tasks by Planner and To Do’ app for Microsoft Teams. The new feature is designed to help users keep track of their tasks and remain organized, declutter the workspace, and also consolidate the tasks list.
To access the ‘My Day’ view feature in Teams, here’s what you’ll need to do:
Launch Microsoft Teams.
Next, select the Apps tab located in the left-hand sidebar.
Now, search for Tasks by Planner and To Do and click on it.
Alternatively, you can opt to pin the app for easier accessibility every time you want to make use of it. Simply, right-click the app and pin it on the left navigation bar on Microsoft Teams. You’ll find the My Day view feature in the left-hand panel.
From this point, you can start adding tasks to stay organized. All you need to do is right-click on the task and select the Add to My Day option. This way you’ll be able to complete your tasks in a timely manner and avoid stretching deadlines.
Microsoft has released a new Edge Dev build update, coming in at 113.0.1774.3. The update adds several new features as well as the usual reliability fixes and policies. Here’s everything you need to know about this release:
First, users will now be able to edit images directly from the context menu. Next up, Microsoft Edge now features a Show Discover option in the Sidebar settings, Moreover, the release also ships with new filter options in the address bar.
Additionally, Android users are also getting a Wallpaper Center. We invite you to check out Microsoft’s blog post for more information about the reliability fixes and policies that shipped with this new release.
The Edge build update should roll out to users automatically, however, if this is not the case, you can trigger the update manually by visiting Edge’s Settingsmenu, then click on Help and Feedback, select About Microsoft Edge, and then wait for the browser to download the update.
In other Edge-related news, the Split screen feature officially shipped to the browser thus allowing users to split one window into two tabs. Share your thoughts with us in the comments.
On Windows 11, you can see a cute little graphic sitting nicely on the search bar on your taskbar. Once clicked, you can search for apps, settings, or documents or even pull out a link to an internet search if you’re connected.
However, some users find the graphic unpleasing. They consider it one of Microsoft’s many advertisement attempts, even if Microsoft calls it Search Highlights, and you can customize it in deployment tools for companies, mainly to substitute the image for the company’s logo.
If you relate to that situation, this article is for you. It explains how to remove the search bar image on Windows 11.
How to remove the search bar image on Windows 11?
From Windows Settings
1. Go to Settings ➜ Privacy & Security.
2. Scroll down to Search permissions.
3. Scroll down until you see More settings and a toggle below Show search highlights. Turn that off.
Your PC has many processes running in the background; sometimes, you might notice an unusual process, such as alg.exe, running in the background.
Unknown processes can be dangerous, so many are extra cautious whenever they notice an unfamiliar application on their PC. To learn more, be sure to check our guide on how to see all running processes on your PC.
In today’s guide, we will explain what alg.exe is, what it does, and how to disable it on your PC, so let’s get started.
What is the ALG EXE process?
ALG.exe stands for Application Layer Gateway Service, and it’s located in the Windows directory.
Using this file, you can get support for third-party protocol plug-ins and use them with Intent Connection Sharing and Windows Firewall.
Where is the ALG exe file?
The location of this file is in the System32 directory. The exact path is C:\Windows\System32
In case you notice this file in any other directory, the file may be malicious.
Is alg.exe malware?
No, ALG.exe isn’t malware, it’s a legitimate Windows process. Although this is a genuine file, it can be corrupted by malware.
If you suspect this file is infected, be sure to scan it with your antivirus software. In case you notice this software in Task Manager, there’s usually no need to worry since this is a system application.
What is ALG used for?
Application Layer Gateway operates at the infrastructure layer or layer 7 in the OSI model. Some of the functions include the following:
Address and port translation
Resource allocation
Application response control
Data synchronization and traffic control
ALG can also act as a proxy for application servers and protocols such as SIP and FTP. As such, it can control application session initiation and protect application servers by stopping connections when necessary.
ALG uses deep packet inspection and it will detect and block attacks before starting the application session. It will also block traffic from reaching the application.
Can I disable Application Layer Gateway service?
Yes, it’s possible to disable this feature but keep in mind that it works as a security feature, so you can put your PC or network at risk by disabling it.
How can I disable alg.exe?
Use Services window
Press Windows key + R and enter msconfig. Press Enter.
Next, locate Application Layer Gateway Service and double-click it.
Click on Stop to stop the service if it’s running. Set the Startup type to Disabled.
Lastly, click on Apply and OK to save changes.
Should I disable ALG?
In most cases, ALG shouldn’t be disabled, but it can sometimes interfere with IP addresses and signaling protocols.
Microsoft Viva is an online workplace platform where people can interact with their colleagues on various topics. It’s essentially a form of social media but a lot less busy and filled with ads.
One of its features is sending out emails that provide insights into people’s work habits. In theory, this is a great way to learn to be more efficient at work, but it quickly leads to an overstuffed email account.
What causes the Unsubscribe button not to work?
Normally, you would scroll down to the bottom of a Viva email and click Unsubscribe to end the emails. However, there have been reports of Viva emails continuing to show up in some user accounts.
There are a handful of reasons why this could happen, and it’s important to go over them.
You have corrupt files on your computer – Corruption can mess with many important computer functions. It’s for this reason that you should run an SFC scan to clear it up.
Missing or broken files interrupt services – Similarly, missing components can mess up your computer too. For this reason, it’s recommended that you run some repair tools.
Administrator settings are incorrectly configured – The workplace admin who controls Viva may have the wrong settings activated, forcing everyone to get emails even if they don’t want them.
How can I forcefully unsubscribe from Microsoft Viva?
There are multiple ways to do so, and don’t take much time to accomplish. Before you do, there are several things you’ll need to do first:
If you don’t have admin-level access to Microsoft Viva, reach out to someone on your network who does and see if they can help you.
And if they can’t help, ask them to give you admin-level access. The only way you can solve this problem is to have elevated permissions.
1. Connect to PowerShell Exchange Online
To begin, you will need to connect to the PowerShell Exchange Online module. One way is to ask your network admin for help connecting to the module.
You can also connect to the module online yourself. If you don’t have it installed, go to PowerShell Gallery, copy the command you see there, and run it on PowerShell.
Press the Y key to install the module, then hit the Akey on the following question. Give PowerShell enough time to finish.
Enter the following command: Connect-ExchangeOnline -UserPrincipalName <company email>
Replace <company email> with the email you have with your place of work or the network. The image below shows an example.
You’ll be asked to sign into your account after this.
This step must be done before you can move on to the following solution.
2. Use PowerShell to disable the briefing email
In PowerShell, enter the following command with the user accounts you want to remove from Microsoft Viva: Set-UserBriefingConfig -Identity <company email> -Enabled $false
You can check if you did this correctly by entering the following: Get-UserBriefingConfig -Identity <company email>
To disable Microsoft Viva emails to all users on the network, first enter $user = Get-User
Next, run the following command: $users | Foreach { Set-UserBriefingConfig -Identity $_.UserPrincipalName -Enabled $false }
3. Turn off Microsoft Viva through the admin center
Sign in to the Microsoft 365 admin center.
Click the Settings tab in the left-hand menu. In the smaller context menu that appears, select Org Settings.
Under Org Settings, select Services at the top of the page.
Click Briefing email from Microsoft Viva in the list that appears below.
Uncheck the box next to Let people in your organization receive Briefing email.
Go to the Microsoft Viva Insights website and click the three dots in the top right corner. Select Settings in the context menu.
In Settings, click the Briefing tab.
Click the toggle switch underneath Daily Briefing email to disable the Microsoft Viva emails.
Next, go to the Privacy tab.
Toggle off Viva Insights and Viva Digest Email.
Is it possible to make myself an administrator to do Microsoft Viva fixes?
All of the Microsoft Viva solutions require you to have administrator-level access. As mentioned earlier, you can ask your network admin to give you the permissions, or you can do it yourself.
There are several ways to do this. PowerShell has a specific command you can run to give yourself admin permissions. Or you can create a brand new account with that high level of access.
While we have you, be sure to check out our guide on installing and using Microsoft Viva Engage, a feature that allows employees to connect with anyone across the company from anywhere, anytime.
Feel free to comment below if you have other Microsoft Viva problems. Also, leave comments below about reviews you’d like to see or information on other Microsoft apps and platforms.
DRIVER_LEFT_LOCKED_PAGES_IN_PROCESS (BSOD) error occurs in Windows operating systems. It usually indicates that a driver or system process has failed to release its memory. Therefore, we will discuss how to fix the 0x000000CB error.
Proceed with the following advanced troubleshooting if the error persists.
1. Restart Windows Update services
Right-click the Windows icon and select Run to open the Run dialog box. Type services.mcs In the dialog box and press Enter to open the Services window.
Navigate to the Windows Update, right-click on it, and click Restart.
Wait for the process to complete and restart your device to take effect.
Resetting the windows update service will fix issues with incomplete windows updates.
2. Clean the SoftwareDistribution folder
Press the Windows + X key and click Run to open the Run dialog box.
Copy and paste %windir%\SoftwareDistribution\DataStore and press Enter.
Press ctrl + A to select all the files and delete them.
Close the Windows File Explorer and restart your device.
The Windows cache folder temporarily stores downloaded files. Deleting all the files will troubleshoot incomplete Windows update downloads.
Moreover, you can use a dedicated app to run an in-depth scan of your PC for corrupt or missing files and replace them with new parts from its large vault.
4. Run printer troubleshooter
Press the Windows + I to open the Windows Settings.
Select System and choose Troubleshoot from the right-side pane.
Then select Other troubleshooters.
Navigate to the Printer and click on Run.
If your printer is not listed, select the My printer is not listed option and click Next.
Wait for the process to complete, close the Settings window and restart your device.
Performing the above process will fix issues with the printer.
By now, you know that the new Outlook for Windows application has been in public preview for nearly a year, as the tech giant continues to add new features to the email client.
Today, however, Microsoft announced that the preview version of Outlook for Windows is finally starting to add support for third-party email accounts.
According to a recent blog post, Microsoft said that they are starting third-party support with the obvious choice, which is Google’s Gmail.
Furthermore, Outlook for Windows users can also get support for Google Calendar and Contacts in the app, a feature that the older Outlook client could not support.
But the good news doesn’t stop here. Pretty soon, the tech giant will also add support for Yahoo and iCloud, as well as the ability to connect your mailbox through IMAP.
Redmond developers stated that it is their intention that every person be able to access all of their emails in one spot, on any Windows 10 or Windows 11 device.
Thus, users can start adding their Gmail account just by choosing the Add account option at the bottom of the folder pane.
Also, they can do the same thing by going to Accounts, then selecting Email accounts, followed by Settings to input their Gmail account.
Allegedly, that will also be the case when the other third-party email accounts are supported. Microsoft has also added even more features to the Outlook for Windows preview version, such as:
Rich editing, spelling, and auto complete suggestions powered by Microsoft Editor.
The ability to send emails with polls to help make decisions quicker. (Work and School accounts only)
Delay the delivery of an email for up to 10 seconds so you have a chance to “undo” sending – always an excellent feature if you have a typo or accidentally forgot someone on an email – or just want to make a few quick changes.
The ability to join a Skype or Teams call directly from the new Outlook for Windows.
The ability to pin important emails to the top of your inbox – helping ensure you don’t forget to follow up on those most important messages.
The ability to add multiple shared calendars
Supporting multiple time zones
Adding daily weather in Calendar view
The ability to track packages and check in to flights directly from your Inbox.
Reminders about important messages that still need a reply.
Search folders for quick and easy access to all of your emails.
The ability to customize your email density and views.
But wait, there’s more. The tech giant also vouched to add even more features in the near future, some of which we will explore now.
So, before we go thinking that this is all we get, here’s what we can expect from Microsoft:
Numerous visual updates and personalization options so you can create your preferred email experience.
We’re giving our calendar surface a fresh new look with bolder colors and better readability. Whether you’re scanning your day or organizing your month, your calendar will look beautiful.
Offline support so you can get things done and access content even when not connected to the Internet.
Native ICS file type support.
Needless to say, if you have yet to try out the new version of Outlook for Windows, you can open the current version and simply toggle on Try the new Outlook in the upper right-hand corner of the app.
Be sure to leave a comment below, sharing your thoughts and opinions on this matter. We’d also like to hear if you have any suggestions for the future.
Cdd.dll is a critical system file in Windows that is responsible for rendering graphics on the screen. However, people have reported system crashes due to cdd.dll BSoD errors. Hence, we will explore the causes of the cdd.dll BSoD error and provide solutions to fix it.
cdd.dll BSoD error can be caused by various factors, some of which include:
Malware infection – System malware is designed to harm or exploit any computer system and can corrupt system files, including cdd.dll, causing system instability and resulting in the BSoD error.
Corrupted system files – A damaged or unreadable system file within the operating system can advance to the cdd.dll BSoD error.
Registry issues – Windows configuration settings, preferences and options for the Windows operating system are stored hierarchically in the Windows Registry. Therefore, a missing Windows registry can also cause the cdd.dll BSoD error.
Outdated or faulty drivers – A system driver is a utility software that allows the hardware to communicate with the operating system. However, outdated or faulty drivers can conflict with the system’s hardware, leading to the cdd.dll BSoD error.
These factors can differ on various computers depending on the circumstances. Regardless, we will discuss how to cdd.dll BSoD error.
How can I fix the cdd.dll BSoD?
Before proceeding with any advanced troubleshooting steps, go through the following:
If you can’t resolve the error, try the steps below:
1. Rollback graphics card driver
Press the Windows key, type devmgmt,and press Enter to open the Device Manager.
Double-click the Display adapters to expand it, right-click on your graphics driver, and select Properties.
Click on the Driver tab from the top, click the Roll Back Driver button, and give a reason for rolling back.
Select the Yes button to complete the process and restart your device.
Rolling back your graphics card will restore the graphics card driver to the previous version, troubleshooting compatibility issues. You can read about how to roll back drivers on Windows PCs.
2. Reinstall the graphics card driver
Press the Windows key, type Device Manager, and press Enter to open it.
Double-click the Display adapters to expand it, and right-click on your graphics driver. Select Uninstall device from the context menu.
Then, check the box set before Delete the driver software for this device and click Uninstall.
Close the Device Manager, restart your device and redownload the driver pack.
Reinstalling the driver will fix outdated drivers and corrupt oneself. Feel free to check our guide on manually downloading a driver pack on your computer.
Press the Windows button, type Command Prompt and click on Run as administrator to open it.
Click Yes if the Windows User Account Control prompt appears.
Type the following and press Enter: sfc /scannow
Then type this command and press Enter: Dism/Online/Cleanup-Image/RestoreHealth
Restart your PC and check if the error persists.
Performing an SFC/DISM scan will troubleshoot the storage device and repair corrupt storage. Check our guide about fixing SFC scannow not working on Windows.
Or, as a more straightforward solution, you can use third-party software to repair the corrupt storage automatically with healthy parts as replacements.
4. Register the cdd.dll file
NOTE
We don’t recommend you download from third-party websites. However, our expert has tested and proven these steps to be safe.
Click on Show extracted files when complete and select Desktop as location. Then, click Extract.
Press the Windows key and type cmd, and click on Run as administrator.
Select the Yes button on UAC to open the Command Prompt.
Type the following in the Command Prompt and press Enter: regsvr32 cdd.dll
Registering cdd.dll is the process of adding the cdd.dll file to the Windows registry, which allows it to be accessed and used by other programs and processes running on the computer.
Antivirus software may sometimes show a warning saying Trojan/win32.casdet rfn on Windows 11 laptops. It indicates the PC is infected by Trojan malware, causing it to malfunction. Fortunately, there are possible ways to troubleshoot this, as outlined below.
Trojan/win32.casdet rfn is a severe Trojan virus infection that can overtake the system and kill its processes, leaving it vulnerable.
The virus usually sneaks into the system with junk email attachments, torrents, and free software packages. It can cause damaged or corrupt system files, and program files, hijacks your browsing activities, etc.
Furthermore, the Trojan/win32.casdet rfn is fatal and should be removed immediately with proper caution. It can result in the virus deleting important files, stealing confidential information and bypassing privacy protections, and causing large amounts of pop-up ads.
Scan your PC with Antivirus Software – You can check our recommendations for the best antivirus software to download on your computer.
If you still notice the activities of the virus, proceed with the steps below:
1. End task for unnecessary programs
Right-click the Start button and select Task Manager from the menu.
Select the Processes tab. Select each of the programs from the list, right-click on it, then click End Task from the drop-down menu.
Restart your PC.
Ending tasks for unwanted or unnecessary programs on your PC will kill its activities and stop it from running. Check our article for more shortcuts to open Task Manager on Windows PC.
2. Uninstall recently installed programs
Left-click the Start button, type Control Panel, then open it.
Click on Programs, then select Programs and Features.
Find the recently installed app, right-click on it, then select Uninstall from the drop-down.
Follow the onscreen instructions and Restart your PC to see if the virus symptoms persist.
Uninstalling the program can prevent the Trojan/win32.casdet rfn threat and remove its components.
Open the Google Chrome browser on your PC, then click three dots to open the Menu. Go to More tools and then click on Extensions.
Toggle off all the recently downloaded extensions.
Click the Remove icon to delete the extensions from your browser.
Deleting the extension will remove its established threats on your browser and prevent further attacks.
4. Reinstall the browser
Press Windows + I key to open the Windows Settings app.
Select Apps and select Installed apps.
Find the browser app, select the options button, and click on Uninstall.
Download the browser from an MS store and install it on your PC.
Reinstalling the browser will remove the hijacking files and tools relating to Trojan/win32.casdet rfn on it.
5. Reset your PC
Press Windows + I key to open the Settings app.
Select System from the left pane. Click on Recovery on the right side of the screen.
Click on the Reset this PC button, then select Reset PC.
Select the Keep my files option, and choose cloud or local.
Resetting your PC is the last option to try, as it can result in data loss. However, it will erase any established data by the Trojan Horse virus and give your system a fresh and safe start.
When it comes to file management, we can all appreciate how file compression software comes in handy. You can easily send and download large files in record time. The problem comes up when you try to access the compressed folder but are hit with an error.
Some Windows users report that after downloading zipped folders, trying to access it later is impossible. They get a message saying that the compressed folder is invalid. So why does this happen? Can it be fixed? Here are our answers.
Why is my zip file saying invalid?
Some of the most common reasons for your zip file bringing up an invalid error message include:
Extension mismatch – Some applications will not open zip files unless they have been added as an extension on your computer.
Insufficient storage – If there isn’t enough disk space available on your computer when you try to extract all your files from a compressed folder, things can go wrong pretty fast.
Outdated software – If you haven’t updated your compression software in a while, it may fail to open or extract files because of compatibility issues.
Viruses/malware – Sometimes, there are bugs in your system which prevent them from correctly extracting certain types of files.
Insufficient permissions – You may get access to the compressed (zipped) folder is denied message if you do not have sufficient privileges to access the folder where your zip file is stored.
How do I fix a compressed zipped folder invalid?
A few workarounds that could help you get out of this rubble include:
Ensure you’re running the latest version of your file compression tool.
Check the permissions on your files and folders to ensure they are correct. Also, ensure you’re using an administrator account, as local accounts have some restrictions.
If you don’t have the same version of the software installed on your computer as the person who sent you the file, it might not work properly.
In some cases, an update that caused the problem with your compressed folder may have been released. However, reinstalling the software from scratch can often fix this issue and make your compressed folders work again.
5. Try a different file compression software
If reinstalling does not work, you may need to try using another compression program instead of the one you have. This might seem overkill since most people only use one program to compress their files.
However, sometimes there are issues with certain programs that can cause this type of problem with your compressed folders. If downloading another program seems over the top, try online compression tools.
That brings us to the end of this guide, but keep the conversation going in the comment section below. Is there a trick that worked for you that we may have missed? Share with us below.
If you are using Hyper-V for your virtualization needs, you might have encountered the error 0x8009030E. This is a common issue that many users face while migrating a virtual machine from one host to another.
Live migration is a critical feature of Hyper-V. It allows you to move virtual machines from one host to another without disrupting their services. However, some users are down on their luck as the Hyper-V error 0x8009030e prevents the migration.
Let’s have a closer look at why this happens and how you can have a successful migration.
What is Hyper-V error 0x8009030E?
Hyper-V error 0x8009030E is a common error that occurs when trying to create a virtual machine. The error code is described as no credentials are available in the security package.
You may encounter this error when you try to perform a live migration in Hyper-V. When you’re trying to move a virtual machine from one Hyper-V host to another, the source Hyper-V host must be able to communicate with the destination Hyper-V host.
If the source and destination hosts cannot communicate with each other, then they cannot send the necessary information to complete the migration operation successfully.
But why does the migration fail? There are many reasons for Hyper-V Live migration to fail. Let’s take a look at some of the most common ones:
Improper configuration – This error can occur if the Hyper-V host is not configured correctly or if the source and target virtual machines are incompatible.
Incorrect firewall configuration – If your firewall is blocking ports needed for Live Migration, it will not work properly.
Network issues – The migration may fail if you have multiple network adapters on your server or multiple virtual switches with different configurations and settings on your host.
Incompatible Hyper-V – Live migrations are supported only if both hosts are running the same version of Hyper-V, and they must be able to communicate with each other over their network connection.
Insufficient authentication – The Kerberos Constrained Delegation is a security feature that allows a service to delegate authentication to another service while controlling which services can request delegation and what types of delegation they can request. The live migration will fail if the particular user account does not have the requisite permissions.
How can I fix the Hyper-V error 0x8009030e?
Check off the basics before reaching out to the complex solutions:
Live migrations are only enabled for VMs configured for this purpose. Ensure that your VMs have been configured for the migration.
Ensure that there is enough free space available for each VM on its destination host before attempting a live migration operation.
Some operating systems require the Kerberos Constrained Delegation as a protocol transition. Ensure you verify the user account has the required permissions to perform the migration.
Verify that the host and destination VMs belong to the same domain.
1. Enable Kerberos authentication
On your host machine, navigate to Hyper-V settings and click on Live Migrations to expand.
Click on Advanced features, and under the Authentication protocol, check the Use Kerberos box.
2. Configure constrained delegation
Open your Active Directory Users and find your Hyper-V host computer account.
Right-click on it and select Properties. Click on the Delegation tab.
Check the Trust this computer for delegation to specified services only and Use Kerberos only boxes.
Repeat these steps for the other host computer.
Sign out, then sign back in for the changes to take effect.
Constrained delegation is a mechanism that can limit the scope of an authentication ticket’s validity. This allows you to create more secure environments by limiting the ability of users to impersonate other users or access resources they shouldn’t have access to.
If a service ticket has been issued with constrained delegation, then only services configured to trust the issuing service can use the ticket to authenticate.
Other related errors you may run into include the Hyper-V is not authorized to connect error, so pass by our helpful article for quick fixes.
Let us know of any other solutions you may have tried in the comment section below.
Teams users are getting more and more features and new functionalities these days, so it seems like it really pays to use this software, some would say.
If you are a Teams member, you surely know that towards the end of last month, Microsoft released a revamped Teams.
This version actually brought in faster performance for the app, a consequence of lowered CPU, disk, and memory usage, as well as a simpler overall UI and UX.
Developers dubbed this version the New Teams, and the improvements it managed to make under the hood are now beneficial to Teams for Education users as well.
Know that, in a recent blog post on the Tech Community forums, the tech giant has now detailed the most recent improvements.
You will be surely pleased to know that these include 50% less memory, CPU, and disk usage, which in turn leads to twice the performance throughput.
Microsoft touted this to be the beginning of a new era of Microsoft Teams, reimagined from the ground up for a faster, simpler, and more flexible Teams experience.
The Redmond-based tech colossus has since begun rolling out the public preview version of the new Teams desktop app for Windows.
Let’s have a quick look at what exactly we can expect from this new and improved version of the Teams communications app:
2X faster, whether you’re starting up the app, presenting in a meeting, or responding to messages
50% less memory, lower CPU, disk utilization, and less battery life
Use multiple accounts and multiple tenants (MTMA) more seamlessly
More reliable, improved security, and better manageability, using trusted types, stringent CSPs, and integration with MSIX
Please keep in mind that these improvements can be especially useful for the younger demographic, as many children could be using budget laptops for their educational purposes.
Good plan, actually considering that most of these devices don’t have the fastest or most powerful hardware inside.
And, apart from performance-related optimizations, the New Teams for Education also features several functionality improvements as well.
Among these, we can remind you of Viva Connections for Education, assignments updates, inactive assignments, a new create experience, and also apps in channel meetings.
What other features do you feel would be beneficial for the Teams conferencing app? Share your thoughts and ideas with us in the comments section below.
Early made bets on virtual reality by many tech companies seem to be losing steam according to a new survey by Piper Sandler that shows teens in the United States, simply aren’t interested in the technology.
While the tech industry waits with baited breath for Apple to unveil its own VR headset project, the rest of the world appears to have moved on from feverish interest in the space that saw efforts such as Microsoft’s HoloLens, Magic Leap, HTC’s Vive, and even Sony’s PlayStation VR christen headlines with ambitiously glowing reviews or optimistic perspectives.
Even Facebook CEO Mark Zuckerberg has had to simmer on an entire business pivot to a virtualized social media platform in his overzealous rush to craft the metaverse as sales of the Quest 2 and Quest Pro linger and Meta Horizon Workrooms draws more questions and criticism than adoption.
Perhaps more damning for the future of VR is a survey published by Piper Sandler, a leading US independent investment bank and financial services company, who polled 5,600 teens in the US to gauge their interest in virtual reality.
According to the numbers, roughly 29 percent of teens own a dedicated VR device versus the 87 percent who do not but do hold an iPhone with a capacity for VR engagement. Never the less, of the 29 percent who own dedicated VR hardware, only 14 percent use their headsets weekly and an even smaller 4 percent use it daily like Zuckerberg is betting on with his Metaverse pitch.
Furthermore, the teens polled showed little interest in upcoming VR efforts with 52 percent of teens stating they were unsure or uninterested in a future purchase of a headset and only 7 percent who plan to grab a new device.
Sandler analysts concluded from the survey that “To us, the lukewarm usage demonstrates that VR remains ‘early days’ and that these devices are less important than smartphones.”
It seems safe to argue that Sandler analysts are being a bit euphemistic in their conclusion as VR continues to stagnate as an adopted technology in the average consumer’s day-to-daily life. VR first surfaced in the 50’s, gained a wider audience in the late 80’s and 90’s and still has yet to find legs in 2023. Despite billions invested in the sector, the practicality of VR as standard tech experience continues to allude businesses and many are finally beginning to side step the conversation altogether.
Microsoft has recently been enthused with the idea of artificial intelligence as of late, combining many of its flagship products and services with various Generative Pre-trained Transformer models to usher in an era of increasingly intelligent chat bots for users to engage with.
What Microsoft hasn’t been touting in the past few months are its ambitions for enterprise level metaverse, nor expanding its work on a Mixed Reality shared spaces that would combine both augmented and virtual reality interfaces. The Piper Sandler survey seems to buttress Microsoft’s corporate sleight of hand to Bing Chat, OpenAI and GPT 5 and away from burping up the phrase metaverse every five minutes as it did in 2022.
Perhaps Apple has found the right mix between hardware and experiences with their rumored VR headset, but some of its most fervent customers seem to currently lack the imagination or interest to even explore that possibility with them.
Nobody wants to know what are 5 advantages of e-commerce anymore. It’s already proven its prowess at reaching large customer pools in the absence of a physical store location. But what does headless eCommerce mean and what are its benefits? Why pick a headless eCommerce platform over others? In other words, what are headless commerce advantages?The most important thing that sets it apart is its cross-device capability.
The usual eCommerce platforms have the front end tied to the back end. But if you want to have your content available for all devices, you need a headless eCommerce platform.
? Just quick a reminder here → the front end is what your customers see when they enter the store. Meanwhile, the backend includes all the operations that happen in the background like billing, integration with suppliers, and more.
Usual eCommerce platforms are already among the most popular web apps out there and that’s because they can offer a convenient mix of features.
For instance, in addition to its website builder software, Wix also provides a digital commerce platform. You can further improve your workflows by pairing Wix with a lag-free browser.
If you also value security – and let’s face it, who doesn’t when dealing with payment processing and customer data – you can go directly for an e-commerce-ready browser, such as Opera.
Before we dig into headless commerce advantage – what does headless eCommerce mean? If the front end and back end are tied up, you need to create content for different devices separately.
For showcasing a product on a website or mobile app, you have to build the listings for each one individually.
Now, on headless eCommerce platforms, the front end is separate so you only need one listing because the content will be automatically adapted to any device.
That’s headless commerce explained briefly. Now, you might want to see a few headless commerce platform examples as well. So, what is a headless solution? We hear you, so read on.
Real-time data handling for accurate headless commerce statistics
Best headless eCommerce platforms
How do they do that? By using APIs or Application Programming Interfaces which are the link between the front end and back end.
Whether you click on Buy links on a mobile app or website, both requests will be handled by the headless commerce API. And the API, in turn, will address the same back end to process the requests.
The backend will apply different procedures for each activity and communicates back with the front end to confirm the purchase. Let’s see what are the advantages of headless commerce.
What are the advantages of headless commerce?
1. Perform changes quickly
All online media changes, and online stores, more than any, need to stay updated on new developments and requirements.
On a traditional platform, to change a field on the customer’s profile, you have to change the whole code.
And sometimes, that means that you need to shut down your store temporarily so that the changes can take effect.
On headless eCommerce, you add elements, and even modify backend features easily, without missing a beat on your e-store.
2. The shopping list remains consistent on any platform
The most important aspect is to meet the customer’s expectations and provide a great experience.
With headless commerce, the customer will have the same results and contents on his account whatever the platform he or she uses.
For instance, if they go on the mobile app and add an item to the cart, later, when they get to their website account on the PC back home, the item will still be there.
They won’t be losing precious time in finding that product over again because the unified backend will store the information.
Also, as a business owner, you will have information related to the customer’s purchase channel preferences and provide relatable offers.
3. Design flexibility
The important information is on the backend while the front end can be customized exactly as you want with new plugins, themes, templates, or anything you want.
And that’s just because the two are separated and you can leave the designers to work on the interface of the website.
And this way, everyone is happy. Most importantly, the brands get their content delivered without interruptions and without breaking everything.
You will be able to play as much as you want with the front end without changing the backend code.
With the headless architecture, you can switch the customer’s history from the website to the mobile app or even their smartwatch.
So, this way, they won’t have to enter their information and payment method when they changed the device they were using to shop.
5. Faster transactions
Having the front end and backend connected can often translate into a slower loading of your website because all tools and apps are working at the same time.
We don’t need to tell you that customers may lose patience quickly and leave for another store.
By using APIs, everything goes a lot quicker because the user will get a lot faster to the backend. That’s one of the most important headless eCommerce benefits.
That, in turn, translates into a faster-loading website that will also rank higher on Google which considers the loading time as an important factor.
Even if you’re using a more traditional platform for your digital commerce, such as Etsy or eBay, you should still keep loading speed in mind. Try pairing your selling with an Etsy-compatible browser to get more out of it.
Do I have to pay more for headless eCommerce?
We already outlined some really important headless commerce advantages. Big retailers have already gone on that road but the distinct front end and back end also mean separate programming for each (architecture and mode).
This can involve an additional budget, time, and a great team of developers who know their job really well. The more front ends you build, the higher the budget but the bigger the business, the higher the payout.
The shopping habits of customers are switching to mobile and voice-controlled devices, away from the traditional desktop approach.
Headless eCommerce is clearly the future and the businesses that adopt these platforms are most likely to grow their operations.
It’s up to you to assess the budget and decide whether to switch to this model now or later. Did you find our information interesting? We wait for your feedback in the comments section below.
0x00000139 Kernel_security_check_failure is a blue screen error that can appear under different circumstances. You may be trying to upgrade to a newer Windows version or update an application.
Since various issues can cause this problem, it’s important to identify the cause before attempting to fix it. If you’re unsure what’s causing this problem, use this guide to help determine what might be causing it so that you can act accordingly.
What is blue screen bug check code 0x00000139?
The blue screen bug check code 0x00000139 is a hardware-related error that can occur on all versions of Microsoft Windows. If you receive this message, your computer may be unstable and crash again shortly after rebooting.
The error code is caused by a hardware malfunction that causes the operating system to crash and display a blue screen error message.
Other causes include:
Overheated hardware or software failure – A PC component may fail due to excessive heat and cause blue screens, system crashes, and other issues.
Memory issues – If your PC is having issues with allocating memory, you may experience frequent crashes due to instability.
Driver issues – A lot of the time, most BSoD errors are caused by either corrupt, malfunctioned, or incompatible drivers.
Malware – A virus or other malware may have corrupted the operating system files or registry data required for Windows to run properly.
How do I fix 0x00000139?
Try the following before attempting any advanced steps:
Check your hard drive for disk errors using the CHKDSK command.
Run a memory test on your PC to check if there are any issues with your RAM.
1. Run the DISM and SFC scans
Click on the Search icon on your taskbar, type cmd in the search bar, and click Run as administrator.
Type the following commands and press Enter after each one: DISM.exe /Online /Cleanup-Image /Restorehealthsfc /scannow
Restart your PC.
Sometimes running the DISM and SFC scans may not repair all of your computer’s stability issues, and for that, we strongly suggest you try a specialized program that will help you detect all malfunctioning operating system files and repair them by finding healthy replacements from its database.
2. Scan for malware
Press the Windows key, search Windows Security, and click Open.
Select Virus & threat protection.
Next, press Quick scan under Current threats.
If you don’t find any threats, proceed to perform a full scan by clicking on Scan options just below Quick scan.
Click on Full scan to perform a deep scan of your PC.
Wait for the process to finish and restart your system.
3. Reinstall your GPU drivers
Click on the Start Menu icon, type Device Manager in the search bar, and click Open.
Navigate to your Graphic driver, right-click, and select Uninstall device.
Confirm the uninstallation by clicking Uninstall in the next dialog box.
Restart your PC, and the driver will automatically reinstall.
For users who found their graphics card to be the culprit, the NvLddmkm display driver was found to be at the center stage of all this chaos. This is a NVIDIA driver that may have stopped responding.
If so, you first need to address this issue by either updating your NVIDIA driver from the manufacturer’s site or roll back to a previous driver version.
4. Check for Windows updates
Click on the Start Menu icon and click on Settings.
Hit Windows Update on the left pane, then select Check for updates.
Hit the Windows key, type msconfig, and open System Configuration.
Switch to the Services tab and select Hide all Microsoft services.
Click on the Disable all button, then hit the Apply button to save the changes.
Go back and click on the Startup tab, select Open Task Manager then click OK.
In the Startup tab of the Task Manager, Disable all the Enabled startup items.
Close Task Manager and restart your PC.
Is Kernel Security Check Failure serious?
Kernel Security Check Failure occurs when your computer’s kernel, the core of all Windows operating systems, fails to perform certain tests that ensure its integrity.
It manages all activities related to hardware and software resources for applications and drivers. When there’s a problem with its security, it will disable itself from allowing any other process to access resources until you fix it.
The most common symptom of this problem is the blue screen of death (BSOD). It could be a hardware problem or a software issue. Both components are critical in the smooth running of your OS, so you need to address this issue as soon as possible.
Insider Gaming has reported that Sony is making a new handheld device. It even has a code name, apparently: the Q Lite.
Don’t look for this new Sony handheld to be a true successor to the PlayStation Vita, however. Rather, the Q Lite will be a complimentary device utilizing Remote Play, according to the report, which emphasizes that the device will not incorporate cloud gaming as a feature.
Remote Play is an application that allows users to control the PlayStation 5 console remotely with a high-speed internet connection, from a different device at a different location.
The Q Lite will feature adaptive streaming up to 1080p at 60FPS, and will require a constant internet connection. The device will look much like a PS5 controller, albeit with an 8-inch LCD touchscreen in the center.
The Q Lite will be only one of a whole slate of new PS5-related hardware offerings coming soon, alongside a new detachable PS5 disc drive, the “Project Nomad” wireless earphones and “Project Voyager” wireless headset. And of course the PS5 Pro is slated to arrive sometime in 2024.
Many of our readers have reported the DistributedCOM error 10005 appearing on their Windows PCs. It indicates that the program is trying to access the DCOM server without permission. Hence, this article will guide you through ways to fix the error.
Alternatively, you can read about what DCOM Error 1084 is and how you can fix it.
What is DistributedCOM error 10005?
DistributedCOM is a protocol that allows software components to communicate directly over a network. It runs into problems when a program tries to access DistributedCOM Server, but doesn’t have enough access.
Furthermore, the DistributedCOM error 10005 on Windows 11 mostly appears when there are issues with the Windows Search function. Some factors that may be responsible for the error are:
Incorrect configuration relating to DistributedCOM – Wrong settings in the Windows Search or DistributedCOM system component can cause the error 10005 to appear.
Permission issues – Programs trying to access the DCOM server without permission can affect communication. So, you can run into the error if your Windows device isn’t updated or doesn’t have authorization for the process.
Corrupt system files – When the system files are corrupted, programs and services dependent upon them won’t be able to access them. Hence, the DCOM processes will fail if the files responsible for it are not intact.
Viruses and malware – Cyber infections like viruses and malware are dangerous to the system as they can disrupt the activities running on the computer and lead to Microsoft Windows DistributedCOM error 10005.
These factors can vary on different computers. Nevertheless, you can fix them by following the troubleshooting steps outlined below.
How can I fix the DistributedCOM error 10005?
Try the following before attempting any advanced troubleshooting steps:
As an automatic alternative, we suggest you repair corrupt system files with specialized third-party software that offers advanced repair technology alongside substantial new Windows components.
Starting at $119 for the Keyboard and $99.99 for the mouse
The Dell Premier Collaboration Keyboard and Rechargeable mouse iterate on last year’s models, the Dell Premiere Multi-Device Wireless Keyboard and Mouse in some nifty new ways that should set the standard for keyboard use going forward.
Dell Peripheral Manager (Windows only)
OS Required
Apple MacOS, Linux, Android, Google Chrome OS, Red Hat Enterprise Linux 8.0, Ubuntu 18.04, Microsoft Windows 7 / 8.1 / 10 / 11
Battery
Rechargeable/ 20 Days
What’s in the box
Graphite
Included Accessories
USB-C to USB-C cable
Compliant Standards
AES-128
Specs
Dell Premier Rechargeable Mouse
Device Type
Mouse
Wireless Receiver
USB wireless receiver
Bundled Services
3 years Advanced Exchange Service
Interface
2.4 GHz, Bluetooth 5.1
Input Device
Wireless
Movement Resolution
8000 dpi
Buttons Qty
7 (3 programmable)
Features
Vertical and horizontal scrolling, rechargeable battery, hyper-fast scrolling, thumb rest, track-on-glass sensor
Dimensions
Width
3.5 in
Depth
5 in
Height
1.8 in
Weight
4.75 oz
Color
Graphite
Software & System Requirements
Dell Peripheral Manager (Windows only)
OS Required
Apple MacOS, Linux, Android, Google Chrome OS, Red Hat Enterprise Linux 8.0, Ubuntu 18.04, Microsoft Windows 7 / 8.1 / 10 / 11
Battery
Rechargeable/ 3 Months
What’s in the box
Graphite
Included Accessories
USB-C to USB-C cable
Compliant Standards
AES-128
Look and Feel
The Dell’s Premier Collaboration Keyboard (KB900) and Rechargeable Mouse (MS900) look similar to their cousins the Premier Multi-Device Wireless Keyboard and Mouse (KM7321W). The keyboards adopt a minimalist approach to lines and angles on leveraging a wedge-like design that automatically props the device up to a 20-degree angle for a more comfortable typing experience out of the box.
There are some padded tilt legs that can be flicked out from either corner of the keyboard as well as middle pad to keep the keyboard rigid during typing. Despite having some rounded angles on all four corners of the keyboard, the edges still feel rough and sharp when managing the device in hand.
The KB900 opts for a darker grey than the previous model which made use of lighter two-tone gray color scheme. Graphite grey is my personal favorite as it seemingly can be paired with a variety of desktop color arrangements. Both the mouse and keyboard make use of the darker grey color colors to their advantage of attractive set pieces without being detractive.
Aside from the red and white LED panel that sets above the direction keys, the other notable thing about KB900 is its weight, at 25.68oz or 1.60lbs, KB900 comes with a hefty but solid feel. There is little to no flex with the keyboard and keys feel rigid and secure to the frame.
The typing experience on the KB900 is similar to its predecessor, with heigh key travel, despite its low-profile appearance. The scissor key technology even distributes a keypress across the entire key unlike similar low-profile keyboards that can wobble and indent on pressure.
Lastly, the KB900 comes in a few inches shorter all around than the KM7321W for any concerned about diminishing desktop space.
As for the Rechargeable Mouse, it’s much lighter than it appears at 0.29lbs. While the mouse may feel hollow, its construction is resoundingly solid. Thumb indent and button placement fell very ergonomically conscious. Both the horizontal and vertical scroll wheels have interval bumps that help make scrolling on a device feel very precise and intentional
Dell also aligned the connecting input switcher right behind the top scroll wheel, presumably to help facilitate hot swapping between devices. The rubber padding at the bottom helps the mouse’s grip and reduces the number of times a user may over target when interacting with content.
Performance
I tend to measure most of my typing experiences against the Microsoft Designer Keyboards which offer a great balance between key travel and low-profile design. With that being said, the KB900 nails both while also offering a level of customization and added conveniences the Microsoft Designer Keyboard does not. Among the additional conveniences for the KB900 is the touch-enabled LED conference buttons that flicker on when a Zoom call is initiated.
The LED lights have consistently lit up during each Zoom call I tested them with, often times being more reliable than the Zoom call itself. Unfortunately, the light panel above the direction keys doesn’t support any other conferencing platform even for universal commands such as mute, video on and off, or share screen. Aside from the keyboard’s standout feature being locked to a single conferencing platform, the rest of the device is stellar. The key-noise on the keyboard is relatively quiet, I have not had any issues with connecting or reconnecting to multiple devices, and the backlighting is pretty clear in the dark.
The other thing the KB9000 offers is a dedicated app that allows users to quickly customize hotkeys, lighting, and connectivity.
As for the mouse, MS900, lighter weight profile makes it easy to use for extended periods of time. The rubber padding at the bottom can pose an issue for users who want to use the mouse on a variety of surfaces, with or without a decent mousepad. Another thing of note is the scroll wheel in the middle of the MS900 can be finicky out of the box, it’s recommended users visit either the Microsoft Windows Settings page or download and explore the Dell Peripheral Manager to set the feel of their keyboard to their liking.
Summary
The KB900 isn’t for everyone, especially if you do little conferencing within Zoom, but it as standalone keyboard, it does set a bar for spec inclusion. Going forward, all keyboards should move more modern and consistent charging protocols, support connectivity to more than a single PC or device, offer customization through apps or webapp platforms, all while still providing a quiet and enjoyable typing and surfing experience.
UsbHub3.sys is a Windows driver file but can sometimes cause issues that may lead to Blue Screen errors on the PC. This may be due to numerous problems affecting the file, resulting in the UsbHub3.sys error. Fortunately, this guide will discuss the causes and possible fixes for the error.
Here are some notable factors that can cause the UsbHub3.sys error BSoD to appear on your computer:
Corrupt system files – If the system files are corrupted, they can infect other files running the device drivers, resulting in corrupt or virus-contaminated UsbHub3.sys.
Conflict with Antivirus programs – Antivirus software may interfere with the activities of the driver files on your PC or pick them as threats to the system.
Outdated or conflicting device drivers – When you install a driver not compatible with your system, it can affect other drivers running on your PC.
Hardware issues – The error can occur after installing new hardware or software, such as a Windows update on your computer.
Nevertheless, you can fix the UsbHub3.sys error by following the steps below.
How can I fix the UsbHub3.sys error?
Before proceeding with any advanced troubleshooting steps, go through the following:
Press Windows + R key to open the Run dialog box, type control, then press Enter to open the Control Panel.
Type recovery in the Control Panel search bar and select Recovery.
Then click Open System Restore.
Click Next in the Restore system files and settings window.
Choose the restore point you want to restore from and click Next.
System Restore will remove recent activities after the restore point, recovering the system to the previous point with its files intact. Read our guide on how to fix Restore Point if it’s not working on your PC.
5. Update Windows OS
Press Windows + I key to open the Windows Settings app.
Click on Windows Update and select the Check for updates button. If there are any updates available, it will search for and install them.
Updating Windows will fix system bugs impeding the driver’s processes and install new features to help the system run correctly.