10 Best CRM Email Marketing Software & Platforms in 2026

Email marketing is still a very powerful tool to use in today’s world despite the presence of social media channels.

The benefits of email marketing as a primary customer targeting tool for any business or brand include business expansion, maintaining customer relationships, and receiving feedback that would otherwise not have come through.

In order to capitalize on the rich advantages that email marketing provides for your business, whether it is an online or physical store, you need the best CRM email marketing software to get you started.

This article looks at the top CRM email marketing software popularly used across the globe, their features, and benefits for business growth and increased customer engagement.

What is an email marketing campaign?

To define an email marketing campaign, you need to understand its essential components: the given time and the purpose of your email campaign.

In other words, you can think of it as a multitude of emails that contain valuable information for the users regarding your brand, products, or events.

Regarding the purpose of your email campaign, you can set up different actions for your recipients in order to meet marketing goals.

For example, you can write informative and captivating content regarding your brand, and add Call-to-actions for different steps like downloading or purchasing something.

You should make sure that your emails are well written and without grammar mistakes. Plus, you need catchy subject lines and useful content.

Which are the best CRM email marketing software tools?

Moosend – Best consumer experience tools

Moosend is an email marketing and CRM company that delivers professional tools for email campaigns, marketing automation, and other practical needs.

This valuable solution is created to support reaching your email audience with professional tools like segmentation lists or efficient automation processes.

One thing is clear, every person is unique and needs personalized information. This is why you can personalize your emails according to users’ characteristics and likes.

The segmentation feature lets you understand your public and create convincing emails based on the real behaviors and needs of your subscribers.

To be more clear, you’ll find out what your customers prefer and how they consume your content, from where or at what time.

With this creative tool, it’s a pleasure to make your emails using the email editor with drag-and-drop functionality or intuitive elements

Hence, you can benefit from data analytics and always be aware of the results and future actions. Plus, there are smart tools like A/B testing or website and user tracking.

Moosend

Do you need a skyrocket business growth? This email marketing client helps you persuade your consumers without exception.
Check price Visit Website

SendinBlue – Effective email marketing results

With this CRM email marketing software, you can design beautiful email campaigns using the drag-and-drop email designer that needs no skills to use. It also has a template gallery from which you can select and customize templates for emails that inspire action.

The main features include an email designer, contact management, campaign reports, marketing automation, transactional messaging, deliverability, and integrations/API.

This software is designed to help your email marketing campaigns perform with personalized content, manage and segment or grow your audience with smart targeting and advanced search/segmentation, easy organization of your contact lists and details, easy optimization of your campaigns in real-time, targeting based on customer actions and preferences.

It also includes a powerful API to create custom integrations with your website, mobile app, or services, as well as plugins to connect with popular CMS and e-commerce platforms.

Lastly, it’s worth mentioning that you can design your emails using such an intuitive platform and design professional emails to reach your audience fast.

Sendinblue

Make the best of your business campaign with this CRM email marketing tool.
Check price Visit Website

Omnisend – Most effective on-brand campaigns

An indispensable tool for email marketing automation, Omnisend is a fully integrated service for email campaign automation.

Using this digital marketing platform you can increase not only email performance but get a total perspective on your online marketing activity. Therefore, by email or SMS automation process, you will see the difference in your sales reports.

At the same time, the email marketing services provided by this tool are very useful for any entrepreneur, thanks to features like an e-commerce templates library, plain campaign editor, audience segments build-up, or sales tracking dashboards.

With this marketing tool, you have the possibility to create astonishing email campaigns or newsletters effortlessly by using automation and e-commerce strategies.

Check out the main feature of Omnisend:

  • Campaign booster tools
  • Omnichannel function
  • Drag & drop content editor
  • Segmentation by sales tracking
  • Track visitors’ data through the GDPR form
  • Web push notifications

Omnisend

Hit the button to create your hero campaigns with leading email marketing services.
Check price Visit Website

Active Campaign – Best automation for e-commerce

This customer experience software provides excellent services of email marketing and CRM tools that grow customer engagement naturally.

Firstly, with this marketing tool, you will develop a logical strategy regarding customer experience with your brand products. Thus your audience will never feel anxious about your emails.

So, the aforementioned process involves stages like Reach and engagement for the exact targeting of your audience, Nurture and educate to grow a stable relationship with readers, Convert and close using time-suited CTAs, and Support and grow.

Moreover, by using this workflow your audience will respond through higher conversion rates, and more importantly with love brand actions that will boost your identity.

In addition to that, with this solution, you assure email campaigns’ efficiency and transmit the right message to your public.

Whether using broadcast, targeted, or triggered emails your newsletter or promos will fit right in the screens of your public.

Active Campaign

Build your precious community easily with a proficient email marketing automation platform.
Check price Visit Website

Atomic Mail Sender – Best for bulk email campaigns

Email marketing is primarily composed of you advertising your product to as many potential clients as possible via email, so the core element in doing so efficiently is bulk mailing.

Ironically enough, the best product on our list for this given job also happens to be called Atomic Mail Sender, owned by Bulk Mailer.

This CRM online service provides you with everything you may ever need to spread the word about the product or services that you are offering as fast as possible.

Of course, you’re not just spreading your content, you’re spreading quality content thanks to the built-in tools that will make your emails feel more special, personal, and non-spammy, all thanks to the enormous amount of free HTML templates for you to choose from.

As for spreading the word, a Bulk mailer allows you to send newsletters to 50,000, 100,000, and even 200,000 recipients at a time, easily.

Here are some of the features of Bulk Mailer:

  • Flexible SMTP settings
  • Proxy server support
  • Detailed statistics
  • Spam check
  • Unsubscribe wizard
  • Free templates

Atomic Mail Sender

If you want your services to be known by all of your potential clients, then you need to spread the word with a service like Atomic Mail Sender!
Check price Visit Website

MailChimp – Complex email marketing tools

MailChimp has been in the CRM email marketing game for quite a while now, and it’s only getting better.

With this email marketing software, you can build your brand, sell to customers whether you’re an online e-commerce shop or a big retailer, find your audience and engage with them, plus automate your marketing with the best email campaigns that suit your message.

Features include e-commerce integration to connect your business, and marketing automation to reach the right people at the right time while targeting based on behavior, preferences, and previous sales.

It also comes with built-in segmentation, advanced analytics, in-depth reporting insights, social media ads to reach a wider audience, a comprehensive mobile app so you can create and send campaigns from mobile devices, and an easy drag-and-drop designer to create campaigns that match your brand and style.

The latest MailChimp feature is the Google remarketing ads with which you can convert your website’s visitors into customers using retargeting ads that display automatically across top sites and mobile apps.

⇒ Get MailChimp

Constant Contact – Efficient editor and customer tracking

With this email marketing software, you can create professional, interactive, and engaging emails that deliver customers right to your doorstep.

Features include an easy drag-and-drop editor that customizes the email template to your liking, and you can automatically send the right email message, at the right time.

You can also design personalized emails with an autoresponder and send automatically for triggers like birthdays or milestones, set a series of emails for your contact lists, import and upload your email list from Excel, Gmail or Outlook, and others, while the software handles the unsubscribes, bounces or inactive emails automatically.

Other features include real-time email tracking so you can see who is opening, clicking, and/or sharing your emails and social media posts, and extend marketing through live events, online surveys, trackable coupons, and much more, all in one place.

⇒ Get Constant Contact

Vertical Response – Advanced reporting tools

This CRM email marketing software has tools that let you build powerful email campaigns in just a few minutes, and send and track them on any device.

Features include an easy to use editor to customize the look and feel of your emails to match your brand, automated email follow-ups that reach up to 40 percent more of your target audience or customers (especially if they didn’t see it in their inbox), autoresponders, automated email series for your contact lists, advanced reporting so you can analyze and see what clicks with your readers and a landing page builder.

Other important features any CRM email marketing software should include are A/B testing to know which of your subject lines converts better, a Test Kit to preview how emails will look on inbox or subject lines, integrations with e-commerce tools, and apps, scheduling, and batch delivery.

With that being said, you have all the features in terms of CRM email strategy included in this platform, so you can focus on the message you want to express for the beloved email audience.

⇒ Get Vertical Response

Zoho Campaigns – Feature-rich email builder

With Zoho Campaigns, you can be sure your email marketing campaigns will wow your audience.

This CRM email marketing software features pre-designed templates and layouts to get you started, a simple drag-and-drop editor, scheduling and sending tools with automated follow-ups, autoresponder, social media integration, and buttons.

You can also use it to import, manually add, or syncing of email recipient lists, tracking and reporting tools, plus QR codes you can embed to reach smartphone users who scan it and become subscribers.

It also has the A/B testing tool, landing pages for Facebook marketing, and e-commerce integrations. More so, you can manage your subscriber lists and see valuable personal data about them, to better know how to address your emails.

Hence if you need useful traits as pre-designed templates, drag and drop editor, or automation tools, this program is the place to be.

⇒ Get Zoho Campaigns

Campaign Monitor – Beautiful email campaign designs

Create and design stunning and engaging email marketing campaigns with this email marketing software, guaranteed to look amazing in every inbox, and on every device.

With Campaign Monitor, you can build gorgeous emails using its powerful email builder, send personalized and relevant content, optimize for results using A/B testing, and track your successes anytime and anywhere.

You can also organize your contact data and do segmentation based on custom criteria using list management tools and integrations, automate your email campaigns and enjoy 99% customer satisfaction rates.

In addition, this software delivers among major email marketing software vendors.

It also comes with 24/7 global customer support to help you around the clock, besides giving you everything you need to run a gorgeously designed, and professional email marketing campaign for better business growth.

⇒ Get Campaign Monitor

Are you ready to set up your email marketing campaign? Let us know which one of these email marketing software tools you plan to use by leaving your comment in the section below.

Rotate Screen Windows 11 Shortcut Not Working: 5 Fixes

One of these display features on Windows is the screen auto rotate mode. Undoubtedly, most users are unaware you can use your computer in another display orientation other than Landscape.

However, some users complain about not being able to use the auto rotate feature on Windows. Hence, the need to provide ways to fix the Windows 11 auto rotate not working issue is essential.

Furthermore, several things can be responsible for the Windows 11 auto rotate not working or rotation lock greyed out issues.

However, it can be a graphics driver issue, hardware issues, or display settings error. Fortunately, there are some easy fixes for the Windows 11 auto rotate not working issue.

Hence, this article will discuss what to do if auto rotate doesn’t work on Windows and help users access Windows 11 screen rotation shortcut.

Why has my Windows 11 auto rotate stopped working?

  • Outdated graphics drivers: Whenever your computer’s drivers are outdated, it can affect many components like the screen auto-rotate feature. Moreover, outdated graphics drivers can become corrupt and, as a result, malfunction due to bugs.
  • Outdated Windows: It is undoubtedly true that outdated Windows can cause many difficulties with your computer. Likewise, it can be the culprit for the Windows 11 rotate screen shortcut not working. It prevents the system from accessing necessary updates that help it function properly.
  • Hardware interference: Plugged-in gadgets and hardware like keyboards can cause issues with your computer like the auto-rotate feature. However, this may not be so with users who use laptops without an external keyboard.
  • Auto rotate is not enabled: The auto-rotate display feature can’t work without being allowed. So, not enabling the auto-rotate screen will prompt the Windows 11 auto rotate not working issue.

How do I fix the rotate screen Windows 11 shortcut not working?

1. Restart your computer

  1. Press the Alt + F4 keys together to prompt the Shut Down Windows.
  2. Click on Restart, then OK.

Restarting your computer can fix auto rotate issues.

2. Update graphics drivers

  1. Press Windows + R keys simultaneously to prompt the Run dialogue box.
  2. Type devmgmt.MSC into the search space, then click the OK button.
  3. Locate and expand Display adapters.
  4. Select the driver, right-click on it, and choose the Update driver.
  5. Then select Search automatically for updated driver software.

Updating your graphics drivers will help it run better and can fix the Windows 10/11 upside-down screen resolution issue.

2.1. Update drivers automatically

While Windows has a small database of drivers, sometimes it won’t find the one you are looking for. Why not go for a database of over 18 million driver files? Outbyte Driver Updater has this kind of driver database.

Fast and reliable, Outbyte Driver Updater will scan your entire system, find any outdated drivers, and update or repair them if possible. This tool will also create a backup for every driver it updates/repairs so the installation process is safe.

Outbyte Driver Updater

Safest tool to update your drivers for an optimized system.

3. Update Windows

  1. Click Start on your screen.
  2. Select Settings from the options.
  3. Click on Windows Update, then select Check for updates.

Windows will automatically search and download updates if there are any available.

4. Disconnect the external keyboard

Disconnecting your keyboard from the computer can fix the Windows 11 auto rotate not working issue. Also, we recommend you disconnect other hardware and see if the problem persists.

5. Disable Rotation lock

  1. Right-click on your screen and select Display settings.
  2. Under Scale & Layout, locate the Rotation lock and toggle it off.

We recommend that you restart your computer to allow the changes to sync correctly.

Why won’t some of my apps rotate?

The main reason auto-rotate doesn’t work for some apps is the rotation locked grey-out issue. However, the auto rotation lock prevents the computer from rotating, which can affect some apps.

We recommend you read more about how to fix the rotation lock greyed out issue on Windows 10/11 issue.

How do I force an app to rotate?

  1. Press the Windows + A keys to prompt the Action Center.
  2. Expand the drop-down, then click on the Rotation lock to turn it off.

Turning off the rotation lock can help you force an app to rotate.

Windows 11 screen rotation shortcut

  1. Press Ctrl + Alt + Up Arrow keys simultaneously to rotate the screen to landscape mode.
  2. Press Ctrl + Alt + Down Arrow keys simultaneously to set the screen on flipped landscape mode.
  3. Press Ctrl + Alt + Right Arrow keys simultaneously to set the screen on flipped Portrait mode.
  4. Press Ctrl + Alt + Left Arrow keys simultaneously to set the screen on Portrait mode.

These are various shortcuts users can use to access the screen rotation features in Windows 11.

These are the best fixes for the Windows 11 auto rotate not working problem. Ensure to follow all the steps included in the fixes for optimal results.

Furthermore, we recommend that users with MacBooks read through our article about how to rotate your screen on MacBook. Also, you can check out our article on how to rotate the screen on Windows 10.

Leave your comments and feedback below if the guide has been helpful to you in solving the rotate screen Windows 11 shortcut not working issue. We’d like to hear your response.

7 Best WordPress Hosting to Make Lightning-Fast Websites

WordPress is a free, simple, template-based, and versatile application you can use to create stunning websites.

With some, you can start with not much technical knowledge. That might not be the case for all of them.

One thing is clear – when it comes to blogs, your visitors don’t want to spend too much time on loading times. They want to see the content fast.

How can good hosting help my WordPress website?

When choosing the best WordPress hosting, whether it’s for an e-commerce store or blog, there are a few things you need to look out for to help you make an informed decision:

➡ Fast loading speed

As we already mentioned, you have to keep your website clean, without too many obstacles for the readers to get to your content.

Speed is definitely vital, so you should search for the fastest WordPress hosting. But that’s just one thing among many.

➡ Quality service

Other factors to consider include the proper infrastructure, the right security, and the technical know-how to run WordPress, which most can do, but not all hosts do it the right way.

Look out for features such as scalability, backups (easy to restore with prior automatic updates), support specific to WordPress, and automatic updates for plugins, themes, and other tools.

➡ Customization features

Also, important items such as premium themes and plugins allow for a more unique and functional site. Not to forget a content delivery network and an easy-to-use admin interface.

You should look for tools to implement your ideas quickly and easily and to use your plug-ins efficiently.

That’s why we made a comprehensive top list with the fastest WordPress hosting providers. And not only in regard to speed, but overall performance, as well.

What is the best WordPress hosting to get?

Bluehost – Dynamic upgrades

Bluehost hosting software

For speed, security, and simplicity, BlueHost is the best WordPress hosting for Windows you can buy.

Some of the benefits you’ll enjoy for choosing BlueHost include exclusive, 24/7 access to WordPress expert support, and extreme speeds what with BlueHost’s revolutionary VPS platform for unprecedented performance.

Plus it is so simple to use because it integrates key features and tools that make WordPress a breeze to run.

The ultra-fast access is also ensured thanks to the SSD storage that is available for any hosting plan you would choose.

Features include a MOJO marketplace for plugins, scripts, and other tools to enhance your website in one click, and WordPress-centric controls to manage WordPress on your server with a custom-designed control panel.

It has SiteLock for security with an advanced content delivery network and SiteLock WAF.

BlueHost also includes dedicated backup storage with automated backups for your sites to ensure your data is always safe, plus dynamic upgrades that instantly add more CPU, RAM, and SAN storage in just a click.

Choose from four options: WP Standard, WP Enhanced, WP Premium, or WP Ultimate.

Let’s see what are its best features:

  • Dynamic upgrades for your resources
  • MOJO marketplace
  • 24/7 client support
  • Revolutionary VPS platform
  • SiteLock WAF

BlueHost

Choose this platform to host your website on WordPress and get it done easily.
Check price Get it now

WP Engine – Professional support

WP-Engine hosting software

WP Engine is a powerful WordPress hosting platform that can turn your website into the perfect digital experience.

This hosting service handles anything you expect it to; it powers campaign sites to content hubs and eCommerce extensions.

It’s perfect for both small businesses, as well as large enterprises but it can also be used for hosting a small blog.

WP Engine delivers engaging, lightning-fast, and secure experiences that will significantly reduce bounce rates and improve conversions.

The platform also offers you valuable information on the performance of your pages and content. You can then analyze and use this data to enhance your visitors’ experience on your website.

WP Engine offers four different plans: Personal, perfect for a small blog or website, Professional, suitable for a small business, Business, with advanced features to accelerate your website’s growth, and Custom, fully customized for high-traffic websites and businesses.

Let’s take a look at its most important features:

  • Fast access with SSD storage
  • Content hubs and eCommerce extensions available
  • Professional support
  • Proactive threat blocking and security
  • One-click staging and backup

WP Engine

Building your website from scratch? Choose WP Engine hosting for best-class services and guidance.
Check price Visit Website

A2 Hosting – Dual firewall

A2 hosting software

A2 Hosting lets you select any plan from three hosting options: Lite, Swift, or Turbo, each with its own advantages, but you still get blazing-fast speeds that are 20 times faster than competing WordPress hosts, high performance, and security.

Features include pre-installed WordPress software, free account migration, A2 Optimized that ends the guesswork on getting fast page loads, plus auto-configuration for the best performance and most secure settings.

Users rank A2 hosting as the best WordPress hosting for Windows because it lets you focus on building your site, and creating content or promotion, while the host delivers fast performance, 99.9% uptime for reliability, and 24/7 year-round guru crew support.

A unique feature is its LiteSpeed Cache for WordPress which statically caches your dynamic pages to reduce your site’s page load time. It is built into your server so there are fewer overhead costs.

A2 Hosting is developer-friendly, plus offers perpetual security to prevent hacking, with its HackScan Protection that blocks hacks before they damage your site.

Other security features already in place include KernelCare kernel updates, brute force defense, and a dual firewall.

Let’s review some of its best features:

  • KernelCare kernel updates
  • Dual firewall
  • HackScan protection
  • 99.9% uptime
  • 24/7 specialized support team

A2 Hosting

Grow conversion and reduce bounce rates seamlessly using A2 Hosting to improve your site instantly.
Check price Visit Website

HostGator – Infinite storage

HostGator hosting software

Hostgator is a shared hosting service that offers all-in-one benefits for basically anyone who wants to start a website project online.

First things first, hosting doesn’t have to be complicated and with this solution, you benefit from needed services like unlimited bandwidth, SSL certificate, infinite storage, and much more to go.

So, choosing a suitable plan for your website means that you will be able to administrate your domain without problems, also getting full access to hosting features provided by this client.

What’s worth mentioning are aspects like the longevity of this tool, 2 million+ hosted websites or the 30% of professional customers that use this hosting platform. However, advanced and beginner users alike are using it due to its website performance and useful functionality.

Other amazing benefits confirm 150$ Google Ads, cPanel access, eCommerce tools, 45 days guarantee, or 99% uptime availability.

All in all, it is impossible to fail to use such a productive platform in order to host your website efficiently, plus get closer to your digital business goals.

Take a look at its best features below:

  • cPanel access
  • 99% uptime guaranteed
  • Over 2 million websites hosted
  • Unlimited bandwidth
  • Infinite storage on higher plans

HostGator

Take advantage of this professionally made hosting platform and get your flexible website now.
Check website Visit Website

SiteGround – Built for security

This is a great app as it is feature-rich, engineered for speed, built for security, and comes with an official recommendation by WordPress.

With SiteGround, expect great, swift customer service for all your issues, plus an amazing price with great discounts based on what they have to offer, backed by a good reputation.

Features include WordPress support that’s a phone call or chat away, and a fast start-up process for your site or blog within minutes once you choose your plan.

Also, it has an easy installation, free themes, and some premium ones, security for your site and content with 24-hour backups, fast loading speeds, and you don’t have to worry about your site being down.

SiteGround also enjoys great user reviews (even from bloggers and independent review sites) so you’ll find it ranked among the top two – if not the first – best WordPress hosting for Windows.

It provides the most enjoyable experience, free of hassles and stress, and comes with three plan options you can choose from StartUp, GrowBig, or GoGeek, so you can scale up as your site’s traffic increases.

You will benefit from these great features:

  • WordPress Support
  • Fast website builder
  • Free automated WordPress migration
  • SSD persistent storage
  • Powered by Google Cloud

SiteGround

Build up your website with high protection and fast page load using SiteGround for hassle-free hosting.
Check price Visit Website

InMotion hosting – Drag-and-drop functionality

InMotion’s WordPress hosting platform is fine-tuned for superior performance, security, and hosting experience.

It is ranked as the best WordPress hosting for Windows with benefits such as free site migration, pre-installation of WordPress, friendly customer service that covers your needs 24/7, optimized speed, high performance, and secure hosting.

Features include hack and malware protection, free SSD storage, NGINX, PHP7, advanced caching, free automatic backups, and a free domain.

It has safe upgrades, drag-and-drop functionality, free themes, pre-installed site launch on checkout, full design and hosting, and plugins including eCommerce for WordPress.

Let’s see what are its most important features:

  • Free SSD storage
  • Hack and malware protection
  • Advanced caching
  • Free automatic backups
  • Free WordPress themes

InMotion Hosting

Consider this leading hosting platform if you need business stability for your website.
Check price Visit Website

iPage – Customizable control panel

iPage hosting software

iPage comes with a myriad of features and benefits for hosting your website or blog, so it’s no wonder it ranks among the best WordPress hosting for Windows.

Some of these great benefits include expert support, increased load speeds up to 2.5 times faster, and enhanced security.

It’s an excellent service with a 30-day money-back guarantee, plus you can chat with WordPress experts any time of day or night.

Once you decide on using iPage, you get to enjoy features such as a customized control panel, pre-installed themes and plugins, unlimited storage space, scalable bandwidth, free search engine marketing credits, free domain registration, and curated themes handpicked to spice up your site, among other features.

Choose from WP Starter or WP Essential options to get your WordPress site or blog up and running.

Take a look at some of its best features:

  • 30-days money-back policy
  • Increased load speeds
  • Customizable control panel
  • Unlimited storage space
  • Free domain registration

iPage

Build up your website as you like with this intuitive hosting service that gets everything online.
Check price Visit Website

Which of these best WordPress hosting for Windows are you ready to get this year? We hope that you already found the right one on our list.

Remember to double-check the uptimes for all the hosts and even visit some of the websites they are hosting.

That is the best way to figure out the quality of their services. However, it’s also about how you manage your website and keep it as light as possible from your end.

If you’re looking for bargains, you should also check our list including the best web hosting deals that you can take advantage of right now.

For any other ideas, feel free to share your favorite hosting service in the comments section below. That can help other users like you to make the right choice.

9 Best Email Extractor Software for Windows 10/11

Email extractor software involves an email address harvester. In other words, an email extractor tool extracts email addresses from the Internet.

You are able to determine any search criteria which can be a domain name, a search engine, and a keyword.

There are lots of email extractor tools on the market, and we chose the best nine of them, just to make your choice much easier.

What’s the best email extractor to collect email addresses?

Hunter.io – Transparent policy

Outreach is one of the key components of successful marketing and online money-making.

That is why you will need an email extractor software that will penetrate the deepest layers of the internet and find for you valuable emails of top management levels.

Hunter.io gained a lot of popularity in recent years and is one of the most popular options right now. It scrapes the website of the company and then analyses the adjacent positions attached to the emails.

The bulk email finder is one of the most useful and time-saving options if you have lots of companies and names to scrape. Also, you can see the freshness of the mail and conclude if it is good for you or not.

Other key features of Hunter.io include:

  • Verify the deliverability of any email address
  • Transparent policy only uses public sources
  • Domain Search
  • Author finder

The email verification feature is also great for email protection which makes sure that your emails won’t get to the spam folder as often. It also comes with Zapier integration for seamless synchronization between apps and management tools.

Hunter.io

Use Hunter.io to find email addresses properly, with complete and honest data transparency.
Check price Visit Website

Technocom Email Extractor – Select dig levels


Technocom Email Extractor is one of the fastest tools that we tested. It extracts all possible email addresses from all websites, URLs, and generally from the web.

With it, you can extract emails in fast mode. All you have to do is to add the URLs you want the emails extracted from and start the process.

Another great functionality is the elimination of duplicate addresses. You will have less selection and deleting work thus speeding up your workflow.

You can also select to keep the emails you really want and focus on the important addresses by using the “dig up to level” function.

Technocom Email Extractor claims to be one of the fastest software of its kind, with a powerful engine and plenty of filtering options.

Users of this software can save the email addresses found in different formats, including CSV and TXT.

The tool is very easy to use. Just enter the URL of the website you want to extract email addresses from and let the utility conduct the scan.

Other key features of Technocom include:

  • Criteria and filtering
  • Select dig levels
  • Displays a list of all addresses found

You can download it for free and test it and you also can directly buy it from the links below.

Technocom Email Extractor

Extract and organize emails at a higher speed, directly from URLs, and with no duplicate mistakes.
Check price Visit Website

Y-LEADS EXTRACTOR – Easy and intuitive

Yellow Leads Extractor is a useful and professional tool for those who need to create a database of business prospects.

In fact, the program is able to scan and extract contact data (such as business name, phone, and email address) of thousands of companies directly from the Yellow Pages websites all over the world.

It’s easy and intuitive. Just select the desired country, choose a category, a location, and a keyword and press the “Get Data” button. At the end of the extraction process, you can export all records to Excel or CSV.

The sources supported by Y-Leads Extractor are YellowPages, Yelp, and Infobel directories of the major countries of the world such as the USA, Germany, Canada, Spain, France, Brazil, Russia, India, and many others.

The software is very easy to use, you can start your search in just a few minutes.

Just download and install the application following the prompts in the install wizard and then launch the app. 

On the main screen, you will see many different source sites. You can select your favorite and start the search.

Other key features of Yellow Leads Extractor include:

  • Exports data as CSV
  • Can export individual or bulk email lists
  • Supports sources for many different locations

The program is constantly updated and new sources are added monthly.

Yellow Leads Extractor

Connect with professionals around the world with Yellow Leads Extractor.
Check price Visit Website

GetEmail.io – API Access

GetEmail.io is an online service that promises to extract the email addresses for anyone from pretty much any website, regardless of the domain or email format.

Not only that but if the person of interest is not publicly displayed on any website anywhere, the program uses clever algorithms to generate a professional email address for you.

That being said, as long as a person has an email address that adheres to a certain format, GetEmail.io will get it for you in mere seconds, saving you precious time otherwise scanning a website that might not even be displayed there.

The application features an easy-to-use interface. It is a great tool if you are looking for the contact information of a specific person, as it lets you provide names.

Other key features of Getemail.io include:

  • Browser extension
  • CSV download
  • API Access

The program is available via web browser, so there’s no additional software to install, and the price plans are quite accessible, with a free version available so you can test out just how good it is.

⇒ Get GetEmail.io

Email Extractor Pro – High-quality support

Email Extractor Pro is an advanced email address harvester that extracts email addresses from the Internet. The software’s powerful engine will quickly extract email addresses from the websites and top search engines including MSN, Yahoo, and Google.

This email extractor software for Windows 10 and Windows 11 can help you stay organized by automatically deleting any duplicates within your emails and contact lists.

The software is able to save you plenty of time and create comprehensive emailing lists with very little effort on your part.

It can extract email addresses from the web and local files as well.

You can set it up and carry on with more important tasks. The software uses very few system resources and it can run smoothly in the background.

Other key features of Email Extractor Pro include:

  • Easy to use, user-friendly interface
  • Fast and powerful engine
  • Easy to install/uninstall
  • High-quality support from a professional team

Despite the fact that the tool is lightweight and it won’t take up lots of space on your system, its speed rate is awe-inspiring.

⇒ Get Email Extractor Pro

Gmail Email Extractor – Lightweight app

email extractor

Gmail Email Extractor can harvest email ids in bulk from Gmail, and this tool is small but effective at the same time. It has mastery in fetching email IDs from the Gmail account.

Users of this email extractor for Windows are able to harvest email IDs directly from Gmail folders. It scans your inbox, sent, drafts and other folders you may have and generates an email list of all contacts found.

The tool also gives the option to fetch email IDs from fields including To, CC, From, BCC, and so on. 

The process is very straightforward and effortless on your part. Just set up the soft and it will automatically generate a comprehensive email list.

The tool also takes care of duplicates so you will not have to come back and fix this issue manually.

Other key features of Gmail Email Extractor include:

  • Extract name and email addresses
  • Download extracted data as a CSV file
  • Extract from unread emails

This is a premium service, but you can benefit from a free trial and try it out first.

⇒ Get Gmail Email Extractor

GSA Email Spider – Javascript Analysis

GSA Email Spider allows you to collect and extract emails and also phone and fax numbers from websites around the whole world.

The tool will enable you to use specific keywords and the sites will be analyzed by the app using the keyword that you previously entered.

The tool is able to spider, grab, crawl, rip, harvest, and extract items.

Not only does this email extractor gather addresses from your inbox, but it can also identify them on specific websites.

Along with that, it is also able to extract phone and fax numbers. It also lets you harvest emails with the help of search engines (300+ included).

This tool has a simple and intuitive user interface that is available both in English and German.
Other key features of GSA Email Spider include:

  • Support for HTTPS websites
  • Support for SSL-only email providers
  • Protection from anti-spider engines
  • Javascript analysis

You will be able to enjoy high-speed processing. For instance, with 100 threads, you can easily extract 500 new emails a minute.

⇒ Get GSA Email Spider

Top Lead Extractor – Filtering options

Top Lead Extractor can extract email addresses, phone numbers, fax numbers, Skype, MSN, AOL, Yahoo, and ICQ IDs from the web.

Communicating with your friends by Skype or phone, or SMS messages is often more effective than sending them bulk emails, and that’s why this tool will find and collect information for you in just a couple of minutes.

Top Lead Extractor can extract email addresses, landline contact information, mobile phone, and fax numbers, as well as contact information for Skype, MSN, and ICQ IDs.

This application extracts the information using information available in search engines such as Yahoo, Google, Bing, and so on.

It is designed to extract the data with various criteria and options in order to provide relevant results for its users.

Other key features of Top Lead Extractor include:

  • Filtering options
  • Save search results in different files
  • Effortless user interface

It can process hundreds of contacts per second from multiple sources at once. The tool uses multithread technology.

⇒ Get Top Lead Extractor

Email Grabber – Duplicates removal

Email Grabber allows you to extract email addresses from various websites automatically. This is a fast email extractor that uses multiple simultaneous connections in order to scan more URLs at the same time and also as fast as possible.

Email Grabber uses its own Search Wizard option where you can provide either a website URL or keywords and then let it conduct its research.

The tool crawls the web and collects all email addresses it finds.

You can customize your search by using the level filter and URL filters.

This email extraction application lets you filter your search by restricting the number of levels allowed.

In case you want to interrupt a search session, you can save it and resume it later on, so no data gets lost.

Other key features of Email Grabber include:

  • Extract addresses in multiple formats
  • Remove duplicates
  • Available for Windows and macOS

The software navigates the web by searching for email addresses, and it performs this incredibly fast saving you lots of time. Email Grabber comes with tools that allow you to guide the software so you can keep the search focused on your objective.

⇒ Get Email Grabber

These are the best seven tools for extracting emails and as you can see they all come with unique features.

Visit their official web pages to find out more details about these programs and choose the one that you like the most according to your needs.

If you have any other suggestions or questions, don’t hesitate to drop them in the comments section below.

8 Best Shoe Design Software For Windows 10/11 [2026 Guide]

In order to be able to gain success in any business, it’s crucial to make use of the best tools available.

Designing trendy shoes is much more comfortable with the help of shoe design software, and those who are looking for some top-quality shoe design tools have a lot of options to choose from these days.

We gathered five of the best shoe design tools, and we are listing their extensive sets of features and functionalities in order to help you make the best decision for your needs.

With high-quality software, you’ll be able to create outstanding models and show off your creativity to the whole world.

Your customers are able to create their very own shoes using some of the tools that we’ll present below.

What are the best shoe design tools for stunning footwear?

Adobe Illustrator – Create print-ready designs

Adobe Illustrator

Adobe Illustrator has everything that you might need from an online product design program. This is a Web-to-Print software that includes a lot of exciting features:

Adobe Illustrator is suitable even for a specialist with less experience as it offers a lot of training and online materials in order to create outstanding shoe designs.

If you want to transpose your product design from a paper sketch to a CAD designing tool, Adobe can help you, as it offers a lot of productive features for creating design patterns, and colors in an interactive and creative way.

Adobe Illustrator will provide you with useful panels for creating fine corners for the shoe design (Corner Widget), separating shapes that afterward can be fulfilled with color.

You can also create elementary shapes (Shape Builder Tool), draw a zipper and a zig-zag with Pattern Brush, and not least design patterns for the shoes.

As you can see, it is the perfect tool for choosing your product design work.

Other key features of Adobe Illustrator include:

  • Create customized and print-ready designs.
  • Browse through a massive library of images, clipart, and texts to create personalized designs.
  • Tons of templates with multi-colored texts and multiple fonts
  • Besides shoes, you can customize a lot more items with the help of this tool such as T-shirts, hats, bags, and more
  • You will be able to craft designs on any product that has a printable surface

Moreover, Adobe Illustrator is part of the Creative Cloud and you can use it freely with other apps like Photoshop, Indesign, Adobe XD, and Adobe After Effects in creating outstanding graphics.

Adobe Illustrator

You can design the perfect shoes with Adobe Illustrator by creating amazing shapes and defining unique lines.
Free trial Visit website

CorelDraw Graphics Suite – Easy-to-learn interface

Corel is a veteran in digital graphics and provides a wide range of tools, but CorelDraw Graphics Suite is one of the best tools that will assist you in modeling various 2D and 3D works.

Speaking about this, you can also create a shoe concept in this software in 2D and 3D. It will even help you print in 3D the shoes you have created in the software (at least the physical form, you can color them later). 

Well, these are just a few of the main features, but you can do a lot more using CorelDraw Graphics Suite. If you plan to take this hobby on a business path – this tool will be your best friend.

Corel Draw has advanced options for typography design, so after you are done with the model of your shoe, you can start designing the details that may oftentimes include inscriptions of one sort or the other.

Another important thing to mention about CorelDraw is that it offers the possibility to connect with your teammates and collaborate on projects.

This is great if you split your design tasks or want to give or receive feedback from your peers.

Here are some notable features this powerful design tool offers:

  • Easy-to-learn interface
  • Vectorize design elements
  • Use graphic ready-to-use templates
  • PDF/X export
  • Great performance and stability
  • Improved pixel workflow for pixel-perfect documents
  • Perfect for 3D printing design

CorelDraw is a licensed software. You can get it either as an annual subscription plan or as a one-time purchase.

CorelDraw Graphics Suite

CorelDraw Graphics Suite will be perfect for designing great-looking shoes.
Check price Visit Website

AutoDesk Maya – Wide variety of tools

While not exactly a dedicated tool for shoe design, Maya is one of the best design tools in general.

This feature-packed tool comes with everything you may ever need to design a good-looking pair of shoes for both men and women.

From the shape thanks to the 3D engine to the colors and patterns thanks to the texture support, Maya will become your best help in designing awesome footwear.

More so, your files can then be exported into a variety of formats for others to use as templates.

The fact that Maya is also a very popular CAD tool also means that even if you aren’t used to using it, you won’t have any problem finding someone who does.

Let’s see some of its best features:

  • A wide variety of tools at your disposal
  • Can support all steps in designing a shoe, from the shape to the colors and patterns
  • It has the same familiar UI that all AutoDesk products are known for.
  • 3D engine for perfect shapes of the shoes

All in all, it is a great CAD tool that can take designed common footwear to a whole new level, and even if you don’t use it for that, you’ve just got your hands on one of the best 3D design tools on the market anyway.

AutoDesk Maya

Maya is a great CAD tool that can be used to create any 3D design from buildings and bridges to awesome shoes.
Free trial Visit website

Fusion 360 – Great for minimal design techniques

Yet another AutoDesk product, Fusion360 makes for a CAD tool that can even be used for simple and unlikely tasks such as shoe design.

It features pretty much the same tools as AutoCAD or Maya, albeit in a more minimalized manner.

Fusion 360 is great for mechanical or technical designs, but its ability to sculpt artistic 3D models is very restricted, which makes it an even more beginner’s version of AutoCAD.

On the flip side, students and teachers can get educational licenses that are free of charge, making this product extremely familiar to those that studied it.

Thus, you will never have problems finding someone capable of using it if you cannot do it yourself.

Take a look at some of its most important features:

  • Student licenses are free
  • Familiar AutoDesk interface
  • Great for minimal design techniques
  • Good for the more precise part of shoe creation (measurements, curvatures, etc.)

Fusion 360 is a paid service, with several subscription plans available. 

Fusion 360

Design precise shoe models with this well-equipped, yet intuitive tool.
Check price Visit Website

inkXE Shoe Design Software – Lifetime support

The inkXE shoe design software is an ideal tool tailored for businesses, and it deals with designing shoes and customizing their features according to every user’s needs.

This program is compatible with all kinds of e-commerce platforms such as Shopify, Magento, OpenCart, WooCommerce, PrestaShop, and many more.

inkXE comes with preloaded design templates that allow you to design your shoes fast without having to actually create artwork. You will be able to use various templates and edit them to get the right models.

This tool allows you to apply image filters, and mask effects, and you can also vectorize uploaded images. There’s also an irregular print area feature included in this program for sneakers.

inkXE will also allow you to add text with effects to make your design look more appealing.

There are more features such as admin functionalities and more included in the program, and you can check them all out on inkXE’s official website.

Check out the best features that are included in this program:

  • The program consists of both basic and advanced features and functionalities for designing shoes.
  • This tool comes with an effortless installation process.
  • You will be able to enjoy lifetime support from inkXE team.
  • This tool provides the flexibility needed to use any printing method.
  • You will be able to customize the software according to your business’s requirements.
  • You will also be able to remove background images and more unwanted design elements.
  • Switch between multiple printing methods according to your needs.
  • Save and share your designs.
  • Preview your shoes in 3D.

⇒ Get inkXE Shoe Design Software

Shoemaster – Innovative system

Shoemaster is a world-leading CAD/CAM system that provides 2D and 3D solutions for the footwear industry.

This program is designed by traditional shoemakers, and it offers solutions and tools required for the design, development, and engineering of various footwear.

You will be able to produce efficient and proportional 3D designs using corporate colors, components, and materials. With this tool, you can build seasonal ranges, and you will get virtual environments as well.

To find out more about this tool’s functionalities and features and to discuss the options that you have available you are advised to contact Shoemaster via the Contact Us page on the official website.

Take a look at the most interesting features that are included in this program:

  • This is an innovative system that will reduce costs, improve quality and increase productivity as well.
  • Shoemaster Creative is the ideal solution for designers and development technicians.
  • This tool offers versatility and creativity combined with the accuracy of working on a 3D shoe.
  • You will also get the chance of reducing the costs and speeding the process by reducing the need for physical samples.

⇒ Get Shoemaster

Design Software Ninja – Custom color palette

Design Software Ninja, from Magento, allows you to let your customers design or customize various products such as shoes but also more items including t-shirts, labels, letters, stickers, apparel, and more.

This tool is a bit different compared to the other ones from this list, but it’s nonetheless useful. It’s different because it will allow your customers to add both text and images on the products, resize, flip, rotate, and more.

Design Software Ninja uses Fabric.js which is a powerful Javascript library specifically built to handle designing and customizing canvas elements.

The tool lets you easily add all sorts of objects and elements to your design, including text, clipart, patterns, and more.

It gives you full control in terms of alignment, size, opacity, angle, and scale.

Take a look at more exciting features that are included in this program below:

  • Your business customers will be able to upload images and clipart from their own folders, social media, and so on.
  • Admins can also add flexible pricing.
  • Admins will be able to enable customization for any individual product or all the products.
  • You will get the chance to define a custom color palette or just enable a full-color picker tool.
  • You can define customization options, and you’ll receive the customized product details in the dashboard.

Design Software Ninja comes with a friendly interface and design. You can check out more features that are packed into this tool by visiting the official website of Design Software Ninja.

⇒ Get Design Software Ninja

No-Refresh Shoe Design Tool – 3D preview of the product

No-Refresh Shoe Design Tool provides a shoe design program that comes with the efficiency of designing various shoes online.

The makers of this program claim that they entirely understand the need for customers to make designer shoes online according to their own preferences.

They also state that you can expect to earn massive revenues because this online shoe-designing tool is compliant enough to provide easy handling to the end-users.

No-Refresh Shoe Design Tool comes with lots of options to select the perfect shoes and users will also be able to customize any part of the desired shoes according to their needs.

Check out more exciting features that are included in No-Refresh Shoe Design Tool:

  • You will get the chance to have a 3D preview of the footwear, and this will make sure that you’ll get an excellent visualization.
  • This program is appreciated as well for its compatibility with lots of the current browsers and operating systems.
  • To be able to use this tool efficiently, users will not have to be advanced.
  • You will be able to install this tool effortlessly.

This program comes with a color box that provides varied options for colors to the users so that they will be able to create their own shoes. There is a pre-loaded library of basic designs, symbols, pictures, and more.

⇒ Get No-Refresh Shoe Design Tool

This is where our top shoe-designing tools list comes to an end. Make sure to head over to all these programs’ official websites to be able to analyze more in-depth details on all these tools before making the right decision.

If you have any other suggestions or questions, feel free to reach out in the comments section below.

How to Remove Duplicates on Power BI [Full Guide]

You must have found this guide because you need to remove duplicates on Power BI. We will share with you all you need to know.

Duplicates are a nightmare for anyone who works with data, and they will quickly ruin the integrity of your data.

Microsoft’s Power BI is a dynamic data visualization software application that primarily emphasizes business intelligence. It’s an element of Microsoft’s Power Platform. It also offers multiple ways of handling duplicates.

Does Power BI automatically remove duplicates?

Power BI automatically deletes duplicates when you add data to the data model. Any duplicate rows in the data will be immediately found and removed when you import them. This process is very beneficial;l in the following ways:

  • Automation – Manually eliminating duplicates may be time-consuming and error-prone, particularly if you have a lot of data. This procedure is automated by Power BI, allowing for speedy and precise duplication removal.
  • Customization – Power BI allows you to define the columns you wish to use to find duplicates, allowing you to eliminate duplicates in a manner that suits your particular requirements.
  • Usability – Power BI is simple to use even if you are unfamiliar with data analysis tools because of its user-friendly design.
  • Integration with other products – Power BI connects with various tools and platforms, making it simple to utilize in combination with other applications and linking it to your current data sources.

Overall, utilizing Power BI to eliminate duplicates may help you save time, minimize mistakes, and improve the usability of your data.

How do I remove duplicates in Power BI?

1. Removing Power BI duplicates based on a column

  1. Click on the Home menu and select the Group by option.
    power bi remove duplicates
  2. Select the element you need to group this data by and make sure you choose Max for the Operation value.
  3. Click OK.

This method in Power BI will remove duplicates but keep the latest or last entry.

2. Remove Power BI duplicates from a table using the Remove Duplicate function

2.1 Remove from a single column

  1. Open Power BI and select any table containing duplicates.
  2. Click the column header where you need to remove duplicates.
  3. Now under the Home menu, expand Remove rows and select Remove duplicates.

Looking at this process’s code, you will see that the duplicates are removed only for that column and nothing else.
power bi remove duplicates

You may also select two columns and follow the same steps to remove duplicates on Power BI based on two columns.

Sometimes, you may want to remove duplicates in more than one column. You should try the process listed below.

2.2 Remove from multiple columns (the entire table)

  1. Open Power BI and select any table containing duplicates.
  2. Select the top cell just before your column headers and select Remove duplicates.
  3. This will eliminate duplicates across the table, and you can verify this by looking at the formula produced for this operation.
    power bi remove duplicates

A few users have asked how do I remove duplicates from multiple columns in Power BI. You should know that the solution above is the perfect way to achieve this.

3. Remove duplicates in Power BI with DAX

  1. Use the DISTINCT function with the script below (Here, you have a table called Table1 and a column called Category):
    UNIQUE_Categories = DISTINCT(Table1[Category])
  2. You may also pass arguments in this formula using the script below (This will count the number of unique category values in Table1):
    UniqueCategoryCount = COUNTX(DISTINCT(Table1[Category]), Table1[Category])

Step 1 will create a new table called UNIQUE_Categories that only contains unique values from the Category column of Table 1.

Step 2 returns the number of unique category values in Table 1.

That is as far as we will discuss in this article. Now you should have successfully eliminated duplicates in your data.

Tell us in the comments which of these solutions is most convenient for you.

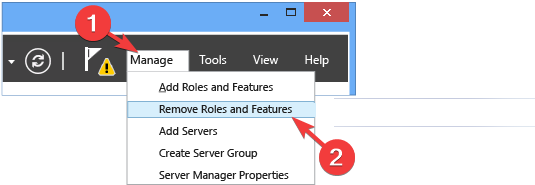
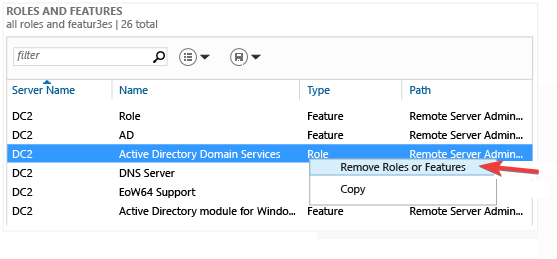
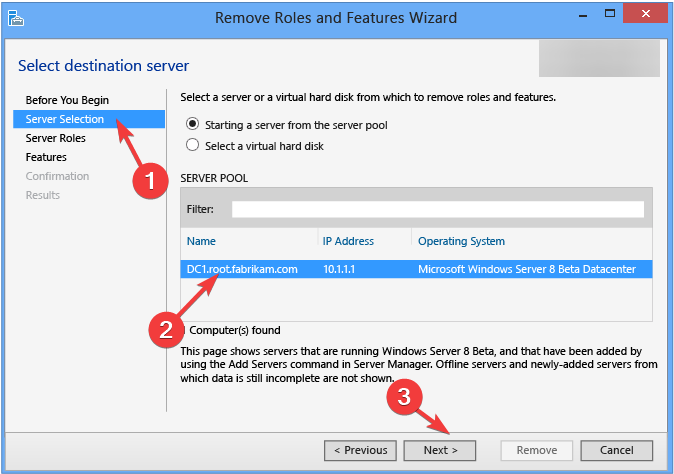
How to Fix The System Cannot Contact A Domain Controller

Suppose you encountered the system cannot contact a domain controller to service the authentication request error. In that case, your computer cannot connect to the server that authenticates users in the Windows domain. 

Here in this guide, we will talk about ways to fix the issue right after discussing the reasons for its occurrence.

What causes the system cannot contact a domain controller to service the authentication request?

There could be various reasons for active directory domain controllers cannot be contacted on Windows 10 or 11. Some of the popular ones mentioned are: 

  • The domain controller is offline – You might get this error if the domain controller is unavailable or offline due to maintenance or power outage.
  • Network issues – If the client device is not correctly configured to establish communication with a domain controller, or there are issues in the network, you might face the problem. 
  • Host server issues – A domain controller is a virtual machine; if there is an issue on the host server, you could get the error.
  • Incorrect DNS configuration – If the DNS configuration of the client machine is incorrect, it won’t resolve the domain controller’s hostname to an IP address, hence the issue.

What can I do if the system cannot contact a domain controller to service the authentication request?

Before diving into the detailed troubleshooting, make sure you perform these general checks: 

  • Remove the security program on your machine temporarily.
  • Remove the VPN if installed.

1. Check Event logs

  1. Press Windows + R to open the Run window.Event Viewer - the system cannot contact a domain controller to service the authentication request
  2. Type eventvwr.msc and press Enter to open Event Viewer.
  3. Go to Windows Logs, then click System. Event Logs
  4. Inspect the errors or warning messages related to the domain controller.

2. Check if the Domain controller is accessible

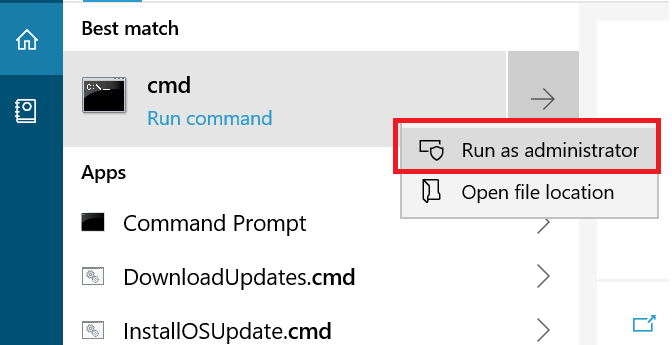
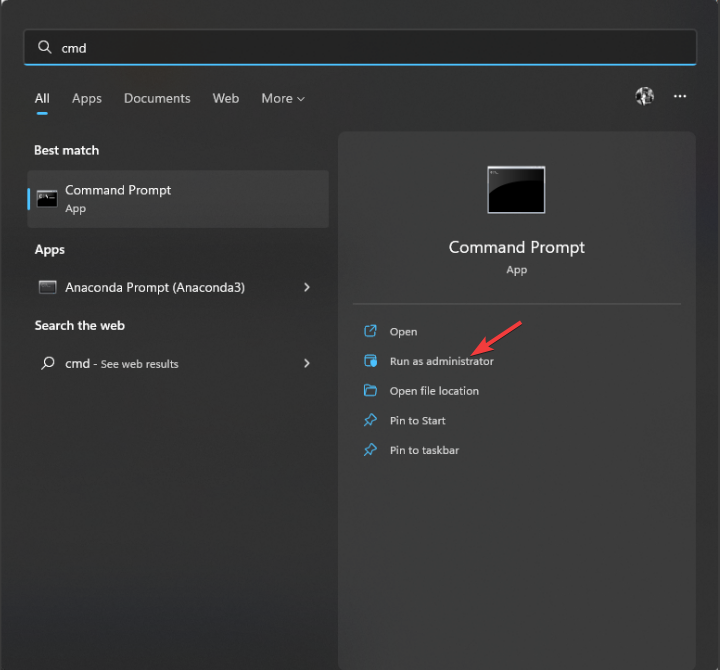
  1. Go to Search, type CMD, and press Run as administrator. 
  2. Type the following command and press Enter: ipconfig /allIPV4 prefered -the system cannot contact a domain controller to service the authentication request
  3. Copy the IPV4 value and type the following command to know if the server is accessible. Then, replace the IP address with the IPV4 address shown on your machine:  ping 192.168.1.148 Ping
Tip icon Tip
Repeat the same steps on the client’s machine to ensure it is connected to the network and can communicate with the domain controller.

3. Check the Network Configuration settings 

  1. Press the Windows key, type Control Panel and click Open.
  2. Select Large icons for View by and click Network and Sharing Center.CP Network - the system cannot contact a domain controller to service the authentication request
  3. Click the active connection to open the Status window.Active connection
  4. Click Properties. Properties
  5. Go to Internet Protocol Version 4 (TCP/IPv4) and click Properties.IPV4 Properties
  6. On the next page, check the Preferred DNS server field and copy the current value if it is not the preferred IPV4 value. DNS PREFerred
  7. Change the value to the IPV4 value (Preferred) mentioned in the first step.
  8. Paste the value you copied from the Preferred DNS server field in the Alternate DNS server field.
  9. Click OK. Restart your computer to let the changes take effect. 

4. Add the Domain Controller again

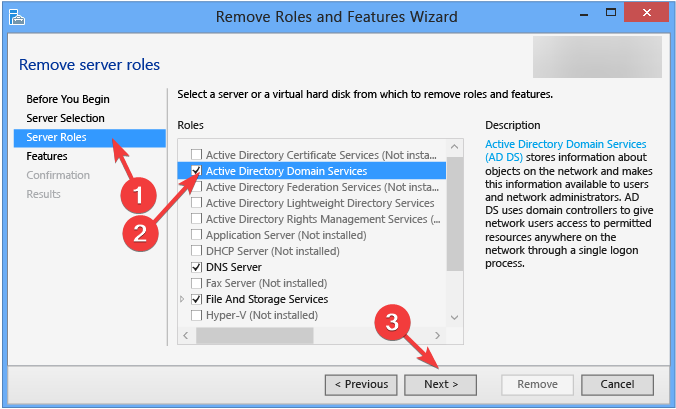
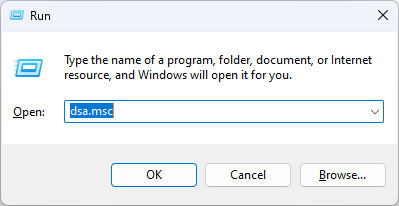
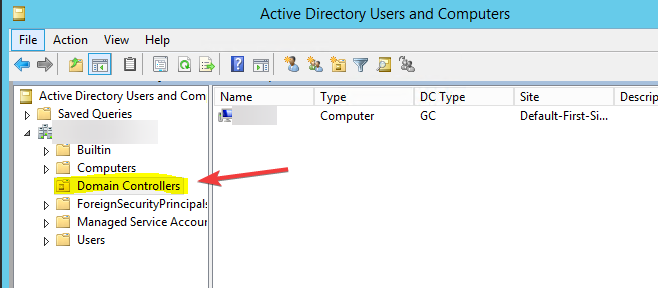
  1. Press Windows + R to open the Run window.DSA - the system cannot contact a domain controller to service the authentication request
  2. Type dsa.msc and press Enter to open Active Directory Domain Services (AD DS).
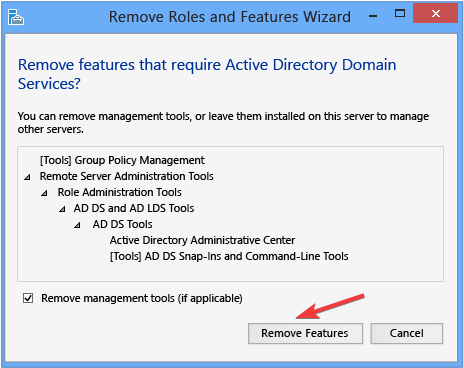
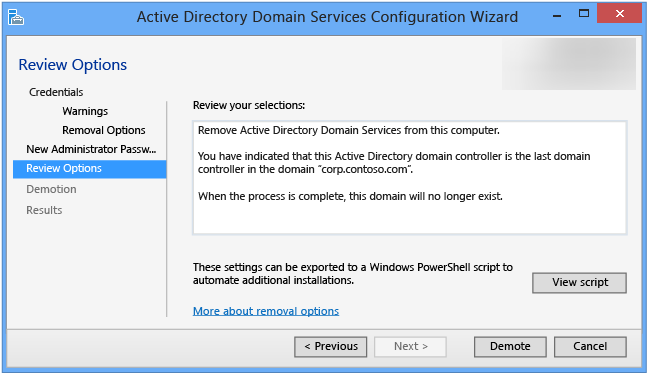
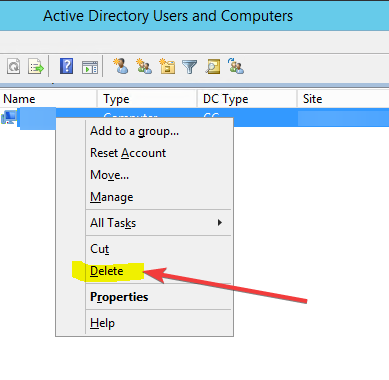
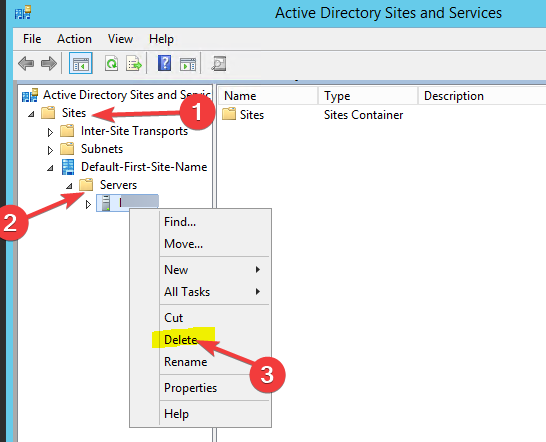
  3. Go to the Domain Controllers folder, right-click on the domain controller you want to delete, and select Delete.ADUC Delete DC
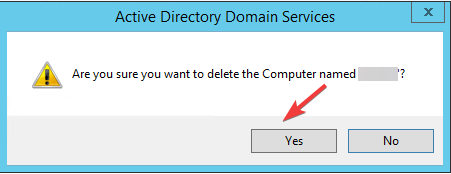
  4. Click Yes on the next screen.
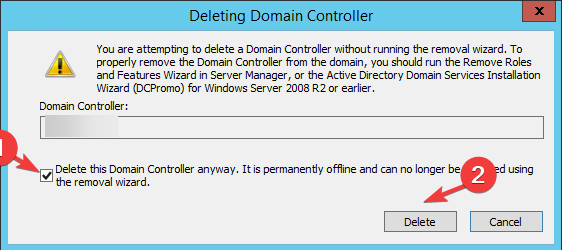
  5. On the Deleting Domain Controller page, select Delete this Domain Controller anyway. It is permanently offline and can no longer be removed using the removal wizard option. Click Delete. Delete DM
  6. Click Yes. 
Tip icon Tip
To add the domain controller, you can follow the same steps you previously used to add it or refer to the method here.

So, these are methods that you can use to fix the system cannot contact a domain controller to service the authentication request error.

Try these methods and let us know which worked for you in the comments below.

How to Setup Monitors With Different Resolutions

Here’s how to set up dual monitors with different resolutions on Windows 10 and Windows 11 to ensure both screens display correctly. When 2 monitors are showing different resolutions, it can cause issues like incorrect scaling or blurry images. Adjusting the settings properly will fix these problem.

How to set up dual monitors with different resolutions

1. Change the resolution from the Settings app

  1. Make sure that both monitors are connected and detected by your system.
  2. Now go to the Settings app. You can do that quickly by using Windows Key + I shortcut.
  3. When the Settings app opens, go to the System section.
    system settings app dual monitors with different resolutions windows 10
  4. Select the display whose resolution you want to change.
  5. Now set the Display resolution to the desired value.
    display resolution dual monitors with different resolutions windows 10
  6. Now select the other monitor and adjust the desired resolution.

After doing that, your dual monitor setup will use different resolutions for each monitor. Windows selects the optimal resolution for each monitor by default, but you can adjust that with ease.

In most cases, it’s best to use the same resolution because it feels more natural, but if that doesn’t work for you, changing the resolution shouldn’t be a problem.

2. Change settings from graphics configuration software

  1. Open Nvidia Control Panel or Catalyst Control Center.
  2. Navigate to Desktop Properties.
  3. Select the desired monitor and choose the suitable resolution.
    display resolution catalyst control center dual monitors with different resolutions windows 10
  4. Click Apply to save changes.
  5. Now do the same for the other monitor.

We described how to do this in Catalyst Control Center, but if you’re using Nvidia graphics, the process is more or less the same in Nvidia Control Panel.

Having dual monitors with different resolutions isn’t a problem in Windows 10 because Windows detects them and configures them automatically.

However, if you want to use different resolutions for your dual monitor setup, you can change them easily from the Settings app or from the graphics configuration software.

Boot Device not Found HP, Hard Disk 3f0 Error [Step-by-Step]

Some HP laptop owners reported encountering error code 3f0 upon booting their systems.

This error code comes along with the message Boot Device Not Found. Please install an operating system on your hard disk 3f0 which indicates the system could not find the hard drive.

We managed to compile a series of fixes meant to help you solve this frustrating issue once and for all.

How to fix Hard Disk 3f0: boot device not found on HP error?

1. Hard reset your laptop

In order to perform a hard reset on a laptop with a removable battery, follow these steps:

  1. Turn off the system
  2. Disconnect the laptop from every connected device and remove the power cord
  3. Take out the battery from its compartment
  4. Press the Power button and hold it down for at least 15 seconds
  5. Put the battery back in and connect the AC adapter
  6. Turn the laptop on
  7. If booting takes place normally, connect all the needed devices to the laptop.

If you own a laptop with a non-removable battery, perform the same steps without attempting to take out the battery, of course.

2. Reset BIOS to its default settings

  1. Turn off the computer and let it rest for at least 5 seconds
  2. Turn on the computer > press F10 while booting takes place in order to access the BIOS menu
  3. After being prompted to the BIOS menu, press F9 to choose and load the BIOS Setup Default settings
  4. Press F10 in order to have the changes saved and exit the BIOS
  5. Choose Yes and press Enter
  6. Restart the computer and see if it fixed the issue.

3. Use the HP Hardware Diagnostics tool

  1. Turn on the computer and keep tapping Esc until a menu opens > press F2
  2. In the HP PC Hardware Diagnostics menu, select Components Tests
  3. Select Hard Drive > Quick Test > Run Once
  4. If you have more than one drive, select Test All Hard Drives
  5. Wait until the process finishes, then the results will prompt on the screen
  6. If the issues persist after completing the Quick Test, choose to perform the Extensive Test.

4. Reconnect your hard drive

  1. This is a delicate task. If you can’t complete it by yourself, ask for professional help.
  2. Reconnect the hard drive following these steps:
    • Turn the computer off and remove the power cable
    • If you have a removable battery, take it out
    • Disconnect your hard drive and then connect it back
  3. Reassemble your computer and turn the computer on to see if it fixed the issue.

If the message stating please install an operating system on your hard disk 3f0 HP still pops up, ask for professional help to make sure that your hard drive is not damaged and needs replacement.

You can also check a full guide on fixing this error on Windows PCs by visiting Boot Device Not Found guide.

Let us know in the comment section if this article helped you to fix the issue.

8 Best Interactive eBook Creator Tools in 2023

Today’s competitive world makes it vital for book authors or content marketers to create eBooks that really appeal to readers. This is where interactive eBook software comes into play.

eBooks are some of the best platforms to keep us engaged digitally, and they’re also one of the best ways that you can pass your content to a more extensive audience base.

An elaborately created eBook is able to convince customers and readers of the author’s knowledge and resources.

Readers can download an eBook right away rather than waiting for the physical version to be released and this will keep the content fresh in their minds.

Here are five of the best interactive eBook software to create and showcase your enriched content.

Product nameFree usageClickable menus feature
Adobe InDesign✅✅
Visme✅✅
Canva✅✅
Scrivener❌❌
Kotobee✅❌
Flip PDF✅❌
Sigil Ebook✅❌
Calibre✅❌

What is the best interactive ebook creator software?

Adobe InDesign – Best in-depth editor

Topping out our list is a software tool used for desktop publishing and typesetting that has proven itself to be extremely efficient over the years.

Not only can Adobe In Design be used to create eBooks, but once you have it you can also create posters, flyers, brochures, magazines, newspapers, presentations, and books.

Of course, eBooks work best on tablets and other touchscreen-enabled devices. That is precisely why it is great that Adobe InDesign can publish content suitable for tablet devices thanks to the Adobe Digital Publishing Suite.

The interface is fairly simple to use, especially if you’re an Adobe fan, so get used to the program in no time.

Speaking of Adobe in general, InDesign is perfectly capable of integrating with many other Adobe Products, such as Adobe Photoshop or Illustrator.

Here are some of the best features in Adobe InDesign:

  • PDF Accessibility Enhancements
  • Gain access to alternative text
  • Tag Page Items
  • Offers support for endnotes
  • Comes with HTML export capabilities
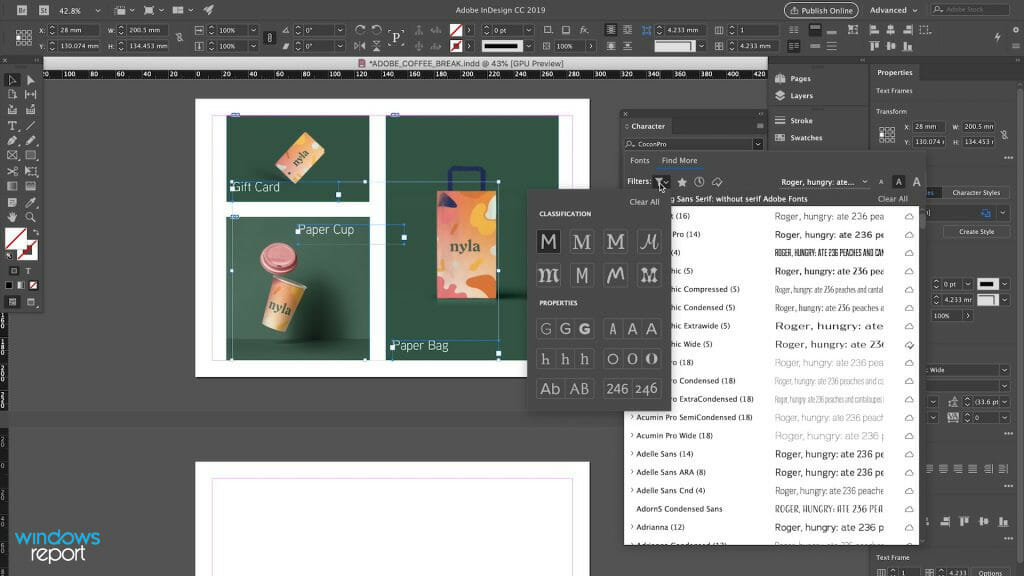
  • Font Search and Filter
  • Paragraph Borders
  • Offers text management in Creative Cloud Libraries

How do I create an interactive eBook in InDesign?

  1. Download and install Adobe InDesign
  2. Open the document that you want to turn into an eBook
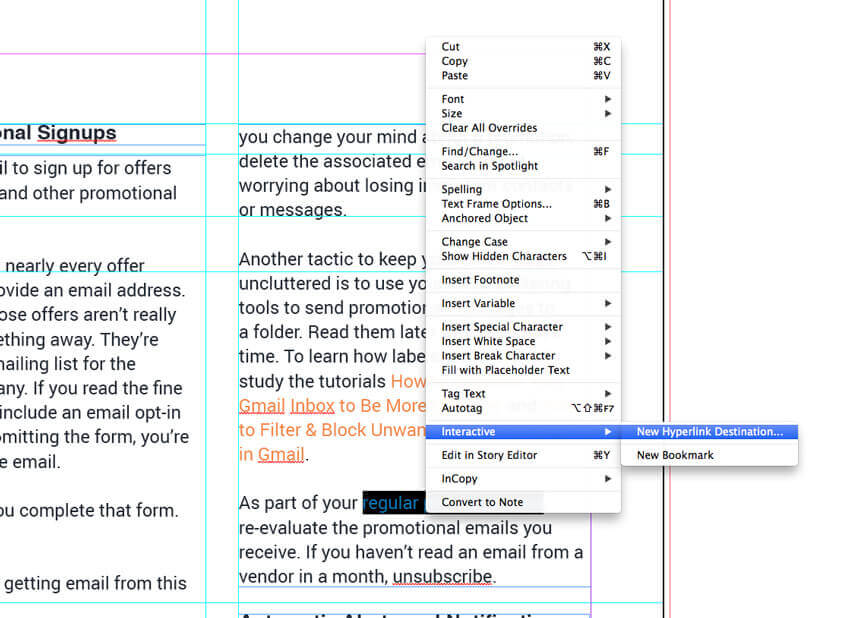
  3. Add clickable cross-reference links
    • You can do this by right-clicking and choosing Interactive > New Hyperlink
    • Highlight the segment of text that you want to use as your cross-reference link
    • With the text still highlighted, right-click > Interactive > New Hyperlink Destination.
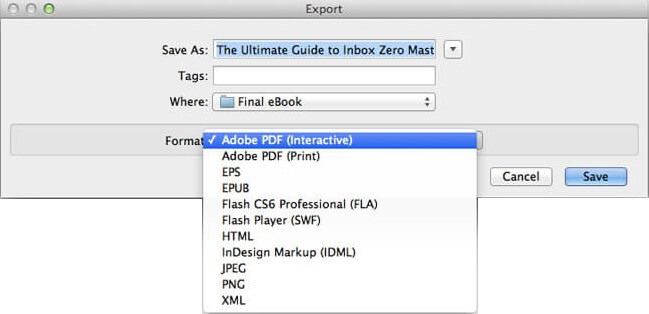
  4. Once you’ve prepared your hyperlinks and cross-references, it is time to export your document as an interactive PDF.
  5. Click on File > Export
  6. Give the eBook a name and choose an appropriate file path.
  7.  From the Format menu, choose Adobe PDF (Interactive)
  8. Use the Image Handling page to adjust the conversion settings of your images.
  9. Click Save

Lastly, you don’t have to worry about not having any money upfront, since you can access a free 7-day trial where you can test out all Adobe products.

Adobe InDesign

Unlimited access to cloud-based libraries and all the tools you need to create astonishing eBooks.
Free trial Visit Website

Visme – Tons of interactive elements

Visme is an all-in-one design application. It has a wide range of dedicated tools for plenty of different projects.

IT can help you build brand visuals from scratch, create graphs and infographics, presentations, and, of course, ebooks.

The Ebook Creator feature in VIsme is actually free. It offers support for interactive ebooks and even includes some templates that will help you get started.

You can embed videos, rollover and pop-up effects, and other interactive features to help your reader better understand your content.

The editing panel is easy to use, with drag-and-drop controls. You can easily implement graphs, images, or design objects directly from the sidebar on the left.

Everything is highly customizable. You can adjust the color of the objects, the alignment, size, and position.

That’s also true for your text content. In Visme, you have access to serif and sans-serif-based fonts that you can adjust to your own liking.

Other key features of Visme include:

  • Download your ebook as a PDF
  • Create a clickable table of contents
  • Add voiceovers
  • Access to tons of stock images and videos
  • Generate a sharable link to your book
  • Tutorials and guides to help you get started

If you want access to more features or to implement Visme into your business and easily collaborate on projects, you can get a premium subscription plan. 

Visme

Create interactive ebooks with pre-made templates, add embedded videos, add popups, and more!
Free trial Visit Website

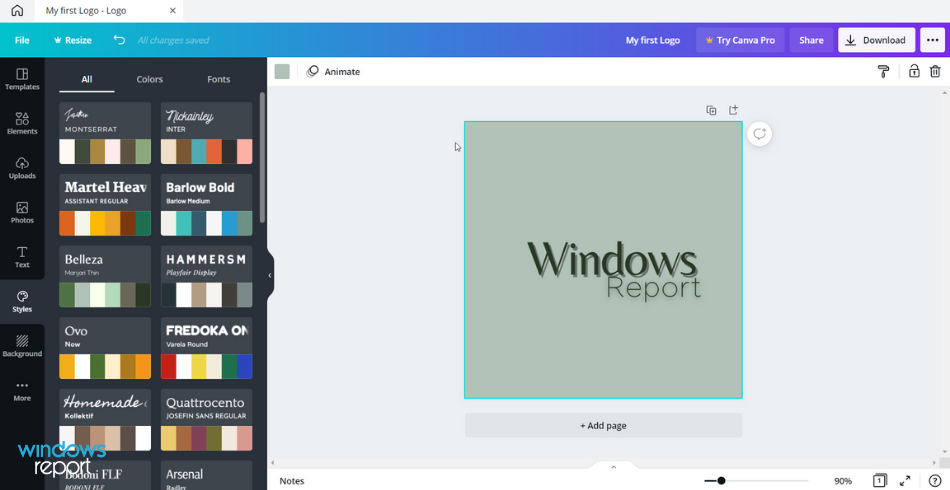
Canva – Easy drag-and-drop tools

Canva aims to enable anybody, regardless of experience, to create outstanding projects in just a few steps.

The tool offers a lot of handy features that will help you get started with your interactive ebook project.

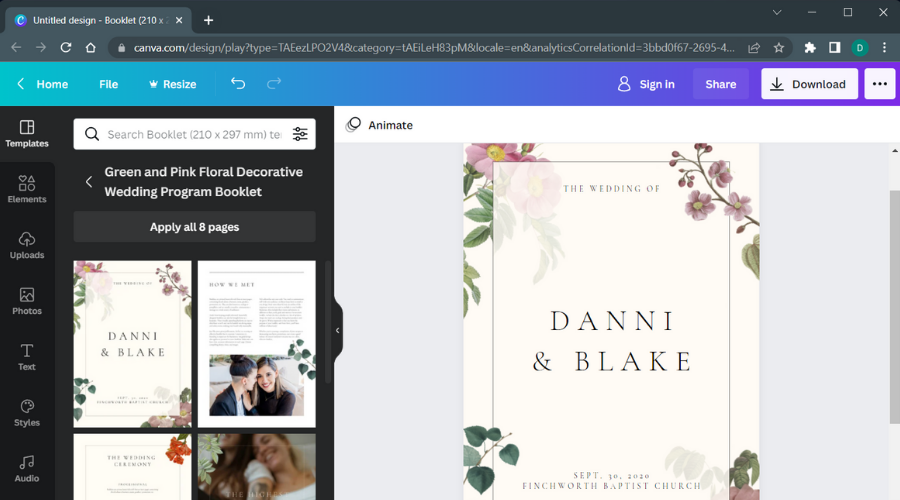
Canva offers an impressive amount of pre-made templates that give you the power to create outstanding books. 

Not only does it offer you access to tons of objects and images to combine and create unique covers, but it also has rich text editing options.

You can add as many pages as you want and when you are finished, you can generate a PDF document directly from the share button.

Canva gives you the possibility to easily collaborate. If you design as part of a team project, you can easily share your ebook with other members and they can give their input and even contribute to the design.

Other key features of Canva include:

  • Easy drag-and-drop editor
  • Crop, resize and align any image or object
  • Wide range of sound effects for videos
  • Free stock images and videos

Canva has a free version that can be enough to get you started. If you want more professional tools like access to more stock images, background removal tools, more fonts, and other benefits, try the Premium plan. They have a 30-day free trial.

Canva

Create stunning ebooks easily with resourceful templates, stock images, text editing tools, and more!
Free trial Visit Website

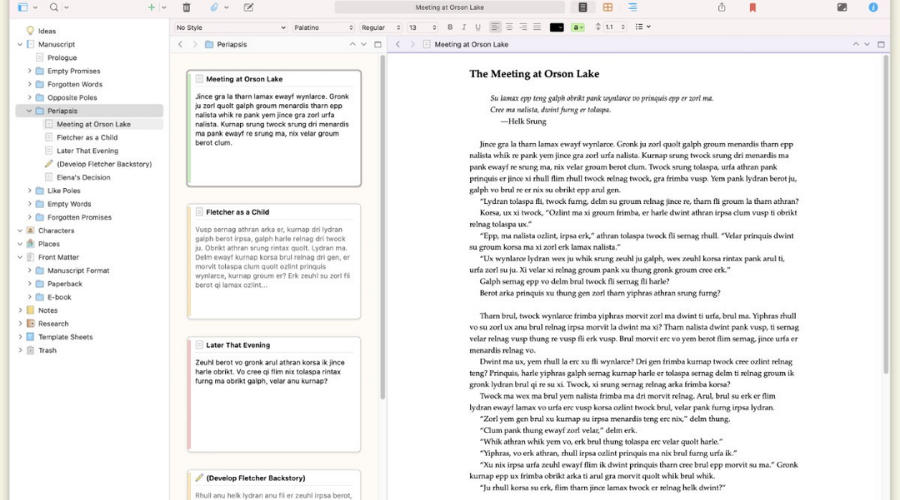
Scrivener – Advanced writing toolset

Scrivener is writing software that serves as your personal assistant, regardless of the purpose of your writing adventure. Also, you can use it as your eBook buddy. 

To start here, this writing tool provides every need you would have in the process of writing, from organizing tools to research sources or vocabulary. You can find every resource in one place and concentrate on what matters- your paper.

Moreover, it helps you to grow your project according to your rhythm or structure, organizing your text into sections or small parts.

In addition to that, it’s possible to use a writing overview and outline every word so you can see the details, or zoom out for the big picture. Thus anytime you want to transform an entire chapter you simply take five minutes.

Knowing that the research and documenting stage is among the essential ones, Scrivener lets you split-screen and shows your materials while you take notes or draft content.

Lastly, it’s important to mention that such a flexible program is created for all types of writers. So if your job requires writing, Scrivener is your pen and paper.

Check out the main features of Scrivener: 

  • You can structure your manuscript in your way, adding sections when inspiration strikes
  • Structure your ideas with the Project Outline feature
  • Easy research method with the split-screen option for your materials
  • The Corkboard feature lets you organize the manuscript based on your synopsis cards
  • Support for plenty of formats, including PDF, MS Word, EPUB, or Kindle Ebook

Scrivener

Write your fantastic story with Scrivener and share it easily with the world through Ebook format! 
Check price Visit Website

Kotobee – Multi-platform support

Kotobee allows you to create interactive eBooks effortlessly even if you are a beginner.

First, let’s acknowledge the fact the ebook market is exploding right now, and so many readers use ebooks to read their titles.

So, if you plan on writing any piece of work you may consider this ebook software.

Thus this software supports multiple sectors, like education, training, or publications. So regardless of the theme or topic you write about, you can easily manage it and design it for an ebook.

Moreover, you are able to customize your content as wanted plus create interactive pages that don’t lose your readers’ attention.

Whether you write an ebook for corporate training or book publication, you have the right tools confirmed.

Lastly, this comprehensive program can export your ebook in more formats, like EPUB, mobile, Kindle, or Word documents. Also, it has Kotobee Reader embedded to offer a pleasant experience for the public.

Check out the most important functionalities that come together with this software:

  • Besides creating interactive eBooks, you will also be able to export them to the web, mobile, and desktop
  • Connect your eBook to the cloud and control users’ access and also integrate with external systems
  • Provide users with interactive reading tools via a standalone or an embedded reader
  • Kotobee allows you to use videos, interactive images, and also widgets to engage readers

⇒ Get Kotobee

Flip PDF – Free eBook Creator – Best to import pre-made books

Flip PDF is a suite of powerful eBook publishing tools for eBook authors to create cross-platform eBooks. With Flip PDF, you can create an eBook from a PDF.

This multifunctional platform can offer a realistic experience due to its page flip motion, helping you as well to create and publish an ebook easily in minutes.

Hence you actually do not need any other writing tools thanks to this ebook program, because it provides you with all necessities to publish the final paper.

The process couldn’t be easier than this, practically you just have to import your PDF in Ebook format and enjoy the results.

Moreover, you can use the cloud option to upload your ebook online. That can provide good help for anyone that needs to publish ebooks online and use PDF format.

Thus you can upload your ebook to the Flipbuilder.com server immediately.

You can analyze your performance as well through Analytics and see how your visitor responded to your art, getting to know what your audience wants to hear from you.

Check out the best features that you will be able to enjoy if you get this eBook creator:

  • Using this tool, you can import a PDF of your eBook and add interactive features to it
  • Build a responsive page-flipping eBook
  • In just a few minutes you can publish animated eBooks across various channels
  • You can make sure that your eBook can be accessed from more devices
  • If you want to highlight the main points on the page of your publication, the application of Hot Spot to your eBook will maximize your marketing effectiveness.
  • Measure the number of your visitors with Google Analytics

⇒ Get Flip PFD

Sigil Ebook – Integrated spellchecker and dictionary

This is another excellent eBook editor that comes packed with a lot of useful features which guide your ebook writing.

The software is an open-source solution for EPUB format ebooks that is entirely developed by volunteers. So if your activity implies publishing books or writing your own you sure need such an efficient eBook editor.

Furthermore, if you need to create your publications and format them in ePUB format choosing this tool’s features guarantees your ebook success.

That’s because it includes a metadata editor, table of contents generator, or support for multiple OS.

Other worth mentioning features provides help with aspects like EPUB 2 and 3 spec support, multiple views (code view or preview), spell checking with configurable dictionaries, and more to go.

Thus you should consider this simplistic yet effective tool and manage your ebook publications easily without any expenses.

Here are the most important features:

  • You can create eBooks with ease even if you are a beginner
  • This tool comes with a Spellcheck Dictionary, and it includes a Preference setting that allows users to add words with numbers in them
  • Two Quick Launch Icons for plugins
  • Metadata Editor placeholder text will help beginners get the hang of how things work
  • The Preview Windows Title bar shows the height and width of the Preview Window

⇒ Get Sigil eBook

Calibre – Support for all major ebook formats

Calibre is a multi-platform free eBook creator that comes packed with all the necessary features that help authors build their personal eBooks quickly.

This eBook platform started out back in 2006 right after Sony released the first e-ink reader in the U.S. Also, this is a completely free tool and a very simple-to-use e-book viewer and editor as well.

The simple user interface allows anyone to navigate quickly with large buttons or intuitive tabs for smooth ebook management.

More so, the software includes comprehensive e-reader capabilities that permit multiple devices and formats so you can manage your e-book collection.

Lastly, you are able to download your favorite ebook or magazines from the web and enjoy the stories. Besides that, it includes an editing option for your personal library in formats like EPUB or Kindle.

Take a look at the most exciting functionalities boasted by this tool:

  • Calibre supports lots of file formats, and these can be converted to output documents.
  • Edit any of your earlier eBooks that have been printed or downloaded by adding illustrations, author descriptions, images for the eBook’s cover, and more
  • Add a customizable cover image to your eBook using the built-in cover creator
  • You will be able to add a content table and word search, and there’s a replacement option as well

Calibre provides authors with all the essential features and functionalities that they need for creating and managing eBooks with ease.

⇒ Get Calibre

What is an interactive ebook?

As opposed to a regular ebook document, an interactive ebook can include a wide range of content materials that will make it more engaging and easier to digest.

Some of the most common interactive ebook components are the clickable table of contents, interactive quizzes with built-in results and feedback, informative pop-ups, and more.

Some even like to integrate videos and voice-overs into their books to make the reader’s experience as useful and pleasant as possible.

How do I make an interactive ebook?

The simplest way is to use dedicated software. Although it is possible to start off with writing your book in a text format and then convert it and add interactive elements, using an ebook creator tool will save you time and hassle.

Tools that support this type of project generally come with easy-to-use, visual editors that don’t require any coding. Just implement everything you want into your book and the soft takes care of the rest.

There are plenty of things you can do with these tools, from clickable links, and tables of contents, to videos and even voiceovers on specific pages or paragraphs.

How do I publish and sell an interactive ebook?

There’s more than one way to distribute ebooks. You can generate shareable links and only give access to paying customers, email the files, or sell them through a third-party publishing company.

You can make use of eCommerce platforms if you want to start a serious book business. These give you the tools you need to commercialize any type of product and even offer marketing support.

These are some of the best programs for creating interactive eBooks that are compatible with systems running Windows.

Head to their official websites and check out their complete sets of functionalities to see which one is the best choice for you.

How to Check Your Windows Product Key Using Powershell and CMD

You can get your Windows activation key using PowerShell or CMD with just a quick command, no extra tools or installs needed. Whether you’re reinstalling Windows, switching devices, or backing up your license, this guide shows you the easiest ways to find your product key using built-in tools.

How do I use PowerShell to find the Windows key?

1. Use PowerShell to find product key

  1. Right-click on Start and click on Windows PowerShell (Admin).start powershell admin find windows product key in powershell
  2. In the PowerShell window, type powershell "(Get-WmiObject -query ‘select * from SoftwareLicensingService’).OA3xOriginalProductKey"
  3. Press Enter. Your Windows product key will shortly appear.

2. How to find Windows product key using CMD

  1. In the Windows search box type cmd, right-click the result, and choose Run as administrator. If you can’t start Command Prompt as administrator, check out our guide on how to fix it.run as administrator cmd find windows product key
  2. In the cmd window, type wmic path softwarelicensingservice get OA3xOriginalProductKey
  3. Press Enter.
  4. Your Windows product key will show up. It’s in the form of XXXXX-XXXXX-XXXXX-XXXXX-XXXXX.

As you can see, it’s pretty simple to get the Windows serial number with PowerShell. These aren’t the only methods, and we have a great guide on how to view your Windows 11 product key that shows you even more ways to do it.

Keep in mind that issues with product keys can occur, and we wrote guides on what to do if the Windows product key not working or if the Product key can’t be used on this copy of Windows.

We also have a great article on how to find your serial number on Windows 11, so don’t miss it for more information.

If you have any other questions regarding the Windows product key, please leave them in the comments section below.

Checkbook Register Software: Best Options for Windows 11 (Free & Paid)

If you’re looking for reliable checkbook software, you’re in the right place. Whether you’re managing business transactions or keeping track of personal finances, we got you covered.

What is the best checkbook software?

Note icon NOTE
Find reliable free checkbook software. They’re great for personal use. If you need one for business, going pro is most likely the better route.

1. Moneyspire – best checkbook software for personal use

Best financial investment tracking software

Moneyspire lets you keep an eye on your upcoming expenses and helps you carefully plan your budget.

It displays financial data in a clear tree view, allowing you to focus on a single account or budget, giving you better control over your finances.

Check out this software’s best features below:

  • Generate detailed reports such as cash flow, income, and expenses as well
  • A guided setup process and a straightforward interface
  • Manage finance-related tasks in multiple accounts
  • Keep track of your credit card balances, set your personal budgets, get bill reminders, and much more
  • Import account transactions from OFX/QFX, QIF, and CSV files
Moneyspire

Moneyspire

Keep an eye over your finances with daily charts, overviews and reports!
Check price Visit website

2. QuickBooks – Complete financial solution

QuickBooks will allow you to record the cash and check transactions for a specific accounting period which in turn can help you spot mistakes, create reports, and create a better budget.

Being a complete software, it is also very useful in case you need to edit, void, or delete any transaction. Plus, the reconciliation of transactions or individual payments can also be made through it.

Here are some of the main features that QuickBooks brings:

  • Create instantly payable invoices
  • Automatic bookkeeping
  • Manage cash flow
  • Chargeback protection
  • Cashflow forecast
  • Many integrated app

QuickBooks

Manage your checkbook registry with this complete solution.
Check Price Visit Website

3. Moneydance – Payment Scheduling

Moneydance has an easy-to-scan homepage, with all the important information set in an intelligible way

Import financial data, including transactions, with one click. The website offers tech support and tutorials. Moneydance helps manage checkbooks, budgets, investments, and online bill payments..

Check out this software’s best features below:

  • Automatically download transactions and send payments online from hundreds of financial institutions
  • Categorize and clean up all downloaded transactions automatically
  • It provides a handy graphics tool that will generate visual reports of your expenses and income
  • The account register is used to introduce, edit, and also delete transactions in a specific account and it’s similar to a paper checkbook
  • Set up a payment schedule for single transactions or recurring ones
  • Handles various currencies, and it provides a great set of financial reports
Moneydance

Moneydance

Be prepared financially at any time and track every penny with this proficient banking software
Check price Visit Website

4. Empower – Completely free

Whether you need to stick to a limited budget, have summaries of your spending, or pay bills on time, this easy-to-use checkbook software is ideally suited for these tasks.

The Cash Flow Analyzer Spending tool reveals all your weekly, monthly, and yearly spending habits, while the Fee Analyzer tells you how much your retirement plan is costing you.

Take a closer look at some key features you’ll most likely enjoy:

  • The core software is completely free
  • Detailed reports of forthcoming bills and their due dates
  • Investment Checkup features to keep an eye on the health of your investment asset allocation
  • Tracking features to make sure you’re in line with investment goals
  • Retirement Paycheck to wisely withdraw money during retirement

Empower

Manage your financial goals better with this intuitive and advanced program.

5. AceMoney Lite – Spending habits tracking

AceMoney Lite is a free checkbook software that includes all essential features.

You can enjoy the security of password protection for every file, scheduled backups, and more without having any financial experience. This checkbook register software will also help you plan debts and mortgage payments, and do e-business.

Check out some key features below:

  • Track your spending habits and see where your money is going
  • Generate home budget reports by categories or payors/payees
  • Quickly locate all your withdraws and deposits as well
  • Download all stock quotes automatically
  • Supports more than 150 currencies, and it will automatically download their exchange rates

⇒ Get AceMoney Lite

6. Buddi – Available in multiple languages

Buddi is a checkbook register software that caters to those of you who have little to no economic background.It is open-source and free, allowing you to use it to full capacity, with no time limit or disabled features.

With this software, anybody can manage their finances in a very simple way using the most intuitive interface. Plus, it is designed for people with little or no financial knowledge so every person can use it.

Check out some key features below:

  • Runs on any computer that has a Java virtual machine installed
  • Available in multiple languages with all kinds of tutorials to help you out
  • For enhanced safety, it can encrypt financial data with a password
  • You can use it for budgeting, tracking accounts, personal finance reports, and more

⇒ Get Buddi

7. GNUCash – Manage mutual fund accounts

GNUCash is a personal or small-business financial accounting program that is available for Windows and other platforms. This checkbook software for Windows 10 is designed in such a way that it’s effortless to use even for beginners.

You can track multiple bank accounts, stocks, income, or big expenses.Another worth-knowing side is the fact that you may benefit from business-related accounting, scheduled transactions, plus reports and graphs for your budget.

Check out some key features below:

  • It allows you to track your bank account, income, stocks, and expenses
  • Quick and intuitive as a checkbook register
  • Ensures balanced books and the most accurate and detailed reports
  • It performs double-entry accounting, small business accounting, scheduled transactions, and financial calculations
  • It allows you to manage your mutual fund accounts

⇒ Get GNUCash here 

These are the seven great checkbook software that you’ll be able to use effortlessly at home. Do so whether you are a beginner in the financial domain or you’re more advanced.

Whether you are looking for a checkbook, accounting, or bookkeeping software, it’s always important to do proper research and pick the app that most suits your needs.

All of this checkbook register software is packed with really handy and easy-to-use features and functionalities to help you manage your money in the best possible way.

Which one fits your financial needs? Feel free to share your choice with us via the comments section below.

5 Best Steel Structure Design Software [2026 Guide]

In the past, if you wanted to construct a steel structure, you first needed to manually create a construction plan and draw hundreds of sketches on paper. This can be a tedious process and it is very impractical compared to using PC steel structure design software.

One of the hardest parts of creating steel structures by using sketches is the fact that you can not test the resistance of the steel structure only after you have built it. Steel structure designers now use specialized software to achieve their goals.

Today, anybody who has the design capabilities can use specialized software that allows you to easily create complex steel structures with a lot more ease than if you would do this manually.

In this article, we will explore some of the best software options on the market that can get you started designing your steel project.

What are the best steel structure design tools for Windows 10?

Advance Steel – Autodesk – Intelligent structural objects

Advance Steel from Autodesk is one of the most powerful tools for designing steel structures on your PC.

This software is built on the AutoCAD platform, giving you the power to create 3D modeling, and use parametric steel connections, stairs, railings, etc.

You can create sheet metal and folded plate work by using its integrated features.

You can use Advance Steel to access and transfer data and properties about your project, and easily create complete structures with the Dynamo extension.

You have the ability to isolate specific parts of your project and obtain detailed data about it with ease.

Advance Steel also has a wide range of objects and other tools in the program’s library. The wide range of objects found in the library helps you advance your project faster, eliminating the need to create every element from scratch.

Key features of Advance Steel from Autodesk include:

  • Intelligent structural objects
  • Steel shop drawings
  • NC data- can generate data for CNC workshop machines
  • BOM’s based on design data
  • AutoCAD Plant 3D interoperatibility
  • Robot structural – optimize structures using bidirectional links
  • Open and flexible API
  • Ability for several users to work on the same project at the same time
  • You can color-code objects based on approval status

If you feel like you need a step-by-step tutorial on how to use Advance Steel, you can find a good range of tutorials to choose from the official page.

Advance Steel

Advance Steel

Advance Steel is the perfect CAD tool, especially created for designing 3D steel structures.
Check priceVisit website

AutoDesk Revit – Design documentation feature

Autodesk Revit is a BIM software that has an extensive amount of features which include advanced structural design options.

With Autodesk Revit, you can conduct a structural analysis of your models. You can also generate physical models of the designs. Moreover, if you need to put together more detailed plans, the software covers this as well, with its design documentation feature.

The software allows an optimal work environment for teams. You can create collaborative projects which are accessed through a centralized shared files network.

Since the toolset is quite extensive, the user interface is vast as well, but they provide tutorials and guides that help new users familiarize themselves with the features. The user experience is reportedly pretty undemanding in regards to the UI.

In addition, you should know that you can collaborate with your teams and across disciplines. It brings more disciplines like architecture and engineering into one unified environment.

Therefore, you can improve your 3D modeling designs quickly with this complex software, using automated services for routine tasks to concentrate on the big picture.

Key features include:

  • Sketch and create free-form models
  • Generate 3D models from 2D designs
  • Generate different alternatives for the same plan
  • Tasks and projects can be scheduled
  • Automatization of routine tasks

Autodesk Revit is a tool designed for architects and engineers of all levels. Its versatility makes it a good fit for both independent and team workers.

Autodesk Revit

Benefit from consistent modeling designs using proficient engineering services with the help of this strong tool.
Check price Visit Website

RAM Steel – International standards and specification

The RAM Steel software developed by Bentley is one of the best steel structure design software on the market.

It lets you design and create advanced steel structural plans.

The program is extremely useful and its features prove it is professional software that can be used no matter the complexity of your project.

With RAM steel you can automate recurring tasks in the design process. This allows you to save significant amounts of time and work more efficiently. 

The tool lets you focus on the central parts of the project that do require your undivided attention.

One of the most efficient features of RAM Steel is its powerful computation of tributary loads.

It lets you create buildings in accordance with the building codes and can help you reduce the loads put on your steel structure joints.

Other key features of RAM Steel include:

  • Design and analyze structural models
  • Wide range of international standards and specification
  • Test your steel structure’s stability by applying winds, seismic loads, etc
  • Ability to generate design documents
  • You can transfer structural model geometry between applications

This is a paid software that offers multiple subscription plans. Some cater more towards individual/educational use, and others are made for enterprise-level projects.

⇒ Get RAM Steel

Edilus Steel – Dynamic constructions price estimating

Edilus Steel from ACCA Software is a powerful steel structure design tool that also integrates building information modeling (BIM).

This software aids you in designing and verifying any steel structure. Edilus Steel can work perfectly with other software from Edilus like Concrete or Edilus Masonry.

This allows you to create an entire building from scratch while having specialized software for each part of the structure.

With Edilus Steel you can make calculations for the entire structure or specific parts of the structure, solve structural issues with ease, create diagrams and graphical representations, etc.

This structural design software gives you the ability to use FEM solver to calculate and test your design structure.

Other key features of Edilus Steel include:

  • Each BIM model is created using parametric objects – columns, beams, bracings, etc.
  • Magnetic Grids – allows you to create magnetic points in the structure of any shape and size
  • 3D input – with the ability to control, insert, and move any feature
  • Ability to observe every part of your steel structure by graphic analysis of strain and displacements
  • Dynamic constructions price estimating

If you feel like you need a step-by-step guide on how to use Edilus Steel, you can find it on the official page.

⇒ Get Edilus Steel

Dlubal Software – RSTAB – Professional-level structures

RSTAB from Dlubal is another complex and powerful steel structure design tool that you can use for professional-level structures.

With this tool, you can quickly analyze a structural model and then easily calculate the forces and deformations that apply to your structure.

If you need additional tools and features for designing your building even further, you can find a wider range of Dlubal add-ons on the official site.

One of the most useful features of RSTAB is that it’s perfectly compatible with CAD software and building information modeling (BIM).

This allows users to streamline the transfer of information from one software to another, making it easier than ever to add a new level to your design.

RSTAB includes the features necessary to conduct 3D finite element analysis and design that you can use to define structures, loads, and materials for planar.

Other key features of RSTAB include:

  • Can analyze stress of members and surfaces and compare them to limit stresses
  • Warping Torsion – lateral torsion analysis of members
  • Eigenvalue stability analysis – linear and nonlinear stability analysis

If you need a tutorial on how to start using RSTAB, go to the official support page.

⇒ Get RSTAB

Tekla Structural Designer – Optimize multi-material buildings

This software option is a great professional tool created for designing steel structures. This program has a wide range of features for steel design that allow you to easily create or edit existing designs efficiently.

You can use Tekla to quickly observe any differences between design schemes by using its quick comparison feature. This software is designed to be incorporated into BIM software.

Key features include:

  • Ability to optimize multi-material buildings
  • Fully automated software
  • Integrated analysis and design – time of analyzing data is reduced considerably
  • You can add reinforcements to your design – columns, slabs and automatically apply changes to the entire structure
  • Ability to design entire steel structure automatically, based on requirements

⇒ Get Tekla Structural Designer

In this article, we explored some of the best options on the market that allow you to create steel designs on your PC. The various features of each of these programs will surely get you on your track with your design task.

What options did you choose from the list presented in this article? Let us know why in the comment section below.

How to Demote A Domain Controller on Windows Server?

The domain controller is a server that manages the authentication and authorization of users and computers on a Windows server. If you are looking for a way to demote a domain controller to remove it from the domain or modify its role in the network, look no further. 

To demote a domain controller, you need to remove Active Directory Domain Services role and return it to the member server.

Here, in this blog, we will discuss two scenarios and step-by-step instructions to complete the work. Let’s get started! 

How can I demote a domain controller on Windows Server?

Before moving to the methods to demote a domain controller, make sure you perform these checks: 

  • If you have Windows Server 2003 or earlier, clean up the metadata using the ntdsutil command.
  • Close all the services running on the server before shutting down the server. 

Once done, follow any of these methods to demote the domain controller on Windows Server 2008, 2016, and 2018

1. Use the Server Manager 

  1. Go to the search bar and click the Server Manager. 
  2. Select Manage and then click Remove Roles and features.Manage - Remove Roles
  3. On the navigation pane, select AD DS or All Servers. Then, go to the Roles and Features section.
  4. Now, select and right-click the Active Directory Domain Services from the list and choose the Remove Role or Feature option.Remove Roles and Features
  5. On the Before you begin page, click Next.
  6. Now on the Server Selection page, choose the server you want to demote and click Next. Server Selection
  7. Remove the checkmark next to Active Directory Domain Services on the Server Roles page. Server Roles
  8. On the Remove features that require Active Directory Domain Services page, click Remove features. Remove features
  9. Click on Demote this domain controller and then OK.
  10. On the next screen, remove the checkmark beside Force the removal of this domain controller. Click Next. 
  11. You can change the Credentials on the next screen and click Next.
  12. On the Warnings screen, place a checkmark beside Proceed with removal and click Next. 
  13. Now on the Removal Options page, select Remove DNS delegation if you have DNS delegation. Click Next.
  14. On the New Administrator Password window, put in the password for Password and Confirm Password fields and click Next. 
  15. Now on the Review Options page, click Demote. Demote
Tip icon Tip
If there are additional domain controllers to remove, you can click View script to generate a PowerShell script to automate the steps. 

2. Use the manual method: If the server is dead or out of reach

2.1 Removing domain controller

  1. Press Windows + R to open the Run window.DSA
  2. Type dsa.msc and press Enter to open Active Directory Users and Computers.DC -demote a domain controller
  3. Locate the Domain Controllers folder. Then, right-click the domain controller you want to remove and click Delete. ADUC Delete DC
  4. Click Yes on the following prompt.Deletge DC -demote a domain controller
  5. On the Deleting Domain Controller page, place a checkmark next to Delete this Domain Controller anyway. It is permanently offline and can no longer be removed using the removal wizard. Click Delete. Delete DM - DC -demote a domain controller
  6. Click Yes. 

2.2 Remove the DC server instance

  1. Go to Server Manager, then click Tools.
  2. Select Active Directory Sites and Services.Server delete -Delete DM - DC -demote a domain controller
  3. Expand the Sites, right-click the server you want to remove, and select Delete.
  4. Click Yes to confirm the action.

2.3 Remove metadata using Command Prompt

  1. Press Start and locate Command Prompt (Admin).
  2. Type the following command and press Enter: ntdsutil ntdsutil
  3. You will get a metadata cleanup prompt. Type the following command and replace servername with the name of the targeted domain controller and press Enter:  remove selected server <servername>
  4. Click Yes to proceed.

How long does it take to demote a domain controller?

Usually, it takes a couple of minutes to demote a domain controller. However, the exact time can’t be stipulated as it depends upon various things, including the number of domain controllers, the size of Active Directory, and available network bandwidth.

So, these are two methods that you can use to demote the domain controllers you want. Try any of them and let us know which way worked for you in the comments section below.

7 Free Hotspot Software for Windows 7 to Setup Wi-Fi Sharing

A proper internet connection usually stands behind a fixed, cabled network. With Wi-Fi becoming the norm these days, what happens when you want to share the internet connection from the PC to other wireless devices? Well, the idea of a hotspot is clearly the answer.

In this guide, we’re going to showcase the best free hotspot software tools for Windows 7, which allow users to set up a Wi-Fi sharing system right from their PCs.

Creating an Internet hotspot basically means sharing the internet connection to other devices through a Wi-Fi network. The originating source of data can either be a fixed cable network or a mobile data plan, for those using their smartphone.

In other words, the device which creates the hotspot acts as a router and handles data sharing through wireless.

This is pretty easy to accomplish from a mobile device but problems appear when users are behind a Windows 7 computer. Luckily, there are enough software solutions that can create a hotspot using the PC.

Here’s a quick rundown of the best hotspot software for Windows 7.

What are the best free Wi-Fi hotspot software for Windows 7?

Connectify Hotspot – Monitor network usage

Connectify Hotspot is hands down the best hotspot software that tops the list due to its wide popularity. It’s a fully-featured routing software that transforms your PC or laptop into an actual Wi-Fi adapter.

This allows users to share the connection with other gadgets like smartphones, tablets, and so on. Best of all, it’s available for free.

However, for advanced features, users can opt for the paid version: Pro or Max. While the free version lets users share from Ethernet and Wi-Fi networks only, the premium versions also offer the option of sharing phone data.

Other features that are commonly shared by all versions are the ad-blocking facility and real-time network usage monitoring.

Some of the features that set the premium versions apart are the option to select the firewall controls, custom SSID, and a wired router type.

Moreover, you can be shielded using this Wi-fi sharing program, due to the universal ad blocker that prevents aggressive ads from displaying on your connected devices.

Other key features of Connectify Hotspot include:

  • Secure connection with WPA2-PSK encryption
  • Monitor network usage
  • Custom hotspot naming (Pro and Max plans)

All things considered, we must admit that Connectify is a very good and reliable hotspot solution that provides all benefits of a router device. The tool has both free and paid versions.

Connectify

Spread the connection throughout your home with the PC as a Wi-fi source, all done with this trusted solution.
Check price Visit Website

Baidu Wi-Fi Hotspot – Minimalistic interface

Baidu Wi-Fi Hotspot is easily the next most popular hotspot software after Connectify. It’s known for its multitude of features such as the integrated Wi-Fi hotspot facility in your mobile phone device.

Once you have downloaded the software and the installation is complete, it will identify the Wi-Fi connection, automatically create the virtual network, and connect the devices present in the Wi-Fi zone.

The best part is that users do not need to create a password once the installation is complete. As an extra, Baidu does allow users to modify the SSID and password at any given time.

The software is known for its secure connection and reliability. So if you need capable software that will connect your devices efficiently, this is definitely a good choice.

The tool is suitable for pretty much any type of device, as it is very light and has a small resource usage rate.

It will not cause any performance issues to your PC, so you can rest assured and let it generate a secure and shared connection for all your devices.

Other key features of Baidu WiFi Hotspot include:

  • Compatible with Windows operating systems starting with Windows 7
  • Minimalistic and easy-to-use interface
  • Support for data transfer

Baidu WiFi Hotspot is freeware. You just have to install it on your PC and start using it right away.

⇒ Get Baidu Wi-Fi Hotspot

mHotSpot – WPA2 PSK password security

mHotSpot is another great hotspot software for Windows 7 that converts your system into a real-time Wi-Fi router.

It’s a cross-platform software that enables users to share LAN, mobile, Wi-Fi, and Ethernet connections with several devices on all major platforms like PCs, laptops, smartphones, tablets, and PDAs.

The software comes with plenty of features in comparison to its adversaries and can connect up to 10 devices at a time.

mHotSpot connects the devices to a hotspot created by itself, and it can also work as a repeater, helping to lengthen the Wi-Fi range. The Wi-Fi hotspot is also secured with a WPA2 PSK password.

Best of all, it’s completely free with no additional upgraded versions.

Although the user interface looks a bit outdated, it is very functional and includes everything you need to set up a reliable hotspot connection.

Not only that, but this tool is very lightweight, so you should not worry about running it even on older or lower-end computers.

Other key features of mHotspot include:

  • WPA2 PSK password security
  • Details about connected devices (name, IP address)
  • Can share any type of Internet connection

mHotspot is ideal for personal use, allowing you to connect a generous number of devices without placing any restrictions.

⇒ Get mHotSpot

HostedNetworkStarter – Multi-language pack for UI

If you are looking for an alternative to Connectify, HostedNetworkServer can be a great try. It’s another hotspot software that can easily convert the PC into a Wi-Fi adapter.

The software share similar functionalities with the previous programs, including the possibility to create a Wi-Fi hotspot using the wireless network adapter of the computer.

Not only that, but it also gives permission to any other device with a Wi-Fi router to access the Internet and the network available on your PC.

What we especially like about the software is that it does not need to be installed on your PC to be operated. All you need to do is to download the zip file, open the file, and start the executable file at once.

Hence, it’s recommended to try this comprehensive solution to have real benefits regarding hotspot efficiency.

Other key features of Hosted Network Starter include:

  • Compatible with all versions of Windows
  • Multi-language pack for the UI
  • Option to save and store your network key

Hosted Network Started is a completely free tool, but it offers everything you need and is very reliable and secure.

If you are a power user, you can make use of the command-line criteria to improve the software features.

⇒ Get HostedNetworkStarter

Virtual Router Manager – Lightweight app

Virtual Router Manager is another great program that is simple yet efficient enough to convert the Windows 7 system into a hotspot in minutes.

Downloading the software will allow users to connect their PC to any device that is Wi-Fi enabled.

This is an extremely useful program that does not require the usual configuration process. The connection created by the tool utilizes WPA2 password security offering you a secure connection.

Bonus – apart from being free of cost, it’s free of ads and also never tracks your web footfall.

This hotspot software lets you monitor the connected devices by displaying a list with their names as well as MAC and IPs.

It is also important to note that, to run the application, Windows 7 users are required to have administrator privileges on their machines.

Virtual Router Manager ensures a secure connection with WPA2 encryption.

Other key features of Virtual Router Manager include:

  • Lightweight
  • Easy to install
  • Simple user interface

Virtual Router Manager is free software that takes only a few minutes to install and set up.

⇒ Get Virtual Router Manager

MaryFi HotSpot Software – Wide range of devices to connect

Those looking for software that can convert the Windows PC into a virtual router should use MaryFi, as it can well suit your requirements.

It comes with a lot more features than Connectify’s free version, apart from offering support for Ethernet, Wi-Fi, and cellular.

Moreover, it’s compatible with multiple platforms, allowing a wide range of devices to connect, such as smartphones, laptops, desktops, tablets, gaming consoles, or music players.

MaryFi offers a nice user experience, with a minimalistic and functional user interface that gives access to all controls you need without inserting any annoying advertisements or popups, even though the software is free.

Other key features of MaryFi Hotspot include:

  • Multiple language support
  • Support for data transfer and file sharing between connected devices (even offline)
  • Runs on Windows 7 or higher

It’s a secure program offering WPA2 encryption, which helps users to password-protect their system for enhanced security.

⇒ Get MaryFi

My Public Wi-Fi – Incorporated AdBlocker

MyPublicWiFi lives up to its name by allowing users to create their own public Wi-Fi. It’s a simple program that comes with a user-friendly design.

The program is easy to understand and hence, can be easily installed and set up on the hotspot. Users simply need to install the software on the machine, enter the network key and click “Start”.

The software allows to enable or disable file sharing allow or block of URL logs.

When enabled, the program lets users record and keep a check on all the URL pages that have been accessed using the specific Wi-Fi connection.

This software incorporates a free adblocker that automatically stops intrusive ads from interrupting your browsing.

It is an effective way to save data and protect your privacy.

Other key features of MyPublic Wi-Fi include:

  • Firewall protection
  • URL tracking
  • Bandwidth Manager
  • Available in 12 language

MyPublicWiFi can also be used without an Internet connection, enabling users to create a local connection between their devices.

⇒ Get MyPublicWiFi

Conclusion

While you can always connect your Windows laptop with the tethering hotspot on your smartphone device to access Wi-Fi, these hotspot solutions for Windows 7 make for a perfect way to convert your machine into a Wi-Fi hotspot in seconds.

Moreover, they also offer additional settings.

So, simply choose your favorite from the above list, and happy surfing!

Important note: Microsoft officially ended Windows 7 support. If you’re planning to upgrade to Windows 10, make sure to check out our wide collection of guides on how to make the transition as smooth as possible.

Some hotspot software developers may no longer support Windows 7. As a result, particular tools may no longer work as intended but the programs listed above should not be affected by this change. Before setting up a hotspot, make sure your PC is already online. You can follow this guide on how to connect Windows 7 to WiFi to get started.

If you use Windows 10, check out the best Wi-Fi hotspot software for Windows 10!

Visit our Hotspot hub read more awesome guides!

Fix: Printer Connected to Wi-Fi but Computer Can’t Find It

Many Windows 10 users who tried installing their printers on a wireless network are having issues connecting to it. Even though your network connection is working flawlessly and also the Wireless Printer is connected to the network, normally you can still encounter a lot of issues.

Why can’t I see my wireless printer on my network – that’s the big question, and we’re going to try and answer it properly here.

How do I get my computer to recognize my wireless printer?

Before going to the actual troubleshooting solutions, let’s make some preliminary checks and apply some easy fixes:

  • Turn off your router, wait for at least 30 seconds and turn it back on. Wait for another 30 seconds for the router to reboot and check if the wireless printer is connected to the router.
  • Make sure you have the latest firmware for the printer and the router. For that, it is recommended to connect the printer to a computer by a cable and install all the necessary software.
  • Check if the printer and PC are connected to the same Wi-Fi hotspot. If the printer is shared through another PC, make sure that you connect to the same network as that PC.
  • Make sure that the printer is turned on and connected to the router. Usually, you will have a green light indicator or an icon showing that on a screen (if the printer has one).
  • Disable the antivirus and firewall temporarily.
  • Move the printer closer to your router and make sure that there are no obstructions between them.

If you have cross-checked these simple measures, let’s try to fix this problem with the solutions provided below.

1. Add the printer using its IP address

  1. If you are confident that the printer is connected to the router properly, using the information provided in the manual of the device, address the router settings to check the IP of the printer.
  2. So, after logging into your router settings page, look for attached or connected devices, and there you should find your printer under the Wireless devices list. Note down its IP address.
  3. Now, click the Start button, type control, and select Control Panel from the results.
  4. Choose Devices and Printers.
  5. If you can see the printer on the list of devices, click on it and select Remove.
  6. Now, click on Add a printer and select The printer that I want isn’t listed.
  7. In the next window, check the Add a printer using an IP address radio button and hit Next.
  8. Select the printer type, enter the IP address of the printer and click Next.
  9. The system should identify the printer and install the necessary software.

If this solution was not comprehensive enough, we have a full guide on how to set up your printer using its IP address.

For a step by step walkthrough with extra details, check this full guide on how to connect an HP printer to Wi-Fi.

2. Run the printer troubleshooter

  1. Click the Start button and select Settings.
  2. Choose Update & Security.
  3. Now, click on Troubleshoot from the left pane and select Additional troubleshooters from the right.
  4. Click the Printer menu and hit the Run the troubleshooter button.
  5. Follow the on-screen instructions to identify and fix the printer issue.

3. Disable and reenable the network adapter

  1. Click the Start button, type network connections, and select View Network Connections from the results.
  2. Right-click on your wireless network adapter. and select Disable from the menu. You might be asked for an administrator account and password.disable network adapter
  3. Now, right-click on the network adapter again and select the Enable option.

4. Install the latest printer driver updates

Check on the Wireless Printer Manufacturer’s website to see if you have the latest drivers installed. This is usually one of the most common issues if your printer is not recognized on the network.

Also, most printers come with their own administrative software that includes a driver update feature.

However, if all else fails and if you are looking for a quicker and easier solution, using a specialized driver updating tool is what you need.

You can update any of your PC’s drivers by selecting the download and install options within the driver updater.

Why is the computer not finding my wireless printer?

Some of the common issues that may appear when you connect your printer to WiFi are an incorrect setting of the Wireless printer you might have overlooked, or Windows 10 does not have the feature Find devices and content switch.

Here are some of the probable causes for this issue:

  • The PC and wireless printer are not connected to the same network – To identify the printer, your device must be connected to the same Wi-Fi hotspot.
  • Firewall is blocking the printer – As happens with a lot of other network devices, an overzealous firewall may consider the communication with your printer a threat and block it.
  • Incorrect sharing settings – If the printer is connected through another PC to the network, check the sharing settings for that printer on the respective PC.
  • The printer is offline – That can mean a lot of things, including that the printer is not on, it’s not connected to the router properly, or even an empty toner.

Our readers also reported the following issues, which will most likely be solved using the same solutions provided below: some can’t find the printer on the network, or the Wi-Fi printer is not showing up at all.

As for the laptops that can’t find the wireless printer, the list includes Epson, Brother, HP models, and more as well as cases when the Canon printer is connected to Wi-Fi, but the computer can’t find it.

If none of these solutions worked in your case, we recommend connecting the printer directly to the router or PC with a cable if possible.

By connecting it to the router, you will bypass any issues related to its possible wireless problems.

In case you have upgraded to the latest OS, here’s a comprehensive guide on how to add a wireless printer to Windows 11.

If you have any additional questions related to this article, let us know in the comments section below, and we will help you further.

How to Disable Screenshots in Facebook: Step-by-Step Guide

Yes, you can disable screenshots in Facebook by activating the Profile Picture Guard on the mobile version. This way, no one will be able to capture any photo on your profile. We have some solutions to restrict screenshot on Facebook on the desktop browser so read on.

How do I activate Facebook screenshot protection?

1. Use Profile Picture Guard

Note icon NOTE
Profile Picture Guard only works on the mobile version of Facebook, and it’s not available in all regions. If you can’t find it, move on to the next solution.
Use-Profile-Picture-Guard-facebook-screenshot-protection
  1. Visit Facebook and log in to your account.
  2. Go to your Facebook profile page.
  3. Click on your profile picture.
  4. Select the Options link from below the photo.
  5. From the context menu, hit Turn On Profile Picture Guard.

As we mentioned in the note above, the function isn’t available in all regions, but if you’re using Facebook on a browser, there is a Chrome extension that does the same thing.

2. Hide your profile from strangers

  1. Log in to your Facebook account.
  2. Click on the downward-facing arrow at the top right corner of your screen.
  3. From the dropdown, select Settings.facebook-settings-screenshot-protection
  4. Go to the Privacy tab on the left panel.privacy-setting-facebook-screenshot-protection
  5. Scroll down to the Your Activity section.
  6. Click on the Edit button to the right of the who can see your future posts? option. modify-privacy-facebook-screenshot-protection
  7. Click on Public and select the most suitable setting.facebook-screenshot-protection-change-public-to-private
  8. Go to Limit last posts.
  9. Click on the Limit last posts buttons.
  10. Change the settings as you did in step 7 above.

3. Limit Who Can See Your Posts

You can stop random users (or even some friends) from seeing your posts:

  1. Go to Settings & privacy > Settings > Privacy.
  2. Under Your Activity, tap Who can see your future posts?
  3. Set it to Friends, Only me, or a Custom list.
  4. For older posts, tap Limit Past Posts to quickly restrict visibility.

Fewer eyes = fewer screenshots.

4. Restrict Access to Photo Albums

Make your albums visible only to trusted people:

  1. Visit your profile and go to Photos > Albums.
  2. Open an album and tap the three-dot menu > Edit album.
  3. Under Audience, choose Friends, Only Me, or a custom list.

You can do this for every album that contains sensitive or personal content.

5. Customize Post Visibility with “Custom” Sharing

For extra control when posting:

  1. When creating a post, tap the audience selector (Friends, Public, etc.).
  2. Choose Custom.
  3. Select specific friends to include or exclude.

This helps you avoid sharing posts with anyone likely to screenshot.

6. Turn On Tag Review for Photos

Tagged photos can show up on your profile—even if you didn’t post them:

  1. Go to Settings > Profile and Tagging.
  2. Turn on Review posts you’re tagged in before they appear.
  3. Enable Review tags people add to your posts.

This gives you full control over what shows up on your timeline.

7. Use Secret Conversations in Messenger

If you’re sharing private images or messages, do it in Secret Conversations:

  1. Open Messenger.
  2. Start a chat, tap the person’s name, and select Go to Secret Conversation.
  3. Use the timer icon to set messages to auto-delete.
  4. Facebook will notify you if the recipient takes a screenshot.

Ideal for personal photo sharing you don’t want saved.

Note icon NOTE
Who can see your future posts? option protects the content that you publish after modifying these settings. Limiting your last posts protects your existing content.

The first Facebook screenshot protection method doesn’t hide your profile from everyone; it only makes it impossible for them to download it. If they finally download or take a screenshot of your profile picture, they can never upload it to Facebook.

The next solution protects your privacy by showing your content to only the chosen people. Depending on your privacy needs, you can use any of these methods.

If Facebook won’t let you share anything from your PC, click the highlighted link for the proper solutions.

We also have a helpful guide on how to download a Facebook video on your PC if you were looking for that.

Let us know in the comments if you managed to block Facebook screenshotting by using our solutions.

Gallery feature spotted in the latest Windows 11 Dev Channel Build

We’ve already presented the first Windows 11 Beta Channel Insider Preview Build for 2023, so it’s time to move to the other side.

Indeed, Microsoft released the first Windows 11 Insider builds of 2023 today on both Dev as well as Beta channels, and we get to check them out right here.

You should know that, besides all the many bug fixes it brings, the former also has a hidden feature in it, a new option in the File Explorer navigation pane called Gallery and it also has a new icon.

Also, be sure to check out the latest version of Windows 11 (22H2) if you haven’t already. Also, check out the list of known bugs and issues.

What to expect from Windows 11 Insider Preview Build 25272

For the time being, it is not clear why the tech giant added the new icon and option since it is basically doing the same thing that Pictures does.

However, many now think that Pictures will get replaced by Gallery in the near future, along with other older components of the OS.

Windows 11 Dev Build 25272 includes fixes for Task Manager filter search, broken UI elements in apps, and more.

Furthermore, there are also some changes and improvements in the new build, as well as some open issues you can look for in this software patch.

One of the more notable changes is that Microsoft is removing the suggestion action for searching copied text in Microsoft Edge and showing recommended common websites on the Recommended section in Start.

Microsoft also moved Quick Assist out of Windows Tools so it displays directly in the Start menu’s All apps list and is easier to find.

We also have to mention that, starting with Build 25267, the inbox version of Windows Subsystem for Linux has been removed.

Now, when you install a build with this change if you’re a WSL user you will need to update to the latest WSL version outlined here in this GitHub post to ensure WSL continues working on your PC.

And, for those of you who constantly use printers with your Windows PCs, know that the company added a refresh button to the Windows print queue.

Now, let’s see what fixes this Insider Dev Build comes with and what else we should be aware of before or after installing it.

Fixes

[General]

  • Fixed an issue where some Arm64 devices experienced a black screen while resuming from sleep or hibernate.
  • Fixed an issue causing various UI elements in apps to disappear and reappear sometimes in recent builds.

[Search on the Taskbar]

  • Fixed the issue causing the search box on taskbar to not render correctly and display visual artifacts.
  • Japanese IME candidate items should display correctly now inside the search box on the taskbar.

[Task Manager]

  • Fixed an issue causing filtering by publisher name to not match correctly on the Processes page.
  • Fixed an issue causing some services to not show in the Services page after filtering is applied.
  • Fixed an issue which resulted in new processes appearing in a filtered list if launched while a filter is set.
  • Fixed an issue where Task Manager did not display light and dark content correctly, rendering potentially unreadable text.
  • Fixed an issue causing the Startup apps page in Task manager to not list any apps for some Insiders.
  • If there are no matching search results, Task Manager will now explicitly say that.
  • Fixed a Task Manager crash that could happen when attempting to end certain processes.
  • You can now set focus to the search box by pressing CTRL + F.

[Narrator]

  • Fixed an issue that was causing Settings to crash after turning Narrator on or off in Lithuanian and Hungarian builds.
  • Narrator should now be working correctly with Windows Defender Application Guard for Edge.

[Live Captions]

  • Fixed the issue that was causing Live Captions to not work in the latest Insider Preview builds in the Dev Channel.

[Input]

  • When using the Japanese IME with Narrator, Narrator will no longer read out the entire composition string each time you press a key.
  • The message displayed the first time you use ALT + Shift should no longer display if you only have one input language installed.
  • Fixed an issue where the Surface Pen could no longer advance PowerPoint slides in recent builds.
  • Made a change to help improve performance when using a high report rate mouse while gaming.
  • Fixed an issue where if you used the touch gesture for opening the Start menu, it could get stuck halfway.
  • Fixed an issue which could cause Excel to stop responding on certain mouse drag events when using the Japanese or Chinese IMEs.

[Settings]

  • Fixed an issue which could cause a hang if you cancelled out of certification authentication when connecting to VPN.
  • Fixed an issue which was causing Settings to crash when opening Power and Battery sometimes.
  • Fixed an issue causing Quick Settings crashes sometimes when navigating to the Bluetooth section.
  • Fixed an issue where the app icons under Settings > Apps > Default apps might be blurry.

[Windowing]

  • Fixed an issue causing a black screen when ALT + Tabbing out of certain games in recent builds.
  • The maximize button should no longer be slightly smaller than the close and minimize buttons when you highlight it in File Explorer and certain other apps while using dark mode.
  • Fixed a couple DWM crashes that were introduced in recent builds.

[Other]

  • Fixed an issue which was causing some Windows Security app crashes.
  • Fixed an issue where the print queue was showing stale job information for printer connection printers.
  • Fixed an issue where when creating a FIDO2 credential for a website in a browser, you might see the dialog twice in a row in certain cases.
  • This build contains the fix for an issue impacting Windows Hello on certain PCs. We are continuing to investigate an issue specific to Arm64 PCs (see known issues).
  • Fixed an issue which could lead to the Camera app showing that something went wrong if you pressed Pause while recording video.

Known issues

[General]

  • Using Windows Hello to sign in with facial recognition may not work on Arm64 PCs. A workaround for this is to use the Hello PIN path.

[Taskbar & System Tray]

  • The taskbar is sometimes cropped in half when using the tablet-optimized taskbar. You may also see this issue on secondary monitors.

[Search on the Taskbar]

  • In right-to-left display languages like Arabic, there are layout issues with the text in the search box on taskbar.

[Task Manager]

  • Some dialogs may not render in the correct theme when applied from Task Manager Settings page.
  • The data content area of the Processes page may flash once when theme changes are applied in the Task Manager Settings page.

[Widgets]

  • Investigating an issue where the widgets board will get stuck open in an invisible state for Insiders in China (and potentially others), causing clicks on the left side of the screen to not work. If you encounter this, pressing WIN + D may resolve the issue.
  • In right-to-left display languages like Arabic, content animates out of view before the widgets board resizes when clicking to expanded view of the widgets board.

What can I do if can’t install Build 25272?

  1. Press Win+ I to access Settings.
  2. Select the System category and click on Troubleshoot.w11 troubleshoot
  3. Press the Other troubleshooters button.other troubleshooters windows 11
  4. Press the Run button next to Windows Update.windows update troubleshooter

Be sure to report any other issues you might come across, in order for Microsoft to address and improve the overall OS experience for us all.

This is pretty much everything you can expect if you are a Windows Insider. Leave a comment below if you found any issues since installing this build.

Check out the first Windows 11 Insider Beta build for 2023

We’ve successfully and carefully navigated toward the new year and it’s time to leave all of 2022 in the past, looking ahead to a brighter future.

In case you weren’t already aware, Microsoft has released the first 2023 latest Beta and Dev Channel builds for Windows 11 Insiders.

Everybody is now hoping that the new year new me concept will also apply to the latest Microsoft-designed operating system.

Looking ahead, the tech giant says there are only good things to come from associating ourselves with its products.

What should I look for in KB5022364?

Be sure to check out the latest version of Windows 11 (22H2) if you haven’t already. Also, check out the list of known bugs and issues, just so that you aren’t caught off guard.

Circling back to what we are here for, know that Microsoft released builds 22621.1095, and 22623.1095 to the Beta Channel for Windows Insiders, which is a pretty big jump from 226x.1037.

As we said, this first build of 2023 includes more tweaking of the search functions in Windows 11, this time on the Start menu itself, and a good number of fixes.

For example, the search box design in the Start menu has been updated with more rounded corners to reflect the design of the search box on the taskbar.

Design of search box on the Start menu has more rounded corners.

The Redmond tech company has also changed the experience for preview .NET Framework updates, so that’s something else to look for.

After you installed this update, all future preview (optional) .NET Framework updates would display in the Settings app.

Another equally important fix is for the issue causing the data content area of the Processes page to flash once when theme changes are applied in the Task Manager Settings page.

Furthermore, Microsoft has oved Quick Assist out of Windows Tools so it displays directly in the Start menu’s All apps list and is easier to find.

Let’s take a closer look at the changelog as well and see what else Microsoft has prepared for all its Windows 11 Beta Channel Insiders.

Fixes in Build 22623.1095

[Taskbar & System Tray]

  • Fixed a couple issues which could result in the top half of the taskbar getting clipped.

[Start]

  • Fixed an issue where the uninstall app dialog might not display correctly in the Start menu in certain cases, making the buttons inaccessible.

[Task Manager]

  • Fixed an issue causing filtering by publisher name to not match correctly on the Processes page.
  • Fixed an issue causing some services to not show in the Services page after filtering is applied.
  • Fixed an issue which resulted in new processes appearing in a filtered list if launched while a filter is set.
  • We fixed the issue where some dialogs were not rendering in the correct theme when applied from Task Manager Settings page.
  • The issue causing the data content area of the Processes page to flash once when theme changes are applied in the Task Manager Settings page is fixed.
  • The Startup apps page in Task manager will now list apps as expected.
  • Fixed an issue which could cause a black flash when opening Task Manager.
  • If there are no matching search results, Task Manager will now explicitly say that.
  • Fixed a Task Manager crash that could happen when attempting to end certain processes.
  • You can now set focus to the search box by pressing CTRL + F.

Fixes for BOTH Build 22621.1095 & Build 22623.1095

[Search on the Taskbar]

  • Made improvements to reliability to fix some crashes and the performance of animations and transitions.
  • Fixed the issue causing the search box on taskbar to not render correctly and display visual artifacts.
  • Fixed the issue causing layout issues with right-to-left display languages like Arabic.

[Other fixes]

  • Changed the experience for preview .NET Framework updates. After you installed this update, all future preview (optional) .NET Framework updates would display on the Settings > Windows Update > Advanced options > Optional updates On that page, you could control which optional updates you wanted to install.
  • Ffixed an issue that affected Windows Server 2022 domain controllers (DC). They stopped responding when they handled Lightweight Directory Access Protocol (LDAP) requests.
  • Fixed an issue that might have occurred when the Input Method Editor (IME) was active. Applications might have stopped responding when you used the mouse and keyboard at the same time.
  • Fixed an issue that affected conhost.exe. It stopped responding.
  • Ffixed an issue that affected how fast you could copy items from a network to a local computer. For some users, the copy speed was slower than expected.
  • Fixed an issue that affected certain systems that had firmware Trusted Platform Modules. (TPM). This issue stopped you from using AutoPilot to set up those systems.
  • Fixed a resource conflict issue between two or more threads (known as a deadlock). This deadlock affected COM+ applications.
  • Fixed an issue that affected devices that were subject to Microsoft Exploit Protection Export Address Filtering (EAF). Some applications stopped responding or did not open. These included Microsoft Office and Adobe Reader.
  • Fixed an issue that affected searchindexer.exe. It randomly stopped you from signing in or signing out.
  • Fixed an issue that might have occurred when you converted or reconverted Japanese Kanji using a multibyte character set (MBCS) app. The cursor might have moved to the wrong location when you typed.
  • Fixed an issue that affected mstsc.exe. It stopped responding while connecting to a RemoteApp and Desktop Connection.
  • Fixed an issue that might have affected FindWindow() or FindWindowEx(). They might have returned the wrong window handle.
  • Fixed an issue that affected picture files you found using search on the taskbar. This issue stopped you from opening those pictures.

This is pretty much what you can look for in the new Windows 11 Insider Beta Channel. We will keep you posted once something changes for better or worse.

Also, please keep in mind that next week we will have the January 2023 Patch Tuesday rollout, which is an important time of the month.

What can I do if I can’t install KB5022364?

  1. Press Win+ I to access Settings.
  2. Select the System category and click on Troubleshoot.w11 troubleshoot
  3. Press the Other troubleshooters button.other troubleshooters windows 11
  4. Press the Run button next to Windows Update.windows update troubleshooter

Also, make sure to report any other issues you might come across, in order for Microsoft to address and improve the overall OS experience for us all.

This is everything you can expect if you are a Windows Insider. Leave a comment below if you found any issues since installing this build.

Protect your Privacy with the Cyber Privacy Suite Software

Nowadays, your privacy is in danger every time you open your browser, but Cyber Privacy Suite is a tool that can prevent that.

And not only that, but it also has built-in antivirus protection, which makes it a great combination with a VPN.

What is Cyber Privacy Suite and how can it help?

As we’ve mentioned above, Cyber Privacy Suite is a combination of VPN and antivirus, password protection, and a lot more.

This solution also features a browser tracking and ad blocker that will ensure you won’t be bothered by any distractions while you work or play.

Not only that, but it also blocks any attempts of microphone and webcam highjacking by wrongdoers.

So, this solution is perfect for home, but it really becomes an asset if you really need to connect through a public hotspot.

Now that we know all that, let’s see what are its best features and how to use this tool efficiently.

What are the best features of Cyber Privacy Suite?

1. Dedicated VPN

Cyber Privacy Suite has a built-in VPN with more than 20 locations in the world to choose from.

After you turn it ON from the Status tab, you will be prompted to choose a virtual location and click the Activate button.

It will take up to 30 seconds to connect to the server but after that, your real IP will become invisible to everyone.

To be honest, it’s not nearly the best VPN solution we’ve seen but it still covers the most part of the world and it’s pretty fast.

We wouldn’t recommend it for gaming or unleashing a world of online geo-blocked content but it’s perfect for when you log in from a public hotspot or you simply want to conceal your identity online.

2. Login credentials and personal information protection

After scanning your device, Cyber Privacy Suite will find all the login credentials that can be potentially exposed.

Usually, you would need to go through all these accounts and change the passwords and eventually get a password manager app to protect them.

With Cyber Privacy Suite, you only need to click on the Move to Vault button to be automatically encrypted on your machine. And this way, no one will be able to access them on your device if they hijack the system.

In the same way, this tool identifies any profiles you’re using and the exposed data that they contain.

3. Tracking blocker and eraser

Cyber Privacy Suite not only has a tracking blocker, but it also scans all your browsers for tracking and browsing records.

And, with a simple click on the Delete button under the Browser Tracks tab, you simply get rid of them.

You can do that manually on any of your browsers, but this feature really saves you a lot of time and effort.

4. Sensitive documents encryption

If you have sensitive documents on your device, Cyber Privacy Suite will find them and with a single click, it will encrypt them for safety.

When a highjacker gets into your system, that’s what he’s looking for, and if they’re out in the open, you will suffer the consequences.

This tool runs a deep scan on your device, finds them, and protects them in seconds. If you have them stored in a folder, you may add it too for encryption.

However, you should know that if sensitive information appears on an image file, the tool won’t identify it.

Also, although the tool tells you that it saves the documents into a vault, which is not a regular folder on your PC.

In fact, everything is stored into a page of the applications which is a lot better because they cannot be physically located by any trespassers.

5. Antivirus protection

ShieldApps doesn’t offer too much information about its built-in antivirus from Cyber Privacy Suite. However, we confirmed with the developer that it’s the same product included in its dedicated Shield Antivirus.

They say that it offers active protection against malware, spyware, viruses, ransomware, trojans, and more.

In our tests, it did turn a red flag on a shady website that was not secure and safe to access and that was a sign that the tool is working.

Also, the developer also provided a VB100 test report from Virus Bulletin that certifies a 100% malware detection rate.

6. Webcam and microphone protection

Not many security solutions protect your webcam or your microphone although they are important components targeted by hackers.

And unless you want to cover them with duct tape, Cyber Privacy Suite protects them by detecting and blocking any unauthorized access.

You don’t even need to know the whole mechanism behind it. Just turning the Camera and Microphone protection settings to ON, will do the trick.

How do I get Cyber Privacy Suite and what is its price?

  1. Go to the Cyber Privacy Suite website and hit the Download Now button.
  2. Next, click the Download button for your operating system. As you can see, it’s also available for Mac, iOS, Android, and Chromebook devices.
  3. After you download the installer, run it and go through the steps for installation.

When you start it for the first time, the software will perform a scan of your system, identifying any possible problems and vulnerabilities.

That being said, Cyber Privacy Suite will be installed on your PC. However, that will be the 7-day trial version.

It is a limited version that only identifies the problems, without actually fixing anything.

If you want to protect your device by using all the features, you will have to pay $77.99 for a licence that covers all your devices.

⇒ Get Cyber Privacy Suite

Pros
Simple to install and use
Built-in VPN with 20 locations
Compatible with Windows, macOS, Android, Chromebook and iOS devices
Documents and credential protection
Antivirus protection for malware, spyware, viruses, ransomware, trojans, and more
Cons
Not too many server options for the VPN
The antivirus protection is not as strong as with a dedicated tool

Final notes

Cyber Privacy Suite doesn’t surpass more powerful dedicated VPNs simply because it doesn’t have as many servers available.

However, on the antivirus side, it provides a clear certification for malware detection, so it covers the security part pretty well.

It’s a very useful tool for home usage and it offers excellent protection if you want to work outside the home and connect it to public Wi-Fi.

Also, it does a very good job of protecting you from website tracking and it does block ads as well.

So, our conclusion is that Cyber Privacy Suite is a very useful multitool for non-techies that want to protect their privacy without any sophisticated settings and controls.

You might also be interested in checking our selection of the best privacy protection tools.

We hope that our article offered useful information. Just give it a try yourselves and let us know about your impressions in the comments section below.

Solved: Windows Could Not Start the Service on Local Computer

Sometimes, when trying to open a Windows service, it fails to start with the error, Windows could not start the service on a local computer. While this issue is common with the Windows Update service, it can also show up with other services, such as the audio service.

This usually happens if the service dependencies are not running, if the service is disabled or when the service does not have full permissions. However, it could also be due to overflowing temp files or system file corruption.

What to do if Windows could not start the Windows Update service on the local computer?

1. Run Windows Troubleshooter

  1. Press the Win + I keys together to launch the Windows Settings app. Click on System on the left side of the app and then click on Troubleshoot on the right. system troubleshooter
  2. Next, click on Other trouble-shooters on the right. Other trouble-shooters
  3. On the next screen, go to the right, look for the troubleshooter related to the service, for example, Windows Update and click on Run. windows update troubleshooter
  4. The troubleshooter will now start looking for any issues, and if any are found, it will apply the fix automatically.

Once done, restart your PC and check if the service is running or if you still encounter the Windows service error.

But if the Windows Troubleshooter is not working for some reason, here we have a detailed post on how to fix the issue.

2. Give full permission to the Windows service

  1. Press the Win + R keys simultaneously to launch the Run console. Type services.msc in the search be and hit Enter to open the Service manager. run services.msc command
  2. In the Services window, go to the right and look for the service, for example, Print Spooler. Double-click on it. open print spooler service
  3. As the Properties window opens, select the Log On tab, select This account and click on Browse.this account - browse
  4. Next, in the Select User dialog, click on Advanced. selecet user advanced
  5. In the next window, click on Find Now. Now, from the Search results below, select Local Service and press OK. select user - local service
  6. Let the password field remain blank. Press Apply and then OK to save the changes and exit.

Now, reboot your PC and check if you still see the error, Windows could not start the service on a local computer. Changing the Log On settings also helps with Error 1067: The process terminated unexpectedly.

But if the local print spooler service is still not running, you may refer to the troubleshooting methods in our guide to fix the issue.

3. Re-configure the service

  1. To open the Run console, press the Win + R shortcut keys. Type cmd in the search bar and press the Ctrl + Shift + Enter keys to launch Command Prompt with admin rights. run cmd command
  2. Run the below commands in the Command prompt window one after another and hit Enter after each one (replace the highlighted part with the relevant service):
    • net stop w32time
    • w32tm /unregister
    • w32tm /register
    • net start w32time
    • w32tm /resync
  3. Once the commands have been executed successfully, close the Command prompt, restart your PC, and you should not see the error anymore.

4. Delete Temporary Files

  1. Open the Windows Settings app by pressing the Win + I keys together. Click on System on the left and then click on Storage on the right. system storage
  2. Now, on the right, click on Temporary files.
  3. On the next screen, select the files you want to delete and press Remove files.

Once all the files are deleted, close the Windows Settings app and reboot your PC to see if you still encounter the Windows service error.

5. Run SFC Scan and DISM Tool

  1. Press the Win + R keys together to open the Run dialog, type cmd, and press Ctrl + Shift + Enter keys to open Command Prompt with admin rights. run cmd command
  2. Execute the below command in the Command prompt (admin) window and hit Enter: sfc /scannowSFC/scannow
  3. Windows will now start looking for the corrupted files and repair them automatically. The process takes a while, so wait patiently till you see a success message.
  4. Next, run the below command and hit Enter: DISM /Online /Cleanup-Image /CheckHealthrun dism scan
  5. This process also takes a while, so wait patiently till the utility repairs or replaces the faulty files.
  6. Once done, exit the Command Prompt and restart your PC.

At the same time, you must also run an antivirus scan or make sure that the Windows Defender Firewall is activated for added protection.

But, if you bump into a Windows service error like WLAN AutoConfig error 1068 instead, we have some effective workarounds for you to fix the issue.

You can let us know in the comments box below for any other queries related to any specific Windows service not running.

Fix: Mailbox Has Been Temporarily Moved on Microsoft Exchange Server

Microsoft Outlook is a good email client, especially beneficial for organizations or schools. While the client is featureful, there are a bunch of errors such as the Your mailbox has been temporarily moved to Microsoft Exchange server error.

This error makes it a bit difficult for users to use Microsoft Outlook. If you are among such users, then this guide is just for you.

What causes Your mailbox has been temporarily moved to Microsoft Exchange server error?

After some research, we have found a bunch of reasons that would trigger the Your mailbox has been temporarily moved to Microsoft Exchange server error:

  • Corrupt Outlook profile: It goes without saying that any problem with your Microsoft Outlook profile will trigger issues with it.
  • Outlook has connected with Exchange Server: Chances are that your mailbox has been temporarily moved to a Microsoft Exchange Server.
  • Disable add-ins: Add-ins might be conflicting or interfering with Microsoft Outlook causing the issues.
  • Registry tweaks are needed: There are some users have reported that a few registry tweaks fix the problem.

How can I fix the Your mailbox has been temporarily moved to Microsoft Exchange server error?

Before going ahead with the advanced solutions, we would suggest you try the below simple methods to fix the problem:

  • Restart your PC. Check some recommended solutions if the computer is stuck on restarting.
  • Try restarting the Microsoft Outlook program and make sure no other program is running in the background.
  • Check your internet connection and make sure it is working fine.

Now let us check out the advanced solutions.

1. Keep the primary profile and delete others

  1. Close Microsoft Outlook.
  2. Open the Start menu.
  3. Open Control Panel.
  4. Select Mail.
  5. Click Show Profiles.
  6. Select the profile you wish to remove and click Remove.
  7. In the message prompt that appears, select Yes.
  8. Perform the same steps for other profiles, except for the primary one.
  9. Start Outlook and check if this resolves the issue or not.

Do note that if you delete a profile, all the data associated with the profile will also be deleted. So, make sure that you are deleting all the secondary profiles and not the primary one.

2. Create a new profile and delete your original profile

  1. Close Microsoft Outlook.
  2. Open the Start menu.
  3. Open Control Panel.
  4. Select Mail.
  5. Click on Add.
  6. Set a name for the profile and press OK.
  7. Follow the on-screen prompts to add an account.
  8. Click Finish when the process completes.
  9. In the prompt that appears, select Yes.
  10. Select the newly created profile.
  11. Choose Always use this profile option.
  12. Click Apply.
  13. Select the old profile and hit the Remove button.
  14. Start Outlook and check if this fixes the issue or not.

3. Disable Outlook add-ins

  1. Launch Outlook.
  2. Click on File.
  3. Select Options.
  4. Choose Add-ins.
  5. Click on Go button for Manage.
  6. Uncheck the add-ins that you want to disable.
  7. Select OK and check if this resolves Your mailbox has been temporarily moved on Microsoft exchange server error.

4. Enable the cached Exchange Mode

  1. Exit Microsoft Outlook.
  2. Open the Start menu.
  3. Open Control Panel.
  4. Select Mail.
  5. Select E-mail Accounts.
  6. Double-click on your account.
  7. Check the Use Cached Exchanged Mode.
  8. If the option is checked, uncheck it and check it back again.
  9. Click Next.
  10. Restart Outlook.

5. Tweak Registry

  1. Press Win + R keys to open the Run dialogue.
  2. Type regedit and press Enter.
  3. Navigate to the below path and press Enter. HKCU\SOFTWARE\Microsoft\Office\15.0\Common\Identity\
  4. Double-click on the EnableADAL key.
  5. Under Value Data, enter 1.
  6. Click OK.
  7. Double-click on the Version key.
  8. Set the Value data as 1.
  9. Restart your PC for the changes to take effect.

For users who are encountering Your mailbox has been temporarily moved on Microsoft exchange server error, we would suggest you follow the above steps and tweak the registry.

We have a guide that will help you with some easy ways to restore Windows registry without backups.

6. Disable Firewall or malware checker

  1. Open the Start menu.
  2. Type Windows Defender Firewall and open it.
  3. Select Turn Windows Defender Firewall on or off option from the left.
  4. Check the boxes for Turn off Windows Defender Firewall (not recommended) for both Public and Private networks.
  5. Click OK.
  6. Launch Outlook and check if this resolves the Your mailbox has been temporarily moved on Microsoft exchange server error.

That is it from us in this guide. You can apply the above-mentioned solutions for other Outlook errors such as :

  • Your mailbox has been temporarily moved on Microsoft Exchange Server Office 365
  • Your mailbox has been temporarily moved on Microsoft Exchange Server Exchange 2016
  • Your mailbox has been temporarily moved on Microsoft Exchange Server Exchange 2013

If Microsoft Outlook is running slow for you, then we would suggest you check out our guide on it which will help you resolve the problem.

Several users have reported that for them, their Outlook folder disappeared. Fortunately, we have a guide that will help you resolve the problem.

You can also check out our guide on how you can add multiple accounts to Outlook. We also have a guide that will help you with how to use Outlook scheduling assistant.

Let us know in the comments below, which one of the above solutions resolved the Your mailbox has been temporarily moved on Microsoft exchange server error.

WSL2 Stopped Working: 4 Easy Ways to Make It Work Again

When running a Linux virtual machine on your Windows PC, you may come across issues such as the WSL2 stopped working, which has been troubling other users.

In this guide, we will discuss what is WSL and what it does in actual terms. Moreover, we will give you a few solutions that will help you resolve the problem on your end. Let us get right into it.

What is WSL or Windows Subsystem for Linux?

WSL or the Windows Subsystem for Linux lets users run Linux OS directly on their Windows PC. The best part of using WSL is that it lets you run complete Linux inside Windows, allowing you to use the same files and apps seamlessly.

WSL2 makes use of the Hyper-V virtual machine technology. This boosts the performance of using Linux on Windows OS as the compatibility is improved and the file access speed is up to 20x faster than WSL1.

Microsoft introduced WSL2 in 2020, so it is compatible with the latest version of Windows, i.e., the Windows 11 OS. However, if you are using Windows 10, then you need to manually configure it for better performance.

While you will get almost similar performance on Windows 10, as per user reports, WSL2 performs well and is stable on Windows 11.

What can I do if WSL2 stopped working?

1. Set the LxssManager service startup to Automatic

  1. Press Win + R keys to open the Run dialogue.
  2. Type regedit and press Enter.
  3. Navigate to the below-mentioned path. HKEY_LOCAL_MACHINE\SYSTEM\CurrentControlSet\Services\LxssManager
  4. Double-click on the Start key.
  5. Under the Value data field, type 2.
  6. Press OK.
  7. Restart your PC.

Following the above steps will set LxssManager to auto-start. We would advise you to only tweak registry settings if you know what you are doing, as incorrect tweaks can lead to system failure and important services getting disabled.

2. Restart LxssManager Service

  1. Open the Start menu by pressing the Win key.
  2. Type services and open it.
  3. Locate LxssManager and double-click on it.
  4. Under Service status, select Stop if it is running.
  5. Click Apply.
  6. Select Start under Service status to run the service.
  7. Click OK and Apply.
  8. From the Startup type drop-down, select Automatic.

Often the LxxManager service can come across an issue that could result in its malfunction. In such a case, we would advise you to restart the service back again by following the above steps and check if this fixes the WSL2 issue.

3. Uninstall Windows update

  1. Press Win + I keys to open the Settings menu.
  2. Select Windows Update from the left pane.
  3. Click on Update history.
  4. Scroll down and click on Uninstall updates under the Related settings section.
  5. Hit the Uninstall button next to the update you wish to uninstall.

We have shown the steps to uninstall updates for Windows 11 OS, but the steps are similar for Windows 10 as well.

Chances are the version of Windows update that you are running has some bugs which are causing the WSL2 stopped working problem. You can uninstall the update and check if this fixes the problem or not.

4. Enable Hardware Virtualization

  1. Press Win + I buttons to open Settings.
  2. Select Recovery from the right side.
  3. Under Advanced startup and hit the Restart now button.
  4. Select Troubleshoot.
  5. Choose Advanced options.
  6. Select UEFI Settings.
  7. Choose Restart.

Now follow the below steps depending on the brand of laptop you have.

For Acer laptops

  1. When the system is about to boot press F2 to enter the BIOS menu.
  2. Select Advanced page.
  3. Enable the Intel VTX and Intel VTD settings for Intel-based processors.
  4. Enable AMD-SVM and AMD-IOMMU for AMD-based processors.
  5. Press F10 to save the settings.

For Dell laptops

  1. When the system is about to boot press F2 to enter the BIOS menu.
  2. Select Advanced.
  3. Choose Virtualization.
  4. Set Virtualization to Enabled.
  5. Set Virtualization for Direct-IO (or VT-d) to Enabled.
  6. Save and Exit.

We have shown the steps to enable Hardware Virtualization for Acer and Dell laptops. But you can check out this official Microsoft support page to know how to enable the settings for other brands.

That is it from us in this guide. Readers can also check out our guide to know how they can fix the Windows 10/11 bootloader from Linux.

Readers who want to know how they can create a bootable USB media for Linux OS can refer to our dedicated guide.

Let us know in the comments below, which one of the above solutions helped resolve the problem at your end.

Latest Microsoft PowerToys update ships with self-contained .NET 7

Microsoft has just released the latest update for PowerToys bumping it to v0.66.0. When compared to the previous update, this is quite a significant update as it features a self-contained .NET 7 thus making it easier to keep it updated. It also saves on storage space. What’s more, users now get to pick which language the Text Extractor uses from the installed OCR languages.

On top of these, the update also unpacks a ton of bug fixes and stability improvements, not to mention the new setting that lets users sort the order of the accented characters by usage frequency in Quick Accent and fix for the reduced resource consumption bug that was caused by logging. Be sure to check out the full changelog over at GitHub for more details on the changes made as well as fixes.

If you are interested in trying out PowerToys on Windows 10 or 11, you can download the version 0.66.0 update from the GitHub page. If you already have PowerToys running on your device, it should automatically notify you of this update. Alternatively, you can get this update manually today by launching your app, then clicking on General followed by the Check for Updates, and then the Install Now button.

Microsoft Teams’ Meeting toolbar redesigned to enhance navigation and more

Microsoft recently announced that it is making several improvements to the Meeting toolbar in Teams. The goal behind refreshing the Meeting toolbar and adding new features to it is o make it easier for users to navigate meetings and uncover new features as well as capabilities. Here’s everything you need to know about these improvements:

First up is the added capability that allows users to raise their hand via the new dedicated Raise Hand button that can be found in the redesigned Meeting toolbar.

Improved Meeting toolbar

Second up, you will now be able to make use of the More menu to find any command they are looking for via the new and well-defined sub-menu groupings.

More menu

What’s more, you can easily switch views during meetings by simply clicking on the View button and get to select the option that best suits you.

View button

That said, it is worth noting that these improvements have currently been rolled out exclusively to users in the Teams Public Preview channel running on either Windows or macOS. The improvements are likely to be rolled out to general availability in form of a future update.

In related news, we invite you to check out our post that highlights all the new features that made it to Teams in December last year. Share your thoughts with us in the comment section below.

How to Reset iTunes Library on Windows [Easy Guide]

You have found this guide because you want to reset your iTunes library on Windows. Here is all you need to know.

If the iTunes program is giving you problems or you want to start over with a new collection, resetting the iTunes library on a Windows machine might be a helpful troubleshooting step.

In this article, we’ll look at the many choices and the procedures you may use to reset your iTunes library on a Windows computer. There are a few different methods to reset the iTunes library.

Why Reset the iTunes Library?

You may wish to restart your iTunes collection on a Windows machine for several reasons:

  • For example, if iTunes is running slow or experiencing other issues – If iTunes is running slow or experiencing other problems, resetting the library can sometimes help resolve these issues.
  • You want to start fresh with a new library – If you have been using iTunes for a long time, your library may be cluttered with old or unused media. Resetting the library allows you to start fresh with a new library and can make it easier to manage your media.
  • You have a new PC or replaced the hard drive – If you have a new one or have replaced the hard drive on your current computer, you will need to reset the iTunes library to use iTunes on the new device.

On a Windows PC, several different methods exist to reset the iTunes library. Whether you want to start with an empty library or maintain your media files will determine your choice.

Let us now get to it.

How do I reset my iTunes music library?

1. Reset the iTunes library without deleting media files

  1. Open the iTunes folder on your computer after closing iTunes. Depending on where you installed iTunes, the location of the iTunes folder may vary, although it is often found in the user directory’s Music folder.
    C:\Users\afamo\Music\iTunes
  2. Locate the iTunes Library file in the iTunes folder and change its name to iTunes Library.old.
    reset itunes library windows
  3. Open iTunes to automatically create a new iTunes Library.
    reset itunes library windows

2. Reset the iTunes library and delete media files

  1. Open the iTunes folder on your computer after closing iTunes. The location of the iTunes folder may vary depending on where you installed iTunes. However, it is often found in the user directory’s Music folder.
  2. C:\Users\afamo\Music\iTunes
  3. Locate the iTunes Library file in the iTunes folder and change its name to iTunes Library.old.reset itunes library windows
  4. Delete the iTunes Media folder in the iTunes folder. Your media files, such as movies, music, and TV series, are in this folder.
  5. Lastly, open the iTunes app. If prompted, select the Create Library option and enter a name for the new library. iTunes will create a new iTunes Library file and an empty iTunes Media folder.

You can get rid of all your data or keep them during an iTunes library reset. It would be best if you chose what seems most appropriate for you.

Finally, let us know in the comments below if you have had any success using these methods to reset your iTunes library on Windows.

5 Best Samsung Smart TV Keyboards: High-Rated Picks

Samsung Smart TVs can be compatible with third-party peripheral devices such as wireless keyboards.

Smart TV keyboards make it easier to navigate through the settings and some even come with a trackpad, making the navigation process simpler.

If you are looking for a keyboard to pair with your TV, this is the article you need.

We have listed the best Samsung smart TV keyboards that offer wireless connectivity, touchpad, as well as customization to make your TV-watching experience better.

Note: Deals are subject to change. Keep in mind that the price tag often varies. We recommend going to the vendor’s website to check the price. Some products may be out of stock by the time you’ve made your purchasing decision. So, hustle and hit the buy button for one of the following products.

What are the best Samsung Smart TV keyboards to buy?

1. SAMSUNG Official Smart Keyboard Trio 500 White

  • Easy pairing with 3 devices simultaneously
  • DeX mode for desktop-like usage
  • Tailored for any Samsung devices
  • To-go and slim layout
  • No backlit for night utility

If you’re looking for the most suitable keyboard for Samsung devices, this official Samsung keyboard it’s what you need in terms of compatibility, usage, and connection.

You have up to 3 device control at once, a switching functionality with 1 click, and productivity features to navigate through windows or apps on your Samsung TV and additional devices.

In addition, take advantage of customized hotkeys for easy access to your favorite streaming apps or frequently used apps on your Smart TV.

2. Logitech K600 TV

  • Wireless keyboard with all-in-one content navigation
  • 15-Meter wireless range
  • Easy switch feature to work with multiple devices
  • Compatible with Samsung, LG, and other Smart TVs
  • Strictly for casual users

The Logitech K600 TV is the size of an average laptop keyboard with an integrated touchpad. It is a Bluetooth keyboard and offers 15 meters wireless range offering a reliable connection to your Samsung Smart TV.

Logitech K600 TV’s Easy-switch feature allows you to switch between multiple devices with a tap of a button. The media keys offer basic functionalities to play, pause, mute and adjust the volume.

3. Logitech K400 Plus

  • Low-cost wireless keyboard with touchpad
  • Works with PC, Android and Chrome OS
  • Up to 10 meter wireless range
  • Compact and slim
  • Nothing noticeable

Logitech’s K400 Plus offers similar functionality as its elder sibling but at a lower cost. It is a compact and slim wireless keyboard that is designed to work with Smart TVs.

Logitech K400 Plus offers up to a 10-meter range. It is a full keyboard with a functional touchpad which is small but should work for navigation purposes.

The unifying receiver makes the setup of your TV keyboard a snap. It also has familiar media key controls to adjust the media properties.

4. Arteck 2.4G Wireless Keyboard Ultra Slim Silver

  • Easy setup with USB receiver
  • Long battery life & low consumption
  • Ergonomic design and scissors X structure
  • Compatible with SmartTV and Windows 11 or later
  • Small footprint keys

Arteck USB wireless keyboard is a neat choice to achieve your SmartTV navigation needs. You benefit from intuitive usage and a delicate typing experience.

When it comes to battery, this keyboard has everything you need. You can use it without breaks for hours and preserve battery life with the automatic sleep mode.

It’s worth mentioning that it has 10 meters (33 feet) wireless range so you can utilize it from a long distance.

5. Macally Bluetooth Keyboard with Touchpad

  • Couch media for streaming TVs and apps
  • Touchpad with left/right mouse buttons
  • Multi-device compatibility
  • Pair and switch between 3 devices
  • Too sensitive touchpad

This wireless touchpad keyboard from Macally is the ideal choice for using multiple interfaces right from your bed.

You have multi-compatibility for TV, laptop, or mobile devices and access TV apps or web browsers seamlessly.

Plus, you can use this highly compatible keyboard with Mac, Windows, and Samsung TVs. Also, be aware of the D-Pad button and 13 multimedia shortcut keys.

All the keyboards listed in this article offer wireless functionality. While Logitech keyboards offer a solid build and good typing experience, other keyboards offer backlit keys and are cheaper alternatives.

Go through the list and pick a keyboard that meets your requirements the best.

Opera GX VS Firefox – Which Is Better For You in 2026?

Now if you are considering making a switch and wondering if Opera GX is a better alternative than Firefox, this is the article you need.

You are no stranger to the fact that Firefox is a popular web browser available across platforms with over 10% browser user market share.

With excellent add-on abilities, good privacy, and security features, it is one of the best web browsers available across platforms.

Google Chrome, on the other hand dominates when it comes to web browser market share.

While its extensive Chrome Store extensions are enticing, but not the first choice of browser for individuals skeptical of privacy concerns.

Fortunately, there are multiple Chromium-based browsers like Opera GX from different companies.  Opera GX is aimed at gamers and offers some unique features unrivaled by any other browser for PC users. 

For more useful information, don’t hesitate to read our in-depth review of Opera GX.

Is Opera GX better for low-end PC?

The advantage of Opera GX is that you can customize the resources it uses. In other words, it can squeeze any of the specs you’ve got to run.

When you think that the browser was created for gaming, you might imagine that it was made for a high-configuration PC, but it’s the opposite.

Is Firefox slower than Opera?

To find out which browser is faster, we tested them with 3 different tools: Speedometer, JetStrem 2, and MotionMark, and here’s what we’ve found:

Tester
(runs per minute)
Opera Firefox
Speedometer108.2098.40
JetStream 2123.2682.30
MotionMark403258

Clearly, Opera GX beat Firefox on all grounds at speed so there is no doubt about that. Since it has its bandwidth limiters available, it surely is a better browser for low-end PC.

Opera GX is slim and it has low resource consumption just so it doesn’t interfere with your gaming needs and that makes it perfect for low-end PCs.

Opera GX

Take advantage of the network limiters, RAM and CPU controllers, and battery savers for your laptop and phone.

We have compared the two browsers and evaluated them carefully, so don’t hesitate to take a closer look right away.

Opera GX vs Firefox – features, design, & security compared

?️ UI & Design 

Opera GX vs Firefox

Firefox and Opera GX are nothing alike but are intuitive to use. Opera has made a conscious effort in improving the user experience by offering some unique features with its GX browser.

Starting with Firefox, the design language is modern yet simple. Any type of user can get used to the functions and features offered by the browser. 

Opera GX is a gaming-inspired browser. With a dark and red accent theme and Razer Chroma integration, GX can complement your gaming rig and match the theme. 

Opera GX vs Firefox

You can pick from one of the pre-selected colors or any color you like by opening the Easy Setup function from the top right corner. Furthermore, you can customize the browser with custom wallpapers.

Due to better tab management and easier navigation to access advanced settings, Opera GX wins the battle between the two web browsers in Firefox vs Opera GX based on the user interface.

⚡Performance 

Opera GX vs Firefox

Firefox is known for its excellent memory management. It helps in faster data retrieval and response interval and is ideal for multi-tab users. It can handle heavy sessions without hogging and restrict RAM usage.

Opera GX is on par with Firefox when it comes to RAM management. However, the built-in resource management tool GX Control gives it an edge over Firefox.

Opera GX vs Firefox RAM usage

GX Control comprises a few tools, including CPU, RAM, and Network Limiter. Once enabled, it allows you to limit how much RAM, CPU, and network usage your browser takes up.

So, this would be a hard assessment since there are several factors and variables.

However, Opera GX doesn’t have to deal with any RAM issues since you can allocate it as much as you want.

In fact, this is one of the differences in an Opera browser vs Opera GX comparison.

Regarding the Hot Tab Killer feature, note that it allows you to slash tabs that steal your resources.

While both browsers offer excellent performance and use system resources efficiently, Opera GX offers more for advanced users to prioritize the resources depending on the task.

? Features 

Firefox has an extensive add-on library. Although it may not be as large as Chrome’s web store, you can find all the major extensions you want there.

The browser also comes with some handy built-in features, such as the screenshot tool. Right-click on any web page and choose the Take Screenshot option. 

You can capture the full screen, choose a specific area or save a full web page. The images can be copied or downloaded to your computer.

Other handy features include a Reading mode that strips off unwanted contents from the web page and Pocket integration to save web pages.

Opera has its add-on library, but it is not as good as the Firefox add-on library. However, this Chromium browser fully supports Chrome Web Store extensions.

In our testing, all the Chrome extensions worked normally without any issues.

Opera GX vs Firefox

Similar to Firefox, Opera GX also offers some handy built-in tools, including a screenshot tool. You can take screenshots, add text, and emojis and annotate and share it on social media. 

Additionally, it also offers an intuitive Dark Mode feature. Right-click on any webpage and choose the Force Dark Mode option. Opera GX will show the webpage in dark mode.

As a gaming browser, GX comes with built-in streaming apps and social media integration.

The sidebar allows you to access popular streaming and social media apps, such as Twitch, Spotify, YouTube Music, Apple Music, Discord, and more directly from the browser.

Security and Privacy 

Firefox offers excellent privacy features. You can choose what to block and allow from the settings. The company being non-profit means it is much easier to trust the company when it comes to user data.

Users can block trackers, cookies, crypto miners, and fingerprints from the settings. The Enhanced Tracking Protection blockers target over 2,000 trackers including trackers from companies like Facebook, Twitter, and more.

As for the Firefox Monitor feature, it can automatically notify you if your password has been breached.

Opera GX offers a similar set of privacy and security features as Firefox, in addition to a free VPN and ad blocker.

The built-in ad blocker blocks suspicious and annoying ads on web pages. As for the VPN, you can access restricted content securely.

Both browsers warn you about suspicious pages by checking the active page against its database of phishing and malware websites. 

Opera GX vs Firefox privacy

Firefox and Opera GX offer great security features, including a third-party cookie tracker blocker.

Opera GX, however, has an edge with its adblocker and built-in, which is not a standard feature across browsers, including Firefox.

⇒ Get Opera GX

⇒ Get Firefox

Opera GX vs Chrome vs Firefox

Chrome beats the two other browsers in terms of market share and extensions, but it’s not ideal when it comes to sheer functionality.

We’re not even getting to features because we constantly deal with Chrome’s multitude of errors and problems that we addressed until now.

While Chrome and Opera have a Chromium engine, Firefox has its own Gecho engine, which makes it a bit different.

In features, Opera GX stands out again with its social network integration and a free VPN that you usually need to pay a lot of money for.

Which one is your choice?

Mozilla Firefox is an excellent browser when it comes to performance, design, security, and features. However, for gamers and power users, Opera GX offers more.

Apart from the unique GX control feature that allows you to limit the CPU, memory, and network usage of your browser, it also comes with social media and streaming app integration.

For those who want to switch from Firefox to a Chromium-based browser, Opera GX is an excellent alternative. It offers more features, better security, and greater control over your browser.

You should also consult our list of the best browsers with low memory usage if you want an efficient browser.

Which one did you choose? Share your insights with us in the comments section below.

How to Change Password on Remote Desktop? 5 Ways

Changing the password for your remote desktop connection is essential to ensure your device’s security. There are various ways in which you can change the password. 

This guide has discussed some of the easiest ways to change passwords for Remote Desktop on Windows 10 and 11. 

How to change the Remote Desktop Password in Windows 10?

1. Use a shortcut 

  1. Press Ctrl + Alt+ End together.CTRL + ALT + END -change password on Remote Desktop
  2. From the pop-up, select Change a password.
  3. Follow the on-screen prompts to complete the process.

2. Use the Command Prompt

  1. Press the Windows key, type CMD and click Run as administrator. DOS COmmand Prompt -change password on Remote Desktop
  2. Copy and paste the following command and press Enter: C:\Windows\explorer.exe shell:::{2559a1f2-21d7-11d4-bdaf-00c04f60b9f0}
  3. Then, on the Windows Security Options page, click Change a password. 

3. Use the Windows PowerShell

  1. Press Windows + X to open the Power User menu.
  2. Select PowerShell(Admin).powershell- change password on Remote Desktop
  3. Input the following command after replacing UserName with your user name and InputNewPassword with the password you want to set and press Enter: Set-ADAccountPassword -Identity UserName -NewPassword (Read-Host -Prompt “InputNewPassword” -AsSecureString) -Reset

3. Use the on-screen keyboard 

  1. Press Windows + R to open the Run window. osk - change password on Remote Desktop
  2. Type osk and press Enter to launch the on-screen keyboard. 
  3. Press and hold Ctrl + Alt on your physical keyboard and click Del on the on-screen keyboard. 
  4. Minimize the on-screen keyboard and click Change a password. 

5. Use the Active Directory Users & Computers console

Tip icon Tip
You can use this method to change the password for your RDP connection even if you don’t remember the current password.
  1. Press Windows + R to open the Run console. 
  2. Type dsa.msc and press Enter to open Active Directory Users and Computers console. 
  3. Click Users. Navigate to the username for which you want to change the password. 
  4. Select and right-click the account and click Reset password. Reset Password - change password on Remote Desktop
  5. On the next screen, enter the password next to New password and Confirm password.Reset password- change password on Remote Desktop
  6. Click OK.

How to change the password on a Remote Desktop after the password has expired?

If the password has expired and you have lost connection to the remote device, then only the admin of the remote device can help you regain access. Also, it would be best if you asked them to make changes to allow remote users to reset expired passwords in the future.

How to change the Remote Desktop password in Windows 11?

Changing the passwords for RDP on Windows 11 is the same as on Windows 10. Therefore you can use any of the above methods to change the password.

So, these are the ways that you can use to change the password for Remote Desktop on Windows 10/11. Try them and let us know which worked for you in the comments below. 

5 Best Iphone Backup Software For PC [2026 Guide]

Electronic devices are prone to malfunctions, and when the device is iPhone, you better have an up-to-date data backup ready. Apple offers its own backup management software iTunes for iOS device users.

iTunes works well for the basic stuff like purchasing apps and playing media files, but when it comes to taking a backup, iTunes is nowhere near perfection.

This is where the third-party iPhone backup software for PC comes in. iTunes is an in-house product that does not cost anything to download and use but has a terrible iOS restore and update manager.

Even more, it stores all the backup and firmware update files in the internal drive of the PC, without any option for the external drive.

If you have ever tried taking backup of iMessage conversation using iTunes, you would know that is not possible either.

Fortunately, the third-party iPhone backup apps for PC can resolve these issues and offer a more seamless and better-organized mode of iPhone data backup and file management experience.

If you are looking for the best alternative to iTunes, we have done the heavy lifting for you and compiled this list of the best iPhone backup software for PC.

Before making the purchase, download the free trial, try the backup software, and later make the decision. So, let’s get started.

Which software is best for backing up iPhone on PC?

iMazing Backup iPhone& iPad – End-to-end encryption

iMazing Backup iPhone& iPad is another powerful data management software designed especially for iOS devices. It works with online cloud storage and it claims to never overwrite your iPhone and iPad backups.

Users of iMazing can choose how frequently each device is backed up and how many of the backups the app should keep: a month’s worth, a week, or all of them if you want to.

If you happen to need to do advanced digging into your data looking for some long-lost pictures, a unique feature that comes in handy in this type of situation is the Time Machine-like snapshots of your devices provided by iMazing Backup iPhone & iPad. 

Additionally, this software comes with automatic functionality to safely back up data while your phone rests in your pocket. Therefore you don’t have always to remember to back up new files.

It also assures the user end-to-end encryption in case of Wi-fi transfers, backup security with AES-256 support plus private storage settings on the hard drive of your choice.

The user interface is easy to navigate, you can browse through your backups effortlessly and access the data you need, all in one place.


Other features include:

  • Automatic back-ups
  • End-to-end encryption
  • Recover from existing back-ups
  • Decide where to store your iOS recovered data: other iOs devices, Mac, Android or Windows

With all being said, it’s no need to think twice about this free backup solution and choose to efficiently consider your data assurance and protection.

iMazing Backup

iMazing Backup

Take care of your data using this active solution of data backup of your iPhone and iPad.
Check priceVisit website

Xilisoft iPhone Magic Platinum – Ringtone Creator

The iPhone Magic Platinum from Xilisoft is an all-in-one iPhone manager that facilitates the transfer of files from iOS devices to Mac and PC.

iPhone Magic Platinum can also convert and transfer video and audio files to iOS devices. It also comes with an iPhone ringtone maker option for customization.

The basic features of the iPhone Magic Platinum include the transfer of files between devices through PC / Mac. Users can create personalized ringtones and download online videos from sites like YouTube.

Those who want to move content from their DVD/CD drives to iPhone can use the convert feature to convert and transfer the files. Besides, it also supports app transfer between iOS and computer.

Other features in the software include multiple media file management, photos, and videos transfer to PC, and the ability to export the contacts and notes in .csv / .vcard file, etc.

What is not so good about iPhone Magic Platinum is the performance which at times depending on the tasks may take several minutes to finish.

Key features that you are about to enjoy:

  • Transfer files between multiple devices
  • Download online videos from Youtube and MetaCafe
  • Ringtone Creator
  • Convert DVD /CD files and transfer to iPhone
  • Transfer apps, contacts, music, videos, and documents to and from PC
  • Supports iOS 12, iPhone X, and other iOS devices

The developers can also work on optimization as the software still eats a good amount of memory when in action.

Xilisoft iPhone Magic Platinum

Xilisoft iPhone Magic Platinum

Xilisoft iPhone Magic Platinum lets you manage your iPhone and optimize backup experiences on all your devices. Eager to try it out?
Free trialVisit website

Dr. Fone – All-in-one data management

Dr. Fone is a wide-ranging iPhone data management app focused mainly on data backup and recovery. This mobile backup solution will help Apple users to get back important lost files immediately.

Not only can it recover deleted or lost files, backup data, and restore it on another device, but the app can also restore iTunes and iCloud backup files without the risk of overwriting.

Your stored data can be accessed on different devices with no impediments as Dr. Fone provides real-time sync. On top of that, the backup storage is extensive and can be increased as needed.

A very useful feature of the App is Screen Unlock for iOS. Just make sure to be connected to Dr. Fone on your PC as well as on your phone and you’ll be able to unlock your screen in case you forgot your passcode.

Moreover, this option stands out by the flexibility of recovering lost data and you can perform it selectively without overwriting existing files on your iPhone. Thus you can back up essential data without the risks of doubling your files.

Thus if you need a 1-click backup solution for iPhone to recover your valuable files selectively, you can simply do it using this software.

Other features include:

  • Restore and export iOS device data directly to a computer and get a full report of the recovered files once the process is finished
  • Transfer data from one phone to another using a computer
  • Transfer data from an iOS device to an Android device without computer assistance
  • Transfer media files between iTunes and iOS Devices
  • Erase all data of your iOS device without leaving any trace
  • iPhone screen recorder

Dr. Fone backup is a good all-in-one option for data management that covers all the main points of such tools and offers some advanced features as well.

Dr. Fone

Manage all your iPhone files with this proficient data backup solution.
Check price Visit Website

iSkysoft iTransfer – Intuitive interface

iSkysoft iTransfer is no longer available as a standalone product and has since been integrated into Dr.Fone.

best iphone software for pc

iTransfer from iSkysoft is an all-in-one iPhone manager offering a backup and data management solution. It gives the user control over iPhone files including music, videos, contact, call logs, voice memos, iMessages, etc.

An interesting feature of iTransfer is its ability to break the barriers of iTunes and let the user sync music from the iTunes library to Android and vice versa.

Besides, users can also drag and drop files from iTunes library/PC to iPhone, copy songs from iPhone to iTunes with a single click, and even backup music from iPhone to Mac and PC.

On PC, iTransfer allows the user to manage the iPhone storage like a flash drive. Users can browse, manage files and folders and move and remove files with no restrictions.

Similar to iMazing, iTransfer also offers the ability to batch export iOS apps by exporting all .ipa apps from iPhone to Mac and PC. But, the feature is currently limited to iOS 9 and below running devices only.

Key features that you are about to enjoy:

  • Install and uninstall iPhone apps in batch
  • Intuitive interface
  • Manage iPhone files like photos, videos, call logs, and voice memos
  • Copy and transfer data from one iOS device to another

A few less great things about iTransfer include the price tag which is higher than iMazing, the fact that it does not support some audio and video formats, and comes with not-so-useful features like the explorer making the software cumbersome.

iSkysoft iTransfer

iSkysoft iTransfer

As the ultimate iTunes alternative, iSkysoft iTransfer is an ideal iPhone backup software for PC. Don’t hesitate to try it out!
Free trialVisit website

iMazing Transfer – Supports Apple Watch

iMazing Transfer is an iPhone management utility and one of the best alternatives to iTunes. Not only does it offer iPhone backup and restore options, but it also lets users update their iPhones to the latest iOS firmware without having to use iTunes.

This software is available both for Mac and PC. It can do stuff that iTunes can’t such as exporting iMessages as a backup, storing iPhone backups on an external hard drive, and browsing archives.

It can manage apps, photos, videos, notes, and call history along with PDF documents and ebooks from and to the iBooks. One can also import the pictures from PC to iOS by using the drag and drop feature.

The ability to clone and transfer the entire device backup to a new device is what makes iMazing amazing as it removes the hassle of using iCloud or iTunes to restore and wait for ages for it to complete.

You can directly connect the devices to the computer, launch iMazing, and start the transfer.

With all the pros, there are some cons as well. Many users complain about the infinite time the iMazing takes to complete the first scan. You also can’t view messages, call history, etc. from the device but only from the backup.

Key features that you are about to enjoy:

  • Create a complete iPhone/iPad/iPod backup
  • Restore backups directly from iMazing
  • Clone and copy one iOS device’s data to another iOS device
  • Manage apps, logs, photos, videos, documents, and game progress
  • Supports Apple Watch

iMazing is available under two subscription plans. The cheapest option lets you manage 3 apple devices, whilst the other plan can be used on an unlimited number of devices.

⇒ Get iMazing Transfer 

iFunbox – Completely free

iFunbox is the best free alternative to iTunes, period. Using the software iPhone users can install unsigned .ipa (iOS apps) into their iPhone through their PC.

Users can also access the root folder and explore the data in the sandbox. However, only jailbroken iOS devices can install third-party iOS app .ipa files and access the root folder using the tool.

As a file manager, iFunbox allows users to manage multimedia files including the transfer of photos, music, ringtones, videos, voice memos, and other files instantly.

The mobile hard disk folder in iFunbox’s toolbox tab lets the user manage the iPhone as a flash drive storage for easier access to files and folders.

While iFunbox offers a good number of features, it does miss out on some must-have features as well. First, unlike the iMazing app, iFunbox does not support iOS device-to-iOS device data transfer.

So, if you want to export data from one iOS device to another device, it will be a cumbersome experience. It also misses out on the iCloud data management option.

Key features that you are about to enjoy:

  • Intuitive user interface
  • Completely free to use
  • Ability to install .ipa files on jailbroken iOS devices
  • Allows access to the root folder on jailbroken devices

But for what’s it worth, iFunbox is undoubtedly one of the best file managers for iPhone and it’s worthy of your attention.

⇒ Get iFunbox 

iExplorer 4 – Cross-platform support

iExplorer is yet another iPhone backup software for PC that comes with a host of features. iExplorer facilitates the transfer of music, iMessages, photos, videos, and other documents to a Mac or PC easily.

The disk mounting feature lets the user enjoy the iDevice as a USB flash drive for easier access to data. It also gives access to saved app data and other directories from iPhone.

Other features supported by iExplorer include the export of voicemails, address book, calendar events, reminder notes, and call history as a backup to your PC.

Just like iMazing, iExplorer allows browsing of iTunes backups and access to media folders containing iTunes purchases. iExplorer with all its features has some cons that need to be addressed as well.

To begin with, the performance of iExplorer is inconsistent, which can be annoying at times. In comparison to other iPhone backup software, iExplorer feels a little expensive.

Even more, the trial version of iExplorer does not allow the user to explore all the features (even in a limited way) without having to buy the license.

Key features that you are about to enjoy:

  • Cross-platform support
  • Compatible with iOS 12 and the latest iOS devices including iPhone X/Xs/XR
  • Offers a complete iPhone backup solution

iExplorer has a free, limited version as well as a paid version. The tool is compatible with all Apple mobile devices, even very old ones.

⇒ Get iExplorer 4

Taking a regular backup of your iPhone’s data is essential and having good iPhone backup software for PC makes the task easier. In this article, we have listed the best iPhone backup software tools with their pros and cons.

On the other hand, there are distinct efficient solutions to transfer files from your PC to your iPhone and have everything updated.

Each software comes with a free trial version with limited access, but that should give you enough time to assess and analyze the tool before making a purchase. Let us know your pick in the comments area below.

How to Dual Boot Windows 11 and Linux [Step-by-Step Guide]

One of the biggest competitors of Windows is Linux, and with Windows 11 in the spotlight, the competition is greater than ever.

Both systems have their advantages and flaws, and if you want to learn more, we suggest that you read out Windows 11 vs Linux guide for in-depth information.

However, you don’t have to pick one or the other. With a bit of effort you can dual boot Windows 11 and Linux on your PC, and today we’re going to show you how to do that.

How can I dual boot Windows 11 and Linux?

Note that dual-booting can be done in two ways. You can install Windows 11 from Linux and if you already have Windows 11 on your PC, just install Linux by applying the below steps.

Tip icon Tip
Before starting, it’s always a good procedure to back up your files, to avoid any inconvenience. We recommend reading also this guide on how to automatically backup your device.

1. Install Linux from Windows 11

1. Create a new partition for Linux

  1. Press Windows Key + X and select Disk Management from the list.
  2. Select the drive that has extra space. Different Linux distributions have different requirements, so you’ll need about 50-100GB+ of space, depending on your needs.
  3. Right-click that drive and select Shrink Volume from the menu.
  4. Set the desired amount of space in MB in the Enter the amount of space to shrink in MB field and click the Shrink button.
  5. This will create unallocated space. Right-click the Unallocated space and select New Simple Volume.
  6. Set the Simple volume size in MB to the maximum possible value and click on Next.
  7. Now you just need to enter the desired letter for this drive and its label.
  8. Click the Finish button to complete the process.

In order to have a new partition created, you need to download Linux and create a bootable flash drive to install it.

2. Download Windows ISO and create a bootable flash drive

  1. Visit the download page of the distribution that you want to download. In our example, we used Linux Mint, but you can use any other distribution that you want.
  2. Select the source that you want to use and wait for the download to finish.
  3. Connect a USB flash drive to your PC.
  4. Once the ISO file is downloaded, download Rufus and run it.
  5. Select your flash drive from the list of devices.
  6. Click on Select and select the ISO file that you downloaded.
  7. Make sure that your settings are correct and click on Start.
  8. A confirmation dialog will appear asking you to format the drive, so be sure to format it to proceed.
  9. Wait for the process to finish.

Once the process is finished, you’ll have a bootable Linux flash drive ready. Now we can go on and install Linux.

3. Change the boot order and install Linux

  1. Restart your PC and press Del to access BIOS. Some motherboards use a different key, so be sure to check your PC’s documentation/motherboard documentation.
  2. Navigate to the Boot section, set your flash drive as the primary boot device, and save the changes.
  3. Once your PC restarts, you’ll be booted to Linux Mint live session. Select Install Linux Mint.
  4. Select the desired language and click on Continue.
  5. Up next, select your network if you want to download the third-party software for your graphics card, Wi-Fi, and media devices.
  6. Select Something else and choose Continue.
  7. You can now select the partition created at the beginning of this section. It’s crucial that you select the correct partition or else you might format the wrong drive and lose your data.
  8. Since Linux doesn’t work with Windows filetypes, you’ll need to edit the partition and set its file type to Ext4. Keep in mind that this process will format the partition and remove all files from it.
  9. Once the drive is converted to the Ext4, you can proceed and install Linux on it.
  10. Select your time zone.
  11. Select the desired keyboard layout.
  12. Now enter your user information. You can uncheck Encrypt my home folder option.
  13. Wait for the installation to finish.
  14. Once the installation is finished, click on Restart now button.
  15. Optional: Enter BIOS once again, and set your hard drive as the primary boot device.
  16. Once your PC boots, you’ll be asked to choose between Windows 11 and Linux, so pick the desired operating system and that’s it.

After completing all these steps, dual booting Windows 11 and Linux should be working properly. Of course, you’ll have to select the desired operating system every time you boot your PC.

We used Linux Mint in our example, but the steps are more or less the same for every Linux distribution.

2. Install Windows 11 from Linux

1. Create a new partition for Windows

  1. On your Linux PC, open GParted or any other disk management software that you’re using.
  2. Optional: You can install GParted by running the following command in the Terminal: sudo apt install gparted
  3. Locate the partition that you need to shrink. Keep in mind that you can’t shrink the partition that has Linux installed on it while running Linux. If you want to do that, you need to boot from Linux Live USB and perform these steps from there.
  4. Right-click the partition that you want to shrink and select Unmount.
  5. Just right-click the partition again and choose Resize/Move from the menu.
  6. Set the New size to at least 50000, but if you want to install additional apps, we suggest making it larger. Click on Resize/Move once you’re done.
  7. Now click the Apply icon in the toolbar to make the changes.
  8. Right-click the unallocated space that you just created and choose New.
  9. Set the File system to NTFS and click on Add.
  10. Click the Apply button to now save changes.
  11. Locate the partition that you unmounted in Step 4, right-click it and choose Mount.

Now that we have our Windows partition ready, we need to download Windows and create a bootable USB flash drive.

2. Download Windows and create a bootable flash drive

  1. Go to the Microsoft download page on your Linux PC.
  2. Select the version of Windows that you want to download and click on Confirm.
  3. Choose the desired language and click the Confirm button.
  4. Select the version that you want, but we recommend using the 64-bit version to avoid compatibility issues.
  5. Choose the save location and start the download.
  6. Wait for the process to finish.
Note icon NOTE
We’re using Windows 10 ISO since Windows 11 ISO isn’t officially available, so the only way to get Windows 11 is to Install Windows 10 and then upgrade to Windows 11 Technical Preview.

3. Create a bootable USB flash drive

  1. Connect the USB flash drive to your PC. Make sure that the drive is at least 8GB in size, but 16GB is recommended.
  2. Start GParted or any other disk management software that you have.
  3. Select your USB flash drive from the menu in the top right corner. Your drive should be labeled /dev/sdb or something similar. Make sure that you select the correct drive.
  4. Check if partitions have a key icon next to them. If so, right-click those partitions and choose Unmount.
  5. Now right-click the partition on your flash drive and choose Format from the menu.
  6. Make sure that the new partition will use the maximum space of your flash drive.
  7. Set the file system to ntfs or exfat and click Apply.
  8. Now click the Apply button in the toolbar to save the changes.

Learn how to use Win32 Disk Imager to create bootable USB drives from ISO files: How to Use Win32 Disk Imager.

4. Mount Windows 10 ISO and create installation media

  1. Make sure that your USB flash drive is connected.
  2. Locate the Windows 10 ISO file that you downloaded.
  3. Right-click it, and choose Open With and select Disk Image Mounter.
  4. Locate the mounted ISO file and select all files. Now select Copy.
  5. Navigate to your USB flash drive and paste the files there.

If you don’t have the option to mount the drive from the context menu, you can do that with these commands in the Terminal:

sudo mkdir /mnt/windows10/

sudo mount -t auto -o loop /path/to/window-10-iso /mnt/windows10/

Once the files have been copied, your bootable flash drive is ready to use, so let’s go on and install Windows 10.

5. Install Windows 10

  1. Access BIOS on your PC. You can usually do this by pressing a dedicated key while the system boots. Usually, that’s Del but it can vary depending on your motherboard.
  2. Go to the Boot section and set your USB flash drive as the first boot device.
  3. Navigate to the Security section and disable Secure Boot. Some users are also recommending disabling the Compatibility Support Module so you can do that as well.
  4. Save changes and restart your PC.
  5. When your PC restarts, press any key to boot from your flash drive.
  6. Choose the language that you want to use and click on Next.
  7. Select the version of Windows 10 that you want to install.
  8. Be sure to accept the terms of service.
  9. Choose Custom: Install Windows only (advanced).
  10. Select the partition on which you want to install Windows 10. It’s essential to select the partition that you made for Windows 10. Click Next.
  11. Wait for the installation to finish.

6. Join the Windows Insiders Program and download Windows 11

  1. Boot to Windows 10.
  2. Open the Settings app and select Update & Security.
  3. Select Windows Insider Program and click the Get Started button.
  4. Click on Link an account and select your Microsoft account.
  5. Make sure to select Dev Channel or Beta Channel. Dev Channel gets more frequent updates, but the Beta Channel is more stable. After that, click on Confirm.
  6. On the privacy statement window, click Confirm.
  7. Click on Restart Now.
  8. Once your PC restarts, go to the Settings app. Head to the Update & Security section and click the Check for updates button.
  9. Windows 11 update will download.
  10. After the download is finished, restart your PC to install it.

After completing these steps, you should have Windows 11 running on your PC, alongside Linux.

Why is Linux missing after installing Windows in dual boot mode?

We’ve observed that Linux might be missing after installing Windows in dual boot mode. Although this can be extremely alarming, it’s expected because Windows will overwrite the Linux bootloader.

However, there’s a way to repair this:

  1. Press the boot menu key while your system boots. Usually, it’s F12, but it can change depending on your motherboard. Now select Ubuntu to boot to it. If this method doesn’t work, use Linux Live USB.
  2. Create a Linux Live USB.
  3. Boot from the Linux Live USB.
  4. Make sure that you’re connected to the Internet.
  5. Open the Terminal and run the following commands:
    sudo add-apt-repository ppa:yannubuntu/boot-repair
    sudo apt-get update
    sudo apt-get install -y boot-repair && boot-repair
  6. Now open Boot-Repair, you should find it in the list of installed applications, or type boot-repair in the Terminal.
  7. Select Recommended repair and that should hopefully fix the problem.

Some users claim that you can fix this issue by this method as well:

  1. Boot to Linux or start Linux from Live USB.
  2. Open Terminal and run the following command:
    sudo update-grub2
  3. Wait for the command to finish.
  4. After doing that, access BIOS and set Linux as the first boot disk.
  5. Save changes.

These instructions are intended for Ubuntu distributions, and other versions of Linux might require you to use different methods to repair the bootloader.

We have a dedicated guide on how to repair Windows 10 bootloader from Linux, so be sure to check it for more information.

Does Secure Boot interfere with Linux dual boot?

The Secure Boot capability is one of Windows 11’s requirements along with the TPM, so let us tell you how this could affect Linux computers and dual booting.

Secure Boot technology allows only the approved boot loaders to boot your PC in order to protect it from malware.

The issue arises because many versions of Linux aren’t compatible with Secure Boot, and since Secure Boot is a requirement for Windows 11, many were worried that Linux might not run in dual boot mode with Windows 11.

The answer is yes, Linux will be able to run long Windows 11, but you’ll have to use Linux that is compatible with Secure Boot, such as Ubuntu or Fedora, or disable the Secure Boot from the BIOS.

As you can see, to use Windows 11, you need to have Secure Boot capability, but you don’t have to keep this option enabled at all, which means that you can dual boot Linux without any issues.

Should I install Linux or Windows 11 first when dual booting?

If you want to dual boot Linux and Windows, it is usually a better option to install Windows first, and then create a new partition for Linux.

For starters, it’s a lot easier to create a Linux bootable drive and the necessary partitions from Windows, however, the biggest issue is the bootloader.

If you install Windows after Linux, you’re going to overwrite your bootloader and you won’t be able to boot to Linux until you repair the bootloader.

Therefore, we suggest installing Linux after your install Windows to avoid these types of problems. Are you using dual boot on your system? Let us know in the comments below.

How to Connect to Exchange Online in PowerShell

To perform PowerShell cmdlets to execute some operations in the Exchange Online environment, it is essential to connect Exchange Online in PowerShell.

Here in this blog, we have mentioned two different methods with step-by-step instructions to get it done. Let’s get started! 

How do I connect to Exchange Online in PowerShell?

Before moving to the detailed steps, make sure you perform these preparatory checks: 

  • You must have PowerShell on Windows 7 SP1 or more recent desktop Windows versions and Windows Server 2008 R2 SP1 or newer server Windows versions.
  • The latest version of Windows Management Framework 3.0, 4.0, or 5.1.
  • .NET Framework 4.5 or above Installed.
  • Stable internet connection with TCP port 80 opened to connect from local machine to host.
  • You must have access to Exchange Online PowerShell enabled for the existing user. 

1. Connect to Exchange Online in PowerShell – Classic way

  1. Press the Windows key, type PowerShell, and click Run as administrator.Powershell -connect to exchange online powershell
  2. Copy and paste the following command and press Enter: Set-ExecutionPolicy RemoteSignedAdmin Powershell - Set-ExecutionPolicy RemoteSigned
  3. Type Y when prompted.
  4. Type the following command and press Enter: $UserCredential = Get-Credential
  5. You will get a pop-up to enter your username and password. Input the credentials and press OK.
  6. Input the following commands one by one and press Enter after every command: $Session = New-PSSession -ConfigurationName Microsoft.Exchange -ConnectionUri https://outlook.office365.com/powershell-liveid/ -Credential $UserCredential -Authentication Basic -AllowRedirection Import-PSSession $Session Get-Mailbox -Filter '(RecipientTypeDetails -eq "RoomMailBox")'

2. Connect to Exchange Online in PowerShell – Alternative method

2.1 Install Exchange Online PowerShell module

  1. Press the Windows key, type PowerShell, and click Run as administrator.
  2. To check if the Exchange Online PowerShell module is already installed, type the below-mentioned cmdlet and press Enter: Get-Module -ListAvailable -Name ExchangeOnlineManagementWindowsTerminal - Get-Module -ListAvailable -Name ExchangeOnlineManagement
  3. If it is not installed, copy and paste the following command and press Enter: Install-Module -Name ExchangeOnlineManagement -ForceWindowsTerminal - Install-Module -Name ExchangeOnlineManagement -Forceconnect to exchange online powershell
  4. Input the following command and press Enter if you have an outdated version installed: Update-Module ExchangeOnlineManagement

2.2 Connect to Exchange Online PowerShell

  1. Now, to connect your Microsoft 365 Exchange Online with the Connect-ExchangeOnline cmdlet, type the following commands and press Enter after every command: #Connect to Exchange Online Connect-ExchangeOnlineExchange Online - connect to exchange online powershell
  2. Enter the credentials on the authentication pop-up window and establish the connectivity.

2.3 Disconnect the Exchange Online PowerShell session

  1. Press the Windows key, type PowerShell, and click Run as administrator.Powershell -connect to exchange online powershell
  2. Copy and paste the following commands and press Enter after every command: #Disconnect Exchange Online Disconnect-ExchangeOnline -Confirm:$FalseDisconnect Exchange -connect to exchange online powershell

So, these are the simplest ways to connect to Exchange Online in Powershell. Try any of them, create a remote session, provide a connection setting, or import PowerShell cmdlets smoothly. 

Connect to Exchange Online can also help you set up DKIM for Microsoft 365 for your domain; read this guide to learn more.

Please let us know in the comments section below if you have any questions or concerns.

Can Windows 11 Brick My PC? Here’s What You Should Know

This is recent information, and although not confirmed by a major news outlet or company, social media has been absolutely buzzing.

Many users that tried upgrading to Windows 11 on Hp and Dell devices ended up having to buy new hardware after the transition went horribly wrong.

I had to basically get my BIOS chip replaced on my Dell Inspiron 7569. Initially thought that the HDD got corrupted but nop, Windows 11 nuked the BIOS.

Costed me 2500, in case wondering.

Be careful as this is not a joke, and all the excitement of moving on to a new OS can turn into an absolute nightmare.

Windows 11 upgrade can break your PC

Various users are reporting serious problems with the upgrade to the new operating system, so be aware of this before you try to do it yourself.

We are not sure if devices from other manufacturers are going through the same ordeal, but Dell and HP gadgets have broken after Windows 10 transitioned to 11.

So, long story short, some users that bought new Windows 11 compatible devices were among the first to receive the free OS update.

Upon trying to get the operating system on their laptops, they were in for a big surprise – they have to buy another laptop.

Pretty expensive for a free upgrade, don’t you agree?

Apparently, a few people managed to move past this nuisance, after about 15-20 minutes of panic. The main idea here is that this update seriously messes up your BIOS.

The only advice here would be to postpone the transition for a bit until Microsoft acknowledges this issue and actually does something about it.

People trying to upgrade on older PCs also experienced problems, even if their devices were technically compatible with the new OS.

So, the problem might be a lot ampler than we initially thought but some more research is needed.

Is my PC bricked, or it’s just a software problem?

We have to get into some details to understand the difference between a bricked PC and some software issues.

So, a bricked PC is one that you can only use as a paperweight or, in other words, has become completely unusable.

Therefore, we also encountered cases with people that are using the word to describe some other problems that can be fixed with some tweaking.

For instance, in a Reddit post above, a user is complaining about having his Zephyrus G14 laptop bricked after the Windows 11 upgrade.

Fortunately for him, it’s just a case of the blank Taskbar problem that we have dealt with and found some useful solutions.

Although it’s a very annoying issue that shouldn’t happen to a brand new OS and you can’t click on any app or the Start button, the situation is not desperate.

If you experience the same symptoms on your PC, check our guide on how to fix the Windows 11 empty Taskbar problem.

We will keep you posted as soon as we receive information about this sensitive topic. Until then, try to be careful with this major step and take all the necessary precautions.

We know it’s just software, not a time bomb, but this can apparently cost you a lot of money. Don’t do that especially if your hardware doesn’t meet the requirements.

Not long ago, Microsoft issued a waiver that you need to sign before upgrading your PC to Windows 11 if you don’t have the proper configuration together with a warning that this might be dangerous for your computer.

Have you managed to upgrade to Windows 11? Tell us all about your experience in the comments section below.
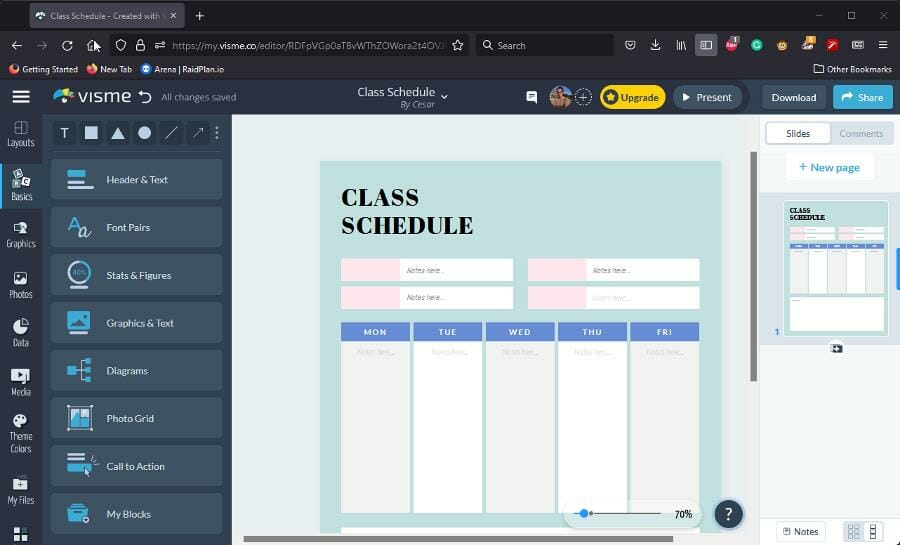
6 Best Tools to Create Custom YouTube Thumbnails

YouTube is the ultimate platform where you can upload your own clips. Every YouTube video includes a thumbnail image that is either a snapshot from the video or an original picture that isn’t captured from the clip.

YouTube restricts users from selecting a thumbnail from three automatically generated video images.

However, users with verified accounts can add their own custom thumbnails to videos with JPG, GIF, PNG, and BMP images that match the required 1,280 x 720 resolution.

There are numerous web apps that provide image thumbnails specifically tailored for YouTube videos that you can edit as required.

Alternatively, you can utilize thumbnail maker software for PC to capture images from within videos to include as YouTube thumbnails.

These are a few handy web apps and thumbnail creators for PC tools that you can use to set up a YouTube video with thumbnail images.

What is the best thumbnail maker for PC?

Adobe Creative Cloud Express – Wide variety of fonts

Adobe Creative Cloud Express is a graphics design web tool with which you can design menus, presentations, flyers, newsletters, brochures, cards, posters, invitations, and, of course, YouTube thumbnails.

There are no additional fees for any of the app’s pre-made template images, but the thumbnails do include a Creative Cloud Express logo. You can remove the logo by upgrading to a premium account.

Adobe Creative Cloud Express provides some great typography options for Youtube thumbnail images as users can select a wide variety of fonts (and upload them), add shapes to text, add text effects, select alternative color schemes and customize the text styles.

You can therefore create customized thumbnails for your YouTube qualitative videos and use different icons or other design assets included in the editor.

The users can also add their own photos, logos, and a multitude of icons (otherwise stickers) to the thumbnails.

This being said, you should employ this Adobe solution to create suggestive thumbnail images for your YouTube videos in just a few simple steps.

Adobe Creative Cloud Express

Looking for the best app to set up stunning YouTube thumbnails? There is no match for this mighty, yet lightweight tool.
Check price Visit Website

Canva – Background remover

Canva is among the best web apps to set up a custom YouTube video thumbnail image.

There isn’t a subscription fee for the web tool, but there are charges for its optional stock photos and clip art.

Canva’s stock library includes more than one million graphics, illustrations, and photos for Youtube thumbnails.

Plus, the users can choose from more than 130 fonts and customize the images’ text boxes and text colors.

Another great thing about Canva is that you can upload your own images with which to set up Youtube thumbnails.

In addition, this free designing tool is meant for every single person that needs creative tools for personalized video thumbnails or presentation banners.

You also have premium features that can be of much help, such as brand kits, magic resize options, or background remover.

Canva

Try this easy-to-use tool to get a vast library of illustrations and unique designs.
Free trial Visit Website

Fotor – Pre-made layouts

Fotor collage

Fotor is a web app and Windows desktop software that includes a variety of YouTube thumbnail templates with various themes, such as cooking, games, travel, sports, music, Christmas, seasons, etc.

Fotor users can edit the background color and text of all the themes and add a plethora of stickers to them. Or you can set up your own thumbnail image from scratch.

This page includes the Fotor templates, which you can open and edit without an account. You can edit anything on the official website directly.

More so, using the Fotor platform is entirely suited to creating expressive thumbnails with practical tools like text combinations, lots of photos, diverse backgrounds, and more.

It is possible as well to customize your project using multiple elements. You have illustrations, shapes, or icons to add to your video thumbnails.

In this way, you ensure the quality of your YouTube videos due to eye-catching thumbnails meant to convince even the most selective viewers.

It’s also possible to create custom thumbnails designed for your YouTube videos in a very short time. You can browse many templates based on categories to get more inspiration.

Otherwise, just select the thumbnail format and start it from scratch with various graphic tools or visual elements.

Fotor

With this clever tool, you may access millions of pre-made layouts for eye-catching YouTube thumbnails.

Thumbnail me – Simple interface

If you need to capture a snapshot from a video for its YouTube thumbnail, Thumbnail me is worth noting. Thumbnail me is freeware software that you can run on Windows platforms from XP to 10.

The software enables users to capture one thumbnail image or a group of images from a video for a grid of pictures.

When you’ve opened a video to capture images from in Thumbnail me, you can configure the number of rows and columns for the thumbnail to include.

To include just one video image in the thumbnail, adjust the row and column values to 1.

You can select an exact time to capture an image from the video with the software’s timeline.

Thumbnail me users can select alternative output formats and background colors for the video. You can also add additional title text to images.

In addition, this open-source thumbnail creator is highly capable to transform your favorite media into thumbnails, ready to be used.

The tool is continuously developed by contributors and it was tested on different Windows platforms like Windows 7 and later versions.

⇒ Get Thumbnail me

Video Thumbnail Maker – Two functionalities

Video Thumbnail Maker is similar to Thumbnail me. The software enables you to capture a single image thumbnail or a whole grid of images from a selected video.

VTM has silver, gold, and platinum versions available on the publisher’s website. However, the unregistered version adds watermarks to the thumbnail images.

Video Thumbnail Maker includes more extensive options for setting up video thumbnails than Thumbnail me.

Users can select to set up a Simple Matrix or Special Matrix, with one expanded image set alongside smaller ones, and customize the technical details, tile effects, and backgrounds of the thumbnails.

Alternatively, you can configure a matrix to include just one image from a video. VTM supports most video formats, and you can also batch-process multiple video files.

This valuable thumbnail tool can help you create the most impressive thumbnails for YouTube videos.

It offers you the chance to create various thumbnails that can be used for home-video catalogs or for network video sharing.

This software contains two main functionalities that will surely help you. You have the thumbnail maker and thumbnail viewer with the ability to start video files right from the thumbnail sheet.

⇒ Get Video Thumbnail Maker

AMT – Auto-Movie-Thumbnailer – Multiple formats supporter

AMT – Auto-Movie-Thumbnail is another software that you can use to extract image thumbnails from videos.

The AMT software can also come in handy for grabbing snapshots from videos for YouTube thumbnails.

It is freeware software that you can utilize to extract multiple or single images from a selected video.

The software’s Layout tab provides numerous settings with which to customize the thumbnail’s color and design, the number of images included within the thumbnail, and its timestamp.

The tool can do much more, and help you create convincing thumbnails for your YouTube channel. Plus, it’s multifunctional and can support you with different movie formats and customized screen captures.

The known fault of this software is that short movies might not contain enough keyframes, thus you can’t create more thumbnails than the keyframes of the specific movie.

Users can also add custom text, info headers, and logos to the thumbnails with the software.

Plus, this automated GUI can help you batch screencaps or index thumbnail pictures. It supports many different input formats, basically any format supported by Media Player.

Using this tool offers you to chance to customize the design or layout of your screen captures in order to create eye-catching thumbnails.

⇒ Get AMT

In conclusion, we created this guide on the best YouTube thumbnail tools for you in order to have valuable resources to create impressive video thumbnails.

Do not hesitate to share your experience with any of the software in the comments section below.

FIX: WhatsApp Chat History Sync Stuck On In Progress

One of the most common issues users face is WhatsApp Web not syncing messages. Many things, from internet connection issues, an outdated app or WhatsApp server problems can cause this.

The good news is that this is easy to fix, and we’ll explain everything you need to know below.
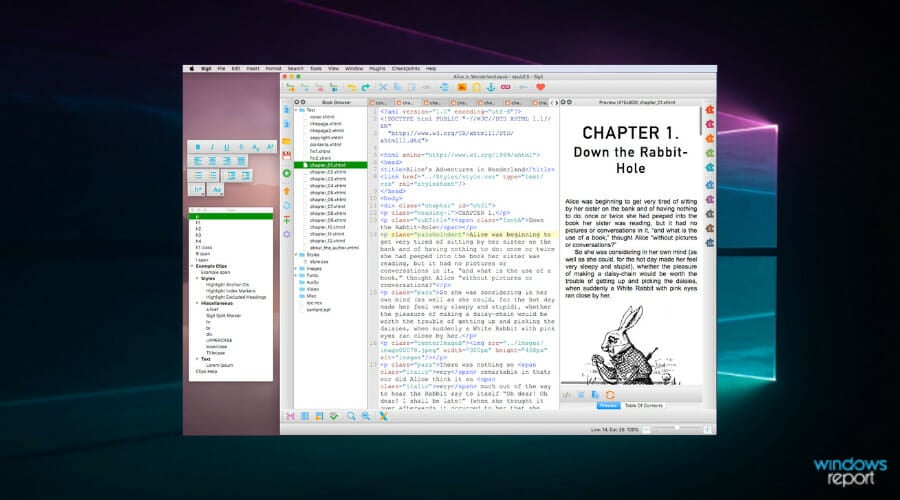
What can I do if WhatsApp Web is not syncing messages?

First, try restarting your PC, closing and reopening your browser, using incognito mode and switching from the Beta to the Stable version of WhatsApp. If you’re still having issues, follow the steps below:

If none of these worked for you, then move to the troubleshooting methods below: 

1.1 Android 

  1. Launch WhatsApp on your device and click on three dots. Select Linked devices.Linked Devices Android -whatsapp web not syncing messages
  2. Tap on the device that you want to unlink.Linked devices list Android
  3. Click Log out.logout Android

1.2 iPhone

  1. Launch WhatsApp. Go to Settings.Settings iPhone
  2. Tap Linked Devices.Linked Devices -whatsapp web not syncing messages
  3. Go to the list of devices, and tap on the device you want to unlink.Select Linked Device
  4. Tap Log Out.Logout
  5. You can now link your device again.

2. Clear WhatsApp Cache

Tip icon Tip
To clear the cache on your iPhone, you need to reinstall the WhatsApp app.
  1. Launch Settings on your Android. Settings app Android
  2. Tap on Apps.Apps Android
  3. Select App Management.App Management
  4. Navigate to the list of apps and tap on WhatsApp.Whatsapp Clear -whatsapp web not syncing messages
  5. Tap on Storage usage.Storage Usage
  6. Click Clear cache.Clear Cache

3. Remove cookies and cache on the browser on your PC

  1. Launch your preferred browser. (Here, we are mentioning the steps for Chrome)
  2. Go to three dots, and click Settings.Settings -whatsapp web not syncing messages
  3. Click Privacy & Security from the left pane and select Clear browsing data.Privacy Settings Chrome
  4. Place a checkmark beside the Cookies and other site data & Cached images and files options and click Clear data.Clear data

4. Reinstall the WhatsApp app and download the WhatsApp Desktop app

  1. Press and hold the WhatsApp app and select Uninstall icon on Android and the Remove app option on iPhone to delete the app.Uninstall Android -whatsapp web not syncing messages
  2. Confirm the action by clicking on Uninstall on Android or Delete app on iPhoneUninstall Confirm
  3. Now, go to your device’s Google Play Store or App Store to reinstall the app.
  4. You can also download the WhatsApp Desktop app for the official website or Microsoft Store for easier use on your computer.

So, these ways can help you fix the WhatsApp Web not syncing messages problem. Try them and let us know what worked for you in the comments below.

This isn’t the only issue, and many reported Can’t download. Please ask that it be resent to you in WhatsApp, but we have covered this issue in a separate guide.

And if you can’t access WhatsApp web because of the out of memory issue, check out our expert article on how to get it back.

Elsewhere, you may be interested in turning off the end-to-end encryption feature, especially if you want to decrypt your cloud chat backups.

Can You Play Valorant Without Secure Boot?

There’s still a lot of confusion about Windows 11, despite it already being released this month, and one of the biggest issues is with the new OS’s TPM 2.0 requirement to protect against firmware attacks.

While this security feature can be bypassed to run Windows 11, Riot Games and Valorant have already begun to enforce the measure, thus PCs running Windows 11 without TPM 2.0 cannot run Valorant.

No Secure Boot, no TPM, no Valorant

Some users have begun to report that trying to play Valorant results in them getting error messages that state the current build of Riot’s anti-cheat service Vanguard requires both TPM 2.0 and Secure Boot enabled.

And, after being warned, players are quickly kicked out of the game.

The main reason Riot enforced this is that the Trusted Platform Module firmware system makes it far harder for players to cheat, as cheaters who get banned will not be able to immediately spoof a new hardware ID. 

Given how useful it is for developers, it’s also entirely possible that the TPM 2.0 requirement won’t stay isolated to Windows 11 for Valorant, since Riot is quite able to enforce it on Windows 10, too.

Will Valorant work after I activate Secure Boot?

The answer is yes, and you should consider doing this before even trying to run the game itself.

Just open your Command Prompt, run it as administrator, and type mbr2gpt, Press enter and your drive should be converted to gpt without data loss.

Experts actually expect more and more titles to be playable only if such security features are enabled on the machine in question.

Judging by the way things are shaping, we are definitely moving towards a more secure online era, and we surely won’t be able to avoid these security measures forever.

Have you managed to successfully install and play Valorant on your Windows 11 powered device? Share your experience with us in the comments section below.