Best back to school Minecraft Education Edition resources for educators

Updated: 2/21/2023

Summer grows long in the tooth and that means it’s back to school season once again. What better time to check out the best resources available for teachers in Minecraft Education Edition?

It has a wealth of lesson plans covering almost every academic topic out there, and something for educators of all types. Here we’ve selected some of the best lessons, challenges, and activities Minecraft Education Edition has to offer. So with no further delay let’s have a look at them.

Minecraft: Education Edition: Teacher Academy

Illustration of Minecraft: Education Edition course progression: Earn a badge for each module. Once you complete all three modules, you receive the Minecraft Certified Teacher badge.

This course for teachers new to Minecraft Education Edition consists of three modules: building individually; modifying together; and building worlds together. The course has a well-laid-out pathway for educators and makes for a great introduction to Minecraft Education Edition.

It is designed to accommodate various teaching and learning styles. For teachers looking to dive into this learning tool, this is the place to start.

Back to School!

Back to school!

This custom Minecraft world is specifically designed for students going back to school in a virtual environment. In Back to School! Students are asked to create something unique within the game with which to introduce themselves to the class. The student’s creation – or rather a screen capture of it – is shared via Microsoft Teams or Flipgrid.

Inside the virtual classroom are posters displaying rules for digital citizenship, upon which students are tested via NPC challenges. Back to School! is a great activity for helping returning virtual learners get back into the swing of things after the long summer break.

Element Scavenger Hunt

Learn all about the elements with these fun scavenger hunt activities. The great thing about these challenges is that they have lesson extensions, such as researching an element and creating a build in Minecraft that contains that element. These are also great for building collaboration and critical thinking skills.

League of Literacy

Created in partnership with Random House and the National Literacy Trust, this lesson has students reading the first official Minecraft novel Minecraft: The Island by Max Brooks in class and then in the game building a shelter inspired by the novel.

Students then create a short video showing their Minecraft build and explaining their use of the six Ps from the text: Planning, Preparing, Prioritizing, Practice, Patience, and Perseverance. It’s a fun activity for students and a great way to spark their creativity.

Build Your Emotion

This challenge helps students build their emotional self-awareness. The challenge for students is to build something in the world of Minecraft that matches how they are feeling at present.

First students use the Book and Quill to write a paragraph about what is affecting their mood. Then, they build something for each emotion they record. And lastly, the student then shares that build with the class.

Fantastic Mr. Fox

Fantastic Mr. Fox

This Minecraft world is based on Roald Dahl’s Fantastic Mr. Fox. It is designed to help teach English/Language Arts and allows teachers to create their own lessons alongside those included in the lesson plan.

Lesson ideas include having students explore the lesson world and find scenes from the book. Or have students build a village for the animals from the story to live in. These are just a few ideas of how the Fantastic Mr. Fox Minecraft world can be used to improve students’ language skills in an engaging way.

Desert Island

The concept of this lesson is fairly simple: have students build an object in Minecraft that represents the one thing they would bring with them to a desert island. Lesson extension ideas include having students take pictures or screen captures of their creations and share them with the class.

Additionally, you can have them write a paragraph about what they built and why. And, most interestingly, have them switch to survival mode in Minecraft to see how long they can last on the island with the object they built.

Wrap up

These were really just a small sampling of what Minecraft Education Edition has to offer. Do yourself a favor and take time to explore the Minecraft Education Edition site and discover for yourself the range of educational tools and resources available. It is a great tool that can engage students and is especially invaluable in digital learning. Be sure to also check out our post where we compare Minecraft Education Edition and Roblox Education.

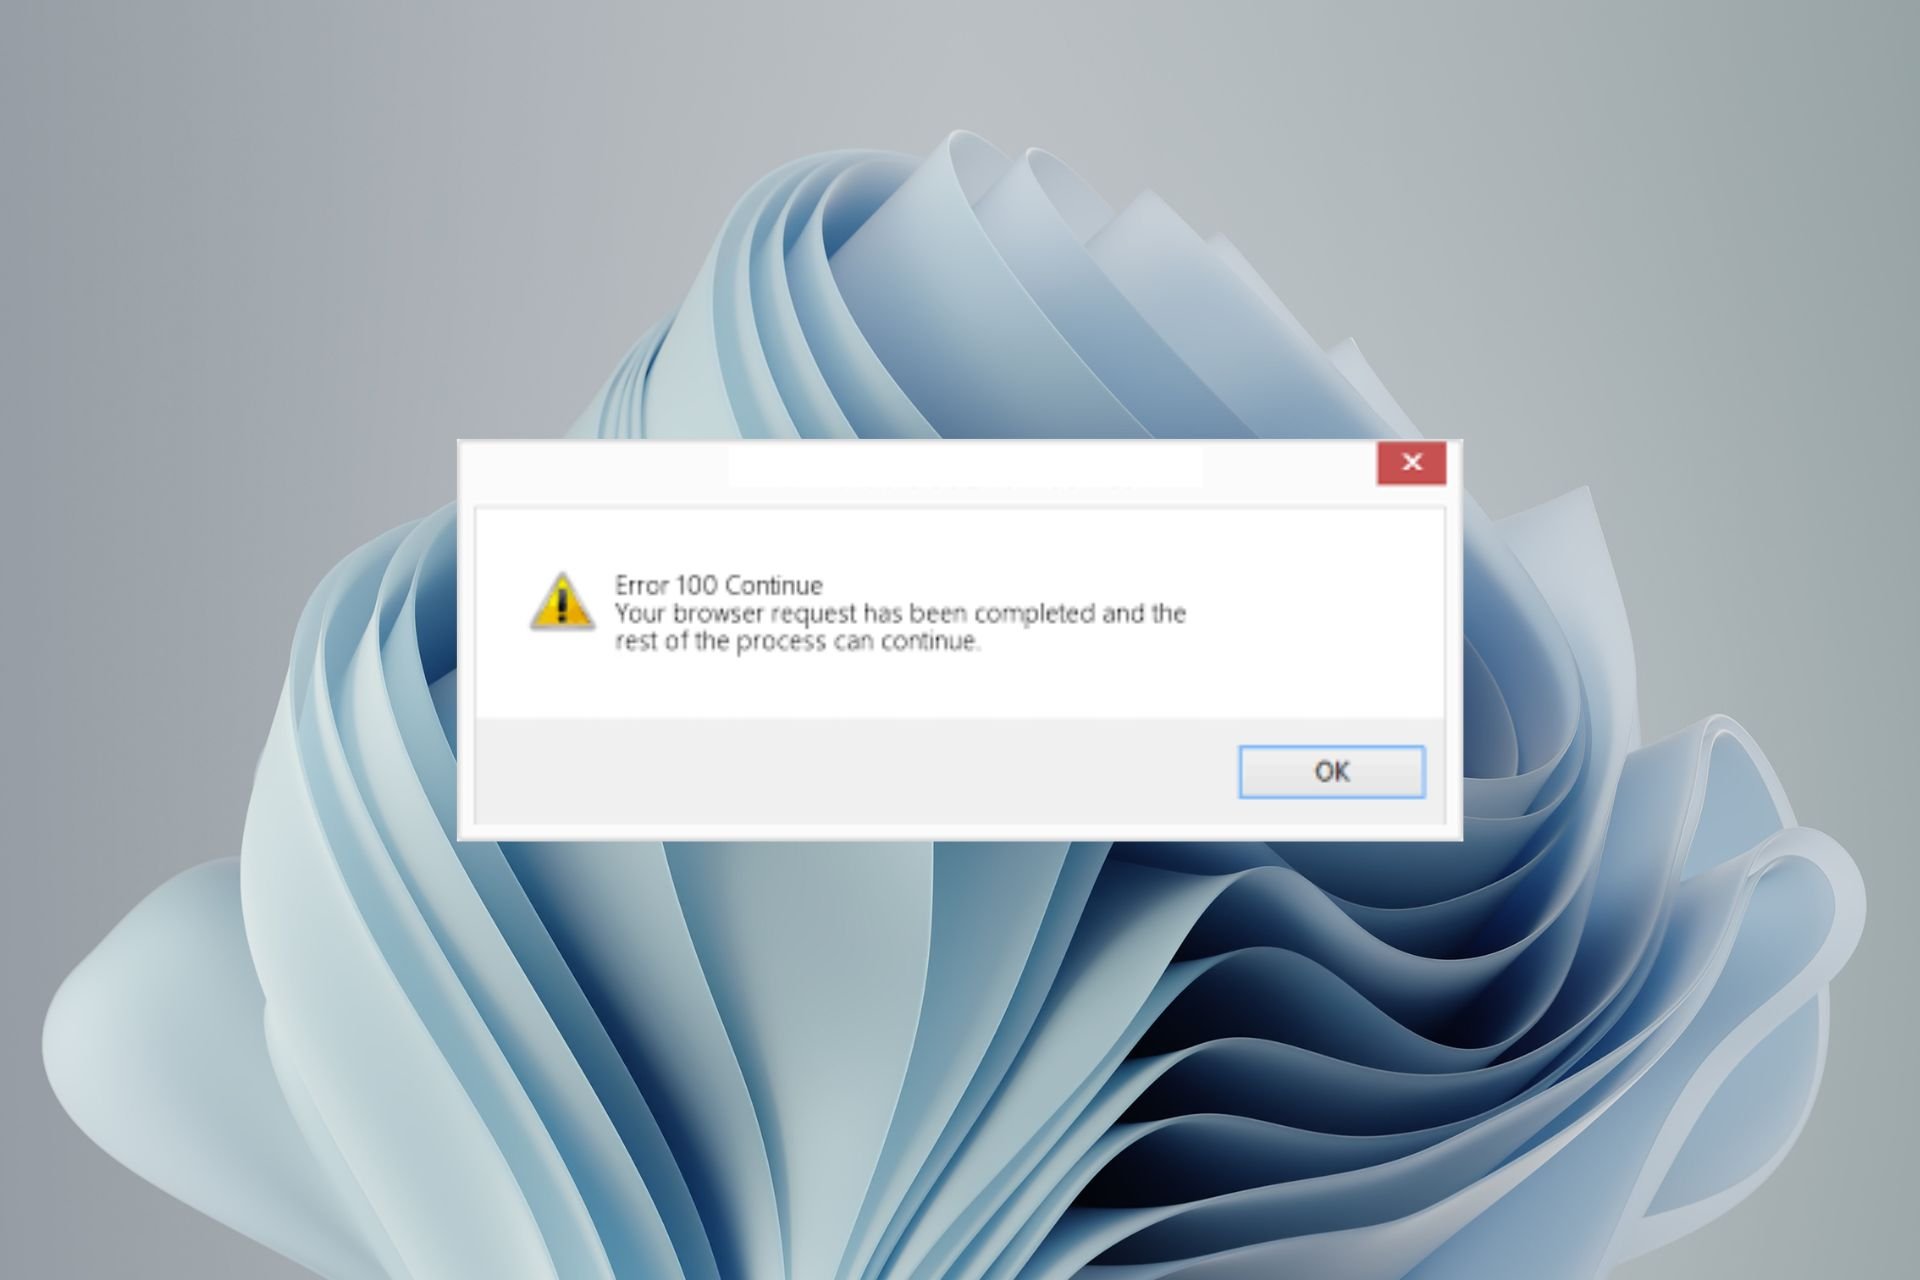
Browser Not Supported (Error Code 100): 3 Ways to Fix It

Error Code 100 is a browser not supported error code. It indicates that the website you’re trying to visit is not compatible with your browser. This could be due to an outdated browser version or a problem with your operating system.

Generally speaking, older browsers don’t work well with newer websites because they don’t support newer technologies and features.

You may also encounter a this site can’t be reached error, but we have adequately covered various fixes to help you bypass this issue.

What does error code 100 mean? 

Error code 100 is an error code that means the browser could not establish a connection to the server. It can be caused by a number of reasons, so the first thing you should do is check your internet connection.

Other reasons include:

  • Bad response from server – The server might be down or overloaded and cannot handle all of the requests it is receiving at the time hence giving you a bad response. 
  • Unsupported browser – You may also get this error if you are using an unsupported browser. In order to resolve this issue, you will need to upgrade your browser or use another one altogether.
  • Corrupted files – If you’ve just downloaded some new software, then it’s possible that one or more files within that program have become corrupted during download or installation.

In some rare cases, it could also be because there’s a problem with the website’s security certificate. If this is the case, don’t hesitate to check our expert article on recommended fixes.

Quick Tip:

Use a more stable browser if you keep having problems with your current one. We recommend Opera One as a stable and lightweight solution.

Running on a Chromium engine, this browser is compatible with all Chrome extensions and includes familiar tools for tabbed browsing, and advanced tools like an adblocker, VPN and an AI.

Opera One

Say goodbye to errors by using this performance-optimized browser.
Free Download Visit website

How do I fix the browser not supported error code 100? 

1. Update your browser

In order to fix the error code 100, all you need to do is upgrade the browser from the one that is currently installed on your computer so it supports all the websites that require a specific browser version. 

By upgrading your current browser, you can ensure that all supported sites will work properly without any errors or crashes in future visits.

2. Clear cache and cookies

One of the most common causes of this error is an outdated cache or cookie file in your browser. You may also be able to fix this problem by clearing your browser’s cache and cookies. 

Clearing your browser cache deletes temporary files stored on your computer by your browser that may be causing sites to load slowly or incorrectly.

3. Uninstall recent updates 

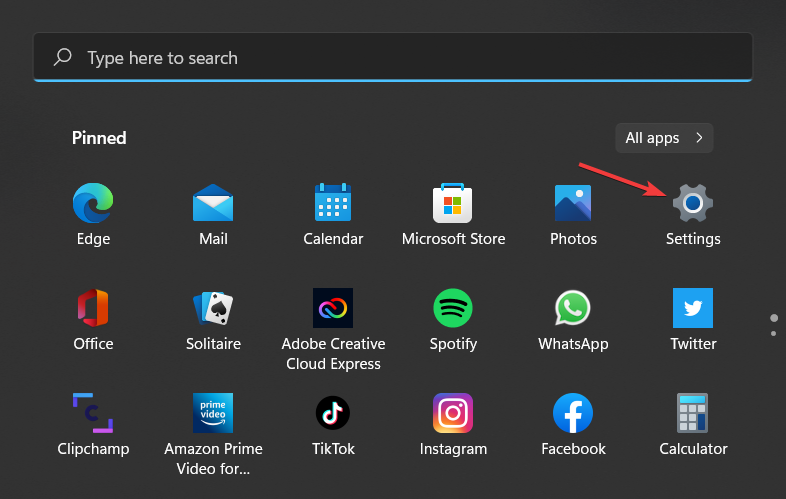
  1. Press the Windows + I keys simultaneously to open Settings.settings-option oops thre was an error
  2. Navigate to Windows Updates, then select Update history.
  3. Click on Uninstall updates.
  4. Select the most recent update, then click Uninstall.

What are the most common browser not supported errors? 

A browser not supported error is an alert that web pages may display to users when their browser is incompatible with a particular website’s requirements. It can manifest in different forms, such as:

  • Error 400 Bad Request – This error occurs when the request sent by the client is invalid or malformed. The server returns this error when receiving a request with an empty body, partial content, or certain characters.
  • Error 404 Not Found – This error occurs when a URL requested by the client does not exist on the server side and cannot be found by the server. It can sometimes happen because of incorrect linking or missing files on your web server.
  • Error 500 Internal Server Error – This typically means that your web server has been unable to process a request because of an internal error or misconfiguration.

You can easily solve most browser errors by updating your browser or clearing cookies. In some cases, you may also not have enough memory for your browser to handle such requests, or a virus has infected your system.

It is why we recommend that you install a reliable antivirus to prevent such occurrences. Hopefully, you have been able to resolve the browser not supported error code 100 from one of our solutions above.

Let us know of any other additional solutions not mentioned here that may have worked for you in the comments section below.

How to enable Edge automatic profile switching to keep your work and personal life separate

In a new update, you can now enable Edge automatic profile switching, so the browser will use a certain user profile for opening links in Microsoft and other third-party applications.

Previously available in Edge Canary build 81.0.413.0 and above, the update brought the feature to Edge’s Stable Channel. The new-to-you feature is called Edge automatic profile switching.

Other Chromium-based browsers like Google Chrome allow specifying the profile to use for links, but the process is a bit more complicated forcing you to make command line and Windows Registry changes.

Edge looks to make the process a whole lot easier. Once set up, if Edge detects a link that is a personal or work link, the browser will automatically prompt you to switch to the appropriate Edge profile.

Edge automatic profile switching is greyed out

Edge automatic profile switching is enabled by default. However, if the Edge automatic profile switching is greyed out and you can’t select it, there’s a reason for it. You need to make sure you have at least two profiles attached to your Edge browser.

edge automatic profile switching

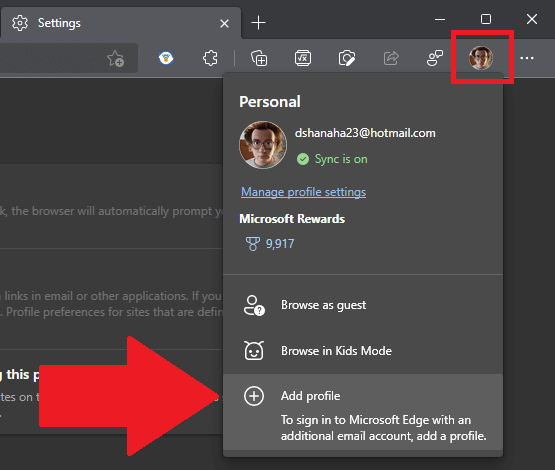
If you need to add a profile to Edge, click the profile tab and click Add profile.

edge automatic profile switching

You will need to login to your Microsoft work or personal account in order to add it to your Edge browser.

Enable Edge automatic profile switching

Once you have at least two profiles on Edge, here’s what you need to do to set up automatic profile switching.

1. Open Microsoft Edge.

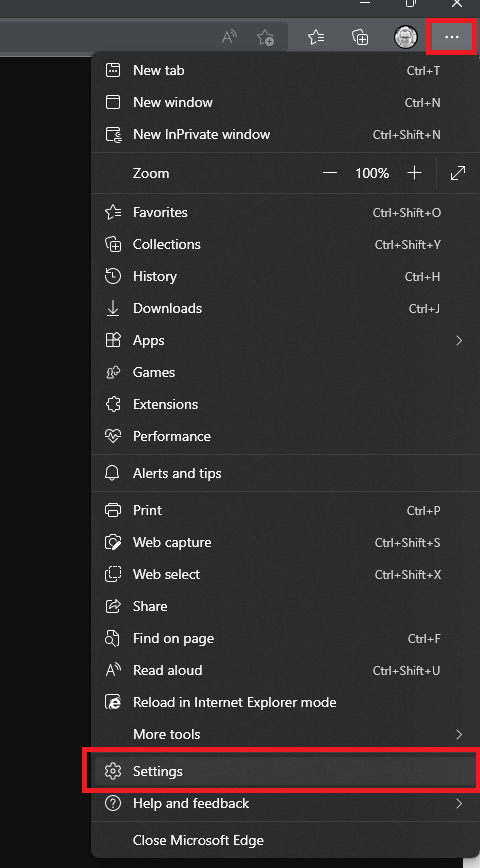
2. Click the three-dot menu in the upper right and then click Settings.

edge automatic profile switching

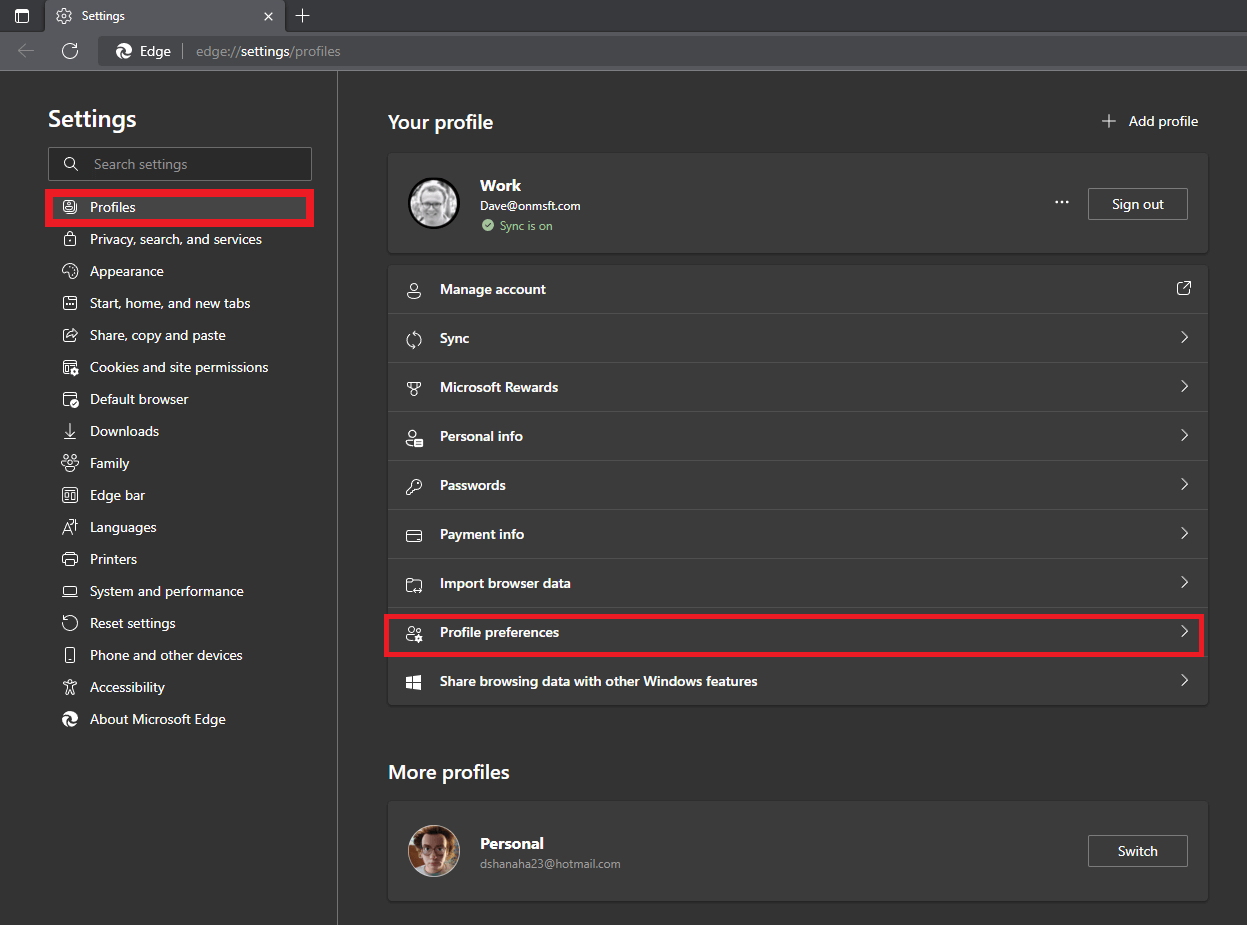
3. In the left pane, click Profiles.

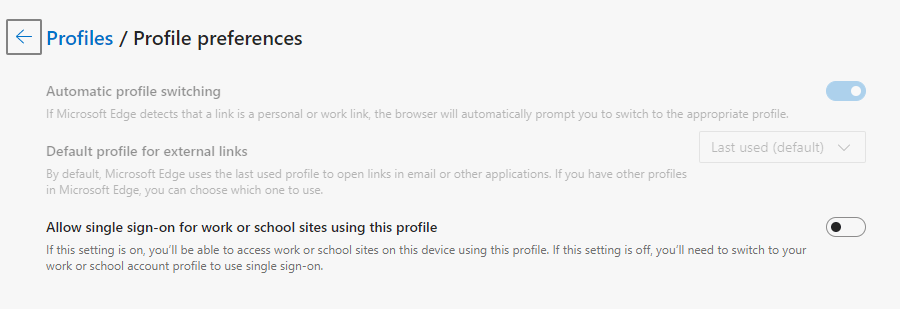
4. In the right pane, click Profile preferences.

edge automatic profile switching

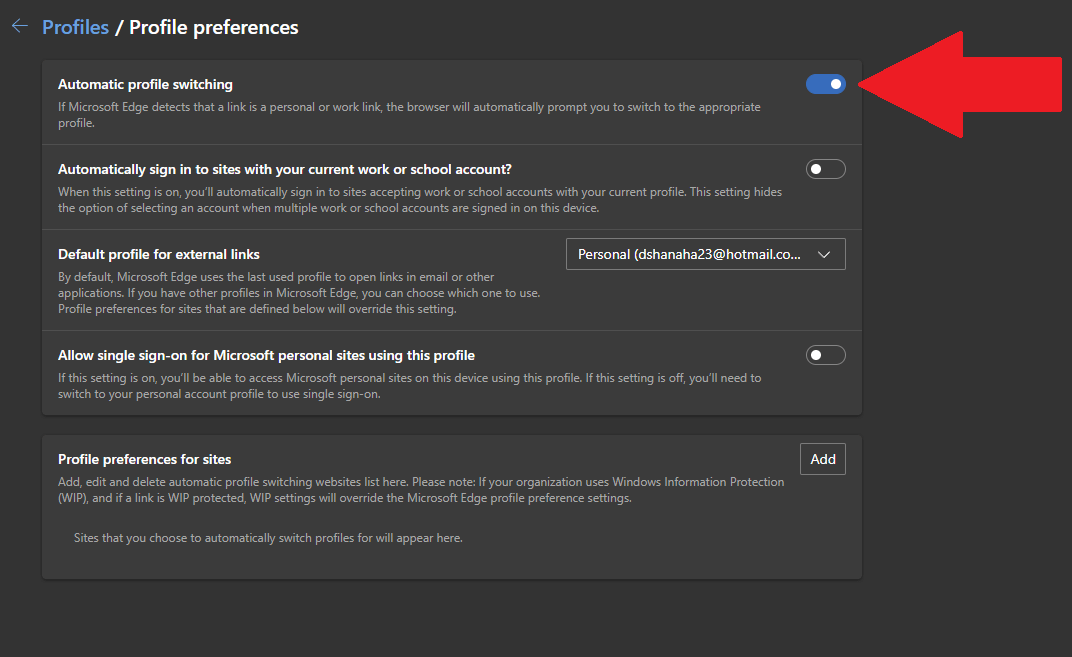
5. Toggle Automatic profile switching on.

Edge automatic profile switching

To reiterate, you need at least two profiles on Edge for automatic profile switching to function.

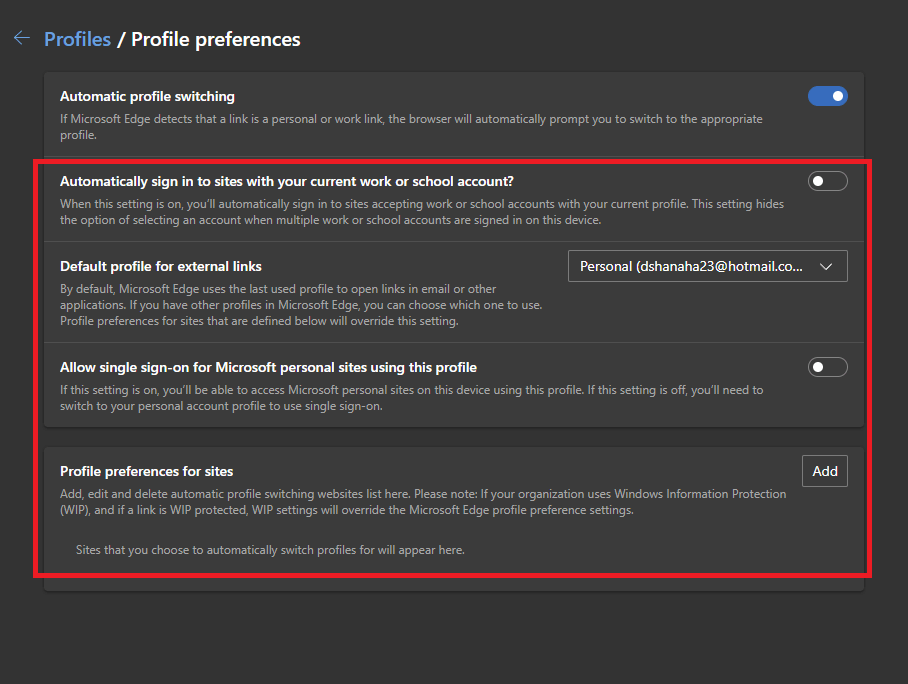
Once you turn on automatic profile switching, there are a few additional Edge settings to configure.

Additional Edge Settings

edge automatic profile switching

Underneath Automatic profile switching, here are the 4 options and what they do:

    1. Automatically sign into sites with your current work or school account?: Choose this option if you want to use only one profile, either personal or work, for opening links in emails and other applications on your PC.
    2. Default profile for external links: Here you can pick the default account you want Edge to use. The default option enabled is “Last used (default).”                                           If you want to specify which account to use, click the dropdown menu and choose the profile you want Edge to always use for external links.
    3. Allow single sign-on for Microsoft personal sites using this profile: When this setting is enabled, you can access Microsoft personal sites using the profile you indicated.
      If this setting is turned off, you will need to switch to your personal account profile to use single sign-on.
    4. Profile preferences for sites: This setting allows you to add, edit, and delete automatic profile switching websites list. Sites that you specify will automatically switch profiles. Please note: If your organization uses Windows Information Protection (WIP), and if a link is WIP protected, WIP settings will override the Edge profile preference settings.

Once you are finished, Edge will now open links in email and other applications using the settings you configured.

Is Windows 11’s Shut Down UI being redesigned?

Microsoft just released Windows 11 build 25174.1000 to the Dev Channel which featured the new Game Pass widget and the usual bug fixes. But as it now seems, there are some changes that might have been rolled out with this build that were not highlighted in the release notes. As spotted by @XenoPanther on Twitter, the “PC-like icon on the Shut Down menu is missing”.(via Neowin)

While following up on the matter, Xeno discovered that the “Icon” and “Icon Group” folders within the “shutdownux” DLL file were also missing.

Xeno also recently discovered that users could still run Internet Explorer in Windows 11. Could this be an indication that Microsoft is planning to redesign Windows 11 Shut Down icons or is it just a bug? Share your thoughts with us in the comment section below.

6 Best Browsers for Canvas [Ranked by Speed & Security]

The Canvas Learning Management System is a great tutoring tool. It facilitates students and teachers to get along with their studies at the K12 level.

Everything about Canvas is done online, including courses, study materials, or submissions of assignments. So, you must have the right browser to ensure a truly hassle-free learning experience.

If you rely on the Canvas Learning Management System to facilitate teacher-student collaboration, check out this article to learn the best browsers for the Canvas platform.

What is the best browser for Canvas Learning System?

Opera One – Overall best browser for Canvas

Opera One packs many features that make it the best browser for Canvas and online teaching.

You can use the bookmark feature and the built-in bookmark manager to create folders. You can also use it to save the web pages you often use when teaching.

The Snapshot tool lets you capture entire web pages or parts of them and quickly edit them. This is a useful feature as you no longer need to install third-party tools to take screenshots to send to your students.

Educators and teachers will love the Workspaces feature. You can use it to organize your tabs according to their role: teaching materials, homework ideas, lesson planning, and more.

The Unit converter is another useful feature. The built-in currency, measurement, and time zone converters allow you to convert unknown numbers and time formats without opening a new tab.

As you can see, Opera One packs plenty of useful features for teaching online classes.

Opera One

Get the most amazing features that will make your online learning easy to organize and manage. 

UR Browser – Private browser

ur browser

The UR Browser may be among the newest kid on the browser’s block but is already making waves with the several exciting features that it comes with.

That includes the excellent security credentials it boasts that make the browser well suited for even security-sensitive tasks such as banking or other financial transactions.

It is also quite light on the hardware, which means fewer computer resources are diverted to keep the browser going.

It is also updated regularly, which makes it perfect for Canvas. The speed advantage that the browser has over its rival is also another reason why it is considered ideal for Canvas.

The browser’s security features are another plus, as anything you do on Canvas remains private and secure.

UR Browser

Navigate on this multilayered private browser and access Canvas without issues of any kind.

Google Chrome – Fast browser

chrome

Chrome is one of the best browsers out there. It is available across a wider device segment – mobiles, desktops, and tablets.

This way, you can carry on with whatever you’ve been working on any device. That said, Canvas encourages using its app on mobile devices instead of the browser.

Additionally, Chrome gets the highest recommendation as the preferred browser for Canvas.

Among the other positives that make it right for Canvas, we need to mention its speed and efficiency. It may not be the fastest browser, but it works well.

With regular updates, the Chrome browser is also quite great in dealing with most security threats, which include malware and virus attacks.

So, you can rest assured your activities on Canvas remains unhindered.

⇒ Get Google Chrome

Mozilla Firefox – Browser with low resource usage

mozilla firefox best browser for canvas

It’s another browser that enjoys a wide appeal, perhaps next only to Google Chrome. It also gets updated quite regularly. So, you can be sure that you will always get all the features Canvas offers.

Besides Chrome, Mozilla is another browser that enjoys the highest recommendation from Canvas.

Firefox is also among the faster browsers, which means you won’t be left wanting for speed while on Canvas.

The latest Firefox Quantum is also hyped for being the most secure and private browser Mozilla has ever created.

That makes it another reason why you might opt for it for Canvas. Overall, a simple, safe, and speedy browser can be a nice fit for Canvas.

⇒ Get Mozilla Firefox

Microsoft Edge – Best browser for Canvas on Windows

edge

The Edge browser is great and can be used to access Canvas as effectively as any other browser though this is applicable for Windows devices only.

In other words, Edge will be best for Canvas on Windows PCs and tablet devices only.

Worth mentioning that the official Canvas app is only available for Android and iOS, meaning that the only way you can avail of Canvas services and features in a Windows environment is via the Edge browser.

Microsoft has also been doing a great job updating the Edge browser regularly while adding new features to the browser.

More recently, Microsoft announced adopting the Chromium platform for Edge, which should make for a more streamlined and user-friendly user experience with the Edge.

Plus, it’s fast and secure, too, all of which make it the best browser for Canvas for Windows users.

⇒ Get Microsoft Edge

Internet Explorer 11 – Simple browser

best browser for canvas IE

Although Microsoft is keen to uphold Edge as the default browser for current and future Windows devices, it has also packed Internet Explorer 11 within Windows 10, just in case you need it.

If you like the browser, you can still access Canvas with Internet Explorer 11.

However, things might look slightly different in Canvas when using Internet Explorer 11, given that the browser is somewhat dated compared to Edge.

Internet Explorer 11 isn’t given as much attention within Microsoft as Edge. Hence, it is not the first choice for Canvas.

That said, things aren’t expected to be different by a wide margin. This is because the Canvas basic functionality is going to be the same.

So, if you are on Windows and are somehow looking for an alternative to Edge, Internet Explorer 11 can be a nice option.

⇒ Get Internet Explorer 11

What devices does Canvas support?

Canvas is an online platform built using web standards. It works on virtually all devices, provided you have a supported browser.

This means you can use Canvas on Windows, Mac, Android, iOS, Linux, and other devices with any of the browsers listed above.

There you have it: The best browsers you can use for Canvas on any device. You can confidently choose any of the browsers on the list to get maximum performance on the popular learning platform.

If you need a list of the best interactive training module software, check our list of carefully curated tools in the linked guide.

Feel free to let us know in the comments below the browser you enjoy using for Canvas.

Insomniac Browser Review: Here’s What You Should Know About It

The best secure browsers are increasingly becoming important, with data theft and spying more prominent on the web than ever. Having your browser as a haven in the insecure web gives you respite and lets you go about your business freely.

The Insomniac browser falls into this category of secure browsers you can use. However, that is not all it offers, as it thrives in other features.

This guide will show you everything you need to know about the browser, especially what you should expect regarding privacy and security.

What is Insomniac browser?what is insomniac browser

The Insomniac browser is a privacy-focused app, and unlike other browsers, it will assign a custom IP address for each open tab.

The browser has a Gmail Switcher feature that allows you to easily switch from one Gmail account to another with a single click.

How do I download the Insomniac browser?

  1. Visit the Insomniac browser official website in order to download the installer.
  2. Click the Download version for your version of PC.
    download
  3. Wait for the download to complete.

How do I install Insomniac Browser?

  1. Click the downloaded Insomniac installer.
  2. Click the Install button when prompted.
    install
  3. Wait for the installation to complete.

And with that, you have the Insomniac browser installed on your PC.

Why should I use Insomniac browser?

The major selling point of the Insomniac browser is its privacy feature. However, it offers so much more than that.

It supports advanced timers, and your tabs will change colors according to the remaining time on a timer.

Adding to the productive features, Insomniac allows you to organize your tabs vertically to navigate them faster. This is quite useful if you have dozens of open tabs.

Besides, the Pasties features work like a clipboard for each tab so that you won’t paste anything in a wrong tab by accident anymore.

If needed, you can clean your cookies with a single click. It’s worth mentioning that you can clean the cookies for the current tab, website, or just Google cookies.

Insomniac is available for download on the official website, either as an independent web browser or as an extension to Firefox or Chrome. Apart from the freeware version, the browser also has an Ultimate version (paid), with many extra features.

What are Insomniac browser alternatives?

Other browsers, such as Opera One, offer similar features free of charge. Opera One has built-in tracking protection that permanently blocks tracking scripts and cookies, thus improving page loading time.

In addition, there’s a built-in ad blocker, so you won’t have to deal with ads anymore. As for privacy, there’s a free and unlimited VPN available.

It’s worth mentioning that Opera One is based on Chromium and can work with Chrome extensions and it comes with it’s own AI.

Opera One requires few resources and is compatible with most operating systems (mobile versions included). Switching to Opera One and then customizing the browser is extremely easy and intuitive.

Opera One

Switch now to Opera One to benefit from many smart, unique features that make browsing more efficient.
Free Download Visit website

There is everything you need to know about the Insomniac browser. While it lives up to its privacy-focused tag, the pricing is a letdown, as there are free browsers that has everything it offers and more. So, you might be better off using those browsers.

If you need a list of the secure and private browsers you can download today, check our guide on the topic to ease your decision-making.

Feel free to let us know your experience with the browser in the comments below.

10 Best Privacy Extensions For Firefox That Are Safe To Use

From malware to spyware to web trackers, all of these entities can be a potential threat. While you can use antivirus software to protect your PC offline, online threats have become a challenge, and this is where the best privacy extensions for Firefox come into the picture.

Fortunately, with the right privacy extensions for Firefox, you can protect your sensitive information from malicious websites.

Similar to Google Chrome, Firefox also offers plenty of third-party extensions to protect you from online trackers and unwanted advertisements such as misleading banners and pop-up ads.

In this article, we take a look at the best Firefox security extensions to install today.

Quick Tip:

Opera One can help by protecting you and your data and allowing you to browse privately and securely without having to depend on third-party extensions.

Opera One browser offers privacy features such as an ad blocker to help you prevent clicking on suspicious ads and save bandwidth data, a tracker blocker for online trackers like analytic scripts, and a free VPN to protect your data on public Wi-Fi networks.

Opera One

Protect your privacy online without any extra extensions, by using the built-in VPN service.

How good is Firefox for privacy?

Firefox is one of the best browsers for privacy, and you can always enhance the security and privacy measures by installing extensions. But even without these, things should function smoothly.

Firefox offers tracking protection, an HTTPS-only mode where connections to secure websites are only permitted, blocks dangerous downloads, and a feature to prevent unauthorized access to your account.

Can I trust Firefox extensions?

You should not blindly trust the extensions, even the ones downloaded from the Add-Ons store. Always verify the permissions to be granted and the data an extension could read.

Every extension submitted on Firefox goes through a series of checks to verify its integrity and safety. But that too doesn’t guarantee 100% security, as quoted by Firefox.

So, we recommend being cautious before installing an extension, doing thorough research on it, and checking what others users have to say.

Is there a VPN extension for Firefox?

Yes, there are several VPN extensions for Firefox, both free and paid. Though in the free version, you wouldn’t have access to as many servers, and the functionality would be limited.

Here are some of the VPN extensions for Firefox:

Now, that you have a basic understanding of extensions in Firefox, let’s see the best ones for privacy.

What are the best privacy extensions for Firefox?

DuckDuckGo Privacy Essentials – Say no to tracking

privacy extension for Firefox

DuckDuckGo is popular for its privacy-focused search engine that, unlike the traditional SE’s, does not track your searches.

The Privacy Essentials is an add-on to make online browsing secure as it allows you to take control of your personal information. 

DuckDuckGo comes with features like a tracker blocker, built-in encryption, private search supported by DuckDuckGo, and built-in GPC to invoke your legal privacy rights, which tells websites not to sell or share your personal data by default.

⇒ Get DuckDuckGo Privacy Essentials

Ghostery – Offers the best ad blocker

privacy extension for Firefox

Ghostery is one of the best privacy add-ons for Firefox. The extension has been designed to offer all the goodies of popular privacy extensions in one place.

It comes with enhanced ad blocking that works with anti-tracking technology to block ads that may slip through the ad blocker.

Ghostery can also improve the page loading speed by preventing the page from loading unnecessary media in the form of videos and ads.

You can view and customize the privacy filter to block the tracker on the website you browse and customize your display with the multiple insights dashboard.

⇒ Get Ghostery

Blur – For enhanced online privacy 

privacy extension for Firefox

If you want an all-in-one extension with privacy settings, password management, and generation capabilities, Blur is an excellent choice.

It allows you to create strong encrypted passwords, save, encrypt and organize your password with auto-login, works with iPhone, iPad, and browser, and supports touch ID and other login features.

The secure payment options allow you to shop online without giving out your credit card information to the merchant. It also offers other usual privacy protection features, including a web tracker and ad blocker, and privacy filters.

⇒ Get Blur

Facebook Container – Stops Facebook from tracking activity

privacy extension for Firefox

Like most tech giants, Facebook relies on user data for targeted advertising. Even if you are not using Facebook, it can track your visit to other websites through cookies.

The Facebook Container extension for Firefox prevents Facebook from tracking you around the web. You can take control and isolate your web activity from the big blue tech giant.

⇒ Get Facebook Container

uBlock Origin – More than simply an ad blocker

Security add-ons for Mozilla Firefox

uBlock Origin is a popular ad-blocker extension available for almost all major browser platforms, including Firefox.

This extension can block all of the intrusive ads through its filters by default. Furthermore, you can customize the filters to adjust the effectiveness according to your preference.

uBlock Origin can protect you against EasyList ads, malware domains, and trackers, and offers customization to work with Fanboy’s enhanced tracking list, Dan Pollock’s HOSTS file, MVPS Hosts, Spam404, and many more.

⇒ Get uBlock Origin

Private Bookmarks – To password protect your bookmarks

Security add-ons for Mozilla Firefox

If you don’t want everyone accessing your PC and peeping into your bookmarks, Private Bookmarks offers a special password-protected bookmark folder.

It encrypts the private bookmarks with a password chosen by the user. Since the extension works offline, you have complete control over the data.

⇒ Get Private Bookmarks

Avast Online Security – For all-round protection

Security add-ons for Mozilla Firefox

Avast Online Security is a browser security and web reputation extension. It is one of the best privacy plugins for Firefox.

It uses the crowdsourced web reputation rating to offer protection against known phishing and malware sites to improve your browsing experience.

The extension’s notable features include blocking phishing sites, website ranking by users, and blocking tracking cookies.

⇒ Get Avast Online Security

NoScript Security Suite – Eliminates threats like no other

privacy extensions Firefox

NoScript Security Suite is a simple Firefox extension that allows you to run specious and potentially malicious web content from your trust sites.

It helps mitigate XSS and other web security exploits executed remotely. 

NoScript Security Suite protects your trust boundaries against cross-zone DNS rebinding / CSRF attacks, clickjacking attempts, and more.

⇒ Get NoScript Security Suite

Privacy Badger – To automatically block trackers

Security add-ons for Mozilla Firefox

Privacy Badger saves the user hassle of blocking individual sites manually as it can learn and block invisible trackers automatically.

Based on the tracker behaviors, it decides what to block without requiring any input from the user.

It also sends a GPC signal to opt you out of data sharing and selling and a DNT signal to tell companies not to track your movement across the internet.

⇒ Get Privacy Badger

Cookie AutoDelete – Deletes cookies after every session 

privacy extension for Firefox

Firefox, like other modern browsers, offers an option to clear cookies. However, clearing cookies may feel like a laborious process for those who have to clear their cookies every few hours.

Cookie AutoDelete inspired by the Self Destructing Cookies, deletes any cookie not being used when you close the tab automatically. You can whitelist the ones you trust, and the rest will be deleted.

⇒ Get Cookie AutoDelete

How do I maximize privacy in Firefox?

Firefox offers a plethora of features aimed at enhancing privacy and security for the user. You can switch to Strict tracking protection for a safer browsing experience.

Besides, configuring Firefox to never remember the browsing history can be a handy privacy measure, though you won’t be able to check the webpages accessed earlier.

And, do not forget to regularly clear the browsing data. This not only prevents your activity from being tracked but also reduces the possibility of encountering several errors.

Whether you are a privacy enthusiast who chose Firefox for its Privacy features or a regular user, protecting yourself and your data should be a priority.

By installing the best privacy extensions for Firefox, users can protect against Malware, web trackers, and browser-based security threats.

Also, discover the best free VPN extensions in Firefox.

Explore the list and let us know your favorite Firefox privacy extension in the comments below.

Best back to school gaming gear for 2022

Back to school season is almost upon us. And you know what that means: it’s time to stock up on this year’s hottest gaming gear. You’re in luck, because we’ve got some of the flyest apparel already picked out for you to peruse. Have a look.

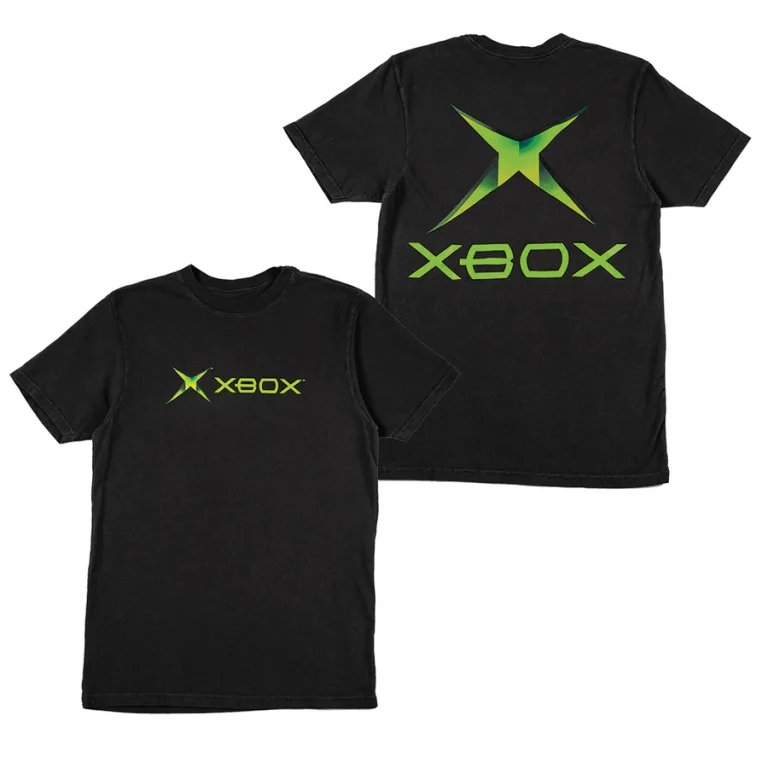
Xbox Heritage Logo Tee ($29.99)

Wrap yourself in comfortable nostalgia with this Xbox Heritage Collection inspired by the feelings and iconography of those very first years of gaming together on Xbox consoles. 

If you have a soft spot for the original Xbox, then the Xbox Heritage Logo Tee is just for you. It features the iconic original Xbox logo and makes a great fashion-conscious homage to the first Xbox.


Xbox Black Sphere Gaming Hoodie ($59.99) 

Game time just got infinitely more stylish with this Xbox hooded pullover made of a quality tri-blend fleece. It boasts a loose, cozy fit and a thick drawstring. Complete the winning look with matching Black Sphere Gaming Joggers. 


As classes start back again Autumn is right around the corner, and with it cooler weather. Stay warm and stay stylish at the same time with this hoodie, which displays the black Xbox sphere. It is the perfect Fall apparel for any Xbox fan.


Halo Garment Washed Adjustable Cotton Ballcap ($16.99) 

Made for true Halo enthusiasts, the official Quick Turn Halo Infinite Logo Hat is subtle but impressive. The Halo Infinite logo embroidered in bright white pops against the solid black hat. A traditional adjustable back gives it a classic look and soft, washed cotton makes this hat feel comfortable and worn in like you’ve had it forever. Proudly represent the United Nations Space Command like any off-duty soldier would with this cool Halo Infinite hat. 


Halo fans will love this officially licensed headwear. The adjustable snapback ballcap features the UNSC logo from the Halo games. The best part about this Halo headwear is that it won’t bust you back to school budget.


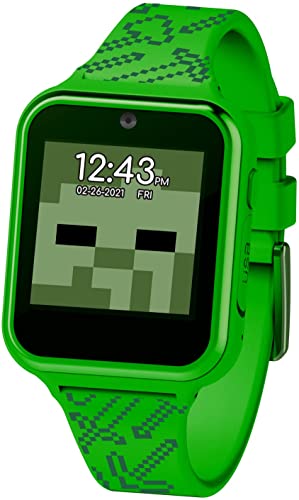
Accutime kids Minecraft smart watch ($34.99) 

This Minecraft kids smartwatch is one of the coolest things you can get your little Minecraft fan! With a generously sized, easy to read touchscreen display and a cool, fun Minecraft design featuring their favorite characters, this is a smartwatch that boys and girls of all ages can enjoy. 


Let us introduce you to your kid’s favorite back to school accoutrement. The Accutime Minecraft smart watch comes loaded with learning games, pedometer, calculator, alarm, selfie camera and so much more.


Fortnite Headline Kids’ 18″ Backpack ($29.99) 

Calling all Fortnite players: this backpack will have you set for the long haul while letting everyone know exactly what your favorite game is. The classic silhouette features modern add-ons like a laptop sleeve, mulitple pockets, and an internal organizer, plus fun details like a logo emblazoned shoulder strap and embroidered back panel.


This Fortnite backpack is the quintessential back to school item. Celebrate everyone’s favorite free-to-play online shooter with this Fortnite-themed 18’ backpack. It features padded shoulder straps and an expanding water bottle pocket.


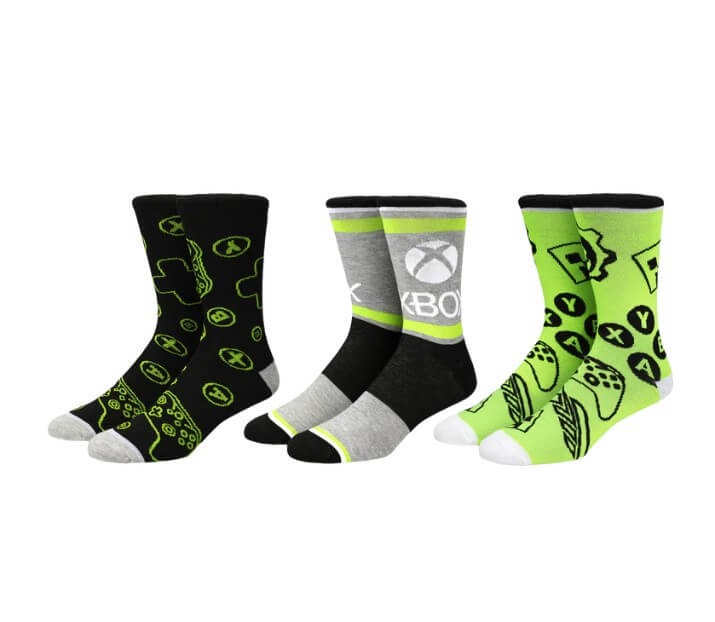
Xbox Icons Crew Socks 3-Pack ($19.99)

Mix and match with these officially licensed Xbox Crew Socks. This pack includes three pairs featuring a playful assortment of iconic Xbox graphics. 


Back to school gaming style extends from head to toe. And on that latter end we have you covered with these officially licensed Xbox crew socks. They’ll keep your feet warm and toasty, not to mention snazzy with three different styles to choose from.


Xbox Green & Black Pompom Beanie ($24.99) 

Look appropriately festive while keeping your head toasty warm with our Xbox pom pom beanie. 


Beanie season is closer than you think. Why not round out your back to school gaming gear collection this gaming headwear? The beanie features the trademark green and black Xbox colors and the Xbox sphere logo. Let everyone know you’re an Xbox gamer who knows style.

Wrap up

Are you excited about our back to school gaming gear collection? Will you be buying any of the items on this back to school gaming gear list? Let us know in the comments.

World of Tanks Blitz: Is It Worth Downloading It on Windows 7?

World of Tanks Blitz went a long way from its beginnings in 2014. Back in the day, it was exclusively developed for handheld devices, but the developers made it cross-platform and bring it to Windows 10.

Now, Windows 7 version wasn’t supported until the end of 2016, but now you can play it seamlessly on the most popular Windows iteration.

Many folks are unaware of the facts mentioned above, so we decided to showcase this game and even tend to certain issues that occur from time to time on Windows 7.

Here’s everything you need to know about World of Tanks Blitz on Windows 7, so make sure to check it out.

What devices can you play World of Tanks Blitz on?

Players may get their fill of tank warfare anywhere they can access the Internet since World of Tanks Blitz can be played on various platforms, including Android, iOS, Mac OS X, and Windows computers and mobile phones.

Before downloading World of Tanks Blitz, ensure your computer meets the minimum requirements listed below.

Can I play World of Tanks on browser?

Because World of Tanks requires it to be downloaded onto your computer, you cannot play the game from your browser now.

However, there is no need to be concerned since the game is playable on various systems thanks to the minimal minimum system requirements.

What is there to know about World of Tanks Blitz?

1. System requirements and how to download

World of Tanks Blitz is a cross-platform game on Windows, macOS, Android, and iOS. The game isn’t demanding, so most contemporary machines can run it without a sweat — Windows 7 PCs included.

Here are the World of tanks Blitz system requirements you’ll need to meet to play the game:

  • OS: Windows 7, 8.0, 8.1, 10
  • CPU: 2GHz
  • RAM: 2GB RAM (4GB is recommended for the 64-bit version)
  • Graphics: DirectX 9.0c compliant video card with 256 MB RAM
  • Storage: 3GB available space

Once you’re certain that you’re PC is up to the task, follow the steps below to Download World of Tanks on your Windows 7 PC:

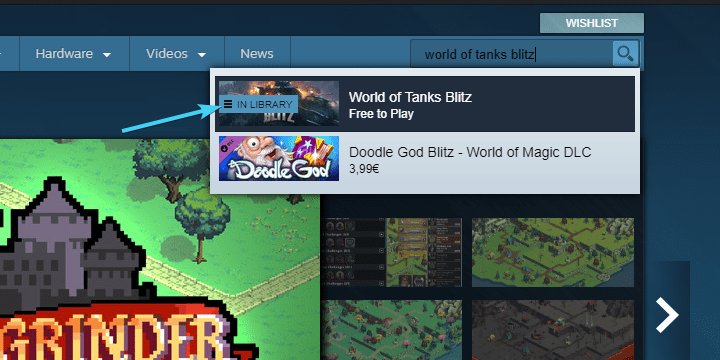
  1. Download the Steam desktop client and run it.
  2. Open the Steam desktop app and search for World of Tanks Blitz.world of tanks blitz windows 7
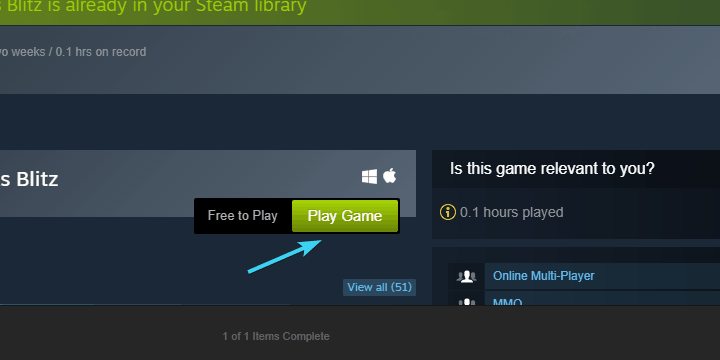
  3. Download and install World of Tanks Blitz.
  4. Run the game from the desktop shortcut or from the Steam’s library.world of tanks blitz windows 7
  5. Create your account and start participating in multiplayer tank battles.

2. How to resolve compatibility issues

When the title was in beta back in 2016, some players had issues with Windows 7 compatibility that should now be history, but if you bump into some issues on Windows 7 ( crashes or performance inconsistency), make sure to run the game as an administrator and update it timely.

Follow these steps to run World of Tanks Blitz with administrative permissions on Windows 7:

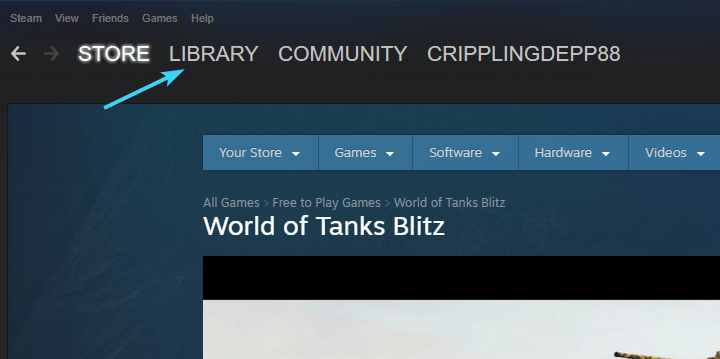
  1. Open the Steam desktop client.
  2. Click on the Library.world of tanks blitz windows 7
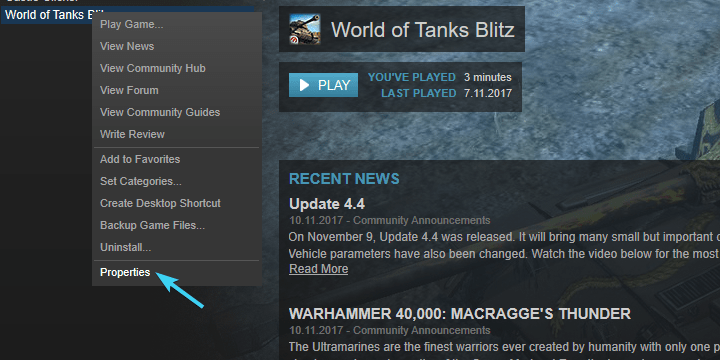
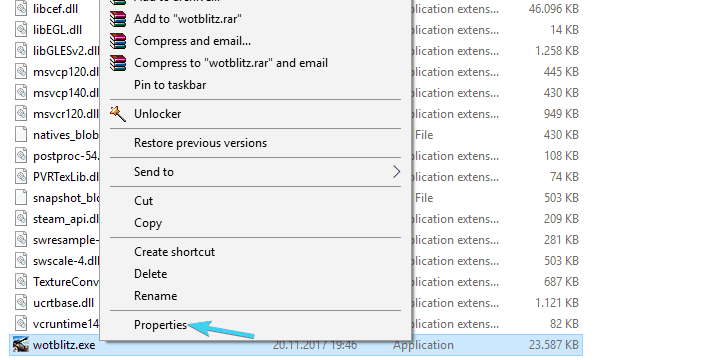
  3. Right-click on the World of Tanks Blitz and open Properties.world of tanks blitz windows 7
  4. Select the Local Files tab and then click on the Browse local files button.
  5. Right-click on wotblitz.exe and open Properties.world of tanks blitz windows 7
  6. Select the Compatibility tab.
  7. Check the Run this program as an administrator box and confirm changes.world of tanks blitz windows 7

Furthermore, since we’re referring to an online game, make sure to disable VPN/Proxy and, in some cases, antivirus.

In addition, it’s advised to check the Windows Firewall and let the WoT Blitz communicate through it.

3. Game in detail and all about tanky tanks gameplay

If you ever came across the standard World of Tanks game, then you’ll find Blitz to be a light port with, basically, quite a similar approach.

The in-game physics are similar, the team-based pub battles are similar (7 vs 7 instead of 15 vs 15), and the advancement through a tech tree is almost the same.

It’s a free-to-play game with in-game microtransactions like premium accounts, premium tanks (for faster credit-grinding and extra experience), and gold coins for certain purchases.

The Wargaming took the opportunity to earn a bit more cash, so the advancement through tiers, similar to some other mobile titles, might take some time. At least if you decide to play without the investments.

Even though it was primarily oriented for handheld devices, nowadays is available for almost every given OS that’s out there.

This, in my opinion, is a bit unfair for players that play on smartphones or tablets. It’s much easier to utilize in-game mechanics, move around, aim, and fire with the keyboard and mouse.

There are 7 nations with their respective tech trees, and you can choose between 4 different tank classes. Besides the light, medium, and heavy tanks, you can play with tank destroyers.

The diversity of the classes makes it more interesting since you’ll need to adapt to different play styles. There are 10 tiers, with tanks dating from World War I and leading to Cold War armored vehicles.

You might need some time to take a grip on the gameplay, but once you learn map positioning and game mechanics (double-bush, side scraping, and hull-down) and upgrade the system, it will get much easier.

In-game purchases can and will affect your overall success since they directly improve various important features.

Some might call it a pay-to-win policy, but in the era of the loot box in AAA titles, what else to expect from the free-to-play game?

4. Community reviews

When it comes to community reviews, World of Tanks Blitz is getting mostly positive reviews.

Many users deem it much better than before, but since the game tracks closely its big brother, it’s not unusual for Wargaming to make dubious changes that won’t meet the expectations of the experienced player base.

Special emphasis is put on update 3.8 which changed the way the upgrade system functions.

The latest updates changed a lot, but game developers are still receiving a huge backslash on Steam and the official forum, respectively.

We advise you to try out the game and see for yourself. In the end, it’s free. However, if you want to be competitive and make better results, prepare to reach for your wallet.

What are your thoughts on World of Tanks Blitz? Make sure to tell us in the comments below.

Tip icon Tip
Microsoft officially ended Windows 7 support. If you’re planning a change, check out our guide on how to upgrade to Windows 10 for free.

And if you decide to hit the upgrade button, you may also want to check out this list of the best tank games for Windows 10.

Also, don’t hesitate to comment in the sections below and share your thoughts with us. Thanks for reading, and happy gaming!

Microsoft Word gets a new “Review mode”

If you have previously worked on a collaborative project in Microsoft Word with users who play different roles, then you have probably encountered some challenges. For instance, some of the parties involved might end up altering the document and editing out crucial components of the project due to a lack of control.

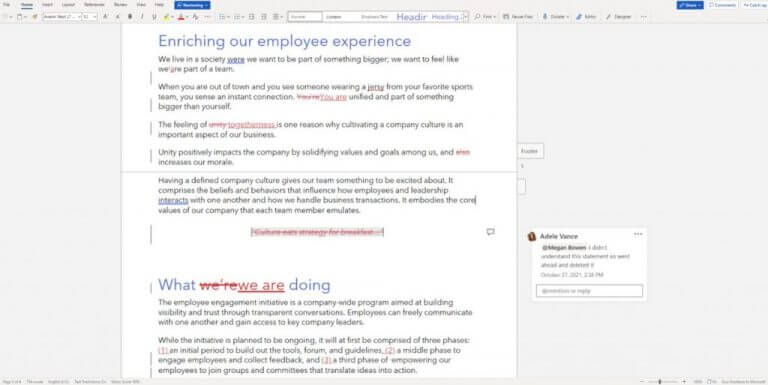
But through a blog post, Microsoft has announced that they are introducing Review Mode in Microsoft Word in an attempt to establish control and transparency. The Review Mode in Word will help the people taking part to stick to their roles, that is, if the document is shared with you for review you will be restricted to that only.

This means that you will not be able to edit the document, however, you can leave comments and suggestions that you think might be worth consideration and should be incorporated into the document. Only document owners and other collaborators will be able to edit the document and approve the suggestions made by reviewers.

review mode in Microsoft Word

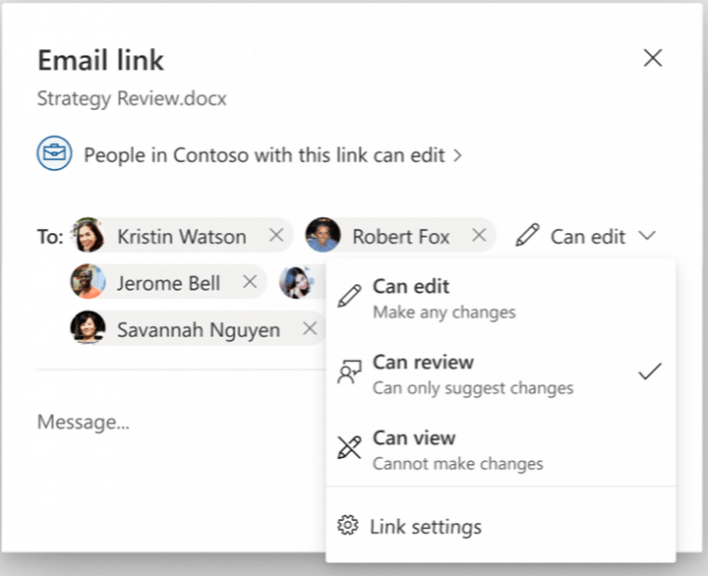
If you want to share a Word document in Review Mode you will need to click on the Share button, then click on the Share command in the menu. Finally, add people that you want to review the document then select the Can review option, which is also available under Other settings in the Link settings dialog box.

Review Mode does come with limitations, for instance, it only works on documents that are stored in  OneDrive or OneDrive for Business. This means that the capability will not work on documents stored in a SharePoint library, because the file permission settings for the library are prioritized thus allowing users to edit the document despite it being shared to them in Review Mode.

Review Mode is currently available for users in Word for the web, and to all Beta Channel, Current Channel (Preview) and Current Channel users in Word for Windows and Word for Mac. As for the ability to share a document for review via the Can review option. It is expected to rollout to the Beta Channel, Current Channel (Preview) and Current Channel users in Word for Windows and Word for Mac soon. In other Word news, be sure to check out our news report where we talked about the new comment like feature that made its way to Microsoft Word on the web.


4 Best Chrome Extensions to Help You Stop Procrastinating

Let us discuss the best Chrome extension options to stop procrastination. The Internet is perhaps man’s best invention, but sometimes this wonderful tool can become a double-edged sword.

The World Wide Web is full of exciting information from a wide array of domains, and when we find something we’re interested in, we often jump from website to website, losing all track of time.

We connect to Facebook, we come across the profile of a long-forgotten friend, and then we start browsing through their posts. We could stay glued to YouTube for hours watching funny cat videos.

Before we notice, we’ve spent most of the time doing nothing, and that dreadful deadline is only drawing nearer.

If you want to stop procrastinating, consider installing the following Google Chrome extensions on your Windows computer.

How do I block procrastination on Google Chrome?

This is a problem that most people face, and a few suggestions may help on your Chrome browser.

  • Customize your PC settings to remove focus on certain apps
  • Use anti-procrastination extensions
  • Create work Chrome groups
  • Create a profile dedicated to work

These suggestions may not be 100% effective, but they are a good way to maintain focus and help reduce procrastination. We, however, will recommend as a top solution the use of anti-procrastination extensions.

We will share our best recommendations in this article.

How do I put Chrome in focus mode?

In the past, there was a Chrome flag called Focus Mode. Sadly now this is done away with, and you will no longer be able to put Chrome in focus mode.

However, you can get the best out of your surfing using some of the extensions we will discuss. To get the total package, you may want to use these tools in addition to a motivation Chrome extension.

Quick Tip:

Opera One is free to install and use, and it comes with a lot of awesome handy features, most of them just one click away.

This browser already has a lot produictivity and organizational tools built right in. At a click away you can organize your browsing with workspaces, tab islands and AI.

Opera One

Stay focused on your work and never miss a deadline using Opera One’s exclusive features and plugins.
Free Download Visit website

What are the best Chrome extensions to stop procrastinating?

Site Blocker – Subdomain blocking

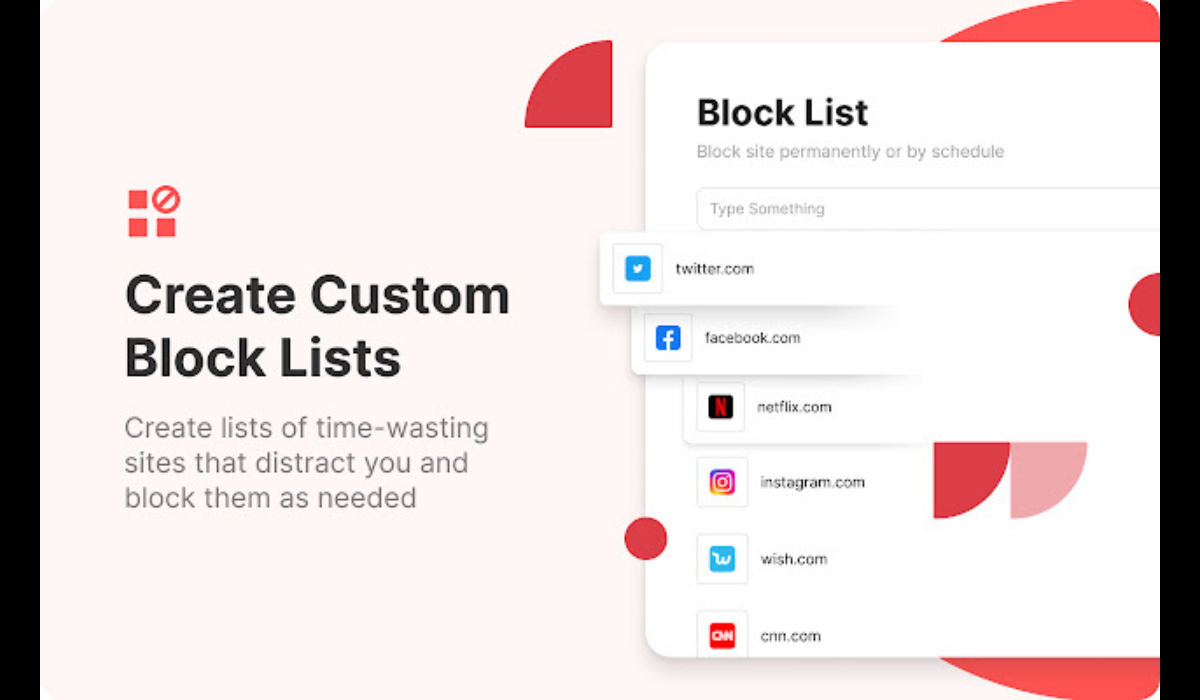
Let us start with Site Blocker, a Chrome extension that will help you avoid procrastination. You can safeguard your workday by preventing unproductive websites. You can maintain your attention on what’s essential in this manner.

The tool prevents access to websites either permanently or for a set period.

For your benefit, you’ll block undesirable websites or shield your kids from offensive material. Additionally, it contains a function called Net Safely that will block all websites in a prohibited category.

The essential point is that having a predetermined blocklist with thousands of rules has minimal benefit if you only ever utilize a tiny portion of it. With the tool, you create the blocklist on the go with the Block Site addon.

It is a great Chrome extension to stop procrastinating; you should give it a try.

Important features:

  • Subdomain blocking
  • Block sites by entered keys
  • White list

⇒ Download Site Blocker

Block Site – Great for creating active days

chrome extension procrastination

Block Site allows you to stay focused and block any websites that you can’t stay away from.

Add the webpages to your block list, and every time you want to visit them, Block Site will redirect you to a special page animated by the funny mascot Mr. Wips.

Block Site is an excellent tool that can block specific search queries on search engines and URLs so that you can stay focused on your work.

The adult-related list of blocked words allows you to block the predefined bad and profanity words. This option is handy for parents who want to keep their children safe from inappropriate content.

With the help of the Active days & Times feature, you can choose the days and time intervals when you want the tool to be active so that you don’t procrastinate during certain activities.

This is an anti-procrastination extension that you should try.

Important features:

  • Focus mode
  • Adult content filtering
  • Scheduling

⇒ Download Block Site 

Procrastinator – Multiple blocking rules

chrome extension procrastination

Here is another Chrome extension that will help you avoid procrastination. Procrastinator blocks unnecessary distractions, helping you to fight against your procrastination tendencies.

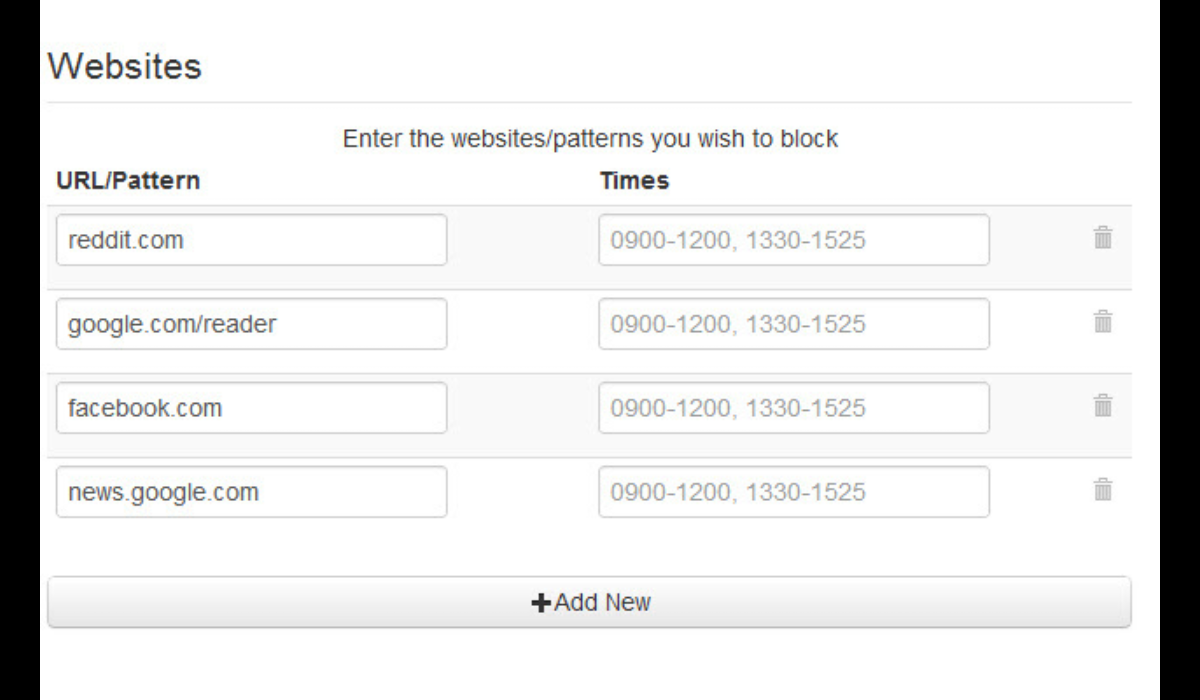
Unlike other website blockers, Procrastinator offers you many customization options: you can add your URL and decide how long particular websites should be blocked.

You can also block sub-sets of websites using pattern matching techniques, as well as regular expressions to fine-tune dangerous websites.

If you are looking for a procrastination blocker, we recommend Procrastinator.

Important features:

  • Individual website controls
  • Block list definition
  • General time span

⇒ Download Procrastinator

TimeDoser – Great work/break management

chrome extension procrastination

Human beings can’t work for hours on end. But, from time to time, we need to take a break and relax.

The only problem appears when these breaks take longer than expected, and we indulge in not-so-productive activities.

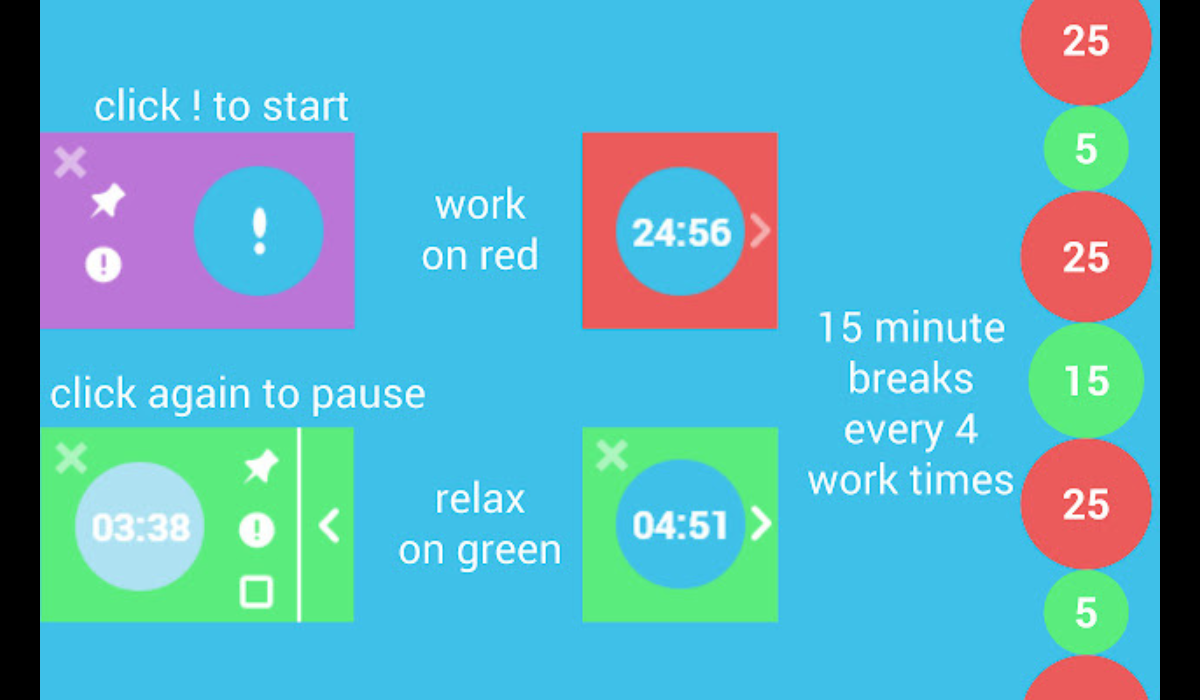
TimeDoser helps you stay focused by selecting the amount of time for work and breaks.

You can also switch on/off notifications, audio, and much more to eliminate the factors that may disturb your concentration.

With TimeDoser you’ll become more productive, and you’ll be able to control those annoying procrastination tendencies that you may experience from time to time.

It is a great Chrome extension for focus.

Important features:

  • Skip and accumulate breaks
  • Notifications
  • Pinned window

⇒ Download TimeDoser

The four tools listed above are valuable allies in your battle against procrastination. If you want to remain productive, we recommend using any of these Chrome extension options to avoid procrastination.

Tell us which tool works best for you. It can be one of these, or perhaps you’ve got another app that you prefer. Your feedback is welcome in the comments section.

Finally, while you get the best out of work, we recommend you take charge of your online security and use any of the best Chrome extensions to protect your privacy.

Nintendo Switch has now sold 111 million units, will likely become one of the best-selling consoles of all time

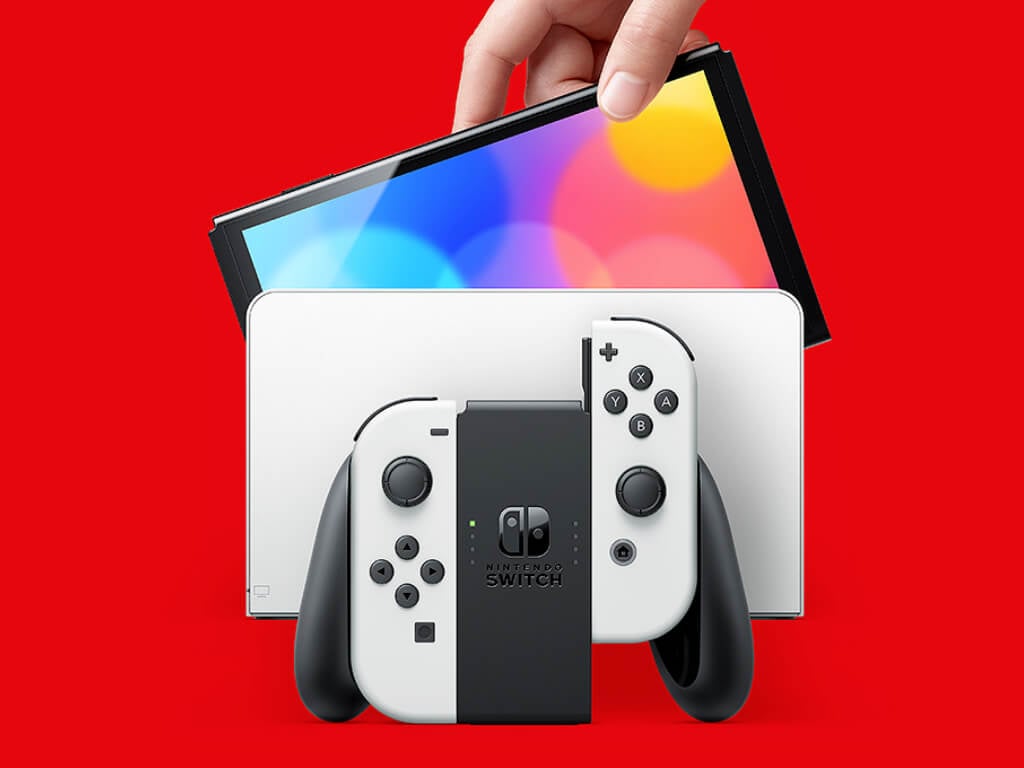
The Nintendo Switch keeps right on riding a wave of success that started when the hybrid console launched back in March of 2017. How much success? Answer: over 111 million units worth as of August 2022.

That puts it currently in fifth place in the list of all-time best-selling game systems, behind Sony’s PlayStation 4 which sold 117 million units. The Game Boy sold over 118 million units including the Game Boy Color variant. The Nintendo DS and PlayStation 2 have sold 154 million and 155 million units respectively.

The Switch will have a bit of an uphill climb if it is to eventually take over the top spot. And with Switch sales down 23% compared to a year ago (though still relatively strong), it seems more unlikely that that will happen.

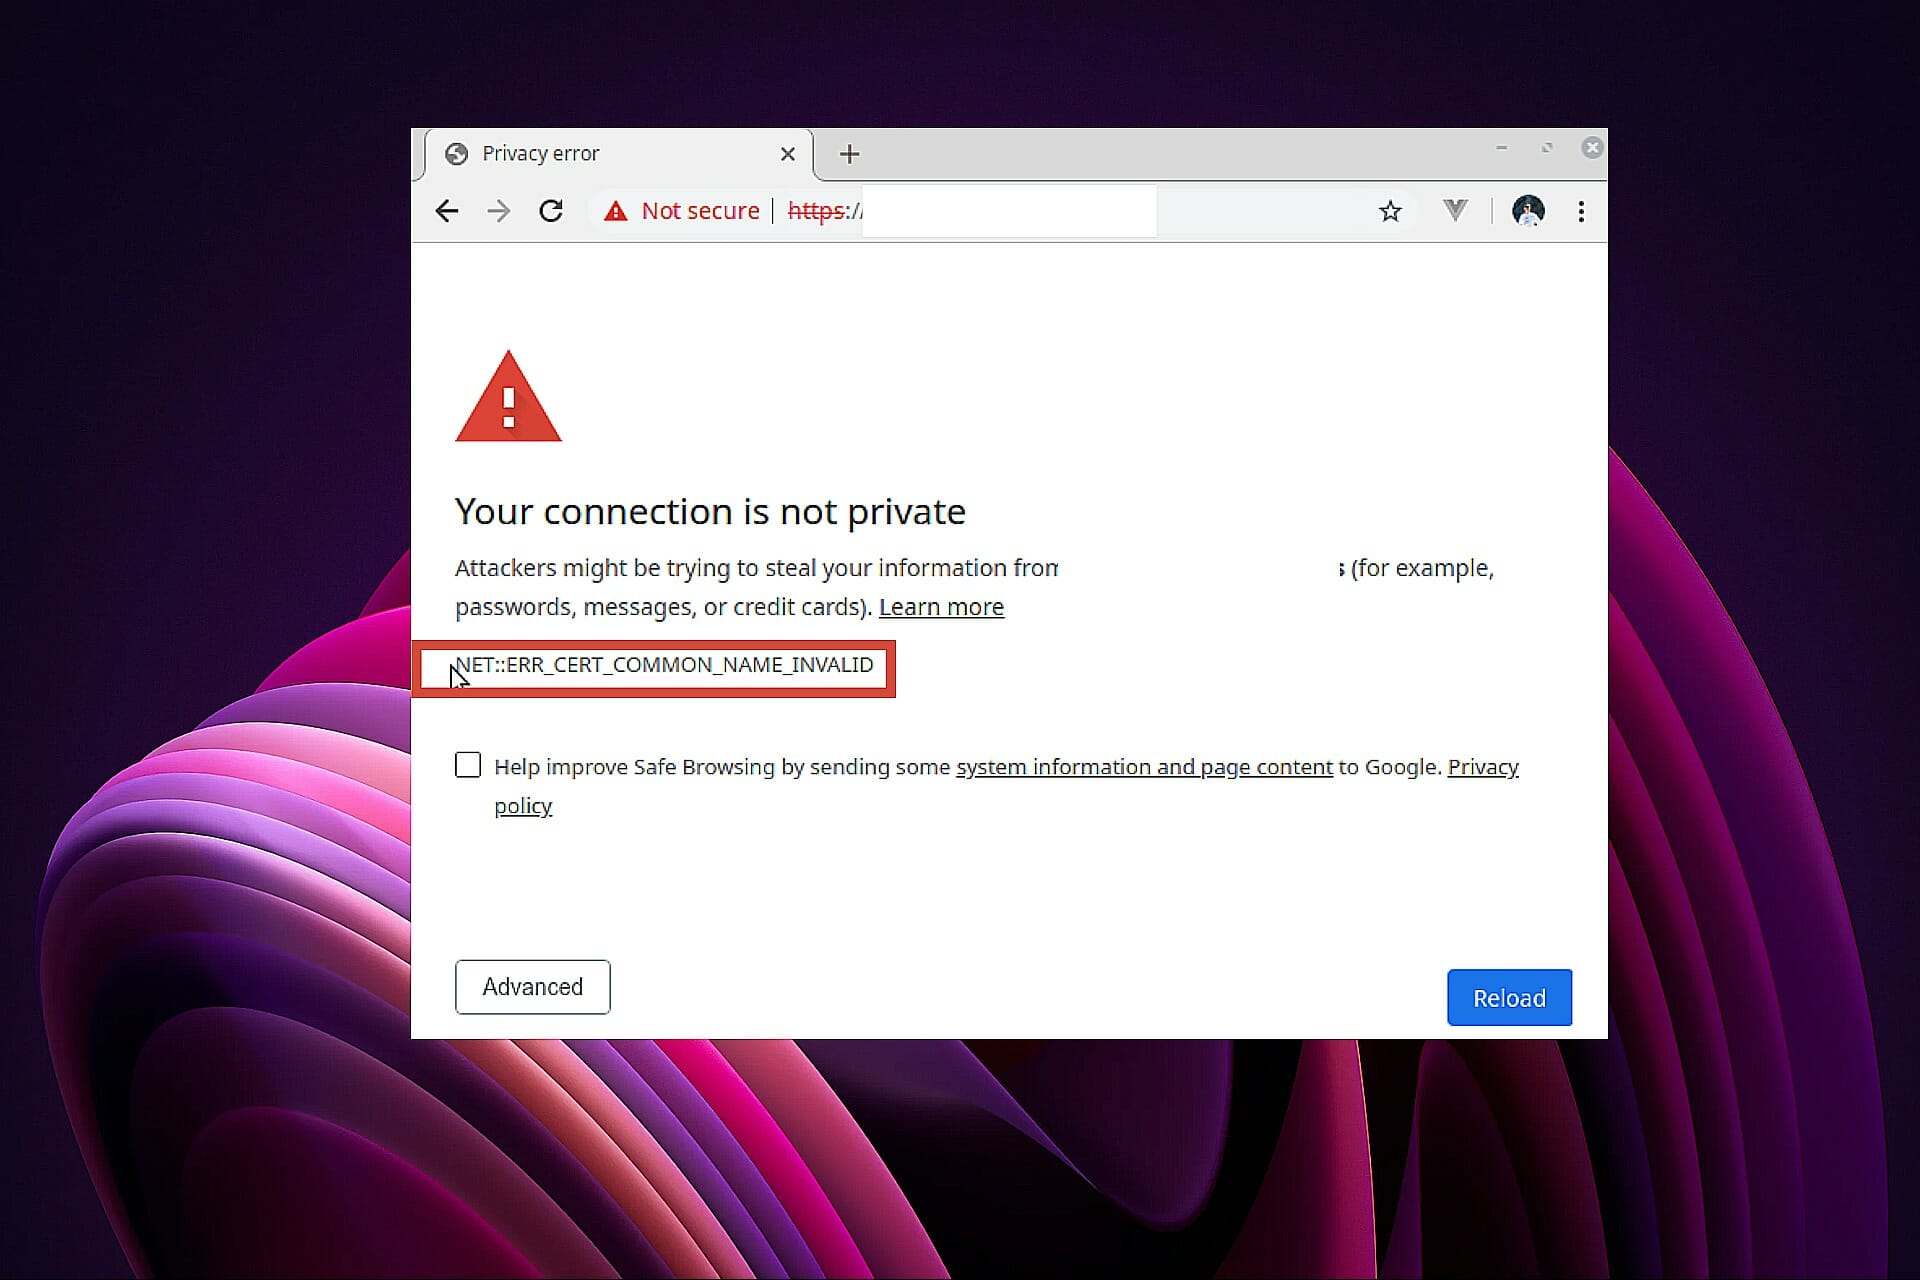
7 Ways to Fix Net::err_cert_common_name_invalid Certificate Error

You found this article because you got an error message that read net::err_cert_common_name_invalid. We will show you all the ways to resolve this issue on your browser in this article.

We connect to the Internet through our web browsers. However, the interconnection they offer may expose us to online threats and malware. An excellent way to stay safe is to communicate with security certificates between our browsers, servers, or web resources.

However, when credentials are mandated, we may receive error messages if something is out of sync.

How do I fix NET :: ERR_CERT_COMMON_NAME_INVALID?

1. Disable your antivirus or firewall

  1. Click the Start menu, type firewall, and select the Windows Defender Firewall app.
    net::err_cert_common_name_invalid
  2. On the left pane, click Turn Windows Defender Firewall on or off.
    net::err_cert_common_name_invalid
  3. Click on both options to Turn off Windows Defender Firewall.
    net::err_cert_common_name_invalid
  4. Visit a web resource and verify that the net::err_cert_common_name_invalid error is gone.

Antivirus programs and firewall applications are also the culprits for your browser’s errors. This results in SSL issues that will limit your browsing.

You may disable security applications in the interim and check if it solves the issue.

Additionally, you could try using an antivirus tool that is reliable and has minimum system interferences.

Antiviruses that are compatible with Windows 10 and 11 PCs are generally well-built, with frequent updates that allow them to keep your system protected without causing any interference with other apps.

There are lightweight options silently in the background, stopping all forms of malware before it can even enter your PC.

Ensure you get a utility with a fast response rate and can run regular scans while you take care of other tasks.

Thankfully, many antiviruses implement more than just one type of shield, being able to prevent and remove all sorts of threats.

2. Reinstall Chrome

  1. Click on the Start menu, type Chrome, then right-click on the Chrome app and select Uninstall app.
    net::err_cert_common_name_invalid
  2. Follow the wizard to complete the uninstallation.
  3. Visit the Chrome website and click Download Chrome to get a new executable file.
  4. Click on the downloaded file and follow the wizard to complete the reinstallation.

This should resolve possible issues and get you in the clear. But, of course, don’t forget to backup your bookmarks and passwords.

You can do it manually or use a third-party cleaner utility. One such tool is CCleaner. It will remove any browser trace, allowing you to reinstall it as if it was never there.

⇒ Get CCleaner

3. Identify problematic extensions

  1. Click on the Chrome menu, select More tools, and click on Extensions.
  2. Click on the Remove button for individual extensions.
  3. Visit a web resource and verify that the net::err_cert_common_name_invalid error is gone.

To determine if an extension is causing the trouble, you may browse in incognito mode first to see if everything is fine.

An extension might be the culprit if you don’t see the error message in incognito mode.

To identify the problematic extension, disable all the plugins in your Chrome browser, following our outlined steps.

Then, enable one extension at a time and visit any site to see if the error message still appears. Repeat this step for the rest of the extensions until you find the culprit.

4. Check proxy settings

  1. Click the Start menu, type inetcpl.cpl in the Search box, and open the inetcpl.cpl utility. 
    net::err_cert_common_name_invalid
  2. Go to the Connections tab and click the LAN settings button.
  3. Tick the Automatically detect settings checkbox and hit OK.

Now check if the error is gone after correcting your proxy settings. Proxy settings can also affect how your browser works. For example, a small error in the configuration is enough to cause problems with browsing, so be sure to check your proxy settings.

5. Clear cache and data

  1. Press Ctrl + H on your keyboard.
  2. On the left pane, click on Clear Browsing Data.
  3. Select All Time from the Time range dropdown box, tick the options for Browsing history, Cookies and other site data, and Cached images and files, then click on the Clear data button.
  4. Visit a web resource and verify that the net::err_cert_common_name_invalid error is gone.

6. Clean your SSL cache

  1. Click the Start menu, type inetcpl.cpl in the Search box, and open the inetcpl.cpl utility. 
    net::err_cert_common_name_invalid
  2. Open the Content tab, then select Clear SSL State.
  3. Click OK on the popup.

7. Update your Chrome

  1. Launch the Chrome browser.
  2. Click the browser menu, select Help, and click the About Google Chrome option.
    net::err_cert_common_name_invalid
  3. Wait for the browser to check for updates, then restart your browser automatically.

How do I check my SSL certificate?

  1. Navigate to the website.
  2. Click on the padlock icon beside the website address and select Connection is secure.
    net::err_cert_common_name_invalid
  3. Finally, click on Certificate is valid.

As you must have guessed, this error is related to certificate issues. It simply means that your certificate’s common name is invalidated.

In such cases, your domain name and certificate name are mismatched. Other problems may also arise from various extensions installed on your browser.

This common SSL error on many platforms can also be due to a server misconfiguration of your website, a Chrome bug, firewall issues, or third-party extensions.

Also, while each Chrome update resolves known bugs in the browser, it can introduce new issues if things don’t go as they should and could be a cause of the error.

Users may have an issue displaying any of the following messages:

  • err_cert_common_name_invalid
  • net::err_cert_common_name_invalid
  • err_cert_common_name_invalid in Chrome
  • Edge chromium err_cert_common_name_invalid
  • net::err_cert_common_name_invalid HBO
  • err_cert_common_name_invalid in Windows 10

Why is my SSL certificate not secure?

There are a few reasons why your SSL certificate may not be secure, but in most cases, it is because it has expired. In some cases, it could also be because the installation is not correctly done or completed on the server.

How do I install an SSL certificate?

  1. Launch your browser.
  2. Type the path below in the Address bar and click Enter.
    chrome://settings/security
  3. Click on Manage certificates.
  4. Click the Import button and follow the wizard to install your certificate.

If you have read to this point, we believe you must have fixed the net::err_cert_common_name_invalid error.

As a general rule, we recommend regularly updating your browser; it is a great way to avoid browser-level errors.

Some of the solutions will also work if you have a no proceed option certificate error on Chrome. You can also check our guide on solving SSL_ERROR_BAD_CERT_DOMAIN error.

If you know of any other method to fix the ERR_CERT_COMMON_NAME_INVALID issue in Chrome, share them with us in the comment section below!

7 Ways to Fix Teams if Your Bluetooth Headset is not Working

Some users utilize Bluetooth headsets for listening to meetings with the Microsoft Teams app. However, a few users have said in forum posts their Bluetooth headsets don’t work with MS Teams.

Those users can’t hear audio from Teams with Bluetooth headsets. One user’s forum post said this:

When I use Hands-free AG Audio, there is some static disturbance. When watching videos, the stereo option gives great sound quality, but for some reason, it doesn’t give any sound during a meeting in Teams. In device settings during a meeting, once I choose Hesh 3 Stereo, the voice just stops.

Why are my Bluetooth headphones not working with Teams?

Bluetooth headphones may not work with Microsoft Teams for several common reasons. These are:

  • You have not selected the correct audio device
  • Improper privacy settings
  • Problematic Bluetooth driver
  • Wi-Fi and Bluetooth signal interference

The reasons mentioned above don’t only cause Teams Bluetooth headset no sound, not working or bad quality issues on Windows 10/11, but also on Mac.

If you can overcome these situations, BT headphones will work again with teams.

How do I get my Bluetooth headphones to work with Teams?

1. Try utilizing MS Teams within a compatible browser

If your Bluetooth headset is not working with the Teams UWP app, you can try utilizing the Teams web app instead.

The Microsoft Teams web app is compatible with all major web browsers, but for the best results, we recommend using Opera One.

The browser is built on Chromium, which means that all your Chrome extensions will work with Opera One. In addition, the software has built-in tracking protection, its own adblocker and native AI.

For extra security, Opera One offers free and unlimited VPN, which is always a welcome feature. If you need a reliable browser that works with Microsoft Teams, be sure to give Opera One a try.

Opera One

The sound settings are easily configurable on Opera One and many devices are compatible.
Free Download Visit website

2. Run the Bluetooth troubleshooter

  1. Launch Settings by pressing the Windows + I hotkey.
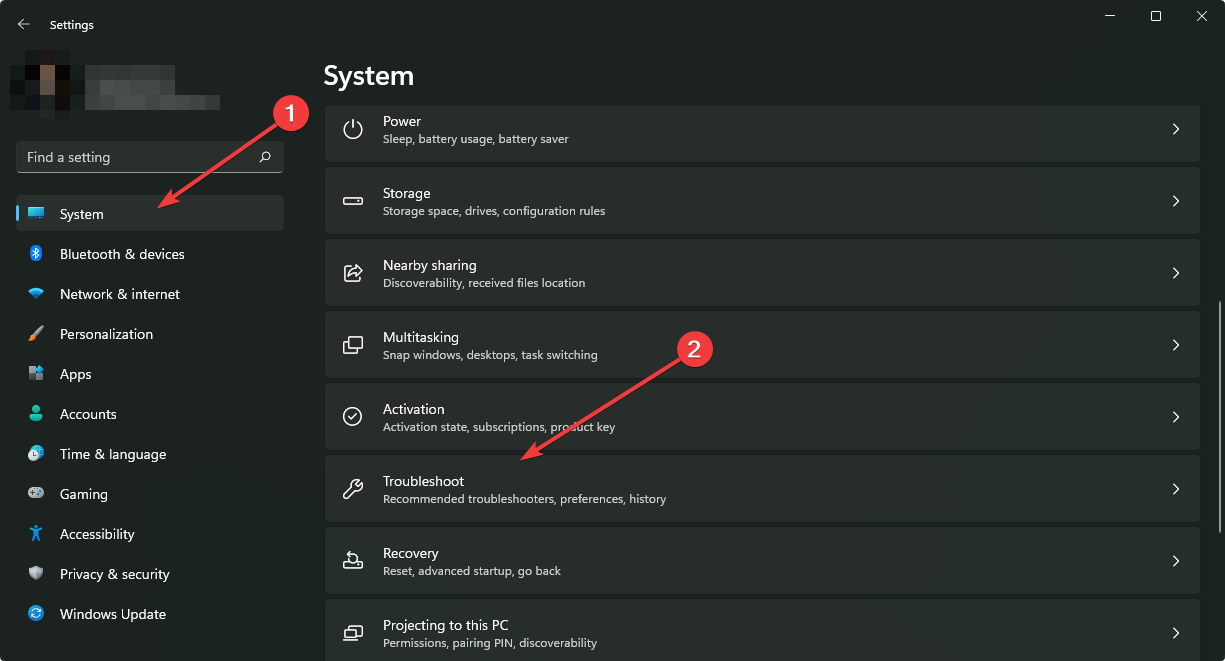
  2. Click on System and go to Troubleshoot.going system and troubleshoot windows 11 settings
  3. Go to Other troubleshooters.
  4. Next, select the Bluetooth troubleshooter; and click the Run button.clicking run bluetooht troubleshooter windows 11 settings
  5. Thereafter, follow the troubleshooter’s instructions to fix Bluetooth issues.

After running the troubleshooter, check if Bluetooth headset is still not working with Microsoft Teams.

3. Update Bluetooth drivers

If you’re encountering a more general Bluetooth audio issue for Teams and other apps, updating drivers is recommended. You can scan your PC with driver updater software to check if its Bluetooth driver needs updating.

If so, you can also install the latest drivers with a driver updater utility. It can be updated automatically without having other system issues due to incompatible drivers.

Updating drivers may help you to get rid of Plantronics, Jabra, or any other Bluetooth headset not working issues with Teams.

⇒ Get Outbyte Driver Updater

4. Make sure your microphone is enabled for apps

  1. Go to Windows Settings like before.
  2. Go to Privacy & Security and click Microphone on the left side of Settings.going microphone privacy settings windows 11
  3. Allow microphone access for Microsoft Teams.
  4. Scroll further down to toggle the Allow desktop apps to access your microphone setting on.granting microsoft access to desktop apps
  5. Make sure that microphone access is specifically turned on for the MS Teams app listed within the Microphone Settings tab.

If the Bluetooth headset is not working with Microsoft Teams, it’s possible that the app doesn’t have permission to access your microphone, so be sure to change that.

5. Disable the Bluetooth Enumerator LE device

  1. On Windows Settings, go to Bluetooth & devices.going bluetooth devices windows 11 settings
  2. Remove the Bluetooth headset that you wanted to use with Teams.removing bluetooth devices windows 11 settings
  3. Open the start menu, search for Device Manager, and open it.
  4. Double-click Bluetooth to expand that category.
    bluetooth device manager
  5. Right-click Bluetooth LE Enumerator and select the Disable device option on its context menu.
  6. Select the Yes option on the Microsoft Bluetooth Enumerator confirmation prompt that pops up.
  7. Thereafter, open Bluetooth & other devices in Settings again.
  8. Click Add Bluetooth or other device to pair the headset you previously unpaired.

If the Bluetooth headset is not working with Microsoft Teams, you need to remove the device and add it again to fix the problem.

6. Check app audio configuration in Settings

  1. Open the Settings, and then click System and go to Sound.
  2. Go to Volume Mixer.
  3. Make sure the Microsoft Teams app audio isn’t muted there and is correctly configured with the required audio output device.windows volume mixer windows 11 settings
  4. Then open your Microsoft Teams app.
  5. Right-click the account button to select Settings.
  6. Select Devices on the left of Settings.
  7. Make sure your PC’s microphone is selected within the Microphone drop-down menu.
  8. First, unpair your Bluetooth headset via Settings as outlined within the fourth resolution.

7. Change MS Teams’ Permissions settings

  1. Open the Microsoft Teams UWP app window.
  2. Right-click your user account button and select the Settings option.
  3. Then click Permissions to open the options shown below.
  4. Turn on the Media (Camera, microphone, speakers) option if it’s disabled.
  5. Thereafter, pair your Bluetooth headset with Windows 10 PC again.

Many users have confirmed the above resolutions can fix Bluetooth headset issues with Microsoft Teams. Therefore, there’s a pretty good chance those resolutions will fix Bluetooth headset audio for Microsoft Teams.

Did you find a solution to this problem on your own? Share it with us in the comments section below.

How to Enable Read Aloud in Edge [Even When It’s Stubborn]

Today we’ll teach you everything you need to know about enabling and disabling the Read Aloud accessibility feature in Edge.

Before we start, it’s important to note that sometimes, even after enabling Read Aloud using the browser’s built-in settings, it might not work as expected.

But don’t worry, if you follow all the steps in this article, you’ll be all set.

How to use Read Aloud in Edge

1. Make sure Read Aloud is enabled

  1. Open the webpage, PDF, or document that you want to read aloud and click on the Read aloud icon.read aloud in Microsoft Edge
  2. You can also use the Ctrl + Shift + U Microsoft Edge read-aloud keyboard shortcut to enable the feature.
  3. To modify the read-aloud settings, click on the Voice options icon once the feature is enabled.voice options
  4. You can now change the playback speed, or choose a different voice and language based on where your region.change

The feature supports a wide range of languages, ensuring that users from most parts of the globe can use it. And Edge is adding more periodically to enhance accessibility.

Also, when read-aloud is enabled in Microsoft Edge, the part being read is highlighted, so you always know which part the focus is on presently.

If you tried using the feature and it’s not working after enabling it, continue with the steps below.

2. Reset Edge

  1. Press Windows key + i to open Settings.
  2. Select Apps from the left pane and go to Installed Apps.apps installed apps
  3. Scroll down to Edge and click on the three dots next to it.
  4. Select Advanced options.advanced options in apps settings
  5. Scroll down to the Reset section and click on the Reset button. Confirm your choice and wait for the process to complete.reset edge

3. Clear cookies and cache

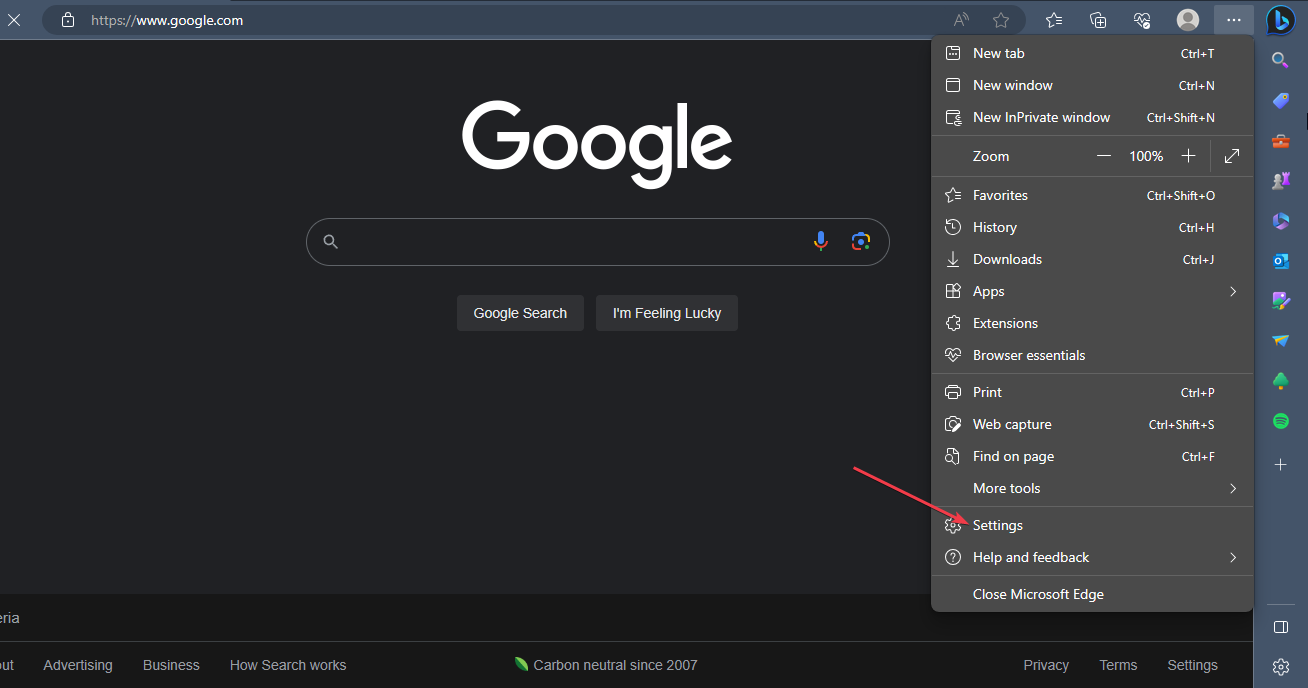
  1. Launch Microsoft Edge, click on the three dots on the top right side, and select Settings.microsoft edge settings
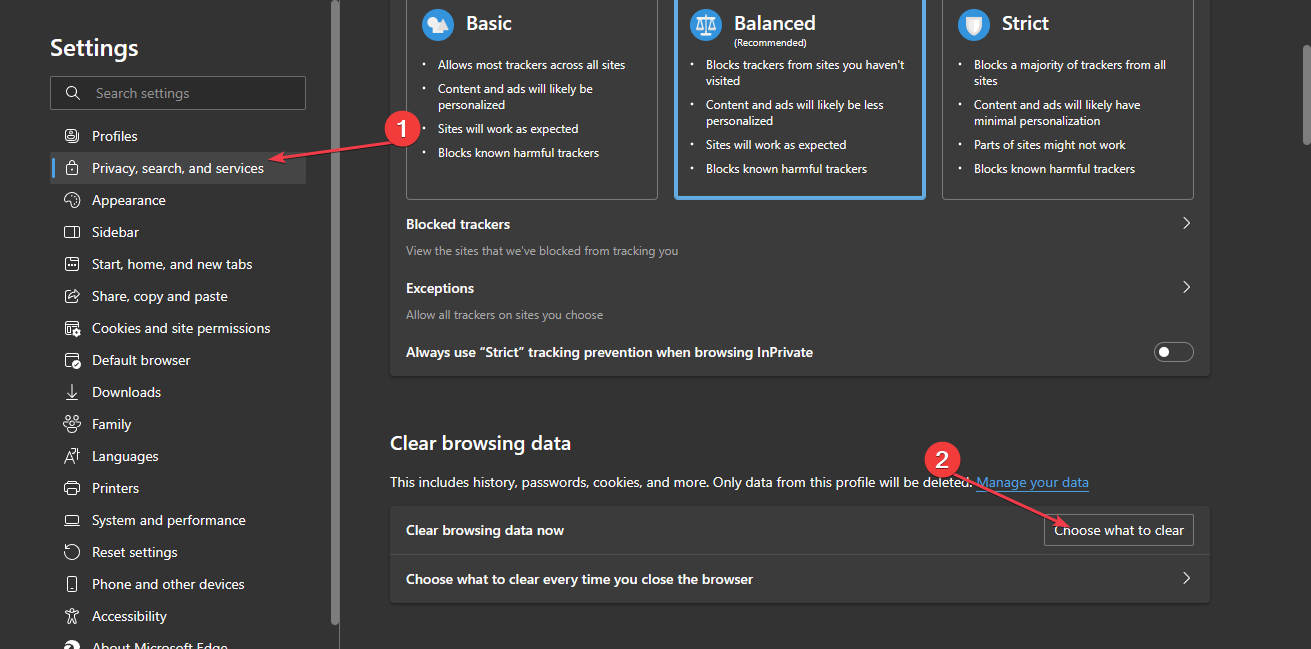
  2. Select Privacy, search, and Services.privacy search and services edge
  3. Go to the Clear browsing data section.
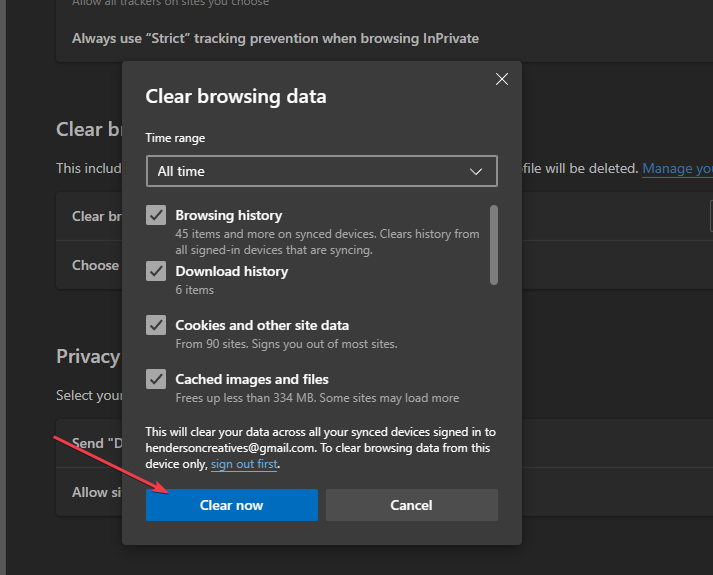
  4. Select the Choose what to clear option.choose what to clear microsoft edge
  5. Then, select All Time from the time range at the top.
  6. Check the boxes next to Cookies and other site data, and the Cached images and files option and click on Clear now.clear now microsoft edge

How do I disable Read aloud in Microsoft Edge?

Right now, disabling the Read aloud function in Microsoft Edge is impossible. You may only turn the feature On or Off. Here’s what to do:

  1. Open Edge, then click the Read aloud icon in order to turn this feature off.disable-voice read aloud edge enable
  2. Once you’ve done this, the Read Aloud function will be turned off. To re-enable it, click the icon again.

That’s all you need to know about using read-aloud in Edge. After working with it for a few days, you can easily configure the various Microsoft Edge read-aloud settings per your preference.

Also, you can download voices for Microsoft Edge read-aloud to increase its scope further.

Besides, find out all the new feature in Microsoft Edge on Windows 11.

We hope this quick article helped you. Share your thoughts on the read-aloud feature in the comments section below.

10 Best Online & Offline Racing Games to Play on Windows 10/11

After watching Fast & Furious, get your speed fix safely with the best racing games for Windows 10 and 11. These games don’t just look fast—they make you feel like you’re behind the wheel, racing at full throttle.

Ready to race? Here are the best racing games to satisfy your need for speed.

Which is the best racing game for PC?

GT Racing 2 – Windows mobile and PC compatible

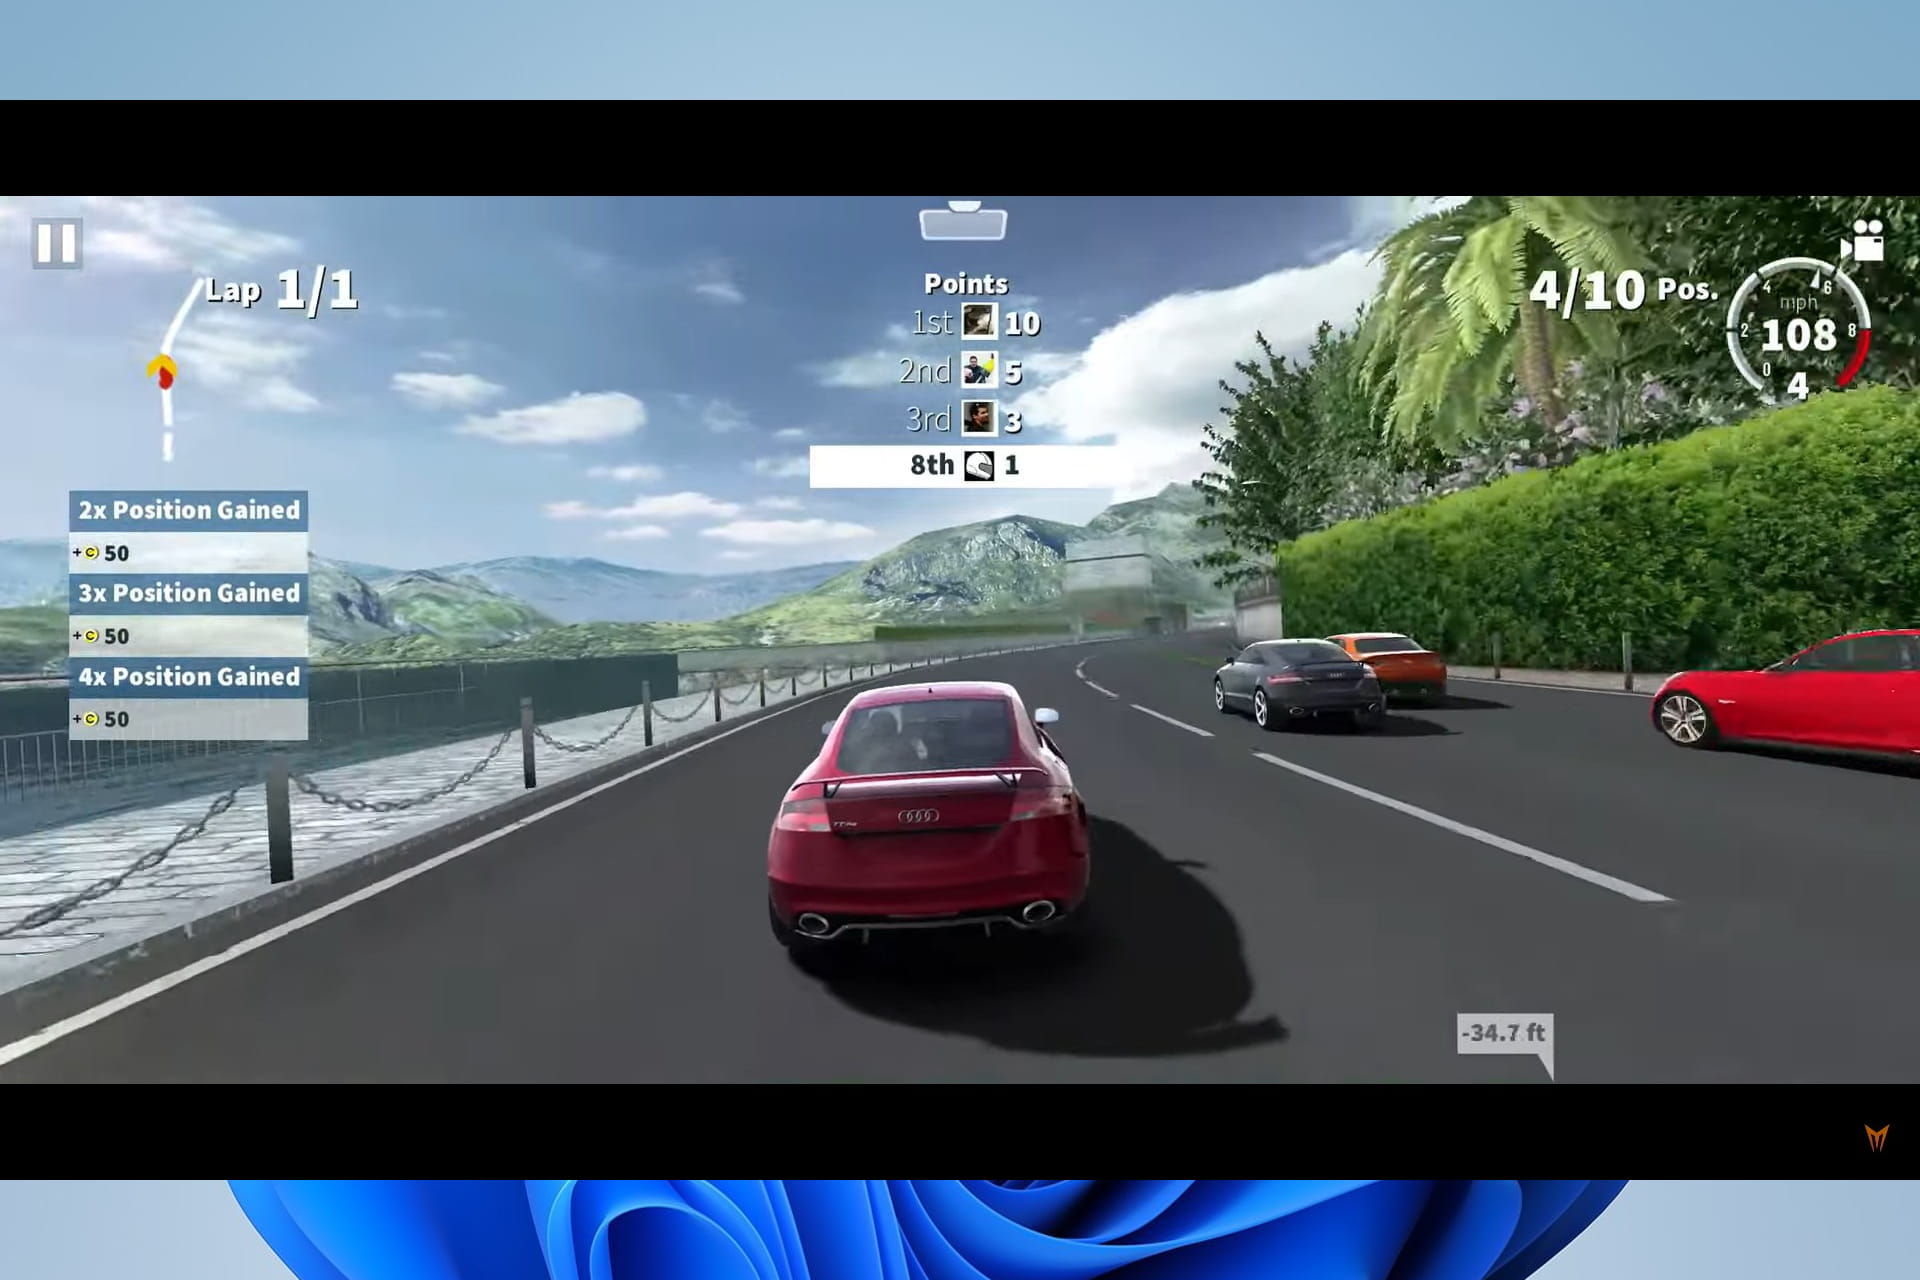
If you are fascinated by Le-Mans racing or Grand touring and how those cars race at a neck-breaking speed with crowds full of cheering spectators, you might want to try out the GT Racing 2.

This game will give you a natural driving feel, like game physics and realistic graphics. You can choose from a variety of high-end cars, including the phenomenal Ferrari, Mercedes, and more. And you can also upgrade them with visual upgrades and performance kits.

The game’s performance is boosted by the variety of driving modes that it offers. For example, you can choose from Classic races, Overtakes, Knockout rounds, and One on One.

Various camera modes exist, and you can select the view that suits your style, including the interior view.

GT Racing 2 is available for both Windows mobile and PC. Even better, you can play solo, and if you have a friend who wants a challenge, you can choose the Multiplayer option.

The game also offers 13 tracks with different times of day and weather.

Best features:

  • Original circuits
  • International competition
  • Human-like AI opponents

⇒ Get GT Racing 2

NFS: Hot Pursuit – Crime chase racing game

Hot Pursuit is one of the few games that will let you experience the need for speed you enjoy on your console right into your PC or Windows mobile. This game offers racing alternatives that put you right into action.

You can be that angry cop chasing down rogue drivers or the racer outrunning the law with that high-end exotic car. You can choose your favorite driving style with different control options ranging from motion sensor controls to on-screen controls.

NFS: Hot Pursuit offers players racing options that keep them engaged throughout the game. A cop can use roadblocks and spike strips to smash down racers or use EMP to fry the racer’s electrical system.

Racers can use oil slicks, overdrive, or jammers to outrun the cops. This game truly puts you in the escape mood and is a hot pursuit, as the name suggests. NFS: Hot Pursuit is also X-Box live enabled.

You should download this game as a super car racing game option for PC.

Best features:

  • Cross-platform multiplayer
  • Exotic cars with weapons
  • Enhanced visuals

⇒ Get NFS: Hot Pursuit

DiRT Rally – Dirt racing game

Codemaster’s DiRT Rally game is a gem in the gaming universe and has surpassed its predecessor, Dirt 3.

It is the best game Codemasters have made in years. DiRT Rally does away with many of the arcade touches that persist in the core series with an advanced handling model.

The game’s setting is on dirt tracks with lots of sideway sliding driving, and to succeed in the race, you have to master all the wheel controls. The race is not a joke; you must apply strategy and resource management while taking care of the car at every turn.

DiRT Rally captures the elements that make rally unique —the hassle of trying to remain in control of your emotions as you hurtle at a neck-breaking speed.

You will have to strike the perfect balance between speed and control, knowing that a single crash could irreparably harm your stage time. Everything from speed control to the most subtle weather and lighting changes is well set to improve the game.

Best features:

  • Iconic rally cars
  • Team management
  • Custom rally events

⇒ Get DiRT Rally

Hydro Thunder Hurricane – Water racing game

Hydro Thunder Hurricane changes the environment as it takes your need for speed to the water, where you get to race an assortment of speed-hungry boats. The game offers players over ten playing environments, including the Bermuda Triangle, Monster Islands, and Area 51.

Each environment offers players plenty of drop-offs, jumps, and secret passages. You can choose from a wide variety of over twenty boats. The boats become more powerful as you progress and are customizable with a series of skins.

Hydro Thunder has an efficient control system, and the racecourses are challenging. The game offers four racing modes: Championship, Gauntlet, Ring Master, and Gate.

Hydro Thunder has a lot to offer and comes with some unique features that you might not find in any other game. However, the game is not free, and you have to buy it for $9.99, although a free trial will help you determine whether it’s worth the investment.

Best features:

  • Rocket powered speedboats
  • Race against friends
  • Great water physics

⇒ Get Hydro Thunder Hurricane

CSR Racing – Microsoft Store game

CSR Racing has slowly become one of the most popular titles in the market. The game is played from a profile view and allows you to participate in fierce city street drag racing.

You will have to choose from over 90 licensed cars with a customizable appearance and upgrades available through the game’s garage.

The game has four playing modes, which include:

  • Multi-Player Racers – where you challenge other racers
  • Ladder Racing – where you face multi-stage events
  • Crew Battles – where you compete against five racing families
  • Regulation racing – where you compete against randomly selected opponents

As you win races, you earn cash that can be used to upgrade your existing fleet or buy new cars. Upgrades cover your turbo boost, engine, transmission, tires, and body adjustments. You can also change your paint to suit your color of preference as well as customize your license plate.

CSR Racing is easy to play. Once you set the engine to the maximum level before the race starts, acceleration becomes automatic. Your work will only be to shift gears promptly to keep acceleration smooth.

It is an excellent Windows 10 and 11 racing games free download option. For more free titles from the Microsoft Store, you can also explore this guide to free racing games on Microsoft Store.

Best features:

  • Brilliant graphics
  • Over 100 cars
  • World tours

⇒ Get CSR Racing

CarX Drift Racing – Great drifting physics

windows 10 racing games

You may have seen in movies how crazy drivers swing hot rides around corners and utilize hand brakes till the car burns rubbers. If you want a game that can do precisely that, then CarX Drift Racing is what you are looking for.

What more? You can customize your ride and change the color of the ride smoke—something that movie stars in real will never be able to do, so you are one step ahead.

CarX Drift Racing has a series of classic cars to choose from, like muscle cars, coupes, and pickup trucks for those who prefer something more prominent.

You will love the wheel physics and the drive mechanics employed in this game. Endless controls exist that you can customize to suit your driving style.

You can turn on and off steering and brake assists as per your ease. You can also adjust graphic settings to get an authentic experience. Best of all, the game is available for free.

Hit the download link below and transform your PC into a racing field within minutes.

Best features:

  • Friend challenge
  • Diversified routes
  • Plenty car options

⇒ Get CarX Drift Racing

TrackMania 2: Canyon – Great car dives and stunts

windows 10 racing games

TrackMania 2 features a fantastic opening sprint that you might not find in any other game. It starts with one car on the starting block, but when the counter hits zero, that’s when you realize you have 20 cars to compete against.

Naughty terrain, abrupt turns, exit into suicidal drops, and many other surprises will make your race unbearable. But you are trained for this, so when others make mistakes, you will head straight into the tunnel and into the mouth of the mountain.

You will learn that a typical race doesn’t end at the finish line but in a disastrous environment where cars bounce on top of you. Impossible jumps, wide barrel rolls, and floating platforms set the TrackMania series apart from other arcade racers.

The competition is fierce and fanatic. A race can quickly devolve into a hilarious scene of an unforeseen corner or missed jumps. You might spend hours without noticing because the terrain and the competition you will face will not allow you to drift your eyes off the screen even for a second.

Best features:

  • 100+ players
  • In-game video studio
  • Thrilling racing experience

⇒ Get TrackMania 2 Canyon

City Racing 3D – Racing game in slim size

windows 10 racing games

City Racing 3D is not only characterized by its stunning graphics but also by its small size of just 46MB. The game is powered by a Self-developed 3D Engine and Real Physics.

You get to choose from a variety of high-end cars and race in the world’s most beautiful cities like Paris, Tokyo, Chicago, London, and many more.

You also race with all the styles you want, from Classic, 1 ON 1, to Elimination with stunning 3D graphics and natural scenes. The game also offers various camera modes and controls so you can adjust them to suit your driving style.

Best features:

  • Worldwide cities
  • Unbelievable 3D racing
  • Realistic sound effects

⇒ Get City Racing 3D

Asphalt 8: Airborne – 8-player game

windows 10 racing games

Asphalt 8: Airborne is a thrilling game from Gameloft that is available for both Windows Mobile and Windows PC. The game has responsive controls and fantastic graphics and is one of the best racing games available.

The game offers all you need to feel the sensation of a racing driver and more. The visual effects will put you right into the action, from the airborne jumps to the slow impacts. Asphalt offers over 100 cars, including high-end exotics like Ferrari, Chevrolet, Tesla, Lotus, Dodge, and Audi.

Asphalt does not restrict you to one racing field; instead, it allows you to explore various venues that give you a real-life experience.

If you are a city boy, you can choose cities like Venice, Iceland, or any city from the nine venues, and if you prefer to get a little dirty, you can tear the dirt in the Great Nevada desert.

The game also has a multiplayer mode that supports up to 8 players and can be saved locally or in the cloud to continue playing across devices. Control options include keyboard controls, on-screen controls, and tilt sensors.

Best features:

  • Stunning graphics
  • Arcade gameplay
  • 400+ career events

⇒ Get Asphalt 8: Airborne

Beach Buggy Racing – Beach free driving game

windows 10 racing games

If you feel that car racing is not quenching your thirst for speed, you might want to try cart racing. This is where speed and madness collide. The game immerses you into an action-packed world of off-road kart racing.

You race against a motley bunch of rival drivers, each with special abilities and unique personalities. Your racing buggy can be upgraded to increase your peak speed, boost acceleration, and strengthen your kart to remain strong even when you smash into things.

The game also offers you a wide variety of power-ups that you can collect during the race to conquer your opponents. For instance, you can use oil spills to slow them down, monster truck tires to increase your ability to smash things, or rockets that you can use to blast your opponents off the track.

Beach Buggy Racing has four modes: Championships, Career, quick races, and split-screen multiplayer races. The game comes with 12 racetracks to conquer and has gaming control support for your keyboard, gamepad, and tilt sensors.

Best features:

  • Cool animated graphics
  • Realistic sound effects
  • Different game levels

⇒ Get Beach Buggy Racing

What’s the best browser for gaming?

Opera GX is top-rated for gamers, offering lightweight performance, built-in Twitch and Discord, plus gaming sound effects to enhance your play.

Opera GX

Opera GX

Go with this full-speed browser and hit the nitro switch on your racing games.

What racing games can my PC run?

This will depend on the system requirements of the game you need to run. You must note that the system requirements will vary per game basics, and you must consult the manufacturer’s site to know if your PC can run it.

Generally, we recommend Windows 11 and a great Graphics card for best performance. However, any of these best PCs for gaming may be a good fit. If you’re looking to expand your collection further, be sure to explore our comprehensive list of the best car games for PC, covering everything from stunning visuals to custom tracks and diverse gameplay modes.

For some of the games discussed, after download, you can play them as Windows 10 and 11 and offline racing games.

Racing games are a great way to pass the time, and the big screens of our Windows 10 and 11 devices add to the entertainment value of these games.

There are so many racing games out there, and since we could not fit all of them into one roundup, we only selected the top-rated. A few of these are also great Windows 10 and 11 online racing game options.

So if you missed your favorite from the list above, sound off in the comments section below, and we will see how well it fits on the list.


6 Ways to Fix Chrome Autofill when It’s Not Working

Chrome autofill couldn’t have come at a better time when people are tired of typing in their contact details like name, email, phone number, address, and other information online – it is a tedious process.

Autofill has been around for a while as part of the browser experience, but most of us don’t think about it as often or think to use it unless it is pointed out to us. With this feature, you can automatically store specific contact data in your browser and then use it when filling out forms online.

However, this feature still has its downsides because Google Chrome stores your credit card numbers, including its expiration date and CVV code, besides your contact information.

Even though Google tries hard to protect your information, it is wise to think twice about keeping such information on your computer. It differs from Autocomplete, which gives you suggestions as you type in a form field, as you would on your browser’s URL bar or search box.

Let us present the best solutions if Chrome autofill is not working on your browser.

Why is Chrome not autofilling my passwords?

While this service runs seamlessly for most users, a few things can trigger a malfunction in Chrome autofill. A few significant culprits are:

  • Compatibility issues with extensions
  • Outdated cache data
  • A disabled autofill feature
  • A corrupted browser

Whatever the reason behind the Chrome autofill not working, our solutions should effectively restore your browser to normal functionality.

Where is autofill in settings?

Once you are in your Chrome Settings, you will locate the autofill on the left pane, among other setting options.

Quick Tip:

If you are concerned and tired of Chrome’s autofill not working, then switching to a different browser is more efficient than trying to troubleshoot your old one.

Opera One’s autofill option it’s safe due to its fraud & malware protection. Plus, Opera One comes with built-in security measures such as VPN, Ad blocker, tracker blocker and it also features a native AI.

Opera One

Benefit from great privacy and online security, thanks to this browser with an advanced built-in VPN.
Free Download Visit website

How do I get Chrome to Autofill back?

1. Clear browsing data

  1. Launch the Chrome browser.
  2. On your keyboard, press Crtl + H.
  3. Click on Clear browsing data on the left panel.
    chrome autofill not working
  4. Select All Time from the Time range dropdown box, tick the options for Browsing history, Cookies and other site data, and Cached images and files, then click on the Clear data button.
    chrome autofill not working

2. Turn on Chrome autofill

  1. Launch the browser.
  2. Type the path below in your Address bar and hit Enter.
    chrome://settings/autofill
  3. Click on Password if Chrome is not auto filling passwords.
    chrome autofill not working
  4. Toggle on the Auto sign-in option.
  5. Repeat Step 2 if Chrome credit card autofill is not working, then click on Payment methods.
  6. Toggle on the option for Save and fill payment methods.
  7. Repeat Step 2, then click on Addresses and more.
  8. Toggle on the option for Save and fill Addresses.
    chrome autofill not working

3. Check the Never Saved section

  1. Launch the browser.
  2. Type the path below in your Address bar and hit Enter:
    chrome://settings/autofill
  3. Click on Password.
    chrome autofill not working
  4. Scroll down to the Never Saved section.
    chrome autofill not working
  5. Check if your site or sites are listed. If they are, remove them by clicking the X at the end of the row and revisit the websites.

This is an essential fix if Chrome autofill is not working on some sites.

4. Create a new user profile

  1. Exit the Chrome browser.
  2. Open your File Explorer.
  3. Type the path below in the address bar and hit Enter:
    %localappdata%\Google\Chrome\User Data
  4. Find the Default folder in the directory window.
    Chrome autofill not working
  5. Rename it as Backup default.
  6. Open Chrome.
  7. A new Default folder will be created automatically as you start using the browser.

Now verify if the issue of Chrome autofill not working has been resolved.

5. Reset Chrome settings

  1. Launch the browser.
  2. Type the path below in your Address bar and hit Enter:
    chrome://settings
  3. On the left pane, click on Reset and clean up.
    chrome autofill not working
  4. Click Restore settings to their original defaults.
  5. On the popup, click the Reset Settings button.

Now verify if the issue of Chrome autofill not working has been resolved.

When you reset the Chrome settings, it changes the default search engine back to Google, your homepage and tabs, and your extensions and themes back to default.

6. Disable extensions

  1. Launch the Chrome browser.
  2. In the address bar, type the code below and hit Enter:
    chrome://extensions
  3. Click on the Disable switch for individual extensions.

Disable all the plugins in your Chrome browser using our instructions to find the problem extension.

Where is Google Autofill data stored?

Data from autofill is kept in the Google cloud. If you keep credit card information on your PC, your tablet and smartphone will also access this information.

In addition, note that if you delete your browser history, passwords, and sign-in information from a device, they will no longer exist on all your devices.

In this article, we presented you with all the solutions you can apply if you notice that Chrome autofill is not working.

So whether you opt to use a different browser or decide to go through the troubleshooting process, we are sure that you will be able to get rid of the annoying problem if you just follow our guide.

If any of these solutions helped, we’d like to hear more from you about it, so leave a comment in the dedicated section below.

If you have issues with password managers on Chrome, you may find our guide on fixing LastPass not auto-filling in Chrome handy.

Why Do I Have Two Google Chrome Icons on My Taskbar & How to Fix It

Some users have reported having a duplicate Chrome icon on their taskbar in Windows 10/11. This can become extremely frustrating in time, as the space available in the taskbar is limited.

Here’s how one user described the issue on Microsoft Answers forums:

Double Google Chrome icon on the taskbar. I’ve tried to unpin the first one on the left, and then pin the new one on the right, but I can’t pin that one because there is no option to pin it. If you can, please help me!

For these reasons, in this article, we will explore some of the best-proven methods to solve this issue and clear your taskbar from any unwanted icons. Read on to find out how to do it.

Why does a second Chrome icon appear on the taskbar?

It is conceivable that you have pinned the app’s shortcut rather than the program itself if you are seeing multiple icons in the taskbar.

If this is the case, you will need to unpin the shortcut. Therefore, when you activate the application, you will see that there is a duplicate icon in the taskbar. This is because Windows believes there are two distinct instances of the program now active.

Now, let’s see in more detail how you can remove two Chrome icons from your taskbar. Follow along!

Quick Tip:

If you keep having trouble with Chrome, try another browser instead. We recommend Opera One because it offers a similar user experience and is compatible with all Chrome extensions.

The browser is heavily optimized for user privacy and doesn’t store tracking cookies or your personal info. It comes with a built-in VPN, an ad blocker, social media integrations, and more.

Opera One

Have an error-free experience on the web with this reliable browser.

How do I remove two Chrome icons from my taskbar?

1. Pin Chrome to your taskbar

  1. Open up File Explorer then copy-paste this location into your explorer. Note, if you can’t see the AppData folder, check out how to show hidden folders in Windows 10: C:Users/your_username here/AppData/Roaming/Microsoft/InternetExplorer/QuickLaunch/UserPinned/TaskBarfile-bar double chrome icon on taskbar
  2. Launch Chrome and pin it to your taskbar. This way you will also fix the Chrome opens new icon on taskbar issue.windows explorer google chrome - double chrome icon on taskbar

2. Unpin the second Google Chrome

  1. To fix the Google Chrome taskbar duplicate issue, open Google Chrome then right-click the icon that is not active.
  2. Select Unpin from taskbar.unpinning Chrome from taskbar - double Chrome icons on taskbar
  3. Right-click on the other icon and select Pin to taskbar.

3. Create a Google Chrome shortcut

  1. Right-click on each of the Chrome icons and select Unpin from taskbar.
  2. Click on the Start menu and search for Google Chrome.Chrome in Start menu - Double Chrome icons on taskbar
  3. Drag and drop Google Chrome to your Desktop.
  4. Double-click the shortcut from your Desktop to open Chrome
  5. Right-click the Chrome icon and select Pin it to Taskbar.pinning Chrome to taskbar - double Chrome icons in taskbar

In this article, we explored the best-proven methods to solve having two Google Chrome icons on your taskbar.

Please follow the methods presented in this article in the order that they were written to avoid any other issues.

Moreover, we recommend that you take a look at what to do if the Windows 11 Taskbar is empty.

Feel free to let us know if this guide helped you solve your problem by using the comment section found below.

Opera One vs DuckDuckGo: Which is The Safest Browser?

Protecting your privacy online is essential; many tools can help you with that. Speaking of valuable tools, today we will compare Opera vs DuckDuckGo.

Each has certain benefits, so join us while we closely examine and compare the two in detail.

DuckDuckGo vs. Opera One: Which one protects my online privacy?

Opera One browser – Highly customizable

What is Opera One?

Opera One is a web browser that has been on the market for 25 years. It’s completely free, and in the early days, it was a great alternative to Internet Explorer.

Over the years, the browser has evolved, and it now offers many helpful tools, some of them unique.

What are the pros and cons of Opera One?

Pros:

  • Low hardware usage
  • Built-in adblocker and tracking protection
  • Unlimited free VPN
  • Available on all desktop and mobile platforms
  • Advanced tab management
  • My Flow tool to share work across all devices

Cons:

  • Few VPN servers
  • It might load slower with some websites

What features does Opera One have?

Opera One is simple to use, and with its low hardware requirements, it’s perfect even for low-resource PCs. The browser offers certain privacy features, blocking both trackers and ads.

For an extra layer of security, there’s even a built-in VPN that offers unlimited bandwidth. The tool does not require any registration or additional downloading.

We must also mention that the browser has crypto-mining protection and an integrated crypto wallet.

As for additional features, the browser has a battery saver that will give you an extra hour of battery life. Moreover, you get a redesigned interface, tab islands to enhance multitasking, a mouse gesture facility, and many more.

Opera One

Get advanced privacy features and create your own workspace for secure browsing!

DuckDuckGo – Minimalistic web browser

What is DuckDuckGo?

DuckDuckGo is a privacy-focused search engine that doesn’t store your data.

The company also has a dedicated app for mobile, Windows, and macOS, so you can use it instead of your regular browser.

What are the pros and cons of DuckDuckGo?

Pros:

  • Offers a private search engine
  • Blocks trackers, ads and protects your data
  • It doesn’t sell your browsing information to third parties
  • Has extensions available for all major browsers
  • The browser app is lightweight and extremely fast

Cons:

  • The desktop browser offers only the essential functionality
  • It lacks certain features that other search engines have

What features does DuckDuckGo have?

DuckDuckGo browser comes with a minimalistic design and only the most essential features. The browser uses the DuckDuckGo by default, so it won’t track your online searches and sell your data to advertisers.

The browser has built-in tracking protection, so websites can’t gather your information. In addition, all ads are blocked out of the box, so you can enjoy an ad-free browsing experience.

If you care about stats, you can even see how many tracking attempts have been blocked in the past week and see which websites tried to track you the most.

Lastly, the browser allows you to quickly clear your cache and browsing history, which can be helpful if you’re sharing your PC with others.

⇒ Get DuckDuckGo

Opera One vs DuckDuckGo: The verdict

Opera One is a full-fledged browser with various customization options. While Opera One and DuckDuckGo browsers can block trackers and ads, Opera works better as a web browser.

In terms of privacy, the DuckDuckGo browser might be a better choice. Still, you can achieve the same results using the DuckDuckGo extension in Opera and a few privacy extensions.

This brings us to our biggest complaint. DuckDuckGo doesn’t support any extensions, so while it can be used for private browsing sessions, it still lacks the essential features to become our default browser.

It’s worth mentioning that the built-in VPN in Opera One will give you an additional layer of privacy, and this is just one of many reasons why it’s a browser of choice for so many users worldwide.

⇒ Get Opera One

Does Opera use DuckDuckGo?

Opera offers DuckDuckGo as one of the available search engines. While it’s not selected as the default search engine, you can easily switch to it at any time.

The DuckDuckGo browser offers only the most essential features, and while helpful, it can’t be compared to any major browser on the market simply because it lacks so many features.

As for the search engine, it lacks some features, including the following:

  • Since it doesn’t collect user data, DuckDuckGo doesn’t offer personalized search.
  • It doesn’t offer any integrated services like Google does.
  • It has a smaller search index, so it might be less effective than Google.

Can you still get viruses on DuckDuckGo?

While DuckDuckGo blocks trackers and doesn’t collect data, it allows you to access harmful websites, the same as Google or any other search engine.

If you’re not careful, you can get viruses using the DuckDuckGo search engine.

What are the disadvantages of the Opera browser?

The browser offers many features, and while many are helpful, others, such as social media integration, aren’t something that most regular users plan to use daily.

VPN and ad blockers offer limited functionality, and some users think third-party solutions offer more advanced features.

There you go; these are our thoughts on DuckDuckGo and Opera One. If you want to learn more, be sure to read our Opera One review as well as our guide on how to download the DuckDuckGo browser.

Also, we have an exciting guide that answers whether DuckDuckGo is a VPN, so you might want to check it out.

If you prefer using a different browser, don’t miss our guide on DuckDuckGo vs Brave to see which one is better to use.

Which browser do you use? Feel free to let us know in the comments below.

10 Best Itch.io Browser Games [Tagged Browser Games]

Spending your time playing games isn’t a bad thing as some people make it to be. As long as you are enjoying the company and the experience, it is a time well spent. And today we’ll show you some of the best Itch.io browser games.

Browser games, unlike its counterpart, are often dismissed as a throwaway experience. However, that’s not true. Services like Itch.io have found a way to bring the best browser indie games online.

Itch.io is a website for the user to host, sell and play indie games online. Since its launch, the service has hosted hundreds of thousand games, most of which are free. 

If you are new to Itch.io, it is easy to get lost in the sea of indie games. If you are looking to enjoy your lunch break playing some fund indie games, check out the best Itch.io browser games below.

Can you play games on Itch.io without downloading?

Itch.io is a platform that many independent game developers use as a support mechanism for their work. The website welcomes independent programmers and provides them with a venue where they may showcase and, in some cases, sell their games.


The website operates on a commission model, which means that the owners receive a tiny share of the revenues that are generated by the developers.

Yes, you can! All the games on Itch.io are free indie games that work only inside your browser. Some exceptions might have a version available for download, but those are exceptions.

Feel free to access Itch.io’s platform to explore their vast library of indie games. But now, let’s see whether they are safe or not!

Quick Tip:

Dedicated gaming browsers like Opera GX can reduce the impact on your system resource as it is specially built to complement gaming, especially when accessing Itch.io.

Some of the notable features include GX Control to customize the browser’s system resource usage, Hot Tabs Killer to free up resources without leaving the browser, and Discord integration.

Opera GX

Experience unprecedented speeds and stability while playing games in your browser with this amazing software today.

Are games on Itch.io safe?

The website asserts that it will examine every game that is submitted to its platform, despite the fact that it is impossible for them to monitor and regulate every single piece of code that is transmitted through a game.

When downloading anything from the Internet, exercising extreme caution is always the best course of action. Due to the fact that Itch.io sends you to the website of the game creators, you will be unable to view any comments left by other users.

In general, the website is renowned to feature games that are both respectable and secure. If your concerns have not been allayed, continue reading this part, which will explain what steps you may take to avoid contracting a virus.

This being said, let’s see what some of the best Itch.io browser games are, that you can play right away!

What are the best Itch.io browser games?

Adventures With Anxiety! – A game about anxiety

itch.io browser games

Adventures With Anxiety is a browser-based game. It is an interactive story about anxiety, and you play as the anxiety.

The game has been designed to help users with anxiety issues with interactive multi-choice questions. How you move forward depends on the choices you make during the gameplay.

The game lasts for about 30 minutes, and as the developer notes, it is more of an interactive story than a game. This is one of the best games on Itch.io to play in your browser.

⇒ Play Adventures With Anxiety

Sort the Court – Ruler simulator

itch.io browser games

Sort the Court is a simulation-based game where you decree in simple yes and no answers. You can choose to play as the King or Queen at the beginning. We regarded it as the second-best Itch.io browser game despite its simplicity, due to how entertaining it is.

Once you have chosen to play as the king or queen, you will be presented with a few questions by the Royal Advisor and other characters. You need to answer Yes, or No, by pressing Y or N.

Depending on the answers given, you will gain or lose points. As a ruler, you have to keep an eye on the people in your kingdom without depleting the wealth with the ultimate goal of growing the city.

⇒ Play Sort the Court

Goodbye, Doggy – Popular puzzle game

itch.io browser games

Goodbye, Doggy is a puzzle game where you help your family with your demise as a ghostly dog.

You will deal with the family’s grief by drifting from room to room and exploring the house.

Use the arrow keys to move around the house and press the Z key to interact with the characters. Make use of the hints to solve the puzzle and complete the game.

⇒ Play Goodbye, Doggy

A Tale Spanning Centuries – A fantasy romance story

itch.io browser games

As the title indicates, A Tale Spanning Centuries is a fantasy romance story with ME roots on PC and mobile.

A text-based browser game with choices throughout to shape both the main character’s personality and skills and influence their relationship dynamics.

⇒ Play A Tale Spanning Centuries

Six Cats Under – Puzzle game with cats

itch.io browser games

Six Cats Under is another Itch.io puzzle game. The game revolves around a cat that has died and has unfinished business to take care of.

In this point-and-click game, you rescue your herd of cats by directing them with your poltergeist powers.

⇒ Play Six Cats Under

Scout Chapter 4 – Interactive fiction game

Tagged Browser games

Scout Chapter 4 is an interactive fiction game based on a text choice in an apocalyptic setting. As a young survivor of a natural calamity that hit the region, you put your skills to use on regular scouting missions.

The gameplay involves choosing your name, appearance, and scouting team positions. The choices you make throughout the story will affect your standing in the community.

⇒ Play Scout Chapter 4

Plant Daddy – A plant growing game

Tagged Browser games

A simulation-based browser game on Itch.io, in Plant Daddy, you grow plants in your sunny apartment.

Your plants grow in real-time, water them, repot them, purchase furniture and then close the tab. You can come back to continue the game when you have some spare time. 

⇒ Play Plant Daddy

Grey-Box Testing – Exploit bugs to solve puzzles

Tagged Browser games

If you like puzzle-based browser games, then try Grey-Box Testing. In the game, you exploit bugs to solve puzzles and progress.

If you like challenging tasks like finding in reality, Grey-Box Testing can help you give your mind a tough assignment to solve the game by exploiting the bugs like a tester.

This game uses WASD to move, E or P to pause the game, Space to jump, and the mouse clicks as control options.

⇒ Play Grey-Box Testing

Mobs Inc – Action browser game

Tagged Browser games

Mobs Inc is a fun, fast-paced action browser game that is also the winner of Ludum Dare 33.

As a new monster recruit, you as a new monster attack adventurers by dashing through a point-and-click mechanism.

The more adventures you kill with your special skills, you will be promoted. If you disappoint the monster boss 4 times, you will be fired.

⇒ Play Mobs Inc

Tanuki Sunset Classic – Third-person racing game

Tagged Browser games

Tanuki Sunset Classic is a third-person racing longboard-skating game. You, as the main character raccoon, skating downhill on a procedurally synthwave-theme seaside road.

You can drift your way around the narrow corner while gathering Tanuki Bits to fill up your Bonus Roulette Meter and try to gather as many points as you can.

⇒ Play Tanuki Sunset Classic

There you have it. Some of the best free games on Itch.io that you can play on your favorite browser like Opera GX.

Browser games are the best way to enjoy short breaks as they are quick and not so addictive, like the mobile and console games that can take hours of your time.

All the best Itch.io browser games in this list offer fun time without taking up space on your laptop. 

We have included adventure, fantasy, racing, puzzle, and action games in this list, offering something for everyone. Which is your favorite game? Do let us know in the comments.

How To Play Pandemic Board Game Online With Friends

It’s been shown, recently, that people all over the world feel the need to get emotionally involved in representations of catastrophic events to which they can relate to.

Besides movies and books, online games such as Pandemic make no exception from the activities that some adults resort to.

What is the Pandemic online game?

Pandemic is a free multiplayer online game that is an adaptation of the award-winning board game of the same name, created by Matt Leacock.

Created as a strategy and simulation game, it can be played by 2 to 5 players that have to team up and cooperate to find sustainable cures to fight the deadly disease that holds up the entire world. Unless they do it, humanity becomes extinct.

Can you play Pandemic online with friends?

Yes, it is one of the most popular games to play with your friends, locally and remotely due to the Remote Play Together feature it comes with.

Keep on reading to find out where and how you can play Pandemic and have a great time with your close friends!

Quick Tip:

There is a worth knowing method you can fully optimize your Pandemic gameplay, namely using a gaming-focused browser like Opera GX.

Opera GX

Enjoy end-of-the-world gameplay like Pandemic on this integrated browser.

How to play Pandemic?

Pandemic is not a multiplayer game, so it’s local-only. But it comes with a Remote Play Together feature, which allows the owner of the game to invite friends to collaborate and fight the disease together.

It can also be played via video platforms such as Zoom, letting your friends do their part, in turn.

With 5 difficulty levels to suit all categories of gamers, the players travel the globe to protect cities, contain infections from spreading, and discover the cure for each disease. 

The Medic, the Scientist, or the Quarantine Specialist – each member of the team is indispensable as they all have their own strengths, so the elite team has to be created wisely.

How can I get the Pandemic online game?

The game is available on a multitude of platforms, from gaming consoles to mobile devices running on Windows, macOS, or iOS, at prices starting from $4.99.

⇒ Get Pandemic on Amazon

⇒ Get Pandemic app for iOS

⇒ Get Pandemic app for Android

In our busy, modern lives, many of us devote so much of our attention to our jobs and the responsibilities of our families that we never seem to have time for simple enjoyment. We stopped playing some time during our transition from childhood to adulthood.

When we do have some spare time, we are more likely to zone out in front of the television than we are to engage in play that is both enjoyable and restorative, as we did when we were children.

However, the ability to play is not only important for children; it can also be a significant source of relaxation and stimulation for adults. This being said, have fun playing Pandemic!

For more entertaining games we recommend that you check out our post on five free online game platforms to use with your friends and join multiplayer games.

That’s it! Thank you for reading this article and we hope it proved to be helpful to you. Don’t hesitate to leave a comment in the sections below and share your thoughts with us.

NVIDIA Control Panel Only Shows 3D Settings: 3 Ways to Fix It

Some users have discussed an issue on NVIDIA’s forum that NVIDIA Control Panel only shows 3D settings.

The issue prevents users from accessing or modifying certain things in the NVIDIA Control Panel, which affects the overall graphics experience.

Here’s all you need to know about why NVIDIA Control Panel only shows 3D settings and the solutions that worked for most users.

Why is my NVIDIA control panel only showing 3D settings?

This issue generally arises on laptops with two GPUs, where one is integrated while the other is NVIDIA.

In this case, sometimes, the BIOS configuration is such that the integrated graphics card controls certain settings, and as a result, NVIDIA Control Panel only shows 3D settings on the laptop.

Also, the problem may lie with the NVIDIA Control Panel application itself, or the driver may be outdated.

Since it’s difficult to identify the problem, we recommend executing the steps in the same sequence as they are listed to fix things when NVIDIA Control Panel display settings are missing.

What can I do if I can only see 3D settings in NVIDIA’s Control Panel?

1. Update drivers for NVIDIA graphics cards

As the missing settings on the NVIDIA Control Panel can pertain to antiquated graphics card drivers, an advanced driver updating tool is a potential resolution.

Note: If your NVIDIA graphics card already has the latest driver, uninstall the NVIDIA GPU via Device Manager. Then you can utilize this tool to reinstall its driver.

2. Disable your PC’s integrated GPU

  1. Open the NVIDIA Control Panel and click Manage 3D settings on the left.manage 3d settings
  2. Select High-performance NVIDIA processor in the Preferred graphics processor drop-down menu.high performance
  3. Click Apply to save the changes.
  4. Press Windows + R to open the Run command, enter devmgmt.msc in the text field, and click on OK.devmgmt.msc
  5. Double-click on the Display adapters category, right-click on the integrated graphics card and select Disable device.Device Manager nvidia control panel only showing 3d settings
  6. Click Yes to confirm.
  7. Once done, restart Windows for the changes to come into effect.

After the computer restarts, check if NVIDIA still only shows 3D settings. If that’s the case, head to the next method.

3. Restart the NVIDIA Control Panel

    You can efficiently fix NVIDIA Control Panel by restarting the service with the intuitive steps presented below.

  1. 1. Press u003ckbdu003eCtrlu003c/kbdu003e + u003ckbdu003eShiftu003c/kbdu003e + u003ckbdu003eEscu003c/kbdu003e to open the u003cstrongu003eTask Manageru003c/strongu003e.

  2. 2. Select the u003cemu003eu003cspan id=u0022urn:enhancement-c1f0b8aeu0022 class=u0022textannotation disambiguated wl-organization wl-linku0022u003eNVIDIAu003c/spanu003e Control Panelu003c/emu003e process and then click on u003cstrongu003eEnd tasku003c/strongu003e.

    End task

Once done, launch the NVIDIA Control Panel, and it should now show all the settings. You will now be able to access the various other customizations and make the desired modifications.

How do I check if my GPU drivers are up to date?

A simple way to check if the drivers are up-to-date would be to use the Device Manager. Simply head to the GPU adapter’s properties, and identify the driver version. You can then check the OEM’s website and verify if the one installed is the same as the latest available version.

Also, you could use an effective driver updater tool to automatically locate and install the latest version of the GPU driver. This way, the GPU, as well as the other drivers, will always be up-to-date, and you wouldn’t have to verify that time and again.

These resolutions helped users when the NVIDIA Control Panel display settings were missing in Windows 11 or the previous iterations.

Also, find out what to do if NVIDIA Control Panel is not opening in Windows.

If you still need more potential fixes, contact a support agent by clicking Chat Now under Live Chat on NVIDIA’s Consumer Support page.

Posted in Fix

How to Use Terraria Save Editor to Get the Best Items

Terraria has received its last updates, which bring the decade-long journey to a sad but satisfying end. The latest update has added items, bug fixes, and map optimizations. But getting your hands on all the 5000+ items will be hard without a Terraria save editor.

This software will allow new and returning players to browse the catalog of items and give themselves a boost in the game. Of course, it will take away from the experience of farming for rare items.

Is it safe to use a Terraria save editor?

An inventory editor is a third-party tool that may be used to add or remove goods from the inventory of a local character, and in many cases, change other character data. Inventory editors are available for a wide variety of games, including World of Warcraft and Elder Scrolls Online.

Inventory editors are largely developed for the personal computer (PC) version of the Terraria video game. Before beginning to work with any form of inventory editor, it is strongly recommended that a backup of the character data be created first.

Terrasavr is a web-based application that combines an inventory editor with a character editor, and it has an intuitive user interface. Because it does not have any kind of interaction with the files that are found in the local Terraria directory, using it is absolutely risk-free.

Quick Tip:

A great method to improve your gaming experience is by using the most suited browser for games, Opera GX.

This optimized browser includes numerous features like RAM and CPU limiters or enhance security with free VPN support.

Opera GX

Enjoy Terraria gameplay with Terrasavr save editor on this gaming dedicated browser.

What Terraria save editor should I use?

Terrasavr – Most popular and versatile option

best save editor for terraria

Terrasavr is a web-based Terraria save location where users can edit their character and inventory. The platform is easy to use and doesn’t have any paywalls, staying true to the Terraria philosophy.

Note that it also works as a save editor for the Terraria Calamity mode, in case you are interested in this alone.

To edit your character, all you’ll need to do is to go to the Terrasavr page and load your character by clicking the Load Player button on the top left-hand side of the screen.

In the browse window, you will need to find your player and open it. The default save location will be C: > Users > [Your Username] > Documents > My Games > Terraria > Players.

The player file will have the same name as your in-game player and the extension .plr.

find terraria save game

Once your character is loaded, you can navigate via the tabs on the second line. From here, you can edit:

  • Character appearance
  • Equipment (including vanity items)
  • Pets, mounts, and misc items
  • Player Inventory
  • Bank, safe, Forge, and Void
  • Buffs and Research

How to add items to your inventory?

In order to add items to your inventory, you can click on the Library button, which will open the category list. From here, you can browse or use the search function if you’re on the lookout for a specific item.

The items you can add to your inventory will be shown on the lower part of the inventory. If something catches your fancy, simply drag and drop it into your player inventory and it’s yours.

In addition to changing your character and inventory, you can create item inventories for when you need to edit multiple characters. Simply add all the items you want to your inventory and then click on Save items.

terrasavr save editor

This will download the inventory file to your PC and you can load it to a different character from Terrasavr, the Terraria character editor, and save editor.

Once you have finished updating your Terraria character, you can save by clicking the Save Player button at the top of the screen. This will download the player file. All you need to do now is replace the original player file with the new one and you’re all done.

Terrasavr has worked wonderfully in our testing, but we do encourage you to make a backup of your player before you start adding items and editing your save. Also, this Terraria save editor works with all versions of the game: Windows, macOS, Linux, and mobile.

Also, Terrasavr has been updated to work with Terraria 1.4 and includes all the items which have been added to the game. Some other Terraria save editors have not been updated and therefore will not work, as in the case of Terraria InvEdit.

How do I use Terraria editor?

  1. Go to Terrasavr and load your player file.
  2. Change your look and inventory then save the file.
  3. Replace the original player file and that’s it! Note that it works as a Terraria save editor for mobiles, as well as a Terraria, save editor for PS4.

If you don’t already know, Terraria is one of the best survival games ever made. Sharing some similarities with Minecraft, Terarria has differentiated itself by its sheer amount of activities and items that can be crafted.

Moreover, developer Re-Logic has received overwhelming praise for its pro-consumer attitude. In a world of paid DLC, microtransactions, loot boxes, and aggressive anti-cheat, developers who will support a game completely free for nearly a decade are few and far between.

This is why both Terraria and Re-Logic deserve a big round of applause from every gamer around the world, regardless if they like Terraria or not. Hats off to the devs!

Have you enjoyed playing Terraria? And do you agree with the use of Terraria save editors? Let us know in the comments section below.

Amazon Prime Video app updates on Xbox and Windows with new design

Amazon’s recent design revamp for its Amazon Prime Video apps is now live both on Windows devices and Microsoft’s Xbox One and Xbox Series X video game console families.

The new Amazon Prime Video app design allows for more menu content to be shown onscreen, does a better job at labelling content that’s free for Amazon Prime subscribers, shifts the main menu to the left side of the screen, and more prominently displays content above the Channels which require additional subscriptions or memberships.

Amazon Prime Video Windows app

Amazon’s Prime Video app has long been criticised for its convoluted and confusing design. Some of the bigger issues many took issue with was the difficulty in finding content and the confusing way in which individual seasons of TV shows are all listed on the menu and in search results instead of collected together like in pretty much every other streaming app.

This new design does seem to have reduced the number of multiple seasons of a show all displaying in the menu and search listings and the menu for navigating show seasons within a show’s individual page is much smoother than before.

After more Xbox and Windows app news? Give us a follow on Facebook and Twitter.


7 Best Horror Browser Games to Play With Your Friends

Horror games have become more popular this last decade, which may be attributed to the tremendous success of titles such as Five Nights At Freddy’s and Resident Evil.

Advanced aesthetics and the like aren’t necessary for an engaging horror experience. However, you can make some terrifying games once you can establish and develop suspense while engaging the players’ imaginations.

This rise in popularity and technological advances have led to increased audacity in video game design. We have already seen many excellent browsers of FPS games with controller support in the past.

We introduce you to seven of our favorite browser horror games in this article, so let’s get started.

What’s the scariest co-op horror game?

We’re going to go with The Forest. In theory, you can play with as many people as you want, thanks to dedicated servers, but eight players are the recommended max by the fan base.

You will play as survivors of a plane crash, and you will all be tasked with establishing a shelter, and defenses, and gathering weapons to find the small child kidnapped by a group of primitive cannibals living in the area.

However, this is not a browser game, so consider this when thinking about trying it yourself. On the other hand, our list will surely satisfy your needs if you are looking for browser horror games.

What browser is best for browser horror games?

There are a few excellent choices when it comes to online gaming. However, all the games we suggest work great on Opera GX, which will be our foremost recommendation. 

This browser allows you to set RAM, CPU, and network limits, thus ensuring that all your applications get enough hardware power.

There’s also Twitch and Discord available in the sidebar, allowing you to stay in touch with your friends during all your gaming sessions.

Please read our guide on the five best gaming browsers to discover more about the several excellent gaming browser options.

Opera GX

Level up your in-browser game experience with dedicated features for high performance and uninterrupted gaming!

What are the best browser horror games?

Filled with freedom

browser horror games

It had been a long journey. Finally, you’ve arrived at the home of your grandparents. They lived there for forty-three years, and now you have the entire house to yourself. Oddly, your parents didn’t say much about your great folks, and since childhood, you’ve always wondered who they were. 

In this scary game, you will be horrified by the item you may have to uncover when you visit your grandparent’s home after many years.

The game starts with a warning of flashing lights and random loud music. This warning should suffice if nothing else gives you a clue of what you are about to be undertaking.

You should expect to be chased by different monsters and have your heart racing from the word go.

  • Great graphics
  • Fantastic songs and sounds

⇒ Play Filled with freedom

Five Nights At Freddy’s

browser horror games

Scott Cawthon got the concept for Five Nights at Freddy’s after hearing unfavorable feedback about his initial game, the family-friendly Chipper & Sons Lumber Co.

Players described the primary figure as looking like a horrific mechanical animal, while reviewer Jim Sterling described the game as accidentally unsettling. Cawthon was dismayed by the criticism but later utilized it to create something purposely scarier.

This series comprises suspense video games where you assume the role of an employee working at night at a location associated with Freddy Fazbear’s Pizza, a fictitious children’s restaurant modeled after ShowBiz Pizza Place and Chuck E. Cheese’s.

Additional features:

  • Realistic graphics
  • Great sound accompaniments

⇒ Play Five Nights At Freddy’s

Nightmare On Elm Street

browser horror games

This is a side-scrolling game where you must battle along Elm Street. Outside homes, you battle bats and snakes; inside, you fight demons and other animals.

The gameplay comprises a sleep meter that steadily decreases as you pass the different levels or when you remain motionless. In addition, when you take damage, your sleep meter also decreases.

If you are out of sleep meter, your character will fall asleep. At this point, the colors on the screen will darken, and the monsters will shift and become more challenging to overcome.

Dream tokens are strewn across the game, allowing you to transform into dream avatars with particular skills. For example, picking coffee cups spread around buildings will improve sleep, and discovering a boombox can help you wake up. 

The music in the background will change, and Freddy will arrive to battle you if you do not reach the level boss or wake up within a specified amount of time while sleeping.

You gather Freddy Krueger’s bones throughout the game to toss into a furnace at the conclusion.

Additional features:

  • Well made graphics
  • Multiple weapon types

⇒ Play Nightmare On Elm Street

How to make a cup of tea

browser horror games

This is an amusing yet terrifying simulation game in which you must create a cup of tea no matter what happens.

You aim to make an excellent cup of tea by following the basic directions. First, you will heat the water, drop in your teabag, mix, and add sugar and milk, and that’s all there is to it.

Unfortunately, things aren’t always what they seem or where you expect them to be. The routine will be changed in some way constantly, from the teabag location to modifications such as the whole area being transformed into a new dimensional environment and some strange little people conversing with you.

You’ll finally figure you have been preparing tea for some dude in the next room after going insane continuously performing the same process. 

Additional features:

  • Great sounds
  • Nice changing graphics

⇒ Play How to make a cup of tea

A Slide In The Woods

browser horror games

This is a free horror adventure game in which you investigate an actual slide in the woods from a first-person viewpoint.

There is almost no context in the game. You’re dropped amid a misty woodland with nothing else to do except slide down.

Johnny’s Games, a small independent studio, produced the game. This horror game is presented with limited vision, creepy music in the background, a gloomy setting, and a confined area.

Regardless of its low-resolution images, you have enough to offer you a disturbing experience. The only downside is that the continual creeping may bore you.

Additional features:

  • Cross-platform compatibility
  • Nice sound accompaniments

⇒ A Slide In The Woods

9 Masks Of Fire

browser horror games

It’s not always about actual sudden jump scares or identifiable creepy figures in horror. But, sometimes, the ambiance and the things you can’t name give that prickling feeling.

This game is a Gala spins slot machine game based on the idea of old, almighty masks. Although it doesn’t adhere to traditional horror tropes, there’s always something frightening about a detached mask looking back at you from the center of the fire.

With the addition of some somewhat unsettling sound effects, you have the impression that you’ve arrived on the wrong side of an old ceremony.

Additional features:

  • Scoring system
  • Features multipliers and scatters

⇒ 9 Masks Of Fire

Creepy Granny Scream

browser horror games

Creepy Granny Scream is a shooter game set in a large home controlled by a vicious psychopath. You are to explore the house to locate all the goods that will assist you in escaping without being caught by the insane lunatic.

You have a timer set to five nights to flee, so you must make the most of it. You’ll need to pay attention to your environment and solve various tricky riddles to get out. The 3D visuals are impressive, and the action is thrilling. 

Will you be able to get away from Freddy and get out of the house?

Additional features:

  • Clean and cool graphics
  • Nice soundtracks

⇒ Play Creepy Granny Scream

Are there any multiplayer horror browser games?

A straight answer to this will be yes! However, this is a minimal subset of browser games, and you will probably come across just a handful.

A few to consider include:

  • Kindling: The Last Light
  • Slender Multiplayer
  • Utsuru – Inkfection
  • Graverobber Online – Petscop

That is our list, and it has been made in no particular order. You should find all the suspense and creepiness enough for you and your friends in this game.

Once your browser is updated, you will have no problems enjoying any of these games. If you’re looking for a multiplayer experience, you might want to check the best browser games to play with friends.

Scary browser horror games have always been attractive even to casual gamers, which is why all are looking for good browser horror games in multiplayer.

Next time you look for unblocked browser horror games, browser horror games to play with friends, or VR browser horror games, know that you can go to the right place.

However, we are curious which of these will become your go-to for browser horror games. Please let us know in the comments.

3 Quick Ways to Fix DirecTV Player When it’s Not Working

DirecTV is an excellent TV service offering thousands of channels and many other excellent features for you and your family.

The direct broadcast satellite service is number one in features and functionality in America, including RVU services compatible with smart TVs, recording, re-watching, and much more.

Enjoying your free time with your family has never been easier thanks to this service, which is compatible with most devices, offering your children movies, shows, sports, and cartoons.

Even better is that the service is available for multiple platforms, not just TVs. This means you can watch your favorite shows on a PC, tablet, or laptop.

Why does the DIRECTV player not work?

Several DirecTV users running the latest Windows 10 complain that they can’t watch the shows in the service or the app stops working several times a day.

If any of these sound familiar to you, here are some quick solutions you can try:

  • Check for software updates and install them accordingly (Feel free to use specialized driver updater software that automatically handles this task for you).
  • Close all other programs that may be running in the background.
  • Clear the cookies and cache on your browser (While you’re at it, ensure the browser does not block pop-ups and cookies altogether).
  • Restart or reset your current browser. Alternatively, you can try a different browser.
  • Restart the DirecTV app/DirecTV player or uninstall and reinstall it if the first attempt does not work.

If you can also not watch DirecTV on your device, don’t imagine it is incompatible with Windows 10.

This post will offer a few workable methods to change that, so we invite you to follow them in the given order.

Can I watch DirecTV on my laptop away from home?

The company responsible for the product has changed some things regarding streaming, so keep that in mind.

Only mobile devices can stream DVR content outside of the home. Why do you ask? The reason is that your mobile device is registered to your receiver, while the computer is not. 

This is precisely why your computer needs to be on the same network as your receiver, just so there is no confusion.

Quick Tip:

Use an alternative if you don’t want to troubleshoot your current browser. A good option that is known to have a minimal error rate is Opera One.

Opera One is private, performance-driven, and optimized for playing videos and streaming without buffering, lags, or interruption. Its integrated VPN lets you access content from anywhere in the world.

Opera One

Enjoy unlimited DirecTV streaming with this fast and secure browser!

How do I fix the DirecTV player when it’s not working?

1. Restart your device

  1. Press the Windows Key and bring up the Start Menu.
  2. Click the Power button.

  3. Select Restart and let your PC finish the process.
  4. After the computer is back on, check to see if this has fixed the DirecTV issue.

If your DirecTV player won’t download or install, don’t think of the worst and try out a simple restart procedure first.

Your device will reboot next. If you have any open programs, chances are you’ll be prompted to close them before the power gets interrupted.

2. Delete cookies on your Windows 10 device

  1. Open the menu in the top right corner—click Settings.
  2. Go to Privacy and Security and select Cookies and other site data.
  3. Delete your cookies and try again.
  4. If that does not work, open Settings.
  5. Scroll down to the Privacy & Security section and select Clear browsing data.
  6. Then hit Clear Data.
Note icon NOTE
The steps above apply only if the DirecTV player is not working on Google Chrome. They might vary slightly depending on your browser.

Don’t fool yourself into thinking that cookies are the same as your cache or browser history. While cache temporarily stores web documents, cookies store your information.

Even if the purpose is to create a personalized experience, there are also times when clearing browsing data is inevitable.

You may also delete browsing history and cookies from Control Panel.

  1. Go to Control Panel.
  2. Select Network and Internet.
  3. Then, click Delete browsing history and cookies and follow the given prompts.

3. Enable plugins to run on your browser

  1. In the address bar, on the right-hand side, you’ll see a small icon that looks like a shield popping up.
  2. Click on it right away and select Manage exceptions.

Other users describe another working solution that you may consider as well. For example, most web browsers these days load Flash and other plugin content the second you open a web page.

However, a little interference from your part is sometimes needed, so make sure to allow plugins to run on your browser, too.

The steps above apply to the IE browser. In the case of using a newer version of Google Chrome, for example, you may find a similar setting called Let me choose when to run plugin content.

Restarting your router/modem and completely reinstalling DirecTV from scratch are options.

Now, if you want to install a DirecTV player, or can’t watch DirecTV on your computer, or the DirecTV video player is not working, you better understand the situation.

You might also encounter annoying situations when the DirecTV player is not working on Chrome, the DirecTV player is not working on Firestick, or YouTube is not working on DirecTV.

We hope that by following these procedures, you managed to fix the DirecTV issues in Windows 10. Also, let us know if you have other suggestions for readers experiencing the same problem.

5 Best Twitch Alert Sounds for your streams [Free & Paid]

If you’re looking for the best Twitch alert sound repositories, you’re in the right place! Our today’s article will show you only the most valuable options.

Twitch is the number one streaming platform for games. A lot of Twitch users incorporate overlays into their streams that provide more information for viewers.

Those overlays include alert notifications that provide users with additional info. The alerts have their sound effects to highlight the notifications.

A lot of users might stick with the default sounds provided by Twitch web toolkits such as Streamlabs. However, there are a few overlay download websites that also include groovy alert sound packs, which users can purchase for their Twitch streams.

These are five websites that include unique Twitch alert sound packs and alerts for users to download, and most of them also include anime Twitch alert sounds as well, and many other variations.

How can Twitch alert sounds help me?

If you don’t know yet, Twitch alert sounds are special notifications that appear during your broadcast, either on the website or apps (on gaming consoles such as Xbox, PlayStation, etc).

You can customize the alerts to trigger when something specific appears, such as a new follower/subscriber or a fresh live-streaming video you like.

The greatest thing about these features is that you can change and adjust them according to your own needs, preferences, and personality. In this way, you can personalize the environment to feel more comfortable when you’re streaming or playing.

Now, let’s see what are the best options you should try out today. At the end of this article, make sure you let us know which one is your favorite.

What alert sounds are allowed on Twitch?

As it is in the case of using GIFs, sound alerts are situated in a legally gray area, as the sound bites should not be infringing on the rights of the owner.

In order to ensure that is the case, as long as the audio recordings are short, you won’t have issues using them.

There are several types of alert sounds that you can make on Twitch:

  • Cheer Alert Sounds
  • Host Alert Sounds
  • Donation Alert Sounds
  • Follower Alert Sounds
  • Raid Alert Sounds
  • Subscriber Alert Sounds
  • Sound Alert Packs

Now that you know what types of sounds you can use and create on Twitch, it’s time to discuss some of the best alert sounds available on this platform.

What are the best Twitch alert sounds?

Epidemic Sound

Epidemic Sound offers users the chance to select out of thousands of high-quality music snippets and allows you access to the entire database with a free 30-day trial.

Even though these are not free twitch alert sounds theoretically, you can use the samples found on this site free for a month, making it a very good choice for people looking for quality results.

⇒ Try Epidemic Sound

Sound Alerts

Sound Alerts is one of the few Twitch resource repositories specifically for alert sounds. Thus, this is probably the best website for alert sound downloads.

This website includes sound alert packs along with follower and subscriber alert sounds. Plus, the Twitch viewers can earn channel points from watching or participating in a raid.

So the streamers have the option to create custom channel points rewards with sounds playing on the stream.

Apart from sound alerts via Twitch extension or sound alerts via Channel Points, the streamers can add other alert types for different events on their streaming channel.

You should also know about the overlay alerts that can show catching overlay animations on the broadcast every time a Sound Alert is played.

The alert sounds there are compatible with all the foremost streaming apps, such as Streamlabs and StreamElements.

⇒ Get Sound Alerts

Own3d.TV

Own3D.TV is a website that includes a repository of full overlay and stream designs along with additional alerts and alert sounds. A collection of professionally produced stream alert sounds are available on that site.

Twitch streamers can purchase Dubstep, Rock, Fantasy, Military, and Electro Twitch alert sound packs among others from there to match the themes of their streams.

With this stream overlay solution, you have animated stream webcam overlays, animated stream alerts, and instant download after purchase.

It’s worth mentioning that you have multiple languages available for your alert notifications and overlays.

Some of their sound packs can be a little pricey. However, the Own3d.TV alert packs are currently retailing with a 50% streaming sale applied.

⇒ Get Own3D.TV

Twitch Temple

Twitch Temple is a website from which users can download full overlays, alerts, and alert sounds. Their users can download comprehensive alert sound packages that incorporate a variety of audio effects.

The alert audio packs are available on Twitch Temple at a reasonable price. The video below provides a preview of the Pretty Sprites alert sound effects that users can snap up on Twitch Temple.

By choosing this complete solution, you can highly improve your streaming quality on Twitch or YouTube with the help of premium or free alert sounds.

You can offer your streaming channel a better image by employing these overlays and widgets in order to better engage with your viewers.

As we said, it’s possible to improve the looking of your channel using free overlays and stream packages with more intuitive graphics.

⇒ Get Twitch Temple

Nerd or Die

Nerd or Die is one of the most comprehensive repositories for Twitch resources. Their users can freely download some full-stream packages and alerts that come with their own unique sound effects.

Users can also snap up short and long variations of sound effects for their Twitch stream at Nerd or Die.

Those alert audio effects are compatible with both the StreamElements and Streamlabs uploading services.

You can choose from a wide range of templates and widgets that will offer engaging times with your streaming public.

You can therefore employ this complete stream design solution to upgrade your live stream on Twitch, YouTube, or Facebook Gaming.

⇒ Get Nerd or Die

What other Twitch features should I use?

  • Emotes – Because most Twitch users like to express themselves in the chat, emotes are actually some of the most popular features of this app. With them, you can feel like part of the community, by interacting with other streamers. To discover the best Twitch emote maker software to create emoticons, make sure you check our dedicated guide.
  • Browsers – It seems like many users are interested in using the Twitch web version app. In this matter, it is important to choose a trustworthy web developer. Take a look at the best browsers to stream Twitch effortlessly, and find how you can get a pleasant experience.
  • Other extensions – Extensions create live apps and most importantly, they let you interact with the stream in the most efficient ways. These features are extremely diverse and if you’re not sure of what to choose, verify the best Twitch extensions anybody should use.

Twitch alert sounds not working

  1. Check if the sound is turned on by using the Enable Sound option.
  2. If it wasn’t activated, then activate it, press Save, and then reload the browser source so everything is set up accordingly.
Note icon NOTE
If you can’t see the Advanced Audio Properties option, then it might be the case that the sound alerts extension is missing from your installation of Twitch.
If that is the case, see the steps below this note.

If you don’t have access to the Advanced Audio Properties, then you will need to add the Sound Alerts extension as a separate audio source inside OBS.

To do so, follow these steps:

  1. Right-click your Sounds Alerts browser source and choose Properties.
  2. Add a checkmark next to the option Control audio via OBS.

Those are a few websites worth noting for users who are looking to add more appealing alert sound effects to their streams. Thus, we have to admit that our presented options are the best Twitch alert sounds you can find.

Furthermore, keep in mind that you can also download some great overlays and graphics for streams from some of those sites.

Are you still not sure what you should choose? Make sure you leave a detailed comment in the section below.

School WiFi Blocks VPN: How to Get Your VPN Unblocked

If your school Wi-Fi is blocking VPN connections, you’re in for a treat. We’ll show you how to fix it in just a few minutes. The best way to unblock websites on school Wi-Fi is by using a VPN with advanced protocols and built-in Smart DNS features.

Here’s all you need to know.

How do I unblock my VPN in schools, hotels, colleges, or universities?

1. School WiFi blocks VPN

Networks that block VPN traffic can be unblocked using several techniques and/or tools to regain full access.

Even if your VPN cannot get through the school’s firewall, others actually can – they’re called Stealth VPNs.

Schools these days have internet access, but admins are always checking that students don’t do monkey business online, so they monitor and/or restrict access by blocking social networking, gaming sites, and VPNs.

The good news is that blocking such VPN traffic requires identification, but you can disguise your traffic and make it unblockable.

Therefore, to fix the issue of VPN not working on school WiFi, consider using a tool that can camouflage VPN traffic as regular HTTPS:

Private Internet Access

PIA is a world-class VPN service owned by Kape Technologies with one major goal: freeing the internet for you.

Cleverly bypassing admin restrictions, geo-targeting, ISP throttling, and more, PIA is your trusted partner in fighting online censorship.

With PIA, you can circumvent network restrictions imposed by any institution. Plus, you’ll enjoy lightning-fast download speeds, unlimited bandwidth, and an impressive global collection of 3292 + servers while you’re at it.

Let’s quickly look at its key features:

  • Private IP address allocation for anonymous browsing
  • Protection against your ISP and more with a strict no-logs policy
  • Liberate streaming, bypass censorship, and unblock geo-restricted websites and content
  • Highest download speeds and unlimited bandwidth without any buffering or slow loading times (ideal for streaming, gaming, and P2P torrenting)
  • Access to servers from all over the world (3292 + servers in 46 locations)
  • Secure Protection on Public Wi-Fi and military-grade encryption for your traffic data
  • Block ads, trackers, and malware
  • Secure VPN Protocols and tunneling technology
  • Protects up to 10 devices simultaneously with just 1 subscription

Private Internet Access

Bypass network restrictions in any institution, whenever, and wherever with PIA!
Check price Visit website

Note: We suggest you avoid free VPNs because most of them do not protect you at all.

1.1 How to unblock VPNs in school

A stealth VPN can scramble traffic to look like regular TLS-encrypted web traffic. If you want to unblock your VPN, do this:

1.1.1 Run OpenVPN on port 443

This port is used mostly by SSL/TLS encrypted web traffic as a standard internet encryption protocol each time a site with sensitive data is accessed.

OpenVPN already uses the SSL encryption library, so switch the port to 443, and it will slip through, except for the most difficult DPI firewalls. VPNs let you switch port numbers or give dedicated server locations to allow access to port 443, so check with your VPN’s tech support on how to set it up.

1.1.2 Obfuscation

Most VPN protocols have a data packet header, like a fingerprint, that can let a firewall recognize VPN traffic. In this case, using a VPN with obfuscation or stealth technology will obscure the packet headers so that the fingerprint isn’t recognizable.

1.1.3 Use TOR network

For advanced obfuscation, you can use the TOR network for maximum privacy and unblocking. This makes your VPN unblockable, but it will be routed via multiple proxy layers that are encrypted and come with different speeds, so it can get really slow.

The configuration process is also complicated, but there are VPNs with built-in VPN-over-TOR support.

2. VPN is blocked at College

Network administrators in colleges usually block site access, especially to social networking and streaming platforms like Netflix and others. This is because students are known to do a lot of torrenting, so college Wi-Fi was one of the major culprits for this; hence, it was nipped in the bud.

Today, college students can only dream about torrenting, plus the main idea is to help them focus more on their studies. Additionally, the bandwidth use is affected if each student is downloading or streaming videos, so throttling happens often and faster.

However, since students are in a digital world, there is a need to access these sites.

So restrictions affect and defeat the intentions of study and research, which should break information barriers and increase global collaboration.

This is why students use VPNs to circumvent such restrictions.

However, colleges can block VPNs, so to get around these limitations, you can either use VPNs with obfuscation or change the port number. In most cases, college firewalls detect encryption tools via Deep Packet Inspection, so to bypass this, hide your encryption protocols.

3. VPN is blocked at the University

This is a place of higher learning, and what better way to increase knowledge and share information than by using the internet?

Unfortunately, like colleges, Wi-Fi restrictions also apply to campus networks in Universities. They can block VPN services on specific ports.

While university firewalls do that, HTTPS/HTTP ports are open. Similarly, the university can use advanced filtering methods like Deep Packet Inspection.

Port Blocking is the most common technique to restrict all ports not for Internet browsing. That’s why you can still use the internet but block specific apps or services that work online.

Encrypted traffic (HTTPS) uses port 443, and unencrypted traffic (HTTP) uses port 80. This is why ports 443 and 80 are always open.

While default configurations of OpenVPN, IPsec/L2TP, and PPTP do not use any of these, SSTP is the only encryption protocol that works on port 443 by default.

It is thus the best protocol to use on networks that need port 443 for regular browsing. Unlike PPTP, SSTP is very secure and only works on Windows.

You can forward OpenVPN via port 443, but not all VPN providers allow this, though they have this feature in their desktop software (mobile devices don’t support it).

Hence, if the university firewall only blocks ports that encryption protocols are using, choose a VPN that offers SSTP protocol or allows OpenVPN port forwarding to port 443 (maybe port 80) to bypass the firewall and gain unrestricted access to the Internet.

Another way to block VPNs is via a highly advanced firewall like the Chinese Firewall that uses DPI to detect encryption tools.

This means the port forwarding isn’t enough, as the firewall can distinguish traffic and block the data routed through your VPN. In this case, hide or mask encryption protocols by sending OpenVPN over SSL and SSH tunnels.

Using stealth VPNs can mask your VPN traffic and make it undetectable because all your traffic will look like HTTPS, so your university won’t tell you you’re using a VPN.

Otherwise, you can get a cheap smartphone and make a WiFi hotspot.

4. VPN is blocked in hotels

If you’ve tried using a VPN in a hotel, you may find that it doesn’t work, as they may want you to pay for in-hotel movies instead of streaming for free.

Here’s what to do when your VPN is blocked by the hotel:

  • Disguise your VPN traffic as regular web browser traffic, which makes it impossible for the hotel’s network to block your VPN service unless they want to block all HTTPs browser traffic, which is unlikely.
  • Check with your office IT admin on your computer’s configuration so they can log the situation and troubleshoot it for you. In the case of an overlapping subnet, the hotel router assigns your machine a private IP address range, and this matches that of the office, so when your VPN client connects, it uses the current source IP address (office network), and the gateway you connect to sees this as a local address, so they overlap and deny your VPN connection.
  • Ask your IT admin to set up a different IPsec client for you to navigate automatically.
  • Use stealth VPN technology to disguise and/or scramble your VPN traffic so that it isn’t easy to identify as such or disguised as regular encrypted web traffic. You can do this by running OpenVPN on port 443, or using stealth VPN or obfuscation.
  • You can also run your VPN through the Tor network, as it makes it virtually unblockable and highly anonymous. The downside is that routing traffic through multiple proxy layers can slow the connection.
  • Switch between DNS servers by replacing the DNS of your ISP or increasing your browsing speed.

Hide.Me

Hide.Me VPN

Hide.Me is a VPN tool that will work great on school networks.

This eVenture Ltd. owned VPN client will allow you to connect via multiple servers all over the world, so you can be untraceable. Moreover, Hide.Me work in more privacy-sensible countries like China and Russia.

Another great feature of this tool is that you can use it on 10 different devices. More so, it doesn’t affect your bandwidth to any noticeable degree, so your browsing will not be just secure, it will also be fast.

Let’s quickly look at its key features:

  • No sign-up or registration required
  • No logs of your online activity
  • Access to 1700 servers located worldwide
  • IP Leak Protection and Split Tunneling
  • Strong AES-256 encryption
  • Secure VPN protocols
  • Compatible with all major operating systems

Hide.Me

With Hide.Me you will protect your identity wherever you are in the world on 10 different devices at once.
Check price Visit website

Explore more VPN Solutions to cover every one of your needs. Don’t forget to visit our Unblocking VPNs Hub as well.

Are there other ways you know to get around VPN blocking in hotels, schools, universities, or colleges? Let us know in the comments section below.

How to use a VPN to get around blocks at school?

To get around blocks at school with a VPN, you have to connect to a server. Once you do that, you no longer access the internet directly through your school’s network. Therefore, the admin won’t see what you do online, and banned sites, games, or apps become available again.

How to install a VPN on a school computer?

Go to your VPN provider’s website and download the app. If your school blocked access to the VPN’s site itself, you have other options:

  • Use a proxy to access the VPN website
  • Download the app’s .exe file to another device, then send it to your school’s computer using your email or by adding it to a flash drive
  • Use Tor to access the VPN website

How to use a VPN on school WiFi?

You can use a VPN on school WiFi by simply installing it on your device. Enabling extra security features like server obfuscation will ensure the school network won’t block your VPN. Having your VPN blocked by security settings means your privacy might be compromised, so take a closer look at our dedicated guide.

Are there any free unblocked VPNs for school?

Free VPNs are easier to block completely because they have fewer IPs. That said, out of the free providers we tested, these are the most likely to work: hide.me, ProtonVPN, and TunnelBear.

Even more, note that VPNs can sometimes trigger various connectivity issues, yet rest assured that our tips can help. And due to geo-restrictions, ISP blocks, or misconfiguration, some online pages are blocked, but you can take immediate action.

If your VPN is blocked by your Windows Firewall you can tweak settings to get around it.

How to Export WWE 2K22 MyRISE Characters

You don’t have to wait anymore! WWE 2K22 is here and brings up tons of incredible features that seem to excite worldwide players. For example, many are interested in discovering if they can export My Rise characters on WWE 2K22.

With a hard reset from the old MyCAREER, things got taken to another level with WWE 2K22 MyRISE. Fortunately, we have all the details you need about this new game mode.

Can you export your MyRISE character?

Unfortunately, you have to know that you’re not allowed to export MyRISE characters on WWE 2K22, as you can not import a character either.

Discussions are being carried out on various forums covering the possible reasons why the WWE 2k22 MyRise import doesn’t work, but no official information has been released yet.

Unfortunately, the WWE 2k22 can also not copy any MyRISE character, as this could cause concerns for users when it comes to security.

This could be because the character’s progress and stats are tied to that mode, similar to previous years.

However, you can recreate your CAW. Then, you should save it and go back to Edit custom superstar. After that, it should ask you if you want to keep it for Roster play and a My Universe slot to play WWE 2k22 MyRISE character in My Universe.

So, as you can see, there is not much to say about the MyRISE characters exported on WWE 2K22. Thus, we all have to wait until the manufacturers come up with some big news.

Also, it seems like WWE 2K22 might sometimes not work. It can be pretty annoying, so if you ever face this issue, do not hesitate to check some practical solutions to solve it.

If your WWE 2K22 MyRISE got stuck, simply restarting the game will resolve this issue.

Can I use a downloaded superstar in MyRise?

If you’re also wondering whether or not you can export the CAW in WWE 2K22 My Rise to use it in other modes, you’re not the only one! This is how other users were trying to find related answers:

Has anyone figured out how to export your MyRise character to play in exhibition modes?

Just spent hours creating the My Rise character, attire, moveset, entrance, etc. I don’t want to do it all over again unless I absolutely have to.

To discover more about this subject, make sure you keep reading because we’re going to answer as clearly as possible.

What are the WWE 2k22 system requirements?

To ensure smooth gameplay, make sure to check if the system requirements for the game fit your setup:

  • Minimum specs

Processor: Intel Core i5-3550 / AMD FX 8150
Memory: 8 GB
Graphics: GeForce GTX 1060 / Radeon RX 480
Additional Notes: At least 4 GB of Video Memory


  • Recommended specs

Processor: Intel i7-4790 / AMD FX 8350
Memory: 16 GB
Graphics: GeForce GTX 1070 / Radeon RX 580
Additional Notes: At least 6 GB of Video Memory

If you want more details on the requirements, check out the official EA WWE 2K22 webpage.

Also, if you have any additional questions on want to share some new information, feel free to use the comment section listed below.

How to Extract And Decompress BZ2 Files in Windows 10

The BZ2 file format is usually used for Linux or UNIX systems and can only compress one file at a time. It cannot be used for multiple files.

You can, though, compress multiple files using a different tool and afterward get that final archive and compress it with BZIP2.

Even if BZIP2 is not used in Windows 10 as much as on the other mentioned operating system, there are ways to decompress the BZ2 file.

This article will show you some really easy ways to extract and decompress BZ2 on your Windows 10 device.

How can I extract and decompress BZ2 files in Windows 10?

1. Use a dedicated tool to unzip BZ2 files

There are many tools out there that will allow you to decompress and extract BZ2 files and after testing them all, we would like to recommend you the best one to use.

WinZip is a versatile tool that not only opens BZ2 format files but many others, such as RAR, 7Z, ISO, IMG, TAR, GZ, TAZ, and TGZ.

This complex software supports all the above formats but is more than just a simple compressing and archiving tool.

WinZip can also repair and manage zip files. In addition, it comes with strong security features. The almost bank-level encryption feature will make sure your files are safe even while compressing them.

If you are sharing them online or sending them via email, then you can rest assured that at any moment your data is safe and secured.

You can password-protect your archive and opening them without it would not be possible.

If you prefer to protect them using a password, make sure to keep a good password manager too at hand.

Here is how you can extract BZ2 files using WinZip:

  1. Make sure to save the BZ2 file on your device.
  2. Download and install WinZip on your PC.
  3. Go to the Integration Panel in WinZip and make sure that the BZ2 file extension check box is ticked.
  4. Launch WinZip from the start menu.
  5. Next, click on File and select Open.
  6. Select the file or files inside the compressed folder.
  7. Click on Unzip and choose where you want them to be saved.

This unique software makes sending large files via email possible. Most of the time this is a great concern for all team members when they need to share a large file.

WinZip will break the big file (such as ISO images, for instance) into smaller chunks without affecting the image quality in any way.

Moreover, if you are used to working with cloud system storage, such as Dropbox, Google Drive, or OneDrive, you can manage your files inside the cloud without interrupting your workflow.

⇒ Get WinZIP

2. Use the native app

  1. Go to the Bzip2 Github page and download the right tool for your Windows system (32bit or 64bit).
  2. Extract the files on your PC and run the bzip2.exe file.
  3. However, you will also need the vcruntime140.dll installed from Visual Studio 2015 C Runtime Library. Visit Microsoft’s Latest Supported Visual C++ Downloads page for download links if you don’t have it installed.

The Bzip2 developer recently created a Windows app you can install on your PC. However, if you don’t have Visual C++ installed, it’s more complicated than using WinZip, 7Zip, or other readily available unarchivers that support the BZ2 format.

3. Use an online tool to open BZ2 files

Another easy and fast way to extract and decompress BZ2 files is through an online website.

There are many options out there that will do exactly that, and finding the right one for you should not be a problem.

Usually, decompression websites run locally as a browser app, making the process work faster.

Based on how they were created, some will have size limitations for how big the BZ2 file you are trying to extract can be. There are websites, though, that will not have such conditions.

One crucial aspect you will need to keep in mind is the privacy of your data. Considering that you will be uploading information online, it’s essential to check how secure the site is.

Moreover, before downloading the extracted files onto your device, check that your antivirus is active and working correctly.

Considering that the file will be downloaded over the Internet, it’s better to have an extra layer of security that will keep your privacy in check.

Please let us know in the comments section below if you have additional comments or suggestions.

5 Best Dictionary Extensions In 2026 [Chrome, Edge, Firefox]

If you’ve got a Web page open with some heavy jargon, it might be handy to have a good online dictionary. Then you can look up some of the vocabulary for further clarification.

Numerous dictionary browser extensions available for the foremost search engines provide you with a quick dictionary.

Browser extensions are the bread and butter of all significant browsers allowing users to customize and improve their browsing experience.

This article explores some of the best dictionary browser extensions for Chrome, Firefox, and Opera.

While at it, you may want to speed up your Chrome browser with these extensions.

What is the Google Dictionary extension?

This plugin is your mobile word reference tool. You may double-click on a word that has been highlighted to read its definition in a bubble. Using the toolbar dictionary, you may see the entire meaning of any phrase or word.

How do I add extensions to my browser?

  1. Navigate to the extensions page.
  2. Click on the Add to Chrome button. This could be an Add to Firefox or Opera button, depending on your browser.
    best dictionary extension
  3. Click on Add extension when prompted.
    best dictionary extension

Quick Tip:

Extensions often trade privacy for the sake of versatility. The Opera One browser blocks this with the integrated VPN and ad-blocker and allows the import of data from Chrome safely.

There are also some great extensions that you can add, such as Dictionary, ImTranslator: Translator, Dictionary, TTS, and Lingvanex – Translator and Dictionary. Opera One also helps your learning with native AI, workspaces and tab islands.

Opera One

Extensions here are more reliable and secured with built-in security measures.
Free Download Visit website

What are the best dictionary extensions?

Google Dictionary – Great Chrome dictionary

This is a great dictionary for web browser extension developed by Google for its Chrome browser. It is about the best dictionary extension for Chrome, and it seamlessly integrates with the Google search engine to give you definitions.

The great thing about this extension is that you can double-click any word to look it up in the dictionary. Doing this will open your definitions in a bubble.

This tool also works with foreign languages as a translation tool. Alternatively, you can click the Google Dictionary toolbar to enter text into a dictionary search box instead. It can also save words that you look up.

Other features:

  • Search history
  • Multi-language support
  • Translation

⇒ Download Google Dictionary

Dictionary Pop-Up – Firefox dictionary

Dictionary Pop-Up is an exclusive Firefox add-on you can add to the browser. This is pretty similar to Google Dictionary, except that it’s integrated with Dictionary.com.

Double-click words on a page to open the definition bubble and click More to open the definition in Dictionary.com.

The good thing about this add-on is that it also includes options for you to customize the popup bubble’s fonts.

Other features:

  • Define custom dictionary sites
  • Multiple dictionary sites
  • Definition of selected words

⇒ Download Dictionary Pop-Up

Dictionary Tooltip – Cross platform dictionary extension

Tooltip Dictionary is another excellent Firefox dictionary add-on that may be used on Chrome.

Like Google Dictionary and Dictionary Pop-Up, you can double-click words on a page to look them up; or you can also select the text and press Ctrl + Shift + K to open the window directly below.

However, what elevates this add-on above some of the others is that it enables you to look up words with multiple dictionaries.

All you need to do is click Show Dictionaries and select alternatives from the drop-down menu.

This is one of the best dictionary extension options for Firefox.

Other features:

  • Keyboard shortcuts
  • Double click definitions function
  • Cross-browser operability

⇒ Download Dictionary Tooltip

Instant Dictionary – Popup dictionary extension

This is a popup dictionary extension for Chrome integrated with GoodWordGuide.com. You can look up words by double-clicking them on the page, much the same as the others.

However, you can also select the text and press the D button to automatically enter a word in the extension’s search box.

Furthermore, the extension also includes extra configuration options for trigger keys and the font size.

Other features:

  • Google Docs compatible
  • One-click access
  • Double-click definition view

⇒ Download Instant Dictionary

Dictionary Anywhere – Opera/Firefox compatible

This is an excellent instant dictionary extension for both Opera and Firefox. You can add it to Opera, or you can add it to Firefox.

Dictionary Anywhere enables you to select words in pages for definitions. However, unlike some of the others, it’s also a translation tool.

When you click the extension’s button, it will open the window below that provides a definition and includes translate options.

Furthermore, you can also click Search to look up the word in the Google search engine instead. In addition, it includes a Copy button that you can press to copy text to the Clipboard.

Other features:

  • Multi-language support
  • Definitions popup
  • Double-click definition function

⇒ Download Dictionary Anywhere

With these dictionary tools, you can quickly look up jargon in websites open in Chrome, Firefox, or Opera.

Those that include translate options can also help translate pages, but there are better translation extensions available.

Also, note that some of the Chrome extensions discussed are also among the best dictionary extension options for Edge since it is built on the same engine.

If you’re learning Japanese, you might want to check our Rikaikun Firefox extension guide for more online dictionaries.

Let us know which of these are your favorites.

Microsoft Edge server asking for username and password [Fix]

Since its introduction to Windows 10, Microsoft Edge has become one of the best browsers on all devices. This built-in browser is far from being a same-level competitor with Chrome and Firefox.

Every good few traits are shadowed by a few issues, which isn’t something anyone wants to deal with daily.

Not necessarily deal-breakers, but things like the Microsoft Edge server asking for username and password every time you run it can be a drag. Don’t worry. We have a fix for you.

Why does Edge keep asking for my credentials?

If Edge keeps asking for your username & password or other credentials, it is most likely due to malware. This virus can hijack the operation of your browser, leading to an error.

Another reason, especially when Edge is prompting for credentials on the intranet, is the activity of your credential manager. So, the causes are not far-fetched.

Quick Tip:

One good alternative to try is Opera One, a lightweight browsing tool built using the Chromium engine, just like Edge. The big difference is that Opera One is a privacy-oriented browser, thus a password keeper.

However, the built-in password manager makes Opera One shine in this situation. Beyond that you can also enjoy built-in features like VPN, Ad Blocker, AI and modular AI-ready Design.

Opera One

Provides one master password for all your accounts to avoid this never-ending loop of login.
Free Download Visit website

How do I stop Edge from prompting for password?

1. Scan for malware and remove PUPs

This is quite a rare occurrence on any personal computer. On the other hand, it can happen from time to time on a shared PC.

Of course, it’s important to know whether this is a legit Windows prompt or if some adware is trying to hijack your PC.

That shouldn’t be that hard, as the prompt Windows shouldn’t be distinguishable from the Edge interface.

If unsure, ensure to uninstall all suspicious third-party applications and scan for malware. And there is no better tool than dedicated software like TotalAV.

Just install it, run a scan, and wait for the result. Once the scan is complete, you can decide what the antivirus does with suspicious files found.

Performing these actions regarding Windows security might fix the Microsoft Edge credentials problem.

Alternatively, if you need another efficient antivirus software, you can benefit from valuable anti-malware features anytime.

2. Check the Credential Manager

  1. In the Windows Search bar, type Credential and open Credential Manager.credentials manager
  2. Open Web Credentials.
  3. Remove the password from credentials, and you should be good to go.

The Credential Manager is a function that allows users to visualize their sign-in info to different websites, apps, or networks.

Running this feature to review your Microsoft Edge credentials is an easy method that might help you solve the login prompt issue.

The Microsoft Edge keeps asking for credentials issues that can quickly sap the fun of your browsing session. But, with the fixes above, you should be able to solve the problem for good.

Do you want to know how to fix Microsoft Edge if it won’t close? Check our detailed guide on the topic to get it done quickly.

In case you have any questions or, possibly, an alternative solution, feel free to post them in the comments section below.

5 Best VPNs to Fix NBA 2K22 Lagging Online And Reduce Ping

NBA 2K is a series of basketball video games that you can play on a number of platforms, including Windows, PlayStation, Xbox, Wii, iOS, Nintendo Switch, and Google Stadia.

The latest edition is NBA 2K20, available for Windows, Switch, PS4, and Xbox One.

In NBA 2K20, you can control a single player or an entire basketball team, as well as choose players from the current NBA season. The game also features career and online modes.

Unfortunately, many users report NBA 2K lag and various errors when trying to join online sessions, which can become really frustrating.

However, you can use a VPN to improve your ping and gameplay, eliminate all latency issues, and fix high ping.

Why is NBA 2K so laggy?

There are multiple possible culprits that cause 2K lag, some related to your game’s configuration, and others caused by underlying issues in your connection:

➡️ NBA2K servers are down: it’s possible that the servers you try to access are currently out of service or undergoing maintenance. You can check server status on  NBA 2K’s Downdetector page.

➡️ Your device doesn’t meet the system requirements: if you don’t have the resources recommended by the game’s manufacturers, it’s very likely to experience lag and other issues

➡️ Interfering apps: sometimes your antivirus or firewall may block or restrict other apps on your PC, check your settings and whitelist NBA2K if necessary

➡️ Bad Internet: make sure your connection is up and stable and contact your ISP if necessary

NBA2K most common errors:
All the above-mentioned problems can cause latency issues within the game and other issues related to responsiveness and errors. According to players, the most common issues that appear in-game include:

  •  NBA 2k mobile out of sync
  • NBA 2k mobile lag
  • NBA 2k22 online lag ps4
  • 2k22 lagging ps5
  • NBA 2k22 ping issues
  • NBA 2k22 delayed shooting
  • 2K servers lagging

Good VPNs let you can overcome latency issues and secure a stable connection. You can also use their mobile versions to fix lag when playing NBA2K on your phone. We looked into the best clients that offer high-speed servers for NBA2K and comprised an overview of the features they include.

What are the best VPNs to fix NBA 2K lag?

Private Internet Access – largest server network

Private Internet Access (PIA) is the easiest way to fix NBA 2k lagging. It’s a reliable virtual private network solution that can fix packet loss and improve gameplay by getting rid of any latency causes.

This VPN offers access to server locations all around the world. You have the possibility to quickly connect at the press of a button.

PIA VPN app will automatically choose the best server for your particular configuration, which is ideal if your goal is to fix lag in NBA 2K or other online games.

You can also manually select your server and pick your preferred location from a list. The VPN has powerful AES-256-bit encryption on each server and comes with a secure killswitch to prevent data leaks.

Made by Kape Technologies, PIA can be installed on a number of devices, including Windows, Switch, PS4, and Xbox One, making it an excellent VPN for NBA 2K20. Plus, it’s one of the few VPNs with 24/7 live chat support.

How can PIA help you:

  • +30,400 servers in 80+ countries
  • Port forwarding to enhance your connection quality
  • 10 simultaneous connections
  • Great for fixing NBA 2K input lag
  • 30-day money-back guarantee (no free trial)

Private Internet Access

Fix NBA 2k lag and reduce ping using this trustworthy VPN service for PC and consoles.
Check price Visit website

NordVPN – great privacy features

Another reliable VPN that can help with latency issues when playing games online is NordVPN.

It’s a user favorite thanks to its high-speed servers located in various corners of the world.

NordVPN is untraceable, thanks to its powerful AES-256 bit encryption as well as zero logs policy that leaves no room for weak points.

The tool has an advanced double VPN option that adds an extra layer of security. It’s a great way to protect your data when gaming and prevent DDoS attacks.

NordVPN offers private DNS servers and has a SmartDNS feature that lets you bypass geo-blocks when traveling.

Other key features of NordVPN include:

  • Emergency killswitch that blocks traffic if you disconnect
  • Split tunneling
  • Cybersec feature for threat protection
  • Dark web monitor that alerts you if your account has been compromised
  • Advanced server obfuscation

NordVPN is subscription-based, but you can get a refund in the first 30 days of your subscription if you are not satisfied with the service.

NordVPN

Connect to a fast server for reduced lag and privacy protection!
Check price Visit website

Surfshark – multi-device support and unlimited connections

Surfshark is yet another performance-oriented VPN service that aims to provide high-speed rates.

It has over 3200 servers across the globe. This means that you are able to get the best traffic available for your configuration.

This VPN ensures that none of your data is collected. Along with the fact that you get great privacy, this also means that your internet service provider won’t be able to place any restriction on your traffic.

If you want to increase your speed and reduce the risk of ping, you can also allocate all your traffic to NBA 2K. For this, you will have to activate the Bypass feature.

This will enable you to connect to your game via a VPN, while the rest of your apps will connect directly to your actual IP. It can really boost speed, and you can quickly enable and disable it in just one click.

Other key features of SurfShark include:

  • Secures lost connections with Kill Switch
  • Powerful AES-256-GCM encryption
  • Secure IKEv2/IPsec protocols
  • Private DNS on each server
  • Compatible with all major platforms

SurfShark is a subscription-based service with three different plans available. You can try it out for free for 7 days and see how it works for your needs.

Surfshark

Pick the device of your choice and enjoy NBA 2K with no interruptions.
Free trial Visit website

CyberGhost VPN – easy to use apps for all devices

Another way to fix NBA 2K20 lag on PC and console is by turning to CyberGhost VPN, which is also a product of Kape Technologies.

It offers a simple solution to eliminate network congestion so that you can enjoy the online edition of the popular basketball game.

CyberGhost VPN is compatible with a wide range of devices, including Windows, Switch, PS4 and Xbox One, which are supported by NBA 2K20.

Plus, it has split tunneling mode so that you can easily set up whitelists and blacklists.

How can CyberGhost VPN help you:

  • +6,400 servers in 89 countries
  • Private DNS servers and DNS leak protection
  • 7 simultaneous connections
  • Excellent for eliminating NBA 2K20 lagging on Xbox
  • 45-day money-back guarantee (1-day free trial)

CyberGhost VPN

Remove the NBA 2K lag and boost your Internet connection with CyberGhost VPN!
Check price Visit website

BullGuard VPN -fast servers to fix lag on mobile

BullGuard VPN can help you with NBA 2K lag on Switch, PS4, Xbox One, and Windows. It’s a fast VPN service owned by BullGuard, which can fix jitter and speed up your Internet connection.

You can share BullGuard VPN with all your devices to secure web connections, as well as use it to minimize Wi-Fi packet loss. The tool uses the OpenVPN protocol to encrypt your data traffic.

How can BullGuard VPN help you:

  • +2,000 servers in 16 countries
  • Evade geoblocks and access blocked sites
  • 6 simultaneous connections
  • Works best with NBA 2K mobile lags
  • 30-day money-back guarantee (no free trial)

Eliminate NBA 2K lag and speed up your Internet connection by using this practical VPN service.

⇒ Get Bullguard

The NBA 2K video games are great for basketball fans, especially thanks to the high resolution that significantly improves your gameplay. However, it can become really annoying to deal with NBA 2K lag and high ping every time you join an online server session.

By redirecting all your network traffic through VPN servers, you can fix any issues related to connection delays and drops. It also makes it possible to host your own game servers. You just need to use fast VPN servers, like the ones provided by Private Internet Access.

For any errors related to your virtual private network service, see our VPN Troubleshooting Hub.

Join our Gaming VPN section if you have lag and high ping in other games.

5 Best Browsers that Support HEIC [Ranked by Image Quality]

Looking for a browser that offers support for HEIC image files? We recommend some of the best browsers that not just help you open the files but also offer the best image quality.

However, HEIC is more of a container for images and audio. It allows you to save your pictures in a better way.

It compresses the images to make them smaller in size and save data without losing image quality.

But, as of today, HEIC files are not supported by any of the browsers natively. So how do you view a HEIC image on your web browser?

Can you display HEIC in HTML?

HEIC and HEIF files are not supported by the <img> tag in HTML5 and so, the only option is to convert the file format as below:

  • Convert the files on the fly into a Buffer
  • Parse the Buffer into a Base64 String
  • Provide the output to an image tag

You can then convert the images using a conversion library, for example, the heic2any library by Alex Corvi or using the heic-convert project.

How do I open HEIC in my browser?

If you come across the HEIC unsupported file type on your browser, you can follow the below instructions to open the image file:

  1. Plug your iPhone into the PC with the USB cable for it, and then transfer your HEIC photos to Windows.
  2. Now, save the photos to your desktop or laptop.
  3. Next, go to your browser and try to open the downloaded HEIC image file.
  4. You will see a message saying, The HEIF Image Extension is required to display this file. The HEIF Image Extension is required to display this file
  5. Below the message, click on the Download and install it now link. download and install it now
  6. On the Microsoft store web page for HEIF Image Extensions, click on Get In-Store app. get app in microsoft store
  7. In the prompt, click on Open to open it in the Microsoft Store.open HEIF image extensions
  8. Select the folder in the Photos app that has your iPhone’s photos. Click the Add folders option to select the image. add iphone pictures
  9. Now, go to the folder where you saved your iPhone’s photos, select it, and click on Add this folder to Pictures option.

You can now view the HEIC images within the Photos app on your Windows PC.

For more information on how to open & convert HEIC to JPG on Windows 11/10, you can refer to our comprehensive guide here.

But if you are looking for the best browser that offers support for HEIC images and maintains image quality, we have a few recommendations below.

What are the best browsers that support HEIC?

Opera One – High-quality image viewing

The most underrated of all, the Opera One browser surprises its users by displaying the images as it is from the content.

It’s one of the browsers that supports almost all major image formats, including, JPB, PNG, APNG, AVIF, GIF, TIFF, and so on.

So, for example, if you want to view a HEIC image using an extension or software, it will display the converted image with the same original quality.

Opera One is one such browser that makes good use of your system’s graphics card and display resolution.

Some of its other major features include:

  • Built-in ad blocker and VPN
  • Pinboards to save web content
  • Organizing tabs in separate workspaces
  • Easy capture and edit with the snapshot tool
  • Quick file attachment option

Opera One

Convert and view HEIC file format in this browser with the help of useful extensions.

Google Chrome – View all image formats with Google Photos

browser support HEIC

The most popular browser in the world, Google Chrome, is known for offering a plethora of advanced features, including a wide range of useful extensions.

Chrome supports almost all major image formats, for example, PNG, GIF, JPG, or SVG without any additional tool.

However, it does not support HEIC image format natively, but, you can view the images using Google Photos and Google Drive.

Chrome will then display the images in the original image quality using the full potential of the system graphics.

Among its other significant features are:

  • Application shortcuts for favorite websites
  • Pin Tab feature
  • Cast tab or desktop
  • Search with Omnibox, or search highlighted text
  • Live captions for audio/video

⇒ Get Google Chrome

Microsoft Edge – Edit images with the web capture tool

browser support HEIC

Known for its ability to play 4K video quality for Netflix, Microsoft Edge is the new solution for the Ultra HD video lovers.

A feature-rich browser, Edge is also known for its web capture tool that now comes with a lot of improvements.

So, if you open a HEIC image file on Edge using a dedicated tool, you can even edit the image right in the browser while it maintains the original quality.

Moreover, it can even label an image found on the web (through the screen reader) automatically, using its ML (machine learning) algorithms.

Here are some of its other key features:

  • Option to import data automatically from other browsers
  • Three levels of privacy settings
  • Sync data across devices
  • Get all Chome extensions apart from its own
  • Option to install websites as apps

⇒ Get Microsoft Edge

Mozilla Firefox – Fast browser with a superior image viewing experience

browser support HEIC

Apart from its excellent picture-in-picture function, Mozilla Firefox is also known to help you view different image formats in high-quality.

It supports all major image formats including WebP, JPEG, PNG, APNG, AVIF, GIF, BMP, and more.

However, since the browser does not support HEIC, you can use an extension like the File Conversion Tool or using an online image converter.

Once you successfully open the converted HEIC image file in Firefox, it will be of the highest quality as the original.

Below are some of its other important features:

  • Good collection of extensions
  • Uses minimum resources
  • Supports private browsing
  • Blocks ad trackers
  • Picture-in-picture mode

⇒ Get Mozilla Firefox

Apple Safari – Native support for iOS devices

browser support HEIC

While Apple does not support HEIC image format on macOS, it does support the file extension in its iOS devices.

However, according to Apple, you can upgrade to iOS 11 or later or macOS High Sierra or later to view, edit, or duplicate HEIF or HEVC media captured with an iOS device.

In the non-supported versions of macOS, you can either convert the image to JPEG on your iOS device and transfer it to your Mac or use a 3rd party HEIC converter.

Once you have the converted file on your Mac, it will display the image with the same quality as the original one.

Here we have listed some of its other major features:

  • Browse anonymously with private browsing
  • Check privacy report
  • View compromised or reused iCloud Keychain passwords
  • Side by side view of images
  • Manage downloaded files

⇒ Get Apple Safari

Is HEIC better than JPEG?

Yes, HEIC is a better image format than JPG in terms of its ability to compress pictures into a small file size while maintaining the original quality.

However, although it’s gaining popularity, it’s not as commonly used as the JPG format, and not many apps and devices offer support yet.

Web browsers don’t render graphics, but only content, and hence, a high-resolution image depends on your computer’s graphics and the display resolution.

A browser can take advantage of the system’s graphics settings and display the image.

So, for those looking for the best browsers that support HEIC files with the same image quality, we recommend the above list.

However, there are more ways to open & convert HEIC to JPG on Windows 11/10 as explained in our detailed guide.

You can also use HEIC viewer on Windows 10 or 11 to view these types of files, and we have a special guide on it.

For any other queries on browsers or image formats, you can leave a message in the comments box below.

Create Better Subtitles Faster with Matesub Software

Whether you’re into the subtitling business or just want to create a nice surprise for your family, Matesub subtitle software is here to help you.

Thanks to its built-in AI technology and a powerful WYSIWYG editor you will be able to create higher-quality subtitles a lot faster.

So, if you need to create subtitles faster and more conveniently, we’ve tested Matesub for you and we’re sharing its best features along with our experience with the software.

How can Matesub help me?

Matesub software is a cloud-based tool that transforms the work of setting up the subtitles on a video into a fast and pleasurable experience.

That’s mostly because it shortens the process significantly by using speech recognition to transcribe the audio into text.

And not only that but it also places the text on the timeline exactly where the words are spoken.

All this is doubled by a very friendly interface that makes editing your subtitle a child’s play.

What are Matesub’s best features?

1. Automatic transcription and translation

The most important feature of Matesub is its speech recognition feature that automatically transforms the audio into text.

After you upload the video, you can specify the audio language and the language of the finished subtitle.

So, not only it identifies the audio speech in no less than 28 languages but then, it also translates it into 65 available languages.

It does a great job on the most used languages and, providing translation suggestions, helps people focus on the creative part of the work, letting the machine take care of the most time-consuming tasks required by the rest of the process.

However, it gives you an awesome head start and you can always edit the subtitles after the tool processes them.

2. Auto-spotting

After Matesub analyzes the video and translates the audio, you can edit the subtitles and make the final touches.

However, you will have a big surprise there because transcripts are placed precisely on the timeline, so you can see exactly when each word is spoken.

Although we chose a music video for our test the software performed extremely well on getting the words and placing them in the right spots.

3. Create your own guidelines

Matesub already has a few guidelines on how to create the subtitles automatically. You can follow Disney, Netflix, and TED’s default ones but you can also make your own.

Set up the text alignment, how much the text stays on the screen, the maximum number of lines on a subtitle and the minimum interval between two subtitles, the font, and a lot more.

And when you finish customizing your personal guidelines the way you want, just hit the Save button to use them for your next project.

4. Intuitive WYSIWYG editor

This software comes with a WYSIWYG editor and that’s an acronym for what you see is what you get.

That means that you edit the subtitles exactly as they appear on the screen. The editor is so simple to use and so intuitive that it seems pointless to explain it.

All the subtitles are placed chronologically on the left panel and just by clicking on them gets you exactly on its timeframe.

Then, just select the subtitle on the preview screen and make the changes using your keyboard.

How can I create subtitles quickly using Matesub?

  1. Visit the Matesub website and click on the Try Matesub for free button.
  2. Now, you can either enter your email and password to create an account or use the Google or LinkedIn account.
  3. To start off, click the New Project button. You will probably notice that you have 60 minutes available per month in the free Starter plan.
  4. In the next window, enter the name of your project, then select the guidelines from the drop-down menu, or the existing one with your preferences.
  5. Going down the list, you need to upload your video (just drag-and-drop it), select the audio language, and click the Continue button.
  6. In the next window, you can either generate the subtitles or choose an existing subtitles file, then select the language for the translation and click on Create at the end.
  7. Now, Matesub will analyze your video and generate the subtitles, and as you can see, you are able to create subtitles in more languages at the same time.
  8. After the process is done, you will see an entry for each language and you can hit the Edit button to make your adjustments.
  9. To edit a subtitle, just go through the subtitles list on the left pane, and you will immediately see it on the preview video, exactly as you will see it on the finished video. Just clicking on it will allow you to edit the text.
  10. Of course, you may change the text alignment and style from the toolbar on the right, and adjust the placement of each word and duration from the timeline below with pinpoint accuracy.
  11. At any point, if you want to add a new subtitle, just hit the + sign on the list of subtitles to do so.
  12. To make your work even easier, after you’re happy with a subtitle, you can hit the Confirm subtitle button. That will highlight the subtitle so you can see that you’ve reviewed it.
  13. Whenever you feel you’re done, click the Export button to save your finished work in plain text, WebVTT, SubRip or SubRip with position formats.

That’s how easy it is to create a subtitles file from scratch with Matesub. And although the many steps we included probably made things seem complicated, they definitely aren’t.

However, we explained the basics of how to use this tool. You can go a lot further in editing your subtitles.

For instance, you can search and replace any words within your subtitles, merge one subtitle with the next, and use many other features.

What are the Matesub available subscription plans?

We have just highlighted the best features and tested Matesub under the free Starter plan that offers 60 minutes of processing per month.

If you upgrade to the Individual plan, you will get 1800 minutes of uploads per month. That’s a pretty good quota if you’re a professional freelancer.

Finally, the Enterprise plan is dedicated to companies and professionals and it has a customizable upload allowance.

However, upgrading to this plan will also allow you to share projects with your collaborators which can be a huge advantage.

⇒ Get Matesub

Pros
Simple and comprehensive user interface
Automatic transcription and translation
Top of the line AI speech recognition technology
WYSIWYG editor
Places the text exactly where the words are spoken
Accurate timeline editing
Cons
Only 60 minutes of upload for the free version

Final notes

As you’ve probably noticed, the built-in AI technology does more than 80% of the subtitling work for you. Although, no AI is perfect at recognizing all the words in a recording.

And then, Matesub’s editor offers all the tools you need to get the job done at a professional level.

All that with a software that you don’t even need to install on your computer. All your work is available in your cloud dashboard, on any device you want to work on.

The interface is so friendly and simple to use that it doesn’t need any guidelines whatsoever.

We’ve been impressed by how quickly we were able to go from a music video to create a full subtitle for it in just a couple of minutes.

You should also take a look at our list with the best subtitle editing software for Windows and compare it with other tools.

Have you tried Matsub? Share your thoughts and experience in the comments section below.

How to Move the Taskbar to Other Monitors in no Time

There are situations in which having a multiple-monitor setup can be extremely useful, but many users don’t know how to move the Taskbar to other monitors.

By doing so, you can better organize your workspace and get more space to perform your tasks comfortably.

The option to do this comes ingrained in Windows 10, and the trend continues in Windows 11 as well. So that should not be a problem.

How to move Taskbar to the second screen?

The real issue here is that the monitor settings can be somewhat confusing.

But we are about to shatter this perception so that you can freely and easily switch between monitors and take your taskbar with you as you go.

There is a catch, however. Keep in mind that your multiple monitor setup needs to be in place, up and running in order to be able to perform this change.

Without further ado, here’s a step-by-step guide to help you move your Taskbar to the second monitor quickly and easily.

    Move Taskbar to the other monitor in Windows 10

    It is very easy to move your Taskbar to another monitor on Windows 10. All you need to do is unlock the Taskbar, then drag and drop it to the monitor of your choice.

  1. 1. Right-click on your Taskbar, and check whether the Lock the Taskbar option is activated. If it is, deactivate the setting to unlock the Taskbar.

    Taskbar settings 2 - move taskbar to second screen
  2. 2. Next, we will need to right-click again on the Taskbar and choose Taskbar settings.

    Taskbar settings 3 - move taskbar to other monitor
  3. 3. Once the Taskbar settings window is opened, scroll down to the Multiple Displays section.

  4. 4. Toggle the option Show taskbar on all displays to Off.

    Taskbar settings 4 - move taskbar to second monitor
  5. 5. Now you can simply drag-and-drop your Taskbar to any of the multiple monitors connected to your PC, and customize it to your needs.

In this guide, we explored the easiest and fastest way to move a taskbar to another monitor. As you can see, the process is incredibly simple and easy to perform, so you won’t have any issues.

Nevertheless, that does not mean that the taskbar itself is exempt from issues. For instance, the taskbar can become unresponsive after a while, be it in Windows 10 or 11.

Speaking about the new OS, there were quite a few reports concerning missing Taskbar icons in Windows 11.

If you happened to notice this behavior on occasion, don’t procrastinate and deal with it sooner rather than later.

Feel free to let us know if this guide helped you move the taskbar to another monitor and do share any other solutions that you may be aware of with us.