Third-party VoIP apps like Discord makes it easy to communicate with players during the gaming session.
However, keeping your microphone on all the time means the background noise can overwhelm your friends.
Enabling Push to Talk in Discord can help you negate this problem altogether. With Push to Talk enabled, the app will mute your mic automatically until you hit the pre-defined key and speak.
If you are new to Discord and not sure how to use this feature, this is the guide you need. In this guide, we have discussed in detail how to enable, disable and configure push to talk in our presented soft.
Why would I use Push to Talk in Discord?
This option might be extremely useful because it prevents accidental and embarrassing moments. In addition, it is also able to keep overall noise down from environmental noise like your keyboard or other people talking to you.
In case you are someone that can comfortably use your thumb for your push-to-talk key, C, V, or B on your keyboard may be suitable options. Another great key choice could be the scroll wheel click on your mouse.
Now, let’s have a look at some useful ways to use this amazing feature.
How does Push to Talk work on Discord?
1. Enable it in Discord
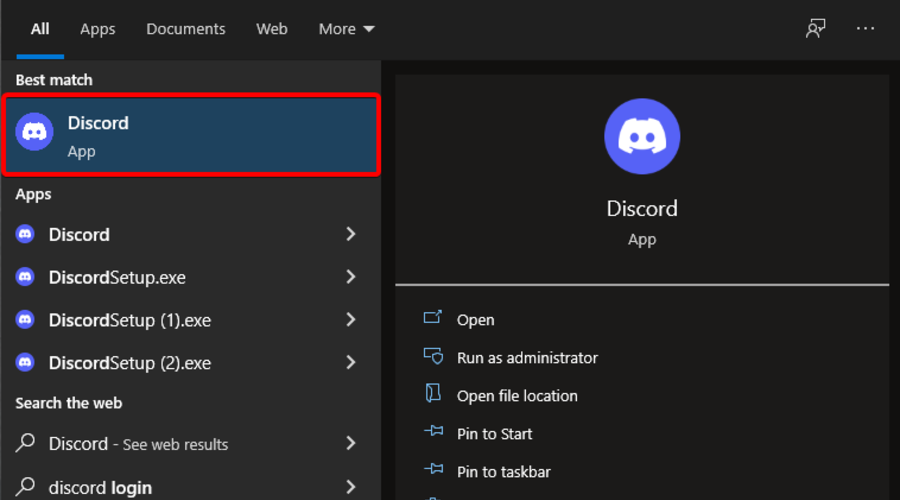
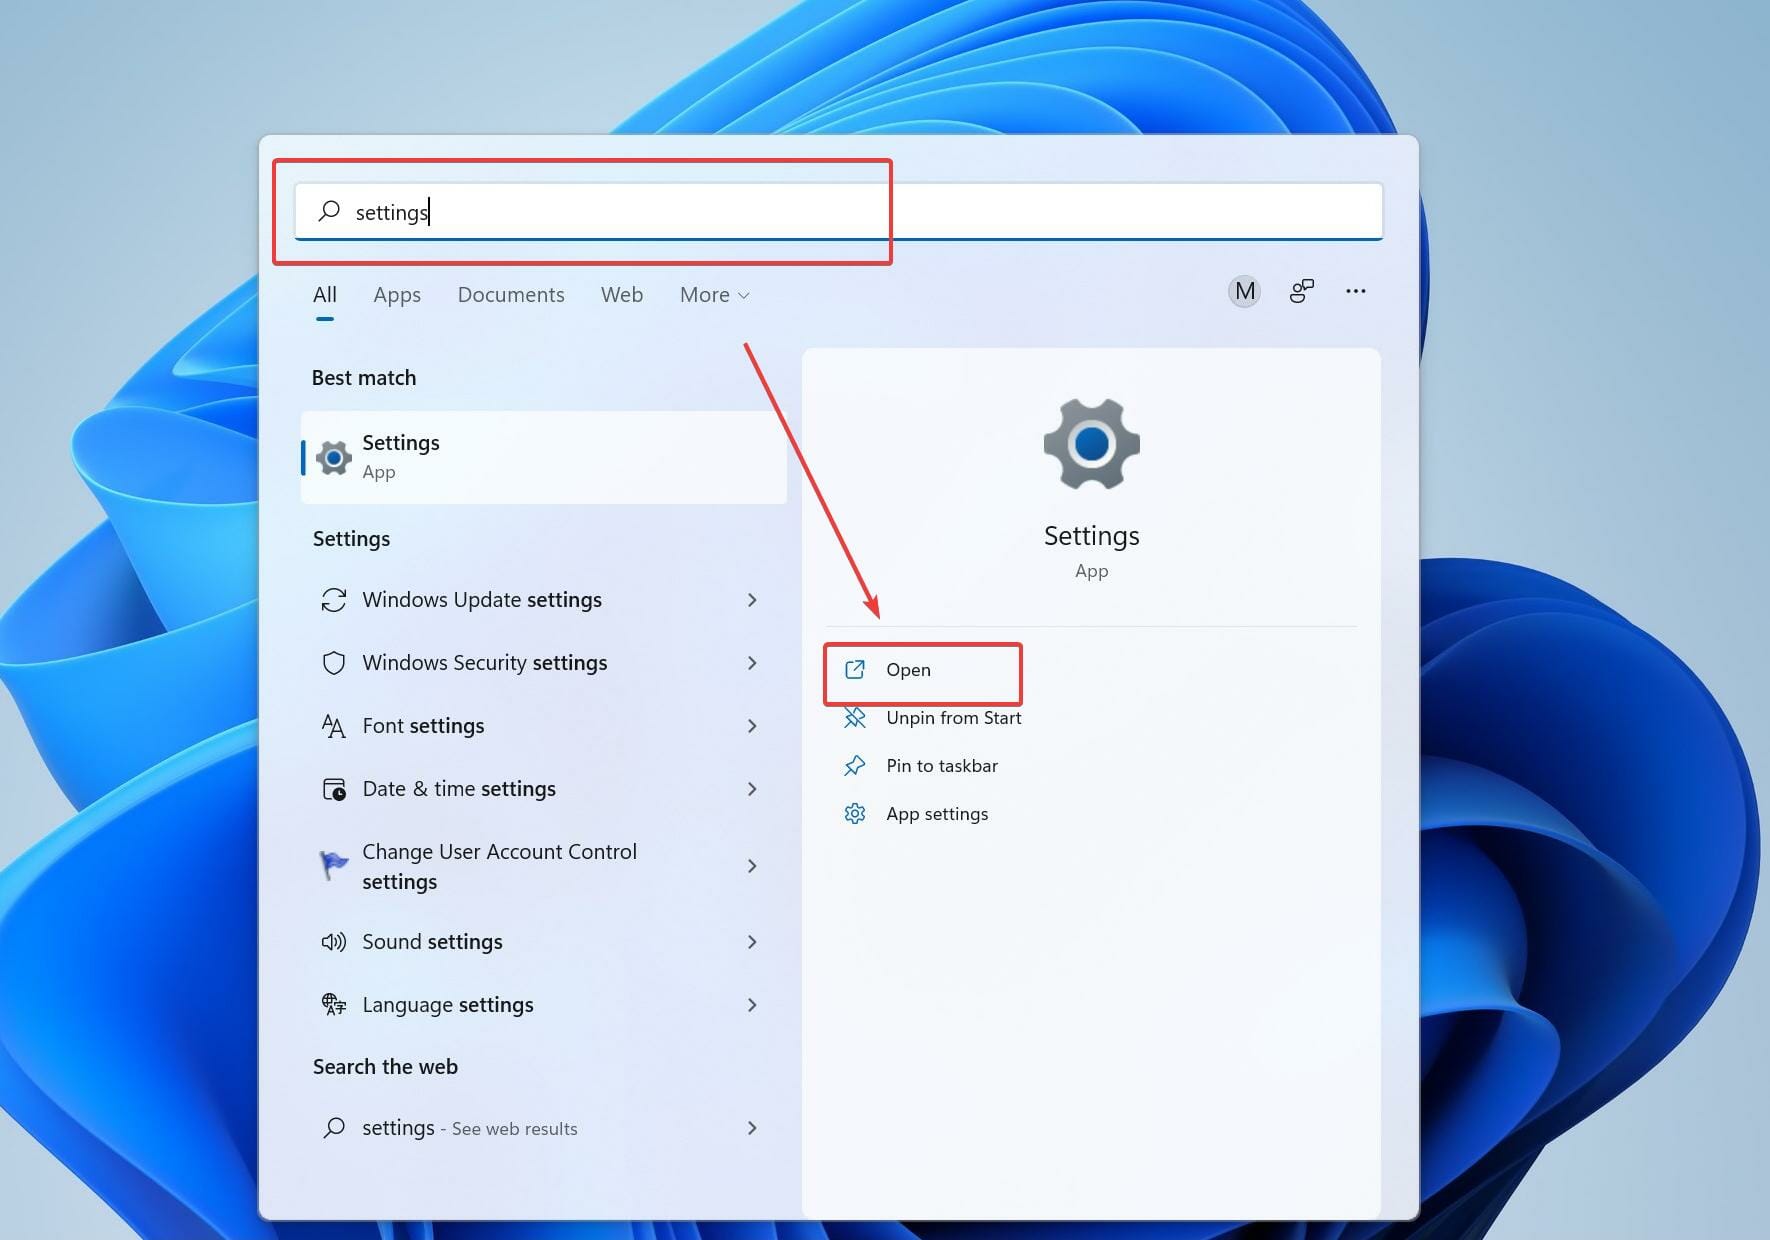
Hit the Windows key, type Discord, then open the first result.
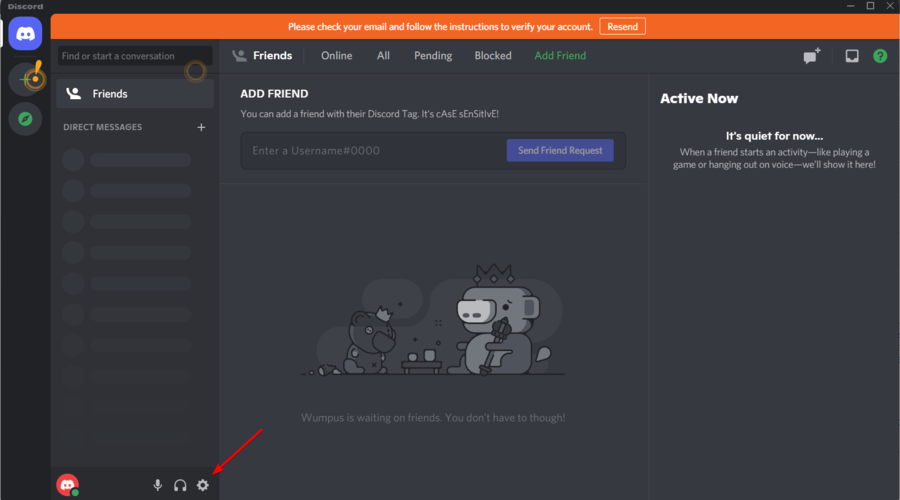
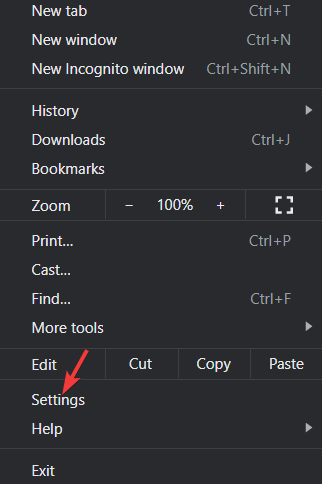
Click on the Settings (Gear icon) at the bottom of the window.
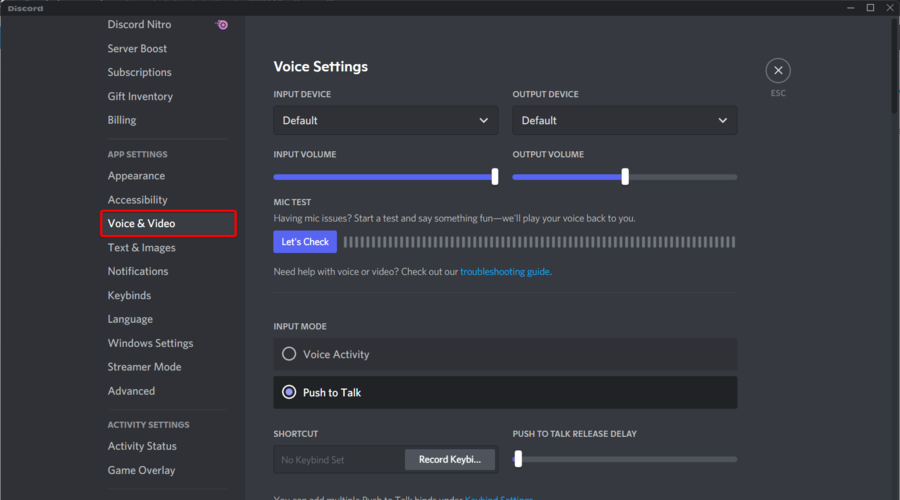
Open the Voice & Video tab under the App Settings section.
In the Input Mode, checkmark the Push to Talkoption.
You may see other related settings for Push to Talk; however, leave it as it is for now as we will cover them in the configuration section later.
Once you have enabled Push to Talk in Discord, you need to configure the properties to use it. The app allows you to set a dedicated key to activate Push to Talk and configure other aspects of it as well.
2. Disable this feature in Discord
Hit the Windows key, type Discord, then open the first result.
Click on the Settings (Gear icon) at the bottom of the window.
Navigate again to the Voice & Video tab.
Choose the Voice Activity optionto disable Push to Talk.
How can I configure Push to Talk in Discord?
Hit the Windows key, type Discord, then open the first result.
Click on the Settings (Gear icon) at the bottom of the window.
From the left pane, click on Keybinds.
Click the Add a Keybind button on top.
Click the Action drop-down menu and choose Push to Talk.
In the Keybind field, enter the letter that you want to set as the shortcut to activate Push to Talk. Discord allows you to set multiple keys for the same feature.
To enter the shortcut key, click on the Keyboard icon on the Keybind field.
Press the shortcut key that you want to assign to Push to Talk, and then click on Stop Recording.
Next, go back to the Voice & Video tab.
Here you will notice a Push to Talk Release Delay slider. Crank it up a bit to avoid interrupting yourself by mistake.
Discord uses the delay slider input to determine when to cut your voice after releasing the Push to Talk key.
You can further suppress the background noise by enabling the Noise suppression feature. Discord uses organic, locally-sourced Opus Voice codec as well as third-party codecs from Krisp.
The shortcut key listed in the Push to Talk section is the button to use for Push to Talk in Discord. You can also learn about the shortcuts by accessing the Keybind tab under Settings.
To check your newly enabled Push to Talk key bind, click the Let’s Check button. If the volume indicators show movement, it means the mic is working.
Keep in mind that if you want to use Push to Talk Discord in your browser and Chromebook, you can access the Discord web app. However, the Push to Talk feature is limited online and only works when the browser tab has focus.
The Push to Talk feature can help in many ways, especially when you don’t want to listen to all that’s happening in the background of your friend’s stream.
By enabling Push to Talk, you and your friends can listen to only what’s necessary.
In case you have additional questions, feel free to use the comment section listed below.
It is not an uncommon occurrence if you are browsing and after a few hours, you have too many browsers open that it starts becoming confusing. At this point, you are probably wondering how many internet browser sessions can you have open at one time?
Well, the internet browser is the most used tool on computers and has become an indispensable part of our lives. It’s the conduit to most of the research, work, and fun we have online.
There are, however, many browsers to choose from, and even though they have the same goal of opening the doors to the www, they achieve this in different ways.
Some hog a lot of computing memory, and others deliver the experience you want while optimizing PC memory. For instance, Microsoft Edge, Opera One, and Brave are famous for being easy on your RAM usage, while Chrome might take up more memory.
This article explores how many sessions you can run and gives you our expert tips on opening multiple browser sessions simultaneously. Note that you can correct the rare cases of your browser opening multiple tabs automatically with a few steps.
Is it possible to run more than one web browser on your computer at once?
Installing several browsers is feasible, and they will not clash with one another.
Firefox, Chrome, Internet Explorer, Microsoft Edge, and various other internet browsers may be installed and used on your PC just like any other software.
Having all of them installed on your computer could be of some benefits. For example, certain websites, particularly older ones, need Internet Explorer to function properly.
Furthermore, Google Chrome plays Flash videos without third-party plugins or software, while other web browsers will require an Adobe Flash Player installation.
You may further improve your privacy by using a different web browser for websites like Facebook or Google, which monitor browser activities. In this case, you must take care to not enable the browsers to exchange your personal information.
When using multiple browsers, cookies, bookmarks, history, and other content may be imported from one browser to another.
How many internet browser sessions can you have open at one time?
The number of simultaneous browsers that you can run will depend on The system OS, the computer’s hardware capacity, and the internet browser.
Certain operating systems will restrict the number of concurrently running tabs regardless of your web browser.
For example, Windows 10 and 11 have no restrictions on the number of tabs that may be opened. However, macOS X allows for six distinct browsers, with each window having a maximum of three tabs.
Furthermore, your computer must have sufficient capabilities to handle numerous tabs open simultaneously.
If you lack processing and memory capacity, many opened tabs will lead to more delays, crashes, and lag because each tab starts a new PC process that requires extra hardware.
Quick tip:
If you require a browser that is light on resource usage and includes user-centered features, you have the OperaOnebrowser.
Using this solution, you can not only use multiple tabs but manage everything with pinboards, chat right on the homepage, easily send or receive files, social media integration, and have access to it’s native AI.
In terms of security, you’re safe with a built-in VPN service or ad blocker tools for personal data trackers.
Opera One
Experience faster results with this browser and manage any tasks without delays or other performance issues.
Click on the Start menu and type NotePad, then click the app.
In Notepad, paste the following text after substituting the website links for the ones you actually need to open. Also, substitute the browser name for whatever browser you use. @echo off start chrome https://www.windowsreport.com start chrome https://www.facebook.com start chrome https://www.google.com
Click on File on the menu bar and select Save as.
Name the file and end the name with .bat, then click Save.
Double click on the file in the save location to open all the tabs simultaneously.
2. Open many tabs using a bookmark folder
Launch your browser, open all the websites you need, and then hit the hotkeys Crtl +Shift +D.
Name the tab in the Name field, select Bookmarks bar, then click the Save button.
You should now see the bookmark displayed on your browser’s Bookmarks bar.
Right-click on the newly created folder on your Bookmarks bar, and select the Open all option.
Google Chrome offers a bookmarks bar. Here, you can store and visit your most loved and used websites with a click. While we have used Chrome in this example, other browsers have this feature, and the process will be very similar.
On the top right corner of the browser, click the extension’s icon, paste the links of the websites to be opened, check the Preserve input box and click the Open URLs button.
Using the Open Multiple URLs extension works on the Chrome browser, but there are others for different browsers that will open many internet browser sessions at one time. For instance, there is Multi URL Opener for Firefox and Bulk URL Opener extension for Opera.
How many tabs can be opened in a browser?
This depends on the individual browser. Here is what you can expect for different browsers:
Microsoft Edge – You have no known tab limits. Microsoft’s support suggests not having more than 50 open tabs to avoid stressing your system and generating any undesired behavior.
Chrome – The number of tabs you may open at once in Google Chrome is unrestricted. However, it would be best to consider how much your internet and computer can take before they slow down and become inefficient.
Firefox – Firefox uses less than 20MB of RAM, reducing the likelihood of system crashes and strange behavior. However, in Firefox, you don’t have a documented restriction on simultaneous open sessions.
Safari – Apple formerly set a limit of 30 open tabs but removed the limits with iOS 10 in 2016, allowing for an unlimited number of tabs.
Internet Explorer – Its 10th edition featured a maximum of 10 concurrent open tabs. In IE11, users may open up to 100 tabs/window. IE11 allocates RAM to every tab automatically while halting idle tabs.
Now you have a better idea regarding how many internet browser sessions you can open at one time. It is good practice always to open just what you need to get by, but if, for some reason, you do not want to close tabs, always be careful so that you do not overclock your browser.
The Push to Talk feature in Discord helps avoid keeping your microphone on all the time and prevents background noises from leaking.
Even if this is a great tool, several users have reported the Discord Push to Talk not working in a game problem. In this guide, we have listed a few troubleshooting methods. So, if Discord Push to Talk is not working, quickly scroll through all the presented steps to resolve the issue.
Why can’t I Push to Talk while in game on Discord?
If you’re not sure why Discord Push to Talk is not working on your PC, we suggest verifying the following reasons that we’ve compiled for you:
Audio driver problems – When the Discord Push to Talk is not working in the game, it might occur due to corrupted audio drivers on your computer.
Wrong Discord Voice & Video settings – The error might also come up because of inconsistent in-app settings, so checking the Voice and Video settings is recommended.
Incorrect keybind settings – If you use PTT, you’re probably already aware of key binds and how they work. However, you might get into trouble if you don’t configure them properly.
Apps are blocking the feature – Another reason could be external factors like your PC settings or third-party applications like your antivirus that could interfere with the proper functioning of the Push to Talk feature.
Wrong user privileges – If your game runs in administrator mode, it may need to be specially set to recognize the Push to Talk keys.
What can I do if Discord Push to Talk is not working in game?
1. Update the audio driver
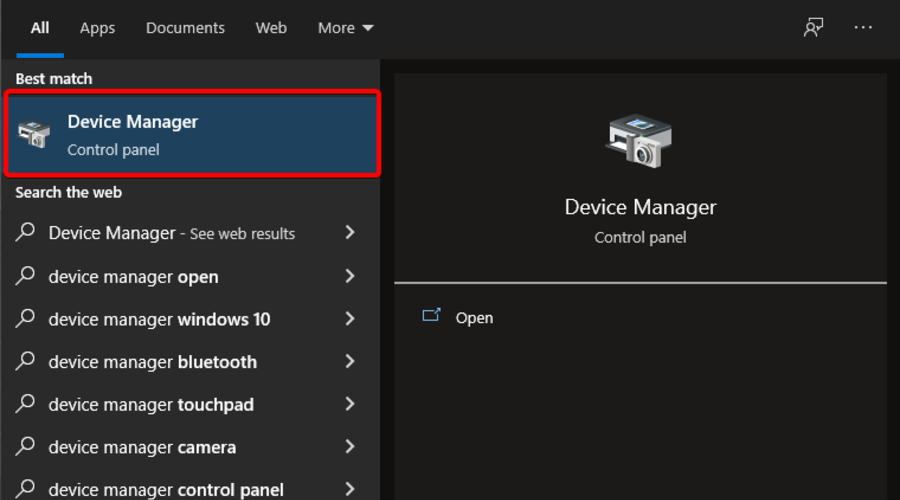
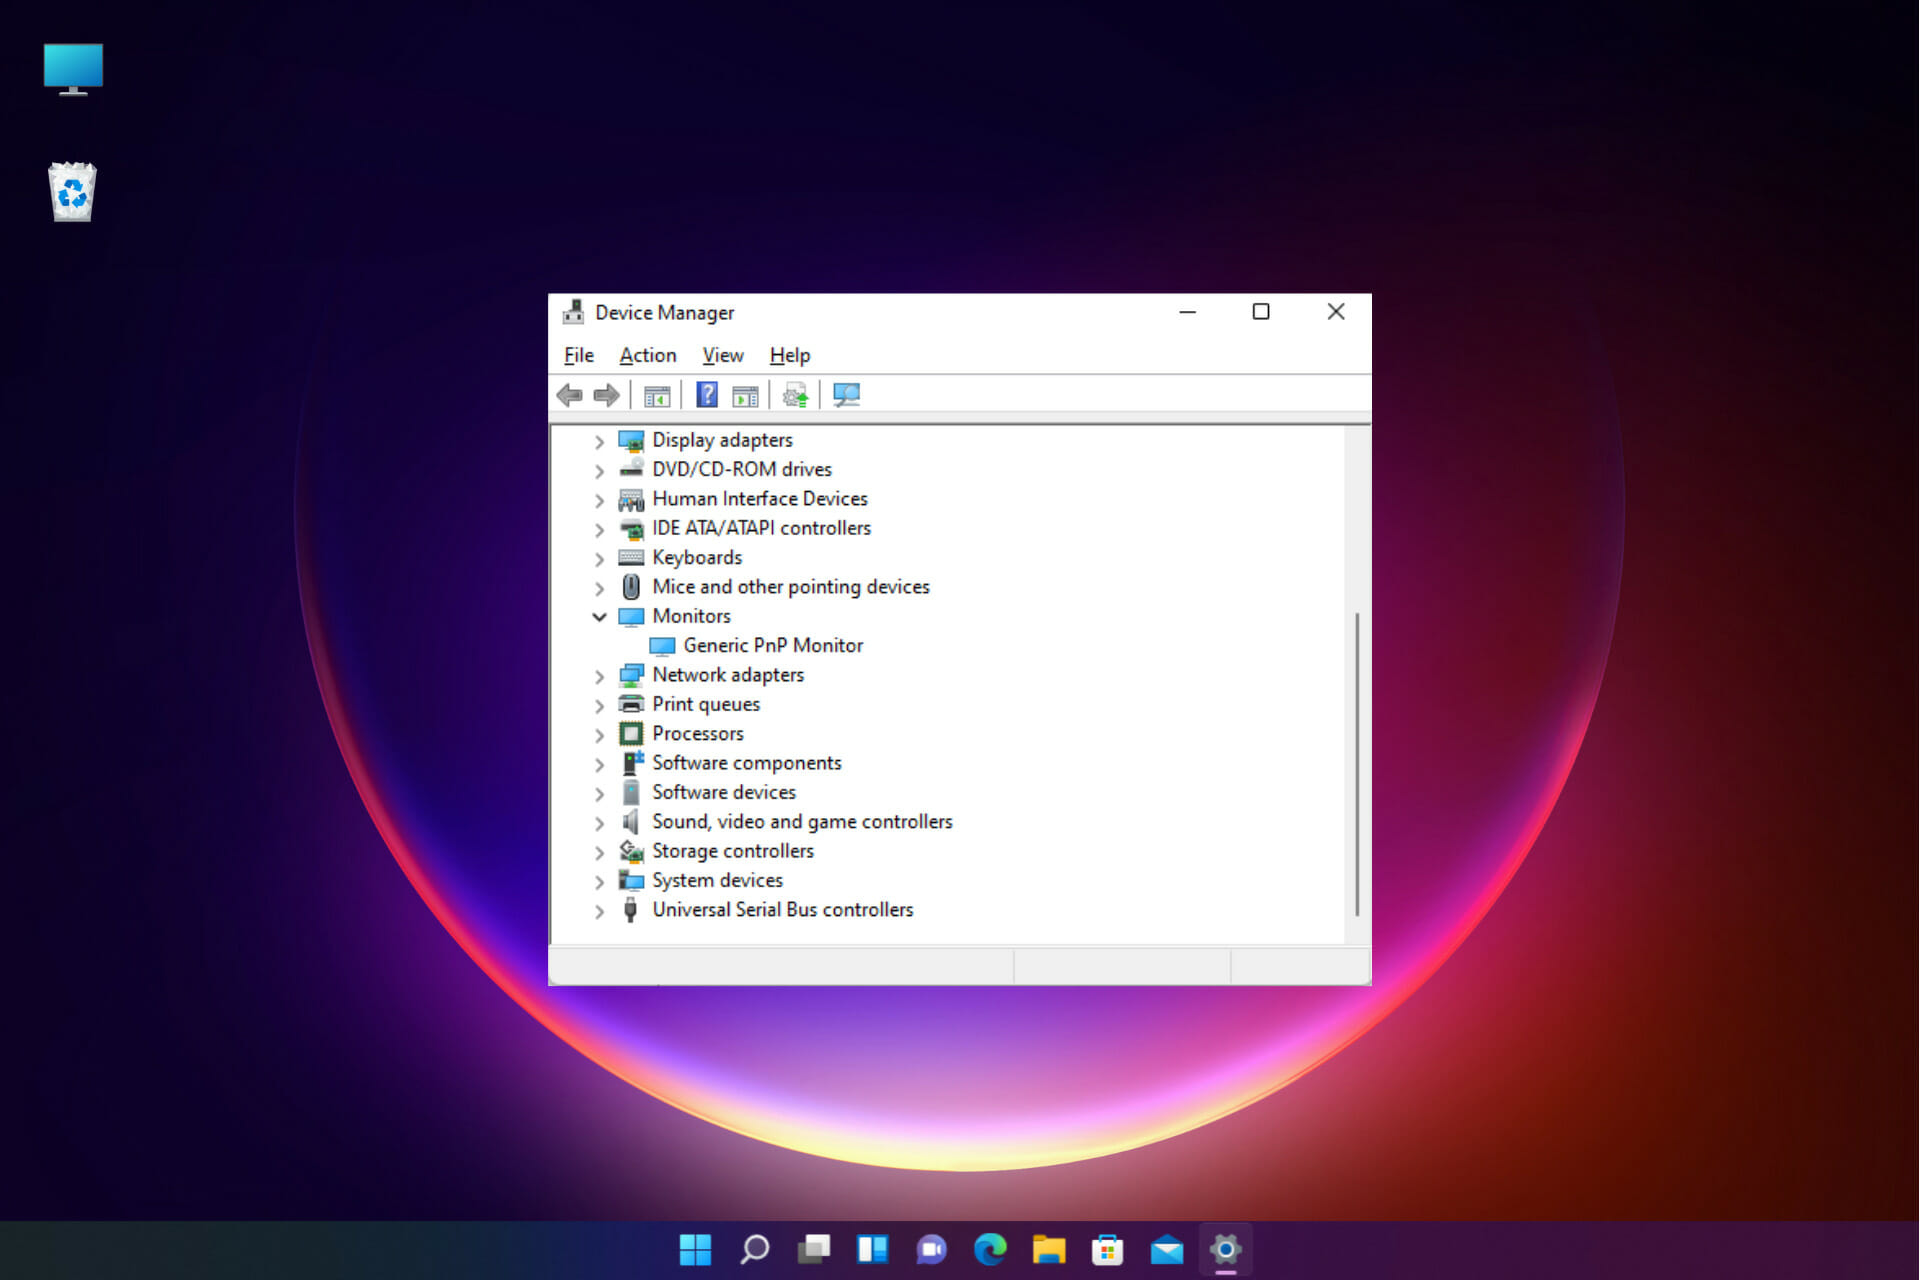
Hit the Windows key, type Device Manager, then open it.
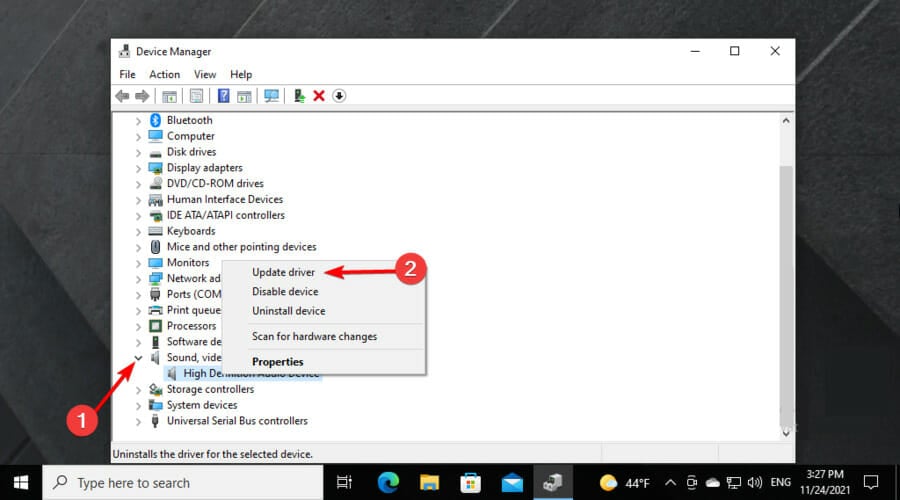
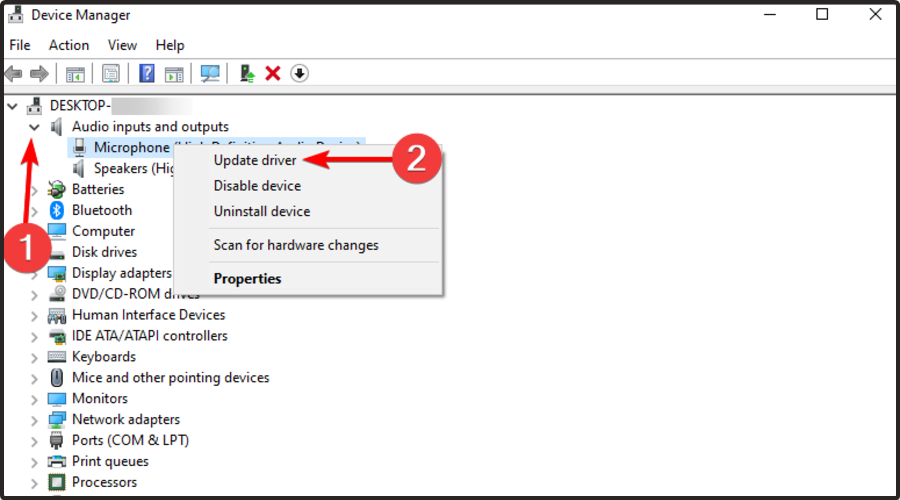
Expand the Sound, video, and game controllers section, right-click on your audio driver, and choose to Update driver.
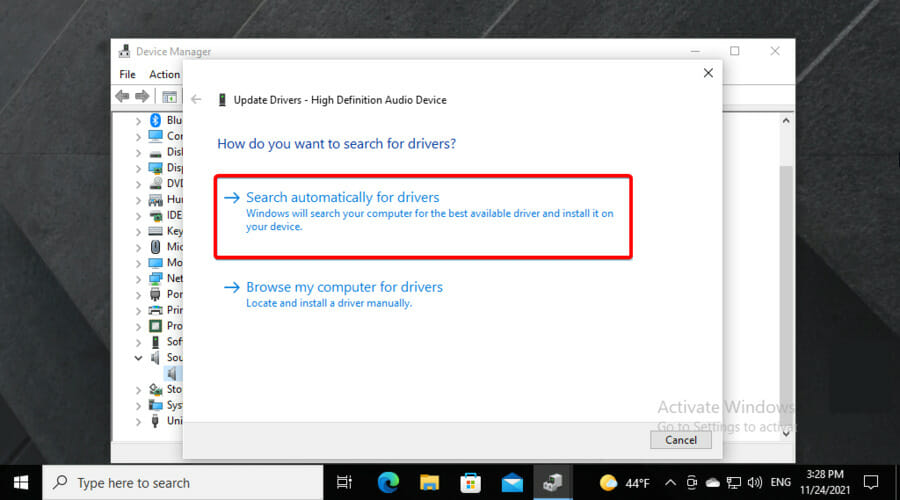
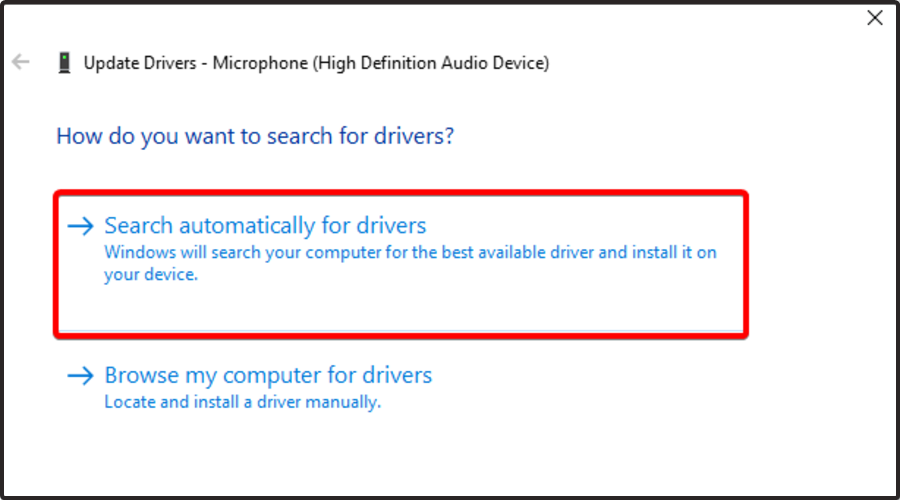
Select Search automatically for drivers.
If any available drivers need to be updated, you’ll be notified.
If you require a more effective and time-saving solution to update any of your drivers, there is a dedicated tool for this task.
This practical driver software will scan your PC for outdated or broken driver files and resolve them quickly.
You can select the audio driver or any others and update them in one go or individually. Plus, you can perform it securely without getting the wrong driver version.
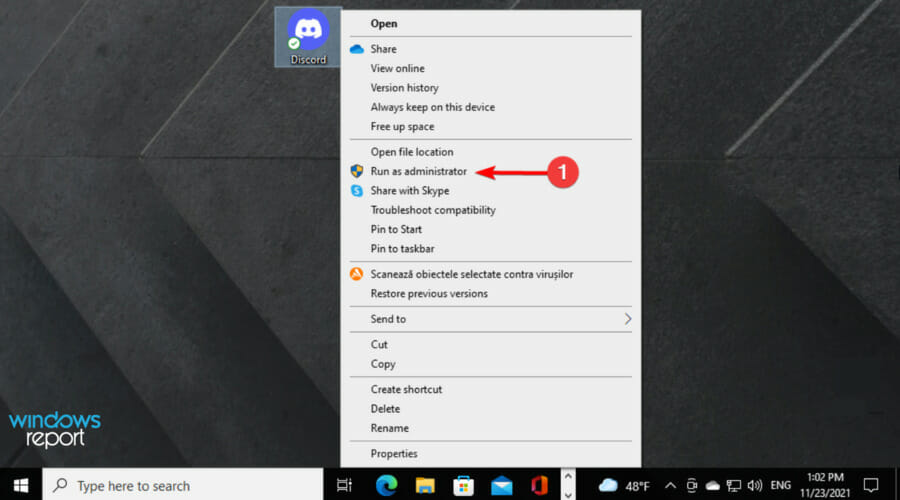
Right-click the Discord shortcut from the desktop, then choose Run as Administrator.
UAC may prompt you to confirm the action; click on Yes.
Once the app is running, try using the Push to Talk feature in Discord to see if the Push to Talk not working in game problem is resolved.
Running Discord in administrator mode may be necessary if your game also uses the admin mode. Operating the VoIP app with administrative privileges has fixed many user issues.
However, if the problem persists after opening Discord with administrator privileges, try restarting your PC. After the restart, run the app with administrator access and check for improvements.
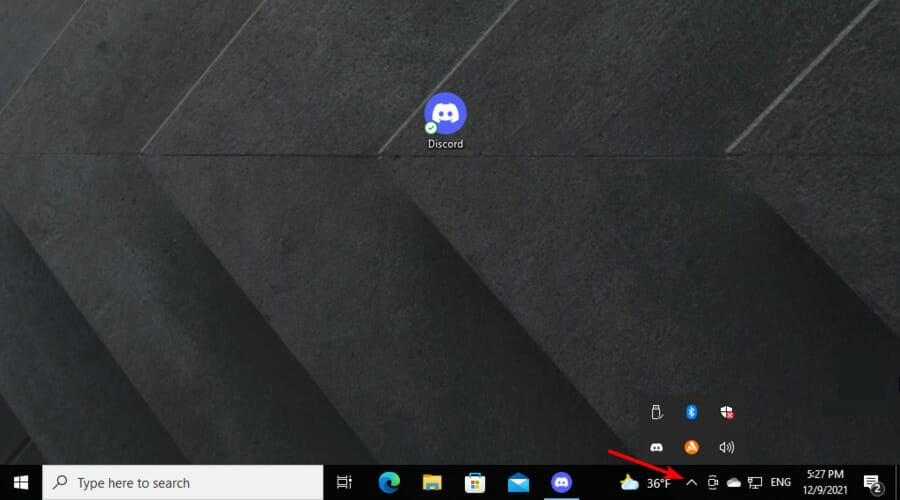
If you’re unsure how to check your System Tray, you should click on the arrow from the bottom right of the Taskbar.
If the Discord Push to Talk feature is still not working in-game, make sure you keep on reading.
3. Check keybinding and reset Discord settings
Use the following keyboard shortcut: Windows + S.
Type Discord, then open the first result.
Navigate to the User Settings on the bottom (marked as a gear).
Open the Keybinds tab from the left pane.
Scroll through the Keybind and make sure you are not using the same key for Push to Talk and Push to Mute.
Next, open the Voice & Video tab from the left pane.
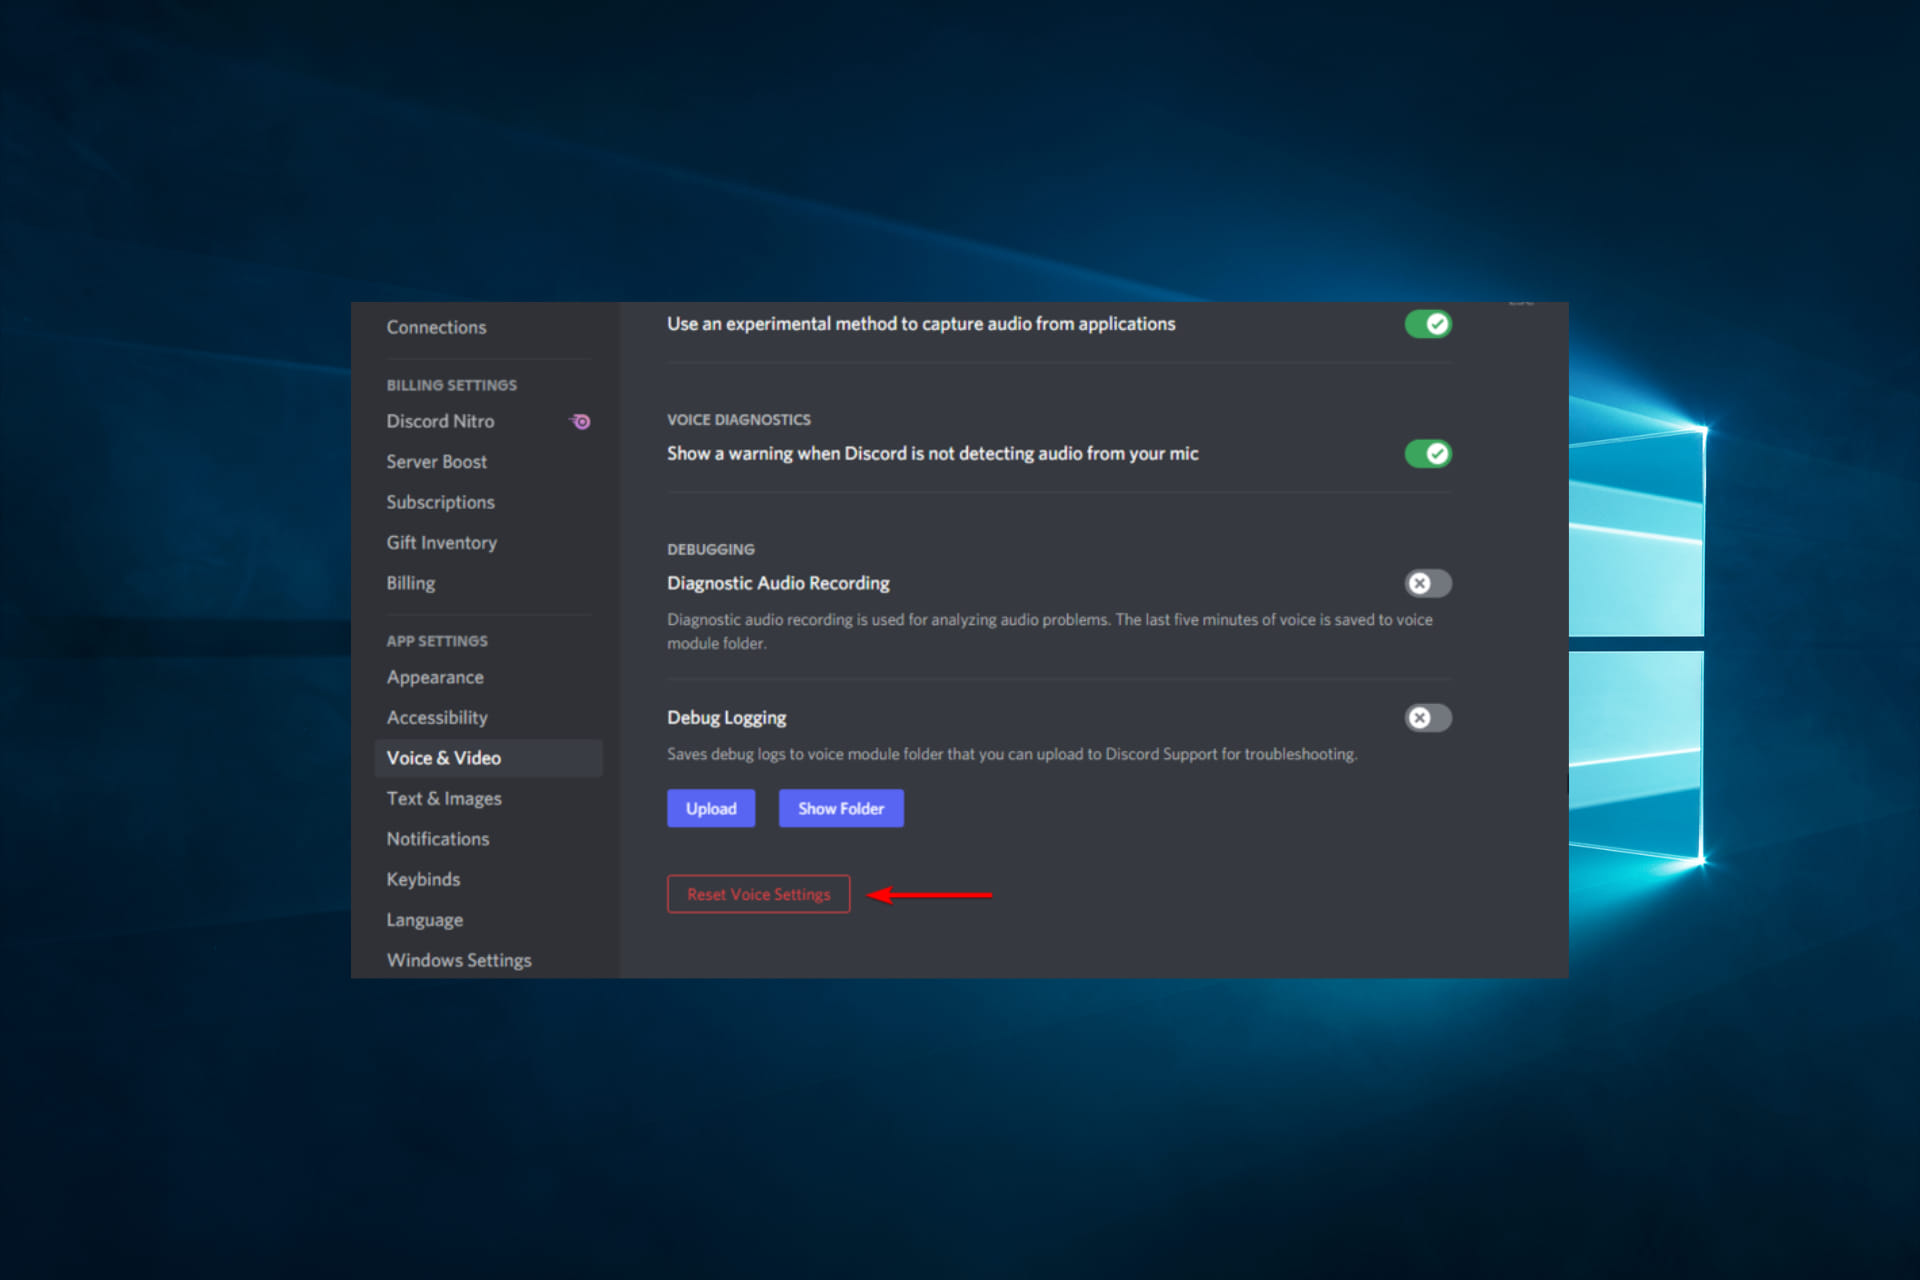
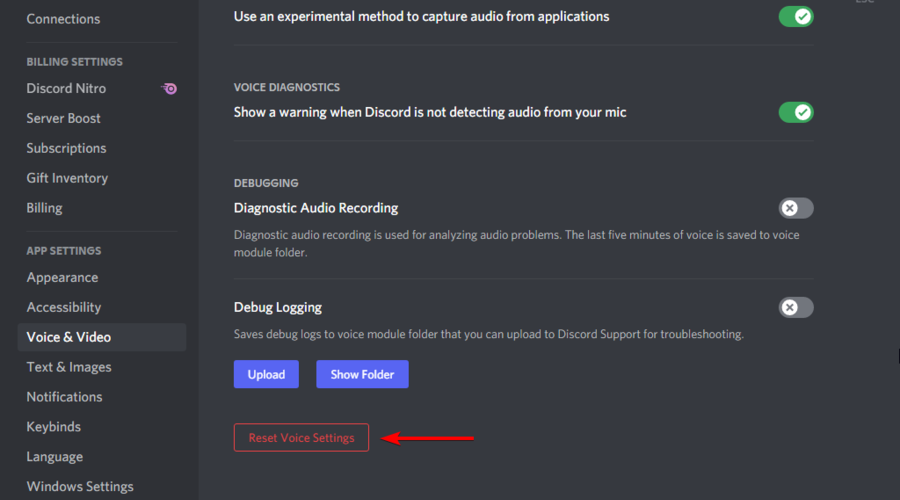
Scroll down to the bottom of the page and click on the Reset Voice Settings button.
Click OK to confirm the action when prompted by Discord.
Resetting the Discord voice and video configuration will restore the default settings. After resetting the Voice Settings, create a new Keybind for Push to Talk. Use the newly created Push to Talk key if it is working.
4. Boot in Safe Mode
Use the following keyboard shortcut: Windows + R.
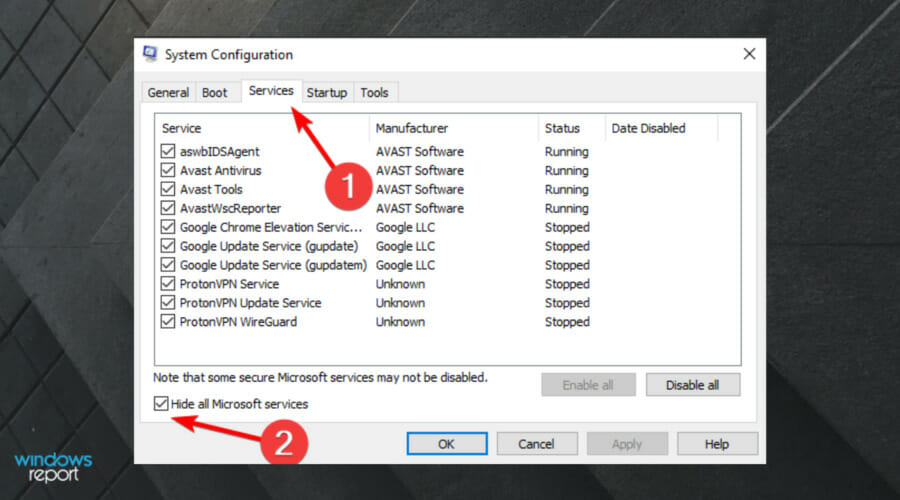
Type msconfig and click OK to open System Configuration.
Open the Services tab and check the Hide All Microsoft Services box. It is important to check the box to avoid accidentally disabling essential Microsoft services.
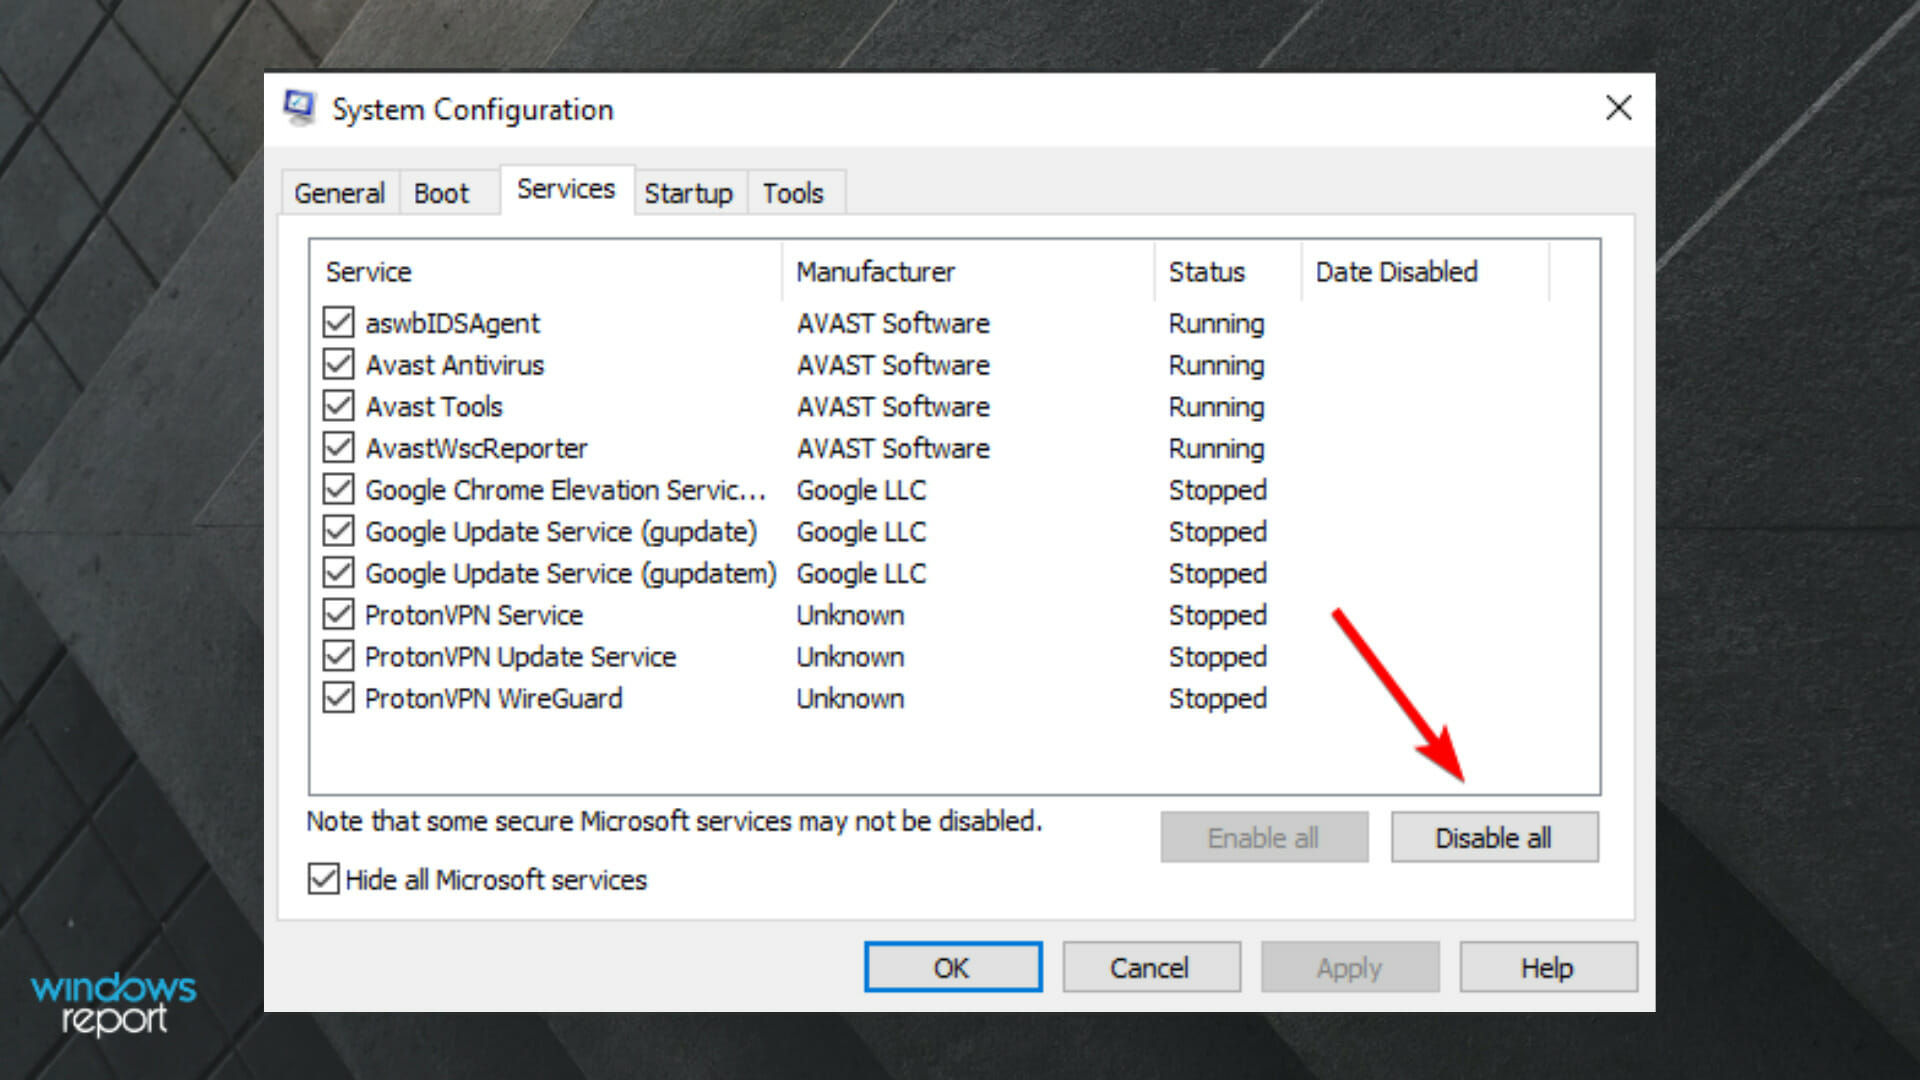
Once done, click the Disable All button.
Open the Startup tab and click on the Open Task Manager.
In Task Manager, disable all the Startup enabled apps.
Go back to the System Configuration window and click Apply and OK.
Click Restart Now and wait for the PC to start in Safe Boot mode.
In Safe Boot mode, Windows loads with minimal drivers and programs. You can use this to diagnose the problem and check if it is triggered due to a third-party app.
In Safe Boot mode, launch Discord and check if the Push to Talk feature works in the game. If it works, find and uninstall the third-party app that may create conflict.
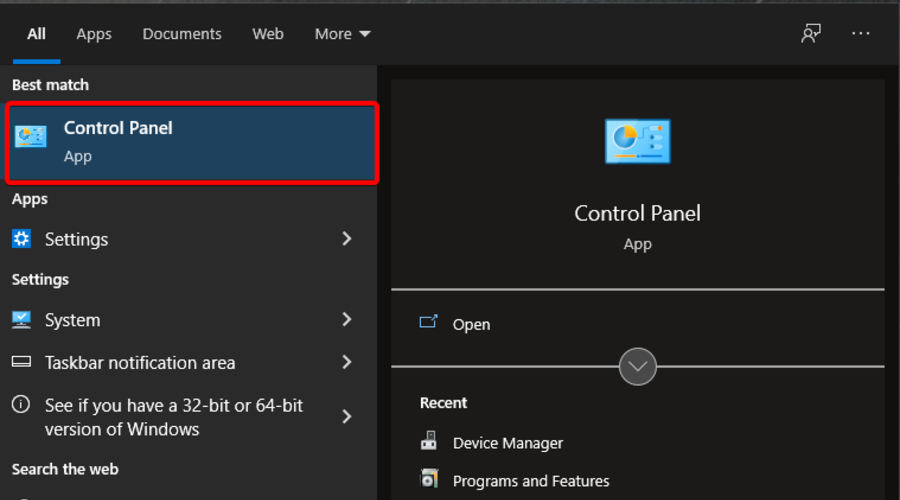
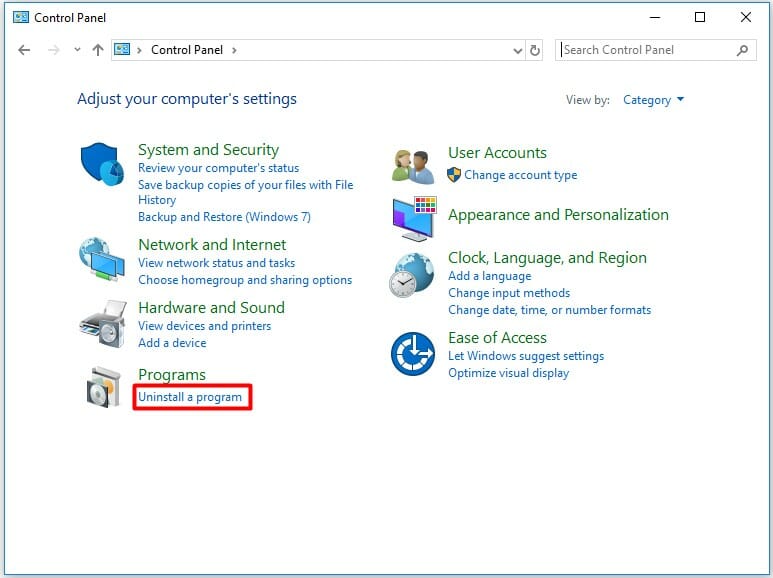
Hit the Windows key, typeControl Panel, then open it.
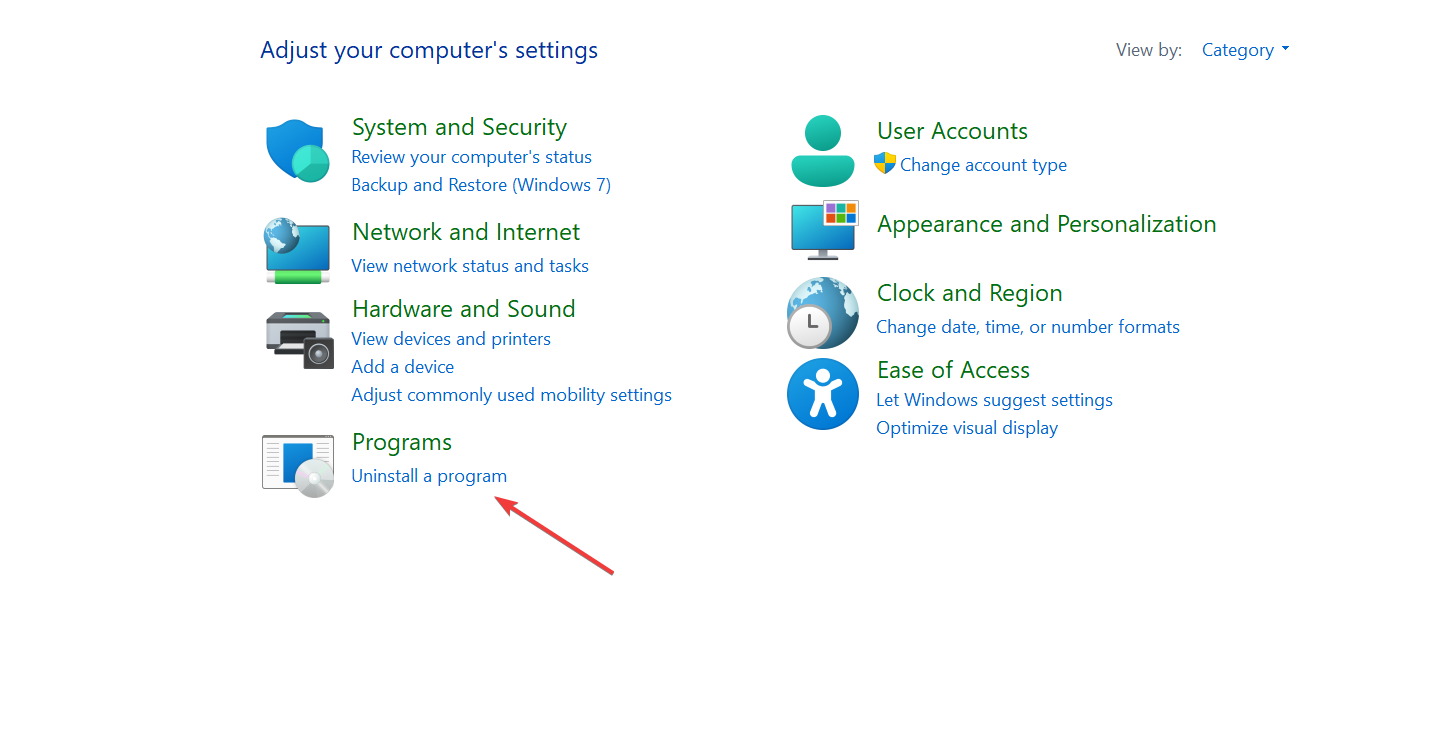
Go to Programs.
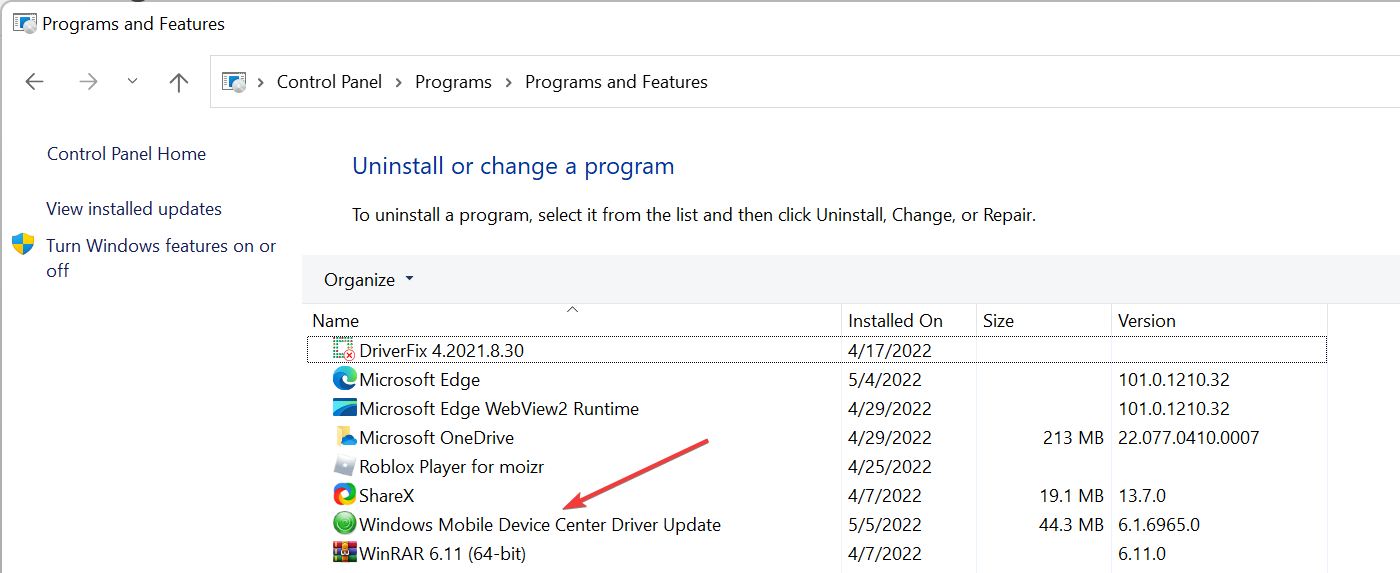
Navigate to Programs and features.
Scroll through the apps and select the most recently installed app. If you have installed third-party audio or VoIP software, choose that instead.
Right-click on it, then select Uninstall.
Confirm the action by clicking on Yes.
Wait for the app to uninstall, and then restart the computer.
After the restart, relaunch the app, and check if Push to Talk is enabled. Once done, connect to a game and check if Push to Talk is working again.
In this article, we have listed a few easy fixes. Work your way down the list till you find the one that works. You can also check the official Discord support page to discover more about the feature.
Because your opinion is important to us, do not hesitate to share it by leaving a comment in the section below. So, if our steps worked for you, please notify us.
The Discord live view screen sharing feature is undoubtedly one of its standout features. It enables users to share what’s on their PCs’ displays.
However, some users have said in forum posts that the software only displays a black screen when they try to screen share their browsers.
Why can’t I use Discord live viewing in the browser?
Discord’s black screen streaming can arise because of an app permissions conflict. In addition, live viewing in Discord often doesn’t work for browser users who have hardware acceleration enabled.
Keep in mind that you might not be able to see live streams on Discord because of trying to share software in full-screen mode.
Now, let’s see what you can do to easily solve this annoying issue.
Quick Tip:
If Discord live viewing is still not working in your main browser, we have another solution. Thus, you might find Discord’s screen sharing works fine with a different browser.
Consider switching to the Opera browser for Discord screen-sharing purposes. Opera is one of the most innovative web browsers that incorporates a wide range of unique features.
The Opera GX version is an especially good Discord browser that’s optimized for games.
Opera GX
The integration and full support for Discord will make your gaming sessions more enjoyable and fun.
What can I do if Discord live viewing isn’t working in the browser?
1. Run Discord and your browser as an administrator
1.1 Discord
Right-click on the Discord desktop icon and choose to Run as administrator.
1.2 Browser
Right-click on your browser’s shortcut. and choose Run as administrator.
Make sure you’re running both Discord and the browser with admin rights. Then, the software will start with elevated admin rights.
2. Make sure your browser isn’t in full-screen
Almost all browsers have full-screen browsing modes that fill the entire display with URL bars and the taskbar removed.
However, Discord’s screen share feature doesn’t support full-screen sharing. So, don’t try to screen share your browser with its full-screen mode enabled.
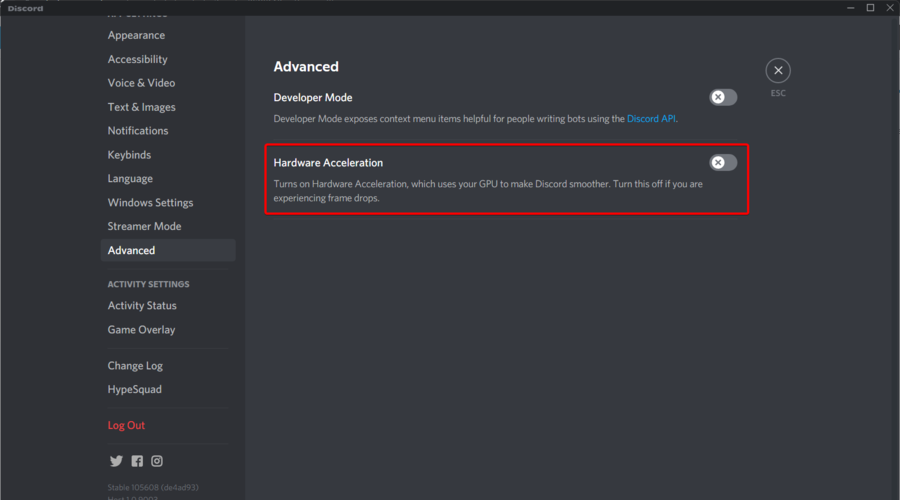
3. Turn off hardware acceleration in Discord and browser
3.1 Discord
Hit the Windows key, type Discord, then open the first result.
Click on the Discord’s Settings button in the left bottom corner of the window.
Then click Appearance on the left of Discord to open the tab shown directly below.
Turn the Hardware Acceleration option off.
Click the Okay button to confirm.
3.2 Google Chrome
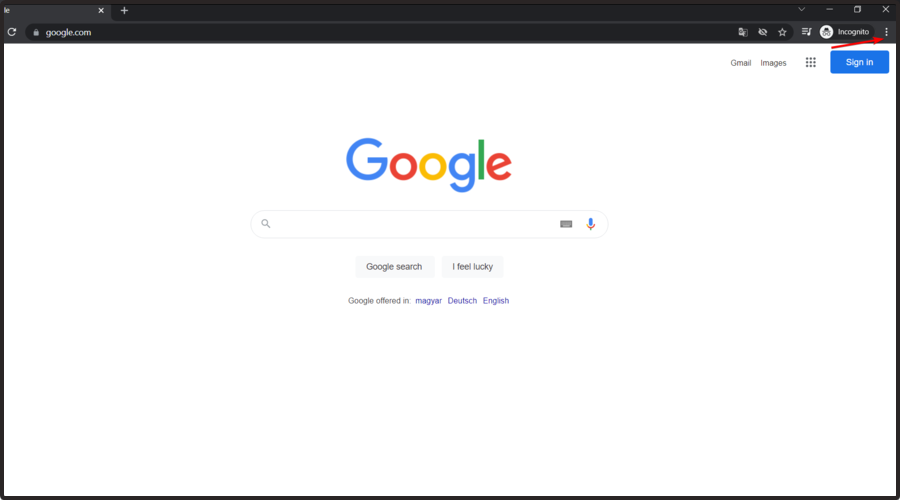
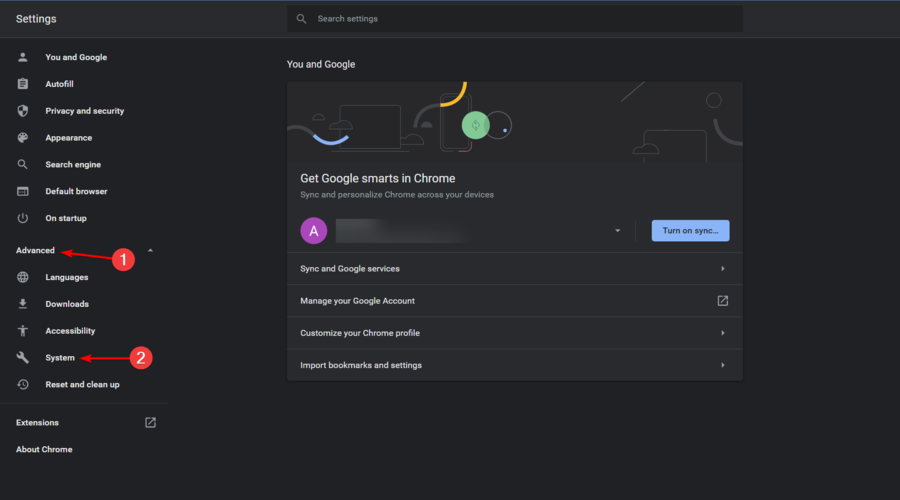
Click on the Customize and control Google Chrome menu button (marked as three vertical dots).
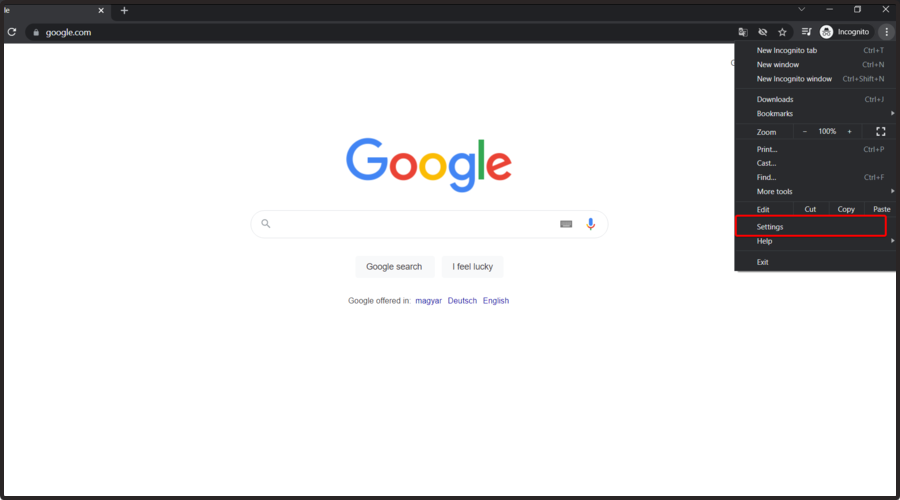
Select Settings to open that tab.
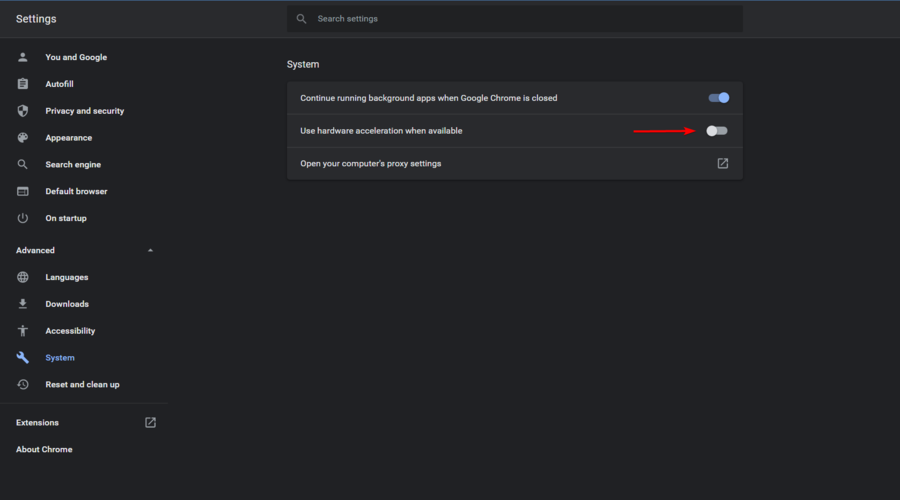
Expand the Advanced section, then click on System.
Toggle the Use hardware acceleration option off if it’s enabled.
3.3 Microsoft Edge
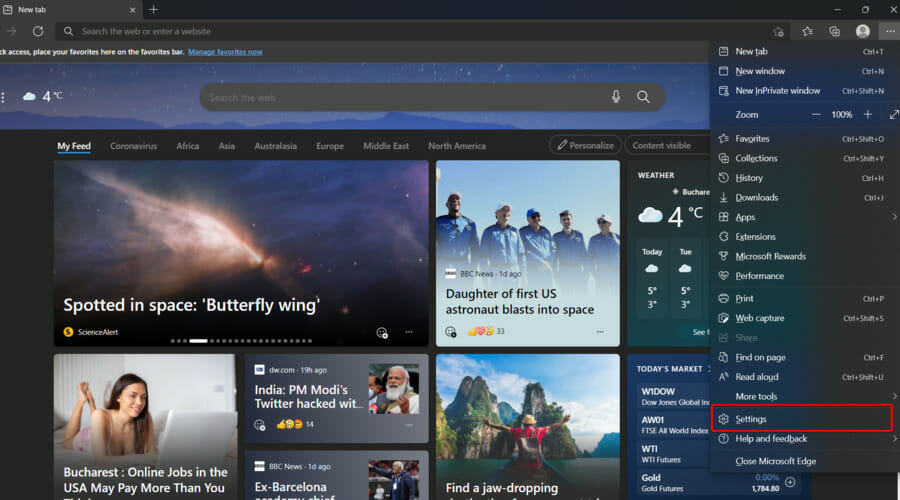
Open Microsoft Edge, by double-clicking on its desktop icon, then use the following keyboard shortcut: Alt + F.
Click on Settings.
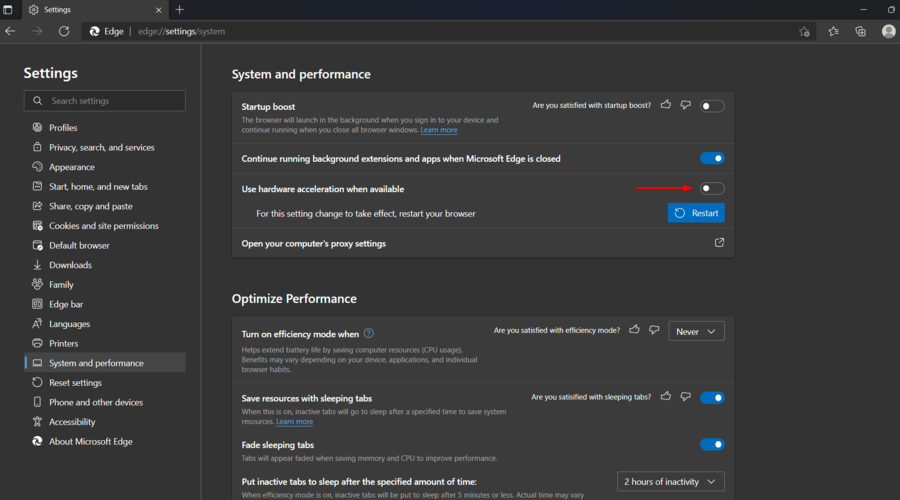
From the left window pane, chooseSystem and performanceto open the options in the snapshot directly below.
Click on the Use hardware acceleration when available toggle button to turn it off.
Now, restart your browser.
3.4 Mozilla Firefox
Open your browser, then click on the three horizontal lines.
Click on Settings.
Stay on the General tab, then scroll down until you see the Performance section in the right window pane.
There, uncheck the Use recommended performance settings, then uncheck theUse hardware acceleration when available option.
Restart your browser.
4. Disable Discord’s Use our latest technology option
First, hit the Windows key, type Discord, then open the first result.
Click on Settings at the bottom of Discord’s left sidebar.
Select the Voice& Video tab.
Then scroll down and toggle the Use our latest technology to capture your screen setting Off.
5. Close superfluous background software
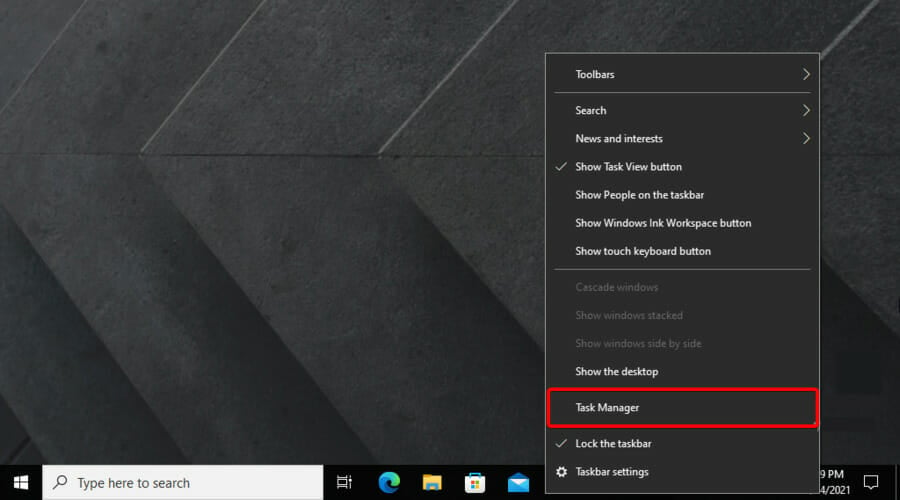
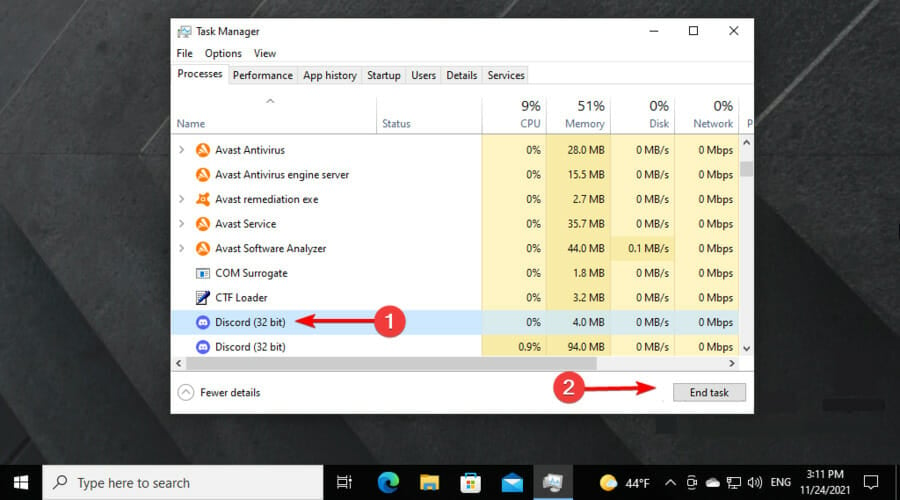
To ensure background programs aren’t conflicting with Discord, right-click your taskbar and select Task Manager.
First, select all software listed under Apps, then click on the End task button.
Then have a look for background programs listed under background processes. Right-click third-party background programs there and select End task.
You can also check for background programs on your system tray. Right-click system tray icons and click their Exit options to close programs.
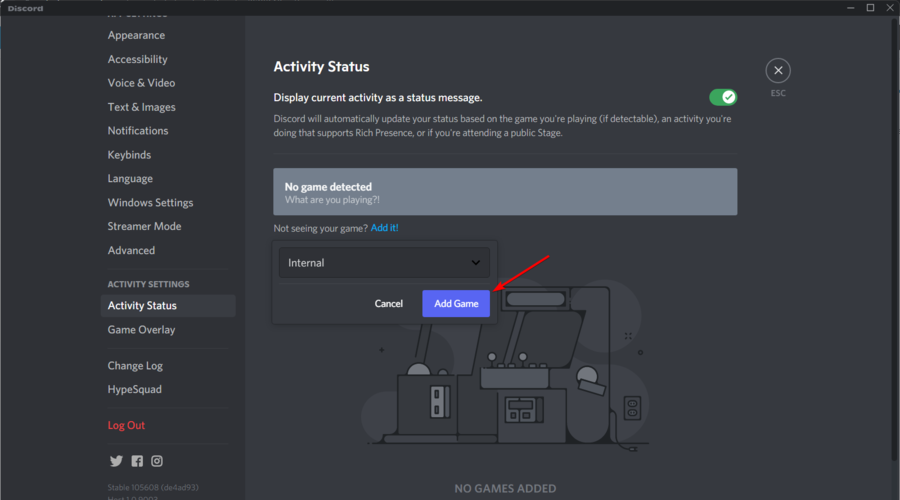
6. Add your browser as a game to share movie streaming services
To screen share movie streaming services, such as Netflix, in browsers, log-in to a streaming service within your browser.
Navigate to Discord Settings.
Go to the Activity Status section.
Click onAdd it.
Select the browser you’ve opened the movie streaming service in on the drop-down menu.
Click on the Add Game option.
This resolution is specifically for users who need to fix Discord’s live view screen sharing for online video streaming services in browsers.
7. Update Discord
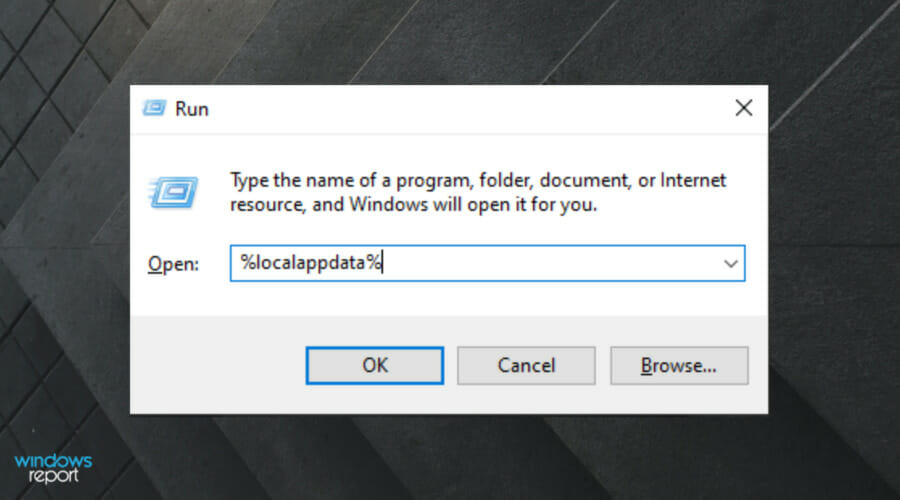
Launch the Run dialog box by pressing the Windows + R keyboard keys at the same time.
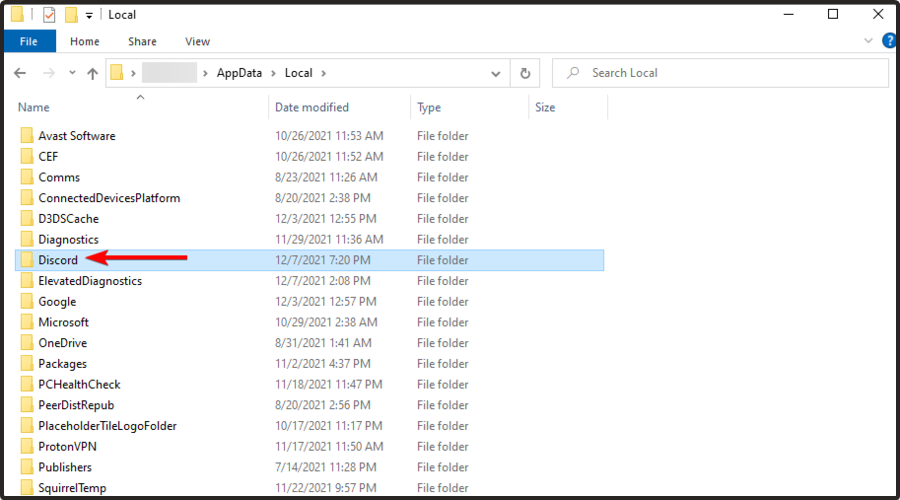
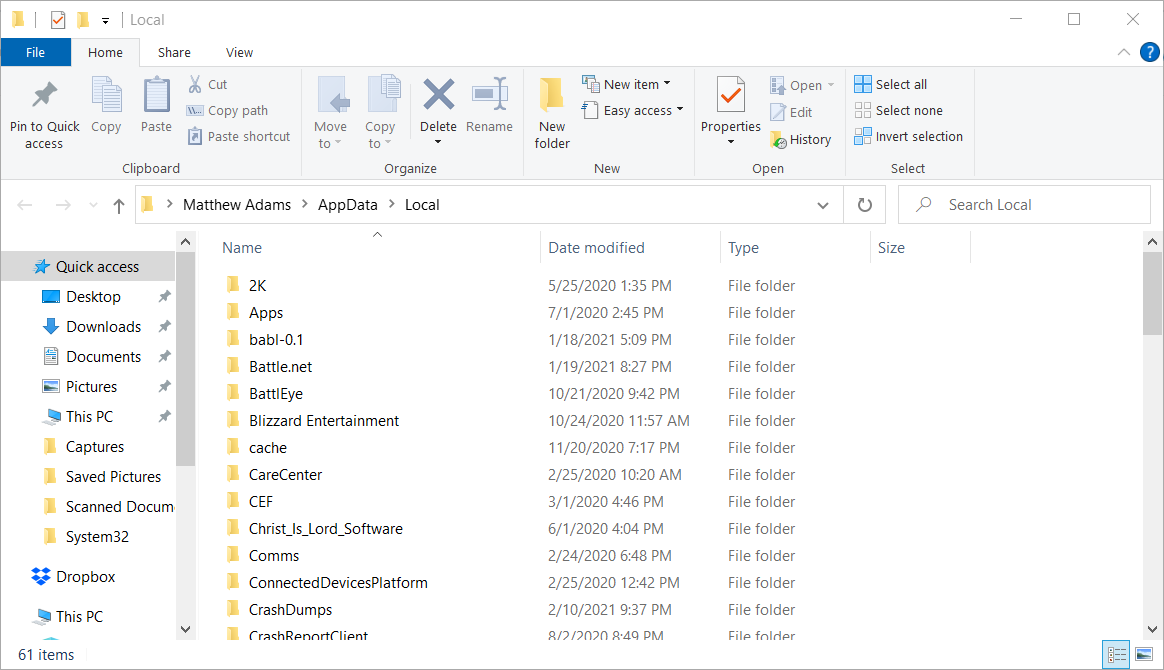
Enter this path command in Run’s text box, then click on the OK button to open your Local folder: %localappdata%
Click the Discord folder to open it.
Then click Update.exe to update Discord.
You can also update Discord by reinstalling that software with its latest version. If Discord won’t update on your Windows 10 PC, make sure you take a look at some useful solutions.
Reinstalling Discord will also ensure the software is correctly installed. So, try that as a last resort if other resolutions don’t work.
What other Discord in-browser problems should I be aware of?
Like any other browser app, Discord can cause many other related issues that you should keep in mind. We’ve compiled a list of the most common ones, so we suggest checking them carefully:
Discord is not playing any sounds in your browser – This can be extremely frustrating, especially if it occurs in the middle of your favorite game. Fortunately, if you ever encounter this problem, you can easily solve it by using our dedicated solutions.
Browser goes online, but not on Steam or Discord – As many users have reported, not all browsers will offer the same experience with using these services. If it’s happening to you, feel free to check some easy fixes.
Discord can’t unmute browser – It seems like you might notice that all of a sudden you cannot continue to communicate with your friends. To discover how to unmute the browser with Discord, verify our guide.
Those are some of the resolutions that can resolve browser Discord live viewing not working so you can screen share your web browser.
If you still need further resolutions, however, open Discord’s Submit a request page to send a support ticket.
The Opera Browser assistant offers features such as instant access to frequently visited sites, quicker search and navigation tools.
If you saw this process in Task Manager and thought about disabling it, read this before you do. It might have perks you’ll enjoy.
What is Opera browser assistant?
The Opera browser Assistant is an official program from Opera. It is downloads automatically with the Opera browser and runs in the background to improve your experience with the app.
It poses no danger to your PC – it’s not a virus.
How does it work?
The Opera browser assistant helps to improve the efficiency of the browser.
According to the official website, it sometimes displays notifications to inform you of some Opera browser features you might be missing while also checking if you have any missed notifications.
It is important to note that the Task Scheduler on your PC has a task dedicated to the program. This task, named Opera scheduled assistant 1584408358, is there specifically to ensure the program stays up-to-date.
Furthermore, to improve your experience with the browser, the program collects data such as feature usage statistics. It should be noted that no personal information is collected or sent.
Is Opera browser assistant necessary?
Opera browser assistant is a good-to-have feature. As mentioned earlier, it is all about improving your experience with your browser.
Also, since it is not dangerous and does not collect your personal information, you have nothing to lose having it on your PC. However, it is not the most important feature.
How do I download the Program?
You can’t download this software as a standalone program, since there’s no Opera browser assistant installer. It is automatically installed with the browser when you download it.
How do I disable the Opera browser assistant?
Disable Opera browser assistant in Windows 11
1. Disable from Startup
Press the Windows key and type Task Manager. Click the Task Manager app.
Select the Startup tab from the options at the top of the window.
Locate Opera Browser Assistant and right-click on it.
Click the Disable option.
This solution helps you stop the Opera browser assistant from running on startup. However, this does not mean it will not be present on your PC. It will still be there but with reduced resource usage, especially when you start your PC.
2. Remove or rename the program
Press the Windowskey and type Task Manager.
Select the Task Manager app from the options displayed.
Click the Startup tab at the top.
Right-click on Opera Browser Assistant and select the Disable option.
Right-click on the Opera Browser Assistant.
Select Open the file location.
Locate the file named browser_assistant and rename or remove it as you deem it fit.
If you can’t rename or remove the program, restart your PC in Safe mode and repeat the steps. In this mode, you should be able to make the required changes.
Disable Opera browser assistant in Windows 10
1. Disable from Startup
Press the Windowskey + X and select the Task Manager option.
Choose the Startup option from the Menu tab at the top.
Locate Opera Browser Assistant and right-click on it.
Click the Disable option and close the window.
Like Windows 11, this fix does not allow Opera browser assistant to autostart, thereby reducing its resource usage. But it will still be on your PC and only work when needed.
2. Remove or rename the program
Press the Windowskey + X and choose Task Manager.
Select Startup from the menu tab at the top.
Locate the Opera Browser Assistant and right-click on it.
Choose the Disable option.
Select Processes from the menu tab.
Right-click on the Opera Browser Assistant.
Select Open the file location.
Select the browser_assistant and right-click on it.
Choose the Rename option to rename it or Delete to remove it.
These steps only remove the software in the folder you selected. To remove everything that has to do with it, choose all the files in the location and delete them.
Note that removing these files does not affect the performance of the Opera browser in any way.
Press the Windowskey and type msconfig in the search box.
Select the msconfig option. This will open the System Configuration window.
Click the General tab from the top menu.
Check the radio button for Selective startup.
Now, select Startup from the top menu tab.
Find Opera Browser Assistant and uncheck it.
Click the Apply button followed by OK.
Finally, click the Restart button when prompted.
It is imperative that you enable the Selective Startup mentioned in Step 4. If you fail to enable it or disable it in the future, the program will start running on startup again.
2. Delete or rename the program
Click the Start icon, type msconfig in the search box, and select the msconfig option.
Click the General tab from the top menu and check the box for Selective startup.
Select Startup from the top menu tab and uncheck Opera Browser Assistant.
Click the Apply button followed by OK.
Click the Exit without restart button when prompted.
Now, press Ctrl + Shift + Esc keys to open the Task Manager app.
Click the Processes tab at the top.
Right-click on the Opera Browser Assistant and select Open the file location.
Find the file named browser_assistant.exe and rename or remove it.
If you can’t rename or remove the program, restart your PC in Safe mode and restart the process from Step 6 till the end. This should correct all issues causing the problem.
It is important to state that the fixes for disabling Opera browser assistant on Windows 11/10/7 will continue to work till you update your browser. After an update, the program will likely start running again.
All you need is to repeat these steps, and things should be back to normal.
That’s all you need to know about the Opera Browser Assistant process. If you’re still not sure how to use it or removing it is a headache, feel free to let us know in the comments below.
Discord is one of the best Windows 10 VoIP apps, used by over 250 million unique users worldwide. Its popularity rose over the years, and now it’s one of the most successful apps of its kind.
Once in a while, a few errors regarding the app might appear. One of the most important ones is that you can’t hear anyone in Discord despite your speakers/headphones working just fine.
This is a big problem, but don’t panic. We have the perfect solutions to fix it. Before anything else, remember that you can quickly solve the problem by performing standard checks.
Why can’t I hear people in Discord?
This error can be explained through several aspects, as follows:
Improper audio settings – You have to ensure that the default and output devices are configured properly and according to your own needs. We’ve compiled some methods to do it with ease.
Audio device not being selected as the default one – In this case, Discord audio might also keep cutting out. If it’s happening to you, we suggest verifying some dedicated solutions.
Poor updates or app bugs – Because any software can be corrupted by temporary errors, you might need to reset your PC, app and specific settings. Also, it is always recommended keeping your elements up to date.
Fortunately, most of these problems can be eliminated within a few minutes, so you don’t have to worry. To discover how to solve this issue with ease, make sure you check the information listed below.
What can I do first if I can’t hear people in Discord?
First, keep in mind that you’ll have to do some common checks to make sure that everything is working properly:
Refresh/Restart Discord.
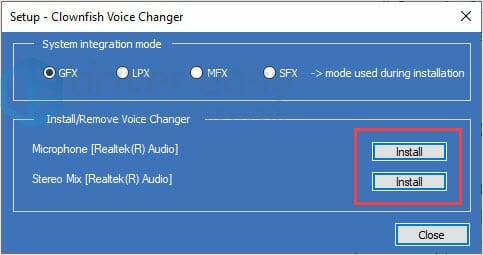
Turn off any third party voice altering software.
Reset voice settings in Discord user settings.
Check your speakers/headphones/mic to see if they work.
Make sure your peripherals are properly connected.
What can I do if I can’t hear anyone talk in Discord?
1. Set as Default Device
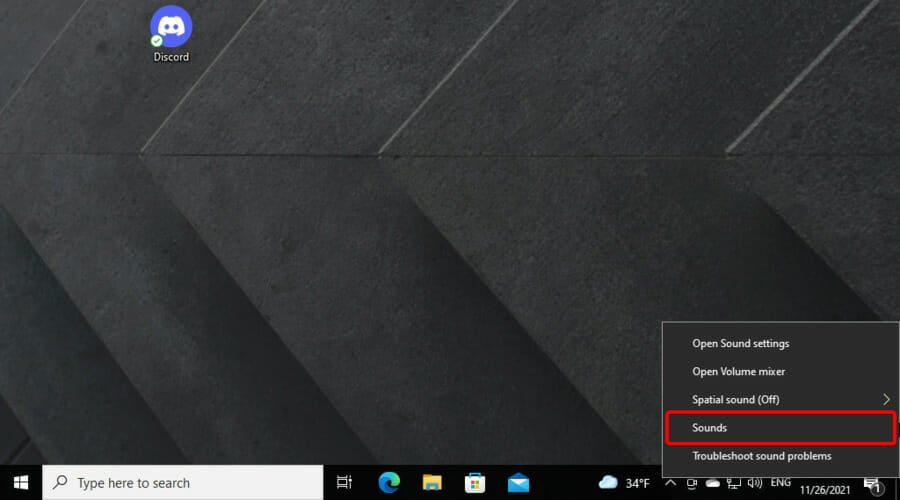
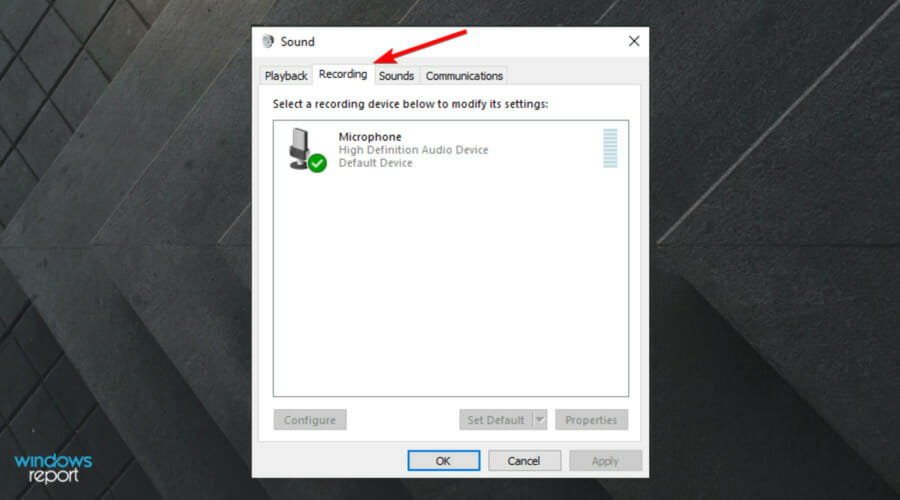
Right-click on the Speakers icon in the right bottom of the Windows taskbar, then select Sounds.
In the Sound window, click on the Playback tab.
There, click on your desired device, then select to Set as Default Device.
Repeat the process, but now check Set as Default Communication Device.
A green check-mark will appear to confirm the Default device.
Click Apply then hit OK.
In case your preferred device is not set as default, then this can be the problem. Because it’s not a setting in Discord and it’s mostly about Windows 10, you’ll have to perform the above steps.
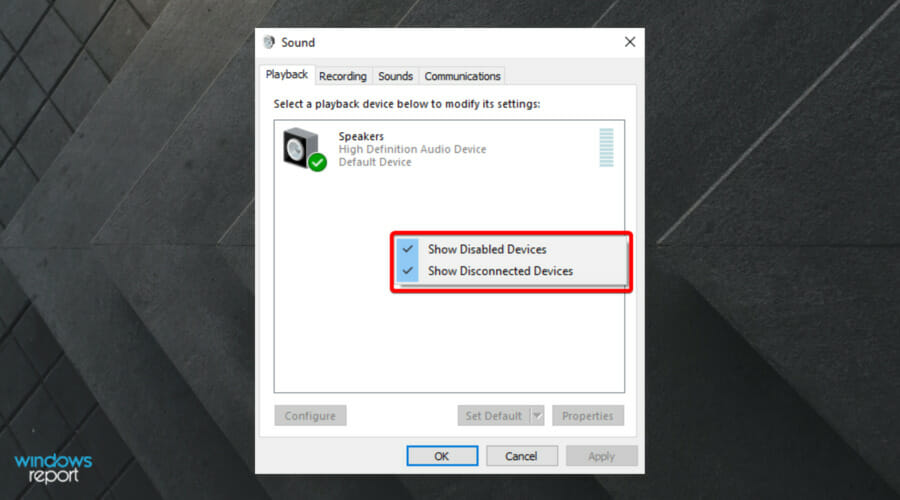
If the desired device doesn’t appear in the list, right-click in an empty spot and check Show Disabled Devices as well as Show Disconnected Devices.
When the device that you want shows up in the list, right-click it and select Enable, and then follow the steps above.
If you still can’t hear anyone on Discord, make sure you keep on reading and discover more efficient solutions.
2. Use the correct Output Device
Use these keys: Windows + S.
Type Discord and open it.
Click on User Settings (cog icon next to your avatar).
In the left menu choose Voice & Video.
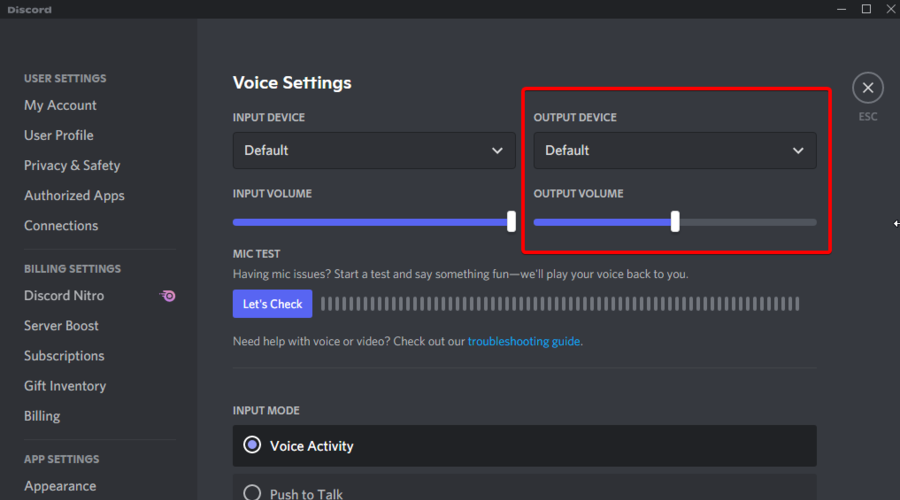
Under Output device, in the drop-down menu, choose your preferred device and make sure that the output volume is not 0.
The problem should be solved. If you’re still having issues, go to the Input mode section and toggle on and off Voice activity and Push to Talk to see if that changes the outcome.
3. Use Legacy Audio Subsystem
Hit the Windows key, type Discord, then click on the first result.
Click on User Settings (cog icon next to your avatar), then access again Voice & Video.
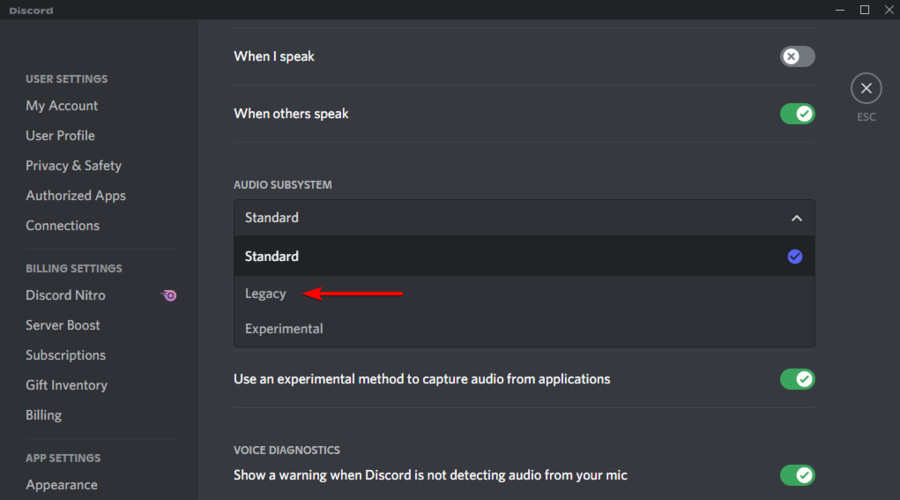
Scroll down until you see the Audio Subsystem option. In the drop-down menu choose Legacy.
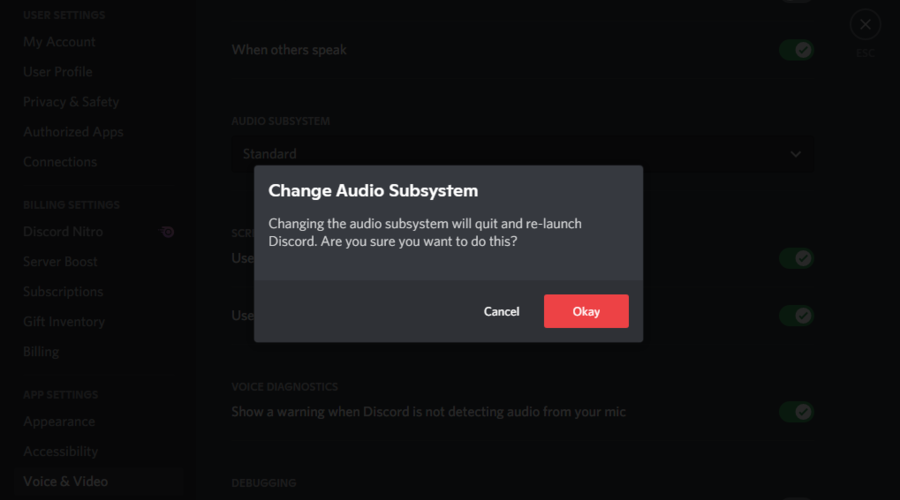
In the window that appears, click on Okay.
Discord will re-launch.
After this, the problem should disappear.
If you notice that you can’t hear anyone on Discord after an update, more often than not is because of the incompatibility between your hardware and the app’s latest subsystem.
Reverting to Legacy Audio Subsystem solved the problem for a lot of users and it should also work for you.
What can I do if I still can’t hear anyone on Discord?
Remember that if nothing works, you can always use the web version of the app. If the problem is related to your Windows 10 Discord app, with this version, you won’t encounter it anymore.
Optionally, you can use The Voice Debug Panel, as recommended by Discord themselves, to self-diagnose any issues with the app.
It was initially designed for gaming communities, but now it’s used by everyone who needs a chat channel to communicate. Discord is spread around multiple platforms including Windows, Android, IOS, macOS, Linux, and web browsers.
What other Discord audio problems should I be aware of?
Besides the problem presented in today’s article, you must know that you might face many more others with Discord’s audio function.
1. Discord picking up game audio issues
If Discord picks up game audio issues, it can be a sign of incorrect sound settings and corrupted sound drivers. To discover how to easily fix it, make sure you check our dedicated guide.
2. Microphone not working on Discord
This one seems to be one of the most annoying errors. However, if the Discord mic is not working, you should read some detailed instructions on how to solve it without any effort.
3. Discord audio keeps cutting out
Getting rid of this issue is extremely simple and doesn’t consume time. Fortunately, we have the perfect guide for this kind of situation.
If Discord audio keeps cutting out, you won’t be able to communicate efficiently with your teammates, so it is important to discover the best ways to fix it.
So here you are, having a complete guide on what to do if you can’t hear anyone on Discord. We guarantee that at least one of the above solutions will work perfectly. And if your sound gets automatically muted when you get on a call, we also have a fix for that.
Is Discord your favorite VoIP application, or do you prefer another one? Let us know in the comments section below, along with any other questions that you may have, and we’ll take a look.
It’s been a while since we’ve been introduced to the Oculus tech, with the added feature of you purchasing your games through their platform.
It goes without saying that all your Oculus devices share the same payment method, be it Paypal or other online means.
But no service is fully foolproof, and some issues regarding payment have arisen. An issue that has been affecting old users and new alike.
Many have reported this on Reddit threads, with complaints following up on purchase errors.
I just went to checkout with the Adventure Pack, upon adding my card details it tells me that there is an error adding this card, try another.
But fear not, for we have a list of possible workarounds this issue. As they might fix the trouble you’re experiencing when working with your Oculus store. So let’s get to it, shall we?
Quick Tip:
If you to be able to make quick and safe transactions online, we suggest you try Revolut. It generates your own unique virtual card that is completely safe to use for online payments.
You can use it to create a temporary card for safe online payments. It is completely free. Add the exact amounts you plan on paying and then enter the card information into your Oculus account.
The service is compatible with 30+ currencies. You can convert to and from any combination. Verify your payment history, get insightful reports, create budgeting plans and store your own vaults.
Revolut
Make safe online payments, transfer money anywhere, create budgets and get insightful spending reports.
How can I fix Error adding payment method on Oculus?
1. Try a virtual credit card software
If you quickly want to get rid of these Oculus payment issues, then feel free to enjoy the advantages of a digital bank or virtual credit card.
A wide array of features is waiting to be enjoyed, including the ease of managing your money, free withdrawing from ATMs worldwide, and avoiding those terrifying errors regarding adding your card.
Virtual credit card software generally include mobile apps that you can use to pay with your phone and also see real-time balance reports.
On top of that, they include additional features such as conversion to different currencies, money transfers, split bills, and more.
2. Add or remove the payment method for VR Gear
Open your Oculus app on your mobile device.
Press on More and then press Payment Method.
Select the Add Payment button.
Press on Add a credit card or Add a PayPal account.
Now just enter your payment info to add your payment method.
In order to remove any payment method, simply press the Remove.
3. Add or remove payment methods for your PC
Firstly head on over your Oculus app and open it.
Select the Settings in the left menu section.
Select the Payment section.
Now click on the Add Payment Method panel.
Select between Credit or Debit Card or PayPal Account.
Enter your payment info to add your payment method.
In order to remove any payment method, click on the Remove button near your credit card.
If you have a PayPal account, link your card to your PayPal, then check out with your Paypal.
You know what to do when getting an Oculus error while adding a payment method or if the Oculus payment failed.
Let us know in the comments area below which solution worked for you.
You should check out this Oculus section too for more comprehensive tips to follow.
Also, take your time to bookmark our Web Apps Hub, assuming that you like the idea of being prepared for pretty much any scenario.
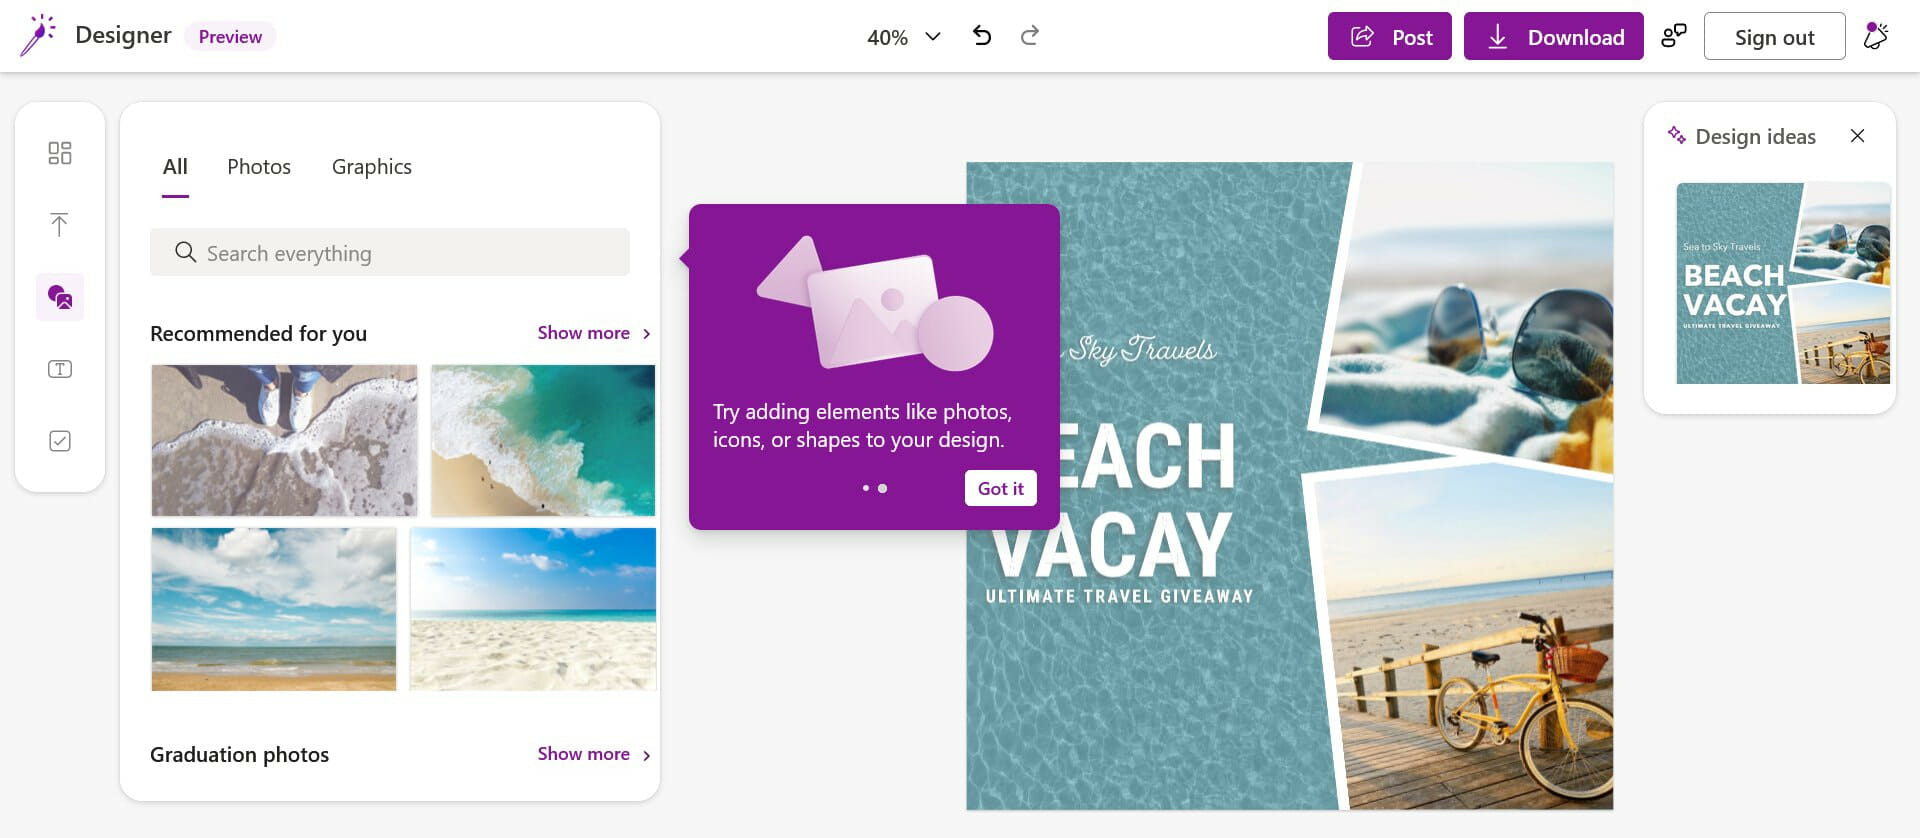
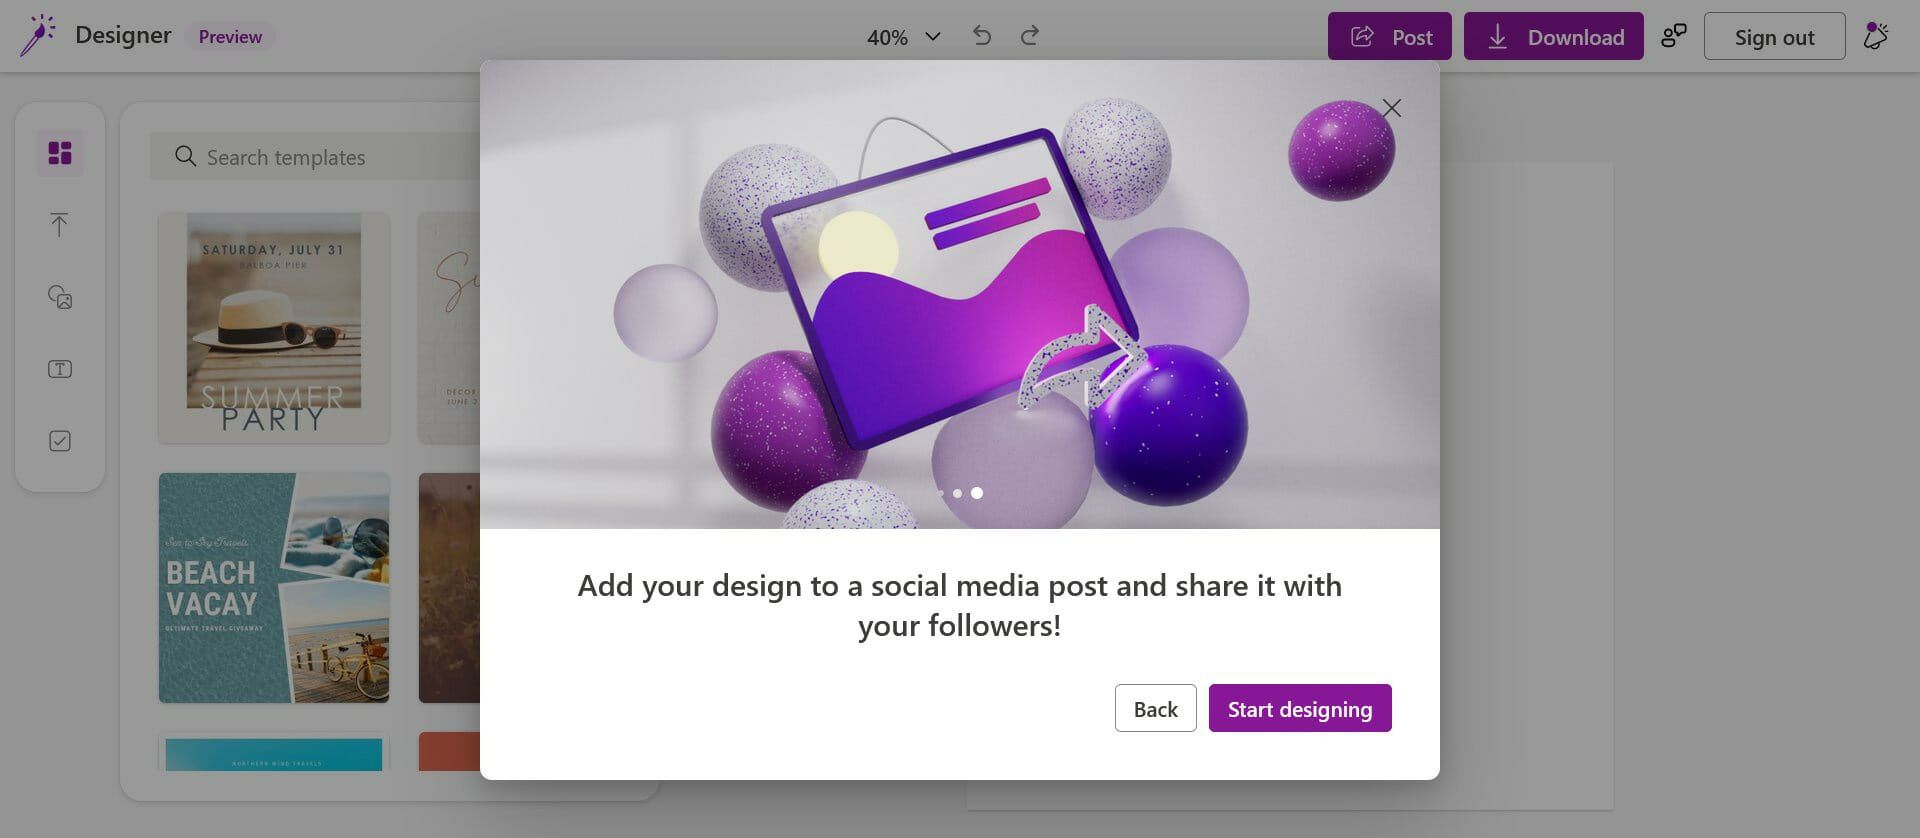
Ready for another Remond leak? The tech giant is apparently working on a new application for Windows 11, which is called Designer.
The general opinion is that this new software will be yet another surprise coming with Sun Valley 2, which is actually Windows 11 22H2.
And, as you would have expected, multiple images of the preview version of the app have leaked out. So, if we got your attention, check out the rest of the available information.
First goto https://t.co/s0RGdr2Vaw , will display blank page, then open DevTools > Local Storage, find key "persist:featureGates", change its value to this: https://t.co/2LgSwSIyYR , then Refresh the page ?
We’re actually talking about the Designer feature in PowerPoint back in 2015, which received significant feature upgrades a year later.
Given the fact that these pictures have just surfaced, other information on the matter is pretty scarce and nothing is for sure for the time being.
However, Designer could also be Microsoft’s in-house solution and competitor for Canva, which is a popular design tool that’s available on Windows.
The latter seems to be the most plausible since even the product’s interface resembles Canva. Whatever it is, we’ll just keep an eye on it and see what we are dealing with.
For the time being we can’t know for sure if this software will also be available to Windows 10 users, or if it will be exclusive to Windows 11.
As soon as new information becomes available, you will be among the first ones to find out more about Designer, and what purpose it will serve on the new operating system.
What is your opinion about this new app? Share your thoughts in the comments section below.
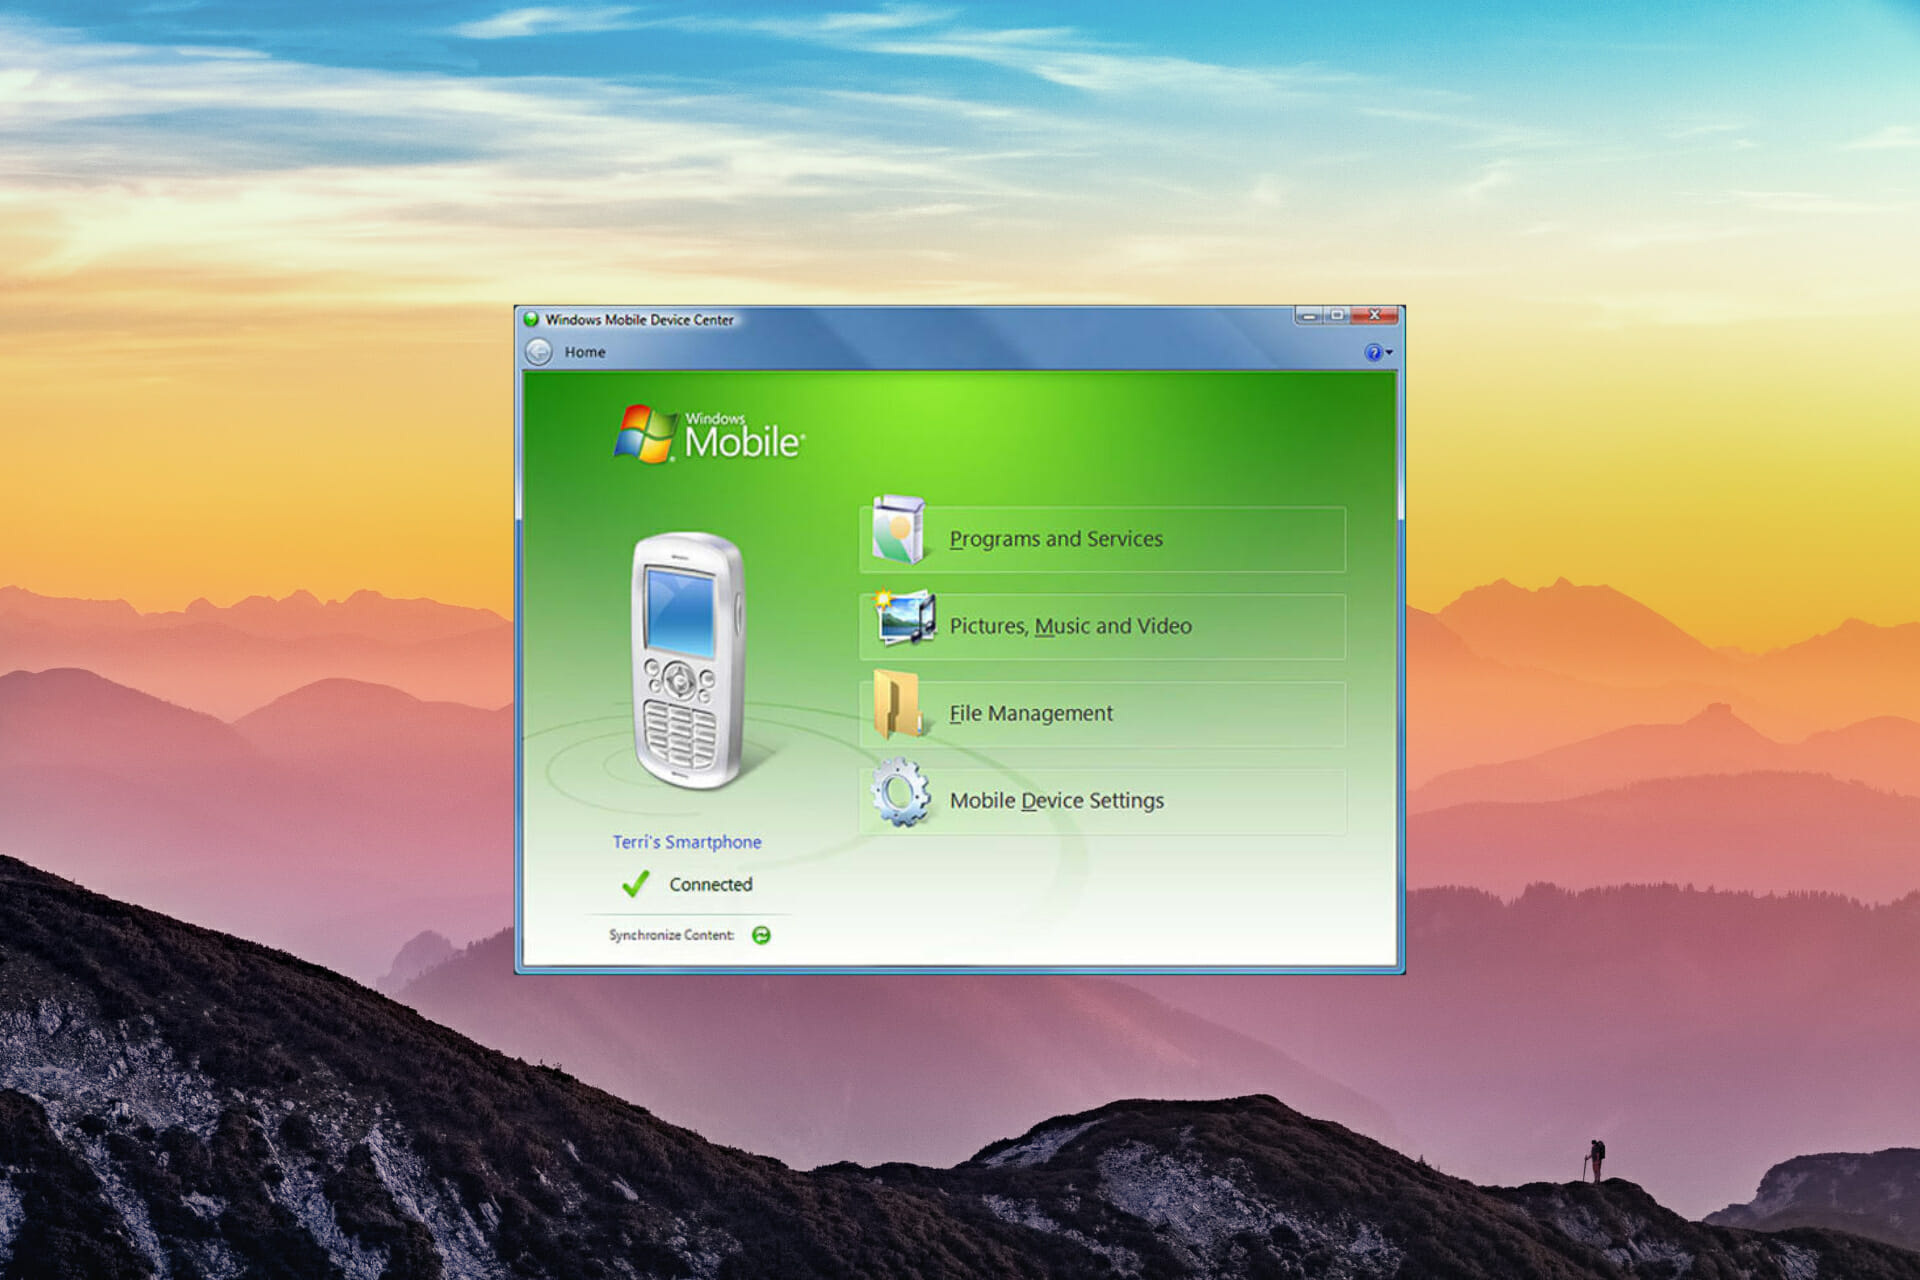
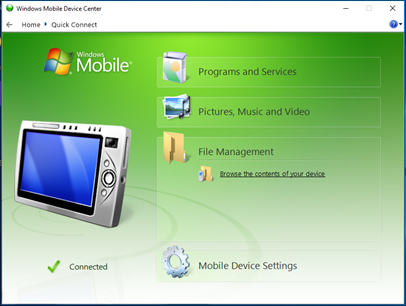
If you don’t know already, Microsoft no longer offers any support, such as new features or security updates, for the Windows Mobile Device Center, but people who still use Microsoft mobile devices still use this app to this day.
The application allows users to sync the whole content of their devices, such as files, media content, contacts, calendars, and you name it. The app was initially built under the name ActiveSync but was later renamed to Microsoft Windows Mobile Device Center for Windows Vista.
Although users can still download windows mobile device center and use this software despite Microsoft’s discontinuance of providing any more support, the app can stop working.
In today’s article, we will show you how to fix the Windows mobile device center that stopped working.
What is the Windows Mobile Device Center and why is it used?
It is worth noting that you can install the Windows Mobile Device center on an OS that runs Vista or later, but you cannot install it on Windows XP or earlier versions.
You can also use the Windows Mobile Device Center with devices that use Windows Mobile 2003 or a later version and sync files and media, or transfer the data.
The Windows Mobile Device Center lets you manage the files and media of your Windows Mobile device and also sync them. In 2009, Microsoft announced that it would no longer actively develop Windows Media Center.
Windows mobile device center is unable to connect to Windows 10: Make sure you have.NET 3.5 installed, and change the settings of services for Windows Mobile-2003-based device connectivity and Windows Mobile-based device connectivity as mentioned above.
Windows mobile device center error no default mail client cannot fulfill the message request: try the above-mentioned steps to fix the issue, otherwise, uninstall and reinstall.
Windows mobile device center won’t open: If your mobile device center won’t open, the first step is to reboot your PC. If it is still not working, you should fix it using the above-mentioned steps.
Windows Mobile Device Center not working after update: If the Windows Mobile Device Center is not working after the update, you should uninstall and reinstall the software, and then run the WMDC-helper utility tool.
Windows Mobile Device Center not loading on Windows 10: You should close the application and reboot your computer. After you have rebooted your computer, confirm it works now.
What can I do if the Windows Mobile Device Center is not working?
1. Verify if .NET Framework 3.5 is installed
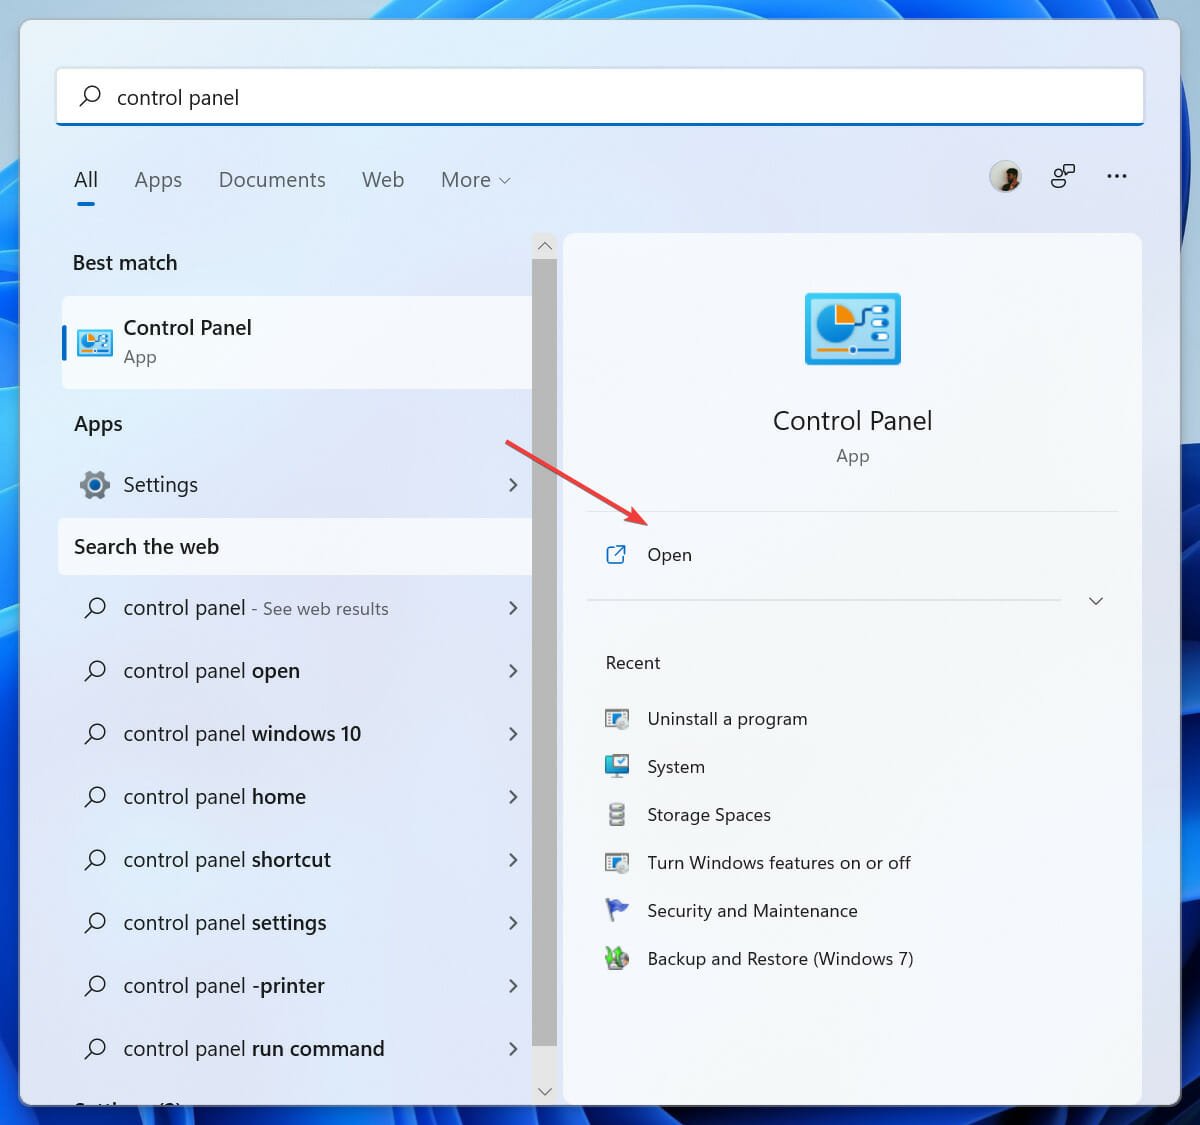
Click on the Start button and search for the Control panel.
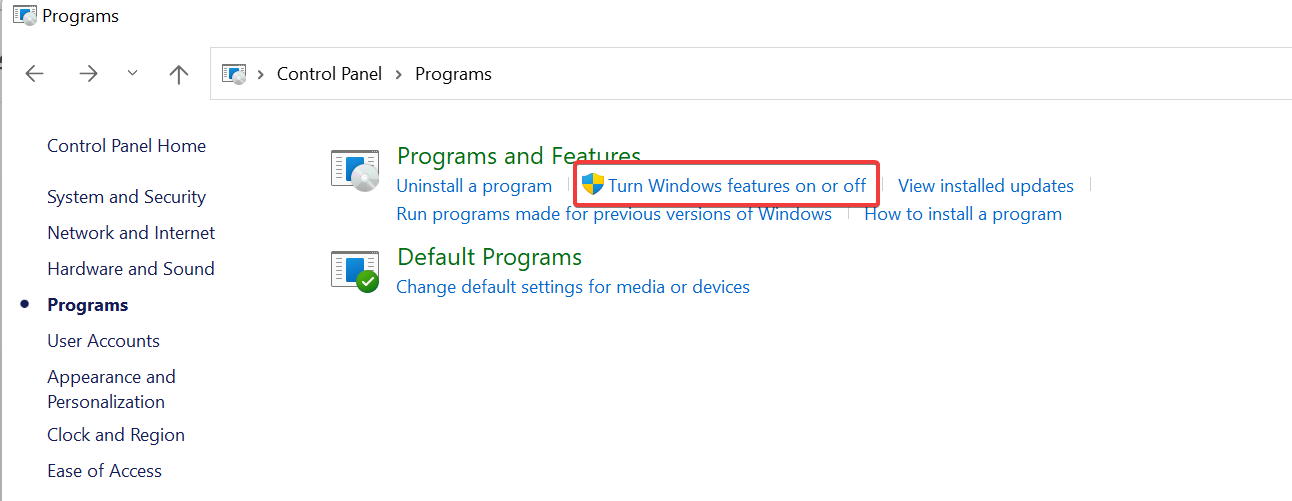
Click on Programs, followed by Turn Windows features on or off.
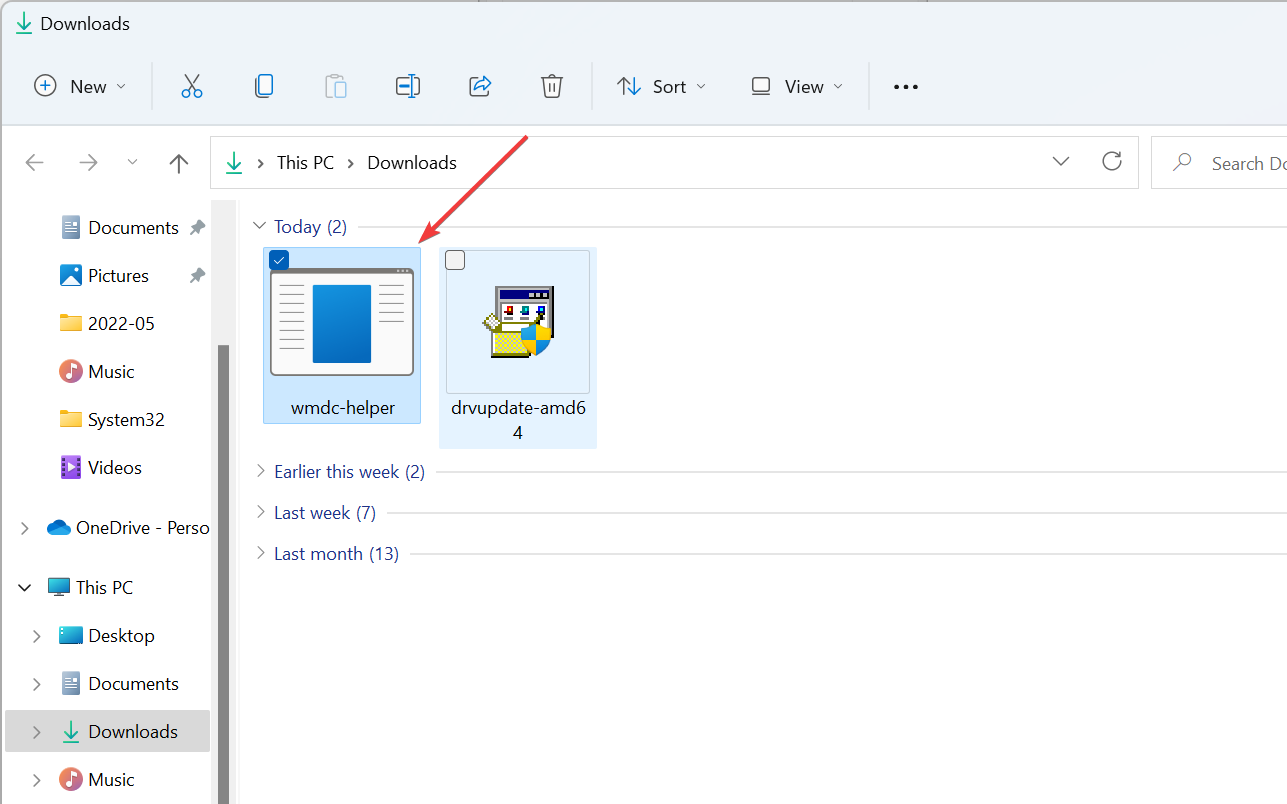
Once the installation has been completed, download and run the WMDC-Helper.exe utility tool
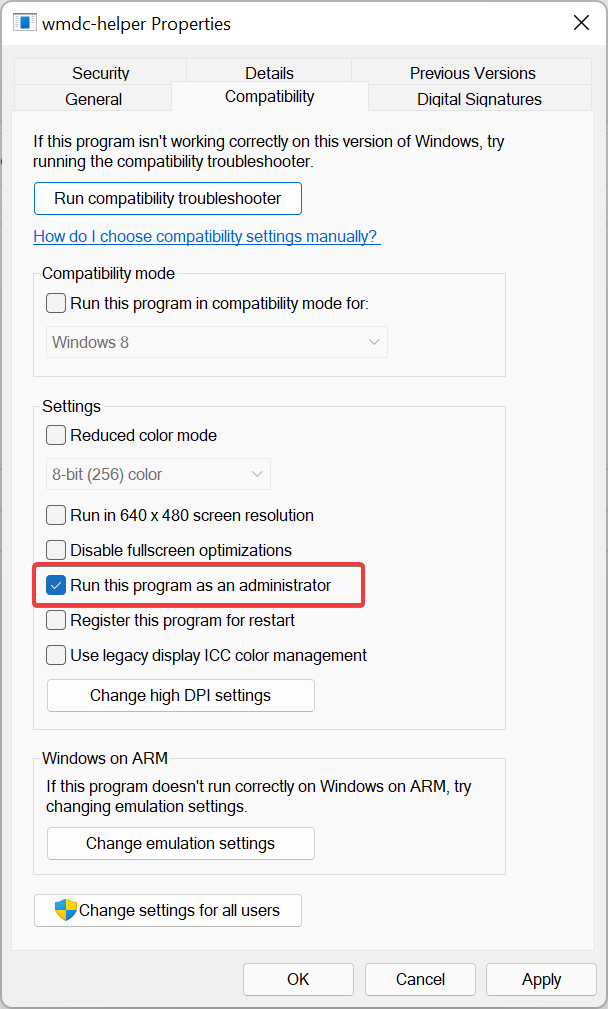
Run it as an administrator to fix all the compatibility issues.
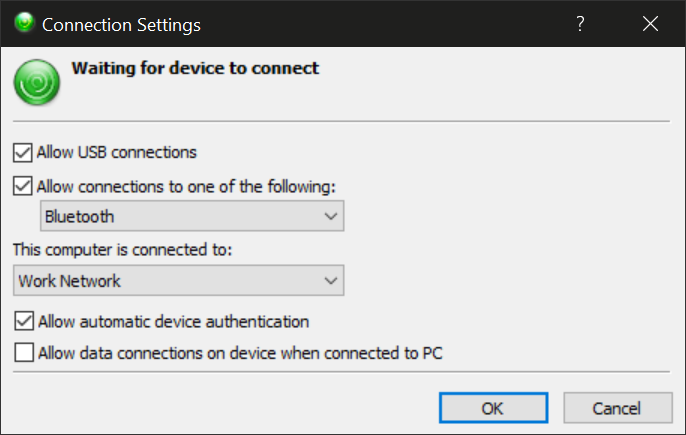
Once the WMDC-Helper.exe is finished running, it will now restart. After your computer restarts, open the Windows Mobile Device Center and go to Connection Settings. Select all the boxes if they are not selected, and click on Ok.
Now connect your Windows Mobile device and it should detect it and work now.
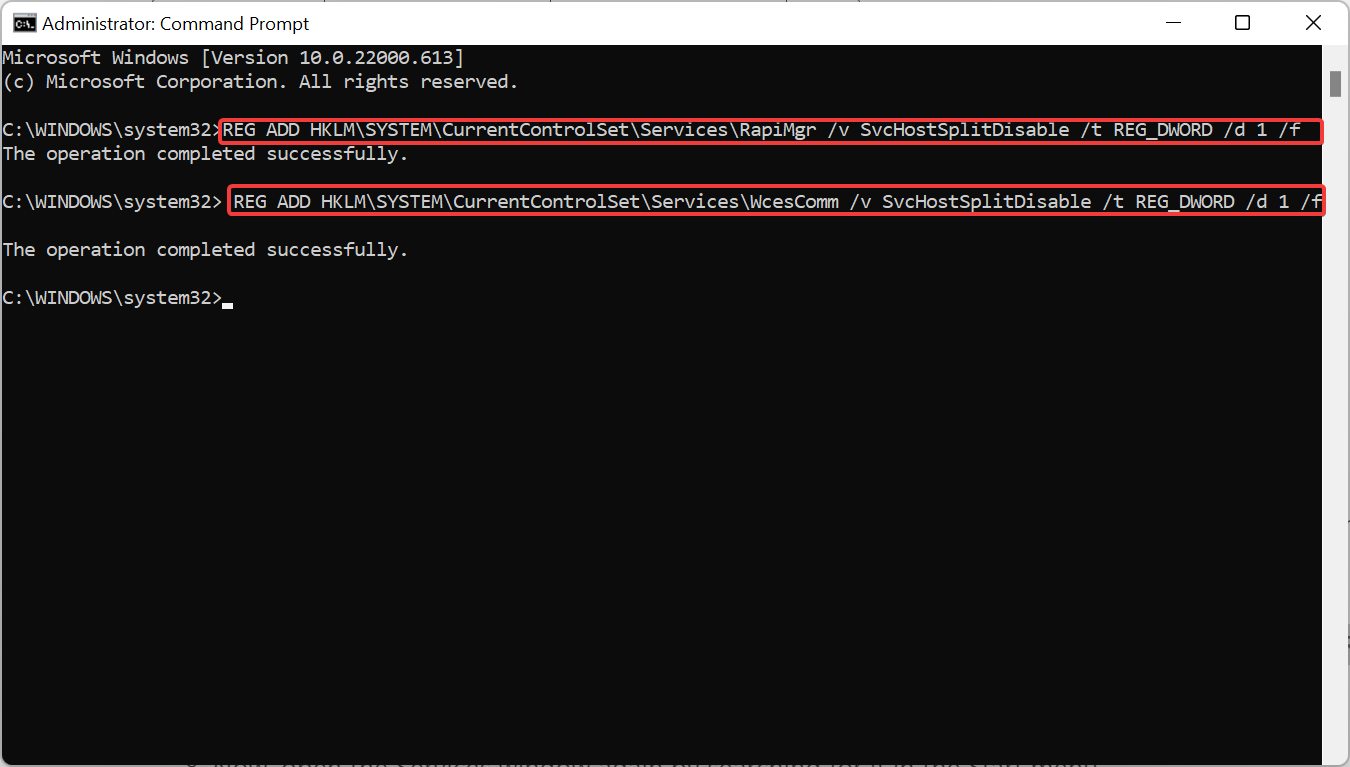
If the problem wasn’t fixed, open the command prompt as an administrator and use the following two commands: REG ADD HKLM\SYSTEM\CurrentControlSet\Services\RapiMgr /v SvcHostSplitDisable /t REG_DWORD /d 1 /fand REG ADD HKLM\SYSTEM\CurrentControlSet\Services\WcesComm /v SvcHostSplitDisable /t REG_DWORD /d 1 /f
Reboot your computer.
Now, open the Services window again by searching for it in the Start menu.
Locate Windows Mobile-2003-based device connectivity and Windows Mobile-based device connectivity.
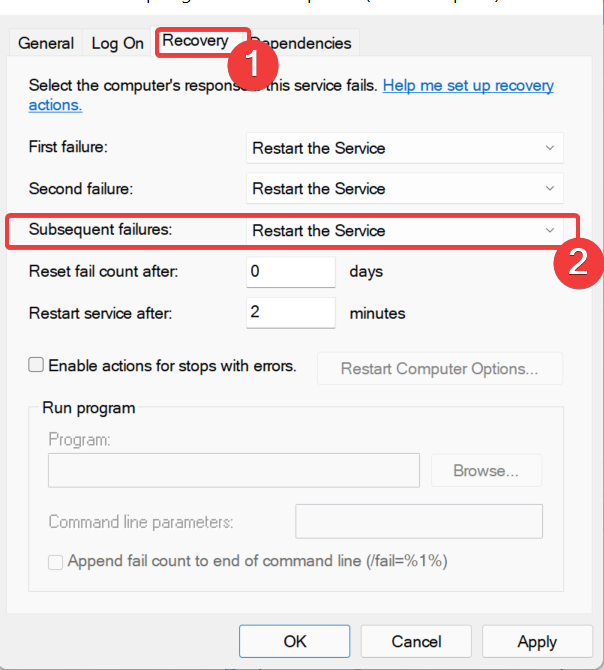
Double-click on Windows Mobile-2003-based device connectivity and Windows Mobile-based device connectivity and set the Subsequent failures to Restart the Service under the Recovery tab.
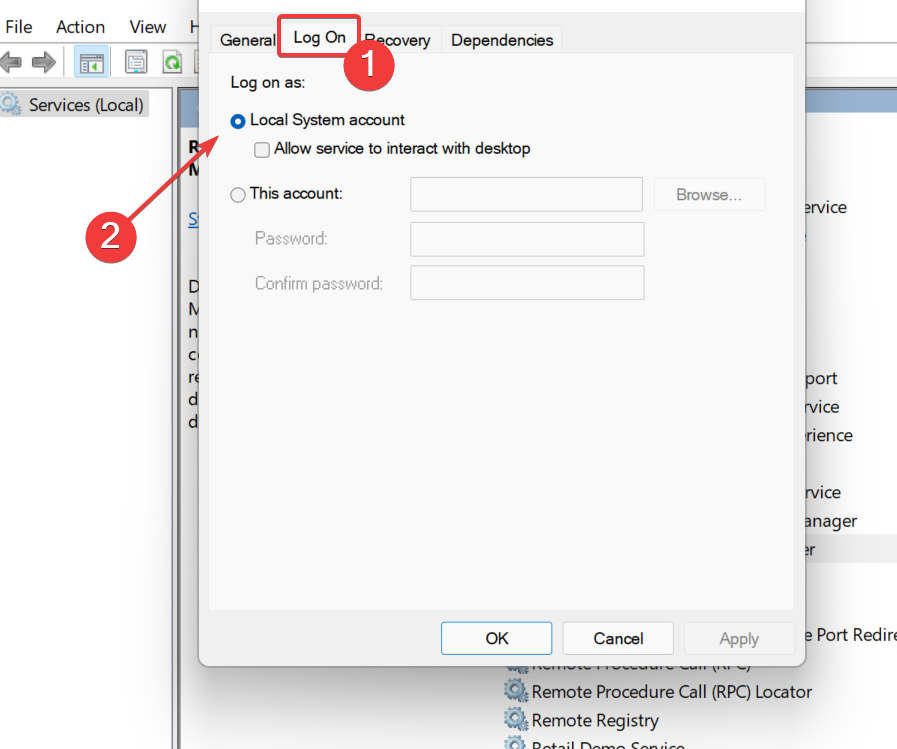
Select the Startup type as Automatic for both services, and set the Log on as to Local Service.
Now repeat steps 3rd and 4th step, and check if it works now as you completely removed the program and re-installed it. If this still didn’t help, follow the below fixes as they should help fix the issue.
5. Uninstall and reinstall the drivers
Uninstall the drivers
Connect your mobile device to your computer.
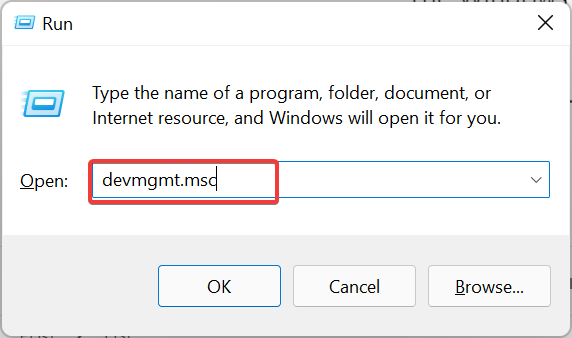
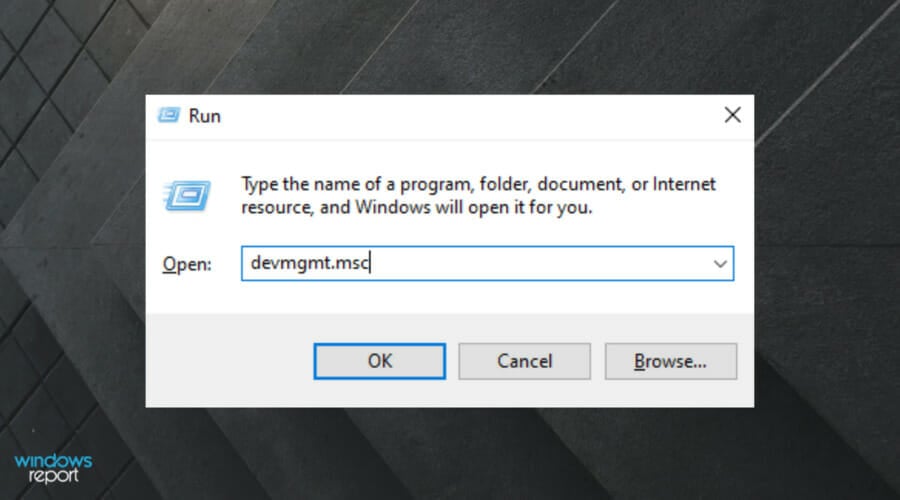
Press Win + R to open the Run dialog box and type devmgmt.msc
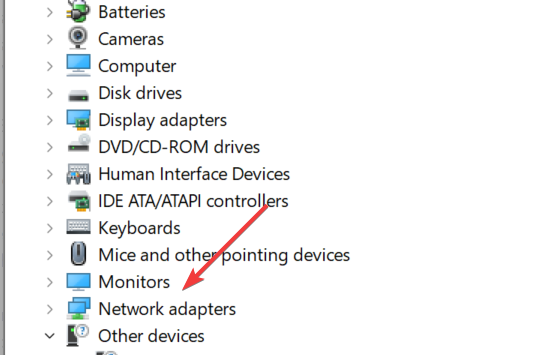
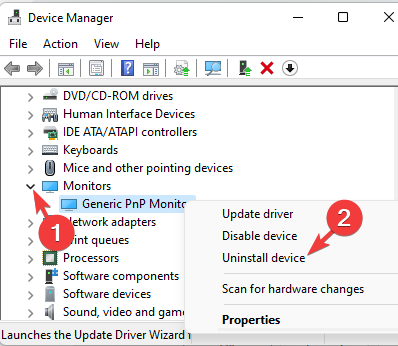
Locate the Microsoft Windows Mobile Remote Adapter under the Network adaptersand the Microsoft USB Sync under Mobile Devices.
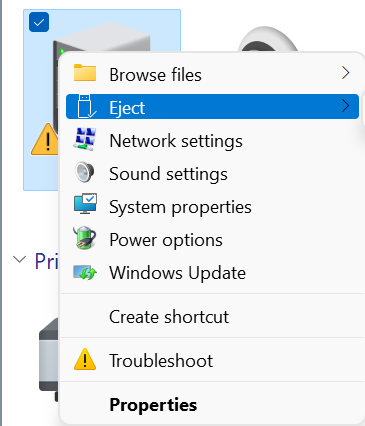
Right-click on the Microsoft Windows Mobile Remote Adapter under Network adapters and select Uninstall. Repeat the same with Microsoft USB Sync under Mobile Devices.
Reinstall the drivers
If you can’t find it, disconnect the device and reconnect it.
Once your computer detects the device, it will automatically install its drivers.
Now, the Windows Mobile Device Center will launch after successfully detecting the drivers.
As an alternative, you can use a more effective way to manage any drivers on your device.
With Outbyte Driver Updater, you have full driver support and practical tools that automatically detects outdated or missing drivers.
Then, you can proceed to reinstall or update a multitude of drivers at once. You can as well repair your broken device drivers within a few clicks.
Plus, the software also protects your PC from unexpected errors with a driver restore point, in case you want to restore a driver version.
So, as we already covered the entire spectrum of information on this topic, one question remains: What replaces Windows Mobile Device Center in Windows 10?
Microsoft has made sure that the same services and capabilities will be covered by using the Mobile Connect utility software, USB Flash Drive compatibility, and Wifi Remote Access utility.
Users can still download and install the WMDC software on their Windows PC, but only if the system has Vista or a later OS installed.
Feel free to share your experience with us by using the comment section below this guide.
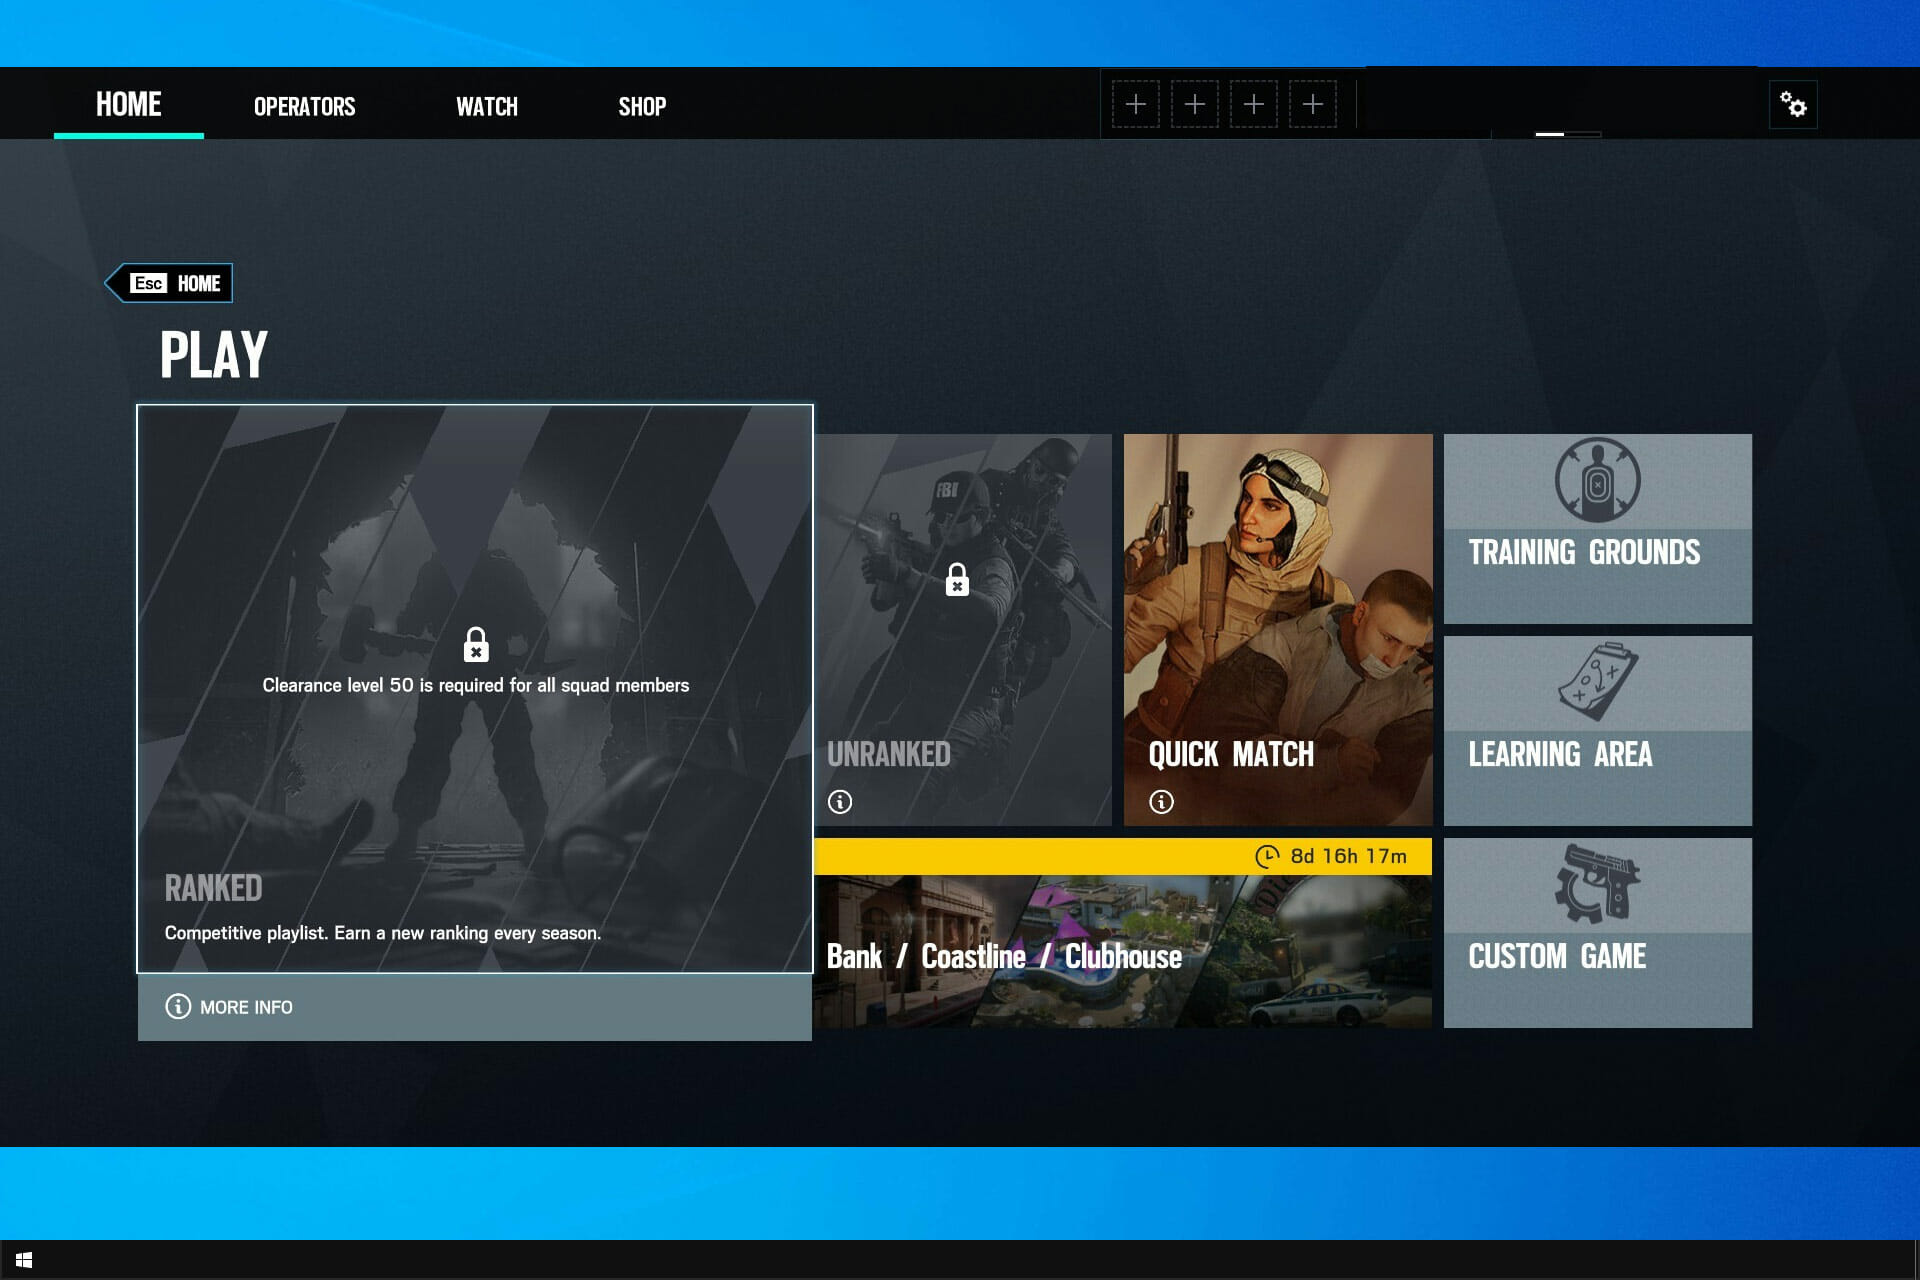
Rainbow Six Siege is a tactical online game from Ubisoft. Recently, users have faced problems updating the game, but Rainbow Siege won’t update whenever they try.
This guide’ll focus solely on the update issues and the best ways to fix them.
What can I do if the Rainbow Six Siege won’t update?
1. Restart the Windows Installer service
Press Win + R to open the Run dialog box.
Type service.msc into the search box and press Enter.
A list of all available services will now appear.
Highlight the Windows installer service.
Double-click on it to open.
If the Windows Installer service is running, click the stop button to stop it.
Click on OK.
Close the service window and check if the problem is resolved.
When Rainbow Six Siege keeps updating, stopping the Windows Installer service is one way to stop it.
2. Run Uplay as an administrator
On your computer, go C:\Program File (x86)\Ubisoft\Ubisoft Game Launcher
Right-click on Uplay.exe.
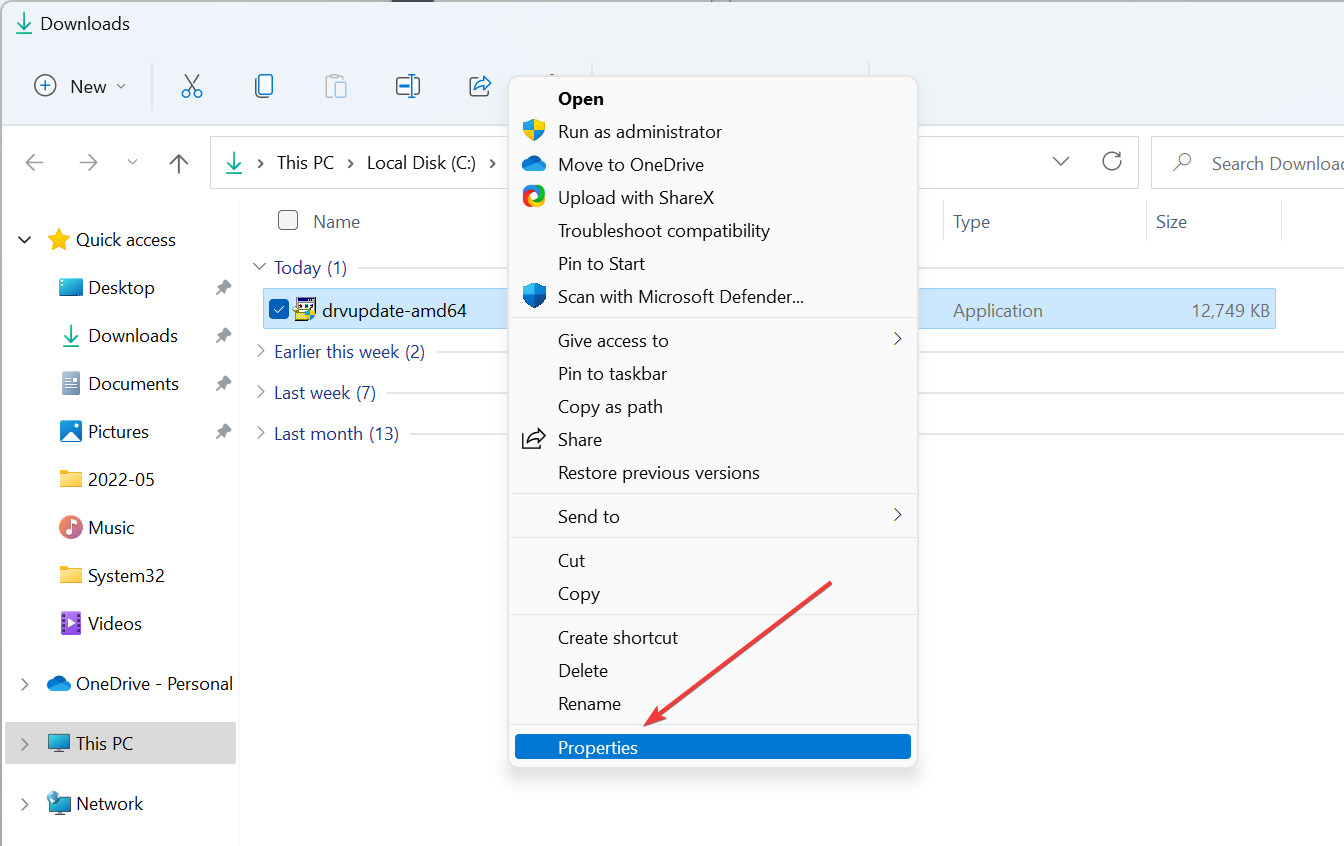
Select properties.
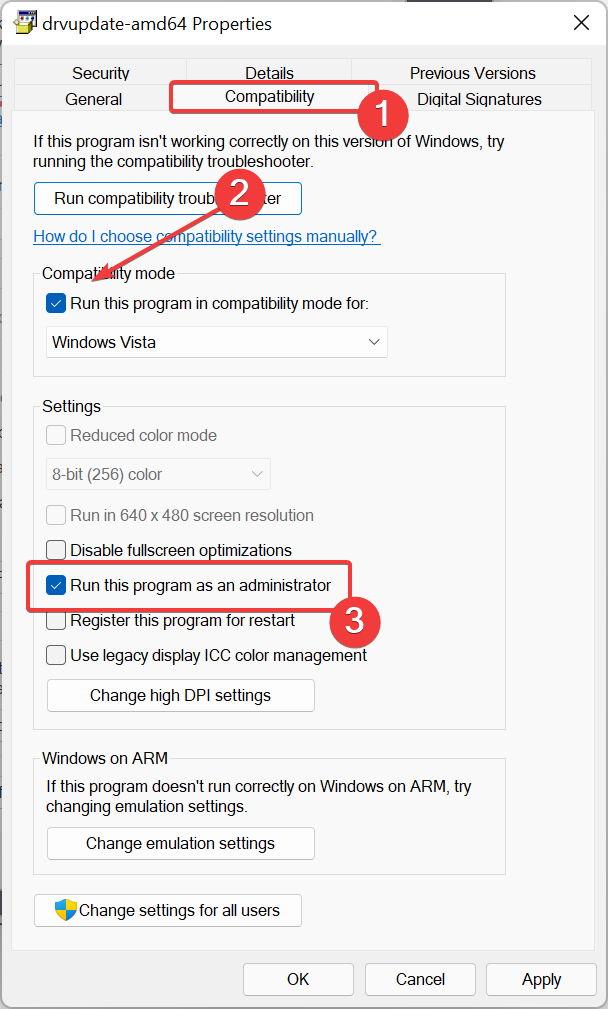
Switch to the compatibility tab and tick run this program as an administrator.
Running the game in administrator mode will ensure that you have full read and write privileges. The administrator privileges can help you resolve issues relating to the game freezes and verifying files.
Click on properties on the left-hand side of the game overview.
Under local files, choose Verify files.
If prompted, select Repair.
Click Close after verifying.
After the repairs, log out of Ubisoft Connect PC and close the program. Try relaunching the game to see if it prompts you to download an update. It also fixes the Rainbow Six Siege error code 10-0x00000.
If any Rainbow Six Siege files are corrupt, Ubisoft Connect PC will download and restore any missing or corrupted files and can help you fix the Rainbow Six Siege error code 3-0x000c0054.
If your Rainbow Six Siege won’t update on Xbox One, you can verify the game files on your Xbox using a similar method.
Why does my Rainbow Six say installation is still in progress?
This problem usually occurs when you launch the game before it finishes installing. It’s recommended you remove the game and download it again.
After the download, install the game without running other applications. You should have enough space on your internal hard disk drive when installing Rainbow Six Siege.
Tom Clancy’s Rainbow Six Siege is an outstanding tactical game. To ensure the best performance, you need to keep your drivers updated, and we have a unique guide on how to update your video driver for Rainbow Six Siege.
For any other issues like the matchmaking error, see our guide for easy solutions.
The above troubleshooting methods will help resolve the Rainbow Six Siege download problems. In the comment section below, let us know which one was helpful.
Minecraft has yet again proved itself to be an unstoppable force in the gaming industry, becoming the third best-selling game on the Nintendo Switch in the UK. The latest UK videogame sales charts revealed that Minecraft was the seventh best-selling game on Switch last week – up from the no.10 spot last week. (Note that this data reflects physical game sales only).
This means that the Mojang Studios sandbox game has listed in the top-40 sales charts for 193 consecutive weeks. And as of this week the game hit an impressive milestone surpassing Nintendo’s first-party giants such as Breath of the Wild, Super Mario Odyssey, Super Smash Bros. Ultimate, and the entire Pokémon franchise. Only Mario Kart 8 Deluxe and Animal Crossing: New Horizons have outsold Minecraft on the Switch in the UK.
While this is quite an impressive feat, it shouldn’t come as any surprise given that Minecraft is the best-selling game of all time overall, across all platforms, not to mention the most popular game on YouTube, having become the first game to reach 1 trillion total views on the platform in late 2021.
Microsoft Teams users, this one is for all of you. We know that the Teams app is not hard to get at all. but the Redmond tech giant will further facilitate adoption.
The company had previously updated the 365 Roadmap with a new entry signaling the upcoming release of Teams in the Microsoft Store.
Until this process was finalized, the only way to get the ultra-popular messaging and conferencing app is to download it from the official website.
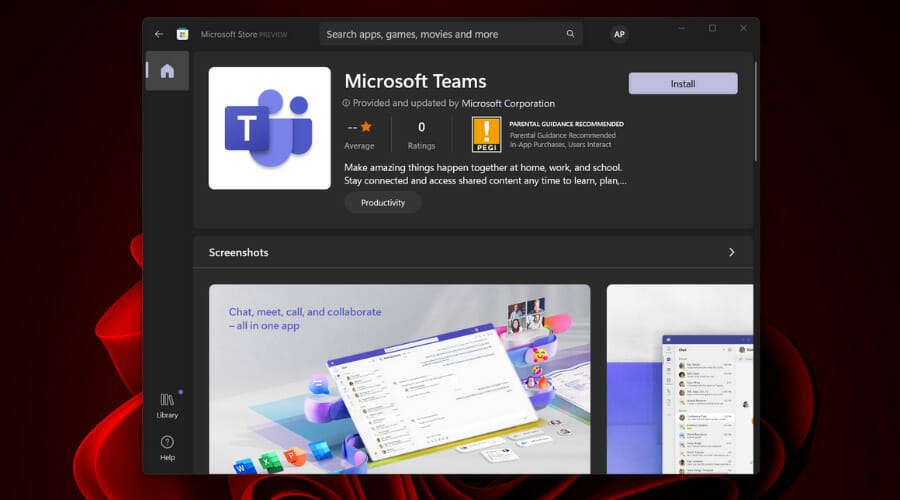
Download Teams directly from the Microsoft Store
Teams in the Microsoft Store will provide Windows 10 and 11 users with a simpler and more convenient way to install the program.
The software will thus support work, school, and consumer accounts on Windows 10, and only work or school accounts on Windows 11.
By reading the available information, one might even think that Microsoft does not plan to make Teams less confusing than it currently is.
We’re saying that because, right now, the tech giant has two versions of the Teams app. There’s a regular one that you can download from the official website and one built-in Windows 11.
Redmond developers state that the latter is an alternative to mainstream messaging platforms and voice and video calling solutions for regular customers.
It is also known that Windows 10 has no built-in Teams capabilities, meaning that the upcoming Microsoft Store version will allow regular customers to use the app for their daily home needs.
That being said, Windows 11 users will have to stick to the built-in Chat app you can find on the taskbar.
The giant tech company is also working on calendar statuses and the ability to enable Together mode for all participants.
Have you already downloaded the Teams app directly from the Microsoft Store? Share your experience with us in the comments section below.
Last month, Microsoft heard complaints from small European Cloud providers that they were being treated unfairly, in the words of one CEO saying he was “a victim of friendly fire” in Microsoft’s competition with Amazon. Back in 2019, Microsoft made licensing changes that made running Microsoft services like Windows Server and Office on anything but Azure (read: AWS) more expensive (via Mary Jo Foley)
Today, Microsoft President Brad Smith outlined changes the company is making, outlining a set of “European Cloud Principles,” and softening licensing costs and restrictions for small European cloud providers. This will allow those providers to offer Microsoft services both more easily and more cheaply than they were able to before the 2019 changes.
To be clear, these new changes do not affect costs or licensing for companies using AWS, Google, or Alibaba for their cloud solutions, it will still be more expensive with more hoops to jump through to run Microsoft products on those services. These changes only affect small European cloud providers, a blip on the radar of worldwide cloud services.
In the EU Policy blog post, Smith outlines what the company is announcing for these small providers: the ability for the first time for them to be able to offer Windows and Office, “as part of a complete hosted desktop solution,” to companies, and to allow customers who purchase Windows and Office software from other vendors to host their offerings in the (small, European) cloud.
Windows Server licensing restrictions will also be somewhat relaxed, and Microsoft is creating a new European Cloud Provider support team., as well as making a number of changes designed to make small European cloud providers more easily able to work with Microsoft.
It’s interesting that Smith takes great pains to detail what Microsoft is doing to make it easier to sell Microsoft products to small European cloud providers, while at the same time dodging the elephant in the room, that companies that want to use AWS or Google to run Microsoft services will continue to have to pay more and deal with more restrictions than if they use Azure.
Many PC users and gamers have reported they encountered Launch Error 20006 or Error Code: 20006 (Cannot create service StartService failed: 1058).
This error happens when they install games, including Ghost Recon, Warface, Fortnite, Robocraft, etc.
Because the AntiCheat system cannot be located, this problem occurs frequently. Let’s discuss what the StartService Failed 1058 error is before we get into the solutions.
What is the StartService Failed 1058 Error?
Error 1058 or Error Code: 20006 (Cannot create service StartService failed: 1058) usually occurs when you install a game for the first time.
Another scenario where this error appears is when a service on your computer suddenly stops working. It also happens when you try to open a program or start a service.
If the StartService Failed 1058 Error happens after installing a game, it occurs because the game can’t find the AntiCheat system.
Another possible AntiCheat issue triggers the error code 30005 and it’s resolved the same so read on to find out how.
EasyAntiCheat is an application to combat in-game cheating that comes with Steam and other gaming apps. In other words, the AntiCheat system ensures no fragility or modes affect the game.
You may also encounter system error 1058 when a service stops working because it is disabled.
The main reason for this error is the sudden termination of service because of internal conflicts or changes in settings.
How do I fix the Cannot create service (StartService failed 1058) error?
1. Restart the service
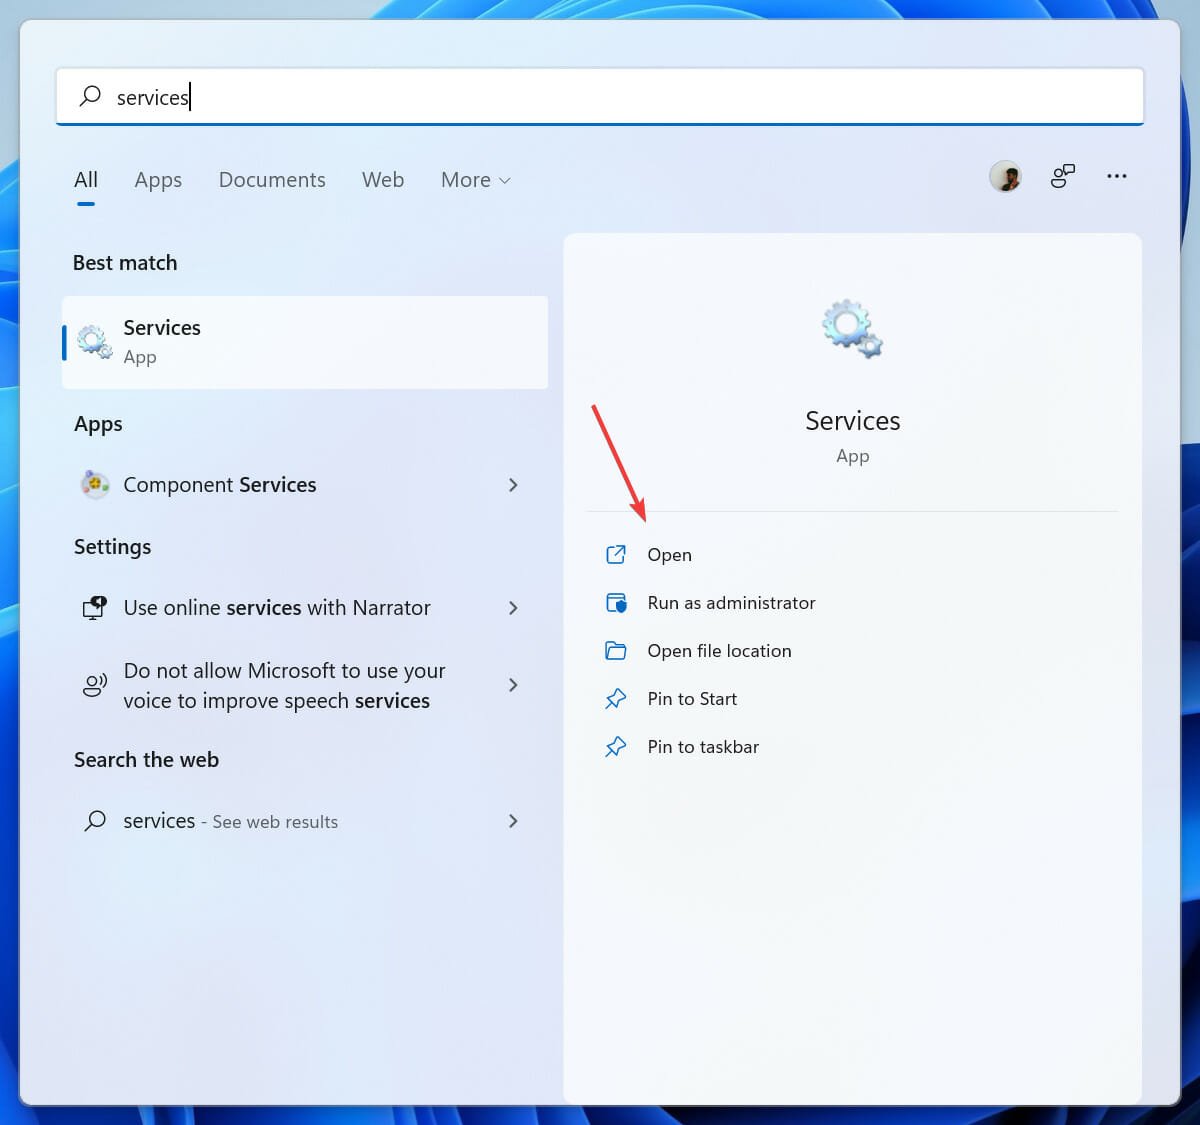
Click on the Start menu button and type Services in the search box.
Open Services and search for the Windows Update service then double-click on Windows Update.
If the service is disabled, open Startup type and choose the Automatic option.
Click Apply.
After that, select Start to run the service.
Click OK.
If the service starts, the problem is solved. If not, click on the Dependencies tab.
Find all the services mentioned in the box, then click OK.
Open each of the services above and click on the Start button to start them all.
The first thing you can do to fix Error Code 20006 – StartService Failed 1058 is to open the Services app on your computer.
After enabling the disabled service, it should start immediately. If it doesn’t, you must follow the steps above.
2. Use a PC repair tool
If the above-mentioned solution doesn’t work, you can use a PC repair tool to fix whatever is wrong with your computer’s operating system. These tools will scan your computer, particularly the system files, for faulty or missing data.
They are effective in the majority of situations and help you get the most out of your computer by boosting its performance.
3. Install the EasyAnti-Cheat System
Press the Windows key + E to start File Explorer.
Go to C:\Windows\SysWOW64 and copy EasyAntiCheat.exe.
Paste the EasyAntiCheat.exe file in the C:\Windows\System folder.
If you couldn’t find the file, search for it in File Explorer and put it in the correct folder or download it from the dedicated website.
The most common solution is to make sure the executable EasyAntiCheat system file was where it was meant to be.
4. Disable the antivirus
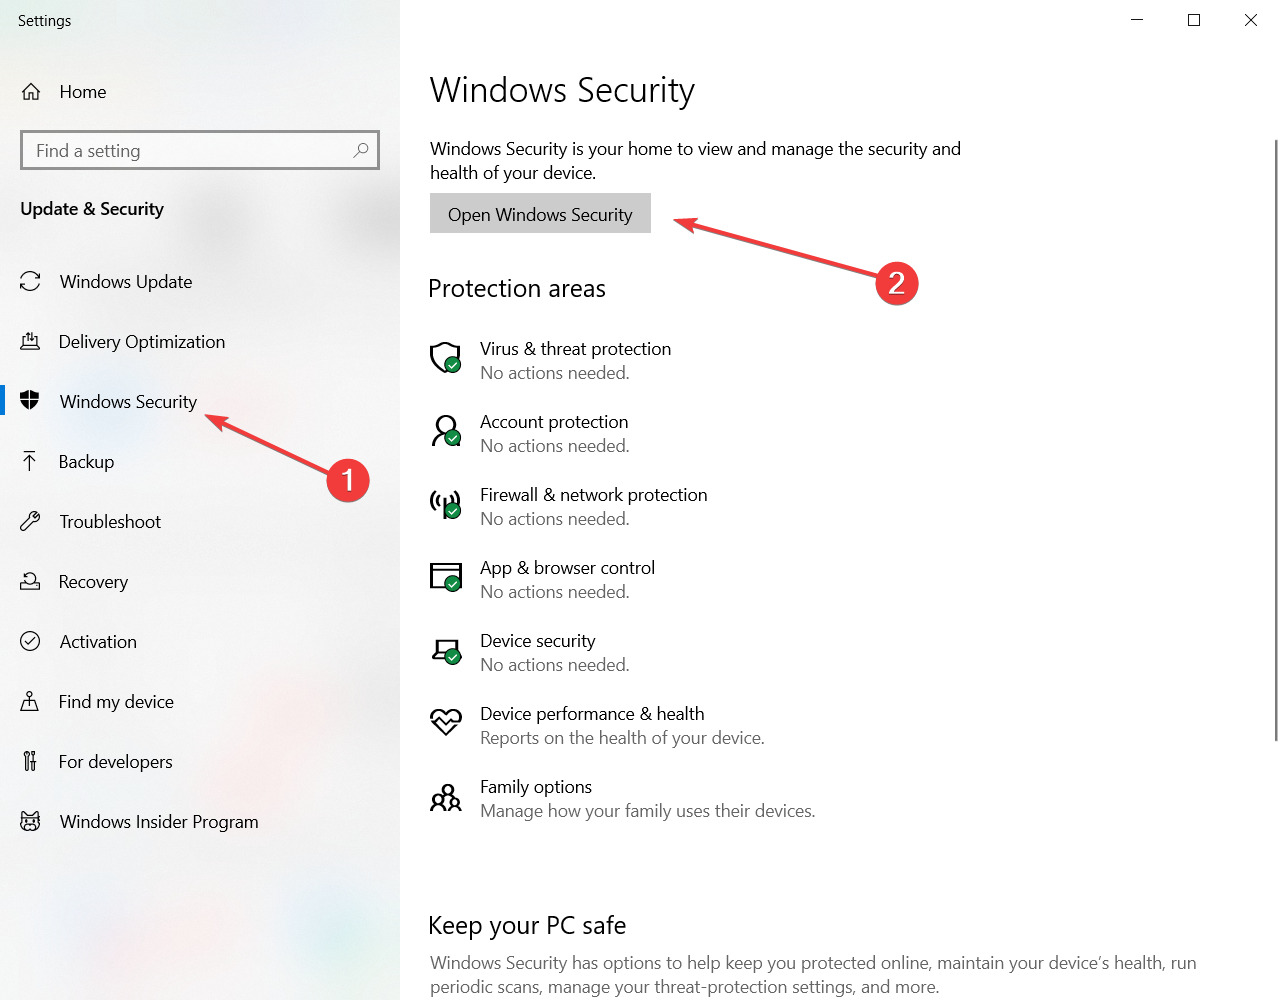
Press theWindows key + Ito open theSettings app.
From the menu on the left selectWindows Security then, click onOpen Windows Security.
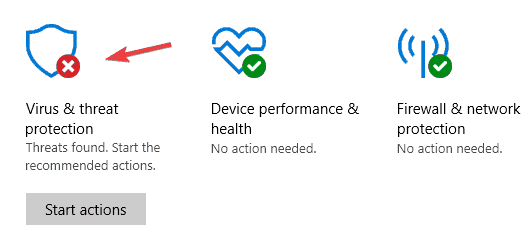
Now, selectVirus & threat protection.
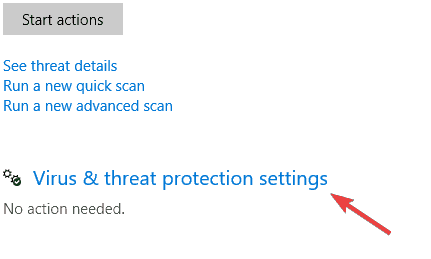
ChooseVirus & threat protection settings.
DisableReal-time protection. If you want, you can disable all other options on this page as well.
Although it’s not common, some users have reported their antivirus quarantined EasyAntiCheat.exe file. Disabling antivirus and running the game can prove if it’s a problem or not.
We have shown you how to disable Windows Defender but if you have a third-party antivirus, open its settings menu and disable it from the security menu.
As we said earlier, when the game cheat system not being installed or enabled correctly, it will cause the error 1058 to occur.
However, other reasons may stop you from playing Fortnite and encounter error 1058.
Incomplete installation files and missing Windows files may cause LAUNCH ERROR START SERVICE FAILED: 1058 appears.
You can reinstall the game or necessary system files to solve the error, or third-party PC Repair tools to scan and fix the Windows missing files.
If you encountered Error 1058, StartService Failed: 1058, the abovementioned solutions will help you fix the error and enable the service or run the game put you in trouble.
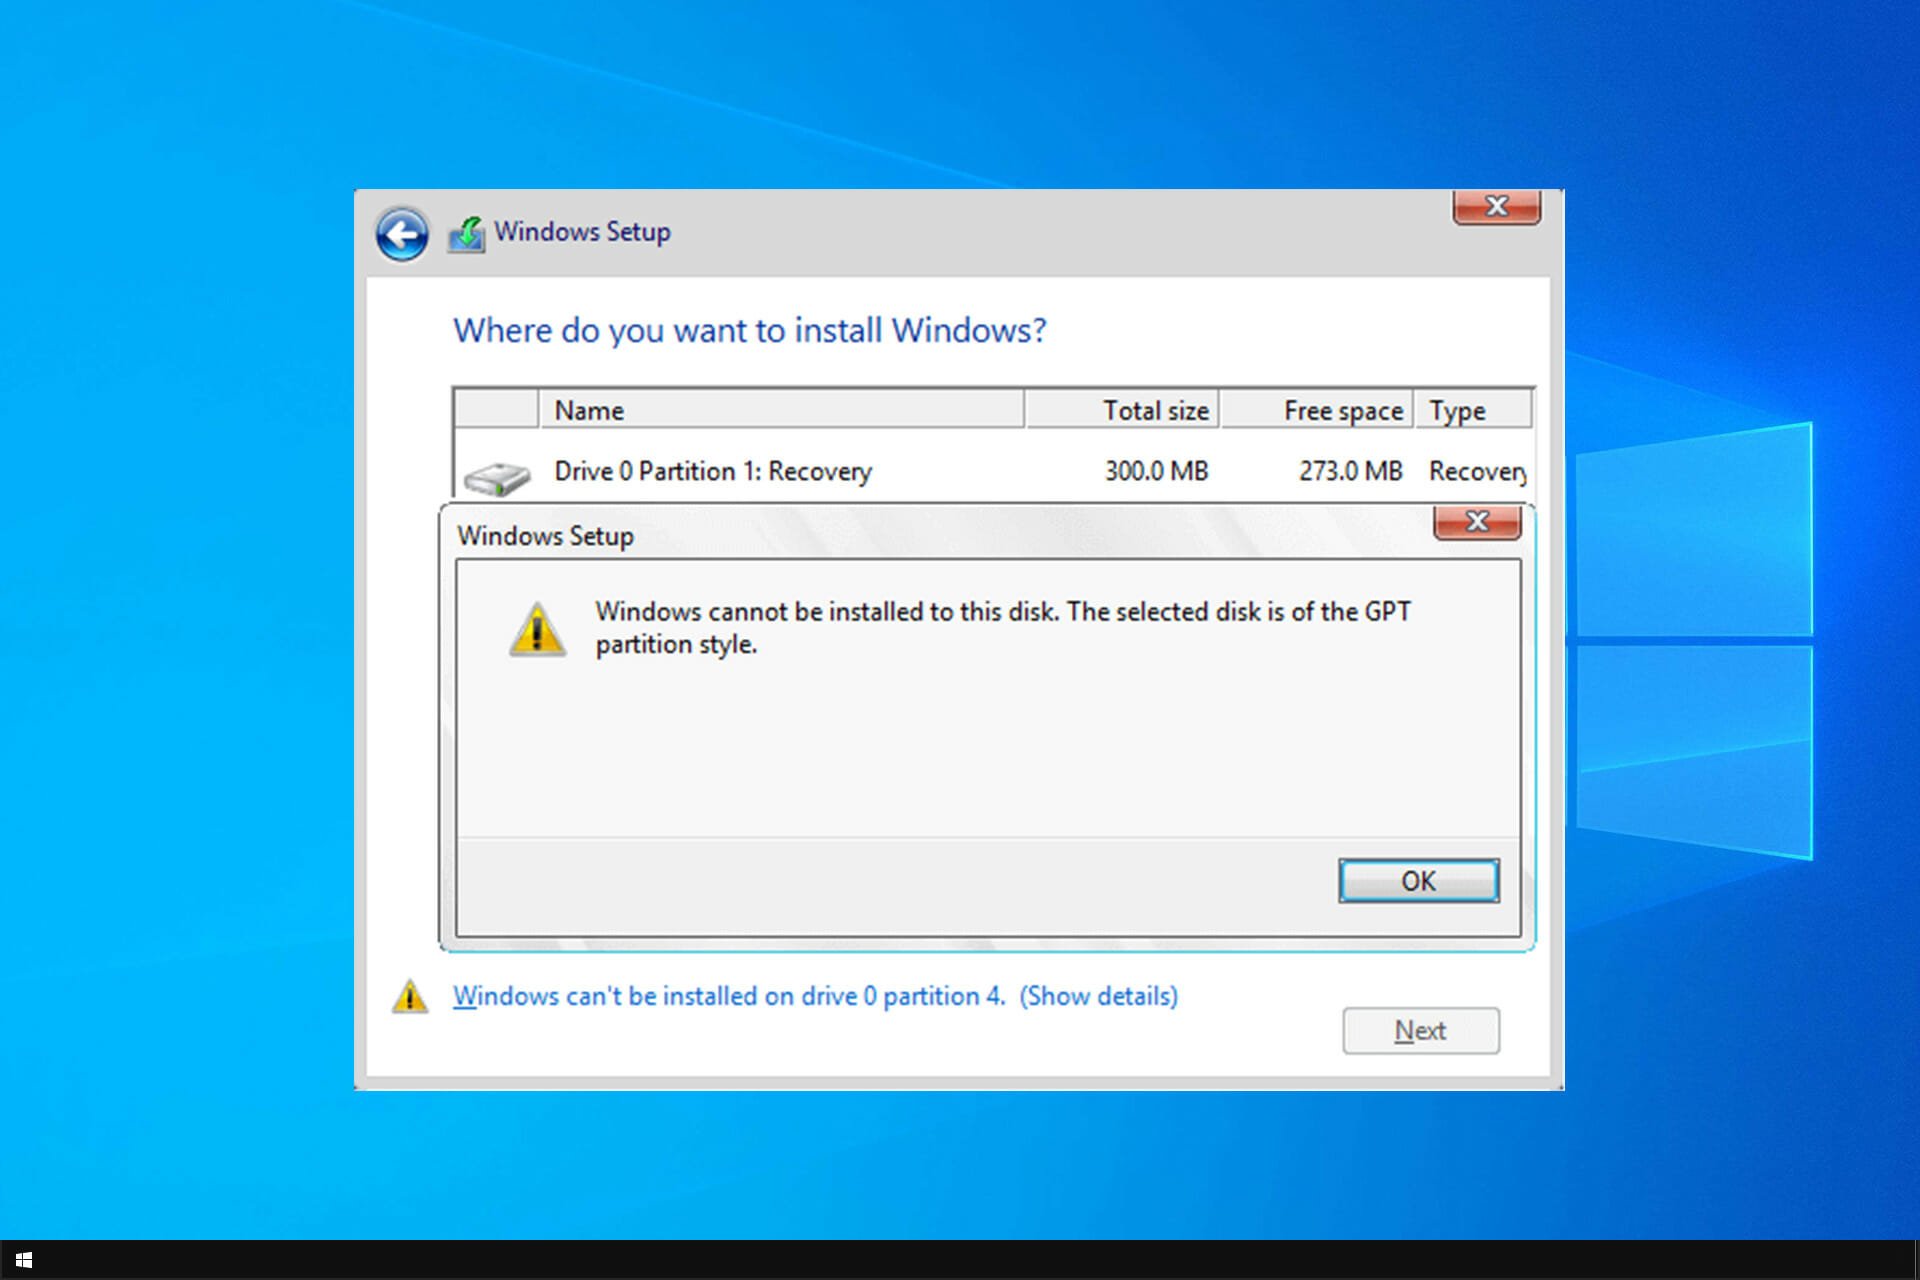
Installing Windows isn’t always simple, and sometimes certain issues can occur. One of the most problematic issues is Windows cannot be installed to this disk error, so let’s see how to fix it.
This isn’t the only installation error, and many have reported Installation failed in the safe_os phase, so the problem can appear during any parts of the setup.
In most cases, the error is caused by hardware incompatibility. After that, check your SATA device or use the diskpart tool.
For full instructions, check the guide below.
What can I do if Windows 10/11 cannot be installed to this disk?
1. Make sure that no additional hard drives are connected
Sometimes additional hard drive or storage devices can cause this error to appear, therefore you need to disconnect all hard drives except the one that you’re going to use to install Windows 10.
Users also reported that sometimes USB flash drives or SD cards can interfere with Windows 10 installation, so be sure to remove them all. If needs be, try to install Windows 10 from a DVD.
2. Check your SATA device
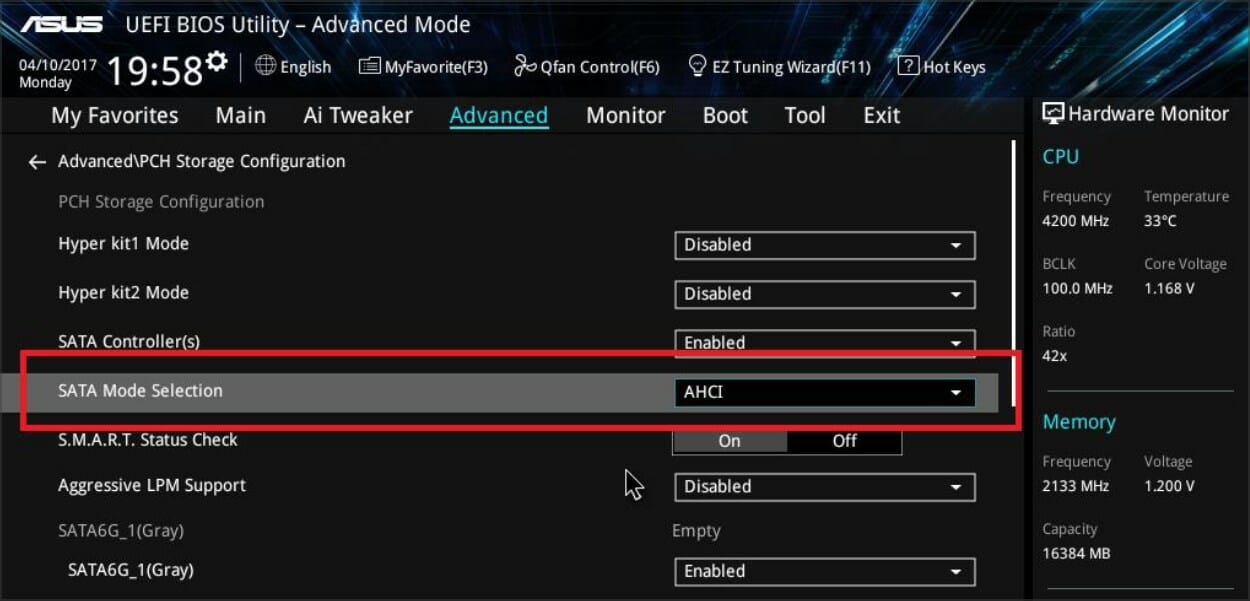
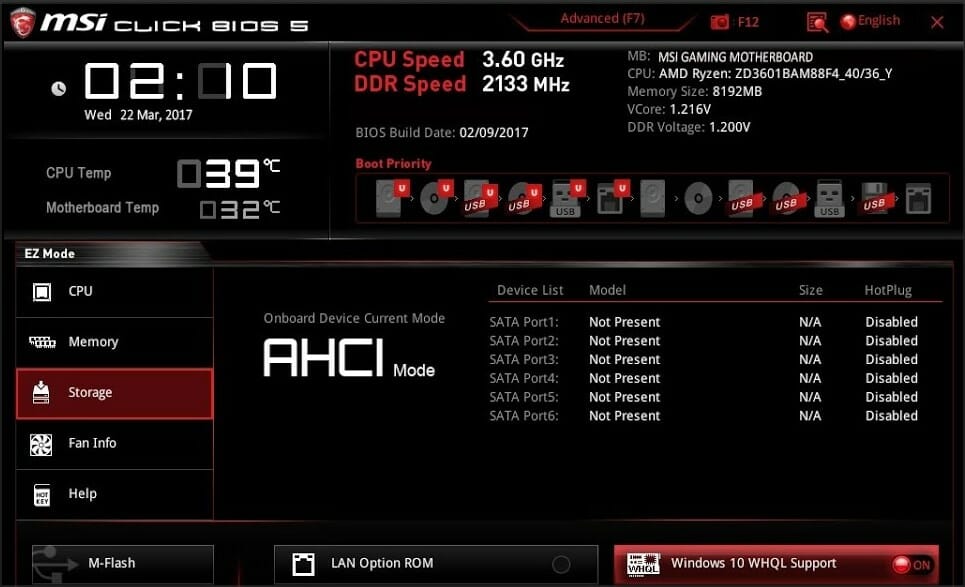
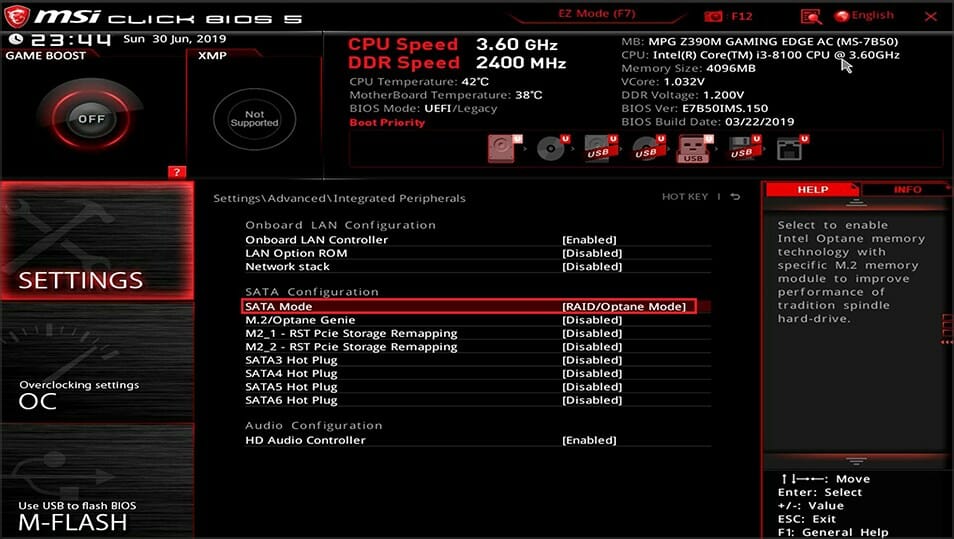
According to users, this error can appear if your primary hard drive is attached to eSATA port, so be sure to connect it to a different port. In addition, be sure that your SATA controller is set to AHCI or RAID mode.
If you have CD, DVD or Blu-ray drive attached to eSATA or SATA 3 port, be sure to disconnect them and attach them to SATA 2 controller.
Also, do not use an enclosure casing with a SATA 3 HDD that is connected to a SATA 3 controller.
Keep in mind that a faulty drive will cause you to get Windows cannot be installed to this disk the disk may fail soon error, so be prepared to replace your drive.
Windows 10 can’t install on GPT partitions
1. Use diskpart tool
During the Windows 10 setup, press Shift + F10keyboard shortcut to open Command Prompt.
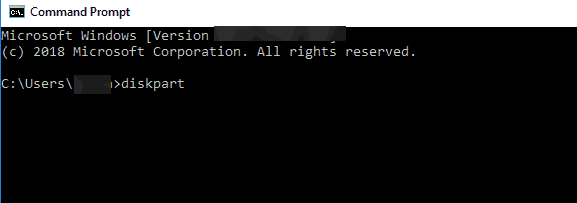
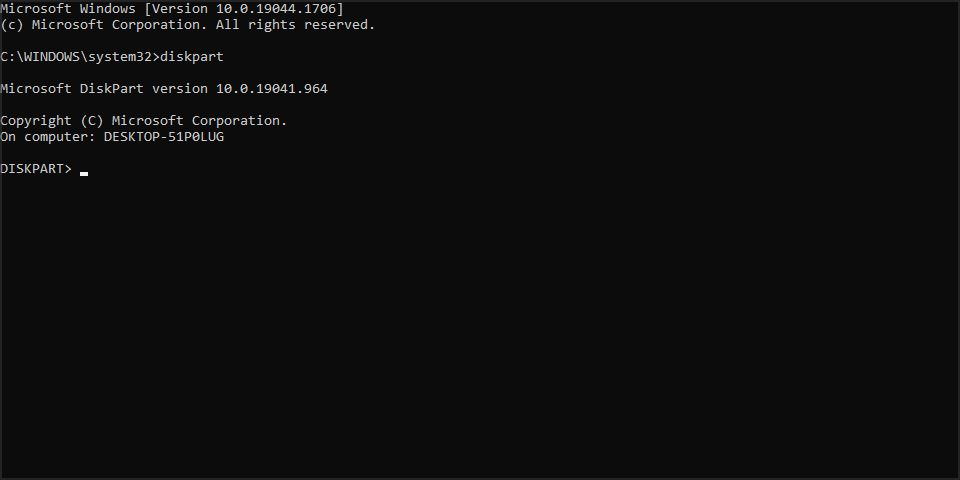
When Command Prompt opens, enter diskpart and press Enter.
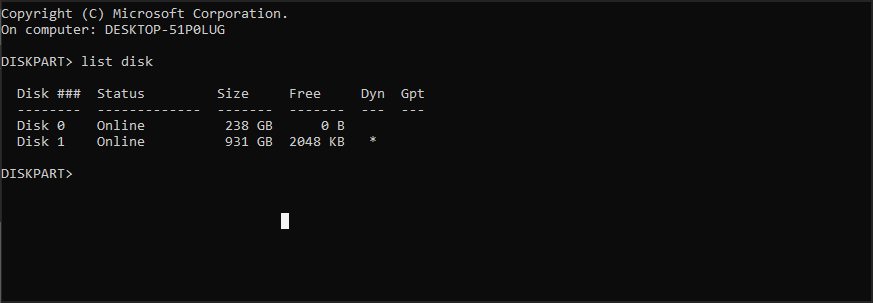
Now enter list disk and press Enter.
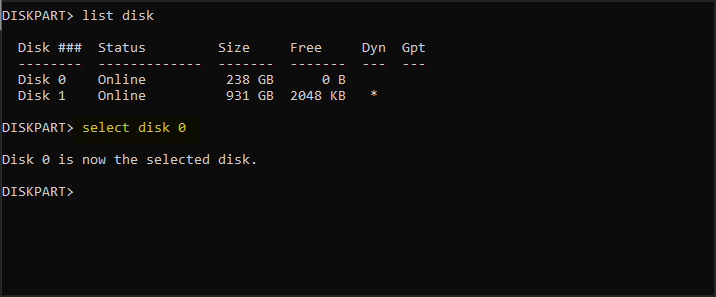
List of all available hard drives will appear. Typeselect disk 0 and press Enter.
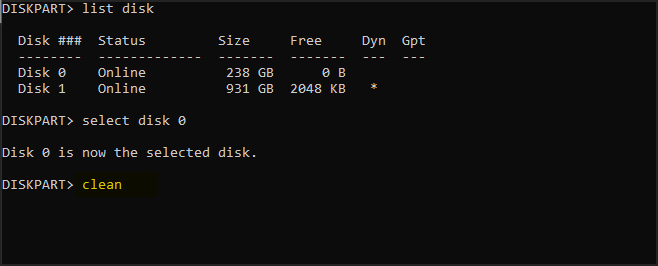
Enter clean and press Enter.
Optional: Use convert gtp or convert mbr command to convert your drive to the desired type.
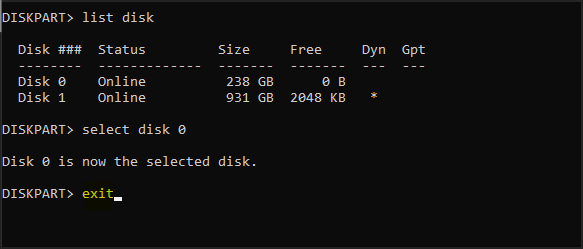
Enter exit and press Enter.
Close Command Prompt and try to install Windows 10 again.
Once again we have to mention that the clean command will delete all files and partitions from a selected hard drive.
Therefore be sure to back up important files or use this solution if you have a new computer that doesn’t have any important files on it.
2. Use legacy BIOS mode
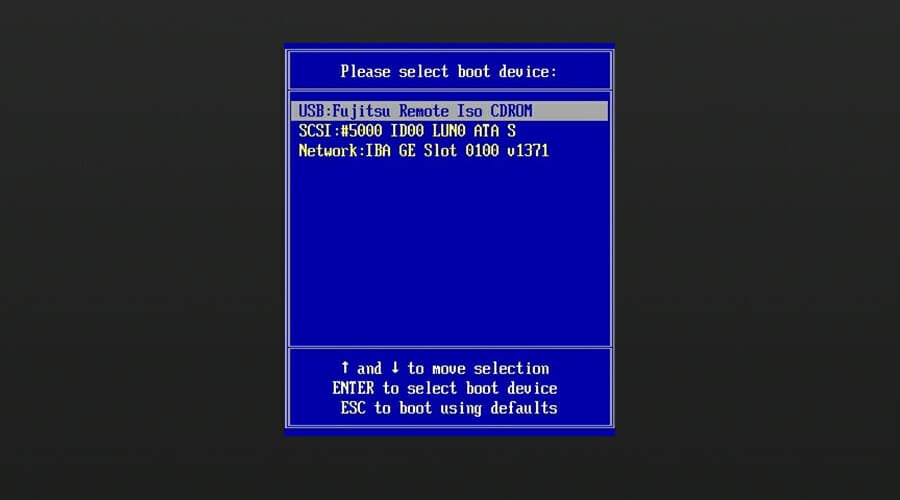
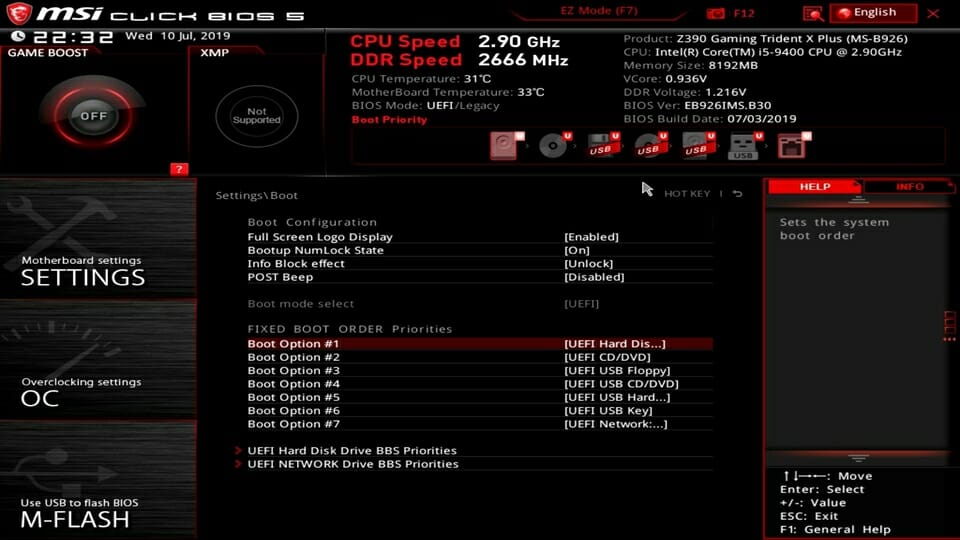
While your computer boots press the appropriate key to open Boot Menu. Usually that key is set to Esc, F2, F9 or F12, but it can be different depending on your motherboard.
Once the Boot Menu opens, select BIOS USB Drive option and press Enter and you’ll boot from that flash drive using the BIOS Legacy mode.
Proceed with installation and install Windows 10.
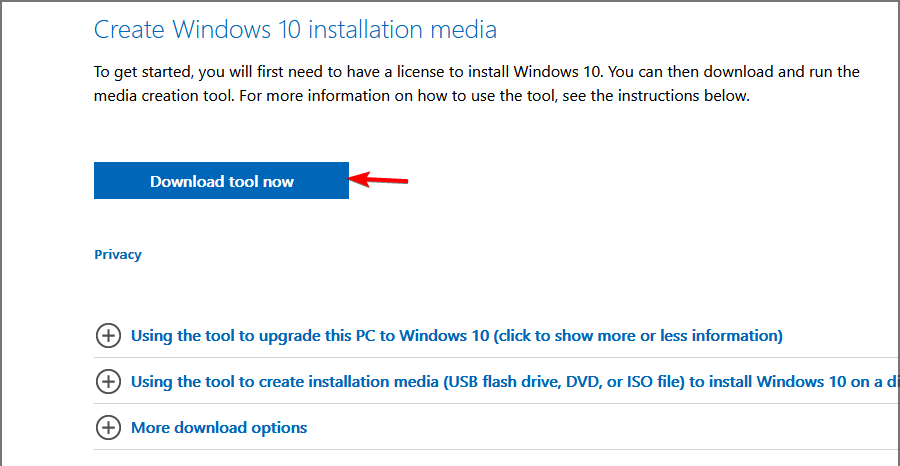
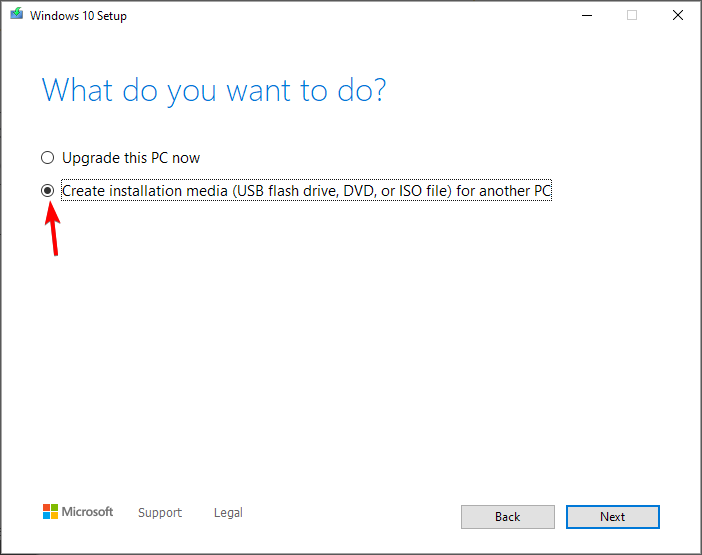
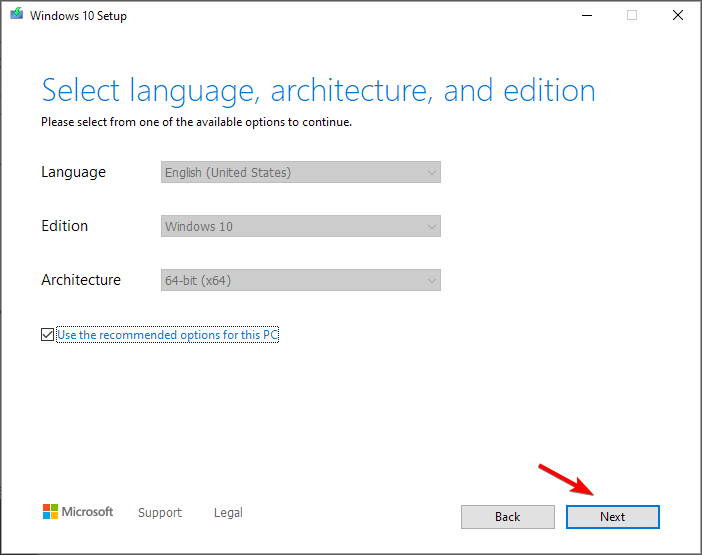
3. Use Rufus to create a bootable USB flash drive
Get a 8GB or 16GB flash drive and connect it to your PC.
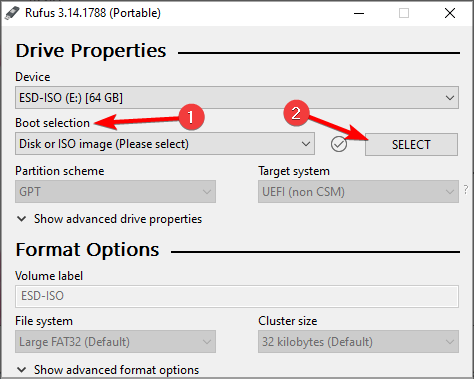
Set Boot selection to Disk or ISO image. Click on Select button and choose your Windows ISO file.
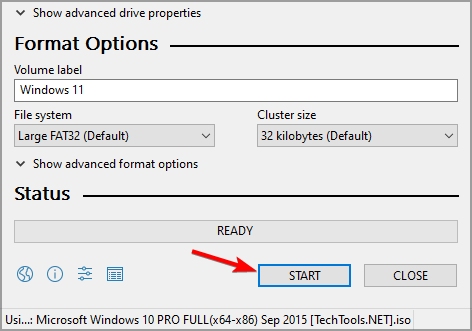
Click Start to start the process.
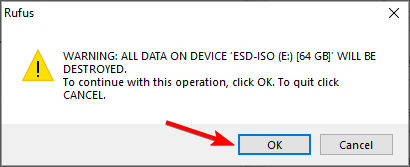
You’ll be asked to format the drive, so click on OK to proceed.
Wait for the process to finish.
Windows 10 can’t install on MBR partitions
1. Disable EFI boot sources
While your computer boots press the appropriate key to enter BIOS. Usually that’s Del or F2, but it can be different on your PC.
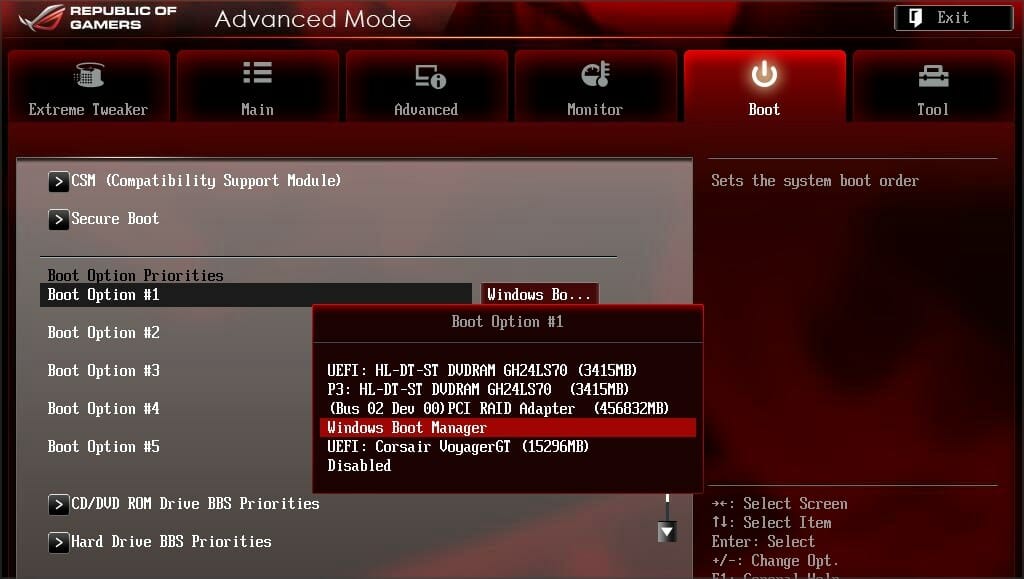
Once you enter BIOS, you need to locate Boot Order section and disable EFI Boot Sources.
Save changes and restart.
After disabling EFI Boot Sources you should be able to install Windows without any issues. If the installation is successful, you need to go back to BIOS and enable EFI Boot Sources.
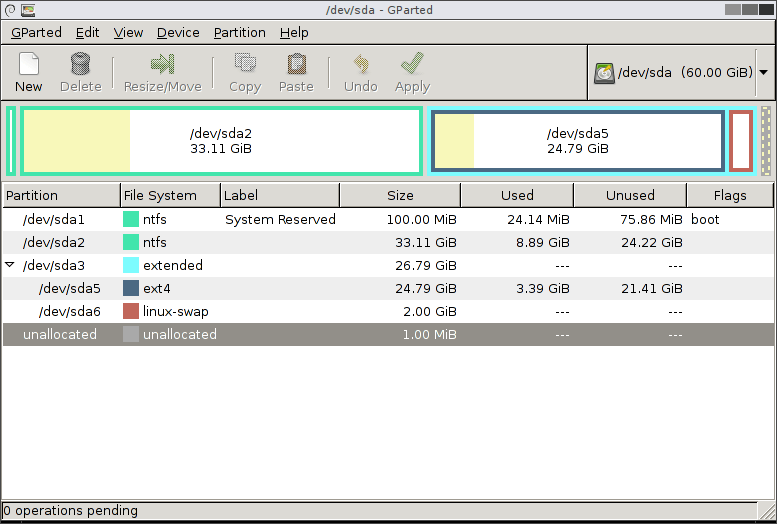
2. Delete the partition and format it again
Boot your device from installation USB.
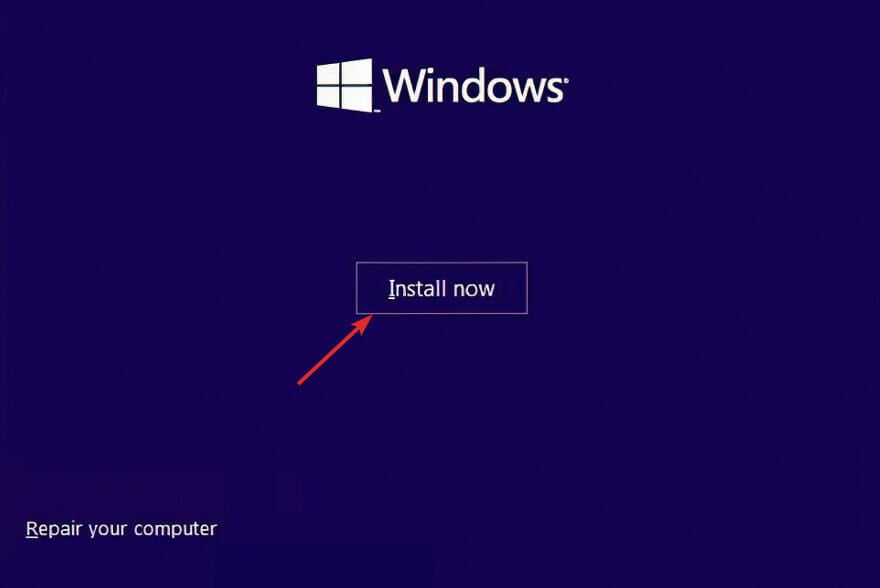
Click on Install now.
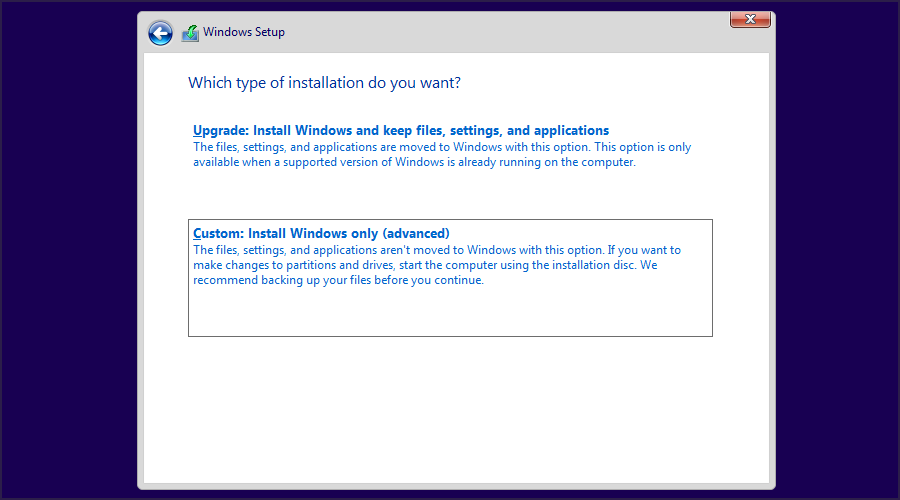
Select Custom: Install Windows only (Advanced).
Choose the drive on which you want to install Windows and click on Delete.
Now click on New to create a new drive.
Select the new drive and follow the instructions on the screen.
If you’re getting Windows 10 cannot be installed to this disk MBR partition table on EFI system, then your only option might be to format your drive.
3. Use a DVD drive
If you’re having this problem you should be able to circumvent it by using a DVD drive to install Windows 10. When installing the operating system from a DVD users are suggesting to use ODD option instead of EFI.
In addition, you can also try to use an external DVD drive to fix this problem.
4. Disable UEFI boot
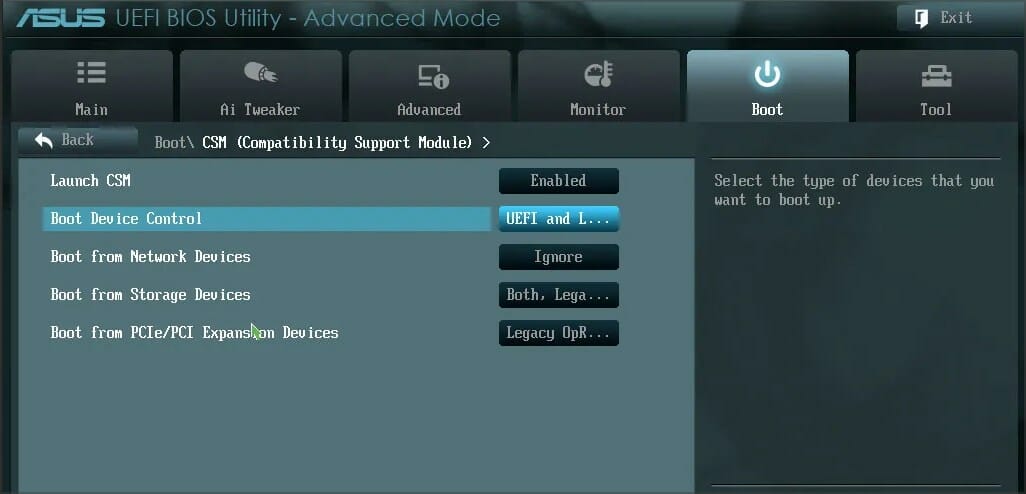
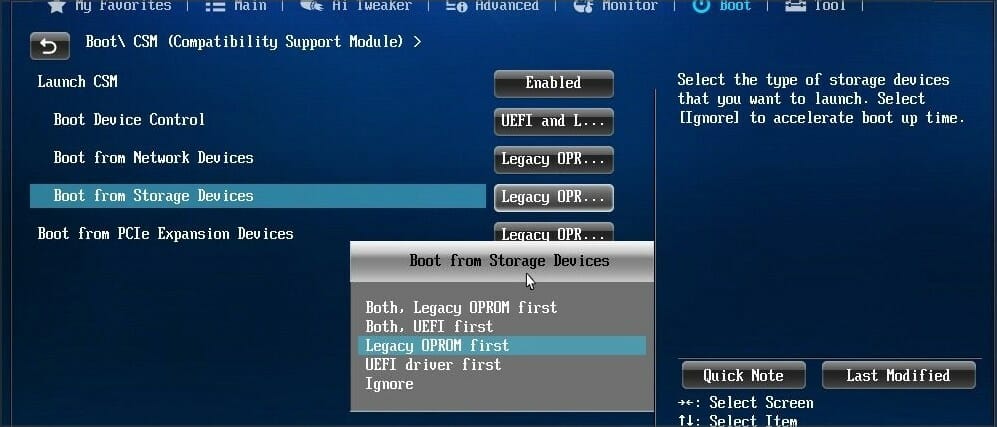
Newer motherboards support UEFI boot option, but sometimes UEFI boot can give you Windows cannot be installed to this disk error. To fix it, you need to enter BIOS and enable Legacy Boot option.
For more information on how to enter BIOS and how to use Legacy Boot, we strongly advise you to check your motherboard manual.
Some motherboards support both UEFI and Legacy boot so you can use both modes without having to disable anything. In some situations, you can even fix this problem by disabling Legacy boot and using UEFI instead.
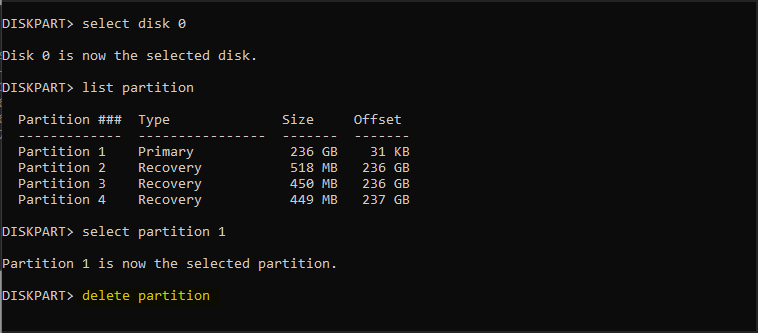
5. Use diskpart to delete the problematic partition
NOTE
This solution will remove all files from the selected partition, so be sure to back up your files beforehand.
Open Command Prompt. If you’re trying to install Windows 10 you can use Shift + F10 shortcut to start Command Prompt.
Enter diskpart.
Now enter list disk.
Select the disk that you want to use. Enter select disk #. Replace # with the appropriate number that represents a certain disk. We used disk 0, but it might be different on your PC.
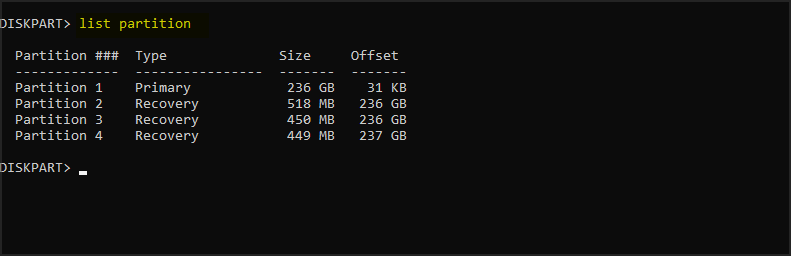
Enter list partition.
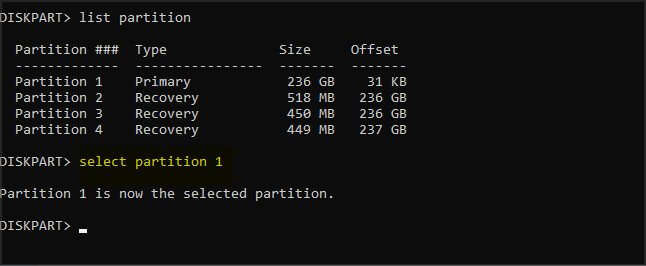
Locate the partition that you want to delete and enter select partition #. Replace # with the appropriate number that represents the partition.
Lastly, enter delete partition.
After that, try to install Windows 10 again.
If this process seems complicated to you, you can always use third-party tools that come with graphical interface, such as AOMEI Partition Assistant.
With such tools you can easily delete partitions, format them or perform any other disk-managing actions easily and in a matter of seconds.
6. Wait until Press any key to boot from disk message appears again
Many motherboards support both UEFI and Legacy boot, and some motherboards will start UEFI boot first. If you see Press any key to boot from disk message, do not press anything.
If your motherboard has UEFI and Legacy boot enabled the same message will appear again. When Press any key to boot from disk message appears for the second time press any key to boot from a designated device.
7. Use a USB 2.0 flash drive
Users reported that USB 3.0 flash drives don’t give them the option to choose MBR or Legacy boot while choosing a boot device, but you can fix this problem by using a USB 2.0 flash drive instead.
Alternatively, you can use USB 2.0 port on your PC if you have one.
The computer hardware may not support booting
1. Delete all partitions and convert your hard drive to GPT
To fix Windows 10 cannot be installed to this disk GPT without losing data error you might have to delete all your partitions. This procedure will delete all your files, therefore we urge you to create a backup before you start.
If your hard drive is larger than 2TB, you must convert it to GPT. To do that, use diskpart tool to clean your hard drive and then convert it to GPT.
For more instructions on how to do that be sure to check our guide on how to convert MBR to GPT disk.
2. Format your hard drive from Linux
If you don’t want to use command line to fix this problem, you can start your PC from a Live Linux CD. After Linux starts, locate the appropriate disk management tool and format it to FAT32 drive.
Be sure to use the slow method to completely clean your hard drive. This procedure will delete all files from your hard drive, so be sure to back them up.
After your hard drive is formatted, try to install Windows 10 again.
3. Disable unnecessary boot devices in BIOS
While your system boots, press F2 or Del to enter BIOS.
Now navigate to the Boot section.
Disable all unnecessary boot devices.
For more information on how to disable boot devices be sure to check your motherboard manual.
4. Connect your hard drive to Intel SATA 3 port instead of Marvell port
Restart your PC.
While it boots, press F2 or Del. This should take you to BIOS.
Now locate settings for Intel SATA 3 controller and set it to run in AHCI Mode.
Turn on SMART option for Intel SATA 3.
These types of problems can sometimes appear if your hard drive is not connected to Intel SATA 3 port, so be sure to connect it to Intel SATA 3 port on your PC.
5. Connect your hard drive and optical drive to correct SATA ports
Some motherboards require that you connect your hard drive and optical drive to appropriate ports. Users reported that after connecting the hard drive and optical drive to SATA 5 and SATA 6 ports on their motherboard the issue was resolved.
For more information on which SATA ports you should use, we strongly suggest checking your motherboard manual.
6. Remove your USB installation media after the first restart
Few users reported that you can avoid this issue simply by removing your USB installation media. According to users, you need to remove your installation media before your computer restarts during the setup process.
After the USB media is removed, the installation should continue without any issues. In addition, be sure that you don’t have any additional USB drives or devices attached to your PC.
We don’t know if this solution works, but a couple of users reported that it fixed the issue for them, so feel free to give it a try.
7. Check if your hard drive is on the list of boot devices
Restart your PC and keep pressing F2 or Del to enter BIOS.
Navigate to the Boot section.
Make sure that your hardware is added as a boot device.
Few users reported that their hard drive had an exclamation mark before it in Boot options menu, meaning that the hard drive is disabled.
According to them, you can enable your hard drive again simply by using Ctrl + 1 shortcut. Keep in mind that different versions of BIOS might use different shortcuts, so check your motherboard manual for detailed explanation.
8. Disable External Device Boot
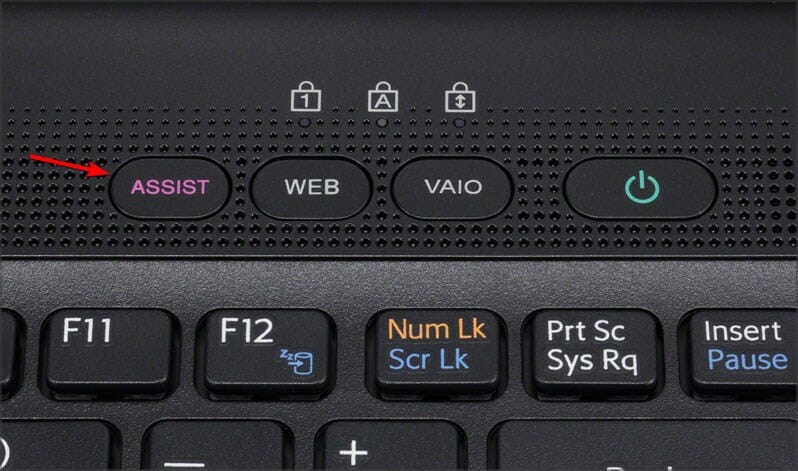
Open BIOS settings. You should be able to do that by pressing the Assist button on your laptop.
Go to External Device Boot settings and disable this option.
Save changes and try to install Windows 10 again.
Few users reported that you can fix this issue on Sony Vaio devices by disabling External Device Boot. According to them, the device finds more than one boot option from BIOS, but you can fix that by following these steps:
9. Disable Intel Boot Security
While your PC boots, press F2 to access BIOS. Note, your PC might use a different key.
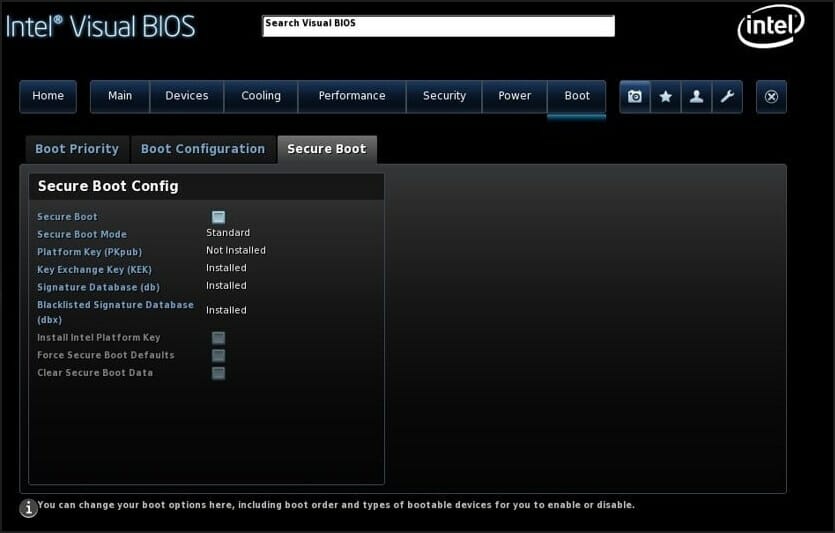
Navigate to Secure Boot section.
Now disable Intel Boot Security.
If your device supports Intel Boot Security feature you should disable it from BIOS. Users reported that Intel Boot Security feature can interfere with Windows 10 installation, therefore be sure to disable this option in BIOS.
After disabling Boot Security Windows 10 should be installed without problems.
10. Disable the AHCI mode
Restart your PC and enter BIOS. You can do that by pressing F2 during boot.
Now look for storage settings.
Locate the AHCI mode for your drive and disable it.
After using this solutions, the Windows cannot be installed to this disk ensure disk controller is enabled in BIOS message will be gone.
11. Unplug your Ethernet cable
Many users reported that they fixed this issue simply by unplugging the Ethernet cable.
We don’t know why Ethernet cable caused this problem, but if you’re getting The computer hardware may not support booting error be sure to try this solution.
12. Set the boot order properly
Restart your PC.
While the PC boots, keep pressing F2 or Del to access BIOS.
Navigate to Boot section.
Now make sure your flash drive is set as first boot device.
Few users reported this error while selecting their USB drive as the boot device. According to them, the only way to fix this issue was to enter BIOS and set the USB flash drive as the first boot device.
For some strange reason the quick boot menu option wouldn’t work for them, but after changing the boot order in BIOS the issue was resolved.
13. Setthe partition to active
NOTE
Using diskpart tool can lead to file loss, therefore we recommend that you back up your important files before using it.
Start Command Prompt. If you’re trying to install Windows 10 you can start Command Prompt by pressing Shift + F10.
After Command Prompt opens, enter diskpart and press Enter.
If you have two or more hard drives, enter list disk command. Locate your the hard drive that you want to use to install Windows 10.
Enter select disk #. Replace the # with the appropriate number. If you have only one hard drive use disk 0.
Now enter list partition.
Locate your desired partition and enter select partition #. Replace the # with the appropriate number.
Enter active.
Close Command Prompt and try to install Windows 10 again.
Sometimes you might get Windows 10 cannot be installed to this disk the selected disk is of the GPT partition style error, but that can be fixed with diskpart.
Windows cannot be installed to this disk SSD
1. Be sure that your SSD is clean
According to users, installation problems with Windows 10 can occur if your SSD drive isn’t clean. To fix this problem be sure to remove all partitions and files from your SSD and try to install Windows 10 again.
In addition, be sure that AHCI is enabled.
2. Try non-UEFI boot
Restart your PC.
While the PC boots, press F2 or Del.
Now go to the boot section and disable UEFI boot.
Few users reported that you can fix this problem simply by using non-UEFI boot, so you might want to try it.
3. Disconnect other SSD
If you have two or more SSDs on your PC you might experience this error. One of the simplest solutions is to disconnect all other SSD drives and check if that fixes the problem.
In addition, be sure to disconnect any storage devices from your PC.
Users reported that this issue can occur if the SATA 3 expansion board is faulty, so you might want to try using SATA 2 port instead.
According to users, they were able to install Windows 10 after connecting their SSD to SATA 2 port, so be sure to try that.
5. Connect your DVD drive to the motherboard
It seems that this issue appears when you connect both your SSD and DVD to the controller.
One of the simplest solutions is to disconnect your DVD drive and connect it to the motherboard while keeping the SSD connected to the controller.
After doing that, Windows cannot be installed to this disk setup does not support USB message will be gone.
6. Remove RAID configuration
Restart your PC.
During the boot, keep pressing F2 to access BIOS.
Navigate to Storage settings.
Set the SATA Mode to anything else then RAID.
Users reported this problem while using RAID, and according to them, removing RAID configuration from BIOS fixed this issue.
After removing RAID, create it again, make it bootable and you should be able to install Windows 10.
7. Make sure that your USB flash drive and SSD don’t match
This is a very unlikely issue, but users reported that Windows 10 installation can fail if you’re trying to install it with USB flash drive.
Users reported that they had problems with Corsair USB flash drive and SSD, but after replacing the Corsair flash drive with a different brand the issue was fixed.
The partition contains one or more dynamic volumes
Convert your dynamic disk to a basic disk
During Windows setup, press Shift + F10 to open Command Prompt.
Now type diskpart.
Enter list disk. Locate the disk that you want to convert.
Enter select disk #. Replace # with the appropriate number.
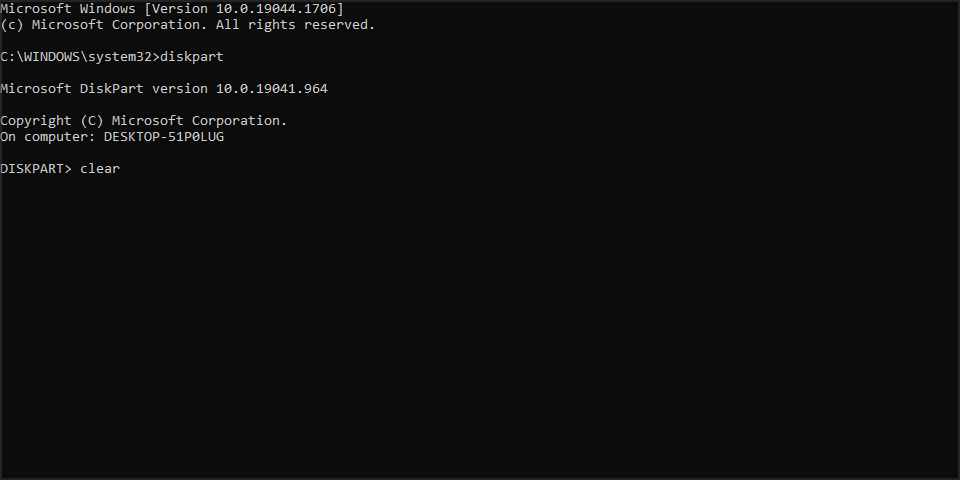
Enter clear.
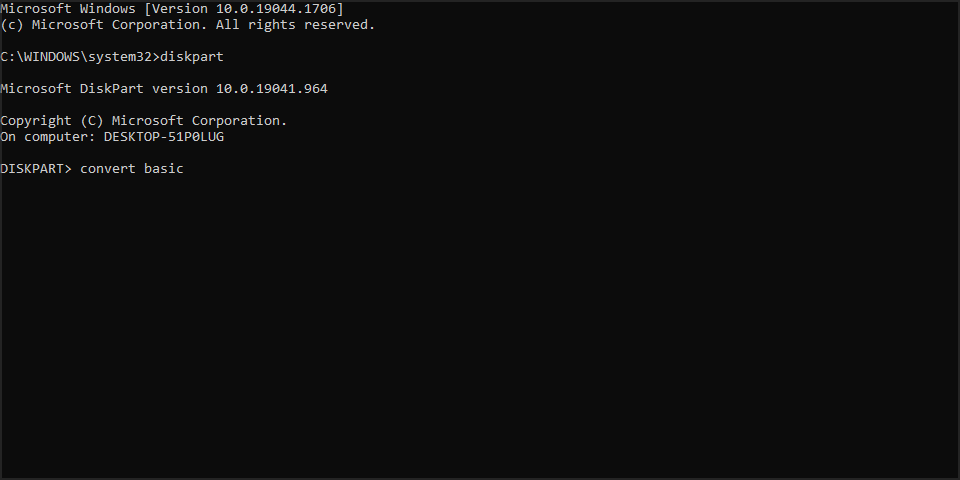
Now enter convert basic.
Close Command Prompt and try to install Windows 10 again.
After your disk is converted to basic, try to install Windows 10 again.
What can I do if Windows 11 cannot be installed to this disk?
This issue affects all versions of Windows, and in most cases it’s caused by your configuration, so adjusting the BIOS settings will fix the problem.
Since this is such a common issue and caused by BIOS, fixing it on Windows 11 is exactly the same like on the older versions.
Windows cannot be installed to this disk error can be a big problem and prevent you from installing Windows 10, but you should be able to fix this issue by using one of our solutions.
Microsoft has been long rumored to be working on a successor to Outlook, and/or a “One Outlook” app, merging Mail, Outlook.com, and Outlook for Windows / Mac into a new, sleeker mail client that shares code across all the variations of Outlook.
Microsoft has just officially released in Beta the first steps in that process (an early version of the New Outlook was discovered on the Microsoft Store), offering the “New Outlook for Windows” for Office Insiders in the beta channel, as long as you’re using a commercial or enterprise Microsoft 365 account to access Outlook, and that your organization has enabled beta channel access for you.
Once you’re eligible, you’ll see a “Try the New Outlook” toggle in the upper right hand corner of Outlook. Turn the toggle on to receive New Outlook, and you’ll be able to switch back at any time.
This New Outlook, in addition to bringing “consistency across our Windows and web codebases” and a new look, offers some Outlook.com like features, and bakes in new Microsoft properties like Loop, To Do, and elements from Teams like @ mentions. Here’s a quick recap:
Microsoft Loop Components
Microsoft Loop offers users a way to create snippets of data that can be updated or edited, embedded in programs like Microsoft Teams or the New Outlook, and kept up to date without having to send new emails or new Teams chats. Users will be able to edit or update Loop components from within (for now) Outlook emails or Teams chats, or (eventually) from a dedicated Loop website that will contain all the Loops you’re able to access.
@ mentions for people, files and documents
In Outlook you can already @ mention people, quickly adding them to emails without having to look up email addresses, etc., but now with the new Outlook you’ll be able to do the same for files and documents (as long as they are stored in the cloud, ie: your OneDrive for Business account). In the New Outlook, just @<name of your file>, and the New Outlook will show you options, allowing you to quickly access files without leaving Outlook.
Message reminders for important emails
Of course it wouldn’t be a Microsoft product without some AI sprinkled in, and the New Outlook will automatically remind you about “important” emails you haven’t responded to, pinning them to the top of your inbox until you respond or dismiss the reminder
To Do integration
The New Outlook allows you to drag and drop email messages into an integrated To Do list, allowing you to create list items for messages to be able to come back to them when you’re ready.
A Calendar “Board”
The New Outlook introduces the concept of a Calendar “Board,” a single view of your Calendar entries, To Do items, widgets you add, and more.
Meeting coordination
The New Outlook makes meetings management, whether in physical or virtual space, more seamless, allowing you to indicate whether you’ll attend meetings in person or virtually.
Pinned Items
Need to re-access emails and tired of searching or scrolling? The New Outlook allows you to Pin emails to the top of your inbox.
Sweep comes to Outlook
Sweep, a way to manage emails by automatically moving them into folders, keeping only the most recent email or emails while deleting or archiving the rest, and more, has been a feature of Outlook.com for a number of years, but with the New Outlook, it’s coming to Outlook proper. A simplifed but still powerful implementation of Outlook Rules, Sweep makes managing emails a lot easier.
If you’re a Microsoft 365 customer, you can try out the New Outlook if your organization allows and you’re in the beta channel on at least version 2205 of Outlook. Let us know what you think, what you’re missing from traditional Outlook, and whether you think this New Outlook is right for you in the comments below.
Emails are an integral part of everybody’s daily life. Introduced way back in 1965, email is still a main form of communication.
An average American checks their emails at least 15 times a day, or every 37 minutes, and an email client with a calendar can help boost productivity even more.
What if there was an email client that can help you achieve this? Doesn’t It sound amazing?
Keep reading as we have some of the best email clients that come with calendars for your PC as well as for your Mac.
Is there a better email client than Outlook?
An email client is a piece of software that you install on your device, and it can store and categorize your emails, help you focus better, and allow you to respond to the important emails first.
So, if you’re a Windows user, Microsoft’s Outlook is a great email client but there are a lot of other software out there that can do the job even better.
It all depends on your requirements as well as the functions you need it to perform. Outlook has the advantage of integrating a lot of other Microsoft services, but maybe you want something else.
In the list below, you will see some free and paid email clients that can integrate social media or have better storage and backup functions.
What is the best email client with calendar and tasks?
Mailbird is an excellent email client that is only available for Windows users at the moment.
Usually, most developers focus on bringing their apps and programs to Apple devices first, such as Macs and iPhones.
However, it is available only for Windows users currently, with a promised release for Macs in the future.
One of the unique features of this program is that it can integrate with numerous third-party applications and can display both your emails and the integrated apps under one window.
This tool is actually very similar to the Postbox email client that is not included in this selection because it’s a pretty young software.
It also has a calendar and the ability to create tasks by integrating Todoist or any other third-party application with Mailbird, making it one of the best email clients for Windows 10 and other Windows versions.
Some notable features include:
24/7 support
App integration
Unified inbox
Multi-language support
Dark theme
Mailbird
Mailbird is currently a stand-alone email client for Windows, with a promised future release for Macs.
The eM client works on both Mac and Windows PC. The sleek and user-friendly interface is a joy to use.
This email client with a calendar is extremely customizable, and every aspect of the UI can be customized to your liking.
You can also create a task by clicking on the checkmark icon and also select a due date with reminders.
If you’re sending out a large number of emails with the same message, you can use the Quick Text feature to help you send them with just a click.
You get a free license for two accounts, and you can upgrade to the Pro version for $49.95, which includes unlimited account support, VIP support, and other perks.
Some noteworthy features include:
Complete Gmail Sync
Built-in translator
Automatic data backup
Supports all mail protocols
Delivery and read receipt
eM Client
Get an excellent free email client with complete Gmail Sync and great customization features.
ProtonMail is another privacy-centric email client that is web-based instead of app-based.
You can download the application for your smartphone that is running on iOS or Android, but if you want to use it on your PC or Mac, you need to access it using your browser of choice.
ProtonMail offers end-to-end encryption and zero-access encryption for your emails. It strips your IP address when sending an email, and a lot more.
This client has a free version, but it has its limitations. You can use the free tier to try out things and see if they are a great fit for you.
The secure email service is fully integrated with an encrypted calendar that will help you keep your events private as well.
Some of the key features are:
100% strictly no-logs policy
Email that self-destruct
The IP address is not tracked
Built-in PGP encryption
ProtonMail
This great tool goes the extra mile to protect your emails and online privacy by hiding your IP.
A product of Mozilla that is open-source and privacy-focused. This is one of the oldest email clients on our list of the best email clients for PCs and Macs.
Thunderbird offers end-to-end encryption and has a huge library of add-ons from various developers that you can use to enhance your productivity and user experience, and they are all free.
Compared with other email clients, Thunderbird is a little slower in sending out emails. But this is a great pick if you value privacy.
But if you are wondering if Thunderbird is the best email client, the answer depends on your requirements or needs.
It is certainly one of the best open-source email clients that value users’ privacy, and it also has its own calendar called Lightning Calendar that is integrated with Thunderbird and many other features.
And every email client has its own pros and cons. So, if you want a privacy-focused email client, Thunderbird is the answer.
You can install Thunderbird on both PC and Mac, and it is free to download.
The following are some notable features:
End-to-end encryption
Matrix Support
Phishing protection
Open-source
Tabbed emails
One-click address books
Thunderbird
Thunderbird is an open-source product by Mozilla that is focused on protecting users’ privacy.
If you are someone that’s tied down by Microsoft’s Office suite, then Outlook from Microsoft is the perfect choice. It has been around for decades and is the default email client for most businesses and enterprises.
Is there a better email client than Outlook? Yes, each email client has its own set of features, use cases, and more. You have to determine what your use case is and what features you need.
Outlook is a great option for users who use Microsoft’s other services, such as Microsoft Office. This can be a great option for others as well, but again, it depends on what you need.
It is extremely feature-rich. It comes with its own calendar, you can create a task, set-up meetings, and a lot more.
The Microsoft Outlook is one of the best email clients for Windows 10 & 11, Mac, Android, and iOS devices.
Some of the key features of Microsoft Outlook are:
Email scheduling
Creating tasks, appointments, and more from one window.
Calendar and contact sharing
Seamless Office integration
Microsoft Outlook
Get this all-time popular Microsoft email client and integrate your Office products seamlessly.
If you are looking for a simple email client that does most of its job well and an email client with a calendar, then Gmail is a perfect choice.
Launched in 2004, Gmail is like a starter for beginners who have just started with emails. It has a large feature set, and many more are being added with time.
It also filters your email into three types: Primary, Social, and Promotion. That helpsyou focus better.
Just like Outlook, Gmail has all the same features, but it is a little bit intelligent as it uses its AI capabilities to enhance your experience, like predicting sentences, advanced grammar error detection, and lots more.
You can access Gmail on PCs and Macs using a browser, but it can also be downloaded on Android and iOS devices and get the same experience.
Some of its best features are:
Smart reply
Smart Compose
Undo sent email
Confidential mode
External account support
Gmail
Get this popular tool because it’s free, comes with great cloud storage, and has a great spam filter.
Outlook is overkill for many ordinary home users, which is why Microsoft created Mail, which is also known as Microsoft Mail and Calendar, a lightweight email client that comes preinstalled on Windows computers.
With Mail, you can add accounts from iCloud, Google, Yahoo, and other popular email service providers.
With Microsoft Mail, you can create tasks and also add important events to Microsoft Mail’s calendar easily.
Mail is one of the best free email clients for users who want a simple and lightweight email client.
Some of the best Microsoft Mail’s best features are:
Caret browsing
Personalized Alerts
External account support
Pinning inboxes to the Start menu
Easy to use and configure
Microsoft Mail
This app comes preinstalled in Windows and it’s probably the most basic and easy-to-use email client.
Google is constantly improving its services, and if you use Google Calendar to sync your day across multiple devices, you need an email client with Google calendar integration.
That way, you will never lose important meetings that are scheduled, appointments that you have created, and more.
An email client with Google Calendar integration can automatically add the meeting or an appointment to the calendar after detecting an upcoming event that has to be scheduled.
This makes it extremely convenient for users to add events and stay up-to-date. To answer the question, most email clients can integrate this feature and the functionality is the same.
Now that we have gone over our top email clients, we are sure this has been helpful.
If you are still wondering, what is the best email and calendar app? We would answer it is all of them, but it is on you to decide which one works for you.
It is for this reason that it is such a frustrating experience especially if there are a lot of edits made and you are working on a deadline.
Luckily, there are quick solutions you can try to fix Windows video editor issues and get to export your video in no time.
How do I export from Windows video editor?
You can export your video after you are done making the necessary edits to a folder of your choice.
Launch the Microsoft Photos app and begin editing your video.
Once you are done, name your video.
Click on Export and wait for the process to finish.
Why does video editor take so long to export?
The exact Windows video editor export time depends on the size of your project and the speed of your computer. A more powerful computer will also export faster.
If your computer isn’t powerful enough or there isn’t enough RAM, this processing will take even longer. Other reasons why the video editor takes so long to export include:
The resolution is set too high. If your quality is in HD or 4K, it will take time to export.
You have used many effects in your video that makes it difficult for the system to render them all at once.
When you have many projects opened at once, it will slow down the whole process and cause the exporting speed become very slow.
So, how long does exporting a video take in video editor? Well, it depends on various factors. The higher the quality output, the longer it will take.
You can turn off all other programs running on your computer while exporting as they’ll use up extra CPU power that could be better used by the video editor and make the process faster.
What can I do if Windows 11’s video editor isn’t exporting?
1. Check for app update
Press the Windows key and search for the Microsoft Store.
Once opened, search for Microsoft Photos and check whether there is an update available.
If there’s any, install and try exporting your video again.
2. Reset/Repair Photos App
Press the Windows + I keys simultaneously to open Settings.
Navigate to Apps and click on Apps & features on the right pane.
Locate the Microsoft Photos app, click the three ellipses and select Advanced options.
Select the Repair button.
Next, click on the Reset button.
Try exporting your video and see if the problem persists.
3. Uninstall and reinstall the Photos App
Press the Windows key, search for Windows Powershell and click Run as administrator.
Type in the following command and press Enter: get-appxpackage *Microsoft.Windows.Photos* | remove-appxpackage
Restart your PC.
Launch Microsoft Store and search for Microsoft Photos to install.
This method works mostly when Windows video editor is stuck on exporting. Sometimes it’s just a bug and a refresh of the system will get your video exporting again.
The Pictures folder is the default WIndows video editor export location. If you would like to assign it a specific folder, you can do so at the export stage and select the new location.
We hope our recommended solutions have been of much assistance to you if you encountered this problem.
Remember to check out our article on video stuck at export if you face any related problems. We also have a rich library of video editing software if you are looking for more advanced tools.
Let us know which solution worked for you in the comments section below.
If you’re a T-Mobile user, you surely have encountered the T-Mobile error 111. It is frustrating to face it, especially when you need your phone.
T-Mobile is a brand name that some companies owned by Deutsche Telekom AG use. Deutsche Telekom AG is a German telecommunications firm.
It is most commonly used in the Czech Republic, Poland, the Netherlands, and the United States. Their headquarters, on the other hand, is in Bonn, Germany
One of the main reasons for their popularity is that they used to have a relationship with Google and stocked Google Pixel phones, especially Google Pixel 6, in their stores.
In this article, we will explore easy ways to fix T mobile error 111 so that the next time you face it, you can fix it without getting frustrated.
Why is my T-Mobile phone not sending messages?
T-Mobile error 111 is not the only problem you might face when you use the service. You most probably will run into errors while sending messages as well.
One common problem is that all your messages will have the Sending status, and you also will not receive 2FA or OTP texts from the platforms you use daily.
You need to turn off your Wi-Fi and Bluetooth first.
Then, under Settings, tap on Apps and Notifications, then on App Info.
Go to the Carrer Services application.
Finally, click on Storage and Clear Data.
This was the solution their support staff recommended. However, if this did not work, simply download Google Messages. You will see that it magically fixes everything.
How can I fix T mobile error 111?
1. Restart the T-Mobile device
One of the most effective ways to fix many issues in the world of technology is restarting your device. If you are facing T-Mobile error 111, just restart and see if it goes away.
To restart your Android phone, just long-press the Power button, then select the Restart option that will pop up.
This is how to restart a T-Mobile device and it will help clear out temporary issues and errors.
Additionally, you may remove your SIM as well. Wait for at least two minutes before turning it back on.
2. Make sure it is not because of message blocking
If the message blocking feature is enabled for that certain contact, the messages you send to them will not be able to get through.
You will find that feature if you go to the Messaging app and select the Settings option in Android.
Disable the message blocking feature on your phone if you can, to see if it helps you reach your receiver and fix T-Mobile the error 111.
Encountering T mobile error 111 can be because of connecting to improper network data. This can easily become problematic and result in your messages not being sent.
If you think this might be the case, ensure that your phone is connected to a T-Mobile network and not Wi-Fi or something else.
To do that, go to Settings, tap on the Mobile data option, then go to Network provider and select T-Mobile from there.
If you can’t connect to the network, call T-Mobile to provide you with the correct settings for your mobile device.
4. Reset the network data
From your Home screen, click on Settings.
Head over to General and choose Transfer or Reset iPhone.
Finally, select Reset Network Settings and type your password in.
Some of our readers are asking how do I reset my T-Mobile network on a phone and as you can see, it’s pretty simple.
Resetting your T-Mobile network can go a long way in fixing the T-Mobile error 111 if it was caused by bad network data. It also helps with EE error 0.
Other causes for the T-Mobile error 111
Although this error can happen due to many reasons, there are some that you should especially pay attention to:
➡ The SIM card is not inserted properly – If the SIM card is not firmly locked in place, it won’t be connected to the network.
➡ Insufficient account balance – If you have a prepaid T-Mobile account, chances are you are out of credit, and that’s a perfectly valid reason for this error.
➡ Incorrect message settings – Checking your T-Mobile text message settings might also help you. When you can’t send a message and face error 111, especially on Pixel 6 phones, the bad configuration can be the cause.
➡ Pending updates – Additionally, make sure that your phone is not running an old OS and that all your applications are updated to their latest version.
That being said, we hope that our guide helped you fix the T-Mobile error 111, and now your phone works as it’s supposed to.
If you are trying to play MOV files on Windows 11, you’re in the right place. We’ll show a few different ways to achieve this. You can employ both built-in Windows tools or use additional software.
Now proceed to set up the software and run the converter.
Next, add the MOV files you want to convert to the interface.
For this guide, we chose the Wondershare UniConverter because it’s very easy to use but the conversion process is very similar to other products as well.
Click on Choose format. Select WMV on the left and on the right and select the video quality.
Back on the interface, click on Convert.
Once done, go to the file location and you can now play the .mov file in the Windows Media Player.
To explore another modern video format, see how to play AV1 files on Windows using free codecs and reliable media players.
Once downloaded, install it on your Windows 11 PC.
Now, press the Win + I keys simultaneously to open the Settings app.
Next, click on Apps on the left and then click on Default Apps on the right.
On the next screen, on the right side, type the extension in the search bar, in this case, it will be .mov format.
You will now see Films & TV by default.
Click on it to open the How do you want to open .mov files from now on prompt. Select VLC media player and press OK.
Now, under the Set a default for a file type or link type section, the default video player shows as the VLC media player.
More about the MOV file format
MOV is a MPEG-4 video file format, developed by Apple and is similar to the MP4, MKV, or WMV, formats. These files include videos, audio, subtitles, and timecodes.
This format was exclusively designed for their native QuickTime multimedia framework and Quicktime player. But, Windows and Linux systems can play MOV files as well.
While the MOV videos play automatically on Apple devices, you would need to install the appropriate codecs to run them on Windows.
Summary
You can now, go to the video file and when you run it will open in the VLC Media Player, and run smoothly.
It’s completely free and one of the most popular media players that run almost all formats including MOV files without the need to install extra codecs in most cases.
Alternatively, you can go to Apple support and download the default MOV player – Quick Time Player for Windows. Install the player and now, open the MOV video file with QuickTime.
This will not just address your query, Why won’t MOV files play on my computer? but will also help you play the MOV file on the Windows Media Player and on other media players.
If you still encounter any errors while playing the MOV files on Windows 11 or you discover a solution, do let us know in the comments box below.
Our iTunes library can get messy at times, and this means that there could be lots of duplicate songs in it which can genuinely devour our hard drive space.
They clutter up the library and even destroy the whole music listening experience because it gets harder and harder to find your favorite music.
On the other hand, another annoying thing that might happen is that the iTunes library has missing or mislabeled songs, album artwork, artist information, and so on.
These are the reasons for which we picked out five of the best tools that will prove to be extremely helpful in cleaning and organizing the iTunes music library.
The tools will help you delete song duplicates, complete music data, and do more exciting things that will bring things back to normal.
What are the best tools to fix iTunes library in Windows 10/11?
Wondershare TidyMyMusic is a handy tool that has been created to help users download album artwork and lyrics, fix mislabeled music, and also remove duplicate tunes that you might have in your library.
This software will come in handy when the local music folder or the iTunes library becomes a mess, and the whole music collection gets tangled.
Wondershare TidyMyMusic is a great tool to clean up and organize the iTunes music library so check out the best features that you can enjoy if you get this tool:
You can take advantage of advanced acoustic fingerprint search which will precisely scan and add missing data such as artist-related info, track names, album artwork, genre info, lyrics, and more
This tool is also able to identify duplicated songs and then remove them in order to free up disk space
It efficiently fixes missing and mislabeled music data effortlessly
There’s also the possibility to batch process your music collection, and this will save you tons of time
With the help of this tool, you will be able to download lyrics and add them to your MP3 files easily
After identifying duplicate songs, Wondershare TidyMyMusic deletes the unneeded ones to save up even more space
The program needs a small amount of time to scan your music library
The tool’s interface is easy to use even for beginners, and it’s very intuitive
TidyMyMusic by Wondershare
With this software, you will be able to tidy up and organize your whole iTunes library in no time.
Tenorshare TunesCare can be the answer for repairing iTunes library issues and over 200 system issues on your Apple device.
This multi-functional software is capable to fix different types of iTunes errors that include Syncing issues, iTunes Playing issues, and Install or Update issues.
In the first place, you can fix playing issues if your library won’t open or it keeps crashing on your Windows and iOS devices.
More so, it’s possible to resolve sync errors between the iTunes library and devices like iPhones, iPad, or iPods.
You can as well benefit from installing or updating errors and thus fix your iTunes service in case it stopped working, it’s not properly installed, and any other issues.
Here are the best features that you can enjoy using Tenorshare TunesCare on your own computer:
It’s possible to enhance the performance of iTunes
Compatible with the latest iTunes 12.10
Restores Apple devices’ tune files
Covers various syncing or playing errors for the iTunes library
Repairs iTunes updates failure
Resolve iTunes unexpected crashes
Descriptive guides on how to repair iTunes specific errors
Tenorshare TunesCare
Choose this simple-to-use software and repair any iTunes errors or malfunctions in a short time.
Leawo Tunes Cleaner is a brilliant iTunes cleanup software that will help you search for missing album artworks/lyrics/title/metadata, song tags, and more.
It will also identify all the duplicate songs that you have stuck in your library and toss them away to free up space on your hard drive.
The tool’s manual editor is powerful, and it will allow you to edit song details effortlessly.
This amazing piece of software not only tides up the largest of the iTunes libraries but also fixes users’ local song folders as well. Take a look at more interesting functionalities that this program has to offer:
By cleaning up the iTunes music library, you can also sync the fixed music files to iTunes or the original music folders with a single click to organize all your music libraries
Leawo Tunes Cleaner scans your iTunes music library automatically and identifies and deletes duplicates really fast.
This tool can get your albums’ artworks and download and add music tags that are missing
You will also be able to edit the music tags manually if this is what you want
Leawo Tunes Cleaner can repair and clean up your iTunes library with lots of practical functionalities
There is also an initial scoring system that shows you the health of your music library
The tool’s user-friendly interface includes three options: Start to Clean iTunes, Open Music File, and Load Saved Results
The program is straightforward to use and the operations that have to be performed and quite simple
iToolLab TunesPal is free and intuitive software that resolves various iTunes errors and manages the clutter in your music library.
By choosing this solution, you can identify and proceed to repair multiple errors and problems that occur with iTunes services.
This free software can handle hundreds of issues with the iTunes platform, including updating errors, data recovering matters, connectivity errors, device syncing, and so on.
You have specialized support for 200+ issues for iTunes and repair different errors that involve backup, or firmware updates.
It’s worth mentioning that you can clean your drive memory from iTunes junk files and erase cache or cookies that may generate issues with your library and on the system.
Check out the most essential features of TunesPal software below:
Clean up iTunes junk files for extra memory space
Fix iTunes not working or crashing issues
Repairs iTunes freezing problems on Windows
Resolve specific errors caused by iTunes backup and restore
Wide Angle’s Tune Sweeper is another excellent option that you have available as an iTunes cleanup program. This tool can identify and remove duplicate tracks in your iTunes library.
The program’s interface is easy to use and really intuitive, which makes it appropriate even for beginners.
It can also locate and fix incorrect song tags and more. Check out the key features that you will be able to use if you try this software:
Wide Angle’s Tune Sweeper scans iTunes for duplicates based on your preferred criteria including matching artist, track name, or album
After the scan, it chooses the version that you want to keep according to your preferences
The files that you don’t need anymore will be marked for removal, and all that you’ll be left with will be the highest quality, last played, most extended length, and more such files
All you need to do is decide which files you want to keep, and the unwanted duplicates will get removed in an instant
This tool also removes tracks in iTunes that are no longer present in your computer running Windows 10
Wide Angle’s Tune Sweeper can also find the songs on your PC that are not listed in iTunes
The software downloads and adds missing or incorrect details of your songs
You will get the chance to view graphical statistics regarding your iTunes library
These are the best iTunes cleanup software that we chose for fixing and better organizing your iTunes library.
No matter which one you will decide to use, it will work flawlessly on your system running Windows 10, and it will tidy up your iTunes library for sure.
These tools offer you the possibility to obtain the cleanest and most enjoyable music-listening experience.
You can also choose one of the best alternatives to iTunes for Windows and forget all about this app altogether.
What product did you choose? If you know other good programs to organize iTunes, tell us about it in the comments below.
Discord is a great platform with dozens of different features, and one of the most popular ones is the ability to play music.
To do this, you’ll need to use a Discord music bot, and in today’s article, we’re going to show you the best music bots for your Discord server.
How can a Discord music bot help me?
Most people use Discord to communicate with teammates while playing their favorite video games. Whenever you add music to your Discord voice chats, you make the experience much more immersive and entertaining.
So, that is the whole point of using Discord music bots – to create a new and improved environment.
Even if this is an amazing feature to use, it seems like sometimes the Discord music bot is lagging. If you also face this issue, make sure you check a dedicated fixing guide.
Now, let’s see what are the best options you should definitely try. To discover the best of these tools, make sure you read this guide completely.
The first Discord music bot that we want to show you is Groovy. This bot is incredibly simple to use and you can add it to your server with just a couple of clicks.
The bot is simple to use, and it requires no additional setup. It’s also worth mentioning that it’s lag-free, so you’ll enjoy music without any stuttering.
Groovy offers advanced features, and it has about 40 available commands, so be sure to try it out.
Another great Discord music bot that we need to mention is Rythm. The bot supports about 36 different commands, and it can easily play any song with the play command.
If you want, there’s a built-in search command that will provide you with the top 10 search results from YouTube and you can choose manually which one you want to play.
Of course, you can also paste URLs and play them directly if that’s what you prefer. As for additional features, this bot supports playlists, lyrics, and there’s also a queue feature.
Check these Rythm features:
Simple to use
Works with YouTube, SoundCloud, Twitch, Vimeo, and Mixer
FredBoat is a free Discord music bot that works with popular services such as YouTube, SoundCloud, Bandcamp, Vimeo, etc. It can even work with Spotify playlists in the premium version.
The bot supports about 20 different commands, so you can easily control the playback. As for playback, you can search for a specific song and then pick from the top 5 results, or play the URL directly.
FredBoat is simple to use, and it has a secure permission system, so you can easily restrict access to it on your server. Overall, it’s a simple and powerful Discord music bot, so you should try it out.
FredBoat features:
Works with services YouTube, SoundCloud, Bandcamp, Twitch, Vimeo, Mixer, and Wastebin
Supports playlists
Has 20 commands available
Can work with Spotify playlists in the premium version
Vexera is another Discord music bot and unlike with other bots, you can control the playback right from the web panel or by using channel commands.
Speaking of commands, Vexera has more than 60 commands available in total, and about 16 music commands.
Besides music playback, this bot can be used for moderation, so you can easily kick or mute server members. You can also use this bot to create greetings.
Certain advanced features such as volume control, Spotify support, and HTTP streaming are available, but only in the Premium version.
Overall, Vexera is a solid Discord music bot, but it also has a wide array of other commands, so it’s a solid all-in-one solution for your Discord server.
Vexera features:
Simple playback control from the web panel or channel commands
Over 60 different commands available
Can be used for moderation and greetings
Support for volume control, Spotify, and HTTP streaming in the premium version
Octave is a Discord music bot, and it works with services such as YouTube, SoundCloud, Mixer, Bandcamp, and Spotify. The bot fully supports tracks, playlists, searches, and streams.
Speaking of playback, you can easily control the playback and volume of the bot with 21 available music commands.
The bot supports configuration, and you can set it to assign roles to certain users or to ignore certain commands. If needed, you can even set the bot to ignore certain users.
Octave is a great Discord music bot, and we encourage you to try it out if you haven’t.
Check out these Octave features:
21 available playback commands
Supports YouTube, SoundCloud, Mixer, Bandcamp, and Spotify
Can assign roles to users, ignore commands or users
Getting back to our today’s subject, let’s see now why your Corsair Void mic is not working with Discord.
Why is the Corsair Void mic not working with Discord?
The Void Pro mic not working with Discord issue can occur due to several reasons. One of the most common ones is related to outdated drivers. Because these elements always need to be updated, any incompatibility can cause troubles.
In addition, keep in mind that your Corsair Void mic might not work due to some incorrect audio settings or corrupt Discord voice configuration. Of course, any hardware issue can determine issues with your device.
Fortunately, we’ve compiled solutions that will help solve this issue, no matter the cause of it.
What can I do the Corsair Void mic is not working with Discord?
1. Verify your default audio settings
In the taskbar, right-click on the Speaker icon, then choose the Sounds option.
In the Sound window, open the Recording tab.
Select Headset Microsoft Corsair Void Wireless Gaming Dongle from the list, then click on theSet Default button.
Next, click the Properties button in the Recording tab.
In the Properties window, open the Levels tab.
Drag the volume slider for Microphone to the maximum.
Click Apply and OK to save the changes.
Open the app and check the Corsair Void Pro mic is still not working with the Discord. While it usually detects the microphone and sets it as default, at times, the configuration may not work properly.
Ensure you have the right input device as the default device can fix audio-related issues with your head.
2. Run the audio troubleshooter
Press theWindows + Ikeys to open Windows Settings.
Go to Update & Security.
Open the Troubleshoot tab from the left pane.
Scroll down and check if any troubleshooting option is available. If not, click the Additional troubleshooters link.
Scroll down, click on Recording Audio, then choose to Run the troubleshooter.
Windows will scan and detect problems that are preventing the device from working correctly. The scan may take some time, so wait till it is complete.
Follow on-screen instructions and apply recommended changes.
Close the troubleshooter and launch Discord. Check if you can use the Corsair Void Pro headset mic to communicate with your teammates.
The Windows troubleshooter can find and fix many common issues that may prevent your audio device from working. If the troubleshooter did not help, repair the Corsair iCUE software or look for hardware failure.
3. Reset Discord voice settings
Press simultaneously on the Windows + S keys, then type Discord, and open the first result.
Click on Settings (Gear icon) in the bottom-left of the app dashboard.
Open the Voice & Video tab from the left pane.
Scroll down to the bottom and click on the Reset Voice Setting button.
Click the OK button to confirm the action. Discord will restart now.
After making these changes, check if Corsair Void mic is still not working with Discord. If it does, make sure you keep on reading.
4. Update the audio driver
Hit the Windows key, type Device Manager, then open it.
Expand the Audio inputs and outputs section, then right-click on your Corsair headset, and select Update driver.
Choose to Search automatically for drivers.
Now, wait to be notified if there are any available drivers to update.
Outdated or missing audio device drivers can cause your device to malfunction or stop working completely. To resolve the issue, try updating your audio driver. Driver updater utilities can help you find and install pending updates instantly. We recommend Outbyte Driver Updater as a safe tool that will scan your PC for missing or outdated drivers and update them automatically.
5. Update device firmware with Corsair iCUE
Press on the Windows key, type iCUE, and open the first result.
To update your headset firmware, open the app and then click on Settings (marked as a gear).
From the left window pane, click on Updates.
Choose to Check for updates.
If any related updates are found, you’ll be notified.
Corsair releases firmware updates for its devices to fix known bugs and glitches. Try to repair or reinstall the iCUE tool if updating the firmware is not helpful.
If you don’t already have the app, download the latest version of Corsair iCUE, then follow the on-screen instructions to install it.
6. Repair Corsair iCUE
Press the Windows + Rkeys to open the Run dialog box.
Type devmgmt.msc and click OK to open Device Manager.
In Device Manager, expand the Human Interface Devices section.
Right-click on Corsair composite virtual input device and choose Uninstall device.
Once uninstalled, re-run the iCUE installer file. You can download it from the iCUE download page.
In the iCUE setup page, select the Repair option.
Click Next. The repair tool will scan the setup for existing issues and apply fixes.
Once the repair is complete, close the troubleshooter and restart your PC. After the restart, check if the Void Pro mic is working with Discord. If not, perform a clean install of iCUE to fix the problem.
7. Clean install iCUE software
Open the Settings app. You can do that with Windows + I keyboard shortcut.
Navigate to the Apps section.
In the right window pane, select iCUE software and click on Uninstall.
If you want to ensure that iCUE software is completely gone from your PC, we suggest using dedicated uninstaller software such as CCleaner.
8. Check for hardware issues
Clean installing iCUE in most cases should resolve the problem with your Void Pro mic in Discord. However, if that did not help, check your headset for hardware issues.
To do this, connect the headset to any other computer and run an audio test. You may also want to confirm if there is an issue with the audio port of your device.
Previously, we have covered the Discord mic not working in Windows 10 issue in detail too. In this article, we have listed a few troubleshooting steps to help you resolve this issue on your PC, so take a look as well.
What other Corsair Void Pro problems should I be aware of?
Corsair Void Pro might not be working at all on Discord. However, some other problems can occur, and you should be aware of them.
Corsair Void Pro mic quiet – Usually, it is because of the in-app settings that have not been calibrated properly. In this case, you should first check the calibration.
Corsair Void Pro keep beeping – It seems like the headset can sometimes be fully loaded on battery and after a few hours it starts beeping randomly. If it happens to you, we strongly recommend updating the related drivers.
These troubleshooting steps in the article should help you resolve the problem quickly. Did you manage to achieve your goal? Let us know in the comments below.
Most gamers are probably very familiarized with what Discord is. For those of you that aren’t, it represents a proprietary freeware Voice-over-Internet-Protocol app and digital distribution platform.
It is mostly preferred by users all around the world, although that isn’t all that it is used for.
Most games have dedicated channels on Discord, while MMORPGs may even have Discord channels for each of their major guilds.
Of course, managing such a guild can be tiresome, and keeping it lively can be pretty hard, especially if time isn’t one of your strong points.
If that is the case with you as well, then a Discord bot is what you need.
What are Discord bots and why should I use them?
A discord bot is something that’ll help you make do things in your guild easier. It provides various functions ranging from playing music to sending memes.
More advanced bots can even help you administrate your discord guild when you’re away.
Given their usefulness, we’ve decided to compile a list of the top Discord bots that you can have if you want to make your Discord channel a lot more dynamic.
RPG players are a separate class of players, especially those that are into the RP part of the game.
If you too are one of them, then EPIC RPG is definitely the Discord Bot for you. It is designed to attract user loyalty through the use of an in-game economy.
With EPIC RPG installed, you can use commands to hunt, fight, and search for coins and loot.
But the fun doesn’t stop there since you can also use commands to:
Create regular events each day for players to take part in
Buy virtual items in the shop
Fight other players
EPIC RPG
EPIC RPG proved to be one of the most exciting Discord bots, so do not hesitate to give it a try!
Let’s face it, gaming and the love for anime and Pokemon are something that synergetically goes hand in hand.
That being the case, it is obvious why one of the best bots one could get for their Discord channel is Pokécord.
What makes it so popular? Well, suffice it to say that this bot’s commands allow users to collect, battle, and catch Pokemon straight from within Discord.
More so, the commands allow you to grow and level up your Pokemon, allowing you to become the very best like no one ever was.
Below you can find the best features of Pokecord:
96620 servers
Awesome giveaways
Global market
Dedicated to pokemon’s dimension
Pokecord
Pokecord is the best Discord bot for Pokemon passionate, so if you’re in the same boat, feel free to try it right now!
Many users are wondering if the Discord bots can be used without any cost. If you’re in the same boat, keep in mind that Discord along with all of its bots is completely free, making it one of the most popular gaming VoIP on the market.
That being the case, if you want to breathe new life into your Discord experience for both you and those on your server, get a Discord bot.
MEE6
NuggetBot
EPIC RPG
Pokécord
Octave
These are the top 5 Discord Bots that you can use. As you can see, we’ve chosen from a wide variety of types, from Anime to RPG-oriented ones.
In order to get the most of this app’s experience, do not hesitate to also check the best music bot for Discord.
To make your Discord server more engaging and lively, try adding a few versatile bots that enhance moderation, entertainment, and interaction. From music players to AI assistants, the right mix of bots can transform your community experience. If you are looking for a great starting point, check out how to add Arcane Bot to Discord and see how it can boost activity and organization on your server.
If you have any additional questions regarding this subject, feel free to use the comment section below.
It was only days ago that The Redmond tech company released Windows 11 Build 22610 for Insiders in both the Beta and Dev Channel.
And although this recent update doesn’t bring any exciting or game-changing new features, some users managed to see it for what it supposedly is.
The attention grabber here is the technical preview watermark that we got used to during all of these Insider previews. And by that we mean it was missing.
If you didn’t get what we were hinting at, this usually means that the new major Windows 11 update might be RTM (release to manufacturing) sooner than we think.
The imminent release of Windows 22H2 (Sun Valley 2) may have just been confirmed on social media, so users are now even more excited.
It first started with the speculation that Windows 11 build 22621 is what Microsoft wants to ship as the final build for version 22H2, and that sign-off is May 20th.
Windows 11 build 22621 is what Microsoft wants to ship as the final/base build for version 22H2. Sign-off is May 20th. Assuming there are no showstopping bugs found before then, 22621 will be the base build that the public gets later this year.
Shortly after, Microsoft’s Senior Program Manager, Brandon LeBlanc replied to one of the comments on the above-mentioned Twitter post.
He actually gave no refutation against this rumor indicating that there is a decent chance of it being true indeed, as everyone else thought as well.
Features like tabs in File Explorer will show up to Windows Insiders (between the Dev and Beta Channels) when they are ready, we're not as "release" based as we used to be as we mentioned in this blog post back in February. https://t.co/fWAvvAPZfS
Windows 22H2, also known as Sun Valley 2, is actually this year’s only major Windows 11 update since Microsoft switched to an annual cadence.
If you keep up with the OS and everything involving it, you should remember that the tech giant ended the bi-annual H1 and H2 releases we were used to with Windows 10.
Thus, the official Windows 11 22H2 update could come with a ton of new features, including the ability to make app folders in the Start Menu, colored Task Manager, Focused Assist integration with the Notifications Center, more colorful Task Manager, tabbed File Explorer, and so much more.
We previously covered all of these changes in the weekly cumulative update releases.
Since we’re speaking of New updates, Microsoft has been informing Insiders that the Dev Channel will start flighting Sun Valley 3 builds soon, which is the next version of Windows 11 that will release in 2023.
Now, everyone’s just waiting for Microsoft to confirm the information and provide a realistic release date for future products.
Excited about all of the changes for Windows 11? Share your thoughts with us in the comments section below.
Lenovo is introducing updates to its performance line of ThinkPad’s with the all new “power-packed” ThinkPad P16 and ThinkPad C14 for 2022.
ThinkPad P16
Starting at $1,979
For starters, the ThinkPad P16 will combine the efforts of the ThinkPad P15 and P17 into the single screen option of the P16 going forward. Perhaps, in an effort to consolidate materials and resources the P16 will now become the DeFacto option for performance workstations under the ThinkPad branding at the 14+ screen size aspect ratio.
For the P17 crowd concerned with how the reduction in size might play out with thermal throttling and like, Lenovo claims that the despite its 16-inch display and modernized chassis, the P16’s thermodynamics of the computer have been entirely revamped. Starting with a new cooling solution equipped with dual fans, dual vapor chambers, keyboard air intake, and dual by-pass design.
In addition to more air passing through the system, Lenovo also upgraded the CPU and GPU to take advantage of the new cooling designs with 12 Gen Intel HX-Series Core that can add up to 16 cores to the laptop as fast as 5.0GHz, as well as a discrete NVIDIA RTX A5500 or Integrated Intel UHD graphics.
Buyers can configure their workstations with up to 128GB DDR5 4800MHz and up to 8TB of M.2PCIe Gen 4 NVMe SSDs all powering three different screen options that include 16:10 WQUXGA (UHD+), WQXGA (QHD+) and WUXGA (FHD+). All screen options for the ThinkPad P16 supports 100% sRGB, Low Blue Light, and X-Rite FCC.
While the P16 is marketed as the Windows powered workstation, it can also support Ubuntu Linux, Fedora Linux, and Red Hat Enterprise Linux variants.
The ThinkPad P16 comes with a slightly upgraded outer design starting with a Storm Grey Aluminum option with red rear accents versus the traditional matte black offering over the years.
The port selections remain pretty robust for the P16 which includes 2 USB-A 3.2 Gen 1 Always On ports, 2 USB-C Thunderbolt 4 supported ports, 1 USB-C 3.4 Gen 2 port on the side, and HDMI slot on the back as well as smart card SD Express 7.0 reader and headphone jack combo.
ThinkPad C14
Starting at $629.00
Lenovo is also bringing additional options with its enterprise Chromebook the ThinkPad C14 which adds an Abyss Blue Chrome color option for the laptop as well as the latest Intel chipsets for performance.
More specifically, the C14 comes with support for up to vPro Intel 12 Gen i7 processors and integrated Intel graphics. Memory configurations support up to 16GB LPDDR4x and buyers can make out on-device storage with either 128GB of eMMC or 256GB of SSD options.
As with most Chromebooks, the battery is expected to be stellar with a 57 Whr battery packed in there with support of Rapid Charge with 65W AC.
As for the overall design, the C14 sports 14-inch FHD IPS and IPS LCLW touch options that can get as bright as 300 nits and now weighs a solid 3.44 lbs. which is a 2% increase over last year’s option.
Unfortunately, Lenovo is still reliant on buyers accepting an FHD RGB webcam in 2022 but does include a backlit keyboard, Waves MaxxAudio supported front firing speakers and plenty of ports such as a full HDMI port, 2 USB-A 3.2 slots, 2 USB4 Type-C (vPRo with Thunderbolt) ports and an audio jack.
As an added layer of security Lenovo is also packing in a Titan C security chip for enterprise use as well as Chrome Enterprise with Chrome Zero Touch Enrollment out of the box for the C14.
The P16 goes on sale later this month while the C14 makes its debut in June, 2022.
As we had already informed you, May is a busy month for Xbox Game Pass and now it’s time for you to charge your controllers and get ready. As such, Microsoft has just shared a comprehensive list of Xbox Game Pass titles that are set to be launched soon. Some of the listed entries are already available for play while the rest are expected to be released as this month progresses. This is on top of the four video games that already joined Xbox Game Pass on console, PC, and cloud earlier this month.
Her Story is already available, where you will get to delve deeper into the mystery and in the process get to uncover the woman’s story. Another entry that is already available on Cloud, Console, and PC is Jurassic World Evolution 2 where gamers will be introduced to “a compelling new campaign and Chaos Theory Modes, range of new features, customization options and awe-inspiring new dinosaurs that include flying and marine reptiles.”
Other entries that are also available for gameplay include:
Little Witch in the Woods (Game Preview) (Console and PC) ID@Xbox
Skate (Cloud) EA Play
Umurangi Generation Special Edition (Cloud, Console, and PC) ID@Xbox
Coming Soon
Microsoft has a couple of entries in store that will be released throughout the cause of this month, among them Farming Simulator 22 set to be released on May 19 which features new ground working techniques, improved build mode, and a new character creator. With that said, Vampire Survivors will also be coming to Xbox Game Pass on the same date where you will get the chance to go against hordes of monsters with an array of weapons at your disposal.
Floppy Knights, a day one release, will make its way to Game Pass on May 24 for Cloud, Console, and PC. Hardspace: Shipbreaker, another ID@Xbox game, will also be available on May 24 where gamers will now be able to upgrade their gear which will in return allow them to score high-paying contracts that will allow them to settle up their debt LYNX Corporation.
Sniper Elite 5, another ID@Xbox game will be available on May 26, where gamers will be able to battle their way through the “most impressive map yet” that incorporates real-world locations. The game also features an improved traversal system that is set to enhance gameplay. Cricket 22 which features 4k visuals and more licenses and Pac-Man Museum+ will both be available on May 27.
Game Updates
Grounded: The Bugs Strike Back is also set to receive an update where gamers will be equipped with “new base defense modes, new armor upgrades, additional crafting items and traps, an all-new bestiary system, and more.”
Microsoft has also incorporated Xbox touch controls to more games, this way they get to tap into a wider audience rather than limit the fun to gamers with controllers. The Xbox touch controls are now available to 11 more games that are ready to play from the cloud.
A lot of players utilize Discord’s voice chat for gaming. However, a No Route Discord error can arise when some users try to connect with a voice channel. Consequently, they can’t utilize the voice chat in Discord.
Even if this might be a pretty annoying issue, you don’t have to worry! We have some methods to get rid of it with ease and effortless.
Because it’s important to be aware of the reasons why this error may occur, we suggest checking the following information.
What can cause the No Route Discord error?
Before trying to fix this annoying issue, you should be aware of its causes. This occurs when you attempt to connect to a voice channel in a Discord server and the ISP/Network on the user end is unable to connect.
Thus, the app becomes obstructed from connecting to a voice server more often than not by an issue linked to dropouts, VPNs, and firewall restrictions.
There are some potential resolutions for the No Route Discord error and we’re going to present you the best of them.
How do I fix the No Route Discord error?
1. Restart the router
First, try restarting your PC and router. To restart the router, unplug it. Wait for a few minutes, then plug it back in.
You can also restart the application, so the Windows system checks any issues and resolves them when needed.
2. Check the firewall settings for Discord
Hit the Windows key.
Typle firewall, then select Windows Defender Firewall to open that Control Panel applet.
Click Allow an app or feature through Windows Defender Firewall to open the allowed app option shown directly below.
Click the Change settings option.
Then select all the check boxes for Discord if they’re not selected.
Press the OK button.
3. Turn off the Enable Quality of Service High Packet Priority setting
Click the gear button at the bottom left of Discord to open further options.
Go to Voice & Video.
Scroll-down and toggle the Enable Quality of Service High Packet Priority option off.
After disabling this option, restart Discord.
Using Quality of Service High Packet Priority will offer the best latency. This feature is enabled by default in Discord, but some routers or ISP (Internet Service Providers) might misbehave when this option is enabled in Discord settings.
Turning off Discord’s Enable Quality of Service High Packet Priority option might fix the No Route error for some users.
4. Disable VPN software
Hit the Windows key, type network, then select View network connections to open the Control Panel applet shown directly below.
Right-click your VPN there and select Disable.
Then try connecting to a voice channel in Discord with the VPN disabled.
The No Route error can arise on Discord when users are utilizing VPN software that doesn’t utilize the User Datagram Protocol.
5. Uninstall antivirus software
Use the following keyboard shortcut: Windows + R.
Input appwiz.cpl in the Open box, then click on OK to open the Programs and Features applet.
Select your listed antivirus software, and click on the Uninstall option.
Click Yes on any confirmation prompt that opens.
Restart Windows after uninstalling the antivirus software.
6. Flush the DNS
Hit the Windows key, type cmd, then right-click on the Command Prompt result, and select Run as administrator.
First, type the following command, then press Enter: ipconfig /release
Next, copy and paste this, and press Enter: ipconfig /flushdns
Thenuse the following command and don’t forget to press Enter: ipconfig /renew
Restart Windows after flushing the DNS.
What incidents were recorded with Discord this year?
Because it’s important to be aware of the most frequent Discord problems, we strongly recommend accessing the Discord incidents history.
The producers ensured delivering every day the status of the app. The image below shows an example of that.
So, as we can see, Discord records the following incidents for the last 2 months of 2021:
October – captchas failling (it seems like this one has been resolved), bot rate limiting issue (the rollback has been complete, so there are no longer generating erroneous 429s for bots), and ebeds not unfurling (this has also been resolved).
November – connection & message issues (all services are fully recovered), connectivity issues on various university campuses (the incident has been resolved), and some push notifications are being dropped (the issue has been remediated).
Those resolutions are among the more widely confirmed fixes for Discord’s No Route error. Users who have fixed the same issue with different options are more than welcome to share them in the comment section below.
One of the most voice translating applications in the world, Clownfish Voice Changer works well most of the time on Discord.
Clownfish Voice Changer not working in Discord can definitely cause a lot of frustration, especially when in the middle of a game.
Why is clownfish Voice Changer not working?
There can be various reasons to why Clownfish Voice Changer for Discord is most often related to outdated drivers.
After checking all the possible causes, in this article we will present you the exact steps you need to make in order to cover them all and fix the issue.
How can I fix the Clownfish Voice Changer for Discord?
1. Use a specialized software
Outdated drivers can cause Clownfish Voice Changer to stop working. Although you can update the audio driver manually from the manufacturer’s website, specialized software makes this task simpler.
A simple tool such as Outbyte Driver Updater will save you plenty of time and hassle. You just have to open the app, start a scan process and then let it download and install the newest drivers versions to your PC.
Such tools are safer than manual driver installs because they detect the exact type of hardware you have and they find the perfect driver match for it. Installing a faulty driver can cause major damage to your PC.
Outbyte Driver Updater is light and you can let it run in the background and set it up to regularly scan and fix any outdated, damaged, or missing drivers on your machine.
Discord and Rainbow Six Siege are not working together? Make sure you verify this guide entirely.
Some players are running Rainbow Six with the Discord software, with the app’s overlay feature. However, some of them claimed that they can’t open the Discord overlay on Rainbow Six.
In other cases, players have said that Discord’s voice chat doesn’t work for Rainbow Six. Consequently, they can’t hear Discord’s voice chat from other players when playing Rainbow Six Siege.
Fortunately, we compiled some efficient solutions that will help to play Rainbow Six Siege with Discord. So, you won’t have to worry again about this irritating problem.
Why are Discord and Rainbow Six Siege not working?
Not being able to run one of your favorite games must be pretty annoying. Before getting into the main subject, let’s have a look at a series of reasons why Rainbow Six Siege is not working with Discord.
Before anything else, you should know that you must run the app with the correct privileges. Thus, you must ensure that you’re using the administrator ones.
Also, Discord overlay is known to cause all kinds of issues with your games and applications. In these terms, it might be useful to disable this feature.
Rainbow Six Siege won’t properly work on Discord if you have configured incorrect settings in your game activity. In addition, keep in mind that you’ll probably need to turn on the Hardware Acceleration option.
To discover what can you do in each of the above cases, make sure you verify all the steps listed below.
What can I do if Discord and Rainbow Six Siege are not working?
1. Run Discord as an administrator
Right-click the shortcut you usually click on to open Discord and select Properties.
Click the Compatibility tab.
Select the Run this program as an administrator checkbox.
Click Apply to save the setting.
Press the OK button to exit the Discord Properties window.
2. Disable Discord Overlay
Hit the Windows key, type Discord, then open the first result.
Click on the User Settings button (marked as a gear).
Select Overlay to open the options shown directly below.
Disable the Enable in-game overlay option.
3. Check the Game Activity settings
Hit the Windows key, type Discord, then open the first result.
Click on the User Settings button (marked as a gear).
In the left window pane, click on Activity Status to open the options in the snapshot directly below.
Toggle the Display currently running game as a status message option on.
Click Add it to open a drop-down menu.
Select Rainbow Six Siege and click the Add Game button.
4. Turn on Discord’s Developer Mode and Hardware Acceleration settings
Press on the Windows key, type Discord, then open the first result.
Click on the User Settings button (marked as a gear).
Select the Advanced tab shown directly below.
Turn on the Developer Mode and the Hardware Acceleration options.
How can I fix Discord voice chat not working for Rainbow Six Siege?
1. Select 1 Frame Vsync
To fix Discord voice chat not working for the game, launch Rainbow Six Siege.
Click on the Settings button at the top right of Rainbow Six’s title screen.
Select Options to open settings.
Select the Display tab.
Then scroll to the VSync setting and select 1 Frame.
Click the Apply button.
2. Set the Discord task priority to high
When Discord is running, right-click on your taskbar and select Task Manager.
Select the Details tab in Task Manager.
Right-click the Discord.exe process that’s utilizing the most memory (RAM), choose to Set priority, then select the High option.
Select the Change priority option on the confirmation prompt window that opens.
3. Cap the frame rate for Rainbox Six
Use the following keyboard shortcut to open File Explorer: Windows and E.
Open your Rainbow Six Siege game folder.
Select to open the folder with a string code like the one shown directly below.
Click the GameSettings configuration file to open it in Notepad.
Scroll down to the Display section in the configuration file.
Reduce the FPSLimit value to 75 if it’s currently higher than that.
Click File to select the Save option.
Then close Notepad.
Right-click the GameSettings file and select Properties.
Select the Read-only attributes option.
Click the Apply button, and select the OK option to exit.
Those are some of the resolutions players have confirmed can fix Discord overlay and voice chat issues for Rainbow Six Siege.
So, those potential resolutions are worth a shot when you can’t see the Discord overlay or hear in-game voice chat when playing Rainbow Six Siege.
Discord is one of the most popular chatting tools, especially for gamers. However, it seems like the search function is sometimes not working as it should be.
The issue may be on the app’s side, as Discord relies completely on its servers to work properly.
There are many filters in Discord search like from and mentions, which helps to quickly track the message. Thus, encountering related problems can be pretty annoying.
Fortunately, we’re here to support you with a few solutions, but you should discover first why the Discord search function is sometimes not working.
Why is Discord search function not working?
In case you notice that the Discord search option is not working, remember that it can be related to your Internet connection.
When the Internet is slow, some functions might not run in proper conditions. As a first recommendation, you should check your experiences with connections and slowdowns, the cables, and the Wi-Fi connection.
Moreover, our presented issue can occur due to Discord’s poor updates. Similar to any other program or software, this one needs to be constantly updated. Otherwise, it might get you into various troubles.
Now, we’ll offer you three efficient methods that will help you get rid of this problem once and for all.
What can I do if Discord’s search function is not working?
1. Verify your Internet connection
Internet connectivity issues can cause some of Discord’s functions to not work properly, including the search option. In this case, it’s best to check if you are experiencing connection issues or slowdowns.
For example, if you are currently connected via Wi-Fi, check if your signal is strong enough.
A weak Wi-Fi signal can cause Discord functionality issues, and in this case, it is best recommended to either use an Ethernet cable or to improve your Wi-Fi connection.
Discord’s main functions rely heavily on the server-side. When there are server issues or outages, many of Discord’s features such as the search function will fail to work.
When this happens, it’s best to check Discord’s status page. On this page, you can see if the client is currently experiencing or has experienced server issues and if any of its services (or APIs) are affected and check if a fix has been deployed.
Major outages are indicated by the red lines, while partial ones are indicated by yellow lines.
If you scroll down the page, you can find current and past incidents on Discord’s services. You can also check what has been done to resolve the issues.
3. Update Discord
Head over to the bottom right side of your Windows 10 Taskbar.
Right-click on the Discord icon, then click on Close window.
Open Discord again and the app should start the update proces by itself.
Restarting your Discord app to check for updates can provide a fix to some of the issues on the client, including the search function.
Right-clickon the Discord icon, then choose toRun as administrator.
Agree with the changes by clicking onYes.
Discord will start and update itself.
5. Disable Windows Defender
Use the following keyboard shortcut to open the Settings menu: Windows + S.
Go to Update & Security.
From the left window pane, navigate to Windows Security, then look at the right side and click on Virus & threat protection.
In the opened window, expand the Microsoft Defender Antivirus options, then turn off the Periodic scanning.
Confirm the changes by selecting Yes.
Now, try relaunching Discord.
Because Windows Defender acts as a sort of guard dog while you operate on PC, it will block you from opening some apps if they seem to be dangerous.
Sometimes, it can be a bit too protective, so maybe that’s why your Discord search function is not working as it should be.
What other Discord functions may have problems?
The search function is not the only one that can generate issues while running Discord. Because it is a complex app and millions of users are using it, Discord can usually be corrupted by various problems:
Audio errors – If Discord audio keeps cutting out, it means that you won’t be able to communicate efficiently with your teammates. Make sure you check our dedicated article to get rid of this issue in a few minutes.
App freeze – Another annoying problem is related to the overall app activity. Some users describe that Discord keeps freezing, but there are a few methods you can try to fix it.
Our presented app is used by a large number of users, and due to its popularity, it can generate several errors.
If the Discord search function is sometimes not working as expected, at least one of today’s solutions will work.
For any other additional questions or curiosities regarding this subject, do not hesitate to use the comment section below.
While chatting on Twitch or your Discord server, you may encounter Sending messages in this channel is disabled error. The error can affect some users while other users on the same channel can chat.
This error can occur due to multiple reasons. When the error affects Discord users, it may often be due to the server being down. However, the error can occur even if you are using any other chatting platform.
If you are also troubled by this error, here are a couple of troubleshooting tips to help you resolve Sending messages in this channel is disabled error in no time.
How do I fix Sending messages in this channel is disabled error?
1. Check the service status
This error issue usually occurs if the service servers are down. Discord informs the users on its Reddit community page and Twitter account if it is a sitewide issue.
Check the Discord’s Reddit and Twitter page to get an ETA on the same.
Discord may ban or temporarily limit the functionality of the user for violating its terms of use.
To make sure Discord hasn’t banned you, try creating a new account and using it.
You may also try to use another IP address to access the account and see if that helps.
3. Change DNS settings
Press Windows Key + R to open Run.
Type control and click OK.
In the Control Panel window, go to Network and Internet.
Click on Network and Sharing Center.
From the left pane, click on the Change adapter settings option.
Right-click on your network adapter and select Properties.
In the Properties window double-click on Internet Protocol Version 4 (TCP/IPv4).
Select Use the following DNS server addresses option.
In the Prefered and Alternate DNS server field, enter the following address. 8.8.8.8 8.8.4.4
Click OK to save the changes and close the properties window.
Open Discord again and check for any improvements.
Apart from the Google Public DNS server address mentioned above, you can also use a third-party, public DNS server. Alternatively, download the DNS Jumper tool. It is a handy little tool that can help you find the fastest public DNS server address and also help you apply the DNS server address with a click.
If the issue persists, try connecting to a different network connection. You may also use your phone’s hotspot feature to test if the issue is with your internet connection. This will also help with Temporary Network error on Discord.
Additionally, disable/close any active VPN connection that may create issues with your Discord connection.
The Sending messages in this channel are disabled error gets resolved automatically if the problem occurred at Discord’s end.
However, if the issue has affected only a few people, follow the troubleshooting tips in this article to find and resolve the error.
If you have run into the dreaded error 403 forbidden PayPal while attempting to make a payment, this article is for you. The real problem occurs after this as you notice that suddenly PayPal is not working on your browser.
The issue can be frustrating, similar to eBay 403 forbidden error, especially if it prevents you from completing routine transactions.
How do you fix the error 403 Forbidden on PayPal?
1. Clear cookies and caches
Open your browser and go to Settings.
Next, select Privacy and Security.
Click on Clear browsing data and check the box beside clear cookies and cache.
Finally, click on Clear data.
When you get a varnish cache server error 403 PayPal, one possibility is that the page has been cached but swapped the link in the code. You can fix this by clearing your browser’s cookies and cache.
This won’t affect your browsing experience much, but the website might take a few more seconds to load. Overall this is one of the most effective workarounds that can help you easily fix the issue.
2. Double-check the URL
Open up your browser.
Visit the PayPal website.
Double-check that the URL doesn’t contain any special character in the end.
The most common reason for a Paypal error 43 forbidden is that people have mistyped the URL. Make sure you’re typing the URL correctly in the browser address bar and without any extra characters in the end, like a period or slash /.
Many servers are configured to block directory browsing for security reasons, which could be a significant reason you’re experiencing error 403 forbidden from PayPal.
3. Disconnect the VPN
Press Windows + I key combination on your keyboard to open up the Settings app.
In the right pane, select Network and Internet.
Next, click on VPN.
Select the VPN service you want to disconnect and finally click Delete to confirm the changes.
If you’re logged on to PayPal through a VPN and getting the error 403, we recommend that you check to see if there is a connection issue. If you suspect this is the case with you, disconnect the VPN and try accessing the page.
If you see the error 403 forbidden when trying to log in to your PayPal account, your internet service provider is likely to blame. Try connecting to a different router to figure out where the problem lies.
If the issue persists, it’s time to contact your ISP for further assistance.
In some cases, PayPal has been blacklisted by your public IP address provided to you by your internet service provider. If this is the case, communicate with your ISP and see if they can help fix the issue.
You can raise your concern by sending them a message, calling them, or asking a question in the community.
If you are unable to access this page, you may dial 1-888-221-1161 to reach customer care.
6. Try a different virtual card
You can also resort to a different online payment service. If the issue persists even after trying out these methods, creating a new account on a different platform can save you a lot of headaches.
A reliable alternative is Revolut. It’s a virtual card company that offers great service for free. Once you create an account, it generates a unique virtual bank card that you can use for online transactions.
It has desktop and mobile applications that you can use to check your balance and manage your money. Revolut has some budgeting solutions, gives you reports on your spending, and is very secure.
The app supports easy transfers between Revolut users and other bank accounts. It supports over 30 world currencies, plus cryptocurrencies.
If you have NFC on your mobile device, you can also use Revolut for POS payments. They can also send you a physical card if you want.
If the methods listed above don’t work for you, contacting PayPal Customer Care could be an option if you encounter 403 forbidden errors.
You can try contacting them through forums, their official website, or social media. If you have unanswered messages on Twitter, try DMing them.
While PayPal is a very secure payment gateway and the most widely used among merchants, it is not immune to certain technical errors caused by user errors, server glitches, or configuration issues.
In such cases, users may be unable to log in to their accounts or send money through the system.
Furthermore, You can go through our guide on the Steam PayPal purchase error for the most accurate resolutions.
We hope the methods listed in this guide have helped you resolve the problem. If you have any questions or queries, ask away in the comments section below.
Plain-text log management was the norm for many years, and still can be useful in many situations, but a reliable management tool can do much more.
Syslog management solutions can help you gather critical data about your network, and improve the quality of code and your business workflow.
Logs are messy, but a critical aspect of any system. A log management tool can take all the messy data and present it in a visualized way to help you quickly determine the cause of any application problem.
How are syslog managed?
Syslog consists of information generated by the network devices such as a server, firewall, and routers.
Trying to manage these text-based logs manually is a challenging task. Syslog management solutions provide an easy way to manage those logs.
In this article, we have listed the best syslog management solutions to help you pick the right tool for your needs.
ManageEngine EventLog Analyzer is an all-in-one log management, auditing, and IT compliance solution.
It allows you to know what’s happening in your network and offers insights into potential threats and prevents any attack.
Custom log parsers can extract fields of log formats and offer a single console for viewing all your security log data.
ManageEngine EventLog Analyzer can listen to your logs, audit network devices, conduct in-depth application auditing and provide real-time event log correlation to trace potential security threats.
Key features of ManageEngine EventLog Analyzer:
Collect, manage, analyze, correlate, and search through the log data
Audits log data from perimeter devices
Audits critical changes, detects data theft, identifies attacks, and tracks downtime
Integrated compliance management
ManageEngine EventLog Analyzer
Collect, manage, analyze, and correlate all system logs on your network devices with this great tool!
Log360 is one of the best syslog management solutions that will also ensure fast response for your IT personnel in case of emergency.
The tool tracks all the possible events from all your devices within the network, including file and web servers, Microsoft 365 and Exchange servers, and a lot more.
The solution even logs events from public cloud platforms, like AWS (Amazon Web Services), Microsoft Azure, Salesforce, and others.
All you need to do is to customize the alert profiles to get complete reports on any syslog produced by your devices.
Log360 is not limited to sys logging management but also focuses on tracking file integrity and detecting any changes made to sensitive data within your devices.
And if you were also looking for ticketing, the tool integrates services like ServiceDesk Plus, Jira Service Desk, Kayako, and more.
Take a look at some of its best features:
Advanced sys logging management tools
Customizable alerts and profiles
Analyzes logs from any network devices, including file servers and databases
File integrity monitoring
Monitors cloud platforms like AWS and Microsoft Azure
Log360
This tool not only offers a complete analysis of your sys logs but also provides alerts for quick response.
Syslog is a standard for sending log messages with a network and is supported by a number of devices providing a wide range of systems info.
Syslog monitoring solutions help you capture and monitor syslog messages and analyze the content of all the messages that are sent to the tool.
Explore the tools in this article to get all relevant information with regard to the message, including IP address, time of the message, and potential emergencies.
Apart from the syslog management capabilities, PRTG Network Monitor allows you to monitor the availability of all hardware in your network, check network bandwidth usage, downtime reports, port report, and top 10 Talkers report.
Key features of PRTG Network Monitor:
Capture and analyze syslog messages
Alerts in the event of syslog error incidents
Downtime report, port reports and top 10 talkers report.
Analyzes severity level to check for potential emergencies
PRTG Network Monitor
Track everything happening in your local network with the help of the world’s best monitoring tool!
Whatsup Gold Log Management is an automated tool that collects, stores, archives, and saves logs from Windows events and more.
It provides easy device log data management. You can monitor, filter, search and alert logs for every device in your network with additional insights for log volume changes.
Whatsup Gold Log Management offers a convenient way to manage the system and Windows log events, focusing on pre-and post-filtering capabilities to reduce the firehose of logs.
It can send system alerts via the web, email, SMS, or even third-party software like Slack when log status or events are triggered.
Key features of Whatsup Gold Log Management:
Visualize and control your system logs
Can filter Windows Event Logs and Syslogs
View log status and events on customizable dashboards
LogDNA is a powerful Syslog management solution that comes with powerful exclusion rules to store what’s important and keep your log volume under control.
Using the tool, you can achieve everything and forward it to S3 or any other storage services. It can also visualize and aggregate critical events to pinpoint the issues in your system.
LogDNA offers role-based access control to limit unauthorized access to sensitive logs and actions, SS0/SML for enterprise-grade user authentication, and usage reporting to ensure you are keeping an eye on your volume.
Key features of LogDNA:
Powerful Syslog manager with exclusion rules and archive features
Analysis and monitoring tools to visualize critical events
One-click filters to drill down based on app, host, cluster
With Datadog Log Collection & Management solution, you can easily collect and manage logs across your environment, from apps, servers, and browsers, and all of the other services in-between.
With custom processing pipeline development, you can automatically parse and enrich raw logs to extract the most insights from your data.
Other features offered by Datadog Log Collection & Management include discovering log patterns and errors rapidly, automatically detecting outliers, anomalies, and log errors, quickly accessing old logs, and decreasing the retention period per log index.
Key features of Datadog Log Collection & Management:
Powerful log management solution to collect data from apps, server, and browsers
Create analytics dashboard in seconds with datalog
Set up alerts for anomalies and outliers
Add comments to your alerts and notify the team through Slack, PagerDuty, and more
Sematext’s syslog management solution offers secure & scalable monitoring and logging services with fast and powerful human syntax search, easy setup, and support for log shippers such as Logstash, Filebeat, Rsyslog, Logagenet, and more.
Centralized logging system makes real-time log monitoring and analysis from a single dashboard offering structured and organized insightful data with automated log parsing and structuring.
Other features include log alerts, log security, live tail, and multi-user role-based access control.
Key features of Sematext Cloud Log Management and Analysis:
Easier user access management from a single dashboard
Compatible with multiple log shippers, libraries, platforms, and frameworks
Splunk – Ideal for virtual and non-virtual environments
Splunk is a tool to search and analyze all your log data and is compatible with Windows, Mac, and Linux platforms.
It lets you search, alert, report, and monitor all your logs from one dashboard in real-time.
Apart from including custom application logs and multiline logs across both virtual and non-virtual environments, you can also troubleshoot application outages, check for security vulnerabilities and demonstrate compliance in minutes.
Key features of Splunk:
Powerful tools to search and analyze system log files
You can search, set alerts, view the report, and monitor all the logs from one centralized dashboard
Indexes all your data from both virtual and non-virtual environments
Troubleshoot application outages and check for system threats
Graylog offers seamless log data collection, faster analysis, and security. It provides insight into your data by building and combining multiple searches for customized analysis and reports.
You can also build complex alerts depending on the events or missing events collected by the service.
Other features of Graylog include building and executing queries in a few minutes and viewing log data in real-time. For threat-hunting or root cause analysis workflow, you can chain queries together.
Key features of Graylog:
Centralized log management solution for data collection and faster analysis
Gain insight into your data by building and combining multiple searches
Custom alerts build based on a relationship between multiple events
GoAccess – Best open-source real-time web log analyze
GoAccess is an open-source real-time web log analyzer and interactive viewer that runs in a command window. You can also run it through your browser to get fast and valuable HTTP statistics.
While the tool offers default terminal output, it can generate a complete, self-contained real-time HTML, Jason, and CSV report.
Key features of GoAccess:
Fast, and real-time open-source log manager
Support all the major log formats including Apache, Nginx, Amazon S3, Elastic Load Balancing, and more
Logs are messy and, depending on your network’s amount of log, they can be challenging to deal with. That said, syslog management is still a very critical aspect of any business.
If you are looking for a solution to fix Windows 11 Forticlient VPN not working issue, you’re in the right place.
Forticlient VPN “Connection Failed” error message on Windows PC
Many encountered this issue after upgrading from Windows 10 to Windows 11, but it’s not the only instance. Faulty settings as well as a full DNS cache could also lead to errors.
Here are the fixes:
How can I fix the Windows 11 Forticlient VPN not working?
1. Re-install with the latest version
1.1 Uninstall
Press Win + I on the keyboard to open Windows 11 settings.
Go to Apps.
Click on Apps & features.
Look for the Forticlient VPN.
Click on the three vertical dots next to the VPN client and choose Uninstall.
After adding each service, make sure both Private and Public boxes are checked.Click OK to save your changes.
3. Change DNS
3.1 Set DNS address
Go to Windows Settings like before.
Click on Ethernet or Wi-Fi, depending on which connection you are using.
Click on Edit next to the DNS server assignment.
Select Manual.
Enable IPv4 or IPv6, depending on your preference.
Set your preferred DNS address and click on save. In our case, we have used Google DNS: 8.8.8.8, 8.8.4.4.
3.2 Flush DNS
Open the Start menu.
Type cmd and hit enter to open the Command Prompt.
Type the following command and press enter. ipconfig /flushdns
After changing the DNS, you can try to connect to your VPN network using FortiClient. Hopefully, it will not disconnect again and work properly on Windows 11.
4. Check proxy settings
Go to Network settings like before.
Click on Proxy.
Click on Edit next to the Use a proxy server.
Turn it off.
Do the same for the Use setup script.
5. Update network driver
Open the Start Menu.
Type device manager and press enter to open Windows Device Manager.
Expand Network Adapters.
Right-click on your network driver and choose Update Driver.
Click on Search Automatically for drivers.
Windows 11 will try to find the latest driver and install it automatically.
NOTE
If you can’t find your network adapter or want to avoid regular updates, use Fortect Driver Updater. It automates driver updates and easily identifies new drivers (and it’s free to try).
6. Reset network
Go to Network settings.
Click on Advanced network settings.
Next, click on Network reset.
Click on Reset now.
Click on Yes.
7. Re-enable ethernet
Navigate to the Network settings again.
Go to the Advanced network settings.
Click on Disable next to the Ethernet connection you are using.
After a few seconds, click on Enable.
8. Use Wi-Fi
To fix Windows 11 FortiClient VPN not working issue, you should use the Wi-Fi connection rather than Ethernet.
For some reason, on some computers, the error only appears when users try to connect to the VPN network using the Ethernet connection. But, when they try to do the same thing using Wi-Fi, it works surprisingly.
9. Use SSL-VPN
If FortiClient VPN still does not work on Windows 11, you should change something on your VPN configuration. Instead of IPsec VPN, use SSL VPN.
For this, configure every necessary setting on both the server-side and the client side.
According to a significant number of users, this technique is very effective.
10. Switch to another VPN
If FortiClient VPN is not necessary for business purposes and connecting to a corporate network is not required, consider using another VPN service.
ExpressVPN is highly recommended for its performance and security on Windows 11.
It offers a user-friendly interface, fast connection speeds, and robust security features. It’s an excellent choice for gaming, streaming, and secure browsing.
ExpressVPN
Switch to ExpressVPN for fast, secure internet browsing
These are the most effective ways to get rid of the FortiClient VPN not working issue on Windows 11. Feel free to share any other effective methods in the comment box if you know any other effective techniques.
If you recently upgraded to Windows 10 or 11, you may need to download the Generic PnP monitor driver on your PC.
PnP stands for Plug and Play which allows you to add or remove external devices without any need to configure or install the appropriate drivers manually.
Below are a few ways to download and install your Generic PnP monitor driver on Windows 10/11.
How do I install a Generic PnP monitor driver on Windows PC?
1. Install all available Windows Updates
Press the Win + I keys simultaneously to launch the Settings app.
On the left side of the pane, scroll down and click on Windows Update.
Now, navigate to the right side and click on the Check for updates button.
Windows will now start looking for any available updates.
If available it will install them automatically and display a prompt to Restart now or later.
You can choose to restart your PC immediately or after your work is completed.
Now, go to Device Manager and check if you have the latest Generic PnP Monitor driver downloaded.
2. Update the monitor driver
Right-click the Start button and select Device Manager.
In the Device Manager window, expand Monitors, right-click on Generic PnP monitor driver, and select Update driver.
Click on Search automatically for drivers.
Windows will now start detecting any latest versions of the driver and if available, it will automatically install the Generic PnP monitordriver update.
To ensure you install the right generic PnP latest drivers, a driver updater software such as Fortect Driver Updater is used to download and install the suitable and compatible drivers for your PC.
Furthermore, a solution like Fortect Driver Updater does more than just download and install drivers, it also manages them by troubleshooting, backing up, and restoring them.
Right-click on the Start button and select Device Manager from the menu.
Go to the Display adapters section and click to expand. Right-click on your graphics card and select Update driver.
Click on Search automatically for drivers.
If available, Windows will install the driver automatically.
Once done, close Device Manager and restart your PC to check if the monitor looks good.
4. Reinstall the Generic PNP monitor driver
Right-click on the Start menu and click on Device Manager in the list.
Here, expand the Monitors section.
Next, right-click on Generic PnP monitor and select Uninstall device.
Press Uninstall again to confirm.
Now, go to the Action tab and click on Scan for hardware changes.
Windows will now detect the actual monitor (instead of the Generic PnP monitor) and install the driver accordingly.
Next, turn off your monitor and disconnect it from the PC and remove the video cable of your PC.
Wait for 2 to 3 minutes, attach all the cables and the monitor once again, and reboot your PC.
After successfully reinstalling the latest driver for the Generic PnP monitor, you should see the real monitor now.
NOTE
You cannot remove the Generic PnP driver as it comes integrated with Windows. But you can reinstall the driver if you are facing any issues with the monitor.
Nevertheless, there will be no issue with uninstalling the driver as Windows will install the device when it reboots!
5. Install the Generic non-PnP monitor driver
Right-click on Start and select Device Manager.
Navigate to Monitors and expand the section.
Right-click on the Generic PnP monitor device and select Update driver.
Click on Browse my computer for drivers.
Next, click on Let me pick from a list of available driverson my computer.
If you see the Generic Non-PnP monitor driver listed under Model, select it and press Next.
Once installed, restart your PC and you should now see the Generic Non-PnP monitor driver in the Device Manager.
Alternatively, you can uncheck the box next to Show compatible hardware and select Standard monitor types on the left.
Now, on the right side, select Generic Non-PnP monitor from the Model list and press Next.
It will take a few seconds for the driver to be installed.
Once done, reboot your PC and the Generic PnP monitor driver download on Windows 11 should be successful now.
Troubleshooting PnP driver issues
If you encounter issues like a blurry display, limited resolution options, or the Generic PnP monitor driver instead of the correct monitor, ensure the video cable is properly connected and clean the cable ports.
Reconnect the cable securely. If the issue persists, try removing and reconnecting your GPU. Also, replacing the video cable may help.
Moreover, if you are facing any driver download issues or have discovered other ways to download and install the Generic PnP monitor driver, let us know in the comments box below.