Concrt140.dll: How to Download & Fix it When it’s Missing

So many users have reported that whenever they were trying to run an application, it threw an error message saying that The code execution cannot proceed because CONCRT140.dll was not found.

You might face CONCRT140.dll not found when opening the Adobe applications, Halo, Forza Horizon 5, etc. So, it is not a problem specific to one application.

Without the correct DLLs installed, applications fail to work properly because their code depends on the code written in these libraries.

In this article, we will see what CONCRT140.dll is and why it goes missing, and also how we can download it and fix the error.

What is the CONCRT140.dll file?

Dynamic-link library files (DLLs) are an important part of every Windows application. They are an implication of the concept of shared libraries and Microsoft’s idea to keep the size of their applications smaller.

CONCRT140.dll is a component of the Visual C++ Redistributable Packages that install run-time components needed to run C++ apps that are written using Visual Studio.

The CONCRT140.dll file, as well as other DLL files, are located in the following folder and are responsible for the base of the codes.
C:\Windows\System32\

How to fix code execution cannot proceed because CONCRT140.dll was not found

Now, to fix CONCRT140.dll missing on Windows 10 or code execution cannot proceed because CONCRT140.dll was not found, follow the instructions below.

    Fix CONCRT140.dll missing error by reinstalling Microsoft Visual C++

    Because CONCRT140.dll is a part of the Microsoft Visual C++ Redistributable package, an outdated or corrupt version of it can be the main cause of the error. Reinstalling this package can hopefully fix the error and enable you to run your applications with ease.

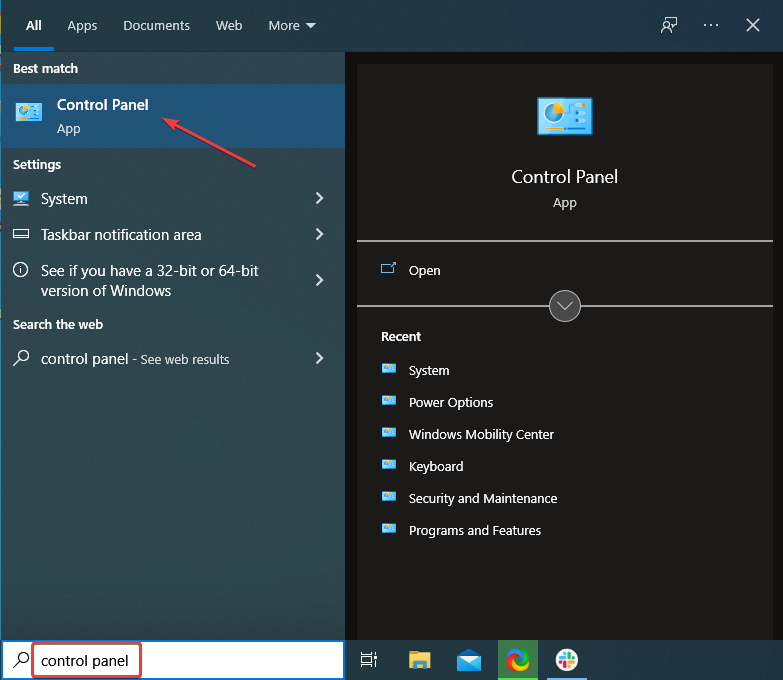
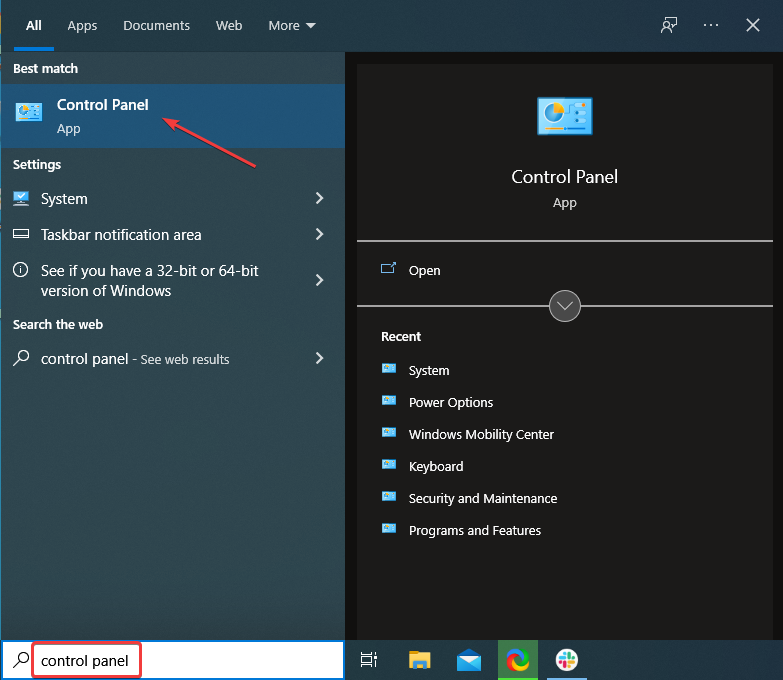
  1. 1. Click on the Start menu, search for Control Panel, and select Open.
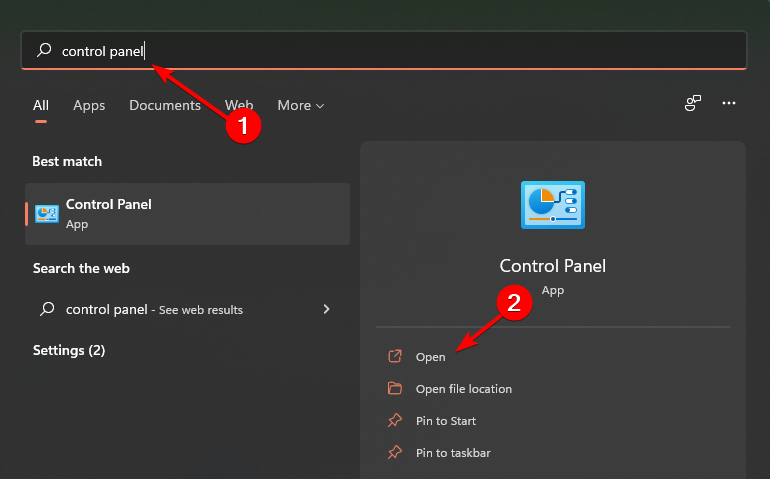
    launch control panel
  2. 2. Next, in Control Panel, navigate to the Programs section.

    Click on Uninstall a program settings
  3. 3. Choose Uninstall a Program.

  4. 4. From the opened window, double click on every package version of Microsoft Visual C++ Redistributable and choose Yes.

    Uninstalling Microsoft Visual C++ Redistributable settings
  5. 5. Then, download Microsoft Visual C++ Redistributable from the official Microsoft website and install it by following the on-screen instructions.

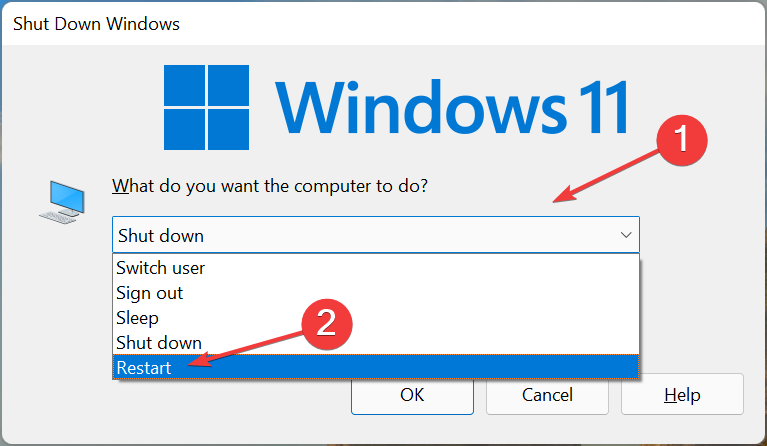
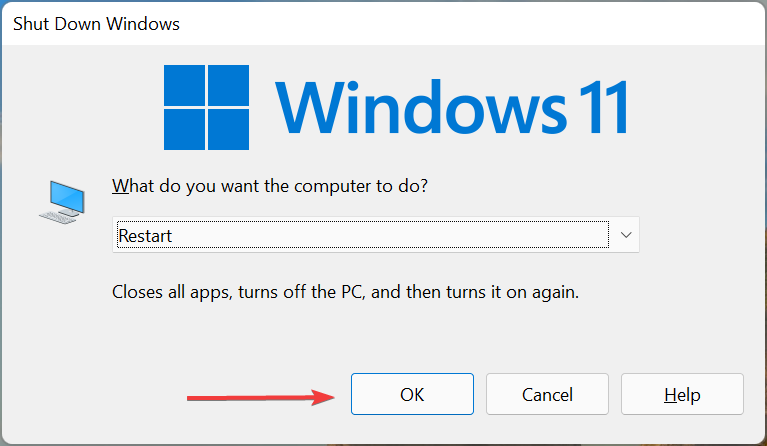
  6. 6. Finally, reboot your computer.

Install a PC repair tool

Users have three options for resolving operating system-related issues: finding a true fix and executing it, reinstalling Windows, or repairing it via the Windows wizard.

Here, a PC repair tool can come into action to fix the problem in the quickest time possible, without needing you to interfere.

Register the missing DLL file

  1. Click on the Start menu, type Command Prompt right-click on it, and select Run as administrator.
  2. Type the following command and press Enter:
    regsvr32 concrt140.dll
  3. This command registers the missing DLL file. However, if more than one DLL file is not registered, you can use the following command:
    for %1 in (*.dll) do regsvr32 /s %1

This makes sure that all the DLL files in your system are registered and detectable by Windows. It might take several minutes to execute, so be patient.

Install the latest version of DirectX

  1. First, head over to the DirectX download page on Microsoft’s website.
  2. Next, choose your desired language and click on Download. This saves the setup file to your computer.
  3. Double-click the dxwebsetup.exe file to open it and follow the on-screen instructions to complete the installation of DirectX.
  4. Reboot your computer.

DirectX is a mixture of APIs (Application Programming Interface) that manage tasks related to multimedia. CONCRT140.dll issues in games like Halo can be fixed by installing the newest version of DirectX.

How do I download CONCRT140.dll?

One of the ways to fix CONCRT140.dll is to download it from a reliable source and install it in the right place so that Windows can identify it.

If you have downloaded CONCRT140.dll separately, you can either copy it to the program’s installation directory or you can move it to the following folder alongside other DLLs:
C:\Windows\System32

However, keep in mind that if your processor has a 64-bit architecture, look for the CONCRT140.dll 64-bit download file and then place it in the following folder:
C:\Windows\SysWow64\

Make sure to reboot your computer for the changes to take effect, or else your Windows will still not be able to recognize that the DLL is in its place.

CONCRT140.dll not found is an error that most users run into from time to time. However, it is mostly because of not installing their programs correctly.

Always make sure to have reliable installation files for your applications and that your installation is completed and performed properly.

Any improper or incomplete installation can cause you to face the CONCRT140.dll missing error and you should reinstall the program afterward.

If your application was working correctly before, but you suddenly ran into this error, you can use System Restore to get your system back to its last saved state.

Let us know if you were able to resolve the problem, or if you know of another solution that can help users who are experiencing the concrt140.dll error in the comments section below.
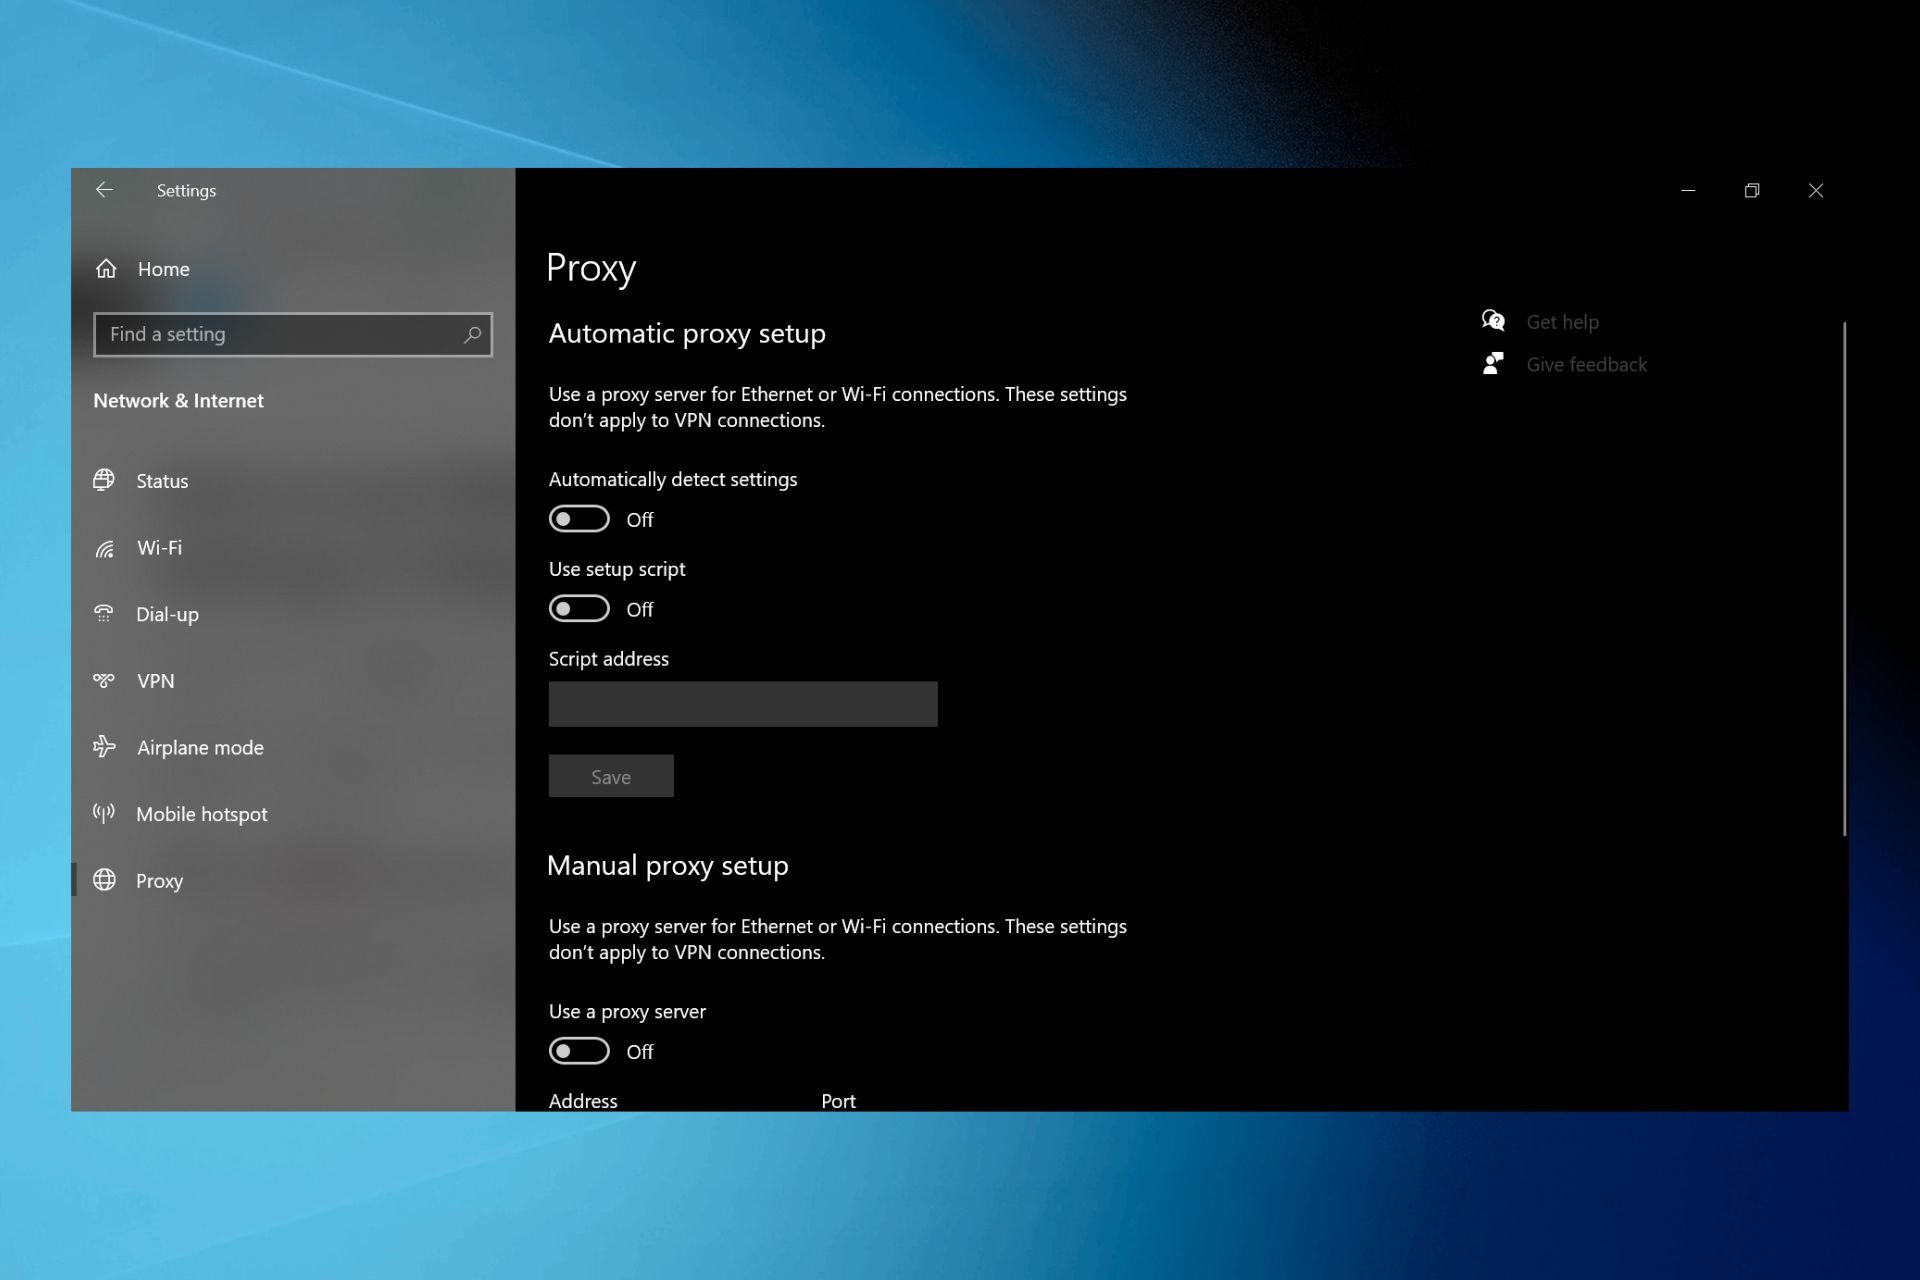
6 Ways to Setup SOCKS5 Proxy in Windows 10/11

There are built-in Windows proxy settings, but you can also set it up through other methods. SOCKS5 is the latest version of this protocol, coming with better security.

With it, you can bypass restrictions, access blocked websites, and enjoy enhanced speed and reliability across various applications. Here’s how to use SOCKS5 proxy on your laptop or desktop:

How do I use SOCKS5 proxy settings on Windows?

1. Windows manual proxy setup for SOCKS5

configure Windows 10 proxy settings
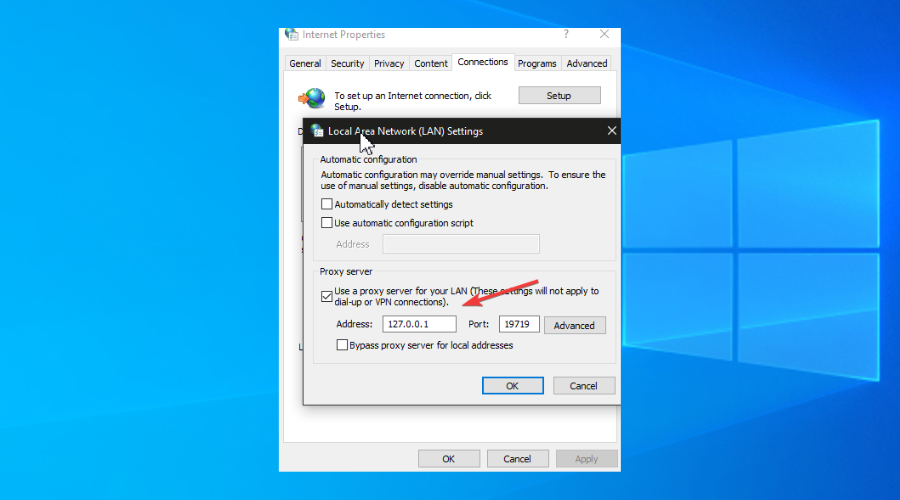
  1. Go to Control Panel > Internet Options.
  2. Switch to the Connections tab.
  3. Click LAN settings.
  4. Enable Use a proxy server for your LAN.
  5. Activate Bypass proxy server for local addresses.
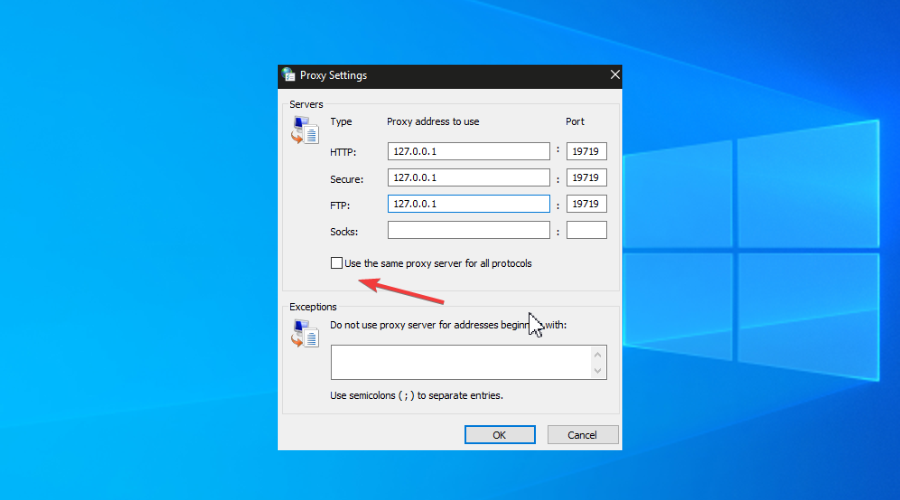
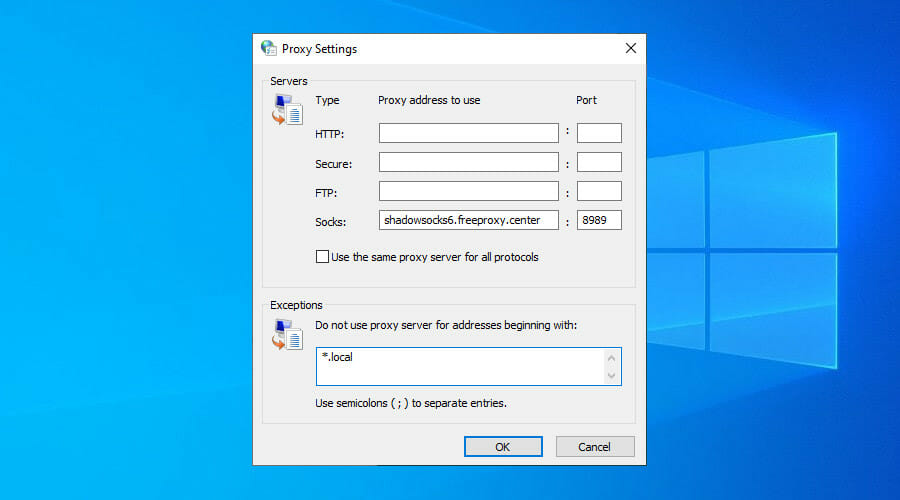
  6. Click Advanced.
  7. Disable Use the same proxy server for all protocols.
  8. At Socks, specify the server address and port of the SOCKS5 proxy.
  9. Delete everything at HTTP, Secure, and FTP.
  10. Click OK > Apply.

You can configure SOCKS5 proxy settings in Windows 10 without having to install any additional software. Plus, the setup applies to all software applications with Internet access, not just your web browser.

2. From Mozilla Firefox

configure Firefox SOCKS5 proxy
  1. Download Firefox and install it on Windows 10.
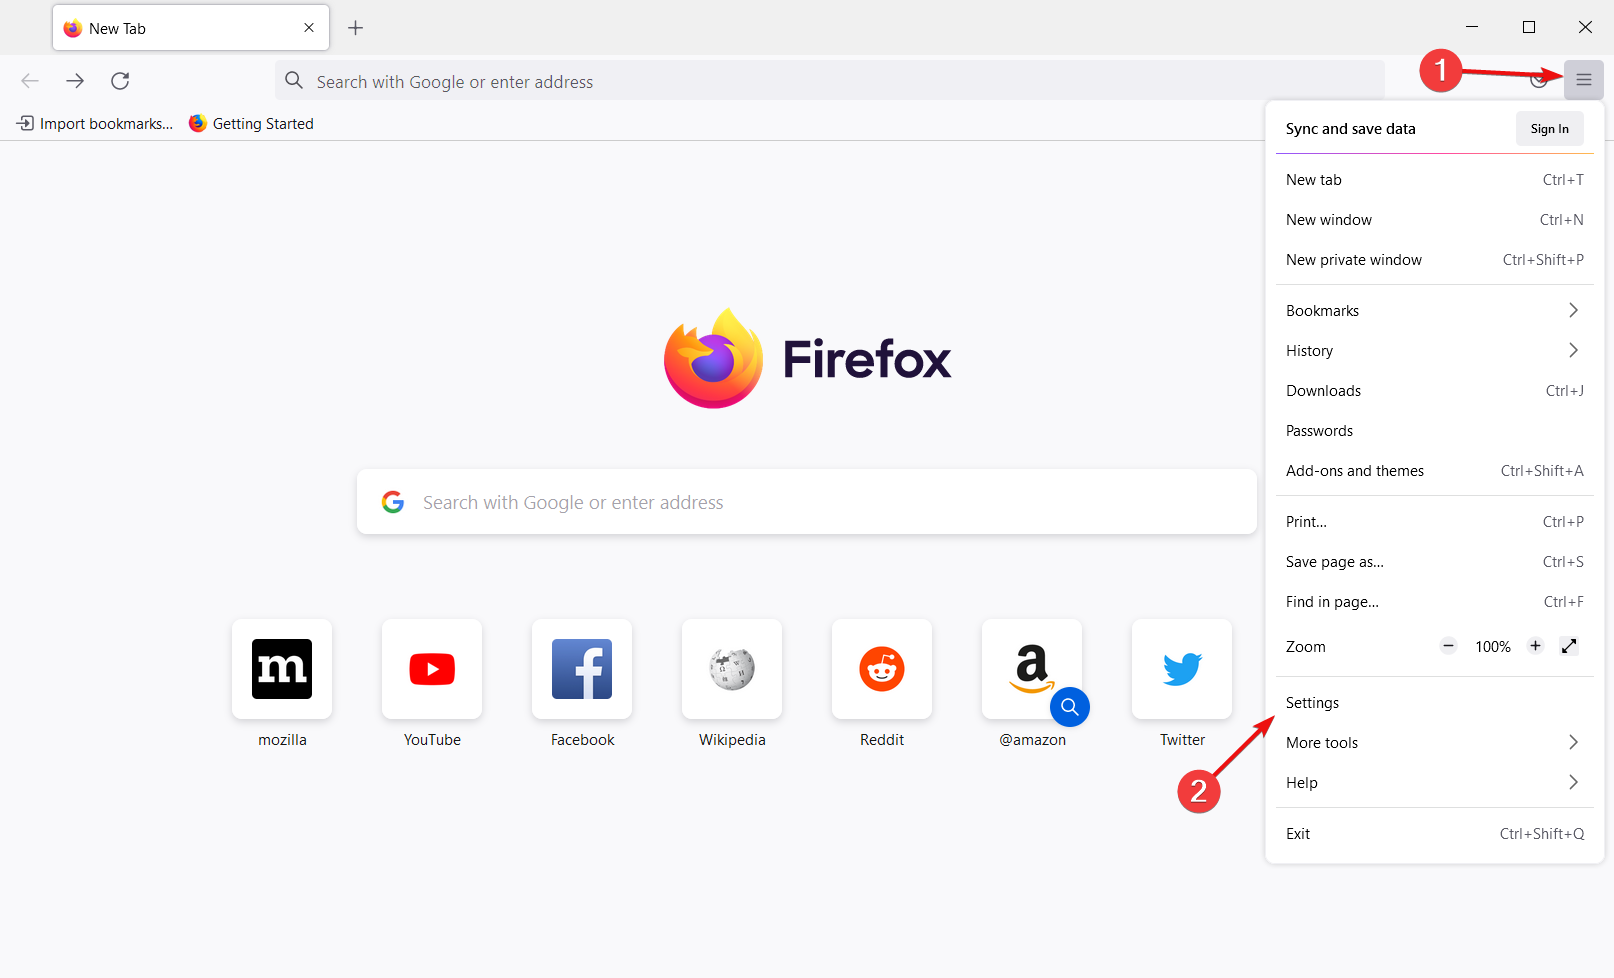
  2. Click the ≡ button and go to Options.
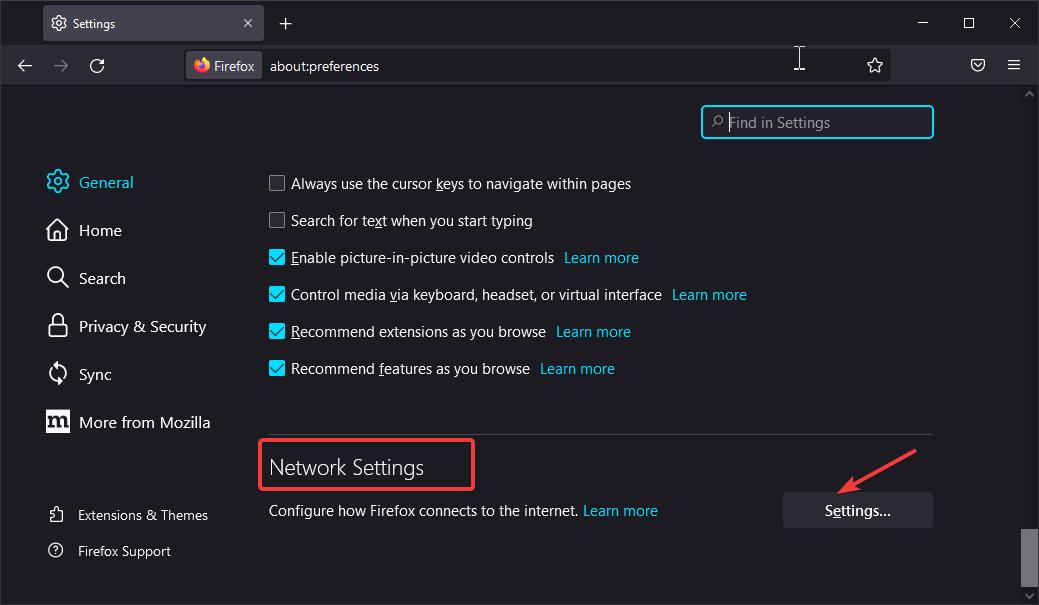
  3. In the General tab, scroll down to Network Settings.
  4. Click Settings.
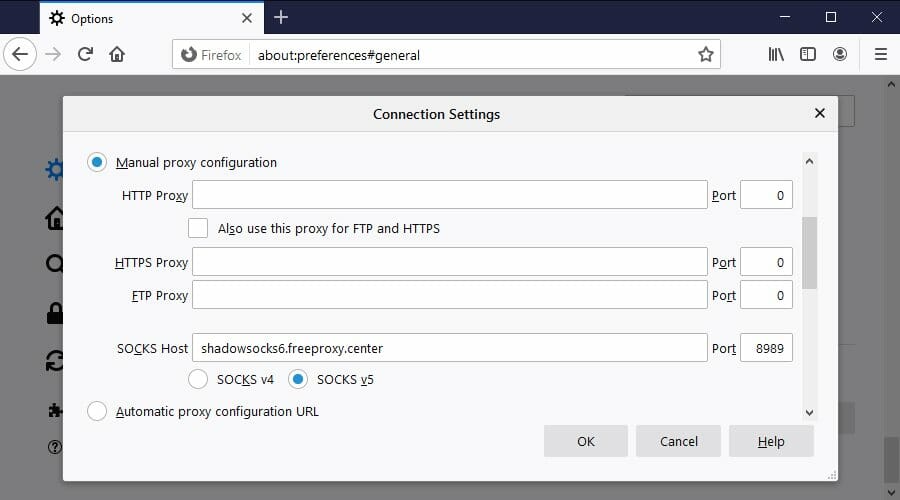
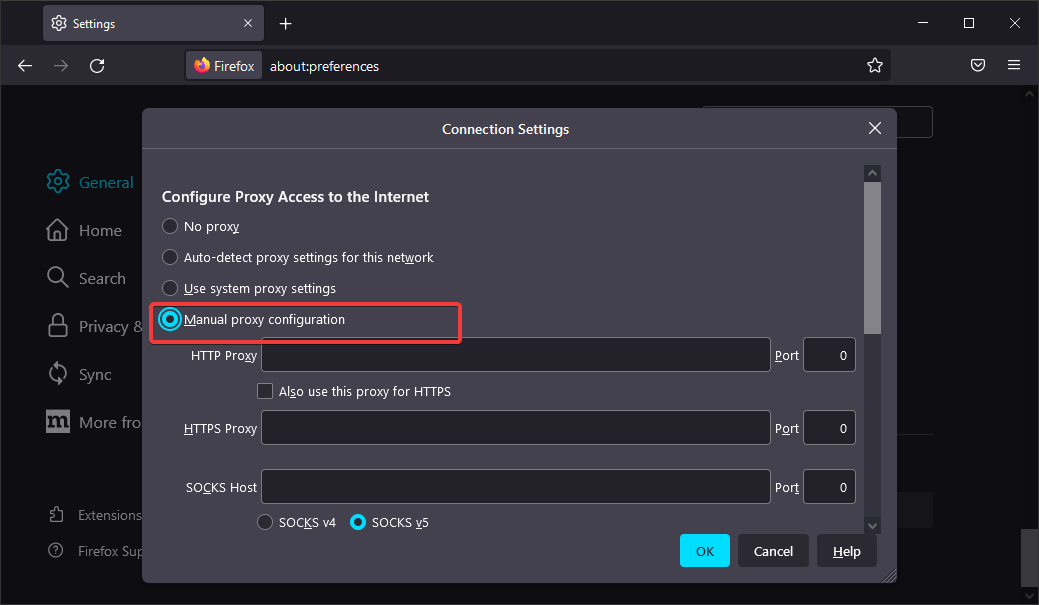
  5. Select Manual proxy configuration.
  6. Set SOCKS5 Host and Port to the server address and port of the SOCKS5 proxy.
  7. Select SOCKS5 v5.
  8. Click OK.

If you prefer using a web browser with a SOCKS5 proxy instead of the entire computer, Firefox is your best bet. While using Firefox for SOCKS5, you can use any other browser for direct Internet connections.

3. Using Google Chrome

For Chrome, the process is very similar:

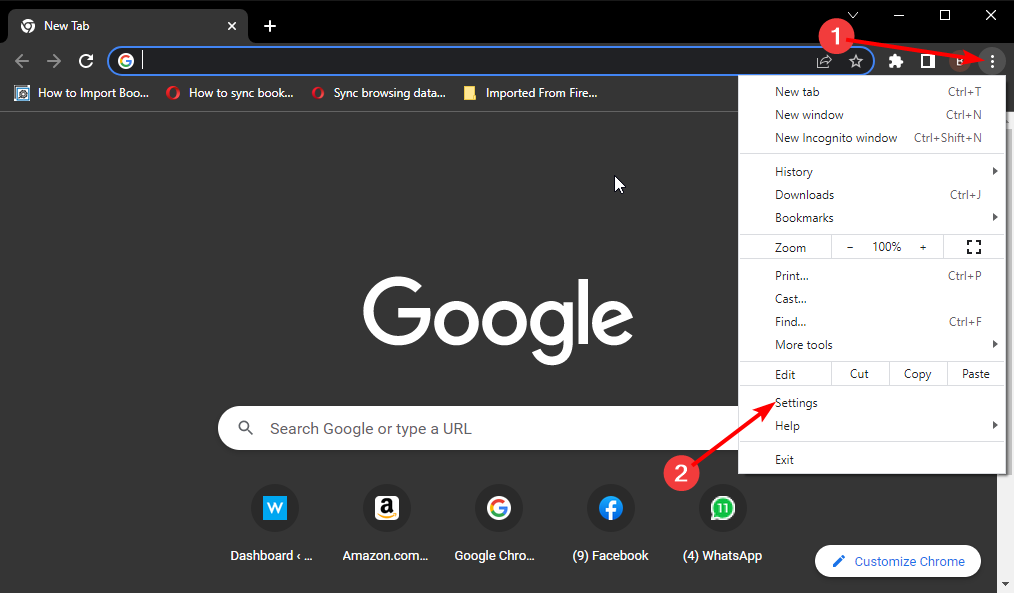
  1. Click on the menu button.
  2. Select settings.menu settings aw snap error chrome windows 10
  3. Select the System section.
  4. Click on Open your computer’s proxy settings.
  5. Enter your Proxy server address as shown in the first solution.

If you wish to regularly switch SOCKS5 proxy servers, you can install an extension like Decodo (formerly Smartproxy).

Smartproxy

Decodo

Switch your IP address for increased privacy and reduced website tracking or blocking chances.

4. Use VPN with SOCK5 features

configure proxy settings in Private Internet Access
  1. Sign up for a PIA subscription plan.
  2. Download and install PIA to your PC.
  3. Right-click PIA’s systray icon and go to Settings.
  4. Switch to the Proxy tab.
  5. Select Shadowsocks, click Configure and choose a location.
  6. Or, choose SOCKS5 Proxy, click Configure, and set the SOCKS5 proxy details.
  7. Left-click PIA’s systray icon.
  8. Press the big power button to connect to a VPN server.

If you want to not only spoof your IP address but also encrypt your traffic, use PIA- A SOCKS5 client for Windows and a VPN at the same time.

In Shadowsocks mode, you can connect the VPN server to a second location for increased privacy and security. It’s similar to using a double VPN to stay connected to two VPN servers at once.

In SOCKS5 proxy mode, you simply specify the connection details of a SOCKS5 proxy server. It’s the custom alternative to Shadowsocks mode, but it’s a bit more complicated.

Private Internet Access

Private Internet Access

Get unlimited access to thousands of SOCKS5 servers with this reliable and fast tool!
Check price Visit website

5. Setup from Shadowsocks

use Shadowsocks on Windows 10
  1. Go to the Shadowsocks page.
  2. Download the latest version for Windows 10/11.
  3. Unzip the archive and run the executable file.
  4. Set the IP address, port, and password of the SOCKS5 proxy.
  5. Click OK.
  6. Right-click the Shadowsocks systray icon.
  7. Select System Proxy > Global.

Shadowsocks is a SOCKS5 proxy client that can be easily installed on Windows 10 to use SOCKS5 proxy settings. It runs in the systray and can be quickly configured, enabled, and disabled.

Furthermore, Shadowsocks features several encryption methods to make up for the fact that SOCKS5 doesn’t have one, including 256-bit AES military-grade encryption.

In addition to security, a huge benefit of using Shadowsocks is that it applies the SOCKS5 proxy settings globally to Windows 10. As such, all Internet-enabled programs will use it.

6. Setup on uTorrent

use SOCKS5 proxy in uTorrent
  1. Download uTorrent on your Windows PC.
  2. Install the torrent client and launch it.
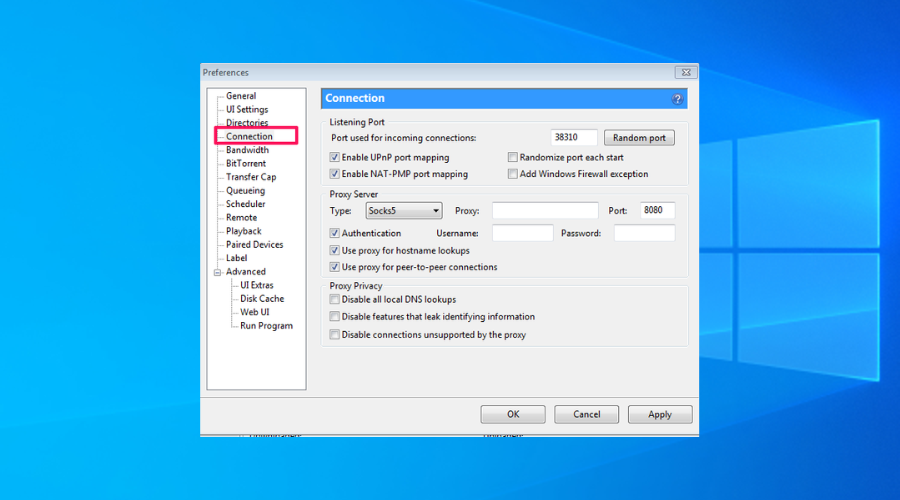
  3. Open the Options menu and select Preferences.
  4. Go to Connection.
  5. Set Proxy Server Type to Socks5.
  6. Set Proxy and Port to the server address and port of the SOCKS5 proxy.
  7. Click Apply.

On Windows 10 and other operating systems, you can configure SOCKS5 proxy settings directly in a torrent client to make your IP address anonymous and protect your true identity in the torrent swarm.

To summarize, you can easily set up SOCKS5 proxy settings on Windows 10 using the built-in system options.

However, it’s also possible to resort to other methods, like configuring Firefox, uTorrent, or Shadowsocks settings.

But the best solution is to use VPN and SOCKS5 at the same time with the help of Private Internet Access.

7 Tips to Fix CCleaner Duplicate Finder not Working

CCleaner is one of the best utility programs that can delete unwanted files from computers, but many claim that CCleaner duplicate finder is not working for them.

If you’re not familiar with this process, we have a great guide on how to remove duplicate files in Windows, so we encourage you to read it.

Keeping your PC free from unwanted files is important, so it’s important to fix this issue right away. Therefore, in this post, we have compiled a list of some workarounds that will definitely help you.

Is CCleaner duplicate finder safe?

CCleaner has been one of the best PC cleaners available for over a decade. But is it safe to use?

The answer here is yes. The company behind this software has a great reputation, and their applications are well-known for being both safe and incredibly useful.

Since this is a core feature of CCleaner, it’s safe to use, but we advise you to always double-check your files manually before removing them.

How can I fix CCleaner duplicate finder if it’s not working?

1. Turn off compression attribute

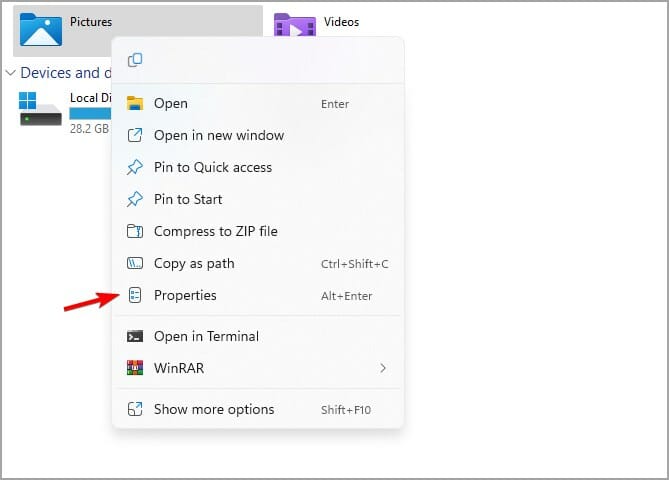
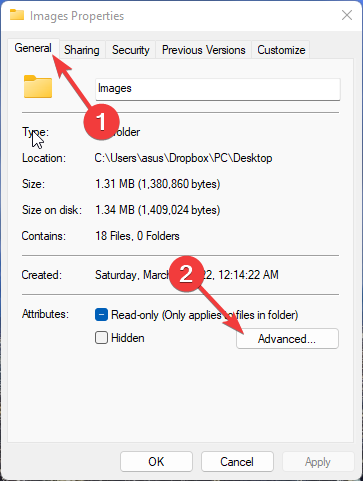
  1. Right-click on the file you want to delete and click Properties.
  2. Navigate to the General tab and click on Advanced.
    CCleaner duplicate finder not working
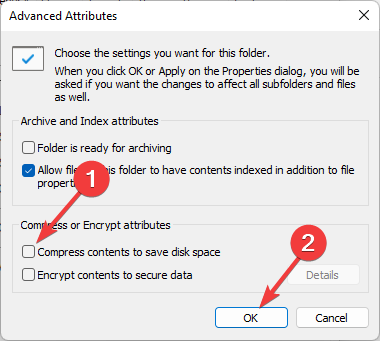
  3. Under the Advanced dialog box, uncheck the option Compress contents to save disk space. This will disable the compress attribute.
  4. Click on OK to save the changes.
    CCleaner duplicate finder not working

Duplicate files sometimes won’t delete even after using CCleaner duplicate finder. The reason for this is the file compression feature. Turn off the compression attribute and try deleting files again.

2. Turn off Read-only mode

  1. Right-click on the duplicate file you want to delete.
  2. Click on Properties.
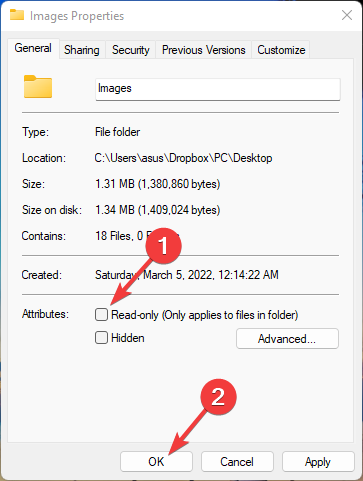
  3. Navigate to the Attributes section and uncheck the Read-only option to disable it. Click on OK to save the settings.
    dISABLE READ ONLY

If the Read-only mode is enabled, you cannot delete or modify the files. So, disable the read-only mode and check if CCleaner duplicate finder works correctly.

3. Check if the folder is in the include list

  1. Right-click on the folder you want to delete files.
  2. Click on the Properties.
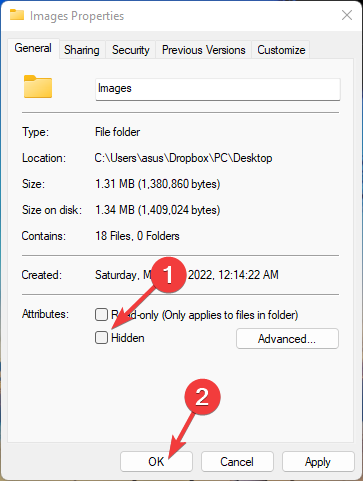
  3. Look for the Hidden checkbox. If enabled, disable it and click OK to save changes.
    Hidden
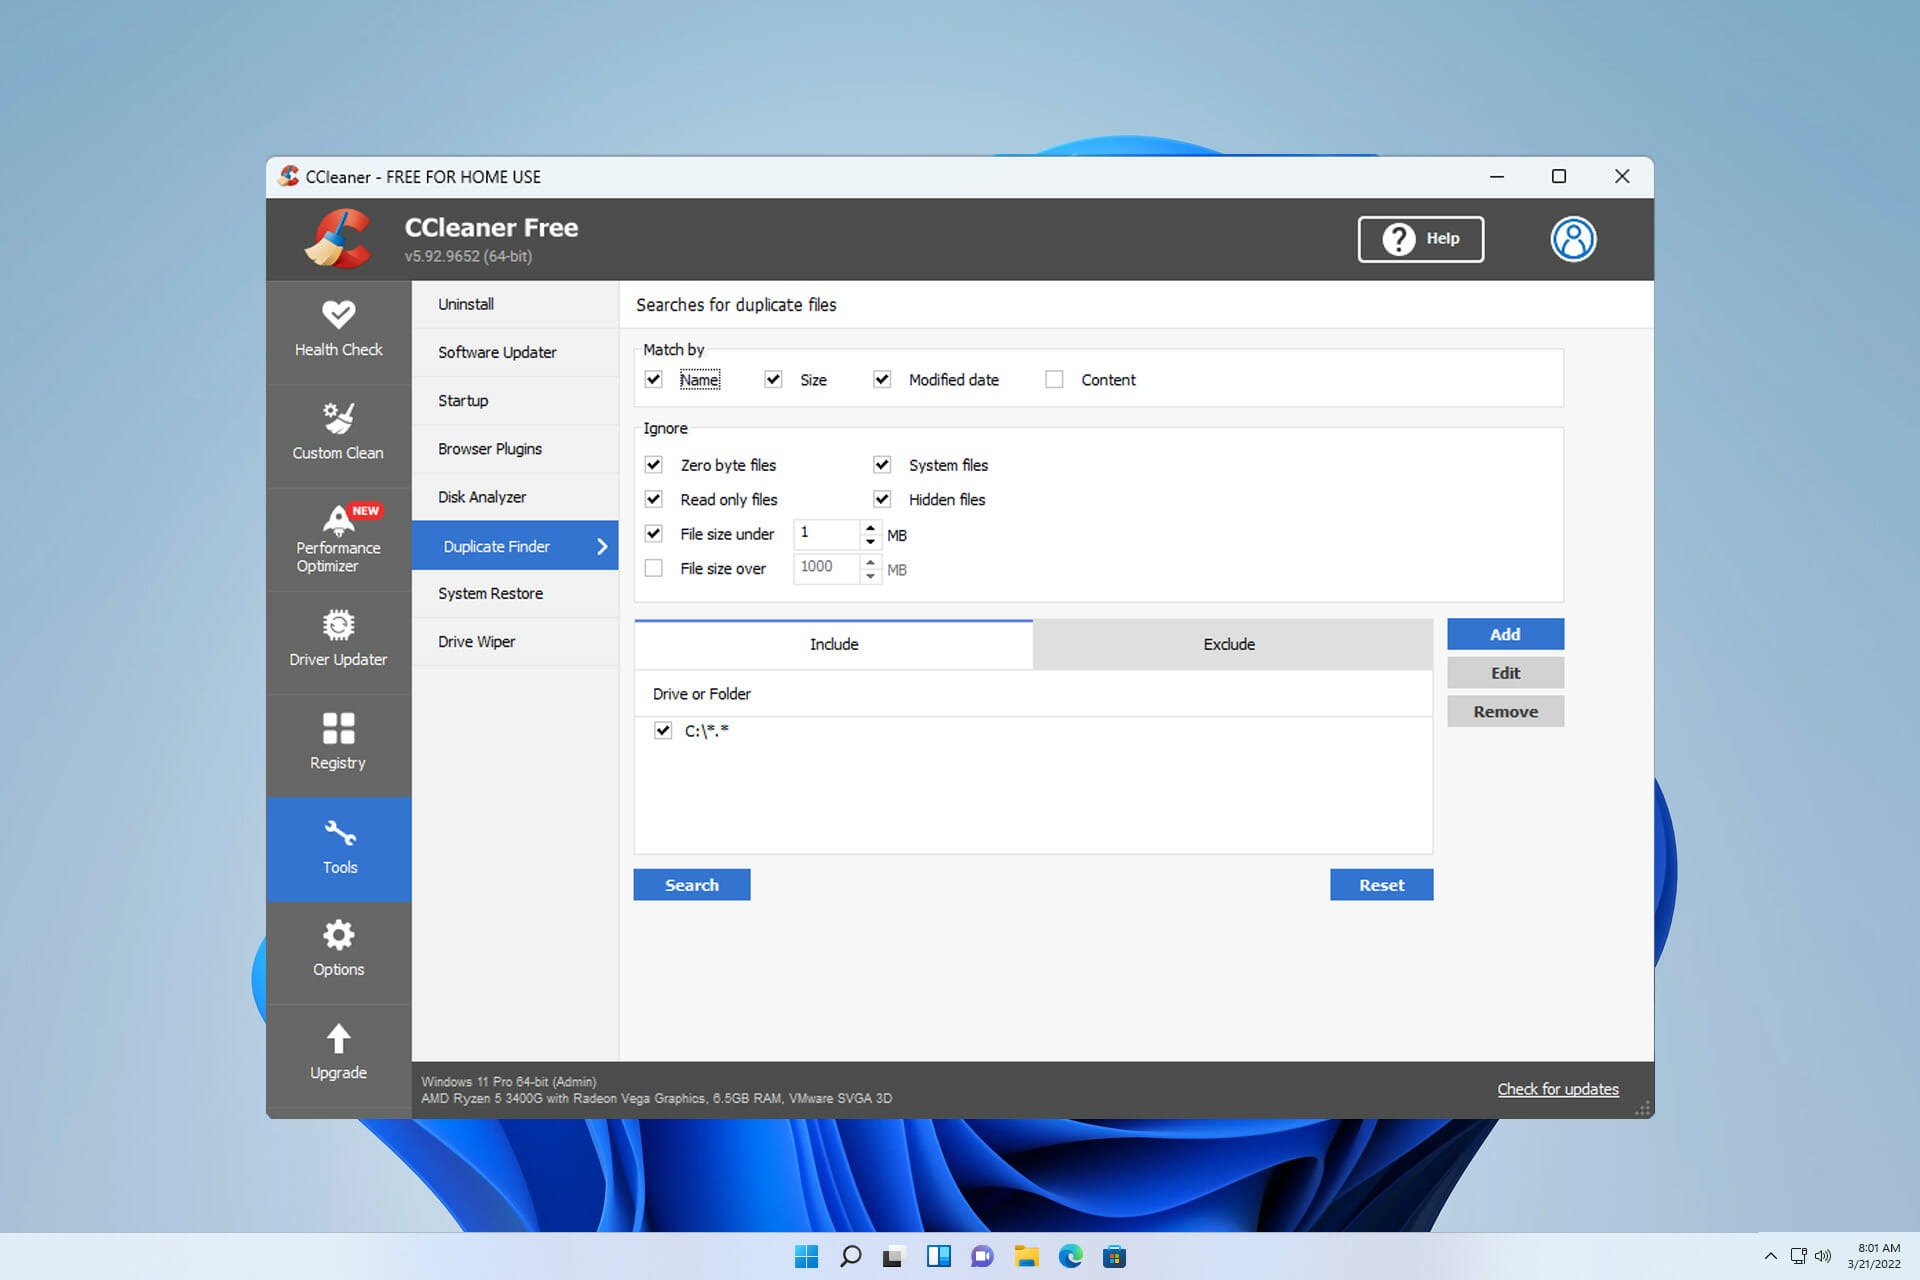
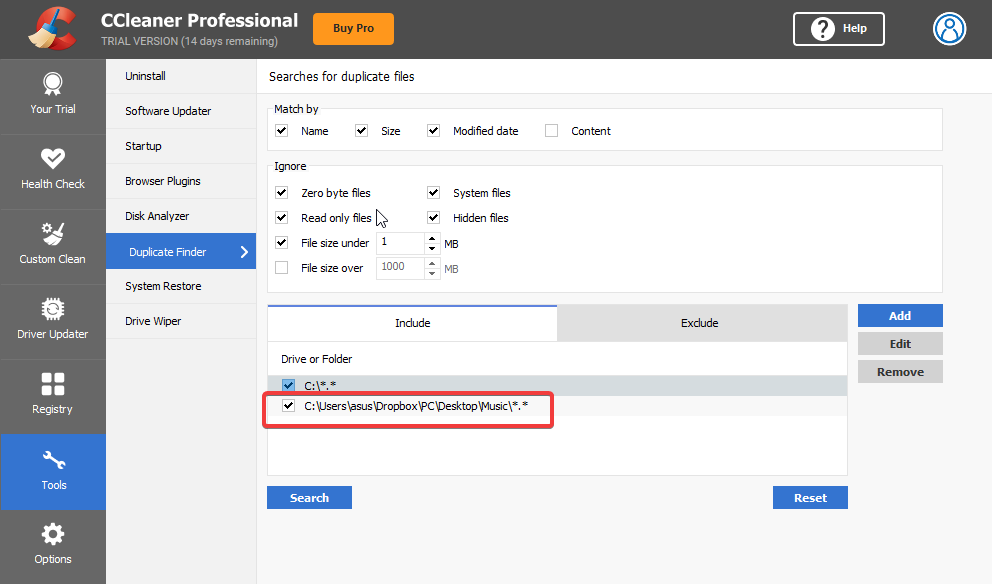
  4. Open the CCleaner application, and select the Duplicate finder.
  5. To the Include list, add the folder which you want to search.
    Add Folder
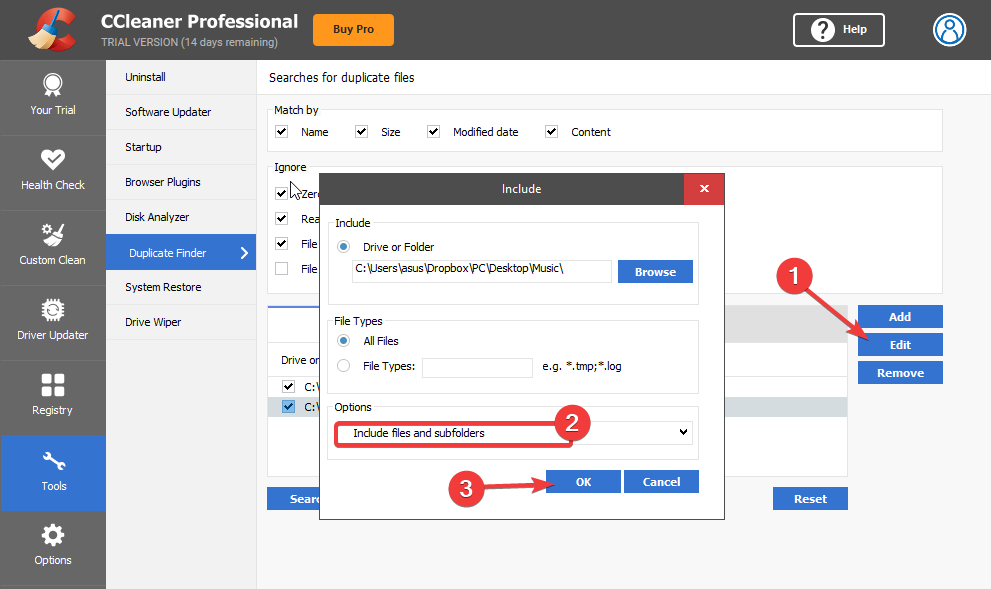
  6. Now, click on the Edit option. Select Include files and subfolders under Options. Click on OK to save the changes.
    Include file and folder

4. Run CCleaner as an Administrator

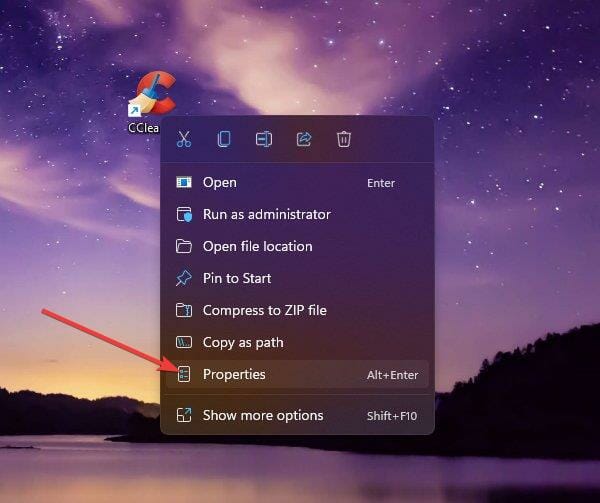
  1. Right-click on the CCleaner.exe file on your PC and select Properties.
    Properties CCleaner
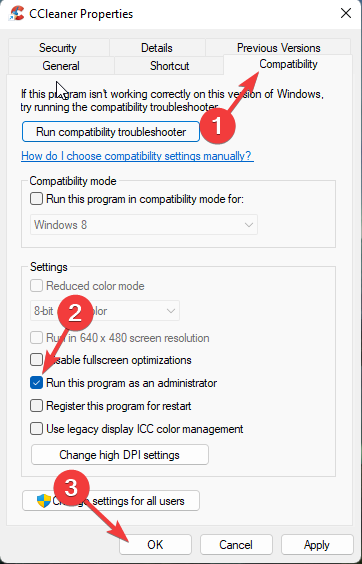
  2. Navigate to the Compatibility tab. Select the option Run this program as an administrator.
    Run ccleaner as admin
  3. Click on OK to save the changes.

5. Disable third-party antivirus

  1. Right-click your antivirus icon in the system tray.
  2. Now select the option to stop protection.
  3. After disabling the protection, check if the problem is still there.

If disabling didn’t work, uninstall it temporarily and check if CCleaner is still not finding duplicates.

6. Remove CCleaner Registry keys from the Registry Editor

Note icon NOTE
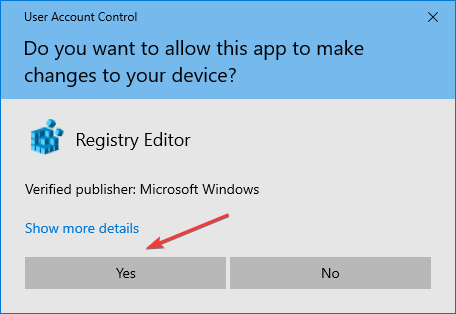
Before getting started with this method, create a System Restore Point or a backup the registry, so that you can restore your PC if anything goes wrong.
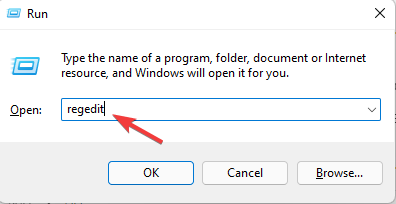
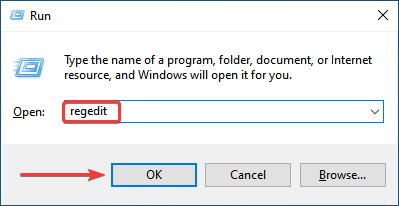
  1. Click Windows key + R to open the Run dialog box.
  2. Type regedit and hit Enter.
    Run command - regedit - Enter
  3. Navigate to the following path.
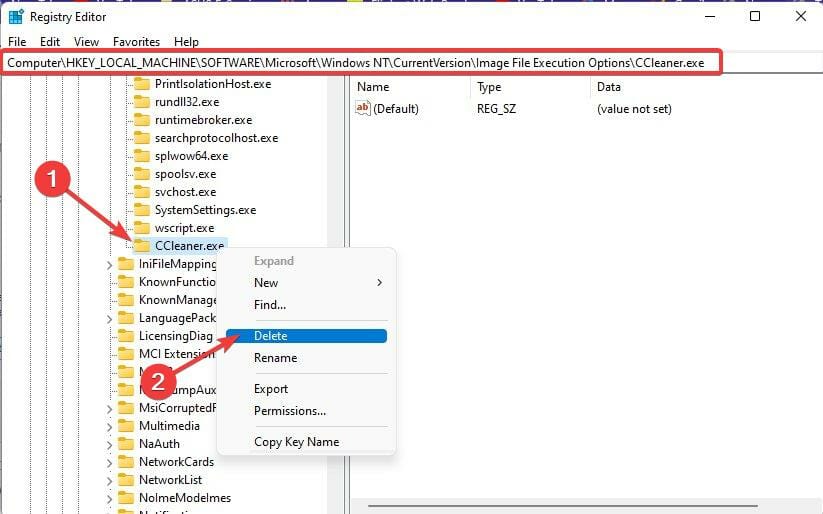
    HKEY_LOCALMACHINE\SOFTWARE\Microsoft\Windows NT\CurrentVersion\Image File Execution Options\
  4. Right-click the CCleaner entry key from the list of entries and select Delete.
    CCleaner duplicate finder not working
  5. Once done, Close the Registry Editor and check if the CCleaner not detecting duplicate files issue has been resolved.

Many users also complain about CCleaner keeps crashing. Rest assured that our guide shows you what to do in case that happens.

7. Reinstall CCleaner

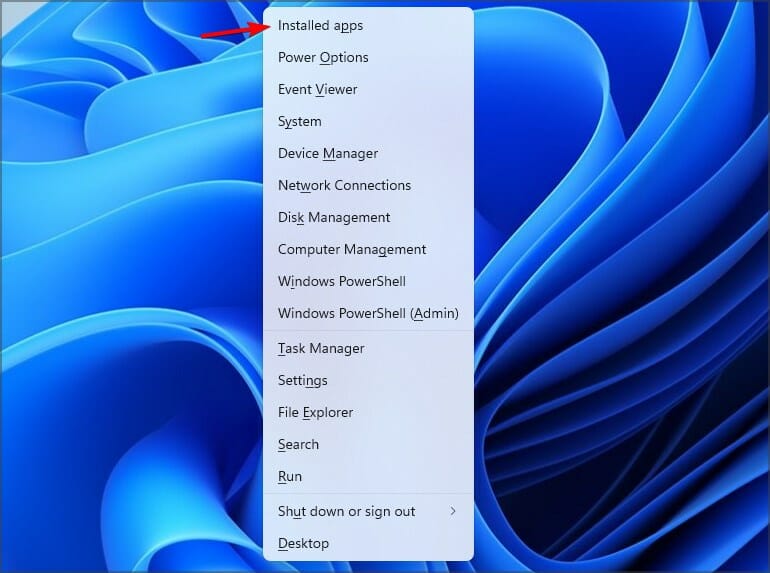
  1. Press Windows key + X and select Installed apps.
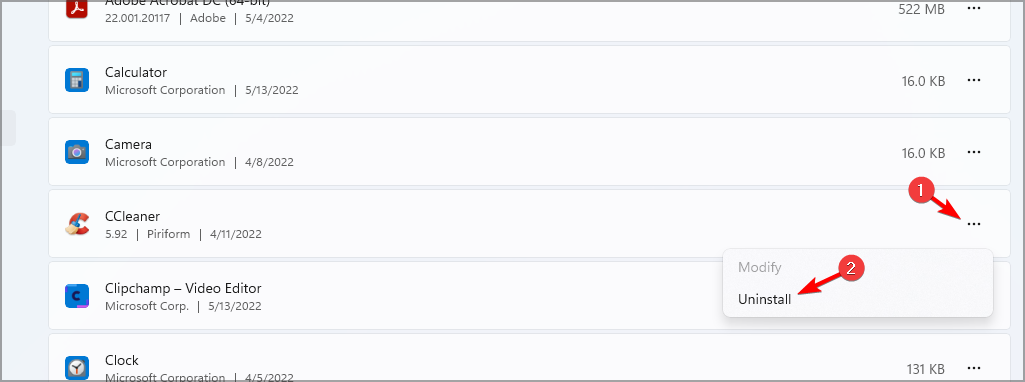
  2. Locate CCleaner on the list. Click the three dots on the right and choose Uninstall.
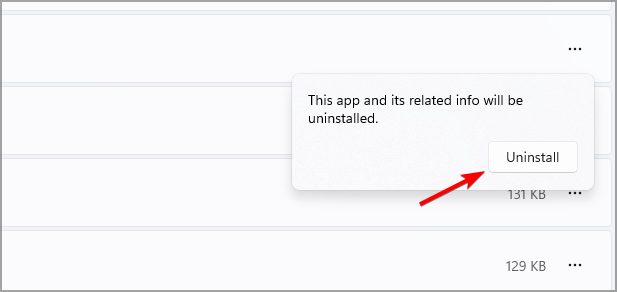
  3. Click Uninstall to confirm.
  4. Follow the instructions on the screen to complete the process.

Once you’re done, visit CCleaner website and download the latest version.

The most common reason this issue occurs is the Compression Attribute. However, running CCleaner as an Administrator has also been helpful to many users.

Follow the steps mentioned above to fix CCleaner not deleting duplicate files. If the troubleshooting methods mentioned above could not help you, try updating Windows to its latest version.

Also, take a look at our article on the best tools to find and remove duplicate files. If this guide was helpful, do let us know in the comments below. We’re eager to hear from you.

10 Best Software to Remove Internet Tracking from Your PC

Internet tracking is a common practice that website owners and advertisers use to collect information about you. They then use this information to tailor ads or even sell your personal data to third parties.

While this is not necessarily a bad thing, some users prefer not to have their online activity tracked by third parties. This may prompt them to look for ways to remove or block tracking sites.

Given that cybercriminals are constantly perfecting their skills, users have been wondering how to remove tracking cookies from Windows 10 and 11. It is crucial that every internet user practices safe browsing tips and tricks to avoid falling victim.

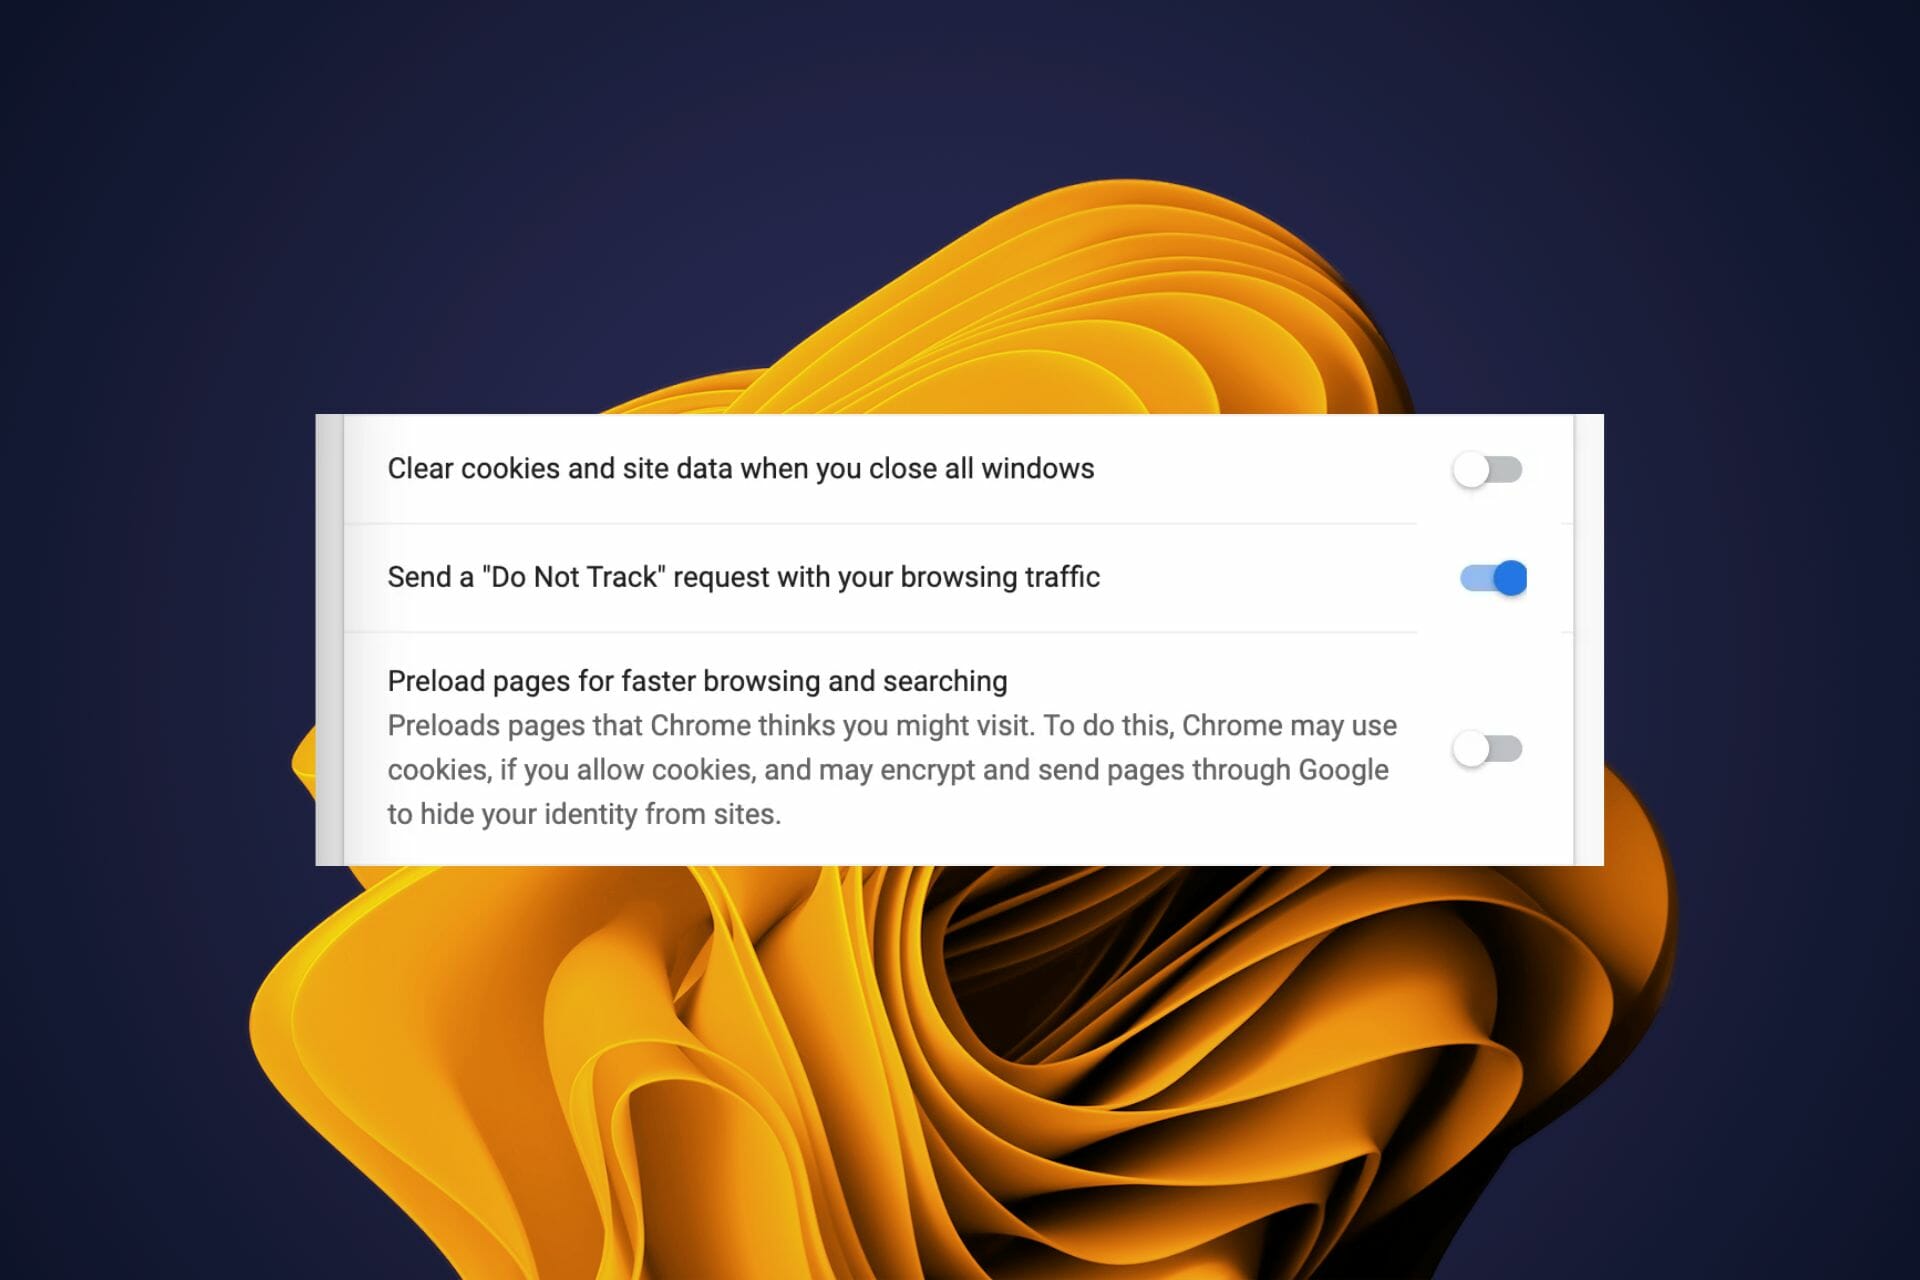
There are many ways to remove trackers from your PC. These include deleting cookies, clearing cache, and disabling tracking on websites. 

At times, these methods can be time-consuming and difficult to do if you have no technical knowledge. Fortunately, there are several cookie cleaner software that you can use to protect your privacy.

The best way is to stop any trackers before you reach to a point of removing internet tracking cookies. You can check out our article on software to stop online tracking on your PC for Windows 10.

What is anti-track software?

Anti-track software is a type of software that protects your privacy by preventing websites from tracking you. By using anti-track software, you can prevent websites from collecting information about you and your online activities.

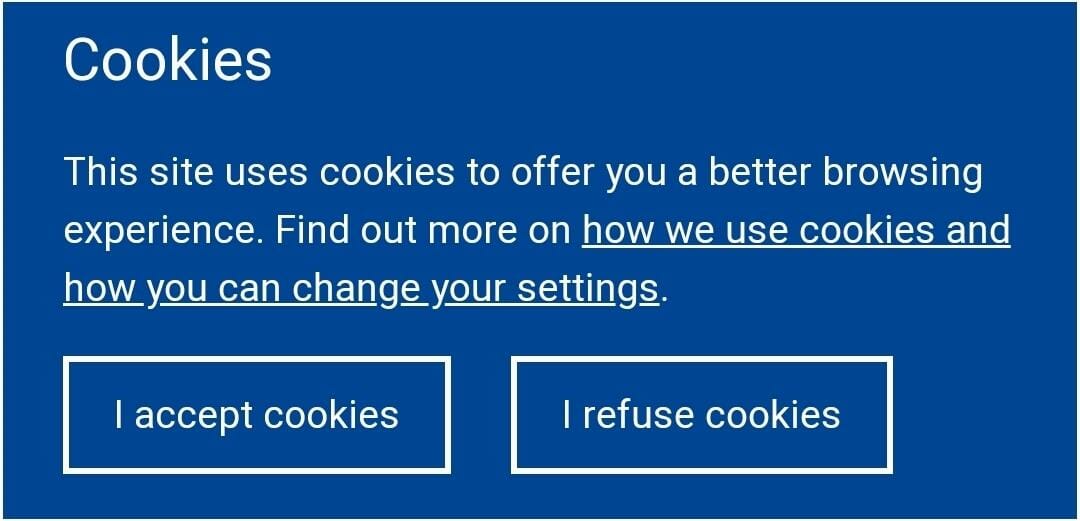
Cookies are small files that store your preferences and activities on the web. They can be used to track your browsing history, and even create profiles of you.

To identify tracking cookies, you can use one of the following:

  • Browser extensions – Browser extensions are add-ons that can be installed directly within the browser itself, like Mozilla Firefox or Google Chrome. They provide extra functionality beyond what the browser offers by default and can inform you if you are being tracked.
  • Antivirus software – Antivirus tools typically come with a built-in feature that can detect and remove tracking cookies from your computer. If you don’t have one installed on your device already, there is free software to remove tracking cookies.

Some browsers also provide analytics and let you know the kind of cookies you have accepted.

What is the best software to remove internet tracking from your PC?

Fortect – Great malware monitoring

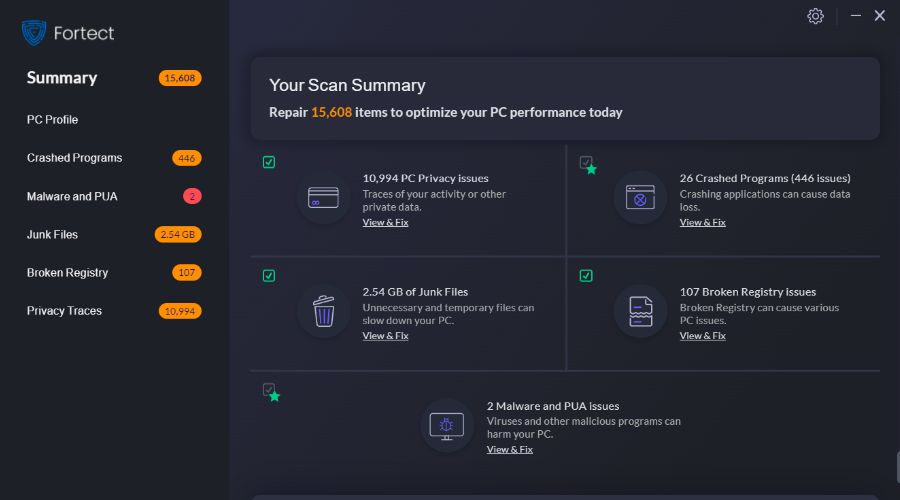
Fortect is a strong software specially created to protect, repair, and optimize your computer thanks to its numerous complex features.

It is able to help you clear any trace of your browsing activity by removing all web browser tracking cookies that may collect your personal data and further affect your computer.

You can also use Fortect to keep your computer safe because it has a malware-monitoring feature that checks your installs, and executables for viruses and other digital threats to remove and replace all the damaged files caused by them.

Additional features:

  • Detect and repair stability issues
  • Junk files removal
  • 60-day money-back guarantee
  • User-friendly service

Fortect

Erase internet tracking and digital threats that may harm your device with the Fortect program.
Free Trial Download now

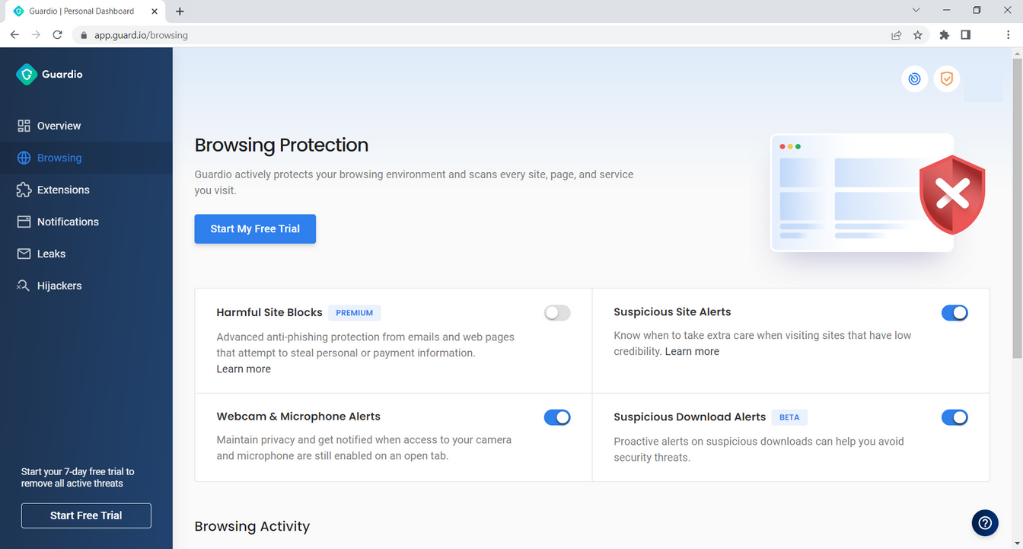
Guardio – Highest prevention and blocking rate

Guardio is a browser extension that prevents internet tracking by examining how old the website is, the genuineness of the design, the legitimacy of the URL, and much more.

Guardio employs an algorithm that learns about extension installation and uninstall rates, analyzes user reviews, and understands how to detect malicious activity inside the code itself. This information assists Guardio in identifying harmful extensions and preventing their installation.

All of this information assists Guardio in determining the amount of confidence you should place in a website. When it is not high enough, you will be notified instantly by a little push notification on the right side of your browser.

Additional features:

  • Blocks out harmful phishing and scam sites
  • Prevents abusive push-up notifications
  • Informs about data leaks
  • 24/7 user support

The advantage of this is that it is not invasive, is a really friendly approach, and you know you are protected.

Guardio

Safeguards you from phishing attempts by alerting you anytime you open fraudulent mail or visit a scam website.
Free Trial Visit Website

BitRaser File Eraser – Best in class tracking erasure tool

This fully developed software is essentially a cleaning tool that can entirely delete all sensitive files from your desktop or laptop.

So by choosing this tool, you ensure complete privacy on your browser and avoid tracking files with clever tools for clearing browsing history or many other files.

It is essential to feel protected when navigating online and giving personal data. This is why you should use this software to eliminate your traces and permanently delete Internet data from cookies, temporary files or autocomplete data in forms.

In case you have many files on your PC that are not for sharing, it’s easy to defend yourself by erasing any files like photos, videos, or documents from any Windows devices.

Additional features:

  • Permanently erase banking data or online passwords
  • Removes personal traces from activity logs, preferences, or cookies
  • Complete security for external storage devices like USB or SSD drives.
  • Entirely erase deleted information
  • Delete system traces like temporary files
  • Erasure task scheduling and erasing list tools

BitRaser File Eraser

Are you still worried about Internet tracking? Get rid of it while wiping out the personal files stored on your current browser.
Check price Visit website

Avast AntiTrack – Comprehensive solution

Avast AntiTrack is an application that protects your privacy by preventing websites from tracking the sites you visit. This helps protect you against malware and other unwanted intrusions into your system. 

What’s more, it provides you with an option to scan the computer for any kind of tracking software, browser extensions, and cookies that are installed on your PC.

Once the scan is complete, you will be able to see the list of websites tracking you. You can choose to block these websites by adding them to the blacklist section of Avast AntiTrack. 

Additional features:

  • It has an easy-to-use interface.
  • Multiple browser integration.
  • Masks your IP address so you can browse privately ad securely.
  • Erases your browsing history once you are done.
  • Send you an alert when a tracker is detected.

Avast AntiTrack

Hides your online identity and behavior, you can prevent trackers from collecting and sharing your data.
Free trial Visit website

AdGuard – The most advanced option

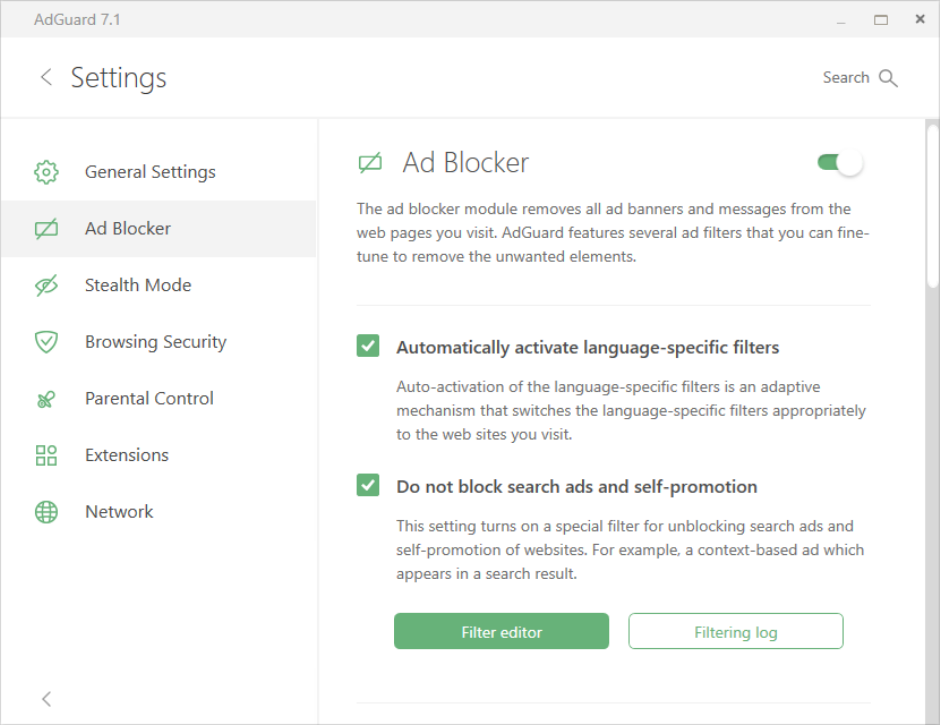
AdGuard is one of the best software to remove internet tracks from your PC. The software works by filtering out certain types of content before it reaches your browser or device.

It blocks all kinds of ads including banners, pop-ups, video ads, and others. Plus, it also blocks all tracking attempts like cookies, beacons, and javascripts used by companies to record users’ activities on the Internet.

Additional features:

  • Comes with a VPN available in 50+ locations.
  • Enhances site loading.
  • Multiple functionalities for both browsers and the desktop app.
  • Blocks ads and site trackers.
  • Works quietly in the background without interfering with your activities.

⇒ Get AdGuard

Malwarebytes AdwCleaner – Best malware detection

AdwCleaner is an excellent tool for removing malicious software that may have been installed on your computer without your knowledge.

In addition to that, cleaning out junk files that slow down performance also helps to keep your computer running smoothly.

Lastly, if you’re concerned about privacy issues related to Internet tracking and advertising, AdwCleaner is a must-have program.

Additional features:

  • Has an extensive database to identify and remove unwanted software.
  • Lightweight so it doesn’t take up too much storage space.
  • Detects Potentially Unwanted Programs (PUP) that change the homepage or redirect pages and block them.
  • It can be used as a free scanner to detect spyware.

⇒ Get Malwarebytes AdwCleaner

Ghostery – User-friendly extension

Ghostery is a browser extension that provides users with the ability to block web trackers. The software will block all trackers on a page or allow you to choose which ones you want to block.

Firstly, it can also help you identify where you are being tracked, so you can make more informed decisions about what information you share online.

The tool makes it easier to understand what information is being collected about you online by showing you what’s being tracked on each site you visit

Additional features:

  • It lets you conduct private searches on the web.
  • Supports multiple browsers.
  • Has an extensive tracker database making it more efficient.
  • Block tracking services in real-time.
  • See which third-party companies are collecting data about you.

⇒ Get Ghostery

Privoxy – Most versatile

Privoxy is an application that allows you to filter what your kids see on the internet.

This tool functions by installing a small program on your computer that routes all of your internet traffic through its servers.

Hence, the main advantage of Privoxy is its ability to work with almost all browsers including Google Chrome and Mozilla Firefox.

Additional features:

  • Remove tracking cookies from your browser.
  • Highly customizable allowing you to personalize your installation. 
  • It uses minimal system resources.
  • Compatible with multiple browsers.

⇒ Get Privoxy

Spybot – Search & Destroy – Lightweight program

Spybot has the ability to scan for malicious programs that may be hidden in your system files, registry entries, and other parts of your computer.

So this software is small and fast, has no ads, and its malware scanner can detect many types of spyware, including Trojans and rootkits.

The program also includes a variety of tools to help you keep your computer safe while surfing the web and block infiltrating ads from gathering your private information.

Additional features:

  • Easy to use interface.
  • Supports multiple devices.
  • Includes a system scanner that can detect any other software.
  • Has various tools for additional protection.

⇒ Get Spybot – Search & Destroy

The CCleaner software provides a simple and effective way to clean up your PC by removing temporary files, recent documents, and web history.

Additionally, delete other unnecessary files that clog up your hard drive and slow down your system.

More so, it is one of the best tools to remove internet tracks from your PC. It not only lets you clean up junk files, but also gets rid of all the tracking cookies, cache, and other files that are slowing down your computer and making it vulnerable to malware.

Additional features:

  • Ensures your browsing activity is kept private.
  • Detects any internet tracking and stops it early in advance.
  • Runs a health check on your PC to keep malware and viruses at bay.
  • Speeds up your computer.
  • Cleans up your hard drive.

CCleaner

The Smart Cleaning feature prevents internet tracking by cleaning your PC on a schedule while working silently in the background.
Free trial Visit Website

In case you are wondering how to remove tracking cookies from Chrome or remove tracking cookies from Internet Explorer as a target browser, refer to our dedicated guide on how to proceed. 

Alternatively, you can opt to use browsers without tracking to safeguard your online activity at all times. 

We hope that at this stage of the article, you have been able to make a decision on what software is best to remove internet tracks from your PC.

We’d love to know what software or browser extensions you are using to remove internet tracking cookies and secure your privacy. Let us know in the comments section below.

7 Best Email Clients for Microsoft Office 365

If you’re already using Windows, then you probably have a good idea of what email client works best for the Microsoft Office 365 suite. 

Email clients are programs that allow you to read, write and send emails. When it comes to choosing email clients, most people are looking for basic functions while others are looking for email apps to boost productivity and get things done faster.

Because Microsoft Office 365 hosts a bunch of productivity apps, it is recommended that when exploring other options, you should consider email clients that are compatible.

What are the best email clients for Microsoft Office 365?

Mailbird – Cloud-supported email client

Mailbird is a free email client for Windows, Mac, and Linux. It supports Gmail, and Office 365 accounts, as well as other popular webmail services. It has a clean design, with a dark theme and the option to customize colors. 

It is often confused with Thunderbird as users wonder whether there is an option for Thunderbird Office 365 but there isn’t. However, by tweaking some configurations, you may get it to work.

You can also use Mailbird’s snooze feature, which lets you set reminders for messages so they show up again later in your inbox at a time that works best for you.

Mailbird also supports cloud storage services like Dropbox and Google Drive, so if someone sends you an attachment in an email, it will automatically download to your computer and save it in one of those cloud services for easy access later on.

Additional features:

  • The unified inbox feature allows you to see all of your incoming emails in one place.
  • Supports several app integrations.
  • Has custom notification sounds with the option to upload your own.
  • Its speed reader allows you to go through your emails faster.
  • Keyboard shortcuts are perfect for power users who prefer keyboard navigation.

Mailbird

Improve your email experience and use this fully integrated email client for Office 365.

eM Client – Most customizable email client

eM client is a great email client that works with Microsoft Office 365. It offers a desktop-class email experience on your mobile device. When you do a side-by-side comparison of eM Client vs Outlook, eM Client is superior.

The interface is clean and intuitive, but you can customize it to suit your needs. eM Client supports keyboard shortcuts, which makes it easy to navigate quickly through your inbox and enhance productivity.

The app is available for iOS and Windows. One feature that sets eM apart from many other email clients is its super-fast search function which is incomparable to other apps on this list.

Additional features:

  • Has custom themes.
  • Comes with an in-built email chat.
  • Has a super import feature to easily migrate from other email clients.
  • Unique sidebar for quick access.
  • Automatic backup tool.

eM Client

Benefit from increased productivity with this suitable email tool for your Windows or Mac devices.
Check price Visit website

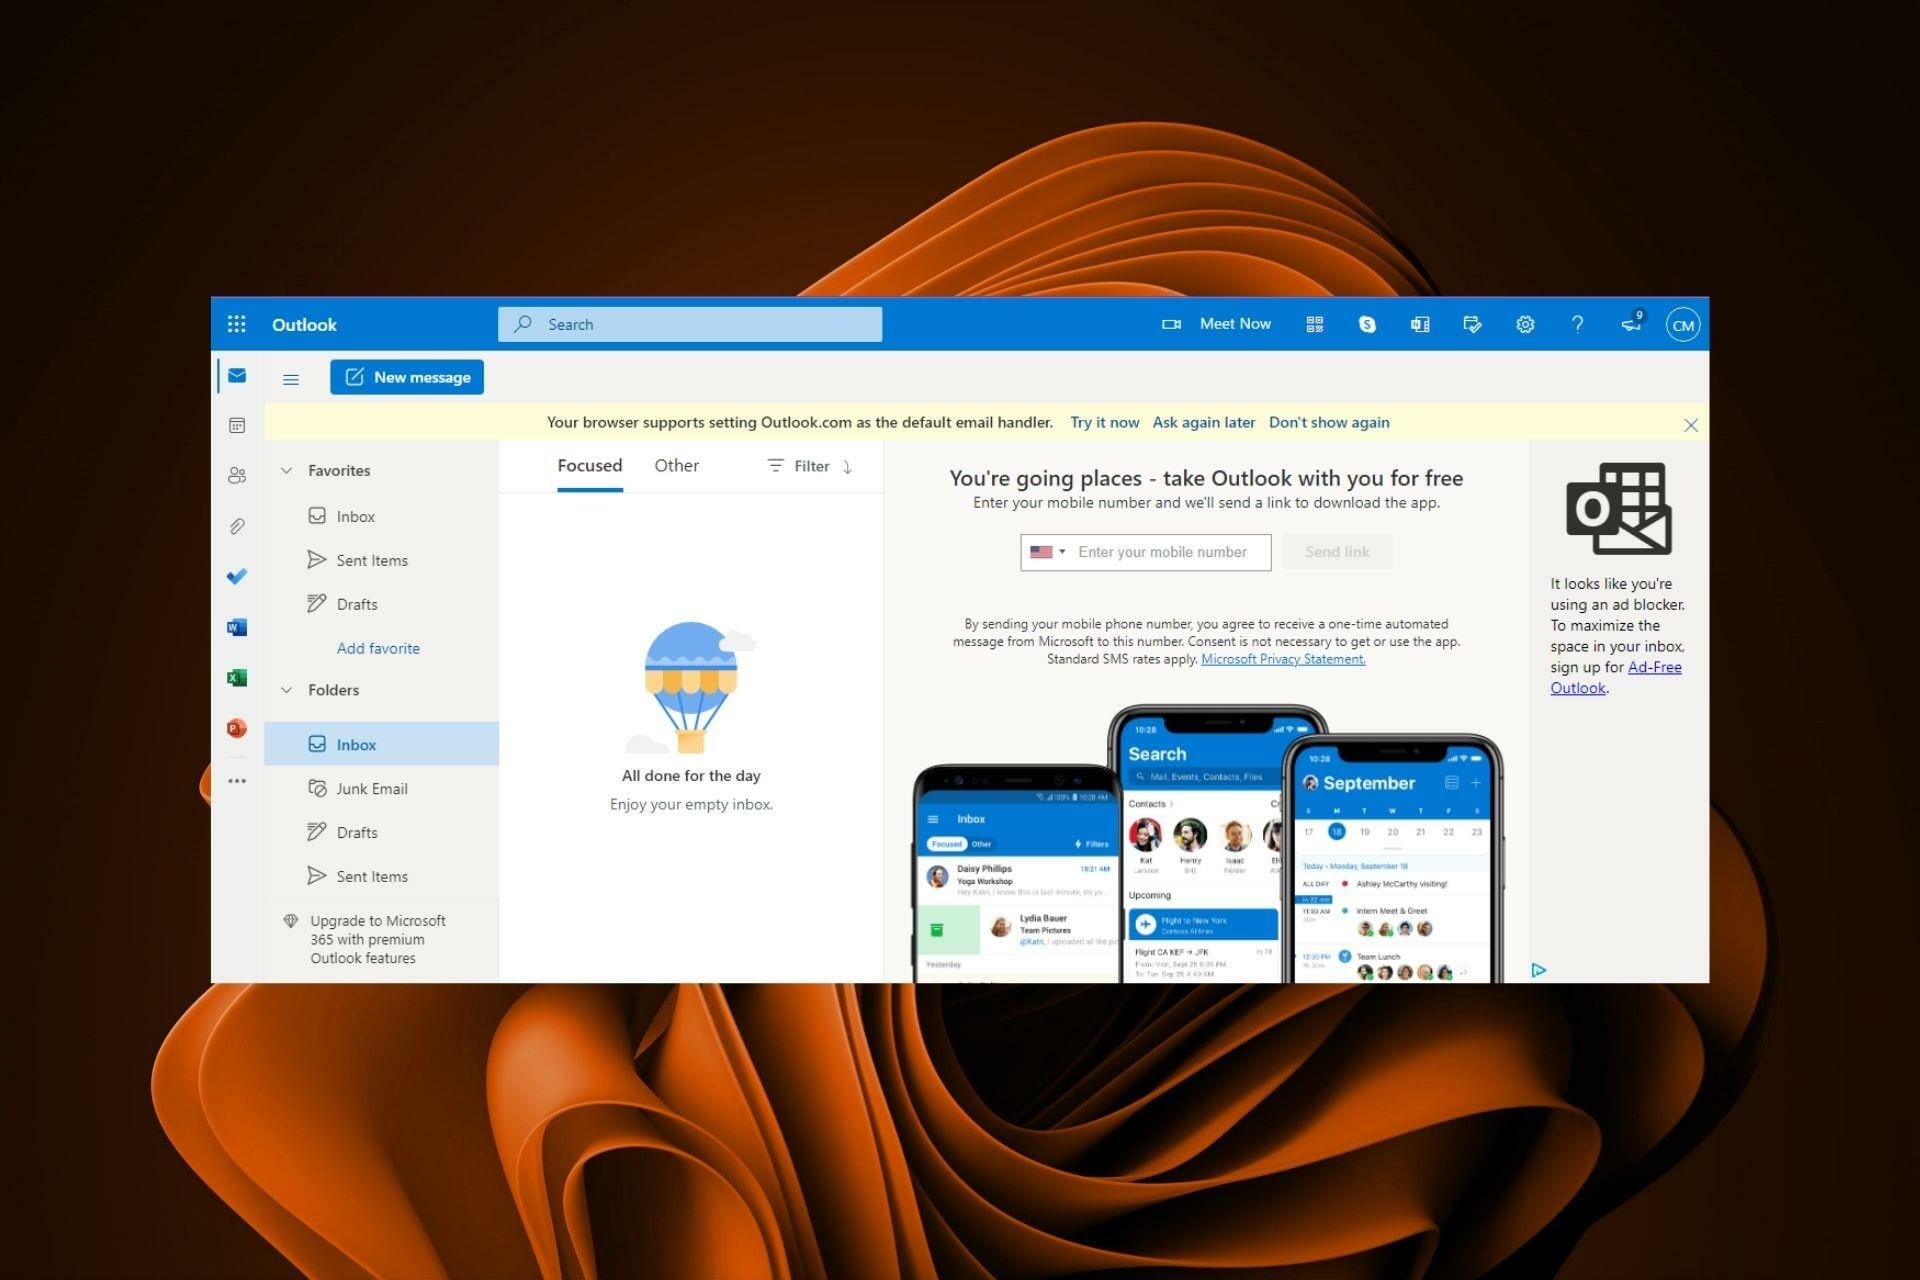
Outlook Mail – Default Office 365 email client

This is the default email client included in all versions of Microsoft Office 365. It works well with both desktop and mobile devices.

It has useful features such as extensions and add-ons that can enhance productivity without needing special training or support from IT staff members. As a full-featured email client, it has support for all the most common email protocols and file attachments.

The best thing about Microsoft Outlook is how easy it is to use and how much integration there is between the various applications within Office 365. 

Additional features:

  • Integrated with Outlook contacts.
  • Share files and folders easily with others.
  • Protect your documents by setting permissions so only you can see them.
  • Offers storage space for your files.
  • Has excellent features for managing your calendar, contacts, and files.

⇒ Get Outlook Mail

Mailbox – Most secure

Mailbox is one of the most popular options for managing Microsoft Office 365 email accounts and is an open-source email client.

It is an Outlook free alternative app that’s designed to help you manage your inbox. The app features a clean, minimalist user interface with intuitive gestures that make it easy to navigate your inbox.

One of Mailbox’s best features is the ability to snooze emails so they come back to the top of your inbox at a later time. 

Additional features:

  • You can create your own domain name.
  • Integration with all Office features.
  • Secure your files through its cloud storage.
  • Supports anonymous use to protect your privacy.

⇒ Get Mailbox

Airmail – Fastest email client

Airmail is one of the fastest email clients for Microsoft Office 365 users. It is efficient, reliable, easy to use, and supports major email providers.

The app offers many customizations and features that help you get the most out of your inboxes such as a dark theme and swipe actions.

Security is another area where Airmail excels in with its multi-factor authentication protocol that requires a face or touch ID to access your inbox. At the moment, it only supports iPhone, iPad, and Mac devices.

Additional features:

  • You can read your email messages directly on your Apple watch.
  • Manage multiple accounts in the same mailbox.
  • You can schedule emails to send later when you are away from your desk.
  • Has a smart inbox to show you the most relevant emails first.
  • You can snooze emails until you are ready to deal with them.

⇒ Get Airmail

Newton – Smartest email client

Newton Mail is one of the smartest email clients that work with Microsoft Office 365. It has a clean and user-friendly interface, but it’s also packed with features that make it easy to manage your inbox.

It offers an attractive option for anyone looking to reduce their reliance on Microsoft Office 365 with enhanced security and support for third-party plugins.

Users can also schedule messages to be sent at a later time or date — perfect for reminding yourself about important events or sending follow-up emails without having to remember to do so later on down the line.

Additional features:

  • Comes with read later support that users can save interesting websites or articles for later reading.
  • Integration with cloud storage services.
  • Support for multiple accounts from a variety of providers.
  • Newton Mail can suggest smart replies to your emails with its templates and snippets feature.
  • Dark mode support.

⇒ Get Newton

Spark Mail – Most productive email client

Spark Mail is a simple and easy-to-use email client, with a clean interface and intuitive user experience. It allows you to manage your email from any device, including desktop computers, laptops, smartphones, and tablets.

In addition, you can also personalize your inbox and widgets to reflect your personality and allow you to be more productive.

One of the main reasons why it is preferred is its email delegation feature that allows you to assign tasks and track their progress right from your email.

Additional features:

  • Smart inbox that automatically sorts emails into different categories based on their content.
  • Spark lets you schedule emails to be sent later.
  • You can snooze emails so they return when you need them most.
  • Easily compose and send emails quickly with templates.
  • Allows you to set up smart notifications so that you are notified whenever an important email hits your inbox.

⇒ Get Spark Mail

Does Office 365 have an email client too?

Yes, Office 365 has an email client as well. It’s called Outlook, and it comes with your subscription to Office 365.

Note that Office 365 offers several different plans to suit business needs ranging from small businesses to large enterprises.

If the Office 365 suite is not a contentious issue for you, feel free to check out our recommended best email clients that support multiple accounts to help you manage your inboxes seamlessly.

We also have an excellent list of the best email clients for Windows 7 so be sure to check that out too.

At this point of the article, we hope you have been able to find the perfect email client that works with Microsoft Office 365.

Let us know which email client you are currently using and your reasons for selecting it in the comments section below.

Startup Folder Empty: 3 Quick Solutions to Fix it

Most of us add have a few apps configured to launch at boot, and these are referred to as startup apps. There are various ways to do this, but the startup folder method seems to be the most convenient option. But, what do you do if the startup folder is empty in Windows 11?

There’s a lot to the concept that most users are unaware of, and therefore unable to solve problems with it. It’s imperative that you know how to use the startup folder.

But, don’t worry! We have got you covered. Read the following sections to find out all about the problem and the best solutions for it.

Why is the Windows 11 startup folder empty?

There could be a lot of reasons behind the problem, but first, try to remember whether you did add any apps to the folder. Because many use Settings or Task Manager to configure startup apps, As a result, the startup folder is empty, though many apps load at boot.

Also, there are not one but two startup folders. One operates for individual users and the other on the system level. So, there’s a good chance that you may have added the app to one but are looking for it in the other, and it would seem that Windows 11 startup folder is empty.

Besides, there may be a problem with the Startup folder itself, which can be resolved using an effective repair tool. Let’s now walk you through the most effective solutions if there are no startup items to display in Windows.

What do I do if Windows 11 startup folder is empty?

1. Check both the startup folders

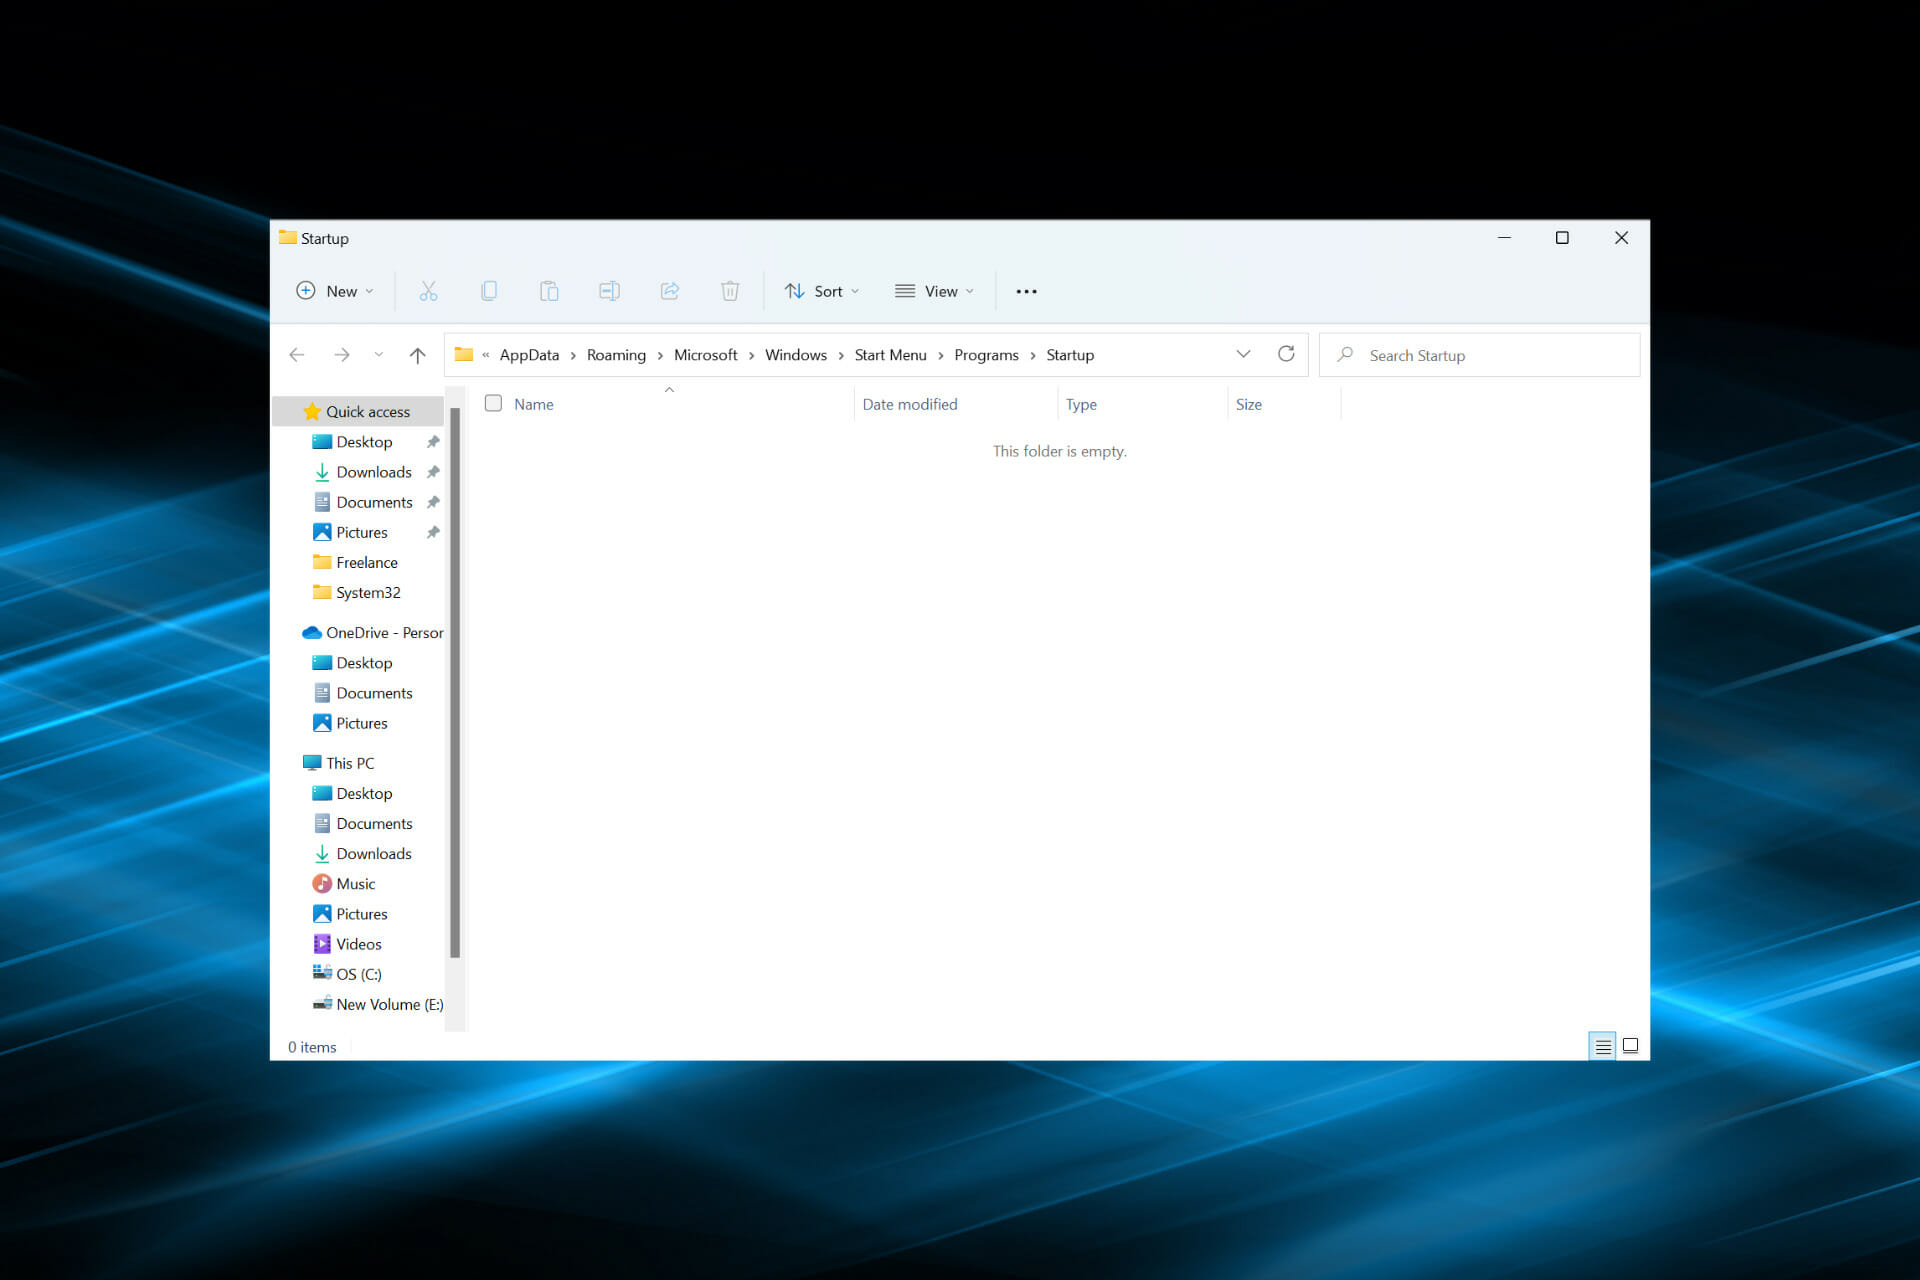
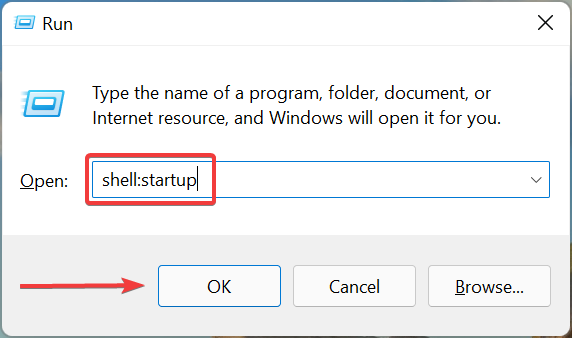
  1. Press Windows + R to launch the Run command, enter shell:startup in the text field, and click OK or hit Enter to launch the user-specific startup folder.startup folder
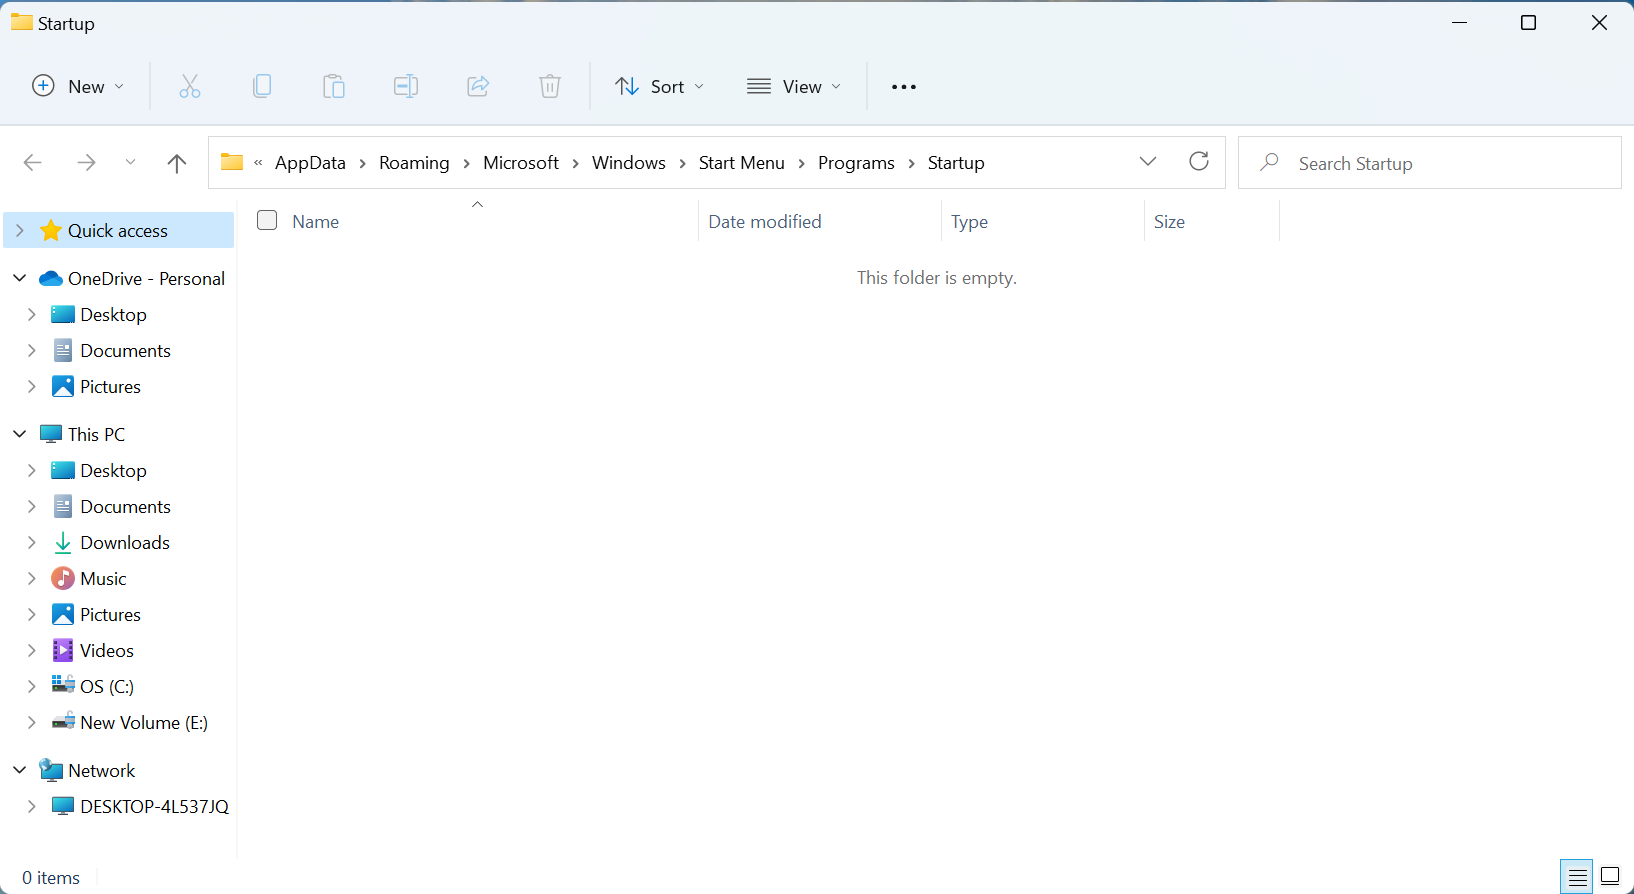
  2. Now, check if the app that you are looking for is located here. If it’s not, we will next check the common startup folder.check if windows 11 startup folder empty
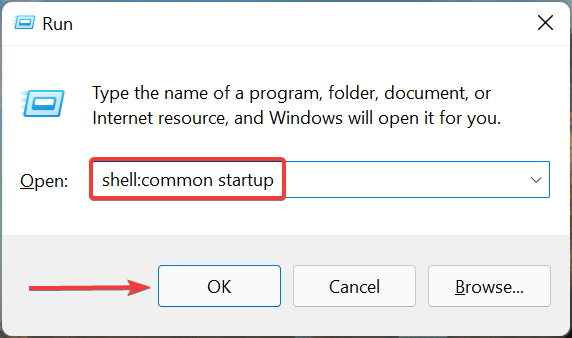
  3. Again, press Windows + R to launch the Run dialog box, enter shell:common startup in the text field, and click OK.common startup folder
  4. Check if the app is located here.check if windows 11 common startup folder empty

The app that you are looking for should be located in one of these folders if it has been manually added previously. But, if the Windows startup apps are still missing, head to the next method.

Also, you now know the Windows 11 startup folder location, so adding or removing apps shouldn’t be an issue from now on.

2. Verify if startup apps have been configured through Task Manager

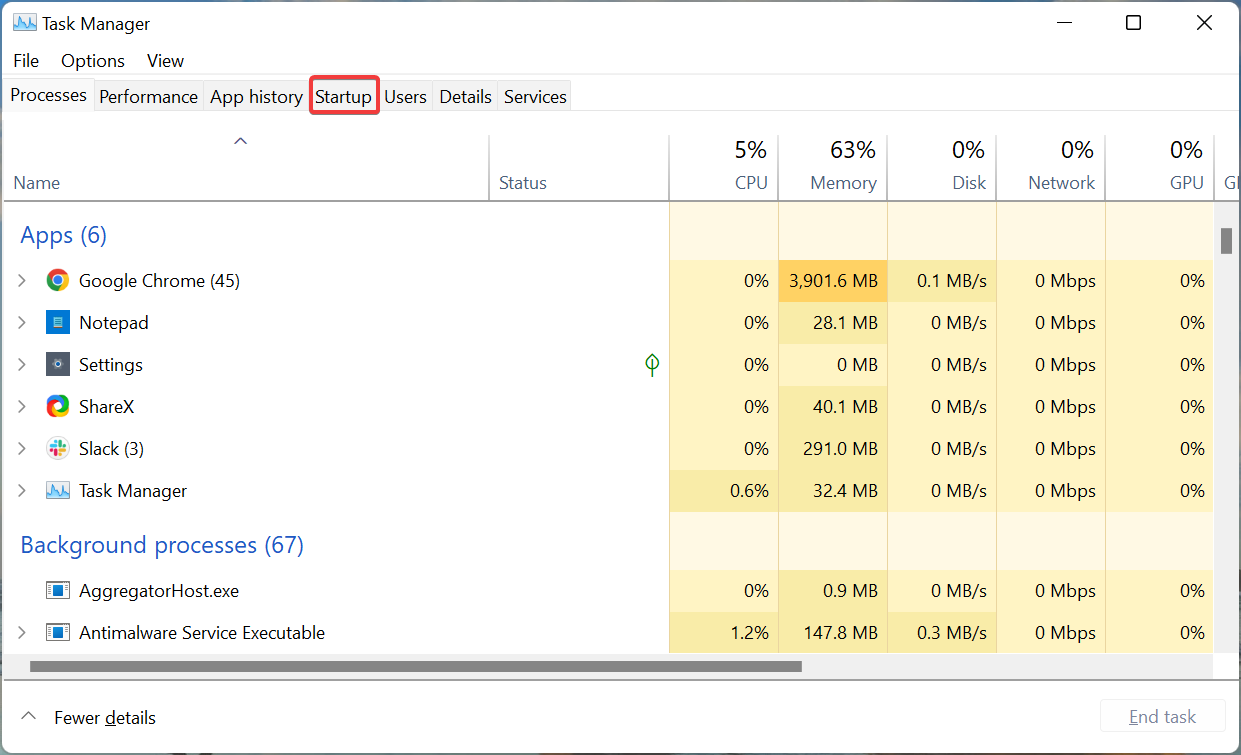
  1. Press Ctrl + Shift + Esc to launch the Task Manager, and navigate to the Startup tab from the top.Task Manager
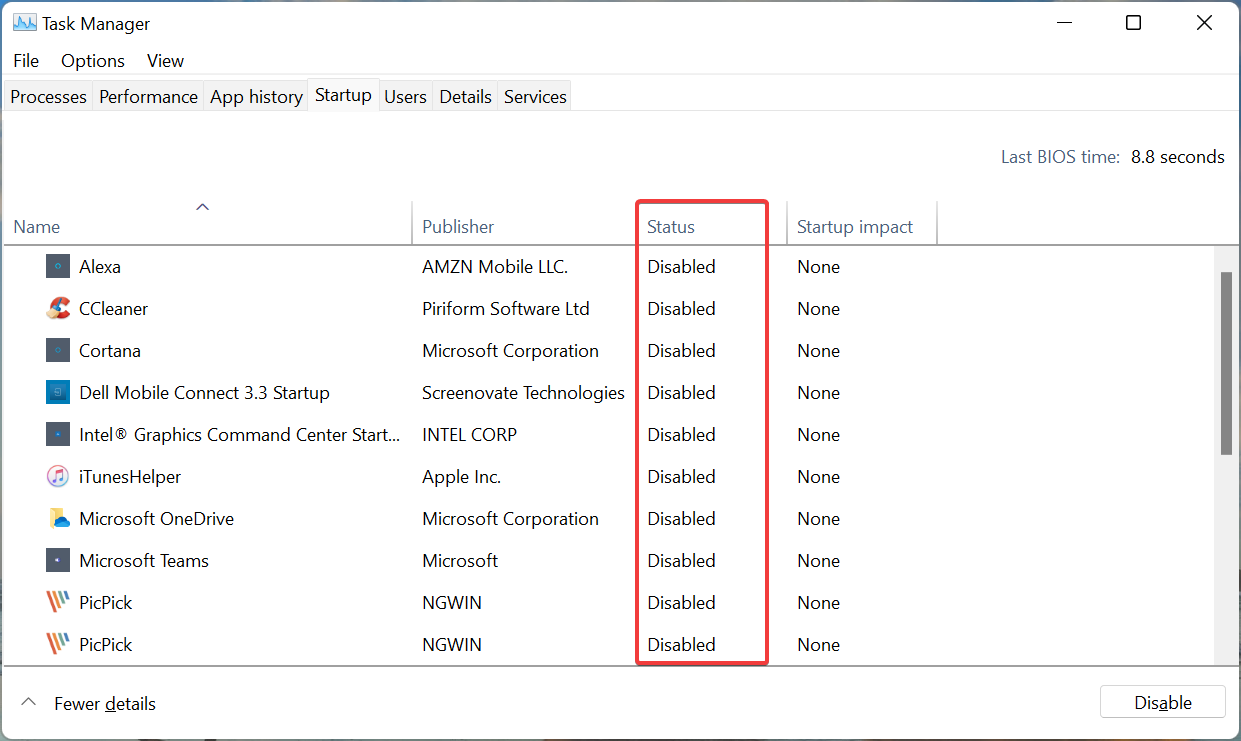
  2. Now, locate the program you are looking for here, and check if it’s Enabled, under the Status column.Status tab
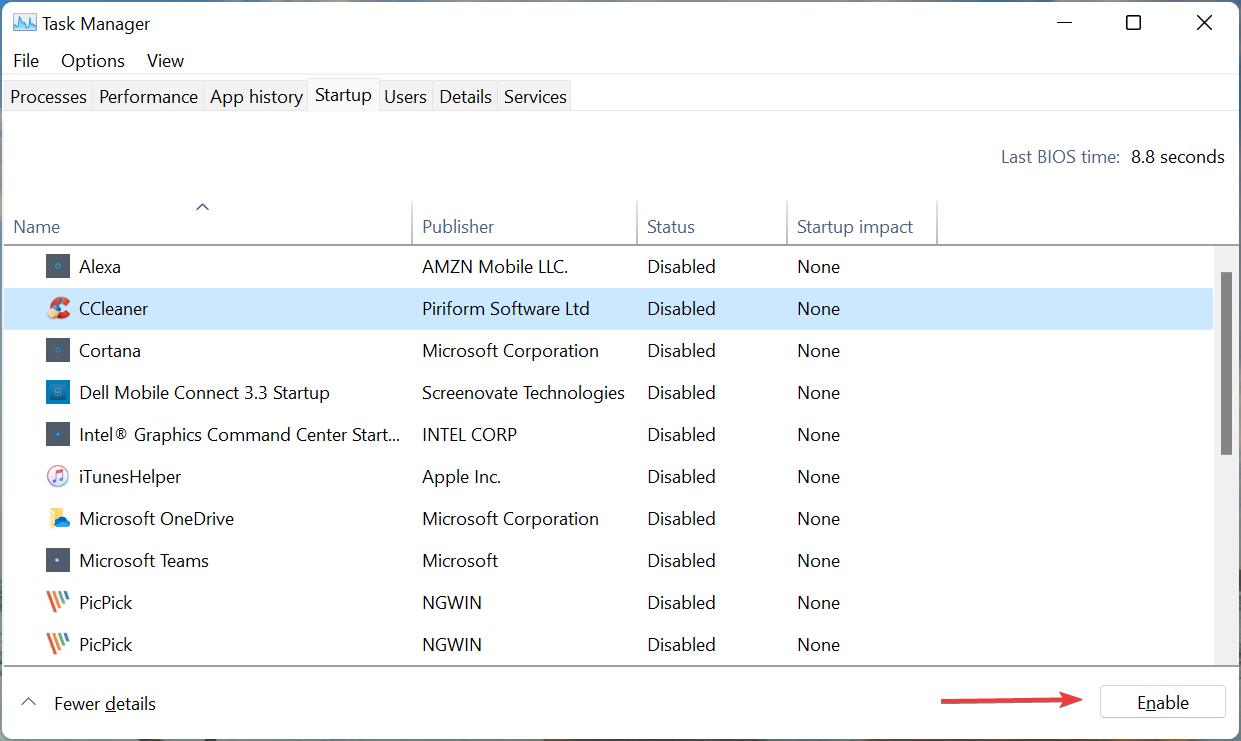
  3. If not, select it, and then click on the Enable button at the bottom.Enable to fix windows 11 startup folder empty

Even if the Windows 11 startup folder is empty, you can still set an app to launch at boot using the Task Manager.

Actually, this would be the ideal approach. This is because the OS first loads apps that are enabled via Task Manager and then look through the ones stored in the startup folder.

3. Add the apps again

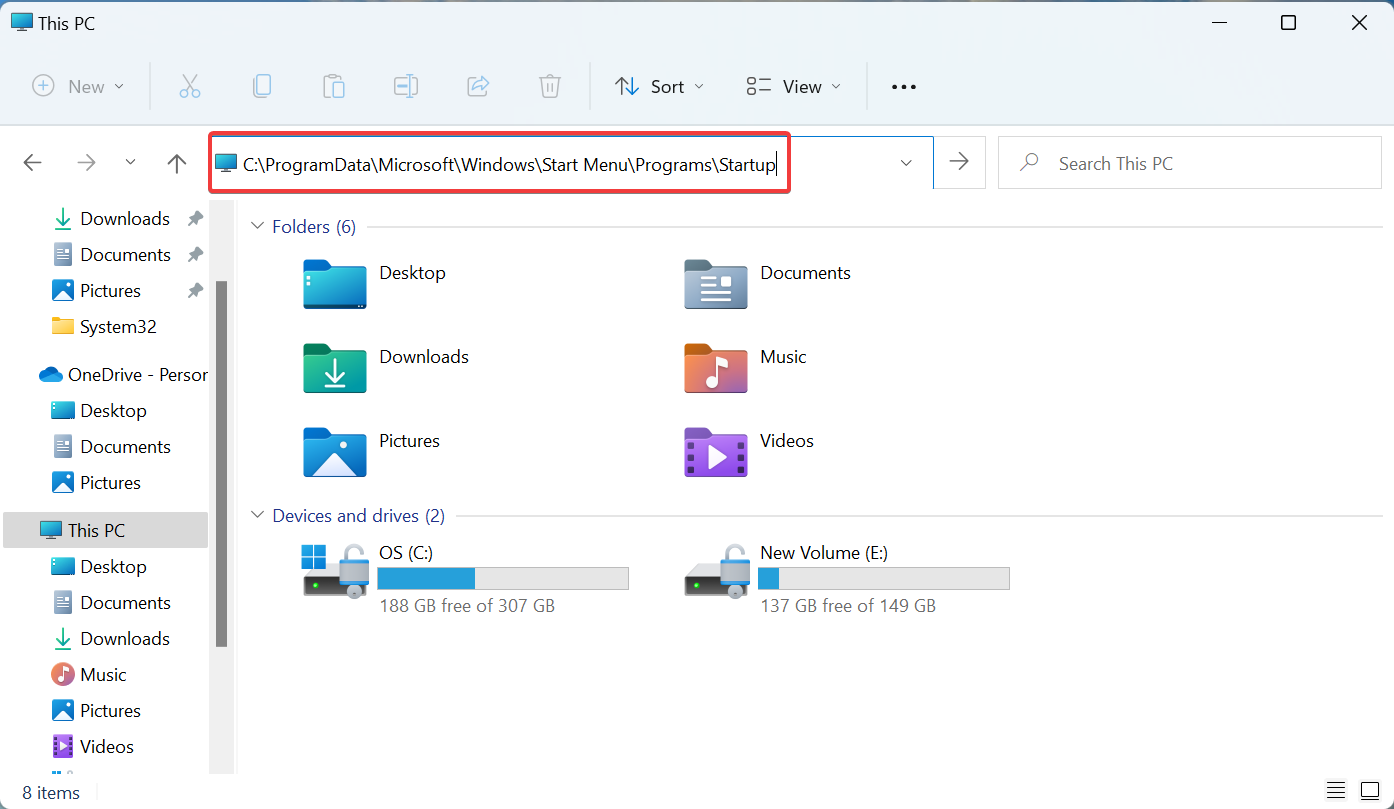
  1. Press Windows + E to launch the File Explorer, paste the path for the desired startup folder in the address bar, and hit Enter.
    • For the user-specific startup folder, use the following path:C:\Users\kazim\AppData\Roaming\Microsoft\Windows\Start Menu\Programs\Startup
    • For the common startup folder, use the following path:C:\ProgramData\Microsoft\Windows\Start Menu\Programs\StartupPaste path
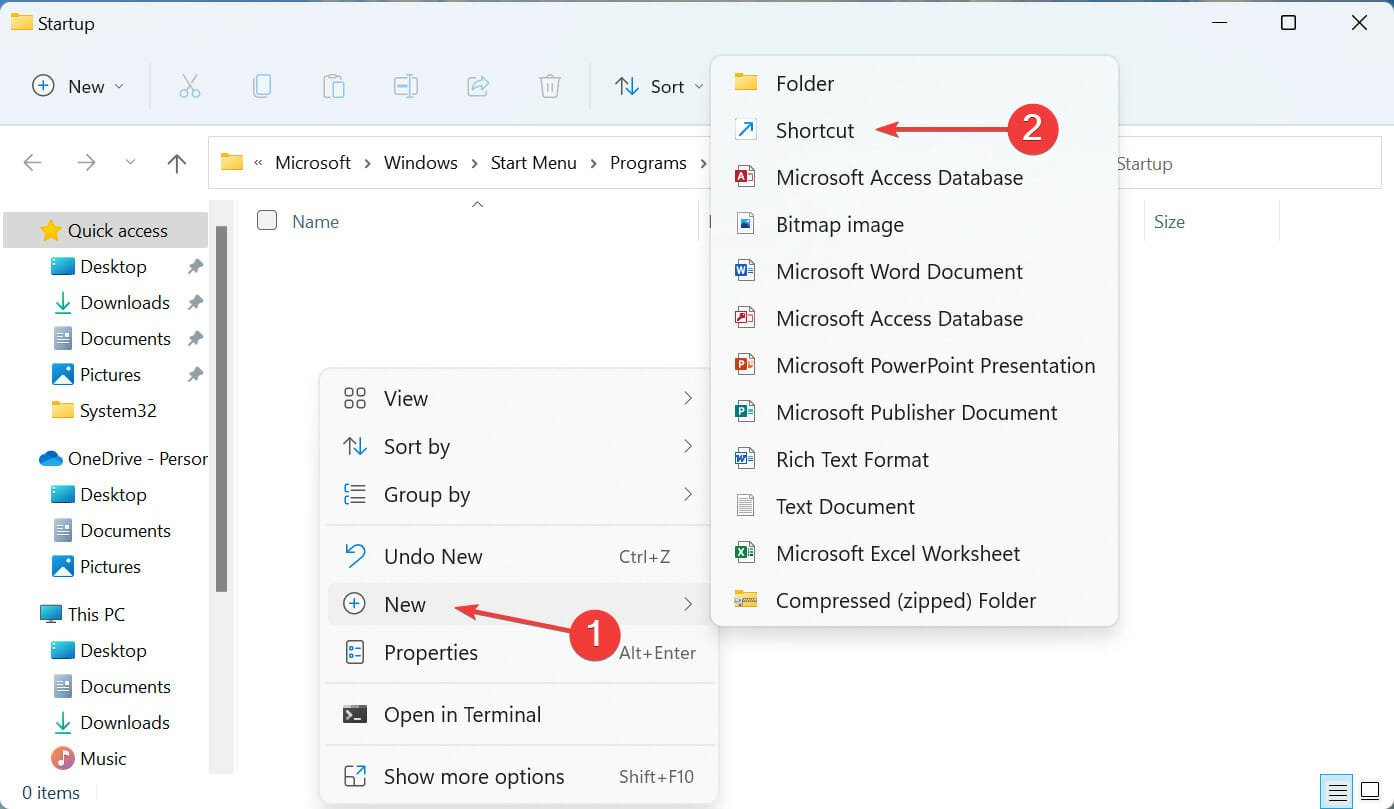
  2. Now, right-click on the empty portion, hover the cursor over New, and select Shortcut from the list of options.Shortcut to fix windows 11 startup folder empty
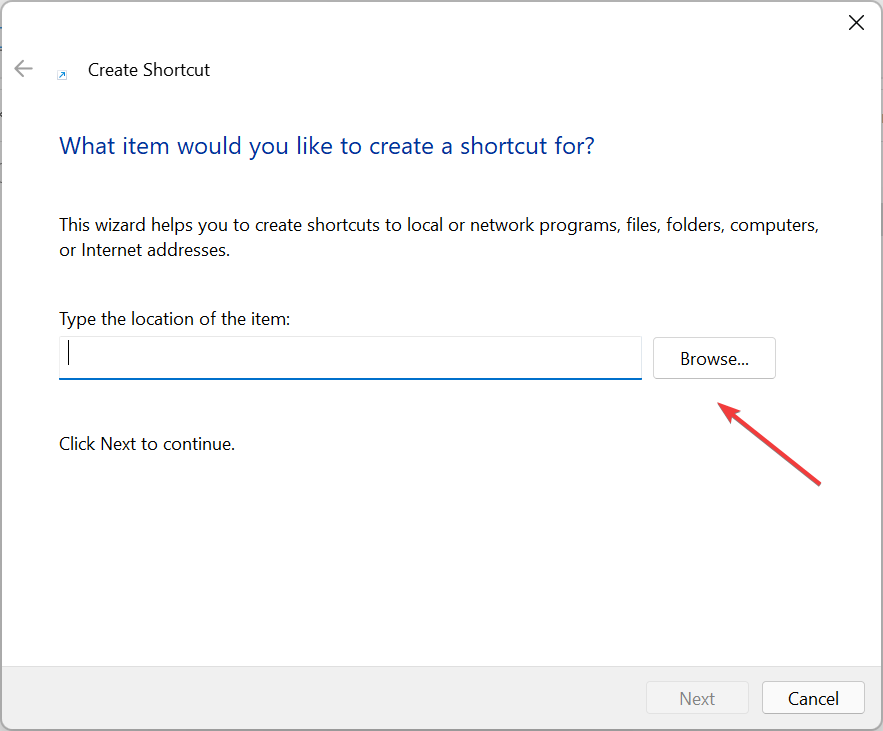
  3. Click on the Browse button in the Create Shortcut window.Browse
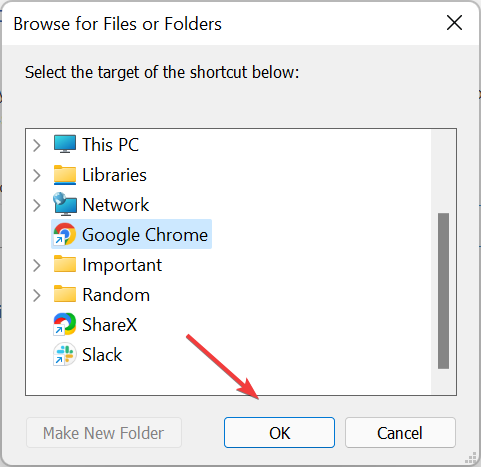
  4. Go to the location where the shortcut is stored, select it, and then click on OK.OK
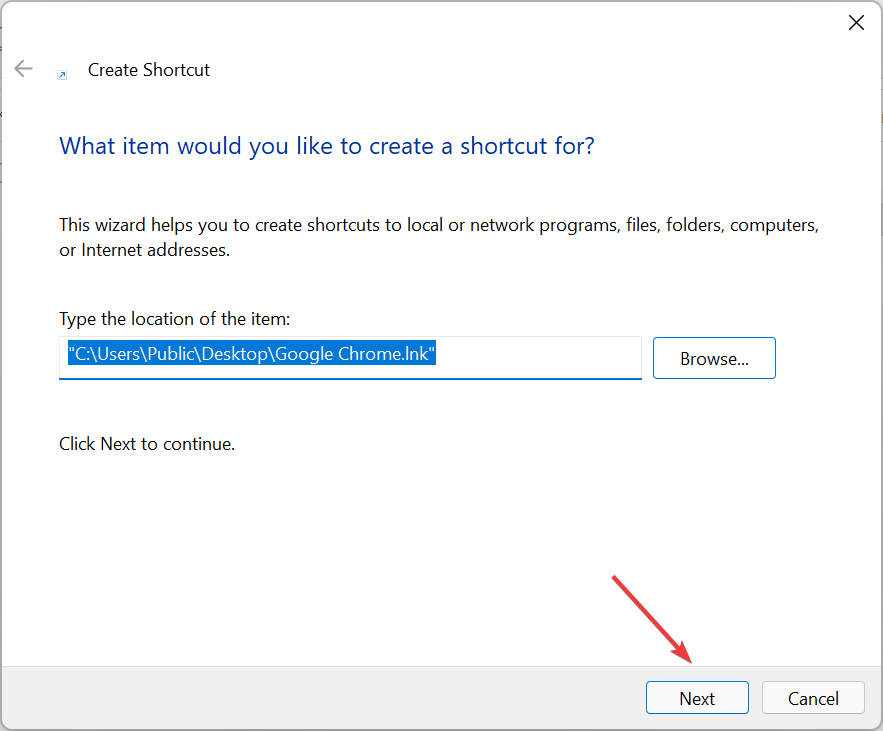
  5. Click on Next at the bottom.Next to fix windows 11 startup folder empty
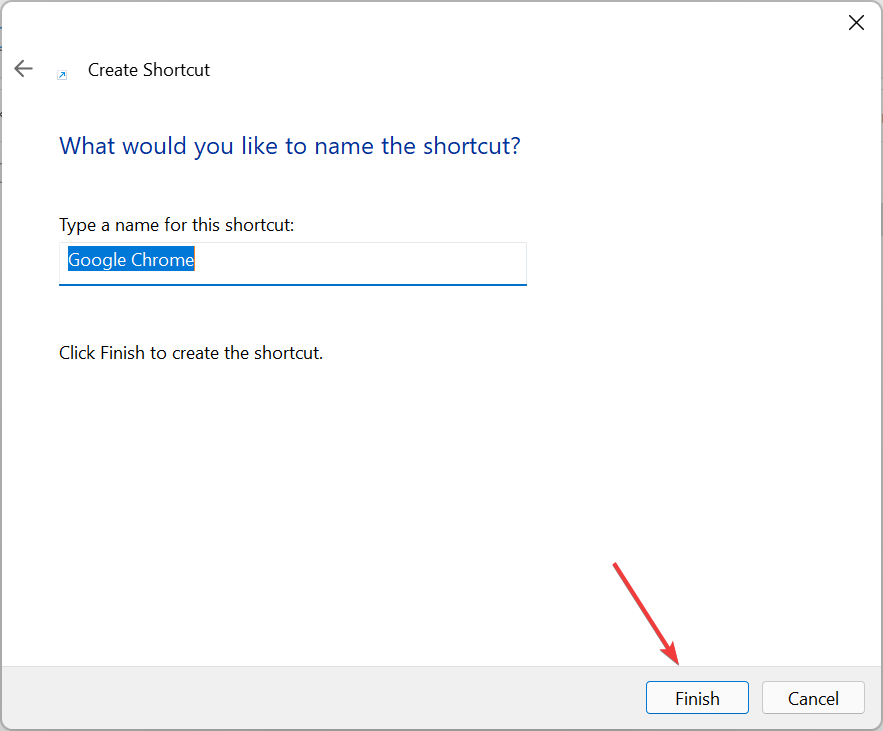
  6. Finally, click on Finish without changing the default name entered in the text field.Finish

If the Startup tab in Task manager is empty, manually adding apps to the startup folder in Windows 11 could do the trick.

Make sure to add the shortcut for the app you want to load at startup, and not the launcher (.exe file). Once done, the Windows 11 startup folder would no longer be empty.

Should I disable all startup apps in Windows 11?

The more startup apps you have, the longer it would take for the OS to boot. But, this also does not mean that you should disable all of them. Some applications are critical, for instance, the antivirus, and these should be allowed to load at startup.

However, you can disable other applications that you do not use frequently to make Windows 11 faster and more responsive. Most users prefer launching apps manually after turning on the computer rather than having them load automatically. It’s up to you which option you choose.

These are all the ways you can make sure that Windows 11 startup folder is not empty, and that the required apps are loaded when you boot the OS.

Also, find out what to do if the Windows 11 startup folder is not working. To learn how this folder works, you might want to check our guide on how to disable startup programs on Windows 7.

If you have any other queries, drop a comment in the section below.

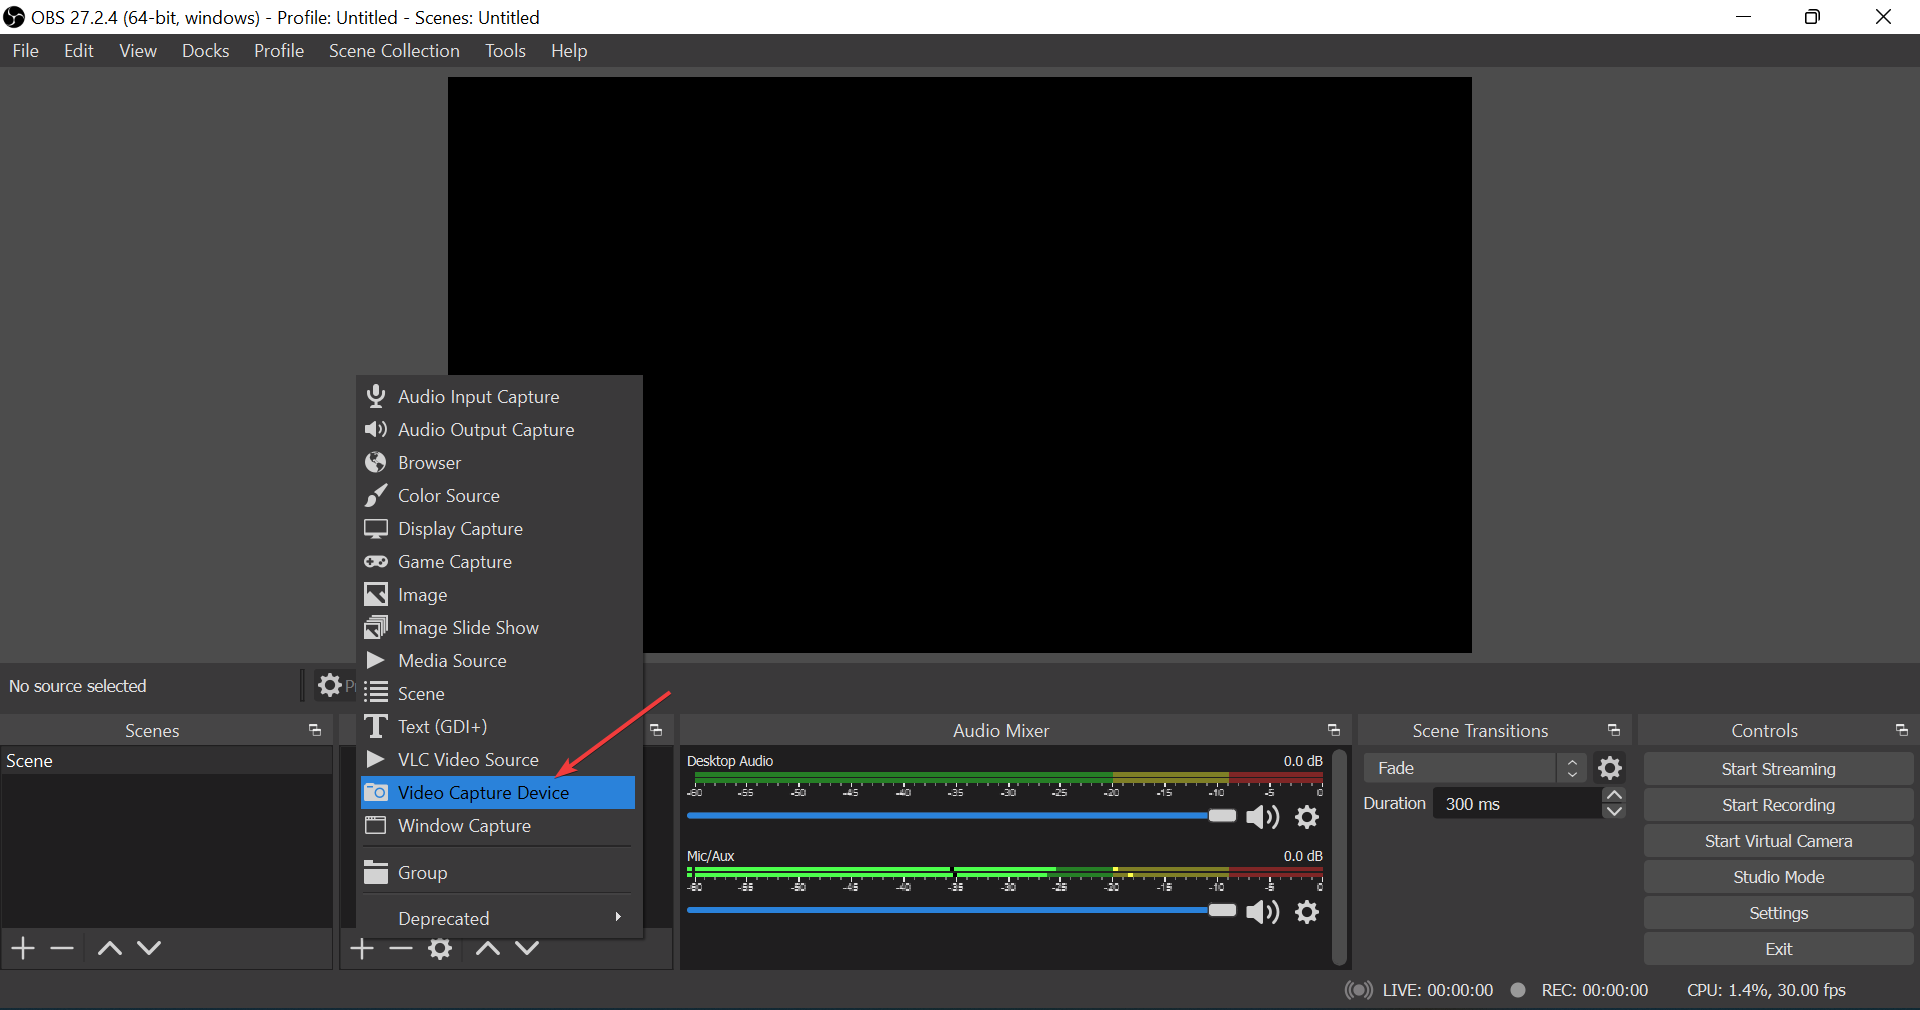
Complete Guide to Fix OBS Studio NVENC Errors

NVIDIA NVENC is a feature in NVIDIA graphics cards that enables you to perform some tasks, including video encoding but some OBS Studio users have reported NVENC errors.

Thanks to this feature, it offloads the resource-eating task from the CPU to a specific part of the GPU. 

Also, it is good to know that many live streaming and recording programs, for instance, vMix, Wirecast, Open Broadcaster, and Bandicam support the encoder.

Moreover, the NVIDIA Encoder enables you to capture your games and share them. This is included in NVIDIA’s GeForce Experience software.

In this article, we explain how you can solve all the OBS Studio NVENC errors you might run into when you are using OBS.

How do I enable hardware encoding (NVENC) in OBS?

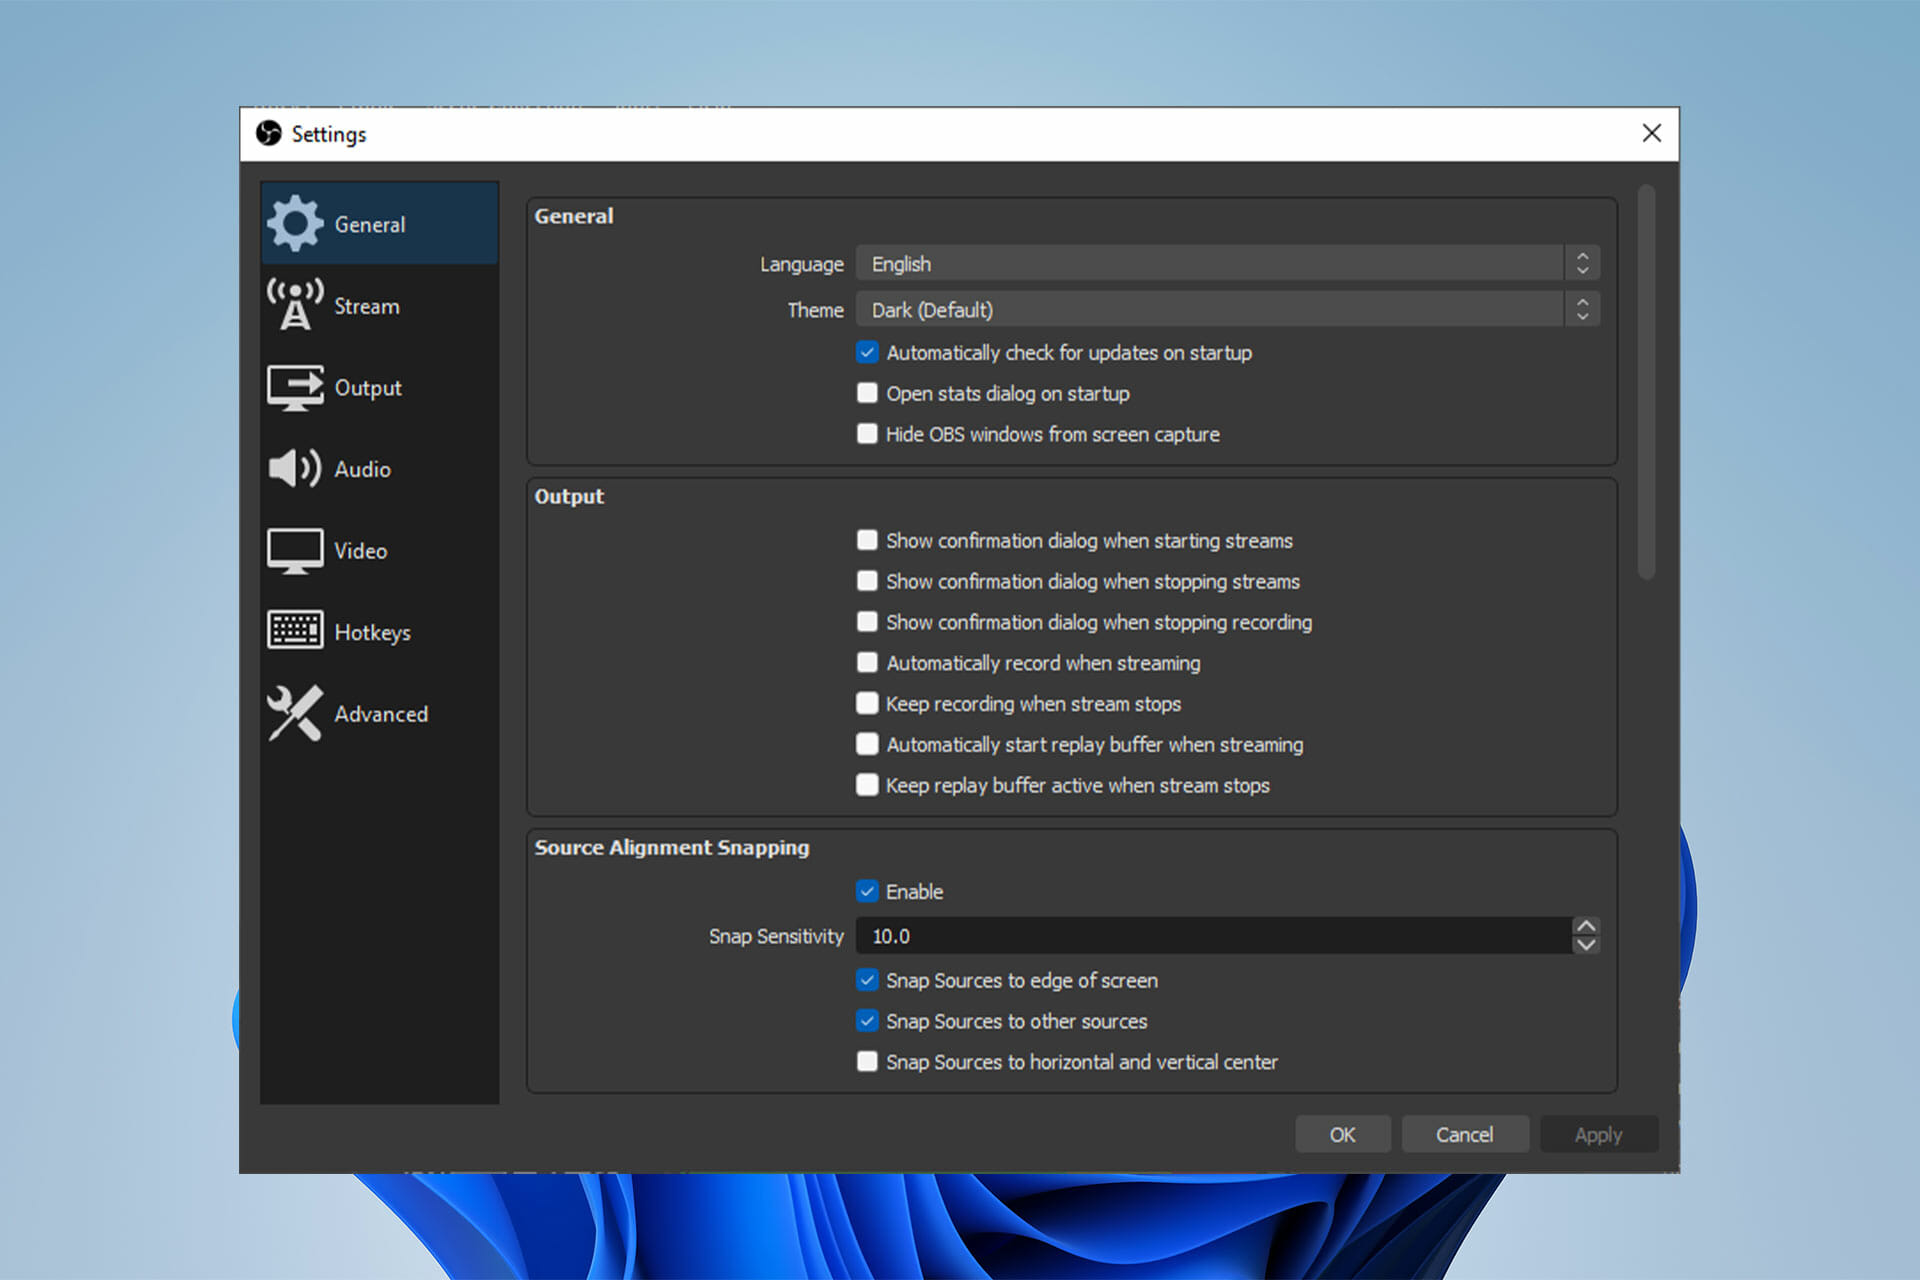
  1. Start OBS, click on Files then select Settings.Go to Settings
  2. Next, select Output (located on the side menu).Go to Output
  3. Finally, click on NVENC H.264 in the window that opens under the encoder drop-down to enable hardware encoding.

If you’re asking what is NVENC codec, it is a tool for hardware encoding available in both Mac and Windows versions of OBS.

But for the best result, it is recommended by the developers to use encoding on computers running Windows.

Also, it is best used with NVIDIA GPUs. Hardware encoding has been available on NVIDIA cards since early 2012.

How can I fix OBS NVENC errors?

1. Fix the OBS Studio NVENC error unsupported device

  1. First, open the OBS program.
  2. Click on File and head over to Settings.Go to Settings
  3. Go to the Output tab.Go to Output-OBS Studio NVENC errors
  4. Then, find the streaming box.
  5. Tap on the Encoder and change it to Quicksync (QSV) or x264 instead of NVENC.
  6. Finally, select OK.

2. Fix the OBS NVENC error: Too many concurrent sessions

OBS NVENC error that says you have too many concurrent sessions means that you have more concurrent encoding sessions than your GPU supports.

Up-to-date GPU drivers can support up to three sessions, while the older drivers cap at two sessions. If you think you do not have this many concurrent sessions, reboot your computer.

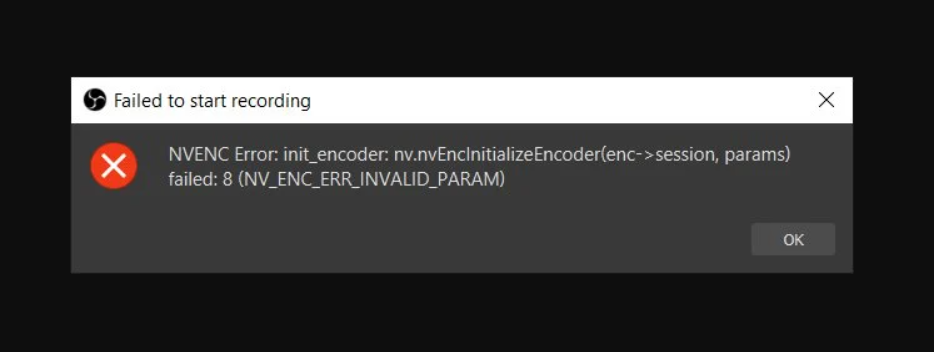
3. Fix the OBS NVENC error failed: 8

The complete error message for this issue is accompanied by the NV_ENC_ERR_INVALID_PARAM specification.

The reason for this error is that NVENC does not support resolutions that are higher than 4096 on their largest side and it fails to capture or show anything.

You should set your output resolution to be lower than 4096 on its largest side. Base (canvas) resolution can be the larger one rather than the output (scaled) one if you need it to.

4. Fix the OBS NVENC error init encoder

  1. Right-click the Start button and select Device Manager from the list.
  2. Expand the Display Adapters section, right-click the NVIDIA driver, and select Update driver.
  3. Click on Search automatically for drivers and the system will look for the best driver.

To fix the Init encoder error, you need to update your NVIDIA driver to its latest version.

If the solution above wasn’t enough, visit the NVIDIA driver download section and get the latest driver from their website.

Make sure to get the corresponding version for your hardware. Otherwise, you risk getting other graphical errors and system problems like BSoDs.

To avoid that, use a tool like Fortect Driver Updater that detects the hardware you run and automatically downloads corresponding drivers.

Also, replacing the nvEncodeAPI.dll located in the following directory with previous versions of this DLL file can help fix OBS Studio NVENC errors: C:\Windows\SysWow64

You need to boot into Safe Mode to be able to do this. Previous versions of nvEncodeAPI.dll can be found in the following location: C:\Windows\System32\DriverStore\FileRepository\nv_disp.inf_amd64_neutral_

5. Fix the OBS NVENC error invalid param

The maximum resolution you can aim for in an NVENC h.264 is 4096×4096. However, NVENC h.265 supports resolutions of up to 8192×8192 pixels.

The point is that h.265 is not supported by streaming services. You can only use it with the FFmpeg output of the OBS. So, you are going to go for the 4096 one mostly.

6. Fix the OBS NVENC codec: Function not implemented

  1. Go into the icon File and click on Settings to open it.Go to Settings
  2. A setting window opens on your screen; now select the Output tab.Go to Output-OBS Studio NVENC errors
  3. Afterward, look for the streaming box.Change Encoder to fix OBS Studio NVENC errors
  4. Click on the Encoder and change it to Software instead of NVENC. 
  5. Now click on OK.

How can I fix the OBS NVENC Encoding Overload?

One solution that can fix this OBS NVENC error is to reduce the frame rate. If you’re capturing at a high frame rate (48 to 60), you may experience lags.

This can happen for a number of reasons. However, the main reason is that your GPU cannot render the game itself as well as the video you’re streaming.

  1. First, open Settings and click on Video.
  2. There is a section called Common FPS Values. Select it and choose 30 or less.
  3. Then, click on OK and close the OBS. Now restart your computer and check your stream to see if the error comes up again.

If you haven’t updated your drivers on OBS NVENC after you open NVIDIA GEFORCE EXPERIENCE, click on the drivers and update them. Make sure to reboot your computer afterward.

You can also use ICQ as the rate control and set the ICQ quality value between 20 (better quality, larger files) and 23 (diminished quality, smaller files).

Remember that OBS uses a fabulous open-source video encoding library – x264. You can set your x264 encoder preset to ultrafast to reduce CPU usage.

Let us know which solution you used to successfully fix OBS Studio NVENC problems in the comments section below.

Microsoft news recap: new HQ in Canada opens, Xbox streaming device could launch soon, and more

Microsoft news recap is a weekly feature highlighting the top Microsoft news stories of the past week. Sit back, grab some coffee, and enjoy the read!

New Microsoft patent may allow users to convert Xbox game discs to digital versions

A new patent from Microsoft has emerged that demonstrates a method of converting a physical Xbox game disc into a digital version, though no detail was provided on what would happen to the physical disc after it has been converted.

Microsoft to help pay for employees to travel for abortions, gender-affirming health care

Employees’ expenses for travelling for abortions or gender-affirming health care could be covered by Microsoft, according to a new report. Whilst Microsoft already covers some expenses for this care in the US, the difference is that travel expenses are to be included into this arrangement.

travel

Microsoft opens new headquarters in Canada

Toronto has become the home of Microsoft’s new Canada headquarters, as the HQ opened on May 3.

Microsoft India

Microsoft’s Xbox streaming device and TV app set to be released soon

After announcing last year that an Xbox streaming device and a TV app are in the works, new reports suggest that both the streaming device and TV app could release soon, though some patience will still be needed.

That’s it for this week. We will be back next week with more Microsoft news.

8 Safest Password Managers with Multifactor Authentication

In this age of advanced cybercrime, a multifactor authentication password manager comes in handy. Whenever you are signing up for a site, you are usually asked to create a strong password that you have not used anywhere. 

A strong password is one that is hard for hackers to crack or through guessing techniques. Password managers are an essential tool in the fight against password fatigue. It is overwhelming to remember a different password for every site and service.

Many users resort to using the same password for many of their accounts. This makes it easy for hackers to gain access to all these accounts by breaking into one of them.

If you find it hard to develop strong passwords, you can opt for password generator software to secure your accounts.

Once you have your password, a multifactor authentication password manager will help you manage your passwords. Aside from password management, they also make it much harder for hackers to access your online accounts.

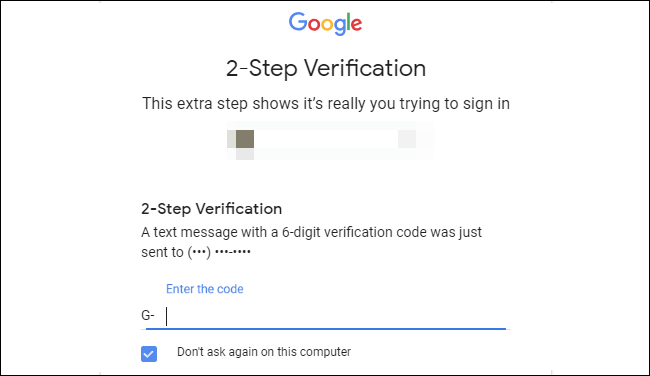
What are some multifactor authentication examples?

Multifactor authentication is a system that requires two or more proofs of identity before granting access to an account.

The benefit of multifactor authentication over just using passwords alone is that it makes it much harder for intruders to access your online accounts. Even if someone knows your password, they won’t be able to log into your account and view saved passwords without having access to the second factor as well.

Some examples include:

  • Text message – The most common form of multifactor authentication is text messages with a one-time code. The code is typically sent to your mobile device with a validity timestamp.
  • Biometric data – Biometric data such as fingerprints or retina scans can be used as part of multifactor authentication too. Some systems use fingerprints in combination with something else like a mobile phone or SMS message to make it harder for someone else to pretend they’re you.
  • Authenticator applications – An app on your smartphone, such as Google authenticator, generates a one-time passcode that changes every few minutes and must be entered into an online form before proceeding with login. This ensures that only someone who has access to the app and the device it’s installed on can use it.
  • Physical device – A physical device provides something only you have, which makes it harder for someone else to pretend they’re you.
  • Voice call –  This type of authentication requires a user to speak a unique code or phrase to a representative, who will verify this with the user’s phone number.
  • Email – An email with a one-time use code is sent to the user’s inbox, which they must enter before proceeding with their session.

What are the safest password managers with multifactor authentication?

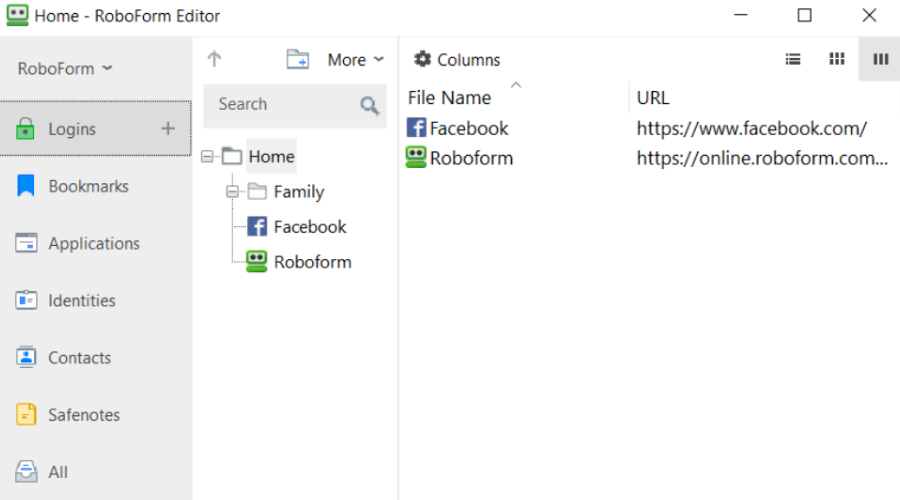
RoboForm – Strongest two-way authentication security

Roboform password manager software

Using RoboForm, you can secure online data with the greatest encryption tools and two-factor authentication to store all your passwords in seconds.

The software offers ultra-useful capabilities that give you unlimited logins with a Master password or syncing one account for all devices, including mobiles or the safest password vault.

Moreover, the user interface is pretty straightforward and comes with handy menus and services that help you store all your account passwords in one place.

That said, you can log in to the app with your email and password and activate the multifactor authentication for safety against online data theft.

RoboForm

Take this skilled password manager with a two-way authentication and multiple plans you can choose from.
Check price Visit website

NordPass – Best data breach scanner

NordPass lets you store your passwords in an encrypted database and then synchronize them across all your devices so you can access them anywhere. It also has a password generator that makes strong passwords for each of your accounts.

The app offers a browser extension for Chrome, Mozilla, Safari, Edge, and more so you don’t have to switch between multiple apps or tabs for the autosave and autofill features. It is the best password manager, which can be used alongside the Nord VPN.

Even better, it syncs all your passwords across devices so you can access your accounts from anywhere. 

Additional features:

  • You can organize your passwords into folders for easy access.
  • Has a password health tool to identify vulnerable passwords.
  • Compatible with multiple browsers.
  • You can easily import your passwords across password managers.

NordPass

Protect, organize, and evaluate the vulnerability rate of your passwords. Get quick access on all devices.
Free trial Visit website

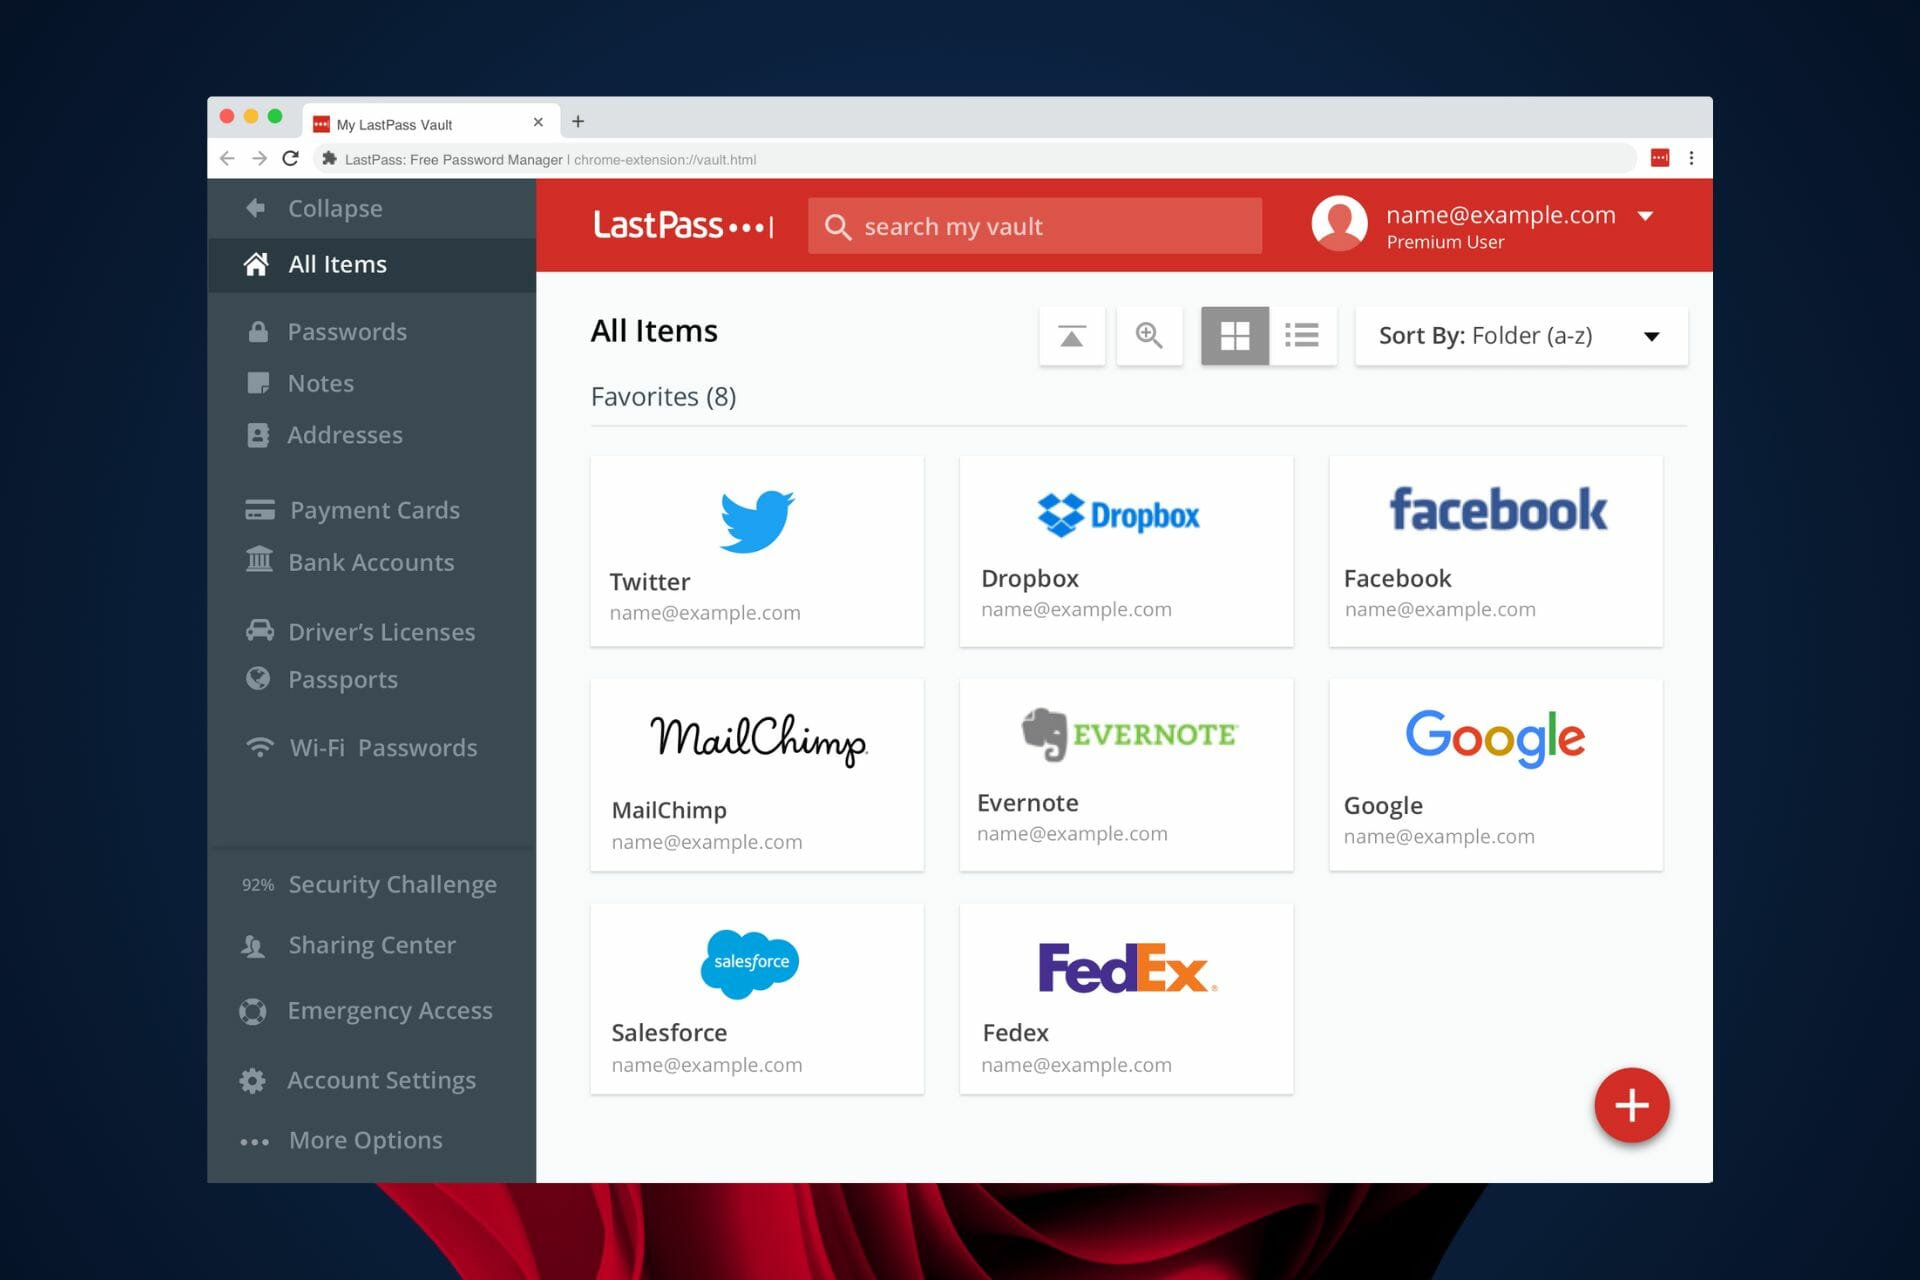
LastPass – Most popular

LastPass is the leading password manager in the market. The software enables you to create and store passwords for all of your accounts while ensuring that you’re using a strong password. 

If you are not good at developing strong passwords, you will benefit from its built-in password generator that can generate random passwords for you.

LastPass two-factor authentication policies require a security code to log in, but you can add additional multi-factor authentication protocols for an extra layer of security.

Additional features:

  • The free mobile app allows you to access and manage all your passwords from anywhere.
  • You get notified whenever your information is at risk.
  • Password generator for random passwords.
  • LastPass can fill out forms automatically when you visit websites.

Last Pass

Generate secure passwords and keep track of them with this reliable and safe password manager.
Free trial Visit website

Dashlane – Most versatile

Dashlane has the ability to keep track of all the passwords that you have to remember. You can also use the app to store usernames and passwords for your accounts, as well as credit cards, IDs, and other sensitive information.

Perhaps its most efficient feature is its automatic password changer. It helps you change your passwords on sites where you have multiple accounts.

It works by automatically changing all of your old passwords whenever you change one of them, so you don’t have to remember which accounts need resetting.

Additional features:

  • Autofill for sites and apps.
  • Share logins securely with family members or business partners.
  • Security alerts in case of risks detected.
  • Stores sensitive credentials.

Dashlane

Use Dashlane’s highly secure repository to store passwords, bank information, and other sensitive data.
Free trial Visit website

1Password – Best for shared groups

1Password is a password manager with 2FA that makes creating, managing, and using strong passwords easier. The app can also help you log into sites securely, generate random passwords, and recover your account if you forget your password.

When you first install the app on a desktop or mobile device, you’ll be prompted to create a master password. This master password is then used to generate an encryption key to unlock your entire vault when you sign in.

You can share your confidential information securely without worrying about unauthorized persons having access to it.

Additional features:

  • You can log in automatically from any device using 1Password on iOS or Mac.
  • Generates strong passwords for you.
  • Has a master password.
  • Automatically fill out forms on web pages with the click of a button.

1Password

Create and store strong passwords in an encrypted vault. Save some time with the auto-fill feature.
Free trial Visit website

RememBear – Most secure

RememBear Password Manager is a free, secure, and easy-to-use password manager that makes it simple to create and organize logins for all of your favorite sites and apps.

You can securely store all your passwords in one place and access them anywhere you go. RememBear also works on any device, so you can enjoy peace of mind no matter where you are.

Additional features:

  • RememBear encrypts all your information with AES-256 encryption, so it’s protected from prying eyes.
  • Sync your passwords across all devices for maximum account security.
  • Automatically fill out login forms on websites in order to make logging in as simple as possible.
  • Has browser extensions for multiple browsers.
  • Supports multiple devices such as iOS, Android, Windows, and macOS.

⇒ Get RememBear

KeePass – Best free password manager

Although KeePass is only available for Windows PCs, it is still quite popular. It stores all your passwords in a server which you can access by creating a master password.

You can keep multiple databases with different passwords in one database file at once — which makes it easy to share passwords among different people who need access to them.

Another important feature is its password generator. If you have trouble coming up with secure passwords, KeePass can create one for you.

Additional features:

  • KeePass can be transferred to a USB drive.
  • Has an autofill feature to quickly sign in to websites.
  • Uses strong encryption standards considered unbreakable by current technology. 
  • Supports multiple languages.

⇒ Get KeePass

Bitwarden – Cloud-hosted password manager

Bitwarden is a password manager with multifactor authentication, secure file sharing, and cloud storage. It has all the features you need to keep your passwords safe, including two-factor authentication, privacy protection, and secure data backup.

It can be installed on your own server, but it also includes cloud storage with multi-factor authentication.

Bitwarden has some unique features that make it stand out from other password managers. The end-to-end encryption and open source software make it difficult for even the developers to access your data.

Additional features:

  • You can sync your information across an unlimited number of devices.
  • Has a username and password generator.
  • Has a data backup feature.
  • Supports multiple languages.

⇒ Get Bitwarden

Should I use 2FA for my password manager?

In a world where hackers are constantly trying to break into the accounts of people, the question of whether or not you should use 2FA for your password manager is worth considering.

2FA is an extra layer of security for your online accounts that requires you to type in a code that’s sent to you via text message or email when you try to log in from a new device or location.

It’s especially important for password managers because it allows you to verify that it’s really you trying to log in and not just some hacker who has stolen your password.

Just like many other applications, password managers have their own faults and you may find yourself having lost your passwords and locked out of your accounts.

In such a case, you will need a reliable password recovery tool to regain access. Additionally, you should always have privacy protector software to secure your information from hackers.

While on the internet, consider using secure browsers alongside password managers for maximum protection of your sensitive information.

We hope you were able to find a multifactor authentication password manager that adequately meets your needs from this list.

Let us know what other tips you have up your sleeve when it comes to safe browsing habits and password management in the comments section below.

Windows Modules Installer Worker: How to Safely Disable It

Whether you are using an old computer or need your PC to run many tasks simultaneously, you probably want to disable the Windows modules installer worker.

The reason is that the Windows modules installer worker puts a high load on your disks, CPU, and memory. You may use the best software to fix high CPU usage, yet some reports show that it might even take 100% of them to itself.

While it helps you maintain a more secure and reliable system, it takes its toll. So, you are the one who can decide to keep it or disable it to avoid performance issues.

In this article, we will explore in detail what a Windows modules installer worker is and how you can enable or disable it. We will also see if it is necessary for your system or not.

What is the Windows modules installer?

If you are a Windows user, you must see that Windows updates itself automatically occasionally. However, you most probably do not know how it does so.

Windows modules installer (also known as Windows Modules Installer Worker, WMIW, or TiWorker.exe) is the system process that enables automatic installation and modifications of Windows updates.

You owe your bug-free system to this core Microsoft component because it automatically checks for updates and installs the necessary ones to give you a more seamless experience.

However, it is not the perfect component due to its huge resource usage. It can take up to 100% off your Central Processing Unit (CPU), your memory, and your disk.

Windows modules installer worker high disk usage, combined with high memory and CPU usage, can cause too much friction in your system and slow down all your processes.

How can I disable the Windows modules installer worker?

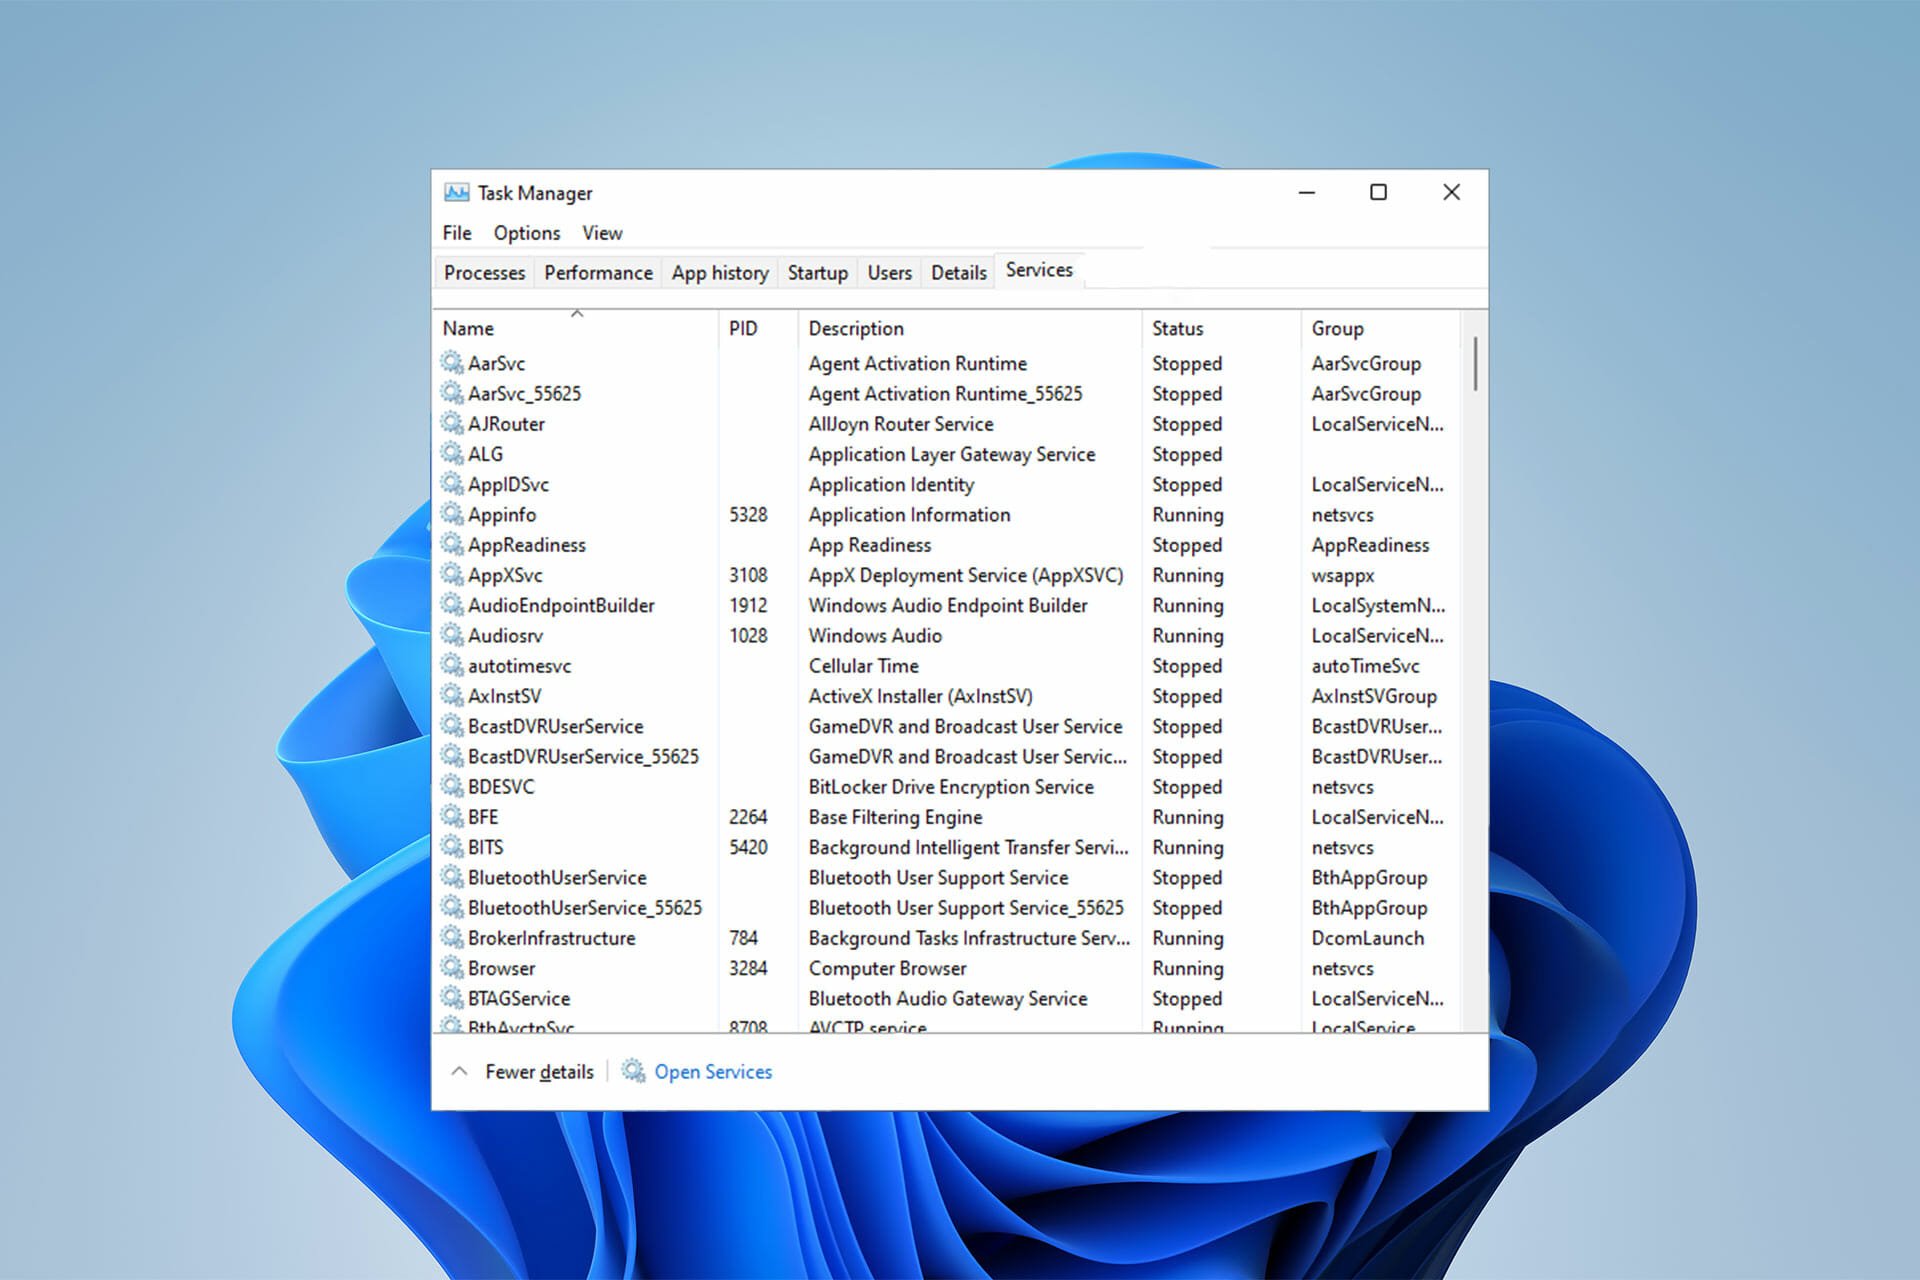
  1. Open Task Manager by pressing Ctrl + Alt + Delete and go to Services. Next, tap on Open Services.Click on Open Services
  2. Afterward, right-click on the Windows Modules Installer Worker and head over to its Properties section.Go to Properties of WMIW
  3. Finally, select Disabled from the Startup field and tap on OK.Disable windows modules installer worker

Is a Windows modules installer worker necessary?

It’s best to not disable the Windows modules installer worker and let it do its work. After it is done, you can have your functional system back.

This is because the Windows modules installer worker has a crucial role in keeping your system safe from malware such as the WannaCry ransomware.

It updates your system with security patches that can resist the attacks of different viruses and malware from different sources worldwide.

Microsoft is keen when it comes to security and always prioritizes its users’ security over the new features it wants to add. So, TiWorker.exe will mostly increase your computer’s stability.

If you do not want to permanently disable the Windows modules installer worker, you can disable it temporarily by ending its task from Task Manager. However, it will come back on reboot.

It may be helpful to change your Internet connection type to Metered Connection. If you’re wondering why it’s because it turns off Windows Automatic Updates and reduces resource usage.

Also, use Windows Update Troubleshooter to ensure that Windows Automatic Updates work properly.

You should take advantage of a system file checker tool as well to scan your computer and ensure that none of your files are corrupted and fix them if they are.

Many users want to disable this process because of Windows Modules Installer Worker high CPU usage, and we covered this issue in detail in a separate guide, so don’t miss it.

Let us know whether you were able to successfully disable the Windows modules installer worker in the comments section below.
5 Best Weather Apps For Windows 11

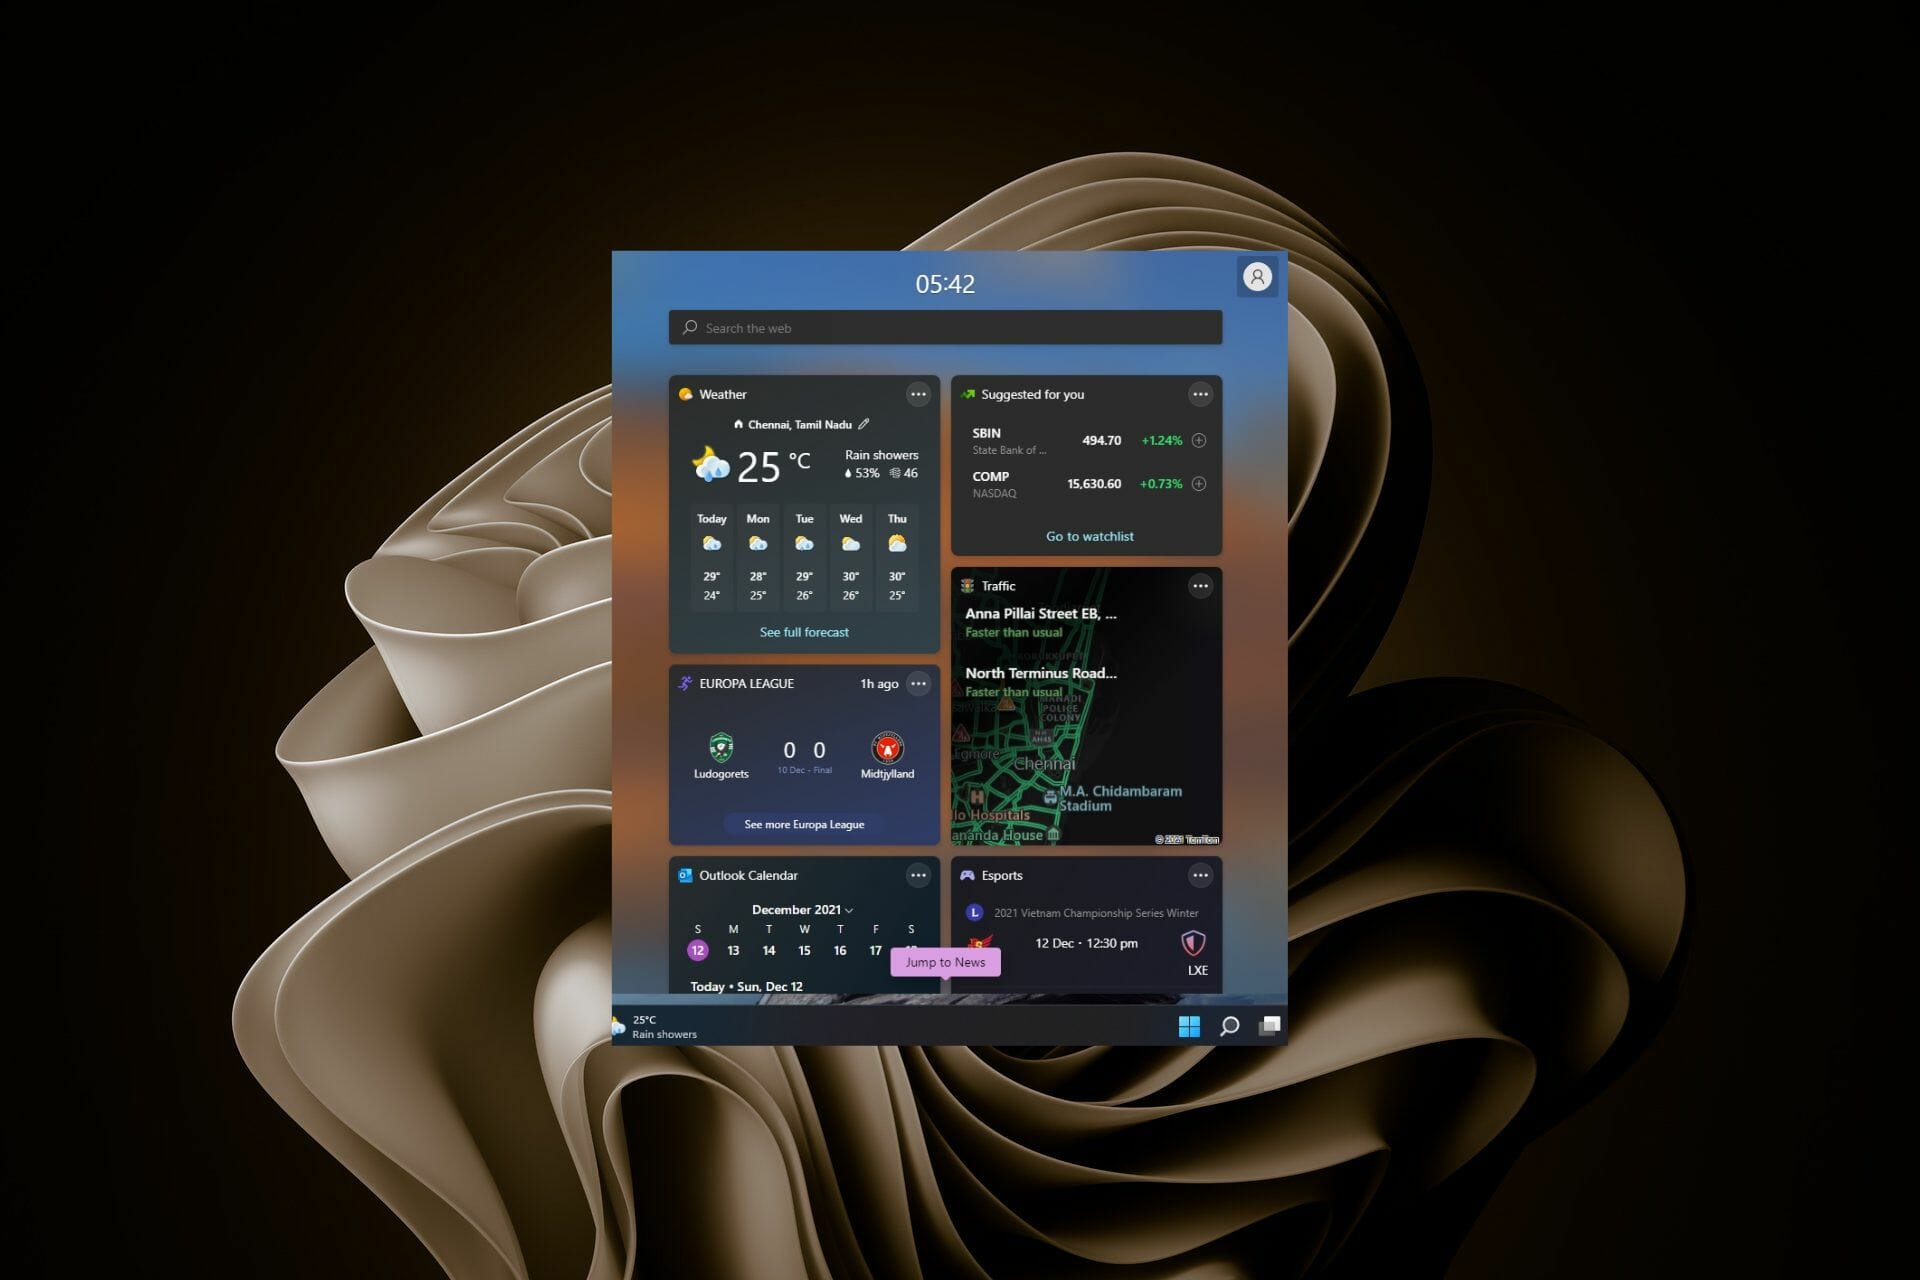
The Windows 11 weather app for desktop is a great tool for people who want to be prepared for whatever the weather may bring. It is simple, easy to use, and user-friendly.

A weather app is absolutely essential when it comes to planning your day. This is because it helps you avoid getting caught in the rain and even helps you plan your wardrobe for the day.

The Windows 11 weather app does a pretty good job, but some users may be looking for more than just a simple weather app. 

Others may be looking for a replacement because their Windows weather app is not working. This leads them to source for other weather applications. Most of them provide detailed and accurate temperatures for your location with a variety of additional features. 

What are the best weather apps for Windows 11?

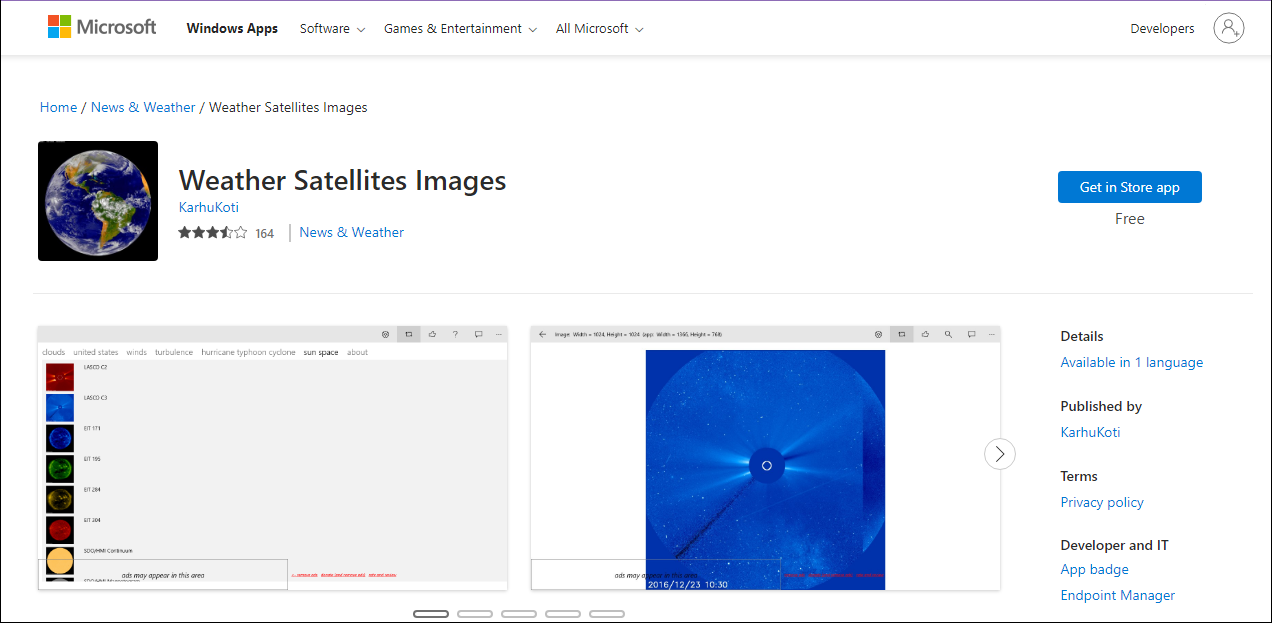
1. Weather Satellite Images – Most realistic weather app

Weather Satellite is the best free weather app for Windows 11 available on the Microsoft Store. It gives you access to images from satellites all around the world, giving you a realistic view of how the weather is shaping up.

It is not just another weather app, it’s an entire resource center in one simple package! This tool has everything needed to monitor conditions anywhere around our planet.

Additional features:

  • Weather satellite imagery useful in tracking hurricanes.
  • The aurora viewing map displays the aurora forecast for the next hour along with an interactive map that shows you what it looks like in your area.
  • Severe weather alerts.
  • Beautiful background images from around the world.
  • Detailed information about temperature, rainfall and wind speed.

⇒ Get Weather Satellite Images

2. MSN Weather – Most flexible weather app

The app allows you to view live weather updates, local weather conditions, and forecasts for the next few days.

MSN Weather comes with live tiles support. Wit this app, you can pin different sections of this app to your Start screen. This means you can get real-time information about the weather conditions on your phone’s start screen without even opening the app!

It features a simple and clean interface that offers all the information you need about the current conditions, as well as future forecasts for any given location. What’s even better is that the MSN weather app for Windows 11 recently got a revamp so more reason to install it.

Additional features:

  • The live tile support allows you to customize your start screen to get your local forecast at a glance.
  • You get current conditions and see what the weather is like at the moment in your area.
  • Ability to check hourly forecasts up to 24 hours to get a sense of what’s headed our way.
  • Interactive weather map with animated radar and satellite imagery.
  • Weather alerts for severe conditions.

⇒ Get MSN Weather

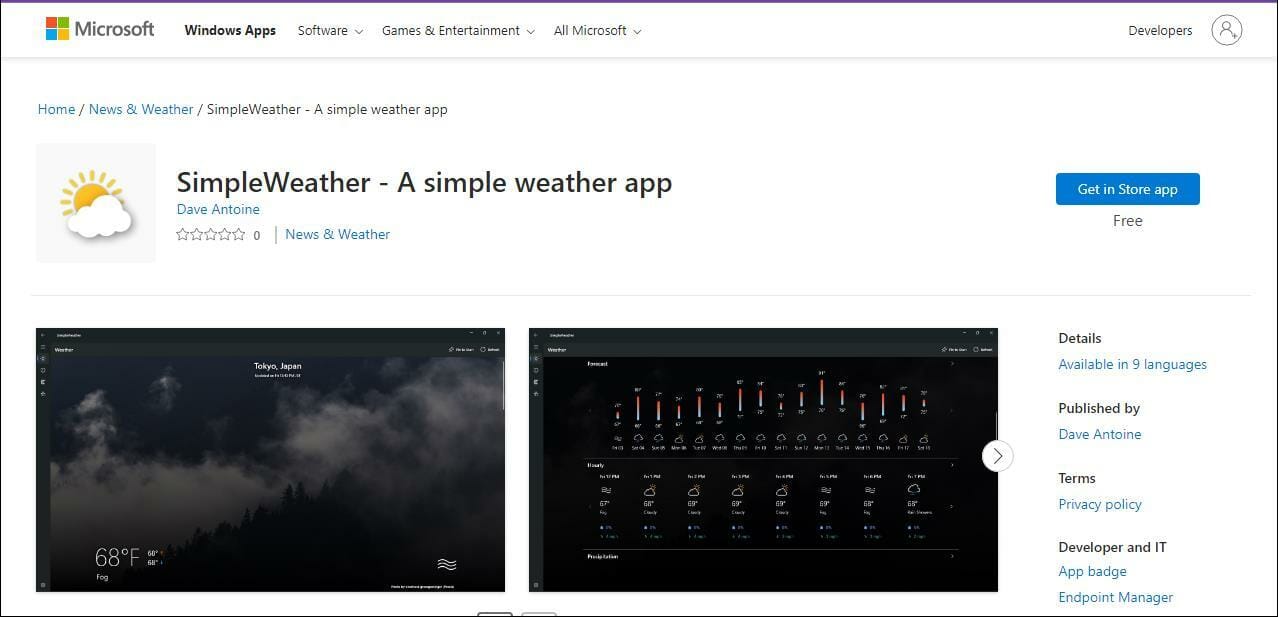
3. SimpleWeather – User-friendly app

This is one of the simplest weather apps for Windows 11. It is for anyone who desires more out of the weather forecast without too many complicated settings.

With this app, you will not only get weather updates. Other useful information such as sunset time are also included in case you want to get a nice picture or simply enjoy the view.

Another interesting feature is its resizable tile. You can pin it on your desktop to display only the most important details that you want to keep up with at all times.

Additional features:

  • You can favorite your frequently visited locations and get live updates on the weather situation.
  • Allows you to see the weather forecast for up to a week.
  • Sunrise/sunset times, moon phase, and astronomical events.
  • Hourly weather forecasts.
  • Weather alerts for rain, snow, wind and more.

⇒ Get SimpleWeather

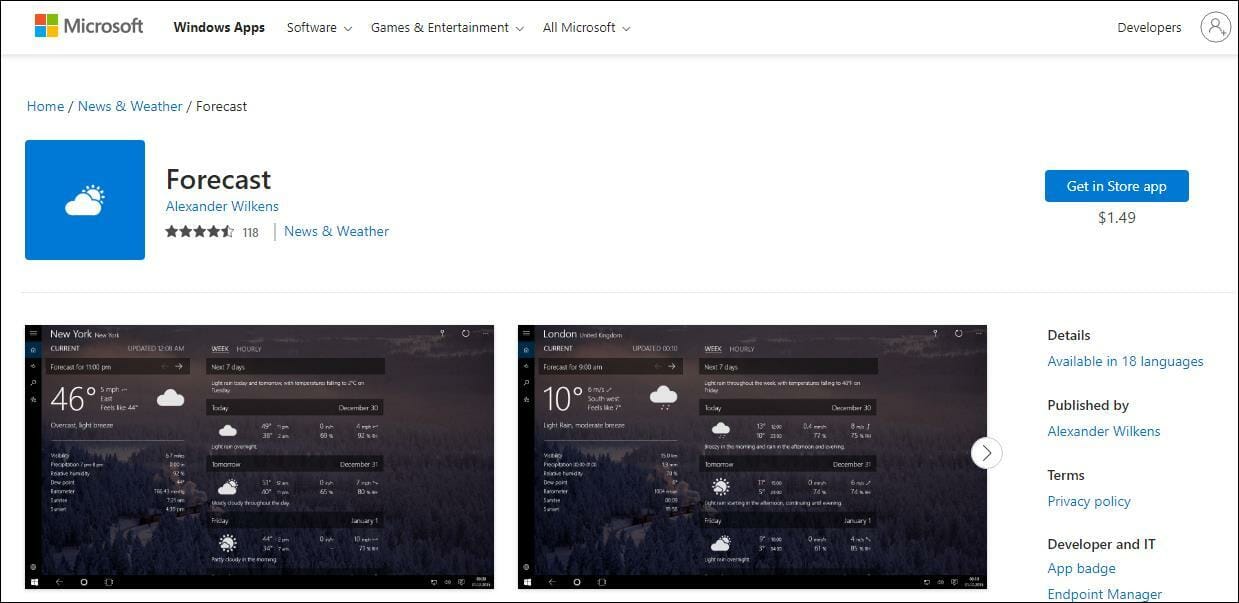
4. Forecast – Fastest weather app

The Forecast weather app is a great choice for Windows users who want a lightweight, simple, and easy-to-use tool.

The app shows you current conditions, temperature, humidity, and wind speeds in real-time and has a high response rate perfect for those with busy schedules.

With its swipe features, you can easily preview multiple weather conditions of different locations in seconds.

Additional features:

  • Live tile support with dynamic background image and accent color option.
  • Daily forecast information is available in both Celsius and Fahrenheit scales.
  • Forecasts for multiple locations.
  • High-quality detailed graphics and animations.
  • Does not take up too much storage space.

⇒ Get Forecast

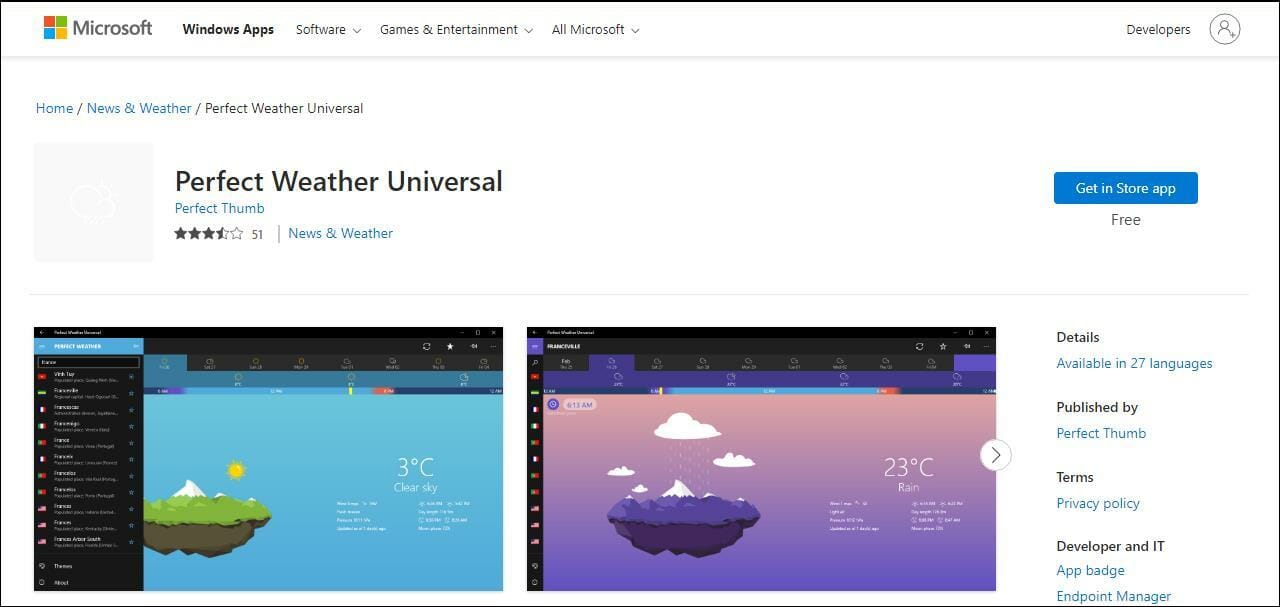
5. Perfect Weather Universal – Most detailed

Perfect Weather Universal features a beautiful, streamlined design that lets you see the weather forecast at a glance.

It displays current conditions, temperature and humidity, feels like temperature, wind speed and direction, precipitation probability, and pressure.

Additional features:

  • Has an excellent easy-to-use user interface with beautiful graphics.
  • Extensive collection of templates to change the look of the app.
  • Easy swipe feature to view the day’s weather forecast by the hour.
  • Detailed weather information including temperature, humidity, and wind speed.
  • Daily forecast for the next 9 days.

⇒ Get Perfect Weather Universal

Which weather app is most accurate?

There are many weather apps available that provide accurate real-time data. However, the accuracy of any app depends on the source of its data and how it is interpreted.

The most accurate weather apps use information from a variety of sources, including local weather stations, satellites, radar, and global positioning systems (GPS).

Some apps combine this information with historical data, allowing them to predict future weather conditions based on past events or trends.

You can always download two or more apps and estimate the accuracy but usually, the difference is negligible.

Whereas the apps listed in this article are not exhaustive, you will definitely be spoilt for choice on what to go for.

The list above may be for Windows 11 but you can also find the best weather app for Windows 7 free download here. Better yet, check out our comprehensive list of the best weather apps for Windows 10 if you are yet to upgrade to Windows 11.

If you encounter any other related issues such as the Windows 11 weather app missing in the Taskbar, we have a dedicated article with several fixes to help you out.

Let us know which Windows weather app works for you and some of the features that make it the perfect weather app for you.

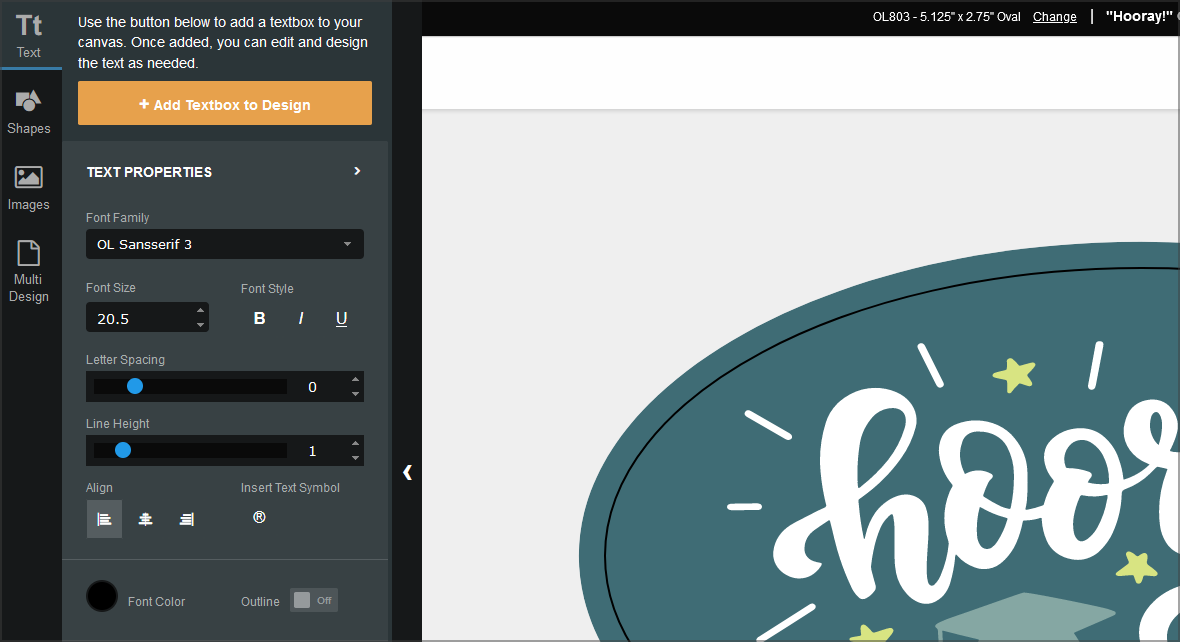
7 Best Circle Sticker Template Software [Free & Paid]

Are you looking for a free circle sticker template software? If so, you’ve come to the right place.

Customers perceive the value of a brand based on how it is presented and how the products are designed. The appearance of the label and stickers is also crucial. Surprisingly, you no longer require a design team because it is so simple to create.

And, fortunately, you don’t necessarily need to spend thousands of dollars to create a logo or a sticker. All you need is design software that can bring your idea to life.

So, what is the best software to create stickers? In today’s guide, we have selected our top photo-editing software to help you make the best round stickers for free.

What to consider when selecting the sticker template software?

The number one thing to consider when selecting a sticker template software is if it has pre-designed sticker templates. As that is the point of the whole thing because you want to design quickly and with less investment.

Most programs have a large library of pre-designed label and sticker templates that you can select from, customize, and add your flair to it.

The second thing to consider is whether you need a QR code or barcode that redirects your customers to your product page if they scan it. If you do so, you need software that can generate QR codes and barcodes.

So you’re probably wondering, how can I make my stickers for free? Keep on reading to find out.

What is the best paid and free circle sticker template software?

Adobe Illustrator – Best for vector graphics

If you know how to design and want to do something professionally, Adobe Illustrator is the perfect answer to your sticker design solution. You get all the tools, you get creative independence, and you get to add your flair to your round sticker template with Illustrator.

With Adobe Illustrator, the possibilities are endless, but it is often time-consuming and not a cost-effective solution.

With such great features, Illustrator is perfect if you want to create a round sticker template for your business.

Adobe software is traditionally very expensive and requires hours of training to master. But if you are someone who already knows how to design using Adobe Illustrator, then this is the perfect tool for you.

Key features:

  • Extremely versatile
  • Can be used for large-scale projects
  • Industry-standard
  • Intended for professionals

Adobe Illustrator

Adobe Illustrator is the industry standard for vector-based graphics creation and design.
Check price Visit Website

Adobe Creative Cloud Express – Easy to use

This is a powerful image editing application that you can use to create all sorts of templates and stickers. Since it’s available on the web, so it will work in any web browser out of the box.

By using this service, you get access to Adobe Stock images, you can always find the right picture for all your design projects.

It’s important to mention that this service is incredibly simple to use, and you can remove backgrounds from images with just a few clicks.

With this app, you can make a round sticker template for Word or Excel with just a couple of clicks, so if you want something easy to use, this might be the right tool for you.

A wide array of objects is available, as well as effects allowing you to create amazing stickers even if you’re a first-time user.

Key features:

  • Available in the cloud
  • Great for beginners
  • Solid image editor
  • Easy to use

Adobe Creative Cloud Express

Create amazing designs in your browser in a matter of minutes with Adobe Creative Cloud Express.

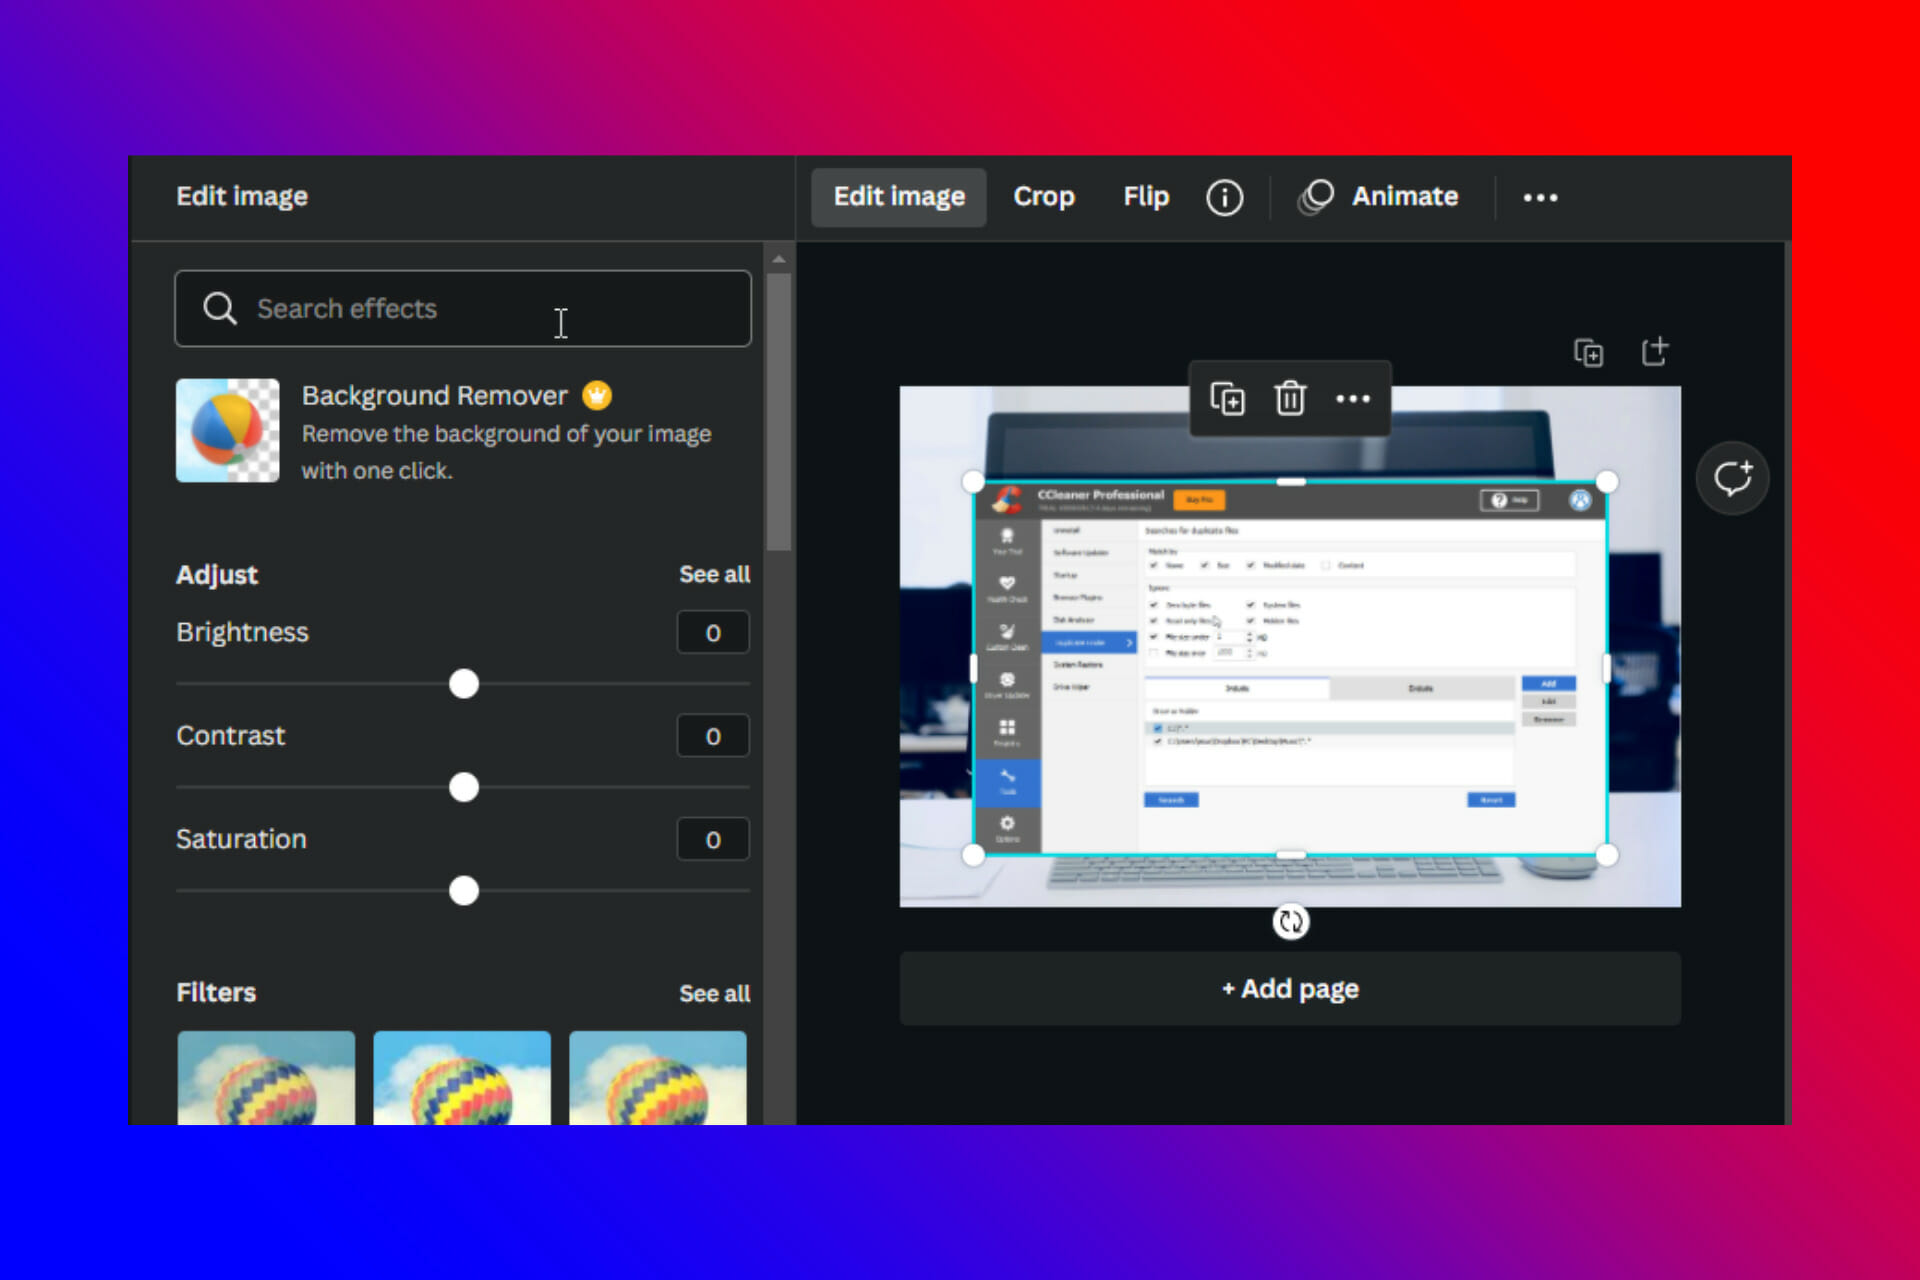
Canva – Most accessible

Canva is a top-rated design platform that is used by professionals, students, designers, and ordinary people from different walks of life, and you can use it to create a circle sticker template for Cricut.

It has a massive library of pre-designed templates, fonts, and a slew of other features.

You can customize the templates to your own liking by adding your own photo, selecting cool fonts, using charts, and more.

If you were wondering if this is a free circle sticker template software, yes, it is! But there is also a premium version of Canva which will unlock even more features and offer special templates that are otherwise locked in the free version.

The Canva app is available for your PC, Mac, Android, and iOS devices.

Key features:

  • Available in any browser
  • Easy to use
  • Many available templates
  • Great for beginners

Canva

Canva is a free graphic design app that can be used to make stickers, social media posts, logos, invitations, and more.

CorelDRAW – Supports vector and raster graphics

If you want to easily create your templates, then you might want to consider using CorelDRAW. This is vector graphics software, and it allows you to create high-quality designs that will look great on any resolution.

The software can work with multiple pages at the same time, so you can create advanced designs with ease. Of course, there’s advanced support for typography and there are many fonts available to choose from.

Speaking of which, you can access more than 1000 fonts from Google Fonts with ease. The software also allows you to edit photos, so you’re not limited just to vector graphics.

Overall, CorelDRAW is an incredibly versatile software, and it’s perfect for both professionals and less experienced users.

Key features:

  • Supports vector and raster graphics
  • Designed for professionals
  • Support for Google Fonts
  • Great for larger projects

CorelDRAW

Edit both vector and raster graphics like a professional with the CorelDRAW software.
Check price Visit website

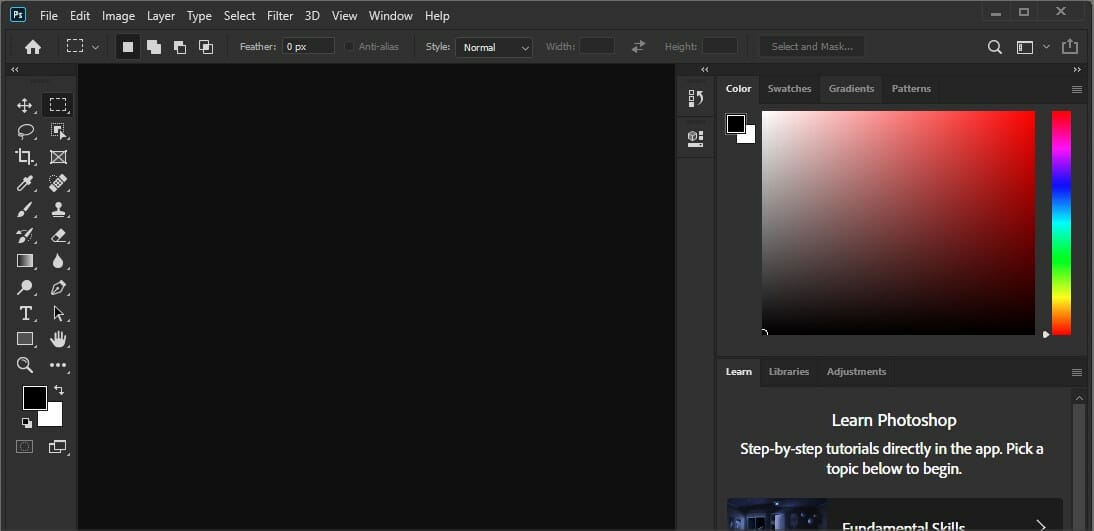
Adobe Photoshop – Great for raster graphics

In case you need advanced software to create circle templates for your stickers, Adobe Photoshop might be the right tool for your needs.

This is a professional photo editing software and it allows you to enhance your photos by changing their colors, lighting, and various other settings.

You can also create vector graphics, and combining that with powerful editing options and you can create all sorts of amazing designs with ease.

The software also has a wide array of effects, brushes, and objects, and you can import your own and customize your library any way you want.

With such customization options, Photoshop is perfect if you need to create a round sticker template or any other design.

When it comes to photo editing, this is one of the best applications on the market, and you can’t go wrong with it.

Key features:

  • Extremely versatile
  • Supports various effects
  • Customizable
  • Made for professionals

Adobe Photoshop

Create incredible designs and edit raster graphics like a pro with Adobe Photoshop.
Check price Visit website

Picsart – Simple to use

If you prefer online services, then Picsart might be just what you’re looking for. This app allows you to create all sorts of designs quickly thanks to many available templates.

You can add photos from your device, and edit them by adjusting the colors, lighting, or blend mode. There are also various shapes available, allowing you to create all sorts of interesting designs in a matter of moments.

Batch editing is also supported, allowing you to remove backgrounds and apply various effects to multiple images.

This is a simple web app, and as such, it’s perfect for less experienced users who want to create their designs without too much effort.

Key features:

  • Available in any browser
  • Easy to use
  • Batch editing support
  • Ability to easily remove backgrounds

Picsart

Thousands of quick and easy editing tools, fashionable filters, amusing stickers, and dazzling backgrounds.

Maestro Label Designer – Browser-based and simple

Maestro Label Designer is a web app, and as such, it works in any browser or platform without issues. Thanks to the dozens of available templates, you can create stickers in a matter of moments.

If you want, you can design stickers from scratch by combining text, custom shapes, and images into a unique creation.

The app also has available clipart that you can use, but no photos are available, so if you want to use them, you’ll have to upload them from your PC.

Overall, this is a simple to use but powerful app, and it’s a great choice if you need a free circle sticker template software tool.

Key features:

  • Web-based
  • Simple to use
  • Can generate barcodes and QR codes
  • Many available templates to choose from

⇒ Get Maestro Label Designer

We hope this guide has helped you make the right choice with your next adventure at creating stickers for your brand or as a hobby.

All these applications can be used to create any type of design, but if you need more apps, you should check these great free photo editors for Windows 11.

Let us know in the comment section how you found them!

7 Best Ways to Fix Canva Background Remover not Working

Canva is a free graphic design platform that allows users to edit photos, but many reported that Canva background remover is not working for them.

As you probably know, this is an online photo editing software, and with it users can easily create social media graphics, presentations, posters, documents, and other visible content on Canva.

Removing the background from images is one of the most used photo editing features to enhance photo backgrounds. You can upload your image on Canva, and it won’t take more than 15 to 20 seconds to remove the background from an image.

But recently, many users have been complaining about Canva background remover not working. It’s mainly due to an unstable or lousy internet connection. However, other factors may be responsible for this issue.

So in this post, we have compiled a list of some tips to help you fix the Canva eraser tool.

What can I do if the Canva background remover is not working?

1. Clear browser cookies and cache

On Chrome

  1. Open Google Chrome and click on three vertical dots at the top right corner.
  2. Click on Settings.
  3. Navigate to Privacy and Security. Click on Clear Browsing Data.
    Chrome privacy and security
  4. Check the options Cookies and other site data and Cached images and files. Once done, click on Clear Data.
    canva background remover not working

If Chrome’s cache data gets corrupt or full it can cause Canva effects not working error. Clear Chrome’s cache data and cookies then check if the error gets fixed.

On Firefox

  1. Open Firefox and click on the hamburger icon at the top right corner. Click on Settings.
  2. Navigate to Privacy & Security. In the Cookies and Site Data section, click on Clear Data.

  3. Now click on Clear to confirm the process.

There is another method suited for this task that can save you more time and clear browsing data safely.

Namely, you can use CCleaner software to clean junk files and speed up the entire system in a few clicks.

With the Custom Clean service, you can select which browser data to delete and pick cache files, cookies, or other Internet data that takes valuable memory.

In addition to that, you have registry cleaning tools capable to get rid of temporary files or junk files left behind by every program.

2. Disable VPN

  1. Press Windows key + I to open the Settings app.
  2. Navigate to Network & Internet.
    Network and internet option on Windows 10
  3. Select VPN from the left pane. In the right pane, pick your VPN connection and click on Remove.
  4. If you’re using a VPN client, make sure to disconnect from the VPN.

3. Check your Internet connection

  1. Visit the Speedtest website.
  2. Click on Go.
  3. Wait while your connection is being tested.
    canva background remover not working

If you don’t prefer this services, you can use any other Internet speed tester to check your connection.

4. Disable or uninstall Chrome extensions

  1. Click on the Extensions icon in the Chrome browser.
  2. Click on Manage extensions.
    canva background remover not working
  3. Switch off the toggle under each extension to disable it.
  4. To uninstall an extension, click on the Remove option.
    Disable Chrome Extensions

Chrome Extensions are designed to improve our online surfing experiences. However, specific extensions may occasionally interfere with Chrome’s operation.

To confirm that an extension isn’t causing this problem, disable all extensions one by one and see whether Canva functions as expected. Uninstall the extension if Canva begins working after you disable it.

5. Upgrade to Canva PRO


Upgrade to Canva PRO

Removing backgrounds from images is a pro feature on Canva. You won’t be able to remove background from images as Canva doesn’t offer a free background remover. You’ll have to purchase Canva Pro to access this feature.

Once you upgrade to Canva Pro, any work you create in Canva won’t be trademarked or limited to your brand or team. Also, the subscription will automatically renew after your paid period or when the free trial ends.

Do note that full access to Canva Pro is only available on desktop and mobile browsers.

Several users complain about the fact that Something went wrong while loading Canva. Rest assured that our guide shows you what to do in case that happens.

6. Re-login into your account

  1. Click on the profile picture icon on the top right corner of Canva.
  2. Hit the Sign Out button.
    Sign out Canva
  3. Wait for a few moments and then sign back in again.

Signing out of the website and then logging back in will refresh your account’s data that may have encountered this error.

It will also establish a proper connection between your browser and Canva’s servers, and help you if Canva effects are not working.

7. Check Canva servers

  1. Visit the Canva Status page.
  2. Look for any issues.
  3. In case there are problems with the services, you’ll have to wait for the developers to fix them.

That’s all on how you can fix Canva background remover not working. Several issues are to be blamed, but this usually occurs due to a bad Internet connection.

Follow the steps mentioned above to fix this error. If the troubleshooting methods mentioned above could not help you, perhaps consider using a different poster and banner design software.

If you managed to fix this issue, don’t miss our latest guide to learn how to blur the background in Canva and if Canva is unresponsive, we also have a fix for that.

If you still have any issues, feel free to drop a comment below. We’re eager to hear from you.

7 Tips On How To Start Lost Ark With The Easiest Class

You’re here, which means you decided to start playing the ultra-popular Lost Ark game, and you would like some early tips on how to make your life easier, and longer.

You came to the right place, as we’re about to break down these classes and tell you which ones are the best for beginner players.

Now, you can play whatever class you want and still excel with it, but there are some that are either better to start with, or much more potent in the hands of novices.

Lost Ark features five playable classes (Warrior, Martial Artist, Gunner, Mage, and Assassin), and each splits into Advanced Classes.

  • Warrior: Berserker, Paladin, Gunlancer, Destroyer.
  • Martial Artist: Striker, Wardancer, Scrapper, Soulfist, Glaivier.
  • Gunner: Gunslinger, Artillerist, Deadeye, Sharpshooter.
  • Mage: Bard, Sorceress
  • Assassin: Shadowhunter, Deathblade

These are all the Classes/Advanced Classes we have available for Europe and the United States, with the rest of the options only playable in Korea.

So, if you consider yourself ready to venture into the massive online world that is Lost Ark and prove yourself worthy, here’s what you should know before you actually start.

1. Berserker is by far the easiest class to start and play with

If you want an easy hero class that is simple to play and can become overpowered easily, you should definitely go for the Warrior.

They are very tanky and their abilities are simple enough to give new players the hang of the game. While all three warrior Advanced Classes are entertaining to play, you should start with the Berseker.

The Berserker is a melee hero whose attacks deal area of effect (AoE) damage., and is suited not only for PvE but for PvP as well.

Another interesting fact is that new players don’t have to put the extra effort into builds and engravings at the beginning.

While they give some much-needed boosts, new players can take their time in learning about them because Berseker is quite sustainable even without them.

All-in-all, a perfect class for the novice Lost Ark players. Give it a go and see for yourself how easy it is to overcome your foes as a Berserker.

2. If you’re more into PvP, the Bard is also an excellent starting choice

PvP for Lost Ark will unlock at level 26 in the main questline when you are given access to the Proving Grounds arena.

If you aren’t comfortable going face to face against other players, the Bard can be a great first choice, thanks to her ability to support her team from a distance.

Provide your teammates with buffs such as shields and damage reduction, and get them out of tight spots with the healing identity skill.

3. If you want to become a Martial Artist, go for the Scrapper first

Scrappers are an Advanced Class for Martial Artist, which you should know is quite recommended for beginner players.

Sure, there are others, but the remaining Martial Artist Advanced Classes aren’t as accessible as the Scrapper.

If you decide to go for it, you will discover that it offers two playstyles. Complete beginners can go with Taijutsu, and other players who are a bit familiar with the game can try Shock Training.

4. Novice Assassins should go for the Shadowhunter

This unique character is definitely something you should try in order to make your playthrough interesting.

As the Martial Artist, the other Assassin Advanced Classes aren’t as easy as this one. Shadowhunter is a good pick as you get to experiment with both ranged and melee attacks.

Even though some might argue about the difficulty of this Advanced Class, once you take it for a test run you will see that it is very easy to play.

5. If you’re a bit more defense-oriented, try the Paladin first

Fancy tanking and keeping your team safe from harm? If so, the Paladin is definitely the Advanced Class you should try if you were thinking about Warriors.

But don’t be fooled by his large armors and apparently sluggish behavior, as these heroes can still put out a pretty decent amount of damage when needed.

This is also one of the few support classes in the game, providing your colleagues with cleanses and shields, making it an overall excellent starter pick.

6. Avoid Assassin classes if you aren’t good with positioning

Although Assassins are a great pick for massive DPS, and an excellent pick for PvP, you should steer clear of them if positioning and map awareness isn’t your strong suit.

They are fast, agile, and capable of delivering some massive damaging finishers, but they are also squishy if not handled properly.

Thus, if you want to play a melee class but would rather sit there and take some of the damage instead of constantly dodging and moving around your enemy, it’s best you stick to Warriors.

7. Sorceresses are extremely fun and overpowered, but harder to play

This ranged DPS has great spell variety, it can do huge AoE, tons of damage and will perform incredibly well throughout the PvE content, even if you are playing solo.

The amount of damage and AoE stagger you have available make this Advanced Class a worthy opponent.

It’s also fantastic later on in the game for things like dungeons, raids, and PvP. That being said, it is a harder class to understand and master, so keep that in mind before choosing it.


These are our 7 tips for new Lost Ark players, tips that will ensure a much more fun starting experience and spare you the frustration of choosing an overly complicated class.

We can also help if you’re having problems with the game, such as Lost Ark not installing on Steam, not starting due to authentication errors, or the dreaded EasyAntiCheat errors.

The rest is up to you, so go out there and make yourself an adventure worthy of remembrance. Only you can make the game a lot more fun than it already is.

What class did you decide to pick up as your first in Lost Ark? Share your opinions with us in the comments section below.
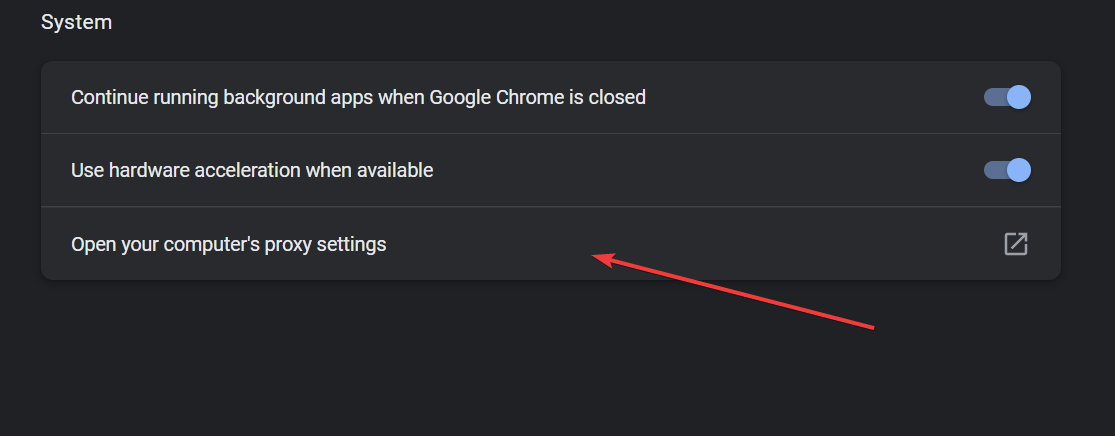
PS4’s 9.60 update: 5 problems and fixes that we found

As most of you are probably aware by now, Sony just released a brand new update for their console lineup, which also included some of the older models.

It has definitely been somewhat of a busy week for PlayStation users, as the PS3 and PS Vita also received new system updates just a few days ago.

Contrary to what Sony had planned, these recent updates didn’t please users at all, as they had to deal with whole new situations after.

Playstation 4 and Playstation 5 also received new software and, even though not all of them had problems afterward, some reported some pretty weird console glitches, especially on the PS4.

What issues are players experiencing after update 9.60?

Well, let’s just say that the patch notes weren’t exactly right about what was about to happen after players installed the new software version.

  • This software update is improving the efficiency of the system.

That’s what the release log said, but the reality is a bit different. There’s even a Reddit post where people share the situations they had to go through since this patch was out.

Ever since this update was downloaded and installed, some PS4 users started experiencing:

  1. Random freezes during gameplay.
  2. Receiving random errors when trying to play Youtube videos.
  3. Triangle and square buttons not working on Youtube anymore.
  4. Internet connection not working on PS4.
  5. Console crashing with error codes su-30746-0, and su-42118-6.

Before we start showing you the solutions, you should know that the PS4 SU-42118-6 error mostly results in a restart loop for PS4 and it’s mostly due to a broken ribbon connector between your motherboard and BD-ROM.

How can I fix the problems caused by update 9.60?

1. Rebuild database

  1. Completely power off your console.
  2. Press and hold the power button.
  3. Release the button after you hear the second beep.
  4. For PS4, you’ll need to connect your controller via USB, then choose to Rebuild Database.
  5. For PS5, you’ll now boot into Safe Mode. Plug your controller in with the cable, then go down and select Clear Cache and Rebuild Database.
  6. After that, click on Rebuild Database, then on OK.

2. Manually install the update file

  1. Plug USB into your PC and create a folder called PS4 on the USB root path.
  2. Create an Update folder within the initial PS4 folder.
  3. Download the System Update file from the PS4 official website.
  4. Save it with the name PS4UPDATE.PUP and store it in the Update folder.
  5. Connect the USB drive to your PS4
  6. Turn on PS4 and click the PS button on the controller.
  7. Now go to Settings, then System SoftwareUpdate.
  8. Follow the on-screen instructions to complete the process.

3. Reinstall system software

  1. Power off your console completely, then unplug any cables (Keep in mind not setting it to Rest Mode).
  2. Press the power button on your PS4, then hold it down until you hear two beeps (It usually takes like 10 seconds).
  3. You’ll see a black screen when the system boots up in Safe Mode.
  4. There, you can either choose Restore Default Settings, Initialize PS4, or Initialize PS4 (Reinstall System Software).

If nothing on this list works for you, seriously consider contacting PlayStation Support about this problem.

Also, if you are dealing with error code su-42118-6, replacing your PS4’s hard drive is also a valid option you might want to look into if nothing else works.

Some of the affected PS4 users even said that this update bricked their consoles, so be very careful when dealing with it.

If you haven’t yet installed it, we recommend postponing until Sony has properly evaluated the situation and found a solution.

Are you dealing with problems you haven’t seen in this guide as a result of updating your PS4 to version 9.60? Share your experience with us in the comments section below.

Google Chrome Journeys: What is it & how to turn it off

Google Chrome is by far one of the most used browsers out there, and there’s not even worth debating that, as numbers speak for themselves.

Sure, some of us use Opera, Brave, Firefox, or Edge, but Chrome has remained a user favorite throughout the years, even though it’s not at all a light app when it comes to resource usage.

Google spends a lot of time and resources constantly perfecting everyone’s go-to browser, so new features and fixes are always cooking and on the way.

We can’t always tab every website we visit, so having neat features such as browser history is really helpful when you’re trying to go back to the same pages.

But what if we tell you there’s an even better way to group up your searches and find all you need a lot faster and better arranged?

Yes, you guessed it. We’re actually talking about the Journeys feature for Chrome, which you can find by accessing the History page.

What is Journeys in Google Chrome?

We all know by now that finding stuff on the internet is pretty easy. That being said, what’s hard is finding that exact web page you knew you were reading last week.

And, even though you know what it was about, no matter how hard you try or how much time you spend, you just can’t find it in your history or even a regular search. 

This is where the Journeys feature comes into play. When you type in a word from a previous research session, Journeys asks if you want to resume your research and takes you back to where you left off. 

It will also show you a list of relevant sites you have already visited. sites you have spent more time interacting with are bumped up the list. How handy is that?

However, if you feel like you have little use for this neat little software help, you can always turn it off and we’re about to show you how to do so.

How do I remove journeys from Chrome?

  1. Open Google Chrome.open chrome
  2. Click on the three dots in the top right corner.chrome options
  3. Select History.history chrome
  4. Press the Turn off Journeys button.turn off journeys

How do I delete journeys?

  1. On the Journeys tab, click on the three dots next to the first one.Journeys tab Chrome
  2. To delete only one webpage from the Journeys, select it and click on Remove from History.remove from history
  3. To delete the entire Journey, click on Remove all from History.remove all from history
  4. Click on the option you want and then press the Remove button.remove Journeys

There you have it! If you feel like this feature’s utility has run its course and you have no use for it whatsoever, this is what you need to do in order to deactivate it.

Of course, if at some point you feel you could make use of it, simply follow the same steps and turn it back on at your leisure.

It’s a simple process that will only take up a minute of your time, so don’t be discouraged by thinking it’s a daunting task.

Has this guide been helpful in achieving your goal? Share your experience with us in the comments section below.
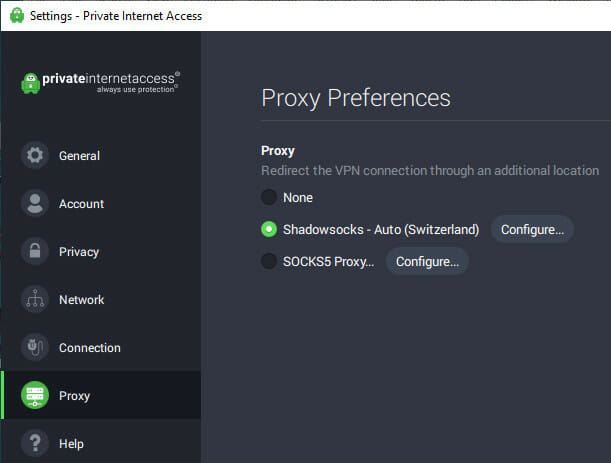
5 Best HTML5 Online Photo Editors To Use In 2026

An HTML5 online photo editor offers a number of advantages over native applications.

For one, they are compatible with all major browsers such as Microsoft Edge, Google Chrome, Firefox, Tor, Opera, etc.

This means users can use HTML5 editors on all platforms, from Windows 10 to iOS and Android.

Furthermore, HTML5-based applications tend to load faster due to having lighter coding. Users also do not have to waste time downloading additional plugins to get the online editor to work.

If you are interested in using an HTML5 online photo editor, then you will want to take a look at the list below.

All of the photo editors in this list are based on HTML5 and can only be accessed online. It is important to note that there are of course other top online photo editors found on the Internet.

This list is merely meant to help point users in the right direction. In addition, the photo editors in this list are not ordered from best to worst.

Rather, each of these applications is unique, and will hopefully help each reader out in his/her quest for an HTML 5 online photo editor.

What are the best HTML5 online photo editors?

Fotor – Best HTML editor for professionals

fotor HTML5 image editor

Fotor is an online editor software you can use for graphic designing, editing images, collage maker, or NFT creation.

With this free photo editor, you have a world of possibilities in terms of editing tools for professional photos or designs.

For instance, these next editing features are helpful for both beginners and professionals who need impressive pictures.

You have a photo enhancer that helps to improve image quality with HDR, plus background remover, blemish removing tools, photo effects, and so on.

The editing process couldn’t be more simple. You just need to select your photo and upload it, choose from multiple features and edits, adjust the last details for preview – and download your photos.

More so, there is the graphics tool. You can choose from thousands of templates and graphic elements for social media designs, book covers, invitations, or flyers.

So you can’t go wrong choosing this online photo editor that works for any online browser with HTML5 support.

Fotor key features include:

  • Manipulate fonts, image shapes, icons, clip arts, stickers, shadow, color, and much more
  • Thousands of preset templates are available
  • Create posters, cards, social media covers, blog designs, advertisements, etc.
  • The beauty retouching feature allows quick touch up for photos
  • Quick access to easy-to-follow tutorials

Fotor

Create your most expressive photos with this thrilling editing and graphic creator software.

Photopea – Best photo editor for beginners

photopea HTML5 online photo editor

More powerful than Picozu, Photopea has often been called online Photoshop because of its handy features.

Designed more for users who have had experience editing photos, Photopea can be overwhelming for first-timers.

The great thing about Photopea is that it doesn’t trouble itself with a fancy, artistic user interface to entice users. Instead, it relies on its powerful tools and features to keep users coming back for more.

You simply have to click on the link and use the online photo editor. It does not require the download of a plugin.

The program supports PSD format, which is the format Photoshop uses for its shortcuts but you can also save your images in JPG, PNG, and SVG.

It works great on all major browsers and usually does not have any lag when you are editing photos.

So, if you are someone who prefers a clean application with highly effective tools to work with, then you will want to consider using Photopea.

Here are some of its best features:

  • Supports the PSD format but also JPG, PNG, and SVG
  • No plugin download required
  • Works great on all major browsers
  • Friendly interface and straightforward usage
  • Perfect for beginners

⇒ Get Photopea

DeviantArt Muro – Best photo editor with drawing capabilities

deviant Art muro HTML5 editor

Specifically built for artists, DeviatArt lets you edit photos as well as use a number of tools to create art.

If you’re looking for more drawing tools than editing tools, you will certainly enjoy this application more.

Users looking for an outlet for their creativity should check out this HTML 5 photo editor. While DeviantArt muro is simple, it has a pleasant interface and offers some neat layering options.

This application runs entirely on HTML 5, so you can also quickly access the editor with a simple click of its link. No additional plugins are required to be installed.

DeviantArt muro is a niche application that caters to individuals who want an editor that has drawing features.

However, you can’t make modifications to the filters and that makes it a bit too simplistic for the likes of professionals.

Take a look at DeviatArt muro’s key features:

  • Projects are automatically saved if you sign in to a DeviantArt account
  • Highly effective drawing tools  
  • Simple access and convenient layout
  • Save your work in vectorial formats
  • Graphical interface based on layers

⇒ Get DeviantArt muro

Pixlr Editor – Best HTML editor with free templates

Pixlr Editor is an excellent HTML5 online photo editor that’s very easy to use. The user interface is very intuitive. If you’ve used Microsoft Paint before, you’ll quickly get the hang of Pixlr Editor.

The platform offers a series of advanced photo editing options that allow you to create impressive images or improve the quality of the pictures you upload.

Besides photo retouching, this online tool allows you to save your work in PDF and PXZ formats, the last one being ideal for collaboration.

You can do a lot with this app for free but there is also a premium version available that allows you to unlock many useful design templates, stock images, and editing features.

Check out some of its key features:

  • Work on multiple layers
  • Simple and easy to use photo retouching features
  • Save your work in JPG, PNG, WEBP, PDF, and PXZ formats
  • Great set of editing tools arranged conveniently
  • Create photo collages with ready-made layouts

⇒ Get Pixlr Editor

Fix the photo – Best photo editing professional service

Although Fix the photo is not an editing app, it is extremely convenient if you want to save your time and benefit from professional-level results.

It is actually a service that provides photo fixing and retouching according to your desired specifications.

And the usage is very straightforward. Simply upload photos, write your requirements, and a dedicated team of graphical specialists will take care of the rest.

For a small per-photo fee, they will make portraits, wedding, body, product shots, or any other photos look great, even ready for magazine publishing.

They will enhance body shapes and skin texture, remove all unwanted elements, editing the images in a realistic fashion.

So, with this service, you no longer need to have any skills or worry about filters, colors, and whatnot.

Take a look at its key features:

  • Professional photo retouching services
  • Just upload photos and describe your requirements
  • Fast and reliable service
  • Easy to use, just by creating an account
  • No download and graphical skills required

⇒ Get Fix the photo

An HTML5 online photo editor offers many advantages over traditional editing applications.

Faster, easier, and more flexible, HTML5 applications are a highly effective solution to your editing problems.

With this list, you will find it easier to find the online photo editor that meets your unique needs.

We also included a professional photo retouching service in case you don’t want to spend any time and get the best results.

You should also look at our selection of the best free photo editors for Windows 11 because you might also get some suggestions. Don’t worry, they also work in Windows 10.

Have you tried any of these apps? Let us know about your experience in the comments section below.
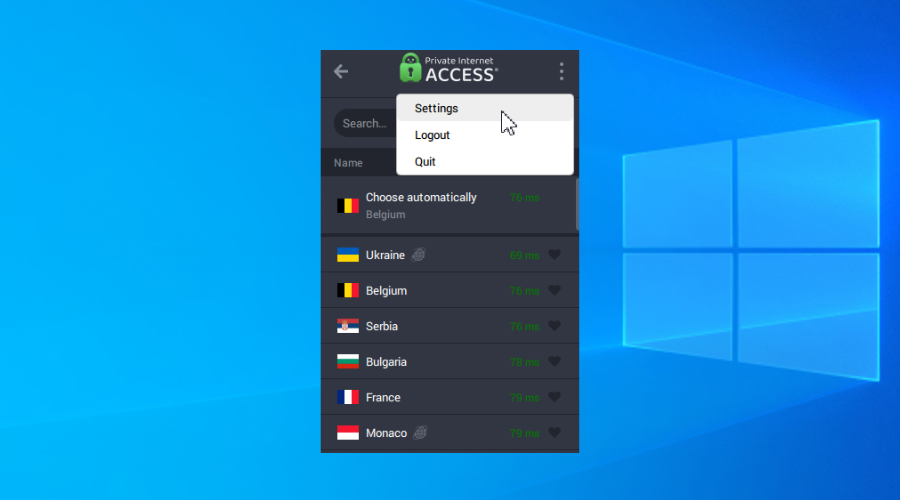
Microsoft celebrates the new Top Gun movie with custom Xbox and Microsoft Flight Sim DLC

Microsoft is celebrating the release of Top Gun: Maverick with a new custom Xbox Series S console as well as new DLC for Microsoft Flight Simulator.

The Top Gun Series S console features a unique skin inspired by the new film, with a matching controller. This isn’t a console you can go out and buy, though. Rather, it is up for grabs in the latest Xbox custom console competition, which U.S. residents can enter over on Twitter by retweeting the tweet below and following @TopGunMovie.

The prize also includes a pair of aviator sunglasses and an advance screening ticket for the movie. The official rules for the sweepstakes can be found here.

The Top Gun DLC pack for Microsoft Flight Simulator will coincide with the movie’s release on May 25. Details on just what content will appear in the DLC still remain scanty at this point, though you can rest assured it will delight any fans of the Top Gun franchise.

As mentioned, Top Gun: Maverick will premiere later this month. The Paramount Pictures movie stars Tom Cruise and is a sequel to the 1986 classic Top Gun. The new film is projected to earn anywhere from $94 million to $130 million in its first week.


Here is next week’s lineup for Xbox game releases

It is looking like another solid week in Xbox next week, with 9 more titles slated for release from May 16—20. While there aren’t any blockbuster AAA games coming out next week, there is a good variety of quality games releasing if you’re in search of a new favorite.

Umurangi Generation Special Edition – May 17

A retro-futuristic, first person photography game that has players documenting an alien invasion in the New Zealand town of Tauranga. This special edition of the game will hit both Xbox Game Pass and PC Game Pass when it releases on Tuesday.

Behind Closed Doors: A Developer’s Tale – May 18 

Have you ever wanted to play as a video game developer trapped inside his own game? In this pixel art game you play as Ethan, who works for a small video game developer who somehow gets sucked in the game world after getting a strange call in the middle of the night.

Divination – May 18

As the Diviner, you will play an enigmatic fortune teller in this rather unique game set in a dystopian cyberpunk metropolis full of uncertainty and despair. Meet a range of characters – humans, robots, and hybrids – and scry their futures via a pair of hands that can foretell the future.

Endzone – A World Apart – May 19

This survival/city-building game is set in an alternate world which was brought to the brink of annihilation in the year 2021 by a nuclear cataclysm. Those who managed to survive escaped to underground “Endzones.” Now, 150 years later, players must guide humanity as it returns at last to the surface – a dangerous world plagued with contamination, climate change, and raiders.

They Always Run – May 19

Gamers play as a three-armed mutant bounty hunter in this side-scrolling adventure. Hunt down the most nefarious, most dangerous criminals in the galaxy using your additional appendage to manipulate the environment, destroy objects and use targeted throws, all in gorgeous 2.5D.

Vampire: The Masquerade – Swansong – May 19

Guide the fates of three main characters in the latest installment of this cult-classic narrative rpg series. When you pre-order this game you will be able to immediately install and play Vampire: The Masquerade – Coteries of New York. (Pre-ordering the game will also nab you the Alternate Outfits Pack DLC). Note that this is the Series X|S version of the Vampire: The Masquerade – Swansong, and is not playable on Xbox One.

Deadcraft – May 20

This zombie apocalypse title puts gives a fresh take on the genre in which you play as a half-zombie named Reid. Reid can plant the corpses of his zombie foes to grow into zombie followers to do his bidding. This in addition to a crafting element that allows Reid to forge new weapons and tools (and even create some post-apocalyptic cuisine) make him an unstoppable force against all enemies, human and zombie alike.

Dolmen – May 20

Journey into the hostile alien world of Revion Prime and bring back samples of the Dolmen – crystals that can facilitate interaction between alternate realities. With a rich combat system and gorgeous visuals, Dolmen looks like a promising title, especially for space-starved gamers.

Nirvana: Pilot Yume – May 20

Neon lights, beautiful women and ultra-fast spaceships are the order of the day in this low-poly, retro-inspired racing game that blends anime cutscenes and spaceship racing, with a story that features 5 different endings.

So there you have it: another week in Xbox releases, another respectable lineup. There is something in the lineup to suit just about all kinds of gamers, with racing, action, role playing and adventure games all accounted for.

Disk Has Been Surprise Removed [Event ID 157 Fix]

The disk has been surprise removed is an error in the system event log on Windows devices. It’s an unusual issue on the virtual disk that all XBOX Live PC and Microsoft PC installations depend upon.

Usually, this issue occurs when something disrupts the system’s communication with a disk.

The Event ID 157 disk has been surprise removed in Event Viewer disables the user from using the designated virtual drive to install the games. This virtual drive won’t be visible in File Explorer like other drives.

You could also encounter the Disk has been surprise removed VMWare issue. And the solutions below will fix the problem but you will have to do the changes directly in the emulated OS from VMWare.

As it’s an issue of concern, it should be fixed right away. In this guide, we will be looking at some troubleshooting methods that will surely help you.

What does the Disk has been surprise removed mean?

The PNP manager does something called enumerations. An enumeration could be understood as a request sent to the drive that controls a bus, such as PCI.

These take an inventory of the devices on the bus and report back a list of all. Enumerations like these occur for several reasons.

When an enumeration request is received, the bus drivers will reach the bus for all devices. It will then issue commands to the existing devices as looking for new ones.

When these commands fail on an existing unit, the driver will mark the device as missing. Then it won’t be reported back to the PNP in the inventory.

Once the PNP determines the device isn’t available in the checklist, a surprise removal request will be sent to the bus driver to remove the device object.

As the CLASSPNP driver controls the device tag and receives a request for the disks, it sees the surprise removal request and logs an event if the disk is non-removable.

As a result, the disk would disappear from the system with no indication, and the message Disk has been surprise removed will appear.

How do I fix the Disk has been surprise removed error?

1. Update Storage Spaces Controller Driver

  1. Click on Start, type device manager, and select the app from the results.
  2. Expand the Storage Controllers section.
  3. Right-click on Microsoft Storage Spaces Controller and choose Update driver.
  4. In the next popup screen that appears, click on Search automatically for drivers.
  5. Once done, Windows will now automatically search and install any driver updates on your device.

The storage controllers are in charge of your storage drive ports, i.e., the SATA ports. If your storage controller drivers are out of date or corrupted, you may encounter the Event ID Disk has been surprise removed Xbox issue.

The majority of device driver issues on Windows are caused by missing, corrupted, or out-of-date drivers. This is just one of many reasons why you should maintain your device drivers up to date.

A computer cannot handle video cards, XBox controllers, sound cards, or other hardware; they must be managed by a driver. You can update drivers manually if you are completely familiar with the drivers your PC requires.

The ideal option is a driver updater program like Outbyte Driver Updater, which not only replaces but also backs up broken drivers.

The error will be resolved once you have downloaded and installed the most recent drivers. You will also notice an improvement in the performance of your device, and The disk has been surprise removed error will be eradicated. 

2. Run a CHKDSK scan

  1. Click on Start and search for cmd, then click on Run as Administrator.
    Disk has been surprise removed
  2. Type the following command and press Enter.
    CHKDSK C:/f/r/x
  3. The command won’t start running as your device’s root drive is already in use. Instead, it will ask you to begin scanning when you restart your PC.
  4. Type Y, press Enter, then reboot Windows and wait for the procedure to complete.
    Disk has been surprise removed

This issue can also occur if any hard drive parts are corrupted and running a CHKDSK can help fix this issue. CHKDSK is an inbuilt Windows Utility that scans and repairs system disk errors.

Several users complain about the fact that CHKDSK sometimes gets stuck in Windows. Rest assured that our guide shows you what to do in case that happens.

3. Tweak the Registry

Note icon NOTE
Before getting started with this method, create a System Restore Point or back up your Registry. So, if in case anything goes wrong you can restore it and your Windows system will be back to normal.
  1. Click Windows key + R to open the Run dialog box.
  2. Type regedit and hit Enter.
    regedit
  3. Once the Registry Editor opens, navigate to the following path:
    Computer\HKEY_LOCAL_MACHINE\SYSTEM\CurrentControlSet\Services\disk
  4. Right-click on TimeOutValue in the right pane and select Modify.
    Modify
  5. Set Base to Decimal.
  6. You will now see the default value in the Value data as 60, so set it to 61 instead.
  7. Once done, click on OK to save the changes and close the Registry Editor.
    Disk has been surprise removed
  8. Restart your device and check if the issue is fixed.

4. Clean boot your PC

  1. Click on Start, search for system configuration and open it from the search results.
  2. Navigate to the General tab, check the Selective Startup and Load System Services options under it.
    Disk has been surprise removed
  3. Now navigate to the Services tab and check the option Hide all Microsoft services.
  4. Now click on Disable all at the bottom right corner and click on OK to save the changes.
    Clean Boot

Windows will start with a minimum set of required drivers and programs by performing a clean boot. It will ensure if a third party or background program is causing an error.

The disk has been surprise removed Windows may also arise when a drive is damaged or when a user unplugs a disk while the system is running. To correct this, you will need to verify the health of the disk subsystem.

Well, that’s all from our side on how to fix the Disk has been surprise removed and we hope that our solutions helped you solve this issue.

If the troubleshooting methods didn’t solve this error, try reinstalling Windows. But this should be only a last resort.

If you still have any issues, feel free to drop a comment below. We’re eager to hear from you.

May’s Windows 11 Patch Tuesday Update could cause authentication issues

We recently reported on both Windows 11 and Windows 10 May Patch Tuesday updates and gave you a rundown of what changes and updates to expect. But as it now seems, some users that made the update are experiencing authentication issues such as Network Policy Server (NPS), Routing and Remote access Service (RRAS), and Radius among others as confirmed by Microsoft via the Windows Health Dashboard.

In the report, Microsoft identifies Windows Servers machines used as domain controllers to be the most affected by these bugs.  However, client Windows devices and non-domain controlled Windows Servers have not been affected by these challenges.

Microsoft has indicated that they are currently investigating the matter and will provide an update during the upcoming release where they will hopefully come up with a permanent fix for this issue. But in the meantime, as a workaround, Microsoft recommends manually mapping certificates to a machine account in Active Directory to bypass the authentication challenges. Users can visit Certificate Mapping documentation for a more detailed account of how to go about this process.


You can now try a native VPN feature in Microsoft Edge Canary

On May 12, Microsoft indicated it’s testing out Microsoft Edge Secure Network in the Canary channel of Microsoft Edge. Edge Secure Network’s purpose is to help users enhance their privacy and security on their devices while connected to public Wi-Fi, by hiding their IP address.

Furthermore, the tool helps protect your data and routs it “through a secure network (powered by Cloudflare) to a server that is geographically co-located” which essentially makes it even harder for attackers to gain access to your device passwords.

Users will be provided with “a small amount of free Secure Network bandwidth to use however they see fit”. Its usage varies depending on your activities on the web, therefore, Microsoft encourages the use of in-built controls for better management.

Microsoft has partnered up with Cloudflare to ensure that the VPNs are widely available, such that, the user will be able to get accurate results tailored to their specifications without compromising their security as their location will still remain undisclosed.

According to the blog post Edge Secure Network:

It also prevents your internet service provider from collecting your browsing data, like details about which websites you visit, and helps prevent online entities from using your IP address for profiling and sending you targeted ads.

However, it is mandatory for the user to sign into Edge using their Microsoft Account. With that said, this preview is will be availed to a small number of people as it is still in the testing phase. Microsoft hopes to use the feedback and recommendations that they get from the audience to improve its user experience, which might eventually help it to reach general availability.


New patent suggests Microsoft is developing an external disc drive for the Xbox Series S

A few days ago it was reported that a new Microsoft patent demonstrated a method for validating and converting Xbox game discs to digital downloads. A deeper look at the patent description suggests that the process may involve a “secondary device” which in all likelihood would come in the form of an external disc drive that could be connected to the Xbox Series S.

According the patent summary, the process of validating physical game discs would involve two devices, the first of which would be the game console. The second device, for example, “may comprise an optical disc comprising the electronic content…If the second device is able to validate the user’s ownership of the electronic content, the first device is provided access to the electronic content.”

The second device being described is clearly an optical disc drive, and judging from the patent description it would be able to connect to Xbox servers independently. At present the Xbox Series S has no external disc drive solution. Such a device would certainly be a boon for those eyeing the more affordable (albeit digital-only) next generation Xbox who are concerned over backward-compatibility with their previous generation games.

Of course, many patents never see the light of day on the consumer retail market, though many have been speculating since before the platform’s launch that Microsoft would eventually implement such a feature for its all-digital console.


Microsoft Teams adds support for Ukrainian, Somali, and Zulu languages

Microsoft strives to mitigate the needs of every student by trying to make classroom tools accessible to everyone. In an attempt to achieve this, through a recent update, Microsoft Teams has added support for Ukrainian, Somali, and Zulu languages, bringing the total number of supported languages to 105.

The addition of these languages is an elaborate measure employed by Microsoft to ensure that all the students from Ukraine get to have a smooth transition and do not miss out on their studies because of the language barrier.

With that said, the auto-detect speech detection for the Ukrainian language in Reading Progress has already reached general availability. Ukrainian students can now make use of the tool to translate whatever is being taught in class, which in return makes the learning and teaching process more effective and efficient.

Immersive Reader and Microsoft Translator are also part of the initiative that will help students progress with their studies as they provide support for the Ukrainian language and are also available in tools across Microsoft 365. Microsoft has also rolled out Read Aloud support for Somali and Zulu in Immersive Reader. Be sure to check out our expert guide on how to use Immersive Reader.


5 Ways to Fix ODBC Issues on Control Panel in Windows 10

ODBC is quite useful for application access routines, especially for professional users. And, seemingly, there are a plethora of ODBC issues on Windows 10, when launching it through Control Panel or executing tasks.

The issues are all different here. For some, ODBC, both 32-bit and 64-bit, failed to load altogether, while others faced issues working on it. It’s generally encountered by users who either upgraded from Windows 7 or updated the Windows 10 version to the latest release.

This puts users in a fix since there’s not much information available on the web. If you’re one of them, check the solutions listed below for ODBC issues on Control Panel in Windows 10.

How do I fix the Control Panel ODBC issues in Windows 10?

1. Remove SMBv1 and enable SMBv2

  1. Press Windows + R to launch the Run command, enter regedit in the text field, and either click on OK or hit Enter to launch the Registry Editor.
    regedit to fix windows control panel odbc
  2. Click Yes on the UAC (User Account Control) prompt that pops.
    Click Yes
  3. Now, paste the following path in the address bar at the top, and hit Enter:Computer\HKEY_LOCAL_MACHINE\SYSTEM\CurrentControlSet\Services\LanmanServer\Parameters
    Go to path
  4. Right-click on the empty space, hover the cursor over New, select Dword (32-bit) Value, and name it SMB1.
    DWORD
  5. Next, double-click on the newly created entry to modify the value data.
  6. Enter 0 in the Value data text field, and click on OK to save the changes.
    0 to fix windows control panel odbc
  7. Again, right-click on the empty space, hover the cursor over New, select DWORD (32-bit) Value, and name this one SMB2.
    SMB2
  8. Now, double-click on it to open the Properties.
  9. Enter 1 under Value data and click on OK.
    1
  10. Close the Registry Editor.

After making the changes, restart the computer for these to fully come into effect. This is one of the quickest ways to repair ODBC control panel issues in Windows 10.

2. Disable Windows Firewall

  1. Press Windows + S to launch the Search menu, type Control Panel in the text field, and click on the relevant search result.
    Control Panel
  2. Select System and Security from the options listed here.
    System and Security to fix windows control panel odbc
  3. Next, click on Windows Defender Firewall.
    Windows Defender Firewall
  4. Click on Turn Windows Defender Firewall on or off from the options listed on the left.
    Turn Windows Defender firewall on or off
  5. Now, tick the checkboxes for Turn off Windows Defender Firewall (not recommended) under both Private network settings and Public network settings, and click on OK to save the changes.
    disable

In some cases, users found that it was the configured firewall causing issues with ODBC in Control Panel on Windows 10, and disabling it did the trick.

Remember, the steps listed here are for the Windows Defender Firewall. In case you have a third-party firewall installed, make sure to disable it.

3. Update drivers

Oftentimes, you will need to manually install an ODBC driver if Windows does not include them. And there are several of these, for instance, the ODBC driver for Oracle or the ODBC Driver 17 for SQL Server.

The process here is not the same as updating the device drivers. It’s a lot more intricate and requires a proper understanding of the process before you proceed. But once you are done updating the ODBC driver in Windows 10, there shouldn’t be any issues with it in the Control Panel.

Also, remember that while updating the ODBC driver, you would be provided the option to overwrite the one already installed, but it’s recommended that you first remove it, and then install the latest version.

To speed up the process and ensure you install the correct ODBC driver version, you can use dedicated software. Outbyte Driver Updater for instance can automatically detect what driver you need and install it using its own up-to-date database.

4. Update Windows 10

  1. Press Windows + I to launch Settings, and select Update & Security from the options listed here.
    Check for updates
  2. Click on the Check for updates button on the right in the Windows Update tab.
    Check for updates to fix windows control panel odbc
  3. If an update is listed after the scan, click on the Download and install button to get it.
    Download & install

If you are running an outdated version of Windows 10, there is a chance of encountering issues with ODBC in the Control Panel.

Also, if the error started after installing an update, the best way here is to check if there’s a newer version available since it would most likely have a patch for the issue. If there are no updates available, head to the next method.

5. Uninstall the recent Windows update

  1. Press Windows + I to launch the Settings app, and select Update & Security here.
    Update & Security
  2. Now, click on View update history on the right in the Windows Update tab.
    View update history
  3. Click on the Uninstall updates option.
    Uninstall updates to fix windows control panel odbc
  4. Locate the problematic update, select it, and click on Uninstall.
    Uninstall to fix windows control panel odbc
  5. Click Yes in the confirmation prompt that pops up.
    Click Yes

If the problem started after installing an update for Windows, the easiest way out here is to uninstall it and wait for the next one before making the upgrade. Once done, the issues with ODBC Data Base Administrator in Windows 10 would be eliminated.

How do I open ODBC in Control Panel on Windows 10?

  1. Type Control Panel in the Search bar, and click on the relevant search result.
    Control panel
  2. Click on the View by dropdown menu, and select Large icons from the list of options.
    Large icon
  3. Now, locate and click on Administrative Tools here.
    Administrative tools
  4. You will now find the ODBC 64-bit and 32-bit options listed here depending on the architecture of the OS installed.
    Open ODBC

There are other methods as well to open the ODBC manager in Windows, but this is probably the simplest of all.

These are all the ways you can fix a plethora of issues with ODBC. Also, the methods listed here would help eliminate problems with ODBC in Control Panel on Windows 7 and Windows 11 as well. Though on the latest iteration, it is listed under Windows Tools.

Also, find out how to install and configure the MySQL ODBC driver.

Tell us which fix worked for you in the comments section below.

Outlook Message Body Disappears? Pick from These 4 Fixes Now

While users have reported that sometimes their Outlook message body disappears, numerous experts have attempted to offer some possible solutions.

For people with busy schedules and complex timetables, this application, like other Microsoft applications, is a must-have.

As a result, many people are irritated by this issue because it stops users from seeing the entire email text, forcing them to look for other ways of reading the email.

Quick Tip:

If you find yourself in a situation where the body of an Outlook message disappears, there is a third-party repair solution that can assist you in resolving these issues.

The trustworthy professional software  Stellar Repair features an Outlook scanpst.exe program that diagnoses and repairs issues in your Outlook data file (.pst).

Stellar Repair for Outlook not only restores damaged PST files but also recovers unintentionally deleted or lost mailbox items such as emails, contacts, notes, tasks, and journals. Following restoration, the program indicates damaged mail items in red, which you may then pick and save as a PST, HTML, EML, MSG, RTF, or PDF file.

Stellar Repair for Outlook

Repairs faulty PST files, retrieves all mailbox contents, and recovers lost emails.

What causes the Outlook message body to disappear?

Many users have noted that this issue only happens on their PC version of Outlook, not the mobile version, implying that Add-ins are used on the desktop version of this app.

The Avgoutlook is primarily to blame for the problem. AVG Addin or any other third-party extensions that cause conflict and incompatibility can cause the issue.

It’s worth mentioning that these factors can also result in the body of emails missing when forwarded or replied to.

Follow the instructions below to resolve this issue, as well as any others comparable to it, such as incoming emails that are blank when opened, the body of the email missing in Outlook 365, Outlook text missing, and Outlook text invisible.

Some of our readers also experience issues where the body of email messages are missing when you forward or reply to them.

What do I do if the Outlook message body disappears?

1. Disable AVG and other add-ins from Outlook

  1. Open Microsoft Outlook and select File.file section in outlook
  2. Select Options from the File menu.options section in outlook
  1. Navigate to the Add-ins tab in the Outlook Options window, then click the Go button next to the Manage COM add-ins option.addins section and then the go button
  2. Next, uncheck the add-in’s checkbox and then press the OK button if you only want to disable it temporarily.unchecking the addins checkbox
  1. Restart Outlook to see if the issue persists.

As previously stated, the Avgoutlook.Addin AVG Addin is largely to blame for the problem. So, try disabling or deleting it and see whether the problem persists.

If you have another antivirus program for Outlook installed, turn it off or uninstall it because it may be causing the issue with the outlook message body disappearing.

2. Restart Outlook in Safe Mode

  1. Simply open the Run dialog box by pressing Windows + R hotkey.
  2. Type outlook.exe/safe in it and then press the OK button. typing outlook in the run app

The body of an email or text missing issue may be resolved by restarting Outlook in Safe Mode just by following the steps above. 

After that, you should now be able to see the body and text of your Outlook emails.

3. Disable hardware acceleration

  1. To disable it, open the Outlook application and go to File.file section in outlook
  1. Select Options.options section in outlook
  1. After that, go to the Advanced tab and scroll down to the Display section. Make sure the Disable hardware acceleration option is chosen. If not, uncheck the box and press the OK button.disable hardware acceleration

4. Update Outlook

  1. Go to File and then Office Account, and click on the Update Options drop-down button.locating the update button in outlook
  2. The last thing to do is to click the Update Now button. update now from dropdown

Updating this application can fix flaws and difficulties, so follow these steps to update it and check if the problem with Outlook not displaying the body of the message persists.

What other alternatives can I use instead of Outlook?

If Outlook is not displaying email content correctly, try utilizing an alternative. There are many other e-mail clients out there with great potential.

Take a look at our selection of the best Windows 10 email clients & 3 best apps to use and make your informed selection.

Returning to our subject, because Outlook is the default personal information management app on most Windows devices, Microsoft should fix the bugs in the app.

However, the email display issues could be caused by a user’s incorrect settings in the app, which can be undone to resolve the issue.

Ultimately, users can install other software that provides the same functions but without the annoying errors and problems.

Let us know if you were able to resolve the Outlook message body disappears or any other similar issue in the comments section below.
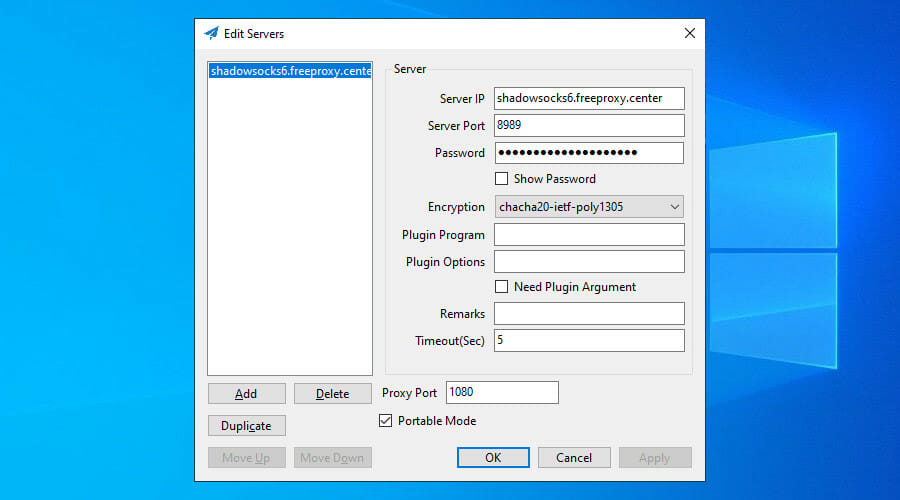
7+ Hacks to Fix Windows has Detected an IP Address Conflict

Your router is the gateway between your home network and the public Internet. When it receives information from the outside web, it relays the message to a specific device on your LAN.

To do this, it takes into account the device’s local IP address. Otherwise, it wouldn’t be able to tell your printer apart from your smartphone or air purifier, for example.

What we draw from this is that every device with Internet access must have a unique private IP address, including Windows computers.

If you’re getting the Windows has detected an IP address conflict error on a computer, it means that another device in your local area network is already using that local IP address.

Here’s what it looks like:

Network error: Windows has detected an IP address conflict

What does it mean when Windows has detected an IP address conflict error occur?

This error message indicated that more than just one device on your network uses the same IP address.

Obviously, this should not happen. Your router is meant to automatically assign unique IPs to all devices connected.

Luckily, for the most part, the issue is caused by minor irregularities within your network configuration. It is possible that due to some errors your router used the same IP address for two or more devices.

This happens when you have not reset your router in a long time. Some users report also having it happen when they connect older devices that have not been used in a while.

Some attribute the Windows has detected an IP address conflict to a hacker attack. That can happen, but very rarely. It is difficult to access a network or connected device without an account and a password.

You can check all connected devices with the help of a network monitor. If there is an unrecognized device, change your credentials immediately.

How do I fix the Windows has detected an IP address conflict network error?

1. Restart your router

  1. Pick up your router and locate the power button on the back
  2. Press the power button to disable all Internet access in your household
  3. Wait a couple of minutes
  4. Turn the router back on

In most cases, the Windows has detected an IP address conflict message appears due to certain glitches with your router.

Join our Router Troubleshooting Hub to fix any router-related issues.

2. Reset your IP address using CMD

use ipconfig/release and ipconfig/renew in CMD
  1. Run Command Prompt: press Win + R , type cmd, press Enter
  2. Type ipconfig/release and press Enter to release your current IP
  3. Enter ipconfig/renew to reset your IP

A good way to fix Windows network errors is by releasing and renewing your IP address.

Don’t worry if you won’t have Internet access after using the ipconfig/release. You’ll get back online after inputting ipconfig/renew, which sends a request for a new IP address from your DHCP server.

3. Refresh your network settings

flush DNS servers in Windows 10
  1. Run Command Prompt as admin
  2. Copy and paste the next lines (press Enter between each line)
ipconfig /flushdns
ipconfig /registerdns
NETSH winsock reset catalog
NETSH int ipv4 reset reset.log
NETSH int ipv6 reset reset.log
exit

After quitting CMD, make sure to restart your PC.

Network conflicts can be often resolved by flushing your DNS servers and resetting Winsock, which is in charge of your TCP/IP configuration. It’s the IP equivalent of turning your Internet off and on again.

4. Disable or reconnect to the VPN

connect to VPN on Windows 10

If you’re using the Windows 10 built-in VPN service to create a secure tunnel to the public Internet, it could cause network errors.

For instance, your VPN might have trouble attempting to reconnect to the web when your PC wakes up from hibernation mode.

To fix this problem, disable or manually reconnect to the VPN service. However, if you’re looking for a long-term solution, consider using a premium VPN instead of a manual VPN connection.

Dedicated VPN providers have a larger set of features than the inbuilt VPN such as split tunneling, kill switch, and built-in ad blockers.

The best VPNs for Windows 10 have top-level encryption, a large number of servers across the globe, as well as support for multiple devices and operating systems.

5. Use a dynamic IP address

Obtain an IP address automatically in Windows
  1. On Windows 10, right-click the Start button and go to Network Connections
  2. Click Change adapter settings
  3. Right-click your Internet connection and select Properties
  4. Double-click Internet Protocol Version 4 (TCP/IPv4)
  5. In the General tab, select Obtain an IP address automatically
  6. Click OK

If you have IPv6 connectivity, then double-click Internet Protocol Version 6 (TCP/IPv6) and select Obtain an IP address automatically there, too.

A static IP address could be the reason why you keep seeing the Windows has detected an IP address conflict message.

But you can fix the problem by forcing your PC to obtain a dynamic IP address automatically from your ISP.

Private Internet Access supports both static and dynamic IP addresses.

If you have trouble with modifying the static IP address on your PC, try forcing this option using PowerShell or Command Prompt (our guide shows how).

6. Disable IPv6 connectivity

disable IPv6 in Windows
  1. Go to Network Connections and click Change adapter options
  2. Right-click your Internet connection and go to Properties
  3. Deselect Internet Protocol Version 6 (TCP/IPv6)
  4. Click OK

If your ISP didn’t assign an IPv6 address on your home network, there’s no point in keeping it enabled. In fact, it might clash with IPv4 and cause network errors due to incorrect IP assignments.

The steps above apply only to your Windows computer. If you want to be thorough about it, then you should disable IPv6 connectivity in your router admin panel.

disable IPv6 in the router admin panel

7. Reinstall network adapters and update drivers

unintall a device using Device Manager
  1. On Windows 10, right-click the Start button and go to Device Manager
  2. Expand the Network adapters menu
  3. Right-click your network adapter and click Uninstall Device
  4. If you’re using a VPN, do the same for all TAP and Miniport entries
  5. Open the Action menu and select Scan for hardware changes

To get rid of the Windows has detected an IP address conflict message, it’s a good idea to reinstall your network adapters.

And, if this doesn’t fix the problem either, then make sure to update your network drivers to the latest version. You can do this manually or by using a driver updating tool.

8. Change your DNS servers

Use the following DNS server addresses in Windows
  1. Head over to Network Connections > Change adapter options
  2. Right-click your Internet connection and select Properties
  3. Double-click Internet Protocol Version 4 (TCP/IPv4)
  4. Select Use the following DNS server addresses
  5. Set Preferred DNS server to 8.8.8.8
  6. Set Alternate DNS server to 8.8.4.4
  7. Click OK

If your DNS resolver is faulty, it could cause various network errors, including IP conflicts on your local network. But you can fix this issue by modifying your DNS server addresses.

In our example above, we listed the free and public DNS server addresses provided by Google Public DNS.

However, if you use a premium VPN service like Private Internet Access, you don’t have to worry about DNS issues.

While staying connected to the VPN, PIA redirects your network traffic through its private DNS servers to make your Internet connection faster and protect you from DNS hijacking.

Conclusion

To sum up, you can fix PC network errors like the Windows has detected an IP address conflict message by restarting your router, resetting your IP address through Command Prompt, and refreshing your network settings.

But you can also disable or reconnect to your VPN, use a dynamic IP address instead of static, disable IPv6 connectivity if you don’t use it, change your DNS servers, as well as reinstall your network adapters and update your network drivers.

We also have a guide on what to do if Ethernet doesn’t have a valid IP configuration, so don’t miss it.

How did you manage to fix the network error? Did you use a solution not listed in this article? Let us know in the comment section below.

Overwatch Lost Connection to Game Server [LC-202 Error Fixed]

Overwatch is a popular vibrant, team-based shooter game that offers some futuristic gameplay. That said, several overwatch players have reported the lost connection to game server error when playing the game.

This issue can occur due to many reasons, including malware infection. The Overwatch error lc-202 can be resolved by performing basic troubleshooting steps like troubleshooting your home network and updating drivers, resetting Winsock data, and changing the DNS server.

If you are also troubled by this, here are a couple of troubleshooting tips to help you fix the Overwatch lost connection to a game server error on your Windows computer.

How do I fix Overwatch lost connection to the game server?

1. Scan your PC for virus

This error can occur if malware or virus creates an issue with the game functionalities or your network. To fix the issue, try performing a full scan of your PC.

The easiest way of completely protecting your PC from all types of cyber threats is to install one of the best antiviruses available, which is TotalAV, which is truly effective in removing malware and adware hidden deep inside your directories.

If you prefer to use Window Defender instead, here is how to perform a full scan.

overwatch lost connection to game server
  1. Click on Start and select Settings.
  2. Go to Update & Security.
  3. Click on Windows Security.
  4. Click on Virus and Threat protection.
  5. In the new windows, click on Scan options.
  6. Select the Full Scan.
  7. Click Scan now to initialize the scanning process.
  8. The scanning may take some time to complete.
  9. Windows Defender will alert and remove malware and adware that you can delete from the Quarantine page.

2. Restart your home network

  1. Disconnect your PC from the network.
  2. Power of the router and the modem.
  3. Disconnect the ethernet cable from the modem.
  4. Leave the network device idle for a few minutes.
  5. Power on the router/modem and wait till all the lights stop blinking.
  6. Connect your PC to the network and check for any improvements.

If restarting the network didn’t fix the issue, try updating the network driver from the device manager.

Update Network driver

overwatch lost connection to game server
  1. Press Windows Key + R to open Run.
  2. Type devmgmt.msc and click OK.
  3. In Device Manager, expand the Network Adapters category.
  4. Right-click on your network adapter.
  5. Select Update Driver.
  6. Select Search automatically for Updated drivers software.

Windows will scan and download any pending updates for the driver, which can help you fix the Overwatch 2 keeps crashing issue.

3. Reset the Winsock catalog

overwatch lost connection to game server
  1. Press the Windows key.
  2. Type cmd.
  3. Click on Run as Administrator for Command Prompt.
  4. In Command Prompt, enter the following command and hit enter:
    netsh Winsock reset
  5. Close the Command Prompt window and reboot the computer.

After the restart, reconnect to your network to see if the Overwatch lost connection to the game server error is resolved.

Stop background apps using network resources

Overwatch connection error

If you have background apps that are hogging all the network resources, the game may display an error due to an unstable network connection.

  1. Right-click on your taskbar.
  2. Select Task Manager.
  3. Check if any app is using a considerable amount of network resources.
  4. Usually, the Windows update services download update packages automatically.
  5. Try ending or disabling the process completely to see if that resolves the issue.

4. Change DNS server

Overwatch connection error
  1. Press the Windows key.
  2. Type control and click on Control Panel.
  3. Go to Network and Internet.
  4. Click on Network and Sharing Center.
  5. From the left pane, click on Change adapter settings.
  6. Right-click on the network adapter.
  7. Select Properties.
  8. Double-click on Internet Protocol Version 4 (TCP/IPv4).
  9. Select Use the following DNS server addresses
  10. Enter the following DNS server address in the Preferred and Alternate DNS server field.
    8.8.8
    8.8.4.4
  11. Click OK to save the changes.
  12. Relaunch the game and check if the error is resolved.

 5. Overwatch game server connection failed

game server connection failed
  1. Quit the Battle.net desktop app.
  2. Restart the computer.
  3. After the restart, launch Battle.net again.
  4. Install pending updates. The desktop app will prompt you to install the updates.
  5. If no updates are suggested, try to update your game manually.
  6. At times, it may take more than an attempt at updating the game for the update to download and install.

The Overwatch lost connection to game server error usually occurs due to issues with your home network. In rare cases, it can also occur due to malware infection.

You have the chance to explore more useful fixes and guides by visiting our detailed Blizzard Hub. 

For more guides to fix game issues on Windows, there is our thorough Gaming Troubleshooting webpage.

Make sure to follow the steps to troubleshoot your home network and scan your PC for malware and adware to fix the error.

Destiny 2 Isn’t Updating On Steam: 7 Quick Ways To Fix It In 2026

Destiny 2 is one of the greats in the current meta of online shooters. However, because various in-game bugs too often plague this Activision-produced game, it requires maintenance and adding in-game features.

Note icon NOTE
Since 2019, all eight Destiny 2 videogames have been exclusively accessible for Windows PC via the Steam gaming platform, migrated from Battle.net. The game is available for purchase through the Steam Store, including in special bundles offered by Steam.

Both are provided via frequent updates. And that’s the problem we’re trying to tackle today. Namely, many users cannot update the game through the Steam client since the update is stuck on initialization.

What can I do if Destiny 2 won’t update on Steam?

1. Check the connection

Obviously, this is a matter we can’t avoid when it comes to updating and running games in the Steam client.

Even though we’re quite certain you’re well aware of network performance, we still encourage you to check everything out before we move to additional steps. So, check whether your PC can connect to the internet.

If the issue is widespread and we can’t ascribe it solely to Ubisoft, follow these steps to troubleshoot network issues:

➡️ Restart your PC
➡️ Use the wired connection
➡️ Restart router and modem
➡️ Flush DNS
➡️ Make sure the ports
➡️ Make sure the client can communicate freely through Firewall. Open the Firewall and check the list of allowed apps. Confirm that Steam is allowed to connect to both public and private networks.

In case you are facing other issues we have a guide that can help you fix Destiny 2 stuck on initializing and other problems, so don’t miss it.

2. Restart the Steam client

Firstly, restart your PC and try rerunning the Steam desktop client. If the issue persists, you might need to kill the client process and allow it to restart the update sequence from the get-go.

You can do so in Task Manager, with a particular focus on the Steam agent’s process.

Here’s what you’ll need to do:

  1. Close the Steam desktop client.
  2. Right-click Start and open Task Manager.
  3. Terminate all Steam-related tasks, including Steam Update Agent.
  4. Restart the client and try updating Destiny 2 again.

In addition, you can right-click on the Steam desktop app and run it as admin. It might help overcome certain system-imposed limitations for third-party apps.

3. Reinstall the client cleanly

Reinstalling the client might help, as well. There are multiple reports garnering around the lackluster desktop client provided by Ubisoft.

And the developer is, seemingly, working on addressing all of those. However, we recommend reinstalling the client when a certain game fails to update.

Here’s how to uninstall and install again the Steam client on Windows 10:

  1. Navigate to Settings > Apps > Apps & features.
  2. Uninstall the Steam desktop app.
  3. In the Windows Search bar, copy-paste %ProgramData% and press Enter.
  4. Delete both Steam and Destiny 2 folders. You might need administrative permissions to do so.
  5. Navigate to the Steam Store official site and download the client again.
  6. Install it and sign in.
  7. Wait until it synchronizes with the installed games. Try updating Destiny 2 again.

After removing game patches, files, and directories, you will have numerous leftovers and cache you will not need.

We recommend using third-party professional software like CCleaner to remove the Steam desktop client from your computer thoroughly.

Persistent data may not be removed manually; therefore, CCleaner is an excellent tool for thoroughly removing any stored local files. If the software has been uninstalled but the program name remains, use CCleaner’s Delete Entry to delete the Steam desktop client uninstall entry.

4. Clear Steam download cache

  1. Open the Settings panel from the top left client menu in the Steam Client.
  2. Select the Downloads tab in the Settings panel.
  3. Click the Clear Download Cache option at the bottom.
  4. Then click OK to confirm and agree that you will need to log back into Steam.

5. Verify files integrity

Of course, this is rare but it can cause the updates to be stuck on initialization. If some game files are corrupted or incomplete, the client won’t be able to update them accordingly.

Because of that, we encourage you to check for the integrity of the game files and then move to the updating process.

Here’s what you’ll need to do:

  1. Start the Steam client.
  2. Go to the Library tab, right-click on Destiny 2, and then select Properties.
  3. Navigate to Local Files and then click Verify game file integrity.
  4. Wait till the verification process is complete.

6. Remove the game folder and restore it before updating

Some users managed to resolve the issue at hand with one simple witty trick.

It seems that the updating process is having issues determining where the game installation is stored.

For that reason, the update process gets stuck. And, seemingly, no matter how many times you restart it — the result is the same. With this approach, you should be able to update Destiny 2 without any issues.

Follow these instructions closely and be patient:

  1. Follow the instruction from the above-mentioned step to completely shut down the Steam client.
  2. Navigate to C:Program Files (86x) and drag the Destiny 2 folder to the desktop.
  3. Open Steam and click Install.
  4. Before the Install starts, stop at the pop-up window.
  5. Move the Destiny 2 folder back to C:Program Files (86x).
  6. Start the update and wait until all files are checked and updated and, hopefully, successfully downloaded.

7. Wait for the servers to respond

Eventually, if the issue persists and you cannot update Destiny 2, we advise you to wait. Sometimes, servers will be clogged, and you must wait until the update is successfully downloaded and installed.

In addition, don’t be discouraged if the UI shows download speed 0 kb/s. That’s hardly the case, and we’re looking at the bug. Just restart your PC and wait until they fix what’s broken.

We covered a similar problem in our Destiny 2 CAT error when no update is available guide, so don’t miss it.

Also, don’t forget to share your experience with the update error on Destiny 2 and related questions or suggestions. You can do so in the comments section below.
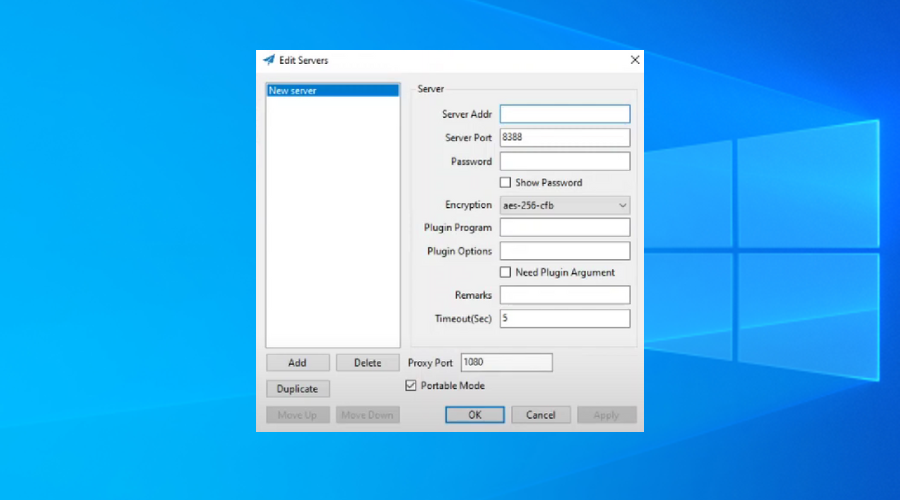
Fix: Xbox Cloud Gaming Controller Not Working [5 Easy Ways]

Are you looking for a solution to your Xbox cloud gaming controller not working? Although Microsoft has created a state-of-the-art controller to go with their console, it has flaws. Therefore, we’ve come up with fixes that will hopefully resolve any issues you might have.

Cloud gaming is the most recent and advanced technology, gaining popularity in the gaming industry. It allows users to access and play games without traditional hardware remotely.

The technology is quite similar to cloud computing in that it only requires the end user to have enough bandwidth and processing power to decode and render the video stream. The technology works well with a controller.

The best Xbox controllers come with a variety of buttons, triggers, and joysticks that help you to control the game. Each device has a unique design and grouping of buttons.

However, at times, the wireless Xbox controller doesn’t work too well with cloud gaming. If you are facing the same issue, read this article for the resolution.

Why is my Xbox controller connected but not working?

There are many possible causes of the Xbox cloud gaming controller not working in a game, and some of the most common ones are:

  • The Xbox cloud gaming controller software is outdated: You can fix this problem by updating it.
  • Incompatible USB: The USB cable, which is usually shipped with the controller, may not be compatible with your PC.
  • PC is not detecting the controller: Sometimes, the PC isn’t detecting the controller properly. Try reconnecting it using a different USB port and see if that works.
  • The controller’s battery is low: Charge your controller’s battery for a better gaming experience.

Now, let’s look at the steps that will do the trick to fix the Xbox cloud gaming controller not working on the PC issue.

What should I do if my Xbox cloud gaming controller is not working?

1. Check the battery of your controller

The most common reason your controller won’t work is that the battery is drained. Thus, charge the batteries of your controller sufficiently and insert them correctly before powering on your controller.

If it still doesn’t power on, get the batteries replaced.

You can also disconnect the controller from your console and try pairing it again on a different USB port. This will be especially helpful if your PC is not detecting the controller properly.

However, if the battery and USB are working fine, you can skip this step and move on to the next resolution to fix the issue.

2. Update your controller on the PC

  1. Visit the Microsoft Store and search for Xbox Accessories.
  2. Next, open the Xbox accessories app and connect your controller with a USB cable or via the Xbox wireless adapter for Windows.
  3. If an update is required, the app will offer instructions on how to install it.

Updating your controller with the latest software allows you to use its full capabilities and makes it compatible with other devices.

Therefore, it may help fix the Xbox cloud gaming controller not working. If the problem persists after updating your controller, move on to the following resolution.

3. Unpair and then re-pair your controller

Unpair your controller

  1. Press Windows + I key on your keyboard simultaneously to open up the Settings app.
  2. Scroll down and select Bluetooth and devices.
  3. Next, click the three dots beside your controller.
  4. Hit Remove Device.
  5. After waiting for a few seconds, enter the pairing process again.

Re-pair your controller

  1. Press the Windows + I key combination again.
  2. Next, select Bluetooth and devices from the list.
  3. Once you do that, click the + icon for Add device.
  4. In the Add a device window, choose Everything else.
  5. Select your controller from the list of devices that pop up right after.
  6. Finally, choose Connect.

Once done, check whether your Xbox cloud gaming controller is working. If it doesn’t work as expected, don’t hesitate to apply the following workaround.

4. Power cycle your Controller

  1. To turn off your Xbox controller, press and hold the Power button for five to ten seconds.
  2. Wait for fifteen seconds.
  3. To turn it back on, press and hold the Power button for five to ten seconds before releasing it.

Many Xbox cloud gaming controller issues can be easily fixed by performing a power cycle. Therefore, you must apply these steps to get your controller working again.

5. Switch to Xbox type controller

  1. Press the Menu and View buttons at the same time for three seconds, then release.
  2. Your Xbox cloud gaming controller should be listed as a connected device.
  3. Connect it and check if your controller works fine now.

Xbox controller manufacturers like MOGA make designated controllers for mobile and cloud gaming, but the controller might stop showing up when connecting it to a PC.

This is because it will only work as an Xbox-type controller (XInput support) via a USB cable.

Some PC titles may not be compatible with the controller when Bluetooth connect and will require you to switch the controller to XInput support.

What controllers can I use with cloud gaming?

If you want to play Xbox games in the cloud, any controller compatible with the console can be used. However, if you’re using a web browser to play cloud games, the Xbox Wireless Controller is currently the only officially supported controller.

If you have any issues with the Xbox cloud gaming controller not working on iOS, Mac, or Android, you can contact Xbox controller support for further assistance.

That’s it, our guide on the Xbox cloud gaming controller not working has been concluded. We hope the workarounds listed above have helped you solve the issue.

If you can’t edit your avatar on Xbox One, be sure to click the link and go through our detailed guide for the resolutions. With Xbox-specific devices, users found out that the controller only works in Steam, but that’s easy to fix!

We also have a great guide on how to get Xbox Cloud Gaming unblocked, so you might want to check it out.

If your controller works fine but you’re still dealing with Xbox Cloud Gaming not working in browsers, the issue might be unrelated to your gamepad. In that case, you can troubleshoot browser-specific problems to make sure the service runs smoothly.

Have any questions or feedback that you may want to share with us? leave us a comment in the section below. We would love to hear from you.

5 Best Cross Browser Testing Tools

Cross browser testing tools are game-changers in the website and app development industry. In the past, developers and QA experts tested their websites manually. This was not only time-consuming but expensive.

With time, developers came up with automated testing tools that simplified the website testing process. This, with other improvements like the release of the best coding browser extensions, has made working with browsers enticing for developers.

However, choosing the right testing tool might be difficult due to the number of products out there. To ease your search, we have picked five of the best cross browser testing tools for you.

What is cross browser testing?

Cross browser testing is a nonfunctional test that ensures websites and web apps work as planned on different browsers across various devices.

The goal is to ensure end-users get the intended performance level irrespective of browser or device. Some of the tested parameters are speed, style, and other UI elements.

How is cross browser testing handled?

Cross browser testing could either be done manually or automatically. The choice depends on the complexity of the task and preferences.

Below is a quick rundown on the two methods:

1. Manual cross browser testing

cross browser manual testiing

In manual testing, you need to install the browsers you want to use for the test and their various versions. This will be done for different operating systems on desktop and mobile.

Also, you will write out the test cases for testing. This will be run on each browser on various devices, with debugging done manually.

Manual testing is effective for small projects. However, it can be time-consuming, and stressful when dealing with medium to complex websites.

2. Automated cross browser testing

automated test

Automated testing is done with online testing tools. These tools have been built to carry out all the difficult tasks. You only need to enter your website name or URL, the test cases, the browsers, and the operating systems to test.

More importantly, some of these automated tools provide the option of manual testing. This allows you to write custom codes to test your websites and pages to your satisfaction.

What are the best tools for cross browser testing?

LambdaTest – Best for online testing

lambdatest

LambdaTest is a tool that allows you to carry out cross-browser testing online on over 2000+ real browsers.

You can test with various operating systems, using different screen resolutions. Whether it is a mobile or desktop app, LambdaTest ensures its compatibility with all browsers across devices.

What’s more, it supports the oldest versions of popular browsers like Opera, Chrome, and Safari. With this, you are sure your web page will work with all versions of the browsers.

Other features:

  • Local testing on hosted pages.
  • Provides Smart Visual Regression testing option.
  • Allows automation tests on a Selenium grid.
  • Live chat support.

LambdaTest

Test all the browsers out there and decide what is the best choice for your needs and online activities.
Check price Visit website

Selenium – High-level automated testing

selenium browser testing

Selenium is a popular open-source cross browser testing tool. It has an interface that allows you to write test scripts in languages like PHP, Python, and Java.

This allows you to automate your web page and app testing process. Selenium testing tool is simple to use, thanks to its components that cover all you need.

With its IDE, WebDriver, and Grid components, you can carry out the same test cases on various browsers. It just about puts the control of your website testing in your hands.

Other features:

  • Automation-aided exploratory testing.
  • Regression automation testing.
  • Record and playback feedback on tests with browsers.

⇒ Get Selenium

CrossBrowserTesting – Free lifetime testing

crossbroswertesting tool

This is a cross browser testing tool created by SmartBear for easy website and app testing. It ensures you get the perfect web experience on all devices with its cloud-based lab.

CrossBrowserTesting is a paid tool with a free lifetime trial. It allows you to live test and debug your website on over 2050 real mobile and PC browsers. This makes it the best free cross browser testing tool you will find.

With this tool, you can view the performance of your website on multiple browsers at once for live debugging.

Lastly, it is one of the few tools that run automated cross browser testing in Selenium and Appium.

Other features:

  • Allows running of regression tests.
  • Offers tools and extensions like Chrome Dev.
  • Visual testing is available.
  • Record and replay for recording live tests.

⇒ Get CrossBrowserTesting

BrowserStack – Effective manual testing

browserstack

BrowserStack is a household name in the industry. It allows its over 50,000 users to perform cross browser testing manually. Note that it is also one of the best tools for automated testing.

It claims to drive over 2 million tests daily with little to no delay. This shows the power of its 15 data centers across the world.

Finally, it gives you access to over 3000 devices and browsers to test your website and app. Based on a reliable cloud structure, it easily scales its resources to the requirements of its users.

Other features:

  • Offers integration with all major CI/CD tools.
  • Automated Visual tests.
  • Offers support firewall and Active Directory.
  • Works with the major test automation frameworks.

⇒ Get BrowserStack

HeadSpin – The highest number of real devices for testing

headspin cross browser testing

This top-level cross browser testing tool allows you to test apps and websites on thousands of real devices. One of its biggest advantages is the level of accuracy.

It helps test core parameters such as load testing in mobile apps or web pages. This test is carried out in real environments for 100% accuracy.

What’s more, HeadSpin provides a scalable and distributed system to improve automated testing. There are also the Appium, Selenium, and Appium Inspector integrations to easily test website and mobile apps.

Other features:

  • Compatible with a host of apps like Slack, Flutter, Jenkins, etc.
  • Can monitor non-noise interference data.
  • Resources are scalable.

⇒ Get HeadSpin

When can I perform cross browser testing?

The time to perform cross browser testing depends on your preference. Generally, there are three stages for testing:

  • At the start of website development: This involves testing a website or web app immediately after a page is developed. This test will be repeated for every page till the project is complete. While this can be time-consuming and tiring, it helps to detect errors at early stages.
  • After development: This is the process of testing the functionality of the app or web page after the development is complete. This allows you to fix the errors at once before releasing it to the end-users. This method does not usually take much time, but it might be problematic if you run into complex problems.
  • After the release of the website: In this case, you release the website to end-users before testing. This can be costly, as it might require multiple deployments based on the bugs fixed.

With the rate at which websites are developed, cross browser tools are now more important than ever. The best of them gives you so many options and delivers accurate results.

Do you need the tools that will ease your website design task? Check out our list of best website design software without coding to make an informed decision.

Be free to discuss the tool you used from our list in the comments section below.
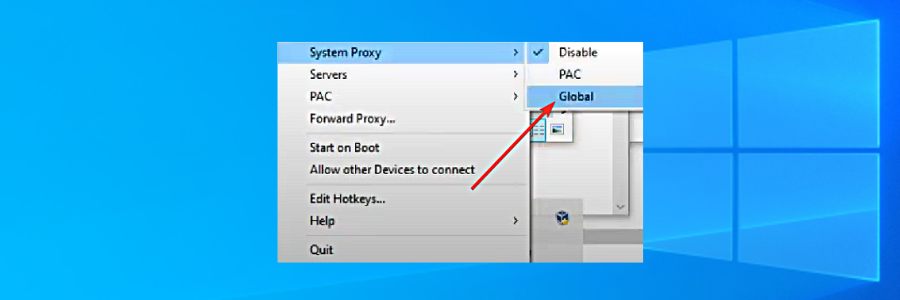
Is Y8 Browser Safe to Download? All You Need To Know

Y8 Browser is generally safe. It uses HTTPS security protocols and gets regular updates and security patches.

However, it doesn’t have as many advanced data protection features as other mainstream browsers do. Its support of the outdated Flash Player could also pose some risks.

Let’s take a closer look.

What is the Y8 browser?

y8 browser

Y8.com is a prominent website with free online games. The Y8 Browser is built specifically to offer support for these games. The platform’s gaming library comprises WebGL, Adobe Flash, and HTML5 games.

It hosts more than 60,000 online browser games at Y8 Games, including dress-up and Unity3D automobile games.

Is the Y8 browser trustworthy?

Yes, the Y8 browser is trustworthy. Just make sure to download it from the official website. The tool is legit and has been around for over 10 years, with millions of downloads.

⇒ Get Y8 browser

Do Y8 games have viruses?

The Y8 website doesn’t have any known virus reports or problems. However, it hosts a lot of ads which could lead to suspicious pages and services, so be cautious about what you click on.

In general, just playing games on the site should be safe. However, for maximum protection, consider using an antivirus with real-time protection so it can quickly detect and stop any potential threat.

Is Y8 games still working?

Yes, Y8 games is still working. In 2020 there were rumors that Y8 would be closing down, but these misrepresented the company’s Twitter post that talked about fading out some types of games.

y8 browser safe

4 years since that scare, Y8 games are still working, and you will still be able to enjoy many of your favorites.

If some of the phased-out games are classics you would still love to play, then you should consider playing browser games on Opera GX. This is the first and most robust browser dedicated to gaming.

It has all the cool advantages of the Opera browser. This includes customization and a vast extension library, and the added benefit of gaming features like a RAM and CPU limiter.

⇒ Get Opera GX

How can I play Y8 browser hacked games?

  1. Launch the Y8 game browser.
  2. On the menu tab, click View, then from the list of options, select Toggle Developer Tools.
    y8 browser safe
  3. Click on the Console tab.
  4. Enter the following code and hit Enter.
    location.href="https://nameofthewebsite.com"
  5. Click on any of the new hacked games to start playing.

Now you will be able to play any of your favorite hacked games on the Y8 browser.

We hope this article has been helpful. Browser games are increasingly becoming popular, and as browser tech improves, you can expect more quality games on your favorite browsers.

If you would like an alternative for playing flash games, you could pick from any of the best browsers to play Flash games.

Eligible Hulu subscribers can get three months free of PC Game Pass

Hulu has announced that it is partnering with Microsoft to give gamers an interesting offer. Subscribers to The Walt Disney Company’s streaming service in the U.S. in “good standing” can now get three free months of PC Game Pass if they have never tried PC Game Pass before.

Available on this webpage, Hulu says that this offer is part of its ongoing commitment to providing its subscribers with added value. This offer will be available through July 23, 2022, and will give members access to over 100 high-quality games on Windows PCs like Minecraft, Microsoft Flight Simulator, and even titles from the EA Play on PC catalog. The offer is a perk from the Hulu Friends with Benefits program, which is a way to reward fans the way a friend would.

“At Hulu, every decision we make starts with the viewer. We do this through the stories we bring to life, and by giving Hulu subscribers the opportunity to engage with their favorite shows, films, and brands through select perks and activations, including the “Hulu Friends with Benefits” initiative, Hulu’s way of thanking you for simply being a fan – because that’s what friends are for,” explained Hulu in an emailed press release.

OBS Studio Virtual Camera Not Showing Up? 5 Simple Solutions

OBS Studio is one of the best screen recording and streaming software. With Window’s built-in recording tools not offering many options, users go with third-party apps like this. However, some reported that the virtual camera is not showing up in OBS Studio.

The virtual camera in OBS is a great utility since it allows us to modify the video output of the webcam, and enhance the video quality. This becomes all the more important in present times when video conferences have become a part of life.

So, let’s walk you through the OBS Studio virtual camera not showing up problem and the most effective fixes for it.

Why is the OBS Studio virtual camera not showing up?

The problem can be encountered on several apps, but generally, users talk about the following apps as being affected:

  • OBS Studio camera not showing up in Zoom – most commonly encountered due to incorrect camera selection
  • Also, the OBS Studio camera is not showing up in Teams – the issue is not as frequent as the other three
  • OBS Studio camera not showing up in Discord – it could be due to a lot of reasons, both on Windows and macOS, and requires proper troubleshooting
  • Another issue is that the OBS Studio camera is not showing up with Google Meet – incorrect webcam selection or a problem with OBS Studio itself is most likely the underlying cause

In most cases, users later realized that the Virtual Camera feature was not enabled in OBS Studio. Apart from that, if you are using an older version of the software, chances are that it doesn’t include the virtual camera feature. Updating the software is the best option in this case.

Also, if OBS Studio does not have the necessary permissions while running, you might come across the issue. This can be seen when the OBS Studio virtual cam is not showing up in Google Chrome. Besides, it could have to do with hardware acceleration as well.

Now that you have a basic understanding of the underlying causes, it’s time we head to the fixes.

What do I do if OBS Studio virtual camera is not showing up on Windows 11?

1. Restart the computer

  1. Press Alt + F4 to launch the Shut Down Windows box and select Restart from the dropdown menu.Restart to fix obs studio virtual camera not showing up
  2. Next, click on OK to restart the computer.OK

Several users reported that OBS Studio is not showing up in Teams due to a conflict. Here it’s generally a minor bug or some background process that’s conflicting with the functioning of the software. If restart the PC doesn’t fix the issue, head to the next method.

2. Run OBS Studio as administrator

  1. Locate the shortcut for OBS Studio, right-click on it, and select Properties from the context menu. Alternatively, you can select it and hit Alt + Enter.Properties
  2. Navigate to the Compatibility tab.Compatibility tab
  3. Now, tick the checkbox for Run this program as an administrator, and click on OK at the bottom to save the changes.Run this program as administrator to fix obs studio virtual camera not showing up

There are several permissions a program may require to run, and while some programs are good to go with just a few of these, others may require administrative privileges. So, set OBS Studio to run as an administrator and check if the virtual camera starts showing up in Windows 11.

3. Make sure the virtual camera is turned on

  1. If you see a screen like this on Zoom or other apps when using OBS Virtual Camera, it indicates that the feature is not turned on.Screen
  2. Open the OBS Studio app, and click on the Start Virtual Camera option near the bottom-right corner.Start Virtual Camera to fix obs studio virtual camera not showing up
  3. Once done, also verify that it’s been Activated. For that, just make sure the button next to Filters reads Deactivate.Activate to fix obs studio virtual camera not showing up

After you are done making the changes, the OBS Studio virtual camera not showing up in Zoom issue should be eliminated, and you should have the software effectively projecting video on other apps. If this method doesn’t work, head to the next one.

4. Update OBS Studio

  1. Launch the OBS Studio app, and click on the Tools menu from the top.Help menu
  2. Now, select Check For Updates from the listed options.Check fo updates to fix obs studio virtual camera not showing up

As discussed earlier, the feature was not present in the previous versions of the app, and therefore, if you haven’t updated OBS Studio in a while, make sure to do that. Once done, check if the OBS Studio virtual camera not showing up with the Google Meet problem is fixed.

5. Reinstall OBS Studio

  1. Press Windows + R to launch the Run command, enter appwiz.cpl in the text field, and either click on OK or hit Enter to launch the Programs and Features window.appwiz.cpl
  2. Now, locate the OBS Studio and OBS-virtualcam entries here, select each individually, and click on the Uninstall button.Uninstall to fix obs studio virtual camera not showing up
  3. Click Yes on the UAC (User Account Control) prompt that appears.Yes
  4. Follow the on-screen instructions to complete the process.
  5. After uninstalling both, restart the computer for the changes to come into effect, and then again download OBS Studio.

If none of the methods listed earlier worked to fix the OBS Studio virtual camera not showing up in Windows 10, you are left with no option but to reinstall the app. When you reinstall it, any issues that might have crept in during the installation process will be eliminated.

In case you are running the latest iteration, find out here how to install OBS Studio in Windows 11. Also, if the OBS Studio virtual camera is not showing up in the Tools menu, just download the OBS-VirtualCam plugin.

6. Use an alternative video recording software

If you have tried all these solutions and don’t seem to solve the issue, a quick fix would be to try an alternative software.

There are other reliable screen recording software that offer a similar feature set to OBS Studio. One of the best alternatives is Camtasia.

It comprises both a screen recorder and a video editor. You can use only this app to create videos from start to finish.

It includes everything you need to create professional-level content. It offers templates, presets, drag-and-drop video editing, built-in royalty-free music and images, web camera capture, and many more.

⇒ Get Camtasia

What do I do if OBS Studio virtual camera is not showing on Mac?

1. Run code in Terminal on Mac

  1. Click on the Launchpad icon at the bottom.launchpad
  2. Next, click on Other from the options listed here.Other
  3. Select, Terminal.Terminal to fix obs studio virtual camera not showing up
  4. Now, run the following code here:sudo codesign --remove-signature /Applications/Discord.app/Contents/Frameworks/Discord\ Helper\ (GPU).app /Applications/Discord.app/Contents/Frameworks/Discord\ Helper\ (Plugin).app /Applications/Discord.app/Contents/Frameworks/Discord\ Helper\ (Renderer).app /Applications/Discord.app/Contents/Frameworks/Discord\ Helper.app

Once done, restart your MacBook for the changes to fully come into effect. This method has worked for users facing the OBS Studio virtual camera not showing up in Discord issue on macOS. So if you too are unable to access the virtual camera on Discord, try this.

2. Reinstall an older version of OBS Studio

  1. Go to the Download page for OBS Studio, and click on the Previous Releases option.Previous releases
  2. Now, locate the previously installed version here, and click on the relevant link to download it.Dowload to fix obs studio virtual camera not showing up
  3. Once the download is complete, run the installer.

Though it’s not generally recommended, you can try installing an older version of OBS Studio if the problem started after an update. Many a time, it’s a bug in the current version that leads to the OBS studio camera not showing up on apps on Mac.

How do I enable the virtual camera in OBS Studio?

  1. Launch the OBS Studio app, and click on the Add icon under Sources at the bottom.Add to fix obs studio virtual camera not showing up
  2. Now, select Video Capture Device from the flyout menu.Video capture device
  3. Make sure that option for Create new is selected, enter a name in the text field or go with the default one, and click on OK at the bottom.Create new
  4. You can now modify the various properties here, but we recommend keeping it as is for now. Finally, click on OK.OK

That’s it! A virtual camera has now been added to OBS Studio and it will appear in other apps from now on.

These are all the ways that might help if OBS Studio virtual camera is not showing up on other applications on the Windows 7, 10, 11, and macOS ecosystems.

Also, find out what to do if OBS Studio keeps crashing in Windows.

Tell us which fix worked and your experience of OBS Studio, in the comments section below.
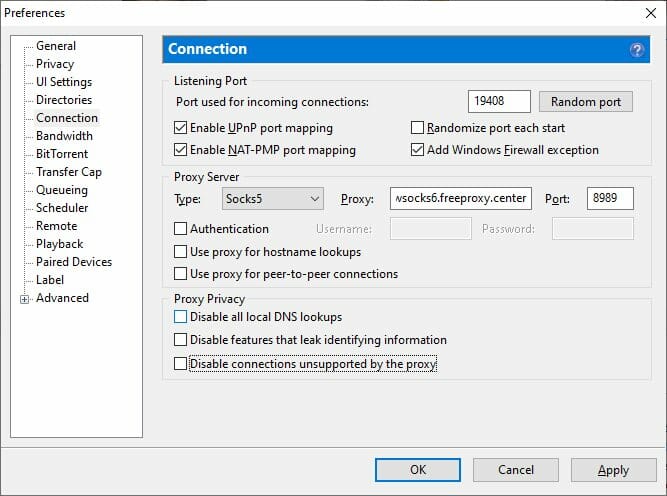
Asus Touchpad Not Working on Windows 11: How to Enable it

A touchpad is similar to a mouse and helps control the cursor. It’s the first choice for many laptop users, given that it’s inbuilt and to some extent, more convenient. However, several users reported that their Asus touchpad is not working in Windows 11.

For most users, the problem arises out of the blue without any indication whatsoever which leaves them perplexed. But, don’t worry! It’s most likely not a hardware issue and can easily be fixed. Other users with different laptops too face issues with the touchpad in Windows 11.

To find out all about why the Asus touchpad is not working in Windows 11 and the most relevant fixes for it, read the following sections.

Why is the Asus touchpad not working in Windows 11?

The most common reason here is that you might have mistakenly disabled the touchpad. There is an option for it in the Settings.

Also, if you started encountering the problem after updating the OS, it’s could be that a new driver was downloaded for the touchpad which is not functioning properly.

Besides, third-party applications are often found to conflict with the functioning of the touchpad. If you have installed a software to alter the touchpad’s performance, this could be the reason why the one on your Asus laptop is not working in Windows 11.

Another reason, though not as likely as the ones mentioned earlier, is the presence of conflicting hardware. Here, simply remove all the non-critical ones and reconnect them one at a time to identify the faulty device.

Let’s see the various models where the problem can be encountered:

  • Asus ZenBook touchpad not working
  • Touchpad not working in Asus VivoBook on Windows 11
  • Many also found the Asus ExpertBook touchpad to be not working
  • Another model with the touchpad not working is Asus Rog

The problem also arises in different situations for users. For some, the Asus touchpad stopped working when it was plugged in, while others reported that the Asus touchpad stopped working when the mouse is disconnected. In the case of the latter, a simple restart should do.

Let’s now walk you through the most effective fixes.

What do I do if the Asus touchpad is not working in Windows 11?

1. Make sure the touchpad on your Asus laptop is enabled

  1. Press Windows + I to launch the Settings app, and select Bluetooth & devices from the tabs listed in the navigation pane on the left.Bluetooth and devices to fix asus touchpad not working windows 11
  2. Next, click on the Touchpad entry here.Touchpad
  3. Now, make sure that the toggle for Touchpad is enabled, and if it is not, click on the toggle.Enable to fix asus touchpad not working windows 11
  4. Also, check that the configured touchpad settings match the expected behavior and make the necessary changes if required.check settings

Once you are done making the changes, restart the computer for these to fully come into effect, and check if the Asus touchpad now starts working in Windows 11.

2. Update the touchpad driver

  1. Press Windows + S to launch the Search menu, enter Device Manager in the text field at the top, and click on the relevant search result.Device Manager
  2. Double-click on the Mice and other pointing devices entry here.Mice and other pointing devices
  3. Now, right-click on the malfunctioning touchpad and select Update driver from the context menu.Update driver to fix asus touchpad not working windows 11
  4. Finally, select Search automatically for drivers from the two options in the Update Drivers window.Search automatically for drivers
  5. Wait for your computer to install the best available driver.

If the Asus touchpad stopped working after an update, installing the latest driver version could fix the issue. If that’s the case, a newer version with a patch for the bug would be released soon.

In case the Device Manager method didn’t work, you can also manually install the latest driver in Windows 11. Besides, if the Asus touchpad driver is not showing in Device Manager, there are a few quick ways to access it.

Alternatively, to save time and automate the task, you can use dedicated software. We recommend Outbyte Driver Updater because it’s up-to-date, error-free, and easy to use.

3. Remove conflicting third-party apps

  1. Press Windows + R to launch the Run command, enter appwiz.cpl in the text field, and either click OK or hit Enter to launch Programs and Features.appwiz.cpl
  2. Now, locate the problematic program, select it, and click on Uninstall.Remove app to fix asus touchpad not working windows 11
  3. Follow the on-screen instructions to complete the process.

If the Asus touchpad is not working after a few minutes, it could be a third-party application conflicting with the functioning of the system.

Just, recollect when you first encountered the problem, and individually remove the apps installed around the same time until you identify the problematic one.

These are the three ways you can fix the problem in Windows 11. Also, the methods listed here would work just fine if the Asus touchpad is not working in Windows 10 or Windows 7.

In case you are looking for ways to customize the OS, learn how to set touchpad gestures in Windows 11.

Tell us which fix worked for you in the comments section below.
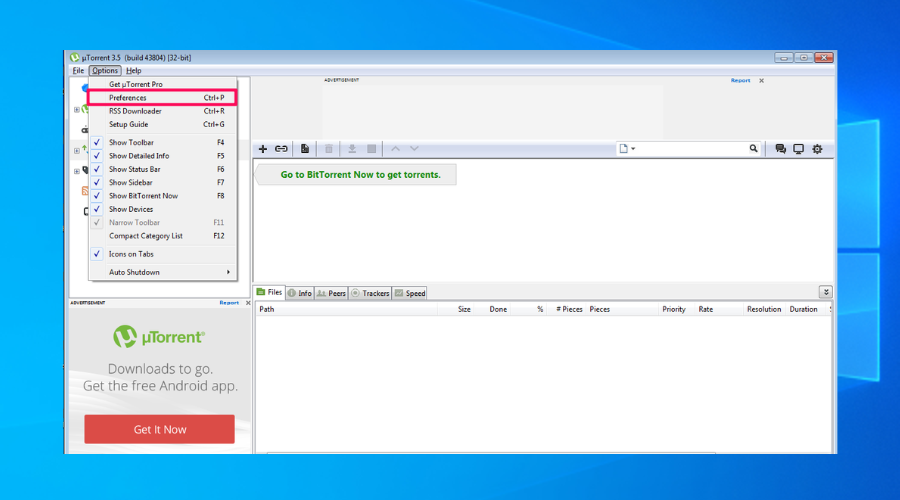
KB5013943 causes apps like Discord and Teams to crash inexplicably

More problems for Windows users that went ahead and installed the May 2022 security updates from Microsoft.

It seems that KB5013943, which is the mandatory security update, is crashing apps that use .NET framework with the error code: 0xc0000135.

As detailed by affected users, these crashes are common among apps that use .NET Framework and apps like Discord or Microsoft Teams are also affected.

.NET Framework apps affected by another Windows update

It was only days ago when we were talking about yet another Windows security update that was messing with the .NET Framework apps.

Now, we appear to have another compatibility issue between the .NET framework and Windows 11. Of course, users took to social media and forums to report these issues.

People reported issues with ShareX, KeePass, Microsoft Teams, Visual Studio installer, and Discord, which is concerning, to say the least.

Another user posted on the Feedback Hub that he is unable to start the Teams app due to the error message process exited with code 3221225781 (0xc0000135).

What can I do to fix this issue?

  1. Open the Start menu and search for Turn Windows features on or off.turn windows
  2. Disable and enable all .NET frameworks and press the OK button.framework
  3. Reboot your system.reboot pc

This is the recommended path to take until Microsoft deals with this problem from their end, only to avoid unpleasant experiences.

How do I uninstall KB5013943?

  1. Press Windows + I in order to open Settings.
  2. Select the Windows Updates tab, then click on Updates history.update
  3. Click on Uninstall updates.uninstall updates
  4. Click the Uninstall button for the update you want to remove.update uninstall

We will keep you posted on any development in this situation, so rest assured you will be among the first ones to know when anything changes.

Were you also affected by this annoying bug delivered by KB5013943? Share your experience with us in the comments section below.