If you’re a console gamer, you know the Xbox controller is an indispensable control pad for an optimal experience. It has two sections. On the back, you’ve got the pair button, the USB-C power port, the left and right bumpers, and the left and right trigger buttons.
The front of the controller houses the RS and LS buttons that pack many functions.
In this guide, we will explain everything about the RT and LT buttons, as we did with the functions of the R1 and L1 buttons on your Xbox controller.
What is RT on my Xbox controller?
RT is the Right Trigger on your Xbox controller. Along with the LT, its homolog button from the left side, they serve as triggers in game interactions with the Xbox console.
The RT and LT buttons sometimes vibrate to provide feedback in some games, but you can turn off this feature from the controller settings.
How can I fix my Xbox RT button if it’s not working?
Press the Power button on your Xbox One console for about ten seconds to turn off the console.
Wait five minutes, plug in the console again, and turn it on.
Re-sync your controller with the console again.
Like with any controller buttons, if the Right Trigger is not working, this is caused by a syncing problem or simply a connection bug with the console.
Just to be on the safe side, see if there is any new controller firmware and update it, then make sure to replace the batteries. This usually restores everything back to normal.
Also, for some of our readers, the RT button gets stuck or remains pressed and many ask how do you fix a sticky right trigger? In this case, try to clean it using some cotton buds, lightly damp with alcohol, and gently clean the controller.
Once your trigger is working again, you may also want to learn how to turn off Xbox controller to keep it from draining power when not in use.
The RT button on the Xbox controller is very important since, as its name suggests, it is often used as a trigger in shooter games or other important actions.
RB stands for Right Bumper, and it’s positioned right above the RT (Right Trigger) on the Xbox controller. All the bumpers, triggers, and sticks on the right half of the controller fall under this category.
The RB button is also known as the right shoulder button and it can be used for many actions in games.
Testing the hard drive speed is essential to detect the HDD’s health or determine if everything works fine.
What is the best speed for a hard drive? The best speed for an HDD is 7200 RPM. As you’ve noticed, the HDD speed is measured in RPM – Rotations per minute. A typical 7200 RPM speed translates into an average read/write speed of 80-160MB/s.
Don’t worry! If you don’t know how to test the hard disk speed, this article will clear everything out for you.
How do I test hard drive speed?
1. Test Hard Drive speed using EaseUS Partition Master
After installing it, launch EaseUS Partition Master and click the download button to activate the DiskMark feature under the Discovery section.
In the DiskMark window, select the drive, test data, and block size.
If everything looks right, hit the Start button to begin the disk speed test. When the test is over, you will see the Sequential or Random read/write speed, I/O, and Delay data.
As you can see, using EaseUS Partition Master is the easiest way to test the dive speed, and it works on HDD and SSD without exception.
You should know that testing the health and speed of HDD is only one of the features of EaseUS Partition Master. Here are some of its other important features and tools:
Seamless drive partitioning – You can create, delete, or merge partitions, resize or move them, extend system partitions, and more.
Data management and backup – Copy OS and data to another HDD/SSD, transfer files, apps, settings to new drive/PC.
PC Cleaner – Dedicated app for cleaning your PC from junk files and apps you no longer need or use.
Data recovery – The Data Recovery Wizard comes with a lot of options to restore previously deleted data.
File shredder and BitWiper – Two distinct apps that ensure complete wipeout of all the sensitive data before selling your PC or laptop.
Click the Start button, type cmd, and select Run as administrator from the results to open Command Prompt with administrator privileges.
In the Command Prompt, type or paste the following command to perform a HDD read/write speed test (replace C with the letter of the drive you want tot test): winsat disk -ran -write -drive C
Command Prompt and the WinSAT command provide a very accurate speed test reading and you can use it without the -ran parameter to get even more information.
However, the command line interface is not very friendly and can even be confusing for someone who didn’t use it before.
You might prefer using HD Tune, which offers an easier way to check drive speed and health, and you can read more about it in our guide on HD Tune software.
3. Run an HDD read/write speed test using Task Manager
Right-click on your Start button and select Task Manager from the list.
Here, find and click the Performance tab, then select the Drive section.
Here, you can view the read and write speed of your hard disk along with other key information.
Testing the HDD speed in Task Manager is almost instant, but the readings are not always so accurate. However, it’s a great way to get some quick readings.
4. Confront the data with the manufacturer’s specifications
We have explained above how to test the speed of the HDD but those are just numbers if you don’t actually know what they should be.
So, you should actually look at the HDD, take down its brand and serial number, and visit the manufacturer’s website to look for the actual specifications of the drive.
If you can’t access the data visually, Seagate has a small tool called DriveDetect that you can run to find out the data you need.
To sum up our guide, it’s very important to keep an eye on the speed and health of your PC’s hard disk. This way, you will find out if the HDD is about to fail and save your data before it’s too late.
FAQ on how to test the hard drive speed
1. What is the best hard drive speed test software?
From our latest tests in the WR labs, we recommend using EaseUS Partition Master for the quickest and most accurate results. However, we have a list of the best HDD benchmarking tools if you need more suggestions.
2. How to test hard drive speed on Mac?
Most users point out that you can test the HDD speed on Mac using the Blackmagic Disk Speed Test or AmorphousDiskMark apps you can find in the Apple AppStore.
3. Can I run an HDD speed test online?
No, you can’t run an HDD speed test online because a website can’t accurately access your hard drive and measure its parameters.
Here we conclude our guide on test hard drive speed and how to use local and third-party tools for an accurate measurement.
BSoD errors like cldft.sys can upset your routine if they happen frequently enough. For us, it kept logging us out of Steam, and that is pretty annoying. We compiled these tested solutions to ensure you don’t go through the same.
What is the cldft.sys error?
This is a type of BSoD error that causes your PC to crash but restarts after a while. If left unresolved, it increases in frequency and can occur up to three times a day.
Most BSoD errors are caused by software conflicts, and for this one, KeePass, a password manager, seems to be at the center stage. Other possible reasons could be a problematic Windows update, outdated drivers, or hardware failure.
How do I fix the cldft.sys error?
Check off the following preliminary steps before moving on to the complex solutions:
Click on the Start Menu icon, type Control Panel on the search bar, and click Open.
Select Uninstall a Program under Programs.
Find the problematic app, in this case the KeePass app, click on it, and select Uninstall.
Confirm uninstallation in the next pop-up. Also, remove software leftovers before installing the app again.
Go to your dedicated app store or official KeePass website and download the app again.
Observe how your PC behaves over the next few days and see whether it will throw the cldft.sys error again. If it doesn’t, it means the previous app installation was corrupt and has now been fixed.
However, if the BSoD error persists, you might have to do away with the KeePass app. Lucky for you, you’ll find other password managers just as good or even better.
2. Uninstall recent Windows update
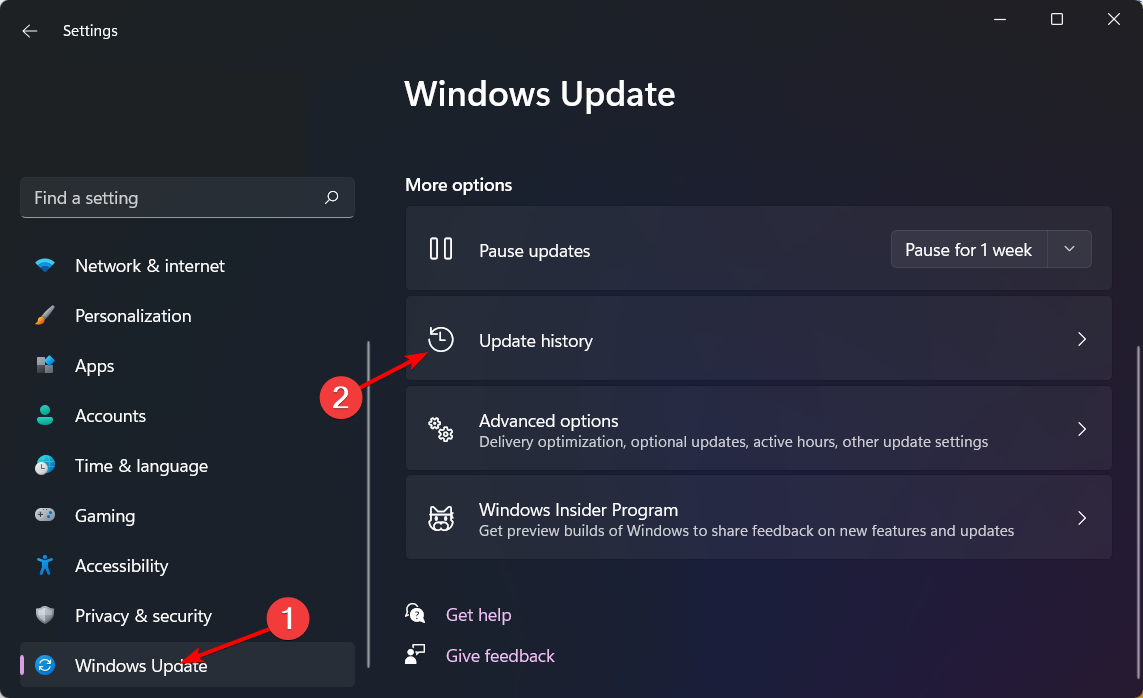
Press the Windows + I keys simultaneously to open Settings.
Navigate to Windows Update, then go to Update history.
Click on Uninstall updates.
Select the most recent update, then click Uninstall.
3. Perform DISM and SFC scans
Hit the Start Menu icon, type cmd in the search bar, and click Run as administrator.
Type the following commands and press Enter after each one:DISM.exe /Online /Cleanup-Image /Restorehealthsfc /scannow
Alternatively, if you’d prefer to save time and prevent other issues from occurring, I recommend a handy BSoD fixer.
4. Create a new user profile
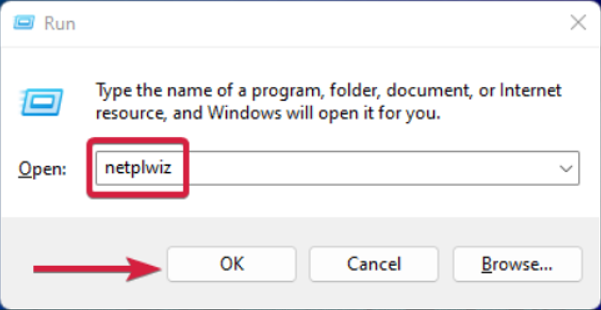
Press Windows + R to launch the Run console, enter netplwiz in the text field, and click OK.
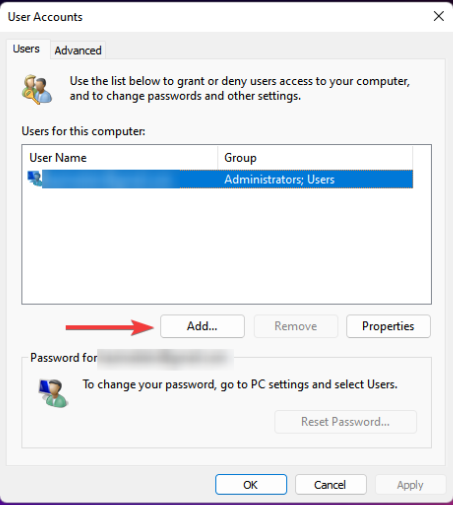
Click Add in the User Accounts window.
Select Sign in without a Microsoft account (not recommended).
Click on Local account button.
Enter a username and password (optional) for the new user account, and a hint, in case you set a password. Once done, click on Next.
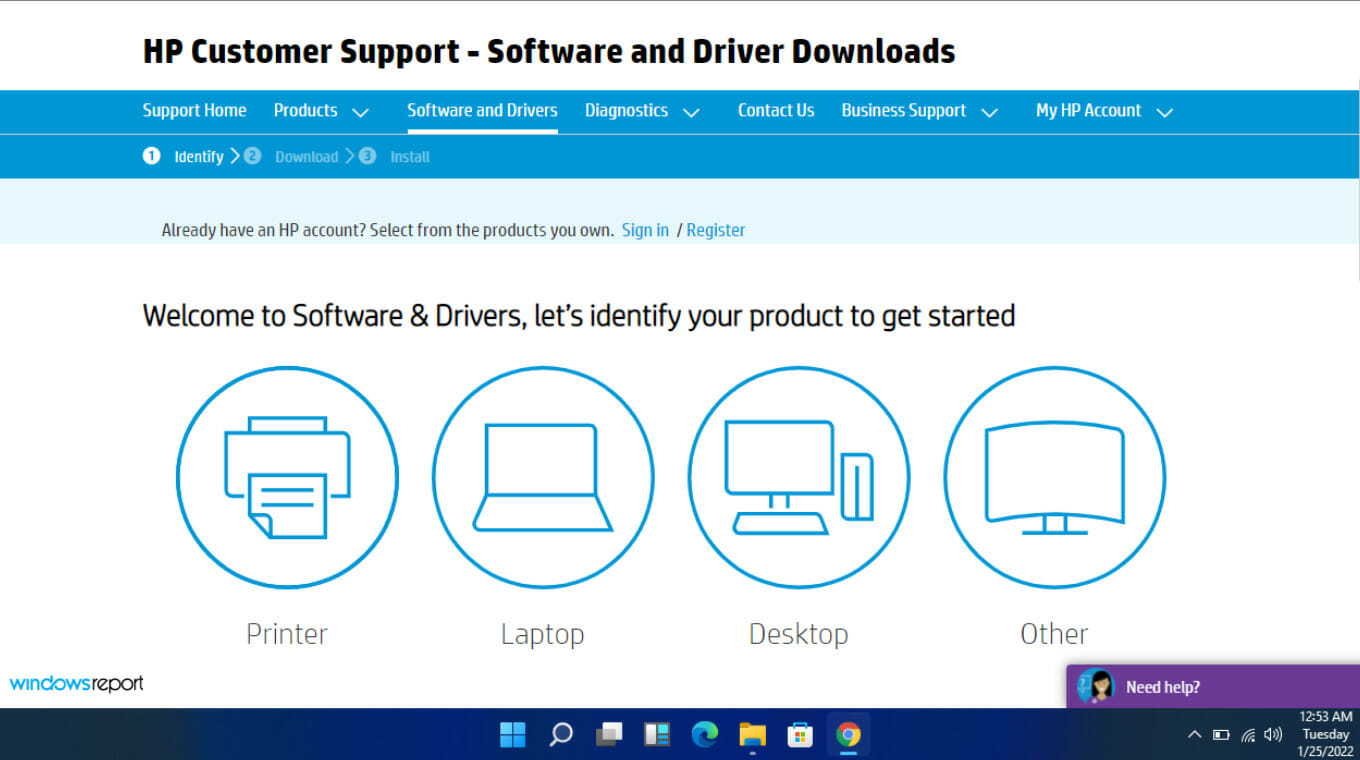
Choose laptop or desktop, depending on the type of computer you’re using.
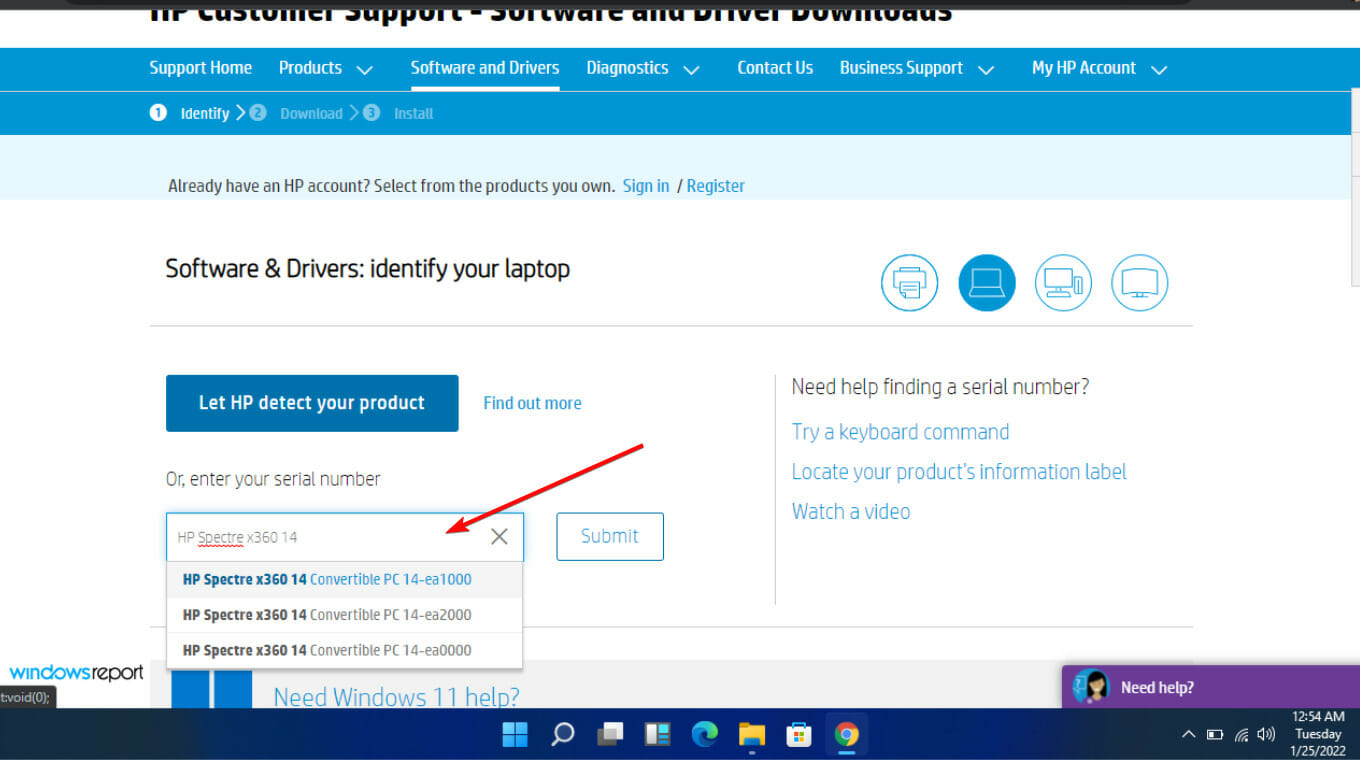
Enter your exact serial number or your exact computer model.
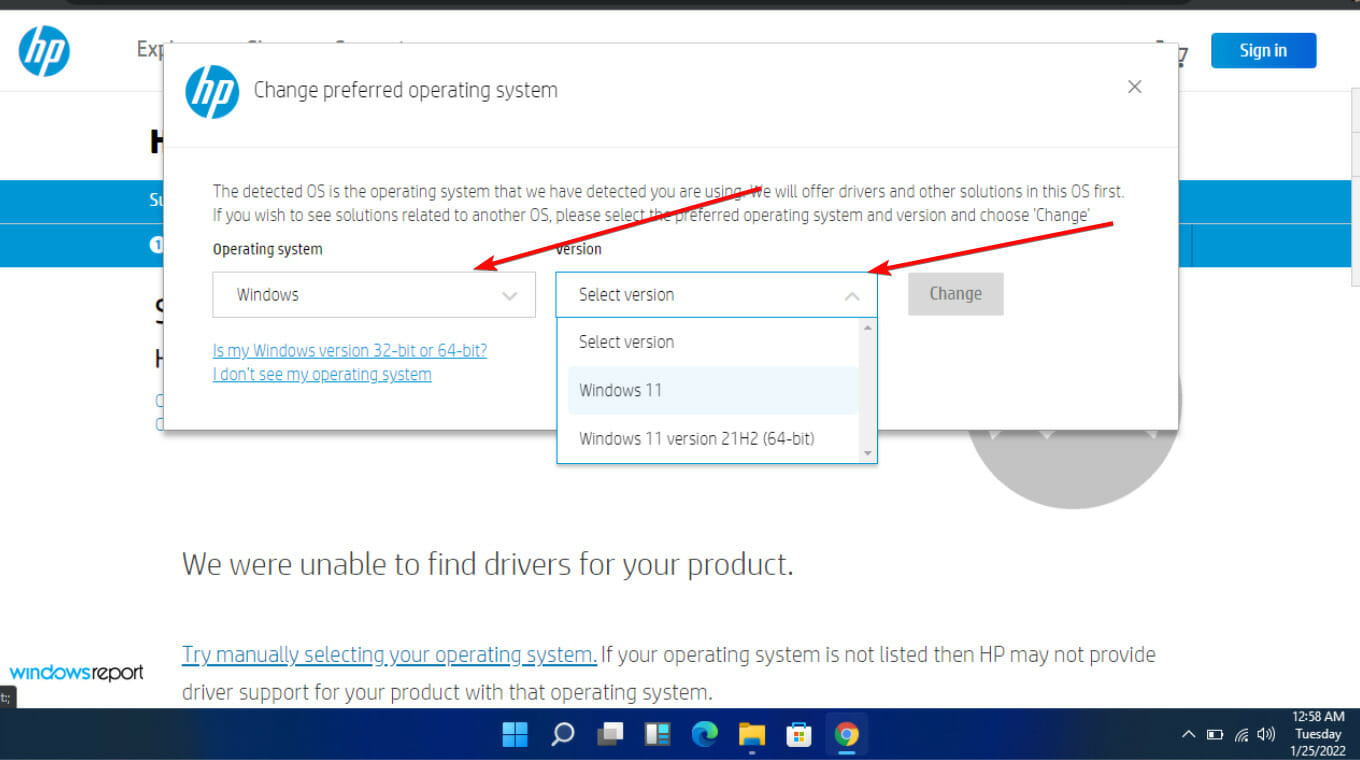
Select your OS and OS version, then click Submit.
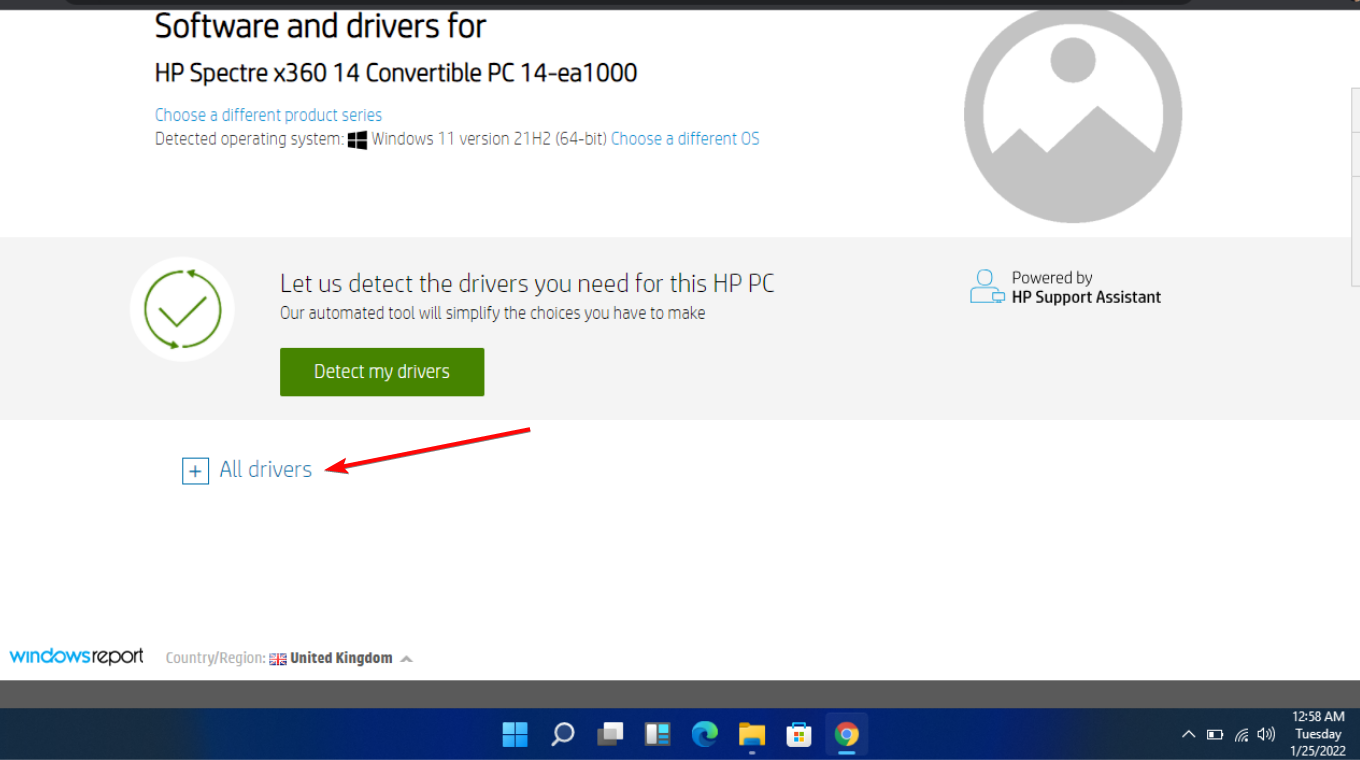
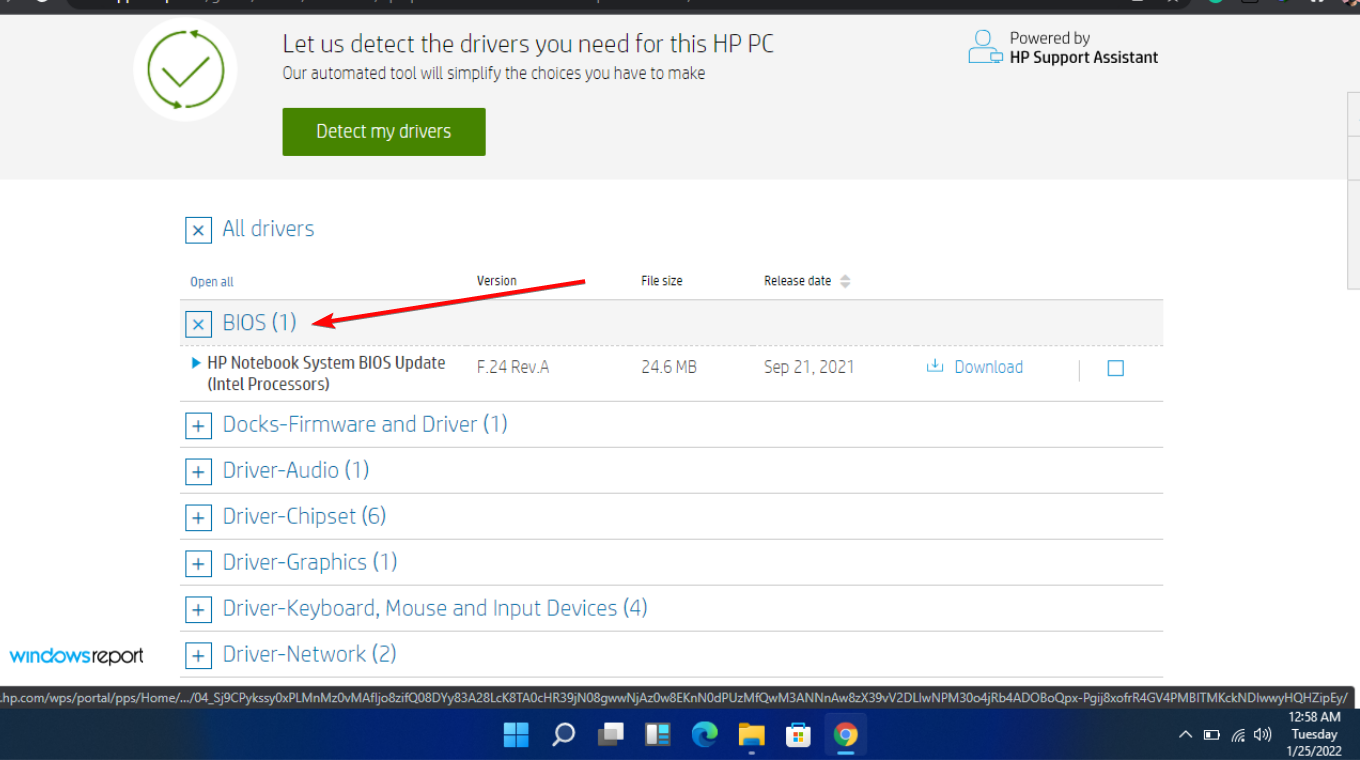
Click on All drivers and then expand BIOS to see available updates.
Click the download icon.
Install the .exe file, following the on-screen instructions.
Restart your PC.
An outdated BIOS is one of the major causes of hardware and software conflicts, so updating it should clear any compatibility issues and resolve the cldft.sys error.
6. Perform a clean boot
Hit the Windows key, type msconfig, and open System Configuration.
Switch to the Services tab and select Hide all Microsoft services.
Click on the Disable all button, then hit the Apply button to save the changes.
Go back and click on the Startup tab, select Open Task Manager then click OK.
In the Startup tab of the Task Manager, Disable all the Enabled startup items.
Now, wait for Windows to prepare the setup and click Yes when prompted.
Next, accept the Licence Agreement and wait while Windows downloads the required updates.
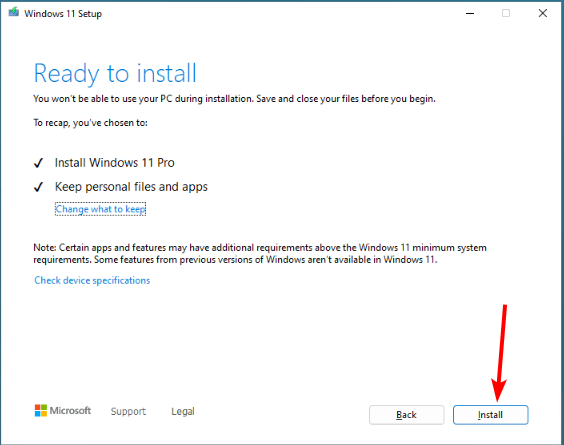
Select between keeping your files and apps and removing them. Since you want to perform an in-place upgrade, leave the recommended settings, i.e., keep your files and apps.
Now, click the Install button to start the in-place upgrade.
Finally, wait for Windows to copy the necessary files to upgrade your device and restart your PC.
When it comes to BSoD errors like cldft.sys or Wpprecorder.sys, it’s usually trial and error until you get down to that solution that fixes it. We have already outlined a general BSoD repair guide for such issues.
However, if you don’t have the time to go through multiple-step solutions, you can opt for a BSoD repair tool. Further, if you’ve encountered a bunch of BSoD errors and would like to understand them to better resolve them, you can install the BSoD Viewer to help you break down and analyze the error.
Another effective but unorthodox trick is to trigger your own BSoD. You’ll be able to detect and fix any underlying issues before they become catastrophic.
That’s a sign-out from us, but we are keen to hear more from you. If you have any additional solutions not mentioned here that worked for you, share them with us in the comment section below.
When turning off a Windows PC, you may get the Closing 1 app and shutting down error. Sometimes, the error window reads, Task Host is stopping background tasks followed by the path to the problematic process. In this case, you can simply terminate or delete the process.
But more often than not, the problematic app is not listed. You may find a random process name, say, simply t, or no name at all. Here, you will have to manually identify and disable the application/process.
How do I fix the Closing 1 app and shutting down error?
Before we start with the slightly complex solutions, try these quick ones:
If there are no critical apps running, click the Shut down anyway button to ignore the prompt.
Check for any pending Windows updates and install them. Also, disable fast startup.
Make sure all the installed apps are updated. You can check for updates on the official website or Microsoft Store, depending on where the app was downloaded from.
1. Terminate all processes before shutdown
Before shutdown, press Ctrl + Shift + Esc to open the Task Manager.
Now, select any active applications or processes and click on End task.
Repeat the same process until only the Task Manager is left, then terminate it as well.
Finally, you can safely shut down the Windows 11 PC without getting the Closing 1 app and shutting down error.
2. Check the Event Viewer to identify the problematic app
Press Windows + S to open Search, type Event Viewer in the text field, and click the relevant result.
Go to Windows Logs from the navigation pane and then select Application under it.
Now, locate logs on the right that were created around the same time the Task Host Window error appeared and have Winsrv listed under Source.
If any of the logs, when selected, read The following application attempted to veto the shutdown, followed by the app name, that’s the one preventing the shutdown.
You can now decide whether to uninstall the app (steps in solution 6), disable the service triggering the process, or manually terminate it each time before turning off the PC.
3. Create the AutoEndTasks string
Press Windows + R to open Run, type regedit in the text field, and hit Enter.
Click Yes in the UAC prompt.
Navigate the following path or paste it in the address bar and hit Enter: Computer\HKEY_CURRENT_USER\Control Panel\Desktop
Right-click on the empty portion, hover the cursor over New, select String Value, and name it AutoEndTasks.
Double-click the AutoEndTasks string.
Enter 1 under the Value data text field, and click OK.
AutoEndTasks ensures that all the active processes are terminated before shutdown and prevents unnecessary crashes and data loss.
4. Run the Program Compatibility Troubleshooter
Press Windows + S to open Search, type Control Panel in the search bar, and click the relevant result.
Click on Programs.
Now, click on Run programs made for previous versions of Windows under Programs and Features.
Click the Advanced option.
Click on Run as administrator.
Next, tick the checkbox for Apply repairs automatically, and then click Next.
Follow the on-screen instructions to let the Program Compatibility Troubleshooter fix things.
Press Windows + R to open Run, type msconfig in the text field, and click OK.
Go to the Services tab, tick the checkbox for Hide all Microsoft services, and click the Disable all button.
Now, head to the Startup tab, and click on Open Task Manager.
Identify any apps listed here that have Enabled listed under the Status column, select them individually and click on Disable.
Once done, go back to the System Configuration window, then click Apply and OK to save the changes.
Click Restart in the confirmation prompt.
When the PC reboots, check whether the error still appears.
If not, re-enable the processes and startup apps one at a time and wait for the error to appear. As soon as it does, the item enabled last is the problem.
A clean boot is an effective troubleshooting environment for identifying third-party app conflicts. If the underlying cause is an app, uninstall it, and if it’s a service, disable it via the Services.msc utility.
6. Remove the problematic application
Press Windows + R to open Run, type appwiz.cpl in the text field, and hit Enter.
Select the app you identified to be causing the error and click Uninstall.
Follow the on-screen instructions to complete the process.
If this doesn’t work, use an effective software uninstaller to delete any leftover files and Registry entries. We found these apps to trigger the error:
A similar set of solutions also helps when you get the Task Host is stopping background tasks error. Remember, you just have to identify the problematic process/application that vetoes the shutdown and then disable it.
For any queries or to share what worked for you, drop a comment below.
Google Chrome is the most popular and widely used web browser worldwide. Many people may need to screen capture videos like video tutorials, online courses, online meetings, seminars, webinars, or streaming videos on Chrome browser.
Therefore, they must find some screen recorder apps that can perfectly capture windows tabs on Google Chrome. In the parts below, we provide readers with the exact steps on how to record a video on Chrome.
How to choose the best way to record video on Google Chrome?
So, how do we choose the best method to take videos or screenshots on Chrome browser?
We have tested the screen recording tools listen below. You can refer to the table below for testing information, including effectiveness and their respective suitable scenarios, which may help you choose the best Chrome screen recorder.
Viable Methods
Description
EaseUS RecExperts
It is a full-featured Chrome screen recorder that comes with both desktop apps and an online version, which can screen capture Zoom meetings, YouTube videos, or online game chats in 4K video. Therefore, the webcam browser recorder is best for video makers who require powerful screen-capturing and video-editing functions. You can easily and quickly master how to record high-quality videos.
OBS Studio
Boasted with powerful configuration options and a complicated user interface, this screen recorder with webcam overlay is more suitable for professionals to record high frame rate game highlights.
QuickTime Player
It is popular among Mac users. However, it doesn’t support webcam recording and provides medium efficiency.
Xbox Game Bar
The built-in screen recorder program is available on Windows 10 version 18362.0 or higher. The maximum frame rate supported is 120fps. So, it is most appropriate for game players to record game videos on Google Chrome.
Scre.io
It is a free Chrome extension program for screen recording, available for Chrome and Edge browsers. Users can capture unlimited videos without any watermark.
According to the table information, for most professional workers with a high demand for video recording and editing features, EaseUS RecExperts and OBS seem to be the most effective and comprehensive solutions. But for beginners who participate in simple tasks, an online screen recorder and some Chrome extensions are better choices.
Of course, if you want to record some online games, you can also choose Xbox Game Bar, but you must ensure that the PC runs Windows 10 or higher. In addition, QuickTime Player can also meet basic, simple needs of screen recording for Mac users.
Now, let’s learn how to screen record on Chrome!
1. Record a Video of Your Chrome Browser via a Full-Featured Chrome Screen Recorder
The first method we mostly recommend is using a third-party tool: EaseUS RecExperts. It is an excellent desktop screen recorder for most users, and it is compatible with Windows and macOS systems. This screen recording tool can help you capture any region on your computer with a few clicks, like recording the full screen or part of the screen. Therefore, it is easy for you to record browser actions on Chrome.
Besides, this HD video recorder software can help you record 2D or 3D gameplay without any lay and time limit. You will obtain a high-quality recorded video with sound as it is powered by AI noise remover. Or you can use its online screen recorder to help you record streaming videos or online seminars on Chrome.
More importantly, it supports dual recording, which means that you can record the screen and webcam at the same time. If you want to record some reaction videos, video tutorials, online courses, or game commentary, EaseUS RecExperts will be your best choice.
Following are some extra highlights that can greatly improve your experience in screen recording videos from any platform through a web browser.
Help record encrypted video without a black screen
Capture mouse click effects when recording a screen window
Capture videos and camera simultaneously on Google Chrome or Firefox
Follow the instructions to learn how to record video on Chrome.
Start EaseUS RecExperts. There are two screen recording modes. Full Screen will record the entire screen; selecting Region will require you to specify the recording area manually. Moreover, you can choose different displays.
Next, select whether you want to record the webcam, system sound, or microphone. Of course, if you only need to record the silent screen, you may turn them off.
Start recording by picking the red REC button. When recording, you can click the Pause or the red Stop buttons as you like. Besides, you can take screenshots by clicking on the Camera icon, set the time for an auto stop by picking the alarm icon, or add annotates to the screen you are recording by choosing the Pen icon.
The recording list interface will appear after you have finished recording. You may quickly access or edit your recordings, like trimming, compressing, converting to constant frame rate, or extracting audio from videos.
2. Record a video on Chrome for free using OBS Studio
The second method we suggest is to use an open-source screen recording software: OBS Studio. This Chrome screen recorder can also help you record any region from Google Chrome or other applications. So, you can try using OBS Studio to record a video on Google Chrome. Moreover, you can also record HD video from a webcam to a PC.
Here are some detailed steps for you to learn.
Download and install OBS Studio.
Open the OBS and click the plus button to view all the options at the bottom of the screen.
Choose the Browser option.
Copy and paste the Chrome link into the URL box in the browser window.
To save the file to your system after you finish, click Stop Recording.
3. Capture a video on Chrome on Mac with QuickTime Player
The third method to record a video on Chrome is to use QuickTime Player. As a built-in program of Mac, users can use this tool to record browser videos and audio. In addition, it also provides users with simple video editing functions.
Let’s learn how to record video on Chrome.
Launch QuickTime Player.
Click on File and then choose screen recording.
You will see the recording interface. Click on the arrow and choose Internal Microphone if you want to record a video with audio.
Then, choose the region you want to record. If you want to record the full screen, you just need to click on the screen; if you want to record a part of the screen on the Chrome browser, you need to drag the cursor to create a new window.
Then, you can start recording. After recording, press the Stop button.
Click on File and Save, and choose the file locations you want to save.
4. Record a Video on Chrome on PC using the Xbox Game Bar
If you are a Windows user and do not want to download any software, how can you screen record on Chrome?
Do not worry, Windows PC also has a built-in screen recording program: Xbox Game Bar. This game recorder for Windows 10 can be connected to any Xbox for gaming, so many Windows users use it to record gameplay. Of course, you can also use it to capture or take a video on Chrome browser.
Now, follow the steps below to learn about how to record video on Chrome.
Open the page on Chrome you want to screen record.
Press Windows + G on your keyboard simultaneously, and you will see the recorder bar on the screen.
Choose Start Recording. Or you can press Windows + Alt + R to start recording your screen directly.
If you want to record the microphone, click on the right icon to enable the microphone. Then click on Stop Recording to end this operation.
In a word, this method makes it easy for users to screen record browser videos on Chrome. However, this tool has limited features, as it can only record video with audio. Besides, some users often encounter the Xbox Game Bar not working on Windows 11.
If you want to screen record video and webcam simultaneously, this tool cannot achieve that. But EaseUS RecExperts can help you fix this problem.
You can share this passage on your social media to help more people in need to know how to record videos on Chrome.
5. Take screenshots or screen record videos on Chromebook using Google Extensions
If you prefer to screen record a video or take screenshots on a Chromebook without downloading software, you can use a Google extension for screen capture called Scre.io. You can easily find it because you can add this plugin as a TAB in the Chrome browser.
This Google Chrome plug-in tool with an audio recorder can help you screen capture or record a webcam with audio on the Chrome browser. However, this tool has limited user features, so the Chrome extension is only suitable for simple screen recording actions.
Now, you can proceed with the following instructions.
Open the page you want to record in Google Chrome. Start the Google extension.
Choose the screen or webcam only as you like. Besides, choose the audio type: none, microphone, system sound with Mic, or system sound only. After that, you can click on the Start Recording button.
After recording, you can choose to Stop Sharing on the screen and save the newly recorded video.
For more step-by-step options, check out our full guide on how to screenshot on Chromebook and learn different capture methods.
How to fix common problems of Chrome browser recording
When screen recording a video on Google Chrome, you may encounter some common problems. Here are a few, along with their simple solutions:
1.Google Chrome doesn’t have screen recording permission on Windows 10
If you don’t have screen recording permission on Windows 10, it could be due to several reasons. One common reason is that the privacy settings on your computer might not be allowing screen recording. Another reason is that your graphics drivers are out of date.
Try the following solutions to fix this problem.
Check Privacy Settings – Enter the Windows Settings menu, select Privacy, and click Screen Recording. Ensure that the toggle switch for allowing apps to access screen recording is turned on.
Update Graphics Drivers – Outdated graphics drivers can sometimes cause permission issues. Update your graphics drivers to the latest version to ensure compatibility with screen recording.
2.Can’t stop screen recording on Chrome
If you’re unable to stop screen recording on Chrome, you can try the following solutions:
Use keyboard shortcuts – Press the key combination to stop the recording, which is typically Ctrl + Shift + Alt + R on Windows PC or Command + Shift + Option + R on Mac.
Restart Chrome – If the keyboard shortcut doesn’t work or you cannot locate it, you can try restarting Chrome. Close the Chrome browser completely and relaunch it. This should stop any ongoing screen recording session.
Restart your computer – If the above steps don’t work, try restarting your computer. Sometimes, a temporary issue or conflict might prevent the screen recording from stopping.
Conclusion
To conclude, this article has provided 5 helpful methods with detailed guides for you to learn how to record video on Chrome. You can pick the most appropriate way for yourself according to your own requirements.
The following table concludes the effectiveness and difficulty level of the 5 screen recorders. There is no doubt that from the comprehensive performance of the above screen recording tools, EaseUS RecExperts will be your best choice.
Methods
Effectiveness
Difficulty Level
EaseUS RecExperts
High – Provide comprehensive screen recording, editing features, and flexibility, suitable for both beginners and intermediate users
Easy
OBS Studio
High – Record high-quality videos with advanced settings catering to advanced users
Difficult
QuickTime Player
Medium – Meet basic recording needs, suitable for casual Mac users looking for a straightforward recording solution
Medium
Xbox Game Bar
Medium – Offer basic recording capabilities as a simple tool integrated into specific platforms
Medium
Scre.io
Medium – Support recording screen or webcam separately
Easy
FAQs about how to record video on Chrome
After learning about how to record browser videos on Chrome, there are some other related questions that you may be interested in. Read them now to find the answers!
1. What is the best Google screen recorder for Android?
The best screen recorder for Android that doesn’t lag and uses the least amount of resources to meet all of your screen recording requirements for Android devices is listed below. Here is a quick list:
X Recorder
AZ Screen Recorder
Apowersoft Screen Recorder
Master Screen Recorder
Unlimited Screen Recorder
2. Can screen recording be detected on Chrome?
The answer is no in this sense since websites are unable to identify user actions like screen capture.
3. What are the best screen recorder Chrome Extensions?
There are some of the best Chrome extensions for screen recording as follows:
Loom
Vidyard
Screencastify
Movavi Screen Recorder for Chrome
Awesome Screenshot and Screen Recorder
Hopefully, now you know exactly how to record video on Chrome and what are the best tools to use for optimal results.
If you have any other questions or suggestions, feel free to use the comments section below.
The VSServer.exe process is a part of the VisiSat program developed by Schneider Electric. The program is used for graphic representation of control applications and objects. It can also be used for MicroNet networks to get drawings, diagrams, and reports.
The program serves a specific purpose and is only for a dedicated set of users, and if you haven’t manually installed it, uninstalling it poses no harm and will remove VSServer.exe.
How do I remove VSServer.exe?
1. Disable the VSSGateway service (disables the process)
Press Windows + S to open Search, type Services in the text field, and click the relevant result.
Scroll down, locate the VSSGateway service, right-click on it, and select Properties.
Select Disabled from the Startup type dropdown menu, and click the Stop button under Service status.
Finally, click Apply and OK to save the changes.
If VSServer.exe leads to high CPU usage, but you don’t want to remove the process altogether, disabling VSSGateway from the Services console is an effective approach. The service is responsible for automatically loading the process and other VisiSat components.
2. Manually delete the process
Press Windows + E to open File Explorer, navigate the following path or paste it in the address bar and hit Enter: C:\Satchwell
Now, look through the sub-folders to locate the VSServer.exe process, select it, and then hit Delete.
Choose the appropriate response in case a confirmation prompt appears.
Remember, after deleting the process, the VisiSat application may stop working or re-download the file during subsequent updates.
3. Uninstall the VisiSat program
Press Windows + R to open Run, type appwiz.cpl in the text field, and hit Enter.
Select VisiSat from the list of applications, and click on Uninstall.
Follow the on-screen instructions to complete the process.
Similarly, uninstall the VisisatCETStyle program, if listed here.
Finally, restart the computer for the changes to apply.
If VSServer.exe is still found after you uninstall the application, it wasn’t likely deleted. In this case, use an effective software uninstaller tool to get rid of all leftover files and Registry entries. Do the same for other Schneider Electric programs.
If nothing else works, you can always reset Windows 11 to factory defaults. This will help delete VSServer.exe for good. Also, if it’s a malware with the same name, a reset is the preferred approach.
Before resetting the PC, make sure you copy the critical personal files to an external USB drive or use a reliable backup solution to avoid data loss.
This should get rid of the VSServer.exe process from the PC. Also, while you are here, discover some quick tips to make Windows faster than ever!
For any queries or to share how the process triggered issues in your case, drop a comment below.
Many users have encountered the Memory could not be read issue while trying to launch or play Apex Legends, causing the game to crash.
In this guide, we will discuss common causes for the issue and delve into WR experts’ tested methods so that you can resume playing the game.
What causes the Memory could not be read issue?
The error mostly appears on your computer if you have damaged game files, an outdated Windows version, a corrupted GPU driver, or conflicting background apps.
How can I fix the Apex Legends: Memory could not be read issue?
Before proceeding with any steps to fix the Memory could not be read issue, go through the following preliminary checks:
Ensure your Windows OS and graphics drivers are up to date, then restart your computer.
Press Ctrl + Shift + Esc to open Task Manager, select all the unwanted processes one by one, and choose End task.
1. Delete the contents of the assets folder
Navigate to this path after replacing Username with your current user profile name: C:\Users\Username\Saved Games\Respawn\Apex\assets
Open the local folder, press Ctrl + A to select all files, and press the Delete icon to remove all content.
Launch the game and check if the issue persists.
2. Delete the certification folder
Right-click Apex Legends from the desktop and select Properties from the context menu.
Go to the Shortcut tab and click the Open File Location button.
Look for Easy Anti Cheat, then locate and delete the certification folder.
3. Modify the Compatibility settings
Right-click Apex Legends from the desktop and select Properties from the context menu.
Go to the Compatibility tab, under Compatibility mode, and place a checkmark next to Run this program in compatibility mode for.
From the drop-down menu, select Windows 8.
Now, go to the Settings section, and place a checkmark next to Run this program as administrator and Disable fullscreen optimizations.
Click Apply, then OK to save the changes.
Running the game as administrator can help you prevent other issues like Apex Legends not launching; read this guide to learn more.
4. Repair the game file
Press the Windows key, type ea, and click Open.
Click My Collection from the left pane.
Locate Apex Legends and click the three dots icon to open Settings.
Choose Repair.
These steps will verify the integrity of the game files and download any damaged or missing content necessary to ensure your game runs without glitches.
Right-click Apex Legends from the desktop and select Properties from the context menu.
Go to the Shortcut tab and click the Open File Location button.
Open the EasyAntiCheat folder, locate and double-click EasyAntiCheat_Setup.exe to run it.
On the next screen, choose Repair Service to initiate the repair process.
Once it is complete, reboot your computer and see if the issue persists.
6. Disable the Windows firewall temporarily
Press the Windows key, type control panel, and click Open.
Select Category from View by and click System and Security.
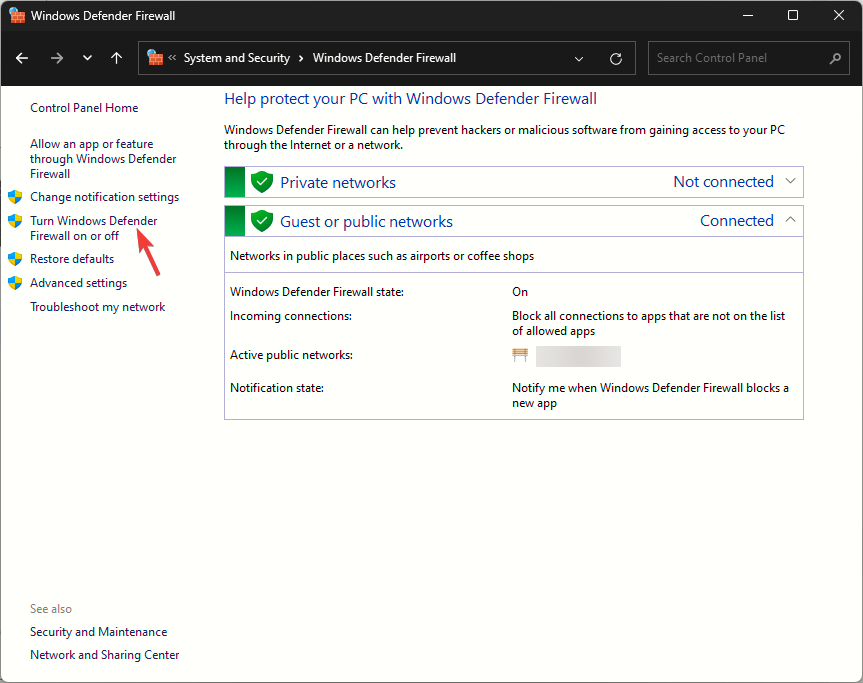
Click Windows Defender Firewall.
Select Turn Windows Defender Firewall on or off.
Next, place a checkmark next to Turn off Windows Defender Firewall (not recommended) for both Public & Private network settings.
Click OK to confirm.
Now, if the game works fine, then follow these steps to add the game file to the exclusion list of your Windows Security.
Press the Windows key, type windows security, and click Open.
Go to Virus & threat protection, locate Virus & threat protection settings, and choose Manage settings.
Go to Exclusions, and select Add or remove exclusions.
Click Yes, then click the Add an exclusion button, choose File, then select R5apex.Exe, and click Open.
Now reboot your PC and reverse engineer the steps to turn the Firewall back on. Adding the game files to an exception list on your antivirus can also help you fix Apex’s anti-cheat error; read this guide to learn more.
7. Modify registry entries (Only for Windows 7 users)
Press Windows + R to open the Run window, type regedit, and click OK to open the Registry Editor.
Navigate to this path: HKEY_LOCAL_MACHINE\SOFTWARE\MicrosoftWindows NT\CurrentVersion\Image File Execution Options
Right the Image File Execution Options folder, select New, then Key, and name it r5apex.exe.
Now select r5apex.exe, choose New, then Key, and name it PerfOptions.
Right-click PerfOptions, select New, then choose DWORD (32-bit) Value, then name it CpuPriorityClass.
Double-click CpuPriorityClass, set Base to Hexadecimal and change the Value data to 3, then click OK.
Restart your PC to let the changes take effect.
If nothing has worked for you, you can go to the official Apex Legends support forums and ask for help. The developers and EA admins respond to the queries very fast.
In conclusion, to fix the Memory could not be read issue, you need to ensure that your antivirus is not interfering with any of the game-related processes.
Also, you can adjust the compatibility settings, repair the game, and the anticheat service to try and resolve the issue.
Furthermore, always ensure your Windows operating system and network drivers are updated to the latest version, as they can also help you avoid high CPU usage issues.
If you have any questions or suggestions about the subject, feel free to mention them in the comments section below.
If you are not able to upload a file and are stuck with the file cannot be empty error on Discord, this guide can help!
We will talk about the probable causes behind the problem and offer WR experts’ recommended solutions to help you upload the file without any issues.
Why can’t I upload my file on Discord?
You get the file cannot be empty error on Discord if you have internet connectivity issues, technical issues from the server end, or if you are trying to upload a file that is not compatible and is of the wrong size or format.
How can I fix the file cannot be empty error on Discord?
Before proceeding with any steps to fix the file cannot be empty error, go through the following preliminary checks:
Restart your device and router, then verify if you have a stable internet connection.
If you are using Discord on iPhone and store photos on iCloud, click the + icon, select View all, and choose the picture from the Cloud to upload.
Ensure that the Discord server is not facing downtime or having technical issues.
1. Check the file you want to upload
If you see this error, first check the size and format of the file you want to upload. Then, ensure the file is not corrupted due to malware. For that, you can first scan the file using a reliable antivirus tool before uploading.
Also, make sure you have proper permissions to share or upload the file on the Discord platform from your device.
2. Update the Discord app
Press the Windows key, type ms store, and click Open.
Go to the Library icon, then locate Discord and choose Update.
Alternatively, you can relaunch Discord, and it will automatically make the app check for updates & download them if available.
3. Change the Server region
Go to the User Settings.
Choose Server Boost.
Next, select Server Settings.
Click Overview, then locate Server Region, click Change, and select the server location.
Now, enter your username, agree with Discord’s terms and conditions, and press the Enter key.
Next, you need to agree with the captcha notification and try uploading the file now.
Using the web version on your browser can also help you fix other issues like Discord app won’t open on your PC; read this guide to learn about the solutions.
6. Reinstall the app
Press Windows + I to open the Settings app.
Go to Apps, then select Installed apps.
Locate Discord, then click the three dots icon.
Select Uninstall.
Click Uninstall to confirm the action.
Press the Windows key, type ms store, and click Open.
Search for Discord and click Install.
Reinstalling Discord should be the last resort; this process also helps if you are trying to fix the Discord won’t update issue. To learn other solutions, read this guide.
If nothing worked for you, it could be the issue at the server’s end; we recommend you contact the Discord customer support team, explain the issue to them, and provide details of the fixes you tried for further help.
To fix the file cannot be empty issue, you need to check your internet connection, ensure your Discord app is up to date, try changing the server region, or reinstall the app.
Unfortunately, Virgin Media blocks many VPN services and restricts access to specific websites and services. So, you must get a reliable VPN that effectively circumvents the Virgin Media VPN blocks and other geo-blocks.
Today we’ll take a look at some of the best options tested by our experts. So if you’re ready to access the platform without errors, keep reading.
What are the best VPNs that don’t get blocked by Virgin Media?
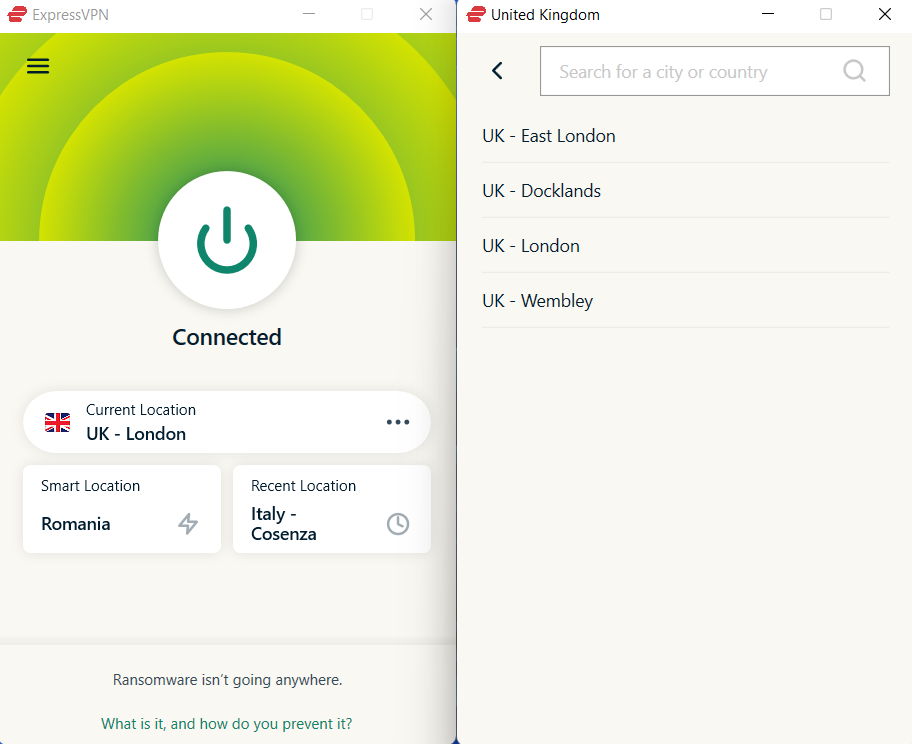
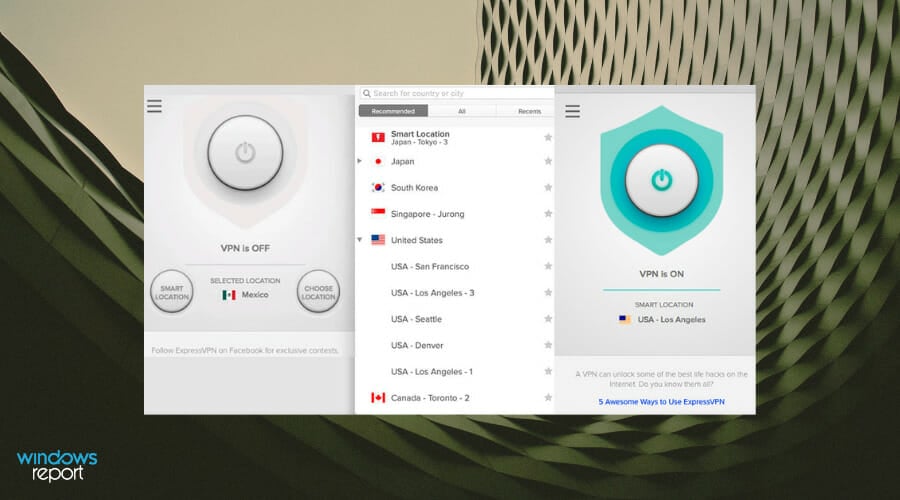
ExpressVPN – Best features to bypass Virgin Media VPN blocking
ExpressVPN comes with native VPN apps for all the major operating systems and devices, including Windows, macOS, Linux, Android, iOS, and Amazon Fire/Kindle Fire.
Also, you can use it on your smart TV to enjoy your favorite Virgin TV Go content without limitations both from the UK and outside the country.
The supported smart TV devices are:
Apple TV (DNS setup)
Samsung Smart TV and LG Smart TV (MediaStreamer)
Amazon Fire TV/Fire TV Stick (app)
Nvidia Shield TV (Android APK file)
Roku and Chromecast (VPN router, virtual router, mirror to TV)
With over 3,000 servers globally, it unblocks streaming services like Virgin TV Go with ease, and provides top-tier encryption, including AES-256 bit and proprietary Lightway protocol.
More about ExpressVPN:
3,000+ servers in 160 locations across 94 countries
No activity and connection logs
5 simultenous connections
Risk-free 30-day money-back guarantee
24/7 help via email and live chat
ExpressVPN
Secure your browsing activities and circumvent geo-restrictions from anywhere with the all-around ExpressVPN.
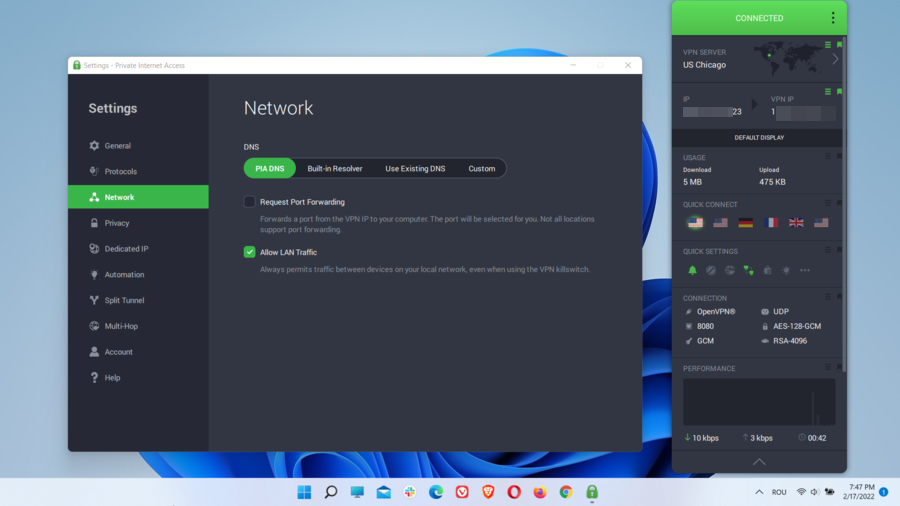
Private Internet Acces (PIA) is based in the United States and managed by Kape Technologies. It’s one of the best VPN services on the market, so the fact that it’s our top recommendation for Virgin Media shouldn’t be a surprise.
Kill Switch
PIA MACE
Split Tunneling
Request Port forwarding
Multi-Hop (Multi-hop and Obfuscation)
Connection Automation
Dedicated IP
Unlimited bandwidth.
P2P and torrenting support
As you can notice from the above description, Private Internet Access is a strong, reliable, and feature-rich VPN, so if you like what it offers, then you should confidently try it out.
Since it comes with powerful security and privacy features, as well as effective unblocking capabilities, PIA can be a great VPN solution for Virgin Media, no matter if you want to bypass ISP throttling, stream online content available on Virgin TV Go, or access other geo-blocked websites.
Private Internet Access
Is your VPN blocked on Virgin? Check out Private Internet Access to get around any VPN blocks in no time.
CyberGhost VPN – Tools optimized to fix Virgin Media VPN issues
CyberGhost VPN is already a household name in the VPN market and boasts more than 36 million users worldwide. This means it does its job very well, so we can safely recommend it for Virgin Media.
CyberGhost also includes the following important VPN features:
Block content
Prevent DNS leaks
Automatic Kill-Switch
App Split Tunnel (Android)
Private DNS
Smart DNS
Dedicated IP
P2P support
It provides strong AES-256 encryption and supports WireGuard, OpenVPN, and IKEv2 protocols.
CyberGhost also features a kill switch, DNS leak protection, and a dedicated IP for enhanced privacy. It’s ideal for unblocking Virgin TV Go and offers a 45-day money-back guarantee.
More about CyberGhost VPN:
9,000 + servers in 100+ countries
No-logs policy
Up to 10 devices connected simultaneously
45-day money-back guarantee
24/7 email & live chat customer support
CyberGhost VPN
Try this advanced VPN service whether you use the Internet from Virgin Media or want to watch Virgin TV Go without limitations.
Owned by Surfshark Ltd., with headquarters in the British Virgin Islands, Surfshark VPN has been a well-established VPN service since its launch in 2018.
Other notable Surfshark features include:
Split Tunneling (Bypasser)
Private DNS on every server
Secure Kill Switch
Strict no-logs policy
Camouflage mode
NoBorders mode
It’s ideal for bypassing Virgin Media blocks with features like CleanWeb, multi-hop connections, and Camouflage mode.
Surfshark provides AES-256 encryption and a kill switch to ensure secure browsing. With a strict no-logs policy, it’s perfect for users seeking privacy and security at an affordable price.
More about Surfshark:
3 200 servers in 65 countries
Connects to an unlimited number of devices
Compatible with all major platforms
24/7 customer support
Lets you connect to OpenVPN
Industry-leading AES-256-GCM encryption
Surfshark
Watch Virgin TV Go from all around the world and keep your data completely private with this leak-proof VPN.
If Virgin Media blocks your VPN, you should try the abovementioned solutions. All of them can effectively bypass the restrictions implemented by the ISP.
In addition to keeping your devices safe and browsing private, you’ll circumvent the content geo-blocks in the UK. Furthermore, you can watch Virgin TV Go when traveling or living abroad.
Finally, we hope that our list of best VPNs for Virgin Media helped you get access to the Internet without limitations.
Binance is the largest cryptocurrency trading platform, where users can sign up for an account and start trading Bitcoin, BNB, and over 350 other crypto coins. It also has over 30 million annual users on its platform.
Unfortunately, Binance.com is no longer available in the US, and to access it, you must employ different tricks.
If you try to access the website with a US IP address, you’ll get a service notification informing you that they can’t provide you services from that region, and you’re recommended to use Binance.US instead.
Here is a screenshot of the message displayed when you try to access Binance.com taken by one of our US-based colleagues:
As you can see, it advises you to try the American version of the website. However, Binance.US offers only a limited selection of cryptocurrencies and trade options compared to the main platform, has higher deposit and margin fees, limited crypto-to-crypto trading, no margin trading, and does not allow credit card purchases.
For these reasons, for United States citizens, Binance.US is not a great alternative to Binance.com.
ExpressVPN is another extremely useful cryptocurrency VPN to use for secure online browsing for any activity you may perform.
This tool offers complete protection for your online activity, including the financial component of online trading, to ensure good results.
You can protect your data and online exposure with extremely secure 256-bit encryption. Moreover, to access everything you need, you can use servers from anywhere on your PC.
Thankfully, with ExpressVPN, you can get unlimited bandwidth power for the fastest connection. With its fast connection and ability to unblock content from anywhere, you can access Binance.com safely.
Using ExpressVPN is the right choice for your cryptocurrency trading activities. It will offer a different IP address to increase anonymity every time. Plus, it gives access to multiple trading platforms and the chance to use the Tor network simultaneously.
As for the security protocols used by ExpressVPN, one of the most important and useful is OpenVPN.
This powerful protocol ensures constant avoidance of all potential vulnerabilities, and it is presented in an open-source manner.
As you can see from the image below, there is a wide range of protocol options for your setup.
With most of the focus on OpenVPN for ExpressVPN, the security level is powerful. It also offers access to the native protocol called Lightway. Using the wolfSSL cryptography library, Lightway bolsters this VPN’s software encryption level.
ExpressVPN offers 160 server locations in 94 countries, making it one of the most diverse services.
As for data logging, ExpressVPN claims it collects no important data from its users, thus enabling full anonymity online.
That said, the service still gathers some information that isn’t enough to identify you, but it’s worth noting.
It includes the data amount users transfer, the most recent date (without a specific time), and successful connections.
More about ExpressVPN:
Full support 24/7 by live chat
High-speed servers
Access to other devices like Windows, Mac, iOS, Android
No activity or connection logs
ExpressVPN is a great tool for accessing Binance from the US or anywhere else. Plus, it will provide unbreakable encryption, ensuring online data protection.
It hides your actual IP and makes it appear as if you are browsing on local traffic. That allows you to conduct safe and unrestricted trading on mobile or PC.
ExpressVPN
Try out ExpressVPN to protect your online financial data fully, and invest in any cryptocurrency you like.
NordVPN was created by Tefincom & Co. and is based in Panama, a country with no mandatory data retention laws and that does not participate in any international surveillance alliances such as the Five Eyes or the Fourteen Eyes.
With more than 12 million customers around the globe, NordVPN is already a household name in the VPN market, which is for good reason since it comes packed with a host of great features.
This VPN can be installed on all major operating systems. You can even set it up on a router to provide VPN access to all connected devices to reach Binance from any platform.
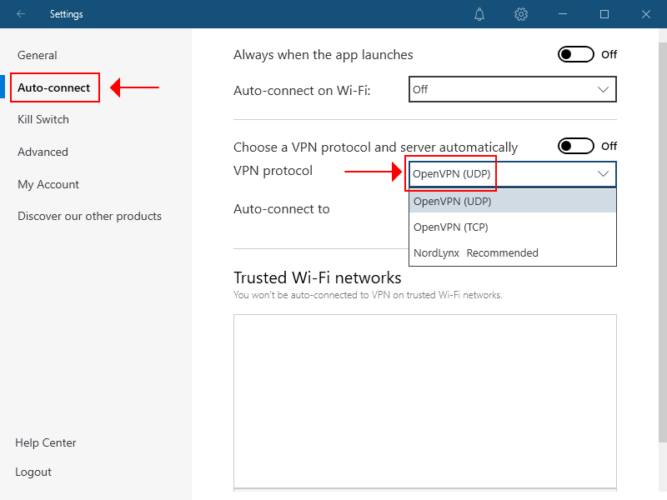
NordVPN protects your financial details using the AES with a 256-bit essential encryption standard, which the military, intelligence agencies, and governments also use. NordVPN uses the OpenVPN, IKEv2/IPsec, WireGuard, and NordLynx VPN protocols to encrypt your data.
Some of the most important features offered by NordVPN are two versions of kill switches (one for desktop and one for mobile), split tunneling, obfuscated servers, multi-hop, and dedicated IPs.
The desktop version of the kill switch has two options: an in-app kill switch that applies only to specific apps you select and an internet kill switch that applies system-wide.
The mobile version only has the internet kill switch option but offers enough protection for this environment.
The split tunneling feature lets you route some of your apps and traffic via an encrypted tunnel while the others are routed via a tunnel on the open network.
Obfuscation mode is a unique feature that allows you to maximize security and hide the fact that you’re using a VPN by making the VPN traffic look like HTTPS traffic so that you can fly under the radar and bypass VPN blocks and censorship in heavily restricted environments.
NordVPN supports private and custom DNS servers. It also offers a Double VPN feature – also known as multi-hop – which encrypts your data twice, adding a security layer. It has a malware and ad blocker called NordVPN CyberSec. Finally, the Onion Over VPN option routes traffic via the Onion network.
More about NordVPN:
5,400+ servers in 59 countries
Strict no-logs policy
Up to 6 devices connected simultaneously
30-day money-back guarantee.
24/7 live customer support
All in all, NordVPN will guarantee your online privacy, anonymity, and security. You won’t have to worry about trackers, hackers, or other third parties that may use your information without consent.
In addition, Binance can block your VPN connection if you’re in a restricted country like the US. However, if you experience issues with NordVPN, you can resolve them quickly by disabling the CyberSec option in the settings.
Given its powerful security features, NordVPN is an excellent solution for cryptocurrency. So you can trust it to buy, sell, and trade crypto on Binance from outside the US. You only need to pick a non-US server, connect to it, and start trading hassle-free.
NordVPN
Get unrestricted access to Binance and maximize your crypto protection using this dependable VPN.
Private Internet Access (PIA) is owned by Kape Technologies and is based in the USA, a 5 Eyes country. However, this should not discourage you in any way from using this service since they do not collect any identifying information, regardless of the amount of pressure that may be exerted.
This VPN has unique features and is trusted by many users worldwide. In fact, it is one of the best VPNs for cryptocurrency, so that is why we want to wholly recommend this best VPN to use with Binance in 2024.
PIA has more servers available than any other VPN counterpart, having them distributed across multiple locations and countries.
So it’s a great choice that will allow you to switch servers whenever you have a slow connection or if your VPN is not working with Binance because of IP bans or other issues.
Therefore, with its aid, you can access Binance from anywhere in the world, protect your finances and sensitive information, and circumvent geo-restrictions.
PIA can secure your crypto data using AES-128 (GCM) or AES-256 (GCM) military-grade encryption, which is top-notch.
It also uses the OpenVPN and WireGuard VPN protocols, with the first being stable and secure (18 years of open-source development), whereas the latter is newer, more efficient, and has the potential for better performance.
Due to this strong encryption, you can surf the internet anonymously and securely without worrying about surveillance, cyberattacks, or any other third-party meddling in your online activities, for that matter. Neither your ISP nor the government can track you while connected to PIA.
Private Internet Access has an easy-to-use interface for multiple devices and systems. Among the most important features, it offers a kill switch, PIA MACE anti-tracker, split tunneling, port forwarding, dedicated IPs, Shadowsocks and SOCKS5 proxies, P2P, and torrenting support.
The killswitch prevents IP leaks by blocking any traffic outside the VPN, and the PIA MACE blocks domains used for ads, trackers, and malware.
With split tunneling, you can choose which apps connect directly to the internet and which connect only when the VPN is on.
Port forwarding allows you to access your home devices remotely and contribute to faster torrent speeds.
With a dedicated IP that will be only yours to use, you can enjoy full anonymity online, work from home safely, easily access your accounts, see fewer captchas, and protect your IoT devices.
According to the users, with PIA, you can access Binance from the US without losing your internet connection or getting “connection refused” error messages.
More about PIA:
32,000+ servers in 101 locations across 78 countries
No traffic or request logs
Up to 10 simultaneous connections
Risk-free 30-day money-back guarantee
24/7 live chat customer support
Considering everything that Private Internet Access offers, we strongly encourage you to try it out if you believe that the above features are what you’re looking for when it comes to trading crypto on Binance and for a better overall online experience.
We understand the importance of your finances, whether we talk about general online banking transactions or cryptocurrency transactions on Binance. With a powerful VPN service like PIA, you’ll get amazing protection while not affecting the speed at which you can browse the internet.
Private Internet Access
Access Binance from anywhere in the world and protect your finances using PIA.
Surfshark is operated by Surfshark LTD and is based in the British Virgin Islands, which is a plus for privacy since the country has no obligatory data retention laws, and therefore, it’s a perfect location for a VPN provider.
This VPN is the most affordable on this list, and when you combine that with the many awesome features it provides, you should definitely consider giving it a try since it will make your trading experience on Binance safer and smoother.
And the best part is that you can protect any number of household devices by sharing your VPN account. This is actually a very unique feature among the best VPNs to use with Binance in 2024.
With a single subscription, you and your family members or relatives can use this VPN to access Binance from the USA.
Surfshark has a user-friendly interface; you can set it up on all major devices. It also provides a decent number of servers across multiple countries, so you’ll have many options to choose from.
Surfshark ensures your online security and privacy via military-grade AES-256-bit encryption and the WireGuard, IKEv2, OpenVPN, and Shadowsocks VPN protocols. WireGuard is sleek, modern, and secure; IKEv2 is the best, fastest choice for mobile; OpenVPN is reliable and open-source; Shadowsocks is the top choice in restrictive countries and covers your browser traffic only.
Among the main features included with a Surfshark subscription, we have a kill switch, Whitelister, Camouflage mode, MultiHop, NoBorders mode, CleanWeb (ads and malware blocker), private DNS and leak protection, P2P, and torrenting support.
The kill switch turns off your internet connection if the VPN connection drops unexpectedly; the Whitelister functions like split tunneling in that it allows you to route some of your traffic over the VPN while the rest will use the Internet as usual; the Camouflage mode or obfuscation makes your VPN connectivity look like a regular internet connection, which helps you bypass VPN blocks.
The double VPN or MultiHop adds an extra layer of security by allowing you to connect via two different VPN servers, while the NoBorders mode will enable you to use Surfshark in restrictive regions (when the client detects restrictions on your network, it automatically enables the NoBorders mode).
More about SurfShark:
3200+ servers in 65 countries
Strict no-logs policy
Unlimited devices connected simultaneously
30-day money-back guarantee
24/7 friendly customer support team
All things considered, Surfshark is a really good value for money, as it brings some unique features that distinguish it from other competitors. In fact, it’s one of the best crypto-trading software tools.
This VPN option will completely hide your IP address and obscure trading activities from your curious eyes. Plus, you can use cryptocurrencies like Ethereum or Litecoin to purchase SurfShark VPN.
As a result, if you want to bypass geo-blocking and trade on Binance regardless of your current physical location while also staying private and protected online, then look no further than Surfshark.
Surfshark
Thanks to this secure and budget-friendly VPN, start trading crypto on Binance, even if you’re outside the US.
CyberGhost VPN is owned by Kape Technologie and is located in Bucharest, Romania – a country that is outside of the 5 Eyes or 14 Eyes jurisdictions, which means that your online data wouldn’t be shared with international surveillance agencies from other countries.
This VPN is capable of bypassing firewalls and circumventing geo-blocks, and since it’s trusted by more than 15 million customers worldwide, we believe it’s the tool you can trust as well to preserve your online anonymity and protect your devices from hackers while you’re busy trading on Binance.
Cyberghost VPN is wrapped in a super-intuitive user interface, ideal for users inexperienced with virtual private network solutions. In addition to being one of the best VPNs for Bitcoin, CyberGhost VPN is optimized for streaming, gaming, torrenting, and secure browsing.
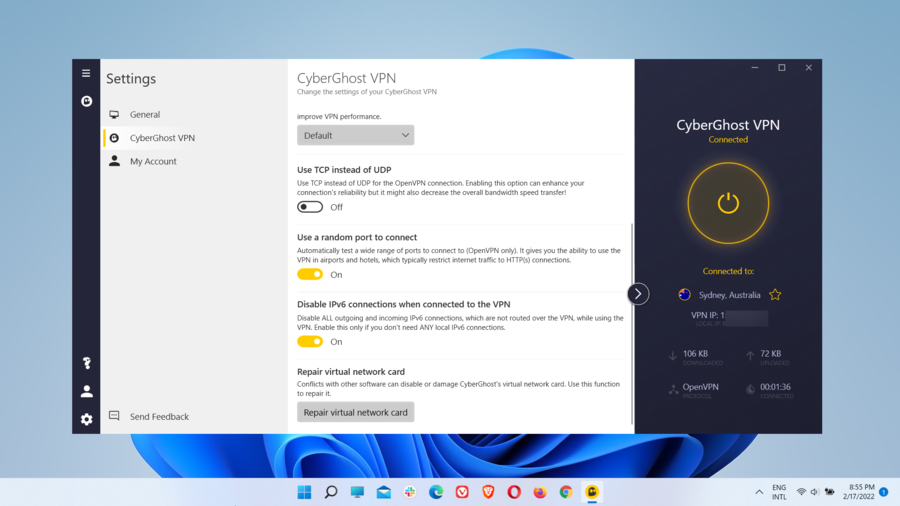
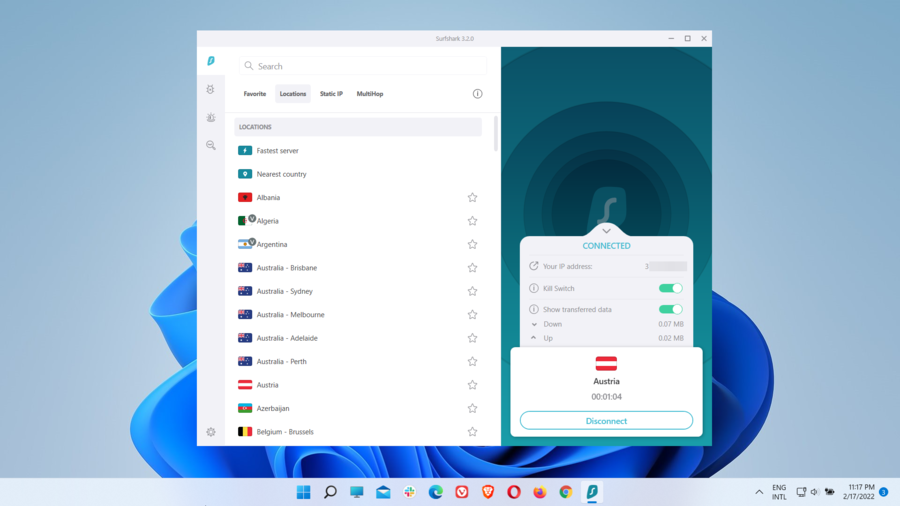
With plenty of servers spread across many countries, Cyberghost VPN will allow you to access Binance from the USA by simply connecting to such a server.
Therefore, geo-blocking should no longer concern you whether you want to trade on Binance or access any other website, online service, app, or game.
Your online anonymity and protection of sensitive data, such as financial details, are guaranteed by the AES 256-bit military-grade encryption and the OpenVPN, IKEV2, WireGuard, and L2TP/IPSec VPN protocols.
As such, potential cyberattacks, tracking, spying, and surveillance will be a thing of the past.
CyberGhost VPN comes with split tunneling, dedicated IPs, access to NoSpy servers, and support for P2P and torrenting.
Plus, thanks to an integrated kill switch, exclusive DNS servers, and DNS leak protection, you don’t have to worry about any browser leaks.
The NoSpy servers – part of a state-of-the-art global server infrastructure – differentiate CyberGhost VPN from other VPN services.
It is built to keep them safe from mass surveillance and isolated from third-party meddling.
They are independently operated at the highest security standards, meaning that only the CyberGhost team can access, control, and operate them, which reduces the risk of exposure and interference from external actors.
Also, they provide greater anonymity and security and high speeds that are great for streaming, gaming, and torrenting.
More about CyberGhost VPN:
7,200+ servers in 91 countries.
No-logs policy.
Up to 10 devices are connected simultaneously.
45-day money-back guarantee.
24/7 email & live chat customer support.
If you find the above features useful for a safe and private surfing experience in general and for trading securely and without restrictions on Binance, irrespective of your location, then you should confidently give CyberGhost VPN a shot.
Moreover, to test whether this VPN is worth every penny – and you’ll see it is – you can try it out before purchasing a subscription since it offers an all-premium feature free trial, which is not common among other VPN products.
CyberGhost
Spoof your location to access Binance outside of the US, thanks to this reliable VPN.
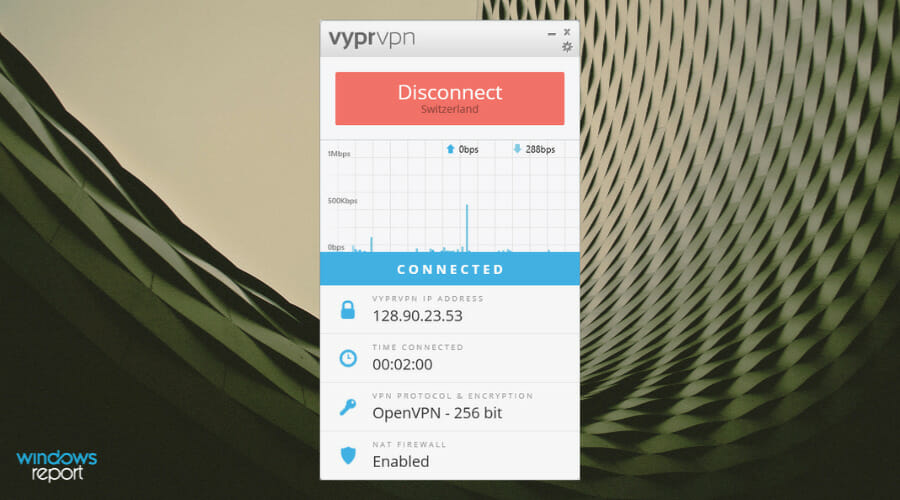
VyprVPN is owned by Golden Frog, a Switzerland-based software company that provides top-level privacy and security tools. It comprises a modern set of features that make it a top recommendation to secure Binance transactions.
With this VPN you will be able to secure your Binance transactions and keep your identity shield.
The tool hides your IP address, so no one can detect your location or any information regarding your activity.
That is important for online transactions, as the web is filled with malicious data breachers looking for weak links in your connection.
With VyprVPN, you can change your virtual location and further secure your transactions. Your online activity stays undetected, so no one can even know that you are making these transactions.
Another benefit of changing your location is that you can further increase your Crypto profit. You can get information about the markets and crypto rates worldwide and see if there are any currency differences.
VyprVPN offers its users access to over 300 000 IP addresses placed in over 70 countries across the world. So, you can really benefit from the geolocation feature and get a lot of online freedom.
VyprVPN uses a powerful VPN protocol that goes under the name of Chameleon. It combines the security and anonymity capabilities of the OpenVPN 256-bit protocol, but with higher speed rates.
The protocol ensures that you don’t send traffic information signaling your VPN in the first place.
This removes additional restrictions, as many websites and services fight against VPN usage by trying to detect and block it.
VyprDNs offers DNS protection on all its servers and implements a strong no-logs policy. They do not store any information about your activity.
To make sure your Binance transactions are always secure, you can activate the Killswitch feature in Vypyr VPN.
This feature automatically detects any change or drop in connection and blocks all traffic data until your connection is restored.
This significantly decreases the risk of leaking any data, even when you are not connected to the VPN. VyprVPN is one of the most versatile VPNs out there, providing dedicated applications for plenty of mobile and desktop devices.
Not only that, but those who don’t want to use an app can secure their connection directly from the router.
VyprVPN is an overall secure VPN that implements multiple features to ensure your connection stays private. It’s a good choice for securing your Binance transactions. Furthermore, its large server coverage allows the additional benefit of checking the international crypto market.
VyprVPN
Use this secure VPN to log in to Binance from around the world and start trading crypto.
ZenMate VPN is based in Germany and is considered the best VPN to use with Binance in 2022. It can ensure your online anonymity and free access to any website.
With this solution, you can easily access geo-restricted websites by connecting to one of the 81 server locations worldwide.
You’ll also benefit from high-speed connection and support for multiple devices. That way, it’s possible to get complete anonymity while transacting on the Binance platform.
This skillful tool promises comprehensive privacy for sensitive data and safeguards against phishing attacks or hackers.
Hence, every user can rest assured regarding their browsing history data or government restrictions due to ZenVPN’s latest privacy tools.
In addition, you have secured servers that will help you access any cryptocurrency websites you require, including Binance.
On top of that, you’re totally protected while performing financial activities online, like trading, selling, and buying crypto.
It’s possible to trade without being obstructed by regional limitations with the strong browser privacy offered by ZenMate.
So, this VPN software will completely hide your digital presence with unbreakable privacy. It can be used as a browser extension or desktop program as well.
Other key features of ZenMateVPN include:
Strict no tracking log data
Access to restricted websites and blocked content
Kill switch functionality
Unlimited bandwidth network
Available on multiple devices (Windows, macOS, Linux, or mobile)
This privacy solution gives you 100% online protection. It hides sensitive information from hackers or phishing attacks on your assets or personal data stored in your browser.
By securing your online identity with this software, you’ll have an encrypted connection to exchange coins and make investments.
ZenMate VPN
Utilize this VPN client to guard your digital information on Binance, and never think about region limitations again.
As mentioned above, due to a change in its terms of use (strict KYC and anti-money laundering restrictions), Binance no longer allows US investors to deposit and trade on its exchange platform.
Of course, there is the alternative of using Binance.US for those living in the USA, but unfortunately, this one is not even close to Binance.com, as it comes with many limitations.
Another reason to use a VPN is frequent Binance errors, like Binance IP address issues you don’t want to stumble upon when you have something urgent to do on the platform.
Can I use Binance with a VPN to enjoy its full features from the USA?
If you live in the US and still want to access Binance.com, you can use a VPN to hide your IP address, spoof your actual location, and connect to any country other than the US.
Check out our step-by-step guide below to learn how to use a VPN for Binance. Discover the best VPNs that can not only access blocked websites but also maximize your online security when dealing with financial data.
How do I use a VPN with Binance?
Using a VPN for Binance is a piece of cake when having a premium VPN that is user-friendly and intuitive to use.
Following extensive research, we’ve decided that NordVPN is the ideal choice for Binance due to its wide amount of servers, speed, and privacy features altogether.
Choose any location outside of the US. Choose an available Binance country like UK, Spain, Germany, Italy, or France.
Go to Binance.com and start trading!
Try to clear your cache before accessing the platform and use a VPN server from the same location. Otherwise, because the platform detects irregularities in connection, you may end up with more errors like Binance Alerts not working.
The tool has a Personal use plan that can secure multiple devices. Alternatively, it offers a Business plan that includes additional features and benefits. Both include a free trial.
What should I look for when choosing a VPN for Binance?
To access Binance from any country you live in, consider specific attributes that will help you bypass regional limitations or government restrictions.
Hence, the following key points will help you select the most-suited VPN for Binance:
? Good worldwide server coverage
? Powerful encryption and no-logs privacy policy
?️ Extra measures of security such as a Killswitch or DoubleVPN
⚡ High-speed servers
? Ability to surpass Binance’s VPN detection mechanics
How to access Binance with a VPN from Ontario?
The world’s biggest crypto exchange, Binance, closed its doors to users from Ontario in 2021. That happened after the Ontario Securities Commission (OSC) took action against it earlier that year.
Although Binance still doesn’t allow Canadians from this area to trade on the platform, doing so is still possible with the use of a VPN.
These services conceal your IP address and give you access to any site you want.
Here’s how to do it with ExpressVPN, one of the top VPN options in Canada.
Purchase an ExpressVPN plan from the company’s website.
Download and install the app on your device.
Log into your account with your credentials.
Connect to a server in a country where Binance works.
Visit binance.com and log into your account. You can now trade on the platform without any restrictions.
How to access Binance with a VPN from Singapore?
At the end of 2021, Binance closed its digital token exchange in Singapore. Now, only a few cryptocurrency services are licensed entities in the city-state.
Fortunately, you can still trade on the platform using a VPN.
In this test, we relied on Surfshark to switch our IP to one in Thailand, one of the closest locations to Singapore, where Binance works. Here’s how to do it:
Purchase a plan from the Surfshark website.
Download the app and install it on your device.
Log in with your Surfshark credentials.
Connect to a server in a suitable location. Thailand is a great option as it’s nearby.
Log into your account on the Binance platform and start trading.
How to access Binance with a VPN from Malaysia?
Malaysia is another location where Binance isn’t licensed or regulated if you use a VPN to mask your IP address when trading, that can also help there.
In this test, we accessed Binance through one of NordVPN’s servers in Thailand.
Choose the NordVPN plan you want to buy.
Download the app and install it on your device.
Log in using your account information.
Connect to a server in a country that Binance operates in. Thailand is, again, a great option.
Trade freely on Binance.
All things considered, we understand that you want to use the Binance cryptocurrency exchange platform while located in the USA.
But at the same time, we advise you to do it with caution and take the necessary precautionary measures to prevent any loss of money. To keep you safe from losses because of market fluctuations or hacking activity, here is a short list of functional materials for you and any other crypto-trader:
Since you can bypass a lot of geographical fences by using a virtual private network, you should also take a look at our list, which includes the best VPN for Windows 10 PCs, and pick a solution for general usage.
Should you have any questions about all you have read, you can write us a comment in the section below.
Despite ongoing objections from the US Federal Trade Commission’s, Microsoft is plowing forward with its acquisition of Activision Blizzard and has begun its consolidation of executive bureaucracy starting with a farewell to ABK’s CEO Bobby Kotick.
In an internal memo reported on by The Verge, Head of Xbox Phil Spencer bids Kotick adieu while both thanking him for his “invaluable contributions to this industry,” and laying forth an upcoming reorg that beings to blend Microsoft executives among Activision duties while preserving much of ABK’s top brass.
Instead of sourcing a single Microsoft executive to become a one-for-one CEO replacement of Kotick at Activision, the company has dispersed the duties among ABK president and former Microsoft executive Mike Ybarra, Activision publishing president Rob Kostich, and ABK vice chair Thomas Tippl, who all now report to Microsoft Studios president Matt Booty for the time being.
Booty’s plate just became a bit fuller as he recently took on managing Microsoft’s other recently acquired studios Bethesda and ZeniMax.
Fortunately, soon Booty will be steering the Activision Blizzard King ship with tried-and-true upper management already established by the publisher as Microsoft has retained the previous executive order within the company.
However, some immediate notable shifts between Microsoft and Activision’s executive branch now include communications officer Lulu Meservy departing ABK alongside vice chairman Humam Sakhnini of Blizzard and King; both leaving in the next two months with a few other executives planning to sail off sometime in March 2024.
Among the ABK top brass that remains are chief admin officer Brian Bulatao, chief people officer Julie Hodge, CFO Armin Zerza, and chief legal officer Grant Dixton who all now report to their counterparts on the Microsoft Games business.
Ending the year on a reassuring note to lower-level employees concerned about layoffs and overlapping consolidations, Spencer also mentions that “for most of you, your day-to-day work will remain the same-it’s still business as usual in bringing more groundbreaking experiences to more players around the world.”
Earlier today, Activision CEO Bobby Kotick formally announced that Friday December 29th, 2023, will be his last day at Microsoft Gaming. Under Bobby’s watch, Activision Blizzard in its many incarnations has been an enduring pillar of video games. Whether it’s Call of Duty, World of Warcraft, Candy Crush Saga or any number of other titles, his teams have created beloved franchises and entertained hundreds of millions of players for decades. I’d like to thank Bobby—for his invaluable contributions to this industry, his partnership in closing the Activision Blizzard acquisition and his collaboration following the close—and I wish him and his family the very best in his next chapter.
With Bobby’s impending departure, we are taking the next step in aligning Activision Blizzard with Microsoft Gaming, by making the following organizational changes:
Thomas Tippl (Vice Chairman, Activision Blizzard), Rob Kostich (President, Activision Publishing), Mike Ybarra (President, Blizzard Entertainment) and Tjodolf Sommestad (President, King) will report to Matt Booty (President, Game Content and Studios). The leadership teams for Activision Publishing, Blizzard and King will remain in place, with no changes to the structure of how the studios and business units are run.
Brian Bulatao (Chief Administrative Officer) will report to Dave McCarthy (Chief Operations Officer, Microsoft Gaming).
Julie Hodges (Chief People Officer) will report to Cynthia Per-Lee (Corporate Vice President, Gaming Human Resources).
Grant Dixton (Chief Legal Officer) will report to Linda Norman (Corporate Vice President, Gaming CELA).
Armin Zerza (Chief Financial Officer) will continue to report to Tim Stuart (Corporate Vice President, Finance), as we previously announced to the Finance team in October.
Thomas, Brian, Julie, Grant and Armin will continue to help us with the transition through March 2024.
Lulu Meservey (Executive Vice President, Corporate Affairs and Chief Communications Officer) will be leaving ABK at the end of January. She has agreed to support Kari Perez (General Manager, Communications) on a leadership transition plan for the ABK Communications team, which will report to Kari. Additionally, Humam Sakhnini (Vice Chairman, Blizzard and King) will depart at the end of December. We thank Humam and Lulu for their leadership over the past year.
For most of you, your day-to-day work will remain the same—it’s still business as usual in bringing more groundbreaking experiences to more players around the world. At the leadership level, these changes will provide the clarity and accountability that is necessary to achieve our ambitious goals and foster a culture that is welcoming, empowering, and committed to Gaming for Everyone. We have an exciting 2024 lineup of games across Activision, Bethesda, Blizzard, King, and Xbox Game Studios, and I know that we all look forward to sharing more details with our player communities when the time is right.
Phil
Kotick’s departure from Activision following Microsoft’s successful acquisition of the company was expected by many in the industry. At the start of the regulatory gauntlet, the phrase “Golden Parachute” accompanied Kotick’s name in stories speculating what would become of the embattled CEO facing both personal and corporate harassment cases that initially led to an opportunity for Microsoft to pitch its bid for the game publisher.
What becomes of Kotick beyond his departure from Activision is unknown, but now in full control of ABK, Microsoft is promising an “exciting 2024 lineup of games across Activision, Bethesda, Blizzard, King and Xbox Studios.”
Today, we’ll show you the best VPNs for Eero routers. These options are easy to set up, provide online anonymity, and help bypass geographic restrictions.
While Eero supports VPN passthrough, VPNs can’t be installed directly on the router, so choosing the right client is crucial.
What are the best VPNs to install on Eero routers?
NordVPN lets you connect to more than 5,400 servers in 59 countries to access your devices securely. It’s compatible with Windows, macOS, Android, and iOS.
It supports manual OpenVPN configuration. Therefore, you’ve got a winning combination: the router ensures strong Wi-Fi for all your devices, and the VPN secures every smartphone, laptop, or gadget connected to your Eero router.
More about NordVPN:
OpenVPN and NordLynx (a modded version of WireGuard)
Private Internet Access takes our top spot for eero routers. This VPN has over 35.000 servers located in 90+ countries all across the globe, making it ideal to circumvent geo-blocks.
It even accepts Bitcoin or gift cards from Starbucks if you want your subscription to be untraceable.
More about PIA:
No IP, DNS, or WebRTC leaks
Latest encryption protocols, including OpenVPN and WireGuard
Split tunneling
Opera, Chrome, and Firefox extensions
Protect up to 10 devices at a time
24/7 live chat support
30-day money-back guarantee
Private Internet Access
Employ the latest encryption protocols to secure your web activity with Private Internet Access.
Surfshark is another reliable VPN service that can be installed directly onto your router. It has over 3000 servers worldwide.
The VPN is also highly secure and protects your identity and browsing activity. It has a strict no-logs policy, and it uses powerful end-to-end encryption.
Other key features include:
Unlimited number of platforms/devices for one account
OpenVPN
Hides your IP address
Adblocker and anti-tracker
Surfshark
Connect Surfshark to your Eero router and enjoy private and secure browsing on all your devices.
CyberGhost VPN – Powerful encryption and public Wi-Fi protection
Eero’s plug-and-use flexibility lets you easily build a setup for all your network devices, but CyberGhost is another VPN that steps in to guarantee their security.
CyberGhost supports DD-WRT, so it can be tweaked to support eero. Moreover, it offers a nice mix of server locations – over 6400 in 89 countries, and the numbers rapidly change.
More about CyberGhost VPN:
Confirmed no-log policy
OpenVPN with up to 256-bit AES encryption
It unblocks basic websites and streaming services like Amazon Prime and Netflix
Available apps for Windows, Mac OS, Linux, iOS, Android, and Amazon Fire TV
It allows unlimited torrenting
Great quality service
CyberGhost
Secure your Eero network with CyberGhost—DD-WRT support, 6400+ servers, and top-notch encryption!
ExpressVPN – Leading VPN technologies for fast and secure browsing
ExpressVPN is a great fit for Eero routers because it supports OpenVPN manual configuration mode.
As such, every device on your network can take advantage of its benefits.
For example, it has a Smart DNS feature called MediaStreamer, which enables you to unblock streaming services on devices without native VPN support, such as Xbox, PlayStation, and even your Apple TV or Nvidia Shield TV.
More about ExpressVPN:
Countless servers in key locations worldwide
Superior security
Compatible with desktop and mobile platforms
Web extensions for both Chrome and Firefox
Customer support is available 24/7 to help you get started
30-day money-back guarantee
ExpressVPN
Enhance your Eero network with ExpressVPN—unblock streaming, enjoy top security, and 24/7 support.
IPVanish is a powerful United States-based VPN worthy of a place on our list Besides having custom software apps for Windows, Mac, Amazon Firestick, and mobile platforms, it is also ideal for Eero routers.
Note that it supports no less than 10 simultaneous connections and unlimited installations, so you’ll never be in the position of choosing No less important, this VPN allows torrenting on all servers, and its integrated kill switch always prevents traffic from leaking.
Another reliable VPN that includes OpenVPN support is VyprVPN. The client has dedicated guides in its support section explaining how to install it on routers.
Thanks to its zero log policy and unlimited bandwidth, it’s an ideal candidate to pair with Eero routers. It will let you secure your traffic on all devices without the risk of running out of data.
VyprVPN has 700+ VPN servers all around the globe and gives users the possibility to browse privately with the help of IP masking and AES-256-bit encryption.
Other key features of VyprVPN include:
Streaming optimized servers
NAT Firewall
24/7 customer support
Secure kill switch
Public Wi-Fi protection
VyprVPN
Route your eero traffic through a secure VyprVPN tunnel for fast and private connections!
All these VPNs are capable of holding a good connection regardless of how many devices you connect to Eero.
They include OpenVPN support, allowing you to install them to a second routing device you can bridge with Eero.
Note that all your devices will be connected to the same VPN server. If you want access to multiple locations and to change up servers, you can create separate VPN profiles for each server.
Decide on a good router for VPN. For this guide, we decided to use a DD-WRT Router.
Get a VPN client and create an account. We decided to installNordVPNon Eero because it’s secure and fast.
In your web browser, open theDD-WRT Administrative Interface.
Go to Setup.
Select Basic Setup.
Scroll to Network Addresses Server Settings (DHCP) and enter the following information:
Static DNS 1: 103.86.96.100
Static DNS 2: 103.86.99.100
Static DNS 3: 0.0.0.0 (default)
Use DNSMasq for DHCP: Checked
Use DNSMasq for DNS: Checked
DHCP-Authoritative: Checked
Go to Setup>IPV6.
Check the box for Disable and save your settings.
Go to the Services Tab and select VPN.
Scroll to OpenVPN and set Start OpenVPN Client to Enable.
You will have to enter a server address for the NordVPN server you want to use and download its corresponding OpenVPN configuration files.
Fill in the DD-WRT form with the corresponding information. You can find the best NordVPN server for your configuration, plus downloadable OpenVPN files on the official website.
Open your Nord Account in a web browser and select NordVPN from Dashboard.
Use the service credentials from Advanced configuration for your account and password.
Enter your credentials and the OpenVPN server configuration info to your DD-WRT panel and save your settings.
Enable Bridge Mode on DD-WRT and your Eero router.
To secure your entire network with a VPN, you must create a VPN pass-through for Eero. The router doesn’t support native VPN installs, so you need a secondary router that has support for VPN.
At this point, both devices should reconfigure and connect through a VPN.
How to set VPN passthrough on Eero?
After installing your VPN client to your router, you must connect it to Eero to secure your connection. You must enable the Bridge mode in your Eero application to do this.
In your eero app, open the Settings panel.
Select Advanced.
Go to DHCP & NAT.
Enable Bridge or Manual.
Save your settings.
Once the bridge mode is activated, your Eero router can connect to your secondary routing device (which is connected to A VPN).
Got any further questions about these VPNs for Eero routers? Take a look at our FAQ at the end of this article, or feel free to use the comments area below.
Assuming you like to keep up with trends, our Routers section is waiting to be discovered.
Our VPN Hub will also point you in the right direction when looking for more VPNs.
Since Eero routers don’t offer built-in VPN management, a pass-through is the only way to set them up with one. This involves using a secondary router that supports VPNs.
That said, many of the leading VPN services work flawlessly with various router models. So, you can pick any of our top 7 recommendations – NordVPN, PIA, Surfshark, etc .– and get the same great results.
For step-by-step installation instructions, check out the full guide above.
Even more, many users don’t know the differences that set VPN routers and VPN services apart. Our article dedicated to VPN router vs VPN service is definitely recommended in this case.
Trying to book tickets and got hit with Ticketmaster Error Code U533? This quick guide explains what’s causing it and how to fix it fast so you don’t miss out.
Error Code U533 it usually means your transaction was flagged as fraud, or your browser’s cache and cookies are interfering with the process.
How can I fix the error code U533 on Ticketmaster?
Before proceeding with any steps to fix the error code U533, go through the following preliminary checks:
Press F5 to reload the page and try VPN, or use a different browser to book a ticket.
Restart your device, then ensure that you have a stable internet connection and check the Ticketmaster server status.
Make sure you are only logged in on a single device.
1. Clear the browser cache & cookies
Open the preferred browser; we are using Google Chrome here.
From the top-right corner, click the three dots icon.
Select Settings.
Click the Privacy & settings from the left pane, and select Clear browsing data.
For Time range, choose All time, and put a checkmark next to Cookies and other site data, & Cached images and files.
Click Clear data.
Next, click Extensions from the left pane.
Go to the unwanted extensions, disable them using the toggle, or click Remove to delete them permanently.
If nothing helped you fix the error code U533, you need to reach out to the Ticketmaster customer support team using the 888-731-4111 number and talk to the fraud team for assistance.
To conclude, the error code U533 on Ticketmaster can be fixed by clearing the cache and cookies and removing malicious extensions from your browser.
Many users have encountered the No coredump target has been configured. Host core dumps cannot be saved error after making changes to disk or installing ESXi and adding into Center.
In this guide, we will delve into WR experts’ recommended solutions to fix the issue right after discussing some of the common reasons behind the error.
What causes the No coredump target has been configured issue?
This error usually occurs if no core pattern is defined, you have insufficient permissions, or have storage space issues.
How can I fix the No coredump target has been configured issue?
1. Adjust the allowCoreDumpOnUsb boot variable
Press Shift + 0 during the ESXi boot to get to the boot options.
Now locate allowCoreDumpOnUsb, change its value to allowCoreDumpOnUsb=TRUE, and hit Enter to continue booting.
Once the boot options are updated, open an SSH session to the ESXi host.
Type the following command to verify if the core dump file was created on the VMFS-L filesystem within OSDATA: esxcli system coredump file list
2. Configure the remote core dumps on an ESXi host
First, connect to the ESXi host via the vSphere Client or direct console.
Type the following command to list VMkernel interfaces and identify the one used for communication with the Center Server appliance: esxcfg-vmknic -l
To set remote core dumps, which specifies the VMkernel interface, the port for remote core dumps collector and vCSA’s IP address: esxcli system coredump network set --interface-name vmk0 --server-ipv4 192.168.15.8 --server-port 6500
Copy & paste the following command to enable remote core dumps: esxcli system coredump network set --enable true
To get & check the network settings for core dumps, type the following commands one by one to confirm the configuration:
esxcli system coredump network get
esxcli system coredump network check
Copy & paste the following commands one by one to disable and remove local core dumps:
esxcli system coredump file set --enable false
esxcli system coredump file remove --force
Type the following command to ensure there are no more local core dumps: esxcli system coredump file list
Now to save the configuration changes for future reboots, copy & paste the following command: /sbin/auto-backup.sh
On the ESXi Host to Configuration, then select Software.
Select Advanced Settings.
Remove the checkmark next to VMkernel.Boot.autoCreateDumpFile, then click OK.
The core dump file needs a volume larger than 4 GB, so make sure it has the required space to avoid the error in the future as well.
Launch the vSphere Client, and choose the affected ESXi host.
Go to the Configure tab, then select System.
Choose Advanced System Settings, and click Edit.
Look for UserVars.SuppressCoredumpWarning, change the value of the string to 1, then click OK.
Next, search for VMkernel.Boot.allow and locate VMkernel.Boot.allowCoreDumpOnUsb.
Change its value from False to True.
Next, connect to the host via SSH, then look for available storage locations, and follow these steps:
Copy & paste the following command and hit Enter: esxcli storage filesystem list
To create the coredump file, type the following command after replacing DATASTORE and HostName: esxcli system coredump file add -d DATASTORE -f HostName -s 2000
Type the following command to verify if the coredump file was created: esxcli system coredump file list
Copy & paste the following command to set the values to false: esxcli system coredump file set -s -e=True
4. Create a dump file (If using iSCSI storage for ESXi hosts)
First, connect to the ESXi host via the vSphere Client or direct console.
Go to Configure, then Security Profile.
Choose Services.
Locate SSH from the list and click Options.
Click Start.
Now, use an SSH client like PuTTY to connect to the ESXi host via IP address or hostname.
Once connected via SSH, type the following command to confirm the core dump file location & filename after replacing your_datastore_name and the_dumpfile_name with your ESXi hostname, then press Enter: esxcli system coredump file add -d *your_datastore_name* -f *the_dumpfile_name
Copy & paste the following command to set the newly created sump file as your active dumpfile after replacing the your_datastore_name & the_dumpfile_name: esxcli system coredump file set -p /vmfs/volumes/*your_datastore_name*/vmkdump/*the_dumpfile_name*.dumpfile
Next, confirm your dump file is in place, and press Enter: esxcli system coredump file list
So, to get rid of the No coredump target has been configured message, first try adjusting the allowCoreDumpOnUsb boot variable during the reboot process, then configure the remote core dumps on an ESXi host.
Microsoft has moved swiftly to fix a bug that was causing broken Wi-Fi connections on public, enterprise and educational networks with the latest Windows 11 updates.
Users reported the issue after installing the December Patch Tuesday updates KB5032288 and KB5033375. Universities and businesses were most affected, with users reporting slow and broken wireless connections. Windows 11 users on home networks were apparently unaffected, as were Windows 10 users. Microsoft remedied the issue in a little more than 24 hours via its Known Issue Rollback (KIR) system.
For those unfamiliar, Known Issue Rollback allows Microsoft to quickly revert a single, targeted problematic fix without the need for users to uninstall entire updates or download patches. Known Issue Rollback was introduced with Windows 10.
Microsoft has confirmed the recent updates were the source of the issues.
Microsoft has received reports of an issue in which some Wi-Fi adapters might not connect to some networks after installing KB5032288. We have confirmed this issue was caused by KB5032288 and KB5033375. As reported, you are more likely to be affected by this issue if you are attempting to connect to an enterprise, education, or public Wi-Fi network using 802.1x authentication. This issue is not likely to occur on home networks.
Affected users need not do anything to implement Known Issue Rollback (save perhaps a device reboot), and at this point all Windows 11 PCs should be back online.
You may get the Array.prototype.map() expects a return value from arrow function error when using the Array.map() arrow function.
The error appears when the map function returns nothing or if the filter method is used wrongly. Besides, users sometimes mistakenly set up for Array.forEach() instead of Array.map(), which triggers the error.
How do I fix Array.prototype.map() expects a return value from arrow function?
Before we start with the slightly complex solutions, try these quick ones:
Make sure you are first filtering the data and then mapping over the array that returns. To do that, first use the filter function and then the map function.
Verify that the filter function has a return statement.
1. Use the Array.prototype.forEach() function
If a return value is not required from the function, and the array created by Array.prototype.map() is not used, then go with the Array.prototype.forEach() function.
The latter doesn’t return any special value and is the best choice in such cases. To learn more about Array.prototype.forEach(), check the Mozilla developer document.
2. Replace {} with ()
Using {} in the function will create an arrow block that requires an explicit return statement. If that’s not the case with your code, replace it with ().
Now, you will have an implicit return and the Array.prototype.map() expects a return value from arrow function error will be fixed.
Another approach is to return a null value if the provided conditions don’t match. To do that, add the following toward the end, right before the closing parenthesis: return null;
4. Use Array.prototype.filter() instead
If it requires filtering, you should consider using Array.prototype.filter() instead of Array.prototype.map(). This will create a copy of the elements that pass the requirements set by the function.
These are all the ways to fix the Array.prototype.map() expects a return value from arrow function error. Remember, you don’t necessarily have to use the map() function each time. Given the situation and whether a return value is required, switch to filter() and forEach().
NPM errors often occur because of broken dependencies or misconfigured packages so you might see a message like this: NPM err! could not determine executable to run.
This means that the NPM command line tool was unable to find an executable file in your path. Usually, it’s your NPM version causing the conflict.
No matter the cause, with the steps below you should be able to fix it.
How to fix the NPM err could not determine executable to run
Start by making sure all the files needed are in your git depository, and check for typos or missing dependencies. Also, verify that you’re running an updated version of your NPM and upgrade if necessary.
If those won’t cut it, follow the more advanced steps below:
1. Set the path variable
Hit the Windows key, type PowerShell and click Run as administrator.
Type and run the following command: export PATH=~/.npm-global/bin:$PATH
This is a common problem when you install NPM globally, but then try to run it in a subdirectory.
NPM uses the Path environment variable to determine where the global node modules are located. If you’re using a package.json file, it is possible that your current path doesn’t include the global directory.
Once you’ve set the path, you should be able to run any installed package’s executables without needing to specify their full path every time.
2. Downgrade your NPM version
Hit the Windows key, type PowerShell and click Run as administrator.
Type and run the following command to check your current NPM version: node -v
Next, type in the following command to downgrade to a specific version. Remember to replace version with the version number: npm install -g npm@version
Sometimes, your project dependencies require an older version of NPM to run properly. Further, upgrading to newer versions immediately they’re released can often cause issues as they’re not yet stable enough.
Hit the Windows key, type PowerShell and click Run as administrator.
Type and run the following command. Remember to replace npm with the package name: npm uninstall -gnpm
Hit the Windows + E keys to open File Explorer.
Go to or paste the following path in the address bar: C:\Users\AppData\Roaming\npm
Delete the npm folder.
Go back to your command line and enter the following command to reinstall a compatible version. Remember to replace npm with the package name: npm install -g npm
Uninstalling NPM will remove all packages and their configuration files from your system. This way, if there were any corrupt files causing the NPM err could not determine executable to run, they will be recreated with a fresh install.
Tips to prevent NPM errors
Use a package manager – These tools allow you to manage dependencies, install them locally, and update them when new versions are available.
Check your dependencies – If one of your dependencies has a different version number from what’s listed, there will be compatibility issues.
Keep your packages updated – Older versions might contain bugs that cause problems with NPM commands unless otherwise stated.
Use a package-lock file – When creating a new project or updating dependencies, a package-lock file will keeps track of all the packages installed and prevent conflicting versions from being installed.
NPM is a very powerful tool, but with great power comes great responsibility. The tool can also be somewhat unpredictable and error prone. You may encounter the module not found error but with the above tips, you can reduce the chances of running into such issues in future.
Installing NPM packages has been made easier especially with package managers. Still, there will be times when you screw it up by installing the packages incorrectly. Hopefully, this article has succeeded in helping you find a solution to your problem.
If you’re a developer, we’ve lined up a few front-end software other than NPM that may come in handy depending on your skill level and framework of your project.
We’d like to hear about your encounters with NPM and what you would do in a similar situation. Drop us a line below.
Many users have found that MyFiosGateway is not working and doesn’t redirect to the router settings. For those who managed to access the admin panel, it showed that the webpage was not secure. Some even had a certificate error on MyFiosGateway.com.
This is usually the case when you use the incorrect address, there are problematic extensions installed, the browsing data is corrupt, the date and time are not set correctly, or the network settings are misconfigured.
What can I do if MyFiosGateway is not working?
Before we start with the slightly complex solutions, try these quick ones:
Restart the router and device, then try again. Also, make sure you are connected to the Verizon router when trying to access the router settings.
Use the IP address, 192.168.1.1, instead of www.myfiosgateway.com.
Switch to Incognito (Ctrl + Shift + N) or the browser’s Private mode and check for improvements.
Tip
For browser-based solutions, we are using Google Chrome, though the steps remain the same for all Chromium-based browsers. If you are using another browser, check the official website for the exact steps.
1. Clear the browsing data
Launch the browser, click the ellipsis near the top right, and then select Clear browsing data.
Now, select All time from the Time range dropdown menu, tick the checkboxes for Cookies and other site data and Cached images and files, then click on Clear data.
Relaunch the browser and verify whether MyFiosGateway is still not working.
2. Remove the browser extensions
Launch the browser, click on the Extensions icon near the top right, and select Manage extensions.
Individually disable the toggle for the extensions listed here, and after each, check whether the web address becomes accessible.
Once it works, click the Remove button under the extensions last disabled.
Again, click Remove in the confirmation prompt.
3. Set the correct date and time on the device
Press Windows + I to open Settings, go to Time & language from the navigation pane, and click on Date & time.
Enable the toggles for Set time zone automatically and Set time automatically, and check for improvements.
If that doesn’t work, disable the toggle for both, and select your Time Zone (region) from the dropdown menu.
Now, click the Change button next to Set the date and time manually.
Set the correct date and time from the dropdown menus and click on Change.
4. Reset the network settings
Press Windows + I to open Settings, navigate to Network & Internet from the left pane, and click on Advanced network settings.
Click on Network reset under More settings.
Click the Reset now button.
Finally, click Yes in the confirmation prompt.
A reset will reconfigure the settings, remove any misconfiguration, and clear the corrupt DNS cache. Remember, resetting the network setting also helps if the router won’t connect to the Internet.
5. Temporarily disable the firewall
Press Windows + S to open Search, type Control Panel in the text field, and click the relevant result.
Click on System and Security.
Now, click on Windows Defender Firewall.
Select Turn Windows Defender Firewall on or off from the left pane.
Choose Turn off Windows Defender Firewall (not recommended) under both Private network settings and Public network settings, then click on OK to save the changes.
Finally, try to access MyFiosGateway or 192.168.1.1 and check whether it is working.
We recommend you don’t disable the firewall for long when unable to access the router page. Re-enable it as soon as you are done with the changes. And while the firewall is turned off, do not access any unreliable websites or run third-party apps.
You can also reset the router if the previous solutions don’t work. For most models, there’s a small reset button at the back. Hold it or press the button with a pin for 15-30 seconds to complete the reset.
Factory reset button on the router
If your router doesn’t have a reset button, check the manual or the manufacturer’s website for the exact steps.
7. Ignore the warning
On the MyFiosGateway security warning screen, click on Advanced.
Now, click on Proceed to www.myfiosgateway.com.
Often, the security warning appears because the web address has outdated certificates, but it’s still safe since you are not accessing any third-party servers. But make sure to verify the web address before bypassing the warning.
By now, you should have got MyFiosGateway working if it was not earlier. Remember, www.myfiosgateway.com is not a separate website but simply redirects users to the router’s admin panel. For the login details, you can refer to the sticker on the router.
When running a Symphony app, users often get the An exception occurred in the driver: could not find driver error followed by the configured driver path. This is the case when the app uses the MySQL database.
The error usually appears when MySQL is not installed, you have incorrect file names, critical files are missing or stored in the wrong directory, or the required extensions are not installed or activated.
How do I fix the An exception occurred in the driver error?
Before we start with the slightly complex solutions, try these quick ones:
Make sure you have saved the .env.local with a period (.) before the file name and that it’s stored in the app/ directory. Both app/.env and app/.env.local need to be stored in the same directory.
Run the command inside the PHP container instead of the PC’s default terminal.
Ensure the php.ini is named as such and not php.ini-prod after editing.
1. Install MySQL and its drivers
Install MySQL by running the following command in the terminal: sudo apt install php-mysql
For those running Linux, use this command to install the missing extensions: sudo apt-get install php-mysql php-pdo
If you use Docker, use this command to install the MySQL drivers: RUN docker-php-ext-install pdo pdo_mysql
2. Activate the extensions
In the php.ini file, add the path where xampp installed the extensions next to extension_dir. For instance, it could be: C:\xampp\php\ext
If you are getting the An exception occurred in the driver: could not find driver error while running: php bin/console doctrine:database:create or symfony console doctrine:database:create
Replace 127.0.0.1 with localhost in DATABASE_URL. It finally becomes: DATABASE_URL="mysql://db_user:db_password@localhost:3306/db_name?serverVersion=5.7&charset=utf8mb4"
The solution has been confirmed to work by many users. You should try this even if both [email protected] and root@localhost are stored in the MySQL user table.
5. Reinstall PHP’s PostgreSQL and remove unused PHP versions
Remove Symphony from the computer. Check the ~/.symfony directory or any other location where it may be stored.
Now, run the following command to remove PHP’s PostgreSQL: sudo apt-get --purge remove php-pgsql
Remove the unused PHP version with this command (the version may differ in your case): sudo apt-get purge 'php5.6'
Use this command to install PHP’s PostgreSQL: sudo apt-get install php-pgsql
Finally, download Symphony from the official website for your operating system and check for improvements.
One of these solutions should have helped fix the An exception occurred in the driver: could not find driver error. Remember, the error may arise from trivial misconfigurations to major corruption, and you will have to tackle it appropriately.
YouTube Music is one of the most popular choices when it comes to listening to your favorite songs; however, if it keeps pausing on your smartphone during your music session, it could frustrate you.
In this guide, we will discuss common causes behind the issue and delve into working solutions to fix the problem once and for all.
Why does YouTube Music keep pausing on smartphones?
The songs might keep pausing if you have an unstable internet connection or an outdated version of the app.
How can I fix the YouTube Music keeps pausing on smartphone issue?
Before proceeding with any steps to fix YouTube Music keeps pausing, go through the following preliminary checks:
Verify if you have a stable internet connection, and disconnect any other Bluetooth accessories.
Close YouTube Music on all your devices, then turn off low power mode & data saving options.
Disable Autoplay and check your YouTube Music subscription.
1. Force close the app
Android
Tap Settings from the home screen.
Choose Apps from the next page.
Tap App Management.
From the list of apps, locate and select YouTube Music.
Tap on Force stop to close all the running instances.
iOS
Swipe up from the bottom of the screen to view all the opened apps.
Next, swipe up YouTube Music and close it. Now tap on the icon to launch the app again.
2. Update the app
Android
Locate the Google Play Store app from the home screen.
Click your profile and choose Manage apps & device.
Tap Updates available.
Look for the YouTube Music app and tap Update.
iOS
Locate the App Store app from the home screen.
Tap the profile icon.
Under Upcoming Automatic Updates, locate YouTube Music, then Choose Update.
3. Clear the app cache
Android
Tap Settings from the home screen.
Choose Apps from the next page.
Tap App Management.
From the list of apps, locate and select YouTube Music.
Tap Storage usage.
Now, tap Clear cache to delete the app cache, and check if the issue reappears.
If it does, repeat the steps and tap Clear data this time.
Tap Delete to confirm the action.
iOS
Go to Settings from the home screen.
On the Settings page, tap General.
Next, choose iPhone Storage.
Tap YouTube Music.
Click Offload App.
Tap the Offload App option again to confirm the action.
Once you have deleted the cache and data, you need to sign in to the app again, so keep your credentials handy.
Select the Unrestricted from the Manage battery usage options.
Click Allow to confirm the action.
5. Reinstall the app
Android
Locate and tap the app from the home screen, then select Uninstall.
Open the Google Play Store, type in YouTube Music in the search bar, and click Install to reinstall the app.
iOS
Locate and tap the app from the home screen, then choose Remove app.
Open the App Store, type YouTube Music in the search box, then tap Get or Install.
If you want to download the YouTube app for your PC to enjoy non-stop music and other interesting content available, we have a detailed guide for you.
6. Update the OS
Android
Go to the Settings app from the home screen.
Tap About device.
Tap on the operating system version to check for updates.
If available, tap Download and Install.
iOS
Go to the Settings app from the home screen.
Tap General.
Select Software Update.
Tap on Update Now.
If nothing worked for you, you can click Help & Feedback> Contact us on your YouTube Music app for further assistance.
To conclude, you need to use a stable internet connection, reconnect Bluetooth accessories, and turn off low power & data-saving modes.
Also, you can check for updates for the app and the operating system, then clear the app cache & data or reinstall the app to fix the issue.
If you are having the same issue on your Windows PC, we have a detailed guide on solutions to fix YouTube Music not working.
In case background playback from an unsupported region is not available, we suggest you use one of the best VPNs for streaming.
Did we miss a step that helped you fix the YouTube Music keeps pausing on smartphones issue? Don’t hesitate to mention it in the comments section below. We will happily add it to the list.
If you are getting error code 403-1000 Access Denied while trying to stream live sports events or watch highlights on Fox Sports, this guide can help!
We will discuss the common causes behind the error and offer WR experts’ recommended solutions so you can watch the sports events without any issues.
What causes error code 403-1000?
This network error could occur due to incorrect login credentials or expired subscription. Moreover, your flaky internet connection or the server having technical issues could be to the reason.
How can I fix error code 403-1000 on Fox Sports?
Before moving to the detailed instructions to fix the error 403-1000, make sure you perform these checks:
Restart your device & router, then verify if you have a stable internet connection, and try using a reliable VPN.
NOTE
You can use the below-mentioned solutions on all devices, whether you use the Fox Sports app or its web version.
1. Clear the cache
Android
Tap Settings from the home screen.
Choose Apps from the next page.
Tap App Management.
From the list of apps, locate and select Fox Sports.
Tap Storage usage.
Now, tap Clear cache to delete the app cache, and check if the issue reappears.
If it does, repeat the steps and tap Clear data this time.
Tap Delete to confirm the action.
iOS
Go to Settings from the home screen.
On the Settings page, tap General.
Next, choose iPhone Storage.
Tap Fox Sports.
Click Offload App.
Tap the Offload App option again to confirm the action.
Once you have deleted the cache and data, you need to sign in to the app again, so keep your credentials handy.
Clearing the cache of an app helps you fix other issues on your devices like the browser keeps opening itself; read this guide to learn more about the solutions.
2. Update the app
Android
Locate the Google Play Store app from the home screen.
Click your profile and tap Manage apps & device.
Tap Updates available.
Look for the Fox Sports app and tap Update.
iOS
Locate the App Store app from the home screen.
Tap the profile icon.
Under Upcoming Automatic Updates, locate Fox Sports, then tap Update.
Locate and tap the app from the home screen, then select Uninstall.
Open the Google Play Store, type in Fox Sports in the search bar, and click Install to reinstall the app.
iOS
Locate and tap the app from the home screen, then choose Remove app.
Open the App Store, type Fox Sports in the search box, then tap Get or Install.
4. Delete browser cookies & cache (If using a browser)
Android
Launch the browser, then tap three dots.
Select History.
Tap Clear browsing data.
Choose Browsing history, Cookies and site data, & Cached images and files.
Tap Clear data.
iOS
Open the Settings app from the home screen.
Locate Safari from the list.
Click Clear History and Website Data.
For the Clear History pop-up, choose All history.
Tap Clear History.
Clearing cache and browser data can help you fix other app-related issues, such as error code 403 on Fox Sports; read this guide to learn more.
If none of these methods work for you, first try using the Fox Sports Go app for Windows; then contact the Fox Sports customer support team and explain to them the issue, and provide the details of the fixes tried for further help.
To avoid such connection errors, make sure you have a stable internet connection, an active subscription, an updated app, and the latest device operating system.
Also, check the server status of Fox Sports for tech issues and ensure you have legit credentials to log in to your account.
Did we miss a step that helped you fix the network issue? Don’t hesitate to mention it in the comments section below. We will happily add it to the list.
The WebDriver cannot be resolved to a type or ChromeDriver cannot be resolved to a type errors encountered when running a script highlight compilation issues. This is usually due to missing Selenium jar files, but a misconfigured path or similar problems can also trigger the error!
How do I fix the WebDriver cannot be resolved to a type error?
Before we start with the slightly complex solutions, try these quick ones:
Restart the device and try again.
Change the Java Compiler’s compliance level to 1.8.
Check if you are missing the selenium-java-2.53.0-srcs.jar and selenium-java-2.53.0.jar files from Selenium 2.53.0. These are not included in lib but must be included manually from the same folder.
Now, locate the downloaded .zip file, right-click on it, and select Extract All.
Go with the default extraction path and click the Extract button. To change the path, click on Browse and set a new one.
Now, move the extracted files to the preferred location.
1.2 Adding the JAR files
Right-click on the project in the navigation pane, hover the cursor over Build Path in the context menu, and select Configure Build Path.
In the Libraries tab, expand the Modulepath entry, select all the files listed here, and click the Remove button.
Now, select Classpath and click on Add External JARs.
Navigate to the path where the downloaded JAR files are stored, hold the Shift key, then select them all, and click on Open.
Once done, click on Apply and then Apply and Close for the changes to come into effect.
When compiling Selenium projects in Java, you need to add the Selenium Jar files. While doing so, make sure to get the latest stable version and also include jar files from the lib folder.
When adding the property, many users miss out on the lowercase and have parts of it in uppercase instead. Also, the path must include chromedriver as chromedriver.exe.
So, if you currently have the property as (the path is just for reference, Username is the active profile name): System.setProperty("Webdriver.Chrome.driver","/C:/Users/Username/Downloads/chromedriver_win321/chromedriver");
Change it to: System.setProperty("webdriver.chrome.driver","C:/Users/Username/Downloads/chromedriver_win321/chromedriver.exe");
This should fix the WebDriver cannot be resolved to a type error. Also, it works for ChromeDriver and Firefoxdriver since the idea remains the same.
If UC Browser isn’t allowed in your country, there are ways to download and use it despite the restrictions. Here’s a simple guide to setting up DNS and VPN to make UC Browser work seamlessly.
A powerful VPN, such as ExpressVPN, is excellent for this task. This tool will allow you to connect to any of its numerous servers, located in 105 countries, all around the world.
You can easily change your IP address to one of those countries and access and use otherwise geo-blocked content, as UC Browser might be.
ExpressVPN
Enjoy navigating the internet on UC Browser with this powerful VPN solution.
Scroll down and select UC Browser from the list of installed applications.
Tap the Uninstall icon at the bottom.
Choose Yes in the confirmation prompt.
Restart the device and then reinstall the browser from the Google Play Store.
If it still shows not allowed, the last option is to reinstall UC Browser in case you already have it installed.
5. Switch to another
When nothing else works, you should switch to a fast cross-platform browser that offers a dedicated Android app.
Also, you may consider downloading a top-rated Android emulator and running UC Browser through it from your PC. To learn more about this software, we also have a guide on how to download any video in a UC Browser, so feel free to check it out.
For any queries or to share what worked for you, drop a comment below.
Even though ASUS already has released its ROG Ally gaming handheld, the tech giant can easily transform the newly-leaked ROG 8 into another handheld device with the new ROG Tessen Mobile Controller.
This piece of hardware, leaked to us by a trustworthy source, looks like the perfect companion piece to have if you’re thinking about getting the ROG 8 phone, as it will take its gaming capabilities to the next level.
ASUS has taken the essence of the previous ROG Kunai 3 Gamepad and decided to give it a sturdy twist with additional RGB lights, capable of handling diverse gaming situations. The new ROG Tessen Mobile Controller looks more compact, and it has a firmer handgrip, but that won’t take away its versatility.
Its handgrips are expandable, and it allows for greater mobility, making it a perfect piece of hardware for every phone. It could be a wise purchase, whether you’ll own a ROG 8 or not.
It can be twisted and turned into various modes of play: you’ll have the handheld mode (perfect for the new ROG 8), the all-in-one mode, and the mobility mode, which pretty much serves all the mobile gamers out there. Plus, the ROG Tessen Mobile Controller’s additional Aura RGB lightning makes this device stand out: it’s sleek, subtle, and futuristic.
The controller can be connected to the ROG 8 phone through its wired USB-C connection plug, as you can see in the image above. This means the connection will have near zero latency, allowing for a seamless mobile gaming experience, without any sort of lags, or unresponsive behaviors.
Akin to its previous version, this controller is capable of providing real gaming experiences for mobile gamers everywhere: it combines real control keys with analog triggers and ALPS joysticks.
It will most likely come out in different color versions, but based on the exclusive images that we have, the black version is already looking incredible, as it emphasizes the subtle RGB lights without overdoing them.
When it comes to the price and the battery life, we don’t expect the ROG Tessen Mobile Controller to experience any major differences. This piece of hardware will most likely have a price of $139 to $159, and up to 6 hours of battery life in wireless mode.
Many users reported getting the unable to update local ref error when executing the Git Pull or Git Push command.
This usually happens due to a mismatch in the commit IDs or due to permission issues when the local repository is created as a different user.
How do I fix the unable to update local ref error?
Before we try more complex solutions, try restarting your PC and ensuring that you can access project files. Also, keep Git updated and check the names of the branches for mismatches.
1. Optimize the local directory
Open your console.
Run the following commands: $ git gc --prune=no $ git remote prune origin
The first command cleans up the unnecessary files. It’s recommended to run it in each repository for optimal disk usage and better performance.
The second, remote prune, command removes the old, unused remote-tracking branches.
Remember, you may have to run the second command more than once to fix the unable to update local ref error.
2. Update the reference
Start the console
Use the following command: $ git update-ref -d refs/remotes/origin/[branch name]
Here, [branch name] refers to the branch that’s throwing the error due to a Commit ID mismatch. Once done, you can continue with the Git Pull or Git Push command.
3. Check for a bad reference
Open the command line.
Run the following command: rm .git/refs/remotes/origin/master
4. Delete the corrupt or broken references after a BSOD
Open File Explorer.
Navigate to refs/remotes/origin/
Delete the references.
You can also access them by navigating to: %repo_root%/.git/refs/remotes/origin/some/branch
One of these solutions should help fix the unable to update local ref Git error. Remember, there are several underlying causes, but in most cases, the git prune command should do the trick! It works for 7 out of 10 users.
Earlier this month, the Microsoft 365 team bestowed a new PowerPoint feature for Insiders in the way of Cameo, a formatting placeholder for video layouts and templates.
What is Cameo?
While not a widespread tool for most Microsoft 365 users, those who have access to Cameo will note it’s an experience that allows live camera feeds to be embedded into PowerPoint slides. The larger selling point of Cameo for PowerPoint is that users can make adjustments to their own level of customization that includes formatting, transitions, and themes all centered around live video.
How do I use Cameo in the Office 365 desktop version?
Enroll into the Microsoft 365 Insider channel
Download and update all Office productivity suite of apps per Insider instructions
Search for Cameo in within PowerPoints ribbon menu.
Select Insert > Cameo. You should see a placeholder for the camera feed that will appear on the slide itself.
Select the Preview icon in the placeholder to turn on the camera. In a shared document, only you see your video feed.
In the Camera tab, select the area below the Preview button to select connected 3rd party cameras. Only one video feed can be used on a slide.
Make use of the customization tab to apply effects like Camera Styles, Camera Shape, Camera Border, and Camera Effects. You can also arrange slides or overlay the camera feed with the same drag-and-drop style you would any other picture or object on a slide or in the Navigation Pane.
Use the picture anchors to adjust the size and placement on the slide key combinations.
Camera feeds can also be cut-and-pasted, plus support Animations and Transitions, like Morph. Design Ideas.
Select Slide Show (in the ribbon) to present using cameo.
You can only use Slide Master view in PowerPoint for Windows and PowerPoint for Mac, so cameo placeholders can only be added to presentations on those platforms. After a cameo placeholder has been added to the layout, you can use the layout to add new slides with cameo in PowerPoint for the web.
How do I use Cameo in the Microsoft 365 web app?
Unfortunately, Cameo support via a web browser hasn’t manifested yet, and Microsoft’s doesn’t seem poised to offer it anytime soon.
However, users can still open a PowerPoint file once logged into their M365 account.
Following login, users can visit the Editing drop-down and select Open in Desktop App.
Selecting the Editing drop-down should enable drop-down and recently uploaded Downloadsto PowerPoint Insiders using either Macs or Windows PCs.
Microsoft is rolling out its Cameo feature so it may not be readily available for all M365 Insiders all at once. Insiders should be on the lookout for build numbers 2309 (16827.20278) for Windows platforms and 16.77 (23082700) for MacOS platforms.
Gaming aside, HP is set on refreshing most of its productivity lineup with new products and updates to the current ones. The main 2024 focus of the company is AI, reimagining workflows and processes with both software and hardware improvements. Here are the highlights:
HP 400 Wired Backlit Keyboard – quiet keys, 3 levels of backlit LED illumination, 12 programmable keys.
HP 430 Programmable Wireless Keypad – fully customizable numpad keypad with 5 configurable keys and swapable keycaps.
HP 690 Rechargeable Wireless Mouse – 6 programmable buttons, wireless Qi charging, and connectivity to up to 3 devices.
HP 960 Ergonomic Wireless Keyboard – split-zone layout, separate numeric keypad, and multiple ergonomic adjustments to fit your precise hand position.
HP Series 5 Monitors – 9 monitors ranging from 24 to 32 inches, 100Hz refresh rate across the board, 1500:1 contrast ratio, 2 HDMI ports on all 27-inch monitors, Eyesafe Certification.
HP Spectre x360 14 and 16 – new 9MP webcam with AI improvements and security features, OLED display with 120Hz refresh rate, Intel Core Ultra CPUs (H models thanks to new cooling technologies), Nvidia RTX graphics (up to 4050 on the 16-inch model), new NPU engine for sustained AI tasks, 4 speakers tuned in partnership with Poly
Poly Voyager Free 20 Earbuds – sleek design and small form factor.
Thanks to our trusted sources, we have detailed info on each device, including info on their capabilities, specs, and, of course, exclusive images. Let’s take a closer look at each device.
HP 400 Wired Backlit Keyboard
The HP 400 Wired Backlit Keyboard is designed for professional settings, sporting 12 programmable keys with backlit LED illumination, allowing for quiet typing.
The keyboard comes with a USB-C cable, and it will include a USB-A adapter, for faster connectivity.
HP 430 Programmable Wireless Keypad
This one is a fully customizable Bluetooth mechanical keypad, with configurable keys and swapable keycaps.
From the look of it, as you can see below, it also seems to be ultra-portable, so users will be able to take it with them anywhere they go, as it can easily fit in a pocket.
HP 690 Rechargeable Wireless Mouse
This mouse has 6 programmable buttons, it’s capable of wireless Qi charging, and it will connect up to 3 devices, through Bluetooth or Microsoft Swift Pair.
HP 960 Ergonomic Wireless Keyboard
This fantastic keyboard features a split-zone layout which greatly reduces hand muscle stress, and a separate numeric keypad, with multiple ergonomic adjustments to fit your precise hand position.
It will be a great addition to office settings, but by the looks of it, it could also be used for more professional tasks, such as coding, due to its versatility.
HP Series 5 Monitors – 9 monitors
HP is also coming with 9 monitors ranging from 24 to 32 inches, 100Hz refresh rate across the board, 1500:1 contrast ratio, 2 HDMI ports on all 27-inch monitors, and Eyesafe Certification.
These will be perfect for every situation, as each monitor has a thin design, and can be easily carried over rooms, offices, and so on.
They can be used for Windows devices, sure, but the HP Series 5 Monitors are also capable of connecting to Chromebooks, so it can be the perfect choice for those who want to transform their home offices into a work setting.
HP Spectre x360 14 and 16
HP will also debut two new Spectre x360 laptops designed for content production, media editing, and office work. The laptops come with a new 9MP webcam with AI improvements and security features, meant to keep your files safe when you’re away from them. We’re talking about features such as privacy alert, or wake on-approach.
They also come with an OLED display with 120Hz refresh rate, that will automatically dim at a glance, which means there will be a longer battery life all around.
HP Spectre x360 14 and 16 also sport Intel Core Ultra CPUs (H models thanks to new cooling technologies), Nvidia RTX graphics (up to 4050 on the 16-inch model), and the new NPU engine for sustained AI tasks, 4 speakers tuned in partnership with Poly.
All of these specs will make the laptops useful devices to have for content production, especially media editing in apps such as Photoshop, or Premiere Pro.
One important characteristic to mention is the AI-enhanced adaptable video calls, which means your video calls will automatically be enhanced with extra-security features, such as Automatic framing and Background Blur.
HP USB-C Travel Hub G3
This USB-C travel hub has plug-and-play connectivity, and it features a sturdy design with no less than 5 ports (USB-C, USB-A, and HDMI ports).
It is a universal travel hub, and most devices should connect to it.
Poly Voyager Free 20 Earbuds
With a sleek design and a small form factor, the Polu Voyager Free 20 Earbuds are capable of hybrid adaptive noise cancelling.
Plus, they have a battery life of up to 28 hours, so you won’t have to worry about recharging them often.
The HP’s productivity family also includes an array of new devices meant for gamers. Our trusted sources told us they will be unveiled at CES 2024 on the 8th of January, and we already have exclusive images and info about them.
Some of the products will be available later in the spring and summer of 2024.
HyperX has always been a trusty brand regarding headsets, but for CES 2024, the company is set to take its gaming lineup to the next level with some incredibly awesome accessories. We’ve been the first to show you exclusive images and specs with HP’s Omen Transcend 14 gaming laptop, and now we’ve got our hands on images with HyperX accessories. Spoiler: they look incredible!
HP’s Transcend family gets a brand-new addition
We’re starting things off with great news for those who love big screens: the HP Omen Transcend 16 also gets an update for 2024. Besides new Intel Core Ultra processors and up to Nvidia RTX 4070 graphics, HP’s gaming flagship also gets a new 240Hz OLED screen and many AI improvements.
The Transcend lineup is completed by the new OMEN Transcend 32 UHD 240Hz OLED Gaming Monitor. As the name implies, it’s a 32-inch gaming display with a refresh rate of 240Hz. It’s also 4K, with a peak brightness of 1000 nits (HDR). The new monitor supports both AMD FreeSync and Dolby Vision.
It uses Omen Tempest Monitor Cooling Technology to reduce burn-in, and it has KVM functions built into it, making it the first gaming monitor with independent switchable USB ports.
In terms of connectivity, it has 1 DisplayPort 2.1, 2 HDMI 2.1, 1x USB-C® upstream (Full-featured, DisplayPort Alt mode, Power delivery 140W), 3x USB-A 3.2, 1x USB-C 3.2, and 1x USB-C with for data connection (15W).
HyperX is going all out, and not just with headsets
HyperX is also bringing some gaming gear to the table, starting with three new HX3D collections:
HX3D Valkyrie Collection – for fans of the Norse Mythology and Valkyries
HX3D Werewolf Collection – self-explanatory for those who appreciate the legendary mythical creature
HX3D Nature Collection – for fantasy lovers, inspired by ethereal spirits
Each collection can be specifically designed with options for ESC keys, movement WASD keys, spacebars, headset toppers, and earcups.
Another exciting set of peripherals is the HyperX Alloy Rise Keyboard and the HyperX Pulsfire Haste 2 Mini. The Rise is a hefty 75% gasket mounted keyboard that’s customizable and has a smart ambient light sensor for the RGB backlighting.
It comes with different top plates, badge packs, and hot-swappable switches.
The Haste 2 Mini is a wireless mouse tailored explicitly for gaming on the go. Following in the footsteps of the popular HyperX Pulsefire Haste 2, Mini’s main advantages are its size (16% smaller than the Haste 2), weight (59 grams), and wireless connectivity. Both accessories come in two colors, black and white.
For console gamers, there’s the new Youth lineup aimed at a younger audience. It comprises the HyperX Cloud Mini, HyperX Cloud Mini Wireless, and the HyperX Clutch Tanto gaming controller.
Considering the lineup name, it might be a more affordable alternative to HyperX’s premium accessories. Both headsets feature multiple color options and audio safeguarding below 85dB, while the Xbox-certified (yes, it’s officially licensed by Xbox) controller comes only in black and it’s multiplatform compatible.
Finally, HyperX also offers a solution to take all these accessories with you: the HyperX Delta and Knight backpacks.
While we don’t have any info on the materials, both backpacks might be splashproof and perfect for up to 16-inch laptops. The Knight seems to be the more practical one, as the Delta focuses more on looks. Both gaming-inspired backpacks will come in black at launch.
HP’s Omen family is a real treat for all gamers who appreciate incredible performance packed in a sleek design that’s not always screaming “gaming”. The Transcend series perfectly embodies that, bringing RTX graphics and the latest CPUs from Intel in a portable, 16-inch gaming laptop.
The HP Omen Transcend 16 was an absolute banger, and based on its success, the company is preparing to launch the newest family member, the Transcend 14. The smaller format promises the same performance as the 16 in a much smaller footprint of 14 inches; frankly, it looks even better than its big brother. We’ve got our hands on some exclusive images with the Omen Transcend 14 and also some specs. Spoiler: it doesn’t disappoint in the performance department!
HP Omen Transcend 14 design and portability
The new Transcend 14 follows the same design language as the Transcend 16, with some slight adjustments. And that’s not a bad thing at all, as the Omen design was appreciated and characterized as stealthy by most gamers, making it perfect for those who also want to do some light work on the side.
Obviously, the Transcend 14 is much smaller than the 16, following the current industry trend, but it doesn’t compromise essential things such as the airflow grills or I/O (while the side grills are gone, the back grill is very similar to the Transcend 16).
The left side now houses only one USB-C (Thunderbolt) and a headphone jack (the 16 has two USB-C ports), while the right side has two USB-A ports, one more than the Transcend 16. Speaker grills remain on each side in the exact location, only smaller.
Another USB-C and an HDMI port on the middle backside complete the I/O, making it more versatile than many other competitors in this space.
Opening the Omen Transcend 14, you’ll see only two significant changes from the 16: the trackpad is now centered, and the Up/Down arrow keys are now half-keys. The keyboard is full RGB and can be controlled through the Omen software, and the webcam is in the same position as the Transcend 16.
HP Omen Transcend 14 specifications
Maybe the most crucial thing about HP’s latest gaming flagship is that the Omen Transcend 14 is marketed as the world’s lightest 14-inch gaming laptop. Judging by the slickness of the design, this may very well be true!
Another significant advantage that the 14-inch slim profile offers is portability. Pair that with the laptop’s Intel Core Ultra CPU, the Nvidia RTX graphics, and the clever airflow design, and you get an incredible powerhouse to use on the go.
As expected, you can always keep things under control with the Omen Gaming Hub, ensuring that your set temperatures and the fans’ speed remain stable. You can also customize your Omen Transcend 14 keyboard RGB directly from the hub or add accessories like the HyperX Cloud II Core Wireless Headset (which we suspect will come pre-bundled at some point).
As the name implies, the HP Omen Transcend 14 has a 14-inch screen. But considering it’s a gaming powerhouse, HP couldn’t equip it with anything other than an incredibly beautiful OLED panel with inky blacks and an excellent contrast ratio.
But that’s not the only excellent thing about it. Check the table below for full specs:
– Multiple USB ports, Thunderbolt™ 4, HDMI 2.1, headphone/microphone combo
Wireless Technology
– Intel® Wi-Fi 7 BE200 (2×2) and Bluetooth® 5.4 wireless card – Intel® Wi-Fi 6E AX211 (2×2) and Bluetooth® 5.3 wireless card
Battery Life & Power
– Up to 11.5 hours – 6-cell, 71 Wh Li-ion polymer – 140 W USB Type-C® power adapter
Weight and Dimensions
– 1637g – 313 (W) x 233.5 (D) x 17.99 (H) mm
HP’s gaming laptop will come in two colors: Shadow Black and Ceramic White. While there isn’t an official launch date or price yet, we suspect the HP Omen Transcend 14 will be officially unveiled at CES 2024.
We think the Transcend 14 has a real chance to be one of the best portable gaming laptops on the market, but what’s your take on it? The specs are enough for on-the-go gaming, so let us know in the comments section below if HP has done enough to convince you of that.
The SbPFSvc exe (executable) file is a part of the Sunbelt Personal Firewall installation and is developed by Sunbelt Software. Its program folder also contains a wide array of other executables and DLLs.
The SbPFSvc.exe file supports the third-party firewall but often conflicts with the built-in processes, causes a slow Internet connection, or leads to high CPU usage. Remember, SbPFSvc.exe is not a critical system file and can be removed safely!
How do I remove SbPFSvc.exe?
1. Manually delete the process
Though not the ideal approach, you can always delete the SbPFSvc.exe process individually from the installation folder. It’s stored in: C:\Program Files\Sunbelt Software\Personal Firewall
To delete it, press Windows + E to open File Explorer > navigate the path > right-click the SbPFSvc.exe file > select Delete > confirm the change.
2. Uninstall Sunbelt Personal Firewall
Press Windows + R to open Run, type appwiz.cpl in the text field, and then hit Enter.
Select Sunbelt Personal Firewall from the list of applications, and then click Uninstall.
Follow the on-screen instructions to complete the process.
Restart the computer for the changes to apply.
If uninstalling the Sunbelt Personal Firewall doesn’t delete SbPFSvc exe (executable), it may have been left behind. In this case, you can use an effective software uninstaller to remove all leftover files and Registry entries!
Remember, you will lose all the stored files. So, we recommend creating a backup or moving the critical files to an external USB storage before the reset.
Executables from third-party developers are known to cause issues, and it’s best that you disable startup apps to prevent such problems in the future. Also, scan the PC using the built-in Windows Security or an advanced antivirus solution for a secure Windows experience!
For any queries or to share the issues you faced with the file, drop a comment below.
The RDK-03013 is encountered when setting up the X1 Xfinity box right after the welcome screen. This is usually the case when the X1 box is not set up correctly, the connections are improper, or the TV box can’t reach the Xfinity servers.
The error message reads, Sorry, we’re having some trouble. Please tighten your cable connections then restart your TV box, which can often fix common issues, with a Restart option and the error code listed at the bottom right.
How do I fix error code RDK-03013?
Before we start with the slightly complex solutions, perform these quick checks:
Make sure the connections are proper, and re-plugin all the cables. Use the coax cable to connect the wall port to the TV box, then an HDMI cable from the box to the TV.
Check the Xfinity Status Center to verify if there is a network outage in your region.
In case you recently switched from another cable provider to Xfinity, ensure none of the previous connections conflict with the current setup.
1. Factory reset the X1 box
Press the Xfinity button on the remote, and go to the gear icon to open Settings.
Scroll down to the bottom, select Help, and press OK on the remote.
Choose System Refresh.
Select Refresh Now, and press OK to confirm the change.
Wait for the process to complete. It typically takes 10-15 minutes.
Remember, you can only use System Refresh once within a 24-hour period, but it should fix the RDK-03013 X1 streaming coax error in the first go.
2. Check the splitters
If you are using splitters, make sure they are MoCA (Multimedia over Coax Alliance) compatible, and the input and output lines are set up correctly.
Also, if there are multiple splitters connected, replace each individually and check whether the X1 error code RDK-03013 is fixed. Malfunctioning splitters can just as well trigger the error!
If the previous solutions didn’t work, it is best that you reach out to Xfinity support and ask for a technician’s visit to be scheduled. The technician will be able to better identify the problem and fix it because, in all likelihood, it’s the connection to blame.
Also, seeking professional help becomes imperative if you get RDK-03013 after trying self-installation. And that’s our recommendation too!
You never know how things were configured earlier, especially when switching between cable providers, and it’s best to seek professional help.
In the meanwhile, you can use the Xfinity Stream app on the mobile or PC. If you run into issues with that, discover some easy fixes to apply when Xfinity Stream is not working.
For any queries or to share what worked for you, drop a comment below.
A majority of exe files on your PC are tied to apps you’ve downloaded, but if you spot a cc.exe file and can’t put your finger on where it came from, you need to investigate before removing it.
What is a cc.exe file?
The cc.exe file is associated with an advertising program named Sqwire. Its main job is to collect data on your browsing habits and report back so that you can have targeted ads.
If you installed it, there’s no issue. However, this process can cause problems with your system if it starts to consume too much CPU usage or memory usage resulting in slow PC performance and other issues.
How can I remove cc.exe from my PC?
1. Uninstall the associated program
Click on the Start Menu icon, type Control Panel on the search bar, and click Open.
Select Uninstall a Program under Programs.
Find the Sqwire Program, click on it, and select Uninstall.
Confirm uninstallation in the next pop-up.
Uninstalling alone may not finish the job. Some residual files may remain behind and continue the work of the program in the background. To prevent this, ensure you remove any software leftovers.
2. Scan for viruses
2.1 System scan
Press the Windows key, search Windows Security, and click Open.
Select Virus & threat protection.
Next, press Quick scan under Current threats.
If you don’t find any threats, proceed to perform a full scan by clicking on Scan options just below Quick scan.
Click on Full scan, then Scan now to perform a deep scan of your PC.
Wait for the process to finish and restart your system.
For increased security and more advanced scanning features, you can use third-party security software, such as TotalAV. This tool will allow you to perform an in-depth scan of your whole system and provide you with additional security like real-time scanning, a powerful firewall, ransomware protection, and many more.
Open your Chrome browser and click on the three vertical ellipses at the top right corner.
Select Settings.
Next, click on Reset and cleanup then select Cleanup computer on the right.
Hit the Find button next to Find harmful software.
Wait for the scan to finish and remove any recommended software.
Not all browsers have a built-in virus scanner, so you may have to reset or reinstall your browser to rid off the cc.exe process in its entirety.
3. Run DISM and SFC scans
Hit the Start Menu icon, type cmd in the search bar, and click Run as administrator.
Type the following commands and press Enter after each one: DISM.exe /Online /Cleanup-Image /Restorehealthsfc /scannow
4. Cleanup your Registry
If the cc.exe file has been in your system for a while, there is a high chance it has accumulated invalid or unwanted registry entries. And while you can remove these entries manually, it can be hard to figure out the exact ones.
Worst case scenario, you’ll end up deleting entries you’re not supposed to and cause stability issues. To prevent these risks, we recommend using a registry cleaner.
They remove invalid registry entries, repair corrupted files, delete broken references in the registry, and optimize your PC’s performance by making necessary adjustments.
Press the Windows key, type Control Panel, and click Open.
Select Large icons as View by and click Recovery.
Click Open System Restore.
Select Choose a different restore point and click Next.
Now select the restore point and click Next.
Click Finish to restore the previous settings, and Windows will restart.
System Restore helps you restore your computer’s system files to an earlier point in time when your PC worked properly by rolling back changes made by applications or drivers that caused errors or crashes.
In some unfortunate cases, the cc.exe file may have done irrecoverable damage to your PC such that none of these steps can remove it completely. If this is the case, you may want to do a clean install of Windows.
Aside from the cc.exe file, there are a bunch of more exe files lingering in your computer, like the unknown.exe so find out what it is and take the necessary steps to remove it.
To better protect and secure your system, you need to be aware of the various browser attacks and how they manifest themselves. This way, you can spot the early signs and take action.
For any additional tips on this topic, drop us a comment below.
To connect to docs.google.com, you must have a Google account and be logged into it. And if you’ve met all the conditions but it refuses to connect, here are some tips for troubleshooting.
Why is Google Docs saying no connection?
If you’re having problems connecting to docs.google.com, it could be an unstable Internet connection, or the server is having issues. Also, if you try to open too many documents all at once, you may get this error.
What can I do if docs.google.com refuses to connect?
Kickstart troubleshooting with these preliminary steps:
Check your connection to ensure that it is working properly and has a strong signal, then remove and re-add your account.
Ensure your browser is up-to-date, then try opening other Google services like Gmail and YouTube to ensure they work properly.
Switch to an incognito browser tab or a different browser altogether and see if it works, or try to view the Google Doc anonymously.
1. Delete browser cache
For this step, we shall be using the Chrome browser.
Launch your Chrome browser and click the three vertical ellipses in the top right corner.
Select Settings.
Click on Privacy and security, then select Clear browsing data.
Check Cookies and other site data and Cached images and files, then hit Clear data.
2. Disable your antivirus temporarily
Hit the Start menu icon, type Windows Security in the search bar and click Open.
Click on Firewall & network protection, then select Public network.
Locate Microsoft Defender Firewall and toggle the off button.
If after disabling the firewall or antivirus, you’re able to gain access to the site, it might be a case of this website is not allowed error, so you need to whitelist docs.google.com to prevent future errors.
Click on Network & Internet on the left pane, then scroll down and click Proxy on the right pane.
Select Edit next to Use a proxy server option in the Manual proxy setup section, toggle off Use a proxy server and click on Save.
Although proxy servers are set up for security reasons, they may block certain types of traffic, preventing Google services from connecting to the Internet. Most schools and workplaces usually set up proxies, so you might have to contact your IT administrator to remove the restrictions.
4. Reset browser
Open your Chrome browser and click on the three vertical ellipses at the top right corner.
Select Settings.
Next, click on Reset and cleanup, then select Restore settings to their original defaults.
Confirm Reset settings in the next dialog box.
Resetting your browser will help clear any browser settings that you may have inadvertently changed or via an extension you installed, causing you to lose access to the doc.google.com site. This may also resolve the issue with files not loading in Google Docs.
5. Contact Google
At this point if you’re still struggling with the docs.google.com refused to connect error message and the server is active, it is time to contact Google support. You may need additional assistance with your account.
Unfortunately, Google has an unpredictable turnaround time, especially when it has to do with Google Docs not opening.
As you wait for feedback, you cannot leave your work pending. You can try other word processors in the meantime. It’s good to always have an alternative so that your productivity is not affected.
Well, that’s it. In some cases, the solution might be simple. Having either forgotten to update your browser or a plugin causing these conflicts. All in all, we hope you’ve found this article useful.
We’d love your feedback if you have any additional thoughts on this topic. Leave us a comment down below.
The XRE-03059 error code on Xfinity is a temporary error that usually arises due to network or signal issues, interference at the operator’s end, or loose or damaged coax cables. In most cases, the error resolves on its own within a few hours.
The Xfinity streaming error may affect one or more channels, and the message reads, Sorry, we’re having trouble connecting. Our system is unable to connect at this time, followed by two troubleshooting steps: chatting with the Xfinity support agent or using the Xfinity Stream app on your mobile or tablet.
How do I fix error code XRE-03059 on Xfinity?
Before we start with the slightly complex solutions, try these quick ones:
Select Try Again on the screen, and if that doesn’t work, try accessing the channel in a few minutes.
Check for any localized outages using the Xfinity Status Center after logging in to the official website.
Make sure the cable is properly plugged in at both ends. Also, reboot the cable box and the TV.
1. Change the resolution preference
Press the Xfinity button on the remote.
Go to the gear icon and open the Settings.
Select Preferences from the list of options and press OK.
Choose General.
Finally, set the Prefer Best Available Resolution setting to Off, then restart the device and check improvements.
Often, we get the XRE-03059 Xfinity error when the HD streaming isn’t available, and switching to SD by changing the preferences does the trick!
2. Clear the device’s cache and cookies
Press the Xfinity button on the remote, and open the device Settings.
Scroll down, select Privacy from the list, and press OK on the remote.
Choose Locally stored data and press OK.
Finally, choose OK to clear the cache and cookies, then restart the device.
Clearing the device’s cache also helps with Xfinity Error 500. Besides, make sure to move the Wi-Fi router or any other signal-emitting device away from the cable box.
If none of the solutions listed here have worked, you can always contact Xfinity support. They will share a series of dedicated fixes based on the condition and, if required, schedule a technician’s visit.
In many cases, users reported replacing either the cable box, the coax cord cable, or both fixed things.
When faced with the XRE-03059 error, it’s best to let the experts handle the troubleshooting because the generic fixes don’t always seem to work.
In the meanwhile, you can catch the streaming on the Xfinity mobile app or the website. Or record the program on the channel throwing XRE-03059 because the device then accesses it from the cloud.
The XMZX file extension is used by SofTest by ExamSoft, a program used to conduct tests and examinations. ExamSoft developed the extension.
The program initially opens the XMZX file, then deletes it and creates an XMWX file, which is auto-saved every minute, and once the exam is over, the final answer file uses the XMDX extension. All three can be viewed in SofTest by ExamSoft for assessment.
How do I open the XMZX file extension?
1. Use SofTest by ExamSoft
Run SofTest by ExamSoft, and then click on the Take An Exam button.
Select the required .xmzx or test file from the dropdown menu.
Enter the Student ID, Exam Name, and Instructor Name in the dedicated fields, if required, and then click Start. Refer to the instructions at the bottom for the Student ID’s character count.
Click OK in the confirmation prompt. This will terminate all programs running on the device.
The best option to open XMZX files is SofTest by ExamSoft. The program is available for both Windows and MacOS.
2. Use other ExamSoft programs
There are a few other ExamSoft programs to open XMZX files. Remember, these can only be used to view and print the file, not take online assessments. These are:
You can also convert the XMZX file into a readable format. There are both online and downloadable converters available.
But you always stand the risk of file corruption, often beyond repair. Also, ensure the converter is safe and scan the downloaded file post-conversion.
You now know how to open .xmzx in Windows and Mac. We recommend the dedicated ExamSoft software for the best results. If you don’t yet have SofTest by ExamSoft, contact the organization’s administrator for the download link.
If you want to access the Edge browser from your desktop quickly, find below a straightforward list. These steps are the same on both Windows 10 and Windows 11.
Search for Edge: Use the search bar to find Microsoft Edge.
Open File Location: Right-click the Edge icon in the search results and select “Open file location.“
Create Shortcut: In the file location, right-click the Edge icon, choose “Send to,” and then “Desktop (create shortcut).” On Windows 11 you need to click on show more options.
This should be enough. If you know the location of Edge or any other app, you can also add it directly from the desktop by doing the following:
Right Click anywhere on the Desktop area
Choose New => Shortcut
Here input the location of Edge or anything else you want to put on the desktop