Top Webcam Security Camera Software to Turn a PC into a Monitor

Do you want to add a plus of security to your home or business without having to invest too much in specialized hardware solutions? Webcam security camera software is your answer.

If you are worried about your private space or if you just want to be able to verify certain locations remotely, then you should consider using your own Windows 10 PC as a security camera.

In the following guidelines, we will review the best apps that can be used on Windows to control the built-in webcam as a security surveillance camera. Here’s a quick preview of our top picks:

  • EyeLine Video Surveillance – Webcam motion detection software with playback footage
  • iSpy – Free webcam surveillance software (for personal use only)
  • ContaCam – Lightweight & intuitive webcam CCTV software
  • Yawcam – Easy-to-use webcam surveillance software
  • Active WebCam – Stealthy & discreet webcam spy software
  • WebCam Monitor – Best webcam monitoring software for entry users

How is that possible? As you will see, it’s not that complicated to use a webcam as a security camera on Windows 10. But, you do need to install a dedicated program on your computer.

Can I use a webcam as security camera?

Yes, that’s right. Your own computer can serve as a real security service for home and business. And you won’t have to buy and set up an actual security network.

Instead, you can choose to use your computer’s built-in web camera, or other external webcams that can be attached to your Windows 10 system.

These programs will enable the webcam and will add dedicated features to transform the built-in camera into a security surveillance service and solution.

What app can I use to view my security cameras?

EyeLine Video Surveillance – Top-notch webcam motion detection software

security camera for Windows PC

The EyeLine webcam security camera software helps you set up each camera with just a click of a button and alerts you when it detects any motion.

You also have a web control panel to access and view recordings remotely over the Internet.

After hours, it monitors office buildings for security and is extremely effective for video surveillance in retail establishments to discourage theft.

EyeLine Video Surveillance allows you to record and save compressed surveillance material for later use. Motion detection recording saves space by only recording when necessary.

When you have pets and leave them at home alone, simple and effective video security may be particularly useful.

Furthermore, when implemented in combination with a security alarm system, it may be used to playback footage and determine the cause of an alarm while you are away.

Here are the key features of EyeLine:

  • Simultaneously records up to 100+ camera sources
  • USB cameras and networked IP cameras both supported
  • Email or SMS alerts available for motion detection
  • Optional time stamping of recorded video frames
  • Video can be monitored live as it is being recorded
  • Display options for watching the video on a second monitor, television, or other screens
  • Find and play surveillance recordings ordered by camera, date, duration, and motion detected

EyeLine Video Surveillance

Enjoy a multi-camera security system that records motion for 100+ cameras.
Free trial Visit website

iSpy – Free webcam surveillance software (personal use only)

security camera for Windows PC

iSpy is perhaps the most complex open-source video surveillance software available for the Windows platform.

The program will control your webcams and will let you access the recorded content from anywhere in the world. You can do it from a laptop, notebook, desktop, and even from a portable device.

It has features for both mid-range and high-end users. This means it can be used in different situations and for solving various security challenges.

The app can also be customized and optimized through dedicated plugins and comes with built-in functionality for:

  • motion detection & motion processing
  • recording, scheduling & audio
  • remote access, network audio broadcasting & password protection
  • desktop recording, cloud uploading, and a lot more

Even though its user interface can be a little bit intimidating, once you get used to its options and everything that you can configure, you will be more than satisfied with your choice.

And everything without investing a single cent. As already outlined iSpy is an open-source app so it can be downloaded and used for free.

⇒ Get iSpy

ContaCam – Lightweight & intuitive webcam CCTV software

security camera for Windows PC

ContaCam is another open-source video surveillance program that works great on Windows 10 OS.

Unlike iSpy, this software brings a more user-friendly interface with intuitive built-in settings. The basic features include:

  • history tracking
  • remote watching through port forwarding or Dropbox
  • audio support, and motion detection

ContaCom can be very useful especially if you aren’t looking for a complex/complete service. You won’t get extra plugins or other similar tweaks as explained in the iSpy review.

Furthermore, ContaCam is a light and fast application which runs great even in a low-light environment. Additionally, it won’t require too much power so it can be successfully used on low-end configurations.

⇒ Get ContaCam

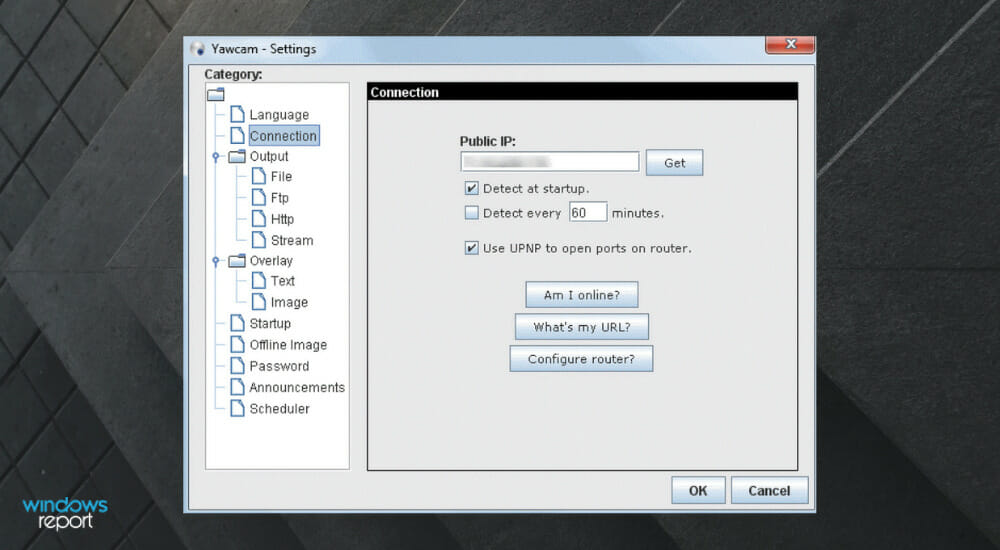
Yawcam – Easy-to-use webcam surveillance software
security camera for Windows PC

Yawcam comes as yet another webcam software but it’s more than that. So, is Yawcam safe?

As safe as it gets. Written in Java, this program ensures great webcam control when it comes to setting up a basic video surveillance network.

Just like the other apps that were reviewed already, Yawcam will use the built-in webcam and the external cameras that are attached to your Windows 10 computer. It will record everything that happens in the implied perimeter.

You can install and configure Yawcam within minutes. It features intuitive settings that can be smartly applied even if you aren’t used to these kinds of operations.

And yes, it packs all the basic features such as motion detection, FTP upload, password protection, video streaming, and multi-languages.

⇒ Get Yawcam

Active WebCam – Stealthy & discreet webcam spy software
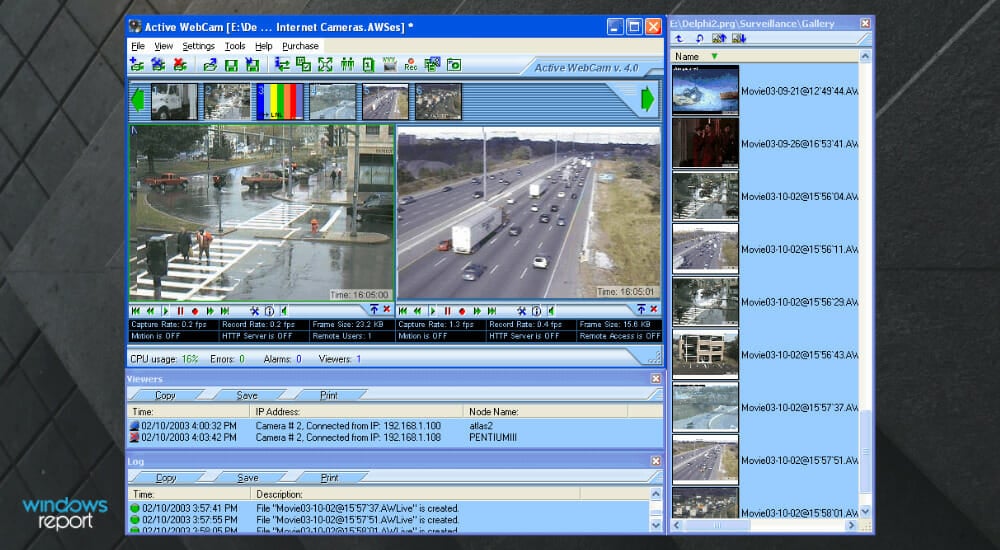
Active WebCam can control an unlimited number of cameras and ensures simultaneous recordings which you can observe remotely from any web browser.

You can also watch a playback while the recording is still going, or you can choose to see an archive of snapshots in a sequence of still images.

It works with all USB and Parallel Port cameras, Capture Devices, and Framegrabbers compatible with Windows, TV boards, and Network IP Cameras.

The stealth mode renders the software entirely invisible, as no icon appears in the system tool tray and no taskbar tray is displayed.

You can launch the software as a Windows service. This means it begins automatically when the system boots and runs even when no user is signed in.

These are the main features of Active WebCam:

  • Encrypted Transmission is supported
  • Dynamic IP Service, which changes your computer’s IP address as needed
  • Assists you with developing a web page for your web camera
  • The active region for motion detection may be defined

⇒ Get Active WebCam

WebCam Monitor – Best webcam monitoring software for entry users

WebCam Monitor is another webcam security camera software that got good reviews from both entry-level and power users.

The program is packed with essential features so it can detect motion and noise, trigger alerts, and send email notifications or text messages.

The recorded videos will be stored on a specialized server. Alternatively, you can choose to stream certain recordings over the Internet if you want to have full control over your security cameras from any computer or portable device that has an Internet connection enabled.

Setting up this surveillance system can be done through a dedicated wizard, which will guide you through different tweaks and functions.

These built-in features can be configured depending on what you want to obtain from your own security solution.

⇒ Get WebCam Monitor

So, does Windows 10 have camera software? It does and it is simply called Camera. If your camera app isn’t working, make sure to check out the workarounds we suggested.

These are some of the best webcam security camera software that can help you use a webcam as a security camera on Windows 10.

If you have trouble getting your camera up and running, here’s how to fix webcam connection issues on Windows.

SharePoint vs Dropbox – Which one should you choose?

SharePoint and Dropbox are two of the popular cloud storage solution and collaboration platforms. While Dropbox is geared towards the non-tech savvy casual business users, SharePoint, on the other hand, is preferred by IT corporates for security and integration with Microsoft Office.

Now if you had to choose between the two for your company, what would you choose? The answer lies in knowing your requirements. While both of them are great products but are designed to serve different purposes.

In this article, we pitch SharePoint against Dropbox and explore the advantage and disadvantages of these services to help you make your decision easier.

SharePoint vs. Dropbox 

Let’s begin by exploring what two of these programs have on offer, along with their pros and cons. Later, we will explore in detail which platform fulfills the most collaborative requirements depending on the consumer requirement.

Dropbox

Dropbox vs SharePoint

Dropbox is a modern workspace designed to reduce busy work so you can focus on the things that matter. The service offers cloud storage, file synchronization, personal cloud, and client software.

The Dropbox Basic account is free to use and offers 2GB of space. Additional storage can be added with the premium plan starting at $9.99 months, which provides an additional 100GB of storage.

The app is available for your Windows, Mac, and Linux platforms, including mobile platforms such as Android and iOS.

Dropbox allows users to create individual folders on their computers. Dropbox then synchronizes with the account and across devices irrespective of the device in use. The user can import and export files to these folders using the web application interface or the smartphone app.

Pros:

  • Ease of use.
  • Universally accessible
  • Works as a cloud file server

Cons:

  •  Not the most cost-effective solution
  • Being a consumer-grade file-sharing collaborative platform, data security can be a concern for corporates.

SharePoint

Dropbox vs SharePoint

SharePoint is a web-based collaborative platform that is sold as a document management and storage system.

That said, the product is highly configurable, making it the ideal solution for large enterprises due to its flexible nature. SharePoint, being a Microsoft product, offers seamless integration with Microsoft Office.

While SharePoint can be used to perform simple tasks like document sharing, it can also be used as an internet portal, internet site, business intelligence, collaboration tool for project management, synchronizing calendars with Outlook, etc.

The popularity and versatility of the platform can be judged by the fact that 78% of Fortune 500 companies rely on SharePoint to get their job done.

The sheer number of possibilities means the platform is generally more expensive if used just as online data storage and file-sharing platform, which is where Dropbox makes its case.

Pros:

  • Excellent integration with Microsoft products.
  • Robust, cloud, hybrid, and on-premise deployment.
  • It offers the most value for large as well as small businesses.

Cons:

  • Generally, for more expensive if used as a file-sharing platform.
  • Implementation is a complex task and takes time, depending on the size of the business.

Things to consider before selecting the service

Dropbox vs SharePoint

No single service fulfills all the document-sharing and collaboration requirements. However, while choosing a service, consider what’s right for your organization by analyzing the following factors and if they apply to your business.

1. Deployment and Ease of use 

Getting started with Dropbox is as easy as creating an account and downloading and installing the app. The user can start sharing files in less than a few minutes. However, setting up and deploying SharePoint is a complex task and requires IT support.

It may take from anywhere a day to weeks to set up the platform, depending on the requirement.

2. Integration 

SharePoint, being a Microsoft product, offers excellent integration with Microsoft products like Office 365.

The fact that many organizations already use Microsoft Office, SharePoint usually looks like a natural choice due to the seamless integration that the service offers. Dropbox, on the other hand, can use third-party extensions to integrate with Microsft Office.

3. Security 

SharePoint comes with advanced features like password protection, encryption, document access control tracking, and reporting out of the box. Services like Dropbox do not offer these features. While you may still be able to add these functionalities using an extra layer of third-party services, it will take away the simplicity factor from Dropbox.

Who should use Dropbox?

  • Dropbox is an excellent choice for freelancers and other independent workers who offer online service-based business and looking for an easy way to share files with the client and teammates.
  • Dropbox is also an excellent choice if you are looking for a file storage solution to store your personal and work-related documents on the cloud.
    • Cross-platform support means you can access your document on the go on any device.

Who should use SharePoint?

  • SharePoint is better suited for medium and large organizations looking for a tailor-made solution to handle storage, file sharing, and collaborative challenges.
    • It also offers excessive security features such as encryption, password protection, and remote wipe along with an on-premise cloud storage facility to keep the company’s data secure.
  • SharePoint is a go-to choice if your organization is using other Microsoft products like Microsoft Office.
    • The seamless integration with Microsoft products offers enhanced collaboration for your teams.

Microsoft SharePoint and Dropbox are excellent products that cater to the needs of different user bases.

While Dropbox offers ease of use with file sharing and collaboration services, SharePoint is more than just a file storage and sharing platform with a flexible structure and scalability designed to meet the needs of small to large-scale businesses.

How will Microsoft’s planned layoffs affect ChatGPT’s integration into BIng?

This week, Microsoft made an announcement that highlighted its plan to cut 10,000 jobs over the next three months. The company’s CEO further highlighted that the move will help them “adapt to platform shifts” and that they will be taking a $1.2 billion charge in revolving around changes in hardware portfolio, severance cost, and more.

The layoffs will be reportedly spread across different divisions within the company, including teams handling web products like Bing and Edge as well as the ones handling devices like the Surface Hub, as spotted by Business Insider.

Microsoft’s Web Experience Team, WebXT will also be impacted by this change. The team is responsible for building engaging and informative content, services, and platforms for users that can be accessed anywhere on the web.

With the WebXT team also taking a hit from these massive layoffs, what does this mean for the ChatGPT-powered Bing? Earlier this month, there was an indication that Microsoft was working closely with OpenAI to integrate ChatGPT into Bing in a bid to enhance the search experience for users and provide human-like responses. Another report also highlighted that Microsoft was planning to inject a $10 billion investment to ensure that its plans come to fruition.

According to Business Insider’s sources, Microsoft laying off high-earning employees across various divisions is a strategy devised in that it can now hire new employees at significantly low rates and uses their services in “investment areas” such as Bing. Another source also told the Insider that it was possible that some of the tasks being done by the WebXT team were being duplicated by Microsoft’s OpenAI partnership thus creating redundancy.

It seems the layoffs will further affect employees in the devices division, particularly those in the Surface Hub whiteboard team, gaming, recruitment, sales, human resource as well as consulting roles. As such, the affected parties will remain employed for 60 days. They won’t be required to report to work, instead employees on visas will be expected to use this time to seek employment elsewhere so that they don’t have to go back to their motherland. What’s more, they’ll receive a minimum of one month of severance based on tenure.

Microsoft is expected to launch the revamped Bing sometime in March, we will have to wait and see what’s in store for us and the implications these changes have. Share your thoughts with us in the comment section.

via: Business Insider

Mailbox Quota Exceeded: What It Means & How to Fix It?

Many users have complained that their mail server sends a quota exceeding the mailbox for users is full warning message. Luckily, it can be fixed in no time.

Here, we will discuss what this warning means and what we can do to fix the mailbox quota exceeded for Outlook.

What does exceeding the Quota for the mailbox mean?

The mail server sending quota warning appears when users are about to or have exceeded the limit provided for their email account. 

Addressing it is essential to avoid the problems such as not being able to login into your account and error sending emails from your mailbox. Moreover, due to this error, the receiving emails will bounce back to the sender. 

What causes the mailbox quota exceeded error? 

There could be several reasons why you are getting this error; here are some of the popular ones: 

  • Trash and Spam folder is full – If you get a lot of spam messages on your email account, hundreds of emails stored can consume the space provided. Check if you have the Spam quarantine feature enabled; it can accumulate space. Disable it and remove unwanted emails to recover space.
  • IMAP account not maintained – We sync our email on multiple devices, for which we use IMAP in place of POP. This results in storing a lot of emails. Deleting them is also not easy, as these emails might be needed for references. So, you need to be very careful while deleting these emails.
  • POP3 account is configured – With a POP account, all emails are downloaded on the device, and no emails are on the server unless a user has confirmed otherwise, resulting in unnecessary space on the server.
  • Catch-All address feature is enabled – Users enable Catch-All to avoid sending messages to the wrong email addresses. However, the problem with the feature is that it also stores spam emails. Hence taking up unnecessary space and causing the issue.
  • Exhausted the hosting space – If you have exhausted the quota assigned for keeping the database, mail files, and other data, you might get this error. Look for old site backup, unmaintained apps, database dump, & other unnecessary data on the server and delete them.

What can I do if the mailbox quota is exceeded?

Before moving to the troubleshooting steps,  you should consider performing the preliminary checks first:

  • If you are using Microsoft 365, you can ask your IT administrator to increase the mailbox space.
  • Empty your spam folders to retrieve space in your mailbox.
  • Unsubscribe from unwanted mail chains and delete the unwanted messages in the inbox.
  • Save your essential email attachments to OneDrive and delete them from your mail account

1. Delete older inbox items 

  1. Launch Outlook on iOS or Android and go to Settings. Outlook Settings - mailbox quota exceeded
  2. Click Swipe Options. Select Delete as the Swipe option.Delete option Swipe Options
  3. Now you can swipe your way through your inbox to clean it.Swipe Options

2. Remove files from the server if POP3 is configured

  1. Open the Outlook app on your Windows 11 computer. Go to the File tab. File tab -mailbox quota exceeded
  2. Click Account Settings. Account settings
  3. Double-click the mail address. Settings page
  4. Click the More Settings button.More Settings
  5. Go to the Advanced tab.Advanced tab
  6. Place a checkmark next to Leave a copy of messages on the server. 
  7. Place a checkmark next to Remove from server after and reduce day to 1.Leave copy
  8. Click Next and then Finish.

3. Set the Mailbox limit 

Tip icon Tip
Before going through this method, you have to connect the Exchange Online PowerShell module. To know more, click here. Once it’s done, follow the steps mentioned below.

3.1 For single user 

Once you have connected Exchange Online, type the following command on PowerShell, replace User ID with either GUID or email address, replace the Value parameter with the number in GB or MB, and press Enter: Set-Mailbox < UserID > -ProhibitSendQuota < Value > -ProhibitSendReceiveQuota < Value > -IssueWarningQuota <value>

To check if the current list of quotas is attached to the mailbox, copy and paste the following command and press Enter: Get-Mailbox < User ID > | Select *quota

3.2 For multiple users 

After connecting the Exchange Online PowerShell module, copy and paste the following command, replace the value parameter which a number in GB or MB, and press Enter:

Get-Mailbox | Set-Mailbox -ProhibitSendQuota < Value > -ProhibitSendReceiveQuota < Value > -IssueWarningQuota < Value >

So, these are the ways to fix the mail exceeded quota error on Outlook 365. Try them and let us know which worked for you in the comments below.

Fix: PowerPoint Cannot Insert A Video From the Selected File

Suppose you are getting PowerPoint and cannot insert a video from the selected file, verify the necessary 64-bit codec while trying to add a video to your PowerPoint slide.

In that case, you are not alone. Unfortunately, this happens to the best of us. Fortunately, it can be easily fixed.

Here, in this guide, we will discuss some of the best methods to fix this issue right after explaining the causes.

What causes PowerPoint cannot insert a video from the selected file? 

There could be various reasons for PowerPoint cannot insert a video from the selected file; some of the popular ones are: 

  • Video format not supported – PowerPoint supports limited video file formats, including MP4, AVI, and WMV. If you try to add a video file to PowerPoint whose file format is not supported, you might get this error.
  • Incompatible video codec – If the video codec used to compress the video is not recognized by PowerPoint, then you might get this error.
  • Video file corrupted – If the video file you are trying to add to PowerPoint is damaged, you won’t be able to add it, hence the issue.
  • Large video file – PowerPoint has a file size limit for video. So, if you are adding a large video file that PowerPoint can’t handle, you might get this error.
  • Missing codecs – If your computer misses the necessary codecs for PowerPoint, you might see this error. You need to install the codecs on your own.
  • Video file is protected – The video file that you are trying to add to PowerPoint is protected or embedded. Therefore you need rights to access the video file. 

What can I do if PowerPoint cannot insert a video from the selected file? 

Before engaging in the troubleshooting steps, go through these preliminary checks to fix the issue:

  • Use .MP4 files encoded with H.264 video and AAC audio. The video will be compatible with PowerPoint for both Windows and Mac.
  • Check the video file to see if it was downloaded or copied correctly and was not damaged.
  • Compress the video if it is a large file.

1. Install K-Lite Codec Pack 

  1.  Go to the official website of K-Lite Codec Packs.
  2. You will get four variations of the pack. First, choose the Standard pack and download it.Klite -powerpoint cannot insert a video from the selected file
  3. Choose Save if prompted.
  4. Double-click on K-Lite_Codec_Pack_1365_Standard.exe and choose the appropriate option from the installation wizard.
  5. Choose Normal mode.Normal -powerpoint cannot insert a video from the selected file
  6. Click Next.
  7. Modify or accept the installation preferences, then click Next.K-Lite_Codec_Pack_1740_NEXT
  8. On the Additional Tasks and Options, click Next.Additional Tasks and Options
  9. Click Next on the MPC-HC configuration window.MPC -HC configuration Next
  10. Place a checkmark next to Decoding Method under Hardware Acceleration. Click Next.Decoding method
  11. On the next page, for the Preferred Language, accept the default and click Next.Preferred language Next
  12. Click Next on the Audio configuration settings. On the next window, you will be offered additional software; decline the offer.Audio configuration
  13. Now under Ready to Install, click the Install button.Read to install
  14. Once it is installed, restart your PC, then try to add the video to PowerPoint.

2. Change the video format

  1. Open your preferred browser and go to the online video converter website.
  2. Click on the website’s Select or drop file button to add your video file.Select or drop file -powerpoint cannot insert a video from the selected file
  3. From the list of different video formats, choose WMV.
  4. The website will convert the video file, and you can download it once ready.

3. Make changes to video settings. 

  1. Select, right-click on the video file and click Properties. 
  2. Now on the General tab, put a checkmark next to Unblock.Unblock -powerpoint cannot insert a video from the selected file
  3. Click Apply and OK. Try to add the video again.

4. Enable Windows Media Player controls in PowerPoint

  1. Launch PowerPoint. Click File.File tab PowerPoint -powerpoint cannot insert a video from the selected file
  2. Select Options.Options
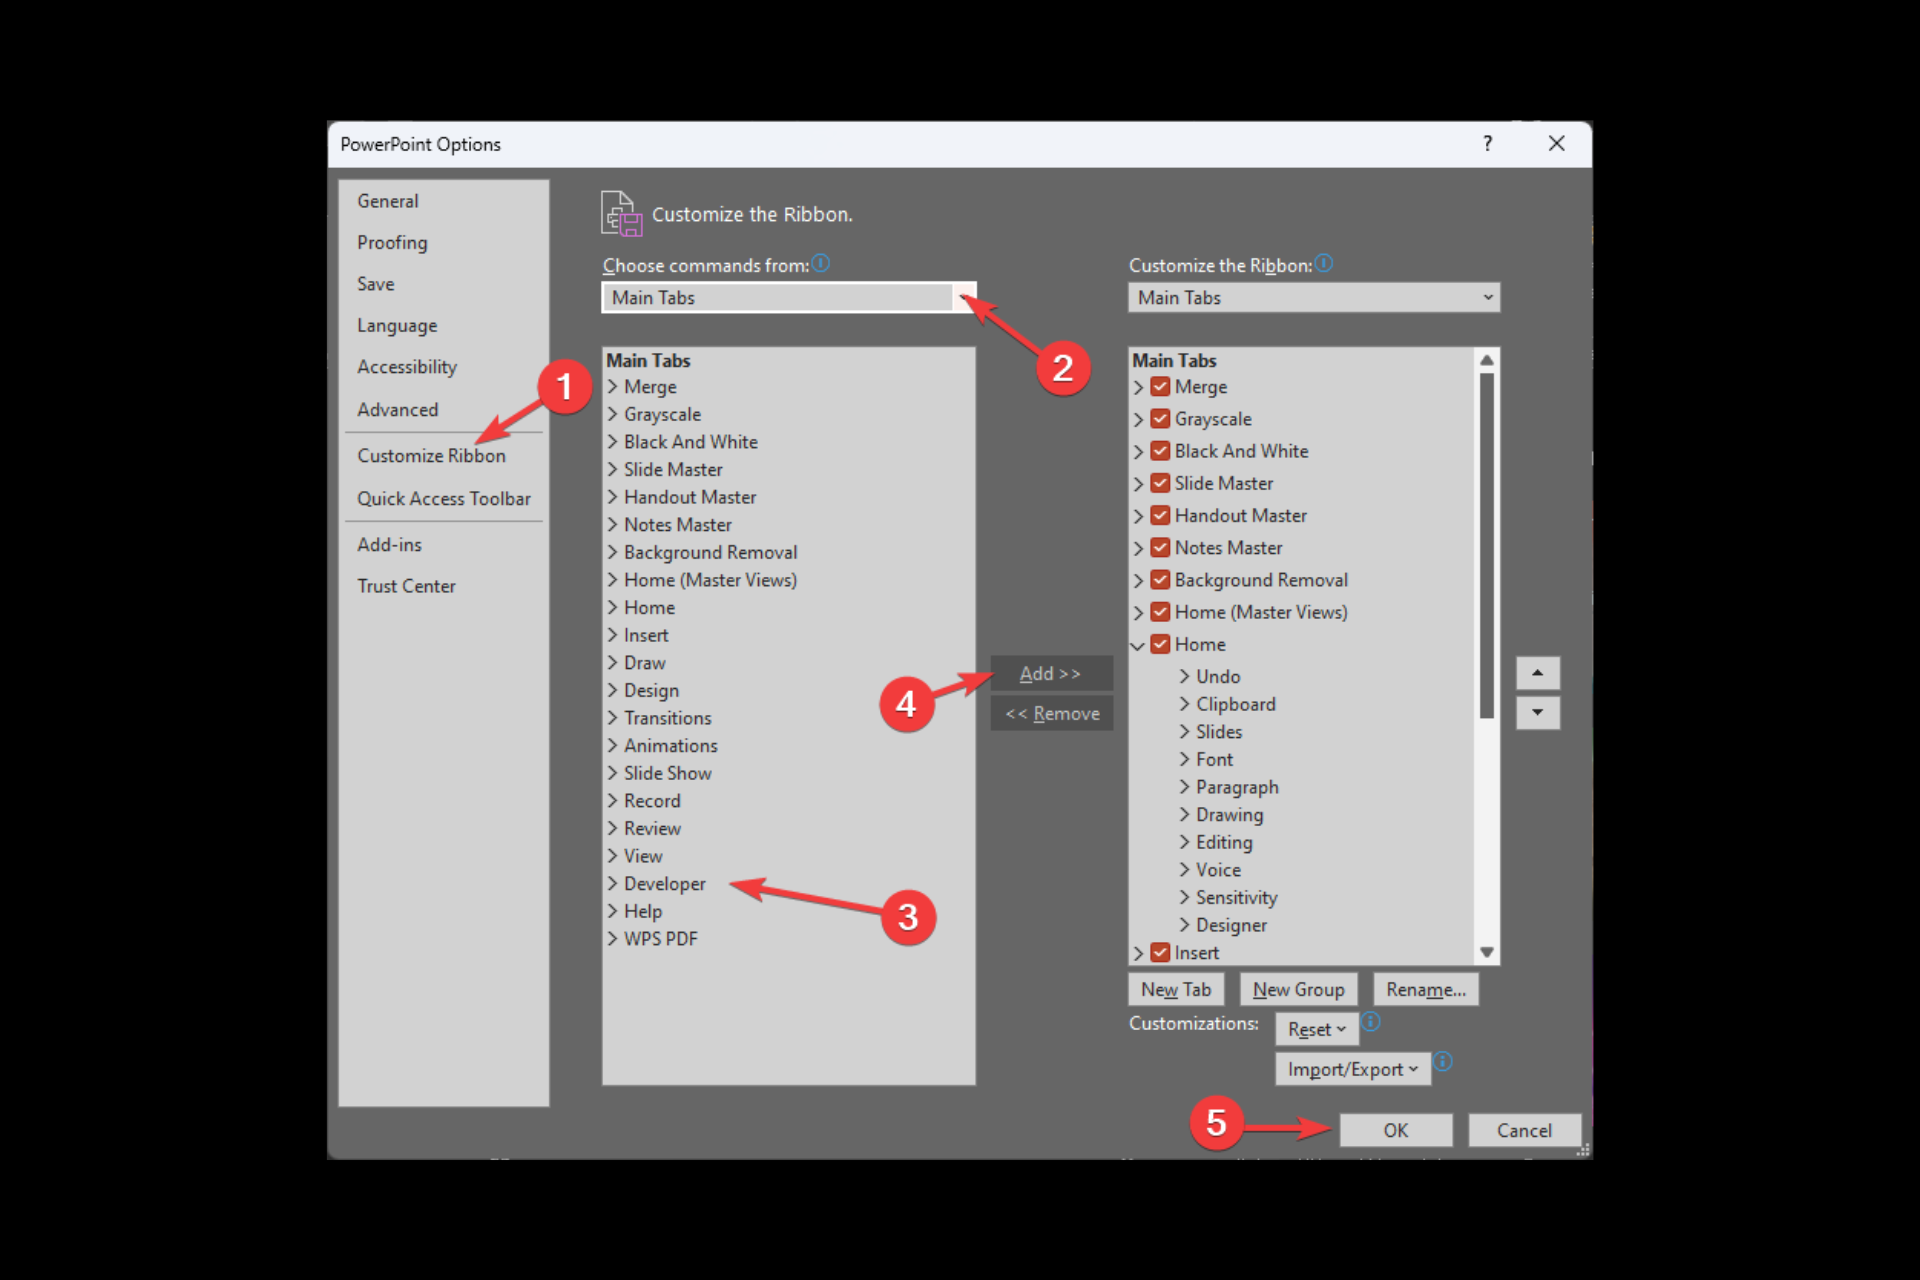
  3. Click Customize Ribbon; from the Choose commands here, select Main tabs. POWERPNT_Customize Ribbons
  4. Click Developer from the list, and choose Add.
  5. Click OK.
  6. Now from the Developer tab, select More Controls from the Controls section.Developer Controls
  7. From the next window, select Windows Media Player and click OK. Try to add the video to PowerPoint.Windows Media Player

5. Update drivers 

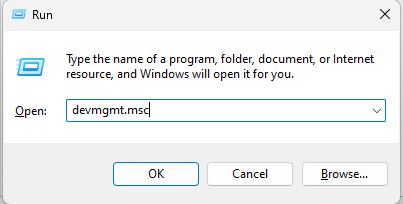
  1. Press Windows + R to open the Run window.Device Manager RUN COMMAND
  2. Type devmgmt.msc and hit Enter to open Device Manager.
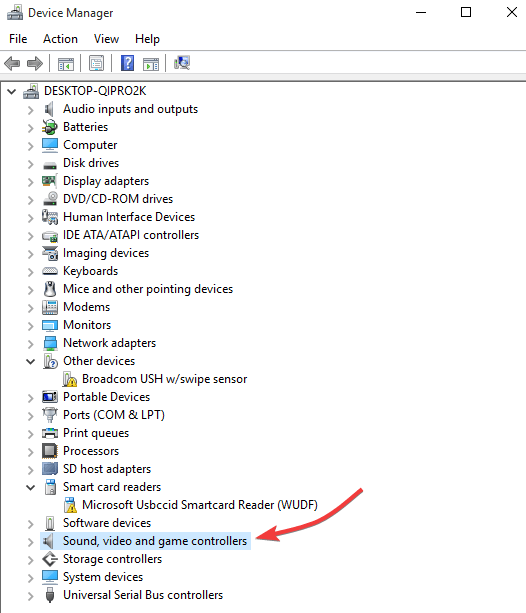
  3. Locate and click Sound, video and game controllers to expand it.Update driver -powerpoint cannot insert a video from the selected file
  4. Right-click on every driver present one by one and select Update driver.
  5. On the next window, select Search automatically for drivers.Update drivers - search automatically
  6. Follow the onscreen instructions to complete.

If you’re looking for other ways to update your drivers, we recommend you try Outbyte Driver Updater, as it can detect all the outdated or missing drivers and update them quickly with the latest versions.

Outbyte Driver Updater

Find the newest updates for your drivers and use Outbyte Driver Updater to perform this action in no time.
Free Trial Download now

So, these are some methods you can use to fix PowerPoint that cannot insert a video from the selected file. Try them and let us know which worked for you in the comments section below.

Play Tiny Tina’s Wonderlands this week with Xbox Free Play Days

Xbox Free Play Days returns for another week of free game trials for subscribers of Xbox Live Gold and Xbox Game Pass Ultimate. There are two games in this week’s Xbox Free Play Days lineup, available from Thursday, January 19th through Sunday, January 22nd. Check them out below.

Tiny Tina’s Wonderlands

Tiny Tina's Wonderlands
Developer:
2K
Price:
$14.99

Embark on an epic adventure full of whimsy, wonder, and high-powered weaponry! Bullets, magic, and broadswords collide across this chaotic fantasy world brought to life by the unpredictable Tiny Tina.
Roll your own multiclass hero and loot, shoot, slash, and cast your way through outlandish monsters and loot-filled dungeons on a quest to stop the tyrannical Dragon Lord. Everyone’s welcome, so join the party, throw on your adventuring boots, and be Chaotic Great!

Space Crew: Legendary Edition

Space Crew: Legendary Edition
Developer:
Curve Games
Price:
$24.99

This is Space Crew: Legendary Edition. The legendarily challenging single-player strategic survival simulation game!
You are a captain in the United Defense Force, captain of your own star ship. Recruit your crew, customise your ship and head out to explore the galaxy, defending Earth against the mysterious extraterrestrial threat, known as the Phasmids! There will be challenges ahead. Crew members will be lost. Dangerous missions must be undertaken. Galactic Legends will be made!

Wrap up

It’s a pretty exciting lineup with this week’s Xbox Free Play Days event, though likely the highlight for many will be Tiny Tina’s Wonderlands. As you can see above, both games are steeply discounted this week, so if you want to purchase them be sure to do so before the event ends. And if you would like to learn more about the program, you can head on over to the Xbox Free Play Days FAQ page.

Microsoft OneNote vs Google Keep – Which is Better?

There are dozens of good note taking apps available on the web. Each of them has a different bouquet of features to offer along with the standard note writing. Here I take a closer look at Google Keep and Microsoft OneNote. One is a free application while the other follows a freemium model for offering additional features.

Let us compare them on different platforms and explore the individual features that set them apart.

OneNote vs. Keep – Head On

I took both the apps on a test drive on my Android phone. Do note that Keep has been with me for a longer period but this time around I dig in to explore everything that these note taking apps has to offer.

Before moving forward, you should know that in Microsoft OneNote, a “notebook” is a collection of notes that are organized together in a single file. Each notebook can contain multiple sections and pages, and each page can contain text, images, and other content.

A “note” is a single piece of content within a notebook. It can be a text note, an image, or a file that you’ve added to a page. Notes can be organized and rearranged within a notebook as needed.

Mobile App

Notes Visibility

The mobile users are growing at an exponential rate compared to desktops so it is only fitting to start with the user experience on the mobile app. Microsoft OneNote focuses on taking advantage of the display size and shows significantly more notes. You can see first-two lines of a note in tile and list view on a 6.5 inch screen.

Microsoft onenote vs Google keep

OneNote misses out on the feature to pin notes to the top. They have the option to display by recent access, creation date, and alphabetical but its not the same. Sometimes you need more than one note at the top for quick access for a project.

Google Keep shows you fewer notes but more information from them. The visible notes can preview up to 6 lines, which feels more than enough to get the idea about when scrolling through notes.

Microsoft onenote vs Google keep

Keep lets you pin 3-7 notes, depending on the size, that appears at the top of the home screen. Other notes appear below the pinned items. Unlike OneNote, you cannot sort the notes here and they appear in the order you arrange them.

Notes Taking Experience

Jot down notes by tapping on the page button at the bottom. This will create a page in your default notebook which can be re-arranged. On the other hand, taking a sticky note has an extra step which could have been avoided. You tap on the vertical-three-dots and then select Create a Sticky Note to start writing a note.

Microsoft onenote vs Google keep

Hand written notes work without a sweat while tapping on camera icon lets you take pictures through the device’s camera. You can always add it on any note or page from the editor menu.

The dictation has impressed me on the first try. You can select from 9 different spoken to get better results apart from the 16 plus preview languages which are in beta. The dictation really comes together once you learn the phrases for new line, paragraphs, full stops, smileys, and more.

Microsoft onenote vs Google keep

Keep starts strong with a big plus button for a new note. The positioning is ideal for right-hand users with average size hands. It will be a stretch for left-handed people on larger displays.

Microsoft onenote vs Google keep

The audio dictation here will need you to hold your breath and keep talking to continue the dictation session. You take a pause for more than 2 seconds and the dictation session will be over.

It will appear in sentences with punctuation. That is not all, you will get an audio recording of your dictation which comes in handy when the dictation session has lower accuracy. You can always go back and listen to the recording to fill in the gaps.

Microsoft onenote vs Google keep

Deleted Notes

(note: updated Jan 20 with corrections)

OneNote gives you a 60-day window here to recover deleted items from the bin. On the web, find them in View > Delete Notes.

On the desktop app, go to History > Notebook Recycle Bin to see the deleted items.

Microsoft onenote vs Google keep

Keep lets you preserve the deleted items in the bin for 7 days before they are permanently deleted. You can recover deleted notes from there within a week’s time.

Microsoft onenote vs Google keep

Widgets

Opening the app is not plausible at all times. Widgets let you create notes instantly without looking for the app on the home screen. 

OneNote has five widgets to offer, aimed at single use scenarios. Keep has two widgets which have all the note-taking functionalities in one place. It’s a matter of personal preference in this regard.

Microsoft onenote vs Google keep

Desktop Experience

OneNote clearly has the upper hand here with its robust apps and web experience. Sticky notes are available on onenote.com/stickynotes or your Microsoft email’s notes section so you don’t have to install the app for quick notes.

You can access OneNote web through any browser by logging into your linked Microsoft account. The user interface is similar to a moderately powered Word document with lot of formatting tools.

Microsoft onenote vs Google keep

Similarly the OneNote app for Windows is a part of the Office suite. You can install it as a standalone version or with the package. The desktop app has additional export and history feature that lets you have more control over the notes.

Microsoft onenote vs Google keep

Keep does not offer a dedicated desktop and the support for the Chrome app ended a year ago. The web user-interface takes inspiration from the app. Access pinned and standard notes in the same order. You can create a new note using the note-taking box positioned at the top.

Microsoft onenote vs Google keep

Browser Integration

OneNote Web clipper is available for Chrome, Firefox, and Edge, essentially covering all browsers. Format the text selection and then add it to your Notebook or as an individual note.  The web clipper lets you clip different parts of the page with its box selection.

Microsoft onenote vs Google keep Microsoft onenote vs Google keep

Keep falls a little behind here as their browser extension is available only for Chrome. While two third of the internet uses Google’s browser, it would have nice to have something for Firefox.

Select a region and click on the Keep icon in the toolbar to open the clipper for saving to notes.

Microsoft onenote vs Google keep Microsoft onenote vs Google keep 

Collaboration and Sharing Options

The desktop and web versions of OneNote let you share pages and the entire Notebooks using shareable links. Collaborate with others on a Notebook and manage it together.

You can set the link to view-only or edit. Email-only invites to the notes are also available. OneNote also lets you email a notebook or its page.

Microsoft onenote vs Google keep

Google Keep lets you add people or groups for collaboration via email. You can also create of copy of the note on Google docs.

Microsoft onenote vs Google keep


Over to You

Now all depends on your note taking style. If you are more inclined towards dictation for taking notes, then OneNote is much better suited. On the other hand, Google Keep can accompany you for quick note taking on different devices.

9 Best Music Recognition Software for PC [Free Apps]

Are you looking for music recognition software? We share the best tools you can use in 2020.

Every music lover likes to sing along to the lyrics of their favorite songs. Knowing the lyrics is one thing, but knowing who sang the song is another.

Sometimes you want to save the track on a playlist or share it with your friends so they can find it online or request it on their favorite local radio station.

Sure, you can type a few words on YouTube or Google search, but these bring up thousands, even millions of search results, and sometimes the lyrics are similar to a different song, so you’d have to listen to each result to point out the specific one you wanted.

This is where music recognition software comes in – to help you know exactly who sang the song, even the year.

Here are the best music recognition software tools to take the hassle out of your online searches for both the artiste and/or lyrics.

Top 9 music recognition tools for Windows 10

  1. Shazam – Most popular music recognition app
  2. SoundHound – High accuracy
  3. MusixMatch – Huge music catalog
  4. TrackID – Built-in live map
  5. Audiggle – Multi-language feature
  6. Midomi – Easy to use
  7. Audio Tag – High speed
  8. Tunatic – Versatile tool
  9. WatZatSong – User-friendly tool

Shazam

music recognition software

Shazam is one of the world’s most popular music recognition software apps, which is available for free download on your Windows device.

Its user-friendly interface has features such as auto-listen, which identifies the music for you, and continuous song recognition, which even recognizes songs and shows it hears from your TV.

Here are key features of the Shazam music recognition software:

  • Finding new music
  • Browsing music charts to see what other listeners are searching for
  • Listen to sample music
  • Watch music videos
  • Find other songs from the same artiste
  • Access daily music mixes, as well as videos
  • When offline, Shazam saves the music it picks up with its audio listening feature, then matches it for you
  • Gives detailed information
  • Tag as many songs as you like

Shazam, as mentioned, is very popular, and users love its colorful and user-friendly interactive interface (four panels), plus its ability to identify not just music but also movies and TV shows quickly and accurately.

One of its benefits is its full integration with social media platforms such as Facebook and Twitter, as well as other channels such as Spotify and Pandora.

⇒ Get Shazam

SoundHound

music recognition software

SoundHound is perhaps the biggest rival of Shazam in the music recognition software tools category.

SoundHound provides a full-featured music recognition interface with its iconic big orange button, which lets you tag music by saying ‘Ok Hound’.

Another one of its unique features is supporting voice controls.

You can even hum your favorite track, and Sound Hound will try and identify it. This isn’t found with most other apps. But your humming needs to be accurate so the app can guess the song correctly.

Here are cool features of the SoundHound app:

  • Use voice input to tag music and search for artiste info (no need to use your hands)
  • Play tagged songs
  • Play popular music mixes
  • Add tagged songs to your favorite playlist
  • Read the lyrics to a song
  • Know the albums of your favorite songs

It’s easy to see why SoundHound gives Shazam a run for its money. This tool is also available for free download.

⇒ Get SoundHound

MusixMatch

music recognition software

Nothing makes singing along to a song better than having the actual lyrics.

The MusixMatch music recognition software tool was previously paired with Spotify. It’s because it has a huge catalog of music lyrics that makes it popular among users.

It is also compatible with most third-party music player apps but doesn’t come with music charts.

Here’s what you can do with the MusixMatch music recognition app:

  • Tagging lyrics
  • Saving and sharing lyrics with others
  • Browse lyrics to a song even when offline
  • Play music from your playlist or music library and see its lyrics in real time through the app’s floating lyrics feature
  • Sync lyrics with the song from any point in the song as it plays

⇒ Get MusixMatch

TrackID

music recognition software

You may not have heard about Sony’s TrackID music recognition software tool, but it’s definitely worth your attention. Compared to the others mentioned above, it has a surprisingly large following of users.

Here’s what makes TrackID special:

  • The Discover tab allows users to see what is trending and what’s hot in the music charts
  • The Live map shows tags from different people worldwide in real time. You can also listen to songs that come in only for a few seconds.

However, TrackID has limited tagging options and doesn’t give links to music lyrics and videos, but it redirects you to find them on YouTube or a lyrics website.

⇒ Get TrackID

Audiggle

music recognition software

Audiggle is a new music recognition software tool that instantly lets you know the artist and song name of anything playing on your computer. So if you aren’t sure what a song, movie, or TV show’s name is, use this app.

Here’s what you can expect from Audiggle:

  • Audio recognition that recognizes a song you’ve heard but doesn’t know who sang it
  • Any Source feature which lets you identify any media be it a soundtrack, a YouTube clip, or even your favorite Internet radio
  • Download feature lets you download a song from iTunes or Amazon using links provided
  • Lyrics library that lets you get the words to a song you’ve tracked
  • Multi-Language feature lets you recognize music from all over the globe

⇒ Get Audiggle

Midomi

music recognition software

Midomi is a web-based music recognition software platform owned by the same company that owns SoundHound (mentioned above).

Midomi lets you identify your favorite songs by singing or humming into your microphone, then it gives back the information on the song. If you can’t hum or sing it, you can play the song’s audio clip to your microphone, and it will recognize it.

⇒ Get Midomi

Audio Tag

With Audio Tag, a web-based music recognition software tool, you need only upload an audio track or paste the URL of the audio clip, and it will identify it for you.

The audio clip must be between 15-45 seconds in duration for it to begin identifying the same.

⇒ Get Audio Tag

Tunatic

music recognition software

The Tunatic music recognition software tool lets you identify music after downloading and installing it on your computer. All you need to do is play the song on your earphone on the microphone, then click Search.

You need to be online to connect to the Tunatic database, after which the tool shows you the song’s title and the artiste who sang it.

Tunatic supports both Windows and Mac operating systems.

⇒ Get Tunatic

WatZatSong

music recognition software

Like its name suggests, the WatZatSong music recognition software tool lets you post an audio or music clip on its site, then other followers or users on the site chip in to help identify the song.

This means the tool is based on human knowledge, so you may not get the results as snappy as you would expect.

⇒ Get WatZatSong

Have you tried any of these music recognition software tools? Let us know your experience with these tools, or share which other ones you think are cool to use too.

How to Fix Vizio TV Remote not Working: Step-by-Step

The Vizio remote is important for using your smart TV since you can navigate the menu and various applications. However, some users complain that the Vizio TV remote sensor is not working.

This can be due to a series of factors, but it is not an issue that is impossible to fix. And we will show you how to get it working again in this guide.

Why isn’t my Vizio TV responding to the remote?

Below are some of the reasons your Vizio TV remote sensor might not be working:

  • Low batteries: The first thing to check if your Vizio TV is not responding to the remote is the remote battery. The solution to this is to change your batteries.
  • Presence of obstacles between the remote and TV: There must be a clear path between your remote and TV for the sensor to work. If obstacles block the path, the sensor might fail to work.
  • Interference from other electronic devices: Another potential cause of this issue is the presence of electronic devices emitting radiations that interfere with your remote. The fix to this is to remove these devices.

How to fix Vizio TV remote sensor not working?

1. Check if the sensor is emitting IR

  1. Turn on your mobile phone camera and point the remote to the camera (the end that you will normally point towards your TV).
  2. Press and hold any button (especially the power and volume buttons) on the remote while still pointing toward your camera.
    power button
  3. Check your camera screen to see if the LED light at the top of the remote is flashing light.
  4. Finally, repeat this for all buttons on your remote.

Before making changes to your TV and remote, you should check if the remote is still emitting IR. If it does, you can proceed to the other fixes.

If the test fails, you might need to take the remote to a repair shop or replace it altogther.

2. Change batteries

battery vizio tv remote sensor not working

This is one of the quickest solutions to make sure the Vizio TV remote sensor is working. Just make sure you replace the batteries with fresh and compatible ones.

Most Vizio remotes will take either two AA batters or two AAA batteries. If the new batteries don’t solve the problem, move on to the next solution. 

3. Power cycle the remote and TV

  1. Take the batteries out of the remote.
  2. Press the power button and hold for a few seconds, then release.
    power
  3. Now, press every button on the remote at least once while the batteries are out. This helps to clear residual power from the remote.
  4. Insert the battery into the remote.
  5. Next, unplug the TV from the power outlet.
  6. Press and hold down the TV’s power button for a few seconds. Wait for one minute after doing this.
  7. Finally, plug the TV back into the power source and power it on.

After doing this, check if the Vizio TV remote sensor is now working. This can also work when your TV won’t turn on.

4. Clear the way to the TV sensor

The IR sensor of the TV is usually located either on the bottom left or bottom right of the TV. The sensor is susceptible to anything that might block it, even the protective plastic wrap that comes with new TVs.

This can be the reason the Vizio TV is not responding to any remote. So, move anything that might be in front of the sensor, including books, picture frames, etc.

Also, use a cotton swab with a bit of distilled alcohol to clean any impurities on the TV sensor and the IR remote sensor ( the small lightbulb on the remote‘s front edge).

5. Reset Remote to Clear the Memory (for Universal Remotes)

  1. Press and hold the Set or Setup button. Release the button when the LED light on the top of the remote blinks twice.
  2. Type in the reset code of your remote, most Vizio universal remotes have a reset code of 981 or 977. You can also consult your remote’s manual to find the reset code.
  3. Again, the LED should flash twice. This means that the memory has been cleared, and any firmware issues should be resolved.
  4.  Switch it back to the TV using the button at the bottom of the remote and see if it works.

6. Change the power source

Another effective solution that has been reported to work for some users is changing the power source your TV is connected to. This is imperative if the power transferred to your TV from the source is abnormal.

This can stop your Vizio TV from responding to the remote or buttons, as it will misbehave due to the dirty power. The solution is to change to a stable power source that can provide the quality your TV needs.

We have come to the end of this guide on the Vizio TV remote sensor not working issue. If the problem persists, the problem might be related to the IR sensor. The only solution here is to replace it altogether or to change the sensor.

Similarly, if the Vizio smartcast is not working, check our detailed guide to fix it quickly.

If our solutions worked for you or if you have any other ideas, leave us a note in the comments below.

Printer not Printing Actual Size: Why & How to Fix it

Your printer allows printing of documents in different sizes. Users can select what size of print they need in the printing interface. However, at times the printer fails to print the document in the right size.

This seems to be a common issue with the HP Printer. The issue can occur due to several reasons and most of them are related to the printer driver, misconfigured printer settings, etc. If you are also troubled by this error, here are a couple of ways to fix this issue.

How do I get my printer to print full size?

1. Set Printing Preference

  1. Press Windows Key + R to open Run.
  2. Type control and press OK to open the Control Panel.
  3. Click on Hardware and sounds.
  4. Click on Devices and Printers.
    Printing preferences Control Panel
  5. Right-click on Printer and select Printer Preferences.
  6. Now select Paper Source and set as desired.
  7. Next, select Paper Size and set as desired.
  8. Select Media and set it as desired.
  9. Click OK to save the changes.
  10. Now try to print the document or picture you were trying to print and check if the printer prints correct size.

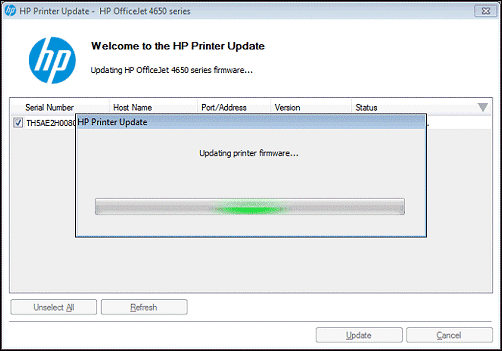
2. Update Printer Driver and firmware

  1. Press Windows Key + R to open run.
  2. Type devmgmt.msc and press OK to open the Device Manager.
  3. In the Device Manager, expand the Printers section.
  4. Right-click on your printer and select Update Driver.
    Download Printer driver
  5. Select “Search automatically for updated driver software” option.
    Update Driver Device Manager Printer
  6. Windows will look for a new version of the driver for your printer. If found it will download and install the driver.
  7. Reboot the system and check for any improvements.
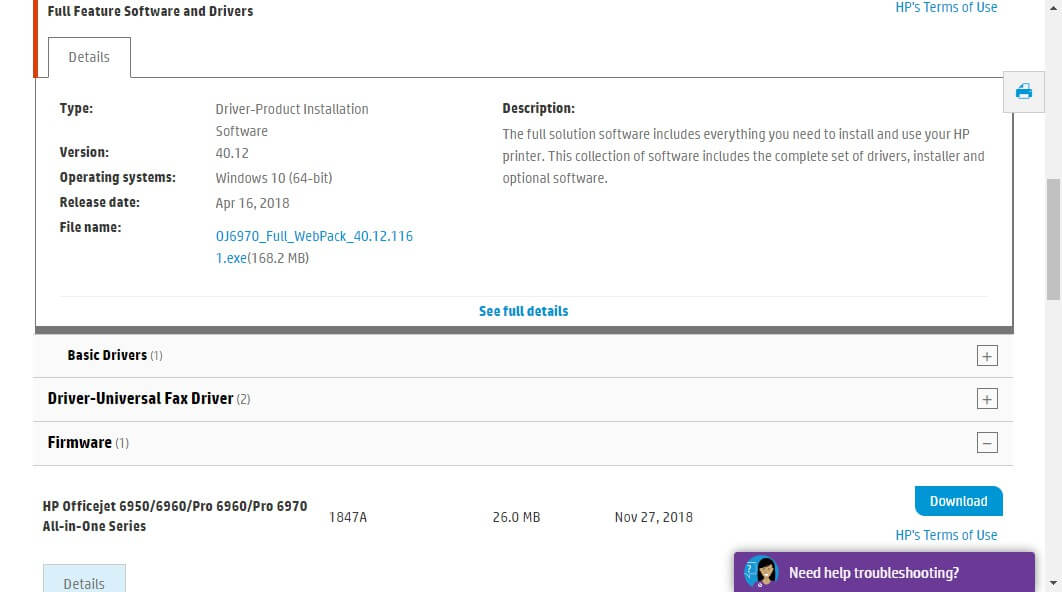
  8. You can also uninstall the driver and the system, if the device is connected, should install it automatically. Alternatively, navigate to the official support website and download drivers there.

For this task, you can employ the help of professional driver updater software, such as Outbyte Driver Updater. This tool will allow you to scan all the drivers, identify missing or broken ones, and then have them replaced or updated in just a few minutes.

⇒ Get Outbyte Driver Updater

3. Run HP Print and Scan Doctor

HP Printer Diagnostic tool
  1. Go to HP Print and Scan Doctor page.
  2. Click the download now button to download HP Print and Scan Doctor to your PC.
  3. Run the program and select any terms and conditions.
  4. In the HP Print and Scan Doctor window, click the Start button.
  5. It will now scan your system and the printer to connected for any issues. Make sure the printer is connected to the computer before running the program.
  6. Follow the on-screen instructions and apply any recommended fix to fix the issue.

Finally, with modern printers like HP, you can change paper sizing for custom prints so that you always have a clean job. This is actually how to change print size on HP printer.

If you have any questions or solutions we didn’t think about, write them down in the comments.

Fix: Windows 10 Volume Keeps Going Up Automatically

When the volume increases automatically on your Windows 10 device, the problem could either be software or hardware related, such as mic/headset settings, or sound/audio drivers which bring it up.

No matter the cause, this article should help you resolve the sound issue even if you’re not a tech expert.

Before we jump into the solutions, make sure you perform these preliminary checks:

  • check your speaker and headphone connections for loose cables or the wrong jack;
  • check your power and volume levels, and try turning all the volume controls up;
  • some speakers and apps have their own volume controls, check them all;
  • try connecting using a different USB port.

If you’ve already gone through all of these, but none helped, move on to the steps below.

What can I do if the sound goes automatically up on my PC?

1. Update sound driver

  1. Right-click Start and select Device Manager
  2. Expand Sound, video, and game controllers
  3. Select your Sound card and open it
  4. Go to the Driver tab
  5. Select Update driver. If Windows doesn’t find a new driver, look for one on the device manufacturer’s website and follow their instructions.

Alternatively, uninstall your audio driver from Device Manager, by right-clicking on it and selecting Uninstall. Restart your device and Windows will attempt to reinstall the driver.

You can also use the generic audio driver that comes with Windows from Device Manager.

  1. Right-click your audio driver
  2. Click on Update driver software
  3. Choose Browse my computer for driver software 
  4. Select Let me pick from a list of device drivers on my computer
  5. Then select High Definition Audio Device, click Next, and follow the instructions to install it.

We also strongly recommend Outbyte Driver Updater to automatically download all the outdated drivers on your PC. This tool will keep your system safe as you can manually download and install the wrong driver version.

Outbyte Driver Updater fully scans your system not just for outdated audio drivers, but for any driver that is out of date. It then recommends the compatible software for your device.

The best thing is that you can use Outbyte Driver Updater whenever you suspect that there’s a similar problem with your device.

⇒ Get Outbyte Driver Updater

2. Run the Audio troubleshooter

  1. Open the search bar and type troubleshooting then press enter.
  2. Click Hardware and sound
  3. Click Playing Audio and then click Next
  4. The troubleshooter will search for any issues and give feedback on the next steps.

3. Run hardware and device troubleshooter

  1. Click Start and type Troubleshooting in the search box to open the troubleshooter.
  2. Select Hardware and sound
  3. Click Hardware and Devices then click Next to start the process and find out what could be the issue – either mic or headset.

4. Check sound settings

  1. Right-click on the speaker icon on the toolbar
  2. Click Sounds
  3. Go to the Playback tabhdmi no signal
  4. Right-click your speaker and select Properties
  5. Under General tab, select Properties again
  6. Go to the Driver tab
  7. Click Roll Back driver.

Note: If the Roll Back Driver option is grayed out, it means that your system is running the default and standard sound driver.

You can download the most current audio driver directly from the Realtek website or your device manufacturer’s website, then install it.

5. Disable sound effects

  1. Click start and type sound to open the Sound window.  (You can also right-click on the sound icon in the tray area and select Sounds.)
  2. Select the Playback tabhdmi no signal
  3. Right-click on Speakers and select Properties
  4. Go to the Enhancements tab
  5. Uncheck Disable all sound effects (or any similar option you see there)
  6. Restart your computer and see if it works better now.

6. Try different audio formats

  1. Go to Start, type Sound, and press enter
  2. Select Sound Control Panel from the list of results
  3. Go to the Playback tab
  4. Right-click the Default Device and select Propertiesdefault speaker properties
  5. On the Advanced tab, under Default Format, change the settingchange speaker properties Windows 10
  6. Retest the sound. If that doesn’t work, try changing the setting again.

7. Set default audio device from USB or HDMI

  1. Click Start and type Sound
  2. Select Sound from the list of search results
  3. Go to the Playback tab
  4. Select a device and then Set Default.
Set default audio device from USB or HDMI

8. Uncheck Loudness Equalization

  1. Right-click the speaker icon on your taskbar
  2. Select Open your playback device (the one that is actually playing)
  3. Click Properties  and go to Enhancements
  4. Uncheck Loudness Equalization

Were you able to fix Windows 10 sound increases automatically using any of these fixes? Let us know in the comments section below.

How to Fix Corsair Headset Mic not Working [HS80, HS45]

Sometimes, upgrading to the latest version of Windows might cause issues on your peripherals. Thus, a significant number of users reported the Corsair headset mic is not working on Windows 10.

Considering this, they were complaining about experiencing problems where the mic did not record any audio but provided sidetone audio through the earcups.

We have to mention that this issue may also be caused by the latest iCUE software update coming into conflict with your Windows build. 

Even though these kinds of issues may happen often, you should consider that there are options that can fix your unworkable Corsair headset mic.

This article will offer some of the best options to solve your error and make sure that it will never bother you again.

How can I fix Corsair headset mic not working on Windows 10?

1. Check if the headset is correctly connected to your computer

  1. Go to Settings.
  2. Click on the System section.
  3. Go to Sound and scroll down to the Input section.
  4. Under Input, look at Test your microphone and check if the blue bar rises and falls as you speak into your microphone.
  5. If the bar is moving, your microphone is working properly.

2. Use Privacy settings

  1. Go to Settings.
  2. Click on Privacy section.
  3. Go to Microphone.
  4. Check if the toggle switch at the top is enabled.

3. Use Recording tab

  1. Right click on the speaker button and select Sound.
  2. Click on the Recording tab.
  3. Right-click on the Corsair Device and choose Properties.
  4. Select the Advanced tab and then the drop-down list to choose DVD Quality.

4. Increase the volume of your mic

  1. Go to Settings.  
  2. Click on System.
  3. Select Sound and scroll down to Input section.
  4. After you check your microphone is selected under Choose your input device, select Device Properties.
  5. On the Volume section, adjust Microphone Boost slider as needed and click on Start test while speaking into your microphone.

5. Uninstall and reinstall the Corsair headset and iCUE software

  1. Open Control Panel.
  2. Click on Device Manager.
  3. Double click on Audio inputs and outputs from the shown window.
  4. Right-click on the Corsair headset and select Uninstall Device.
  5. Unplug the headset from your PC, and do NOT plug it back in until these instructions state to, then restart your computer.
  6. After your PC is restarted, open Control Panel again.
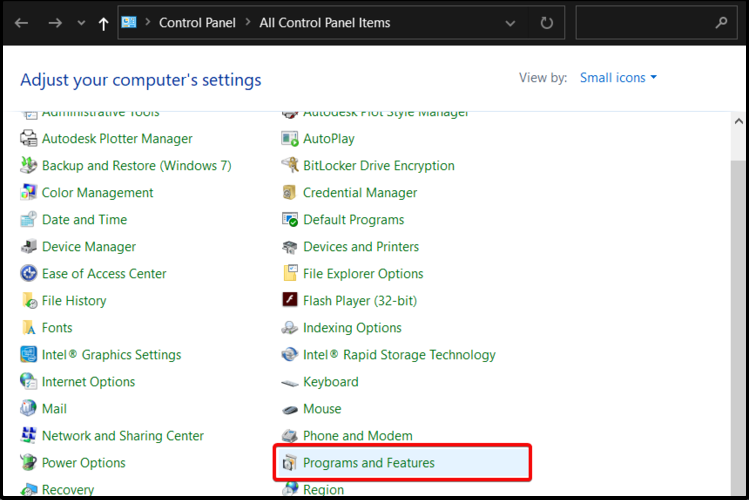
  7. Select Programs and Features.
  8. Right-click on the Corsair iCUE software, select Uninstall, then restart your PC again.
  9. Once your computer is restarted, open an Internet browser, download the latest version of iCUE, install it and then restart your PC last time.
  10. After reopening your computer, make sure iCUE is running.
  11. Plug your headset back in, and check the functionality.

These were our most relevant options in order to help you fix Corsair headset mic not working on Windows 10. Hopefully you will solve your issue without no trouble.

If you encounter any other question related to this article or unclear information, please don’t hesitate to contact us.

Also, if you’re interested in how to easily fix headphones not working / detected in Windows 10, you’ll find some useful options.

Moreover, in order to complete your Corsair set, we recommend you 5 best Corsair keyboards to buy, so make sure you choose the best one!

How to Edit Right Click Menu on Windows 10: Step-by-Step

Customizing the right click menu window for Windows 10, 8 is probably one of the best features Microsoft has offered, in my opinion. There are a lot of options there like “Copy” and “Paste” a folder or file of your liking or just “Rename” a folder with a name of you’re choosing. These are just a few menu items that you can choose that makes the job a lot easier if you have them around.

The menu that appears when you right click on a folder or an open space on the desktop of the Windows 10, 8 PC can be modified to fit your every day need or you can just take out of there the Windows 10, 8 features that you probably won’t use in your everyday activity. The tutorial below will show you exactly how to customize your right click Windows 10, 8 menu window just by doing a few easy steps I have posted below.

How to customize the right click menu on Windows 10?

1. Use the Registry Editor

  1. Go with the mouse over to the left side of the screen.
  2. Click (left click) in the search box in the upper left of your screen.
  3. Type in the search box “Run” or an easier way to do this is by pressing the buttons “Windows key” and the “R” key on the keyboard(Windows key + R).
  4. Click (left click) on the “Run” icon that appears in the upper left of your screen.
  5. Now you should have the “Run” window in front of you.run window PC
  6. Type in the box on the right from “Open:” the command “REGEDIT” exactly the way I have written it in quotes.
  7. Click (left click) on the “OK” button situated in the lower side of the “Run” window.
  8. Now you should have in front of you a “Registry Editor” window.
  9. Click (left click) on “Computer” icon you have on the upper left side of the “Registry Editor” window.
  10. In the list that you opened you should have there “HKEY_CLASSES_ROOT”, double click (left click) on it.hkey classes root windows 10
  11. In the “HKEY_CLASSES_ROOT” folder you should have there a folder that is named with “*”,double click (left click) on it.
  12. In the “*” folder you should have there a folder that is named with “Shellex”, double click (left click) on it.shellex registry editor
  13. In the “Shellex” folder you should have there a folder that is named with “ContextMenuHandlears”, double click (left click) on it.
  14. Right click on the folder “ContextMenuHandlears”.
  15. In the menu that shows hover the mouse cursor over “New”
  16. Another menu should open up, click (left click) on “Key“ in the “New” menu you opened.
  17. Now you only need to enter your item name that you want to appear in the right click menu.Example “Copy to”
  18. If you want to remove an item from the list , click (left click) on the item and press “Delete”
  19. Click (left click) on the item you created and on the right side of the “Registry Editor” window you should have “Default”.
  20. Click (right click) on “Default”
  21. Click (left click) on “Modify” in the menu you opened.
  22. An “Edit String” window should of opened up.
  23. Under the “Value data” in the white box write for example the code “{C2FBB630-2971-11D1-A18C-00C04FD75D13}” , this code is specific for the “Copy to” item on your right click menu.
  24. Click (left click) on “OK” in the lower side of the “Edit String” window.
  25. Go on the Desktop and right click a folder or file and you should have there the item “Copy to”.

2. Use a context menu editor

If you don’t feel comfortable using the Registry Editor, you can also use a menu editor. These tools feature a user-friendly interface that’s very intuitive to use, thus making your task of personalizing right-click menu much easier.

One of the best right-click menu editors for Windows 10, 8.1 is Easy Context Menu. This software allows you to add a variety of commands and tweaks to the right-click context menus when you select My Computer, your computer’s Drives, and many other Windows components. Using this tool is as simple as a walk in the park: check the box next to the items you wish to add and that’s it.

There you have it, in a few easy steps posted above, you can now customize your right click menu on Windows 10, 8. If you have other suggestions regarding this article and you want to share them with us , feel free to post them in the comments below.

RELATED STORIES TO CHECK OUT:


How to Fix This Installation Package Could not be Opened Error

We all have various third-party applications on our PCs, but sometimes issues while installing applications can occur.

According to users, they are receiving the This installation package could not be opened error message while trying to install certain applications.

Luckily, there are ways to fix it on Windows 10.

How to solve this installation package could not be opened?

Solution 1 – Make sure that the application is unblocked

Depending on your security settings, Windows 10 can sometimes block certain applications from installing, causing the This installation package could not be opened error to appear. To fix this problem, you just need to find your setup file and unblock it. This is rather simple:

  1. Locate the problematic setup file, right-click it, and choose Properties from the menu.
  2. When the Properties window opens, go to the General tab and locate the Unblock checkbox at the bottom. Make sure that the Unblock option is checked.
  3. Now, click Apply and OK to save changes.
  4. If you see a confirmation message, click Continue.

After unblocking your setup file, try to run the application again. If you don’t have an Unblock option, it means that this file is already unblocked, so you’ll need to use a different solution.

Solution 2 – Temporarily disable your antivirus

Your antivirus is one of the most important applications on your PC, protecting you from unsafe and malicious files. It can also prevent certain files from running, however. If that happens, you can encounter the This installation package could not be opened error message.

According to users, you might be able to fix this problem simply by disabling your antivirus software. After disabling your antivirus, try running the setup file again and check if the error message appears.

Keep in mind that Windows 10 comes with built-in antivirus with its Windows Defender, so even if you disable your third-party antivirus your PC will remain safe.

If disabling your antivirus fixes the problem, you might want to check its configuration and try to find the cause of the problem.

On the other hand, if this error appears frequently, you might want to try updating your antivirus. In the worst-case scenario, you might need to switch to a different antivirus software altogether.

Solution 3 – Check if Windows Installer service is running

In order to install any application, Windows Installer needs to run. Sometimes, though, this service can become disabled which can cause the This installation package could not be opened error.

To fix it, you need to manually start Windows Installer. This is relatively simple:

  1. Press Windows Key + R and enter services.msc. Click OK or press Enter.
  2. List of all available services will now appear. Locate Windows Installer service and double-click it to open its properties.
  3. If you can, set Startup type to Automatic. Now, check the status of the service. If the service is stopped, click the Start button to start it. After that, click Apply and OK to save changes.
  4. Close Services window and try to install the application again.

The installation process is closely related to Windows Installer service, so if you’re having this problem, be sure to check if the aforementioned service is running.

Solution 4 – Modify your registry

According to users, you might be able to solve this issue simply by modifying your registry. Modifying the registry can be potentially dangerous and can lead to system instability, therefore we advise you to be cautious.

To modify your registry, do the following:

  1. Press Windows Key + R and enter regedit. Click OK or press Enter.
  2. When Registry Editor opens, in the left pane navigate to HKEY_LOCAL_MACHINESYSTEMCurrentControlSetControlFileSystem.
  3. Optional: Right-click FileSystem key and choose Export from the menu.
    Enter the desired file name, choose the save location and click the Save button.

    You can use this file to restore your registry in case anything goes wrong. This step isn’t mandatory, but it’s always good to make a backup before making any registry changes.
  4. After you navigate to the FileSystem key, locate NtfsDisable8dot3NameCreation DWORD in the right pane. Check the Data value for this DWORD. If the Data isn’t set to 0, double click NtfsDisable8dot3NameCreation to open its properties.
  5. Now, set Value data to 0 and click OK to save changes.
  6. Locate Win31FileSystem DWORD and check its Data value. If its Data value isn’t set to 0, be sure to change it by using the same methods we used above.
  7. Close Registry Editor.

After making the changes, try to start the installation again.

If any new problems occur after changing your registry, you can restore it at any time simply by running the backup file that you created in Step 3.

Solution 5 – Create a new user account

According to users, you can fix the This installation package could not be opened error simply by creating a new user account. Sometimes, your regular user account might not have the necessary privileges or it might be corrupted, causing this problem to occur.

To fix the issue, you need to create a new user account and try to install the application from that account:

  1. Press Windows Key + I to open the Settings app.
  2. When the Settings app opens, navigate to the Accounts section and choose Family & other people tab. In the Other people section, click Add someone else to this PC button.
  3. Click I don’t have this person’s sign-in information.
  4. Now, click Add a user without a Microsoft account.
  5. Enter the desired user name and click Next.

After creating a new user account, log out of your current account and switch to the new one.

Now, locate the setup file and try to run it. If you manage to install the application, you can go back to your main account and try to run it again.

After doing that, feel free to delete the newly created account since you won’t need it anymore.

A few users reported that this error occurs because they have a special character in their username.

Certain setup files can’t handle special characters, so they will give you this error message. If that’s the case, you’ll have to create a new account that has only alphanumeric characters in its name and use it to install the problematic application.

Solution 6 – Enable a hidden administrator account

If creating a new user account doesn’t fix the This installation package could not be opened error, you might need to enable the hidden administrator account. This is rather simple:

  1. Press Windows Key + X to open Win + X menu. Choose Command Prompt (Admin) from the menu.
  2. After Command Prompt opens, enter net user administrator /active:yes.
  3. Close Command Prompt.

This will enable the hidden administrator account. Now, log out of your current account and switch to the new administrator account. After doing that, locate the setup file and try to install the application again.

If you manage to install the application, go back to your main account.

After switching back to your main account check if the application is working properly.

If so, start Command Prompt as administrator and run the net user administrator/active:no command to disable the administrator account.

Solution 7 – Move the setup file to the root directory

Sometimes, in order to fix the This installation package could not be opened error, you need to move your installation file to the root directory on your PC.

To do that, you just have to locate the setup file and move it to C: or any other root directory. After doing that, simply start the installation and it should work without any issues.

Keep in mind that you can move the setup file to any root directory on your hard drive.

Solution 8 – Create a .bat file

According to users, you can fix this problem by creating a .bat file and using it to run the installation. To do that, follow these steps:

  1. Open Notepad.
  2. When Notepad opens, enter msiexec /i %1.
  3. Now, click File > Save as.
  4. Set Save as type to All Files and enter install.bat as the File name. Choose a save location and click Save.
  5. In order to install a certain application, simply drag the setup file to the install.bat file. Keep in mind that this solution only works with .msi files.

If this method works, you’ll have to use it every time this message appears.

Several users are also suggesting to make some adjustments to your registry in order to fix this problem. Before we start, we advise you to back up your registry just in case.

We have to mention that this solution is potentially dangerous, so use it at your own risk. To make these changes, do the following:

  1. Open Registry Editor. To see how to check Solution 4.
  2. When Registry Editor opens, navigate to HKEY_CLASSES_ROOTMsi.Packageshell in the left pane. We recommend you export a shell key in case you need a backup. To see how to export a key, check Step 3 in Solution 4.
  3. Navigate to Open > command in the left pane and double-click on (Default) in the right pane.
  4. The properties window will now appear. In the Value data field, remove the quotes around %1. Be careful to not remove anything else from this field. If you accidentally remove something else, you can cause issues with your PC. To summarize, change “%SystemRoot%System32msiexec.exe” /i “%1” %* to “%SystemRoot%System32msiexec.exe” /i %1 %*. Click OK to save changes.
  5. Now, go to Repair > command in the left pane and double-click on (Default) in the right pane.
  6. When the Properties window opens, replace “%SystemRoot%System32msiexec.exe” /f “%1” %* with “%SystemRoot%System32msiexec.exe” /f %1 %* in Value data field. Click OK to save changes.
  7. Navigate to Uninstall > command in the left pane and double-click (Default) in the right pane.
  8. Change Value data from “%SystemRoot%System32msiexec.exe” /x “%1” %* to “%SystemRoot%System32msiexec.exe” /x %1 %*. Click OK to save changes.
  9. Close Registry Editor and try to install the application again.

This is a bit of an advanced solution, so you need to be extra cautious while performing steps 3 to 8.

As we already mentioned, it’s highly recommended you create a backup of your registry so you can easily restore it in case anything goes wrong.

Solution 9 – Try using a different browser

According to users, the This installation package could not be opened error can appear because your download is corrupted. To fix this problem, you need to download the setup file again with a different browser.

Several users reported that this solution worked for them, so we highly recommend you try it out.

Solution 10 – Make sure that the setup file is located on a local drive

Users reported that the This installation package could not be opened error appears if your setup file is located on a network drive.

If that’s the case, simply move the setup file from a network drive and try to install it again.

Solution 11 – Re-register Windows Installer

You might be able to fix the This installation package could not be opened error simply by re-registering Windows Installer. This is relatively simple:

  1. Start Command Prompt as administrator.
  2. When Command Prompt opens, enter the following lines:
    • msiexec /unregister
    • msiexec /regserver
  3. After running both commands, close Command Prompt.

After doing that, try to install the application again and check if the problem is resolved.

Solution 12 – Change environment variables

You might be able to fix this problem simply by changing your environment variables. This is relatively simple, and you can do it by following these steps:

  1. Press Windows Key + S and enter variables. Select Edit the system environment variables from the menu.
  2. The System Properties window will appear. In the Advanced tab, click the Environment Variables button.
  3. A list of environment variables will appear. Double-click the TEMP variable to change it.
  4. When the properties window opens, change the Variable value to C:Temp. Click OK to save changes.
  5. Repeat the same steps for the TMP variable and save changes.

After doing that, try to install the application again. If the problem persists, you might want to return environment variables to their default values.

Solution 13 – Completely remove iTunes and QuickTime

According to users, they are getting this error when trying to install iTunes.

To fix the problem, you need to uninstall iTunes and QuickTime. To do that, follow these steps:

  1. Press Windows Key + I to open the Settings app.
  2. Go to System section and select Apps & features tab. Select iTunes or QuickTime and click the Uninstall button.
  3. After removing the problematic applications, try installing iTunes again.

A few users reported that in order to fix the problem, you need to delete all the files associated with iTunes and Quicktime, so be sure to do that as well. After, you should be able to install the application without any problems.

Before we go, we covered a similar error in our This app package is not supported for installation by app installer article, so check it out for more potential solutions.

The This installation package could not be opened error can prevent you from installing new applications and even though this error can be a nuisance, you should be able to solve it by using one of our solutions.

Fix: Chromebook Won’t Connect to WiFi & Main Reasons

To use a Chromebook, you rely heavily on an internet connection, and when your device doesn’t connect to WiFi, it is useless.

This issue can be due to wrong Chromebook settings or other factors. However, it is not the most difficult issue to fix, just like the microphone not working on the Chromebook issue. In this guide, we will show you the best ways to fix it for good.

Why is my Chromebook not connecting to WiFi?

Below are some of the reasons your Chromebook might not connect to WiFi:

  • Outdated OS: One of the major causes of issues on Chromebook is an outdated operating system, and you can’t rule it out here too. The quickest way to remedy this is to update your Chromebook to the latest version.
  • Disabled setting In some cases, it might be that your WiFi is disabled. This can happen if your PC has a physical WiFi key. To be sure, you need to look for the switch and check if it is turned off.

How do I force my Chromebook to connect to WiFi?

1. Disconnect and reconnect to the WiFi

  1. Click the Time on your taskbar, followed by the Gear icon.
    gear icon  chromebook wont connect wifi
  2. Select the Network option in the left pane.
  3. Now, choose WiFi.
    wifi
  4. Next, select the Known networks option.
    known networks
  5. Select the network you are trying to connect to under the All networks section.
  6. Click the Forget button.
    forget
  7. Finally, go back to the WiFi page, select the network, enter the required details, and click the Connect button.
    connect chromebook wont connect wifi

If your Chromebook doesn’t connect to WiFi, you can fix it by forgetting the network and connecting to it again. This will clear any minor roadblocks that can prevent the connection.

2. Update Chrome OS

  1. Launch the Settings app.
  2. Click About Chrome in the left pane.
  3. Finally, click the Check for updates button and install any available updates.
    update cchrome

An outdated Chrome OS is prone to different issues, including the Chromebook won’t connect to the WiFi problem. Updating your OS to the latest version should do the trick.

3. Remove all preferred networks

  1. Launch the Chrome browser, type the command below in the address bar, and hit Enter: chrome://settings/clearBrowserDatabrowser data
  2. Click on the Clear data button.
    clear data chromebook wont connect wifi
  3. Now, type chrome://settings > click on the network that appears.
    settings
  4. Click on Preferred Networks > Delete all available networks.
  5. Finally, click on the Done button.

4. Run Chrome Connectivity Diagnostics App

The Chrome Connectivity Diagnostics App is a Chrome extension that can quickly troubleshoot whatever problem the device might detect.

It also checks out connectivity, so if there’s an issue here, you’ll be notified of why and possible solutions. So, if your Chromebook won’t connect to WiFi, download this extension and run it.

5. Perform a hard reset

A hard reset is one of the quick ways of fixing issues on Chromebook. Even if you are not dealing with any problems, doing this helps keep your device in top shape as it helps remove junk files.

To perform a hard reset, press and hold the Power + Refresh buttons and leave the Refresh button when your device boots up.

6. Powerwash Chromebook

  1. Press the Ctrl + Alt + Shift + R simultaneously.
  2. Select Restart.
  3. Now, click on Powerwash.
    powerwash
  4. Finally, click Continue and follow the onscreen instructions to complete the operation.
    continue
  5. Follow the prompts to complete the operation.

Your Chromebook may be unable to connect to WiFi because of wrong configuration, settings, or system file errors. So this solution will reset your Chromebook to factory default settings.

It’s recommended to back up all your files and data before you powerwash your Chromebook.

You could also:

  • Turn off your router and restart the Chromebook
  • Look for any physical WiFi switch
  • Use a USB WiFi adapter instead
  • Ensure that your network can work with a Chromebook
  • Move closer to your router
  • Update router firmware

That is about the Chromebook won’t connect to the WiFi problem. Hopefully, you didn’t get to the last step to solve the problem.

If you want to know how to find and share your WiFi password on Chromebook, check our detailed guide to do it quickly.

In case your device keeps restarting, don’t forget to check our Fixing Chromebook Rebooting: Common Causes guide.

Any comments on your particular situation are welcome in the dedicated section below.

How to Fix Black Desert Online Not Working / Not Responding

If you’re having Black Desert Online issues on your Windows 10 PC, you might not be able to start this game at all.

There are various problems that can occur with Black Desert Online, and in today’s article, we’ll show you how to fix some of the most common problems.

Black Desert Online is a popular living-world MMORPG. As a player, you’ll experience fast-paced combat, hunt monsters and kill bosses, while training a series of important life skills that include fishing, trading, crafting, cooking, and more.

At the same time, the game will also offer you the opportunity to train your troubleshooting skills. Players report that Black Desert Online is affected by a series of issues that range from crashes and black screen issues, to FPS drops.

In this article, we’ll show you how to fix the following issues:

  • Launch issues
  • Graphics bugs
  • Lag and disconnections
  • Crashes and freezes
  • FPS drops.

How can I fix Black Desert Online bugs on my Windows 10 PC?

1. Black Desert won’t launch

Here are the most frequent launch issues and how to fix them:

  • Failed to read launcher version error

This error occurs when the launcher couldn’t contact the server. To fix this error, flush your DNS and clear TCP/IP, change your DNS to Google Open DNS and disable your Proxy Settings.

  • Black Desert Online Launcher.exe is not responding

This error is usually caused by improper proxy settings. Disabling your Proxy Settings should eliminate Launcher crashes.

Proxy server issues are pretty annoying. Make them a thing of the past with the help of this guide.

  • Only the game background is visible

Sometimes, after you launch the game, only the background is visible — there are no buttons, text boxes, or other type of information.

To fix this problem, replace the DGCefBrowser.exe file in the installation directory. You can download the DGCefBrowser.exe file from Black Desert’s official support page.

Then move the new file to the same directory where the current DGCefBrowser.exe is located. When prompted by Windows, choose Replace.

  • Launch errors 3, 901 and  903

These errors usually occur when there is a network issue. Try refreshing your Internet connection and launching Black Desert Online again.

If the issue still persists, update your graphics drivers, disable background programs and switch to a wired connection if you’re using a Wi-Fi connection.

  • Launch errors 10, 11, 201, 202 and 203

To quickly fix these errors, simply close the game client, log in to Steam again and launch the client again.

2. Graphics issues

There are several types of graphics issues that may affect the game. Here’s how to fix the most frequent ones:

  • Black world, and overlaying windows

This appears to be a graphics driver issue affecting mainly AMD cards. To fix this problem, downgrade to driver version 16.12.2.

  • Other players’ effects are not visible

Auto Frame Optimizer often removes other players’ effects in order to boost FPS. This usually happens on low-end devices. To fix this problem, simply go to the Game Settings and disable the “Auto Frame Optimizer” option.

  • Game looks pixely

This problem is usually caused by the Upscale option which increases game performance. To fix the pixely-looking graphics, turn off the upscale option.

  • Textures and non-player characters keep popping in

Sometimes textures, NPCs and other random objects suddenly pop up on screen while players move around the world.

To reduce this effect, turn on the High-end mode option. However, keep in mind that this action may negatively impact your game’s performance.

3. Black Desert Online lags or disconnects

If the game is too slow or even disconnects, follow these troubleshooting steps:

  1. Go to the Options menu, select Screen and lower all your game settings. If your computer barely meets the minimum system requirements to run Black Desert Online, you will often experience lag.
  2. Install the latest graphics driver updates from NVIDIA or AMD.
  3. Disable unnecessary background programs to reduce strain on your computer’s resources. For more information on how to perform a clean boot, check out Microsoft’s support page.
  4. If you’re using a Wi-Fi connection, switch to a wired connection to reduce packet loss. Also, install the latest modem drivers from your device’s manufacturer website.
  5. Power cycle your modem. Sometimes, power cycling your modem works wonders. Turn off your computer, and then remove the power cable from your router/ modem. Wait for thirty seconds, and then plug your devices back in. Turn your computer back on and launch Black Desert.

We mentioned that a driver update might fix the network issues with Black Desert Online.

If you don’t want to manually search for and download driver updates, you can always use third-party software to automatically upgrade all of your selected drivers.

 4. Black Desert Online crashes or freezes

Black Desert Online sometimes crashes after hitting ALT + Tab, and this problem is often caused by the Windows 10 KB3197954 update. To fix this issue, simply uninstall KB3197954.

If the game crashes with error 0xE19101A, try disabling Driver Signature Enforcement in Windows 10 to solve this problem.

If Black Desert Online crashes randomly, follow these troubleshooting steps:

  1. Run the game as an Admin.
  2. Close background programs. Launch the Task Manager, click on the Processes tab, and filter the programs by memory. Close all the programs that are using a lot of memory.
    task manager memory sort Black Desert Online problems
  3. If you’re using high video settings, try lowering them to medium.
  4. Uninstall and then reinstall the game to fix corrupted game files.

5. Fix FPS drops in Black Desert Online

  1. Disable overlaying programs such as MSI, Steam Overlay, AMD Gaming Evolved, Nvidia GeForce Experience, etc.
  2. Reset your ingame display settings
  3. Turn off the Game Bar DVR feature. This feature is available on Windows 10 and is known to cause various game issues. Open the Registry Editor, go to HKEY_LOCAL_MACHINESOFTWAREMicrosoftPolicyManagerdefaultApplicationManagementAllowGameDVR, set the value to 0 and reboot.
  4. Change the power profile selection on your computer:
    • Go to Control Panel >Power Options.
    • Click the Change battery settings option.
    • Select the High Performance profile.
      high performance power plan
  5. Update your graphics drivers.If the FPS is limited to 24 or 30, enable the full screen windowed mode. This is a known issue with the AMD / Nvidia drivers when your monitor is identified as a TV in their code.
  6. Change the graphics settings of the game using the following values:
    • Graphics Quality – High 2 > Medium 2 (or lower)
    • Texture Quality – High > Medium (or lower)

If you can’t open the Registry Editor in Windows 10, follow this guide to solve the problem. And here’s a similar guide for Control Panel.

Also, if you’re having trouble finding your Power Plans, check out this amazing article.

There you go, we hope that the workarounds listed above helped you to fix the Black Desert Online bugs that you encountered.

As always, if you’ve come across other workarounds, you can list the troubleshooting steps in the comment section below.

Sorry Something Went Wrong Facebook Error (Fix Guide)

The sorry something went wrong Facebook error appears when Facebook can’t process your request during login, browsing, or posting. Causes range from server outages and browser conflicts to account or security glitches. Use the steps below to identify the issue and fix it quickly.

What Is the Facebook “Something Went Wrong” Error?

When Facebook says sorry something went wrong, the platform failed to load or complete your action. It’s a generic message, not tied to a single cause. Triggers include temporary server downtime, corrupted browser data, or a two-factor authentication (2FA) redirect failure.

Why Am I Getting a Sorry Something Went Wrong Error on Facebook?

  • Facebook server outages – downtime or maintenance on Meta’s side.
  • Browser cache or cookies – corrupted data prevents pages from loading.
  • Outdated app or browser – older versions may conflict with recent changes.
  • Unstable or restricted network – weak Wi-Fi or filtered networks block requests.
  • Account/session glitches – expired sessions or internal security flags.
  • Conflicting extensions – ad blockers or VPNs interfering with scripts.

Related issues include the Facebook app not working on Windows 10 and being unable to log in to Facebook on PC, which share similar root causes.

Recent Variants of the Error

1. 2FA / Login Loop Error

Since 2024, some users hit the error during two-factor authentication. After entering credentials, Facebook fails to load the 2FA page.

Fix: Remove inactive devices under Settings → Accounts Center → Security → Two-Factor Authentication, switch the 2FA method (SMS/App), and retry.

2. Account-Specific Lockouts

One account shows the error across devices while others work normally—often similar to Facebook error code 2 or a persistent “session expired” state.

Fix: Log out from all devices, reauthorize, and if needed, submit a report via the Help Center.

The error appears in one browser but not others; it may also resolve in Incognito. Similar conflicts cause Facebook videos not playing in Chrome.

Fix: Clear Facebook cookies and cache, then retest in a private window or different browser.

4. Marketplace or Posting Errors

Some users see the message only when posting in Marketplace or groups, much like when you cannot post while memory is loading.

Fix: Update the app, switch browsers, and ensure the post complies with rules.

How to Fix Something on Facebook

  1. Refresh and retry
    • Reload the page or restart the app.
    • Log out and log back in.
    • Switch between Wi-Fi and mobile data.
    • If desktop fails, try logging in via mBasic Facebook.
  2. Clear cache and cookies
    • On desktop: clear browser cache and Facebook cookies.
    • On mobile: clear the app cache/data in settings.
    • This often resolves related issues like Facebook error fetching data.
  3. Update or reinstall
    • Update your browser to the latest version.
    • Update the Facebook app in the App Store/Google Play.
    • Reinstall if needed; outdated builds can cause issues such as Facebook Dating not showing up.
  4. Check Facebook’s status
  5. Disable conflicting extensions
    • Turn off VPNs, ad blockers, or browser add-ons temporarily.
  6. Reset your login session
  7. Fix 2FA/Login loop issues
    • Open the mobile app, go to Accounts Center → Security → 2FA.
    • Remove inactive devices.
    • Change your 2FA method (SMS/app).
  8. Fix Marketplace or posting errors
    • Update your Facebook app.
    • Switch browsers and retry posting.
    • Confirm content doesn’t violate Facebook rules. Problems like content not available on Facebook often overlap.
  9. Contact Facebook support
    • Use the Report a Problem option in the app.
    • Meta support may need to review your account.
    • Recurring alerts like Facebook unknown error code 1 may require direct support.

FAQs

Why am I getting a sorry something went wrong error on Facebook?

It usually means Facebook can’t process your request due to server issues, browser cache problems, or account login glitches. In some cases, it relates to issues like Facebook error fetching data.

How do I fix Facebook login errors?

Clear cookies, update your app/browser, disable extensions, and reset your login session. If it’s a 2FA issue, update your authentication method in the Accounts Center.

Final Thoughts

The something went wrong Facebook error is frustrating but usually temporary. Most issues resolve by clearing cache, updating the app, or adjusting login/security settings. If nothing works, check if it’s a platform-wide outage or contact Meta’s support.

LockDown Browser is Not Working? 3 Quick Fixes

If you did an online exam during the corona period, you might have had to download the LockDown Browser. Many universities, institutions, and online courses use browsers to administer exams for students to avoid exam irregularities.

LockDown Browser, compatible with Windows 10 and Windows 11, uses different technology and mechanisms to control cheating. It records the student’s webcam, which the teacher reviews after the exams are over.

Some students and other people are coming ways how they can bypass browser tracking. Many students reported the LockDown Browser was not working during the exam when they tried to access it. This article will look into several ways of fixing the error.

Preliminary steps to fix the LockDown Browser

Before starting to tweak the Windows and browser settings, let’s go through a couple of checks to eliminate some of the potential causes for this error.

➡ Close any other apps, especially the browsers

LockDown Browser detects if there are other open programs like Chrome and File Explorer and other software that may interfere.

Check if there are open programs; close them. Relaunch the LockDown Browser to see if the error persists.

Make it compulsory to confirm this before using the browser. You will get rid of the browser not responding error.

➡ Check your Internet connection

Exit the browser and confirm if the network connection is stable. If not, try troubleshooting or changing the type of network from Public to Private.

It’s also advised to use Ethernet over a Wi-Fi connection as it’s likely to slow down or fluctuate when using the browser.

And if you have no choice but to rely on the wireless connection, try to position yourself closer to the router.

How can I fix the LockDown Browser not working error?

1. Disable your antivirus

  1. Go to the Start Search box and type windows security, then hit Enter.
  2. Click on the Virus & threat protection tab.
  3. Select the Manage settings option.
  4. Click on the Real-time protection tab to turn it Off.
  5. Try to access the exam in the LockDown Browser.

Windows Defender or your third-party antivirus may block some of the browser’s features preventing you to access certain web pages.

We have outlined the solution to disable the Windows protection but if you have a different antivirus installed on top, you should check its security menu to disable its protection temporarily.

Turning off the virus protection is then the logical choice to unlock the page in the LockDown Browser.

However, don’t leave your PC unprotected for a long period of time because there are a lot of threats lurking online.

2. Try changing the account type to an administrator.

  1. Go to the Search box, type Control Panel, and hit Enter.LockDown browser not working
  2. On the user Accounts tab, click the Change Account type option.
  3. Confirm if you are the administrator. If you are not an administrator, click on the Change account type.LockDown browser not working
  4. Select the Administrator option and click on the Change the account type button.LockDown browser not working
  5. Restart your PC to apply the changes.LockDown browser not working

3. Check the version of the LockDown Browser you use

Respondus releases different versions of the LockDown Browser occasionally. You have to keep checking if the browser needs an update. Confirm if there is a pending, update it, and try accessing it.

Pending updates slow down the browser’s activity, making it misbehave. If it’s corrupt or fails to update, you can download it direct from their website.

It’s free to download, and it will take a few seconds. Run the executable file and perform a clean installation of the browser.

What are the features of the LockDown Browser?

The LockDown Browser has many features that ensure exam cheating doesn’t through. It uses different methods to achieve this. Some of the features include:

  • When you open it, it enters full-screen mode, giving you no options of minimizing or going back.
  • The right-click of the mouse and keyboard shortcuts get disabled, making it hard to copy and paste.
  • You must present your school ID and face when the browser launches to log in.

Do I pay to use the LockDown Browser?

The browser offers a two-month free trial for teachers, students, and institutions. Those who want to use the browser to monitor online exams have to pay an annual fee ranging from $2795 to 10,000, depending on the number of students per school.

If you have over 40,000 students, you may be required to contact them to provide a special price. This browser helped thousands of universities to administer exams. Once the school pays, everyone gets catered to in the plan.

You can check out the best interactive training module software to host your online courses if you are a university or college teacher. Some tools allow you to set your questions to gauge if the students understood what you taught.

The solutions here, though meant for Windows, hold good for other operating systems as well and will help you fix things if the LockDown browser is not working on iPad, Macbook, and Chromebook.

Remember, the LockDown browser is not compatible with Windows 10/11 S Mode and the SE version of the OS. So, if you are running these, switch to the regular versions of either Windows 10 or Windows 11.

In case you are one of those who had trouble downloading it, find out what to do if you can’t install the LockDown browser. Also, for those using the browser, learn how to fix things when the webcam is not working on the Lockdown browser.

We have covered several ways of fixing the LockDown not responding error, which one did you try and worked for you. Let us know in the comments.

YouTube Could Not be Run, Could Not be Installed [Roku]: Fix

Roku is one of the most popular digital media player manufacturers which allows the users to stream media content from multiple online services, including YouTube.

However, several users have reported a YouTube not working on Roku issue in the Roku community forums.

When the user tries to launch the YouTube app on Ruku, it displays the can’t run channel error. The full error reads, “YouTube could not be run because there is not enough space. Please remove one or more of your installed channels and try again.

If you are also troubled by this error, here are a couple of troubleshooting tips to help you resolve the YouTube not working on Roku problem.


How do I fix the YouTube could not be run because it could not be installed from the network error?

1. Force restart Roku

Youtube not working Roku
  1. Press the Home button on your Roku remote.
  2. Press the following button consecutively:
    • Home 5 times.
    • Up.
    • Rewind 2 times.
    • Fast Forward 2 times.
  3. Press the button in the said order, and your Roku device will briefly turn off. After a few seconds, the device will start automatically.

Force rebooting the Roku device can help you with any temporary issues that might be preventing the apps from launching. If the issue persists, try the next step.


2. Uninstall and reinstall YouTube

Youtube not working Roku
  1. Press the Home button on your Roku remote.
  2. Use the navigation button to highlight the channel you want to remove that is YouTube in this case.
  3. Press the Star (Asterstics *) button on your remote to open the options menu.
  4. Select the Remove channel option and select Yes when asked to confirm the action.
  5. Wait for the YouTube app to uninstall from your device.
  6. Once uninstalled, restart your Roku device.
  7. Go to Settings > System > System Restart.
  8. After restarting the device, install Roku from the channel store.
  9. Press the Home button on your Roku remote.
  10. Scroll down and select Streaming Channels.
    • This will open the Channel Store.
  11. Locate YouTube and select Add Channel.
    • Wait for the device to install the YouTube app.
  12. Try launching the YouTube app and check if the error is resolved.

While the error message may indicate at insufficient storage space problem, several users have reported that removing and reinstalling the YouTube channel has helped in fixing the issue.


3.  Perform a system update

Youtube not working Roku
  1. Press the Home button your Roku remote.
  2. Scroll down and select Settings.
  3. Open the System option.
  4. Select System update.
  5. Select Check Now.
    • This will manually check for any pending updates.
  6. Click on Download/Install to download and install any pending updates.
  7. The device will reboot after the updates are installed.
    • Check for any improvements.

By default, the Roku player, checks for new updates automatically. However, if your Roku player has been disconnected for a long time or if you have installed a non-certified channel, the device may fail to check for newer updates.


4. Remove the channel and restart the device

  1. Go to the channel tile.
  2. Press the * on your remote and select Remove channel.
  3. Go to Settings, select System and choose System restart (that will restart your system).

After your device starts up again, add the channel once again. This should solve the YouTube running problem.

YouTube not working on Ruku problem can occur due to a temporary glitch in the YouTube channel, outdated system version, or any other issues.

Follow the steps in this article one by one to fix the problem with your Roku device.

Do let us know which method helped you resolve the error in the comments.

Minecraft Chat not Working / Disabled: Why & How to Fix

Minecraft has become a huge draw for many creative Windows users, allowing players to build complex worlds and let their imagination run wild, with a multiplayer mode so that players can get together and create their own online societies. The problem is that from time to time, they often find themselves unable to talk to each other because of the ‘Can’t chat in Minecraft‘ error.

Why can’t I chat on Minecraft?

The main reason why the ‘Can’t chat in Minecraft” error occurs is quite simple: the game comes with a set of default settings in the multiplayer section and usually, the chat setting is set to command only. This allows you to input commands but does not let you chat with other users or interact with them.

How do I enable chat in Minecraft?

1. Adjust In-Game Chat Visibility Settings

To fix the ‘Can’t chat in Minecraft” error,  go to Options > Chat settings and change the settings from Command Only to Shown. This will let you talk and share your thoughts with all the other creative Minecraft players.

If chat is still unavailable, disconnect from the game and then enable the connection again.

This is the most common fix you can find for this situation.

2. Check Parental Controls (Microsoft/Xbox Settings)

If you’re using a child or teen account, parental controls may block chat features.

  • Visit https://account.xbox.com/Settings
  • Sign in with the Microsoft account used for Minecraft
  • Under Privacy & online safety, allow:
    • “You can communicate with voice and text”
    • “Others can communicate with voice, text, or invites”
      This mostly affects Minecraft Bedrock Edition (Windows 10/11, Xbox, Mobile).

3. Verify Server Chat Permissions

If you’re playing on a server, chat may be disabled or restricted.

  • Ask an admin if the server has muted chat or imposed group limitations
  • For servers using EssentialsX or similar plugins, ensure your role includes essentials.chat

4. Check Keybinds for Chat Access

You might have unassigned or changed the key used to open chat.

  • Go to Options > Controls > Key Binds
  • Locate “Open Chat” and ensure it’s set (default key: T)
  • Reassign if necessary

5. Disable Mods That Alter Chat Behavior

Certain mods or modpacks can interfere with chat functionality.

  • Run Minecraft in vanilla mode (no mods)
  • If chat works, enable mods one at a time to identify the issue
  • Common culprits: chat filtering mods or UI overhauls

6. Test Without VPN or Proxy

Network interference can block chat features.

  • Disconnect any active VPN or proxy server
  • Try a different network or hotspot
  • Reopen Minecraft and reconnect

7. Reinstall Minecraft

A corrupt game install might prevent chat from working.

  • Backup your saves
  • Uninstall Minecraft completely
  • Reinstall it from the official launcher
  • Launch with default settings and test chat

We hope this article will help you fix the Minecraft chat issue. If you have come across other methods to solve this problem, please list the troubleshooting steps in the comment section bellow.

Windows.edb File on Windows 10: What is it & How to Delete

Windows.edb is a Windows Search Service database file, which provides search results for files, content, and property caching after indexing. The Windows.edb may get bloated by Windows Search Service after some time. This leads to Windows.edb increasing in size and consuming large disk space. In this case, you need to find a way to free up disk space fast.

In this guide, the Windows Report team will show you how to fix Windows.edb huge file problems in Windows 10.

How to fix Windows.edb huge file on Windows 10?

Solution 1: Defragment the index

You can easily fix the Windows.edb file huge Windows 10 problem by defragmenting the index in Windows Search Service. This enables the system to organize the index for faster data access.

Here’s how to defragment the index:

  1. Go to Start > Command Prompt
  2. To prevent Windows Search service from starting automatically start, enter the following command in command prompt:
    • Sc config wsearch start=disabled
  3. Run the following command to stop the Windows Search service:
    • Net stop wsearch
  4. Enter the follow command to defrag Windows.edb file:
    • esentutl.exe /d %AllUsersProfile%MicrosoftSearchDataApplicationsWindowsWindows.edb
  5. Enter the following command to change the Windows Search service to delayed start:
    • Sc config wsearch start=delayed-auto
  6. Afterwards, run the following command to start the Windows Search service:
    • Net start wsearch

If you still experience the Windows.edb file huge Windows 10 problem, you can proceed to the next solution.

Solution 2: Delete and rebuild Windows.edb file

Another quick fix to solve the Windows.edb file huge Windows 10 issue is by deleting the Windows.edb file.

Step 1: Terminate SearchIndexer.exe in Task Manager

  1. Press Ctrl+Alt+Delete and open Task Manager.
  2. After Task Manager opens, click on the ‘Processes’ tab
  3. Select SearchIndexer.exe process and click on Stop.

After terminating the search process, proceed to delete the Windows .edb files.

Step 2: Delete Windows.edb file

  1. Go to Start > Run > Type services.msc in the Run program, and then hit ‘Enter’.
  2. In the Services window, navigate to Windows Search service.
  3. Double-click on it to open its dialog box. Stop the Service.stop windows search service windows 10
  4. Now, right-click on the Windows.edb file folder and delete it.

Step 3: Rebuild the index

Although, deleting the Windows.edb file resolves the Windows.edb file huge Windows 10 issue. But afterwards, running searches may be slower; hence, you need to rebuild the index.

Follow these steps to rebuild the index:

  1. Go to Start > Control Panel > Indexing Optionsindexing options control panel
  2. Click on Advanced and select the Rebuild on the Indexing Settings tab.Rebuild search Indexing Settings
  3. Click OK to confirm.

Solution 3: Disable Windows Search in Control Panel

Windows.edb file is accumulated due to Windows searches. Therefore, another way of resolving Windows.edb file huge Windows 10 problem is to disable Windows Search. This can be done by using Control Panel.

Here’s how to disable Windows Search in Control Panel:

  • Go to Start > Control Panel > All Program Items > Program and Features
  • In the Program and Features window, go to Windows features on or offturn windows features on off
  • Uncheck Windows Search option.

This should resolve the Windows.edb file huge Windows 10 problem.

Solution 4: Change Windows.edb file location

Windows.edb file can eat up the hard disk space in the long run. Therefore, it is necessary to move the .edb file to another location.

Here’s how to change Windows.edb file location:

  • Go to Start > Control Panel > Indexing Options
  • In the Indexing Options, go to Advanced tab > Index location > Select newselect new Index location
  • Browse to the ‘new’ folder and set it as the new location for the .edb file’s folder.

However, if you still experience the Windows.edb file huge Windows 10 problem, you may proceed to the next solution.

Solution 5: Use Microsoft Hotfix

Microsoft released an update to fix the Windows.edb file huge Windows 10 problem. Therefore, you can install and use the Hotfix to resolve the problem.

Here’s how to do this:

  1. Go to the Microsoft Support link.
  2. Now, Click on Hotfix Download Available menu
  3. After download, Install the Hotfix by following the prompts
  4. Restart your PC afterwards.

Note: This Hotfix is preventative as well in fixing Windows.edb file huge Windows 10 problem.

Solution 6: Run Windows Update

Microsoft consistently releases new patches to fix several issues such as the Windows.edb file huge Windows 10 issue. Therefore, you need to run Windows Update to resolve the problem.

In addition, it improves system performance and stability; therefore, you should run Windows update.

Here’s how to run Windows update:

  • Go to Start>type “update” in the search box and then click on “Windows Update” to proceed.
  • In the Windows Update window, check for updates and install the available updates.windows.edb file huge Windows 10
  • After the update is complete, restart your Windows PC.

Have you tried any other solution in solving Windows.edb file huge Windows 10 problem? Let us know by commenting below or you can ask questions if any. We would gladly respond.

10 Best Online Games on Google Chrome 2022

Chrome is one of the best web browsers for all devices and the most popular. One of its endearing properties is the ability to add extensions from the Google Chrome Web Store and play the best online games.

Google’s Web Store offers thousands of games you can play directly in your browser. All you need to do is add the game to the Chrome browser, just like you add an extension, and hit the play button. So, let’s find out the best online games on Google.

Can I play online games on Chrome?

One of the endearing features of Chrome is the incredible browsing and page loading speed. Also, it can run complex and heavy pages with ease.

This makes it one of the ideal browsers for online gaming. So, whether it’s free online browser games or those from the Web Store, Chrome can play them all easily.

And, for those of you wondering, Chrome is one of the best browsers for online gaming. It’s fast, seamless, and user-friendly, making it the ideal choice for gaming. If you are looking for other options, look at our list of the best browsers for gaming.

Does Chrome Web Store have games?

The Google Chrome Web Store has different games you can install on your browser. From creative single-player games to those you can play with your friends, you are not short of games to play on your Chrome browser from the Web Store.

More importantly, most of these games are free. You only need to add them like an extension and start playing.

For those wondering what is the best game on the Google Chrome Web Store, 2048, King of Thieves, Cut the Rope, and Robbers in Town are some of the popular titles. We have listed the top 10 online games on Google in the section underneath.

Quick tip:

Another browser that offers you the opportunity to explore the world of games is Opera GX. It is based on Chromium and includes a unique design as well as a lot of unique features that empower gamers.

We recommend Opera GX because the browser will maintain a balance between the user experience and memory usage. Also, It supports most Chrome extensions and comes with a wide range of themes.

Opera GX

Use this cool and unique robust browser that will get the most out of both gaming and browsing.

What are the best online Google Games?

Solitaire – Popular Google Chrome web game

solitaire

Solitaire is one of the most popular Google online games, with over 700k users, and is often regarded as the best game on the Chrome web store.

This free game offers nine challenging Solitaire games: FreeCell, Klondike, Klondike by Threes, Forty Thieves, Golf, Pyramid, Spider Four Suits, Spider One Suit, and Spider Two Suits.

There is no download or registration required. The game features smooth animations and many beautiful card sets, card backs, and backgrounds to choose from.

Chrome’s Solitaire, one of the top online games on Google, uses the same game mechanics as the original game: double click to auto move cards, the hint function suggests a move if you need help, and more.

⇒ Get Solitaire

Cut the Rope – Easy to play game

cut the rope

Like Solitaire, Cut the Rope is one of the best online Games on Google that doesn’t need any introduction. This game has almost one million users on Chrome.

A mysterious package has arrived, and the little monster inside is desperately looking for candies. As a player, you’ll collect gold stars and hidden prizes and feed more sweets to the little monster.

⇒ Get Cut the Rope

Pacman – Offline game for Google Chrome

pacman  google chrome web games

Pacman is an incredible maze action web game for Google Chrome with a long history. It has been around since 1980 and boasts amazing gameplay.

You will be controlling Pacman in this game, and your task is to ensure it eats all the dots in an enclosed maze. Unlike most games on this list, Pacman has an offline version. This allows you to play when your internet is out.

⇒ Get Pacman

HalloweenMatch – Challenging Google Chrome web game

halloweenmatch

At first sight, HalloweenMatch appears to be a simple game to play. Once you hit the play button, you’ll soon realize that it is one of the most challenging games on Google, as finding the pairs is not an easy task.

This free Halloween game challenges you to touch the required cards to make the cards equal. Once you find all the pairs successfully, you win the game. Overall, the game is fun, engaging, and challenging.

⇒ Get HalloweenMatch

Girls Dressup – Excellent fashion game

girls dressup

Girls Dress up is the game every fashionista loves to play. This game is about fame, fashion and shopping.

Don’t hold off. Fill your closet with the latest fashion items and decorate your house, turning it into fashion heaven.

There are over 50,000 pieces of clothing, makeup, and decor to use. You can also design and sell your clothes, hair, and accessories. What’s more, you can show off your fashion skills and enter fashion contests.

It is just one of the most creative and best online games on Google you can play.

⇒ Get Girls Dressup

Frosty Fox – Free adventure web game for Google Chrome

frosty fox

Frosty Fox is a land where adventure unleashes. It is one of the few Google games that feature a breathtaking free-to-play 3D fantasy world where you need to overcome iceballs.

You must move from left to right, jumping over iceballs icicles, to stay alive in this game. Also, you need to collect some of the available gems to unlock new outfits for your little Foxy.

⇒ Get Frosty Fox

Guess Number – Game of numbers

guess number google chrome web games

Guess Number is an excellent web game for Google Chrome that guesses an integer from 1 to 1000. You have to guess this number until you hit the correct number that was chosen.

Concentrate, use your logic, and study the patterns to know the right number.

⇒ Get Guess Number

Extreme Traffic – Excellent 3D game for Google Chrome

extreme traffic

Extreme Traffic is an impressive racing web game for Google. It brings 3D graphics to your browser window and features dozens of maps and weather conditions.

Choose the fastest car available, change its wheels and other accessories, and hit the roads. In this game, you must race in the worst weather conditions without accident.

Put your driving skills to the ultimate test with this superb 3D game.

⇒ Get Extreme Traffic

Grand Commander – Strategic game

grand commander

Grand Commander is a free-to-play Chrome strategy web game. You need to kill Zombies with a Shotgun and special skills on air and land to survive.

Develop your strategy, build your base, optimize your resource production and upgrade your army.

Create new attack and defense tactics, so you don’t get caught off guard. Don’t forget to build strategic alliances to coordinate massive attacks and support each other if necessary.

⇒ Get Grand Commander

Fruit Slasher – Competitive game

fruit slasher google chrome web games

Fruit Slasher is a challenging Chrome web game that challenges you to slash all the fruits that appear on the screen.

You have got your work cut out, as you must make sure you slash the fruits before they drop. Also, you need to avoid the bombs on the floor to stand any chance of survival.

⇒ Get Fruit Slasher

What are the best chrome games to play with friends?

1. Tanki Online – Exciting gameplay

A 3D-action and adventure game, Tanki Online has a large user base that prefers the web version of it. The graphics and gameplay resemble the real-world setup, and the controls are smooth and seamless.

Additionally, the game doesn’t require much practice, and every group of friends can start playing it and learn along the way.

⇒ Play Tanki Online

2. Skribbl.io – Relive the good old days

It’s one of the best free Google games, the real version of which we all must have played in our childhood. With a simple interface and easy access, both on mobile and computer, Scribble.io is one of the best online multiplayer games on Google.

The game is all about guessing words drawn on the board. So, while one of the players draws the word, others will take turns guessing it, and the quicker you guess, the more points you score. At the end of each round, the tool score is tallied, and a winner is announced.

With up to 10 players being able to join Scribble.io, some even call it the best online game to play with friends on Google Chrome.

⇒ Play Skribbl.io

3. UNO Online – The perfect game for friends

Another fun Chrome game to play with friends, UNO Online is a card game wherein the first player to finish all the cards is the winner.

Each player gets 7 cards and can play one that matches either the color or the number of the top card on the pile. It is easy to learn and can be played amongst friends from across the globe, one of the benefits of online gaming.

⇒ Play UNO Online

Does Google have a secret game?

Google has some hidden web games you can only play from the search engine. Some examples are Zerg Rush and Attari Breakout.

Most of these games are basic games with no special functions. However, they are still good options to pass the time on the web.

We’ll end our list here. As you can see, there are plenty of games to install from the Google Chrome Web Store and play on your browser. Also, you know the best Google Chrome games to play with friends worldwide.

Check out our list of the best all-time browser games, and the full-screen hidden object games to play for free. Besides for those of you who want to save storage space, find the best games that don’t require downloading.

Feel free to let us know the game you enjoyed most from our list in the comments below.

6 Best Offline Translator Apps for PC That Don’t Need WiFi

If you’re looking for a translation app that you can rely on even without an internet connection, we’ve got you covered.

These applications will work even if you don’t have a stable Internet connection since they will download their entire database to your PC.

Let’s check them out.

PROMT Master – Best overall

PROMT Master is a great translation software that comes in money-saving, multilingual packs and offers great functionality for businesses working with overseas offices.

This tool offers several language translation programs with versions that cover up to 16 languages.

From the format files you might encounter and need to translate, PROMT Master supports PDF, DOC, DOCX, RTF, XLS, XLSX, MSG, HTML, PPTX, XML, and more.

Other key features include:

  • Integration with SDL Trados for professional translators
  • Suggests translations directly into your source document
  • General and domain-specific dictionaries for high accuracy

⇒ Get PROMT Master

Babylon 10 Premium Pro – Great language support

Babylon Translator is dubbed as the best translator software. Using this software, you can recognize and translate up to 77 languages.

While other translators ask you to define the language you intend to translate, Babylon automatically recognizes the language. The software comes with robust grammar and spell-checker tools that make your work look and sound professional.

It also comes with an integrated dictionary. And if you worry much about pronunciation, just click the ‘Speech’ icon and Babylon will teach you how to pronounce those words correctly.

Other key features include:

  • Text-to-speech support
  • Language lessons
  • Support for human voice products
  • Free software updates for premium users

⇒ Get Babylon Translate

Dual Clip Translator – Incredibly fast

Dual Clip Translator provides fast, real-time translations directly on the source text window. It can be a great choice for those who need to quickly understand the content of a web page or an instant message.

The translation engine is powered by Google and Microsoft providing accurate AI translations fast. You get to pick which one you want to use and alternate them whenever you want.

Dual Clip Translator has various hotkey commands that allow you to quickly translate clipboard contents, change the original text, copy selected text, and more. 

Other key features include:

  • Font and format settings of the translation view
  • OCR support
  • Increase processing speed with priority settings

⇒ Get Dual Clip Translator

Microsoft Translator app for Windows 10 – Simple to use

The Microsoft Translator may not translate as many languages as Babylon, but offline translation is the forte of this application.

As of now, the app supports 60 languages and the number of supported languages keeps on increasing.

One of the features that make it stand out is the camera translation. Just point your camera at signs, newspapers, menus, or any printed text and the app will translate the text in a single tap.

Tapping on the speaker icon lets you hear the pronunciation of the translated phrase. The app saves all your translations and you can also mark them as favorites to access them easily.

Other key features include:

  • Supports sharing translations with other apps
  • Download any language for offline neural machine translation
  • Phrasebook to store translated words/idioms
  • Simple, intuitive UI

⇒ Get Microsoft Translator App for Windows 10

Just Translate – Can also fix spelling errors

Just Translate is yet another free online translator that packs all you would want in translator software, including automatic language recognition.

Its built-in proxy support allows users to translate even if they are offline. In addition to translation, the translator has an inbuilt grammar checker tool that corrects spelling mistakes.

The software also has a text-to-speech feature that is great for language learners but can also be very useful if you need to create presentations or send voice messages in your target language. 

Other key features include:

  • Recognizes tone and text style
  • Can translate full websites
  • Optimized for business document translations

⇒ Get Just Translate

Virtaal – Great plugin support

Virtaal is a feature-rich offline multi-format translation software that allows you to focus on translation in an uncluttered user interface.

You can easily insert your text with copy+paste and generate a translation, but you can also add text files to the UI with drag-and-drop. It supports multiple formats including XLIFF and PO.

Virtaal has an integrated tutorial that you can access directly from the app after the installation. It gives you all the information you need to start translating right away.

Other key features include:

  • Color highlighting
  • Quality checks
  • Auto-complete
  • Terminology assistance both online and offline
  • Spell checker

⇒ Get Virtaal

Can I use Google Translate offline?

Yes, it’s possible to use Google Translate offline, but in order to do that, you need to download all the languages that you want to use on your phone beforehand.

To learn how to do that, we have a great guide on how to use Google Translate offline, so don’t miss it.

Offline translator software for PCs has many benefits, and we hope that this guide helps you find the right one for you. If you need something more advanced, consider using these live translation apps instead.

You can also find out about the leading Kanji image translator options in one of our previous guides, so don’t miss it.

What is your favorite translator software? Let us know in the comments below.

Fix: DDE Server Window is Preventing Shutdown

Windows 10 is the most popular Windows operating system, but despite its popularity, some users report errors. One of these errors is DDE Server Window: explorer.exe Application Error shutdown error, and today we’ll try to fix it.

DDE Server Window: explorer.exe Application Error is caused when you try to shut down your computer. Users report that when they press the Shutdown button, they get this error preventing the shutdown process.

Just like with many errors, before trying any of the solutions, check for the latest Windows updates. Users report that updating to the latest build fixes DDE Server Window: explorer.exe Application Error, so be sure to keep your PC up-to-date.

DDE Server Window message can prevent your PC from shutting down, but users reported the following problems as well:

  • DDE Server Window explorer.exe memory could not be written – According to users, sometimes you might get an error message saying that memory could not be written. This can be an annoying error, but you should be able to fix it by using one of our solutions.
  • DDE Server Window preventing restart – In addition to shutdown, this problem can also prevent your PC from restarting. If you encounter this problem, the cause is most likely a third-party application.
  • DDE Server Windowexplorer.exe system warning – Sometimes, you might get a system warning while trying to shut down your PC. However, you can fix that problem by changing your antivirus configuration.
  • Windows 10 won’t shut down – This is a somewhat common problem, and we covered a similar issue in our Computer won’t shutdown article, so be sure to check it out for more solutions.

What can I do if DDE Server Window is preventing shutdown?

1. Don’t shutdown your computer from the Start menu

According to the users, this issue appears when you press the Power button in the Start menu, but there’s a simple workaround.  You can shut down your PC by using Win + X menu. To do that, just follow these steps:

  1. Right click Start Button or press Windows Key + X to open Win + X menu.
  2. Now choose Shut down or sign out > Shut down from the menu.
    DDE Server Window explorer.exe memory could not be written

Another way to force your PC to shutdown is by using the shutdown command. To do that, just do the following:

  1. Press Windows + R to open the Run dialog.
  2. Enter shutdown /s in the input field and press Enter or click OK.
    DDE Server Window preventing restart

Alternatively, you can just press the Power button on your PC case in order to shut it down. If that doesn’t work, you need to check your Power Options and configure your PC to shut down when you press the Power button.

This is just a workaround, but by using it, you should be able to shut down your PC without any errors.

2. Check your antivirus

Antivirus software is a crucial component of every PC, but sometimes your antivirus can interfere with your operating system and cause a DDE Server Window error to appear. If you’re having this problem, you might want to try disabling your antivirus and check if that helps.

If the issue still occurs, you might have to uninstall your antivirus. To completely uninstall an antivirus, it’s always a good idea to use a dedicated uninstaller. Many antivirus companies offer uninstallers for their software, so be sure to download and use one for your antivirus. An uninstaller is useful since it will remove all files and registry entries, ensuring that your antivirus doesn’t interfere with your system in any way.

Once you uninstall the antivirus, check if the problem still appears. If so, you might want to switch to a different antivirus solution. There are many great antivirus tools available, and if you’re looking for a new antivirus, we strongly suggest you try TotalAV.

3. Disconnect your second monitor

If you’re using multiple monitors or laptops along with another monitor, it’s advisable to disconnect your second monitor before turning off your computer. Some users say that this works, but this also isn’t a permanent solution. It’s just a workaround.

4. Install the latest drivers

If you’re having problems during shutdown with DDE Server Window, the problem might be related to your drivers. Several users reported that their AMD drivers were the issue, but after downloading and installing the latest drivers, the issue was resolved. In some cases, installing the latest Beta drivers can help.

To see how to update your graphics card driver, we advise you to check our guide on how to update your graphics card driver. To be sure that the issue doesn’t reoccur, it’s a good idea to update all other drivers on your PC as well.

Since updating drivers manually can be a long and tedious process, you might want to use a tool that will automatically update all your drivers for you. We highly recommend Outbyte Driver Updater, which has a huge database of drivers and is completely safe to use.

5. Create a new user account

DDE Server Window: explorer.exe Application Error could be related to your user account, and in order to fix it, you might want to create a new account. To do so, follow these instructions:

  1. Open the Settings app.
  2. When Settings app opens, navigate to Accounts section.
    DDE Server Window preventing restart
  3. From the menu on the left select Family & other people. In the right pane, select Add someone else to this PC.
    DDE Server Window explorer.exe memory could not be written
  4. Click I don’t have this person’s sign-in information.
    DDE Server Window preventing restart
  5. On the next screen, select Add a user without a Microsoft account.
    DDE Server Windowexplorer.exe system warning
  6. Enter your account information, such as username and password, and click Next to proceed.
    Windows 10 won't shut down

After you’ve created a new account, switch to it and see if the problem is resolved. If the issue is resolved, you might have to move your personal files to a new account and use it as your main account from now on.

6. Uninstall Adobe Acrobat DC

According to users, sometimes you might experience problems with DDE Server Window while trying to shut down your PC due to third-party applications. Various applications can interfere with Windows 10 and cause this and other errors to appear.

According to users, one application that can cause this issue is Adobe Acrobat DC. To fix the problem, you need to remove Adobe Acrobat DC from your PC. Once you remove the application, the issue should be resolved completely.

Keep in mind that sometimes you might need to remove all files associated with Adobe Acrobat DC in order to fix this problem. You can do that manually, but the faster way to do it is to use an uninstaller application.

Uninstallers will remove all files related to the problematic application and completely remove the application from your PC. If you want to completely remove Adobe Acrobat DC and prevent this error from appearing, you might want to try using 3rd party uninstaller software.

7. Disable Autohide taskbar option

Many users like to hide their Taskbar while working, but sometimes automatically hiding the Taskbar can cause a DDE Server Window message to prevent your shutdown. To fix the issue, users are recommending disabling autohide option for your Taskbar. To do that, you just need to do the following:

  1. Open the Settings app. You can do that quickly by using Windows + I shortcut.
  2. Go to the Personalization section.
    DDE Server Windowexplorer.exe system warning
  3. Choose Taskbar from the menu on the left and make sure that the Automatically hide the taskbar in desktop mode option is disabled.
    Windows 10 won't shut down

After doing that, this error message won’t appear any more and you should be able to shut down your PC without any problems. Many users reported that this solution worked for them, so if you’re having this problem, we strongly recommend you try it out.

8. Keep your Windows up to date

If you’re having problems with shutdown and DDE Server Window, you might be able to fix the problem simply by updating your Windows. By default, Windows 10 installs the updates automatically, but sometimes you might miss an important update.

Instead of waiting for Windows to check for updates on its own, you can manually check for updates. To do that, just follow these steps:

  1. Open the Settings app and go to Update & Security section.
    DDE Server Window explorer.exe memory could not be written
  2. Click Check for updates button.
    DDE Server Windowexplorer.exe system warning

Windows will now check for available updates. If any updates are available, Windows will automatically download them in the background. Once the updates are downloaded, Windows will install them as soon as you restart your PC.

Microsoft is aware of this issue, so it’s rather likely that you can fix the problem by using Windows Update. If your Windows 10 isn’t up to date, be sure to update it and check if that solves the problem.

That’s about it, we hope at least one of these solutions helped you to shut down your computer normally. If you have any comments or questions, just reach for the comments below.

HP Printer Cannot Connect to Server: Why & How to Fix

Some HP printers enable users to utilize web-connected printing services. However, some HP printer users have said that a There was a problem connecting to the server error arises when they try to scan emails.

The printer doesn’t connect to Web Services when that error arises. These are a few fixes that might resolve the There was a problem connecting to the server HP printer error for some users.

What to do if HP printer won’t connect to server?

1. Check the Printer’s Connection

USB connection There was a problem connecting to the server

First, check that the printer is certainly connected to HP Web Services. Note that HP printers can’t connect to Web Services when plugged in with a USB cable. Users can check the printer’s connection status by opening a Wireless Network or Settings menu on its LCD display.

Then users should see a solid, blue wireless icon light that highlights a printer is connected. Users will need to connect the printer with Web Services if they can’t see that light.

2. Restart the Printer, Router, and PC

There was a problem connecting to the server power button
  1. Restarting the router, printer, and PC can resolve connectivity issues. First, turn off and unplug the router.
  2. Then switch off the HP printer.
  3. Shut down the desktop or laptop.
  4. Plug the router back in, and turn it on.
  5. Turn the printer back on.
  6. Then boot up the desktop or laptop.

3. Turn on Web Services From the Printer’s Embedded Web Server Webpage

Some users might need to turn on Web Services via the Embedded Web Server page to fix the There was a problem connecting to the server error. To do that, users will first need to print a Network Configuration Page from a Setup, Network Settings, or Wireless menu on their printer’s LCD display. Users can check their printer manuals for more specific details on how to print a Network Configuration Page. Then follow the guidelines below when you’ve printed that page.

  1. Open a web browser in Windows.
  2. Then enter the URL for the Embedded Web Server listed on the Network Configuration Page in the browser’s URL bar. That URL takes the form of a number and might be something like: https://169.172.123.45.
  3. Then click a Web Services Tab on the EWS page that opens.
  4. Press the Continue, Enable, or Turn on button on the Web Services tab. Then users can go through the Web Services setup wizard.

4. Adjust the DNS Settings for the HP Printer

Some users have confirmed they’ve fixed server connection errors by changing the DNS server for the HP printer to Google’s 8.8.8.8 IP address.

To do that, open the Embedded Web Server page as outlined above. Then click Wireless on the left of the Network tab. Select the IPv4 tab, enter 8.8.8.8 as the first DNS there, and click Apply. Then users have configured the printer to utilize Google’s DNS instead of the router’s DNS server.

5. Update HP Printer Firmware

  1. Firmware updates for some HP printers might also fix the There was a problem connecting to the server error. To update HP printer firmware, open this HP Customer Support webpage.
    firmware There was a problem connecting to the server HP printer
  2. Click Printer on the HP Customer Support page to open a search box.
  3. Enter your HP printer model in the search box, and click the Submit button.
  4. Then scroll down to and click Firmware on the printer’s page.
    firmware details There was a problem connecting to the server
  5. Click Download to save the update printer firmware.
  6. Then click the downloaded firmware file to open the HP Printer Update window. Note that the printer should be on when updating its firmware.
    firmware install HP printer
  7. Select the checkbox for the HP printer’s serial number.
  8. Then press the Update button.

6. Run the HP Print and Scan Doctor

HP Print and Scan Doctor is a utility that can fix HP printer connectivity issues. So, that might also come in handy for resolving the There was a problem connecting to the server error. Users can run the HP Print and Scan Doctor as follows.

  1. Click Download Now on the HP Print and Scan Doctor page to download that software.
  2. Then click HPPSdr.exe to open the HP Print and Scan Doctor window.
  3. Click Start and select your HP printer.
  4. Press the Next button.
  5. Select Fix Scanning if the There was a problem connecting to the server error arises when trying to scan.
    HP printer softawre
  6. The utility might then automatically fix some detected issues. However, follow the guidelines provided if it provides further resolutions for issues.
    There was a problem connecting to the server HP printer software

Some of the resolutions listed above could feasibly resolve the There was a problem connecting to the server error so that users can utilize HP’s web-printing services. For further fixes, HP users can sign in to HP Customer Support.

Adobe Fill And Sign Not Working: 4 Quick Fixes

There are many PDF readers available for Windows 10 but unfortunately, not all of them are as error-free as needed.

If you can’t fill and sign your pdf PDF file as many users have reported, then know that you are not alone since this is a common situation that you can encounter.

In some cases, it might be useful to use form filler software to help you complete repetitive tasks, and save you time in the process.

A form filler software relies on a technology that lets you fill forms automatically and add new information to where it’s needed.

It saves lots of time and effort and allows you to manage your documents better and autofill your preferred fields with minimal effort. Plus, you will avoid fill and sign not showing in Adobe issues.

Why is Adobe Fill & Sign not working?

Essentially, you may encounter Adobe signature errors due to different reasons involving your PDF files or even bugs with the PDF Reader tool. Other common causes are the following:

We will explore in this article a few simple steps that you need to take in order to solve the Adobe fill and sign not working issue.

How can I fix Adobe fill and sign not working issue?

1. Download the latest Adobe Acrobat software version

Adobe Acrobat is one of the most used tools for opening and reading PDF files and we would also recommend you use the latest version to avoid PDF fill and sign not working scenarios.

It is constantly improved and it also comes with plenty of useful features and is less often to have issues while using it, as compared with other programs.

Always make sure though, that you are using the latest version available by downloading it from the manufacturer’s website.

With Adobe Acrobat you can edit, sign and create comments on the file easily and also perform other useful actions.

Adobe Acrobat

Manage all your documents like a pro using Adobe Acrobat, a complete PDF solution.
Free Trial Visit Website

2. Run the program in compatibility mode

  1. Go to the following file path:
    C:Program Files (x86)AdobeAcrobat Reader DCReader
  2. Locate AcroRd32.exe and right-click it to go to Properties.
  3. Go to the Compatibility tab.
  4. Right under Compatibility mode, check the box next to Run this program in compatibility mode.
  5. Select Windows.
  6. Try launching Adobe Acrobat Reader DC again.

3. Disable protected view

  1. Open Adobe Reader and go to Edit.
  2. Next, select Preferences and click on Security (Enhanced).
  3. Uncheck Enable protected mode at startup and press OK.
  4. Open the PDF file again and try to access the fill and sign options.

4. Run the program with admin rights

  1. Go to the following file path:
  2. C:/Program Files(x86)/Adobe/Acrobat Reader DC/Reader
  3. Locate and right-click on AcroRd32.exe.
  4. Next, go to Properties and click on the Compatibility tab.
  5. Check the box next to where it says Run this program as an administrator.
  6. Try launching Adobe Acrobat Reader DC again.

We hope that by following the above steps you have successfully managed to fix the fill and sign options in your PDF.

Let us know which of the presented solutions worked best for you in solving the Adobe fill and sign PDF not working issue in the comments section below.

Fix Arduino Port not Showing Up or not Detected [IDE, UNO]

Development boards like SparkFun RedBoard for Arduino require special drivers or code that lets your PC interact with them. If the Arduino port is not showing up on your PC, you’re in the right place.

We will show you how to enable a port in Arduino, and properly update, or install Arduino port drivers on your Windows, or Mac OS.

Let’s see why the port is disabled or now showing in Arduino, to begin with.

Why is my Arduino port not found?

  • Faulty USB cable or connection
  • Port drivers are deprecated or corrupted
  • Drivers are not installed

Now, users have had a hard time with this for quite some time. Let’s quickly go through some of the most common issues:

  • Arduino port not showing up Windows 10, Windows 11, or Mac
  • Arduino port not detected, no ports discovered or not recognizing port
  • Serial port not selected Arduino
  • Arduino USB, OTA, NANO port not showing up
  • Port not showing in Arduino IDE
  • Arduino port not showing in Device Manager
  • Arduino port greyed out

How do I enable Arduino ports?

1. Verify that ports are enabled both on the board and on the PC

Arduino side:

  1. Open the software and go to Tools, then access the Board menu.
  2. Locate the Port menu and hover over the option to display all the ports (COM, respectively LPT).
  3. Verify if there is a board connected to the port you’re interested in (the name will be shown after the port).
  4. If not, make sure your board is connected to the computer and restart the software.

PC side:

  1. Open the Device Manager and head over to the View tab.
  2. Select Show hidden devices from the drop-down menu. xbox-party-not-working
  3. Locate the Ports section and expand it to identify COM, respectively LPT ports. windows-10-doesnt-recognize-android

If you need further help on how to show hidden devices in Device Manager, we have some extra tips for you.

2. Update Arduino drivers

  1. Open the Start Menu, and type Device Manager on the search bar.
  2. Click the Device Manager icon to open a new window.
  3. Scroll down to Software Devices and click to expand.
  4. Double-click the unknown Arduino device for the Properties window to display.
  5. Select the Driver tab, and click Update Driver.
  6. Choose the Search automatically for drivers option.
  7. Windows will begin to update.
  8. Run a final check to be sure the driver was updated correctly.

If your Arduino drivers are not up to date you will usually get Arduino ports not showing up. Update them accordingly.

However, if this method fails, you will have to reinstall the Arduino driver to fix the issue.

3. Install Arduino port drivers

The next solutions will show you the right ways to install the driver on Windows and macOS.

3.1. Install Arduino drivers on Windows

  1. Click the search bar and type Device Manager. Open it.
  2. Check the options under Ports COM & LPT. You will see an open port labeled Arduino UNO COMxx.
  3. Right-click on the Arduino UNO COmxx and select Update Driver.
  4. Continue by clicking the Browse my computer for driver software option.
  5. Navigate to the driver folder of the Arduino software, locate Arduino.inf driver file, and click on it.
  6. After selecting the file, click OK.

When an Arduino board is plugged into a Windows computer, a driver is installed automatically for it to be able to communicate properly with your PC.

The driver configures it as a virtual COM port in the Device Manager. Should you require further assistance on how to install Arduino software and drivers on Windows, we have some extra tips for you.

3.2. Install Arduino port drivers on Mac

  1. On your Mac OS, go to the FTDIUSBSerialDriver_v2_2_18.dmg file.
  2. Double-click on it and select the driver file that matches your OS version.
  3. Wait for it to install and click Close.
  4. Open the Arduino software for a final check.
  5. Go to Tools -> Serial Port and look for the USBserial option.

If you do not know the version of your OS, click on the Apple icon in the top left corner of your screen, and select About This Mac.

We hope you managed to fix the Arduino port not showing up issue with our solutions.

How To Disable Auto Arrange In Folders On Windows 10

In previous versions of Windows, you could arrange icons inside a folder freely. However, this option was removed from Windows 7 and all other versions that came after Windows 7.

If you’re missing this feature in Windows 10, there’s a way to disable auto arrange in folders in Windows 10, so keep reading.


How can I disable auto arrange in folders?

1. Disable auto arrange in Registry Editor

  1. Press the Windows Key+ R, and type regedit to open Registry Editor.
  2. Navigate to the following key on the left panel, and delete the Bags subkey: HKEY_CURRENT_USER\Software\Classes\Local Settings\Software\Microsoft\Windows\ShellHow to Disable Auto Arrange in Folders in Windows 10 1
  3. Go to the following key on the left panel, and delete the Bags subkey here again: HKEY_CURRENT_USER\Software\Microsoft\Windows\Shell
  4. Navigate to the following key, and delete the Bags subkey here as well: HKEY_CURRENT_USER\Software\Microsoft\Windows\Shell\NoRoam
  5. Close Registry Editor.
  6. Open Task Manager by pressing Ctrl+ Shift+ Esc.
  7. Locate Windows Explorer from the list of processes, and click the Restart button.
  8. Download disable-auto-arrange.zip.
  9. Extract the files from the archive you just downloaded.
  10. Run disableautoarrange.reg to add it to your registry.
  11. Open This PC, and close it.
  12. Repeat Step 7 to restart Windows Explorer.

Auto arrange should be disabled now, and you can manually arrange files in a folders. We have to mention that this method works only for large icons, medium icons, small icons, and extra-large icons icon views.

If you can’t edit Windows 10’s Registry, try our quick solution to solve this problem.


2. Turn off auto arrange in Registry Editor

  1. Press the Windows Key+ R, and type regedit to open Registry Editor.
  2. Navigate to the following key, and delete the Bags subkey: HKEY_CURRENT_USER\Software\Microsoft\Windows\Shell\NoRoam
  3. Close Registry Editor.
  4. Open Task Manager by pressing Ctrl+ Shift+ Esc.
  5. Locate Windows Explorer from the list of processes, and click the Restart button.How to Disable Auto Arrange in Folders in Windows 10 2
  6. Download disable-auto-arrange.zip.
  7. Extract the files from the archive you just downloaded.
  8. Run disableautoarrange.reg to add it to your registry.
  9. Open This PC, and close it.
  10. Repeat Step 5 to restart Windows Explorer.

Auto arranges should be disabled. Try to freely arrange files inside folders to check if this method worked.

Again, keep in mind that this method works only for the large icons, medium icons, small icons, and extra-large icons icon views.

Most users have no idea how to deal with a slow Task Manager. Don’t be one of them and read this quick guide to learn how to make it faster!


3. Disable auto arrange in File Explorer

How to Disable Auto Arrange in Folders in Windows 10 3
  1. Open any folder using File Explorer, and right-click the empty space.
  2. Go to View, and make sure that the Auto arrange option is unchecked.
  3. If the option is turned off, you can easily arrange items in any way you want.

4. Manually arrange files in a folder

sort file explorer files

There is another method to sort files and folders in File Explorer.

There is an option called Sort by that allows you to sort your files and folder depending on various criteria, including file size, date modified, name, and so on.

Of course, you can also choose to sort your files in ascending or descending alphabetical order.


That’s about it, we hope this article helped you to disable auto arrange inside a folder. If you have any comments or questions, just reach for the comments below.

How to Repair Corrupted WAV Files: 3 Quick Ways

A WAV file, also known as a WaveForm audio file, is a standard audio format that is found mainly on Windows computers.

Such files are normally uncompressed, though they support full compression. When uncompressed, the files are larger than the major audio formats such as MP3.

Because of this, WAV files aren’t always used as the preferred audio format. This applies especially when trying to share music files or when purchasing music online.

Files get corrupted for several reasons like an unexpected computer shutdown or software error.

In the case of WAV files, there are ways to repair and/or fix corrupt elements using audio-editing software programs that play, manage, edit, and fix WAV files easily.

The common ways you can open WAV files include using VLC, iTunes, Windows Media Player, etc.

Here are some solutions you can use to fix a corrupt WAV file.

How can I repair corrupted .wav files?

1. Determine if the file is damaged

  1. Find the corrupted WAV file.
  2. Right-click it and select Properties.
  3. Select the Details tab
  4. Check for the information of the file from the Details pane (if there’s no info, the file is corrupted).
  5. Open an audio-editing software.
  6. Open the corrupt WAV file to repair as a RAW file.
  7. Save the file in the WAV format.
  8. Close the audio-editing software and try to play the file to ensure repair and conversion was finished.

In addition, you can use one of many available services that let you repair WAV file online.


2. Use Adobe Audition to repair the file

If you don’t have the time to manually fix corrupted WAV files, you can use Adobe Audition to automatically repair and restore audio.

The tool offers a series of troubleshooting options that will help you to fix corrupted audio files, reduce noise, add or remove audio effects, and more.

This amazing software enables you to repair corrupted WAV files with just a few clicks of the mouse.

Because time is very important for everybody in this day and age, being able to fix corrupted WAV files quickly can save you a lot of trouble. This applies even more in the case that the corrupted file is needed for your work.

Lucky for you, because Adobe Audition is the perfect corrupt WAV file repair software, you’ll get professional results with a minimum level of effort.

  1. Select the problematic WAV file.
  2. Open it in Adobe Audition.
  3. Navigate to the Effects Menu.
  4. Select the Diagnostics option to detect and repair issues.adobe audition repair wav file
  5. Wait for the process to complete.
Adobe Audition

Adobe Audition

Fix audio quality problems with any of your recordings, and enjoy in wide range of incredible features with Adobe Audition.
Free trialVisit website

3. Use the VLC Media Player

  1. Download VLC and install it.
  2. Right-click your WAV file, and select Open with VLC Media Player.
  3. Open the Playback section and click the Media menu.
  4. Select the Convert/Save option.
  5. Click Add from the File menu.
  6. Choose the WAV file and click Convert/Save from the bottom of the screen.
  7. Click Browse and choose which folder should be used to save your new WAV file.
  8. Type in the file name and extension. (ex. convertedfile.wav)
  9. Choose the Audio CD option from the Settings menu.
  10. Click Start to run the process.

Once completed, the audio file will appear in the folder you chose earlier, and the header information will be reconstructed. This enables you to play the file in any other media player.

If this method didn’t work for you,you can use other services to repair corrupted audio file online.

Were you able to repair the corrupted WAV file using any of these solutions? Let us know in the comments section below.


CS:GO Packet Loss: What Causes it & 5 Ways To Fix it

CS: GO packet loss can be a major issue as it will influence your latency and multiplayer experience. However, there are ways to fix this problem, and today we’re going to show you how to do it.

Why does CS:GO lose packets?

This happens due to network issues or DNS problems on your PC.

How to fix packet loss in CS:GO?

1. Restart your modem and router

  1. Turn off your PC.
  2. Unplug your modem and router for at least 30 seconds.
  3. Reconnect them and wait until they are fully operational (the indicator lights are back to their normal state).
  4. Restart your PC and relaunch CS:GO to see if everything is working properly.

2. Use a VPN to access more gaming servers

  1. Sign up for a premium VPN subscription. (We tested ExpressVPN)
  2. Install the VPN on your PC.
  3. Launch it and log into your account.
  4. Connect to a convenient server. (Try connecting to recommended servers first.)
  5. Launch CS:GO.
  6. Check if the problem still persists.

ExpressVPN is an excellent, all-around VPN from Kape Technologies that passed all of our tests successfully. Aside from improving your packet loss situation, ExpressVPN can also improve your online privacy, circumvent geoblocking, and secure your connection.

However, it’s worth mentioning that using a VPN might not always improve packet loss. This fix should only work if your ISP is the cause of the issue (bandwidth throttling, improper network management).

Thus, if the issue lies on your side with the device itself, or the game server is in maintenance, using a VPN won’t solve the packet leaks situation. It will be useful for you to use a VPN solely to reroute the traffic better.

Furthermore, the support you get from customer care ExpressVPN cannot be understated.

ExpressVPN

If ISP is throttling you, turn to a VPN service that can actually provide an array of optimized servers.
Check price Visit website

3. Troubleshoot your connection manually

  1. Use our comprehensive guide to run a packet loss testPacket loss analysis Windows with tracert and pathping
  2. Locate the node (hop) that’s leaking packets
  3. Take any of the following measures, depending on the results:
  • Check/repair/update/upgrade/replace any faulty component on your home network (PC, cables, router)
  • Check Counter Strike latency
  • Try using a wired connection instead of Wi-Fi (Wi-Fi can cause packet loss).
  • Call your ISP if you notice any malfunctions on its corresponding hops.
  • Ask your ISP to contact the network distribution company if the issue is on their side.
  • Contact Valve’s support crew if it seems their servers experience packet loss.

4. Flush your DNS cache

  1. In the Windows search bar, type Command Prompt.Start CMD
  2. Choose Run as administrator.
  3. If you are asked for permission, select Yes.
  4. In the Command Prompt window, enter the following commands one by one and press Enter:
    ipconfig /flushdns
    netsh int ip reset
  5. Wait for the process to finish before closing the Command Prompt window.
    Check to see if your ping time in CS:GO has improved.

5. Switch to a Google DNS server

  1. Select Run by right-clicking the Start button.
  2. In the Open box, type ncpa.cpl and press the OK button.
  3. Right-click your internet connection and select Properties.
  4. Double-click Wi-Fi Properties to bring up the window shown below. change dns server manually WiFi properties - fix attackers might be trying to steal your information from
  5. Click on Configure.
  6. Select the radio button Use the following DNS server addresses.
  7. In the Preferred DNS server box, type 8.8.8.8.
  8. In the Alternative DNS server box, enter 8.8.4.4.
  9. Check the Validate settings on the exit checkbox.
  10. Click the OK button.

In order to fix CS:GO packet loss, you need to practice healthy network management. This is the most efficient course of action you could take against packet loss.

Check out our comprehensive guide on packet loss if you want to find out more about the matter.

To wrap it up, you can fix CS:GO packet loss easily if all the stars are aligned.

However, sometimes the issue is on your ISP’s side and there’s little to nothing you can do to alleviate it, other than contacting customer support and informing someone about the situation.

You can use a VPN to improve packet loss, but note that it will only work if packet leaks occur on your ISP’s end.

Visit our Gaming Hub to discover more awesome reviews, guides, and tips & tricks.

Although a VPN might not fix packet loss every time, we still recommend it for the privacy and security boost it can give you. And the geo-restriction bypass, of course.

[Fixed] Fatal Error: Failed to Connect With Local Steam Client

The Fatal error failed to connect error message pops up for some Steam users when they try to launch games.

The error message states: Fatal error failed to connect with local Steam Client process. Please make sure that you are running the latest version of Steam.

That error usually occurs for Valve games, such as Counter-Strike and Team Fortress 2. Those games don’t launch when the Fatal error failed to connect error message pops up.

So let’s explore how to easily fix this error that blocks your access to your favorite games.

How can I fix failed to connect with local steam client process?

1. Verify game files

  1. Open the Steam client software.
  2. Select the Library tab in Steam.
  3. Right-click the game that doesn’t launch and select Properties.
    steam properties Fatal error failed to connect
  4. Click the Local Files tab.
  5. Then select the Verify Integrity of Game Files option.
    verify integrity of game files Fatal error failed to connect with local Steam Client process

2. Log out and back in to Steam

Log out and back in to Steam
  1. Open the Steam window.
  2. Click the Steam menu at the top left of the software’s window.
  3. Select the Change user option.
  4. Press the Logout button to provide further confirmation.
  5. A Steam Login window will then open from which users can enter their account details to log back in.

If the error pertains to a user’s Steam account, logging out of Steam and then back in might just fix it.

And this is a surprisingly straightforward resolution that some users have said fixes the Failed to connect with local Steam client process error.

3. Close Steam via Task Manager

  1. Right-click the Taskbar and select Task Manager.
  2. Then select Steam Client on the Processes tab.task manager Fatal error failed to connect
  3. Press the End task button to terminate Steam.
  4. In addition, select all other Steam processes listed on the Processes tab (if any) and click End task.
  5. Thereafter, restart the Steam software.
  6. Some users might also need to restart Steam with admin rights by right-clicking the software’s shortcut icon and selecting Run as administrator on the context menu.

Note that users who successfully used this solution also closed the gaming client, and all other Steam processes, with Task Manager.

4. Switch to a Steam Beta account

Switch to a Steam Beta account
  1. Launch the Steam client.
  2. Click the Steam menu, and select the Settings option from there.
  3. Click Account on the left of the Settings window.
  4. Press the Change button.
  5. Select the Steam Beta Update option on the Beta participation drop-down menu.
  6. Select the OK option.
  7. Then restart Steam as prompted.

Don’t worry! A beta account gets all the latest updates before it rolls out to non-beta users.

5. Check for Steam updates

The error message states, Please make sure that you are running the latest version of Steam. Thus, the error message drops a hint for users to update Steam.

You can check for updates by clicking Steam and File. Then select the Check for Steam Client Update option.

Reinstalling Steam is another way users can update the software. Then users can get the most update Steam version from the software’s website before reinstalling.

However, you will need to copy the Steamapps folder to another directory to preserve their game data when uninstalling.

  1. Press the Windows key + E keyboard shortcut to open File Explorer.
  2. Open the Steam game folder in File Explorer. The default path for that folder is C:Program FilesSteam.
  3. Then select the Steamapps subfolder, and press the Copy to button.copy to Fatal error failed to connect
  4. Select a folder to copy Steamapps to.
  5. Thereafter, uninstall Steam by pressing the Windows key + R, entering appwiz.cpl, in Run, and clicking OK.uninstall applications Fatal error failed to connect with local Steam Client process
  6. Then select Steam, and click the Uninstall or Change/Remove button.
  7. Restart Windows after removing Steam.
  8. Thereafter, click Install Steam on the software’s website to download the installer for the latest version. Open the setup wizard to add Steam to Windows.
  9. Move the copied Steamapps subfolder back into the Steam folder after reinstalling the gaming client.

Those are some of the resolutions that players have confirmed to fix the Fatal error failed to connect error.

As such, the above resolutions will probably fix the error for most users so that they can play Valve games on Steam again.

Before you leave, don’t forget to check our guide on lowLevelFatalError since it can offer more insight on this issue.

How to Change Domain Controller IP Address

Domain Controllers (DCs) are actively used for authenticating users and the devices connected to the domain.

Because of these works, they are best set up and left as is. This becomes important in terms of their hostname and network details.

Changing the IP of the domain controller may not be ever required but a time may come when you change it.

Moreover, domain controllers are assigned to a static IP address so they are reliable and discovered across the network without any issues.

While changing the IP address of the domain controller may cause certain issues for the administrator, because of its critical nature.

However, if the DC is not hosting any other roles, changing IP isn’t a big problem and can be done easily.

In this guide, we will show you exactly how you can change the IP of the domain controller safely and with no issues. Let us get right into it.

How do I find the IP address of my domain controller?

  1. Open the Start menu.
  2. Type Command Prompt and open it as an administrator.
  3. Execute the below command and press Enter. set userchange IP of domain controller cmd
    • If the USERDNSDOMAIN isn’t displayed then likely the server isn’t a domain member. You may want to consult with your Network Admin because it will be required in the later steps.
    • You need the USERDOMAIN value for the DCDiag test.
  4. Type the below and press Enter. nslookup
  5. Execute the below command and press Enter. set type=all
  6. Type the below command and press Enter. _ldap._tcp.dc._msdcs.<DOMAIN_NAME>change IP of domain controller press enter
    • Replace the <DOMAIN_NAME> with the USERDNSDOMAIN value you got in Step 3.
  7. This DNS query will display the SRV record of each domain controller.
  8. Check for hosts containing the same name or the same IP address. Notably, each entry should have a unique hostname and IP address.
  9. To exit out of nslookup, enter: exit

Using the above steps, you would be able to find the IP address of your domain controller. The steps may look a bit too much but it is for those who know what they are doing.

How do I change the system name and IP address from the domain control network?

1. Rename the system name

1.1. Using System Properties

  1. Download the Remote Server Administration Tools.
  2. Launch the installer.
  3. Read and accept the license and click I accept.
  4. After the installation is complete, open the RSAT tool.
  5. On the start screen, click on Server Manager.
  6. Click on Change System Properties.
  7. Click on the Computer Name tab, and click Change.
  8. Hit the OK button to acknowledge the renaming.
  9. Under Computer Name, type the name you wish.
  10. Click OK.

1.2. Using Netdom

  1. Open the Start menu.
  2. Run the command prompt as an administrator.
  3. Execute the below command and press Enter. netdom computername <Current computer name> /add:<New Computer Name>
    • <Current Computer Name>: Enter the current, or primary, fully qualified DNS name of the computer that you are renaming.
    • <New Computer Name>: Enter the full qualified DNS name for the computer you are renaming.
  4. Type the below command to assign the new name to your PC and press Enter. netdom computername <CurrentComputerName> /makeprimary:<NewComputerName>
  5. Restart your PC.
  6. After the PC reboots, open CMD.
  7. Execute the below command. netdom computername <NewComputerName> /remove:<OldComputerName>

We have shown you two methods to change the system name, i.e. one using system properties and the other one using Netdom.

Do note that whichever method you choose, you have to update the FRS object and Update the DFS Replication member object.

2. Update the FRS member object

  1. Open the Start menu.
  2. Open Windows Tools.
  3. Select Active Directory Users and Computers.
  4. Click Advanced Features in the View menu.
  5. Expand the domain node, System, File Replication Service, and Domain System Volume (SYSVOL share).
  6. The objects below Domain System Volume (SYSVOL share) are the FSR Member objects, find the object that shows the old name of the domain controller.
  7. Right-click the FRS Member object and click Rename.
  8. Type the new name of the domain controller.

3. Update the DFS Replication member object

  1. Open the Start menu.
  2. Open Windows Tools.
  3. Select Active Directory Users and Computers.
  4. Click Advanced Features in the View menu.
  5. Expand the domain node, System, DFSR-GlobalSettings, Domain System Volume, and Topology.
  6. Locate the <DomainControllerName> object showing the old name of the DC.
  7. Right-click the msDFSR-Member object and click Rename.
  8. Enter the new name of the domain controller.

4. Change the IP address of domain controller

  1. 1. Press the Windows key on your keyboard or click on the Start button on your taskbar to open the Search menu.

  2. 2. Type cmd in the search box and right-click on the first result, then select Run as Administrator.

    cmd-run-admin 0x80070002 windows update
  3. 3. Write the below command and press Enter to remove any cached DNS entries created by the local DNS server: ipconfig /flushdns

    flush dns
  4. 4. Execute the below commands one by one and press Enter:

    Net Stop DNS

    Net Start DNS

    Net Stop Logon

    Net Start Logon


  5. 5. Now run the below command to ensure the new IP address is registered by the DNS server: ipconfig /registerdns

    ipconfig command cmd
  6. 6. Finally, run the below command to update the Service Principal Name (SPN) records: dcdiag /fix

  7. The Domain Controller’s IP can be easily changed via the built-in command tool known as Command Prompt or cmd. All you need to do is input a few commands in it, and the tool will do the job for you.

Is a domain controller the same as Active Directory?

We won’t give you complex terminologies as we want you to understand terms easily. An Active Directory is like a database. It stores information of users and computers as objects.

On the other hand, the domain controller is a service that runs Active Directory and uses the data stored by the AD for authentication and giving access to the user. Notably, a DC or domain controller manages the security policies of Windows NT or Windows Server.

So, the easiest way to remember the difference between Active Directory and DC is that Active Directory handles your identity and security access, on the flip side the Domain Controllers authenticate your authority.

That is it from us in this guide. We hope that we gave you the complete information on how you can change the IP of the domain controller. Let us know in the comments below if you come across any issues while following the above steps.

What is MEMZ Trojan Virus & How to Remove it for Good

MEMZ is a Trojan that has received much attention from Windows PC users lately, who are intrigued by the vortex images it creates on their computers.

To this day, MEMZ still remains an obscure virus for many Windows users, and the chance of getting more information from Microsoft is zero now.

The tech giant has locked the original thread about this Windows 10 MEMZ virus. There is only this active thread Microsoft Community. It seems like it all began as a joke, but many users got affected by it.

Leurak, the creator of the virus, intended it only to be for fun, and it was for Youtuber danooct1’s ‘Viewer-made malware’ series. He privately sent it out to some others, and some of the reciepients failed to follow Leurak’s request NOT to share it to their peers or strangers.

MEMZ virus on a stream was originally created by Leurak for YouTuber danooct1’s Viewer-Made Malware series.

Now it’s available to the public and you can find several versions on GitHub: some are MEMZ virus Clean and others Destructive.

What is and how do I remove the MEMZ virus?

1. What is the MEMZ virus?

MEMZ is a custom-made Trojan that uses highly complex and unique payloads that activate in a row. The first few payloads are harmless, but the final payload can make your PC completely unusable.

Once a computer is infected, the virus displays a message informing users they won’t be able to use their machines if they restart them. So remember to never restart a PC with MEMZ on it.

If you’re wondering how this Trojan manifests itself, some effects include automatic web search queries in the browser, the mouse cursor changing form, and random clicking.

Many other weird errors and glitches, concluding with a screen tunnel from countless screenshots can also take over your display. 

Furthermore, MEMZ Trojan can do an exciting and very destructive thing: overwrite the first 64 KB of the hard disk. 

Your machine won’t be able to run the OS and will display this message instead: Your computer has been trashed by the MEMZ Trojan. Now enjoy the Nyan cat…

After that, the Nyan Cat will take over your computer. MEMZ’s trademark is the Nyan Cat animation acting as a bootloader.

There are two versions of MEMZ: a harmless one, which people use for fun, and a malware version that affects the Master Boot Record. The second one is dangerous and can make a PC unusable.

2. Remove MEMZ from Command Prompt

  1. Open the search bar and type cmd.
  2. Select Command Prompt as admin.
  3. In the Command Prompt window, type the following command and press Enter: taskkill /f /im MEMZ.exe 

This kills all the MEMZ processes without crashing the system. The downside is that the Nyan Cat will still appear after you restart your computer.

3. Use a third-party antivirus

An excellent antivirus will for sure get read of any computer viruses, malware, and even this annoying and dangerous Trojan.

We recommend you install a modern cybersecurity solution that can help you eliminate multiple other threats, like spyware, ransomware, and Trojan viruses.

AI-powered, this antivirus software learns continuously how to protect your computer better. This solution is used by over 110 million users around the world, so that’s one of the first reasons to try it.

TotalAV

Get rid of the problematic MEMZ Trojan with one of the best antiviruses available.
Free Trial Visit Website

4. Reinstall your Windows 10 OS

If no solutions worked for you, there is only one other you may try. Unfortunately, some Trojan viruses are so well made, that only a fresh reinstall of OS will save you from them.

However, you don’t have to be scared of this step. Save all your data on an external hard disk or cloud and then use the installation CD.

It should not take 30-40 minutes to reinstall Windows 10. The most time-consuming part is reinstalling all other software, but your computer will be free of Trojan viruses in a few hours.

Don’t forget to install an antivirus to protect your PC from upcoming threats. You can use the one from the above solution or any of these best antiviruses compatible with Windows 10.

If you ever encountered the MEMZ virus on your PC or even the Zeus malware, use the above solutions and tell us if they worked for you in the comments section below.

To remove any other Trojans or malware, consider using any of these best virus removal tools for Windows 10.

Also, if you are aware of other ways to remove the trojan, feel free to mention them.

How to Fix TeamViewer Not Connecting / Not Working on PC

Did you experience any issues with your Teamviewer program on Windows 10? There are some glitches in this new OS that you will need to fix in order to make the app for remote connections work again.

But don’t worry because after reading and following the instructions listed below, your TeamViewer will work again. The most common issues on Windows 10 are related to black screen errors. 

For example, when you log in to another Windows PC and all you see is a black screen but you can move the mouse normally or perhaps you just cannot connect to any requested PC or laptop.

Unfortunately, this is not the only issue affecting the software. Other Teamviewer problems include: the app stops working, doesn’t connect to another PC, or it won’t start.

There are also various Teamviewer errors such as No connection to partner, Session limit reached, and so on. For a general understanding of these issues, read the troubleshooting guide available below.

How do I fix Teamviewer issues on Windows computers?

1. Install the latest Teamviewer version

The best way for checking your Teamviewer is to make sure you have a version compatible with your Windows 10 system. If you do not, then the program will stop working.

You can uninstall the current Teamviewer version and try to install the latest version from the official website.

But before you do, make sure that the version you install is completely compatible with your Windows 10 operating system either for a 32-bit system or for a 64-bit system.

If you don’t know how to check the exact version of your Windows operating system, you should take a look at our dedicated guide and find out.

2. Turn off Windows Firewall

  1. Left-click on the Search button you have in the menu bar.
  2. Write in the search box the words Windows Firewall.
  3. Select Windows Defender Firewall.
  4. In the Windows Firewall window click on the feature Turn Windows Firewall on or off.
    how to turn off windows firewall
  5. Select Turn off Windows firewall for both private and public networks.
    Turn off Windows firewall
  6. Reboot your system.

Check if your TeamViewer is still having problems connecting. If this didn’t resolve the issue turn the Windows 10 firewall back by following the steps above and selecting Turn on Windows firewall.

Additionally, you can manually check if the Windows Firewall is blocking an app, such as TeamViewer, or a port. For more details, check our comprehensive guide.

3. Use a more reliable remote desktop software

There is a large market for software that can help you enter a device remotely. Therefore, we highly encourage you to take advantage of this opportunity and choose Mikogo.

When TeamViewer fails to function, a dependable alternative option is always handy and unquestionably time-saving.

If the issue persists and hampers your Windows 10 system, we have a series of remote desktop solutions you can try. Browse our itemized guide and choose the one that suits your needs.

4. Check your antivirus settings

Anyone should use an antivirus to keep the computer and other devices safe from online threats, such as viruses, ransomware, spyware, and more.

Sometimes, a virus can block applications on your computer, so, make sure to run a full system antivirus scan as malware may also prevent TeamViewer from opening.

Despite the benefits of having a cyber-security tool installed, keep in mind that your antivirus may sometimes block TeamViewer.

False positives can occur even for the best cyber security solutions. However, you can add TeamViewer to the antivirus exclusions list.

If the issue persists and it’s affecting your Windows 10 system, we’ve got a list of remote desktop solutions that you can try. Check out our detailed guide and choose the one you like.

So, follow the suggestions listed above to fix your Teamviewer issues on Windows 10. If you want to know more about this software, visit our latest guide on Teamviewer_Service.exe. Also, if you have any questions related to this article, use the comment section below to let us know.

How To Add An User To Windows Server [2008, 2012 & 2016]

If you want to know how to add a user to your Windows server machine, you don’t need to search for the answer anymore. You will find it on this page.

It is very important that you understand that every user that uses your Windows server needs to have a user account. You will need to create a new domain user account.

In this how-to guide, we will explore this subject entirely, and we will offer you step by step instructions to achieve this easily.

All you need to do is to carefully follow the steps in the order they were written. This will ensure that you will not change any settings that may affect the way your machine operates.


How can I add an user to Windows Server?

Note: You will need to be logged in to an account with administrator privileges to be able to create new users on any version of Windows Server.

Windows Server 2008

  1. Press the Start button -> select Administrative Tools -> Active Directory Users and Computers.
  2. Right-click the domain on which you want to create the user on -> choose New -> User.
  3. Type the user‘s name in the respective boxes.
  4. Choose a user logon name (needs to be unique in the respective domain).
  5. Type the required password twice correctly.
  6. Choose any options that you want to apply to the password.
  7. Click Next -> verify that the entire set of information is correct.

Windows Server 2012 and 2016


Note: Even though the specific steps for these two versions of Windows Server (2012 and 2016) will vary, the general idea is the same.

  1. Press the Win+X keys on your keyboard -> choose Computer Management.
  2. Click the Local Users and Groups option from the left-side menu to expand it.
  3. Right-click the Users folder -> choose New User.
  4. Fill out the form with the appropriate name and description.
  5. If you want the newly created account to have a password that never expires, you should click the respective box. If not, the password will expire after some time, and it will need to be reset.
  6. Click the Create button
  7.  If you want to add this account to the Admin group -> click on the Groups folder – double-click Administrators from the list -> click Add -> add the name of the account you created -> click Apply -> Ok.

In today’s how-to guide we explored the best method to add new users to a Windows Server.

Please make sure to follow the steps presented in this list carefully in order to avoid causing any issue on your Windows Server.

We would love to know if this guide has proven useful to you. You can let us know by leaving the comment in the section found below this article.

Blueprint Software for PC: 7 Best to Use in 2026

Construction projects are a complicated task, and having the right set of tools can make the designing and modeling process much simpler.

A blueprint does just that: it simplifies things. In fact, its role is to act as a proposal that shows clients what the suggested floor or design plan will look like.

If you get the green (or should we say blue?) light at this stage, a 3D model of the exterior and interiors usually follows. As such, the ability to create 2D and 3D objects along with blueprints is a big plus.

Luckily for you, we have reviewed some of the best home design software that lets you effortlessly design highly accurate floor plans, so you don’t have to worry about finding it on your own.

Packed with drag-and-drop capacities, these feature-rich home design software with blueprints are a sure bet when it comes to delivering results. Put your trust in our research and you won’t be disappointed.

So make sure you take these tools for a spin and pick the one that meets your requirements. Here are our top picks for the best blueprint-creating software for Windows.

Product nameCollaboration toolsKey feature
Adobe Illustrator✅– Vector graphics for blueprints
Edraw Max✅– Thousands of templates and symbols
AutoCAD✅– 2D and 3D geometry models
Autodesk 3ds Max✅– 3D Stunning rendering
DreamPlan Home Design Software✅– Interior design modeling
SmartDraw✅– CAD software tools
Sketchup✅– Sustainable building designs

What is the best blueprint software to get?

Adobe Illustrator – High-resolution vector designs

Only with the correct software will you obtain the best blueprint results in the shortest time. If that’s precisely your goal, then do keep in mind that Adobe Illustrator is more than the best vector graphics software.

Perhaps the most interesting fact about Adobe Illustrator is how versatile it really is. You just need a little time to get used to it and you’ll be able to create whatever you have in mind.


Start with simple logos or book illustrations and go all the way to making floor plans.

This can prove extremely useful if you’re into construction projects or if you intend to move into a new apartment or house and want to take care of everything in advance.

To make it happen, simply activate the shape tool you want to use, click the artboard, and add the dimensions of the shape you want to create.

The next step is to add objects to the room, so don’t hesitate to use the Shape tools to accomplish this. Things could get even easier if you know the precise measurements of the objects you want to add to the room.

Some key features you’ll most likely appreciate:

  • Resolution-independent vector graphics for top results on all your projects
  • A generous suite of styles, effects, and individual characters
  • Seamless integration with other Adobe products
  • Both students and teachers are eligible for a great discount on the Creative Cloud apps collection
  • Countless tutorials regardless of your current skill level

Adobe Illustrator is subscription-based. You can pick from multiple subscription plans. You can try it for free for 7 days.

Adobe Illustrator

From simple logos to full-scale construction plans, there’s nothing you cannot design with the most versatile vector-based design software.
Free trial Visit website

Edraw Max – Floor plan designs

Edraw Max is a multi-purpose program and offers one of the easiest blueprint designing tools to create floor plans, office layouts, and building plans.

It can produce up to 13 types of floor plans that can be applied to home design, office layout, electrical and telecom, and security access plans. It also features an option for garden design.

The floor plan maker comes equipped with a good number of floor plan templates and samples to give you a head start while more can be downloaded from the library online.

You can add more information to the floor plan by adding hyperlinks, attachments, and other graphics objects. The finished blueprint can be exported in multiple formats including Visio, Office, and graphics format.

Edraw Max is not just a blueprint and floor plan-creating tool but can also be used for other diagram works in different fields like electrical and science illustration etc.

EdrawMax has top-level SSL encryption. No one can access any information without your permission. All actions made within the app are completely private.

Some key features you’ll most likely appreciate:

  • Full vector graphics design solution for Floorplans
  • Support Visio XML documents
  • Drag and drop functionality
  • 13 types of floor plans included
  • Hyperlink support

EdrawMax can be used with a subscription, but you can try it for free for 30 days.

Edraw Max

Edraw Max

Edraw Max is an application to create diagrams on Mac and PC, and it is one of the best Visio alternatives in the marketplace.
Free trialVisit website

AutoCAD – 2D and 3D drafting tool

AutoCAD is probably the most well-known CAD program that you can have today. Despite offering an extensive set of design tools, it has a user-friendly interface great for beginners and intermediate users.

If you are a student, AutoCAD has a free editor for young learners. It is a professional-grade program used to create 2D and 3D drawings for architecture and mechanical parts.

You can use AutoCAD to create floor plans, sections, and elevations. It is compatible with multiple file formats including DWG, DXF, DWF, DGN, SKP, STEP, and STI.

You can also import plans from other programs or even 3D print your designs. AutoCAD is a subscription-based software that requires the users to pay on a monthly basis but offers web and mobile app support.

There are third-party add-ons made available for AutoCAD that add an additional set of features to the program.

AutoCAD has a renovation mode that can display existing construction, add on top of it, and demolish. All these actions are done in one drawing in order to avoid layering errors.

The software also lets you create notes and add important information to your design. It offers detailed components such as bolt heads, fixed-length nails, connectors, and more.

Some key features you’ll most likely appreciate:

  • A user-friendly and intuitive user interface
  • Free student program
  • Create 2D / 3D drawings for architecture and mechanical parts
  • Recommended for beginners and advanced users

AutoCAD is a subscription-based software with multiple plans available. It has a 30-day free trial.

AutoCAD

Design all your favorite floor plans, sections, and elevations with this amazing software. Get the best deal now.
Free trial Visit website

Autodesk 3ds Max – 3D rendering and animation

When dealing with construction projects, Autodesk 3ds Max is one partner you can trust to alleviate those early, but rather challenging stages that imply designing, 3D modeling, and rendering.

Packed full of rich and flexible tools, this software will shape your architectural vision perfectly down to the last detail.

You can start your project by importing already existing CAD files to create your design frame and start building it up in 3D from there.

Another important aspect on which the software has focused is productivity. 3ds Max lets you accelerate your workflow with automation, extend built-in workflows with APIs, and scale content quickly and easily.

Autodesk can help you create realistic designs. The material, texture, and color editor lets you add material finishes, create and customize textures, and play with colors to generate designs that don’t miss any detail.

Some key features you’ll most likely appreciate:

  • Extensive toolkit to model premium designs and finely detailed interiors
  • Living space design visualization and preview rendering
  • Friendly UI and intuitive controls
  • Integrated workflows to accelerate productivity

Autodesk 3ds Max is a paid service, but you can try it for free and see if the features it provides satisfy your design needs.

Autodesk 3ds Max

Design and model detailed projects with efficiency by using the intuitive, yet advanced Autodesk 3ds Max
Check price Visit website

DreamPlan Home Design Software – Realistic 3D dream house

The home design software for DreamPlans is the cheapest blueprint creation software on this list, but do not get fooled by its price, because it does still pack a punch when it comes to features.

While it may not offer as many features as other tools, for small projects, DreamPlan provides enough features to create a blueprint of a floor plan while finishing it with a 3D home model.

The tool is easy to use and offers a roof wizard to get started. The floor plans can be imported into the software for modification.

Creating floor plans for homes, condos, and apartments is easy with the DreamHome program. Plans are further customizable using a custom set of colors, textures, furniture, and decoration tools.

DreamPlan is good for small projects and offers a good number of tools to create blueprints and 3D / 2D maps along with interior and exterior decoration options.

However, the tool lacks advanced plumbing and electrical tools which means you need to consult a third party for these tasks.

You can design rooms in detail with appliances for bedrooms, kitchens, or bathrooms. It also offers some furniture and other objects that you can experiment with your design.

Some key features you’ll most likely appreciate:

  • Affordable home design program
  • Basic design tools for floor plan
  • 3D home model support

When it comes to exterior design, DreamPlan has landscape and garden tools that allow you to plant trees, create gardens, reshape outdoor terrain, and more.

DreamPlan Home Design

Use DreamPlan Home Design to create the blueprint for your projects at a competitive price.
Check price Visit website

SmartDraw – Simplified CAD tool

The next software is an intuitive solution for getting blueprint designs using professional tools and templates.

SmartDraw comes with improved diagrams and visual representation for your dream home, offering blueprint examples for different constructions.

Additionally, the software provides standard templates for various industries such as flowcharts, mind maps, floor plans, network diagrams, project timelines, etc.

The users can easily add shapes, text, images, and other elements to their blueprint project.

You should know it’s possible to automate diagram creation and blueprint designs, arrange objects and automatically connect shapes on your sketch board.

It’s worth mentioning that it allows a wide range of diagram types with CAD engineering designs that will boost your blueprint drawing ability.

Besides all, you have a clever formatting system that helps the user with moving or rearranging shapes automatically to keep a logical view.

Other key features include:

  • Thousands of blueprint templates
  • Over 70 diagrams and charts
  • Import and export option
  • Integrate Office and Google workspaces

⇒ Get SmartDraw

Sketchup – Visual 3D modeling

Sketchup is an advanced and versatile 3d modeling tool that is suitable both for beginners and advanced users. It has a web-based version that is available for free and a pro version that offers a larger set of features for more demanding projects.

This tool can be easily integrated into other similar software, but you can also use it on its own since it provides enough features that let you work through every stage of the project.

Users report that it is easier to use and learn than other similar tools. You can easily draw your 2D designs and the software generates precise 3D presentations of them.


Sketchup can easily import pre-existing 3D modeling projects without any errors. It is compatible with all models available in the 3D Warehouse, which is a great resource for free, user-generated 3D model projects of all sorts. It is available as a plugin for Sketchup or as a stand-alone app.

The software allows you to create your models, define and fully customize all parameters, and also plan every step necessary. It can also generate construction and fabrication documentation based on your models.

Sketchup also has multiple learning materials available online. It has a blog with news, tips, and tricks, a discussion forum where users can share experiences and help each other.

Moreover, it is resourceful in professional-level, in-depth tutorials for multiple types of projects including landscape designs, interior designs, and general modeling practice.

Some courses provide captions in multiple languages.

Other key features include:

  • Extensive object library
  • Supports testing and comparing
  • Layer manager
  • Lightning effects

Sketchup is a great tool for professionals and beginners alike, providing special plans for students and teachers. The free, web-based version is a great starting point that you can use to get acquainted with the program and learn its basics.

⇒ Get Sketchup

Most of these blueprint programs let you achieve more than one task. Apart from creating blueprints for home and mechanical projects, you can also use them to create 3D visuals of the actual project.

Whether you are an individual, an architect, or a student, this list of the best software to create blueprints and home designs will help you get started. Do let us know your pick in the comments.