Photo Printing Software for Windows 10 & 11: 8 Best in 2026

In the past, in order to print out your photos, you would have to go to a specialized printing shop, and you had to print out all the photos found on the camera film.

This technique did not allow you to choose which of the photos gets printed or apply any effects or templates before printing.

Fortunately for us, by using digital images, we can use specialized software that allows us to choose which photos will be printed, how the pictures will be framed, what effects are applied, and can also edit the photos in a variety of ways.

In this article, we will explore some of the best software options on the market that allow you to create professional-level photo prints from the comfort of your own home and at a fraction of the cost. Read on to find out more.

What is the best photo printing app for PC?

  1. Adobe Lightroom – Overall best photo printing app
  2. Fotor – Simple software
  3. Corel PaintShop Pro – High flexibility
  4. ArcSoft Print Creations – User-friendly tool
  5. Pixlr – Online photo editor
  6. XnView – Quick and effective
  7. PhotoElf – Top-notch photo management app
  8. PhotoLightning – Excellent user interface

Adobe Lightroom – Best photo editing and print

When it comes to photo manipulation and design, few software giants come close to what Adobe has achieved.

However, when it comes to enhancing photos while still making them believable, the crown goes to Adobe’s very own Lightroom.

This program not only allows you to capture incredible photographs but also lets you retouch them on the go. Apply filters before the photo is taken, or perform more advanced tasks once in your device’s storage.

The license gives you access to the program for all devices, from the common PC to the portable tablet version.

Editing has never been easier since the UI has been completely streamlined over the years. In fact, if you haven’t used Lightroom in over 2 years, you might as well get a hand on it now while you may still recognize what’s left of the interface.

All in all, if you are looking for the perfect blend between professional tools and beginner handling, then Adobe Lightroom is the program for you.

Adobe Lightroom

Use this up-to-date software to benefit from the combined effect of professional touch and novice operations for your digital imaging art.
Check price Visit website

Fotor – Greatest online photo editor

When you think of photo-enhancing programs, you probably think of overcomplicated software that has overcrowded UI elements and 100 buttons that handle just color balance.

However, that isn’t the case with Fotor, as it values simplicity over all else. In fact, if you’ve ever had one of those simple phone apps for photo enhancement, then you already have a very good idea about what to expect with Fotor.

However, this doesn’t mean that the product doesn’t do a good job. On the contrary, Fotor manages to deliver stunning photos in a simple manner precisely because the algorithms anticipate what you would like the outcome to look like.

Of course, enhancing your own photos is great, but you can even use Fotor to earn an income.

Accent your ideas with many preset templates, ranging from social media designs, including Facebook covers, posters, photo cards, YouTube banner ads, and much more in just a few clicks.

Do whatever you like, from portrait retouching to adding outrageous photo effects, all from a simple touch of a button or an adjustment of a slider, all within the same simplistic yet amazing photo editing tool.

Fotor

It’s all about using photo effects to stretch your imagination and personalize your ideas with simple actions, using a wide range of templates.
Check price Visit website

Corel PaintShop Pro – Breath-taking digital photos

PaintShop Pro Corel_best photo correction tool

Corel PaintShop Pro is definitely one of the most flexible and wonderful software for editing and printing your favorite photos.

With the new technologies included in Corel PaintShop Pro, intricate and time-consuming adjustments have never been easier to do, thanks to the well-organized and simplified UI.

Using composition principles, the Golden Ratio, and the Rule of Thirds, you may easily crop sections of your image to change the emphasis and print a different version of your photographs.

Furthermore, because you wish to print your masterpiece at home so you can save time, you may quickly select from a range of settings to adjust the picture. Printing is possible from the Manage workspace, Edit workspace, and Adjust workspace.

Crop and registration markings can also be printed. You may print crop markings to use as guidelines when trimming the page. Registration markings are used to align film for proofreading or printing plates on a color press. They print on each page of color separation.

You may expand a picture without introducing unwanted distortion with AI Upsampling, remove artifacts and noise from your images with a single click using AI Artifact Removal or AI Denoise, and stylize your photos with unique effects with AI Style Transfer. You now have the greatest photograph ready to be printed and shared with the world!

Corel PaintShop Pro

Look into various unique visual effects to make your photographs more distinctive and unique for sharing and printing!
Free trial Visit website

ArcSoft Print Creations – Various edits and cameras

Arcsoft Print Creations - print photos at home

ArcSoft Print Creations is a great user-friendly software that allows you to edit, modify and apply filters to any of your favorite digital pictures and then easily print them out by using your printer.

This software has a wide range of features that can help you with your digital photo projects. The setup of this software can feel a bit confusing when you try it the first time, but we will look at some steps that will ensure you will get through it without any issues.

After you’ve installed Arcsoft Print Creations, you will be able to find a list of different modules in the Start menu called ArcSoft Print Creations.

The options in that folder include items like Quarter-fold greetings cards, Funhouse, Half-fold greeting cards, etc. It can be a bit confusing to choose from one of the options presented in this menu.

In order to make the entire process of choosing the right module easier, we recommend that you first start the Print Creations LaunchPad.

This module allows you to understand what each option has to offer, and it allows you to create a new project or edit an already existing project.

If you choose to start a new project, you will need to choose which project setup works best for your needs. It is now easier to choose the right option as the software offers a graphic icon showing you the preset characteristics.

Even though at first, the modular structure of this software seems like a disadvantage, it can be an extremely efficient way of organizing your projects.

Once you got used to the names of the modules and understand what each one of them does, you can start the appropriate module directly from the Start menu of your Windows 10 PC, avoiding the LaunchPad.

Once you select the right type of project setup, you can simply select the photos you want to be included, edit them in a variety of ways, apply templates, etc.

When you’re happy with how your project looks, you can choose to save the project in order to share it with your friends digitally or print it out as you would do in any printing software.

⇒ Get ArcSoft Print Creations

Pixlr – Free online photo hub

Pixlr, the Online Photo Editor, allows you to edit images, print photos at home, and create stunning graphics directly in your browser.

Experience next-generation, intuitive picture editing and graphics design with AI-powered tools for rapid yet professional changes.

The image editor supports nearly every image format, including PSD (Photoshop), PXD, JPEG, PNG (transparent), WebP, SVG, and others. Begin with a blank canvas or one of the professionally designed templates provided.

The printing option is available on the File tab of Pixlr E but not in Pixlr X, which is intended for simple and rapid graphic design. To print a high-quality image, choose a BMP file format, which is bigger and captures more data, to get the best out of the printed image with Pixlr.

Do you want to show the real vibe of your photos? To get the required photo effects in your visuals, use the right photo filters to immediately spice things up and print a mood-swinger picture at home.

⇒ Get Pixlr

XnView – Batch image multimedia tool

Program to open CAN files

XnView MP and XnView Classic are both free Image Viewer that allows you to open and modify your photo files quickly and efficiently before printing.

All major picture formats are supported by XnView (JPEG, TIFF, PNG, GIF, WEBP, PSD, JPEG2000, OpenEXR, camera RAW, HEIC, PDF, DNG, CR2), so printing at home is easy and efficient.

Color changing, image resizing, cropping, screen capture, information editing (IPTC, XMP), and much more are all available in XnView.

XnView MP has an easy-to-use explorer-like interface that allows you to not only see but also manage your photographs and photos.

You may generate contact sheets and slideshows, as well as batch rename, batch converter, duplicate image detection, and image comparison.

XnView is compatible with all major operating systems and mobile devices, and if you’re a developer, this is the photo conversion tool you’ve been looking for.

⇒ Get XnViewer

PhotoElf – Photo printing for all Windows OS

PhotoElf - printing photos at home

PhotoElf is another great software option that allows you to easily manage, sort, and print your favorite photos at home.

The customization tools found in this software offer you the possibility to combine up to 144 photos on one page and customize the size of every print.

In addition, the software allows you to print multiple images at once and offers you access to a wide range of printing templates.

Because it is very important that before printing, your photos are edited, this software allows you to do so with standard photo editing options and effects.

Even though PhotoElf was designed for older versions of Windows, we managed to install it on Windows 10 without any issues at all.

All you need to do in order to run the setup is to download the files, then right-click on the installer and choose ‘Run as administrator. It only takes a few seconds to install, so you can start creating wonderful photo collages and print them easily.

One of the best features found in PhotoElf is its ability to split a large-sized image into separate A4 pages, allowing you to print photos to any size you desire.

The printer will take every page found in PhotoElf and will print it out in the same way you build a puzzle piece.

Here are some of the best features found in PhotoElf:

  • Can create amazing templates that can be saved and used as many times as you want to
  • Ability to batch print more than 1 photo per page
  • Can add text and captions to the printed page
  • Quickly find photos on large HDDs
  • Can edit, rotate, crop, and use a red eye removal tool
  • Can convert images to different formats
  • Can print extra-large posters and banners
  • Batch rename, resize, rotate, image format converting, JPG compression, cropping, etc.

⇒ Get Dod PhotoElf

PhotoLightning – Fast digital photos print

PhotoLightning - photo printing at home

PhotoLightning is another great software option that you need to try. This software allows you to easily customize your favorite digital photographs, add effects, and print photos out.

The user-friendly UI found in this software makes the entire printing process easy, helps you download the pictures from your camera, allows you to easily choose the right photos, set the specific quantities to be printed, and even uses custom frames with preview features.

This allows you not to waste any precious time by printing out different versions of the project.

Besides the editing and printing capabilities of this software, PhotoLightning also gives you the tools needed in order to send your projects via email without leaving this software dashboard.

Here are some of the best features found in PhotoLightning:

  • Can set custom font size, color, captions, etc.
  • Can print complete albums with one click
  • Can print out a different number of copies for each of the images found in your project
  • Automatically fits your photos in the available print space
  • Automatically rotates photos to save space, time, and money
  • Remembers your chosen printer and favorite printing paper
  • Supports photo paper templates from Canon, Epson, Hewlett-Packard, Kodak, Sony, etc.

⇒ Get PhotoLightning

In this article, we explored some of the best software options that allow you to easily print out your favorite digital photos from the comfort of your own home.

A digital photo frame can be a nice gift or addition to your house design, and you could also explore our Digital Photo Hub for more top lists in the same regard.

Let us know how these software options worked for you by using the comments below.

Fix Windows Error Recovery Loop on Windows 7 & 10 [Laptop, PC]

If you’re wondering how to fix Windows error recovery, you’re in the right place. Obviously, you are not alone. In fact, many users reported similar issues. The good news is that they also managed to solve these problems.

Let’s quickly review some of the most common issues related to Windows Recovery mode:

  • Windows error recovery loop Windows 7 – If Windows 7 failed to start it’s likely you encounter the recovery Windows error on a Dell laptop, HP laptop, and so on.
  • Laptop recovery problem – Speaking about portable PCs, more often than not, you’ll get the recovery screen on laptops.
  • Windows error recovery on startup
  • Obviously, the issue can impact all versions of the OS and a particularly common scenario takes the form of Windows error recovery in Windows 10.
  • Windows error recovery keyboard not working

Don’t worry, we’ll show you exactly what to do when your PC says recovery. But first let’s see what we’re dealing with and what is it that triggers such errors, to begin with.

What is error recovery in computer?

Running apps might seem like a straightforward action, but it’s in fact a complex process involving syntax verification, compiling, and parsing operations that your computer constantly runs in the background.

The Windows error recovery is usually caused by problems such as corrupt system files, a hardware change, or a compromised Boot Configuration Data (BCD). The good news is that all of these are easy to resolve.

In fact, some of the situations generating this error have more than one solution meaning there is a huge chance of cracking the matter.

We’ll show how to fix Windows error recovery without CD or with a CD. There are various methods available, so you’ll be able to find the right Windows error recovery Windows 7 solution or Windows 10 fix effortlessly.

How do I fix Windows 10/7 recovery error?

➡️ If possible, make sure that the computer is connected to a reliable internet network as you execute these steps.

➡️ We will be using an HP laptop for demonstrative purposes, but the operations can be applied as such on any other brand (Dell, etc.)

1.  Remove recently added hardware

  1. Turn off your laptop and remove the AC adapter and its battery.
  2. Disconnect the newly added device. You may have to reopen the laptop to access whatever hardware you had installed (if it was an internal addition).
  3. Return the battery.
  4. Turn on the laptop the usual way.
  5. The laptop may successfully boot to the desktop and the Windows error recovery message will not be redisplayed.
  6. You can now try to reconnect the device and wait for Windows to recognize it (for external hardware like a USB webcam).
  7. For hardware that is installed on the motherboard, the best approach is to ensure that you are installing a compatible device and to introduce the right drivers immediately.

Adding hardware, for example, a new RAM module can sometimes originate Windows instability problems. This triggers the Windows error recovery loop, making your laptop fail to reboot.

Use these steps to rectify whatever issues arose as a result of installing new hardware.

Tip icon Tip
If you are adding more than one device, it’s advisable to connect one at a time and keep restarting the computer with each addition until you locate the device causing the error.

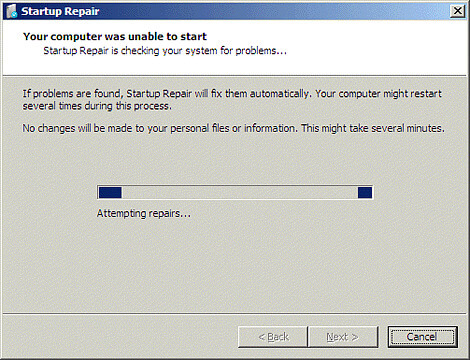
2. Run Windows Start Repair

  1. Let the laptop timer countdown run to zero once the error message appears or just press Enter while the launch start repair option is selected.
  2. The startup repair interface opens and starts scanning your laptop for problems. windows error recovery loop
  3. Implement the suggestions made by the startup repair wizard to rectify the pending faults.
  4. The laptop should soon restart and boot into your normal desktop.

You can now attempt to repair a faulty Windows startup process by mending the relevant files.

3. Boot into LKGC (Last Known Good Configuration)

  1. Restart your laptop.
  2. Press F8 repeatedly until the advanced boot options appear.
  3. Choose LKGC (last known good configuration -advanced) then press Enter.

Booting into the last known good configuration is easy and could solve the problem without much fuss.

4. Restore your laptop with System Restore

  1. Turn off the laptop and then, press its power button to turn it back on.
  2. Now, start pressing the F8 key repeatedly until a startup screen appears.
  3. Highlight the safe mode option using the up/down arrow keys and press Enter.
  4. Select an administrator user account when the Windows login screen displays and enter your password (if any).
  5. When the desktop appears, press the windows button on the menu then click inside the search bar.
  6. Type cmd then press Enter.
  7. In the Command prompt window, type rstrui then press Enter again.
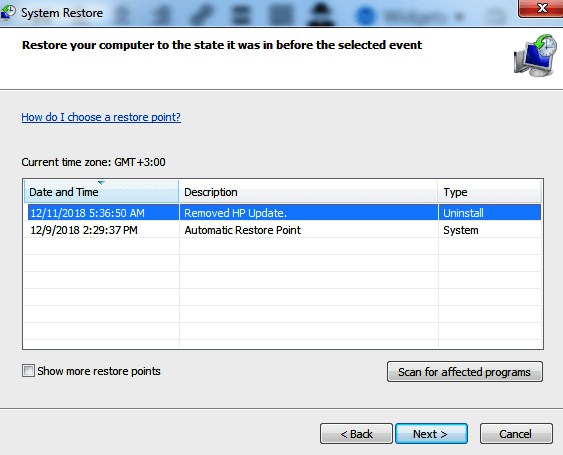
  8. The Restore System screen opens.
  9. Click Next, then choose the last restore point that worked (from the displayed options) then click next.windows 10 error recovery
  10. Now click Finish and wait for the checkup and restart process to complete. Again be patient.

Restoring the laptop takes it back to the settings that previously worked. You can execute the system restore directly from the startup repair window if that option pops us.

Here is how to initialize restore if the option wasn’t provided and fix the Windows error recovery via Command prompt.

Besides the Windows error recovery loop, this method should also help if your computer is stuck in a restart loop, so make sure you check it out.

5. Recover the Laptop

Recovering a laptop is equivalent to resetting the computer its factory configuration.

  • Windows 7
  1. Turn off the laptop.
  2. Turn it on and press the F11 key repeatedly until the Recovery Manager (Windows 7) opens.
  3. Click System recovery under the I need help immediately tab.
  4. Select your preferred backup option when the system recovery asks for your backup preferences.
  5. Click OK when and if a warning displays.
  6. Click Finish to reboot the laptop as soon as the recovery is complete.
  7. Now go over the typical Windows setup until the laptop finishes the fresh reconfiguration.
  8. Restart your computer to ensure everything sails smoothly again.

You may have to reinstall some or all of your previous software including the antiviruses and business programs (if any) plus any backup files.

  • Windows 10
  1. Turn off the laptop.
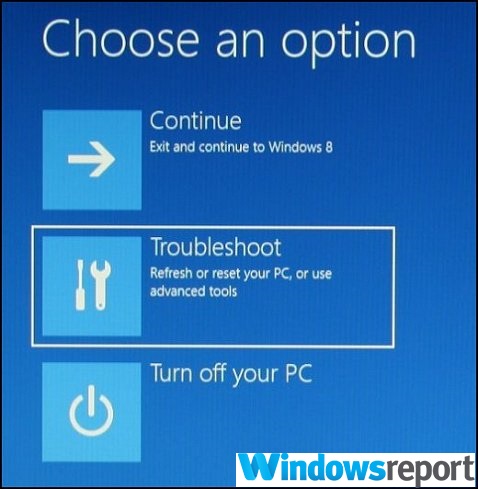
  2. Turn it on and press the F11 key repeatedly until the Choose an option window is displayed.
  3. Click Troubleshoot under the Choose an option tab.
  4. Next, click Recovery manager on the Troubleshoot tab.
  5. Finally, click System recovery under Help to finally progress to recovery.
  • Windows 8
  1. Turn off the laptop.
  2. Turn it on and press the F11 key repeatedly until the Choose your keyboard layout window is displayed when the laptop restarts.
  3. In the new windows, click Troubleshoot.hp computer stuck in recovery mode
  4. Click Recovery manager on the troubleshooting window.
  5. Select Windows 8 to open the all-important recovery manager.
  6. Now, click System recovery for the laptop to be reset to its original factory setup.
  7. Another option would be to click the minimized image recovery in order to restore only your windows 8 operating system, and drivers, and select Software.

Use the HP Recovery disc to run the recovery

  1. Turn on the laptop and then insert your first HP recovery CD/DVD into the drive.
  2. Turn off the computer.
  3. Now turn it on.
  4. Press the escape key continuously until a window’s startup menu or the select boot device window opens.
    • If you get the select boot device menu, click the correct CD/DVD drive then press enter.
    • Else press F9 to access the boot menu/ device option then choose the right CD/DVD drive and press enter.
  5. If the window requesting you to run recovery from the hard disk appears, choose the Run program from disc option and click next.
  6. Select Recovery discs created from your computer/ Recovery discs received from HP support option appropriately.
  7. Select Factory reset/ Reset the computer by erasing the entire drive and restoring to the factory setup depending on what’s shown on the screen. 
  8. Select a suitable backup option or otherwise.
  9. Click OK to hide the warning that appears.
  10. Follow the steps and insert the next recovery disc when prompted.
  11. Click Finish/Next as prompted when the recovery ends.
  12. The laptop may turn off or restart automatically. If it is turned off, wait about 5 seconds before turning it back on.

Boot from a USB recovery drive

  1. Turn on the laptop and insert the recovery USB flash disk into the USB port.
  2. Now turn off the laptop and turn it back on.
  3. Press the ESC key continuously until a window’s startup menu or the select boot device window opens.
  4. The selections you need to make vary slightly depending on the type of menu that displays on your screen:
    • For select boot device menu, select the correct USB storage drive then press Enter.
    • For the startup menu, press F9 to access the boot menu/ device option. Again select the right USB storage drive and press enter.
  5. The rest of the steps are as I explained above for CD/DVD.
  6. Remember to remove the USB drive before restarting the laptop.

6. Perform Startup Repair with a Windows installation disc

  1. Restart the computer and press F9 (repeatedly) until you see the message Press any key to boot from CD or DVD on the screen.
  2. Select your preferred language, time plus currency, and a favored keyboard/input method, and then click next.
  3. Choose Repair your computer.
  4. In the next system recovery options window, choose the drive where your Windows installation is and click next.
  5. Click Startup repair in the next dialog.
  6. Select System restore and follow the steps until the computer is repaired.

We already showed you how to fix Windows error recovery without CD. However, all methods may fail if there is a critical error with your Windows installation.

In such an instance, you need to repair the original Windows installation using the disk. Finally, should everything else fail, you may need to reinstall a fresh copy of Windows.

FIX: Laptop Connected to TV with HDMI has No Sound

If you have connected your laptop through an HDMI cable to the TV and your sound is not working don’t be alarmed because there are a few tips and tricks in Windows 10 that you can do in order to fix the sound.

A few of the reasons why your sound is not working might be because the TV does not support audio output from an HDMI cable or because of the drivers in Windows 10.

Also by following the tutorials posted below you will quickly resolve your laptop HDMI to TV no sound problem in Windows 10 or perhaps find out how to get sound from your laptop to a tv with HDMI.

How do I fix no HDMI sound from a Windows laptop to a TV?

1. Change your Hardware and Sound settings

  1. Press the Windows Key + X.
  2. Select Control Panel.
  3. Go to Hardware and Sound.
  4. Under Sound, click on Manage audio devices.
  5. Next, click on the Playback tab.
  6. Then, right-click on the Digital Output Device (HDMI).
  7. Afterward, check Set as Default Device, then click Ok.
  8. Reboot your device.

If you want your sound to work through an HDMI cable you will first have to adjust some settings in Windows 8 or Windows 10.

2. Update your drivers

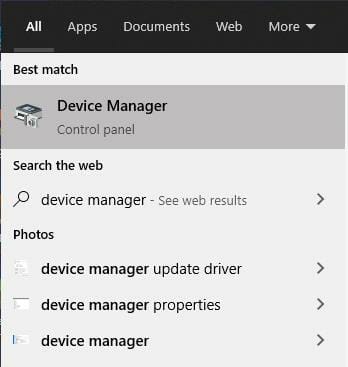
  1. Press the Windows Key + S and type in Device Manager.
  2. In the Device Manager, find the sound driver and expand it.
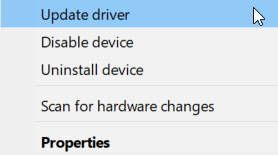
  3. Right-click on your HDMI TV and select Update driver.
  4. Let Windows check and update the driver.

Manually updating your PC drivers with the Device Manager requires time and it doesn’t always end up finding the latest compatible version.

2.1 Update the driver automatically

We recommend updating your sound driver automatically by installing a third-party driver updater that will scan your PC’s peripherals for new software versions.

Not only will this app make your life easier and remove any driver-related problems from your system, but it will also constantly update all of your drivers.

Therefore, get all your drivers up to date and avoid related system problems that can cause sound issues, all with the help of Outbyte Driver Updater.

3. Connect your laptop to a sound system

If your TV or your laptop does not support an HDMI audio output you will not be able to hear any sound, but there will be video output.

Having no HDMI audio support is not uncommon, and while it is unfortunate, there are physical workarounds for such a problem.

Mainly, you will need to connect the laptop to a sound system directly in order to have the sound enabled and good to go on the TV.

Therefore, you will need to connect something else to your laptop, which is not entirely optimal, but it works, and an audio system will provide better sound quality overall.

The connected audio system does not need to be speakers either. You can connect your headphones as well if you prefer.

4. The HDMI might have other problems

This issue may occur not only because of some audio components. It may also be the cause of a greater malfunction, like, the HDMI connection to a laptop or TV.

We suggest checking out this thorough article dedicated to HDMI issues in Windows 10 to get more solutions related to HDMI cable problems.

Your HDMI output cable might be malfunctioning as well, so we recommend checking out another great guide dedicated to HDMI output problems.

If you are looking for a new HDMI cable, we recommend choosing one from our top list of the best HDMI cables that you can find on the market.

After following these simple tutorials you should have your sound up and running in no time but if you still have questions about these issues please feel free to write us below in the comments section of the page.

Single Sign On vs Multi-Factor Authentication: Which Is Better?

Single Sign On (SSO) is a convenient way to log in to multiple applications and websites with a single user ID and password. In contrast, Multi-Factor Authentication (MFA) requires users to provide additional verification to prove their identity.

Most people are familiar with and have even set up their PCs with multi-factor authentication in Windows 11. In this article, we will compare Single Sign On vs Multi-Factor Authentication. We shall also discuss some of the most prominent solutions used in the market today.

Is there a difference between MFA and 2FA?

Multifactor authentication (MFA) and two-factor authentication (2FA) are two different approaches to the same goal: adding an extra layer of security to your accounts.

It’s common for people to use the terms interchangeably, or even incorrectly. But there is a difference between MFA and 2FA. 2FA is short for two-factor authentication, which is a type of MFA.

MFA makes it more difficult for unauthorized users to access your account by requiring a second authentication factor before logging in. A second factor is usually something you know (like a password), but it can also be something you have (like a phone). 

With MFA, the second factor must be provided every time you sign in or perform any actions on your account. This means that if someone tries to log in using just their email address and password, they won’t be able to do so unless they have access to your mobile device.

What is the main advantage of Single Sign On?

1. Ease of use

Users can log in once with their credentials and then access all other applications that are part of the SSO system. This makes it easier for them because they don’t have to remember multiple sets of login credentials and passwords for different applications. 

Also, when doing so, they will not have to deal with additional password prompts or any other issues that may occur due to using different passwords for each application or service.

The administrator can also benefit from a unified user interface when managing these accounts because they all share the same login page and interface, making it easier for them.

2. More secure authentication

SSO can greatly reduce security risks by reducing the number of credentials that attackers would need in order to gain unauthorized access.

By eliminating the need for each application to maintain its own authentication system, you can reduce the risk of sharing credentials across multiple systems or having your user database compromised by hackers who steal information from one site and use it on another site as well.

3. Reduces costs

Single sign-on (SSO) is a technology that allows users to authenticate themselves to multiple applications with a single set of credentials. It reduces IT support costs because there is only one password standard that needs to be enforced across all applications.

With SSO, users can access multiple applications without having to log in for each one separately. It can also enforce more robust password policies since they do not have to manage multiple rules for various applications or databases.

4. Centralized management

Because there are fewer components to manage, it’s easier to keep up with updates as they become available. All applications can use a single set of user profile information. This means that IT doesn’t have to create new accounts for users in individual systems.

Additionally, if one component fails, it doesn’t necessarily affect other components. This is because they’re not interconnected as they would be in a multi-component solution.

5. Increase productivity

SSO is essential for some business functions, such as human resources (HR) applications, that require employees to access multiple systems throughout the day. 

With single sign-on, users don’t have to enter their username and password before logging into each application separately.

This makes it easier for them to complete their tasks in less time and with greater efficiency. If you’re looking for ways to increase productivity in your organization, SSO is the way to go.

What are the best Active Directory tools with MFA and SSO integration?

While Active Directory is the heart of your organization’s infrastructure, it can be difficult to manage. There are many tools that can help you with management, but many of them don’t integrate with multi-factor authentication (MFA).

There are many ways to manage Active Directory while keeping it secure, including using MFA (multi-factor authentication) to protect your users.

ADManager Plus – Feature-rich AD tool

ADManager Plus is a user-friendly and feature-rich administration and reporting tool for Active Directory. It allows you to easily manage your Active Directory environment, including but not limited to user accounts, groups, computers, and distribution groups.

The software comes with built-in support for multi-factor authentication (MFA). It can be used in conjunction with other apps to provide secure access to your network resources by requiring users to authenticate through an additional means after they have entered their credentials.

Other features include:

  • Simplified AD management activities
  • Bulk computer management
  • Audit management

ADManager Plus

Get the best Active Directory management tool to keep track of any network events easily.
Free trial Visit website

ADSelfService Plus – Flexible AD tool

ADSelfService Plus allows you to configure different security policies and access levels for different types of users in your company. For example, you can give some users the ability to reset their own passwords while others will not have this right at all.

ADSelfService Plus also supports multi-factor authentication (MFA) and single sign-on (SSO). If you’re looking for an AD solution with the best of both worlds, this here is the perfect fit for you.

Other features include:

  • Multiple layers of authentication
  • One-click sign-on to integrated apps
  • Self-service audit reports for password changes

ADSelfService Plus

Sign on once or enable MFA for multiple applications with a tool that offers the perfect SSO and MFA for Active Directory.
Free Trial Go to website

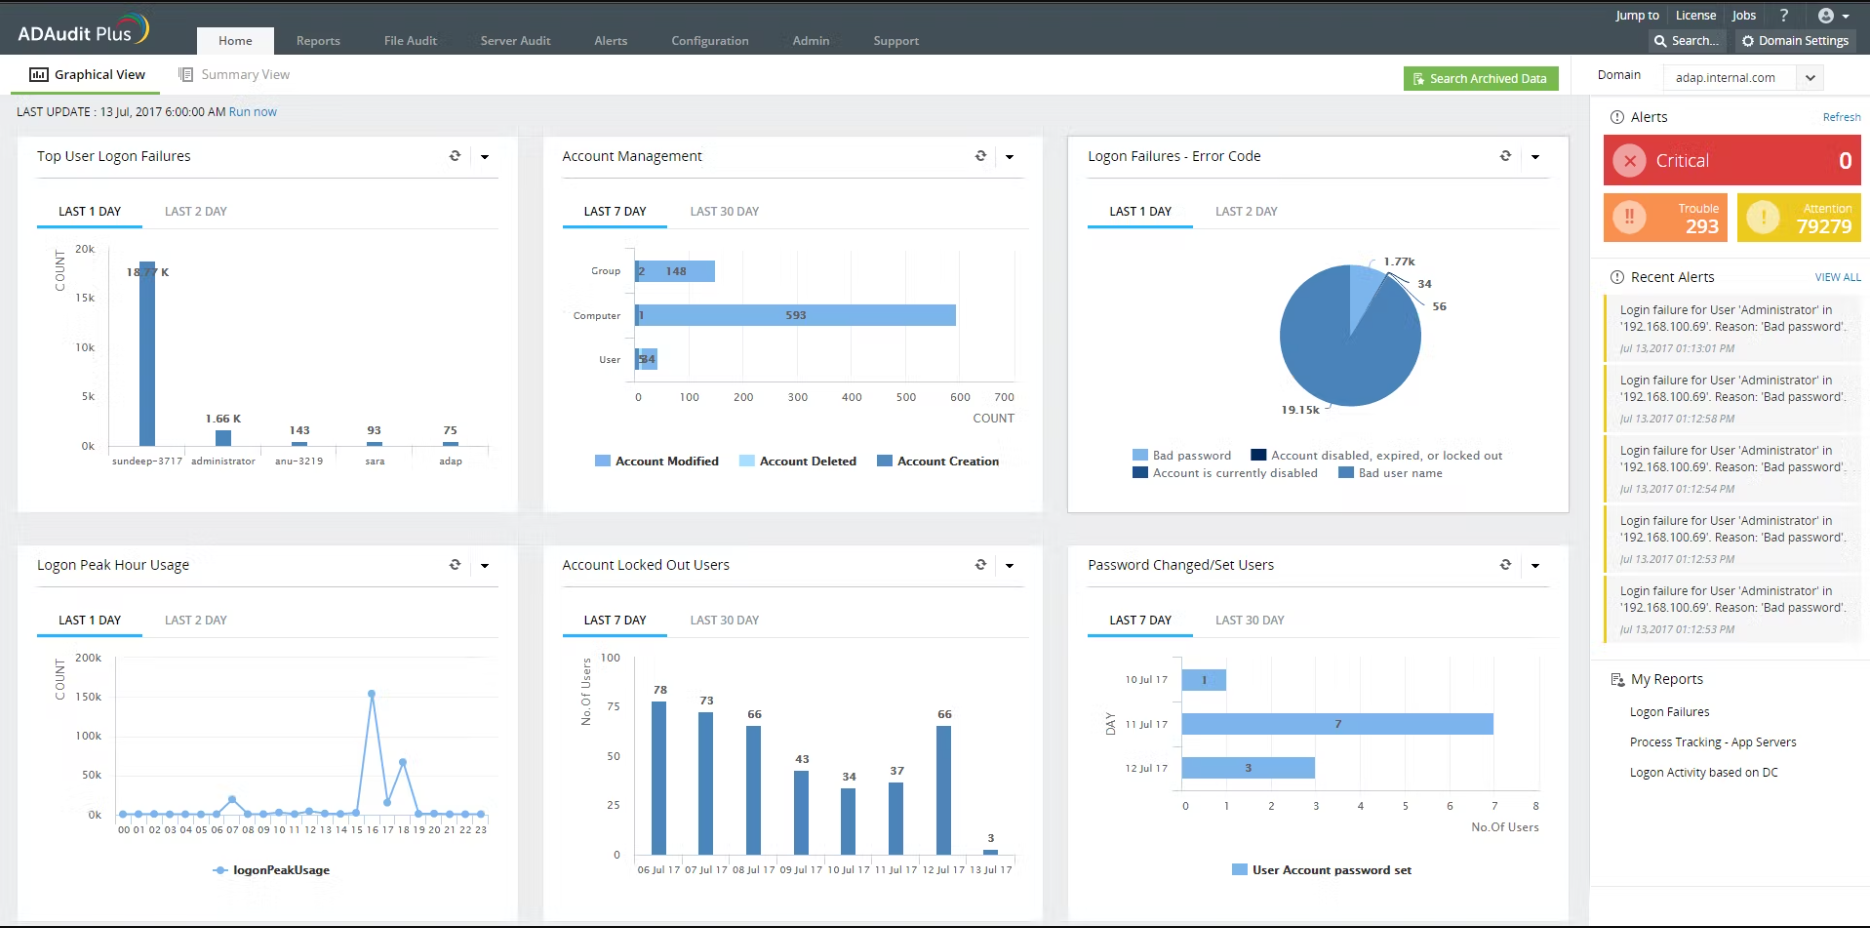
ADAudit Plus – Comprehensive AD tool

ADAudit Plus is a cloud-based tool that allows you to monitor and manage all of your Active Directory users, groups, and computers. It also has the ability to monitor for changes in policies and configurations.

Although you can enable SSO in ADAudit Plus, you have to do it through a third-party access management service such as OneLogin or Okta.

You can use it to identify users whose accounts are configured in a way that makes them vulnerable to phishing attacks.

Other features include:

  • Integration with third-party tools
  • Fulfils most compliance standards
  • Comprehensive search feature

ADAudit Plus

Ensure security and compliance in your network with the best Active Directory auditing tool.
Free trial Visit website

Do I need MFA if I have SSO?

If you have SSO, then you don’t need MFA. This is because when you log in, you are already authenticated before you enter your password. However, the big question is whether SSO is more secure than MFA. While SSO may be ideal in several situations, it is not perfect.

In some cases, it’s not a good fit as it raises some security concerns with SSO. For example, if someone breaks into a company server, they can get all the user credentials. Once they access all the different servers, they become compromised.

If you want to ensure that no one can get access to your account if they steal your password, then you should enable multi-factor authentication (MFA). Further, some reliable password managers will also come in handy if you don’t want to burden yourself with remembering all your passwords.

We have also outlined best practices for your Active Directory account to help you set it up if you’re a beginner.

If you’ve experienced either SSO or MFA on your AD, we’d love to hear your input and which one you prefer between the two. Share your thoughts in the comments section below.

Fix: Taskbar Won’t Hide on Windows 10 [6 Quick Ways]

The Windows Taskbar is a quintessential part of the whole Windows experience. However, many of us are unaware of how to hide or back up the taskbar on Windows 10 to enjoy a distraction-free desktop.

Also, some users are trying to hide the Taskbar on Windows 10, but they cannot do so for some reason. This guide will show you everything you need to take full control of Taskbar easily.

Why can’t I hide the taskbar?

A series of factors can be responsible for the taskbar won’t hide on Windows 10 issue. Below are some of the popular ones:

  • Issues with Windows Explorer: The Windows Explorer process is responsible for many features on PC and can affect your taskbar if it encounters an issue. You need to restart it in the Task Manager to be sure it is working well.
  • Wrong taskbar settings: Sometimes, you might have enabled the auto-hide taskbar feature. To make sure, you should double-check and tweak your taskbar settings accordingly.
  • Outdated PC: An outdated operating system is another possible cause of this issue. Updating your PC to the latest version should fix this effectively.

What can I do if my taskbar won’t hide automatically?

1. Check taskbar settings

  1. Press the Windows key + I and select the Personalisation option.
    personalisation taskbar wont hide windows 10
  2. Click the Taskbar option in the left pane.
  3. Now, toggle the switch for Lock the taskbar backward to disable it.
  4. Finally, toggle the switch for Automatically hide the taskbar in desktop mode forward to enable it.
    enable

The first thing to do if your taskbar won’t hide automatically on Windows 10 is to check if you have enabled the feature. If the feature is already enabled, you can try to disable and enable it again.

2. Restart Windows Explorer

  1. Press the Windows key + X and select Task Manager.
    task manager
  2. Right-click the Windows Explorer process.
  3. Now, click the Restart option.
    restart taskbar wont hide windows 10

Another possible fix if your taskbar won’t hide in fullscreen on Windows 10 is to check if Windows Explorer is not messing with it. After restarting it, you can check if your taskbar is going away.

3. Change notification settings

  1. Press the Windows key, type notifications, and choose Notifications & actions center.
    notification
  2. Toggle the switch for Get notifications from apps and other senders backward to disable it.
    get
  3. Go to the Get notifications from these senders section.
  4. Finally, toggle the switch for the apps there backward to disable them.
    disable

In some cases, app notifications might prevent your taskbar from hiding on Windows 10. You need to disable them in the settings app to ensure your taskbar hides automatically.

Also, if you know the app that keeps sending notifications like Chrome, you can open it and change its notification settings.

Finally, it should be noted that some apps like Spotify that start automatically may also be the cause of this issue. The solution is to click the app icon on your taskbar and minimize the Window.

4. Start and close the Windows search

  1. Press the Windows key + S to launch Windows Search or simply click the search icon on your taskbar.
    seaarch taskbar wont hide windows 10
  2. Now, click any space on your desktop to close Windows Search.
  3. Finally, check if your taskbar is still there.

While this might be a weird solution for the taskbar won’t hide on Windows 10 issue, it has worked for many users. So, you should try it too.

5. Update the PC

  1. Press the Windows key + I and select the Update & Security option.
    update and
  2. Click the Check for updates button.
    check for
  3. Finally, download and install any available updates.

An outdated PC can cause many issues, including the task won’t hide on the Windows 10 problem we are dealing with. The quickest way around this is to download the latest updates and restart your PC.

6. Re-register taskbar

  1. Press the Windows key, type powershell, and select Run as administrator under Windows PowerShell.
    powershell admin
  2. Type the command below and hit Enter: Get-AppXPackage -AllUsers | Foreach {Add-AppxPackage -DisableDevelopmentMode -Register “$($_.InstallLocation)AppXManifest.xml”}reregister taskbar wont hide windows 10
  3. Now, wait for the command to finish running and enable the auto-hide feature again.

If all the solutions above prove futile in fixing the taskbar won’t hide on Windows 10 issue, you need to re-register it. This should restore the taskbar settings to default.

There you have it: everything you need to fix the taskbar won’t hide on Windows 10 issue. You only need to follow the instructions in this guide carefully, and things should be back to normal.

If the taskbar is unresponsive or frozen on your PC, check our dedicated guide to fix that too.

Feel free to let us know the solution that helped you fix this issue in the comments below.

6 Best iOS Emulators for Windows 10 [iPad & iPhone Emulators]

The iOS platform is always stereotyped with the class due to the mind-blowing features, apps, and games that come with it. And everyone wants to enjoy these features provided by Apple Inc.

But that may not be the case for everyone. As you all know, Apple products don’t come cheap.

That being said, there are a good number of iOS apps that people want to enjoy on their Windows 10 or Mac, but most of these apps have not been customized for use on desktops or laptops.

As part of our objective to provide you with solutions and tools that enrich your Windows experience, we will show you how to access the best iOS applications now on a Windows 10 PC.

To do so, you will need to download and install an iOS emulator compatible with Windows 10.

In this article, we will introduce you to the best iOS emulators, which you can use to run your favorite iOS apps and games on Windows 10 PC.

What are the best iOS emulators & simulators for Windows 10?

iPadian iOS Emulator for Windows 10

Best iOS emulators for Windows 10

iPadian iOS emulator is arguably the best iOS emulator for Windows 10. Fans of iPad would really love the iPadian to access iOS apps on their Windows PC since it provides the real iPad interface on Windows.

App icons, gestures, and backgrounds give an untainted iPad experience. iPadian comes with all the popular apps such as Twitter, Facebook, Instagram, YouTube, and many others apps pre-installed.

It also features a customized apps store from where you can access all your iOS apps on Windows. Other features that you find on iPad such as a dashboard, dock, and sidebars are also available on this emulator.

iPadian is the best iOS emulator for playing iOS games on a Windows computer. It can also be used on Linux and Mac OS X systems. Apart from the pre-installed apps, iPadian also comes with pre-installed games.

It’s very easy to use, and you only need to double-click on any application to launch it.

Mirror your iPhone/iPad screen to Windows 10 in just a couple of easy steps. Check out this guide for more info.

How to Download & Install iPadian iOS emulator for PC running Windows 10

Everything you will find on the iPadian emulator is pretty amazing. The emulator is available in two variants; one is free and you have to pay for the other one.

Both work almost the same but of course, with the paid variant, you get more features and functionality. You pay $10 dollar to download the paid version, not very cheap but it allows you to install any iOS app like Snapchat or Whatsapp.

To install the iPadian app, follow the steps below.

  1. Download iPadian from this link.
  2. Open the .exe file once the download is complete.
  3. Follow the on-screen instruction to complete the installation
  4. Restart the app once the installation is complete.

You can also watch the video below for more information.

Air iPhone

Best IOS emulators for Windows

Air iPhone is another great emulator that is a complete package in itself. You can make and receive calls, send voice messages, add contacts and of course download and install iOS apps and games on your Windows 10 computer.

This emulator has been tested under the conditions in which the iPhone operates and checked for its response. Air iPhone is compatible with Windows 7/8.1/10 and XP.

This is the best alternative to iPadian as you can enjoy all iOS apps on your Windows PC without spending an extra buck.

If you want an emulator that replicates the iPhone interface on your PC, then Air iPhone is your best choice. Additionally, developers can also use it to test apps before pushing them into the app store.

If you need to back up your iPhone data on a Windows 10 PC, check out this guide to do it with ease.

How to install Air iPhone emulator for PC

The installation process for the Air iPhone emulator is easy and straightforward.

  • First, download the file and save it on your PC
  • Once the download is complete, double-click to open the .exe file and follow the onscreen instructions.
  • Once installed, launch it, search and download iOS apps on your PC for free.

You can also upload the app you want to test and Air iPhone will allow you to test its functionality for free.

Download Air iPhone emulator from this link.

Please note: because the tool is created with Adobe, you will need to install Adobe Air on your Windows PC. 

Xamarin Testflight

Best iOS emulators for Windows

Xamarin Testflight is quite different compared to the two iOS emulators for PC discussed above. With this one, you will need to create the current iTunes record account. This is not a free app, but if you can, it’s worth every penny.

In terms of developer support, Xamarin Testflight is by far the best iOS emulator for PC. It comes with advanced support and a user-friendly interface for iOS apps.

Apart from offering excellent developer support, it allows you to run all your favorite iOS apps and games on your Windows 10 computer without any interruptions.

Xamarin Testflight is also compatible with all versions of Windows operating system so you are assured it will work no matter the version of Windows you are using.

Follow the link below for a detailed procedure and an amazing tutorial on how to download, install and use the Xamarin Testflight.

Xamarin Testflight Download and Installation tutorial

Transfer any files from your Windows 10 PC to your iPhone with the help of this step-by-step guide.

MobieOne Studio

Best iOS emulators for windows

Just like Xamarin Testflight, this emulator is more than just an ordinary iOS emulator. You can use this emulator to run all your favorite iOS apps and games on your Windows 10 PC.

And if you are a developer, you will love what MobieOne Studio has to offer. First, it resembles the Android SDK used by developers to develop applications for the Android platform.

Looking for some Android emulators? We’ve prepared a complete list for you to check out.

The only downside is that this one is not available for free. However, you can enjoy the first 15 days for free after which you will need to pay in order to continue with the service.

MobieOne Studio offers advanced support to developers. Even if you are not a developer and you wish to develop an app, this emulator will guide you through everything you need to know including the technical stuff.

Not only can you use this tool to develop iOS apps, but Android apps and games as well.

And if you are not a developer, you will still benefit from the emulator as it allows you to download all your favorite iOS apps and games on your Windows PC, so you don’t need to buy an iOS device to access some of those premium iOS apps.

MobieOne Studio also allows you to configure the application on your iPad or iPhone if you have one, build status notifications on your desktop, as well as share the application.

You can also check the status of the download progress of the apps you are downloading as well as customize the icons of the applications in MobiOne Studio.

Having problems with the iPhone AutoPlay on Windows 10? Solve them quickly by following this useful guide.

Additionally, MobieOne Studio is compatible with all versions of the Windows Operating System, Windows 10 included.

Watch the video below on how to download and install MobieOne Studio on Windows.

Smartface

Best iOS emulators for Windows

Smartface enables you to emulate iOS at no cost. It is one of the top-rated iOS emulators for Windows and also allows you to develop unlimited apps free of cost.

Smartface allows you to emulate different iPad and iPhone versions such as iPad mini, iPhone 5, iPhone 6, and more.

Can’t upload photos from your iOS device to Windows 10? Solve the problem easily by following this handy guide.

This program is also a very handy tool for developers and enables them to perform various functions such as adding texts, images, videos, scroll view, a map view, and many other components in the development process.

Smartface has a user-friendly interface and apart from iOS, you can also use it to emulate Android apps. Although it’s mostly used by developers for designing and testing apps, it performs exceptionally well when used to emulate iOS on Windows 10.

Download Smartface from this link

Ripple Emulator

ripple ios emulator windows 10

Ripple emulator is an amazing tool that can help you test your HTML5-based apps. Normally you have to do that using PhoneGap or other similar tools, but Ripple Emulator is a simple Chrome extension that can run many iOS functionalities so you can run the apps.

This tool is great for testing your apps but it cannot be used as a true emulator as it is a bit more sophisticated than the emulators listed above.

You can download it here

If you need an iPad file manager tool for Windows 10, take a look at this list with our best picks.

Wrapping Up!

Due to the existing similarities between an emulator and a simulator, most people find it hard to differentiate between the two. Although both sound the same, there is a variation between them.

An emulator works to replicate the original device. It is designed to run the applications and software of the original device without modifying them.

iOS emulators are normally used by non-iOS users who want to have a taste of the iPhone interface without having to buy the device.

On the other hand, a simulator can set up an environment similar to one of the original device’s operating systems but does not attempt to replicate its hardware. Due to this reason, some applications may not run at all on simulators while others may run differently.

Windows Report has just shown you some cool ways to enjoy iOS apps on your windows computer. Just follow the above instructions and don’t hesitate to let us know if you encounter any problems. Feel free to comment and share.

EDIT: Unfortunately, we’ve made a mistake. All of the presented apps are actually iOS SIMULATORS for Windows 10. So, if you’re looking for an iOS EMULATOR, you won’t find it here. In fact, we’re not sure if there’s any on the market at all. If you’ve heard of a ‘real’ emulator for iOS, please let us know in the comments. We apologize for the misunderstanding once again. 

Fix: Unable to Find & Connect to Proxy Server in Windows 10

If you get the error message Unable to connect to a proxy server in your Windows 10 operating system, you will learn exactly the cause of this issue and how to fix it in the shortest time possible.

The Unable to connect to the proxy server error can be caused by several reasons like installing a third-party proxy program that might malfunction or your antivirus blocking your access to the proxy server.

Unable to connect to proxy server error can prevent you from accessing the Internet, and speaking of proxy issues, users reported the following problems as well:

  • Cannot connect to proxy server (Windows 10) – This is a relatively common problem on Windows 10, and if you experience this issue, you should be able to fix it using one of our solutions.
  • Can’t connect to the proxy server Microsoft Edge – This error can also appear while using Microsoft Edge. If you’re having this problem, be sure to reset your Internet settings to default and check if that helps.
  • Can’t connect to proxy server (Windows 10 WiFi) – Sometimes, this error can occur if you try to use a WiFi connection. If you’re having this problem, try switching to the Ethernet connection and check if that solves the issue.
  • Unable to connect to proxy server Chrome, RocketTab – This error can appear in Chrome, and it’s often caused by the RocketTab add-on. If you have this problem, reset Chrome to default and remove any suspicious applications and extensions.
  • Error proxy server connection failed – This is another common proxy error that can appear on your PC. If you encounter this issue, be sure to try some of our solutions.

Here, we will see how to deal with this and prevent it from happening again.

How can I fix unable to connect to proxy server?

1. Reset Internet options

According to users, this error message can appear due to your Internet settings. This can happen if you manually change your settings, but sometimes other applications can make the changes without your knowledge.

To fix the problem, you need to reset your settings to default by doing the following:

  1. Press Windows Key + S and enter internet options. Select Internet options from the menu.
    Can't connect to the proxy server Microsoft Edge
  2. When the Internet Properties window opens, navigate to the Advanced tab. Now click the Reset button.
    Can't connect to proxy server Windows 10 WiFi
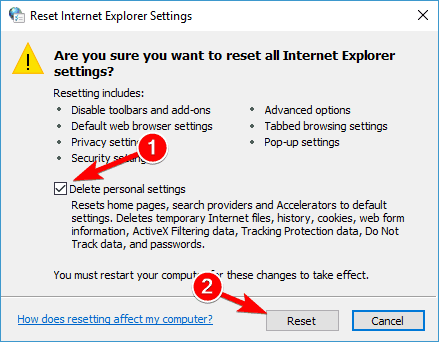
  3. Check Delete personal settings and click the Reset button.
    Unable to connect to proxy server Chrome

After doing that, your Internet settings will be reset to default, and the problem with the proxy server should be resolved.

Resetting Internet options can also help you to fix the ERR_PROXY_CONNECTION_FAILED issue; read this guide to learn more.

2. Disable proxy

If you’re getting Unable to connect to proxy server error message, you might want to try disabling your proxy. This is rather simple, and you can do it by following these steps:

  1. Open Internet Options window.
  2. Go to the Connections tab and click the LAN Settings button.
    Unable to connect to proxy server Chrome
  3. Uncheck Use a proxy server for your LAN option and click on OK to save changes.
    Error proxy server connection failed

You can also disable the proxy by doing the following:

  1. Press Windows Key + I to open the Settings app.
  2. When Settings app opens, go to Network & Internet section.
    Cannot connect to proxy server Windows 10
  3. Select Proxy from the menu on the left. In the right pane, be sure to turn off all options.
    Can't connect to the proxy server Microsoft Edge

Several users reported that this solution only works in Safe Mode, so be sure to enter Safe Mode and try this solution from there.

Once you disable the proxy, the issue should be completely resolved, and you’ll be able to access the Internet without any issues.

3. Use a VPN

VPN is a common solution nowadays for all users who are used to a proxy connection. These services offer you a connection via thousands of different servers all around the world, thus keeping your identity safe.

Changing the IP address and blocking incoming attacks, a VPN tool might become your best friend. The big plus of such a tool is that it is a third-party app and will always work.

In case you cannot connect to a proxy server, we strongly recommend using VPN software that comes with lots of useful features like unblocking streaming, anonymous surfing, anonymous torrenting, and wi-fi protection.

If you want to be sure that your digital print remains untraceable on the internet and you cannot access a proxy server – you should definitely try out one of the VPN software for Windows 10.

ExpressVPN

Improve and secure your internet connection with this professional VPN solution.
Check Price Visit Website

4. Use ipconfig command

If you’re getting Unable to connect to proxy server error message, the problem might be related to your IP address. However, you can fix that problem simply by running a few commands in Command Prompt.

To do that, just follow these steps:

  1. Start Command Prompt as administrator. To do that, just press Windows Key + X to open Win + X menu and choose Command Prompt (Admin). If Command Prompt isn’t available, you can also use PowerShell (Admin).
    Cannot connect to proxy server Windows 10
  2. When Command Prompt starts, run the following commands:
    • ipconfig /release
    • ipconfig /renew

After both commands are executed, close Command Prompt and check if the problem still appears.

As you can see, this is a simple solution and many users reported that this solution worked for them, so feel free to try it out.

5. Reset Chrome settings to default

Many users reported Unable to connect to proxy server error message while using Google Chrome. However, you can easily fix that simply by resetting Chrome’s settings to default.

Keep in mind that this process will disable all extensions and clear your cookies, so you’ll have to enable them manually. To reset Chrome, do the following:

  1. Start Chrome and click the Menu button in the top right corner. Choose Settings from the menu.
    Can't connect to proxy server Windows 10 WiFi
  2. When the Settings tab opens, scroll all the way down and click on Advanced.
    Unable to connect to proxy server RocketTab
  3. Scroll all the way down to the Reset section and click on Reset.
    Error proxy server connection failed
  4. A confirmation dialog will now appear. Click the Reset button to confirm.
  5. Wait for a few moments while Chrome resets to default.

Once the reset process is finished, Chrome will use default settings and the problem should be resolved.

If the issue is resolved, it’s rather likely that you have a malicious extension installed, so you should remove it from Chrome in order to prevent this error from appearing again.

6. Remove any suspicious applications

Sometimes Unable to connect to proxy server error message can appear if you have a malicious application installed on your PC.

Applications such as RocketTab can cause this error to appear, and if you have any unfamiliar applications installed on your PC, be sure to remove them and check if that solves the problem.

In order to fix this problem, it’s required that you completely uninstall the malicious application from your computer. This includes removing all associated files along with their registry entries.

You can remove these files manually, but it’s a lot faster and more straightforward to use uninstaller software to do that. These tools can easily remove any application along with its associated files and registry entries.

If you have a malicious application that you need to remove, be sure to try one of these tools. All of them have a simple and friendly user interface, so you should be able to remove problematic applications without any problems.

Be sure to check out this amazing list with more uninstaller software tools you can use right now.

7. Scan your PC for malware

If you’re getting Unable to connect to proxy server messages, the problem might be a malware infection. Certain malware can interfere with your Internet connection or change your proxy settings without your knowledge.

To fix that, you need to scan your PC for malware. If your current antivirus can’t find anything, you might want to try using a different antivirus application.

If you want to keep your PC clean and safe from malware, we recommend you try one of the highly-rated antiviruses.

After scanning and removing the malware from your PC, the issue should be completely resolved.

8. Modify your registry

Another way to fix Unable to connect to proxy server error is to modify your registry. To do that, you need to follow these steps:

  1. Press Windows Key + R to open the Run dialog. Enter regedit and press Enter or click OK.
    Cannot connect to proxy server Windows 10
  2. When Registry Editor opens, in the left pane navigate to ComputerHKEY_CURRENT_USERSoftwareMicrosoftWindowsCurrentVersionInternet Settings key.
    Can't connect to the proxy server Microsoft Edge
  3. In the right pane, locate ProxyEnable and ProxyServer values and delete them. To do that, simply select the value, right-click it and choose Delete. When the confirmation dialog appears, click on Yes.
    Can't connect to proxy server Windows 10 WiFi

After removing both of these values from your registry, the issue should be resolved. If you don’t have both of these values in your registry, this solution probably won’t work for you.

Remember that modifying your registry can be potentially dangerous, so be extra cautious. If you experience any issues after making these changes, be sure to revert them and recreate deleted values.

Is your internet connection working after you tried the methods above?

If it is, you can go on with your everyday activities. also, if you have further issues, please write us below in the comments section of the page, and we will see what we can do to help you further with the problem.

How to Check NTFS Permissions: 2 Quick Methods to Pick From

IT administrators have a lot of tasks in their hands such as network monitoring, auditing, security, compliance, etc. Another important thing is permissions management. This ensures that proper permissions are set to a file or a folder with users.

You may want to check NTFS permissions to know what permissions are set for which users. Sometimes you may need to elevate the permissions or the other way around.

How can I check NTFS permissions?

1. Use the Permissions for section

  1. Right-click on the file or folder.
  2. Select Properties.
  3. Click on the Security tab.
  4. Under the Permissions for section, you can check out all the permissions you have set for files or folders you are sharing on your network.
  5. Here you can allow or deny the below-mentioned permissions.
    • Full control: Gives users complete permissions to read, write, change, and delete files and subfolders, and change settings for all files and subfolders.
    • Modify: Gives permission to read and write files and subfolders and deletion of the folder.
    • Read & execute: Allows users to view, and run EXE files, including scripts.
    • List folder contents: Lends permission for viewing and listing files and subfolders, executing files, inside the folders.
    • Read: Gives permission to view the folder and subfolder contents.
    • Write: Allows users to add files and subfolders and write to a file.

This gives you information on what permission you will be extending when you share an NTFS file or folder.

2. Use a specialized tool

  1. Login to ManageEngine ADManager Plus.
  2. Click on the AD Reports tab at the top.
  3. Select NTFS reports from the left pane.
  4. Click on Permissions for Folders.
  5. Click on Select beside the Shared resource path.
  6. Select the folder in which you wish to see the permissions.
  7. Hit the Generate button.
  8. You will see the permissions as well as to whom the applied permissions are accessible.
  9. You can click the Advanced button under the Permissions section, then you can see all the permissions that you have set for that particular folder or file.

ManageEngine ADManager Plus tool is a unified active directory and Office 365 management specialized tool. It gives you a plethora of reporting solutions.

Here some of the best features of the ADManager Plus tool include Active Directory management, Active Directory bulk user creation, export of over 150 pre-installed reports of your AD, AD Logon reports, AD Password reports, and single sign-on feature.

The list of features goes on and on. It is basically a well-rounded Active Directory management tool that will help IT admins ease off multiple tasks.

⇒ Get ADManager Plus

What is the difference between NTFS permissions and Share permissions?

Now, many confuse NTFS permissions with Share permissions, but in reality, they both are slightly different. Both serve the same purpose of preventing unauthorized access by employees or third-party to your critical folders in your network.

That’s why you may come across error 0x80070299 when moving files but are unable to.

In simple terms, Share permissions mean that you can allow or deny certain permissions to the files or folders over the network. These permissions won’t apply to users who are accessing the files locally. Moreover, Share permissions do not give you the option to apply permissions to individual subfolders and objects.

On the other hand, NTFS permissions are permissions that are allowed or denied for users accessing the files locally. NTFS permissions, unlike Share permissions, get applied for both network and local users.

That is it from us in this guide. For users who are facing NTFS file system error on their PCs, they can check out our guide that will help you fix the problem.

You can also check out our guide on which format among FAT32 and NTFS is best for system reserved partition.

Feel free to drop in a comment and let us know which one of the above ways you used for checking NTFS permissions.

Fix: Field Browser Doesn’t Contain a Valid Alias Configuration

Web development is a complex process. Sometimes, errors such as Field ‘browser’ doesn’t contain a valid alias configuration resolve as module can appear while developing a new web app.

These types of errors can prevent your web apps from working properly. But there are ways to fix that issue.

What do I do if the Field browser doesn’t contain a valid alias?

1. Check import paths

  1. Check your Webpack configuration.
  2. Locate the following line: import DoISuportIt from 'components/DoISuportIt';
  3. Change it to: import DoISuportIt from './components/DoISuportIt';

2. Check the entry resolve values

  1. Open your configuration file.
  2. Locate the entry value and make sure that the path is correct. Usually, the problems occur due to missing ./ at the beginning of the file name.
  3. Now check the resolve value and make sure that it’s included.

This solution worked for React projects, so feel free to try it out.

Quick tip:

If you’re a web developer, it’s important to ensure that your application works in all web browsers, including Opera. The browser is based on a Chromium engine, so it’s quite similar to Chrome in terms of functionality.

Opera offers a wide array of features, it supports Chrome extensions, and if you haven’t tried it, we suggest that you do so.

Opera

Opera is a powerful Chromium browser, intended for both developers and average users alike.

3. Check the casing

  1. Open the configuration file.
  2. Locate the following line: ./path/pathCoordinate/pathCoordinateForm.component
  3. Change it to: ./path/pathcoordinate/pathCoordinateForm.component

4. Check your aliases

  1. Open your configuration file.
  2. Now locate your aliases and inspect them thoroughly.
  3. Make sure that they aren’t using any names that are already taken.

Users reported Field browser doesn’t contain a valid alias configuration because they used redux as an alias, but after changing it to something else, the issue was resolved.

5. Check for any typos

  1. Open the webpack.config.js file.
  2. Look for any typos, especially related to commands.
  3. Also, make sure that the export command is present.
  4. If not, simply add the following code and save changes to fix that: export default Config;

Several users reported that they used export instead of exports, and that led to this problem. The issue can also appear if you don’t have the export command at the end of the config file.

This error occurs if Webpack isn’t configured properly or if your paths aren’t correct, but after adjusting that, the issue should be gone.

If you use Webpack, we also have a guide on Error occurred while trying to proxy request, so don’t miss it.

How to Get a OneDrive Usage Report: Audit Log Best Practices

Microsoft provides a slew of features for businesses and organizations. One is the OneDrive for business, which is Microsoft’s cloud-based storage solution. It allows companies to store and work on files that authorized people can access. You can share files with others or work on them together in real time.

However, you should have an eye on the OneDrive storage so that it is used efficiently. For this, the OneDrive usage report can come in handy.

Not only it will give you details about the storage, but it will also give you details on who, what, when, and why someone accessed the storage. In this guide, we will show you the best ways to get OneDrive user activity logs report.

What is the OneDrive user activity logs report?

Before we go ahead and look at the different and effective ways of accessing the OneDrive user activity logs report, let us first understand what is a user activity logs report.

Basically, the OneDrive user activity logs report will give you detailed information on when users took different actions to access the files stored in OneDrive. The access could be from a workplace, school, or even home.

It also includes both internal and external users. Internal users are within your Microsoft 365 subscription, whereas external users are those who do not belong within the subscription.

What information is recorded or created in a user activity log report?

Here is the information that is recorded in a OneDrive user activity logs report:

Collaboration activities

  • AccessInvitationAccepted: Records when a user accepts an external user invitation to access a file or folder.
  • AccessInvitationCreated: Record of the instance when a user invites an external user to access a file or folder.
  • AccessInvitationExpired: Captured automatically after 7 days, when an invitation to an external user has not been acted upon.
  • AccessInvitationRevoked: Recorded when a user revokes an external user invitation to a file or folder.
  • AccessInvitationUpdated: The event is recorded when a user updates an existing external user invitation.
  • AccessRequestApproved: Captured when a user approves an internal user to access a file or folder.
  • AccessRequestCreated: Recorded when an internal user requests to access another user’s file or folder for which he or she does not have permission.
  • AccessRequestExpired: Captured automatically after 7 days when there is no action on the access request by the user.
  • AccessRequestRejected: Captured when a user rejects an internal user request to access a file or folder.

File access and management

  • FileCheckedIn: Recorded when a user checks in a file that was previously checked out.
  • FileCheckedOut: The event is recorded when a user checks out a file. This also prevents other users from saving changes.
  • FileCheckedOutDiscarded: Records when a user discards the lock on a previously checked-out file.
  • FileCopied: Details an event when a user creates a copy of a file located in a document library.
  • FileDeleted: Details an event when the user deletes a file from OneDrive for work or school clients.
  • FileDownloaded: Captured when the user downloads a copy of a file to his or her hard drive.
  • FileModified: Captured when a user saves a file or when a file is auto-saved.
  • FileMoved: Recorded when a user moves a file located in the document library into another folder located in the document library.
  • FileRenamed: Records when a user renames a file.
  • FileRestored: Records when a user restores his or her file from the site recycling bin.
  • FileUploaded: This is captured when a user uploads a file to a document library.
  • FileViewed: The event is recorded when a user views a file from Office Online apps. Other views captured capture of other view events will be added during the Beta period.

File Sharing

  • SharedLinkCreated: It is captured when a user creates a View or Edit link.
  • SharedLinkDisabled: It is captured when a user disables a sharing link; in other words, the previously created link will not be accessible anymore.
  • SharingRevoked: It is recorded when a user revokes the sharing permission to a file or folder to a designated user.
  • SharingSet: It is captured when a user creates or updates a permission sharing to a file or folder.

How can I get the OneDrive user activity logs report?

1. Using the admin center

  1. Sign in to Microsoft 365.
  2. Go to the admin center.
  3. Click on Reports at the left pane.
  4. Click on Usage.
  5. You can select Choose Columns to sort data from the report. The different columns that you can add or remove are:
    • URL
    • Deleted
    • Owner
    • Owner principal name
    • Last activity date (UTC)
    • Files
    • Active files
    • Storage used (MB)
  6. Hit the Export button to get the file in CSV format.

2. Use a specialized tool

  1. Download ManageEngine M365 Manager Plus tool.
  2. Install the program.
  3. Launch M365 Manager Plus.
  4. Click on the Reports tab on the top.
  5. Click on Other Services on the left pane.
  6. Select OneDrive for Business Reports.
  7. Click on the OneDrive Usage Reports link button on the right side.
  8. Select any of the listed reports.
  9. Select the Microsoft 365 Tenant for which you want to generate the report.
  10. Choose the time frame of the report from the Period drop-down.
  11. The report will be generated along with a graphical representation for easy understanding.

While you can always use the in-built report generation method available in OneDrive as shown in method 1, the information in that can be viewed for an interval of 7, 30, 90, and 180 days only.

For those who wish to have granular information at hand and want to know the OneDrive usage report for a specific period in a year, then have to make use of the ManageEngine M365 Manager Plus.

You can monitor storage, user activity, file, and other aspects over a given period of time with a graphical representation of the data. You can get 25+ reports for OneDrive for Businesses.

⇒ Get ManageEngine M365 Manager Plus

What are audit log best practices to follow?

Auditing important information will help you assess the risk for each application, user, or system as a whole. While you can make use of feature-rich tools to audit for monitoring, there is some key information that you need to log:

  • User IDs
  • Date and time of log on and log off
  • Successful or failed login attempts to access the services
  • Files and networks accessed during the auspicious time frame
  • Changes made to the system configurations
  • Usage of system utilities and apps
  • Notification or alarms triggered
  • Activation of protection systems

We would suggest you make use of a trusted auditing tool called ManageEngine ADAudit Plus, to get the above and other important information.

It will help you with Windows logon auditing, account lockout analysis with source determination, work hour monitoring, real-time notifications and alerts, ransomware detection, and much more.

ManageEngine ADAudit Plus

Feature-packed auditing and monitoring tool to get you granular information.
Check price Visit website

We have a list of some of the best open-source network monitoring tools, that can help businesses keep a track of logon activities and prevent threats.

For businesses, maintaining a huge data set of credentials is important but centralizing it and managing it can be hard. You can make use of single sign-on tools, for this purpose. And if you are confused about which one to choose, then you can refer to our guide on the best single sign-on tools for businesses.

Feel free to let us know in the comments below, which one of the above solutions you used for getting the OneDrive user activity logs report.

The European Commission readies its formal ‘charge sheet’ of objections to the Microsoft and Activision deal

Microsoft will soon be receiving the European Commission’s formal list of concerns regarding its $68.2 billion dollar bid for Activision Blizzard.

A Reuters report says that “Microsoft is likely to receive an EU antitrust warning,” in the coming weeks. While we have floated concerns mentioned by parties “familiar” with the EU acquisition investigation, there haven’t been any official ones listed until now.

As the EU comes up on its own April 11, 2023 as the deadline for making its decision, it should be sending over its list of objections and concerns to Microsoft soon so that the company has time enough to hammer out the necessary concessions for approval.

For its part, Microsoft continues to preach the same familiar cooperative rhetoric it has for months, ahead of this news that includes, “we’re continuing to work with the European Commission to address any marketplace concerns. Our goal is to bring more games to more people, and this deal will further that goal.”

The EU’s charge sheet comes as the first of the major anti-competitive regulatory bodies Microsoft will need to gain approval to successfully acquire Activision Blizzard, as both the UK’s CMA and the US Federal Trade Commision wait in the wings to issue their own list of objections to the deal.

Perhaps in an attempt to shorten the EU’s charge list of objections, Microsoft has already begun issuing certain concessions and assurances to its competitors in the gaming market.

Sony has been assured by Microsoft that its concern over Activision’s Call of Duty becoming an exclusive bargaining chip will not be a thing as the company has offered to extend a licensing deal for up to 10 more years. Microsoft has also offered to publish the game for the Nintendo platform as well as directly to Steam.

Once the charge list is released, Microsoft’s legal team will have to work rather diligently to meet as many concessions as it can before the April 11, 2023 EU decision deadline to prevent any potential additional delays to their own acquisition timeline.

How to Find the Source of Active Directory Account Lockouts

Auditing the Active Directory is very important as it can help you review the access rights to important decisions and also monitor who is creating a new account. By default, Active Directory does not audit all your security events. We have a complete guide on how to install Active Directory on Windows Server.

One of the most common problems that an admin of the Active Directory face is how to identify the source of frequent account lockouts. Thankfully, in this guide, we will give you a detailed solution on how to find the account lockout source in Active Directory.

How can I find the source of Active Directory account lockouts?

1. Use the Group policy editor

  1. Login to the domain controller with admin privileges.
  2. Press Win + R keys to open the Run dialogue.
  3. Type gpedit.msc and hit Enter.
  4. Expand Computer Configuration.
  5. Select Windows Settings.
  6. Expand Security Settings.
  7. Choose Local Policies.
  8. Click on Audit Policy.
  9. Open Audit process tracking and check the Success and Failure boxes.
  10. Click OK.
  11. Open Audit logon events and check the Success and Failure boxes.
  12. Click OK.
  13. Press the Win key to open the Start menu.
  14. Type Event Viewer and open it.
  15. Search for the Security log for event ID 4625.
  16. You will find the source of Active Directory account lockouts.

2. Use Windows PowerShell

  1. Press the Win key to open the Start menu.
  2. Search for Windows PowerShell and open it as an admin.
  3. Type the below command and press Enter to install the PowerShell Active Directory module. Install-WindowsFeature RSAT-AD-PowerShell
  4. You can verify the installation by running the below command. Get-WindowsFeature -Name RSAT-AD-PowerShell
  5. Run the below command to find the locked-out user account. Search-ADAccount -LockedOut | FT Name,ObjectClass -A
  6. You will see a list of locked accounts.

While this method may seem pretty easy as you only have to run a few commands, this process will only give you a list of names of the accounts that are locked out. It won’t give you the exact reason for the lockout.

For that, we would suggest you check out the below solution.

3. Use a dedicated tool

  1. Download ManageEngine ADAudit Plus.
  2. Install the program on your PC.
  3. Launch the program.
  4. Click on Reports at the top menu bar.
  5. Select Active Directory.
  6. Click on User Management.
  7. Select Account Lockout Analyzer.
  8. Click on Details under the ANALYZER DETAILS section.
  9. You will now see the possible reasons behind each account lockout.

Using the ManageEngine ADAudit Plus tool, not only do you get other benefits, but you also get comprehensive details on how to find account lockout source in Active Directory.

Speaking of other features, you can track down the lockout source faster, improves desk efficiency, and productivity is improved, server downtime is minimized, and get compliance standards such as GDPR, SOX, HIPAA, FISMA, PCI DSS, and GLBA.

Over 10,000+ organizations across the globe are using the services of the ManageEngine ADAudit Plus tool with their Active Directory.

ManageEngine ADAudit Plus

A well-packed and complete Active Directory Auditing and Reporting tool.
Check price Visit website

How to perform account lockout analysis?

Now that you have got your report on the account, analyzing it and getting meaningful information from it is very important.

  1. In the Account Lockout Analyzer, you will who, when and where, and even why of every lockout. It can be exported to formats such as CSV, PDF, XML, and HTML.
  2. Clicking on Details gives you the entire information which would have been pretty tedious when using Event Viewer or PowerShell.
  3. The Recent Logon history of the user is the main area that will help you narrow the source of the account lockout. This section gives you details such as:
    • User name
    • Client IP address
    • Client host name
    • Domain controller
    • Logon time
    • Event type
    • Failure reason
    • Event number

You can also check out our guide on how you can enable Active Directory users and computers in Windows 10 as well as Windows 11.

Feel free to let us know your views on which solution you made use of to answer your query on how to find the account lockout source in Active Directory.

Windows 11 Mouse Click Not Working: How to Easily Fix it

Like any other machine, a computer is bound to encounter issues from time to time. But the best part is that most of these problems can quickly be resolved. So, If the Windows 11 mouse click is not working, here is all you should know.

This is usually intermittent, but working on the PC becomes impossible when it’s there. Most users replace the mouse believing that the issue lies with it, but that’s not always the case.

So, you must follow a systematic approach to fix the Windows 11 not responding to clicks problem quickly.

Why is my mouse not clicking Windows 11?

There are varying causes for this problem. Among them include the following:

  • Hardware malfunction – If your mouse had been showing signs of malfunctioning for some time and the clicks then stopped working, it could be a hardware issue. Mouses are meant to last a certain number of clicks, and once it’s past that, you may start to encounter problems.
  • Wrong settings – If the mouse is new, the problem could be with the configured settings.
  • Driver issues – An outdated driver is also known to trigger various issues, including problems with mouse clicks.
  • OS update issues – Often, running an older version of the OS too can lead to the problem. But, most common of all remain issues with the Windows Explorer process.

Now that you have a basic understanding of the underlying causes, let’s walk you through the fixes for Windows 11 not responding to click errors.

Note icon NOTE
Since you cannot use your mouse, you must use the Tab, arrow keys, and Enter to browse through the menus and select your options. If you have a laptop, feel free to use the touchpad to access the options from this guide.

How can I fix the mouse click not working on Windows 11?

It is essential to do some primary checks before going into complex solutions.

  • First, verify if the connections are in order. Then, you can remove the end plugged into the PC and then replug it, whether it’s a wired or wireless mouse.
  • To be sure, plug your mouse into another computer and check if it works. If it does, it’s likely a software issue and one that can be fixed with the methods listed here.

1. Restart the Windows Explorer process

  1. Press Ctrl + Shift + Esc to launch the Task Manager.Task Manager
  2. Use the arrow buttons on the keyboard to highlight the Windows Explorer process and use the Tab key several times until the Restart option is highlighted, then press Enter.
  3. The taskbar and desktop icons may disappear, and you may notice a momentary flash, indicating that the process has been restarted.

The Windows Explorer process is responsible for several tasks, and if it runs into a problem, you are likely to face Windows 11 not responding to clicks error. If restarting the process does not fix it, head to the following method.

2. Update the mouse driver

  1. Press Windows + X, then use the Up arrow key to select Device Manager in the menu and press Enter to launch the app.
  2. Next, click the Tab key once to get to the menu, use the Down arrow until you highlight Mice and other pointing devices entry, press the Right arrow key to expand the section, use the arrows again to get to the mouse driver, and press Enter.Mice and other pointing devices
  3. Use the Tab key to get to the General menu and use the Right arrow to change the tab to Driver.
  4. Now, use the Tab key again to highlight Update driver and hit Enter.
  5. Finally, select Search automatically for drivers from the options in the Update Drivers window.Search automatically for drivers

After updating your driver, you can also explore practical ways to test automated mouse actions and ensure responsiveness. Learn all the steps in this guide on how to use OP Auto Clicker.

An outdated driver is just as likely to cause Windows 11 not to respond to clicks. And if that’s the case, updating the driver should fix it since, with each new version, various features, performance enhancements, and patches for known bugs are introduced.

Try other methods to update the driver if you cannot install the latest version using the Device Manager.

A more straightforward solution would be to use a reliable third-party app. Then, a dedicated tool such as Fortect Driver Updater will scan all available sources for the updates and install them for the drivers on the system, thereby keeping such errors at bay.

⇒ Get Fortect Driver Updater

3. Run Hardware and Devices troubleshooter

  1. Press Windows + R to launch the Run dialog box, paste the following command in the text field, and either click OK or hit Enter to launch the Hardware and Devices troubleshooter:
    msdt.exe -id DeviceDiagnostic
    Hardware and Devices troubleshooter to fix windows 11 not responding to clicks
  2. Now, follow the on-screen instructions and choose the appropriate response when prompted to complete the troubleshooting process. Use the Tab and arrow keys to navigate through the options.Follow

4. Reconfigure mouse settings

  1. Press Windows + I to launch the Settings app and select Bluetooth & devices from the tabs listed in the navigation pane on the left by using the arrow keys and selecting the option with Enter.Bluetooth and devices
  2. Next, use the Tab key on the keyboard to highlight the Mouse option on the right and select it with Enter.Mouse
  3. Click on the dropdown menu next to the Primary mouse button entry.
  4. Select Left from the menu.
  5. Use Tab to get to Additional mouse settings under Related settings.Additional mouse settings
  6. Make sure the option for Turn on ClickLock is unchecked, and then select OK at the bottom.Disable ClickLock

There are specific settings that, if misconfigured, may affect the proper functioning of mouse clicks. For instance, many users unknowingly set the right click as the primary mouse button and thus cannot select with the left click.

Besides that, the ClickLock feature is also known to cause some user trouble, so make sure it’s disabled. After making these changes, check if the issue of Windows 11 not responding to clicks is fixed.

5. Check for Windows updates

  1. Press Windows + I to launch the Settings app and select the Windows Update tab from the navigation pane on the left by using the Tab key.Windows update
  2. Click on the Check for updates button on the right to scan for any available newer versions of the OS.Check for updates to fix windows 11 not responding to clicks
  3. If any are listed after the scan, select Download & install.Download & install

6. Run the DISM and SFC scan

  1. Press Windows + X and select Windows Terminal (Admin) from the list.
  2. Select Yes in the UAC (User Account Control) prompt that pops up.Click Yes
  3. Now, use Tab to highlight the downward-facing arrow at the top, and select Command Prompt from the list of options. Alternatively, you can hit Ctrl + Shift + 2 to launch Command Prompt in a new tab.Command Prompt to fix windows 11 not responding to clicks
  4. Now, paste the following command and hit Enter to run the DISM tool: Dism /Online /Cleanup-Image /RestoreHealthDISM scan to fix windows 11 not responding to clicks
  5. Once done, execute the following command to run the SFC scan: sfc /scannowSFC scan to fix windows 11 not responding to clicks

Corrupt system files are often found to cause issues, including the Windows 11 not responding to clicks problem. In this case, running the DISM (Deployment Image Servicing and Management) tool and SFC (System File Checker) scan would help replace the corrupt files.

These are all the ways you can fix the Windows 11 mouse click not working problem. If the problem doesn’t resolve by now, it’s time you purchase a new reliable mouse for your computer.

If both the mouse and keyboard are running and not working, learn how to fix it since the problem is different from the one we discussed here.

Besides, find out what to do if you can’t click anything in Windows 10 if you have a PC running the previous iteration.

Please tell us which fix worked for you in the comments section below.

Everything new in Microsoft Viva Goals in 2023: Health Insights feature & more

Last year in May, Microsoft launched Viva Goals in private preview, a module designed to improve clarity, focus, and the ability to bring your goals into the flow of your everyday work. The company later announced its general availability featuring the new goal-setting and management solution.

The module has since received a ton of improvements as well as features all designed to enhance its user experience. And today, Microsoft is announcing the general availability of new features that will build on the objectives and key results (OKR).

Analytics

First up is the new Analytics feature that is now broadly available and designed to provide admins with more insight in regards to the trajectory that the organization is taking, that is, the successes and setbacks. This way it is easier to make elaborate measures that will help mitigate these issues and allow the organization to run at an optimum level.

Multiple Check-in Owners

Next up, is the transition of Viva Goals from single check-in owner to multiple check-in owners. This makes it easier to “build an effective and inclusive check-in rhythm.” Microsoft further added that, “To reach high level team objectives, there may be more than one owner who is responsible for an OKR’s success. The ability to designate more than one check-in owner helps address customer needs of differentiating ownership, particularly for large projects or during times of transition.”

More languages

The module supports 10 Tier 1 languages currently but with the new capabilities it has expanded its reach and now supports 37 languages in total.

Security and data privacy improvements

Microsoft is also laying more emphasis on security and data privacy with new updates as well as Azure Active Directory. This means that admins can control who has access to certain types of data using Conditional Access Policies. “Our identity updates also include AAD identity federation using 3rd party identity solutions OKTA, and Google. ”

EU Data Residency

EU Data Residency for Viva Goals is widely available meaning EU residents can make use of EU-based data centers to store their data. Viva Goals users gained access last year in December, while Ally.io customers transitioning to Viva Goals will access it later this month.

Microsoft Teams integration

Viva Goals OKRs are integrated with Teams more as a fully featured app. This means that, “Users can view OKRs directly assigned to them, pin OKRs for teams they work with, toggle across different departmental OKRs and see notifications in-app for OKR activities. The new dashboard feature in Teams also offers insights for business review or meeting updates, where users can present and author the dashboard content within Teams.”

Microsoft has promised to include OKRs as a tab in Teams that will allow users to check their notifications directly from their feeds as well as share the OKRs directly into Teams chats and channels.

Power BI integration

Microsoft has integrated Viva Goals with Power BI with the aim of leveraging powerful data driven graphics directly within Viva Goals. In turn, users will be able to identify the metric that resonates with them and then visualize the progress of the Key Results automatically.

Planner integration

Viva Goals now integrates with Microsoft Planner, thus making it easier for users to access their progress and helping them stay on track toward their goals. “Microsoft Planner so you can connect your Planner
tasks and plans to update your KRs and projects in Viva Goals automatically.”

Project integration coming

And finally, users should also look out for the Viva Goals and Project integration that should be available in the near future. It will assist the users to keep track of their milestones and “automatically update to show the
latest status of the connected OKRs and projects.”

Do you use Microsoft Viva Goals? Engage us in the comment section!


How to test Python on Windows 11 to make sure that it installs correctly

The first thing you should do after installation is to test Python on Windows 11 to ensure that it is working correctly. There are a couple of ways to do this that this guide will show you.

Test Python on Windows 11 via Terminal

You can test Python on Windows 11 by opening a new Terminal (PowerShell or Command Prompt) window and typing python and pressing Enter. If Python is properly installed, you should see the version number and a prompt to enter a command. This means that Python is installed and working correctly on your system.

test python on windows 11

Test Python using a simple script

Another way to test your python installation is by running a simple script. Open Notepad on Windows 11, create a new text file, name it “test.py” and add the following line of code:

print("Hello, Python!")

Save the file and then go back to the Terminal window from the first step and navigate to the directory where the file is saved. Once you are in the correct directory, type python test.py and press Enter. If everything is working correctly, you should see the message “Hello, Python!” printed in the Terminal.

test python on windows 11

Additionally, you can also test specific modules or packages by installing them using pip and importing them in a script or shell. pip is a package management system for Python that installs different software packages to your machine.

Check the Python Package Index to browse packages you can use. Type pip install <package_name> and press Enter, and pip will install the package. Once it is installed, you can test it by importing it in a script or the Python shell and using the functionality provided by the package.

Once you confirmed that Python is installed and working correctly, you can start learning more about Python by going through the tutorials and documentation available online.

Efficiently download and install Python on Windows 11

Python is a popular programming language that is widely used for web development, data analysis, artificial intelligence, and more. If you’re a Windows 11 user, you can get started once you download and install Python.

Download and install Python

Before you begin, you’ll need to download and install Python from the official website (https://www.python.org/downloads/). Make sure to download the latest version of Python for Windows 11.

download and install python

Once you’ve downloaded the installer, double-click on it to begin the installation process. On the first installer screen, make sure to check the Add Python to PATH option. This will add the Python executable to your system’s PATH, allowing you to run Python from the command line.

Now, click Install Now button to start the installation. The installation process may take a few minutes, depending on your computer’s performance. Once the installation is complete, you’ll see a message indicating that Python has been installed successfully.

download and install python

You’re now ready to start using Python on your Windows 11 machine. To start writing your first Python script, open the Windows 11 Terminal and type python and press Enter to start the Python interpreter. You can then start writing Python code and run it directly within the interpreter.

download and install python

Alternatively, you can also use a text editor to write your Python script and then run it using the Command Prompt. For example, you can use Notepad++ and save the script with a .py file extension, then use the command python ScriptName.py to run it.

Python is a powerful language and offers a wide range of libraries and frameworks for different tasks. With the ability to run on Windows 11, you can now take advantage of Python’s capabilities and start building your own projects in no time.

How to set up Multi-Factor Authentication on RDP

Many are using Remote Desktop Protocol to access remote PCs, and if you want to take your security to a new level, we suggest using multi-factor authentication for RDP.

MFA is extremely useful, and if you’re using VPNs, be sure to check our guide on how to set up MFA for VPN. Setting multi-factor authentication doesn’t have to be difficult; in today’s guide, we will show you the best ways to do it.

How can I set up multi-factor authentication in RDP?

1. Use ADSelfService Plus

  1. Log in to the ADSelfService Plus admin portal.
  2. Next, navigate to Configuration and then choose Multi-factor Authentication. Lastly, pick Authenticators Setup.
  3. Click on Choose the Policy and select the desired one.
  4. Configure the authenticators according to your organization’s needs.
     
  5. Next, head over to Configuration. Choose Multi-factor Authentication and then select MFA for Endpoints.
  6. In the MFA for Machine Login section, check Enable _ factor authentication for machine login. After that, choose the authentication factors that you want to use.
  7. Lastly, select the desired authentication methods and click on Save Settings.

Do not hesitate to give it a try as well!

ManageEngine AdSelfService Plus

Enhance the security of your organization and secure remote sessions with AdSelfService Plus.
Check price Get it now

2. Use Azure Multi-Factor Authentication

Configure the Remote Desktop Gateway

  1. Open RD Gateway Manager, right-click the desired server, and choose Properties.
  2. Head to the RD CAP Store tab and choose Central server running NPS.
  3. Add one or more Azure Multi-Factor Authentication Servers as RADIUS servers. You can do that by entering the server’s IP address.
  4. Lastly, create a shared secret for each server.

Change the timeout policy

  1. Open NPS and head to the RADIUS Clients and Server. Next, select Remote RADIUS Server Groups.
  2. Choose TS GATEWAY SERVER GROUP and go to the Load Balancing tab.
  3. Locate the following settings: Number of seconds without response before request is considered dropped and Number of seconds between requests when server is identified as unavailable. Set them to 30-60 seconds.
  4. Lastly, go to the Authentication/Account tab and check if RADIUS ports match the MFA Server ports.

If you want to exclude a user from MFA on Azure, this guide will come in handy.

Prepare NPS for MFA authentication

  1. Right-click RADIUS Clients and select New.
  2. Now add Azure Multi-Factor Authentication Server as RADIUS client. Choose a Friendly name and specify a shared secret.
  3. Now head to the Policies menu and select Connection Request Policies.
  4. Right-click the TS GATEWAY AUTHORIZATION POLICY and choose Duplicate Policy.
  5. Open the new policy and head to the Conditions tabs.
  6. Add a condition that matches the Client Friendly Name with the Friendly name.
  7. Now head to the Settings tab and choose Authentication.
  8. After that change the Authentication Provider to Authenticate requests on this server.
  9. Lastly, ensure the new policy is set above the original policy in Connection Request Policies. This will prevent loop conditions from occurring.

Configure Azure Multi-Factor Authentication

  1. Open Azure Multi-Factor Authentication Server and select RADIUS.
  2. Now check the Enable RADIUS authentication.
  3. Navigate to the Clients tab and make sure that ports match the ones configured in NPS. After that, click Add.
  4. Add the RD Gateway server IP address, application name, and a shared secret. Keep in mind that the secret needs to be the same on both Azure Multi-Factor Authentication Server and RD Gateway.
  5. Go to the Target tab and select the RADIUS server(s).
  6. Click on Add and enter the IP address, shared secret, and ports of the NPS server.

Setting up multi-factor authentication for RDP can be complicated, depending on your service.

However, some services are more straightforward to configure than others, so use the ones that match your needs. To find suitable software for these needs, we suggest using one of these multi-factor authentication software tools.

What methods do you use for MFA for RDP? Let us know in the comments section below.

What Is & How to Set Up Domain Password Policy

A password policy ensures that a user has created a strong password, which is less prone to cyber-attacks or impossible for hackers to crack down. A Domain Password Policy needs to be set up in the Active Directory to keep all the user accounts safe and secure. Well, there’s more to it.

This guide will explain the domain password policy and how to set it up. There are several aspects to keep in mind when setting up a domain password policy for user accounts, which we will cover right away.

What is the domain password policy?

The Active Directory (AD) is configured with a default domain password policy. This policy defines the password requirements for users’ accounts such as the password length, age, and so on.

So, basically, the complexity of the password is what the domain password policy determines and enforces users to follow the same guidelines.

A domain password policy is an Active Directory feature that forces all users to follow a set security policy to access the domain and its assets. Password policies are associated with the domain and can be tweaked using group policy.

There are six password policies that you can configure:

  • Enforce Password History: This policy prevents users from creating the same passwords or reusing the old ones.
  • Maximum Password Age: It defines the number of days a password can be used before it needs to be renewed.
  • Minimum Password Age: It determines the minimum number of days a password can be used before it needs to be changed.
  • Minimum Password Length: It defines the number of characters a user can use to create a password for their user account.
  • Password Must Meet Complexity Requirements: You can enable or disable this feature and can define the user to create complex passwords based on guidelines.
  • Store Passwords Using Reversible Encryption: Encrypted passwords are stored in the database and cannot be converted into plain text. So, you need to enable this feature to allow decrypting passwords, only for special cases.

How to set up a domain password policy?

1. Use PowerShell

  1. Open the Start menu by pressing the Win key.
  2. Type powershell and open it.
  3. Type the below command and press Enter. Get-ADDefaultDomainPasswordPolicy

2. Use Group Policy Management

  1. Press the Win + R keys to open the Run dialogue.
  2. Type gpmc.msc and press Enter.
  3. Expand Domains.
  4. Expand your domain and then Group Policy Objects.
  5. Right-click the default domain policy and select Edit.
  6. Navigate to the below path. Computer Configuration\Policies\Windows Settings\Security Settings\Account Policies\Password Policy
  7. Double-click on one of the settings on the right side to edit.
    • For example, double-click the Minimum password length option and select 14 characters.

What other tools to use for password settings?

Apart from the default Windows password policies, you can use third-party tools to enhance the level of policies further and customize the Active Directory’s domain password policy, as per your business’s needs.

1. Password Audits

To avoid attacks on large password depositories, you can perform regular password audits to ensure that all your passwords are safe and secure.

For this purpose, we would suggest you make use of ManageEngine’s ADAudit Plus tool. It has a plethora of features among which some of the best are listed below:

  • Continuously audits logon activity.
  • Tracks login failures as well as login history.
  • Receive real-time alerts regarding lockouts.
  • Help find the root cause of lockouts.
  • Monitor employees’ work hours.
  • Insider threat detection and ransomware detection.
  • Get full visibility to AD and GPO changes.

ManageEngine ADAudit Plus

A well-packaged tool for real-time auditing.

2. Password policy enforcement

ManageEngine also offers another third-party tool to help you with the password policy enforcement task. We recommend using the ManageEngine ADSelfService Plus tool.

This package is available for Windows Server, Azure, and AWS platforms. It helps you create a single sign-on portal that enables users to access all of your domain’s apps and services with a single password.

Some of the best features of the ManageEngine ADSelfService Plus tool are:

  • Self-password reset mechanism.
  • Self-account unlocks mechanism.
  • Web-based domain password change.
  • Password policy enforcer.
  • Multi-factor authentication for Windows, Linux, macOS, and cloud apps.
  • Multiple factor authentication for VPNs.
  • Notifies you about password expiration.
  • Manage passwords right from your mobile.
  • Follows security compliances including NIST, HIPAA, and PCI DSS with ADSelfService Plus.

ManageEngine ADSelfService Plus

A secure, trusted, and feature-packed password management program with a policy enforcement feature.
Check price Visit website

With Microsoft Teams, you can also configure it to be HIPAA compliant especially, if you’re dealing with sensitive data.

Feel free to let us know in the comments below if this guide helped you understand the domain password policy and how you can set it up on your PC.

4 Best Group Policy Reporting Tools [2026 List]

Group policy reporting tools are software programs that help organizations manage and monitor the policies and settings for their Windows-based networks.

These tools can be used to monitor and report on the configuration of group policies, including which policies are in effect, which users and computers are affected by them, and how they are configured. Let us now explore some benefits and some of the best available options.

What are the benefits of using group policy reporting tools?

Group policy reporting tools offer several advantages for organizations that use Windows-based networks. Some of the benefits include:

  • Improved visibility into the configuration of group policies, making it easier to identify and troubleshoot issues.
  • Tracking changes to group policies over time can be useful for auditing and compliance purposes.
  • The ability to generate reports on group policies, which can be used to demonstrate compliance with regulatory requirements or to identify areas where policies need to be improved.

With that said, let us highlight some available options.

What group policy reporting tools should I use?

ADManager Plus – Active Directory (AD) management tool

ADManager Plus is not specifically a group policy reporting tool but Active Directory management and reporting software that provides a range of features to manage and report on Active Directory, Group Policy, and other Windows-based services.

It allows IT administrators to manage and report on user and computer accounts, group membership, security settings, and more.

The tool has a built-in reporting feature that allows you to generate predefined and custom reports on Active Directory and Group Policy changes, which can be helpful for auditing and compliance purposes.

It also allows you to manage Group Policy Objects (GPOs) from a single console.

Additionally, it can generate reports on group policies and track changes over time. Still, it does not explicitly focus on Group Policy reporting as its main features like the GP Reports Manager, Policy Reporter, and GPO Migrator.

Some features we like include the following:

  • Reporting
  • Bulk management
  • Delegated administration
  • Active Directory management

ADManager Plus

A unified administration and reporting solution for Active Directory (AD), Skype for Business, Exchange, Office 365, and G Suite.
Free Trial Download

GP Reports Manager – Great for Microsoft Dynamics GP

GP Reports Manager is a tool for Microsoft Dynamics GP (formerly Great Plains) that allows users to manage, schedule, and distribute reports in a centralized and automated way.

It allows users to schedule reports to run at specific times and then distribute them via email or to a network location.

It also provides a web-based report management interface, allowing users to view, edit, and run reports from any web browser.

Additionally, GP Reports Manager includes security features, such as restricting access to specific reports based on user roles and permissions.

Overall, GP Reports Manager is a powerful tool for automating and managing the distribution of reports in an organization that uses Microsoft Dynamics GP.

Some features we like include the following:

  • Automated report generation
  • Access restriction
  • Great web-based report management

⇒ GP Reports Manager

GPO Migrator – Excellent GPO migration features

GPO Migrator is a tool for managing and migrating Group Policy Objects (GPOs) in a Microsoft Active Directory environment.

It allows administrators to view, compare, and migrate GPOs between domains and forests and generate reports on GPO settings and configurations.

With GPO Migrator, administrators can also backup and restore GPOs, and track and manage GPO changes over time.

GPO Migrator also provides a graphical user interface, simplifying managing and migrating GPOs. Additionally, GPO Migrator can be integrated with third-party reporting tools to provide detailed information about GPO settings, configurations, and changes.

GPO Migrator is a valuable tool for managing, migrating, and reporting on GPOs in an Active Directory environment.

Some features we like include the following:

  • GPO to GPO migration
  • Migration from RSOP
  • GPO backup creation

⇒ GPO Migrator

Group Policy Reporting Pak – Robust group policy reporting

Group Policy Reporting Pak is a collection of tools that allows administrators to report on and analyze Group Policy Objects (GPOs) in a Microsoft Active Directory environment.

It provides a variety of reports that can be used to view the settings and configurations of GPOs, as well as track changes over time.

Some reports generated with Group Policy Reporting Pak include GPO settings, GPO links, GPO permissions, GPO WMI filters, and GPO status. Additionally, the tool can produce detailed information about GPO settings, configurations, and changes.

The tool is designed to be easy to use and can be integrated with other reporting tools.

Group Policy Reporting Pak is valuable for gaining insight into GPOs, troubleshooting problems, and managing GPOs in an Active Directory environment.

Some features we like include the following:

  • Group policy environment analysis
  • GPO links, settings, and filter generation
  • Multi-tool integration

⇒ Group Policy Reporting Pak

Ultimately, the best group policy reporting tool for your organization will depend on your specific needs and requirements.

So, it’s recommended to evaluate each of the above-mentioned tools and choose the one that best fits your organization’s needs.

Lastly, let us know which of these tools you are leaning toward in the comments below.

Microsoft news recap: Unlimited paid time off for employees, all Xbox Series X|S consoles to be switched to energy saving mode, and more

Microsoft news recap is a weekly feature highlighting the top Microsoft news stories of the past week. Sit back, grab some coffee, and enjoy the read!

Congress puts a pause on further Microsoft HoloLens headset purchases for the Army

Congress has put a halt to the Army purchasing more Microsoft HoloLens headsets in 2023, after a field test conducted last summer resulted in a unsavoury report.

Ubisoft Plus may be coming to Xbox consoles later this month

It’s been a year since it was announced Ubisoft Plus would come to consoles, and it’s now being reported, based on Xbox titles being tagged ‘free’ on the platform backend, with an industry analyst predicting the service will become available on Xbox before January 25, ahead of Developer_Direct.

Microsoft is set to offer unlimited paid time off

Microsoft has informed its salaried US employees that it will be moving to a “discretionary” time off policy, which essentially allows unlimited paid time off, with employees with accrued vacation days receiving a one-time payout in April.

Microsoft to switch all Xbox Series X|S consoles to energy saver mode

A new report suggests that Microsoft is looking to release a one-time update to Xbox Series X|S consoles that will switch them all to energy saver mode, as part of Microsoft’s sustainability efforts. Users will be able to change the setting as they desire after the update.

That’s it for this week. We will be back next week with more Microsoft news.

7 Best Practices for NTFS Permissions: Keep Your Data Secure

NTFS permissions are a security feature in Windows that allows administrators to control who can access files and folders on an NTFS file system. These permissions work with local and network resources.

They are also essential to securing sensitive data and ensuring compliance with various regulations. This article will discuss seven best practices for configuring NTFS permissions. Hence, it will show you how to keep your data secure and reduce the risk of unauthorized access.

What are NTFS Permissions? 

NTFS permissions or access control entries (ACEs) determine who can access a file or folder and what actions they can perform. 

There are two kinds of NTFS permissions: basic permissions and advanced permissions. Basic permissions include read, write, and execute, while advanced permissions have full control, modify, and read & execute.

There are a few advantages associated with NTFS permissions. These include the following:

  • Granular control – NTFS permissions provide a high level of granularity, allowing administrators to control access to individual files and folders down to the user or group level. This allows for a more secure and efficient use of resources.
  • Inheritance – NTFS permissions can be inherited from parent folders to child objects, simplifying the process of managing permissions and reducing the risk of errors.
  • Auditing – NTFS permissions can be audited, so administrators can track and log changes to permissions. This can help to detect and prevent unauthorized access.
  • Security – NTFS permissions provide an additional layer of security for your files and folders. You can help minimize the risk of unauthorized access and data breaches by controlling your data.
  • Compliance – NTFS permissions can help you meet various compliance requirements, such as HIPAA and PCI-DSS.

Let us now explore some noteworthy best practices.

1. Use a permission management tool

These tools can automate many tasks associated with managing permissions, such as reporting and alerting.

Note that a few tools may help with permissions. ADAudit Plus is one example. This tool can provide detailed visibility into changes made to NTFS permissions, including who made the change, when it was made, and what the change was.

ntfs permissions best practices

It also provides real-time alerts for critical NTFS permission changes and allows you to generate reports on NTFS permission changes.

ADAudit Plus

Great audit tool that offers comprehensive file audit, monitoring, and NTFS permission options.
Free Trial Download

2. Least Privilege

Least Privilege is a best practice when configuring NTFS permissions, which means giving users and groups only the permissions they need to complete their tasks and nothing more.

This principle helps to ensure that users and groups have access to only the resources they need to perform their job functions and that they cannot access sensitive data or perform actions that could harm the system.

By applying the principle of least privilege, you can help to reduce the risk of unauthorized access and data breaches. For example, if a user only needs to read a specific file, they should be given read permission and nothing more.

3. Deny permissions

The Deny permission is a powerful NTFS permission that can override any Allow permissions. While it can be helpful in certain situations, it is important to use it sparingly and with caution, as it can also lead to confusion and errors.

The Deny permission is used to explicitly prevent a user or group from accessing a specific file or folder, regardless of any Allow permissions granted.

It’s important to note that the Deny permission takes precedence over any Allow permission, which means that if both Allow and Deny permissions have been assigned to a user or group, the Deny permission will take precedence, and the user or group will be denied access.

4. Use groups

Using groups as an NTFS permissions best practice is a method of managing permissions that can make it easier and reduce the risk of errors.

ntfs permissions best practices

Instead of granting permissions to individual users, groups manage permissions. By assigning permissions to groups, you can simplify the process of managing permissions and make it more efficient.

When using groups, assigning users to the appropriate groups is essential based on their roles and responsibilities. This ensures that the user only has access to the resources they need to perform their job function and nothing more.

5. Remove unused permissions

Removing unused permissions is a best practice when working with NTFS (New Technology File System) permissions.

NTFS permissions control access to files and folders on an NTFS-formatted drive. These permissions can apply to individual files and folders and entire drives.

By removing unused permissions, you can ensure that only authorized users can access sensitive data and eliminate potential security vulnerabilities.

6. Test permissions

By testing permissions, you can ensure that the permissions you have set up are working as intended and that only authorized users can access sensitive data.

This is important because if a user has permissions that they should not have, they may be able to access sensitive data or perform actions that could compromise the system’s security.

Additionally, by testing permissions, you can identify and resolve any issues with permissions that may be causing problems for users or administrators.

7. Document permissions

NTFS permissions control access to files and folders on an NTFS-formatted drive and can be complex to manage and understand.

By documenting permissions, you can ensure that your permissions are understandable. Also, you can identify any potential issues or changes and address them quickly.

This is important because if permissions are not well-documented, troubleshooting and resolving issues or making future permissions changes can be challenging.

Additionally, documentation can help with compliance and auditing requirements.

By following these best practices, you can ensure that your NTFS permissions configuration is correct. Hence, your data is secure.

Remember, NTFS permissions are a critical aspect of securing your data. So, it is essential to take the time to configure and manage them properly.

5 Best Group Policy Management Tools [2026 List]

Group policy management tools help administrators manage and enforce Group Policy Objects (GPOs) across their Windows-based networks. GPOs are collections of settings for configuring and securing servers, workstations, and users within an organization.

These tools provide a central location for managing and reporting on GPOs, making it easy to ensure consistent and secure system configuration. So, let us get into it.

What is a group policy management tool and what are its effects?

A group policy management tool allows IT professionals to manage GPOs from a central location. These tools provide an interface for creating, editing, linking GPOs, and enforcing settings across an organization’s network.

There are several advantages to using group policy management tools for managing GPOs on a Windows-based network; some of them are:

  • Centralized management – Group policy management tools provide a central location for creating, editing, and linking GPOs. Hence it is easy to ensure proper system configuration.
  • Automation – These tools automate the configuring and enforcing GPOs, saving IT professionals time and resources.
  • Improved security – By using group policy management tools, organizations can improve security by enforcing consistent and secure settings across their networks.
  • Better reporting – Group policy management tools provide reporting and auditing capabilities. This is useful to track changes to GPOs as well as ensure compliance with internal policies and external regulations.
  • Better scalability – Group policy management tools make it easy to scale GPOs to large networks with many systems, users, and locations.

So, let us now explore some of our favorite group policy management tools.

What tools should I use to manage group policy?

AD Manager Plus – Web-based Active Directory management

AD Manager Plus is a web-based Active Directory management and reporting tool that provides several features for managing and automating various aspects of Active Directory and other related Microsoft technologies, such as Exchange and Office 365.

However, even though you could achieve some level of group management, it does not have a specific feature or module for Group Policy management.

Also, it can do various AD management tasks like creating and managing users, groups, and computers. Additionally, you can use it to manage passwords, group membership, and other attributes.

Furthermore, it is excellent for providing detailed reports on Active Directory and other Microsoft services.

So, it is not a Group Policy management tool that focuses specifically on the management and administration of Group Policy Objects (GPOs). Still, it can do some related management tasks like managing the users or groups for which GPO applies.

Some features we love:

  • Active Directory management
  • Reporting
  • Bulk management
  • Delegated administration

AD Manager Plus

An integrated tool for AD (Active Directory), Skype for Business, Exchange, Office 365, and G Suite management and reporting.
Free Trial Download

ADAudit Plus – Robust GP configuration reporting

ManageEngine Group Policy Auditor (ADAudit Plus) is a software tool used to audit and report on the configuration of Group Policy objects (GPOs) in a Windows Active Directory environment.

It helps IT administrators understand and monitor the GPOs applied to their networks. Also, it detects any issues or inconsistencies that might affect the organization’s security or compliance.

Furthermore, the software allows IT administrators to audit GPO changes, access history, and track who made changes, when, and where.

Additionally, they can monitor GPO links and inheritance, identify and report on GPO conflicts, get alerts for critical GPO changes, and generate GPO configuration reports.

So, it can be considered a group policy management tool, focusing on auditing and reporting instead of modifying and managing the GPOs themselves.

Some features we love:

  • Compliance reporting
  • Alerting and notifications
  • Delegated auditing
  • Historical reporting

ADAudit Plus

Great audit tool that offers comprehensive file audit and monitoring.
Free Trial Download

Microsoft Group Policy Management Console – Great for Windows

Microsoft Group Policy Management Console (GPMC) is a group management tool for Windows-based networks.

It is a built-in tool provided with Windows Server that allows administrators to manage Group Policy Objects (GPOs) on their networks.

GPMC provides an easy-to-use interface for creating, editing, and linking GPOs and enforcing settings across an organization’s network. It also provides reporting and auditing capabilities, tracking changes to GPOs and ensuring compliance with internal policies and external regulations.

Additionally, it provides an interface to create and modify GPOs, and to manage the applications of GPOs to computers and users in Active Directory domains.

Furthermore, you can perform various management tasks, like creating and editing GPOs or linking GPOs to sites, domains, and OUs.

You can also manage the GPO settings, including security filtering and WMI filtering, GPO backups and restore, and much more.

Lastly, GPMC is part of the Remote Server Administration Tools (RSAT) and needs to be installed separately in case it’s not present by default on a server.

Some features we love:

  • Centralized management
  • Linked Group Policy Objects (GPOs)
  • Versioning
  • Security filtering

⇒ Get Microsoft Group Policy Management Console

PolicyPak – Windows-based policy management

Firstly, PolicyPak is a software product that helps IT professionals manage group policy settings for Windows-based computers and servers.

It is designed to extend the functionality of the Group Policy feature built into Windows and provide a more robust and flexible way to manage policy settings for end-user devices.

Also, PolicyPak can configure settings for a wide range of Windows-based applications and services, including Internet Explorer, Chrome, Firefox, and Microsoft Office.

Additionally, it provides a way to centrally manage settings for third-party applications that Group Policy may not natively support.

Some features we love:

  • Application security services
  • Email security services
  • Data security services
  • Incident response services

⇒ Get PolicyPak

Netwrix GPO Reporter – Excellent for the Windows AD environment

Netwrix GPO Reporter is a software tool used to audit and report on Group Policy objects (GPOs) configuration in a Windows Active Directory environment.

It is a tool that helps IT professionals and administrators to audit, report and analyze Group Policy Objects (GPOs) configurations and changes.

The tool can also track GPO changes and access history, identify and report on GPO conflicts, and generate GPO configuration reports.

Additionally, you will be able to identify GPOs with no links or orphaned GPOs and schedule and automate reports.

Furthermore, it is similar to ManageEngine Group Policy Auditor, which focuses on auditing and reporting on GPOs rather than managing and modifying them.

Lastly, it gives IT professionals insight into the Group Policy changes, which could be helpful for compliance and security purposes.

Some features we love:

  • GPO change auditing
  • GPO conflict detection
  • Seamless GPO reporting
  • Automated report scheduling

⇒ Get Netwrix GPO Reporter

Ultimately, your organization’s best group policy management tool will depend on your specific needs and requirements.

Hence, by evaluating the features and capabilities of different tools and testing them in your environment, you can select the one that best meets your needs.

Lastly, comment below and tell us your favorite GP management tool.

How to Normalize Volume in Windows 11: 3 Easy Ways

Volume normalization in Windows 11 is a digital audio processing technique compensating for the differences in audio volumes across different devices. In simple terms, it ensures that the loudest parts of your music are always at the same level.

If you’ve ever experienced a significant audio difference or the volume is too low, this feature can help balance it. In this article, we look at how you can achieve that balance.

Why do I need to normalize volume in Windows?

Volume normalization in Windows 11 may seem like an unnecessary process. But it’s important to ensure everyone can hear what you’re saying and understand what you’re saying. Other benefits include:

  • Consistent sound levels – Normalizing sound in Windows ensures the audio levels are within a specific range. 
  • Avoid sound spikes – Normalization allows you to define the levels of your audio files. This ensures that there are no gaps or spikes in the volume.
  • Prevent sound distortion – If you experience sound cackling or distortion in Windows 11, this feature allows you to hear everything clearly. You don’t have to worry about how loud each application or program is playing.
  • Improve sound – If you have a high-quality microphone and low-quality headphones, normalizing can help you improve both inputs.
  • Aids people with hearing problems – It makes it easier for people with hearing problems without their hearing damage being exacerbated by software changes made during normalization.
  • Prevents ear damage – When you have multiple audio streams playing with distinct sound levels, it is easy to forget the recommended volume level, especially when using headphones. Over time, this can cause hearing impairment.

How do I normalize audio in Windows 11?

Before you embark on any sound normalization, ensure you do the following:

  • Ensure you have updated your sound drivers to the latest version. If not, here’s how to get the best audio driver.
  • If you use speakers or headphones, check whether they are plugged in correctly and properly.
  • Check and test your microphone to ensure it is working.

1. Use Settings

  1. Hit the Windows key and click on Settings.settings windows 11
  2. Click on System on the left pane then select Sound on the right pane.
  3. Navigate to the Output section and click on your sound device.
  4. Scroll down and select More sound settings.
  5. In the Sound dialog box that pops up, under the Playback tab, click again on your sound device then select Properties at the bottom.
  6. Navigate to the Enhancements tab and check the Loudness Equalization box.
  7. Click Apply then OK to save changes.

2. Use the Control Panel

  1. Hit the Windows key, type Control Panel in the search bar and click Open.
  2. Click on Hardware and Sound.going hardware and sound control panel win11
  3. Navigate to Sound.
  4. In the Sound dialog box that pops up, under the Playback tab, click on your sound device then select Properties at the bottom.
  5. Navigate to the Enhancements tab and check the Loudness Equalization box.
  6. Click Apply then OK to save changes.

It is important to note that at times, the Windows 11 loudness equalization feature may be missing from your PC. An easy workaround would be to update your sound card drivers.

3. Use third-party software

If you want more control over your sound output, use a third-party app. Several tools can be used to create custom sound settings for your Windows 11.

Some tend to be quite expensive or require some technical background knowledge. But others are free and very easy to customize your volume levels. To that effect, we have an expert recommendation of the best audio equalization software.

Does volume normalization affect sound quality?

Volume normalization is a signal processing technique that attempts to bring the loudest and quietest parts of an audio stream into balance. It does not affect sound quality in any way. If you’re looking for a way to enhance the sound, you’re better off installing audio enhancers.

However, when it comes to listening to some specific aspects, say high-pitch vocals or instruments that are meant to be a little bit quiet, volume normalization may not be for you.

This is because it removes all volume differences across channels. It can make it challenging to preserve crucial characteristics when using this technique. You may have to disable this feature if you want to retain some particular characteristic in each track.

Also, if you’re looking to optimize your sound while gaming, be sure to check out the best gaming equalizer settings that guarantee you an enhanced experience.

You may also benefit from volume mixer alternatives that have volume equalizer options for sound normalization. It can also be simply to get more control over your sound.

Let us know if you spot any difference when you normalize the volume in Windows 11 and when it’s off.

Best Windows Settings for Maximum Crypto Mining Performance

Cryptocurrency mining is the process by which new coins are created and added to the circulating supply. If you’re new to crypto mining, you’ll benefit from our recommendation of the best cryptocurrency mining PCs. 

This process requires your computer’s processing power to solve complex mathematical problems that verify transactions on a blockchain network. As such, it is important that you optimize your Windows settings to get the most out of this process.

What factors impact mining performance?

The biggest factor that affects the performance of a computer is its hardware configuration. This includes CPU, GPU, and RAM. However, other factors that also play a vital role include:

Hardware requirements

  • Powerful GPU – When you have a powerful GPU, the faster it will be able to mine cryptocurrencies.
  • Motherboard – To maximize your mining performance, you want a motherboard that has an optimal balance between power efficiency and maximum throughput when mining cryptocurrency.
  • CPU – The more cores your CPU has, the better it will perform in terms of hash rate. 
  • Hard drive space – If you’re planning on mining multiple different coins at once — or if you want to store large amounts of data — then having enough hard drive space is absolutely essential. 

Software requirements

  • Operating System – The operating system you are using can have a significant impact on how fast your computer will be able to mine crypto coins.
  • Mining software – If your mining software doesn’t meet your hardware requirements, it can be problematic due to compatibility issues. 

Other requirements

  • Network configuration – You need enough bandwidth for all of your programs, such as the operating system and software updates, as well as for the additional software that you are running.
  • Power Supply Unit –  It is also important for miners to get an efficient PSU because it can help improve the performance of their mining rig overall. You can use PSU test software to ensure it’s within the recommended limits.

What Windows settings guarantee the best crypto mining performance?

Before you move to tweak any settings, ensure the following are in place:

  • Ensure your PC fan is working normally and get a CPU cooler if necessary.
  • Check your GPU temperature and ensure it is not overheating.
  • Ensure you’re running the latest version of Windows.

1. Adjust your graphic settings

  1. Press Windows + I to open Settings.settings windows 11
  2. Click on System on the left pane then select Display.System - Display- Photoshop not using GPU
  3. Under Related settings, click on Graphics.
  4. Select your crypto mining software from the list, and click on Options.
  5. Now, choose High Performance and click Save.

2. Tweak your Power plan settings

  1. Hit the Windows key and click on Settings.settings windows 11
  2. Select System on the left plane then Power on the right pane.
  3. Click on the drop-down menu next to Power mode and select Best performance.
  4. Restart your PC.

3. Increase Virtual Memory

  1. Hit the Start Menu icon and click on Settings.settings windows 11
  2. Click on System and select Advanced system settings.
  3. Navigate to the Advanced tab in the System Properties window that pops up.
  4. Select the Advanced tab in the Performance Options window that appears.
  5. Uncheck Automatically manage paging file size for all drives.
  6. Select the drive you wish to increase virtual memory, check Custom size box and enter a maximum number then press OK.

How can I ensure I get maximum performance for crypto mining?

As the crypto mining industry expands and improves, so does the competition for mining hardware. This means that mining difficulty is going up faster than ever before. It’s no longer enough just to have fast hardware — you also need to make sure it’s performing optimally.

  • Monitor your hardware – You can use PC monitoring tools to get an overview of your system’s performance.
  • Get more RAM – The more RAM you buy for your machine, the faster it will run at maximum capacity.
  • Up-to-date OS – Always keep your operating system updated to get the best performance.
  • Update drivers – Make sure that your drivers are up-to-date and that the BIOS settings are optimized for mining when possible.
  • Limit background processes – Minimize unnecessary background processes when running crypto miners.
  • Maintain CPU and GPU temperatures – CPU and GPU monitoring software will keep your system healthy and speedy.
  • Turn off your antivirus software – Some antiviruses can interfere with bitcoin mining software and cause errors or crashes.
  • Overclock your GPU – Try overclocking software for your graphics card in order to increase its hashing capabilities further. 

To ensure you carry out the mining process efficiently and securely, you will need VPNs for crypto trading, and we have an awesome recommendation for the best in the game.

Further, for better management of your resources, crypto-currency price apps will come in handy to keep tabs on real-time market changes.

That’s all we had for this article. Be sure to keep the conversation going in the comment section below on any other settings that have improved your crypto mining performance process.

The Filename or Extension Is too Long? Here’s a Fix

System errors can occur sooner or later, and many users reported having an ERROR_FILENAME_EXCED_RANGE error It’s often followed by the filename or extension is too long error message.

What to do if the filename or extension is too long?

1. Create a Network Drive

  1. Locate the folder that contains the problematic file and right-click it. Choose Share with > Specific people from the menu.
  2. Select the user or a group that you want to share your file with and click on the Share button. For security reasons, it’s probably best to select your user name.

You can also temporarily fix this problem by creating a network drive. Before you can use this solution, you need to share your folder. This is relatively simple, and you can do it by following the above.

Once the folder is shared, you need to create a network drive. This is relatively simple, and you can do it by following these steps:

  1. Open This PC. Click the Computer tab and choose the Map network drive option.
  2. Select the desired drive letter and folder path. Be sure to uncheck Reconnect at sign-in option and click the Finish button.
  3. Once you’re done, you’ll see a new drive available and can use it to access the problematic files.

2. Add those files to an archive

You can archive files without third-party tools; to do that, you need to right-click the file or folder you want to archive and choose the Add to archive option.

Several users also recommend using the 7-zip tool to fix this problem. According to them, you can use this application to create a zip archive, but you can also use it to remove problematic files from your PC.

3. Use Command Prompt

  1. Press the Windows key, type cmd, and click Run as administrator under Command Prompt.
    cmd admin the filename or extension is too long
  2. Once the Command Prompt opens, type the command below and hit Enter: subst X: "C:Path_to_the_problematic_file"problematic
  3. After the command is executed, you should be able to access X: drive and all the problematic files.

4. Use Long Path Fixer

Several users reported that you can easily fix this problem using Long Path Fixer. This is a freeware application, and it will allow you to rename, copy or delete problematic files.

In addition, you can try using tools such as Long Path Eraser Free or Ant Renamer. All these tools are free, and you can use them to rename problematic files or folders and get access to them.

5. Use Command Prompt to rename files or folders

5.1. Show hidden files

  1. Open File Explorer.
  2. Click the View tab and check File name extensions and Hidden items. By doing so, you’ll reveal all hidden files and extensions.

Before you can rename your files, you need to reveal hidden files, folders, and extensions. You can do that with ease by following the steps above.

5.2. Rename the file

  1. Start Command Prompt as administrator.
  2. Once the Command Prompt starts, type the command below and hit Enter: REN "C:\Path_to_the_problematic_file\ProblematicFile.txt" "File2.txt"file 2

Remember to enter the correct path to the problematic file and the file extension. We used ProblematicFile.txt as an example, so replace it with the actual file name giving you this error.

If you have multiple files that you can’t access, you might want to try changing the name of the folder. To do that, do the following:

  1. Open Command Prompt as administrator.
  2. When Command Prompt opens, type the command below and hit Enter: REN "C:\Path_to_the_problematic_folder" "New Folder Name"new folder
  3. Be sure to select the folder that has the longest name and rename it to make it shorter.
  4. After renaming the folder, you should be able to access the problematic files without any problems.

The filename or extension is too long error message can prevent you from accessing your files or folders due to their long path, but you can circumvent this problem by renaming them.

This is a bit advanced solution, so it might not be suitable for basic users. If you’re unfamiliar with Command Prompt, it might take a few tries to rename your files or folders properly.

6. Make changes to Group Policy

  1. Pressthe Windows key + R, type gpedit.msc, and click the OK button.
  2. Once Group Policy Editor starts, in the left pane, navigate to Local Computer Policy > Computer Configuration > Administrative Templates > System > Filesystem. Now locate Enable NTFS long paths in the right pane and double-click it.
  3. Select the Enabled option and click on Apply and OK to save changes.
  4. Close Group Policy Editor, restart your PC, and check if the problem is resolved.

According to users, Windows 10 brought some improvements related to path character limits. In previous versions of Windows, users were limited to 260 characters for paths, but this limitation can be lifted in Windows 10.

If you can’t access Group Policy Editor on your version of Windows, you can also remove this limitation by using Registry Editor. To do that, follow these steps:

  1. Press the Windows key + R, type regedit, and click OK.
  2. When Registry Editor opens, navigate to the path below in the left pane: HKEY_LOCAL_MACHINE\SYSTEM\CurrentControlSet\Control\FileSystem
  3. In the right pane, locate and double-click LongPathsEnabled DWORD. If this key isn’t available, you’ll need to create it manually.
  4. To do that, right-click the space in the right pane and choose New > DWORD (32-bit) Value. Enter LongPathsEnabled as the name of the new DWORD and double-click it to open its properties.
  5. Once the Properties window opens, set the Value data to 1 and click OK to save changes.
  6. Close Registry Editor and restart your PC.

If you don’t want to edit your registry manually, you can use this zip file and the files inside to apply changes instantly.

Simply run the Remove 260 Character Path Limit.reg file from the archive to remove file path limitations. You can also run the other file from the archive to enable the limitation again.

Irrespective of your chosen method, enabling this option will allow you to access any file path without issues, so try this solution out.

The filename or extension is too long message and ERROR_FILENAME_EXCED_RANGE error can appear on any PC, but you should be able to fix them easily by using one of the solutions from our article.

If you can’t delete a file on your PC, check our detailed guide to rectify the issue quickly.

Feel free to let us know the solution that helped you fix this issue in the comments below.

What is Active Directory Account Lockout and How to Prevent It

Active Directory (AD) is a centralized database that stores information about users, computers, and other resources in a Windows network. 

A critical feature of AD is the ability to lock out accounts after a certain number of failed login attempts. This is known as Active Directory account lockout.

When an AD account is locked out, the user cannot log in to the network until the account is unlocked. This is a security measure to prevent unauthorized access to the network and protect sensitive information.

What causes an Active Directory account to lockout?

There are several reasons why an AD account may be locked out, including:

  • Incorrect login credentials – One of the most common causes of account lockout is incorrect login credentials, such as a wrong password or username.
  • Stale credentials – If a user’s password has expired or been changed, but their device or application is still using the old credentials; this can cause the account to lock out.
  • Account lockout threshold – AD has a built-in feature that locks out an account after a certain number of failed login attempts. This is known as the account lockout threshold.
  • Cached credentials – A device or application may cache login credentials. Hence, causing the account to lockout if the cached credentials are incorrect or have been changed.
  • Brute-force attacks – A brute-force attack is a type of cyber attack where an attacker repeatedly tries different login credentials to gain access to an account. If an account lockout threshold is not in place, this type of attack can cause an AD account to lock out.
  • Synchronization issue – Some accounts may lock out if there is an issue with the synchronization between domain controllers, causing a mismatch of account status.

How can I prevent AD account lockout?

1. Monitor suspicious activity

Monitoring suspicious activity can prevent active directory lockout by promptly identifying and addressing potential security threats.

This can include monitoring for unusual login attempts, such as multiple failed login attempts from the same IP address or login attempts from unusual geographic locations.

By monitoring for suspicious activity, security administrators can quickly detect and respond to potential security threats, such as a brute force attack on the active directory.

This can help to prevent unauthorized access to the active directory and protect against lockout caused by incorrect login attempts.

Lastly, good tools like ADAudit Plus make monitoring easy and more manageable.

ADAudit Plus

Great audit tool that offers comprehensive file audit and monitoring.
Free Trial Download

2. Keep your AD environment updated

Updating your Active Directory (AD) environment can prevent active directory lockout. It ensures that all systems and components within the environment are running the latest security patches and updates.

Also, this can help to address any known vulnerabilities that unauthorized individuals could exploit to gain access to the active directory or cause a lockout.

By keeping the AD environment updated, you can ensure that all systems and components are running the latest security patches. This can reduce the risk of unauthorized access and protect against lockout caused by exploiting known vulnerabilities.

Additionally, updating the AD environment can also improve the overall performance and stability of the environment.

lastly, we recommend using AD management tools to make this process easy and quick. Our top recommendation is ADManager Plus.

ADManager Plus

An integrated tool for AD (Active Directory), Skype for Business, Exchange, Office 365, and G Suite management and reporting.
Free Trial Download

3. Use a strong password

A strong password can prevent active directory lockout by making it difficult for unauthorized individuals to guess or crack the password through brute force.

This helps to ensure that only authorized users can access the active directory, reducing the risk of lockout due to incorrect login attempts.

Additionally, multi-factor authentication or other security measures can further strengthen the active directory’s security and help prevent lockout.

4. Use a strong password policy

A strong password policy can prevent active directory lockout by setting guidelines and requirements for creating and managing passwords within the active directory.

This can include requirements such as minimum length, complexity, and regular updates. Hence, enforcing these guidelines makes it more difficult for unauthorized individuals to guess or crack passwords.

So, it is less likely that users will choose weak or easily guessed passwords.

Additionally, regular updates of passwords can further prevent unauthorized access, even if a password is compromised.

5. Enable account lockout threshold

Enabling an account lockout threshold can prevent active directory lockout by limiting the number of incorrect login attempts a user can make before their account is locked. This can help to prevent unauthorized individuals from guessing or cracking a password through brute force methods.

When an account lockout threshold is set, after a certain number of failed login attempts (usually between 3 to 5), the account will be locked, and the user will not be able to log in until the account is unlocked.

This helps to prevent unauthorized access to the active directory and protect against lockout caused by incorrect login attempts.

Additionally, setting an account lockout threshold can also help prevent account lockout caused by users accidentally mistyping their password, as they can try again without getting locked out.

In conclusion, Active Directory account lockout is a security feature that helps protect against unauthorized access to the network.

By understanding the causes of account lockout and implementing preventative measures, organizations can reduce the risk of account lockout and protect sensitive information.

How to Fix You Need Permission to Perform This Action Error

In Windows 10, like in any other version of Windows, you might notice that you can’t access all the files from your device. When you try to make changes to some folders, you might get a You need permission to perform this action error.

This is understandable if you are trying to access some system files. But if it happens for all folders on your PC, then there is a problem somewhere.

In this guide, we will show you how to eliminate this error for good and regain unrestricted access to your folders and files.

Why is my computer telling me I need administrator permission?

Below are some of the possible reasons you are getting you need permission to perform this action error on your PC:

  • Lack of privilege: The obvious reason you might be facing you need permission to perform this action error when you want to delete a file on Windows 7, 10, or 11 is lack of administrative privileges. Also, it might be because you are not the owner of the file. The solution is to take ownership of the folder and try again.
  • Faulty system files: Sometimes, this problem might be caused by one or more corrupt system files. You need to restore and repair these files to get past the error.
  • Presence of malware: Another known cause of the you need permission from the administrator to perform this action error is activities of viruses on your PC. Running a virus scan with Windows Defender should do.

How do I fix I need permission to perform this action?

1. Check your account type

  1. Press the Windows key, type control, and select Control Panel.
    control panel
  2. Click the User Accounts option.
    user accounts you need permission to perform this action
  3. Now, click the User Accounts option again.
    user accounts you need permission to perform this action
  4. Finally, check your account type in the right pane.
    account type

To get unrestricted access to the contents on your PC, you need to use an administrative account. Else, you will get a You need permission to perform this action error while trying to perform some actions.

Also, if you are using a local account, you need to switch to an admin account or change it to an administrator account.

2. Enable Safe Mode

  1. Press the Windows key + I to open the Settings app and select the Update & Security option.
    update you need permission to perform this action
  2. Select Recovery in the left pane and click the Restart now button under Advanced startup.
    restart now you need permission to perform this action
  3. When your PC restarts, choose Troubleshoot > Advanced options.
    advanced options
  4. Now, select the Startup Settings option.
    startupp settings
  5. Next, click the Restart button.
    restart you need permission to perform this action
  6. Finally, press 4 or F4 to Enable Safe Mode and check if the file or folder works.
    enable safe

Sometimes, a third-party app or process might be causing the You need permission to perform this action error. Starting your PC in Safe Mode will limit the number of drivers and processes that boots with your PC.

3. Change the owner of the file or folder

  1. Right-click the problematic folder or file and select Properties.
  2. Click the Security tab at the top, followed by the Advanced button.
  3. Now, click on Change in the Owner section.
    change Folder Access Denied You need permission to perform this action
  4. Click the Advanced button in Select User or Group window.
    advanced Can't delete file Access Denied
  5. Next, click the Find now button and select which group should have full file permission on your computer. Click OK to close this window.
    find now File Access Denied copy paste
  6. Go back to the Advanced Security window and click the Add button under the Permissions tab.
    permissions File Access Denied external hard drive
  7. Now, click on Select a principal.
    select a principal File Access Denied Cannot take ownership
  8. Repeat Steps 4 and 5 to select the desired user or group.
  9. Set the Type to Allow and check the Full control option.
  10. Finally, click the OK button to save changes.
    full control Windows 10 Access Denied administrator

After doing that, you’ll have ownership over the selected file, and you’ll be able to get rid of the You need permission to perform this action error.

4. Add account to the list of admins

  1. Press the Windows key + X and choose the Computer Management option.
    computer management
  2. Choose Local Users and Groups > Users in the left pane.
    users you need permission to perform this action
  3. Now, right-click your user account and choose the Properties option.
    properties
  4. Next, click the Member Of tab at the top and click the Add button.
    member you need permission to perform this action
  5. Type Administrators in the Enter the object names to select box.
  6. Finally, click the Check names button, followed by OK and restart your PC to effect the changes.
    check names

In some cases, you need to ensure that your account has all the administrative rights. To do this, you need to add the user account to the list of admins on the PC.

This will get rid of the You need permission to perform this action error. However, you should know that this fix will not work if your account is a standard one that has been restriccted by the admin.

5. Scan for malware

  1. Press the Windows key, type virus, and select Virus & threat protection.
    virus
  2. Click Scan options.
    scan options
  3. Now, select your preferred scan option and click the Scan now button.
    scan now you need permission to perform this action

Sometimes, viruses can mess with your PC leading to the You need permission to perform this action error. This is especially true if the folder or file in question is infected.

Also, it is important to note that your third-party antivirus can cause this issue. So, you should disable it and use Windows Defender for the virus scan.

6. Repair system files and memory partitions

  1. Press the Windows key, type cmd, and click Run as administrator under Command Prompt.
    cmd admin
  2. Type the command below and hit Enter: DISM /online /cleanup-image/restorehealthdism
  3. When the command finish running, type the command below and hit Enter: sfc/scannowsfc
  4. Finally, wait for the command to finish running, type the command below, and press Enter to run it: chkdsk c: /rchkdsk you need permission to perform this action

If the solutions above prove abortive in fixing the You need permission to perform this action error, the issue might be with your system files or memory. Running the command above should fix the cause of the issue and restore normalcy.

With this, we can conclude this detailed guide on how to fix a You need permission to perform this action on OneDrive, external drive, or any other folder, app, and files on your PC. You only need to follow the instructions carefully and things should be back to normal.

If you are facing other issues like You require permission from trustedinstaller, check our dedicated guide on topic to fix it for good.

Feel free to let us know the solution that helped you fix this issue in the comments below.

Top 7 Practices for Active Directory to Apply Now

Active Directory (AD) is the most widely used directory service in the world. Businesses, government agencies, and educational institutions use it to manage their identities and resources. However, most people don’t know the best practices to get the most out of AD tools.

This is because it provides a central location for managing users, computers, printers, and other network resources. It also provides an authentication mechanism for client computers so that they can access network resources.

Because of the importance of AD in an organization’s IT infrastructure, you should follow best practices when managing your AD environment.

What is a good practice when creating an Active Directory design?

1. Usability

The Active Directory design should be easy to use for users and administrators alike. The best practice for designing an Active Directory structure is to keep it simple and easy to manage.

Make sure the tool is easy to use and understand. Users should be able to get up and running without needing an IT expert on hand. It’s important to keep your Active Directory design simple.

The more complex a design is, the harder it will be to manage and maintain it. You’ll also need to invest more resources in training users on how to navigate through it.

2. Efficient network usage

It is important to design your tool so that it uses minimal network bandwidth and resources to perform its tasks. You want your network infrastructure to be as efficient as possible so that users aren’t experiencing delays when they try to access resources on the network.

This way, it won’t affect other processes running on the same computer or server where it runs. If it uses too much bandwidth, it may become overwhelmed when you need to scale up or when performing network-intensive tasks.

Also, it’s best practice for your Active Directory that your network infrastructure can support the increased load from users accessing resources on these servers.

3. Minimal memory requirements

You should design your tool so that it does not use more memory than necessary. This will ensure that the operating system does not crash because of too much memory usage by your tool.

The more memory you allocate to AD DS, the more likely it will be able to handle the load without requiring additional hardware or software upgrades.

While Domain Controllers do not need a lot of resources, other services hosted on them (such as DNS servers) may require more resources than you expect.

4. Fast response time

Responsiveness is a critical part of any application or service. When users are trying to log in, or when they are attempting to access resources, they expect a fast response.

Your tool should respond quickly when performing its duties. Users should not see any delay when using their computers or applications.

5. Scalability

Scalability refers to the ability of the system to handle increased workloads without becoming overloaded or unstable. It also refers to the ability of the system to grow in capacity when needed.

The tool should be able to handle thousands of users at once with no problems. The best practice for your Active Directory is to plan for the future should you expand your business.

6. Performance

When designing your Active Directory structure, consider how it will affect performance and how much maintenance will be required over time.

Active Directory can be accessed by many applications, users, and clients across a network. How do you ensure that the Active Directory service is up and running at all times? You should be able to meet your performance requirements without compromising security or scalability.

If you don’t have enough hardware to support all users accessing their resources at once, the performance will be greatly affected. The tool should perform quickly over the network so that users don’t have to wait for their results.

7. Security

The security of your Active Directory environment is critical. It’s important to protect user accounts, computers, and other resources from unauthorized access or modification.

The best way to do this is through careful planning based on your organization’s security requirements and policies. The tool should not expose any sensitive data or allow unauthorized access to company resources by hackers.

What are some of the best security tools for managing Active Directory?

ADManager Plus – Comprehensive AD tool

ADManager Plus is a comprehensive, feature-rich, and easy-to-use Active Directory management software. It includes all the necessary tools to manage your Active Directory, including user account management, group management, and password reset options.

ADManager Plus provides your entire Active Directory structure’s comprehensive auditing and reporting capabilities. This is one of the best practices for an Active Directory, as it allows you to keep tabs on what’s happening in your network.

You can get detailed reports about changes made on the Active Directory. These include; who made those changes, and when they were made. This helps significantly in monitoring user activity in your network.

Other features include:

  • Audit management
  • Password reset and recovery
  • Group management
  • User and computer auditing

ADManager Plus

Get the best Active Directory management tool to keep track of any network events easily.
Free trial Visit website

ADAudit Plus – Powerful security tool

ADAudit Plus is the ultimate Active Directory auditing tool. It’s designed to help you ensure your AD environment is secure and compliant. This is done by providing detailed information about changes made in your AD environment.

ADAudit Plus auditing solution combines pre-defined and custom-made reports with a web interface. It’s designed to simplify tracking changes in Active Directory and generating reports on those changes.

Other features include:

  • Easy-to-use interface with no technical knowledge required
  • Compliance checks
  • Realtime monitoring
  • Powerful search feature

ADAudit Plus

Ensure security and compliance in your network with the best Active Directory auditing tool.
Free trial Visit website

ADSelfService Plus – Intuitive AD tool

ADSelfService Plus is a single-sign-on (SSO) solution for Active Directory environments. It provides users with the ability to sign on once and access multiple applications without having to create new user accounts or passwords.

This reduces the IT workload and improves security by eliminating the need for administrators to manage passwords and manually reset them when they are changed.

Other features include:

  • Secure self-service password with multi-factor authentication integration
  • Real-time password synchronization
  • Integration with multiple enterprise services such as G-suite and Office 365

ADSelfService Plus

Sign on once and access multiple applications with a tool that offers perfect SSO for Active Directory.
Free trial Visit website

AD360 – Customizable AD solution

AD360 is a powerful platform that allows you to audit your Active Directory environment and get a detailed report of all the changes.

This tool can be used to track changes made in Active Directory, including users, groups, computers, and other objects. Over time, you can identify potential risks or compliance issues before they become problems.

It is a comprehensive, cloud-based solution that helps you manage the entire audit process from start to finish. The software is highly customizable and can be used for both internal and external audits.

Other features include:

  • Automated policies
  • AI-powered
  • MFA integration

⇒ Get AD360

Adaxes – Automated AD tool

Adaxes is a powerful and easy-to-use Active Directory management tool. It lets you manage your users, groups, computers, and other objects in your AD environment.

The tool allows you to perform various administrative tasks such as user creation, group membership changes, password resets and group policy modifications with ease. This is one of the best practices for Active Directory, especially where large groups are involved.

With Adaxes you can delegate rights to any number of users or groups so that they can perform specific administrative tasks for themselves or for their subordinates without having access to sensitive data stored on servers or desktops.

Other features include:

  • Active Directory delegation
  • Password self-service
  • AD reporting

⇒ Get Adaxes

How can I make Active Directory better?

Active Directory is a critical component of any enterprise network, and as such, it’s best practice to ensure that it’s running at peak efficiency. This means having good performance, security, and the right permissions set up for your users.

To that effect, you can do the following to ensure it is at optimal performance:

  • Build the forest first – Implement the core functionality of Active Directory first before adding any additional domains or forests. This will help reduce complexity when configuring trusts and cross-forest functionalities.
  • User groups – Create groups based on common characteristics such as job titles or departmental affiliations. Then, use these groups to delegate permissions to control access to resources across the entire organization.
  • Use GPOs – GPOs are a great way to manage AD. The good thing about GPOs is that you can use them for almost anything.
  • Check health regularly – Make sure your AD environment is healthy. For instance, ADAudit details how to check the health of your AD. This allows you to scan your environment for potential problems and address them before they become an issue for your users.
  • Automate tasks – Use PowerShell scripts to automate everyday tasks. These include adding new users or resetting passwords for multiple accounts at once. It will save you time and reduce errors caused by humans making mistakes.

Using an Active Directory is not without its ups and downs, and sometimes, you may find that the Active Directory users and computers are not responding. If so, feel free to check out our comprehensive article on the issue for a quick fix.

You may also check our guide on troubleshooting trust relationship errors that occur when your workstation cannot communicate securely with the AD domain.

That brings us to the end of the article, but you can keep the conversation going in the comment section below. Do share with us your experience with AD tools and what best practices you’ve adopted.

5 Best File Activity Monitoring Software [2026 List]

This article will explore file activity monitoring tools, showcasing their strengths and advantages. File activity monitoring is a process that tracks and monitors changes made to files and folders on a computer or network.

This type of monitoring can detect and prevent security breaches, troubleshoot issues, and ensure compliance with regulatory requirements. Let us explore some benefits of using some of these tools.

What are the benefits of using file activity monitoring software?

There are many advantages to using these tools. A few of them include the following:

  • Breach detection – By tracking changes made to files and folders, administrators can quickly identify and respond to any suspicious activity, such as unauthorized access or changes to sensitive files. This can help organizations avoid costly data breaches and protect sensitive information.
  • Troubleshooting – Another advantage of file activity monitoring is troubleshooting issues. Administrators can quickly identify the source of a problem and determine the best course of action. This can help organizations minimize downtime and keep systems running smoothly.
  • Regulatory compliance – File activity monitoring can also ensure compliance with regulatory requirements. By tracking changes to files and folders, organizations can demonstrate compliance with HIPAA, PCI-DSS, and SOX regulations.

Many options are available on the market when choosing a file activity monitoring software. So, we discuss some of the best software options available in 2023 below.

What file activity monitoring software should I use?

ADAudit Plus – Activity monitoring for Active Directory

ADAudit Plus is a tool for monitoring and auditing Active Directory, Windows File Servers, and Exchange Server.

It is not a file activity monitoring tool explicitly. However, it can monitor file and folder changes and changes to other types of objects within Active Directory, Windows File Servers, and Exchange Server.

The tool allows administrators to track changes made to files and folders, including who made the change, when the change was made, and what the difference was.

Additionally, it allows administrators to generate detailed reports on file and folder activity and set alerts to notify them of any suspicious activity.

So, ADAudit Plus is a tool that can be used to monitor and audit file and folder activity. Still, it is a broader solution that includes other features such as monitoring and auditing Active Directory, Windows File Servers, and Exchange Server.

Some reasons why we love this tool include the following:

  • Delegated auditing
  • Compliance reporting
  • Historical reporting
  • Alerting and notifications

ADAudit Plus

Great audit tool that offers comprehensive file audit and activity monitoring.
Free Trial Download

SolarWinds File Auditing – Real-time monitoring

SolarWinds File Auditing is a file activity monitoring tool. It allows administrators to track and monitor changes made to files and folders on a computer or network, including who made the change, when the change was made, and what the difference was.

It also provides real-time monitoring and alerting for file activity and detailed reporting and search capabilities.

Additionally, it includes a built-in compliance reporting feature that makes it easy to demonstrate compliance with regulations.

With SolarWinds File Auditing, administrators can quickly identify and respond to any suspicious activity and detect unauthorized access or changes to sensitive files. This can help organizations avoid costly data breaches and protect sensitive information.

Overall, SolarWinds File Auditing is a powerful tool for monitoring and auditing file activity in an organization.

Some reasons why we love this tool include the following:

  • Active directory management
  • File server auditing
  • User provisioning
  • SharePoint permissions management
  • Active directory reporting.

⇒ Get SolarWinds File Auditing

Netwrix Auditor – Great for network monitoring

file activity monitoring

Netwrix Auditor is a file activity monitoring tool that allows administrators to track and monitor changes made to files and folders on a computer or network. It provides real-time monitoring and alerting for file activity and detailed reporting and search capabilities.

The software allows one to view who made the change, when the change was made, and what the difference was.

Additionally, it includes a built-in compliance reporting feature that makes it easy to demonstrate compliance with regulations.

This feature can help organizations identify any suspicious activity and unauthorized access or changes to sensitive files, which can help them avoid costly data breaches and protect sensitive information.

Netwrix Auditor also includes monitoring and auditing other areas of your IT infrastructure, such as Active Directory, Exchange, SharePoint, and Office 365.

Overall, Netwrix Auditor is a comprehensive solution for monitoring and auditing file activity as well as other areas of your IT infrastructure.

Some reasons why we love this tool include the following:

  • Using state-in-time reports
  • Configuration best practices
  • Data remediation workflows
  • User activity video recording

⇒ Get Netwrix Auditor

Audit NTFS – Best for NTFS file system

file activity monitoring

Audit NTFS is a file activity monitoring tool that allows administrators to track and monitor changes made to files and folders on a computer or network.

It is specifically designed to monitor the NTFS file system and allows administrators to track who made the change, when it was made and what the difference was.

The software provides real-time monitoring and alerting for file activity and detailed reporting and search capabilities.

Additionally, Audit NTFS allows filtering, sorting, and exporting data to various formats. It also allows you to set up alerts for specific events so that administrators can be notified of any suspicious activity or unauthorized access.

Overall, Audit NTFS is a powerful tool for monitoring and auditing file activity on the NTFS file system.

Some reasons why we love this tool include the following:

  • Customizable filtering
  • Multi-format exporting
  • Detailed audit result

⇒ Get Audit NTFS

LepideAuditor – Free file activity monitoring

file activity monitoring

LepideAuditor is a file activity monitoring tool that allows administrators to track and monitor changes made to files and folders on a computer or network.

It provides real-time monitoring and alerting for file activity and detailed reporting and search capabilities. The software allows one to view who made the change, when the change was made, and what the difference was.

Additionally, it includes a built-in compliance reporting feature that makes it easy to demonstrate compliance with regulations.

This feature can help organizations identify any suspicious activity and unauthorized access or changes to sensitive files, which can help them avoid costly data breaches and protect sensitive information.

LepideAuditor also includes monitoring and auditing other areas of your IT infrastructure, such as Active Directory, Exchange, SharePoint, and Office 365.

Overall, LepideAuditor is a comprehensive solution for monitoring and auditing file activity as well as other areas of your IT infrastructure.

Some reasons why we love this tool include the following:

  • Track account lockouts
  • Active directory security
  • Password expiry notifications
  • Manage inactive accounts
  • Privileged access management

⇒ Get LepideAuditor

Overall, file activity monitoring is critical for protecting against security breaches, troubleshooting issues, and ensuring compliance with regulatory requirements.

Also, by using one of the software mentioned above, organizations can easily track and monitor changes made to files and folders and take action to protect sensitive information and systems.

Let us know which of these tools you prefer using in the comments below.

What Is & How to Track a Windows Audit Failure

If you have several user accounts on the computer and want to monitor their login activity or believe someone is trying to gain access, the Windows Audit Failure comes to the rescue.

Though remember that every login attempt is not necessarily from an end user but could be due to the services running on the computer.

What is Windows Audit Failure?

Audit Failures are generated when a logon request does not go through and are stored in the Event Viewer for quick access. They serve a vital security purpose and allow users to identify login attempts.

You are likely to find several Logon types, each denoting a specific case. Here are the most important ones:

  • Logon Type 2 – Local user logged in
  • Logon Type 5 – Login by a service

Now that you have a basic understanding of the concept, let’s head to how to track Windows Audit Failure using the built-in methods and with a reliable third-party tool.

How do I track Windows Audit Failure?

1. With the Event Viewer

  1. Press Windows + S to open the Search menu, type Event Viewer, and click on the relevant search result.event viewer to view windows audit failure
  2. Expand Windows Logs and double-click on Security under it.windows logs
  3. You will now find the login attempts listed on the right. Double-click on any to open its properties.event
  4. Verify the information here and identify whether the login attempt was from an end user or a service.windows audit failure

That’s it! The Event Viewer is one of the handy tools that allow users to view logs of almost every critical activity on the computer, including Windows Audit Failure.

2. Use a dedicated solution

  1. Download and install ManageEngine ADAudit Plus.
  2. Configure your network and endpoints.
  3. Run ADAudit Plus.
  4. Click the Reports tab, then select the Active Directory and choose Workstation Logon Activity.
  5. Now, select the workstation you want to interrogate, and you will see all the login attempts with the Audit Failure attempts.
  6. You may also switch to Local Logon Failures to see all the failed login attempts on each account on the workstation.

Those looking for an Active Directory tool with a host of other features should go with ADAudit Plus, one of the most effective software for the job.

It offers real-time auditing for Active Directory, Windows Server, File Servers, Workstations, and Azure AD Tenants. The software offers a fully-functional free 30-day trial to users before purchasing the subscription.

Besides this, here are a few notable features of ADAudit Plus:

  • Data archiving
  • User behavior analytics
  • Performs comprehensive search

ADAudit Plus

Check any logon activity and failed audit attempts with a dedicated tool for your network.
Free trial Visit Website

Get a password self-service tool

Tip icon Tip
Another reliable tool that comes in handy when it comes to monitoring Windows Audit Failure is ADSelfService Plus. Used by top firms across the globe, the software has managed to capture a large market share.

It offers password self-service, wherein users can manually manage passwords, reset them, and unlock several accounts. Besides, there’s 2-FA (Two Factor Authentication) and MFA (Multi-factor Authentication).

Other notable features in ADSelfService Plus include:

  • Easy and flexible access
  • Send real-time alerts
  • Eliminates the need to reset passwords through tickets

ADSelfService Plus

Manage passwords, reset them, and unlock accounts on all the endpoints on your network!
Free trial Visit website

That’s it! These are all the ways you can monitor Windows Audit Failure, view the logon requests, and identify whether it’s from a user or a service.

If you have a personal computer that doesn’t require high security, find out how to disable the login password and access Windows quickly.

If you have any other queries or want us to cover similar topics, drop a comment below.

5 Best Server Remote Monitoring Tools [2026 List]

Server remote monitoring is a process that tracks and monitors the performance and health of servers from a remote location.

With the help of specialized software, administrators can monitor and manage servers, even if they are located in different locations. This can be particularly useful for organizations with multiple servers or those needing to monitor servers in remote locations.

What are the advantages of server remote monitoring?

A few essential advantages of server remote monitoring are the following:

  • Improved uptime – With remote server monitoring, administrators can quickly identify and resolve issues that may cause a server to go down. This can help to improve uptime and reduce downtime.
  • Increased efficiency – Remote monitoring tools can automate many routine tasks, such as software updates, backups, and performance monitoring, which can help to increase efficiency and reduce the workload of administrators.
  • Cost savings – Remote monitoring tools can help to reduce the costs associated with managing servers. This can be particularly useful for organizations with multiple servers or those needing to monitor servers in remote locations.
  • Greater visibility – Remote monitoring tools provide detailed information about the performance and health of servers, which can help administrators to identify potential issues and take proactive measures to prevent problems.
  • Proactive monitoring – Remote monitoring tools allow administrators to monitor servers in real-time and receive alerts past certain thresholds. This can help them to take proactive measures to prevent problems.

Now, let us explore some tools you should try out.

What are the best tools for remote server monitoring?

Nagios – Great open-source monitoring tool

Nagios is an open-source monitoring tool that can be used to monitor servers, network devices, and services.

It allows administrators to proactively monitor the performance and availability of various network resources and services, such as servers, switches, and applications.

Nagios can monitor remote servers by installing Nagios plugins on the remote servers and then configuring Nagios to monitor the plugins.

The tool can monitor servers by checking their CPU usage, memory usage, disk usage, and network traffic. It can also monitor servers running on servers, such as HTTP, FTP, and SSH, and custom services using Nagios plugins.

Nagios can also send notifications via email, SMS, or other methods when it detects a problem. It also provides a web interface that allows administrators to view the status of all monitored resources and services and to view historical data for analysis.

Additionally, Nagios provides a powerful event-handling system that allows administrators to automate responses to problems, such as restarting a service or notifying the appropriate personnel.

Some features we love are the following:

  • Comprehensive monitoring
  • Problem remediation
  • Multi-tenant capabilities

⇒ Get Nagios

SolarWinds Server & Application Monitor – Robust remote monitoring

SolarWinds Server & Application Monitor (SAM) is a comprehensive remote monitoring tool designed to provide detailed information about the performance and health of servers and applications running on them.

It allows administrators to monitor servers and applications in real time and receive alerts when certain thresholds are exceeded.

This can help administrators to take proactive measures to prevent problems and improve uptime.

SAM monitors server and application performance and provides detailed information about the health and status of servers and applications. Also, it receives alerts when certain thresholds are exceeded, such as high CPU or memory usage.

We love it because it can generate detailed server and application performance reports, including historical data and trends. Additionally, it will monitor and manage large numbers of servers and applications, making it suitable for organizations of all sizes.

It offers extensive customization, and you can expect customizable monitors and alerts will be created to meet an organization’s specific needs.

Furthermore, it monitors various applications, including Microsoft Exchange, SQL, and SharePoint. This comprehensive tool will integrate with other SolarWinds tools, such as Network Performance Monitor and Log & Event Manager, for a more comprehensive view of your IT environment.

Some features we love are the following:

  • Real-time monitoring
  • Robust scalability
  • Highly customizable

⇒ Get SolarWinds Server & Application Monitor

PRTG Network Monitor – Great for threshold management

PRTG Network Monitor is a comprehensive network monitoring software developed by Paessler AG. It allows administrators to monitor and manage the performance and health of servers, network devices, and other IT infrastructure components.

It has become popular because it monitors network devices, servers, and applications in real-time, and provides detailed information about the health and status of these devices.

Also, with this tool, you receive alerts when certain thresholds are exceeded, such as high CPU or memory usage. Additionally, it generates detailed reports on network and device performance, including historical data and trends.

It is a good scalability choice since it can monitor and manage large numbers of devices, servers, and applications. Hence, it is suitable for organizations of all sizes.

The tool offers customizable monitors, and alerts can be created to meet an organization’s specific needs. Additionally, it offers auto-discovery of new devices on the network.

Overall, PRTG Network Monitor is a robust and comprehensive network monitoring solution that can help organizations to improve uptime, reduce downtime, and proactively manage and troubleshoot network devices and servers.

Some features we love are the following:

  • Real-time monitoring
  • Extensive reporting
  • Alerting

PRTG Network Monitor

Increase your network performance with this powerful network manager.
Check Price Visit Website

ManageEngine OpManager – Good for large and small businesses

ManageEngine OpManager is a network monitoring and management software solution for businesses of all sizes. It is designed to help IT teams monitor and manage their network infrastructure, including servers, switches, routers, and other devices.

The software provides real-time monitoring and alerts for network performance, availability, and security. It also includes device discovery, inventory management, and reporting.

OpManager supports various platforms, including Windows, Linux, and VMware, and is compatible with various network protocols, including SNMP, WMI, and JMX. Additionally, it offers integration with other ManageEngine products and third-party tools via APIs.

Some features we love are the following:

  • Intuitive dashboards
  • Intelligent reporting
  • Network traffic analysis

ManageEngine OpManager

Monitor network performance and security in real time with this professional software.
Check Price Visit Website

Zabbix – Great for high performance and scalability

Zabbix is an open-source monitoring tool that can be used to monitor servers, network devices, and services.

It provides high performance and scalability and can monitor large, complex networks with thousands of hosts and devices.

Zabbix can monitor remote servers by installing Zabbix agents on the remote servers and configuring Zabbix to monitor the agents.

The agents can collect various performance metrics and send them back to the Zabbix server, which can then analyze the data and send notifications when it detects a problem.

Zabbix can monitor servers by checking their CPU usage, memory usage, disk usage, and network traffic. It can also monitor services running on servers, such as HTTP, FTP, and SSH, and custom services using Zabbix templates.

Zabbix also provides a web interface that allows administrators to view the status of all monitored resources and services and to view historical data for analysis. It also supports alerting via various methods, such as e-mail, SMS, or custom scripts.

Additionally, Zabbix has a powerful data visualization feature, allowing administrators to create custom graphs and charts. These are useful in identifying trends, patterns, and outliers in the data. Lastly in all, this is very helpful in identifying and troubleshooting issues.

Some features we love are the following:

  • Problem detection
  • Metric collection
  • Data visualization

⇒ Get Zabbix

That is as far as we will be sharing in this article. With these tools, you can achieve as much remote server monitoring as you desire. You can also check out processes like WbemCons.exe, which is part of HP devices.

This list is not in any particular order, and your choice should depend on personal preferences. However, in the comments below, don’t hesitate to share your chosen tool.

Outlook Drag & Drop Attachments Not Working: 5 Easy Fixes

Several users told us that although the drag-and-drop feature is working fine on their PC, it isn’t working when done from Outlook. The drag-and-drop feature lets you easily attach any file to your email on Outlook otherwise it would take multiple clicks to accomplish.

But the fact of not being unable to drag and drop attachments on Outlook can be frustrating. Fortunately, in this guide, we will give you some effective solutions that will help you understand why this problem is occurring and how you can easily fix it.

Why am I unable to drag and drop attachments on Outlook?

After our research, we have prepared a list of some of the most common reasons which is why you are unable to drag and drop attachments on Outlook:

  • There is a bug in your browser: Some user reports confirm that because of a bug present in a specific browser, you won’t be able to perform drag-and-drop on Outlook.
  • The Outlook windows aren’t active: You need to make sure that the two windows on which the operation is being performed in active and selected.
  • Outlook folders are corrupt: This issue can also pop up when any Outlook-related folder is corrupt.
  • Outlook is running with admin privileges: Running Outlook with different permissions than File Explorer can also cause this problem.
  • You are not moving files of the same type: You should ensure that you are dragging and dropping files of the same type. For example, you can’t drag calender items to an Outlook folder.

How can I resolve unable to drag and drop attachments on Outlook problem?

Before applying any advanced solutions:

  • If the drag and drop feature suddenly stops working, even throughout your Windows OS and not just Outlook, you need to press the Escape button multiple times. To be specific, pressing 3-4 times would do the job. You can also try pressing the Escape button multiple times and then restarting your PC. This would definitely fix the problem.

1. Do not run Outlook with admin privileges

  1. Right-click on the Outlook app icon.
  2. Select Properties.
  3. Switch to the Compatibility tab.
  4. Make sure that the Run this program as an administrator option isn’t selected. If yes, then uncheck the box.
  5. Click Apply and OK.

When the program, in our case MS Outlook, is running with admin privileges, or elevated privileges than the File Explorer, then drag-and-drop between the two won’t work.

Trying to do so will show you a blocked mouse icon or a different icon to highlight the operation cannot be performed. So, follow the above steps, uncheck the admin option and see if this resolves the problem or not.

2. Reset MS Outlook folders

  1. Exit MS Outlook.
  2. Press the Win + R keys to open the Run dialogue.
  3. Type the below command and press Enter. outlook.exe /resetfolders

The issue can also trigger because of corrupt Outlook files and folders. You can run the above command and reset the Outlook folders. Do not worry, they will be automatically created once you launch Outlook back again.

3. Toggle on/off Cached Exchange Mode

3.1 Method 1

  1. Close MS Outlook.
  2. Open the Start menu by pressing the Win key.
  3. Open Control Panel.
  4. Select Mail.
  5. Choose E-mail Accounts.
  6. Double-click on your account.
  7. Check the Use Cached Exchanged Mode if it is unchecked, and uncheck it if it is already checked.
  8. Click Next.
  9. Restart Outlook.

3.2 Method 2

  1. Launch Outlook.
  2. Click on the File tab on the top Menu bar.
  3. Select Account Settings.
  4. Click Account Settings from the drop-down.
  5. In the Email tab, double-click your email account.
  6. Toggle on or off the Use Cached Exchange Mode to download email to an Outlook data file option.
  7. Click Next.
  8. Click Done.

4. Create a new Outlook profile

  1. Open the Start menu by pressing the Win key.
  2. Open the Control Panel.
  3. Click on Mail.
  4. Choose Show Profiles.
  5. Click on your account and hit the Remove button.
  6. Click Yes in the message that appears.
  7. Hit the Add button.
  8. Enter your Outlook credentials and follow the on-screen prompts.
  9. Restart the app.

A corrupt Outlook profile can also trigger multiple issues with your email client, one of which is the unable to drag and drop attachments on Outlook issue.

Simply delete your previous account, follow the steps to add a new Outlook account, and check if this resolves the issue or not.

5. Use Microsoft Support and Recovery Assistant

  1. Download the Microsoft Support and Recovery Assistant.
  2. Run the EXE file and install it on your PC.
  3. Agree the privacy terms and agreements.
  4. Sign in with your Microsoft account.
  5. Select Outlook and click Next.
  6. Click on Other problems and click Next.
  7. Click on Yes and Next.
  8. Follow the on-screen prompts and apply the suggested solution to resolve the problem.

You can also use the troubleshooting tool, which will help you fix certain problems related to Microsoft Office programs, including Outlook.

Also, you can refer to our use multiple accounts in MS Outlook guide. Did you know that Microsoft Outlook also comes with an automated replay feature, that replies to incoming emails on your behalf?

We also have a troubleshooting guide to fix Outlook that keeps asking for a password issue. If Microsoft Outlook is running slow for you, then we would suggest you check out our guide.

If for you, one of the Outlook folder has disappeared check out our dedicated guide to fix the problem.

Feel free to let us know in the comments below, which one of the above solutions resolved the unable to drag and drop attachments on Outlook problem.

Script Error in Outlook: 6 Confirmed Solutions to Pick From

Microsoft Outlook is an efficient email client that is used by professionals and businesses to carry out their daily email-related tasks. It is widely used because of its ease of usage, better email management, and other features. However, it is prone to multiple issues, one of which is the script error in Outlook.

As reported by multiple users, you will face script errors in Outlook when you receive a new mail, attempt to edit a mail, and other scenarios as well. In this guide, we will talk about solutions that will help you fix the script error in Outlook. Let us get right into it.

Why am I facing a script error in MS Outlook?

We did some research at our end and read online user reports regarding the script error in Outlook and found a bunch of reasons that would trigger this problem:

  • Corrupt Outlook profile: Any problem with your Microsoft Outlook profile will cause issues with your profile, like the one at hand.
  • There is a bug: Chances are that a bug in the Office.com website is calling the MS Outlook app incorrectly, throwing the script error.
  • Add-ins: Add-ins might be conflicting or interfering with Microsoft Outlook triggering the script error problem.

How can I fix the script error in Outlook?

Before we jump ahead with the advanced solutions, let us first apply some simple ones and hopefully get rid of the issue:

  • Restart your PC. You can find some recommended solutions if the computer is stuck on restarting.
  • Also, try restarting the Microsoft Outlook program from your desktop and make sure no other program is running in the background as they may interfere with it and cause problems.
  • Ensure your internet connection is working fine.

Now, let us check out the advanced troubleshooting solutions.

1. Create a new profile

Note icon NOTE
Keep in mind that if you delete a profile, all the data associated with the profile will also be deleted. So, make sure that you are deleting all the secondary profiles and not the primary ones.
  1. Exit Microsoft Outlook.
  2. Open the Start menu by pressing the Win key.
  3. Open Control Panel.
  4. Select Mail.
  5. Click on Add.
  6. Set a name for the profile and press OK.
  7. Follow the on-screen prompts to add an account.
  8. Click Finish.
  9. In the prompt, select Yes.
  10. Select the newly created profile from the drop-down.
  11. Select Always use this profile option.
  12. Click Apply.
  13. Choose the old profile and hit the Remove button.
  14. Open Outlook and check if this fixes the issue or not.

As per several users, the script error in Microsoft Outlook was associated with their corrupt user profiles. You can easily fix this by creating a new profile and deleting the original one.

2. Use the official program or the website

A suggested workaround to fix the script error in Microsoft Outlook was to open the service either by using the dedicated Outlook desktop app on your PC or using the Outlook.com website to access it.

This is because there was a bug in the Office.com website that wrongly called the Outlook app causing the script error. So, avoid accessing Outlook from the Office.com website and use the above-mentioned ways.

3. Disable add-ins

  1. Close Outlook.
  2. Press Win + R to open the Run dialogue.
  3. Type outlook /safe and press Enter.
  4. Check if the program works without any issues. If yes, then there is a problem with your add-ins.
  5. Open Outlook.
  6. Click on File.
  7. Select Options.
  8. Select Add-ins.
  9. Under Manage select COM Add-ins.
  10. Click on GO beside Manage.
  11. Uncheck all the add-ins and click OK.
  12. Restart Outlook and see if you get script error messages in Outlook or not.

Conflicting add-ins can cause issues with any program, be it Outlook or any other. You should first run the program in safe mode and see if the problem is solved. If yes, then you should uncheck all add-ins as they are the culprit.

4. Rename the Outlwvw.dll file to Outlwvw.old

  1. Open the File explorer.
  2. Click on C Drive or the drive where you have installed Microsoft Office.
  3. Open Program files.
  4. Select Microsoft Office.
  5. Open the Office folder.
  6. Choose 1033 folder and open it.
  7. Right-click on the Outlwvw.dll file and select Rename.
  8. Rename the file to Outlwvw.old and press Enter.
  9. Close File explorer.
  10. Restart your PC.
  11. Open Outlook after the system boots up and check if this resolves the issue or not.

This solution was suggested by one user on the official Microsoft support forums and has helped some users resolve the script error issues in Outlook.

5. Repair MS Office

  1. Open the Start menu by pressing the Win key.
  2. Open Control Panel.
  3. Choose Programs and Features.
  4. Click on Microsoft Office.
  5. Select the Change or Modify option.
  6. In the repair wizard, choose the Repair option.
  7. Click on Continue.
  8. The repairing of the Office programs will begin.
  9. Once done, restart your PC.
  10. Open Outlook and check if this fixes the issue or not.

The best way to fix any bug or glitch with a program is to repair it. Microsoft Office allows you to repair the program and get rid of the errors that you might be getting.

6. Tweak the registry

  1. Close Outlook.
  2. Press Win + R keys to open the Run dialogue.
  3. Type regedit and press Enter.
  4. Navigate to the following path. HKEY_CLASSES_ROOT\Typelib\0006F062-0000-0000-C00-000000000046
  5. Expand {0006F062-0000-0000-C000-000000000046} on the left side.
  6. Right-click the 1.2 folder and select Delete.
  7. Close the registry editor.
  8. Restart your PC.
  9. Open Outlook after the PC boots up and check if this fixes the issue or not.

That is it from us in this guide. These are some of the most effective and working solutions to fix the script error in Outlook.

You can apply the abovementioned solutions for other Outlook errors including:

  • Outlook operation failed due to an installation problem
  • Outlook class not registered

We have a guide that lists some solutions to resolve the Mailbox that has been temporarily moved on the Microsoft Exchange Server error in Outlook.

Users have reported that for them Microsoft Outlook is running slow which you can easily solve by checking out our guide on it.

If the Outlook folder disappeared for you then it could be annoying as it might be an important folder for you. Fortunately, we have a guide that will help you resolve the problem.

We would also suggest you check out our guide on how you can add multiple accounts to Outlook and how to use Outlook scheduling assistant.

Let us know in the comments below, which one of the above solutions resolved the script error in Microsoft Outlook.

How to Fix Blurry Fonts on Windows 10 & 11 [5 Quick Ways]

Windows 10 and 11 boast modern UI and some impressive features. However, it is not all roses, as some users are complaining of blurry font on their Windows PC.

Various factors can cause this font problem, but you can fix it for good with the right information. This guide will show you the solutions that have proved effective in fixing this feature.

Why are my Windows fonts blurry?

Below are some of the factors that can cause your Windows font to be blurry:

  • Outdated PC: Sometimes, the blurry font issue can be caused by an outdated operating system. The quick way out of this is to update Windows 10 to the latest version.
  • Wrong settings: Another cause of this issue is scaling on high DPI settings. You need to disable this feature to get past this problem.

How can I fix blurry fonts on a Windows 10 PC?

1. Use the built-in tool

  1. Press the Windows key + I and select the System option.
    system windows font blurry
  2. Click Advanced scaling settings under Scale and Layout.
    advanced options
  3. Now, toggle the switch for Let Windows try to fix apps so they’re not blurry forward to enable it.
    let

Windows has a built-in feature that allows you to fix blurry font on apps. Following the steps above will fix the issue for you.

Finally, ensure you restart the app causing the problem or your PC to effect the changes.

2. Change scaling settings manually

  1. Press the Windows key + I to open the Settings app and select the System option.
    system windows font blurry
  2. Check under the Scale and Layout section to see if you are not using custom scale settings.
  3. Now, click the dropdown under Change the size of text, apps, and other items and choose the recommended percentage (mostly 100% or 125%).
    recommended windows font blurry

At times, if you might be tempted to change your default scaling settings because you want font sizes to be bigger or smaller. However, this can lead to the blurry font on Windows 10.

The solution is to use the recommended scaling settings on your PC.

3. Run the ClearType wizard

  1. Press the Windows key, type cleartype, and select the Adjust ClearType text option.
    cleartype
  2. Check the box for Turn on ClearType.
  3. Now, click the Next button and follow the onscreen instructions to complete the tuning process.
    turn on

Windows has introduced the ClearType feature to make texts clearer and easier to read on PC. So, if you are dealing with blurry fonts on Windows 10 and 11, you can use this feature to tune the clarity to your taste.

4. Disable scaling on high DPI settings

  1. Right-click the app that has blurry font issues and select the Properties option.
    properties
  2. Click the Compatibility tab at the top, followed by the Change high DPI settings button.
    compatibility  windows font blurry
  3. Now, check the Use this setting to fix scaling problems for this program instead of the one in Settings box.
  4. Next, check the box for Override high DPI scaling behavior.
    use override
  5. Click the Scaling performed by dropdown and select Application.
  6. Finally, click the OK button and relaunch the application.
    ok

In some cases, the blurry font on Windows 10 and 11 might be due to the affected app’s scaling setting. The quickest way around this is to disable the scaling settings for the app and relaunch it.

5. Update your PC

  1. Press the Windows key + I and select Update & Security.
    update windows font blurry
  2. Click the Check for updates button.
    check for
  3. Finally, install any available updates.

Blurry fonts in Windows 10 can be caused by an outdated PC. You need to update your PC to the latest version to fix the issue.

Also, you should update any app on which you are experiencing this issue.

We hope that these troubleshooting recommendations from our list were helpful for you in fixing this issue. Just the steps therein carefully, and your fonts should be normal.

If you face other issues like blurry legacy apps on Windows 10/11, check our detailed guide to fix it convincingly.

Feel free to let us know the solution that helped you fix this issue in the comments below.

Windows Update Error 0x80080008: 7 Ways To Fix It

We’re all familiar with Windows 10 update issues. This kind of problem is probably the most common flaw that Windows 10 users encounter from time to time.

All of those pesky issues are followed by an identification code in order for them to get sorted out easier. One of those errors that are common and repetitive is the one with the code 0x80080008.

Namely, you’ll get prompted with this error code when your update is either stuck or some of the update files are not successfully downloaded and installed.

But, don’t worry, we have a few workarounds that should resolve the Windows Update error 0x8008000.

Windows update error 0x80080008 variations

Update error 0x80080008 will prevent you from downloading the latest updates. Speaking of which, here are some similar issues that users reported:

  • 0x80080008 Server 2016 – Many users reported this issue with Windows Server 2016. Although our solutions are mostly for Windows 10, you should be able to apply some of them to the Windows Server as well.
  • Windows update failed – This is a Windows Update error, and it will cause updates to stop working. However, you should be able to fix the problem by disabling your antivirus or by downloading the update manually.

How can I fix the error 0x8008000?

1. Perform SFC and DISM scans

If you keep getting update error 0x80080008 on your PC, the issue might be your installation. Your Windows installation might be damaged or corrupted, and that can lead to this error.

However, you can fix the problem simply by performing an SFC scan. To do that, just follow these steps:

  1. Right-click and open Start menu.
  2. Choose Command Prompt (Admin).
    0x80080008 Server 2016
  3. Type sfc/scannow in the command line.
    0x80080008 Server 2016
  4. The procedure will search for corrupted files and repair them.

This tool proved valuable in many situations. Nonetheless, if the corrupted files are not the core of the problem, you may want to try other workarounds.

If SFC scan can’t fix the problem, or if you can’t run SFC scan at all, your next step would be to run DISM scan. To do that, just follow these steps:

  1. Start Command Prompt as administrator.
  2. Type following command on the command line:
    • DISM.exe /Online /Cleanup-image /Restorehealth
      0x80080008 Server 2016
  3. In case the DISM can’t obtain files online, try using your installation USB or DVD. Insert media and type following command:
    • DISM.exe /Online /Cleanup-Image /RestoreHealth /Source:C:RepairSourceWindows /LimitAccess
  4. Be sure to replace ”C:RepairSourceWindows” path of your DVD or USB.

Once the scan is finished, check if the problem is still there. If you weren’t able to run SFC scan before, try running it again after DISM scan and check if that solves the problem.

2. Restart Windows Update components

According to users, sometimes you might encounter Update error 0x80080008 due to Windows Update components. To fix the problem, it’s required that you restart Windows Update components.

You can do this manually, but that can be a tedious process, so usually, it’s better to use Command Prompt.

To reset Windows Update components using Command Prompt, you just need to do the following:

  1. Start Command Prompt as an administrator.
  2. Now run the following commands:
  • net stop wuauserv
  • net stop cryptSvc
  • net stop bits
  • net stop msiserver
  • ren C:WindowsSoftwareDistribution SoftwareDistribution.old
  • ren C:WindowsSystem32catroot2 Catroot2.old
  • net start wuauserv
  • net start cryptSvc
  • net start bits
  • net start msiserver

After running these commands the issue should be resolved and you’ll be able to download the updates again. Running these command manually can be tedious.

If you want to automatically reset Windows Update components, you can create a Windows Updates reset script and run it to automatically reset the required services.

3. Check your antivirus

According to users, sometimes Update error 0x80080008 can appear due to problems with your antivirus. To fix this issue, it’s recommended that you disable certain antivirus features and check if that helps.

If that doesn’t work, you might have to disable your antivirus completely and then try to perform the update. However, if the issue is still there, your next step would be to completely remove your antivirus.

Even if you decide to remove your antivirus, your PC should still be protected by Windows Defender, so you won’t have to worry about your safety.

If removing the antivirus solves your problem, this might be a good time for you to consider switching to a different antivirus solution.

There are many excellent solutions available, but the antivirus software for Windows 10 that is most compatible with your PC will not give you any problems.

4. Manually download the update

If you keep getting update error 0x80080008, you might be able to circumvent it simply by downloading and installing the update manually.

This is relatively simple, and you can do it by following these steps:

  1. First you need to find the KB number of the update you’re trying to download. You can do that from Windows Update section on Windows or by visiting Windows Update History website.
  2. Once you find the KB number of the update you’re trying to download, you need to visit Microsoft Update Catalog website. Now you just need to enter the number of the update in the search field.
  3. List of results will appear. Find the update that matches your system architecture and click the Download button to download it.
    0x80080008 Server 2016
  4. After you download the update, run the setup file in order to install it.

Once the update is installed, your system will be updated to the latest version and the issue will be resolved.

Keep in mind that this solution won’t fix the core problem, instead, it will just allow you to download and install the update manually and circumvent the issue.

5. Restart BITS services

Background Intelligent Transfer Service (BITS) is an essential service for Updates. On some occasions, due to various reasons it can crash and stop working.

What you need to do is restart the service and see if there is an improvement in the Update protocol.

  1. Press Windows key + R. In search line type services.msc and press Enter.
    0x80080008 Server 2016
  2. Look for Background Intelligent Transfer Service (BITS) and double-click it to open its properties.
    Windows update failed
  3. If the service isn’t running, click the Start button.
    0x80080008 Server 2016
  4. Choose Recovery tab and make sure that First failure and Second failure are set to Restart service.
    Windows update failed
  5. Confirm selection and check for updates.

That gets the job done for some users. However, if you are still prompted with the error, move on to the next solution.

6. Boot in a Safe Boot mode

On some occasions, the background programs and their respective processes can slow down or even prevent an update. So, try tweaking out your services and startup to prevent the possible conflict.

  1. Press Windows Key + R and enter msconfig. Now click OK or press Enter.
    Windows update failed
  2. Go to Services tab and check Hide all Microsoft services box. Then click Disable All and click Apply.
    0x80080008 Server 2016
  3. Go to Startup tab and choose Open Task Manager.
    Windows update failed
  4. Disable all Startup programs individually.
    Windows update failed
  5. Restart your PC and try updating.

You should be able to find and download available updates after this workaround.

7. Perform an in-place upgrade

According to users, sometimes your only way to fix this problem is to perform an in-place upgrade.

In case you’re not familiar, an in-place upgrade will force Windows 10 to install the latest version while keeping all your files and applications untouched.

To perform an in-place upgrade, you need to do the following:

  1. Download Media Creation Tool and run it.
  2. Select Upgrade this PC now and click Next.
  3. Wait while the setup prepares the necessary files.
  4. Now select Download and install updates (recommended) and click Next.
  5. Wait for the updates to download.
  6. Follow the instructions on the screen until you reach Ready to install screen. Click on Change what to keep.
  7. Select Keep personal files and apps and click Next.
  8. Follow the instructions on the screen to complete the installation.

Once the process is finished, your Windows will be updated to the latest version and the problem should be permanently resolved.

Done. Have in mind that you can use workarounds presented in this article for multiple errors, not just the one we addressed today.

In case you have any questions or suggestions, the comments section is below.

Windows Update Error Code 80200056: 3 Quick Fixes

Time has shown us that upgrading to Windows 10 isn’t going as smoothly as planned. A lot of users receive various error codes that prevent them from downloading and installing Windows 10 normally.

One of these errors is error code 80200056, which prevents users from downloading Windows 10. In this fix guide, we’re going to help you solve this problem.

Error 80200056 means that your Windows Update service requires data from the online server, in this case, Microsoft’s servers, but it doesn’t get any response.

This could happen if Microsoft’s servers are overloaded, but it also could be system-related. If Microsoft’s servers are the problem, all you can do is wait.

However, this error code also appears if you accidentally restarted your computer or lost the internet connection while downloading the Windows 10 update.

So, in order to download and install Windows 10, you have to delete the corrupted update files and then run the update process again, from scratch.

How can I fix the error 80200056?

1. Remove corrupted update files

So first, you need to delete the corrupted Windows 10 update files, which became damaged once you interrupted your update process. To delete these corrupted files, do the following:

  1. Go to the following folder: C:WindowsSoftwareDistributionDownload folder and delete everything in it.SoftwareDistribution
  2. Restart your computer.
  3. Now, right-click on the Start Menu button and open Command Prompt (Admin).
  4. Enter the following command and press Enter: exe/updatenow.
  5. Go to Windows Update and check if you’re able to download Windows 10 now.

If you’re still unable to download Windows 10, even after performing this fix, then something’s wrong with Microsoft’s servers.

So you should wait for a little until Microsoft’s developers have fixed everything. After that, you’ll be able to install Windows 10 normally.

On the other hand, if you don’t want to wait for Microsoft’s servers to start functioning again, there’s one thing you can do. You can head over to Microsoft’s website and download the official ISO file with the installation of Windows 10.

Since you were able to install Windows 10 through Windows Update, you probably have a genuine version of Windows 7 or Windows 8.x.

This means you’ll be able to install Windows 10 from the ISO file without any limitations. Just download it, create an installation media and install the system.


2. Use DISM

  1. Open Start Menu, type in the search box Command Prompt, right-click on it and select Run as administrator.
  2.  After the Command Prompt opened, insert the following commands and press the Enter after each one:
    –DISM.exe /Online /Cleanup-image /Scanhealth 
    -DISM.exe /Online /Cleanup-image /Restorehealthcommand prompt dism
  3. Exit the Command Prompt window
  4. Restart the computer and check if your problem is solved.

3. Run the Windows Update troubleshooter

Another quick way to fix update problems is to run the Windows Update troubleshooter. You can launch it either from the Settings page or Control Panel.

Wait for the tool to complete the scan and fix your update issues and then restart your computer. Try to install the problematic update again.

windows update troubleshooter


I hope this article helped you with the error code 80200056. If you have any other working solutions for us, don’t hesitate to share them in the comments section below.

You may be notifying and manually start the procedures, or even disable Windows Update completely.