There are different reasons RuneScape might not load. From problems within your PC to interference from another app, the causes are numerous. Below are some of the common ones:
Outdated drivers
Compatibility issues
Firewall interference
Problems with your version of the game.
Why is RuneScape stuck at loading application resources?
RuneScape will be stuck at loading application resources if you use a second screen connected via an HDMI cable. This is because the client and the loading screen must share the same monitor for the game to load properly.
The only way to fix this issue is to close the client, unplug the HDMI cable, and connect it back once the client finishes loading successfully.
How can I get RuneScape to load again?
1. Temporarily disable antivirus/firewall
If you have an antivirus or any firewall activated on your PC, it might be causing RuneScape not loading on Steam. This might create a false alarm and stop the game from connecting to its server.
In this case, the easiest way to fix the issue of Old School or the normal RuneScape not loading is to disable the antivirus software temporarily. After the game has established a connection, you can enable it again.
2. Update the graphics driver
2.1 Update driver manually
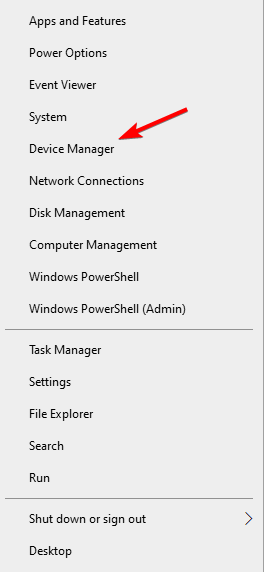
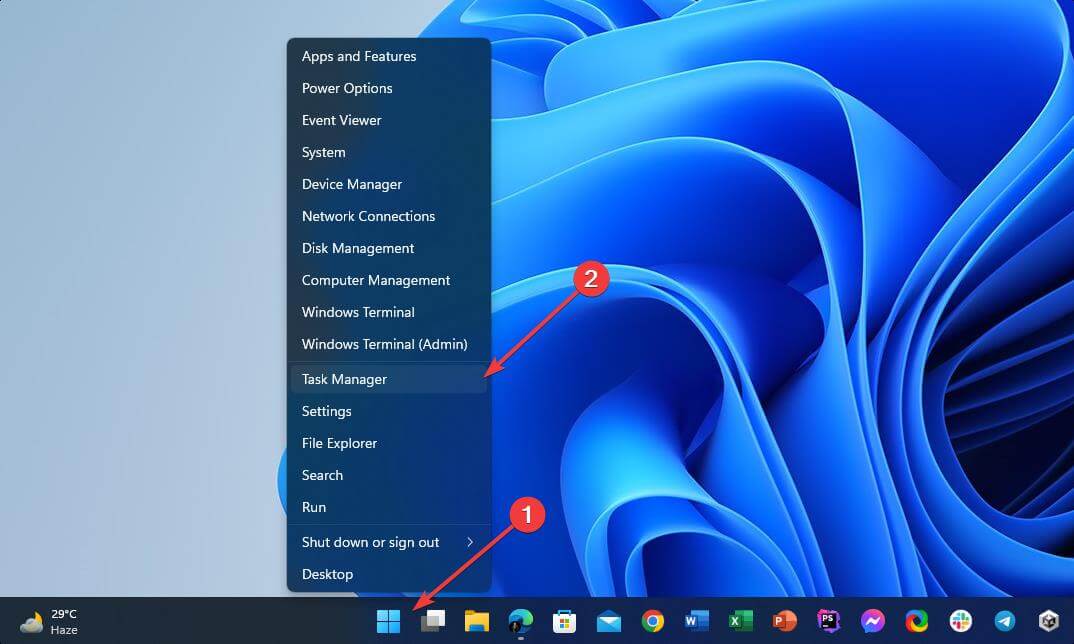
Press the Windows+ Xkeys and select Device Manager.
Click on the Display adapters option to expand it.
Right-click on any driver there and select the Update driver option.
Choose the Search automatically for drivers option.
Wait for the search to complete and update the driver if there are any.
Outdated drivers cause RuneScape not loading issues accompanied by a black screen. This manual driver update should help restore normalcy.
Instead of going through the numerous steps above to search and install a driver update, you can automate the process with a driver updater in Fortect Driver Updater.
This tool is a top-notch software that automatically scans, updates, and fixes drivers. Whether outdated, broken, or missing drivers, this tool keeps them all in top shape.
And with a very large database of original drivers, you can be sure it has everything you need to fix RuneScape stuck on loading, please wait, and other related issues.
Check the box for Run this program in compatibility mode for.
Finally, click the Apply button followed by OK.
This fix is effective if RuneScape is not loading after an update on your PC.
The RuneScape not loading can be exasperating, as the cause can sometimes be difficult to pinpoint. With the fixes recommended in this guide, you should be able to get the game working again.
A while ago, Firefox and Chrome users complained about sec_error_ocsp_future_response on the Mozilla forum. Unfortunately, this is still not in the past.
It seems then the error code: sec_error_ocsp_future_response pops out when users try to open webpages in Firefox and Chrome.
As frustrating as it may be, there are still ways to circumvent this error and we will explore them in the guide below. So, read on and discover how to fix sec_error_ocsp_future_response on Windows 7, 10, and 11.
What does Sec_error_ocsp_future_response mean?
This error occurs if the OCSP response isn’t valid. This can happen if there are problems with date and time on your PC.
The full error message states that the the OCSP response is not yet valid (contains a date in the future).
An error occurred during a connection to. The OCSP response is not yet valid (contains a date in the future). Error code: SEC_ERROR_OCSP_FUTURE_RESPONSE.
In this guide we’ll show you how to fix sec_error_ocsp_future_response in Firefox and Chrome, so let’s get started.
Quick Tip:
If you have trouble opening web pages in Firefox on a permanent basis, you should consider switching to Opera One.
Based on the impressive core features this browser has to offer, it’s safe to say you won’t be bothered by sec_error_ocsp_future_response again. The video pop-up, built-in VPN, integrated messenger, and My Flow are just some of its biggest enhancements.
Opera One
Looking for a fast and reliable browser with a redesigned UI? Suit yourself right away.
How to fix error code Sec_ error_ OCSP_ old_response?
1. Update the browser
OpenFirefox.
Click Firefox’s Open menu button. Click Help to open further menu options.
Select the About Firefox option.
Press the Restart to update Firefox button.
Error code: sec_error_ocsp_future_response can be triggered when users run an outdated version of the browser. Make sure you follow the steps we described above to bring Firefox up to date.
If you’re on Chrome, do the following:
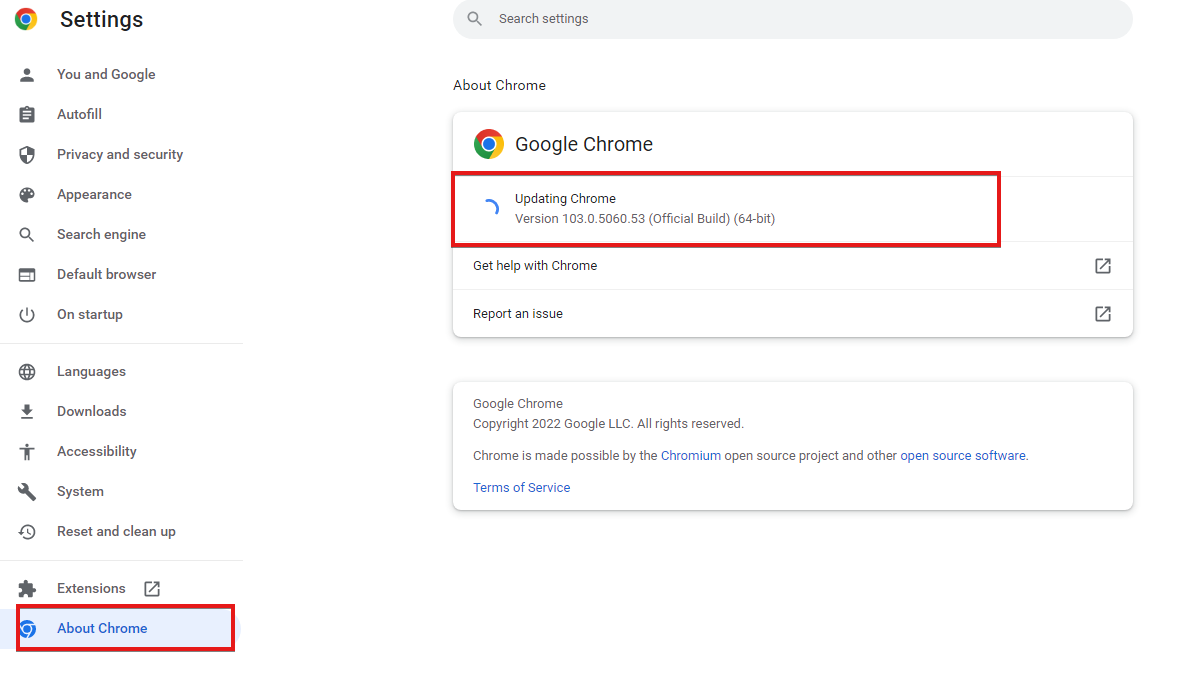
Click the menu button and select Help. Now choose About Google Chrome.
Wait for the updates to download.
Restart your browser.
2. Check the time and date in Windows 10
Press the Windows key + S keyboard shortcut.
Enter the keyword time in the search box. Click Change the date and time.
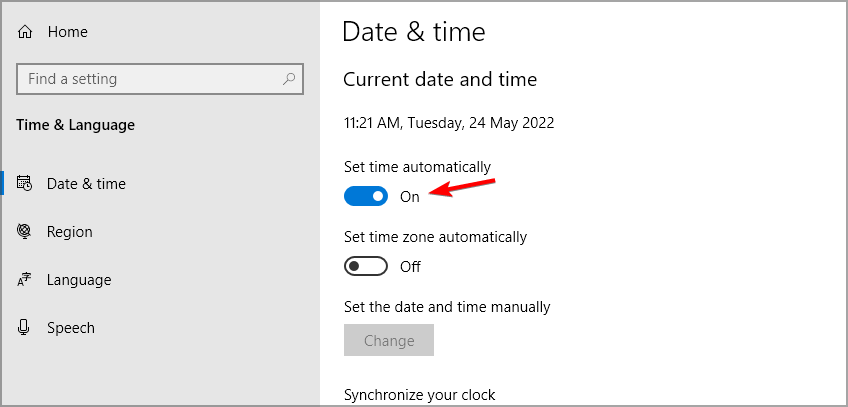
Turn on the Set the time automatically option.
Restart your desktop or laptop.
Click the Change button to manually adjust the time and date settings.
Press the Change button, and restart Windows.
The ocsp response is not yet valid (contains a date in the future). error code: sec_error_ocsp_future_response message appears if the date or time on your PC is wrong, so update it to fix this issue.
Note: You might also need to replace your PC’s CMOS battery if the date and time keep changing in Windows. You can do that by removing the old CMOS from the motherboard, but some users might prefer to hand their PCs to IT repair services to replace CMOS batteries.
3. Turn off OCSP verification
Launch Firefox.
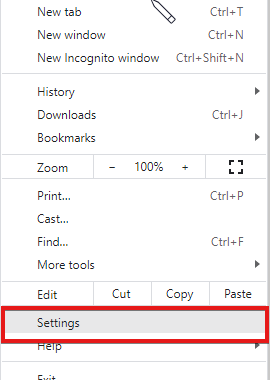
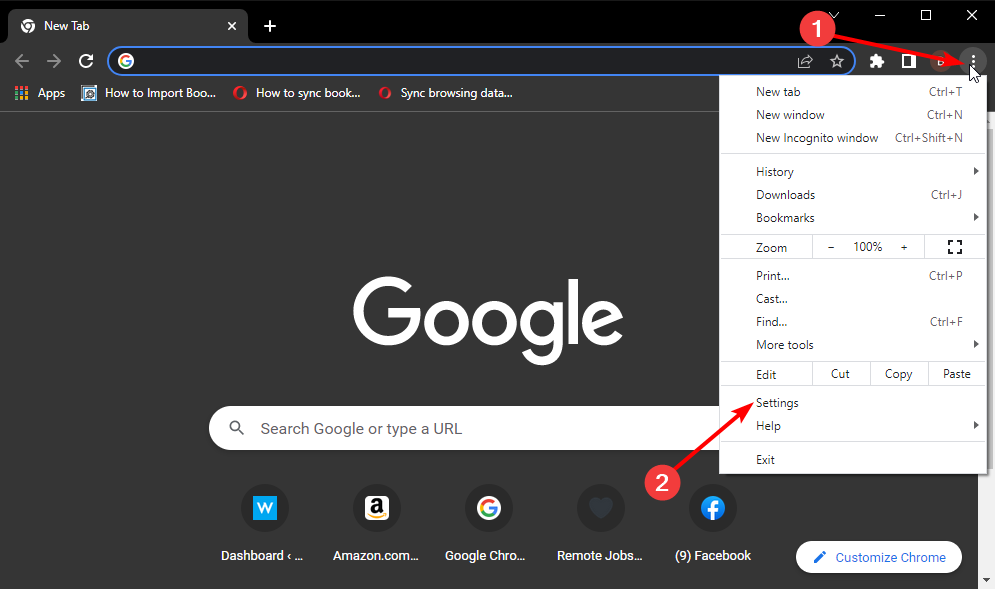
Click the menu button and select Settings.
Click Privacy and Security on the left of the tab. Scroll down to the Query OCSP responder servers to confirm the current validity of the certificates option and disable it.
Close and restart Firefox.
One way to circumvent the Unable to check ocsp response due to network error is to disable certain security features in the browser, so you might want to try that as well.
By following these steps, you should be able to completely fix the SEC_ERROR_OCSP_FUTURE_RESPONSE error in Mozilla Firefox.
Discord is the best web-communication tool that you can use to communicate with friends and family members.
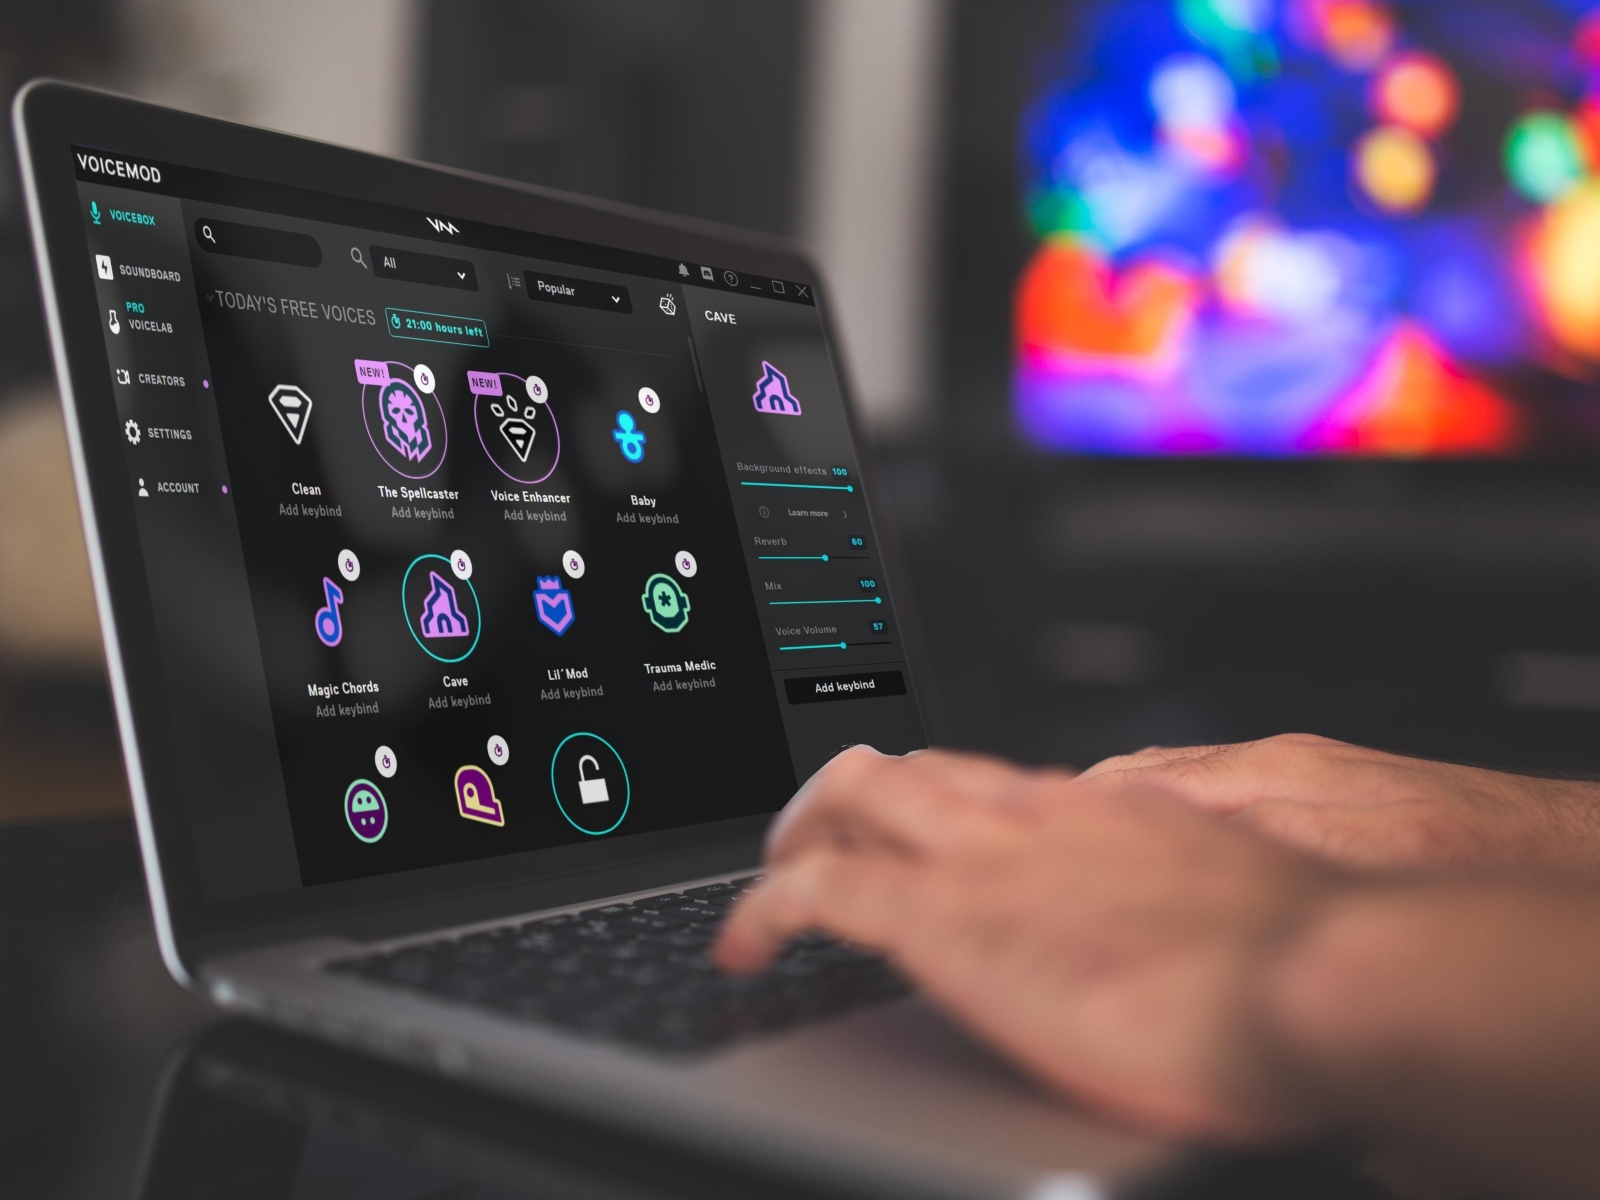
With multiple mods, you can even enhance your voice chatting features on Discord. One such mod is Voicemod.
Voicemod is a free voice changer that lets you change your voice by applying filters that bring the fun factor while voice chatting with your friends. Do note that there is an extensive list of voice filters from which you can choose within Voicemod.
However, Voicemod is known to misbehave often, and sometimes it won’t work at all with Discord. Several users have experienced Voicemod not recognizing the mic issue.
This prevents users from using the voice filters using the mod and, hence, makes the chatting on Discord a little less fun.
If you are one of such users and are looking for solutions to fix Voicemod not recognizing mic issue, then you are in the right place.
Because in this guide, we will explain to you all the features that will help you fix the problem at hand. Let us check out the guide.
How to add Voicemod to Discord?
Visit the official Voicemod website and download the app.
Install the app on your PC.
Verify your account by login in using your email ID, Twitch ID, or Discord ID.
On the homepage, Voicemod will ask you to select your default Select your microphone, and Select your speaker. Do the necessary selections.
Now open the Discord app.
Click on the Settings icon.
From the left pane, select Voice & Video.
Under the INPUT DEVICE option, select the Microphone (Voicemod Virtual Audio Device (WDM)) and select your headphone as your OUTPUT DEVICE.
Then it will open the Voicemod app.
You will be asked to do some tweaks under Discord User Settings, i.e., disable Input Sensitivity, Noise Suppression, Echo Cancellation, Noise Reduction, and Automatic Gain Control.
After you do all the above-said tweaks, you can use the Voicemod voice changer application with your Discord app and have some fun chatting with your friends by applying voice filters.
How can I fix Voicemod not recognizing mic issue?
1. Restart your PC and app
The first simple solution that we would advise you to try out to fix the problem is to simply restart your PC.
There are chances that the settings that you have chosen with the Voicemod or Discord app did not really apply to these apps, and they require a restart.
In such a case, you can turn off your PC, and wait for about 10 seconds before booting it back up again. Also, you can try to close the Voicemod and Discord apps and open them back again to check if this resolves the Voicemod not recognizing mic issue.
2. Set up your input device properly
Press Win + I keys together to open Settings.
Select Sound.
Scroll down and under the Input section, select the correct microphone device.
Open Control Panel.
Click on Sound.
Switch to the Recording tab.
Make sure to enable the correct microphone device.
Restart the Voicemod application and check if this fixes the Voicemod not recognizing mic issue or not. Similarly, make sure to select the correct output device under the Playback tab.
Under the APP SETTINGS section in the left pane, click on Voice & Video.
Under the INPUT DEVICE option, select the Microphone (Voicemod Virtual Audio Device (WDM)) and select your headphone as your OUTPUT DEVICE.
In order for Voicemod to work correctly with your target app, you need to configure it appropriately. The best part is that whenever you download Voicemod, it prompts you to perform the settings for it to function correctly.
Follow the above steps to select the correct input device in the target application, and check if Voicemod is working as intended or not.
Furthermore, if you are facing any microphone or audio-related issues with Discord, you can check out our dedicated guides Is the Discord mic not working in browser/app, or Can’t hear anyone on Discord? [3 Easy Solutions] for quick fixes.
4. Reinstall Voicemod drivers
Press the Win + R keys to open the Run dialog.
Type the below command and press Enter. devmgmt.msc
Expand the Audio inputs and outputs section.
Right-click on the Microphone (Voicemod Virtual Audio Device (WDM)) and select Uninstall device from the pop-up menu.
Your system will check for any available updates and prompt you to install it if found any.
Your PC may not function smoothly and may display multiple errors, including the Voicemod not recognizing mic issue, due to a system glitch or bug in the current version of the Windows update.
In such a case, we would advise you to check for a fresh update and install it. Microsoft typically upgrades its operating system on a regular basis, including the most recent security features and bug fixes.
6. Reinstall Voicemod
There are chances that the previous instance of Voicemod installed on your PC did not install correctly and missed a few important files during the process.
To rule out this doubt, you can uninstall Voicemod from your PC, head over to the official website, and download the latest version of Voicemod.
Follow the on-screen instructions to install the app on your PC and connect with your target app, such as Discord, and go through the steps mentioned above to set it up and finally check if this fixes the issue or not.
Voicemod can’t hear myself: How to quickly fix it
There are several user reports on various forums and Reddit that indicate that they cannot hear themselves in Voicemod.
Since it has been reported by multiple users, it does seem to be a pretty serious issue. While there is no perfect solution to fix this, as users have fixed it by applying different solutions, we have a few effective tips that may help you fix the problem, if you haven’t already fixed it.
➡ Turn off mic-exclusive mode
Launch Voicemod.
Go to Settings.
Expand Advanced settings.
Turn off the toggle for MIC EXCLUSIVE MODE.
➡ Contact customer support
As a last resort, for any of your Voicemod-related problems, you can get in touch with its customer support and hopefully get your query resolved.
You can visit this official support page, select the topic of the query, enter your issue, along with your name, email address, country, etc., and expect a reply from their end for a solution.
Business laptop bags tend to be boring, black, and boxy. In an ocean of similar-looking bags, they will not win you any points for personality and style.
But let’s be honest, in this day and age, you don’t want to be embarrassed about carrying a nasty laptop bag around.
This is the exact reason for which we have selected a series of well-made, trendy, and smart business laptop bags for traveling. A great laptop bag can make traveling to your next business destination a bit less stressful.
The tech-savvy bags we’ve got prepared below mean business when it comes to organizing and protecting your stuff. These models will amaze you as they’re not only useful but incredibly stylish as well.
What are the best business laptop bags that I can buy?
Topping off our list is a business bag that looks simple and yet has a bit of elegance to it without sacrificing utility at all.
It is made with durable, water-resistant canvas, and together with the inner padding, it is excellent for protecting whatever you are carrying in it, including a laptop.
Speaking of which, if you want it as a dedicated laptop bag, know it can handle any model up to 15.6-inch in diagonal.
If you are looking for a business laptop bag that won’t draw too much attention and focuses on utility, then the Ytonet laptop bag is the model you need.
It has plenty of pockets, the interior is very roomy, and it can be further expanded via a zipper that will allow you to fit even more things inside.
It is also very padded for extra protection from whatever you are carrying, and the water-resistant material makes it great if you’re caught in the rain.
Sometimes brand-name products are not worth the money since the logo is pretty much what skyrockets the price, so Amazon basics are a great alternative.
This is also the case with the 13 best business travel laptop bags, as it is an incredibly affordable option for those who really need a laptop travel bag but have a tight budget.
However, this bag isn’t wrong at all, as it has all the essential features that you would expect from such a product, and they are surprisingly well-built, too.
Business laptop bags don’t all have to be black, serious, and plain, especially if you’re a lady who likes to treat herself just right.
The EaseGave briefcase is the epitome of what it means to be elegant, cute, and functional simultaneously, thanks to the Vintage Purple Saffiano Eco-leather build.
It is great for work and school, and its design allows it to double as a regular bag as well, not just a bag for laptops or documents.
CoolBELL is at the cutting-edge of fashion trends. The company pursues the best quality in laptop bags and is devoted to offering the best products to its customers.
This laptop bag features three carrying styles. You can use it as a backpack, shoulder bag, and messenger bag. The straps can also be hidden when you use them as messenger and shoulder bags.
Here are the complete bag specifications:
Size: 18.8 x 5.1 x 13.7 inches; Fits laptops up to 17.3 inches.
This CoolBELL laptop bag for business traveling features two main compartments designed for keeping your laptop/tablet and other items.
The accessory compartment features pockets inside for keeping items like power cords, mice, keys, phones, passports, etc. The three front pockets have a zipper.
The bag is perfect for keeping your items safe thanks to the two layers of shockproof solid padding.
Users are very satisfied with the bag’s quality. The only setback identified by some users is the bag’s aspect was deemed a little strange. However, we really like the overall design of this laptop bag.
This business travel laptop bag has a classic look that will definitely turn heads. It is made out of Full Grain Napa Calfskin Leather.
The bag features a front zipper pocket for small miscellaneous items, and a front zipper organizer pocket for pens, business cards, and small devices.
The front zipper compartment features two sections for documents. The back zipper compartment features a padded laptop compartment that holds and protects most laptops up to 15.6 in size.
Users confirmed that this bag is an excellent product. Buyers appreciated especially the leather that the bag is made of.
This bag is made out of high-quality thick top oil leather and you should also know that it’s handmade by professional artisans. Every inch is inspected to ensure the highest standard of quality.
Here’s a brief list of the bag’s specs:
It has one laptop compartment inside
Dimensions:38(L)*11.5(W)*30.5(H)cm /15*4.5*12 Inch. Net Weight:1.48KG
It will fit 14″ Laptop,100% Brand New & Top Quality
You can wear it as a daily life bag, business or traveling bag, and so on
The bag’s price is around $150, a medium price for its value
Business traveling can be hard without ensuring the safety of your items, and the Vintez Fireproof Document Bag certainly takes care of that.
It has a size of 14.2×10.6×4 inches, and it comes with a lock, file organizer bag, home office travel safe bag, two fire, and water-resistant zippers, and multi-layered portable filling storage for documents and laptop.
The fireproof, waterproof bag has plenty of space and has three compartments to store all your documents, cards, passports, money, certificates, and electronics.
Vintez’s bag comes with a 4-layer non-itchy silicone-coated fiberglass that passed the SGS TEST (UL94 VTM-0 certified) for fire and water hazards.
The exterior material of the bag is made out of super durable water-resistant nylon fabric, and the inner material is soft fleece.
Here are the product’s specs:
External Dimensions: 15.83 x 1.18 x 11.26 inches, 40.2 x 3x 28.6CM (L x W x H).
Package Dimensions: 17 x 12.5 x 1.5 inches
Item Weight: 1.4 pounds
It is great for the most popular up to 15.6 Inch Laptops / Notebooks / Ultrabooks; it may not fit perfectly all computers due to variations in the sizes of different models.
Check out some of the bag’s key features and advantages:
Its sleek design lets you carry it with ease, and it gives you a light business fashion experience.
Its top handle can hide away and retract into the pocket, and the luggage belt from the back provides the function of fixing on the luggage trolley.
The bag is universal, and it is not designed for a particular model. But you should check your laptop’s dimensions and ensure it will fit into the internal compartment.
Most users are delighted with the product, judging by their reviews. They especially appreciate its water-resistant feature.
This Lifewit bag features some unique crazy horse leather that becomes nicer with age. Its rugged and scarred styling gives off a vintage and timeless appeal.
Check out more features of this bag below:
The messenger bag’s exterior is water-resistant, and it will manage to protect the stored items from rainy weather
The heavy-duty shoulder strap and the top carrying handle offer multiple ways of carrying
The ample storage capacity will safely secure everything from tablets, laptops, tablets, cables, documents, wallets, and so on
Its great functionality, coupled with the timeless unisex design, will make the messenger bag an ideal companion for men and women in business and casual settings
Here are the bag’s specs:
Materials: Waxed canvas & Crazy horse leather
Color: Gray
External Dimensions: 43 x 32 x 10cm/16.93 x 12.6 x 3.94in
Laptop Compartment Dimensions: 40 x 24 x 4cm/15.75 x 9.45x 1.57in
Adjustable Shoulder Strap: 27.5 – 50.5 inches
The laptop pocket on the back of the backpack can hold computers of up to 15″ in size. The integrated anti-collision isolation pad protects devices against impacts from bumps and drops.
This Viosi business laptop bag is the only product from its class that is certified by TUV Germany for RFID shielding for all standard frequencies. It keeps your credit cards safe from identity thieves.
The manufacturer used a new and improved leather treatment to eliminate color transfer. It is made from the finest selection of full buffalo hides, offering maximum strength and minimal stretch.
The bag’s specs are the following:
Exterior: it has 2 Large Front Pockets: 10.5″ x 6″, 3 Pen Holders, 1 Passport Slot with Button Snap: 4.50″, 1 Front Pocket: 3.40″
Interior: it has 2 Pen Holders, 1 Pocket: 6″ x 4.50″, 1 Pocket: 3.50″ x 4.50″, 1 Zipper Pocket: 9.50″ x 7″, 1 Padded Laptop Holder with Velcro Strap: 16″ x 12″
Large Exterior Zipper Compartment: 11″ x 8″
Overall: 16″ x 12″ x 3″
Item Weight: 5 pounds
The bag includes a ten-year, no-fussle warranty by the California-based family business.
This was our list of 13 business laptop bags. We bet that one matches your taste and style these, so find it and get it while it’s still in stock.
Every aspect of your outfit is crucial, and this naturally includes your accessories, starting from your shoes and finishing with your laptop bag.
You can now carry your electronics with style, and you have plenty of options. Get your favorite business laptop bug and go beyond the boring traditional laptop bags.
If you think a backpack would be more suited for you and it also happens to game on your laptop, you can check our best laptop backpack for travel, maybe you’ll find what you are looking for.
Pokemon is a top-rated franchise with games on multiple platforms. And, there are many Pokemon browser games available that you must try, both free and paid options, though we will be focussing on the former here.
With there being so many options available, it often becomes difficult to find the best Pokemon game, and that too, one that doesn’t consume considerable resources and can be played online.
In this article, we’ll show you how to play a Pokemon browser game easily from your computer without downloading.
Is there a free online Pokemon game?
There is not one but several free online Pokemon games. Most of these would work well on any PC especially when you’re experiencing server issues with games like Pokemon Home on your phone.
Many online platforms have a dedicated section for Pokemon games, and you will find many titles displayed there.
Also, we have listed some of the best platforms to play Pokemon games on your browser:
You can try them all out or choose the one that seems best and play Pokemon online.
How can I play Pokemon on my computer browser?
Open your web browser, and go to the Crazy Games website.
Choose a title from the ones listed here.
Click on the Play Now button to start.
The process is more or less the same for all Pokemon browser games. Some might require you to first register on the platform using an email address.
For the best in-game performance, it’s advised to use a proper browser, such as Opera GX for example.
This browser is focused on gaming, and it comes with features that limit the amount of CPU, RAM, and bandwidth your browser uses.
By limiting the bandwidth and resource usage, you can rest assured that other processes are running smoothly in the background.
The browser has a GX corner that allows you to be updated with the latest news from the gaming industry. There’s also an integrated messenger, which can be useful during gaming sessions.
Additional features include a built-in ad blocker, free unlimited VPN, and a pop-out video player. Due to its low hardware requirements, Opera GX will be perfect for all your gaming needs, so try it out.
Opera GX
If you love playing Pokemon browser games, then might s well play them in a browser that will make you feel like a real gamer.
Playing Pokemon games in your browser is incredibly simple, and you can run the game in less than a minute without it occupying any space on your computer. In case you’re having issues with some games, we have a guide on how to fix Pokemon Home error code 400, and error code 10104 so don’t miss it.
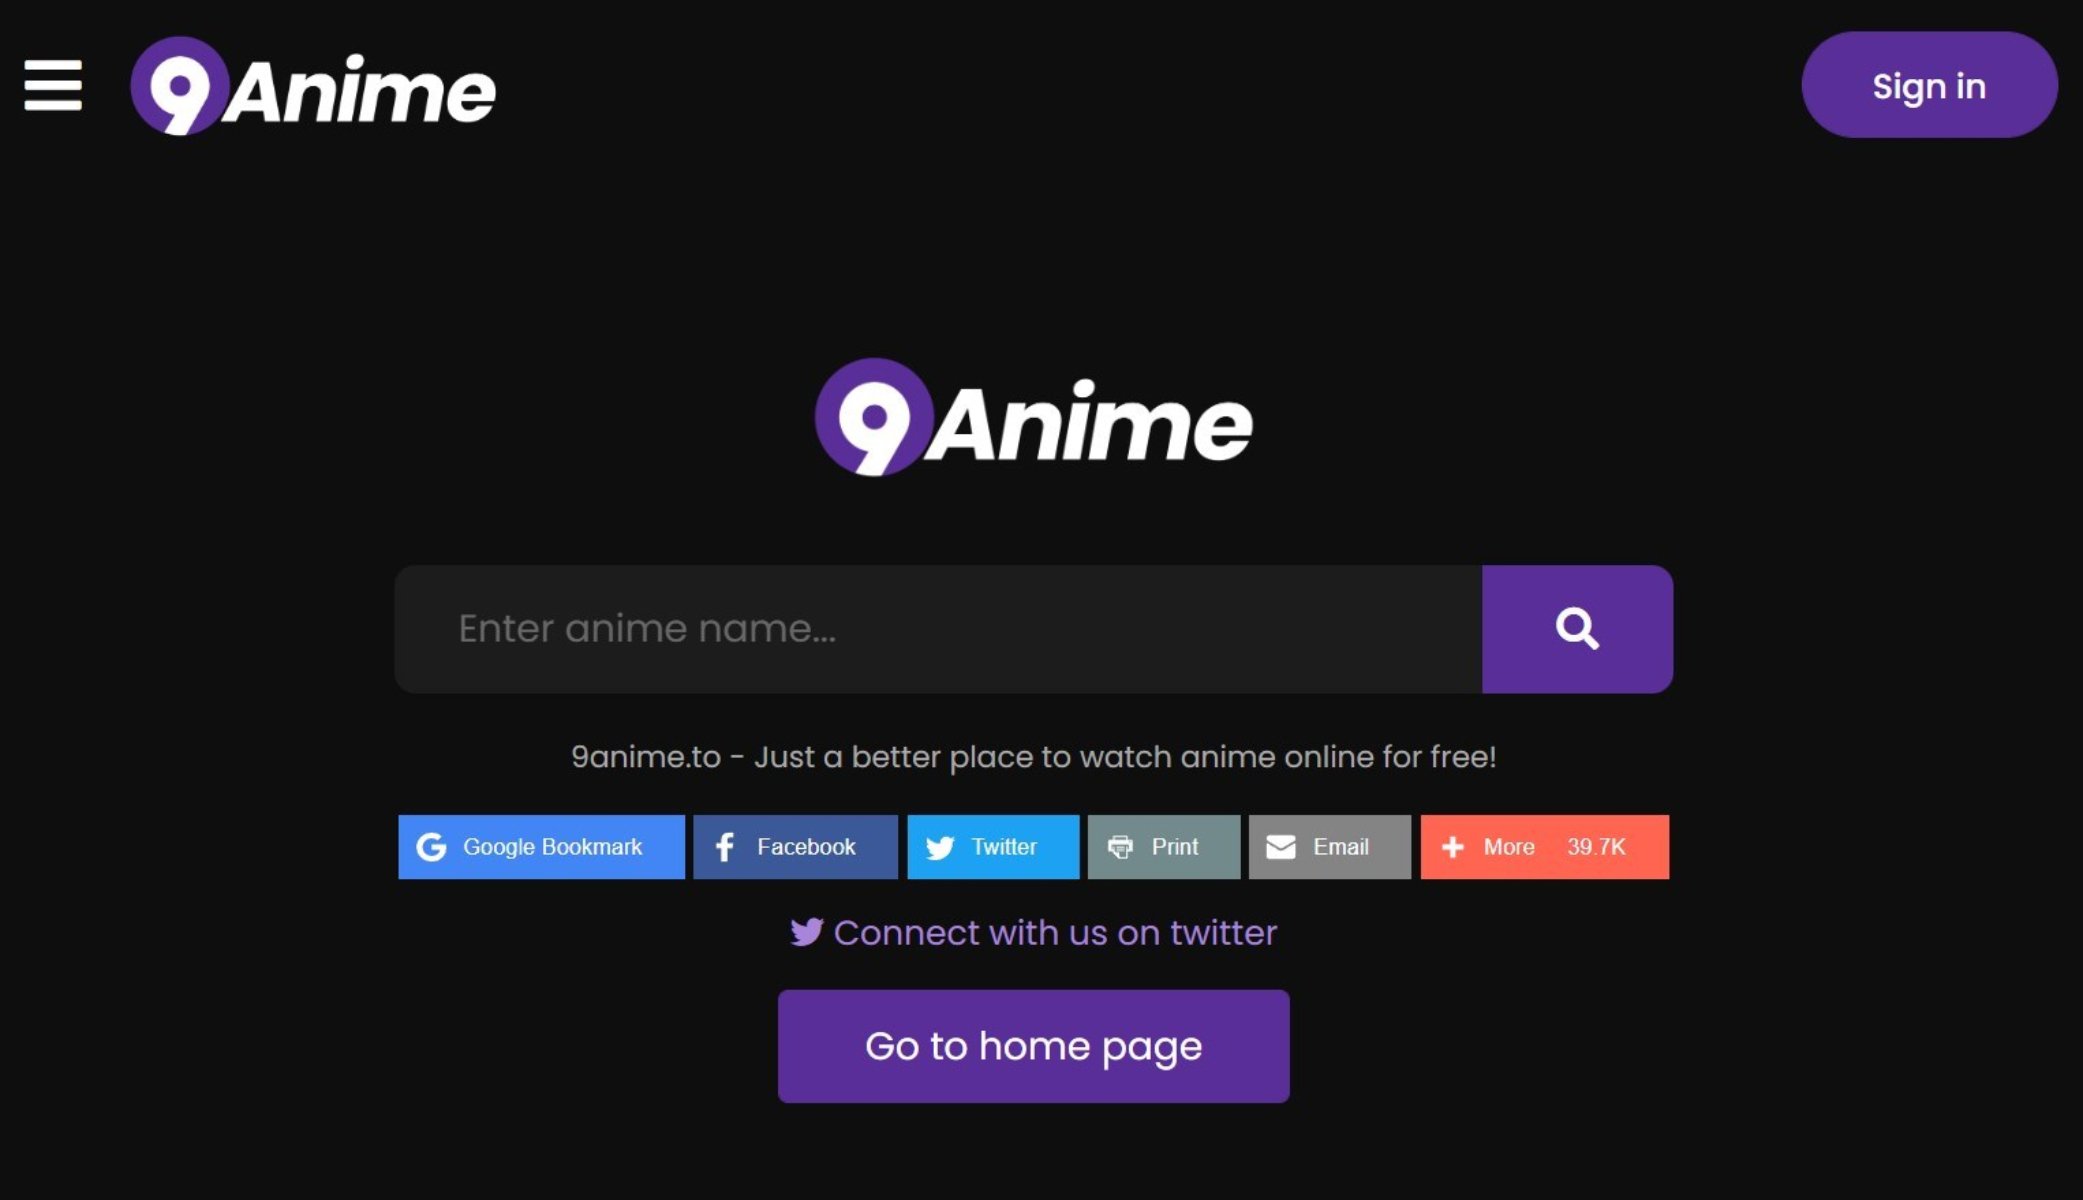
If you love watching anime online, then 9Anime is the best streaming website. It gives you access to a bunch of exciting animes to watch for free.
The website, which was launched in 2016 has come a long way since its launch and also offers HD quality anime streaming. Moreover, you can watch animes from various genres such as action, comedy, demons, historical, school, romance, and much more.
9Anime keeps itself up to date with the latest releases so that you have the latest episode available to watch for free.
However, during the process of updating or due to some technical glitch, you may come across multiple issues when streaming 9Anime.
Google Chrome users, especially, have reported that for them 9Anime is not working, preventing them to watch their favorite anime online.
The errors come with different error code numbers, but the fact of the matter is that 9Anime is not working for users on Google Chrome. If you are also one of such users and are looking for solutions, then you are in the right place.
Because, in this guide, we will give you solutions to fix 9Anime not working in Chrome issue. Let us check out the guide.
Why is 9Anime not working on Google Chrome?
It is the burning question that we have on our hands. Understand this in a way that since 9Anime is a free website and does not hold any rights to the content that it publishes on its websites, it has to source content, i.e., anime from various sources.
One of the reasons 9Anime is not working on Chrome could be because the original creator of the anime might have caught 9Anime and blocked the website.
There are some other reasons that might trigger 9Anime not working on the Chrome issue, which we have listed below:
Ad blockers are conflicting with the website and treating the streaming window as a false positive and blocking it.
9Anime servers may be down because either the website is refreshing with new content or there are some technical difficulties that they are trying to fix.
The browser data, i.e., cookies or cache data might be corrupt.
The Google Chrome browser is not up to date.
Your internet connection isn’t stable.
How can I fix 9Anime error 502 / 521 / 522 / 404 issue?
1. Check 9Anime server status
Often issues related to 9Anime are server-related and they can pop up anytime. They might be undergoing maintenance or having some issues.
In any case, you will see a 9Anime page showing you a server issue error or any error code containing the error message.
You can check the official Reddit page of 9Anime or the official Twitter handle, to check if the website is experiencing any issues or undergoing any refresh. Till that time, all you can do is wait for some time before loading the page back again.
For a complete set of quick fixes that cover all common errors, see our full guide on 9anime not working.
2. Turn off or delete Adblockers
Launch Chrome.
On the top-right toolbar, click on the Adblocker extension.
Turn off or Pause the adblocker and check if this fixes the 9Anime not working on Chrome issue or not.
Alternatively, you can right-click on the Adblocker extension icon.
Select Remove from Chrome.
Again press Remove to uninstall the extension from Google Chrome.
Simply restart the browser and check if this fixes the issue or not. Adblockers, no matter how effective they are, often trigger false positives and can cause multiple issues with websites, especially streaming websites.
Since they block video ads as well, sometimes adblockers may block the content that is streaming. In such a case, you can either disable or pause the adblocker or uninstall it from your browser to see if this fixes the 9Anime not working on Chrome problem.
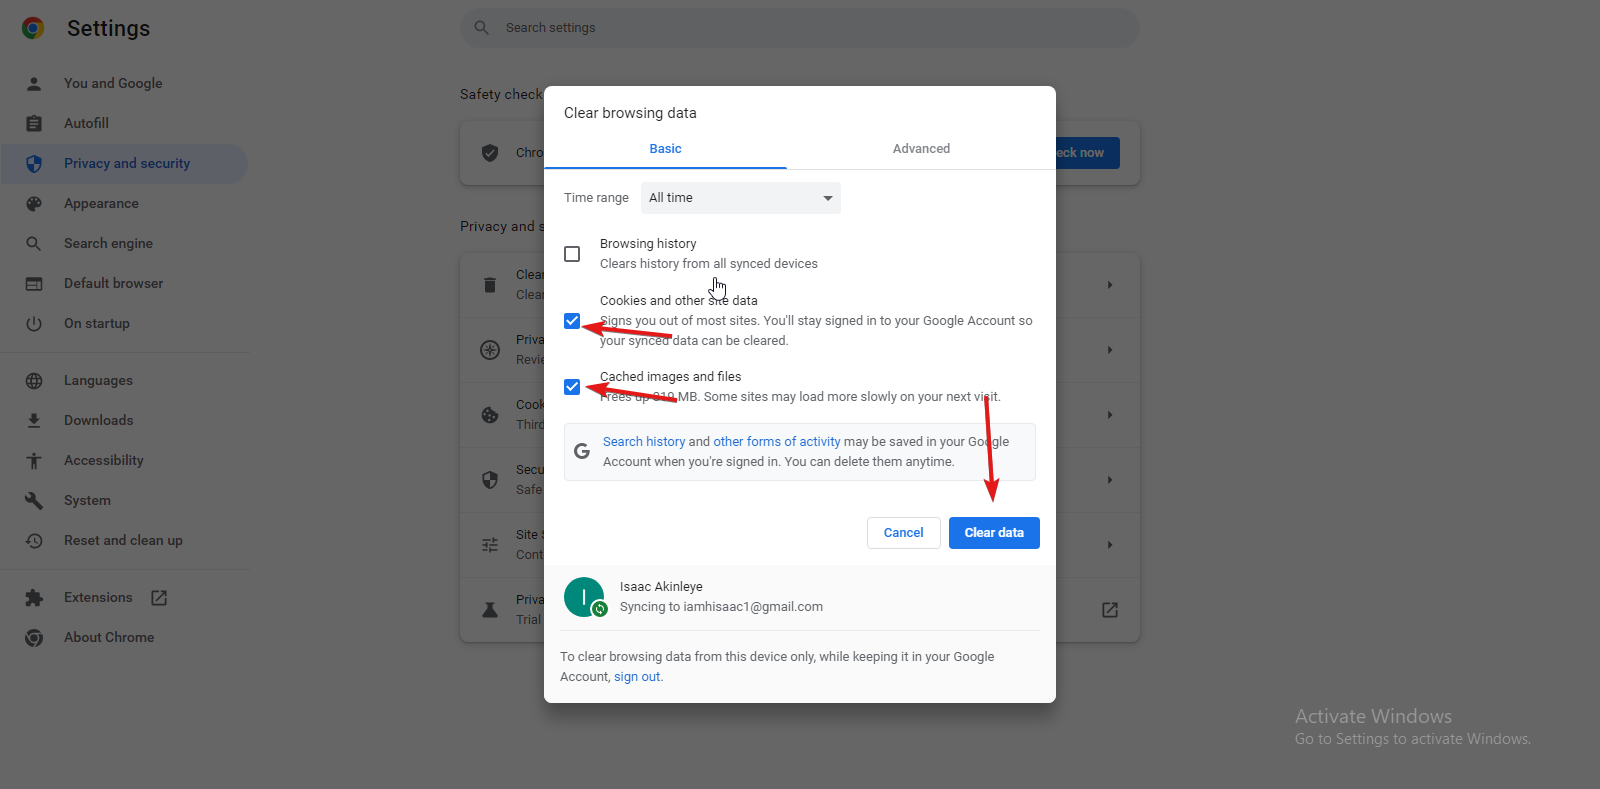
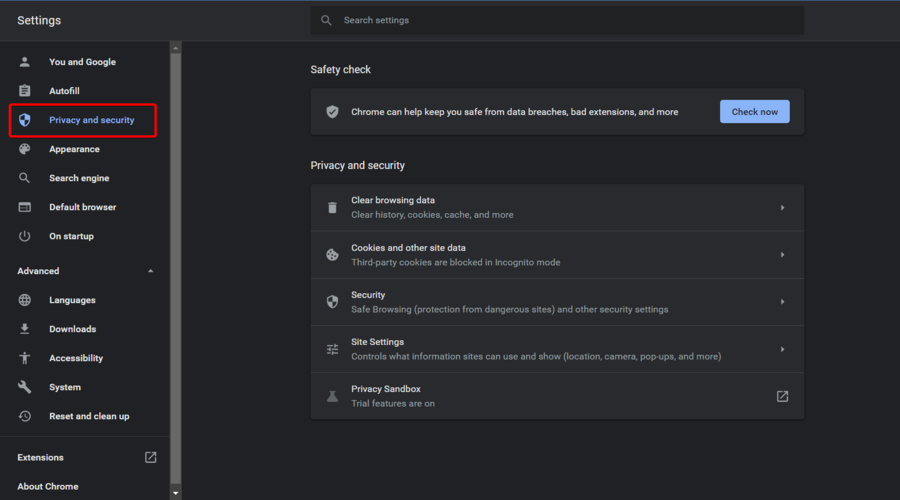
From, the left pane, select Privacy, and Security.
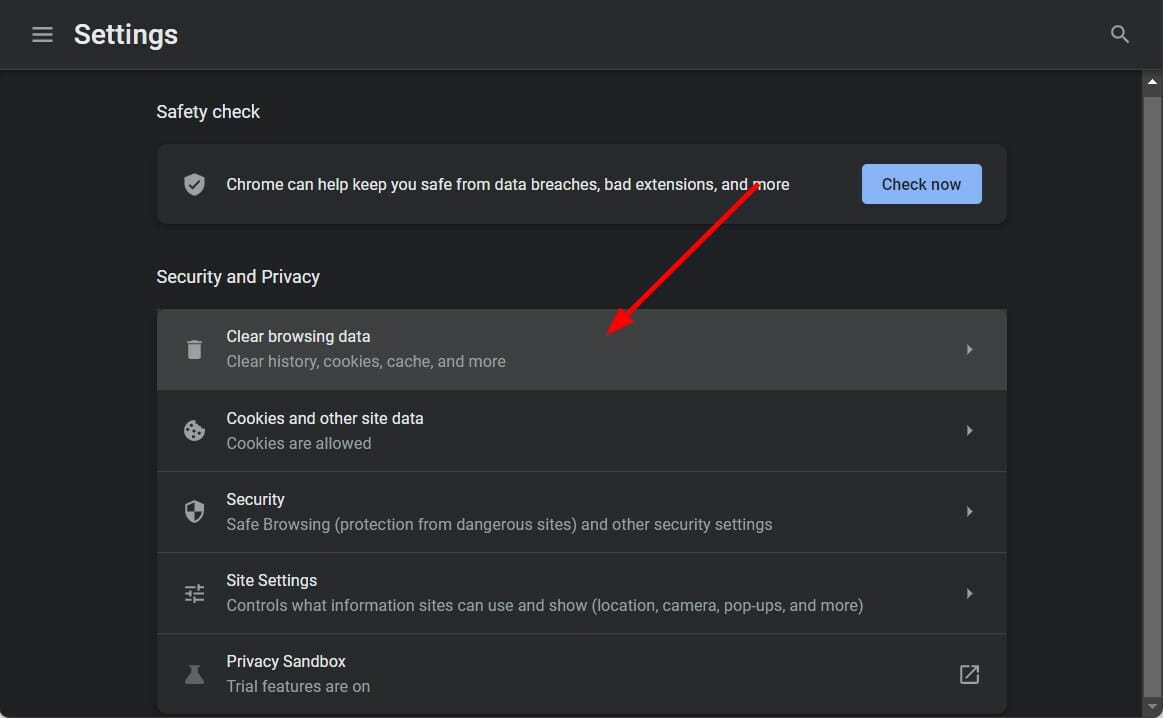
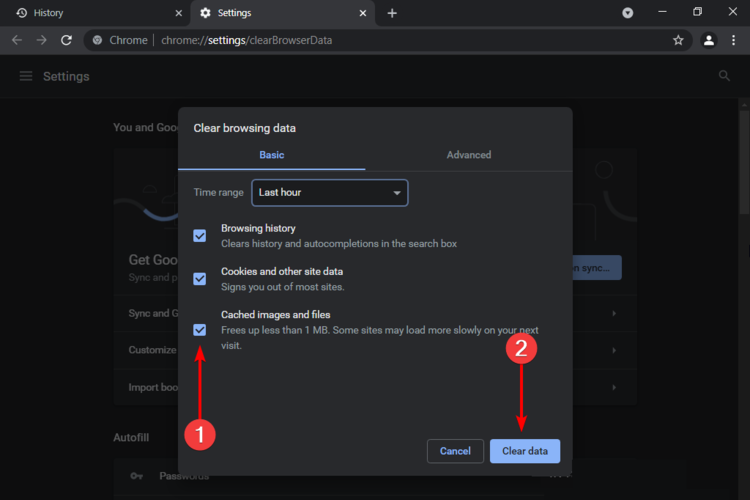
Select Clear browsing data on the right side.
Check the boxes next to Cached images and files and Cookies and other site data.
Hit the Clear data button.
Cookies and cache data are temporary files that browsers store for all websites to load all the personalized settings and options.
However, if this cache and cookies get corrupt, these can pile up and cause the browser to malfunction. In such a case not only with 9Anime but you will come across errors with other websites as well on Chrome.
So, we would advise you to follow the above steps and clear the browser cookies and cache data and check if this fixes the 9Anime not working on Chrome issue or not.
How can I fix 9Anime DNS error?
Apart from multiple 9Anime error messages with error codes 502 / 521 / 522 / 404, you will come across a specific issue known as 9Anime DNS error.
While you can follow the above steps and try to fix the problem, there are a few more solutions that can possibly help you fix the 9Anime DNS error in case the above solutions don’t work.
➡ Restart your router or modem
The issue with the DNS configurations of your router is the main reason you could come across a 9Anime DNS error.
A simple restart of your router or modem will fix this problem, and will also refresh the internet settings.
A temporary glitch might be causing the issue with 9Anime. In such a scenario, we would advise you to simply refresh the web page and wait for it to completely load.
➡ Switch to a different browser
Since several user reports are regarding 9Anime not working on Chrome, you can always switch over to a different browser and see if the error exists in those browsers as well.
If you are confused about which browser to choose for your PC and to stream content from 9Anime, you can check out our best browsers for Windows 11 guide.
➡ Try Other 9Anime Mirrors
9Anime is blocked by some ISPs. This is the reason why you are not able to access the website, while your friend with a different ISP is able to stream 9Anime content.
Do not worry, as there are multiple 9Anime mirrors, that you can opt for and check which one works for you. Check out the list of the best 9Anime mirrors:
9anime.to
9anime.id
9anime.pl
9anime.tv
That’s it from us in this guide. We hope the above solutions helped you fix the 9Anime not working on Chrome issue and you got back to streaming your favorite anime on 9Anime.
Additionally, if you are facing similar problems on other streaming platforms, you can follow this guide to fix HiAnime not working with step-by-step solutions.
Although Java applets have been disappearing from the web, some websites still have them. So, some users might still encounter an error message that states, Your browser does not support Java.
Fixing this error message is simpler than you think, and in this short guide, we’ll show you the best methods to fix it.
Java applets used to be required to correctly open web-based pages. Most browsers already had the Java applet built-in and all computers used to have the Java application installed.
The technologies have however evolved and many browsers started implementing more modern technologies to enable an even better web experience.
For this reason, Java applets are no longer used, but the Java application is still available for personal use and may come in handy in some situations.
Which browsers still support Java?
The most notable browser that still supports Java, is Opera One. By using this browser, you will have built-in Java support.
Why did browsers stop supporting Java in the first place if it’s such a good program? This is a topic that many of you have asked, and we think it’s safe to say that it’s a question that has merit. They did not, in any case.
Java is a web technology that continues to enjoy massive popularity. The plugins, on the other hand, are a very other matter. Because of safety concerns, the plugin architecture of the vast majority of current browsers has been extensively rethought.
Java plugins are susceptible to viruses, and hackers often take advantage of this feature to inject harmful code into your system in a way that is undetectable by the sentinels that protect it.
However, this does not imply that each and all Java plugins or material written in Java is a ticking time bomb ready to go off.
If you aren’t using a browser that supports Java, you will get the Your browser does not support Java error message or one of the variations below:
Your web browser does not support Java, which is required to launch this course
Please login with a Java-compliant browser and try again
If you see this you don’t have a Java-enabled web browser
Here’s a picture of what you are missing
Cannot display applet
Your browser does not have Java enabled or it does not support it
The visualization runtime could not be started
The browser does not support Java
The Java plug-in is not installed or the applet could not be loaded
Your current browser version no longer supports Java
You may choose to either use designfor digital signing or any browser version with Java support for DSC
This browser does not support applets
What can I do if the Java browser is not supported?
1. Your browser does not support Java Edge
Click the three-dot menu in the top right corner and choose Settings.
Click Default browser on the left side of the tab.
Select Always on the Let Internet Explorer open sites in Edge drop-down menu.
Turn on the Allow sites to be reloaded in Internet Explorer mode option. Finally restart Edge to solve the Your browser does not support Java issue.
2. Your browser does not support Java Internet Explorer
Click Internet Explorer’s Tools menu button then select Internet Options to open that window.
Select theSecurity tab on the Internet Properties window and press the Custom level button.
Then scroll down to the Scripting of Java applets setting and Enable it. Select OK to apply the new setting.
Click Trusted sites on the Security tab.
Reduce the Allowed levels for this zone bar to Low then click the Sites button.
Enter the URLs for the webpage the Java not supported error arises to, and click the Add button.
Click Close to exit the Trusted site window and select Apply in order to save the changes made.
Once you make these changes, check if Your browser does not support Java message is still shown.
3. Your browser does not support Java Opera One/Chrome
Open the IE Tab extension page in a Chromium-based browser such as Opera One or Chrome and click on the Add to Opera One (or Chrome) button.
Select the Add extension option to confirm.
Next, click on the IE Tab extension button. An ietabhelper.exe will download when you click that button.
Double-click the ietabhelper.exe and select Run to complete the IE Tab extension installation.
Thereafter, you can click the IE Tab button to open a page with the Internet Explorer rendering engine. Click that extension button for webpages the Java support error arises.
After doing that, check if Your browser does not support Java message is still there. The IE Tab add-on is available for the Google Chrome web browser, as well as other Chromium-based browsers.
Users are granted the ability to view webpages using the MSHTML browser engine when the extension is installed. This may be used to see sites that will only display correctly in Internet Explorer or will not operate at all in any other browser.
NOTE
The latest Java version still needs to be installed and enabled for Java content to work in Chromium browsers with the IE Tab extension.
4. Your browser does not support Java Firefox
Open the Uninstall Java Versions webpage in a browser and click the I Agree to the Terms and Want to Continue button on that page to download the Java Uninstall Tool.
Open the Java Uninstall Tool’s window and select the Agree option.
Next, select a listed Java version and press the Next button to uninstall the selected Java version.
Then double-click on the downloaded Java installer to reinstall the latest Java.
You can also thoroughly uninstall outdated Java versions with dedicated PC cleaner software. There’s a certain tool designed to remove any unwanted software in one click.
Moreover, rest assured that it cleans up the leftovers as it includes a registry cleaner as well.
As we have already mentioned, not all browsers support Java anymore and you will have to either use a third-party extension or tweak your settings to get your browser to support Java. The same goes if you get the Your current browser version no longer supports Java error message.
Don’t worry if you will have to change your browser to another one, as exporting your bookmarks is easier than ever before.
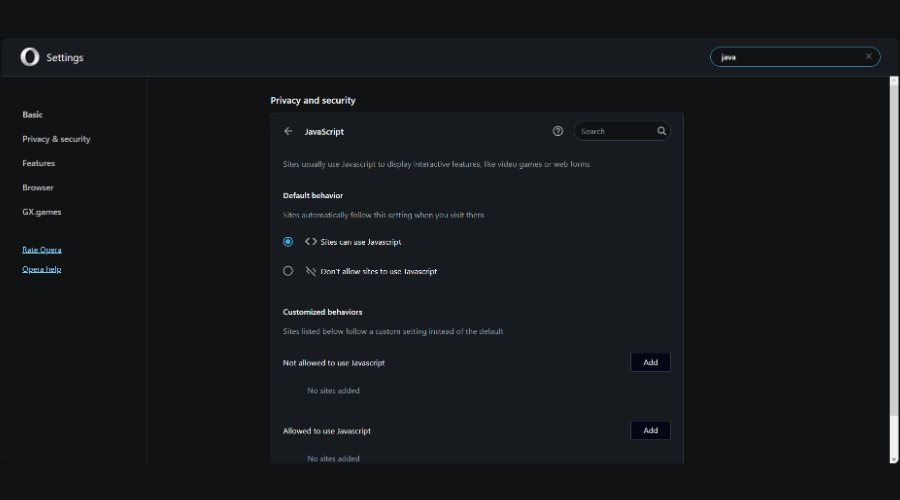
We recommend you check out our article on how to enable Java support inside the browsers that have the option to do so.
So, that’s how Internet Explorer and non-IE users can feasibly fix the Java not supported browser error. With that error fixed, websites will then run Java applets without any issues.
Online security is an invaluable part of the everyday web-browsing experience. Chrome, for example, has a quite strict policy on downloads, especially the EXE files, which are mostly installation packages.
Speaking of which, sometimes your antivirus blocks EXE files, in order to prevent malicious files from affecting your PC.
It’ll make sure to inform you that, well, the program you’re trying to obtain is possibly a virus and can cause inexplicable damage to your system.
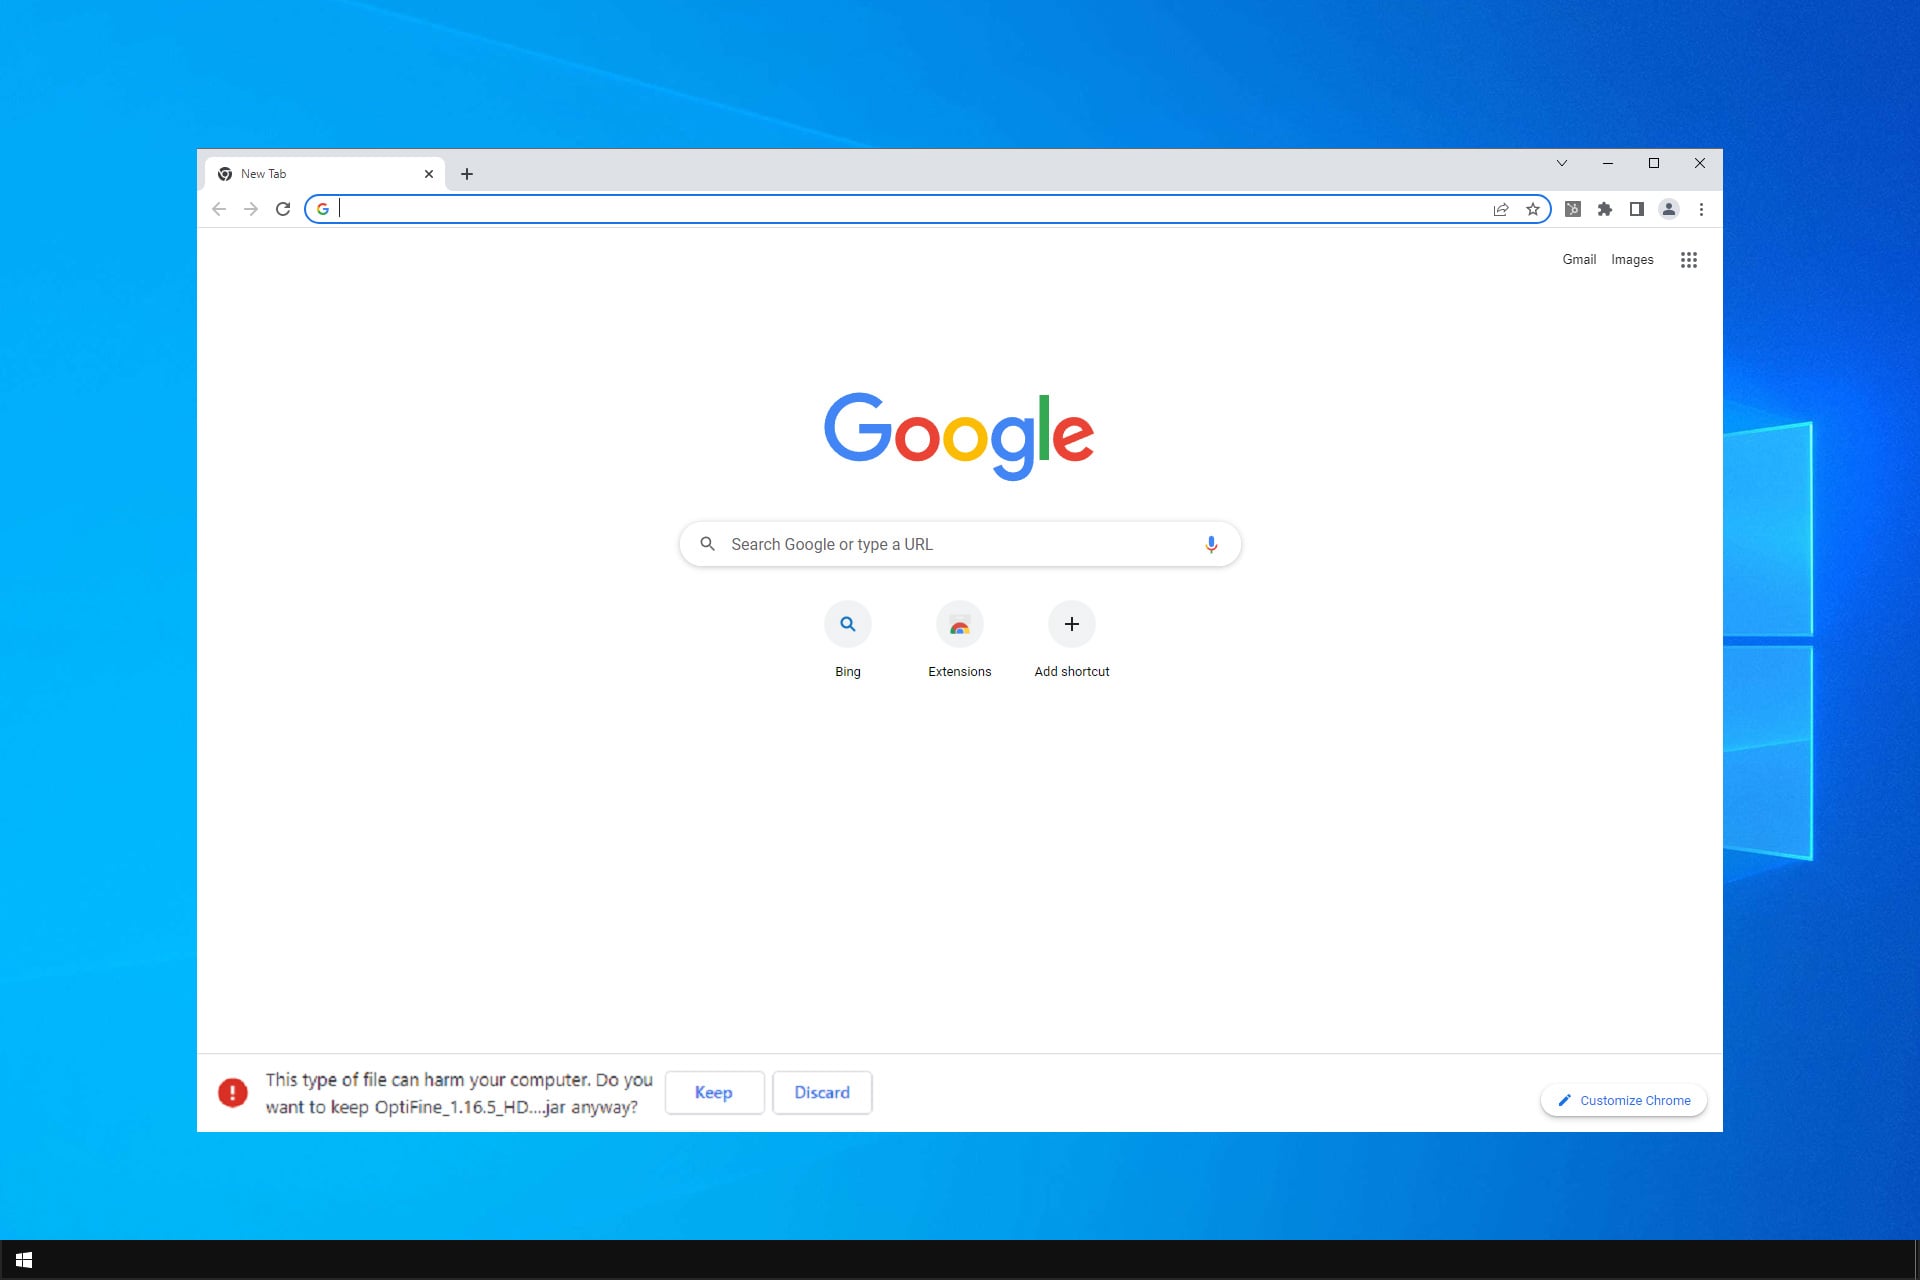
But, the ”This type of file can harm your computer” message can get on your nerves after some time, especially when you’re certain that the installation file comes from a trusted source.
If you’re downloading files frequently and the file’s extension triggers an annoying prompt message, this might help you. So make sure to check out the explanation below.
The fixes listed in this article will also prove helpful if you are experiencing any of these issues:
This type of file can harm your computer: This is a common message, and it appears if you download an unverified file.
Chrome this type of file can harm: Chome has its own file scanner, and if a suspicious file is detected, you’ll get this message.
This type of file can harm your computer turn off: It’s possible to turn off this notification. Sometimes you might get false positives, so many users choose not to use this feature.
This type of file can harm your computer Chrome: As previously mentioned, this is a standard message in Chrome, and it’s designed to inform you about malicious files.
This type of file can harm your computer. Do you want to keep: Messages such as these will give you a choice to keep a file or remove it. If you think that the file is safe, you can keep it, and if it’s not, you can block the download.
Was blocked because this type of file can harm your device Chrome: Some files will be automatically blocked since they don’t come from reliable sources.
What is file might be harmful?
This is just a security warning that appears when you try to open certain files. Usually, this happens when you try to open files that you downloaded or transferred from another PC.
This issue occurs due to your security settings, and it can be fixed simply by adjusting them.
Quick Tip:
Use a browser that offers strong online security without annoying, false alerts. Opera One is a great option, with built-in website filtering.
Not only that, but the browser is able to detect potentially harmful files and boosts your privacy using its anti-tracking and VPN features.
Opera One
Use trustworthy security features and browse without worries about online threats.
Bottom line is, you can’t disable this feature. You can merely tweak the download settings in order to avoid it.
But, then again, it might be easier to confirm that the suspected file is indeed non-harmful than to enable Ask where to save each file before downloading. If you’re downloading multiple files in a succession, this isn’t the way out.
With that, we can conclude this article. We hope that you managed to fix This type of file can harm your computer on Windows 10/11.
Pinterest is a great website to share images on, allowing users to set up boards that include an image collection. As such, it’s a visual bookmarking tool for saving pictures directly from the web. However, users are demanding a way to batch download Pinterest images.
Unfortunately, it doesn’t include an option to batch download images in order to save them to a hard drive folder. Something like this would come in handy for users with lots of photos to keep.
Nevertheless, you can still download all images from a Pinterest board with a few browser extensions and desktop software.
Are images from Pinterest copyright free?
Pinterest has a license for the material on its site that is both non-exclusive and transferable on a global scale. This indicates that others will be able to share and store any material that is submitted on that platform.
However, this only applies to Pinterest. It does not imply that you are permitted to copy stuff from there and publish it elsewhere.
Whether you are not absolutely positive that the picture may be shared (for example, if you have permission from the owner or if it is in the public domain), you should refrain from sharing the image anywhere else on the Internet.
The protection afforded by copyright is crucial for the integrity of any original work of writing. Any kind of creative expression may fall under this category. If you have developed anything and represented it in a definite form, you immediately acquire ownership rights under copyright law.
Can you copy images from Pinterest?
You are only permitted to repin photos on Pinterest. This means that you cannot duplicate them to use them on another service/platform.
Due to the fact that you are solely responsible for everything that you publish on Pinterest, you run the risk of infringing on someone else’s intellectual property rights if the picture you’re repinning was uploaded to Pinterest without the author’s consent.
Quick Tip:
You should consider using a lightweight and fast browser like Opera One. You’ll make sure you’ll be done with the task without errors.
Plus, the Download all images extension in the Opera One add-ons shop allows you to download any image from a web page, including full Pinterest boards.
Opera One
Quickly download whole Pinterest boards with handy in-browser add-ons!
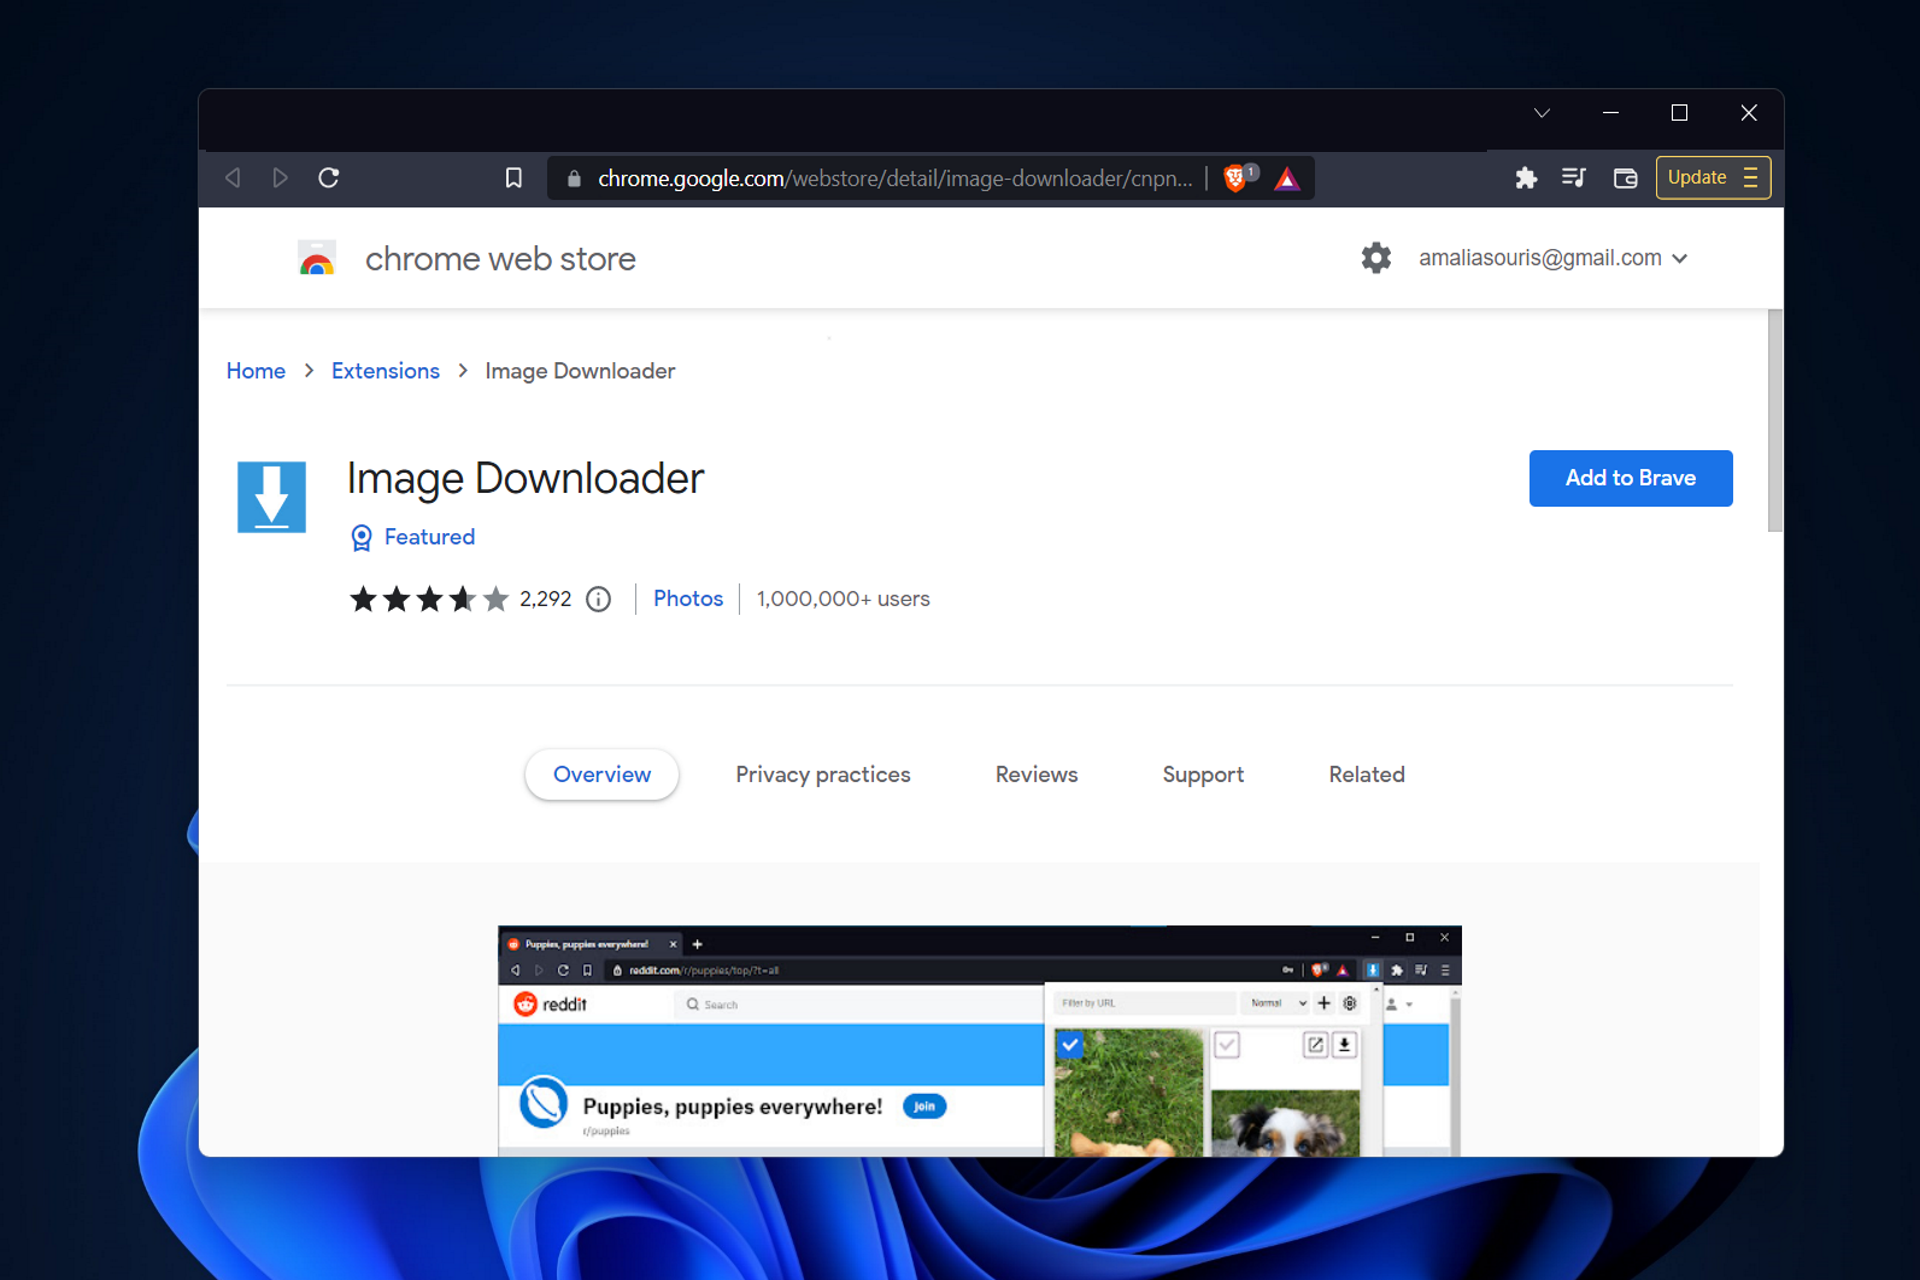
In order to batch download Pinterest images in Chrome, open the image downloader web extension and click on Add to Chrome. Image Downloader adds the extension shown directly below to Chrome’s toolbar.
Open one of your boards on Pinterest.
Click the Image Downloader button on the toolbar to open the extension.
Doing that displays all the pictures on the page, including those saved to your Pinterest board. To filter out images that aren’t saved to your board, enter media cache in the Filter by URL text box.
Select the Pinterest board thumbnail images displayed there with the cursor, or click the Select all option instead and press the Download button to save the selected photos to your folder.
You can edit where they download to by entering an alternative subfolder in the extension’s path text box. To further configure the extension, you can right-click its toolbar button and select Options.
The first extension to note is ImageDownloader for Google Chrome. This is an extension that enables you to select multiple images on website pages to download in a single batch.
To download multiple Pinterest images, navigate to the PinDown extension to add the extension to your browser and configure Chrome’s settings before using the PinDown tab that opens. (Note that you’ll also need to restart the browser after installing PinDown.)
Open one of your Pinterest boards in Chrome, then, the PinDown toolbar icon will include a small number highlighting how many pinned images an album includes as shown directly below.
Click the PinDown extension button to save the album to your HDD.
You can enter an alternative title for the Pinterest picture subfolder in the text box shown to you. However, you can’t enter alternative folder paths for the subfolder.
Press the Let’s rock! button to save the Pinterest board to the download folder.
If you wonder how to use PinDown, we’ve got you covered. PinDown is a Google Chrome extension that enables you to download a full image collection within a Pinterest board. You can download up to 250 pictures per album with PinDown Free, with no restrictions in the full version that retails for $0.99.
3. Use Image Picka
In order to batch download Pinterest images in Firefox, navigate to the Image Picka add-on and press the Add to Firefox button to install the add-on, then restart the browser.
Open your Pinterest board in Firefox and click the Pick Images button to open the extension’s window as below.
Press the Show All button to include all the album’s images. Then, you can select the board pictures to download.
Press the Browse button to choose a folder directory to save the files to, then click Save to download the Pinterest album.
PinDown and Image Downloader are Chrome extensions, but Firefox users can batch download Pinterest pictures with ImagePicker.
This extension is pretty similar to Image Downloader as it enables you to select multiple pictures on a page and download them in a batch.
Although PinDown and Pinterest Downloader only support Pinterest.com and Instagram.com, you can batch download pictures from any site with Image Picker and Image Downloader.
How do I convert my Pinterest boards to PDF?
Open up your Pinterest board then right-click anywhere in the window to choose Print.
Next, select Save as PDF under the Destination option and click Save.
This is how you can save your boards as PDF files. Furthermore, you might be interested in learning how to use the Pinterest Windows app and download it as well.
You won’t need a web browser to use the Pinterest app that’s available in the Windows 10/11 Store since it provides access to the popular site. Simply said, it is a wrapper that, once installed, will deliver the service or website in question right to your desktop in a matter of moments.
It goes without saying that you’ll need a Pinterest account in order to make use of it, but you probably already knew that. Without a genuine account, the website won’t even function properly, so you’ll have no choice but to keep plugging away at it.
If you have any other suggestions or questions, don’t hesitate to leave them in the comments section below.
As a casual Windows 7 user thinking of Internet Explorer 11, let us tell you from the start that you can follow the links below to download the RTM version to your 32 or 64-bit version of Windows 7.
The preview version of Internet Explorer 11 has been released in June, last year, but Microsoft’s browser has been officially launched along with the Windows 8.1 introduction.
Actually, for those who don’t know, Internet Explorer 11 is included by default in Windows 8.1 and comes with a lot of optimization for touchscreens.
Even if it’s an older browser, there are ways to continue using Internet Explorer on Windows 11, and we covered that in a separate guide.
Windows 7 is still a popular OS choice, so the RTM version of Internet Explorer 11 is appreciated by its users worldwide.
What is the latest version of Internet Explorer 11 for Windows 7?
Although Internet Explorer has been discontinued, you can still download it for Windows 7 right from Microsoft’s website.
As for the available version, the latest one is 11.0.0.4, so keep on reading to learn how to download IE11.
Can I still use Internet Explorer after 2022?
You can still use Internet Explorer after 2022, but Microsoft is working hard to retire it completely, so you the official support won’t be available in the upcoming years.
As a result, Internet Explorer will become unsafe to use, so it’s recommended that you switch to a different web browser that is regularly maintained.
Quick tip:
You can use a new-age browser that is still receiving updates, then rest assured that Opera One is a great choice for you. An up-to-date browser means better Internet security.
The browser comes with a free VPN and Ad-blocker, not to mention that it has one of the fastest and most liquid UI. Plus, it comes with integrated messengers and web apps for those in need.
Opera One
Launch this modern browser on your Windows 7 PC without functionality issues.
After doing that, the download should start automatically.
Once the file is downloaded, run it and follow the instructions on the screen to complete the process.
If you’re looking for a 32-bit version, here’s the 32-bit version of Internet Explorer to download. Keep in mind that Internet Explorer 11 for Windows 7 32-bit requires a Service Pack 1, so be sure to install it.
You can also use Internet Explorer 11 for Windows 7 32-bit/64-bit offline installer, the official page is available, but it lacks the download links, so we doubt that you can use it.
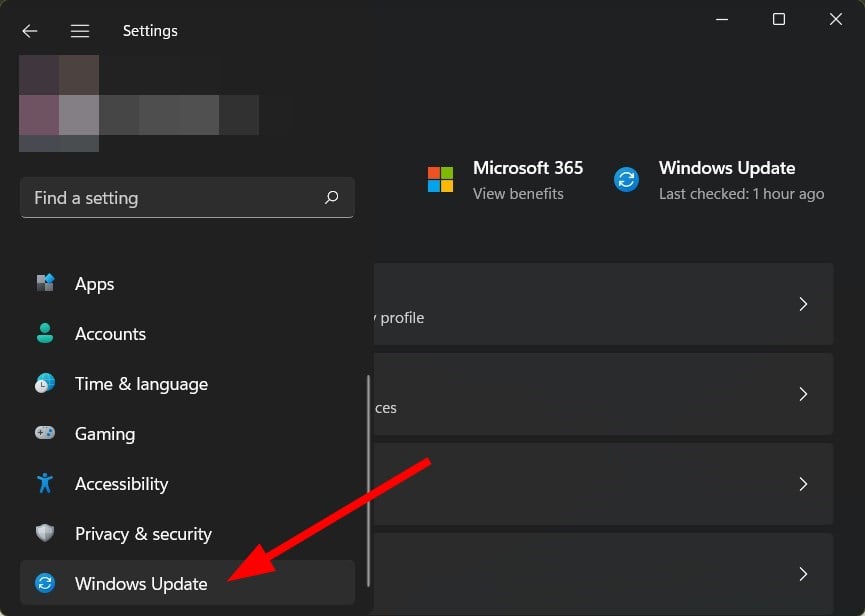
2. Use the Windows Updater
Open the Windows Start Button.
Type Update in the search box, select Windows Update from the results, then press Enter.
Click Change Settings on the left pane.
On Important Updates, select that you want them.
Then, under Recommended Updates, select that you want them delivered to you the same way as the Important Updates.
Fortunately, for those who already have an old version of Internet Explorer installed on their operating system, there is an easier way.
If you have Windows Update ticked to deliver automatic updates, then you are supposed to get the latest version automatically. Make sure to enable automatic updates by following the aforementioned steps.
Why can’t I install Internet Explorer 11?
If you can’t install Internet Explorer 11, check if your system is compatible. Currently, you can install IE11 on the following systems:
Windows 7, 32-bit/64-bit with Service Pack 1 (SP1), or later
Windows Server 2008 R2 with Service Pack 1 (SP1), or later
In addition, you need to ensure that you have all the prerequisite updates installed. It’s also important to install the correct version, and you won’t be able to install the 64-bit version on the 32-bit operating system.
Lastly, if you have previous versions of Internet Explorer, uninstall them and then try installing the latest version.
Internet Explorer used the be the most used browser as it was the default browser for Windows 8.1. Now, many users upgraded from Windows 8 to Windows 10, and things have drastically changed.
If you need a different browser, then you might want to check out our guide on the best browsers for Windows 7.
If that’s still your browser of choice, you can always find the necessary tips and tricks on our website.
Some users have said that Windows 10’s Firewall blocks Chrome for no apparent reason. The Windows Firewall has blocked some features of this app error message appears for those users. One user stated in a forum post:
Every time I boot up my computer, I get pop up from Windows Firewall that some features have been blocked for the same apps: Chrome, Steam, and any steam game that I boot up.
Why is my computer blocking Chrome?
This Windows Defender blocking Chrome situation could appear if the system identifies malicious software or questionable behavior on the Internet.
Your computer’s built-in Windows Defender as well as any other antivirus software that you have installed will instantly prevent Google Chrome from installing.
How can I tell if my firewall is blocking something?
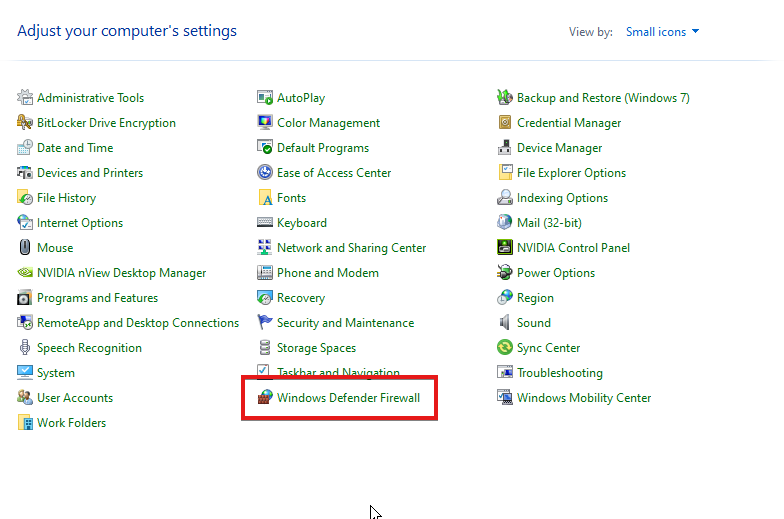
Press Windows + R and type control in order to open Control Panel.
Click on System and Security.
Click on Windows Defender Firewall.
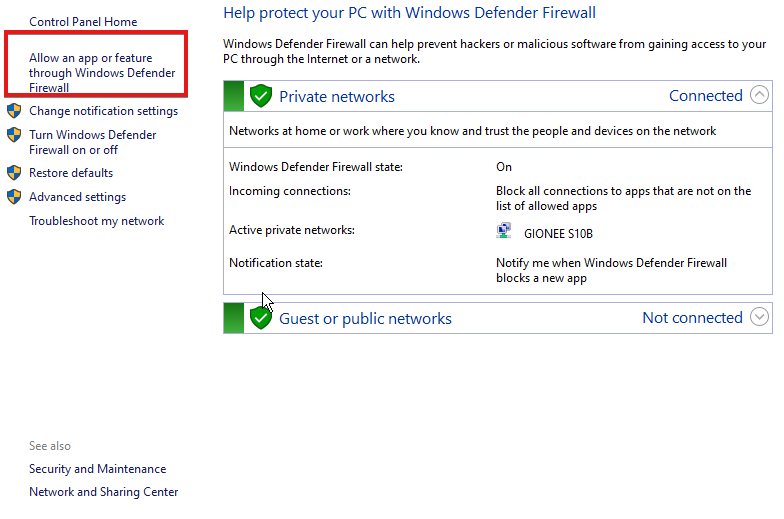
From the left pane, select Allow an app or feature through Windows Defender Firewall.
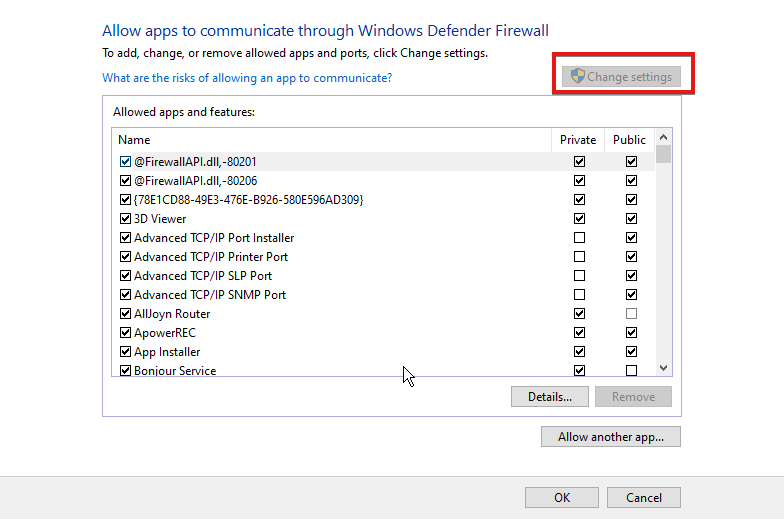
Click on Change settings then scroll through all the apps and check those that you want to be allowed through your Firewall. If the box is unchecked then your Firewall will block the app. Don’t forget to click OK to save the changes.
Quick Tip:
The built-in proxy VPN of the Opera One browser can help you change your IP address, and does not conflict with the Windows firewall whatsoever.
It’s built on the Chromium engine, just like Chrome, and every saved password, bookmark, and other data can easily be transferred to Chrome so you can have at least a backup when something happens.
Opera One
Make the switch and use setup your Firewall settings, and have another reliable browser at hand.
How do I allow Chrome through my firewall in Windows 10/11?
1. Check the Windows Defender Firewall permissions
If you wonder how to remove Chrome from Firewall, check the Windows Defender Firewall permissions for Google Chrome. Press the Windows key + S hotkey to open the search utility then enter Windows Defender in the search box and click on the topmost result.
Click Allow an app or feature through Windows Defender Firewall to open the options shown directly below.
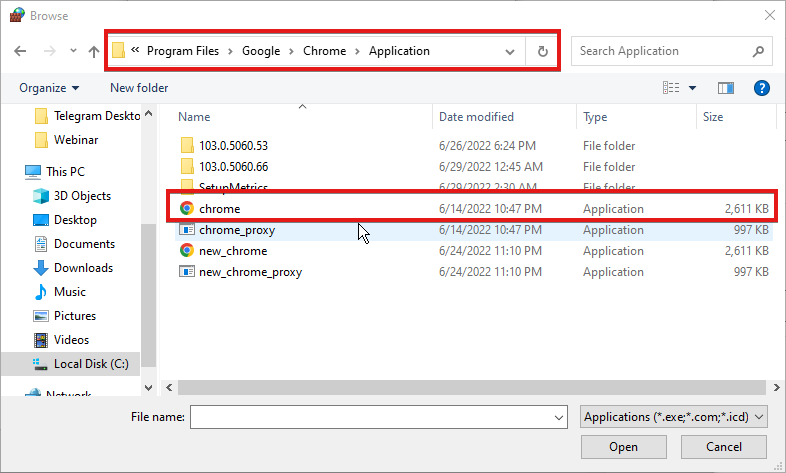
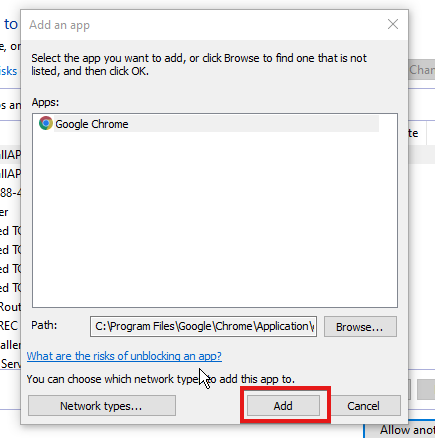
Press the Changesettings button and check all the boxes for Google Chrome if they’re not already selected and click the OK button.
If Windows Defender was blocking Chrome, the steps from above should fix it. In case you are wondering the process to allow Chrome to access the network in your firewall or antivirus settings are similar.
2. Disable Network adapters
Users have confirmed that they’ve fixed the firewall error by disabling network adapters. To do that, press the Windows key + X hotkey and select Device Manager to open that window.
Click the Network adapters category to expand it and then right-click on the first option to choose Disable device.
3. Uninstall VPN software
The Chrome firewall blockage can be due to VPN software (especially Tunnelbear), and users have said that they’ve fixed the issue by uninstalling VPNs. To do that, open Run pressing Windows + R, and enter appwiz.cpl then click on OK.
Select the VPN software listed within the uninstaller window and click Uninstall to remove the software.
Restart the desktop or laptop after uninstalling the VPN.
Some users might still need to delete a remaining VPN network adapter. To do so, enter ncpa.cpl inside the Run box and click OK.
Then right-click the VPN connection and select the Delete option.
4. Turn off Chrome extensions
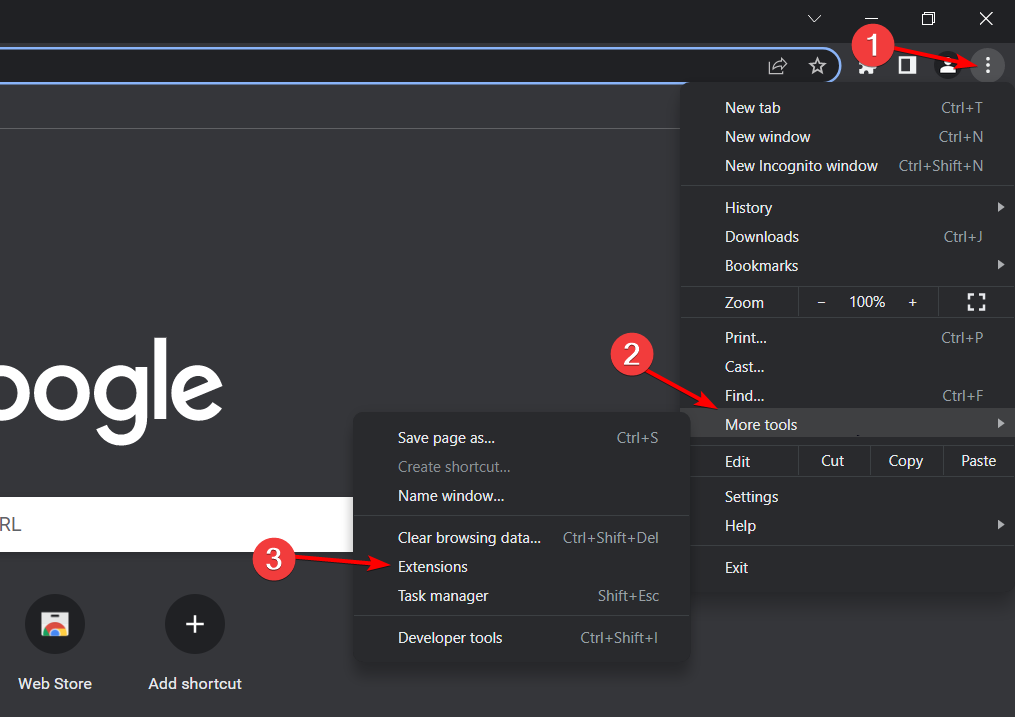
In order to fix the Windows 10 blocking Chrome install error, start a new Chrome window and click on the three-dot menu followed by More tools and Extensions.
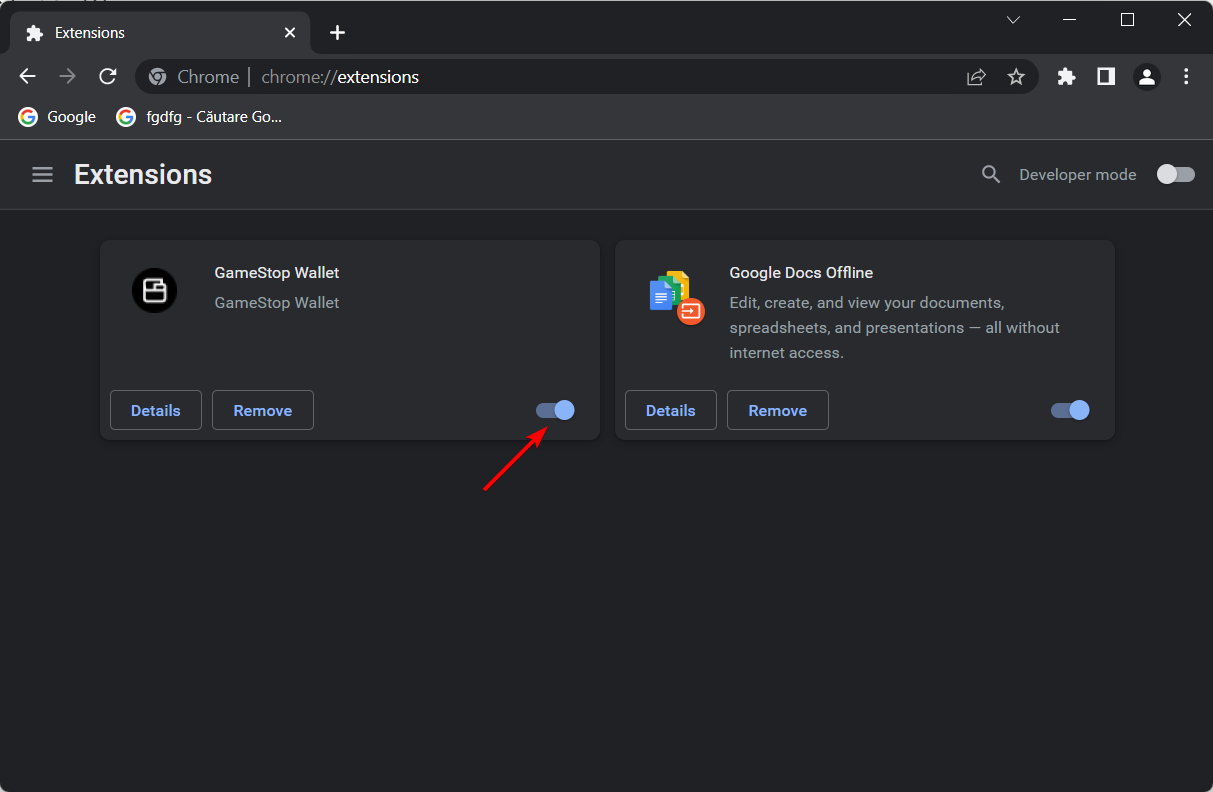
Next, turn off the toggle next to all of your extensions.
5. Reset Google Chrome
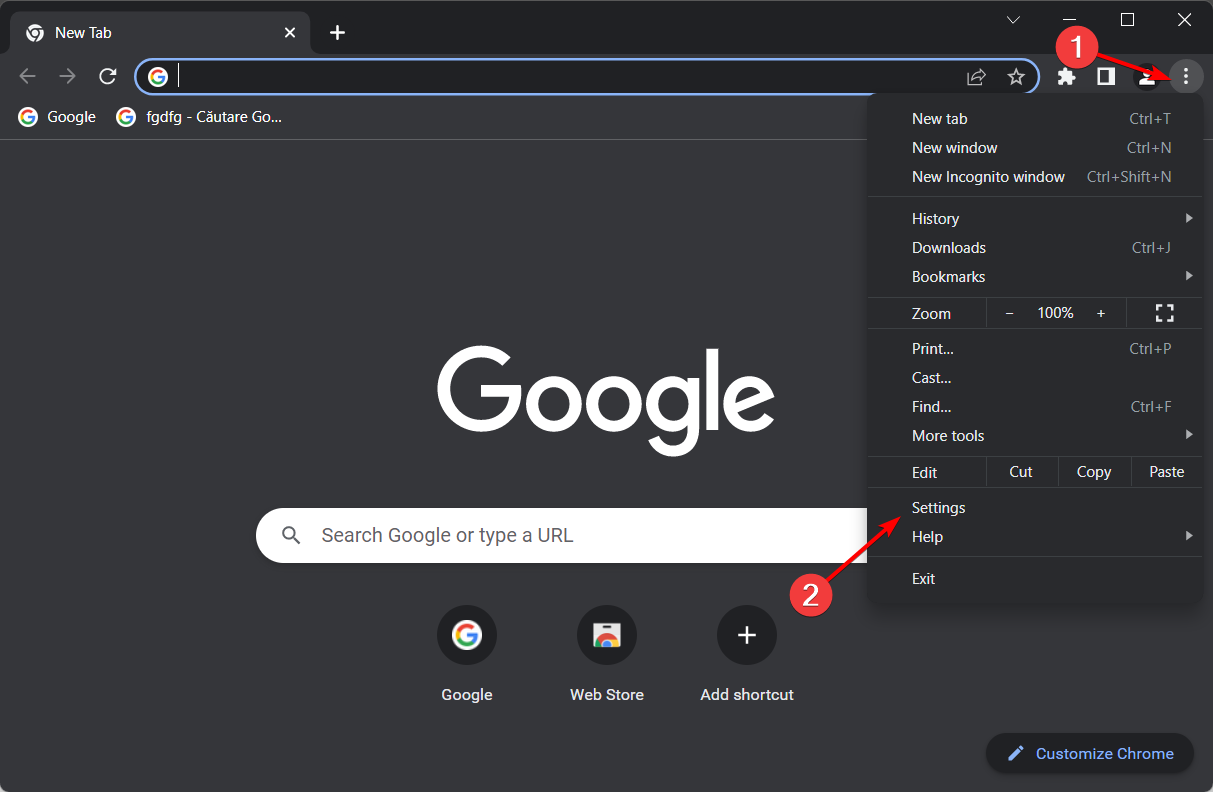
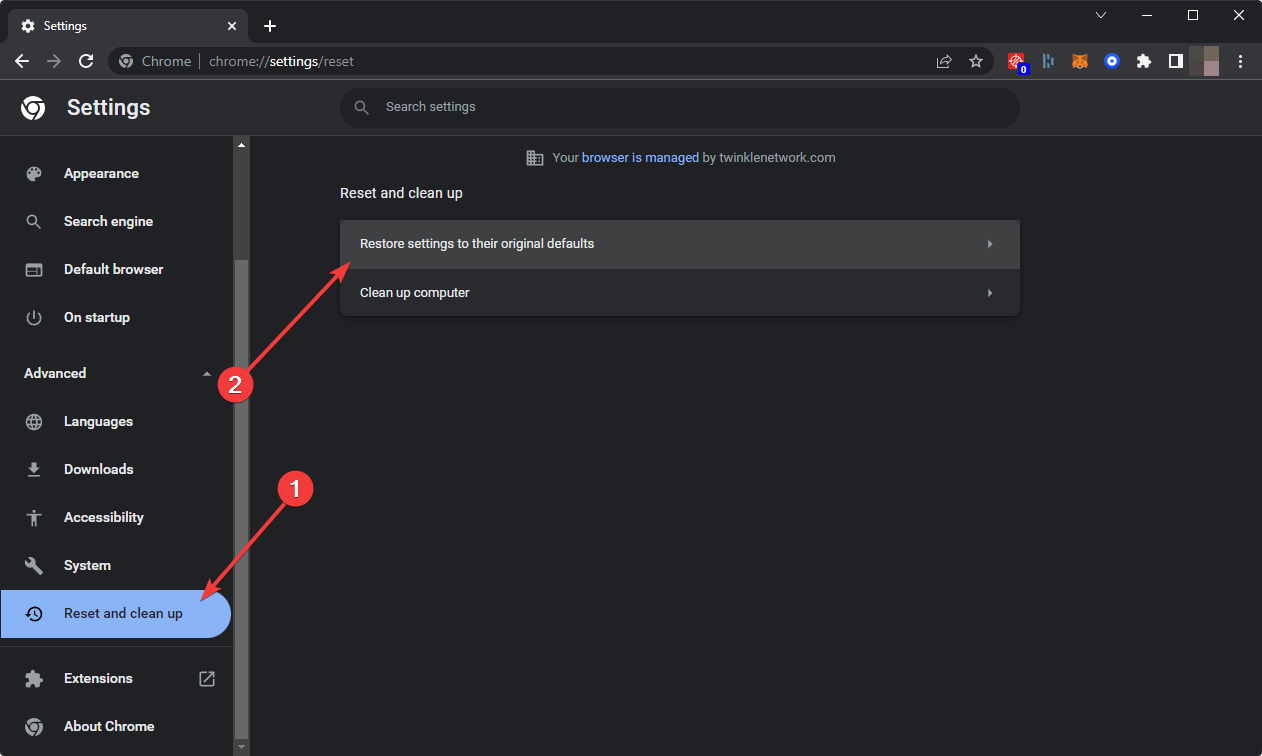
Resetting Google Chrome will turn off all its extensions, which might fix the Windows Firewall has blocked some features of this app error. Users can reset the browser by clicking on the three-dot menu followed by Settings.
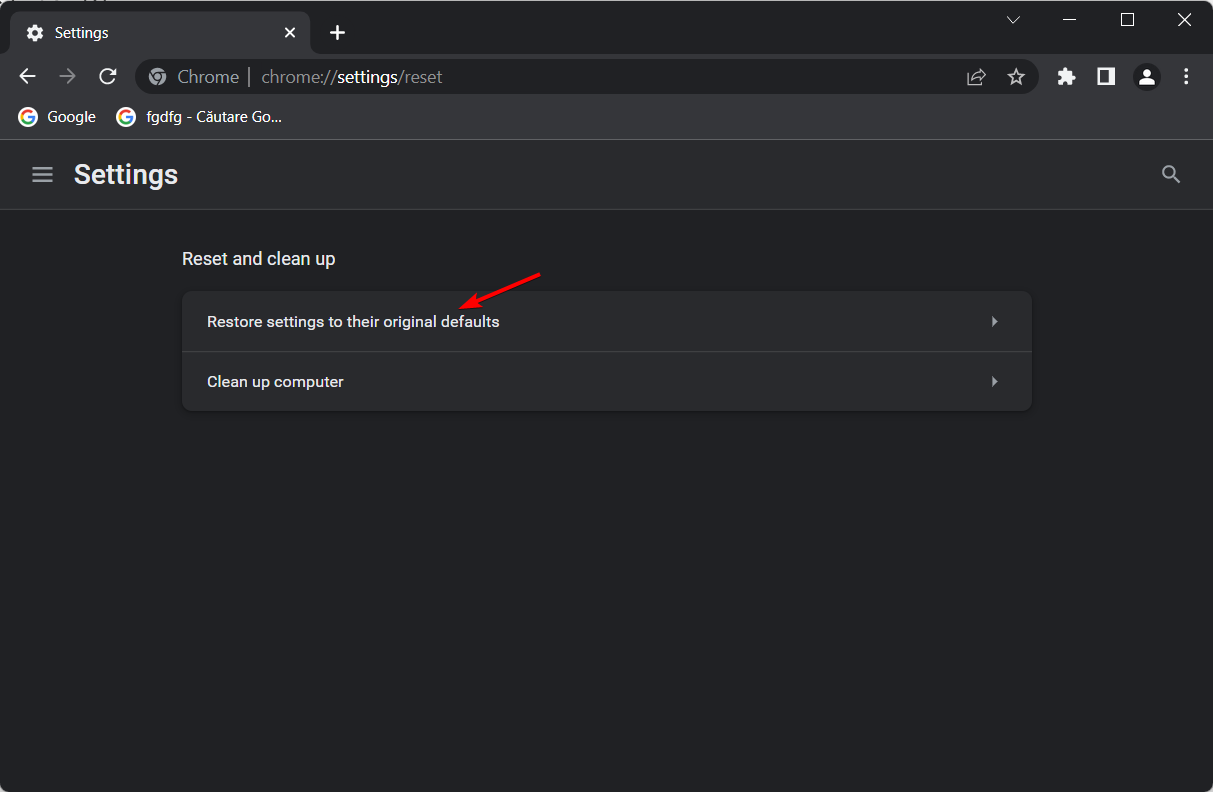
From the left menu select Reset and clean up.
Now click on the Restore settings to their original defaults option.
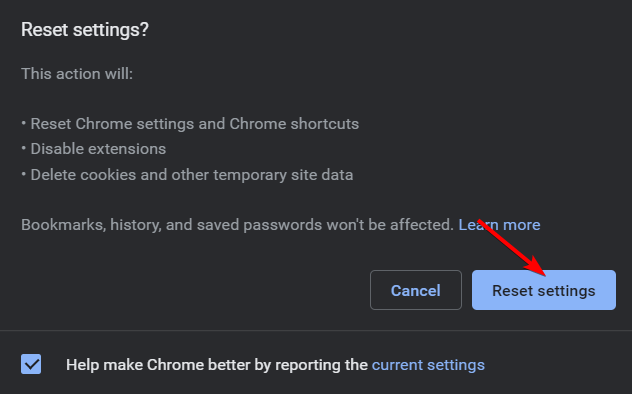
And lastly, click on Reset settings.
After doing this, you should successfully reset Chrome firewall settings and the problem should be gone.
How to check if Chrome is blocked by antivirus
In order to check whether your antivirus is blocking Chrome or not, you need to open it and go to the Blocked apps section. In there you will see all of the files and apps that your antivirus deems unsafe.
By clicking on a specific app you will be shown options to unblock it and label it a safe app.
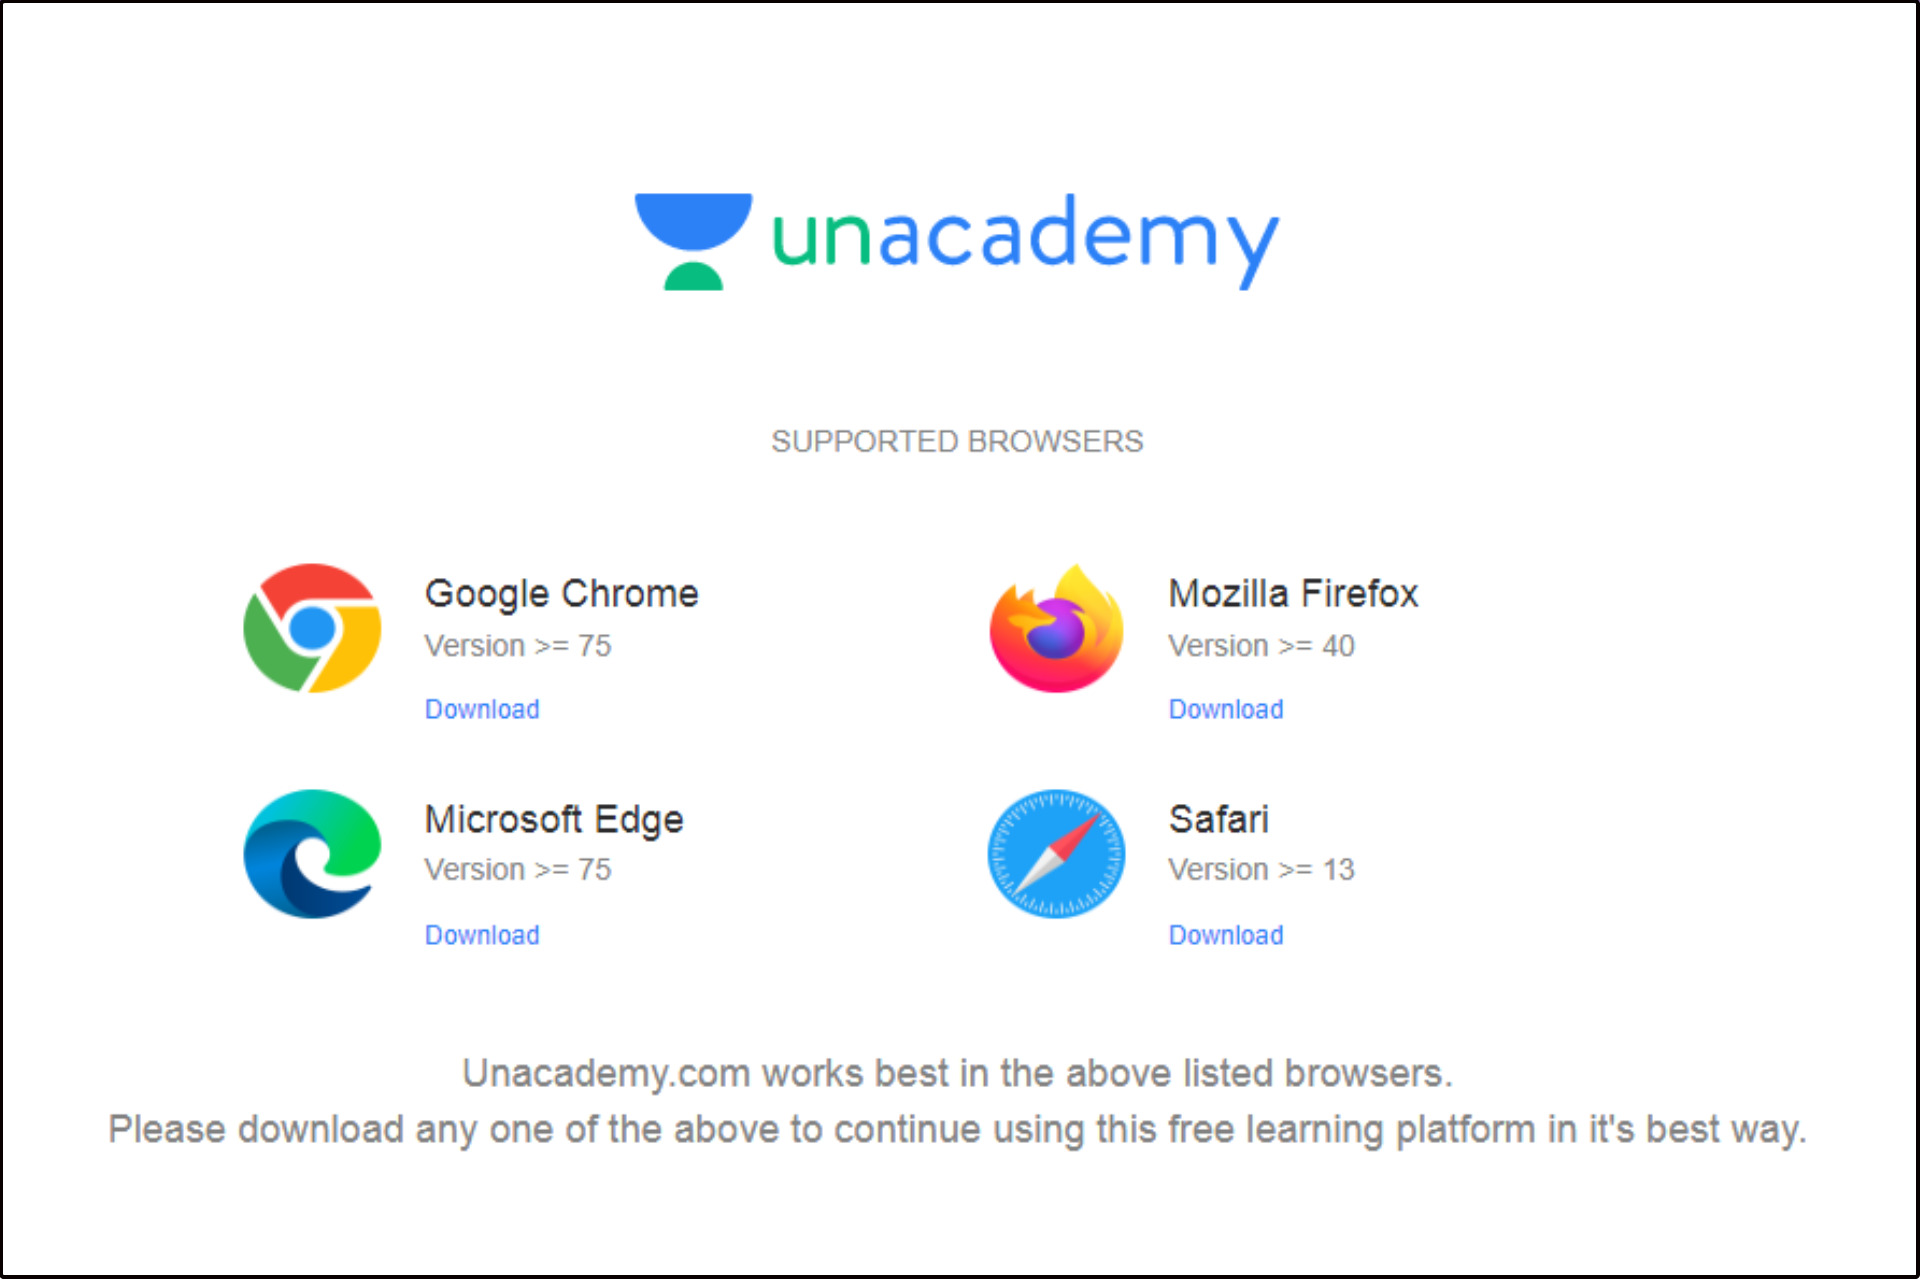
Unacademy is an online learning platform that offers free courses in various topics such as programming, marketing, UX design, and more.
The website also provides students with a lot of resources like videos and PDFs which can be used to learn new skills. However, not all browsers are compatible with this site.
For this, you will need a good browser that can save a webpage as a PDF among other things when the need arises. The best browsers will be fast, secure, and easy to use.
Does Unacademy work on Firefox?
Yes, Unacademy works on Firefox. All you have to do is download it from the Mozilla website and then install it on your computer or laptop. You can also access all courses on the mobile app for iOS and Android or get Unacademy App for PC.
Can I use Unacademy on my laptop and mobile?
Unacademy is a web-based platform so you can use it from anywhere in the world. You don’t have to install anything on your computer or mobile phone. All you need is a web browser and an internet connection.
Opera offers a number of features that make it a great choice for anyone who spends a lot of time reading online.
It has a Speed Dial feature that lets you create custom shortcuts for your favorite websites so you can access them easily the next time you launch your browser.
Additional features:
Reader mode is activated to allow you to concentrate
Built-in battery saver
Notes feature included
Opera
Get ready for meaningful exams or take courses on Unacademy from this upgraded browser.
Chrome is the most popular browser on Android phones and tablets, as well as on desktop PCs. It’s fast, smooth, and syncs with your Google account, which makes life easier if you use Chrome on multiple devices.
Another advantage is that it also has many extensions that add extra features like password management or ad blocking.
Apple’s browser isn’t as popular as Chrome or Firefox, but it’s still a solid option for browsing the web on Unacademy.
Safari is one of the most popular browsers on the Internet because it has a simple user interface and offers plenty of speed improvements over older versions of other browsers like Internet Explorer and Firefox.
Additional features:
Quick downloads feature
Private Browsing allows you to browse without saving cookies or history
Microsoft Edge browser has many features that make it a good option for Unacademy users. The browser is fast and lightweight, so it can handle your favorite websites without slowing down your computer.
It also has a built-in reading mode that makes it easy to read the text without distractions, including ads allowing you to concentrate.
Additional features:
Advanced ad blocking
Reading View that lets you focus on the text without distractions
Pin tabs so they stay open while you browse other sites
PC privacy screen filters keep confidential data safe from wandering eyes. String passwords and encryption software help you keep your private work data private.
But such tools can’t stop someone from peering at your screen from over your shoulder or snapping a picture of what you are working on.
This is called visual hacking, and it is a serious security threat that businesses shouldn’t ignore anymore. Fortunately, the issue can be easily fixed with privacy filters that adhere to a machine’s display.
These filters severely restrict the viewing angle in such a way that only someone who is sitting in front of the screen can see what’s on it.
Anyone who tries to sneak a peek from the sides or the top will only get to see a blank screen.
Why should I use a privacy screen?
In addition to protecting your documents from being viewed by prying eyes, a privacy filter can also help eliminate excessive glare from your computer screen.
Did you know that glare causes all types of conditions ranging from chronic headaches to Presbyopia which is actually the weakening of your eye muscles?
When you are able to eliminate glare from your computer screen, you can work much longer house without feeling tired or getting a headache.
People who have complained of headaches at the end of every day found a significant improvement in their condition as soon as they installed an anti-glare filter on their computer screen.
How do privacy filters work?
Privacy screens are quite low-tech, and they consist of only a polarized plastic sheet. Polarization works as an optical filter that blocks out light from particular angles.
This is the same technology that is used for polarized sunglasses and some types of camera lenses.
What to look for in a high-quality privacy filter?
➡ Clarity of image
Privacy filters have the tendency of blocking some light from the PC’s screens making them appear dimmer. Dimming can be offset by turning out a screen’s brightness, on the other hand.
➡ Application
The way that you apply the filter to the screen varies from model to model, and you should look for a filter that is easily applied and removed over and over again.
The best filters adhere to using reusable micro-suction strips that will not leave any sticky residue.
➡ Matte finish
Some privacy filters can give glossy screens a matte look, and this will help ward off distraction reflections, but it can also make the display look pretty dull.
Some filters are reversible, and they let you choose between a matte or a glossy side before you apply them.
➡ Colors
Privacy filters come in more colors, and the basic ones will look black once you apply them when they are viewed from an angle.
You can also get filters that give off a gold sheen when they are viewed from the side.
Such gold filters will be a bit more expensive because they will not dim your screen so much but on the other hand, they also tend to be more reflective than black ones.
This means that they are not that good for people who are working outdoors. To make your task easier, we selected 4 of the best privacy filters for PC using the criteria listed above.
What are the best privacy filters for your Windows PC?
In case you fear that lots of people are prying around and snooping into your desktop screen, we have the perfect solution for you.
If you hesitate to enter the passwords or to read, view, or surf your desktop content in an office environment for the same reason, install this privacy filter from Mosiso and you can relax.
No more prying eyes, the screen is dark from the side (beyond 30 deg) but clear from the front.
The advanced micro-replication technology and 12 layers of film make Privox Privacy Filter one of the best privacy screens on the market.
It is designed to fit all widescreen laptop LCD monitors (19.0″ screen and a 5:4 aspect ratio) and it has an extra slim, lightweight, and frameless design.
The Computer Privacy Screen Filter provided by Vintez is designed for 24-inch 16:9 widescreen computer monitors.
However, they offer lots of such films for all sizes, from 19 to 32 inches providing anti-glare and anti-scratch protection besides the obvious confidentiality.
The screen is perfect for public and high-traffic areas and it can fit any brand of monitor, including HP, Samsung, Dell, Lenovo, Acer, Asus, LG, ViewSonic, and others.
After you apply the privacy filter, the monitor will appear dark when looked at from an angle higher than 30°- 60°, but bright when looking directly at it.
This filter fits most 22 to 24-inch widescreen monitors with a 16:10 or 16:9 aspect ratio.
It manages to narrow the field of vision on the monitor to +/- 30 degrees, helping you keep the information on your screen to yourself.
The spring-loaded mount attaches to the screen without hassle or adhesives. The textured surface with a light tint minimizes glare and improves contrast, and it also reduces harmful blue light by up to 30%.
Its hard-coated surface protects the sensitive flat panel screen from smudges and damage.
The Vintez Computer Privacy Screen Filter limits the viewing angle of your screen to a straight position such that only you can see the contents of your monitor screen while everyone on either side of it sees only a darkened monitor screen.
It also helps improve the confidentiality of your information, your surfing details, and so on. In other words, it reduces the risk of any visual hacking or visual theft.
Users who access corporate networks from remote locations pose a potential danger to data confidentiality because they are in an unsecured and uncontrolled area.
The danger consists in allowing unauthorized people to view the data that you are accessing, and this is why you really need a privacy screen filter.
All the filters that we have presented are ideal for keeping your privacy as it should be, private.
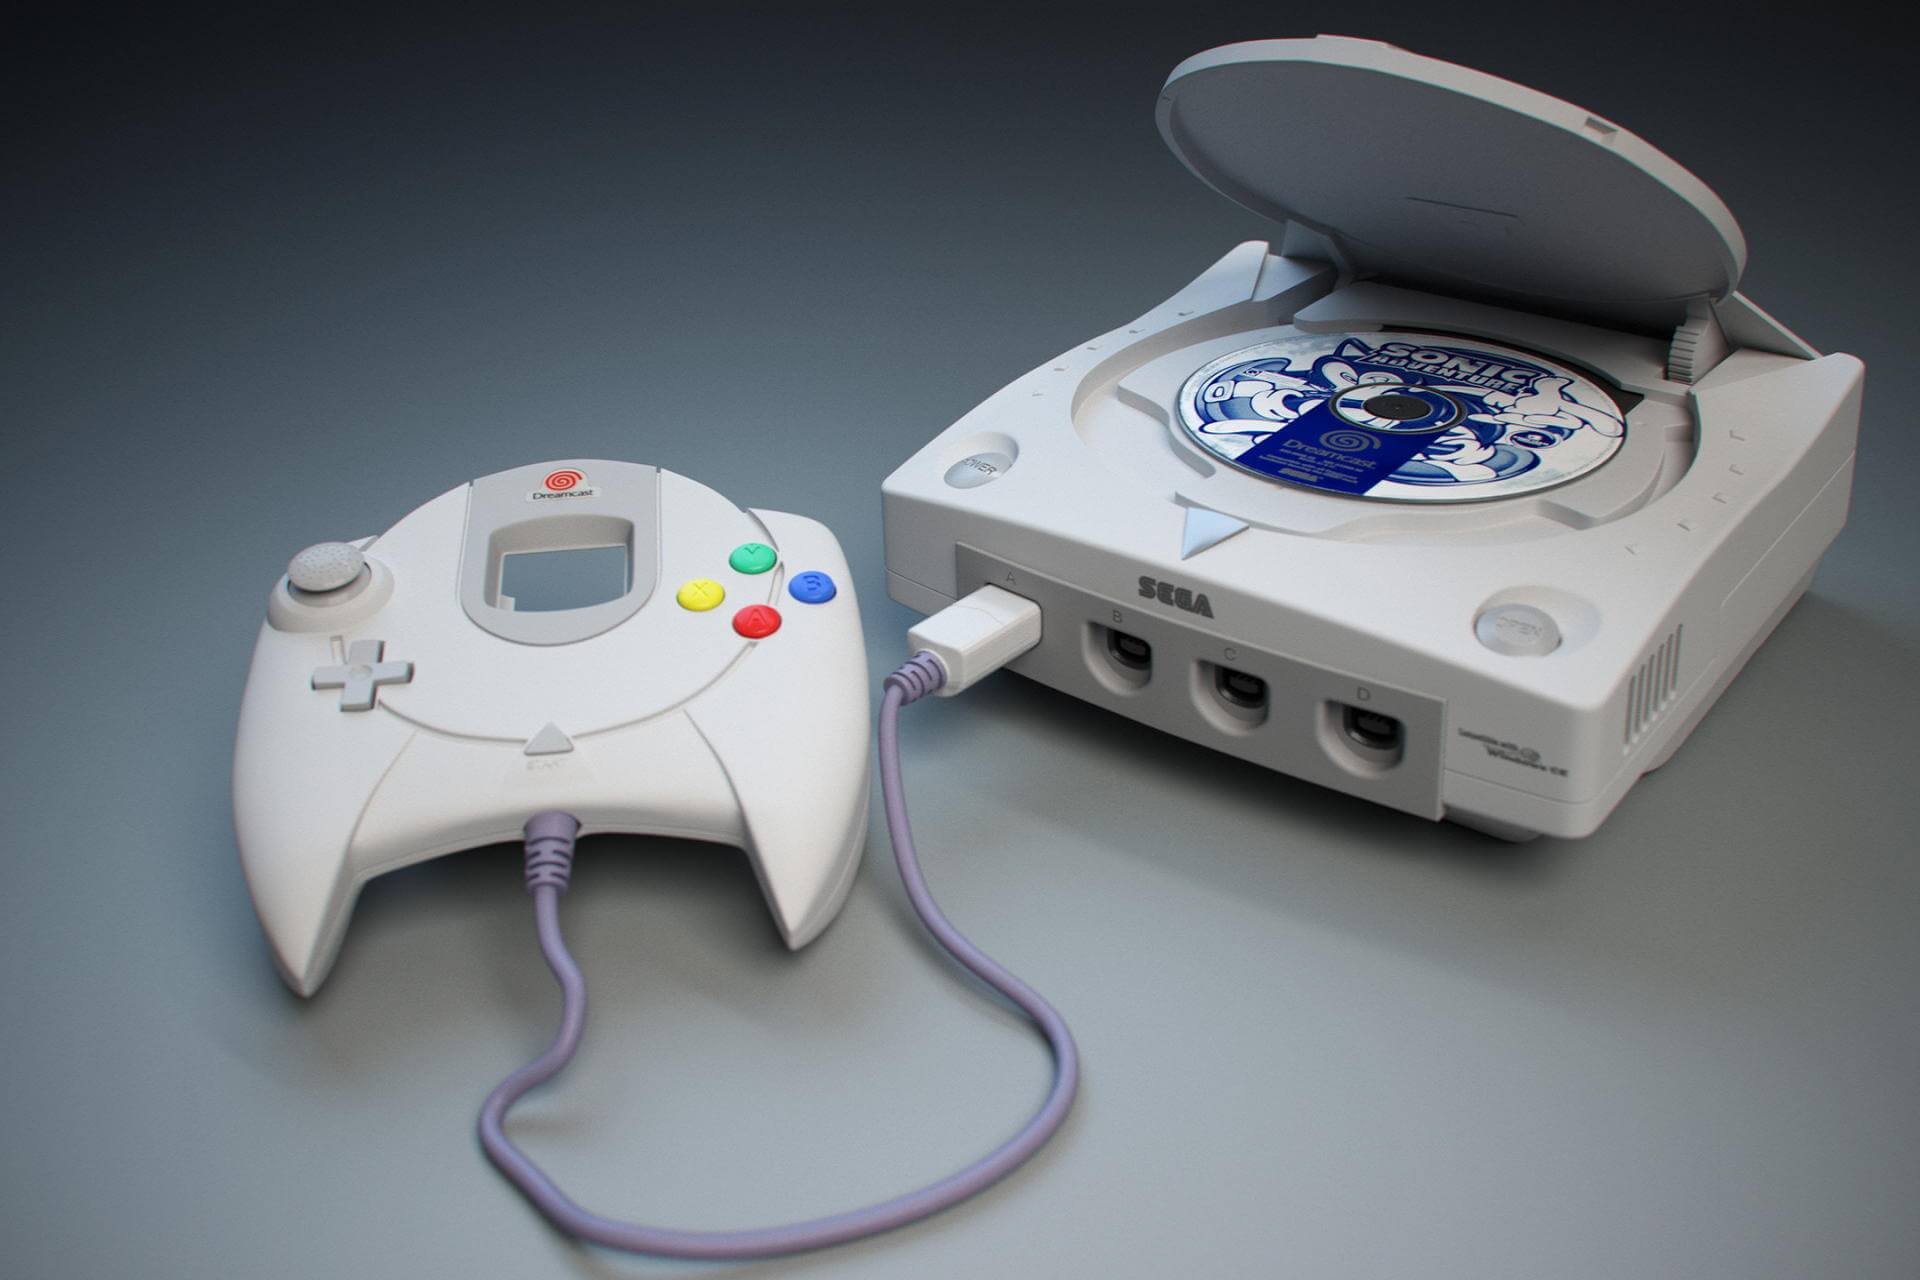
A Dreamcast emulator for PC lets you play classic Dreamcast games right on your Windows 10 computer without needing the original console.
If you’re looking for the best Dreamcast emulator in 2025 that’s free to download and offers the most accurate gameplay, this guide will help you find the right one. Whether you want smooth performance or the closest experience to the real thing, we’ll cover the top options for your Windows 10 PC.
DEmul is a popular Dreamcast emulator for Windows that many players consider to be the best one. This emulator is compatible with basically any Dreamcast ROM out there, thus we recommend it as the best PC Dreamcast emulator.
Besides Dreamcast games, DEmul can also emulate arcade hardware, like Naomi 1, Naomi 2, Hikaru, and Atomiswave.
DEmul uses a plug-in system for video and audio outputs, to provide you with the best possible experience. And indeed, Dreamcast games work pretty well on DEmul, without any major bugs or lags.
The virtual memory card is also supported, which allows you to save the game progress at any time.
The developer of DEmul stopped supporting the emulator a long time ago. However, a Russian firm took over so the emulator still works perfectly in Windows operating systems, including Windows 10.
If you want to download the best Dreamcast emulator for Windows 10/11, you can do so for free from the link below.
NullDC is an open-source Dreamcast emulator for Windows. It is also considered another best PC Dreamcast games emulator on the market.
This emulator can run basically any Dreamcast game, including commercial games. This ability gives NullDC an instant advantage because very few emulators are capable of running commercial games.
According to users’ reviews, NullDC provides a great gaming experience. Graphics and sound are on an exceptional level.
NullDC uses a plug-in architecture for graphics, sound, memory cards, and reading games burned to CD-ROMs. Unfortunately, NullDC is no longer under active development, as the latest version was released in 2011.
However, despite the fact the developer doesn’t release an update for NullDC anymore, it should run without any problems on your Windows PC.
One of the leading Sega Dreamcast emulator in this category is most certainly Reicast.
Widely acknowledged as the best Dreamcast emulator for Android, it is also available for Windows 10/11. It brings to the table nice looking interface and a joyful experience.
One of the main traits of Reicast is great stability and relatively regular updates. Regular updates will also make sure this experience is available for Windows 10 users.
Beyond that, you just can sit in a time travel machine, relax and let the memories of the past get to you.
Chankast is a simple and easy-to-use Dreamcast emulator. It was the first of its kind to run commercial games. It was initially designed for Windows XP/2003, but it runs without any problems on Windows 7/8/10.
The reason behind that is the minimum requirements you’ll need: Pentium 4 with at least 1.6 GHz, 256 MB Ram, Windows 10/8/7/XP/2003, latest DirectX, a dedicated graphics card such as Nvidia or Ati, DC Bios.
It’s a fun little emulator that can help you do your thing without any headaches.
Redream is another great Dreamcast emulator that promises to be one of the, if not the best. Part of the reason is that Redream is an ongoing process that keeps evolving.
An important aspect of this emulator is that it can run Sega Dreamcast games on Windows 10/11 in HD.
Besides that, you can always render your games in 1080p or 4k to change the gaming experience completely.
Redream can support almost all of the Dreamcast’s library and unlike other emulators, you don’t have to configure your controller or your files.
You just have to add your favorite games and play them. Even more, keep in mind that there are two versions: a Lite one – that is free, and a Premium one – that costs $5.
The difference between them is that on the Premium one you have HD rendering and on Lite you don’t.
2.8Ghz Pentium 4 processor or a 2.0Ghz AMD Processor
128 graphics card
512 RAM
Reicast
CPU: AMD Athlon XP/64/Turion at 2 GHz or Intel Pentium D at 2.1 GHz or equivalent
Video Card: Nvidia GeForce 4 Ti or ATi Radeon 8500
RAM: 1GB
DirectX 9.0 or greater
Chankast
Pentium 4 with at least 1.6 Ghz
256 MB Ram
Windows XP or 2003 (It won’t work under any other Windows)
Latest DirectX
Powerful Graphic Card such as Nvidia or Ati
DC Bios
Redream
Windows 7+ 64-bit, macOS 64-bit or Linux 64-bit
x86_64 compatible with AVX2 or SSE2 support
512 MB RAM
OpenGL 3.1 graphics
Resident Evil: Code Veronica, The House of The Dead 2, Crazy Taxi 2, Sonic Adventure 1 and 2, and Virtua Tennis – these are a few games presented by Sega for this amazing console that ended way too soon.
How do you play Dreamcast games on PC?
You will need an emulator in order to play games designed for the Sega Dreamcast on a computer running Windows 10/11. This is a sort of program that transforms your personal computer into a Sega Dreamcast gaming console, enabling you to play any of the system’s games on it.
What is the most accurate Dreamcast emulator?
Demul is a well-known Dreamcast emulator for Windows that was developed by a variety of programmers, including Wind, DreamZzz, and ajax16394, among others. You may play a variety of video games by using this emulator, including Hikari, Naomi 1, and others.
This Dreamcast emulator makes use of the plug-in system for both visual and audio output, and it works faultlessly on Windows versions up to and including Windows 10.
Additionally, since it is compatible with memory cards, this emulator allows you to store your progress when playing games. This indicates that you will be able to pick up playing the game just where you left off.
Even though the maker of this fantastic Dreamcast emulator has ceased providing maintenance for it, another company in Russia has ensured that it continues to function without any issues whatsoever. You may get it by clicking the button that’s been provided below.
Wrap up
Maybe Dreamcast has lost the battle, but the legacy that made a mark in the gaming industry is still alive. Since you are looking for some fun, check out these all-in-one emulators with which you can play any old or arcade game.
Do you ever want to just play songs on your browser without being redirected to another app or audio player? That’s what browser audio players are for, and almost every browser is fitted with this feature.
Audio and visual content capture the audience’s attention more than mere texts in the content market. While it was easy to integrate images and videos on web pages, adding audio files was still a mystery.
After Internet Explorer broke the ice and became the first browser to support audio players by simply adding an audio tag, it was a long process of fine-tuning the feature.
In 2015, HTML5 audio was introduced to simplify the process of adding audio to web pages.
The HTML5 audio allows users to tweak audio settings (pause, skip, play, etc.), but there were limitations with accessing the audio frequency and volume.
However, web audio players have evolved with newer software that goes beyond the limitations of HTML5. Read on and find out some of the best browser audio players you can use.
Can browsers play MP3?
Almost all browsers can play MP3; however, there are modifications to which versions can support MP3 and which cannot.
Here are some browsers that support MP3:
Google Chrome 4 to 6
Safari browser 4 to 11.1
Opera One browser version 15 to 53
Mozilla Firefox 22 to 60
Microsoft Edge browser 12 to 18
How do I play music files in my browser?
Open your browser app on your computer.
Open a new tab.
Press CTRL + O.
Select an audio file from your file manager and press enter.
You can control the sound from the top right corner of the screen by clicking the media control icon.
You can perform several functions such as pause, skip, and go to the next or previous song. Your audio will continue playing even if you leave the tab.
How do I add audio to Chrome?
Open the Chrome browser on your PC.
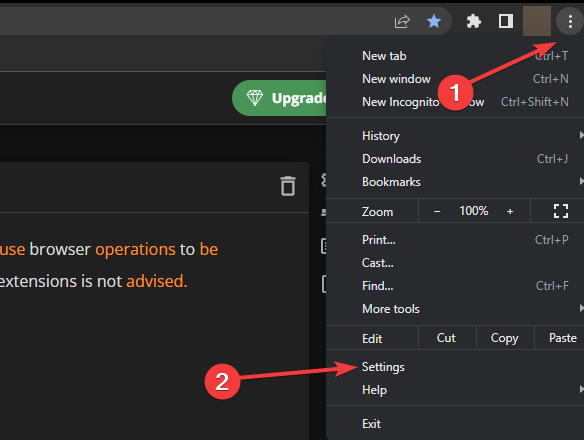
Click on the Menu icon (the three dots) to access the options and select Settings.
Scroll down and click on privacy and security.
Select site settings from the options.
Select Additional content settings.
Click on Sound.
Turn on the Allow sites to play sounds feature by clicking the toggle beside it.
It’s not enough to have a browser audio player. Finding the right one with the right tools for your website is just as important. Let’s check out some of the best free browser audio players:
Quick Tip:
Before going in-depth with other players, consider a perspective shift with a new browser, Opera GX.
This browser is designed for gamers or regular users who need a player integration on the sidebar containing all your music services in one glance.
So enjoy your music from YouTube or Spotify readily from this full-featured browser choice.
Opera GX
Consider this option for an integrated player and many other unique browsing tools.
The Audio Waveform player adopts some of the design concepts from SoundCloud and throws in some fantastic features, including start and end time, playback speed, playlists, sound download, social sharing, tooltips, and many more.
The Audio Waveform player with playlist is perfect for self-hosted audio like podcasts and bands hosted on Google Drive. The visual features are unique and can be easily customized to the user’s taste.
This audio player comes with a stylish design with a wide range of color options and playlists to choose from.
The Disk Audio Player for WordPress is very user-friendly and easy to navigate with several unique features, including an autoplay option, duplicate functionality, and keyboard control, among many others.
Integrating the Chameleon HTML Audio player into your website is straightforward. It is easy to customize and features a variety of color schemes and great audio features for your site, including the ability to create playlists from MP3 files.
The software is compatible with mobile devices, supports multiple instances, and has 35+ JS options, among many other excellent features.
The Apollo – Sticky with Full-width HTML5 Audio Player is customizable and can be integrated to fit your website design.
It features standard and sticky audio player versions, a responsive interface, a pop-up window player, and a playlist search and buy button.
One of the best things about this audio player is its extensive audio player controls and social media share options that make displaying and previewing your audio easier. Users can also download lyrics with this audio player.
This audio player’s design is similar to that of SoundCloud, and it features different schemes and themes that make it very customizable.
It is SEO friendly, responsive to adobe flash backup, and touch-optimized. It also uses an API key that supports SoundCloud streams and YouTube audio streaming.
We hope this article has answered all your questions on browser audio players and also helped you to find the best free HTML5 audio player for your website.
If you’re looking for a way to boost your PC audio, here’s a list of sound volume booster software.
For any other suggestions or questions, you’re welcome to use the dedicated comments section below.
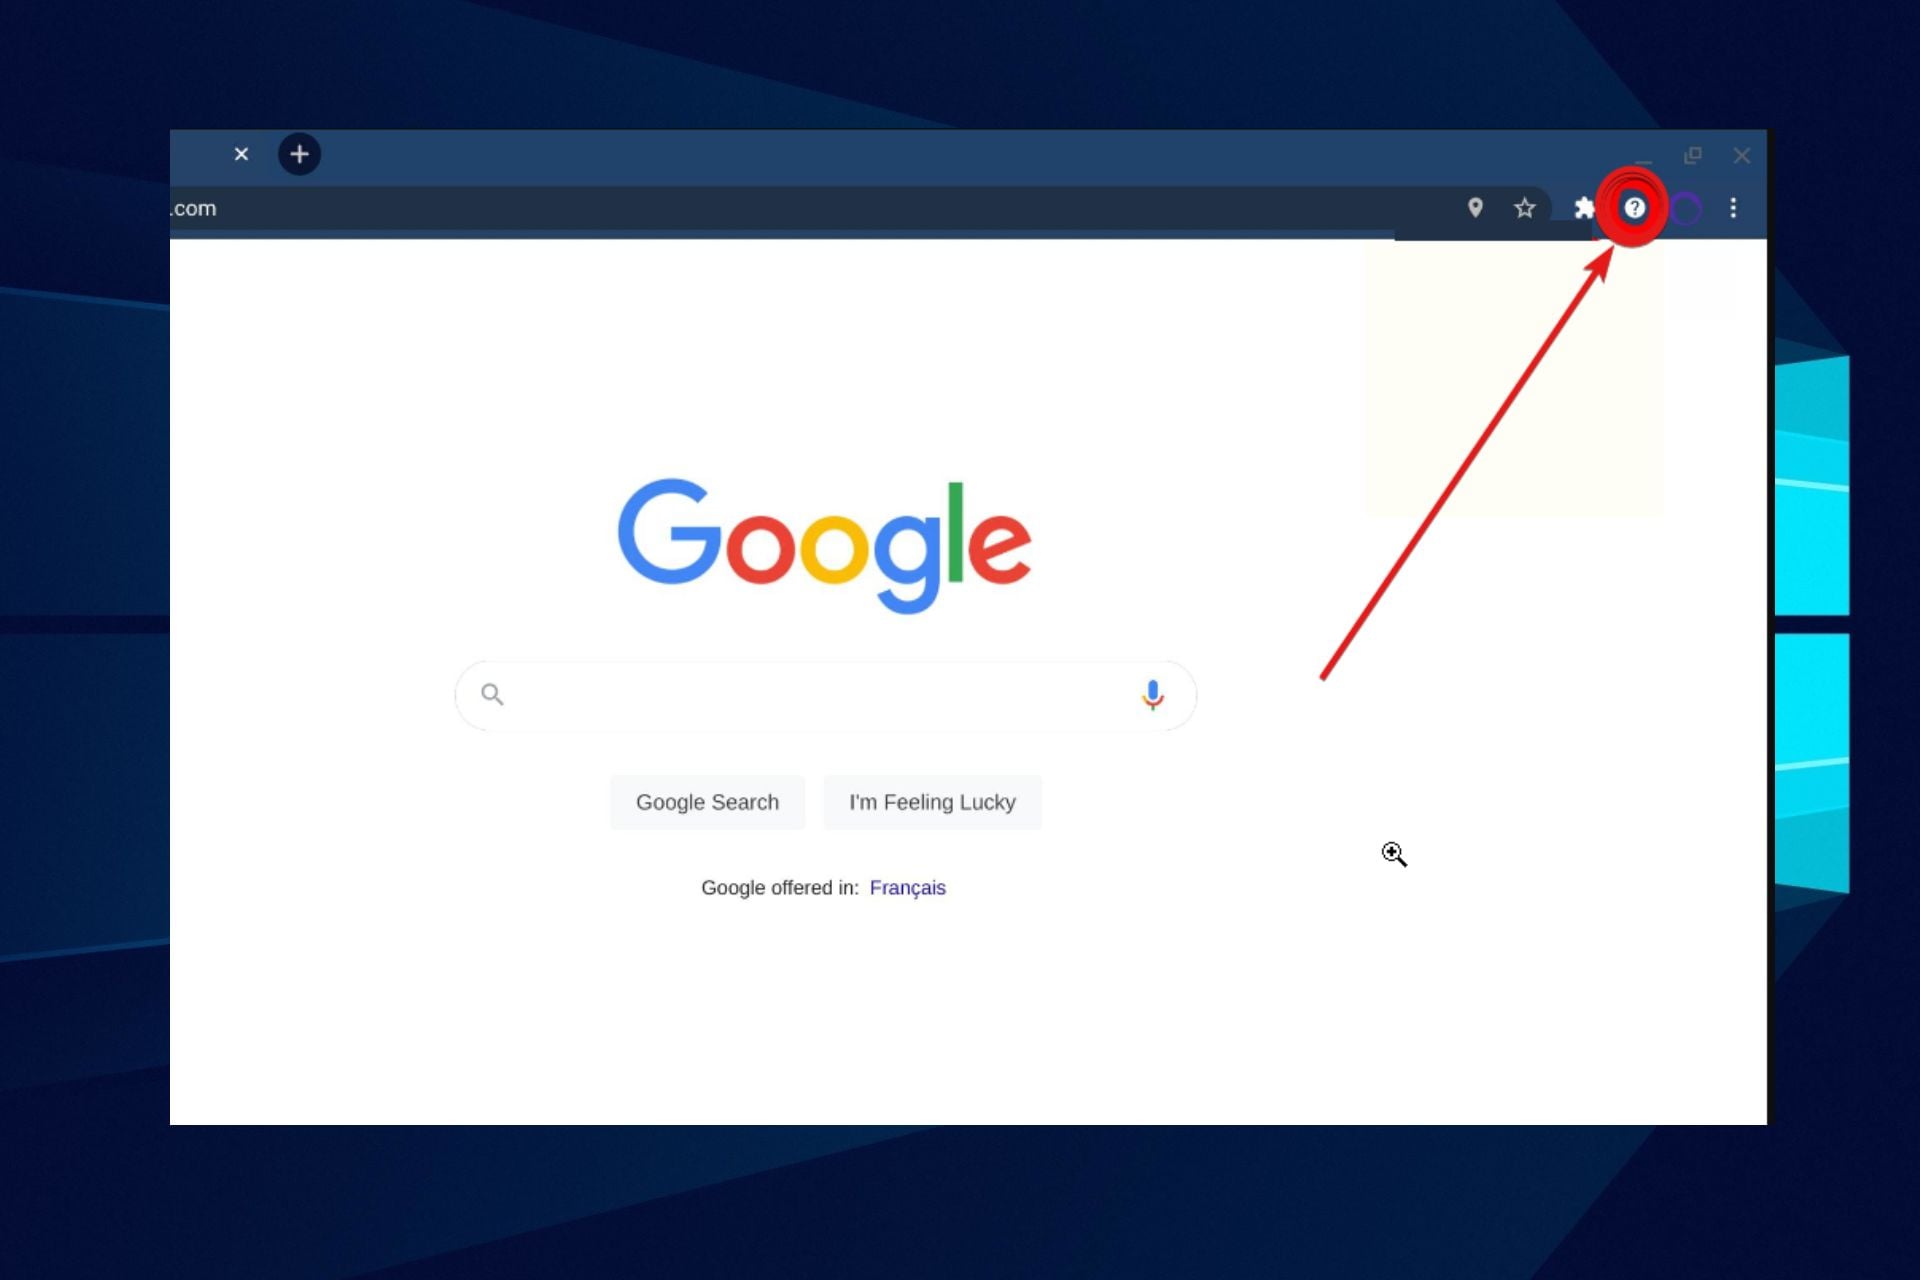
There are lots of errors and difficulties you can encounter on your browsers, specifically Google Chrome. Most times, they are not as complicated as they look. One of the errors users complain about is the question mark in chrome.
While trying to use the Chrome browser or in the process, a question mark can pop up. It signifies that something wrong with Chrome or the site you are working on.
Also, it can indicate that something is missing, e.g., an icon or some text. However, there are some effective fixes for the question mark in Chrome error.
What does it mean when Google Chrome has a question mark?
It means something is missing from the browser or the website you are trying to load. Also, it indicates uncertainty in the action you are performing, like downloads. This can range in the case of how much time is left, the size of your downloads, etc.
Another meaning is that your computer cannot display the character you want to load.
Why is there a question mark on Google Chrome? (common causes)
1. Chrome can’t display characters
You can get a question mark if chrome encounters an issue while loading contents for you. This error prompts the question mark.
2. Uncertainty in the action
Google Chrome can show a question mark while you are downloading documents or media files. It indicates that chrome can’t say the exact size of the file. Also, it can signify that the time left for action is indefinite.
3. Missing texts or thumbnails
When some content on your browser is missing, it can prompt the question mark. Also, the Chrome logo can show a question mark, which means it is inaccessible, or it’s been deleted.
4. Network issues
It means that your chrome can’t connect to its servers due to poor internet connection.
Quick Tip:
It’s no secret that Chrome uses quite a lot of system resources. You could try a Opera one for a change. it consumes much less resources as systems like VPN, Ad blocker and AI come already built in.
Opera One has its own system of alerting you whenever a webpage seems unsecured or malicious. That being said, it has way fewer errors, so you can trust that it won’t give you false positives.
Opera One
Browse the web freely and prevent slow connections, errors and high resource usage.
Press and hold the Ctrlkey and press F5. (For Windows)
Hold down Command + Shift keys and press the R key. (For macOS)
2. Check your Internet connection
Make sure your Internet connection is stable. You can do this by performing a power cycle on your router. Also, you can switch to a wired connection for a more stable internet connection.
Launch Chrome, click the More icon, and select Settings.
Click Privacy and Security on the left pane.
Select Site setting and tick the Allow sites to save and read cookie databox.
Another solution is to restart your PC. Restarting your computer will help it sync better and run smoothly.
Also, you can learn about easy fixes to use when Google Chrome isn’t responding or working. Let us know which of the above solutions worked for you in the comments area below.
If Pinterest is not working on Chrome, you won’t be able to view your saved pages or even access the website. Today, we’ll show you how to fix it.
In most cases, third-party apps like Survey Junkey cause this error. Certain extensions, as well as adblockers, can also prevent Pinterest from working. Here’s how to stop them:
What can I do if Pinterest doesn’t work in Chrome?
Press the Windows key + I to open the Settings app.
Go to Apps and choose Installed apps.
Locate Survey Junkie Pulse software on the list.
Click the three dots next to it and choose Uninstall.
Follow the instructions on the screen to remove it.
Sometimes, other apps on your PC can interfere with your browser and stop Pinterest from working. The most common culprit we know of is Survey Junkie Pulse, but others could cause it to.
If you have this app, make sure to remove it.
And if Pinterest stopped working on Chrome after you installed something on your computer, order the Installed apps by date (most recent), and remove the latest ones you added.
2. Disable other extensions
Launch the Chrome browser and click the extension icon.
Select Extensions Manager.
Disable other extensions by toggling off the blue icon beside them.
Users reported that Vimego – Simple Video Downloader, OrangeMonkey, and MyJDownloader Browser extensions are the most common causes, but other ones can also cause this problem.
If you’re blocked from Pinterest, you most likely violated the terms of service. If that’s not the case, you should contact Pinterest support.
These are the most effective fixes for fixing Pinterest not working in Chrome. If you have managed to fix the problem, you might be interested in our guide that shows you how to save pictures from Pinterest to your computer.
If none of these fixes solve the issue, it may be related to your account or site verification. In that case, check this guide on fixing Pinterest validation error for more advanced troubleshooting steps.
Let us know which solution worked for you in the comments area below.
Discovery Plus is a streaming service for movies, shows, and other programs owned by Warner Bros.
Areas with accessibility include the United States, Brazil, Canada, parts of Asia, and Europe. Nevertheless, there are other ways to watch it outside of these locations.
Discovery Plus offers thousands of episodes of your favorite shows on the cable network, including cooking shows, true-crime series, dramas, and nature programs.
Can I watch Discovery Plus on a browser?
You can watch Discovery Plus on a browser. However, if you want an excellent viewing experience, downloading the Discovery Plus app is recommended.
Discovery Plus is an excellent value if you don’t have pay-TV service.
Does Discovery Plus work on Chrome?
Of course, you can stream Discovery Plus on Chrome. In fact, you can do that on almost any major browser.
After you sign up, download, and install it, you will be able to stream Discovery Plus with the browser and enjoy good speeds and an enhanced viewing experience.
The Opera One browser stands out for its brilliant user interface, making it an ideal choice for web-based streaming. So, enjoying services like Discovery Plus is no issue.
Asides from its attractive interface, the browser boasts a host of top-notch security features to enhance users’ viewing experience. Opera One is truly one of the most versatile browsers around.
Key features:
Built-in Ad blocker, VPN, tracking blocker
Native AI and modular AI-ready design
Integrated messengers and social media
Workspaces and tab islands
Opera One
Watch your documentaries and favorite content from this integrated browser.
Apple developed Safari web browsers as an alternative to Internet Explorer, Netscape Navigator, and Cyberdog for Mac computers. Safari versions 10 and above support Discovery Plus.
However, you should note that Apple has stopped developing the browser for the Windows Platform. Nevertheless, the old versions still work well with Discovery Plus.
The Mozilla Foundation and Mozilla Corporations developed the Firefox browser. It uses Gecko engines to display web pages. The Mozilla Firefox browser is a free and open-source browser.
Discovery Plus supports Firefox versions 47 and above. Firefox gives a great Discovery Plus experience; however, not all functions are accessible.
Android WebView is a component of the Android operating system that permits users to view the contents of a webpage directly from an app.
The WebView allows users to view specified HTML strings inside the application, and you can stream Discovery Plus on Android WebView versions 70.0.3 and above.
The first thing anyone notices when using any of these recommended browsers for Discovery Plus is how fast it is without buffering and freezing.
You can also stream Discovery Plus on your Apple TV, Android TV, Roku, Amazon Fire TV, Samsung Smart TV, and Xbox. However, you may be inclined to try out the Discovery Plus app to access more features.
Thank you for reading this article, and please remember to share your thoughts in the comments section.
Google TV is a Smart TV interface from Google which runs on Android OS. It supports an inbuilt Chromecast that allows you to share content from your devices with the Google TV browser.
GoogleTV offers Google Assistant integration to give you access to streaming platforms like Netflix, YouTube, Hulu, Sling TV, and so on.
If you wish to use your browser to access streaming platforms, your smart TV can stream countless movies, documentaries, and TV series.
As far as Google TV browsers go, it’s important that you use one that has adblocking capabilities so that you can enjoy the browsing experience unhindered.
In this article, we’ll discuss the best browsers for Google TV that have this attribute.
Is there a web browser for Google TV?
As a Google product, it’s only natural that its line of smart TVs come with the native Chrome browser. It is easy to navigate on the web browser.
On the left-hand side of the screen, you can access your favorite search engines, bookmarks, and the settings menu.
Do any streaming devices have web browsers?
Roku has a couple of dedicated web browsers. Also, the Amazon FireStick has the Amazon Silk browser, while Chrome is available for Google TV.
However, devices like Apple TV have no dedicated web browser. However, you can still use the AirPlay feature on your iOS device to connect to Apple TV and then use its browser.
Can I install the Chrome browser on Google TV?
Yes, it is possible to install the Chrome browser on Google TV. There are two approaches available, both of which require some side loading on your TV to get the Chrome browser.
You can start by installing Aptoide on your Google TV. Afterward, launch the Aptoide app and run a search utilizing the search box at the top of the page for Google Chrome.
Click on the correct search result and select the Install button from the list of options at the top. Follow the on-screen prompts to confirm the installation, and leave the rest to Aptoide.
It has a straightforward, familiar, and beautiful renewed user interface that supports private browsing with its incognito mode feature.
This means Opera One won’t collect your information, leaving zero traces of your data or browsing history, plus it will block all annoying ads thanks to its advanced AdBlocker.
Key features
Google ad-block
Tab Islands
Dark Mode
Opera One
Download Opera One and enjoy ad-free, secure, and seamless browsing on your Google TV!
Google Chrome is the default browser for Google TV. It’s one of the best cyber-secure browsers available and is designed to protect users from malicious sites.
One of the pros of Google Chrome is that it synchronizes your bookmarks, browsing history, and other synced content. It secures your data with advanced security features like sandboxing, and site isolation
Firefox is one of the top browsers for Google TV. It’s a popular solution for users that are concerned about secure internet use, particularly for its selection of privacy configuration and security add-ons.
You can get it on your Google TV by sideloading the file either sent from your phone or downloaded from alternative app stores for your TV like Aptoide.
This browser works with your Android TV’s basic remote, making it an excellent choice for all users. It works differently from other browsers in that it renders web pages via its own cloud, rather than directly.
This reduces the risk of infecting your device with malware and other undesirable elements. The Puffin TV browser is lightweight, fast, and has top-grade encryption protocols.
Key features
QR codes for adding your favorite sites to the app
TV Bro is a browser with a TV remote. It’s open-source, accessible, and works well. In addition, it has adaptive mouse speed and comprehensive remote control enabled.
A built-in download manager makes downloading photos, videos, movies, and other files easy. It also has a great user interface and advanced security features.
Kiwi Browser is an excellent browser for Google TV with one of the best page loading speeds. Its incognito mode is quite secure, and it has other extensive privacy attributes.
The Kiwi browser can manage downloaded files and adjust the search bar to any place on the screen for comfortable surfing. It can also block all types of ads and pop-ups on websites.
Key features
The ability to switch to dark mode
A built-in translator app that translates the pages on the go
TVWeb Browser for TV is made for smart TVs and has good performance on Google TV. The user interface is very intuitive, making it easy to perform different functions like accessing web history and using the search engine
It seamlessly operates entertainment, games, media, news, and sports websites and has a simple interface for easy usage.
You found this article because your Topaz Signature Pad is not showing signatures, but here is what you must know.
As far as electronic signature pads go, Topaz is one to look out for. While signing, these signature pads will display your signature on the pad and computer screen.
It is an excellent electronic signature solution that will work wherever you have to go for business.
That said, you may find it to bug every once in a while, especially on your browser. Hence we will be taking you through the process of what to do when Topaz Signature Pad is not working in Chrome.
Try installing the Topaz Signature extension to Opera One instead. It’s a Chromium-based browser that fully supports all the Google Chrome extensions.
It’s fast and runs a modern UI packed with handy tools and features. Opera One even comes with a native AI, and support for other AI technologies through it’s modular AI-ready design.
Opera One
Say goodbye to annoying errors with this up-to-date browser that offers peak performance!
When your Tropaz Signature Pad stops working, it could be any of the following reasons:
A bad connection
Outdated or corrupted software
How do I get my Topaz signature pad to work?
1. Check for an internet connection
You may have easily overlooked the fact that you are not connected to the internet. You should double-check your connection, either replug in your ethernet cable or restart your Wi-Fi.
Once you have the internet restored, you should try it again.
2. Enable the Chrome extension
Launch your Google Chrome browser.
Paste the Chrome extensions link below in the URL locator and hit Enter: chrome://extensions/
Lastly, search for the Topaz Signature extension and toggle on the switch.
3. Update the Chrome browser
Launch your Google Chrome browser.
Paste the Chrome Settings link below in the URL locator and hit Enter: chrome://settings/
On the browser’s left pane, click the About Chrome option.
Now you can connect the Topaz Signature pad and use it on your browser; you may want to start by running a Topaz Signature pad test.
With these fixes, you will be able to use your device on Chrome.
While we have focused on getting it to work on Chrome, some users have also experienced issues with the Topaz Signature pad not working on Windows 10/11. In such cases, you may consider reinstalling the drivers to get it running again.
Leave us a comment and let us know if this guide has been helpful.
An Outlook Lite app for Android has been added to the roadmap. Whilst details are limited, the new app is designed to bring the best bits of Outlook to low-end devices, using less storage space and being less network intensive.
Samsung Gaming Hub rolls out today, bringing Xbox Game Pass to Samsung 2022 smart TVs
Xbox Game Pass has officially arrived on Samsung 2022 smart TVs, after the company began rolling out its Samsung Gaming Hub. The new feature allows owners of 2022 smart TVs by Samsung to stream games via Xbox Game Pass directly to their TV, removing the need for an Xbox console.
Collections in Microsoft Edge is getting the ability to save images and videos
Updates to the Collections feature in Microsoft Edge have been announced. In a future version of Microsoft Edge, it will be possible to save images and videos into Collections, providing a space to quickly store content that is useful or interesting, as well as share it with others in order to collaborate.
That’s it for this week. We will be back next week with more Microsoft news.
When you use a trading platform like Trust Wallet, it’s important to have a browser that works well with the platform.
Otherwise, you may run into problems accessing your account or sending and receiving funds. Here are three ways to make sure your browser is compatible with Trust Wallet.
Today we’ll look at the best ways you can make your browser work again on Trust Wallet if you’ve been having problems recently. So read this to find out more.
Can you use Trust Wallet on browsers?
No, Trust Wallet can’t be used on a browser. It only works on your mobile device, within the app for Android and iOS.
The app has its own browser called DApp. As you will see below, sometimes, this browser is not activated on Android, and below we explain how to do that.
In June 2021, due to modified App store guidelines, Trust Wallet had to remove its browser from Apple iOS devices.
Why can’t I browse on Trust Wallet?
There are a few possible reasons why you may not be able to browse the Internet on Trust Wallet. The most common causes are:
DApp browser is not enabled in the Trust Wallet app
Your device is not connected to the Internet
The website you’re trying to access is down or experiencing technical difficulties
You’re using an outdated version of the Trust Wallet app
How do I enable my browser in Trust Wallet?
As we’ve explained above, Trust Wallet comes with its own in-built browser called DApp. This is for security reasons, and you can enable it from settings within the Trust Wallet app.
Unfortunately, you can’t even use Trust Wallet on your PC unless you’re using an Android emulator.
What can I do if my browser doesn’t work on Trust Wallet?
1. Check your browser settings
Open Settings and tap on Preferences.
Then tap on DApp Browser.
Choose Enable.
2. Restart your device
Long-press the power button until you see options on the screen.
Tap on Reboot/Restart and wait for the device to restart.
3. Update the Trust Wallet app
Go to Play Store and search for Trust Wallet. If there’s an update available, you should see the option.
How do I use the Trust Wallet browser on iPhone?
As we’ve written above, Trust Wallet had to remove the browser on the iOS app but you can still use an open protocol called WalletConnect to fix that.
Here’s exactly what to do:
Open your browser on your iPhone and go to a transaction website, for instance, PancakeSwap.
Click on the Connect Wallet button at the top right-hand corner of your browser and choose the WalletConnect option.
Now, click on Trust Wallet and click on Open when you’re prompted to use the Trust Wallet app.
The one thing left to do is to link your wallet to the DApp. The PancakeSwap site you opened before will show you are connected via browser and that means you are ready to make transactions.
We have shown you how to use the DApp browser on iPhone by using WalletConnect but there are lots of other options, including Opera Wallet, Metamask, and more.
Which is better, MetaMask or Trust Wallet?
There is no clear answer to this question as it depends on personal preferences. MetaMask is a popular Ethereum wallet that offers some unique features, such as the ability to access DApps directly from the browser extension.
Trust Wallet is also a popular Ethereum wallet that has been around for longer than MetaMask.
Trust Wallet offers a mobile app as well as a desktop app, which may be preferable for some users. Ultimately, it is up to the individual to decide which wallet is better for them.
So, there you have it, you should be able to handle any issues that come up when using Trust Wallet.
Chrome is a popular browser with millions of users, and it is by Google. It uses the chromium code. With many features, it offers one of the best internet services.
QuickBooks is a tool for managing business and financial projects. It is an accounting software by Intuit. Some features help manage accounting, payroll, expenses, budgeting, payments processing, tax filing, invoicing, and inventory.
However, users complain about QuickBooks not working in Chrome. This issue can occur for different reasons, which we’ll discuss as we dive into this article.
Why is my QuickBooks Online not opening?
1. Browser cache and cookies
Cache and cookies can cause some issues because they can block the path of web pages from connecting to the server.
2. Browser compatibility
If some features are not available to help your browser run it, it can prompt QuickBooks to not work in chrome. Also, it means there are some browsers that QuickBooks supports.
3. Poor network connection
To be able to load QuickBooks smoothly on your browser, you must have a stable networking connection. A bad internet modem or router can make QuickBooks not work on your browser.
4. Outdated browser
Most times, not using an updated version of your browser can make you encounter issues with loading some sites. It is because these sites require some features that are not present in the current version.
Does QuickBooks work with Chrome?
Chrome is the best browser that QuickBooks supports and works with smoothly. It is because chrome has a lot of features that help it run web apps like QuickBooks.
The QuickBooks web app requires a responsive browser that’s able to load all its features properly. A good alternative to Chrome is Opera One because it’s light and fast.
With a very low error rate, this browser has crucial features to help you avoid such errors: a battery saver mode that uses fewer resources, an adblocker, a hardware acceleration option, and an AI.
Opera One
Focus on your finances without worrying about errors or connection problems with Opera One, the ideal browser for Quickbooks!
How do I fix QuickBooks if it doesn’t work in Chrome?
1. Clear your browser’s cache and cookies
Launch Chrome and click More.
Select More Tools and click Clear browsing data.
Select All time under time range
Tick the boxes next to Cookies & other site data and Cached images and files.
Click Clear data.
2. Switch to a supported browser
To fix the QuickBooks not working in chrome issue, switch to another browser. It will help you detect if the issue is from Chrome or QuickBooks server.
3. Restart your router
It will help improve your network connection and also help your router receiver work better. It can help QuickBooks work on your browser.
If there’s an update available, it’ll update automatically.
Chrome is the default browser for QuickBooks. Hence, it is recommended as the best option to use with the QuickBooks browser version.
You should also learn more about some interesting QuickBooks deals & sales. Your friends and family members might also want to organize their business finances from a dynamic platform.
Is JavaScript not working on Safari? If you are a Mac or iPhone/iPad user and facing this problem, this article can help you.
Below, we’ll explore why this happens, but first, let’s see how we can fix it:
How do I fix JavaScript on Safari?
1. Disable third-party extensions
1.1 Disable third-party extensionson macOS
Open Safari.
Press Command + , to go to Safari preferences.
Go to the Extensions tab and untick the extensions you want to disable.
1.2 Disable on iOS
Go to Safari Settings.
Tap on Extensions.
Toggle the switch off the extensions you want to disable.
Last year, Apple brought extension support for Safari on both iPhone and iPad. Disabling some like ad script blockers may fix JavaScript not working on Safari on iPad or iPhone.
2. Clear browsing data
2.1 On macOS
Go to Safari preferences.
Go to the Privacy tab and click on Manage website data.
Click on Remove all.
2.2 On iOS
Go to Safari Settings.
Tap on Clear History and Website Data.
Clearing browsing data will not only fix the problem on macOS but also fix JavaScript not working issue on iPhone.
3. Update Safari
3.1 Update on Mac
Click on the Apple icon on the menu bar and go to About This Mac.
Click on Software Update.
It will check for new updates and prompt if anything available.
Install any available updates.
On older macOS, Safari gets an update with the OS. However, on any version of modern macOS, Safari gets separate updates.
3.2 Update on iPhone/iPad
Go to iOS Settings.
Go to General and tap on Software Update.
Updating the browser as well as the macOS and iPad OS will both help to get rid of JavaScript-related issues on Safari.
4. Try another browser
You can consider using a different web browser if the problem repeats itself. For this, we suggest Opera One, a very lightweight and fast browser with a lot of privacy and security settings.
Being based on Chromium, it is more compatible and robust than Safari. Opera One is available on both macOS and iOS, with the capacity of translating JavaScript language more accurately.
Opera One
Easily enable/disable Javascript using Opera’s simple settings menu!
Is CSS not loading in Chrome? This can be a big problem as it will cause your pages not to be rendered properly and make the website unusable.
Although this can be a major issue, fixing it is relatively simple, and in today’s guide we’re going to show you a couple of solutions that you can use.
Why is my CSS file not working on Chrome?
The web designer used different encoding for HTML and CSS.
Corrupted cache and cookies can sometimes cause this issue.
Internet connection problem.
CDN server that has hosted CSS may be down or going through errors.
Third-party extensions or outdated versions of Chrome browser.
There may be other reasons. But, in most situations, these are the ones you will see.
What can I do if CSS is not loading in Chrome?
Before we start fixing this issue, there’s one thing you need to check:
Check the name of your file. A few users reported fixing the issue after renaming the file from style.css to styles.css.
1. Update Chrome
Open the Google Chrome.
Click on three vertical dots and Settings.
Go to About Chrome.
Google will check for the update and install if any update is available.
Relaunch Chrome.
Quick Tip:
It may be a real nuisance to deal with CSS problems on your current browser, so won’t you consider a change?
For instance, Opera One brings enhanced navigation for advanced UI websites, integration features with popular apps, and even Web3 browsing technology.
Opera One
Don’t ever worry about broken CSS, and obtain smooth browsing today.
Check Cache images and files and then click on Clear data.
3. Disable problematic extensions
Type the following address in the Chrome address bar and press Enter. chrome://extensions/
Toggle the switch off next to the extensions you want to disable.
4. Check if the web server has a problem or not (for designers/developers)
Navigate to the web server provider and check if it’s working properly.
If you’re using CDN, try to open the CSS file directly in your browser.
In case that’s not working, check your links and ensure the CSS file is properly added.
Alternatively, contact the web hosting provider.
5. Correct CSS encoding and format (for designers)
Open the CSS and HTML files on the editor.
Click on the encoding format name like UTF-8 on the right-bottom side and choose the correct format.
Save changes.
6. Disable CSS minification and lazy loading (For developers)
If you see WordPress is not loading CSS in Chrome properly, it may be because of CSS minification and combination.
Try to disable it from your cache plugin.
Also, disable Lazy loading and see if it helps.
7. Try a different network
If your internet connection fails to load all website resources, CSS may not work in Chrome or any other browser. So, you can try to use a VPN or a different network to check if everything is OK.
We suggest Private Internet Access (PIA) as it is the most stable-performing VPN due to its largest global network.
What to do if CSS is not working in Chrome but works in Firefox?
This issue is widespread. You may see that CSS is not working on Google Chrome but works on IE, Firefox, Edge, or any other browser.
The reason can be the corrupted temporary data, different CSS encoding, and a third-party Chrome extension that utilizes CSS stylesheets. The above methods are enough to solve this type of situation. You will not need to follow anything else.
This can be an inconvenient issue, but our fixes should be able to help you. Keep in mind that this can affect other problems, and many reported that CSS is not working in Firefox and CSS issues in Safari.
This article has shown the most effective ways to fix CSS not working on Chrome and similar problems. If you know other methods, write in the comment box.
Is your webcam not working in Chrome? This article will explain all the details and solutions to fix this problem.
Google Chrome is the most compatible browser for any platform. It has all the necessary features and amazing privacy settings suitable for most people. However, sometimes, unexpected problems may occur.
Even though Chrome users may experience high CPU usage issues, they still continue to use this browser. But, If something else like the webcam not working occur, this is a very annoying problem.
Fortunately, you can easily solve any webcam-related issues on Google Chrome.
Is Chrome blocking my camera?
Depending on your privacy preferences, Google Chrome can block the camera. It can be for a specific website or for all the websites.
By default, when someone first time wants to use the webcam on any website, Chrome will ask your permission. If somehow you disapprove, this browser will continue blocking the camera access.
This is not only the reason you may face webcam issues on Chrome. Whatever it is, in the next part of this article, you will get the seven most effective methods to fix the camera not working on Chrome.
How do I turn on my camera on my laptop for Chrome?
If your laptop has a working webcam, you will not need to do anything else to turn this on to open it on Chrome unless a third-party application is blocking the access.
Some laptops come with a physical button and a webcam cover. Turn it on by pressing the correct switch and un-covering the webcam.
If your laptop camera is not working in Chrome, follow these methods to solve all of your camera-related issues on Chrome.
Quick Tip:
In order to avoid a faulty webcam on your Chrome browser, it’s better to switch to another browser.
By choosing the Opera One browser, you have integrated webcam support and multiple integrated features with social media apps.
Opera One
Join your online calls from this browser for a sound experience with no failures.
1. Check if another app is using the webcam or not
If you have another app already using your webcam, a second application like Chrome won’t be able to use it simultaneously. So, double-check if Skype, Team, Camera, or any other app is using the webcam or not.
2. Restart your computer
Windows may have been going through some tasks that utilize your webcam. Sometimes, the process may be stuck at a certain stage. For this, a restart is always the safe choice to fix if the camera is not working on Chrome.
3. Give proper permission
Press Win + I to open Windows settings.
Go to Privacy & Security and then Camera.
Make sure that this option: Let desktop apps access your camera is enabled.
Windows has this amazing privacy setting. Doing the above things will fix if the webcam is not working in Chrome on Windows 10/11.
4. Check permission on Chrome
Open Google Chrome.
Type the following address on the address bar and hit enter to go to Chrome camera settings. chrome://settings/content/camera
Make sure the proper webcam device is selected, and then tick Sites can ask you to use your camera.
Delete any not allowed sites that were added by mistake.
After that, try to access the website where the camera was not working. It will ask for permission again. Allow and fix the webcam not working on Chrome.
5. Check if the antivirus is blocking camera access
Open your antivirus or security program.
Go to its privacy Settings.
Go to Video & Audio Protection.
Allow Chrome to use the webcam.
We have shown the instruction for Bitdefender Total Security. If you use any other security programs like TotalAV, certain steps may vary.
6. Disable suspicious extensions
Open the Chromium browser.
Click on the extension icon and go to Manage extensions.
Toggle the switch off next to the extensions you want to disable.
Make sure you are disabling the problematic extensions, mainly which may utilize the Camera and Microphone.
7. Run the camera troubleshooter
Open Windows Settings like before.
Go to System and click on Troubleshoot.
Go to Other troubleshooters.
Click on Run next to the Camera.
Follow on-screen instructions.
This method is a very effective solution if the webcam is not detected in Chrome. By applying the steps from this method, you will also know if your webcam is problematic or not.
How do I test my webcam?
After applying these 7 methods, if the problem persists, you may need to test if your webcam is functional or not. For this, follow these steps.
For Windows:
Open the Start Menu, type camera, and open the application.
If you don’t see anything, click on the Change camera button and see if it works.
For Mac:
Press Command + Space on the keyboard to open the search bar.
Type Photo Booth and open the application.
If you don’t see anything, this may be the reason the webcam is not working on Chrome on Mac.
These are the ways to fix the webcam not working in Chrome issue. If you have another solution that can help others, let us know in the comment box.
There are several issues you can encounter when using Telegam Web in Chrome. Your browser might be out of date. Or you have a poor internet connection. Or there are some Windows Firewall issues.
If Telegram is not working on your PC, chances are that it’s the same case on your browser. Whatever the case may be, you can find a few different ways to fix it below. We’ve outlined them using simple steps, so all you have to do is carefully follow them.
How do I fix Telegram web if it doesn’t work in Chrome?
1. Restart the Chrome browser
A simple fix for this issue is by restarting your browser. It allows it to sync better and load the Telegram web app faster. This is the first thing you should do and if the issues persist, proceed to the other solutions below.
2. Update the Chrome browser
Launch the Chrome browser on your desktop, click the More button, and select Settings.
Click the About Chrome option.
Click UpdateGoogle Chrome.
If there’s an update available, it’ll update automatically.
This solves compatibility issues that may prevent Telegram web from working on the Chrome browser.
3. Clear Chrome browser cache and cookies
Launch the Chrome browser and click the More button.
Select More Tools and then click Clear browsing data.
Check the boxes next to Cookies and other site data and Cached images and files.
Click Clear data.
As earlier stated, corrupted cookies and cache can affect the functionality of the Telegram web on chrome. Hence, this should fix the issue.
Press the Windows + R, type in the Control panel, and click OK.
Open Windows Firewall Defender.
Then click on Allow an app through Windows Firewall.
Click Change Settings and select Yes.
Click the Allow another app button.
Press the Browse button.
Go to the following path: C:Program FilesGoogleChromeApplication
Select the chrome.exe file, then click Open.
Click the Add button.
Ensure you tick the Private and Public boxes, then click OK to save the changes.
5. Check for server information
Check Telegram social media groups for updates about the platform’s server. Although the server is rarely down, it could happen.
6. Use another browser
To quickly access Telegram and keep track of all your messages, connect using the Opera One browser. It has dedicated support for messenger apps, including Telegram.
You can send and read messages directly from the sidebar, without having to open a separate tab for Telegram or install any add-on. Also, Opera One comes with built-in AI.
Opera One
Use the Telegram integration to log in and get quick access to your channels in just a few clicks.
For an optimal Telegram experience, it’s advised to use a secure browser that can protect your data and detect suspicious behavior. Good options include Firefox, Opera, Safari, and Google Chrome.
Telegram web also requires a stable browser. One of the best options that are lightweight, fast, and also very secure is Opera. It includes dedicated support for Telegram plus installable add-ons.
If there is anything you should know about server breakdown, it’ll be on their page. Hence, all you can do is wait till it’s resolved.
Let us know which solution worked for you in the comments area below. We’re eager to hear from you.
Chromium browser high CPU usage issue is not rare. If you are having this problem, this article will guide you on how to fix it.
Chromium is right now the most popular and compatible browser engine. Many independent browser makers like Opera and even the tech giant Microsoft have given up on their browser technology and adopted Chromium.
If you look at the best web browsers, you will notice that most of them are based on Chromium.
The above statement proves how powerful Chromium is. Even though Chromium-based browsers can outperform all other browsers in terms of performance, speed, and compatibility, people still may face some problems.
High CPU usage is one of the most common and annoying limitations of Chromium that is creating problems for low-end device owners.
Why does Chromium use so much CPU?
There are many reasons Chromium-based browsers may use much CPU power on your computer. Here are the most significant ones:
The Chromium-based browser uses hardware acceleration and multi-threading by default
Third-party extensions and services may utilize more CPU power
Too many extensions can use too much computing power
Browsing unoptimized javascript-based websites
Operating system issues
Fortunately, you can reduce Chromium browsers’ CPU usage significantly by following the methods shown below.
How can I fix high CPU usage in Chromium browsers?
1. Disable unnecessary extensions
Open the Chromium browser.
Click on the Extension icon and go to Manage extensions.
Toggle the switch off for the extensions you want to disable.
2. Disable hardware acceleration and background tasks
Go to Settings of Chromium browser.
Go to the System tab and toggle the Continue running background apps when the browser is closed off.
Similarly, disable the button for Use hardware acceleration when available option too.
Restart the Chromium browser.
3. Use a performance-boosting extension
Though excessive use of the extensions causes high CPU usage on Chromium browsers, some extensions come in handy to reduce the CPU usage and enhance your experience.
For example, extensions like The Great Suspender Original kills inactive tab and reduce CPU usage. This type of extension can improve the overall CPU usage status for any Chromium browsers.
Please note that some browsers have built-in features that automatically kill inactive tabs and reduce computing power usage. You don’t need such extensions for these browsers.
Click on Reset, clean up, and then Restore settings to their original defaults.
Click on Reset Settings.
5. Limit CPU resources for Chrome
Right-click on the Start icon on Windows and go to Task Manager.
Go to the Details tab.
Right-click on the chrome.exe or any Chromium browser’s process.
Set CPU priority to Below normal, as shown in the screenshot.
If you see multiple processes of the same browser, do the same for each of them.
These 5 methods can help you to reduce Chromium CPU usage. However, these will not work if the problem is something else. As internal operating system issues can also cause this type of problem, you should focus on that too.
Always keep Windows, Mac, and Linux OS up to date. Also, regularly update your browsers to avoid high CPU and memory usage issues.
The methods mentioned in this article will help you to fix the Chromium browser’s high CPU usage problem. If you know any other better methods, feel free to let us know in the comment box.
They recommend that you either install or upgrade to a supported and updated version of the browsers mentioned in the above list.
Why isn’t my browser supported?
If you get an unsupported browser error on Chrome, it could be possible that you are either running an outdated version of the browser or an unsupported browser.
Alternatively, you could also come across the issue, if JavaScript is not enabled to use the feature.
But if you are using a supported browser, and you are still getting the error, you can try the below methods to troubleshoot the issue.
How do I fix a browser not supported by the Service Portal?
1. Enable JavaScript in the browser
If you are using Chrome, then click on the three dots on the top right, and select Settings.
Next, click on Privacy and security on the left.
Now, click on Site Settings.
Next, under Content, click on JavaScript.
On the next screen, under Default behavior, select Sites can use JavaScript.
Now relaunch Chrome and try accessing the Service Portal.
The process would be similar if you want to upgrade your Safari or Firefox browsers to the latest version.
The same method is applicable if you encounter this browser is not supported bythe service portal on iPhone and you are using Chrome.
Sometimes, even official online services can experience downtime or unexpected glitches. If you’ve run into issues recently, you’ll be glad to know we also wrote a full guide on the IRCC portal not working, which covers the most common errors and fixes.
If you are still facing any issues with the browsers, do let us know in the comments box below.
Google Chrome, the world’s most popular web browser, is the default browser for millions of people who want to watch content on their favorite streaming platforms, such as Amazon Prime Video.
However, there are several users who have reported facing the Amazon Prime Video not working in Chrome issue. This prevents them from watching their favorite content on Amazon Prime.
If you are among such users looking for solutions, you are at the right place. This guide will give you 3 effective solutions to quickly resolve the Amazon Prime Video not working in Chrome issue. Let us learn more about it in detail.
Why is the video not working on Amazon Prime?
After careful research, we have deduced that the reasons mentioned below could very well be why you are facing the Amazon Prime Video not working in Chrome issue:
Amazon Prime servers are down
Google Chrome isn’t updated
Cache and cookie data is causing issues
Installed extensions aren’t compatible with certain websites
Your internet connection is jumpy
You are using a VPN
Does Prime Video work on Chrome?
Yes, you can use Google Chrome to stream content from Amazon Prime Video. However, there is a certain list of browsers that Amazon Prime Video is compatible with. You can check that out here.
The best part is that you don’t need to install an app to watch your favorite content. You can check out our list of best browsers for Windows PC to check out the details about compatible browsers.
Furthermore, when you want to make a switch to another Chromium browser, Prime Video runs smoothly on Opera One as well.
To optimize your Prime Video streaming, you can use Opera One’s integrated ad blocker to effectively remove annoying ads and load your pages faster.
If you want to get more out of Opera One, you may install add-ons that help you with Amazon for a better experience, that also works in Chrome.
How can I fix Amazon Prime Video when it’s not working in Chrome?
1. Check Amazon Prime servers
There are chances that because of some technical difficulties, the Amazon Prime servers are down, which is the reason why you are facing such an issue.
In such a case, you can make use of websites such as DownDetector to know if the servers are down or not and wait till they are back up.
2. Check for Google Chrome update
Open Chrome.
Click on the 3-dot menu icon.
Select Settings.
From the right pane, select About Chrome.
Chrome will automatically update the browser if it detects a new one, and will prompt you to restart to install the update.
3. Clear cookies and cache data
Open Google Chrome.
Click on the 3-dot menu.
Select Settings.
From, the left pane, select Privacy, and Security.
Click on Clear browsing data on the right side.
Check the boxes next to Cached images and files and Cookies and other site data.
Hit the Clear data button.
Clearing built-up cache can also resolve other streaming issues like error 7136.
While Google Chrome is good for streaming content, issues such as Amazon Prime Video not working in a browser can occasionally pop up. In such cases, we would recommend you use the Opera One browser for it.
Several unique features make Opera One a more versatile and feature-rich browser than Google Chrome, some of which are:
It includes a pop-up video feature.
Offers a Turbo Mode to save data while playing videos and speed up browsing.
Comes with a built-in VPN.
Also comes with an integrated and powerful ad-blocker to watch content without disturbance.
There you have it from our side in this guide. We hope this guide helped you fix the Amazon Prime Video not working in Chrome issue. Let us know which solutions helped you resolve the issue in the comments below.
Pokémon Showdown is an online battle simulator that allows users to play against others from their browser. However, users have reported Pokémon Showdown not working in Safari and Chrome. Follow our solutions to solve this issue.
Why is Pokémon Showdown not working in my browser?
Pokémon Showdown could be acting up for several reasons, one of which is a poor internet connection. If you’re in an area with an unstable or public connection, it could be causing loading issues.
Another reason could be the platform you’re using. If using a browser on a mobile device, it might not be supported like the desktop version.
Quick Tip:
Open Pokémon Showdown using Opera GX. It’s a dedicated gaming browser specifically optimized to load and support long hours of gaming without interruptions.
It includes performance-oriented features like a RAM and CPU limiter, built-in integrations for Twitch and Discord, and a wide range of gaming-related installable add-ons.
Opera GX
Take your gaming to the next level with dedicated support for peak performance!
What can I do if Pokémon Showdown is not working in my browser?
1. Play it in your PC browser
Users reported having issues when playing using a browser on their mobile device, mainly using Chrome or Safari.
The game may be getting stuck in loading mode as it would when offline, even when users have a stable internet connection. Try playing from a browser on your PC to see if this fixes the issue.
If in Chrome on Windows hold down Ctrl and press F5.
In Safari on macOS press Cmd + Shift + R.
Doing this will force a full refresh and restart of the server, which may solve the issue. Remember that this does not clear the browser cache; follow the next step to see how to do that.
In Chrome, click on the three dots in the top right corner and select Settings.
Under Privacy and security, select Clear browsing data.
Click Clear data.
Restart your browser.
If using Safari and Pokémon Showdown is not working, you can clear the browsing data by selecting clear history from the menu. Many users reported that clearing their browser cache helped get Pokémon Showdown working again, as it refreshes the game and gives access to any client changes.
We hope one of the above solutions helped solve Pokémon Showdown not working on Chrome or Safari. For a more detailed guide on how to fix Safari if the server stopped working, we have solutions for that.
Sometimes Microsoft Edge is not opening, displaying a message saying it’s taking too long to connect.
It’s most likely due to corrupt system files, misconfigured settings, or a problem with the current user profile. Below, we show you how to address these common causes to make your browser work properly.
How do I get Microsoft Edge to open?
1. Delete the Local State file
Press the Windows key + F to open File Explorer.
Type %LocalAppData%\Microsoft\Edge\User Data\ in the address bar and press Enter.
Look for a file called Local State.
Right-click on it and click the bin icon to delete it.
Deleting the Local State file forces Edge to create a new one. This could fix the issue if the file becomes corrupt and prevents Edge from opening.
2. Repair Microsoft Edge
Press Windows + I to launch Settings, and select Apps from the tabs on the left.
Click on Apps & features on the right.
Now, locate Microsoft Edge, click on the ellipsis next to it, and select Modify from the menu.
Click Yes in the UAC prompt.
Finally, click on Repair.
3. Clear cache and browsing history
Launch Edge, click the Menu button in the top right corner, and choose Settings.
Select the Privacy, search, and services tab from the left, and then click on Choose what to clear under the Clear browsing data section.
Make sure the Time range is set to All time, all three options, Browsing history, Cookies and other site data, and Cached images and files, are selected, and then click on the Clear now button.
A crowded cache could also lead to bugs that prevent Edge from opening, so consider clearing it. As a rule of thumb, keeping tabs on your cache is good practice if you want good performance and no errors.
Log in with an administrator account on the computer.
Press Windows + R to launch the Run command, type msconfig in the text field, and then click on OK.
Go to the Services tab, select theHide all Microsoft services check box, and then click onDisable all.
Go to the Startup tab and then click on Open Task Manager.
Select each item on the list, right-click on it, and then select Disable.
Go back to the System Configuration window and click on Apply and OK.
Now, restart the computer.
After this, Windows will boot with minimum drivers, services, and programs. If Microsoft Edge is now opening, the underlying cause could be related to an interesting driver or app.
So, start enabling them one at a time and restart the computer after each to identify the problematic process, driver, or service.
Once done, make sure to keep it disabled until Microsoft Edge addresses the problem in the subsequent versions.
5. Run the System File Checker tool if Microsoft Edge won’t open from Taskbar
Press the Windows + R to launch the Run command, type wt, hold the Ctrl + Shift keys, and then click on OK.
Click Yes on the UAC prompt that pops up.
Press Ctrl + Shift + 2 to open Command Prompt in a new tab.
Type the following command, and press Enter to run the SFC scan:sfc /scannow
Do not close the Command Prompt window until the verification is 100% complete.
The SFC (System File Checker) scan is used to identify the corrupt system files and replace them with the cached copy stored on the PC.
6. Run PowerShell Command
Press Ctrl + Shift + Esc to launch the Task Manager.
Click the File menu at the top-right, and then select Run new task.
Enter powershell in the text field, check the Create this task with administrative privileges option, and then click on OK.
Type the following command in the Powershell window and hit Enter:Get-AppXPackage -AllUsers | Foreach {Add-AppxPackage -DisableDevelopmentMode -Register "$($_.InstallLocation)AppXManifest.xml"}
Wait for PowerShell to complete the process. Ignore the errors (in red) that might pop up.
If Microsoft Edge is not opening in Windows 10/11, this command would get things up and running in no time.
7. Close all other Edge processes
Press Ctrl + Shift + Esc to start Task Manager.
Right-click on processes related to Edge and choose End Task from the menu.
Do this for all of the Edge processes.
After ending all such processes, you should be able to start Microsoft Edge again without any issues. Keep in mind that you might have to repeat this solution if the issue reappears.
Press Windows + I to open the Settings app, and go to the Accounts tab.
Click on Family & other users.
Now, click on the Add account button next to Addother user.
Click on I don’t have this person’s sign-in information.
Now click on Add a user without a Microsoft account.
Enter the desired user name and a password for it though it’s not mandatory, and then click on Next.
11. Try an alternative browser
If Edge won’t load or crashes frequently, perhaps it’s time to try another browser. In this particular situation, we recommend using Opera One.
The tool comes with customized versions for PC, mobile (including older phones), Mac, or Linux. Besides, you can synchronize the Opera One browser across all your devices, to easily manage all the settings.
Starting from the basic version, you can bring your own flavor to the browser, adding icons, sidebars, workspaces, and bookmarks for ease of access and a better-organized workflow.
Opera One
Switch to Opera for better stability and up-to-standard browsing features!
Tell us which method worked best for you. As always, if you have any other questions or suggestions, feel free to leave them in the comments section below.
Web browsers are among the most essential software for all device platforms. All users will need a browser to navigate the web on Android, Windows, iOS, or macOS devices. Thus today we will show you the best cross-platform browser to use.
There are quite a few browsers to choose from but most users are probably only familiar with a minority of them.
A lot of them only have a very small share of a software market increasingly dominated by Google Chrome.
Internet Explorer was once the king of the browsers, but that has steadily declined in the wake of more cross-platform browsers.
Today, users prefer to utilize cross-platform browsers that support various desktop and mobile platforms.
The advantage of utilizing the same cross-platform browser on multiple devices is that users can sync data between PCs and mobile devices.
For example, users can open page bookmarks bookmarked with their desktop browsers on their mobiles with bookmark syncing.
What is a cross-platform browser?
A piece of software that has been designed to run on more than one kind of computer platform is referred to as a cross-platform application. In a similar vein, a website that has been designed to work across several browsers is referred to as a cross-browser website.
If there were a single platform that developers had to focus on, the job would be much easier. However, since we all use more than two devices in our day-to-day life, such as a PC and a mobile device, cross-platform applications ensure that we have access to the same app on all of our devices.
How do I ensure cross-browser compatibility?
When you’re designing your website, make sure the code you use is straightforward and reusable. Write a reusable function that you can use whenever you need it, and you won’t have to waste time copying and pasting the same code into other files.
Incorrect HTML and CSS code might cause your website to behave incorrectly in a variety of different ways depending on the browser being used.
It may be difficult to locate the flaws. And even after doing so, the website will generally still build with a few minor issues that seem to be completely random. This, in turn, makes it difficult to debug.
In a perfect world, you would be able to do in-person testing of your website using a wide variety of browsers and computing platforms. On the other hand, this may not be feasible for organizations with smaller teams.
Hence, you may wish to investigate cloud-based browser testing. Which enables your website to be concurrently tested on a variety of various browser combinations.
Testing for compatibility across several browsers may be performed rapidly and effectively using LambdaTest, BrowserStack, and SmartBear, respectively.
Opera One is a reliable browser that matches many of Chrome’s and Firefox’s features and even surpasses them. Despite having embraced a Chromium engine, it retains a distinct look from Chrome and most other alternatives.
It is compatible with Windows, Linux, and macOS desktop platforms. Opera Mini and Mobile are two alternative versions that users can utilize on iOS and Android devices. Thus we regarded it as the best cross-platform browser.
When users first open the Opera One browser, it’s immediately apparent that this isn’t just some Chrome clone. The browser’s Speed Dial, which enables users to merge multiple page shortcuts together, is a more novel tab page.
Users can select to pin the Speed Dial’s sidebar which includes handy shortcuts to the browser’s bookmarks, page history, Speed Dial tab, extension tab, and more.
Among other Opera One key features is the snapshot for screen capturing and the Turbo Mode that speeds up browsing by compressing webpage images and graphics.
Thanks to a built-in adblocker you can further increase speed and remove distractions. The flow syncing function helps you sync images, links, text snippets, and notes with other devices.
Other useful features:
Snapshot tool
Workspaces
Pinboards
Opera One
Level up your Internet experience with an excellent browser that improves your workflow!
The constant evolution of software development brings more and more quality browsers. UR Browser is something you shouldn’t sleep on.
Everything a user wants from a browser is reliability, speed, and obviously, these days, a seamless transition between platforms. Add the full privacy-oriented remarkableness and you have yourself a perfect browser.
UR Browser hits the sweet spot between these points with, obviously, being focused on privacy and speed.
Some of its key features include Windows and Mac compatibility making it the second best cross-platform browser. In addition, it offers 3 levels of Privacy dedicated to keeping your privacy untouched in the virtual world and preserving your virtual identity.
You can go as much as staying completely anonymous while browsing or go lighter on limitations while browsing a trusted website
There’s also the first-party VPN integration that comes with the browser to hide your digital tracks.
Other useful features:
Third-party cookie blocker
Virus scanner
Anti-fingerprinting
Ur Browser
Get your hands on a great browser that comes with advanced privacy features so you can feel safer online!
AVG browser is a privacy-first solution that can be used cross-platform and provide all the security services you need.
First of all, this browser earns its place due to anti-tracking assistance and digital fingerprint masking for smooth navigation on any of your devices.
If you’re worried about adware, it’s covered. AVG comes with an automatic ad-blocker that detects irritating ads from afar.
When it comes to functionality, you have useful tools such as Stealth mode for tracking cookies or a Privacy cleaner to erase every bit of browsing data.
Besides all, there is a smooth integration with AVG’s famous antivirus that will keep your devices safe regardless of platform.
In addition to that, you have VPN integration for anonymous navigation no matter your real location.
AVG Secure Browser
Surf on every website securely and don’t look back for unsecured browsing.
Vivaldi Technologies launched the browser in 2016 to revive the features of the old Presto-based Opera One, which is now Chromium-based software.
Thus, Vivaldi is similar to Opera One, and it is compatible with Windows (from Win 7 to Win 10), OS X, and Linux.
Vivaldi is among the best cross-platform browsers as it boasts a plethora of built-in customization settings that few others can match.
Its users can customize the browser’s tab and tab bar positions, address bar, window appearance, Start Page, and keyboard shortcuts.
Some key features you’ll enjoy are the page action settings that can help you customize the page display to your specific needs.
You can also further customize Vivaldi with the full repository of Chrome’s extensions. Another perk is the cutting-edge tab bar with 14 tab management options, page thumbnail previews, and more.
You can group tabs by stacking them and then tiling the stacks to display multiple pages within one window.
Chrome is the world’s favorite cross-platform Internet browser developed by Google. This search engine didn’t climb to the top of the browser pile for nothing as it incorporates all the latest web tech, integrates neatly with Google’s services, and packs in handy options and features.
This browser is also compatible with a wide variety of platforms, such as Android, Windows, Linux, iOS, macOS, and Chrome OS.
You’ll love Chrome’s streamlined UI design, speed, and extensions. Benchmarks highlight that Chrome is at least among the fastest browsers.
With a vast repository of extensions and themes, you are free to customize the browser in many ways. It also provides in-built handy tools such as its profile manager, task manager, and a built-in ad-blocker,
Chrome features advanced sync settings such as the sync Chrome apps, bookmarks, open tabs, themes, settings, and extensions.
It is compatible with iOS and Android platforms, as well as Windows (users can sync browser data to most mobile devices). Thus, we recommend it as another best cross-platform browser.
Other useful features:
Automatic translation and spell check of web pages
Firefox was the foremost browser for a while before the rise of Google Chrome. This browser’s user base might have declined, but Mozilla Firefox is just as good as it once was, if not better since its Quantum update back in 2017.
Firefox is open-source software that users can utilize on Windows, Linux, Android, iOS, and OS X platforms.
Today, Firefox is widely regarded as the best Chrome alternative, especially for laptops and desktops with lower system specifications.
Firefox is among the most system resource-efficient browsers that utilize less RAM than Chrome and other alternatives.
Thanks to its high adaptability you can add and remove buttons from the URL toolbar and select new themes for the browser.
A great feature you’ll like is the Options tab that includes customization settings for Fox’s New Tab page, fonts, tabs, and page scrolling. In addition, you also have a plethora of Firefox extensions available.
This is a great browser that provides bookmark sync, allows you to take a screenshot, copy a link, send a tab to a device and enables users to send tabs to Firefox on synced devices.
With Brave, it is possible to prevent advertisements from displaying on websites that you visit by using this browser, which, similar to other browsers, does not cost anything to download or use.
Chromium, an open-source project that is maintained by Google and others, serves as the foundation upon which Brave was created.
Brave is powered by the same back-end technologies that are used to power Chrome. These technologies include the Blink rendering engine and the V8 JavaScript engine. And of course, it is another best cross-platform browser to use.
Instead of relying on Apple’s Safari browser, Brave for iOS uses WebKit, an open-source foundation that also drives Apple’s Safari browser.
It supports Windows, Mac, Linux, iOS, and Android platforms thus making it another powerful option for those looking for the best cross-platform browser.
The worldwide Internet browser startup Maxthon has published Maxthon 6 browser, which has technologies based on blockchain to revolutionize the way the Internet is used.
Blockchain technology like Bitcoin SV (BSV) is the only one that can make this new Internet and the Maxthon 6 browser a reality. Since 2003, Maxthon has been offering a cutting-edge, multi-platform web browser that is one of the most popular in the world.
In fact, it is the default browser for more than 670 million users. Since its beginnings, Maxthon has achieved several top prizes in About.com’s Readers’ Choice Awards, a nomination for PCWorld’s 100 Best Products, a 5-star rating from CNET, and the title of Best Free Software.
The latest version of Maxthon, version 6, aims to be a fully-featured web browser. It incorporates the most interesting aspects of the widely used Maxthon 5 browser as well as the most useful aspects of Google’s open-source Chromium project. Such as cross-platform integration for Windows and Mac.
Other useful features:
Built-in Flash, Java, and ActiveX blocking capability
Multiple web pages may be seen side by side in the same window using split-screen surfing
So, these are the best cross-platform browser for users who use the web on multiple devices. They also include all the essential browser features along with additional novelties and extensive customization options.
What is the difference between native platforms and cross-platform?
Native applications are software that has been developed expressly for a particular operating system by making use of programming languages that are platform-specific.
The process of developing applications or software that must be used on certain devices and mobile app platforms such as Android and iOS is referred to as native app development.
Designing apps that are optimized for a particular platform assures that the apps will have a high level of performance.
Cross-platform apps are compatible with several platforms and will offer easy deployment, strong functionality, and cost-effective manufacturing.
In the long term, it is beneficial for both the owners of businesses and the developers of software to get reusable code that is supported by increased productivity and efficiency.
In this respect, a cross-platform app development framework has a distinct advantage over several other available options.
How do you keep your data synced across devices? Share your experience with us by reaching the comments section below.
CSS isn’t working in the Safari browser? It can be a real pain, especially if you’re trying to complete a project.
Safari is one of the most popular browsers in the world. It’s available on iOS, macOS, and even Windows computers. It is compatible with most website design software so you can always expect it to deliver efficiency.
However, if you are developing a website or web application and you want to use CSS to style it, then you might have come across a problem such as CSS not loading in Safari.
CSS stands for Cascading Style Sheet and is used to style your website. It is a powerful tool that changes the look and feel of your website.
Does Safari support CSS?
Safari does support CSS and is compatible with most modern browsers. However, because it’s not as popular as Chrome or Firefox, users tend to ignore it.
Why does CSS not work on Safari? If your website is not working in Safari, that means a few things. You either have a CSS error that needs to be fixed or you have a browser compatibility issue.
Other reasons include:
Old web browser – If you have an old version of Safari installed, you should update it immediately. The older versions of the browser may have some bugs and glitches which can cause problems with CSS styles. In such cases, you may experience CSS not showing in Safari.
Wrong syntax code – Syntax refers to the way a code is written so that it can be read by machines or computers. If you are developing a website using HTML5 or XHTML5 then make sure that you have used the proper syntax code correctly and accurately otherwise it won’t work properly on any browser including Safari.
You’ve used an unknown/unsupported CSS – There are thousands of CSS properties and even more new ones being added all the time, but only a small subset is supported by any browser. If you’re using one that isn’t supported, it won’t work in any browser and you may get a message saying WebKit CSS not working in Safari.
While there is no CSS hack code for Safari, there are some workarounds you can attempt to get it working again on your browser.
What can I do if CSS doesn’t work in Safari?
1. Update your browser
First, make sure you’re using the latest version of Safari. You can check for updates by opening the App Store app and looking for an option to update your software.
An updated browser ensures all the latest and stable tools are available at your disposal and that there are no limited functionalities when you try out your codes.
Navigate to Safari on the menu bar and select Preferences.
Click on the Advanced tab and check the Show Develop menu in menu bar box.
Select Develop on the menu bar and hit Empty Caches.
3. Validate your CSS code
The CSS code that is copied from the web is not always correct. Sometimes this is because of a typo and sometimes it’s because of bad CSS coding practices. It’s easy to accidentally paste an invisible character such as a newline or tab, which can break the code.
You can paste your code onto a CSS validator or an HTML editor with a built-in validator. Alternatively, you can type it manually and see if the problem persists.
How do I make CSS compatible with all browsers?
CSS is not inherently compatible with all browsers, because there are many different ways to interpret the same CSS rules.
The best-case scenario to widen your reach is to use CSS as intended. That means using the correct syntax and naming conventions for your properties and values.
Hopefully, this article was able to shed some light on what to do if CSS is not working on your Safari browser.
While you are still here, we’d like to redirect your attention to our comprehensive list of web authoring software that you may find useful when building a website.
Let us know what solution worked for you in the comments section below.
Some Chrome tabs might display a Not enough memory to open this page or oogle Chrome ran out of memory while trying to display this page error messages when you try to open a webpage.
That usually means that there isn’t enough free RAM. Here’s how to fix it:
How do I fix Not Enough Memory to open this page?
1. Close tabs and disable the browser extensions
Press the Customize Google Chrome button.
Click on More tools, and select Extensions.
Then click all the extension switch buttons to turn off the add-ons. Alternatively, users can press the Remove button to delete the extensions.
Restart Chrome after turning the extensions off. Then try opening the page that didn’t open before.
Users should also close other third-party programs. To do that, right-click the taskbar to select Task Manager. Then, users can close listed programs on the Processes tab by right-clicking them and selecting End task.
If you’re getting not enough memory in Chrome messages, disabling the unused applications and extensions is the best way to fix them.
2. Expand page filing
Open Cortana by pressing the Type here to search button on the taskbar.
Enter advanced system settings in the search box. Then click View advanced system settings.
Press the Settings button.
Then click the Advanced tab on the Performance Options window.
Press the Change button.
Deselect the Automatically manage paging file size for all drives option.
Select the Custom size radio button.
Now enter a figure in the Initial size text that eclipses the Recommended and Currently allocated values shown at the bottom of the window.
Users can enter the same number in the Maximum size text box as the one input in the Initial size box. Alternatively, enter a higher value in the Maximum size text box.
Press the Set button, and then click OK to close the window.
If you’re getting Not enough memory to open this page on Windows 10/11, adjusting the virtual memory settings can help.
Quick Tip:
You can also try a browser that has built-in features that help reduce memory usage in order to get the best performance.
We suggest you try Opera GX because it’s light and easy to use, and you can enable the CPU and RAM limiter by just toggling a button.
Opera GX
Use this lightning-fast browser with minimal resource usage to open any page!
Enter the following in Google Chrome’s URL bar: chrome://settings/
Go to System in the left pane.
Then toggle the Use hardware acceleration when available option off.
Restart Google Chrome.
5. Disable extensions
Click on the three vertical dots in the upper-right corner of the Chrome browser window.
Hover over More Tools in the dropdown menu, then click on Extensions.
Toggle off the switch next to each extension to disable it. The switch will turn from blue (enabled) to gray (disabled).
Doing this stops extensions that use too much memory or are unstable and interfere with performance.
How do I get more memory for Chrome?
To give Chrome more memory, disable unused extensions, close unneeded tabs, and shut down other applications. If memory issues persist, consider adding more RAM.
Some browsers don’t have the configuration option to access DOD or army websites. It is why you need to download the best browser for army websites. Many browsers are online, but only a few can unblock military websites.
The conduct of the military around the world is strict, with maximum security. Military websites require validation certificates like DOD root certificates before the browser can unlock them. Also, navy website certificates for validation are the SSL certificate.
It would help if you had a secure and private browser before accessing any army websites. As we go through this article, we’ll examine the five best secure & confidential browsers for army websites.
How do I unblock military websites?
1. Use a VPN (Virtual Private Network)
The easiest way to unblock any website is by using a VPN. It can serve many purposes ranging from clearing sites that are geographical restrictions, keyword filters and blocked IP addresses, etc.
Also, VPN protects your browsing activities from intruders by encrypting your web traffic. So, use a VPN to unblock military websites and other restricted websites. It is, however, not illegal to unblock websites with a VPN.
If you are not planning to use a browser that can unlock the army websites, it is advisable to use a VPN.
2. Try using an open web proxy
Using a web proxy can quickly unblock some websites. In addition, it does not require any download or installation. All you have to do is to connect to a proxy server, then go to the website.
However, web proxy is a good way of unlocking sites, but there are some it can’t get by. Hence, the need for browsers for army websites.
3. Use the section of the Restricted site in your browser
In your browser, you need to do some troubleshooting to be able to unblock websites. So, check if the website you want to visit is on the restricted sites list. It is possible the website is not safe, so it is blocked.
Also, you may need to download a certificate on your browser to give it access to be able to access restricted sites. For example, the SSL certificate unblocks sites in your browser.
You don’t need to install a VPN if you have a good and reliable browser. The browsers listed below have an inbuilt security system that functions like a VPN. However, if the reason for you being unable to access a website is location related, the VPN is the best option.
It is a very productive browser and a good choice for unblocking websites. In addition, it has an SSL certificate which helps it unblock sites.
UR Browser is also very customizable. It’s not really a useful feature to access army websites but it helps you enjoy your experience and that’s important, right?
Install DOD root certificates on your computer through the InstallRoot utility.
Install the DOD CA certificate.
Launch Google Chrome and go to Settings.
Click Privacy and security, then scroll down.
Select Manage certificates and check if the CAC is there. (If it appears, restart your computer, and you are good to go)
However, there are different reasons why a website to blocked. It can be inaccessible without a particular certificate. It can be geographical, identity, etc.
So, depending on why one is, the list of the best browser for army websites will help access DOD sites.