Latest Chrome Canary build adds light or dark theme settings

Microsoft is bringing a manual toggle for the light/dark mode setting to its new Chromium-based Edge Insider browser (via Neowin). The toggle has already made its way to the Canary channel, allowing users to change the theme straight from within the browser settings.

Dark mode in the Edge Insider browser isn’t entirely new, as the browser already could adjust the theme mode automatically based on the system settings on either Windows 10 or macOS. However, now users can choose the theme manually, or leave it on automatic if they prefer. This setting is especially useful on older versions of Windows, namely 7 and 8.1, which don’t natively support dark mode.

Those who have the Canary version of the browser (currently at 77.0.213.1) can try the new feature now. With any luck, we could see it reach the Dev version soon, which provides a slightly more stable experience than the Canary builds. Do you prefer the light theme of Chromium Edge, or do you prefer being on the dark site? Feel free to leave your thought down in the comments area below.

Failed to Contact The Steam Product Key Server [Fix]

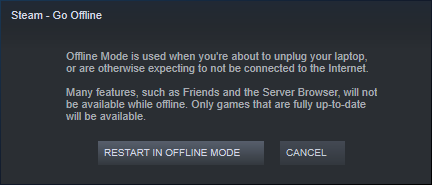
Failed to contact the Steam product key server error can appear if you try to play a Steam game offline.

This error can be rather annoying, and it can prevent you from playing certain games offline. However, there’s a way to fix this problem.

Why am I getting Failed to contact the Steam product key server error?

  • The game you’re trying to start isn’t available for offline play.
  • You haven’t run the game online at least one time.
  • There are issues with your Steam account.

How can I fix Failed to contact the Steam product key server error?

1. Make sure the game is available to play offline

  1. Not all games are available for offline play in Steam.
  2. In order to play a certain game offline, you need to check if this option is available.
  3. This varies from game to game, and some developers keep allowing you to play their games offline while others don’t.
  4. If the game doesn’t have offline play feature enabled by default, there’s not much you can do.

2. Run the game online at least once

  1. Make sure that you have an active Internet connection.
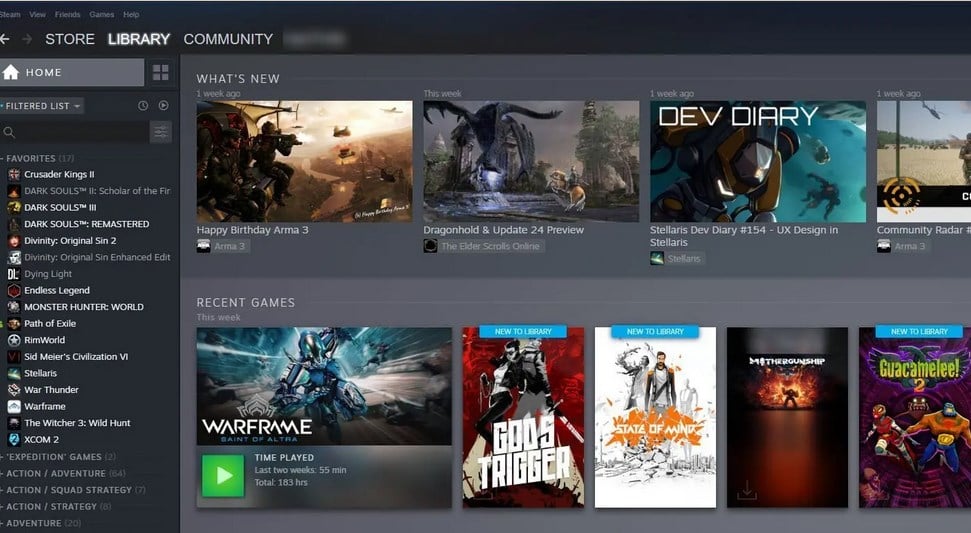
  2. Log in to Steam and go to your Library.
  3. Start the game you wish to play while online.
  4. After a few minutes of gameplay, turn the game off.
  5. The game will now be available for offline play.

3. Wait or contact Steam support/developers

  1. In some instances, this problem can occur due to issues with the server.
  2. If that’s so, try waiting for an hour or so or for 24h.
  3. In case the problem is still there, contact Steam support or the game developer.

Sometimes contacting the developers might be the best way to fix this issue, so don’t hesitate to contact them.

4. Set up a temporary Steam account

  1. Set up a new Steam account.
  2. Try to launch the game from the new account.
  3. Uplay client should now start, and you’ll be able to play the game.
Note icon NOTE
This is just a workaround, and it only works with UPlay games or games that use third-party launchers.

There you go, four quick and simple solutions that might help you fix Failed to contact the Steam product key server error.

This isn’t the only issue you can encounter, and we have already covered Steam content servers unreachable error in the past.

If these solutions worked for you, please let us know in the comments section below.

How to customise the contents of Windows 10’s File History backups

Windows 10 retains the File History backup feature which was introduced with Windows 8. File History saves copies of your files periodically, giving you the ability to go back in time and recover earlier versions.

By default, File History is configured to backup a set of commonly used folders. After you enable the feature, you’ll find your libraries and user profile folders are automatically copied to your backup destination. If you want to add more directories to the backup, read on to be shown how.

File History is one of Windows’ features which still has its settings spread across the Settings app and the traditional Control Panel. Only the Settings app contains the option to add extra folders to your backup – the Control Panel won’t even update to show you’ve included the new locations.

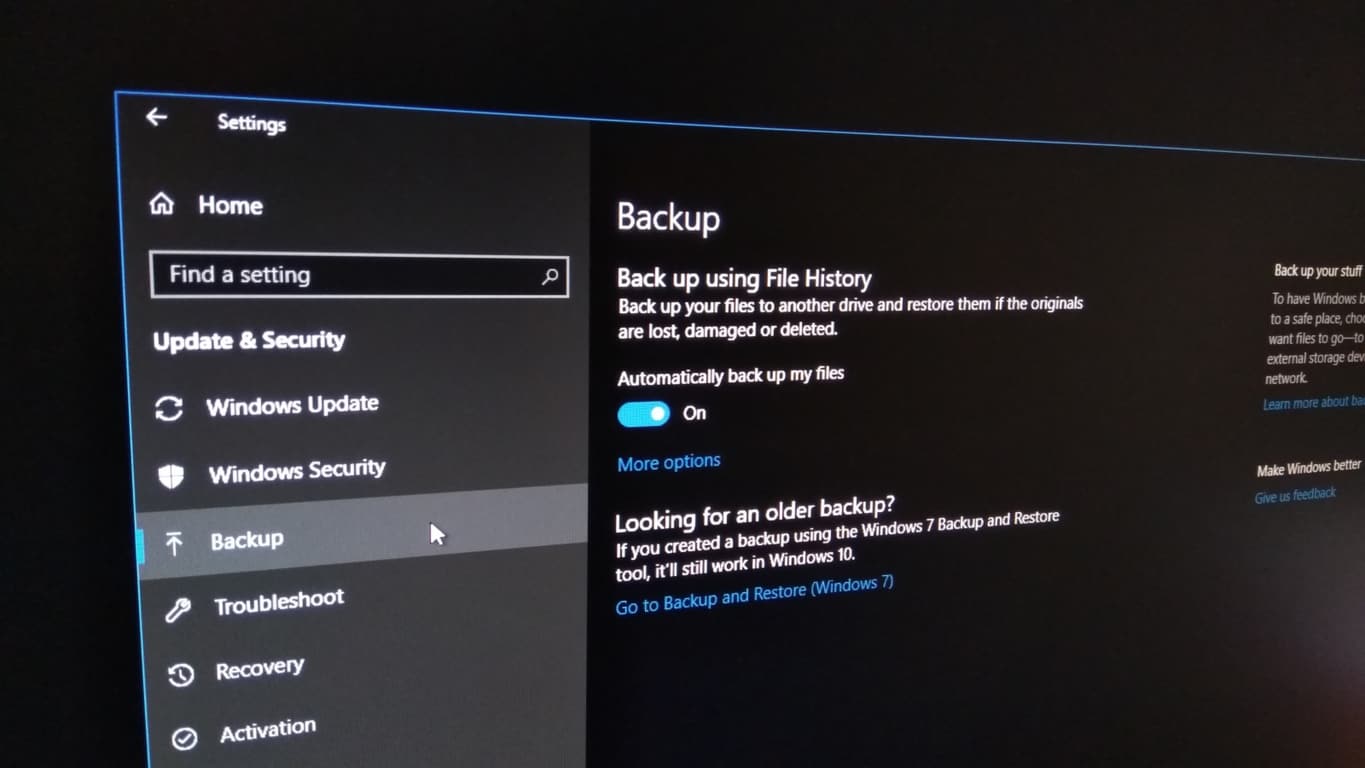
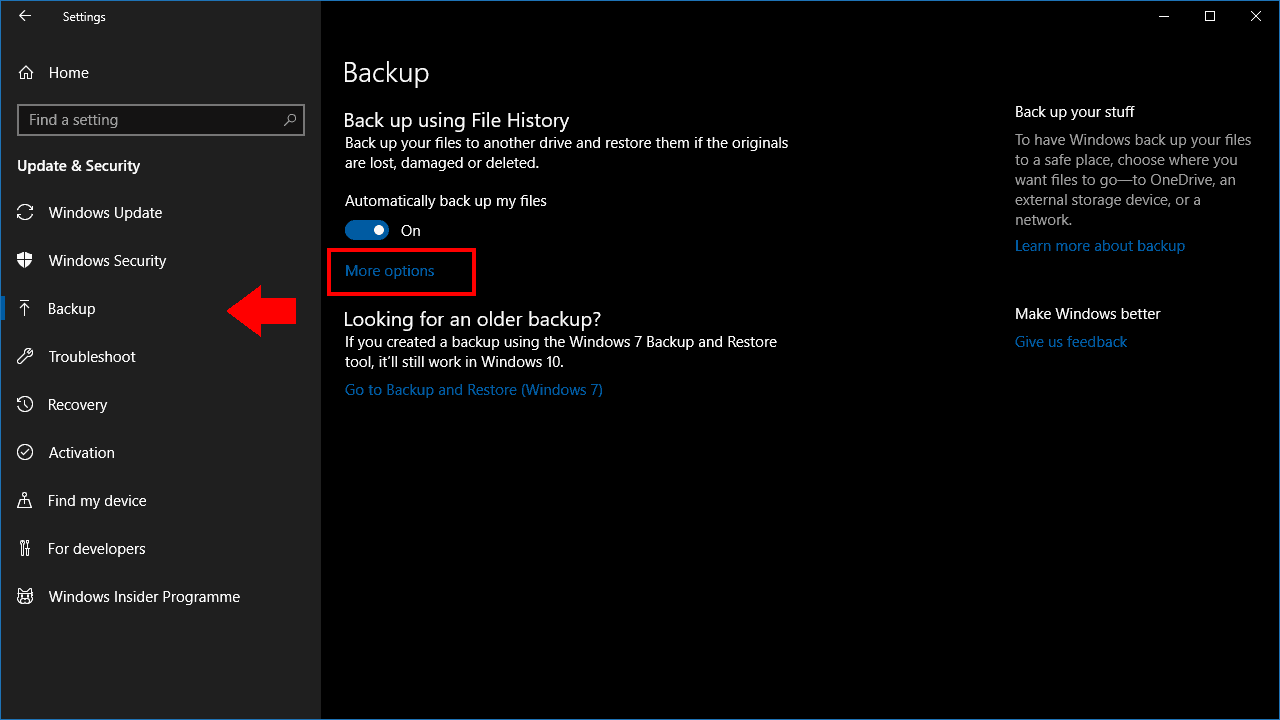
Open the Settings app from the Start menu and click the “Update and security” category. Choose the Backup page from the sidebar. We’ll assume you’ve already setup File History; if not, toggle the “Automatically back up my files” button to enable the feature.

Screenshot of File History settings in Windows 10

Click the “More options” link on the Backup page. Here, you can customise File History’s operation. Under “Back up these folders,” you’ll see a list of the locations which are included in your backup. Click the “Add a folder” button to add another directory.

Repeat the process to add further directories. We recommend including any folders which contain personal files, as well as folders which store application configuration files (these are usually C:ProgramData and C:Users%userprofile%AppData). Click the “Back up now” button at the top of the page to immediately run the backup and copy the new files.

Screenshot of File History settings in Windows 10

The rest of the options on this page let you finetune File History’s operation. You can change the backup schedule, restrict File History’s disk usage on the backup drive, or blacklist folders with the “Exclude these folders” section at the bottom of the page.

Some of these options are also available through the File History page in the Control Panel. However, we recommend using the Settings app to manage File History. The Control Panel interface is dated and doesn’t expose all the available options. In addition, some changes made in the Settings app (such as extra backup folders) aren’t reflected in the Control Panel, which could lead to confusion if you need to adjust the options in the future.

Microsoft is retiring these 6 classic Windows XP, ME, and 7 video games soon

Microsoft has confirmed in a new forum post (via MSPU) that they will be retiring all of their Microsoft Internet Games titles which were released on the older Windows XP, ME, and 7 operating systems.

The six video games being affected are Internet Backgammon (XP/ME, 7), Internet Checkers (XP/ME, 7), Internet Spades (XP/ME, 7), Internet Hearts (XP/ME), Internet Reversi (XP/ME), and MSN Go (7).

Windows XP and ME users will lose access to these titles on July 31st this year, which is just three weeks away, while Windows 7 users will have until January 22nd next year.

“We truly appreciate all the time and passion you’ve put into Microsoft Internet Games. This has been a great community,” the official post reads. “However, the time has come for us, along with our hardware and software partners, to invest our resources towards more recent technologies so that we can continue to deliver great new experiences.”

With most people having made the jump to Windows 10, and Microsoft having already released a variety of newer video games for casual players in the Microsoft Store, it’s unlikely that these six classic games had a large enough playerbase to justify continued support. Those who are still playing will likely be disappointed though.

Have you been playing any of these games on your Windows computer? Let us know which ones in the comments below and then follow us on Pinterest for more Windows gaming content.

Xbox One’s Attack on Titan 2: Final Battle video game features 40+ playable characters

The Attack on Titan 2: Final Battle Upgrade Pack is out now on Microsoft’s Xbox One family of consoles. This new release comes with the main Attack on Titan 2 video game plus a large number of downloadable content (DLC) that adds playable storylines from the first three seasons of the popular anime series, over 40 new characters, new gear, and a new Territory Recovery game mode.

Gamers who buy this release before August 1st will also get a variety of extra costumes for customizing characters in-game.

Here’s the official store description:

Attack on Titan 2: Final Battle Upgrade Pack contains the latest content for the tactical hunting action series based on the hit anime series Attack on Titan.

  • Includes the stories from seasons 1~3 of the anime!
  • More than 40 playable characters join the battle!
  • Experience the thrilling action of “ODM Gear”!
  • New equipment “Thunder Spear” and “Anti-personnel Omni-directional Mobility Gear” have been added!
  • The new mode “Territory Recovery Mode” has been added!

Are you an Attack on Titan fan and will you pick up this latest video game release? Share your thoughts with the community in the comments below and then follow us on Pinterest for more geek culture content.

Telegram app updates on Windows 10 with new animated sticker feature

The official Windows 10 Telegram app updated to Version 1.7.13 earlier today, adding Telegram’s new animated stickers in addition to support for strikethrough and underline text formatting.

These new animated stickers use the .TGS file format which allows for high quality images and 60 frames per second for each sticker. Like Telegram’s regular stickers, anyone can create and upload their own animated stickers for use either personally or for use by the general public.

Here’s the official release notes:

  • Send ultra-lightweight high-quality animated stickers to express emotion with motion.
  • Receive animated stickers instantly on any connection at just 20-30 KB per sticker.
  • Enjoy smooth animations at 60 frames per second.
  • Create new animated sets and upload them to @stickers for everybody to use.
  • Try out these sample stickers: t.me/addstickers/hotcherry
  • Use strikethrough and underline formatting

Telegram’s previous updates added other options for chats in addition to the new location-based communication tool.

Do you use Telegram or do you prefer another chat app? Let us know in the comments below and then follow us on Twitter for more tech news.

The app was not found in the store. ?

IP Helper Service is Not Running: How to Turn it on

At times, you may see Windows flashing IP helper event error saying that the IP helper service is not running.

This can cause various problems such as unreachable IP address, and in today’s guide, we’re going to show you the best ways to fix this problem.

What is the IP helper service?

  • IP Helper is designed to help with the administration of the local computer.
  • It allows applications to retrieve information regarding network configuration.
  • IP Helper provides notifications to the application when a network configuration change is detected.

How do I turn on IP helper?

1. Set DHCP Client to Automatic

  1. Press Windows Key + R to open Run.
  2. Type services.msc and press OK to the Service window.
  3. In the Services window, search for DHCP Client.
    DHCP Client Service Set Automatic
  4. Right-click on DHCP Client and select Properties.
  5. Make sure the startup type is set to Automatic. If not, click the drop-down menu and select Automatic.
    Set DHCP Client to automatic to start IP Helper
  6. Click Apply and OK to save the changes.Service set to Manual
  7. Next, look for WinHTTP Web Proxy Auto-Discovery Service. Right-click on it and select Properties.
    Set WinHTTP Web Proxy Auto-Discovery Service to manual to start IP Helper
  8. Make sure the Startup type is set to Manual. If not, click the drop-down menu and select Manual.
  9. Click on Apply and OK to save the changes.
  10. In the same Services window, right-click on IP Helper and select Properties and check if you can set it to Automatic.

2. Boot into Safe Mode for Diagnosis

  1. Click on Start.
  2. Now press and hold the Shift key and click on Power > Restart.
    Safe Mode - Shift - Restart - IP Helper
  3. The computer will restart again and show the Choose an Option screen.
  4. Click on Troubleshoot and then select Advanced Options.
  5. Go to Startup Settings and click on Restart.
  6. The computer will restart again and show multiple options. Press F4 or 4 to boot into Safe Mode or preferably F5 or 5 to boot into Safe Mode with Networking.
    Windows 10 Safe Mode - IP Helper
  7. After the restart check if the IP Helper error still appears or if you are able to restart it from the services.
  8. If you are able to restart it successfully or if the error does not appear, you may have a third-party program that is creating a conflict with the service.

Finding the conflicting program 

  1. Finding conflicting software can be a tricky task. Your best bet is to check if you have installed any software recently and try to uninstall it. Or try to perform a System Restore using Restore Point option to restore your PC to an earlier point.
  2. Programs that are known to create IP Helper issues are game-boosting software or Game boost modes offered by antivirus software like Bitdefender etc.
  3. So, if your antivirus has a game profile or game boost mode, disable it. Also, uninstall any game-boosting software that you might be using. The same is the case with Drive booster from IObit etc.
  4. If the issue persists, temporarily disable the antivirus and then try to restart the IP Helper service.

As you can see, it’s relatively simple to fix the IP helper service is not running error message on your PC, as long as you follow our guides.

If you want to learn more about IP addresses, we have a great guide on how to find IP address on your PC, so be sure to read it.

What methods did you use to fix this error? Let us know in the comments below!

Microsoft Internet Games supports for Windows XP/7 ends next year

Microsoft recently announced its plans to end support for Microsoft Internet Games on Windows XP, Windows ME, and Windows 7 next year.

This news was pretty shocking for many Windows fans because, let’s admint it, we’ve all have been playing these games for years. Microsoft explains in a recent post:

We truly appreciate all the time and passion you’ve put into Microsoft Internet Games. This has been a great community. However, the time has come for us, along with our hardware and software partners, to invest our resources towards more recent technologies so that we can continue to deliver great new experiences. Current players may enjoy the games until the dates above, when game services will cease, and the games listed will no longer be playable.

The company made it clear that support for Microsoft Internet Games services on Windows 7 ends on January 22, 2020. As a quick reminder, this is the date when the big M will officially end support for the good old Windows 7 OS as well.

Moreover, Windows XP and ME users can have some extra time to enjoy these games until July 31, 2019. According to the post, Microsoft plans to end support for these popular games on all three platforms.

  1. Internet Backgammon (Windows XP/ME, 7)
  2. Internet Checkers (Windows XP/ME, 7)
  3. Internet Spades (Windows XP/ME, 7)
  4. Internet Hearts (Windows XP/ME)
  5. Internet Reversi (Windows XP/ME)
  6. MSN Go (Windows 7)

Most of these games were used for educational purposes back then. As kids, many of us learned to use basic mouse functions by playing Solitaire.


Speaking of Solitaire, here are some of the best Solitaire games that you can play in 2019.


Moving Further, Spades and Checkers helped students to improve their IQ level. Most importantly, these games were free from any type of violence. We can see that today many online games promote violence among young kids.

Don’t worry, you can find many alternatives to these games by doing a quick search on the Microsoft Store.

You can find thousands of games by typing “Solitaire” or “Spades” on the Store.

What’s your favorite childhood game on Windows XP or Windows 7? Comment below.

RELATED ARTICLES YOU NEED TO CHECK OUT:

Steam games fail to launch with error 0x800f0805 [QUICK FIX]

Many gaming platforms have emerged during the past few years. However, the gaming community has always preferred the Steam/Windows 10 combo.

Steam‘s library offers a huge variety of popular titles and games that attract towards the platform. However, there are some players who reported that some games fail to launch on their systems.

Oftentimes, the games fail to launch with the error code 0x800F0805.

Bought the game from the steam sale, saw some issues online after but don’t know if this is the same problem? Game won’t start and initialization fails after the error code, tried loading from the expansions too but no luck. Is the my computer or the game? Can’t find much about the error code online. Any help would be appreciated. 🙂

This situation is frustrating for many gamers because there is no workaround to fix the bug.

Steps to fix error 0x800f0805 on Steam

1. Verify  the integrity of your game files

Many such issues occur when the installation files are either corrupted or some of them are missing. Therefore, you need to verify the integrity of game files in such cases.

During this process, Steam compares the files downloaded on your system to those available on the game servers. When a file is missing or corrupted, it is downloaded again on your PC.

There are some simple steps that you need to follow to fix the issue.

  1. Reboot your Windows 10 PC and launch the Steam game engine.
  2. Navigate to the Library section and find your game.
  3. Now right-click on the specific game and click Properties.
  4. Go to the Local files tab and hit the Verify integrity of game files button. Steam properties
  5. Steam will start the game verification process. You may need to wait for a few minutes.

Finally, reboot your system and launch the game again. The game should now start without any issues.


You can automatically repair corrupted files on Windows 10 with these software solutions.


2. Update your graphics drivers

Sometimes, outdated graphics drives prevent games from running on your system. If you have not updated your graphics drivers yet, you should install the latest version now.

Otherwise, your games may fail to initialize or launch properly.

For more information on how you can update outdated drivers, check out this step-by-steps guide.

3. Reinstall the game

If none of the above-mentioned solutions worked, you need to uninstall the game, delete relevant files on your system, and redownload the game.

Have you experienced any such issues on your system? Let us know in the comments section below.

RELATED ARTICLES YOU NEED TO CHECK OUT:

Posted in Fix

Found unauthorized changes on the firmware [QUICK FIX]

Have you recently tried to boot up your computer but before anything else you get hit by the message System Found Unauthorized Changes on the Firmware?

We know this might be frustrating, but there is no need to panic. We found a few solutions and possible reasons for this that we will share with you in the next article.

My system found unauthorized changes on the firmware

1. System restore point

  1. Insert the Windows installation media and boot from it in the beginning.Found unauthorized changes on the firmware
  2. In the first window that pops up, press Repair your computer.
  3. After the tool scans your operating system, it will give you the option to Restore to a previous point.
  4. After that, follow the steps in the prompt and select a system restore point dated before the occurrence of the issue.

However, by using this method, it is likely that you will encounter the issue again after a while.

It is advisable that you do not update your operating system for a while until a new fixed version occurs.


Are you still stuck on the Boot screen with the Unauthorized changes error? Resetting your system should help.


2.Disable the Secure Boot

  1. In order to do so, you will need to access your BIOS or UEFI settings. Doing this can be slightly different, depending on the motherboard. If you are having trouble with accessing BIOS, you can read more about how to do it by accessing this link.
  2. After you manage to access the BIOS/UEFI, you will need to search for a Boot section. Under it, you should find an option called Secure Boot. As soon as you find it, you will have to change the OS Type to Other OS.
  3. This way, your Secure Boot should be disabled and your startup should work flawlessly.Found unauthorized changes on the firmware

READ ALSO:

Xbox Game Pass is fair for developers, these Gamelab panelists agree

Two years after Xbox Game Pass made its debut on Xbox One, Microsoft’s gaming subscription service has recently launched on PC with a catalog of over 100 games. Xbox Game Pass was preceded by other services from Sony and EA, but it seems that Microsoft’s initiative is the one that had the biggest impact on the video games industry so far.

During a panel hosted by GameIndustry.biz at Gamelab 2019, several developers have voiced their enthusiasm about Xbox Game Pass. Microsoft never really discussed how it was remunerating developers and publishers who agreed to release their games on Xbox Game Pass, but it’s clear the Redmond giant definitely has the resources to bring several AAA games on the catalog. In recent months, we’ve seen recent blockbuster games such as Shadow of the Tomb Raider or Wolfenstein 2: The New Colossus join Xbox Game Pass, and Metro Exodus, a game that was an Epic Games Store exclusive on PC is also playable with the new Xbox Game Pass for PC.

We may never get details about Microsoft’s deals with game publishers, but Fredrik Wester, Executive Chairman of the Board at Paradox Interactive and one of the panellists at Gamelab 2019 referred to Spotify and Netflix to explain the different business models that subscription services can use. The Spotify business model, where artists get more money depending on their song’s popularity may be more interesting for live service games, but Microsoft apparently opted for personalized deals with developers and publishers.

“Spotify pays you depending on how many times your song is played,” Wester said. “Netflix pays you a fixed fee, depending on what it thinks your TV series is worth. They are fundamentally different things, and that’s what you see [with Game Pass] as well.

“OnLive, for example, they said, ‘You can have your game on our service, we’re going to attract a lot of customers, and we’re going to deliver you money based on how many hours people play your game.’

“Now, at Paradox we love that business model, because people play our games for 3,000 or 4,000 hours… While the Game Pass model — to us — is still a decent model, but we think we’re not getting paid enough, because people play our games more than they play very single-player, narrative-driven games.”

Even though the Netflix-like business model may not be ideal in the “game as a service era,” it still seems like third-party studios interested in Xbox Game Pass can still strike some pretty good deals with Microsoft. Dino Patti, Co-Founder and former CEO of Playdead and now Executive producer and Co-Founder of Jumpship said during the panel that Microsoft understands what developers really need.

“For me — and I might be a bit biased — but I think the way the business is with Game Pass is the first time subscription is what could be considered fair for developers,” he added. “All other business models that have been suggested with subscriptions have never worked out, because they didn’t know what developers actually need.
“With Game Pass, Microsoft is doing it correctly, I feel, for the developers.”

Game subscription services are still quite new in the video games industry, but the competition is already heating  with the upcoming launch of Ubisoft’s Uplay+, Apple Arcade and Google Stadia this Fall. According to Wester, this is a great opportunity for game developers and publishers to make more money. “People are throwing money at everything, and if you can’t make money today in the games industry then you probably will never be able to make money, ever, in this industry — if you’re an established company, because new companies always struggle,” he explained.

VLAN ID is Missing in Windows 10: How to Fix it

If your VLANs ID, or the tab altogether, is missing in Windows 10, you’ve come to the right place. The problem has been faced by many and is usually a result of outdated drivers, misconfigured network settings, or missing components.

In this quick guide, we’re going to list the troubleshooting steps you need to follow in order to solve things when VLAN ID is missing in Windows 10.

What can I do if the VLAN ID is missing in Windows 10?

1. Make sure .NET Framework 2.0 is installed on your PC

  1. Press Windows + R to open Run, type regedit, and then press Enter.
  2. Navigate to the following location inside Registry Editor:HKEY_LOCAL_MACHINE\SOFTWARE\Microsoft\NET Framework Setup\NDP
  3. Check the subkey values from the right-side panel. If you can see version 2.0 listed, restart the computer and verify whether the problem is not resolved.Net framework value in Registry Editor - Vlan tab missing

A missing .NET Framework often results in issues with the VLAN ID in Windows 10. So, your primary approach should be to verify this and if it indeed is missing, install or activate the framework, as discussed next.

2. Activate .NET Framework 2.0 on Windows 10

  1. Type in Control Panel in the search bar, and choose the relevant search result.
  2. Choose Large icons from the View by dropdown menu, and select Programs and Features.Programs and features control panel - Vlan tab missing
  3. Click on Turn Windows features on or off.Turn Windows features on or off - Vlan tab missing
  4. Check the box next to .NET Framework 3.5 (includes .NET 2.0 and 3.0), and then click OK.Activate NET framwork 3.5 - Vlan tab missing
  5. Windows Update process will start, and it will download the .NET 3.5 files.
  6. Restart your PC to apply changes.

As stated earlier, installing the .NET Framework will help when VLAN ID is not showing in Windows 10. In case the problem remains unresolved, head to the next solution.

3. Create VLANs using PowerShell (Admin)

  1. Press Windows + R to open Run, type powershell, and hit Ctrl + Shift + Enter.powershell
  2. Click Yes in the UAC prompt.
  3. Copy and paste this command to your PowerShell window and hit Enter: Import-Module -Name" C:\ProgramFiles\Intel\WiredNetworking\IntelNetCmdlets\IntelNetCmdlets"
  4. Now, run the following command to get the display the name of your network adapter:Get-IntelNetAdapter
  5. Execute this command to start the creation of a VLAN: Add-IntelNetVLAN
  6. Copy the exact name from the previously used Get-IntelNetAdapter command, paste it into the ParentName section, and then press Enter.

That’s it! By now, you would have the missing VLAN ID available in Windows 10 using one of the solutions listed here.

Before you leave, do check some quick tips to increase the Internet speed in Windows.

Please feel free to let us know if this article helped you create VLAN networks by using the comment section found below.

You Don’t Have Permission to Create an Entry in This Folder [Fix]

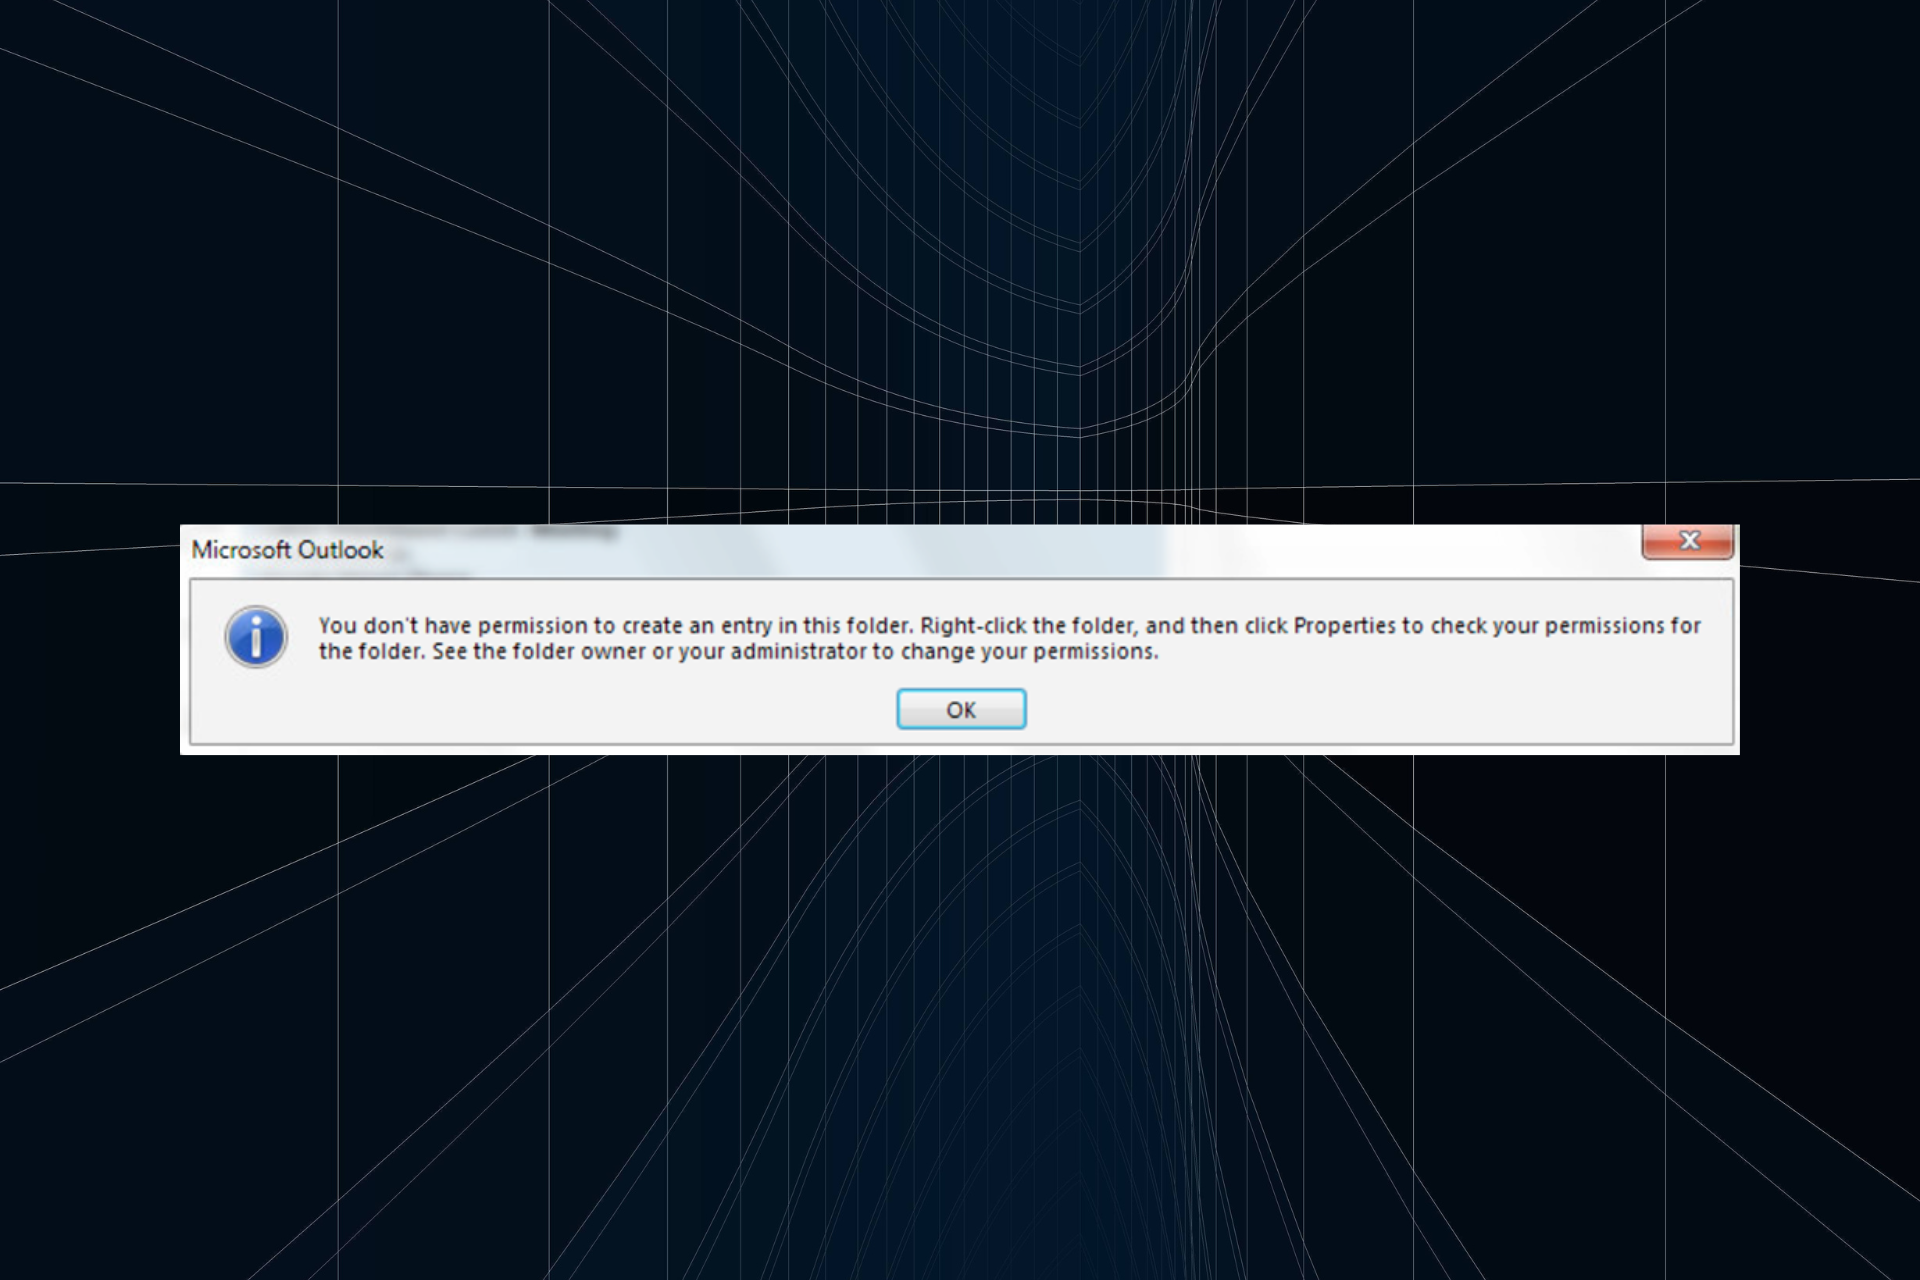
A large number of users have reported seeing the message, You don’t have permission to create an entry in this folder when trying to change data in Microsoft Outlook.

This is usually linked to missing permissions or issues with the Outlook cache. But the problem is easily fixable, as detailed in the following section. Keep reading to find out!

Why don’t I have permission to create an entry in Outlook?

This happens when two profiles using different Microsoft Outlook versions created two Microsoft Exchange Server accounts. A folder is created that can be seen by both, but only one account has permission to access it and change the information.

This error is caused by Outlook not being able to delete the stored cache when switching between accounts on the same profile.

Because the account without permission tried first to access the folder created earlier, that account has momentary ownership of the folder, so the user with permission will see the same message.

How do I fix You don’t have permission to create an entry in this folder Outlook error?

1. Clear the Outlook cache

  1. Save your work and close Outlook.
  2. Double-click on the Outlook executable file in order to open it again.outlook
  3. This will clear the cache stored in Outlook.
  4. After the restart, make sure to try and access the folder created first with the account that has access to the resource.

This will give that user full ownership of the created folder and, subsequently, no error will appear.

2. Modify permission levels from admin account

  1. Open Outlook and choose the folder for which you want to modify the permissions.
  2. Right-click on it and select Properties.
  3. Inside the newly opened window, select the Permissions tab.
  4. Select the user to which you want to give permission from the list.
  5. Under the Permissions section of the same window, select the desired permission level, Owner, Editor, Author, or another one.
  6. Click the Apply button.
  7. Check to see if the issue persists.

3. Uninstall and re-install Office 365

  1. Press Windows + X, and then select Apps and Features.Apps and features win 10 - you don't have permission to create an entry in this folder
  2. Scroll through the programs list, select Office 365, and click Uninstall.
  3. Follow the on-screen instructions to complete the process.
  4. Go to the Office website and sign in.Office 365 website - You don't have permission to create an entry in this folder
  5. Install Office 365 by following the on-screen instructions.

You can also uninstall Office by using specialized uninstaller software such as Revo Uninstaller. By using this software, you’ll ensure that Office 365 is completely removed from your PC along with all of its files and registry entries.

In this article, we explored some of the best methods to fix the You don’t have permission to create an entry in this folder Outlook error.

In case the problem persists, you can always switch to a more reliable email client.

Please feel free to let us know if this guide helped you solve your issue, by using the comment section found below.

Fix: You Don’t Have Permission to Book This Resource

A number of users have reported seeing the error message You don’t have permission to book this resource whenever they try to book a room (or other assets), by using the Outlook Exchange.

This isn’t the only error, and in the past, we already covered You must connect to Exchange with the current profile message.

Today we’ll focus solely on resource booking, so let’s get started, shall we?

Why am I getting You don’t have permission to book this resource message?

  • You don’t have the right permissions on your Exchange Online account.
  • Your account isn’t added to the Open Room Mailbox.

How do I fix You don’t have permission to book this resource error?

1. Assign corresponding permissions of the room mailbox to your Exchange Online account

  1. Log into the Exchange Admin Center with your administrator account.Microsoft Office 365 admin - You don't have permission to book this resource
  2. Navigate to Recipient and then Resources.Microsoft Office 365 admin - You don't have permission to book this resource
  3. Double-click the room mailbox.
  4. Inside the pop-up window that appears, select Mailbox Delegations.
  5. Add your administrator account inside the Full Access blank space.
  6. Click on the Save button.
  7. Open Room Mailbox again and check to see if the issue persists.
Note icon NOTE
It is recommended that when performing these above steps, you use a private browsing session. Press Ctrl + Shift + P for Mozilla Firefox, Microsoft Edge, and Internet Explorer. For Google Chrome, press Ctrl + Shift + N.

2. Add your account to Open Room Mailbox

  1. Log into your Open Room mailbox account.
  2. Select Options and go to Resource Schedule page now select Add your account to the list.
  3. Inside your Outlook (with admin access) and right-click Calendar. Lastly, select Data Properties.
  4. Inside the Permissions tab add the users with the appropriate access level and click Save.Microsoft Office permissions - you don't have permission to book this resource
  5. Try to see if the issue persists.

Another possible reason for this error message could be caused by users trying to book rooms with 1 year before the preset time limit. This information can be checked by going to Portal and then Exchange. After that, go to Recipients, select Calendar and choose Edit booking options.

In this article, we explored a quick fix for the error You don’t have permission to book this resource when trying to reserve a room or other assets on Exchange Online.

Because this issue is caused by porting the data storage from local to the cloud, the problem can be fixed by re-allowing access for each user inside your Microsoft Exchange Admin Center.

In case you’re not pleased with Exchange, we have a great guide on migrating from Exchange to Office 365, so don’t hesitate to check it out.

Please let us know if this guide helped you solve your problem by using the comment section below.

Fix: Deleted User Account Keeps Reappearing [Windows 10/11]

Some users have posted on forums about deleted Windows 10 user accounts reappearing. Thus, users can’t erase the user accounts that keep re-emerging.

Learn how to delete your account, but this time for good.

Does deleting a user account delete everything?

If the account you are trying to delete is a local account, all your data will be deleted. This is because the data is saved locally on your PC unless you back it up to another drive or cloud storage.

On the other hand, if the user account is linked to your Microsoft account and you have created a backup on OneDrive, your data should still be available on the cloud storage.

What can I do if a deleted user account is still showing in Windows 10?

1. Remove ESET Anti-Theft Phantom Accounts

  1. It is often the case that deleted accounts keep reappearing for users who utilize ESET Smart Security, and those users need to delete their ESET phantom accounts first via ESET settings. To do that, open a browser; and log in to ESET Anti-Theft.
  2. Then select the I recovered my device option.
  3. Select the required device listed under devices protected by ESET Anti-Theft, and click the View details.ESET devices windows 10 deleted user account reappearing
  4. Select Settings on the left.
  5. Then press the Phantom account state Delete button. Select the Delete option to confirm.
  6. In addition, some users might need to turn off an ESET Anti-Theft setting with the ESET software. To do that, open ESET Smart Security in Windows.
  7. Click Setup and Security Tools to open further options.
  8. Then turn off the Anti-Theft option.
Anti-Theft setting windows 10 deleted user account reappearing

2. Delete the Account Via Command Prompt

  1. Users can try deleting accounts via an elevated Command Prompt when the user account options in
  2. Settings don’t remove them. To do so, open the search box with the Windows key + S keyboard hotkey.
  3. Input ‘cmd’ in the Type here to search box.
  4. Right-click the Command Prompt and select Run as administrator, which will open an elevated CP window.
  5. Next, enter ‘net user username /delete’ in the Command Prompt; and press the Return key. Replace ‘username’ with the actual user account name.Net user delete command windows 10 deleted user account reappearing
  6. Then restart Windows.

3. Delete the Account Via the Registry

  1. Alternatively, users can try erasing registry keys for user accounts that keep on reappearing. Users can do that by pressing the Windows key + R, entering ‘regedit’ in Run, and clicking OK.
  2. Then go to this registry path in the Registry Editor: Computer\HKEY_LOCAL_MACHINE\SOFTWARE\Microsoft\Windows NT\CurrentVersion\ProfileList.The ProfileList key windows 10 deleted user account reappearing
  3. Then select the S-1 subkey for the user account that keeps reappearing after you seemingly delete it. The subkey will include a ProfileImagePath string that references the user account.ProfileImagePath string windows 10 deleted user account reappearing
  4. Right-click the subkey that includes the ProfileImagePath string for the account that keeps reappearing and select Delete.

4. Disable the Account

  1. Instead of deleting the user account, try disabling it instead, which will remove the account from Windows 10’s sign-in screen. To do that, open the Type here to search box.
  2. Input the keyword ‘cmd’ in the text box, right-click Command Prompt, and select Run as administrator.
  3. Then input ‘net user username /active:no’ in the Command Prompt window, and press the Return key. Remember to replace ‘username’ in that command with the actual user account name.net user active command windows 10 deleted user account reappearing
  4. Thereafter, restart Windows. The login page will no longer include the user account, but users can still reactivate it by entering ‘net user username /active:yes’ in the Command Prompt.

What can I do if a deleted user account keeps reappearing on Windows 11?

  1. Press the Windows key + R, type netplwiz, and click OK.
    netplwiz deleted account reappearing
  2. Now, select the account you want to delete.
  3. Finally, click the Remove button and follow the onscreen instructions to complete the process.
    remove

This should remove the account for good on Windows 11.

So, users who utilize the ESET Anti-Theft utility will probably need to delete their phantom account, as outlined above, to fix an account that keeps reappearing after deletion.

Hopefully, the Windows 10 deleted user account reappearing won’t bother you anymore. If your deleted files keep coming back, check our detailed guide to fix them.

Feel free to let us know the solution that helped you fix this issue in the comments below.

Are you sure you want to delete message not showing [SOLVED]

To avoid any file from being deleted accidentally, Windows OS prompts the user with a confirmation message whenever the user uses the delete options. However, some users have reported that the Are you sure you want to delete? message is not showing while deleting any file.

You can easily enable Are you sure you want to delete this file confirmation box in Windows 10 by following these steps.

How to enable the Delete confirmation dialog box?

1. Enable From Local Settings

  1. From the Desktop, right-click on Recycle Bin and select Properties.
  2. In the Recycle Bin Properties window, check “Display delete confirmation dialog” option.
    unable are you sure want to delete message box
  3. Click on Apply and then on OK to save the changes.

Now try to delete any file and check if you get the “are you sure you want to delete this file” message.


If you deleted something important from your PC and want it back, check these tools.


2. Enable by using Group Policy Editor

  1. Press Windows Key + R to open the run dialog box.
  2. Type gpedit.msc and press OK to open the Group Policy Editor.
  3. In the Group Policy Editor, navigate to the following location.
    Local Computer Policy > User Configuration > Administrative Templates > All Settings
  4. Now you need to locate “Display confirmation dialog when deleting files” policy and double-click on it open the properties window.
    Enable delete Confirmation Message
  5. Now, set the policy to “Enabled”.
    enable Delete confirmation message GP Editor
  6. Click Apply and OK to save the changes.
  7. Close the Group Policy Editor.
  8. Reboot the system (optional).

Conclusion

Although some people prefer not getting the confirmation dialog box while removing a file as they can always restore the deleted file from the recycle bin, some would like to avoid the situation at all by having the Windows OS show the confirmation dialog box.

We have listed two options to enable Are you sure you want to delete this file confirmation dialog box. Do let us know which method worked for you in the comments below.

RELATED STORIES YOU MAY LIKE:

Publisher Cannot be Verified: 4 Ways to Disable it

For security reasons, Windows 10 tries to verify the software that the user is trying to install, but sometimes you can get a Publisher cannot be verified message.

When this message occurs, users can’t install anything on their PC, so it’s crucial to fix this error, and today we’re going to show how to do that.

What does verified publisher mean?

  • Being a verified publisher means that your code is authentic and coming from a legitimate source.
  • Verified publishers are a part of the Microsoft Verified Publisher Program.
  • The developer’s digital identity is closely tied to the app ensuring authenticity.
  • Software from verified publishers has increased reputation and easier adoption.
  • Using software from verified publishers drastically reduces the chance of malware or phishing.

How do I bypass this app package’s publisher certificate could not be verified?

1. Disable the error message

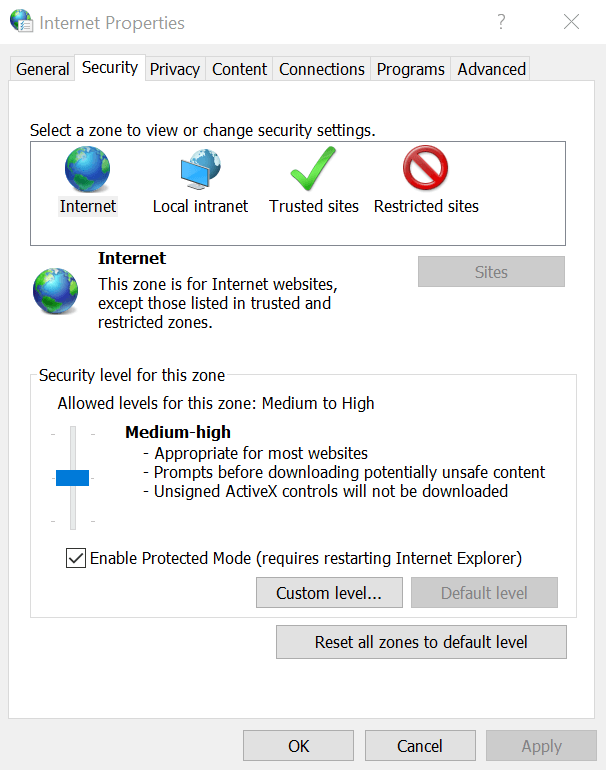
  1. Type Internet Option in the search bar. Click on Internet Options to open the Internet Properties window.
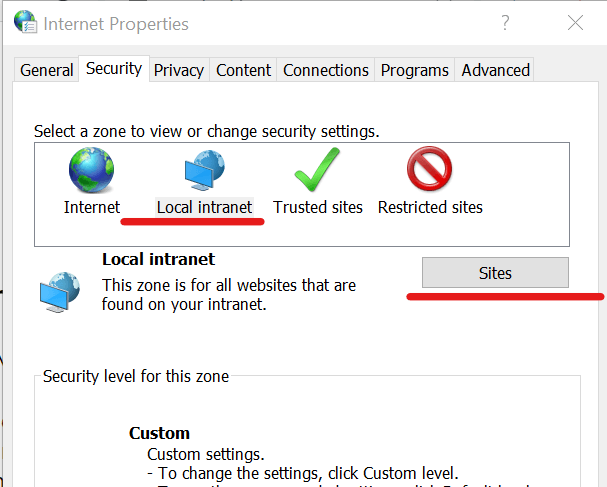
  2. Choose the Securities tab and select Local Intranet.
  3. Click on the Sites button beside Local Intranet.
    Disable Publisher could not be verified message
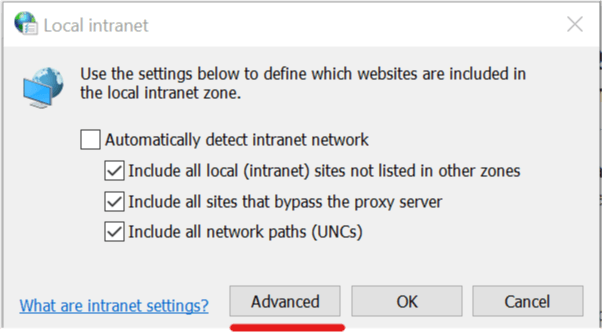
  4. In the new window, click on the Advanced button.
    Disable Publisher could not be verified - add server name
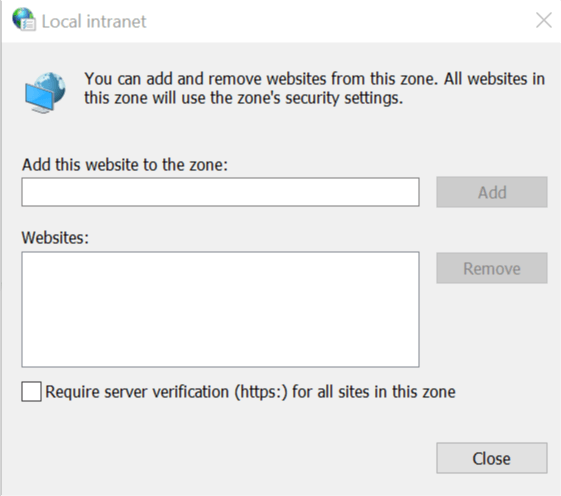
  5. In the Add this website to the zone field, you need to enter the server name or domain. Your server name is the address that appears after the From in the Security warning window.
    disable publisher could not be verified - add server name
  6. Make sure you uncheck Require server verifications (https:) for all sites in this zone message and click Close.
  7. Close all the Internet Properties and Internet options window.
  8. Now try to run the software and check for any improvements.

2. Disable read-only permission

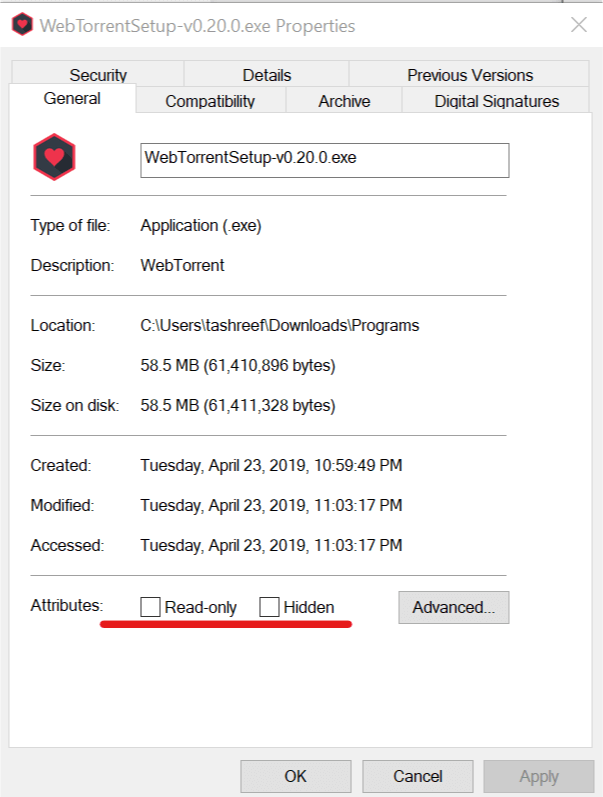
  1. Right-click on the program that is giving you the error and select Properties.
  2. Open the General tab in the new window.
  3. Now at the bottom of the window, uncheck Read-only and Hidden attributes. Publisher could not be verified - change program attributes
  4. Click Apply and OK to save the changes.

3. Enable launching applications and unsafe files

  1. Type Internet Options in the Cortana search bar. Click on Internet Options from the search result to open it.
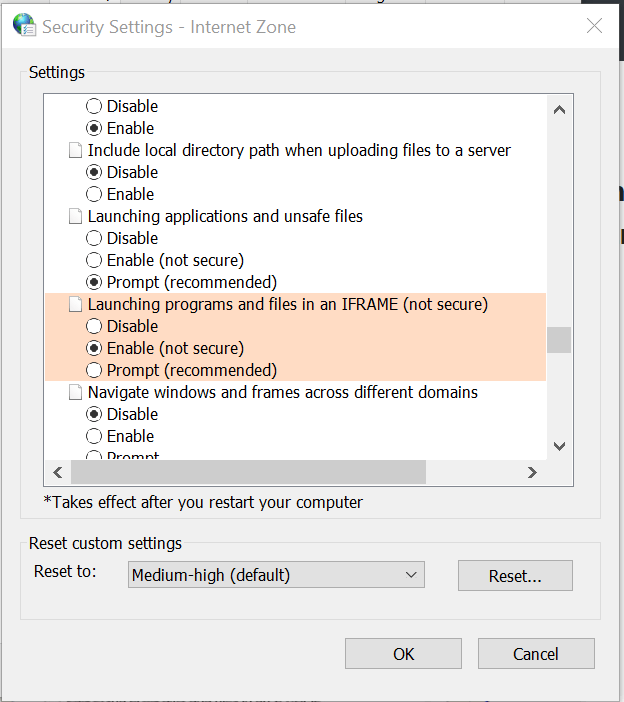
  2. In the Internet Properties window, go to Security tab and click on the Custom Level button.
    Enable custom level security Internet Options
  3. In the new Security Settings window, you need to look for Launching applications and unsafe files section.
    Enable Unsafe Files and Application Option
  4. Under the section, make sure you select Enable (Not secure) option.
  5. Click OK to save the changes.

After doing that, check if the error is gone.

4. Modify the registry

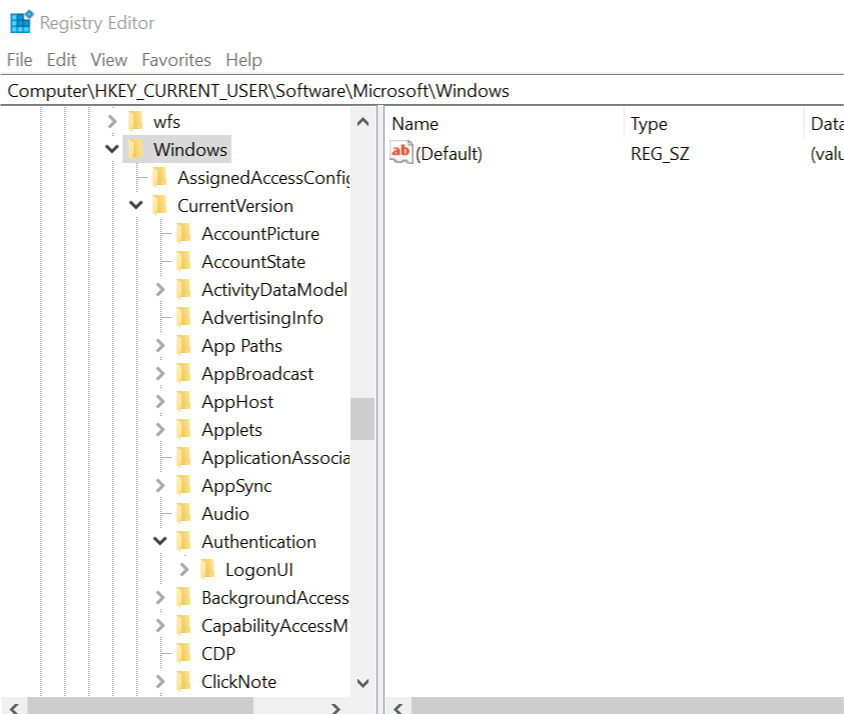
  1. Press Windows key + R to open Run.
  2. Type Regedit and press OK to open the registry editor. Fix the publisher could not be verfied by deleting the registry key
  3. In the registry editor, navigate to the following location:
    KEY_CURRENT_USER -> Software – > Microsoft -> Windows -> CurrentVersion -> Policies -> Associations
  4. Now you need to find and delete the following key:
    “LowRiskFileTypes”=”.exe”
  5. To delete the key, right-click on it and select Delete.

The publisher could not be verified are you sure to run this software can cause issues while installing software, so it’s important to address it properly.

All apps can experience installation problems, and many reported that they can’t install apps from Microsoft Store, but we covered that issue in a separate guide.

Did you use a different method to fix this issue? If so, feel free to share it with us in the comments section below.

How can I fix Rage 2 common bugs [Simple Guide]

The FPS formula is back, with Rage 2, the game brought to us by Avalanche Studios and id Software.

The game picks up after 30 years from the original events of Rage, featuring a more open world, new abilities, a new roster of weapons and skills that can be tuned to fit your play style.

As we’ve learned across the years, no game launch can be deemed flawless, and Rage 2 is no exception. We covered some of the most common Rage 2 bugs, but we’ll expand the list as the new bugs show up.

What are the most common Rage 2 bugs?

1. Audio bugs

There are instances when the audio simply cuts out, or some NPC’s are unable to initiate dialogue with the protagonist.

Frequent audio dropouts. Cannot talk to certain NPC’s, the guy who sells maps at Gunbarrel and also Dr Kvasir which is a gamebreaker.

2. Game crashing

Being able to play for extended periods of time is a must, but some players have experienced the game crashing while going through the notes menu.

Here’s a couple of more I noticed: Game crashes when going through notes menu for extended time

3. Game stutter

There are reports in regards to the game stuttering at various points.

That stutter issue persists through all the zones no matter if I’ve traveled to them or not. Kinda kills the driving combat for me.

4. Graphical issues

Some users have had issues with the game’s temporal anti-aliasing, causing some problems along the way.

My biggest problem is the awful TAA, please Avalanche do something! The mouse seems a little screwy as well, people are reporting negative acceleration.

How to fix common Rage 2 bugs?

 1. Audio bug fix

  1. A solution for this is turning on the subtitles from the game’s menu.
  2. You can also go by changing your audio from surround sound to stereo. On your desktop, just right-click on the speaker icon on the bottom right corner of your screen and select Sounds.
  3. Now go to Playback and disable all the sound devices except the internal speaker or the speaker which you wish to use.
    sound properties window rage 2 bugs

2. Game crashing fix

  1. Go to your Steam client.
  2. From the Library section, right-click on Rage 2 game and click on Properties from the menu.
  3. Now select the Local files tab and click on the Verify integrity of game files.

    verify integrity of game files steam RAGE 2 bug fixes
  4. After this is done, try running the game again.

3. Update drivers to fix the stutter issue

  1. Right-click the Start button and select Device Manager.device manager
  2. Expand the Display adapters section.
  3. Right-click the driver and select Update driver from the list of options.
  4. Select the first option, Search automatically for drivers.
  5. The system will install the newest default driver for the component.
  6. Restart the PC if it installed a new one.

Manually updating the drivers might not get you the best results and it can be time consuming. You could be forced to look for the correct driver on the manufacturer’s website.

But if you want to get rid of all the headaches, you can quickly update all outdated drivers automatically, by using a third-party tool like the one recommended below.

⇒ Get Fortect Driver Updater

4. Graphics fix

  1. Open your Nvidia Control Panel, and select 3D Settings.
  2. Turn off the Dynamic Super Sampling.

There you go, these are some common Rage 2 bugs that you can experience. Be sure to try all of our solutions and let us know which solution worked for you.

Microsoft news recap: Xbox app on iOS and Android gets advanced messaging features, former Microsoft exec going to jail for stealing Super Bowl tickets, and more

Microsoft news recap is a weekly feature highlighting the top Microsoft news stories of the past week. Sit back, grab some coffee, and enjoy the read!

New Outlook on the web is now available for Office 365 customers

Office 365 users will begin to see the new Outlook web experience as the company makes it available to all customers by default. The new experience has been available as an opt-in experience, but with this change, it will now become the default experience.

Xbox app updates on iOS and Android with advanced messaging features

For those who send and receive messages via the Xbox app on iOS and Android, the latest update has brought more advanced functionality to the messaging feature. It is now possible to click on web links, whilst also send animated GIFs.

Xbox App Android

Microsoft new survey tool Microsoft Forms Pro is now generally available

Microsoft’s new survey tool, Microsoft Forms Pro, is now generally available. Those with a Dynamics 365 Enterprise licence can access the tool as part of their subscription, but Office 365 users can also add it. The tool helps in collecting information and then analysing it.

A businessman and woman with a Surface Pro

Former Microsoft exec, in charge of the NFL’s Surface program, going to jail for stealing Super Bowl tickets

A former Microsoft exec who was in charge of the NFL’s Surface program has been sentenced to prison for stealing Super Bowl tickets. The exec has been sentenced to 28 months for invoice and Super Bowl ticket fraud.

That’s it for this week. We’ll be back next week with more Microsoft news.

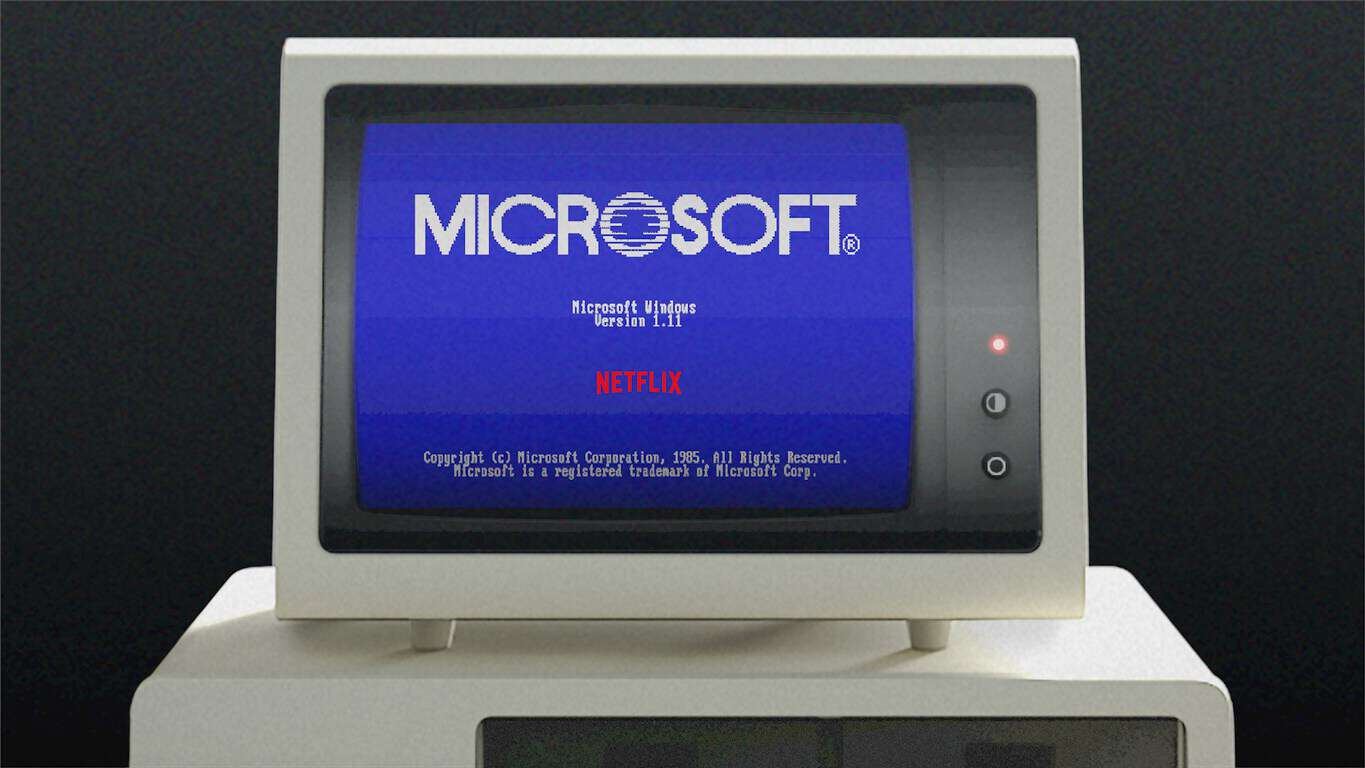
New Windows 1.11 game will blend together Windows 1.0 and the Stranger Things universe

Over the past couple of days, the official Windows Twitter account has been tweeting mysterious messages about Windows 1.0, and it all appeared to be linked to the release of Stranger Things’ season 3 on Netflix this week. For those unfamiliar, the show is set in 1985, which is the year when Windows 1.0 was released.

If Stranger Things’ new season was released on July 4 on Netflix, the latest tweet from the Windows Twitter account yesterday included a Morse Code hinting at a July 8 announcement (thanks to Richard Hay for the decryption).

Well, it turns out the news is a “Windows 1.11” game that Twitter user WalkingCat discovered on the Microsoft Store yesterday. The app is described as a companion game for Stranger Things’ season 3, and it’s built as reimagination of Windows 1.0 with a Stranger Things twist. The official description reads:

Experience 1985 nostalgia with a special edition Windows 10 PC app inspired by Windows 1.0—but one that’s been taken over by the Upside Down from Stranger Things. Explore the mysteries and secrets plaguing Hawkins, unlock unique show content and easter eggs, and play retro games and puzzles—all building off Stranger Things 3. Join Eleven, Steve, Dustin and gang as they seek to save Hawkins and the world. Embrace the 80s and grab your hairspray, because it’s basically the raddest show companion experience ever. But fair warning: beware the Mind Flayer.

Unfortunately, the Windows 1.11 game can’t be downloaded as of this writing, and we may finally get an official announcement on July 8. Overall, the game looks like a pretty cool way to promote the Netflix exclusive show while putting the spotlight on the very first version of Windows, which you probably didn’t get the chance to use back in the day unless you’re an Gen Xer or baby boomer. It’s also interesting to see that Netflix chose to highlight Windows 1.0 instead of the classic Mac OS, which made its debut in 1984 with the iconic Macintosh.

Are you looking forward to download 1.11 on your PC, and do you think this is a clever way to promote Stranger Things’ season 3? Sound off in the comments below.

Windows 1.11
Windows 1.11
Price:
Free

Failed to Start your Wi-Fi Hotspot 1002: 4 Quick Ways to Fix

Users have reported having issues when trying to create Wi-Fi from their Windows 10 operating systems. They get a message that reads: failed to start your WiFi hotspot 1002.

This issue can be extremely annoying and can stop you from using your internet connection the way you want to. The frustration of users increased considerably as they had used Windows 7 before and had not encountered any similar issues.

How can I fix the failed to start your Wi-Fi hotspot 1002 error?

1. Change adapter settings

  1. Press the Windows key + X and select the Settings option.
     Wireless card doesn't support wifi hotspot creation Windows 10 Win X Settings
  2. Inside the Settings window, choose Network and Internet > Mobile Hotspot.
  3. Toggle Mobile hotspot -> On.
  4. From the section ‘Share my Internet connection from’ select the source of the internet (In my case, it’s Wi-Fi).
  5. Select how you want to share your Internet connection (Wi-Fi or Bluetooth).
  6. Activate the option ‘ Turn on remotely’.
  7. Click on ‘Change adapter options’.Mobile hotspot settings windows 10 - Wireless card doesn't support Wifi hostpot creation windows 10
  8. Right-click on the connection that has access to the Internet -> select Properties.Wifi properties - Wireless card doesn't support wifi hostpot creation win 10
  9. Inside the Properties window, choose the Sharing tab -> tick the box next to ‘Allow other network users to connect through this computer’s Internet connection’ -> Click ‘Ok’.Wifi properties allow other network users to connect - Wireless card doesn't support wifi hotspot creation win 10
  10. Check to see if the issue with the Wireless card doesn’t support Wi-Fi hotspot creation on Windows 10 still exists.

2. Update both your Network adapter drivers

  1. Press the Windows key + X -> Device Manager.
  2. Expand the ‘Network adapters‘ section.
  3. Right-click on your adapter -> Update driver.update driver for network adapters - Wireless card doesn't support Wi-Fi hotspot creation Windows 10
  4. Close Device Manager and restart your PC.

Also, you can fix the secure hotspot is not supported by your network adapter issue by using automated software such as Fortect Driver Updater if you want to make the process quicker and easier. You can set it up to regularly update your drivers so you won’t have this issue ever again.

⇒ Get Fortect Driver Updater

3. Uninstall your virtual adapters

  1. Press the Windows key + X on your keyboard and select Device Manager.
  2. Expand the Network adapters section.
  3. Right-click and select ‘Uninstall’ for all virtual adapters.Unisntall network adapters - Wireless card doesn't support wifi hotspot creation win 10
  4. Click on the Cortana search bar -> type ‘Regedit’ (without quotes) -> Right-click -> Select ‘Run as administrator.
    run as admin regedit - wireless card doesn't support wifi hotspot creation win 10
  5. Navigate to this registry: Computer\HKEY_LOCAL_MACHINE\SYSTEM\CurrentControlSet\Services\WlanSvc\Parameters\HostedNetworkSettings
  6. Delete the key called HostedNetworkSettings by right-clicking on it.registry editor deleting value - Wireless card doesn't support Wi-Fi hotspot creation Windows 10
  7. Restart your PC and check to see if the issue persists.

4. Run the Network adapter troubleshooter

  1. Press the Windows key + X and select Settings.
  2. Choose Update and Security -> Troubleshoot.
  3. Scroll down and select ‘Network adapters’. Wireless card doesn't support wifi hotspot creation Windows 10
  4. Click on ‘Run the troubleshooter’.
  5. After the process is completed, restart your PC and check to see if the problem with the Wireless card doesn’t support Wi-Fi hotspot creation Windows 10 is solved.

Hopefully, you will be able to fix the failed to start your WiFi hotspot 1002 issues with your Wireless card. If your mobile hotspot is not working on Windows 11, check our detailed guide to fix it.

Feel free to let us know the solution that helped you fix this issue in the comments below.

How to Configure Windows Firewall to Allow IP Ranges [Full Guide]

The Windows Defender Firewall can block network traffic for IP (Internet Protocol) addresses. However, some users might need to unblock a range of IP addresses on their home networks.

Users can do that by setting up a rule that permits an IP address range through the Windows Defender Firewall. This is how users can set up a firewall rule that permits an IP range.

How do I Set up an IP Range Firewall Rule?

  1. First, open the search utility in Windows by pressing the Windows key + S keyboard shortcut.
  2. Input the keyword ‘Windows Defender Firewall’ in the search box.
  3. Then click Windows Defender Firewall with Advanced Security to open the window shown directly below.Windows Defender Firewall Advanced Security windows firewall allow ip range
  4. Select Inbound Rules and click New Rules to open the window in the snapshot directly below.The New Inbound Rule Wizard windows firewall allow ip range
  5. Select the Custom option, and click Next.
  6. Click the Next buttons for the Program and Protocol and Ports steps.
  7. Select the These IP addresses radio button shown directly below.These IP addresses option windows firewall allow ip range
  8. Then press the Add button, which will open the window in the snapshot directly below.IP Address window windows firewall allow ip range
  9. Select the This IP address range option.
  10. Then enter the IP address range in the From and To text boxes.
  11. Click the OK button.
  12. Press the Next button to proceed to Action.Allow the connection option windows firewall allow ip range
  13. Select the Allow the connection option there if it’s not already selected, and click the Next button.
  14. Click Next on the Profile step.
  15. Then enter a title for the rule.
  16. Users can also add some extra details for the rule in the second text box.Name step windows firewall allow ip range
  17. Select the Finish option.

Now, the Windows Defender Firewall will allow the IP range specified within the rule to establish connections.

If you want to learn more, we have a great guide on how to remove duplicate Windows Firewall rules, so be sure to check it out.

Users can also block IP ranges establishing connections by selecting the Block the connection option on the Action steps instead. Users may double-click the IP range rule within Inbound Rules to modify it.

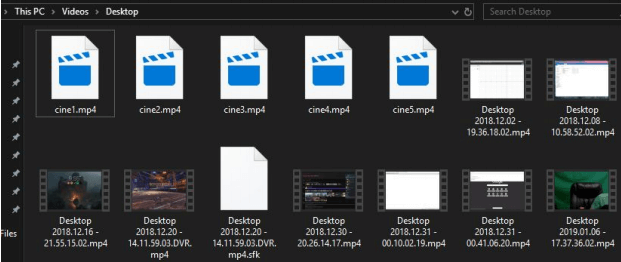
Newly created files have no thumbnail? Here’s how to fix that

If you have an extensive collection of multimedia files, especially photos and videos, you’re most likely used to having them displayed with thumbnails.

Of course, as your collection gets bigger and bigger, you might start noticing that the newer files you create no longer have thumbnails, and that can ruin the whole visual impact of your collection.

new files no thumbnail

The most probable cause for this issue is either your icon cache is close to being full, or it is damaged.

The icon cache is a database of icons which Windows 10 keeps in order to display the icons of all of your programs instantly, instead of loading them every time you open a folder.

The problem is that this icon cache is stored on your system partition (Drive C:) and whenever that runs out of disk space, the icon cache no longer update itself with anything new.

More so, icons can simply get damaged during backups, OS upgrades or updating the programs themselves if they come with newer icons.

One simple solution to this issue would be a total icon cache reset, which can be done manually.

What do to if new files have no thumbnail?

There are two ways you can manually clear your icon cache:

  • Clearing the whole cache of your system partition
  • Clearing just the icon cache

1. Clear the whole cache of your system partition

  1. Open This PC
  2. Right-Click on your system partition and select Properties
     windows 10 this PC
  3. A new window will open, select the General sub-tab
  4. Select Disk Cleanup
    disk cleanup
  5. Check all the boxes in the Items to delete menu.

Looking for a tool to convert icons in Windows 10? Check out this extensive list.


2. Clearing just the icon cache

  1. Open This PC
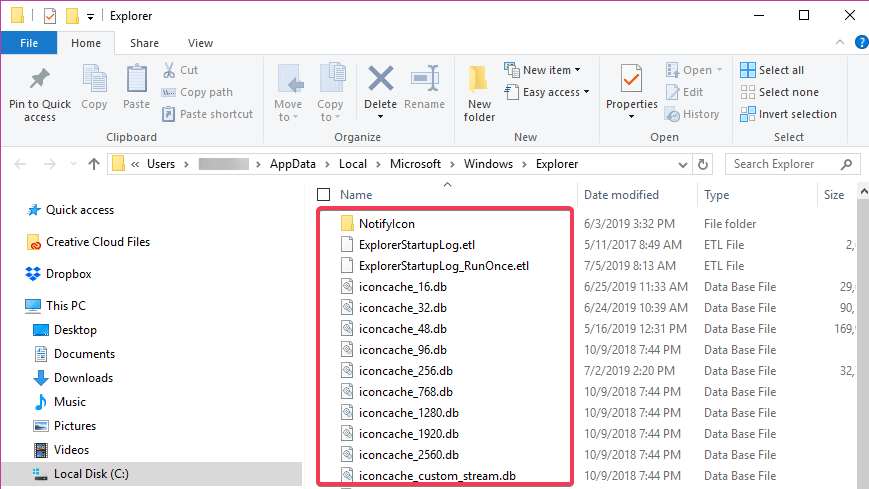
  2. Navigate to the following folder using the search bar: C:\Users\%username%\AppData\Local\Microsoft\Windows\Explorerapp data explorer folder
  3. Delete all the files you find in this folder

If for whatever reason you can’t delete all files:

  1. Open the Task Manager
    Task Manager windows 10
  2. Select Windows Explorer
  3. Right-click it and select End Task
  4. Press Start
  5. Type in Run
  6. Type cmd.exe and select to run it with administrative privileges if that option is not already available
  7. In the command prompt, insert the following line: cd /d %userprofile%\AppData\Local\Microsoft\Windows\Explorer attrib –h
    iconcache_*.db del iconcache_*.db start explorer

This will rebuild the icon cache from scratch and now all files will be displayed correctly.

RELATED POSTS:

Rules of Survival currently doesn’t support emulator error [FIX]

Rules of Survival is a multiplayer battle royale game for Android devices that’s similar to PUBG Mobile. However, 300 players in Rules of Survival (150 more than in PUBG) shoot it out on maps until there’s just the one standing. However, RoS is not so widely supported on Android emulators. Even older versions of BlueStacks don’t support the game.

The Rules of Survival currently doesn’t support emulator error message pops when players try to play RoS in some older BlueStacks versions. However, the latest BlueStacks 4 and Nox Player emulators do support Rules of Survival.


Looking for the best emulators to play mobile battle royale on your PC? Here are the best options.


How to Play Rules of Survival on BlueStacks 4 emulator for Windows 10

Reinstall the BlueStacks Emulator

  1. Players can update BlueStacks by uninstalling the outdated version and then installing the latest BS 4. To do that, press the Windows key + R hotkey.
  2. Open the Windows uninstaller by entering ‘appwiz.cpl’ in Run and clicking OK.The Windows uninstaller rules of survival currently doesn't support emulator bluestacks/mox/memu
  3. Select BlueStacks and click Uninstall.
  4. Click the Yes button to provide further confirmation to remove BlueStacks.
  5. Restart Windows before reinstalling BlueStacks.
  6. Click the Download BlueStacks button on the emulator’s website to save the setup wizard for BS 4.
  7. Then open the setup wizard for BlueStacks 4 to install the emulator.
  8. Next, open the BlueStacks software.BlueStacks 4 rules of survival currently doesn't support emulator bluestacks/mox/memu
  9. After launching BlueStacks, users will need to sign in to a Google Play account. So, enter the login details for a Google Play account.
  10. Then open the Google Play store in BlueStacks.
  11. Enter the keyword ‘Rules of Survival’ to search for the game.
  12. Click the Install button on the Rules of Survival Google Play page.Rules of Survival Google Play page rules of survival currently doesn't support emulator bluestacks/mox/memu
  13. Thereafter, users can launch Rules of Survival in BlueStacks.
  14. Click Start Playing on the Battle Royale popup message.
  15. Thereafter, click Accept to accept the user terms.
  16. Then players can select the Play option to get blasting!Rules of Survival game rules of survival currently doesn't support emulator bluestacks/mox/memu
  17. Players can adjust in-game settings for Rules of Survival by clicking the Settings button at the top left corner when playing RoS.
  18. Select Basics to configure the graphics and sound settings. There, players can toggle a High FPS option to get a better frame rate.
  19. The default key controls for RoS are W, A, S, D to move, Z to go prone, C to crouch, Space to Jump, and F to open doors. Players can configure the game’s default controls by pressing BlueStacks‘ Ctrl + Shift + H hotkey.Game controls in BlueStacks rules of survival currently doesn't support emulator bluestacks/mox/memu
  20. Click Edit on the game guidance window.
  21. Then users can select the keyboard controls listed and press an alternative key to change them.
  22. Alternatively, click the Advanced game controls button at the bottom of the emulator’s window to adjust controls for Rules of Survival as shown in the video below.

So, that’s how players can fix the “Rules of Survival currently doesn’t support emulator” error to play RoS in BlueStacks. Alternatively, players can also play RoS in the latest Nox Player emulator. Just make sure that you’ve installed the very latest version of either emulator.

RELATED ARTICLES TO CHECK OUT: 

Outlook for Web gets a modern UI and new features this month

Microsoft has been neglected its Outlook email service for years. The email service failed to compete with other popular services in terms of new features.

Microsoft has been testing the new Outlook on the Web experience for months. However, both individual and enterprise users are eagerly waiting to see the new features.

Today, we have a piece of good news for you. Microsoft plans to roll out the new Outlook on the web experience in late July. We are going to get a quick overview of some major features coming your way soon.

Microsoft revamps Outlook for Web

Categories

You can now easily categorize emails in your inbox. You can organize, find and tag emails messages in your inbox.


Are you drowning in files and folders? Use the information organizer software solutions.


Dark mode

Sometimes, your eyes may get tired by looking at your PC’s screen for hours on end. Dark mode comes to the rescue in those situations.

Today more and more apps offer dark mode support in Windows 10. Now you can apply dark mode to your inbox too.

Favorites

Now you can tag a group, contact, or category as a favorite in your Outlook account. Your Outlook mobile app is also going to sync your selection.

New message tab

Previously, many people had to repeatedly jump between the reading and writing pane while composing a message. Microsoft understood the discomfort and added a new writing tab at the bottom of the reading pane.

Time management features

Microsoft added new features in Outlook that help its users to effectively manage their time throughout the day. Now Outlook helps you to stay organized by creating event and meeting reminders.

Moreover, the calendar search feature allows you to look for a keyword, person or location.


Install one of these reminder tools to make sure you never forget anything.


Snooze your emails

Most of the times, we don’t want to see an email at the top of our inbox and you wish that it should disappear. Outlook now allows users to snooze those emails to read them later at some time.

Month view option

We always want to keep track of our events so that we don’t miss anything. Now you can see a big picture of the events with the month view option.

Online meetings

Microsoft added some new features in order to streamline your online meetings. You can either create a new online meeting, join an ongoing meeting, or see the number of attendees.

Microsoft encouraged its users to provide their feedback to improve existing features and design.

RELATED ARTICLES YOU NEED TO CHECK OUT:

You Don’t Have Permission to Save Changes to This File [Full Fix]

Our readers have reported that they get the error message: It looks like you don’t have permission to save changes to this file whenever they try to edit a photo in Windows 10.

Getting this error when trying to perform low-impact changes to your Windows 10 images is extremely annoying. In this article, we will explore some of the best ways to deal with this issue. Read on to find out how to do it.

What can I do if I don’t have permission to save changes to a file?

Before going into more complicated solutions, check these prerequisite methods from the list:

  • Make sure that you are logged in as an administrator.
  • Go to the file’s Properties menu and check if it has a read-only attribute and uncheck the box.

If none of these preliminary steps fixed the issue, let’s move to the solutions below.

1. Run the photo editor software as an admin

  1. Navigate to the location of your preferred photo editor software.
  2. Right-click on the icon and select Run as administrator.Run photo editor software as admin - you don't have persmissionto save changes to this file
  3. Edit your photo again, and then try to save the file.
  4. If the issue persists, please follow the next method.

In case you’re using the Windows 10 built-in Photos app to edit your photos, skip to the next method.

2. De-activate your antivirus software temporarily

antivirus software options - you don't have permission to save changes to this file
  1. It is recommended that you temporarily shut down your antivirus protection to be sure that it is not causing the issue. Depending on the antivirus you’re using, these steps will vary.
  2. After you’ve temporarily stopped the antivirus service, please try and edit your photo again.

Please make sure to re-activate your antivirus protection after trying this method.

3. Run the DISM command

  1. Press the Windows key+ X on your keyboard and select Windows PowerShell (Admin).
    Windows PowerShell Admin - you don't have permission to save changes to this file
  2. Inside the PowerShell window -> paste this command:DISM.exe /Online /Cleanup-image /RestorehealthPowershell with dism command - You don't have permission to save changes to this file
  3. Press Enter and wait for the process to finish.

4. Run the SFC command

  1. Press the Windows + X keys on your keyboard and choose Windows PowerShell (Admin).
  2. Type the command below and hit Enter: sfc /scannowPowershell with sfc command - You don't have permission to save changes to this file
  3. Wait for the process to complete, and try to see if the issue is resolved.

In this article, we explored some of the best troubleshooting methods to deal with not having full access to edit your photos even though you have administrator privileges.

Please feel free to let us know if this guide helped you solve your issue by using the comment section below.

This version of drawing file is not supported [SIMPLE FIX]

Users of CAD software keep seeing this error message This version of drawing file is not supported. They have reported that the issue arises when trying to export or import files from/to a .DWG format into their preferred Auto CAD software. This issue seems to be present in a variety of situations and with a wide range of CAD software options.

Getting this error can be extremely annoying, as it doesn’t allow you access to the information stored inside the files, and no specific error code is shown other than the one previously mentioned.

This issue is varied across different platforms and also happens in different CAD software. It is extremely hard to pinpoint the issue for this reason. Our team has researched the issue intensively, and we came up with a troubleshooting guide to try and fix this issue.

It is worth mentioning that this troubleshooting guide will only apply to only a set of users. Solving the issue at its base requires personalized troubleshooting methods for each case in part.


How to fix Drawing file is not valid AutoCAD error?

1. Make sure the files you’re trying to open are compatible with your CAD software

When it comes to CAD software format compatibility issues, it is recommended that you use the same version of the software in which the files were originally created. In order to find out in which CAD software and which version they were created, follow these steps:

  1. Right-click on the file that’s causing the error message -> Open with -> select a text editor from the programs list.DWG file open with - this version of drawing file is not supported
  2. Inside the text editor, search for a value code at the start of the ‘text’.DWG file open in notepad - this version of drawing file is not supported
  3. That will be the version of the software that was used to create that file.
  4. Check online to see if that version of the software is still available for download.

Note: Files with the format .DWG, and .DXF can only be worked with if your version of the software isn’t older than the version of the software in which they were created in.


Need to convert AutoCAD file to PDF? Try these great tools!


2. Use another software to open the DWG file

  1. Right-click the file that’s causing issues -> select Open with -> choose another compatible software (AutoCAD mobile in my case).AutoCAD mobile - this version of drawing files is not supported
  2. After opening the file in the CAD software of your choosing, export it as a new file with either .DWG or .DXF format.
  3. Re-try to open the file in your initial CAD software.

In case you don’t have another compatible software on your PC, follow these steps:

  1. Right-click the .DWG file -> Open with -> Search the Store.search the store - this version of drawing is not supported
  2. Choose an application from Windows Store and repeat the steps found in Method 2.

In this article, we explored a quick workaround for the issue caused by incompatibility between CAD file formats. Please feel free to let us know if this guide helped you solve your issue by commenting below.

READ ALSO:

How to use network file shares while offline in Windows 10

Network drives are often used to share common files across organisations, particularly where migration to cloud-based infrastructure such as OneDrive has not yet occurred. One of OneDrive’s big advantages is its seamless offline syncing support, which lets you keep using your files without an Internet connection.

It’s possible to replicate this functionality using a traditional on-premises network drive and Windows’ Sync Center component. Although essentially unchanged since the days of Windows 7, Sync Center is still alive and well in Windows 10. We’ll show you how to set it up to keep your network files accessible even when you’re offline.

Creating a sync connection

First, you’ll require a mapped network drive to work with – you can follow our guide if you need to create a new connection. Next, open File Explorer and right-click the drive under “Network locations.” From the menu which appears, click “Always available offline.” You can also choose to sync a set of folders within the share, rather than the entire share itself. In this case, navigate to the folder, right-click it and choose “Always available offline” instead.

Screenshot of Sync Center in Windows 10

Windows will now start to synchronise the contents of the network share or folder. This may take some time, depending on the size of the files within the share. You’ll see the Sync Center icon appear in your system tray to alert you to the current sync status.

Once the sync completes, your files will be ready to use offline. Disconnect from the network and you’ll still be able to browse all your files using the network share. Any edits you make, or new files you create, will be automatically uploaded to the share once you’re back online. Likewise, new files saved to the server while you’re away will download to your device when you return.

Use Sync Center

To manage your synced files, open the Sync Center by either double-clicking the tray icon (green circle with two yellow arrows) or searching for it in the Control Panel. The Sync Center interface lets you see the sync status of all your offline files. You can also take action to resolve conflicts which may occur during the sync process.

Set up a schedule

Sync Center lets you customise when it should sync your files. Click one of the synced shares under “Folders” and then press the “Schedule” button at the top of the screen to open the scheduling wizard.

Screenshot of Sync Center in Windows 10

The first screen of the wizard lets you choose whether to create, edit or delete a schedule. Click “Create a new synchronisation schedule” to continue. You can return to this screen later when you want to adjust your sync schedules.

You’ll now need to choose which shares to include in your schedule. Click Next once you’ve made your selection.

Screenshot of Sync Center in Windows 10

Finally, you’ll be prompted to choose between time or event-based scheduling. Using the time option, you can tell Sync Center to sync on a periodic schedule, such as every 15 minutes or once a day. Events let you force a sync whenever a certain event occurs, such as when you unlock your PC. Select the relevant option and use the next screen to configure the time or event you want to use.

Screenshot of Sync Center in Windows 10

You can now save the schedule to start using it. If you want to combine multiple schedules – for example, to sync files periodically and when you unlock your PC – you can create another schedule using this method and apply them both to the relevant shares.

Manage storage space

Sync Center also gives you control over how much space your offline files use. Click “Manage offline files” in the left sidebar to open a new popup window. Switch to the “Disk usage” tab to see how much space your offline files and temporary files are using.

Screenshot of Sync Center in Windows 10

Click the “Change limits” button to adjust the maximum disk space which offline files can use. Beyond this point, Sync Center will stop pulling down network files to your device, so you won’t be able to use them offline. Temporary files refer to files you edit or create while offline which are cached on your device before they’re saved to the server.

Screenshot of Sync Center in Windows 10

Another option with the Sync Center management dialog is encryption. Click the “Encryption” tab to configure optional encryption for your offline files. This can give you peace-of-mind if your device is lost or stolen, ensuring any sensitive data won’t be accessible without the encryption key. Click “Encrypt” to start the encryption process – you’ll be given a recovery key which you should backup to a secure location.

Sync Center: file sync without the cloud

While Sync Center isn’t often talked about, it remains a useful component of Windows 10 for those businesses and organisations which either can’t or won’t move to cloud storage.

Sync Center offers many of the capabilities of cloud storage clients, including seamless offline file access and the ability to create files on network shares while you’re offline. If you’ve ever been caught out trying to access a company network share while on the go, enable Sync Center to avoid the situation next time you leave the office.

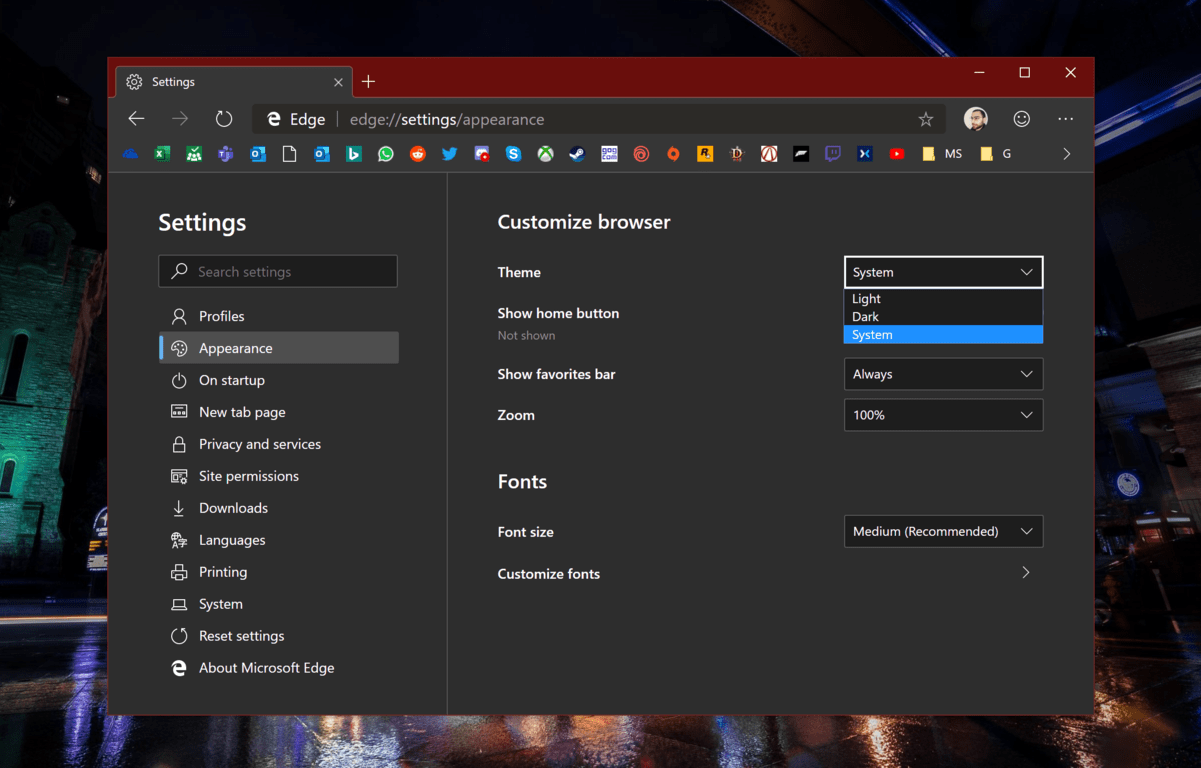
Failed to Send Authorization Request (25): How to Fix

Many users have reported seeing the error Failed to send authorization request (25) in Steam. If Family Sharing is not working on Steam, an authorization problem such as this one is likely causing it.

Luckily, there are ways to fix this problem, and today we’re going to show you how to do it.

Why am I getting a Steam request access failed message?

  • A lack of administrative privileges can cause this error message to appear.
  • Corrupted game installation can sometimes cause this issue.
  • Incorrect Family Sharing settings can cause the problem.

How can I fix Failed to send authorization request (25) in Steam?

1. Run Steam with administrator privileges

  1. Navigate on your PC to the location of your Steam installation.
  2. Right-click on the Steam icon and select Run as administrator.run steam as administrator - Steam failed to authorize computer
  3. Try to see if this method solved your issue.
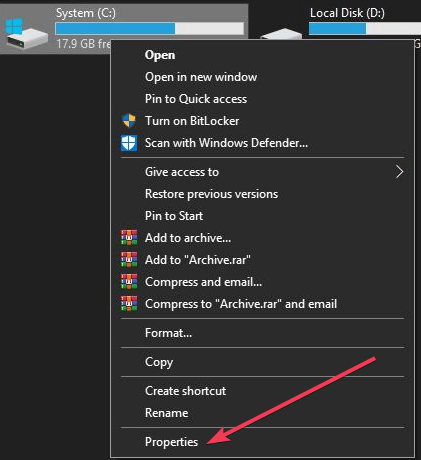
2. Verify the integrity of your game files
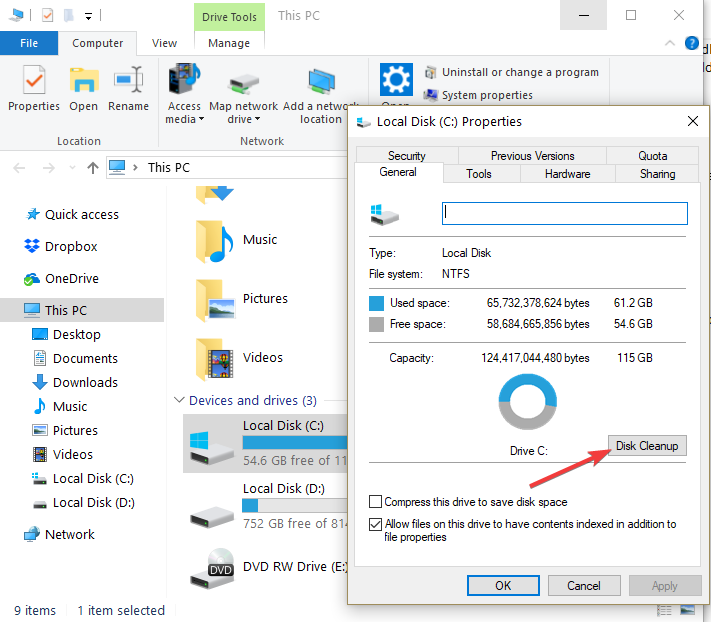
  1. Open Steam and navigate to the game you want to share inside your Steam Library.
  2. Right-click the game Properties.
  3. Inside the Local Files tab, click on the Verify integrity of game files button.Steam verify game data - Steam failed to authorize computer
  4. Wait for the process to complete and check to see if the issue persists.

After doing that, check if Failed to authorize with Steam message is gone.

3. Modify Family settings in Steam

  1. Open Steam and go to Settings.
  2. Select the Family tab.Steam family settings - steam failed to authorize computer
  3. Click on Eligible accounts.
  4. Tick the box next to the friend that you want to share your library with and make sure they do the same.
  5. Click OK and try to authorize the computer again.

4. De-authorize your PC from the other person Steam account

  1. Ask your friend or family member to go into their Steam Settings and select Account
  2. Next, go to Manage Other Computers and select ‘name of your PC‘. Lastly, click on De-authorise.Steam family settings other accounts - steam failed to authorize computer
  3. Follow the same steps, but this time authorize your PC.
  4. Log out of Steam and exit it completely (from your PC).
  5. Log back into Steam.
  6. Try to see if the issue persists.

In this article, we explored some of the reasons that can cause the error message Failed to send authorization request (25) and some of the recommended troubleshooting methods.

If the problem is still there, be sure to read our guide on common Steam errors to see how to fix it.

Please let us know if this guide helped you solve your issue by using the comment section below.

2 best Mac to Windows software to get acquainted with MacOS

If you have been a long time user of Windows OS and are curious about the next best thing MacOS, you don’t necessarily need to spend a four-figure fortune on buying an all-new shiny Macbook or iMac.

You can try out all the working of the MacOS from the comfort of your Windows computer.

That said, running the MacOS on your Windows computer is comparatively tedious tasks than running Windows on a Mac.

While the Mac users have virtualization software like the Parallel Desktop, Wine, Bootcamp, VMware Fusion, Windows users are limited to a few open sources virtual software.

Nevertheless, the software works and allows you to experience the working of the MacOS on your Windows system.

In this article, we take a look at the best two Mac to Windows applications to run Mac exclusive apps on your Windows system.

Run MacOS on Windows with these 2 tools

WMware Workstation Player 

Run Mac software on Windows

  • Price – Free  for personal use /  Starts at $149

VMware Workstation Player is a streamline desktop virtualization application that allows you to run one or more operating system on the same computer without having to reboot the system again and again.

It is a premium software and starts at $149 for the commercial use but you can grab the free copy to test it out for your personal use.

VMware offers simple but power virtualization with nearly 20 years of active development. The sandbox features offered by the VMware Workstation Player allows the users to run and learn about the different operating system without affecting the main desktop environment.


In case you decide to install MacOS on a standard PC, learn how to do it here.


On the performance front, VMware Workstation Player appears to be a better choice over the VirtualBox. Although VMware Workstation Player appears to be more reliable with the more polished environment and fewer bugs and glitches to deal with, it still lags behind when it comes to compatibility with other systems.

VMware Workstation Player is an excellent virtual machine to run MacOS on your Windows System. However, some features of the software are locked for premium users only.

Apart from that VMware Workstation Player is reliable software to test and run the MacOS on your Windows computer.

Download VMware Workstation Player

VirtualBox 

Run Mac Software on Windows

  • Price –  Free 

VirtualBox is among the most popular Virtualization machines for Windows computers. It is an open source project and is available for download and use. It is a multi-platform software, in case you want to install it on other environments.

Compared to WMware Workstation Player, the VirtualBox interface is a bit intimidating for the average and first-time users. You may need to read some guide or watch a YouTube video to understand the working and use of VirtualBox.

On the performance front again WMware Workstation Player looks better optimized for the system with low/medium hardware.

However, if you have powerful enough system you probably won’t notice the difference between the two virtual machines.

VirtualBox no doubt can boast about its compatibility features which we found a bit lacking in WMware Workstation Player for the advanced users.

You can set up virtual machines, save a snapshot and launch the virtual data on a different computer immediately. This feature is not available in the WMware Workstation Player free version.

Other feature like a shared folder, shared data transfer, and seamless mode is offered by both the virtualization software. If you have a decent system with good configuration and you don’t want to pay for any features, VirtualBox fits the bill perfectly.

Download VirtualBox


Conclusion

So, these are the two best Mac to Windows software that you can use to run the Mac apps on your Windows computer.

The VirtualBox is completely free software with all the features on offer whereas the VMware Player offers better reliability, easier to use but requires you to pay for some additional features.

If you are a tech enthusiast, try both the software and compare them side by side. But, if you are a casual user, go with VMware Player.

What do you think? Do let us know which virtualization software you prefer in the comments below.

RELATED STORIES YOU MAY LIKE:

Why is Microsoft.Photos.exe trying to access the internet?

Microsoft.Photos.exe is the process for Microsoft Photos, which is Windows 10’s default image viewer. However, some users get a little concerned when third-party antivirus software flag Microsoft.Photos.exe.

Then antivirus window prompts pop up requesting that users select to either allow or block Photos’ internet communications. Some users might wonder why Photos is trying to access the internet and why antivirus utilities flag a trusted Microsoft app.

There are actually three reasons why Photos needs to access the internet. Firstly, because Microsoft updates Photos just the same as it updates other UWP (Universal Windows Platform) apps that come with Windows 10. Thus, Photos can’t receive any updates without access to the net.Microsoft.Photos.exe trying to access the internet


Secondly, Photos includes a OneDrive syncing option. When users enable OneDrive syncing, Photos syncs images stored in OneDrive cloud storage. The net connection is essential for the app’s OneDrive cloud storage syncing.

Photos, and other UWP apps, also send data back to Microsoft. That data usually takes the form of diagnostic data. Thus, the Photos app‘s internet communications can also be outgoing.

Some antivirus software flag Photos’ internet communications as that app have an unknown signature. Microsoft seemingly forgot to add its official digital signature to Photos. Antivirus utilities don’t recognize programs with unknown signatures and duly prompt their users when those apps try to access the net. Users can then select Block options on the antivirus prompts to sever Photos’ net communications.


We’ve written extensively on Photo app issues. Check out these guides for more information.


Why Does the Photo.exe Keep Running?

Some users have also raised this question: Why do Photos keep running when it’s not open on the taskbar? That is primarily because Photos is Windows 10’s default image viewer configured to run as a background app.

Windows 10 apps usually have permissions to run in the background so they can get updated and send notifications. Like other default apps, Photos keeps running even when users close its window.

How to Turn Off or Remove the Photos Background App

  1. Background apps consume system resources, and users can turn off Photos’ background app permission via Settings. To do that, open the search utility with the Windows key + S hotkey.
  2. Enter ‘background apps’ in the Type here to search box.
  3. Select Background apps to open the options shown directly below.
    Background app list microsoft.photos.exe is trying to access the internet
  4. Then turn off the Microsoft Photos background app.
  5. Alternatively, users can uninstall Photos if that app is surplus to requirements. Enter ‘PowerShell’ in Windows 10’s search box.
  6. Right-click PowerShell and select the Run as administrator context menu option.
  7. Enter ‘Get-AppxPackage *photo* | Remove-AppxPackage’ in PowerShell as in the shot below, and press the Return key.
    Uninstall Photos command microsoft.photos.exe is trying to access the internet
  8. Then restart Windows after uninstalling Photos.

Although Photos isn’t a bad app, there are still quite a few third-party image viewers that are good alternatives. So, it’s worth considering replacing Photos with an alternative default image viewer that doesn’t collect data for Microsoft and hogs fewer system resources.

RELATED ARTICLES TO CHECK OUT: 

This is how you can fix Xbox error 0x87de0017 in 3 simple steps

Many Xbox One users encountered error 0x87de0017 when trying to download new games on their Xbox One consoles. Unfortunately, many said this error code affects all downloads, not just certain game titles.

Now, one of the first steps to finding a solution to this problem is knowing the cause. So, what could be the cause of error 0x87de0017?

There are several factors that might be causing the Xbox One error code 0x87de001.

The following are some that you might want to look into:

  • Xbox Live services might be down — This happened in the past when Microsoft’s servers were hit by DDoS attacks. If this happens, you can’t do anything but wait patiently for Microsoft to fix the issue. Keep checking the status page of the Xbox Live page from time to time.
  • Game update bugs– Many users encountered this error after manually downloading game updates by going to the My Game and App section, thereby forcing the update to download.
  • Other game bugs – This kind of error takes place with updates from physical games i.e. when a game disk is inserted in the Xbox console. In this kind of situation, the fastest solution is to uninstall the game and perform a hard reset.

So, carefully scroll through this guide, follow the steps and get rid of this error once and for all.

Steps to fix Xbox One error 0x87de0017

Solution 1: Check the status of Xbox Live Services

Make sure this issue is not beyond your control. Check the status of the Xbox Live services.

If you notice  there are problems with their services, wait patiently wait for some hours, then try to download the problematic game or game update again.

If you discovered that there is nothing wrong with their services, then move on to the next solution.


Experiencing slow Xbox One download issues? Use these solutions to fix the problem.


Solution 2: Download the game again

A temporary issue with your DNS might be the cause of you getting the Xbox One error code 0x87de001.

In this situation, the solution is to try to download the content again.

  1. While on your Home screen, navigate to the My games and apps using the R2 button.xbox one my games
  2. On the My game and app menu, select the Queue window.
  3. Check the status of the game you are having the error code issue with is Queued or Paused.
  4. If it is any of these, carefully select it from the list of other games and click on Resume Installation for a re-download.

Solution 3: Uninstall the game and hard reset the console

Performing a hard reset when then the internet connection is disabled might help you to fix this error. Ideally, uninstall the problematic game first, and then hard reset your console.

Here are the steps to follow:

  1. Go to your game queue and cancel any installation or updates.
  2. Navigate to the Game menu, select the game and click on uninstall. Make sure this is done after you canceled the update.
  3. Go to the Setting > Network and click on the Network settings.xbox Network settings
  4. In the Network settings, click on Disconnect wireless.
  5. If you are facing the issue with a physical game, bring out the disk.
  6. Make a hard reset by pressing down the power button for a few seconds.
  7. Put on the Xbox console again, slot in the disk and allow the game to copy fully, then enable the internet connection again.

As soon as the internet connection is activated, try to install the previous pending updates or download the problematic games again.

With these all solutions, we believe you should be able to get rid of this error code.

If you solved your Xbox One error code 0x87de001 with another method, tell us about it in the comments below.

RELATED POSTS:

Can I use Paint 3D to Convert Images to Black and White?

Unfortunately, Paint 3D doesn’t have a feature to turn pictures black and white. Ho

The best free alternative is the good old Paint, but if you are looking for a more tedious, professional approach, Corel Paint is the software for you.

Below, we explain how to use both to convert images to black and white.

How to convert images to black and white without using Paint 3D

Using Microsoft Paint

  1. Click on the Paint button.
  2. Select Save as.
  3. From the dropdown menu choose Monochrome Bitmap as shown below.
black white image paint

Paint offers a rather limiting monochrome bitmap conversion which is not quite advised for highly-detailed images.

That kind of conversion is better done on more advanced photo-editing applications, like Photoshop. On the other hand, it does quite well when it comes to simple images you just want to get black and white.

How to convert images to black and white with Corel Paint

  1. Open CorelDRAW.
  2. Go to File, and select Import.
  3. Pick Bitmaps, then select Mode, then Grayscale.
  4. If you want to adjust, go to Effects, select Adjust, then Brightness/Contrast/Intensity.
  5. Go to File, and select Save As to save the image.

On the other hand, besides Photoshop, Corel Paint is definitely a tool to go for when it comes to color conversion. The images stay true to the original form in regards to details.

That’s why, if you need a professional touch, Paint is a no-go. Corel Paint is a professional suite and thus it will cost you some money. But the end result is worth every penny.

To learn more on how to convert images to black and white with Corel Paint, go to the tools’ official support page. There, you’ll find all the information you need on how to properly use the greyscale option and create high quality black and white images.

How to open VFS files on Windows 10 [COMPLETE GUIDE]

VFS is a somewhat obscure file format that few programs support. Those are files that contain an index of directories from HDD or media storage. The file type is associated with some HP all-in-one-printers and games that utilize the VFS extension for file archives.

A VFS file is an animated slide saved in an archive format and keeps assets that assemble a slide, such as graphics, audio, and textures.

VFS files are usually used for presentations, promotional videos, and product reviews, and are similar to the .PPTX format.

If you want to learn how to open VFS files, then follow the recommendations mentioned below in our article.

How can I open VFS Files?

1. Open Game Archive VFS Files With Explaindio

  1. Download and install the Explaindio software, then run the app.
  2. Open the folder where the files are located.
  3. Search for the preferred .VFS files.
  4. Unzip it and import the files into the Explaindio app.
  1. Now you should be able to see every individual slide.

2. Open Game Archive VFS Files With Dragon UnPACKer 5

  1. As mentioned, a few games have VFS archives that contain images, audio, maps, and other data. Users can open VFS archive files with Dragon UnPACKer 5 by clicking the Get the recommended version button on the program’s website.
  2. Click dup570beta-setup.exe to open the setup wizard for Dragon UnPACKer 5. Then install the software with the setup wizard.
  3. Next, open the Dragon UnPACKer 5 window shown directly below.The Dragon UnPACKer 5 software how to open vfs files on Windows 10
  4. Thereafter, click File > Open.
  5. Select the VFS, and press the Open button. That will open the VFS as shown directly below.A VFS file opened in Dragon unPACKer how to open vfs files on Windows 10
  6. Thereafter, users can browse through the VFS subfolders on the left of the window. The right side of the window displays the files within each subfolder.

If you’re looking for the best clouds to back up your files and put some peace in your mind, then you can check here the best options.

3. Convert HP VFS Files to Alternative Formats

  1. Users can convert the HPIMAGE.VFS file to various alternative file formats, such as JPG, PDF, and ABM, at Conversion Ai. Open the HP All In One Thumbnail File (.VFS) page on that website in a browser.
  2. Then select HP All In One Thumbnail File (.VFS) on the top VFS Converter drop-down menu.
  3. Select an alternative format to convert it to on the second drop-down menu, and click the Convert button. Thereafter, open the converted file with software that supports the format.
Conversion Ai website how to open vfs files on Windows 10
  1. Note that users can also eliminate HP VFS files by turning off the Enable Faster Browsing setting. To do that, select Setup on the printer’s control panel.
  2. Select the Preferences option with the arrow keys.
  3. Press OK to confirm.
  4. Then select the Enable Faster Browsing setting, and press OK.
  5. Select the Off option, and press OK to confirm the new setting. That will stop the printer from adding VFS files to flashcards.

Read more about this topic

FIX: Windows 10/11 Firewall disabled but still blocking apps

The Windows Defender Firewall in Win 10 monitors network traffic and blocks unpermitted programs connecting with the internet. Thus, some users might need to occasionally turn off the Windows Firewall; or at least configure the firewall’s settings to enable certain programs through it. However, some users have said that Windows 10 Firewall is disabled but still blocking programs.

How do I stop Firewall from blocking programs in Windows 10?

1. Turn Off the Firewall via the Advanced Security Window

  1. To ensure the Windows Defender Firewall is off for all network profiles, try turning it off via the Advanced Security instead. Open the Win 10 search box with the Windows key + S hotkey.
  2. Then enter the keyword ‘advanced security’ in the Type here to search box.
  3. Click Windows Defender Firewall with Advanced Security to open the window shown directly below.Advanced Security window windows 10 firewall disabled but still blocking
  4. That window might show some users that the Windows Defender Firewall is, in fact, still on for one network profile. Click Windows Defender Firewall Properties to open the window shown directly below.Firewall state option windows 10 firewall disabled but still blocking
  5. Then select Off on the Firewall state drop-down menus for the Public, Private, and Domain Profile tabs.
  6. Select the Apply option to apply the settings.
  7. Then click OK to exit the window.

2. Adjust the Network Location Awareness Startup Type Setting

  1. Adjusting the Network Location Awareness Startup type setting to Automatic (Delayed Start) might fix a turned off firewall still blocking programs for business network users. To do that, press the Windows key + X keyboard shortcut.
  2. Select Run to launch that accessory.
  3. Input ‘services.msc’ in Run and click OK to open the window in the shot directly below.The Services window windows 10 firewall disabled but still blocking
  4. Double-click Network Location Awareness to open the properties window for that service.Network Location Awareness service windows 10 firewall disabled but still blocking
  5. Select Automatic (Delayed Start) on the Startup type drop-down menu.
  6. Click the Apply and OK options. That will ensure the NLA service has more time to correctly authenticate the domain so that it doesn’t wrongly identify it as a public network with a firewall enabled by default.

3. Turn Off Third-Party Antivirus Utilities

  1. Users who utilize third-party antivirus software may need to turn off those utilities’ firewalls, which might be the ones blocking programs. To disable a third-party antivirus utility, right-click its system tray icon to select turn off or disable context menu option.
  2. Alternatively, users can clean boot Win 10 to ensure that no third-party antivirus utilities, or other programs that might have firewalls, start with Windows. To do that, enter ‘msconfig’ in Run and click OK.
  3. Click Selective Startup, on the General tab, and deselect the Load startup items check box.System Configuration windows 10 firewall disabled but still blocking
  4. Check the Use original boot configuration and Load system services checkboxes.
  5. Select the Services tab, and select the Hide all Microsoft services option.The Services tab windows 10 firewall disabled but still blocking
  6. Select the Disable all option to remove superfluous third-party services from the system startup.
  7. Click the Apply and OK.
  8. Then press the Restart button on the dialog box that pops up.

Printer is not Printing Barcodes: How to Fix it

Printing documents is usually easy, but sometimes printer is not printing barcodes. This can be an issue, but it’s not the only problem you can encounter.

A few users reported that the printer is not printing the whole page , but this issue has its own guide.

In today’s article, we will focus only on the issues with printing and barcodes.

Why is my printer not printing barcodes?

  • Outdated firmware can sometimes cause issues while printing.
  • Certain printer settings can interfere with the printing process.

What can I do if the printer is not printing barcodes?

1. Update the firmware of your printer

  1. Open your printer software.
  2. Select your printer model and select Firmware Updater.
  3. Click on Install.
  4. Follow the installation instructions on the screen.
  5. Once the firmware is ready to be installed, click the Start button.
  6. Wait for the process to complete and don’t interrupt it.
  7. Once the process is done, click on Finish.

If the Epson printer not printing barcodes, you can follow these instructions to update its firmware.

Note icon NOTE
These are general instructions for Epson printers. To avoid permanent damage, always check your printer manual for exact steps.

2. Uncheck the print as image option

  1. Go to the print option.
  2. Locate the Advanced button and click it.
  3. Disable the Print as image option.
  4. Resume printing.

In this article, we discussed the reasons for printing issues, and we hope you found this guide helpful.

In most cases, the problem is related to your settings, but adjusting the settings doesn’t help, then you must upgrade your firmware to fix this issue.

Unfortunately, this is just one of many issues, and speaking of issues, many reported that printer is not working after power outage, so feel free to check that guide for more solutions.

Please let us know if this guide helped you in any way by using the comment section below.