Fileinfo.sys BSOD: 6 Ways to Fix It for Good

The Blue Screen of Death errors lists on the Windows OS are endless. Another one of these notorious issues troubling users is the fileinfo.sys BSOD, which is related to the FileInfo Filter Driver files.

While this issue is not complicated, it can lead to serious problems if left unattended. In this guide, we will show you how to fix this blue screen error effortlessly on your PC.

Why does the fileinfo.sys error occur?

Below are some of the reasons you are getting the fileinfo.sys error with the dreaded Blue Screen of Death:

  • Outdated PC: If your PC is outdated, you don’t need to look too far for the cause of this error. An outdated operating system is prone to different security and software issues. Hence, you need to keep your OS up-to-date.
  • Corrupt system files: Faulty system files are known to be among the leading causes of BSOD errors, including this one. As always, you need to repair these files to solve this problem.
  • Outdated or faulty drivers: Another potential cause of this error is corrupt system drivers. Updating the required drivers should get the job done here.

How can I fix the fileinfo.sys BSOD error?

1. Update your PC

  1. Press the Windows key + I to open the Settings app and select Windows Update.
  2. Click the Check for updates button.
    check for fileinfo.sys
  3. Now, download and install all available updates.

When your PC is outdated, you are likely to get BSOD errors such as fileinfo.sys. This is why you need to update your OS from time to time.

2. Repair system files

  1. Press the Windows + S key, type cmd, and select Run as administrator under Command Prompt.
    cmd admin fileinfo.sys
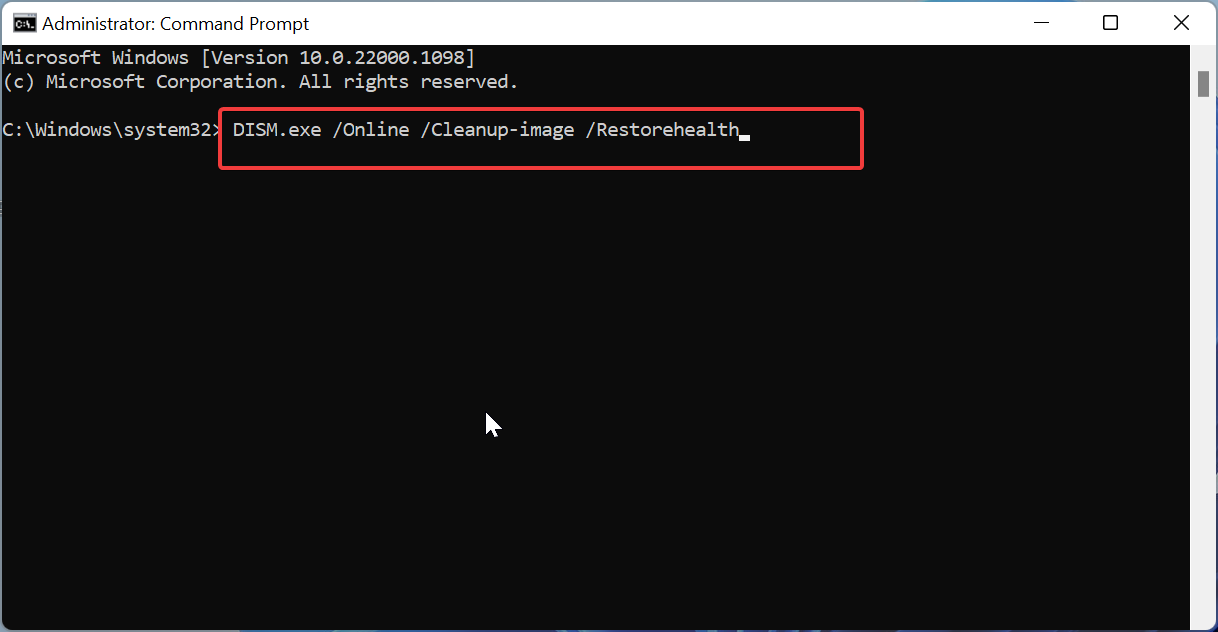
  2. Type the command below and press Enter: DISM /online /cleanup-image /restorehealthdism restore
  3. After the command above finishes running, run the command below: sfc /scannowsfc scannow
  4. Finally, wait for the command to finish running and restart your PC.

System file corruption is another prominent cause of file information.sys error. Running the SFC and DISM scans should restore normal service here.

If you don’t want to go through the stress of running multiple commands, we recommend using a dedicated system repair tool. Such software can also repair system_service_exception and 0x00000154 BSoD errors.

3. Update drivers

  1. Press the Windows key + X and select the Device Manager option.
    device manager
  2. Click the arrow next to the Display adapters section to expand it, and right-click each of the devices there.
  3. Now, choose the Update driver option.
    update driver
  4. Click the Search automatically for drivers option and install all available updates.
    search auto fileinfo.sys
  5. Finally, repeat Steps 2 to 4 for the Chipset and Network adapter drivers.

The fileinfo.sys file is related to your PC drivers. So, when some important drivers are outdated, they can trigger this BSOD. Following the steps above or going to the manufacturer’s website to update your drivers should do the trick here.

4. Run the Memory Diagnostic tool

  1. Press the Windows key + R, type mdsched.exe, and click OK.
    mdsched.exe
  2. Select Restart now and check for problems (recommended).
    restart
  3. Finally, wait for your PC to restart, and the check will start automatically.

Some users have found the fileinfo.sys issue to be due to memory issues. You can rectify this by running the Memory Diagnostic tool on your PC.

5. Scan for malware

  1. Press the Windows key, type virus, and click Virus & threat protection.
    virus fileinfo.sys
  2. Now, select Scan options.
    scan options
  3. Finally, choose the ideal scan option and click Scan now at the bottom of the page.
    scan now

Malware messes with your PC and can be the reason for a hardware malfunction. This, in turn, causes the fileinfo.sys blue screen error. The solution is to run a full system scan to eliminate the malware.

6. Perform a system restore

  1. Press the Windows key + R, type rstrui.exe, and click the OK button.
    rstrui fileinfo.sys
  2. Click Next on the page that opens.
    next
  3. Now, choose your ideal restore point and click the Next button.
    restore point
  4. Finally, click Finish and follow the onscreen instructions to complete the process.
    finish fileinfo.sys

Suppose you are finding it hard to track the cause of the fileinfo.sys BSOD error, the best thing to do is to perform a system restore. With this, you can restore your PC to a point where it works without issues.

We can conclude this guide on fixing the fileinfo.sys Blue Screen of Death issue. Hopefully, you are able to get rid of this dreadful error before exhausting the solutions in this article.

If you are facing a similar issue in navagio.sys BSOD, check our guide on how to fix it. And more useful tips can be found in our Cldft.sys BSoD error fix: Step-by-step guide or l1c63x64.sys as well.

Feel free to let us know the solution that helped you fix this issue in the comments below.

Fix: Restoring your Previous Version of Windows Boot Loop

Restoring your previous version of Windows loop during boot usually occurs due to failed upgrade. The frustrating aspect of this issue is that it prevents users from booting into their PCs.

While the error might look complicated and scary, it is not the most difficult to fix, as we will show in this detailed guide.

What does restoring the previous version of Windows mean?

Restoring your previous version of Windows loop during boot means that something interrupted the system upgrade process. Below are some of the causes of this issue:

  • Corrupt boot files: When there is a problem with your upgrade process, it might cause damage to your boot files. You need to repair the files and restart your PC.
  • Issues with external devices: In some cases, the external devices connected to your PC might cause issues with the upgrade process leading to this problem. The solution to this is to disconnect the connected devices.

How do I fix restoring your previous version of Windows error?

Below are a couple of preliminary troubleshooting steps to try before delving into the more complex solutions:

  • Wait it out.
  • Let your PC cool down.
  • Remove unnecessary external devices.

If this endless loop continues, you can now proceed to the fixes below:

1. Restart the PC multiple times

  1. Press the power button for some time to shut down your PC forcibly.
  2. Now, restart your PC and shut it down forcibly again when the manufacturer’s logo shows up.
  3. Repeat the Steps above twice. On the third trial, keep pressing F8 when you power on your PC.
  4. This should take you to the login page directly.
    login

Oftentimes, restoring your previous version of Windows endless loop during boot on Windows 10 or 11 is due to minor issues. Many users have been able to fix this issue by restarting their PC, following the steps above.

2. Repair boot configuration

  1. Shut down your PC forcibly by holding the power button, and restart it. Now, shut it down forcibly when the manufacturer’s logo shows up and power it on again. Repeat this twice to bring up the Advanced startup window.
  2. Now, select Troubleshoot.
    troubleshoot
  3. Choose Advanced options.
    advanced options restoring your previous version of windows boot loop
  4. Next, select the Command Prompt option.
    command prompt
  5. Type the following commands and press Enter after each: bootrec.exe bootrec.exe /fixmbr bootrec.exe /fixboot bootrec.exe /scanos bootrec.exe /rebuildbcd
  6. Finally, wait for the command to finish running and restart your PC.

An incomplete upgrade process can lead to issues with your boot files leading to restoring your previous version of Windows loop during boot. The only way around this is to fix these files by running the commands above.

3. Use the Startup Repair

  1. Repeat Steps 1 to 3 in Solution 2.
  2. Click the Startup Repair option.
    startup repair
  3. Finally, follow the onscreen instructions to complete the process.

At times, this issue might be due to issues with the startup process. Thankfully, a dedicated Startup Repair tool can help you fix this automatically.

4. Perform a system restore

  1. Repeat Steps 1 to 3 in Solution 2 to bring up the Advanced options.
  2. Select the System Restore option.
    system restore
  3. Now, enter your login details, select your preferred restore point, and click Next.
    restore point
  4. Finally, click the Finish button and follow the onscreen instructions to complete the process.
    finish restoring your previous version of windows boot loop

Restoring your previous version of Windows loop during boot can occur due to changes made to your PC. Performing a system restore to a point when your device was working well should fix this.

5. Reset your PC

  1. Repeat Steps 1 and 2 in Solution 2.
  2. Now, select the Reset this PC option.
    reset this pc restoring your PC to previous windows version boot loop
  3. Finally, choose the Keep my files option and follow the onscreen instructions to complete the process.
    keep or remove

A simple system restore might not be enough to get rid of restoring your previous version of Windows loop during boot. In this case, you need to reset your PC to default.

The good thing about this is that it allows you to keep your files. But if you know you don’t need those files, the ideal option is to wipe them off.

6. Perform a clean install

If you still can’t get rid of restoring your previous version of Windows error loop during boot, you have no choice but to perform a clean install. While this will wipe off your files and apps, it is your only bet of salvaging your PC.

A clean install will give you a fresh Windows installation without these nagging issues.

With this, we can conclude this excellent guide on fixing this endless error loop. Hopefully, you can fix this issue before getting to the last solution on this list.

Did any of the solutions in this guide help you fix this issue? Let us know in the comments below.

Wsock32.dll Missing: How to Fix or Download it Again

Many users are looking for ways to resolve the Wsock32.dll missing error that appears on their computers. The error prevents apps from running. However, this guide will discuss some basic steps for fixing it.

Alternatively, you can read about the causes of missing DLL files on Windows computers and ways to fix them.

What is Wsock32.dll?

Wsock32.dll has the description Windows Socket 32-Bit DLL. It is a Win32-type category DLL (Dynamic link library) file that Microsoft Corporation developed to develop the Microsoft Windows Operating System.

Additionally, Wsock32.dll contains the Windows Sockets API used by network applications to support network connections. It is an essential Windows system file, and its process is needed for your PC to work properly.

Why is Wsock32.dll missing?

Some factors liable to be responsible for the Wsock32.dll file missing are:

  • Recently installed or uninstalled app – When you uninstall apps from your system, it can delete some DLL files from their directories. Likewise, installing the new apps can override some DLL files, subduing and sometimes removing them from the PC.
  • Corrupt system files – The file can also be deleted from your PC if you have corrupted the system files, making them unavailable when required.
  • File in the wrong directory – If the DLL file is not in the proper directory, it becomes inaccessible for the programs meant to use it.

These causes can vary for different users. Regardless, we will take you through fixes to resolve the Wsock32.dll on your computer.

How can I fix a missing Wsock32.dll?

Go through the following preliminary checks before trying any advanced troubleshooting steps:

  • Re-register the file via Command Prompt – If you have the file on your device but are unsure about the error, re-register the DLL file using the regsvr32 [the name of the DLL file] in CMD.
  • Reinstall the app/program causing the error – Sometimes, you may need to disable the antivirus and reinstall the software to overwrite the present data.
  • Perform a System restore – Backdating your system to an earlier point when it last worked perfectly might help resolve the error.  Check what to do if the Restore Point is not working on your PC.

If you’re unable to resolve the DLL missing error, proceed with the fixes below:

1. Use a DLL fixing tool

Dealing with DLL errors can be annoying as it can affect the functionality of some apps on the computer. So, repairing the DLL file is important to ensure the system runs properly. Sadly, repairing these files is difficult if you’re not tech-savvy.

However, you can employ dedicated DLL fixing tools to repair the DLL files. They fix 100% of DLL issues and restore them to a healthy state.

2. Change the file directory

  1. Press the Windows + E keys to open the File Explorer.
  2. Navigate through the following path: C:\Windows\System32\dllcache
  3. Then, select the Wsock32.dll file, right-click on it, and click Copy from the drop-down.
  4. Go to the following directory and paste the file: C:\Windows\System32
  5. Close your File Explorer and try to check if the error still persists.

A wrongfully placed DLL file will automatically cause an issue for the programs that needs it since they can’t access it. Placing it in the correct directory makes it accessible and fixes the Wsock.dll missing error.

3. Run the SFC scan

  1. Firstly, reboot your PC.
  2. Now, left-click on the Start button, type CMD, and click Run as administrator.
  3. Click Yes on the UAC prompt.
  4. Then, input the following and click Enter: Sfc /scannow
  5. Wait for the process to complete and close the Command Prompt.

The users who have claimed this solution worked for them state that it is essential for you to reboot the PC before running the SFC scan.

4. Perform an in-place upgrade

  1. Download Windows 11 Disk Image (ISO) and select Windows 11 (multi-edition ISO).
  2. After downloading, right-click on ISO, select Mount, and then click Setup.exe.
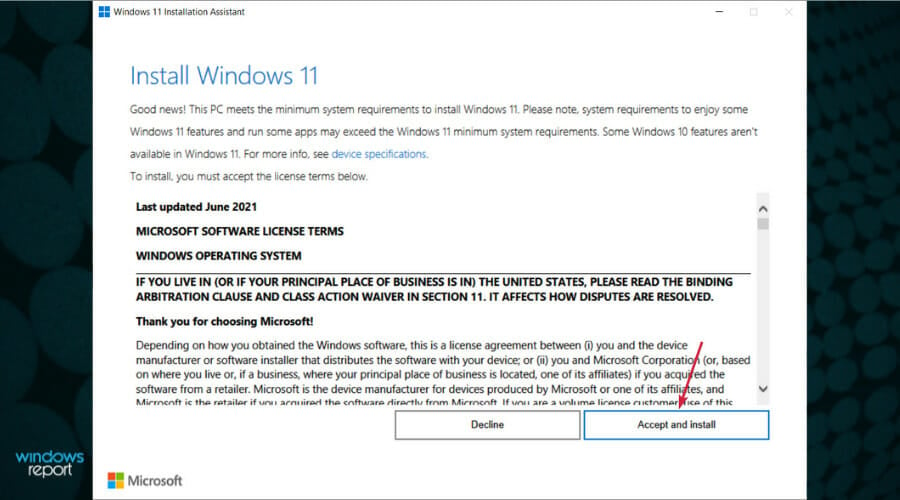
  3. In the Install Windows 11 dialog, click Next.
  4. Now, click on Accept in the license agreement window.
  5. When it prompts the Ready to Install page, check Keep personal files and apps option, and click Install.
  6. Windows 11 will reboot your device several times, leading you to the lock screen.

Running an in-place upgrade is often the last resort to fix this issue. It will resolve issues affecting the previous OS and restore the default health of your system.

Read about ways to resolve Windows Installer Service could not be accessed if you ran into the error.

Conclusively, you can check our guide about installing and fixing missing DLL files on Windows 11. Our latest guide shows you what to do if ws2_32.dll is missing, so feel free to check it out for more solutions.

For further questions or suggestions concerning this guide, kindly drop them in the comments section.

Eax.dll Missing: How to Fix or Download it Again

We have recently received several complaints from users about the Eax.dll missing error. It occurs when trying to start a program or game, preventing the apps from launching. Hence, we’ll take you through some fixes for resolving the error.

Alternatively, you can go through our article about ways to install and fix missing DLL files on Windows 11.

What is Eax.dll?

Eax.dll is a Dynamic Link Library (DLL) file for the EAX (Environmental Audio eXtensions) technology. It is developed to run on Windows PCs by Creative Lab Technology Ltd. It is used for audio processing, enhancing the 3D audio effect in games and other programs.

Furthermore, it contains codes and other information used by the Eax technology. It is an essential Windows component that ensures that its programs function correctly. In short, you can experience difficulties running programs associated with the Eax.dll file if missing.

Why is Eax.dll missing?

Many factors may be responsible for the Eax.dll file missing. Some notable ones are:

  • Corrupt Eax.dll file – It is common for DLL files to go missing or be removed by antivirus software when corrupt. Hence, the file can be missing if it is corrupt.
  • Wrongful placement of the DLL file – Sometimes, the DLL file may be placed in the wrong path or directory, making it difficult for the app to access it when needed.

These factors can vary on different computers. Nonetheless, we’ll discuss detailed steps to help fix the Eax.dll missing error.

How can I fix the missing Eax.dlI?

Before trying any advanced troubleshooting steps, go through the following:

  • Reinstall the app prompting the error – Reinstalling the software might download the DLL file alongside its app package.
  • Create an account on MPlayer and let it update Rogue Spear – Having an account on Player will automatically give you access to updates and patches that could fix these errors.
  • Perform a System Restore – The System Restore will backdate the system, removing recent changes causing the Eax.dll to be missing. Check how to fix Restore Point if it’s not working on your PC.

If the Eax.dll missing error persists, go ahead with the solutions highlighted below:

1. Use a dedicated DLL repair tool

DLL errors can be challenging to fix and affect the functionality of some apps using the file. Hence, repairing the DLL file is essential to help the apps run correctly. Sadly, it is not easy to repair these files if you lack tech knowledge.

Fortunately, users can employ dedicated DLL fixing tools to repair problematic DLL files. These tools fix incompatibility issues due to third-party DLLs and the operating system.

2. Change the DLL file location

  1. Right-click the game icon and click on Open file location.
  2. Locate the Eax.dll inside the GOG version file of the game and copy it.
  3. Then go back to the main BG&E folder where the .exe files are, then paste the DLL file.
  4. Now, restart the game/app to check if the error is fixed.

Depending on the game prompting this error, you should quickly locate the main folder and paste the DLL file. Users have confirmed this process works effectively.

3. Manually install EAXUnified in the folder

  1. Right-click the game icon and click on Open file location.
  2. Locate the EAXUnified.exe, right-click on it, and run as administrator.
  3. Click Yes when the UAC prompt appears.
  4. Then follow the installation prompts till you finish the installation process.

This solution is effective for users who encounter this error when opening Rogue Spear. However, you can also download the Creative EAXUnified and run the installer.

Registering Eax.dll will add it to the Windows registry, allowing it to be accessed by other programs needing it.

Conclusively, you can read about the causes of missing DLL files on Windows PC and ways to fix them.

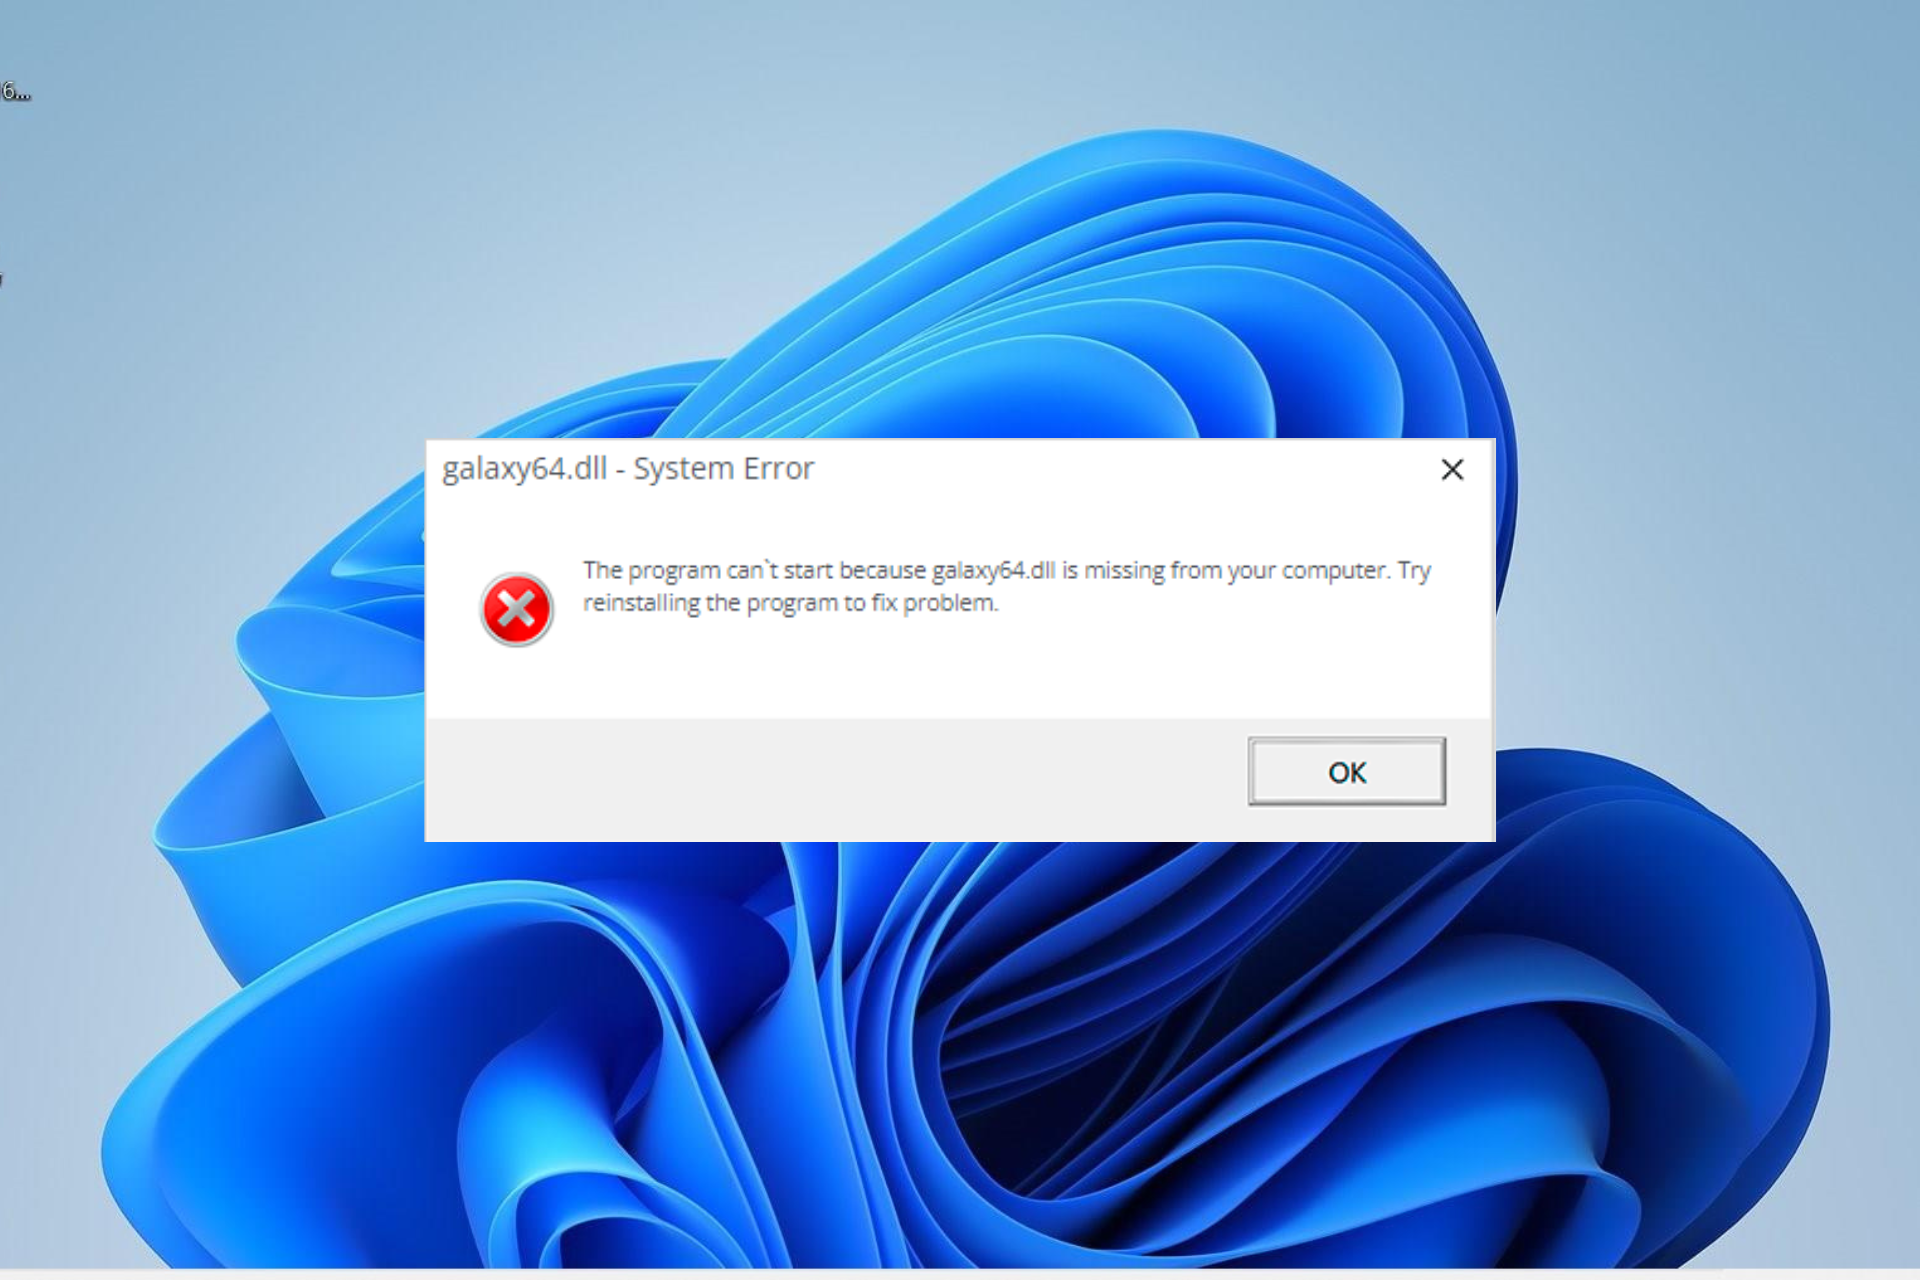
Galaxy64.dll not Found: How to Fix or Download it Again

The Galaxy64.dll file is an integral part of the GOG Galaxy game. It plays an important part in the smooth running of the game.

However, some users report that this DLL file is missing in their game. If you also face this issue, this guide will show you how to restore the file without breaking a sweat.

Why is galaxy64.dll not found on my PC?

Different potential factors can cause the galaxy64.dll not found error. Listed below are some of the well-known causes:

  • Presence of malware: If there are viruses on your PC, you might get this error message while trying to run your game. You need to run a full malware scan with your antivirus software to fix this.
  • Faulty system files: In some cases, this issue can be due to missing or broken system files. You only need to repair these files to get past the error.
  • Too many changes to settings: If you started noticing this issue after making changes to your PC, the changes might have triggered it. Your best bet here is to perform a system restore.

How can I fix galaxy64.dll if it is not found?

1. Use a dedicated DLL fixer

Galaxy64.dll is one of the crucial non-system DLL files installed by third-party software. But with these files comes a persistent compatibility issue, leading to various error messages like this one.

Thankfully, you can rectify this by using a dedicated DLL repair tool. With such special tool, you are sure that all compatibility issues between your PC and any third-party DLL file will be fixed without stress.

2. Download from a third-party website

  1. Visit a third-party website like DLL files.com.
  2. Now, click the Download link.
    download galaxy64.dll
  3. Next, unzip the downloaded file and move the clr.dll file to the path below on a 32-bit PC:C:\Windows\System32
  4. If you are using a 64-bit PC, move it to the path below instead:C:\Windows\SysWOW64
  5. Finally, restart your PC.

In some cases, the galaxy64.dll not found error might appear because the file is missing on your PC. To rectify this, you need to download the file and place it in your system file.

If this does not work, you need to place the file in the GOG Galaxy game file. However, ensure you scan the file and ensure it is safe before installing it.

3. Run an SFC scan

  1. Press the Windows key, type cmd, and choose Run as administrator under Command Prompt.
    cmd admin
  2. Type the command below and hit Enter to run it:sfc /scannow
  3. Finally, wait for the command to finish running and restart your PC.

If some of your system files are broken or missing, you are likely to get this galaxy64.dll not found error. The only way around this is to repair these files by running the command above and restarting your PC.

4. Scan for malware

  1. Press the Windows key, type virus, and select the Virus & threat protection option.
    virus galaxy64.dll
  2. Choose Scan options.
    scan options
  3. Now, select your preferred scan option and click the Scan now button.
    scan now

Sometimes, the galaxy64.dll not found error might be a false alert caused by viruses on your PC. To get t past the error message, you need to perform a deep virus scan.

Another option is to use the excellent TotalAV antivirus software to remove even the most stubborn malware on your PC.

This software scans your PC thoroughly for viruses and removes any traces of malware before they can cause problems.

5. Perform a system restore

  1. Press the Windows key + R, type rstrui.exe, and press Enter.
    rstrui galaxy64.dll
  2. Click Next on the page that pops up.
    next
  3. Now, select your preferred restore point and click Next.
    restore point
  4. Finally, click the Finish button and follow the onscreen instructions to complete the process.
    finish galaxy64.dll

If you started noticing the galaxy64.dll not found error after downloading an app or making some changes to your device, you should perform a system restore.

We have reached the end of this guide on fixing the galaxy64.dll not found issue. With the info in this guide, you should now be able to fix the problem without fuss.

If you are dealing with similar DLL problems in opencl.dll missing, check our detailed guide to fix it effortlessly.

Feel free to let us know the solution that helped you solve the problem in the comments below.

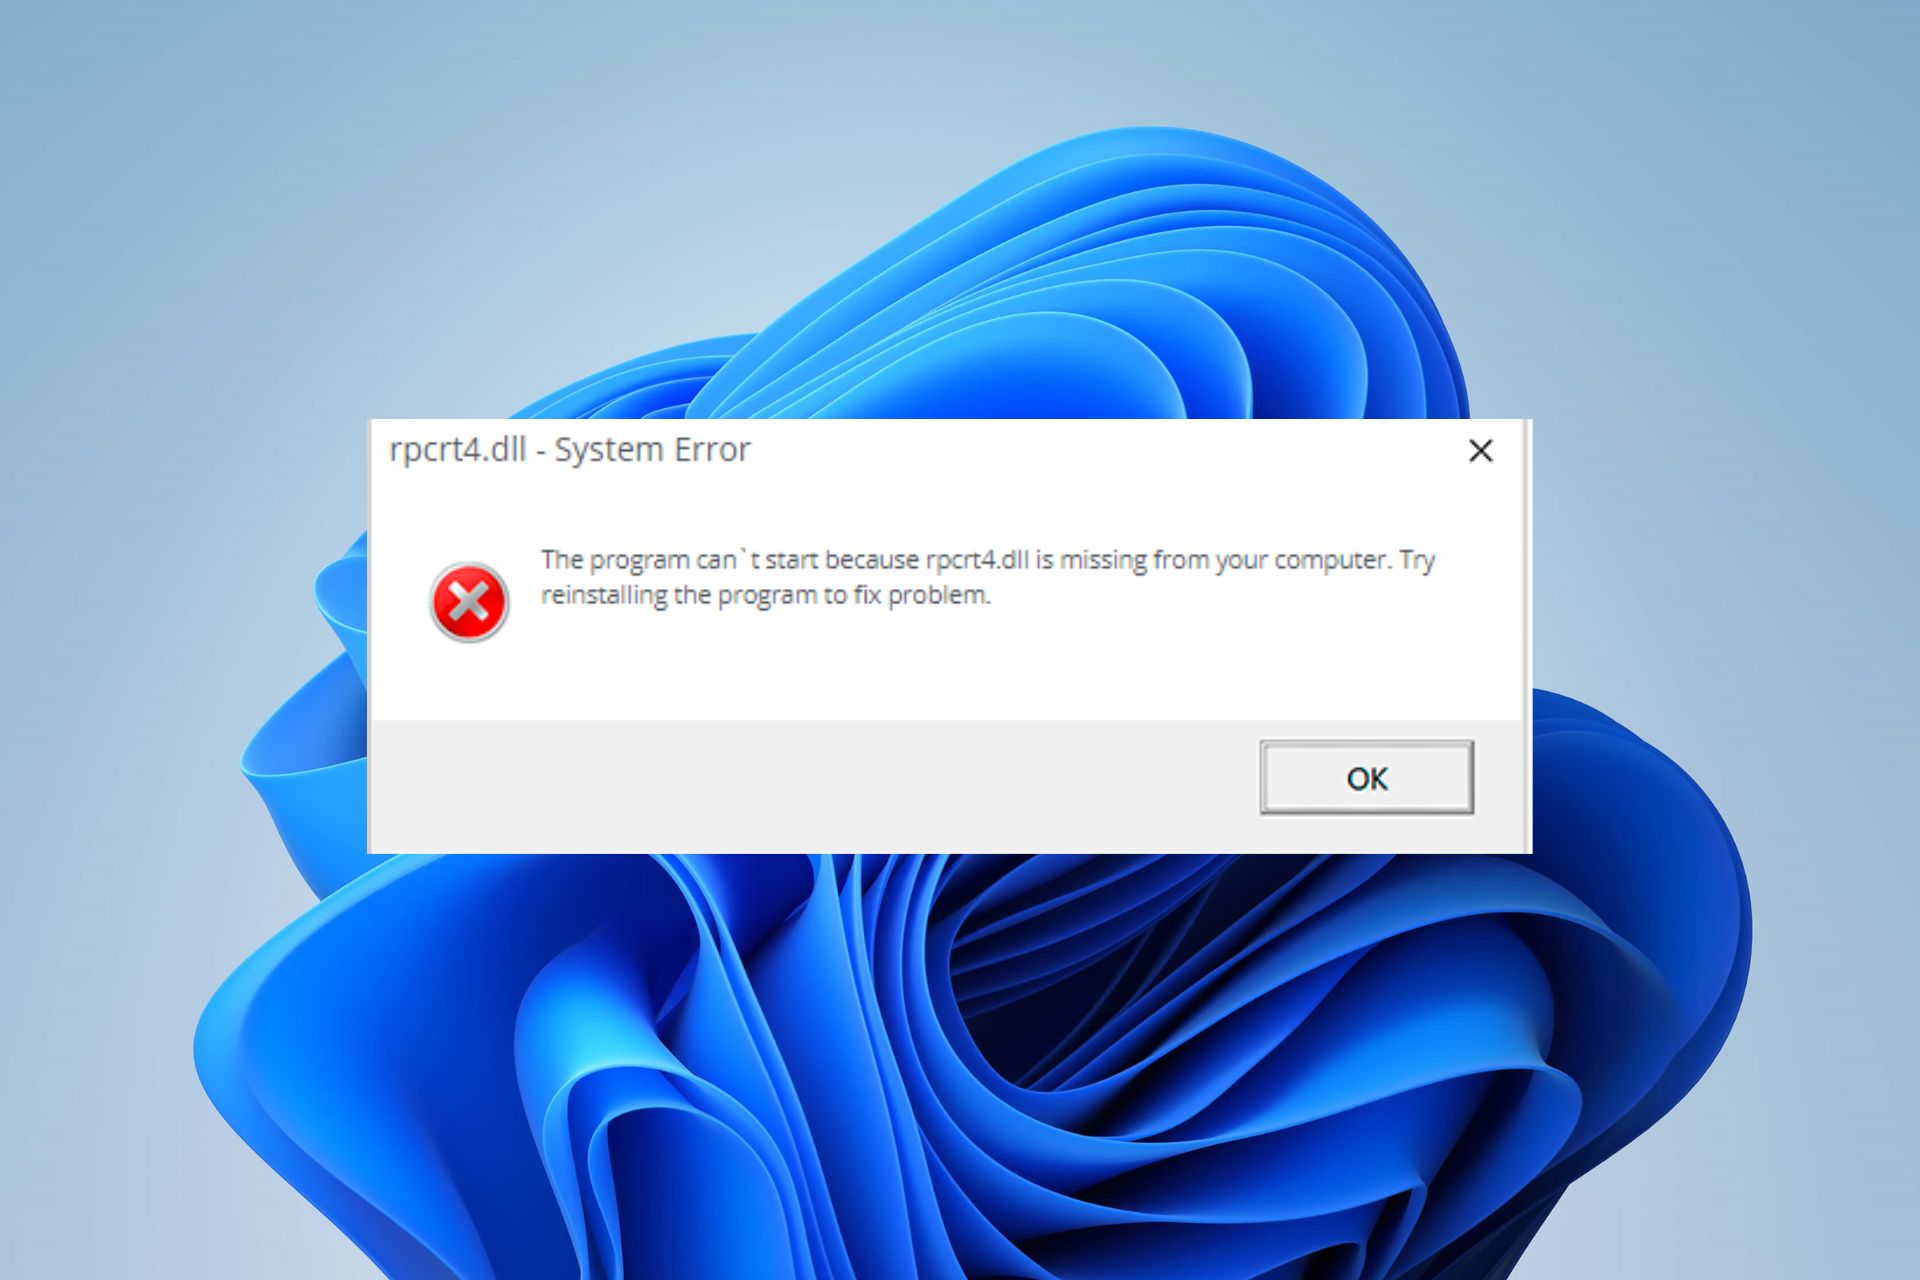
Rpcrt4.dll Was Not Found: How to Quickly Fix it

We have received several complaints about the rpcrt4.dll was not found error popping up on Windows PCs.

The error is said to appear in different instances like during startup, after a recent update, after installing new software, etc. However, we’ll discuss the basic steps for fixing the problem.

Also, you may be interested in our article about ways to install and fix missing DLL files on Windows 11.

What is rpcrt4.dll?

Rpcrt4.dll is a Dynamic Link Library (DLL) file associated with Windows computers’ Remote Procedure Call Runtime programs. Microsoft developed the file for Microsoft Windows Operating System.

It is used by some Windows apps for network and Internet connections, allowing computers and devices to communicate with one another.

Furthermore, Rpcrt4.dll is an essential Windows file and is needed for the system to run efficiently. It stores codes, information, and instructions for executable files to follow.

Why is rpcrt4.dll not found?

Numerous factors may be responsible for the Rpcrt4.dll not found error. Some are:

  • Corrupt system files – The file can also be deleted from your PC if you have corrupted the system files, making them unavailable when required.

However, the causes may vary for different users depending on the circumstances. As we go into this article, we’ll take you through tested steps to resolve the error.

How can I fix rpcrt4.dll not found?

Go through the following preliminary checks before trying any advanced troubleshooting steps:

  • Install Windows updates – Updating Windows will fix bugs from the outdated version. Also, it’ll add new features and components to improve system stability.
  • Run System Restore – Read our guide on how to fix the restore point if it’s not working on your PC.

If you’re unable to resolve the DLL missing error, proceed with the fixes below:

1. Use a DLL fixing tool

DLL errors can sometimes be fatal as they can affect the functionality of some apps on the PC. So, repairing the DLL file is important to help the system run properly. Unfortunately, most users can repair the files because they are not tech-savvy.

However, some dedicated DLL repair tools help automatically repair the DLL files. It can fix 100% of DLL issues and restore them.

2. Move the file from the System32 folder and run an SFC scan

  1. Press the Windows + R keys to open the File Explorer.
  2. Go to the C:\Windows\System32
  3. Select the rpcrt4.dll file, right-click it, and cut it.
  4. Then paste it to any other folder, like the Desktop.
  5. Left-click the Start button, type Command Prompt, and click the Run as administrator option.
  6. Click Yes on the User Account Control (UAC) prompt.
  7. Type the following and press Enter: sfc /scannow
  8. Restart your PC and check if the error persists.

Running an SFC scan will find and repair corrupt system files causing the error and restore disk health. Check our article on fixing SFC scannow not working on your PC.

Alternatively, you can read about the causes of missing DLL files on Windows PC and ways to fix them. Also, we have a comprehensive article about DLL hijacking and how to stop it safely.

Feel free to leave your suggestions, or if you have a different solution that works for you, kindly drop them in the comments section.

0x87e50007 Xbox Error: How to Quickly Fix it

The 0x87e50007 error is one of the common errors users encounter while trying to play games on Xbox. This error usually has to do with an incomplete or broken update.

Irrespective of the cause of this issue, the solutions in this guide will help you fix it for good.

Why am I getting the error 0x87e50007 on Xbox?

The Xbox error 0x87e50007 is related to update issues with the faulty game or your console. Below are some of the known causes of the error:

  • Faulty Mac address cache: Sometimes, when the Mac cache is corrupt, it can cause this frustrating error. What you need to do to get past the error is to clear the Mac cache.
  • Outdated game: If you are getting the 0x87e50007 Xbox error on FIFA22, it might be because the game is outdated. The quickest way to fix this is to update the game.
  • Corrupt storage cache: If your cache is corrupt, you will likely get this error on your console. Clearing the cache should do the trick here.

How do I fix the error code 0x87e50007 on Xbox?

1. Update games

  1. Press the Xbox button and choose My games & apps.
  2. Select the See all option.
  3. Now, click the Updates option in the left pane. You will see the available game updates here.
    updates 0x87e50007 xbox error
  4. You can also try to update your console by pressing the Xbox button and following the path Profile & system > Settings > System > Updates.
  5. Finally, you will see Console update available under Updates if your Xbox needs an update.

The first thing you need to do if you are getting the 0x87e50007 Xbox error is to check if there is an available update for the game giving the error.

You should also check for possible updates for your console to ensure that this is not the cause of the error.

2. Clear Mac address

  1. Select the Settings option on the home page.
    settings
  2. Choose General in the left pane and select Network settings in the right pane.
    network settings
  3. Now, choose Advanced settings.
    advanced settings 0x87e50007 Xbox Error
  4. Select Alternative MAC address.
    alternate
  5. Finally, click the CLEAR button and restart your console when prompted.
    clear

Some users have found this 0x87e50007 Xbox error to be due to a faulty Mac address. The solution to this is to clear the address and restart your console.

3. Clear storage cache

  1. Click the Settings option on the home page.
  2. Select the Devices & connections option in the left pane.
  3. Now, choose Blu-ray.
    blu ray 0x87e50007 Xbox Error
  4. Choose the Persistent storage.
    persistent storage
  5. Finally, click the Clear option to clear the cache.

Sometimes, the 0x87e50007 Xbox error can be due to the accumulation of corrupt storage cache. Clearing the cache and restarting your console should do the trick here.

4. Uninstall the game

  1. Press the Xbox button and select My apps & games.
  2. Highlight the game you want to remove and press the Menu button on your controller.
  3. Now, choose Uninstall option.
    uninstall

If you are experiencing the 0x87e50007 Xbox error on a particular game, you might need to uninstall it to fix this issue. You can reinstall the game after some time and check if the issue is fixed.

5. Reset your console

  1. Press the Xbox button and select the Profile & system option.
  2. Now, choose the Settings option.
    profile and info
  3. Next, select System on the left pane.
  4. Choose Console info on the right pane.
    console info  0x87e50007 Xbox Error
  5. From here, choose the Reset console option.
    reset console
  6. On the Reset your console page, you will be provided the option to wipe everything or to keep your games and apps.
  7. Select Reset and keep my games & apps.
    reset and keep
  8. Finally, if the issue persists, you might have to go with the option to wipe everything instead.

If everything you have tried to fix the 0x87e50007 Xbox error fails, you must reset your console. You have the option of keeping your games or removing everything.

You should try to keep everything first and only opt to wipe your file if you have no option.

We have reached the end of this guide on how to fix the 0x87e50007 Xbox error. Provided you carefully follow the instructions above, the issue should now be history.

If you are facing the for this game, you need to be online error. Check our comprehensive guide on the topic to fix it. Many users recently reported Xbox error code 80151912, but we covered it in one of our recent guides.

In the comments below, let us know the solution that helped you fix this issue.

Fix: Windows Movie Maker Not Showing Video

Movie Maker was a built-in video editing software bundled with Windows and used by amateurs and professionals. It was discontinued on January 10, 2017, though you can still download Movie Maker. Besides, some users report that Windows Movie Maker has no video.

The problem is not new, and there were widespread accounts of Windows Movie Maker not showing video earlier before the software was discontinued. So what caused a black screen in Movie Maker? Let’s find out along with the solutions that work!

Why is video not showing in Movie Maker?

Here are a few reasons Windows Movie Maker is black:

  • Running unsupported formats: The most common reason users encounter the error is when using unsupported formats. While Movie Maker supports a wide range of these, some formats are incompatible or require specific codecs.
  • Outdated graphics driver: When facing issues with any program that relies on graphics, an incompatible or outdated driver could be the underlying cause.
  • Missing codecs: Various formats require a dedicated codec to be installed, and when the latter is missing, Windows Movie Maker will have no video.
  • Issues with Movie Maker itself: For a few users, the problem was with the app itself. It could be missing or corrupt files or an improper installation to blame.

What can I do if Windows Moves Maker has no video?

Before we head to the slightly complex solutions, here are a few quick ones to try:

  • Restart the computer.
  • If the file size is too large, divide it into multiple parts or use a video compressor tool.
  • Convert the video to MP4 format using any software and check whether Windows Movie Maker still has no video.
  • Download all the critical codecs for Windows, restart the computer, and then check for issues.
  • Install the latest Windows updates, if any are available.

If none move, move to the fixes listed next.

1. Run Movie Maker in compatibility mode

  1. Press Windows + E to open File Explorer, paste the following path in the address bar, and hit Enter:C:\Program Files (x86)\Windows Live\Photo Gallerypath
  2. Right-click on the MovieMaker.exe file and select Properties.properties
  3. Navigate to the Compatibility tab, tick the checkbox for Run this program in compatibility mode for, and select a previous iteration from the dropdown menu.compatibility mode to fix windows movie maker no video
  4. Once done, click on Apply and OK to save the changes.

The primary change to make when Windows Movie Maker shows no video is to run the program in compatibility mode with a previous iteration of the OS, since it could have issues with the newer ones.

2. Disable Video Stabilization

  1. Select the video that isn’t playing properly in from the storyboard, and click on Edit.edit
  2. Now, click on Video Stabilization and choose None.set to none
  3. Once done, relaunch the program, and the affected video should play seamlessly.

The fix that worked for maximum users was to disable Video Stabilization when the video wasn’t showing in Movie Maker.

3. Update the graphics driver

  1. Press Windows + X to open the Power User menu, and select Device Manager from the list.device manager
  2. Expand Display adapters, right-click on the graphics adapter, and select Update driver.update driver to fix windows movie maker no video
  3. Now, choose Search automatically for drivers and wait for Windows to install the best one available on the PC.search automatically for drivers
  4. Once done, restart the computer for the change to apply.

If it’s the graphics to blame when Windows Movie Maker has no video, updating the graphics driver should do the trick. Remember that Device Manager only looks for newer versions available locally, so you may head to the manufacturer’s website and manually install the latest driver.

Here are direct links to download pages for the major manufacturers:

4. Repair Windows Movie Maker

  1. Press Windows + R to open Run, type appwiz.cpl in the text field, and hit Enter.appwiz.cpl
  2. Select Windows Essentials from the list of programs, and click on Uninstall/Change.repair to fix windows movie maker no video
  3. Click Yes in the UAC prompt.
  4. Now, choose Repair all Windows Essentials programs.repair all
  5. Wait for the repair to complete, and then restart the computer for the changes to apply.repair

When you have a black screen with no video in Windows Movie Maker, repairing Windows Essentials might do the trick. And while doing this, it’s best that you repair all programs under it.

5. Perform a system restore

  1. Press Windows + S to open the Search menu, type Create a restore point, and click on the relevant search result.create a restore point
  2. Click on System Restore.system restore to fix windows movie maker no video
  3. Select Choose a different restore point, and then click Next to proceed.restore point
  4. Pick a restore point from the list, one created before the error first appeared, and click Next.restore to fix windows movie maker no video
  5. Check the restore details, and click on Finish.start restore

When nothing else works, it could be a recent change to the PC leading to no video available in Windows Movie Maker. And a quick solution for that is to perform a system restore. It will revert the PC to a stable state and get rid of the error.

If the problem persists, you can try a recommended video editing software for Windows.

For any queries or to share what worked for you, drop a comment below.

There Has Been a Critical Error on Your Website [Error Fix]

Also known as the white screen of death, there has been a critical error on your website is one of the most dreadful errors site owners encounter on WordPress.

What makes this issue frustrating is that it does not reveal much detail about the potential cause. Fortunately, there are proven fixes that will you eliminate the error for good.

What causes a critical error on my website?

Below are some of the potential causes of there has been a critical error on your website:

  • Malware infection: One of the prominent causes of this error is the infection of your core site files. You need to perform a deep malware scan to eliminate these viruses to fix this issue.
  • Issues with themes and plugins: If your themes or plugins are faulty, you are likely to encounter this issue. You can fix this by using the default theme and resolving the plugin’s conflicts.
  • Low PHP memory limit: When the memory limit you set for PHP is low, you can face different issues. Raising the memory limit should help you solve the problem.

How do I fix there has been a critical error on your website?

Listed below are some basic troubleshooting steps to try before moving to the sophisticated solutions in this section:

  • Clear site cache.
  • Upgrade the PHP version if it is lower than 7.4.
  • Scan files for malware.
  • Check error logs for crash reports.
  • Rollback site with backup.

If you still can’t eliminate this error, proceed to the fixes below:

1. Enable debugging on WordPress

  1. Sign into your FTP account.
  2. Locate the wp-config.php in the root WordPress directory.
  3. Now, add the following lines of code to the line before the final message: define( 'WP_DEBUG', true ); define( 'WP_DEBUG_DISPLAY', false ); define( 'WP_DEBUG_LOG', true );debug

There has been a critical error on your website can be fixed using the debugging feature of WordPress. After enabling it, your WordPress website should now display debugging information.

After debugging, ensure to remove the code from your PHP file.

2. Switch to the default theme

  1. Visit the WordPress.org theme directory and download one of the default themes like Twenty Twenty-Three.
  2. Now, extract the file on your PC.
  3. Login to your FTP account and navigate to the wp-content/themes folder.
  4. Next, download all the theme folders on your PC as a backup.
    download there has been a critical error on your website
  5. Now, delete the original theme folders.
    delete
  6. Finally, upload the default theme folder you downloaded, and your WP site should have a default theme.

If you are not using the default theme, problems, like there has been a critical error on your website, can occur. The easiest way around this is to revert to a default theme.

3. Disable Plugins

  1. Access your site with FTP and double-click the wp-content folder to open it.
  2. Now, rename the plugins folder to plugins_old. Alternatively, you can open the folder and add _old to the individual plugin files.
  3. You should now be able to get into your WordPress site, where you can enable the plugins one after the other.

In some cases, this issue can be due to plugin conflict. To solve it, you need to disable all the plugins and reactivate them one after the other.

4. Increase the PHP memory limit

  1. Log in to your site via FTP, right-click wp-config.php, and select Edit to open it.
  2. Now, insert the command below before the last line of your PHP command: define( 'WP_MEMORY_LIMIT', '128M' );limit there has been a critical error on your website
  3. Finally, save the code.

There has been a critical error on your website that can occur if your server can not run PHP because of insufficient resources. The solution to this is to increase the PHP memory limit.

Note that you shouldn’t overly increase your PHP memory limit unless a plugin specifically requires it. And in this case, increasing it to 265M should do.

With this, we can now conclude this detailed guide on how to fix there has been a critical error on your website. Just ensure you follow the instructions therein, and you should be able to access your WordPress website.

If you are facing security issues on your WordPress website, check our detailed guide to fix it.

Feel free to let us know the solution that helped you fix this issue in the comments below.

3 Ways to Rotate a Video in Windows Media Player

Many applications work for video play on Windows 11. However, you may want to perform extra video manipulation. For example, a few readers have wondered if a video rotate option exists in Windows Media Player.

We have looked into it, and this guide will show you all the best ways to achieve it on the player.

Can I rotate a video on Windows Media Player?

Before exploring the topic, it is important to answer the question: can you rotate videos in Windows Media Player? Well, even though the tool is robust and powerful, the answer is no.

The media player does not have any native ways of performing this function. However, there may be a few workarounds, and we will study them in this article. Most will bother using third-party tools and importing the video to the media player.

How do I rotate a video in Windows Media Player?

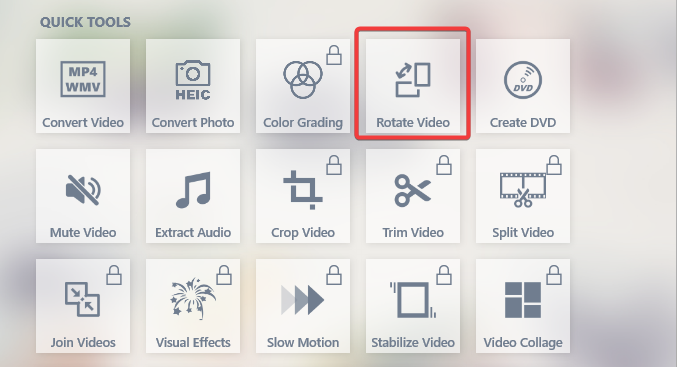
1. Use Windows Movie Maker

  1. Visit the store to download and install Movie Maker.
  2. Click on the Rotate video icon.
    rotate video in windows media player
  3. Select the video you need to rotate.
    rotate video in windows media player
  4. Click on the Rotate right or Rotate left icons at the bottom of the interface.
    rotate video in windows media player
  5. Finally, save the video and upload it to Windows Media Player.

2. Use online services

  1. Navigate to the Clideo service.
  2. Click the Choose file button.
  3. Select the video you need to rotate.rotate video in windows media player
  4. Rotate it using the rotate icons, then hit Export.
    rotate video in windows media player
  5. Finally, download the file and import it to Windows Media Player, and it will display rotated.

3. Use the VLC player

  1. First, download and install VLC from the official website. Or launch the app if you already have it on your device.
  2. Navigate Media, then Open File.
  3. Select the video you need to rotate.rotate video in windows media player
  4. Now, select Tools then click Effects and Filters.
    rotate video in windows media player
  5. Click on the Video Effects tab and select the Geometry option.
  6. Tick the Transform checkbox and select an option from the dropdown list.
    rotate video in windows media player
  7. Once again, click the Media and select Convert/Save.
    rotate video in windows media player
  8. Finally, Import the rotated video into Windows Media Player.

Any of these three workarounds may get the job done. Since Windows Media Player does not natively provide the rotate option, your only alternatives are these workarounds using third-party apps.

Also, you may need to read this detailed article if you have difficulty opening the media player.

With a lot of changes in Microsoft products, maybe one day we will see this inclusion in the media player, but till then, we would like to know what other workaround you may have tried. Please tell us in the comments section below.

Update Your ASUS Mainboard BIOS Without Risk (Windows 10/11)

In this guide, we’ll walk you through how to update the BIOS on your ASUS motherboard using Windows 10 or 11.

Whether you’re building a new PC or keeping your system up to date, installing the latest BIOS version helps improve hardware compatibility, system performance, and security.

It’s easier than you think, and we’ll show you step by step.

How do I update my ASUS BIOS?

Tip icon Tip
Check your BIOS version first to see if you need an update before proceeding to the next section of this guide.

1. Using EZ Flash 3 Utility

1.1. Extract the BIOS Update file

  1. Visit the official ASUS download center and search for your motherboard’s model name.
  2. Click the Driver and Utility option.
    search update bios asus
  3. Now, select the BIOS & FIRMWARE tab.
  4. Next, download the BIOS and right-click the downloaded file.
    firmware
  5. Choose the Extract files option.
  6. Finally, copy the extracted file with the largest size to a USB size. Ensure the USB drive is formatted to FAT32 format before using it.

The EZ Flash feature is a unique feature of the ASUS motherboard. It is built into the UEFI BIOS and can be used to update your ASUS BIOS with a USB or online.

Only motherboards with the ASUS EZ Flash 3 feature built-in can use the feature. If you want to use a USB flash drive, follow the steps above to prepare the BIOS file.

1.2. Employing the EZ Flash Utility

  1. Shut down your PC. Now, power it on again and keep pressing the BIOS key (F2 or Del) to enter BIOS.
  2. When you enter the BIOS, click the Advanced Mode option at the bottom of the page.
    advanced mode
  3. Click the Tool tab at the top.
  4. Now, select the ASUS EZ Flash Utility option in the left pane. If you have the ASUS EZ Flash 2 Utility, you can only use USB for the update, while ASUS Flash 3 can use both USB and the internet.
    tool ez update bios asus
  5. To use the USB drive:
    • Select via Storage Device on the next page and click Next.
      via storage
    • Now, choose the USB drive created above and select the BIOS update file you extracted.
    • Click the Yes button when the confirmation page to read the drive pops up.
      yes
    • Lastly, click the Yes button again to confirm the update, and your PC will restart when the process is complete.
  6. If you have ASUS EZ Flash 3 and want to use the internet (note that you can only use a wired connection):
    • Select the via Internet option in Step 4.
      via internet
    • Choose the DHCP option and click OK when the download confirmation page shows up.
    • Next, click the Yes button when prompted to confirm the BIOS update.
    • Wait for the process to complete, and your PC will restart.
  7. Finally, note that you must not press any key or allow your PC to power off when it restarts after the BIOS update.

With the above steps, you should be able to update your ASUS BIOS using the EZ Flash Utility. To confirm the success of the process, you can check your BIOS version.

2. Using AI Suite

  1. Download the AI Suite 3 app from the Download Center and extract the files.
    ai update bios asus
  2. Double-click the AsusSetup.exe file to run it. Follow the onscreen instructions to complete the process and restart your PC.
  3. Next, download and extract the BIOS update file on your PC.
  4. Now, launch the AI Suite 3 app and click the More button (three horizontal dots) in the top left corner.
  5. Choose the EZ Update option in the left pane.
    ez left
  6. To download the update online:
    • Click the Check Now! button.
      check now
    • Now, click the Connect button to connect to the Internet and check for updates.
      connect
    • If there is an update available, click the Update button.
      update update bios asus
    • Click the OK button when prompted to restart your PC.
      ok
    • When your PC restarts, the EZ Update will be loaded automatically to complete the process.
  7. To use the update file extracted on your PC:
    • Click the three horizontal dots under the Manually update Boot logo or BIOS.
      manual update bios asus
    • Choose the update file you extracted in Step 3 above.
    • Now, click the Update button in the bottom right corner.
      update bottom
    • Click the Flash button and confirm the BIOS file.
    • Finally, click the OK button and wait for the process to complete.
      flash

If you want to update your ASUS BIOS with the update file available locally on your PC, the AI Suite is your go-to option.

Some ASUS laptops also include the MyASUS utility, which supports BIOS updates directly within Windows. To learn how it works and what other features it offers, see How to Use MyASUS.

If you want to update your ASUS BIOS with the update file available locally on your PC, the AI Suite is your go-to option. You can also update your ASUS motherboard drivers to ensure all components stay fully compatible and optimized after the BIOS update.

3. Using the Flashback USB

Tip icon Tip
Note that this method only applies to motherboards that support using Flashback USB for BIOS updates. These types of PCs usually have a USB port with flashback written next to it.
  1. Download the BIOS update file and extract its content.
  2. Double-click the BIOSRenamer.exe file to run it.
    biosrenamer update bios asus
  3. The BIOS update file will be renamed automatically (.cap will be added to the name). Press any key on the command page to end the renaming process.
    .cap update bios asus
  4.  Now, copy the renamed update file to the root file of an empty USB flash drive that is formatted in the FAT32 file format.
    copy
  5. Next, insert the USB drive in the Flashback USB port. Note that this port is usually marked with a flashback near it on the I/O panel. In some cases, it will simply be a USB port with a colored outline.
  6. Now, locate the flashback button on the I/O pane. Press and hold this button for about three seconds till you notice a LED light blinking.
    button
  7. Finally, don’t press anything on your PC, nor let it shut down till the LED light stops blinking.

This method of updating your ASUS BIOS is especially useful if your PC is not detecting the CPU for some reason. But as mentioned earlier, not all motherboards support this option.

We have reached the end of this detailed guide on updating your ASUS BIOS. You should now be able to perform the update effortlessly, provided you follow the above steps carefully.

FAQs

How do I know if my ASUS BIOS needs an update?

You can check your current BIOS version by entering the BIOS setup (press F2 or Del during startup). Then, visit the ASUS support website, search for your motherboard model, and compare the latest BIOS version listed there with your current one.

Is it safe to update the BIOS from Windows?

Yes, updating through the ASUS AI Suite or MyASUS utility is safe if you follow the instructions carefully. Avoid interrupting the process or powering off your PC during the update to prevent potential damage.

What happens if I lose power during a BIOS update?

Losing power mid-update can corrupt the BIOS and make your system unbootable. To prevent this, use a reliable power source or an uninterruptible power supply (UPS) during the update.

Can I revert to an older BIOS version on my ASUS motherboard?

Yes, many ASUS motherboards allow you to downgrade the BIOS using EZ Flash or USB Flashback. However, only do this if a newer update causes instability or compatibility issues.

It should be reiterated that you need to be careful when updating your BIOS, as any mistake can damage your PC.

Updating BIOS can help if the VGA card is not supported by UEFI driver, so be sure to try that by following these steps.

For more tips, check out how to update your BIOS without a USB or follow our guide for updating BIOS on the Acer Swift 3.

If you want to know how to update the BIOS if your PC won’t boot, check our dedicated guide to do it quickly. We also have a guide on how to update BIOS using ASUS Armoury Crate, so don’t miss it.

Feel free to let us know if you encounter any problems while applying the steps above.

How do I Add Thumbnails in Chrome [Easy Ways]

Thumbnails in Google Chrome are a great feature. They let you see what to expect from a site or how a web page looks like without leaving your current tab so that you don’t have to click back and forth between tabs. 

However, not everyone knows how to use this feature on their computers. If you’re one of those people, then you’ll want to learn how to enable it so that you can benefit from it. In this article, we show you how to do so in your Chrome browser.

How do I add thumbnails on the Google Chrome homepage?

1. Add automatically

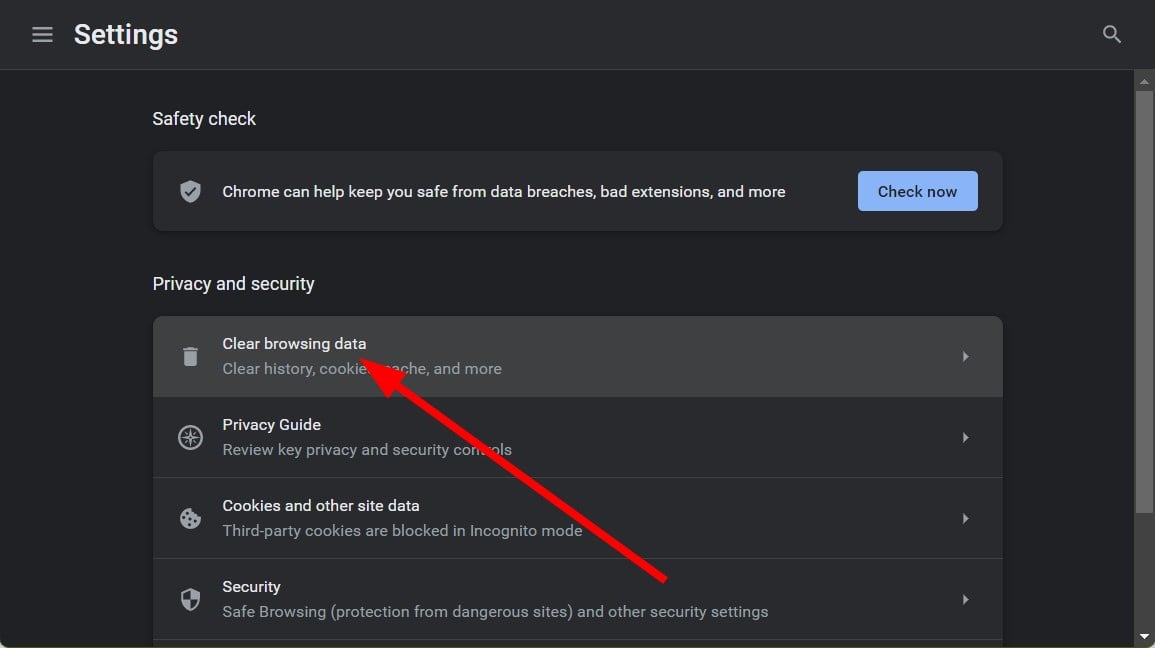
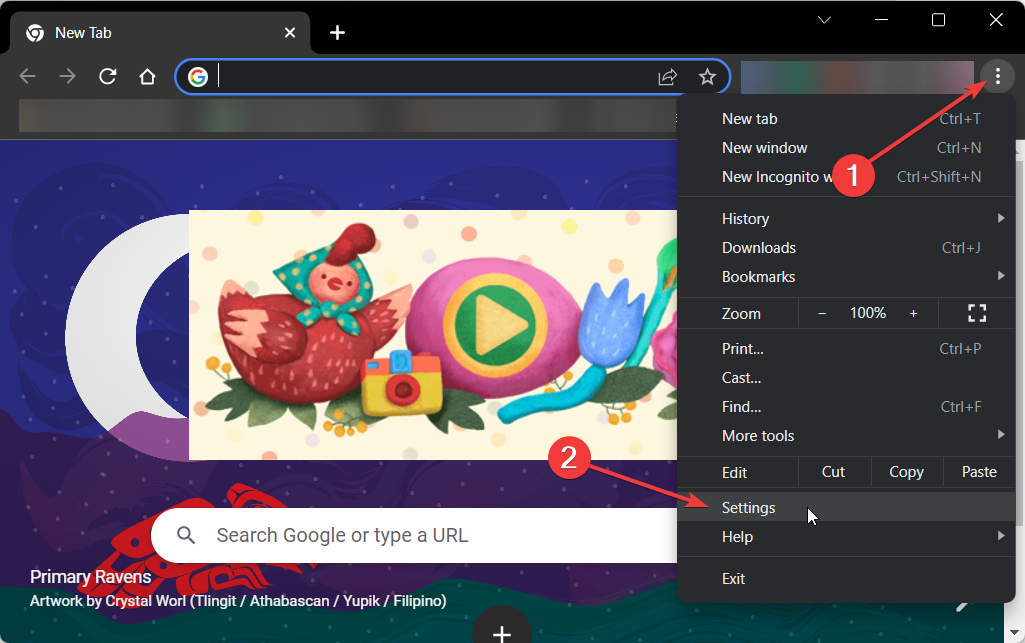
  1. Open your Google Chrome browser, click on the three ellipses at the top right corner, and click on Settings.Settings CHrome
  2. Click on Privacy and security, then select Clear browsing data.
  3. Check Cookies and other site data and Cached images and files, then hit Clear data.Clear data
  4. Restart Chrome and click on Customize Chrome.
  5. Check the Most visited sites checkbox to allow Chrome to curate a thumbnail shortcut list for you.
  6. Next, visit the site you want to add as a thumbnail on Google Chrome’s homepage.
  7. Close and reopen Chrome again, and your site will be added to your thumbnails. 
  8. Repeat these steps until you’ve hit the maximum number of thumbnails or are satisfied with the sites you’ve added.

The essence of clearing cookies is to delete any saved pages that may have been automatically added to your thumbnails owing to the frequency with which you visit the said site.

The same method applies if you want to know how to add thumbnails to Google Chrome homepage on your mobile. Unfortunately, there’s no way to add sites manually for mobile devices.

2. Add manually

  1. Open your Google Chrome browser and click to open a new tab which will lead you to the homepage.
  2. Below the Google search box, you’ll find thumbnails of sites you visit frequently or the default ones if this is your first time using Chrome.
  3. When you hover your mouse over each thumbnail, you’ll reveal three horizontal ellipses that allow you to remove it if you don’t like its position.
  4. To add one, click on an empty icon.
  5. You’ll be prompted to enter the name and site address. Chrome homepage
  6. Once you’re done, the thumbnail of the site will appear.

3. Add Chrome tab thumbnail preview

  1. Open your Google Chrome browser and open a new tab.
  2. In the address bar, type and navigate to the following location: chrome://flags/ 
  3. You’ll be directed to the Experiments tab.
  4. In the search bar, type and enter Tab Hover Cards.
  5. Click on the drop-down menu next to Tab Hover Cards and select Enabled.
  6. Next, click on the Relaunch button that appears at the bottom of Chrome, which will prompt a browser restart.
  7. When you open a few tabs and hover over the non-active ones, you can see a thumbnail displayed.

Aside from adding thumbnails on your homepage, you can also create a preview of the open tabs in your Chrome browser. This is useful so that you don’t have to keep clicking from tab to tab when all you have to do is hover your mouse over an open tab.

Why are my tab thumbnails not showing in Chrome?

If your thumbnails are not showing in Chrome, it could be because of one or more of the following reasons:

  • You don’t have the most recent version of Chrome installed – Tab thumbnails are a feature available in the latest version. If you don’t already, you need to check for the latest updates and download them as soon as possible. If it’s still not working, you may need to reinstall Chrome.
  • Your tabs aren’t open – Tabs must be open for their corresponding thumbnails to show up on Chrome’s New Tab page. If you’re using a different browser or your tabs are closed, they won’t appear.
  • Tab thumbnails aren’t turned on – If you don’t have Tab Thumbnails turned on in your settings, they won’t appear on the New Tab page. Check the steps above on how to turn this feature on.

Now that you know how to add thumbnails on both the homepage and browser tabs in Chrome, your browsing experience should be elevated. Should they go missing, you can easily get your missing Google Thumbnails back with these methods.

If you encounter an error where your Chrome’s most visited sites section is not showing, check out our guide for additional help.

Let us know if you have been able to follow through with this article and successfully create some thumbnails.

No Applicable App Licenses Found: 5 Ways to Fix This Error

The no applicable app licenses found error is an issue users encounter when launching games like Minecraft and Forza Horizon 5. This error is made all the more frustrating because it prevents users from accessing their games.

If you are also facing this issue, there is good news for you as it can be fixed. And we will show you how to do it in this detailed guide.

Why does the no applicable app licenses found error occur?

Several potential factors can cause the no applicable app licenses found error. Below are some of the known causes:

  • Outdated OS: Sometimes, this issue can be caused by an outdated operating system. Hence, you need to install the latest patches on your PC to eliminate this error message.
  • Issues with Windows Store: This error is usually related to Microsoft Store apps, and it can mean there is a problem with the Windows Store. To get past this error message, you need to reset the Microsoft Store cache and run the troubleshooter.
  • Problems with the game launcher: At times, this problem can be due to problems with your game launcher. Uninstalling the program and reinstalling it from the Windows Store should do here.

How can I fix the no applicable app licenses found error?

Before proceeding to the detailed solutions in this section, try the following preliminary troubleshooting steps:

  • Update your PC.
  • Reinstall the game launcher.
  • Log out and log in on the Xbox app.

If you still can’t fix this issue with the steps above, you can delve into the solutions below:

1. Reset the Windows Store cache

  1. Press the Windows key, type cmd, and select the Run as administrator option under Command Prompt.
    cmd admin no applicable app licenses found
  2. Type the command below and hit Enter to run it: wsreset.exewsreset
  3. Finally, wait for a Command Prompt window to open, and the Windows Store app will open automatically.

A corrupt Windows Store cache can be the cause of the no applicable app licenses found error on Xbox game pass and games like Halo Infinite and Back 4 Blood. Resetting the Store cache should help restore normalcy here.

2. Repair the Xbox app

  1. Press the Windows key + I to open the Settings app and select the Apps option in the left pane.
  2. Choose the Apps & features option in the right pane.
    app and
  3. Now, scroll down and click the three vertical dots before the Xbox option.
  4. Next, select Advanced options.
    advanced options no applicable app licenses found
  5. Finally, click the Repair button on the Xbox page and wait for the process to complete.
    repair

If you dealing with the no applicable app licenses found error on the Xbox game pass only, it might due to minor issues with the app. You need to repair the Xbox app to eliminate the error message.

3. Install the Windows Store update

  1. Launch the Windows Store app and select the Library option on the left pane.
    library
  2. Now, click the Get updates button in the top right corner.
  3. Finally, click the Update all option and wait for the pending updates to be installed, including the Microsoft Store app update.
    update all no applicable app licenses found

If the Windows Store is outdated, the apps dependent on it might encounter different issues, including this no applicable app licenses found error. So, you need to update it and other outdated apps.

4. Re-register Windows Store apps

  1. Press the Windows key + S, type powershell, and click Run as administrator under Windows PowerShell.
    powershell no applicable app licenses found
  2. Click Yes when the UAC prompt shows up.
  3. Now, copy and paste the command below and hit Enter to run it: Get-AppXPackage | Foreach {Add-AppxPackage -DisableDevelopmentMode -Register "$($_.InstallLocation)\AppXManifest.xml"}command
  4. Finally, wait for the command to finish running and restart your PC.

If you can’t get past the no applicable app licenses found error message, you need to re-register the Windows Store apps. This will clear the potential causes of this issue and restart all the apps.

5. Run the Windows Store Apps troubleshooter

  1. Press the Windows key + I to open the Settings app and select the Troubleshoot option in the right pane.
    troubleshoot
  2. Select Other troubleshooters.
    other trouble no applicable app licenses found
  3. Finally, click the Run button before the Windows Store Apps option and follow the onscreen instructions.
    run store

In some cases, the no applicable app licenses found error can be down to the failure of multiple processes. The best thing to do here is to run the Windows Store Apps troubleshooter.

This will help you clear the glitches and restart the required services and processes.

With this, we can now conclude this guide on fixing the no applicable app licenses found error. While the error can be annoying, the carefully-curated solutions in this guide should help you fix it.

If you are dealing with the no applicable licenses error on Total War Warhammer 3 only, check our comprehensive guide to fix it for good.

Were you able to fix this issue? Feel free to let us know the solution that helped you in the comments below.

Printui.dll: What Is It & How to Fix Its Errors

When it comes to configuring printers, there are a plethora of tasks that can be automated. The executable file printui.dll is responsible for housing the necessary functions required for printer configuration dialog boxes.

This subject matter shares similarities with error 740 while adding printer but we previously tackled it in a different guide.

However, to effectively confront the matter at hand, we need to investigate its underlying source.

What is the Printui.dll error?

Encountering the printui.dll error can be a frequent problem that stems from an array of reasons:

  • Damaged installation – The DLL files in the Windows installation could be damaged or missing.
  • Unsupported DLL files – It might the DLL files are no longer supported, this might prompt the error.

How can I fix the Printui.dll error?

  • Copy printui.dll – You can copy the printui.dll from another Windows 11 PC and replace the one on your PC.

1. Use a dedicated DLL fixer

Printui.dll is is a system file, so it’s important to restore it. Doing so might be a daunting task, especially if you’re not tech-savvy.

Luckily, you can fix this problem automatically with DLL repair software. Such an application is simple to use, and after scanning your PC, it will restore the missing files and fix any issues that you had.

2. Run DISM tool

  1. On the start screen type command prompt.
  2. Right-click Command Prompt, and click Run as administrator. If you are prompted for an administrator password or a confirmation, type the password, or click Allow.

  3. Type the following commands. Press Enter after each command.

    DISM.exe /Online /Cleanup-image /Scanhealth

    DISM.exe /Online /Cleanup-image /Restorehealth

  4. Exit the command prompt then check if the issue has been handled.

After doing that, check if printui.dll error is gone.

3. Use System file checker

  1. On your search bar type command prompt.
  2.  Right-click Command Prompt, and click Run as administrator. If you are prompted for an administrator password or a confirmation, type the password, or click Allow. 
  3. Run the following command: sfc / scannow
Note icon NOTE
When you input the command, the system will initiate a thorough check. It may take some time, so we kindly ask for your patience and don’t interrupt it.

Our goal is to ensure that this guide has effectively addressed your concerns. If you encounter any additional obstacles, we suggest looking into Rundll32.exe error and may offer similar solutions.

We are eager to hear from you about the solution that has worked best for you. Please share your insights by leaving a comment below and letting us know your thoughts. Your feedback is valuable to us!

UsoClient.exe: What Is It & How to Disable It

Are you experiencing the UsoClient.exe command prompt popup every time you start your Windows? If you’re wondering what it is, whether it’s safe, and how to disable it, you’ve come to the right place.

While it’s usually normal for the UsoClient.exe command prompt to appear briefly and disappear, there are cases where the pop-up may stay longer and not go away. This could result from a bug or a disguised malicious file.

What is UsoClient.exe?

UsoClient.exe is an executable exe file associated with the Windows Update service in the Microsoft Windows operating system.

It is responsible for managing and running Windows Update tasks, such as checking for updates, downloading and installing them, and configuring the system accordingly.

It is essential for getting the latest security patches, bug fixes, and feature updates provided by Microsoft.

Is UsoClient.exe a virus or malware?

Many users are concerned about whether the UsoClient.exe is a virus or malware. USO, which stands for Update Session Orchestrator, is a legitimate Windows process. If you are worried about a potential security threat, you can verify its location to confirm whether this is a legitimate process or a virus.

UsoClient.exe is located in C:\Windows\System32. If you find it anywhere else, it could be a virus. Then, it is recommended that you promptly initiate a virus scan.

How do I disable UsoClient.exe?

1. Disable UsoClient.exe using the Task Scheduler

  1. Press the Windows key + R to open Run, type taskschd.msc, and press Enter.taskshcd.msc
  2. In the Task Scheduler window, navigate to the following location using the left pane: Task Scheduler Library > Microsoft > Windows > UpdateOrchestratorSelect WIndows Update
  3. Once you’re in the UpdateOrchestrator folder, go to the center pane, then select the Schedule Scan task, and click on Disable.1259
  4. Close the Task Scheduler and restart your computer.

After the restart, you should no longer see the UsoClient.exe CMD pop-up. Please note that the Windows Update component will not be informed of the latest updates by disabling this task.

2. Disable UsoClient.exe using Registry Editor

  1. Press the Windows + R, type regedit, and hit Enter.regedit
  2. In Registry Editor, navigate to the following location using the left pane: HKEY_LOCAL_MACHINE\SOFTWARE\Policies\Microsoft\Windowsnavigate to Windows folder
  3. Now, locate and select the WindowsUpdate folder.
  4. If the folder doesn’t exist, right-click the Windows folder and select New and then choose Key.Create new key
  5. Then, name the key WindowsUpdate and press Enter.WindowsUpdate folder
  6. Right-click the WindowsUpdate key, select New, and choose the Key option again.Right-click WindowsUpdate
  7. Name the key AU and press Enter.
  8. With the AU folder selected, right-click on an empty space in the right panel and select New and then choose DWORD (32-bit) Value. Create new key from AU
  9. Then, rename the newly created value to NoAutoRebootWithLoggedOnUsers.NoAutoRebootWithLoggedOnUsers
  10. Double-click on NoAutoRebootWithLoggedOnUsers and set its value to 1.Set value  to 1
  11. Close Registry Editor and restart your PC.
  12. If you want to re-enable the usoclient.exe file, simply navigate back to the same location and delete the NoAutoRebootWithLoggedOnUsers entry or set its value to 0.

3. Disable UsoClient using Group Policy Editor

Note icon NOTE
Unlike the other methods, using the Group Policy Editor allows you to disable the UsoClient.exe file for all users. However, it’s important to note that this method only applies to Windows 10 Pro, Education, and Enterprise editions.
  1. Press the Windows + R, type gpedit.msc in the Run dialog box, and press Enter.gpedit.msc
  2. In the Group Policy Editor window, navigate to the following location: Computer Configuration > Administrative Templates > Windows Components > Windows Update
  3. Select Windows Update in the left window pane.Windows update
  4. Then double-click on the Legacy Policies in the right window pane.Legacy policies
  5. Next, locate and double-click on the No auto-restart with logged on users for scheduled automatic updates installations setting.No auto-restart with logged on users
  6. In the pop-up window, select the Enable option.
  7. Click Apply, and then click OK to save the changes.Choose enable
  8. Close the Group Policy Editor.
  9. Restart your computer for the changes to take effect.

If you are a Windows Home user, refer to our article on enabling or installing the Local Group Policy Editor in Windows 11.

Before you leave, take a moment to review the services that can be disabled to enhance your PC’s performance further.

Another related process, known as usocoreworker.exe, operates alongside UsoClient as part of the Windows Update service, running discreetly in the background, and you can disable it as well.

For any queries and suggestions, drop us a comment down below.

Quickest Ways to Set a Default Printer on Windows 11

When you have multiple printers connected to your Windows 11 computer or network, setting a default printer in Windows 11 allows your documents to be automatically sent to the default printer unless you specify otherwise.

Moreover, it can be really annoying to deal with multiple printers when the default printer keeps changing all the time.

Unless you want to send the wrong document to the wrong printer, check out this article to quickly set a default printer on your Windows 11 device.

What is Default Printer?

A default printer is a device automatically selected as the primary choice for printing documents or files from your computer.

Setting a default printer can be helpful because it saves you from having to select a printer whenever you want to print something.

To set a default printer, you must have the printer installed on your device. If you’re having trouble installing a printer, check out our guide on fixing printer installation issues.

How to set the default printer in Windows 11?

1. Set the default printer from the Printer folder

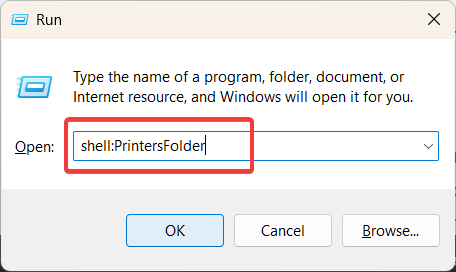
  1. Press Win + R to open the Run command box, then type shell:PrintersFolder and hit Enter.shell-printersfolders
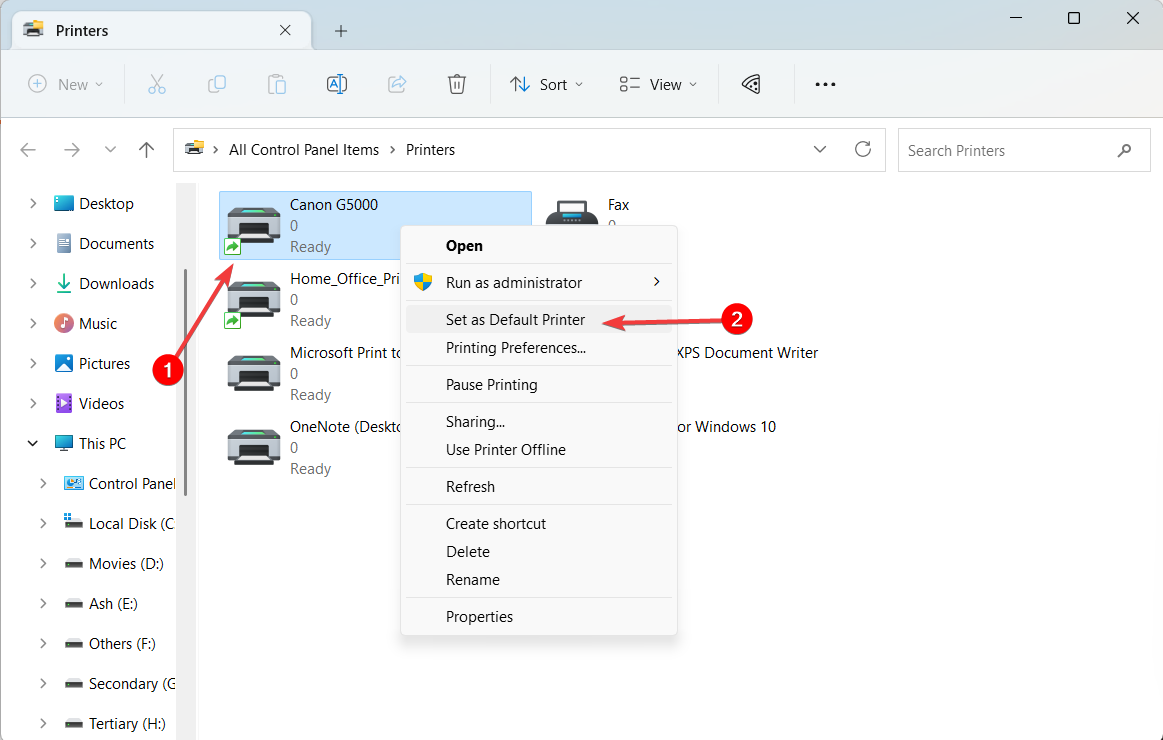
  2. In the Printers folder, right-click on the preferred printer and select Set as Default Printer.Printers folder
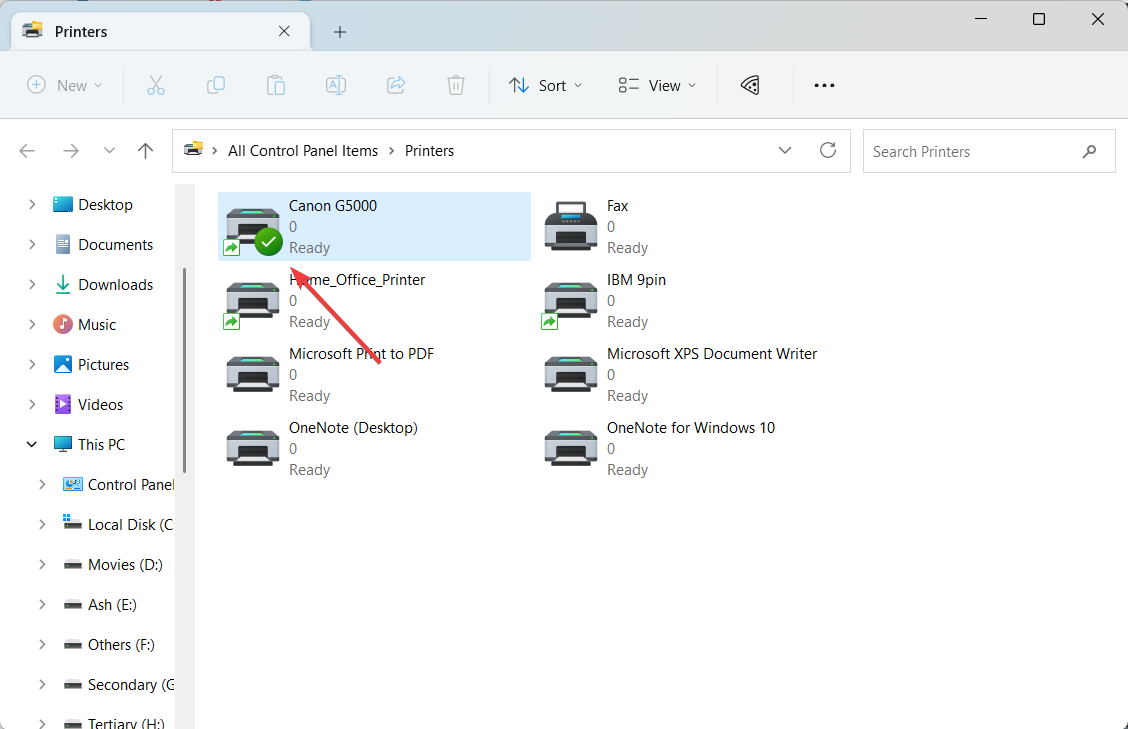
  3. Confirm that the printer’s icon has a checkmark indicating it as the default printer.Check for tick mark

2. Configure the default printer using the Command Prompt

Note icon NOTE
You can execute the below command using Command Prompt, PowerShell, or Windows Terminal.
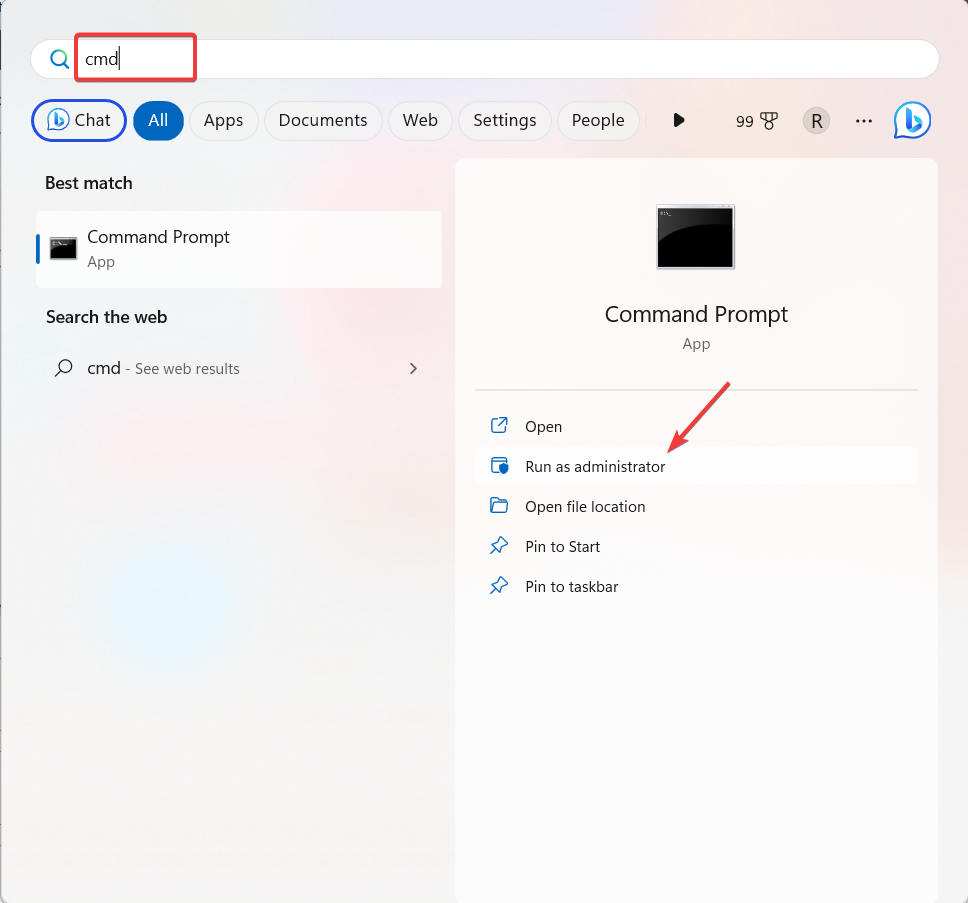
  1. Press the Windows key, type cmd in the search bar, and select Run as Administrator. type cmd
  2. If a User Account Control (UAC) window appears, click Yes.
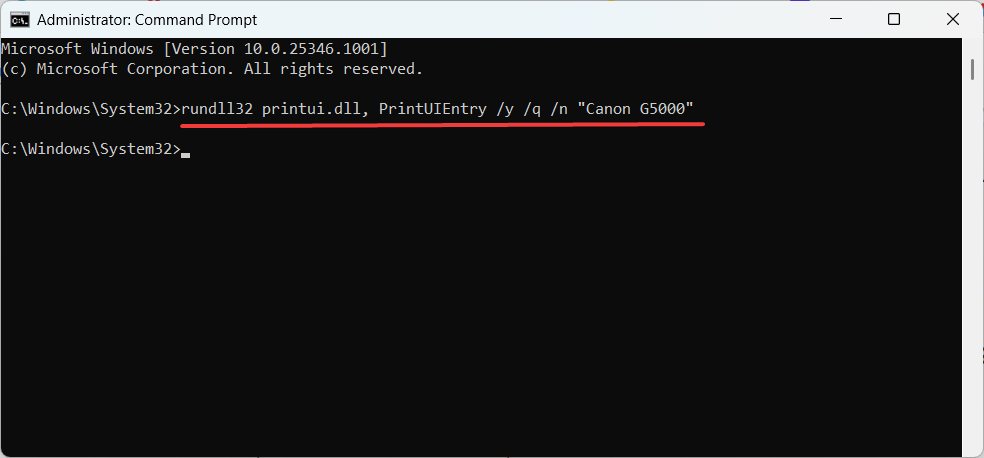
  3. Type or copy+paste the following command into the window: rundll32 printui.dll, PrintUIEntry /y /q /n "Printer name"
  4. Make sure to replace the Printer name with the name of the printer installed on your system.rundll32 command
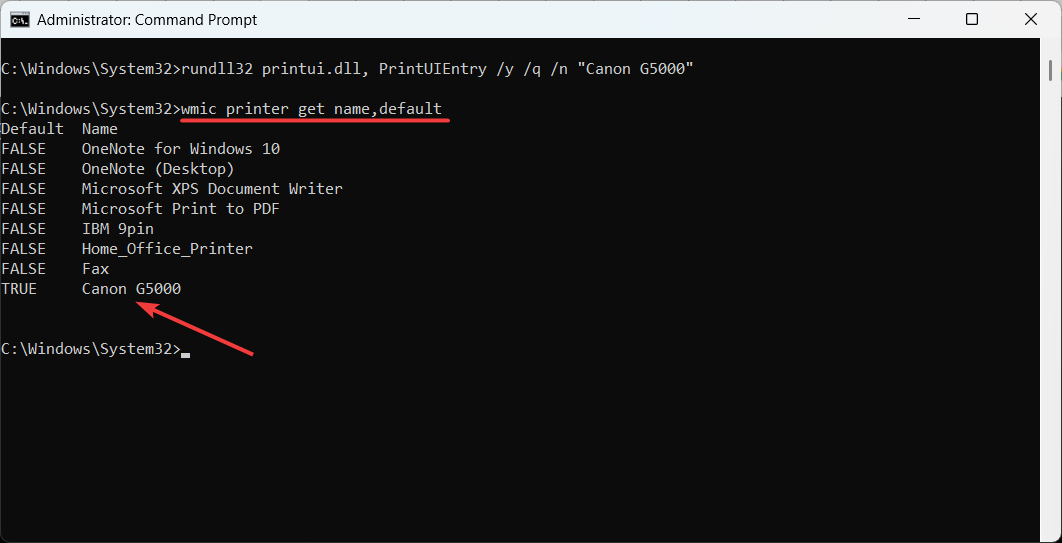
  5. To confirm your default printer using Command Prompt, run the below command: wmic printer get name,defaultwmic printer
  6. You will see a list of printers installed on your computer. Look for the printer that is marked as TRUE in the Default column. This indicates that it is the default printer.

3. Set a default printer from the Settings app

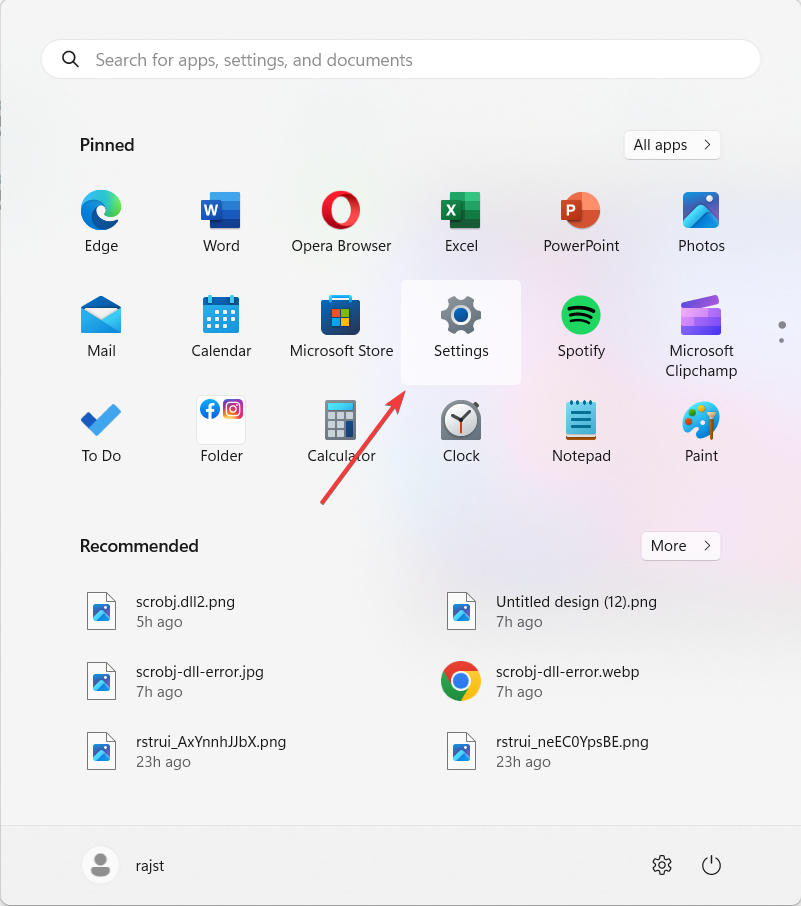
  1. Click the Start button and select the Settings tile on the Start menu.click Start
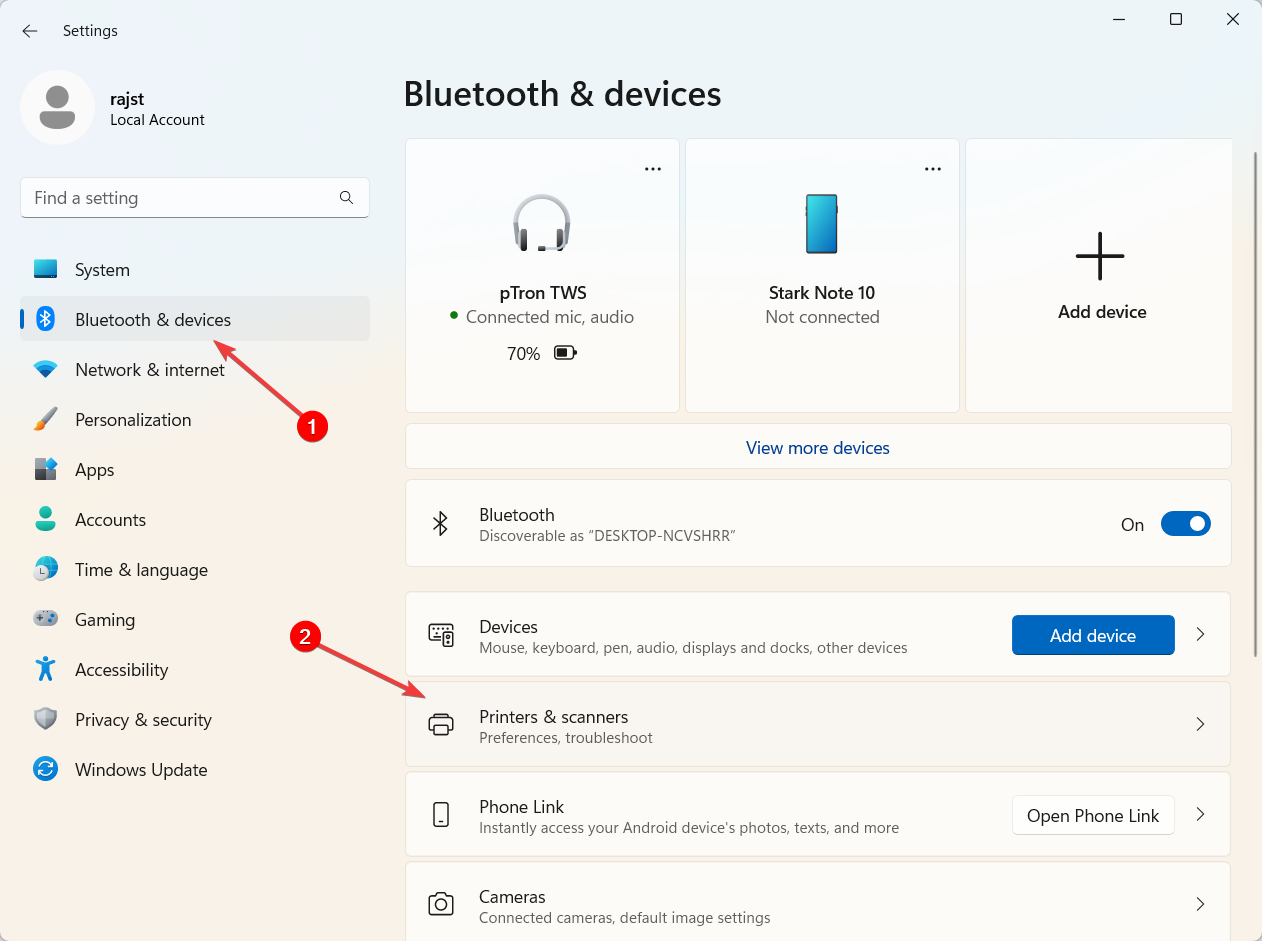
  2. In the Settings window, click on the Bluetooth & devices tab and select the Printers & scanners tile on the right.Printers & scanners
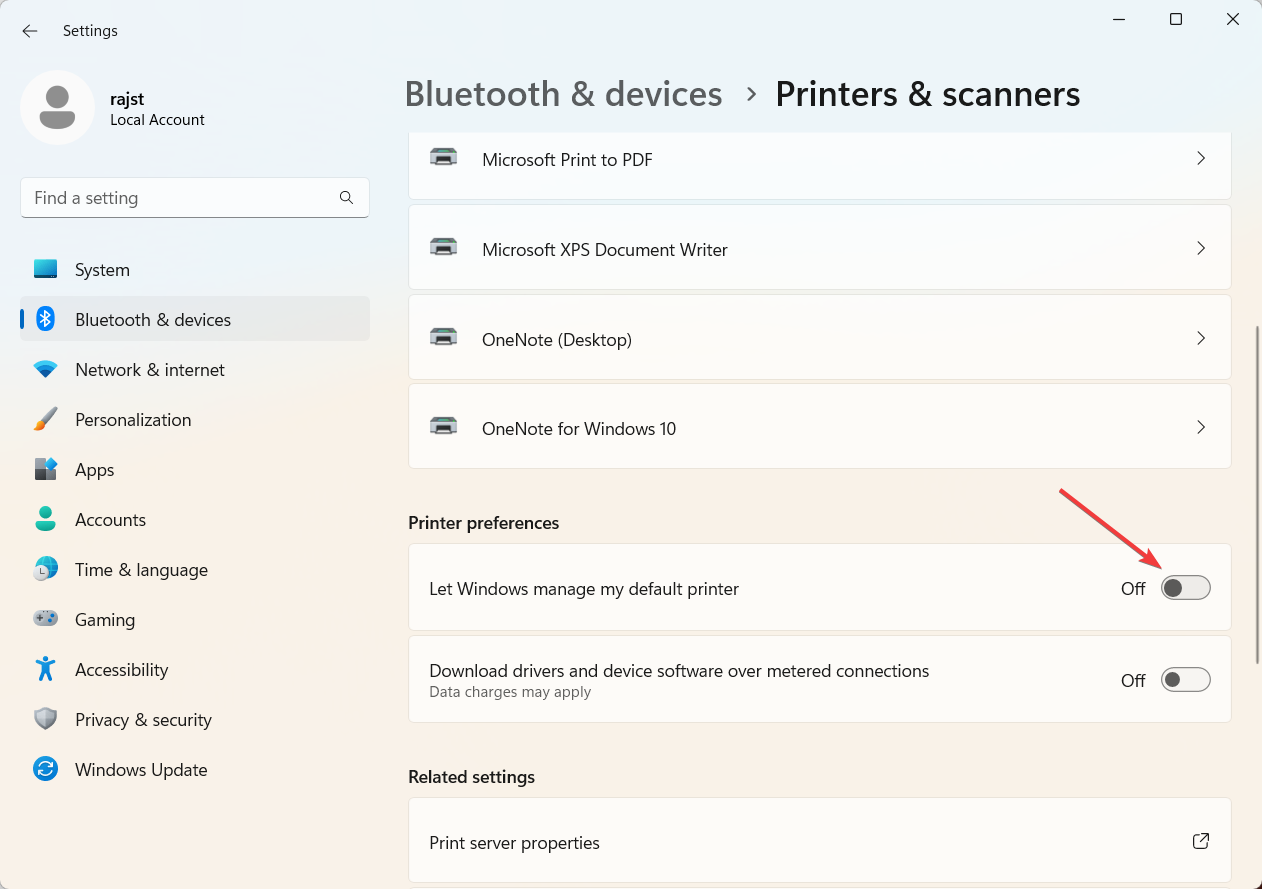
  3. Scroll down on the Printers & scanners settings page and turn off the Let Windows manage my default printer option under the Printer preferences section. By doing this, Windows will no longer change your default printer automatically.Disable Let Windows manage printer
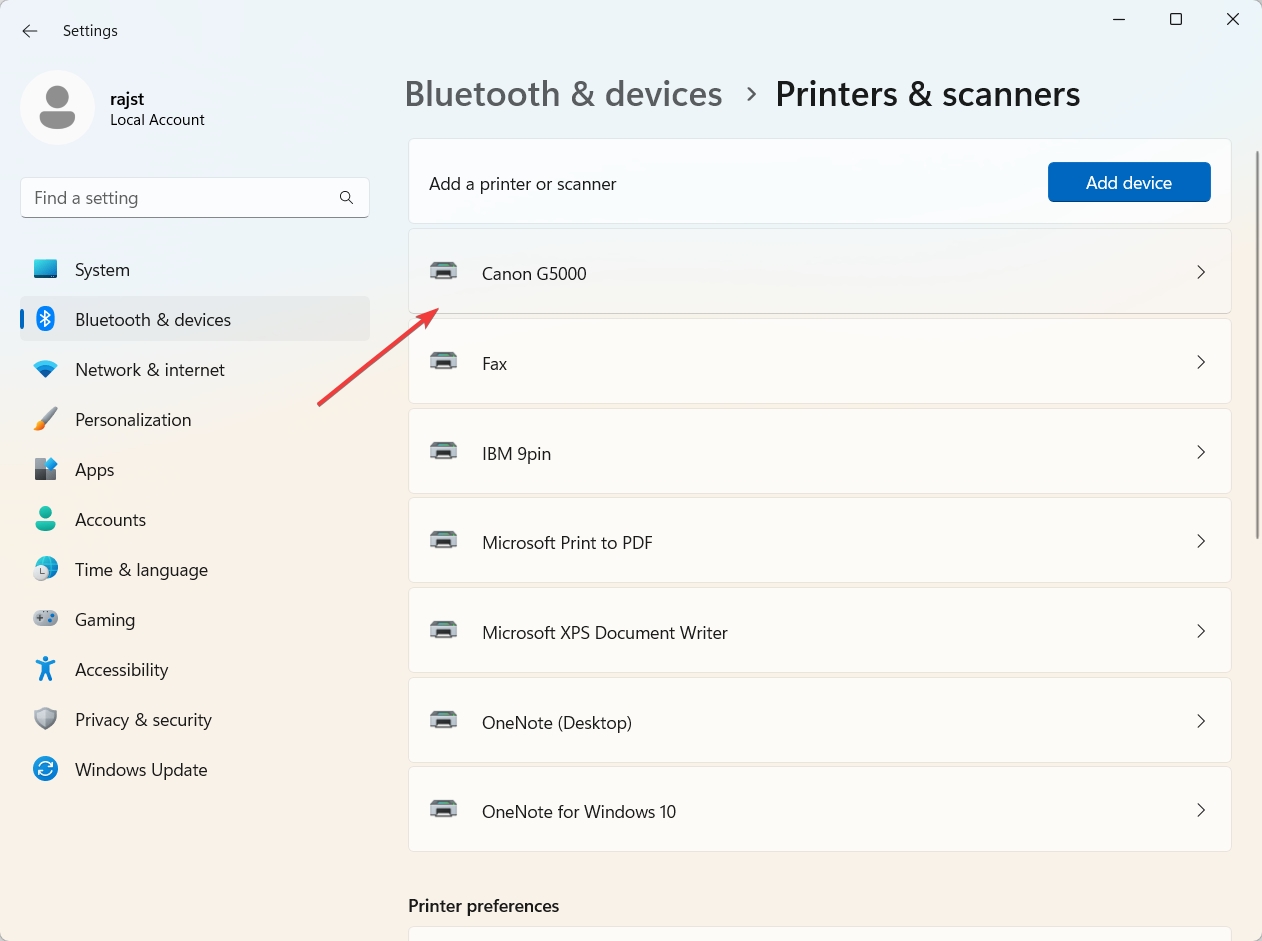
  4. Once you have turned off the automatic default printer option, find and click on the specific printer tile that you want to set as the system default.Select printer
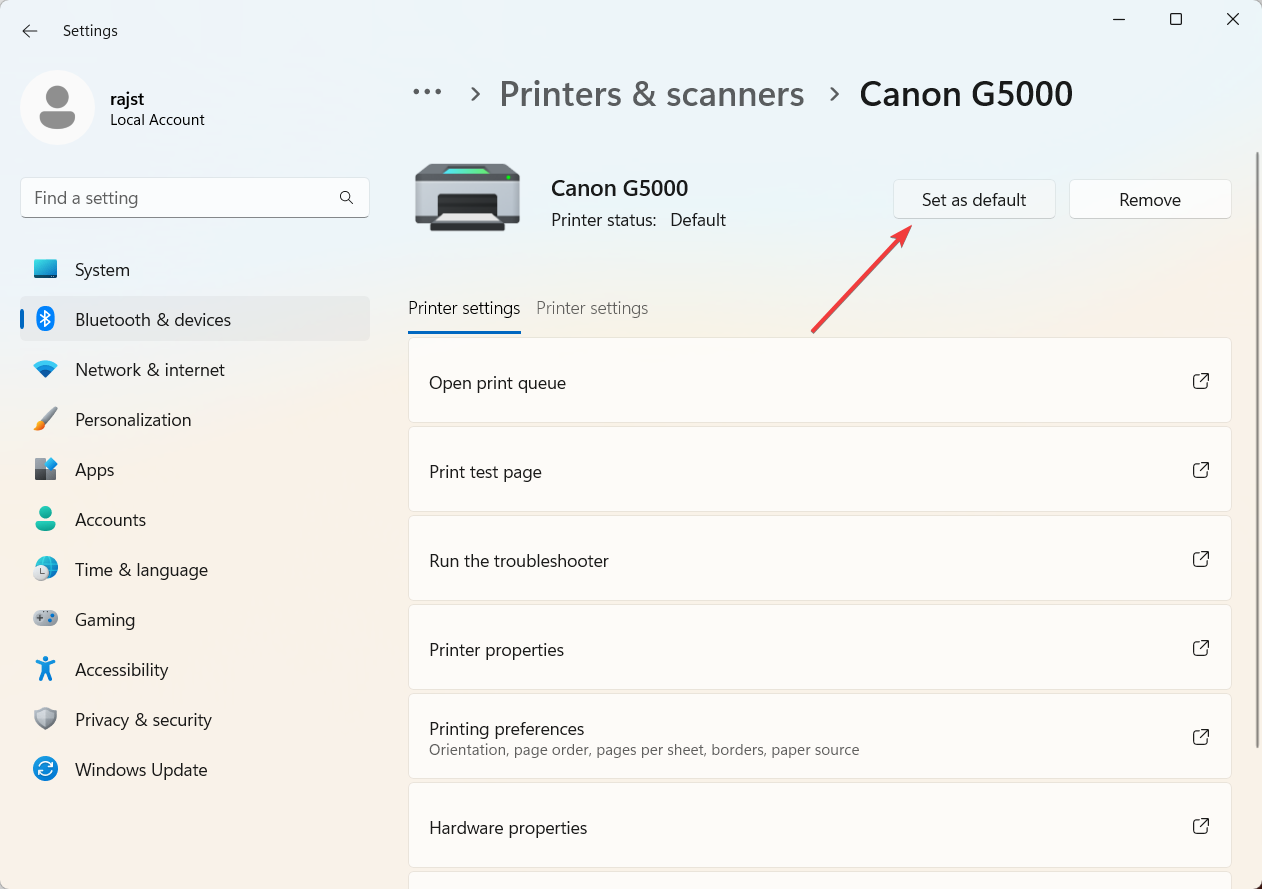
  5. On the printer properties page, click the Set as default button. Set as default
  6. This will set the selected printer as the system default.

Sometimes, you might encounter errors when trying to set a printer as the default in Windows 11. These errors display a message saying Operation could not be completed (error 0x00000709). If you encounter this issue, find some quick ways to resolve the error code 0x00000709.

If you have questions or suggestions, feel free to leave them in the comments section below.

Insufficient Resources to Complete the Requested Service [Fix]

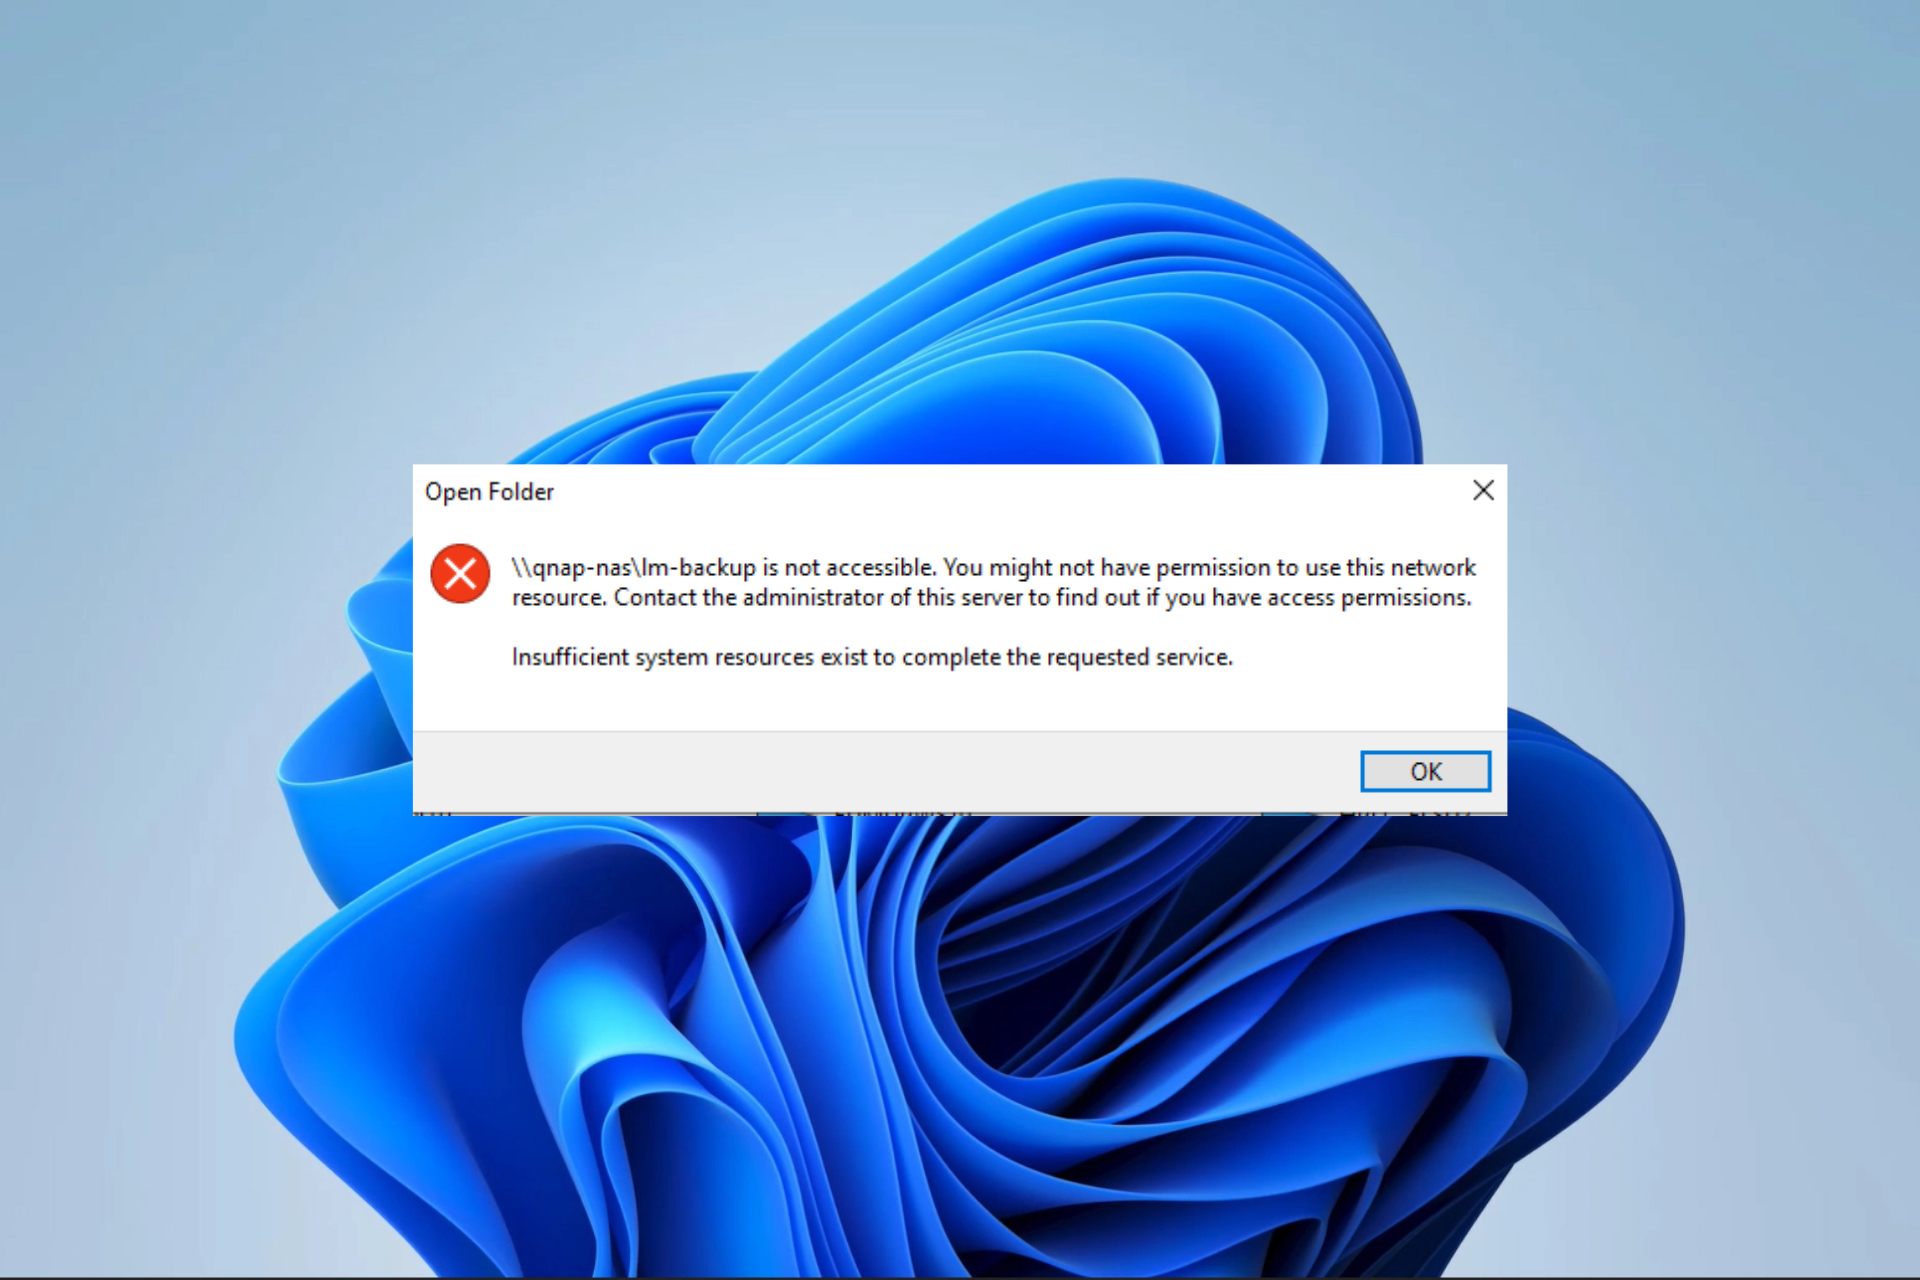
While launching or installing new apps, some of our readers have encountered the notification: insufficient system resources to complete the requested service.

At this point, whatever operation they are working on fails, and you may not be able open applications. So we will help you fix it in this article and introduce some probable triggers.

What does insufficient system resources to complete the requested service mean?

This means the system lacks enough resources for the requested task or service. It is often triggered by any one of the following:

  • High CPU utilization – When the processor is overloaded with existing tasks, it leaves limited processing power for the requested service and triggers the error.
  • Insufficient memory – For devices that lack enough RAM to accommodate the data and processes required for the requested service, you may expect a notification.
  • Low disk space – When your storage devices, such as the hard drive or SSD, run out of space, they will prevent the system from storing or retrieving necessary data.
  • Resource allocation issues – Sometimes, it is triggered simply because the system’s resource allocation settings or configuration are inadequate.
  • Software conflicts or bugs – Software conflicts, compatibility issues, or bugs within the system can lead to resource shortages and hinder the completion of requested services.

How do I fix the insufficient system resources to complete the requested service error?

There are a few recommended workarounds you should first explore:

  • Restart the computer – A reboot is often necessary to end some problematic processes that trigger the error.
  • Run a virus scan – Running a scan with a robust antivirus program is often a good precaution before diving into further troubleshooting.
  • Close open programs – Ending running applications will free up space on the RAM and may help resolve the issue.
  • Uninstall apps – You should uninstall apps you no longer need or use on the device to free up some space.

You may proceed to our solutions below if the error persists after these pre-solutions.

1. Run the Performance and Maintenance troubleshooters

  1. Press Windows + R to open the Run dialog.
  2. Type cmd and hit Ctrl + Shift + Enter to open an elevated Command Prompt.
    insufficient system resources to complete the requested service
  3. Input the command below and hit Enter to run the Performance troubleshooter.
    msdt.exe /id PerformanceDiagnostic
    insufficient system resources to complete the requested service
  4. Input the command below and hit Enter to run the Maintenance troubleshooter.
    msdt.exe /id MaintenanceDiagnostic
  5. Click on Advanced.
    insufficient system resources to complete the requested service
  6. Tick Apply repairs automatically and hit Next.
    insufficient system resources to complete the requested service
  7. Follow any additional prompts and wait for the fix to complete, then check if it resolves the insufficient system resources to complete the requested service error.

2. Run a disk scan

  1. Press Windows + E to open File Explorer.
  2. Navigate to the drive where the problematic program is stored (this is typically labeled Windows (C)). Right-click on it and select Properties.
  3. Select the Tools tab and click the Check button.
    insufficient system resources to complete the requested service
  4. Finally, click on Scan drive.
  5. The scan will commence, and you should follow any prompts given.

3. End running processes

  1. Press Ctrl + Shift + Enter to open the Task Manager.
  2. Click on a running process and hit the End task button.
    insufficient system resources to complete the requested service
  3. Repeat Step 2 for as many tasks as possible.

The insufficient system resources to complete the requested service error is not a complex issue,, and any solutions in this guide should work.

Even though they are not written in any particular order, we suggest starting from the workarounds, as they may be huge time savers.

Please let us know in the comments section if you have success with these fixes.

Error 1723: How to Fix This Windows Installer Problem

Recently, many Windows users complained about encountering an Error 1723 when trying to install, uninstall or update programs on their computers. The error is accompanied by A DLL required for this install to complete cannot be found message, and can be fatal.

However, this guide will discuss easy steps to resolve it. Also, you can check our article on how to fix the error 1721 Windows Installer problem on your PC.

What causes the error 1723?

Many factors may be responsible for error 1723. Some notable ones are:

  • Corrupt Microsoft system files – Running a corrupt or compromised Windows installer on your computer will affect its functionality and cause errors such as 1723 when installing or uninstalling Java. Sometimes, system files like DLL, EXE, sys files, etc., may be corrupt.
  • Temp folder permissions – The Temp folder is a directory that holds temporary files and cached data for all applications installed on the computer. If the installer has insufficient privileges to access the directory, it can prompt the There is a problem with Windows Installer package error.
  • Outdated Windows OS – You can also run into errors like Error 1723 if your operating system is outdated. It prevents the PC from fixing bugs affecting the current version, causing the installer and other components to malfunction.

Different users may experience the error for varying reasons depending on the circumstances. Regardless, our technical team has prepared basic steps to help you fix the error.

How can I fix the error 1723?

Before attempting any advanced troubleshooting steps, we recommend you try these preliminary checks:

  • Perform a clean boot – A clean boot will start your computer with minimal drivers and programs, allowing you to determine if a third-party program is interfering with the Windows installer.
  • Update Windows – Running Windows update on your PC will install the latest update and builds for fixing bugs and adding new features to resolve compatibility issues.
  • Disable antivirus before installation – To avoid issues with the installation, disable the antivirus so that your files are not flagged as malicious or removed.
  • Run the installation file as admin – Giving administrative privilege to the installer will boost the chances of a successful installation while overriding errors like 1723.

If you still can’t get around the error, proceed with the steps provided below:

1. Give yourself rights in the Temp folder Security

  1. Press the Windows + E key to open File Explorer.
  2. Navigate to the following directories: c:\users\"username"\AppData\Local
  3. Right-click on Temp and select Properties from the drop-down menu.
  4. Select the Security option and click the Edit button.
  5. Then, select Add.
  6. Add the username you are using, and give yourself all rights.
  7. Restart your PC to check if the error persists.

Adding yourself to the Security settings gives you full access rights and resolves Temp folder permission issues.

2. Uninstall and reinstall Java

  1. Left-click the Start button and click Settings.
  2. Locate Apps and click on Installed Apps.
  3. Locate Java from the list of applications, select the options button beside it, and click Uninstall.
  4. Confirm the option by clicking the Uninstall button again and following the prompts to remove it.
  5. Then, re-download Java and install it using the offline installer.

Some users have claimed that they encountered an issue while uninstalling Java. Hence, consider downloading the Java Uninstall tool if you encounter such problems.

3. Perform DISM/ SFC scans

  1. Left-click the Start button, type CMD, and click Run as administrator.
  2. Then, click Yes on the UAC prompt window.
  3. In the empty space, input the following commands and press Enter after each of them: DISM.exe /Online /Cleanup-image /Scanhealth DISM.exe /Online /Cleanup-image /Restorehealth DISM.exe /online /cleanup-image /startcomponentcleanup
  4. Then, input the following command after this and press Enter: sfc /scannow
  5. Close the Command Prompt after the process.

This process should identify the cause and troubleshoot it automatically without bothering you.

Conclusively, you may be interested in our article about the Windows Installer package error 1722 and how to fix it.

Should you have further questions or suggestions, kindly drop them in the comments section below.

Drvinst.exe: What is It & What Does It Do?

Since the release of Windows Vista, once the PnP, the Plug and Play manager detects a new device, the OS initiates drvInst.exe. It is the device installation host process that locates and installs the necessary driver for the device.

This article will explore what drvinst.exe is, what it does for the Windows operating system, and how it benefits the operation of your computer.

Is drvinst.exe safe?

Yes, this file is safe and not a computer malware. However, to enter a computer, harmful software often imitates real files. If you doubt its legitimacy, you should run a scan using a reliable antivirus program.

Note that the typical size of this file is approximately 94,208 bytes, and the legitimate file is commonly located in a subfolder of the path below:

C:\Program Files (x86)
drvinst.exe

What is drvinst.exe?

The word drvinst indicates its principal purpose, which stands for driver installation. It is an operating system element controlling the setting up and installing device drivers on your computer.

Printers, graphics cards, sound cards, and network adapters are a few devices that may connect to your computer via device drivers. These drivers are software components.

Drvinst.exe is crucial in installing and managing these device drivers in the Windows operating system. It does this by executing the following functionality:

  • Driver installation – The user-friendly interface offered by drvinst.exe makes installing device drivers on your computer possible. You may activate drvinst.exe to automatically look for the proper driver software and install it when you connect a new hardware device to your system.
  • Driver updating – Hardware producers often update their device drivers to improve compatibility, address issues, as well as boost performance. Your hardware devices remain up to date by using Drvinst.exe to look for and install driver updates.
  • Driver removal – The program drvinst.exe may assist you in removing device drivers from your system if you no longer need a certain hardware component or need to resolve driver-related problems. It correctly removes all related files and registry entries, avoiding irrational resource use.

Should you uninstall drvinst.exe?

We strongly recommend against removing drvinst.exe. Drvinst.exe removal or uninstallation might have serious implications and impair your system’s performance.

However, some of our readers have sighted a few errors around this executable. Some include, cannot find drvinst.exe, drvinst.exe failed to load, and the device not being recognized because of a missing rvinst.exe file.

In these cases, you may update device drivers, update the OS, run a file repairer, or restore your computer. These are better options for uninstalling the executable.

This is as much as we go in this guide. Remember that the drvinst executable is integral to Plug and Play on your computer. Hence, many peripherals will stop functioning without it.

Lastly, we love to hear from you. So, contact us in the comments section below with further questions, and we will be happy to interact with you.

Recipient Address Rejected: Access Denied [Error Fix]

When using Outlook to send emails, a common issue many people face is receiving the Recipient Address Rejected access denied error.

As per user feedback, the error message Recipient Address Rejected: access denied is often accompanied by codes 541 and 550.

The current subject matter shares similarities with a previous concern regarding Outlook has encountered an error, which we previously tackled in an extensive guide.

To tackle the matter at hand, we must explore its fundamental source.

What causes the Recipient address rejected access denied error?

This issue is usually caused by the following:

  • Directory-based edge blocking – The DBEB feature allows administrators to effortlessly add mail-enabled recipients to their Microsoft or Office 365 accounts while preventing any messages from being sent to email addresses not registered within these systems.
  • Anti-spam filters – Automatically sorting suspected spam emails into the Junk Email folder is a feature that can be enabled. Furthermore, any malware, which refers to potentially damaging software or code, is effectively disabled.
  • DNS cache – The DNS server cache prevents users from receiving and sending emails.

How can I fix the Recipient address rejected: Access denied error?

1. Perform a DNS & TCP/IP reset

  1. Type cmd in the Search, right-click the Command Prompt, and choose Run as administrator. Then click on Yes when you are prompted by the UAC window.
  2.  In the elevated Command Prompt window, type the following commands in order and hit Enter after each one:
    ipconfig /flushdns
    nbtstat -R
    nbtstat -RR
    netsh int reset all
    netsh int ip reset
    netsh winsock reset

  3. After finishing the task, you may want to attempt resending the email to the recipient and check if it goes through successfully.

After doing that, check if Recipient Address Rejected access denied error is gone.

2. Be certain all public folders are hosted on-premise

  1. Open the Microsoft Azure Active Directory Connect screen.
  2. Choose Optional Features from the left vertical menu and select the checkbox for Exchange Mail Public Folder from the right-hand panel.
  3. Click on Next to save the changes. Now, you can send the email again and see if the 550 permanent failure for one or more recipients error gets solved.

After doing this, the problem should be gone.

3. Deactivate DBEB

  1. Sign in to Exchange Online, and access the accepted domains tab from the Mail flow section.
  2. Now click Edit beside the root domain of your public folder.
  3. Next, to disable DBEB, select the Internal relay domain option from the This accepted domain is section and select Save.

We hope that this guide has successfully resolved your issue. If you encounter any further obstacles, we recommend exploring how to fix Outlook error 0x80040610, as it may provide comparable solutions.

We highly appreciate your valuable input regarding the most effective solution you have come across. Kindly share your insights with us by leaving a comment below.

Nvapi64.dll: What Is It & How to Fix Its Errors

You might have been encountering issues related to nvapi64.dll, and you are wondering what the file does on your PC. Rest assured that this file is pretty safe and poses no threat to your PC.

In this guide, we have provided detailed information on this DLL file and what to do when you encounter issues with it.

What is nvapi64.dll?

The nvapi64.dll is a 64-bit file that is an essential module of the NVIDIA Windows drivers. This DLL file plays an important role in the smooth running of your graphics driver, which many apps depend on to work properly.

The good thing about this DLL file is that it is completely safe. However, it must be noted that viruses can make these files malfunction, leading to DLL files missing error messages. Usually, a full virus scan should fix this.

How can I fix nvapi64.dll errors?

1. Use a dedicated DLL fixer

Nvapi64.dll is one of the third-party DLL files that come with the needed software. The importance of this file cannot be downplayed, as many apps depend on it to run successfully.

Fortunately, you can fix this DLL file with one of the best DLL repair tools. Such software is known to fix compatibility issues which are the major problem that plagues third-party DLL files and Windows PCs.

2. Download from a third-party website

  1. Go to a top third-party website like DLL files.com and click the Download link.
    download nvapi64.dll
  2. Now, extract the content of the downloaded file and move the nvapi64.dll file to the path below on a 32-bit PC: C:\Windows\System32
  3. Move it to the path below instead on a 64-bit PC: C:\Windows\SysWOW64
  4. Finally, restart your PC.

If you are facing issues related to the nvapi64.dll file on a PC you built, you need to download it from a third-party website. Moving it to your system files should help you fix this issue.

Note that you need to scan the downloaded file to ensure its safety.

3. Update your PC

  1. Press the Windows key + I and select the Windows Update option in the left pane.
  2. Click Check for updates in the right pane.
    check for
  3. Finally, download and install all available updates, including the optional ones.

Windows update is important for fixing many issues on your PC. So, if you are dealing with errors related to nvapi64.dll, you need to update your system and restart it after.

4. Update your graphics driver

  1. Press the Windows key + R, type devmgmt.msc, and click OK.
    devdevmgmt
  2. Click the arrow next to Display adapters to expand it and right-click the device under it.
  3. Now, choose the Update driver option.
    update driver
  4. Click the Search automatically for drivers option and install any available updates.
    search auto nvapi64.dll
  5. If updating the driver does not fix the issue, repeat Steps 1 to 3 and select Uninstall device instead.
    uninstall device
  6. Finally, click the Uninstall button and restart your PC.
    uninstall button

The activity of the nvapi64.dll file is related to your graphics driver. So, when your display driver is outdated or broken, you will likely get different errors. This is also the reason behind amfrt64.dll errors.

An alternate method of restoring your driver to top condition is to use an automatic driver updater in Outbyte Driver Updater. With this tool, you can take out the guessing, as it will scan and repair any faulty driver with just a few clicks.

5. Repair system files

  1. Press the Windows key, type cmd, and select Run as administrator under Command Prompt.
    cmd admin nvapi64.dll
  2. Type the command below and hit Enter to run it: DISM /online /cleanup-image /restorehealthdism restore
  3. Wait for the command to finish running. Now, run the command below: sfc /scannowsfc scan
  4. Finally, wait for the command to finish running and restart your PC.

Sometimes, you might face problems with nvapi64.dll because of faulty system files. The fastest way around this is to run the DISM and SFC scans.

6. Perform a system restore

  1. Press the Windows key, type restore, and select Create a restore point.
    create nvapi64.dll
  2. Click the System restore button on the next page.
    system restore
  3. Now, click the Next button on the page that pops up.
    next nvapi64.dll
  4. Select your preferred restore point and click the Next button.
    restore point
  5. Finally, click the Finish button and follow the onscreen instructions to complete the process.
    finish nvapi64.dll

Sometimes, it might be hard to trace the cause of the nvapi64.dll issue. What you need to do here is to perform a system restore to a point before the problem.

There you have it: everything you need to know about the nvapi64.dll file. You should now know the importance of the file and how to fix its occasional errors.

If you are missing some DLL files on Windows 10, check our detailed guide to get them back.

We also have a guide on what to do if cudart64_90.dll is missing, so don’t miss it. This isn’t the only issue, and we covered libgcc_s_dw2-1.dll was not found earlier, so check it out.

We also wrote about Gwrks64.dll in our latest article, so don’t hesitate to visit it for more information.

Do you have any experience to share about this file? Feel free to use the comments below.

Wfcrun32.exe: What Is It & How to Fix It if It’s Missing

You might have wondered what the wfcrun32.exe file is and what it does on your PC. Though it does not consume high PC resources, it is still one of the lesser-seen processes.

In this guide, we will explain everything there is to know about this executable file and walk you through how to restore it if it is missing.

What is wfcrun32.exe?

The wfcrun32.exe process, also known as Citrix Connection Manager, is part of the Citrix software. This software is known for providing the necessary port devices for server-based computing.

This allows users to run different software without downloading them. Whether or not to disable this process depends on how important its parent software is to you since it is not a system file.

Lastly, you should note that this process is not harmful to your PC normally.

How can I fix wfcrun32.exe if it’s missing?

Try the troubleshooting steps below before moving to the more complex solutions:

  • Downgrade to an older version of Citrix.
  • Restart your PC.

If you still can’t fix this issue, you can now proceed to the solutions below:

1. Reinstall the Citrix client

  1. Press the Windows key + S, type control, and select the Control Panel option.
    control panel wfcrun32.exe
  2. Click the Uninstall a program option under Programs.
    uninstall a
  3. Now, right-click the Citrix ICA Client and select the Uninstall option.
    uninstall correct
  4. Finally, follow the onscreen instructions to complete the process and go to the official website to download and install the app.

The easiest way to restore wfcrun32.exe if it is missing is to restore the Citrix software. This is because the problem might be due to an incomplete software installation.

2. Update your PC

  1. Press the Windows key + I and select the Windows Update option in the left pane.
  2. Click Check for updates in the right pane.
    check wfcrun32.exe
  3. Finally, download and install all available updates, including the optional ones.

The Citrix client needs your PC to be up-to-date to function properly to prevent issues like wfcrun32.exe missing error. So, if your PC is outdated, ensure to install the latest patches.

3. Update your drivers

  1. Press the Windows key + R, type devmgmt.msc, and click OK.
    devmgmt
  2. Click the arrow next to the section you want to update driver for, and right-click each of the devices under it.
  3. Now, choose the Update driver option.
    update driver
  4. Finally, click the Search automatically for drivers option and install any available updates.
    search auto

If you are getting the wfcrun32.exe missing error when running video or gaming software, it might be because of an outdated graphics driver. To be sure, your drivers are not holding you down, it is good practice to update them.

While you can always do this manually, as shown above, you can speed things up considerably by using a dedicated tool.

This special tool will automatically scan for faulty or outdated drivers and replace them with the latest version.

⇒ Get Outbyte Driver Updater

4. Run a malware scan

  1. Press the Windows key + S, type virus, and select the Virus & threat protection option.
    virus wfcrun32.exe
  2. Select Scan options.
    scan options
  3. Finally, choose your preferred scan option and click Scan now.
    scan now wfcrun32.exe

The dangers viruses pose to your PC cannot be stated enough. Some users have found them also to cause the wfcrun32.exe missing error. Hence, you need to perform a full malware scan to get rid of them.

Alternatively, you can opt for a top-notch antivirus in TotalAV. This special tool scans every corner of your PC, including the system files, to eliminate the most hidden viruses.

We can now conclude this detailed guide on what the wfcrun32.exe file does. We have also shown how to restore the app if it goes missing.

In the same vein, if you want to know what the dtsapo4service.exe process does, check our guide on the topic.

Feel free to let us know the solution that helped you restore this executable file in the comments below.

0xC80003FA Windows Update Error: How to Fix It

If you have encountered a Windows Update error 0xC80003FA, it indicates a problem with the Windows Update service or its components.

In this guide, we will discuss some expert-tested methods to fix the issue right after explaining the causes.

What causes the Windows Update error 0xC80003FA?

There could be various reasons for this Windows update error; some of the common ones are mentioned here:

  • System files corrupted -If the Windows Update components have become corrupted, it could cause issues with the update process. Try resetting the components to fix it.
  • Third-party interference – Sometimes, security software and firewalls can interfere with the Windows update process, causing this error. Try disabling the antivirus temporarily.
  • Insufficient system memory -If your computer lacks enough resources, including disk space and memory, to perform the update process, it could cause this issue.
  • Malware infection – Malicious software on your system can disrupt the Windows Update process, preventing updates from being downloaded or installed. Run a deep scan using an antivirus tool.
  • Internet connectivity issues – If the internet connection is unstable or slow, it can prevent the Windows Update service from communicating properly with Microsoft’s servers.

Now that you know the causes of the problem, let us move to the solutions.

How can I fix the Windows Update error 0xC80003FA?

Before engaging in advanced troubleshooting steps, you should consider performing the following checks:

If these tweaks didn’t work, check out the detailed steps below.

1. Run the Windows Update troubleshooter

  1. Press Windows + I to open the Settings app.
  2. Go to Update & Security.0xC80003FA  Windows 10 Update & Security
  3. Click Troubleshoot, then Additional troubleshooters.Additional troubleshooters 0xC80003FA
  4. Locate Windows Update and click Run the troubleshooter.Run the troubleshooter
  5. Follow the on-screen instructions to complete the process.

2. Restart the Windows Update service

  1. Press Windows + R to open the Run dialog box.Services msc
  2. Type services.msc and click OK to open the Services app.
  3. Locate and right-click Windows Update and select Stop.Stop services Windows Update
  4. Once it is stopped, right-click Windows Update and choose Start.Windows Start

This will restart your Windows Update service, then try to rerun Windows updates.

3. Reset the Windows Update components

  1. Press the Windows key, type cmd, and click Run as administrator.Command Prompt Windows Run as Administrator
  2. Type the following commands to stop Windows Update, BITS & cryptographic services, and press Enter after every command:Start the services 0xC80003FA
    • net stop bits
      net stop wuauserv
      net stop appidsvc
      net stop cryptsvc
  3. To delete the qmgr*.dat files, copy & paste the following command and hit Enter:Del "%ALLUSERSPROFILE%\Application Data\Microsoft\Network\Downloader\qmgr*.dat"
  4. To clear the Windows Update cache to allow Windows 10 to re-download the updates, type the following commands one by one and press Enter after every command:
    • rmdir %systemroot%\SoftwareDistribution /S /Q
      rmdir %systemroot%\system32\catroot2 /S /Q
  5. Copy & paste the following commands to reset the BITS and Windows Update service to the default security descriptor and hit Enter:
    • sc.exe sdset bits D:(A;;CCLCSWRPWPDTLOCRRC;;;SY)(A;;CCDCLCSWRPWPDTLOCRSDRCWDWO;;;BA)(A;;CCLCSWLOCRRC;;;AU)(A;;CCLCSWRPWPDTLOCRRC;;;PU)
      sc.exe sdset wuauserv D:(A;;CCLCSWRPWPDTLOCRRC;;;SY)(A;;CCDCLCSWRPWPDTLOCRSDRCWDWO;;;BA)(A;;CCLCSWLOCRRC;;;AU)(A;;CCLCSWRPWPDTLOCRRC;;;PU)
  6. Type the following command and press Enter: cd /d %windir%\system32
  7. To re-register the BITS files & the Windows Update-related dll files, copy & paste the following commands one after the other and hit Enter after every command:
    • regsvr32.exe /s atl.dll
      regsvr32.exe /s urlmon.dll
      regsvr32.exe /s mshtml.dll
      regsvr32.exe /s shdocvw.dll
      regsvr32.exe /s browseui.dll
      regsvr32.exe /s jscript.dll
      regsvr32.exe /s vbscript.dll
      regsvr32.exe /s scrrun.dll
      regsvr32.exe /s msxml.dll
      regsvr32.exe /s msxml3.dll
      regsvr32.exe /s msxml6.dll
      regsvr32.exe /s actxprxy.dll
      regsvr32.exe /s softpub.dll
      regsvr32.exe /s wintrust.dll
      regsvr32.exe /s dssenh.dll
      regsvr32.exe /s rsaenh.dll
      regsvr32.exe /s gpkcsp.dll
      regsvr32.exe /s sccbase.dll
      regsvr32.exe /s slbcsp.dll
      regsvr32.exe /s cryptdlg.dll
      regsvr32.exe /s oleaut32.dll
      regsvr32.exe /s ole32.dll
      regsvr32.exe /s shell32.dll
      regsvr32.exe /s initpki.dll
      regsvr32.exe /s wuapi.dll
      regsvr32.exe /s wuaueng.dll
      regsvr32.exe /s wuaueng1.dll
      regsvr32.exe /s wucltui.dll
      regsvr32.exe /s wups.dll
      regsvr32.exe /s wups2.dll
      regsvr32.exe /s wuweb.dll
      regsvr32.exe /s qmgr.dll
      regsvr32.exe /s qmgrprxy.dll
      regsvr32.exe /s wucltux.dll
      regsvr32.exe /s muweb.dll
      regsvr32.exe /s wuwebv.dll
  8. Type the following command to reset Winsock and press Enter:Reset  1
    • netsh winsock reset
      netsh winsock reset proxy
  9. Copy & paste the following commands to start Windows Update, BITS & cryptographic services, and press Enter after every command:Stop the services
    • net start bits
      net start wuauserv
      net start appidsvc
      net start cryptsvc
  10. Reboot your PC to confirm the changes.

So, these are the methods to fix the Windows Update error 0xC80003FA. If nothing worked for you so far, we suggest you perform a clean installation of Windows.

If you have questions or suggestions, feel free to mention them in the comments section below.

Realtek PCIe GBE Family Controller Driver for Windows [Download]

Realtek PCIe GBE Family Controller driver is an ethernet network driver that helps the system to successfully connect to a wired Internet connection. This chip is located on the motherboard of your PC and it is used for operating the LAN hardware. 

What is the Realtek PCIe GBE Family Controller driver? 

It controls the network function, and the controller chipset connects the computer’s PCI Express (PCIe) bus to GbE (Giga Band Ethernet). If this LAN driver gets outdated, you are likely to face issues with the LAN connectivity. 

For the uninitiated, device drivers are essential components for any system that ensure the effective functioning of the hardware they are responsible for. In our case, the Realtek PCIe GBE Family Controller controls your computer’s network connection and ensures top-notch LAN connectivity.

If this driver gets outdated, you will face random issues with the network connection, or the connection setup may not be successful at all. 

To solve the problem, you need to download and update the latest version of the Realtek PCIe GBE Family Controller driver compatible with your Windows PC.

How can I download the Realtek PCIe GBE Family Controller driver? 

1. Via Device Manager 

  1. Use the Windows + R shortcut to launch the Run dialog box.
  2. Type the following command and press the Enter key. devmgmt.msc Realtek PCIe GBE Family Controller Driver for Windows
  3. Locate and expand the Network adapter category to reveal the list of drivers. 
  4. Right-click the Realtek PCI GbE Family Controller and choose Update driver from the context menu. Realtek PCIe GBE Family Controller Driver for Windows 
  5. In the new window that appears, select the Search automatically for drivers option. Realtek PCIe GBE Family Controller Driver for Windows
  6. Wait for Windows to find and install the latest update if any is available.

In case you see the message The best drivers for your device are already installed, jump on to the next method for installing this ethernet driver. 

Using Device Manager to download the Realtek PCI GBE Ethernet Family Controller driver is the easiest of all methods as it requires minimum effort. 

On the other hand, it’s more reliable to employ a standalone driver app that can install or update any Realtek drivers entirely automatically.

Outbyte Driver Updater

Forget about installing drivers manually and perform it smoothly with this tool.
Free trial Visit website

2. Via the official Realtek website 

  1. Visit the official Realtek website using your preferred browser. 
  2. Click the Menu icon (three horizontal lines) on the top left corner to reveal the drop-down menu. Realtek PCIe GBE Family Controller Driver for Windows
  3. Select the Downloads option followed by Communications Network ICs from the sub-menu. Realtek PCIe GBE Family Controller Driver for Windows
  4. Locate and click the PCI GBE name: Realtek PCI GBE Ethernet Family Controller Software under the Network Interface Controllers section. Realtek PCIe GBE Family Controller Driver for Windows
  5. Press the Download button next to the setup file compatible with your Windows version. 
  6. Click the Download button on the next page to confirm the action. 
  7. If prompted, fill in the captcha to initiate the download of the GBE Family Controller driver for your PC. 
  8. After the ZIP file download is successful, navigate to the download location and unzip its contents.
  9. Next, right-click the installer and choose Run as administrator option from the context menu. Realtek PCIe GBE Family Controller Driver for Windows
  10. Click Yes on the User Action Control prompt that appears. 
  11. The Realtek Ethernet Controller Driver – InstallShield Wizard will appear on the screen. Follow the step-by-step process to complete the installation process. Realtek PCIe GBE Family Controller Driver for Windows
  12. After the installation is complete, restart your PC to apply the changes. 

That’s it! Now you have the up-to-date version of the Realtek PCIe GbE Family Controller driver installed on your PC. 

Hopefully, you were able to download the Realtek PCIe GbE driver on your Windows 10 using the two methods explained in this guide. 

Before you leave, you may want to check out how to download the Realtek Audio Driver for Windows if they have become outdated. 

If you have any suggestions or comments for us, feel free to drop them in the comments below/ 

BrYNSvc.exe: What Is It & How to Fix Its Errors

If you open the Task Manager and monitor the active tasks, there are many background processes running. And it’s a perfectly normal situation. However, problems arise when one starts to throw errors or is not recognized. And brYNSvc.exe fits both of these conditions.

The process is relatively uncommon and is not usually found on most PCs, which raises quite a few questions about the underlying program and its effects. So, let’s find out all about brYNSvc.exe and easy ways to fix any related errors.

What is brYNSvc in Windows 10?

The brYNSvc.exe process is linked to Brother Printer Status Monitor, a utility that manages the connected Brother printers and helps view their state and ink levels. The utility gets installed when you connect and configure a printer manufactured by Brother Industries.

Though not critical since it’s not a Windows process, many users prefer using dedicated software instead of a third-party printer management tool. In which case, you should let brYNSvc.exe run unhindered.

Is BrYNSvc safe to use?

Yes, the brYNSvc.exe process is completely safe and wouldn’t exploit the PC’s security. If you notice high resource consumption or find the process running even after terminating Brother Printer Status Monitor, it could be a virus disguised as brYNSvc.exe.

Here, it’s best to trace the brYNSvc location and scan the file using the built-in Windows Security or a reliable antivirus solution. The usual brYNSvc.exe location is: C:\Program Files (x86)\Browny02

How do I fix brYNSvc.exe errors?

Before we start with the slightly complex solutions, here are a few quick ones:

  1. Restart the computer and check if the high CPU consumption by brYNSvc.exe comes down to normal levels.
  2. Repair the corrupt system files on the PC. This could be done with the DISM tool and SFC Scan.

If none work, move to the solutions listed next.

1. Scan for malware

  1. Press Windows + S to open Search, type Windows Security in the text field, and click on the relevant search result.Windows Security
  2. Click on Virus & threat protection.virus & threat protection to fix brYNSvc.exe
  3. Now, click on Scan options.scan options
  4. Select the Full scan entry here, and click on Scan now.full scan to fix brYNSvc.exe
  5. Wait for the scan to identify any malware, if present, and eliminate the threat.

When faced with a brYNSvc.exe error, your primary approach should be to scan for malware. Windows Security does a perfectly good job at it, though you could use another effective antivirus as well.

2. Reinstall the printer driver

  1. Press Windows + X to open the Power User menu, and select Device Manager from the list of options.device manager
  2. Expand the Printers entry, right-click on the Brother printer, and select Uninstall device.uninstall device to fix brYNSvc.exe
  3. Tick the checkbox for Attempt to remove the driver for this device, if available, and click on Uninstall.uninstall device
  4. Once done, restart the computer, and Windows will automatically install a fresh copy of the driver.

Since the process is related to the printer, an issue with the driver could also trigger errors, and reinstalling the driver should do the trick. If that doesn’t work, the next course of action is to update the printer driver.

3. Remove the associated program

  1. Press Windows + R to open Run, type appwiz.cpl in the text field, and hit Enter.appwiz.cpl
  2. Select any program related to the Brother printer from the list, and click on Uninstall.uninstall to fix brYNSvc.exe
  3. Follow the on-screen instructions to complete the uninstallation process.
  4. Remember to make a list of the programs you removed and then reinstall them from Brother’s website.

In some cases, the Brother Printer Status Monitor utility or any other related program was missing critical files, which led to issues with brYNSvc.exe. When faced with the situation, uninstalling the program and downloading them again should do.

4. Perform a System Restore

  1. Press Windows + S to open the Search menu, type Create a restore point in the text field, and click on the relevant search result.
  2. Click on System Restore.system restore
  3. Select Choose a different restore point in case the one by default is relatively recent, and click Next.choose
  4. Now, pick a different restore point from the list, one created before the issue first started, and click Next.restore to fix brYNSvc.exe
  5. Verify the restore details and click Finish to start the process.system restore to fix brYNSvc.exe

When nothing works against brYNSvc.exe errors, you can perform a system restore as a last resort. This will revert the PC to a previously stable state and eliminate any issues. And if things don’t go as planned, you can always undo a system restore, a fact unknown to many.

After you have fixed issues with brYNSvc.exe and got the resource consumption down, check some quick tips to make Windows run faster than ever.

For any queries or to share which solution worked for you, comment below.

0x80071a2d Windows Update Error: How to Fix it

Running Windows updates is so seamless sometimes we forget that there can be instances where it can fail. This is what the error 0x80071a2d does. 

You may have successfully installed other updates, but for some reason, these start and fail right before they finish. Why does this happen? Let’s find out, shall we?

What is the Windows Update error 0x80071a2d? 

This error occurs when you’re in the middle of installing Windows updates. You may get a head start, but at some point, you’ll get a message saying that the update has failed. But what is the root cause of this issue? Below are some possible causes:

  • Failed connection – The 0x80071a2d error message means that Windows Update could not connect to the Microsoft server. This could be because there was no network connectivity when you tried to install an update.
  • Firewall settings – Antivirus software can interfere with the installation process for Windows Updates.
  • Corrupt system files – The Windows Update error 0x80071a2d can also happen due to corrupt system files and registry entries. When these files become corrupted, it can cause issues with installing updates on your computer.
  • Problem with the Windows Update service – This can happen if your computer has been infected by malware such as viruses. The malware could be preventing the Windows Update service from running correctly.

How can I fix the error 0x80071a2d?

A few preliminary checks that can get you out of this hassle include:

1. Run the Windows Update troubleshooter 

  1. Hit the Windows key and click on Settings.settings windows 11
  2. Click on System and select Troubleshoot.Open system troubleshooter
  3. Navigate to Other troubleshooters.other troubleshooters
  4. Click the Run option for the Windows Update troubleshooter.windows-update-run-troubleshooter runtimebroker.exe error

If the Windows troubleshooter didn’t solve the issue in the end, you could use an alternative method. So, the ideal way to repair corrupted system files or registry issues is a professional system repair tool.

2. Restart the Windows Update service 

  1. Hit the Windows + R keys to open the Run command.
  2. Type services.msc and hit Enter.run services.msc command
  3. Locate Windows update service, double click on it and select Properties.
  4. Navigate to the General tab, under Startup type, select Automatic from the drop-down options, and click on the Start button.
  5. Next, click Apply and then OK.

3. Restart the Background Intelligent Transfer Service

  1. Hit the Windows + R keys to open the Run command.
  2. Type services.msc and hit Enter.run services.msc command
  3. Locate the Background Intelligent Transfer Service, double click on it and select Properties.
  4. Navigate to the General tab, under Startup type, select Automatic from the drop-down options, and click on the Start button.
  5. Next, click Apply and then OK.

4. Run the DISM and SFC scans 

  1. Hit the Start Menu icon, type cmd in the search bar, and click Run as administrator.cmd-run-admin-w11 unexpected kernel mode trap windows 11
  2. Type the following commands and press Enter after each one:DISM.exe /Online /Cleanup-Image /Restorehealth sfc /scannow

5. Reset the Windows update components

  1. Click on the Start Menu icon, type cmd in the search bar, and click Run as administrator.cmd-run-admin-w11 unexpected kernel mode trap windows 11
  2. Type the following commands and press Enter after each one: net stop bits net stop wuauserv net stop appidsvc net stop cryptsvc Del "%ALLUSERSPROFILE%\Application Data\Microsoft\Network\Downloader\*.*" rmdir %systemroot%\SoftwareDistribution /S /Q rmdir %systemroot%\system32\catroot2 /S /Q regsvr32.exe /s atl.dll regsvr32.exe /s urlmon.dll regsvr32.exe /s mshtml.dll netsh winsock reset netsh winsock reset proxy net start bits net start wuauserv net start appidsvc net start cryptsv

6. Download the update manually

6.0 Use the Microsoft Update Catalog

If you have tried all of the above recommended steps and are still getting the error code 0x80071a2d update error, it may be time to download straight from the site.

The problem could be with the built-in update tool. You can find the specific update from the Microsoft Update Catalog.

6.1 Use the Update Assistant

  1. Navigate to your browser and go to the Update Assistant page.
  2. Click on the Download Now button.
  3. Launch the exe file and hit the Accept and Install button.
  4. The updated files will begin downloading as soon as the tool verifies your PC meets the system requirements. You’ll be prompted to restart your PC after completion.

6.2 Use the Media Creation Tool

You can also use the Media Creation Tool as an upgrade tool for updates. You will need an external storage device, and your PC must meet the Windows 11 system requirements.

As a last resort, you may have to perform a clean install, but hopefully, it doesn’t get to that stage.

That’s it for this article, but for any feedback, queries, or comments, leave a comment below.

D3D10Warp.dll: What is It & How to Fix Corruption Errors

D3d10warp.dll is a Dynamic Link Library categorized as a Win32 DLL file, also known as a Direct3D Rasterizer file, developed by Microsoft.

If you are facing an issue related to d3d10warp.dll on your computer, this guide can help you recover the DLL file with ease.

What is d3d10warp.dll?

D3d10warp.dll stands for Direct3D 10 Warp and is associated with the DirectX 10 graphics system on Windows operating systems.

It is a component of DirectX 10 that enables software-based rendering through the WARP (Windows Advanced Rasterization Platform) rasterizer when a physical GPU is not present.

Why is the d3d10warp.dll corrupted?

There could be various reasons for issues related to d3d10warp.dll; some of the common ones are:

  • Malware infection – Viruses can damage your system files, including DLL files, causing errors when the file is called. Run a deep malware scan using an antivirus tool.
  • Software interference – Conflicts between different applications or incompatible software versions can cause corruption in DLL files.
  • Incorrect software installation – If DirectX or other software components are not installed correctly, it can lead to DLL corruption and related errors.
  • Registry issues – Problems in the Windows registry, such as invalid or missing entries, can impact the functioning of DLL files and potentially cause corruption. Run a registry cleaner to fix it.
  • Damaged system files – If critical system files become corrupted due to disk errors, improper shutdowns, or other system issues, it can cause the error.

Now that you know the causes, let us move to the troubleshooting errors.

How can I fix the d3d10warp.dll corruption errors?

Before engaging in advanced troubleshooting steps, you should consider performing the following checks:

  • Try restarting the computer.
  • Reinstall the affected app.
  • Make sure there are no pending Windows updates.

If these tweaks don’t work for you, check out the detailed solutions below.

1. Use a third-party DLL fixer

Restoring a DLL file manually can cause more harm than good to your computer if not done right! Therefore, it is advised to use a third-party DLL fixer tool.

Such a tool can recover or restore all Windows DLL files like d3d10warp.dll without a miss. Thereby resolving the conflicts between third-party apps & the operating system and enhancing PC performance.

2. Reregister the DLL file

  1. Press the Windows key, type cmd and click Run as administrator.CMD elevated D3D10Warp.dll
  2. Type the following command to register the d3d10warp.dll and hit Enter: regsvr32 D3D10Warp.dllcmd_register
  3. Click OK if prompted and restart your computer.

3. Run SFC & DISM scans

  1. Press the Windows key, type cmd, and click Run as administrator.CMD elevated D3D10Warp.dll
  2. Copy & paste the following command to repair system files and hit Enter: sfc/scannow SFCSCANNOW CMD
  3. Wait for the scan to complete, type the following command to restore Windows OS image files, and press Enter: Dism /Online /Cleanup-Image /RestoreHealthRestore health d3d10warp.dll
  4. Once the scan is complete, your PC will automatically connect to the Windows Update service to download and replace the corrupt files. Reboot your computer to let the changes take effect.

4. Perform a System Restore

  1. Press Windows + R to open the Run console.SysDM.cpl open System Properties
  2. Type sysdm.cpl and click OK to open System Properties.
  3. Go to the System Protection tab, and click the System Restore button.System Restore
  4. On the System Restore window, select Choose a different restore point and click Next.Next Choose a different restore point
  5. Select the restore point before the DLL missing error and click Next.Choose a point
  6. Click Finish to start the process.Finish

Windows will restart and restore to the chosen version. If the System Restore didn’t complete successfully, we advise you to check out this informative guide for solutions.

5. Download the file manually & replace it

Note icon NOTE
Using an untrusted website to install DLL files can be dangerous and is never recommended. However, if you know a reliable source, like DLL-FILES, which has been verified and trusted, you can follow the steps mentioned to restore the file manually.
  1. Go to the DLL Files website, search d3d10warp.dll, select an appropriate option, and click Download.Download _DLL
  2. Press the Windows key, type cmd and click Run as administrator.CMD elevated D3D10Warp.dll
  3. Copy & paste the following commands one by one and press Enter after every command:
    • takeown /f %windir%\system32\d3d10warp.dll /a
      icacls %windir%\System32\d3d10warp.dll /grant administrators:F
      ren %windir%\System32\d3d10warp.dll d3d10warp.dll.bak
      copy c:\temp\d3d10warp.dll %windir%\system32\d3d10warp.dll
  4. The new file will be placed in the System32 folder. Try to use the apps that are throwing the error to check if it works now.

So, these are methods you can follow to fix the d3d10warp.dll is missing or corrupted. If you have any questions or suggestions, feel free to mention them in the comments section below.

Why is Perplexity AI Not Working? 4 Ways to Fix It

Perplexity AI is an advanced artificial intelligence system that handles complex tasks and provides accurate responses. However, it has its fair share of issues, including the Perplexity AI not working problem.

In this guide, we will explore why Perplexity AI is not working and provide effective ways to fix the issues.

What causes the Perplexity AI not working issue?

There are several reasons why Perplexity AI is not working; some of the common ones are listed here:

  • Internet connectivity issues – The AI platform needs a stable internet connection to work properly. If your internet is not working properly, there are chances the platform might not respond well.
  • Browser compatibility – If you use browsers other than Chrome, Firefox, and Safari, Perplexity AI will not work. Try using the latest versions of the compatible browsers.
  • Server issues – The platform may not work if the server faces downtime or is under maintenance. Check the server status to be sure that’s not the case.
  • Not logged in – If you are not logged into your Perplexity AI account, you may not be able to access all of the service’s features.

Now that you know the causes of the issue, let us move to the solutions.

How can I fix the Perplexity AI not working issue?

Before engaging in advanced troubleshooting steps, you should consider performing the following checks:

  • Refresh the page and try again.
  • Restart your computer and router, then relaunch the browser.
  • Verify if you have an active internet connection.
  • Check if your Windows is up to date.
  • Log in to your Perplexity AI account.
  • Disable the VPN if enabled.
  • Make sure the server is not down or under maintenance. If it is, wait for it to come online.

If none of these tweaks worked for you, check out the troubleshooting methods mentioned below.

1. Clear the browser cache

  1. Launch your browser. Here we are demonstrating the steps using Google Chrome. Click the three horizontal dots and select Settings.Settings CHrome perplexity AI not working
  2. Go to Privacy and security and click Clear browsing data.Clear browsing data
  3. Select Browsing history, Cookies and other site data, & Cached images and files, then click Clear data.Clear data

2. Disable the browser extensions

  1. Launch the browser and click three horizontal dots.
  2. Select More tools, then click Extensions.PerplexityAI not working Extensions
  3. On the Extensions page, go to the extension and toggle off the switch beside it to temporarily disable all active ones.Disable
  4. Click Remove to delete the ones that you don’t use.Remove
  5. Close the browser, reopen it, and try using Perplexity AI to see if it works.

3. Clear the DNS cache

  1. Press the Windows key, type cmd, and click Run as administrator.CMD run as administrator Pe4rplexity AI not working
  2. Copy & paste the following command to flush the DNS cache to resolve connectivity issues and hit Enter: ipconfig/flushdnsFlush DNS
  3. Reboot your computer to let the changes take effect.

4. Run a malware scan

  1. Press the Windows key, type windows security, and click Open.Windows Security Perplexity AI not working
  2. Go to Virus & threat protection and click Scan options.Scan options
  3. Select the Full scan option and click Scan now.Full now scan now
  4. The tool will scan your computer for suspicious files and list them. Delete them to fix the issue.

If your computer is infected with viruses or malware, it may prevent the normal functioning of your browser and the computer. Therefore, scanning your computer with a reliable antivirus can also help.

So, these are methods you can follow to fix the Perplexity AI not working issue, harness its capabilities to the fullest potential and benefit from accurate, reliable, and efficient AI-powered solutions.

If Perplexity AI is still not working for you, try another web browser or a different device, or we suggest you read our guide to the best AI tools you can try now.

Do you think we missed a solution that worked for you? Feel free to mention it in the comments section below.

Netflix Error Code S7706: How to Fix it

Netflix error code S7706 is one of the most common errors that you will come across when streaming content using the Netflix app. This error usually pops up because of an unstable internet connection.

However, there can be other various underlying reasons for this error and that is exactly what we are going to discuss in this guide and help resolve the Netflix error code S7706 error. Let us get right into it.

What is Netflix error code S7706?

Netflix error code S7706 will appear when you are trying to stream content on the streaming platform. Here are some of the common reasons that could trigger Netflix error code S7706:

  • Faulty internet connection – If your Internet connection is unstable and faulty, then you will come across Netflix error code S7706.
  • Corrupt browser cache – The presence of a corrupt browser cache can also give rise to multiple issues including the one at hand.
  • Netflix server issues – If the Netflix servers are currently down or under maintenance then you will face multiple issues with the streaming platform.
  • Issues with the Netflix website data – Netflix website data stored on your PC might be the reason which is why you aren’t having a smooth experience with the platform.

Let us take a look at the solutions that will help you resolve the problem.

How can I fix the Netflix error code S7706?

Here are a few things that you should try out before going ahead with the advanced solutions to resolve the Netflix error code S7706:

  • Try restarting the web browser or your PC to check if this was a temporary glitch.
  • Check the Netflix servers by visiting the official website.
  • Use a different browser and check if the problem exists there as well or not.
  • Try streaming different content and check if the problem still persists. If not, there is probably a problem with the title you’re trying to watch.

Now let us apply the advanced solutions and check if this resolves the issue or not.

1. Clear the browser cache

  1. Open the browser. In our case, it is Google Chrome.
  2. Click on the Menu icon located at the top-right and click on Settings.
  3. Select Privacy and Security from the left.
  4. Choose Clear browsing data from the right.
  5. Check the boxes for Cookies and other site data and Cached images and files options along with Browser history.
  6. Click Clear data.

Browser keeps the cache files saved for every website that you visit on your PC. If this data is replaced or corrupted, then it can cause multiple issues on your PC.

In such a case, we would suggest you follow the above steps and simply clear the cache file for your browser.

2. Clear website cookies for Netflix

  1. Open the web browser. In our case, Google Chrome.
  2. Click on the Menu button at the top and select Settings.
  3. Select Privacy and security and click on Cookies and other site data.
  4. Click on See all site data and permissions.
  5. Type Netflix in the search field, and click the Delete icon.
  6. Select the Clear button to confirm the action.

Cookies store data for the specific website that you visit. Chances are that the Netflix cookies are corrupt or replaced which is causing the Netflix error code S7706. Simply clear the Netflix cookies and check if this fixes the issue or not.

3. Disable browser extensions

  1. Launch Google Chrome.
  2. Click on the Menu icon at the top right.
  3. Select More tools and click on Extensions.
  4. Toggle off each extension and restart the browser.
  5. Visit the Netflix website and check if this fixes the issue.

Extensions can often conflict with the browser’s functioning and cause multiple issues with the websites that you visit. In such a case, simply disable all the extensions and check if this helps resolve the Netflix error code S7706 or not.

4. Rapair or reset the Netflix app

  1. Press the Win + I keys to open the Settings menu.
  2. Select Apps from the left pane.
  3. Click on Installed apps.
  4. Locate Netflix, click on the 3-dot icon and select Advanced options.
  5. Now, find the Reset section and click on Repair. Check if the problem has been fixed.
  6. If not, hit the Reset button.

If you are getting the Netflix error code S7706 with the Netflix app, then you should simply try to repair or reset the app as it could be because of an underlying glitch.

That is it from us in this guide and we hope that our solutions helped you fix Netflix and now you can watch your favorite tiles.

We also recommend reading our complete guide on how to fix Netflix issues on your PC.

Let us know in the comments below if you applied a different solution to resolve this problem at your end.

Steam Error Code 7: What is it & How to Fix it

Steam is a popular game client that lets you purchase and store all of your games in one place, for quick access. However, many of our readers have reported coming across Steam error code 7 for multiple reasons.

In this guide, we have created a list of solutions that will help you get rid of the Steam error code 7 and will also explain the reasons that could trigger this. Let us get right into it.

What is Steam error code 7?

The complete error message that you will see when coming across Steam error code 7 is Error Code: -7 Failed to load web page (unknown error).

Apparently, Steam users get this error when the Steam client is asked to open any web page. This issue could pop up when visiting the Update News page, inventory page, game-related page, or anything in between.

Here are a few common reasons that could trigger Steam error code 7:

  • There is an issue with the Steam server – Chances are the Steam server is currently down or under maintenance because of which you are getting the error.
  • The firewall might be blocking Steam – Your Firewall or antivirus program is blocking Steam to perform its usual activities.
  • Corrupt Steam client cache – Corrupt or damaged Steam files, especially cache files, can cause multiple issues including Steam error code 7.
  • Your internet connection is faulty – The problem might be with your internet connection and it may not be stable.

Let us now check out the solutions to resolve the error with the Steam client.

How do I fix Steam error code 7?

Before applying the advanced solutions, let us first go through the simple solutions and try resolving the problem.

  • Relaunch the Steam client and check if this resolves the temporary glitch or not.
  • Check if restarting your PC and the router fixes the issue or not.

If the error still persists, let’s apply the advanced solutions to resolve the Steam error code 7.

1. Reinstall the Steam client

  1. Press the Win key to open the Start menu.
  2. Open Control Panel.
  3. Click on Programs and Features.
  4. Select Steam and hit the Uninstall button at the top.
  5. Follow the on-screen prompts (if any) to uninstall Steam from your PC.
  6. Visit the official Steam website.
  7. Download the Steam client and install the program.
  8. Sign in with your credentials and check if this resolves the issue or not.

Some files might have gone corrupt or facing some issues, which can be easily resolved by reinstalling the Steam client on your Windows PC. After reinstalling check if this resolves the Steam error code 7 issue or not.

2. Flush the DNS cache

  1. Open the Start menu by pressing the Win key.
  2. Type command prompt and run it as an administrator.
  3. Type the below command and press Enter: ipconfig /flushdns ipconfig /release ipconfig /renew
  4. After the success message and reboot your PC.

Flushing the DNS cache has helped several users fix the Steam client error 7. You can also follow the above steps and get rid of the error in no time.

3. Disable the firewall or antivirus

  1. Open the Start menu by pressing the Win key.
  2. Open Control Panel.
  3. Click on Windows Defender Firewall.
  4. Click on Turn Windows Defender Firewall on or off option on the left pane.
  5. Check the Turn off Windows Defender Firewall (not recommended) radio buttons for both Public and Private networks.
  6. Click OK and restart your PC.

We have shown the steps to disable Windows Firewall just to show you an idea that you need to disable any antivirus tool that you are using on your PC and check if this helps resolve the Steam error code 7.

4. Clear the Steam cache

  1. Open the Steam client.
  2. Click on the Steam button and select Settings.
  3. Choose the Downloads tab.
  4. Click on the CLEAR DOWNLOAD CACHE button.
  5. Select OK to apply the action.
  6. Relaunch Steam client.

Clearing the Steam cache or the download cache has helped several users resolve the Steam error code 7 on Windows PC. You can also follow the above steps and give it a try.

That is it from us in this guide. For users coming across the Steamclient64.dll not found error, we would suggest you apply the solutions in our guide to resolving the problem.

Feel free to let us know in the comments below, which one of the above solutions resolved the error code 7 in Steam for you.

Cimmanifest.exe: What Is It & How to Fix its Errors

You might have noticed a process named cimmanifest.exe under the processes tab on Task Manager, and you are wondering what it does.

There is nothing to worry about with this process, as it is safe. This guide will alleviate your worries with detailed information about cimmannifest.exe and how to fix its related issues.

What is cimmanifest.exe?

Cimmanifest.exe is an executable file part of the Radeon Software Crimson Edition. It helps to check for updates for its parent software and notify you when a newer version is available.

This process is not harmful and works in the background without hogging your PC resources. It should be noted that viruses can sometimes disguise as different processes.

So, if you notice cimmanifest.exe using a high CPU or disk, it might be due to malware activity. But this should be fixed by performing a malware scan.

How can I fix cimmanifest.exe issues?

1. Uninstall the AMD Radeon Software Crimson Edition software

  1. Press the Windows key, type control, and click the Control Panel option.
    control panel cimmanifest.exe
  2. Click the Uninstall a program link under the Programs option.
    uninstall a
  3. Now, right-click the Radeon Software Crimson Edition software, select Uninstall, and follow the onscreen instructions to complete the process.
    uninstall correct cimmanifest.exe
  4. Finally, visit the official website to download the latest version of the software.

The quickest way to fix issues related to the cimmanifest.exe issue is to uninstall its parent software. This is because most of these problems have been fixed in the latest version of the software.

2. Reinstall your graphics driver

  1. Press the Windows key + X and choose Device Manager.
    device manager
  2. Double-click the Display adapters section and right-click the driver under it.
  3. Now, select Uninstall device option.
    uninstall device cimmanifest.exe
  4. Tick the Attempt to remove the driver for this device checkbox and click the Uninstall button.
    uninstall button
  5. Finally, restart your PC and visit the official website to download and install the latest driver.

Another effective fix for issues related to cimmanifest.exe is to reinstall the AMD Radeon graphics driver. This solution is effective when you are facing issues related to crashing some apps.

3. Update your PC

  1. Press the Windows key + I to open the Settings app and click Windows Update in the left pane.
  2. Click the Check for updates button.
    check for cimmanifest.exe
  3. Now, download and install all available updates.

An outdated PC is the bedrock of many issues, and you cannot rule it out when it comes to issues related to the cimmanifest.exe process. Hence, it is important always to keep your operating system updated.

4. Scan for malware

  1. Press the Windows key + S, type virus, and choose Virus & threat protection.
    virusvirus
  2. Click the Scan options link on the next page.
    scan options
  3. Finally, select your preferred scan option and click the Scan now button.
    scan now

As mentioned earlier, viruses can disguise as the cimmanifest.exe process and cause high CPU or disk usage. In this case, you need to run a full malware scan to eliminate the virus.

Another option is to use effective security software in ESET NOD32 to get rid of even the most hidden viruses. With this tool, you are assured that malware will be eliminated before it can cause problems on your PC.

5. Perform a system restore

  1. Press the Windows key + R, type rstrui.exe, and press Enter.
    rstrui cimmanifest.exe
  2. Click Next on the new page.
    next
  3. Now, choose your ideal restore point and click the Next button.
    restore point
  4. Finally, click Finish and follow the onscreen instructions to complete the process.
    finish

If you started facing problems with cimmanifest.exe after making changes to your PC, you need to perform a system restore. This will help reverse the changes that might be causing the problem.

The cimmanifest.exe process is an integral part of the Radeon Software Crimson Edition software. However, it is not a system file and can be removed if needed.

Also, if you are facing issues related to this process, we have detailed the known solutions to fix them.

In the same vein, if you are wondering what the ose.exe process is, you will find all the information needed in our guide.

Feel free to share your experience with this process with us in the comments below.

What is Dtsapo4service.exe & How to Fix its Errors

There are different processes that run in the background to make the Windows PC click. One of the lesser-seen processes is dtsapo4service.exe.

This process sometimes pops up in the Task Manager and makes users wonder what it does. This guide provides all the information you need about the dtsapo4service.exe process, including fixing its related errors.

What is dtsapo4service.exe?

Dtsapo4service.exe is an executable file that comes with the DTS Sound software. It runs in the background and ensures its parent software runs smoothly.

This process is safe and will not usually hog your PC resources. However, viruses can sometimes be disguised as dtsapo4service.exe, like many other processes, leading to abnormal resource usage.

A simple malware scan should help you in this case. The importance of this process will depend on how much you value the DTS Sound software. But as it is not a system process, you can permanently disable it.

How can I fix issues related to dtsapo4service.exe?

1. Disable the process

  1. Press the Windows key + X and select the Task Manager option.
    task manager
  2. Scroll down and right-click the dtsapo4service.exe option.
  3. Finally, select the End task option.
    end task

The easiest way to fix issues related to dtsapo4service.exe is to disable the process. This is especially true if it is causing high CPU or disk usage.

2. Update/reinstall the sound driver

  1. Press the Windows key + R, type devmgmt.msc, and click OK.
    devmgmt.msc dtsapo4service.exe
  2. Double-click the Sound, video, and game controllers option and right-click the High Definition device under it.
  3. Now, select the Update driver option.
    update driver
  4. Next, choose Search automatically for drivers and install any available update.
    search auto
  5. If updating the driver does not work, repeat Steps 1 to 3 and select Uninstall device instead.
    uninstall device
  6. Finally, click the Uninstall button and restart your PC.

Sometimes, problems related to dtsapo4service.exe might be due to issues with your sound driver. Simply updating your driver should do the trick in most cases.

Reinstalling the drivers could also help fix other DTS-related issues, like DTS Audio Processing settings are unavailable and DTS:X Ultra not working.

However, if that does not work, you might have to uninstall and reinstall the driver. To make things easier and quicker, we recommend using a dedicated tool in Outbyte Driver Updater to sort the issue with your driver.

This tool takes out the guessing game, updating any outdated driver and replacing the faulty ones automatically.

Outbyte Driver Updater

Run your PC error-free and keep your drivers updated with Outbyte Driver Updater.
Free Trial Download now

3. Run the Playing Audio troubleshooter

  1. Press the Windows key + I and select Troubleshoot in the right pane.
    troubleshoot dtsapo4service.exe
  2. Select the Other troubleshooters option.
    other trouble
  3. Now, click the Run button before the Playing Audio option and follow the onscreen instructions.
    run audio

Sometimes, dtsapo4service.exe might be throwing up error messages because of problems with some sound-related processes. Running the built-in troubleshooter should help you clear these glitches and restore normalcy.

4. Uninstall DTS Audio Processing software

  1. Press the Windows key + S, type control, and click Control Panel.
    control dtsapo4service.exe
  2. Choose Uninstall a program under the Programs option.
    uninstall a
  3. Now, right-click the DTS Audio Processing option, select Uninstall, and follow the onscreen instructions to complete the process.
    uninstall
  4. Alternatively, you can open File Explorer and follow the path below: C:/Program Files/DTS Sound/Tobit Software/dts_apo_service.exe_uninstall.exe
  5. Finally, run the uninstaller and follow the onscreen instructions.

If everything else fails to solve your problems with the dtsapo4service.exe process, you need to uninstall the DTS Audio Processing software. This will eliminate the source of the issue, which will, in turn, eliminate the error message.

The dtsapo4service.exe process is integral if you are using the DTS Sound software. It is generally safe and poses no threat to your PC. If you change your mind, our guide on how to install DTS Sound Unbound on Windows 11 will come in handy.

However, it can run into issues at times. But you can always use the solutions in this guide to fix them.

If you want to know about the SelfCert.exe file, our comprehensive guide contains all the necessary information.

Feel free to share your experience with this process in the comments below.

Aadsts90072 Error: How to Fix This User Account Issue

Many users have reported they encounter an error AADSTS90072 during an account login. The issues occurs when you try using an account that is not in the directory, prompting an error error.

Alternatively, you can read through our article about how to fix the 0x801c03f3 Hybrid Azure AD Error on your PC.

Before we fix the issue, let’s take a look at underlying causes for it.

What causes the Aadsts90072 error?

The following are potential causes for the AADSTS90072 error:

  • Account doesn’t exist in the tenant – if the external account that the user is trying to sign in with doesn’t exist on the tenant that they signed into, it can prompt the error. Also, it is because the user can’t satisfy the MFA (Multi-factor authentication) requirements for the tenant, making it unauthorized.
  • There is a mismatch in the ImmutableID attribute – The error can also occur if there is a mismatch in the ImmutableID (sourceAnchor) attribute between Active Directory and Azure AD regardless of the users being synced.

These factors can vary on different computers depending on the condition. However, we’ll take you through detailed steps for fixing the issue.

How can I fix the Aadsts90072 error?

Before proceeding with any advanced troubleshooting steps, try the following preliminary checks:

  • Restart your PC – Restarting the computer will fix temporary issues affecting its performance and refresh its activities.
  • Fix network issues – Power cycling your router/modem or fixing network congestion on your computer can help you connect faster to the internet.
  • Use the Firefox browser and clear cookies for cookies – Clearing cookies for login.microsoft.com and teams.microsoft.com on Firefox should prevent the error from popping up again.

If you can’t resolve the error, go ahead with the solutions below:

1. Exclude Azure Information Protection from Require MFA for guests’ policies

  1. Go to Azure Dashboard and click on the Conditional Access option.
  2. Navigate to the Assignments tab, and select Users and groups under it.
  3. On the left pane, go to the Include tab and check the box for All guest and external users.
  4. Go to the Assignments tab on the right pane and select the Cloud apps or actions section.
  5. Navigate to the Excluded cloud apps section and select Microsoft Azure Information Protection as an exclusion.
  6. Try to log in to your account and check if the error AADSTS90072 persists.

The above steps allow the Microsoft Azure Information Protection cloud app to run without adhering to the Require MFA for guests policies.

2. Exclude guest and external users

  1. Create a new conditional access policy.
  2. Go to the Assignments tab on the left pane, and click on the Users and groups option.
  3. Select the Exclude tab on the right side of the screen, then check the box for All guest and external users.
  4. Under the Assignments tab, click on the Cloud apps or actions section on the left pane.
  5. On the right pane, go to the Include section and check the box for the Microsoft Azure Information Protection cloud app.
  6. Navigate to the Access controls tab on the left pane, and select Grant.
  7. Tick the radio button for Grant access and check the box for Require multi-factor authentication.

The above steps will exclude guests and external users from the RMA (Request multi-factor authentication) and grant access through Access Policy.

3. Disconnect the Organizational account

  1. Left-lick the Start button and click on Settings.
  2. Select the Accounts tab and click on Access work or school.
  3. Further, locate the organization account added and click on the Disconnect button.
  4. Confirm your selection by clicking Yes on the prompt.
  5. Click Disconnect again when another prompt asks you to disconnect from the organization account.
  6. Now, restart the Teams app and check if the error persists.

Alternatively, you can try to access the Teams web version to confirm if the issue is resolved.

In conclusion, our readers can check our guide about the Azure Functions Runtime unreachable error and ways to fix it on their PCs.

If you have further questions or suggestions concerning this guide, kindly drop them in the comments section below.

Error Code 21 in Device Manager: How to Fix it

Many Windows users have complained about running into Error code 21 in Device Manager. The error is accompanied by an error message that says Windows is removing this device. (Code 21) prevents users from performing tasks. However, we’ll discuss the error and ways to fix it.

Also, you may be interested in our article about how to resolve Windows cannot start this hardware device Error code 19 on Windows 11.

What is error code 21 in Device Manager?

Error code 21 in Device Manager is usually found in the device status of the device properties. It appears with an error message Windows is removing this device. (Code 21) indicating Windows is in the process of removing the device, and you need to wait until it has finished this task.

Furthermore, the error is not fatal and can barely stop the system from working but may be annoying to encounter often. Some notable factors causing the error are:

  • Issues loading the device driver – If the system encounters some difficulties loading and accessing the device driver or some files related to the driver, it can cause Windows is removing this device error code 21.
  • Outdated device drivers – You can also run into the Error code 21 in Device Manager due to corrupted, damaged, or outdated device drivers running on your computer. Other hardware issues are likely to prompt the error.

These causes may vary on different devices but can be fixed by following certain steps. As we proceed with this article, we’ll take you through basic steps to resolve the Device Manager error code 21.

How can I fix error code 21 in Device Manager?

Before trying any advanced troubleshooting steps, apply the following:

  • Wait for Windows to finish the removal process – Since the error code is temporary, you can wait for Windows to complete the removal process and then press the F5 key to update the Device Manager view.
  • Restart your PC – Restarting the computer will fix temporary performance issues and refresh every process running on it.

If the error persists, go ahead with the solutions below:

1. Remove all Apple-related programs from your PC

  1. Click on the Windows button, type control panel and launch it.
  2. Click on Uninstall a program link under the Programs section.
  3. Locate each Apple-related program like iTunes, click on them, and select Uninstall.
  4. Follow the uninstaller prompts to remove them alongside their updates.
  5. Then, close the Control Panel and check if the error persists.

Some users claimed that Apple-related programs have been causing this issue for them. Hence, removing them entirely from their PC fixed the error.

2. Disable/uninstall the device

  1. Right-click the Start button and select Device Manager from the menu.
  2. Expand the options and locate the driver. Right-click the device and click Disable device from the drop-down.
  3. Alternatively, right-click the device and select Uninstall device from the context menu.
  4. Click on the Uninstall button to confirm that you want to uninstall the device.
  5. Restart your PC.
  6. Open the Device Manager and select Action from the top menu bar.
  7. Select Scan for hardware changes from the drop-down menu and wait a few seconds.
  8. Check if the error persists in the Device Manager.

Uninstalling the device will stop its activities and prevent the error code 21 from appearing in the Device Manager.

Check our guide about how to reinstall devices in Device Manager Windows.

In conclusion, our readers can read about ways to fix reinstall drivers for this device code 18 error on Windows PCs.

If you have further questions or suggestions, kindly drop them in the comments section below.

5 Ways to Remove Windows Defender Tray Icon

Windows Defender or Windows Security is the built-in antivirus in Windows and comes bundled with the OS. It’s at par with most of the top third-party antivirus software, but its presence in the notification area bothers many. In that case, you can remove the Windows Defender system tray icon.

There are a few ways you can remove Windows Security from the taskbar in Windows 11, but some are afraid that it would leave their PC unprotected. We will be taking all this up in the following sections. So, keep reading!

Will Windows Defender work if I remove it from the system tray?

Yes, Windows Defender will continue to work even after you clear it from the system tray. It won’t show you any unnecessary notifications, though it will continue to detect malware and virus and offer other critical warnings.

The only change you will find is that Windows Defender will now silently work in the background. Besides, it can still be accessed from the Start menu or via the Settings app in Windows 10.

How do I hide the Windows Defender icon from the taskbar?

1. Using the Task Manager

  1. Press Ctrl + Shift + Esc to open the Task Manager, and navigate to the Startup apps tab.startup apps
  2. Select Windows Defender notification icon or SecurityHealthSysTray.exe, right-click on it, and choose Disable.disable Windows Defender tray icon

That’s it! One of the easiest ways to remove the Windows Defender tray icon is via the Task Manager.

2. Through the startup apps settings

  1. Press Windows + I to open Settings, select Apps from the navigation pane, and click on Startup on the right.startup
  2. Scroll down, locate the Windows Defender notification icon entry, and turn off the toggle next to it.remove windows defender tray icon from startup

3. Via Taskbar settings

  1. Press Windows + I to open Settings, select Personalization from the left, and then click on Taskbar.taskbar
  2. Now, click on Other system tray icons, and disable the toggle for Windows Defender notification icon.remove windows defender tray icon via Taskbar settings

Another way to remove the Windows Defender system tray icon in Windows 11 is via the Taskbar settings. Besides, using this method, you can disable the expandable icon menu that lists additional programs altogether.

4. With the Local Group Policy Editor (Gpedit)

  1. Press Windows + R to open Run, type gpedit.msc in the text field, and hit Enter.gpedit.msc
  2. Expand Administrative Templates under Computer Configuration and then choose Windows Components.Windows components
  3. Now, double-click on Windows Security, and select Systray.Systray to remove windows defender tray icon
  4. Double-click on the Hide Windows Security Systray policy on the right.Hide Windows Security systray
  5. Select Enabled near the top left, and then click on Apply and OK to save the changes.disable to remove windows defender tray icon

The Local Group Policy Editor is a quick way to make advanced changes on the PC by modifying the set policies, and it allows users to remove Windows Defender (Windows Security) from the system tray in Windows 10.

It’s available on the Pro and Enterprise editions of the OS. Though you can install the Group Policy Editor in the Home edition as well.

5. From the Registry Editor (Regedit)

  1. Press Windows + S to open Search, type Registry Editor in the text field, and click on the relevant search result.registry editor
  2. Click Yes in the UAC prompt.
  3. Paste the following path in the address bar and hit Enter:HKEY_LOCAL_MACHINE\SOFTWARE\Policies\Microsoft\Windows Defender Security Center\Systraypath
  4. If you can’t find the path, right-click on Microsoft in the navigation pane, hover the cursor over New, select Key, and name it Windows Defender Security Center.key
  5. Similarly, right-click on Windows Defender Security Center, choose New, and then create a Key with the name Systray.
  6. Now, in the Systray, right-click on the empty portion, select New, choose DWORD (32-bit) Value, and name it HideSystray.hidesystray to remove windows defender tray icon
  7. Double-click on the newly created DWORD.
  8. Enter 1 under Value data, and click OK to save the changes.modify value data to remove windows defender tray icon

If the previous solutions didn’t remove the Windows Defender icon from the system tray, you could always use the Registry Editor to make concrete changes. But when working with the registry, make sure not to make any other changes as it could drastically affect the PC.

Before you leave, do check some quick tips to boost Windows 11’s performance and make it run faster than ever.

For any queries or to share which method worked best for you, drop a comment below.

You Don’t Have Authorization to View this Page: How to Fix

A few users have complained about being denied from viewing specific web resources. This comes with the notifications You don’t have authorization to view this page, and sometimes an addition for specific services like HTTP error 403 Netflix, HTTP error 403 Exchange, HTTP error 403 Spring Boot, etc.

This guide will cover resolving the error and outline probable triggers to avoid a repeat occurrence.

Why do I get the notification You don’t have authorization to view this page?

There are several reasons for this error, including the following:

  • Incorrect login credentials – For web resources that require a login, you would need the correct credentials before having access.
  • Insufficient privileges – Even if you have a valid account, you may not have sufficient privileges or permissions to access the specific page or resource.
  • Cookie and cache problem – If you have expired cookies, your browser may still access old and expired data.
  • Expired or revoked authorization – Users who previously had access to the page or resource but whose authorization has expired or been revoked will encounter this error.
  • Web available – There are chances that the web resource is not available. This means you may only be able to try again later.

How do I fix the 403 authorization error, You don’t have authorization to view this page?

There are a few workarounds that we recommend before anything detailed:

  • Use incognito – Open the web resource in incognito. Sometimes, this private browser blocks extension and other bugs that may cause the error.
  • Double-check your credentials – Make sure you are using the correct credentials. You may even need to double-check with an admin when possible.
  • Use a different browser – If the error is browser-based, you may try accessing the resource using a different browser.

Now, let us explore major solutions if the workarounds do not work.

1. Clear your browser cache

  1. Launch the browser and press Ctrl + Shift + Del.
  2. Select a Time range, tick all the checkboxes, and click the Clear data button.
    you don't have authorization to view this page
  3. Restart the browser and verify you no longer get the You don’t have authorization to view this page notification.

Please note that the process above works for Google Chrome and will vary slightly in other browsers.

2. Disable browser extensions

  1. Launch the browser, click on the ellipses, select More tools and Extensions.
    you don't have authorization to view this page
  2. Click on the disable switch or the Remove button.
    you don't have authorization to view this page
  3. Restart the browser and see if you can now access the resource.

3. Reset your browser

  1. Launch the browser.
  2. Type the link below on the address bar and hit Enter.
    chrome://settings/reset
  3. Click on Reset settings on the left pane, then select the Restore settings to their original defaults option on the right.
  4. Confirm your settings and restart the browser after the reset.

With the solutions above, you should resolve the You don’t have authorization to view this page 403 error. We have not made these fixes in any particular order, so you should try what seems the most applicable.

You may also run into the HTTP 302 error if you’ve changed your site’s URL, so check our article for quick fixes.

Lastly, please contact us and tell us what worked for you in the comments below.