A few days before the New Year arrives, all gaming platforms are offering huge discounts on thousands of games, and Steam, Microsoft, and EA are just a few to offer the most interesting game discounts
EA Origin lets you save up to 75% on popular games as well as on older classics. So, if you held off during this year’s Black Friday sales, you’ll be happy to click the buy button on EA Origin’s Holiday Sale. Without further ado, let’s see what the most interesting EA Origin discounts are.
What are the best EA Origin winter game discounts?
Get into your starfighter and join the fight in Star Wars: Squadrons for a realistic piloting experience. Squadrons is a first-person multiplayer space dogfighting game that will get your adrenaline level to its peak.
You will step into the cockpits of starfighters from the New Republic or the Imperial fleets and play in strategic 5 vs. 5 space battles. The strategy also involves modifying your vessel and changing the squadron to suit different missions and requirements.
Get to feel the sounds and technical details of X-wings and TIE fighters, personalize their design, and switch the power between the different weapons, shields, and engines in a completely immersive environment. Talking about immersion, you can also play in VR on your PC.
It’s hard to write about Fifa 23 because everybody knows this game and its unique graphics. Each year, this awesome game gets better and better and the players are perfectly reproduced in the game.
The gameplay realism was raised to a whole new level and now it rewards you for your creativity. You can also play in UEFA Champions League and CONMEBOL Libertadores competitions.
The sound, the music, the cheering fans, and the player movements, all contribute to an unrivaled immersion in a true-to-life experience.
With a Sci-Fi storyline, Mass Effect is a game trilogy that brings you military combat and spaceship elements to immerse you in the alien civilization universe.
This sleek gameplay comes with an enhanced 4K resolution with cinematic graphics to give you memorable times inside this fantastic world.
In addition to that, you can get all three Mass Effect games in one launcher, plus over 40 DLC including promo weapons, player customization, new armor and packs, and much more.
Battlefield is also a big title. Everyone knows all about it and there’s a pretty big online community around it that is ready to welcome you into the battle zone.
Battlefield 4 is much more than a game because the package includes the China Rising DLC, which means a character storyline that offers you the immersive experience of campaigns with the evacuation of American VIPs from Shanghai.
There are ten new vehicles that you can drive, new weapons, and lots of items that you can experience.
Rocket Arena is, as you would guess, all about rockets and this is a real explosive 3 vs 3 shooter where things get hot in no time. All the struggle in this game is to choose your hero to your liking and master its rockets and abilities to become the best.
It’s not enough to shoot your way. You will have to strategize in order to counter the opponents’ power and take advantage of their weaknesses by using your growing roster smartly.
You have a wide variety of dynamic maps to explore and endless combinations to master.
Some users might encounter issues when they burn ISO files to DVDs or CDs on Windows 10. That’s especially the case when users try burning discs with the Windows Image Burner.
The error code 0xc0aa0301 is primarily one that users have been facing during a disc image-burning process. This guide will show you how to fix this error effectively.
What causes error 0xc0aa0301?
Below are some of the causes of the 0xc0aa0301 while trying to burn a DVD:
Outdated chipset driver: If the attempt to burn a disc failed because of error code 0xc0aa0301, it might be because your chipset driver is obsolete. Updating the driver from the manufacturer’s website should do the trick.
Incompatible disk: Sometimes, this problem might be because the disc is incompatible with the disc drive. The solution is to use a compatible disk.
How can I fix error 0xc0aa0301?
Before are some prerequisite checks you need to perform below applying the fix below:
Use the DVD-R format instead of DVD+R
Ensure to use a compatible disc
Try burning disc with Windows Media Player
If these do not resolve the issue, you can now follow the steps below:
Press the Windows key + X and select the Device Manager option.
Click the arrow next to the System devices option and double-click the chipset device you want to update.
Click the Driver tab at the top and note the Driver version.
From here, go to your PC manufacturer’s website to download the latest version of the driver.
Finally, run the installer and follow the onscreen instruction to complete the installation.
The known solution for the 0xc0aa0301 error code is updating your chipset drivers. Also, updating the firmware for the drive has fixed the issue for others.
Alternatively, you can update the drivers automatically using a reliable tool in Outbyte Driver Updater. This is because you might need to update more than one chipset driver, and it might not be easy to download them manually.
This software can quickly scan the device drivers on your PC. Outbyte Driver Updater will show you if there are any outdated, missing, or corrupted drivers.
Users utilizing Outbyte Driver Updater Pro can quickly update or replace outdated or corrupted drivers for DVD/CD-ROM drives.
Outbyte Driver Updater Pro includes an Automatically Install option to install downloaded drivers quickly.
The error code 0xc0aa0301 can be frustrating as it prevents you from burning quickly. But with the fix in this guide, you should be able to fix it for good.
A lot of people rely on computers to perform their everyday tasks and the least bit of inconvenience can be frustrating especially when you encounter problems during startup.
Unfortunately, you cannot always predict when a Windows error will occur and when it does, you will need to be adequately prepared to handle it.
A BCD error is one of the most frequent Windows errors that can prevent you from booting your device and needs to be fixed immediately. Today we will be discussing the Windows error code 0xc0000098.
The error message reads: Your PC/DEVICE needs to be repaired. The Boot Configuration data doesn’t contain valid information for an operating system. File: \BCD. Error Code: 0xc0000098.
Why is BCD important?
Boot Configuration Data (BCD) is a component that helps you boot your Windows device. When the BCD goes missing or corrupt, you won’t be able to access your computer or hard disk drive and might get stuck on the loading screen.
A BCD error may occur because of several reasons but the most common one is the failure of the hard disk drive or the wrong installation of a program.
An unexpected shutdown, malicious software, and the Blue Screen of Death (BSOD) are also leading causes of the BCD error.
Is the BCD error related to the BSOD error?
The BCD error can be linked to the BSOD error since it also causes the device to crash. When a Blue Screen of Death occurs in Windows 11, the computer can sometimes fail to boot. The failure to boot can be caused by a variety of reasons.
It is not uncommon to be worried that a boot can lead to the loss of important files. However, when you perform a BCD rebuild using any of the BCD commands, you are only repairing the boot files and all your files will remain intact.
The Windows 11 BCD repair helps does not in any way affect your personal files but rather helps you gain access since the error prevented your device from starting.
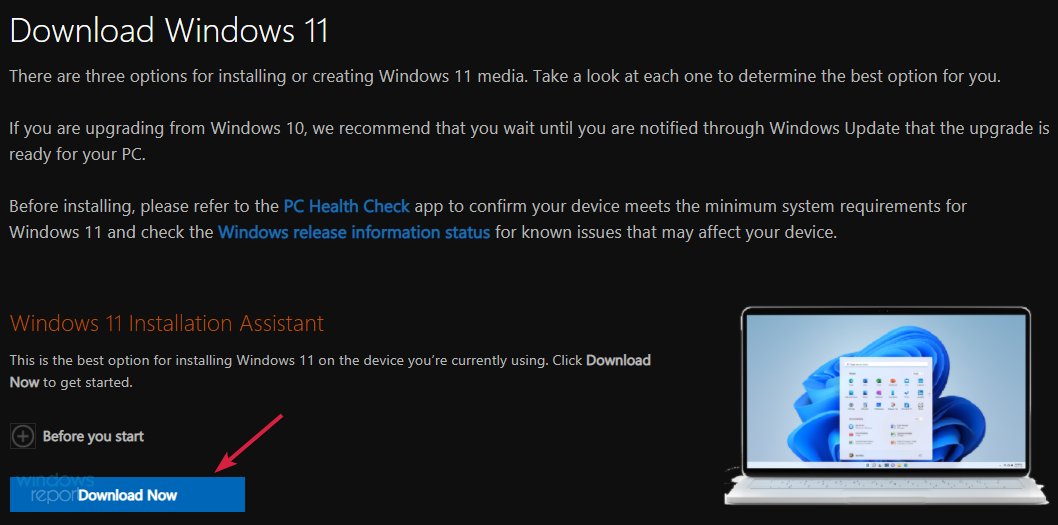
Connect a USB drive with at least 8GB storage and above.
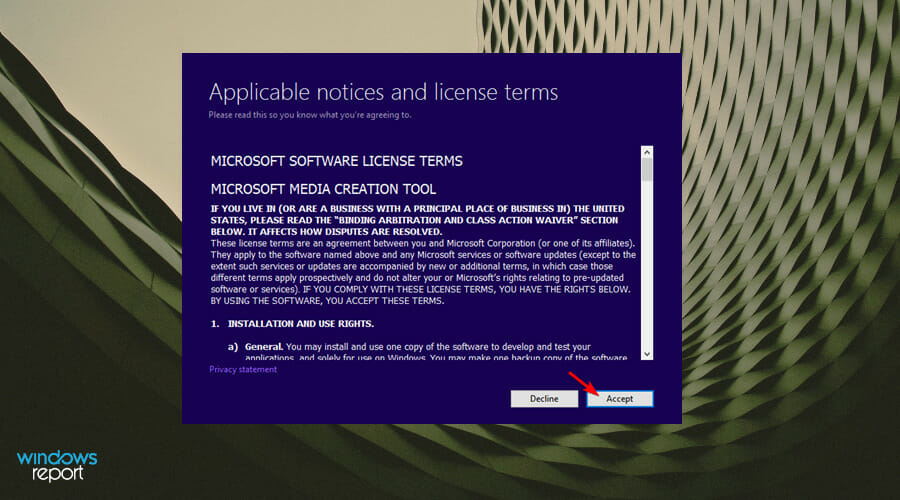
Run the Media Creation Tool and click on Accept for the terms and agreement, then proceed.
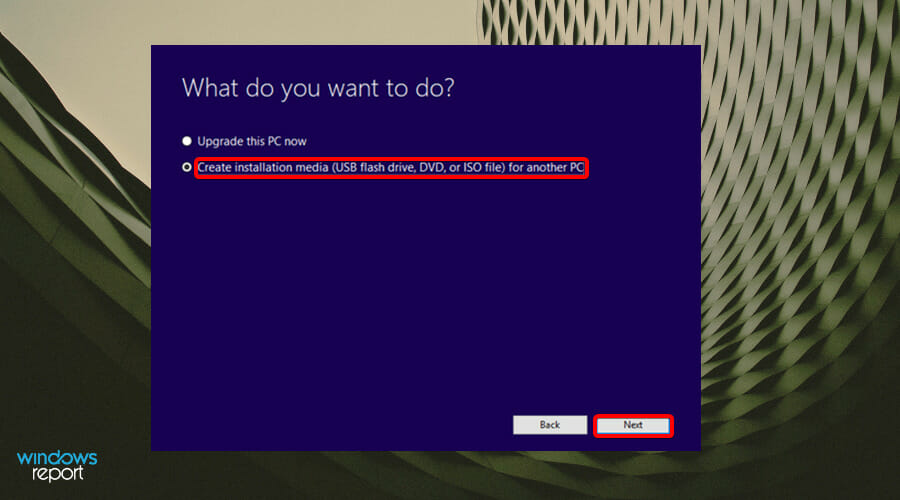
Choose the Create installation media (USB flash drive, DVD, or ISO File) option and click Next to proceed.
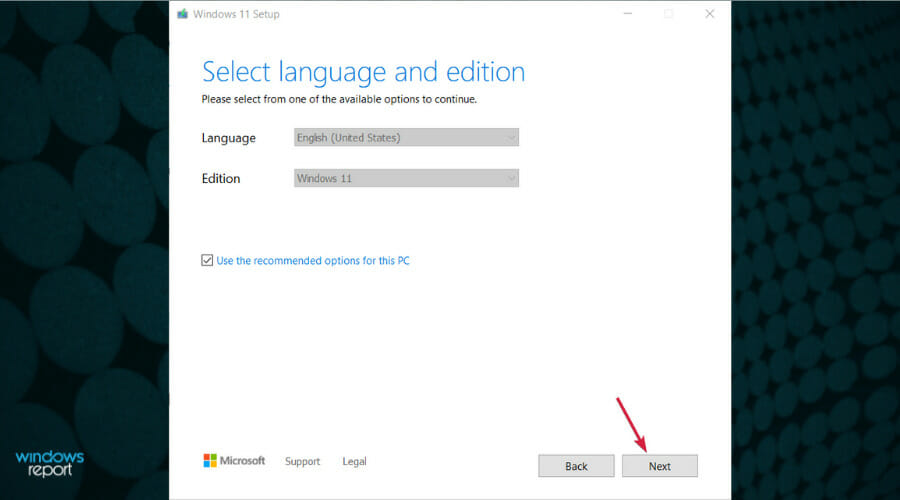
Select language, architecture, and edition from the drop-down menus then click Next.
Choose USB flash drive as the media to use.
Wait for the process to be completed.
1.2 Rebuild BCD
Connect the bootable USB to one of the available ports.
Select the Windows key and press the Power button, then click on Restartto start the troubleshooting via the Advanced Startup option.
A new window will appear with a set of options. SelectTroubleshoot.
Select Advanced options.
Next, select Command Prompt.
In the command window, type the following command prompt and press Enterwhen done: bootrec /rebuildbcd
After typing the command prompt, one of two screens will appear.
If this screen appears, type the following command prompts pressing Enterafter each one: attrib c:\boot\bcd -s -h -rren c:\boot\bcd bcd.oldbootrec /rebuildbcd
If this screen appears, you will have to restart your PC.
This Windows 11 rebuild BCD procedure will restore things to normal and you will be able to use your OS normally. The 0xc0000098 error should be gone now. If not, jump to the next solution.
2. Reset Windows
Press the Windowskey+ Sthen type recovery options.
Select Restart now in the next window and click Enter.
Select Keep my files if you don’t want to lose your files.
Wait for the process to complete.
3. Perform a system restore
Press the Windowskey + S, then type system restore and hit Enter.
Select the restore point you want to revert to and click Next.
Follow the on-screen instructions to finish the procedure.
Alternatively, if none of the above solutions have helped, we recommend using a specialized system file repair software. These tools will scan your PC for missing DLLs, corrupted system files, or missing registry entries and prompt you to fix them.
How can I prevent future BCD errors?
It is always important to take precautions and avoid such errors if you can. One such method is by protecting your device from malicious software.
Additionally, it is advisable to perform regular scans on your device to keep viruses at arm’s length. To perform regular scans:
Press the Windows key and search for Windows Security tool.
Select Virus and threat protection option.
Click on Quick scan.
This quick scan will allow you to assess your device and take the necessary steps. However, if you would like a more in-depth scan, you can click on Scan options and select afull scan.
It will take longer but will review all your operating programs and files. If malware is detected after the scan, you can start the process of eliminating the virus from your device.
We hope this guide is what you were looking for when you encountered the BCD error and that now you can successfully start up your device again with no glitches.
Windows errors are common especially when you have not taken the steps to protect yourself from malware and viruses.
It is why you should always have a reliable anti-malware solution and run regular scan checks to ensure your device is healthy.
Samsung is well-known for its devices, and Samsung’s SSDs are one of the best on the market. Unfortunately, many users reported that their Samsung portable T5 SSD is not showing up on their computers.
This can be a big problem, especially if you just purchased a new SSD, and in today’s article, we’re going to show you how to fix this problem once and for all.
Why is my Samsung Portable SSD not showing up?
There are a few reasons your Samsung portable SSD T5 is not showing up on Windows 10. Below are some of the popular ones:
Wrong power management setting: Your computer can disable certain features when it needs to save power. If this is enabled for your USB controller adapters, it can lead to the Samsung SSD T5 not working issue.
Unassigned drive letter: You need to assign a letter to your drive to make it discoverable on your PC. This is especially common with new external drives. The solution here is to add or change the drive letter of the Samsung SSD.
Unformatted drive: Another cause of this issue is an unformatted drive. Formatting the drive is the quick way of fixing this and some other Samsung portable SSD T5 issues.
What can I do if my Samsung portable SSD T5 is not showing up?
Listed below are some preliminary fixes you need to try before proceeding to the solutions in this section:
Use USB-C and connect it to a USB 3.1 or 3.0 port
Check the hard drive on another PC
Connect the drive to a Samsung android phone and check if it shows up
1. Disable the power management feature
Press the Windows key + X and select the Device Manager option.
Double-click the USB Serial Bus controllers option to expand it, and right-click each driver there.
Now, select the Properties option.
Click the Power Management tab at the top.
Finally, uncheck the box for Allow this device to turn this device to save power and click OK.
In most cases, if the Samsung portable SSD T5 is not showing up on your PC, it might be because it is temporarily disabled. This is because the USB port is set to turn off when your PC needs to save power.
The solution here is to deactivate this feature and reconnect your hard drive.
Another cause might be because of some faulty drivers. One of the fastest ways to update and repair all your drivers is Outbyte Driver Updater, a specialized tool for repairing and installing driver updates.
Make sure your SSD is connected to your PC, press the Windows key + X, and choose Disk Management.
Locate your drive, right-click it, and choose Change Drive Letter and Paths.
Now, click the Add button if the drive does not have a letter. If it already has, click the Change button instead.
Finally, select the letter you want to assign to the drive and click OK.
If disabling the power management feature does not fix the Samsung portable SSD T5 not showing up the issue, it might be because the drive does not have a drive letter. After assigning the letter, the drive should appear on your PC.
Open Disk Management with the drive connected to your PC.
Locate your SSD, right-click, and choose Format.
Enter a Volume label, select a suitable File system (it’s advised to use NTFS), and click OK.
After the drive is formatted, check if the Samsung portable SSD T5 is still not showing up. Knowing that this solution will delete all files from your drive is essential.
So, if you have important files on it, you might want to get data recovery software ready before applying this fix.
If your Samsung portable T5 SSD is not showing up on your PC, it can lead to the loss of essential data. We hope you can prevent this by following the solutions in this guide.
Similarly, if you are facing the Kingston SSD not detected issue, you can fix it quickly by applying the steps in the linked guide.
Feel free to let us know the solution that helped you fix this issue in the comments below.
Christmas is coming and we’re all going to offer and receive many presents. However, choosing the right present for your loved ones or for coworkers can sometimes be quite difficult.
When dealing with a small group, you can just work with some names in a hat to make the Secret Santa draw but if you have over 20+ party, things get complicated.
If you want to find out what your loved ones wish for Christmas and better manage your gift list, we suggest you use one of the Secret Santa websites listed below.
How can a Secret Santa organizer help?
For those of you who don’t know about this tradition, we will explain how it works and how to make the process easier.
Secret Santa is a game created originally for enterprises where the people in a group are randomly assigned a person to whom they offer a gift on Christmas.
The person you are assigned was traditionally made by putting all the names on pieces of paper and drawing from a hat.
This way, you don’t know who is your Secret Santa partner and everyone gets a surprise gift they wouldn’t think about.
With some of the web apps below, you can even tell your partner about your desired gift anonymously so the chances are you will get it.
Add a wishlist so that your Secret Santa partner knows what to get for you
Another condition for this game is to set up a budget limit for the gifts like 20$ or 50$ so that everybody gets similar value gifts and everyone stays happy.
The services we listed below automatize this process so that you can avoid direct contact and do the whole draw a lot faster and easier.
Secret Santa Organizer is a free online Secret Santa gift exchange organizer that will definitely make your work easier. You can use it to better plan your Secret Santa party with friends, family, and co-workers.
First, create your wishlist to let Santa know what you want for Christmas. Then, it is sent to your Secret Santa.
Secret Santa Organizer randomly assigns persons to each other to give a present to one another.
In this manner, you can keep track of the number of persons taking part in this year’s Secret Santa party and you’re sure that the recipients will all love their presents.
Draw Names is a simple platform that allows you to submit the names and email addresses of your friends and organize a Secret Santa gift exchange.
You can also use your group from the last year or add new friends to the list.
Each group chooses one person to be their organizer. The Organizer adds the name and email address of all the group members and sends an email regarding the gift exchange.
The secret Santa randomizer then draws names for all the participants and emails them their drawn names.
Members can submit their own wish list and send questions to their Secret Santa, if need be, for more details.
Elfster’s Secret Santa generator guides you through the whole Secret Santa process.
First of all, you create a wish list, then you start a Secret Santa event by inviting your friends, family, or co-workers. In the end, you simply go shopping using Elfster’s gift guides.
It’s interesting that you can enter your birthday and if all the members of the group do that too, you will be able to use Elfster to know when it’s time to send them a gift.
As you can see, you can find all the Secret Santa resources that you need in one place. The only trick is that you need to sign up first to use the service.
Picking the right gift for your loved ones is never an easy task. But this is where Giftster comes in. This platform offers you all the tools you need to get gifts right.
The Gifter process includes five steps but they are pretty easy to go through. First, create a wish list and add all the items that would make for perfect presents.
Next, enter additional information such as preferences (color, size, etc.) for the gifts. Then, create a private Secret Santa group by sending invites to people.
Giftster will draw the names and as an organizer, you will even be able to see if someone bought the gift because they can check a box on their side of the app.
Picking the names for Secret Santa can sometimes be quite time-consuming but with My Wishlist, you can easily organize your Secret Santa party.
This web app has four steps to go through and the process is pretty simple and straightforward, so you won’t need too much time to complete it.
First, you need to enter your name and email, then the other participants’ names. Next, you can add exclusions for any participants.
For instance, you can block a participant to draw your name or somebody else’s name from the hat.
Next, you need to enter the event name and date and review the list so that you make sure you didn’t leave anybody out.
The last step is to send the Secret Santa drawing by mail or WhatsApp. You can also use your corporate email to send a link that was generated automatically.
The My Wishlist web app is free and easy to use and although the design is not so full of Christmas cheer, it will do the job just fine.
Another interesting choice for an online Secret Santa generator is Pikkado.
The tool allows you to create a dedicated group, launch the invitations by email to make sure that all the people want to participate at your Secret Santa event, draw the names, and then send the Secret Santa names to your friends.
Pikkado also allows you to simulate and perform the virtual draw, reuse your groups year after year (this is a very handy feature), manage your exchange rules, and more.
The tool is perfect for organizing corporate Secret Santa events.
If you really want to impress your loved ones with an original present you can send them a personalized Christmas video. They’re fun and will surely spark laughter and festive cheer.
Indeed, there are not many resources for personalized Christmas videos, but we found a few websites that give you the opportunity to create your own videos.
What are the best personalized Christmas video tools?
1. ElfiSanta – Personalized Christmas Video From Santa Claus
If you want to offer your child a personalized video from Santa Claus, this is the right tool for you. Moreover, you can also use this tool to surprise other members of your family, as well as colleagues.
The video messages from Santa Claus contain a uniquely personalized message, addressed directly to your children, friends, or colleagues.
A personalized video is a thoughtful and remarkably different present that you can offer this Christmas.
JibJab offers you plenty of Christmas-themed videos you can personalize. First, choose how many people you want in your video and then upload your photo(s). You can upload a photo already stored on your Windows computer, use your Facebook photo, or simply take a new photo using your webcam.
Choosing your favorite personalized Christmas video is not an easy task. There are many very funny videos you can star in: Santa’s Twerk Shop, Rocking around the Christmas tree, Hawaiian Christmas, Elffun Factory, Chippendale’s, Tree Slaughter, Gangnam Style Christmas Edition and more.
Portable North Pole lets you create special Santa Videos for your loved ones. Surprise them with a personalized Christmas video and let them know how much they mean to you.
PNP’s videos are high-quality and will definitely make recipients laugh. For a small price, you can unlock and create unlimited Santa videos. Take your loved ones on a visit to an elf’s house, visit secret Christmas places, explore Santa’s village, and more.
This is a website where you can place an order for a personalized video greeting from Santa himself. All you need to do is provide Santa with the information required and confirm your order.
You’ll be asked a series of questions about the receiver of the video to create a personalized experience. You should receive the download link by email in a few hours after you place your order.
Binance is an established cryptocurrency exchange used by numerous investors and traders worldwide.
Unfortunately, customers in the US no longer have access to it and are not entirely satisfied with its local alternative.
However, a VPN can resolve the Binance IP address issue you get when trying to visit the website from the US. Let us show you how!
Why is Binance banned in the US?
Binance was founded by Changpeng Zhao and was initially based in China but moved to the Cayman Islands because of China’s strict regulations and ban on cryptocurrencies.
In the US, it didn’t have a brighter future either, now being investigated by the US Justice Department and the Internal Revenue Service on suspicions of illegal activities such as tax offenses and money laundering.
The company’s issues with US federal law enforcement authorities came amid growing regulatory measures on the crypto market whose lack of oversight made government officials become suspicious about whether the digital assets were used for unlawful activities.
The blockchain forensics firm Chainalysis which works with federal agencies stated that Binance was the primary crypto exchange for illicit cryptocurrency and criminal activities while dodging government oversight.
Binance is also a member of the crypto crime cartel which is known for manipulating markets and money laundering and this is why it has been prohibited from operating in some countries, including the United States.
Those living in the USA are no longer permitted to trade on Binance.com but on Binance.US instead; however, it has fewer trading options, so many are looking for ways to get around this ban.
Why should I use a VPN with Binance?
Those currently located in the USA can bypass Binance’s geo-blocking by using a VPN. That will allow you to use the cryptocurrency exchange as you normally would.
Moreover, we also encourage those of you living outside the US to use such a service – preferably a premium one – while trading on Binance. It will offer many other great benefits and keep your online experience safe and private.
By using a VPN service with Binance you can benefit from the following:
Bypass geo-blocking. A VPN replaces your current IP address with one in another country (e.g. Italy) where Binance is available and thus, you’ll trick the platform into thinking you’re located elsewhere.
Online anonymity. Usually, many of your online activities can be tracked by other parties – crypto trading and transactions are no exception. Since a VPN masks your real IP address, your transactions won’t be linked back to your real address anymore.
Enhanced security. A VPN service provides strong encryption, by routing your Internet traffic through a secure tunnel. Therefore, your online financial activities will be secure and you’ll be far less susceptible to fraud and cyber-attacks.
Avoid bandwidth throttling. Your ISP may throttle your bandwidth based on your specific online behavior or activities. Given that a VPN encrypts your traffic and shields it from your ISP, you shouldn’t worry about slower internet speeds anymore.
Is there a free VPN for Binance?
Yes, there are some free VPNs that might work for Binance. You could keep in mind that free plans don’t have those essential features compared to a premium VPN plan.
Is it illegal to use a VPN with Binance?
Certainly, it’s not illegal to use a VPN service in general except for a few countries that have strict censorship laws and criminalize its use.
So, in countries where using a VPN is not illegal, you shouldn’t worry at all about any legal repercussions neither in general nor in this particular case with Binance.
For example, there have not been any reports of US investors getting penalized when they traded and deposited with a VPN on the Binance cryptocurrency exchange platform.
Nonetheless, if you do use a VPN to resolve the Binance IP address issue or just want to use a specific one for other reasons, you should proceed with caution, as you will be penalized otherwise.
Their terms of use strictly ban those outside of Binance’s supported areas from using the crypto exchange, so you can immediately be denied service, including losing your funds if caught.
? What is the best VPN location for Binance?
Binance used to be supported worldwide, but as of recent changes, that is no longer the case. They dropped the US and several other countries.
The platform does not offer official information about all the countries it supports, but according to Binance users across the globe, the crypto app is available in the following locations:
Many VPN applications can assess the speed rates of their server location. You can choose the location where your VPN provider has the largest number of servers as that promises a lower number of users per server, thus a better connection.
Should I use Binance or Binance.US?
When it comes to choosing between Binance or Binance.US, this certainly depends on where you’re living (except if you choose to use a VPN to bypass geo-blocking) as well as the trading options available.
While Binance is currently available in many countries worldwide, Binance.US is only available in 43 US states across the country; although they bear the same name and logo, they are actually operated by different companies.
As previously discussed, the only way you can use Binance in the USA would be by connecting to a VPN server in a country where the service is available; the same is true if you want to use Binance.US outside of the US – which is less probable.
Now that we already dealt with the Binance IP address issue, let’s take a look at how the two platforms compare in terms of what they have to offer – which will help you make up your mind.
Binance platforms comparison
Binance.com is user-friendly and offers three levels organized according to trading experience; on the other hand,
As far as the number of cryptocurrencies is concerned, Binance.com is the clear winner here with more than 150 supported cryptocurrencies, while Binance.US only supports 52 coins.
The standard Binance.com trading fees are 0.1%, but you can get a discount of 25% if you pay your fees in the BNB native token instead of paying them in the coin you are buying.
Binance.US uses the same fee structure, with trading fees starting at 0.1% but it offers fees as low as 0% to those who invest millions of dollars
Binance.US is less robust and has limited options and higher trading fees.
Also, if you hold BNB in your account, you will have a 25% discount, and your trading fees automatically be deducted.
➡ Limitations
Binance.com
The company allows buying crypto with fiat (e.g. debit or credit cards) and uses the Simplex service which charges 3.5% of a transaction with a $10 minimum (flat fee). The daily limit is $20,000, while the monthly maximum is $50,000 per user.
For crypto-to-crypto transactions, there is no buying limit; however, there is a withdrawal limit of 2 BTC for those with unverified accounts, but this can be lifted if you verify your identity through the KYC process.
Binance.US
This platform also imposes limits on trading but these are high enough, so you probably shouldn’t care that much about them. For example, BTC/USD orders can’t be larger than 3200 BTC, although these limits can vary.
With Binance.US, users can withdraw or deposit up to $1 million via bank wire or can deposit up to $30,000 via ACH bank transfers. Also, you can purchase cryptocurrencies with a debit card.
➡ Location
Given the information presented above, you can either use Binance.com or Binance.US based on your location and without the use of a VPN. If you want to access any platform no matter where you live, use the one that best fits your needs.
In conclusion, you can use a VPN to access Binance.com even if you’re outside of the US. You just have to connect to a non-US server – you can easily choose one from Europe, for example.
However, you need to take into account a few considerations before deciding to use the platform while connected to a VPN service.
First off, keep in mind that you will be doing this at your own risk – which may include losing access to your funds – since the Binance terms and conditions strictly prohibit US residents to use the website.
Secondly, there are limitations as far as the trading volume and transfers are concerned, so if you want to bypass them, you’ll have to verify your account, which will imply uploading a non-US ID regardless of your IP address geolocation.
If you just want to send a few hundred dollars, you should be ok with a VPN; however, you shouldn’t expect to set up a US payment method for evident reasons.
On the upside, you do have a 2 BTC per day withdrawal limit with an unverified account. That’s certainly a lot of money without having to fill out you know your customer (KYC) information.
Best VPNs to Fix the Binance IP address issue
There are many options in the VPN market, so picking the right service can be rather challenging.
Here are our top three recommendations to securely and consistently unblock Binance from the US:
ExpressVPN — With its wide distribution of over 3000 servers worldwide, this provider offers the coverage you need. Furthermore, it’s the best VPN for Argentina and has advanced features that will grant you access to any geo-blocked site.
ExpressVPN
Protect your online identity on the crypto market with this premium service.
NordVPN — Among its numerous benefits, you’ll particularly enjoy unlimited bandwidth for trading crypto. Additionally, it has strong encryption tools and obfuscated mode that will ensure your online anonymity and safety.
NordVPN
Bypass all geo-restrictions with this provider’s advanced features.
Private Internet Access — With PIA, you’ll maintain excellent Internet speeds and have the biggest choice of server locations. It provides military-grade encryption and some unique tools you’ll find invaluable.
Private Internet Access
Enjoy extra security features and a wide-ranging option of servers with PIA
Binance is a leader in the cryptocurrency exchange market, but users in the US have been denied access.
If you’re looking for a way to fix the Binance IP address issue, a premium VPN is your safest bet. It’ll bypass all restrictions and let you trade freely with people worldwide.
For a wider range of VPN options specifically tailored for Binance users, rest assured that we have a dedicated guide. Therefore, do not hesitate to discover the best VPNs for Binance users worldwide right away.
Christmas is coming and if you want to get into the holiday mood, start by playing some fun Santa Claus games. In this article, we’re going to list the best Santa games currently available — all you need to do is hit the play button.
Christmas Carol is a hidden objects game that is packed with gorgeous scenes and catchy mini-puzzles for guaranteed fun and a very nice story.
You will have to help a mother to find her children by exploring the Victorian age London. During your exciting adventure, you will meet the characters from the famous Charles Dickens’ novel and will even be talking to the Christmas Spirits.
You will finally change the future and turn it to your advantage by going through time portals and magical experiences.
How can Santa Claus deliver presents so fast?! It’s a highly discussed dilemma but one way is by using a big, magical sling and he’s aming for the chimneys.
In the Santa Sling VR game, you will be the great slinger of Santa and you will do the job of delivering presents right from Santa’s sleigh during its flight over a Christmas-themed town.
Unfortunately, this game is only for those who own a pretty powerful computer, and the HTCVive Headset and Controllers.
The computer requirements start from a configuration with an Intel i5-4590 equivalent or better CPU, 8 GB of memory, Windows 7 SP1 or later OS, Nvidia GeForce GTX 970, AMD Radeon R9 290 or equivalent graphics cards and 1 GB of free space.
I hate Santa is a very cool VR snowball fight game that you can play with your VR goggles and a controller. Get ready for epic fights while you dodge, shoot against a lot of opponents from the winter realm.
We know you’re the best snowball fighter so you will definitely finish the game and then…you will finally discover Santa’s darkest secret.
The game also has a PVP mode so you can also compete with your friends. Let’s see who is going to own the leader board!
If you like rock music, then Santa Rockstar is the right game for you. Guide Santa around the world and help him slay rock and metal versions of classic Christmas carols together with a reindeer always ready to lend you a helping hand.
In this game, you’ll play Christmas songs such as: Jingle Bells, Carol of the Bells, March of the Nutcracker, Silent Night, God Rest ye Gentlemen, We Wish You A Merry Christmas, Joy to the World, Santa is in Trouble, Little Bells for You, Hark the Herald, Snowball Fight, Three Wise Men, and Santa’s Journey Begins.
You can use your keyboard as a guitar or use a guitar controller to play this budget Guitar Hero for Christmas.
In this title, you’ll track those who have been naughty or nice. As expected, good boys and girls get gifts but bad boys and girls get poop from Santa. Yes, this game may not be appropriate for all ages, but it’s quite fun to play.
The gameplay is quite simple: You can take control of Santa’s sleigh and steer the twelve exploding reindeer to deliver Christmas presents. In each city, there’s someone who has been so naughty that the only gift they deserve is a load of poop down their chimney.
Secret Santa allows you to sneak into people’s houses to deliver Christmas presents. Your task is to complete the list of deliveries and snatch some cookies. This sounds like a pretty easy job to do, right?
The catch is that, paradoxically, everybody’s out to get you so you need to avoid being seen. If they see you, they’ll shot, chop, or blow you up.
You are Santa’s last hope. Find his missing reindeer to avoid Christmas being cancelled before Christmas eve. Your task is to guide the heroes and a band of elves to complete the tasks that appear on the screen.
Manage your time and resources and plan well because you also need to defend your ground when evil Snowmen and Ice Witches attack.
If you’re a Solitaire fan, you’ll definitely enjoy playing Santa’s Christmas Solitaire. In this title, you’ll help Santa solve some strange mysteries. You will visit many locations at the North Pole and Santa’s Village as you collect Santa hats to complete levels and earn Santa coins to progress through the game.
Santa’s Christmas Solitaire is actually a basic Solitaire game with a Christmas user interface.
If you love playing Bingo, here’s a nice Santa-themed game that you can play this winter: Christmas Bingo Santa’s Gifts.
You can play bingo tournaments and enjoy hours of fun with classic bingo rules. There are also multiplayer bingo challenges available and many Santa gifts waiting to be unwrapped.
The game also features impressive Xmas animations, Christmas-themed bingo cards, gifts, Xmas holiday music and many skins and themes like Biker Santa, Shiny nose Rudolph that are available as soon as you’ve unlocked particular levels.
Are audio services not responding on Windows 11? You are not the only person who is encountering this problem.
If you face some audio issues, you may run the Windows sound troubleshooter. But, if it fails by showing the message that the audio services are not responding, this can be an annoying thing. Don’t worry. This article contains the solutions. Before that, let’s know about the reasons.
What causes audio services not to respond on Windows 11?
Luckily there are some specific reasons that cause this problem. As these are easily assumable, you also can troubleshoot the problem quickly. The reasons include the followings:
Outdated Windows: A PC where Windows is not up to date can go through various bugs.
Missing or corrupted system components: System Components are necessary to deliver all functionalities correctly. If not, problems like audio services issues may appear.
Required services are not active: There are some services required to output audio properly on Windows.
Faulty Windows update: Some Windows updates are known to break certain functionalities on certain computers.
How do I fix audio services not responding on Windows 11?
You can easily solve this problem. But before that, you must do these things:
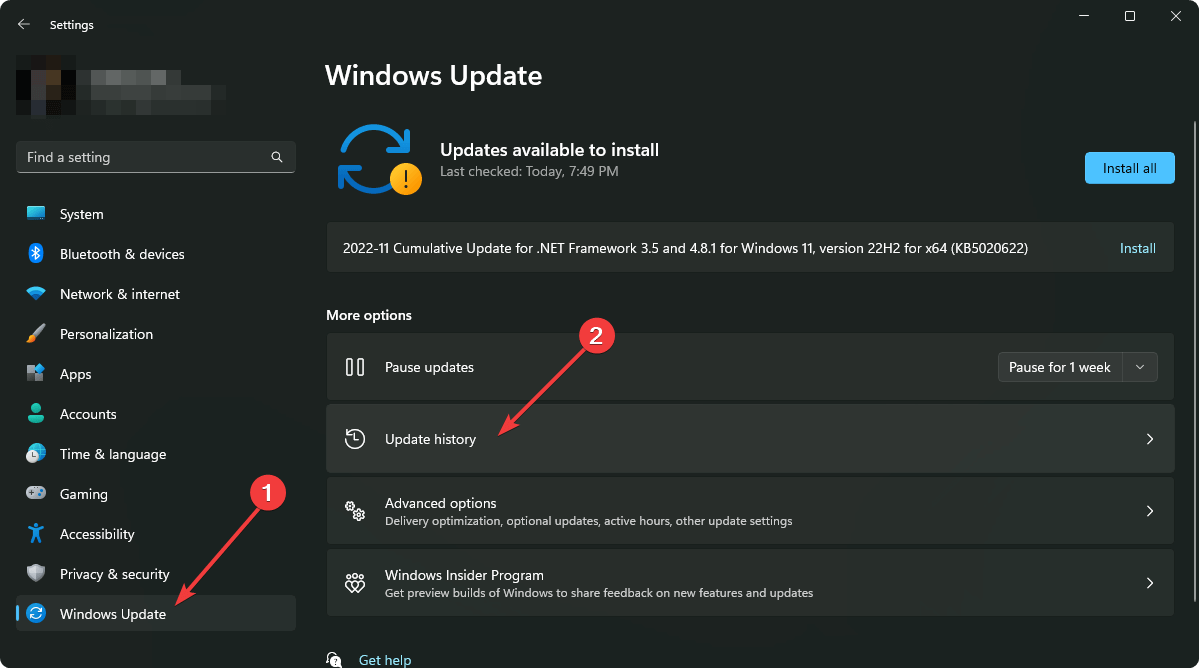
Update Windows to the latest version.
Make sure the output device/speaker is OK.
Doing the above things may save you time, and you may not need to follow the actual ways. However, if you still get the problem, follow these methods:
1. Uninstall audio software
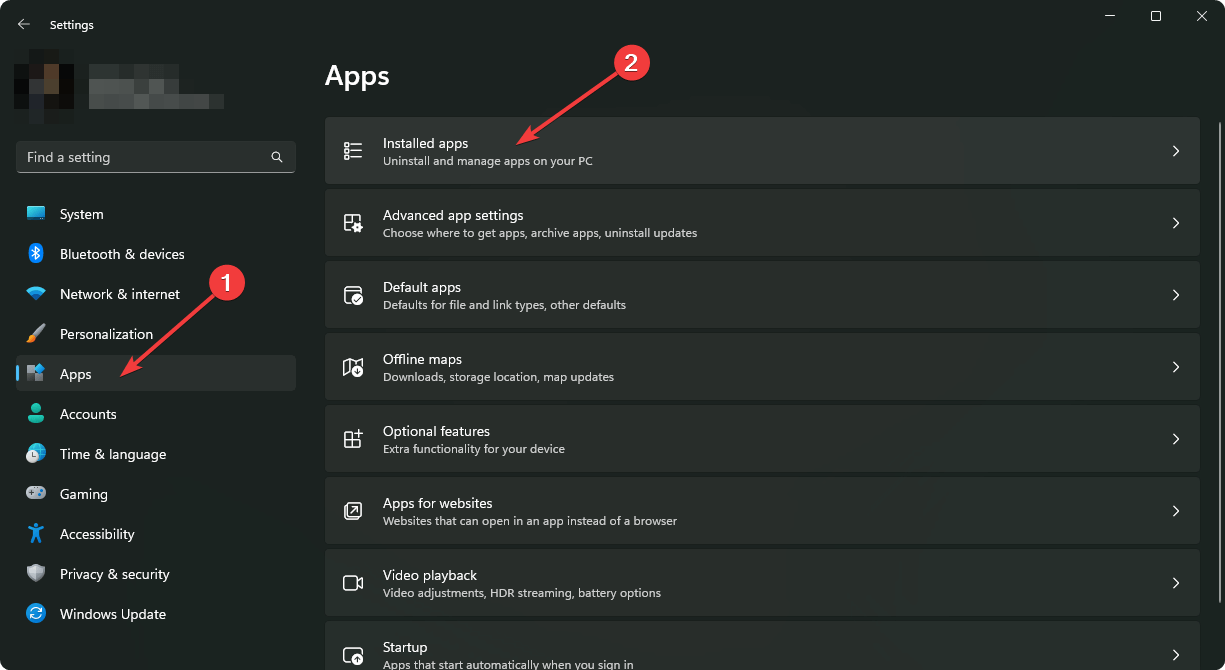
Go to Windows Settings by pressing Win + I on the keyboard.
Go to Apps and click on Installed apps.
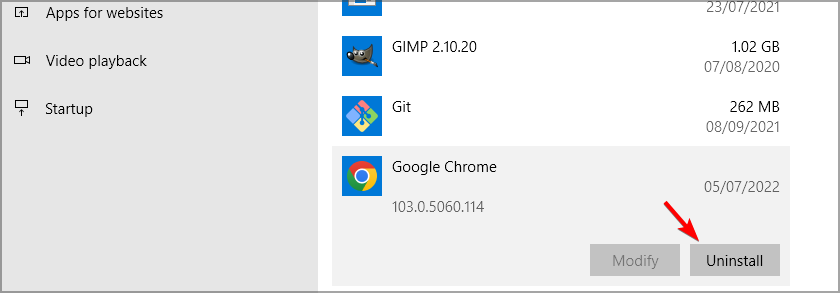
Click on the three horizontal dots next to the audio software you want to uninstall and click on Uninstall.
Now, restart your PC and see if it has fixed the unresponsive audio services problem or not.
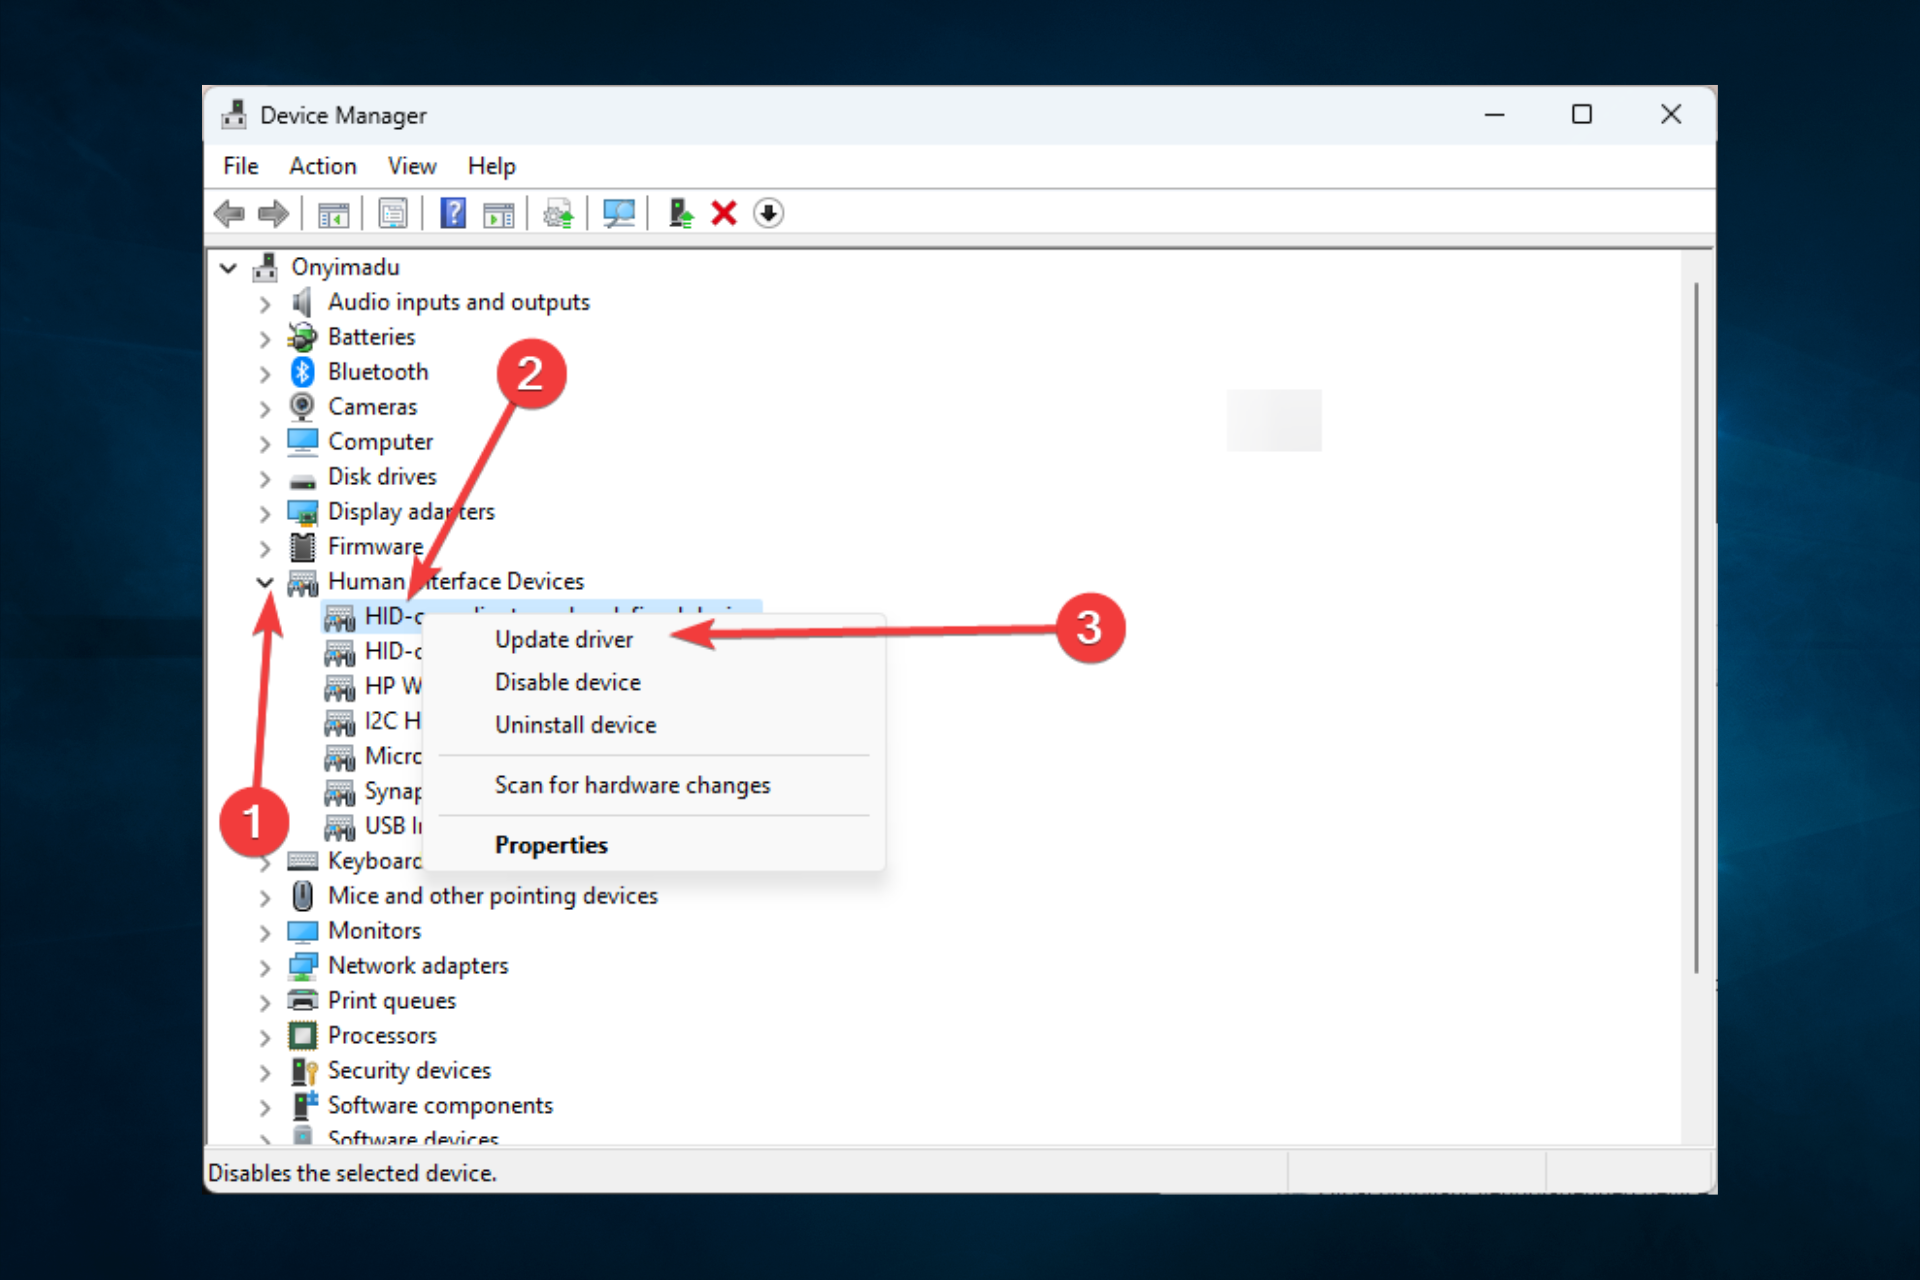
2. Update the audio driver
Open the Start Menu.
Type Device Manager and press Enter to open Windows Device Manager.
Expand Sound, video & game controllers.
Right-click on the audio driver like Realtek Audio and choose Update.
Choose the preferred method to update.
If necessary, expand Audio inputs and outputs and update some drivers.
After updating, restart your computer.
Please keep in mind that the above steps may fail to detect the latest driver. So, we recommend you use an automated tool that can identify outdated drivers and update them with a single click automatically.
3. Re-install the audio driver
3.1 Uninstall the audio driver
Open the Device Manager like before.
Find the audio driver, right-click on it and choose Uninstall device.
Check Attempt to remove the driver for this device and click on Uninstall.
Restart your PC.
3.2 Install the driver again
Go to your motherboard manufacturer’s website.
Download the appropriate driver and install it on Windows 11.
Restart Windows if necessary.
If you can’t do it, restart your PC. In most cases, Windows may install the default audio driver, and it may work without a problem. If not, use software to install the audio driver[check solution 2].
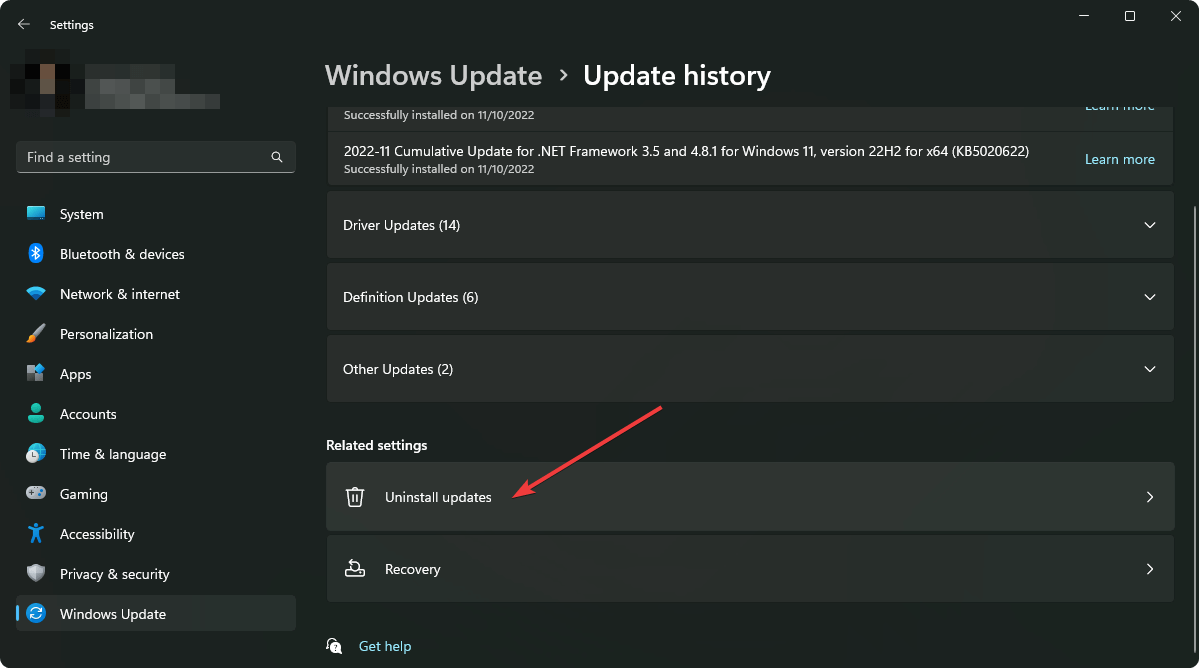
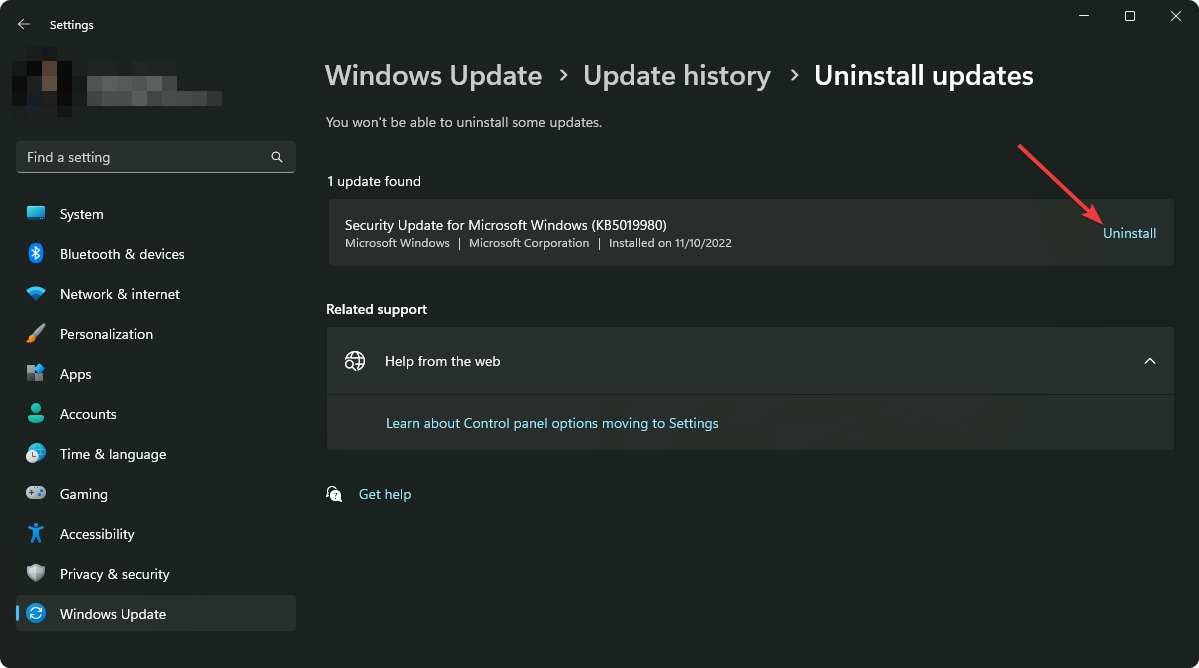
Click on Uninstall next to the update you want to remove.
Restart your PC after completing the process.
Now, try to play any audio. The sound should be OK on your PC, and you will no longer face audio services not responding error.
5. Start/Restart audio services
On the Start Menu, search for services.msc and press Enter.
Find the Windows Audio, right-click on it and choose Restart.
Do the same for Windows Audio Endpoint Builder, DCOM Server Process Launcher, RPC Endpoint Mapper, and Remote Procedure Call (RPC).
Now, try to play any audio file. It should solve Windows 11 audio services not responding problem. If the restart option is not available, choose start.
6. System Restore
On the Start Menu, search for Create a restore point, and click on System Properties.
Go to System Restore.
Check the Choose a different restore point and click on Next.
Select the restore point and click on Next.
Click on Finish.
Follow the onscreen steps to complete the process.
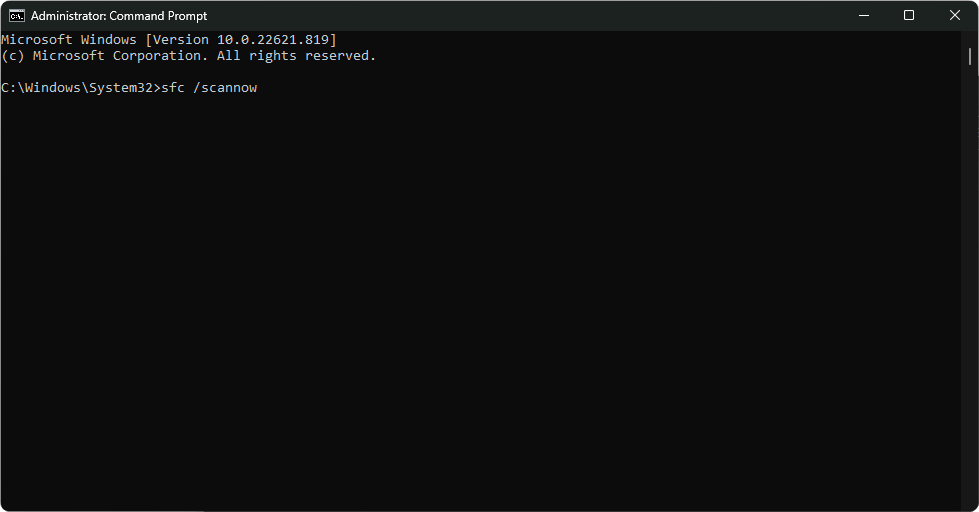
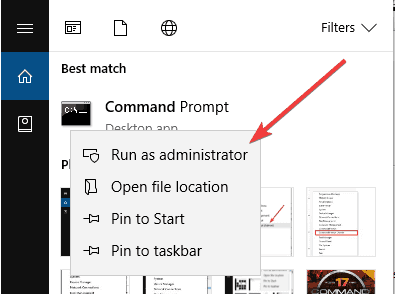
Right-click on the Command Prompt and choose Run as administrator.
Type the following command and press Enter to execute it: sfc /scannow
Restart Windows after finishing the process.
For more steps, learn how to repair corrupted system files on Windows. After that, verify if it has solved the audio services not responding issue on Windows 11 or not.
8. Reset Windows
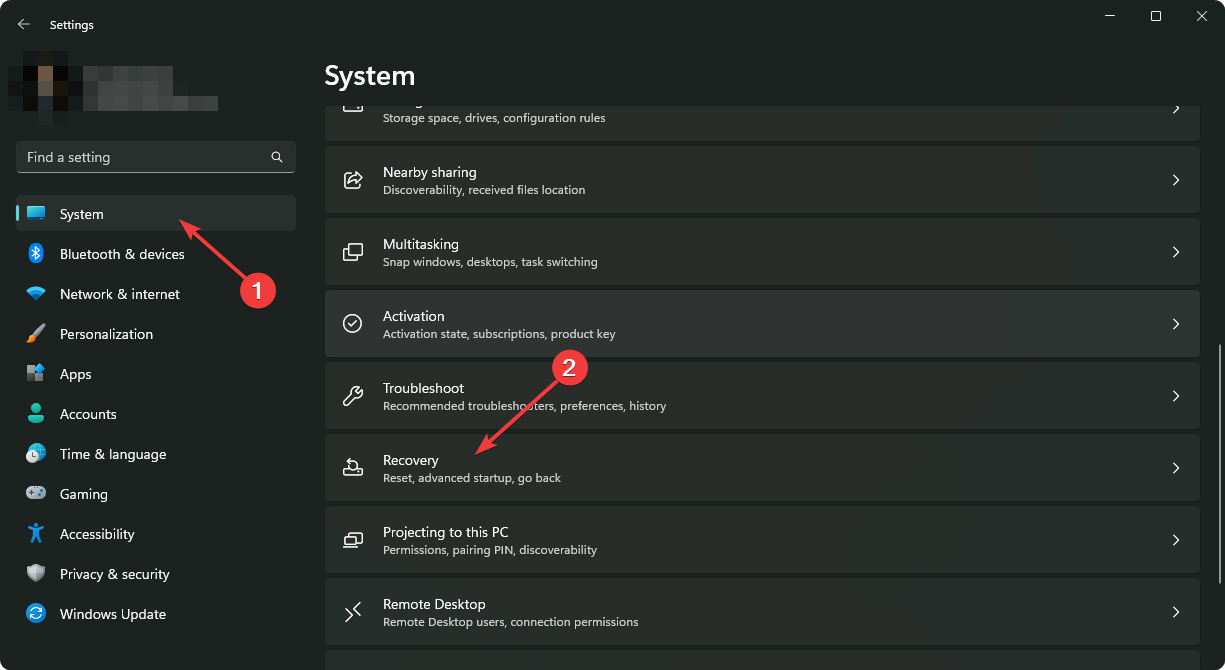
Open the Windows Settings.
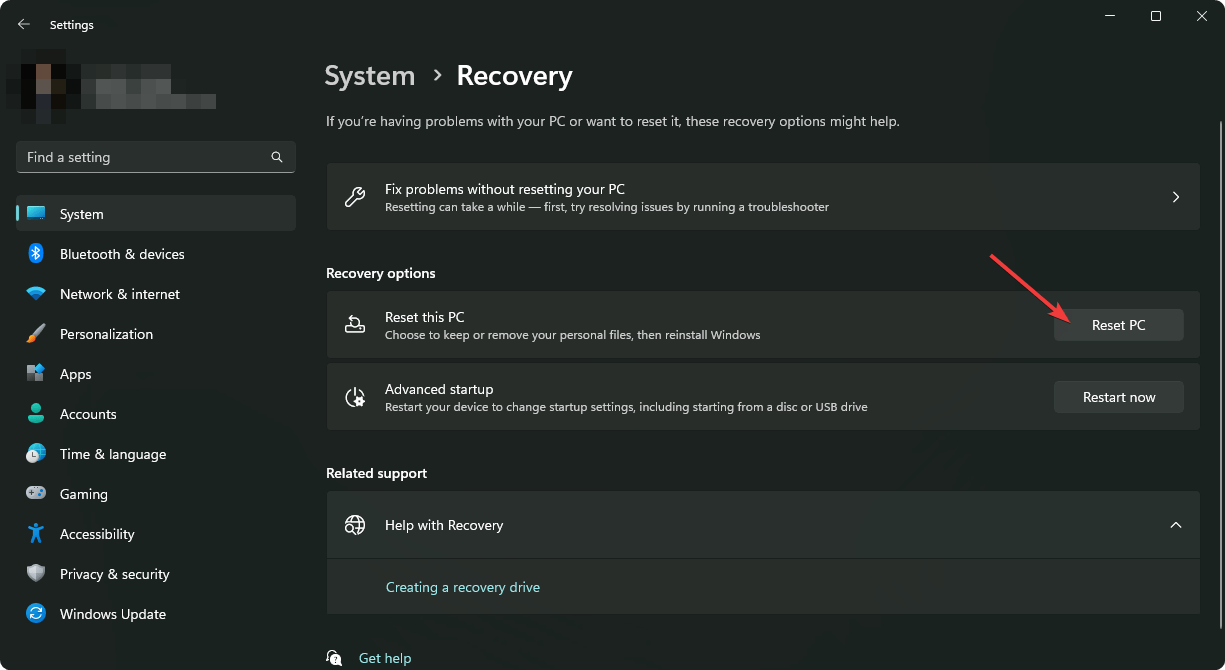
Go to System and then Recovery.
Click on Reset PC.
Choose your preferred way to reset.
Go ahead and finish the process.
Following the above methods will indeed help. However, you also should make sure no software is interfering with your audio services. If appropriate, you also can try to disable the antivirus for a while to see if it improves the situation. Also, consider the clean installation of Windows if required.
This article has mentioned how to fix if audio services are not responding on Windows 11. If you know of any other methods, feel free to let us know in the comment box.
Activating Microsoft operating system is basically impossible without having the associated product key. Finding it is easy in general and many are using Command Prompt for that.
Unfortunately, it seems that there are some users for which the product key is not showing in Command Prompt which is creating a lot of trouble.
We will explore in this article the best workarounds for this problem so that you will gain access to the product key, so make sure to keep on reading.
What to do if product key isn’t showing in Command Prompt?
1. Use PowerShell
Go to the Search bar and type in PowerShell.
Right-click on it and select Run as administrator.
Next, type in the following command and press Enter powershell “(Get-WmiObject -query ‘select * from SoftwareLicensingService’).OA3xOriginalProductKey
Finally, your product key will be displayed so make sure to copy it to a safe place.
2. Run as administrator
Go to the Search bar and type in Command Prompt.
Right-click on it and select Run as administrator.
Now type the following in the cmd and hit Enter: slmgr.vbs /dlv
3. Use a dedicated third-party tool
In case none of the above solutions helped you or if you are looking for a less time-consuming way of finding the product key, then using a dedicated tool is recommended.
We are talking about efficient and easy-to-use recovery applications for Windows that will help you find and keep safe all the activation keys that you will have on your device.
Moreover, these tools can recover lost keys for over 10.000 products. These may be from Windows, Office, Adobe, Electronic Arts, Acronis, WinRar, Nero, and other important utilities.
Additionally, you will be able to backup your activation keys in different document formats so you can save them in one place and never lose them again.
Another alternative to finding the activation product key is by directly contacting your manufacturer through their support page.
If you have bought a device that came with a preinstalled Windows 10, then the product key is preinstalled and you can contact your manufacturer in order to get additional information.
This is about all, and with this last recommendation we will conclude our list and we hope that one of the presented solutions here helped you find the product key.
If you are one of the Windows 10 users who are trying to install the operating system and you get the message:
That key can’t be used to activate this version of Windows
If that’s the case, then this is the tutorial made especially for you. For more details on the matter as well as how you can fix the Windows activation feature in the operating system you can continue reading the lines below.
The message That key can’t be used to activate this version of Windows usually appears in Windows after using the Windows Recovery tool or simply when you install the operating system. So with the help of some useful registry tweaks inside the operating system as well as some additional steps you will be able to fix this issue in the shortest time possible.
However, That key can’t be used to activate this version of Windows is not the only activation error message you can encounter, here are some more error messages that you can resolve with the same solutions:
That key cannot be used to activate this edition of Windows Server 2012 R2
That key can’t be used to activate this edition of Windows. Please try a different key
That key cannot be used to activate Windows on this PC
Product key cannot be used to activate Windows on this computer
The product key you entered cannot be used to activate this edition of Windows
How do I fix a Windows 10 activation key that doesn’t work?
Navigate to the Processes tab. Find Windows Explorer, right click it and choose Restart.
Click on File and choose New Task.
Type explorer.exe and press Enter or click OK. Your Windows UI will be displayed once more.
The first thing we’re going to try is restarting the Windows Explorer proces. According to some users, this process can sometimes block the Windows activation procedure. So, resetting it could solve the problem.
Now you just need to run a single command from Command Prompt to finish the process:
Go to Search, type cmd, and open Command Prompt as Administrator.
In the Command Prompt type the following command and press Enter: slmgr –rearm
Reboot your computer.
Note: Several users reported they fixed the problem by running slmgr /upk command so you might want to try that instead.
2. Use a Digital License
Go to the Settings app.
Open Update & Security > Activation.
Under Add a Microsoft Account, click Add an Account.
Enter your email and password and log in.
Now your Windows 10 copy should be activated.
If you received the That key can’t be used to activate this version of Windows error upon munually inserting the product key, there’s a chance a typo occured. So, it’s advisable to use the digital license tied to your Microsoft account.
If your license key is not associated to your Microsoft account, try some of the following solutions.
3. Use slui.exe
Slui.exe is Windows’ built-in command that allows you to manually activate your version of Windows. So, if you couldn’t activate Windows using previous methods, you may as well try this one:
Go to Search, type slui.exe 3 and press Enter.
Enter your product key and check if you’re able to activate Windows now.
If that doesn’t work, you can try another slui.exe command:
Go to Search, type slui.exe 4 and press Enter.
Enter your product key and check if you’re able to activate Windows now.
4. Disable your antivirus
Windows 10 and third-party antivirus programs don’t go along very well. Although third-party antiviruses usually cause problems with installing Windows updates, they can also block the activation process.
So, try disabling your third-party antivirus temporairly, and see if you’re able to activate your copy of Windows now. If you still can’t activate Windows, move on to the last solution in this article.
If none of the solutions from above solved the problem for you, try forcing the activation of your Windows 10 copy:
Go to Search, type cmd, and open Command Prompt as Administrator.
In the command line, type the following command and press Enter:
SLMGR.VBS –REARM
Now, restart your computer, insert your Activation key (Settings > Update & Security > Activation) and open Command Prompt (Admin) again.
In the command line, type the following command and press Enter:
SLMGR.VBS –ATO
Restart your PC again. That should resolve your issue.
However, if you’re unable to insert your license key in a standard way, you can use the Command Prompt to force the process even further:
Open the Command Prompt (Admin).
Type the following command in the command line and press Enter:
SLMGR.VBS -IPK XXXX-XXXX-XXXX-XXXX
Instead of XXXX-XXXX-XXXX-XXXX insert your license key
Restart your PC and check if the procedure has resolved your issues.
This is pretty much all you need to do in order to fix the That key can’t be used to activate this version of Windows message you get while trying to activate Windows.
If you do run into more issues along the way you can always write to us in the comments section of the page situated below and I will help you further as soon as possible.
Windows 10 has been released for some time, but that doesn’t mean that there aren’t some minor issues from time to time. Speaking of issues, users report that they can’t change Windows 10 product key, so let’s see if we can somehow fix this issue.
According to the users, it seems that when they try to change product key the Settings app freezes and they are unable to change their Windows 10 product key. This sounds like an unusual problem, but fortunately for you, there are few solutions that you can try.
What to do if you’re Unable to Change Windows 10 Product Key
Apparently there’s a bug with User Account Control Settings that prevents you from changing Windows 10 product key but you can try and fix it by following these steps:
Open Settings and search for UAC. From the list of results select User Account Control.
Change the User Account Control settings to Always Notify.
Try to change the product key again. You should get UAC prompt and you should be able to change your product key now.
After you’re finished you can navigate to User Account Control settings and change it from Always Notify to the one you were using before.
Solution 2 – Reinstall Windows 10 upgrade
Some users claim that only way to change your Windows 10 product key if you’re having this issue is to go back to the previous version of Windows that you have activated and then perform the upgrade again.
This might not be the best solution, but even Microsoft suggests it, so if you’re having any issues with changing the product key you might want to try this.
Solution 3 – Restart Windows Explorer process
The next thing we’re going to try is restarting the Windows Explorer process. Apparently, this can affect the the product key settings.
Here’s how to do that:
Right-click the taskbar and select Task Manager.
Navigate to the Processes tab. Find Windows Explorer, right-click it and choose Restart.
Click on File and choose New Task.
Type explorer.exe and press Enter or click OK. Your Windows UI will be displayed once more.
Now you just need to run a single command from Command Prompt to finish the process:
Go to Search, type cmd, and open Command Prompt as Administrator.
In the Command Prompt type the following command and press Enter:slmgr /upk
Reboot your computer.
Solution 4 –Use a Digital License
If you can’t manually insert the license key, use the one associated with your Microsoft Account. Here’s what you need to do:
Go to the Settings app.
Open Update & Security > Activation.
Under Add a Microsoft Account, click Add an Account.
Enter your email and password and log in.
Now your Windows 10 copy should be activated.
Solution 5 – Use slui.exe
Using the slui.exe is one of the most common alternative ways of activating Windows 10. Here’s how to execute this command:
Go to Search, type slui.exe 3 and press Enter.
Enter your product key and check if you’re able to activate Windows now.
If that doesn’t work, you can try another slui.exe command:
Go to Search, type slui.exe 4 and press Enter.
An activation prompt to take over your PC – here you have to select your country and click Next.
Once you have selected your country, you simply have to call one of the listed numbers and follow the instructions given by Microsoft Support.
Solution 6 – Check your internet connection
If your internet connection is not stable, you won’t be able to activate Windows 10. So, if none of the previous solutions resolved the problem, make sure you’re properly connected to the internet.
If there was a problem during the activation process, you can always reset the license status. If you don’t know how, just follow these instructions:
Go to Search, type command prompt, and open the Command Prompt as Administrator.
Enter the following commandand press Enter to run it: slmgr.vbs -rearm
Solution 8 – Force the activation
And finally, if none of the previous solutions managed to resolve the activation problem, you can always force the activation. Here’s what you need to do:
Go to Search, type cmd, and open Command Prompt as Administrator.
In the command line, type the following command and press Enter:
SLMGR.VBS –REARM
Now, restart your computer, insert your Activation key (Settings > Update & Security > Activation) and open Command Prompt (Admin) again.
In the command line, type the following command and press Enter:
SLMGR.VBS –ATO
Restart your PC again. That should resolve your issue.
However, if you’re unable to insert your license key in a standard way, you can use the Command Prompt to force the process even further:
Open the Command Prompt (Admin).
Type the following command in the command line and press Enter: SLMGR.VBS -IPK XXXX-XXXX-XXXX-XXXX (instead of XXXX-XXXX-XXXX-XXXX insert your license key)
Restart your PC and check if the procedure has resolved your issues.
Not being able to change your Windows 10 product key can be a big problem, but as you can see there are few solutions that you can try. We hope that these solutions were helpful to you and that you’ve managed to change your Windows 10 product key.
So you’ve got a machine running WindowsXP. It might be a legacy machine, or maybe you’re keeping it for functionality. Suddenly you are getting a Windows XP needs to be activated before logging in message.
This type of message usually appears only when Windows has not been activated within 30 days since the first installation. Alternately, if you activated Windows recently, then it means that some software or malware has changed your Windows activation information. But we’ve got some solutions for you.
How can I fix Windows XP needs to be activated before logging in error?
You can fix Windows XP needs to be activated before logging in message simply by booting to Safe Mode and running a few commands:
Turn on your machine and press F8 before Windows begins to load.
Go into Safe Mode by selecting the Safe Mode option.
Once you are at the Desktop in Safe Mode, Click Start then click Run.
Type rundll32.exe syssetup,SetupOobeBnk, then click OK.
Wait a few seconds – the screen may blink a few times or so.
This will reset Windows Activation for 30 days.
Reboot the PC into normal mode, login and re-activate Windows.
2. Install Internet Explorer 8
Another way to fix Windows XP needs to be activated before logging in error message is to install Internet Explorer 8.
Restart the PC, and boot it with the Safe Mode with Command Prompt option.
On a separate PC, download Internet Explorer 8 for Windows XP and put it on a memory drive.
Connect the USB drive into the problematic machine.
In Command Prompt install Internet Explorer 8, by selecting the USB drive.
Type the letter of your drive and press Enter.
Select ie8install.exe and press Enter.
Complete the install, restart the PC, and you should be good to go.
Quick Note
You may only do this for a maximum of 120 days after installing any Service Pack for WindowsXP. Also, it’s strongly recommended that you back up your files before the 120 days are up, then reinstall your Service Pack.
Make sure you delete the entire directory from your old Internet Explorer before installing Internet Explorer 8. And keep in mind, for compatibility reasons, you should remove any residual files from your previous Internet Explorer.
3. Use Windows Key Finder
This solution is pretty straightforward. Download Winkey Finder from the official website, and install this software. Once you’ve installed it, simply open it, this should immediately display your current Windows Key. Always remember to write it down, or save it somewhere, just to be safe.
4. Restore your wpa.dbl and wpa.bak files
It the event that any of the solutions above didn’t help, there’s another solution. If you have a backup for all your Windows XP files, go to My Computer > The Drive you have Windows installed > Windows/System32 folder. The next step should be restoring both wpa.dbl and wpa.bak to that folder.
We hope these solutions helped you fix Windows XP needs to be activated before logging in error. In the meantime, let us know in the comment section down below what other solutions you found helpful.
If Windows 10 won’t activate after a reinstall of the operating system, it depends on how it was originally installed on your device.
If you activated a free upgrade or bought from Microsoft Store and activated it, you have a digital license, which means you can reinstall without a product key as Windows automatically activates it online after the process is complete. Before trying to reinstall, ensure you check that it is activated on your device.
However, there are concerns by users that Windows 10 won’t active after reinstall of the operating system. If you share the same concern, then try the solutions below to resolve it.
However you got your copy, the activation can either be done via a digital license or a product key, without which activation is impossible and you cannot substitute the two.
A digital license, also known as a digital entitlement is given instead of a product key and if you have it, you need not enter a product key.
When installing Windows 10, you may either be asked for a product key or if you have the digital license, you can continue without entering a key, and the latter can be bought after installation by going to: Start > Settings > Update & Security >Activation > Go to Store and purchase the license.
Before you resolve the Windows 10 won’t activate after reinstall problem, it is important to note the following:
Give it a few days and Windows 10 should automatically activate itself
If prompted to enter a product key after reinstalling Windows 10, select Do this later and Windows will reactivate in a few days, automatically
Reinstall a valid license that you have either for Windows 7/8.0/8.1 and ensure it is activated, then upgrade to Windows 10
Try a different network connection if possible, so switch from Wi-Fi to Ethernet or vice versa
Update Windows 10 to the latest version using the Windows Update option in Settings > Update & security > Windows Update
2. Reset your license status
Type CMD in the search bar, and right click Command Prompt
Select Run as Administrator
Type the command: slmgr.vbs -rearm
Press enter and exit the command prompt
Restart your computer
Enter the product key using the instructions
3. Force activation
Type CMD in the search bar, and right click Command Prompt
Select Run as Administrator
Type the command: slmgr.vbs -ato
Press enter and exit the command prompt
Restart your computer
4. Replace the product key
This may resolve any problems preventing Windows 10 product activation. To do this:
Type CMD in the search bar, and right click Command Prompt
Select Run as Administrator
Type the command: slmgr.vbs -ipk xxxx-xxxx-xxxx-xxxx (to replace the current product key with the specified) xxxx-xxxx-xxxx-xxxx – represents your product key
If Windows 10 won’t active after reinstall, you may have been running a copy of Windows that isn’t genuine. This could have been bought from an auction website like eBay or Amazon, or a counterfeit copy. You can check the Product ID (PID) to determine the level of support. To do this:
Click Start
Right click Computer
Click Properties
Go to Windows Activation and look at the PID (it has about 20 characters), check the three-digits if they match with the key.
NOTE
You can confirm if it is genuine by checking the Microsoft site, and clicking Validate Windows. If it fails, click Get Genuine button to get a WGA Kit.
6. Check your hardware
If Windows 10 won’t activate after reinstall, and previously it activated, you could have changed some hardware, like your motherboard or processor, which to Windows seems like a totally different PC.
Were you able to resolve the Windows 10 won’t activate after reinstall issue using any of the above solutions? Share your experience in the comments section below.
Update – And as we promised you, Microsoft delivered the ability to activate Windows 10 with a key from older versions of Windows with the November update.
This addition will make activation a lot easier for users who have yet to upgrade their systems to Windows 10.
Namely, you don’t have to upgrade from previous versions of Windows first to get a product key, as Microsoft will now recognize your system license, and provide you with a “digital entitlement,” which will make your installation of Windows 10 fully legitimate.
How can I activate Windows 10 with Windows 7 or Windows 8.1 key?
Activate Windows 10 from the Settings app
The new build for Windows 10 has been released recently, and it brought some changes, both visual and system related.
Besides other additions like Skype Messaging and Video apps, the new build also brought a highly-requested ability to activate your Windows 10 with a product key from your previous Windows 7, Windows 8 or Windows 8.1.
“We have received a lot of feedback from Insiders on making it easier to activate Windows 10 on devices that take advantage of the free upgrade offer to genuine Windows by using existing Windows 7, Windows 8 or Windows 8.1 product keys,” wrote Gabriel Aul, engineering general manager for Microsoft’s OS group, in a blog post.
And Microsoft indeed received ‘a ton of feedback’ on its support pages dedicated to Windows 10 activation errors. There were a lot of threads and more than a thousand messages about it.
People were wondering why they’re not able to manually activate Windows 10, if the automatic activation fails, like they could in previous version of Windows.
Besides using your valid Windows 7 or Windows 8.1 product key for activating Windows 10, if you install Windows 10 on a computer that has integrated product key as a part of its firmware, Windows 10 installer will locate it, and it will install fully-activated version of Windows 10 on your computer.
“If you install this build of the Windows 10 Insider Preview on a PC and it doesn’t automatically activate, you can enter the product key from Windows 7, Windows 8 or Windows 8.1 used to activate the prior Windows version on the same device to activate Windows 10,” said Aul.
Activating your version of Windows 10 with a prior-Windows 10 product key isn’t different than activation with a regular product key.
In order to activate Windows 10 with a Windows 7 or Windows 8 key, you just need to do the following:
Find your Windows 7/8 activation key.
Open the Settings app. You can do that quickly by pressing Windows Key + I shortcut.
Once the Settings app opens, navigate to the Update & Security section.
Now select Activation.
Click on Change Product key and enter your Windows 7 or 8 key.
After doing that, your Windows 10 should be activated and ready to use.
This is a great addition, but it still remains just a promise, as Microsoft still didn’t release the ISO file for build 10565, so we’re unable to check if activation with product key of prior-Windows 10 version of Windows works.
Microsoft will deliver this update update to non-Insider users on Windows 10‘s Current Branch (CD) by the end of the year.
Microsoft already told us that it will release CB updates on every four months, which means that it will arrive sometime in November (four months after July 29th).
But for those of you who are in the Insider Program, you can download the latest build 10565 with this feature from Windows Update now, but only if you’re on the Fast Ring.
A Timeout Period error occurs whenever a third-party service fails to respond to your computer’s request. It can happen to various Windows apps, but this guide will focus on Nvidia’s GeForce Experience.
Although rare, the Timeout Period error for GeForce Experience should be addressed quickly. It can put a real damper on playing video games as the problem stops you from connecting to servers.
What is causing Nvidia GeForce Experience to timeout?
There is a multitude of reasons why your certain operations are timing out. Below is a list of the most common culprits, but are by no means, the only ones:
Computer drivers may be out of date: Conversely, your computer’s NVIDIA drivers may be too old and you need to get new drivers. Fortunately, fixing this is pretty easy to do.
Corrupted system files can mess with other computer functions: Corrupt files can affect more than your video games. Vital systems can shut down and not work.
Apps or processes running in the background: Not all software is perfectly optimized to run with everyone.
Your computer is lacking in RAM: Without an adequate amount of RAM, your computer will experience performance issues.
How can I fix the Nvidia Timeout error?
Before going into the more complicated solutions, it’s important to shout out the easy ones first. These can be done in just a few minutes of your time:
Restart your computer. This is a tried and true method that will solve the vast majority of computer problems.
Increase the amount of RAM available to your computer. This can be done very easily by closing unnecessary apps and windows. It will also free up your CPU thereby improving device performance.
Check the integrity of your game files. It’s possible the problem lies with the games themselves. Verifying files cleans up any corruption found (assuming it works).
Conversely, we also recommend reinstalling the games. Similarly, reinstallation can clean up any and all corrupt files found in a title.
1. Disable automatic driver updates via Search
Start by opening the Windows Search bar and typing the following in: change device installation settings.
Select No (your device might not work as expected in the window that appears.
Click the Save Changes button and close the window.
2. Disable automatic driver updates via the Registry Editor
Bring up the Search bar and type in regedit. Click the first entry that appears.
Select Yes if a User Account Control asks if you want to make changes.
In the address bar at the top, copy and paste the following after Computer\: HKEY_LOCAL_MACHINE\SOFTWARE\Policies\Microsoft\Windows\DriverSearching
Hit Enteron your keyboard to locate the registry file.
Double-click the file that reads DriverUpdateWizardWuSearchEnabled and set its value to 0.
If there’s nothing there, then you don’t have to do anything else.
Search for the Command Prompt on your Windows computer and click Run as Administrator.
In Command Prompt, type in this command and hit Enteron your keyboard: sfc /scannow
Give your computer time to finish the process.
Once that’s done, type in the following and hit Enter: Dism /Online /Cleanup-Image /CheckHealth
Give your computer ample time to finish the previous and following commands.
Now type in: Dism /Online /Cleanup-Image /ScanHealth
Next, type in: Dism /Online /Cleanup-Image /RestoreHealth
Reboot your computer after you’ve done each of the commands.
Another effective method is to use an automated tool that is specialized in checking the system files.
4. Manually install drivers under a clean boot
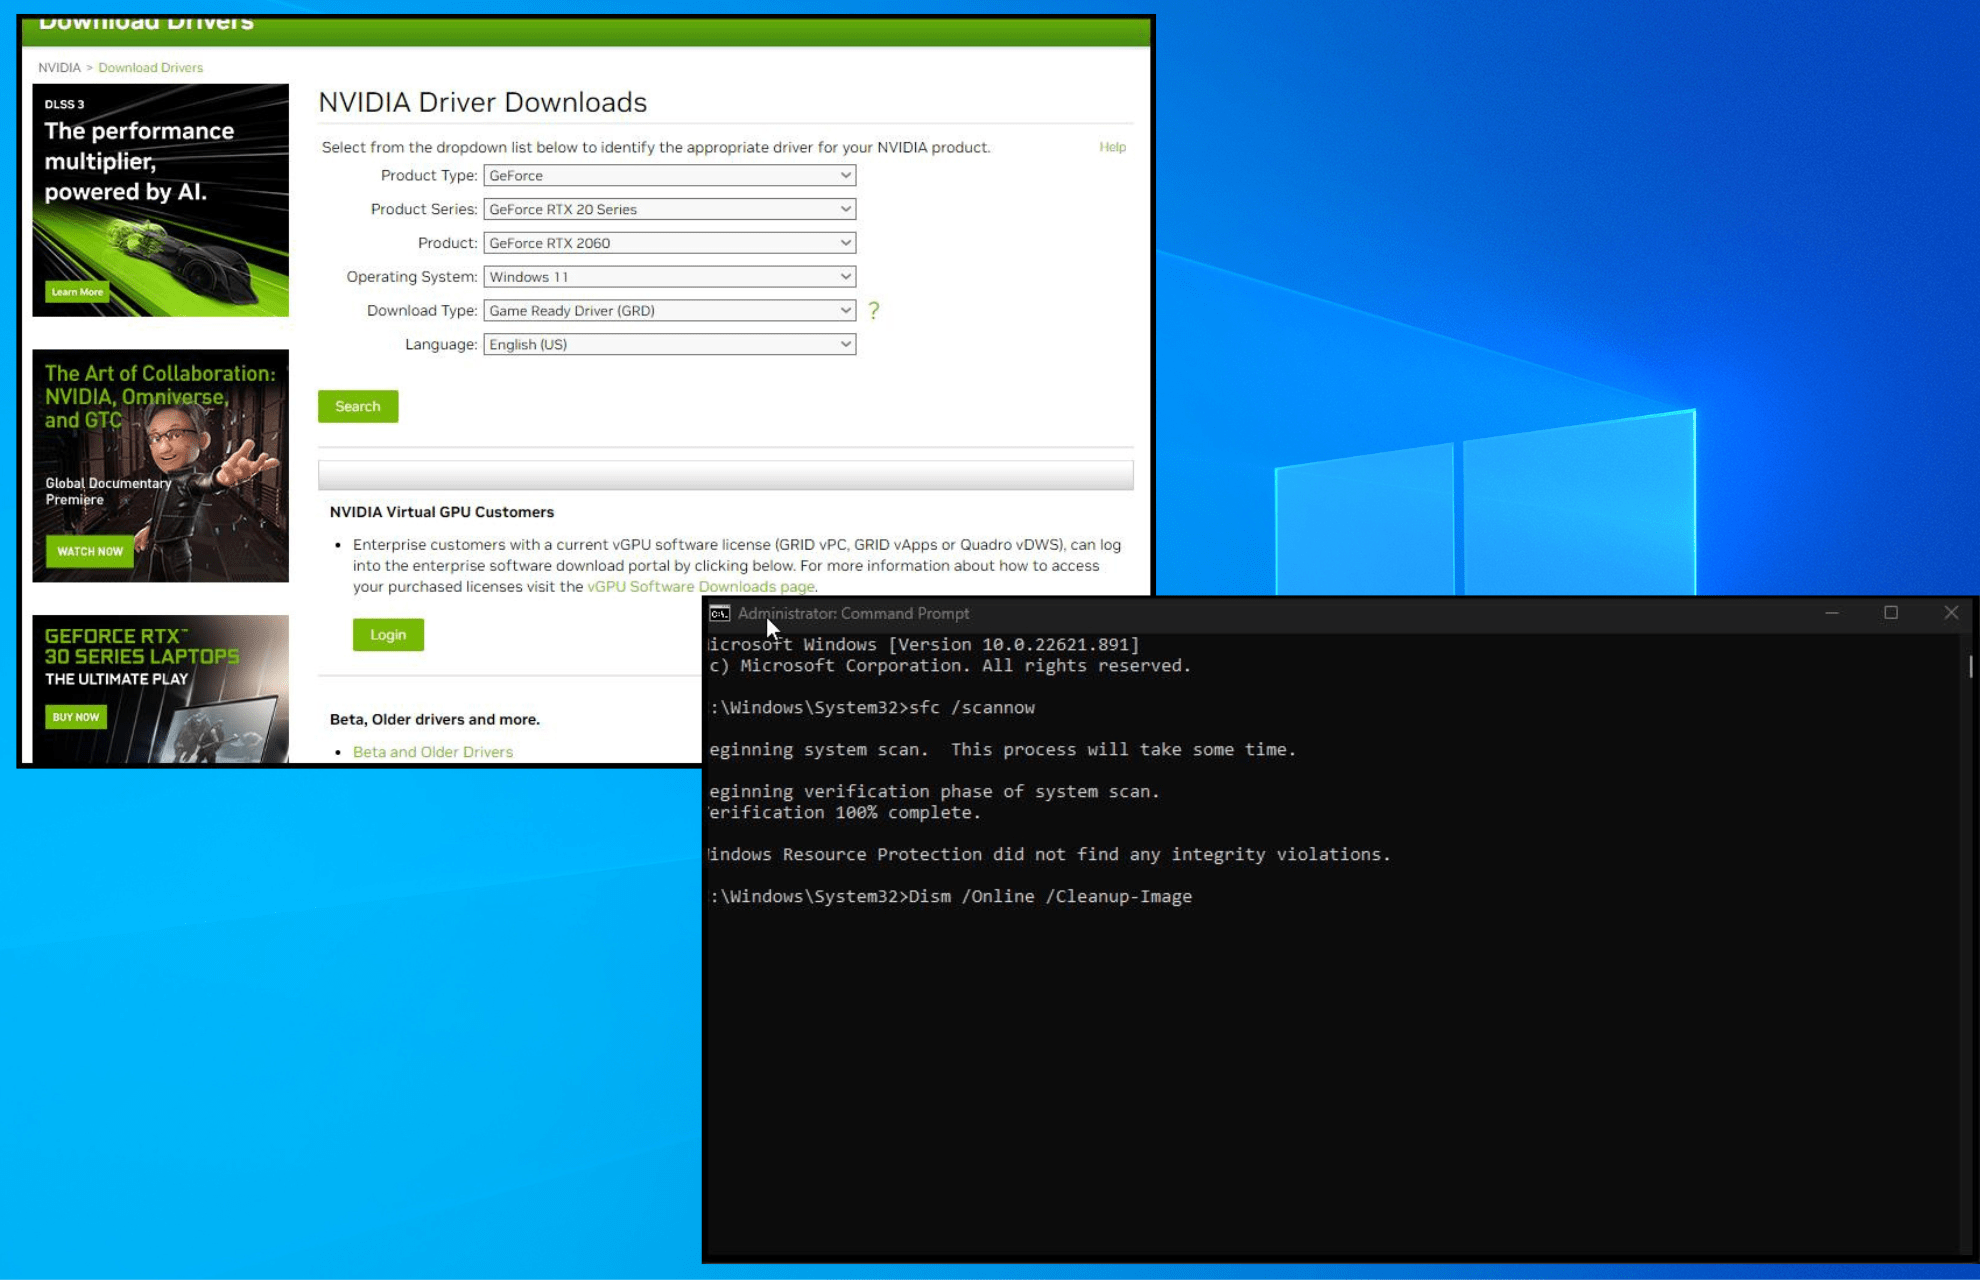
First, go to Nvidia’s driver website and locate the latest drivers for your computer. The image below is one example.
Next, bring up the search bar and locate System Configuration.
Select the Services tab.
Click the box next to Hide all Microsoft services and the Disable All button in Services.
Now go to the Startup tab and click Open Task Manager.
Highlight each of the apps you see open and Disable them. We recommend making note of what they are.
Close the window to return to the Startup tab.
Here, click Apply then OK.
Next, restart your computer to perform a clean boot.
After your computer turns back on, log back in and bring up the Device Manager.
Expand Display Adapters, right-click the Nvidia entry, and select Uninstall device.
Click the Uninstall button when a small window appears.
Go to the location of the drivers you downloaded from Nvidia in File Explorer.
Right-click it and select Run as administrator
Go through the installation wizard to install the Nvidia drivers.
Restart your computer to finish the process.
If this seems too complicated, you should use an automated tool to safely install the right updates. Outbyte Driver Updaterwill find and install all the driver updates your computer needs.
5. Check the manufacturer’s website
If you have a Dell computer, you can go to the company’s support page and have the manufacturer search for the correct drivers for you. Click Check for Updates.
Give Dell some time to finish the process.
Click the Download And Install button when complete to automatically install any missing drivers.
Lenovo owners can do the same thing by going to the company’s support page and clicking Detect Product except the driver will automatically be installed.
HP owners can go to the manufacturer’s support page and click Let HP detect your product to quickly locate drivers.
The reason why we’re specifically showing these support pages is that sometimes manually installing the Nvidia driver doesn’t always. There may be some crucial pieces missing.
So instead of having to dig through your computer’s files, it’s best to go to your computer’s manufacturer support page and download it there. These are only a few examples of possible support pages.
How can I improve my gaming experience on Windows?
First, be sure to learn about 10 of the best mouse settings for gaming sessions on Windows 11 and enjoy a more immersive experience. You’ll learn how to disable mouse acceleration and angle snapping.
Other users have reported certain gaming features suddenly not working. Nonfunctioning features are usually due to an outdated machine or certain media files having gone missing.
Feel free to comment below if you have questions about other video game problems. And please tell us if there’s a specific guide for any specific gaming or error you’d like to see.
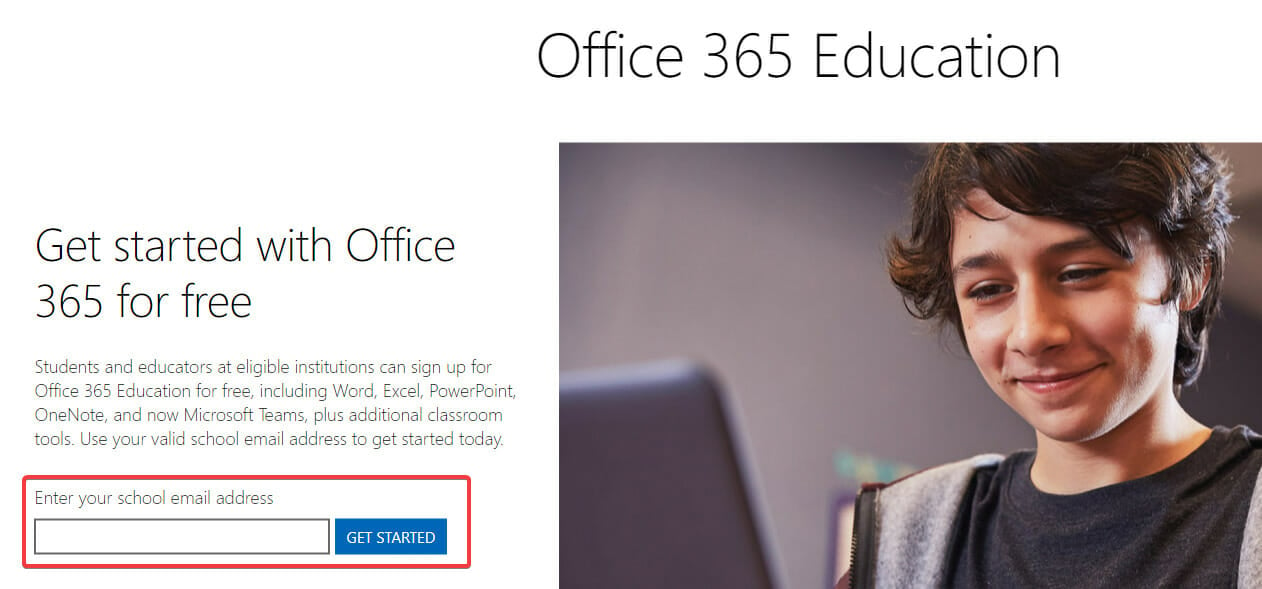
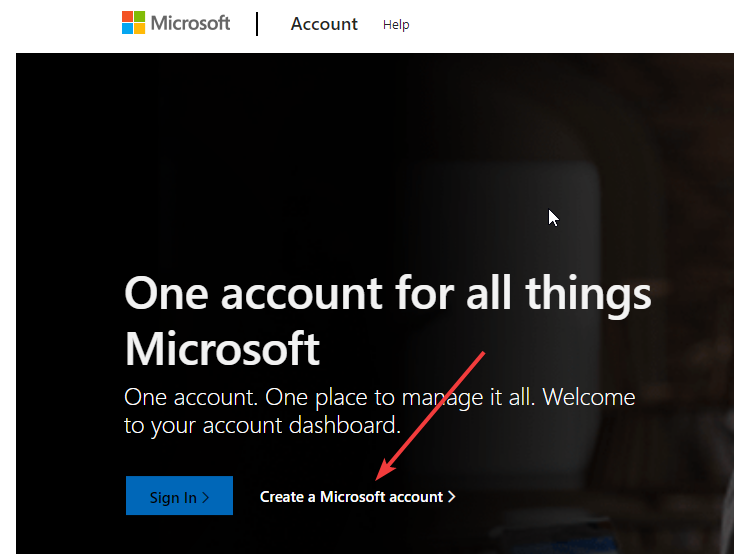
Teachers, students, and faculty members with a school email account, you will qualify to get not only Excel for free, but the whole Microsoft 365 package.
With Microsoft’s automated verification process, most students get verified right away. However, it could take a month to validate your eligibility if you attend a verification-required college.
3. Use the newly created account credentials to sign in.
4. Click on the next button at the lower right side of the window.
5. Under theselect a way to paytab, select your payment method and input your payment credentials. This is required even though the first month is free, and you can cancel it anytime before the payment is triggered.
6. Next, review your information and you will be able to get Microsoft 365 which includes a free month of excel.
You may be wondering why you should pay for Excel if you can use the free version. This is because the tool’s functionality is limited on the free version. Excel will only work in the web browser and only with an internet connection. It also comes with decreased functionality than the full versions of Microsoft 365.
Scroll down to the plans, locate Microsoft Excel Free, and hit the Sign up for free button.
Sign in to your Microsoft account or get a new one.
Once logged in, you’ll be redirected to the Excel online page and you can start working on spreadsheets right away.
Another way to get Excel for free is to sign up for the online version of Excel. You get 5GB of cloud storage and all the baseline features for spreadsheets.
However, there are certain benefits only available in the paid version, such as the ability to exchange links to your work and communicate in real-time, which is comparable to what G Suite offers.
There you have it – if you want to download Microsoft Excel for free on Windows 11, you have 3 options. Check if you qualify for them and pick the one that best suits your needs.
You should also know that there are several free alternatives to Excel that include comparable features. Some of the most notable ones are WPS Office’s Spreadsheets and Libre Office. And yes, google also has a free version for a spreadsheet app called Google Sheets, as part of Google Workspace.
Want an easier way to create or edit spreadsheets without installing anything? Take a look at our guide on free spreadsheet services with no login and start working online instantly.
Let us know in the comments below if you manage to get Microsoft Excel for free by using the methods on our guide.
The console platforms have passed a long way past solely being gaming machines. These days you can enjoy your favorite multimedia content, be that music, TV shows, or movies on a big screen. One of the streaming services with some stellar exclusives is HBO with its HBO Max streaming client.
The app usually works well on Xbox One but it’s far from being perfect. And, it usually suffers from a variety of issues. Starting with HBO Max not Working on Xbox One, slow buffering or failure to load, or crashes followed by errors.
We made sure to inspect this and provide you with some common solutions for the HBO Max not working on Xbox One. Check them below.
How to fix HBO Max not working on Xbox One
1. Power cycle the console
Many issues on Xbox One are easily resolved with a simple power cycle (hard reset). The cached data, especially in apps like HBO Max can result in loading issues.
Users who experienced issues said that only some content wasn’t working, as they were able to stream the majority of content successfully.
So, if we eliminate the possibility of a wide range of issues (certain popular TV show premiers might be unavailable), the power cycle should be enough to resolve this.
Here’s how to power cycle Xbox One:
Press and hold thePower button for 10 secondsor so.
Wait until the console shuts down.
After a minute, turn on the console again and look for changes.
2. Update the app and the console
If the previous step failed you and you’re still having issues with the HBO Max app on Xbox One, consider updating both the console and the app itself.
Issues will emerge sooner or later, but it’s in HBO’s best interest to deal with them as soon as possible, or massive subscription cancelations will occur.
Also, while we’re there, check for the console update as well. Here’s how to manually check for updates for Xbox One and HBO Max:
Under the My games & apps section, highlight the HBO Max app and then press the Menu button on your controller.
Choose Manage app.
Install updates if available under the Updates section.
Now, open Settings.
Choose System and then Updates.
Select Update Console to see if there are any available updates.
3. Check the connection
Now, we mentioned that this isn’t exactly a general issue completely disrupting this streaming service. The app is far from good and the streaming quality is subpar in comparison to some other services.
However, your connection might be the reason why the app underperforms.
That’s why we’ll need you to run some built-in diagnostics in order to determine whether your connection is sufficing.
Here are some steps you can take to diagnose and troubleshoot possible connection issues on Xbox One:
Here’s what you can try to fix connectivity issues on an Xbox:
Make sure you use a wired connection instead of wireless.
Reboot your router and console.
Run diagnostics
Press theXbox buttonto open the guide.
Choose Settings.
Tap All Settings.
Choose Network.
SelectNetwork settings.
Select “Test network connection“.
Set a static IP address
Open Settings and thenAll Settings.
Choose Network.
OpenNetwork settings >Advanced settings.
Write down yourIP and DNS values (IP, Subnet mask, and Gateway).
Under the Advanced settings, openIP settings.
SelectManual.
Once here, openDNS and write downDNS input.
Enter the values you wrote and confirm changes in theAdvanced settings.
Restart Xbox
4. Sign out and sign in again
This is a far-fetched solution but, by signing out and in again with your credentials, the app might just start working.
Miraculous or not, this is commonly recommended by a variety of services with their apps available on the Xbox One platform. So, before we finally move to reinstall the app, give the said sequence a go.
In addition, you can sign out and completely power off the console before signing in again. Some recommend unplugging the power cord for a minute or so. After you turn on the console, sign in and try streaming the HBO content again.
5. Reinstall the HBO Max app
So, if the problem is persistent and you’re unable to wrap your head around it while HBO support doesn’t exactly do customers justice, we can only suggest reinstallation.
With console troubleshooting, users are rather limited. Especially when it comes to third-party apps.
Therefore, we can only recommend reinstalling the app and moving from there.
If you’re not sure how to reinstall the HBO Now app, follow these steps:
Open My games & apps.
Highlight HBO Max and press the Menu button on your controller.
Choose Uninstall.
Power cycle your console.
Go to Apps and install the HBO Max app.
With that said, we can conclude this article. In case you have any questions or suggestions, feel free to tell us in the comments section below. In addition, don’t forget to send your ticket to HBO support until they deal with it.
Many readers have reported receiving the System in Setup Mode! Secure Boot can be enabled when System in User Mode. Repeat operation after enrolling Platform Key(PK) error message. It is an error message that usually comes after trying to enable Secure Boot through your MSI motherboard.
If your system uses the old boot framework and secure boot is not enabled, the Secure Boot state will be unsupported. This happens even if your motherboard includes the Secure Boot option. The solutions work perfectly on Secure Boot unsupported issues for all devices, including HP, Dell and Lenovo laptops or ASRock and Gigabyte motherboards.
How can I fix the Secure boot can be enabled when System in User Mode issue?
To begin, check to see if your PC is supporting Secure Boot without entering BIOS before trying to proceed with other steps to power it in user mode. This should help you if there would be a requirement issue.
You may enable Secure Boot for Windows 11 in user mode from BIOS after verifying its reliability. When you get the Secure Boot can be enabled when System in User Mode error, go to the BIOS screen to enroll platform keys, then repeat the start-up in Secure Boot.
1. Check the UEFI firmware settings
Click on the Start button, go to the Power icon and hold the Shift button on your keyboard while you select Restart.
Select Troubleshoot from the Advanced Startup window.
Click on Advanced Options.
Choose UEFIFirmware setting.
Click the Restart button to restart your PC and open the BIOS settings.
With firmware updates, many manufacturers update their device’s UEFI support and the system settings menu options.
Furthermore, it’s important to have the latest updates from the manufacturer installed on your Windows 11 PC, for a good overall performance.
After your PC reboots, continue with the next solution to change the BIOS settings.
Enter BIOS Setup with the corresponding key on the screen.
Look for the Secure Boot option. In most situations, it will be under the Boot or Security tabs, though the location will change based on your PC.
Change BIOS from Legacyto UEFI.
Enable Secure Boot in user mode (UEFI).
Press the Save & Exit corespondent key on the screen, and you are done.
It’s important to change the PC’s boot mode from Legacy BIOS (also known as CSM Mode) to UEFI BIOS.
After making changes to the settings, restart your computer. This will re-enable Secure Boot on your PC, and the supported value should appear in System Information.
Secure Boot is now enabled on your computer. Use PC Health Check to determine whether your PC meets the Windows 11 system requirements to make an upgrade or a new installation.
3. Convert your partition to GPT, if supported
NOTE
Windows 11 only boots on a GPT partitioning system so if it isn’t already, you need to change the partition from MBR to GPT. This is an advanced procedure so we advise you to create a backup of all the data before starting.
Right-click the Start button and select Disk Management.
Now, right-click your drive and select Properties.
Next, click on the Volumes tab and look at Partition style. If it shows GPT all is well and you can end here. If it shows MBR instead, continue with this solution to change it.
Close the window, click on the Search icon, type cmd, and select Run as administrator.
Type the following command and press Enter to run it: mbr2gpt.exe /convert /allowfullos
After the conversion process completes, check the partition style in Disk Management as instructed above and it should now read GUID Partition Table (GPT).
Why should I enable Secure Boot on Windows 11?
Secure Boot is a function that activates on the latest PC models. This is a UEFI platform feature that replaces the traditional PC BIOS.
Enabling Secure Boot increases the security of your computer and protects it from virus attacks. It would merely protect your computer and have no negative impact on performance.
Secure Boot ensures that a desktop or laptop only opens trusted software, firmware, and apps. Thus, it is perfectly safe to enable Secure Boot on a Windows 11 PC.
Why is certain software enforcing TPM and Secure Boot?
Following these steps to ensure Secure Boot is enabled in Windows 11 in user mode, will also define if you can install and run certain apps that enforce the usage of this feature.
The main reason that apps require TPM 2.0 is for security and safety on the players’ ID. The TPM control assists in preventing hijackers from using cheat codes. TPM is all about security and protocols.
When TPM is applied and they receive a ban, the entire device or hardware ID is blocked. This prevents scammers from spoofing their device to act as another device with a different ID.
To resolve the TPM problem on Windows, simply enable secure boot and then enable TPM on your device.
You may also check Windows 11 ready-laptop choices to help you better understand the compatibility between a computer and how Windows 11 works on it.
Hopefully, we cleared out how to enable Secure Boot. If you encounter other issues, please let us know in the comment area below.
Encountering an error message is the worst thing that can happen when all you want to do is hit the play button on your Xbox One. Error code: (0x80070102) is a complex error code that prevents players from signing in to their accounts and using their consoles. This error is specific to the Xbox One and Xbox One S consoles.
Xbox forced update, now everything throws an error 0x80070102. Literally EVERYTHING throws this error. Xbox starts up fine, but when I try anything, this. Then I can’t chose close or any other choices. From the main menu if I hold down the Xbox button on my controller the screen dims end thats it. If I try pressing it once or navigating left to get to settings, same thing. The update bricked my console.
How to fix the error code: (0x80070102)
Perform a hard reset: hold the power button for 5-10 seconds.
Connect your console to your network via a wired connection.
Disconnect additional peripherals.
Go to My apps & games > go to Apps > load the Avatar app.
Press the center X button on the controller > wait. Two things may happen: the Home menu will pop out after a while, or you’ll get an error. Should you get an error message, press the Xbox button again to make the window go away.
When the Home menu appears on the screen, immediately go all the way up to your Icon > go to the right > sign out.
Go to Settings > check and fix your Internet connection issues.
Sign back in < wait a few minutes for the whole process to complete and then reboot your console.
Are you having issues with your Xbox One S not turning on or off? Well, this concern has been raised before by many Xbox users, not just for the S model, but also for the original, and subsequent models
The most probable cause when the Xbox One S won’t turn on is power supply which may be either faulty or not properly connected. There could be other reasons, but this is the main one.
If you have issues with your Xbox One S not turning on or off, try the solutions below.
FIX: Xbox One S not turning on or off
Note: Try all the solutions below as the issue could be mistaken for a new power supply, while it’s your Xbox One S console that could be in need of repair.
If it won’t turn on
1. Reset your power supply
The Xbox One S console has an internal power supply which works across all regions in the world. If it is not turning on, you may have to do a simple power reset. Usually, power issues are a result of power supply resetting after a power surge experience. To do this:
Unplug the power cord from the Xbox One S console.
Wait for about ten seconds
Plug the power cord back into the Xbox One S console
Press the Xbox button on the front of the console.
If the console turns on, then the power reset solution worked. You can do this if the problem recurs in future.
If it still won’t turn on, try the steps below:
Check if the power outlet you are using works with other devices.
Confirm that the power cable is connected firmly to the wall (power) outlet and to your Xbox One S console.
Make sure you are using the power cable that came with your Xbox One S console, and that it’s the correct cable for your location
If your console still will not turn on, it will need to be serviced, in which case request for service by signing in to the Device support page and submit a service order.
If the LED light on the power supply is on, plug the power supply unit back into your console, without turning on the console, and check if it is on or off. Turn on the console and see if it powers up successfully. If the LED on your power supply unit is off, then it needs to be replaced.
If the power supply unit is still blinking, it needs to be replaced.
2. Check that the console is positioned correctly
The Xbox One S console has two fans so ensure there’s nothing blocking them. Place the console on a flat and stable surface. When the fans or ventilation airways are blocked, the console may overheat and fail to turn on.
The console isn’t meant to operate in a vertical position as this affects disc drive performance. A proper stand is also needed if you want to place it vertically.
Ensure the surface is stable, don’t place it on speakers or subwoofers, and check that the space is well-ventilated, uncluttered, cool, and away from direct heat sources.
3. Turn off background downloads
This keeps the Xbox One S console on to download things off of Xbox Live and can keep the console on even when not downloading, for about ten minutes. To turn it off, do this:
Press Xbox button to open the guide
Select System
Click Settings
Then choose Console Settings
Select Startup and shutdown
Select Background downloads and turn it off
4. Check if you have Guitar Hero
One cause could be that you have Guitar Hero in your played games list, and the guitar is tucked away, it can keep the guide button constantly pressed in, or the batteries could be going flat.
If it won’t turn off
If you’ve tried to turn off the Xbox One S console the right way, and nothing changes, do the following:
From Settings:
Press Xbox button to open the guide
Select System
Open Settings
Then click Power & Startup
Select Power mode and startup
Then chosoe Turn off or restart
Select Full Shutdown or Restart now
You can also use your voice if you have Kinect and the command is in your language (or supports it). To do this, say ‘Xbox turn off’, or, if you have Cortana, say “Hey Cortana, turn off.”
If nothing happens and the Xbox One S console won’t turn off, hold down the power button to force the console to shut down, then unplug the console as a last resort. This may affect any current activity like losing a game or corrupting of the game.
Note: Do not unplug the console while system updates are being installed.
Did any of these solutions fix the Xbox One S not turning on or off problem? Let us know in the comments section below.
If you’ve chosen to upgrade your operating system to Windows 11, you may have encountered a few glitches here and there. Thankfully, they are not very important, but they still affect your capability to use the OS efficiently.
One of the recent issues users are complaining about is that Windows 11 Taskbar is not working. This can be frustrating, but it is not the most challenging issue to fix.
This guide will show quick solutions to restore your Taskbar and get back the ease of access it offers.
Why is my Taskbar not working on Windows 11?
Even though the reasons are present in a significant number of possibilities, the Windows 11 Taskbar not working issue has some common triggers:
System file corruption: If the Windows 11 Taskbar is not working after sleep, on a second monitor, or in other circumstances, it might be down to some broken system files. The easy solution is to restore these files using a top-notch system repair tool.
Issues with the explorer.exe process: The Windows explorer process sometimes makes the Windows 11 Taskbar encounter a glitch. To resolve this, you need to restart the explorer.exe task.
Faulty updates: Some users have reported noticing this issue after installing an update. You need to uninstall this update to get past the issue.
User profile issues: For some reason, problems with user profiles have caused this problem for some users. Creating a new user with administrative rights has effectively fixed it for them.
How can I fix Windows 11 Taskbar if it’s not working?
1. Reinstall the Universal Windows Platform (UWP)
Hit the Windows key + X keys and click Windows Terminal (Admin) from the list.
Click the dropdown at the top and select the Windows PowerShell option.
Copy then paste the command below and hit Enter: Get-AppxPackage -AllUsers | Foreach {Add-AppxPackage -DisableDevelopmentMode -Register “$ ($ _. InstallLocation) \ AppXManifest.xml”}
Finally, restart your PC.
Issues with the Universal Windows Platform can also cause the Windows 11 Taskbar not working issue. Running the command above will help reinstall the platform and fix the issue
2. Restart Windows Explorer
1. Right-click the Startbutton or press the Windows + X keys to open the WinX menu.
Hit the Windows + X buttons and choose Windows Terminal (Admin).
Now, type these commands and hit Enterafter each: Dism /Online /Cleanup-Image /ScanHealthDism /Online /Cleanup-Image /RestoreHealthsfc /scannow
Restart your PC.
If you still can’t fix the Windows 11 Taskbar not working issue, the problem might be with your system files. Running the DISM and SFC commands should do justice to that quickly.
Additionally, we suggest using an automated repair solution to fix the corrupted files from your PC. It will scan the entire system and replace broken system files with other functional ones.
4. Uninstall updates
Press the Windows+ X keys and choose Task Manager.
Click File, then Run new task.
Inside the pop-up, type control.exe, then click OK.
In the Control panel window, click Programs.
Below Programs and Features, click View installed updates.
Right-click the Security Update for Microsoft Windows (KB5006050), then uninstall it.
Restart the computer. The Taskbar should work okay after the reboot.
If you notice that the Windows 11 Taskbar is not working correctly after an update, you need to uninstall the update. Some users have primarily found the Security Update for Microsoft Windows (KB5006050) to cause the issue.
Thus, if you have it, you need to remove it to get your Taskbar back.
Press the Windows+ I keys to open the Settings app and choose Accounts in the left pane.
Choose the Family & other users option.
Select the Add account button in the Other users section.
Choose I don’t have this person’s sign-in information.
Now, click Add a user without a Microsoft account.
Enter the username, password, and security questions, and click Next.
Now, click the dropdown before the account you created and click the Change account type button.
From here, click the dropdown under Account type, select the Administrator option and click OK.
Finally, log in to the account and check if your Taskbar is working.
Some problems with your user profile might be causing the Windows 11 Taskbar not working issue. Creating a new profile has fixed the situation for many users, and you should try it too. And this will also when you can’t dock the language bar in the taskbar.
As you can see, the Windows 11 Taskbar not working issue is not impossible to fix. You only need to follow the steps carefully, and things will return to normal.
Your Xbox One allows you to access all sorts of content online, but sometimes certain errors can occur. Users reported Something went wrong error on their Xbox One, and today we’re going to explain to you how to fix this error.
Xbox One error “Something went wrong”, how to fix it?
1. Redeem your code at a later time
Many users tend to use prepaid codes on their Xbox One to purchase online content, but sometimes certain errors can occur while doing so. If that happens, it means that there’s a temporary issue with the Xbox service, and in order to fix this problem, you should wait for an hour or two and try to redeem the code again.
In order to redeem a prepaid code Xbox Live services need to be running, but if one service isn’t running you’ll encounter this problem. To check the status of Xbox Live services, simply visit the Xbox website. If there’s a problem with Xbox Live services, you can only wait until Microsoft resolves the issue.
In addition, you need to be positive that you’re trying to redeem a prepaid code for an Xbox game or app. If you’re trying to redeem a code for a Windows game or app, you won’t be able to complete the process on your Xbox One.
2. Check your region settings
According to users, Something went wrong error message can appear while redeeming prepaid codes if your region isn’t properly set. To fix this problem, you might have to change your region settings on Xbox One by following these steps:
Make sure that you’re signed in to Xbox One.
Scroll left on the Home screen to open the Guide.
Choose Settings > All Settings.
Now choose System.
Select Language & location.
Select a new location and choose Restart now.
Changing the region on Xbox One is simple, but there are a few limitations that you should know about. Firstly, you can change your region once every three months, so keep that in mind. In addition, you won’t be able to change your region if your account is suspended or if you have a balance due on your Xbox subscription.
Keep in mind that certain services might not be available if you change your region, so choose your new region carefully. In addition, the money on your Microsoft account won’t be moved when you change the region, so be sure to spend it before you decide to change your region.
3. Check your billing information
If you’re getting Something went wrong error message it might be because your billing information isn’t correct. This can occur if your credit card is expired or if you moved recently, so be sure to check the billing information by following these steps:
On the Home screen scroll left to open the Guide.
Select Settings > All Settings.
In the Account section select Payment & billing.
Select Change billing address.
Review and edit your billing information. If you need to skip certain information, press B on the controller and choose Next.
Once you’re done, select Save info to save changes.
You can also change your billing information from your browser. This is a faster solution for some users, and in order to do it you need to follow these steps:
Log in to your Microsoft account with any web browser.
Go to Payment & billing section and choose Billing info.
Select Edit profile and follow the instructions on the screen.
After reviewing and updating the billing information, try to redeem the code again.
4. Redeem the code on the Xbox website
Something went wrong error message can appear when you try to redeem a code on your Xbox One, but a few users reported that they managed to redeem their code simply by using Xbox website.
There’s an option to redeem codes on the Xbox website, so if you can’t redeem the code on your console due to this error, be sure to try redeeming it on the Xbox website.
5. Disable the Instant-on feature
You can fix this error on your Xbox One simply by disabling the Instant-on feature. This feature works as a sleep mode for your Xbox and allows you to put your Xbox One in standby mode quickly.
This is a great feature, but it has its flaws, and sometimes, this feature can lead to certain errors. To fix Something went wrong error you need to disable Instant-on feature by following these steps:
Go to Settings and navigate to Power & startup.
In Power Option section select Power mode and press the A button on the controller.
Select Energy-saving option.
After selecting the Energy-saving option, your Xbox One will turn off completely when you press the power button. This means that it will use less power when it’s turned off, but it will also start a bit slower when you turn it on. After disabling Instant-on feature, check if the error is resolved.
6. Sign out and sign back into your account
According to users, you might be able to fix Something went wrong error message simply by signing out of your account and signing back in. To do that, follow these steps:
Press the Xbox button on your controller to go back to Home screen.
Highlight your account picture in the top left corner.
Select your account, press the A button on the controller, and choose the Sign Out option.
After signing out you just need to log back in again and check if the problem is resolved.
Xbox One “Something went wrong” when trying to play a game
1. Restart the router
According to users, you might be able to fix this error message simply by restarting your router / modem. To do that, you need to follow these steps:
Press the power button on your modem to turn it off.
After the modem turns off wait for 30 seconds or more.
Press the power button again to turn it on.
Wait until the modem starts completely and check if the problem is resolved.
If you use both modem and wireless router, you’ll have to restart both devices in order to fix this problem.
2. Reinstall the game
Sometimes Something went wrong error message can appear if your installation is corrupted, and one way to fix the problem is to reinstall the problematic game. To do that, follow these steps:
Go to the My Games & Apps section.
Highlight the game that you want to remove and press the Menu button on the controller.
Select Manage Game option from the menu.
You should now see relevant game information such as the storage space that it takes and its saved games.
Choose the Uninstall option and wait until the game is removed from your system.
After the game is deleted, you need to install it again by doing the following:
Open Games & Apps section.
Scroll all the way right and you’ll see Ready to install list. This list consists of games that you own but you don’t have currently installed on your console.
To install a game, simply select it and wait for it to install. Keep in mind that installation process can take a while depending on your Internet connection.
Some users are recommending to disable your Internet connection before reinstalling the game from a disc. According to them, an update might be downloading during the installation process and that can cause problems with installation, therefore it’s advised that you go offline and install the game from the disc. To go offline, follow these steps:
Scroll left on the Home screen to open the Guide.
Select Settings > All Settings.
Choose Network > Network settings.
Now select Go offline.
After the game is reinstalled, try to start it again and check if the problem is resolved.
3. Clear the cache
Xbox One stores all sorts of temporary files in its cache, but sometimes those files can get corrupted and cause this and many other errors to occur. The simplest way to deal with corrupted cache is to clear it by following these steps:
Press and hold the power button on your console to turn it off.
After the console turns off, unplug the power cable.
While the power cable is unplugged keep pressing the power button to drain the battery completely.
Now reconnect the power cable and wait until the light on power brick changes from white to orange.
Press the power button again to turn on your console.
After the console turns on the cache will be cleared and the problem will hopefully be resolved. Some users are also suggesting to start your game without signing in to your Xbox account. After the game starts, you’ll be asked to sign in to your Xbox account, so be sure to do that.
Clearing the cache can also help you avoid similar issues like Something went wrong error while playing a game; read this guide to learn more.
4. Restore your Xbox to factory settings
If you’re getting Something went wrong error message when you try to play a game on your Xbox One, you might be able to fix the problem by performing a factory reset. Sometimes certain game files can get corrupted, and the only way to fix the problem is to perform a factory reset. Keep in mind that factory reset might delete all your installed games and apps, therefore be sure to back them up. To restore your Xbox One to factory settings, follow these steps:
Scroll left on the Home screen to open the Guide.
Select Settings > All Settings.
Now choose System.
Navigate to Console info & updates and choose Reset console option.
You’ll see two options available, Reset and remove everything and Reset and keep my games and apps. Select the latter option to keep your downloaded games and apps. If this option doesn’t work you’ll have to use Reset and remove everything option. This option will delete all your installed games so you’ll have to download them again.
Since the download process can take a while, we strongly suggest that you move all your installed games to external hard drive before performing the factory reset.
5. Check the status of your subscriptions
Certain games require subscriptions in order to work properly, and if your subscription is expired you’ll need to renew it. To do that, follow these steps:
Log in to your Microsoft account with any web browser.
Navigate to Services & subscriptions section.
Find the subscription that is expired and select the Renew option. If this option isn’t available, you’ll have to buy the subscription again.
After your subscription is renewed, the error should be completely resolved.
6. Try restarting the game
Few users reported that they managed to fix this problem simply by restarting the game. To do that you need to follow these steps:
Press the Xbox button on your controller to return to the Home screen.
Highlight the game title and press the Menu button on the controller.
Select Quit from the menu.
Wait for 10 seconds or more and then try to launch the game again.
Fix – Xbox One “Something went wrong” update
1. Install the update using a USB flash drive
Sometimes there might be an issue with online update that prevents you from installing certain updates. When that happens you’ll see Something went wrong error message on the screen. To fix this error you can try installing the update offline by following these steps:
Connect NTFS USB flash drive to your PC. Keep in mind that USB flash drive needs to be empty in order to install offline update.
Download the offline system update.
The file will be stored in a zip archive so be sure to extract it.
Locate $SystemUpdate file that you extracted and move it to the root directory of the USB flash drive.
After moving the update file to the USB flash drive you need to install it by following these steps:
If possible, disconnect the network cable from your console. Alternatively, you can turn off your modem.
Turn off your console by holding the power button on the front.
Unplug the power cable and reconnect it after 30 seconds.
Press and hold the Bind button on the left side and the Eject button, and press the Xbox button on the console.
Hold Bind and Eject buttons for 15 seconds.
If you performed the process properly, you’ll hear two power-up sounds. Release the Bind and Eject buttons.
Connect the USB flash drive to your console.
Select Offline system update option from the menu and press the A button to start the process.
Wait until the update process is complete.
After the update is installed, the problem should be completely resolved.
2. Select the Turn off Xbox option
If you’re getting Something went wrong error message after trying to install the update, be sure to try using the Turn off Xbox option. After that, simply turn on your console, and the issue should be resolved. Few users reported that this method worked for them, so be sure to try it out.
3. Go offline and back online
If you receive this error message after installing a new update, you might be able to fix it by going offline and back online. A few users reported that this method helped them fix the problem, so be sure to try it.
Fix – Xbox One “Something went wrong” startup
1. Reset your console to factory defaults
Users reported that this error occurs when they start their console, and if you have the same issue, you might want to reset your console to factory defaults. Resetting your Xbox One to factory defaults will delete all your files from your console so you’ll have to download them again. Your saved games will remain if they are synced with Xbox Live. To reset Xbox One, do the following:
On the Troubleshoot screen choose the Reset this Xbox option and press the A button.
Choose Keep games and apps option.
This option will restore your Xbox to factory defaults without affecting your games and apps. Unfortunately, this option doesn’t always work, so sometimes you might have to use Remove everything option and remove all downloaded apps and games from your system.
After resetting your Xbox One to factory defaults, this error should be completely resolved.
Fix – Xbox One error “Something went wrong” party chat
1. Make sure that your NAT is set to Open
To use party chat on Xbox One your NAT needs to be set to Open. There are many ways to do that, but it’s usually achieved by forwarding your ports or by using DMZ or UPnP feature. We already explained in detail how to do that in “Your network is behind a port-restricted NAT” article, so be sure to check it out.
Something went wrong Xbox One error can create many problems for you, but we hope that you managed to fix it after using one of our solutions.
The Xbox One S is a console that brings a significant performance boost to all your games. This console is 40% slimmer than its predecessor, the Xbox One, and supports 4K and HDR for a better gaming experience.
But all electronic devices are subject to various technical issues and the Xbox One S is no exception, with many error messages that can break your game when you’re in the middle of a decisive moment mid-game. Other errors prevent you from signing in or saving your game.
In this article, we’re going to list the most common Xbox One S errors that affect this console, as well as some quick workarounds to fix them.
How do I fix the most common Xbox One S error codes?
1. Fix Xbox One S error code E200
This error message usually appears when you’re using your Xbox One S console during a system update or a game. It can be a simple E200 error or a more complex E200 XXXXXXXX XXXXXXXX code, where the X digits vary. Follow the steps listed above to fix error E200:
Select I am getting an error message or an error code
Select I am getting an error code
Scroll down > select E200 XXXXXXXX XXXXXXXX
Power cycle your console. If the error occurred during a system update, you should try to install update again.
2. Fix Xbox One S errors codes E102 and E101
Usually, these errors occur upon startup or during OS updates. Basically, these two error messages indicate there is an issue with your Xbox One S system update process. To fix the E101 and E102 errors, you need to update your console offline.
The Xbox One Offline System Update lets you download the update file to a USB flash drive and then install it onto your Xbox One S console. To update your Xbox One S console offline, you need a Windows PC with an internet connection and a USB port, as well as an NTFS-formatted USB flash drive with a minimum 4GB of space.
2. Plug your USB flash drive into your computer’s USB port > open the Offline System Update file OSU1
3. Save the console update .zip file to your computer
4. Unzip the file > select Extract all from the pop-up menu
5. Delete your all the files from your flash drive.
6. Copy the $SystemUpdate file from the .zip file to your flash drive. Don’t forget that the files should be copied to the root directory.
7. Bring up the Xbox Startup Troubleshooter. Here’s how to do this:
Power off your console > unplug the power cord > wait for 30 seconds > plug the power cord back in
Press and hold the BIND button and the EJECT button > then press the Xbox button
Continue holding the BIND and EJECT buttons for 10-15 seconds
Release the BIND and EJECT buttons after the second power-up tone
The console will power up and activate the Xbox Startup Troubleshooter.
8. Plug the USB flash drive into your Xbox One S USB port. The Xbox Startup Troubleshooter will enable the Offline System Update option.
9. Select Offline System Update by using the D-pad and A buttons > the update process will start
10. Once the update has been installed, the console will restart.
11. Remove the flash drive from the USB port of your console.
3. Fix Xbox One S error code E305
The error message E305 or E305 xxxxxxxx xxxxxxxx (the X digits vary) occurs when updating your Xbox One S console. The only solution to fix it is to perform an offline system update. Simply follow the troubleshooting steps listed above for errors E101 and E102.
4. Fix Xbox One S error codes E200, E204, E206, E207
These three errors mainly occur on startup and during the update process. To fix them, you need to restart your console. Use the D-pad and A button on your controller and select Restart this Xbox. You can also press and hold the Xbox button on the front of the console for 10 seconds. Then, turn on the console and check if the update has installed. If not, launch the update process again.
5. Fix Xbox One S error code 0x803f9007
When your game won’t load on the Xbox One S, it’s likely that error 0x803f9007 will appear on the screen. There are three possible explanations as to why this error occurs:
The game disc isn’t in the console
You aren’t signed in and connected to Xbox Live
The game trial period has expired.
As a result, to fix error 0x803f9007, make sure that the game disc is inserted and that you are signed in to your Xbox Live account. Of course, don’t forget to purchase the game if the trial period has expired.
6. Fix Xbox One S error code 0x80bd0009
The 0x80bd0009 error usually occurs when users set up their Xbox One S console and the error indicates there’s no sound available. More specifically, the TV is not sending its EDID properly when there’s a surround sound system attached. Although there is no permanent fix available to solve this problem, you can use the following workaround:
1. Press the Menu button > go to Settings > Display & Sound > select HDTV, not “auto” > this will reset your display and audio output options.
2. You should now be able to select HDMI audio for 5.1 and DTS.
7. Fix Xbox One S error code 0x87e00005
This is another common error message that occurs when users set up their Xbox One S console or when they’re installing a game. If error 0x87e00005 occurs when you try to install a game to an external hard drive, here’s what to do:
Go to My games and apps > press the menu button on the game> go to the Manage game option
Select Move > and then select the hard drive you want to install the game on.
8. Fix Xbox One S error code 0x91d7000a
Error 0x91d7000a occurs when the Xbox One S can’t play 4K Blu-Ray. More specifically, the Blu-Ray app will load for minutes on end, and then display an error message informing users that the HDMI input is not HDCP compliant. Here’s how to fix this:
Go to the Home screen to open the guide > select Settings > All Settings > System > Console info & updates > select Reset console.
That’s about it for our list of common Xbox One S errors. If you’ve encountered other error messages that we didn’t list in this article, use the comment section below to tell us more about your experience.
We’ll try to find a fix for your particular error messages and publish it as soon as possible.
A good number of users have reported encountering the error message 0x80370102 when trying to install Linux Distro for Windows Subsystem for Linux 2 (WSL2).
The WSLRegisterDistribution Failed With Error: 0x80370102 is quite common, since WSL2 was released with the Windows build 18917, and it doesn’t only apply to Linux distros. This error has also been encountered when trying to install the Debian distro as well.
The full error message reads: Error: 0x80370102 The virtual machine could not be started because a required feature is not installed.
This annoying error stops you from finishing the virtual device installation on your PC, so you can’t access the new features contained in the update.
In this article, we will explore some of the best solutions available. Please make sure to follow the steps presented in this list closely, in order to avoid causing any other issues.
How can I fix the WSLRegisterDistribution Failed With Error: 0x80370102 issue?
1. Check if your PC supports hardware virtualization
Right-click on your Windows taskbar -> select Task Manager.
Inside the Task Manager, select the Performance tab, and check to see if the Virtualization and Hyper-V support are enabled.
Close Task Manager and follow the next method to activate any/both of the disabled options.
2. Activate hardware virtualization from BIOS
Reboot your PC.
Depending on your BIOS manufacturer, the key to log into BIOS will vary. Press Del, Esc, F1, F2, or F4 key on your keyboard as soon as the screen goes black. (If you don’t get in the first time, restart your PC and try another key).
Find the CPU configuration section (Menu can be called Processor, CPU config, Chipset, etc.)
Find the virtualization setting and enable it (Intel Virtualization Technology, AMD-V, Hyper-V, VT-X, Vanderpool, or SVM).
Choose the option Save & Exit.
The computer will reboot with hardware virtualization enabled.
Check to see if the issue persists. If it does, follow the next method.
3. Activate Nested Virtualization for VMs using PowerShell (Admin)
On the host machine (with target machine powered off) -> press Win+X and choose PowerShell (Admin) from the list.
Inside the PowerShell window -> paste this command changing the values to your VM processor and name: Set-VMProcessor <VMName> -ExposeVirtualizationExtensions $true
Press Enter to run it.
In case you want to enable this service on all VM’s installed on your PC that is currently turned off, paste this command inside PowerShell: Get-VM | ? State -eq ‘Off’ | Set-VMProcessor -ExposeVirtualizationExtensions $true
In this article, we explored some of the best methods to solve the error code 0x80370102 when trying to install the Linux or Debian Distro for Windows Subsystem for Linux 2 (WSL2).
We hope these steps helped you solve your issue with the WSL error 0x80370102. Please feel free to let us know if this guide helped you by using the comment section below.
These allow you to modify the sound parameters and adjust the quality and output. There aren’t many options when it comes to headphone software for PC, but we managed to find the best ones for you.
Do headphones need software?
It all comes down to requirements, but having a reliable and effective headphone software wouldn’t hurt. Some headphone software are even free. Here are some of the benefits of using Bluetooth headphones software:
Improved quality – One of the significant benefits is the software’s ability to improve audio quality. It reduces background noise and eliminates any distortion, among making other changes.
Louder sound – If an audio or video has an extremely low sound, a headphone software will allow you to enhance the volume.
Presets to choose from – A gaming headset software, and even the other ones, have a range of presets to choose from, thus saving you time.
Boom 3D is an award-winning audio enhancement software that can calibrate itself based on your sound system card. It was designed to play music with 3D effects on any type of headphones and player.
The 3D Surround Sound feature lets you customize equalizer presets for your liking and enjoyable music listening. With Boom, you also get access to 20,000+ local and international radio stations.
You can also adjust the bass level, scale the intensity, and turn on/off the individual virtual sound.
Some features include:
Quick controls
Special audio effects – ambiance, night mode, spatial
Volume booster
Audio controller
Boom 3D
With 3D boosting technology, you can revolutionize the way you listen to music, hear movies, and play video games.
Razer is known for its gaming-based laptops and accessories. On top, Razer also has quite a few software applications like Surround Pro. This is a surround sound application that enables users to experience the best virtual 7.1 channel surround sound on any stereo headphone.
There are two versions of Razer Surround. While the standard version is free, the Pro version of the same comes with a few more added features on its official website.
As said earlier, the Surround Pro works with any headphones, including Razer headphones. The software allows the users to calibrate positional sound as per their preferences. For gamers, this can be of advantage.
Apart from gaming, the Razer headphone software can overall adjust the sound for music and movie, offering a better listening experience. Razer Surround Pro takes time delay, audio interference, amplitude, and other factors and creates sounds from any distance and direction.
The personal calibration can be saved in the cloud and used on any computer by logging into your Razer account saving you from the hassle of having to calibrate the audio preferences manually for each computer.
The free version of the Razer Surround supports 7.1 Surround Sound, pre-configured calibration for razor audio products, and also works with third-party headphones.
The Surround Pro, on the other hand, offers more, including bass boost, sound normalization, voice clarity for incoming communication, voice level adjustment, 11 pre-set and customer equalizer settings, and the ability to calibrate to individual’s preferences.
A few key features include:
Supports 7.1 surround sound
Allows positional calibration of sound
Offers bass boost and voice clarity
Razer Surround Sound
Enjoy a wide range of options for customizing your audio settings and listening to your favorite music!
TNK Surround Audio System is a surround audio-focused server program for an enjoyable experience while using headphones.
Loopback recording allows several devices to be output at the same time. It delivers high-quality audio for Windows 10 through C++ WASAPI (Windows Audio Session API).
You can use an optical audio connection to collect surround audio from your computer or output it to an external audio device if you have an audio pass-through adapter.
If a device does not have a S/PDIF output connection (for example, the PlayStation 5, Xbox Series X), you can import it using an HDMI audio converter.
When you select this function, the volume gradually recovers from quiet to normal level during playback. When you use headphones, you may prevent the problem of a loud sound abruptly bursting out.
It includes a 2-channel surround effect software as well as a virtual surround program that replicates 5.1 channel surround on stereo audio. Even though the audio is the only stereo, you receive surround sound.
Individual recordings of audio can be altered. You may emphasize the volume on the rear, in addition to changing the speaker placement, to assist you in focusing on the back of the 3D game.
A 10-band audio equalization is included. You may assemble your preferred audio environment from a variety of players.
Key features include:
Allows users to output to multiple devices simultaneously
Supports 5.1 surround sound
Offers modification to sound quality
TNK Surround Audio System
Enhance the sound through your head speakers and adapt the inputs for a surround experience with TNK Surround Audio System!
Whether you want precision audio for PC games or spectacular sound while watching movies and listening to music, the Dolby Atmos for headphones can offer it all. It is a premium headphone calibration software that costs $14.99 but comes with 30 days of a free trial.
Dolby Atmos for Headphones works with Windows 10 and Xbox console and is compatible with any pair of stereo headphones, much like Razer Surround Pro.
The software uses the audio object metadata to correctly position the audio within the 360-degree space allowing it to get more than two-speaker sound for the headphone users.
According to Dolby, the software can help you pinpoint teammates, enemies, and obstacles in competitive games. Apart from that, it also allows you to enjoy music and movies with a more encompassing experience.
Do note that Dolby Atmos for Headphone feature is only available on Windows 10 creator updates or above running machines.
FxSound Enhancer is not a virtual surround sound software for headphones but a sound enhancer that offers high-resolution audio, full customization, and tons of presets.
The software boosts the sound quality of the content playing on PC. The software can optimize music in real-time and offer increased bass and crystal clear audio, and high fidelity.
FxSound Enhancer also has a 3D surround sound feature. With 7.1 surround sound support, it replicates a studio-quality listening environment for headphones.
FxSound Enhancer is highly customizable as you adjust the effects for fidelity, ambiance, 3D surround, dynamic boost, and bass functions. It also has over 20 presets and allows you to adjust the audio equalizer precisely.
FxSound Enhancer is a premium software, but you can use the trial version before opting for the premium version of FxSound Enhancer.
SonarWorks uses the same technology that is being used in recording studios and brings it to the masses with its SoundID Reference for headphones. The software currently supports over 287 pairs of headphones from popular brands, including Sony, Beats, and Audio Technica.
With its much-hyped headphone calibration technology, SoundID from SonarWorks allows you to build your unique audio experience through headphone sound and even sub-par headphones for mixing but works really great when gaming.
Our hearing varies, therefore, we use various devices to have the best experience possible when listening to music or speech, and it becomes even more amazing.
Maybe your hearing isn’t symmetrical because you live in a city with a lot of noise pollution. This is something that SonarWorks SoundID can help with, and avoid any distractions while playing your favorite podcast.
Use your existing headphones to their highest capacity, and connect to your computer’s desktop for playback. It’s the only sound technology designed based on tones artists have heard in the studio.
Even with low-cost headphones, you can feel the difference as it offers a better bass response (if it lacks one) and better clarity and details in the high end.
Some key features include:
Supports over 287 headphones
Eliminates distractions
Improves sound quality even on low-range headphones
Spatial Sound Card is one of the latest entrants in the headphone surround sound software market and offers a 5.1 surround sound experience absolutely for free, at least for now.
This program has been developed by a US studio and is mainly aimed at games that want an immersive surround sound experience using their headphones.
It has a simple user interface and is the most accessible headphone software from the lot. The developer claims the software can offer a cinema-like experience while watching movies and exceptional sound quality while listening to music.
During gaming sessions, you can precisely hear the enemy’s and teammate’s movements and unlock an optional low-latency mode optimized for pro gamers. The low-latency feature is being offered as an in-app purchase.
The difference in quality depends on the kind of headphones you own. While you may see substantial improvement in quality and clarity from high-end headphones, the difference may not be as much with low-end headphones.
But all these will enhance the audio quality to the fullest, regardless of the headphone type or price range. So, before you leave, do not forget to check out the best gaming headsets for Windows.
Do let us know your favorite pick in this list in the comments below.
The Xbox One S is a powerful gaming console capable of delivering 4K gaming. But, like all electronic devices, it’s subject to technical issues. If you’re experiencing 4K and HDR not working, such as 4K options not appearing in settings or missing 4K features, then follow the troubleshooting steps listed below.
Fix: Xbox One S HDR and 4K not working
1. Check your TV’s capabilities to make sure you have a 4K TV.
Different TV manufacturers use different names to describe 4K capabilities. Check the packaging or your TV manual and look for the following codes:
HDR Premium, High Dynamic Range, HDR, UHD Color, Ultra HD Premium, Ultra HD deep color
2. Check your TV’s 4K and HDR capabilities with the console connected. Double-tap the Xbox button on the controller, go to Settings > All settings > Display & sound > choose Advanced video settings > 4K TV details. If your TV supports 4K and HDR but these features don’t work, follow the steps below.
3. Make sure the console can automatically detect your TV. Open the guide > go to Settings > All settings > select Display & sound > Advanced video settings > Auto-detect. As a quick reminder, 4K isn’t available when HDMI or DVI is manually selected.
4. For HDR, check if your TV supports the HDR10 media profile. Look for HDR10, BT2020 and HDR support, or some of the names listed in the table above.
5. Make sure your HDMI cable is plugged into the port that supports the full set of 4K features. Check your TV manual to see if there are special 4K HDMI ports.
6. Check your TV’s settings menu. Your TV might have a special mode that turns on 4K or HDR. Refer to your TV manual.
7. If some content won’t play, make sure your TV supports HDCP 2.2. Turn this feature on in your TV’s settings.
8. Use the HDMI cable that was included with the Xbox One S.
9. Try a different HDMI cable. Make sure it’s an HDMI High Speed or HDMI Premium certified cable.
10. Remove any devices plugged in between your TV and console. Plug your TV directly into your console with the HDMI cable that was included with the Xbox One S.
11. Make sure your TV and AV receiver firmware are up to date.
12. If a blank screen or an error message appears while trying to play 4K content, turn native 4K playback off to try to play the content in a lower resolution. Go to Settings > Display & sound > Advanced video settings > clear Allow 4K.
13. If you receive an error message when you choose 4K UHD in your display settings, check this Xbox Support post.
14. If you’re seeing strange colors while playing HDR content, turn HDR off. Go to Settings > Display & sound > Advanced video settings > clear Allow HDR.
If you’ve come across other workarounds to fix the annoying Xbox One S 4K and HDR issues, list the troubleshooting steps in the comment section below.
Are you locked out of your Outlook account and you are finding it difficult to remember your password?
This article is designed to help you out. We’ll be showing you how to recover your Outlook email password, to ensure you are not locked out of your account for long.
People forget passwords every day, which is why there are numerous password recovery programs on the market today.
These apps are specially designed to facilitate password recovery and ensure we are always provided unfettered access to our accounts, documents, gadgets, and so on.
Can I retrieve my Outlook password?
For Microsoft Outlook users, there is a manual procedure, which can easily be followed to recover a lost or forgotten Outlook email password.
And we’ll be enlightening you on how to use this procedure, as well as other notable methods, to recover Outlook email passwords.
How do I recover my Outlook email password?
Microsoft Outlook, like other notable communication programs, provides an option for recovering the forgotten passwords.
This is the basic process for recovering forgotten Outlook password, and it is often referred to as the manual recovery process.
Moreover, this action is the conventional method that can easily be used, first of all, by anyone, to recover Outlookemail passwords.
2. Input your phone, email address or Skype name associated with your Microsoft account.
3. After this, you’ll receive a verification code via the provided email address or phone number.
4. Input the verification code in the appropriate box and press Enter.
5. Reset and generate a new password.
However, if you can’t recall your Microsoft account’s recovery email or registered phone number, you might have to adopt a third-party software solution to recover a lost Outlook password.
Top 3 programs specialized in Outlook password recovery
After testing and trying all the recovery tools out there, we would like to recommend that you give Stellar Password Recovery a try if you can’t remember your Outlook password.
This powerful tool not only allows you to reset passwords, but it can also find the username and password from web browsers, FTP client applications, and even remote desktops.
Moreover, if you have lost the license keys of the Microsoft application, rest assured that Stellar Recovery will help you restore those as well.
This tool works perfectly and performs a smooth recovery without having to make any complex steps. It’s fairly easy to use, once you install the program on your device.
Stellar Password Recovery’s main features:
It makes six sets of passwords that can be used to open locked PST files
Recovers lost or forgotten passwords to open PST files that are locked with a password
Supports PST files that have been encrypted by MS Outlook 2021, 2019, 2016, and earlier versions
Stellar Password Recovery for Outlook
Reset and recover any lost password with ease, including Outlook email, by using this powerful tool.
In case you didn’t know, Outlook stores all of your emails on your hard drive in a format called PST. Programs like Kernel Outlook Password Recovery are designed specifically for handling these types of files, allowing access to them.
The program is extremely efficient at recovering Outlook PST file passwords, thus being of great help to those that have forgotten them.
More so, the PST messages themselves can be unlocked, so you can view their contents, regardless of whether they were password-protected or not.
You are not limited by language barriers since the program supports multilingual password recovery, meaning roman, Arabic, Asian, and all other known alphabets are supported for recognition.
Once the password has been recovered, you can easily change the password attributed to the files as well, and even encrypt the files for a better degree of protection.
Lastly, you should know that this program supports all major versions of Outlook, from the latest Office 365 version up to Outlook 97. This means that emails new and old are up for recovery in no time.
Kernel Outlook Password Recovery’s main features:
Recovers Outlook PST file passwords right away
Effectively unlocks PST files that are locked with a password
Supports recovering passwords in multiple languages
2.1 How to recover Outlook email password with Kernel Outlook?
Purchase the Kernel Outlook Password Recovery tool. You can also download the free trial version.
Install the program on your computer and open it.
Import the passworded Outlook program or document to be recovered.
Select one of the three available password recovery options: Recover, remove, or set a new password.
Open your Outlook account and access your email messages.
After a successful recovery, it is highly recommended you reset your Outlook email password to a less complex combination. If you are still in doubt, then it’s better to outrightly remove the password.
Windows Key from Passware is a prominent password recovery solution for resetting/recovering all types of passwords and security settings on a computer, specifically Windows computers.
It is exclusively designed to support only Windows 10/8.1/8/7/Vista/XP. Also, it can be adapted to reset passwords on Windows Server 2013 and older (down to WinServer 2003).
Windows Key from Passware is fairly easy to use. And it works alongside a bootable USB drive or CD.
The program embeds the recovery tool on a bootable CD/Flash drive, which can then be used to reset Outlook passwords and/or other password-protected programs on your computer.
Passware Windows Key can execute the following security commands: reset the admin password, or other program-specific passwords, reset secure boot, system security policy, and more.
These commands are optimized to operate at a 100% recovery rate.
Windows Key from Passware’s main features:
Helps more than 340 file types
Analysis of live memories
Acceleration of hardware decrypts Encrypting the whole disc (FDE)
3.1 How to recover Outlook email password with Passware Windows Key?
Purchase the program and install it on your computer.
Get an ISO image or a Setup CD (for Windows).
Request for an ISO image, if you don’t have one. You can table your request from this page.
Burn the ISO image on a blank Flash drive or an empty disk.
Allow the Flash drive/CD to take control of your system’s boot process.
Reset the security settings on your computer.
Recover Outlookemailpassword.
After a successful recovery, you are all set! You can now open your Outlook account and access your email messages as you see fit.
If you forgot your Outlook account password, don’t become so hard on yourself; we all forget passwords.
To ensure you are easily able to recover your password and access your Outlook account, we have created a comprehensive guide for you.
In this guide, we have described the conventional Outlookpassword recovery method, as well as durable software solutions, which you can easily employ to recover your password and access your Outlookemail account.
Getting back on topic, we’re about to review builds 22621.1020 and Build 22623.1020, as they just got released to the Beta Channel.
What should I expect from Builds 22621.1020 and 22623.1020?
First of all, yes, there are two builds. Microsoft has released an update with two new builds, which are 22621.1020 and 22623.1020 (KB5020035) to the Beta Channel.
This has been going on for quite some time now, so everybody is surely accustomed to the way Beta Channel Insiders receive their goodies.
And, if you are a Beta Channel Insider, you surely know that build 22623.1020 comes with new features, while build 22623.1020 has new features off by default.
Keep in mind that Insiders who were previously on Build 22622 will automatically get moved to Build 22623 via an enablement package.
Through this release, Microsoft is announcing support for new Braille displays and new Braille input and output languages in Narrator.
Some of the new braille displays we support include the APH Chameleon, the APH Mantis Q40, the NLS eReader, and many more.
NOTE
If you have the JAWS for Windows screen reader installed from Freedom Scientific and are using a version released in April 2022 or later along with a Focus braille display then there is no need to select the braille display as noted above.
Fixes
[General]
The spelling dictionary now uses a language-neutral word list and syncs across all devices that use the same Windows account (Microsoft accounts and AAD) is now available to all Windows Insiders in the Beta Channel. Users can toggle this feature via Settings > Accounts > Windows backup > Remember my preferences > Language preferences.
[Taskbar & System Tray]
Fixed a high hitting explorer.exe crash in the previous Beta Channel flight related to the system tray. This crash is also believed to be the cause of some Insiders experiencing a repeated explorer.exe crash when entering safe mode on that flight.
Fixed an issue which was causing certain third-party app icons in the system tray to be unresponsive after the latest system tray changes.
The Windows Update icon in the system tray should no longer look pixelated after changing between light and dark mode.
[Windowing]
If you have two monitors on top of each other, the Desktops list in Task View should no longer appear to be floating in the middle of Task View.
[Task Manager]
Moved the open navigation pane button to be under the title bar when Task Manager is wide enough to expand it inline – in doing so, addressed an issue where you couldn’t drag Task Manager from the area in the title bar above the navigation pane if the navigate pane was expanded.
The Delete key should work in the search box now.
Fixes for BOTH Build 22621.1020 & Build 22623.1020
Combined Windows Spotlight with Themes on the Personalization page. This made it easier for you to discover and turn on the Windows Spotlight feature.
Provided the full amount of storage capacity of all your Microsoft OneDrive subscriptions. We also displayed the total storage on the Accounts page in the Settings app.
Gave Microsoft OneDrive subscribers storage alerts on the Systems page in the Settings app. The alerts appeared when you were close to your storage limit. You could also manage your storage and purchase additional storage, if needed.
Added the organizational messages feature. With it, third-party companies could provide content to their employees. They did not need to use the default behavior of Windows.
Fixed an issue that affected protocol activation of the Settings app. The app failed to open a page under the Accounts category.
Fixed an issue that affected certain applications. They stopped working. This occurred when you used keyboard shortcuts to change the input mode for the Japanese Input Method Editor (IME).
Fixed an issue that affected cluster name objects (CNO) or virtual computer objects (VCO). Password reset failed. The error message was, ” There was an error resetting the AD password… // 0x80070005”.
Fixed an issue that might have caused certain apps to stop responding. This occurred when you opened the Open File dialog.
Fixed an issue that sometimes affected File Explorer when you opened a file. Because of that, there was high CPU usage.
Fixed an issue that affected Microsoft Defender for Endpoint. Automated investigation blocked live response investigations.
Fixed an issue that affected Distributed Component Object Model (DCOM) authentication hardening. We would automatically raise the authentication level for all non-anonymous activation requests from DCOM clients to RPC_C_AUTHN_LEVEL_PKT_INTEGRITY. This occurred if the authentication level was below Packet Integrity.
Fixed an issue that affected microphone streams that used the Listen To feature to route to the speaker endpoint. The microphone stopped working after you restarted the device.
Fixed an issue that caused File Explorer to stop working. This occurred when you closed context menus and menu items.
Known issues
[General]
Looking into reports that audio stopped working for some Insiders in recent Beta Channel builds.
[Taskbar & System Tray]
The taskbar sometimes flashes when transitioning between desktop posture and tablet posture.
The taskbar takes longer than expected to transition to the touch-optimized version when switching between desktop posture and tablet posture.
[Task Manager]
Filtering by publisher name does not match correctly on the Processes page.
Some services may not show in the Services page after filtering is applied.
If a new process is starting while a filter is set, then that process may appear for a split second in the filtered list.
Some dialogs may not render in the correct theme when applied from Task Manager Settings page.
The data content area of the Processes page may flash once when theme changes are applied in the Task Manager Settings page.
There’s an issue we’re investigating where Task Manager isn’t displaying light and dark content correctly, leading to unreadable text. This happens when you have your mode in Settings > Personalization > Colors set to Custom – as a workaround for the time being, please switch it to Light or Dark.
The Startup apps page in Task manager does not list any apps for some Insiders. If you are impacted, please use Settings > Apps > Startup for the time being.
THere you have it, folks! That’s pretty it much it for the Beta Channel release for Windows 11 as far as this week is concerned.
What can I do if I can’t install KB5020035?
Press Win+ I to access Settings.
Select the System category and click on Troubleshoot.
Press the Other troubleshooters button.
Press the Run button next to Windows Update.
Also, make sure to report any other issues you might come across, in order for Microsoft to address and improve the overall OS experience for us all.
This is everything you can expect if you are a Windows Insider. Leave a comment below if you found any issues since installing this build.
Instagram not working on Chrome isn’t uncommon, but it’s easy to fix. If you’re dealing with problems in the likes of not being able to log in, your Insta feed not loading, or getting a Something went wrong error follow the steps below.
How can I fix Instagram if it’s not working on Google Chrome?
1. Clear the browser cache
Clearing the cache and site data can help if Instagram is not loading on Chrome. However, you may have to repeat the steps if the problem occurs again after a few days.
1. Launch Google Chrome.
2. ClickMore(three dots) and selectMore tools.Lastly, selectClear browsing data.
3. Select aTime range.
4. Check the boxes forCookies and other site dataandCached images and fileoptions.
5. Click theClear databutton.
Once the cache is cleared, relaunch the browser. Open Instagram to see if the issue is resolved.
2. Reset Chrome to default
Launch Google Chrome and click the three dots in the upper right corner.
Click on Settings.
Scroll down to Reset Settings and click on Restore settings to their original defaults.
Click on the Reset settings button to confirm your choice.
Restoring Chrome to default could help fix the issue by disabling possible conflicting settings that prevent you from accessing Instagram web.
3. Check saved credentials
Open Google Chrome, click the three dots and select Settings.
Select Autofill and Passwords and click on Google Password Manager.
Under Passwords, locate Instagram and click on it.
A Windows Security window will pop up requiring your device’s PIN/Password. Enter it to continue.
Click on the eye icon next to your password to view it.
Confirm the password saved in Chrome corresponds to the password you use on Instagram. If it doesn’t click on the Edit button to update it.
4. Disable Google Chrome extensions
Launch Google Chrome.
Click on More (three dots).
Next select More Tools and choose Extensions.
Look for any recently installed extensions such as an ad-blocker, etc.
Toggle the switch to disable the problematic plugin.
Relaunch Google Chrome and try to access Instagram in normal mode. If the issue persists, disable all the plugins one by one until you find the conflicting extension.
5. Disable anti-tracking software/extensions
Open your anti-tracking software or extension.
Navigate to Settings.
Make sure to add Instagram to the list of exclusions.
If available, you can download and install the update.
Once the update is installed, relaunch Google Chrome and check for any improvements. Updating the browser can help if Instagram not working on Chrome, so be sure to try it.
7. Flush DNS
Press the Windows key and type cmd.
Click on Open as Administrator.
In the command prompt window, type the following command and hit Enter to execute: ipconfig /flushdns
Once you see a success message, close Command Prompt.
Open Google Chrome and check if Instagram is working. This is a useful method if Instagram is not working on Chrome, so be sure to try it.
8. Reinstall Google Chrome
Press Windows key + X and choose Apps and features.
Search for Google Chrome.
Select Chrome and click Uninstall.
Confirm the action to uninstall the browser.
Go to Google Chrome’s download page and reinstall it.
Instagram not working in Chrome is easy to fix once you know the underlying causes that interfere with it. The social media app’s web version has issues in other browsers too, notably Firefox.
Following steps like clearing your cache, disabling interfering extensions and flushing DNS usually fixes the problem, regardless of the browser used.
If you spend hours tinkering around with computers or laptops, don’t let Christmas pass by without taking advantage of the incredible PC parts deals available this year. You can buy top-notch GPUs, CPUs and other parts to improve the performance of your PC or repair it if need be.
So, in this quick guide, we’re going to list some of the hottest PC parts deals that you can get as Christmas deals.
Note: Deals are subject to change. Sometimes, some of the deals listed in our guides may no longer be available by the time you hit the buy button. So, hurry up and grab them while they’re hot.
Which are the best deals on PC parts to grab in 2022?
Graphics Cards
Your GPU is crucial for your computer, especially if you’re a gamer. Make sure to equip your machine with a powerful GPU for optimum graphics performance.
Here are some of the best GPUs to get as computer parts and integrate them onto your machine:
Your CPU is your computer’s brain. If you’ve got a few extra dollars to spend, invest them in your CPU. Purchase a powerful CPU and you won’t experience any lag no matter how many processes your computer runs at the same time.
Here are some of the hottest CPUs that you can grab as PC parts deals:
The next piece of hardware you’d want to add in your shopping cart in a memory kit. Make sure that your computer never runs out of memory by installing one of the memory kits listed below:
Next, let’s focus on some of the best Black Friday sound card deals that you can get this year. This piece of hardware is extremely important for gamers and multimedia fans.
So, here are some of the hottest deals to grab right now:
So, if you’re interested in learning what deals are available for other PC parts, do let us know in the comments below. We’ll quickly run a search and update this post using the information that we found.
Xbox One is all about playing your favorite games with your friends. Yes, you can still have fun alone, but it’s much more fun when you have company. And since your friends can’t come over every day, playing online is a great way to stay connected and have fun.
But what if Xbox One multiplayer is not working? Well, in that case, you’re on your own.
Of course not! In case you have problems connecting to the Xbox One multiplayer, we’ve prepared a few solutions that might help you to get back online.
What to do if the Xbox One multiplayer is not working?
1. Restart Xbox One
The very first solution that basically anyone would recommend is simply restarting your console. In case of a faulty connection, restarting the Xbox might be just what you need to solve the connection issues.
In case you’re not sure how to correctly restart your console, just follow these instructions:
Unplug the power cable from the back of the router, and wait for five minutes.
Restart your Xbox One console:
Scroll left from Home to open the guide.
Select Settings.
Click Restart console.
And then select Yes to confirm.
After five minutes, plug the modem in, and wait for it to get back to its normal state.
Try to connect to the multiplayer again.
If you’re still unable to connect to multiplayer with your Xbox One, move on to another solution listed below.
2. Check the network cable
Your network cable needs to be correctly connected to your console in order for the internet to work. So, you need to make sure your network cable is connected properly, and here’s how to do that:
Unplug the network cable from the back of your Xbox One console.
Check the cable’s connector and the Xbox One console socket to make sure that they are clean and debris-free.
Plug it back in.
Now, unplug the network cable from your router.
Check the cable’s connector and the socket of the router to make sure that they’re clean and debris-free.
Now, do one of the following (depending on your network hardware):
Router or gateway: Plug the network cable into a different port. Make sure the cable clicks into place.
Modem: Plug the network cable back into the modem. Make sure the cable clicks into place.
Verify that all power cables are firmly seated in the modem, gateway, or router and that all networking devices are powered on.
Try to connect to the internet again.
3. Connect directly to the modem
If your console is connected to the router, try connecting it directly to your modem. That way, you’ll be able to re-establish the internet connection, in case there’s something wrong with your router.
If the multiplayer on your Xbox One works while you’re connected to the modem, you’ll need to replace your router or investigate for possible issues.
4. Make sure your Live Gold membership is still valid
Being subscribed to the Xbox Live Gold is absolutely mandatory for the multiplayer on Xbox One.
So, if none of the solutions listed above worked, make sure you’re still subscribed to the Live Gold. This especially applies if you’ve recently signed up for the Free trial, as your trial might has just expired.
5. Check the Xbox Live service status
There’s also a chance that Xbox Live services are currently under maintenance or offline. In that case, there’s really nothing you can do. As a matter of fact, the only thing you can do is wait for Microsoft to get the services fixed.
You can check the Xbox Live services status anytime on this link.
6. Make sure your kid isn’t restricted from playing online
If you’re reading this article because your child isn’t able to connect to the internet, you need to check if he/she is eligible for going online at all. Due to age restrictions, kids under a certain age are not able to connect to the internet.
The same goes for account restrictions. You can learn more about managing your kid’s account and safety on Xbox One here.
7. Specific case: Multiplayer error, your account is set up online
You may run into problems if you have an account that was previously made online. In this case, it is likely that your privacy and online settingsaren’t properly set up and you need to make some changes before you continue.
For this problem, you can check out our guide and follow the steps listed there in order to solve your issue. We also have a dedicated guide for a similar Space Marine 2 error code 140 error.
That’s about that. We certainly hope this article helped you to get back online, and play your favorite Xbox One games with your friends.
If you have any comments, questions, or suggestions, just let us know in the comments below.
Kodi is a media player software that has been in the market for a while. It has undergone several changes, but still not the perfect option to consider, which is why users sort out how to uninstall Kodi on their PCs.
Kodi is an open-source media player app that allows you to access different media content, including music and videos. It is a cross-platform media player for various devices.
Nevertheless, many users, particularly Windows users, have complained about encountering numerous issues with the app. The most common problem is that the Kodi app happens to be incompatible with most apps, so they conflict with each other, resulting in issues.
Some other reasons why you should uninstall the Kodi software on your PC are:
Frequent crash –Kodi frequently crashes on Windows PCs and affects other processes on the PC. It can cause other programs to crash or malfunction due to its instability, so uninstalling it is the best way to avoid issues.
Malicious activities on Kodi – Many users report that Kodi software on their Windows PCs has resulted in malicious attacks. It means the software is compromised and can result in threats to your computer.
Low-quality service –Some users think the software is not as advanced as they thought it was, so they don’t want to keep it. Also, other apps in the market offer better services, so uninstalling Kodi is a good idea.
However, the reason for uninstalling the Kodi software on your Windows PC may vary depending on your complaints.
How do I uninstall Kodi on a Windows PC?
There are some steps for uninstalling Kodi on your PC, but we recommend you apply the following preliminary checks first:
Left-click the Start button, type PowerShell in the text box, and select Run as administrator.
Copy and paste the following command in and press Enter: Get-AppxPackage -AllUsers | Select Name, PackageFullName
Find Kodi, select the entire text, and press Ctrl + C key to copy everything next to the PackageFullName line.
Copy and paste the following commands and replace the PackageFullName entry with the text you copied earlier: Remove-AppxPackage -package PackageFullName
Restart your PC and check if you run into any issues.
When users connect their Xbox One to a TV or monitor, the console adapts to the video settings of the respective TV or monitor.
However, this can cause various video quality issues, such as blurry images, fuzzy and static screens, and more.
If you’re experiencing blurry screen issues after you connect your Xbox One console to your TV set, follow the steps listed below to fix this problem.
How can I fix Xbox One blurry screen display issues?
1. Adjust the screen resolution
Scroll left on the Home screen to open the guide > select Settings > select All Settings.
Go to Display & sound > select Video output.
Select TV resolution.
Select the appropriate screen resolution for your TV. The Xbox One offers screen resolutions of 720p and 1080p.
2. Adjust color depth
Go to the Home screen > open the guide > select Settings > select All Settings.
Under Display & sound > select Video output.
Select Color depth > select the option that works best for your HDTV. It is worth mentioning that not all HDTVs accept deep color information, meaning a color depth of 30 bits per pixel (bpp) or higher.
3. Adjust color space
Scroll left on the Home screen to open the guide > select Settings > select All Settings.
Under Display & sound > go to Video output.
Select Color space > choose the best option for your TV:
Standard (recommended): This is the optimal reference level and it should work on all displays
PC RGB – recommended only if you’re using a PC monitor.
4. Contact Xbox Support
If the actions listed above didn’t solve the problem, we suggest reaching to Xbox Support and asking for reparations or replacement.
We hope that one of the solutions above helped you fix your display issues on Xbox One.
If you’re aware of any alternative methods, feel free to tell us in the comments section below.
To ensure that your device is working correctly, you need to have the latest drivers installed, and in this guide, we’ll show you how to download the Lenovo Yoga 11E touchscreen driver.
By downloading the latest drivers, you’ll ensure that your device works without errors and at maximum performance.
There are several ways that you can use to update your drivers, and in this guide, we’re going to show you the best ones.
Where is the touchscreen driver in Device Manager?
Once you open the device manager, you must expand the Human Interface Devices (HID) section. Here you will be able to find your touchscreen driver among other HID drivers.
You can perform different operations on this driver from here unless it has been greyed out.
In some rare cases, it may not be listed under the HID section; you may see it under Compliant Touchscreen.
Let us show you the best ways to update your touchscreen driver on Lenovo Yoga 11E.
How can I update the Lenovo Yoga 11E touchscreen driver?
Press Windows Key + X and choose Device Manager from the list.
Expand the Human Interface Devices section, locate the touchscreen device on the list, right-click it and choose the Update driver option.
Now click on Search automatically for updated driver software.
Windows will now search its driver database for a suitable driver and try to update the driver in question.
Remember that this isn’t the most reliable solution since the Windows database can get outdated, so it’s possible that it won’t download the latest driver.
This method is helpful if you’re a less experienced user and don’t know how to search for drivers properly, but if you’re an advanced user, we suggest using one of our other methods.
Updating the Lenovo Yoga 11E touchscreen driver isn’t as hard as you think as long as you know where to look for the driver.
What methods do you use for a driver update? Feel free to share them with us in the comments section.
Sims 3 is one of the best games in its series. However, some players have posted about a Sims 3 startup error on EA’s forum.
The error message for that issue states, There was an error during startup. Consequently, users can’t launch Sims 3 when the game displays that error message.
Users have also reported getting the Sims 3 error There was an error during startup please see the Log for more details Steam.
Here are the causes and the best fixes for this error.
Why am I getting Sims 3 there was an error during startup error?
From user experiences, we gather that a few factors may trigger this error. The top of the list includes the following:
Press Windows + R and type regedit, then click Enter.
Next, open this registry key: Computer\HKEY_LOCAL_MACHINE\SOFTWARE\WOW6432Node\Sims
Delete Sims 3 expansion registry keys you don’t need by right-clicking them and selecting Delete.
Those are some of the confirmed fixes for the Sims 3 there was an error during startup issue. So, there’s a pretty good chance the above fixes will resolve the issue for most users.
Remember to try what you seem most comfortable with since these solutions are not written in any particular order.
Let us know in the comments below what worked for you.