Want to experience the latest features and functionalities of Windows 11 on your Chromebook? While Chromebooks are designed to run Chrome OS, there are alternative methods to install Windows 11.
In this guide, we will explore quick ways to install Windows 11 on a Chromebook, allowing you to expand your operating system options and unlock the full potential of Microsoft’s latest OS.
If you want to install Chrome Flex on Windows 11, we suggest you check out this guide for detailed instructions.
How can I install Windows 11 on a Chromebook?
Before proceeding with any steps for installing the operating system, go through the following preliminary checks:
Make sure you are always connected to the internet.
Ensure that your device meets the minimum system requirements for running OS.
Back up all your important files and data on your machine.
Chromebook should support Kernel-based Virtual Machines. (applicable to 2nd method)
Should have at least 80GB of space in the Linux partition, as Windows 11 needs 64 GB of storage (applicable to 2nd method)
Download Windows 11 ISO file from the official website and copy it to a USB flash drive. (applicable to 1st method) or on the Chromebook (applicable to 2nd method)
A USB keyboard with functions key and mouse. (applicable to 1st method)
Once you have checked all these, let us check the steps to install Windows 11 on your Chromebook.
1. Direct Installation
Things you must know before proceeding with this method:
Installing Windows on Chromebook might get your device out of warranty.
Once the process is complete, you won’t be able to revert to ChromeOS.
All your data will be erased from your device, so if anything is important, back up first.
There is a slight possibility that the device may break down while flashing the firmware.
If you are OK with all these things, you can proceed with the steps mentioned. If not, then follow the next method to get it done.
1.1 Check the Chromebook compatibility & copy the code name
Once you have located your machine, make a note of your Chromebook Board Name, as it will be used in later stages.
If your device is supported, you can proceed with this method; otherwise, we advise you not to move as it could harm your machine.
1.2 Disable hardware write protection
Next, you need to disable hardware write protection on your Chromebook. The process may vary from one device to another. For older models, like the 2013 ones, you need to use the switch or the jumper to deactivate it.
On the newer models, like the ones in 2014 & 2017, you need to unscrew the back panel and remove a screw from the laptop’s motherboard. However, for the models after 2017, you can temporarily disable the CR-50 security chip by removing the battery and running the device on a power adapter.
1.3 Enter the developer mode
Press Esc + Refresh + Power buttons on your keyboard to enter the Recovery mode.
Press Ctrl + D and hit Enter when you see the screen. This will disable OS verification OFF after a restart.
Once restarted, press Ctrl + D to enter the Developer mode.
Before you paste the Terminal commands in the next section to install QEMU and Virtual Machine Manager, review how to copy and paste on Chromebook so you can move commands and settings accurately.
1.4 Flash new firmware to allow to boot of Windows
After going through the step-up process, open the Chrome tab, and press Ctrl + Alt + T to open crosh window.
Now type shell and hit Enter.
Copy & paste the following commands one by one and press Enter after every command:
This will download supporting files. Once done, you will see a screen with the information on your device. Check if Fw WP is Disabled, then from the options available, type 2 and hit Enter to initiate the Install/update UEFI Full ROM Firmware.
For the prompt, Do you wish to continue, type y to proceed and hit Enter.
If you see a prompt saying Create a backup copy of your stock firmware?, type n and press Enter.
It will now download the Full ROM firmware. Once the flashing is successful, press Enter to return to the main menu and turn off the computer.
1.5 Initiate the Windows installation
Plug in the USB flash drive with Windows 11 ISO and the USB mouse, and turn on your Chromebook.
If you see a command line screen, type exit and hit Enter.
Now use the arrow keys to select the boot menu and choose the USB drive to boot off.
On the Windows Setup screen, choose the Language to install, Time and currency format, Keyboard or input method, and click Next.
Click Install now.
If you don’t have access to the product key at the moment, select I don’t have a product key, and you can add it later.
1.6 Modify the registry entries
When you are on Select the operating system you want to install screen, press Shift + F10 to open Command Prompt.
Type regedit and press Enter to open Registry Editor.
Navigate to this path: Computer\HKEY_LOCAL_MACHINE\System\Setup
Right-click to get New, then choose Key. Name the key LabConfig.
Now select LabConfig, right-click to get New, then select DWORD (32-bit value). Name it BypassCPUCheck.
Create four more DWORDs using Step 5. Name them as BypassRAMCheck, BypassSecureBootCheck, BypassStorageCheck & BypassTPMCheck.
Double-click BypassCPUCheck and change the Value data to 1 and click OK.
Do the same for all the freshly created DWORD entries. Once done, close the Command Prompt and Registry Editor window.
On Select the operating system you want to install screen, choose the operating system, and click Next.
Select Custom: Install Windows only(advanced) on the next screen.
Remove all the partitions except Drive with Unallocated Space and click Next.
Once done, Windows will restart; you can remove the flash drive once the system is shut down and follow the on-screen instructions to complete the process.
1.7 Installing the drivers
Once the Windows setup is complete, login, open a browser, and go to the Coolstar website.
Go to Windows 10/11 OS, and click Install.
Now type the Board Name of the device you noted in Solution 1.
You can download the drivers listed here to complete. The critical ones are Visual C++ Redistributable, Chrome EC Driver, Keyboard Remappings, and Coolstar SST (cAVS) Audio.
Expand the ones you want to download, click the link, double-click the installer file, and follow the onscreen prompts to complete.
Click the Settings icon from the Quick Settings panel.
Now click Advanced in the left pane, and click Developers.
Once you are in the Developers menu, locate the Linux development environment (Beta) and click Turn on.
Click the Install button and follow the onscreen instructions to complete the process.
2.2 Set Up QEMU & Virtual Machine Manager
Go to the Linux apps folder in the App Launcher and select Terminal.
On the Terminal window, type the following command to update all the packages and dependencies and hit Enter: sudo apt update && sudo apt upgrade -y
Copy & paste the following command to install QEMU and Virtual Machine Manager and press Enter: sudo apt install qemu-kvm libvirt-clients libvirt-daemon-system bridge-utils virtinst libvirt-daemon virt-manager -y
Once completed, close the Terminal.
2.3 Install Windows 11
Open the App Launcher, go to the Linux apps folder, and click Virtual Machine Manager.
On the Virtual Machine Manager window, go to File, and select New Virtual Machine.
Select Local install media and click on Forward.
On Create a new virtual machine window, click Browse.
On the next window, click Browse Local.
Navigate to the path where your downloaded Windows 11 ISO file is stored and click Open.
Click Forward.
Next, for Memory, select 4096 (4GB) and select 4 for the CPU cores.
For Create a disk image for the virtual machine, select more than 65 GB for disk space and click Forward.
You can Rename the machine as Windows 11 and click Finish.
If you get a prompt saying, Virtual Network is not active, click Yes to continue.
Once done, Windows 11 will boot on your Chromebook. You will get the setup screen, follow the onscreen instructions and choose the options appropriate to your requirements.
So, these are ways to install Windows 11 on your Chromebook quickly. The first method is for those who want to use just Windows OS on their Chromebook. However, if you want to use both Chrome and Windows OS on your machine, you must go with Solution 2.
Confused about which method to choose? You can read this guide to know which OS to keep between Windows 11 & Chrome OS to make the selection easier.
Please feel free to give us any information, tips, and your experience with the subject in the comments section below.
However, if you think that stopped users from using these obsolete versions or even discourage them a bit, you are far from the truth.
In fact, a lot of people are still using the above-mentioned versions of Windows, despite the alarming security risks.
And, since that wasn’t enough to convince you to upgrade, we’re here to tell you that you are going to lose access to another service if you don’t.
Versions prior to Windows 10 64-bit won’t have Google Drive
If the lack of support and security updates haven’t yet compelled you to upgrade your operating system, Google’s now turning up the heat to get on to a modern OS.
Starting this summer, Google will be discontinuing support for its Windows 8, 8.1, and Windows 10 Google Drive apps.
That’s right! Not only Windows 8 and 8.1 users will have to consider upgrading. On the off chance you are still running Windows 10 32-bit, you will have to upgrade to the 64-bit version.
A new Google Drive support page warns users to upgrade to Windows 10 64-bit for uninterrupted service.
Please keep in mind that, while web access to Drive will still be available, sync will stop working in August. Considering everything, we strongly recommend an OS upgrade.
Even though there’s steep competition between Google and Microsoft, just know that other companies are doing the same.
For example, Mozilla is also ending Firefox support for Windows 7, 8, and 8.1. You might think that this isn’t that urgent, but your access to these services will be restricted.
Don’t worry, as upgrading to Windows 10 is pretty straightforward. Not to mention that if you already have a licensed copy, it won’t cost you anything.
Statistics show that a lot of users are still running obsolete operating systems such as Windows 7, 8, 8.1, or even the good old Windows XP.
That being said, you have to be aware of the implications that not upgrading comes with. you are exposing your PC to malicious third parties that can easily extract information from you.
More and more companies are going to start dropping support for their apps on these old operating systems, so that’s something to definitely consider.
You should also seriously consider upgrading to Windows 11, which is the latest Microsoft-designed OS out there.
Have you considered upgrading to a supported version of Windows 10? Share your experience with us in the comments section located below.
Many of our readers are confused about what is the au_.exe file that is showing up on their Task Manager. Some have noted that this is a virus, while some term this as a file not at all harmful.
In this guide, we will discuss what is au_.exe file and whether you should remove it from your Windows computer or not. Let us get right into it.
What is the au_.exe file?
According to multiple reports, the au_.exe file is a malicious program that belongs to the rogue anti-spyware program called SpyFalcon. It masks itself as an anti-spyware utility but in fact, it is a Trojan.
On the other hand, some have reported it as the scripting engine, which is bundled with the majority of applications. Such programs use AutoIt either during the installation or uninstallation. Some of the popular programs that use au_.exe are listed below:
Flash Player (or Flash Player ActiveX)
Adobe Reader
Google Calendar
Registry Helper
Mozilla Firefox
Yahoo Toolbar
Spotify
Dragon Age (PC game)
TeamViewer
Razer Synapse
Since this file packs a script that auto-starts the script engine, you will see it in your Task Manager. The au_.exe file is usually found inside the C: / Users / YourUserName / AppData / Local/Temp / ~nsu.tmp location.
Should I remove the au_.exe file?
We have mentioned the location where you will usually find the file. In case the file isn’t present in the above-mentioned location and is found somewhere else, then you are dealing with a threat. Let’s take a look at the solutions on how to remove the au_.exe file if you need to.
How can I remove the au_.exe file?
1. Uninstall the associated program
1.1 From the Start menu
To open the Start menu press the Win key.
Click on All apps at the top-right.
Locate the associated app on the list. (Usually the program is the Yahoo Toolbar)
Right-click on the app and select Uninstall.
The above method is a simple process of removing the program that brings the au_.exe file as a bundled package. There is another method to remove the app mentioned below.
1.2 Uninstall from Control Panel
Press the Win key to open the Start menu.
Open Control Panel.
Select Programs and Features.
Select the app and click on Uninstall at the top.
Follow the on-screen steps to remove the program from your PC.
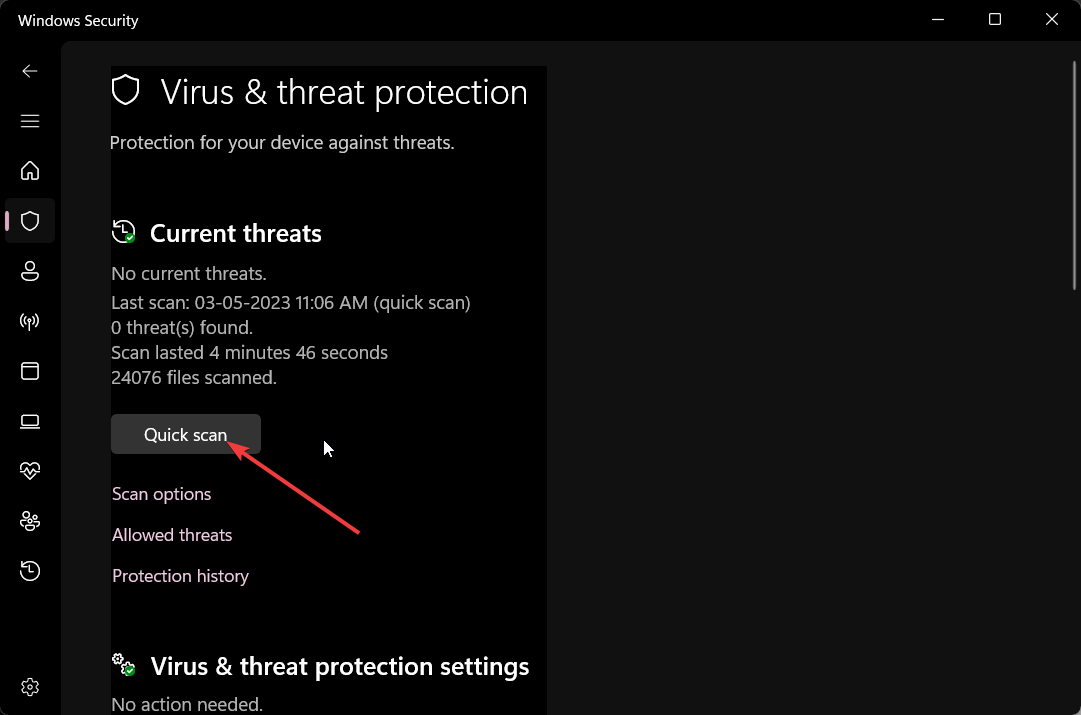
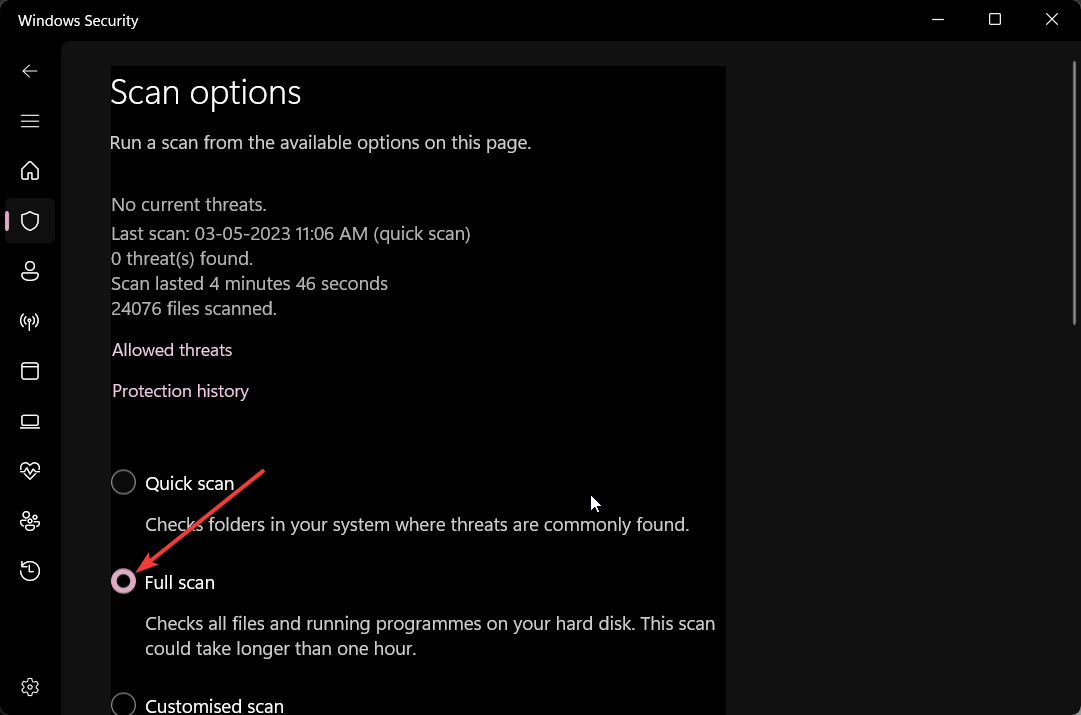
You can also select Scan options and choose Full scan to perform a deep scan of your PC.
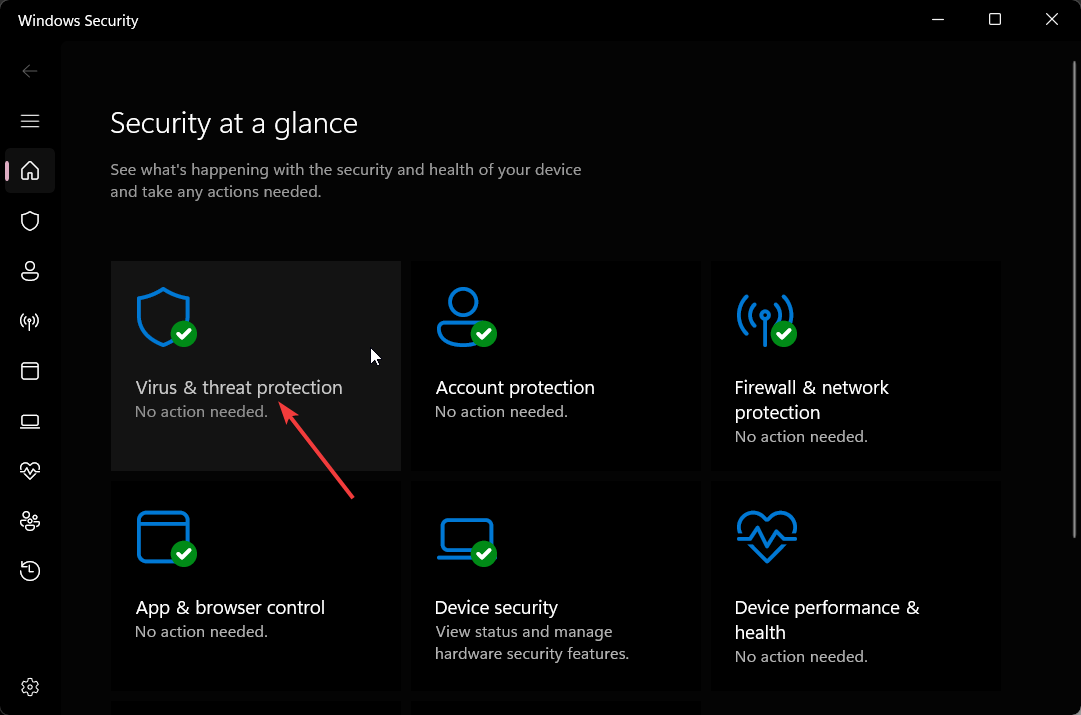
You should always run a virus scan on your PC frequently and make sure that your PC isn’t infected with a virus, malware, or trojan. For that, you can use the Windows Security in-built tool.
However, in most cases, Windows Security isn’t as effective as a dedicated antivirus program. For that scenario, we have listed down some of the best antivirus programs that you can opt for and safeguard your PC.
One of the most popular options we often recommend is the TotalAV program because of its robust scanning engine and advanced heuristics, which helps you identify and eliminate trojans and other malicious threats in a second.
Navigate to the culprit program’s folder and delete all the files inside the malicious program’s folder.
Press the Win + R keys to open the Run dialogue.
Type regedit and press Enter.
Search for any entries related to the culprit program in the HKEY_LOCAL_MACHINE and HKEY_CURRENT_USER.
Delete any entries related to the culprit program and restart your PC.
You can also remove the entire files of the infected program by deleting the remaining Registry entries of the files after deleting all the remains from the installed folder. Simply follow the steps and check if the au_.exe file was removed from your PC or not.
That is it from us in this guide. Many of our readers have asked whether they should remove the WinThruster.exe file or not. You can check our guide and get information about the WinThruster.exe file and how to remove it.
We also have a guide that explains what is the Recenv.exe file and whether you should remove it or not from your PC.
Feel free to share your views on this guide and let us know if you got some information related to au_.exe reading this guide or not.
The Windows 11 Insider program followed up on the “no blog post” Canary Channel release from June 7th and a servicing pipeline build on June 6th with another one today, this one again “designed to test our servicing pipeline,” and again with no new features worth mentioning in a Windows Insider blog post:
Another small servicing update for #WindowsInsiders in the Canary Channel – Build 25387.1200 is now available. This update does not include new content and is designed to test our servicing pipeline. ^JH
When initiating an FRx installation that directs to a network SysData directory, this error 52: Bad filename or number may occur. Other workstations can also encounter this error; however, it is not always the case.
Switching to a local SysData directory resolves the issue, and the error message is no longer received. The matter at hand resembles the Runtime Error 217, which we have addressed in a previous guide.
Before we take any steps to address the issue at hand, we must examine its underlying cause.
What is Microsoft Runtime error 52?
This error occurs in Visual Basic applications, and the most common causes are the following:
Invalid file name – In case the file name is invalid, the code won’t be able to run, and you’ll get this error.
Unspecified file – If the file isn’t specified properly or if it’s closed, you’ll get this error message.
Out-of-range file numbers – Sometimes, a code might generate numbers that aren’t valid, thus causing this error to occur.
How can I fix Runtime error 52: Bad filename or number?
Uninstalling apps clashing in the background might prove effective in handling this error. Also, a program called Worldox found in Excel, locate and delete it, then restart your program.
1. Reinstall runtime libraries
Click on the Windows icon and open Settings.
Now click on Apps, next onApps & Features.
Find and highlight the Microsoft Visual C++ Redistributable Package, now click Uninstall at the top of the list.
We trust that this guide has effectively resolved your problem. Should you encounter any additional obstacles, we suggest looking into runtime error R6025 for similar solutions.
Your feedback would be greatly appreciated, so please leave a comment below and inform us of the most effective solution you found.
The Windows operating system contains a process called PhoneExperienceHost.exe, which handles all phone-related features. This includes managing notifications for incoming calls and messages, as well as other functions that are related to phone usage.
This error can cause the Phone Link app notifications problems, as observed In the related article. To address the issue, we need to delve into the root cause of it.
What Is PhoneExperienceHost?
This Windows service facilitates seamless synchronization between your Android device and PC.
The background process responsible for this magic is PhoneExperienceHost.exe, which actively runs on your PC and notifies you as soon as a notification pops up on your phone.
How can I fix PhoneExperienceHost high CPU?
Update Phone app and Windows – To resolve any internal issues with the app on your Windows PC, update your phone app and Windows OS regularly.
1. Reset or repair the phone link app
Select Start, click on Settings.
Now locate Apps, and click on Apps & Features.
Click on the three dots next to the app you want to fix.
Select the Advanced options under the name of the app (some apps don’t have this option).
Choose Repair or Reset if it’s available.
2. Uninstall Phone link
Right-click on Start and Choose PowerShell (Admin).
When User Account Control pops up, just click Yes.
In the new window, copy and paste the following command and press Enter: get-appxpackage *Microsoft.YourPhone* | remove-appxpackage
Lastly, exit the PowerShell and restart your system.
Click on the Startup Apps tab in the left panel of Task Manager.
Choose the Phone Link app.
Click on the available Enable or Disable button on the command bar for what you want.
If you happen to stumble upon the PhoneExperienceHost.exe error, don’t worry too much – typically, there’s a simple solution that usually requires you to disable Phone Link on your PC.
Our team sincerely hopes that this guide has been helpful to you. However, if you discover another solution, we would love for you to share it without hesitation.
The Office 365 suite includes some of the most used apps like Word, Excel, PowerPoint, and Outlook. However, getting the best out of it may not always be feasible as a few users may experience slow performance in Office 365.
While the cause may not be the app itself, there are a few ways to get around it, and in this guide, we walk you through every one of them.
Why is my Office 365 running so slow?
Low memory or storage space – Applications in the suite use many computer resources and may bug if you do not have adequate space on your device.
Many add-ins installed – Office 365 applications can come with add-ins, making the installation heavier and more resource-intensive.
Slow Internet connection – The applications are cloud-based, requiring an Internet connection. If you are using a slow internet connection, it can slow down the performance of Office 365.
Bad Office 365 installation – There may be a problem with your Office 365 installation, causing it to run slowly.
How do I fix slow performance on Office 365?
Before any major tweaks, try the following workarounds:
Close unused apps since multiple open applications may mean more stress on your computer and reduced performance.
Update your drivers since outdated drivers are often attributed to bad computer performance.
You may also consider reinstalling Office 365, as that may save you the trouble of further troubleshooting.
Change your ISP or connect to a wired network to ensure bad internet is not triggering the slow performance.
After the pre-solutions, you may continue to more detailed fixes below:
1. Disable unused add-ins
Launch Microsoft 365 (Office), and open the application you want to disable add-ins for.
Click on File.
On the left pane, select Options.
Click on Add-ins under Manage, select COM Add-ins, then click the Go button.
Click on any unused Add-in and click the Remove button.
2. Run the disk cleanup tool
Press the Windows key, type clean, and select the Disk Cleanup tool.
Select the drive with your Office 365 installation and click OK.
Tick as many categories to delete as you want and hit OK.
Confirm your choice, and after they are deleted, verify it fixes the slow performance of Office 365.
Press that Windows key, type defrag and click the Defragment and Optimize Drives option.
Select the drive you need to defragment and click the Analyze button.
If the drive is fragmented, click the Optimize button to defragment it.
Now you may verify if it fixes the slow performance of Office 365.
Most of the factors that cause slow performance on Office 365 may be issues that need general computer housekeeping. You should also carry out an exhaustive virus scan, as malware may often affect the performance of computer programs.
You can also use Office 365 online if the app performs poorly on your device. And that is as far as we share in this guide.
Please let us know which solutions were most effective for you in the comments section.
Discord is a popular instant messaging application offering VoIP (Voice of Internet Protocol) and is used by millions worldwide. It’s a go-to choice for many, but issues with Discord are not uncommon. And now, some report that Inspect Element in Discord is not working.
While this isn’t as big a problem for many, others who like more control over the application and messages are having a tough time. It allowed users to view display pictures or modify the page layout. But you can still get Inspect Element back. Keep reading to find out how!
Once in, press Ctrl + Shift + I to open the browser’s inspect element tool and identify the code for the individual page components.
If Discord’s inspect element is not working, you can always head to a browser and use its built-in tool for the job. Remember that the changes won’t be saved and will vanish as soon as you refresh the page. The browser method can be used as a temporary measure.
2. Modify the settings.json file file
Press Ctrl + Shift + Esc to open the Task Manager, locate any Discord processes, right-click on them individually, and select End task.
Now, press Windows + E to open File Explorer, paste the following path in the address bar, and hit Enter:%appdata%/discord
Locate the settings.json file, double-click on it, and open it using a text editor, preferably Notepad.
Now, paste the following command in the same manner as shown in the screenshot:"DANGEROUS_ENABLE_DEVTOOLS_ONLY_ENABLE_IF_YOU_KNOW_WHAT_YOURE_DOING": true
Once done, press Ctrl + S to save the file.
Finally, launch Discord, press Ctrl + Shift + I, and the Inspect Element option will be available.
If things don’t work, make sure the command prior to the one we manually entered has a comma after it.
When Discord’s Inspect Element is not working, you could employ a quick workaround shared by the team to edit the settings.json file in a Reddit comment.
But while modifying the file, make sure you follow the steps as they are and do not make any changes other than the one listed here.
As stated earlier, the Inspect Element functionality has been disabled only in the stable version and continues to work in both Discord PTB and Discord Canary.
Remember, the two are relatively unstable versions and receive updates before these are pushed to regular users, which may sometimes introduce instability. But if you have made up your mind, head to the official download page, get the setup and install the desired one.
Discord PTB (Receives updates after Canary, generally stable)
Discord Canary (Receives updates first, could be unstable at times)
That’s it! If the Inspect Element functionality was not working in Discord, it should now go with the solutions presented earlier.
Keep in mind that the app developers have confirmed that they are removing the Inspect Element functionality in Discord for a very simple reason. It compromised accounts and proved a significant security threat if an untoward change was made.
So, the decision was made with the user’s security and privacy in mind. But if you are an avid tech enthusiast and understand the implications of the changes, all hope is not lost!
The good news is that the Inspect Element feature has been disabled only on the stable version of Discord. So, it remains on the alpha or beta testing versions, namely Discord Canary and Discord PTB.
Customizing your computer helps improve the user experience. However, there are times when you cannot make the required personalization. For instance, when the Screen Saver settings is greyed out.
A few readers complained about this, so we will show you the best steps to rectify the problem on your devices.
Why is my Screen Saver settings greyed out?
Group Policy issue – On computers managed by group policy, you may be unable to make certain customization changes, which may be why the setting is greyed out.
Disabled registry values – A value in the registry can also disable the Screen Saver settings, and an admin may have enabled it.
Corrupted screen saver file – Occasionally, users may get this issue if they have installed a corrupted screen saver file or if there is a problem with a corrupted user profile.
Driver issue: If you are using a third-party screen saver, there may be an issue with the driver for your graphics card.
How do I change my screensaver settings when greyed out?
First, we recommend you try these workarounds:
Ensure your computer is not in sleep mode, which disables the screen saver.
Ensure the screen saver is enabled when your computer is on battery power.
If you use a third-party screen saver, try a different one.
Update driver, especially for third-party applications.
However, if you still have no success, proceed to the detailed fixes below.
1. Update registry values
Press Windows + R to open Run.
Type regedit and hit Enter.
Navigate to the path below: HKEY_CURRENT_USER\Software\Policies\Microsoft\Windows\Control Panel
If you do not locate Control Panel, right-click on Windows and select New, then Key, and name it Control Panel.
Click on ScreenSaveActive (you may create the Dword key for Control Panel if it is absent) and change the value to 1.
2. Update Group Policy settings
Press Windows + R to open Run.
Type gpedit.msc and hit Enter.
Navigate User Configuration, Administrative Templates, Control Panel, and Personalization.
On the right pane, double-click Enable screen saver.
Select Enable, then hit Apply and OK buttons.
Lastly, verify if it fixes the greyed out Screen Saver settings.
In the post, the user is trying to enable Outlook’s newest version, only to freeze and become stuck. And it goes on for some time and then stops. When trying to reach support, the app says that something went wrong. And that an error is occurring.
Outlook reportedly had some issues in the past but it’s quite frustrating to see them persist on the newer version as well. Luckily, the user has quickly found a solution from another Reddit user, dealing with the same issue.
So if you have the same problem with Outlook, try this solution, and see if it works for you too.
Here’s how to fix the new Outlook could not successfully launch error
First and foremost, make sure you can see the hidden files.
Go to the Users folder.
Once you’re there, look for the name of your PC and access it.
Select AppData and access it.
From AppData, go to the Local folder.
In the Local folder, head over to the Microsoft folder.
In the Microsoft folder, locate the Olk folder and delete it.
Your new Outlook app should work now, but if it doesn’t, delete the OneAuth folder too, and see if it works.
In the Reddit thread, the user said deleting the Olk folder restored Outlook and solved the annoying freezing bug.
As we mentioned earlier, Outlook has a lot of issues, but Microsoft is continuously improving it. The app is generally a great tool to use, especially if you have multiple emails. Recently, Microsoft added support for Gmail to it, so you can choose to login with your Gmail as well.
We hope this fix comes in handy when you’re dealing with such an issue. If you experienced this before, tell us about it in the comments section below.
Some notable factors that can cause stuttering in OBS when recording are:
High encoding settings – High frame rate or bitrate recording can strain your system. If the encoding settings in OBS are too high for your system to handle, it can result in performance issues.
Insufficient system resources – Recording high-quality videos requires significant system resources. If your system has low system resources or other resource-intensive tasks run simultaneously, OBS may struggle with the recording.
OBS configuration issues – In some cases, incorrect or suboptimal settings within OBS can cause stuttering during recording. OBS settings, including video, output, and encoding, can cause issues.
Outdated drivers – Outdated or incompatible graphics drivers can cause performance problems with OBS.
Interference from other apps – Other applications running in the background, especially those that utilize significant CPU or GPU resources, can interfere with OBS’s performance.
Disk input and output issues – Recording to a slow or heavily fragmented storage drive can lead to OBS studios recording stuttering problems.
These factors can vary on different devices depending on the circumstances. Nevertheless, we’ll take you through basic steps for fixing the stuttering problem when recording in OBS.
How can I fix OBS stuttering when recording?
Observe the following preliminary checks before attempting any advanced fixes:
Restarting the OBS client will fix temporary glitches affecting its functionality and refresh its processes.
When you turn off background apps, it stops other apps running in the background and can help resolve any interference from third-party apps.
Restart your Network Devices – Power cycle your modem, router, or other network devices to help refresh the router network connection.
Recording to a faster and dedicated storage drive, such as an SSD, ensures smooth recording and avoid lags.
Updating graphics drivers will fix the bugs causing OBS recording to stutter. Check how to update graphics drivers on Windows 11.
If you can’t resolve the error with the above steps, proceed with the solutions below:
1. Run OBS in Compatibility Mode on your PC
Press Windows + E to open File Explorer.
Go to the OBS installation directory: C:\Program Files\obs-studio\bin\64bit
Right-click the executable file, and select Properties from the drop-down.
Go to the Compatibility tab and check the box for the Run this program as an administrator option. Click OK to save the changes.
Running the OBS client as an administrator will give it additional privileges and assign more resources to help it function better.
Click on the Settings button in the bottom-right corner of the screen.
Click on the Advanced tab on the left-hand side. Go to General, expand the Process Priority drop-down menu, and change the setting to High.
Restart OBS and check if stuttering when recording persists.
These steps will set the recording priority to high in OBS settings, allowing it to use more resources.
In conclusion, we have a comprehensive article about what to do if OBS client keeps crashing on your computer. Additionally, you can read about ways to fix corrupted OBS files on Windows 11. Moreover, if you need some tips regarding noise gate settings, we have just the guide for you!
If you have any questions or suggestions regarding this guide, kindly drop them in the comments section.
Many users complain about an error message indicating the apoint.exe file is missing or other related information during startup. It runs on the Windows operating system but can sometimes be an issue. Hence, this guide will discuss its meaning and how to fix the error.
Also, we have a detailed guide on why exe files are not opening on your PC and some fixes for the problem.
What is apoint.exe?
The Apoint.exe file is a software component developed by Alps Electronic Co. It belongs to the Alps Pointing-device Driver and runs the device drivers for touchpads manufactured by Alps. The executable contains the codes helping the software tool perform its PC functions.
Furthermore, these drivers are usually preinstalled on laptops, and they help run the device drivers for touchpads.
Should I remove apoint.exe?
The genuine apoint.exe file is an essential part of the system and is not intended to threaten the PC. Sadly, malware can disguise itself as executable files on the computer. Thus, there is a possibility that the apoint.exe file causing errors is compromised.
Though apoint.exe is not a Microsoft-signed file, terminating its process may result in problems with using the touchpad. However, removing the file can be based on factors such as high CPU usage and other issues. It is important to note that a genuine executable should not adversely affect your computer.
Additionally, check the file location to see if the apoint.exe process on your computer is in the genuine file directory. If it isn’t, then it is most likely a compromised file. To check this;
Right-click the Start button and select Task Manager from the menu.
Go to the Processes tab. Locate the apoint.exe, right-click on it, and click on Open File Location from the drop-down menu.
The default file location is C:\Program Files\Apoint2K\
If the opened directory differs from the above, it is likely malware and should be removed.
Restarting the PC is the quickest way to resolve temporary issues affecting it and refresh its components.
Run a reputable antivirus or anti-malware program to scan the file. This will help identify and remove the file if it is malicious or potentially harmful.
Reinstall the Alps driver – Uninstall the driver and clear its residual data, then reinstall it to fix the issue.
If the apoint.exe errors persist, go ahead with these advanced fixes:
1. Update Alps pointing device driver
Press Windows + R keys to prompt the Run dialog box, type devmgmt.msc, and click OK to open the Device Manager.
Expand the Mice and other pointing devices entry, right-click on the ALPS device, then select Update driver from the drop-down menu.
Click on Search Automatically for the updated driver software option.
Restart your PC and check if the apoint.exe errors persist.
Updating the Alps device driver will fix bugs affecting functionality and improve its performance. Read our guide about ways to update drivers on Windows 11 for more detailed steps.
2. Give administrative permits to Appoint.exe
Press Windows + E to open the FIle Explorer.
Locate the following path: C:\Program files\DellTPad
Locate and right-click the appoint.exe file and click on Properties.
Select Compatibility, check the box for Run as administrator, and click OK to apply.
Left-click the Start button, type services, and launch it.
Double-click Windows Defender service, set the Startup type as Automatic, and click the Start button.
Restart your PC to take effect.
Some users have claimed this solution helped them troubleshoot this issue and restore their PC to full function.
Several readers have been running into issues with NTVDM. While some get an error message at startup, others face problems while running an application.
If you have installed Windows 11, which doesn’t offer a 32-bit edition or another 64-bit iteration of Windows, the component would be missing, and the NTVDM.exe error will be frequently encountered.
Also, Microsoft has confirmed that NTVDM, an older technology, does not receive the same support anymore and encourages users to switch to 32-bit or 62-bit versions of the application relying on it. Besides, given the security risk, Microsoft recommends against using NTVDM in enterprise environments.
How do I fix NTVDM.exe errors?
1. Enable NTVDM
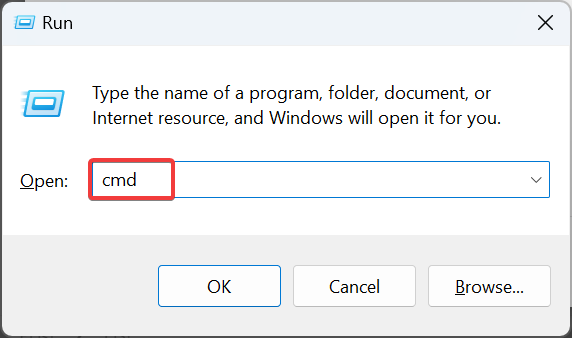
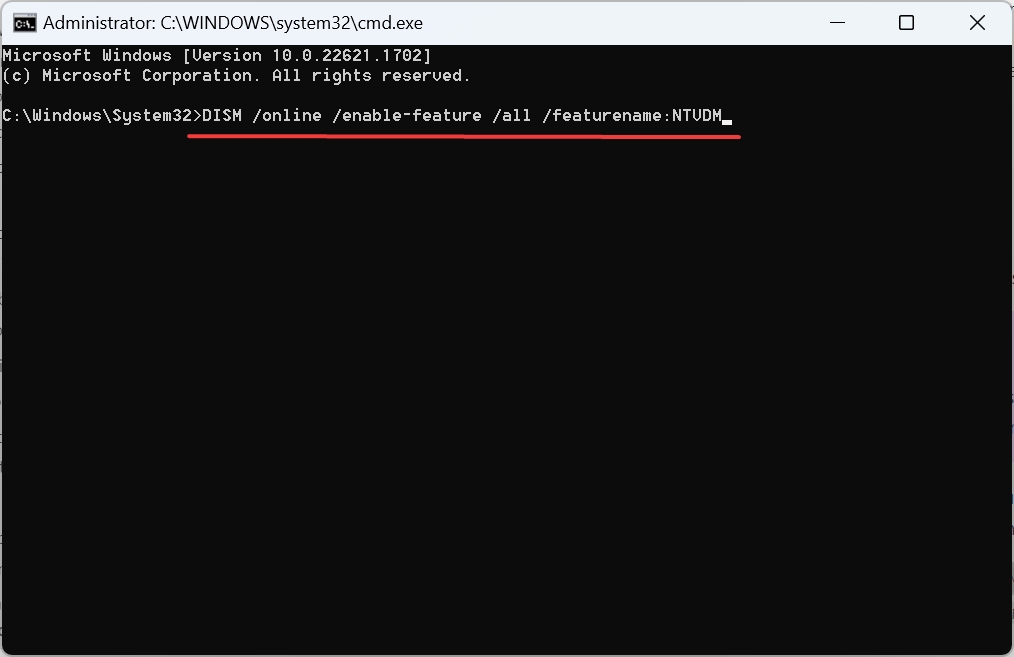
Press Windows + R to open Run, type cmd, and hit Ctrl + Shift + Enter.
Click Yes in the UAC prompt.
Now, paste the following command and hit Enter:DISM /online /enable-feature /all /featurename:NTVDM
Once done, restart the computer and check whether the error has disappeared.
Often, all that’s required is for you to enable the feature to get rid of NTVDM errors.
2. Install NTVDM
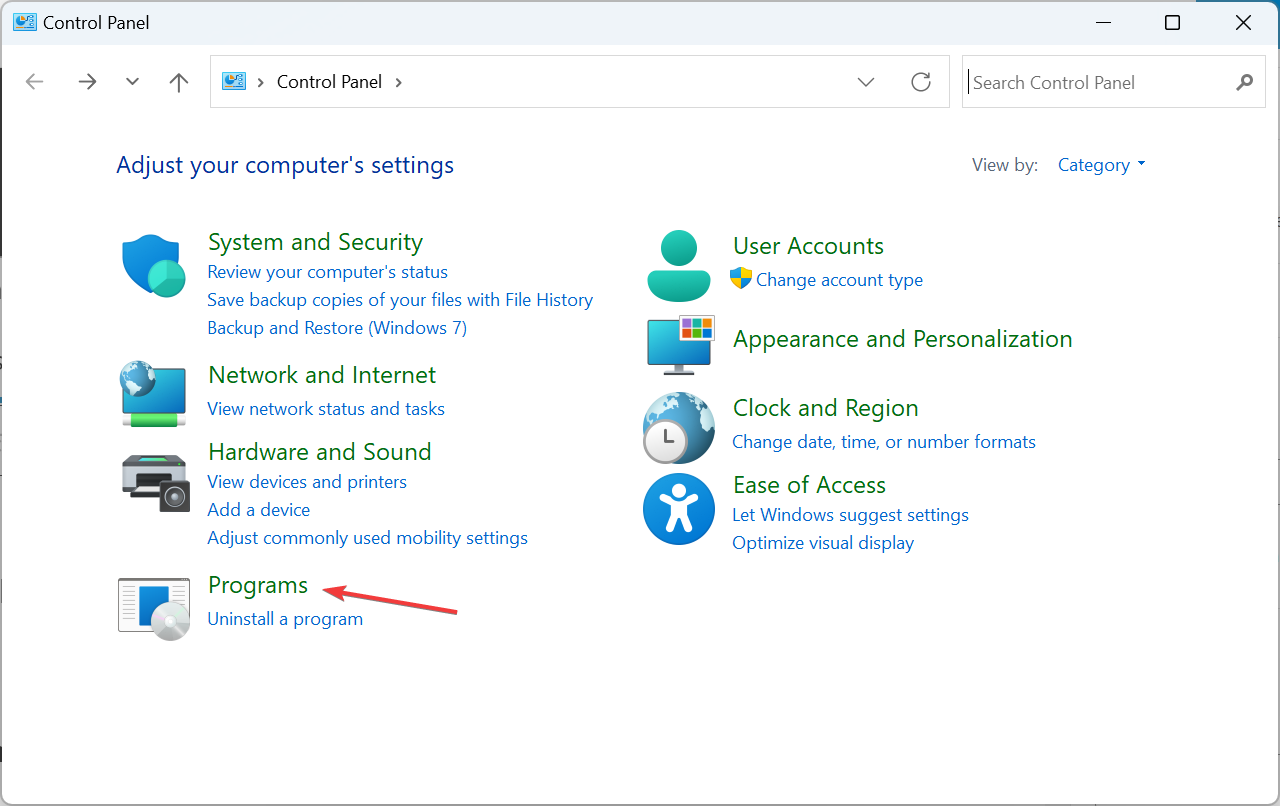
Open Control Panel, and click on Programs.
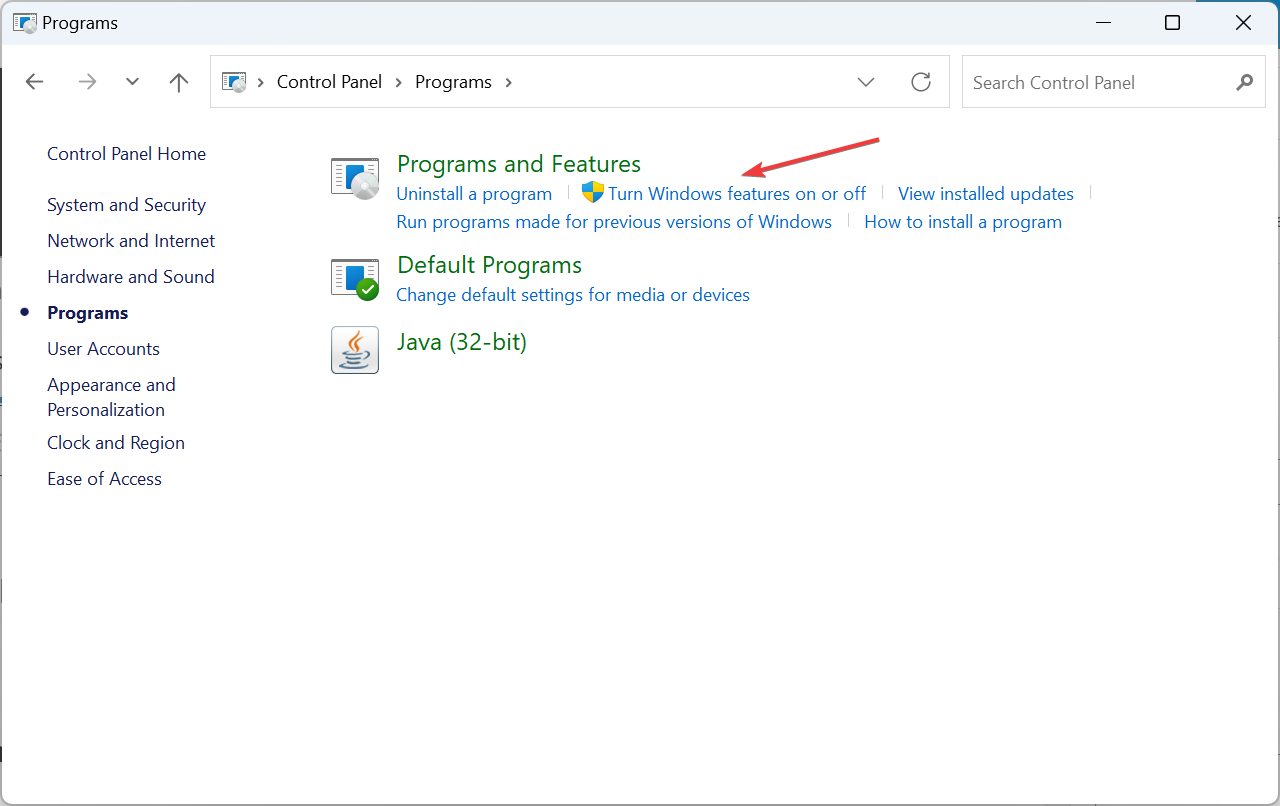
Now, click on Turn Windows features on or off.
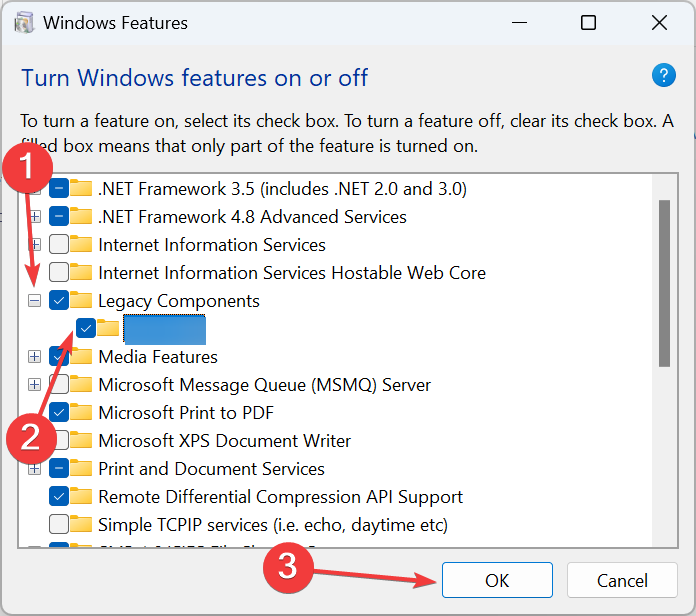
Expand Legacy Components, tick the checkbox for NTVDM, and click OK to install the component.
Restart the computer for the changes to come into effect.
If you just installed Windows and are facing the error, a quick solution is to download NTVDM.exe via the built-in Windows Features option.
Press Windows + E to open File Explorer, and navigate the following path:C:\Windows
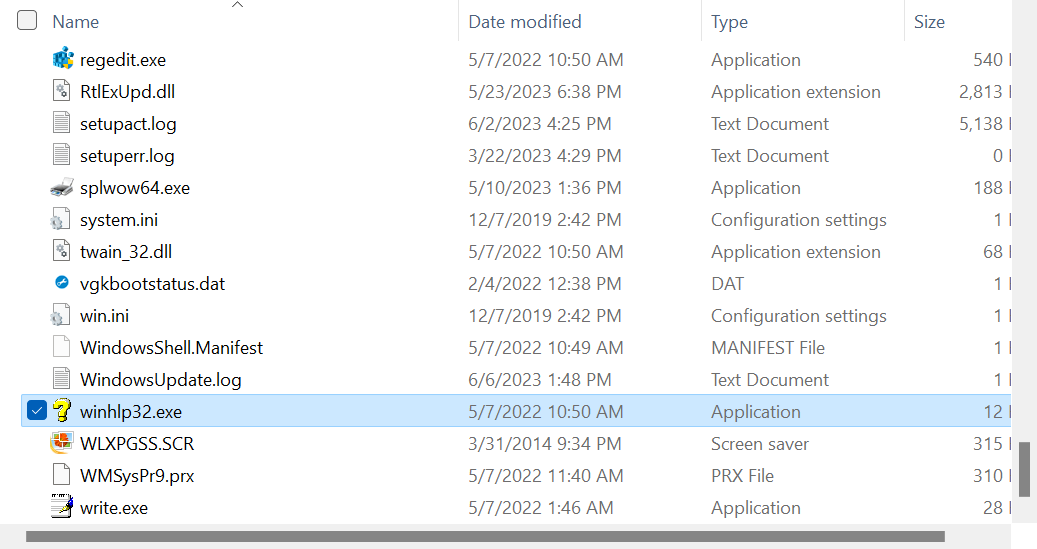
Locate winhlp.exe and winhlp32.exe files, select them, and then hit Delete.
Choose the appropriate response in case a confirmation prompt appears.
For some users facing NTVDM.exe high CPU consumption and not using any application that relied on the component, deleting the relevant files did the trick. So try doing that as well.
4. Run the app in compatibility mode
Right-click on the app throwing the error, and select Properties from the context menu.
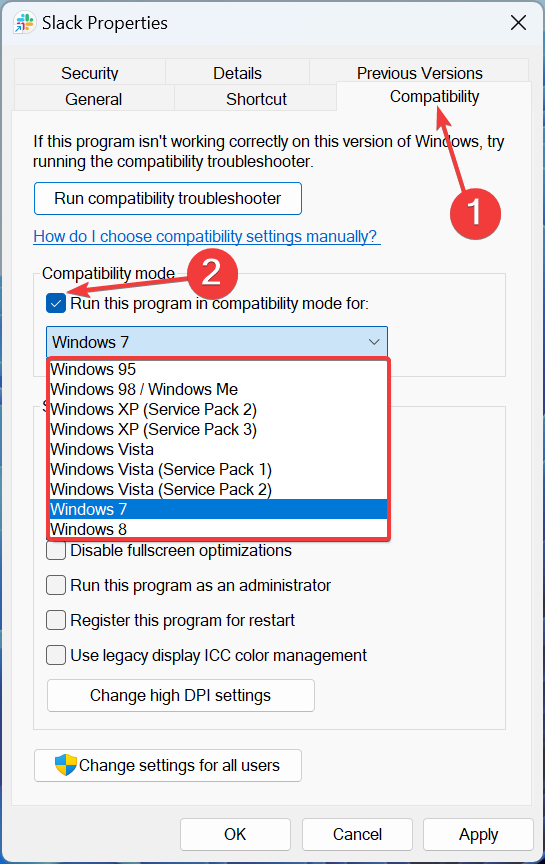
Navigate to the Compatibility tab, tick the Run this program in compatibility mode for checkbox, and select an older iteration of Windows from the dropdown menu.
Once done, click on Apply and OK to save the changes.
If the error persists, choose another iteration in compatibility mode. This basically is a hit-and-trial thing.
In the case of some apps, running in compatibility mode fixed things when users kept getting the NTVDM.exe has stopped working error. Here, the app is run in an environment similar to what it was developed for, thus eliminating any errors.
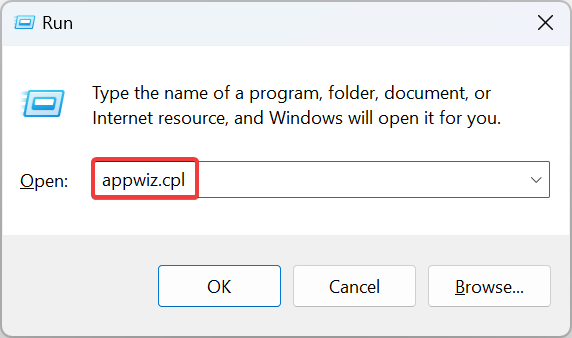
Press Windows + R to open Run, type appwiz.cpl in the text field, and hit Enter.
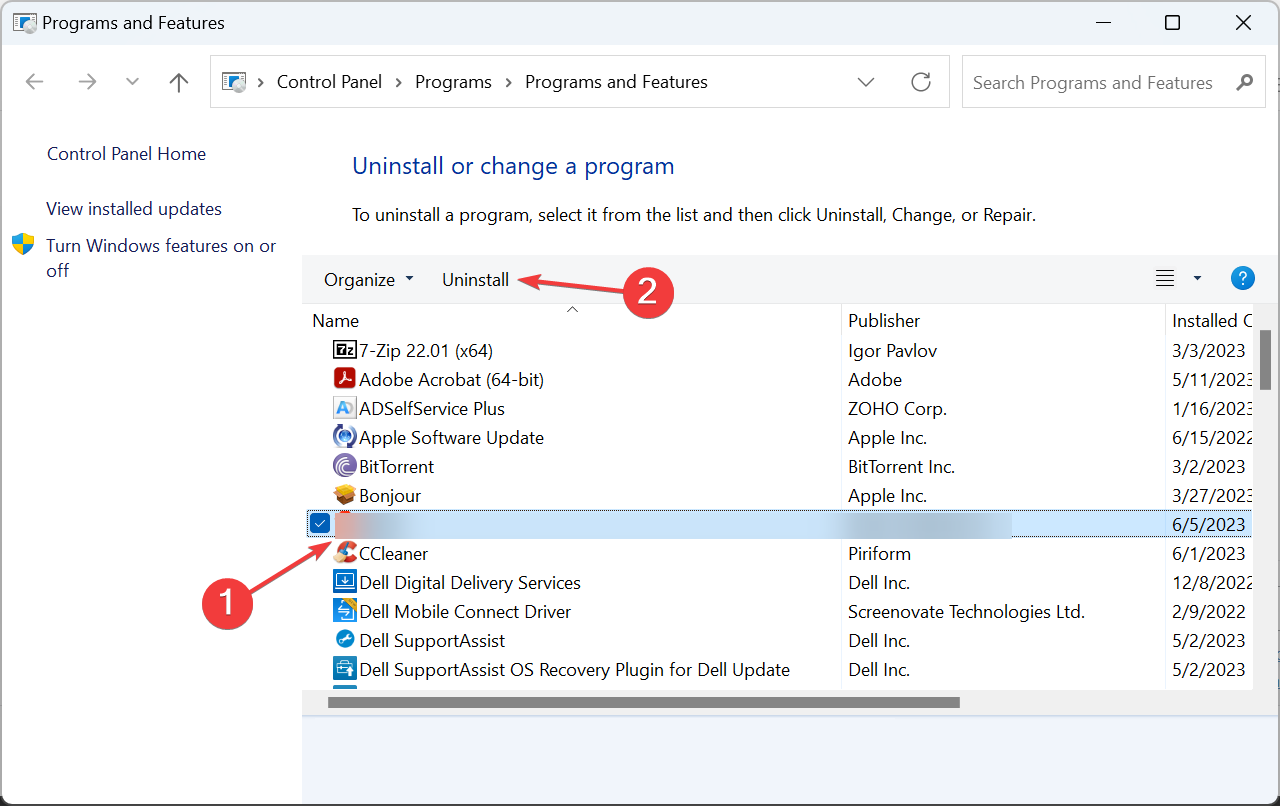
Select the program throwing the error, and click Uninstall.
Follow the on-screen instructions to complete the uninstallation process.
In case only a specific program requires NTVDM.exe, you should uninstall it since the component is now under maintenance mode and not development mode in recent iterations of Windows.
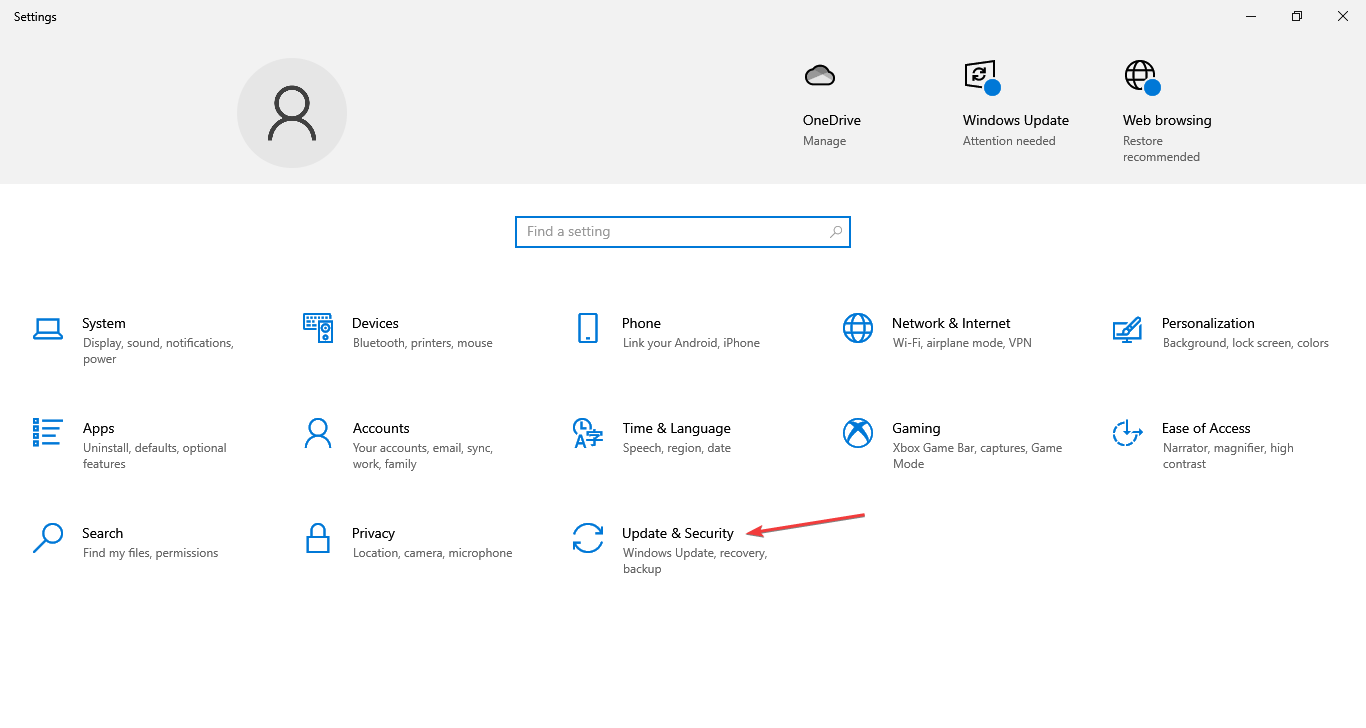
Press Windows + I to open Settings, and click on Update & Security.
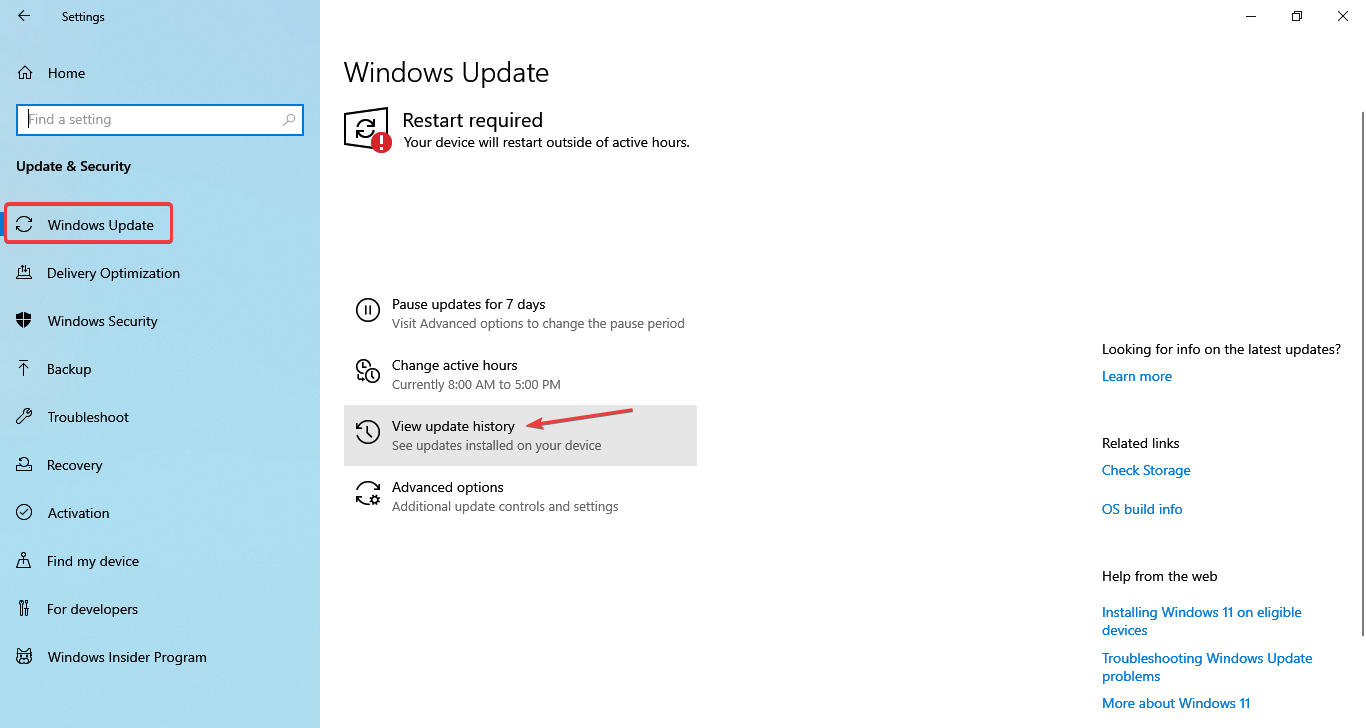
Click on View update history on the right.
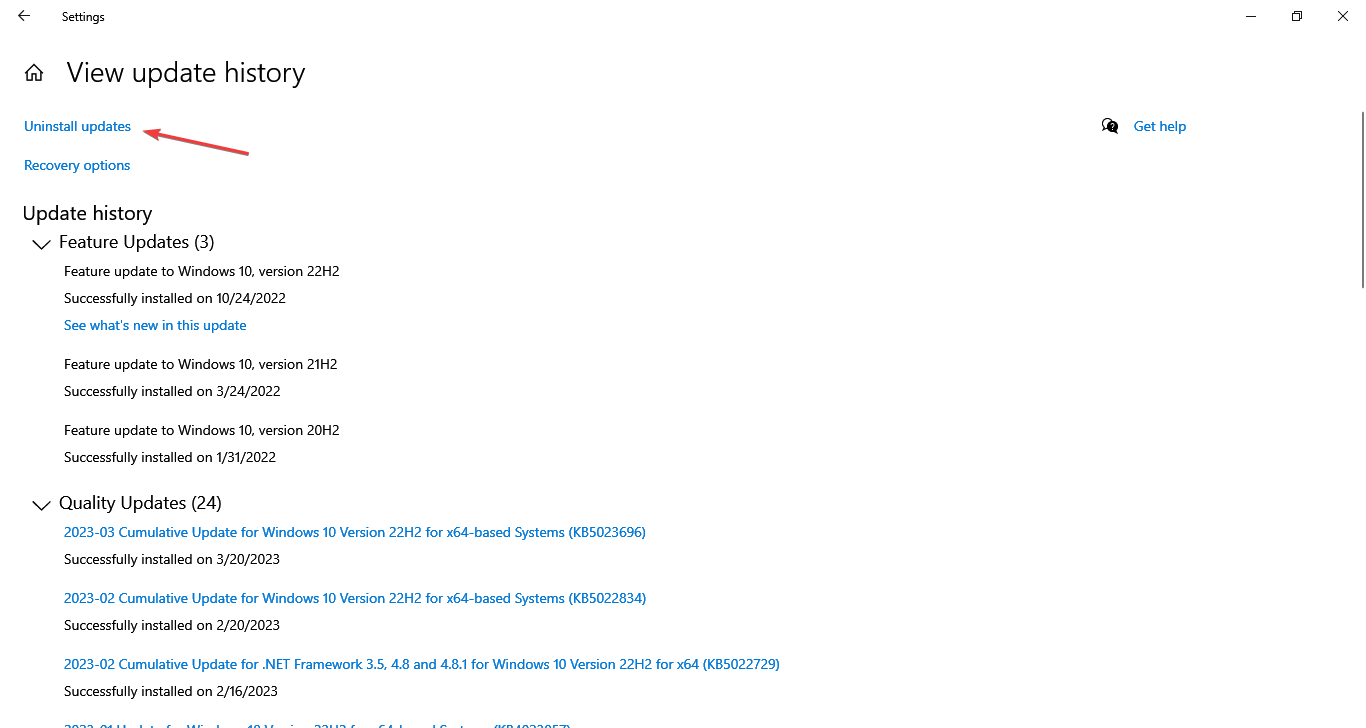
Click on Uninstall updates.
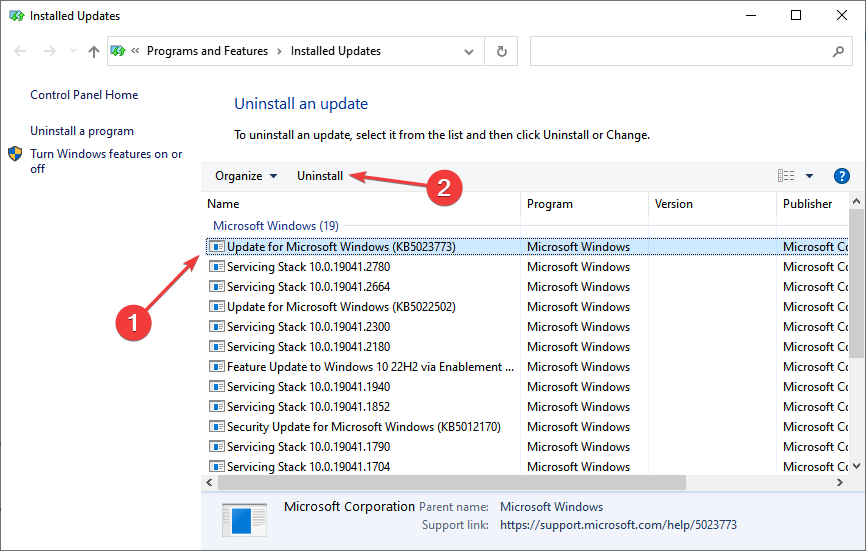
Select the update after installing which the error first appeared, and click on Uninstall.
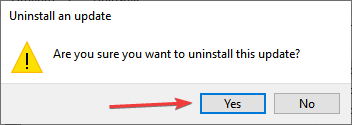
Click Yes in the confirmation prompt.
If reports are to be believed, recent Windows Updates can also trigger the NTVDM.exe is not responding error for many users. And users managed to fix things by uninstalling Windows updates.
7. Perform a system restore
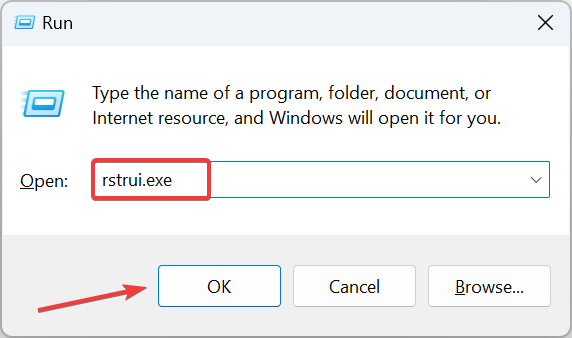
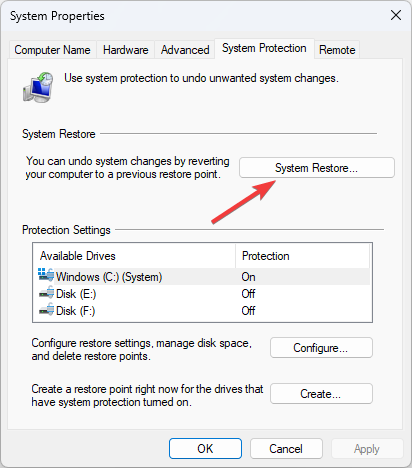
Press Windows + R to open Run, type rstrui.exe in the text field, and click OK.
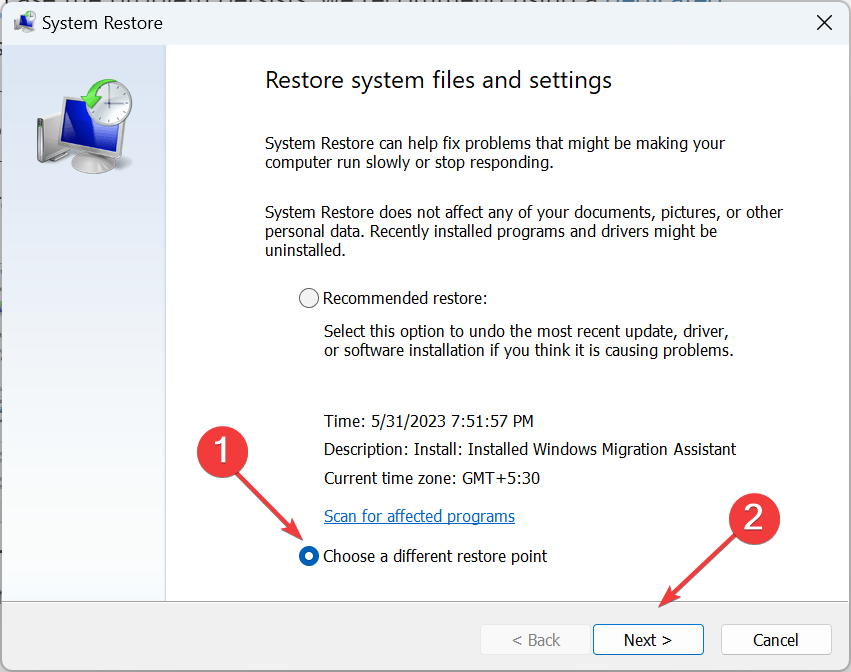
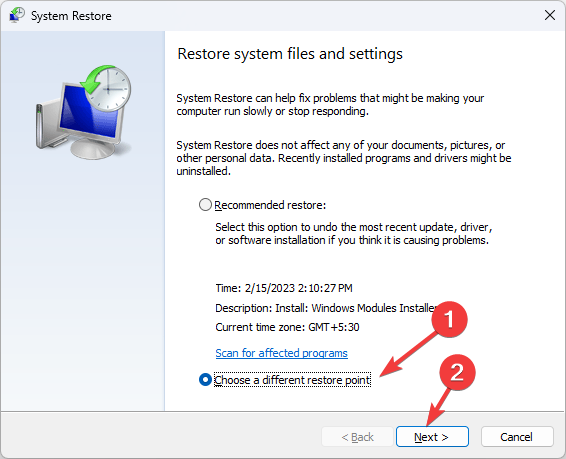
Select Choose a different restore point, if the option is available, and click Next.
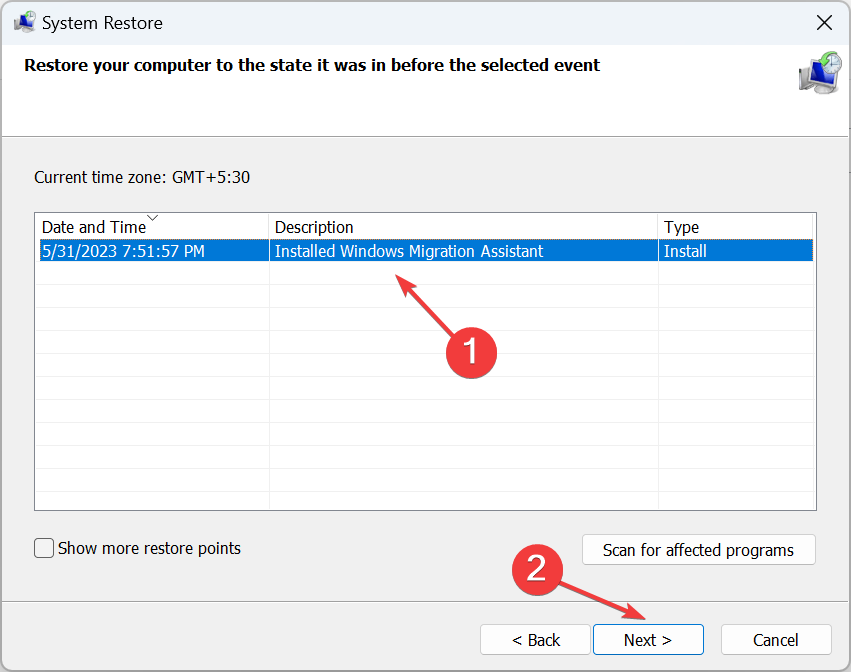
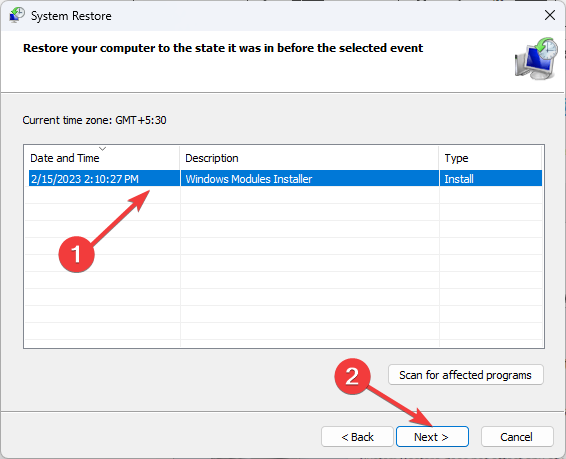
Now, pick a restore point, one created before the error first apeared, and click on Next.
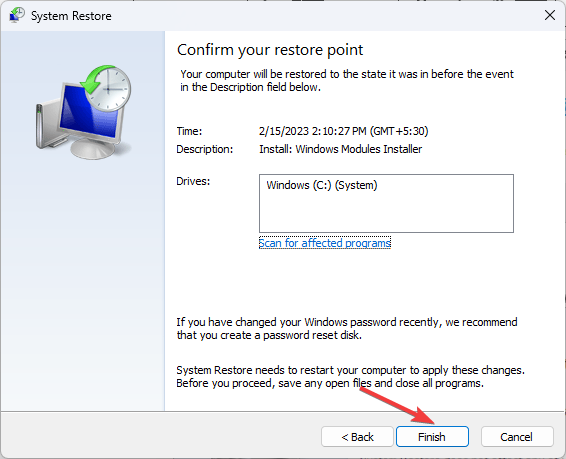
Verify the restore details and click Finish to start the process.
Wait for the restore to complete.
When nothing else works, often, a system restore does the job. It reverts your PC in time to a point where the error didn’t exist in the first place. That’s why we recommend creating restore points or configuring Windows to create some automatically before any major changes.
By now, you should have gotten rid of NTVDM.exe errors in Windows and should have the affected program either up and running or removed altogether.
Space and storage are vital elements tied to the optimal functioning of your computer. So when deleting files doesn’t free up space, it causes a real worry.
However, this should not be the case, as many solutions exist. In this guide, we discuss them and point at some causes of this situation.
Why does deleting files not free up space?
The files are still in the Recycle Bin – Your deleted files may be moved to the recycle bin, which still takes up storage space on your computer.
The files are fragmented – Not all files on the computer are written to the disk sequentially. Instead, the file might be fragmented, making it harder for the computer to get rid of them.
File type – Some file systems don’t support defragmentation, such as FAT32. This implies that your computer cannot defragment your files to free up space, even if they are fragmented.
Disk errors – Some errors on your disk will guarantee that memory is not released after deleting data from your computer.
Malware infection – If files are not correctly deleted, your computer may have some viruses. We always recommend using a robust antivirus.
What do I do if deleting files doesn’t free up space on my computer?
Before you go through the fixes below, you may try these workarounds:
If you have a lot of large files, you may compress them to save space.
Use cloud storage services like Dropbox and Google Drive to store files online. This can be a great way to free up space on your computer and give you access to your files from anywhere.
Run a virus scan to eliminate the chances of the problem due to virus infection.
That said, you may now try the solutions we list below.
1. Permanently delete files
Right-click on the file you need to delete.
Press the Shift key while clicking the Delete icon.
Click Yes to confirm your choice.
2. Empty the Recycle Bin
Press Windows + E to open File Explorer.
Click the first tiny arrow on the Address bar and select Recycle Bin from the options.
Now select the Empty Recycle Bin option at the top.
Finally, verify that some space has been freed up on your device.
Press that Windows key, type defrag and click the Defragment and Optimize Drives option.
Select the drive you need to defragment and click the Analyze button.
If the drive is fragmented, click the Optimize button to defragment it.
Now you may permanently delete files, and they should free up space. However, if the issue of deleting files doesn’t free up space persists, move on to a different solution.
4. Fix disk errors
Press Windows + R to open the Run dialog.
Type cmd and hit Ctrl + Shift + Enter to open an elevated Command Prompt.
Type the script below and hit Enter, replacing E with the drive letter you need to fix. chkdsk E: /f /r /x
Finally, verify if it fixes the issue.
That is as far as we share in this guide. So, if deleting files doesn’t free up space, we hope you can now fix it.
Do you think there are other solutions our readers need to know? If that is the case, leave us a note in the comments section below, we would love to interact with you.
If you have encountered the 0xC00002EE error during the logon process on Windows 10 or 11, this guide can help! The error typically indicates an issue with the user account authentication, preventing you from accessing your system.
We will explore the possible causes behind the logon error and provide effective solutions to fix it on Windows 10 and Windows 11.
What causes the 0xC00002EE error on Windows 10 & 11?
The 0xC00002EE error can occur on Windows 10 and Windows 11 for various reasons. Here are some common causes of this error:
Incorrect user credentials – If you have entered the wrong user credentials during the logon process. It can be a mistyped password, username, or domain name. Verify the credentials & try again.
Corrupt user profile – A corrupt user profile can lead to logon issues and trigger this issue. You might have to repair the user profile to fix the problem.
Malware infection – If your system is infected with malware or viruses, it can interfere with the logon process and cause authentication issues, resulting in this error. Run a malware scan.
Corrupt system files – Corruption in essential system files required for the logon process can prevent successful authentication and trigger the error. Try repairing the system files using an SFC scan.
Domain controller issues – In a network environment, domain controllers are used for user authentication, problems with the domain controller’s connectivity & configuration can cause this issue.
Now that you know the causes; let us move to the potential fixes to resolve this problem.
How can I fix the 0xC00002EE error on Windows 11?
Before engaging in advanced troubleshooting steps, you should consider performing the following checks:
Try restarting your computer.
Use a different login method and then change the PIN.
Restart your router.
You must have administrative access to the PC to perform troubleshooting steps.
Once you checked all these, move to the solutions mentioned below.
1. Perform Startup Repair
1.1 Boot in Windows Recovery Environment
Press and hold the Power button for 10 seconds to shut down your device.
Press the Power button again to turn it on. Once the Windows starts, hold down the Power button to turn it off again.
Follow the above steps twice, and when the system restarts the third time, allow it to fully startup.
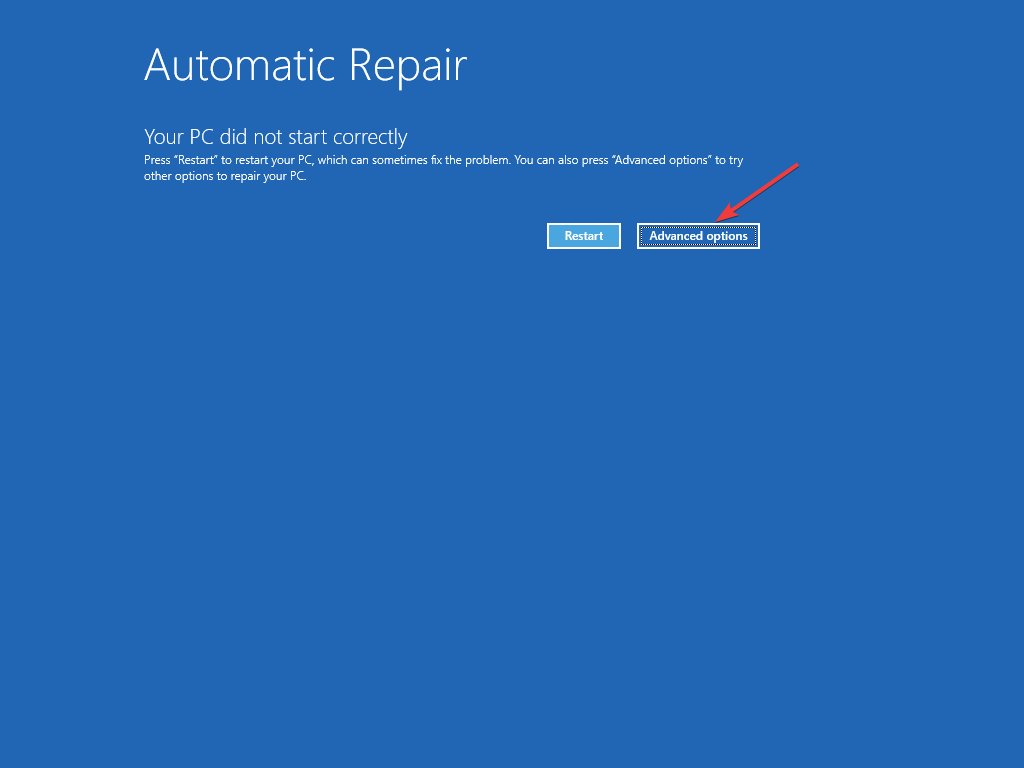
On the Automatic Repair screen, click Advanced options.
1.2 Select Startup Repair
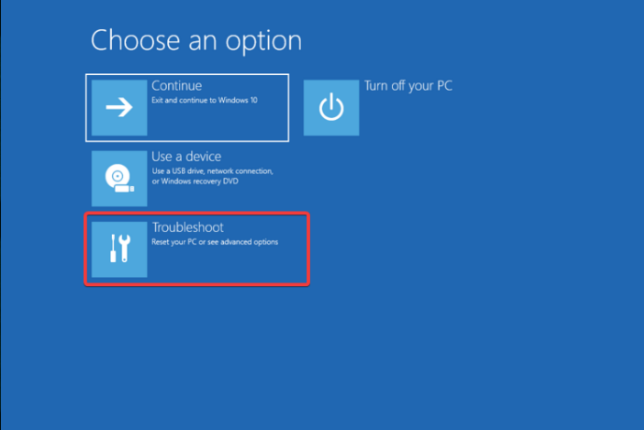
Now on the Choose an option screen, select Troubleshoot.
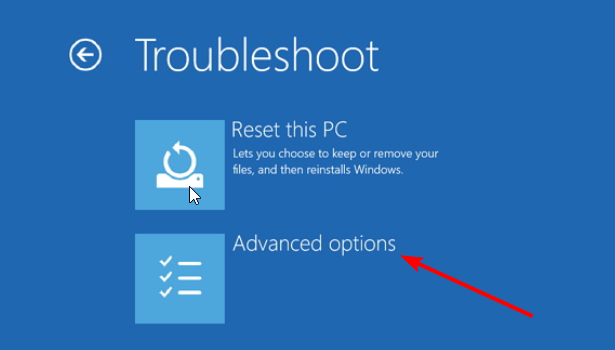
On the Troubleshoot screen, click Advanced options.
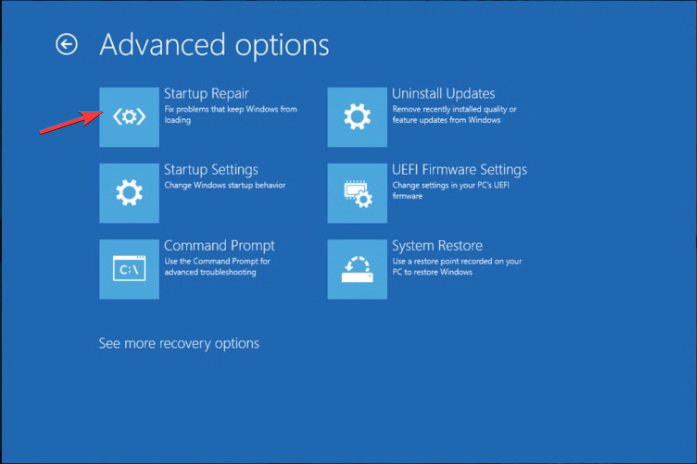
Now click Startup Repair.
Click Restart.
The repair process will begin, and the system will attempt to fix any issues preventing you from logging in. Follow the on-screen instructions and allow the repair process to complete.
2. Use the System Image Recovery process
You must follow the steps in Solution 1.1 to enter Windows Recovery Environment.
Now on the Choose an option screen, select Troubleshoot.
On the Troubleshoot screen, click Advanced options.
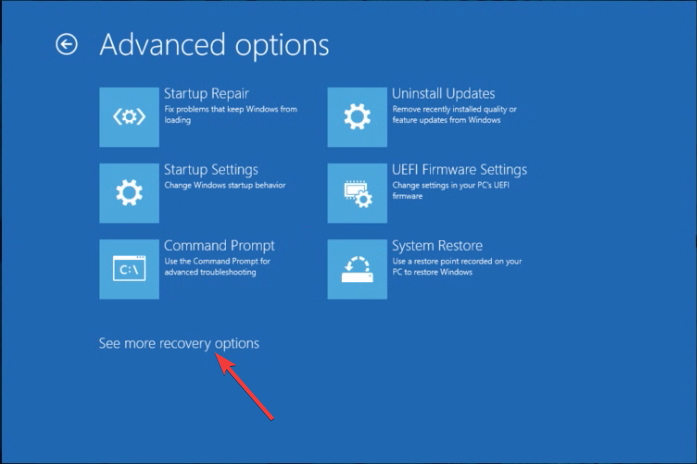
Select click See more recovery options.
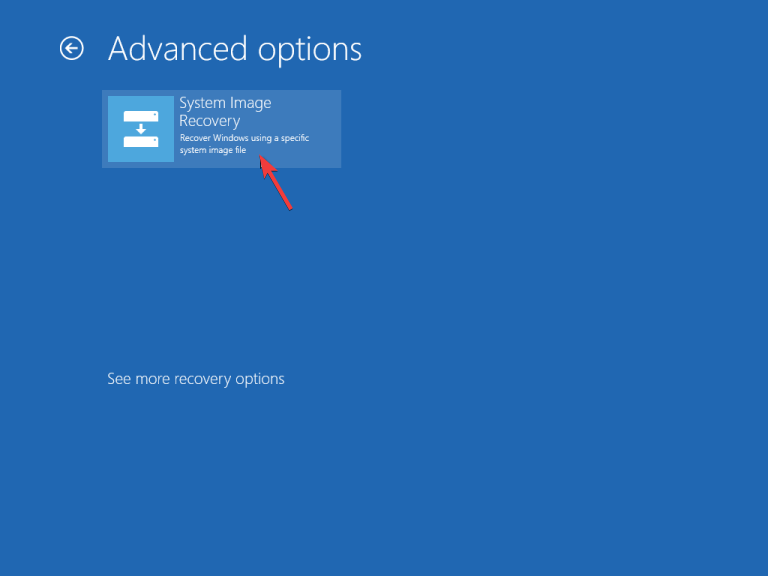
Click System Image Recovery.
Choose the operating system.
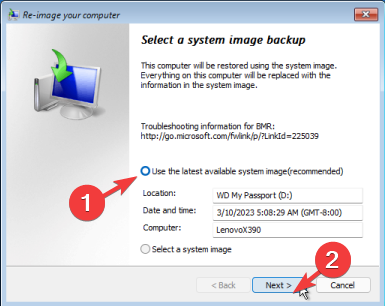
On the Re-image your computer window, select Use the latest available system image(recommended), and click Next.
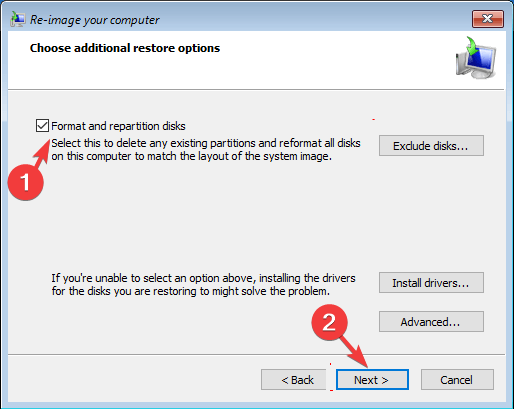
On the next screen, select Format and repartition disks if you want. You can also get the option to install drivers, then click Next.
Click Finish, then Yes to continue.
The recovery process will start and take some time based on the amount of data and the system’s resources.
You must follow the steps in Solution 1.1 to enter Windows Recovery Environment.
Now on the Choose an option screen, select Troubleshoot.
On the Troubleshoot screen, click Advanced options.
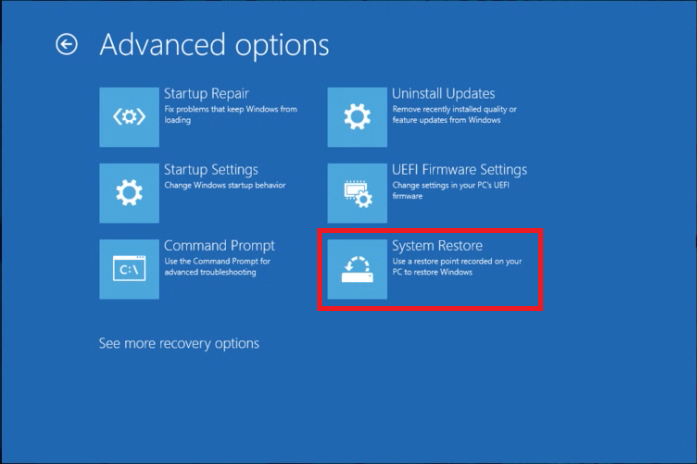
Select System Restore.
On the System Restore window, select Choose a different restore point and click Next.
Select the restore point and click Next.
Click Finish to continue.
Windows will restart and restore the computer to the selected version. If the System Restore is not working for you, we suggest you check out this informative guide to find the solutions.
If you’re not sure about proceeding with the manual steps and want to avoid further issues, we recommend a specialized tool.
4. Run an SFC scan
You must follow the steps in Solution 1.1 to enter Windows Recovery Environment.
Now on the Choose an option screen, select Troubleshoot.
On the Troubleshoot screen, click Advanced options.
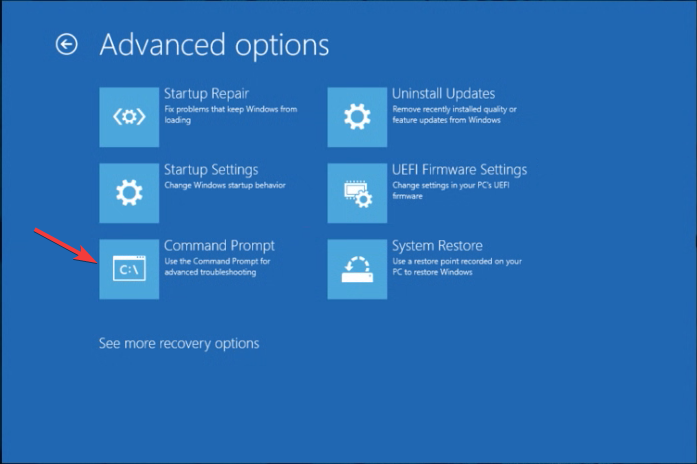
Select Command Prompt.
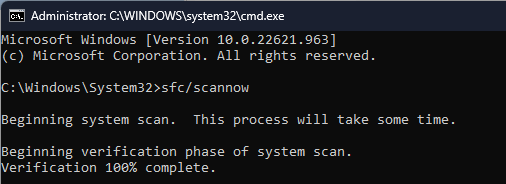
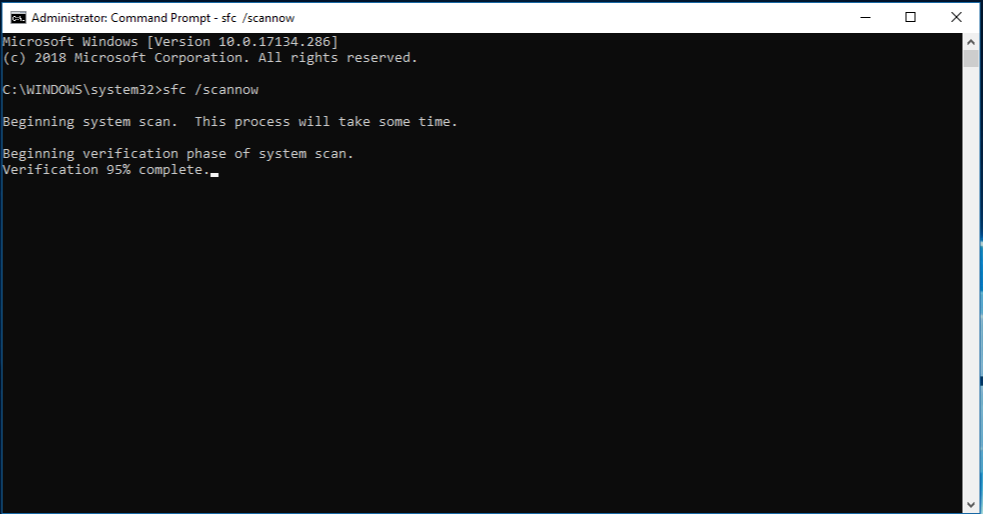
Copy & paste the following command to repair system files and hit Enter: sfc/scannow
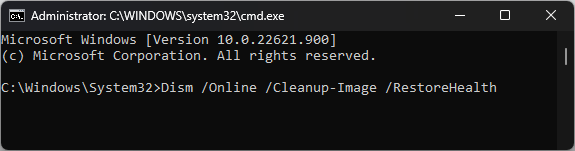
Wait for the process to complete, and type the following command to restore the Windows OS image and hit Enter: Dism /Online /Cleanup-Image /RestoreHealth
Restart your computer to save the changes.
5. Rebuild the BCD (Boot Configuration Data)
You must follow the steps in Solution 1.1 to enter Windows Recovery Environment.
Open the Command Prompt using the steps mentioned in Solution 4.
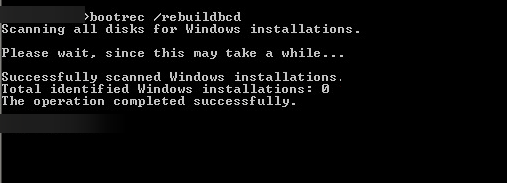
In the Command Prompt window, type the following command and press Enter: bootrec /rebuildbcd
Follow the on-screen instructions to scan for Windows installations. If prompted, select the Windows installation you want to repair.
When the process completes, restart your computer and see if the error is resolved.
What can I do to fix the 0xC00002EE error on Windows 10?
To fix the issue related to fixing the 0xC00002EE error, you need to have a user account with admin rights on your Windows 10 computer, then follow the methods mentioned above for Windows 11.
So, these are methods you can use to fix the 0xC00002EE error on Windows 10 & 11. Please feel free to give us any information, tips, and your experience with the subject in the comments section below.
The time you have all been waiting for is finally here. Blizzard has released the long-awaited Diablo 4 game and the hype is through the roof.
The sequel in the Diablo series is actually Blizzard’s fastest-selling game of all time, thanks to pre-orders. Since early access, Diablo 4 users have spent over 100 million hours fighting evil, so far.
Not only experienced Diablo veterans have decided to pick up this interesting game. First-time players were also intrigued and would like to know more about this beloved RPG.
That’s what we’re going to get into today. Hopefully, by the end of the article, you will have a better understanding of the classes and which one is best for your gaming style.
Before we get into it though, we know that there have been problems. Thus, if you can’t redeem yourDiablo 4 code, we can show you what to do.
What class should I start Diablo 4 with?
After defeating evil foes such as Mephisto, Baal, Malthael, or Diablo himself, the time has come to face the mother of all evil.
This time around we are going to focus on taking down Lillith, after going through literal armies of undead creatures and other monstrosities.
But which of the available classes is better suited for taking on these immense challenges? Actually, all of them are, it just depends on how you want to go about it.
You can stand back and rely on your powerful spells, deceive and trap your opponents, or simply charge at your foes axe in hand.
That being said, know that some classes are a little stronger than others, and depending on how you like to play, there’s a good chance you’ll have some preferences.
In order to help you pick one to play, we’ve broken down everything you need to know about each one, with an overview of each class, and some class suggestions for beginners and solo players.
As of this moment, the class ranking in Diablo 4 looks a little bit like this:
Rank
Class
S
Druid
A
Rogue, Barbarian, Sorcerer
B
Necromancer
Sorcerer
Strengths: High damage, long-range, plenty of status effects
Weaknesses: Low health, less effective up close
As you might have imagined, Sorcerers rely on manipulating magic and the power of the elements to gain the upper hand in a fight.
This class is basically the opposite of a Barbarian, as they have low health, but are capable of very high-ranged magic damage.
Keep in mind that, even though they can’t take much punishment, they’re a great class for careful solo players since they can crowd-control groups of enemies very effectively with their spells.
Use frost spells to chill and trap enemies, slowing them down considerably. Fire spells are fantastic for area-of-effect damage and inflicting damage-over-time effects.
Also, lightning spells deal tons of damage when you get critical hits with them. Remember to stay out of the range of your melee enemies.
Sorcerer’s class-specific resource is Mana, which is similar to Rogue Energy in that it comes back over time and can be regenerated faster by using certain skills and talents.
However, careful mana management is crucial for Sorcerers. Using too much too quickly could leave you unable to use spells and things can get tricky.
In conclusion, Sorcerers are a strong addition to co-op teams. Tankier classes such as Barbarians and Druids can absorb punishment or draw aggro away from them.
Barbarian
Strengths: Superior health, very mobile, more forgiving to play
Weaknesses: Short-range, melee combat can be risky you can get easily overwhelmed
Just as the name suggests, the Barbarians are Diablo 4’s tanky and straightforward melee class, capable of putting out good close-range damage and staying on top of foes with high movement speed.
Barbarians can deal damage over time with Bleed status effects, have plenty of health, and 10% damage resistance, making them easier to play than other classes in most situations.
Yes, it was one of the game’s weakest classes, but Barbarian has surged to the top of the meta thanks to some recent buffs.
The Barbarian’s unique class mechanic is the Arsenal system, which allows you to equip multiple weapons and assign them to individual skills for unique stat bonuses.
As a resource for their most powerful skills, you are going to use Fury, which is rapidly gained while attacking with basic attacks and slowly lost when out of combat.
Keep in mind that Barbarians will struggle more than other classes when facing enemies at a distance, as the Barbarian skill tree doesn’t have any effective ranged options.
Furthermore, enemy crowd control spells and tricks will drastically limit their ability to close the distance if they get hit too often.
If you like this hands-on approach and enjoy charging and smashing through your enemies, you should definitely try this class.
Necromancer
Strengths: Balanced playstyle, use minions to defeat enemies
Weaknesses: Slow, lacks a precise specialization mastery
Are you a fan of monsters, horror movies, and undead monstrosities? Well, if so, the Necromancer class will be right up your alley.
In fact, the extremely versatile Necromancer is capable of both ranged and melee combat, and can summon armies of undead minions that fight on his behalf.
You can even wield fierce Bone, Shadow, and Blood magic that can be used to crowd control groups and convert damage into health.
With a wide array of diverse abilities and minion customization options on the Necromancer skill tree, it’s the most adaptable class in the game by design.
They’re pretty much strong in any situation, including both single and multiplayer. Remember that Necromancers are also one of the best classes for solo play since they don’t have any major weaknesses.
One of the Necromancer’s weaknesses is that it’s not as specialized as something like the Barbarian or Sorcerer when we draw the line.
This class trades maximum potential for versatility, and that’s going to be more of a win in most situations.
Another thing holding the class back is that it’s slow and doesn’t have any mobility options, which can be a problem in endgame scenarios.
Blizzard has nerfed Necromancer’s minions in subsequent beta patches, leaving a bit of a question mark over how they will scale into the endgame.
Rogue
Strengths: Highly versatile, huge crit damage, lots of status effects
Weaknesses: A bit more challenging to play, not very resilient,
You might want to know that Rogues are one of the most versatile classes in the game. They can attack enemies from afar with bows or up close with daggers, or trap them.
Rogues are capable of dealing huge critical damage, and can also imbue their weapons with magic or lay deadly traps to inflict various status effects.
They can begin choosing class-exclusive specializations once they reach level 15, which are essentially bonus mechanics that change how your skills interact with one another.
If you decide to play Rogue, you will use Energy as your primary resource, which is slowly regenerated over time.
Some abilities and talents on the Rogue skill tree, however, improve its regeneration rate or give you a certain amount of Energy points back when used.
Don’t shrug this off, as it can drastically increase your uptime with powerful abilities that require it and make you hit harder and harder to hit.
A lot more elusive and deceitful, Rogues are kind of difficult to play compared to other classes, so you may want to start with an easier class.
Why? Well, because they don’t have a ton of health, and also because managing your skills and Energy efficiently is very important as a Rogue.
Druid
Strengths: Resilient, versatile, pretty good at crowd control
Weaknesses: Crit-dependent, requires damage ramps for some setups
We’ve saved the best for last. Druid is definitely the class to play if you are into shapeshifting and manipulating the elements.
Yes, the Druid is similar to the Barbarian in that the class’ focus is, for the most part, melee damage and tanking opponents.
With this class, you can shapeshift into Werewolf and Werebear forms, with the former boasting high attack speed and crit damage and the latter offering more area-of-effect options and a larger health pool.
Druids are also a bit stronger than some of the other classes in general, and while they’re not quite as tanky as Barbarians, you can still soak up a ton of damage in your Werebear form.
Gamers say that playing on World Tier 2, Druid gets a little rough with damage output in the mid-30s, but once they start unlocking legendary affixes, their damage really ramps up.
Talents offer limited options for ranged combat, but the class can call upon the powers of nature to damage and crowd control foes with Earth, Wind, and Lightning magic.
To avoid some disappointment, don’t expect Druids to be able to snipe or nuke enemies quite as effectively as Rogues or Sorcerers.
So, overall, the Druid’s shapeshifting abilities and nature magic make them a pretty versatile class, especially in close-quarters combat.
Indeed, Druids are a little tougher to play than a Barbarian since there’s more to their gameplay loop than simply slashing at everything in sight, but they’re just as effective thanks to their diverse array of skills.
Initially, Druids were the weakest class in Diablo 4. Since then, however, they’ve been buffed significantly and are now arguably the game’s strongest class.
This is what we’re looking at in terms of available classes to play in Diablo 4. Go with the flow and play whatever you enjoy, as long as you are having a good time.
True, some classes can be a bit more challenging than others, but that doesn’t mean you won’t get good at playing with them.
It all comes down to a little practice and what you are mostly comfortable with. Share with us in the comments below what you’ve decided to go with.
Besides the Dynamic Lighting settings which will allow you to create and customize lightning and effects on your mouse and keyboard, the Build 23475 also comes with a whole new File Explorer and address bar.
There were rumors about File Explorer getting a revamp, but now it seems Microsoft has really delivered and the results look promising in Insider.
So how does it look now, you may ask? Well, not very different, but definitely more sparse and easier to navigate.
Here’s how the new File Explorer and address bar look like
The new File Explorer is powered by Windows App SDK and WinUI, which are UX (user experience) frameworks for both Windows desktop and UWP applications. This means that the new File Explorer benefits from a lot of designs that you mainly find on mobile apps.
If this is intended for a seamless transition and easier navigation, then it’s definitely looking promising, because now you can actually see the previews of documents in the Recommended area.
Not only that, but it seems you can also see who’s commenting on them or editing them.
These are called Recommended files and will be displayed as carousels that support thumbnails.
The new File Explorer in Build 23475 also comes with a new layout for Quick Access, Favorites, and Recents. You’ll be able to see details such as comments, editing, and an overall different experience when interacting with these files.
On another note, the address bar is also looking very good. It automatically recognizes local files from cloud files, and it also gives you details on your OneDrive status.
Besides these features, Build 23475 brings a lot of other new features to the table. You are now able to use more new emoji from the emoji panel. And if you encountered an issue where notification would lead to an explorer.exe crash, it should be solved now.
On the other hand, Microsoft Store has new designs for video games and movie cards. This makes it easier for you to spot and find your next favorite product.
Make sure you have all the necessary personal documentation ready.
Next, find the best method to contact the IRS and explain your issue.
ID.me is aware of this issue, and according to their official response, this error is caused by IRS, so to fix it, it would be best to contact them directly.
Many of our readers have reported facing the Comctl32.dll not found error. This error usually pops up when users try to launch an application, for instance, Google Chrome.
In this guide, we will show you a list of solutions that will help you resolve the Comctl32.dll not found error on your computer. Let us check out the solutions.
What is Comctl32.dll?
The Comctl32.dll is a Dynamic Link Library file that provides common Windows objects, for example, list boxes, combo boxes, etc, to programs written in the Visual Basic language.
In case the Comctl32.dll file is missing or goes corrupt, you won’t be able to launch programs written in Visual Basic.
The Comctl32.dll file is found inside the C:\Windows\System32. The error message that is associated with the DLL is shown below:
COMCTL32.DLL is missing
COMCTL32.DLL not found
Cannot find COMCTL32.DLL
A required component is missing: COMCTL32.DLL
This application failed to start because COMCTL32.DLL was not found. Reinstalling the application may fix this problem
Not being able to launch many of your programs because of the Comctl32.dll missing or corruption, can be pretty frustrating. Let us apply the solutions and fix the problem.
How do I resolve the Comctl32.dll error?
Before starting any tweaking on your PC:
Make sure you install all the pending Windows updates. They may fix the system even before doing anything else.
1. Use a dedicated DLL fixer
DLL files are important for the smooth functioning of your PC. In case they are missing or go corrupt, your PC will misbehave. Moreover, you have to be very careful while fixing DLL-related issues.
To avoid any problematic situation, you can take the help of a dedicated DLL fixing tool. For your convenience, we have created a list of some of the best DLL fixers that will help you resolve DLL-related problems easily.
2. Run the SFC and DISM scans
Press the Win key to open the Start menu.
Type command prompt and run it as an administrator.
Type the below command and press Enter: sfc /scannow
Let the process complete.
Type the below commands and press Enter after each one: Dism /Online /Cleanup-Image /CheckHealthDism /Online /Cleanup-Image /ScanHealthDism /Online /Cleanup-Image /RestoreHealth
Restart your PC.
Corrupt system files can often cause multiple issues and since the Comctl32.dll is a system file, you should run the above commands and fix the issue at your end.
You can also select Scan options and choose Full scan for in-depth scanning, and after that, restart your PC.
You can also run your dedicated antivirus software and remove any virus or malware from your PC that might be the reason for the Comctl32.dll-related errors.
4. Perform System Restore
Open the Start menu by pressing the Win key.
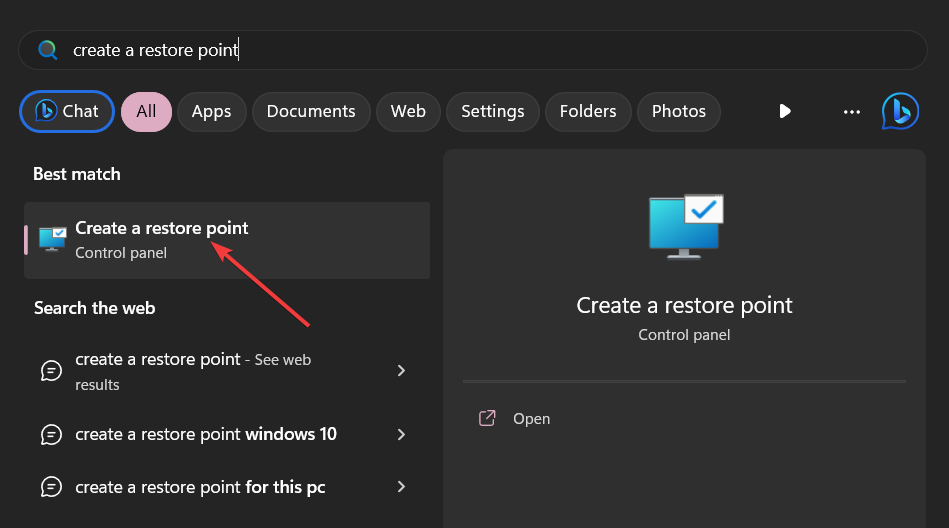
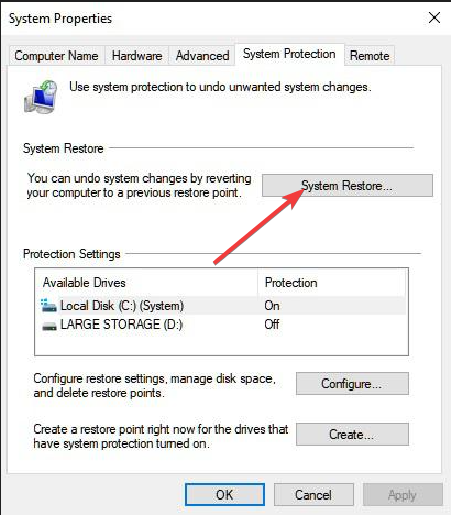
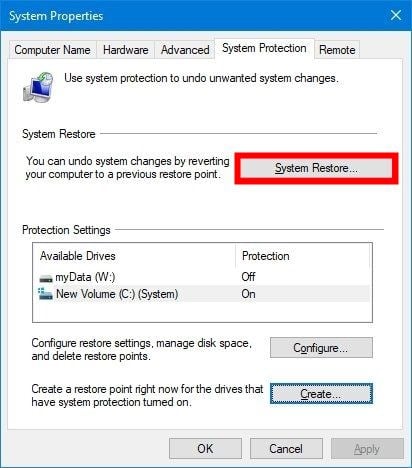
Type Create a restore point and open the appropriate result.
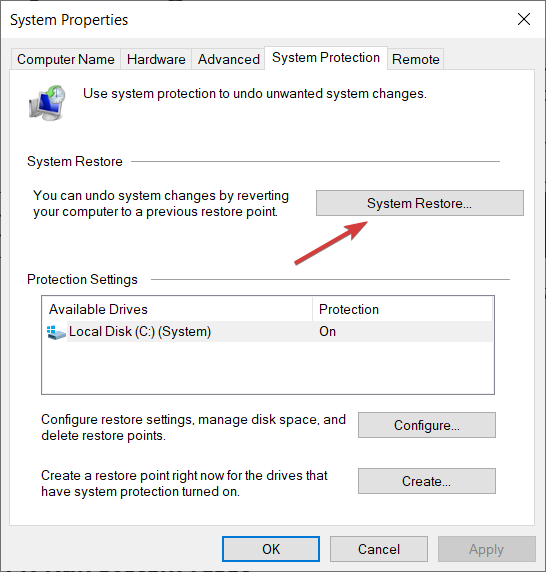
Select the drive where you have installed the OS and click on System Restore.
Select the restore point and click on Next.
Click Finish to begin the restore process.
When you perform a system restore, you ask your PC to revert all settings and take it to a state where everything was working normally.
Do note that the system restore process will work when you create a system restore point on your PC. For that, you can check out our guide, which will explain to you how to create a system restore point.
That is it from us in this guide. Let us know in the comments below if you found this guide helpful. Also, share any other solution that helped you resolve the Comctl32.dll error.
Windows 11 Dynamic Lighting allows you to control lighting on peripherals from different manufacturers on your PC, without using any third-party software.
In today’s guide, we’re going to take a closer look at this feature and see how it works and how to configure it properly.
Benefits of Dynamic Lighting:
It uses the open HID LampArray standard.
Device manufacturers can use one standardized firmware.
Ability to control lighting on multiple devices from the Settings app.
Lighting synchronization across different brands.
How do I control RGB lighting with Windows 11?
Setting up Dynamic Lighting on Windows 11
Press Windows key + I to open the Settings app.
Navigate to Personalization and choose Dynamic Lighting.
Next, turn on Use Dynamic Lighting on my devices.
To customize the lighting, expand the Effects section and adjust your settings as you wish.
In case you don’t want to use this feature, just uncheck Use Dynamic Lighting on my devices option.
Exploring third-party software and hardware options
Understanding RGB lights and lighting controls
Currently, each manufactuer has its own lighting software that allows you to customize how the lighting works, and the software allows you to change the following:
Lighting mode and effects, as well as effect speed.
Colors that used for effects.
Ability to save presets and switch quickly between them.
Hardware manufacturers supporting Dynamic Lighting on Windows 11
Acer, and ASUS ROG.
HP with its OMEN, HP Victus, and HyperX series.
Logitech with its Logitech G Lightsync series.
Razer, SteelSeries, and Twinkly.
Currently, Razer offers the best compatibility, but all the aforementioned manufactuers are partnering with Microsoft, so we should see more devices that support Dynamic Lighting soon.
Finding devices with RGB lights compatible with Windows 11
The Dynamic Lighting support is fairly limited and currently only the following devices fully support it:
Laptops:
MSI CreatorPro Z16
MSI CreatorPro Z17
Keyboards:
ASUS ROG Scope II Wireless 96 Gaming Keyboard – coming soon
The following devices generally suppot Dynamic Lighting, but they aren’t cerfied by Microsoft, so you may experience bugs:
Keyboards:
Razer Turret Keyboard Xbox One Edition
Razer DeathStalker V2 Pro and V2 Pro TKL
Razer Ornata V2, V3, and V3 TKL
Razer Huntsman Tournament Edition, Mini, V2 Analog, V2 Tenkeyless, V2, and Mini Analog
Razer DeathStalker V2
Razer BlackWidow V4 Pro and V3 Tenkeyless
All Logitech G Lightsync RGB devices – coming soon
Mice:
Microsoft Pro IntelliMouse
Razer Turret Mouse Xbox One
Razer Naga Left Handed
Razer Naga Pro
All Logitech G Lightsync RGB devices – coming soon
Investigating Asus ROG products for enhanced RGB experiences
ASUS ROG has partnered with Microsoft and they are planning to release devices that are compatible with Dynamic Lighting in Windows 11. We expect to see some of those devices available later this year.
Dynamic Lighting feature on Windows 11 sounds great in theory, since it will allow you to sync compatible devices without having to use third-party software. However, Windows 11 RGB control is rather limited, and currently only a handful of devices support this new feature.
Multiple Outlook users have reported coming across the Emsmdb32.dll that crashes them out of the Office365 and Office 2016 programs.
In this guide, we will share with you some solutions that will definitely help you resolve the Emsmdb32.dll Outlook error on your PC.
What is causing the Emsmdb32.dll error in Outlook?
Here are a few of those common reasons that could trigger this Outlook error:
Corrupt MAPI service – If important MAPI service-related files are missing from Outlook then it can cause issues such as the Emsmdb32.dll crash error.
Outdated Exchange server – You haven’t installed the latest available Microsoft Exchange server patch that might have brought a fix for this problem.
Outlook is outdated – You aren’t running the latest version of Outlook on your PC, which is why you are getting the error.
Broken/Corrupt Registry – There are chances that the Outlook-related registry files are corrupt or damaged because of which you are coming across this error.
Now let us check out the solutions and try resolving the Emsmdb32.dll Outlook crash error.
How can I fix the Emsmdb32.dll Outlook crash error?
1. Use a dedicated DLL fixer
No matter if you are getting a system-related DLL error or a third-party-related DLL error, you should always take professional help whenever required.
Fixing DLL issues can be a frustrating task, and to avoid such issues, we would suggest you take the help of one of the best DLL fixing tools. Besides having a huge database of system DLL files, such software also fixes the compatibilities between third-party tools and the OS.
2. Disable add-ins
Launch Outlook.
Click on File from the top toolbar.
Select Options from the left pane.
Click on Add-ins.
Make sure that the Manage drop-down has COM Add-ins selected, then click on Go.
Uncheck all the add-ins to disable them and click OK.
Some add-ins can interfere with the smooth functioning of the Outlook app and cause multiple issues including Emsmdb32.dll Outlook crash error. Simply disable the add-ins and check if this resolves the issue or not.
3. Re-enable MAPI
Head to the Exchange admin center’s official Microsoft page.
Log in with your Microsoft Exchange account.
Expand Recipients and click on Mailboxes.
In the mailbox list, choose the mailbox you need to modify.
Go to the mailbox properties page and select mailbox features from the left pane.
Under Email Connectivity, you can check the MAPI status. If it’s enabled, click on the Disable button, then select the Enable button.
In case it is disabled, click on the Enable button, then select the Disable button.
Re-enabling MAPI has helped Outlook users resolve the Emsmdb32.dll Outlook crash error on their PCs. You should also give this solution a try and check if this fixes the error for you or not.
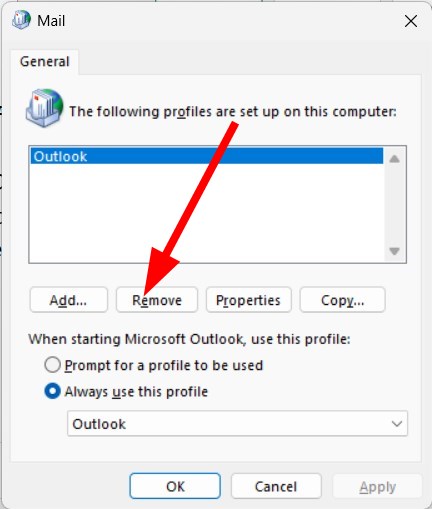
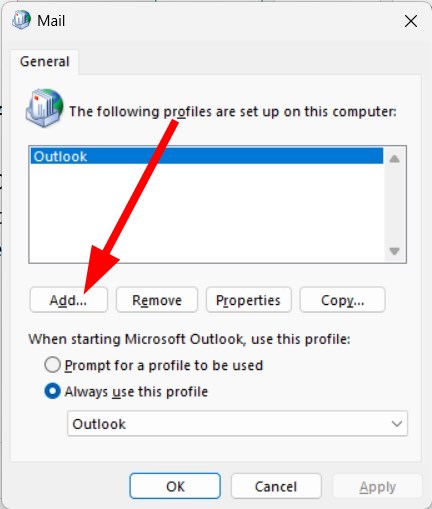
Follow the on-screen instructions to create a new profile and click Finish.
Return to the Mail dialogue box and select Always use this profile.
Click Apply and Restart your PC.
Creating a new profile will help troubleshoot whether there were some issues with your current or old account or not. Follow the steps above and check if this fixes the emsmdb32.dll problem or not.
Follow the on-screen prompts and apply the fixes to solve the problem.
You can also resolve any issues with the Outlook app using the Microsoft Support and Recovery Assistant as shown above.
That is it from us in this guide. Let us know in the comments below, which one of the above solutions resolved the Emsmdb32.dll crash in Outlook error.
Registering the schema.dll file is important to ensure the smooth functioning of the Active Directory MMC Snap-in.
The Active Directory MMC Snap-in is a powerful management tool used to administer and control various aspects of the Active Directory service in Windows Server environments.
In this guide, we will explore the process of registering the file, providing you with the knowledge and steps required to integrate it into the Active Directory MMC Snap-in successfully.
How can I register schema.dll?
Before engaging in advanced troubleshooting steps, you should consider performing the following checks:
Must have admin access to the machine.
You should know the location of the Schema.dll file on your system, which is typically the C:\Windows\System32 directory.
Once checked, move to the different methods to register the file.
1. Use a third-party DLL fixer
Fixing DLL missing errors or registering DLL files manually could be tricky and harm your PC if not done correctly. Therefore, it is advised to use a third-party DLL fixer tool to address this issue effectively.
Tools like this can scan your device for missing DLL files and quickly register files like schema.dll. Hence, resolving the conflicts between third-party apps & operating systems, enhancing system performance, and achieving greater stability for your PC.
2. Use the Command Prompt
2.1 Register Schema.dll
Press the Windows key, type cmd, and click Run as administrator.
To navigate the directory containing the Schema.dll file, use the cd command and type the following command and hit Enter: cd C:\Windows\System32
To register the Schema.dll file, copy & paste the following command and press Enter: regsvr32 Schema.dll
You should see a pop-up message indicating that the registration was successful.
2.2 Create a MMC console with Active Directory Schema snap-in
Press Windows + R to open the Run window.
Type mmc and click OK to open Microsoft Management Console.
Click File, then select Add/Remove Snap-in.
On the Add/Remove Snap-in, locate and select Active Directory Schema.
Click Add.
Click Close, then OK in the Add/Remove Snap-in dialog box.
Choose the File, and click Save As.
On the Save As dialog box, type Schema.msc and click Save.
Press the Windows key, type powershell, and click Run as administrator.
To navigate to the directory containing the Schema.dll file, use the cd command, then type the following command and hit Enter: cd C:\Windows\System32
Now to register the Schema.dll file, copy & paste the following command and press Enter: [System.Reflection.Assembly]::LoadFile("Schema.dll").Location | ForEach-Object {regsvr32 $_}
You will receive a message indicating that the registration was successful.
Close and reopen the MMC Snap-in and follow the same method mentioned in Solution 1.2.
So, these are methods to register the schema.dll and make sure Active Directory MMC Snap-in is functioning correctly.
If you are looking for a way to set permissions in Active Directory for users, we suggest you check out this guide for step-by-step instructions.
Please feel free to give us any information, tips, and your experience with the subject in the comments section below.
After months of speculation and more than a year after it came to PlayStation consoles, Ubisoft+ finally came to Xbox back in April. If you haven’t had a chance to try out Ubisoft’s game subscription service, you are in luck because there is now a free 7-day trial now available on Xbox.
Ubisoft+ offers access to some of Ubisoft’s hottest releases on console and PC, including day one releases. Among the biggest Ubisoft games on the service are Far Cry 6, Assassin’s Creed Valhalla, and many more. There are multiple tiers to choose from, offering monthly rewards, access to premium game editions and more.
The Ubisoft+ free trial offer comes just ahead of the Ubisoft Forward 2023 event. This will stream on Monday, June 12 starting at 12:45 EST. The Ubisoft Forward event can be watched on YouTube and Twitch.
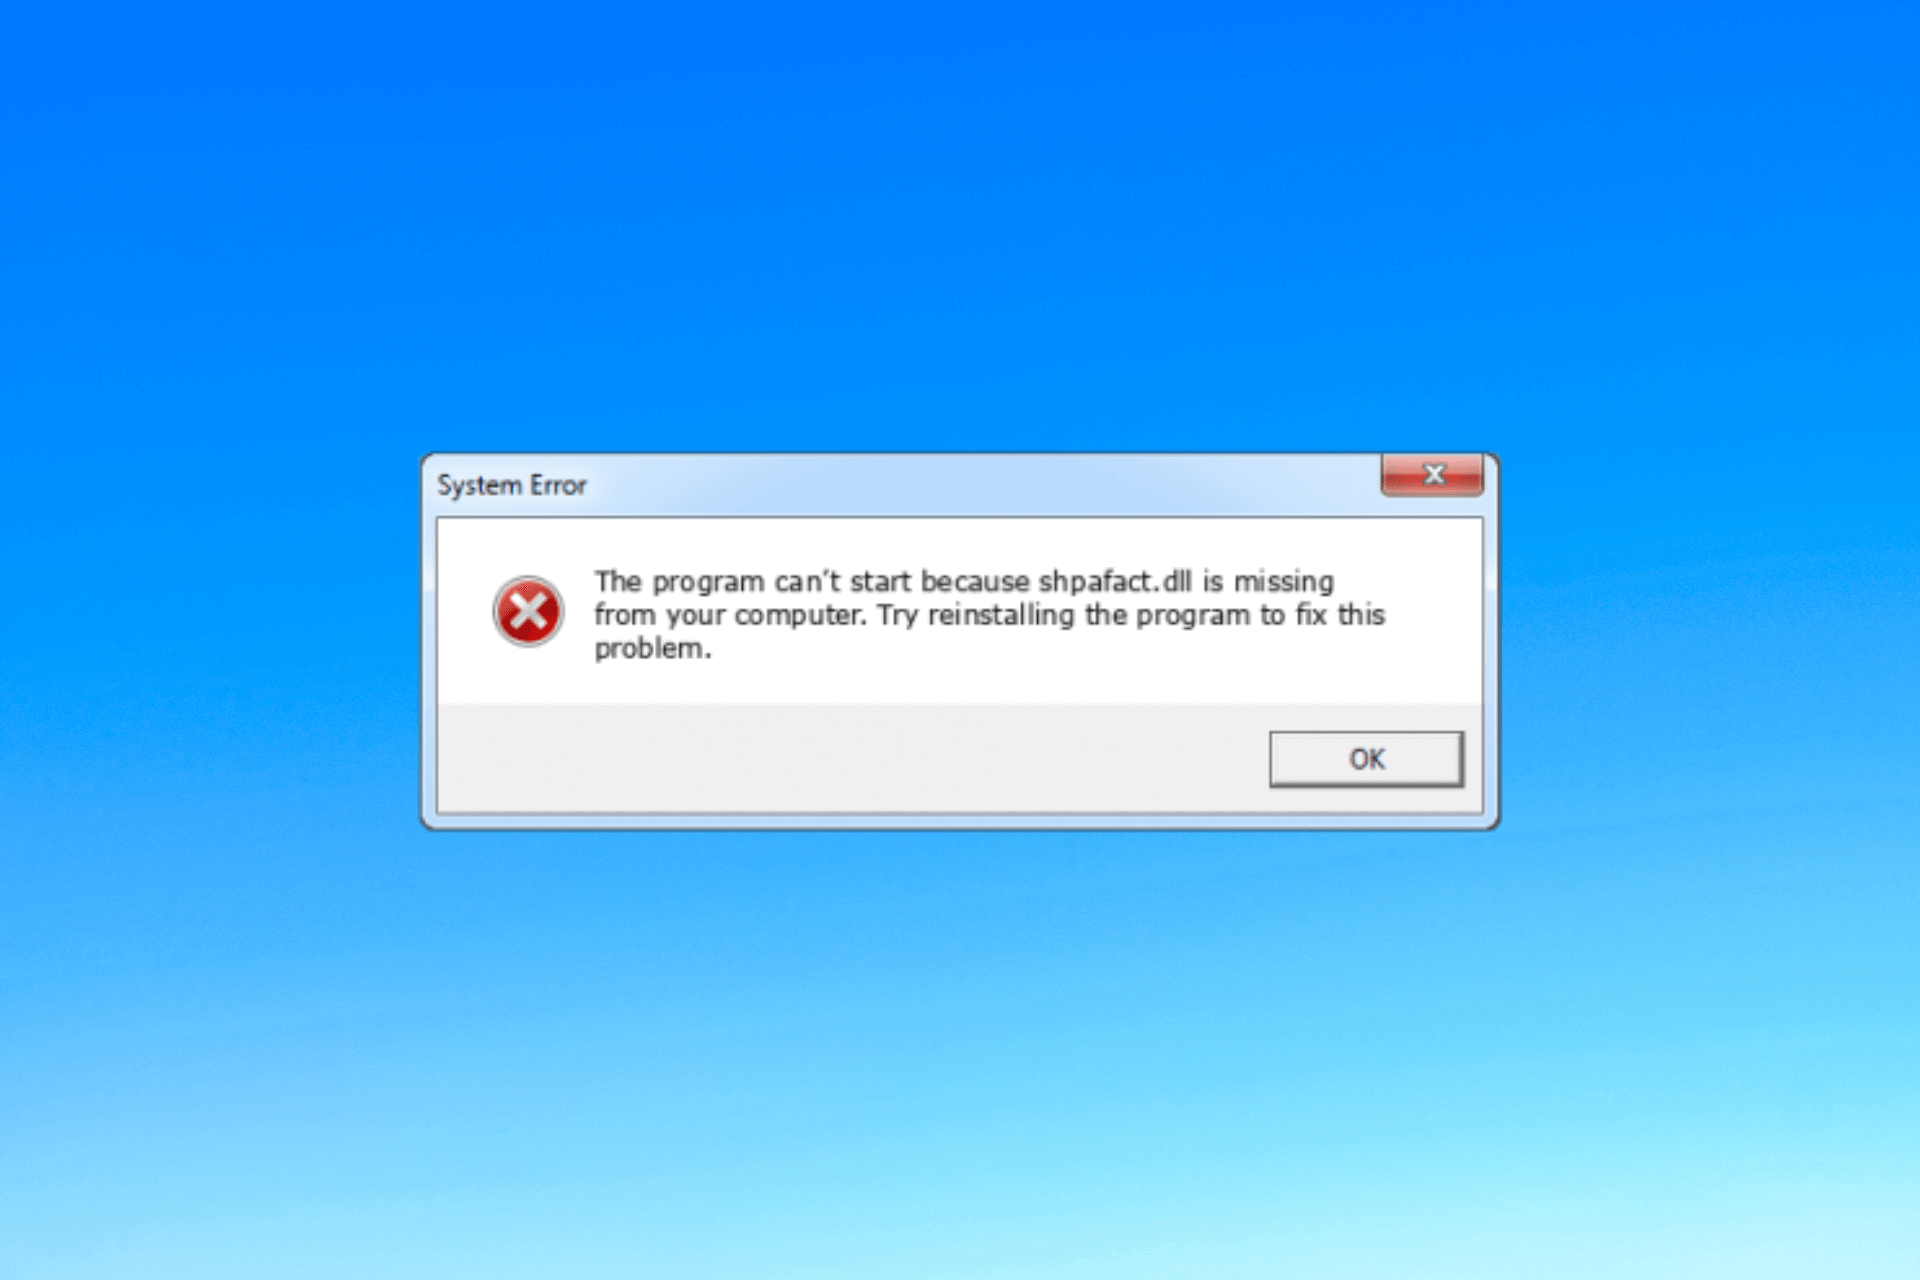
Shpafact.dll, also known as the Windows Shell LUA/PA Elevation Factory DLL file, was created by Microsoft for Windows Operating System.
If you are facing an issue related to shpafact.dll on your computer, this guide can help you recover the DLL file with ease.
Why is the shpafact.dll file corrupted?
There could be various reasons for issues related to shpafact.dll; some of the common ones are mentioned here:
Viruses infection – Malware can damage your critical system files, including DLL files, causing errors when the file is called. Run a deep scan using an antivirus tool.
Software interference – Conflicts between different applications or incompatible software versions can cause corruption in DLL files. Remove unwanted applications to avoid these errors.
Registry issues – Problems with the Windows registry, such as invalid or missing entries, can impact the functioning of DLL files and potentially cause corruption. Run a registry cleaner to fix it.
Damaged system files – If important system files become corrupted due to disk errors, improper shutdowns, or other system issues, it can cause the issue.
Now that you know the causes, let us move to the troubleshooting errors.
How can I fix the shpafact.dll corruption errors?
Before engaging in advanced troubleshooting steps, you should consider performing the following checks:
Restart your computer.
Try reinstalling the affected app.
Make sure there are no pending Windows updates.
If these minor tweaks don’t work for you, check out to the detailed solutions below.
1. Use a third-party DLL fixer
Recovering a DLL file manually can be tricky if you don’t know your way around a computer. Therefore, it is advised to use a third-party DLL fixer tool.
Such a tool can recover or restore all Windows DLL files like shpafact.dll without a miss. Thereby resolving the conflicts between third-party apps & the operating system and improving PC performance.
2. Reregister the DLL file
Press the Windows key, type cmd and click Run as administrator.
Type the following commands to register the shpafact.dll and hit Enter: regsvr32 shpafact.dll
Select OK if prompted and reboot your computer.
3. Run SFC & DISM scans
Press the Windows key, type cmd, and click Run as administrator.
Type the following command to repair system files and hit Enter: sfc/scannow
Wait for the scan to complete, copy & paste the following command to restore Windows OS image files, and press Enter: Dism /Online /Cleanup-Image /RestoreHealth
Once the scan is complete, your computer will automatically connect to the Windows Update service to repair the corrupt files. Restart your PC to let the changes take effect.
Press the Windows key, type windows security, and click Open.
Go to Virus & threat protection and click Scan options.
Select Full scan and click Scan now.
The tool will scan your computer for all malicious files and list them. Delete them to fix the problem.
Running the scan is important because if the DLL issues are caused by malware, this action will remove it, thereby eliminating the issue. Of course, you may also use third-party antivirus software for this task.
5. Perform a System Restore
Press the Windows key, type control panel, and click Open.
Select Large icons as View by and click Recovery.
Click Open System Restore.
On the System Restore window, select Choose a different restore point and click Next.
Choose the point you want your Windows to be restored to and click Next.
Click Finish to initiate the process.
Windows will restart and restore to the selected version. If the System Restore didn’t complete successfully, we advise you to check out this informative guide for solutions.
6. Download the DLL file manually
NOTE
Using an unreliable website to install DLL files can be harmful and is never recommended. However, you may use a trusted source, like DLL Files, which has been verified and trusted. You can follow the steps mentioned to restore the file manually.
Go to the DLL Files website, search shpafact.dll, select an appropriate option, and click Download.
Double-click the downloaded folder to open it and locate and copy the .dll file.
Go to this path and paste the file: C:\Windows\System32\
Reboot your computer to save the changes.
So, these are methods you can follow to fix the issues related to shpafact.dl. If you are facing missing the DLL files issue on your Windows 10, we suggest you read our informative guide to know solutions for this common problem.
Before you leave, you might be interested in our latest guide and learn what to do if lua5.1.dll is missing.
Please feel free to give us any information, tips, and your experience with the subject in the comments section below.
As one of many arbiters of artificial intelligent powered consumer products lately, Microsoft is looking to assuage public concerns regarding abuse and harm that could result from unfettered AI use, with its transparency tenants of Customer Commitments.
In a press authored by Microsoft’s corporate vp and deputy general counsel Anthony Cook, the company offers up three new AI Customer Commitments intended to offer additional levels of “guardrails” and transparency for its customers as they go about using AI today and in the future.
First, we will share what we are learning about developing and deploying AI responsibly and assist you in learning how to do the same. Microsoft has been on a responsible AI journey since 2017, harnessing the skills of nearly 350 engineers, lawyers and policy experts dedicated to implementing a robust governance process that guides the design, development and deployment of AI in safe, secure and transparent ways.
Second, we are creating an AI Assurance Program to help you ensure that the AI applications you deploy on our platforms meet the legal and regulatory requirements for responsible AI.
The program includes regulatory engagement support, risk framework implementation, customer councils, and regulatory advocacy.
Third, we will support you as you implement your own AI systems responsibly, and we will develop responsible AI programs for our partner ecosystem.
Microsoft intends to offer dedicated resources in the form of AI legal and regulatory experts around the world as well as a comprehensive partner network to aid in launching and leveraging new AI platforms.
Admittedly, Microsoft understands that its proposed AI Customer Commitments are only the start of what could be a long AI journey for some businesses but at this moment in time, these commitments need to be considered and adopted by the sector at large.
The Xbox Free Play Days event will run through Sunday, June 11. Remedy Entertainment’s action-adventure game was featured in one of our Xbox Classics Revisited posts, and was generally well-received upon release. It currently has a Metacritic score of 84 for both the Xbox One and PC versions.
After a secretive agency in New York is invaded by an otherworldly threat, you become the new Director struggling to regain Control.
From developer Remedy Entertainment, this supernatural 3rd person action-adventure will challenge you to master the combination of supernatural abilities, modifiable loadouts and reactive environments while fighting through a deep and unpredictable world.
Control is Jesse Faden’s story and her personal search for answers as she grows into the role of the Director. The world of Control has its own story, as do the allies Jesse meets along the way. Jesse works with other Bureau agents and discovers strange experiments and secrets.—Xbox Store Description.
Note that it is the (backward compatible) Xbox One version offered with Xbox Free Play Days this weekend. That version is currently on sale with a 70% discount as part of the Deals Unlocked Sale. The Xbox Series X|S version, Control Ultimate Edition, featured the next–gen upgrades, although that edition is not currently on sale.
A bootable USB media with the ISO file comes in handy if you plan to clean install Windows on your PC. In most cases, it does its job very well; however, sometimes, it may fail to boot your Windows PC or perform a clean install.
To avoid such unfortunate circumstances, it is recommended to check if your USB is bootable before restarting your PC to initiate the clean install.
How do I test if the USB is bootable is not?
1. Perform a booting test
NOTE
Save and back up all your work before proceeding with this method.
Hold down the Shift key and choose Restart from the Power menu.
On the boot menu that appears, select Use a device option to boot Windows from.
From the list of bootable devices, choose the USB Drive plugged into your Windows PC.
Now wait and see if your PC successfully boots from a USB device. If the boot is successful, that means the USB device is bootable.
If the USB drive follows the FAT32 file system and includes an EFI\boot directory, your PC will boot successfully in a UEFI system.
However, booting from a USB drive may fail due to an incompatible file system even if the USB drive is bootable.
Hence, to confirm that the USB is not bootable, you should follow the different USB booting test methods listed below.
2. Use the Disk Management tool
Right-click the Windows icon on the taskbar and choose the Disk Management option from the Quick Links menu.
Locate and right-click the USB drive for which you wish to check the bootable status and choose the Properties option from the context menu.
Switch to the Hardware tab, select the USB drive in question, and click the Properties button present under the Device Properties section.
Next, switch to the Volumes tab of the USB device properties box. Look for the value of the Partition Style entry. If the USB drive is bootable, boot flag markers such as Master Boot Record (MBR) or GUID Partition Table will be listed next to it.
Apart from this, a bootable USB drive may display the Status entry as No Volume/No Media, and Unallocated space and Reserved space will be 0 capacity each.
If the Disk Information is not already displayed in the Volumes tab, press the Populate button on the bottom left to force Windows to display the disk information.
As you will see, the Disk Management tool does not categorize a USB derive to be bootable, but the values of the properties tab help you identify a bootable USB drive.
Once you’ve confirmed that your USB drive is not bootable, you may want to create a bootable USB drive. Learn how to use Win32 Disk Imager to create a bootable USB that works perfectly for a clean Windows installation.
3. Use Command Prompt
Press the Windows key to launch the Start menu. Type cmd in the search bar on top ad choose Run as administrator from the search results.
Type or paste the following command in the command prompt and press the Enter key to access the Diskpart command line tool. Diskpart
Next, type the following command and press the Enter key to view the disk information. List disk
Locate your USB drive in the disk list displayed below and check its Status column. A USB drive will the ISO file will display No Media/No Volume identifying itself to be bootable.
The Diskpart command line tool lets you examine the USB drive properties, which helps you identify a bootable USB.
4. Use Windows Powershell
Use the Windows key to launch the Start menu, type powershell in the search bar on top and select Run as administrator from the right search results.
In the Powershell window, type the following command and press Enter to view the disk-related information: get-disk
Now, verify that the PartitionStyle is displayed as MBR.
Apart from this, the HealthStatus column may display Healthy, and OperationalStatus column displays No Media. If these conditions are fulfilled, it will be safe to say that the USB drive is bootable.
So that’s how simple it is to check if the USB drive is bootable so that you begin the fresh installation of the Windows operating system.
Remember these methods may sometimes give unreliable results depending on how the bootable USB drive is created.
Hence, execute each of the methods listed here to be sure about the bootable status of your USB drive.
First, the Draw tab has been refreshed and now features a new capability that will allow users to undo and redo ink strokes directly from the Draw tab. Previously, users were forced to navigate through the Home tab to access these capabilities, which was a major deterrent to the user’s productivity.
Additionally, Microsoft has also added a new digital ruler that’s designed to help users create and insert straight lines accurately into their presentations. “You can also use the built-in angular display to create accurate angles between lines,” says the company.
And now, it will be easier for users to draw focus during presentations using the laser pointer on the slideshow. Through the feature, you can temporarily ink on slides to highlight important elements in a particular slide. What’s more, you’ll not need to erase the markings, after a few seconds, they’ll automatically disappear, leaving your presentation in its original state.
Finally, Powerpoint for web users will now be able to draw straight lines using their digital pen and mouse easily. You only need to press the Shift key while inking or highlighting your content.
Microsoft has also indicated that users should be able to partially erase strokes using the Point Eraser tool on the Draw tab soon. Let us know which feature you’re excited most about in the comments.
Microsoft has made a significant announcement regarding the expansion of its Microsoft Store Ads platform to over 150 regions worldwide. This global expansion was unveiled during the company’s annual Microsoft Build 2023 conference, where several updates to the Store Ads platform were showcased. Alongside the expansion, Microsoft also introduced new features and enhancements to simplify the advertising process and expand reach.
The introduction of Microsoft Store Ads in 2022 was a major step in assisting developers in enhancing the visibility of their apps and games. Building on that momentum, Microsoft revealed during Build that the reach of Microsoft Store Ads would extend beyond the United States, encompassing more than 150 regions worldwide starting from June.
This expansion will provide advertisers with an opportunity to reach a wider customer base through Premium Search Ads within the Microsoft Store and Bing search results. Leveraging the vast global monthly searches generated by Bing, which amounts to 14.5 billion, Microsoft Store Ads will now extend beyond the Microsoft Store on Windows, enabling advertisers to trigger their ads on Bing’s Search Engine Results Page (SERP), effectively expanding their reach.
To further streamline the advertising process and save time for advertisers, Microsoft introduced enhanced onboarding experiences for Microsoft Store Ads. These experiences enable advertisers to conveniently set up eye-catching ad placements, with one tool called Premium Search Ads specifically designed to assist advertisers in connecting with customers by providing visual and prominent ad placement. Advertisers can now highlight their apps for download within the Microsoft Store using this feature.
Microsoft also announced several features aimed at enhancing the user experience and simplifying processes. The integration of Partner Center allows for seamless registration for Microsoft Store Ads, enabling advertisers to link their apps with just one click. Searching for app information is now easier, as advertisers can use various parameters such as app name, store I.D., publisher name, or seller I.D.
Moreover, advertisers can now track and analyze app installations, in-app purchases, and customer engagement within the app, offering valuable insights into the effectiveness of their advertising campaigns. Additionally, the Microsoft Advertising Software Development Kit (SDK) empowers advertisers to re-target audiences on the Microsoft Network, providing further control and targeting options.
In summary, the updates announced at Microsoft Build 2023 demonstrate a dynamic shift in digital advertising strategies, with Microsoft Store Ads emerging as a pivotal platform. As the platform expands its reach beyond the United States to over 150 regions and introduces new features, advertisers gain more opportunities to connect with their target audiences. These updates offer a glimpse into the future of advertising, where technology and innovation will continue to reshape how businesses connect, engage, and thrive in the digital landscape.
Encountering errors while using iTunes can be frustrating, and one such error is the 0x80090302 iTunes error. When it occurs, you may not be able to access the iTunes Store.
In this guide, we will walk you through various troubleshooting steps to help you fix this iTunes error to regain seamless access to the features and content within iTunes
What causes the 0x80090302 iTunes error?
There could be various reasons for this iTunes error; some of the common ones are mentioned here:
Firewall or security software interference – A firewall on your PC may block iTunes’ access to the internet or interfere with the communication between iTunes and the Apple servers.
Outdated iTunes version – An outdated version of iTunes can lead to compatibility issues with the Apple servers; it can cause the 0x80090302 error. Update your iTunes app.
Proxy settings – If your computer is configured to use a proxy server, it may interfere with iTunes’ connection to the Apple servers.
Issues with the hosts’ file – The hosts’ file on your computer may contain incorrect or outdated entries that interfere with iTunes’ ability to connect to the Apple servers.
So, now that you know the causes, move to the troubleshooting solutions to fix the problem.
How can I fix the 0x80090302 iTunes error?
Before engaging in advanced troubleshooting steps, you should consider performing the following checks:
Make sure you have a reliable internet connection.
Ensure that you have administrative privileges on your computer.
Check the cable connecting your PC and iPhone for any damage.
Press Windows + I to open the Windows Settings app.
Go to System, then click Troubleshoot.
Select Other troubleshooters.
Now go to Windows Store Apps and click Run.
Follow the onscreen instructions to complete the process.
5. Reset the iTunes Store cache
Launch the iTunes app.
Go to Edit, then click Preferences.
Click Advanced, then Reset Cache button. Now restart iTunes.
6. Verify the network settings
Press Windows + I to open the Settings app.
Go to Network & Internet, and click Proxy.
Under Manual proxy setup, for Use a proxy server, click Set up.
On the Edit proxy server window, toggle off the switch for Use a proxy server.
Click Save.
So, these are the general troubleshooting methods that can help you resolve the 0x80090302 iTunes error. If nothing worked for you so far, we suggest you contact Apple Support.
Besides the hotly-anticipated Teams 2.0 and its bunch of improvements, Microsoft is reportedly working on a UI enhancement for the call delegation feature on the app. So, if you often delegate a call on Teams, you’re in for some good news.
As we’ve spotted from Microsoft 365 Roadmap site under Feature ID 123753, Redmond officials are working to bring a feature that allows delegates to seamlessly switch between different delegator lines they manage.
The updated UI will also provide delegates with access to the call history for the delegator’s line, offering valuable insights into previous conversations and ensuring continuity in communication. Delegates will also have a comprehensive overview of past interactions (history) to keep up with everything.
But, when will this feature start rolling out? And what does “delegate a call” mean on Microsoft Teams?
What is the call delegation feature on Microsoft Teams?
To delegate a call on Teams means to make someone else answer or make calls on your behalf on Teams.
Delegates are granted specific permissions to manage calls on behalf of the delegator. These permissions can include making outbound calls, answering incoming calls, transferring calls, and accessing call history.
To do so, you’d have to set the delegates manually through Teams’ settings – in General, you’ll find an option called Manage Delegates if you’re eligible.
The rollout of these feature enhancements is scheduled to begin in August 2023, with availability across different platforms, including desktop and Android devices. This release is part of the General Availability phase, ensuring a stable and accessible feature for all Teams users.
What do you think about the feature that lets you delegate a call on Teams much easier? Have you taken it for a spin? Let us know in the comments!
A fresh Windows 11 installation can do wonders for your PC, and there are many ways to do it, especially with a USB flash drive. But what if you don’t have a USB flash drive available, and you urgently need to reinstall your Windows?
It might sound like a very improbable scenario, but just in case it happens, and it could, you should know that there is a solution to it.
You can actually install Windows 11 using your Android phone as a bootable USB. Yes, that’s right.
Some users, especially on Quora, have been wondering if you can use your phone to install Windows with it.
And the answer is yes. You can use your phone to install Windows 11. The best part? It’s actually very easy to create a Windows 11 bootable USB using your Android phone.
Here’s how you can create a Windows 11 bootable USB using your Android phone
Before we show you how to do it, you need to take into account three important points:
Make sure your phone has at least 8GB or more of free space. If your phone has an SD card, even better. See if there is space on it, and format it.
Go to the Play Store, search for Ventoy, and download it.
Open it, allow it to access your phone.
Select the MBR or GPT option and enable Secure Boot Support.
Select the Install button to install Ventoy.
Click on the Copy button and choose the path to the ISO file.
Wait for Ventoy to copy it.
And that’s all! You can now connect your phone to your PC and install Windows 11.
Again, make sure the battery is charged when you connect it to your PC. Since the process takes time, it going to put a lot of effort into your phone’s battery, so better make sure nothing interrupts the process.
Installing Windows 11 on your PC should be a really straight line, especially if you’ve done it before. But if you’re not sure, you can always check this guide and everything should be alright.
As you can see, creating a Windows 11 bootable USB on your Android Phone is not hard, and actually, it can be very useful when you don’t have any other means and tools available.
Have you ever tried to install Windows 11 this way? Share your experience with us in the comments section below.
And engaging is living up to its meaning here. Org charts in Visio are more than just a chart to read and follow. You can actually organize your entire organization there, with all the members. You can be specific about their role, their tasks, and overall performance.
So, naturally, the Visio app is coming to Microsoft Teams, as a personal or professional workspace. Inside Teams, you’ll be able to use Visio to create, edit, and view Visio files without leaving Teams.
This way, Microsoft Teams becomes the central hub for all your work-related activities. You can start and finish a project in Teams, without ever closing the application.
So, how can you use the Visio App on Microsoft Teams now that it’s here, you may ask? Well, if you have used Visio before, this integration is not going to be hard to understand. On the contrary, it comes with its own set of exciting features that you should know about.
How to set up and use the Visio app on your Microsoft Teams
First things first, Microsoft announced the integration, but the Visio app is not yet fully available in the new Teams experience, but it is coming over the next months.
Next, for you to use Visio, you need a Microsoft 365 subscription. If you’re a Visio 1 or Visio 2 plan subscriber, you need a Microsoft Teams license to use the app.
Now that we got those out of the way, let’s see how we can set up and use the Visio App on Microsoft Teams.
Add the Visio app to your Microsoft Teams
In your Microsoft Teams, go to Apps and select More added apps.
You’ll get a list of apps, go to the Visio icon and click it to open it.
Here you are on the Visio’s menu, which has a lot of other sections that might interest you.
For easy access, pin/unpin or pop out the Visio app
You can also choose to pin the Visio app to access it on your Microsoft Teams homepage. And, if you’re not a fan of using it inside Teams, you can choose to pop it out. Here’s how.
To pin it, right-click on the Visio app and select Pin.
To unpin it, do the same thing and select Unpin.
To pop it out, just right-click on the Visio app again and select Pop out app.
This is how it looks when the Visio app is popped out as a separate window in Microsoft Teams.
You can add a Visio file as a tab
If you use a Visio file often, you can choose to add it as a tab, so you can access it even more quicker. Here’s how you can do it.
Select the (+) button at the top of your channel.
Go to the Visio icon, select it, and from there add your Visio file as a tab.
In the end, it should look like this.
As you can see, this tab also has a lot of options: you can pop it out, expand it, reload it, rename it, or even remove it.
One more thing you need to know before using Visio in Microsoft Teams is that you can share a Visio file in a chat, but it will also open Visio by default.
You can choose to open it elsewhere if you want to. Specifically, you can open it in Teams, the Visio desktop app, or the Visio web app.
This is all you need to know about setting up and using the Visio app in Microsoft Teams. Make sure to follow this article, as we will update it when new features come out.
What do you think about it? Do you use Visio? What about using it in Microsoft Teams? Let us know in the comments section below.
Understanding the significance of Windows security event logs is crucial for maintaining a secure and stable computing environment. One such event, Event ID 5145, denotes a change in the security settings of a file or folder on a Windows system.
In this guide, we will delve into this event ID, exploring its meaning and implications. We will also provide you with valuable insights into the reasons behind its occurrence and the potential risks it may signify.
What is Event ID 5145?
Event ID 5145 is a security event logged when modifications are made to the permissions, auditing settings, or other security attributes of a specific file or folder on a Windows system.
It provides detailed information about the change, including the affected file or folder, the user account that was modified, the type of modification (such as adding or removing permissions), and the specific security attributes that were altered.
It can be valuable for detecting unauthorized access attempts, tracking changes to file permissions, or ensuring compliance with security policies.
Why the Event ID 5145 appears?
Event ID 5145 occurs due to various reasons; some of the common ones are mentioned here:
User actions – The event ID is triggered when a user intentionally modifies the security settings of a file or folder, including adding/removing permissions, changing auditing, or other security attributes.
Administrative tasks – If system administrators perform administrative tasks, like adjusting permissions for security purposes, & granting access to specific users/groups, it triggers event ID.
Malicious activity – Event ID 5145 may indicate that an intruder is attempting to gain unauthorized access to sensitive files or folders, modifying permissions for malicious purposes.
Software or system process – Certain software or system processes can also trigger Event ID 5145 if they change file or folder security settings as part of their functionality.
Now that you know the reasons, let’s check out the methods to deal with the issue.
How can I fix the Event ID 5145 issues?
1. Review the event details & verify the legitimacy
Press the Windows key, type event viewer, and click Open.
Go to Windows Logs, then Security.
On the right pane, you will get the list of events logged.
Locate Event ID 5145, select, and go to General. Check the security change and other modifications made for the file or folder.
If you think the change was legit, you don’t have to take an action. However, if you feel the alteration was unauthorized or malicious, you must move to the next step.
If you have a backup and multiple files were modified, then the shortest way is to restore the data from it. However, if the change was made on a single file, locate the file, right-click it, and select Properties.
Go to the Previous Versions tab, select the version from the box, and click Restore.
Click Apply, then OK to save the changes.
In the future, to prevent unauthorized modifications and maintain the integrity of file and folder security settings, ensure you follow security best practices.
That includes limiting the user access to sensitive files and folders based on the principle of least privilege, regularly reviewing and updating security permissions, implementing strong password policies, and using encryption where necessary.
You must remember that the specific resolution for Event ID 5145 will depend on the context and circumstances surrounding the event.
To monitor all events on the computer, you must know all about Event Viewer and its use. And lastly, an understanding of the Status 50 error will help troubleshoot things with the PC.
Please feel free to give us any information, tips, and your experience with the subject in the comments section below.
Ignorance is one of the biggest reasons people are victims of malicious attacks. Not being aware or motivated enough to protect your information. There is a need for improved public awareness of what they could be vulnerable to and how to prevent them from coming to fruition.
While Microsoft has done a good job of patching vulnerabilities with each new release, many organizations are still running older versions of Windows which have already reached their end of support.
Because of their widespread use, Windows systems are at the top of the vulnerability list. When writing this article, Windows 10 adoption stands at a whopping 71%. This is more than half of the market share.
A single exploited vulnerability can lead to multiple infected machines and data loss, which can seriously threaten individual users and the entire organization they belong to.
This doesn’t have to be you. You can take charge now and prevent becoming another statistic of a compromised system. In this article, we bring expert opinions to shed more light on this matter.
What are the risks of using unsupported Windows versions?
Cyber threats are increasing in frequency and severity. They are also becoming more sophisticated and targeted. This is evidenced by the recent spate of ransomware attacks that have hit large organizations and small businesses. Most notably, DEV-0586.
The geographic distribution of customers notified of all nation-state threat activity
In the world of computers and software, there are two main types of users: those who are tech-savvy and those who aren’t.
The former group, they know that Windows is a great OS. It isn’t perfect, but as long as you’re happy with its performance, your version doesn’t matter.
For the latter group, it can be difficult to understand why anyone would choose not to use the latest version of Windows.
If you have been following the news for the past few years, you may have heard about several major security breaches that have affected millions worldwide.
What these breaches have in common is that they were all caused by computers running an unsupported version of Windows.
And while hackers have carried out some of these hacks, others were caused by human error. Businesses should not be running an unsupported operating system. This is especially true if they want to protect their data and keep customers’ information safe.
As the expert Igal Flegmann, Co-Founder & CEO at Keytos reiterates:
Having security education in your organization is also very important so users do not click phishing emails and report attacks to your security team.
Suppose you’re not conversant with the severity of the risk associated with running a version of Windows that has already reached its end of support, especially for a business. In that case, we break it down for you.
Security risks
It’s been reiterated over and over how running an unsupported OS is detrimental to your security. But just how dire are the risks?
The most important reason you should upgrade from an unsupported version is that Microsoft will no longer release security updates for these versions.
Unsupported software leaves your sensitive data vulnerable to attack by hackers. They can easily search for vulnerable systems that have not been patched.
According to experts, phishing is the most common entry point. Therefore, setting up Windows 11 MFA will go a long way in thwarting these attempts.
This is just the start. You will need more security solutions such that if one fails, your system will still be secure. Depending on one is suicidal because you risk losing your data if it is compromised.
In Joe Stocker’s expert opinion, Founder and CEO of Patriot Consulting and Microsoft MVP:
No security solution is perfect. It is important to have a layered security approach that includes a combination of technical and non-technical controls.
You also need to stay vigilant and have the ability to decipher an attack from miles away.
Otherwise, it’s just like having strong metal gates for protection but forgetting to lock them.
But this is not the only worry when it comes to obsolete OSes.
System failures
If your company is running an unsupported OS, you risk experiencing a system failure when a new vulnerability is discovered.
This could result in loss of data or downtime for your business operations. If you cannot quickly remedy the situation by patching the affected systems, new malware will proliferate throughout your network.
According to Joe Stocker:
Keeping devices patched, and using AV and EDR will reduce the exposure and risk for malware to run on an endpoint.Windows ASR, Applocker, WDAC, or Windows 11 22H2 “Smart App Control” can further reduce the risk of malware.
As seen from the effects of the DEV-0586 security vulnerability, it resides in the system drive and has the power to overwrite the Master Boot Record.
The MBR is the first sector of a hard drive, and it contains information about how to launch and run the operating system. When an MBR-based attack occurs, the bootloader’s ability to load the OS will be compromised, and the computer might not be able to start up normally.
This is why Chris Karel, Security Operations Manager for Infinite Campus recommends that you:
Have consistent backups that can’t easily be deleted or destroyed. And regularly test them to make sure they work, and cover what you need.
The performance of older versions of Windows becomes worse over time. This is because newer hardware requires more resources from an operating system than older hardware.
For example, if you install a new graphics card in your PC that supports DirectX but you’re still running an old version of Windows that doesn’t support these new APIs yet, games may run much slower than they would if you were running a newer version of Windows.
Many applications require specific versions of Windows to run properly, so if an application isn’t compatible with your current version, it may not work properly or at all. This could cause issues for users and IT administrators, who must find workarounds for these compatibility issues.
Chris believes that the only solution is:
Keeping systems patched and up to date. Both the operating systems (Windows, Linux) and the software that runs on it. (Exchange, web browsers, firewalls, etc) Especially with anything exposed to the Internet.
Essential Windows hardening techniques
Hardening refers to the process of making systems more secure. It’s an important step in the overall security process because it helps prevent unauthorized access, unapproved modification, and other attacks on systems and data.
Some of the hardening techniques you can employ include:
System configuration
The standard system configuration is often not secure enough to withstand a determined attacker. You can configure your system to be more secure by changing default configurations, setting up firewalls, and installing antivirus software.
The following are some important steps that can be taken to configure your system:
Changing default passwords – By default many operating systems have a default password. If someone gets hold of your computer, they can log into it using this default password.
Disabling unneeded services/applications – This reduces resource usage (memory and CPU), thus improving the performance of your machine.
Setting up system policies – Policies help in configuring an organization’s systems according to specific requirements. The main objective behind using these policies is to ensure that all systems are set up so that they can be accessed by authorized personnel only.
After all, Igal reiterates that:
The best way to protect organizations in this zero-trust world is by reducing the surface area and removing the security responsibility from the average end user.
User access controls
User access controls are the first line of defense against attacks and should be implemented to prevent unauthorized access to systems.
The idea behind UAC is simple. Before running an application downloaded from the Internet or received in an email, Windows asks the user if this action should be allowed.
This means that if someone tries to install malicious software on your computer, they will need physical access to your PC and must manually approve each installation step. It makes it much more difficult for them to infect your computer without your knowledge.
We’ve seen some users disabling the UAC prompt because it is invasive every time you try to run an app, but it is obvious they haven’t thought about its repercussions. The good news is that Microsoft has made strides in ensuring this is something you can control.
You can use Windows’ built-in User Account Control (UAC) feature to help keep malware and other malicious programs from running on your computer. It is enabled by default, but you can adjust its settings to customize how it works.
Network security
The security of all systems within an organization is of paramount importance. However, network security is critical as it provides the mechanisms to protect other systems from attack.
This broad term encompasses a collection of techniques, processes, and technologies used to secure computer networks and their systems and devices.
Network security aims to protect information from unauthorized access or disclosure. This is done by using a combination of hardware and software to enforce rules that users, administrators, and programs on the network must follow.
These rules typically include authentication, authorization, encryption, and audit trail. To start off, you’ll need to install a firewall. Firewalls are one of the most important network security tools.
They can be software or hardware devices that control access to a network or a computer, providing a layer of protection from the Internet or other untrusted networks.
Another tool you’ll need is a VPN (virtual private network). This encrypted connection allows you to connect securely to an external server for remote access to your internal network.
The main reason why VPNs are considered a Windows hardening technique is that they can provide additional security when combined with other technologies like firewalls and intrusion detection systems.
They use encryption and authentication techniques to ensure that all traffic is secure. This makes it much more difficult for an attacker to gain access to your system to steal or damage information.
In addition to the traditional network security mechanisms, several new technologies that extend beyond traditional network security measures are emerging today. These include cloud computing and virtualization software.
Your network security system needs to be comprehensive, diverse, and flexible to adequately respond to the dynamic needs of today’s technology trends.
Application hardening
Application hardening is a set of best practices that improve the security of your applications. It’s not just about ensuring your system is secure but also that the services that run on it are secure.
It involves systematic processes and procedures to ensure that applications are secure and resilient to attacks. This is one of the most effective ways of reducing the surface area for vulnerabilities in your applications.
Shiva Shantar, Co-Founder and CTO for ConnectSecure believes that:
Weak passwords, outdated protocols, and unpatched systems in combination with untrained staff that click on malicious links are the reason for the vulnerability to spread.
While you can implement all the Windows hardening techniques possible, recovery is critical to the security process. A recovery plan ensures the company can bounce back from a breach quickly and efficiently.
As a safety net, ensure you also run tests periodically on this plan to ensure it works as needed.
Igal emphasizes the importance of a recovery plan:
While prevention is paramount, having a strong recovery plan that gets tested periodically is also a key component of any cybersecurity plan.
Continuous vulnerability management
Continuous vulnerability management is a proactive approach to security that helps organizations avoid security breaches by proactively monitoring for emerging threats. The goal of continuous vulnerability management is to prevent cyberattacks before they occur.
Vulnerabilities can occur anywhere in your network, from your firewall to your web server. Since there exist many different types of vulnerabilities, you should also employ different systems to detect them.
As the threat landscape continues to evolve, so must your security strategy. It’s not a question of if your organization will be breached, it’s a matter of when.
The basic components of a vulnerability management program include:
Identification – Gathering information about potential threats and weaknesses in an organization’s systems or networks that could be exploited by those threats.
Analysis – Examining technical details about each identified threat to determine whether it represents a real risk to an organization or not.
Prioritization – Ranking identified threats according to their severity or likelihood of occurrence. This is done to allocate scarce resources to those that pose the greatest risk to the organization.
Remediation – Implementing controls to eliminate or reduce risks posed by identified vulnerabilities.
Igal raises awareness on cybersecurity:
Cybersecurity is unfortunately expensive in both time and money. But it’s important, so I’d also recommend that companies take it seriously and employ staff focused on security.
Vulnerability scanning
This is a process in which the security of a system or network is checked for any loopholes or vulnerabilities. Vulnerability scanning helps identify any flaws in the system and advises on how to fix them.
Organizations can ensure that their systems remain secure from malicious attacks by having a vulnerability scanner in place.
This is another process that is important for maintaining a secure environment. It involves installing patches for known bugs and vulnerabilities in software applications or operating systems.
It ensures that all systems remain up-to-date with the latest technology updates and that any vulnerabilities are resolved before hackers exploit them.
Incident response
This refers to responding to and recovering from cyber attacks within an organization’s network or system.
Incident response is essential because it helps organizations recover from cyberattacks quickly and efficiently. All this is done while preventing further damage to their systems by hackers, such as ransomware outbreaks or data breaches that could potentially lead to financial losses due to data theft.
Secure Coding Practices
Secure coding practices are a set of coding guidelines that help programmers write more secure code. It is important to note that secure coding is not about preventing all vulnerabilities.
Instead, it focuses on reducing the risk of introducing new vulnerabilities and the impact when vulnerabilities are exploited.
Here are some ways in which secure coding practices can mitigate Windows vulnerabilities:
Secure code review – A secure code review involves reviewing source code for potential security issues before the product is released into production. This helps identify potential problems before they become an issue, thus reducing the likelihood of future attacks against these products.
Test-driven development – Test-driven development (TDD) is a software development process that ensures each unit has been tested thoroughly before being integrated with others and deployed into production environments, thereby minimizing errors due to integration issues at later stages.
Adhering to coding standards is not just about making your code more readable for others; it also helps you write fewer bugs and spend less time maintaining your codebase over time.
Shiva’s sentiments on the issue remains:
Secure coding is not a good practice but a mandatory one.
Cybersecurity education and awareness
Cybersecurity has become a top concern for all organizations — from small businesses to large enterprises — in recent years.
Cyberattacks are increasing in frequency and sophistication, making it more important than ever for companies to have good cyber security tools in place. And while most businesses recognize this need, many don’t know where to begin when it comes to addressing it.
A comprehensive cybersecurity education program can help solve this problem by providing employees with the knowledge they need to identify potential threats, understand how these threats could impact them and their company, and know how best to respond when an attack occurs.
This type of education also helps align employee behavior with company policies related to cybersecurity compliance and risk management.
In addition, cybersecurity education helps reduce costs associated with breaches by increasing the likelihood of identifying and containing them early in their lifecycle.
One of the most effective ways to mitigate risk and prevent security incidents is by promoting a culture of security awareness. This involves empowering your employees to proactively identify and report potential security threats promptly.
There are different ways you can go about achieving this:
Reporting mechanisms – Create a dedicated internal network for reporting suspected incidents. This should be separate from your corporate network so it doesn’t create a single point of failure for the organization.
Employee empowerment – Train employees on identifying suspicious emails or websites and reporting them if they notice anything unusual.
Security training cannot be a one-off event – Security training has to be repeated regularly so that people keep up with new threats and risks that emerge over time.
Conclusion
As more and more organizations downplay the significance of Windows end support, their network and technology risk exposure increases. Fierce attacks that abuse security features in unsupported devices or operating systems have become a high probability.
What is clear from the various risk scenarios here is that the only sure way to safeguard your organization from increasing digital risks is to migrate from legacy Windows OS, critical applications, and systems to supported Microsoft solutions now rather than later.
One thing is for sure. If you’re running a business, you need to take heed of the computing and security changes happening right now. We’ve discussed how upgrading an operating system can pose hidden dangers and the significant costs of neglecting to upgrade.
The rest is up to you to ensure you implement them. Regarding using unsupported OS, taking them off the network is best for you. If it’s absolutely necessary to use them, ensure they’re safely tucked away from online risks.
That was quite a mouthful, but we hope it has been an insightful session and you now understand the implications of stagnating on unsupported Windows versions.
Is your organization up-to-date with your OS? What steps have you picked up from this article that could steer you in the right direction of securing your systems? Let us know in the comment section.
However, Teams Chat still is a big part of Microsoft Teams, so this feature will allow for faster and more efficient communication between workmates.
How will you be able to stream videos in Teams chats
Microsoft makes it pretty easy for you to stream videos in Teams chats and channels. For starters, your videos or those of your organization should be in OneDrive or Sharepoint.
From there, these videos will automatically be embedded in Teams chats and channels. You will be able to preview and play them directly there, in Teams.
Probably one of the most exciting things about this new feature is that it won’t open any browser windows to play the videos. The videos will play in Teams, in a seamless and immersive way.
That’s more than enough to keep everything organized and accessible.
With this being said, Microsoft Teams has what it takes to be the best app for working. The new AI features look very promising. And exciting, too. Any working meeting will automatically benefit from intelligent recap and task suggestions.
If you’re a manager, AI will help you sort out tasks to give to your team. If you’re on the operational side of things, these features will make it very easy for you to follow along.
What do you think about the current state of Microsoft Teams? Do you use it? Let us know in the comment section below.