Check out the first Windows 11 Insider Beta build for 2023

We’ve successfully and carefully navigated toward the new year and it’s time to leave all of 2022 in the past, looking ahead to a brighter future.

In case you weren’t already aware, Microsoft has released the first 2023 latest Beta and Dev Channel builds for Windows 11 Insiders.

Everybody is now hoping that the new year new me concept will also apply to the latest Microsoft-designed operating system.

Looking ahead, the tech giant says there are only good things to come from associating ourselves with its products.

What should I look for in KB5022364?

Be sure to check out the latest version of Windows 11 (22H2) if you haven’t already. Also, check out the list of known bugs and issues, just so that you aren’t caught off guard.

Circling back to what we are here for, know that Microsoft released builds 22621.1095, and 22623.1095 to the Beta Channel for Windows Insiders, which is a pretty big jump from 226x.1037.

As we said, this first build of 2023 includes more tweaking of the search functions in Windows 11, this time on the Start menu itself, and a good number of fixes.

For example, the search box design in the Start menu has been updated with more rounded corners to reflect the design of the search box on the taskbar.
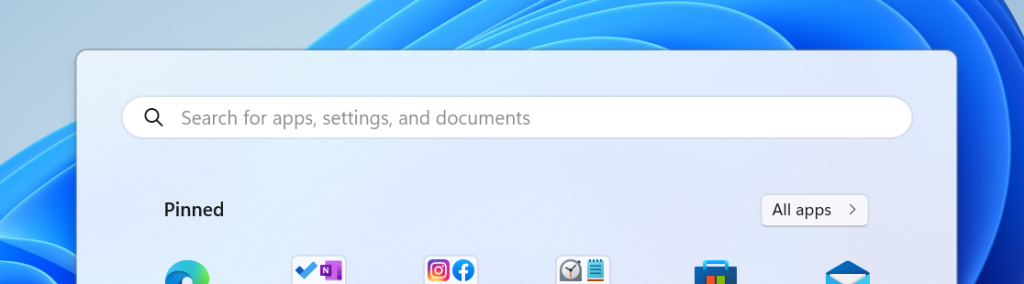
Design of search box on the Start menu has more rounded corners.

The Redmond tech company has also changed the experience for preview .NET Framework updates, so that’s something else to look for.

After you installed this update, all future preview (optional) .NET Framework updates would display in the Settings app.

Another equally important fix is for the issue causing the data content area of the Processes page to flash once when theme changes are applied in the Task Manager Settings page.

Furthermore, Microsoft has oved Quick Assist out of Windows Tools so it displays directly in the Start menu’s All apps list and is easier to find.

Let’s take a closer look at the changelog as well and see what else Microsoft has prepared for all its Windows 11 Beta Channel Insiders.

Fixes in Build 22623.1095

[Taskbar & System Tray]

  • Fixed a couple issues which could result in the top half of the taskbar getting clipped.

[Start]

  • Fixed an issue where the uninstall app dialog might not display correctly in the Start menu in certain cases, making the buttons inaccessible.

[Task Manager]

  • Fixed an issue causing filtering by publisher name to not match correctly on the Processes page.
  • Fixed an issue causing some services to not show in the Services page after filtering is applied.
  • Fixed an issue which resulted in new processes appearing in a filtered list if launched while a filter is set.
  • We fixed the issue where some dialogs were not rendering in the correct theme when applied from Task Manager Settings page.
  • The issue causing the data content area of the Processes page to flash once when theme changes are applied in the Task Manager Settings page is fixed.
  • The Startup apps page in Task manager will now list apps as expected.
  • Fixed an issue which could cause a black flash when opening Task Manager.
  • If there are no matching search results, Task Manager will now explicitly say that.
  • Fixed a Task Manager crash that could happen when attempting to end certain processes.
  • You can now set focus to the search box by pressing CTRL + F.

Fixes for BOTH Build 22621.1095 & Build 22623.1095

[Search on the Taskbar]

  • Made improvements to reliability to fix some crashes and the performance of animations and transitions.
  • Fixed the issue causing the search box on taskbar to not render correctly and display visual artifacts.
  • Fixed the issue causing layout issues with right-to-left display languages like Arabic.

[Other fixes]

  • Changed the experience for preview .NET Framework updates. After you installed this update, all future preview (optional) .NET Framework updates would display on the Settings > Windows Update > Advanced options > Optional updates On that page, you could control which optional updates you wanted to install.
  • Ffixed an issue that affected Windows Server 2022 domain controllers (DC). They stopped responding when they handled Lightweight Directory Access Protocol (LDAP) requests.
  • Fixed an issue that might have occurred when the Input Method Editor (IME) was active. Applications might have stopped responding when you used the mouse and keyboard at the same time.
  • Fixed an issue that affected conhost.exe. It stopped responding.
  • Ffixed an issue that affected how fast you could copy items from a network to a local computer. For some users, the copy speed was slower than expected.
  • Fixed an issue that affected certain systems that had firmware Trusted Platform Modules. (TPM). This issue stopped you from using AutoPilot to set up those systems.
  • Fixed a resource conflict issue between two or more threads (known as a deadlock). This deadlock affected COM+ applications.
  • Fixed an issue that affected devices that were subject to Microsoft Exploit Protection Export Address Filtering (EAF). Some applications stopped responding or did not open. These included Microsoft Office and Adobe Reader.
  • Fixed an issue that affected searchindexer.exe. It randomly stopped you from signing in or signing out.
  • Fixed an issue that might have occurred when you converted or reconverted Japanese Kanji using a multibyte character set (MBCS) app. The cursor might have moved to the wrong location when you typed.
  • Fixed an issue that affected mstsc.exe. It stopped responding while connecting to a RemoteApp and Desktop Connection.
  • Fixed an issue that might have affected FindWindow() or FindWindowEx(). They might have returned the wrong window handle.
  • Fixed an issue that affected picture files you found using search on the taskbar. This issue stopped you from opening those pictures.

This is pretty much what you can look for in the new Windows 11 Insider Beta Channel. We will keep you posted once something changes for better or worse.

Also, please keep in mind that next week we will have the January 2023 Patch Tuesday rollout, which is an important time of the month.

What can I do if I can’t install KB5022364?

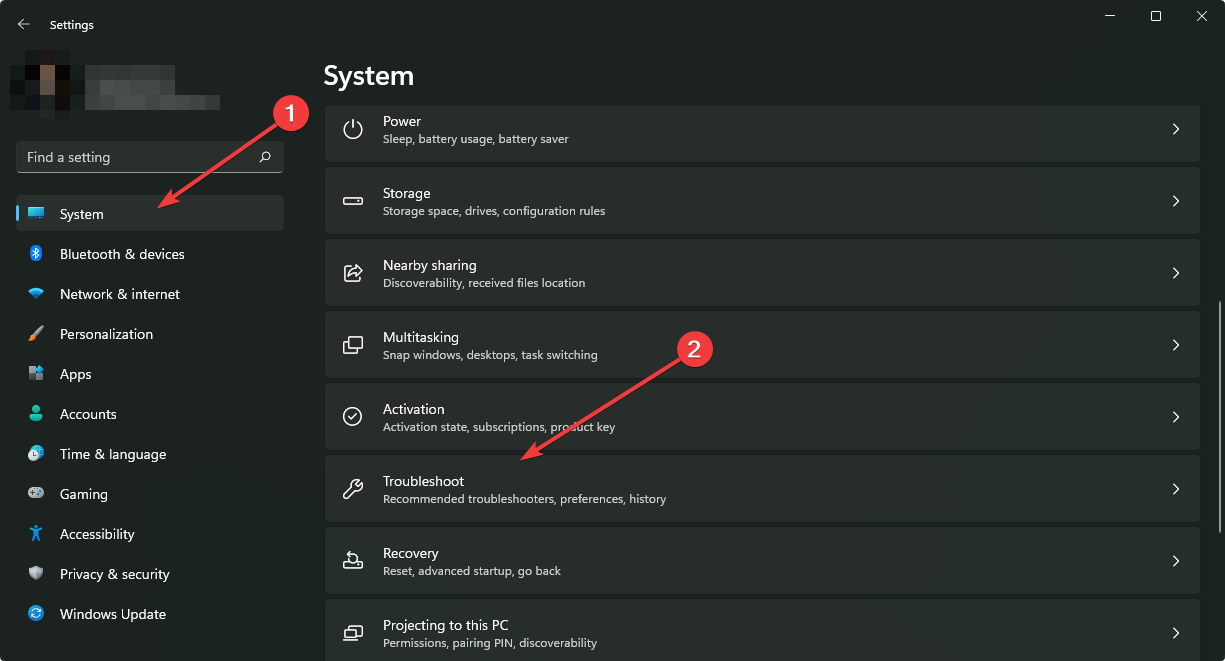
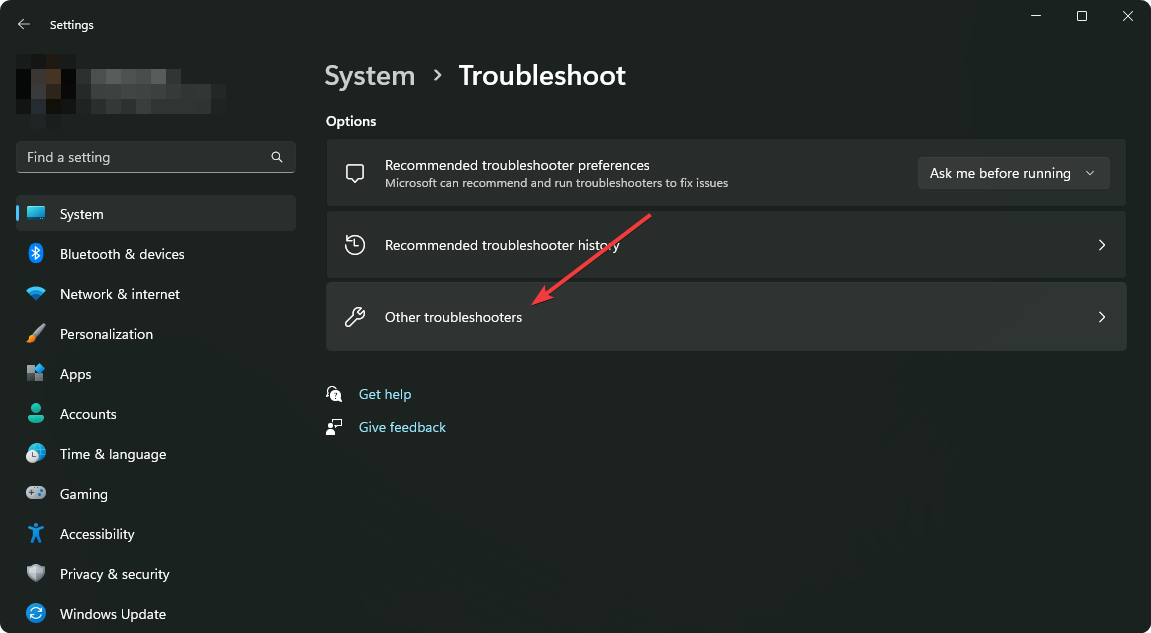
  1. Press Win+ I to access Settings.
  2. Select the System category and click on Troubleshoot.w11 troubleshoot
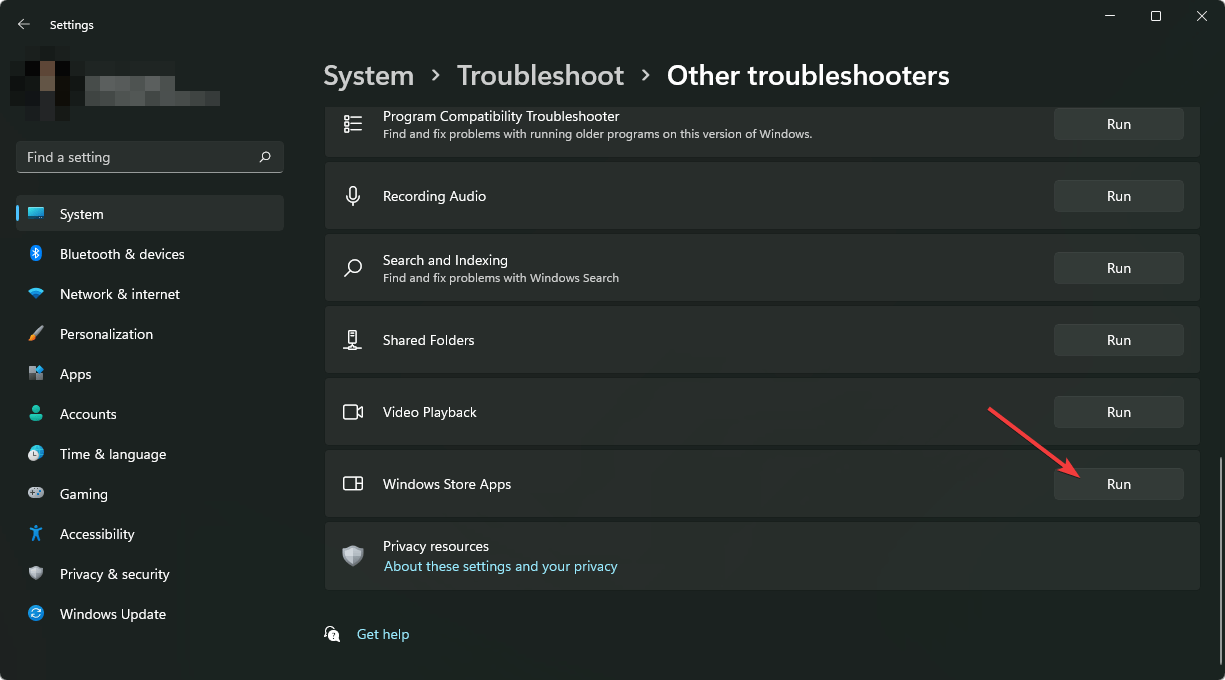
  3. Press the Other troubleshooters button.other troubleshooters windows 11
  4. Press the Run button next to Windows Update.windows update troubleshooter

Also, make sure to report any other issues you might come across, in order for Microsoft to address and improve the overall OS experience for us all.

This is everything you can expect if you are a Windows Insider. Leave a comment below if you found any issues since installing this build.

Protect your Privacy with the Cyber Privacy Suite Software

Nowadays, your privacy is in danger every time you open your browser, but Cyber Privacy Suite is a tool that can prevent that.

And not only that, but it also has built-in antivirus protection, which makes it a great combination with a VPN.

What is Cyber Privacy Suite and how can it help?

As we’ve mentioned above, Cyber Privacy Suite is a combination of VPN and antivirus, password protection, and a lot more.

This solution also features a browser tracking and ad blocker that will ensure you won’t be bothered by any distractions while you work or play.

Not only that, but it also blocks any attempts of microphone and webcam highjacking by wrongdoers.

So, this solution is perfect for home, but it really becomes an asset if you really need to connect through a public hotspot.

Now that we know all that, let’s see what are its best features and how to use this tool efficiently.

What are the best features of Cyber Privacy Suite?

1. Dedicated VPN

Cyber Privacy Suite has a built-in VPN with more than 20 locations in the world to choose from.

After you turn it ON from the Status tab, you will be prompted to choose a virtual location and click the Activate button.

It will take up to 30 seconds to connect to the server but after that, your real IP will become invisible to everyone.

To be honest, it’s not nearly the best VPN solution we’ve seen but it still covers the most part of the world and it’s pretty fast.

We wouldn’t recommend it for gaming or unleashing a world of online geo-blocked content but it’s perfect for when you log in from a public hotspot or you simply want to conceal your identity online.

2. Login credentials and personal information protection

After scanning your device, Cyber Privacy Suite will find all the login credentials that can be potentially exposed.

Usually, you would need to go through all these accounts and change the passwords and eventually get a password manager app to protect them.

With Cyber Privacy Suite, you only need to click on the Move to Vault button to be automatically encrypted on your machine. And this way, no one will be able to access them on your device if they hijack the system.

In the same way, this tool identifies any profiles you’re using and the exposed data that they contain.

3. Tracking blocker and eraser

Cyber Privacy Suite not only has a tracking blocker, but it also scans all your browsers for tracking and browsing records.

And, with a simple click on the Delete button under the Browser Tracks tab, you simply get rid of them.

You can do that manually on any of your browsers, but this feature really saves you a lot of time and effort.

4. Sensitive documents encryption

If you have sensitive documents on your device, Cyber Privacy Suite will find them and with a single click, it will encrypt them for safety.

When a highjacker gets into your system, that’s what he’s looking for, and if they’re out in the open, you will suffer the consequences.

This tool runs a deep scan on your device, finds them, and protects them in seconds. If you have them stored in a folder, you may add it too for encryption.

However, you should know that if sensitive information appears on an image file, the tool won’t identify it.

Also, although the tool tells you that it saves the documents into a vault, which is not a regular folder on your PC.

In fact, everything is stored into a page of the applications which is a lot better because they cannot be physically located by any trespassers.

5. Antivirus protection

ShieldApps doesn’t offer too much information about its built-in antivirus from Cyber Privacy Suite. However, we confirmed with the developer that it’s the same product included in its dedicated Shield Antivirus.

They say that it offers active protection against malware, spyware, viruses, ransomware, trojans, and more.

In our tests, it did turn a red flag on a shady website that was not secure and safe to access and that was a sign that the tool is working.

Also, the developer also provided a VB100 test report from Virus Bulletin that certifies a 100% malware detection rate.

6. Webcam and microphone protection

Not many security solutions protect your webcam or your microphone although they are important components targeted by hackers.

And unless you want to cover them with duct tape, Cyber Privacy Suite protects them by detecting and blocking any unauthorized access.

You don’t even need to know the whole mechanism behind it. Just turning the Camera and Microphone protection settings to ON, will do the trick.

How do I get Cyber Privacy Suite and what is its price?

  1. Go to the Cyber Privacy Suite website and hit the Download Now button.
  2. Next, click the Download button for your operating system. As you can see, it’s also available for Mac, iOS, Android, and Chromebook devices.
  3. After you download the installer, run it and go through the steps for installation.

When you start it for the first time, the software will perform a scan of your system, identifying any possible problems and vulnerabilities.

That being said, Cyber Privacy Suite will be installed on your PC. However, that will be the 7-day trial version.

It is a limited version that only identifies the problems, without actually fixing anything.

If you want to protect your device by using all the features, you will have to pay $77.99 for a licence that covers all your devices.

⇒ Get Cyber Privacy Suite

Pros
Simple to install and use
Built-in VPN with 20 locations
Compatible with Windows, macOS, Android, Chromebook and iOS devices
Documents and credential protection
Antivirus protection for malware, spyware, viruses, ransomware, trojans, and more
Cons
Not too many server options for the VPN
The antivirus protection is not as strong as with a dedicated tool

Final notes

Cyber Privacy Suite doesn’t surpass more powerful dedicated VPNs simply because it doesn’t have as many servers available.

However, on the antivirus side, it provides a clear certification for malware detection, so it covers the security part pretty well.

It’s a very useful tool for home usage and it offers excellent protection if you want to work outside the home and connect it to public Wi-Fi.

Also, it does a very good job of protecting you from website tracking and it does block ads as well.

So, our conclusion is that Cyber Privacy Suite is a very useful multitool for non-techies that want to protect their privacy without any sophisticated settings and controls.

You might also be interested in checking our selection of the best privacy protection tools.

We hope that our article offered useful information. Just give it a try yourselves and let us know about your impressions in the comments section below.

Solved: Windows Could Not Start the Service on Local Computer

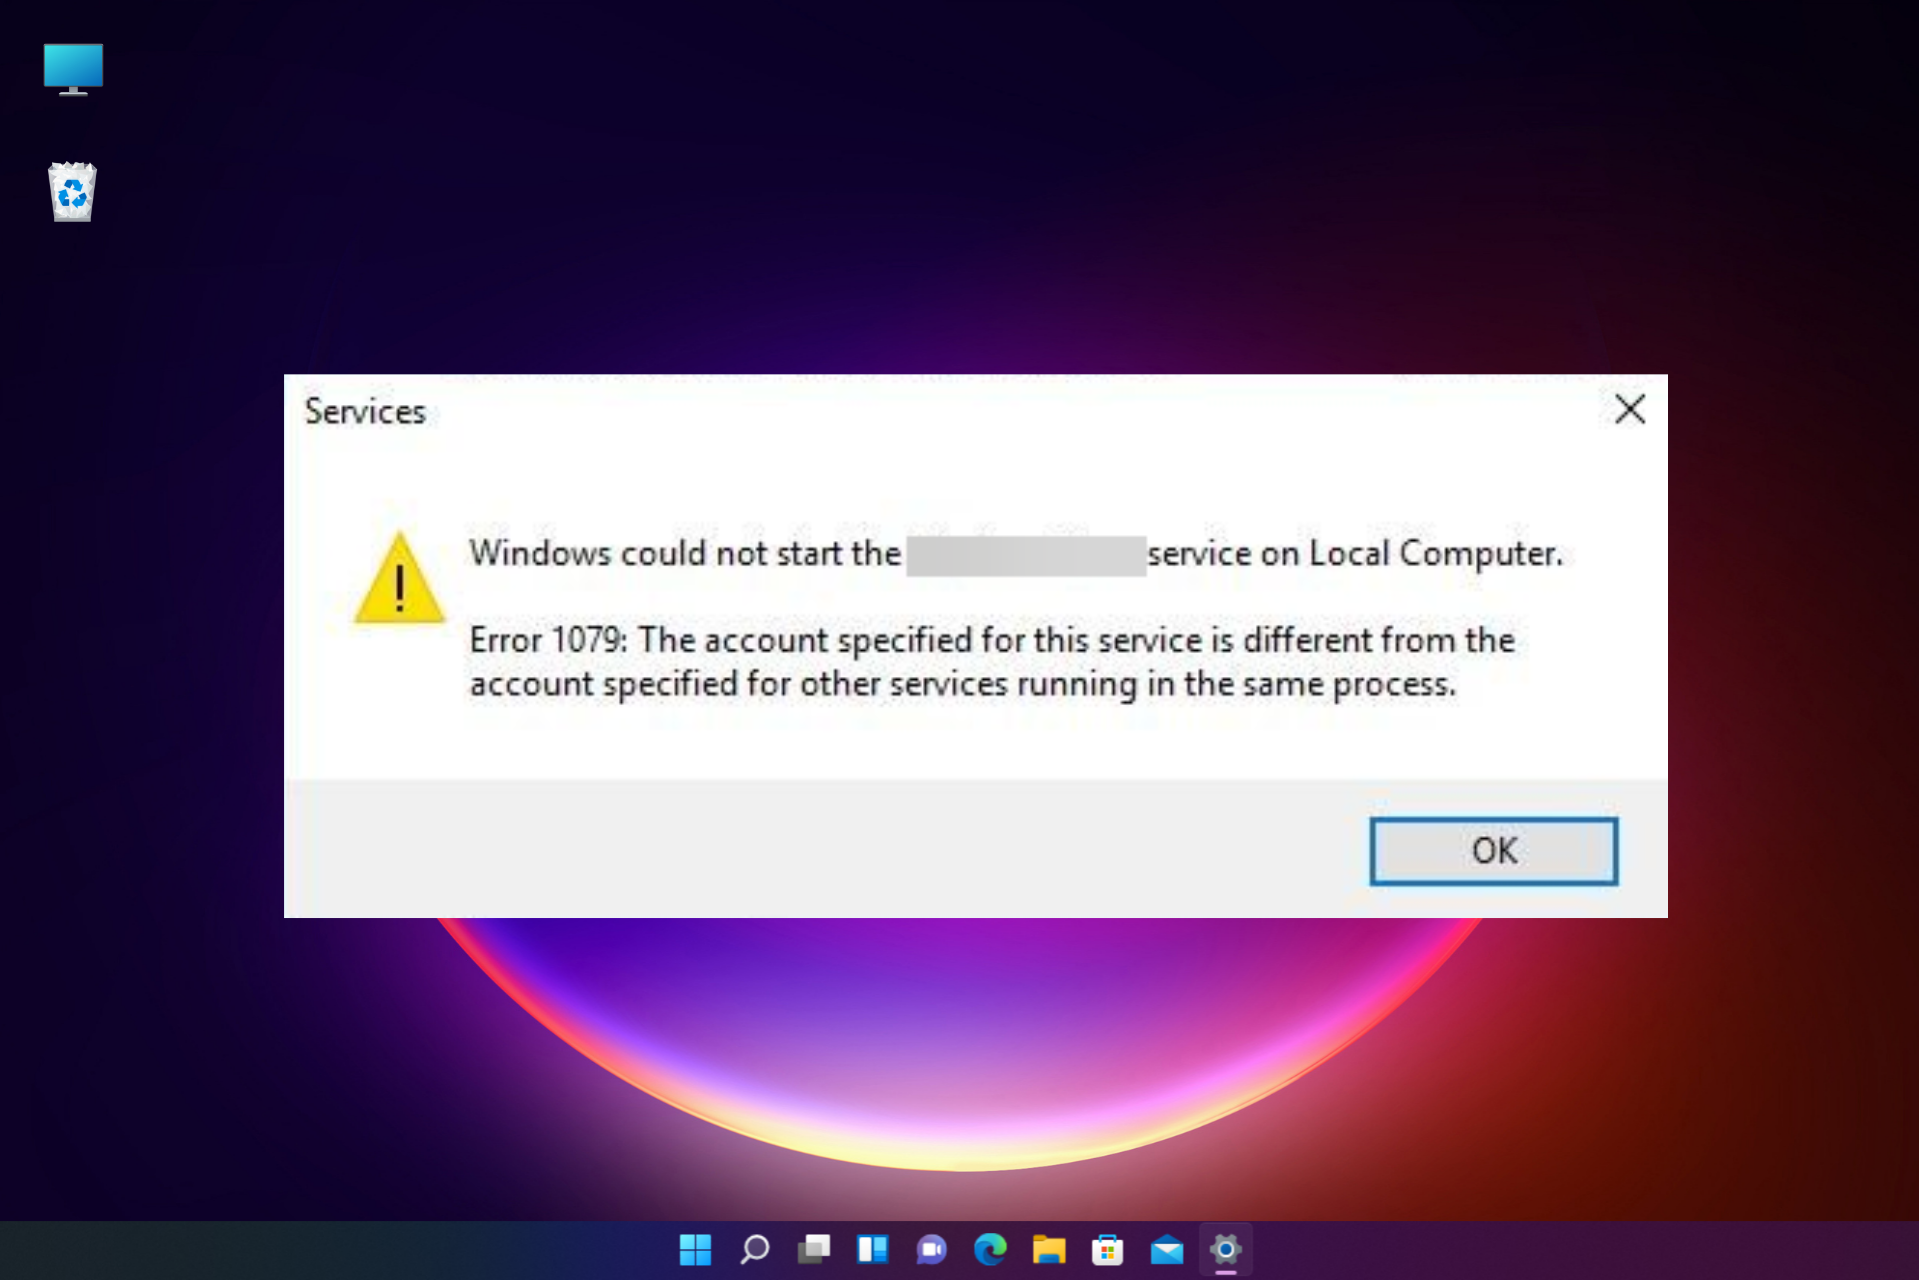
Sometimes, when trying to open a Windows service, it fails to start with the error, Windows could not start the service on a local computer. While this issue is common with the Windows Update service, it can also show up with other services, such as the audio service.

This usually happens if the service dependencies are not running, if the service is disabled or when the service does not have full permissions. However, it could also be due to overflowing temp files or system file corruption.

What to do if Windows could not start the Windows Update service on the local computer?

1. Run Windows Troubleshooter

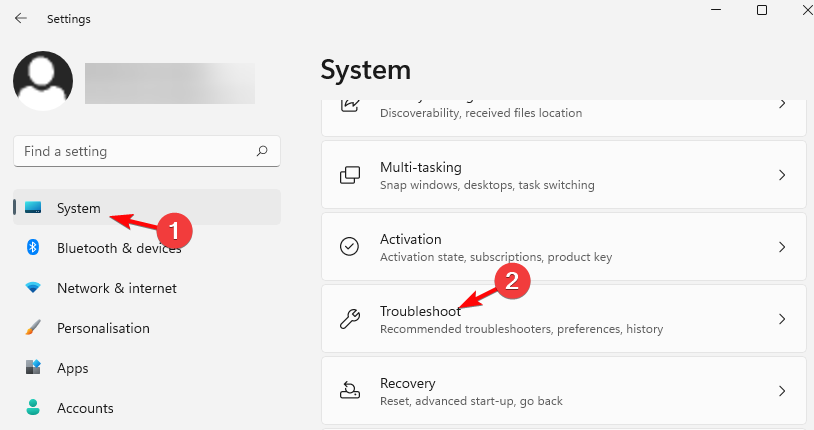
  1. Press the Win + I keys together to launch the Windows Settings app. Click on System on the left side of the app and then click on Troubleshoot on the right. system troubleshooter
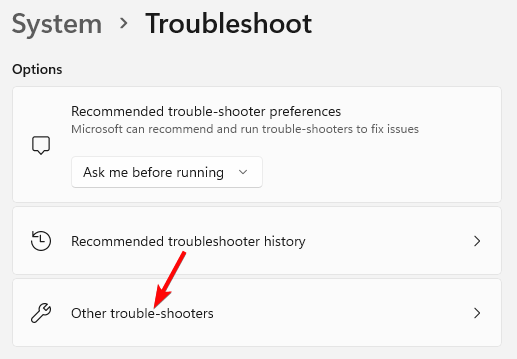
  2. Next, click on Other trouble-shooters on the right. Other trouble-shooters
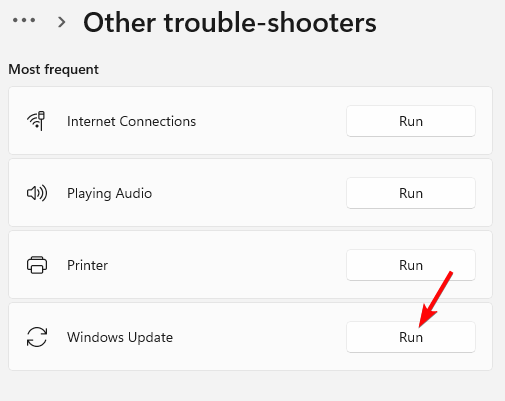
  3. On the next screen, go to the right, look for the troubleshooter related to the service, for example, Windows Update and click on Run. windows update troubleshooter
  4. The troubleshooter will now start looking for any issues, and if any are found, it will apply the fix automatically.

Once done, restart your PC and check if the service is running or if you still encounter the Windows service error.

But if the Windows Troubleshooter is not working for some reason, here we have a detailed post on how to fix the issue.

2. Give full permission to the Windows service

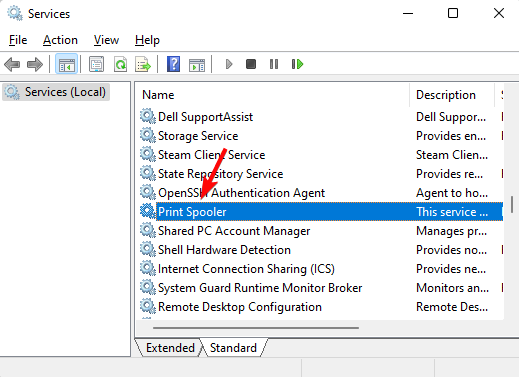
  1. Press the Win + R keys simultaneously to launch the Run console. Type services.msc in the search be and hit Enter to open the Service manager. run services.msc command
  2. In the Services window, go to the right and look for the service, for example, Print Spooler. Double-click on it. open print spooler service
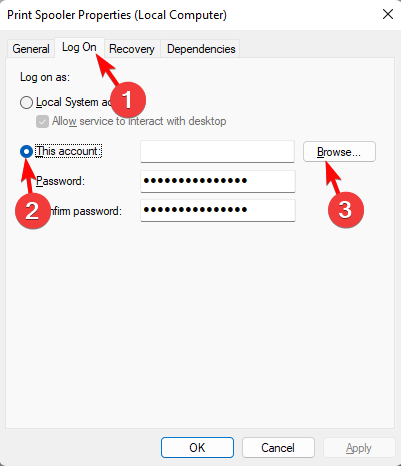
  3. As the Properties window opens, select the Log On tab, select This account and click on Browse.this account - browse
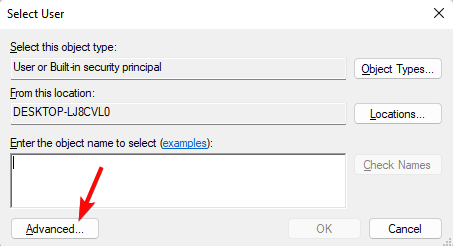
  4. Next, in the Select User dialog, click on Advanced. selecet user advanced
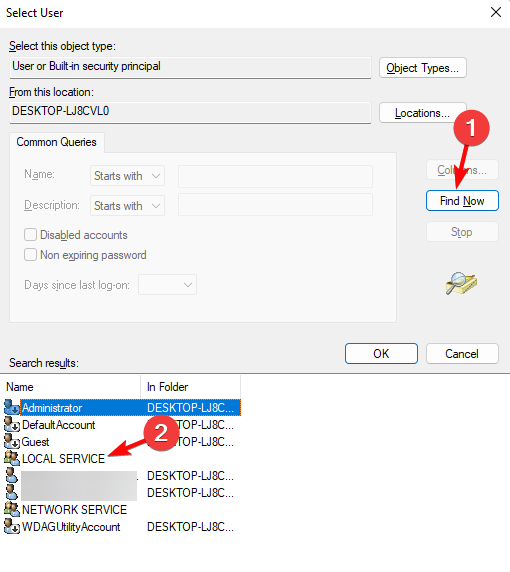
  5. In the next window, click on Find Now. Now, from the Search results below, select Local Service and press OK. select user - local service
  6. Let the password field remain blank. Press Apply and then OK to save the changes and exit.

Now, reboot your PC and check if you still see the error, Windows could not start the service on a local computer. Changing the Log On settings also helps with Error 1067: The process terminated unexpectedly.

But if the local print spooler service is still not running, you may refer to the troubleshooting methods in our guide to fix the issue.

3. Re-configure the service

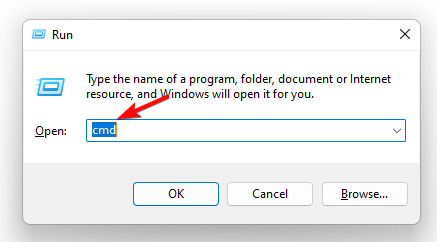
  1. To open the Run console, press the Win + R shortcut keys. Type cmd in the search bar and press the Ctrl + Shift + Enter keys to launch Command Prompt with admin rights. run cmd command
  2. Run the below commands in the Command prompt window one after another and hit Enter after each one (replace the highlighted part with the relevant service):
    • net stop w32time
    • w32tm /unregister
    • w32tm /register
    • net start w32time
    • w32tm /resync
  3. Once the commands have been executed successfully, close the Command prompt, restart your PC, and you should not see the error anymore.

4. Delete Temporary Files

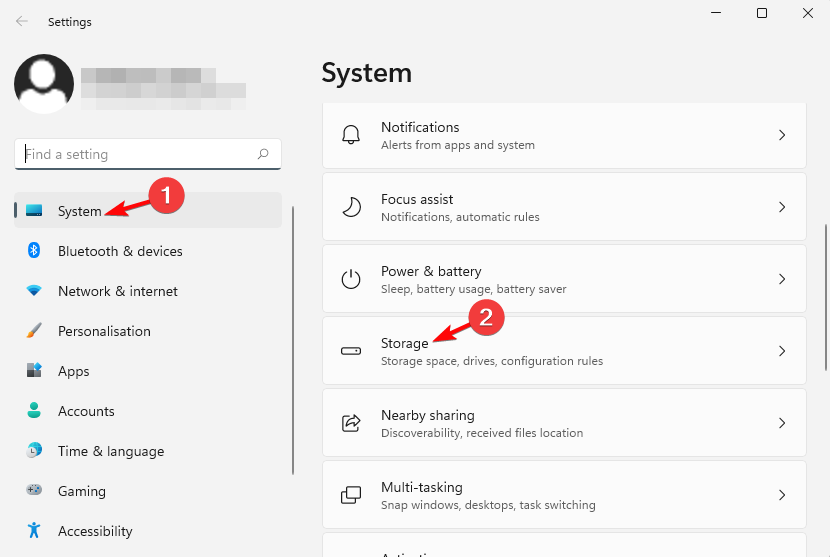
  1. Open the Windows Settings app by pressing the Win + I keys together. Click on System on the left and then click on Storage on the right. system storage
  2. Now, on the right, click on Temporary files.
  3. On the next screen, select the files you want to delete and press Remove files.

Once all the files are deleted, close the Windows Settings app and reboot your PC to see if you still encounter the Windows service error.

5. Run SFC Scan and DISM Tool

  1. Press the Win + R keys together to open the Run dialog, type cmd, and press Ctrl + Shift + Enter keys to open Command Prompt with admin rights. run cmd command
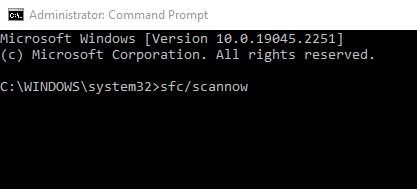
  2. Execute the below command in the Command prompt (admin) window and hit Enter: sfc /scannowSFC/scannow
  3. Windows will now start looking for the corrupted files and repair them automatically. The process takes a while, so wait patiently till you see a success message.
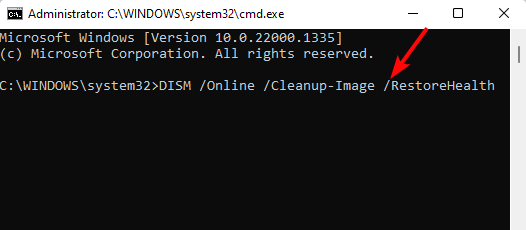
  4. Next, run the below command and hit Enter: DISM /Online /Cleanup-Image /CheckHealthrun dism scan
  5. This process also takes a while, so wait patiently till the utility repairs or replaces the faulty files.
  6. Once done, exit the Command Prompt and restart your PC.

At the same time, you must also run an antivirus scan or make sure that the Windows Defender Firewall is activated for added protection.

But, if you bump into a Windows service error like WLAN AutoConfig error 1068 instead, we have some effective workarounds for you to fix the issue.

You can let us know in the comments box below for any other queries related to any specific Windows service not running.

Fix: Mailbox Has Been Temporarily Moved on Microsoft Exchange Server

Microsoft Outlook is a good email client, especially beneficial for organizations or schools. While the client is featureful, there are a bunch of errors such as the Your mailbox has been temporarily moved to Microsoft Exchange server error.

This error makes it a bit difficult for users to use Microsoft Outlook. If you are among such users, then this guide is just for you.

What causes Your mailbox has been temporarily moved to Microsoft Exchange server error?

After some research, we have found a bunch of reasons that would trigger the Your mailbox has been temporarily moved to Microsoft Exchange server error:

  • Corrupt Outlook profile: It goes without saying that any problem with your Microsoft Outlook profile will trigger issues with it.
  • Outlook has connected with Exchange Server: Chances are that your mailbox has been temporarily moved to a Microsoft Exchange Server.
  • Disable add-ins: Add-ins might be conflicting or interfering with Microsoft Outlook causing the issues.
  • Registry tweaks are needed: There are some users have reported that a few registry tweaks fix the problem.

How can I fix the Your mailbox has been temporarily moved to Microsoft Exchange server error?

Before going ahead with the advanced solutions, we would suggest you try the below simple methods to fix the problem:

  • Restart your PC. Check some recommended solutions if the computer is stuck on restarting.
  • Try restarting the Microsoft Outlook program and make sure no other program is running in the background.
  • Check your internet connection and make sure it is working fine.

Now let us check out the advanced solutions.

1. Keep the primary profile and delete others

  1. Close Microsoft Outlook.
  2. Open the Start menu.
  3. Open Control Panel.
  4. Select Mail.
  5. Click Show Profiles.
  6. Select the profile you wish to remove and click Remove.
  7. In the message prompt that appears, select Yes.
  8. Perform the same steps for other profiles, except for the primary one.
  9. Start Outlook and check if this resolves the issue or not.

Do note that if you delete a profile, all the data associated with the profile will also be deleted. So, make sure that you are deleting all the secondary profiles and not the primary one.

2. Create a new profile and delete your original profile

  1. Close Microsoft Outlook.
  2. Open the Start menu.
  3. Open Control Panel.
  4. Select Mail.
  5. Click on Add.
  6. Set a name for the profile and press OK.
  7. Follow the on-screen prompts to add an account.
  8. Click Finish when the process completes.
  9. In the prompt that appears, select Yes.
  10. Select the newly created profile.
  11. Choose Always use this profile option.
  12. Click Apply.
  13. Select the old profile and hit the Remove button.
  14. Start Outlook and check if this fixes the issue or not.

3. Disable Outlook add-ins

  1. Launch Outlook.
  2. Click on File.
  3. Select Options.
  4. Choose Add-ins.
  5. Click on Go button for Manage.
  6. Uncheck the add-ins that you want to disable.
  7. Select OK and check if this resolves Your mailbox has been temporarily moved on Microsoft exchange server error.

4. Enable the cached Exchange Mode

  1. Exit Microsoft Outlook.
  2. Open the Start menu.
  3. Open Control Panel.
  4. Select Mail.
  5. Select E-mail Accounts.
  6. Double-click on your account.
  7. Check the Use Cached Exchanged Mode.
  8. If the option is checked, uncheck it and check it back again.
  9. Click Next.
  10. Restart Outlook.

5. Tweak Registry

  1. Press Win + R keys to open the Run dialogue.
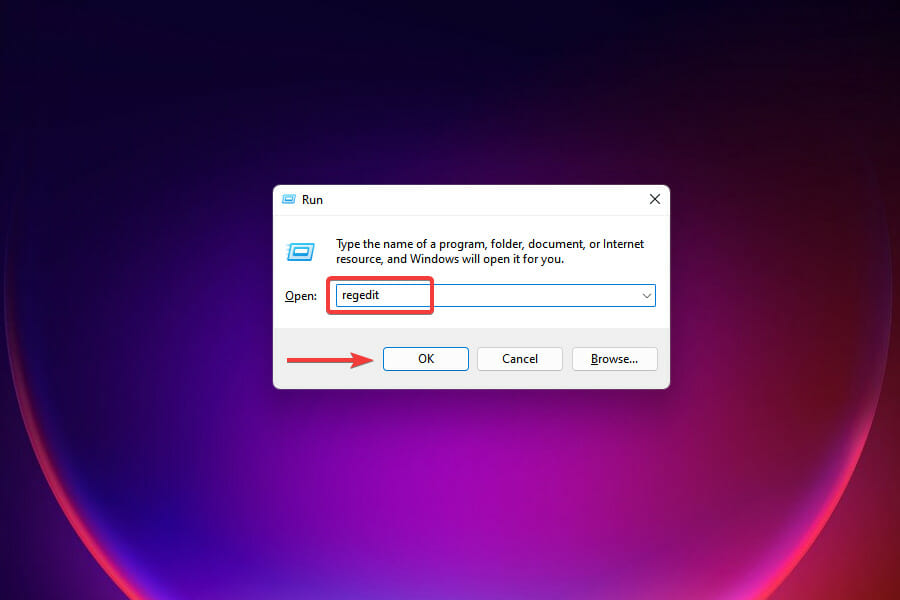
  2. Type regedit and press Enter.
  3. Navigate to the below path and press Enter. HKCU\SOFTWARE\Microsoft\Office\15.0\Common\Identity\
  4. Double-click on the EnableADAL key.
  5. Under Value Data, enter 1.
  6. Click OK.
  7. Double-click on the Version key.
  8. Set the Value data as 1.
  9. Restart your PC for the changes to take effect.

For users who are encountering Your mailbox has been temporarily moved on Microsoft exchange server error, we would suggest you follow the above steps and tweak the registry.

We have a guide that will help you with some easy ways to restore Windows registry without backups.

6. Disable Firewall or malware checker

  1. Open the Start menu.
  2. Type Windows Defender Firewall and open it.
  3. Select Turn Windows Defender Firewall on or off option from the left.
  4. Check the boxes for Turn off Windows Defender Firewall (not recommended) for both Public and Private networks.
  5. Click OK.
  6. Launch Outlook and check if this resolves the Your mailbox has been temporarily moved on Microsoft exchange server error.

That is it from us in this guide. You can apply the above-mentioned solutions for other Outlook errors such as :

  • Your mailbox has been temporarily moved on Microsoft Exchange Server Office 365
  • Your mailbox has been temporarily moved on Microsoft Exchange Server Exchange 2016
  • Your mailbox has been temporarily moved on Microsoft Exchange Server Exchange 2013

If Microsoft Outlook is running slow for you, then we would suggest you check out our guide on it which will help you resolve the problem.

Several users have reported that for them, their Outlook folder disappeared. Fortunately, we have a guide that will help you resolve the problem.

You can also check out our guide on how you can add multiple accounts to Outlook. We also have a guide that will help you with how to use Outlook scheduling assistant.

Let us know in the comments below, which one of the above solutions resolved the Your mailbox has been temporarily moved on Microsoft exchange server error.

WSL2 Stopped Working: 4 Easy Ways to Make It Work Again

When running a Linux virtual machine on your Windows PC, you may come across issues such as the WSL2 stopped working, which has been troubling other users.

In this guide, we will discuss what is WSL and what it does in actual terms. Moreover, we will give you a few solutions that will help you resolve the problem on your end. Let us get right into it.

What is WSL or Windows Subsystem for Linux?

WSL or the Windows Subsystem for Linux lets users run Linux OS directly on their Windows PC. The best part of using WSL is that it lets you run complete Linux inside Windows, allowing you to use the same files and apps seamlessly.

WSL2 makes use of the Hyper-V virtual machine technology. This boosts the performance of using Linux on Windows OS as the compatibility is improved and the file access speed is up to 20x faster than WSL1.

Microsoft introduced WSL2 in 2020, so it is compatible with the latest version of Windows, i.e., the Windows 11 OS. However, if you are using Windows 10, then you need to manually configure it for better performance.

While you will get almost similar performance on Windows 10, as per user reports, WSL2 performs well and is stable on Windows 11.

What can I do if WSL2 stopped working?

1. Set the LxssManager service startup to Automatic

  1. Press Win + R keys to open the Run dialogue.
  2. Type regedit and press Enter.
  3. Navigate to the below-mentioned path. HKEY_LOCAL_MACHINE\SYSTEM\CurrentControlSet\Services\LxssManager
  4. Double-click on the Start key.
  5. Under the Value data field, type 2.
  6. Press OK.
  7. Restart your PC.

Following the above steps will set LxssManager to auto-start. We would advise you to only tweak registry settings if you know what you are doing, as incorrect tweaks can lead to system failure and important services getting disabled.

2. Restart LxssManager Service

  1. Open the Start menu by pressing the Win key.
  2. Type services and open it.
  3. Locate LxssManager and double-click on it.
  4. Under Service status, select Stop if it is running.
  5. Click Apply.
  6. Select Start under Service status to run the service.
  7. Click OK and Apply.
  8. From the Startup type drop-down, select Automatic.

Often the LxxManager service can come across an issue that could result in its malfunction. In such a case, we would advise you to restart the service back again by following the above steps and check if this fixes the WSL2 issue.

3. Uninstall Windows update

  1. Press Win + I keys to open the Settings menu.
  2. Select Windows Update from the left pane.
  3. Click on Update history.
  4. Scroll down and click on Uninstall updates under the Related settings section.
  5. Hit the Uninstall button next to the update you wish to uninstall.

We have shown the steps to uninstall updates for Windows 11 OS, but the steps are similar for Windows 10 as well.

Chances are the version of Windows update that you are running has some bugs which are causing the WSL2 stopped working problem. You can uninstall the update and check if this fixes the problem or not.

4. Enable Hardware Virtualization

  1. Press Win + I buttons to open Settings.
  2. Select Recovery from the right side.
  3. Under Advanced startup and hit the Restart now button.
  4. Select Troubleshoot.
  5. Choose Advanced options.
  6. Select UEFI Settings.
  7. Choose Restart.

Now follow the below steps depending on the brand of laptop you have.

For Acer laptops

  1. When the system is about to boot press F2 to enter the BIOS menu.
  2. Select Advanced page.
  3. Enable the Intel VTX and Intel VTD settings for Intel-based processors.
  4. Enable AMD-SVM and AMD-IOMMU for AMD-based processors.
  5. Press F10 to save the settings.

For Dell laptops

  1. When the system is about to boot press F2 to enter the BIOS menu.
  2. Select Advanced.
  3. Choose Virtualization.
  4. Set Virtualization to Enabled.
  5. Set Virtualization for Direct-IO (or VT-d) to Enabled.
  6. Save and Exit.

We have shown the steps to enable Hardware Virtualization for Acer and Dell laptops. But you can check out this official Microsoft support page to know how to enable the settings for other brands.

That is it from us in this guide. Readers can also check out our guide to know how they can fix the Windows 10/11 bootloader from Linux.

Readers who want to know how they can create a bootable USB media for Linux OS can refer to our dedicated guide.

Let us know in the comments below, which one of the above solutions helped resolve the problem at your end.

Latest Microsoft PowerToys update ships with self-contained .NET 7

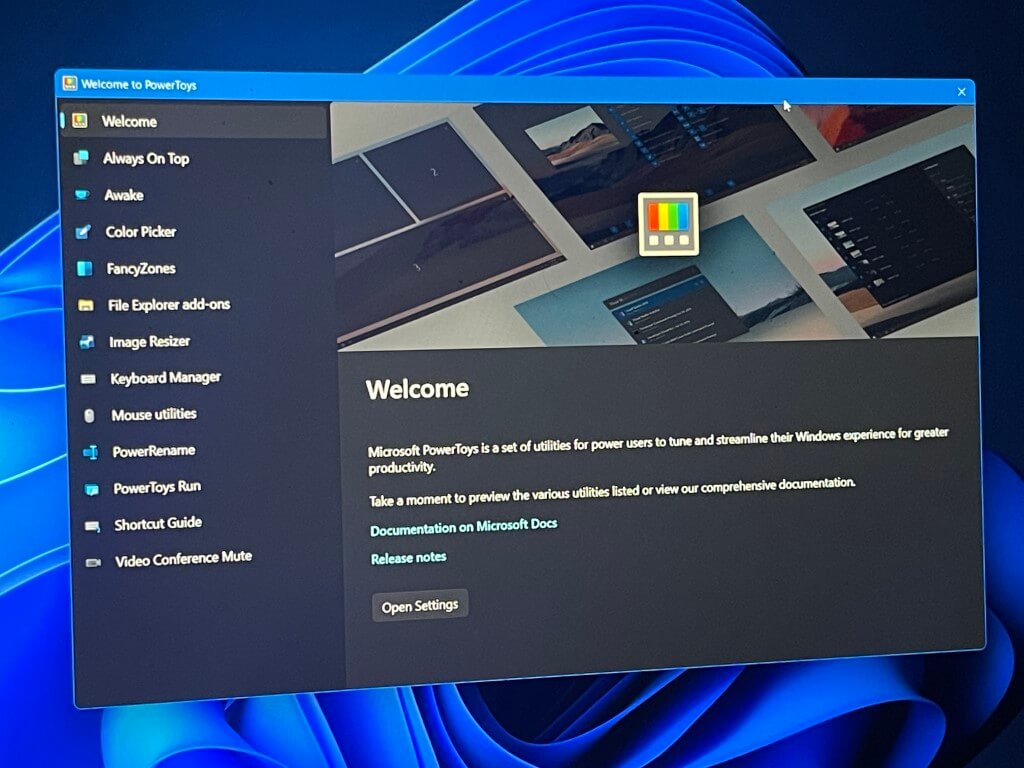
Microsoft has just released the latest update for PowerToys bumping it to v0.66.0. When compared to the previous update, this is quite a significant update as it features a self-contained .NET 7 thus making it easier to keep it updated. It also saves on storage space. What’s more, users now get to pick which language the Text Extractor uses from the installed OCR languages.

On top of these, the update also unpacks a ton of bug fixes and stability improvements, not to mention the new setting that lets users sort the order of the accented characters by usage frequency in Quick Accent and fix for the reduced resource consumption bug that was caused by logging. Be sure to check out the full changelog over at GitHub for more details on the changes made as well as fixes.

If you are interested in trying out PowerToys on Windows 10 or 11, you can download the version 0.66.0 update from the GitHub page. If you already have PowerToys running on your device, it should automatically notify you of this update. Alternatively, you can get this update manually today by launching your app, then clicking on General followed by the Check for Updates, and then the Install Now button.

Microsoft Teams’ Meeting toolbar redesigned to enhance navigation and more

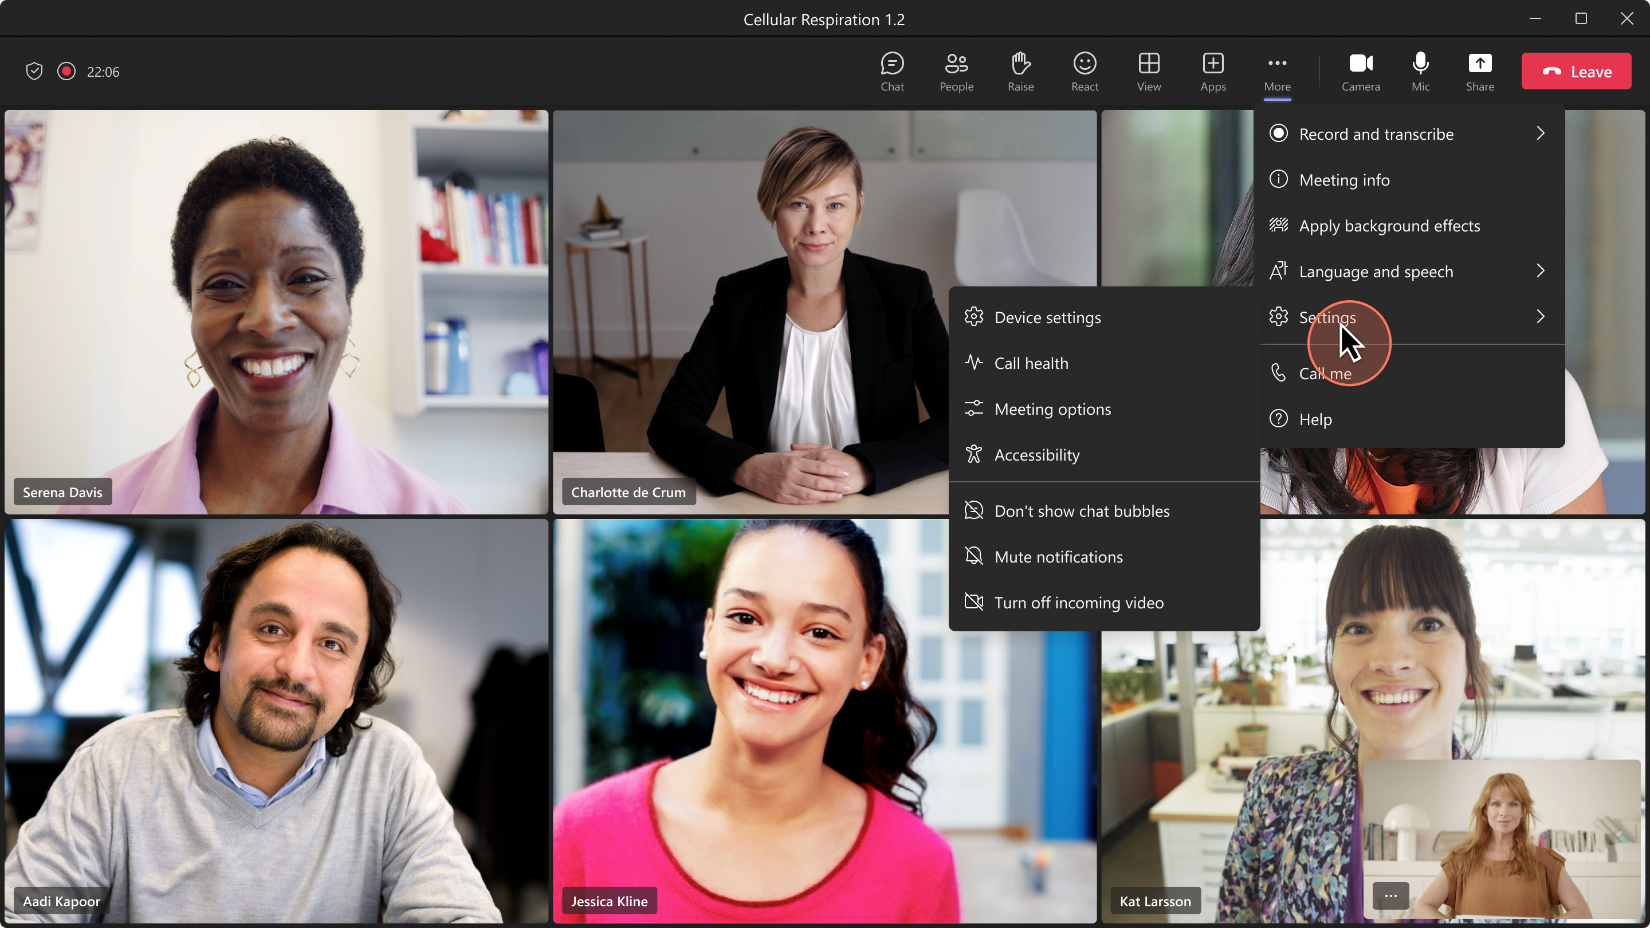
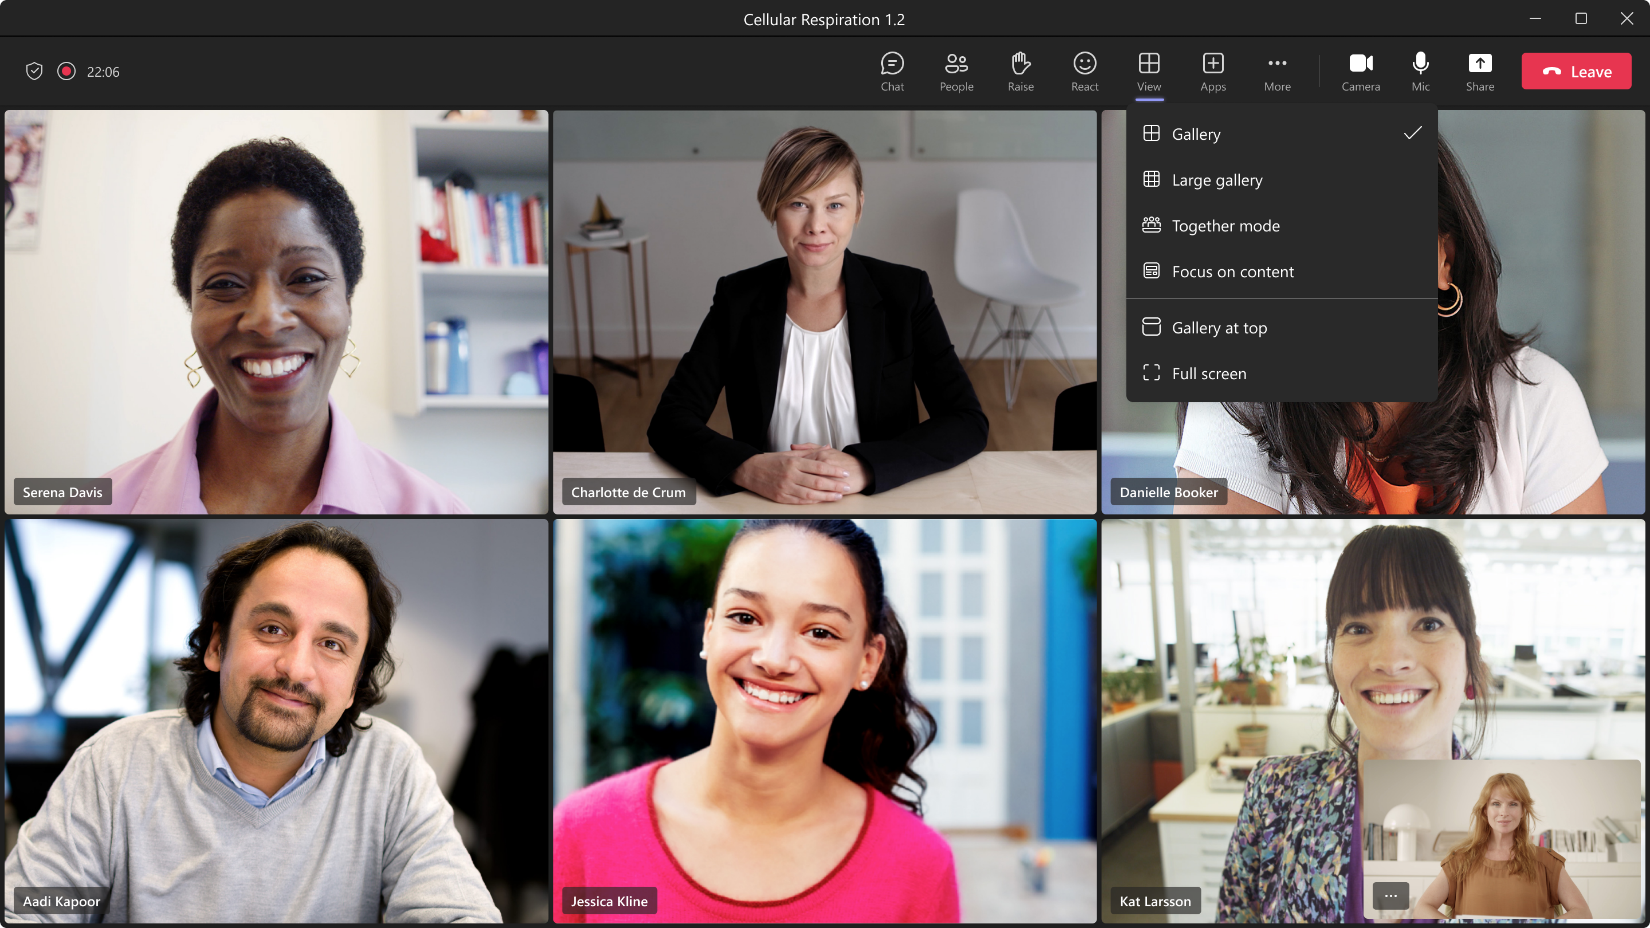
Microsoft recently announced that it is making several improvements to the Meeting toolbar in Teams. The goal behind refreshing the Meeting toolbar and adding new features to it is o make it easier for users to navigate meetings and uncover new features as well as capabilities. Here’s everything you need to know about these improvements:

First up is the added capability that allows users to raise their hand via the new dedicated Raise Hand button that can be found in the redesigned Meeting toolbar.

Improved Meeting toolbar

Second up, you will now be able to make use of the More menu to find any command they are looking for via the new and well-defined sub-menu groupings.

More menu

What’s more, you can easily switch views during meetings by simply clicking on the View button and get to select the option that best suits you.

View button

That said, it is worth noting that these improvements have currently been rolled out exclusively to users in the Teams Public Preview channel running on either Windows or macOS. The improvements are likely to be rolled out to general availability in form of a future update.

In related news, we invite you to check out our post that highlights all the new features that made it to Teams in December last year. Share your thoughts with us in the comment section below.

How to Reset iTunes Library on Windows [Easy Guide]

You have found this guide because you want to reset your iTunes library on Windows. Here is all you need to know.

If the iTunes program is giving you problems or you want to start over with a new collection, resetting the iTunes library on a Windows machine might be a helpful troubleshooting step.

In this article, we’ll look at the many choices and the procedures you may use to reset your iTunes library on a Windows computer. There are a few different methods to reset the iTunes library.

Why Reset the iTunes Library?

You may wish to restart your iTunes collection on a Windows machine for several reasons:

  • For example, if iTunes is running slow or experiencing other issues – If iTunes is running slow or experiencing other problems, resetting the library can sometimes help resolve these issues.
  • You want to start fresh with a new library – If you have been using iTunes for a long time, your library may be cluttered with old or unused media. Resetting the library allows you to start fresh with a new library and can make it easier to manage your media.
  • You have a new PC or replaced the hard drive – If you have a new one or have replaced the hard drive on your current computer, you will need to reset the iTunes library to use iTunes on the new device.

On a Windows PC, several different methods exist to reset the iTunes library. Whether you want to start with an empty library or maintain your media files will determine your choice.

Let us now get to it.

How do I reset my iTunes music library?

1. Reset the iTunes library without deleting media files

  1. Open the iTunes folder on your computer after closing iTunes. Depending on where you installed iTunes, the location of the iTunes folder may vary, although it is often found in the user directory’s Music folder.
    C:\Users\afamo\Music\iTunes
  2. Locate the iTunes Library file in the iTunes folder and change its name to iTunes Library.old.
    reset itunes library windows
  3. Open iTunes to automatically create a new iTunes Library.
    reset itunes library windows

2. Reset the iTunes library and delete media files

  1. Open the iTunes folder on your computer after closing iTunes. The location of the iTunes folder may vary depending on where you installed iTunes. However, it is often found in the user directory’s Music folder.
  2. C:\Users\afamo\Music\iTunes
  3. Locate the iTunes Library file in the iTunes folder and change its name to iTunes Library.old.reset itunes library windows
  4. Delete the iTunes Media folder in the iTunes folder. Your media files, such as movies, music, and TV series, are in this folder.
  5. Lastly, open the iTunes app. If prompted, select the Create Library option and enter a name for the new library. iTunes will create a new iTunes Library file and an empty iTunes Media folder.

You can get rid of all your data or keep them during an iTunes library reset. It would be best if you chose what seems most appropriate for you.

Finally, let us know in the comments below if you have had any success using these methods to reset your iTunes library on Windows.

5 Best Samsung Smart TV Keyboards: High-Rated Picks

Samsung Smart TVs can be compatible with third-party peripheral devices such as wireless keyboards.

Smart TV keyboards make it easier to navigate through the settings and some even come with a trackpad, making the navigation process simpler.

If you are looking for a keyboard to pair with your TV, this is the article you need.

We have listed the best Samsung smart TV keyboards that offer wireless connectivity, touchpad, as well as customization to make your TV-watching experience better.

Note: Deals are subject to change. Keep in mind that the price tag often varies. We recommend going to the vendor’s website to check the price. Some products may be out of stock by the time you’ve made your purchasing decision. So, hustle and hit the buy button for one of the following products.

What are the best Samsung Smart TV keyboards to buy?

1. SAMSUNG Official Smart Keyboard Trio 500 White

  • Easy pairing with 3 devices simultaneously
  • DeX mode for desktop-like usage
  • Tailored for any Samsung devices
  • To-go and slim layout
  • No backlit for night utility

If you’re looking for the most suitable keyboard for Samsung devices, this official Samsung keyboard it’s what you need in terms of compatibility, usage, and connection.

You have up to 3 device control at once, a switching functionality with 1 click, and productivity features to navigate through windows or apps on your Samsung TV and additional devices.

In addition, take advantage of customized hotkeys for easy access to your favorite streaming apps or frequently used apps on your Smart TV.

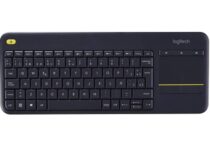
2. Logitech K600 TV

  • Wireless keyboard with all-in-one content navigation
  • 15-Meter wireless range
  • Easy switch feature to work with multiple devices
  • Compatible with Samsung, LG, and other Smart TVs
  • Strictly for casual users

The Logitech K600 TV is the size of an average laptop keyboard with an integrated touchpad. It is a Bluetooth keyboard and offers 15 meters wireless range offering a reliable connection to your Samsung Smart TV.

Logitech K600 TV’s Easy-switch feature allows you to switch between multiple devices with a tap of a button. The media keys offer basic functionalities to play, pause, mute and adjust the volume.

3. Logitech K400 Plus

  • Low-cost wireless keyboard with touchpad
  • Works with PC, Android and Chrome OS
  • Up to 10 meter wireless range
  • Compact and slim
  • Nothing noticeable

Logitech’s K400 Plus offers similar functionality as its elder sibling but at a lower cost. It is a compact and slim wireless keyboard that is designed to work with Smart TVs.

Logitech K400 Plus offers up to a 10-meter range. It is a full keyboard with a functional touchpad which is small but should work for navigation purposes.

The unifying receiver makes the setup of your TV keyboard a snap. It also has familiar media key controls to adjust the media properties.

4. Arteck 2.4G Wireless Keyboard Ultra Slim Silver

  • Easy setup with USB receiver
  • Long battery life & low consumption
  • Ergonomic design and scissors X structure
  • Compatible with SmartTV and Windows 11 or later
  • Small footprint keys

Arteck USB wireless keyboard is a neat choice to achieve your SmartTV navigation needs. You benefit from intuitive usage and a delicate typing experience.

When it comes to battery, this keyboard has everything you need. You can use it without breaks for hours and preserve battery life with the automatic sleep mode.

It’s worth mentioning that it has 10 meters (33 feet) wireless range so you can utilize it from a long distance.

5. Macally Bluetooth Keyboard with Touchpad

  • Couch media for streaming TVs and apps
  • Touchpad with left/right mouse buttons
  • Multi-device compatibility
  • Pair and switch between 3 devices
  • Too sensitive touchpad

This wireless touchpad keyboard from Macally is the ideal choice for using multiple interfaces right from your bed.

You have multi-compatibility for TV, laptop, or mobile devices and access TV apps or web browsers seamlessly.

Plus, you can use this highly compatible keyboard with Mac, Windows, and Samsung TVs. Also, be aware of the D-Pad button and 13 multimedia shortcut keys.

All the keyboards listed in this article offer wireless functionality. While Logitech keyboards offer a solid build and good typing experience, other keyboards offer backlit keys and are cheaper alternatives.

Go through the list and pick a keyboard that meets your requirements the best.

Opera GX VS Firefox – Which Is Better For You in 2026?

Now if you are considering making a switch and wondering if Opera GX is a better alternative than Firefox, this is the article you need.

You are no stranger to the fact that Firefox is a popular web browser available across platforms with over 10% browser user market share.

With excellent add-on abilities, good privacy, and security features, it is one of the best web browsers available across platforms.

Google Chrome, on the other hand dominates when it comes to web browser market share.

While its extensive Chrome Store extensions are enticing, but not the first choice of browser for individuals skeptical of privacy concerns.

Fortunately, there are multiple Chromium-based browsers like Opera GX from different companies.  Opera GX is aimed at gamers and offers some unique features unrivaled by any other browser for PC users. 

For more useful information, don’t hesitate to read our in-depth review of Opera GX.

Is Opera GX better for low-end PC?

The advantage of Opera GX is that you can customize the resources it uses. In other words, it can squeeze any of the specs you’ve got to run.

When you think that the browser was created for gaming, you might imagine that it was made for a high-configuration PC, but it’s the opposite.

Is Firefox slower than Opera?

To find out which browser is faster, we tested them with 3 different tools: Speedometer, JetStrem 2, and MotionMark, and here’s what we’ve found:

Tester
(runs per minute)
Opera Firefox
Speedometer108.2098.40
JetStream 2123.2682.30
MotionMark403258

Clearly, Opera GX beat Firefox on all grounds at speed so there is no doubt about that. Since it has its bandwidth limiters available, it surely is a better browser for low-end PC.

Opera GX is slim and it has low resource consumption just so it doesn’t interfere with your gaming needs and that makes it perfect for low-end PCs.

Opera GX

Take advantage of the network limiters, RAM and CPU controllers, and battery savers for your laptop and phone.

We have compared the two browsers and evaluated them carefully, so don’t hesitate to take a closer look right away.

Opera GX vs Firefox – features, design, & security compared

?️ UI & Design 

Opera GX vs Firefox

Firefox and Opera GX are nothing alike but are intuitive to use. Opera has made a conscious effort in improving the user experience by offering some unique features with its GX browser.

Starting with Firefox, the design language is modern yet simple. Any type of user can get used to the functions and features offered by the browser. 

Opera GX is a gaming-inspired browser. With a dark and red accent theme and Razer Chroma integration, GX can complement your gaming rig and match the theme. 

Opera GX vs Firefox

You can pick from one of the pre-selected colors or any color you like by opening the Easy Setup function from the top right corner. Furthermore, you can customize the browser with custom wallpapers.

Due to better tab management and easier navigation to access advanced settings, Opera GX wins the battle between the two web browsers in Firefox vs Opera GX based on the user interface.

⚡Performance 

Opera GX vs Firefox

Firefox is known for its excellent memory management. It helps in faster data retrieval and response interval and is ideal for multi-tab users. It can handle heavy sessions without hogging and restrict RAM usage.

Opera GX is on par with Firefox when it comes to RAM management. However, the built-in resource management tool GX Control gives it an edge over Firefox.

Opera GX vs Firefox RAM usage

GX Control comprises a few tools, including CPU, RAM, and Network Limiter. Once enabled, it allows you to limit how much RAM, CPU, and network usage your browser takes up.

So, this would be a hard assessment since there are several factors and variables.

However, Opera GX doesn’t have to deal with any RAM issues since you can allocate it as much as you want.

In fact, this is one of the differences in an Opera browser vs Opera GX comparison.

Regarding the Hot Tab Killer feature, note that it allows you to slash tabs that steal your resources.

While both browsers offer excellent performance and use system resources efficiently, Opera GX offers more for advanced users to prioritize the resources depending on the task.

? Features 

Firefox has an extensive add-on library. Although it may not be as large as Chrome’s web store, you can find all the major extensions you want there.

The browser also comes with some handy built-in features, such as the screenshot tool. Right-click on any web page and choose the Take Screenshot option. 

You can capture the full screen, choose a specific area or save a full web page. The images can be copied or downloaded to your computer.

Other handy features include a Reading mode that strips off unwanted contents from the web page and Pocket integration to save web pages.

Opera has its add-on library, but it is not as good as the Firefox add-on library. However, this Chromium browser fully supports Chrome Web Store extensions.

In our testing, all the Chrome extensions worked normally without any issues.

Opera GX vs Firefox

Similar to Firefox, Opera GX also offers some handy built-in tools, including a screenshot tool. You can take screenshots, add text, and emojis and annotate and share it on social media. 

Additionally, it also offers an intuitive Dark Mode feature. Right-click on any webpage and choose the Force Dark Mode option. Opera GX will show the webpage in dark mode.

As a gaming browser, GX comes with built-in streaming apps and social media integration.

The sidebar allows you to access popular streaming and social media apps, such as Twitch, Spotify, YouTube Music, Apple Music, Discord, and more directly from the browser.

Security and Privacy 

Firefox offers excellent privacy features. You can choose what to block and allow from the settings. The company being non-profit means it is much easier to trust the company when it comes to user data.

Users can block trackers, cookies, crypto miners, and fingerprints from the settings. The Enhanced Tracking Protection blockers target over 2,000 trackers including trackers from companies like Facebook, Twitter, and more.

As for the Firefox Monitor feature, it can automatically notify you if your password has been breached.

Opera GX offers a similar set of privacy and security features as Firefox, in addition to a free VPN and ad blocker.

The built-in ad blocker blocks suspicious and annoying ads on web pages. As for the VPN, you can access restricted content securely.

Both browsers warn you about suspicious pages by checking the active page against its database of phishing and malware websites. 

Opera GX vs Firefox privacy

Firefox and Opera GX offer great security features, including a third-party cookie tracker blocker.

Opera GX, however, has an edge with its adblocker and built-in, which is not a standard feature across browsers, including Firefox.

⇒ Get Opera GX

⇒ Get Firefox

Opera GX vs Chrome vs Firefox

Chrome beats the two other browsers in terms of market share and extensions, but it’s not ideal when it comes to sheer functionality.

We’re not even getting to features because we constantly deal with Chrome’s multitude of errors and problems that we addressed until now.

While Chrome and Opera have a Chromium engine, Firefox has its own Gecho engine, which makes it a bit different.

In features, Opera GX stands out again with its social network integration and a free VPN that you usually need to pay a lot of money for.

Which one is your choice?

Mozilla Firefox is an excellent browser when it comes to performance, design, security, and features. However, for gamers and power users, Opera GX offers more.

Apart from the unique GX control feature that allows you to limit the CPU, memory, and network usage of your browser, it also comes with social media and streaming app integration.

For those who want to switch from Firefox to a Chromium-based browser, Opera GX is an excellent alternative. It offers more features, better security, and greater control over your browser.

You should also consult our list of the best browsers with low memory usage if you want an efficient browser.

Which one did you choose? Share your insights with us in the comments section below.

How to Change Password on Remote Desktop? 5 Ways

Changing the password for your remote desktop connection is essential to ensure your device’s security. There are various ways in which you can change the password. 

This guide has discussed some of the easiest ways to change passwords for Remote Desktop on Windows 10 and 11. 

How to change the Remote Desktop Password in Windows 10?

1. Use a shortcut 

  1. Press Ctrl + Alt+ End together.CTRL + ALT + END -change password on Remote Desktop
  2. From the pop-up, select Change a password.
  3. Follow the on-screen prompts to complete the process.

2. Use the Command Prompt

  1. Press the Windows key, type CMD and click Run as administrator. DOS COmmand Prompt -change password on Remote Desktop
  2. Copy and paste the following command and press Enter: C:\Windows\explorer.exe shell:::{2559a1f2-21d7-11d4-bdaf-00c04f60b9f0}
  3. Then, on the Windows Security Options page, click Change a password. 

3. Use the Windows PowerShell

  1. Press Windows + X to open the Power User menu.
  2. Select PowerShell(Admin).powershell- change password on Remote Desktop
  3. Input the following command after replacing UserName with your user name and InputNewPassword with the password you want to set and press Enter: Set-ADAccountPassword -Identity UserName -NewPassword (Read-Host -Prompt “InputNewPassword” -AsSecureString) -Reset

3. Use the on-screen keyboard 

  1. Press Windows + R to open the Run window. osk - change password on Remote Desktop
  2. Type osk and press Enter to launch the on-screen keyboard. 
  3. Press and hold Ctrl + Alt on your physical keyboard and click Del on the on-screen keyboard. 
  4. Minimize the on-screen keyboard and click Change a password. 

5. Use the Active Directory Users & Computers console

Tip icon Tip
You can use this method to change the password for your RDP connection even if you don’t remember the current password.
  1. Press Windows + R to open the Run console. 
  2. Type dsa.msc and press Enter to open Active Directory Users and Computers console. 
  3. Click Users. Navigate to the username for which you want to change the password. 
  4. Select and right-click the account and click Reset password. Reset Password - change password on Remote Desktop
  5. On the next screen, enter the password next to New password and Confirm password.Reset password- change password on Remote Desktop
  6. Click OK.

How to change the password on a Remote Desktop after the password has expired?

If the password has expired and you have lost connection to the remote device, then only the admin of the remote device can help you regain access. Also, it would be best if you asked them to make changes to allow remote users to reset expired passwords in the future.

How to change the Remote Desktop password in Windows 11?

Changing the passwords for RDP on Windows 11 is the same as on Windows 10. Therefore you can use any of the above methods to change the password.

So, these are the ways that you can use to change the password for Remote Desktop on Windows 10/11. Try them and let us know which worked for you in the comments below. 

5 Best Iphone Backup Software For PC [2026 Guide]

Electronic devices are prone to malfunctions, and when the device is iPhone, you better have an up-to-date data backup ready. Apple offers its own backup management software iTunes for iOS device users.

iTunes works well for the basic stuff like purchasing apps and playing media files, but when it comes to taking a backup, iTunes is nowhere near perfection.

This is where the third-party iPhone backup software for PC comes in. iTunes is an in-house product that does not cost anything to download and use but has a terrible iOS restore and update manager.

Even more, it stores all the backup and firmware update files in the internal drive of the PC, without any option for the external drive.

If you have ever tried taking backup of iMessage conversation using iTunes, you would know that is not possible either.

Fortunately, the third-party iPhone backup apps for PC can resolve these issues and offer a more seamless and better-organized mode of iPhone data backup and file management experience.

If you are looking for the best alternative to iTunes, we have done the heavy lifting for you and compiled this list of the best iPhone backup software for PC.

Before making the purchase, download the free trial, try the backup software, and later make the decision. So, let’s get started.

Which software is best for backing up iPhone on PC?

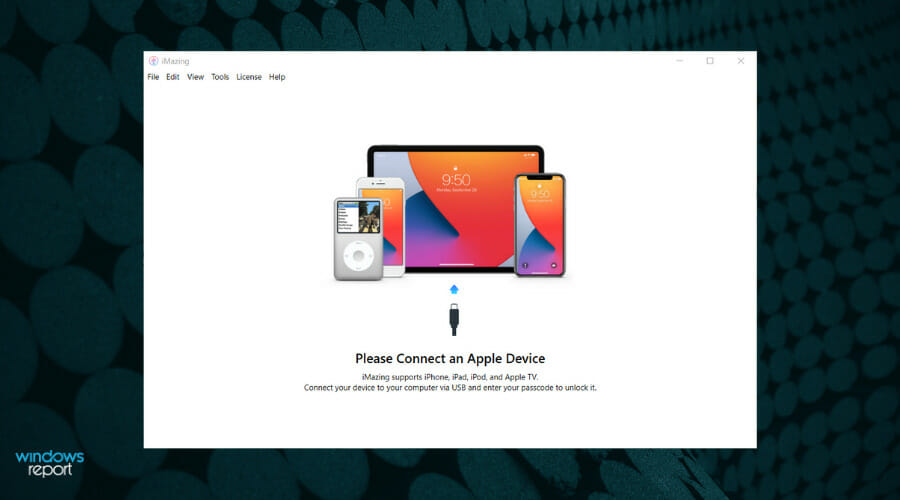
iMazing Backup iPhone& iPad – End-to-end encryption

iMazing Backup iPhone& iPad is another powerful data management software designed especially for iOS devices. It works with online cloud storage and it claims to never overwrite your iPhone and iPad backups.

Users of iMazing can choose how frequently each device is backed up and how many of the backups the app should keep: a month’s worth, a week, or all of them if you want to.

If you happen to need to do advanced digging into your data looking for some long-lost pictures, a unique feature that comes in handy in this type of situation is the Time Machine-like snapshots of your devices provided by iMazing Backup iPhone & iPad. 

Additionally, this software comes with automatic functionality to safely back up data while your phone rests in your pocket. Therefore you don’t have always to remember to back up new files.

It also assures the user end-to-end encryption in case of Wi-fi transfers, backup security with AES-256 support plus private storage settings on the hard drive of your choice.

The user interface is easy to navigate, you can browse through your backups effortlessly and access the data you need, all in one place.


Other features include:

  • Automatic back-ups
  • End-to-end encryption
  • Recover from existing back-ups
  • Decide where to store your iOS recovered data: other iOs devices, Mac, Android or Windows

With all being said, it’s no need to think twice about this free backup solution and choose to efficiently consider your data assurance and protection.

iMazing Backup

iMazing Backup

Take care of your data using this active solution of data backup of your iPhone and iPad.
Check priceVisit website

Xilisoft iPhone Magic Platinum – Ringtone Creator

The iPhone Magic Platinum from Xilisoft is an all-in-one iPhone manager that facilitates the transfer of files from iOS devices to Mac and PC.

iPhone Magic Platinum can also convert and transfer video and audio files to iOS devices. It also comes with an iPhone ringtone maker option for customization.

The basic features of the iPhone Magic Platinum include the transfer of files between devices through PC / Mac. Users can create personalized ringtones and download online videos from sites like YouTube.

Those who want to move content from their DVD/CD drives to iPhone can use the convert feature to convert and transfer the files. Besides, it also supports app transfer between iOS and computer.

Other features in the software include multiple media file management, photos, and videos transfer to PC, and the ability to export the contacts and notes in .csv / .vcard file, etc.

What is not so good about iPhone Magic Platinum is the performance which at times depending on the tasks may take several minutes to finish.

Key features that you are about to enjoy:

  • Transfer files between multiple devices
  • Download online videos from Youtube and MetaCafe
  • Ringtone Creator
  • Convert DVD /CD files and transfer to iPhone
  • Transfer apps, contacts, music, videos, and documents to and from PC
  • Supports iOS 12, iPhone X, and other iOS devices

The developers can also work on optimization as the software still eats a good amount of memory when in action.

Xilisoft iPhone Magic Platinum

Xilisoft iPhone Magic Platinum

Xilisoft iPhone Magic Platinum lets you manage your iPhone and optimize backup experiences on all your devices. Eager to try it out?
Free trialVisit website

Dr. Fone – All-in-one data management

Dr. Fone is a wide-ranging iPhone data management app focused mainly on data backup and recovery. This mobile backup solution will help Apple users to get back important lost files immediately.

Not only can it recover deleted or lost files, backup data, and restore it on another device, but the app can also restore iTunes and iCloud backup files without the risk of overwriting.

Your stored data can be accessed on different devices with no impediments as Dr. Fone provides real-time sync. On top of that, the backup storage is extensive and can be increased as needed.

A very useful feature of the App is Screen Unlock for iOS. Just make sure to be connected to Dr. Fone on your PC as well as on your phone and you’ll be able to unlock your screen in case you forgot your passcode.

Moreover, this option stands out by the flexibility of recovering lost data and you can perform it selectively without overwriting existing files on your iPhone. Thus you can back up essential data without the risks of doubling your files.

Thus if you need a 1-click backup solution for iPhone to recover your valuable files selectively, you can simply do it using this software.

Other features include:

  • Restore and export iOS device data directly to a computer and get a full report of the recovered files once the process is finished
  • Transfer data from one phone to another using a computer
  • Transfer data from an iOS device to an Android device without computer assistance
  • Transfer media files between iTunes and iOS Devices
  • Erase all data of your iOS device without leaving any trace
  • iPhone screen recorder

Dr. Fone backup is a good all-in-one option for data management that covers all the main points of such tools and offers some advanced features as well.

Dr. Fone

Manage all your iPhone files with this proficient data backup solution.
Check price Visit Website

iSkysoft iTransfer – Intuitive interface

iSkysoft iTransfer is no longer available as a standalone product and has since been integrated into Dr.Fone.

best iphone software for pc

iTransfer from iSkysoft is an all-in-one iPhone manager offering a backup and data management solution. It gives the user control over iPhone files including music, videos, contact, call logs, voice memos, iMessages, etc.

An interesting feature of iTransfer is its ability to break the barriers of iTunes and let the user sync music from the iTunes library to Android and vice versa.

Besides, users can also drag and drop files from iTunes library/PC to iPhone, copy songs from iPhone to iTunes with a single click, and even backup music from iPhone to Mac and PC.

On PC, iTransfer allows the user to manage the iPhone storage like a flash drive. Users can browse, manage files and folders and move and remove files with no restrictions.

Similar to iMazing, iTransfer also offers the ability to batch export iOS apps by exporting all .ipa apps from iPhone to Mac and PC. But, the feature is currently limited to iOS 9 and below running devices only.

Key features that you are about to enjoy:

  • Install and uninstall iPhone apps in batch
  • Intuitive interface
  • Manage iPhone files like photos, videos, call logs, and voice memos
  • Copy and transfer data from one iOS device to another

A few less great things about iTransfer include the price tag which is higher than iMazing, the fact that it does not support some audio and video formats, and comes with not-so-useful features like the explorer making the software cumbersome.

iSkysoft iTransfer

iSkysoft iTransfer

As the ultimate iTunes alternative, iSkysoft iTransfer is an ideal iPhone backup software for PC. Don’t hesitate to try it out!
Free trialVisit website

iMazing Transfer – Supports Apple Watch

iMazing Transfer is an iPhone management utility and one of the best alternatives to iTunes. Not only does it offer iPhone backup and restore options, but it also lets users update their iPhones to the latest iOS firmware without having to use iTunes.

This software is available both for Mac and PC. It can do stuff that iTunes can’t such as exporting iMessages as a backup, storing iPhone backups on an external hard drive, and browsing archives.

It can manage apps, photos, videos, notes, and call history along with PDF documents and ebooks from and to the iBooks. One can also import the pictures from PC to iOS by using the drag and drop feature.

The ability to clone and transfer the entire device backup to a new device is what makes iMazing amazing as it removes the hassle of using iCloud or iTunes to restore and wait for ages for it to complete.

You can directly connect the devices to the computer, launch iMazing, and start the transfer.

With all the pros, there are some cons as well. Many users complain about the infinite time the iMazing takes to complete the first scan. You also can’t view messages, call history, etc. from the device but only from the backup.

Key features that you are about to enjoy:

  • Create a complete iPhone/iPad/iPod backup
  • Restore backups directly from iMazing
  • Clone and copy one iOS device’s data to another iOS device
  • Manage apps, logs, photos, videos, documents, and game progress
  • Supports Apple Watch

iMazing is available under two subscription plans. The cheapest option lets you manage 3 apple devices, whilst the other plan can be used on an unlimited number of devices.

⇒ Get iMazing Transfer 

iFunbox – Completely free

iFunbox is the best free alternative to iTunes, period. Using the software iPhone users can install unsigned .ipa (iOS apps) into their iPhone through their PC.

Users can also access the root folder and explore the data in the sandbox. However, only jailbroken iOS devices can install third-party iOS app .ipa files and access the root folder using the tool.

As a file manager, iFunbox allows users to manage multimedia files including the transfer of photos, music, ringtones, videos, voice memos, and other files instantly.

The mobile hard disk folder in iFunbox’s toolbox tab lets the user manage the iPhone as a flash drive storage for easier access to files and folders.

While iFunbox offers a good number of features, it does miss out on some must-have features as well. First, unlike the iMazing app, iFunbox does not support iOS device-to-iOS device data transfer.

So, if you want to export data from one iOS device to another device, it will be a cumbersome experience. It also misses out on the iCloud data management option.

Key features that you are about to enjoy:

  • Intuitive user interface
  • Completely free to use
  • Ability to install .ipa files on jailbroken iOS devices
  • Allows access to the root folder on jailbroken devices

But for what’s it worth, iFunbox is undoubtedly one of the best file managers for iPhone and it’s worthy of your attention.

⇒ Get iFunbox 

iExplorer 4 – Cross-platform support

iExplorer is yet another iPhone backup software for PC that comes with a host of features. iExplorer facilitates the transfer of music, iMessages, photos, videos, and other documents to a Mac or PC easily.

The disk mounting feature lets the user enjoy the iDevice as a USB flash drive for easier access to data. It also gives access to saved app data and other directories from iPhone.

Other features supported by iExplorer include the export of voicemails, address book, calendar events, reminder notes, and call history as a backup to your PC.

Just like iMazing, iExplorer allows browsing of iTunes backups and access to media folders containing iTunes purchases. iExplorer with all its features has some cons that need to be addressed as well.

To begin with, the performance of iExplorer is inconsistent, which can be annoying at times. In comparison to other iPhone backup software, iExplorer feels a little expensive.

Even more, the trial version of iExplorer does not allow the user to explore all the features (even in a limited way) without having to buy the license.

Key features that you are about to enjoy:

  • Cross-platform support
  • Compatible with iOS 12 and the latest iOS devices including iPhone X/Xs/XR
  • Offers a complete iPhone backup solution

iExplorer has a free, limited version as well as a paid version. The tool is compatible with all Apple mobile devices, even very old ones.

⇒ Get iExplorer 4

Taking a regular backup of your iPhone’s data is essential and having good iPhone backup software for PC makes the task easier. In this article, we have listed the best iPhone backup software tools with their pros and cons.

On the other hand, there are distinct efficient solutions to transfer files from your PC to your iPhone and have everything updated.

Each software comes with a free trial version with limited access, but that should give you enough time to assess and analyze the tool before making a purchase. Let us know your pick in the comments area below.

How to Dual Boot Windows 11 and Linux [Step-by-Step Guide]

One of the biggest competitors of Windows is Linux, and with Windows 11 in the spotlight, the competition is greater than ever.

Both systems have their advantages and flaws, and if you want to learn more, we suggest that you read out Windows 11 vs Linux guide for in-depth information.

However, you don’t have to pick one or the other. With a bit of effort you can dual boot Windows 11 and Linux on your PC, and today we’re going to show you how to do that.

How can I dual boot Windows 11 and Linux?

Note that dual-booting can be done in two ways. You can install Windows 11 from Linux and if you already have Windows 11 on your PC, just install Linux by applying the below steps.

Tip icon Tip
Before starting, it’s always a good procedure to back up your files, to avoid any inconvenience. We recommend reading also this guide on how to automatically backup your device.

1. Install Linux from Windows 11

1. Create a new partition for Linux

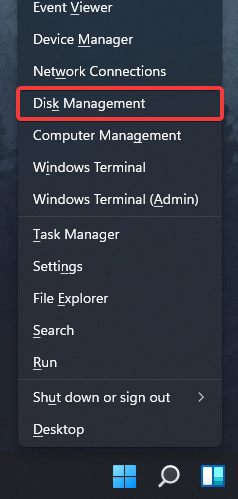
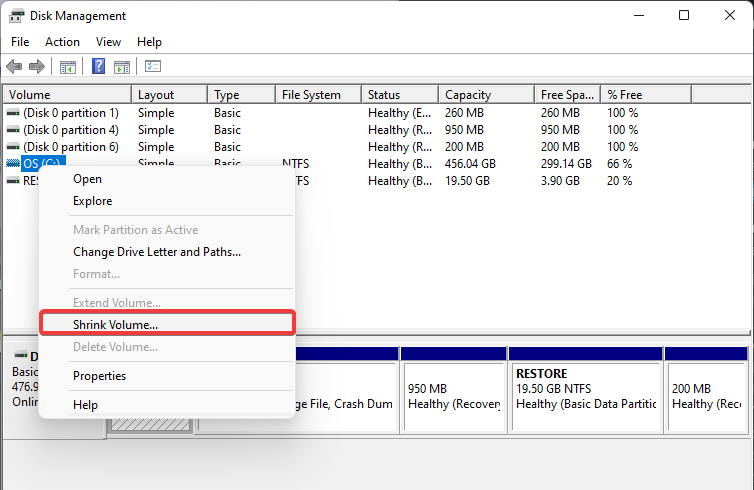
  1. Press Windows Key + X and select Disk Management from the list.
  2. Select the drive that has extra space. Different Linux distributions have different requirements, so you’ll need about 50-100GB+ of space, depending on your needs.
  3. Right-click that drive and select Shrink Volume from the menu.
  4. Set the desired amount of space in MB in the Enter the amount of space to shrink in MB field and click the Shrink button.
  5. This will create unallocated space. Right-click the Unallocated space and select New Simple Volume.
  6. Set the Simple volume size in MB to the maximum possible value and click on Next.
  7. Now you just need to enter the desired letter for this drive and its label.
  8. Click the Finish button to complete the process.

In order to have a new partition created, you need to download Linux and create a bootable flash drive to install it.

2. Download Windows ISO and create a bootable flash drive

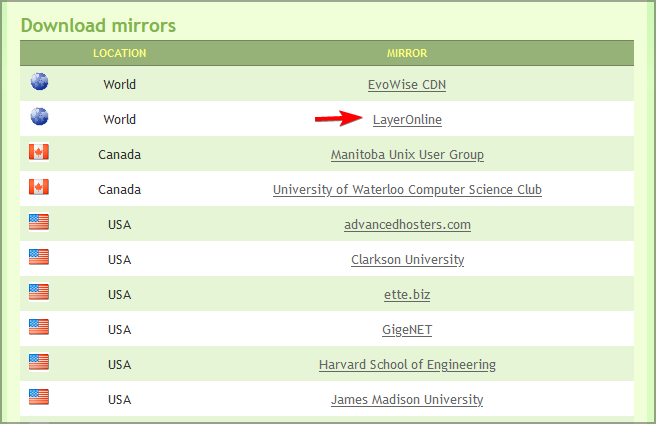
  1. Visit the download page of the distribution that you want to download. In our example, we used Linux Mint, but you can use any other distribution that you want.
  2. Select the source that you want to use and wait for the download to finish.
  3. Connect a USB flash drive to your PC.
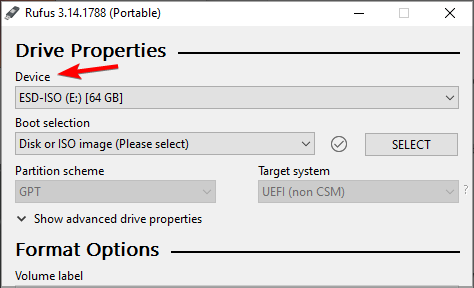
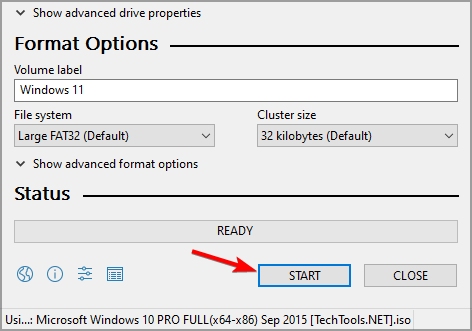
  4. Once the ISO file is downloaded, download Rufus and run it.
  5. Select your flash drive from the list of devices.
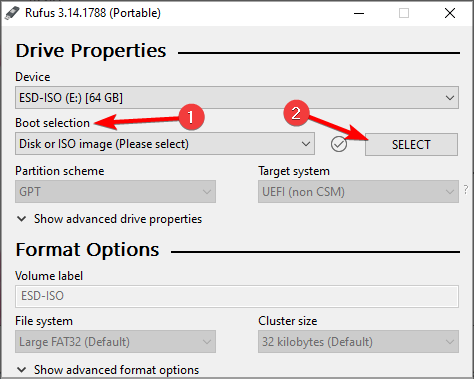
  6. Click on Select and select the ISO file that you downloaded.
  7. Make sure that your settings are correct and click on Start.
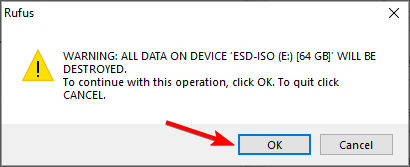
  8. A confirmation dialog will appear asking you to format the drive, so be sure to format it to proceed.
  9. Wait for the process to finish.

Once the process is finished, you’ll have a bootable Linux flash drive ready. Now we can go on and install Linux.

3. Change the boot order and install Linux

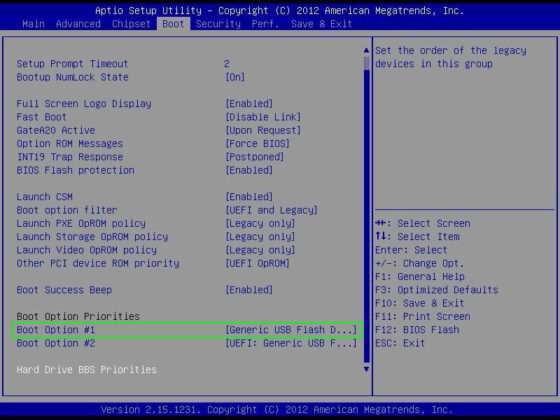
  1. Restart your PC and press Del to access BIOS. Some motherboards use a different key, so be sure to check your PC’s documentation/motherboard documentation.
  2. Navigate to the Boot section, set your flash drive as the primary boot device, and save the changes.
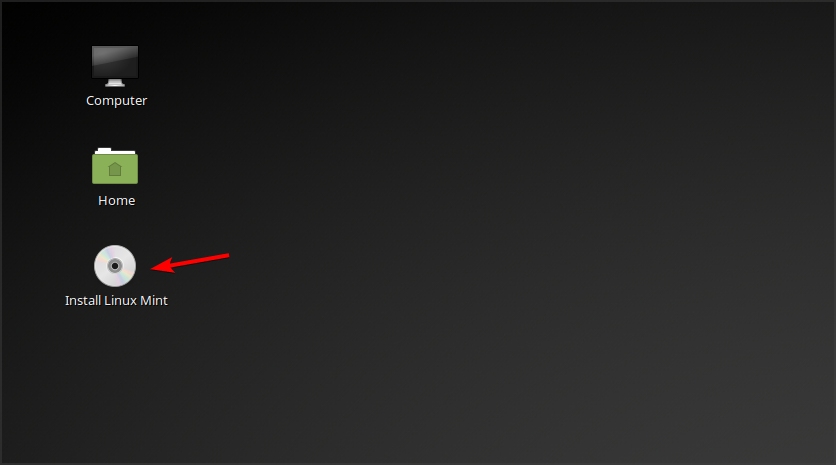
  3. Once your PC restarts, you’ll be booted to Linux Mint live session. Select Install Linux Mint.
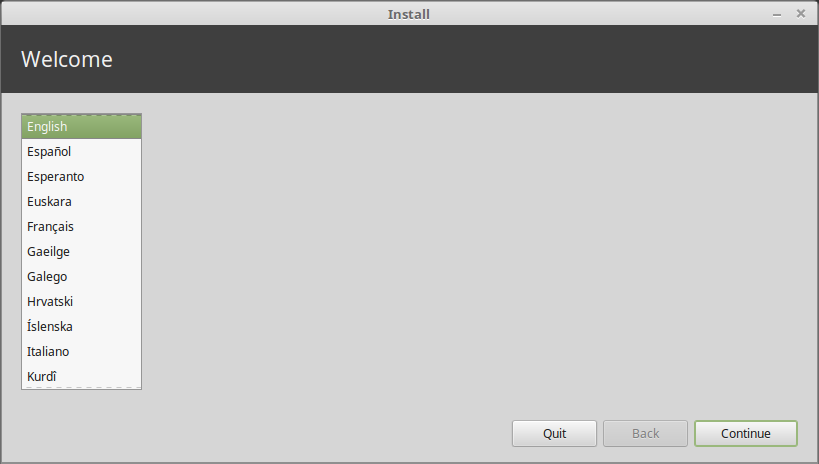
  4. Select the desired language and click on Continue.
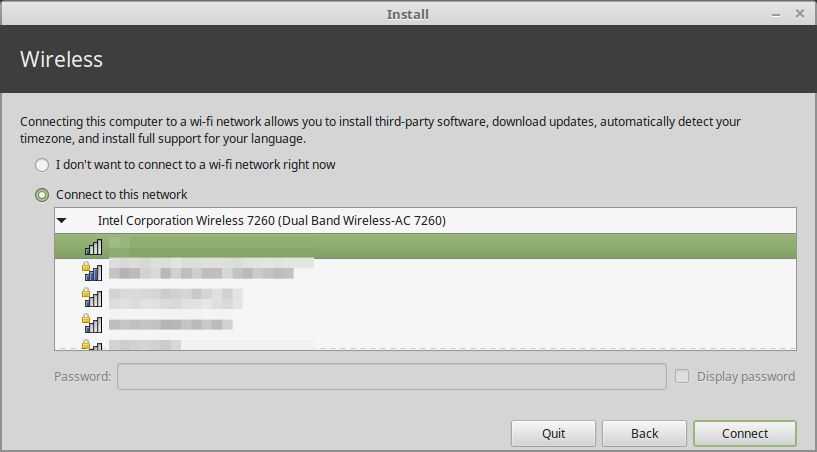
  5. Up next, select your network if you want to download the third-party software for your graphics card, Wi-Fi, and media devices.
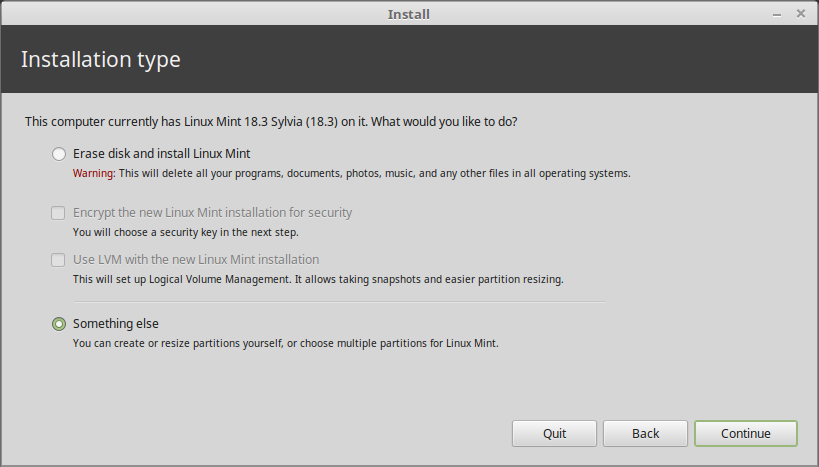
  6. Select Something else and choose Continue.
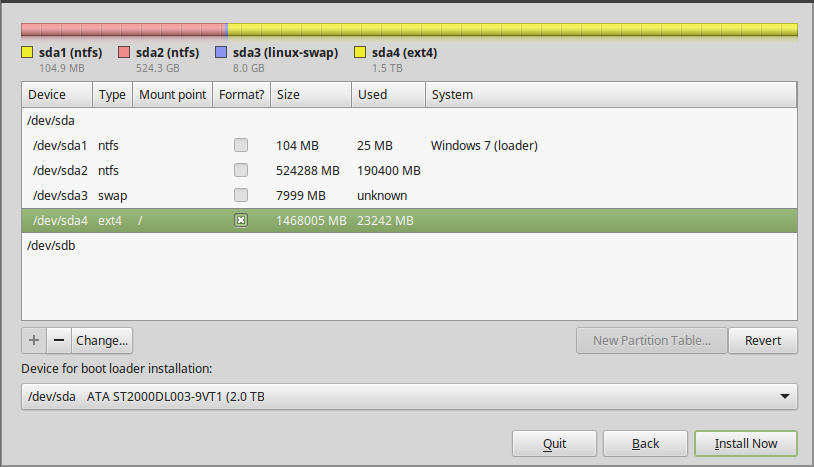
  7. You can now select the partition created at the beginning of this section. It’s crucial that you select the correct partition or else you might format the wrong drive and lose your data.
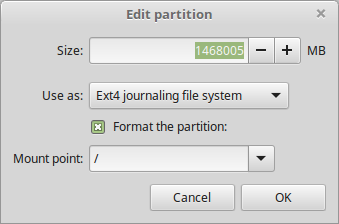
  8. Since Linux doesn’t work with Windows filetypes, you’ll need to edit the partition and set its file type to Ext4. Keep in mind that this process will format the partition and remove all files from it.
  9. Once the drive is converted to the Ext4, you can proceed and install Linux on it.
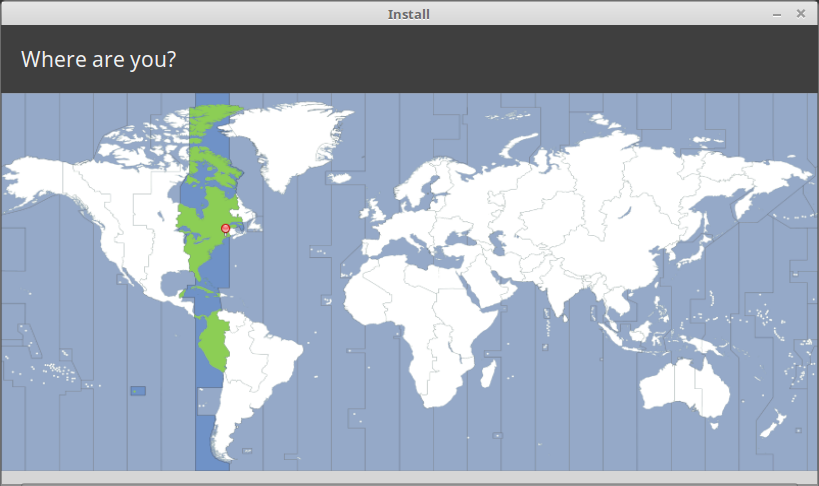
  10. Select your time zone.
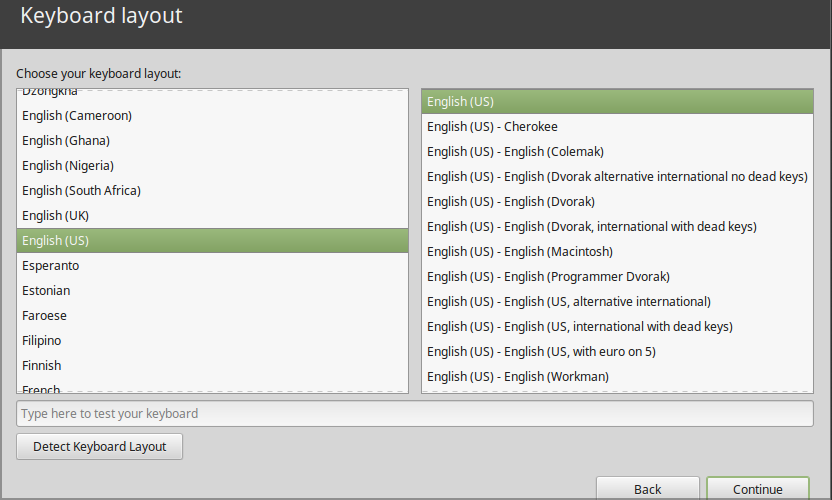
  11. Select the desired keyboard layout.
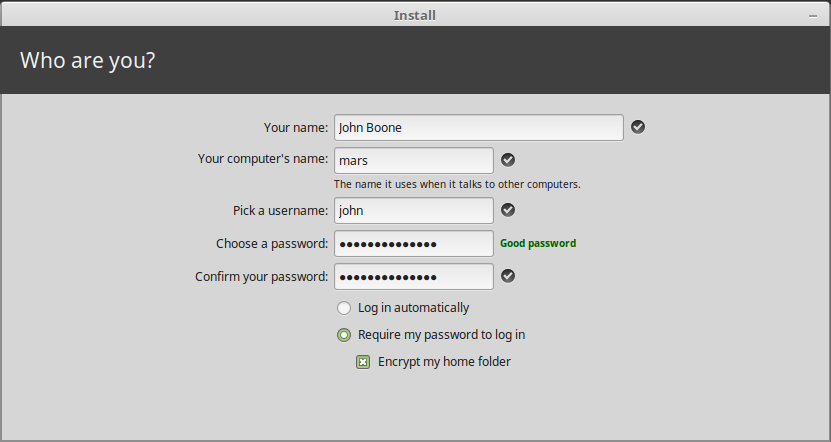
  12. Now enter your user information. You can uncheck Encrypt my home folder option.
  13. Wait for the installation to finish.
  14. Once the installation is finished, click on Restart now button.
  15. Optional: Enter BIOS once again, and set your hard drive as the primary boot device.
  16. Once your PC boots, you’ll be asked to choose between Windows 11 and Linux, so pick the desired operating system and that’s it.

After completing all these steps, dual booting Windows 11 and Linux should be working properly. Of course, you’ll have to select the desired operating system every time you boot your PC.

We used Linux Mint in our example, but the steps are more or less the same for every Linux distribution.

2. Install Windows 11 from Linux

1. Create a new partition for Windows

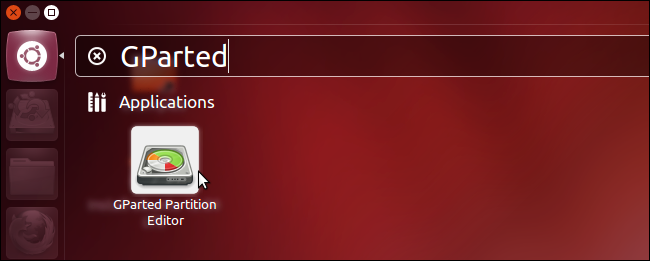
  1. On your Linux PC, open GParted or any other disk management software that you’re using.
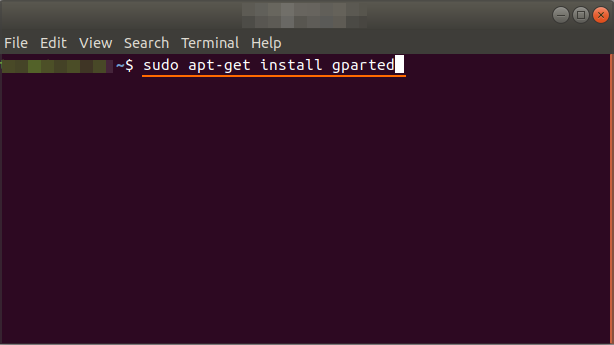
  2. Optional: You can install GParted by running the following command in the Terminal: sudo apt install gparted
  3. Locate the partition that you need to shrink. Keep in mind that you can’t shrink the partition that has Linux installed on it while running Linux. If you want to do that, you need to boot from Linux Live USB and perform these steps from there.
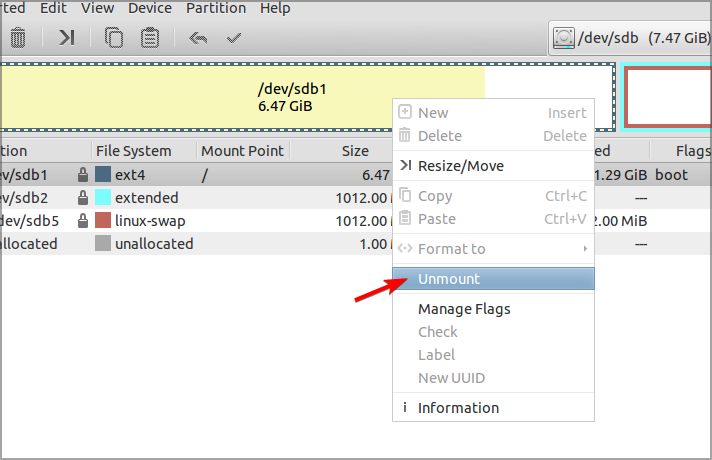
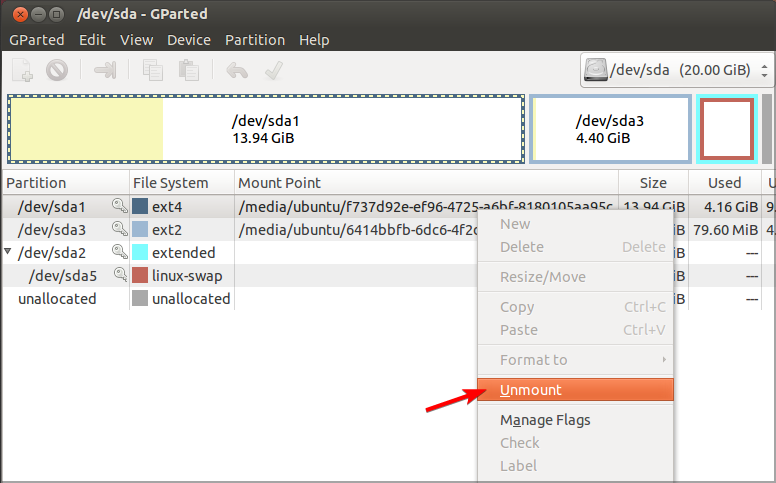
  4. Right-click the partition that you want to shrink and select Unmount.
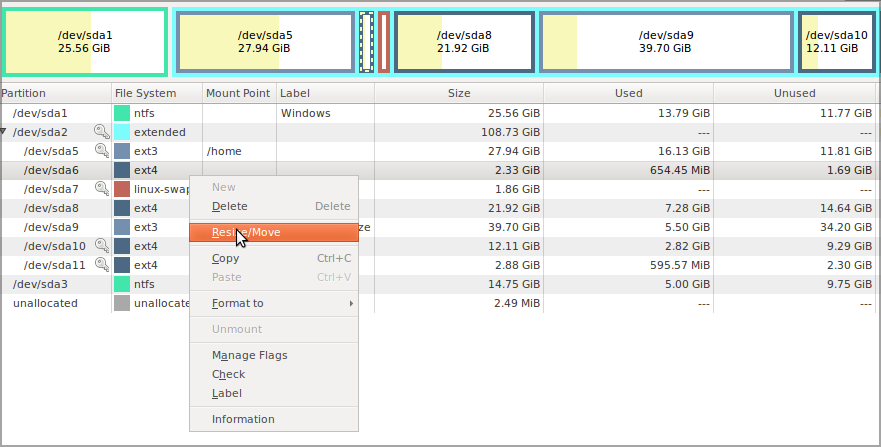
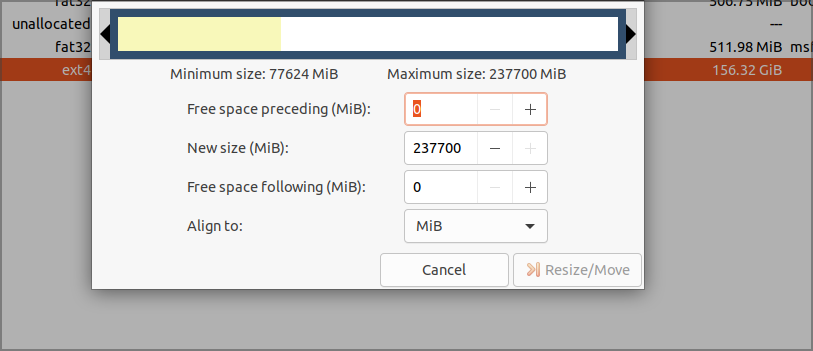
  5. Just right-click the partition again and choose Resize/Move from the menu.
  6. Set the New size to at least 50000, but if you want to install additional apps, we suggest making it larger. Click on Resize/Move once you’re done.
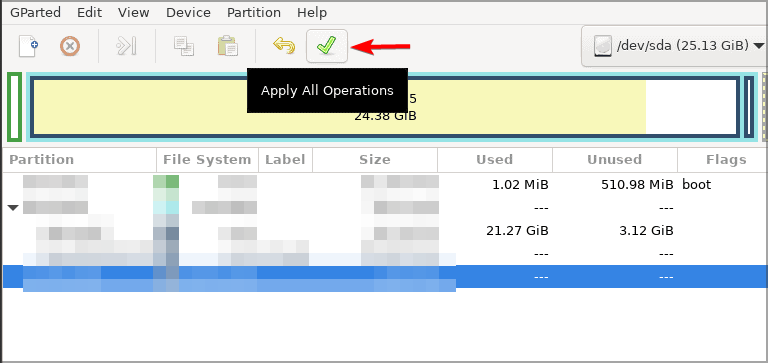
  7. Now click the Apply icon in the toolbar to make the changes.
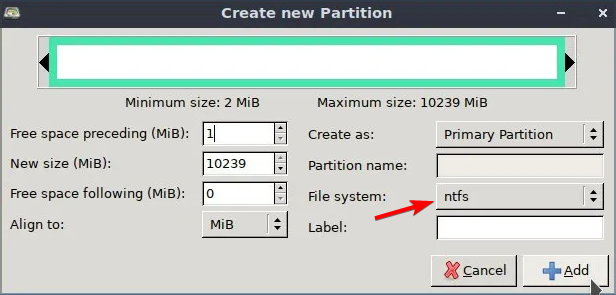
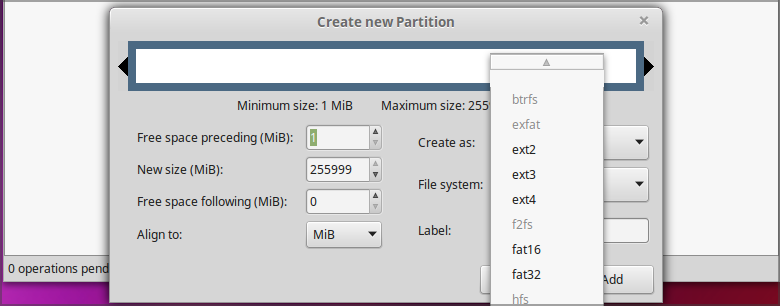
  8. Right-click the unallocated space that you just created and choose New.
  9. Set the File system to NTFS and click on Add.
  10. Click the Apply button to now save changes.
  11. Locate the partition that you unmounted in Step 4, right-click it and choose Mount.

Now that we have our Windows partition ready, we need to download Windows and create a bootable USB flash drive.

2. Download Windows and create a bootable flash drive

  1. Go to the Microsoft download page on your Linux PC.
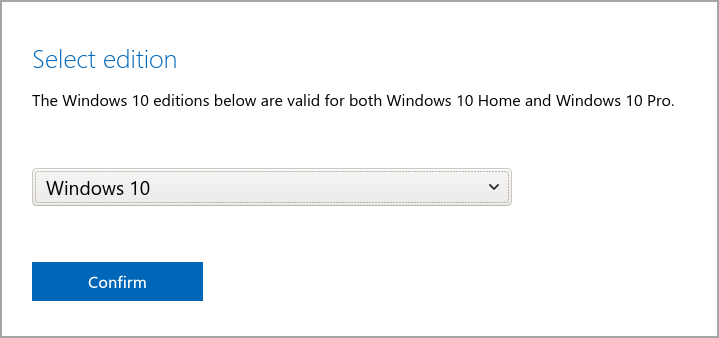
  2. Select the version of Windows that you want to download and click on Confirm.
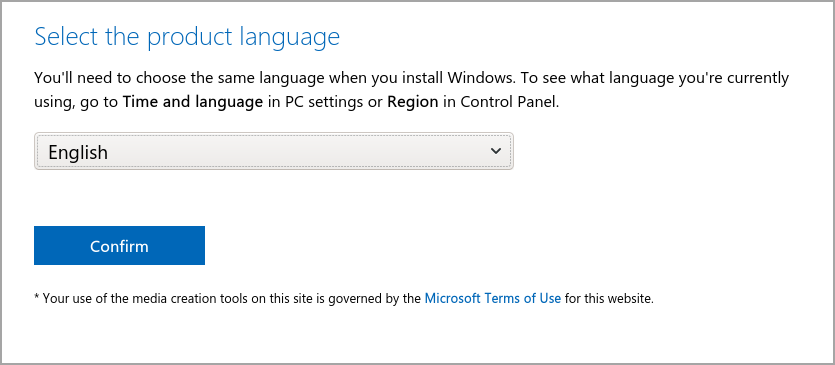
  3. Choose the desired language and click the Confirm button.
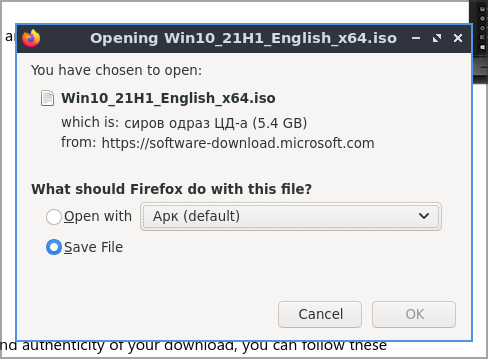
  4. Select the version that you want, but we recommend using the 64-bit version to avoid compatibility issues.
  5. Choose the save location and start the download.
  6. Wait for the process to finish.
Note icon NOTE
We’re using Windows 10 ISO since Windows 11 ISO isn’t officially available, so the only way to get Windows 11 is to Install Windows 10 and then upgrade to Windows 11 Technical Preview.

3. Create a bootable USB flash drive

  1. Connect the USB flash drive to your PC. Make sure that the drive is at least 8GB in size, but 16GB is recommended.
  2. Start GParted or any other disk management software that you have.
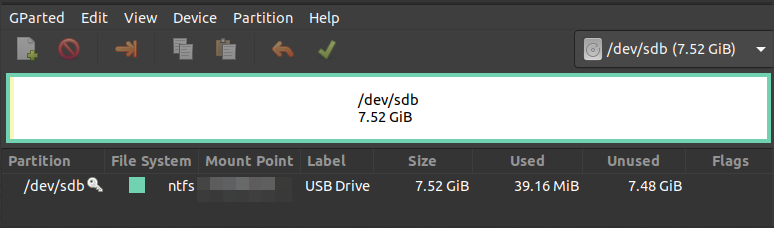
  3. Select your USB flash drive from the menu in the top right corner. Your drive should be labeled /dev/sdb or something similar. Make sure that you select the correct drive.
  4. Check if partitions have a key icon next to them. If so, right-click those partitions and choose Unmount.
  5. Now right-click the partition on your flash drive and choose Format from the menu.
  6. Make sure that the new partition will use the maximum space of your flash drive.
  7. Set the file system to ntfs or exfat and click Apply.
  8. Now click the Apply button in the toolbar to save the changes.

Learn how to use Win32 Disk Imager to create bootable USB drives from ISO files: How to Use Win32 Disk Imager.

4. Mount Windows 10 ISO and create installation media

  1. Make sure that your USB flash drive is connected.
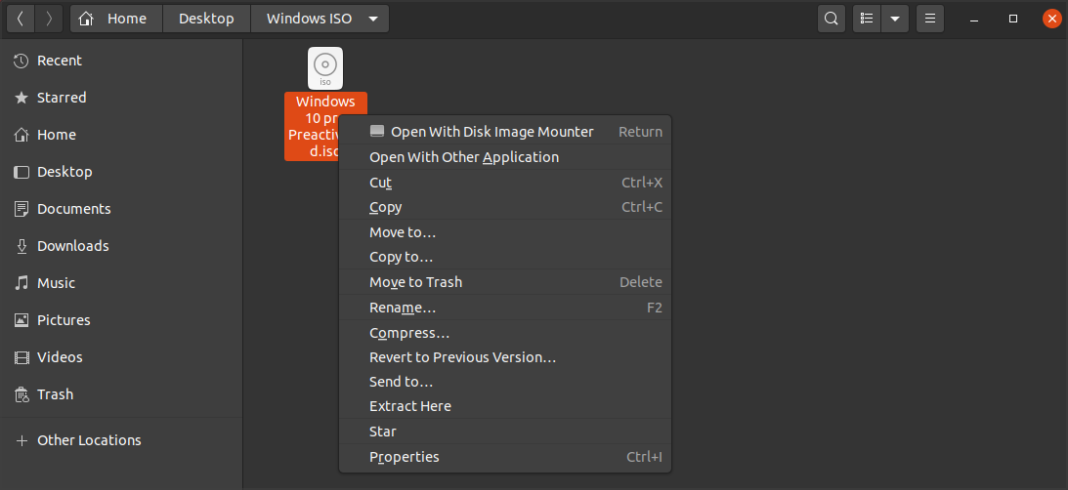
  2. Locate the Windows 10 ISO file that you downloaded.
  3. Right-click it, and choose Open With and select Disk Image Mounter.
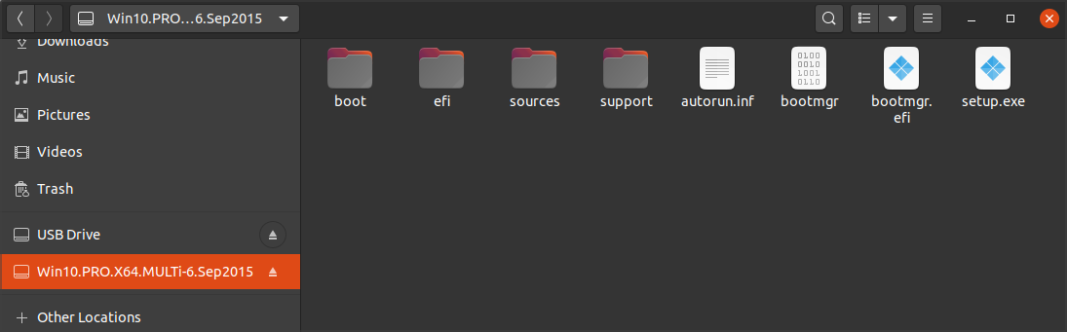
  4. Locate the mounted ISO file and select all files. Now select Copy.
  5. Navigate to your USB flash drive and paste the files there.

If you don’t have the option to mount the drive from the context menu, you can do that with these commands in the Terminal:

sudo mkdir /mnt/windows10/

sudo mount -t auto -o loop /path/to/window-10-iso /mnt/windows10/

Once the files have been copied, your bootable flash drive is ready to use, so let’s go on and install Windows 10.

5. Install Windows 10

  1. Access BIOS on your PC. You can usually do this by pressing a dedicated key while the system boots. Usually, that’s Del but it can vary depending on your motherboard.
  2. Go to the Boot section and set your USB flash drive as the first boot device.
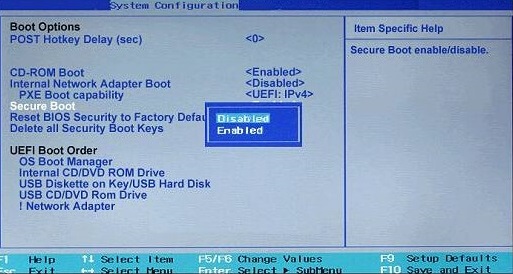
  3. Navigate to the Security section and disable Secure Boot. Some users are also recommending disabling the Compatibility Support Module so you can do that as well.
  4. Save changes and restart your PC.
  5. When your PC restarts, press any key to boot from your flash drive.
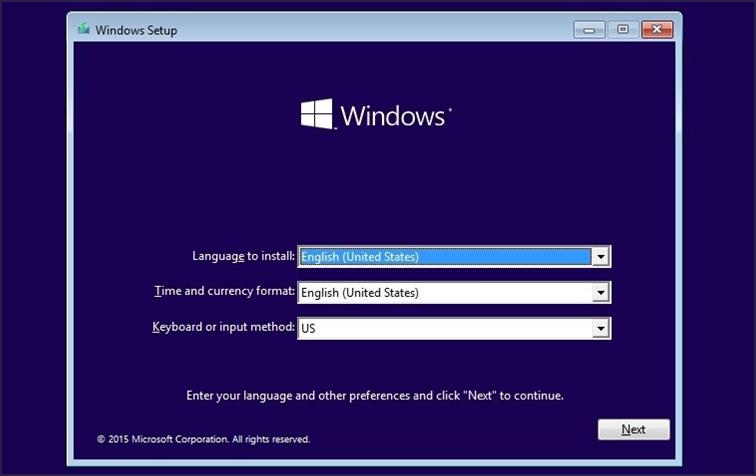
  6. Choose the language that you want to use and click on Next.
  7. Select the version of Windows 10 that you want to install.
  8. Be sure to accept the terms of service.
  9. Choose Custom: Install Windows only (advanced).
  10. Select the partition on which you want to install Windows 10. It’s essential to select the partition that you made for Windows 10. Click Next.
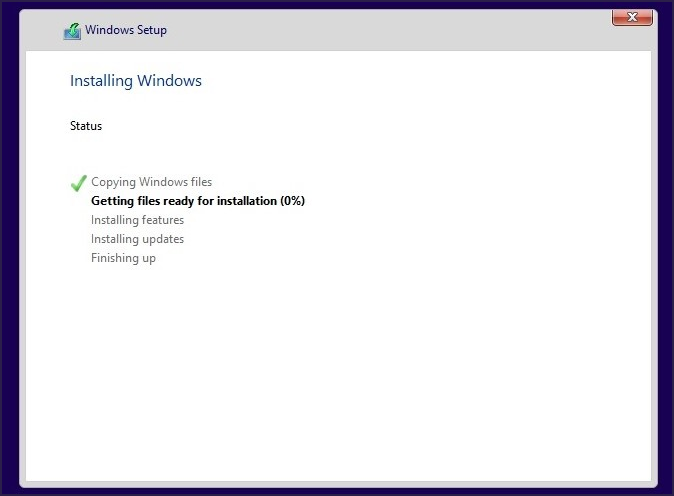
  11. Wait for the installation to finish.

6. Join the Windows Insiders Program and download Windows 11

  1. Boot to Windows 10.
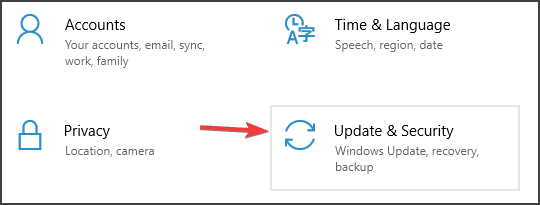
  2. Open the Settings app and select Update & Security.
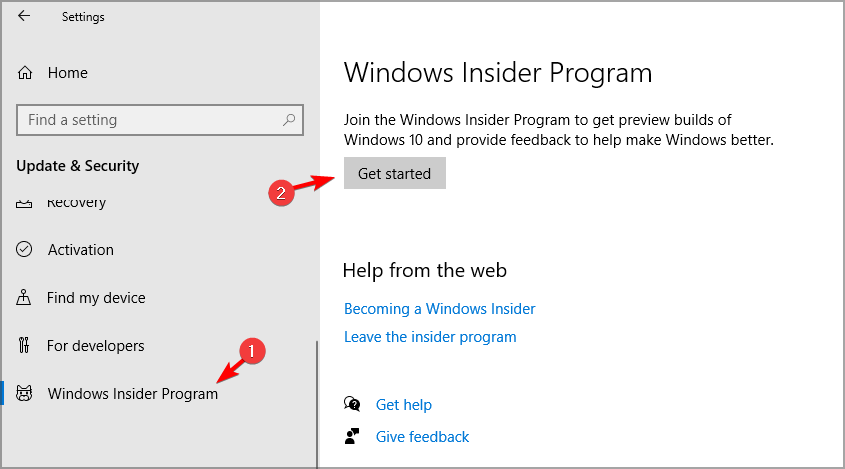
  3. Select Windows Insider Program and click the Get Started button.
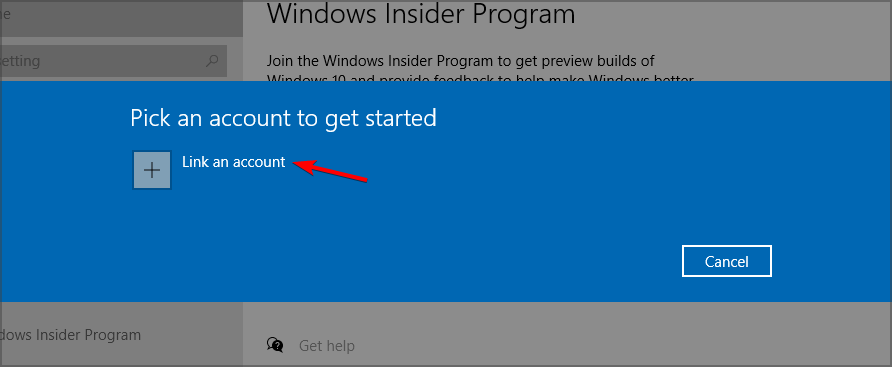
  4. Click on Link an account and select your Microsoft account.
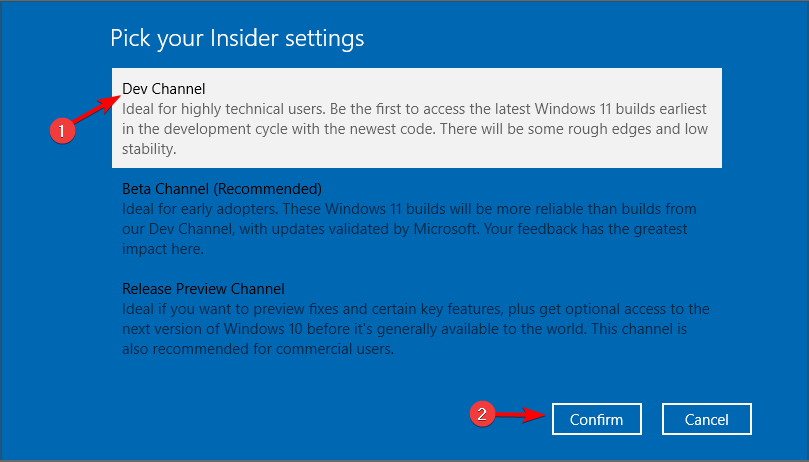
  5. Make sure to select Dev Channel or Beta Channel. Dev Channel gets more frequent updates, but the Beta Channel is more stable. After that, click on Confirm.
  6. On the privacy statement window, click Confirm.
  7. Click on Restart Now.
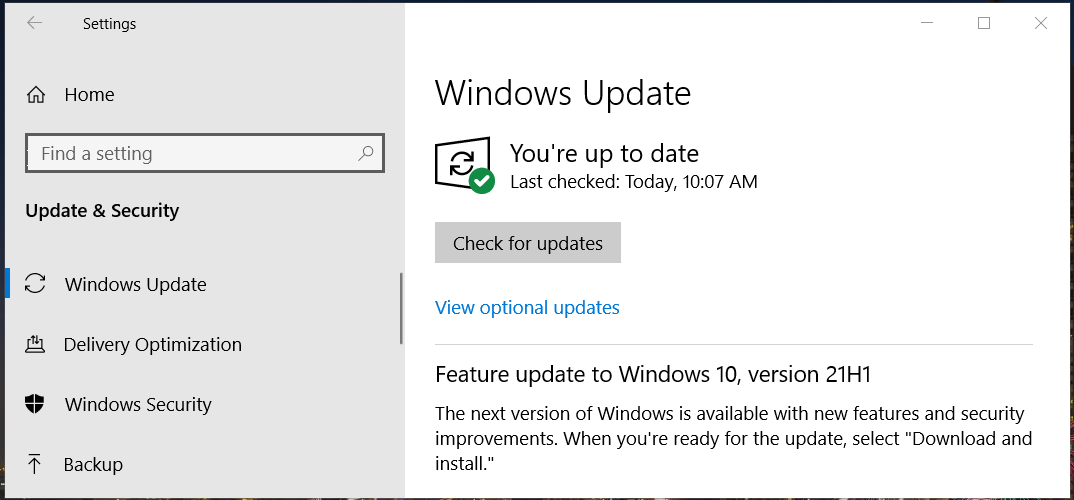
  8. Once your PC restarts, go to the Settings app. Head to the Update & Security section and click the Check for updates button.
  9. Windows 11 update will download.
  10. After the download is finished, restart your PC to install it.

After completing these steps, you should have Windows 11 running on your PC, alongside Linux.

Why is Linux missing after installing Windows in dual boot mode?

We’ve observed that Linux might be missing after installing Windows in dual boot mode. Although this can be extremely alarming, it’s expected because Windows will overwrite the Linux bootloader.

However, there’s a way to repair this:

  1. Press the boot menu key while your system boots. Usually, it’s F12, but it can change depending on your motherboard. Now select Ubuntu to boot to it. If this method doesn’t work, use Linux Live USB.
  2. Create a Linux Live USB.
  3. Boot from the Linux Live USB.
  4. Make sure that you’re connected to the Internet.
  5. Open the Terminal and run the following commands:
    sudo add-apt-repository ppa:yannubuntu/boot-repair
    sudo apt-get update
    sudo apt-get install -y boot-repair && boot-repair
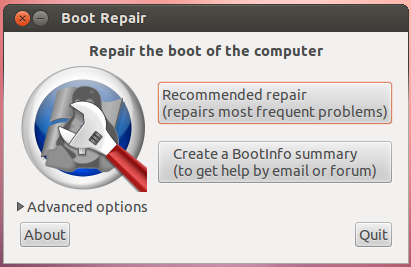
  6. Now open Boot-Repair, you should find it in the list of installed applications, or type boot-repair in the Terminal.
  7. Select Recommended repair and that should hopefully fix the problem.

Some users claim that you can fix this issue by this method as well:

  1. Boot to Linux or start Linux from Live USB.
  2. Open Terminal and run the following command:
    sudo update-grub2
  3. Wait for the command to finish.
  4. After doing that, access BIOS and set Linux as the first boot disk.
  5. Save changes.

These instructions are intended for Ubuntu distributions, and other versions of Linux might require you to use different methods to repair the bootloader.

We have a dedicated guide on how to repair Windows 10 bootloader from Linux, so be sure to check it for more information.

Does Secure Boot interfere with Linux dual boot?

The Secure Boot capability is one of Windows 11’s requirements along with the TPM, so let us tell you how this could affect Linux computers and dual booting.

Secure Boot technology allows only the approved boot loaders to boot your PC in order to protect it from malware.

The issue arises because many versions of Linux aren’t compatible with Secure Boot, and since Secure Boot is a requirement for Windows 11, many were worried that Linux might not run in dual boot mode with Windows 11.

The answer is yes, Linux will be able to run long Windows 11, but you’ll have to use Linux that is compatible with Secure Boot, such as Ubuntu or Fedora, or disable the Secure Boot from the BIOS.

As you can see, to use Windows 11, you need to have Secure Boot capability, but you don’t have to keep this option enabled at all, which means that you can dual boot Linux without any issues.

Should I install Linux or Windows 11 first when dual booting?

If you want to dual boot Linux and Windows, it is usually a better option to install Windows first, and then create a new partition for Linux.

For starters, it’s a lot easier to create a Linux bootable drive and the necessary partitions from Windows, however, the biggest issue is the bootloader.

If you install Windows after Linux, you’re going to overwrite your bootloader and you won’t be able to boot to Linux until you repair the bootloader.

Therefore, we suggest installing Linux after your install Windows to avoid these types of problems. Are you using dual boot on your system? Let us know in the comments below.

How to Connect to Exchange Online in PowerShell

To perform PowerShell cmdlets to execute some operations in the Exchange Online environment, it is essential to connect Exchange Online in PowerShell.

Here in this blog, we have mentioned two different methods with step-by-step instructions to get it done. Let’s get started! 

How do I connect to Exchange Online in PowerShell?

Before moving to the detailed steps, make sure you perform these preparatory checks: 

  • You must have PowerShell on Windows 7 SP1 or more recent desktop Windows versions and Windows Server 2008 R2 SP1 or newer server Windows versions.
  • The latest version of Windows Management Framework 3.0, 4.0, or 5.1.
  • .NET Framework 4.5 or above Installed.
  • Stable internet connection with TCP port 80 opened to connect from local machine to host.
  • You must have access to Exchange Online PowerShell enabled for the existing user. 

1. Connect to Exchange Online in PowerShell – Classic way

  1. Press the Windows key, type PowerShell, and click Run as administrator.Powershell -connect to exchange online powershell
  2. Copy and paste the following command and press Enter: Set-ExecutionPolicy RemoteSignedAdmin Powershell - Set-ExecutionPolicy RemoteSigned
  3. Type Y when prompted.
  4. Type the following command and press Enter: $UserCredential = Get-Credential
  5. You will get a pop-up to enter your username and password. Input the credentials and press OK.
  6. Input the following commands one by one and press Enter after every command: $Session = New-PSSession -ConfigurationName Microsoft.Exchange -ConnectionUri https://outlook.office365.com/powershell-liveid/ -Credential $UserCredential -Authentication Basic -AllowRedirection Import-PSSession $Session Get-Mailbox -Filter '(RecipientTypeDetails -eq "RoomMailBox")'

2. Connect to Exchange Online in PowerShell – Alternative method

2.1 Install Exchange Online PowerShell module

  1. Press the Windows key, type PowerShell, and click Run as administrator.
  2. To check if the Exchange Online PowerShell module is already installed, type the below-mentioned cmdlet and press Enter: Get-Module -ListAvailable -Name ExchangeOnlineManagementWindowsTerminal - Get-Module -ListAvailable -Name ExchangeOnlineManagement
  3. If it is not installed, copy and paste the following command and press Enter: Install-Module -Name ExchangeOnlineManagement -ForceWindowsTerminal - Install-Module -Name ExchangeOnlineManagement -Forceconnect to exchange online powershell
  4. Input the following command and press Enter if you have an outdated version installed: Update-Module ExchangeOnlineManagement

2.2 Connect to Exchange Online PowerShell

  1. Now, to connect your Microsoft 365 Exchange Online with the Connect-ExchangeOnline cmdlet, type the following commands and press Enter after every command: #Connect to Exchange Online Connect-ExchangeOnlineExchange Online - connect to exchange online powershell
  2. Enter the credentials on the authentication pop-up window and establish the connectivity.

2.3 Disconnect the Exchange Online PowerShell session

  1. Press the Windows key, type PowerShell, and click Run as administrator.Powershell -connect to exchange online powershell
  2. Copy and paste the following commands and press Enter after every command: #Disconnect Exchange Online Disconnect-ExchangeOnline -Confirm:$FalseDisconnect Exchange -connect to exchange online powershell

So, these are the simplest ways to connect to Exchange Online in Powershell. Try any of them, create a remote session, provide a connection setting, or import PowerShell cmdlets smoothly. 

Connect to Exchange Online can also help you set up DKIM for Microsoft 365 for your domain; read this guide to learn more.

Please let us know in the comments section below if you have any questions or concerns.

Can Windows 11 Brick My PC? Here’s What You Should Know

This is recent information, and although not confirmed by a major news outlet or company, social media has been absolutely buzzing.

Many users that tried upgrading to Windows 11 on Hp and Dell devices ended up having to buy new hardware after the transition went horribly wrong.

I had to basically get my BIOS chip replaced on my Dell Inspiron 7569. Initially thought that the HDD got corrupted but nop, Windows 11 nuked the BIOS.

Costed me 2500, in case wondering.

Be careful as this is not a joke, and all the excitement of moving on to a new OS can turn into an absolute nightmare.

Windows 11 upgrade can break your PC

Various users are reporting serious problems with the upgrade to the new operating system, so be aware of this before you try to do it yourself.

We are not sure if devices from other manufacturers are going through the same ordeal, but Dell and HP gadgets have broken after Windows 10 transitioned to 11.

So, long story short, some users that bought new Windows 11 compatible devices were among the first to receive the free OS update.

Upon trying to get the operating system on their laptops, they were in for a big surprise – they have to buy another laptop.

Pretty expensive for a free upgrade, don’t you agree?

Apparently, a few people managed to move past this nuisance, after about 15-20 minutes of panic. The main idea here is that this update seriously messes up your BIOS.

The only advice here would be to postpone the transition for a bit until Microsoft acknowledges this issue and actually does something about it.

People trying to upgrade on older PCs also experienced problems, even if their devices were technically compatible with the new OS.

So, the problem might be a lot ampler than we initially thought but some more research is needed.

Is my PC bricked, or it’s just a software problem?

We have to get into some details to understand the difference between a bricked PC and some software issues.

So, a bricked PC is one that you can only use as a paperweight or, in other words, has become completely unusable.

Therefore, we also encountered cases with people that are using the word to describe some other problems that can be fixed with some tweaking.

For instance, in a Reddit post above, a user is complaining about having his Zephyrus G14 laptop bricked after the Windows 11 upgrade.

Fortunately for him, it’s just a case of the blank Taskbar problem that we have dealt with and found some useful solutions.

Although it’s a very annoying issue that shouldn’t happen to a brand new OS and you can’t click on any app or the Start button, the situation is not desperate.

If you experience the same symptoms on your PC, check our guide on how to fix the Windows 11 empty Taskbar problem.

We will keep you posted as soon as we receive information about this sensitive topic. Until then, try to be careful with this major step and take all the necessary precautions.

We know it’s just software, not a time bomb, but this can apparently cost you a lot of money. Don’t do that especially if your hardware doesn’t meet the requirements.

Not long ago, Microsoft issued a waiver that you need to sign before upgrading your PC to Windows 11 if you don’t have the proper configuration together with a warning that this might be dangerous for your computer.

Have you managed to upgrade to Windows 11? Tell us all about your experience in the comments section below.

6 Best Tools to Create Custom YouTube Thumbnails

YouTube is the ultimate platform where you can upload your own clips. Every YouTube video includes a thumbnail image that is either a snapshot from the video or an original picture that isn’t captured from the clip.

YouTube restricts users from selecting a thumbnail from three automatically generated video images.

However, users with verified accounts can add their own custom thumbnails to videos with JPG, GIF, PNG, and BMP images that match the required 1,280 x 720 resolution.

There are numerous web apps that provide image thumbnails specifically tailored for YouTube videos that you can edit as required.

Alternatively, you can utilize thumbnail maker software for PC to capture images from within videos to include as YouTube thumbnails.

These are a few handy web apps and thumbnail creators for PC tools that you can use to set up a YouTube video with thumbnail images.

What is the best thumbnail maker for PC?

Adobe Creative Cloud Express – Wide variety of fonts

Adobe Creative Cloud Express is a graphics design web tool with which you can design menus, presentations, flyers, newsletters, brochures, cards, posters, invitations, and, of course, YouTube thumbnails.

There are no additional fees for any of the app’s pre-made template images, but the thumbnails do include a Creative Cloud Express logo. You can remove the logo by upgrading to a premium account.

Adobe Creative Cloud Express provides some great typography options for Youtube thumbnail images as users can select a wide variety of fonts (and upload them), add shapes to text, add text effects, select alternative color schemes and customize the text styles.

You can therefore create customized thumbnails for your YouTube qualitative videos and use different icons or other design assets included in the editor.

The users can also add their own photos, logos, and a multitude of icons (otherwise stickers) to the thumbnails.

This being said, you should employ this Adobe solution to create suggestive thumbnail images for your YouTube videos in just a few simple steps.

Adobe Creative Cloud Express

Looking for the best app to set up stunning YouTube thumbnails? There is no match for this mighty, yet lightweight tool.
Check price Visit Website

Canva – Background remover

Canva is among the best web apps to set up a custom YouTube video thumbnail image.

There isn’t a subscription fee for the web tool, but there are charges for its optional stock photos and clip art.

Canva’s stock library includes more than one million graphics, illustrations, and photos for Youtube thumbnails.

Plus, the users can choose from more than 130 fonts and customize the images’ text boxes and text colors.

Another great thing about Canva is that you can upload your own images with which to set up Youtube thumbnails.

In addition, this free designing tool is meant for every single person that needs creative tools for personalized video thumbnails or presentation banners.

You also have premium features that can be of much help, such as brand kits, magic resize options, or background remover.

Canva

Try this easy-to-use tool to get a vast library of illustrations and unique designs.
Free trial Visit Website

Fotor – Pre-made layouts

Fotor collage

Fotor is a web app and Windows desktop software that includes a variety of YouTube thumbnail templates with various themes, such as cooking, games, travel, sports, music, Christmas, seasons, etc.

Fotor users can edit the background color and text of all the themes and add a plethora of stickers to them. Or you can set up your own thumbnail image from scratch.

This page includes the Fotor templates, which you can open and edit without an account. You can edit anything on the official website directly.

More so, using the Fotor platform is entirely suited to creating expressive thumbnails with practical tools like text combinations, lots of photos, diverse backgrounds, and more.

It is possible as well to customize your project using multiple elements. You have illustrations, shapes, or icons to add to your video thumbnails.

In this way, you ensure the quality of your YouTube videos due to eye-catching thumbnails meant to convince even the most selective viewers.

It’s also possible to create custom thumbnails designed for your YouTube videos in a very short time. You can browse many templates based on categories to get more inspiration.

Otherwise, just select the thumbnail format and start it from scratch with various graphic tools or visual elements.

Fotor

With this clever tool, you may access millions of pre-made layouts for eye-catching YouTube thumbnails.

Thumbnail me – Simple interface

If you need to capture a snapshot from a video for its YouTube thumbnail, Thumbnail me is worth noting. Thumbnail me is freeware software that you can run on Windows platforms from XP to 10.

The software enables users to capture one thumbnail image or a group of images from a video for a grid of pictures.

When you’ve opened a video to capture images from in Thumbnail me, you can configure the number of rows and columns for the thumbnail to include.

To include just one video image in the thumbnail, adjust the row and column values to 1.

You can select an exact time to capture an image from the video with the software’s timeline.

Thumbnail me users can select alternative output formats and background colors for the video. You can also add additional title text to images.

In addition, this open-source thumbnail creator is highly capable to transform your favorite media into thumbnails, ready to be used.

The tool is continuously developed by contributors and it was tested on different Windows platforms like Windows 7 and later versions.

⇒ Get Thumbnail me

Video Thumbnail Maker – Two functionalities

Video Thumbnail Maker is similar to Thumbnail me. The software enables you to capture a single image thumbnail or a whole grid of images from a selected video.

VTM has silver, gold, and platinum versions available on the publisher’s website. However, the unregistered version adds watermarks to the thumbnail images.

Video Thumbnail Maker includes more extensive options for setting up video thumbnails than Thumbnail me.

Users can select to set up a Simple Matrix or Special Matrix, with one expanded image set alongside smaller ones, and customize the technical details, tile effects, and backgrounds of the thumbnails.

Alternatively, you can configure a matrix to include just one image from a video. VTM supports most video formats, and you can also batch-process multiple video files.

This valuable thumbnail tool can help you create the most impressive thumbnails for YouTube videos.

It offers you the chance to create various thumbnails that can be used for home-video catalogs or for network video sharing.

This software contains two main functionalities that will surely help you. You have the thumbnail maker and thumbnail viewer with the ability to start video files right from the thumbnail sheet.

⇒ Get Video Thumbnail Maker

AMT – Auto-Movie-Thumbnailer – Multiple formats supporter

AMT – Auto-Movie-Thumbnail is another software that you can use to extract image thumbnails from videos.

The AMT software can also come in handy for grabbing snapshots from videos for YouTube thumbnails.

It is freeware software that you can utilize to extract multiple or single images from a selected video.

The software’s Layout tab provides numerous settings with which to customize the thumbnail’s color and design, the number of images included within the thumbnail, and its timestamp.

The tool can do much more, and help you create convincing thumbnails for your YouTube channel. Plus, it’s multifunctional and can support you with different movie formats and customized screen captures.

The known fault of this software is that short movies might not contain enough keyframes, thus you can’t create more thumbnails than the keyframes of the specific movie.

Users can also add custom text, info headers, and logos to the thumbnails with the software.

Plus, this automated GUI can help you batch screencaps or index thumbnail pictures. It supports many different input formats, basically any format supported by Media Player.

Using this tool offers you to chance to customize the design or layout of your screen captures in order to create eye-catching thumbnails.

⇒ Get AMT

In conclusion, we created this guide on the best YouTube thumbnail tools for you in order to have valuable resources to create impressive video thumbnails.

Do not hesitate to share your experience with any of the software in the comments section below.

FIX: WhatsApp Chat History Sync Stuck On In Progress

One of the most common issues users face is WhatsApp Web not syncing messages. Many things, from internet connection issues, an outdated app or WhatsApp server problems can cause this.

The good news is that this is easy to fix, and we’ll explain everything you need to know below.

What can I do if WhatsApp Web is not syncing messages?

First, try restarting your PC, closing and reopening your browser, using incognito mode and switching from the Beta to the Stable version of WhatsApp. If you’re still having issues, follow the steps below:

If none of these worked for you, then move to the troubleshooting methods below: 

1.1 Android 

  1. Launch WhatsApp on your device and click on three dots. Select Linked devices.Linked Devices Android -whatsapp web not syncing messages
  2. Tap on the device that you want to unlink.Linked devices list Android
  3. Click Log out.logout Android

1.2 iPhone

  1. Launch WhatsApp. Go to Settings.Settings iPhone
  2. Tap Linked Devices.Linked Devices -whatsapp web not syncing messages
  3. Go to the list of devices, and tap on the device you want to unlink.Select Linked Device
  4. Tap Log Out.Logout
  5. You can now link your device again.

2. Clear WhatsApp Cache

Tip icon Tip
To clear the cache on your iPhone, you need to reinstall the WhatsApp app.
  1. Launch Settings on your Android. Settings app Android
  2. Tap on Apps.Apps Android
  3. Select App Management.App Management
  4. Navigate to the list of apps and tap on WhatsApp.Whatsapp Clear -whatsapp web not syncing messages
  5. Tap on Storage usage.Storage Usage
  6. Click Clear cache.Clear Cache

3. Remove cookies and cache on the browser on your PC

  1. Launch your preferred browser. (Here, we are mentioning the steps for Chrome)
  2. Go to three dots, and click Settings.Settings -whatsapp web not syncing messages
  3. Click Privacy & Security from the left pane and select Clear browsing data.Privacy Settings Chrome
  4. Place a checkmark beside the Cookies and other site data & Cached images and files options and click Clear data.Clear data

4. Reinstall the WhatsApp app and download the WhatsApp Desktop app

  1. Press and hold the WhatsApp app and select Uninstall icon on Android and the Remove app option on iPhone to delete the app.Uninstall Android -whatsapp web not syncing messages
  2. Confirm the action by clicking on Uninstall on Android or Delete app on iPhoneUninstall Confirm
  3. Now, go to your device’s Google Play Store or App Store to reinstall the app.
  4. You can also download the WhatsApp Desktop app for the official website or Microsoft Store for easier use on your computer.

So, these ways can help you fix the WhatsApp Web not syncing messages problem. Try them and let us know what worked for you in the comments below.

This isn’t the only issue, and many reported Can’t download. Please ask that it be resent to you in WhatsApp, but we have covered this issue in a separate guide.

And if you can’t access WhatsApp web because of the out of memory issue, check out our expert article on how to get it back.

Elsewhere, you may be interested in turning off the end-to-end encryption feature, especially if you want to decrypt your cloud chat backups.

Can You Play Valorant Without Secure Boot?

There’s still a lot of confusion about Windows 11, despite it already being released this month, and one of the biggest issues is with the new OS’s TPM 2.0 requirement to protect against firmware attacks.

While this security feature can be bypassed to run Windows 11, Riot Games and Valorant have already begun to enforce the measure, thus PCs running Windows 11 without TPM 2.0 cannot run Valorant.

No Secure Boot, no TPM, no Valorant

Some users have begun to report that trying to play Valorant results in them getting error messages that state the current build of Riot’s anti-cheat service Vanguard requires both TPM 2.0 and Secure Boot enabled.

And, after being warned, players are quickly kicked out of the game.

The main reason Riot enforced this is that the Trusted Platform Module firmware system makes it far harder for players to cheat, as cheaters who get banned will not be able to immediately spoof a new hardware ID. 

Given how useful it is for developers, it’s also entirely possible that the TPM 2.0 requirement won’t stay isolated to Windows 11 for Valorant, since Riot is quite able to enforce it on Windows 10, too.

Will Valorant work after I activate Secure Boot?

The answer is yes, and you should consider doing this before even trying to run the game itself.

Just open your Command Prompt, run it as administrator, and type mbr2gpt, Press enter and your drive should be converted to gpt without data loss.

Experts actually expect more and more titles to be playable only if such security features are enabled on the machine in question.

Judging by the way things are shaping, we are definitely moving towards a more secure online era, and we surely won’t be able to avoid these security measures forever.

Have you managed to successfully install and play Valorant on your Windows 11 powered device? Share your experience with us in the comments section below.

Minecraft Not Working On Windows 11: How to Fix it

Many players have been enjoying Minecraft on Windows 11 since upgrading to the new desktop platform. However, some users have encountered a few issues when they try to play Minecraft.

Therefore, they can’t play the game because Minecraft keeps crashing in Windows 11. For others, that game might not start at all on the latest desktop platform.

Either way, players can’t enjoy Minecraft when it keeps crashing or doesn’t launch. This happened to Windows 10 users who said that Minecraft cannot open/launch and it seems to happen to users of the latest OS too.

Why won’t Minecraft work on my PC?

There are numerous potential reasons why Minecraft won’t work on your PC. Assuming the computer meets the game’s minimum system requirements, which aren’t particularly high, these are some of the more likely causes for the game not working:

  • Conflicting programs: Various third-party antivirus utilities and other software are known to conflict with Minecraft
  • Outdated or faulty graphics card driver: Your PC’s graphics card driver could be corrupted or outmoded, which is a fairly common cause of gaming issues
  • Restricted access permissions: The game might not work within non-admin accounts because of restricted resource access permissions
  • Outdated Java: Minecraft: Java Edition might not work if you need to update Java on your PC; it certainly won’t work if Java isn’t installed
  • Outdated Minecraft game version: Your Minecraft game version might be somewhat outdated

Are you among those players who need to fix Minecraft not working in Windows 11? If you are, try fixing that game with these potential resolutions.

What can I do if Minecraft is not working in Windows 11?

1. Run Minecraft as an administrator

  1. First, right-click the desktop shortcut for Minecraft and select the Properties option. If you don’t have a shortcut there for the game, left-click and drag the Minecraft app from the Start menu onto the desktop.
    Properties option minecraft not working windows 11
  2. Click Compatibility to open that tab’s options.
  3. Next, select the Run this program as administrator option.
    Run this program as an administrator option minecraft not working windows 11
  4. Make sure you click Apply.
  5. Press the OK button to exit the properties window.
Note icon NOTE
You can also run Minecraft as an administrator by right-clicking its shortcut and selecting Run as administrator. However, selecting that setting as outlined above configures the game to always run with elevated rights.

2. Update Minecraft

You can update Minecraft with its game launcher, the MS Store app, or by reinstalling it. Our how to update Minecraft Windows 10 Edition guide provides full instructions for those alternative methods that may be applied by Windows 11 users too.

Library tab minecraft not working windows 11

3. Reset the Minecraft game app

Note icon NOTE
This fix is for the Minecraft Windows 10 Edition Microsoft Store app.
  1. Click the magnifying glass taskbar icon for opening Windows 11’s search utility.
    magnifying glass button minecraft not working windows 11
  2. Enter the keyword apps & features within the search text box.
  3. Select the Apps & features search result.
  4. Click the three dots button for the listed Minecraft game.
  5. Choose Advanced options on the menu.
    Advanced options minecraft not working windows 11
  6. Click the Reset option.
    Reset button minecraft not working windows 11
  7. Then, select Reset again to further confirm.

4. Update Java

Note icon NOTE
This resolution is applicable for Minecraft: Java Edition. If you play Minecraft Windows 10 Edition, however, you don’t need Java installed.
  1. Open the Java for Windows download page in your web browser.
  2. Press the Agree and Start Free Download button on that webpage.
    Agree and Start Free Download button minecraft not working windows 11
  3. When you’ve downloaded the Java installer, click the File Explorer taskbar button.
    File Explorer button minecraft not working windows 11
  4. Open the folder you saved the Java setup file in.
  5. Double-click jre-8u311-windows-x64.exe to open the Java Setup window.
  6. Click Install on that window.
  7. If an old Java version is already installed, the Java Setup window will prompt you to uninstall it. Click Uninstall to do so.

This also comes in handy when your purple heart cape is not showing up.

5. Update your graphics card’s driver

Note icon NOTE
You can find out what driver version your graphics card currently has by right-clicking Start and selecting Device Manager. Extend the Display adapters category, right-click your graphics adapter, and select Properties. Then select the Driver tab for further details.
  1. Open the driver download page on the NVIDIA, AMD, or Intel website depending on what GPU your PC has.
  2. Choose your graphics card model and Windows platform within the menu selection on the driver download page.
    The NVIDIA driver selection menus minecraft not working windows 11
  3. Click the Submit or Search buttons to find the selected graphics card model.
  4. Then select to download the latest driver for your graphics card that’s compatible with Windows 11.
  5. Thereafter, open the folder you downloaded the driver package to within File Explorer.
  6. Double-click the downloaded driver package to install it.

If you prefer, you can update graphics card drivers with a third-party driver updater utility such as Outbyte Driver Updater. Note that it scans devices on your PC and lists the ones with outdated drivers. You can select to download and automatically install drivers for listed devices with the updater tool.

6. Disable third-party antivirus software

Incompatible third-party antivirus software can stop Minecraft from working. A MinecraftHopper support page lists 14 third-party antivirus and firewall utilities known to conflict with that game. That webpage also includes numerous incompatible Minecraft programs that aren’t antivirus utilities.

If you’ve installed third-party antivirus software, it’s recommended that you at least disable its shield before playing Minecraft. To do so, right-click the antivirus utility’s system tray and select a disable or turn off context menu option. Choose to disable the shield for a few hours.

If your antivirus utility is among those known to conflict with Minecraft, consider completely uninstalling it. However, try disabling its shield first to see if that makes any difference. If it does, you can keep the software installed.

7. Clean-boot Windows 11

  1. First, press the Windows key + X hotkey to select the Run shortcut.
  2. Open MSConfig by entering this command in Run and clicking OK: msconfig
  3. Next, click Selective startup if that radio button isn’t selected.
  4. Deselect the checkbox for the Load startup items option.
    Selective startup radio button minecraft not working windows 11
  5. If not already checked (ticked), select the Load system services and Use original boot configuration checkboxes.
  6. Click Services to view that tab’s options.
  7. Select the Hide all Microsoft services setting that you can see below:
    Hide all Microsoft services checkbox minecraft not working windows 11
  8. Press Disable all button to uncheck the checkboxes for all remaining third-party services.
  9. Click Apply to save the new boot configuration.
  10. Next, select the OK option.
  11. Thereafter, click Restart on the dialog box prompt.
  12. Try playing Minecraft after you’ve clean-booted Windows 11.

If clean-booting Windows 11 does the trick, a third-party program or service was probably previously conflicting with Minecraft. You’ll need to identify what software that is when (or if) you restore the original boot configuration.

You can restore the default boot settings by selecting Load startup items on the System Configuration window’s General tab. To re-enable all disabled services, click Enable all on the Services tab.

8. Reinstall Minecraft

  1. Press the Windows and R keys simultaneously, which will open Run.
  2. To open Windows uninstall, input this command and click OK: appwiz.cpl
  3. Then select the Minecraft game listed within the Programs and Features window.
    Programs and Features window minecraft not working windows 11
  4. Click the Uninstall option for Minecraft. Thereafter, open the Run accessory again.
  5. Type this text in Run’s open box and press Enter: %appdata%
  6. Right-click the .minecraft subfolder within the Roaming folder and select Delete.
    The Delete button minecraft not working windows 11
  7. Open the Start menu, click Power, and select Restart.
  8. Bring up the Minecraft Launcher to log in.
  9. Then click Play within Update Notes to reinstall the game.
  10. Alternatively, click Download for Windows 10/11 on the Minecraft website to download the game’s installer. Then reinstall the game with the downloaded installer.

The above guidelines are for reinstalling Minecraft: Java Edition. You can remove the Minecraft UWP app by uninstalling it via Apps and features in Settings. Then download Minecraft from its MS Storage page to reinstall the game.

How can I fix Minecraft BSOD errors in Windows 11?

Some users have also needed to fix a BSOD error that occurs when they try to launch Minecraft: Java Edition in Windows 11. That’s a more unique error with a special resolution. This is how you can solve Minecraft’s BSOD error:

  1. Open the Java Downloads webpage within whatever browser you utilize.
  2. Click the download link for the x64 installer.
    The x64 Installer download link minecraft not working windows 11
  3. After downloading it, run the x64 installer. Click the Next buttons to install it at the default path.
  4. Next, open the Minecraft Launcher window.
  5. Select Minecraft: Java Edition on the left of the window.
  6. Click the Installations tab.
  7. Then click the three dots button for Latest release and select Edit.
    Installation tab minecraft not working windows 11
  8. Press the More options button.
  9. Click Browse for the Java Executable box.
    Edit installation options minecraft not working windows 11
  10. Navigate to this folder path within the Open file window: C:\Program Files\Java\jdk-17.0.1\bin\
  11. Select the javaw.exe file, and click the Open button.
  12. Press the Save button.
  13. Then try clicking Play to launch Minecraft.

Those potential resolutions are among the most widely confirmed fixes for Minecraft not working in Windows 11. They’re not guaranteed to fix Minecraft for all players, but there’s a pretty good chance they’ll get the game working.

You can get more troubleshooting guidance for Minecraft by sending a support ticket. To do so, open the Minecraft support ticket page. Then fill out the form there, and click the Submit button.

We hope this article helps you solve Minecraft’s issues. Even more, check out this guide on how to update Minecraft on Windows 11. We encourage you to do so since the updating process can be a little confusing as both versions require different methods.

Feel free to discuss fixing Minecraft in the comments section. Players who have discovered any alternative resolutions for fixing Minecraft not working in Windows 11 are most welcome to share them below.

Does Windows 11 Come With Office? Compatible Versions Guide

Microsoft Office is a great package that will simplify your day-to-day activity. Buying an available subscription is one of the best deals for creating and editing more complex files.

We did extensive forum research, and it seems like some users have a dilemma, so we’re here to clarify it.

They wonder if, after upgrading to Windows 11, they will be able to use the same Microsoft Office, which also came by default with the Windows 10 PC.

To find all the answers you can get regarding Windows 11 Microsoft Office compatibility, make sure you read this article thoroughly.

Does Windows 11 come with Office?

While the newest Microsoft OS is free to install on eligible computers (and we recommend checking Windows 11 specifications and requirements), you’ll need to buy a separate subscription for Microsoft Office.

You can choose from two main options:

  • Microsoft 365 Family – This one is a bit more expensive. However, remember that it serves 2 to 6 users, so you can take advantage of it for multiple reasons.
  • Microsoft 365 Personal – The second option is dedicated to one single user which is also cheaper.

If you are wondering whether or not the old Microsoft Office will run on Windows 11, the answer is a total yes! Your already purchased Office license is independent of the OS, so you can use it without any problem.

The new Office UI for Windows 11

Microsoft producers recently released the latest Office visual update. For the moment, the redesign is rolling out to testers in the Office Insider program. It is ready for Windows 11 but can also be used on Windows 10.

Its main purpose is to create a simple but also consistent experience through all your Windows apps. The Office visual refresh is built on customers’ feedback who needed a more natural and consistent experience.

With its new updates and Fluent Design principles, Microsoft delivers an intuitive, coherent, and familiar user interface. These are available across all Office apps: Word, Excel, PowerPoint, OneNote, Outlook, Access, etc.

Microsoft is updating all Office programs (Word, Excel, Outlook desktop, PowerPoint, etc.) with the same intuitive and easy-to-use interface for Windows 10 and Windows 11 operating systems.

If you’re excited about the biggest news and want to try the upgrade, you must join the Office Insider Program’s Beta Channel.

To register as an Office Insider, do not hesitate to access Microsoft’s dedicated page and follow the provided steps.

Windows 11 Microsoft Office compatibility – which versions will run on it?

If you’re wondering whether Office 2013 or Office 2010 will work on Windows 11, this is the right place. Here is the list of releases compatible with Windows 11:

  • Office 365
  • Office 2019
  • Office 2016
  • Office 2001
  • Office LTSC 2001

Unfortunately, the answer to “Will Office 2013 run on Windows 11?” is no. The same goes for Office 2007 and Office 2010.

While the previous Office version runs native at 32-bit, the newest OS has a modern 64-bit architecture. There should not be a problem running older versions of Office on Windows 11.

If you have a device with an ARM processor (such as the Surface Pro X or Galaxy Book S), we strongly recommend upgrading your Office suite.

You can do that by uninstalling your current version and downloading the latest one from the Office official page, which will automatically install the ARM-optimized version of the Office apps.

The Office apps utilize a new technology from Microsoft called ARM64EC, which stands for ARM64 Emulation Compatible.

This technology allows developers to mix and match code built for ARM64. As a result, apps with dependencies that do not support ARM64 can run partly as native apps and partly in emulation.

Keep in mind that Office Insiders can test out the 64-bit ARM version of Microsoft Office for free. Of course, this applies only to an eligible gadget with an already purchased Microsoft 365 subscription.

You’ll need to be running the Windows 11 Insider Preview build. In these terms, learn how to download an Insider Preview Build for Windows 11.

As a result, the latest Office suite brings better performance and improved efficiency while using less memory.      

How can I customize Microsoft Office on Windows 11?

Because we want you to get the best out of the redesign, you should consider these tips:

  • Try launching your pitch deck. Doing it, you’ll notice the new interface elements with customizable ribbon, soft or rounded corners, across these three apps: Microsoft Excel, Microsoft Word, and Microsoft PowerPoint.
  • With the Outlook Win32 app, you can get a cohesive interface by applying the presentation-sharing mode.
  • Microsoft Word has rounded corners, refreshed icons, and new indicators. You can notice them in the top right corner of the menu bar. However, this feature works only when you’re working with teammates on the same Microsoft doc.
  • Keep in mind that Quick Access toolbar won’t show up by default to improve the overall interface. To restore this feature, right-click the ribbon and, under Riboon Display Options, select Show Quick Access Toolbar.

So if you were wondering how Windows 11 Microsoft Office compatibility works, we hope this article helped you get a more complex perspective. You now know which versions of Office work with Windows 11.

To know about the latest iterations of Microsoft Office and understand which one is for you, read this guide.

Do not forget to share your opinion with us by leaving a comment in the dedicated section below.

6 Best Software to Create Certificates [Gift, Stock]

Certificates are not just for awarding people for their achievements but also work as gift certificates.

Today there are some of the best software to create certificates. Before the advent of these tools, people have been just receiving certificates.

Earlier,  institutions or organizations would award certificates to recognize the achievements of the best performers. These were nothing but simple documents for the receiver.

The certificates back then were printed manually with a printing press and would be designed by some remote designers.

Thanks to technology, certificates can be designed by anyone from the comfort of their home these days.

Whether the user is running a course or hosting a competition, these tools empower users to design, create, and share recognition.

Here we have listed some of the best software to create certificates that help users to make custom-made certificates, effortlessly.

What is the best certificate creation software?

Adobe Creative Cloud Express – Professionally-designed fonts

Adobe Creative Cloud Express allows users to create their own customized certificates free of cost. It can help users create exclusive certificates in just a few minutes with no design skills required.

It comes equipped with a gallery full of certificate designs and templates that inspires the users.

Created by professionals, these designs and templates help users make their certificates with ease. All they need to do is to add their own words in the ready sleek template.

They can also make use of color palettes, and various ideas while experimenting with images.

From picking a size and shape, or selecting a theme, to personalizing with images, or inserting captivating text, the users have the freedom to do a lot.

Further, users can download, share, or even get a print of the certificate.

They are also free to choose from the range of attractive professionally designed fonts and pick images from personal collections or the web.

For advanced options, users can upgrade to the Pro version.

Adobe Creative Cloud Express

This is the best tool to create certificates and it comes bundled with a lot of designs and templates.
Check price Visit Website

Canva – Various finish choices

Whether it’s a beginner, an experienced individual, or a team, Canva allows the user to design anything, effortlessly. It even allows users to publish their designs anywhere.

The software offers thousands of templates to choose from and offers professional print quality.

The superior quality print renders a super attractive look to your certificate on paper, just as it appears on the screen.

What’s interesting is, with just a single click, users can send their designs for printing and it’s even delivered straight to the doorstep in the next four days.

Moreover, their 24 by 7 customer support helps users keep track of their orders from start to end.

In addition, Canva also offers various finish choices for the certificate design. From matt finish to glossy finish, it offers a range of options that give the designs an attractive magazine-like look.

Canva

Choose this one-stop design tool for creating professional documents like diplomas or work certificates in a short time.
Check price Visit Website

Photoshop is not to be ignored if you need to create official certificates for diplomatic or celebrating events.

Adobe Photoshop – Ideal for document designs

The description is not fully required for the average user, as everybody knows the benefits and editing capacitors of this tool.

However, there are bold features that support anyone to design meaningful certificates or other official documents.

To exemplify, there are various layouts and color palettes that can be downloaded in various image formats like JPEG, PNG, PICT, PSD, etc.

Another great advantage is that you’re able to create beautiful designs from scratch or use templates for supported creativity.

In addition, using the new Generative AI anybody can manipulate design elements or generate realistic photos from nothing.

It’s also extremely customizable and flexible in terms of UI, which is made possible by plug-ins or 3D effects.

Adobe Photoshop

Own the certificate ceremony with personalized and memorable pages for the best people.
Check price Visit website

Edraw Max – High-quality vector graphics

One of the best certificate makers in the category, Edraw certificate Maker is a compact diagramming application that outshines its competitors in making professional certificates.

It comes with a straightforward interface that looks more like the MS office interface.

Whether it’s for business, education, sports, or social purpose, it allows you to create professional certificates easily.

It helps users make beautiful certificates covered with personalized designs, patterns, and matter.

It offers an easy way to get started for beginners with the help of ready-made templates.

All that needs to be done is to open the chosen template, insert texts and images, modify the colors, and then transfer it over (export) to different formats (PDF, SVG, PNG, Word, EPS, or PS).

Alternatively, users can start again with the help of the off-the-rack certificate elements in the fixed library.

Smart tools for auto-formatting, attractive themes, high-quality vector graphics, or floating dialogues are some of its other major features.

Edraw Max

Design beautiful, professional-looking certificates effortlessly with the smooth UI and inspiring template gallery of Edraw Max.
Check price Visit Website

SmartDraw – Integrated styles

SmartDraw can be the best bet for those looking for a professional certificate maker. It offers two options for its users to get started with the software.

They can either choose to use the online version on their devices or download the desktop version of the tool.

It enables users to create professional-level certificates much more quickly, online. In fact, they can also make award certificates for educational institutions, sports, offices, etc.

It offers different types of borders, examples, integrated styles, and more for professional-level certificates.

From a range of professionally designed certificate templates to inserting images in a single click, many features exist.

⇒ Get SmartDraw

Certificate Magic – Unlimited use

Certificate Magic is another great piece of software that helps users to make their own personalized certificates in a matter of minutes.

All they need to do is to pick their preferred design and add their personalized text, and the certificate is up for download! It can be downloaded in PDF format that can be further printed from the home printer as well.

The best part is, that the software is absolutely free of cost and offers unlimited use. It’s also coming up with an API, especially for web developers.

This will help them to download certificates from their own portal by using the software.

Using this best software to create certificates, users simply need to add a few lines of plain HTML.

This, in turn, will sync the software with the owner’s website and enable them to generate certificates with a professional appearance and no intricate coding.

⇒ Get Certificate Magic

Certificates are a way to encourage the other person for his/her contribution towards the institution, or business.

We believe that performance should be rewarded accordingly and that the best achievements do deserve the best recognition.

Therefore, choose the best certificate makers from our list to create beautiful certificates, and recognize people for their efforts.

Does Blocking Someone on Instagram Delete Messages? Find Out

What happens when you block someone on Instagram or Instagram messages? Does blocking someone on Instagram delete messages? You’re about to find out.

For sure, you know that the person you blocked can’t see your posts or follow you. However, what happens to your previous interaction? Do their likes and comments disappear? Can they contact you in any way? These are some of the questions you might have.

This article answers these questions and clarifies what happens after you block someone on Instagram.

If you block someone on Instagram can they still see DMS you’ve sent them?

? If you block someone on Instagram does it delete messages?

after-instagram-block-what-happens-direct-messages

Instagram doesn’t delete the direct messages of users that you block. Although the messages stay intact, neither you nor the blocked user can send the other person messages.

So that’s that! When you unblock someone on Instagram do the messages come back?

If you unblock them later, you’ll be able to send each other messages. The messages you sent while blocked won’t be delivered to the other party.

Also, if both of you are participants in a group, you’d have to choose whether you want to leave the group or stay. If you opt for the latter, you and the user you blocked will see each other’s messages to the group.

Besides, the user you blocked can’t join a room that you create.

If you’re wondering what happens to your direct messages when you deactivate Instagram or when you block somebody, it is a tricky question.

Do messages get deleted when you block someone on Instagram? No, they don’t.

In fact, nothing happens to the direct messages you and the user exchanged before you blocked them. If you send someone a message on Instagram and block them, can they still read it?

Even if you deactivate your Instagram account, the messages will remain in their inbox. However, if you deactivate your account, no one (not only the blocked user) will be able to DM you.

You practically have no Instagram account, and so when anyone taps your name, they will arrive at a user not found page.

If you want to break communication with a user and also wish to deactivate your Instagram, then you don’t need to block them first. Simply deactivate your account.

? When you block someone on Instagram, do your likes disappear from their photos?

after-instagram-block-what-happens-comments-likes

Technically, yes, your likes and comments on their content should disappear. However, if we’re talking about likes and comments on public posts or photos, then yours will still be visible to the blocked person as long as they follow those specific public accounts.

So, blocked users will view your comments and likes on the posts of other public accounts.

One more question remains: when you block someone on Instagram, what happens to their likes and comments on your content? These interactions will disappear permanently if they liked or commented on your posts.

If, for some reason, you want to delete someone’s likes from your content, simply block and unblock the user.

Instagram deletes the likes and comments of blocked users permanently. This means that even if you unblock them later, these interactions will not return.

?️ If you block someone on Instagram can they see your profile, mention or tag you?

what-happens-after-instagram-block-mention-tag

Users that you block will no longer be able to mention you on posts. They also can’t tag you on posts that they publish on the platform.

If they attempt to tag or mention you on content, they won’t find your username.

If you’re blocking the user for safety reasons, you may also consider changing your username. This way, unless they find out your new username, the blocked user won’t be able to tag or mention you anywhere.

❓ Does blocking someone on Instagram remove them as a follower?

after-instagram-block-what-happens-unfollow

When you block a user, you stop following them and Instagram also deletes them from your follower list.

Before Instagram introduced the remove follower option, the only way to stop someone from following you was to block them (and unblock them after they’re gone).

Instagram’s blocking function is essential to stop stalkers and break contact with users. You now know what happens after you block someone on Instagram – the user loses all access to you.

The only way they can communicate with you is if both of you are in the same group.

Microsoft Store Error 0x80073d02 [Quick Guide to Fix]

Are you repeatedly getting the error code 0x80073d02 on Microsoft Store while updating or installing apps? This article contains the perfect solution for this problem and some other helpful information.

The error 0x80073d02 occurs on both Windows 11 and 10 computers. It’s not an issue like Microsoft Store not opening problem. When it occurs, the installation process of any app or game gets aborted. It may happen randomly or constantly, and you may see the following message:

Installation Failure: Windows failed to install the following update with error 0x80073d02

Why does the error 0x80073d02 occur?

The good thing is there are several tricks you can apply to eliminate this problem. However, before that, you should know about the reasons. It will help to troubleshoot it more effectively. Here are the reasons:

  • Corrupted cache: When cached files get corrupted, the Microsoft Store, formally known as Windows Store, may fail to install or update apps by showing the error code 0x80073d02.
  • Internal problem with Windows: Sometimes, the source of the problem may be related to internal misconfiguration or issues with Windows.
  • Internal issues with the store app: If the Store app gets corrupted, you may face difficulties while installing items on it.
  • Network problem: If you get the error code while downloading any app, it may indicate a network problem.
  • Antivirus: Some antivirus or firewalls may interrupt the download or installation process on Microsoft Store.
  • Time and region problem: Incorrect time and region settings may also lead to this problem.

What can I do when the error 0x80073d02 occurs on Microsoft Store?

You can follow several methods to solve this problem. But at first, you must do the following things to do the whole thing without any unexpected hassles:

If you still experience the same issue, go through these methods to fix 0x80073d02 completely:

1. Correct Time, Time Zone, and Region

  1. Press Win + I on the keyboard to open Windows Settings.
  2. Go to Time & language and then Language & region.going language and region windows 11 settings
  3. Choose the correct country from the Country or region.
  4.  Go back and go to Date & time.
  5. Either choose the correct time zone or enable Set time zone automatically and also Set time automatically.set time automatically win11
  6. Restart your PC.

After that, try to install or update apps on the MS store and see if it has fixed the error code 0x80073d02.

2. Run troubleshooter

  1. Open Windows Settings like before.
  2. Go to System and then Troubleshoot.going system and troubleshoot windows 11 settings
  3. Go to Other troubleshooters.going other troubleshooters win11
  4. Click on Run next to the Windows Store Apps.clicking run windows store apps troubleshooter
  5. Follow any onscreen steps to complete the process.

After that, you should not encounter any Microsoft Store installation or update problems.

3. Repair or reset Microsoft Store

  1. Go to Windows Settings like before.
  2. Go to Apps and click on Installed apps.going installed apps windows 11 settings
  3. Find the Microsoft Store.
  4. Click on the three horizontal dots next to it and go to Advanced Options.going advanced options microsoft store
  5. Click on Repair and see if it fixes the problem.repairing microsoft store app
  6. If not, Click on Reset and try again.

You also reset the Xbox app. Some users have found resetting the Xbox app helpful as well.

4. Re-register the Store

  1. Open the Start Menu, and type PowerShell.
  2. Right-click on Windows PowerShell and choose Run as administrator.
  3. Type the following command and press Enter to execute it: Get-AppxPackage -allusers Microsoft.WindowsStore | Foreach {Add-AppxPackage -DisableDevelopmentMode -Register “$($_.InstallLocation)\AppXManifest.xml”}reregistering microsoft store using windows powershell
  4. After finishing the process, restart your computer.

5. Reset Windows

  1. Open the Windows Settings.
  2. Go to System and then Recovery.going recovery win11 settings
  3. Click on Reset PC.clicking reset PC win11 settings
  4. Then, go ahead and finish the process.

After resetting, you should no longer encounter the error code 0x80073d02.

However, if you still get the error, it may be because of your country’s temporary network connection issues. In this case, we suggest you use Private Internet Access (PIA) or any of the best VPN connections.

This article has explained how you can fix the Microsoft Store error code 0x80073d02. Let us know in the comment box if you have any suggestions or opinions.

If I Block Someone on Facebook, Can They See Me Through Mutual Friends?

If you block someone on Facebook, you’ll vanish for that person on the app – they won’t see you in the mutual friends list, none of your posts on other people’s pages, no activity whatsoever.

So if you want to cut contact with someone completely, blocking them on Facebook is an effective way to ensure they can’t interact with you.

Let’s take a closer look at what happens when you block someone, restrict a profile, or, in turn, how you figure out whether someone blocked you.

What happens when you block someone on Facebook

You won’t appear in mutual friends list

The blocked person won’t see you through mutual friends, be it in friends list, your comments, posts that mutual friends tag you in, and so on. Here’s a more detailed explanation.

They won’t find your profile if they look it up

When you block someone on Facebook, you lock them out of your Facebook universe.

To the blocked user, your account no longer exists on Facebook, including your profile picture and your profile.

A blocked person on Facebook won’t see public posts/tags/comments

People you block on Facebook cannot see anything you publish on the platform:

  • Your comments (even comments on mutual friends)
  • Your friends’ list
  • Posts and shares
  • Their likes will no longer show on your posts

A restricted person won’t see your posts if you tag a mutual friend

The blocked user will NOT see posts you published with a mutual friend tagged.

If a mutual friend posts on your wall, the person you blocked will know that the mutual friend posted something. However, they won’t see the content on the post or know that it was posted on your wall.

All they will see is that the content isn’t available right now.

On the other hand, if a mutual friend tags you to a post (not on your wall), the person you blocked will be able to see the post, but they won’t see the tag.

If someone blocks me on Facebook will they see my friend request?

No – If someone blocks you on Facebook, you won’t be able to send them a friend request in the first place. The moment the person blocks you, you lose all access to his or her Facebook profile or page.

We hope that this guide has managed to answer your questions regarding what happens when you block somebody on Facebook.

Don’t hesitate to share your opinion with us by using the comment section below.

8 Best Course Making Software For E-Learning [2026 Updated]

The learning environment today is heavily influenced by digital technologies, so it’s no wonder that many are using course making software.

Whether you’re looking to create reading or audio/visual content, there’s a wide variety of course-making software you can use as a teacher, or for training purposes, if you’re in a company or organization set up.

Course-making software are tools used to create interactive and engaging training or educational material. They can be used to create materials for students, or employees in a corporate setting.

These courses can then be administered together with other learning material and/or systems, thus providing enough material on your subject matter.

Here are the best course maker applications you can use to prepare the course content regardless of your learning setting.

In addition, why not try student management software? It’s perfect if you want to always keep a close eye on your students and their progression.

What is the best way to create an online course?

The best and most efficient way is to use specialized tools. With them, you can easily integrate everything you envision for your course.

Luckily, online learning is becoming more and more mainstream. This is why we have access to modern and effective platforms dedicated to course makers and learners.

It’s very important to figure out your main topic of discussion and know your learner’s demographic. There are tools that can help you determine what socio-economical group is interested in your topic.

This will help you decide how to structure your course, and figure out a suitable pricing plan that is convenient for potential customers and profitable for you.

What are the best software for creating online courses?

Adobe Captivate – Intended for professionals

Adobe Captivate 2019 release product

This course design software is a desktop app that helps you author batches of content rapidly on HTML5 based platform.

It is touted as the most powerful authoring tool software in the industry, but it needs a lot of understanding to use it, though not much technical ability is needed to create interactive content.

It uses wizards to guide you as you create and publish your content so you will have plenty of insight on how to get the job done.

Features include color palettes, slide master, responsive and interactive output, geolocation capability, powerful scripting functionality, and you can define group actions when working on multiple projects.

Adobe Captivate

Courses need to look good in order to be captivating, so create the most appealing courses using Adobe Captivate
Free trial Visit website

Teachable – Easy to use

course making software

This course maker software allows you to create and build beautiful online courses with a user-friendly interface.

Teachable has an effortless setup such that with a few clicks, you deliver an exceptional learning experience with a fully functioning school, payment gateways, plus sales and marketing tools.

This tool lets your students sign up to your school, view curriculums, and previews, as well as purchase your courses.

In this way, you actually reduce the hassle of orientation and registration that take up so much time when done in the physical school setting.

You also get to customize your website as you have full control over it, by simply uploading the content, creating your beautiful school, engaging your students, then sharing knowledge and selling while you’re at it.

Features include optimization for web and mobile, intuitive user interface, Power Editor for advanced developer customization, and many more.

It also features easy adding of multimedia items and PDF files, templates, a drag-and-drop builder, a free domain, global reach, analytics, hosting and security, interactive learning tools, and discussion forums.

Teachable

Create online courses and coaching services at a high level!
Check price Visit website

Podia – Best for selling online courses

Podia is a platform with multiple uses, one of which is course creation and online selling. It’s the perfect way to start your online journey.

All you need is your content, and Podia handles the rest. You can create a sales page, receive payments, and pre-sell or re-sell your courses. Podia supports all types of marketing strategies.

Podia offers the necessary tools so you can build any kind of course. Whether it’s a standalone, drip, or bundle of courses, the platform has the right tools for any of them.

Podia allows you to create the perfect look for your course that your clients will love. Customizing your website takes only minutes and requires no design or coding skills.

This platform is designed so you can make everything yourself. No sophisticated templates, text, images, videos, testimonials, customizable branding, flexible layout, live previews, and don’t worry it sounds too complex. It’s like a walk in the park.

Podia handles the toughest parts when you face obstacles online. Podia manages sales, marketing, content editing, organization, and much more.

Podia

An all-in-one tool to create, advertise and sell your courses online.
Free Trial Visit Website

DomainRacer – Advanced solution for professionals

If you need software to create online training courses then DomainRacer might help you. This service offers SaaS solutions that allow students to easily enroll.

With this service, users can create reports, attachments, certification generation, participation, and more. The service also delivers a premium video platform as well as live virtual classes with Zoom integration.

In addition, you can create and sell online courses, or construct online quizzes, games, participations, etc.

Overall, DomainRacer is a great service for online courses, so be sure to give it a try.

DomainRacer

The professional way to create courses to boost your content creation.
Check Price Visit Website

Articulate 360 – Great features

With this course building software, you have the right apps and resources to create high-impact, interactive and engaging content.

The apps include Storyline 360 and Rise, which help you develop custom courses that are fully responsive and user-friendly, within the shortest time possible.

There’s also the Articulate Review, which helps you speed up the project review process while delivering feedback in a browser.

Features include templates, multimedia items like photos, videos, icons, and characters, live online training using webinars, and a user-friendly interface.

With Articulate 360, you need not have technical knowledge as there is no coding required.

You also get an active online community for sharing information, and flexibility, and your content is accessible on different devices and platforms.

⇒ Get Articulate 360

CD2 Learning – Easy-to-use interface

This is one of the best course-making software in the market if you want to create interactive and engaging content fast and in the easiest way.

Features include a drag-and-drop interface, mobile capability to create content from anywhere and anytime, change tracking and recall, and the capability to construct games.

CD2 Learning also includes assessments, real-world simulations, keyword and tagging, automatic uploads to a content delivery network, multi-language support, and content listing among many others.

⇒ Get CD2 Learning

Lectora – For desktop and mobile

course making software

This is a well-known brand when it comes to course-making software.

It is a powerful, cloud-based Software as a Service (SaaS) tool that can be used for collaboration anywhere and at any time.

Features include an intuitive interface, zero installation, and automatic file backup. There’s also a quiz builder, collaborative review tools, flexible scripting, and more.

You also have access to a graphics and template library, pre-made actions for animation creation, and easy publishing of courses to any learning management system.

Other notable features include Publish for Seamless Play option. Using it, your content will smoothly flow from page to page. There’s also Branch Track Integration to create and import scenario-based exercises with one click.

You will also find an Anchor Position feature to specify an object’s location on the page, Import and Export Question files, color selection, social objects, and customizable buttons among many others.

⇒ Get Lectora

Shift Learning – Affordable solution

This course-making software offers a single workspace on an intuitive platform with all the tools you need to work smarter, delivering high performance, and while giving you full control.

Features include an extensive template builder and library, and a built-in audio recording studio. There’s also an easy-to-use interface with no coding requirements and a drag-and-drop builder for custom designing.

You will find interactive templates where you can add multimedia. Speaking of which, there is also responsive design for mobile and desktop and a built-in review system.

⇒ Get Shift Learning

These are some of the best course-making software that you can use. Be sure to research them all properly before you make your choice.

If you’re a student or a teacher, we have something for you as well. Go to our education software tools guide for more useful applications.

Are you ready to create engaging and interactive content with any of these course-making software? Let us know in the comments section below.

QuickBooks Keeps Crashing on Windows 10 & 11 [4 Fixes]

Regarding accounting matters, Quickbooks is one of the most renowned software packages; however, a few users have complained that QuickBooks keeps crashing.

We understand that this is a great hindrance to your workflow and productivity.

So, in this article, we walk you through all you should know about this problem, including some common triggers and the best solutions that have been tested to work.

Why does QuickBooks keep closing on me?

There are several possible reasons why QuickBooks might crash on a Windows 10 or 11 computer, and several possible solutions you can try. Here is some potential triggers for the problem:

  • An outdated app – Outdated applications are prone to various problems, including crashes. This may be the case with QuickBooks.
  • Malware – The presence of malware on your computer will affect certain functions and applications and may trigger some of the applications to crash.
  • Compatibility issues – In some instances, you may have compatibility issues between the OS and the application, which may require an OS update.

That said, let us explore some of the most reliable solutions.

How do I stop QuickBooks from crashing?

1. Update Windows

  1. Press Windows + I to open the Settings app.
  2. Click on Windows Update on the left pane, then select Check for updates on the right.
    quickbooks keeps crashing
  3. Updates should now be downloaded. You may be required to restart the computer.

Make sure Windows is running at the most recent version. An obsolete operating system might be vulnerable to crashes, much like outdated applications.

2. Repair QuickBooks

  1. Press Windows + R, type control panel, and hit Enter. quickbooks keeps crashing
  2. Under the Programs menu, select Uninstall a program.
  3. From the program list, click on QuickBooks and select Uninstall/Change.quickbooks keeps crashing
  4. Select Repair and click Next.

This step may be valid, especially if QuickBooks keeps crashing after an update or when opening a company file.

3. Reinstall QuickBooks

  1. Press Windows + R, type control panel, and hit Enter.
    quickbooks keeps crashing
  2. Under the Programs menu, select Uninstall a program.
  3. From the program list, click on QuickBooks and select Uninstall/Change.
    quickbooks keeps crashing
  4. Select Remove and click Next.
  5. Download and install the latest version of QuickBooks.

You may need to remove QuickBooks and then reinstall it from scratch if trying to fix it doesn’t work. This is a good solution, especially if QuickBooks keeps crashing when emailing invoices or if it keeps freezing.

4. Check for viruses or malware

  1. Type Windows Security in the Search bar, and click on the relevant search result.
  2. Now, click on Virus & threat protection here.
    quickbooks keeps crashing
  3. Click on Scan options.
    quickbooks keeps crashing
  4. Now, select Full scan and click on the Scan now button at the bottom.

Your computer may have a virus or other malicious software, which is why QuickBooks keeps crashing. To make sure your PC is virus-free, run a scan.

We have not written any of these solutions in any particular order and recommend that you try what seems the most appropriate.

If you stumble upon the QuickBooks payroll service connection error, the highlighted guide will help you fix the issue. We also have a guide on what to do if Gmail is not working with QuickBooks, so don’t miss it.

We hope these suggestions help! Let us know if you have any other questions.

3 Best Handwritten Notes Apps on Windows with Pen/Stylus

Dedicated apps that allow handwriting fans to write directly on Windows devices are great if you want to centralize all your notes. Not only can you write directly with your stylus, but many of them can also convert handwriting to editable text.

Find below the best note taking apps for Windows that support handwritting.

What are the best handwriting apps for Windows 10?

Nebo – best for handwriting to text conversion

Nebo is a very useful app that allows you to handwrite, draw, edit and format your notes quickly. You can also convert and transport them as digital documents.

The app also lets you structure your notes using titles, paragraphs, and bullet lists.

The list of options doesn’t end here: you can add interactive diagrams, freeform sketches, and annotate pictures. You can view your Nebo documents on any device, on any Internet browser, email client, or on Microsoft Word.

Nebo is designed for Windows 10 and validated with Microsoft Surface Pro and Surface Book with Surface Pen.

Pros:

  • Accurate handwriting-to-text conversion
  • Great for organizing notes
  • Works well with Surface Pen

Cons:

  • Takes time to learn all features
  • Limited functionality on non-Surface devices
Nebo

Nebo

Take notes with the ease of writing on paper with an app that is designed to be modern like Windows 10!
Check price Visit Website

One Note

microsoft onenote

OneNote is literally your digital notebook. You can use it to write down your ideas, keep track of classroom and meeting notes, a clip from the web, make a to-do list, draw, and more.

You can use both your device’s pen and your finger to write and draw. There are multiple types of pens and highlighters you can choose from.

You can personalize your piece of digital paper, write on a white background, or add a grid.

OneNote is perfect to use as a collaboration tool as you can share your notes with colleagues, family, and friends.

Pros:

  • Easy to share notes in real time
  • Syncs with Microsoft tools
  • Lots of customization options

Cons:

  • Interface can feel cluttered
  • Not specialized for handwriting
OneNote

OneNote

This product created by Microsoft itself will make note-taking to an entirely new level!
Check price Visit Website

Evernote

If you own any type of digital device, then you’ve probably heard of Evernote, a world leader in terms of apps used for taking notes.

Well, among the many features that this tool has, taking handwritten notes is one of them, and it also comes with a neat feature that uses OCR in order to convert your scribbled notes into regular text.

Besides, it has wonderful support for touchscreen devices, such as those belonging to the Surface family, allowing you to turn them into a regular notebook instantly.

Pros:

  • Converts handwriting to searchable text
  • Good for multimedia notes
  • Easy to sync across devices

Cons:

  • Some features require a paid plan
  • Not focused entirely on handwriting
Evernote

Evernote

A world leader in note-taking apps, Evernote will take your hand-written entries and turn them into text immediately!
Check price Visit Website

These three apps cover a wide array of needs: choose OneNote if you’re looking for a collaborative tool, and download Plumbago if you need an app to take down notes and draw.

If you’re looking for a simple app to mainly take down handwritten notes, then Nebo is a good enough choice.

If you have any other suggestions or questions, feel free to leave them in the comments section below and we’ll be sure to check them out.

How to Copy Files to Remote Computer With Powershell

You must have found this guide because you want to know how to copy a file to a remote computer using PowerShell.

The good news is that we understand the need for file sharing and have put together every detail you need to know in this article.

So without much ado, let us get to it.

Why should I transfer files using PowerShell?

PowerShell may be used to transfer files for a number of reasons:

  • Speed: When uploading a lot of data across a network, PowerShell may be quicker than utilizing GUI-based solutions.
  • Automation: You may transmit files automatically on a schedule or in reaction to certain circumstances by using PowerShell scripts that have been automated.
  • Versatility: File transfers utilizing FTP, FTPS, SFTP, and SCP are all possible with PowerShell.
  • Handling errors: PowerShell has strong error-handling features that might be helpful when transferring files to make sure the transfer went well.
  • Reporting: PowerShell is capable of generating thorough reports on the transfer procedure, which include the total volume of data transferred, the number of files transferred, and any mistakes that had occurred.

In general, managing file transfers using PowerShell may be practical and effective, especially in a professional setting.

Now here is how to copy files to remote machines using the tool.

How do I copy a file to a remote computer using PowerShell?

1. Copy a file from a remote computer using PowerShell

1.1 Set up the remote connection

  1. Open PowerShell with admin rights, input the command below, and hit Enter.
    Enable-PSRemoting -Force -Verbose
    powershell copy file to remote computer
  2. If you get the error as displayed in the image above, enter the following command; if not, skip this step:
    Set-WsManQuickConfig
  3. Use the following command to configure your trusted host, substituting AFAM with the name of the computer:
    winrm set winrm/config/client '@{TrustedHosts="AFAM"}'
    powershell copy file to remote computer
  4. Use these shell scripts to restart your WinRM service and test the remote computer name after you have added the remote machine name to the trusted host (remember to substitute AFAM for your computer name):
    Restart-Service WinRM
    Test-WsMan @AFAM

A few actions to create a remote connection are listed above. One may copy files to distant machines after establishing the remote connection.

Note that on a remote system, PowerShell remoting must be enabled. To do this, use the steps highlighted above.

1.2 Use Copy-Item to copy the file

  1. Use the New-PSSession cmdlet to start a session using the command below (remember to replace AFAM with the PC name).
    $SESSION= New-PSSession -Computer 'AFAM' -Cred $credential
    powershell copy file to remote computer
  2. Connect to the newly created session using the command below (note that you can use the cd command to change the directory if needed):
    Enter-PSSession $SESSION
  3. Copy the file using the command below (remember to replace initial and final location with the actual paths you need the file copied from and to):
    Copy-Item –Path "initial location" –Destination "final location"
  4. You may need to quit the shell from the remote machine access after interacting with the remote machine. To do this, you must terminate the session using the Exit-PSSession cmdlet as follows:
    Exit-PSSession

2. Copy multiple files to a remote computer using PowerShell

  1. Follow all the steps mentioned in solution 1.1
  2. Declare some variables using the script below (include actual values for the username, password, and both paths):
    $username = "username"
    $password = "password"
    $remote_path = "\remote_computer\c$\path\to\destination"
    $local_path = "C:\path\to\local\files"
  3. Next, create a credential object using the script below:
    $credential = New-Object System.Management.Automation.PSCredential ($username, (ConvertTo-SecureString $password -AsPlainText -Force))
  4. Use the script below to get the local path that has been declared:
    $files = Get-ChildItem $local_path
  5. Finally, copy each file to the remote computer using the foreach function:
    foreach ($file in $files) {
    Copy-Item -Path $file.FullName -Destination $remote_path -Credential $credential
    }

This will copy all the files in the local directory specified by $local_path to the destination directory on the remote computer specified by $remote_path. You will need to provide the correct values for $username, $password, $remote_path, and $local_path.

There you have it. These are some of the best ways to copy files to a remote computer using MS PowerShell.

PowerShell is a very robust tool, and with some knowledge of scripting, there is a lot you may be able to achieve using the tool. You can copy files from and to remote computers using the tool.

Please let us know in the comments below if this guide has been helpful.

21 Best Windows Task Manager Alternatives [Upgraded]

If a certain application is unresponsive or slow, the best way to deal with it is to use Task Manager to close it.

Task Manager isn’t the only task management application for Windows 10, and today we’re going to show you the best task management software that can replace default Task Manager.

The default Task Manager in Windows 10 is a decent tool, but it lacks some advanced features.

If you’re an advanced user, or if you’re looking for a Task Manager alternative, we strongly suggest that you try any of the tools from our list.

What are the best task manager software for Windows 10?

AnVir Task Manager

The best and most powerful task management software that you might want to try is AnVir Task Manager. The application can show you detailed information about each process.

As a result, you can view DLLs that the application uses, inbound and outbound traffic, disk load, performance graph, open files, etc.

In addition, you can also view information about startup programs and services. If needed, you can even remove or add applications to startup.

The application can also show you information about drivers and active Internet connections.

AnVir Task Manager also has tray icons, and you can easily view CPU or hard drive usage right from the system tray. You can also see information about network traffic, laptop battery, and memory from the system tray.

AnVir Task Manager can also show you the security rating of each active process or service. Thanks to this feature you can easily locate potentially harmful software in the list of processes.

AnVir Task Manager will also inform you if any application tries to add itself to the startup. If needed, you can also scan any suspicious process by using the VirusTotal service.

The application also offers some File Explorer enhancements. Using this tool you can easily minimize any open window to the system tray or create a floating icon.

In addition, you can change the transparency and priority of every application with ease. If needed, you can also resize any open window to one of the many available sizes.

AnVir Task Manager is a great tool that allows you to see additional information about running processes.

The free version offers the most features that you need, but if you want to get access to several more advanced features, you might want to consider purchasing one of the two Pro versions.

We also have to mention that a portable version is available, so you can run this tool on any PC without installation.

AnVir Task Manager

This excellent tool shows disk load, performance graphs, open files, and detailed info on any process.
Free Download Visit Website

Wise System Monitor

If you’re looking for a simple and lightweight task manager software, you might want to consider Wise System Monitor. This is a free application that allows you to terminate any process with a single click.

The application will appear on the right side of your screen, and in order to activate it, you need to move your mouse all the way to the right.

Wise System Monitor has a simple interface that lets you view some basic information about running processes. Available information includes architecture, the number of child processes, and windows.

If needed, you can also view subprocesses for your running processes. You can also view additional information about any process simply by double-clicking it.

Regarding process termination, you just need to right-click a process in order to terminate it.

Wise System Monitor doesn’t offer any advanced options, and there are no performance graphs or any information regarding resource consumption.

This is a basic task manager that allows you to terminate any process with a single click. The application is completely free, but it doesn’t offer any advanced features.

Wise System Monitor

Make sure that no suspicious apps are running on your system with this great tool.
Free Download Visit Website

Process Hacker

If you’re not pleased with Task Manager, you might want to consider Process Hacker.

This application can show you detailed information about all running processes. Just like Task Manager, Process Hacker allows you to view a graph of your resources in order to see how much CPU or RAM your computer is using.

The application has one useful feature, and you can hover over the graph and see the application that was using the most resources. If needed, you can double click the graph to see more information about that application.

If you want to learn more about a certain process or application, simply double click it to see the additional information. Process Hacker also allows you to see which processes are using certain files.

This feature is useful if you can’t remove certain files because they are used by other applications.

Unlike Task Manager, Process Hacker has a search bar at the top right so you can easily find any application or process in a matter of seconds.

Using this tool you can see which programs have active network connections or get real-time information regarding disk access. The application can also manage services, which can be rather useful.

Process Hacker is an open-source application, which means that you can easily modify it or redistribute it. In addition, it can be customized with plugins, so you can easily enhance its features.

Process Hacker is available for free, and you can even download the portable version and use it without installation on any PC.

⇒ Get Process Hacker

Process Explorer

Process Explorer is a free and portable task manager software that can show you all available processes and services. Processes are grouped in the left pane, and you can easily expand them in order to see related processes.

Of course, you can click each process and see extensive information about it. If needed, you can also end or suspend a certain process.

We also have to mention that you can end an entire process tree, which can be rather useful sometimes.

Process Explorer allows you to see DLLs and handles related to available processes. In addition, you can also view graphs that allow you to monitor system resources.

The application can also add a live icon to your system tray, so you can easily monitor the desired resources.

Process Explorer also allows you to use drag and drop method to find certain processes, which can be rather useful. In addition, you can use VirusTotal service to scan suspicious files or processes.

If you want, you can replace the default Task Manager with Process Explorer. We have to admit that Process Explorer is a great tool with a wide range of features.

The user interface offers an extensive amount of information, but first-time users might have some issues adjusting to it.

Although Process Explorer is great, we have to mention that you can’t configure services or startup items with it. Despite this minor flaw, this is still an amazing task management software that you should try out.

⇒ Get Process Explorer

System Explorer

If you’re looking for a task management software, you might be interested in System Explorer. This is a free application, and it comes with a simple and neat user interface.

System Explorer uses a tabbed interface, and you can easily remove or add new tabs. The application allows you to choose which type of information you want to see.

For example, you can choose to see processes for all users, Microsoft system entries, or services. In addition, you can also show all processes and services using the tree structure.

The application supports the drag and drop method, so you can easily select any open window and see its process in System Explorer.

Just like any task manager software, you can use this tool to end certain processes or to suspend them. In addition, you can also end the entire process tree with ease.

The application also allows you to check your processes and applications for viruses, which can be rather useful. The software also allows you to view the performance graph thus allowing you to monitor your system resources.

You can also view all available connections using this tool. The application also has a History tab that you can use to view previous events.

In addition to events, you can also view some basic network information as well as a network graph. Of course, you can also manage services right from this tool.

The application also allows you to view startup applications, and you can disable the desired applications with a single click.

System Explorer also allows you to uninstall applications, and this feature can be quite useful to some users. In addition, you can also view security information and additional information about your PC right from this tool.

The application also has support for snapshots and WMI Browser. There’s also a system tray icon that allows you to monitor CPU and memory usage.

System Explorer is a great tool, and with its simple and attractive user interface it’s a great Task Manager replacement.

The tool also offers some additional options, so it should be perfect for both basic and advanced users alike. The application is completely free, and you can use it without restrictions.

⇒ Get System Explorer

Process Lasso

Process Lasso is another free task management software. The application will show you all running processes along with the resource graph so you can easily monitor all active applications.

Process Lasso allows you to balance your resources thanks to the ProBalance, SmartTrim, and IdleSaver features. In addition, you can change your power profile right from this application.

There’s also support for Gaming Mode that will optimize your processes so you can get the best performance.

The application offers extensive configuration, and you can configure CPU, memory, and I/O priority for all processes.

In addition, you can trim virtual memory for specific processes or throttle the CPU usage.

The application also allows you to set a maximum number of instances that you can run, and you can even set processes to automatically restart if a crash occurs.

If needed, you can also prevent sleep while a certain application is running. You can also terminate any running application or automatically terminate a specific application if it starts.

The application also has a useful action log so you can easily keep track of all processes. Process Lasso offers advanced features when it comes to process management.

We have to mention that this application doesn’t allow you to control startup items or to manage services. Despite those limitations, this is still a great task manager software so you might want to try it out.

The application is free for personal use, but if you want to use this tool for commercial purposes and get access to all features, you’ll have to purchase the Pro version.

⇒ Get Process Lasso

Daphne

Daphne is an open-source task management software for Windows. The application has a simple user interface that shows you the list of active processes as well as CPU and memory usage.

The software supports the drag and drop method so you can easily find any open application in Daphne.

Using this tool you can easily find the location of any process or application and end it with a single click. In addition to process management, you can also change the affinity or priority of any process.

This task management software also supports traps, and you can schedule a process to be terminated at a specific time.

The application also allows you to terminate tasks that have the same name. In addition, you can also close all windows that share the same name.

Daphne also supports graphs, and you can see a CPU usage graph at any time. If needed, you can also view the process tree and use it to quickly find the desired process.

This application can also show you all installed applications and allow you to remove them with ease.

Daphne is a solid task management software that offers great features. The only flaw of this application might be its simplistic user interface which doesn’t look too appealing.

Despite this minor flaw, Daphne is still a great task manager software, and since it’s completely free there’s no reason not to try it.

It’s worth mentioning that there’s also a portable version available, so you can run this tool on any PC without installation.

⇒ Get Daphne

What’s Running

Another free task management software that you might want to check out is What’s Running. The application uses a tabbed interface, and you can quickly view running processes, services, modules, or IP connections.

You can also see all available drivers and startup items as well as system information.

Regarding processes, you can view them using the tree interface which makes it easier to find related processes.

The application also allows you to configure your services, and you can easily start or stop any service from this application.

Unfortunately, there’s no ability to configure startup type for your services. What’s Running allows you to configure your startup items, and you can easily disable, remove, or add new items to the startup.

The application can show you extra information about each running process, but you can also view the resource graph for every process.

What’s Running is a solid task manager software, and since it’s completely free, we advise you to try it out. The application also offers portable mode, so you can install it without making any changes to your registry.

⇒ Get What’s Running

Process Security

Another simple and free task management software that you might want to check out is Process Security.

The application has a friendly user interface, and you can easily find any running process. There’s also a useful search option that can help you find the desired process.

Using this tool you can easily end any process or see additional information about it.

If you want, you can start a new process from Process Security, and you can even completely replace Task Manager with it.

The application also allows you to view modules that are associated with a certain process. If needed, you can also assign a different priority to your processes.

Process Security doesn’t have a performance graph, but it has performance bars on the left side. Thanks to these bars you can monitor CPU or memory usage in real-time.

Process Security is a simple task manager software, but it has its flaws. It seems that this application doesn’t show you CPU, memory, or disk consumption per process, which is a major flaw in our opinion.

The absence of this feature makes it a lot harder to find and end demanding processes. Despite this flaw, Process Security is a decent software, so you might want to try it out.

⇒ Get Process Security

Task Manager DeLuxe

If you’re looking for a free and portable task manager software, you might want to consider Task Manager DeLuxe. This is a free and portable application, so it can work on any PC without installation.

The application uses a tabbed interface, and you can easily navigate to the desired section. If needed, you can easily terminate any application from Task Manager DeLuxe.

You can also monitor an application and see its additional information as well as its open windows. All processes are sorted in a tree view, but you can also use the search bar on the top to find the desired process.

The application also works with services, but it offers limited configuration. You can see the information about the service, but you can’t change its startup type.

If needed, you can start or stop any available service. There’s also support for startup applications, so you can easily remove startup items. Unfortunately, there’s no option to add startup items.

Task Manager DeLuxe has performance bars, and you can view them at any time. From there you can see CPU or memory usage, and you can see which processes are using most of your resources.

If needed, there’s also a network graph, disk I/O graph, and performance graph. You can also see some additional information about your system right from the application.

Task Manager DeLuxe offers a wide range of features, and you can even replace Task Manager with it. As we already mentioned, the application is free and portable, so we advise you to try it out.

⇒ Get Task Manager Deluxe

Security Process Explorer

Another free task management software that you might want to consider is Security Process Explorer. The application has a simple and friendly user interface, and you’ll be able to find all the necessary information with ease.

Using this tool you can change the priority of certain processes, end them, or view their details. You can also block certain processes that might be harmful right from this application.

The application doesn’t offer any graphs, so you can’t monitor your system performance. However, you can see how much memory or CPU power each process is using.

We have to mention that you can’t configure services or startup items with this tool.

Security Process Explorer is free and simple task manager software, and with its simple user interface, it will be perfect for first-time users.

However, if you’re looking for some advanced features, this tool might not be for you.

⇒ Get Security Process Explorer

TaskInfo

If you’re looking for a task management software that can show you extensive information about running processes, you might want to consider TaskInfo.

According to the developer, TaskInfo can show you information about all running processes and threads.

The application will show you all running processes in the left pane, and you can see extensive information about each process in the right pane.

You can see general information as well as modules, related files, and handles. Or course, you can easily terminate any running process or simply pause it right from this tool.

In addition, TaskInfo offers extensive information about your system, CPU, open files, connections, drivers, and services.

If needed, you can also stop or run a specific service from this application. The application also has a real-time performance graph, so you can always keep a close eye on your resources.

TaskInfo offers extensive information regarding running processes, so it will be perfect for all advanced users. Due to a large amount of information, this application might seem a bit daunting for basic users.

Despite its complexity, this is one of the most powerful task manager applications on our list, so if you’re an advanced user we recommend that you check it out.

⇒ Get TaskInfo

DTaskManager

If you’re looking for free and portable task manager software, you might want to consider DTaskManager. This application can show you the list of running applications, and you can easily stop any task.

We have to mention that this application allows you to terminate tasks using three different methods. In addition, you can even hide application windows temporarily or permanently.

Regarding processes, you can see memory and CPU usage for each process. Of course, you can suspend or resume any available process.

You can also terminate any process using the three different methods. If needed, you can even change the priority or affinity of individual processes.

Of course, there’s a performance graph thus allowing you to easily monitor your PC performance. The tool also allows you to view networking information as well as user and kernel modules.

We have to mention that you can terminate multiple processes simultaneously, which is an extremely useful feature.

DTaskManager doesn’t offer startup configuration, and you can’t disable services with it. If needed, you can replace Task Manager with DTaskManager completely.

We have to mention that we had some issues with this tool. The application crashed a few times when trying to use certain features.

Some users might not like the user interface because it resembles the old Task Manager from Windows 7.

Despite these issues, DTaskManager is a solid tool, and since it’s free and portable you might want to try it out.

⇒ Get DDTask Manager

Auslogics Task Manager

If you’re looking for a free and simple task manager software, you might want to check out Auslogics Task Manager. The application allows you to see all running applications, and you can easily minimize or maximize any application.

In addition, you can also speed up or slow down a certain task or close it completely. The same goes for available processes, and you can even search for a specific process thanks to the built-in search bar.

Auslogics Task Manager also works with services, and you can easily stop or run any service. Unfortunately, there’s no support for advanced options regarding services.

You can also see locked files with Auslogics Task Manager. Thanks to this feature you can see exact applications that are using your files. If needed, you can unlock any file with a single click.

Auslogics Task Manager is a decent tool, but it doesn’t allow you to see any extensive information regarding your processes.

If you’re looking for a simple task management software that offers some additional features, feel free to try Auslogics Task Manager.

⇒ Get Auslogics Task Manager

Bill2’s Process Manager

Another simple task management software that you might want to consider is Bill2’s Process Manager. The application has a simple interface, and you can easily see all running applications.

By default, some processes are hidden but you can enable them by checking the appropriate options. We also have to mention that Bill2’s Process Manager has a built-in search bar, so you can easily find the desired process.

With this tool, you can easily close an application or terminate a specific process. In addition, you can also set priority and affinity for each process.

If needed, you can suspend or restart any application or process. You can also view detailed information including modules and threads for each process.

There’s also a performance graph and statistics available, so you can easily monitor your resources with this tool. The software also allows you to create specific rules for applications, which can be useful to advanced users.

Overall, Bill2’s Process Manager offers decent features and it’s a solid task manager. The portable version is also available, so you don’t have to install this tool to use it.

We have to mention that our version was in French by default, but you can easily change the language to English from the options menu.

⇒ Get Bill2’s Process Manager

SterJo Task Manager

SterJo Task Manager is another free and portable task management software for Windows. The application has a visually appealing user interface, so it’s perfect for novice users.

Using this application you can easily end any running process or change process priority.

In addition to processes, SterJo Task Manager also allows you to configure startup applications. You can easily disable, remove, edit, and add applications to startup.

The application also works with services, and you can start or stop any service. In addition, you can change the startup type of every service right from this application. Lastly, you can also view all available connections on your PC.

SterJo Task Manager doesn’t have a performance graph, and you can’t see memory usage by process. This isn’t the best task manager on our list, but it’s a decent application with a great interface and some interesting features.

⇒ Get SterJo Task Manager

Yet Another Process Monitor

If you’re looking for a free task management software that can provide extensive information, you might want to consider this tool.

Yet Another Process Monitor allows you to view all running tasks, and you can easily terminate, switch, or minimize them.

Regarding processes, you can easily search for a specific process thanks to the built-in search bar. After you find the desired process, you can terminate it by using several available methods.

You can also stop a process or change its affinity and priority. The tool can also show you detailed information such as modules, handlers, threads, etc. In addition, you can also view file dependencies from this tool.

If needed, you can create specific jobs for your processes. The application supports monitoring, and you can easily monitor a single process and keep track of its performance.

Yet Another Process Monitor also works with services, and you can easily stop or start a service. In addition, you can also change startup type and view detailed information regarding your services.

There’s also support for active connections, and you can easily monitor them with this tool.

There’s also a detailed log that allows you to examine how your processes behave over time. Another feature that we want to mention is the performance graph.

Thanks to this tool you can view system information and monitor performance in real-time. We also have to mention that this tool supports remote connections. As a result, you can easily run it remotely on any other PC.

Yet Another Process Monitor offers an extensive amount of information, a solid user interface, and wide range of features. The tool is completely free, so be sure to try it out.

⇒ Get Yet Another Process Monitor

Security Task Manager

If you want a task management software that focuses on security, you might want to check out this tool. Each process has a security rating that tells you how potentially dangerous the process is.

Keep in mind that this rating isn’t always correct, and even if a file has a high-risk rating it doesn’t mean that it’s malicious.

The application allows you to see the full path to running processes as well as CPU and memory usage for every process. Regarding processes, you can scan each process for viruses right from this tool.

Of course, you can also end any running process using this tool. Another useful feature is the ability to add files to the quarantine, which is great if you need to deal with potentially malicious files.

In addition, the application also allows you to view a short description of each process. There’s also additional information such as the process type and embedded hidden functions.

Overall, Security Task Manager is a decent tool, and it offers some interesting features in terms of security. However, the tool doesn’t allow you to manage services or startup items, which is a flaw in our opinion.

If you want to manage services and drivers, you’ll have to purchase the full version. The application is available as a free trial, so feel free to try it out.

⇒ Get Security Task Manager

Alternate TaskManager

Alternate TaskManager is another free task management software for Windows. Unlike previous entries on our list, this application has a plain user interface that might be a bit confusing to new users.

The application allows you to see process ID, hex value, window caption, and window class name. In addition, you can also see the related executable file.

Since information about available processes isn’t presented in a user-friendly manner, it might be hard to find a specific process.

If needed, you can filter processes by process ID, but you can also choose what type of processes you want to view. In addition, you can view processes that are in a specific process ID range.

Alternate TaskManager allows you to easily end processes and to see additional information regarding each process. However, there’s no ability to configure startup items or services.

In addition, there’s no performance graph as well. Alternate TaskManager might not be the best task manager software on our list, but it’s completely free, so you might want to try it out.

⇒ Get Alternate TaskManager

Chameleon Task Manager

Another task management software that offers a wide range of features is Chameleon Task Manager. The application allows you to view all running processes and you can easily switch to a specific process or terminate it.

In addition, you can change process priority or affinity or restart any process. If needed, you can optimize memory for the selected process or block it from running.

The application has a built-in search bar, so you can easily find the desired process.

The application allows you to see an overview and information for every process. You can also view modules, resources, files, registry entries, handles, and logs for each process.

There’s also a performance graph in the background, but you can move it to a separate panel if you want. If needed, you can configure each individual process and assign rules to it.

The tool also allows you to view your computer statistics. This is rather useful if you need to monitor your PC performance.

Chameleon Task Manager also works with services, and you can start or stop any service using this tool. In addition, you can easily change the startup type of any service.

Chameleon Task Manager is a powerful task manager software, and it offers a wide range of features and information. Unfortunately, the tool isn’t free, so you’ll have to purchase it if you want to keep using it.

We have to mention that there’s also a free version, but it offers only the basic features.

⇒ Get Chameleon Task Manager

Free Extended Task Manager

The Extended Task Manager is on the bottom of the list but it still deserves a try since it brings you additional Windows process management features and information about disk activity and network port usage.

For starters, you can check the Disk I/O chart that allows you to monitor the applications that are running on your computer and see which applications utilize most of your disk at the moment.

Another nice feature is the port monitoring function. This enables you to see who is connected to your computer and the devices’ IP addresses.

Of course, it will also show you who you are connected to.

There are instances where you can’t use or delete a file because it is used by an unknown process.

The Extended Task Manager Another gives you the ability to locate Windows processes that lock a specific file and kill their process to release your file from being used.

This tool has a free other few features so make sure to try them for free, as its name suggests.

⇒ Get Free Extended Task Manager

We hope that you found the best option for you on our list. For any suggestions please leave us a line in the Comments section below.

Microsoft’s chief product officer is building Windows with AI in mind

During CES 2023, Microsoft’s chief product office Panos Panay popped up to give a shout to artificial intelligence and briefly touch upon how it’s going to shape the company’s flagship operating system in the future.

At an AMD’s presentation for CES 2023, Panay took the stage to explain how AI is guiding the way Microsoft engineers Windows.

“AI is going to reinvent how you do everything on Windows, quite literally.”

While Panay didn’t reveal any specifics during the presentation, the background context of his appearance heavily hinted at Microsoft’s recent work with Qualcomm to embed a dedicated processor that leverages machine learning and AI to compartmentalize CPU processes to produce new effects such as Microsoft’s new Windows Studio Effect.

Windows-11-2022-Update-AI-Studio-Effects-in-Teams-1024x576

During AMD’s opening keynote the chip manufacturer unveiled its plans to produce its Ryzen 7000 mobile processors with a dedicated AI engine similar to Apple’s M-series chips, but 20 percent faster. With its new chip architecture, AMD claims it could squeeze out 30 hours of battery life by offloading certain processes to this dedicated AI engine.

While Microsoft isn’t claiming 30 hours of battery life for its Surface Pro 9 with an AI tweaked Qualcomm chip, it does claim those device variants have better battery life than their non-AI dedicated Intel chip counterparts.

Interestingly enough, Intel has plans to produce its own AI infused chipset dubbed Meteor Lake processors, later this year.

As for the future of Windows and AI, users need look no further than the Qualcomm powered Surface Pro 9 which relies on the AI portion of the chip to run its OS-specific Windows Studio Effects such as background noise cancellation and studio-esque background blur from embedded webcams.

As more manufacturers come on board with their own flavor of compartmentalized processing architectures, Panay seems ready to take advantage of the CPU-free resources to enable new experiences in Windows.

Use Text-to-Speech and Voice Recognition on Windows 11

Like Windows 10, Windows 11 computers have text-to-speech capability. Also known as TTS, text-to-speech allows you to hear written text narrated by the computer.

On the other hand, voice recognition software will enable you to perform specific commands on your device using your voice.

How can TTS and voice recognition software help me?

As you speak into a microphone, the computer writes out the text on screen with a combination of text recognition and speech synthesis.

It’s a great tool if you have difficulty reading or writing, as you can perform a stream of consciousness as you talk. You can overcome writer’s block with this handy tool.

TTS can also help you if you want to check the pronunciation of certain words or hear text aloud via Microsoft Narrator. Plus, the software is good at adding proper punctuation, so you can also learn good grammar.

Text-to-speech is also extremely important for users with any visual impairment problem.

What about Voice Typing Tool?

The Voice Typing Tool is an app on Windows 11 that takes advantage of the text-to-speech functionality. The app can be used on any text box, like editors, word processors, chat programs, emails, and wherever you can write on a computer.

It has an auto punctuation feature to accurately and correctly dot your text with the appropriate periods and commands. Voice Typing Tools also supports languages besides English, including Spanish, Simplified Chinese, and German.

This guide will tackle the other aspects of text-to-speech on Windows 11 besides the Voice Typing Tool. It will show you how to turn on text-to-speech, configure it, and go through some features most people may not know.

How can I use text-to-speech on Windows 11?

1. Turn the Narrator option on

  1. Click on the Start menu and click on the Settings icon.
  2. Click on Accessibility and select Speech.
  3. Click on the Narrator option.
  4. Toggle the Narrator switch to turn it on. Once you do, the Narrator app menu will open.
  5. The Narrator app is now on. To configure it, click OK.
  6. The Narrator settings menu is open. Click on Settings.
  7. In the next window, ensure that the keyboard shortcut is turned On.
  8. To change the Narrator’s voice, click on the drop-down menu next to Voice and select an option.
  9. You can change the Narrator’s voice’s Speed, Pitch, and Volume by changing the levels next to their respective configuration.

2. Turn the text-to-speech option on

  1. Click on the Start menu and click on the Settings icon.
  2. Click on Accessibility, scroll down and click on Speech.
  3. You can toggle Windows Speech Recognition in this new window by flipping the switch from Off to On.
  4. Upon flipping the switch, the Set up Speech Recognition wizard will appear, where you can set up from your preferences and connect a microphone.
  5. After clicking Next, the wizard will ask you what kind of microphone you will use. Headset Microphone will be chosen for this guide, but the instructions are the same.
  6. After choosing your device, select Next.
  7. At this point, the wizard will set up your microphone by asking you to keep the mic at a set distance so it can configure the software. When you’re ready, click Next.
  8. Read the sentence that appears so the software can get a sample, then click Next.
  9. Now you’ve set up the microphone. Click Next to continue.
  10. Click Enable document review to allow your Windows 11 computer to read the document before transcribing it to speech. Then click Next.
  11. Here you can select an activation mode. If you choose Manual, the text-to-speech capability won’t activate until you open the app. If you choose Voice activation mode, the computer will listen for a command to turn on the feature.
  12. This guide will select Use manual activation mode, then click Next.
  13. In the next window, you can print out a reference sheet filled with all of the commands that Windows 11 text-to-speech recognizes.
  14. If you don’t have a printer set up, click View Reference Sheet to be taken to a page on Microsoft’s website listing all the commands.
  15. After clicking Next, you can opt in or out of running Speech Recognition every time the computer is turned on.
  16. Windows 11 allows you to learn how to use text-to-speech with a tutorial if you want to learn more. Otherwise, skip it.
  17. A new window will appear on the top of your screen, which is the text-to-speech app listening to your commands. Press the Mic button to turn it on and off.
  18. You can try out text-to-speech by opening Windows Notepad and start speaking to start writing.

3. Configure text-to-speech

  1. Return to the Accessibility panel on the Windows 11 Settings menu and select Speech.
  2. Click Speech under Related settings.
  3. To add more languages, scroll down to Manage voices and select Add voices.
  4. Select a language you want to add or search for one.
  5. Click the box next to the language and select Add at the bottom.
  6. To add a new microphone, click Get started under Microphone.
  7. In the new window, select Cortana can’t hear me.
  8. Select the device you want to add and click Next.
  9. Select Set up the mic.
  10. You will be asked to recite the same sentence as before to calibrate the new device.

Windows 11 has a lot of good native apps, but third-party apps blow what’s on the operating system out of the water. And that’s the case for text-to-speech apps.

Many are on Windows 11, which also appears on Windows 10. Many of them are carry-overs from the older system to the new one. They help immensely with expanding your vocabulary.

Some are apps like Dragon, which is widely known for its high quality, but some online readers are just as good as the apps.

Some of these online readers include the likes of Ivona and NaturalReader, which can convert PDFs and Docx files for free. There are even paid versions that give extra features like Word Prediction.

And if you’re someone or know someone who struggles with dyslexia, NaturalReader is a great tool for helping people overcome that condition.

There are several different apps and services on Windows computers that you should try out if you have dyslexia. KAZ-Type, for example, teaches typing while managing visual stressors and has minimal disruptions.

You can also enhance your voice experience by setting up Speech Recognition in Windows 11 for advanced control and improved hands free operation.

Feel free to comment below if you have questions about other Windows 11 apps. Also, leave comments about guides you’d like to see or information on other Windows 11 features or guides like this.

Improve your Meeting Minutes with Airgram AI Meeting Assistant App

Getting the minutes after a meeting can be painstaking but the meeting agenda templates from Airgram Meeting Assistant will save you lots of time.

This online tool records your meetings and pulls out the transcripts like magic, to share them later with your team.

What is Airgram and how can it help you?

https://www.youtube.com/watch?v=z3Q0Au6A3ww

Airgram is an AI Assistant for Zoom, Google Meet, and Teams that records video conferences in high-quality audio and video.

Then, it transcribes both online and offline meetings automatically. Everything will be marked with time stamps, so you can get back to the meaningful information a lot faster.

The best part is that Airgram offers 8 transcription languages including English, German, French, Spanish, Portuguese, Russian, and more.

Now that we know what Airgram is, we will highlight its best features and show you how to use it.

What are the best features of Airgram?

1. Meeting agenda templates

Airgram features a library with 11 types of templates depending on the purpose of the meeting.

However, you may customize them with notes and actions, set timers for each particular part of the meeting, and more.

This way, you can lead the meeting to the second and go through all the objectives you have targeted.

Moreover, all the related notes are saved, so you may use them in other meetings. You can also share or export them to include in a meeting report if necessary.

2. AI assistant

When you start a call and hit the Start Recording button, the Airgram meeting assistant will immediately join a meeting to create transcripts automatically.

However, you may also schedule the Airgram assistant to join and record Zoom, Google Meet, and Microsoft Teams calls without you being in the meeting.

In the end, you will have everything recorded, including the notes and transcripts to review anytime you want.

3. Get the full meeting transcription

Airgram detects when someone is speaking and starts to write the transcription live, in the Airgram window.

But you don’t need to keep it open, it works seamlessly even if you minimize it. Whenever there is a topic change or something important going on, click the Highlight button below to create a timestamp on the video.

4. Review the meeting recording

The meeting notes and transcript will appear shortly in the Meeting Notes menu of your cloud-based Airgram account.

Of course, there, you can edit them, highlight parts of the text and even cut shorter clips if you need to.

Plus, it’s possible to share individual clips with click-by links.

You may even select individual speakers and get the transcripts only for them. The parts of the meeting when they spoke will be highlighted on the timeline as well.

This way, you can go directly to a statement or look inside their transcripts to find all the meaningful information you’re looking for.

5. Include action items

Whenever there is a task involved, you may click a sentence and add an action item. That will bring the text to the Notepad where you can assign it to one of the meeting attendees, including yourself.

By using the Calendar button, it’s also possible to set a deadline for the task as well.

This really turns the meeting into an instrument to increase productivity and clarity for everyone involved.

6. Export transcripts easily

All the notes and transcripts will be featured in your account and you can access them on virtually any device that can run a browser.

However, you may also export them easily as a Word document, on Google Docs, Notion, or Slack.

The only thing you need to do is to authorize access to the web app you want to export to.

7. Import files to transcribe

We saved the best for last because, with Airgram, you can also upload your own video or audio files and get transcriptions.

Just click on the Import Files button from the upper-right corner, drag-and-drop your video or audio file in the box and select the transcript language and Airgram will do the rest.

It’s an amazing feature when you need to pull out some dialogue from any piece of recording.

How do I get Airgram and set it up?

  1. Go to the official Airgram webpage and click on the Try Airgram for free button.
  2. Now, create a free account or just sign in with your Google or Microsoft account.
  3. Rename your workspace and click the Next button.
  4. Select the default transcription language, choose the video conferencing tool you want to use (Google Meet, Zoom, or Microsoft Teams), and hit Next.
  5. Now, you will be prompted to install the extension for the video conferencing tool you have chosen. In our case, it’s a Google Chrome extension to connect with Google Meet. You may also do that later.
  6. Go to the Meetings menu from the left pane and connect with your Google Calendar and/or Outlook.

How do I create a meeting transcript with Airgram?

  1. From your dashboard, click on the Quick Notes button.
  2. Select the Templates icon.
  3. When the pop-up window opens, select a template from the left, according to your needs, and click the Apply button from the bottom right.
  4. Of course, you can edit the template as much as you want and by introducing the / symbol, you may add timers, talking points, headings, bullet lists, and more.
  5. When you finish the meeting note, click the Start Recording button and select the video conferencing app you want to use.
  6. You will see that an Airgram button has been added. After all, participants have joined the meeting, click the Start Recording button.
  7. The Airgram assistant will ask to join the meeting so click the Admit button.
  8. That’s it! Everyone who is talking will be recorded and the words transcripted.
  9. You may minimize the Airgram window and the app will continue to work in the background. Just hit the Stop button from the Airgram applet when the meeting is over.
  10. Back on your web dashboard, you will see all the meeting notes in chronological order. Just click on any note to review it.
  11. In the new edit, you will be able to view the video and the transcripts and if you click on a sentence, you will see the action menu to create a clip for that particular text, add action items, comment, highlight or copy the text.
  12. After you finish editing, you may share, export, or download the video and transcript.

What are Airgram’s price and plan options?

Airgram can be used for free but there is a limit of 5 recordings per month and a 1-hour time limit per recording.

That may be sufficient for personal use but if you have meetings regularly in your organization, you will have to commit to one of the paid plans:

Airgram Pro – For $8.99/month you will get 10 recordings per month and 2-hour recordings

Airgram Team – For $17.99/month you will have 15 recordings per month and 5-hour recordings. You will also be able to add team members and access the administrator tools.

Airgram

Get professional meeting notes with this tool that offers seamless transcripts and templates!

You can access your Airgram dashboard online, from any location on virtually any device.

Pros
Simple and comprehensive user interface
Plenty of business meeting agenda samples to choose from
The cloud-based web app can be accessed from anywhere in the world
Supports transcription from 8 languages
AI Assistant can join the meetings even if you can't attend
Cons
Only 5 recordings per month are included in the Free version

Closing notes

As we mentioned at the beginning of this review article, getting meeting reports after calls can be really time-consuming but Airgram does it automatically!

Before this amazing tool, you would have to watch the meeting video, take tons of notes, write them down and organize them.

That can turn out to be a 3-hour chore for a 1-hour video and Airgram has it done by the time you finish the call.

Basically, the only thing left to do is to brush up on the transcript after the meeting is over and you’ve got yourself a professional meeting note.

If our tests, the app worked seamlessly with Google Meet although it is the same process on Microsoft Teams and Zoom.

We strongly encourage you to at least give it a try because we remind you that Airgram can be used for free.

If you just need a tool that transforms audio into text, you may also look at our list of the best transcription tools for Windows.

Have you tried Airgram yet? Then tell us all about your experience in the comments section below.

Fix: Windows 11 Drag and Drop Not Working [4 Ways]

Of all the changes that users noticed in Windows 11, drag and drop not working was something that struck them the most. This feature has been a part of the Windows ecosystem for a long time and going by the comments, users are not pleased with its discontinuation.

A feature that we all heavily relied on is absent from Windows 11. Users thought of it to be a bug in the initial version but Microsoft was quick to acknowledge that the feature has been removed.

Other changes pertaining to the taskbar include the inability to launch the Task Manager from the right-click context menu, and dropping apps in the taskbar to create their shortcut.

So, what do you do when the Windows 11 drag and drop not working issue occurs?? There are a few workarounds that could get you similar results and we have listed them all in the following sections. Else, you can get used to the new interface and execute tasks accordingly.

4 Solutions when you can’t drag and drop in Windows 11

It has been reported that users who upgraded to Windows 11 22H2 can now use the drag-and-drop feature properly.

However, at the time of writing this article, the Windows 11 22H2 update is full of bugs, so it may be recommended to wait a bit more before trying it out. In case you decide to skip the update for now, you should use the solutions below:

1. Use the Alt + Tab shortcut

  1. Navigate to the location where the file/folder that you want to move is saved.
  2. Select it, press and hold the left mouse button, and drag the file a little.
    select the file to drag and drop in Windows 11
  3. With the file still grabbed, press the Alt + Tab keys to view all the apps open in the taskbar.
    View all open windows
  4. This will launch a new screen where all the open apps will be listed as separate tiles. The currently open window or the one that was last opened will be listed first, the one before it would be listed next, and the same sequence will be followed.
  5. Now, while holding the Alt key, press Tab to navigate through the open windows.
  6. Release Alt when the desired destination is selected.
    Release Alt at the desired destination
  7. Once the destination window launches, release the left click to drop the file.
    Release the left click to drop the file in Windows 11

This way you can easily move files between apps and get rid of the Windows 11 drag and drop feature not working problem.

Although it will take you some time to get acquainted with the process, once that phase is over, you will find this method convenient and quick. Just practice for a while until you get a knack for it.

2. Open the two windows in split screen

  1. Launch both the windows amongst which you want the drag and drop the file or folder.
  2. Open the one where the file to be dragged and dropped is saved, hover the cursor over the maximize button, and select the first option to snap the current window into half of the screen.
    Split screen to drag and drop in Windows 11
  3. In the other half, you will find listed all the additonal open apps. Select the one where you want to drop the file/folder.
    select the other window for split screen
  4. Now, select the file that is to be moved. Press and hold the left mouse button, drag the file across windows and release the click when you reach the other one.
    drag and drop the file
  5. The file will now be moved to the destination.

The split-screen method in Windows 11 works great if you just have to move files between two locations. In the above case, we took two File Explorer windows, however, you can replace one or both of them with other apps. This is a quick solution to the annoying drag and drop problem.

For some apps, there may be an additional confirmation box to complete the drag and drop procedure. Choose the appropriate response and get done with it.

3. Use the cut and paste operation

  1. Launch the program where the file to be moved is stored.
  2. Right-click on it and select Cut, or as the procedure may be for that particular program.
    Cut files instead of drag and drop in Windows 11
  3. Now, navigate to the destination, i.e., the program where you want to move the file/folder.
  4. Right-click and select Paste, or according to the procedure for that particular program.
    Paste files

Again, a simple workaround for drag and drop not working in Windows 11. However, it’s not as effective as the other two since it requires a tad more time and effort.

Also, some apps don’t support the Cut operation, in which case, you will have to copy the file/folder and move it to the desired location. Once done, go to the source and delete the concerned file.

Those who prefer the keyboard shortcuts can use Ctrl + X to Cut, Ctrl + C to Copy, and Ctrl + V to Paste.

4. Modify the Registry

  1. Press Windows + R to launch the Run command.
  2. Type regedit in the text field, and either click on OK or press Enter to launch the Registry Editor.
    Launch Registry Editor
  3. Click Yes on the UAC prompt that appears.
    Choose yes
  4. Now either navigate to the following path using the pane on the left, or paste it in the address bar at the top and hit Enter:HKEY_LOCAL_MACHINE\SOFTWARE\Microsoft\Windows\CurrentVersion\Shell\Update\Packages
    Navigate the path
  5. Right-click on the empty space, hover the cursor over New, select DWORD (32-bit) Value, and name it as UndockingDisabled. This key will fix the problem in no time.
    Create new key
  6. Right-click on it and select Modify from the context menu.
    Modify the key
  7. Enter 1 in the field under Value data and click on OK to save the changes.
    Change the value data to enable drag and drop in Windows 11
  8. Close the Registry Editor.
  9. You wouldn’t notice any immediate change, since it requires restarting Windows Explorer. There are two ways to do that, either restart the computer or the process itself from Task Manager. We will go with the latter.
  10. Press Ctrl + Shift + Esc to launch Task Manager.
  11. Locate the Windows Explorer process, right-click on it, and select Restart from the context menu.
    Restart Windows Explorer

The taskbar may disappear for a few moments and once it reappears, you will notice that the icons are all aligned to the left. You can now easily pin items to the taskbar as we did in the previous iterations of Windows.

But, there’s a major downside to this method. After making changes to the registry, you wouldn’t be able to launch the Start or Search menu, and Cortana if it’s enabled, by clicking the respective buttons in the taskbar. However, they can still be accessed via other methods.

In case you are willing to make the sacrifice, no other method mentioned above can match the effectiveness of this one.

Is drag and drop available in Windows 11?

After the drag and drop not working in Windows 11 problem was raised by several users, Microsoft issued a response a couple of years ago:

Currently, dragging a file onto an app in the taskbar to open it in that app is not supported in Windows 11, but we appreciate all your feedback, and we’ll continue to use it to help guide the future of features like this.

Based on this statement, we had expected the drag and drop feature somewhere down the line from Microsoft. Luckily, it did go live and Windows 11 22H2 users can now use it.

If the above solutions don’t meet your requirements or some critical functionalities are still left out, you can find a way to bring back the old taskbar and Start menu.

These are all the methods you can go for when the drag and drop function is not working in Windows 11. Although they aren’t as good as the built-in functionality, they do the trick until Microsoft releases a similar feature.

Once you have the drag and drop working in Windows 11, pin as many apps to the taskbar. Or, drop files to the processes in the taskbar to launch in that particular app.

Even more, apply these useful tips if the left mouse button drag doesn’t work. Even though it is a Windows 10 guide, rest assured they are the same as in Windows 11.

And if you change your mind and roll back to the previous OS, take a look at these quick fixes if you can’t drag and drop items in Windows 10. Moving paragraphs, files, or folders around will work like a charm once again.

You can get a detailed breakdown of how drag and drop works in File Explorer by reading this guide on Windows 11 drag and drop behavior.

Let us know your thoughts on Microsoft killing the drag and drop operation and the method you opted for in the comments section below.

0x8024002d: How to Fix This Windows Update Error

Error code 0x8024002d is an issue that arises for some users when they try to install security updates in Windows. That error displays a message along the lines of, There were problems installing some updates, but we’ll try again later… (update reference) Error 0x8024002d.

What causes error 0x8024002d?

Users can’t install patch updates for which error 0x8024002d arises via Settings. To fix error 0x8024002d, we recommend applying the potential Windows 11 solutions below.

Also, Microsoft nor anyone else has identified a specific cause for error 0x8024002d. However, this issue can arise for similar reasons other Window Update errors occur, such as the following:

  • There are corrupted system files – Updating Windows is a system process that can fail because of damaged system files.
  • Corrupted data in the SoftwareDistribution folder – Corrupted (damaged) files in that cache can cause update errors to occur.
  • Incorrectly configured or damaged update components – Some specific Windows Update components are damaged.

Now that we know what causes this problem, let’s start fixing it with the solutions below.

How can I fix the Windows Update error code 0x8024002d?

1. Open the troubleshooter for Windows Updates

  1. Use the Windows + X hotkey to access the Power User menu, and select Run from there.
    Run option 0x8024002d
  2. Type in the following command and click OK to access troubleshooters: ms-settings:troubleshooters
    Run accessory 0x8024002d
  3. Click Other trouble-shooters in the Windows 11 Settings app.
    Other trouble-shooters option 0x8024002d
  4. Select Run for the Windows Update troubleshooting tool.
    Run troubleshoot option 0x8024002d
  5. Wait to see if the troubleshooter detects anything and applies fixes.

2. Run SFC and DISM scans

  1. Click the Search icon from the taskbar, type cmd, and select Run as administrator.
  2. Type the following command and press Enter to run it: sfc /scannow
  3. Wait for the scan to finish, then execute the following command: DISM /Online /Cleanup-Image /RestoreHealth

The SFC and DISM scans will correct any system file problems or bad sectors on your drive.

3. Erase data in the SoftwareDistribution folder

  1. Click the Start button, type cmd in the search window, and select Run as administrator from the results.
  2. Stop some update services by executing these separate commands, one by one, and pressing Enter after each: net stop wuauserv
    net stop cryptSvc
    net stop bits
    net stop msiserver

    net stop commands 0x8024002d
  3. Return to Run, and input the following in that accessory’s command box: C:\Windows\SoftwareDistribution\Download
  4. To select all the data there, press the Ctrl + A key combination.
  5. Click Explorer’s Delete option.
    Delete button 0x8024002d
  6. Then go to this folder path: C:\Windows\SoftwareDistribution\DataStore
  7. Clear the DataStore folder by pressing Ctrl + A and clicking Delete.
    DataStore folder 0x8024002d
  8. Go back to the Command Prompt and restart the services by executing these four commands:

net start wuauserv
net start cryptSvc
net start bits
net start msiserver

4. Reset update components

  1. Download the script needed to reset the update components.
  2. Press the Windows key + E to start File Explorer, go to the download location, right-click on the zip file, and select Extract All.
  3. Open the file, right-click on the WUReset file, and select Run as administrator.
  4. Wait for the script to execute completely.

This simple batch script resets all Windows Update components, like the SoftwareDistribution folder, BTS service, Cryptographic Services, etc.

We also have a complete guide on how to reset the update components and you will find more information.

5. Reset Windows 11 to factory defaults

If error 0x8024002d persists after going through resolutions one to four, we recommend resetting Windows. That final solution will restore Windows to factory settings.

Most of your software will not be preserved after a reset, but you can at least select to keep user files. Have a look at our how-to reset Windows guide for further details.

Those potential error 0x8024002d solutions will address some of the more probable causes for updates failing. There isn’t any widely confirmed fix for this issue, but the ones above are worth a try.

Yet, there could be more ways to resolve that issue as well. Users who’ve found different ways to fix error 0x8024002d are welcome to share their solutions below.

Best JAR File Opener to Download & Use in 2026: #1 is a Must

JAR files are a sub-type of archive file that deals with Java content (Java Archive). Like all archive formats, it is used to aggregate Java metadata into a single file to facilitate transfers and distribution.

Coders that work using the Java format use it a lot. And given its popularity, there are also plenty of tools that will not only show you how to open JAR files but will do so effortlessly.

If you’re wondering what app opens JAR files, here’s a quick preview of our top picks for this year:

? WinZIPHighly versatile (cross-platform compatibility), this is an excellent Mac Jar opener and JAR file opener to download on Windows 10 & 11.
? File Viewer PlusTop Jar file viewer with top-notch support for a multitude of file formats & extensions.
? Java Runtime EnvironmentEnjoy the perks of a native .jar file opener with seamless OS integration, which is also free.
WinRARAgile reader with JAR file extractor capacities
7-ZipArchive-focused app to open JAR files and more

The entries were chosen based on multiple criteria so that you can make a more informed decision before choosing one or another:

  • effectiveness
  • price
  • ease of use
  • system requirements

Do .JAR files work on Windows?

That’s the big question. Now, the format is intended to work as an archive. As such, the JAR file itself is not directly readable or executable. You can, of course, use the Java Platform Binary to open it

However, it’s not the most digestible method. As an alternative, you can convert the JAR file’s extension and extract its content by using dedicated software to open JAR files.

Which are the best apps to open JAR files?

WinZip – The best JAR file extractor to download

Since JAR files are basically built on the ZIP format, the go-to solution would be to use the best tool on the market that also deals with opening ZIP files. And that is WinZIP.

Not only does this tool help you open and extract the data out of JAR files, but it also lets you archive it back into whatever archive file format you want. This also includes formats that are exclusive to WinZIP.

The product is lightweight and integrates with your OS context menus upon installation. Thus, it allows you instant access to WinZIP’s tools as soon as you right-click on a JAR file.

WinZip

Open, extract, and archive back your JAR and Java data with the help of WinZip’s powerful toolset
Free trial Visit website

File Viewer Plus – Universal software to open JAR files & more

If your JAR files aren’t the only ones that you have problems opening, then a good idea would be to switch from a tool that deals with particular file formats. Why not go for universal file openers instead?

In that case, the best choice you should go for is File Viewer Plus. This is currently the world’s best file opener in terms of the number of formats that it supports.

All you need to do is install the tool, and select it as the default program when opening JAR files

Once you do that, all you need to do in the future is simply double-click on JAR files and their contents will become available.

File Viewer Plus

Any file format will be available to you once you use File Viewer Plus, including JAR files.
Free trial Visit website

Java Runtime Environment – Free JAR file opener with native support

If you’re only interested in running or opening JAR files, and not developing them, then your next best pick in the list of JAR openers is the native Java Runtime Environment.

Created specifically for such situations, it allows the integration of Java support on your OS, or on your web browser. However, there is a catch. You can only use it if you’re still running Internet Explorer.

The UI may seem a bit dated, but the program does its job nonetheless, especially since it is designed to work with Java formats natively, and it’s free as well, which is also a big bonus.

⇒ Get Java Runtime Environment

WinRAR – Best JAR file opener with compression capabilities

WinRAR has always been the go-to choice for anyone looking to extract archive formats, most probably because it is constantly updated, free, and with an interface that has become a household item for PC users.

Just like WinZip, WinRAR integrates itself with your OS‘ UI, allowing instant access to archiving and extraction tools straight from the context menus when clicking on an archive.

It has pretty fast work speeds, allowing it to compress and decompress large amounts of data in very short periods of time, without using too many system resources, as you can test for yourself from the Task Manager.

⇒ Get WinRAR

7-Zip – Easy-to-use JAR file viewer with archiving features

If you’re dealing with JAR files, chances are that you’re into coding as well, and if you do, then the best archiving tool that you can use to open JAR files is most likely 7-Zip.

This tool has been around for some time, and while it does come with a traditional UI for beginners, the fine aspects of archiving can be tweaked via detailed commands that you can input in its console.

As far as opening JAR files go, it can be used to efficiently access its contents, and the only real reason it is last on our list is that the tool’s UI-based version isn’t very modern-looking, and may deter certain users.

⇒ Get 7-Zip

This concludes our list of the best tools to easily open JAR files. We hope that our entries have allowed you to make a decision regarding the best app to open JAR files and that they are as varied as possible so that all work styles can be included.

Let us know if there is any other great JAR opener that may have deserved to be added to our list by leaving us your feedback in the comments section below, and we will check it out.

Best Media Player Software: 8 Most Popular Picks of the Year

Media software can be either media centers or media players that support a wide variety of multimedia file formats.

Both are among the most essential software as they play audio and video files on hard drives and Blu-ray Disc, DVD, and CD. Thus, most Windows, Mac, and Linux platforms usually include at least one multimedia program.

What is the best media player to use?

CyberLink PowerDVD – Among most popular media players

PowerDVD is one of the hottest media players primarily designed for movie playback, but you can also utilize it for music and even showcasing.

Supporting all the latest video technologies, PowerDVD allows you to play virtually anything from Ultra HD Blu-ray for 4K to DVDs, BD-Live, 3D DVDs, and even ISO files.

PowerDVD users can embrace virtual reality with their Rift and Vive headsets for 360-degree videos. Media casting is another great addition to this media player that enables you to stream media to the TV via Chromecast, Apple TV, and Roku.

With its lossless audio format music playback, high-resolution photo slideshows, and media libraries, PowerDVD is more of a media center.

Let’s quickly look at its key features:

  • TrueTheater cinematic enhancements for supreme video and audio quality
  • Multichannel lossless sound system
  • Compatible with all platforms and entertainment devices from PC and mobile to streaming devices
  • Content management features to easily search, browse and view your favorite videos
  • Seamless Playback for your entire media collection
  • View wirelessly on any device

CyberLink PowerDVD

Enjoy 360-degree videos, 4K, 8K, HDR, and more! Simply unleash PowerDVD’s potential to enhance your multimedia experience.
Check price Visit Website

GOM Player – High-Rated media player

The GOM player is simply one of the best media players available out there, plus you get to enjoy its amazing features absolutely free of charge.

Of course, if you want to take your viewing experience up a notch, there is also a premium version available that keeps annoying ads at bay and provides a comfortable high-resolution 4K playback without buffering.

Let’s quickly look at its key features:

  • Native file format support (AVI, MP4, MOV, DVD, CD, and more)
  • Capable of rendering even damaged video and/or audio files
  • Extensive subtitle library available with automatic search and sync capacities
  • 360° VR playback with the 360-degree mode
  • Fully compatible with the Windows architecture

GOM Player

The best media player globally acknowledged is up for grabs – take your viewing experience up a notch!

VLC – Over 3.5 billion downloads worldwide

VLC is one of the best-established media players that was first developed in the ’90s.

Despite its relatively plain UI design, VLC remains one of the best media players with a vast array of options and tools for video and music playback.

This is open-source software that runs on most Windows platforms, and it’s also compatible with Android, Mac OS X, iOS, and Linux.

Let’s quickly look at its key features:

  • Extensive audio and video file format support
  • Play YouTube videos within the software, subscribe to podcasts and listen to radio broadcasts
  • Multimedia file conversion via a handy Convert tool
  • Selection of audio and video filters with which you can apply a wide variety of effects for cropping, geometry, colors, overlay, visualization, equalizer, etc.
  • Customization options, skins, plug-ins and visualizations to boot

⇒ Download VLC free here

Kodi – The most popular online TV player in the world

What was originally the XBMC (Xbox Media Center) has now become the biggest media center for Windows and other platforms.

Kodi is a media center that pretty much does it all, and you can run it on most platforms. Windows, macOS, Android, Linux, iOS, and Raspberry PI are all platforms compatible with Kodi.

It’s not an exaggeration that Kodi does it all as the software supports a multitude of video, audio, image, optical drive, network protocol client and server and container formats.

Let’s quickly look at its key features:

  • Play music and video from Blu-ray Disc, DVD, CD, and numerous file formats
  • Organize your multimedia within metadata databases
  • Watch or record live TV, stream films and TV shows and listen to radio broadcasts via add-ons
  • Set up slideshows for your photos, check the weather forecasts and even play Kodi games
  • Customization settings (pre-installed add-ons, unique skins and layouts, menu items, backgrounds, screensavers, visualizations, startup window, regional settings, display mode and much more)

⇒ Download Kodi free here

Plex – Compatible with almost every mainstream platform in the world

Plex is a media center with client and server apps that shares the same XBMC roots as Kodi.

However, Plex is now completely different software and is the best media center for streaming multimedia content across alternative devices.

Plex’s client and server apps are compatible with almost every mainstream platform under the sun. You can utilize its server apps on Windows, Mac OS X, Linux, Netgear, and FreeBSD platforms.

Although the server apps are freely available, you’ll need a monthly Plex Pass subscription to fully utilize all the media center’s features.

Let’s quickly look at its key features:

  • Stream your multimedia content to iOS, Android, Windows Phone, Roku, PlayStation 4, Xbox One, Apple TV, Roku, and Chromecast devices among others
  • Library organization that includes artwork and detailed bios for multimedia content
  • Cast media content to TVs via Chromecast, and watch online channels without subscription
  • Photo albums, photo tagging, lyrics for songs, and cloud storage synchronization (Premium subscription)

⇒ Download Plex here

KMPlayer – Supports 3D video content

KMPlayer is a freeware and highly versatile media player with tons of configuration options for audio and video playback that’s compatible with Windows, Mac, Android, and iOS platforms.

The software now supports 3D video content so that you can play 3D movies, and with its 3D Movies Plus app, you can watch programs from Discovery 3D World.

KMPlayer users can also watch 4K and UHD videos, and with the KMPlayer VR app for Android, you can watch 360-videos with VR headsets.

Let’s quickly look at its key features:

  • Includes video capture tools so that you can capture snapshots from videos
  • Stream compatible media content to mobile devices with KMP Connect
  • Watch 360-videos with VR headsets
  • Supports all the latest video technologies

⇒ Download KMPlayer free here

MediaPortal – Can play all Windows media files

MediaPortal is one of the best open-source media center alternatives to Kodi. The software has a stunning UI, loads of skins and plug-ins, and a full suite of multimedia tools.

MediaPortal pretty much matches, and in some ways eclipses, Kodi’s feature set. The software has its own TV-server with which to watch and record more than 10,000 live channels.

Let’s quickly look at its key features:

  • Watch live TV on multiple PCs with just one tuner card
  • Stream both audio and video content from various sources
  • Set up photo slideshows for your favorite pictures
  • Remote web browser access to MediaPortal
  • Hundreds of plug-ins available for TV, videos, music, games, photos, and weather forecasts

⇒ Download MediaPortal free here

5KPlayer – TrueTheater technology

Compatible with both Windows and Mac platforms, 5KPlayer is a media player that’s had some rave reviews.

This is a 4K 5K media player with which you can play videos with 4K UHD 3,840 x 2,160 resolution.

Let’s quickly look at its key features:

  • High-res video format support
  • Download videos from more than 300 video sites, such as YouTube, DailyMotion, Vevo, and Vimeo
  • Built-in Airplay to stream multimedia from Apple iOS devices to the media player

⇒ Download 5KPlayer here

Media Center vs. Media Player

The main distinction between these two is that you can open and organize all your multimedia files with media centers.

Generally speaking, media centers support a wider range of multimedia formats than players. Aside from music and video playback, media centers also enable you to organize and browse multimedia files within metadata databases and showcase your favorite photographs with slideshows.

Another notable difference is that media centers are also DVR software (digital video recorder) with which you can both watch and record live TV with an additional tuner card. You can also add extra plug-ins to some media centers for weather forecasts, games, movie and TV streaming, etc.

On the other hand, media players are specifically designed for music and video playback. Some are dedicated video or music players (such as MusicBee), but most media players generally support both audio and video file formats.

Although there are a few exceptions, they generally don’t provide live TV and movie streaming.

However, media players can include more extensive options and features for audio and video playback than media centers. If you don’t need live TV, movie streaming, or any photo options, they can actually be a better alternative.

Whether you go for a media center or player, there are plenty to choose from. These are the best media software for Windows you will ever need.

These media software packages include extensive tools and options to get the most from your multimedia content.

As there is some disparity between media centers and players, it’s probably better to add one new media player and one media center to Windows. Then you can get the best of both worlds.

What software are you currently using? Share your experience with us via the comments section below.