If you want to link your Arc Games account to your Xbox One or PS4 account, you have found the right guide.
Being able to have your accounts connected across platforms can help make the entire process of keeping the settings up to date a lot easier.
It is worth noting that even though this enables easier management of settings, the characters you were using on your Arc Games account will not be ported to your Xbox One or PS4 platform.
If you don’t find this to be problematic, then read on to find out how you can link your Arc Games account to your Xbox One or PS4 accounts.
Note:If you perform the link between your console and Arc accounts by using the Neverwinter game, you will also get a bonus and exclusive companion named Renegade Illusionist as a reward.
How can I link my Arc Games account to Xbox or PS4 consoles?
1. Open a game for the first time on your Xbox One/PS4 console. In case you skipped the initial linking window, you can still choose to do it later by clicking Link Account inside the game’s Options menu.
2. A splash screen will appear that will ask if you would like to link your Arc account to yourXbox Live/PSNaccounts.
3. Press theY button (Xbox)or theGreen Triangle button (PS4)to open the browser.
4. This webpage will allow you to log into your Arc account, or create a new account.
5. Once your account is registered, and you’ve signed in successfully, tick the box next to the optionLink your Arc Account to your Xbox Live GamertagorPSN user name.
6. Once this process is completed, your accounts are linked and you can enjoy the benefits of this.
It is very easy to link your Arc Games account to your gaming console account, no matter whether it is an Xbox or a PS4 one. All you need to do is open one of the games you have on them and click on the option that allows you to link the accounts. After, all that remains is for you to follow the on-screen instructions.
Some of the perks of having your accounts linked is receiving exclusive content in-game, that cannot be obtained in any other way.
For example, in Neverwinter, once this process is completed, you will be able to claim the Renegade Illusionist from the Rewards Agent in the Protectors Encvale after completing the quest Rags to Riches. This quest comes immediately after the tutorial.
Changing the scrollbar width or height in Windows 10 can be done very quickly without requiring somebody to have a lot of tech knowledge.
If you increase the width or height of the scrollbar, then every time you scroll with your Windows 10 tablet or Laptop through the content of a folder or web page, it will appear on the right side of the screen or on the left and will show a bigger or smaller scrollbar depending on what changes you apply.
Increasing the scrollbar width/height on Windows 10 PCs or tablets has been an issue for many Windows 10 users.
Although you can do it very quickly, this feature is a bit tricky to get to, but we will see below in a short and very easy-to-do tutorial on how we can change the width/height of the scrollbar in Windows 10.
How can I change the width and height of the scrollbar in Windows 10?
1. Press and hold the Windows and the R buttons at the same time on your keyboard. This is a shortcut for opening the Run dialog.
2. When the Run window pops up, type in the command regedit and press Enter to run it.
3. If you get a message from UAC (User Account Controls), then click on Yes.
4. Now you should have in front of you the Registry Editor window.
5. Click on HKEY_CURRENT_USER, which is situated on the right side of the window.
6. Under the HKEY_CURRENT_USER folder, click on Control Panel.
7. Under the Control Panel folder, click on Desktop.
8. Under the Desktop folder, click on WindowsMetrics.
9. The full path above should look like this : HKEY_CURRENT_USERControl PanelDesktopWindowMetrics.
10. Now, in the right panel, you should have there ScrollHeight. Double-click on it.
11. A window named Edit DWORD should appear.
12. In the field that says Value Data, there should be the value -255. This is the default value.
13. Change this value so that the height of the scrollbar increases or decreases. The values that you can enter can go up to 1500, this will increase the height of the scrollbar to the maximum. What you input depends on you as how much you want to increase the height of the scrollbar on your device.
If you enter for example in that field 600, it will increase your height of the scrollbar to about double its current size.
14. For increasing the width of the scrollbar double click on ScrollWidth, which is on the right side panel in WindowMetrics.
15. Now in the EDIT DWORD window, put the same data value you entered in the ScrollHeight and click on OK when you finish.
16. In order for the changes to take effect in Windows 10, you will have to reboot and sign in again into your user account.
The scrollbar’s width and height on Windows 10 PCs can be easily modified via the Registry Editor. After you access it through the Run dialog, all you need to do is navigate to the DWORDs that are responsible for modifying the scrollbar’s size, and tailor them to your liking.
If you managed to change these parameters without any problem, you may want to do more things with your scrollbars, and we have just the proper guides for you. Your primary approach should be to have the Windows 11 scrollbar always show up.
You may be one of the users that want to reverse its direction as it is known that many people are used to scrolling down in order to get to the top of the page.
This is it, now you can see how easy it is to change the height and width of the scrollbar in Windows 10, please write us below for any input on the subject, and best of luck with using it.
Microsoft has just announced that it is rolling out Microsoft To Do to Outlook for Windows. This means that users can get more productive by staying on top of their To Do tasks and planning your day right from Outlook for Windows. For those not familiar with Microsoft To Do, you can check out our insightful piece that will help you get started.
Here’s a glimpse of the Microsoft To Do and Outlook for Windows for the Current Channel users (starting with Current Channel version 2207) integration.
This integration adds a new feature that lets users view their flagged emails in Outlook in the Flagged email list of the To-Do app directly.
You will be able to get a snippet of the email, but if you want the full details you will have to open it in Outlook. The feature should be on by default, but if it is not available navigate through To Do Settings > Connected Apps > Turn on Flagged email to enable it.
Besides all this, the integration will allow users to find all the assigned tasks from Planner as well as shared lists, right in the Assigned to me list. It also comes with a dark theme to enhance readability that can easily be set by changing your Outlook theme to dark. Microsoft To Do is available to Microsoft 365 Current Channel users running the following versions of Outlook for Windows:
Current Channel Version 2201 (Build 14827.20000) or later: Available by turning on the Coming Soon toggle.
Current Channel Version 2207 (Build 15427.20000) or later: Available by default. (Feature rollout is still in progress. Some users may still need to turn on the Coming Soon toggle until the feature has fully rolled out).
However, if you have an eligible Microsoft 365 subscription and user license for the Microsoft To Do app, “you will be able to easily access To Do alongside the main Outlook functions such as email and calendar which are now displayed vertically to the left of the folder pane.,” explains Microsoft.
European Union cloud users are getting a bit of reprieve from Microsoft’s draconian-like licensing terms that many have claim tether the line of anti-competitive practices.
Earlier this week, Microsoft announced the changes to its EU cloud licensing structure via a blog post titled Making European Cloud Providers More Competitive, wherein the company lays out its three primary goals to assist customers in their flexibility of choice for cloud service products, and presumably, avoiding another anti-competitive strike from the EU in the process.
According to Microsoft, on October 1, 2022, EU partners and their customers should see the following:
Make it easier for customers to bring their software to the partner’s cloud
Ensure partners have access to the products necessary to sell cost-effective solutions that customers want
Empower partners to build hosted solutions with speed and scale
Microsoft gets into the nitty gritty of the licensing terms on another post via its Licensing blog that includes information regarding new flexible virtualization, options for Software Assurance or subscription licenses to license Windows Server on virtual core basis and one- and three-year subscription choices for several products.
We’ll introduce a new Flexible Virtualization benefit for customers that will greatly expand customer choice when outsourcing. Under this benefit, customers with Software Assurance or subscription licenses will be able to use their own licensed software to build and/or install solutions and run them on any cloud provider’s1 infrastructure—dedicated or shared. This will give customers more flexibility to run their software on multitenant clouds. This benefit will be available beginning October 1.
We’re adding the option for customers with Software Assurance or subscription licenses to license Windows Server on a virtual core basis. Under this model, customers can buy licenses for only the virtual cores they need (subject to a per VM minimum), without being tied to a physical number of cores on the server. With the virtual core licensing option, customers can license Windows Server by the number of virtual cores they are using in virtual machines, making Windows Server easier to license when virtualizing or outsourcing.
We’re making it easier to virtualize Windows 10 or Windows 11 by eliminating the Virtual Desktop Application (VDA) add-on license requirement for Microsoft 365 F3, Microsoft 365 E3, and Microsoft 365 E5 users who want to virtualize Windows 10 or Windows 11 on servers and don’t have a primary Windows Pro device.
Under the new Flexible Virtualization benefit, customers can work with partners in the Cloud Solution Provider program to get pre-built hosted desktop and server solutions and either bring their own license or get the license from the partner. A Microsoft Customer Agreement with the participating partner and proof of license will be required to run these hosted solutions.
Customers will have the choice of one- and three-year subscriptions for many products including Windows Server, Remote Desktop Services (RDS), and SQL Server, through partners in the Cloud Solution Provider program, to offer price stability with long-term subscriptions.
The changes come as three years of disgruntled customer experiences began to boil over after Microsoft’s 2019 license overhaul that raised prices across its cloud services portfolio while simultaneously building in discounts for first party integrations.
For the past three years, many partners and customers have complained that the 2019 licensing overhaul was a thinly veiled shift towards “tying” and thus ultimately an anti-competitive decision that heavily disincentives users in choosing AWS or Google Cloud while also running Office or Windows workloads.
In April 2022, Microsoft President and vice chair Brad Smith finally acknowledge the growing concerns over the company’s erratic and prohibitive licensing by saying, “there definitely are some valid concerns, it’s very important for us to learn more and then make some changes.”
Over the next two months leading up to the official licensing changes proposed by Microsoft, the company will also be addressing its outsourcing and hosting terms to more fairly compete with competing cloud platform pricing and services.
It should be noted that the October 1, 2022 due date for licensing changes only apply to the EU and do not address the concerns raised by US-based partners and customers who have raised similar alarms as the EU over the past three years.
Is Valorant not opening on your Windows 11 device? Then, this might be the result of a Valorant bug attacking your operating system.
Several people have also tried to install the game onto their devices. This is despite the game developers categorically indicating that you need the TPM 2.0 feature to play the game on Windows 11.
Remember that gamers cannot enjoy Valorant on unsupported Windows 11 devices, especially if they do not meet the set system requirements. Therefore, the absence of either one of these features might prevent Valorant from opening.
This article will address this problem in-depth and give you the best solution.
Why can’t I play Valorant on Windows 11?
Valorant is a relatively new game in the market. Therefore, there is no clear explanation for why some people face challenges while trying to open it.
However, the issue might occur because some of its main features are still in beta. As a result, gamers experience some glitches, ultimately disrupting gameplay.
There might be instances where your device cannot launch Valorant despite meeting Windows 11’s system requirements. Here are some of the most important:
Minor bug during game launch – This includes using a device that is not eligible to play the game, software glitches such as using outdated graphics drivers, and incorrect installation practices. It often leads to Valorant Error code 59.
Secure boot is off – The Valorant anti-cheating system depends on Secure boot and it can cause additional problems. We have a guide on how to resolve VAN9003 error in Valorant on Windows 11, so don’t miss it.
Overclocking graphics card – Pushing the system to the limit can trigger many unexpected events and even prevent Valorant from opening.
Logging into multiple devices with the same account – This issue can occur with any game, not Valorant, so you should check the devices you use.
Background apps – Some apps running in the background might block Valorant from opening.
We have solutions for all the problems above, so you can proceed and use the methods listed below to fix the issue.
How do I fix Valorant not working in Windows 11?
1. Run the game in compatibility mode
In the following guide, we’ll show you how to run the game in compatibility mode and quickly fix Valorant not working on Windows 11 devices.
1. Right-click Valorantand choose Properties.
2. Under the Compatibility tab, tick the box of Run this program in compatibility mode, then choose an older OS.
3. Click the drop-down list and choose an older version of Windows.
4. Click on OKto save the changes.
Updating Windows can prevent you from running Valorant on your system or even cause a compatibility error, ultimately derailing your efforts to play the game.
In such a situation, try to run the game in compatibility mode and check whether you can resolve the issue.
2. Update your graphics card driver
Launch Device Manager by searching for it on the search bar.
Expand Display adapters by clicking the toggle.
Right-click the GPU driver, and choose Scan for hardware changes.
Let Windows automatically search for the latest driver for GPU and install it on your PC.
If your device operates on an outdated graphics card driver, it may prevent the Valorant game from launching. Therefore you will need to update your graphics card driver.
To ensure a faster resolution when it comes to drivers, you can use a dedicated tool such as Outbyte Driver Updater to keep your drivers updated automatically.
3.1 Try running the game with administrator rights
Right-click the Valorant icon and choose Run as administrator.
See if the game runs with this option activated. If it does, close it and set admin settings permanently by following the next step.
3.2 Set permanent administrator settings for this game
Right-click the executable file and choose Properties.
Click the Compatibility tab.
Check the box of Run this program as an administrator.
Press OK.
Another workaround would be trying to run the game with administrator privileges, and then attempting to open the game once more.
NOTE
If this method works for you, you must set up Valorant, which always runs with administrative rights.
4. Close all Riot-related processes
Launch Task Manager in Windows 11 by typing Task Manager into the search box and clicking the result.
Under the Processes tab, find Riot processes (usually have a Valorant or Riot logo), click one and choose End task.
If one of the Riot processes is not working correctly, then that may be why Valorant is not opening. However, closing the processes might help you resolve the issue.
5. Update your OS
Press the Win + X key combination, and choose Settings.
Choose the Windows Update button from the left pane.
Click the Check for updates button and wait for Windows to check/install them.
Now open the game and verify that the problem of Valorant not opening in Windows 11 is resolved.
6. Reinstall Valorant
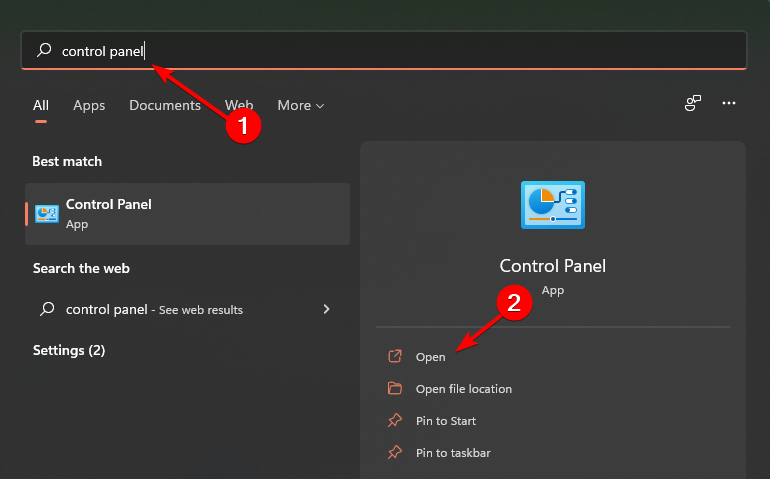
Click the Search button, type in control, and open the Control Panel.
Click on Programs.
Then, click on Programs and Features.
Select the game and click on Uninstall.
In case you are not able to uninstall the game, try using the methods mentioned in this guide to fix the Valorant not working issue.
If you have tried the above methods and none have worked, you can try installing the game on your device again. An error could have possibly occurred while you were establishing the game initially.
Once uninstalling the game, visit its official website and download its latest version. Then, reinstall the game on your device and check whether you can now open the game successfully.
Riot Games updated their Vanguard anti-cheat system, heavily dependent on the Secure Boot and TPM 2.0 features exclusively available on Windows 11.
This move ensures that gamers do not try to cheat the hardware or device ID if they have already been banned from accessing this game.
Besides, Trusted Platform Module 2 (TPM 2) and Secure Boot are all about security. This means they cannot use a new device ID instead of its original identification that was already banned from accessing the game.
However, the ban does not apply to Windows 10 users, who can still run Valorant on their devices despite the absence of Secure Boot and the TPM 2.0 feature.
When you receive the Unable to Start Correctly error, it simply means that Valorant cannot start properly.
One of the most straightforward fixes you could implement in such a situation would be to restart the device. After applying this solution, then check whether the issue has been remedied.
Users should try this several times and let the game start from scratch. Ideally, this is supposed to let you open the game properly. Moreover, it could also present another error leading to a proper fix.
This will allow all your programs to get a fresh start, install any pending updates, and even remove any potential blocks preventing Valorant from running correctly. Furthermore, it will help you clear any issues with the Vanguard anti-cheat software.
We suggest running the games as an administrator and in compatibility mode.
Now let us see detailed solutions to Valorant not opening in Windows 11.
Why is Valorant not responding?
If the game is not responding, it could be because of any of the following:
Conflicts between Windows and Valorant
An old OS and outdated graphics card driver
Secure boot is disabled
Faulty game installation or damaged game files
Apps running in the background
It will most likely respond after using the solutions mentioned in this guide. However, you must note that Valorant heavily depends on Windows 11’s system requirements, specifically the TPM 2.0 feature, because of the hardware and security-related actions.
By complying with the system requirements, you can avoid errors, including the Windows 11 Valorant TPM error.
The feature in Windows 11 provides users with an extra layer of security. For more information about the TPM 2.0 feature, look at our TPM 1.2 vs. 2.0 guide.
Also, check out these great VPNs for Valorant to fix lag and reduce ping. Our top suggestions won’t disappoint you since they can automatically detect the best server to decrease latency.
We hope you were finally able to fix the issue of Valorant not opening in Windows 11. Which of the above methods helped you resolve the problem? Please share your thoughts with us in the comments section.
You probably got a message that reads Windows defender firewall can’t change some of your settings. So let us show you all you must know.
Along with Windows Defender, the built-in Microsoft security solution, the Windows Firewall is an essential feature that can protect your computer against malware or virus attacks.
However, it would help if you didn’t panic, as you can always fix system errors by applying the right troubleshooting solutions.
So, in our case, we will detail the methods that should be applied when the Windows Firewall can’t change some of your settings.
The reasons why this message appears can vary from one situation to another. Therefore, the guidelines below will try to find a fix for each situation.
Why can’t the Windows Defender firewall change settings error appear?
There are a few reasons why a user may experience this error in Windows OS. First, this error could occur if Windows does not have one of its necessary services operating.
Conversely, this problem may also be brought on by a deactivated BITS (Background Intelligent Transfer Service). Therefore, the Background Intelligent Transfer Service must be in a functional condition.
Other common reasons include:
Firewall managed by third-party software
Corrupted Windows Files
Zero access rootkit infection
Most common variations of this error
This error could come in any of the following forms:
Windows firewall can’t change some of your settings 0x800706d9 – Simply said, it indicates that Windows Firewall must be enabled.
Your Windows firewall can’t change some of your settings 0x80070422 – A corrupt user profile might be the issue. Your profile may get damaged for various reasons, but you may create a fresh profile.
Windows defender firewall can’t change some of your settings group policy – It is most likely because the domain controller’s Group Policy Object has made it impossible to alter these settings.
Windows could not start the windows defender firewall service on the local computer – The likelihood is that your Firewall is contaminated. However, it might only indicate that you terminated the Firewall services and that you must restart them to make changes to their settings.
Now let us look at some of the best resolutions for these errors.
How do you fix Windows Defender Firewall can’t change some of your settings?
1. Enable Windows Firewall services
Click on the Cortana icon (it will launch the Windows search engine).
In the Search field, type services, right-click on the first result with the same name, then pick Run as administrator.
From Services, scroll down and find the Windows Firewall entry.
Go to the General tab and change the Startup type to Automatic.
Save these changes.
Then, right-click on the Windows Firewall service and choose Start.
Close the Services window and reboot your computer.
If the Windows firewall fails to launch at start-up, you will receive the Windows Firewall can’t change some of your settings error message.
2. Apply any pending updates
Press the Win + I keyboard hotkeys.
From System, Settings, choose Update & Security.
From the left side of the main window, go to Windows update.
If there is an update patch waiting for your approval, apply it.
Then, reboot your computer and check if the Windows Firewall can’t change some of your setting’s error message is still there or not.
If your Windows system is not updated correctly, you might experience Windows Firewall problems. You may want to explore the Microsoft list of updates and ensure you are current.
3. Reset Windows Update Components
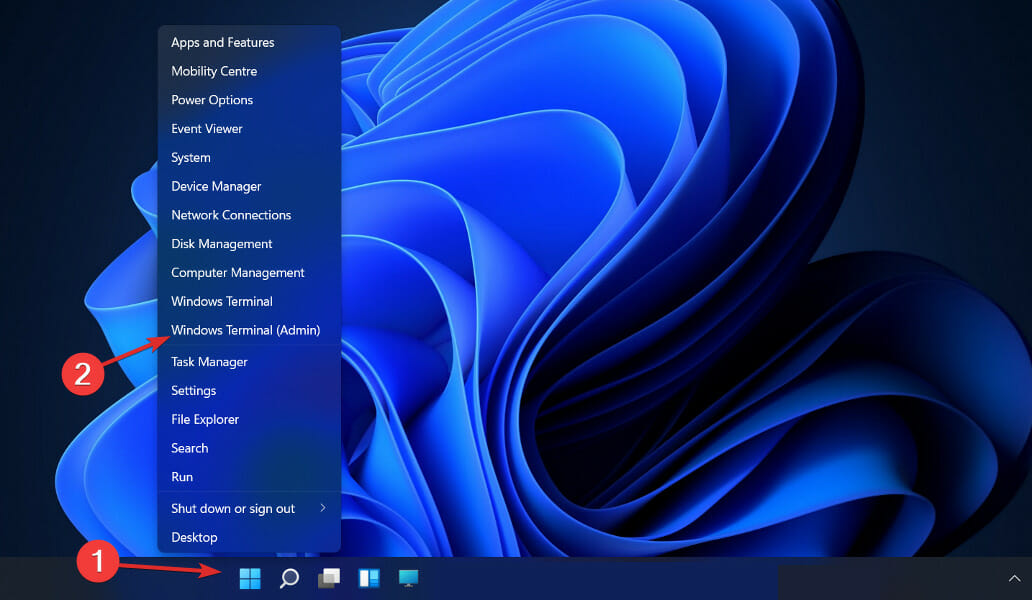
Right-click on the Windows Start button.
From the list, choose Command Prompt (Admin).
Now type in the commands below, hitting Enter after each one. netsh advfirewall reset net start mpsdrv net start bfe net start mpssvc regsvr32 firewallapi.dll
When done, close the cmd window and restart your computer.
4. Configure Background Intelligence Transfer Service
Click on the Cortana icon (it will launch the Windows search engine).
In the Search field, type services, right-click on the first result with the same name, then pick Run as administrator.
Scroll down and find the Background Intelligent Transfer Service entry.
If this feature is disabled, double-click on it, and modify the Startup type to Manual.
Then, click on the Start button beneath Service Status.
Restart your Windows 10 system.
5. Disable third-party antivirus software
In some situations, Windows Defender might not run properly if another third-party antivirus program is on the computer. In addition, conflicts between built-in and third-party programs might cause the Windows Firewall to malfunction.
So, to eliminate the Windows Firewall that can’t change some of your setting’s error messages, you should disable this third-party antivirus software.
You can choose to disable them or to uninstall the programs entirely temporarily. If afterward Firewall works correctly, it means that you found the problem.
If not, you should disable Windows Defender and reinstall your third-party antivirus program, as your Windows 10 system might have viruses or malware.
6. Run a security scan and remove the infected files
Press the Win + R keyboard hotkeys.
In the Run box, type msconfig and press Enter.
From System Configuration, switch to the Boot tab; under Boot Options, select the Safe Boot checkbox and the Network option from beneath.
Save your changes when done, and reboot your computer.
In safe mode, launch the antivirus program and initiate a full scan.
In the end, complete the removal process – reinitiate a scan to ensure all infected files were successfully deleted.
If you cannot fix the issue with the help of the already explained guidelines, you should consider initiating a security scan on your Windows 10 device.
It would help if you did that because your computer might have a virus or malware. And that should be the reason for the Windows Firewall can’t change some of your settings error message.
First, make sure you use a trustful antivirus or antimalware program. In a dedicated review, we already discussed the best antivirus programs on the Windows OS as an alternative to the built-in Windows Defender solution.
However, if you are still using Microsoft’s default security features, the troubleshooting solutions explained above should help you fix the Windows Firewall can’t change some of your settings error message.
If you have questions or if you need our further assistance, don’t hesitate and get in touch with our team. Then, based on the info you provide, we will try to find the perfect solutions for your problems.
Archiving your emails helps you save your emails and their data for later use. It also makes it easy to quickly look up your files when you need to find them. Additionally, it can also come in handy in abrupt data losses where you might otherwise end up losing your critical information.
It makes sense, then, to archive your emails regularly. This article looks at how you can do that without any hassles. So let’s dive right in.
How to archive Outlook emails
Before you begin to archive your Outlook emails, it’s essential to understand that moving your Outlook emails to archived emails is different for different Outlook setups.
For instance, if you’re using Outlook Web you’ll simply move your emails from your inbox to the Archive mailbox. On the other hand, if you’re on the Outlook desktop app, archiving your emails can also be about moving your emails from the mail inbox folder to the Archive folder. So let’s look at both procedures.
How to archive emails on Outlook desktop
To archive your emails on Outlook desktop, you can use the AutoArchive feature in the Outlook app. Made available for free from Outlook, when you’ve enabled this feature, your emails will be archived automatically after a specified period of time. Pretty handy, right? Here’s how you can set up this feature:
Open the Outlook app and select the File option.
Click on Options > Advanced.
Look up the AutoArchive feature and click on the AutoArchive Settings feature when you find it.
Select the Run AutoArchive every radio box and choose how often the AutoArchive feature should run.
From the Default folder settings for archiving section, choose when your Outlook emails should be archived.
Click on Browse and choose a destination for archiving your folder.
Click on OK to save your changes.
That’s it — your Outlook emails will be archived as per your specified settings. If you want to disable the Outlook feature in the future, all you’ve to do is uncheck the Run AutoArchive every radio box again and save your settings—the archive feature will be disabled.
How to archive email on Outlook Web
Archiving your emails on Outlook web is a straightforward affair; much simpler than for Outlook desktop surely. To get started with it, follow the steps below:
Head to Outlook.com account, log in, and go to Inbox.
Select all the emails you’d like to archive and select Archive.
All the selected emails will be archived instantly. If you want to unarchive them later on, head to the Archive folder and select the email. Then click on Move from the top, and choose the location where you want to move your emails.
Archiving your Outlook emails with ease
So that was all about archiving your emails on Outlook, folks. Archiving your files can be super helpful to keep your files protected against accidental data losses and help you pull up your emails instantly. I hope you were able to archive your email successfully after this.
Creating a bootable USB drive is a convenient way to install an operating system on a PC. There are many tools that can help you with this, and today we’ll take a look at two of the best on the market: Rufus and Ventoy.
Both programs have their strengths and weaknesses. Let’s take a closer look.
What are Ventoy and Rufus?
Rufus and Ventoy are utilities that can create bootable USB drives. They are both open-source, portable, and free to use. This means that you can easily use either to copy your favorite operating system on a USB stick or external drive and run it directly from there.
Is there anything better than Rufus?
Rufus isn’t perfect. It features a very simple interface and you can use it to format any type of USB flash drive to either FAT32 or NTFS file system.
But the most useful feature of this tool is that it allows you to create bootable USB flash drives. What makes this app so popular? Well, besides being completely free, it supports a wide range of ISO file formats.
It also allows you to create bootable USB drives for all versions of Windows. The best thing about this app is that it can make installing Windows on Mac computers easier as well. The portable version of this program can be run from any location and doesn’t need to be installed.
Most utilities like Rufus need to be downloaded and extracted. A majority of them also don’t allow multiboot which makes Rufus a top contender among others.
Is Ventoy safe to use?
Yes. Ventoy is a 100% free and open-source application. The source code is available for anyone to download, modify, and redistribute. This allows users to verify that Ventoy does not contain any malicious code.
What are the differences between Ventoy and Rufus?
Both Rufus and Ventoy share similarities but they also have their own differences. The bottom line is that either can create bootable USB drives.
Rufus has a very easy-to-use and minimal interface, but it also has some advanced options for those who need them. Ventoy has its users singing praises as the best one yet since you can create multiboot USB drives.
Do Rufus and Ventoy support Windows 10/11?
Rufus and Ventoy both support Windows 11 in 32-bit and 64-bit versions. This is a great advantage because it means that you can use either application to create bootable USB drives for the latest version of Windows.
With Ventoy, some Windows 11 system requirements may show up during installation but you can easily bypass them.
Both Rufus and Ventoy work with BIOS and UEFI. Booting from a USB drive requires having BIOS or UEFI firmware support for it. UEFI is newer than BIOS, but not all computers have it yet.
If you’re having trouble booting from a USB drive, the most likely cause is that you haven’t set your BIOS or UEFI firmware to support booting from USB drives.
Users with older systems that use BIOS, should look up whether their motherboard supports booting from a USB drive. If not, then you’ll need to upgrade to a newer model with UEFI support (which most modern systems have).
Rufus is popular because it’s simple to use and supports many different types of file systems (NTFS, FAT32, etc.).
Both programs are very easy to use; however, Ventoy has a simpler interface compared to Rufus. Rufus may make it harder for beginners to use this program effectively. Without any prior knowledge about how these programs work, they can be difficult to navigate.
Also with Ventoy, you do not have to extract any files and you can directly copy and paste like regular files.
Performance and speed
Both Rufus and Ventoy are very fast when compared to other similar tools. However, there are some minor differences between them in terms of performance.
Rufus has a slightly faster benchmarking time than Ventoy. This difference may not be noticeable for most users but it can be an important factor if you need to create multiple bootable drives at once.
The most important feature of Ventoy is that it creates bootable USB flash drives without having to go through a complicated process that normally requires a command prompt or third-party software.
It also allows you to create multiple partitions on your hard drive, each one with its own operating system so that you can use more than one OS at the same time.
If you need more control over what happens when your computer boots from a disc or flash drive, try Ventoy instead of Rufus.
Ventoy vs Yumi vs Rufus
There are several tools that can create bootable USB drives, but not all of them are created equal.
Ventoy
Yumi
Rufus
Support UEFI and BIOS
Support UEFI and BIOS
Support UEFI and BIOS
Supports drive partitioning MBR/GPT
Supports MBR partitioning
Supports drive partitioning MBR/GPT
No extraction necessary
Extraction necessary
Extraction necessary
Conclusion
Creating a bootable USB drive is a very simple task. All you have to do is download the ISO of the operating system and then use the right tool to create a bootable USB drive.
When selecting a utility, it should have support for multiple operating systems, can create multiple partitions on the drive, and supports UEFI and BIOS systems.
Don’t forget to install an antivirus program whenever you are using multiboot tools to ensure your system is protected at all times.
If you’re a fan of Rufus, don’t miss our guide on the best Rufus settings for Windows 11. If you’re using legacy systems, we have a fresh guide on how to run Rufus on Windows 7 that you might want to check out.
If you have gotten a chance to use any or all of these tools mentioned here, be sure to let us know what your experience was like.
Xiaomi officially unveiled its new Xiaomi Notebook Pro 120G and Xiaomi Notebook Pro 120 laptops in India. The Notebook Pro 120 and Pro 120G are the successors to the Xiaomi Mi Notebook Pro, which was launched last year. The latest Notebook Pro 120G comes with a bunch of improvements compared to the last generation devices.
Xiaomi Notebook Pro 120G features a 2.5k resolution 120Hz display, 12th Gen Intel processors, dedicated Nvidia GeForce MX series GPU and much more. The base variant Notebook Pro 120 comes with the integrated GPU, and the rest of the specifications are the same as the 120G variant.
Take a closer look at the detailed specifications, features, price, and availability of the Notebook Pro 120G laptop.
Xiaomi Notebook Pro 120G Specifications
The newly launched Xiaomi Notebook Pro 120G flaunts a 14-inches 2.5k resolution display that offers a 120Hz refresh rate, a 16:10 aspect ratio, 100 percent sRGB color gamut, and DC Dimming. The panel of the machine is TUV Rheinland certified.
The Notebook Pro 120G laptop is powered by a 12th Gen Intel Core i5-12450H series processor coupled with an Nvidia GeForce MX550 dedicated GPU. The machine comes with up to 16GB of LPDDR5 RAM and 512GB of PCle Gen4 SSD storage and it runs on Windows 11 Home out of the box.
The machine has a full-sized 3-level backlit scissor mechanism keyboard that offers 1.3mm deep key travel. The laptop has WiFi 6 and Bluetooth v5.2 support.
Xiaomi Notebook Pro 120G draws power from a 56Wh battery. To recharge that big battery, it has 100W fast-charging support. Xiaomi claims that the laptop charges 0 to 50 percent just in 35 minutes. (Via Xiaomi.com)
Talking about the design of the laptop, it has an Aerospace Grade Aluminum alloy build, and a thin and lightweight design (weighs just 1.4kg). It has thick top and bottom display bezels.
As for the port options, the Notebook Pro 120G comes with
1x Type-C USB 3.2 Gen 2
1x Type-A USB 3.1 Gen 1
1x Thunderbolt 4 ( for data transfer and Charging)
1x HDMI 2.0 Port
1x 3.5mm Headphone Jack
Other features of the Xiaomi Notebook Pro include dual stereo speakers with DTS audio, a 720p HD webcam, a fingerprint sensor integrated with the power button, a hurricane dual cooling system, and an in-built microphone.
The base variant i.e The Xiaomi Notebook Pro 120 laptop follows similar specifications as the Pro 120G variant. The only difference between Notebook Pro 120 and the Notebook Pro 120G is that the former ships with integrated Intel UHD graphics.
Xiaomi Notebook Pro 120G Price & Availability
The latest Xiaomi Notebook Pro 120G retails at ₹74,999 (roughly $942) while the Xiaomi Notebook Pro 120 is priced at ₹69,999 (roughly $880).
The laptops will be available for sale from 20th September in India via Amazon, Mi India’s official website, and Mi stores across India.
For more latest and exclusive tech news updates follow us on Google News.
Many users noted Killer Network Service on Windows 11 and other versions of Windows, and they are concerned about it.
In today’s guide we’re going to take a closer look at this service, and see what exactly it does.
What is Killer Network Service and do I need it?
With this service, you can prioritize your online gaming, streaming, and downloading activities on the network by giving them higher priority over other things.
It works by prioritizing your most important tasks so that they get more bandwidth than other tasks.
Why is Killer Network Service on my computer?
The Killer Network Service is a Windows service that allows programs to send and receive network data.
If you have recently installed any network drivers from the Internet, it is possible that Killer Network Service was part of the installation package.
Is Killer Network Service needed?
The service is optional so you get to choose whether you really need it. It has been designed to improve the performance of your computer in games by prioritizing traffic.
If these programs aren’t given priority, they may suffer from lag or buffering issues during peak usage times.
To avoid any inconvenience, we suggest to always performing scanning of any file or program you are downloading. To do so, you can rely on a trustworthy antivirus, such as ESET HOME Security Essential, to scan, detect and remove the malware.
Hit the Windows + R keys simultaneously to open the Run dialog box.
Type services.msc and press Enter.
Navigate to Killer Network Service and double-click on it.
Click on the Stop button under Service status then press OK.
As an alternative, you can opt for bandwidth optimization software to manage your bandwidth usage and allocate it accordingly.
There are other lesser-known services, and we already wrote about NetworkCap.exe in one of our previous guides, so don’t miss it.
Now that you are aware of the Killer Network Service in Windows 11, we’d love to know your experience with it. Have you encountered any performance issues? Start us off in the comments section below.
Network drivers in Windows 11 are required for the computer’s network adapters. Your PC’s network adapter is the device needed for Internet connectivity. Wireless network adapters’ drivers are also known as Wi-Fi drivers.
Drivers facilitate communication between Windows 11 (or any other OS) and internal and external hardware devices. Companies regularly update drivers for their hardware devices.
Therefore, the original drivers that came with your PC will get outdated.
Windows 11 doesn’t include any new utility for updating device drivers. Therefore, there isn’t any new way you can update network drivers in the latest OS.
Do I really need to update my PC’s network driver?
Updating the driver for the network adapter can enhance both its performance and reliability. For example, an antiquated network driver might reduce the download speed on your desktop or laptop.
For the sake of faster download speed, it’s worth updating a network adapter’s driver. Furthermore, connectivity issues will more likely arise on a PC with an outdated network adapter driver.
If you can’t connect to the Internet, you won’t be able to download a new driver to fix that issue. So, it’s best to update your computer’s network driver when you can do so to forestall connection inconveniences.
How to install network adapter driver Windows 11 without Internet?
Without a doubt, our computer and operating system will not function normally if we do not have the appropriate drivers installed.
Before we go any further, you need to be aware that the installation of drivers on Windows 11 may be performed with or without an Internet connection.
It is essential to have up-to-date drivers because, in the event that they become corrupted or otherwise inoperable, hardware may become unresponsive or malfunction.
In addition to this, they conceal the fundamental workings of your hardware devices, so enabling you to make use of an incredibly user-friendly interface.
We prepared a dedicated article on how to manually install your drivers, which we recommend you check out as the first two solutions do not require an Internet connection.
How can I update my PC’s network driver in Windows 11?
1. Use Device Manager
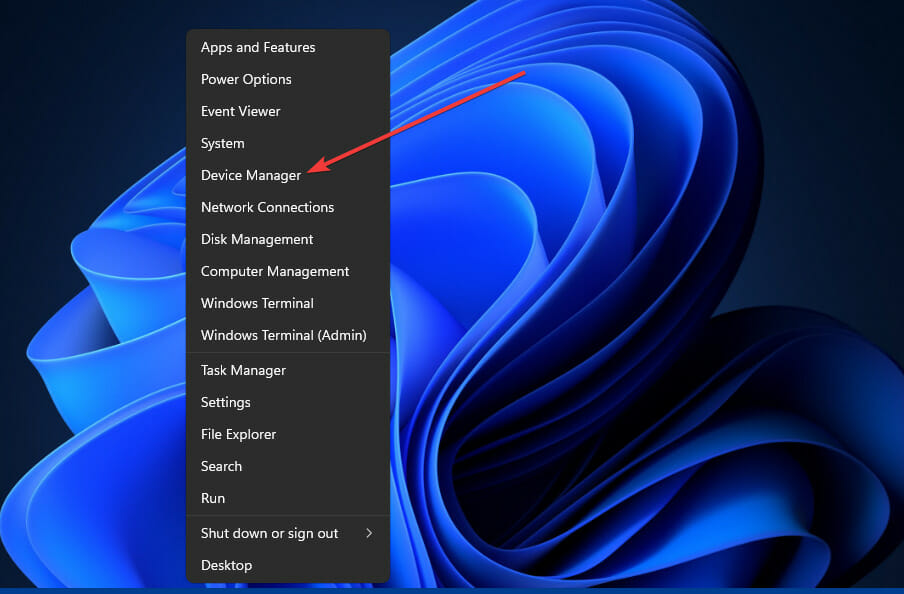
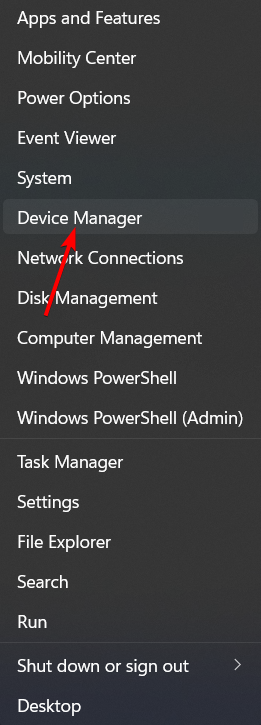
Press the Windows key and X simultaneously to open a menu that includes some handy shortcuts.
Click the Device Manager shortcut to open that utility in Windows 11.
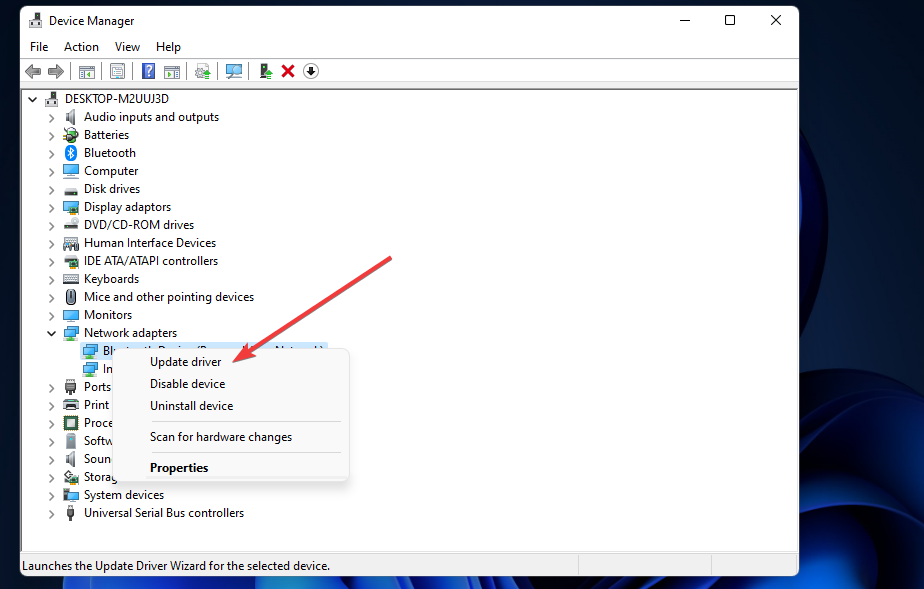
Double-click Network adapters to expand the device list for that category.
Then right-click your Internet network adapter there and select the Update driver context menu option for it. You can do this for any Ethernet driver in Windows 11 as well.
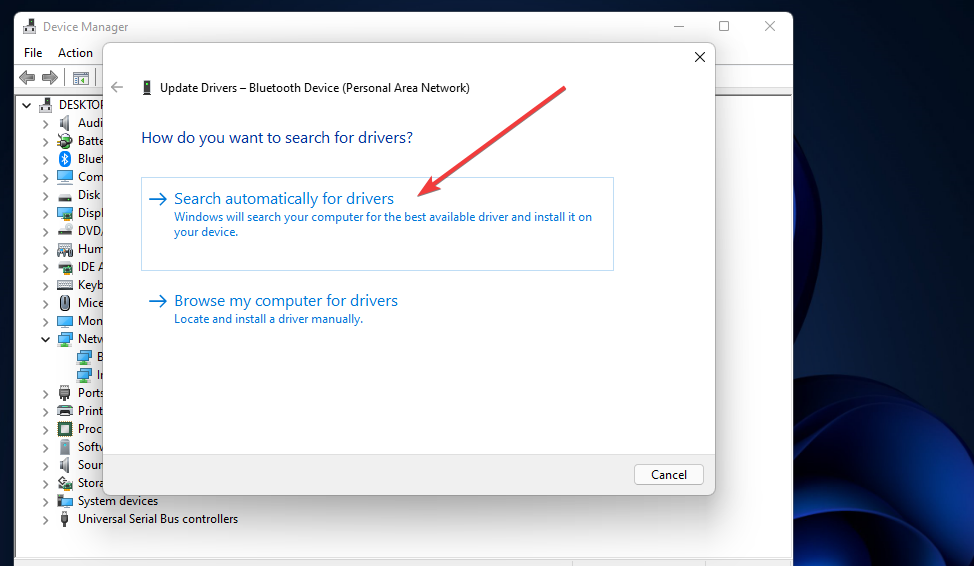
Select the Search automatically for drivers option to initiate a Windows search.
If the updater utility detects a better driver, wait for Windows to install it.
2. Use the Windows Update Service
1. Open theStartmenu by clicking on the Start button on the taskbar.
2. Click on the Settings app pinned to the Start menu.
3. Next, click theWindows Updatetab on the left ofSettings.
4. SelectAdvancedoptions on the Windows Update tab.
5. Click Optional updates within Advanced options.
6. If a network adapter driver is listed within the optional updates, select its checkbox.
7. After, press theDownload & installbutton.
If you are not fan of using Device Manager to update your network adapter drivers, you can instead use the Windows Update Service. It is also a built-in tool, and it is responsible for keeping your device up to date.
From the Windows Update Service menu, you can scan for, download and install new updates for your network adapter driver at any time.
NOTE
To check for new updates, you’ll need to press the Check for updates button in Settings.
3. Manually update your PC’s network adapter driver
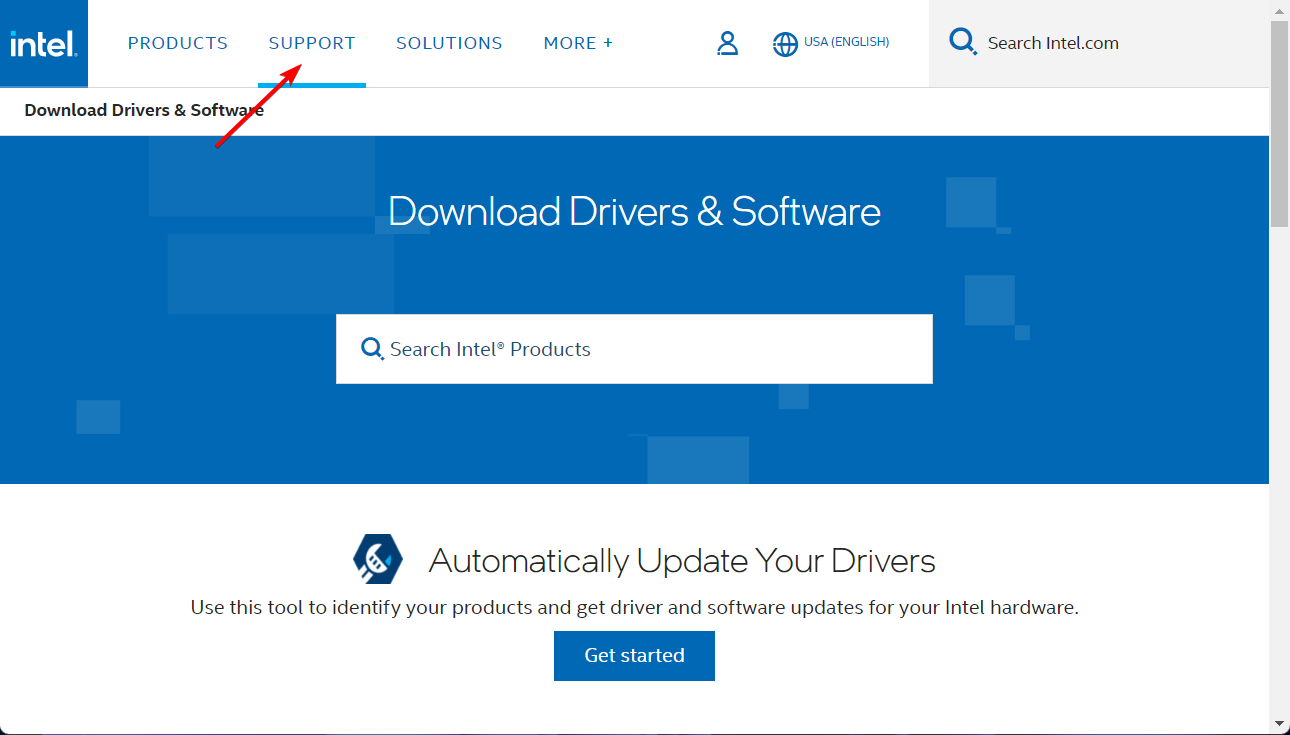
Open a web browser in Windows 11 and search for your network adapter’s driver provider website, which will be the manufacturer’s site. For example, Intel provides the drivers for Intel network adapters.
Then open the manufacturer’s website and click the link for the driver download section of the website. It is usually found under Support.
Select the network adapter (or wireless) product category.
Then enter the name of your network adapter, as specified within Device Manager, in the website’s device search box.
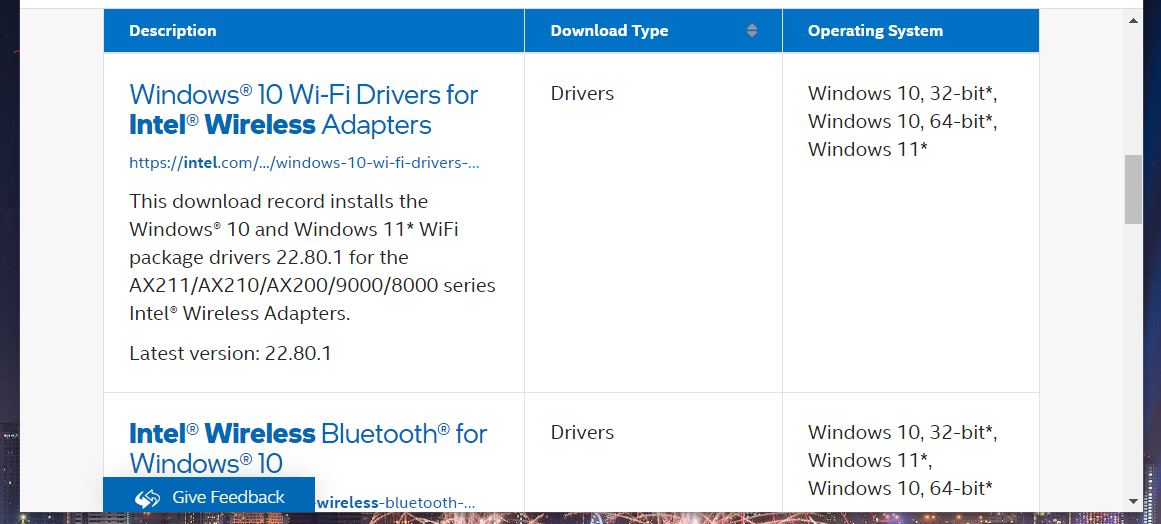
Click the Download option for your network adapter’s latest driver package listed on the website, which must be compatible with your Windows 11 platform.
Thereafter, select a folder to download the driver package to and click the Save button.
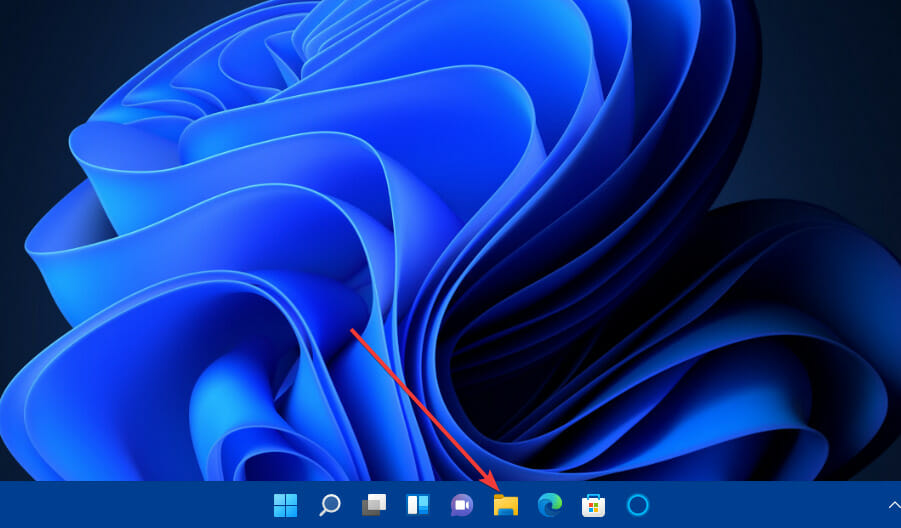
When you’ve downloaded the driver package, click File Explorer’s taskbar button.
Open the folder you saved the driver package in.
Double-click the driver package’s EXE file to open its installer window.
Then go through the installer window’s instructions to install the network driver. You can do this for any network controller in Windows 11 that you need to be updated.
NOTE
Some driver packages have a CAB format. If you download a driver with a CAB format, you’ll need to extract its ZIP archive first. Then select the Browse my computer for drivers option in Device Manager’s Update Drivers utility to install it.
If you are looking for a quicker and easier solution, using a specialized tool is what you need. You can update any of your PC’s drivers by selecting the download and install options within the driver updater.
How do I reinstall network drivers in Windows 11?
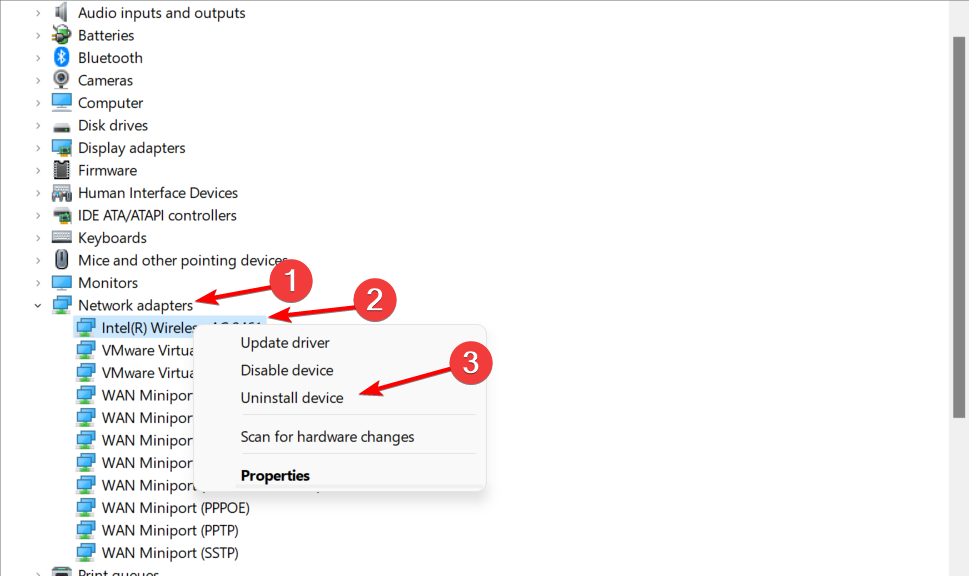
Right-click the Start icon and select Device Manager.
Expand the Network Adapters section, right-click on your network drivers, and select Uninstall device.
Reboot your PC to reinstall the drivers automatically. That’s it!
How can I enable (or disable) automatic driver updates in Windows 11?
Windows 11 will automatically download and install some device drivers if configured to do so. You can enable automatic driver downloads with device installation settings. This is how you can do that in Windows 11.
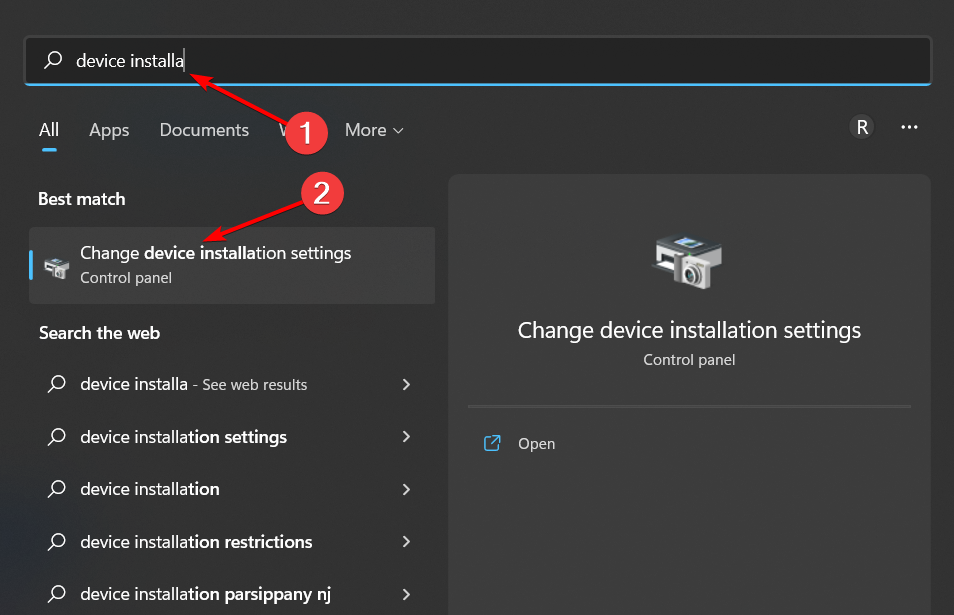
Press Windows then type device installation settings within the search box. Click Change device installation settings to open that window.
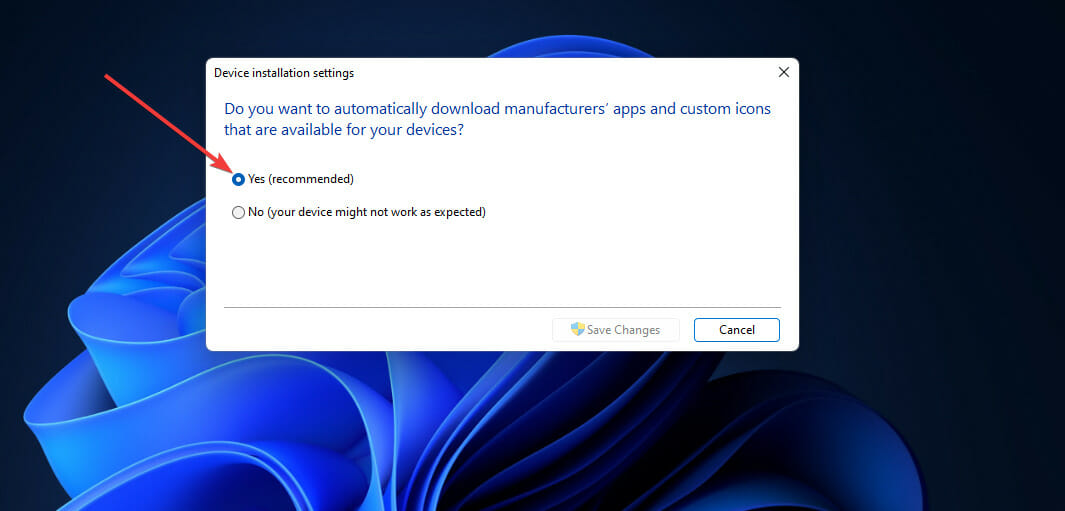
Select the Yes option on the Device installation window if it’s not already selected. Or you can selectNo if the opposite is true.
Press the Save changes button to confirm.
Bear in mind that enabling automatic updates doesn’t mean Windows Update will update all device drivers on your PC. However, it will at least update the more essential device drivers.
So, there are numerous ways you can update your computer’s network driver. Choose whatever method you prefer for updating the network adapter and other device drivers.
Connectivity issues will less likely arise on your PC if you keep its network adapter driver up-to-date with the above methods. It’s best to update network drivers to prevent connection issues from arising in the first place instead of waiting for them to happen.
Outlook is the number one email service provided by Microsoft. The third most popular email service, Outlook comes packed with a ton of features. Be it managing your calendars, creating new meetings, or scheduling your emails, Outlook can help you do all from a single place.
Another such feature is the ability to add contacts to Outlook. You can add information such as name, email address, phone number, address, etc., to these contacts later on. Let’s look at how to get started.
How to add contacts on Outlook
After you’ve added the contacts to your Outlook account, you can then simply type in the name of the contact, and Outlook will autofill the email for you.
To add a person as your contact, head to the email sent by them and click on their name on the To, Cc, Bcc, or From line. Head to the Contact section and select Add to Contacts. On the next window, add in any and all details you want to fill in and click on Create.
Another way to add contacts on Outlook
So that’s one of the ways to add a contact on Outlook. But that’s not the only one. Alternatively, you can add contacts straight from a separate section—without getting into the emails.
To add the contacts in an alternate way, select People from the left-hand side of the main menu. From there, select the Add Contact button.
Enter the information such as First name, Last name, and any other relevant notes you’d like to add on. If you click on Add more, you’ll see a host of other fields you can fill in: email address, work, address, and so on. In fact, you can even put in an image for your contacts.
When you’re done adding in the fields, simply click on Create.
For Outlook app
The above methods are only applicable on Outlook web. If you’re using the Outlook app [Outlook 2013 and over], however, then your steps will be slightly different. Here’s how:
On the Outlook app, click on the People option from the bottom left corner. From there, under the Home tab in the Ribbon, click on the New Contact option in the “New” section from the top-left corner.
You’ll see a new window. Enter the contact details here and click on Save & Close option to save the contact.
Editing the contacts
After you’ve added the contacts, you can also edit them at a later time for whatever reason you need to. Here’s how:
On your Outlook account, head to the People section from the left corner. From there, select the contact you’d like to update and click on Editcontact. In the new dialog box, you can edit all the information you’d like.
Adding contacts on Outlook
If there are people you interact with on a daily basis, it might then be a good idea to add the contacts to your Outlook account. Not only does it help you send emails to multiple contacts right from a single place, but it also helps you keep your important contacts together.
The Memory Management stop code appears alongside the Blue Screen Of Death, which can be very annoying.
The error affects all the iterations of OS, including Windows 10 and Windows 11, and the underlying cause pretty much remains the same. It often occurs when users run highly demanding processes, such as complex games, VR games, watching 4K live streams, etc.
What is memory management blue screen?
Memory management blue screen is a critical memory error usually caused by RAM. If you bump into a Memory Management error on Windows 11 or Windows 10, first make sure to check your RAM modules.
If your memory is the problem, you might encounter Your Computer is low on memory message, or in the worst case scenario, you might not be able to boot your PC at all.
The simplest and the most common solution for this problem is to restart your computer. After the restart, you shouldn’t get this error message anymore. So, before you try anything else, restart your computer and see if the issue has been fixed.
However, if the Memory Management error message still appears after you restart your Windows 10 PC, there are a few advanced troubleshooting solutions that you should try, so read on.
How do I stop blue screen memory management?
1. Run the SFC scanner
The SFC (System File Checker) scan is Microsoft’s tool for resolving various system problems, so you can run this scan to diagnose and resolve system issues that implies BSOD error codes.
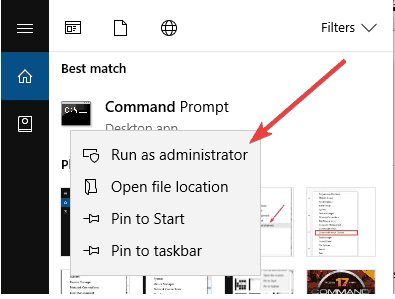
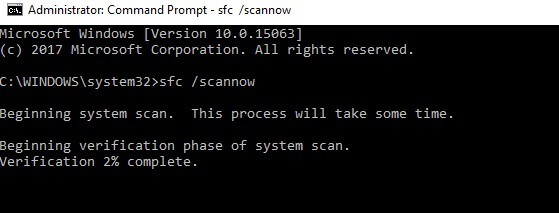
1. Enter Command Prompt in the Search bar, and then click on Run as administrator.
2. Click Yes in the UAC prompt.
3. Paste the following line into Command Prompt and then press Enter:sfc/scannow
4. Wait until the process is finished (it may take a while) and see if any errors are fixed.
Even if it doesn’t sound like a full solution, a lot of users who received this error message said that this command fixed the Memory Management error on Windows 10 startup.
2. Run Windows Memory Diagnostic tool
Press Windows + S to launch the Search menu, enter Windows Memory Diagnostic in the text field, and then click on the relevant search result.
Choose Restart now and check for problems.
Let your PC restart, and on the next startup, the tool will report if something’s wrong with your RAM.
If the SFC command didn’t fix it and you still receive this error message, something’s probably wrong with your RAM.
If your RAM is corrupted, replacing it with a new one is best. But before you remove your current one, you should ensure it’s broken.
We recommend you run the Windows Memory Diagnostic tool, and if it tells you that your memory is the problem, you can change it.
3. Update your drivers
Outdated or broken drivers can cause the Windows Blue Screen Memory Management error in Windows 10. That’s why it is recommended that you always keep the installed drivers up-to-date.
If you want to keep your PC in optimal condition without wasting time performing some extra operations, then you need a great software solution.
For example, IObit Driver Booster is a handy driver updater tool that can install the latest driver versions for your device with just a single click.
Updating the driver can help you fix other issues like Aswhdske.sys blue screen; read this guide to know more.
4. Revert your PC settings to default
If you increase the PC’s clock rate to run it at a higher speed than initially designed, you should expect to encounter various technical issues.
So, if you’re using various overclocking tools, try reverting your computer’s settings to default and check if this Memory Management error in Windows 10 persists. In case it doesn’t head to the next method.
Ensure you’re running the latest Windows OS updates on your machine. Microsoft constantly updates Windows to improve the system’s stability and fix various issues.
To access the Windows Update section, you can type Update in the search box. This method works on all Windows versions. Then go to Windows Update, check for updates, and install the available ones.
8. Clean your temporary files and folders
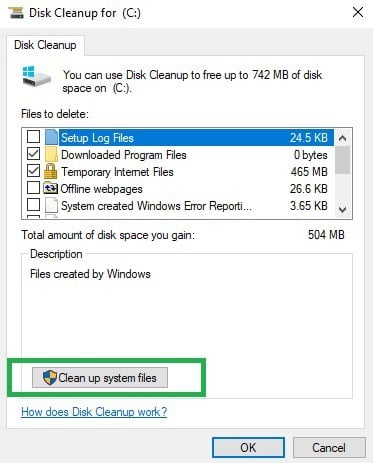
Type Disk Cleanup in the Search menu, and then click on the relevant search result.
Select the disk that you want to clean from the dropdown menu, and then click OK.
Select the files you want to clear and then again click on OK at the bottom.
Click on Delete files to confirm the change.
The simplest and quickest manner to delete your temporary files and folders is to use Disk Cleanup. As you use the computer or browse the Internet, it accumulates various unnecessary files.
These so-called junk files may affect your PC’s processing speed, causing apps to respond slowly, and may also trigger various error codes, including the Memory Management in Windows 10.
Clean your temporary files and then try to write data on the problematic storage device again.
9. Check your disk for errors
Press Windows + R to launch the Run command, enter cmd in the text field, hold the Ctrl + Shift keys, and then click OK.
Click Yes in the UAC prompt.
Paste the following command, replace C with the problematic partition in your case, and then hit Enter:chkdsk C: /f
Once done, run the following command to repair physical issues:chkdsk C: /r
After the check disk is done running, verify if the Memory Management error in Windows 10 is fixed. In case it persists, head to the next method.
10. Remove recently installed software
Press Windows + R to open Run, enter appwiz.cpl in the text field, and then click OK.
Select the program(s) recently added, and click Uninstall.
Follow the on-screen instructions to complete the process.
If you recently installed new software on your computer, try uninstalling it. Then restart your PC, and see if the issue has been solved.
Also, check out the best uninstaller tools to remove residual files and registry entries, along with the app.
11. Check for programs causing memory leaks
Press Ctrl + Shift + Esc to open the Task Manager.
Select the problematic process, and then click the End task button to terminate it.
For this method to work, you will have to check all the processes running on the computer and then identify the one causing the leak.
12. Manually increase Virtual Memory
Press Windows + S to open the Search menu, enter View advanced system settings, and then click on the relevant result.
Go to the Advancedtab, and then click Settings under the Performance panel.
Click the Advanced tab again, go to the Virtual Memory panel, and then select Change.
Clear the Automatically manage paging file size for all drives checkbox, select the desired Drive (Volume Label), and then choose Custom Size.
Add a new size in megabytes in the Initial size (MB) or Maximum size (MB) box, click Set, and then click OK to save the changes.
By increasing the virtual memory, you will be able to resolve the Memory Management error in Windows 10. Of course, you will have to do it manually, as there are no apps dedicated to this matter.
13. Run System Restore or reset the PC
Press Windows + R to open Run, type rstrui.exe, and click OK.
Click Next in the System Restore window.
Select a restore point from the list, and then click Next.
Now, click Finish to start the restore process.
The System Restore option allows you to revert to the previous well-performing system configuration without losing any files, except for a few customizable features and settings.
After the procedure has been completed, check to see if the problem persists.
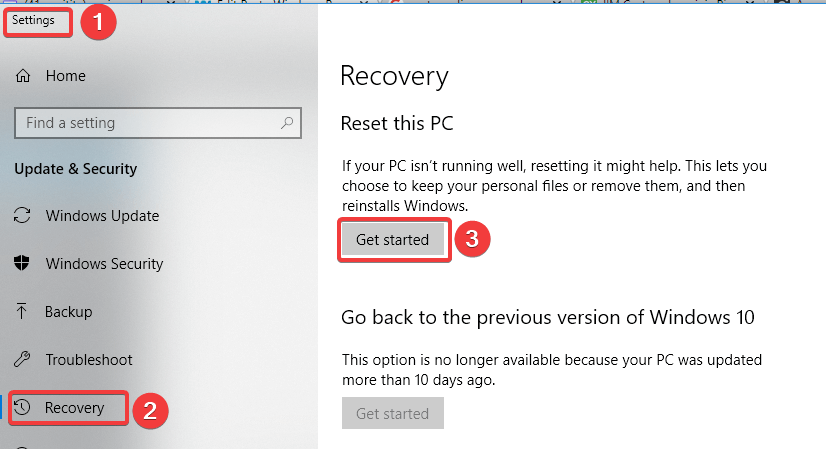
Windows 10 offers advanced recovery options that allow users to clean install the OS. If you’re a Windows 10 user, you can also use the Reset this PC recovery option. To do that:
Press Windows + I to open the Settings app, click on Update & Security, and then select Recovery under the left pane.
Click on Get Started under Reset this PC, and choose to Keep your files.
Follow the on-screen instructions to complete the reset.
Once the reset process is complete, the Memory Management, as well as other errors in Windows 10, will be fixed.
How do I know if my RAM is corrupted?
RAM is one of the most critical components of the PC, and issues with it are pretty easy to identify if you keep a keen eye on them. When the RAM is corrupted, you would frequently encounter BSOD errors in Windows.
In addition to that, the computer’s performance would be affected, and the system would crash when running high-resource-consuming programs. Also, you may see a black screen when turning on the device.
System Information
Besides, the system might list the installed RAM incorrectly in Settings or the System Information window.
What causes Memory Management error?
The Memory Management error occurs in the following situations:
Memory Management on Asus, Acer, HP, Lenovo, Surface Pro and Surface Pro 3
This BSoD error affects all devices, but when it comes to Microsoft’s Surface line, it seems that this issue is prevalent for Surface Pro and Surface Pro 3 devices.
I bought this computer about 2 months ago (Acer Predator g9-791) and whenever I play a game that is graphically intense, like Battlefield 4, I will get a blue screen with the error Memory Management error. I sent in the laptop to Acer and they replaced the motherboard and the ssd, I got the laptop back a week later but I still get the same error.
Memory Management crashes
In most cases, this error message simply remains on the screen, forcing users to reboot their devices.
However, it may also cause PC crashes, and sometimes even crash loops.
Way too many times in the recent past, I have gotten the Windows BSOD error of Memory Management for things that should have been fine for me to run. It was either when I was drawing, watching a livestream and messaging someone at the same time, especially when doing stuff in VR through my Oculus Rift + Touch controllers.
Windows 10 memory management loop
This error message can throw your computer into a so-called error loop. More specifically, although the PC doesn’t crash, the Memory Management error is still there whenever users restart their devices.
Memory management BSOD resulted in laptop rebooting. Since then, I am stuck in an automatic repair loop. I canot get Win10 to run, only access to the Recovery Environment.
That’s all there’s to fixing the Memory Management error in Windows 10 and identifying if something is wrong with the RAM.
The popular xScreen accessory that essentially allows gamers to take their Xbox Series S console on the road is now back in stock and has improved shipping and payment processing for those ordering from outside Australia.
“xScreen is now back in stock and shipping globally!! Order now @ https://UPspecGaming.com,” a tweet posted on the official UPspecGaming Twitter account read earlier this week. “We now have local US shipping and global shipping that includes all taxes at checkout.”
xScreen was first announced in mid-2021 and launched in early-2022. The device is designed to connect directly to the Xbox Series S console and features built-in stereo speakers and an 11.6″ IPS 1080p 60hz screen.
While Microsoft’s Xbox Cloud Gaming service does allow people to play console-quality games on their smart device or laptop, a consistent internet connection is needed. The xScreen, however, can play games locally and doesn’t require an internet connection to work. One is of course needed for online game though.
Branding for the rumored upcoming Family & Friends tier of Microsoft’s Game Pass subscription service has been leaked by reliable leaker, Aggiornamenti Lumia, on Twitter.
This logo, which is really just the generic white-on-green Game Pass logo with the words “Friends & Family” in a white box underneath it, is more confirmation that this new tier for multiple users is planned for a near-future release.
Curiously, there’s no mention of Xbox or PC so it’s possible that this upcoming Friends & Family plan will include both the Xbox console and PC video game libraries as default rather than providing multiple options which could confuse casual consumers. It could also include Xbox Cloud Gaming access, essentially making it like the Game Pass Ultimate tier, with the added benefit of multiple users being allow access to its perks. This is purely speculation though.
Would you upgrade to a Family & Friends tier of Game Pass or are you happy with one of the existing plans? Let us know in the comments below and then follow us on Twitter and Facebook for more Xbox news.
Using a VPN on a Windows Server has a lot of advantages.
It allows users in a small environment to access remote clients or firewalls to Windows Server.
If you’re here to discover the exact steps for installing a VPN on Windows Server 2019, here’s everything you need to know.
Does Windows Server have a built-in VPN?
Affirmative, you can set up a VPN on Windows Server using the right protocols. Plus, there are certain versions that allow this operation
More exactly, it’s possible to use a VPN connection on a Windows Server 2019 and get increased privacy for your server.
In order to set up a VPN connection on this Windows Server edition, you have to use L2TP or PPTP VPN protocols.
How can I set up a VPN on Windows Server 2019?
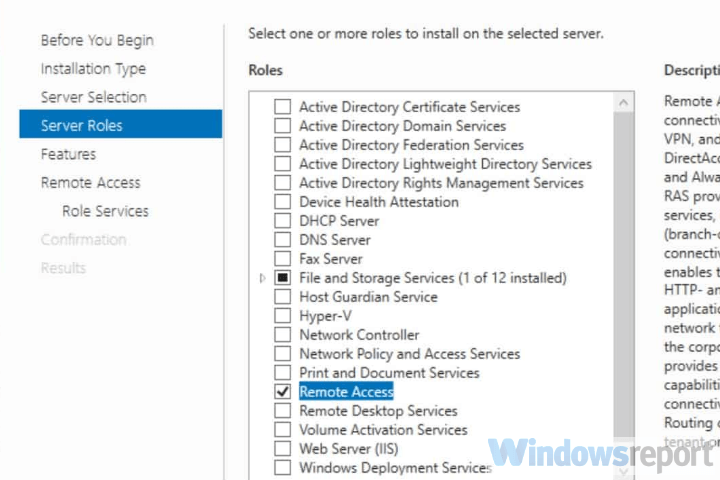
1. Install Remote Access using Server Manager
Open ServerManager
Go to Manage > Add Roles and Features Wizard
Check the Remote Access box and click Next
At Role Services, check the DirectAccess and VPN (RAS) box and click Next
Click Install
Once setup is over, you might have to restart the server
An alternative solution is to install and configure Remote Access using PowerShell.
2. Set up the VPN
Click on the Open the Getting Started Wizard
Choose Deploy VPN only
In the Routing and Remote Access Management Console, right-click on the Server name
Select Configure and Enable Routing and Remote Access from the context menu
Choose Custom configuration and click Next
Select VPN access
Start the VPN service
You shouldn’t stumble upon any issues at this stage if you use the dedicated wizard.
3. Configure VPN access
Finally, the only thing remaining is to configure the VPN User and Network Access. You have to open and forward ports from the firewall to the Windows Server.
Depending on the protocol you use, here are the ports you should open:
For PPTP: 1723 TCP and Protocol 47 GRE (also known as PPTP Pass-through)
For L2TP over IPSEC: 1701 TCP and 500 UDP
For SSTP: 443 TCP
If you don’t have a DHCP server, you can set a static IPv4 address pool. This can be done by following the steps below:
Firstly, make sure all users have Remote access enabled
Open the Properties panel of your VPN server
Click on the IPv4 tab and enable Static address pool
Click Add and add the same static IP address from the same Server subnet
Setting up a VPN on a Windows Server implies technical knowledge, so you have to learn how to configure it on your PC.
In a few words, you need to initially create a new VPN user and then set up routing and remote access features.
Here you have the required setup names and technologies you can use for securing your Windows Server:
Windows Server 2019 VPN setup L2TP
Windows Server 2019 VPN Ikev2 setup
Windows Server 2019 SSTP VPN setup
Windows Server 2019 PPTP VPN setup
setup IPSec VPN Windows Server 2019
In conclusion, you can install a VPN on your Windows Server 2019 in three easy steps: setting up Remote Manager using Server Manager or PowerShell, installing the VPN, and managing VPN access permissions.
Are you noticing that after every reboot or after opening Windows Explorer and returning to the desktop home screen, the theme changes automatically on your Windows 11 PC?
If yes, it could be pretty frustrating because several people go the extra mile to arrange their desktops as they like.
It becomes more frustrating for those who have applied a theme and did all the hard work matching the wallpaper and icons, cursors, etc., only to find it changing automatically every time after your reboot.
Well, this guide is here to help you out if you are facing the Windows 11 theme keeps changing issue on your PC.
In this post, we will share 5 of the best and most effective solutions that have helped users fix the Windows 11 theme keeps changing problem, and keep it stable. So, with that being said, let us jump right into it.
Why does Windows 11 keep changing my theme?
The Windows PC’s desktop consists of multiple elements such as icons, wallpaper, mouse cursor, the different colors of the taskbar, widgets, etc.
We use our Windows PC to go online, download software, and do other tasks on it. There are chances that because of our usage, there might be something that is malfunctioning with the Windows 11 system and causing Windows 11 to change the theme.
After careful research, we have deduced a list of the most common causes that could trigger the Windows 11 theme keeps changing:
Tablet mode is enabled (applicable for Windows 10 PC).
A recent Windows update contains a bug.
The desktop background is set as a slideshow.
Windows PC is syncing with other connected PCs.
Your Windows 11 PC is malware-infected.
Your user profile files are corrupted.
These are the most common causes for the Windows 11 PC changing the theme back to default automatically.
How do I stop Windows from changing themes?
1. Change desktop background settings
Press the Win + R keys to open the Run dialogue on your PC.
Type powercfg.cpl and hit Enter.
For the selected power plan, click on Change plan settings.
Click on Change advanced power settings.
Expand Desktop Background Settings.
Set the slideshow to be Disabled or Paused for both On Battery and Plugged in options
Click on Apply.
Press OK.
Restart your PC and check if this fixes the Windows 11 theme keeps changing problem or not.
2. Scan PC for virus
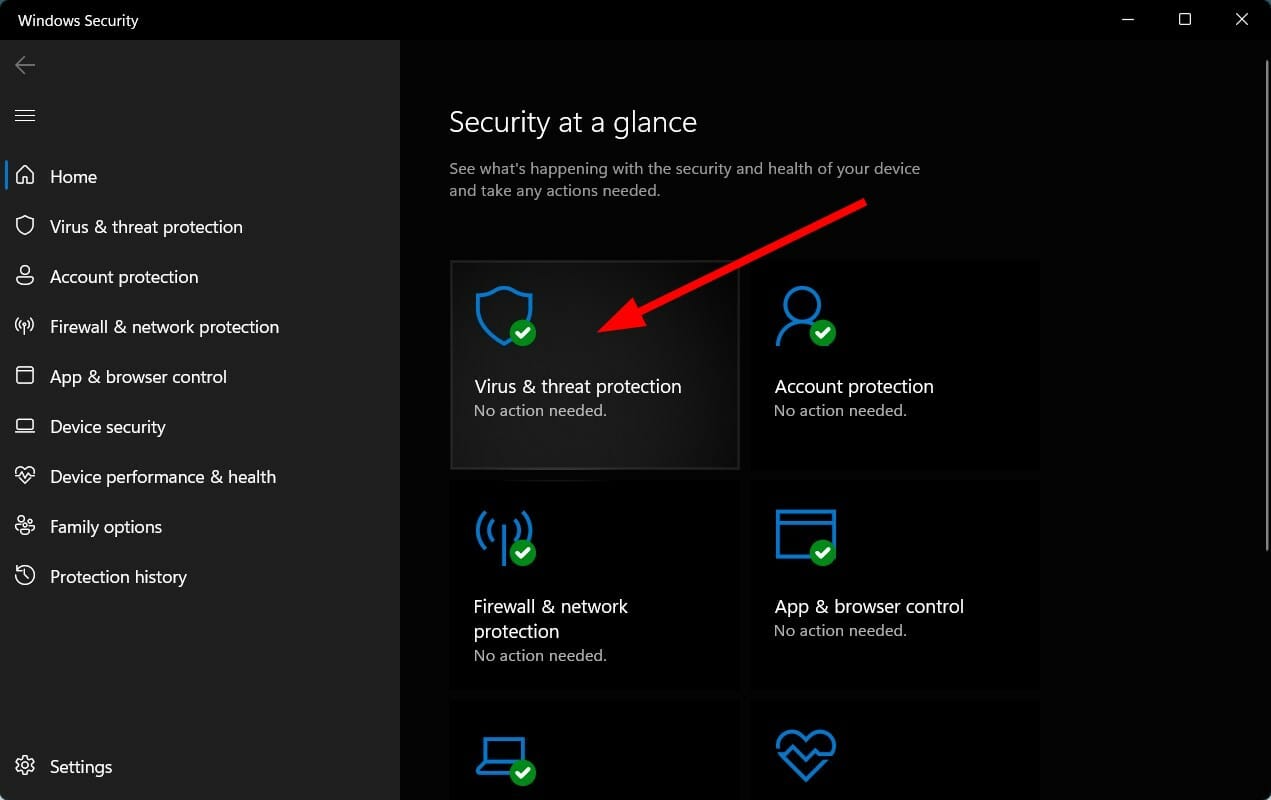
Open the Start menu.
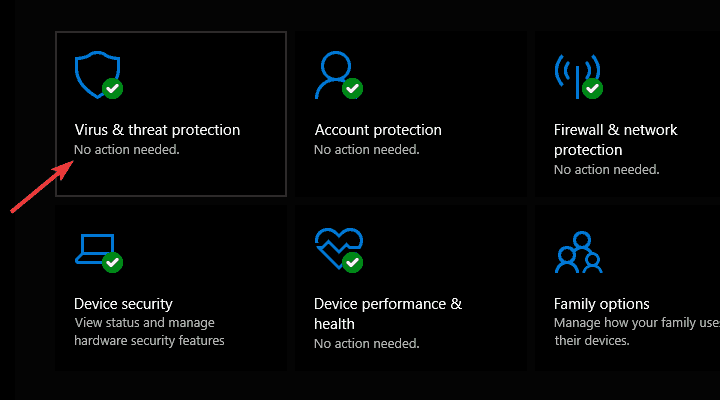
Search for Windows Security.
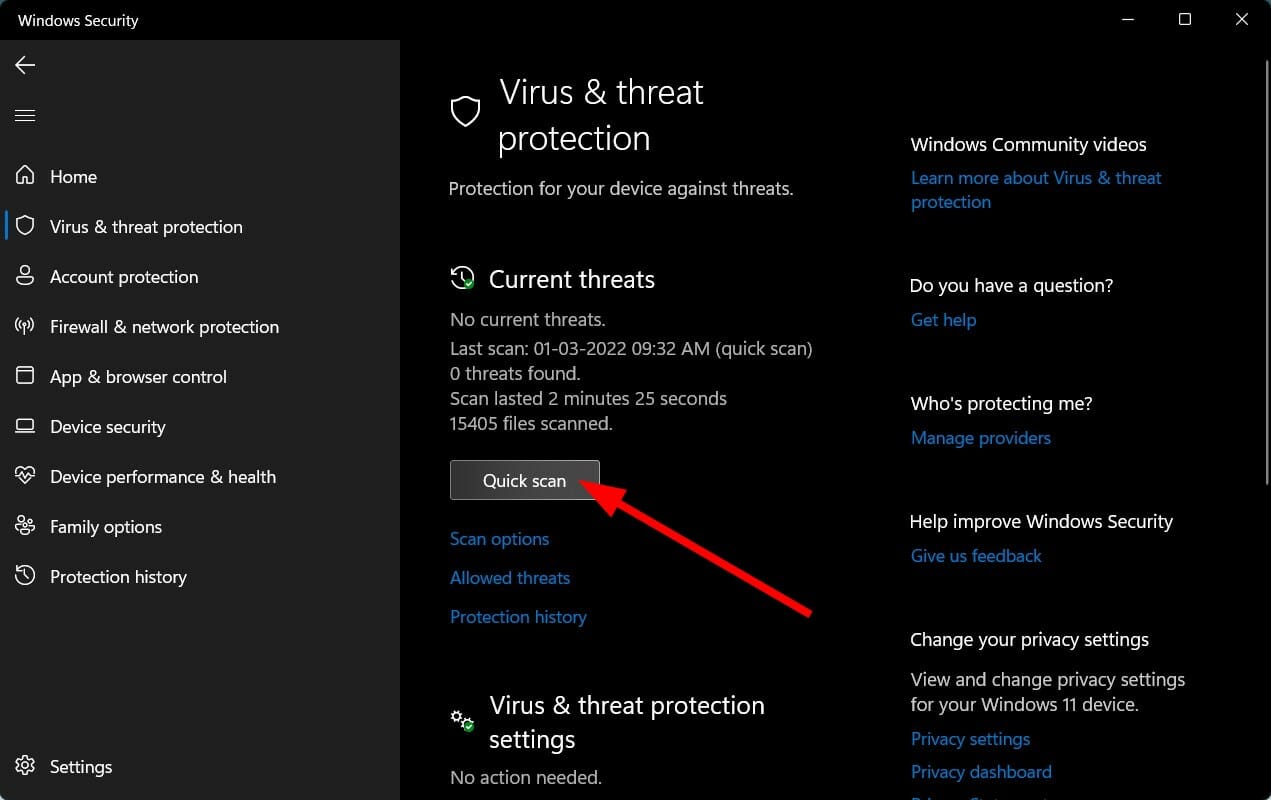
Click on Virus & threat protection.
Hit the Quick Scan button.
Windows Security will start scanning your PC for viruses and, if it detects one, will ask you to take appropriate action.
We have shown the steps for the built-in Windows Security antivirus tool with Windows 11 OS.
However, if you have installed third-party antivirus software, you can perform the same scan on your PC and remove any virus or malware.
If you are confused about which antivirus software to get on your Windows PC, then do not worry, as we have covered you. Instead, you can check out TotalAV. It comes with anti-phishing software and banking protection, and it can even prevent attacks from never-seen-before threats.
TotalAV
Protect your system against malware and other viruses to avoid any inconvenience.
There are chances that your Windows 11 PC is syncing your desktop settings with another one of your synced PC, which is the reason you are seeing changed themes on your Windows 11 PC.
In such a case, follow the above steps, toggle off the setting, and check whether this fixes the issue.
4. Rebuild your icon cache files
Open File Explorer.
Navigate to C Drive > Users.
Open the folder that’s your username.
Select View and then enable the option Hidden items from the top toolbar.
Head over to AppData\Local\Microsoft\Windows\Explorer.
Select all the files that say iconcache. such as iconcache_32.db, iconcache_64.db, etc.
Delete them.
Restart your PC.
If you are facing issues where only the icons on your desktop change back to defaults, you can follow the above step to rebuild the icon cache files and restart your system.
This will fix any corrupt icon cache files or any issues with the icon files and possibly improve the Windows 11 theme that keeps changing the problem or not.
5. Uninstall a recent Windows update
Open the Settings menu by pressing Win + I buttons together.
From the left side, select Windows Update.
Select Update history.
Scroll down and under Related settings, click on Uninstall updates.
Select the recently installed update after which you are experiencing the issue.
Right-click on it and select Uninstall.
Follow the on-screen prompts.
Restart your PC.
This is one of the effective methods listed on this list, as it has helped several users get back their best settings and fix the problem at their end.
Where are Themes stored in Windows 11?
If you want to find the themes installed on your Windows 11 PC, then you can follow the steps below:
First, press the Win + Rkeys together to open the Run command.
Next, paste the below text and press Enter. %localappdata%\Microsoft\Windows\Themes
Here you will find two files:
Custom: This file contains the modified theme files.
Roamed: This file is created when you sync themes between multiple computers.
Moreover, you can find the wallpapers on your Windows 11 PC; you can head over to C:\Windows\Web\. Here you can find four sub-folders that contain wallpapers of different sizes. You must run to the 4K folder to get the full resolution.
That is it from us in this guide. We hope this guide helped you resolve the Windows 11 theme-changing problem. Let us know in the comments below which solutions helped you fix the problem.
When your VPN stops working, it could be due to several reasons, including internet connectivity, incorrect login details, unpaid subscriptions, or technical reasons such as server issues, among others.
A VPN restores privacy to your internet experience, so if it stops working, this privacy is no longer assured. However, you’ll have to check on things like the ports being used, your network, and much more before you pinpoint the main problem causing it not to work.
Why did my VPN stop working?
Virtual private networks (VPNs) have many benefits, but they can also have some very unpleasant downsides. A non-functional VPN is annoying, and a partially functional one isn’t much better.
One explanation might be compatibility concerns with your PC, or it could be network congestion somewhere in the connection that may be fixed with DNS flush. If your VPN is slow, won’t connect, constantly disconnects, or crashes, we have several options to fix it.
Before contacting your VPN provider, check out some of the common issues and their potential fixes listed below.
What can I do if my VPN stopped working?
1. Change your VPN Provider
If your VPN keeps cutting off or stops working altogether, then it might be because of system incompatibility. One surefire way to fix this issue is to switch to a tested VPN provider that has a long-standing record of creating stable software. We recommend Private Internet Access.
PIA caters to everyone’s needs, having covered all the major platforms: iOS, Android, Windows, Linux, and macOS, as well as browser extensions for Google Chrome and Mozilla Firefox.
Additionally, you benefit from a 30-day money-back guarantee as well as excellent customer support to help you diagnose and fix any issues you might encounter. PIA has servers all over the world, which allows you to bypass geo-restrictions and keep your data safe at the same time.
If your current VPN solution has stopped working, then we recommend you check out Private Internet Access as a robust replacement.
Private Internet Access
Multiple VPN gateways through WireGuard, PPTP, OpenVPN, and L2TP/IPSec protocols.
If your VPN stops working, try the following general troubleshooting fixes before trying the next solutions:
Check if there’s a device that is causing the problem, by rebooting all affected devices such as your computer, hubs, your router, and/or modem, and whether your connection is working okay without connecting your VPN.
Connect your VPN on another device within the same network and see if it helps. If it does, then the issue is probably with the device you’ve been using.
Connect your computer directly to your modem – bypass your router – if this helps, then your router is causing issues with your VPN account as sometimes router settings can affect your VPN.
Check your firewall software and test if it’s conflicting with your VPN. Disable and try connecting again. If it works, then you need to set up an exception to use your VPN while your firewall is running, or, set an exception for all traffic to the VPN’s server address.
Delete the first VPN connection you created and see if the second one will work.
Check your country or ISP as they may block VPN connections. You can confirm with friends in the same area or contact your ISP directly.
Ensure you entered the correct passwords (without spaces) and usernames.
Check the date and time settings on your computer to ensure they’re correct.
If your VPN doesn’t support multi-device use on a single account, then check if you’re sharing with another device and use just one.
Change your time zone.
Clear your browser cache as the old information you used before is still there.
Ensure you’re running the latest version of your VPN.
Ensure the server you’re connecting to is online and available.
Try another internet connection.
Try changing the connection to another port/protocol and find one that works for you.
3. Flush the DNS
Doing this lets your computer access your VPN’s DNS automatically for the proper/correct entries. To do this:
Click Start.
Select All Apps.
Click Accessories.
Right-click Start and select Command Prompt (Admin).
Type ipconfig /flushdns and press Enter. A confirmation that says: Windows IP Configuration Successfully flushed the DNS Resolver Cache will be displayed.
4. Reinstall your VPN
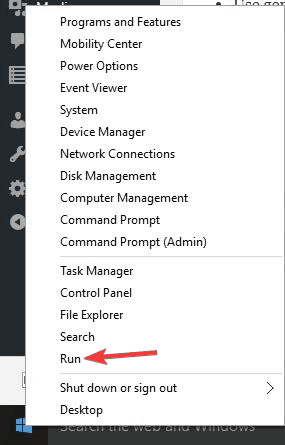
Right-click Start and select Run
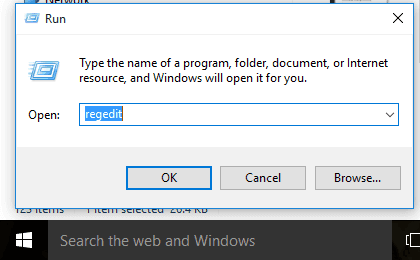
Type regedit and press Enter
You will now see the User Account Control dialog box.
Click Yes
In the Registry Editor, under Computer, double-click on HKEY_LOCAL_MACHINE.
Under HKEY_LOCAL_MACHINE, double-click on SOFTWARE and then [your]VPN.
If you cannot find [your]VPN directly beneath SOFTWARE, go to SOFTWARE > Classes> [your]VPN.
Right-click on [your]VPN and then click Delete. After deletion, you should no longer see your VPNunder Wow6432Node
Depending on which particular issue you have with your VPN stopping, the solutions above should allow you to fix it. Keep in mind that some services like Netflix have been known to stop working when a VPN was activated. If this is the case for you, then try connecting to a different server.
Services like Netflix block thousands of IP addresses constantly, and VPN providers are always countering this by opening new servers and changing the IP addresses of their customers.
A VPN blocked by the router may potentially be the cause of your VPN service not responding as expected.
Isn’t it ironic that VPN connections are being restricted? After all, a VPN is the tool that allows you to unblock numerous online restrictions, and the fact that your ISP, government, or even a website can ban it may leave you with a bad experience.
If the problem began after you purchased a new router or received one from your ISP, the router may be incompatible with the VPN and its protocols.
VPN passthrough is a function available in routers. It permits your traffic to reach the internet without being censored using a VPN. Regrettably, some routers do not enable this capability, while others do not support the protocols used by some VPNs.
One possible workaround for this is to purchase a dedicated IP address from your VPN provider which only you will use.
One other thing you might want to do is to turn off temporarily the ad-block feature that is included in the VPN client.
Let us know in the comments section if any of these solutions helped.
If you’re looking for a simple solution for opening firewall ports in Windows 10, you’ll find all the necessary details in this article.
Opening Firewall ports allow apps and programs to communicate with the network. So, if some of your apps and programs fail to launch, opening firewall ports is one of the first troubleshooting solutions that you can use.
How can I open a port in Windows 10?
Users can manually allow a program to get access to the Internet by opening a firewall port. All you need to know is what port it uses and the protocol to make this function.
1. Navigate to Control Panel> System and Security > Windows Firewall.
2. Go to Advanced settings.
3. Right-click on Inbound Rules > select New Rule.
4. Add the port you want to open and then click Next.
5. Choose the TCP or UDP protocol and the port number, then click Next.
6. Select Allow the connection and then hit Next.
7. Choose the network type, then click Next.
8. Name the rule and press on Finish afterwards.
These are all the necessary steps for opening a port in Windows 10. Remember that you can also use this method for blocking programs or ports.
Firewalls are targeted at protecting your network from various threats coming from outside and trying to get in or threats coming from inside trying to get out. A threat does this by blocking network-enabled ports.
Every time a program tries to communicate through this port, the firewall verifies its database rules to check if it is allowed or not. If it doesn’t know, it will ask the user and that’s why you sometimes see a prompt asking you if a certain program is allowed or not to access the Internet.
A firewall is an essential issue regarding computing and every PC must have one installed. This is the reason why Windows has a firewall bundled and active as standard.
Windows firewalls must occasionally be told to allow a program to communicate with the network and this is the point where opening ports step into the picture.
We hope that our article helped you open ports on Windows 10 devices. Let us know in the comments section below if you have any questions.
Excel is one of the most essential MS Office applications that millions of users utilize for calculating and displaying numerical data. Two of the good things about Excel are its AutoSave and AutoRecover features.
They make it easy for users to retrieve spreadsheet files that weren’t saved. However, those features need to be enabled for users to restore an Excel file not saved.
How can I recover an unsaved Excel file?
1. Make sure the Save AutoRecover information option is selected
To check if AutoRecover is enabled, click the File tab in Excel
Click Options to open the window shown directly below
Click Save on the left of the window to open the tab in the snapshot below.
Select the Save AutoRecover information window every x minutes option if it’s not already checked
Select the Keep the last autosaved version checkbox
You can change how often AutoRecover saves things by entering an alternative value in the option’s text box
The AutoRecover filelocations text box includes the folder path where you can find unsaved documents.
You can change that path by clicking Browse
Click the OK button
Thereafter, a Document Recovery sidebar will open when you first launch Excel after it unexpectedly closed (crashed).
That shows you a list of files that it can recover. Note that the files it displays will have been saved at least once before. Nevertheless, it will enable you to recover content added to a document before the application closed.
2. Select the Recover Unsaved Workbooks option
1. Launch Microsoft Excel on your device.
2. Navigate to the File tab from the menu.
3. In newer Excel versions, click on Open. In older versions, you’ll need to click on Recent.
4. Select Recent to open a list of recent documents. If you are already here, skip to step 5.
5. Click the Recover Unsaved Workbooksbutton.
6. An Open window will then appear that includes a list of unsaved Excel documents.
7. Select an unsaved document from there.
8. Click theOpenbutton to view the file.
To restore a file that has never been saved, you can use the built-in Recover Unsaved Workbooks option. All of your recent unsaved documents will be listed, and you will be able to select those that you want to recover.
However, the new UI is very different from Windows 10 and may be confusing to those who are not the most tech-savvy.
Fortunately, the process of connecting to a Wi-Fi network is pretty straightforward to do once you have learned the steps.
What are the user interface changes to Windows 11?
Most of Windows 11’s improvements were done to make the UI much more approachable and inviting with its hints of colors and depth.
The UI is noted for having rounded corners everywhere and a centered taskbar for the new Start menu. Overall, the new interface feels a lot less cluttered than Windows 10 and the menus are a lot easier to navigate.
The new user interface has dashes of color and depth throughout to help people identify sections and learn what they do.
Sections like the system tray, network controls, and notification center have been simplified to allow users an easier time configuring the settings however they want.
Down at the bottom of the screen, you will find the icons for Widgets, Snap Layout, and other apps.
Widgets are a new section that houses information about the weather, the stock market, and the news of the day, while Snap layouts allow you to string together different windows onto one display for ease of access.
There are a lot of other new features and apps that weren’t mentioned like the Android app compatibility and revamped Microsoft Store.
People will get a lot of mileage from Windows 11 and its new features, but they all require the same thing to work: an internet connection. Without this, you will not be able to utilize Windows 11 to its fullest potential.
How can I connect my PC to the Wi-Fi network?
This guide will show you how to connect your Windows 11 computer to the wifi in 2 different methods, so you can get the most out of it.
1. Connect to WiFi via Taskbar
1. Click on theNetwork iconin the corner of the screen.
2. Select the arrow next to the Wi-Fi icon.
3. Locate the network to which you want to connect’s name on the list.
4. Click the Connect button.
5. Type in the network security key which is the password.
6. Click the Nextbutton after you type the password.
7. Once you’ve completed these steps, the Windows 11 computer will automatically connect to the network using Wi-Fi.
Connecting your Windows 11 device to a WiFi network is very easy and can be done through the built-in taskbar. It functions as a shortcut to the Network and Internet settings that allows you to configure your network connection in a few clicks.
NOTE
It’s recommended that you click the Connect automatically button under the network’s name so you don’t have to manually connect every time you use Windows 11
2. Connect to Wi-Fi using the Settings app
Click on the magnifying glass icon in the center bar to bring up the search menu.
Click on the Settings icon if it’s in the Top apps section or type in Settings in the search bar above.
Click on Network and Internet, which is the third entry in the Settings menu.
Locate Wi-Fi on the right-hand menu and click it.
In the drop-down, click on Manage known networks located on the right side of the page.
On the next page, select the Add network button on the far side.
A small window will appear that will allow you to add a network. Fill in the required network information inside the pop-up window that appears on the screen.
Click Save located at the bottom.
Note: It’s recommended you click the boxes next to Connect automatically and Connect even if this network is not broadcasting to save you the trouble of having to manually connect to the Wi-Fi over and over again.
If you can’t connect to Wi-Fi, check our dedicated article to find out how to fix this issue.
How can I improve my Wi-Fi internet speeds?
Many people will attest to just how tricky and fickle a Wi-Fi connection can be. One minute you’re enjoying a movie on Netflix and the next the signal is lost. There are several things to keep in mind so that your Wi-Fi connection doesn’t weaken.
A major factor in signal disruption is distance. Wi-Fi routers don’t have strong transmitting power and cheap ones may have a hard time covering a small apartment. It’s for this particular reason we recommend that you purchase Wi-Fi extenders to boost the signal range so it stays strong throughout the house.
On the market, you will find many extenders that state they are for Windows 10 computers, but they still work the same for Windows 11 machines.
If you prefer a software solution, you will want to look into Wi-Fi repeater software. A Wi-Fi repeater is a computer or laptop that picks up the signal, acts as a relay point, and sends it to other parts of a house.
You can buy a physical repeater, but if you prefer not to buy another gadget, you can always convert your network device into a repeater.
That second device boosts the signal as it moves across the relay system.
Feel free to leave a comment below if you have any questions on other Wi-Fi connection methods or issues. Or even comments about guides that you’d like to see or information on other Windows 11 features.
The feature has already been introduced with Dev Channel Insider build 22572 but has not been officially announced by the Redmond tech giant.
However, some of the more tech-savvy users stumbled upon it and some of them even managed to activate it.
We know that you’re also curious and eager to try out this long-awaited functionality so, if you are also a Dev Channel Insider, we’ll show you how to activate it yourself.
How can I enable the File Explorer tabs in Windows 11?
In order to enable Explorer tabs on your device, you need to be a Windows Insider member and conduct your work on the Dev Channel. Moreover, you can use the third-party ViveTool app to activate the tabs.
It’s not a really difficult process and it doesn’t require a vast technological experience to get done, only a few minutes of your time.
Note that this change isn’t irreversible and you can deactivate tabs in File Explorer anytime you want, so don’t worry about that either.
Of course, some of you might actually want to revert the changes they made, after they grow bored with the new tabs.
In order to do so, all you need is to use the following command: vivetool delconfig 34370472 2
It’s hard to tell how much longer we’ll have to wait for this feature to make it to the general rollout, but since it’s already added in the Insider build we’re guessing not that long.
File History is a powerful backup feature in Windows 11. To be more precise, it is an automatic backup feature that will back up your user folder libraries to a selected external USB storage device. It also keeps a history of file versions for users.
With File History enabled, you’ll have alternative backup versions of your files available. Then, you can select to restore previous versions of files preserved by the File History feature.
Although you’ll probably rarely need to restore backup versions of files, it’s a good idea to keep backup copies for them with File History, just in case.
You can enable and disable File History with the methods outlined below.
Is File History a new Windows 11 feature, and where can I find it?
File History isn’t something new in Windows 11. Microsoft originally introduced File History in Windows 8 as an alternative to Backup and Restore. It’s a better utility for backing up user folders than Backup and Restore.
However, some users have been confused by the absence of File History options in Windows 11’s redesigned Settings app. Windows 10 includes options for enabling and configuring File History via Settings, which isn’t available in 11.
The only backup options you can configure in Windows 11’s Settings app are for OneDrive. You can set up the OneDrive folder syncing via Accounts, then Windows backup in Settings. That cloud sync feature backs up folders and files to OneDrive.
Don’t worry, File History still exists in Windows 11! However, you’ll need to activate that legacy feature via the Control Panel now. Alternatively, you can enable and disable it with the two other methods below.
How can I turn on Network Discovery for File History?
Keep in mind that you’ll need to have Network Discovery enabled to utilize File History in Windows 11.
If it’s not enabled, File History’s Turn on button will be grayed out in the Control Panel. This is how you can turn on Network Discovery in Windows 11:
To open the search tool, click the magnifying glass taskbar button.
Type the keyword Control Panel within the search box.
Select Control Panel to open it.
Click the Network and Internet category.
Next, select Network and Sharing Center in that category.
Click Change advanced sharing settings on the left of the Control Panel.
Select the Turn on network discovery radio button.
Then click the Turn on file and printing sharing option.
Press the Save changes button to apply the new settings. With Network Sharing enabled, you can then proceed with turning File History on.
How can I turn on and off File History in Windows 11?
1. Use the Control Panel
1. Open Windows 11’s search box by pressing themagnifying glass taskbarbutton on your desktop. Alternatively, you can press the Windows key on your keyboard.
2. Type the word File History within the search box.
3. Select File History from the results to open theControl Panel applet.
4. Next, click theTurn on button shown directly below.
5. You can later disable File History by clicking the Turn off button there.
6. To select an external drive to back up files on, insert a USB storage device in your PC.
7. Click Select drive to bring up the options and choose a storage drive listed there.
8. Press theOKbutton to confirm your chosen storage device.
File History can be very easily managed via the built-in Control Panel. From there, you can toggle File History on and off in a simple click.
First, press the Windows + R keys simultaneously, which will open the Run accessory.
To open Group Policy Editor, type this text in the Open box and click OK: gpedit.msc
Next, open this policy location within Group Policy Editor: Computer Configuration\ Administrative Templates\ Windows Components\File History
Select File History on the left of the window.
Double-click the Turn off File History policy.
Select the Enabled or Disabled option on the Turn off File History window depending on preference.
Press the Apply button to save the new policy setting.
Click OK to exit the Turn off File History window.
NOTE
Group Policy Editor is not available in Windows 11 Home edition. You can utilize Group Policy Editor within the Pro and Enterprise editions of the platform.
3. Edit the registry
Open Run as outlined in the first step of the second resolution.
Type this command in the text box and click OK: regedit
Input this registry key location within the Registry Editor’s path bar and press Enter: HKEY_LOCAL_MACHINE\Software\Policies\Microsoft\Windows\
Now right-click the Windows key on the left the the Registry Editor and select New, then Key.
Input File History for the keyword’s title.
Right-click in the right pane of the registry to select New, then DWORD (32-bit) Value.
Enter Disabled for the DWORD’s title.
Double-click the new Disabled DWORD to open the window in the screenshot below.
You can enter 1 in the Value data box there to deactivate File History. The 0 value in that Value data box enables the backup feature.
Press the OK button to save your value setting for that DWORD.
What can I do if File History doesn’t work?
If File History still doesn’t work with Network Discovery enabled, make sure that Network Discovery stays on as it should.
Even more, the service for that feature might be disabled. Thus, the solution might be to enable the File History Service. You can check that service as follows:
Press the Windows key + S shortcut for the search box.
Type services in the search tool’s text box.
Then click Services in your search results to open that window.
Double-click the File History Service to bring up the properties window for it.
Click the Startup type drop-down menu and select Automatic.
Press the Start button if the service is stopped.
Click the Apply and OK buttons.
Repeat steps five to seven for the Windows Search service.
How can I restore my files with File History?
When File History has preserved some backup copies, you can restore previous file versions any time you fancy. To do so, open the File History Control Panel applet as outlined within the first three steps of the first resolution for activating the backup feature.
Open the Control Panel‘s File History applet as covered within method one.
Click Restore personal files on the left side of the File History applet.
Click the Previous Version and Next Version buttons to browse through your files’ backup versions.
Next, choose a file or folder that you want to restore.
Press the Restore to original location button.
To further configure the backup feature, click Advanced settings on the File History Control Panel applet.
Then you can select alternative options on the Save copies of files and Keep saved versions drop-down menus.
Press the Saved changes button to confirm.
Although there are plenty of third-party backup utilities for Windows, File History is sufficient for preserving user file copies. It’s a convenient feature that automatically backs up user folders at specified intervals.
Don’t think you won’t ever need backup file copies. There are many ways user files can become corrupted or accidentally deleted. So, it might be better to be safe than sorry by enabling and utilizing File History in Windows 11.
You can also take advantage of the Backup and Restore utility to create a system image copy. Our guide on how to create a system image provides details on how you can enjoy that utility in Windows 11.
Follow the steps above and let us know which method worked for you in the comments below.
There are several methods for deleting files. Consequently, it is extremely common for users to require the recovery of files that have been accidentally erased.
The Recycle Bin is a Windows feature that allows you to recover files after they have been deleted. Unless otherwise specified, it saves data that users choose to discard.
As a result, removed user files are frequently recoverable from the bin feature.
All references to a file are deleted when it is totally destroyed, and the hard drive space that it previously occupied is freed up as a result.
Fortunately, files that have been permanently erased can still be recovered. There is, however, one limitation to meeting this requirement.
Continue reading to learn about a variety of methods for recovering both accidentally and permanently erased files.
Where do deleted files go?
When a computer deletes a file or empties the Recycle Bin, it removes its reference from the hard drive. As a result, the computer can no longer see the file if its header or reference is erased.
The space that the file occupied is no longer designated for it, and any new file can be stored there.
Because the file is theoretically present, it may be possible to recover it by utilizing data recovery software to recreate the file header, allowing the computer to see it once more. Note that this software only works if the deleted file was not overwritten by another file or data.
Computers are more efficient at removing a file’s reference than they are at commanding the hard drive to replace the file with new data.
Only by performing a low-level format or using another software that overwrites all deleted files with noughts or other nonsense can you be certain that the data will not be retrieved in the future.
How can I recover deleted files in Windows 11?
1. Retrieve files from the Recycle Bin
Double-click the Recycle Bin icon on your Desktop.
Select the files you want to recover by left-clicking on them.
Right-click any of the selected files and choose the Restore option. Alternatively, drag and drop the selected files to a location of your choice.
Just keep in mind that the Recycle Bin may only be utilized to restore files that have been accidentally deleted into it.
2. Use Undo Delete
Access the folder where your photos were located, then press Ctrl + Z, or alternatively right-click anywhere in the folder and choose the Undo Delete option.
The major drawback of the undo tool is that when you restart your computer, all of your previous activities are erased. Furthermore, because you can only undo one operation at a time, it’s difficult to undelete Windows 11 files that were deleted a long time ago.
3. Use the File History feature
Press the Windows key + S to open the search bar and type in Control panel. Next, click on the most relevant result.
Navigate to System and Security.
Click on File History, then choose Restore personal files from the left sidebar.
Go back in time until you find a backup copy that contains the files you want to recover, then select them, and click on the green recover button from the middle-bottom side.
4. Use data recovery software
Automated data recovery software such as Stellar Data Recovery can identify and retrieve lost data with high accuracy.
Install and launch the application on your Windows 11 PC.
From the main window, select the type of file you want to recover and click Next.
Select the location where your deleted files were and then clik Scan.
After the scan is complete, you will get a list of all files found. Select what you want to recover and click Recover.
Select the location where you want to save your retrieved files and wait for the process to complete.
As you can see, you have the option to browse around and preview your files before you recover. This option can come in handy when the scanner finds old files that you may not remember or recognize.
The tool can save you a lot of time and hassle and strives to offer you a recovery file with the same quality as the original one.
Stellar Data Recovery
A trustworthy data recovery program that helps you retrieve any critical documents and deleted files.
Launch File Explorer and select This PC from the list of locations in the left sidebar.
Right-click the storage device you want to repair and choose Properties.
Navigate to the Tools tab, then click on the Check button.
6. Run the CHKDSK scan
Press the Windows + S key to open the search bar then enter cmd. Right-click on the most relevant result and choose Run as administrator.
Type or paste in the following command, and remove the volume part with the letter assigned to your storage device, then press Enter to repair the corrupted files: chkdsk volume: /r
Additionally, Windows 11 includes a utility known as ATTRIB, which works in conjunction with CHKDSK. This utility allows you to modify the properties or qualities of a computer file or directory in a variety of ways.
7. Use Microsoft’s Windows File Recovery app
1. Press the Windows + S key to open the search bar.
2. EnterMicrosoft Store in the search bar and click the most relevant result.
3. Once you are inside the app, search for the Windows File Recovery tool and download it.
4. After the installation process is completed, press the Windows key + X and choose Windows Terminal from the opened menu.
5. Type or paste in the following command to recover the documents folder on drive C to drive E: winfr C: E: /regular /n \Users\<username>\Documents\
It goes without saying that you may substitute whatever path you like for the Documents folder, and you can choose a different source and destination drive as well.
6. Press Enter to run the command.
You can use the Windows File Recovery app to retrieve your deleted files. It is a dedicated tool from Microsoft that helps users recover deleted files from hard disks, USB drives or memory sticks.
Can I recover permanently deleted files?
Fortunately, files that have been permanently erased can still be recovered. There is, however, one stipulation! If you wish to recover permanently erased files in Windows 10, turn off the device right away.
Otherwise, data would be overwritten, and you will never be able to retrieve your files. You can recover irreversibly erased files if this does not happen.
They aren’t actually deleted from your computer, instead, they are stored in the depths of your hard drive. The system has tagged these files as inaccessible data and is waiting for new data to be overwritten on the disk.
In this instance, there are various viable options for recovering permanently deleted files in Windows 10, as detailed below.
To begin, locate and open the folder containing the deleted files. Then right-click on History and select Previous. Choose the file you want then left-click the Restore button. By now, the files must have been recovered. But if this does not happen, there are other methods.
Alternatively, you can find and select the folder where the deleted files were stored and right-click on it. Click Properties, then choose Restore previous version. Windows will write down the previous versions of permanently deleted files.
Not having a backup for these files is the ultimate apocalypse. As a last solution, you should try using third-party data recovery software. To undo the damage, take a look at five of the best file recovery software programs available.
However, if you already found the answer on your own skin, and it was a rather negative one, check out what to do if an update deleted all your files. The solutions detailed for Windows 10 may be applied by Windows 11 users as well.
Please let us know in the comments section below whether you were successful in recovering your files. We are hopeful that the answer will be affirmative.
Due to how bothersome Facebook Messenger adds account problem pop-up is, you may decide to look for an alternative.
The disruption caused by this pop-up may compel you to switch between accounts or even cause the app to freeze.
Most users recommend limiting the app to no more than two accounts, as the software will prompt you to switch accounts if it detects more than two connected accounts.
However, it would help if you tried several fixes to resolve the Messenger switch account problem forever.
Why is Messenger asking me to switch accounts?
The switch account issue in Facebook Messenger is most likely a bug reported everywhere, including in the Facebook official forum.
However, the leading cause is that your Messenger app has several accounts. Another common reason is that you are not using the same account on Facebook and Messenger.
How do I fix the switch account problem on Facebook Messenger?
1. Disable chat heads
Disable the Chat Heads by opening the Messenger app and tapping your profile symbol in the top left corner.
Scroll down and turn off the toggle next to Chat Heads. This will usually resolve the switch account issue on Facebook Messenger.
Most users solved the switch account issues by removing the Chat Heads in their Android Messenger app.
2. Reinstall the app
Touch and hold the Messenger application icon, then press Uninstall or Remove.
Visit the app store on your phone (Google play for Android and App Store for iPhone.)
Search for Messenger in the search bar and install the latest version of the app.
This procedure allows for the installation of new data on your device and guarantees that you have the app’s most recent version.
To fix the Facebook Messenger add account problem, this will hard reset your app and update it to the most recent version.
You must update the app if you’re having trouble with “Select an account.” Wait for a new update if you already have the most recent version of Messenger.
There are issues in specific releases that need to be fixed in subsequent updates. If the most recent update contains a flaw, you must wait to correct it until Facebook releases the next update.
Can you have 2 Messenger accounts?
Like most other messengers, you can have several active accounts with Facebook Messenger. In addition, you can move between multiple Messenger accounts. There is a five-account limit, though.
Here is how to add an account in Messenger without Facebook:
First, tap your profile image in the Messenger app, then go to Switch Account, select Add Account, and now type in your information to add a Messenger account.
Messenger’s problems are well-known to worsen with each new version, and many have long since given up on the app.
However, users have discovered numerous workarounds or fixes for these issues. The official Facebook Forum is full of such holes that users have submitted over a long period.
The fixes above are meant to assist you in getting rid of the messenger select. An account keeps popping up the issue, so you may use the app uninterrupted. Elsewhere, if the switch account button is missing on Facebook, head on over to our article and see what to do.
If Messenger continues giving you problems and you no longer want to deal with account issues, check out our complete guide on how to delete your Facebook account.
In the comment section below, let us know how you fixed this problem.
Connecting to a router means your computer will use the router’s global IP address. However, changing your IP address can be challenging if you don’t know how to navigate it.
Changing your IP addresses can require you to restart the router. Hence, users inquire about not knowing how to change IP addresses without restarting the router.
Furthermore, changing the IP address of a router can vary. It depends on how the manufacturer has configured it to work.
Likewise, the firmware can make some distinctions on how you can switch your router’s IP address.
Nonetheless, there are some steps you can follow to conveniently change the IP address without restarting the router. Hence, this article will discuss these steps.
Can you change your IP by turning off your router?
Turning off your router is one of the easiest ways to change your IP address. It allows your router to disconnect from your device. However, unplugging your router from its power source for about five minutes and plugging it back in can help reset the router IP.
Furthermore, some users complain about this not working as expected on their computers. The response can vary depending on the router and your device.
Likewise, routers are built to remember the device and assign the same IP address to it. So, it can be challenging to change IP by turning off your router.
Nonetheless, you can change your IP by turning off your router. Also, we recommend you forget to repeat the process a couple of times if turning your router off doesn’t change your IP.
What happens if I change the IP address of my router?
Changing your router’s IP (Internet Protocol) address disrupts every internet connection it has made with the services and programs running on your device. It means the connection previously made with the changed address no longer counts.
However, changing your router’s IP address doesn’t adversely affect your network connection. It can improve the privacy and security of your connection to the internet.
Click the Start button, input the Control Panel, and launch it.
Select Network and Internet and click on Network and Sharing Center.
Click on Change adapter settings from the pane of the screen.
Go to the connection you want to change the IP address and double-click on it.
Click on Properties and select Internet Protocol Version 4 (TCP/IPv4).
Input an IP address or select the Obtain an IP address automatically option to have the router control the IP address. (If you have an IP address to use, you can manually input it.)
Click on OK and close the program to save the changes.
2. Use Commands
Press the Windows + Rkeys to launch the Run dialogue box.
Input CMD and press Enter to launch it.
Type the following and hit Enter: ipconfig /release
Then input this also after the first process stops and press Enter:ipconfig /renew
Close the Command Prompt and check your IP address.
Using the command prompt will force reset the router IP. Hence, this should help change the IP without restarting the router.
3. Use a VPN
Many VPNs can help change your IP address without restarting the router. Select any of the best VPNs available right now and choose a new location.
By doing this, the new server will change your IP address to a discreet location within the area. Hence, it is a faster alternative to consider when trying to change your IP address.
A great option is Private Internet Access (PIA) because it has a fast and easy setup process. It also has a strict no-logs policy feature that doesn’t record traffic or store any browsing data from its users at all.
Private Internet Access (PIA)
VPN with an unbreakable security that has a strict no-logs policy to protect your data.
Getting a new router will change your IP address. The new router will assign a new IP address to your device. So, your IP address will change if you get a new router.
However, if you have set your computer’s Internet Protocol to Obtain an IP address automatically, your IP can change if you get a new router. Unfortunately, if your computer’s Internet Protocol settings are on Manual input, the IP address will be static and may not be changed by switching to a new router.
7 Days to Die is a survival horror game with solo and multiplayer content set in an open world. You can play it on Windows, Mac, Linux, PlayStation 4, Xbox One, and Steam.
In the game, you must do everything you can to survive a zombie invasion, which includes seeking shelter, food, and water. Although you can play it alone, 7 Days to Die is much better with friends in co-op mode.
Regrettably, many users face 7 Days to Die lag, high ping, delays, stuttering, and other slow connection issues. Since every frame counts in an action-packed game where you must run away from zombies, you can use a VPN to improve your ping and gameplay.
Fortunately, you can eliminate lag spikes, laggy servers, and high ping issues by downloading and installing a VPN for 7 Days to Die. It’s also the ideal solution for fixing packet loss.
How do I lower my high ping in 7 Days to Die?
Many users are stating that 7 days to die ping is too high and is messing up their games and eventually end up uninstalling and reinstalling the game. But is that the best approach to fix lag and reduce high ping in 7 days to die? We believe it’s not the greatest method to use.
That high ping generally indicates that you haven’t excluded the game from your antivirus/antimalware software, and it’s stalling the scanning procedures.
It’s also possible that you’re distant from Texas where most servers are located, which might explain your poor gaming experience.
One secured and valid solution to avoid high ping and decrease latency is to utilize a VPN service that connects you to the most appropriate server location immediately. If you wish to set up a private connection and a spoofed location, you may use ExpresVPNto create your own gaming server.
What you’re looking for is a virtual private network solution with high-speed servers, a global network, and security features tailor-made to enhance your gaming experience.
ExpressVPN is a VPN service provided by Express Technologies Ltd, a company registered in the British Virgin Islands.
ExpressVPN is one of our top choices when choosing a GPN over a VPN service. There are several reasons for this, including the option to rapidly change your IP address to one of 160 locations in 94 countries.
A drawback of this VPN service could be the price which is a little bit high for an independent newbie gamer.
It is compatible with any device, with specific programs for PC gamers, and ExpressVPN can be used on your PlayStation 4, Xbox, bypass Nintendo eShop when not available in your country, or other consoles when manually configured.
You are allowed to install the app on as many devices as you like. You can connect to up to three devices simultaneously.
ExpressVPN
Works with a full range of devices, including modern gaming consoles at blazing speed.
NordVPN is yet another splendid choice for fixing 7 Days to Die laggy server issues. You can use it to redirect all network traffic through VPN using more than 5,400 servers from 59 countries.
Created by Tefincom & Co., NordVPN is one of the best VPNs for hosting game servers. Moreover, it’s one of the few VPNs that comes with obfuscated servers, which you can use to hide the fact that you’re using VPN and get around VPN blocks. It’s also ideal for fixing Xbox packet loss.
NordVPN uses the OpenVPN protocol to encrypt your data traffic, optimize it for gaming, and reduce 7 Days to Die ping when it’s too high. It comes with private DNS servers, an integrated ad and malware blocker, and a kill switch to turn off your VPN in case of an emergency.
What else you should know:
One of the most popular VPNs for gaming
Set it up on Windows, Mac, Linux, PlayStation 4, Xbox One
Zero data collection
Allows 6 simultaneous connections
Provides a fast and easy 7 Days to Die high ping fix
30-day money-back guarantee (no free trial)
NordVPN
Reduce 7 Days to Die lag and high ping by turning to this trustworthy VPN service.
The surest way to get rid of 7 Days to Die lag spikes is by using Private Internet Access (PIA). Made by Kape Technologies, this virtual private network service is great for fixing Wi-Fi packet loss and for speeding up your Internet connection for gameplay.
PIA has more than 3,300 VPN servers available in 47 different countries. It supports OpenVPN, WireGuard, private DNS, port forwarding, and split tunneling, together with an ad and malware blocker.
With the help of PIA, you can quickly fix network congestion and 7 Days to Die laggy issues so that you can go back to enjoying the game with your friends. It’s one of the few VPN services that offer 24/7 live chat support.
What else you should know:
Optimized for gaming, streaming, torrenting, secure browsing
Works with Windows, Mac, Linux, PlayStation 4, Xbox One
Strict no-logging policy
10 connections at the same time
Offers a quick and easy 7 Days to Die lag fix
30-day money-back guarantee (no free trial)
Private Internet Access
Whenever you have a 7 Days to Die ping problem, turn to this fast and secure VPN for assistance.
Because of its effective servers and inexpensive pricing, Surfshark VPN is the preferred VPN service for games like 7 Days to Die. It helps to
Nord Security and Surfshark announced their merger in early February 2022, making Nord Security the sole owner of both companies. According to SurfShark’s merger blog article, the companies will continue to operate independently, with different VPN infrastructures.
Surfshark provides fast servers to provide a lag-free gaming experience. But, perhaps as importantly, they are the least expensive VPN for gaming choice on this list. What stands out for Surfshark is the blazing speed connections and gaming-optimized servers.
With over 1040 servers spread around the globe, the network should be adequate to support your games.
What else you should know:
Safeguards you against DDoS cyberattacks
Static IP Servers
Gives access to geo-restricted game servers
Split tunneling
Smart DNS
Unlimited simultaneous connections
Surfshark is available for all major platforms and may be installed on your router as well.
Surfshark VPN
Optimized servers for gaming and VPN chaining technology for 7 Days to Die no lags gameplay.
An alternative solution to fix 7 Days to Die lag multiplayer problems is by using CyberGhost VPN. Also, a product of Kape Technologies, this virtual private network service provides you with over 6,400 servers from 89 parts of the world.
CyberGhost VPN has a split-tunneling mode so that you can set up whitelists or blacklists to manage your bandwidth resources more intelligently. Furthermore, the tool supports exclusive DNS servers, together with DNS leak protection.
You don’t need to worry about hacker attacks while playing 7 Days to Die since the VPN offers anti-DDoS protection. It can eliminate 7 Days to Die lag issues on PS4 and Mac, optimize your network traffic for gameplay, and minimize jitter.
What else you should know:
Secures your router against hacker attacks
Compatible with Windows, Mac, Linux, PlayStation 4, Xbox One
Zero-logs privacy policy
Connect up to 7 devices at once
Ideal when 7 Days to Die is lagging out
45-day money-back guarantee (1-day free trial)
CyberGhost VPN
When you get 7 Days to Die high ping time, turn to this reliable VPN to swiftly resolve the matter.
The issue with 7 days to die multiplayer lag is not uncommon for most users that have a security solution that doesn’t meet the needs of your gaming routine and expectations. For the best overall 7 days to die multiplayer lag fix we recommend using antivirus for gaming PCs to decrease ping and reduce lag.
Ping can be affected by a variety of factors, including network protocol engineering, Internet connection speed, the quality of a user’s Internet service provider, and firewall settings.
Geographic location also has an impact on ping. For example, if someone is in India and playing on a server in the United States, the distance between the two is larger than it would be for players in the United States, therefore data transmission takes longer.
Thus you will get the 7 days to die multiplayer lag whenever you join a different server location from other players of the game.
Join our 7 Days to Die section to stay in touch with news and how-to guides about this game! If you frequently have high ping or packet loss issues in other games, visit our Gaming VPN Hub.
To conclude, if you’re experiencing high ping and lag issues during gameplay, you need a powerful 7 Days to Die VPN to solve this situation hassle-free. Besides, you can also use a VPN to fix packet loss.
It can be difficult to choose the right VPN to get rid of the 7 Days to Die lag. If you can’t decide between the five options we presented above, we suggest picking ExpressVPN since it can not only improve your gameplay but also evade geoblocks.
Windows 11 has the unique ability to run Android apps on a computer alongside other Windows apps. The new feature was shown off when the operating system was first announced, and the ability to run mobile apps excited many people, especially gamers.
This feature has been in the works for a long time, and we probably won’t see an official release until 2022. Fortunately, eager people can now try out a beta version of the Android feature.
What is the Android feature?
This beta version is known as Windows Subsystem for Android with Amazon Appstore, and as the name suggests, it allows you to install apps from the Amazon Appstore only.
Only 50 Android apps are available, from teaching apps to games like Lords Mobile and Color by Numbers.
If you want to try out the Android app feature, you must become a member of Windows Insider and install the latest version of the Windows 11 beta.
You must also live within the United States because this beta is locked to the US. If you’re outside, unfortunately, you are out of luck and will have to wait until Microsoft officially releases this feature.
You will need an American Amazon account to gain access to the Amazon App Store and make sure your computer meets specific requirements.
On top of being able to run Windows 11, your computer needs:
8GB of RAM
Version 22110.1402.6.0 or higher of the Microsoft Store app
Build 22000.xxx or higher of Windows 11
Have a solid-state drive (SSD) storage
Without these requirements, the beta will not work.
That said, this guide will show you step-by-step instructions on how to check if your computer meets the requirements, how to become a member of the Windows Insider Program, and how to install some games.
How can I install Android games and apps on a Windows 11 PC?
1. Check System Requirements
Click on the magnifying glass icon on the bottom bar.
Select the Settings app icon or type it in the top search bar.
Click on System, the first entry in the Settings menu.
Scroll all the way down until you see the About tab on the right side, which gives detailed information on the computer’s specifications.
Click About.
Click Device Specifications on the right side of the window.
Confirm the required RAM in the drop-down menu.
Afterward, open the Windows Specifications drop-down menu and locate the OS build.
Confirm your computer has Windows 11 build 22000.282. This means it can run the Android feature.
Once you’ve confirmed the correct Build, click on System again and scroll down until you see the Storage tab on the right side.
Locate the Storage management section and select Advanced storage settings.
Scroll down and click on the Disks and volumes tab.
Confirm the media type is indeed SSD.
2. Join the Windows Insider Program
Open the Settings app again.
Click on the Windows Update tab located at the bottom of the menu.
Click the Windows Insider Program tablocated on the right side of the window.
Click the Get Started Button.
Tap the Link an account button in the small windows that appears.
Confirm your Microsoft account then click Continue.
Select Beta Channel (Recommended).
Review the device agreements and then hit Continue.
Select the Restart now button to enroll into the beta channel.
3. Download the latest version of the Microsoft Store
Click on Microsoft Store icon on the bottom bar to open the app.
Click on the Library tab in the bottom left corner.
Click on the Get updates button found near the top of the window.
After updating, click on the Profile menu at the top of the window and select App settings.
Locate About this app in the bottom left corner and confirm the version is either equal or higher than 22110.1402.6.0.
4. Install Windows Subsystem for Android
In the Microsoft Store, type in Amazon Appstore in the bottom search bar and open the first app you see.
Click the Install button.
Click Set up when the small window appears.
Click the Download button on the next window.
Click the Next button once it finishes.
Click the Restart button to complete the setup.
After this, you are finally ready to install Android games on your Windows 11 computer.
5. Install Android Games on Windows 11
Windows 11 supports Android games for users who join the Windows Insider Program and install the Amazon Appstore. If you have already done these two things, all that is left to do is open the app to start downloading and installing your desired games.
1. Click themagnifying glass iconon the bottom to open the Start menu.
2. In the top search bar, search for the Amazon Appstore. The full name is Windows Subsystem for Android with Amazon Appstore.
3. On the next window, click the Sign in button.
4. Sign in with your United States-based Amazon account.
5. Select the game and Click the Getbutton. In this example, we’re downloading Color by Numbers.
6. Click the Download button to start downloading the selected game.
7. After the game finishes downloading, the blue bar underneath it changes to Open. Click Open to bring up the game.
8. A small window of the game will appear which can be resized. You can also use the mouth and keyboard to play the game.
Once you’ve completed the steps, you can open the app from the Amazon Appstore or find it on the Start menu.
6. Buy an Android Game
To purchase a game, click the price tag to bring up the purchase menu.
You can either purchase with 1-click settings or Amazon Coins. 1-click takes the money directly from the Amazon account’s wallet, while Amazon Coins are a virtual currency.
After purchasing, it will take some time to download.
Once it finishes downloading, you can open the game and play.
What can I do if I don’t have the system requirements?
If your computer doesn’t meet the system requirements, you can upgrade your hardware by installing an SSD or updating your RAM. But there are so many kinds of SSDs that it can be overwhelming, so it’s essential to research and find out which SSDs are the best.
Suppose you do manage to download the Windows Subsystem for Android beta; note that the selection is pretty slim. Only a handful of games are available, and there is no news if more are coming. But the selection of Android apps is pretty decent as it has other games like Minecraft and some non-game apps.
If you still want to try out Android apps on your computer, there are other options. There are Android emulators that allow people to use apps on a Windows 10 and 11 computer, and the best part is that the best ones are free.
The only downside is that you may experience frequent errors like Eversoul 4010 compared to running them on an Android device.
Feel free to comment below if you have questions about the Android feature methods or issues. Suggest guides you’d like to see or information on other Windows 11 features.
Windows 11 Tablet Mode works differently than in the previous version. It’s more intuitive to use, but it does have a few drawbacks.
In today’s guide, we’re going to take a closer look at it and see what it can do.
Is there a Tablet Mode in Windows 11?
Yes, this feature is still available, but only on compatible devices. This means that you won’t be able to enable it manually anymore on your desktop or any other incompatible device.
How to turn on or off the Tablet Mode in Windows 11?
How do I switch my Windows tablet to Tablet Mode?
1. Turn on your device that you want to use in Tablet mode.
2. For 2-in-1 laptops, while the touch-screen feature works just fine under normal use, rotating the screen all the way back enables the Tablet mode.
3. For tablets with attached keyboards, the mode will kick in as soon the keyboard is detached.
4. To check whether tablet mode is enabled, you need to look at the Taskbar icons. As soon as they space out a little, you will know that Windows has switched modes.
What is the difference between Windows 10 and Windows 11 Tablet Mode?
Windows 10 Tablet Mode drastically changes your user interface which makes it cumbersome to use. In Windows 11, the interface becomes more touch-friendly and behaves almost the same as in desktop mode.
It’s worth mentioning that you can manually access Tablet Mode on Windows 10, on any device while that’s not the case with Windows 11.
In recent days, we have seen users complain that the touch screen is not working in tablet mode. This isn’t the only issue, a few users complained that certain websites are stuck in Tablet Mode, but that’s most likely a browser or website issue.
Tell us your experience with this feature and your thoughts on whether it’s better than the previous iteration of the OS in the comments section below.
Xbox Game Bar allows gamers to capture a video of the game screen, take screenshots, and communicate with friends via Xbox Social.
Game DVR is a feature of the app that is responsible for continuously recording your screen so you can capture a clip of the game whenever you want.
In order to prevent Xbox from constantly collecting video from your screen and consuming your resources, you may turn off the auto-capture option.
The Record what happened feature can be disabled by navigating to Settings, followed by Gaming then Captures, and unchecking the box.
It is not yet possible to completely eliminate the Xbox Game Bar in Windows 11. In contrast to Windows 10, the toggle button to turn off the Xbox Game Bar is no longer available in the Settings menu.
If the feature is causing you problems, you can remove it instead of disabling it.
However, if you find that you can’t uninstall it or that the uninstall option is greyed out, we will present you a list of alternative methods to follow, right after we get a better grasp of the Xbox Game Bar.
What does the Xbox Game Bar do?
The answer to the question of what the Xbox Game Bar accomplishes is deceivingly straightforward. It is a gaming overlay that is included in Windows 11. It was created by Microsoft to allow us to use a variety of widgets while playing games on our PCs.
When you use a simple keyboard shortcut, you can gain access to widgets in the Xbox Game Bar, which allow you to capture game clips while still in the game, take screenshots, find friends, monitor and manage performance, and so on, all without having to exit the game you’re currently playing.
Xbox Game Bar allows you to effortlessly record gameplay and take screenshots of your game while you are still in the middle of it. All you have to do is open the Xbox Game Bar and select the Capture widget from the list of options.
In this manner, you can preserve all of your gaming for eternity, from beginning to end, or merely save highlights, such as your most recent boss battles or Pentakills, for later reference.
When you first activate it, the overlay app immediately displays all of the audio channels that are currently active on your Windows device. Each of them has its own volume control slider, which you can use to adjust the volume of each audio channel separately.
Because of the Xbox Game Bar, you no longer have to go back to the desktop in order to modify the volume of other apps or media players. Instead, you can complete the task directly from your game.
What can I do if I can’t uninstall Xbox Game Bar in Windows 11?
1. Use Windows Terminal
1. Right-click on the Start icon and select Windows Terminal (Admin). If you do not see it, select Command Prompt or Powershell.
2. Select Powershell or Command Prompt from the tool’s menu. If you are already using one of these, skip to step 3.
3. In the command line tool’s window, type or paste in the following command: Get-AppxPackage Microsoft.XboxGamingOverlay | Remove-AppxPackage
4. Press Enter to run the command.
5. The tool will now show the progress of the removal. Do not close the window at this stage as the removal is still in progress.
6. Once done, try to pressWindows+G. The Xbox Game Bar overlay shouldn’t show up as it is already removed from your Windows 11.
If you cannot remove the Xbox Game Bar using traditional methods, you can force uninstall it using the built-in Windows Terminal. All you need to do is open this tool and input a command, then it will delete the Xbox Game Bar for you.
To reinstall the app again, simply go to Microsoft Store, search for Xbox Game Bar, and install it from there.
2. Disable the launch shortcut
Press the Windows key + I to open the Settings app, then go to Gaming followed by Xbox Game Bar.
Turn off the toggle next to the Open Xbox Game Bar using this button on a controller option. This will only disable the launch shortcut.
To make sure the app doesn’t run in the background, go back to Settings, then Apps and lastly Apps & features.
Search for the Xbox Game Bar app, click on the three-dot menu, and choose Advanced Options.
Scroll down until you meet the Background apps permissions section and choose the Never option from the drop-down menu.
Then scroll down further down the page and click the Terminate button to immediately stop the app and its related processes.
Do I need Xbox Game Bar and is it safe?
Gamebar.exe is completely safe. It is a genuine program designed and distributed by Microsoft that manages the background operations that are required in order for the Xbox Game Bar to function properly.
In fact, it comes preinstalled on all Windows 11 computers as the default program. There are, however, some hazards that could arise.
A small number of customers have experienced instances where malware is attempting to pass itself off as the Xbox Game Bar. If you are concerned about the chance of this happening, you should pick an antivirus and malware detection tool that you can rely on, our recommendation is to give it a try to TotalAV.
As a general rule, gamebar.exe will consume very little processing power. It is possible that this figure will climb somewhat if you are recording gameplay footage, but during normal day-to-day, you should see it utilize no more than 1 to 2 percent of your system’s resources in Task Manager.
If you’re a frequent gamer on either Xbox or PC, the Xbox Game Bar can be a useful tool that allows you to stay in touch with friends, capture incredible gameplay moments, or simply listen to music while gaming.
But, if you solely use your Windows computer for business or online browsing, you don’t need the feature. While there is no danger in leaving it enabled, you can quickly disable the gamebar.exe by following the steps outlined above and never have to worry about it again.
The Amazon Fire Stick is an amazing device when you come to realize what it can do.
Down to its very essence, it is a stick you plug into your TV, and it will turn it from a traditional TV into a Smart TV.
This means that you can now access various streaming services, such as Netflix, Hulu, or HBO GO. More so, you can also install apps on your TV now.
However, it does have slightly less power than the TV Box, probably because of the reduced size. Of course, all of these facilities can only be achieved if you have an Amazon account.
If you’ve accessed this guide, then you are probably wondering how to set up an Amazon Fire Stick from scratch.
As such, this step-by-step guide will show you how to completely install your Amazon Fire Stick from A to Z.
What are the requirements to set up the Amazon Firestick?
Before registering per se, you need to set up the device. As such, you must check that you have all the necessary tools:
A compatible TV that has HD or UHD plus an HDMI port
Fortunately, most TV screens today will have this
A wireless internet connection
An Amazon account.
You don’t have to be an Amazon Prime customer to use the Amazon Fire TV Stick
However, you do have to have a regular Amazon account
If you don’t have one, you can simply create one in later steps, when setting up the devices
2 AAA batteries for your TV Stick remote
If you have everything needed, you can proceed to set up and register your Amazon Fire Stick.
How can I set up my Amazon Firestick?
1. Connect the Amazon Fire Stick to a power source.
2. Plug the Fire TV Stick directly into the HDMI port on the back of your TV.
3. Turn on the TV and select the channel corresponding to the port you inserted the Fire Stick in.
4. Put the batteries in your remote.
5. Hold the HOME button pressed for 10 seconds for it to pair with the Fire Stick.
6. Follow the on-screen instructions to connect your Fire Stick to your Wi-Fi network.
Register the Amazon Firestick
After you ensure that you have all the necessary tools to register your Firestick, you can proceed with the process.
The registration can be done directly from your Amazon account as soon as you connect the Firestick to the Wi-Fi network.
1. Open the TV that is connected to the Firestick.
2. Go to Settings.
3. Navigate to My Account.
4. SelectRegister.
5. Enter yourAmazon account informationwhen prompted. If you ordered the Fire Stick straight from Amazon, it will comepre-registered, and the associated name appears on this screen.
Now that you’ve registered your Fire Stick, you are all set to enjoy a whole new dimension of multimedia streaming.
Once your Fire Stick is up and running, you can enhance your streaming experience by learning how to activate the History Channel on your Fire TV Stick. This simple step lets you unlock exclusive documentaries and shows right from your device.
Some office applications, such as MS Office, include macro-recording tools. With those, users can record macros to automate repetitive tasks. Then, they can play macros to carry out their recorded tasks within their applications.
What is Power Automate?
Now, you can automate repetitive tasks within Windows 11 much the same with its Power Automate Desktop app. Note that it comes pre-installed and enables users to record task sequences with flows, which are much the same as macros.
For example, a lot of users often manually empty their Recycle Bins in Windows to free up disk space. With Power Automate, you could record a flow that empties the Recycle Bin.
When played, that flow will carry out all the recorded mouse clicks for emptying the bin.
So, Power Automate can be a very useful app for any user who needs to carry out repetitive tasks in Windows 11 with regularity. You can record both desktop and browser task flows with that software as outlined below.
Is Power Automate only for Windows 11?
Power Automate is also available for Windows 10. However, it doesn’t come preinstalled with that platform. You must install the Windows 10 app by clicking the Get button on its Microsoft Store page.
This app is also available for mobile platforms. You can add Power Automate to Android mobiles from its Google Play page. The iOS version has a download page on the Apple Apple Store.
Is there any prerequisite software or account needed for Power Automate?
NET Framework 4.7.2 or higher must be installed on your PC to run Power Automate. Download the latest version from the .NET Framework 4.8 page if that software is seemingly missing on your computer.
Then install .NET Framework 4.8 with the downloaded installer for it. You’ll also need a Microsoft account to utilize Power Automate.
If you don’t have one already, open the Microsoft account page to set one up. Then, follow the steps below to sign in and record some flows with Power Automate.
How can I record flows with Power Automate in Windows 11?
1. Open and sign in to Power Automate
Click the magnifying glass taskbar icon.
Enter the keyword Power Automate within the search utility’s text box.
Select Power Automate in the search tool’s results to open a Power Automate Desktop window.
Click the Sign in button on that window.
Enter the email address for your Microsoft account within the email address box, and press the Sign in button.
Type in your MS account password, and click Sign in again.
2. Record a desktop flow task
1. First, click the + New Flow button.
2. Type a name for the flow in the text box, and then press theCreate button.
3. Click the Desktop recorder button.
4. Press theRecord button.
5. Minimize theDesktop recorderwindow after starting the recording.
6. Carry out the task you need to record.
7. Click theFinishbutton on the Desktop recorder window when you’re done.
8. Thereafter, click the Run button on the editing window for your recorded flow to play it. Alternatively, you can select to play the recording from your My flows list.
9. Click File and Save on the menu.
10. Press theOKbutton to confirm.
With Power Automate, you can create a macro that records your desktop. You can configure all the settings in the tool, and it will do the task for you.
3. Record a browser task
First, click the + New flow button on the Power Automate Desktop window.
Enter a title for your new flow, and click the Create button.
Click the Web recorder option.
Select a browser to record the flow for.
When the Web Recorder window opens, it will say that you need to install the Power Automate extension for a selected browser if it’s not installed. Click Get Extension on the dialog box.
Then click the install button for the extension on its web page to add it. Make sure the extension is also enabled in your browser after installing it.
Thereafter, you’ll need to repeat steps three and four to bring up the Web Recorder window.
Click the Record button on that window.
Then carry out the task to record in your browser.
Press the Finish button on the Web Recorder window.
Click the Save (disk icon) within Power Automate’s editor window.
What are the best alternative apps to Power Automate?
There are various third-party automation software solutions available for Windows 10 at least. Macro Express, Robo Task, and JitBit Macro Recorder are three notable applications that incorporate macro recorders. Our list including the best programs to automate PC tasks provides further details.
Keep in mind that Windows 11 is a very new platform at the moment. Double-check that those applications are compatible with the latest OS.
Try out their trial packages to check if you can install and run them on your Windows 11 PC.
Even more, feel free to record browser macros with the iMacros extension. That’s an extension you can record tasks in Chrome, Firefox, and Internet Explorer. Since it’s a Chrome extension, you should also be able to install it on other Chromium browsers.
As it comes with Windows 11, and even with occasional network errors, Power Automate is well worth a look before considering other alternatives. It’s a relatively straightforward app with which you can record automated repetitive and monotonous tasks that can be useful for business and home users.
Although more limited than Power Automate, Task Scheduler is ideal for automating tasks. With that utility, you can schedule all kinds of software and files to open at specified times. Task Scheduler is certainly worth noting if you want programs to start automatically.
So, you don’t need to be a programmer to automate tasks in Windows 11. With Power Automate and Task Scheduler, you can automate almost anything in Windows 11 without needing to manually code any complex scripts.
Can I automate tasks with Task Scheduler?
Task Scheduler remains in Windows 11, but it hasn’t changed much. You can still utilize that tool to set up scheduled tasks for opening programs, sending emails, and displaying messages at specific times.
However, you can’t record macros with Task Scheduler. Nevertheless, Task Scheduler is a viable alternative to Power Automate for automating startups for software.
You can also use it to automatically execute Command Prompt commands by adding in arguments. That’s how you can set up tasks for opening programs with this utility:
First, click the search tool’s magnifying glass button on the taskbar.
Next, type the keyword Task Scheduler in the window.
Then select Task Scheduler in the search results to open that tool.
Click Create Basic Task on the right side of the Task Scheduler window.
Enter a title and description for the scheduled task, and press the Next button.
Select a trigger option, and click Next to continue.
Then select more specific time settings, and select the Next option.
Choose the Start a program option.
Click Next to proceed.
Then click Browse on the Create Basic Task Wizard.
Select a program for the task to start, and click the Open button. Alternatively, you could select a file to open with its default software.
Press the Next button again.
Finally, select the Finish option.
After that, the program you selected will automatically start at the time you configured it. You can edit the task anytime by right-clicking it in Task Scheduler and selecting Properties. Then click the Edit buttons for actions and triggers on its properties windows.
To set up a task that executes a command, you must select it to open PowerShell or Command Prompt. Then, enter the command to start within the Add arguments box. For example, you could set up a task to run a system scan by entering this command: sfc /scannow
Just as you can see in this guide on how to schedule tasks in Windows 10, as a Windows 11 user, you may also enable various scripts and schedules to run at a specific time or event, depending on your needs.
While macOS users can also use Microsoft Office programs, many are still partial to their own dedicated software. So, at some point, it’s important to be able to convert Apple Pages to Word documents.
In this step-by-step guide, we will show you how you can convert an Apple Pages document into a Microsoft Word document.
Can Microsoft Word open Apple Pages?
Although you can open a Word document in Apple Pages, Microsoft doesn’t recognize the Apple document format.
That’s precisely the point why if you’re a macOS user, you would want to convert the Pages document to Word. Don’t worry because the conversion is simple.
How can I convert Apple Pages to Word Documents?
Apple Pages files can be easily converted into DOC or DOCX format through the Pages app’s built-in settings. All you need to do is open the file in Pages and export it as a Word document.
1. Open a.pagesfile in Apple Pages.
2. Go toFile.
3. Select Export. You will see multiple available options.
4. ChooseWord.
5. ClickNext.
6. Select the export location for the new Word document.
Normally, the Word tab is automatically selected in the Export Your Document dialog box. This is mainly because there are several other formats you can export your document to as well.
If you are looking to save the document in a specific Word version, you can select the Advanced options.
This will allow you to specify whether to export the document as:
A .docx file
Word 2007 and over
A .doc file
Word 2003 and earlier
More so, those of you that want to password-protect the resulting file can check the Require password to open check box.
By following these steps, you should be able to transform a .pages file into a .doc or.docx file easily.
However, keep in mind that given the different formats, there may be inconsistencies in terms of the fonts and special symbols used.
That is when you will be prompted to replace the missing fonts with ones that you already own. Other than this minor inconvenience, the conversion process should run smoothly.
Do you prefer to use pages or Microsoft Word as your text editor? Let us know which you prefer and why in the comment section below.
Time and date are very important settings on Windows 10 because every app on the system, backups, etc. rely on that information.
Moreover, if you want to restore your system to a previous iteration, having the wrong time and date can lead to errors. In this article we will show you how to change date and time on Windows 10 to avoid any type of those issues.
How to change the time and date on Windows 10?
1. The first thing you need to do is right-click the clock on the taskbar and select Adjust date/time.
2. You’ll be directed toTime & Languagetab in theSettingsapp.
3. The safest way is to make sure that the Set time automatically switch is ON. That will synchronize the time on your PC with the one on the Microsoft Time server.
4. Next, you will see the Related settings section.
5. Click on the link Date, time & regional formatting to modify the format according to your needs (you can set the first day of the week, short date, long date, short time and long time and so on).
6. The date and time you chose are now set up on your PC.
Adjusting time and date can be easily done through the system’s built-in settings. You can choose to set the date automatically or manually.
As you can see, setting the right time and date on Windows 10 is extremely easy and you can do it with just a few clicks.
Of course, you can also turn OFF the Set time automatically switch and hit the Change button below to set it manually but we wouldn’t recommend relying on other conventional methods.
Why are the correct time and date so important on Windows?
The time and date on a PC are not just simple reminders for you to check from time to time instead of looking at your smartphone.
Setting the incorrect information can have implications even on Internet access so here are a few of the most important reasons to set the right time and date:
➡ Connection errors
Typically, the time and date don’t affect the Internet connectivity but if they are way off when the browser looks for PKI certificates, they may look as expired or not valid and you will get some warnings.
Also if need to authenticate on a network for access and the time is off, your computer may not trust the certificate belonging to the authentication server and refuse to connect.
➡ Computer synchronization
If your PC is part of a network, it will need to synchronize with the other ones in order to communicate and exchange data.
Being part of that network works on timestamps that are required for identification within the group. For us, users, time is relative but for machines, time and date are crucial.
➡ Programming software
Software development systems depend on timestamps to know what needs to be recompiled.
Thus, using a remote file system mounted on a PC at the wrong time even by more than a few seconds can lead to serious consequences.
That’s because filesystems store metadata including the timestamps for file creation, modification, and access.
If you want to learn more about how to set the time automatically on Windows 10, be sure to check out this guide on Set Time Automatically on Windows 11.
Transferring files through Wi-Fi is one of the best and fastest ways of sharing files from your laptop to other devices like phones. We will take you through our best five picks of Wi-Fi file transfer software to use on your PC. Likewise, we’ll discuss how to transfer files through Wi-Fi from your laptop.
What is the best software for Wi-Fi file transfer?
This is a reliable tool for transferring files via Wi-Fi from one PC to another. It supports all versions of Windows and can transfer multiple files at once. Ease US can also be used to back up and recover files on the PC.
Further, you can use this software to transfer via the internet or offline. Also, it supports cloud storage transfers and a host of other features. This is one of the best laptop Wi-Fi file transfer software.
You may link two computers to the same LAN and transfer files from one to the other across the network.
Transfer through Image Files allows you to generate images of your files, applications, and accounts and then export them from a source PC to a target PC. It allows you to copy via a wireless connection as well as by sharing an ISO file containing an image of the disk to be copied.
Ease US Todo PCTrans
It allows you to move data from one PC to another in a quick method through Wi-Fi and LAN.
SHAREit is a cross-platform software for sharing files and data from mobile devices to PC. The app is available on Windows, macOS, iOS, and Android. It uses a Wi-Fi connection to link the computer and the mobile phone.
To transfer data between devices, ShareIt uses the WiFi direct idea or a WiFi hotspot. It essentially establishes a file server (your device) and a network (WiFi hotspot or direct). And, because no data connection is necessary, it utilizes the full speed of your WiFi.
The Share It app optimizes chunk size as well as reading and writing files on the sender and recipient sides.
However, the software is one of the best and easiest to use as it doesn’t require lots of experience before use. We recommend it as the best laptop for mobile file transfer software.
Xender is a simple-to-use file-sharing software. It doesn’t require any app download before connecting to your laptop. Users only need to install the app on their mobile devices and connect to the computer through Wi-Fi.
There are over 700 million active users worldwide, speaking over 30 different languages. The program is really basic and straightforward to use and everyone can understand it quickly.
Xender, with its creative technology and high-performance worldwide server network, offers numerous great capabilities for connecting a phone to a PC or smart TV.
However, it allows you to transfer media files like videos, images, and others. It is available across operating systems like Android and iOS. Likewise, it is available on app stores like Google Play Store and Apple App Store.
Droid Transfer allows you to access almost all of the stuff on your Android phone and do anything you want with it. It provides a free edition for new users as well as a one-time payment option for those who wish to achieve further tasks.
When you use your mobile devices on a regular basis, you will ultimately run out of storage space. You must either remove certain files or copy some of them to your PC.
You can enable bulk USB storage for this, but it’s not very user-friendly. This is where Droid Transfer comes in, by giving you a more structured and methodical means of accessing everything.
This software comes with more than just Wi-Fi file-sharing features. It allows you to mirror your phone on your computer. It is one of our best recommendations because it is easy to use.
Also, it allows you to copy files directly from the phone mirror display on your computer.
Get Wi-Fi Transfer is a Windows application that allows you to transfer files between your mobile device and your PC. It can be set up with a password to secure the files transferred over to the other device.
Only Google Chrome allows you to upload or download multiple files at once, as well as upload entire folder structures. Get Wi-Fi Transfer program also allows you to delete, rename, copy, compress, or unzip files and view images straight in the browser.
Furthermore, it allows access to external SD cards and USB storage devices while the device is in hotspot mode. You can set it to automatically connect to your home network, although this is optional and customizable.
However, you need to connect the two devices to the same network to initiate the connection. The app works for Windows 10 upward.
Click on Start, type Device Manager in the search box, and then Enter.
Select Device Manager and click on Network Adapters.
Right-click on your adapter and click on Update Driver.
Then select Search automatically for updates.
Windows will install updates if there are any available. Restart your computer.
However, file transfer on Windows may encounter a lot of difficulties. Users complain about slow file transfer, which can result from various issues. Hence, we recommend that users read through our article about how to fix slow file transfer on Windows 10.
Alternatively, Windows Share to Gmail is a more direct way that is built-in Windows and lot faster.
If this guide is helpful, kindly leave suggestions or feedback in the comments section. We’d like to hear from you.
It can be quite irritating when you’re working on something, and suddenly, Sticky Keys turn on. This is why many want to know how to turn off Sticky Keys on their Windows 11 PC.
While this feature is excellent for users with disabilities, it can sometimes interfere with your daily activities, so today, we’ll show you how to deactivate it.
Why did Sticky Keys turn on?
This feature turns on whenever you press the Shift key five times quickly. This can happen while working on a document or while playing games.
How do I turn off Sticky Keys on my keyboard?
1. Close the dialog box
Stop what you’re doing and look for the dialog box.
Click on No.
Now, resume your previous activities.
Keep in mind that this is just a temporary solution, and this dialog box can appear again.
2. Use the Settings app
Press the Windows + I keys simultaneously to open Settings.
Select Accessibility on the left pane then click on Keyboard on the right pane.
1. Press the Windows + I keys simultaneously to open Settings.
2. Type Control Panel in the search bar and click Open.
3. Select Ease of Access Center and click on Make keyboard easier to use.
4. Uncheck the Turn on Sticky Keys box.
5. Click Apply to save the changes and turn off sticky keys.
A great method to turn off Sticky Keys is to use the built-in Control Panel. The Ease of Access Center from Control Panel allows you to turn on/off Sticky Keys with a simple click.
Should I enable Sticky Keys?
In most cases, no. However, if you have mobility issues or trouble performing certain keyboard shortcuts, feel free to use this feature.
What can I do if I can’t turn off Sticky Keys in Windows 11?
Press the Windows + R, type regedit, and press Enter.
Navigate to the following location and click on Flags: Computer\HKEY_CURRENT_USER\Control Panel\Accessibility\StickyKeys
Under Value data, type in 58,then press OK.
If the Sticky Keys become a nuisance, we hope you can use one of our recommended solutions to turn the feature off. Other features like the Filter Keys can also be switched off if they’re a problem.