Is FIFA 21, Steam, and Origin crossplay apparently broken? It is not necessarily the case, but to discover all you have to know about it, make sure you read this article completely.
Ever since FIFA 21 was first announced, players all over were happy to see what the newest entry would bring.
After much waiting, EA Sports finally delivered, and the game is now out and ready to be played by anyone.
The only problem is that, just like any other year, FIFA 21 is just as plagued with a variety of bugs and issues as any other entry from the past.
However, the biggest drawback so far, for PC players at least, is that the gaming community has been split in half.
Regardless of whether you are an Origin or a Steam fan, FIFA 21 is still the same amazing game.
Is FIFA 21 on Steam the same as Origin?
Some of you are probably wondering where is better to play FIFA 21, on Steam or Origin.
Well, you should know that both platforms will launch the same version of the game. So, the only functional difference is which launcher you’re using to launch FIFA 21.
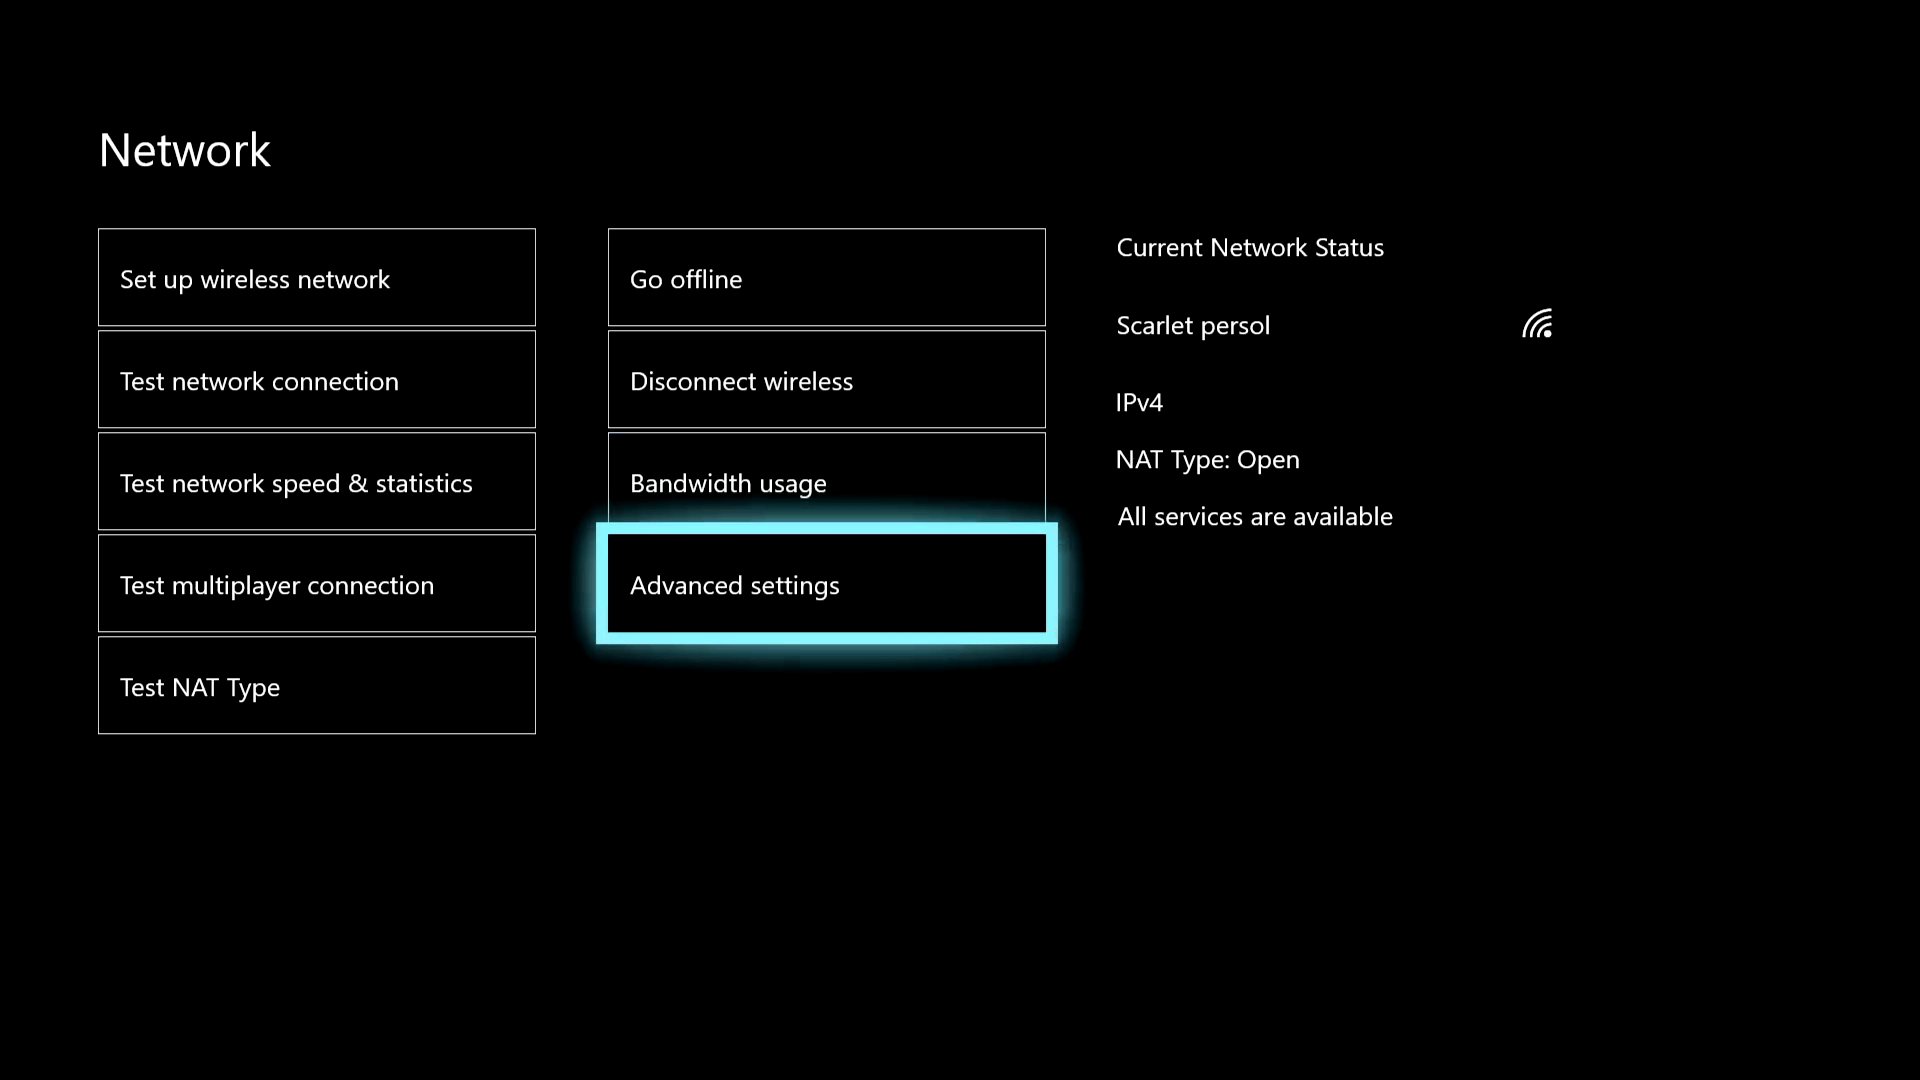
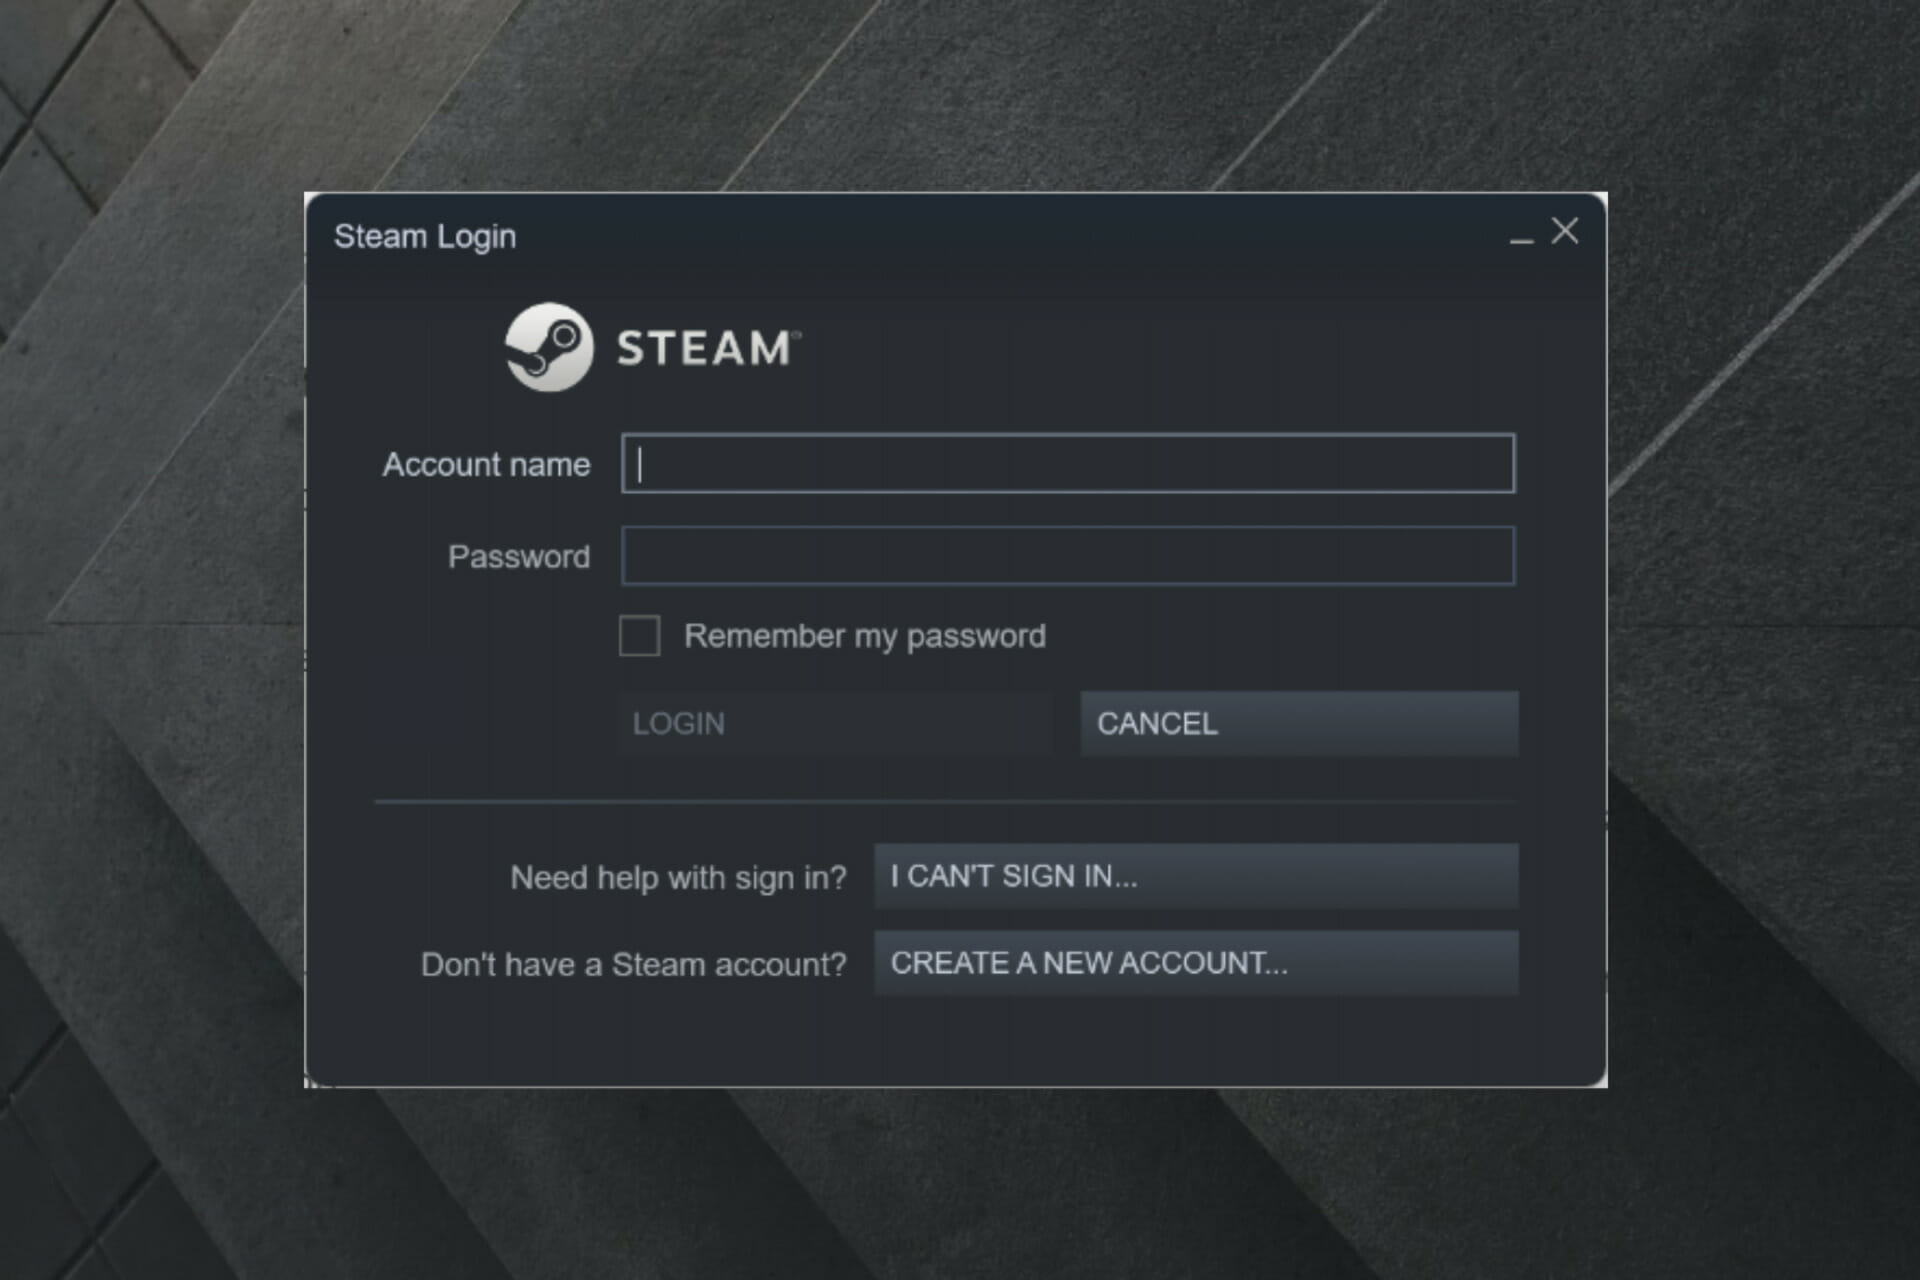
FIFA 21 Steam and Origin crossplay isn’t available
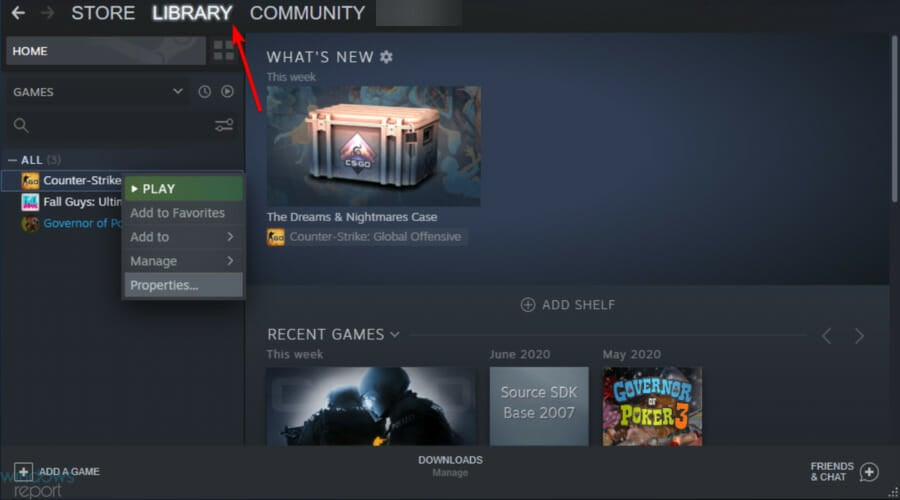
According to many users, PC players that own the game on Origin can’t play with those on Steam:
Hello, FIFA working fine yesterday for all my friends on Clubs and COOP. But today there was an update and now i can’t play clubs with anyone on the steam version and COOP. Works fine with other Origin players.
Additionally, it seems that those who own an EA Play subscription can’t play with those that own FIFA 21 Standard Edition:
Since the latest update, Origin players can’t play with steam players, and players with EA Play PRO can’t play with standard edition players. Co-op, pro clubs, nothing works.
Players are indeed disappointed that two PC versions of the same game can’t play together, especially since Origin and Steam have a good history of linking accounts and content between themselves.
All in all, until this issue has been fixed, FIFA 21 Origin gamers will be stuck playing just with other Origin players. The same can be said about Steam players as well.
This is the second time miscommunications between EA and Steam have led to issues with the game.
This happened after FIFA 21’s system requirements were posted wrongly on Steam, causing many players with otherwise sub-par PCs to buy it.
Can I use the FIFA 22, Steam, and Origin crossplay?
FIFA 22 was recently released and it seems like many worldwide users are running it every day. Similar to the FIFA 21 situation, some people are wondering if the Steam and Origin crossplay works.
In case you’re looking to play this game with friends who run it on a different platform to the one you’re on, things are a bit difficult.
Therefore, keep in mind that FIFA 22 does not have complete cross-play. So, you’re allowed to play only with your friends who are on the same platform/device as you.
As an example, PS5 players can only play with other PS5 players and it also applies when it comes to Xbox Series X|S, Switch, PC, and Stadia fans.
Fortunately, do not forget that there is cross-gen cross-play. It will help those of you who are on last-generation consoles: PS4 and Xbox One.
So, this allows PS4 gamers to play with PS5 ones and Xbox One enthusiasts to connect with Xbox Series X|S ones.
However, those players have to be playing the PS4 or Xbox One version of the game on their next-gen console.
In case you’re using the game’s next-gen version, you’ll be allowed to play only with other next-gen users in the same console family.
Are you interested in discovering how to invite friends to WWE 2K22? Keep in mind that you have to create a lobby first, then allow your teammates to access it.
Playing with your friends is the best you can do in your free time. Unfortunately, it doesn’t allow multiplayer cross-play by default, so PC players won’t be able to compete with console ones.
So, you guys would be allowed to match games between PS4 and PS5, and between Xbox One and Series X/S owners. When it comes to On Steam, PCs can only compete against one another.
Fortunately, at least for now, the WWE 2K22 Community Creations feature has cross-platform functionality. This will let you share custom content with friends across different systems.
If you’re wondering how to invite friends to WWE 2K22 lobbies, make sure you read this guide completely, because you’ll find some important answers.
How can I invite friends to WWE 2K22 lobbies?
Open WWE 2K22.
You should first create your own lobby and to do that, navigate to the Online section located on the main menu.
Now, choose Lobbies.
From the bottom of the window, click on Create Lobby.
Customize your lobby’s settings shown directly below, then confirm the changes by pressing on the Accept button.
Select the superstar you want.
Now, move your controller to the right side, and choose to Invite friends.
Search the teammates you want to invite.
After you send the invitation, a small Status window will appear. The first result will be Waiting… until your friend accepts the request.
As you can see, it is pretty simple to invite friends to WWE 2K22 lobbies, and the best thing is that you can easily personalize your own environment.
If you have no online friends, then you can make your custom room online and wrestle against an online competitor.
Like any other game, this one can also run into several annoying troubles. So, if you ever notice that WWE 2K22 is not launching, crashing, or freezing, make sure you check how to easily fix all of these.
For any additional questions regarding this subject, feel free to use the comments section below.
As of today, Windows 11 has passed the beta stage, and you no longer need to participate in the Windows Insider program to update to the release build of the OS. Thus, we will show you how to download Windows 11 ISO without a product key.
You can even get away without entering a product key, allowing you to use the new operating system for free.
However, as you will see in our last section, you might want to reconsider purchasing a product key as there are some drawbacks to an unactivated OS. But for now, let’s see the Windows 11 system requirements and then move on to the installation process. Follow along!
What are the Windows 11’s system requirements?
In general, as long as your computer or laptop satisfies the minimal requirements, you’ll be able to update to Windows 11 in the same manner you would usually update to new iterations of Windows.
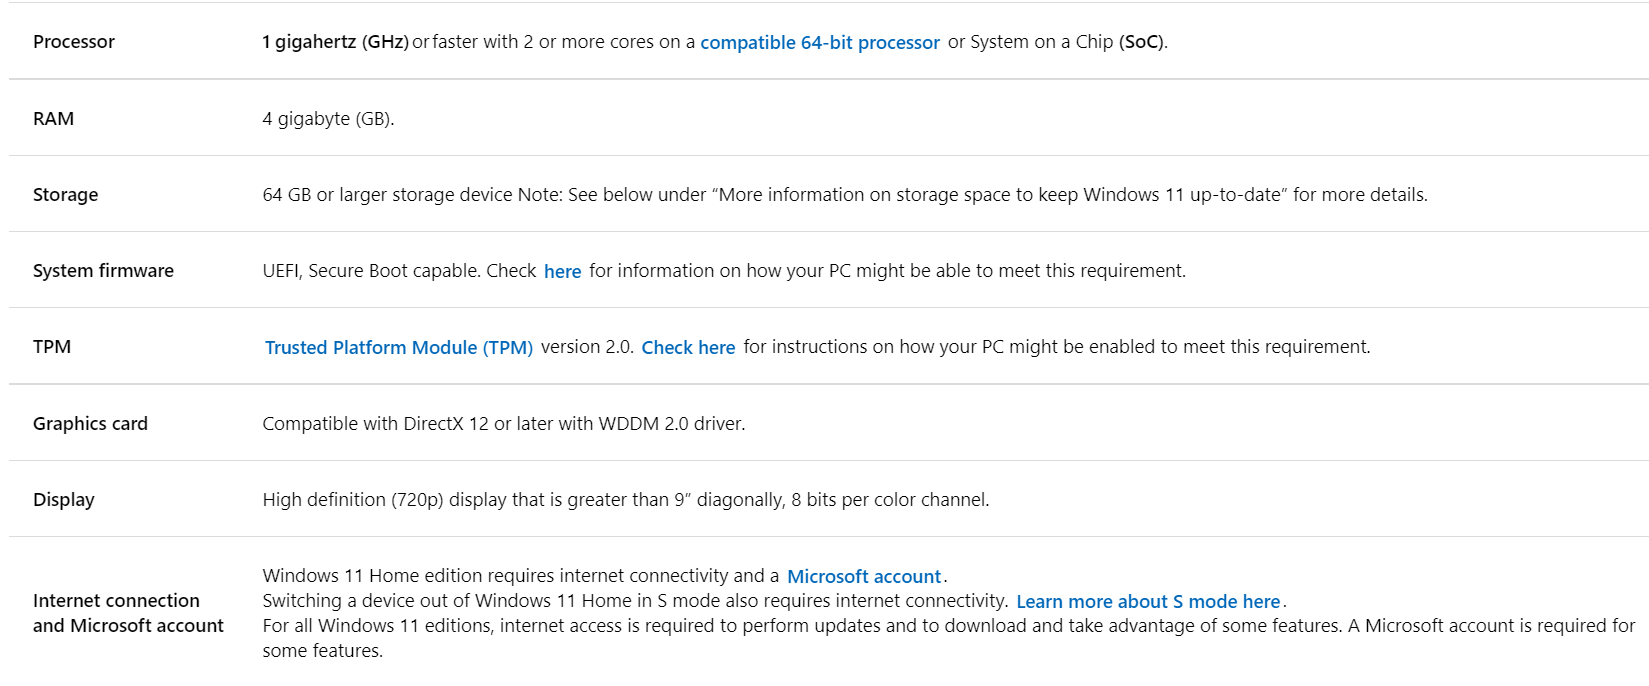
Here are the minimum requirements shared by Microsoft on its official page. Once you meet all of them, you can proceed with the installation process:
If you’re looking for more information than just the Windows 11 requirements, such as its specifications, compatible devices, and CPU compatibility list, we recommend reading our linked post. Now, let’s move on to the download of Windows 11 ISO without a product key.
How can I download Windows 11 ISO without a product key?
Use Microsoft’s page
Head to Microsoft’s official page for Windows 11 downloads and scroll down until you meet the Download Windows 11 Disk Image (ISO) section. Now click on Select download and choose Windows 11.
Hit the Download button and select the language that you want. Lastly click on Confirm and 64-Bit Download, once it appears.
Once the ISO file has downloaded, right-click on it and choose Mount. Alternatively, you can use PowerISO to mount the file. The software allows you to do more actions like extracting, editing, creating and converting ISO files.
A new virtual drive will be displayed inside your File Manager window. Click on it, then double-click the setup file to start the installation process.
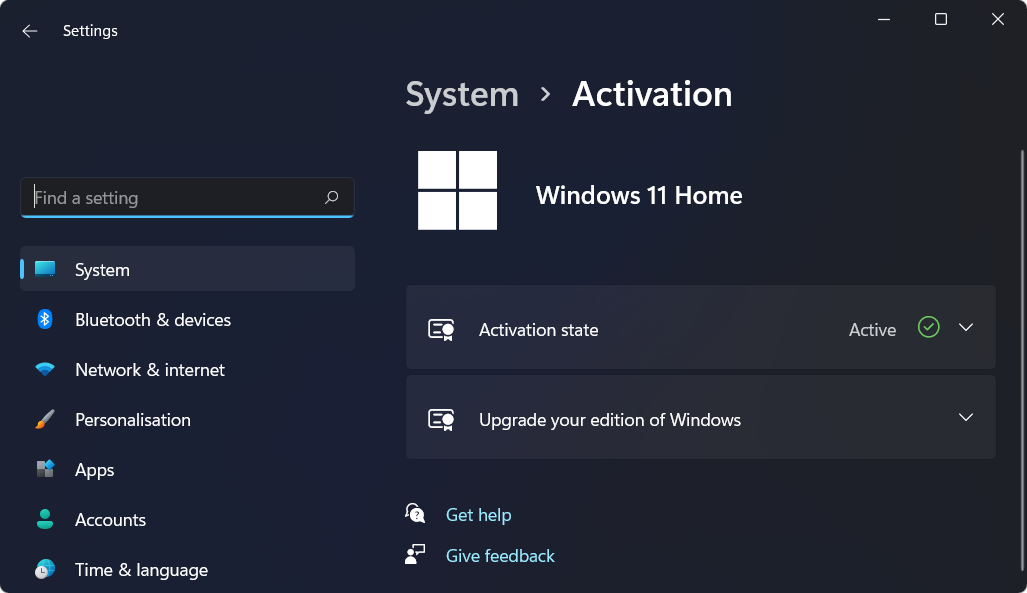
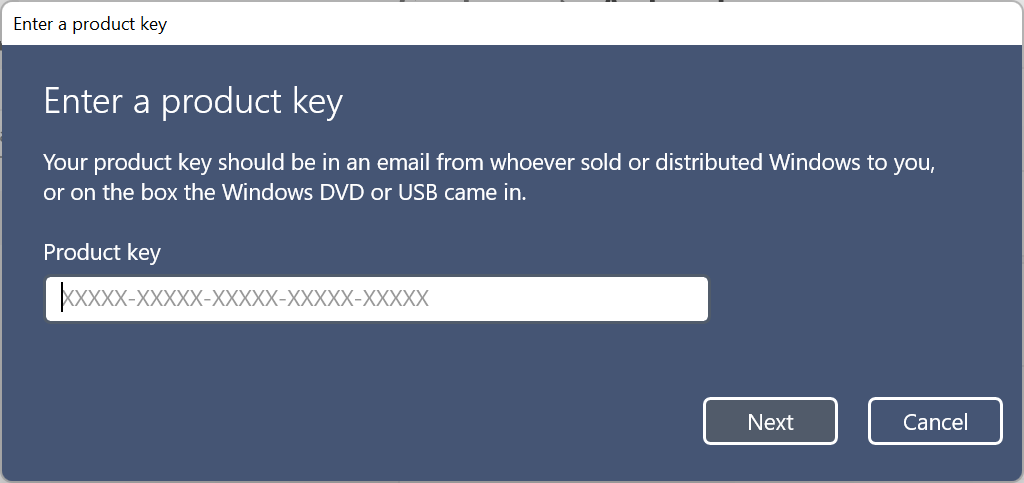
When you will be asked to introduce a product key, simply click on the Skip button, or Do this later, depending on what you get. However, you will be able to use Windows 11 without activating it, with a few drawbacks.
If interested, download the Windows 11 23H2 ISO file and get access to the latest features of the big update. To learn more, check out this guide.
The Activate Windows message will continue to appear in the bottom-right corner of your screen if you have a Windows PC running on it that is not activated.
Even though several methods exist for removing the Activate Windows watermark, it may reappear if there are any problems with the Registry files.
Alternatively, if you do not wish to change files in the Registry Editor, you must accept this watermark as a part of your computing experience.
If you do not activate Windows 11, you will be unable to make any changes to your Personalization options. In other words, you cannot change your wallpaper, theme, title color, Start Menu color, transparency, or any other aspect of your computer.
This is arguably the most inconvenient aspect of not having a properly activated copy of Windows since you will have to stick to the default settings.
Furthermore, numerous messages, delivered at regular intervals, may prompt you to activate your Windows installation with a product key. This popup notice may appear when viewing a movie or reading an article online, depending on your location.
Suppose you decide to activate your operating system. In that case, we recommend only buying product keys from the official vendor, as otherwise, you could get a virus or even buy expired licensing keys.
For more information on activation, do not hesitate to check out our post with what to do if you can’t activate your copy of Windows 11.
Alternatively, if you get the 0xc004c060 error code, take a look at our article on how to fix Windows 11’s activation error 0xc004c060.
Users also reported getting the 0xc004f213 error number, to which we have responded with a thorough guide on how to fix the activation error.
Was this guide helpful for you? Do let us know in the comments section below whether you will activate your copy of Windows 11. Thanks for reading!
Do you like to play pranks? If that’s the case, we have compiled a list of the best Windows 11 error pranks that you can try today to fool your friends or family members.
You may have seen others spend hours coming up with codes to create programs that create an illusion of an error. But, it isn’t supposed to be that difficult. Anyone can create fake prompts, BSOD errors, or make it look like Windows is installing updates.
But before we head the best Windows 11 error pranks, it’s imperative that you know whether it would affect the system.
Is it safe to play Windows 11 error pranks?
In most cases, the answer would be Yes. All the pranks listed in this guide are completely harmless and wouldn’t affect the health of your computer.
Though there may be instances where a particular prank is designed to consume a lot of system resources and ultimately cause the OS to crash. But these too do not adversely affect the PC, and a simple reboot would get things back to normal.
Although there could be Windows 11 error pranks on other websites that may harm your computer. So we recommend that you be wary of these and only proceed at your own risk.
Besides, avoid downloading third-party apps for pranks that can be easily created. For some of the creative ones, you might need specialized software to save time.
What are the best Windows 11 error pranks?
1. Create fake errors in Windows 11
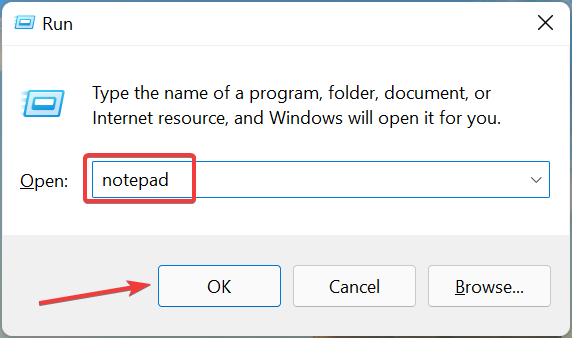
Press Windows + R to launch the Run command, enter notepad in the text field, and either click on OK or hit Enter.
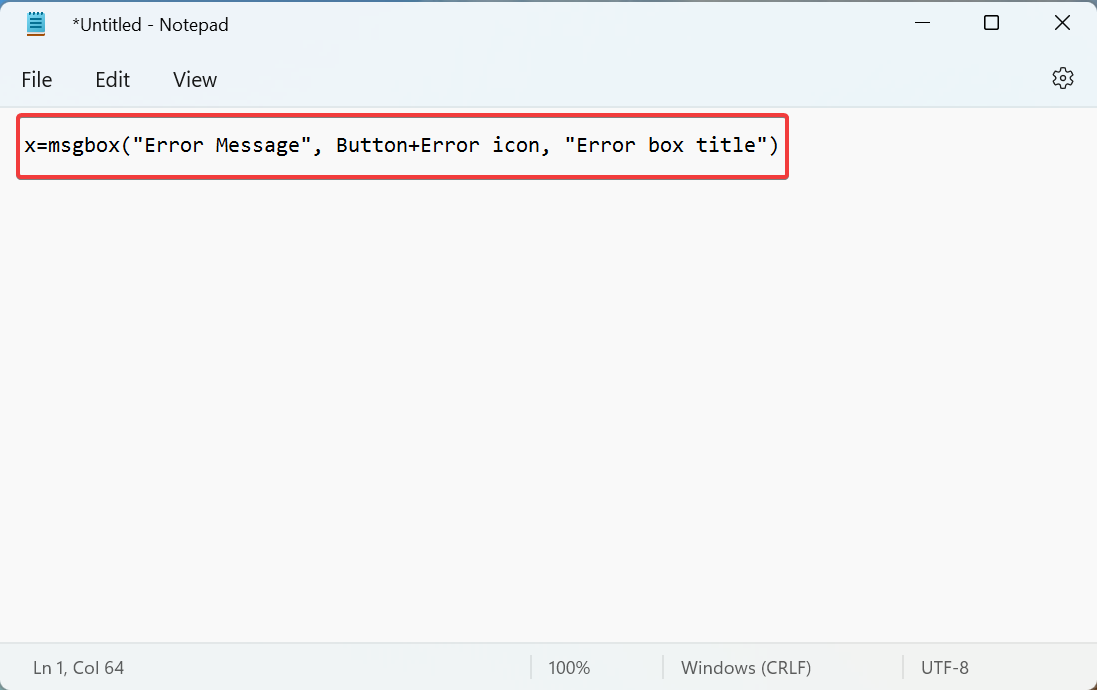
Now, paste the following command in the Notepad, and make the necessary changes as dicussed in the subsequent steps:x=msgbox("Error Message", Button+Error icon, "Error box title")
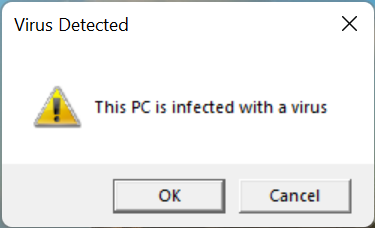
Replace the Error Message section with the one that you want to be displayed. For instance, Your computer needs to restart or This PC is infected with a virus. Remember to not remove the double quotes from the command.
For button, you have various options as follows:
0: OK
1: OK and Cancel
2: Abort, Retry, and Ignore
3: Yes, No, and Cancel
4: Yes and No
To change the error icon, just replace the particular entry in the command with the desired value given below:
0: Icon not present
16: Critical sign
32: Question mark sign
48: Warning sign
64: Info sign
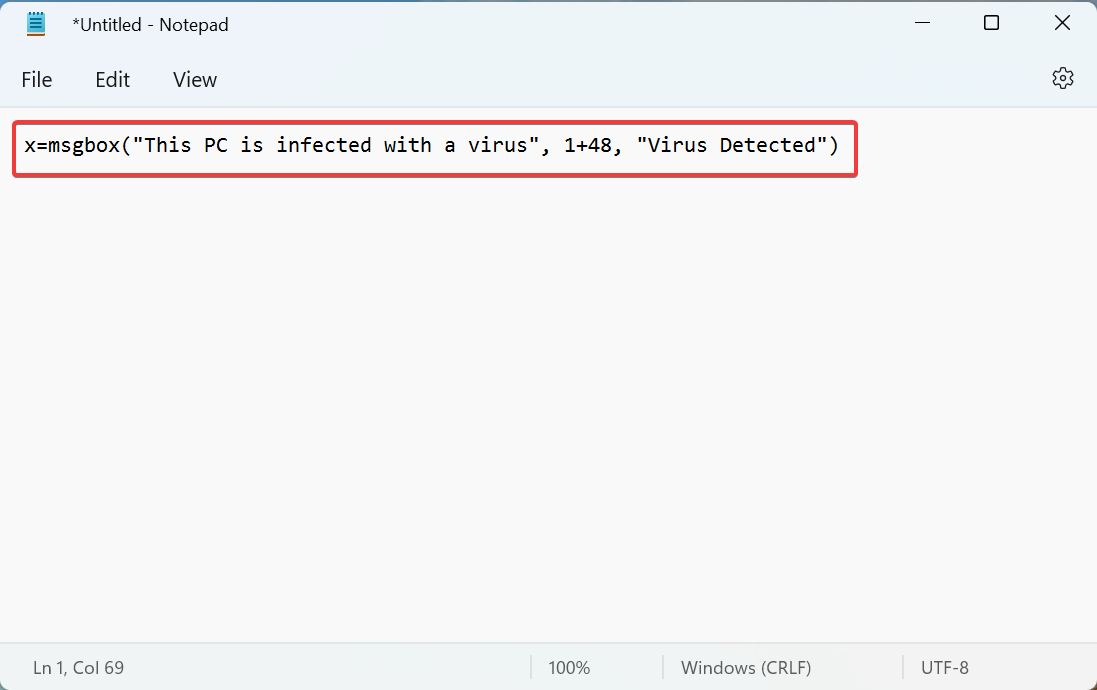
Now, choose the appropriate error title. You can go with something that’s related to the error message added earlier. For instance, Virus Detected.
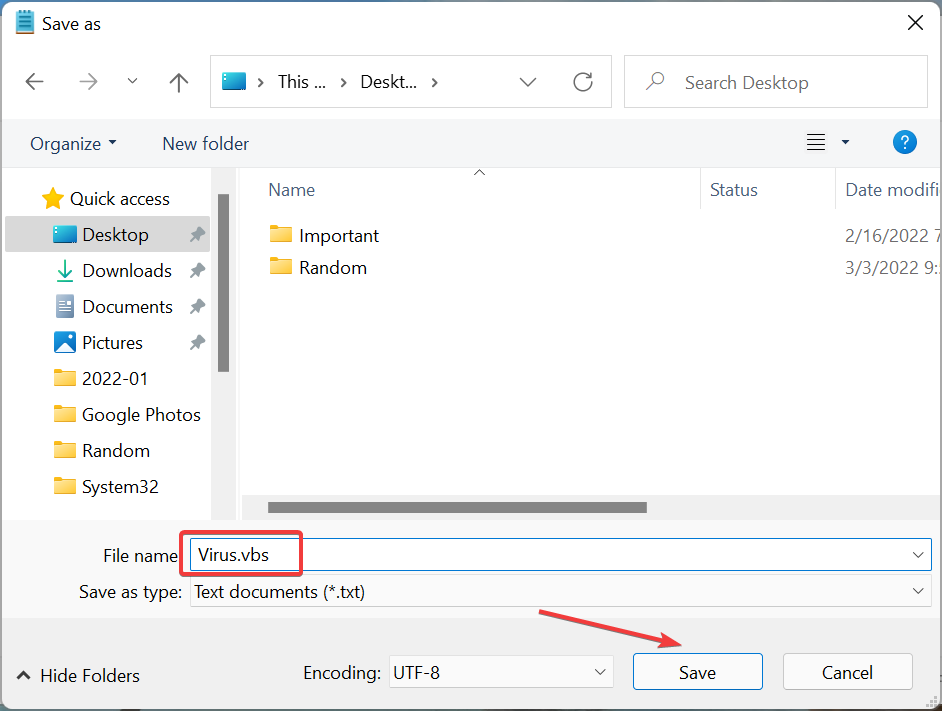
Now, after modifying the command, we came up with this but you can go with any other variation. Just remember to make it look believable:x=msgbox("This PC is infected with a virus", 1+48, "Virus Detected")
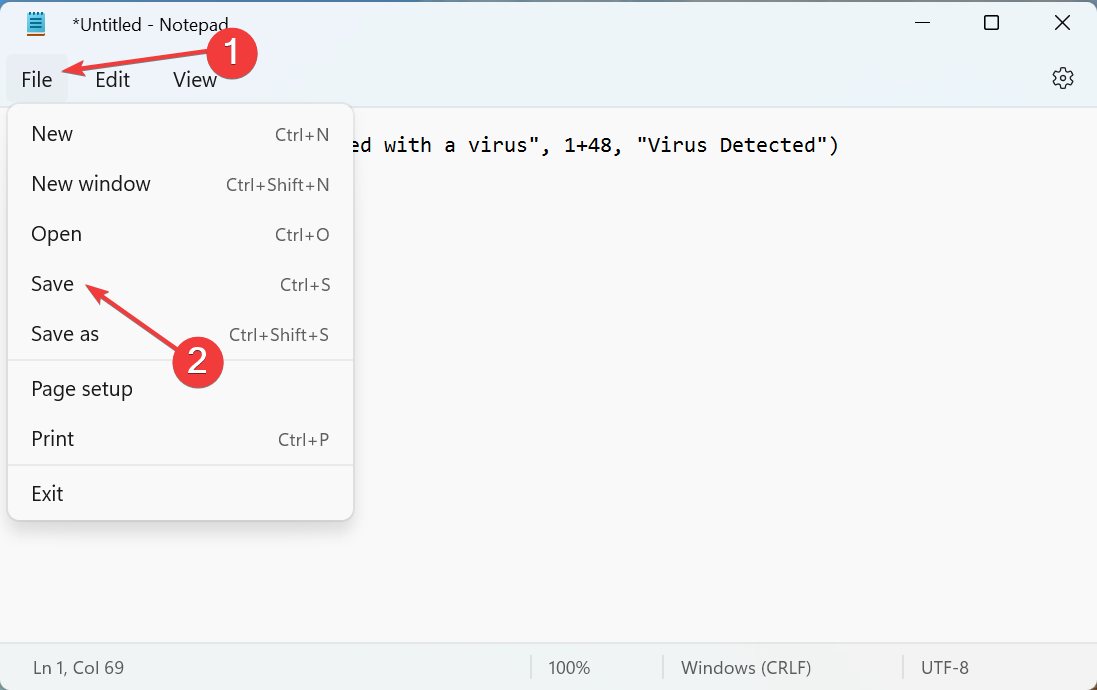
Once done, click on the File menu at the top-left, and select Save from the list of options. Alternatively, you can hit Ctrl + S to launch the Save as window.
Navigate to the desired location, enter a name for the file followed by the .vbs extenstion, and click on Save at the bottom.
Close the Notepad, double-click on the file you just created, and the error message will pop up.
This is probably one of the best Windows 11 error pranks. And on top of that, it offers the option to modify the error prompt as you please, thus making it look believable and easily fooling your friends.
2. Create fake installing updates screen that leads to a BSoD
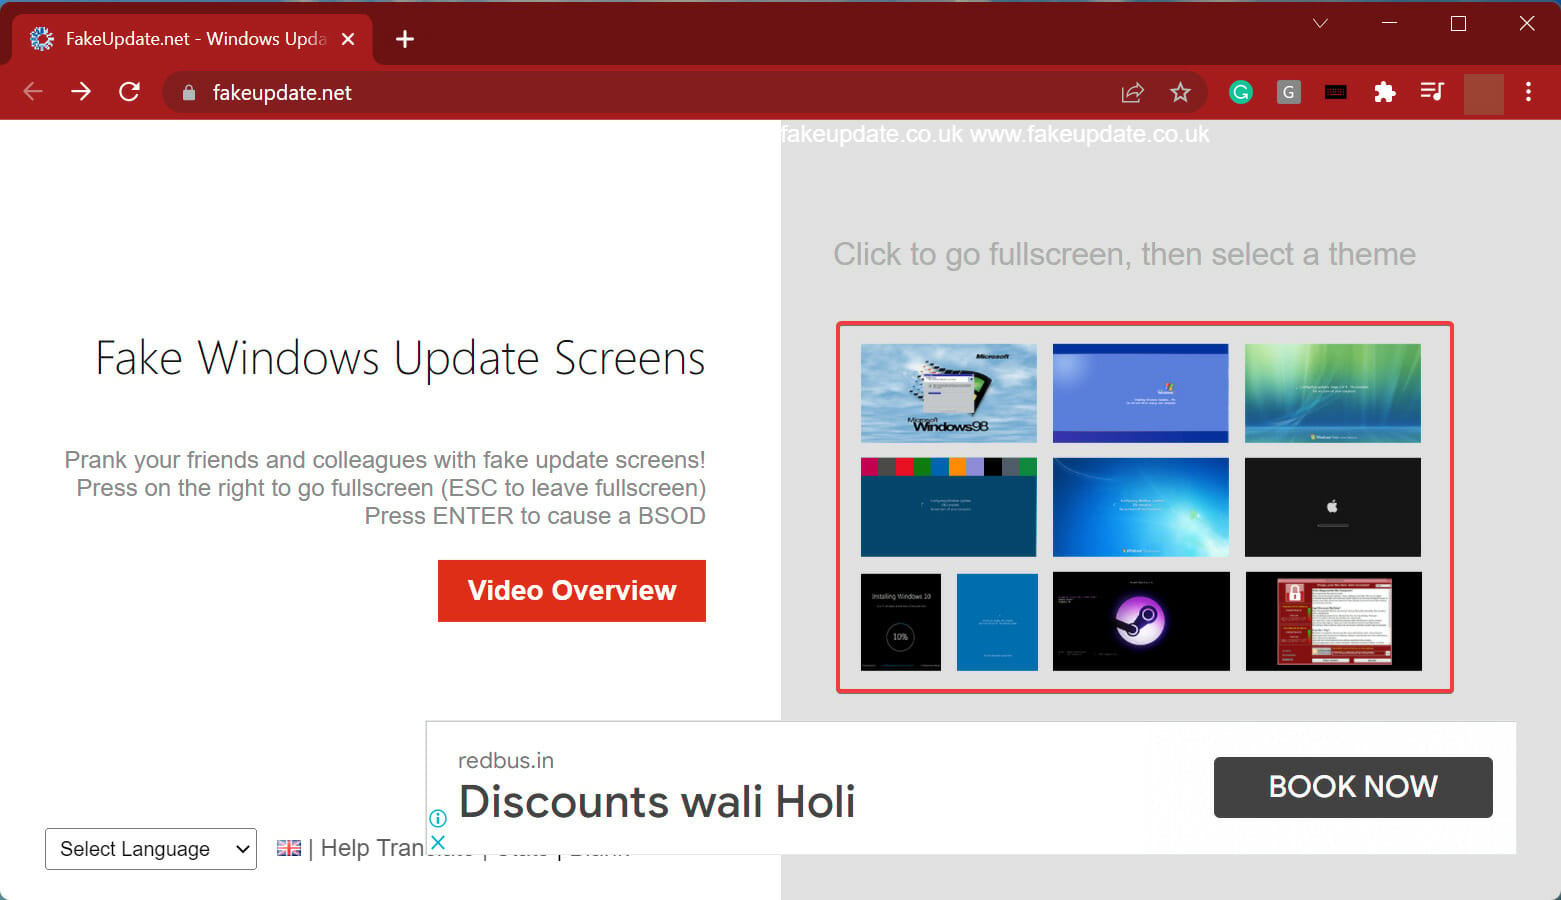
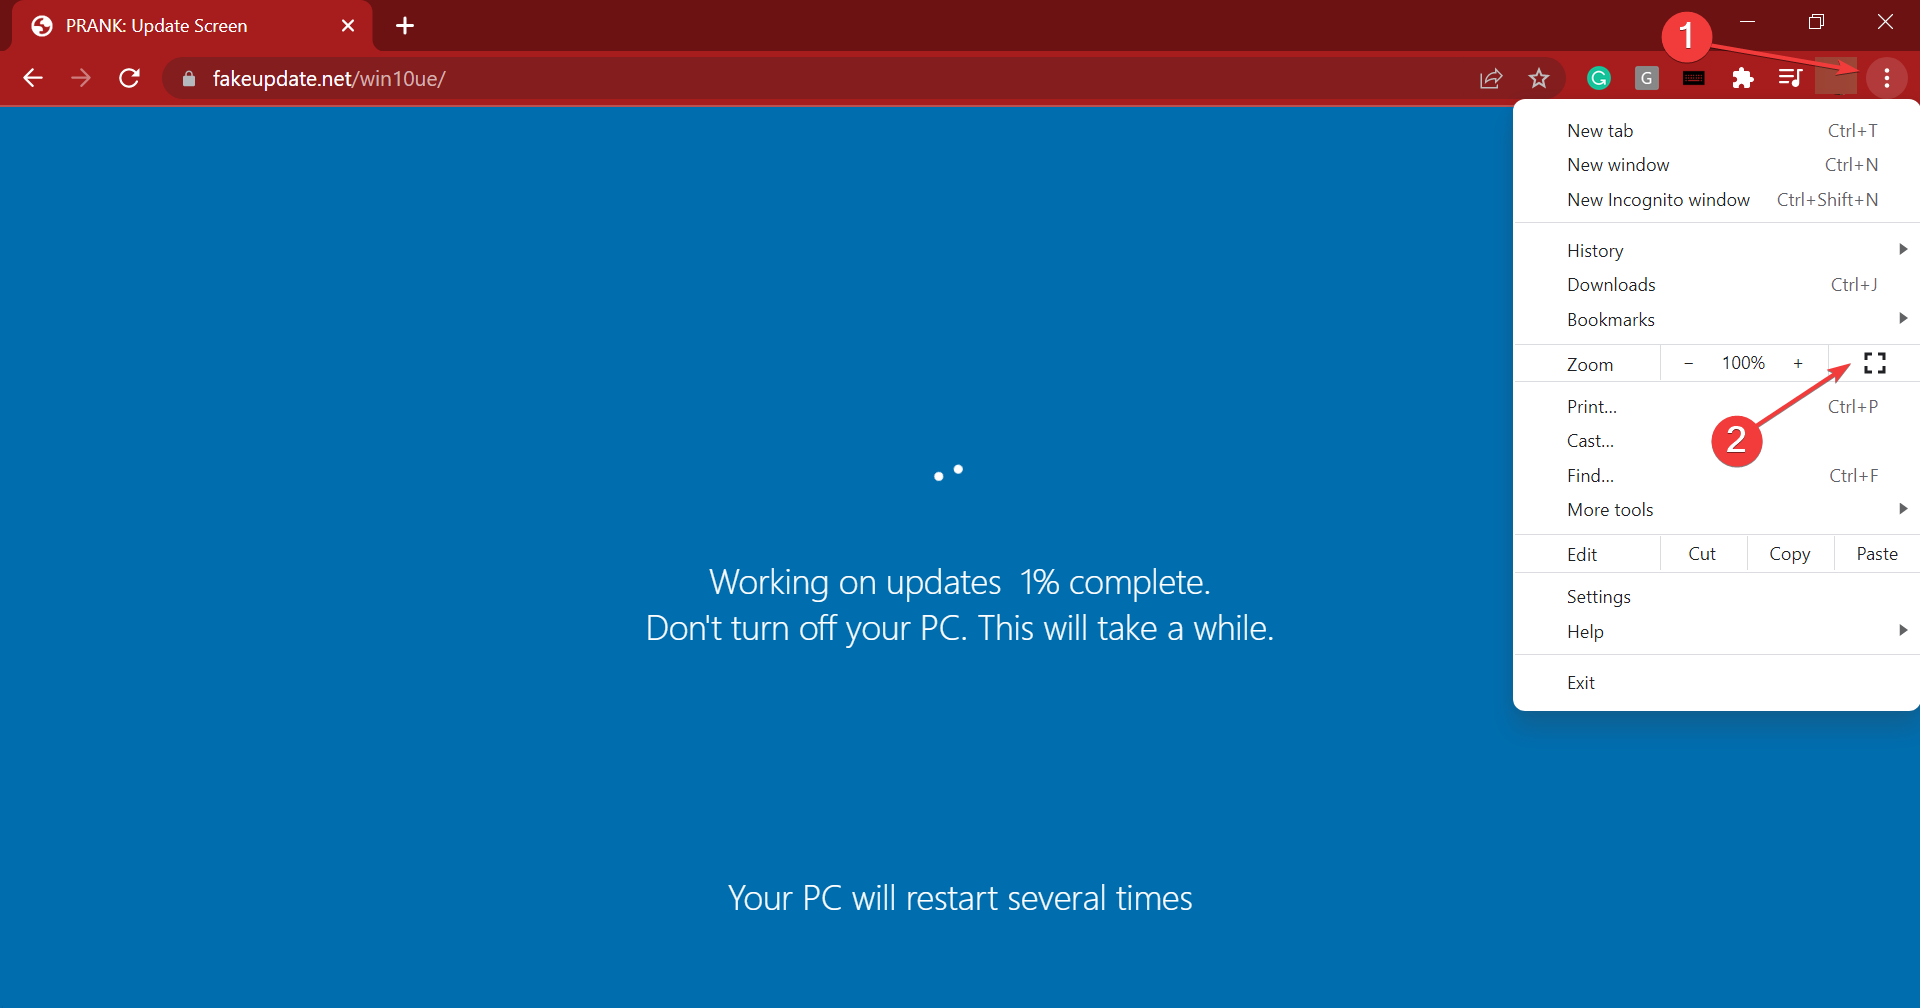
Go to FakeUpdate.net and select any of the available Windows Update themes from the right.
The update screen will now appear in the browser.
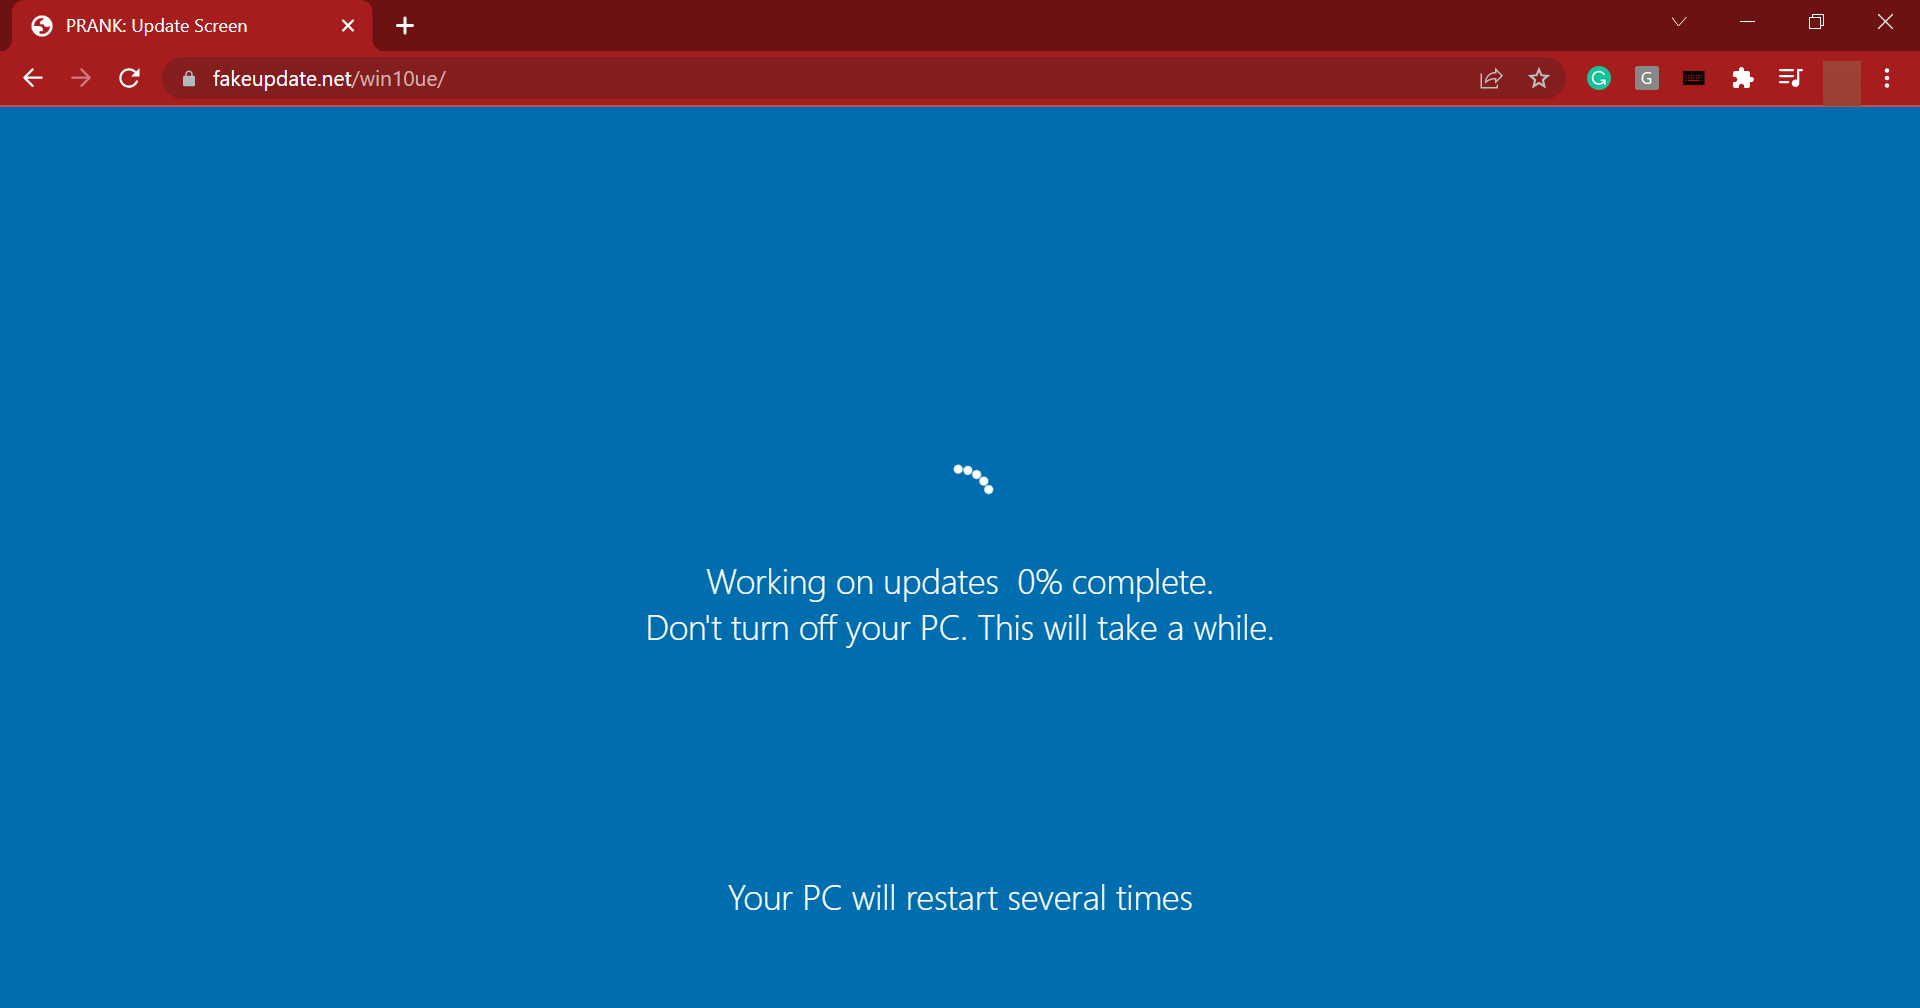
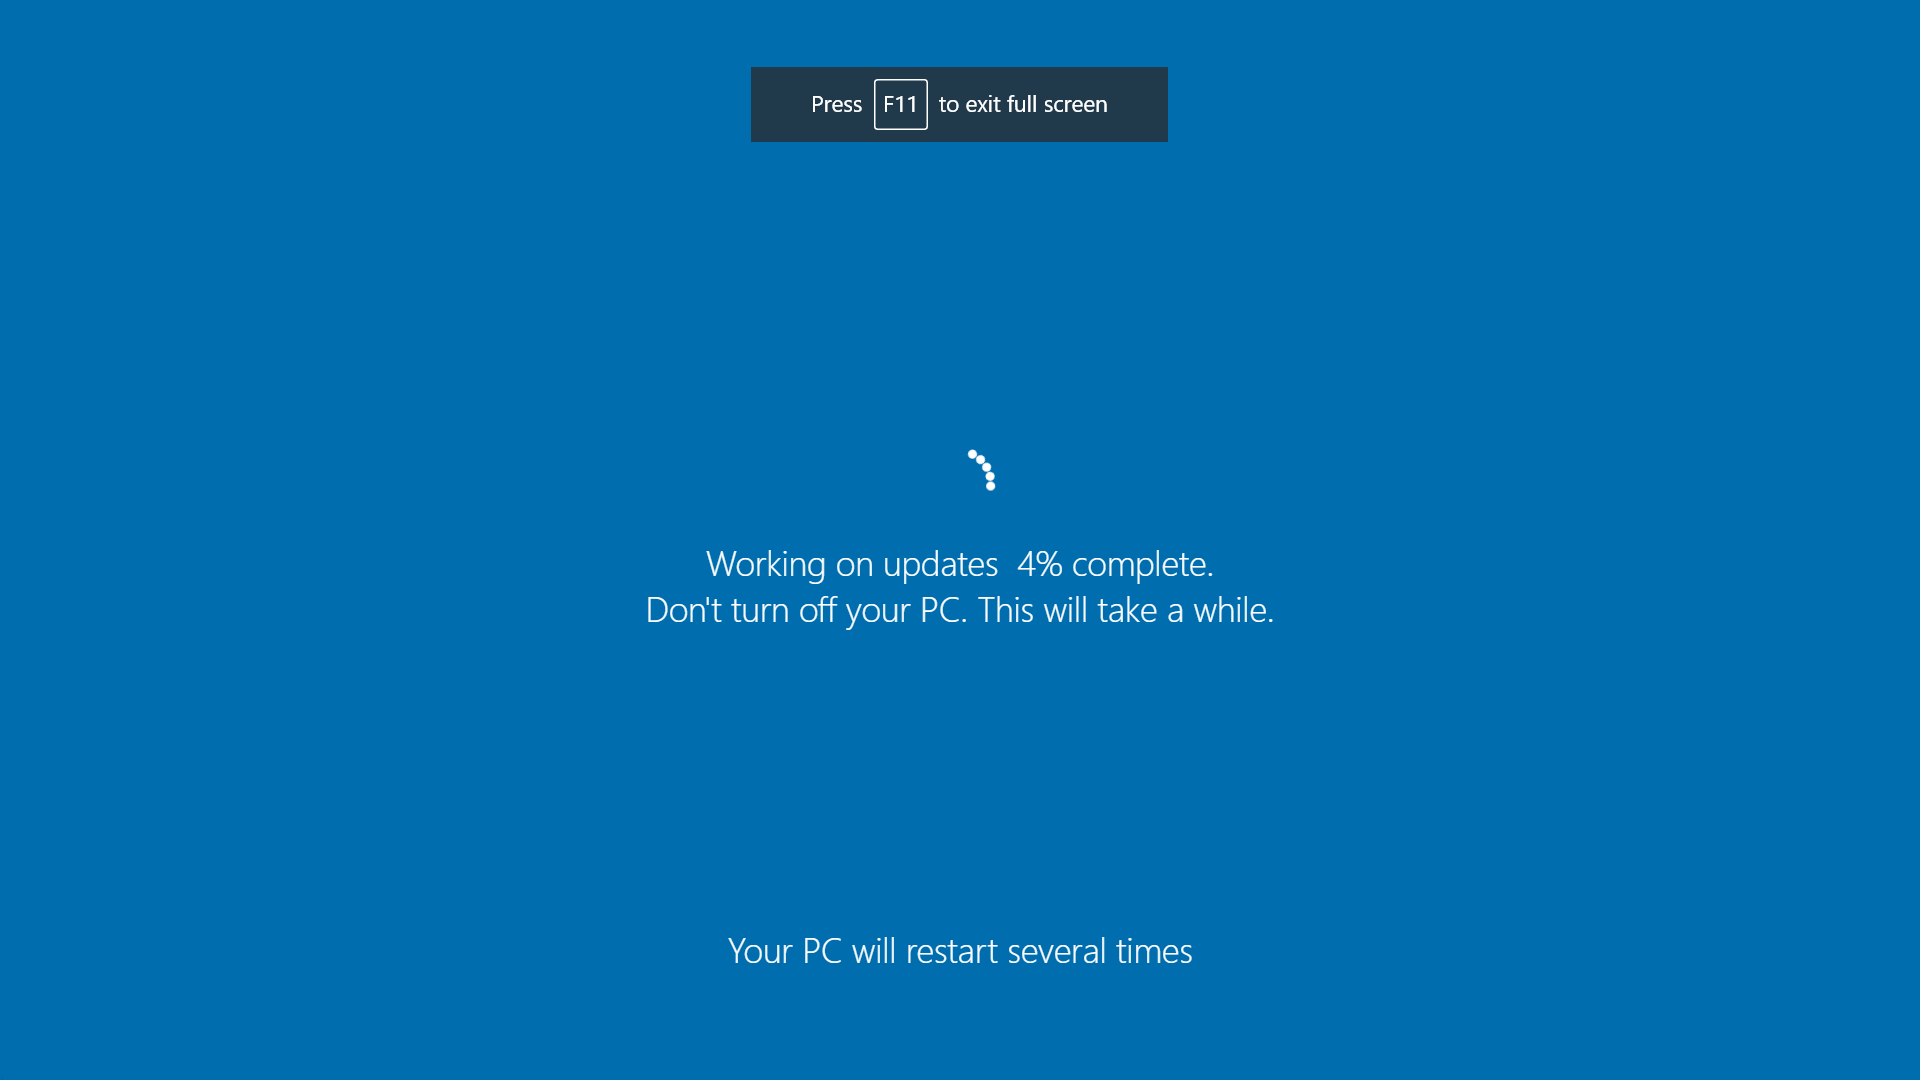
The next step is to go full-screen to make the prank look believable. To do that, click on the ellipsis and select the Full screen icon. Alternatively, you can hit Fn + F11 or just the latter, depending on whether the function keys are locked or unlocked.
The update progress will now appear in full screen.
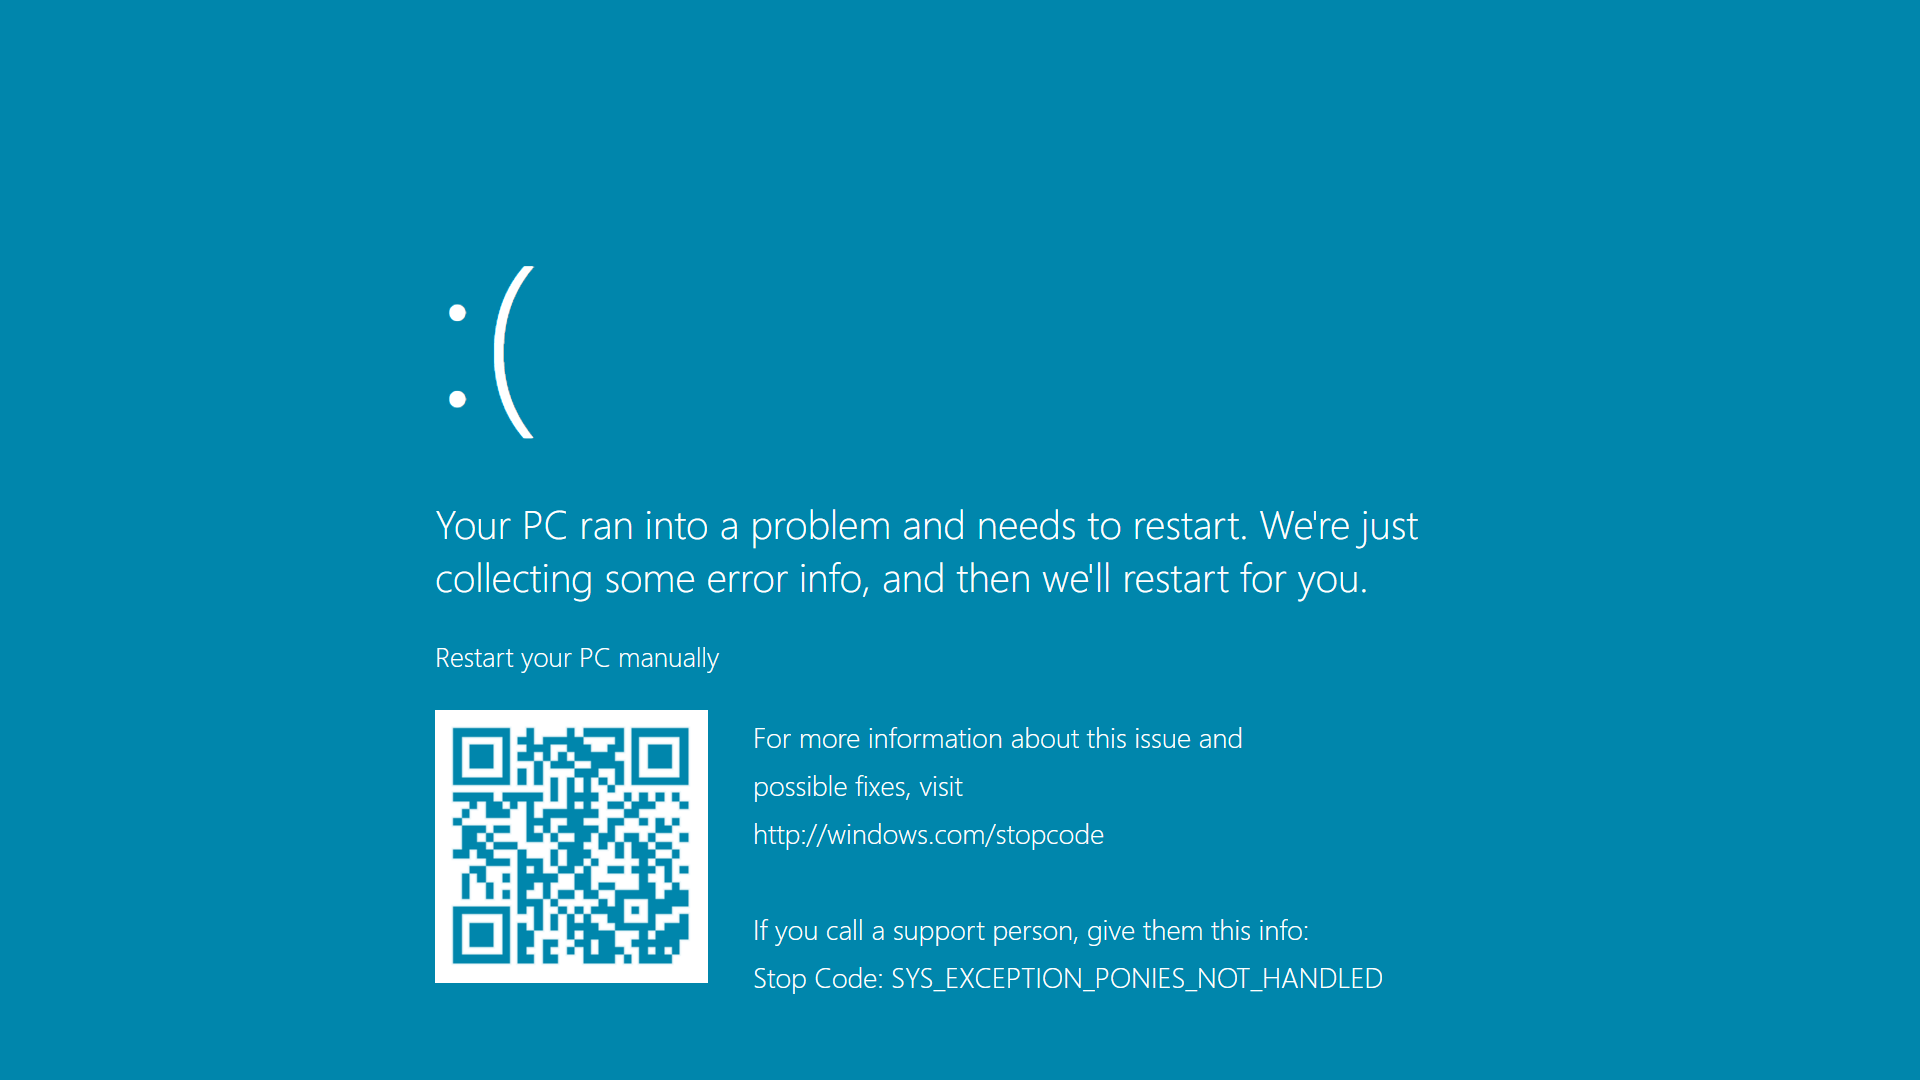
Also, if you hit Enter, a BSOD(Blue Screen of Death) screen will appear.
If you don’t want to let others use your system for a while or maybe keep them off theirs, this prank would keep them away from the PC for a while. And the best part is that you can actually see progress on the fake update screen which apparently makes it all look real.
3. Create an illusion of a non-responsive desktop
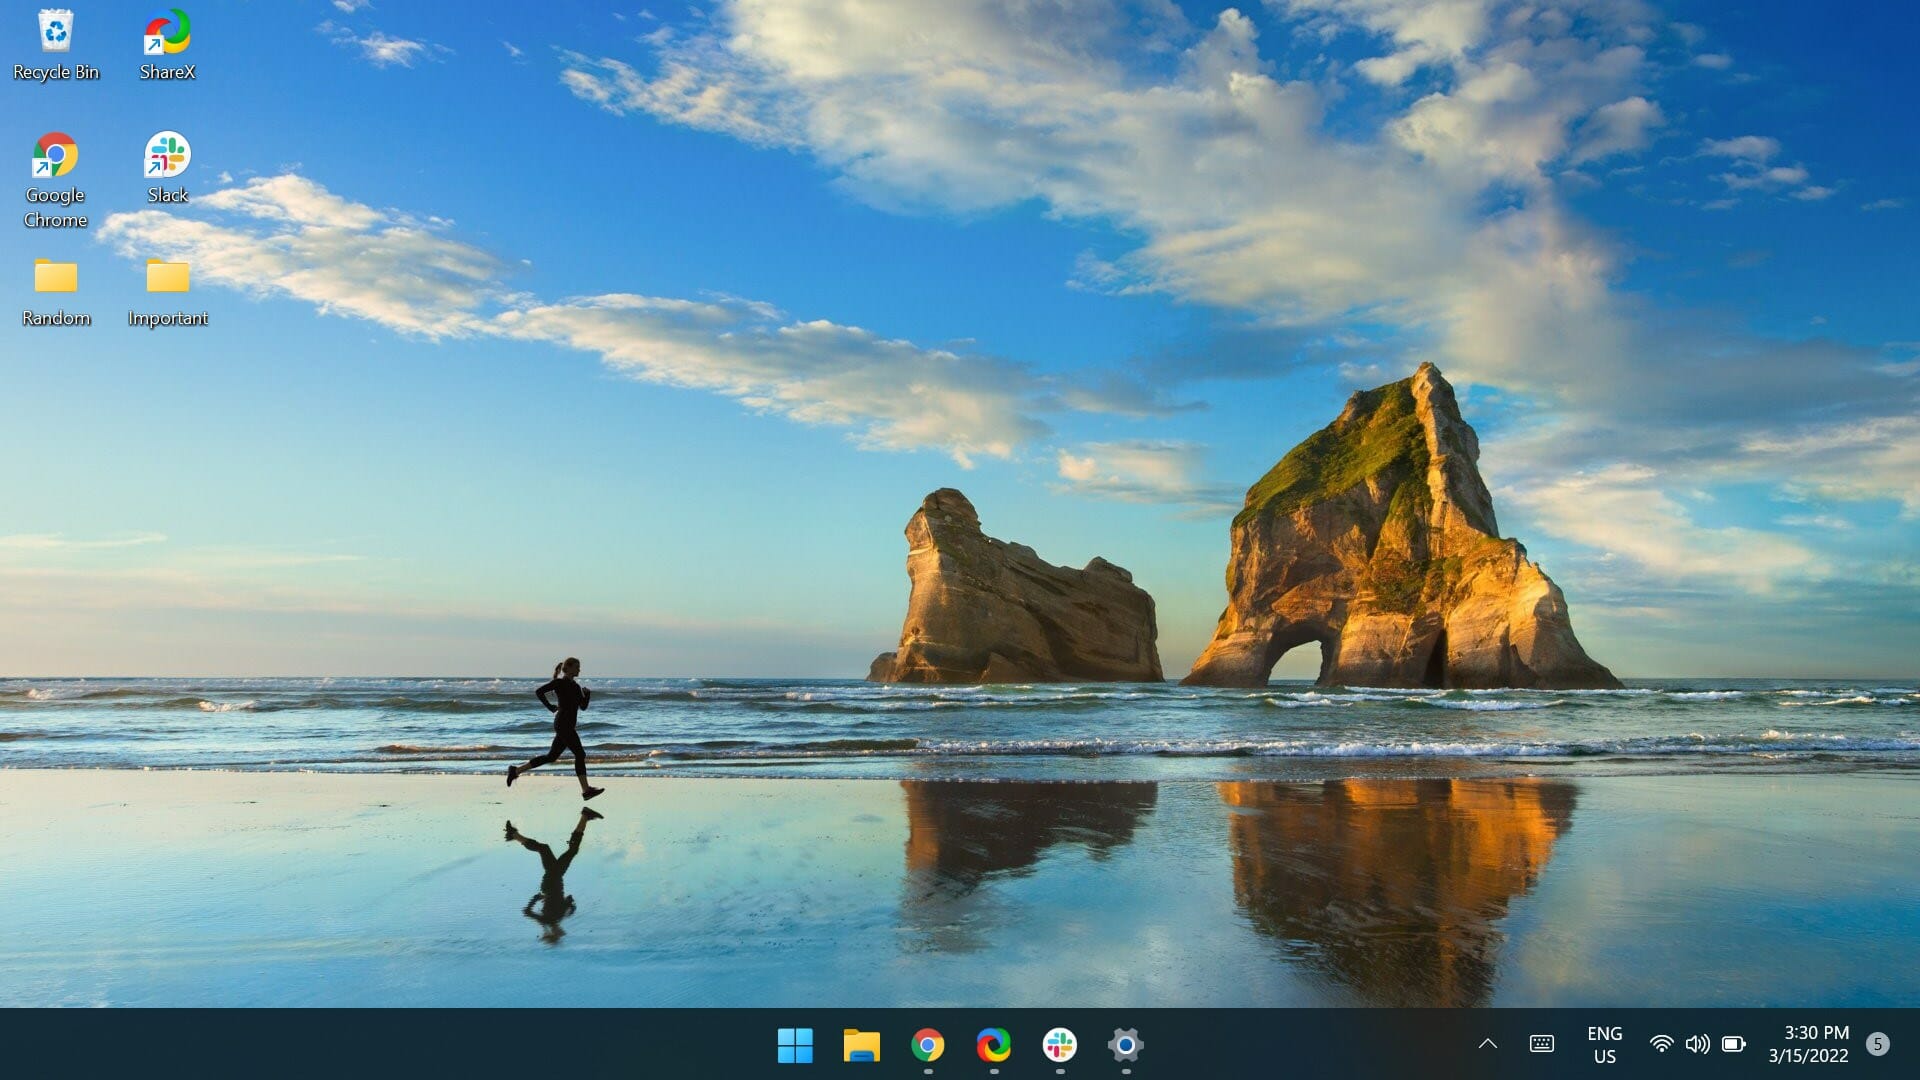
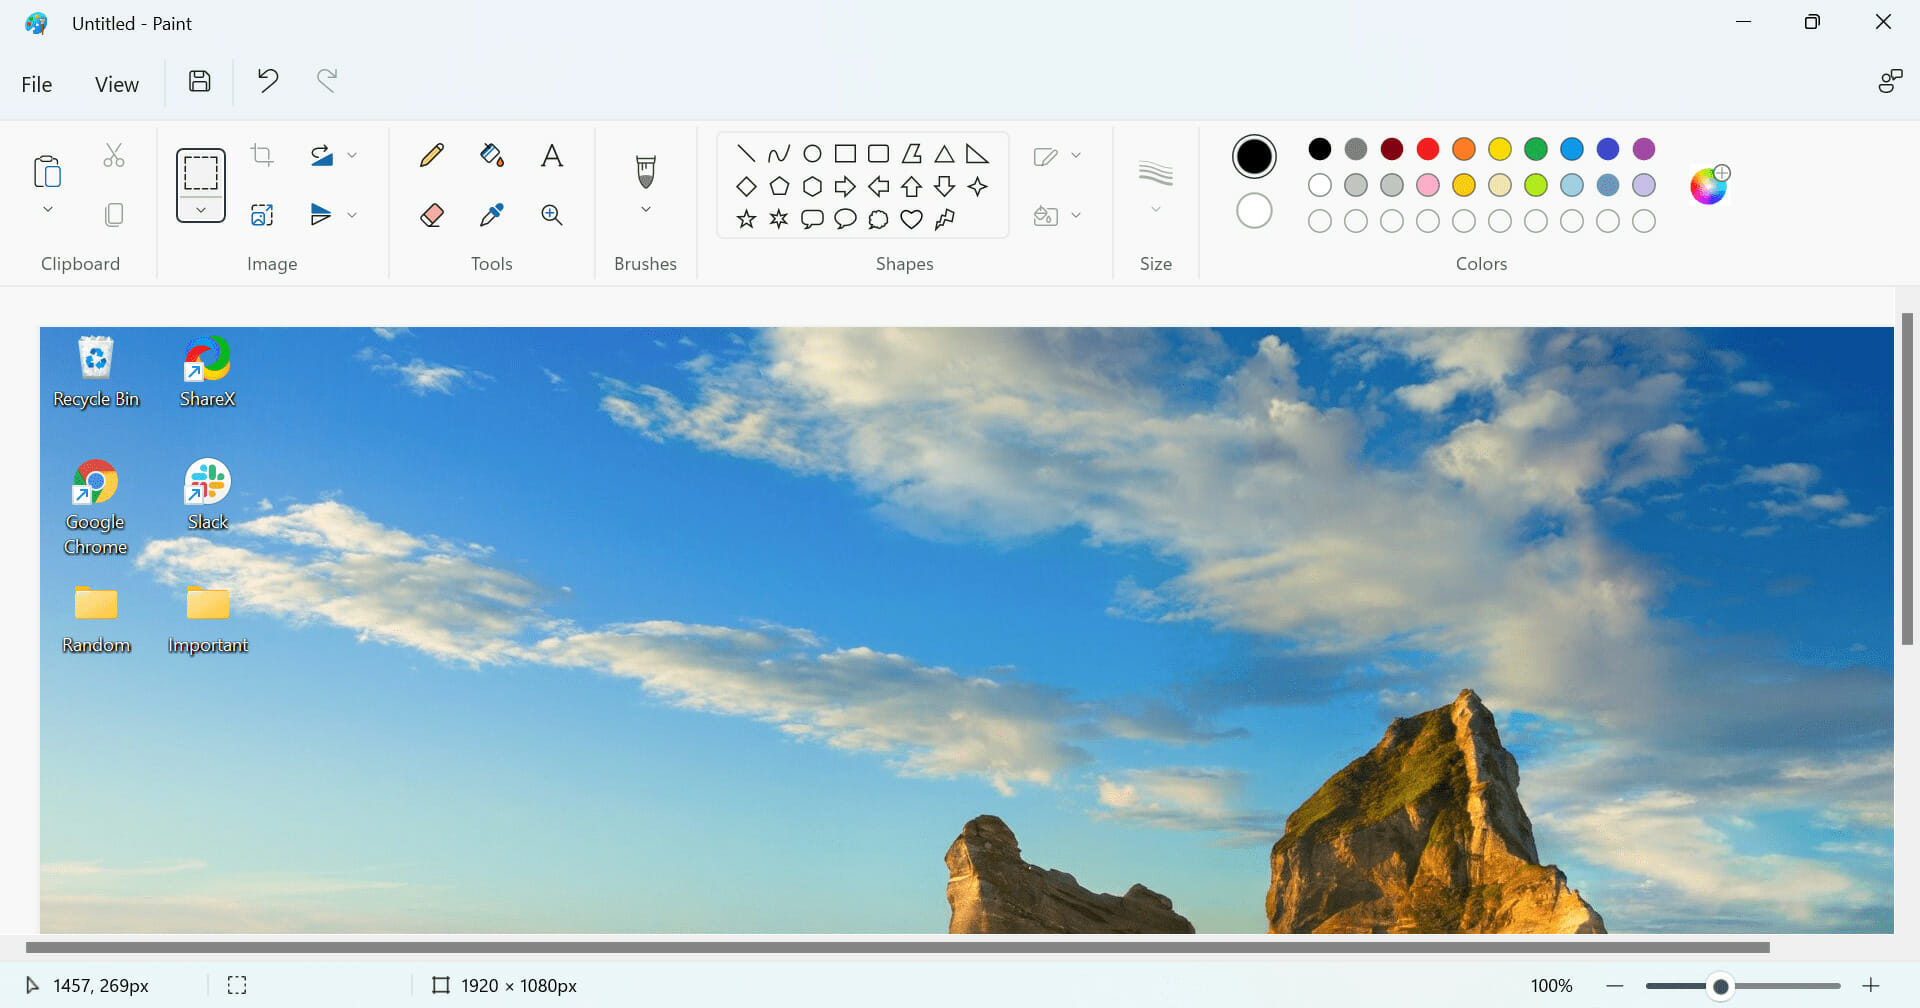
Navigate to the desktop, and hit the Prt Sc key to capture a full-screen screenshot.
Next, press Windows + S to launch the Search menu, enter Paint in the text field at the top, and click on the relavant search result that appears.
Press Ctrl + V to paste the screenshot you captured ealier.
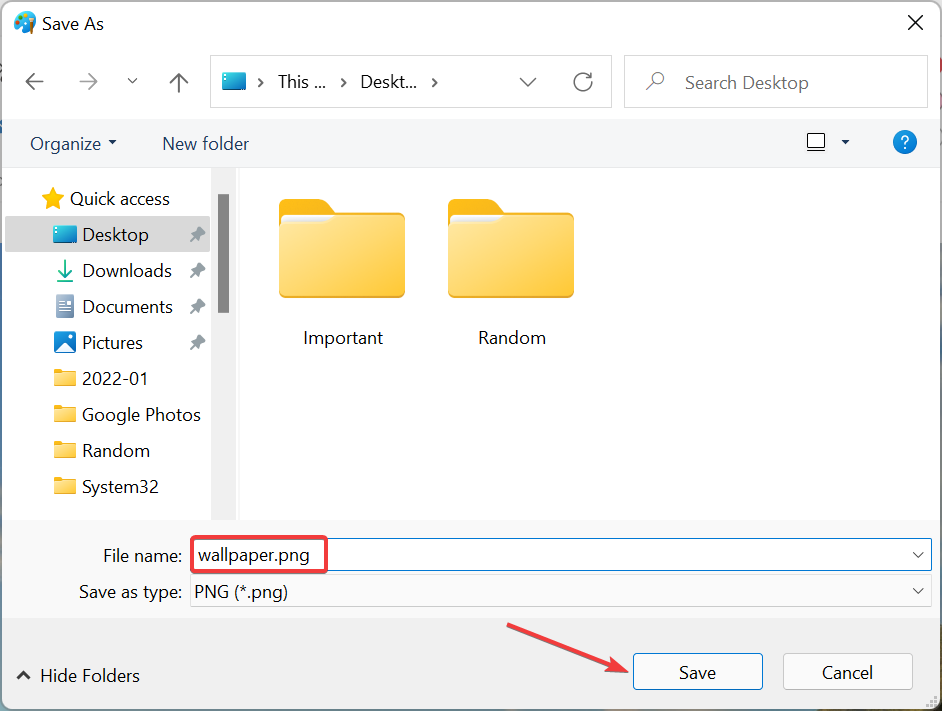
Now, click on the File menu near the top-left and select Save from the list of options.
Choose a location and name for the file, and click on Save at the bottom.
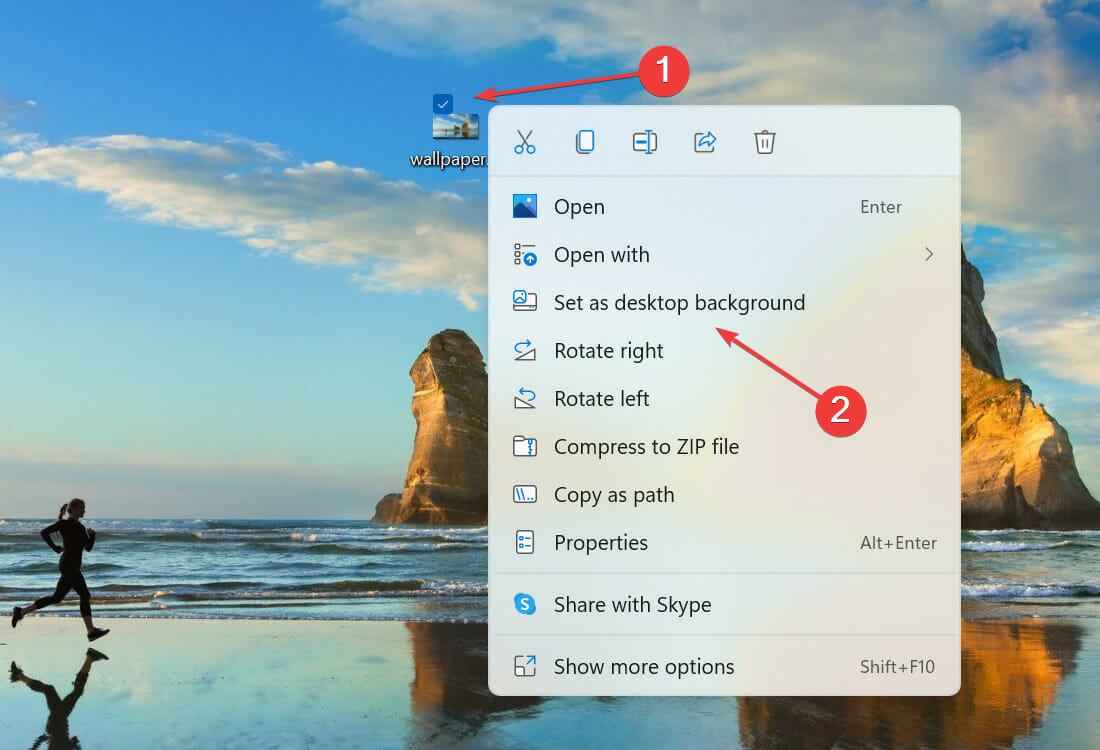
Close the Paint app, right-click on the file you just saved, and select Set as desktop background from the context menu.
Now, select the screenshot file, and hit the Del key to delete it.
Choose the appropriate response in case a confirmation prompt pops up.
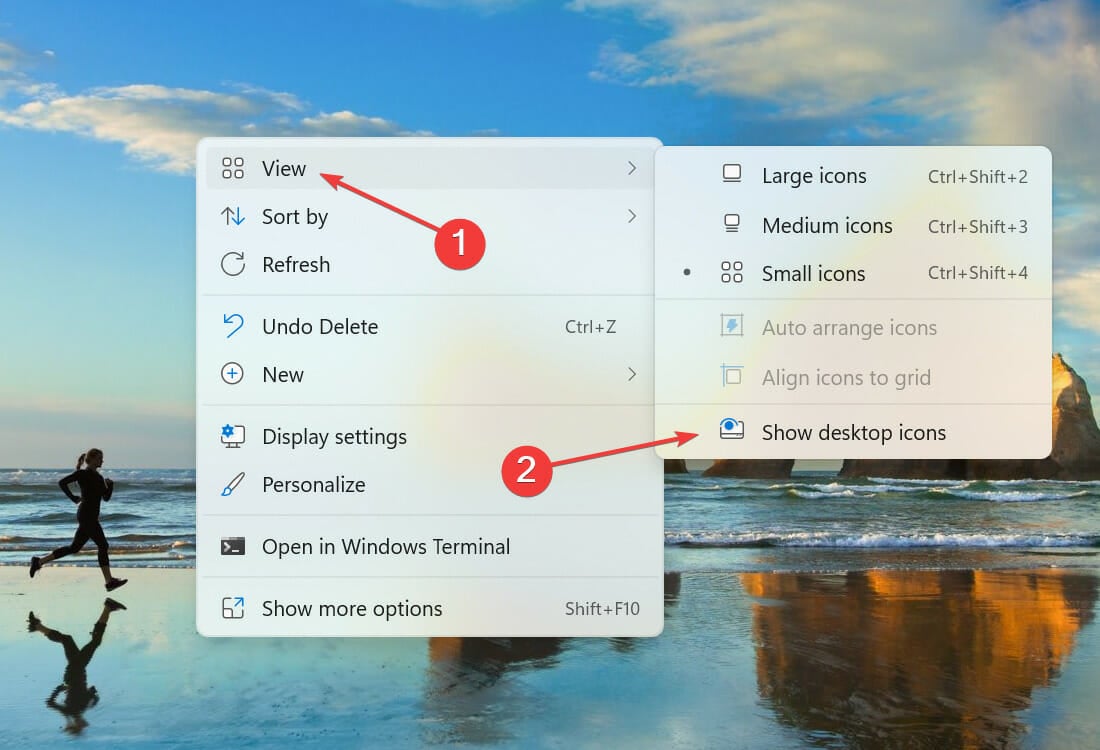
Now, right-click on the desktop, hover the cursor over View, and untick the Show desktop icons option from the flyout menu.
This is another great Windows 11 error prank. While the desktop looks exactly the same, clicking on any of the icons wouldn’t open it since it’s simply an illusion, and these icons aren’t there.
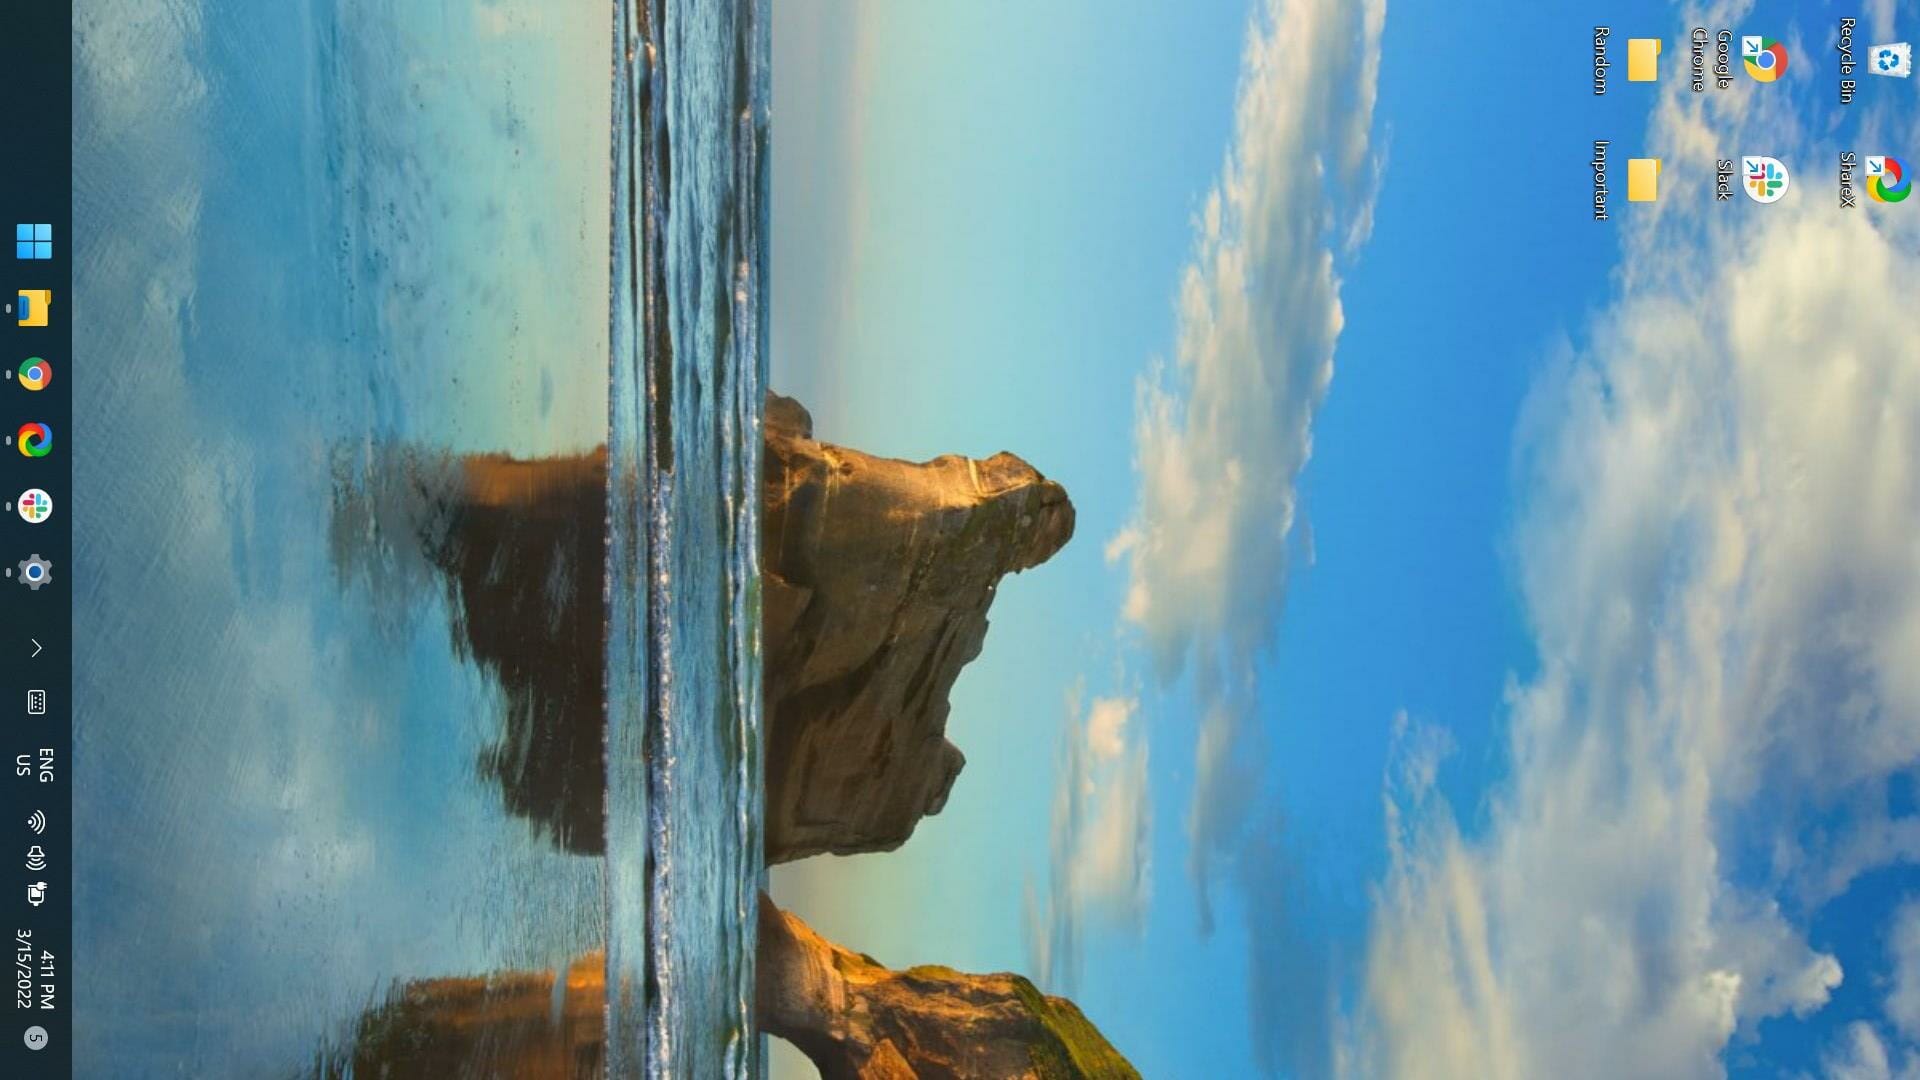
Press Ctrl + Alt followed by any of the arrow keys to rotate the display accordingly. For instance, hitting Ctrl + Alt + Right Arrow will make the desktop look like the screenshot below.
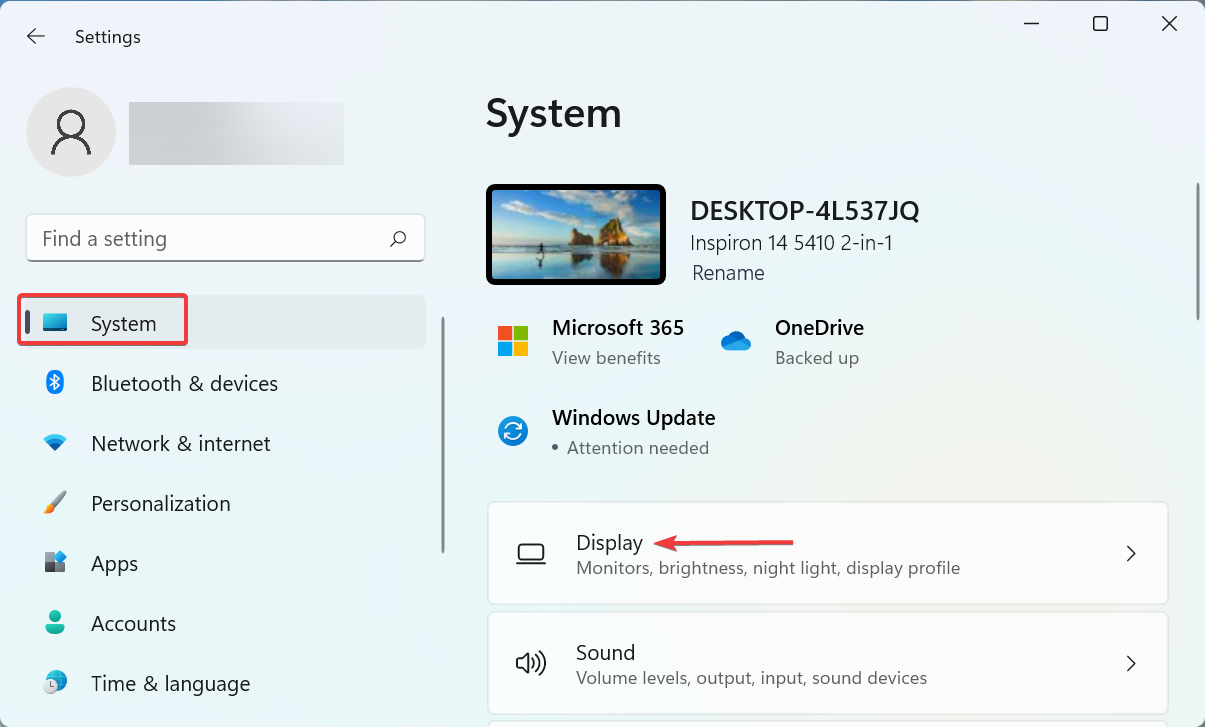
If the keyboard shortcuts don’t work, it’s likely that these are disabled from the graphics control center. In this case, press Windows + I to launch the Settings app, and select Display on the right in the System tab.
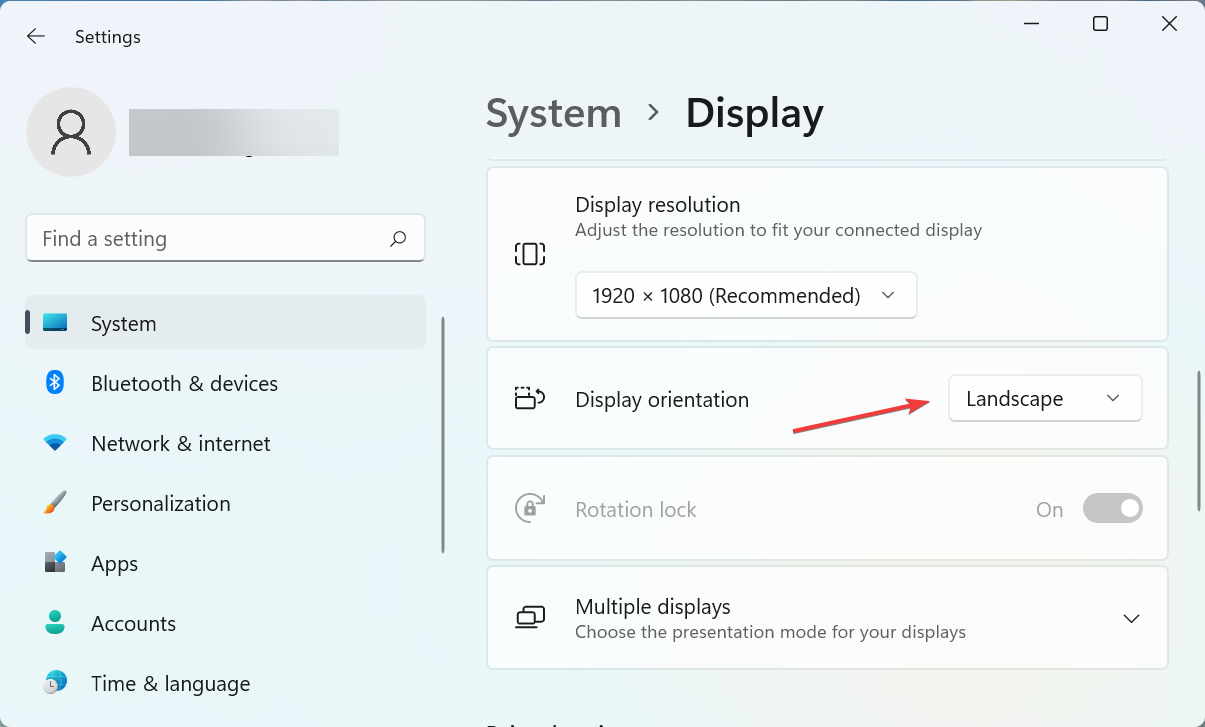
Next, click on the Display orientantion dropdown menu.
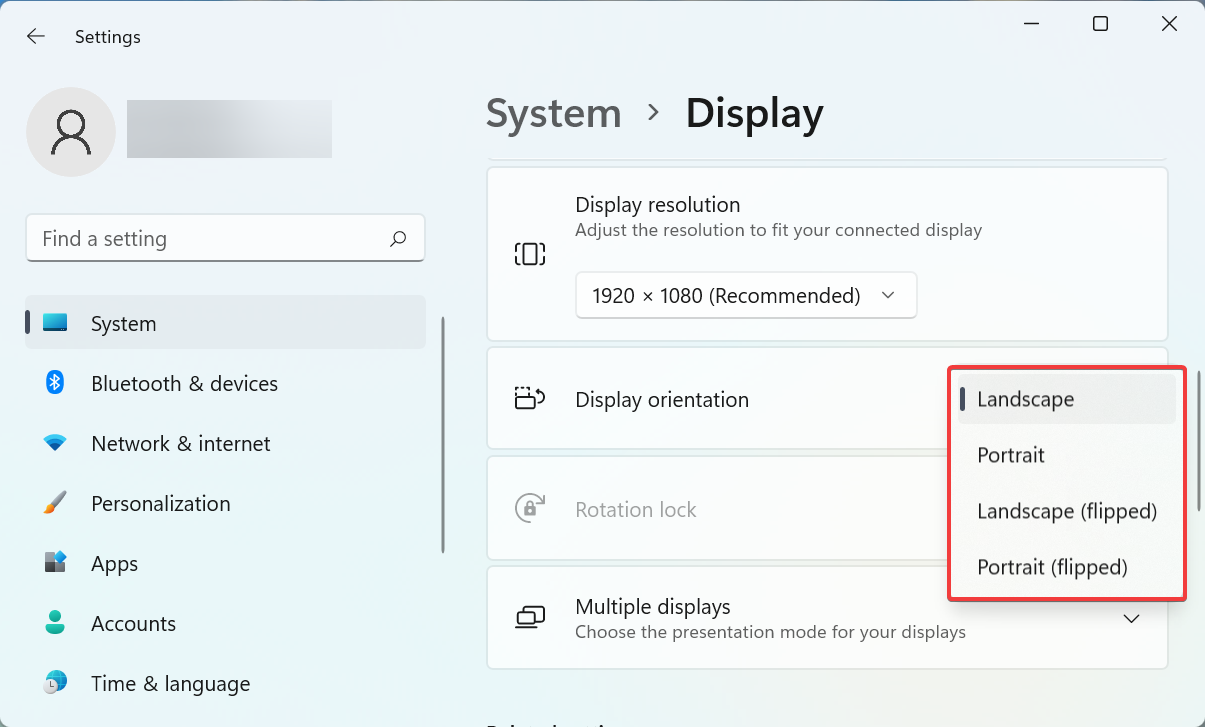
Select the desired option here to change the orienation and rotate the display.
This is one of the simplest Windows 11 prank errors that you can play on your friends. Apart from the orientation seen above, you can also invert the display.
5. Shutdown the PC whenever a particular application is launched
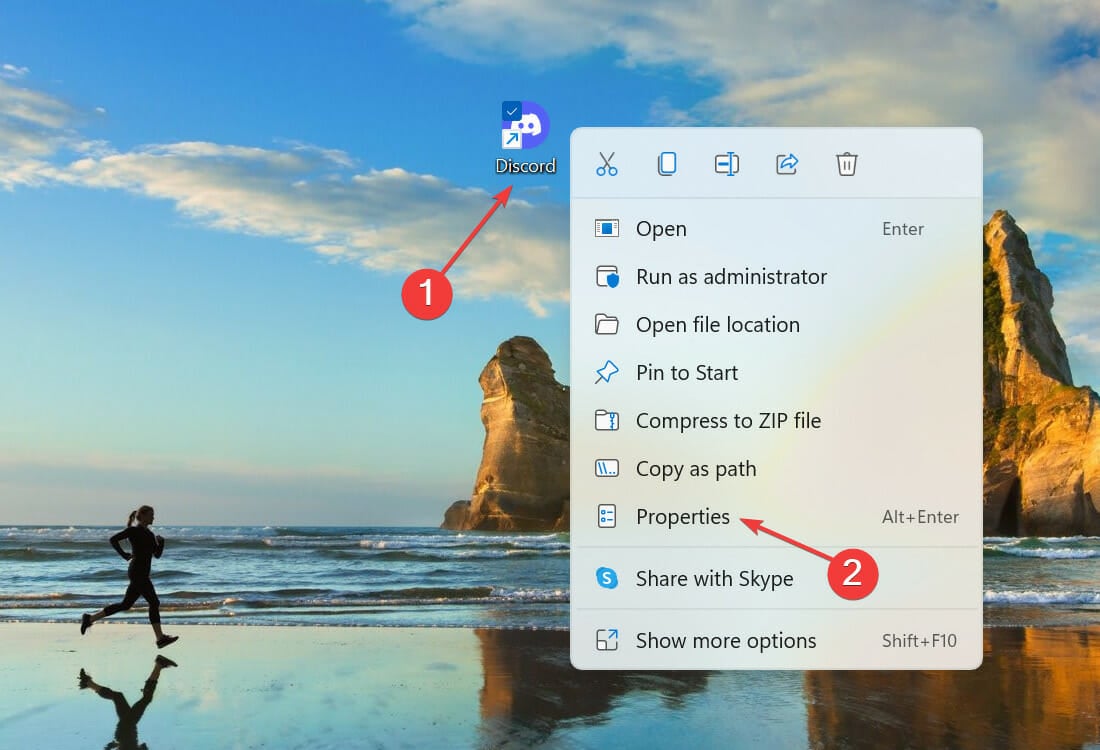
Right-click on the launcher file of the desired application, and select Properties from the context menu. Alternatively, you can select the file and hit Alt + Enter to launch its Properties.
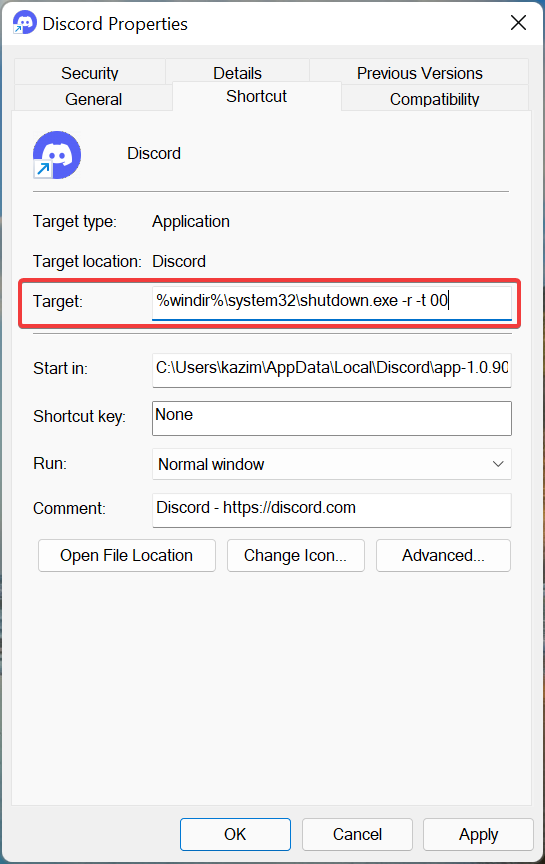
Now, enter the following in the the Target text field:%windir%\system32\shutdown.exe -r -t 00
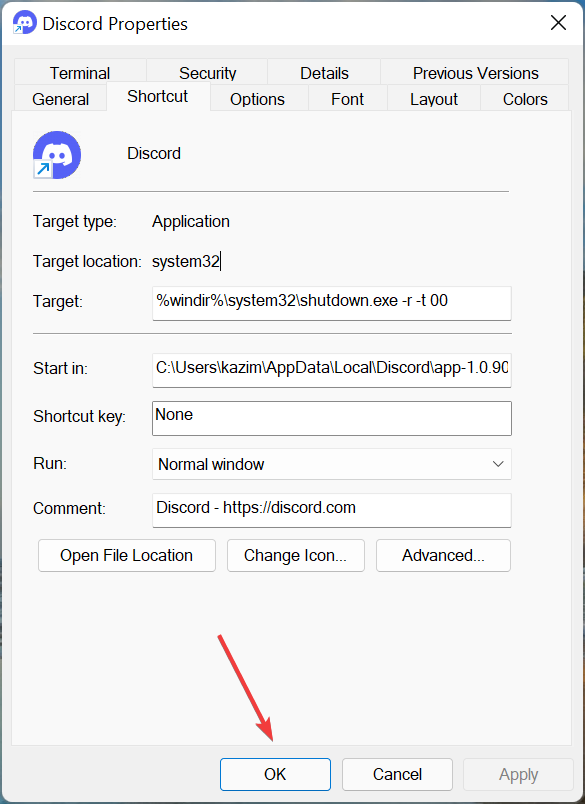
Once done, click on OK at the bottom to save the changes.
Now, every time someone launches that particular application, the PC will shut down. Do remember to save what was initially listed in the Target text field in order to revert to the original settings.
How can I create a fake BSOD (Blue Screen of Death) error?
You now have a fair understanding of how to play Windows 11 error pranks, but why not go a step further and create a fake copy of the dreaded BSoD errors.
Earlier, Microsoft had an app that helped users create fake BSoD errors, and the best part is that the error message read ALWAYS_LOOK_ON_THE_BRIGHT_SIDE_OF_LIFE. Though it has been discontinued, there are still several ways you can create a fake BSoD error.
So, by now you already have a few tricks up your sleeve to fool your friends. Remember that to create a fake error, it should always look real and believable. Just make sure of that, and you are good to go.
During an installation or Windows 11 upgrade, there are many errors you may encounter. However, most common errors would require a few steps to fix. Before exploring fixes for a specific error code, you should try some of these general solutions.
The Windows 11 error aka.ms/windowssysreq will mostly be resolved using the fixes discussed in this article, without the need to buy a new computer with a pre-installed Windows 11 OS.
Ensuring that your system meets the minimum requirements for a Windows 11 upgrade is best to avoid complications during and after an upgrade.
How do you know if you PC meets the minimum requirements for an upgrade?
If you need to upgrade to Windows 11 and have Windows 10 already installed on your PC, you should download and run the PC Health Check app to verify that your computer can be upgraded.
This app accesses core components of the PC to identify which of them do not meet the requirements, and it links to some detailed procedures to make the PC meet minimum requirements.
Should you install Windows 11 on devices that do not meet the installation requirements?
It is not recommended to continue an installation or upgrade to Windows 11 if the computer does not meet the minimum requirements. Such an upgrade would cause errors due to compatibility issues.
One of the most significant drawbacks is the inability of such devices to receive updates, including important security updates.
In fact, from Microsofts disclaimer for updates done on non-compatible devices, you should expect that any damages that the upgrade causes will not be covered under the manufacturer’s warranty.
How can I fix the aka.ms/windowssysreq error in Windows 11?
1. Remove all external hardware
Unplug all external hardware devices. These could include printers, headphones, speakers, USB flash drives, scanners, and external hard drives.
If your laptop is plugged into a docking station, it should be undocked before the installation.
2. Update your OS
Click on the start menu and select the Settings option (the litle gear icon).
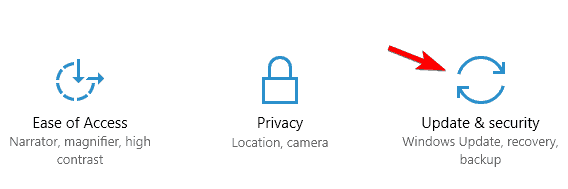
At the bottom of the Settings app, select the Update & Security option.
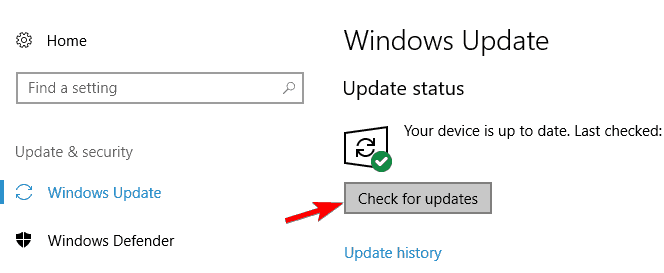
On the left pane of the update home, select Windows Update, click the Check for Updates button on the right pane, and select the option to download and install updates.
3. Update hardware drivers
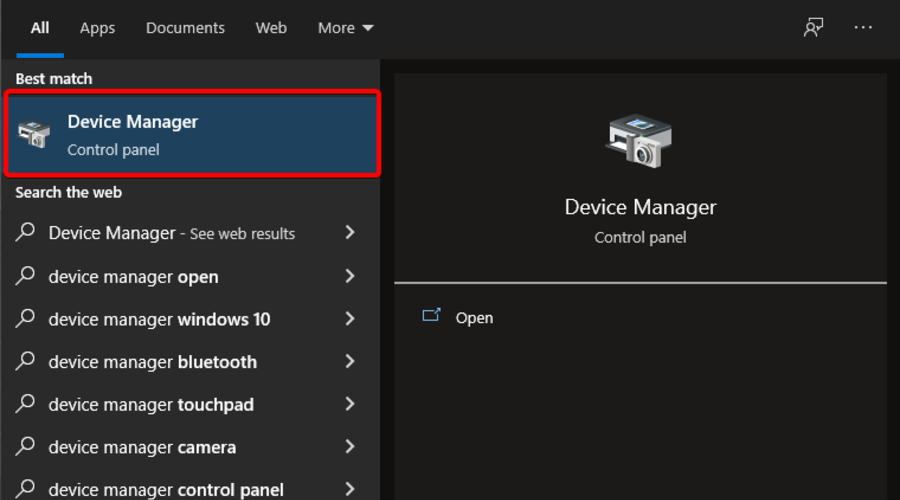
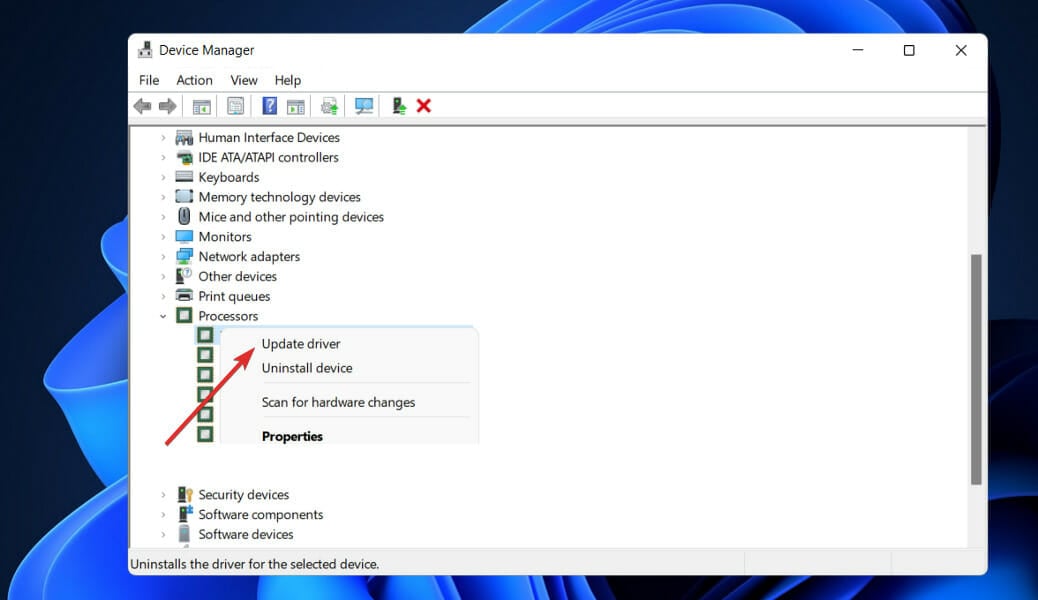
Search for Device Manager in your start menu and click the first option.
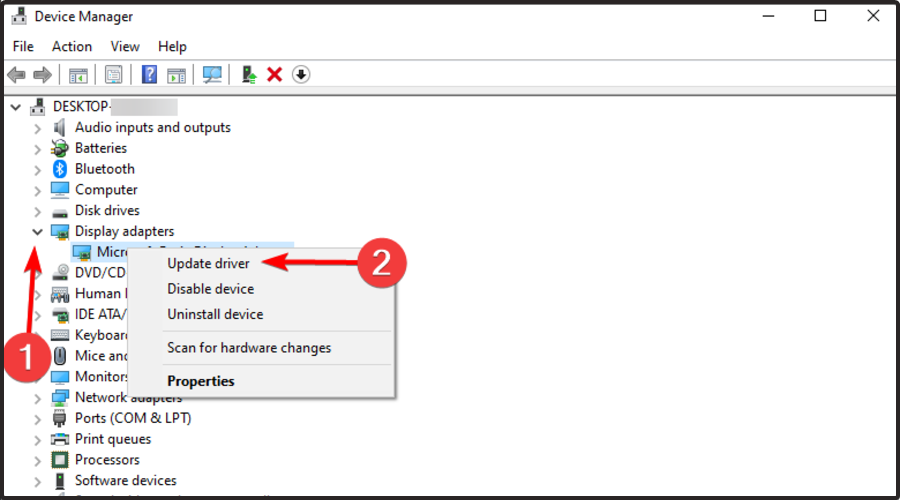
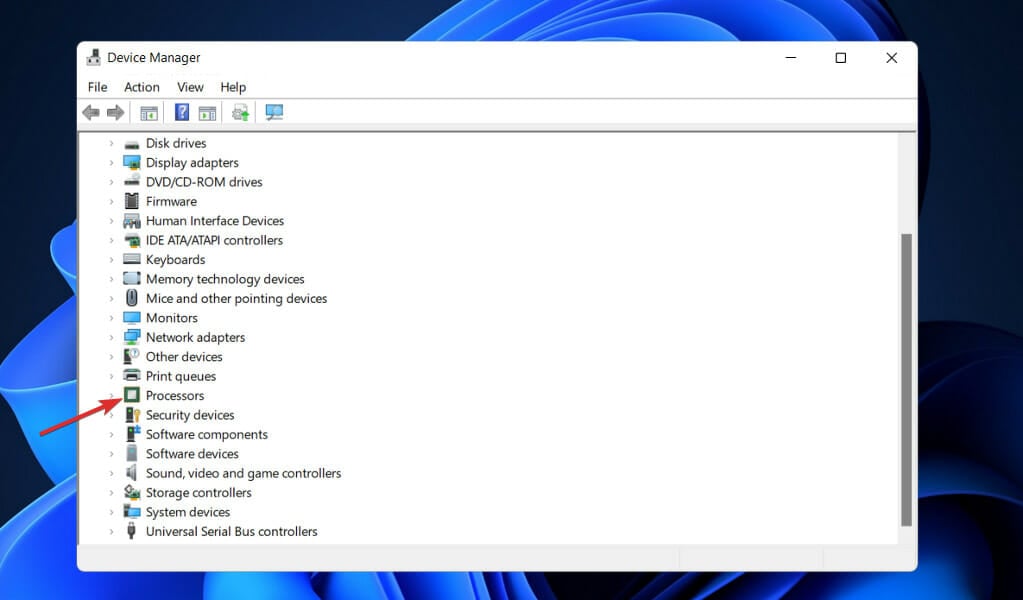
Click on the arrow in front of the device you need to update, to expand it.
Rightclick on the option you want to update from the expanded view and click the Update driver option.
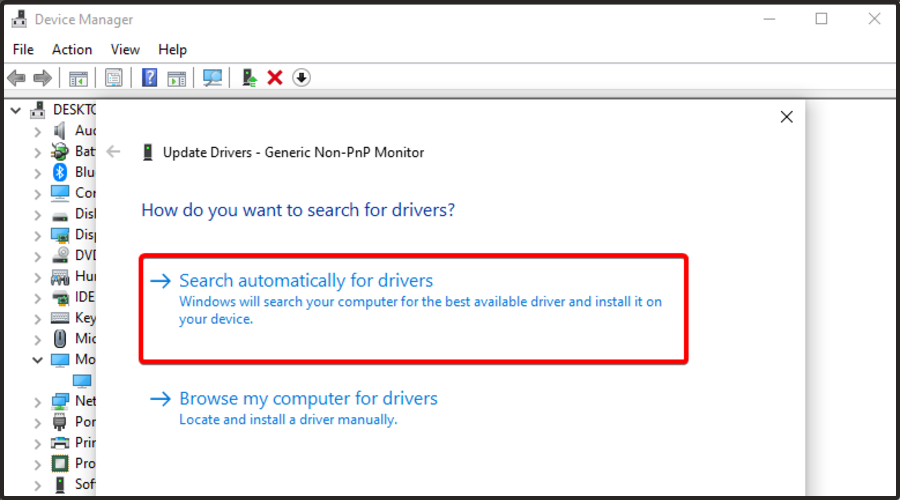
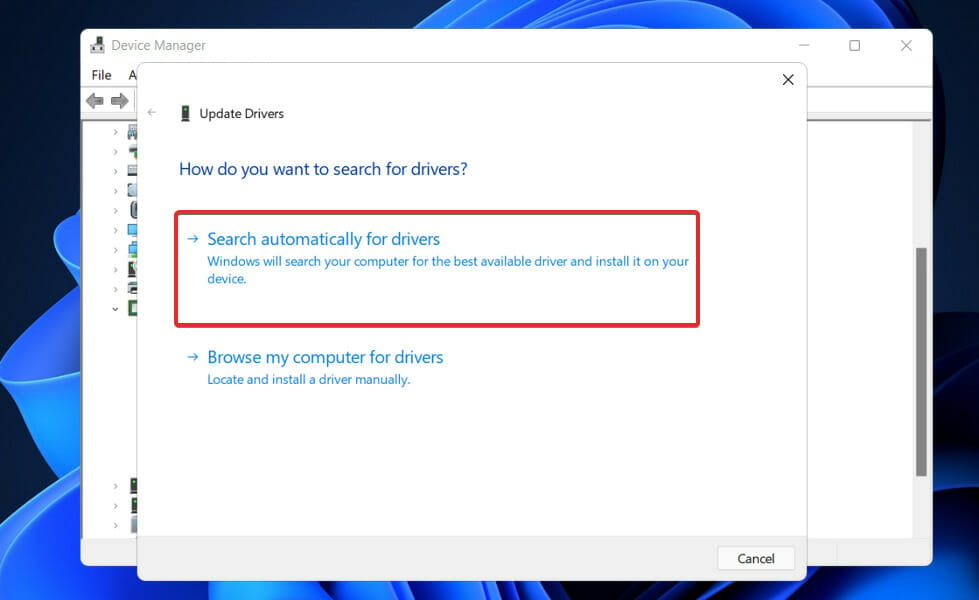
In the update drivers popup, select the first option to search automatically for drivers.
Updating drivers manually can be a time-consuming process, especially if you need to update multiple drivers, but there are specialized tools that can make this tedious process a lot faster.
Outbyte Driver Updater is one of these applications, and it will scan your PC for outdated drivers and update all of them automatically.
4. Uninstall any non-Microsoft antivirus
Open the start menu and search for Control Panel.
Click on the antivirus in the control panel and click the uninstall tab. Click on uninstall again when prompted.
In the antivirus window, check the options for McaFee livesafe and remove all files from this program (This step would be different if you do not use McAfee), then click remove.
Note that the process of uninstalling an antivirus may differ between manufacturers, but generally, you should be able to perform an uninstall from the control panel following the explained steps.
5. Uninstall old and nonessential software
Open the start menu and search for Control Panel.
From the list of applications, click on any outdated or nonessential software in the control panel and click the uninstall tab. Click on uninstall again when prompted.
Removing applications manually isn’t always the best option because sometimes certain files and registry entries are left behind.
These files can create issues in the future, so if you want to completely remove an application, we suggest using specialized uninstaller software.
6. Check and Free up disk space
6.1 Check available disk space
Select the File Explorer in the taskbar.
On the left pane, select This PC. Then from the Devices and drives section on the right pane, select the system drive (the drive with the Microsoft logo). If it is low on space, proceed to free up some space.
6.2 Free up disk space
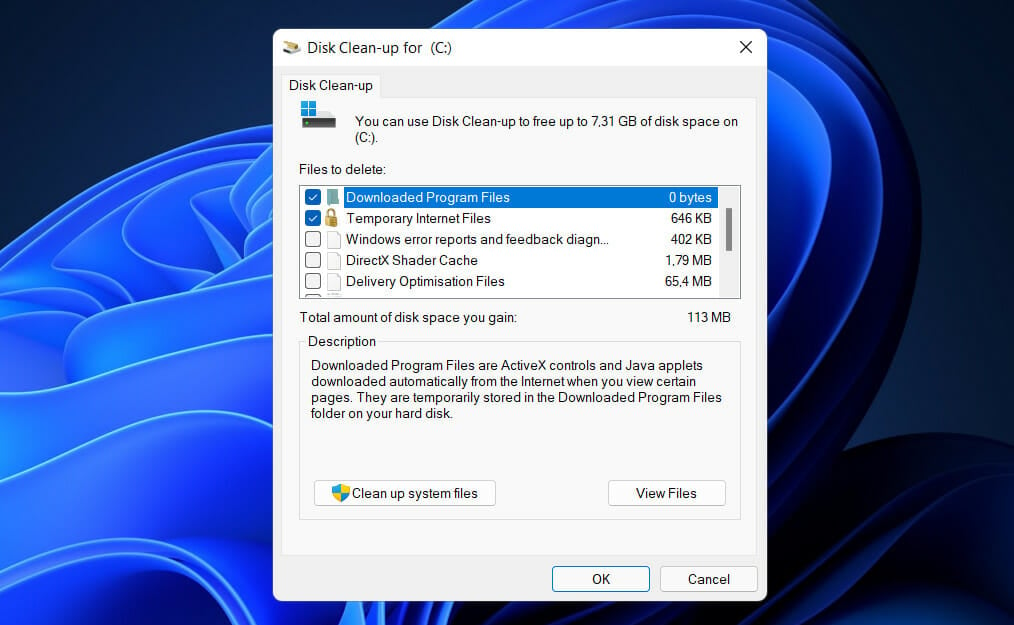
Search for disk cleanup in the start menu and select the first option.
From the pop up window, select the drive you wish to clean.
Under the description section of the Disc dialog box, select Clean up system files.
In the files to delete section, check files you want to delete and click OK.
What do I do if Windows 11 malfunctions after an upgrade?
After an upgrade, you may experience some issues, especially if you have upgraded to a non-compatible PC. In such cases, you are recommended to downgrade back to Windows 10.
You will have this option available up to 10 days after the installation or upgrade was done. After this period, all files required for this process will be removed from your computer to free up additional space for other processes.
If you are curious to know what in-depth fixes apply to some specific installation failures, our guide on Windows 11 errors after an update should come in handy.
If you have any other questions about update errors on Windows 11, don’t hesitate to leave them in the comments section below, and we’ll be sure to check them out.
Looking for an awesome strategy game that will really push your imagination, as well as your capability to lead your troops, to the maximum?
Well, look no further than Feral Interactive’s Total War Warhammer 3, which is a masterpiece among warfare games.
There are tons of features to explore in this game, as well as multiple playing styles and scenarios that will surely keep you immersed for a long time.
However, some Warhammer 3 players have reported not even being able to start the game due to the annoying No applicable app licenses found error.
Being in this situation doesn’t mean you have to uninstall the game and forget all about it, as we are about to show that this too is totally fixable.
Join us in exploring the troubleshooting steps that have proved to work for other Warhammer 3 players that had to deal with the same issue.
How can I fix the No applicableapp licenses found error?
1.Update Windows to the latest version
Click on the Start menu and open Settings.
Select Windows Updates and press the Check for updates button.
Install any pending updates.
2. Logout from Microsoft Store and Xbox app
Open the Microsoft Store.
Click on the profile icon and select Sign out from thr dropdown.
The exact same process goes for the Xbox app as well. Simply start up the application, click on the profile icon and select the Sign-out/Logout option.
3. Repair the Microsoft Store/Xbox app
Open the Start menu and search for Microsoft Store.
Click on App settings.
Scroll down and press the Repair button.
Repeat the exact same process for the Xbox app as well, by following the above-mentioned steps, only instead of Microsoft Store, you search for Xbox.
4. Clear Store cache using Wsreset
Open the Start menu and search for wsreset and click to run it.
A small black window will appear but don’t close it, it will go away and MS Store will start.
5. Use PowerShell
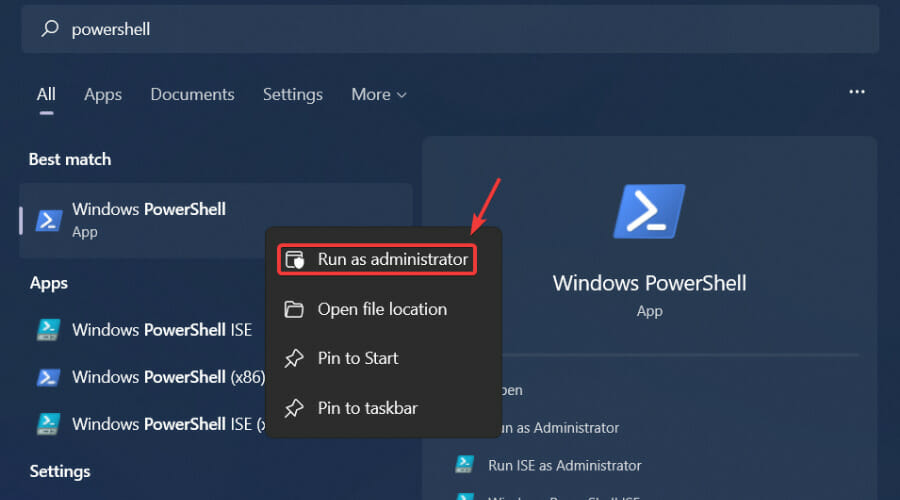
Open the Start menu and search for PowerShell.
Right-click on the PowerShell icon and select Run as administrator.
This is pretty much the entire process when it comes to getting rid of this annoying error. Now, you can enter the game and do what you do best, which is winning.
Next time one of your friends experiences the same situation, you will know exactly how to properly help them overcome it.
Has this guide been helpful to you? Let us know in the comments section below.
Elden Ring is undoubtedly one of the most impressive role-playing games around the world, but some people still think that Elden Ring has bad graphics.
However, you should know that there’s a difference between visual clarity and art style and this is what one user had to say about it:
Does Elden Ring have the highest quality graphics out there? No. But does it have a beautiful art style and look to it? Absolutely.
So, even if the Elden Ring graphics might seem bad to some users, most of them are excited to play along with the game’s features.
This is how most gamers describe what Elden Ring has to offer:
Not to mention that the visual effects are stunning. The weather, fog, and day/night cycle look mind-blowingly good.
Okay it might not have the highest technical quality but it’s also not technically bad either. There are some own right dazzling moments. It actually caught me off guard.
In case you are one of those gamers that don’t get easily impressed, we recommend checking the 2 options below to improve your Elden Ring graphics in no time.
What can I do to improve Elden Ring graphics?
1. Update your graphics drivers
Press on the Windows key, type Device Manager, then open the first result.
Expand the Display adapters section, then right-click on your graphics driver, then choose to Update driver.
Now, select to Search automatically for drivers.
In case any new option is found by your OS, you’ll be notified.
Of course, what you’ve already seen are steps that will help you to manually update graphic drivers. Fortunately, you can try an alternative that will surely save your precious time.
With Outbyte Driver Updater, you’ll automatically find and install all your missing and outdated drivers, so you’ll ensure your graphics stability on Elden Ring.
Plus, it will provide a detailed report of all of your up-to-date and out-of-date device drivers.
Because it seems to be one of the best software from its niche, we strongly recommend trying it today!
Keep in mind that higher resolutions increase the number of pixels that your graphics card needs to render, which can reduce your FPS significantly, so your Elden Ring graphics would be extremely bad.
The ideal solution is optimizing games settings at the same resolution as your screen.
Because some users were struggling to maintain enough FPS even after reducing other game settings, it might be sometimes efficient to reduce your screen resolution.
As you can see, there are always solutions that will help you improve Elden Ring’s bad graphics and they also don’t consume time, so we strongly recommend using them.
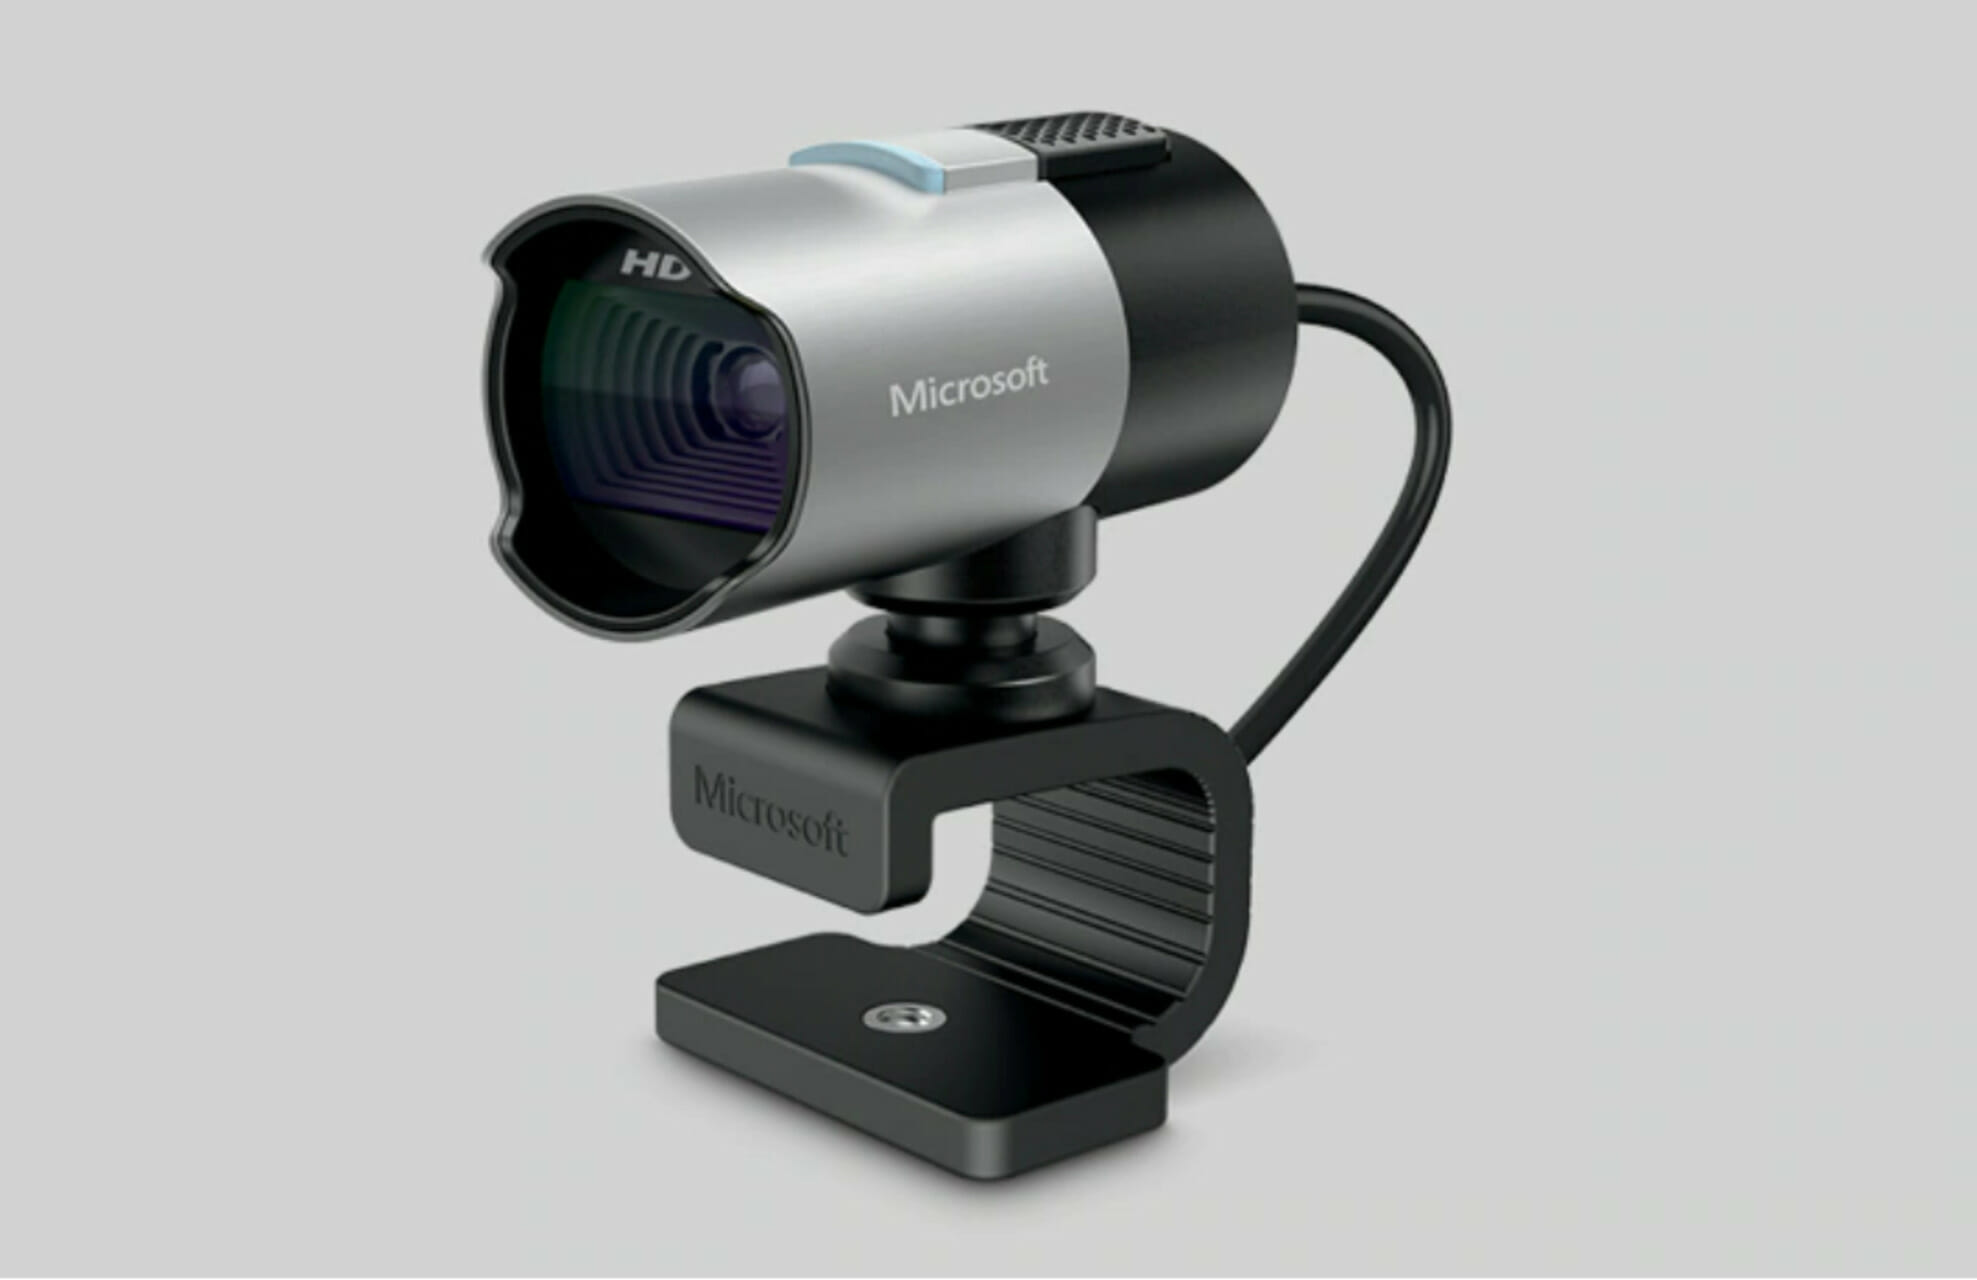
LifeCam is a widely acclaimed series of webcams manufactured by Microsoft. However, several users have reported that LifeCam Studio is either not being detected or doesn’t work in Windows 11.
And in the age of work-from-home, issues with the webcam can undoubtedly wreak havoc, which makes troubleshooting these problems all the more important.
In the following sections, we have discussed the underlying causes and the most effective fixes to get LifeCam Studio up and running in Windows 11.
Why is LifeCam Studio not working in Windows 11?
There could be several reasons behind LifeCam Studio not working in Windows 11, but the most prominent one is the issue with the drivers. When you have outdated or corrupt drivers installed, devices are either not recognized or fail to work, and you need to download the latest LifeCam driver.
Additionally, using an older version of Windows, compatibility issues, and problems with the USB port can also lead to the error.
If you have been facing this issue right from the moment the webcam was first connected, it’s either compatibility or incorrect driver installation to be blamed. Nevertheless, the fixes listed below would help eliminate any problems and get LifeCam Studio working in Windows 11.
What do I do if LifeCam Studio is not working in Windows 11?
1. Connect LifeCam Studio to another port
If LifeCam Studio is not working in Windows 11, your primary approach should be to check for issues with the USB port.
Try connecting another device to the problematic port. If the other device fails to work, it’s most likely that the problem lies with the port, and you will have to get it repaired.
But, you should still verify if the webcam works fine. Connect it to another port on the same system or another PC altogether.
If it works on the other computer but not on yours, we recommend trying the fixes listed below. In case it doesn’t work on both, either get LifeCam Studio repaired or discard it.
2. Reinstall the LifeCam Studio drivers
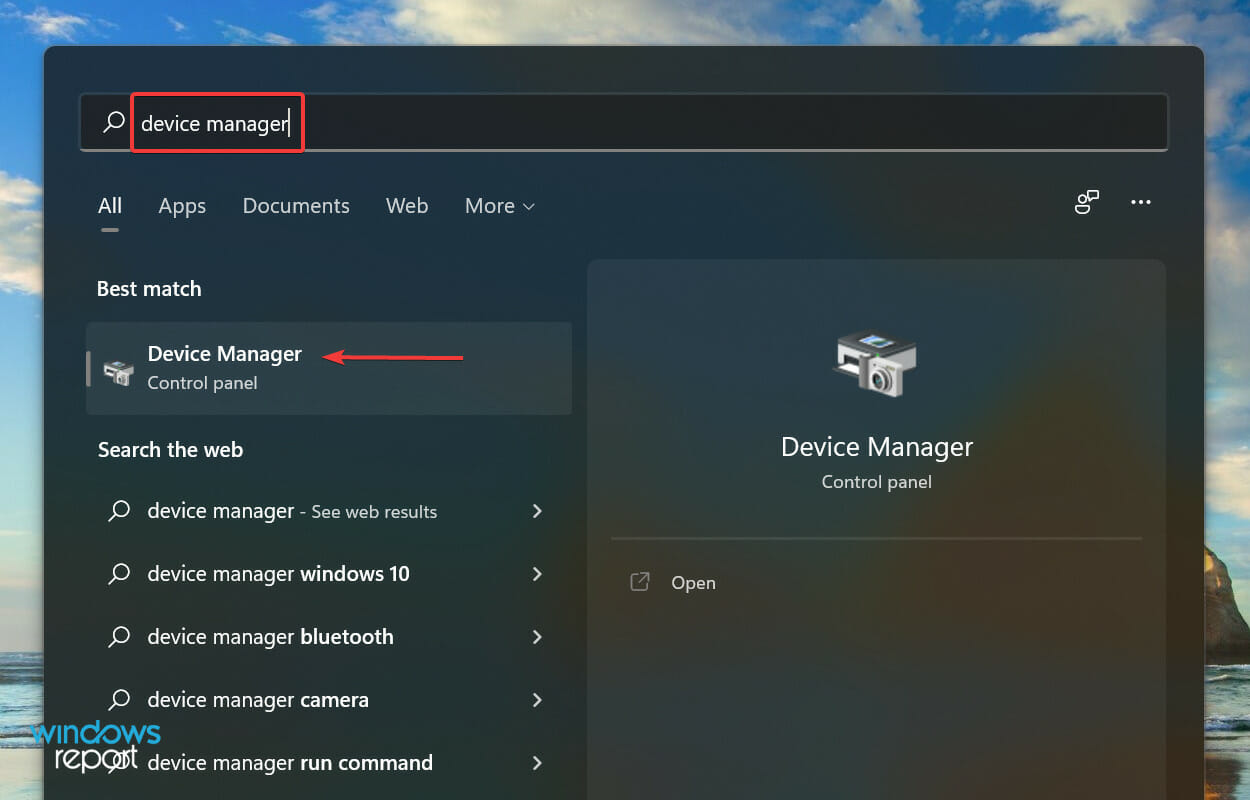
Press Windows + S to launch the Search menu, enter Device Manager in the text field at the top, and click on the relevant search result that appears.
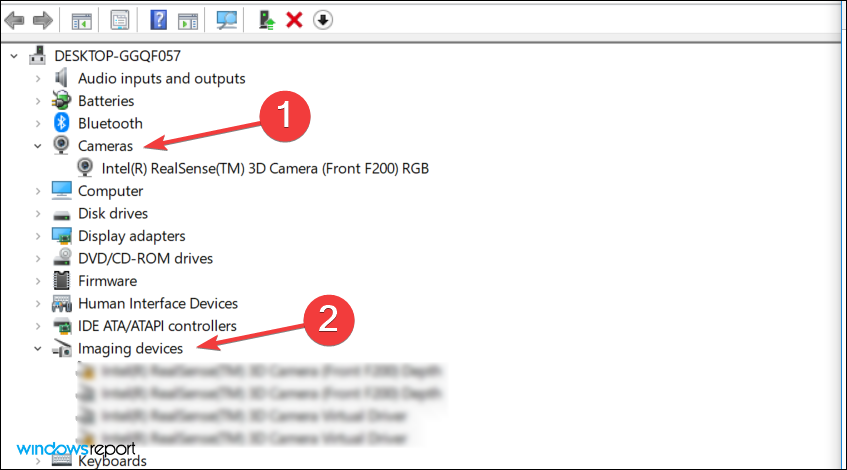
Now, double-click on both Camera and Imaging devices entry, to find LifeCam Studio. The webcam can appear under either of the two entries.
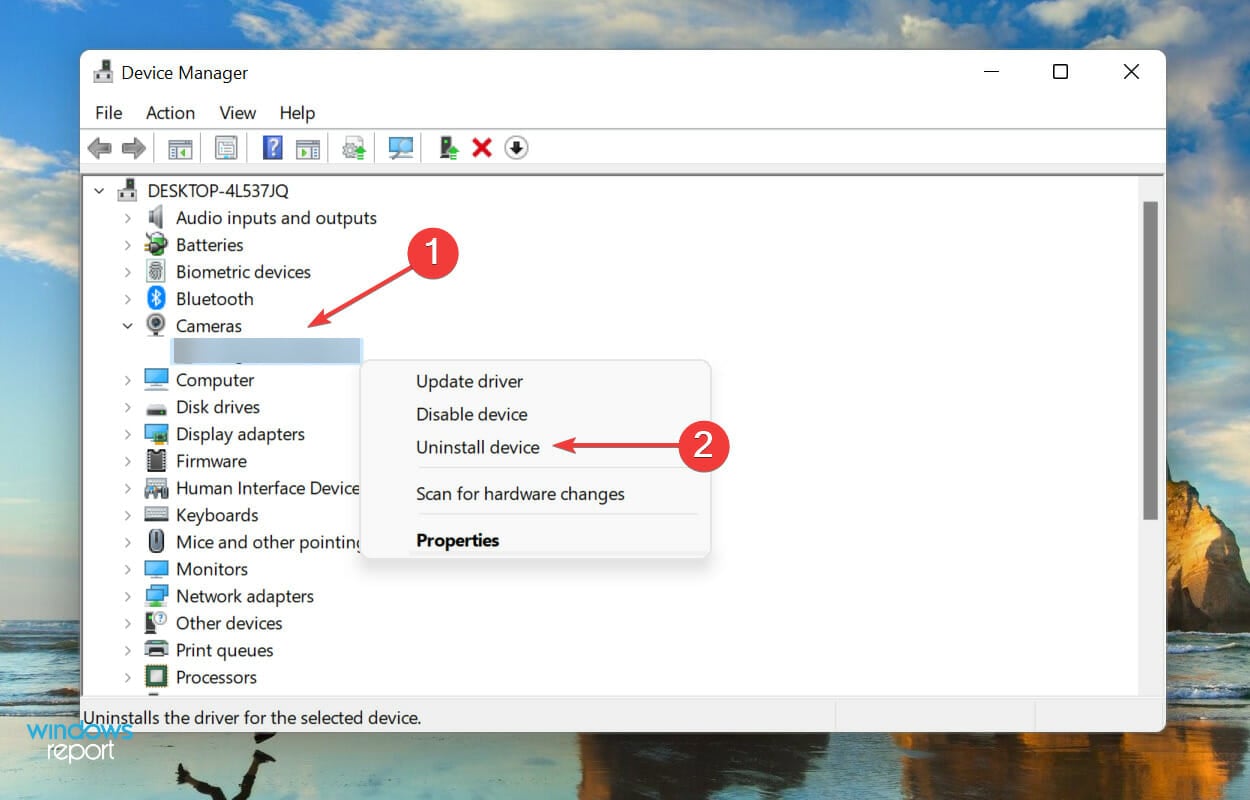
Right-click on the webcam and select Uninstall device from the context menu.
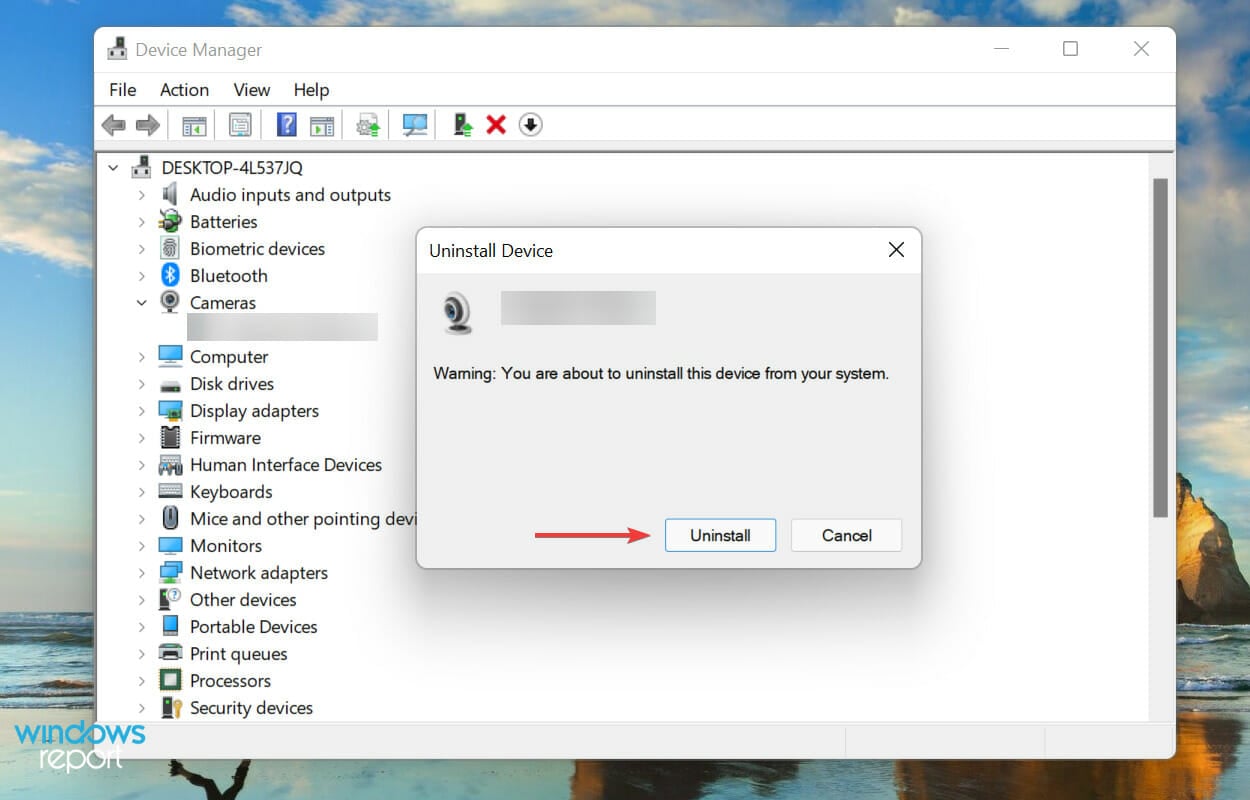
Click on Uninstallin the confirmation prompt that pops up.
Now, restart the computer and Windows will automatically install a fresh driver for LifeCam Studio.
If you were facing the issue due to corrupt drivers, reinstalling the device could help get LifeCam Studio to work in Windows 11. In case the webcam still doesn’t work, head to the next method.
3. Update the LifeCam Studio drivers
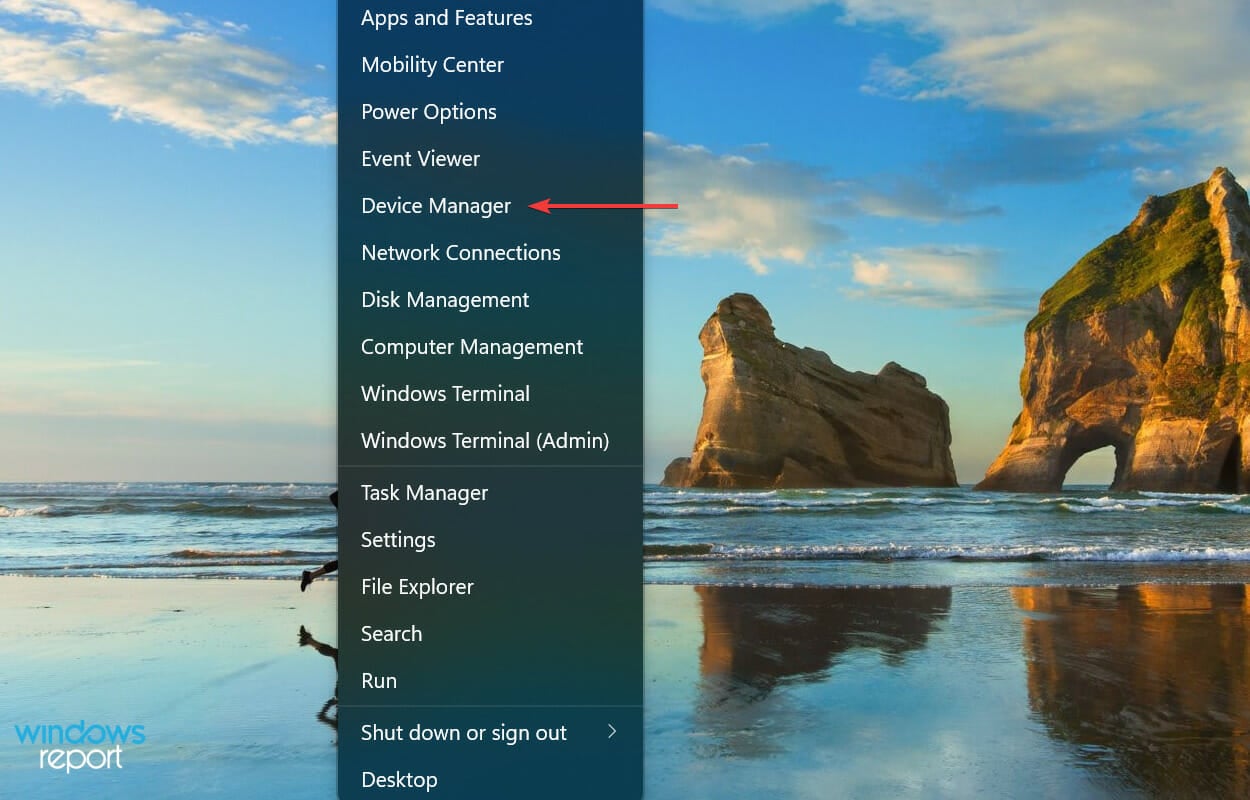
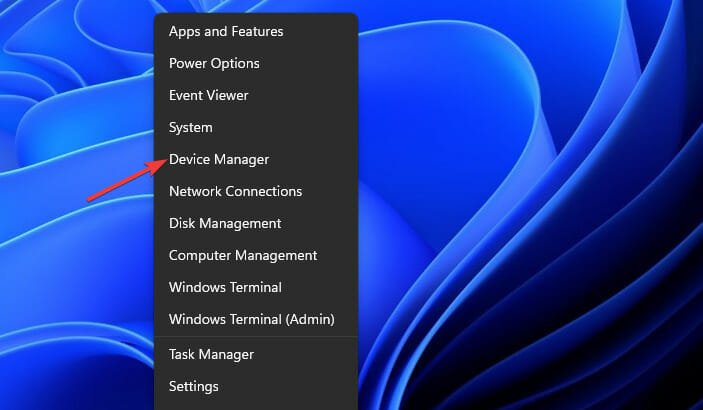
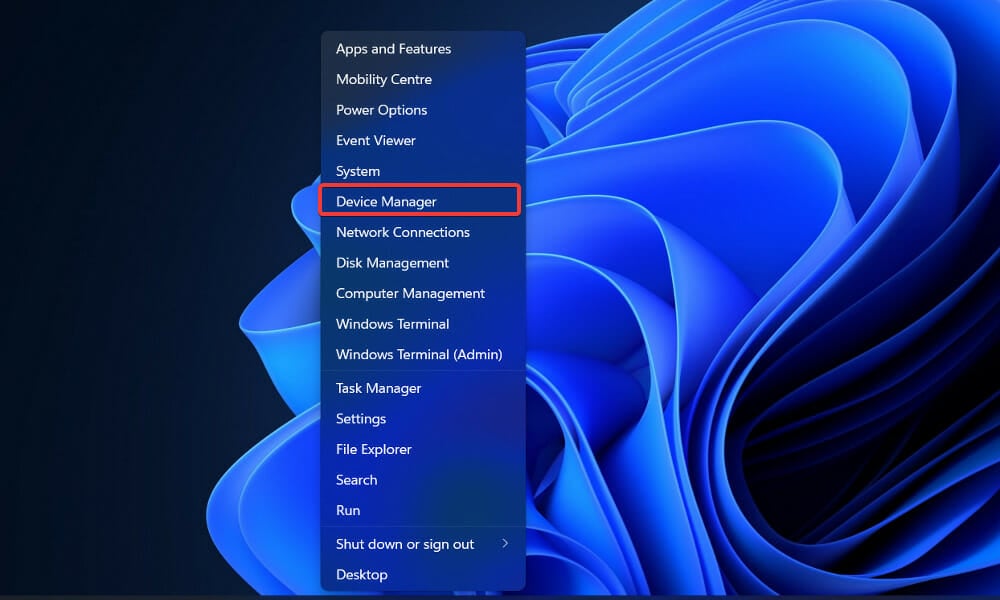
Right-click on the Start icon in the Taskbar or press Windows + X to launch the Quick Access menu, and select Device Manager from the list of options
Now, locate the LifeCam Studio. It should be either under Camera or Imaging devices entry.
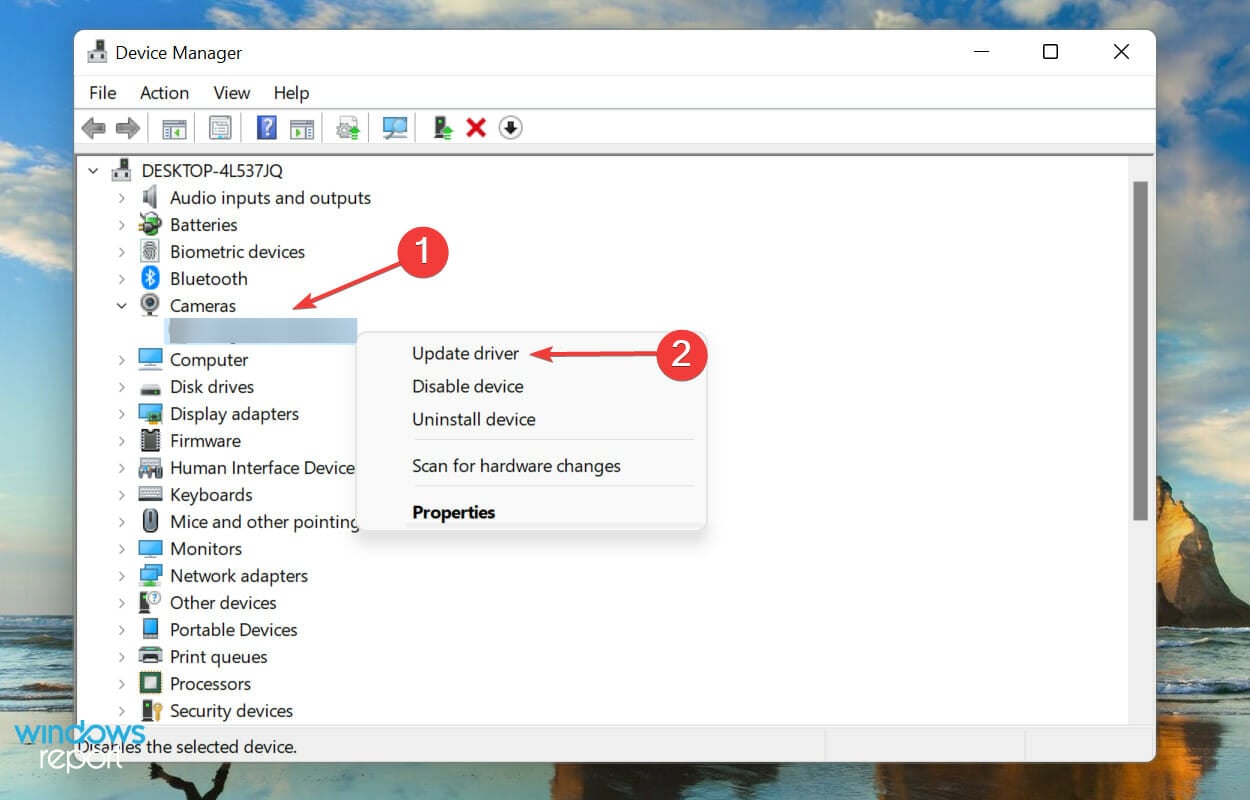
Once found, right-click on LifeCam Studio and select Update driver from the context menu.
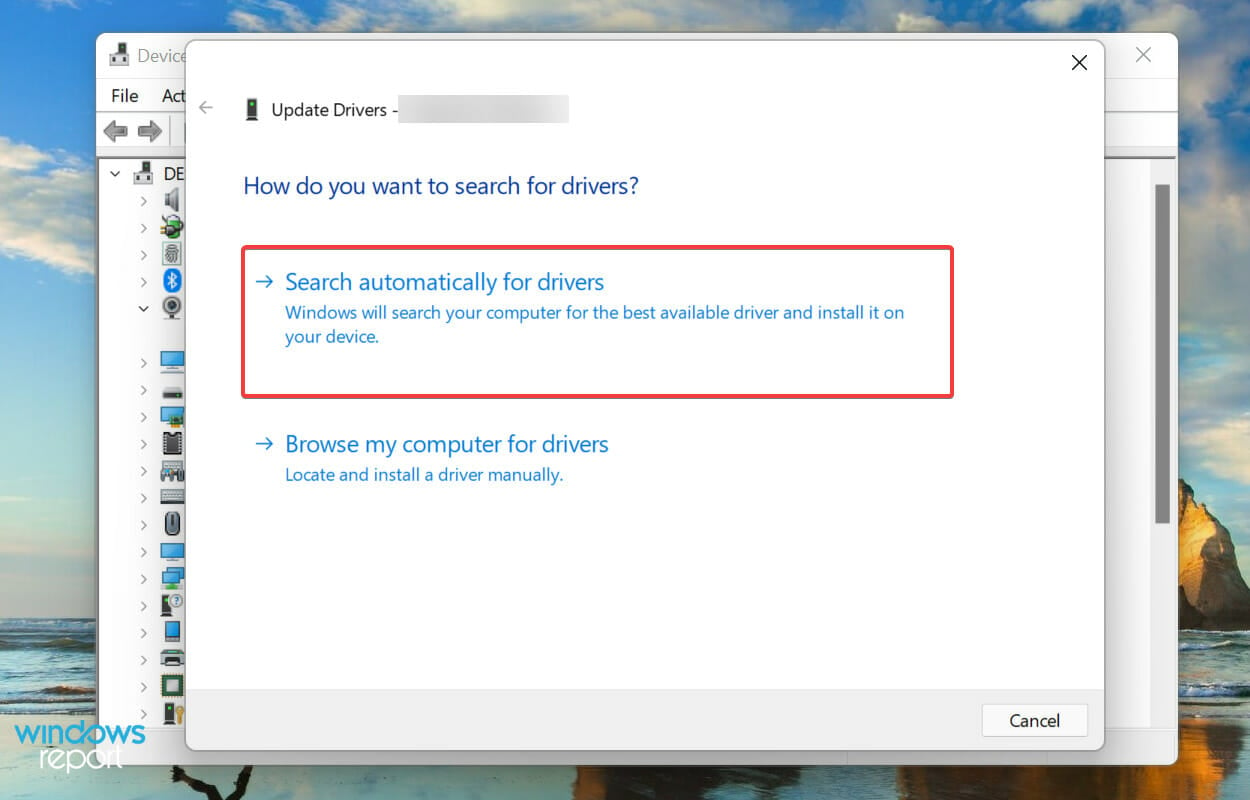
Next, select Search automatically for drivers from the two options that appear in the Update Drivers window.
Windows will now automatically scan for the best available driver for LifeCam studio and install it. But here’s the catch: it will only check for the ones available on the system and not the web, which greatly reduces the chance of finding a newer version.
While in most cases, we would recommend checking the manufacturer’s website, for LifeCam Studio, the updates are released through Windows itself, and there are no other official sources available.
Updating the driver this way can be troublesome and tricky, and a third-party app could help. We recommend using Outbyte Driver Updater, a dedicated tool that will not just keep the LifeCam Studio driver up-to-date in Windows 11 but all the other ones as well.
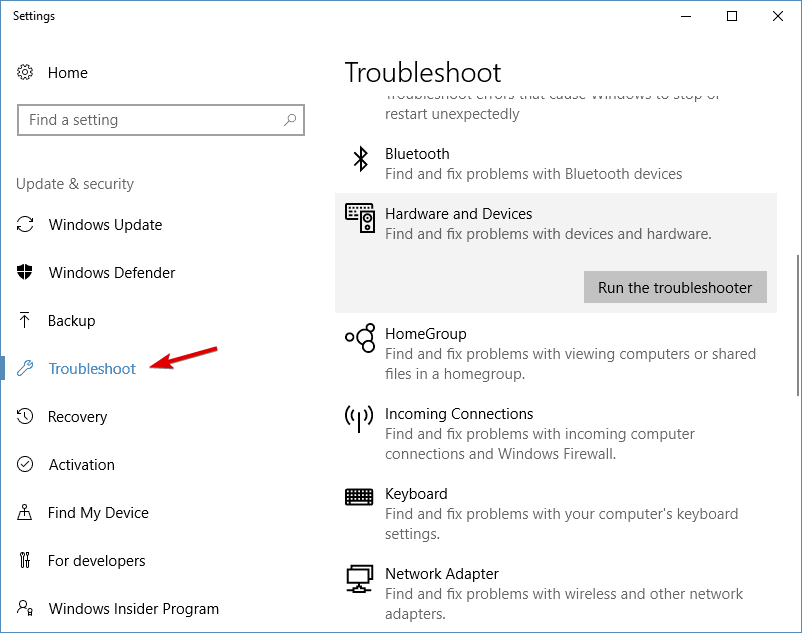
4. Run the Hardware and Devices troubleshooter
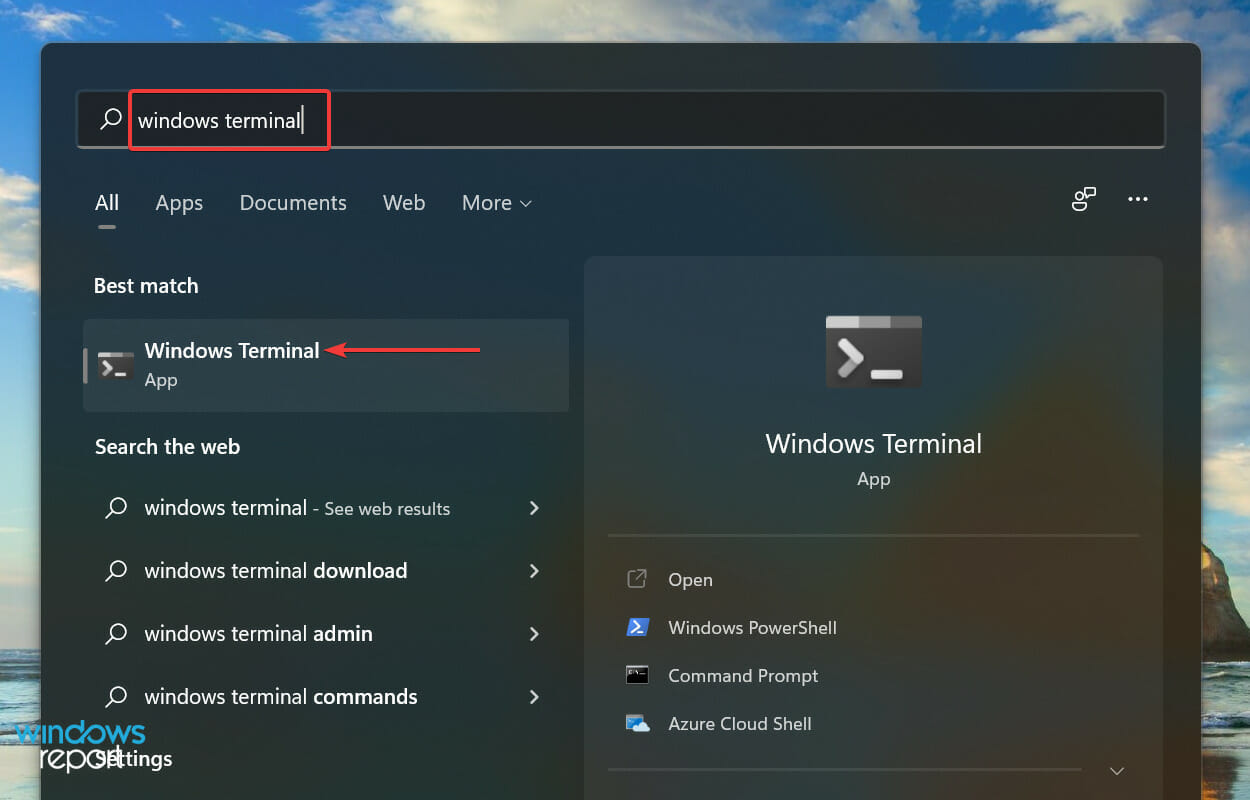
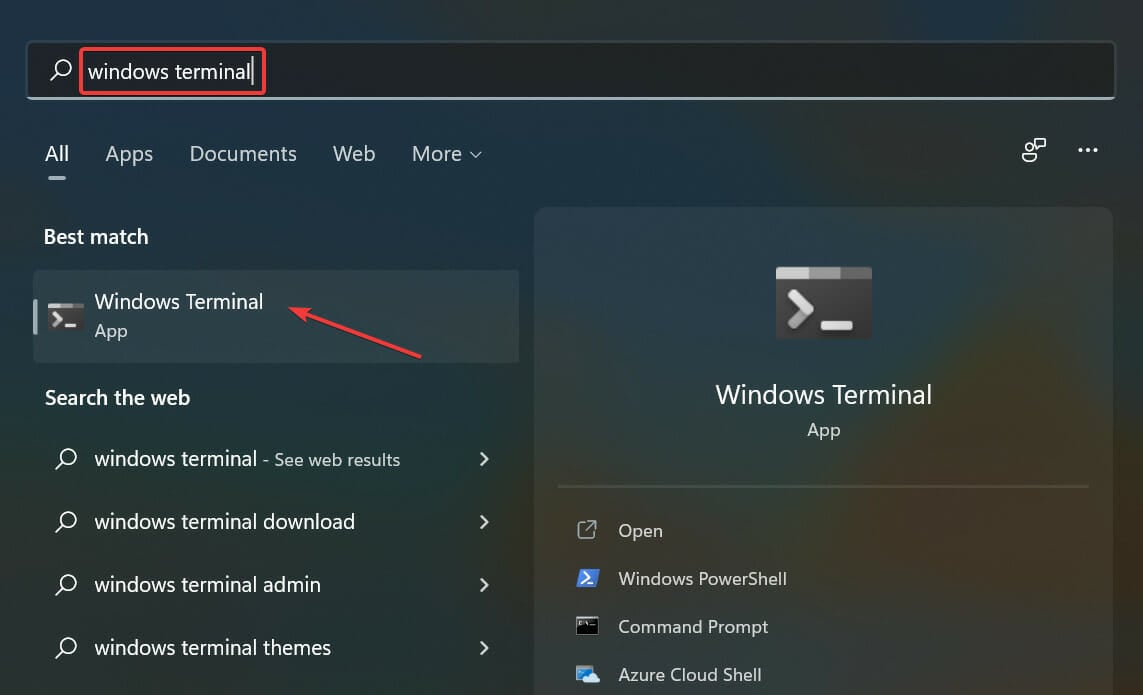
Press Windows + S to launch the the Search menu, enter Windows Terminal in the text field at the top, and click on the relevant search result that appears.
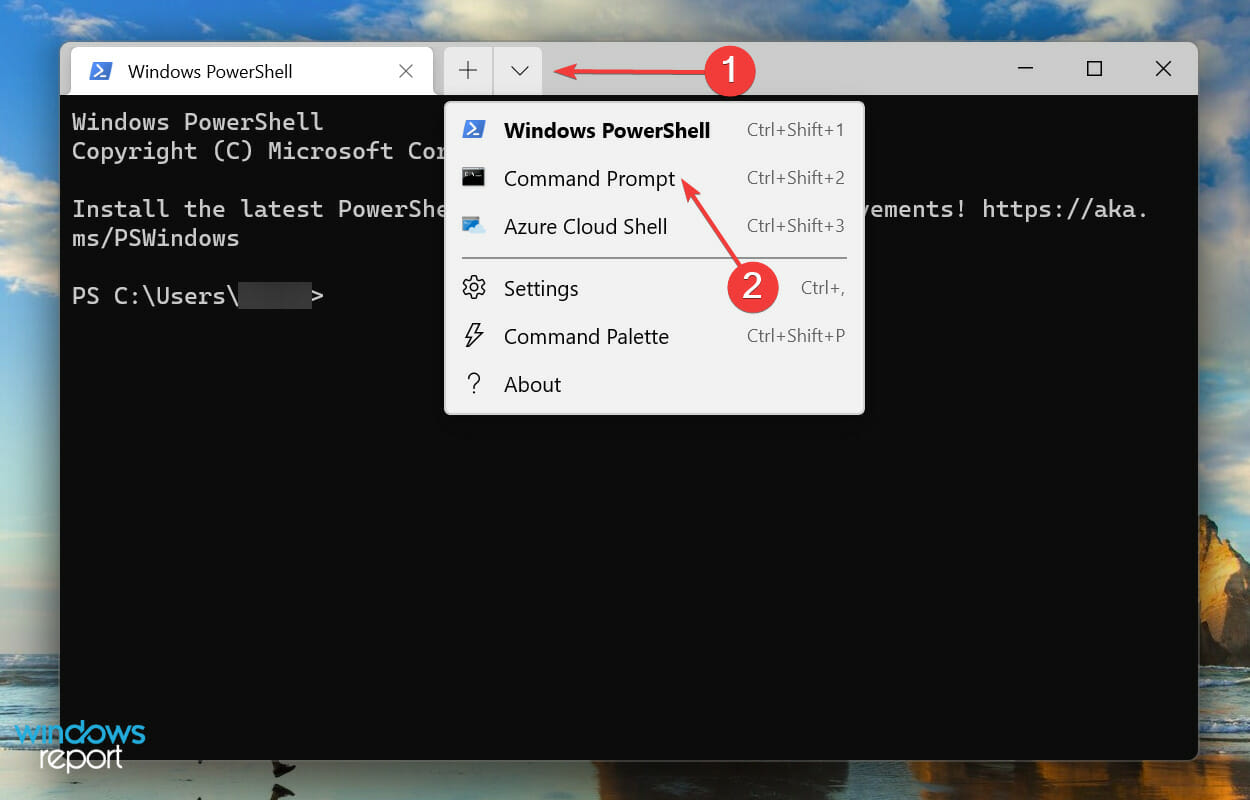
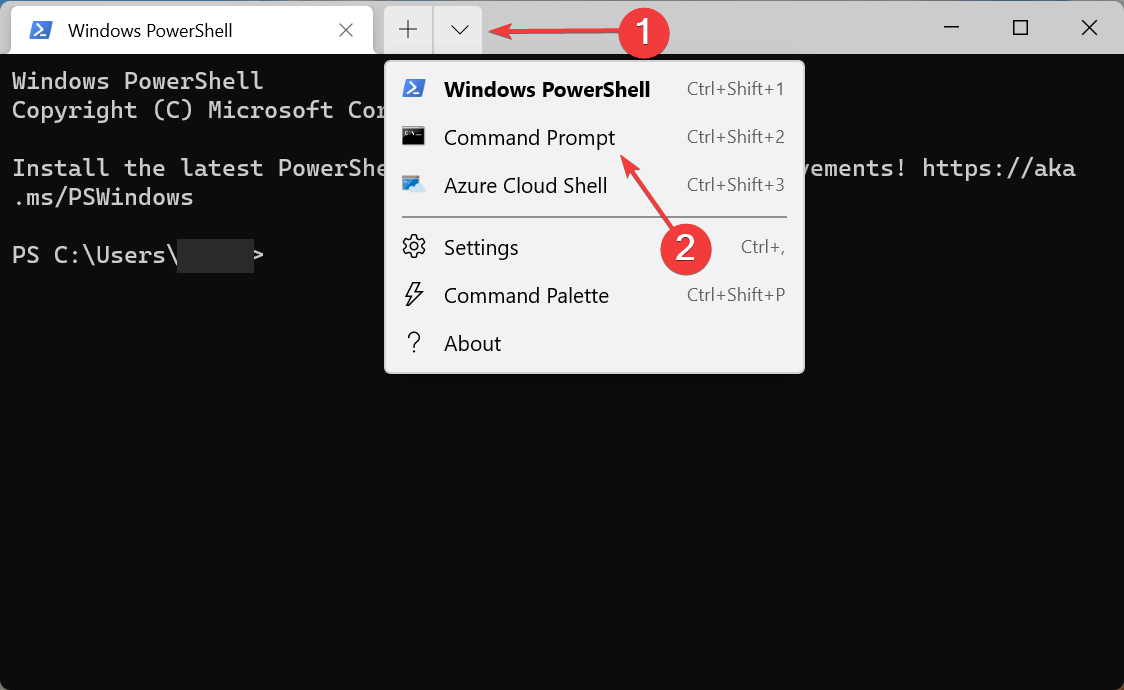
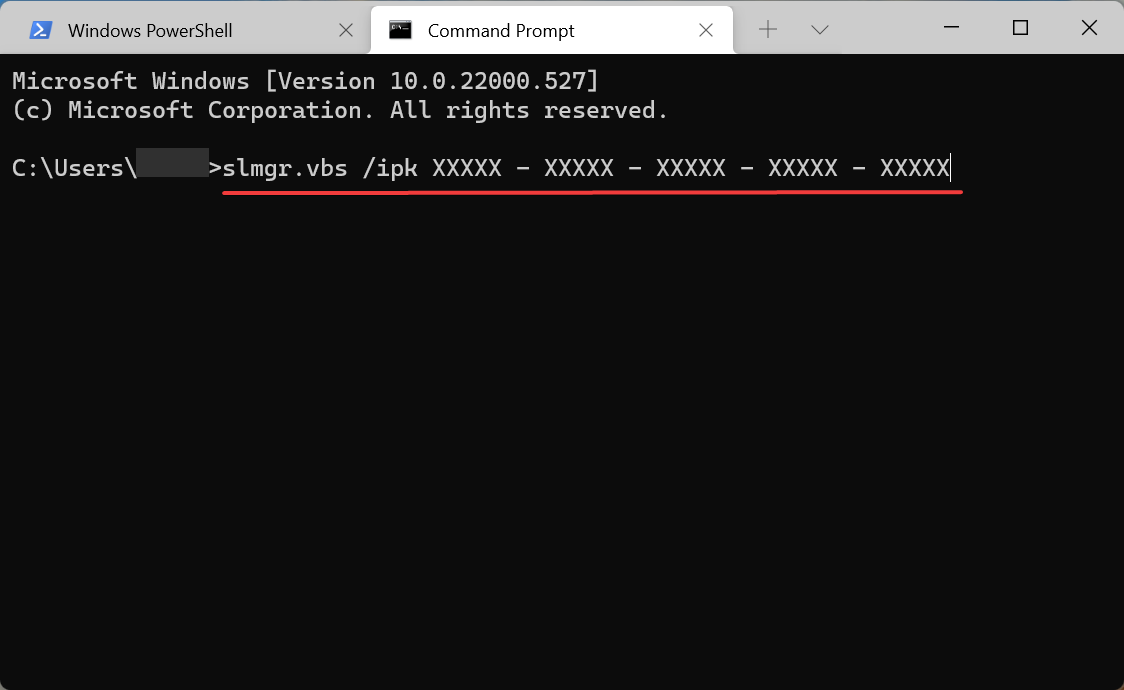
Click on the downward-facing arrow at the top, and select Command Prompt from the list of options in the menu. Alternatively, you can hit Ctrl + Shift + 2 to launch Command Prompt in a new tab.
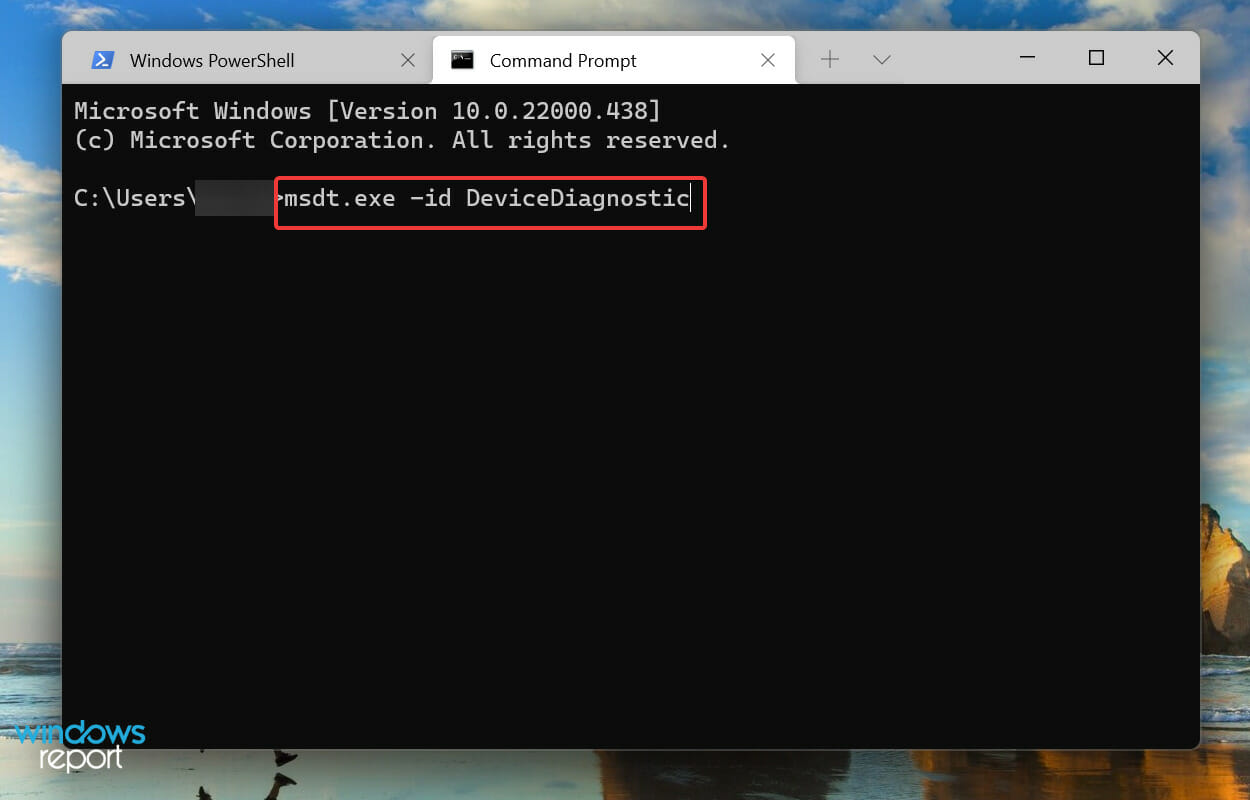
Now, type/paste the following command and hit Enter to launch the Hardware and Devices troubleshooter.msdt.exe -id DeviceDiagnostic
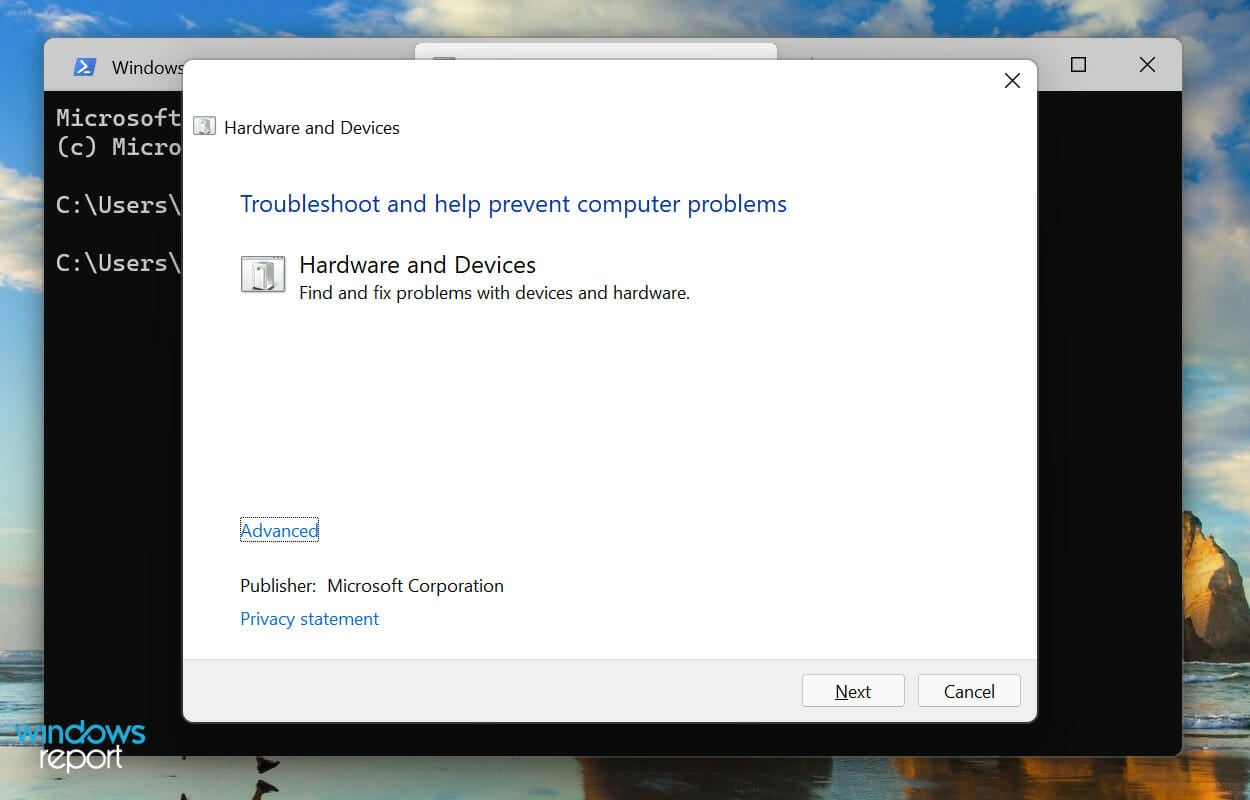
Follow the on-screen intructions and make the recommended changes to fix issues with LifeCam Studio in Windows 11.
5. Update Windows 11
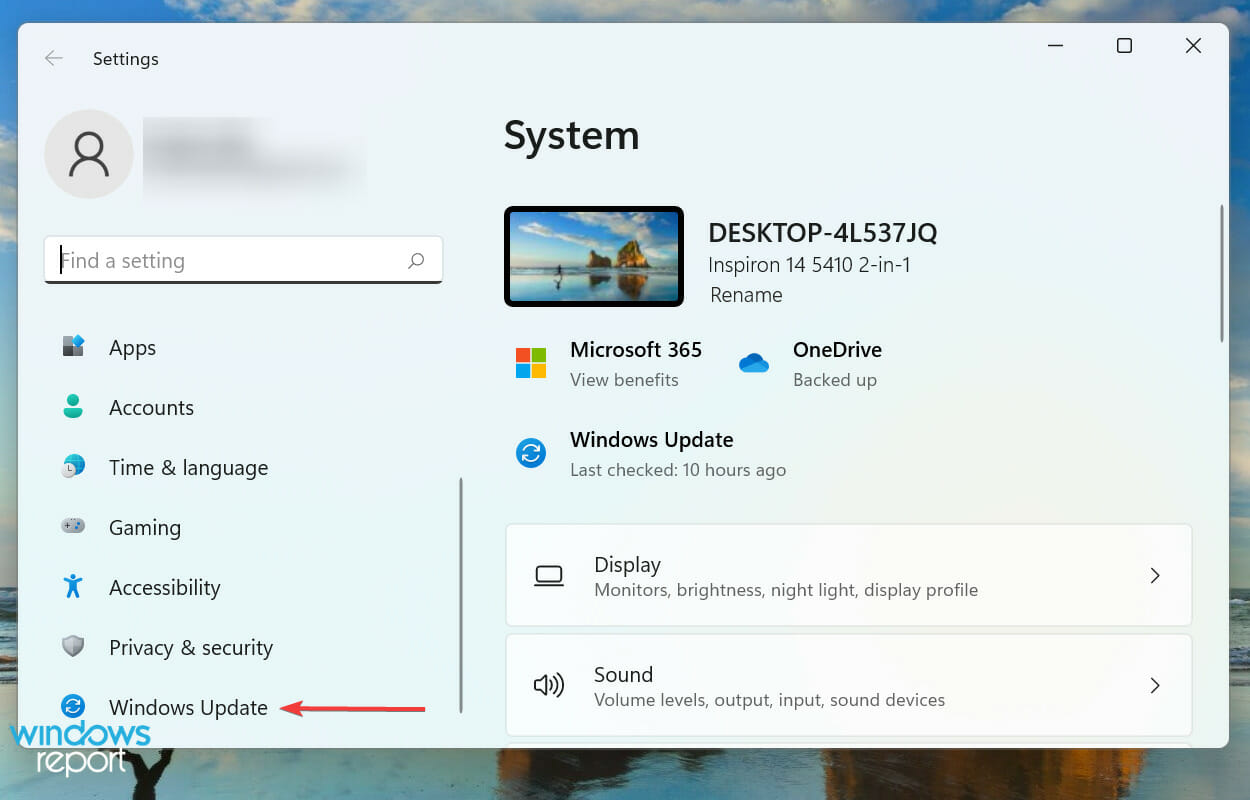
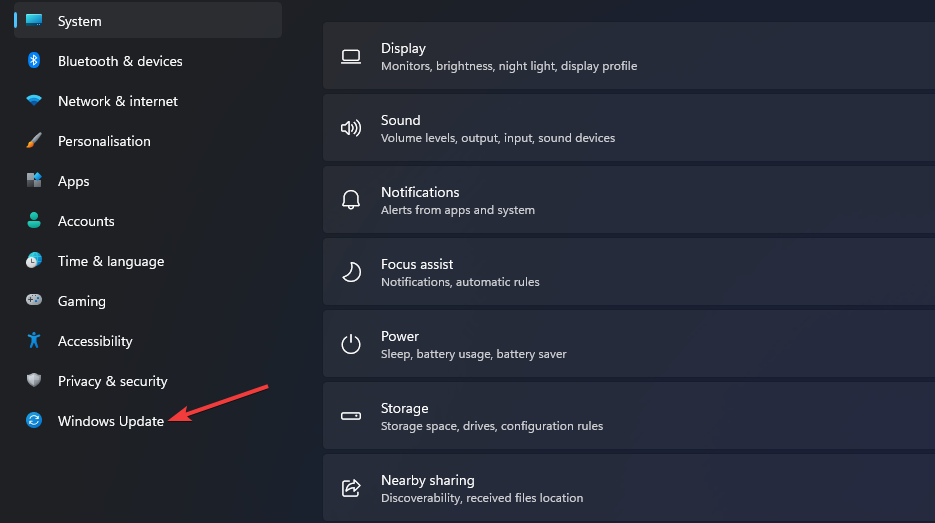
Press Windows + I to launch the Settings app, and select Windows Update from the tabs listed in the navigation pane on the left.
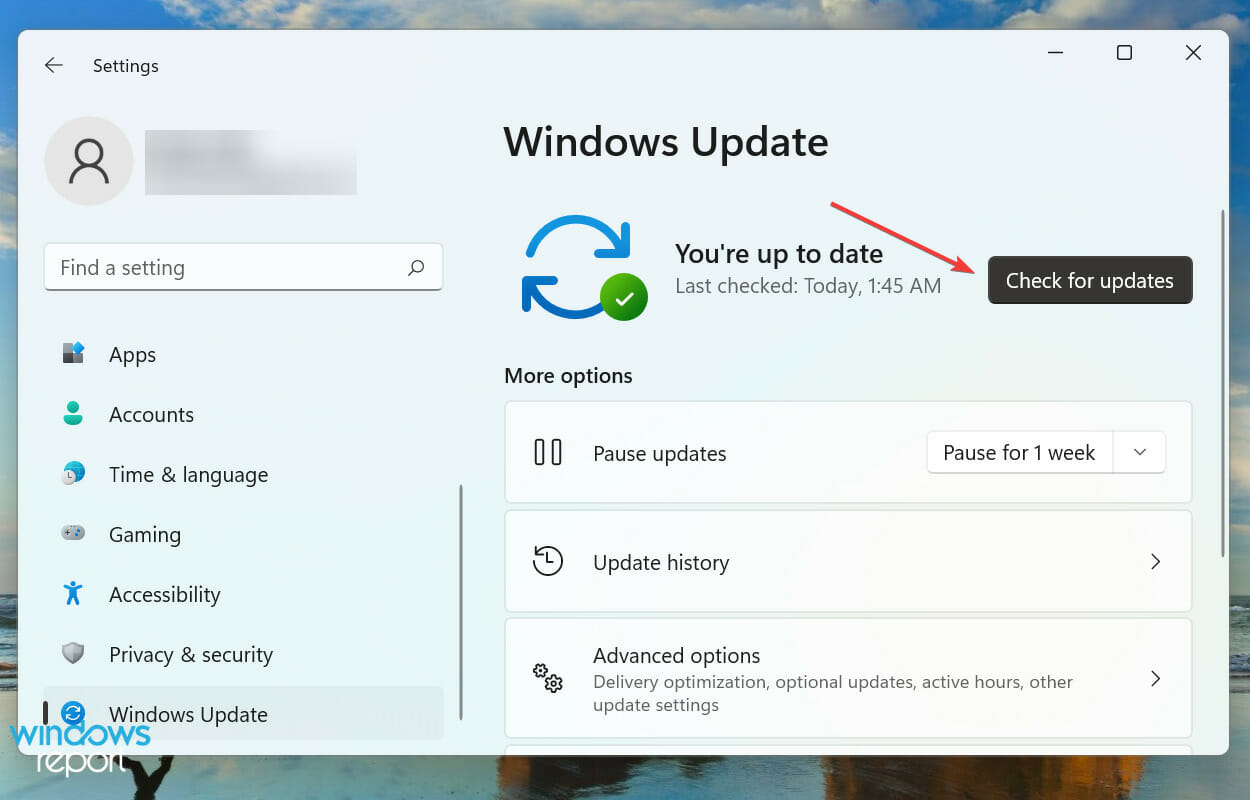
Click on Check for updates on the right to scan for any available new verison of the OS.
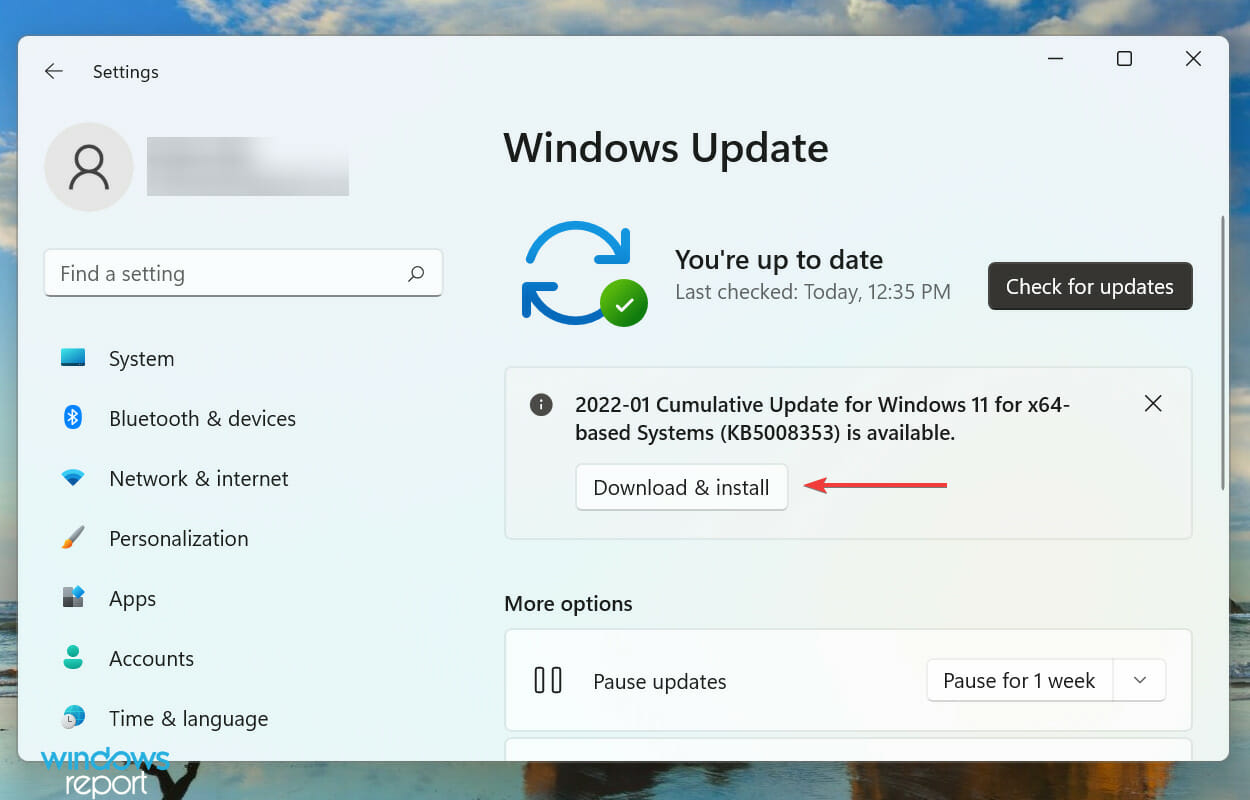
If there are any available, click on Download & install.
In many cases, the older version of the OS behind LifeCam Studio is not working in Windows 11. It could be due to compatibility issues, or a bug in the current version. In both these cases, updating to the latest version of Windows 11 should fix the error.
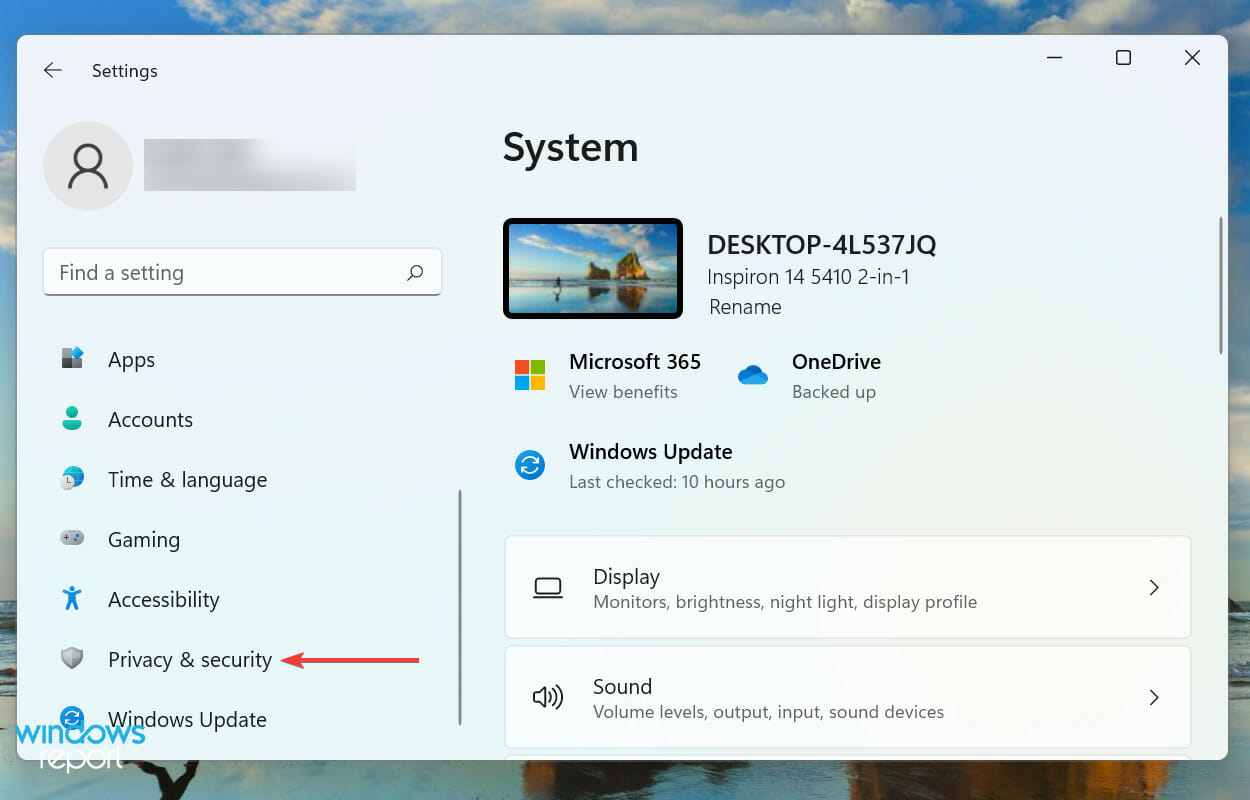
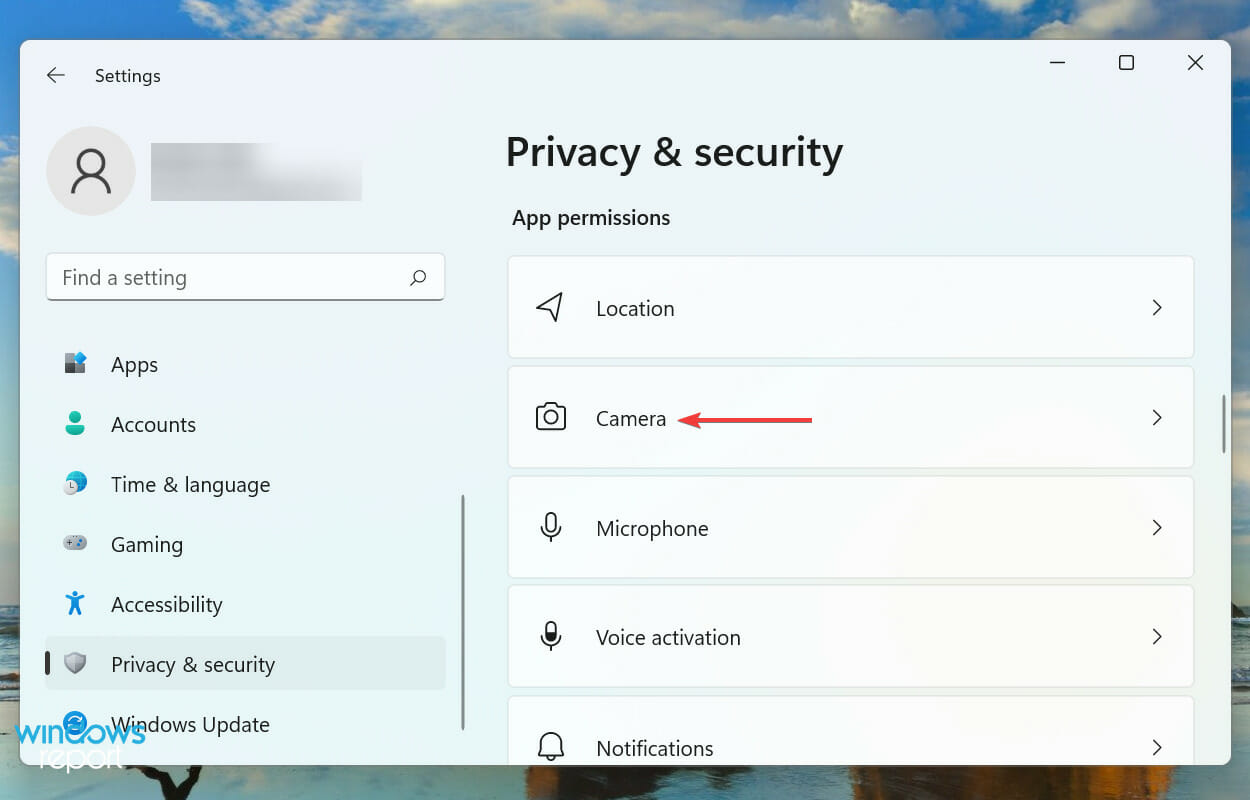
Press Windows + I to launch the Settings app, and select Privacy & security tab from the navigation pane.
Locate and click on Camera under App permissions.
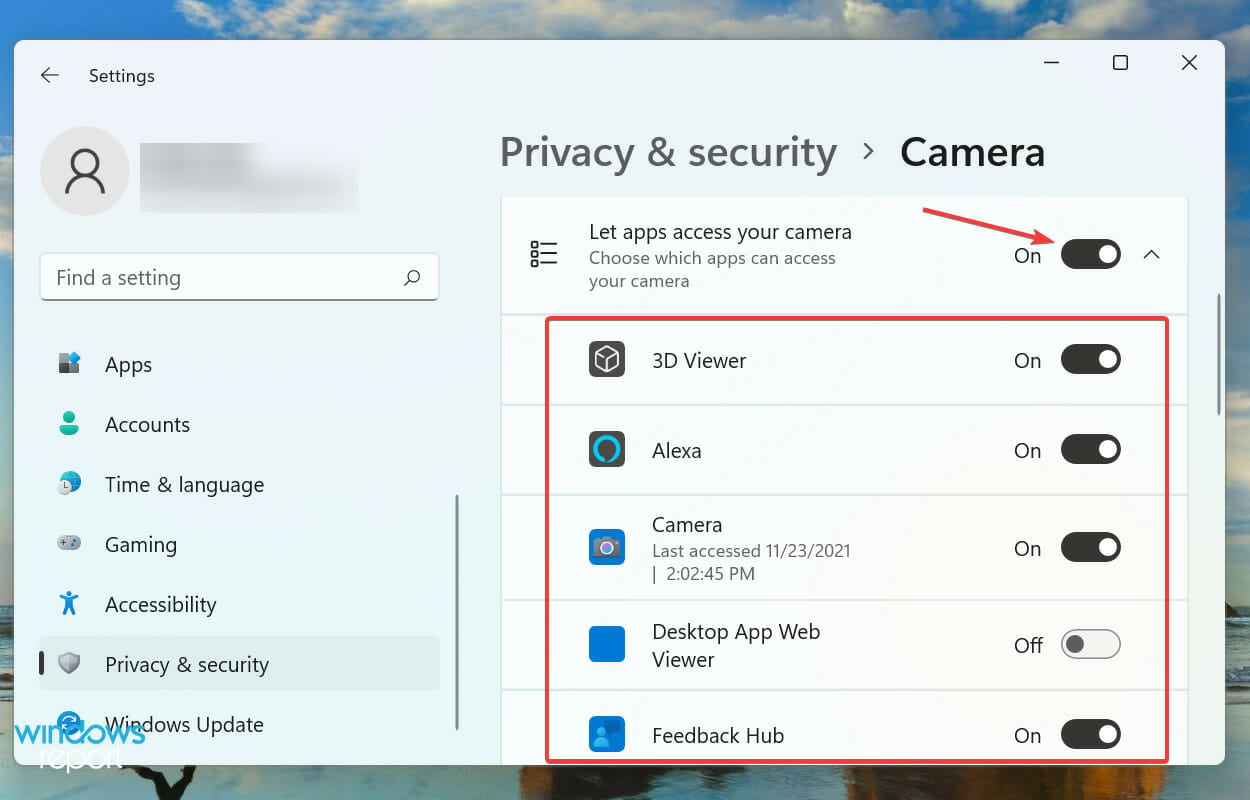
Enable the Let apps access your camera toggle, and verify from the list below that the app(s) you are having problem with has access to the webcam.
Once you are done modifying the webcam settings, LifeCam Studio should now work fine in Windows 11.
What are some other good webcams available in the market?
If the above fixes couldn’t get LifeCam Studio to work in Windows 11, it’s most likely an issue with the webcam itself. In which case, replacing it would be the ideal approach.
Having access to useful information when investing in a 4k-quality webcam can make a huge difference. This affects not only your pocket but also the quality of the results after making a choice.
These are all the ways you can fix issues preventing LifeCam Studio from working in Windows 11. By the time you reach this part of the article, the error should be long gone, and the webcam working just fine.
Even when having the best webcam on the market, to get the most out of it, you will also need powerful and versatile video software. These won’t just help you shoot videos, but also edit them.
Tell us which fix worked for you in the comments section below.
The latest iteration, like its predecessors, is prone to errors. Most of these are easily fixable but some appear to be rather tricky. One such is when users encounter the Windows Error Recovery screen when turning on a Windows 11 PC.
The error could be encountered due to a bunch of reasons, and these could have to do both with the hardware and the software. This makes it all the more difficult to identify the underlying cause and eliminate the error.
Though there isn’t much you can do other than troubleshooting once the error is encountered, there are ways to prevent it from occurring in the first place.
You can use a dedicated repair tool that will scan and eliminate problems both with the hardware and software, thus preventing a plethora of errors, and saving you a lot of time otherwise spent troubleshooting.
Why am I seeing the Windows Error Recovery when turning on a Windows 11 PC?
The primary reason behind the error is when an incompatible or malfunctioning external device is connected to the system. If you have recently added a new piece of hardware or replaced one, it could just as well lead to the Windows Error Recovery screen in Windows 11.
Apart from that, damaged, missing, or misconfigured system files could also be the cause. Also, problems with the boot configuration or installing a third-party application may lead to error.
Be it any of these issues, the fixes listed below would eliminate the Windows Error Recovery screen in Windows 11, and get your PC up and running like before. Just, follow the methods in the listed sequence for quick and effective troubleshooting.
How do I fix the Windows 11 Error Recovery issue?
1. Remove malfunctioning hardware
As discussed earlier, the primary cause of the issue is malfunctioning hardware. To fix it, you will have to identify and remove that device.
Since you wouldn’t be able to right away identify one, the best approach here would be to disconnect all the peripherals, while just keeping the keyboard, mouse, and monitor attached to the CPU in case of a desktop. For a laptop, remove everything.
Now, start connecting each of these devices one at a time and then turn on the computer. If the system turns on without the Windows Error Recovery screen in Windows 11, shut it down and then connect the next peripheral.
Proceed similarly until you identify the malfunctioning hardware. Once you do, disconnect it and contact the manufacturer for a resolution. Until you are able to find one, do not connect that device.
If this doesn’t work and you keep encountering the error, head to the next method.
2. Run Startup Repair
Startup Repair is a built-in tool that eliminates issues, such as corrupt or missing critical system files, preventing the OS from booting effectively. Though the tool won’t look for viruses or fix problems with the hardware.
Here you don’t have to do much since the Startup Repair option is by default selected on the error screen, and it will automatically start if you don’t change the selection within a few seconds.
So wait for Startup Repair to run, and choose the appropriate response when prompted. After running the repair tool, check if you are able to load the OS without encountering the Windows 11 Error Recovery screen.
3. Rebuild Boot Configuration Data (BCD)
With your system shut down, press the power button to turn it on, and as soon as the Windows logo appear, hold the power button to turn it off.
Repeat this process thrice, and when you turn on the computer the fourth time, it will automatically launch the Startup Repair utility.
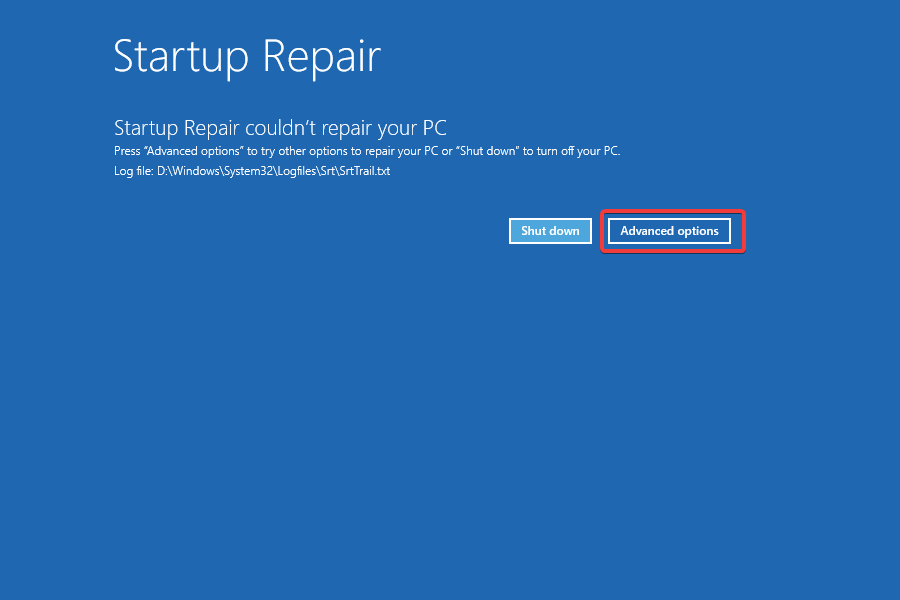
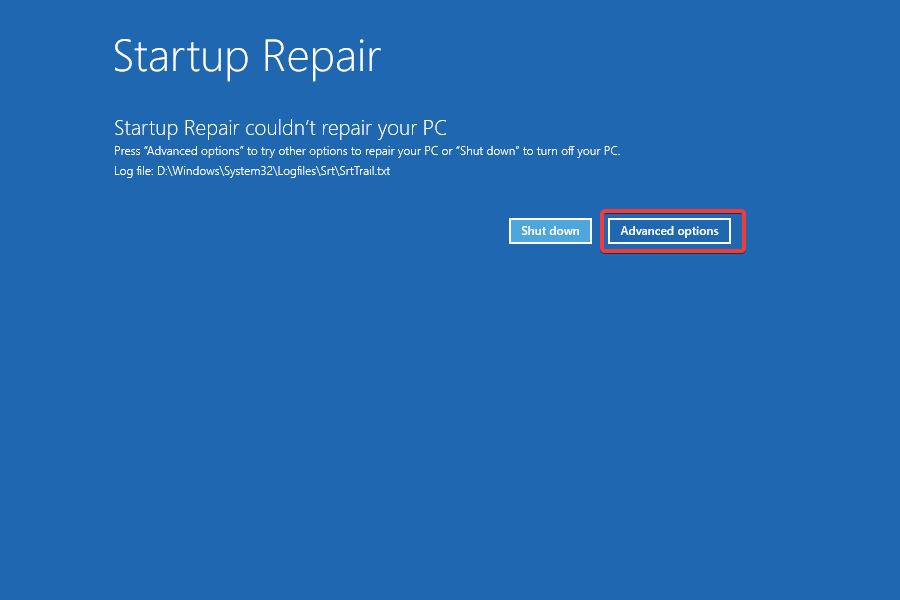
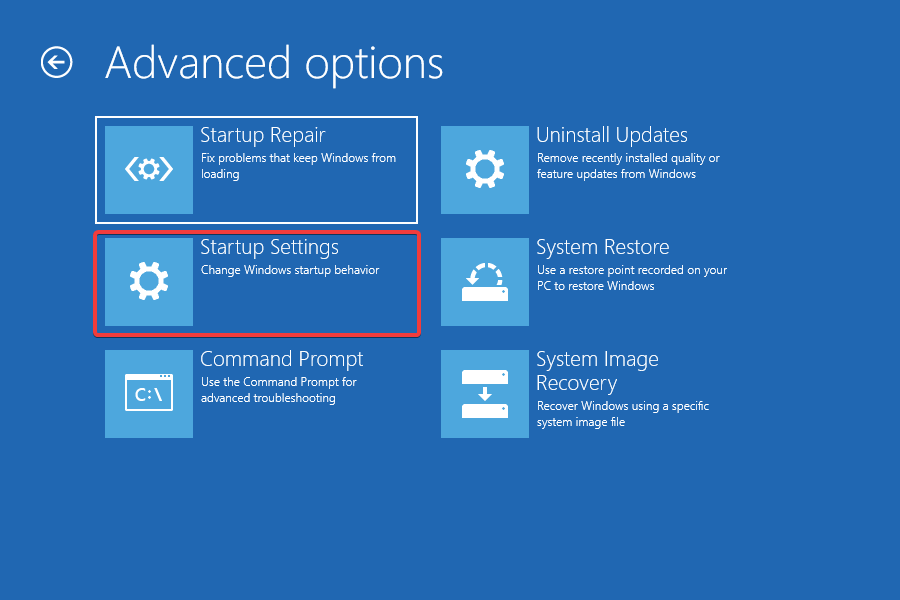
Let it run, and it most likely wouldn’t be able to eliminate the error. Once it’s done running, click on Advanced options.
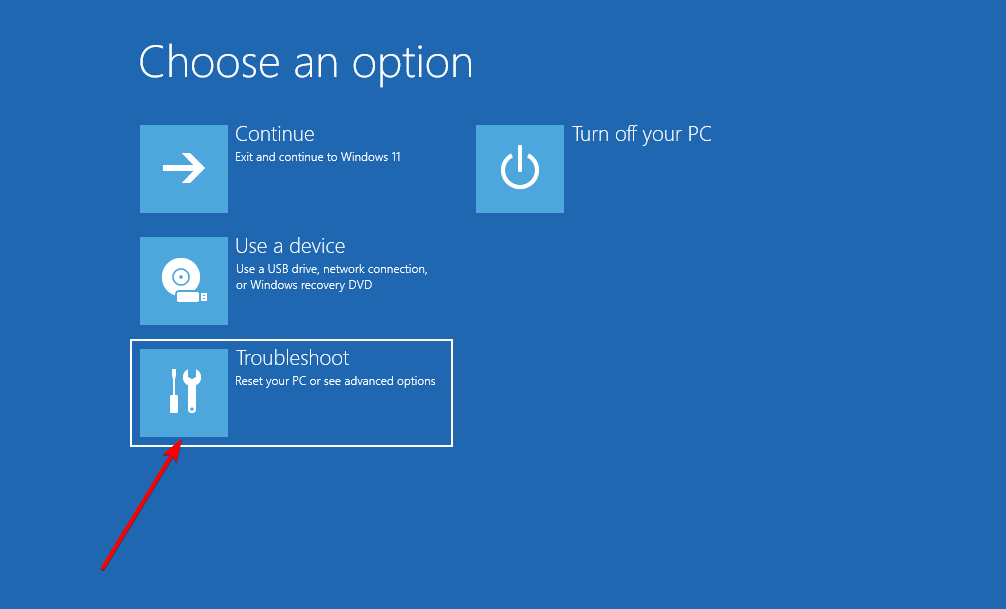
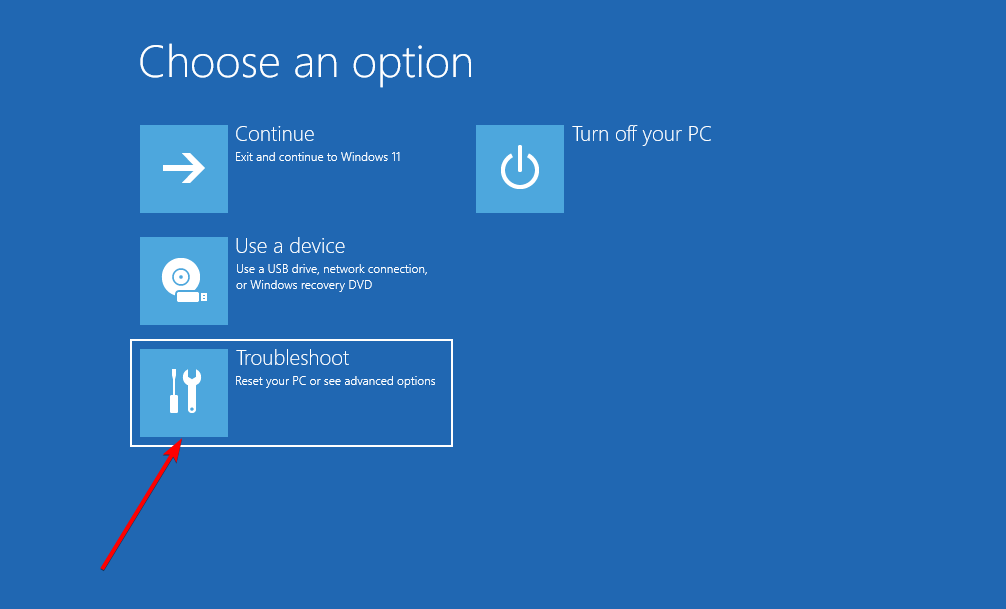
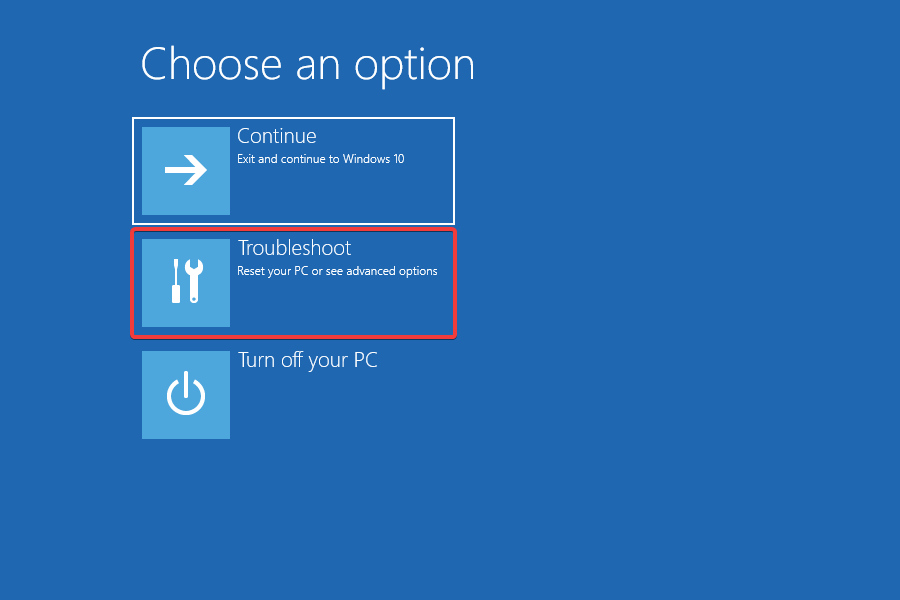
Next, choose Troubleshoot from the options listed on the screen.
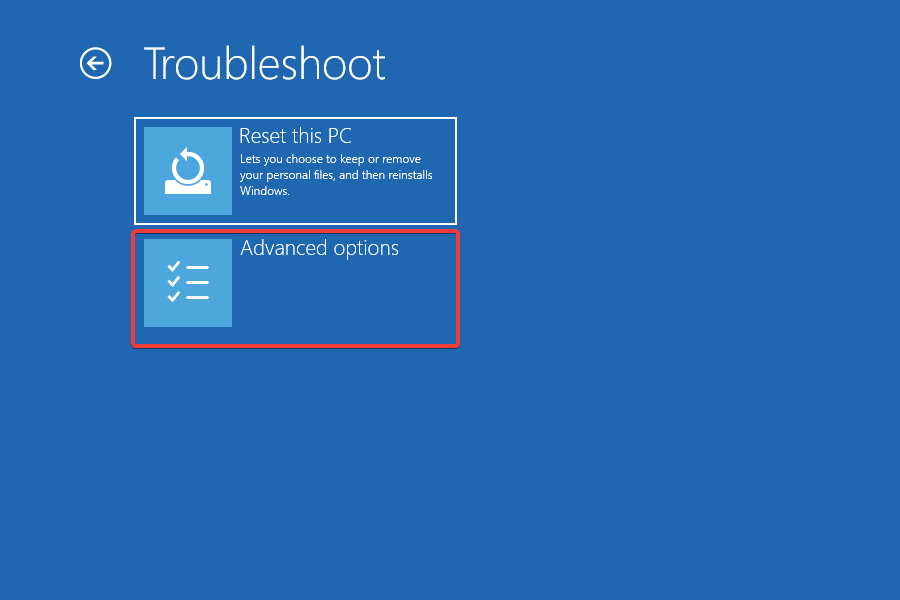
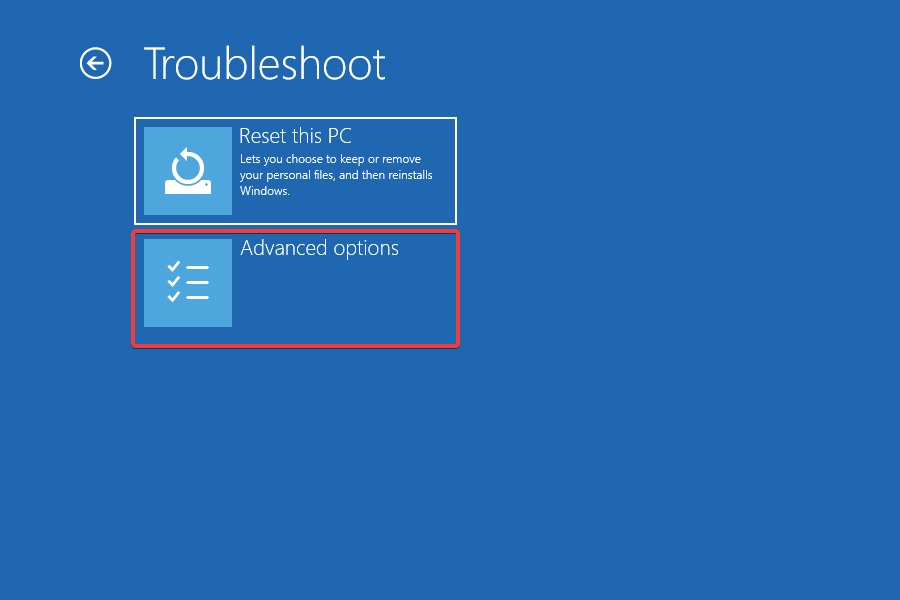
Again, click on Advanced options.
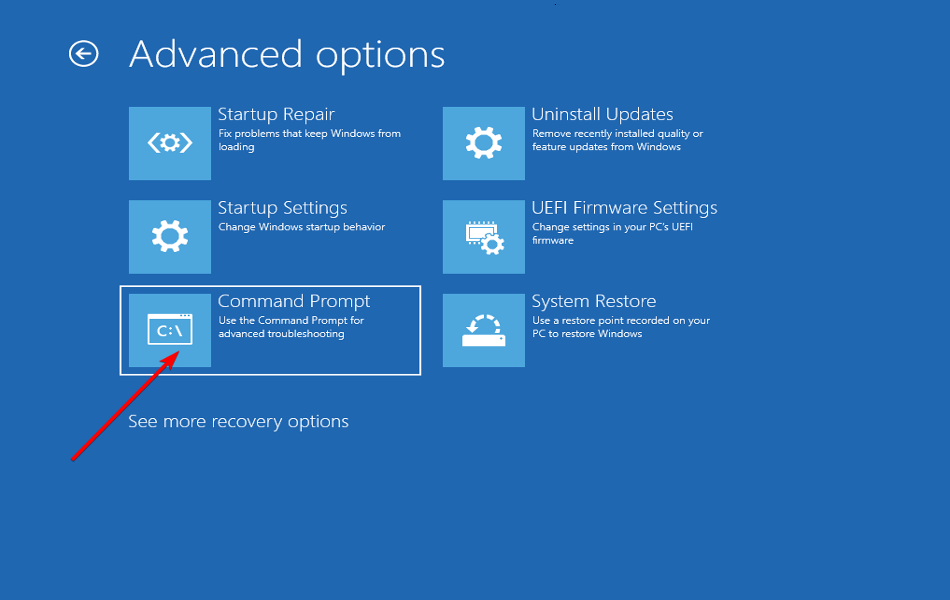
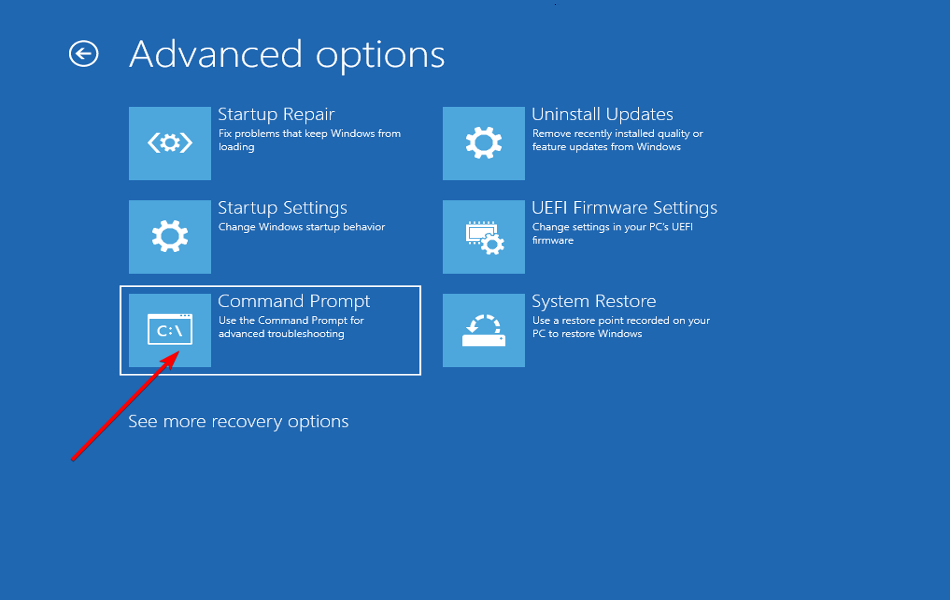
Now, select Command Prompt from the six options here.
Choose your account and enter the password for it on the subsequent screens to launch the Command Prompt.
Now, type/paste the following commands one at a time and hit Enter after each to rebuild the BCD:bootrec/ fixmbrbootrec/ fixbootbootrec/ scanosbootrec/ rebuildbcd
After executing these commands, close the Command Prompt and try to boot Windows.
BCD or Boot Configuration Data helps load the OS, and if it’s corrupt or certain critical files go missing, you are likely to encounter the Windows 11 Error Recovery. If that was the case, rebuilding the BCD should help fix the error.
Shut down the computer, and then press the power button to turn it on. Now, as soon as the Windows logo appears, hold the power button to turn in off. Repeat the same process two more times.
On the fourth attempt, you will find the Startup Repair kick in. Let it check for problems, but it most likely wouldn’t be able to fix it. Once it’s done running, click on Advanced options.
Next, select Troubleshoot.
On the next window, click on Advanced options.
Now, click on Command Prompt.
Select your user account, and enter the password for it on the next screen.
Next, type/paste the following commands one at a time, and hit Enter after each to run the DISM tool:DISM.exe /online /cleanup-image /scanhealthDISM.exe /online /cleanup-image /restorehealth
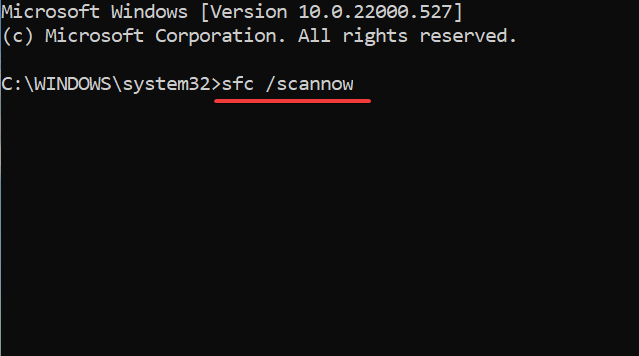
Once the DISM tool is successfully run, execute the following command to run the SFC scan: sfc /scannow
Running the DISM and SFC scan will fix corrupted system files, repair Windows Image, and modify the Windows installation files if required. So if it’s any of these causing the Windows 11 Error Recovery, your system should now be up and running.
5. Uninstall conflicting third-party apps
As you did before, force shutdown the computer thrice to launch and the Startup Repair will launch on the fourth attempt.
Once it’s done running, click on Advanced options.
Select Troubleshoot from the options that appear.
Now, select Advanced options.
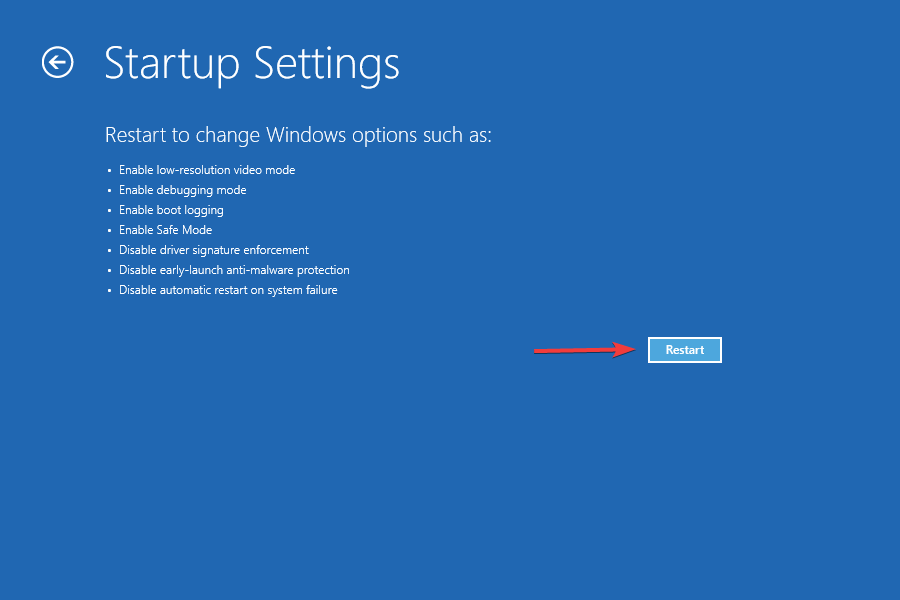
Next, select Startup settings from the six options.
Click on the Restart button.
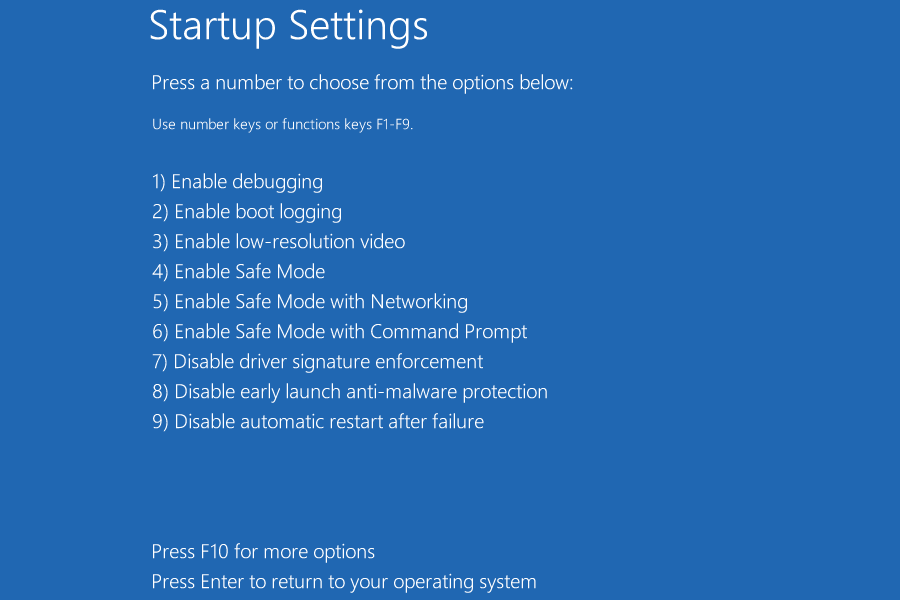
Now either hit 4 or F4 to boot Windows into Safe Mode.
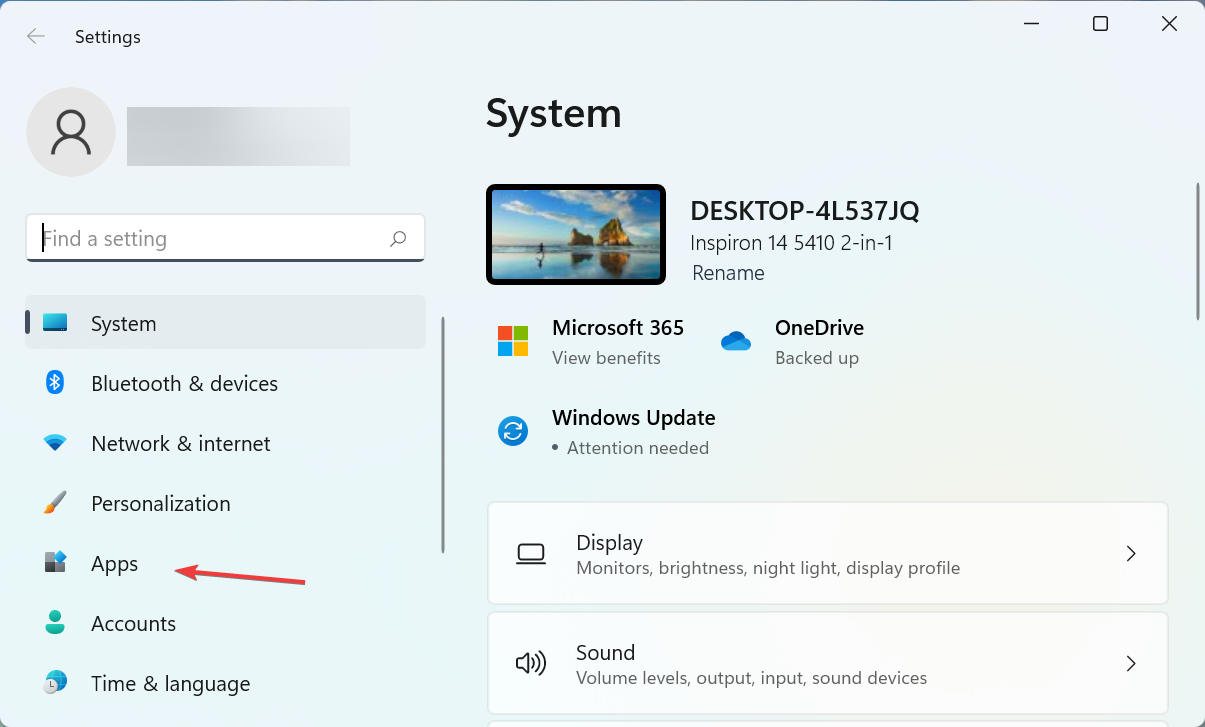
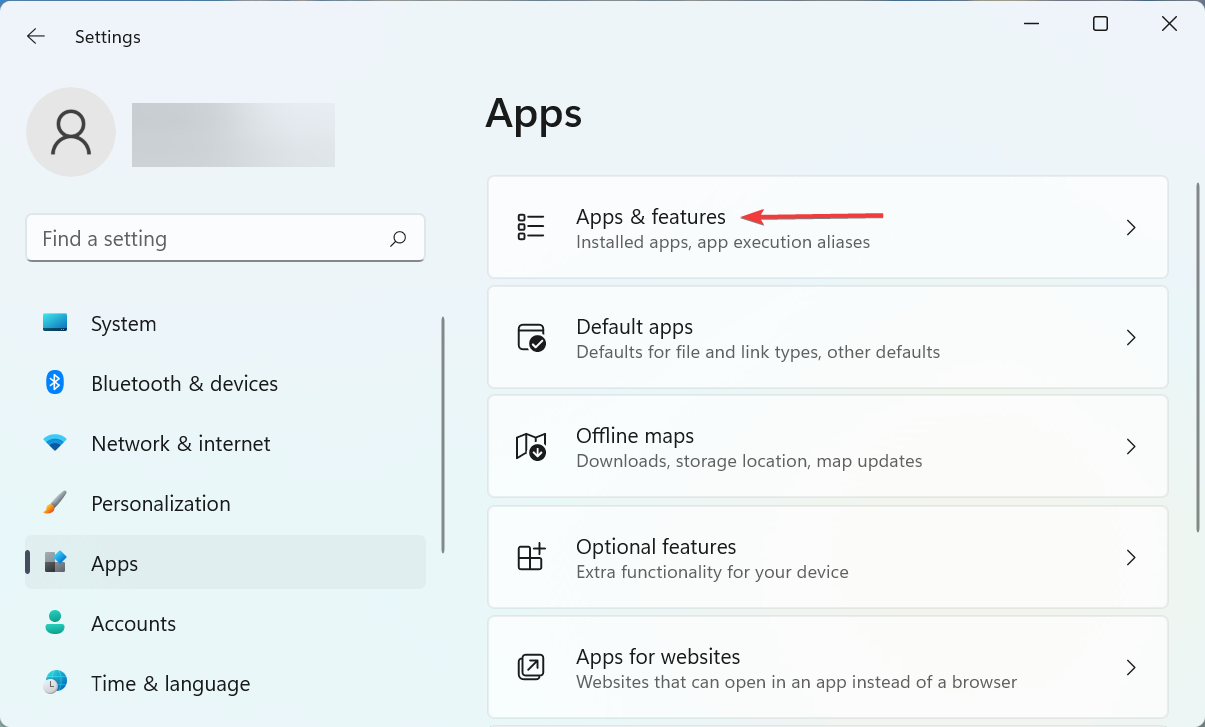
Once the OS boots, press Windows + I to launch the Settings app, and select Apps from the list of tabs in the navigation pane on the left.
Now, click on Apps & features on the right.
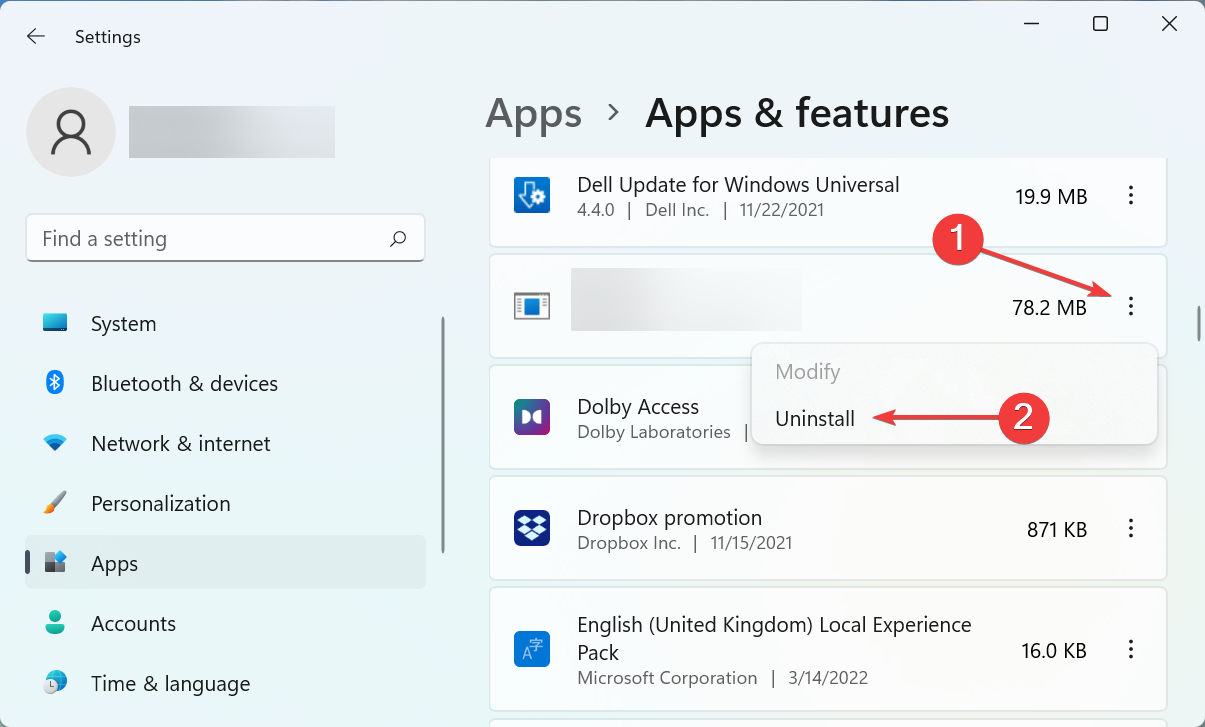
Locate the problematic app, click on the ellipsis next to it, and select Uninstall from the flyout menu.
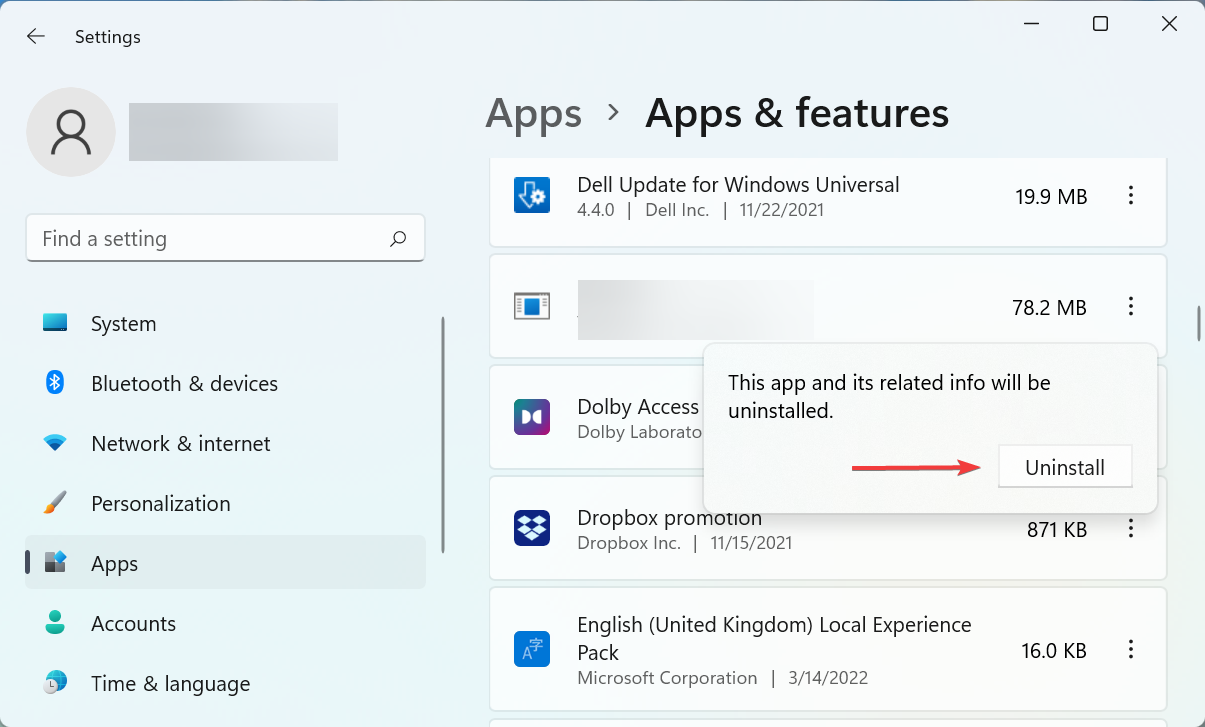
Again, click Uninstall in the prompt that pops up.
The main challenge here would be to identify the malfunctioning app. Here, we would recommend removing the apps installed around the time the error was first encountered one at a time, until the one leading to Windows 11 Error Recovery screen is uninstalled.
6. Reinstall Windows 11
If none of the methods listed above have worked, you have no option but to reinstall Windows 11. Reinstalling the OS will fix almost every issue that is affecting its functioning and leading to Windows 11 Error Recovery.
We recommend going with it as the last resort since it will take some time, and you might end up losing the stored data. But it will for sure eliminate the error, and get your PC running like before.
How do I identify a faulty hardware in Windows 11?
In most cases, faulty hardware will lead to BSoD (Blue Screen of Death) errors, and the error message itself will tell you which hardware is malfunctioning. Also, you can check the error log in Event Viewer to find out all the details.
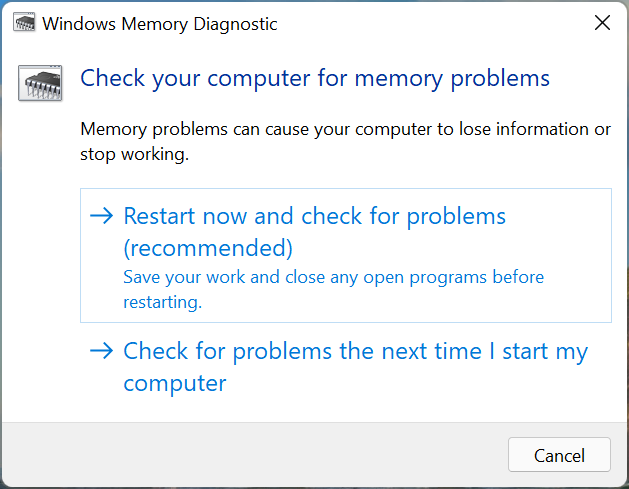
There are also a bunch of built-in tools and utilities that can help diagnose issues with the hardware. For instance, you have the Windows Memory Diagnostic tool to identify and eliminate problems with the RAM.
Windows Memory Diagnostic tool
Besides, you can use a dedicated third-party hardware diagnostic tool, since these perform better compared to those that come preinstalled. Once you know which hardware is malfunctioning, you can have it repaired or replaced to get the best system performance.
So, now that you have the Windows 11 Error Recovery problem resolved, we recommend you take extra precautions to avoid such conflicts in the future.
Epic Games today announced that the company would be donating all revenue generated from the mega-popular Fortnite video game to help humanitarian efforts in Ukraine. Microsoft has also agreed to partake in this initiative and will also donate all Fortnite proceeds generated on its Xbox consoles.
It’s worth noting that Epic Games and Microsoft aren’t just donating profits from Fortnite-related sales but the entirety of proceeds generated from the game.
This Ukraine fundraising initiative will run from today, March 20th, through to April 3rd and includes the purchase (with real-world money or store credit, not in-game V-Bucks) of V-Bucks, new and renewed Fortnite Crew subscriptions, content bundles, and the purchase of the new Chapter 3 Season 2 Battle Pass which beings in just under an hour from now.
The value of codes received elsewhere that are redeemed within Fortnite before April 3rd will also be included.
The announcement post currently lists UNICEF, Direct Relief, the UN World Food Programme, and TUNHCR as the initial organizations that will receive funds raise though it also states that more groups will be added in the future.
For those who don’t want to support Ukraine, Epic Games makes their position rather clear.
“All of Epic’s Fortnite proceeds earned in the window will be distributed to support humanitarian relief,” the announcement reads. “If you’d like to avoid Epic including the funds from your purchase, please hold off buying anything with real money in Fortnite until April 4, 2022 or later.”
In addition to the above initiative to support Ukraine, Epic Games also recently halted sales in Russia though refrained from suspending its services entirely. Ironically, this move now means that Fortnite players in Russia who are against the invasion will be unable to support Ukraine like the rest of the world.
Epic is stopping commerce with Russia in our games in response to its invasion of Ukraine. We’re not blocking access for the same reason other communication tools remain online: the free world should keep all lines of dialogue open.
As for Fortnite’s latest Battle Pass, this is one of the very few times where almost nothing has leaked from it ahead of the update which is now rolling out to Xbox consoles, Windows PCs, and all other supported platforms. There are some rumors that Marvel’s Doctor Strange could be a part of the Battle Pass and that more members of The Seven will appear. All will be revealed soon.
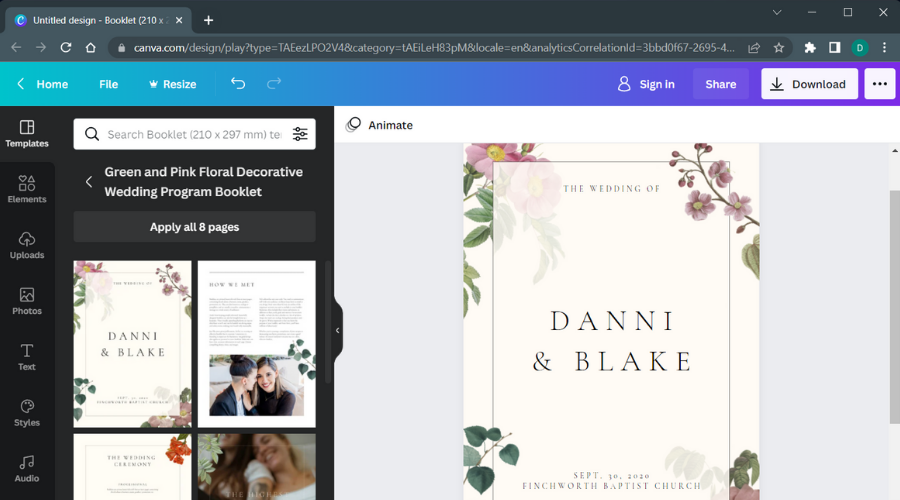
Today we’ll show you the best free word processors for Windows 11 so you can write and edit like a pro. We found tools that offer comparable features to premium-tier options like MS Office.
So, if you want access to features like pre-designed templates, integrated spell-checkers, formatting tools for paragraph alignment and line spacing, table and chart support, and more, keep reading.
What are the best word processors to use on Windows 11?
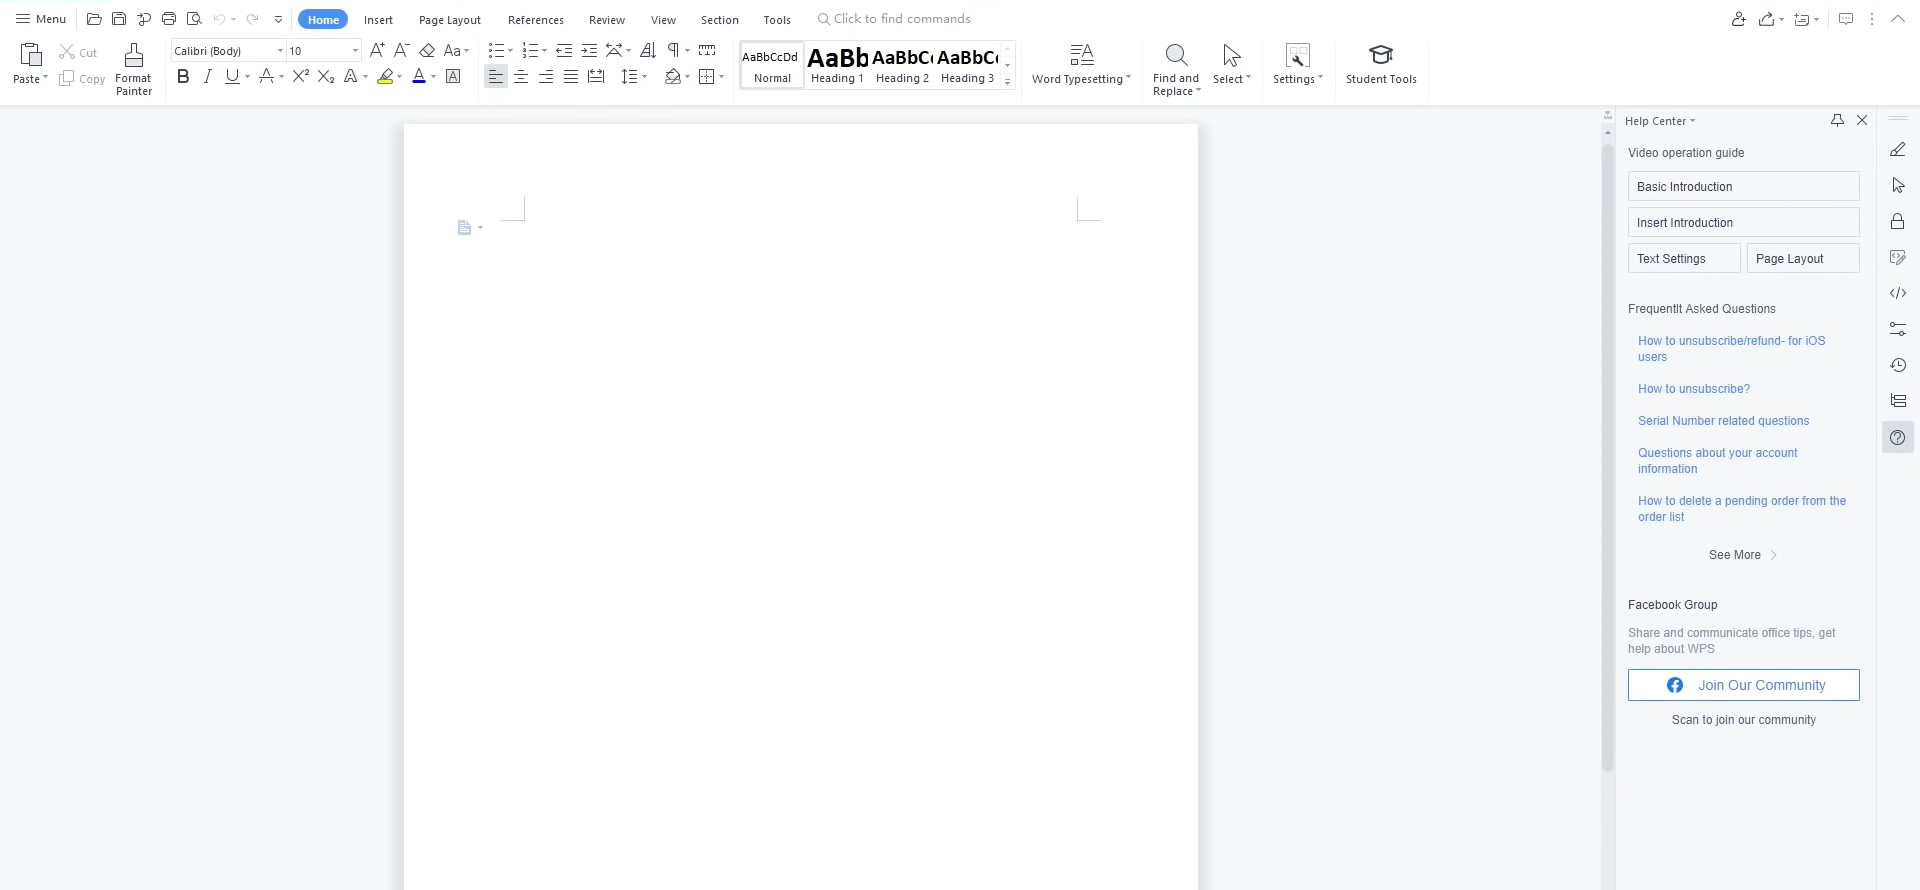
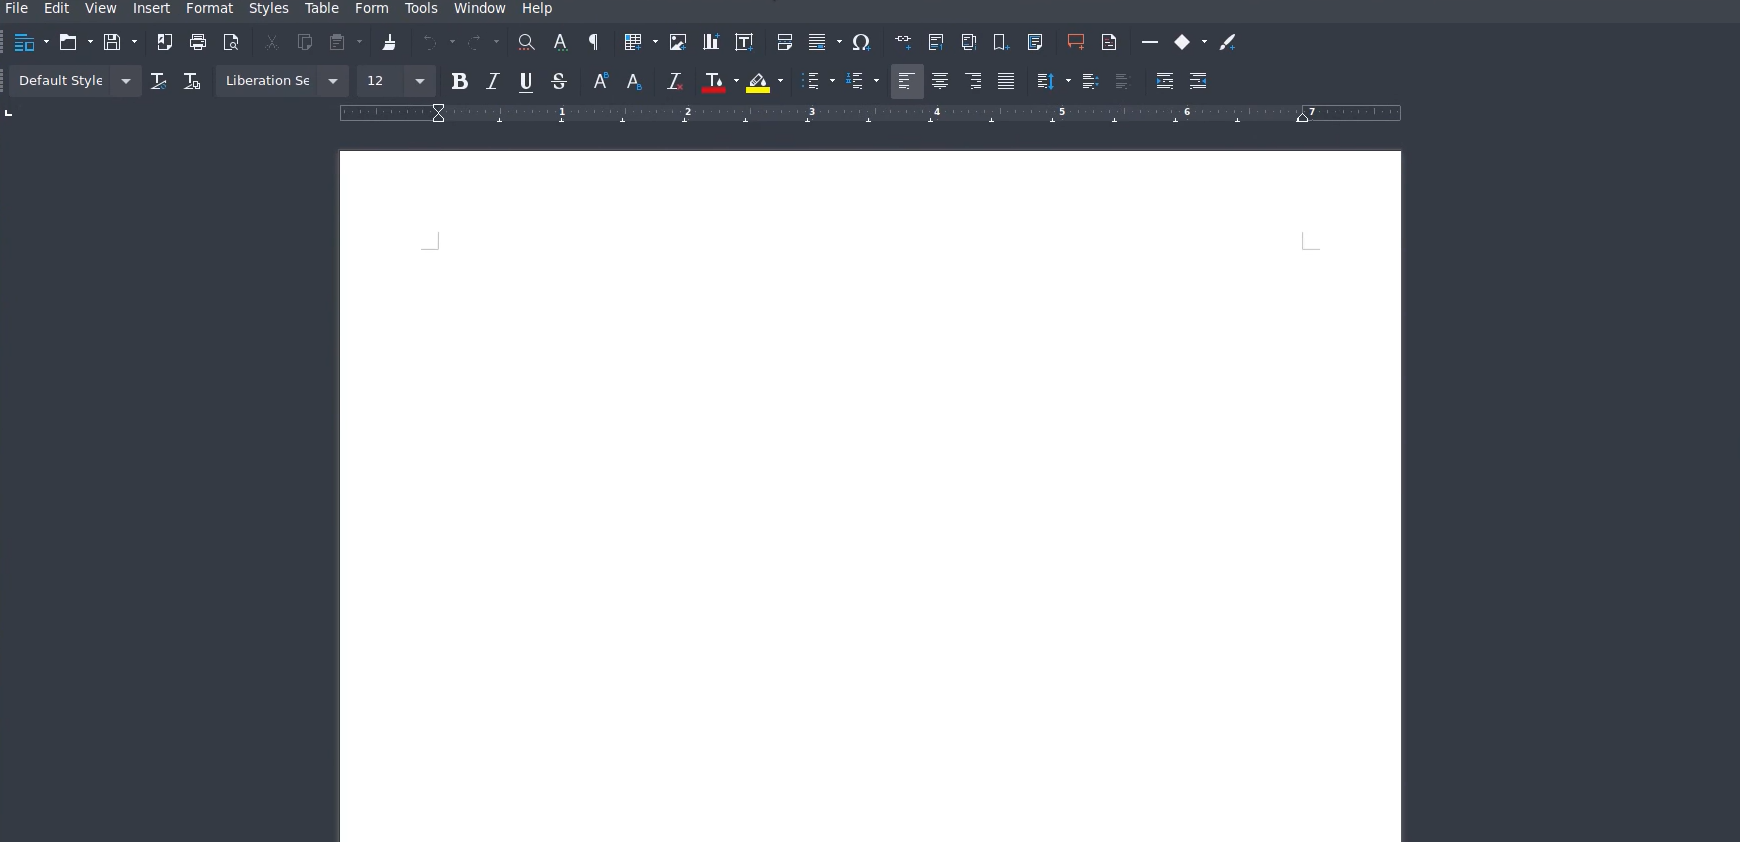
Libre Office Writer comes with the Libre Office suite that is free. You will find it to be versatile and feature-rich.
In addition to the offline writer, you will find the interoperability among its Calc (spreadsheets), Impress (presentations), Draw (vector graphics), Math (mathematical formulae), and Base (databases) services advantageous.
It is excellent for collaborating across teams since you can share documents across Microsoft Word users without any compatibility issues. It also supports DOCX, PPTX, PPT, and other formats.
This free word processor for Windows 11 allows the liberty of choosing between a traditional toolbar and icon interface and a notebook bar similar to the 2007 MS office.
Wordpad unlike the other word processors on this list does not have a suite of applications, but it has the one important advantage of not needing to be installed. It has been part of every Windows operating system since Windows 95.
It is somewhat of a watered-down version of Microsoft Word, but still very effective for creating basic documents as well as opening rich text documents and files that are created using other programs not installed on your computer.
Documents created with Wordpad can be exported in several formats including Rich Text Format (RTF). This format is generic for rich texts including bolds, custom fonts, bullets, etc. It is also compatible with DOCX formats, hence, it is a good alternative if you must work with Microsoft Word documents. It also offers compatibility for files created with Libre office.
Finally, unlike most of the word processors discussed, it has a free version and no paid options.
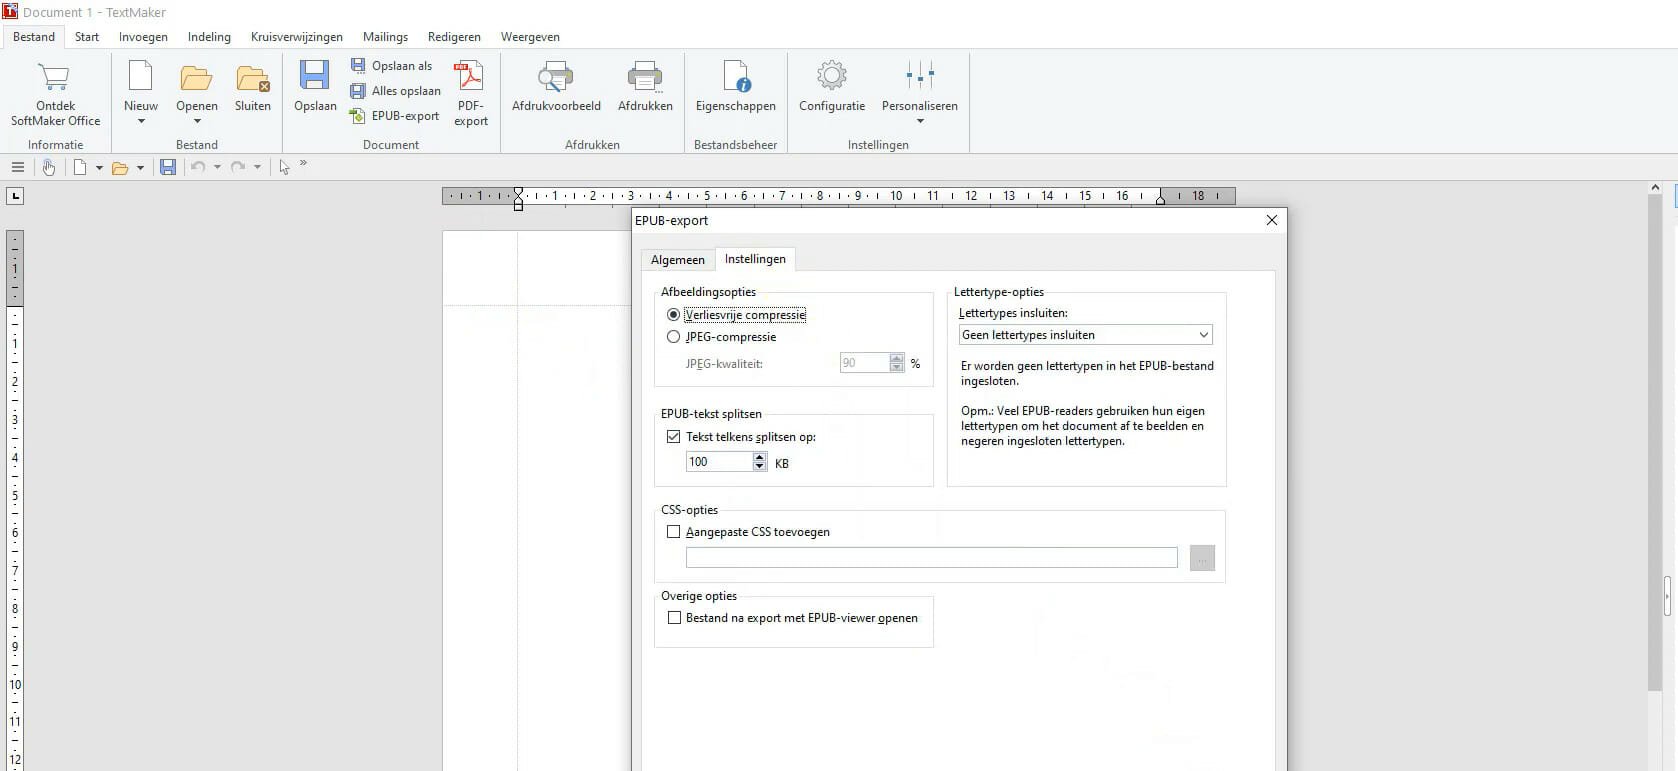
This Windows 11 compatible word processor offers a wide range of options for easy editing of Microsoft PowerPoint, Excel, and Word files. It is also a handy tool for exporting files in pdf and EPUB.
It comes with a small selection of easy-to-use templates, but you will be able to create additional custom-made templates.
FreeOffice TextMaker packs most features you will expect in a modern word processor including a feature for managing doc changes during collaboration, advanced options for formatting text, a feature for creating databases for managing footnotes and bibliographies.
The most easily noticeable drawback of the free version of FreeOffice TextMaker is an inability to save files in DOCX formats. You will need a paid version for this feature.
From the name of this free Windows 11 compatible word processor, you can deduce that it is built to help you focus more while writing. It is packed with tools to make you maximize your work productivity without distraction.
By default, it only displays a blank page, and the toolbar options will only appear after you move the mouse to the screen edge. This word processor goes the extra mile of fading all features except for the current paragraph, or sentence.
Users can also set alerts for different goals including word count. It does not have all the great editing features of most word processors discussed, but none come close in productivity.
Are there good online word processor alternatives?
One of the most robust of the lot is Google Docs. It comes as part of a free Google Editors suite that also includes Slides, Sheets, Forms, Keep, and Google Sites.
In this article, you’ve been introduced to word processors that work offline, requiring an installation on your operating system. If you prefer not to have app installations, there are several online solutions.
This list has not been written in any particular order. Let me know in the comments which of these word processors you prefer.
Users previously reported an IntcOED.sys BSOD error for Windows 10. That’s a blue screen issue with a Driver unloaded without canceling pending operations error message. Now users have posted on forums about that same issue arising in Windows 11. One user’s forum post said this:
After having Windows 10 update to Windows 11 in December 2021, I am facing this issue:
What Failed: ‘IntcOED.sys’ Stop Code: Driver Unloaded without canceling pending operations
Some users have reported that Driver unloaded BSOD errors arise when they start, or shortly after starting, their PCs. Other users have said this blue screen error occurs after their computers come out of sleep mode. Those users have needed to fix recurring Driver unloaded errors.
Do you need to fix a recurring Driver unloaded error in Windows 11 as well? If so, try applying the potential resolutions for the Driver unloaded without canceling pending operations error below.
What is a blue screen error?
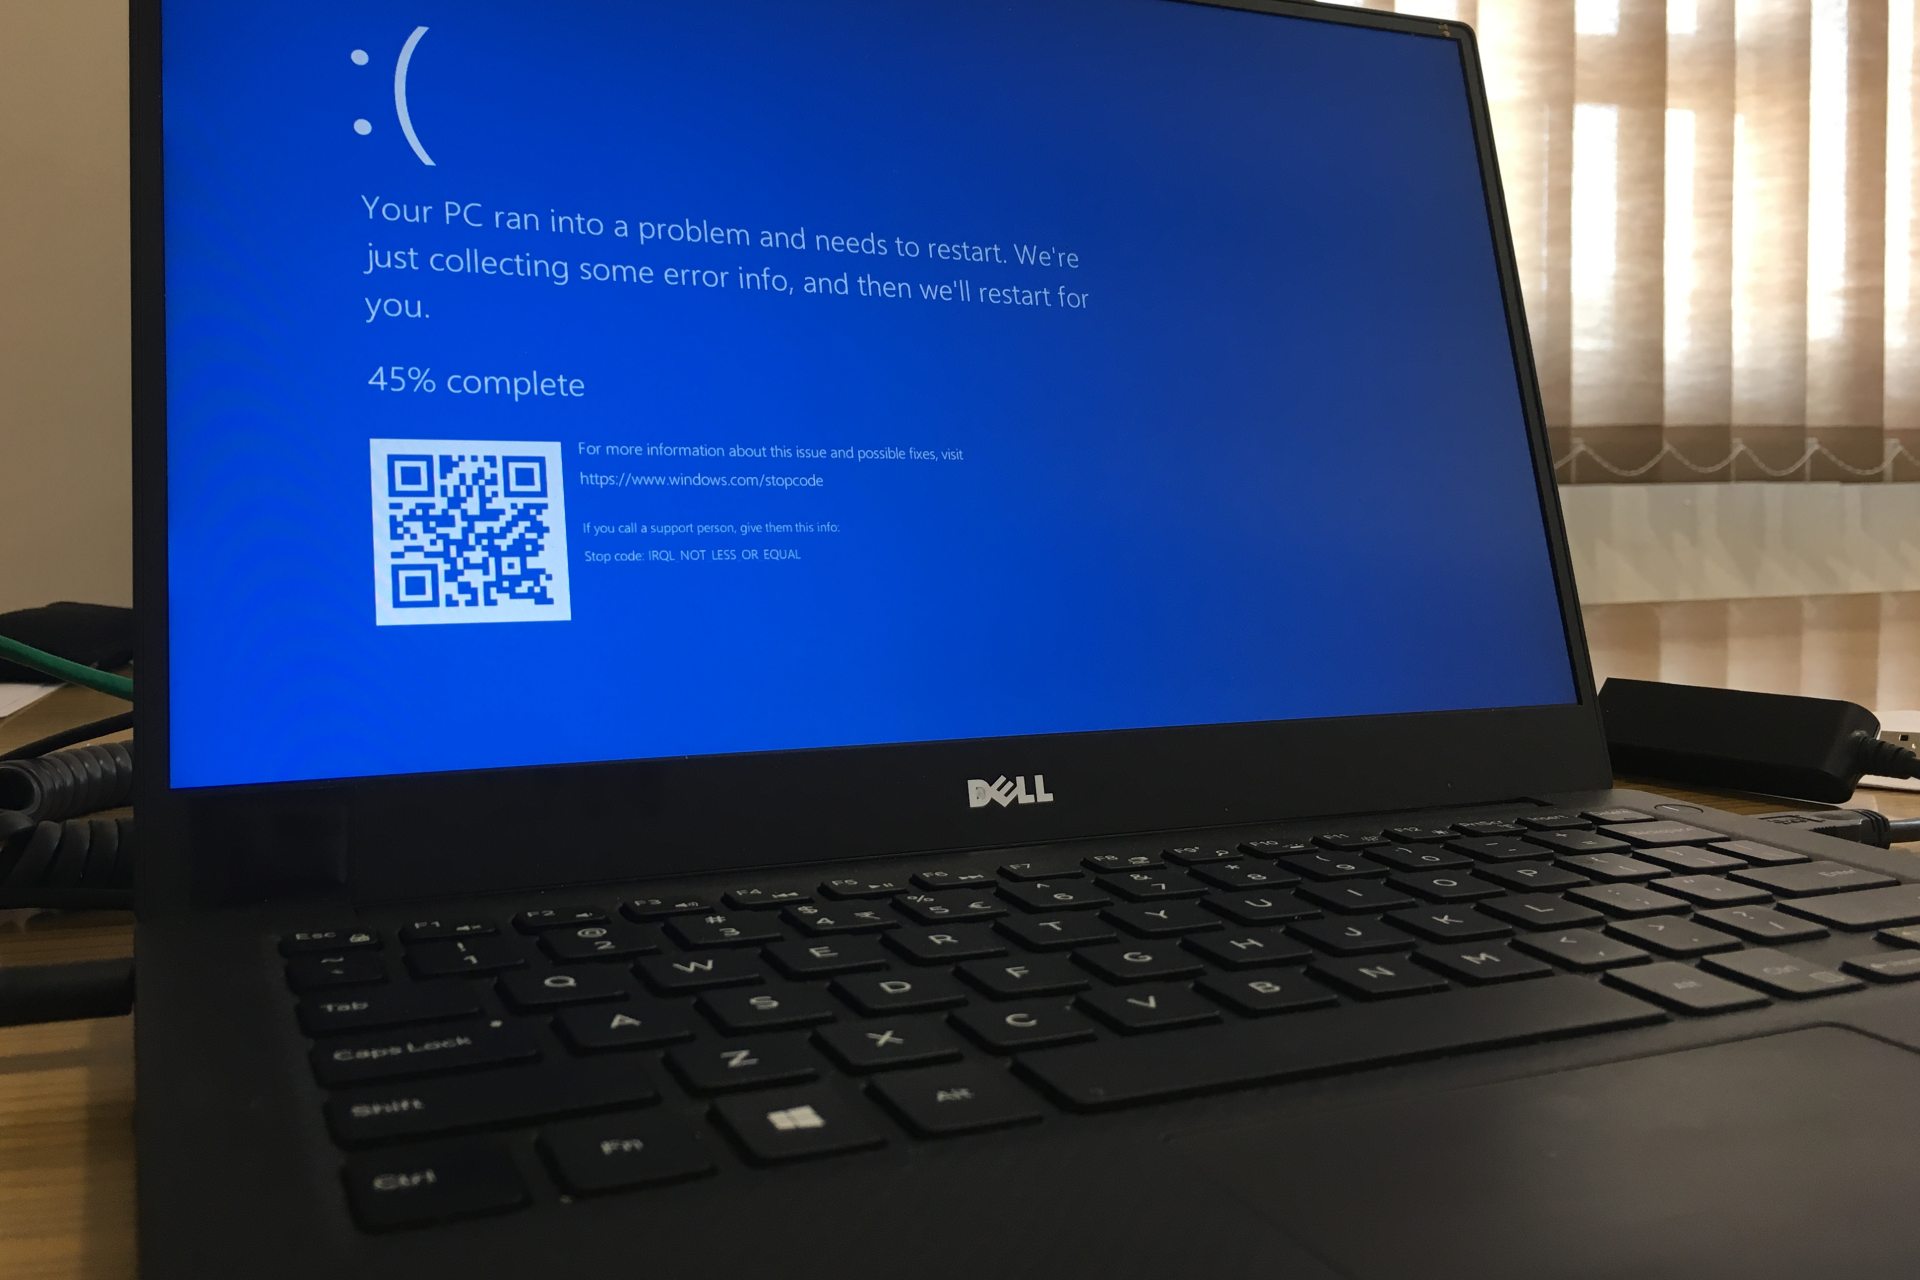
Blue screen errors, also known as stop errors, are those with blue backgrounds and stop codes. They are also referred to as fatal system errors because the Windows OS stops operating. Windows restarts after collecting info after blue screen errors arise.
BSOD (Blue Screen of Death) errors can often pertain to device drivers. A Microsoft webpage says the big M estimates that 70 percent of blue screen errors pertain to third-party device drivers. The Driver unloaded error message specifies the IntcOED.sys driver for Intel Smart Sound Technology.
A one-off BSOD issue isn’t an especially big deal. After restarting Windows, the blue screen error might never occur again. However, users need to fix blue screen errors when they recur on their Windows PCs.
How can I fix the driver unloaded without canceling pending operations error in Windows 11?
1. Update Windows 11
Press Windows 11’s Start button, and select the Settings app.
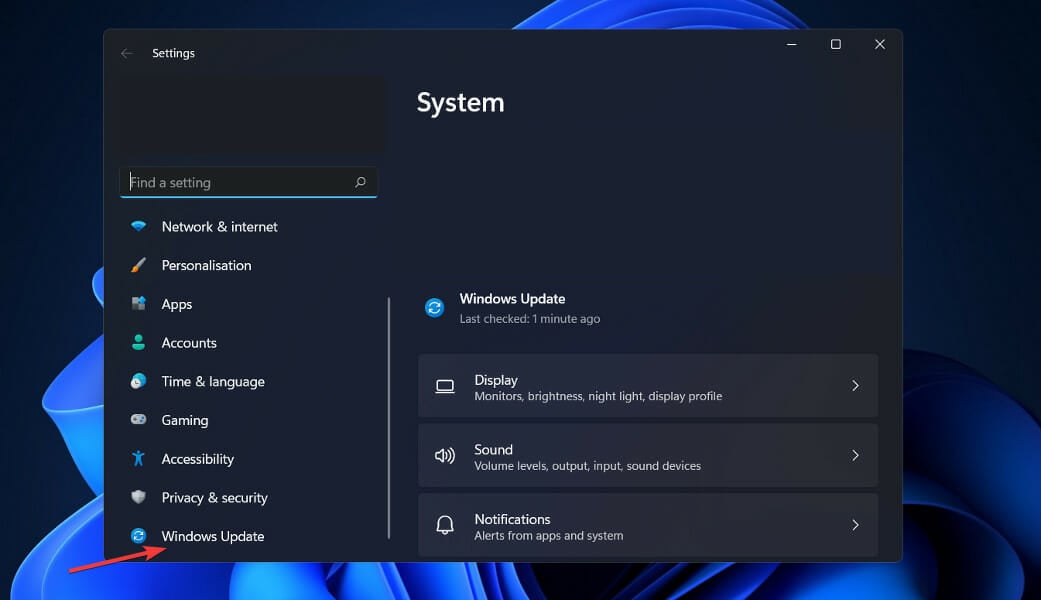
Click Windows Update on the left of Settings.
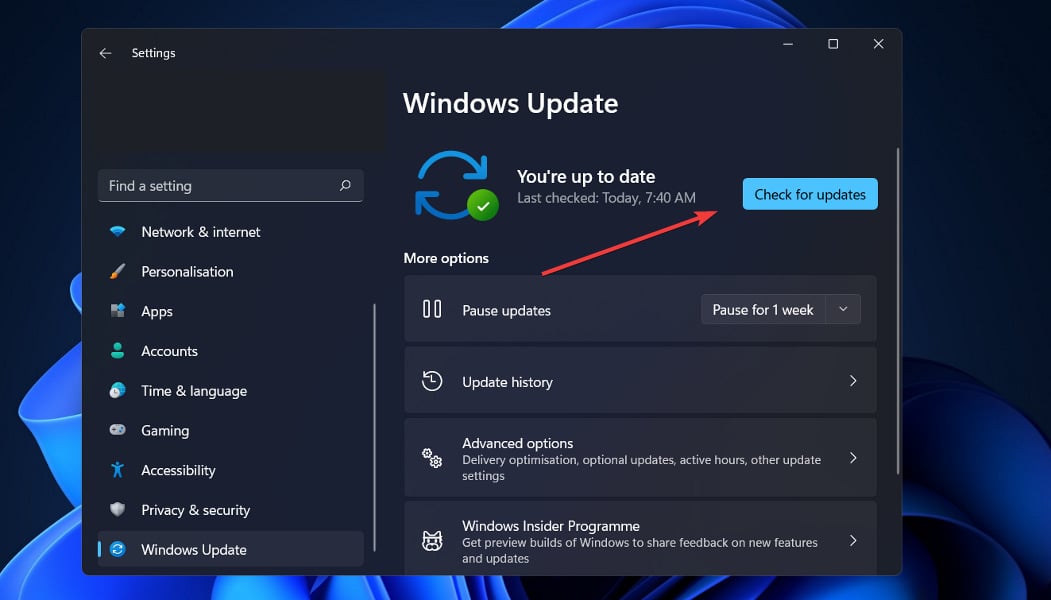
Press the Check for updates button to download and install updates.
Click the Download & install button for any available optional updates.
2. Run a System File Scan
Open the Start menu and type Command Prompt in its search box.
To open Command Prompt with admin permissions, click the Run as administrator option shown directly below.
Input the following command and press Return: DISM.exe /Online /Cleanup-image /Restorehealth
Then start the SFC scan by inputting this command and pressing Enter: sfc /scannow
Wait for the SFC tool to complete its scanning and display outcome.
3. Run Startup Repair
Bring up the Settings app.
Select Recovery on the System tab.
Click Restart now button for the Advanced startup option shown directly below.
Select Troubleshoot in the Windows Recovery Environment.
Then click Advanced options > Startup Repair
Choose an account, and then input the password for it.
As the Driver unloaded error is often due to faulty or outdated drivers, try updating device drivers. To check the status of your PC’s drivers, run a scan with a third-party driver updater utility. That software will provide a full overview of outdated or faulty device drivers on your PC.
5. Uninstall the Smart Sound Technology (SST) driver
Press the Windows + X keys simultaneously, which will open the Power User menu.
Select Device Manager to open the window for that system utility.
Then double-click the Sound, video and game controllers category.
Click Intel Smart Sound device with your right mouse button and select its Uninstall device context menu option.
Select the checkbox for the Delete the driver for this device option.
Click the Uninstall button to confirm.
NOTE
If you see any devices with exclamation marks by them in Device Manager, reinstall the drivers for them. To do so, you’ll need to uninstall drivers as outlined above. Then download the latest driver packages for the devices from their manufacturers’ websites to reinstall them.
6. Disable Intelppm.sys
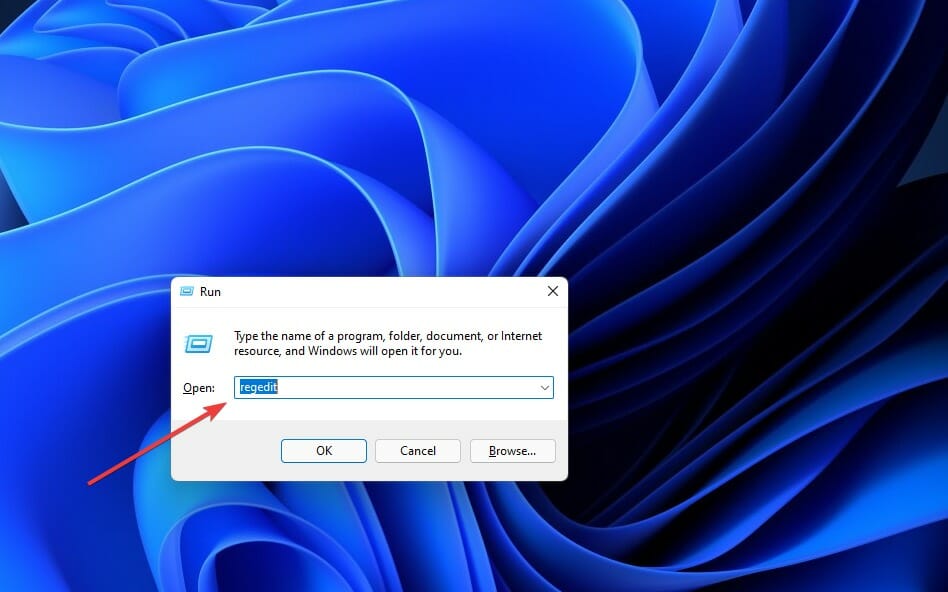
Press the Windows + R key combo.
Open Registry Editor by inputting this Run command in the Open box and clicking OK: regedit
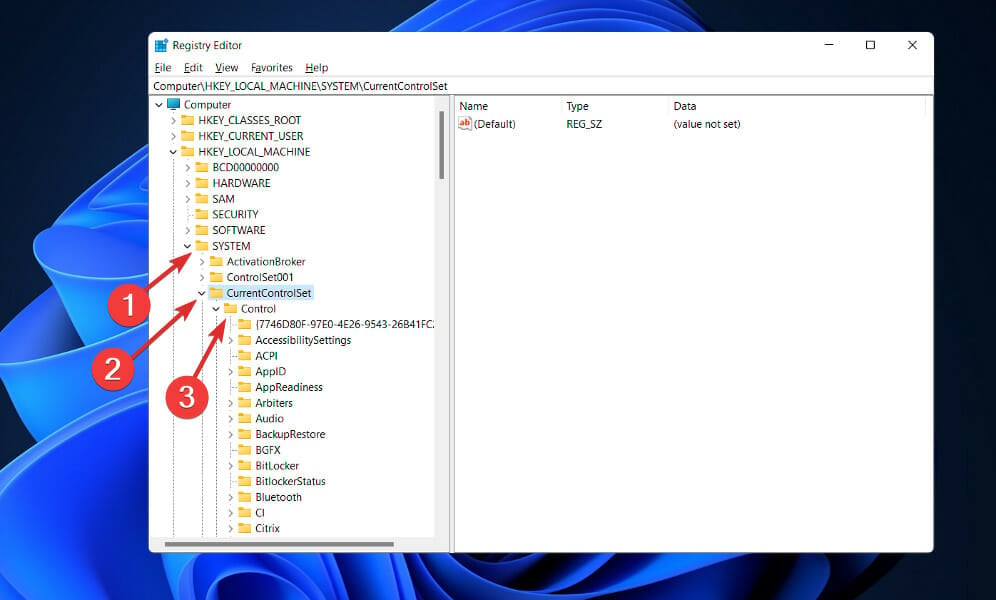
Then input this registry key location in the address bar: HKEY_LOCAL_MACHINE\SYSTEM \CurrentControlSet\Services\Processor
Double-click the Start DWORD for the Processor key.
Enter 4 within the Value box for the Start DWORD, and click the OK button.
Next, navigate to this registry location: HKEY_LOCAL_MACHINE\SYSTEM\CurrentControlSet\ Services\Intelppm
Double-click Start in the Intelppm registry key.
Erase the current value in the text box, and then input 4 to replace it. Click OK to exit the Edit DWORD window.
Bring up the Start menu, click Power, and select Restart.
7. Reset Windows 11
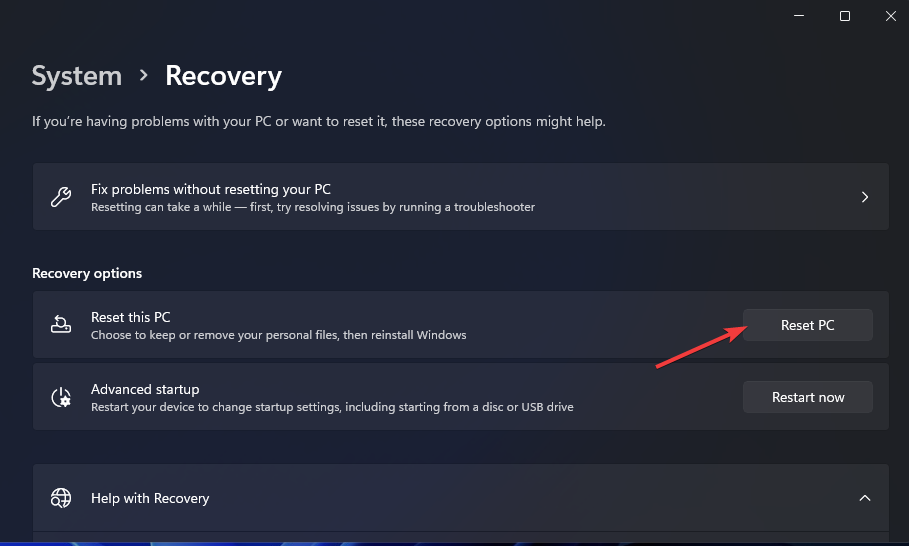
Open the Settings app, and click Recovery in the System tab.
Press the Reset PC button to open a Reset this PC window.
Select Keep my files in the Reset this PC window.
Click the Cloud download or Local Reinstall option.
Press the Next button, and click Reset to confirm.
NOTE
Note that you’ll need to reinstall software packages that didn’t come pre-installed with Windows 11 after resetting the platform. Therefore, it’s recommended that you try some of the alternative resolutions before resetting Windows 11.
How can I enter Safe Mode to apply the above fixes?
If you can’t get into Windows 11 to apply the above fixes because of the Driver unloaded error, you’ll need to boot into Safe Mode via the Advanced Startup Options menu. You can also apply some of the above resolutions from the recovery environment. This is how to boot into Safe Mode.
Turn on your desktop or laptop.
Press and hold the PC’s power key for about five seconds when a logo appears during the startup to shut down the PC. Do that three or four consecutive times until an Automatic Repair screen appears.
Select Advancedoptions on the Automatic Repair screen.
Then select Troubleshoot on the Choose an option menu.
Next, select Advanced options and Startup Settings within the Advanced Startup Options menu.
Click Restart to do that.
After restarting, press the F5 key to select Enable Safe Mode with Networking.
When you’ve booted into Safe Mode, you can apply the potential resolutions above as outlined.
The Driver unloaded error isn’t the most straightforward issue to fix. However, users have confirmed they’ve been able to fix that error in Windows 11 with some of the potential resolutions above. So, maybe one of them will resolve the Driver unloaded error on your PC as well.
For further potential resolutions, Microsoft’s Troubleshoot blue screen error page might be worth a look. That webpage includes a troubleshooter that provides general BSOD fixes. Our How to fix IntcOED errors guide might also include some potential fixes for the Driver unloaded error.
You can chat about the Driver unloaded error in this page’s comments section below. Feel free to enter any pertinent questions about that BSOD error there. Users who’ve found other ways to fix the same issue are especially welcome to share their resolutions below.
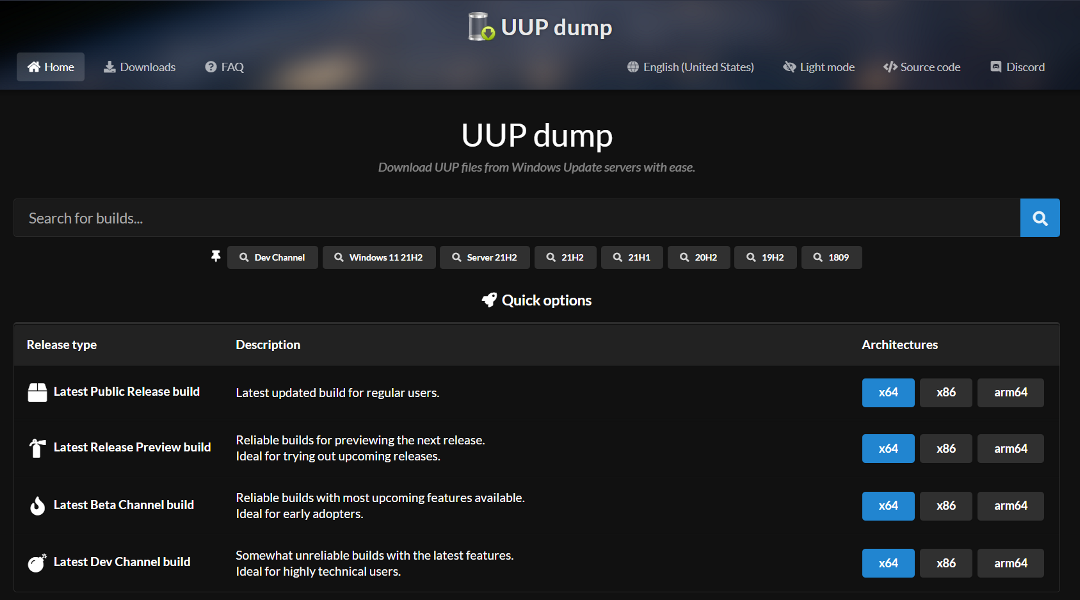
Any preview build of Windows 11, such as build 22H2, that is accessible in the Dev or other channels can technically be obtained by downloading the image file. You just need to use a third-party program, thus we will show you how to download Windows 11 ISO from UUP dump.
Although Microsoft makes the ISO file for previews of Windows 11 available to users so that they can test the clean installation and in-place upgrading processes on virtual machines and spare systems, this is not always the case.
With the help of UUP Dump, you may make a bespoke Windows 11 ISO file from any public preview that is available. There are several tools and scripts included in the package that download the most recent builds from the Microsoft servers and create an unofficial ISO file.
Follow along as we will show you how to download Windows 11 ISO from UUP dump, right after we see whether it is a safe source or not. Keep up with us!
Is UUP dump safe to use?
An open-source application or a website called UUP Dump is basically a tool that allows you to download the UUP files straight from the Windows Update servers and then transforms these UUP files into an ISO file.
Essentially, this platform is intended for developers who are enthusiastic about exploring the most recent releases of the Windows operating system.
Yes, UUP dump is completely risk-free to use, and it is also trusted by the software giant Microsoft. All of the UUP files are obtained straight from Microsoft’s official servers, and the tool does nothing more than assembling them all into a single file.
This being said, let’s move on to the downloading process!
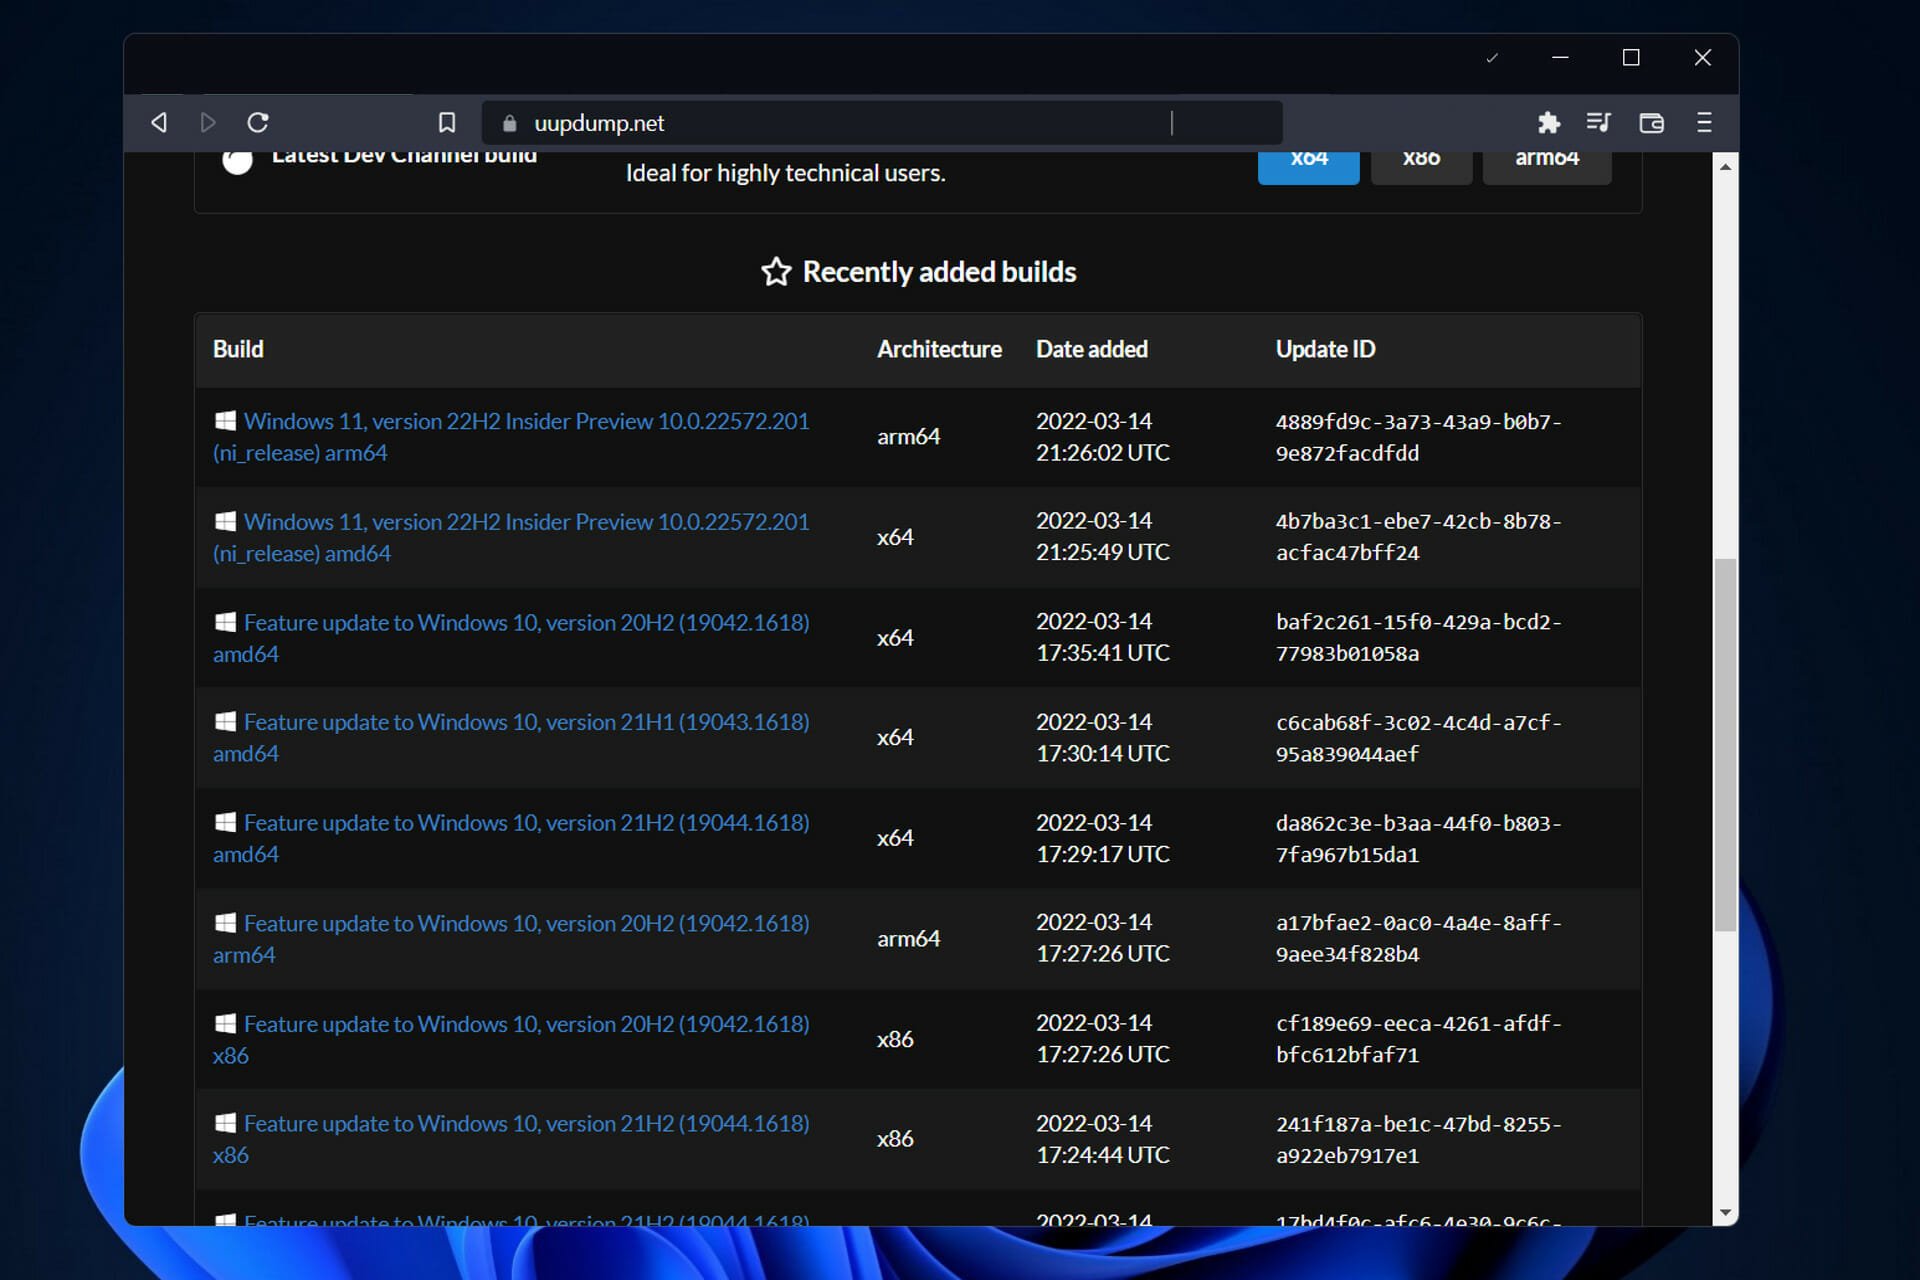
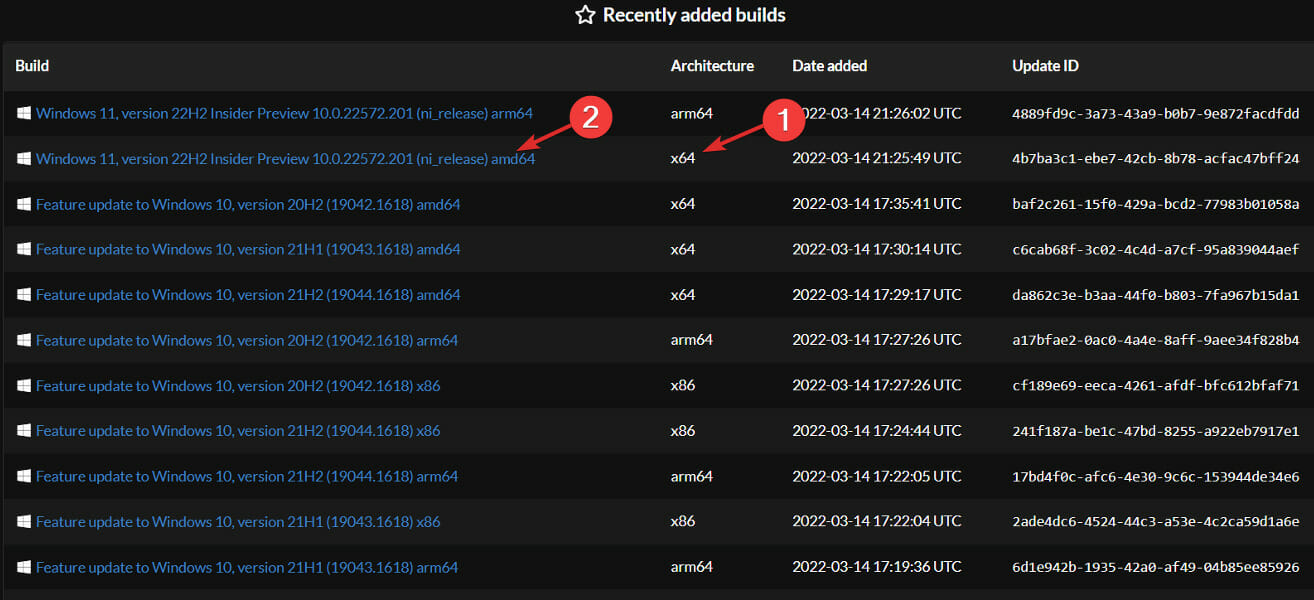
Now, look for the Windows 11 ISO and make sure that the architecture fits your computer. Simply click on the link’s name in order to download the image.
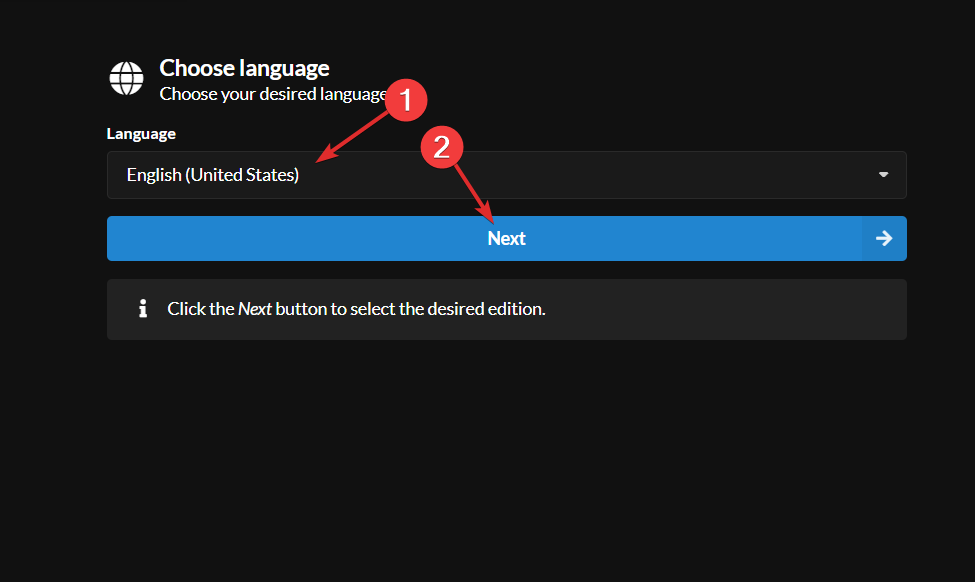
Now choose the desired language for the OS and click on Next.
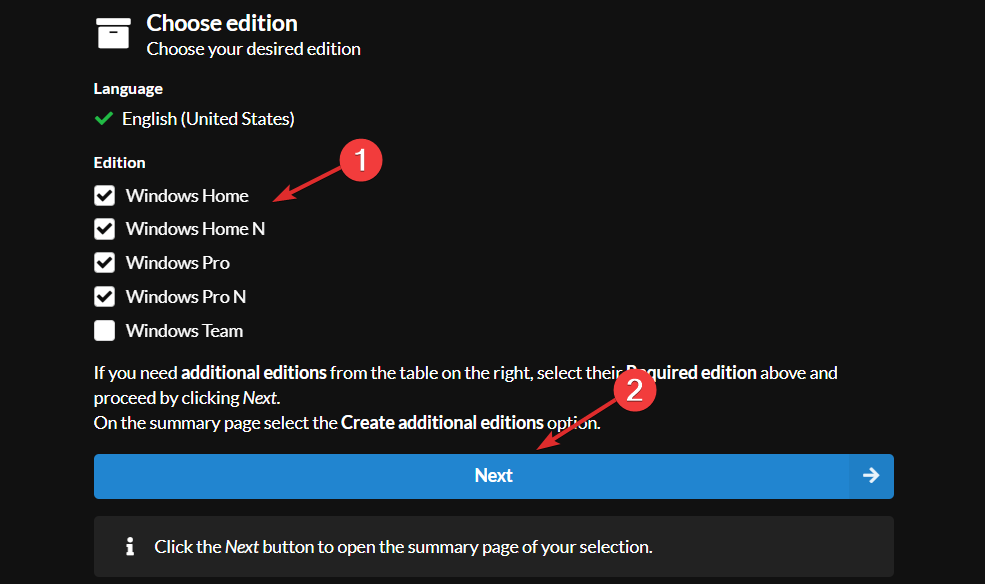
Choose the Edition and click Next.
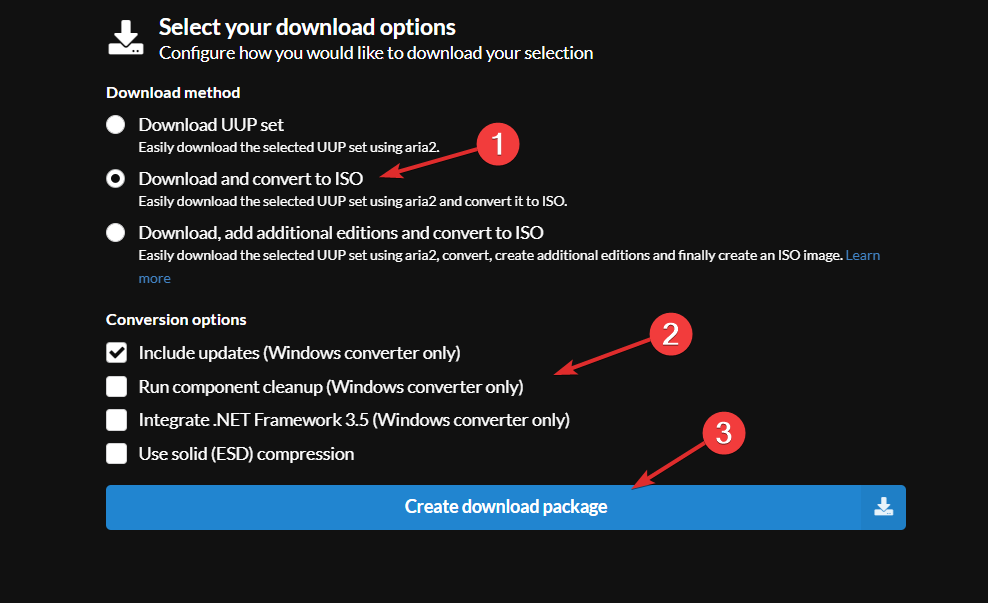
Select Download and convert to ISO, and tick any conversion options that you want. By default you will have Includes updates selected. Lastly, click on Create download package.
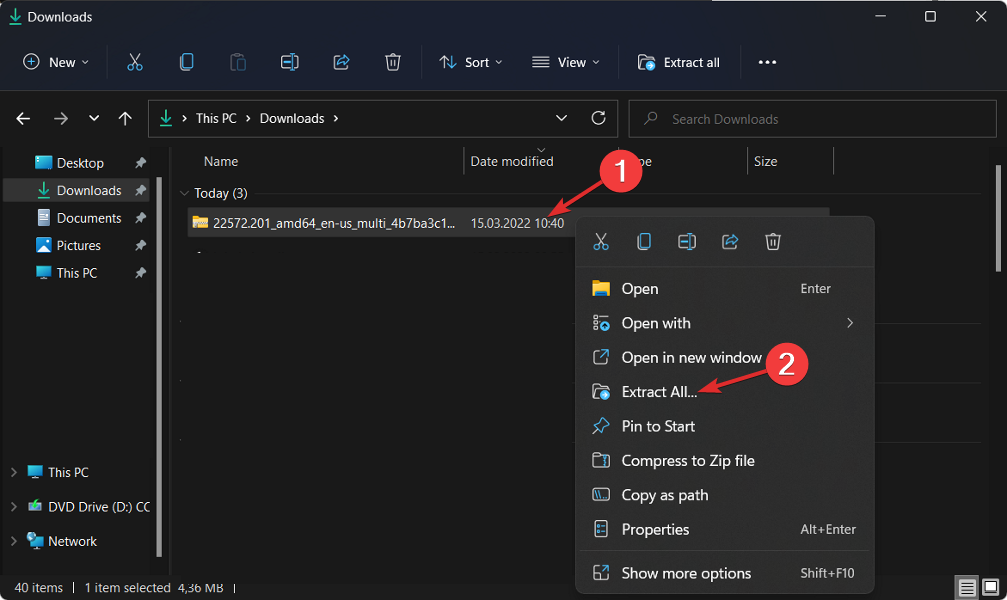
A zip folder will be downloaded which you need to extract as we have shown below.
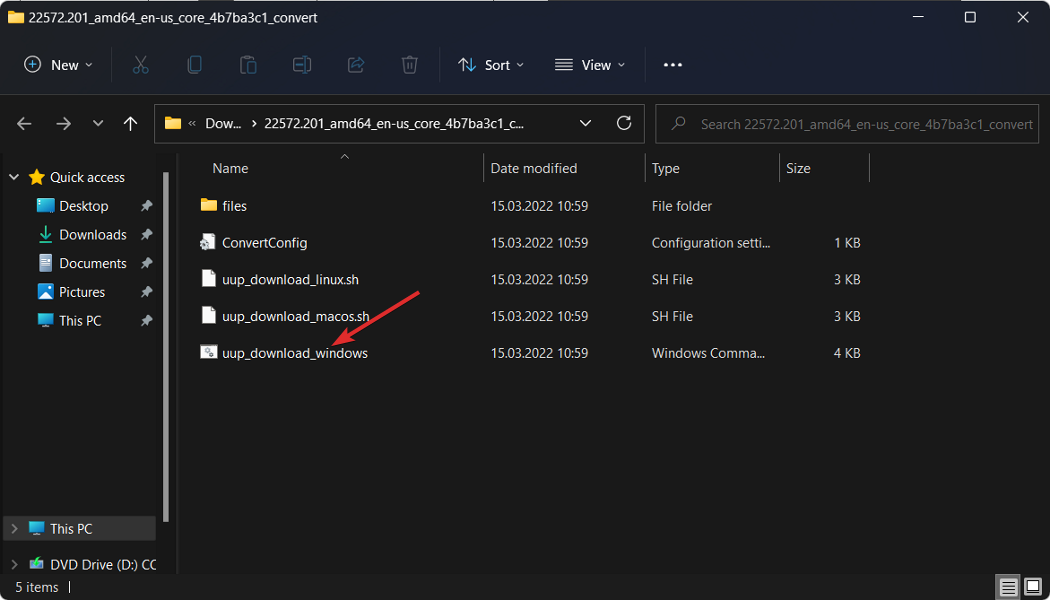
Once it is extracted, start the downloading process by clicking on uup_download_windows.
That’s it! Applying only seven simple steps will bring you closer to what you had in mind from the very start.
What is new in Windows 11?
Windows 11 introduces a completely redesigned UI that is more similar to a Mac. It has a simple design with rounded sides and soft pastel colors to complement it. Along with the Taskbar, the Start menu, which is a Windows icon, is moved to the middle of the screen.
Applications for Android devices are now available for Windows 11 users, or peekers, through the Microsoft Store and the Amazon Appstore, respectively.
For Windows customers, this is something they’ve been waiting for for years, and it represents another step toward the integration of mobile and laptop computers.
Windows 11 will allow you to create virtual desktops in a manner similar to that of Mac computers. It enables you to switch between numerous computers at the same time for personal, professional, educational, or gaming purposes.
New features in the OS include Snap Groups and Snap Layouts, which are collections of the apps you’re currently using that are displayed in the taskbar and can be brought up or minimized at the same moment to make transitioning between tasks more convenient.
You may also plug and remove from a monitor without losing track of where your open windows are placed, which is really convenient. Sounds appealing, doesn’t it?
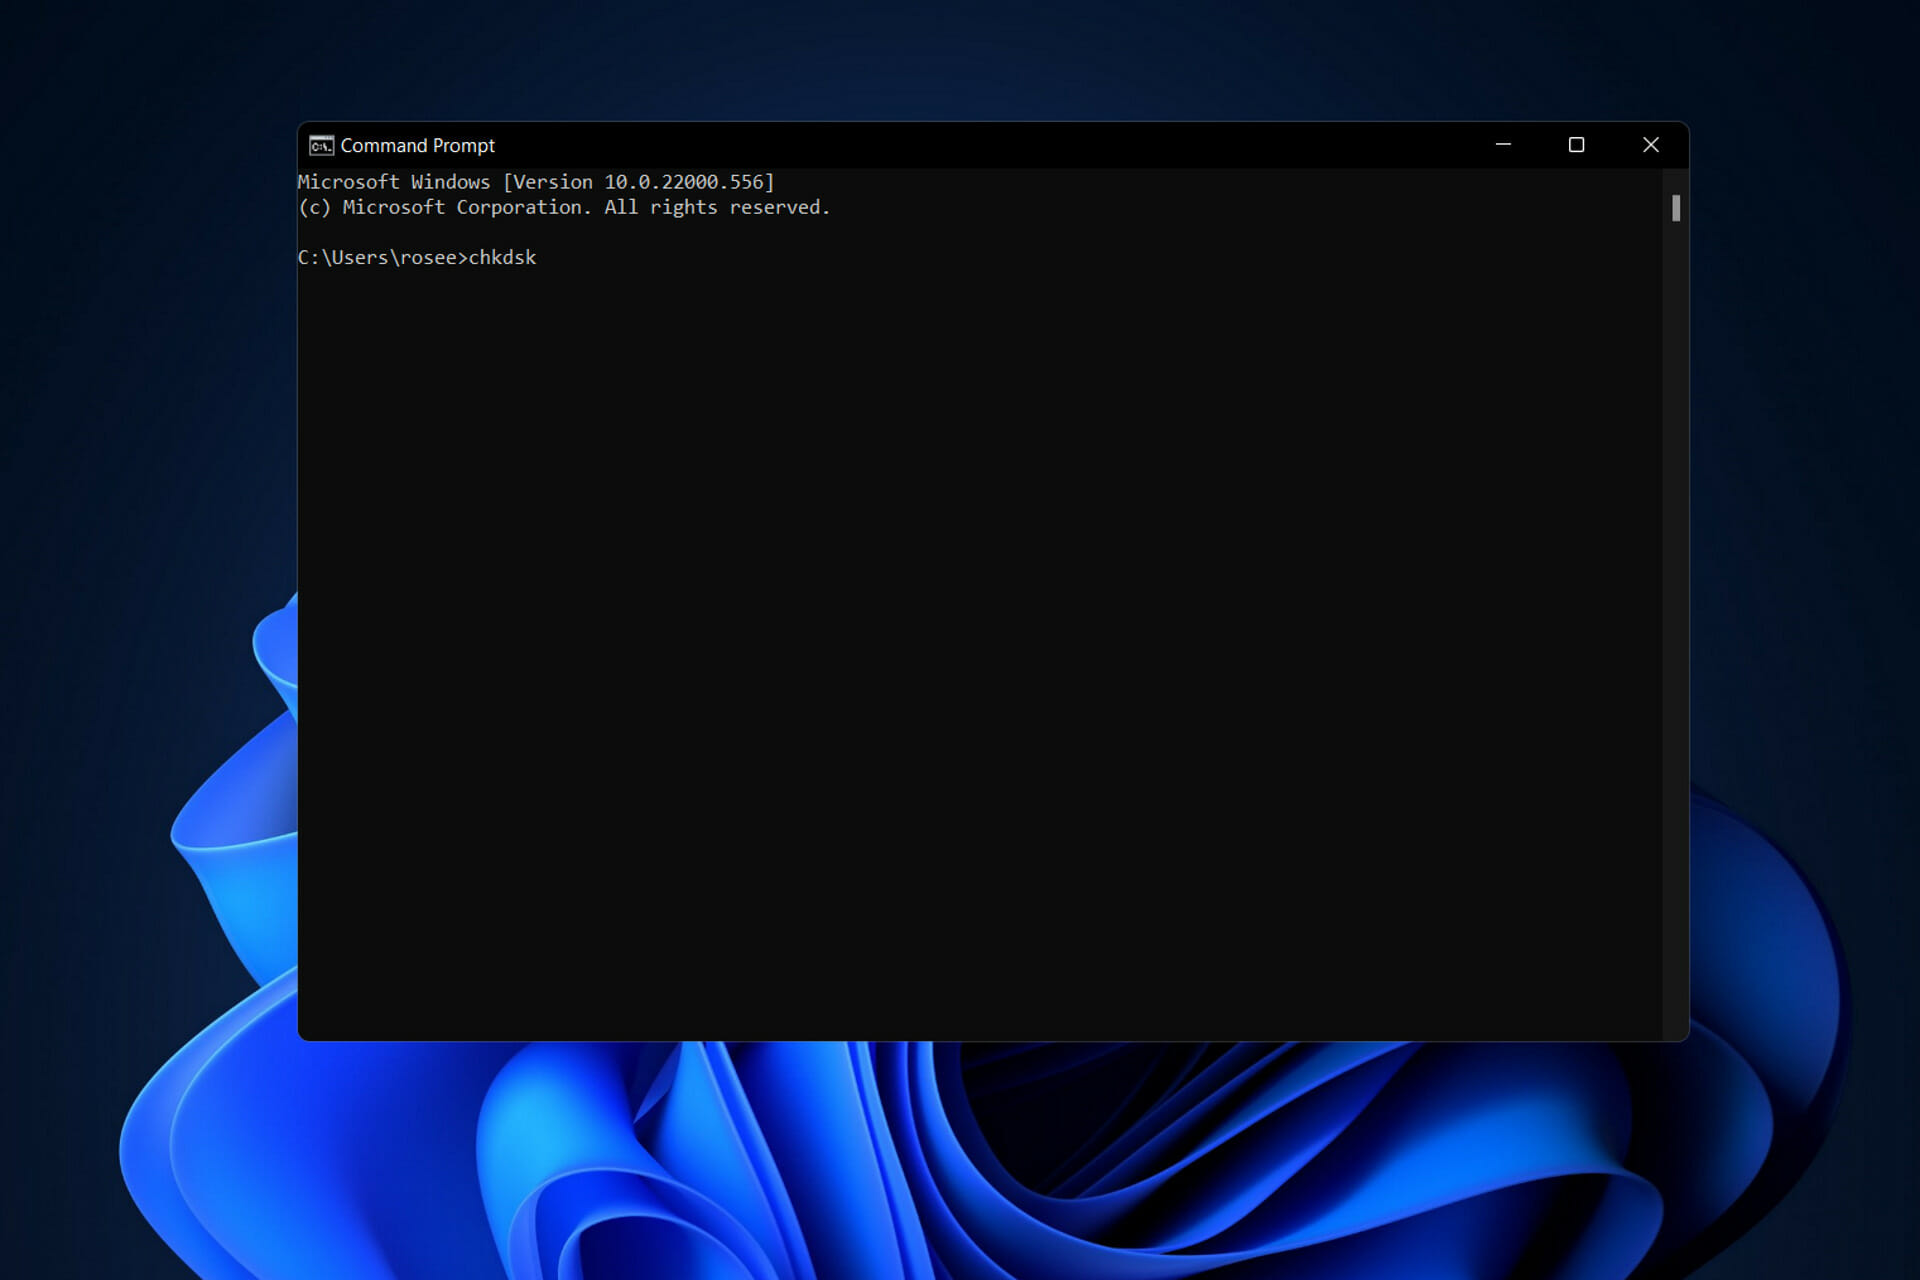
Check Disk, often known as chkdsk, is a critical Windows application used to monitor the health of your hard disks and other storage devices. Thus, you should use this command alone to fix most of the Windows 11 disk errors.
When your hard drives start acting up and you start receiving disk error messages, having the Check Disk program on hand can be beneficial.
Follow along as we will show you how to use the command. right after, we see what it does in more detail and in what forms you can use it. Keep up with us!
What does CHKDSK do?
The command will check minor flaws, such as time stamp misalignment and file size data on the drive, and fix them almost instantly. Larger issues, such as physical errors, will be marked and flagged so that they are not used, and the drive’s software confines the harm.
As a result, your data on the disk will not be compromised, and your hard drive will continue to operate at peak performance and efficiency. When a disk is checked for logical and physical defects, Check Disk examines the integrity of the file system and the information contained inside it.
It will automatically correct logical errors, which are corrupted entries in the disk’s master file table (an important structure that directs the drive on how to order the files).
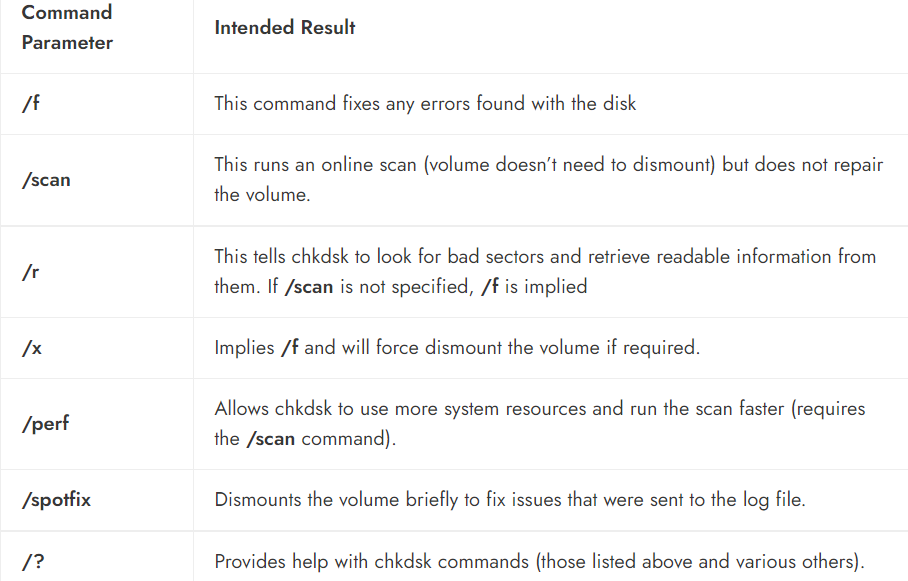
Below, you will find a list with the command parameters that you can use in order to obtain different results:
Even if the Check Disk utility’s operation is not straightforward to comprehend, one does not necessarily need to be familiar with the specifics to know when to use it.
How can I fix any Windows 11 disk error?
1. Run CHKDSK
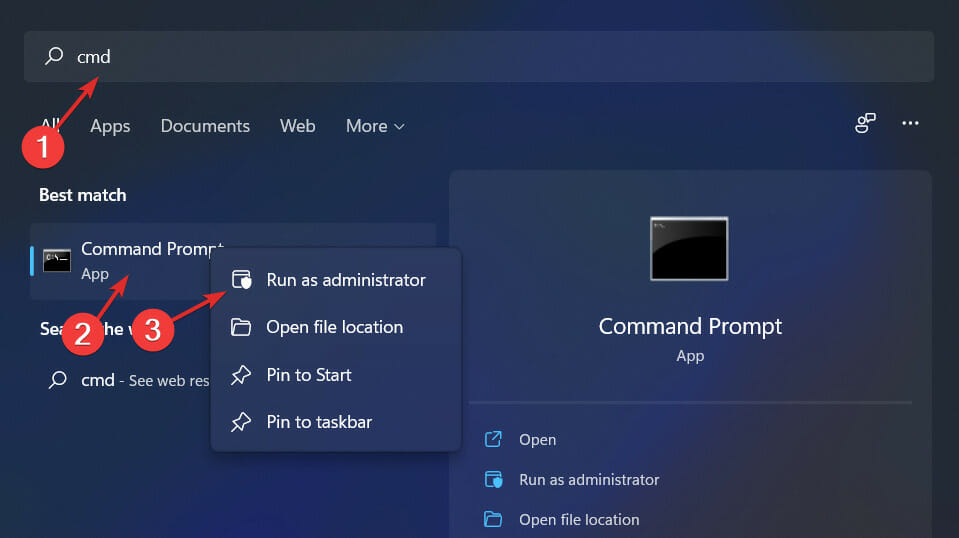
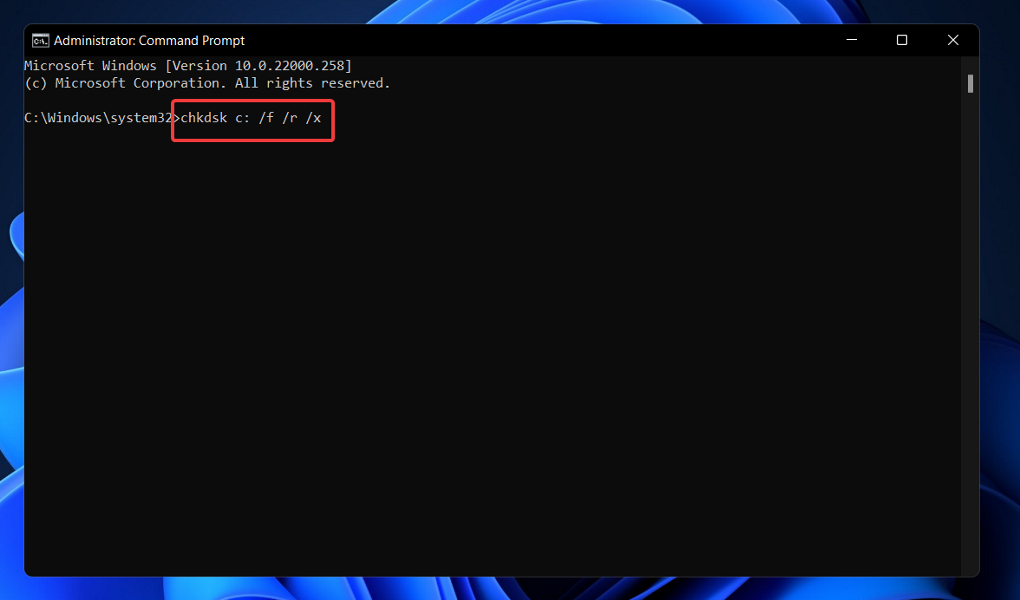
You need to open the Command Prompt by pressing Windows + S and typing cmd inside. Before accessing it, right-click on the top result and choose Run as administrator.
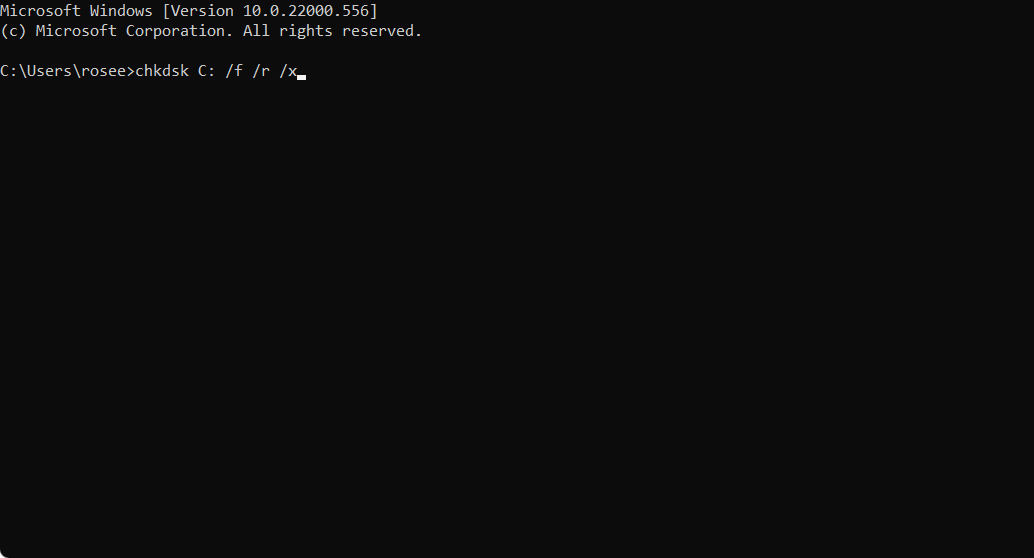
Once Command Prompt opens, type or copy paste in the following command and press Enter to run it: chkdsk C: /f /r /x
Note that you must replace the C with that partition’s name if you want to check another partition. Wait for the process to finish, then restart your computer to apply the changes made.
You can also verify drive health with HD Tune, a tool that checks disk speed and errors, and you can read more about it in our guide on HD Tune software.
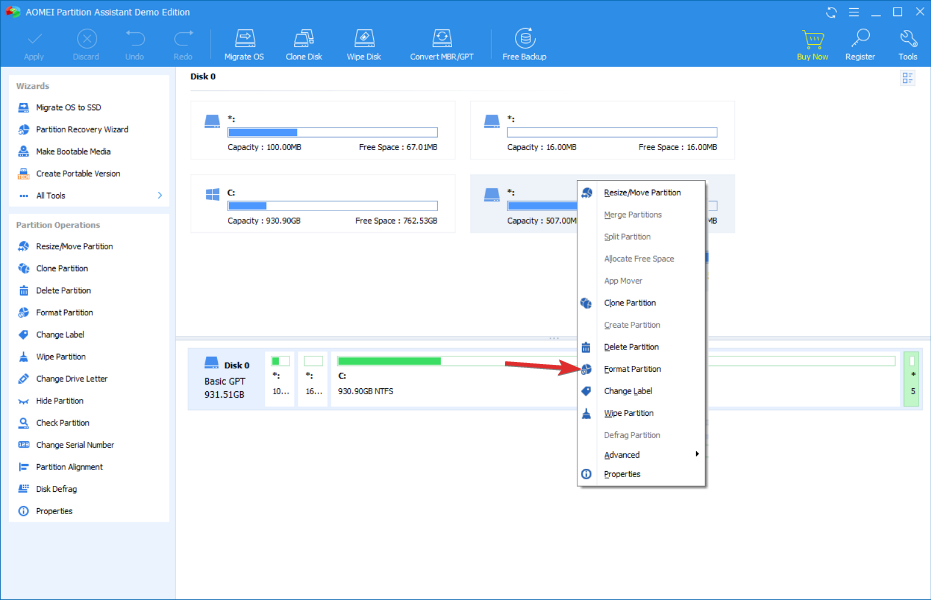
Choose the partition you want to work it, right-click on it, and select Format Partition.
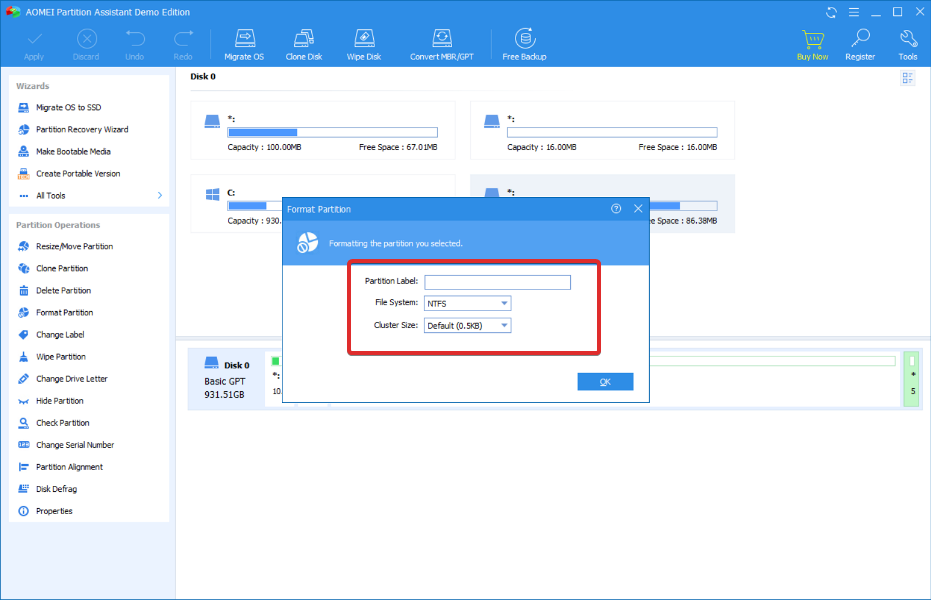
Set the new partition’s label, file system and cluster size, then confirm your choices and hit Proceed.
While the built-in tools in Windows 11 allow you to manage your computer’s partitions, they are difficult to use and it is easy to make a mistake when using them.
When you use a specialized partition manager, such as AOMEI Partition Assistant, you can create and manage your partitions as well as format and delete them, and pretty much do whatever you want with them without having to worry about losing any data.
A common cause of hard drive failure is a problem with a hardware component that is present within the hard disk itself. After more than 50 years of research, hard disk drives are far from being faultless in their performance.
This is due to the read/write heads contacting or gouging into the device’s disks, resulting in damage to the magnetic surfaces of the platters on the device.
Only a few years ago, a problem known as BSY was discovered in a series of drives manufactured by Seagate, which resulted in the failure of these hard disk drives. Firmware corruption, such as this, can cause a disk to become unreadable, resulting in the loss of important data.
A hard disk drive’s components will be severely damaged if the temperature inside the drive is too high. In response to an increase in temperature, disk platters expand and then contract in response to a reduction in temperature.
This can result in a deformed magnetic surface that develops microfractures, which is a serious flaw that inhibits data transmission and storage.
Another cause is power surges, which occur when the power flow is interrupted for a short period and then restarted. It can be induced by various factors, ranging from lightning strikes to power line interruption.
Luckily, we have a great guide on how to fix the Disk read error occurred message, so be sure to check it for quick and easy solutions.
WWE 2K22 is finally out and worldwide gamers can find it on the Steam app and play it on their PCs.
Manufacturers came up with a rebuilt game engine and stunning graphics, providing new heights to this newest game.
Unfortunately, like any other complex game, it is no longer a surprise that WWE 2K22 might run into several annoying issues that will stop you from enjoying a pleasant and smooth experience.
Even if a wide range of gamers provides a positive review on this game, the masterpiece is still in the early stage after its launch. So, developers are still trying to figure out potential issues and how to solve them.
In case you don’t already know, low FPS (frames per second) might occur when your game slows down because it doesn’t have enough power or memory to run it properly.
One of the quickest and most efficient solutions to get rid of this WWE 2K22 issue is to disable the background apps, by following the steps below:
Press simultaneously on the Windows key and I key to open Windows Settings.
Go to Apps, then to Apps & features.
From the right window pane, look for the app you want to disable, then click on the 3-dots menu located next to it, and choose Advanced options.
Then, in the Background apps permissions section, make sure you go for the Never option.
Hit the Windows key, type Device Manager, then open the first result.
Now, expand the Display adapters section, then select the related driver, right-click on it, and choose to Update driver.
Click on Search automatically for drivers.
If any available options are found, you’re going to be notified.
Then, follow the on-screen instructions to complete the process.
This one might be caused due to outdated or corrupted graphic drivers. If that’s the case, then you can fix this problem by updating your drivers.
Of course, by following the steps above you’ll be able to manually update your graphics drivers, but keep in mind that you can also automatically operate the process.
If you choose to run dedicated software, you won’t have to worry about losing your precious time with annoying steps.
The right tool will automatically perform any driver scanning and fixing, regardless of its characteristics.
Outbyte Driver Updater is an incredibly simple but powerful app that will help you keep all your drivers up to date and it will also provide a detailed report of all of your up-to-date and out-of-date device drivers.
Of course, this program will support you in updating not only graphics drivers, but any type you need.
So, feel free to also use it if you ever encounter audio-related issues or other irritating bugs and lags on WWE 2K22, even when the game can not launch.
Keep in mind that you can also use Driver Backup. This is one of Outbyte Driver Updater’s features that will help you fix corrupt installations or if you otherwise wish to roll back to a previous driver.
If you’re interested in discovering more solutions that will help you with the WWE 2k22 black screen issues, make sure you check what to do while facing the black screen when playing games.
As you can see, even if WWE 2K22 is a new one-of-a-kind game, it can still give you headaches. Fortunately, if you carefully apply our recommendations, you’ll surely fix any related issues.
Because your opinion matters to us, make sure you share it by leaving a comment in the section below.
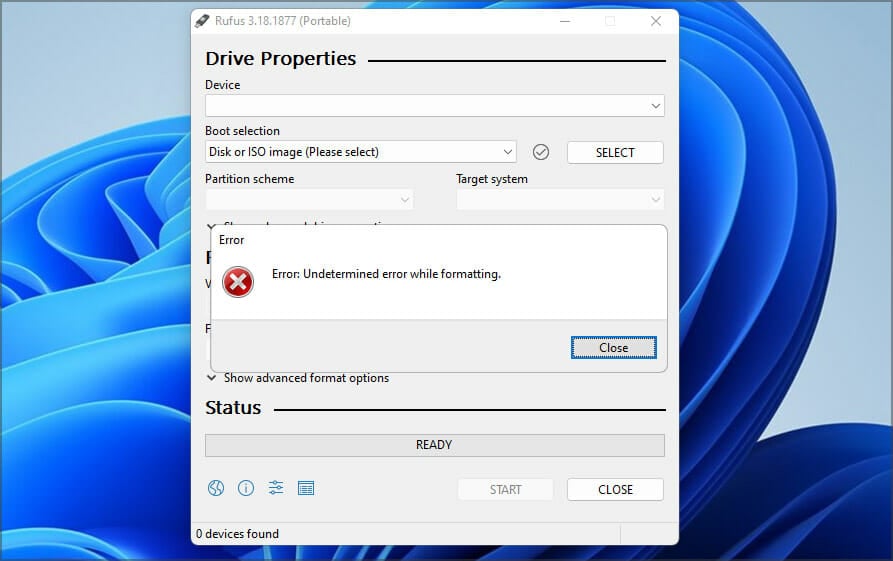
Rufus is a great tool for creating bootable installation media, and many use it to perform a clean install of Windows on their PC. However, many users reported Rufus error on Windows 11.
These errors will prevent you from creating installation media, thus preventing you from installing Windows 11 or any other operating system.
Luckily, fixing these issues is relatively simple, and in today’s guide, we’re going to show you the best methods that you can use to fix this problem.
Why does Undetermined error while formatting in Rufus appears on Windows 11?
There are many reasons for this, and in most cases, it’s just a glitch in the software that causes this problem.
You can fix that by updating the software, or in some cases by switching back to the older version. Many have reported problems with the version from the Windows Store, so you might want to avoid using it.
The software also has a couple of hidden features that you can use that will help you bypass the formatting error with ease.
The developers are familiar with this issue, and they are working hard to fix it, but until the fix is released, you can try using the solutions mentioned in this guide.
How can I fix Rufus error when creating Windows 11 installation media?
Run the software and check if the problem is still there.
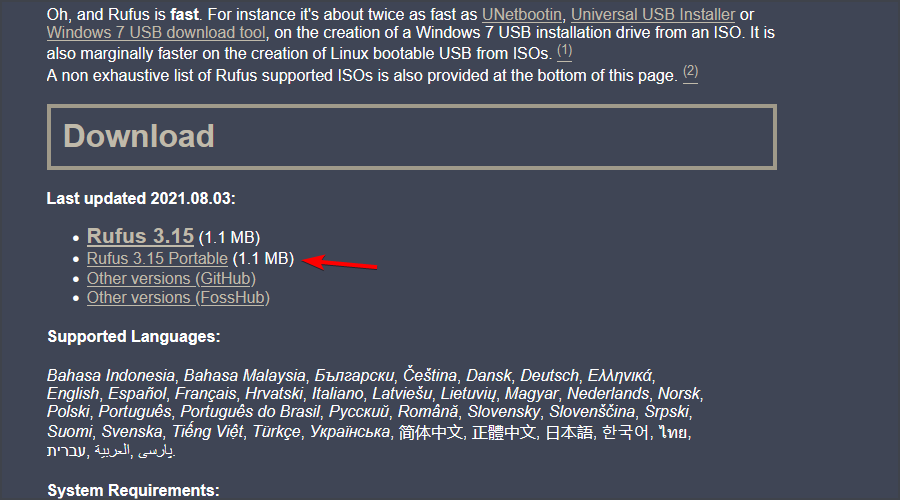
Many users reported issues with the version from the Microsoft Store, but after switching to the Win32 version of the software, the issue was gone, so be sure to try that.
Select the older version of Rufus, such as 3.14 for example.
Wait for the download to finish.
Run the application and try to create the installation media again.
The newest application isn’t always the better, and few users reported that switching to an older version fixed the problem for them, so you might want to try that.
3. Use the shortcuts in Rufus
Start Rufus.
Configure your settings.
Now press Alt + ,. You’ll get a message saying Exclusive USB drive locking disabled.
Now click Start to create your flash drive.
Users also reported using Alt + Z and Alt + V shortcuts, so you might want to try them as well.
4. Close explorer.exe
Start Rufus.
Now press Ctrl + Shift + Esc to open Task Manager.
Navigate to the Details tab. Select explorer.exe and click on End task.
Click on End process to confirm that you want to close the process.
Use Alt + Tab shortcut to get to Rufus and try to create a bootable drive.
Use the same shortcut again to get back to Task Manager. Go to File and select Run new task.
Enter explorer and click on OK.
5. Use diskpart to format your USB drive
NOTE
The following process can cause permanent file loss, so make sure that you select the correct drive to format. If you select the wrong file, you’ll remove all of your files, so use extra caution.
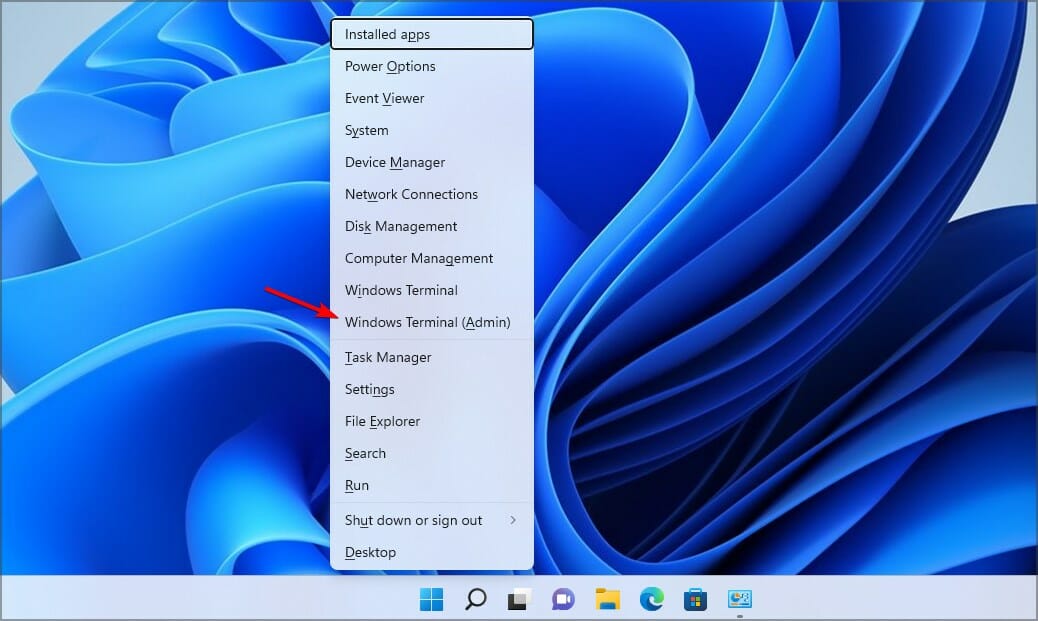
Press Windows key + X and select Windows Terminal (Admin).
Enter run the diskpart command.
Now enter list disk. Locate your USB flash drive. It’s crucial to identify your flash drive correctly or else you can cause permanent file loss.
Enter select disk 1 to select your flash drive. Keep in mind that on our PC the flash drive was assigned to disk 1. On your PC it might be labeled by a different number.
Now run the following commands one by one: clean create partition primary select partition 1 active format fs=FAT32 quick assign exit exit
After doing that, start Rufus and try to create your installation media.
If this method seems too complicated for you, it’s possible to use third-party solutions to achieve similar results.
There are many tools that can do that, but we suggest using Aomei Partition Assistant since it offers great functionality and ease of use.
Does Rufus support Windows 11?
Yes, Rufus works on all versions of Windows, including the latest one, so you can use it without any issues.
Few users have reported issues with Rufus and Windows 11 that prevented them from creating the installation media, but hopefully, you managed to fix them by using the solutions that we mentioned above.
These are just a couple of solutions that you can try if you’re getting a Rufus error on Windows 11 while trying to format your flash drive.
For many of us, the ability to run smartphone apps on a computer has been a long-held dream, and the option to install Amazon Appstore on Windows 11 has made that dream come true.
In the meantime, you might be wondering what it has to do with Amazon Appstore. This service, on the other hand, allows you to install Android apps on Windows 11.
However, this feature is currently only available in the United States, but with this guide, you will be able to use it even if you are not in the U.S.A.
Before we go into how to install Amazon Appstore, don’t hesitate to check out the app’s requirements. So, without further ado, let’s get started.
What are the system requirements for installing Amazon Appstore on a PC?
One of the main reasons for installing the Amazon Appstore is to run Android apps. To be able to do this, your computer must meet the following requirements:
Windows 11
At least 8 GB of RAM
Intel Core i3 8th Gen processor, AMD Ryzen 3000, or Qualcomm Snapdragon
Sign up for the Windows Insider Beta Channel
Enabled Virtualization feature
Country & Region: U.S.
Adding the Amazon App Store and (subsequently running Android apps) is not an easy process, and there are a few changes you need to make.
Once you’ve done that, you can easily add the store to your Windows 11 computer to install Android apps.
How do I install Amazon Appstore on Windows 11 outside U.S.?
1. Join the Windows Insider Program
To get to Settings, first hit the Windows + I key combination.
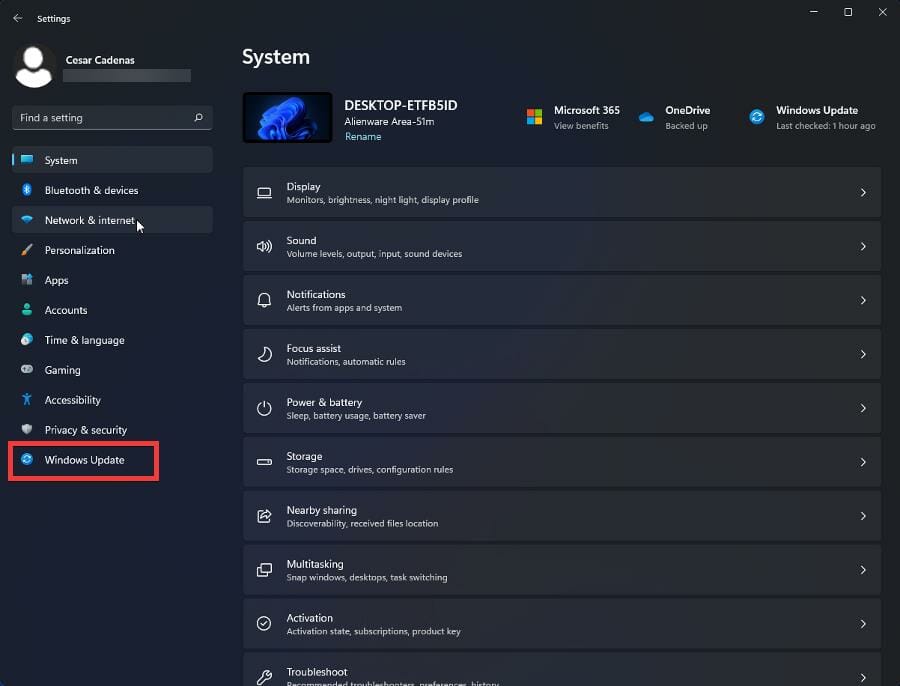
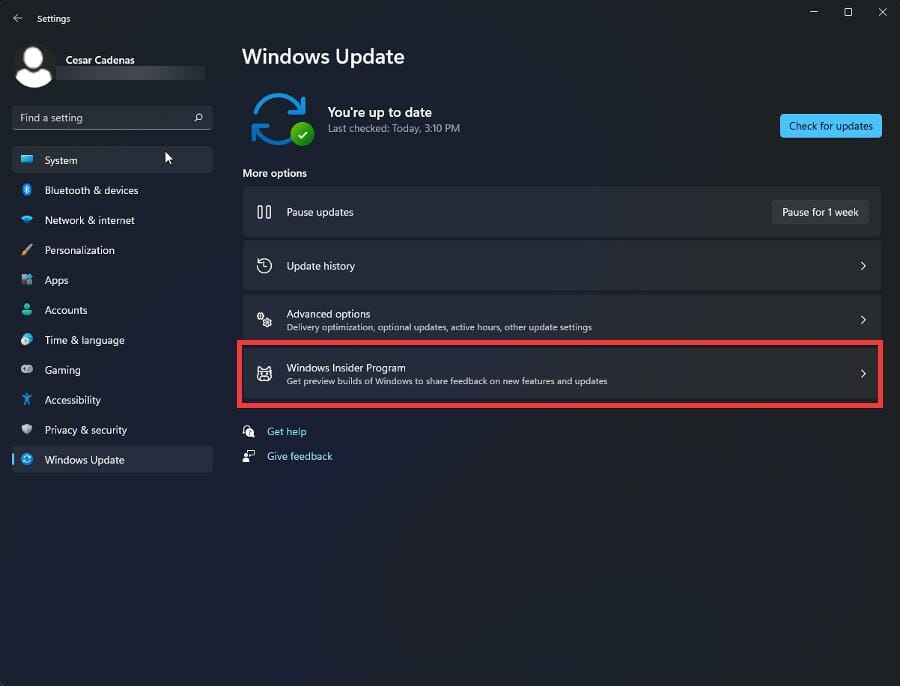
Select Windows Update from the left pane, and then Windows Insider Programfrom the right pane.
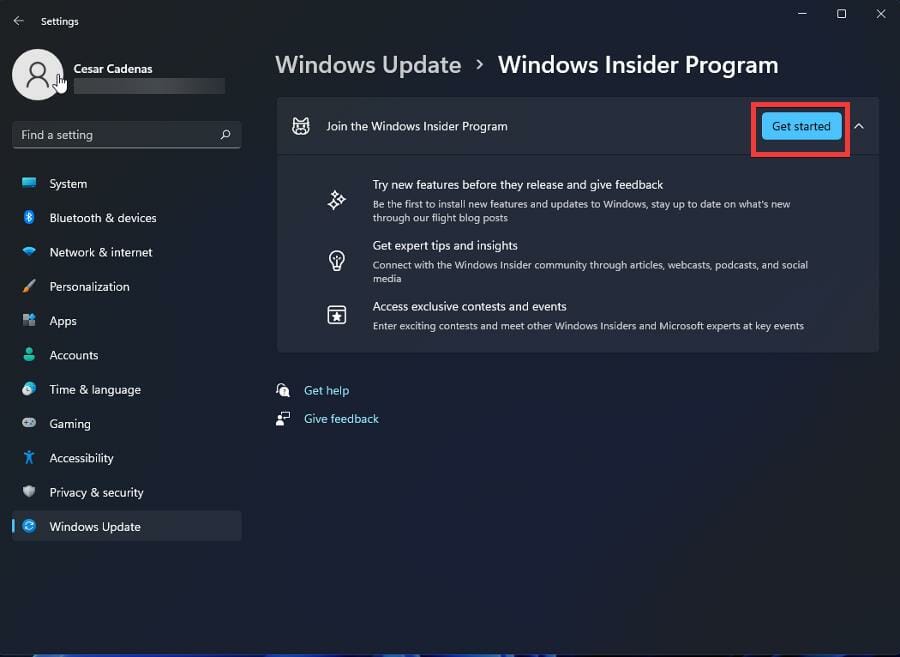
Choose Get Started in the next window.
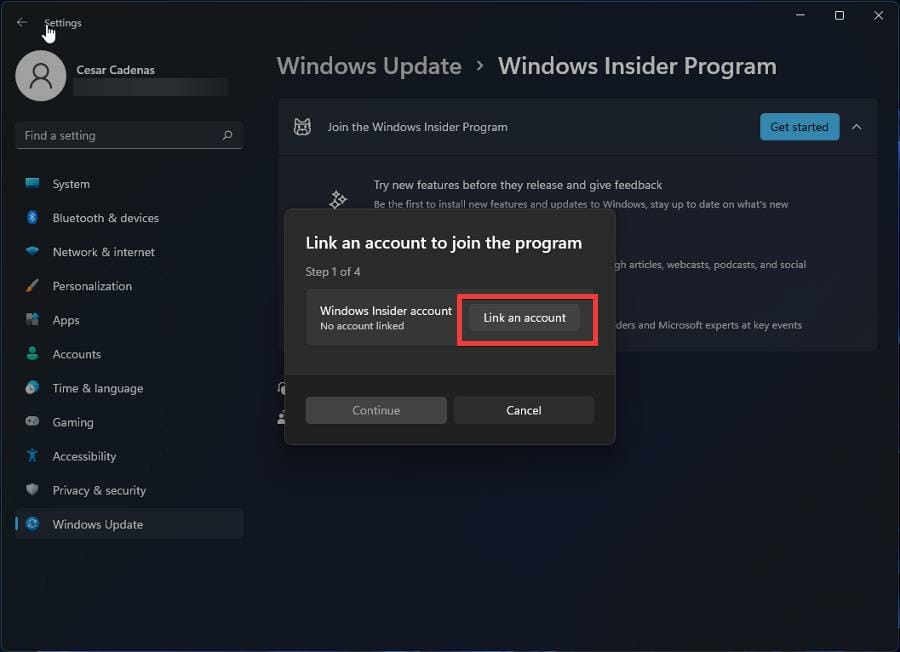
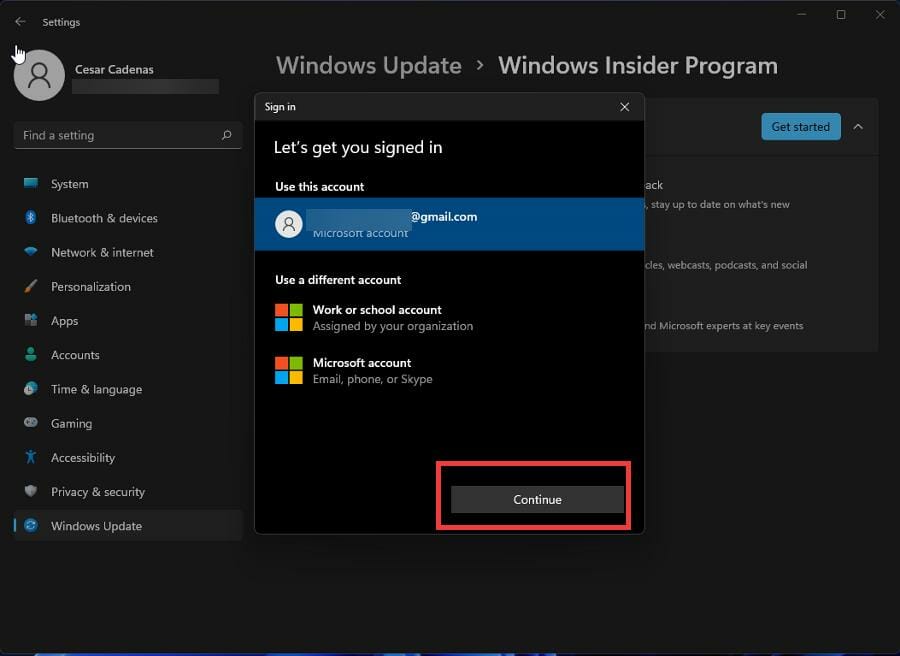
After that, select Link an account. You must register if you do not already have one.
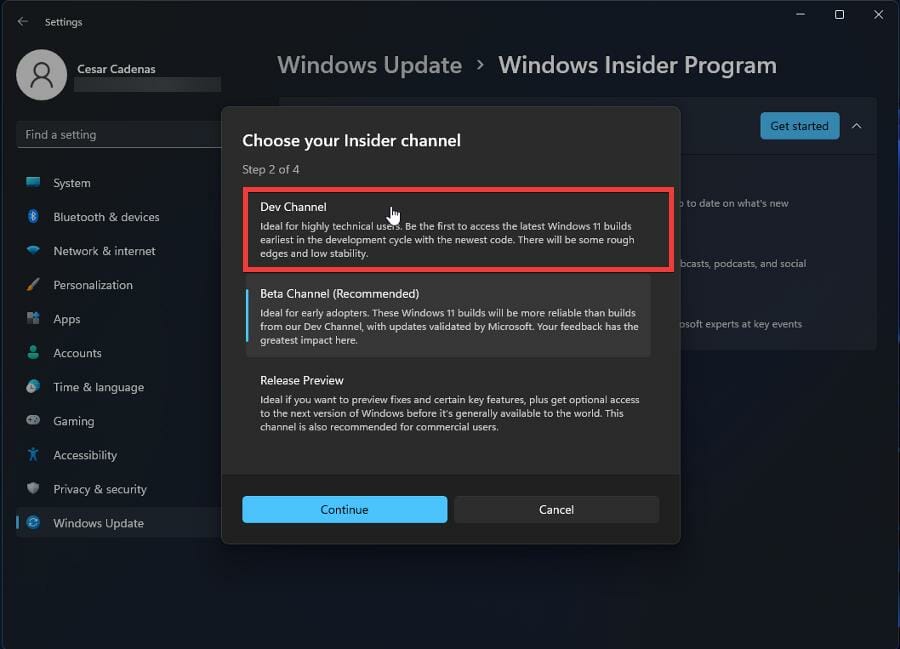
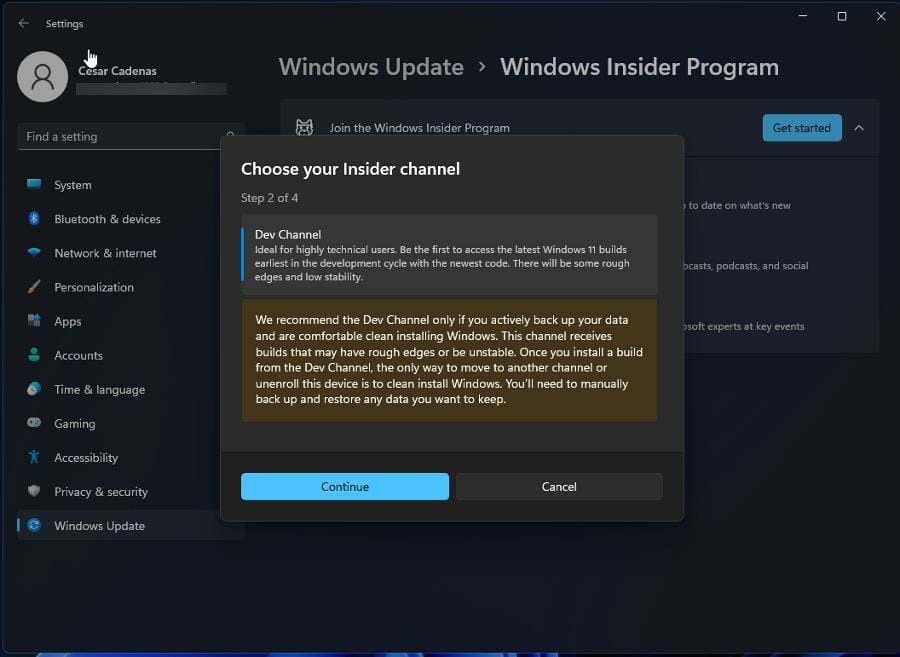
Select Beta Channel and then the Continue option after logging in.
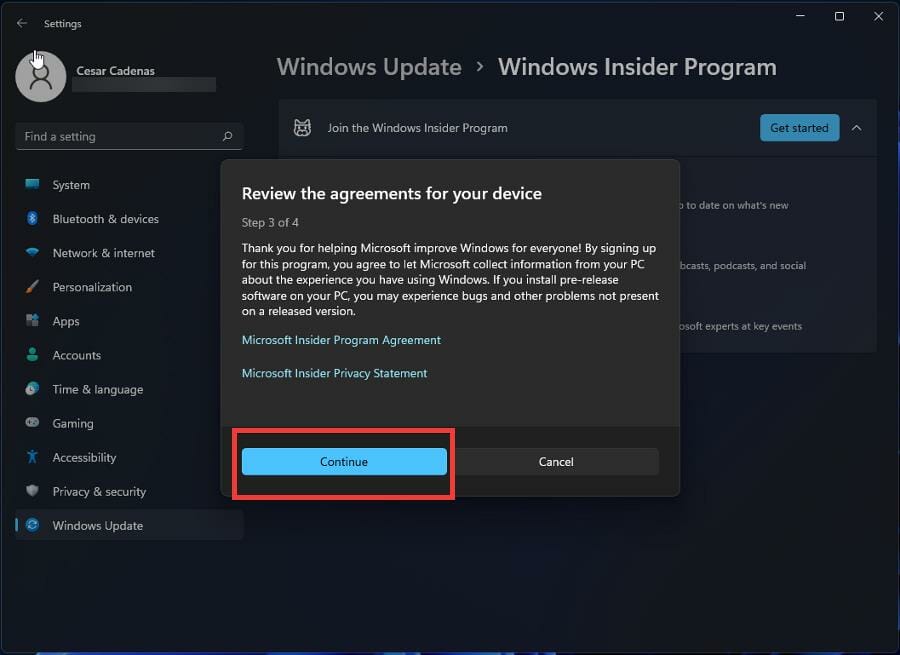
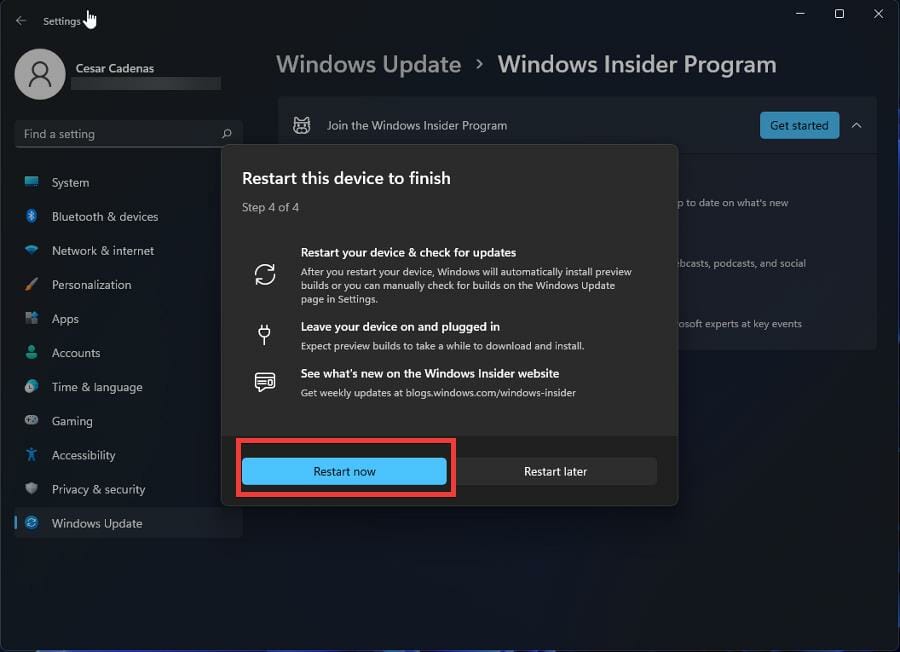
To finish the process of joining the Windows Insider Program, click Restart now in the next step.
The Amazon Appstore is currently only available to Windows Insider beta users. As a result, if you want to install this app store on your computer and use its features, you must register in the beta channel.
2. Enable Virtualization
First, open Start menu then search for Turn Windows features on or off and hit Enter.
In this section, enable the Virtual Machine Platform feature and then click OK.
Next, Restart your computer.
By following these steps, the Virtual Machine Platform lets you create or run virtual machines on your Windows operating system.
3. Change the region to United States
Using the Windows + I key combination, go to Settings.
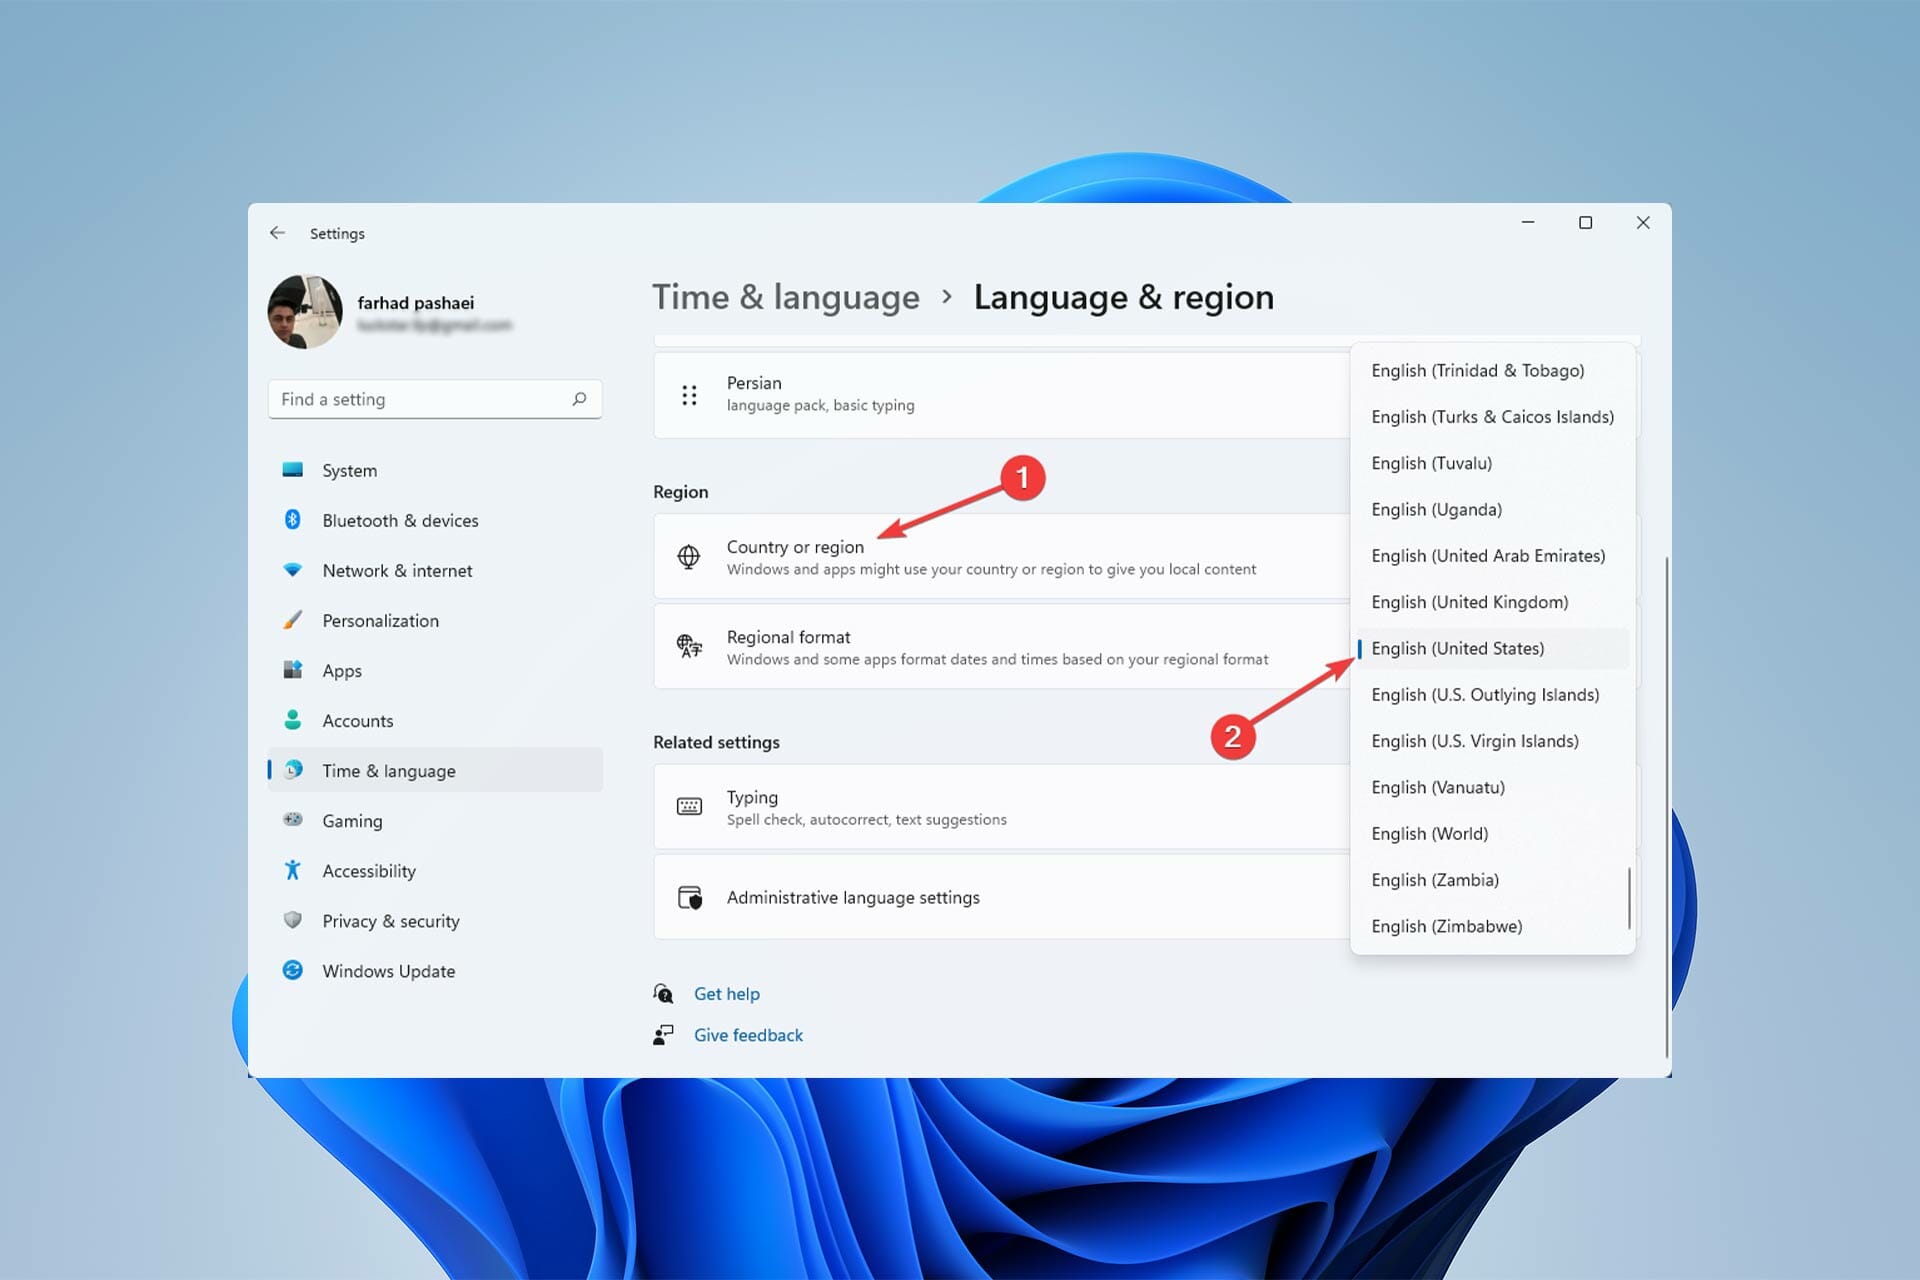
From the left panel, choose Time & language, then Language & region from the right menu.
Select the United States from the drop-down menu by clicking on Country & Region option.
Now restart your computer to apply the changes.
As mentioned earlier, this app is only available for devices in the United States. As a result, you must change the region of your computer to the United States.
After changing your computer’s location, it’s time to change your IP address as well, as failing to do so would prevent you from creating a U.S based Amazon account.
For this, we recommend PIA (Private Internet Access), a secure and user-friendly VPN. It’s as simple as downloading their app and purchasing a subscription, then you’re good to go with an unrestricted internet connection.
Aside from the ability to access the Internet without restriction, it offers MACE features that are capable of blocking advertisements, trackers, and dangerous websites at the DNS level.
Furthermore, PIA encrypts your data using trusted, open-source VPN protocols such as OpenVPN and WireGuard to keep it safe.
Select Open Microsoft Store from the pop-up menu that appears.
Click the Install button under Windows Subsystem for Android with Amazon Appstore in the Microsoft Store.
To download and install it, follow the on-screen instructions.
It is critical to have Windows Subsystem for Android installed on your Windows 11 computer in order to run Android apps available in Amazon Appstore.
Unfortunately, for some users, WSA is not working on Windows 11, but you can still enjoy Android games by using a dedicated emulator like LD Player.
There are many Android emulators out there but this one will definitely improve your gaming experience and allows you to open more games simultaneously.
You’ll be prompted to Open the Amazon Appstore after downloading the Windows Subsystem for Android and Amazon Appstore. Click on it.
Select United States then click Continue.
Sign in if you already have an Amazon account; if not, choose Create a new Amazon account.
You can now install Android apps on your Windows 11 computer.
You can use the search bar at the top to search for your favorite apps. Then, to download the apps, simply click the Get button under them.
Is there a parental control feature in the Amazon Appstore?
Open Amazon Appstore.
Toggle on Parental Controls after clicking on Settings.
Amazon, like all other app stores, has parental controls. When this feature is activated, you will be needed to enter your Amazon password or a pin to purchase in-app items.
By installing the Amazon Appstore on your computer, you can run Android apps on Windows 11.
This feature gives you many capabilities, and you may install your favorite apps on your computer simply by clicking the Get button under the app’s name.
Amazon Coins can be used to buy eligible apps, games, and in-app purchases from the Amazon Appstore. These coins are virtual currency with a value of $0.01 per coin.
An activation error can be tricky, since it outright claims a perfectly valid license key to be invalid, and prevents you from activating the installed version of Windows. One such is the 0xc004f050 activation error in Windows 11 which most often happens when users try to upgrade from Windows 11 Home to Pro edition.
In this case, most users go ahead and purchase another licensed version of the OS. But, that shouldn’t be your first approach, rather there are a few quick troubleshooting methods that could get things up and running.
And in the following sections, we will walk you through both the underlying causes and the most effective fixes for the Windows 11 activation error 0xc004f050.
Why am I encountering the Windows 11 activation error 0xc004f050?
There could be several reasons behind you encountering this activation error in Windows 11. But most often than not, it’s an incorrect key or issues with the server to be blamed.
Also, if the key with you is for a different edition than the one installed on your PC, you would receive an error. For instance, you can’t use a Windows 11 Home key to activate Windows 11 Pro edition.
Besides, if you clean installed Windows 11 using a USB, it too could lead to issues and the key for the previous iteration might not work.
The activation error can also be encountered if you have made major changes to the hardware, such as upgrading the motherboard.
Now that you have a basic understanding of the underlying causes, let’s head to the fixes for Windows 11 activation error 0xc004f050.
How do I fix the Windows 11 activation error 0xc004f050?
1. Check if the Windows 11 license key is correct
As already mentioned earlier, an incorrect license key is most likely to cause the Windows 11 activation error 0xc004f050. So, verify that the key you are entering matches the one provided to you.
Enter correct key Windows license key
Once done, check if the error is fixed. In case it persists, head to the next method.
2. Wait for a day or two and then try activating Windows 11
It’s also likely that the Microsoft servers are down or undergoing maintenance, and as a result, you are encountering the Windows 11 activation error 0xc004f050.
In this case, it’s recommended that you keep trying for a day or two and check if you are able to activate Windows 11. If the error doesn’t seem to go away after two days, the issue lies elsewhere and the other fixes here should work.
The methods listed here might be tricky for many and would consume a lot of time and effort, first to identify the problem and subsequently eliminate it. But, you can use third-party software to get things up and running in no time.
We recommend using a specialized repair tool that identifies and removes almost every error known to us. Apart from that, it will also replace missing DLL or system files. Once you have it installed, encountering errors will be a thing of the past.
4. Run the Windows Activation troubleshooter
Press Windows + I to launch the Settings app, and click on Activation on the right in the System tab.
Now, click on the Activation state entry.
If Windows 11 is not yet activated, you will find an option to run the troubleshooter. Click on it and follow the on-screen intructions to complete the process.
5. Activate Windows 11 using Command Prompt
Press Windows + S to launch the Search menu, enter Windows Terminal in the text field at the top, and click on the relevant search result that appears.
Now, click on the downward-facing arrow and select Command Prompt from the list of options. Alternatively, you can hit Ctrl + Shift + 2 to launch Command Prompt in a new tab.
Paste the following command and hit Enter, while replacing the X’s here with the actual license key at your disposal:slmgr.vbs /ipk XXXXX - XXXXX - XXXXX - XXXXX - XXXXX
Once done, restart the computer for the changes to come into effect.
The command will try to activate the OS and eliminate the Windows 11 activation error 0xc004f050.
6. Reinstall Windows 10 and then upgrade via Windows Update
If you did a clean install of Windows 11 using a bootable USB, it could lead to issues while activating the OS.
If that’s the case, the simplest fix is to reinstall Windows 10, check for an update for Windows 11, and download it. This way, you wouldn’t have to manually activate the OS, and it would be done automatically.
Since the latest iteration is a free upgrade for those running Windows 10 on compatible systems, taking the Windows Update route should eliminate the Windows 11 activation error 0xc004f050.
What are the other activation errors that I may encounter in Windows 11?
Apart from the one we discussed here, there are a bunch of other activation errors that you might encounter in the latest iteration. And, a proper understanding of each is imperative for the best experience.
Most of the modern-day consoles connect over the IPv4 or IPv6 internet connection to provide you with all the internet content.
However, according to Microsoft, to experience the best possible Xbox One gaming, you should connect your console to an IPv6 internet connection.
Xbox One natively supports IPv6 connections. So, you do not need to attach an external device or upgrade it, in order to use the latest IPv6.
But the major problem comes in finding the ISP that supports the IPv6 connection. Using an IPv6 connection ensures that the user experiences less latency when playing multiplayer games, and your internet traffic is much safer and protected.
All this may sound good, but not many know how to connect Xbox One to IPv6. There are not one or two, but several queries by Xbox One users regarding how can they connect their console to IPv6.
If you are one of them and are also looking for solutions to know how to connect Xbox One to IPv6, then you are in the right place.
Because in this guide, we will give you all the information that you will need to know how to connect Xbox One to IPv6. Let us check it out.
What is IPv6 and what are its advantages? How it is better than IPv4?
IPv6 is the latest version of the internet address and the successor to the IPv4. The main advantage of using IPv6 over IPv4 is that the latter only allows for a limited number of addresses. Because it is a 32-bit IP address number.
On the other hand, IPv6 is a 128-bit address number allowing for such a huge number of IP addresses that we would ever need.
IPv6 is the most recent version of the IP address, that allows for smooth, uninterrupted, and faster internet connectivity.
Here is a list that shows the advantages and features of using IPv6 over IPv4:
IPv6 is a 128-bit IP adress that allows for a huge number of IP addresses over IPv4, which is a 32-bit IP address.
The IPv4 uses the numeric addressing method whereas the IPv6 uses alphanumeric addressing method, allowing more gazzilion IP addresses.
IPv6 uses better security measures than IPv4.
IPv6 has a simpler and efficient multitask routing.
IPv6 allows for easier file sharing.
IPv6 is self-sufficient and it does not require NAT (Network Address Translation) as required by IPv4 as IPv6 has enough IP addresses.
IPv6 has 8 header fields as oppose to the 12 header fields in IPv4, alowing for better performance.
How can I connect Xbox One to IPv6 Wi-Fi internet connection?
1. How to check IP connection on Xbox One
Press the Xbox button on your controller.
Select System.
Choose Settings.
Under General, click on Network settings.
Here you will see all the details about your network settings, along with the information on whether you are connected to an IPv4 or IPv6 connection.
Now, conversion of IPv4 to IPv6 cannot be done on the Xbox One console. For that, you need to check in with your ISP if they provide an IPv6 connection or not.
If not, then you need to switch over to an ISP that offers a complete IPv6 connection in your area. This could be a difficult task, but it isn’t impossible.
Once you get an ISP with IPv6 support, you need to follow the below section to understand how you can IPv6 internet connection on your Wi-Fi router.
2. How to change IPv4 to IPv6 on your router
Type the below address on a web browser.https://www.routerlogin.net or https://www.routerlogin.com. (The access address would be different if you have a different Netgear router.)
Enter the username as admin, and password as password. It will be labelled on the sticker below your router.
Go to Advanced tab on top.
Select IPv6 from the left side pane.
Enable the IPv6 toggle.
Fill in the information as suggested by your ISP for different connection types. Below are the connection types you will be offered. – Static IP – Dynamic IP (SLAAC/DHCPv6) – PPPoE – 6to4 Tunnel – Pass-Through (Bridge)
Configure the LAN ports.
Click on Status to check if your IPv6 connection is working properly or not.
Hit Save and exit the browser.
Here, you don’t need to define the DNS servers. Because your router uses the same DNS server as the one used with the IPv4 internet connection.
Moreover, the above steps have been shown for the TP-Link router. However, the steps may be different for routers of different brands.
This is just to give you an idea, how you can change your router’s internet connection from IPv4 to IPv6, if your ISP supports it.
3. How to change IPv4 to IPv6 on Xbox One
Press the Xbox button on your controller.
Scroll to the right and select System.
Choose Settings.
Under General, click on Network settings.
Select Advanced settings.
Configure your router as mentioned in the above-method.
Under the IP settings, select Edit.
Change the configuration type to Manual.
Fill in the details and exit.
Will IPv6 improve my gaming experience on Xbox One?
We have already discussed how IPv6 helps in improving the overall network connectivity for your Xbox One console.
However, there might still be some burning questions in your minds whether to opt for IPv6 or not.
Well, IPv6 does not require NAT, as it natively supports gazillion IP addresses. So, this not only reduces the latency while playing games, but you will be able to play for an extended period of time.
Microsoft itself recommends using IPv6 internet connection to enjoy the best possible gaming on Xbox One.
There are few key points to note regarding IPv6 as well. Since, IPv4 has been in existence for long, it is a bit mature and handles internet connection a bit better (in the current scenario) than the IPv6 connection.
IPv6 will become more faster and stable over time. So, it really depends on the ISP and its reliability and coverage in your area.
Let us know in the comments below if this guide helped you to answer your query on how to connect Xbox One to IPv6 Wi-Fi internet connection.
The Steam Deck just got a little more useful for those who own it. While it recently became possible to run Windows on the hand-held gaming machine, it is now also possible to enjoy Xbox Cloud Gaming using the device’s native controllers. (via The Verge.)
To accomplish the task, Microsoft worked with Valve, as it wasn’t previously possible to use the Steam Deck’s controllers with Xbox Cloud Gaming. Gamers previously had to use an external controller to get it working right. Now, through a new Beta Linux version of Microsoft Edge, support for the controllers was added, per Catherine Gluckstein, who is the head of product and strategy and Xbox Cloud Gaming at Microsoft.
If you’re hoping to try this out on your Steam Deck, you’ll need to head to the Discover Software Center part of SteamOS. A support page for the matter is available from Microsoft, and it’s just a short simple process of creating a shortcut, though some might not find it as easy.
Things are definitely looking good for enjoying Xbox titles on the Steam Deck, as you could have already played Xbox Game Studio titles on the device through the Steam Store. And, though it didn’t confirm anything, Valve’s CEO recently hinted at the possibility of Xbox Game Pass on the device as well.
Since the release of Windows 11, many users have upgraded from older Windows editions. Sadly, not every upgrade to Windows 11 will be successful. The Windows 11 second boot error is one of the few errors you may encounter.
In this article, you should learn what steps to take to fix a second boot error and precautions to ensure a smooth upgrade from Windows 10 to 11.
How can I avoid a windows error in second boot?
It is recommended that only PCs that meet the minimum Windows 11 installation requirements are upgraded. If your computer does not fall under this category, it becomes more likely to encounter errors during the process.
Additionally, if an ineligible PC is successfully upgraded to windows 11, there are chances that it will begin to malfunction somewhere during use.
To avoid any of these scenarios, you should download and run the PC health check app before a Windows 11 upgrade. This tool checks your PC for core components compatible with Windows 11.
Recommended solutions for Windows 11 error in second boot
1. Check and clean the drive
1.1 Check the drive space
Open Windows File Explorer by selecting the folder on the taskbar.
On the left pane of the file explorer, select My PC, then check the installation drive (the one with a Windows logo) on the right pane of the file explorer. If it needs cleaning proceed to step 1.2.
1.2 Clean the drive
Click on the start menu, type Disk Cleanup, and select the app that displays in the right pane.
Select the drive to be cleaned from the disk clean up pop up.
Under the description section, select the Clean up system files option.
Repeat step 2.
In the disk cleanup for windows pop up, check any files you want to delete and hit the OK button.
2. Restart the PC and check for updates
Restart your computer because some updates may need a restart to take effect. If no updates are installed during the restart, proceed to check for updates with the next steps.
Open the settings app by clicking on the start menu and selecting the Settings icon.
Select the update and security option at the bottom.
On the left pane of the settings window, select Windows Update, then Check for updates on the right pane and finally click on Download and install.
Restart your PC.
3. Update drivers with third-party software
Out of date drivers can trigger several errors while updating to Windows 11. Drivers can be updated using Windows Device Manager, however, you may have to update them one at a time. This is a long tedious process.
Third-party apps like DriveFix can be used to automatically update your drivers at once before proceeding to upgrade to Windows 11.
After installing the DriveFix application, it will automatically scan for out-of-date drivers. These drivers will be updated and it will display an updated status on the right pane in front of every driver.
You should then restart the computer and start the Windows 11 upgrade process afresh.
All connected, non-essential external devices should be unplugged. These could include external hard drives, USB drives, headphones, printers, mics, etc.
If your computer is connected to a docking station, undock it. Once every non-essential hardware is unplugged, restart the system and try again.
Open the command prompt with admin rights by searching for command prompt in the start menu and selecting the option to run as administrator.
Run a hard drive scan by pasting this code in the command prompt and hitting enter: chkdsk/f C
When the scan completes run a SFC scan by pasting this code in the command prompt and hitting enter: sfc /scannow
After the scan has execute, run a DISM scan by pasting this code in the command prompt and hitting enter: DISM.exe /Online /Cleanup-image /RestoreHealth
6. Deactivate any third-party antivirus
If you use a third-party antivirus, click on the start menu and type the name, then select the unistall option.
In the control panel, click the name of the antivirus and select the uninstall option.
after the process completes, restart your PC.
These steps should help you fix the second boot error. Let me know in the comments which of the processes resolved your error problem.
Want to make a banner, a short TikTok, a clickable digital leaflet, a cool video, or something of the sort? Take a look at our list of graphic design software below.
We found ad design tools that work for all types of marketing projects.
TLDR: Here’s a quick look at them (more details below):
Adobe Creative Cloud Express – Create sophisticated digital art, graphics, and ad designs. Ideal for those with a strong background in design
Adobe InDesign – For creating flyers, brochures, magazines, newspapers, and books. Perfect if you need advanced layout and typography tools for print and digital media.
CorelDRAW – vector graphic design software perfect for creating detailed illustrations, logos, and ads.
Fotor: Online photo editing tool that provides easy-to-use features for enhancing photos, creating collages, and designing graphics. Ideal for users looking for quick photo edits and basic design functionalities.
Canva: An easy-to-use, web-based design tool with a drag-and-drop interface, perfect for creating simple ad designs quickly. Great for beginners.
And if you want more details:
Software to trust for your digital ad design project
No matter how confusing your brief is, you’ll find the perfect design tool below:
Adobe now offers an online image and video editing tool which is free to use.
The premium version comes with Lightroom CC and Photoshop CC subscription along with additional features that are only available for premium users.
Registration is required but easy to get started. Begin with selecting a video or image template. If you pick the video template, select the video type from the library.
Begin with selecting the layout like full screen or split screen, select a theme, size, and add music. Drag and drop an image onto the editor or upload a video to start creating the story.
For images and videos, multiple slides can be created. You can adjust the duration for each slide from 1 sec to 30 seconds using the slider. The slides can graphics can be downloaded to the local drive or shared using a link.
Adobe Creative Cloud Express is a unique project and is an excellent tool for social media and email campaigns or even outdoor marketing.
Adobe Creative Cloud Express
This all-rounded solution offers an amazing tool for creating email and social media campaigns so try it now!
When it comes to advertisement, good design is crucial to boost brand awareness, and what tool can be better at it than the industry-leading layout and page design software for print and digital media?
Adobe InDesign is an ad creation software that has a clear focus on digital publications and the most complete toolkit to help you achieve the spectacular results you want to associate with your brand.
But you can just as easily apply its magic touch to more traditional advertising materials such as flyers, brochures, posters, and a lot more.
In fact, there is pretty much nothing you cannot do with this amazing all-in-one creative suite that delivers immersive design experiences in any format.
From eBooks, interactive PDFs to slideshows and animations – you name it, InDesign can make it happen.
Adobe InDesign
Master digital advertising in the most creative way with the best layout and page design software for digital media!
Would it make as utterly puerile to say that CorelDraw and graphic design equal love?
Well, as prosaic as it may seem, some things are simply better when left unaltered and we truly believe that when it comes to design, there can be no better contender than the award-winning graphics suite from CorelDraw.
With professional vector illustration, layout, and photo-editing tools at your fingertips, you can easily transform any idea into a captivating ad that captures the very essence of your brand’s principles and spares no efforts to convey the message as such to your target audience.
The best part is yet to come, though! This graphic design software is also highly-focused on performance, productivity, and collaboration.
Hence, it made a mission from delivering the ultimate tools to enable you to accelerate your workflows and connect, share concepts, and exchange reviews with colleagues and clients directly in the Cloud.
CorelDraw
Harness the powers of vector illustration to create compelling ads for your brand in less time and with less effort!
Whether you want to edit a photo, make a collage, or create a design, Fotor is an HTML5 powered online tool offering all the essential features to create stunning digital ad banners in a few clicks.
Fotor comes in both basic and pro plans with obvious limitations on the basic plan. If you want to take it offline, it is available for Windows computers and smartphones as well.
Fotor offers multiple templates sizes, a rich text editor, color correction tools, photo effects, and portrait retouching options to name a few.
You can select from professional templates for creating a Facebook cover or photo cards or even YouTube banner ads.
The user interface is intuitive, and all the tools are easily accessible from the menu. You can import images from the local drive or Dropbox / Facebook and save it to your local drive.
If you are looking for something practical yet straightforward, give Fotor basic plan a try as you can upgrade to the premium plans for more features.
Fotor
If you’re looking for an easy way of getting awesome results, Fotor is the right tool for you!
Canva is a well-known online image editor, and over the years the company has added several features to the tool one of which is the ability to invite team members for collaboration.
Sign-up is required but easy. Begin with selecting a Web banner for design type and then select the type of web banner like Facebook Ad or email header, leaderboard ad, etc.
So if you ever wondered how to create digital ads, Canva is the best tool to get you started with creating exquisite and relevant visuals.
Select one of the pre-made templates and start customizing with elements that include photos, grids, shapes, and charts, add text, change the background and even add your own pictures through the upload option.
Canva has sufficient features to help you create a visually stunning digital ad for your company or client.
However, the free version is severely limited, and you would be better off using the pro version for professional work. The Pro plan comes with a 30-days free trial in case you are unsure about its use.
Ideas for creating effective digital art that sells
We asked our more visual-oriented colleagues how they do their magic. And they warned us: There’s no perfect recipe! Ok, we get it.
But if you need some inspiration, here’s what we gathered:
Check the following phases to create and implement a marketing digital ad campaign:
Set marketing goals or SMART (Specific, Measurable, Attainable, Realistic, Timely) objectives
Create a realistic budget
Do market research to know your public
Establish your targeted personas
Add a clear and persuasive call to action
In addition, you should be aware of different metrics that will make your digital ad shine. For instance, in case your goal is to get more traffic then you should focus on clicks, calculating CPC indicator.
NOTE
If you reach for more brand awareness, you have to invest in impressions by making your ad easy to be recognized.
If you are not already in the same boat as other businesses, it is time you make a move. How? By taking your business online.
We’d start with a website.
But TikTok or Instagram may work better for you. Regardless, the software options in this article work on all mediums.
Don’t forget:a picture is worth a thousand words only when it is captured right.
Have you used any of these tools before? Do let us know your experience with the software to create digital ads in the comments section below.
Lost Ark is beyond any doubt one of the most popular games of 2022, even if it goes head to head against some pretty tough contenders, like Elden Ring, or Horizon Forbidden West.
Even so, players have had just enough of all the errors, crashes, and other issues that have plagued the game ever since it became available.
But could it get even weirder than this? The answer is yes, unfortunately, as players reported Lost Ark unexpectedly uninstalling due to insufficient disk space.
What’s even stranger is that trying to install again will result in a Not enough disk space error, because Lost Ark is installed.
We’re here to bring a fix to this situation, one that has proven to work for other Lost Ark players facing the same annoying predicament.
What can I do if Lost Ark is on an unlisted drive or folder?
Nobody can predict these situations, but if you find yourself in one, here’s what you actually need to do.
Click the Steam button in top left corner and select Settings.
Select Downloads and then click the Steam library folders button.
Click the Add button in the Storage Manager.
Click the dropdown menu and select Let me choose a location.
Press the Add button.
Choose the drive you want to add and click the Select button.
Now your Steam will again recognize the Lost Ark game and your problems will be over and you don’t have to worry about it anymore.
The same process goes if your Lost Ark folder is in a specific place, then when you click the Add button you need to find where the folder is and select it.
Not really hard, but effective, according to Lost Ark gamers that had to deal with the same annoying issue on their PCs.
A graphics card is an extremely important component of any modern-day computer or laptop. Whatever the application, whether it’s heavy-duty games with high-resolution graphics or powerful software that’s filled with larger-than-life interfaces and features, a strong graphics card is required for optimal performance.
When it comes to graphics cards, AMD is unquestionably a power to be reckoned with. Recent reports have surfaced, however, of many gamers experiencing PC crashes as a result of AMD driver errors.
If your AMD drivers continually crash in Windows 11, this post will provide you with a combination of the best troubleshooting strategies to address the problem.
Is Windows 11 compatible with AMD Ryzen?
There has been a great deal of misunderstanding over the Windows 11 system requirements. With everything from requiring newer CPUs to having a TPM on board, PC owners have been scurrying to discover if their computers are up to the task.
There has actually been so much consternation that Microsoft has had to remove the PC Health Check app (and then re-deploy it) due to the overwhelming amount of misunderstanding that has left many people wondering what to do.
AMD’s CPU compatibility with Windows 11 dates back to the year 2018. This includes Ryzen (Zen+) processors from the 2nd generation and upwards.
Microsoft also offers a comprehensive AMD list, which includes processors from AMD’s Athlon, EPYC, Ryzen, and Ryzen Threadripper series, among others.
Furthermore, as PC World pointed out, chips like the 3300X, 3700, 4600HS, and 5900H are missing, despite the fact that they are all relatively recent.
How do I fix AMD driver crashes in Windows 11?
1. Update the driver manually
Right-click on the Start icon in the Taskbar or press Windows + X to launch the Quick Access menu and select Device Manager from the list of options.
Locate and double click on the Processors option.
Right-click on the AMD driver and select Update driver from the context menu.
Select the Search automatically for drivers option as Windows will find the best drivers on your system.
Upon completion of the installation of the update, restart the computer to see whether or not the error has been resolved. For the best results, we strongly recommend that you use a specialist application such as Fortect Driver Updater to do automatic scans of out-of-date drivers on your PC.
There is more. It offers a more effective and automated way to update all your drivers, saving the entire time from performing it manually.
Using the Fortect Driver Updater tool, you will update your AMD drivers in a few simple steps from an extensive database with millions of official driver versions.
In case you’re missing the latest AMD driver from your system, this fast solution will thoroughly scan your PC and find the best driver for your hardware device, without causing functional errors.
The AMD driver can crash if there is too much dust on the fan of your graphics card; if this is the case, you should clean the fan of your graphics card. To accomplish this, first, open your computer case and remove your graphic card, as well as clean the fan of your computer.
It makes no sense to clean the graphics card if the rest of the computer’s components, including the other crucial components, are left uncleaned.
Also, remember to unplug the graphics card and other internal components from the bigger components such as the motherboard and power supply in order to perform a thorough cleaning of them.
If your computer is still covered by the manufacturer’s warranty, you may wish to take it to a repair shop and have them handle it for you.
3. Change the TdrDelay value from Registry Editor
Press the Windows key + R and type or paste in regedit. Press Enter or click OK.
After the Registry Editor window opens, in the left pane navigate to System under HKEY_LOCAL_MACHINE, then go to CurrentControlSet, followed by Control.
Now navigate to GraphicsDrivers and right-click anywhere in the right pane. Choose New andclick on DWORD (32-bit) Value if you use a 32-bit system, or QWORD (64-bit) Value if you use a 64-bit OP.
Enter TdrDelay as the name for the newly created value and double click it to set the Value data to 8 and Base to Hexadecimal.
Click OK to save the changes, then exit the Registry Editor and restart your computer to ensure that the modifications are applied properly.
4. Uninstall your browser
When the AMD driver crashes, it is possible that your browser is to blame. As a result, it is recommended that you temporarily disable your browser until the problem is resolved.
According to some users, Chrome or Firefox may cause AMD drivers to crash, so removing these two browsers may be necessary to resolve this issue.
After you’ve uninstalled them, we strongly advise you to switch to a more dependable browser that includes a current user interface as well as a free VPN.
Virtual private networks, for those who are unfamiliar with the term, are a technology that allows you to browse completely anonymously by routing all of your traffic through secure servers located all over the world.
This implies that your identity will be protected at all times, including from your Internet service provider, and that you will be entirely safe from online threats.
5. Reinstall the AMD driver
Press Windows+ X to launch the Quick Access menu and select Device Manager from the list of options.
Locate and double click on the Processors option.
Right-click on the AMD driver and select Uninstall device from the context menu.
Restart your computer after you have completed the steps indicated above. Windows will now reinstall and update the driver to the most recent version that is currently available. It will also clean up any corrupted driver files that may have been present at the time of installation.
6. Check if there are any hardware issues
Press the Windows key + S to open the search function, type in cmd, and right-click on the most relevant result to run it as administrator.
After the Command Prompt launches, type in the following command and press Enter:chkdsk C: /f /r /x
In this case, Check Disk will do a study of the disk and then correct any faults that it discovers, assuming that the disk is not already in use.
7. Update Windows
Press the Windows key + I to open the settings, then click on Windows Update from the left panel.
If you have any new updates to download, click on the Install now option. Alternatively, click on the Check for updates button.
Running an older version of Windows may have contributed to the error, which may be easily fixed by updating the operating system. The bug will very certainly be fixed in upcoming iterations.
Who makes better CPUs?
In terms of choosing between AMD and Intel, there are only two options if you want the greatest CPUs for gaming or the finest workstation CPU for your computer.
With its Zen-based CPUs, AMD has completely rewritten the rules of the game in both the mainstream desktop and high-end desktop sectors, first catching Intel off guard as the company remained stuck on the 14nm technology and Skylake architectures.
CPUs from AMD have progressed from being low-cost and power-hungry to being high-end architectures with more cores, higher performance, and lower power requirements over the previous several years.
Intel responded by gradually increasing the number of features available across its product portfolio, but this had unintended consequences such as increased power consumption. However, it merely helped to draw attention to the company’s difficulties on the design and fabrication side of its business.
The AMD vs Intel CPU debate, on the other hand, has shifted completely, since Intel’s Alder Lake processors have completely undercut AMD’s price-to-performance ratio.
Destiny 2 is an amazing title, but it has a couple of issues, and many have reported mouse lag while playing Destiny 2.
Any type of lag will reduce your performance in a multiplayer game, and we wrote in-depth on how to fix Destiny 2 packet loss, but this is a different kind of issue.
Fixing this problem doesn’t have to be too hard, and in today’s guide, we’re going to show you the best methods that you can use to fix mouse lag while in game.
Why does Destiny 2 mouse input lag appear?
This issue can appear due to your graphics settings, and if your framerate and Vsync settings don’t match properly, you might encounter some lag.
In some instances, this can be a framerate issue, and lowering the settings can help. To see how to properly fix this problem, be sure to keep on reading.
How can I fix Destiny 2 mouse lag?
1. Change graphics settings
Click the Settings icon in the top right corner.
Now go to the Video tab.
Now adjust Window Mode, Resolution, Vsync, and Framerate Cap settings.
Experiment with different values and check if there’s a change in performance.
Once the download is finished, run the setup file.
Now follow the instructions on the screen to complete the process.
The most common cause for lag are your drivers, so it’s advised to update them. There are many ways you can do that, and most users choose to update drivers manually.
This can be a tedious process, especially if you need to update multiple drivers and you don’t know where to download the right drivers from.
Luckily, there are specialized tools, such as Outbyte Driver Updater that will scan your PC and automatically update all outdated drivers with just a few clicks.
Scroll down to Graphics Quality and set it to Low.
Alternatively, you can try adjusting other graphic settings and try to find the perfect balance between the visual quality and performance.
4. Adjust the configuration files
NOTE
This is an advanced solution, so make sure you edit the configuration file properly.
Press Windows key + R and enter %appdata%. Press Enter.
Now navigate to the following directory Bungie\DestinyPC\prefs\
Locate and double-click the cvars.xml file.
Right-click the file and select Open with. Now pick Notepad or any other code editor.
Locate cvar name=”window_mode” and make sure that it is set to value=”2”.
If you’re running the game in windowed mode, make sure you find this line and adjust it so it matches your resolution, for example: <cvar name="windowed_resolution_width" value="1280" /> <cvar name="windowed_resolution_height" value="720" />
In case you’re running the game in full screen mode, adjust the following line accordingly: <cvar name="fullscreen_resolution_width" value="1920" /> <cvar name="fullscreen_resolution_height" value="1080" />
In the General tab, locate Game Integration and enable Show Game Integration Customization View.
Click the Applets icon in the bottom left corner.
Now click the wrench icon in the blue box.
Select Discord and click on Stop Applet.
Now select Never launch.
Check if that fixes the problem.
If the issue is still there, make sure that your mouse gaming software isn’t running in the background.
Many reported that Logitech software was the culprit behind the mouse lag in Destiny 2, but keep in mind that other software can cause this issue as well.
6. Adjust your mouse polling rate
Open the mouse configuration software.
Locate the polling setting.
Set the polling rate to 250Hz or 125Hz.
Save changes.
What causes Destiny 2 mouse issues?
Your drivers can be the cause for many input issues in Destiny 2, so be sure to update your graphics card and other drivers to the latest version.
Sometimes your mouse configuration software can cause the issue, and by adjusting the polling rate or by disabling certain features, you can fix this problem on your PC.
Fixing mouse lag in Destiny 2 doesn’t have to be hard, and we hope that our solutions helped you fix this issue for good.
We also wrote about other issues that can occur in this game, and if you want to learn more, we suggest reading our Destiny 2 error codes guide for more information.
What solution did you use to fix this issue in your game? Let us know in the comments section below.
SteamVR is a virtual reality platform that’s compatible with Vive, Windows Mixed Reality, and Oculus Rift headsets.
However, error 306 can arise for some users when they try to launch SteamVR. The full error 306 message says this:
Error Starting SteamVR – SteamVR failed to initialized for unknown reasons (Error: Shared IPC Compositor Connect Failed (306))
SteamVR doesn’t start when that issue arises. Speaking of problems, users also reported other possible variations. Check them out below!
Where does this error occur and what can I expect?
SteamVR failed initialization with error code vriniterror_init_hmdnotfound (VR init error HMD not found is one of the most frequent error codes, but there can be others as well)
Frequently associated with Oculus Quest 2: SteamVR Compositor had an error on present (108)
SteamVR error during OpenVR (Also found under this form: OpenVR runtime is not installed)
If you need to fix the SteamVR 306 error, check out these potential resolutions for that issue.
How can I fix SteamVR error code 306?
1. Update your drivers
There are a few ways you can update your graphics card’s driver, but the most straightforward method is to utilize driver updater software.
A quick Outbyte Driver Updater scan will display a detailed report that shows driver versions for your PC’s devices and which ones need new drivers.
Thereafter, you can select to update your graphics card’s driver if required. It will then download your GPU’s latest driver for you.
If you’re utilizing Outbyte Driver Updater Pro, you can then select the Apply All option to quickly install the driver without needing to extract and open its setup wizard.
2. Connect your VR cable with your graphics card’s primary port
First, disconnect the HDMI cable for your monitor from the main port on your desktop graphics card.
Then plug the VR cable (from the VR box) into the graphics card’s Main Port/Primary Port.
Reconnect your monitor via your graphics card’s secondary port.
If your SteamVR app is running, close and restart it to see if the error 306 issue persists.
Select the Restart option on the dialog box that opens.
Then try launching SteamVR after clean-booting Windows.
Note: Steam confirms Razer Synapse, Avast Antivirus, and the Asus AI Suite conflict with SteamVR and its drivers. So, uninstalling those conflicting programs might also help resolve SteamVR error 306.
5. Uninstall Natural Locomotion
To launch Run, press the Windows and R keys at the same time.
Input this command for opening the Windows uninstaller in the Open text box: appwiz.cpl
Select the Natural Locomotion software within the Programs and Features applet.
Click the Uninstall option for Natural Locomotion to remove that software.
Press the Windows + E hotkey to launch File Explorer.
Open the config folder in File Explorer at this path: D:\Program Files (x86)\Steam\config
Right-click the locomotion subfolder and select Delete.
Those are some of the more probable fixes for resolving SteamVR error 306 that are worth a shot.
You can also contact Steam via the Steam support page if further potential resolutions for error 306 are required.
PDF files are useful if you need to send a certain document, but they aren’t always the preferred format for users, since many of them favor using the Word format instead.
Recreating the document in a new format is a time-consuming and often impossible task for many end-users, and this is where file conversion comes into play.
There are multiple methods you can use to convert one file type to another, and in today’s guide, we’re going to show you how to convert big PDF files to Word documents.
Is it possible to convert PDF to editable Word?
Yes, you can convert most PDF files to editable Words documents with ease. There are several methods you can use, and some don’t even require you to install any additional software.
There are multiple reasons why you might want to do that, and many choose to convert their documents if the PDF file won’t open on their PC.
In this guide we’re going to show you the best options that you can use for this purpose, so be sure to keep on reading to find out more.
How can I convert large PDF to Word?
1. Use Word
Open Word and click on File.
Select Open and click on Browse.
Now select the PDF document that you want to view.
Once you open it, Word will ask you if want to convert the file. Select OK.
After the file is open, click on Enable Editing.
Click OK to confirm.
The document should now be fully editable.
Click on File.
Now choose Save as and select Browse.
Set the Save as type to Word Document, enter the desired file name, and click on Save.
This isn’t the most reliable or the most secure method, but it can come in handy if you want to convert documents from a reliable source.
2. Use specialized software
If you want to quickly and easily convert PDF to Word and vice versa, then Soda PDF might be the right tool for you.
There’s support for a wide array of file types, so you’re not limited to PDF and Word formats.
Text recognition feature is also available allowing you to recognize text on scanned documents and edit it as you please.
It’s important to mention that the software works with large files, and with batch processing support, you can easily convert multiple files.
Soda PDF
If you don’t know how to convert big PDF files to Word, Soda PDF is your go-to.
Now click on Select File and choose From my Computer.
Select the desired file.
Choose the output format and click on Convert.
Wait for the process to finish.
Once the process is completed, click on Download.
How to pick a Word to PDF online converter?
It all depends on your needs, and the first thing you should look for is the maximum file size. Some PDF files can get large, so be sure that the service can support them.
Do keep in mind that some of these services might not be perfectly safe, so if you’re planning to convert any sensitive documents, it might be better to use a software solution instead.
There are many online file converters, but for your safety, be sure to only use the ones that are trusted and secure.
As you can see, it’s easy to convert large PDF to Word, as long as you have the right tools for this task.
For more information about the conversion software, you might want to visit our best PDF to Word converters guide.
What is your favorite method to convert PDF files? Let us know in the comments section below!
Next week’s slate of Xbox releases promises quite a lineup, with 14 games in total coming Xbox consoles between March 21 and 25. If you’re wondering what’s coming ahead, then we have you covered. From RPGs to Indie games, to some new weird quirky titles, Here’s what you need to look out for next week on Xbox!
Tuesday
Things kick off on Tuesday with three games. Kraken Academy is a technicolor adventure in which you must team up with a magical Kraken and exploit a time loop to save the world. Kraken Academy will be available on Game Pass. Tainted Grail: Conquest is a deck-building roguelike/RPG already available on PC Game Pass and now coming to Xbox.
Finally, Zero Escape: The Nonary Games rounds out Tuesday’s lineup. This is a bundle of remasters of two previous titles from the adventure game series. It will be coming to Game Pass when it releases.
Wednesday
Four games are slated for release on the 23rd. A Place for the Unwilling is an exploration-based adventure game promising a narrative-driven experience that blends a bit of Dickens with a bit of Lovecraft for a unique experience.
Richy’s Nightmares is a platformer that gamers might find reminiscent of the classic Limbo, at least at first glance. The Pizza Delivery Boy Who Saved the World is a visual novel about a time-traveling pizza boy, and was created by a former pizza delivery driver. Finally, Thunder Kid: Hunt for the Robot Emperor employs run and gun action and a scaled-back visual style reminiscent of the PS One era.
Thursday
On the 24th, A Memoir Blue will be a day one Game Pass game. The adventure game promises an unforgettable story and loads of atmosphere. (Point and click adventure game Norco will also release on Thursday, though not on Xbox. The game will be available on PC Game Pass, however).
Friday
Once again the week in Xbox will close out with a bang with four great titles set to come out just in time for the weekend. Aery —Calm Mind 2 is a unique game that aims for a relaxing, zen-like experience in which the only objective is to fly like a bird and enjoy the beautiful scenery the game world has to offer.
Bouncy Boi in Puzzle Land offers a cutesy puzzle adventure with plenty of color and challenging puzzles galore. A retro-inspired twin stick shooter, Devastator offers some pretty intense gameplay to go with its spectacular visuals.
And capping off the week in Xbox games with what for many will be the week’s highlight, Tiny Tina’s Wonderlands is the perfect answer for those needing a fresh Borderlands fix. This spinoff features more of the same cel-shaded, run and gun looter-shooter action that made the Borderlands series such a hit. The game will be optimized for Series X/S, and available via Smart Delivery.
And there you have it: another exciting week in the making for Xbox releases, with plenty to look forward to. Overall, it has been a really solid month for the Xbox brand so far, and it doesn’t appear to be slowing down.
Many Windows 10 users have reported issues regarding printer connectivity and a glitch that can set active printers offline even if they are connected and fully operational.
The error is usually encountered when speaking of network printers, but home users with a direct connection to their printer have also complained.
We’ll go about fixing this issue just like most other connectivity-related problems, as in most cases, there is a simple explanation for the problem.
It should be noted that different manufacturers have their own diagnostics software which can inform the user of what problems come up (HP’s Print and Scan Doctor comes to mind here).
If your printer‘s manufacturer provided you with this feature, we encourage you to use it at full extent. More often than not, it will set you in the right direction for finding solutions to your problems.
There are many problems that can occur with your printer, and in this article, we’re going to cover the following issues:
Printer offline Canon, HP, Ricoh, Epson – A common problem with printers affecting any brand of printer.
Printer offline error processing command – Caused by trying to use a network printer.
Wireless printer offline – Can appear with all sorts of printers, and many users reported it while using a wireless printer.
The printer is offline unable to ping – Your PC can’t recognize your printer.
Printer offline SNMP – Thes SNMP feature can cause this issue, can be fixed by disabling the SNMP feature.
Network printer offline VPN – Appears when using a VPN and can be fixed by changing your VPN configuration.
Printer not responding, printing, working, connecting, showing up – The printer isn’t responding or not working and sometimes it won’t even show up in settings.
Why does the Printer Offline error occur?
The error appears when Windows 10 sees that the printer is unavailable.
Unfortunately, most of the time, it can’t tell if the printer is really offline or if it has connectivity problems or printing errors. They might occur when:
The connection between the computer and the printer is slow/unresponsive
The printer has encountered an internal error
There are multiple unfinished print jobs in the queue
How can I fix the Printer Offline errors in Windows 10?
Go to the Devices and Printers section in Control Panel.
Locate your printer, right-click it, and choose Remove device.
Click on Yes when the confirmation dialogue appears.
Download the latest driver from your printer manufacturer and install it.
Update drivers automatically
If you do not have the necessary computer skills to update/fix the drivers manually, we strongly suggest doing it automatically by using specialized driver updating software.
2. Check if you’re using a VPN connection
The Printer Offline message can appear if you’re using a network printer and VPN. To fix this problem, it’s advised to disconnect from the VPN and try to access your printer again.
If you want to use VPN and your printer, you need to connect the printer directly to your PC using the USB cable.
Alternatively, you might be able to fix the problem by adjusting your VPN configuration and granting yourself local network access.
You can also use other efficient VPN software that will not interfere with your printer connection, and keep your privacy online too. Therefore choose wisely from the best VPNs for your Windows 10 PC.
3. Change the printer settings
Open Control Panel and navigate to your Printers window.
Check if the correct printer is set to Default (Please watch the video below for more information).
Right-click on your default printer and select the print queue (See what’s printing).
If there are any unfinished tasks, remove them from the list.
From the queue window, select Printer and uncheck the Use Printer Offline option (if the Use Printer Offline option is off, check the option, leave it a few seconds, and uncheck it).
Check if the printer is correctly connected to your computer (unplug the USB cable and plug it in again).
If you own a network printer, try doing a connection test (also, try restarting your router/switch).
Turn your printer and computer off and on again.
If by now the problem isn’t solved, reinstall the printer‘s drivers.
Note: if you are using a wireless printer, then you should try to connect to its IP address. To find its address, go to Control Panel, then click on Devices and Printers, right-click on your printer, and select properties.
Copy the address and write it down in your browser’s address field.
Right-click your printer and choose Printer properties from the menu.
Go to the Ports tab, select your printer’s IP address from the list and click on the Configure Port button.
Uncheck SNMP Status Enabled and click on OK to save the changes.
A user also suggested that you can also leave the SNMP as it is and change its device index to #.
Note: This solution works only if you’re using a network printer. If you encounter any configuration problems with your printer, we’ve prepared a simple guide to help you in that situation.
6. Install the latest updates
Press the Windows Key + I to open the Settings app.
Select the Ports tab and click on Add Port button.
Select the Standard TCP/IP Port and click on the New Port button.
Click on Next after the Printer Port Wizard starts.
Enter the required information. You can get them from your printer’s instruction manual. Click on Next.
Bonus: Printer offline but it is not
We already talked about cases where the printer is clearly offline and it cannot be pinged, but here’s the interesting part. There are also situations in which the Windows 10 printer is offline but can ping.
In other words, the printer says offline but it is connected. So how can that happen and what can you do about it? Don’t worry, we have some tips for you.
Why is my printer connected but not printing?
Before anything else, you should know that this peculiar mismatch happens when your PC is unable to establish communication with the printer. Thus, the very first thing to do is check if both devices are connected to the same WiFi network.
Check out our complete suggestions below:
Open the printer’s menu to check the network it accesses in order to establish connection and make sure it is the same as the one used for your PC
Restart both your printer and your PC and disconnect the power cord from all devices (router, PC, printer), then plug it back
Make sure there is nothing physically wrong with the printer (internal debris like paper jams and so on)
Reinstall printer drivers and check system services on your PC
Hard reset your printer
We hope this guide helped you solve your printer problems in Windows 10. If you’ve tried all of them and your problem still persists, then you might have a hardware-related problem.
In this case, try printing from another computer or try a different printer. Also, if you’re running a wired printer, use a different USB / network cable.
If you have any other questions, feel free to leave them in the comments section below.
If your Steam download randomly drops to 0 bytes, there’s a good chance your connection, cache, or config is working against you. It’ll hinder new game installs and update patches.
The most common reasons why your Steam download drops to 0/mbs are unstable Wi-Fi and hidden background service throttling Steam. But there are a few lesser-known culprits too, so keep reading to tackle them all.
What can I do if the Steam download speed drops to 0?
The most common cause is a network issue. Restart your router and check your settings, then visit Steam Status or the official support page to see if servers are down. If you’re still having problems, check the more advanced solutions below.
Hit the Windows key, type your Internet browser’s name, and open it (In this particular case we choose Chrome).
Check to see if web pages load quickly and without interruption.
Sometimes it’s just a problem with the router or a cable so start by checking all the network components first.
2. Reset your router/modem
Unplug the router and the modem, then wait at least 30 seconds.
Plug in the modem, then waits at least 60 seconds.
Now, plug in the router and wait at least 2 minutes.
When the router and modem restart, test to see if the problem went away.
3. Try using a wired connection (LAN) instead of Wi-Fi
Keep in mind that an Ethernet connection is much more secure than a Wi-Fi connection.
While data on a Wi-Fi network travels through the air and can be more easily intercepted, you can access the data on an Ethernet network only by physically attaching a device to the network.
You can also try to pause the download and resume it after a couple of seconds.
You can also try to pause the download and resume it after a couple of seconds. If your Steam download keeps going on and off, that’s often tied to weak connections or software interference.
4. Clear download cache
Press the Windows key, type Steam, and open the app.
In the top-left corner, click on Steam.
Go to Settings.
Navigate to the Downloads section, then click on the Clear Download Cache button.
5. Disable the Automatically detect settings option
Press on the Windows key, type your browser’s name, then open the first result (In this particular case, we choose Chrome).
Click the three dots icon in the top right corner, then navigate to Settings.
From the left window pane, expand the Advanced options, then click on System.
Under the System section, click Open proxy settings.
Go to the Connections tab an click on LAN settings.
Uncheck the box next to Automatically detect settings and press OK.
Restart Steam and attempt starting the download to see if it works.
Some users reported that after disabling the Automatically detect settings, the download in Steam started working just fine so follow the steps above to do just that.
Open the Windows run dialog box, by using the following keyboard shortcut: Windows + R.
Typesteam://flushconfig and press on Enter.
Wait a few seconds.
Now, use the same hotkey, but now type cmd, then hit Enter.
In the opened window, input the following command, then press on Enter: ipconfig /flushdns
Log back into Steam and see if this fixed the issue.
Flushing the Steam config and DNS can fix this download problem quickly so make sure to run the steps above to do the trick. It can also help if the Steam download limit isn’t working as expected.
7. Disable the Diagnostics Tracking Service
Right-click on your Windows Taskbar, then select Task Manager.
Choose the Services tab.
Find the service named DiagTrack, right-click on it and select Stop.
Restart Steam and try to attempt starting the download again.
We know it may seem a bit unusual but disabling the DiagTrack service worked for some users so make sure you perform de easy steps above to get it done.
8. Disable the Internet Flow Control of your Ethernet
Use the following keyboard shortcut to open the Windows Run dialog box: Windows + R.
In the opened window, type devmgmt.msc, then hit Enter.
Expand the Network adapters section.
Right-click on your Ethernet network adapter, and select Propreties.
Select the Advanced tab, choose Flow Control, select Disabled as the Value option.
Save the changes and try re-attempting the download in Steam.
9. Prioritize Steam downloads over other tasks
Many players are wondering how they can prioritize Steam Downloads according to their own needs.
Well, if it’s happening to be in the same boat, keep in mind that the process is pretty simple, so do not worry if you’re a beginner!
Right-click on your Windows Taskbar, then navigate to Task Manager.
Find the Steam Client Service and right-click on it, then select Go to details.
Now, right-click on SteamService.exe and select Set priority > High.
If the Steam download always goes to 0 bytes, at least one of our solutions will help you solve it. The download can also be affected by the Steam manifest unavailable error, so make sure you fix it.
The Steam download 0 bytes error is not the only one that you encounter on this app. To discover the most popular Steam download-related issues, make sure you check the list below.
Steam download stopping – Usually, this one can occur if there’s not enough disk space for Steam to install the games, but there are many of additional information you should definitely check.
The Steam download is slow – This is a big problem that affects the majority of the gaming community in one form or another. Luckily, you can always find the right ways to fix it in no time.
The Steam download demo button not working – This issue can stem from cache problems, network glitches, or Steam client bugs. Restarting Steam, clearing the download cache, and checking your internet settings usually fix it quickly.
In case you found this article helpful, leave a comment in the dedicated section below.
One of the more highly anticipated games featured was the newly released Tunic. This action-adventure Zelda-like game has been announced – rather unexpectedly – as a day one Game Pass title and could be one of this year’s biggest sleeper hits.
Another game featured during the stream was Voidtrain, a game that promises a completely new take on the survival game, with first-person exploration in a world that is as stunning as it is unique. Though the exact release date has not been determined, Voidtrain will be coming to Xbox Series X/S sometime in 2022.
Coming to Xbox sometime in the second quarter of this year, Trek to Yomi is a side-scrolling hack and slash samurai game with a black and white visual style that evokes such classic cinema classics as Rashomon and Seven Samurai.
One of the bigger surprises revealed at the event was Wrestle Quest – the latest, and probably only, wrestling-themed role playing game. The game features top down exploration and turn-based team combat – or rather, matches – with a pixel art graphical style. Wrestle Quest was likely the highlight of the stream for many.
It was quite a lineup for the first ID@Xbox show of 2022, and there was plenty to get Xbox gamers excited for the coming year in games. While indie-developed games often get overshadowed by the big AAA titles, it is nice to see them get a piece of the limelight with events like these.
The Preview Build includes new apps like Mircosoft Family and Clipchamp, some fixes, and most importantly for this review, a revamped Microsoft Defender.
Microsoft Defender is the company’s antivirus software that comes preinstalled on all new PCs. This new rendition changes its user interface for a more streamlined look and is now available on Android and iOS devices as a standalone app.
This marks the first time Microsoft Defender is available as a mobile app apart from the Endpoint Manager version, which is a service that lets you manage your company’s IT infrastructure and keeps data secure.
Be aware that this Defender preview is only available for users in the United States. Microsoft has yet to say whether or not it will bring the preview or the finished program to other countries.
Is Microsoft Defender a good antivirus software?
As an antivirus software, Microsoft Defender is okay. You’ll hardly ever see reach the list for best antivirus apps or most recommended for Windows 11.
Its features are pretty basic in what it can do with very little in terms of custom configuration, plus Defender isn’t the best at detecting phishing scams.
The SmartScreen Filter feature on Defender only really works on Edge and not on other web browsers, which can be annoying when the app suddenly blocks you from doing something.
It’s also known that SmartScreen can block unrecognized apps and prevent them from working. The UI is just fine. Both the base and Firewall apps tell you everything you need to know but aren’t amazing.
Defender looks fine, but other apps have taken their interface to another level. On the plus side, its malware protections are really good.
It has a wide array of scanning options and fairly decent protection against viruses. Defenders’ ransomware protection is easy to use and understand.
The app’s seamless integration in Windows 11 is great as it doesn’t take up a lot of the CPU’s resources and melds well with apps so that it doesn’t block them (for the most part).
All in all, Microsoft Defender is a decent, if unremarkable antivirus app. However, that’s the old version of Microsoft Defender. The question remains whether or not this new preview version of Defender exceeds or disappoints.
Right off the bat, it can be said that the new Microsoft Defender has a much greater security reach but its standards remain the same.
What does the new Windows Defender app have to offer?
The new Defender is a standalone app for Windows Security instead of being a section in the Setting menu. You can configure and add devices with this app instead of opening the Settings menu.
As you will see, it has a simple user interface with only a few options available. Clicking device details takes you to a page where you can configure your computer’s protection settings.
The Defender will let you know what is or isn’t active, if there are any updates pending, and what the ransomware protections settings are. The manager also tells you how many files have been scanned, all of the users who have protection, and your machine’s security history.
The app tells you how many threats, if any, were found. At the bottom of the Device protection page, you will see a link that will allow you to change Defender’s settings.
Clicking the link takes you to the Privacy & Securitytab in the Settings menu. There you will open Windows Security and make changes.
You can change the configuration of Windows Security by clicking its representative tab and then opening the app to make the changes, just like how it currently is. On the main page, there’s a small Security history tab in the upper right-hand corner.
It’s barely noticeable, but clicking it takes you to a page where you see all of the threats the app has stopped and what you can do. The new Defender is very basic in what it does.
What has been neglected to mention up to this point is the app’s key feature of adding devices to Window Security. This is the main draw of Defender Preview.
You will see a smaller window with Add devices on it. You can add other computers or mobile devices. Follow the instructions below to learn how to add a device.
Is the Window Defender Preview app good?
When it comes to the desktop version, it’s pretty mediocre. There’s not much to it. However, for the mobile app, Defender Preview is pretty good.
It appears that the mobile app is Microsoft’s main focus as it has all of these features and configurations that you can mess around with to your liking.
Microsoft moved the features found on Windows Security to mobile and gave those platforms a big boost in security. Now you have desktop-grade protection on your smartphone.
Microsoft is taking phishing scams much more seriously this time around as it has specific features to combat those types of threats.
It was stated earlier that Microsoft Defender has had a reputation of being poor at defending against phishing scams. This shows that Microsoft is actively listening to the community and providing users with what they ask for.
The desktop version also supports third-party antivirus apps like Avast. This version allows you to open your antivirus software and configure it there, a welcome support feature.
Adding new devices is very simple and easy to do with no limit to how many devices you can add. It’s unknown if this will change when the app officially launches, but hopefully, it stays the same way.
The battery drain is a little annoying, but having that high of a level of security comes at a cost. You can feel safe knowing that your phone is protected and will get timely notifications.
That said, this leads to the overall feeling of disappointment towards Defender Preview. It adds nothing to the desktop version with no new features or extra protections for Defender on Windows 11.
That isn’t to say it’s bad, however. In a certain light, Windows Defender Preview is good for mobile devices as a protection app, but you’ll have to ask yourself if the battery drain is worth it.
Defender Preview takes what’s already available on Windows 11 and adds a nice-looking app to serve as a central hub, but that’s it. The lack of anything substantial is a letdown.
There’s no way for people to configure Defender Firewall or other settings on Security. You still have to open the Settings menu and do everything.
Defender Preview is certainly an interesting move by Microsoft towards protecting mobile devices and those in your family, but that’s it. The app is overall shallow with not much to offer.
Is Windows Defender Preview a must-have?
It’s difficult to say. As the current form of Windows Defender, this preview app is not good or bad; it’s simply okay. The desktop version doesn’t bring anything unique or changes anything.
Defender Preview on desktop utilizes the same computer security measures on Windows 11, but it just gives it a facelift and easier access to the Settings. If you’re like Windows 11 security, then you’ll enjoy this preview.
Defender Preview on mobile is recommended. Its active security features are great and protect you against many threats from malware and sites that will try to steal your information.
Protection for your personal information has never been so important and prevalent than ever before, especially now there have been instances of companies selling data of their customers to advertisers.
People more than ever before are hyper-aware of their info, and speaking of which, the mobile app allows you to manage the personal data on your Microsoft account. The feature is tucked away in the Settings menu.
It’s listed as Data Privacy and allows you to manage browsing data, review your location data, and clear out your search history. It has other services, but Microsoft points out that not all of them are available in all markets.
So there could be some missing or more added later on, but as it currently stands, you can change the privacy settings on a Windows 10 device, your Xbox, Microsoft Teams, and other apps.
Defender Preview mobile is much better at being a central hub security app than the desktop version. But because the app is a part of the Windows Insider Program, you won’t be able to get it by itself.
If in the future the Defender mobile app is released in an official capacity, it would be a great addition to your phone. Since this is still in the early stages, Microsoft will probably add new features and capabilities.
For the desktop version, it can’t be recommended since it doesn’t do anything different. You can try it out, just don’t expect much. The other new features in that preview build are much more interesting.
How can I download the latest Windows 11 Preview Build?
1. Joining the Windows Insider Program
Open the Settings menu on your Windows 11 computer.
Click the Windows Update tab on the left hand menu.
In this section, click Windows Insider Program.
Click the Get started button in the upper right hand corner.
Click Link an account to connect your Windows 11 account to the Insider Program.
Select your account and then click Continue.
Select Dev Channel so you can try out the preview build.
Click the Continue button. You may receive a notice from Microsoft that states they recommend the Dev Channel only if you back up your data. After backing it up, you’ll need manually restore your data.
Click Continue.
You’ll be given the opportunity to read the Insider Program’s agreement and privacy statement. Click Continue to move forward.
To start the Insider Program, click Restart now.
Give your computer some time to restart and enter the Insider Program.
2. Downloading the latest preview build on your PC
Go back to the Windows Update section of the Settings menu. You will all of the features and fixes for the Preview Build available.
Click Download now in the top right corner.
Give your computer time to download the build.
After downloading,click Restart now to finalize the installation.
Like before, give your computer a short amount of time to install the update.
Because there is so much to download, you may have to do the process again in order to download everything.
Restart your computer again to add these updates.
After restarting your computer, you will have the files, but still need the app to access them.
Open the Microsoft Store app.
Search for ‘Defender’ in the search bar.
Select Microsoft Defender Preview.
In the Microsoft Defender Preview page, click Get.
Give the Microsoft Store time to download and install.
Once done, click Open.
Conversely, you can go to the official Microsoft Defender Preview page on Microsoft’s website and download it from there if the Store doesn’t work.
Selecting Download preview will take you to the Microsoft Store.
Sign in your Microsoft account when the Defender Preview app opens.
In the license terms page, select Accept.
Select Go to dashboard to the main page.
NOTE
If you download Defender Preview without signing up for the Insider Program, it will not work. You must be part of the program.
How to add devices on Windows Defender Preview?
1. Adding computer and smartphone
The follow instructions will add a laptop and an Andoird smartphone to Defender Preview, but the instructions are the same.
Start by clicking Add devices on Windows Defender Preview.
You will be given a selection of devices that the app detects. Click one to add.
A notice will appear that reads Protect this device. Click it.
A window will appear giving you a link that the other device must click on to join. You can copy the link and send through a messaging app of your choosing or send it through email.
This guide will select to email the link. Click Email link.
Type in th e receiving email and then click Send link.
Going to your email account to locate the sent link.
Click Download the app.
Defender Preview will automatically download and install onto the receiving device.
Follow the same setup procedures as before like accepting the license terms.
A message will appear stating that your computer is now protected.
Clicking on Go to dashboard takes you to the main page.
On the dashboard, you will see your computer now a part of the protected devices.
To add a smartphone, click Add devices again.
This time, scroll down to the bottom and select Add another device.
In addition to copying and emailing the link, you can also scan a QR code.
The email link method works the same, but this guide will select the Scan QR code option.
A QR code will appear. Use your phone’s camera app or QR code scanning app to scan it.
A link will appear. Click it to go to the Microsoft Defender page on the Google Play Store.
Click Install to install the app.
After installing, open the app and sign into your Microsoft account.
For security purposes, a code will sent to your email in order to verify your identity. Click Send code.
2. Configuring Windows Defender Preview mobile app
Next, you will be given the opportunity to protect your device. Click Get started.
Defender Preview will send you a serious of scenarios of potential security risks.
First, it will ask you if you have ever received a message similar to the one shown.
This guide will select Yes.
Next, you will be given the opportunity to turn on phishing scam protection. This guide will turn it on.
Afterwards, Defender Preview will ask for permission to run in the background and the available to check for harmful links. Running in the background is neccessary for online protection.
This guide will allow the two to work. However, activating the ability to run in the background will impact the battery and drain faster. The guide will allow this feature to turn on.
Turning on accessibility will take you to the phone’s settings. To give it permission, click Installed services or your phone’s equalivalent.
Microsoft Defender Accessbility Service will appear.
Click it and flick the switch to On to give Defender Preview accessbility permissions.
A notice may appear asking you to give the app full control of your phone. Click Allow.
Return to the app and click Next.
The next page will ask you to turn on protections against malicious apps. This guide will turn it on.
Defender Preview will once again ask for more permissions to access device storage and sending notifications.
Allowing access device storage will have the app ask you to give permission.
Permitting notification will take you to the settings menu of your phone. Toggle the switch to turn it on.
Click Next to continue.
Defender Preview will ask you to run a scan. Click Start scan.
Give the app time to scan your smartphone.
After scanning, Defender Preview will let you know the results. Click Done go to the dashboard.
You will see all of the devices added on your smartphone app.
What should be a part of the official Windows Defender app?
Because the app is still in a preview build, there’s lots of room for growth. The biggest issue Windows Defender Preview faces is its lack of engaging features. As stated numerous times, the app doesn’t add anything special.
It would be great to see Defender Preview give users the ability to reconfigure and change Windows Security on the app rather than open the Settings menu. It’ll be less cumbersome and have fewer windows pop up.
Convenience matters a lot to people and giving Defender more control would go a long way. As such, access to the Firewall would be a good idea too.
It’d be great if users could control what gets permission from the Firewall and change its settings in one window rather than spread out through multiple apps. It’s annoying to open Defender Firewall only to realize that you opened the wrong one.
Having Defender Firewall and Firewall with Advanced Security at the same time is confusing, because people may not understand the differences at first.
The Defender Preview mobile app is pretty good as it currently stands. The only real drawback is that it drains a lot of the battery. It’d be great if Microsoft could release a version that is easier on battery life.
Microsoft’s plans for Defender Preview are unknown right now. Hopefully, future versions do more and are better configured for smartphones.
What else came out in the latest Windows Insider build?
Windows Defender Preview wasn’t the only thing that came out in the Windows 11 Insider Preview 22572. The Insider Program now has Clipchamp which is Windows 11’s new video editing app that is centered on making video creation more fun and streamlined, but, you must be on the Dev Channel.
Microsoft Family is now on Windows 11, which is an app that lets you set parental controls that let you filter out inappropriate content for kids and set browsing to strictly child-friendly websites. The app only works on Microsoft Edge, and not on other browsers.
And the last major update is the return of the Mircosoft Bug Bash, an online event where users can search for glitches the development team missed. Participants who complete quests will earn a special badge in the Feedback Hub.
Pros
Malware protection is very good
User-friendly interface
Wide array of scanning options and fairly decent protection against viruses
Low impact on system resources
Cons
The SmartScreen Filter feature on Defender only really works on Edge
Security standards are not any better than in the previous version
SmartScreen can block unrecognized apps
Final Score: 2/5
As you can see from the review, it’s difficult to recommend the desktop app as it doesn’t justify its existence. Windows Defender Preview is not the major draw to the recent Dev Channel build.
Its functionality is limited in size and scope, there are no new features, and you still have to open the Settings menu to configure it. It would have been nice to see this app add some new security measures.
The mobile app is pretty good, however, as it transfers desktop-level security to smartphones, tablets, and other similar devices. The new phishing scam defense is great to have and shows that Microsoft listens.
The main problem with the Defender Preview on mobile is that it drains the battery and is limited to the Insider Program. If things go well, Microsoft will be sure to release the app in an official capacity.
Feel free to leave a comment below if you have any questions on other Windows 11 apps. Also, leave comments about reviews that you’d like to see or information on other Windows 11 features.
The Hunt: Showdown, Narita Boy, and Warhammer: Chaosbane video games are free to play on Microsoft’s Xbox One and Xbox Series X console families from today until the end of Sunday for all Xbox Live Gold subscribers with an active subscription.
As with previous Free Play Weekends, all three titles can be played in full and have their Xbox Achievements unlocked during this period.
Also as part of the promotion, Warhammer: Chaosbane and The Hunt: Showdown have had their regular prices reduced to encourage players to buy them and continue playing after the weekend is over. Narita Boy is actually available to play as part of Xbox Game Pass so those with access to that service have no need to buy it until it exits the Game Pass library at some unknown time in the future.
Warhammer: Chaosbane has been reduced by 80% while its Magnus Edition is now 70% cheaper than usual. The Starter Hunter Edition of The Hunt: Showdown has been given a 75% discount while the numerous The Hunt: Showdown bundles have had their prices temporarily cut by 70%.
There are hundreds of Forex brokers offering their services online so choosing the best one can become quite a challenging task. It can be as difficult as creating a successful strategy.
That’s why we have gathered 8 of the best Forex trading software so your choice will be much easier. These are some of the market’s most legit and reputable brokers.
Featuring a unique combo of easy-to-use, intuitive interface, and innovative trading features, eToro is the world’s leading social trading app with millions of users from over 140 countries.
This tool delivers 2000+ financial instruments such as stocks, and crypto, and is more suited for novices and experienced Forex and CFD traders alike, and ready-made copy portfolios, all while taking good care of your privacy.
eToro USA LLC does not offer CFDs, only real Cryptocurrencies are available for US users. However, eToro offers real-time market analysis for Forex trades that show information about good trading pairings, buying and selling prices of all currencies, and more.
Let’s quickly look at its key features:
Intuitive, user-friendly platforms adapted for all skill levels
Best-in-class security protocols and strong data protection
$100,000 virtual portfolio to practice your strategy
CopyTrader technology for an easy start
Charts and advanced analysis tools
Seamless integration with the eToro wallet
eToro
Into Forex and CFDs trade? eToro is the safest choice among all the licensed brokers out there.
Disclaimer: 74% of retail investor accounts lose money when trading CFDs with this provider. You should consider whether you can afford to take the high risk of losing your money.
ZuluTrade is a simple and versatile tool that grants you access to exclusive access trading services in just a few steps.
The best part is that it comes packed with Forex tools such as a currency converter, margin calculator, and profit/loss calculator to get your Forex transactions boosted in no time.
It is a great choice to start trading Forex as it includes currency converters, a pip value calculator, a margin calculator, and in-depth profit/loss reports.
The Automator feature notifies you when it is a good time to act on your trades. It can also automatically execute actions based on pre-defined rules and settings.
Let’s quickly look at its key features:
Copy-trading feature to get you started
Automatic fully managed portfolio rebalancing with immediate initialization
Risk-free for up to one month
Social Charts to share your comments, exchange views with other traders and explore trends visually
Calendar to schedule your important economic events.
Zulu Trade
Everything you need for simple, and efficient Forex trading in a single app!
TradingView is a social/trader network where anyone is allowed to publish a trade idea. It is the ideal trading software for PC and is accessible even on mobile phones.
This advanced financial visualization platform comes with over a hundred pre-built studies for in-depth market analysis, covering the most popular trading concepts and indicators.
Users are allowed to draw anything on any chart. TradingView pen allows you to draw freely any line or shape.
You can effectively split your screen into many synced-up charts. It makes looking at the time frames much easier by enabling you to view multiple charts on the same screen.
Let’s quickly look at its key features:
Real time curency rates reports
Forex screener
Useful predictions
Technical analysis for your strategy
Interactive community with livestreams from experienced traders
Accountability by sharing or publishing your trade ideas
Trading View has three different subscription plans. Each plan includes a 30-day free trial.
TradingView
Get a true taste of customization with tools that scale from simple to complex to perfectly fit your Forex trading needs.
Forex.com is a resourceful trading platform that offers users insightful market analysis tools as well as the possibility to fully customize their strategies.
It lets you trade in over 80 FX pairs from the global market. It also offers support for trades between several cryptocurrencies.
The platform offers valuable performance analytics tools that assess your trading behavior. You get reviews on the timings of your trades, how your short and long trades perform, and an in-depth scorecard of overall performance.
This platform delivers real-time streaming stock, futures, Forex, options quotes, and analysis on the world’s stock markets that are delivered to PCs, laptops, and mobile devices as well.
eSignal’s user interface is built to let user quickly analyze the markets, as it offers quick insights right from the homepage.
The platform comes with customizable charts so you can pick the most important indicators for your goals and get personalized information.
The backtesting and scannning tools allow you to scale the effectiveness of your trading strategies before putting your money in the game.
Let’s quickly look at its key features:
The platform works at the highest possible speeds
eSignal provides you market data from 100 global markets
You can watch trends on the platform
eSignal also allows you to set your strategy and execute your best trades
eSignal has three main subscription plans, each with a 30-day money-back guarantee.
MetaTrader 4 for PC is the most powerful and convenient tool targeted at technical analytics and trading in the market allowing you to implement all kinds of strategies on any level of complexity.
You will have more tools at your disposal such as Instant Execution, trading from a chart, stop orders and trailing stop, trading history, and a tick chart as well.
Meta Trader 4 provides a robust trading system with support for three execution mdes and eight order types.
Let’s quickly look at its key features:
Algorithmic trading, expert advisors, and more
Access to the MetaTrader Market where you can purchase indicators and trading robots
The news and alert are helpful to inform you about the essential market events
Meta Trader is a free-to-use platform. Note that some costs may apply as your broker or market maker will place some charges on your trades.
ForexTrader Desktop is one of the most advanced trading platforms out there, and it’s designed for active traders who are looking for increased speed, flexibility, and top performance.
It lets you automate your trading strategies with access to 15 pre-defined automatic trading strategies for real-time buy and sell signals.
It also lets you customize your build using the Strategy Wizard within the platform.
With real-time information and headlines from Reuters Newswires and market commentary, Forex Trader allows you to stay on top of all markets.
Let’s quickly look at its key features:
The advanced charting includes customizable technical indicators.
The drawing tools will help you spot patterns and identify trading signals.
Currenex is a market-leading technology provider that offers high-performance technology to the FX community and also deep pools of liquidity for anonymous and disclosed trade execution.
It gives clients a unique service that comes with tailored access to uncovered and also undisclosed cash on just a single screen.
This is a premium source for FX liquidity in the market. Currenex’s real-time market data offers the best deals and bids, the size and depth of the market for increased insight.
Let’s quickly look at its key features:
Corporates will get broad liquidity and competitive pricing across a vast range of instruments
Currenex offers access to your complete trade history and audit trail
You will get an analysis of trading patterns and counterplay activity analysis as well
ActTrader offers a full-featured workspace targeted at traders for a better executing of trades and managing their accounts.
This is a feature-rich desktop application that allows you to monitor the market and also engage in online trading.
An ActFX strategy analyzes one or more charts, and it will automatically open and close orders and positions as well.
It will display these on various charts. You can backtest a strategy on the historical data, and you can also send commands to the strategy even while it’s running.
Each of the windows will show you information and provide access to specific functions. For example, the Dealing Rates windows lets you view the streaming rates, with detailed info on the instruments in the Dealing Rates Table.
Let’s quickly look at its key features:
You have convenient controls via FXVoyager Toolbar.
You can create, test, and run automated trading strategies via ActFX.
The software provides you an opportunity to make a smooth trade
Place a Market order straight from the Dealing Rated window.
Price alerts will let you know when the rate on an instrument reached the predefined level.
Start by learning the basics about the market and setting up a strategy. Know how much you can invest and what realistic goal you can achieve with that amount.
Use a reliable trading platform to assist you with useful information and automation solutions. You can even implement some copy-trading tactics and use strategies tested by experienced users.
The Forex broker should be regulated and should also offer either a selection of account types or any kind of customizability.
You should also check for the variety of currency pairs on offer, the availability of customer service,, and the quality of the trading platform as well.
Conclusion
Keep in mind that CFDs, crypto, and Forex trading are high-risk investments by nature. Make sure you keep the track of your expenses at all times with the Best Financial Investment Tracking Software.
Want to stay on top of the game when it comes to trading cryptocurrencies? Do you have difficulty comparing the value of your crypto coin to another currency? If so, then you will need a reliable, accurate converter.
That’s why we’ve compiled a list of the best cryptocurrency converter apps for Windows for your convenience.
The list offers you a cocktail of extensions, applications, and websites, so you have various options to choose from. Furthermore, all of these converters will work on the Windows 10 OS.
In addition, you can use precise crypto converting tools in order to find out the value of your virtual currencies.
If you need to convert BTC to ETH or backward, you can exchange such coins and other currencies using trustful exchange providers.
What are the best cryptocurrency converters for PC?
eToro is one of the most known social trading platforms and a multi-asset brokerage company. It was founded in 2007 and it’s still going strong with over 6 million traders.
Trading platforms can vary a lot in terms of user-friendliness. Luckily, the interface is quite nice and clean and the platform performs brilliantly. It’s well-suited for beginners and experienced traders alike.
The investment network can be used as a cryptocurrency converter. For any cryptocurrency available in your eToro wallet, you have the convert option which lets you choose what amount you would like to convert and to which currency.
For crypto-to-crypto conversions, there’s a fee of 0.1%. All the popular crypto assets are available in the wallet, so those are the ones you can convert from and to.
Besides converting currencies, you can also use eToro for trading purposes. We particularly liked the fact that you can buy and sell however you like and without limits.
eToro is regulated by the FCA in the UK, the CySEC in Cyprus, and ASIC in Australia. Considering this, we feel there is no need to worry.
eToro USA LLC does not offer CFDs, only real Cryptocurrencies are available for US users.
Finally, you can use the platform for free if you are only interested in watching the market for crypto, assets, stocks, currencies, indices, etc.
Disclaimer: Cryptoasset investing is highly volatile and unregulated in some EU countries. No consumer protection. Tax on profits may apply.
eToro
One of the best trading platforms with a built-in cryptocurrency converter
Disclaimer: This ad promotes virtual cryptocurrency investing within the EU (by eToro Europe Ltd. and eToro UK Ltd.) & USA (by eToro USA LLC).
Don’t invest unless you’re prepared to lose all the money you invest. This is a high-risk investment and you should not expect to be protected if something goes wrong. Take 2 mins to learn more.
Coinbase is one of the most convenient and simple-to-use cryptocurrency platforms out there. You can buy, sell or trade your coins as we speak.
Using this trading platform, you will convert between your currencies directly in your web browser or on your mobile device.
The platform allows you to convert between two cryptocurrencies instantly and exchange your Ethereum into Bitcoin asses.
This process follows some easy steps that anyone can do on their own. Using the intuitive interface of Coinbase, you should first log in and go to the Buy / Sell tab.
You can check your crypto wallet and see what amount you need to convert with other currencies. Afterward, complete the amount you need to convert with another cryptocurrency.
That being said, you should use this highly trusted crypto platform to easily convert your currencies without financial security problems.
Kraken is an exemplary platform to help you manage your crypto assets and exchange them rapidly with immediate results.
This crypto exchange service was founded back in 2011 and it’s one of the most trusted exchange services you might use.
Using Kraken is suitable even for beginners, so if you are new in this domain you can practically learn basic rules and how to trade directly on the platform.
More so, you can learn from the Kraken crypto guides and better understand to buy or sell cryptocurrencies according to market fluctuations or price changes.
At the same time, the platform gives you the highest security. With a team of experts behind, you’re protected against all digital attacks for your crypto investments.
You should also know about the high liquidity exchange service for quicker trade orders at a convenient price. Plus, the fees structure is extremely user-centered for your trading.
Binance is the complete cryptocurrency platform where you can buy or trade multiple currencies and convert between 600+ different coins.
By choosing this trading platform, you have the opportunity to manage your cryptocurrencies all in one place.
This web platform can hold all your currencies and help you convert them into new ones without difficulties.
You only have to log in to your Binance account and access the Convert portal. Besides the standard withdrawal limits, there are no other rules you have to worry about.
As said before, there are 600+ cryptocurrencies listed on this trading platform. You can select your coins and exchange them for any of the available currencies.
Using the crypto converter portal, you will exchange your assets smoothly without complications. There are no order books or extra fees you have to pay, so everything gets easier.
Concluding here, Binance is the go-to crypto hub that helps billions of users trade or convert their crypto coins securely without extra fees.
The name is pretty much self-explanatory. Bitcoin Auto-Converter is an extension that automatically converts cryptocurrencies on your Google Chrome web browser.
Here’s how it works. Once the extension is up and running, the extension will automatically convert BTC values to the currency of your choosing. It works on any website as long as you are using chrome.
If you are not interested in Bitcoin, then you also have the ability to choose an Altcoin.
Why do we recommend this product? Well, it’s original and convenient. Not to mention that you won’t have to install anything on your device.
Of course, there are disadvantages to this extension. The primary disadvantage is that there is no calculator that you can use if you want to convert a number that isn’t from a website.
Moreover, you can save precious time looking for different crypto calculator apps and convert BTC values found on other websites automatically.
You should thus consider this Bitcoin auto-converter to simplify the converting process and see the cryptocurrency values in seconds.
Cryptonator is a website that you can access on any web browser. Because it is on a website, you can access it on Windows Mobile, PC, and pretty much any device that has a web browser.
With Cryptonator you can convert crypto coins to other coins or crypto coins to fiat currencies.
There are hundreds of crypto coins you can choose from, but there are only a few fiat money available. Fiat money available in this platform includes US dollars, Euro, British Pound Sterling, Ruble, Euro.
If you are not interested in converting values to those 4 fiat currencies, then you will want to look for a different convertor.
On the other hand, if choose to use this website, then you will be glad to know that it is accurate, user-friendly, and convenient.
This comprehensive crypto platform includes multiple tools, like a secure wallet, exchange rates, and more. Plus, the website has the best crypto calculator app due to its simplicity and accuracy.
It is also worth noting that if you sign up for free, you will have access to additional services.
Looking for an all-in-one crypto coin application that is downloadable for Windows 10? With Coini you’re covered for every crypto action.
So the best thing about Coini is that your coins in your wallet are automatically converted. Of course, if you want to manually input coin balances, then you can use their very flexible calculator.
It really is an impressive app as it is filled to the brim with useful features. Here’s a quick rundown on what you will have access to in Coini.
Firstly, you have live monitoring of popular coins to keep track of all your cryptocurrencies in one place.
There is wallet value complemented with percentage changes into the currency of your choosing. You have the support of a wide range of fiat money and crypto coins.
Other helpful features that come with Coini are the latest news related to crypto coins, live charts from Trading View, and notifications about price changes.
The bottom line is that Coini is probably one of the best applications you can use on your PC if you do not mind downloading a program. It has a lot of useful features for serious traders and investors.
However, it isn’t recommended for people who are looking for a quick, lightweight convertor. Furthermore, the app only works on Windows 10 PC and not on any mobile phones.
CryptoLoot is another great website that lets you convert digital currencies. It is user-friendly, convenient, and reliable.
All you have to do is choose the currencies you want to convert, type in the amount, then you will be given the exact value.
You can use this tool for selling, buying, trading, etc. In addition, there is a switch option in the converter. This tool allows you to easily find out the equivalent value in other crypto coins.
The great thing about CryptoLoot is that it not only has many digital currencies you can choose from, but it also has a whole lot of fiat currencies you can convert to.
Unfortunately, CryptoLoot doesn’t have other services that you can use such as charts and personal wallets. This website is best for people who are looking for a converter and nothing else.
This is the ideal crypto platform if you struggle with converting your cryptocurrency to different currency units, so don’t hesitate about it.
CoinGecko is a website that has an amazing amount of features. When you are looking up a crypto coin you can check out a very detailed overview of the digital currency. The overview includes a price chart that is accurate and updated regularly.
It also includes information about the coin’s market cap, trading volume, 24h low/ 24h high, an all-time high, and more.
They also include helpful pie charts and a short “About” section of each coin. You can learn so much from just one coin about really any digital coin out there.
In addition to the overview, you have features like trading exchanges, widgets, discussion forums, mining calculators, etc. It has so much information that you can use to help you invest.
Another feature I find especially helpful is their buzz section. Here you can find a wide range of articles that are related to crypto coins.
So as you can see CoinGecko is so much more than a converter. I highly recommend this website as it seems to offer the most tools. It is also very user-friendly.
If you are not sure what something is, you can usually just hover your mouse over it and a helpful, brief explanation will appear.
In the first place, it depends on the cryptocurrency platform you’re using. There is multiple useful converter software that will automatically exchange between different currencies in seconds.
To proceed with the exchanging process, you should first decide the number of crypto coins you need to convert and then access the Buy/Sell section in your platform.
After this, simply insert the amount of cryptocurrency and what other currency you want to convert in.
More practically, this is how you can convert your currency in eToro Money crypto wallet:
Use eToro Money app on your mobile device and sign in to your account.
Under the Crypto tab, insert the cryptocurrency you need to convert.
Press the Convert button.
On the next page, select the amount you want to convert and the received cryptocurrency.
Verify all the details again and slelect Convert.
What is the best way to convert cryptocurrency to real money?
The most simple and efficient method to convert your cryptocurrency funds into cash is with exchange platforms like Kraken or Coinbase.
You can sell your crypto assets to such exchange services and withdraw the cash straight to your bank account.
In order to avoid money laundering illegalities, you need to withdraw your money from the same bank you deposited with.
This process is not the fastest one, and it can take up to 4-6 days in the US, also depending on the country.
Plus, you can convert Bitcoin through a broker. This process is similar to converting fiat currencies, so you deposit your crypto assets to exchange and request the withdrawal through a broker.
There you have it, the best cryptocurrency converters for Windows. There is a wide variety listed above so that you can find one that fits your specific needs and wants.
If you have any other converters for Windows that deserve to be on this, then feel free to comment.
MIDI is the technical term for Musical Instrument Digital Interface, and it consists of a device that is able to connect to a multitude of musical devices.
MIDI drivers were originally made to control keyboards from a computer. MIDI drivers have evolved over the years and are now used by millions of Windows 10 users across the planet.
A particular case concerns Windows 10 Bluetooth midi drivers as these seem to be even more delicate and can easily fail to be recognized by Windows.
Does Windows 10 support MIDI over Bluetooth?
It does, yes. Simply open the Settings on your PC and go to Devices, then Bluetooth & other devices. In here, select Bluetooth and pair your device.
However, some users reported that their MIDI device was no longer recognized following a Windows update. If that is also your case, here’s what we suggest:
Delete all the connected MIDI devices and try to pair them again (as shown above)
Right-click the volume icon on the taskbar and select Sounds. If your MIDI device is missing, choose to Show disconnected/disabled devices and see if that helps.
How do I install MIDI drivers on Windows 10?
1. Use the Windows troubleshooter
Navigate to the Taskbar search box.
Type Troubleshoot.
Select Troubleshoot from the list.
Select Hardware and Devices from the Troubleshooter.
Once the troubleshooter opens click Next.
Select the program that is not functioning from the populated list.
Select the desired troubleshooting option.
Most hardware is plug-and-play. This means that they just plug into the computer and the computer will install the correct drivers.
This doesn’t always work out in the users’ favor and the diver has to be downloaded from a different source. Before taking the time to look for a driver perform the following tasks to troubleshoot the issue:
The troubleshooter will test the program to ensure that it is working. Run the compatibility troubleshooter for any other programs that are not compatible.
Not Compatible? Not a Problem
Click in the taskbar search box.
Type Run Programs.
Select Run Programs Made for Previous Versions of Windows.
This will open the Compatibility Troubleshooter.
Follow the on-screen prompts.
So you’ve tried to run the troubleshooter and it didn’t work. That’s okay, get back up and try again. There is a way to make your program compatible with your version of Windows. Here’s how to do it:
Ensure that you run the Compatibility Troubleshooter for each program needing drivers.
Manually installing drivers is your next option. Manual installation of drivers can be dangerous if you are downloading drivers from an unknown or unrecognized source.
Ensure that all drivers are downloaded from trusted sources such as manufacturers’ websites.
Update drivers automatically
If you don’t want to go through the trouble of manually searching the web for the latest available driver, we suggest using a third-party driver updater software that will automatically do it for you.
Not only will the software update your firmware easily, but it will also constantly scan your device for new drivers by itself, so you don’t even have to do that.
MIDI drivers are significantly harder to install in Windows 10 due to a number of compatibility issues. Each one of the fixes mentioned in this article could potentially fix the issue for your driver.
If you’ve run out of options call the manufacturer for your device and ask for assistance or for a location of compatible drivers.
That’s about it for this article. If you have anything to add regarding the subject, please feel free to do so in the comment section below.