The icmon.exe process is a part of the Sophos antivirus and is closely linked to the InterCheck Monitor. It’s not a critical system file, and removing it won’t affect the functioning of Windows or MacOS (.app file). The icmon.exe process often causes a high CPU or RAM usage.
You can terminate the process in the Task Manager or Activity Monitor, and to remove it, uninstall the Sophos antivirus or reset the PC.
How can I remove icmon.exe?
To start with, disable Live Protection in the Sophos antivirus, and it should prevent the icmon.exe process from running.
Tip
The steps listed here are for a Windows PC, though the same concept applies to MacOS as well.
1. Run a malware scan (if Sophos antivirus is not installed)
Press Windows + S to open Search, type Windows Security in the text field, and click the relevant result.
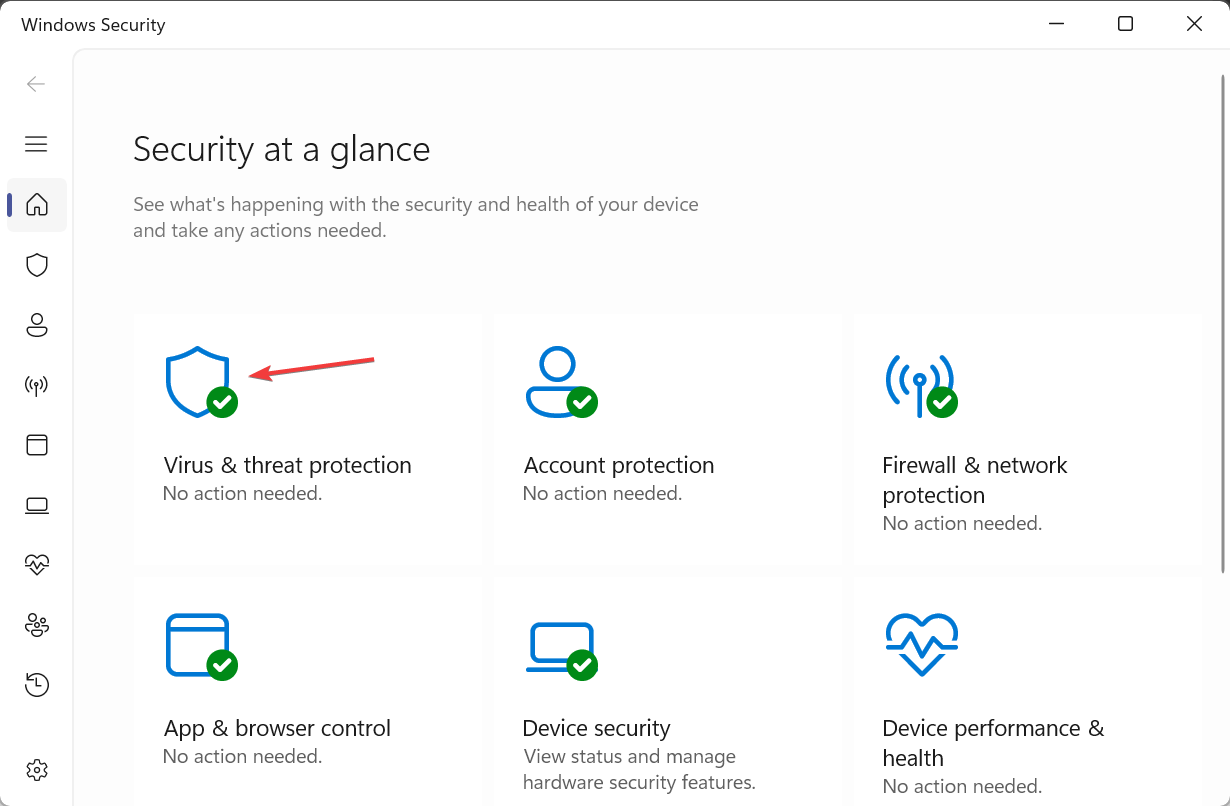
Click on Virus & threat protection.
Click on Scan options.
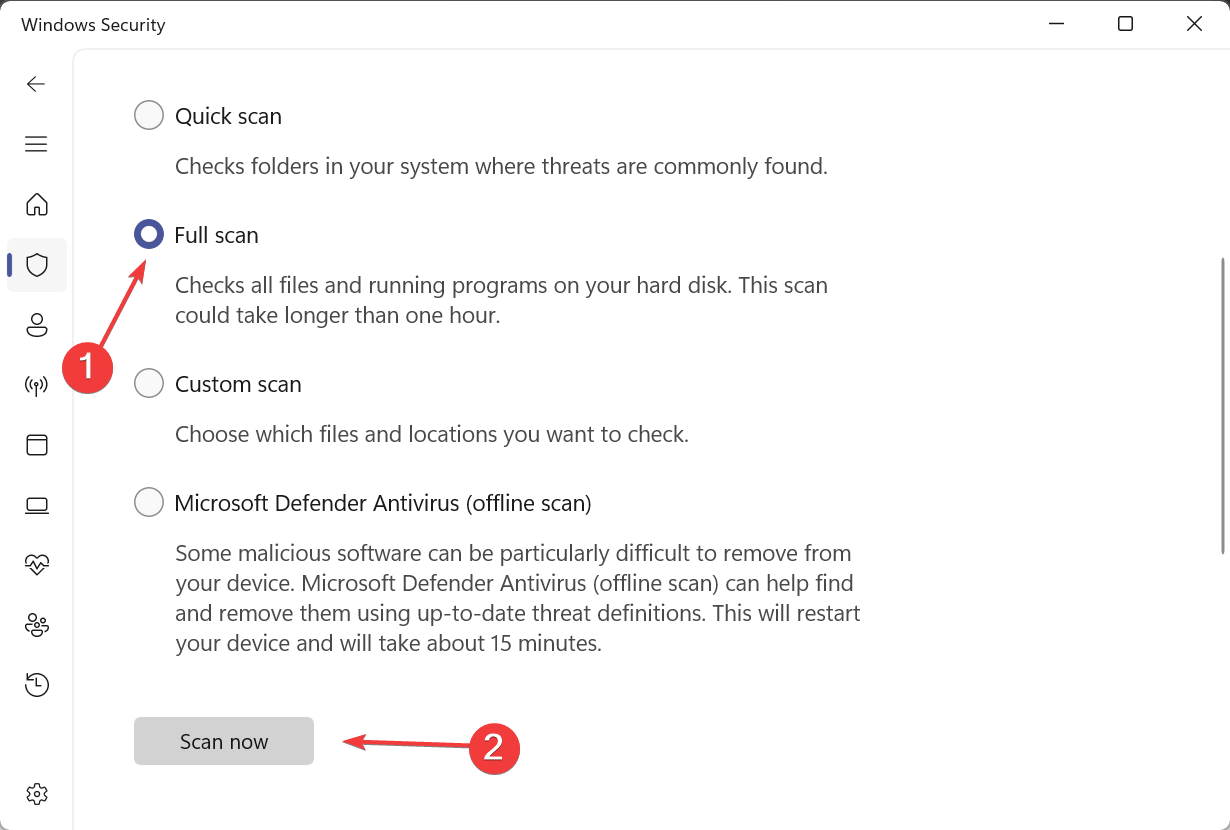
Select Full scan, click the Scan now button, and let Windows Security look for any malware.
If you haven’t installed the Sophos antivirus, the icmon.exe file is likely a virus disguised as the program’s process. We have seen it with the tv_w32.exe process.
2. Uninstall the Sophos program
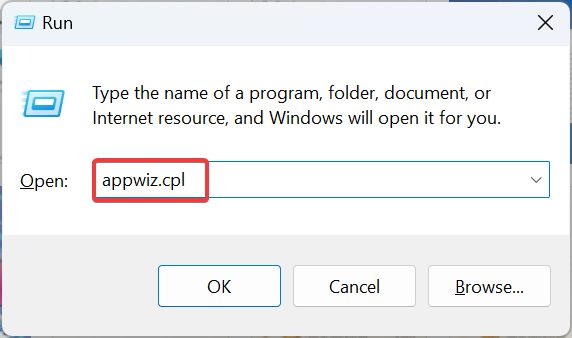
Press Windows + R to open Run, type appwiz.cpl in the text field, and hit Enter.
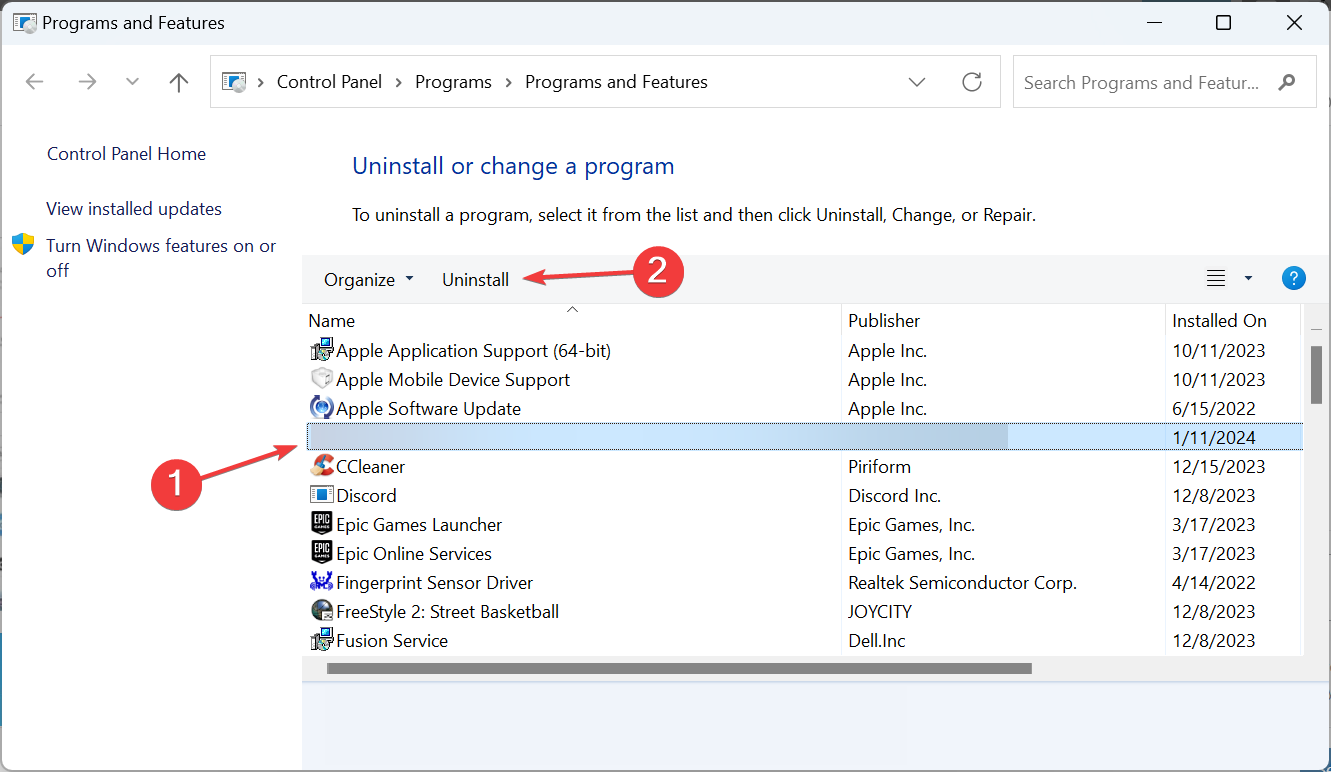
Select the Sophos antivirus from the list of programs, and click Uninstall.
Follow the on-screen instructions to complete the process.
Similarly, remove any other programs from Sophos and reboot the PC for the changes to apply.
When you uninstall the program, i.e., Sophos antivirus, the icmon.exe file is automatically deleted. If that doesn’t happen, use a dedicated uninstaller software to get rid of all leftover files and Registry entries.
Also, removing the icmon.exe file helps eliminate software conflicts, especially with C-Gate, a component of C-Bus Toolkit.
Besides, since you have removed Sophos, we recommend installing an effective antivirus solution to secure the PC. In the absence of any, Windows Security will take over!
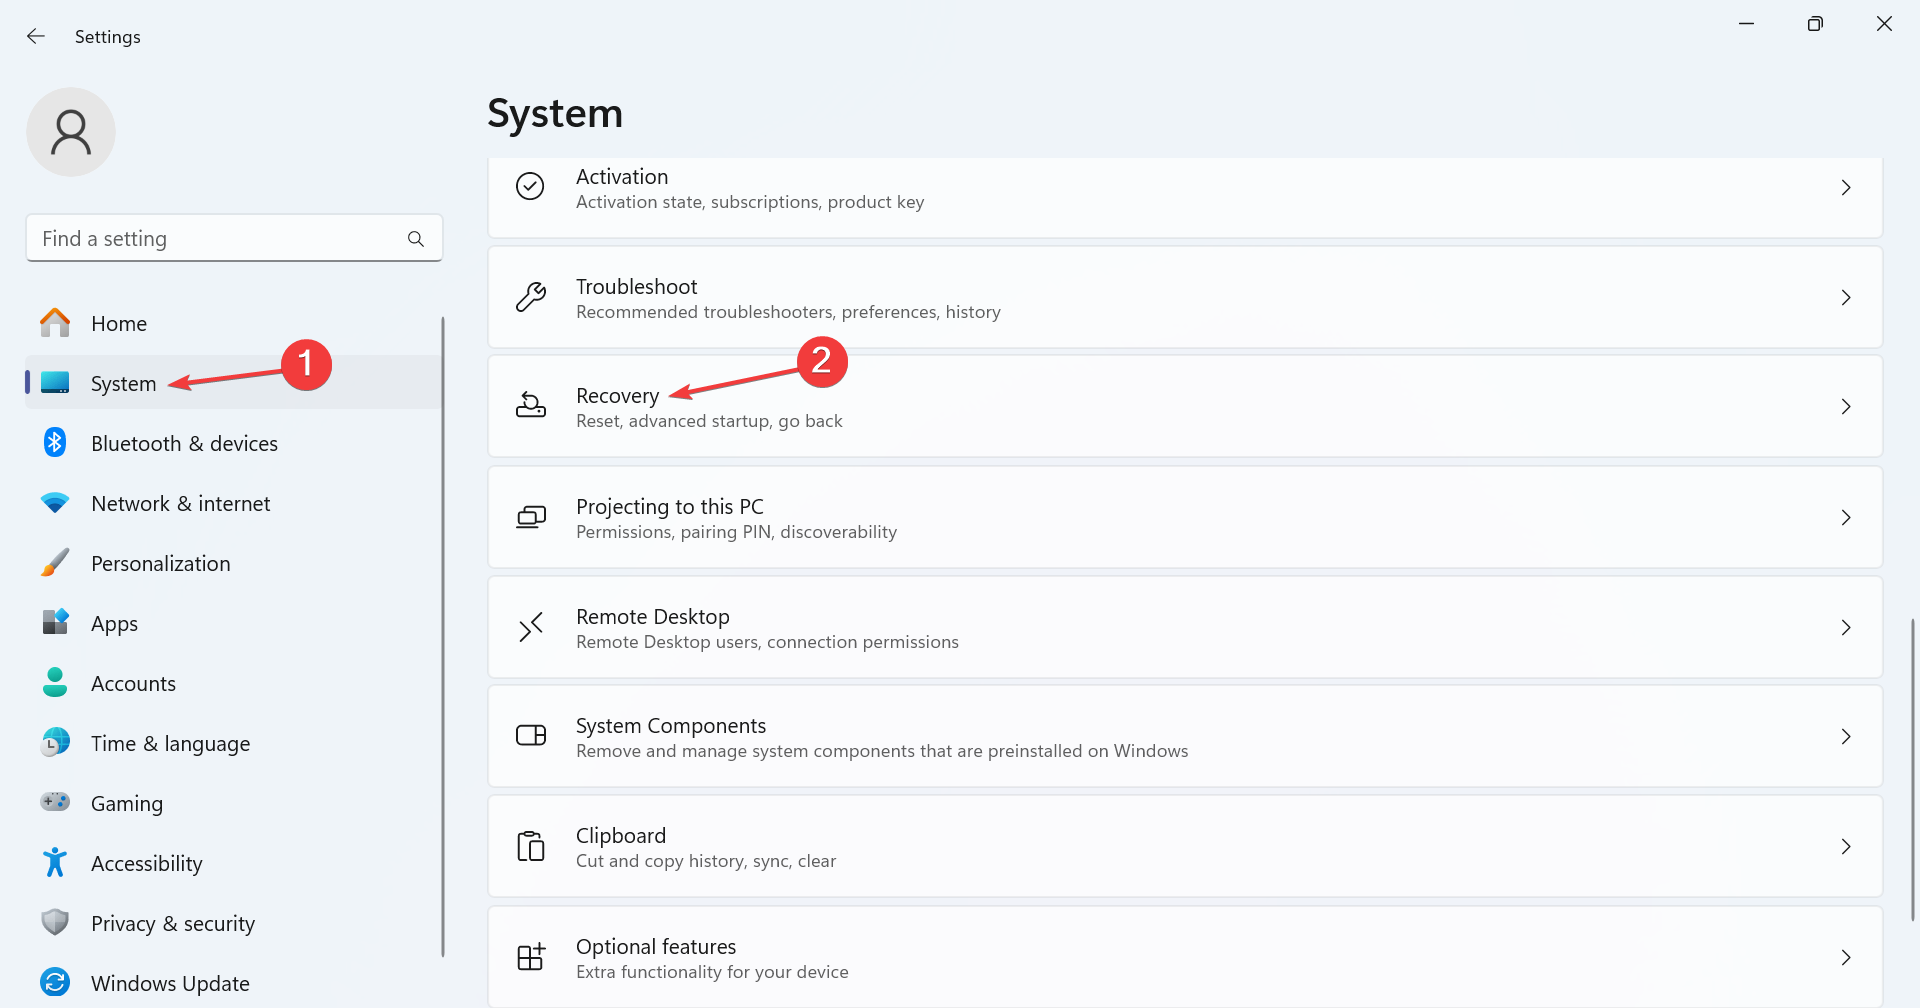
Press Windows + I to open Settings, navigate to the System tab, and click on Recovery.
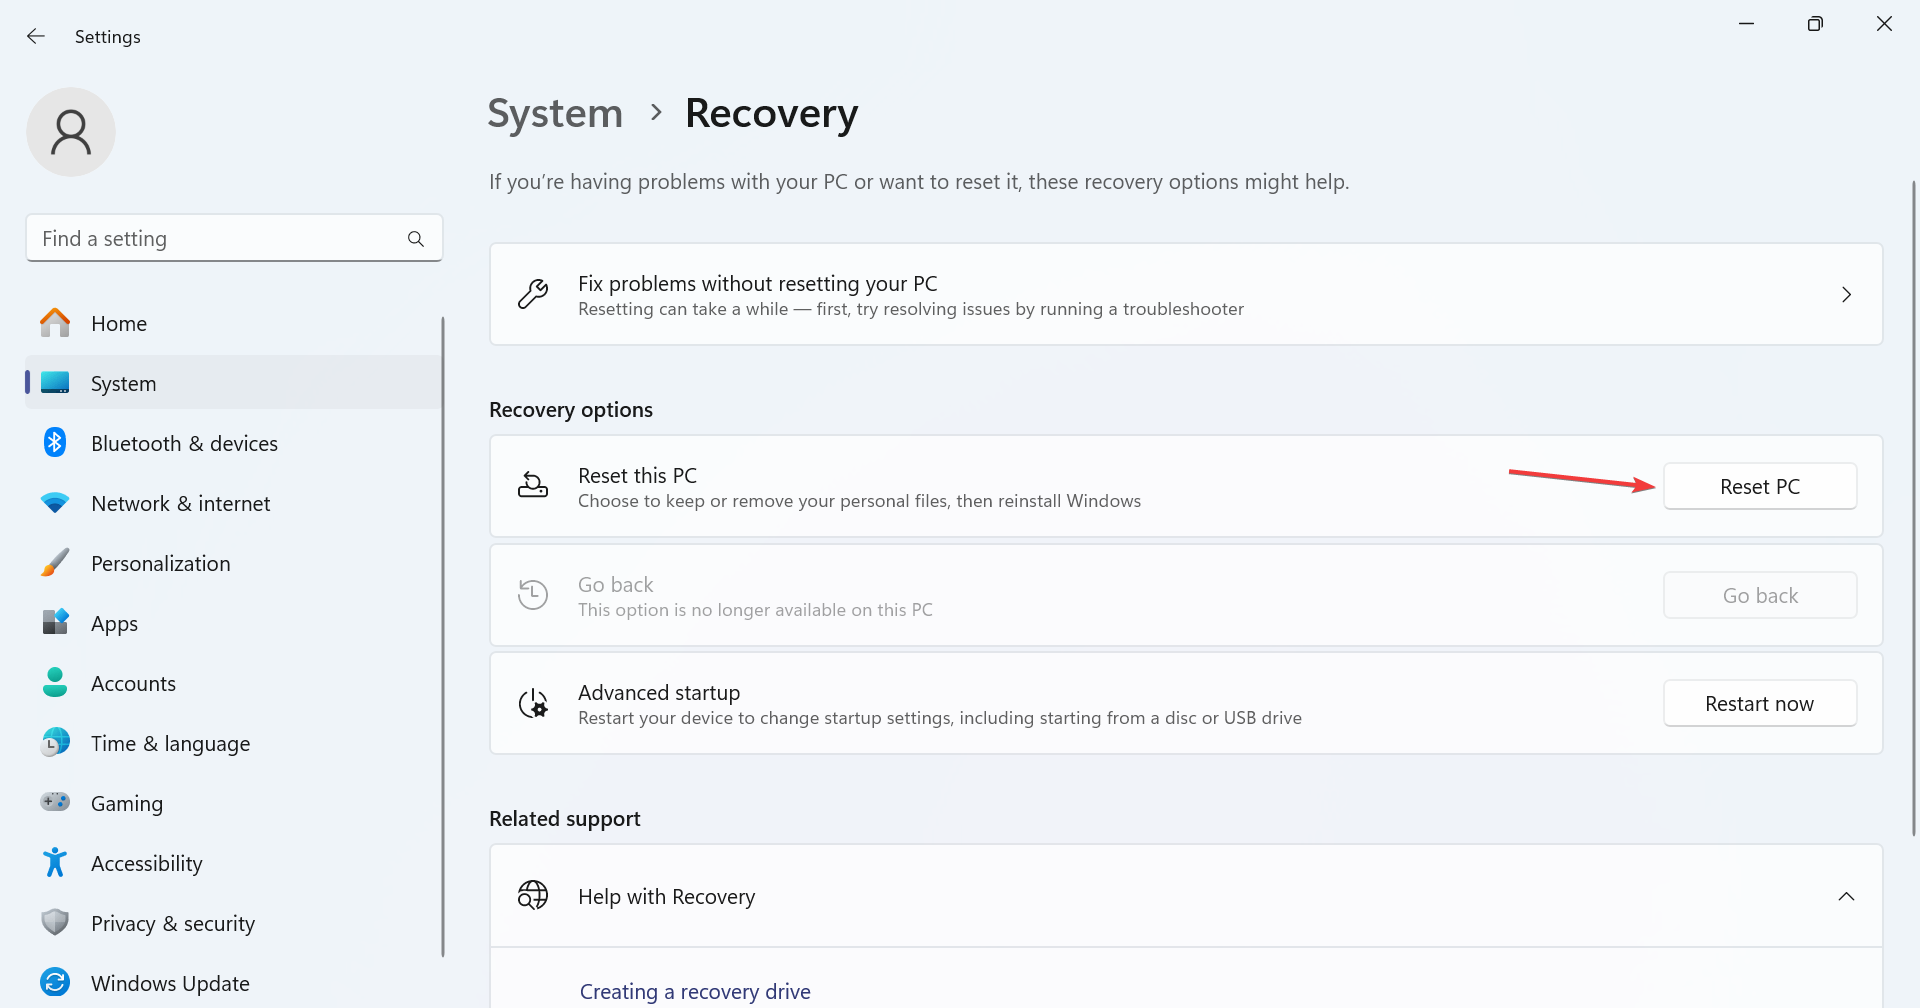
Click the Reset PC button.
Choose the Remove everything option.
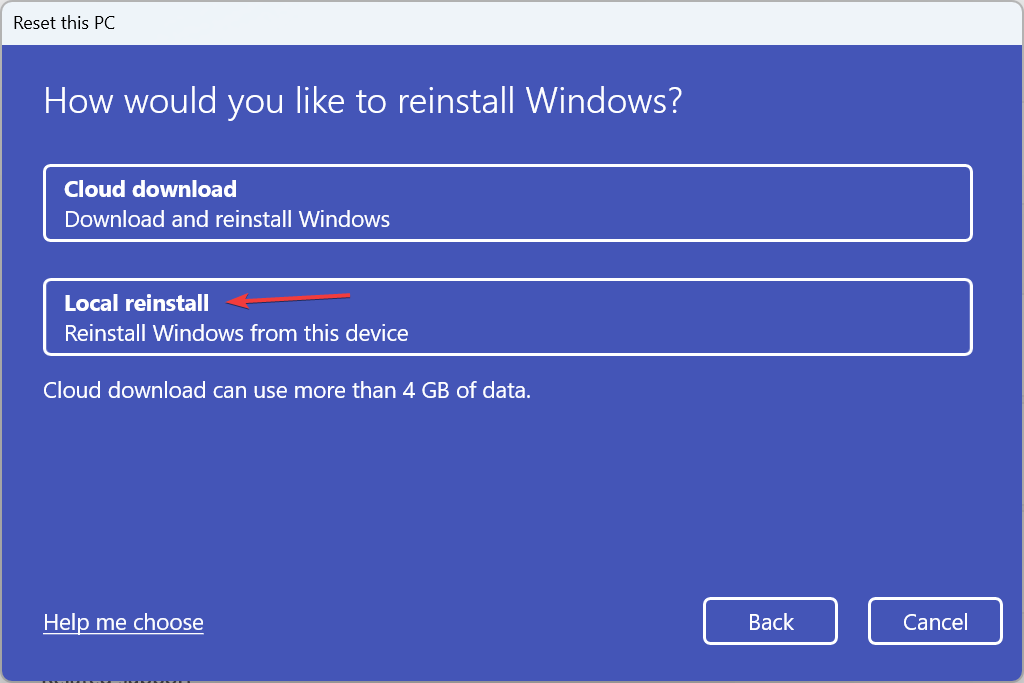
Click on Local reinstall.
Check the current reset settings and click on Next to confirm. To reconfigure anything, click on Change settings.
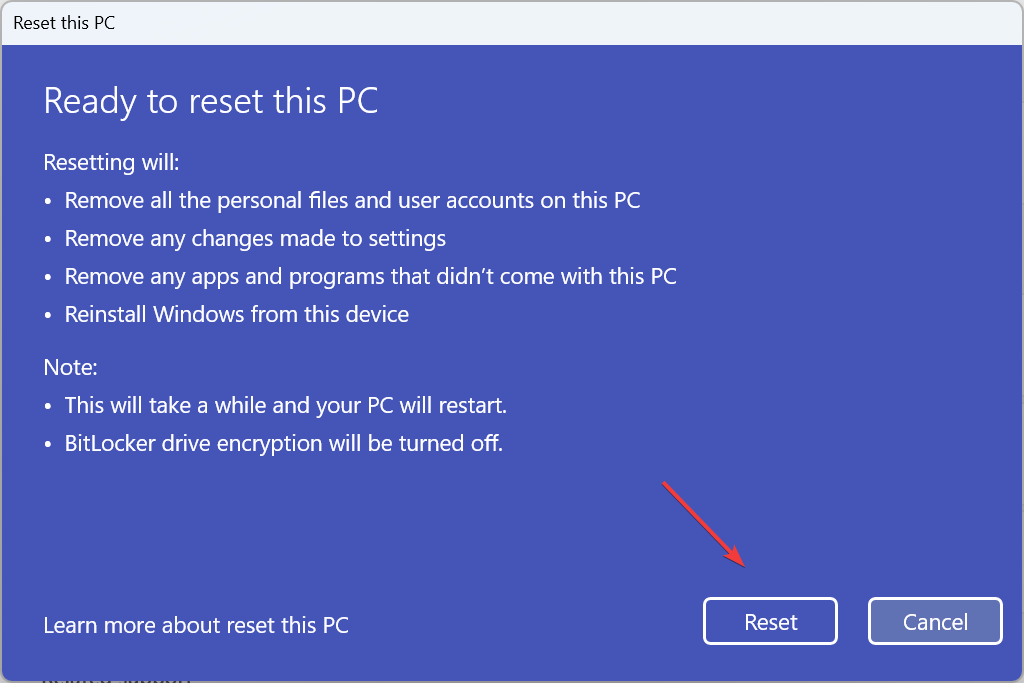
Finally, click on Reset to start the process. The reset may take between 30 minutes to 2 hours.
You should only reset the Windows PC if the icmon.exe process still consumes high system resources or is listed in the Task Manager. Otherwise, removing the Sophos antivirus should suffice.
A Waisheph pop-up notification may appear while you’re browsing, prompting you to allow notifications. If you’re not careful, granting permissions to this site could lead to a series of attacks on your PC so here’s how to remove this PUA.
Waisheph is a pop-up adware that infects computers and displays unwanted advertisements. It is designed to trick you into subscribing to its browser notifications, allowing it to send pop-up spam directly to your computer.
How do I remove Waisheph from my PC?
1. Clear browser cache and cookies
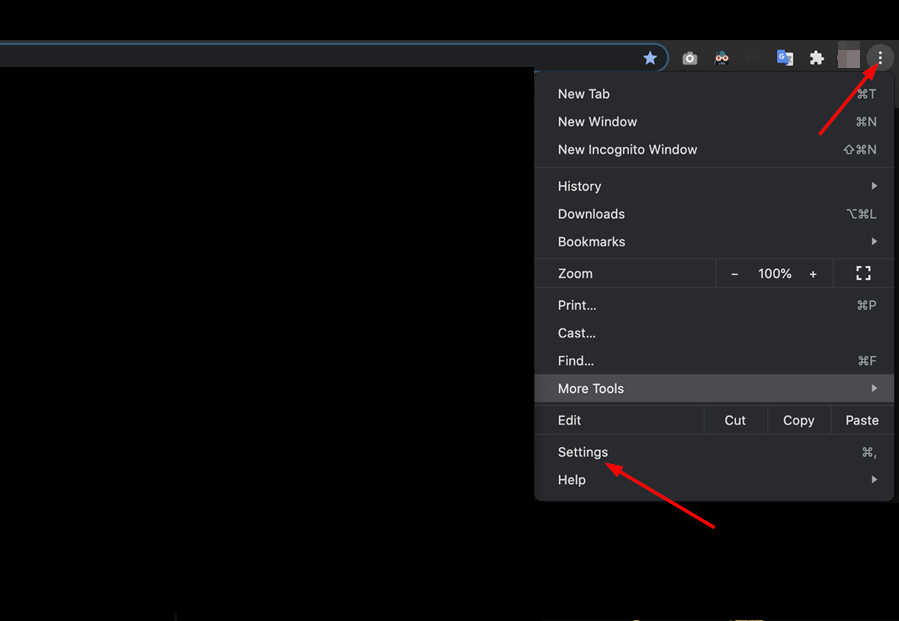
Launch your browser (we’ll be using Chrome for this step) and click the three vertical ellipses in the top right corner.
Select Settings.
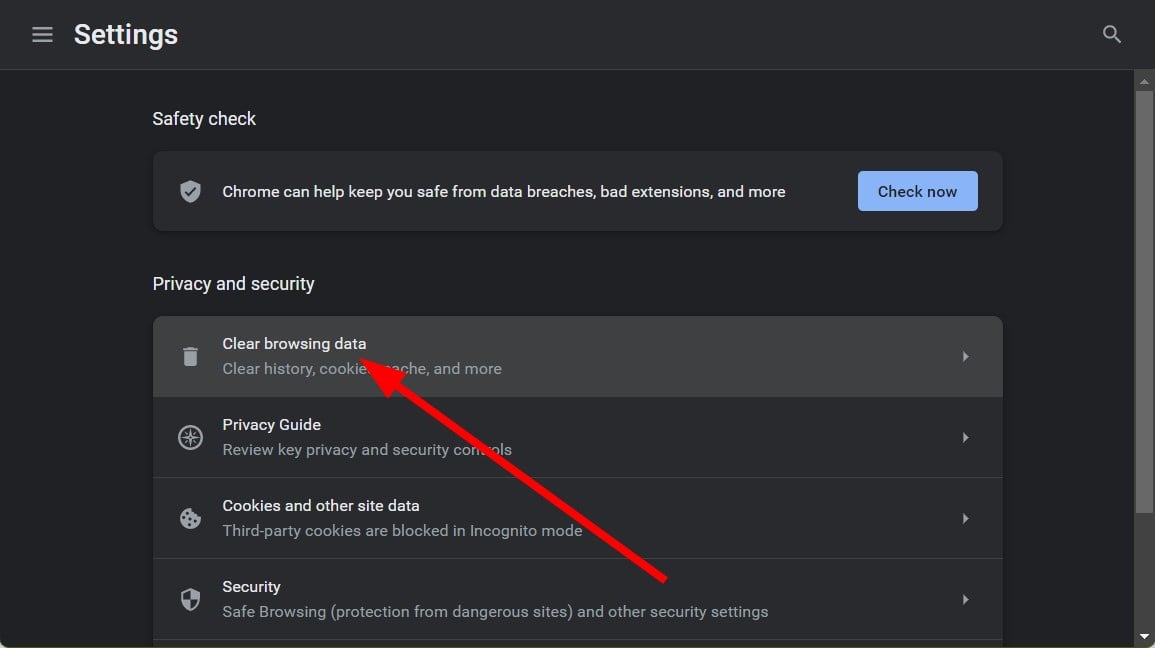
Click on Privacy and security, then select Clear browsing data.
Check Cookies and other site data and Cached images and files, then hit Clear data.
2. Disable malicious extensions
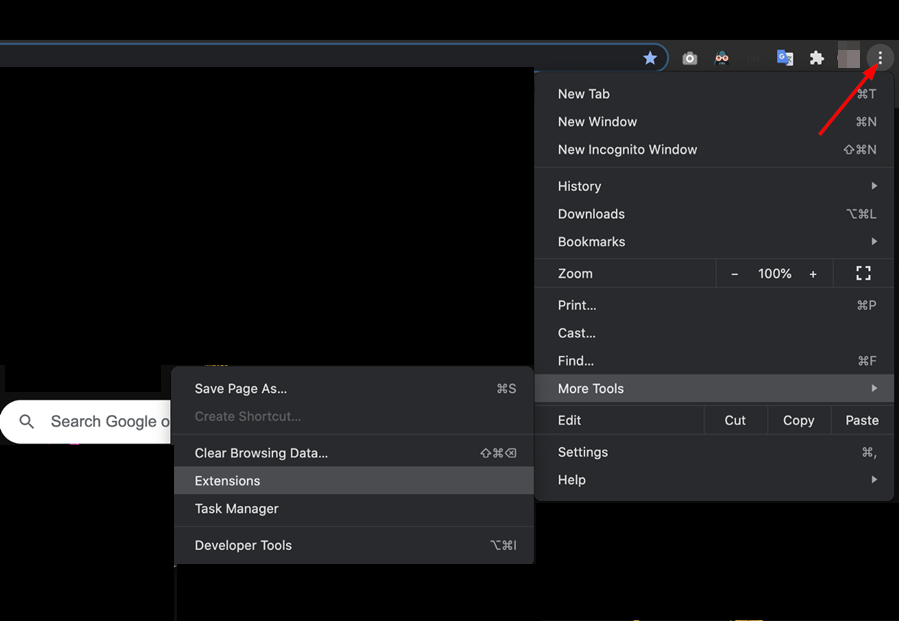
Navigate to your Chrome browser and click on the three ellipses at the top right corner.
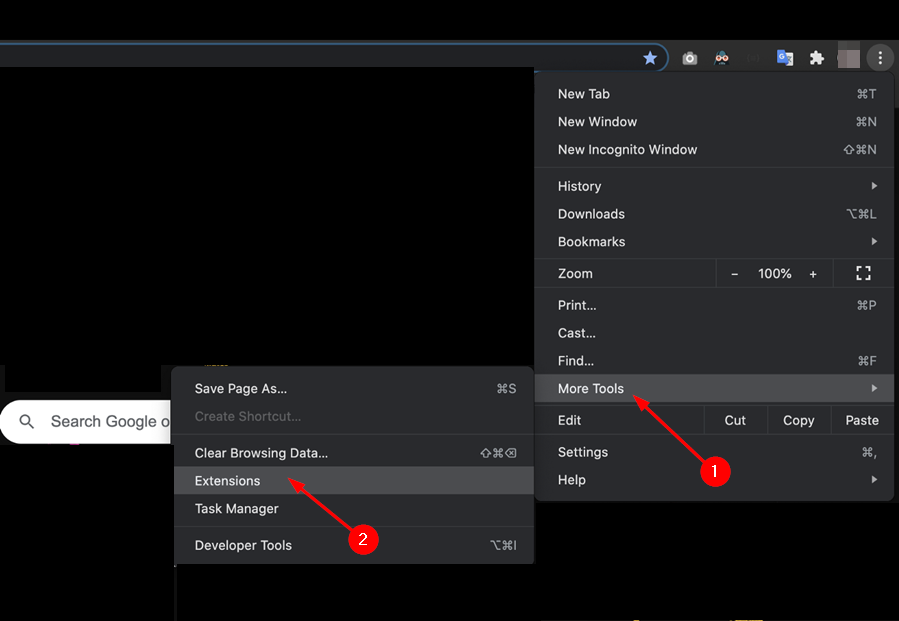
Select More tools, then click on Extensions.
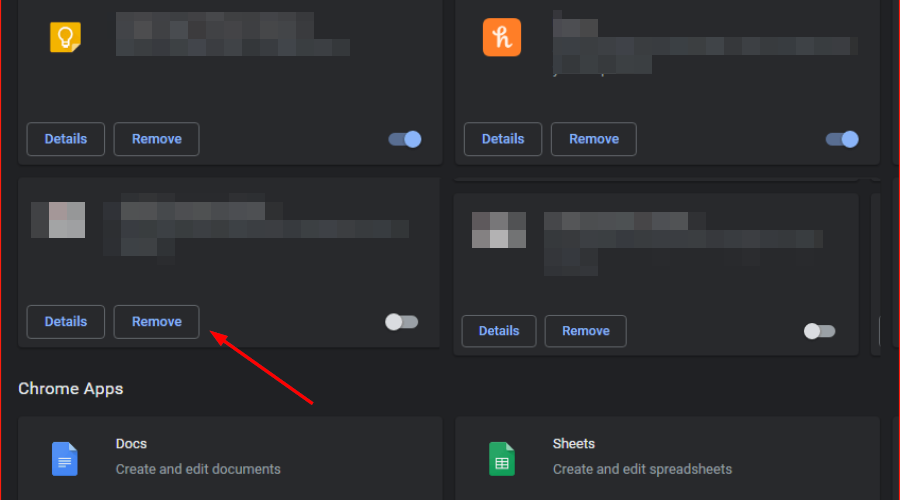
Navigate to the extension you wish to remove, then click on Remove. You may have to remove all extensions and then install them one by one until you find the culprit.
Confirm in the new pop-up dialog box that you wish to remove the extension.
Restart your browser and see if the waisheph pop-up appears again.
3. Run a virus scan
3.1 Browser scan
Open your Chrome browser and click on the three vertical ellipses at the top right corner.
Select Settings.
Next, click on Reset and cleanup then select Cleanup computer on the right.
Hit the Find button next to Find harmful software.
Wait for the scan to finish and remove any recommended software.
3.2 System scan
Click on the Start Menu icon, search Windows Security, and click Open.
Select Virus & threat protection.
Next, press Quick scan under Current threats.
If you don’t find any threats, proceed to perform a full scan by clicking on Scan options just below Quick scan.
Click on Full scan, then Scan now to perform a deep scan of your PC.
Wait for the process to finish and restart your system.
As much as Windows Defender has advanced security tools, some malware does a good job at disguising and may bypass detection. Such cases will require the reinforcement of third-party virus removal tools.
3. Uninstall suspicious programs
Hit the Windows key and click on Settings.
Click on Apps, then select Apps & features.
Find apps you did not install, click on the three ellipses, and select Uninstall.
Confirm uninstallation in the next dialog box that pops up.
Once you’re done, do a cleanup of remnant files and a Disk Cleanup to get rid of any unwanted files. If you occasionally find yourself with unknown apps in your system, you’ll need to be more proactive in blocking PUAs. They can slow down your PC and install harmful software.
Open your Chrome browser and click on the three vertical ellipses at the top right corner.
Select Settings.
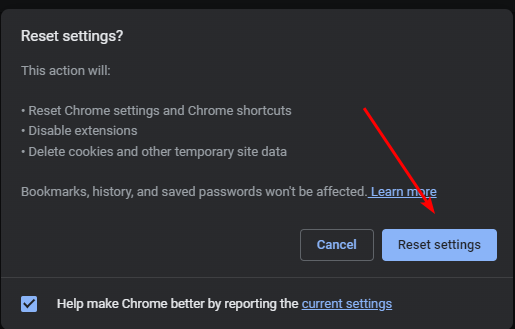
Next, click on Reset and cleanup, then select Restore settings to their original defaults.
Confirm Reset settings in the next dialog box.
If a browser reset doesn’t do the job, you may have to do a clean install of your browser. In some cases, the damage done by the waisheph malware could be extensive.
The above steps are not only great for the waisheph malware but any other PUA that may find itself on your PC. Do let us know of any additional thoughts or comments you may have on this topic.
The tv_w32.exe file is linked to TeamViewer, a program used to access the PC remotely. It’s one of the many executable files critical to the effective functioning of TeamViewer. Deleting it will lead to problems with the program.
We have recently encountered cases where hackers injected the PC with the malicious file tv_w32.exe to trick users, and several antivirus solutions flagged it. So, it’s important that you first verify the file’s authenticity. Let’s find out if the tv_w32.exe on your PC is safe!
How do I fix tv_w32.exe errors?
Tip
The first two solutions here detail the steps to identify whether tv_w32.exe poses any threat. Once you have verified that, head to the fixes listed next.
1. Check the file location
Your primary approach should be to check where tv_w32.exe is stored. The actual and verified executable file is usually stored in the TeamViewer folder in Program Files or Program Files(x86) on the C: drive.
A malware or virus disguised as tv_w32.exe is usually found in the following path, where Username is the active user profile:C:\Users\Username\AppData\Roaming
When we looked for similar malware, the tv_w32.exe executable file was coupled with the tv_w32.dll, tv_x64.dll, tv_x64.exe, and tvr.cfg files and stored in the MicrocoftUrdateNT folder.
2. Scan the PC for malware
Press Windows + S to open Search, type Windows Security in the text field, and click on the relevant result.
Click on Virus & threat protection.
Now, click on Scan options.
Choose Full scan from the list of options, and click on Scan now.
Wait for the scan to complete. It will take 15-45 mins to complete.
If the built-in Windows Security is unable to detect the malware, we recommend using an effective antivirus solution to run the scan, such as TotalAV. Also, you could individually scan the tv_w32.exe file, but we recommend running a full system scan.
A scan also helps identify the authenticity of the icmon.exe file.
3. Reinstall TeamViewer
Press Windows + R to open Run, type appwiz.cpl in the text field, and hit Enter.
Select TeamViewer from the list of applications, and then click on Uninstall.
Follow the on-screen instructions to complete the process.
Press Windows + I to open Settings, go to the System tab, and then select Recovery from the right.
Click the Reset PC button.
Click on Remove everything.
Choose Local reinstall to later reinstall Windows from the device itself.
Verify the reset settings, and then click on Next. Click on Change settings to reconfigure things, if required.
Finally, click on Reset to start the process.
Remember, a factory reset of Windows is effective both against tv_w32.exe error and if the file is a virus. In the case of the latter, you must clear all the files since many might have been infected. Run a scan and move any critical ones to an external drive.
Microsoft is constantly adding new features to the Edge browser to make it useful and user-friendly for all. Recently, the company added a Screenshot button for the browser’s AI assistant to explain images. Now, Edge is testing a new Ask Copilot option in the context menu of highlighted text to get instant explanations without prompts.
Until now, when you select text on a web page and copy it, Copilot asks what to do with it. After submitting the text, you are presented with options like Explain, Revise, Summarize, or Expand. This requires additional clicks and decision-making, which might not always be ideal when you’re in a hurry.
Microsoft is now making the process much simpler in the Edge browser on Windows 11. In the latest Canary version, if you highlight any text and right-click it, you’ll notice a new context menu entry, Ask Copilot. When you select it, Copilot instantly presents explanations without the need to go through multiple prompts and clicks.
How to use the new Ask Copilot option in Microsoft Edge
Open Microsoft Edge.
Right-click on the portion of the webpage you want to understand better.
Select the Ask Copilot option from the context menu.
Copilot will do the rest.
The main benefit of this new experience is speed. Imagine you’re reading an article, researching a topic, or studying a complex concept and are pressed for time or need a quick clarification. Copilot now delivers much faster responses when using the Ask Copilot option.
That’s why the new feature is a game-changer for efficient browsing. Next time you encounter a puzzling phrase, a complex concept, or a technical term, remember to select it, right-click, and ask Copilot. The answers are at your fingertips!
What’s your take on the Edge’s new Ask Copilot option in the context menu? Let us know your thoughts in the comments below.
You might often find that their Camera says USB storage is running out of space, even when there’s sufficient free space on the phone.
The problem appears when the device is unable to find storage to save the captured photos, either on the SD card or the internal storage. When we faced the problem, one of the three: renaming the DCIM folder, clearing the app cache, or factory resetting the device, helped us fix things in no time!
To start with, restart the device and try accessing the camera again. Also, remove and then reinsert the SD card if the phone has one.
What can I do if the USB storage is running out of space?
1. Clear the app cache
Open the Android Settings, and go to Apps.
Choose an app that takes up a high storage space in terms of cache. A few examples include Facebook, Instagram, Twitter, and YouTube.
Tap on Storage.
Now, tap on Clear data and Clear cache and choose Yes in the confirmation prompt.
Similarly, clearly the cache for other apps.
In our experience, the app cache can take up a few GBs of storage on the phone, and clearing it should fix the USB storage is running out of space error on Xiaomi. Also, if you had previously inserted an SD card, make sure to forget it within the phone Settings.
As per our research, the built-in camera app showed USB storage is running out of space on Samsung and other devices, while third-party camera apps worked fine.
A quick Play Store search should yield several results. Choose one that’s compatible with your device and offers a user-friendly interface.
5. Factory reset the device
Open the Android Settings, and go to General management.
Tap on Reset.
Choose Factory data reset from the list of options.
Scroll down to the bottom and tap on Reset.
Confirm the reset and wait for the process to complete.
After the reset, you should be able to get rid of the USB storage is running out of space camera app error. Remember, it will delete all the files and apps on your internal storage, so make sure you go with it as a last resort.
So, now you know what to do when the camera throws the USB storage is running out of space error. Clearing the Camera app cache and renaming the DCIM folder fixed the problem for us many times.
However, freeing up some space on your device or using a different camera app also worked for some of the WR software experts from the lab.
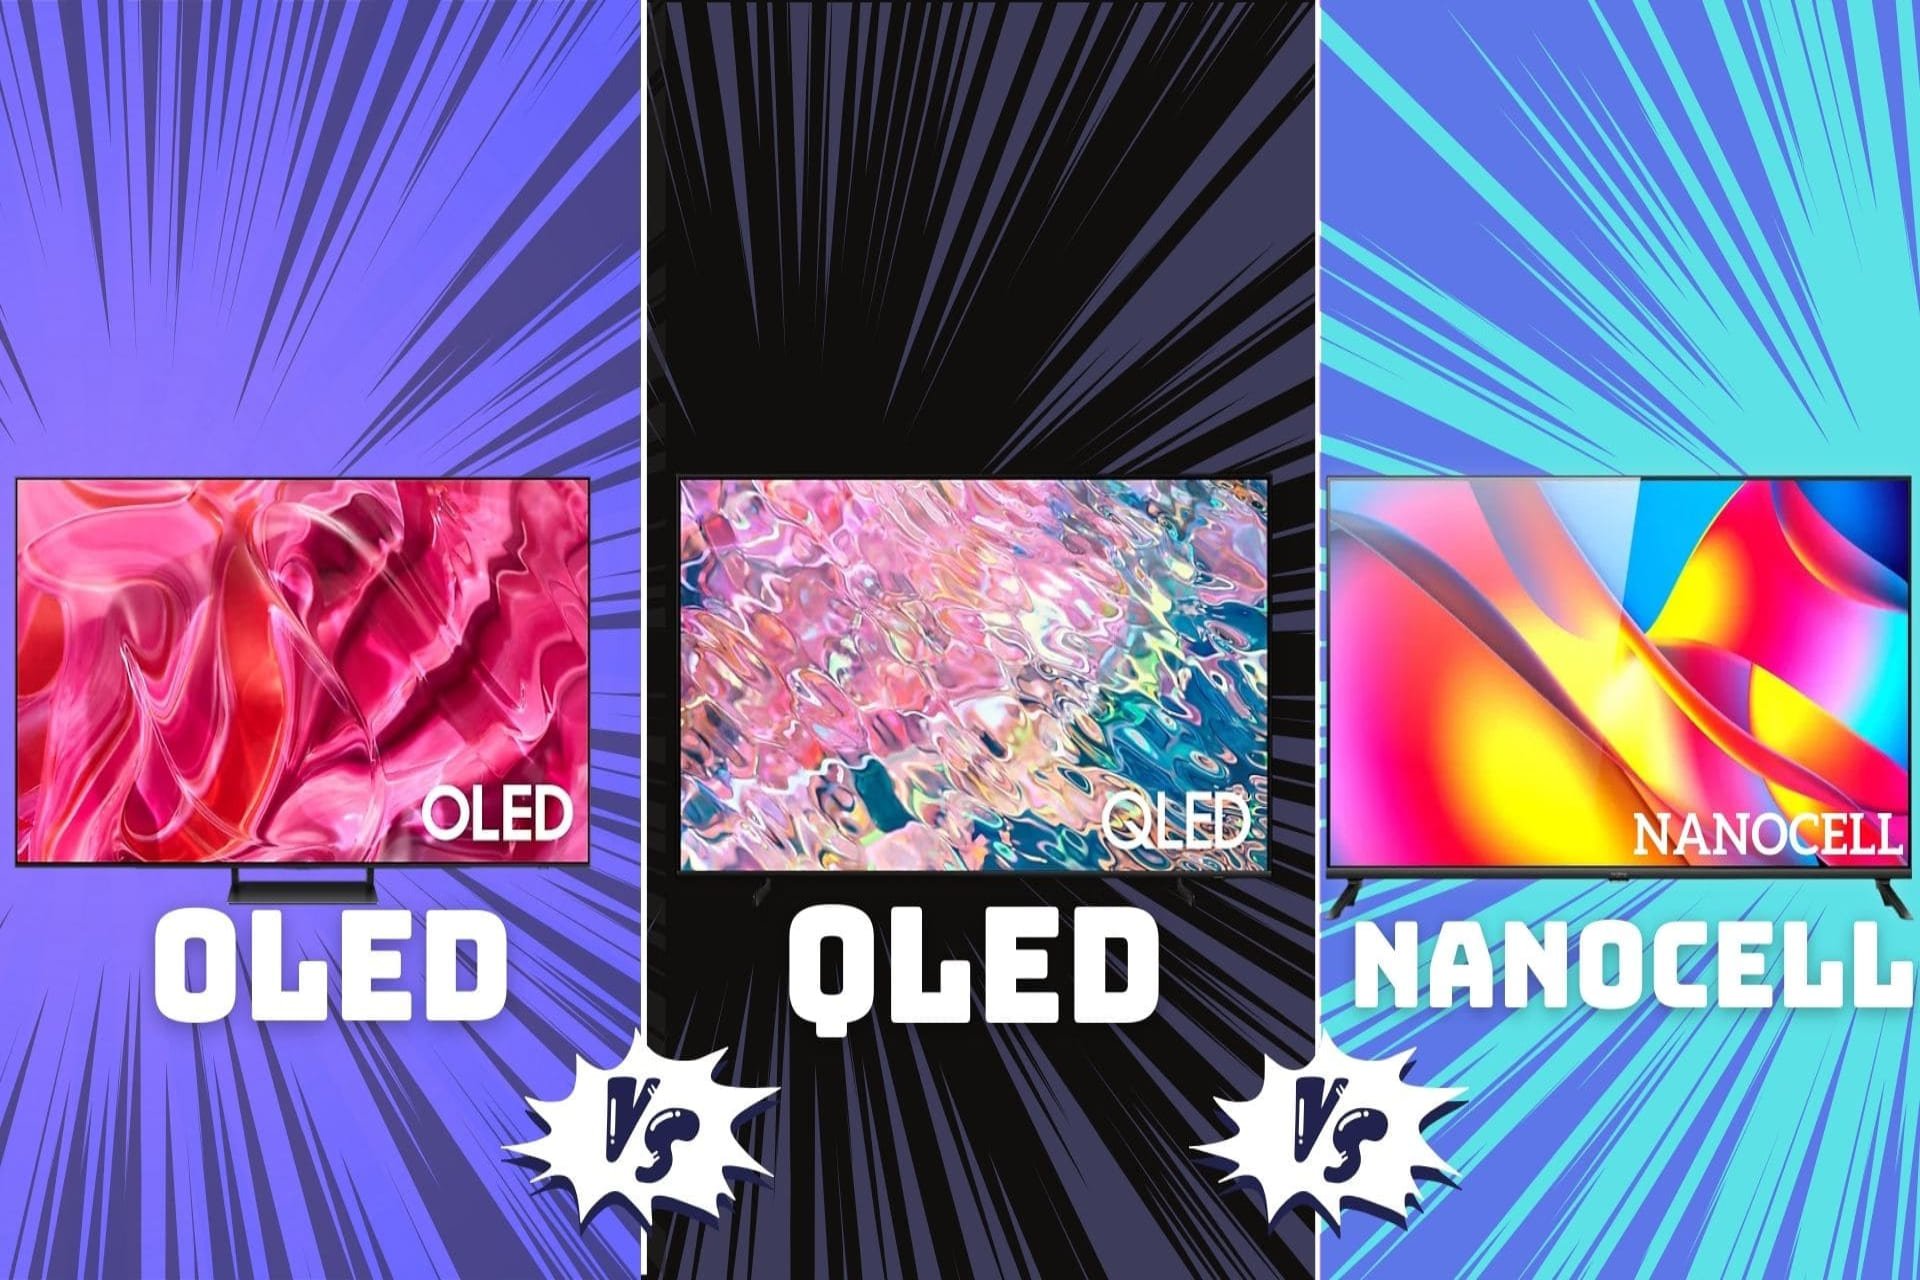
While searching for the perfect TV for your home, you will come across buzzwords like NanoCell, OLED, and QLED each promising the ultimate viewing experience.
So, the question is: Should you really pay for the type of LED screen, or is it just marketing hype?
In this comprehensive guide, I will walk you through the difference between NanoCell, OLED, and QLED technologies, covering their strengths and weaknesses so you can decide what display will power your next TV.
What’s the difference between OLED, QLED, and NanoCell?
Before I jump to the detailed comparison, here’s a quick overview of OLED vs QLED vs NanoCell:
Feature
OLED
QLED
NanoCell
Panel Technology
Organic Light-Emitting Diode
Quantum Dot Light-Emitting Diode
LED LCD with nanoparticles
Backlight
Self-illuminating pixels
Required
Required
Contrast Ratio
1,000,000:1 or higher
Very high (10,000:1+)
1000:1 but can go higher with FALD technology
Brightness
500 to 1500 nits
1000 to 2000 nits on average
300 to 500 nits
Color Accuracy
Excellent, wide color gamut
Excellent, wide color gamut
Good, but not as good as OLED or QLED
Viewing Angles
Best, perfect from any angle
Good
Good, but backlight may affect some angles
Motion Handling
Excellent, near-instantaneous response
Good, but some motion blur is possible
Good, but some motion blur possible
Response Time
<0.1 milliseconds
1-5 milliseconds
5-8 milliseconds
Burn-In Risk
Yes, but reduced risk in recent models
No
No
Price
Most expensive
More affordable than OLED
Most affordable
Energy Efficiency
Most energy-efficient
More energy-efficient than traditional LCD
Similar to QLED
Now, let’s dive deep into each display technology, by which eventually, you can decide what will be the best choice for your use.
1. OLED – The pinnacle of picture quality
The OLED display technology is known for its infinite color contrast and that’s one of the key selling features of this technology.
OLED reads for Organic Light-Emitting Diode and as the name suggests, every pixel is made up of organic material which is carbon-based so when you apply electricity, it emits light.
But it does two things differently than the competition, making it the first choice in smartphone displays:
Each pixel emits light individually.
Pixels are turned off to show the deep black, saving energy and showing the deepest black possible.
Heard of AMOLED displays in Samsung phones? Yes, it’s the same tech with little advancement.
If you are planning to buy a smart OLED TV, then you may want to invest in the smart remote with the keyboard, as typing over a physical keyboard is a quick and enjoyable experience.
Now, let’s take a look at some pros and cons of the OLED display so you can decide if you should pay more for the OLED tech or not (yes, it is the most expensive one).
Pros
Infinite contrast
Vibrant and accurate colors
Wide viewing angles (even from extreme angles)
Energy efficient
Cons
Susceptible to burn-in
Flickering on low brightness
Expensive
Shoter lifespan
2. QLED – Quantum dots and brightness brilliance
The QLED (Quantum dot Light Emitting Display) uses a very unique approach to produce accurate and vibrant colors. Yes, you guess it right. It uses quantum dot technology to project images.
QLED displays are somewhat similar to the good old LCDs but use a layer of quantum dots placed between the backlight and the liquid crystal panel. This way, whenever the backlight shines through the quantum dots, the dots absorb specific wavelengths of light and then emit light of a different color.
By following this approach, QLED displays can produce much more accurate and vibrant colors than a traditional LED display.
Now, let’s discuss some pros and cons of the QLED display.
Pros
Brighter than OLED
High contrast
No Burn-in risk
Longer lifespan than OLED
Cheaper then OLED
Cons
Contrast lower than OLED
Little thicker than OLED
You will find the most QLED option under LG’s name, and it is worth noting that it comes with WebOS, not Android so before purchasing one, make sure you know through our detailed guide on WebOS vs Android TV: Which is Better?
3. NanoCell – The power of nanoparticles
While the term NanoCell sounds like something out of this universe, it is the simplest display technology as compared to the traditional LED displays, the addition of a layer of nanometer-sized particles (nanoparticles) applied to the display.
So, the added nanoparticles act as a filter to enhance color purity and accuracy.
The best part of the NanoCell display is the price. It is the cheapest among the 3 and still, you have no burn-in risk like you have with the OLED.
Now, let’s take a look at the pros and cons of the NanoCell to know if it is a perfect fit to power your next TV or not.
Pros
Chper then OLED and QLED
No burn-in risk
Cons
Lower contrast than QLED and OLED
Backlight dependent
Thicker and heavier
Which one to choose?
Remember, when buying a TV, you are buying an experience, not a spec sheet.
In my opinion, the QLED is the perfect balance between price and performance but buying a TV is a long-term investment as you won’t be changing your TV every year, so visiting the offline store is highly recommended.
Another thing to note is if you already have a modern 4K display but have poor picture quality, then you can fix the blurry issues in your 4K TV which is what I’d recommend before you purchase a new one.
Personally, I’ve been using a Samsung TV powered by NanoCell display for the last 5 years and I have no complaints whatsoever.
So, pay attention to experience and budget and then make a smart move. Which one will you choose? Let’s discuss this in the comments section below.
Microsoft continues to distance its new flagship pre-generative artificial intelligent platform Copilot from its second-rate Bing branding as it looks to monetize its large language models.
Yesterday, Microsoft announced a new subscription-based version of its AI platform Copilot under the brand Copilot Pro, and tucked away in the reveal was a small the small branding change Bing Image Creator to simply Designer.
From Bing Image Creator to Designer
When Microsoft began bundling the power of OpenAI’s text-to-image model DALL-E into the company’s general image search engine Bing it was initially branded with the straightforward title of Bing Image Creator.
However, it looks like with the announcement of a new $20 per user a month subscription model in place to monetize Copilot comes new branding for the text-to-image model, now called Designer.
What is different in Designer?
While DALL-E was recently updated to version 3 and combined with the latest ChatGPT-4 models the focus on more up-to-date data as well as the mitigation of harmful content and privacy, it doesn’t appear that Microsoft is offering any additional features alongside the name change.
Per Microsoft’s Copilot Pro pricing info, Designer will be the name for the text-to-image model for both the Pro and Consumer versions of Copilot.
The free version of Copilot will support consumer created AI images with fifteen boosts per day, while Copilot Pro will support AI created images with one hundred boosts per day, the ability to produce landscape formatted images and well as bump in speed at which images are generated.
To contextualize Bing Image Creator being rebranded to Designer it should be noted that Microsoft also introduced its OpenAI borrowed LLM as Bing Chat to later be renamed to Copilot.
Why change from Bing branding?
Early on Microsoft believed Bing search could be an all-encompassing and nebulous query home bolstered by adding ChatGPT models to it. However, it would seem someone in marketing alerted the higher ups to stagnant branding Bing carries with it, and if Copilot is to succeed, it will have to do so on its own.
As a result, the Bing branding is being detached from Copilot despite it being the underlying infrastructure to many of the LLMs used in platform, and rebranded with more general terms so Microsoft can apply it to many more of its businesses outside of its second rate search efforts.
The American Megatrends AHCI Port0 Device Error is seen on boot and indicates a failing hard drive or a malfunctioning SATA port. The error is generated by BIOS S.M.A.R.T. detection before Windows or another operating system can load.
To fix the AHCI Port0 Device Error, run the Check Disk utility, disable the failing hard drive, or reset the OS.
How can I fix the AHCI Port0 Device Error on boot?
Press F1 on the error screen to normally load Windows, if possible, and check whether the error reappears.
1. Check for disk issues
NOTE
This solution only applies if you can get past the error screen and boot Windows normally.
Press Windows + S to open Search, type Command Prompt in the text field, right-click on the relevant result, and select Run as administrator.
Click Yes in the UAC prompt.
Paste the following Check Disk command and hit Enter: chkdsk /r
If asked to confirm the scan on the next reboot, press Y and then hit Enter.
Restart the PC and let Windows scan for disk issues and repair them automatically.
Since the AHCI Port0 Device Error primarily highlights a failing drive, disk repair on Windows might get things running as long as it is not a hardware issue.
Also, make sure the hard drive is properly connected to the SATA port. Try unplugging and then reconnecting it. And look for any damage to the cable. Besides, disable the affected hard drive in BIOS if it doesn’t store the operating system.
2. Reset the BIOS
Turn off your computer, then power it on, and as soon as the display appears, repeatedly hit the F1, F2, F10, F12, or Del key to access the BIOS, depending on the system manufacturer.
Look through the various settings to find the Load Optimized Defaults or Defaults option, and then click on it.
Click OK in the confirmation prompt to proceed.
If you can’t access the BIOS, another option is to remove and reinsert the CMOS battery, which automatically resets the BIOS to default. It’s a coin-sized battery that powers the BIOS and can be found after removing the back panel.
Remember, this requires a decent understanding of the hardware side of the PC. So, if you are not fully capable, it’s best to contact a repair professional.
If nothing else works, you should consider replacing the hard disk. Solid State Drives (SSDs) typically have a lifespan of 7-10 years, while Hard Disk Drives (HDDs) don’t last for more than 5-7 years, and the former offer significantly better performance.
With the new drive connected, transfer the files to prevent data loss. Also, if the failing disk had the OS installed, you will need to create a bootable USB drive, and then use it to install Windows on the new hard drive.
In our experience, your primary approach when facing the AHCI Port0 Device Error Press F1 to resume message should be to back up the data. This can be easily done while the disk is in a working state. After it fails, you will have to rely on a disk recovery tool.
Once you have things running, discover some quick tips to boot Windows quicker than ever before!
For any queries or to share what worked for you, drop a comment below.
Launch your Chrome browser and click the three vertical ellipses in the top right corner.
Select Settings.
Click on Privacy and security, then select Clear browsing data.
Check Cookies and other site data and Cached images and files, then hit Clear data.
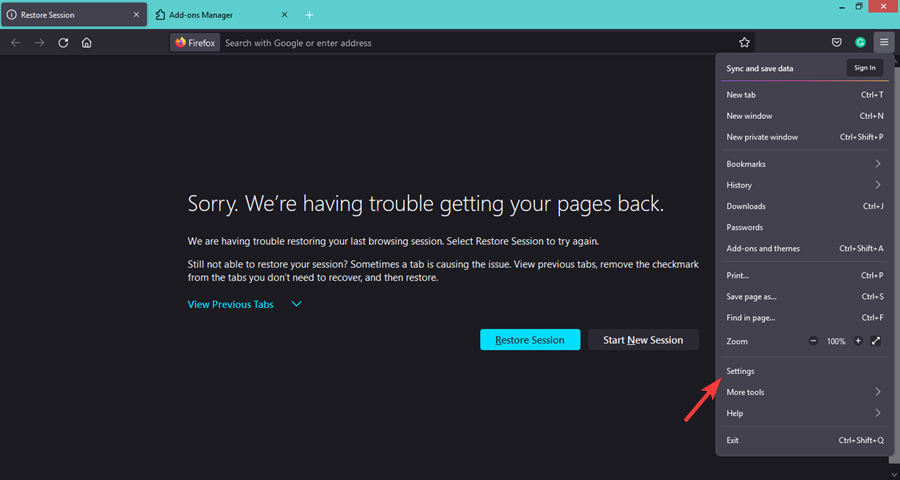
1.2 Firefox
Launch your Firefox browser and click on the three horizontal ellipses on the top right corner.
Click on Settings.
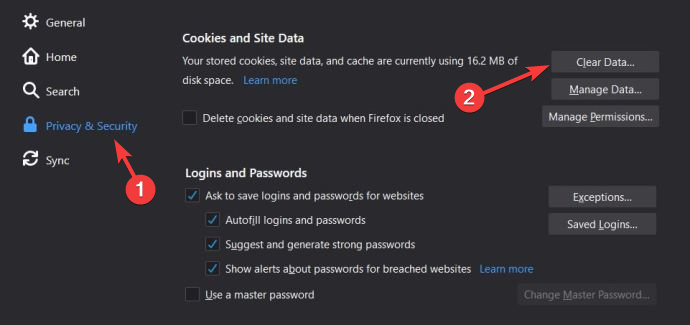
Select Privacy & Security and click on Clear data under Cookies and Site Data.
1.3 Microsoft Edge
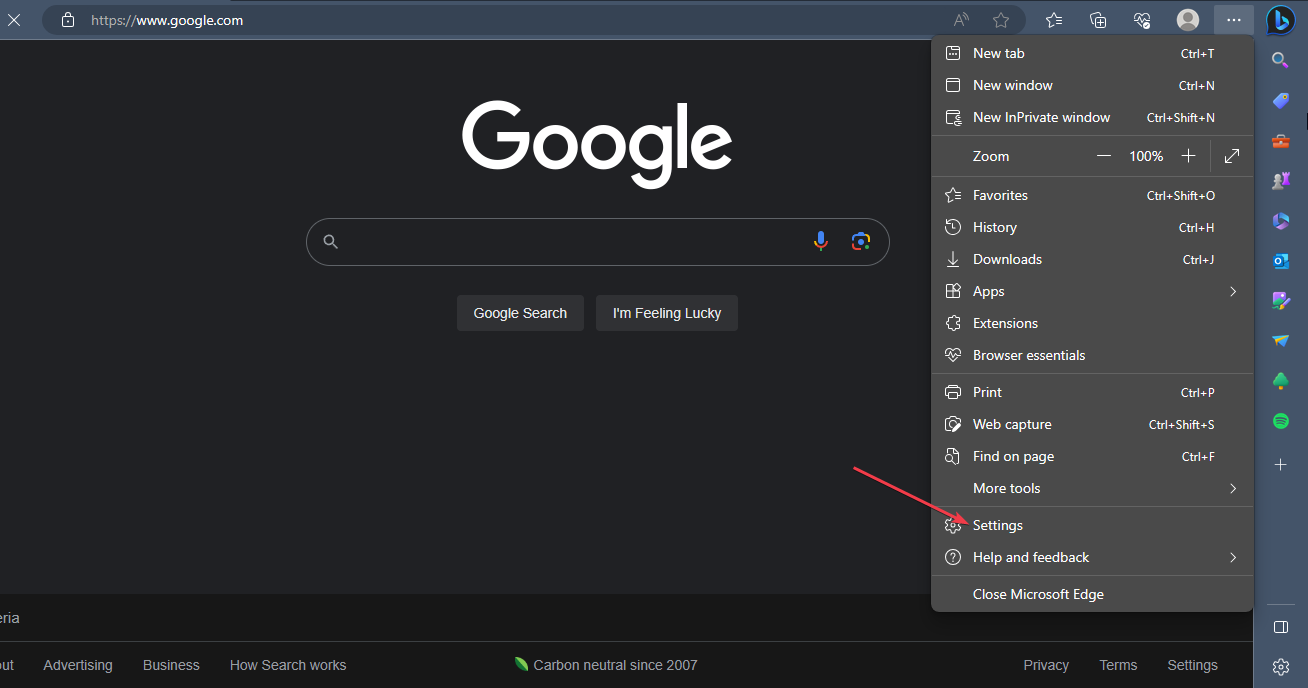
Launch the Microsoft Edge app on your computer. Further, click on the three ellipses on the top right side and select Settings.
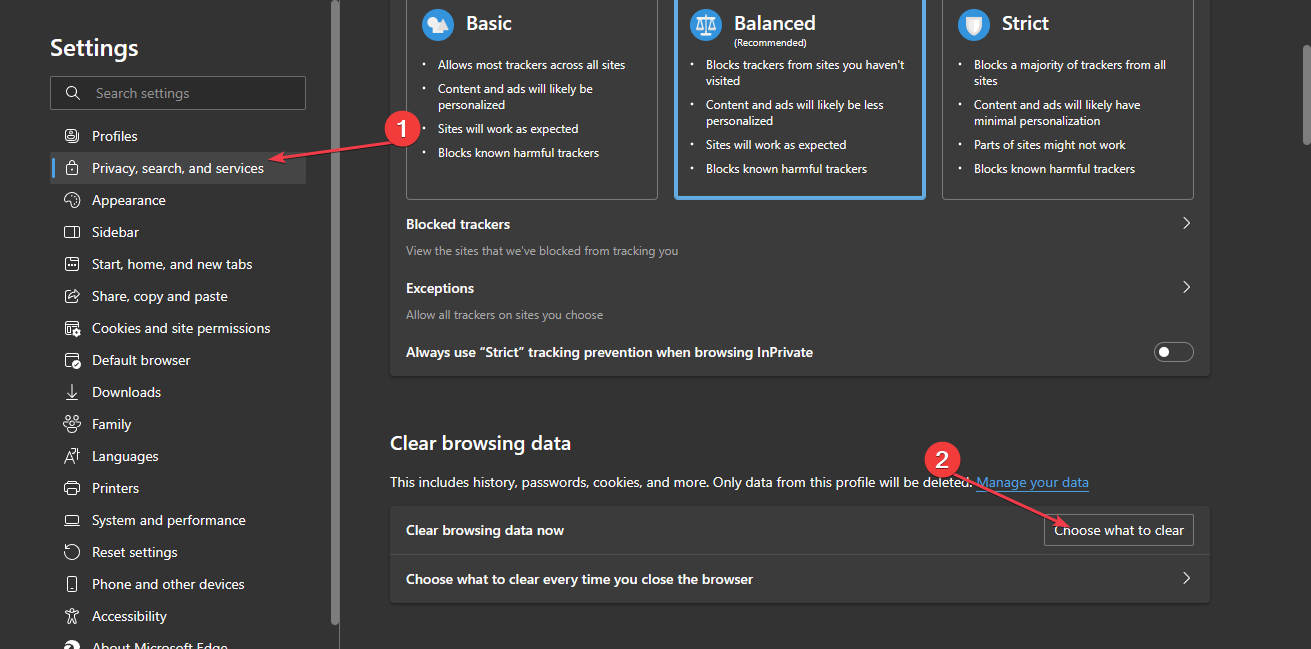
Now, select the Privacy, search, and services option on the left side panel menu,
Navigate to the Clear browsing data section, and select the Choose what to clear option.
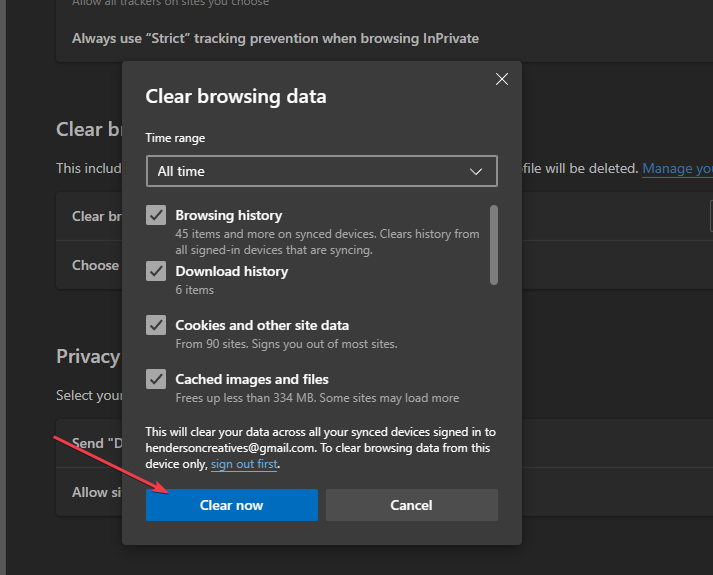
Select All Time from the time range at the top, check the boxes next to Cookies and other site data, and the Cached images and filesoption. Then click on Clear now.
Ensure you have a fast and stable internet connection, your browser is up-to-date and Netflix’s service status is active then try relaunching the page.
2. Disable extensions
2.1 Google Chrome
Navigate to your Chrome browser and click on the three ellipses at the top right corner.
Select More tools, then click on Extensions.
Navigate to the extension you wish to remove, then click on Remove.
Confirm in the new pop-up dialog box that you wish to remove the extension.
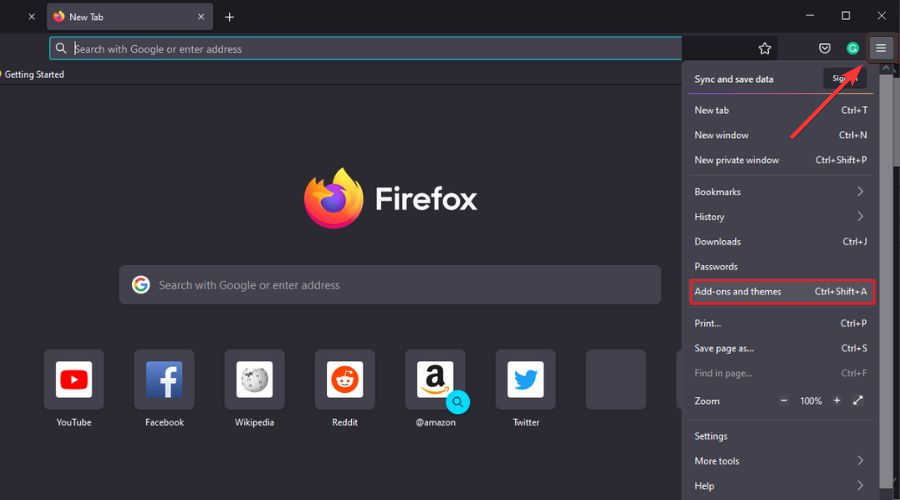
Launch your Firefox browser and click on the three horizontal ellipses in the top right corner.
Click on Add-ons and themes.
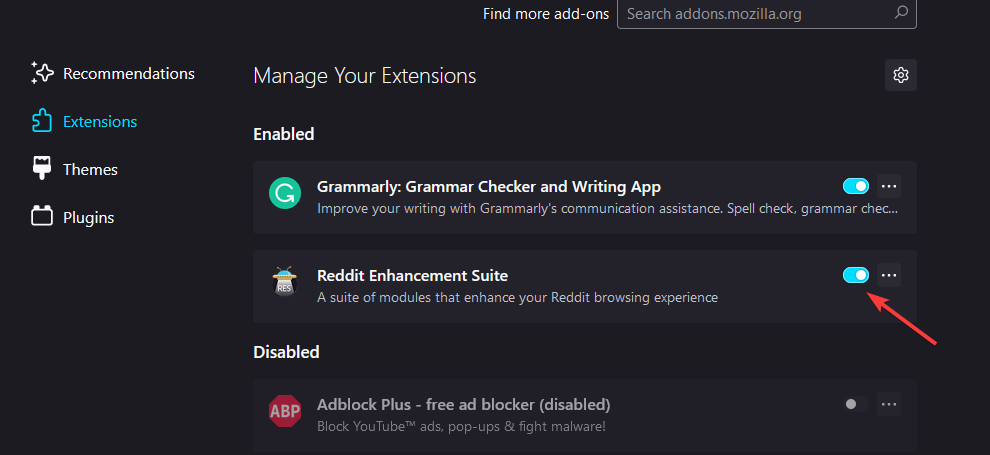
Disable extensions one by one and try reloading the page.
2.3 Microsoft Edge
Open Microsoft Edge and click on the three horizontal ellipses at the top right corner.
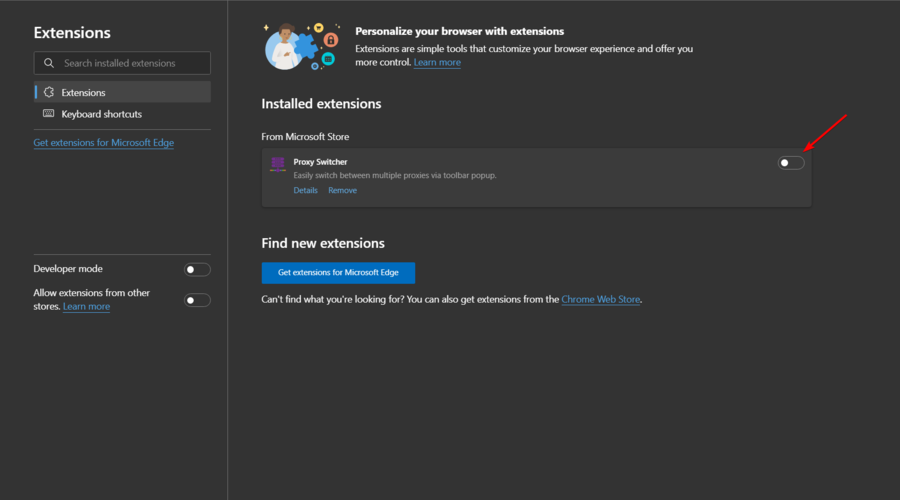
Click on Extensions, then select Manage extensions.
Locate any recently added extensions and toggle the off button. Ad blockers are the most popular culprits so start off with those.
3.1 Google Chrome
3. Reset the browser
Open your Chrome browser and click on the three vertical ellipses at the top right corner.
Select Settings.
Next, click on Reset and cleanup, then select Restore settings to their original defaults.
Confirm Reset settings in the next dialog box.
3.2 Firefox
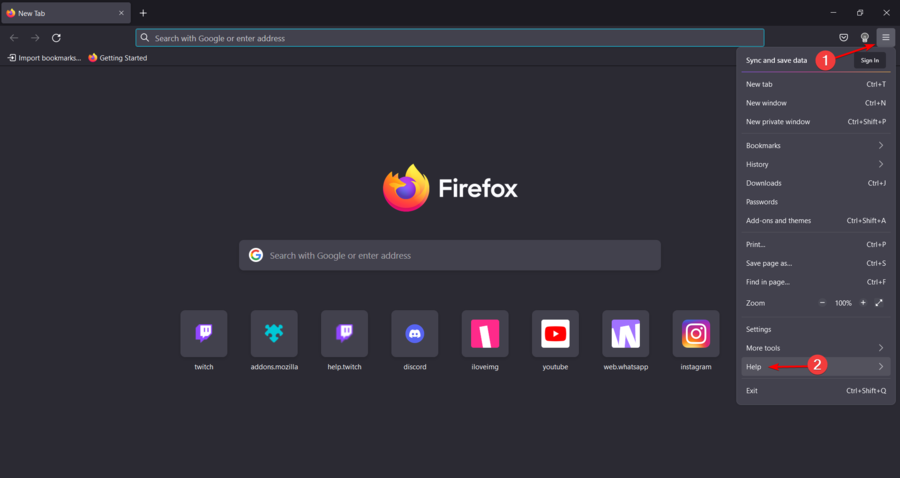
Launch your Firefox browser and click on the three horizontal ellipses on the top right corner.
Select Help.
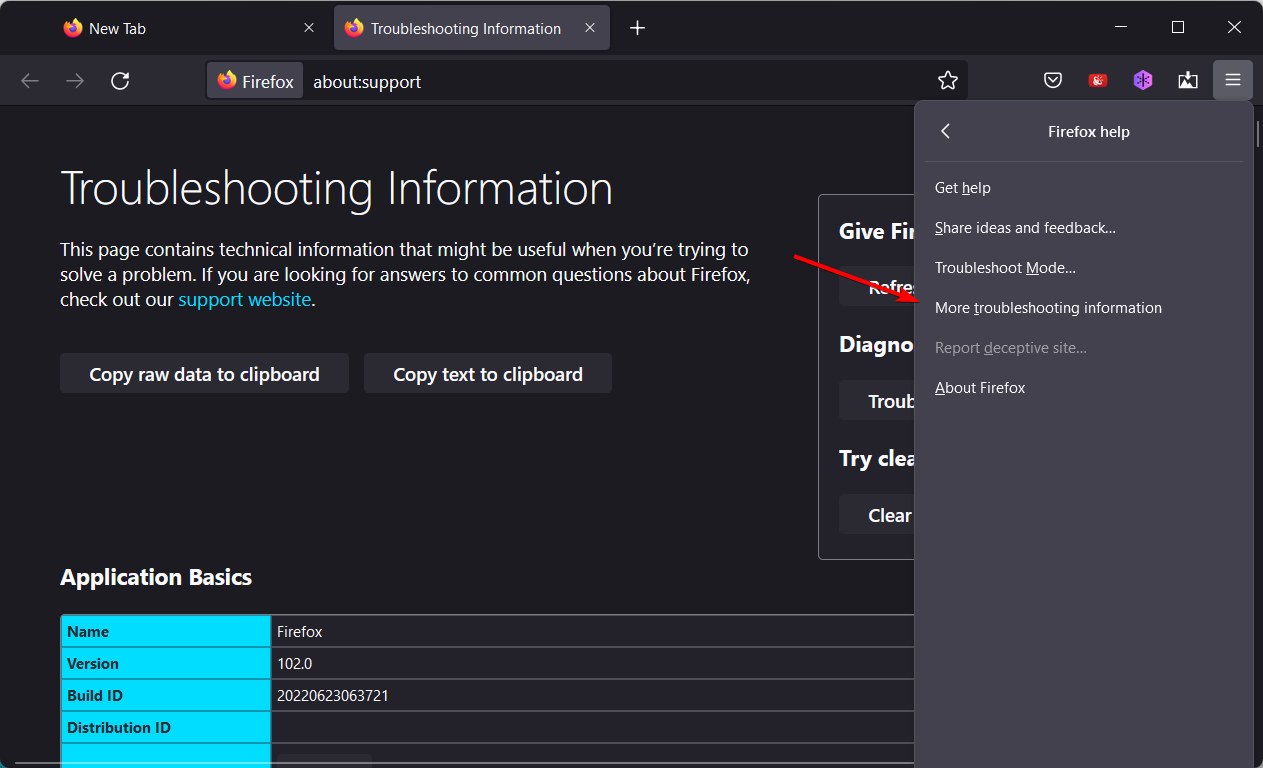
Click on More troubleshooting information.
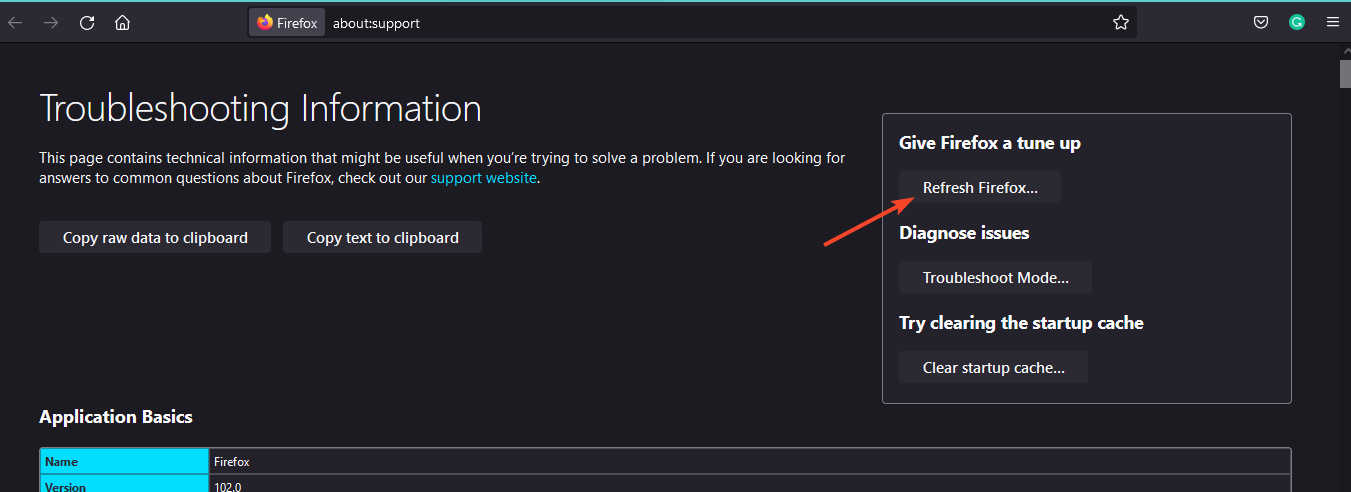
Select Refresh Firefox under Give Firefox a tune up.
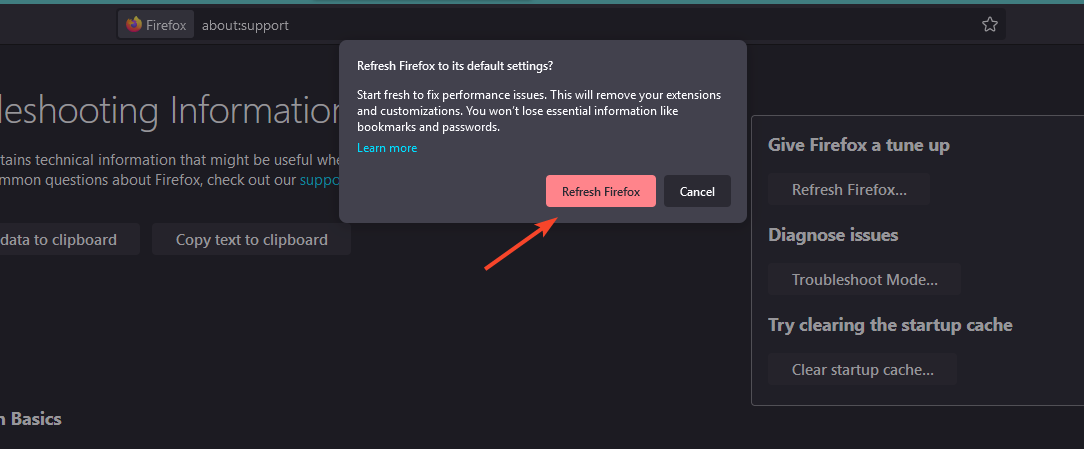
Confirm Refresh Firefox in the dialog box that pops up.
3.3 Microsoft Edge
Open Microsoft Edge and click on the three horizontal ellipses at the top right corner.
Click on Settings.
Select Reset settings and hit Restore settings to their default values.
Confirm Reset in the dialog box that appears.
By following these steps, you should be able to identify and fix the error code m7362 1269 that is preventing Netflix from working on your web browser. Using a Netflix-approved browser also comes in handy.
You can also try accessing Netflix using a different browser to see if the issue is specific to your current browser. If the issue persists, try contacting Netflix support to provide you with additional guidance and support tailored to your specific situation.
And eventhough streaming Netflix works better on the app, Netflix not responding to your browser can also happen on any other streaming device such as your TV or even phone.
If you have encountered Restart Required – Your PC Needs to be restarted to finish setting up this device: Xvdd SCSI Miniport, update or reinstall the gaming service, update the storage driver, and run SFC & DISM scans.
These are the first steps to take because Xen Virtual Disk Drive or Xvdd is a virtual disk used mainly by Xbox App / Xbox Gaming Services, and issues related to it can occur due to virus infection, game data not mounted properly, or outdated device drivers.
How can I fix the Xvdd SCSI Miniport issue?
1. Update the Gaming Services & Xbox app
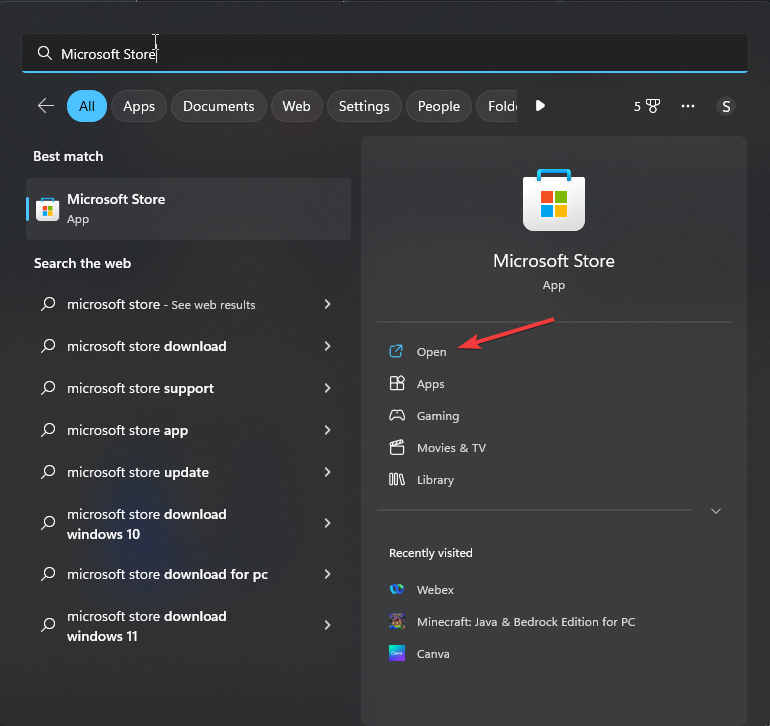
Press the Windows key, type ms store and click Open.
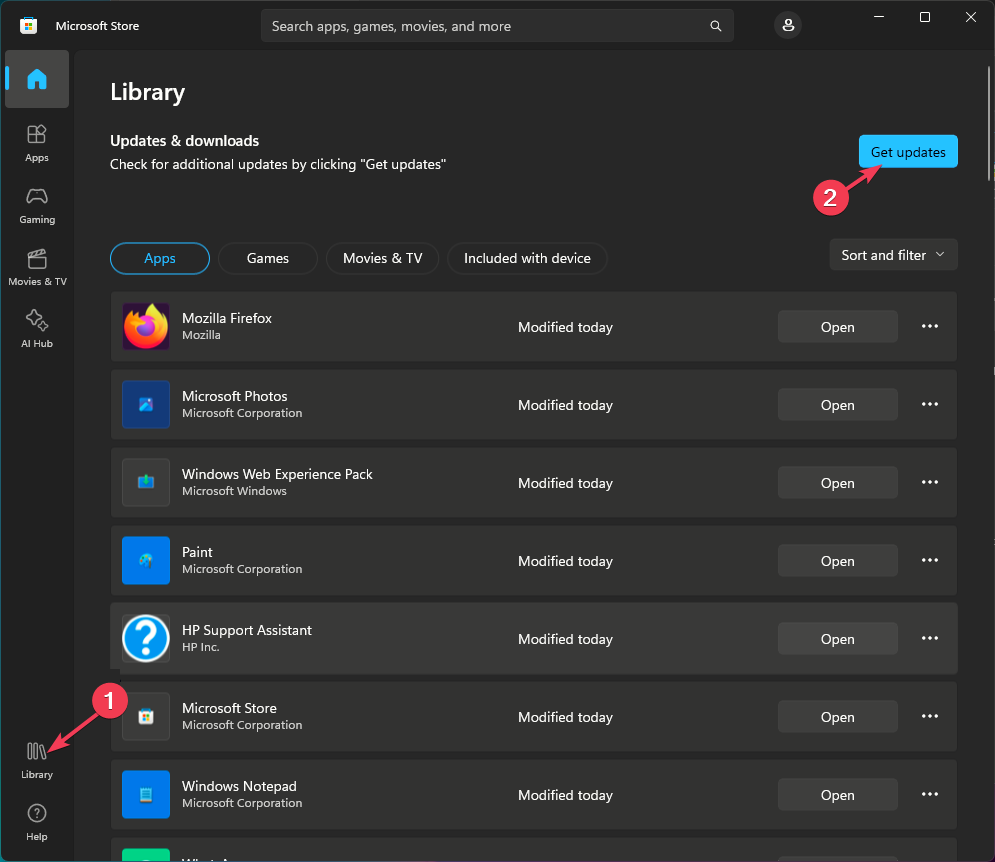
Click the Library icon from the bottom left corner, and select Get updates.
Look for the Xbox and Gaming services app, and click Update for both to install the latest version.
Speaking of updates, make sure your Windows is also updated to the latest version. If you suspect the issue is caused after installing a new app or downloading a file, reboot your computer in clean boot and run a deep scan using a reliable antivirus tool.
2. Reinstall the Gaming Services app
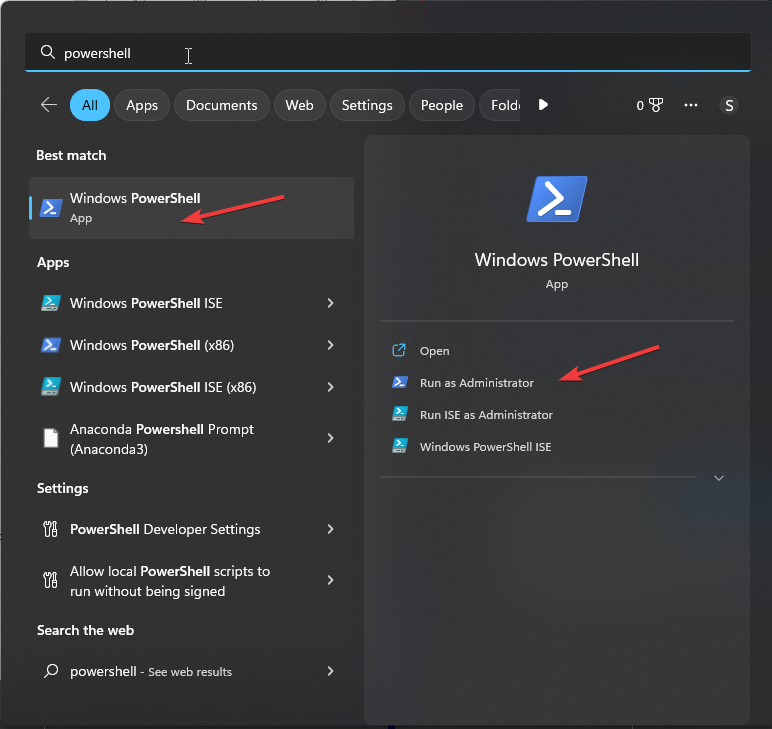
Press the Windows key, type powershell in the search box, and select Run as administrator.
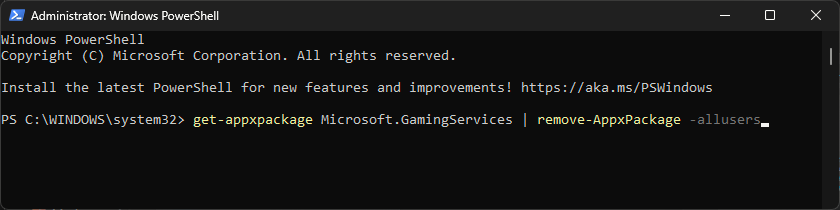
In the Windows PowerShell window, copy & paste the following command to remove the Gaming Services app and press Enter: get-appxpackage Microsoft.GamingServices | remove-AppxPackage -allusers
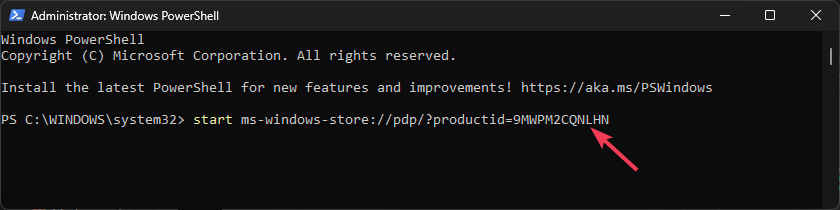
In the same window, type the following command and hit Enter: start ms-windows-store://pdp/?productid=9MWPM2CQNLHN
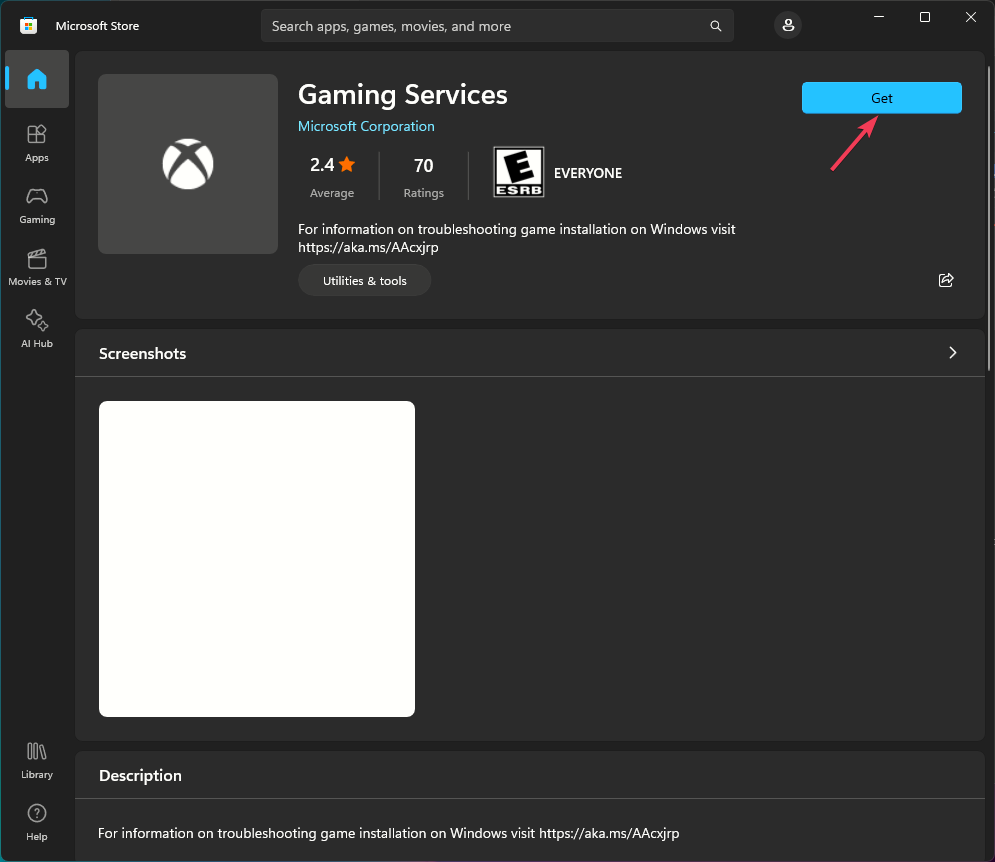
You will directed to the Microsoft Store, and click Get to install the Gaming Services app.
Click Yes when you receive the User Account Control (UAC) prompt.
Restart your computer to let the changes take effect.
3. Update the storage driver
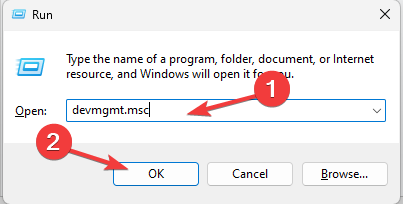
Press Windows + R to open the Run dialog box.
Type devmgmt.msc and click OK to open the Device Manager app.
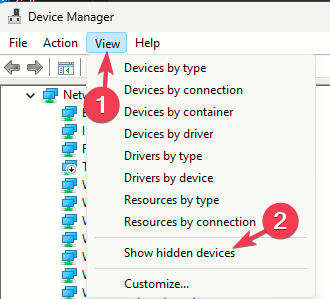
Go to View and select Show hidden devices.
Go to Storage controllers, and click it to expand.
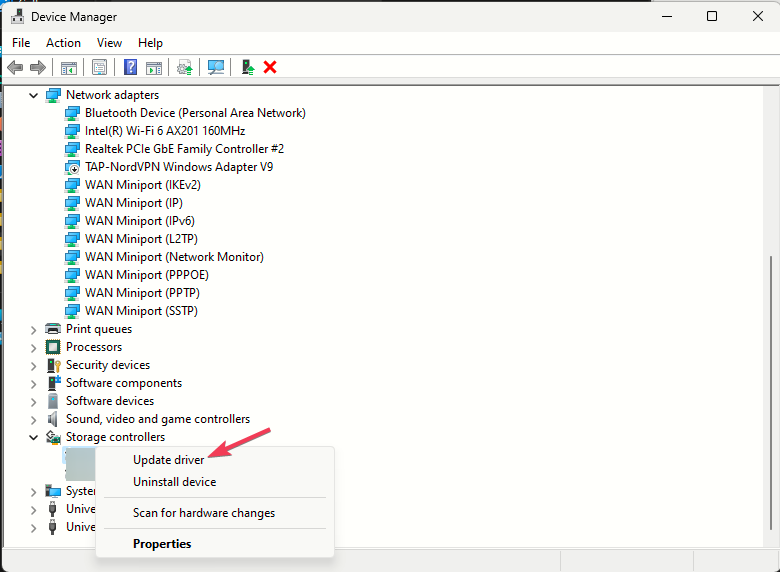
Locate Xvdd SCSI Miniport, right-click it and select Update driver from the context menu.
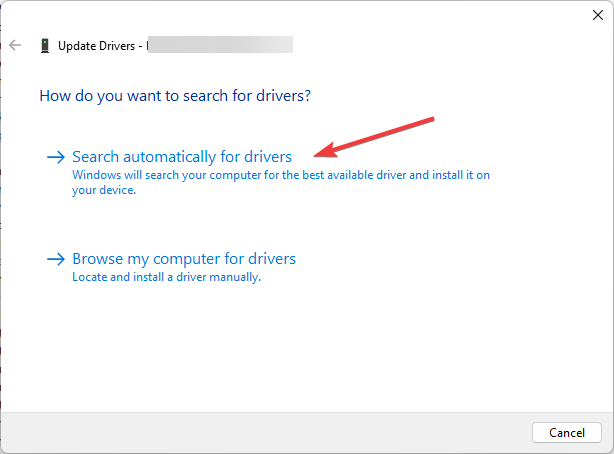
Click Search automatically for drivers.
Follow the on-screen instructions to install the latest version of the driver.
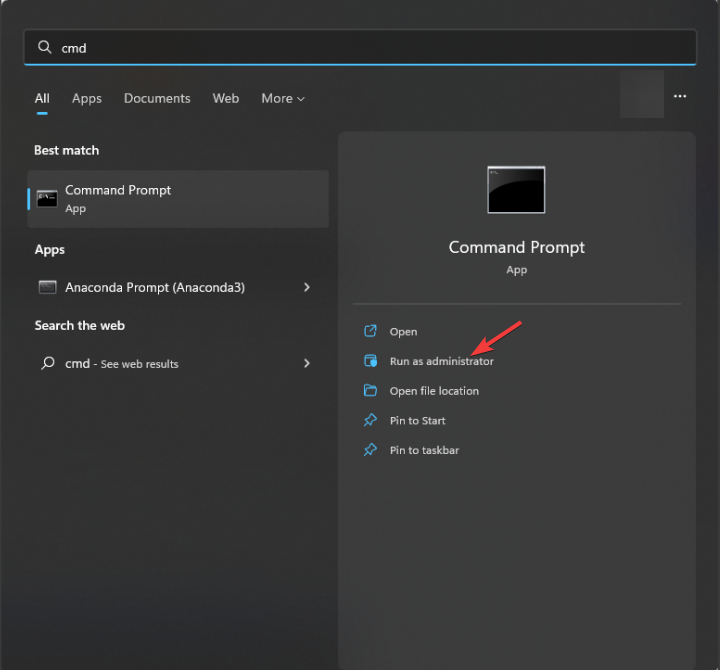
Press the Windows key, type cmd in the search box and click Run as administrator.
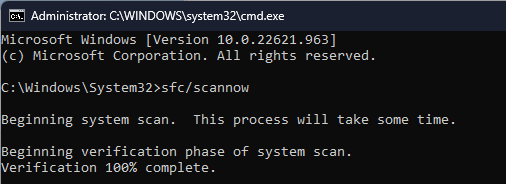
Type the following command to repair system files on your computer and press Enter: sfc/scannow
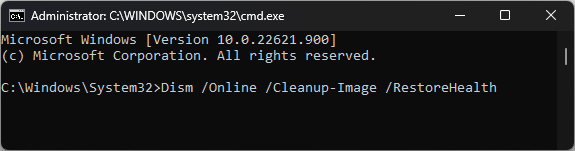
Copy & paste the following command to restore Windows system image files and hit Enter: DISM /Online /Cleanup-Image /RestoreHealth
Reboot your PC to save the changes.
5. Run the CHKDSK utility
Press the Windows key, type cmd in the search box and click Run as administrator.
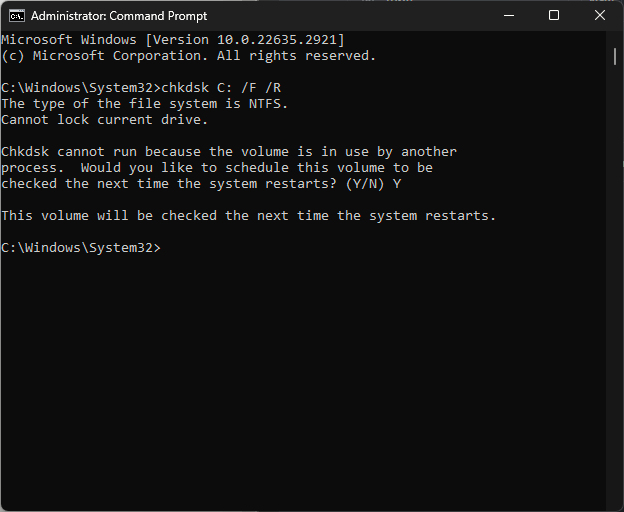
Type the following command to scan the disk for bad sectors and hit Enter: chkdsk C: /F /R
Type Y and press Enter to continue.
Restart your PC, and the tool will scan your drive for errors and try to repair if there are any damaged sectors on it. The scan will take a few minutes to complete; once done, reboot your computer.
6. Re-enable the Xvdd SCSI Miniport device
Press Windows + R to open the Run dialog box.
Type devmgmt.msc and click OK to open the Device Manager app.
Go to Storage controllers, and click it to expand.
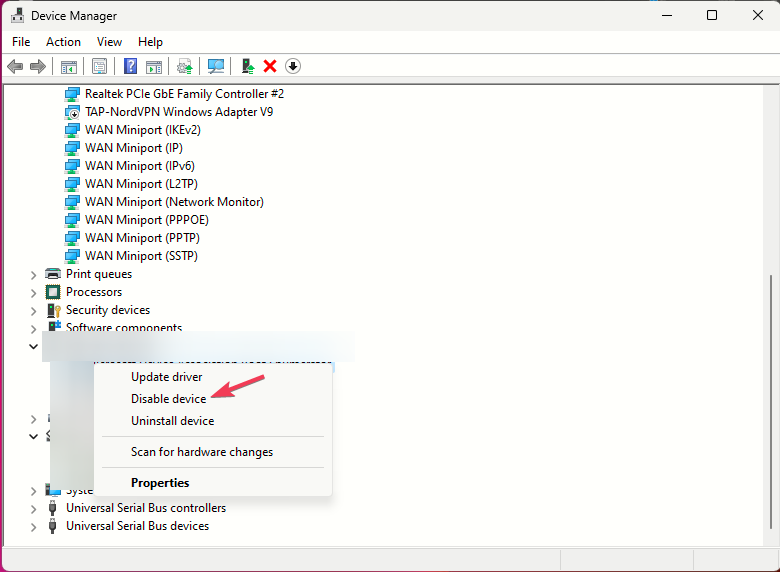
Locate Xvdd SCSI Miniport, right-click it and select Disable device from the context menu.
Restart your computer, then follow the same steps from 1-4 and this time, select Enable device from the menu.
If nothing has helped you, you may want to consider performing a system restore and choose a point before the issue started to fix the problem.
In conclusion, to get rid of the Xvdd SCSI Miniport pop-up, you can uninstall the gaming services app, run the system repair scans, re-enable the device, or update the related storage driver.
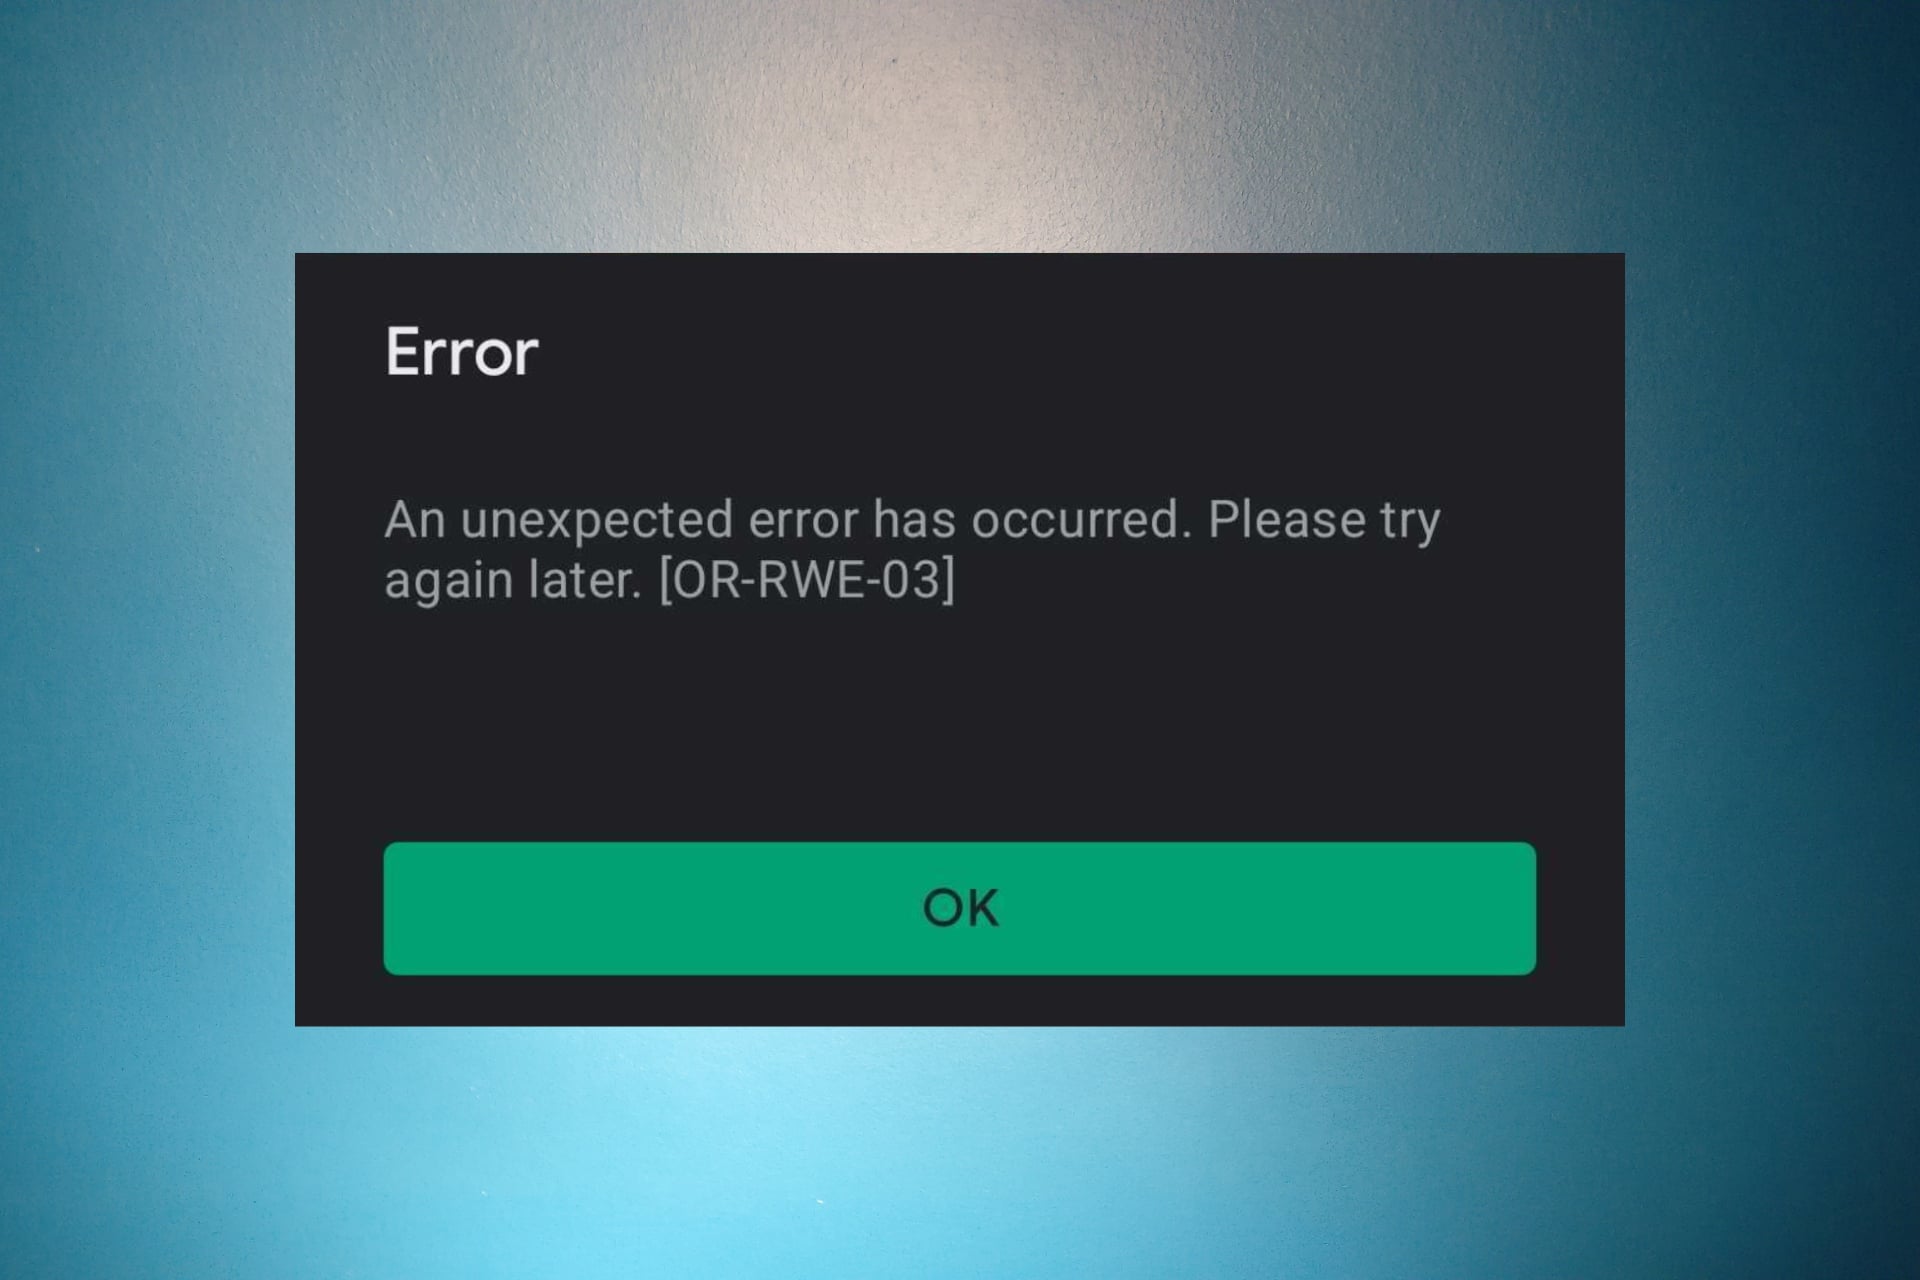
You’re trying to make a purchase in Google Play, and you get the An unexpected error has occurred. Please try again later. [OR-RWE-03] error. To fix the OR-RWE-O3 error, restart the Google Play Store app and clear its data, check the payment method, and check your account balance with the bank.
The error may stem from Google Play, connectivity issues, payment method problems, or bank account issues. Here’s how to fix it.
How do I fix the OR-RWE-O3 payment error on Google Play?
1. Check the Google Play server status
The first thing to do is to check the Google Play Status Dashboard and see if there are any disruptions. If so, try the purchase again later.
One of the most common causes of the OR-RWE-O3 payment error is a server outage or service disruption. They usually don’t last long, but they can happen just when you’re trying to make a purchase.
2. Force restart the Google Play Store app
Go to Settings on your phone, then tap the Apps menu.
Tap on Google Play Store from the list.
Here, tap on Force stop.
Exit the menu, try to open Google Play Store again, and make the purchase.
Sometimes, an app may get stuck without the proper information loaded, and closing the app as usual may not make any difference. However, if you Force stop Google Play Store when you open a fresh instance, the purchase will work.
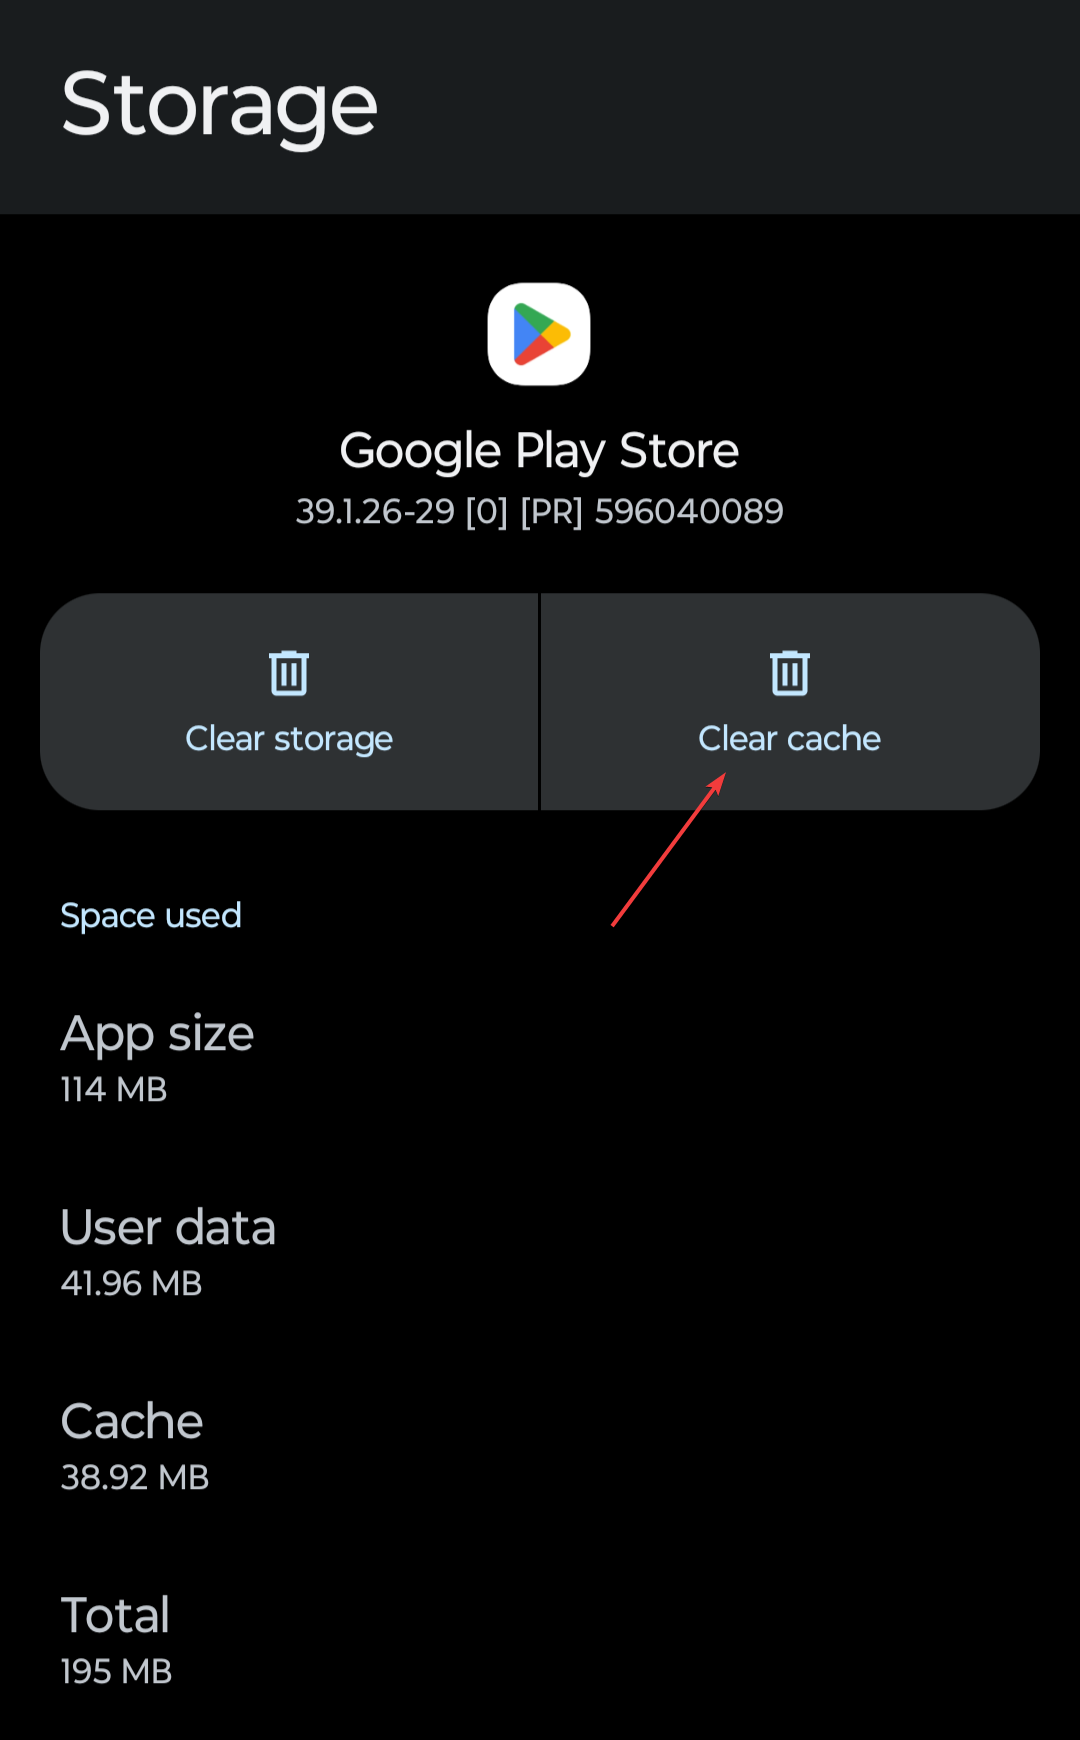
3. Clear the Google Play Store cache and data
Go to Settings on your Android phone, then tap on the Apps menu.
Tap on Google Play Store and next on Storage & cache.
Tap on Clear cache, then try to make the purchase.
If it still doesn’t work, return to the same menu and tap on Clear data this time.
Log into your Google Pay account on the mobile app or any browser on your PC.
Check if you have any alerts in the top-right corner and check them.
If you have any related payment issues, make sure you fix them to avoid getting the error OR-RWE-O3.
5. Try using another payment method
Until you check any problems with your bank account, you should also try using a different payment method like a virtual credit card in the Google Play Store.
After you click on the price, click on the down arrow next to the payment method and select another one if available. If not, you will need to add another payment method.
Other things you can try to fix the OR-RWE-O3 payment error
Change the internet connection from Wi-Fi to mobile data or from mobile data to Wi-Fi.
Ensure you install all the updates on your phone, including Google Services and Google Play.
Reenter the payment details and information. Maybe there was a slight mistake.
Contact Google Support to figure out what the problem is.
Hopefully, now you have fixed the issue and no longer get the An unexpected error has occurred. Please try again later. [OR-RWE-03] message on your phone.
If you purchase often from Play Store, you might’ve noticed Google Chrome temp charge, and we have a new guide that explains what it is, so don’t miss it.
Please let us know in the comments section below if you have any questions about the OR-RWE-03 Google Play error.
Microsoft might release a Shazam-like app for identifying video content, sometime in the future, as the the Redmond-based tech giant filed a patent describing a technology that envisions such an app.
The methods provided herein evaluate a set of conditions to determine whether or not a target video is an abridged version of a reference video.
The app could be used as a standalone product, but it could also work as a feature inside another platform, such as Microsoft Edge, for instance. It would work similarly to Google’s Copyright Match Tool, which is an app that automatically detects copyrighted video content.
This app patented by Microsoft would have the same goal, and it would give content creators, but also broadcasting companies, a viable way to verify copyrighted video materials.
Content creators, such as broadcasting companies, may need to detect copied video content as a part of their workflow. The detection of copied video content is also relevant for uncovering unauthorized copying of video content, e.g. the unauthorized uploading of content to Internet media platforms.
How would Microsoft identify video content?
Same as Google’s Copyright Match Tool, this app would make use of an existing database to identify the videos, and users would only need to provide the video, even in a recorded state, for the app to properly identify it.
Here’s how it would do it:
The method looks at a ‘target video’ and a ‘reference video’.
It checks three things: a) The target video doesn’t have all the shots from the reference video. b) The target video includes groups of shots that are also in the reference video. c) All the shots that are in both videos are in the same order.
If all these conditions are met, the method identifies the target video as a shortened version of the reference video.
The result of this check is then outputted.
When it comes to the existing database, this tool would make use of the Internet, and especially search engines, such as Google to identify the videos, so it won’t be dependent just on Google, as it would take the other Search Engines, such as Bing, into consideration.
Either way, the app allows for flexibility: users would be optionally asked to provide the video and the reference, but in case they can’t, the app will work with the existing data, automatically.
The target video and/or reference video may be selected by a user, or programmatically. In one particular example, the rarget video is selected by a user and there reference video is selected programmatically.
Microsoft does have one tool that identifies and verifies copyrighted material, but it’s only available in Microsoft 365, for apps, such as Word. It doesn’t have a tool that would do the same to video content, for instance, so this kind of app would be quite useful.
However, this feature might be released as a Copilot plugin, because the AI tool essentially, and theoretically, could already do the process of identifying video content. However, users must provide input to the AI tool, first, and for now, even if Copilot on Windows accepts images, such as screenshots, it still doesn’t accept video inputs.
If you have encountered the Cannot Start the PS4 (CE-34335-8) error on your PlayStation 4, reinsert the internal hard drive or format it. That’s the first step in dealing with the problem, as the CE-34335-8 error mainly occurs if the hard drive connection is lost or the disk is damaged.
How can I fix the Cannot start the PS4 (CE-34335-8) error?
1. Clean & reinsert the hard drive
Turn off your PS4 console.
Unplug the power cable and place the console upside down on a flat surface, then remove the hard drive bay cover starting from the right side.
Now, remove the four screws and pull out the HDD mounting bracket.
Next, remove the screws holding the mounting bracket, then take the HDD out.
If you see dust on it, wipe the hard drive with a clean & soft cloth.
Now reinsert the HDD in the mounting bracket, then tighten the screw and put the cover back.
Reboot the PS4 and check if the issue persists.
Also, inspect the SATA connector on your PS4 for damage and clean it if there is dust. If you are using the hard drive for the first time, check if it is compatible with your console model.
Troubleshooting the hard drive can help you fix the PS4 randomly turns off issue; read this guide to learn other solutions.
2. Reinstall the system software
First, connect the controller to the console with a USB cable.
Press & hold the Power button on your PS4 console till you hear the second beep.
Now, the console will start in Safe mode; use the controller to select Initialize PS4 (Reinstall System Software).
Take out your hard drive using the steps mentioned in Solution 1 and connect it to your PC. Once done, press the Windows key, type cmd in the search box and click Run as administrator.
Copy & paste the following command to scan the drive for bad sectors after replacing C with the drive letter for the HDD and hit Enter: chkdsk C: /F /R
Type Y and press Enter to continue.
Reboot your computer, then the tool will scan your drive for errors and will try to repair if there are any damaged sectors on it. The scan will take a few minutes to complete; once done, restart your PC.
Take out your hard drive using the steps mentioned in Solution 1.
Connect it to your computer using a USB cable.
Press Windows + R to open the Run window.
Type diskmgmt.msc and click OK to open Disk Management.
Locate the HDD and check if it appears as RAW or Unallocated. If it does, you need to format it.
Right-click the drive and select Format.
On the following dialog box, select OK.
Once it is formatted, place it back into the console and check if the issue persists. However, if you don’t want to lose the data on your hard drive, you can take the help of recovery software to retrieve the data and then, format it using the steps above.
5. Replace the hard drive
If you think your hard drive is still not working, it might be damaged; therefore, you need to replace it with a new drive. For that, you can follow the steps mentioned in Solution 1 to take out the hard drive from the console, and instead of placing the old HDD back, replace it with the new one.
If nothing helped you so far, you can contact PlayStation support and explain to them the issue, & fixes tried to get further assistance.
In conclusion, to fix the CE-34335-8 error on PS4, clean & reinsert the HDD, run the CHDSK utility to repair the drive, reinstall the system software, format it, or replace it with a new one.
If you have any questions or suggestions about the subject, feel free to mention them in the comments section below. We will be happy to interact!
Error OR_PMCR_32 accompanied by the your transaction can’t be completed message may appear when you’re checking out after paying for a service on Google Pay. Most of the time, Google Pay does not accept your card because of incorrect card information, an unsupported card type, an expired card, or insufficient funds. If you’ve already checked these, you might have some network connectivity issues.
Kickstart troubleshooting by double-checking the card information you have entered, confirm your account balance and ensure you’re not using an expired card. Also, verify that your payment card meets the list of payment card requirements and try with another browser.
How do I fix error OR_PMCR_32 on Google Pay?
1. Clear Google Play Store cache
On your Android phone, open Settings, scroll down, and go to Apps.
Tap on Google Play Store.
Now, select Storage.
Tap on Clear data and Clear cache individually, and choose the appropriate response if a confirmation prompt appears.
Once done, head back to the previous screen and then tap on Force stop.
Finally, relaunch the Google Play Store and try making payment again.
Next, click the Payment Methods tab and select the problematic card.
Click Edit and manually register the CVV/CVC code and the billing address again, even if they did not change.
Finally, update and refresh the page.
Your profile should match the information printed on your card. If any details are incorrect, update them accordingly. and see if it resolves the OR_PMCR_32 error.
If the issue persists after updating your billing address and verifying card details, reach out to Google Pay support for further assistance.
They’ll be able to pinpoint the main issue and advise you on the way forward. Sometimes, it’s your bank that has an issue releasing funds so you’ll need to take it up with them.
At the very least, you know it’s not an isolated issue with Google Pay as occasionally, PayPal is not accepting cards. In such a case, perhaps activating a DCB association may favor your online transactions since it is connected to your network mobile carrier.
If that doesn’t work for you, perhaps virtual credit cards may be able to fulfill your online banking needs and minimize transaction errors.
That’s all we had as far as the OR_PMCR_32 error is concerned. However, if you have any other fixes that worked for you, we’d love to hear about them. Drop us a line below.
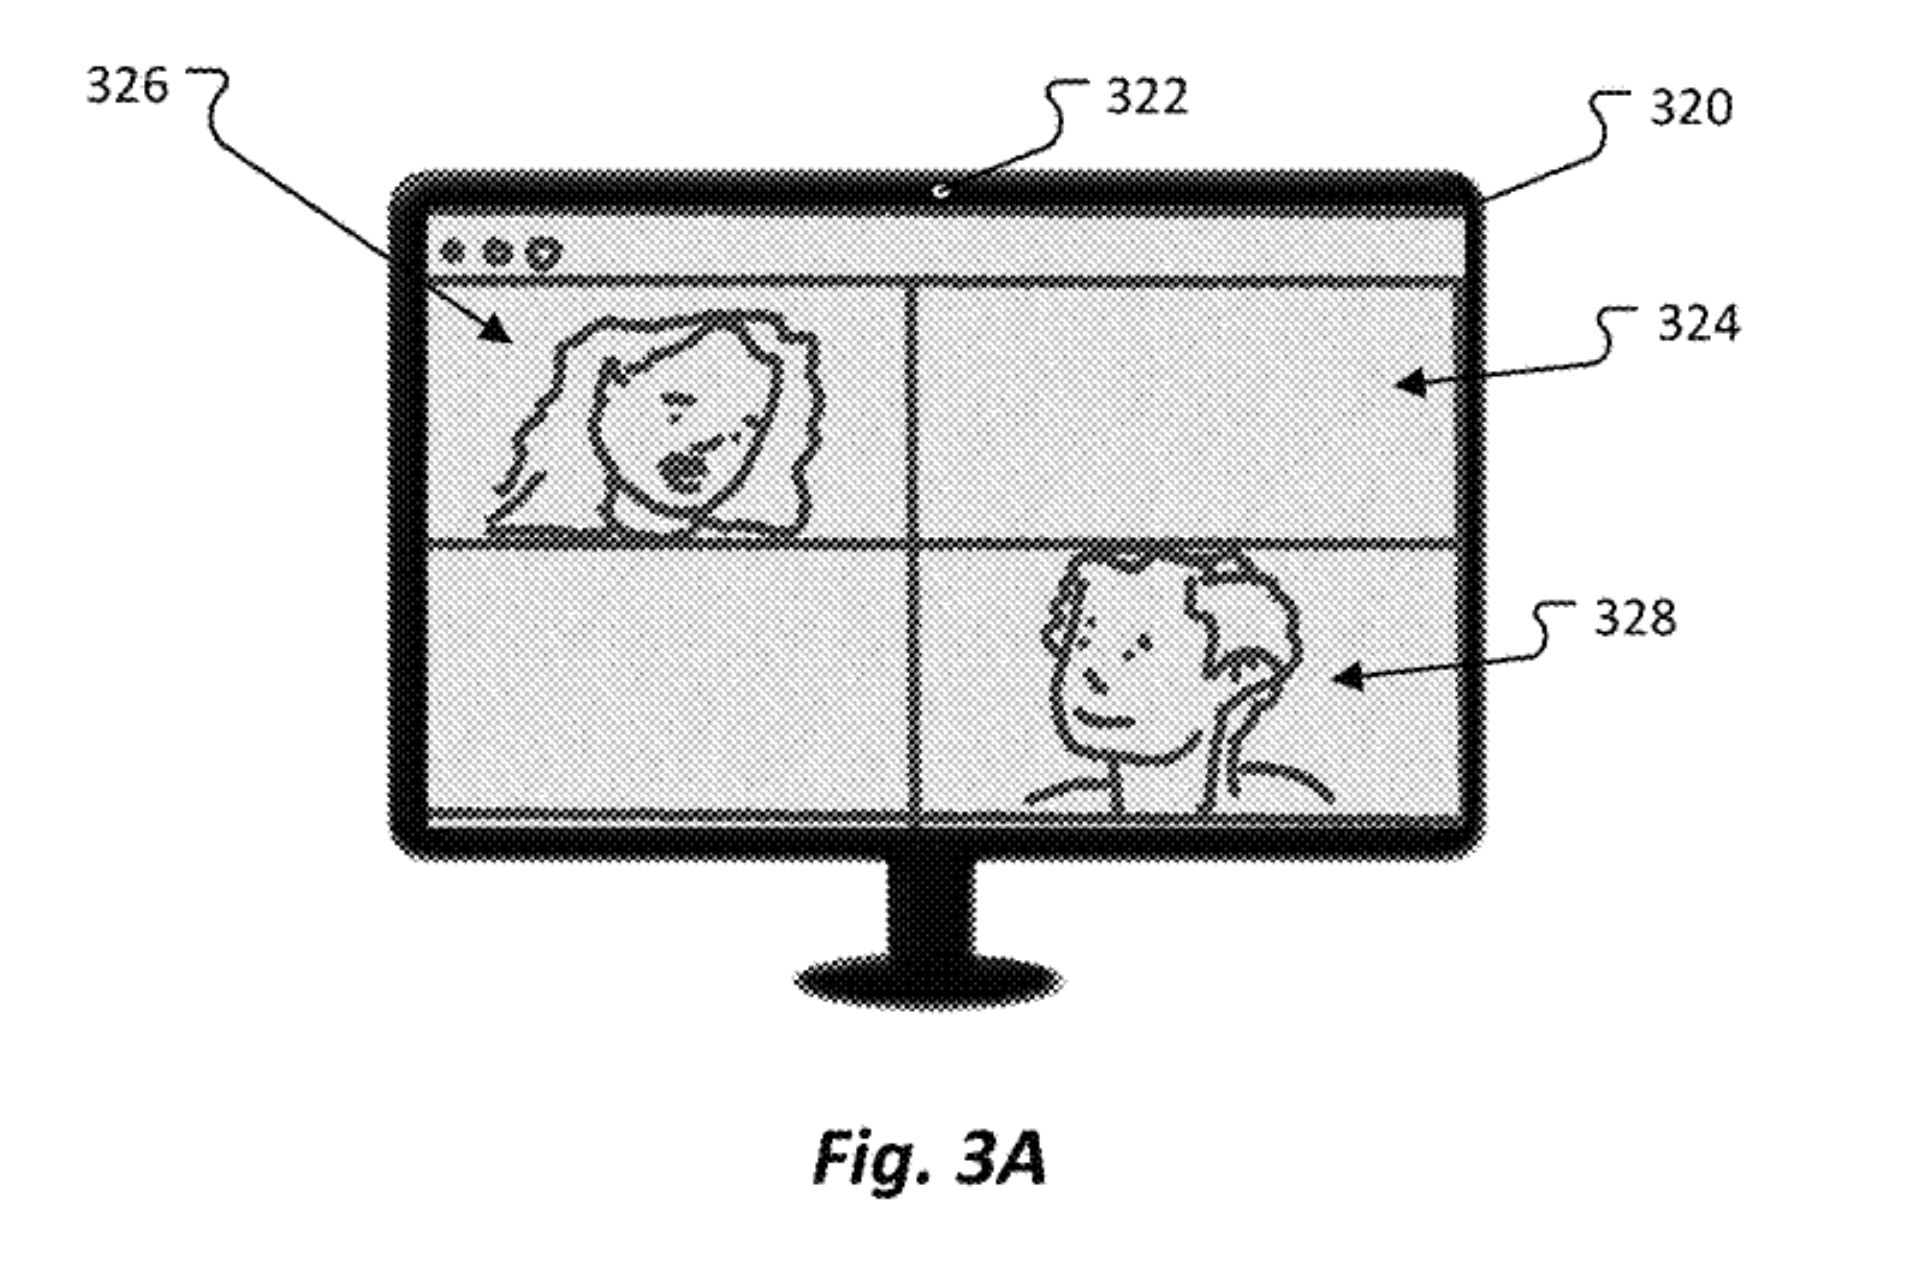
Microsoft is working on a technology that enables hyperreal video calls that allow for eye contact between virtual participants, according to a recent patent filed by the Redmond-based tech giant, and published recently.
The patent describes a technology that automatically adjusts the gaze of participants in a video conference, on platforms such as Microsoft Teams, or Skype, depending on the position of the active participant.
The technology uses an eye gaze tracker that would track the gaze of each participant in the meeting. Then, it would automatically adjust the position to create a sense of virtual immersion, as you can see in the illustration above. Here’s what the patent says:
More specifically, an eye gaze tracker may be used to determine a location at which the eye gaze of a participant is directed. If the eye gaze is directed to another participant taking part in the video conference, then the eyes, head pose, and/or upper body portion of the participant may be modified such that the eye gaze of the participant as displayed in the video conferencing application appears to others to be directed towards the previously identified other participant.
The patent also showcases a scenario where the participants can engage in eye contact interactions in a virtual background, giving a hyperreal impression to the entire virtual meeting. Below you can see the illustration for this scenario.
How does this technology work?
The system receives information about how to adjust the images in a video stream of a participant.
It identifies where this participant’s images are displayed in the video conference layout.
Based on this information, it figures out where another participant’s images are displayed.
The system then calculates the direction of the first participant’s gaze based on the location of the second participant’s images.
It creates new images where the first participant appears to be looking at the second participant.
These new images replace the original ones in the video stream.
In other words, it’s a system that makes it look like the active participant is making eye contact with someone else during a video call.
In many ways, the technology is similar to the existing Intelliframe feature in Microsoft Teams. The Intelliframe feature uses AI to automatically detect and identify participants in the Teams meetings, but this feature also creates immersion by simultaneously streaming multiple perspectives of the meeting.
Microsoft added Intelliframe to Teams to create a more realistic virtual meeting. Remote participants will also be able to stream various IntelliFrame videos at once. They get to see a panoramic view of the meeting, as well as a central view of the person who’s currently speaking in the meeting.
However, the technology described above takes the IntelliFrame feature to another level, as it artificially creates immersion by manipulating images into a single frame.
Could this become a feature in Microsoft Teams? Well, it most likely will, as Microsoft has already started including more immersive features to the platform. Recently, the Redmond-based tech giant introduced Microsoft Mesh for Teams, which allows developers to build their own virtual spaces where participants to a conference can go, although in their avatar form.
But virtual spaces are not the same as the real thing, and this feature specifically could make Teams meetings far more enjoyable and engaging for everyone.
Recently, a few users reported getting error A106 while trying to access Zelle’s Android or iPhone app. It’s a login error where the problem, most likely, lies with the server, corrupt app cache, network issues, or improper network configuration. So, let’s get to the fixes!
To start with, check the official Twitter page or a real-time monitoring service like Downdetector to verify if the Zelle servers are facing an outage. Also, force quit and relaunch the Zelle app or restart the device.
How can I fix Zelle error A106?
1. Clear the app cache
1.1 iPhone
iPhone doesn’t offer a way to just clear the app cache. If you choose Offload app, the related files are still stored on the device. So, your only option is to uninstall the app (steps in the next solution)!
1.2 Android
Open the device Settings, and go to Apps.
Select Zelle from the list of applications.
Tap on Storage.
Now, tap on Clear data and Clear cache individually and choose the appropriate response in case a confirmation prompt appears.
A corrupt Zelle app cache can lead to the A106 login error, and clearing it will get things running! This also helps with Zelle Reason Code 2900.
If the previous solutions didn’t help with the Zelle sign-in error A106, you should get in touch with Zelle support.
You can fill out a form on the support page and wait for a response. For immediate assistance, contact the customer helpline number directly.
After fixing the Zelle error code A106 on iPhone or Android, we recommend you read about the Zelle Facebook scam, as many have been tricked into sending money!
For any queries or to share what worked for you, drop a comment below.
The distnoted.exe process is essential if you’re running Apple programs on your Windows system. However, if it causes system crashes, consistently uses a high percentage of CPU, or presents any suspicious behavior, you need to get rid of it.
The distnoted.exe file is a legitimate system process that is used to manage and execute notifications on macOS systems.
For Windows users who have installed iTunes for Windows, it collects and distributes notifications from various Apple programs, most notably iCloud and iTunes, for syncing purposes.
How do I remove distnoted.exe from my PC?
A few preliminary steps to perform before any technical troubleshooting include updating the iTunes app and restarting it, and closing all iTunes processes from Task Manager. Also, verify its folder location and publisher to confirm its legitimacy. The ideal location should be: C:\Program Files\Common Files\Apple\Mobile Device Support
1. Run DISM and SFC scans
Hit the Start Menu icon, type cmd in the search bar, and click Run as administrator.
Type the following commands and press Enter after each one:DISM.exe /Online /Cleanup-Image /Restorehealthsfc /scannow
2. Scan for viruses
Press the Windows key, search Windows Security, and click Open.
Select Virus & threat protection.
Next, press Quick scan under Current threats.
If you don’t find any threats, proceed to perform a full scan by clicking on Scan options just below Quick scan.
Click on Full scan, then Scan now to perform a deep scan of your PC.
Wait for the process to finish and restart your system.
Distnoted.exe is a system process on macOS and is not typically present on Windows operating systems. Unless you installed iTunes on your Windows PC, it could be a sign of malware or a virus disguising itself as a legitimate process.
3. Reinstall iTunes
Press Windows + I to open the Settings app.
Go to Apps, then click Installed apps.
Locate iTunes, click the three ellipses, and then Uninstall.
Click Uninstall.
Now go to Microsoft Store and search iTunes.
Click Install to initiate the installation of the program.
Press Windows + R to launch the Run command, enter appwiz.cpl in the text field, and either click OK or Enter to launch the Programs and Features window.
Select iTunes here, and then click on Uninstall at the top.
Once the setup file is downloaded, double-click on it to launch the installer and follow the on-screen instructions.
It is possible that your current version is buggy after a new update. New app updates tend to have some glitches and could be behind the numerous distnoted.exe issues. Rolling back to a previous version will allow your app to function normally.
Have you spotted the distnoted.exe file or process on your PC and had any issues with it? Share your experience with us below and how you mitigated the problem.
Valued at a staggering $69 billion, the biggest of its kind, the acquisition brought a lot of hope to those gamers who wanted the Activision Blizzard King games on Game Pass. We’re talking about games such as Call of Duty, Diablo, World of Warcraft, Overwatch, and more.
While both parties are considering it (Microsoft and Blizzard, at least, have been thinking about it, and it might happen in the future), nothing is conclusive so far. However, it seems that until that happens, the Activision Blizzard games might actually find another home on Ubisoft+.
In an interview with Philippe Tremblay, Director of Subscription at Ubisoft+, he revealed that Ubisoft is working on an offer for Activision Blizzard, to host their games on the platform, and more details will be revealed soon.
Can you tell us anything more about the Activision Blizzard games catalog and when it might be coming?
PT: We know players are excited about that, and I am too. We’re working on the offering right now to make sure it’s the best possible experience for our subscribers, and we’ll have more to share later.
Ubisoft News
Could Activision Blizzard games be coming to Ubisoft+ in 2024?
While we don’t know for sure if they’re coming to Ubisoft+ in 2024, the Activision Blizzard games will be coming to the platform sooner or later, as Ubisoft signed an agreement in 2023, that gives Ubisoft cloud streaming rights to games like Call of Duty and more, coming into effect upon the completion of Microsoft’s acquisition of Activision Blizzard, as their press release states.
Ubisoft has the rights to stream the current AB games, as well as those released in the 15 years after the completion of the acquisition. The deal was closed in 2023, so this basically gives Ubisoft rights until 2038.
If you put it that way, it’s a long time. So there is time for these games to be available on Ubisoft+. However, as time is money, delaying the release of the games on the streaming platform would only mean that Ubisoft won’t gain anything from the agreement, so the two parties might actually agree to a release date sooner than we think.
The AB games will probably be available to Ubisoft+ this year, but nothing is certain so far. However, it will definitely happen, sooner or later.
Your browser’s Inspect Element tool allows making temporary changes to a website’s script, and it resets to default the moment you refresh the webpage. To make inspect element changes permanent, download the Permanent Inspect Element or Tapermonkey extension.
How can I make inspect element changes permanent?
Tip
The steps listed here are for Google Chrome, though the extensions are available across browsers, including Mozilla Firefox, Microsoft Edge, and Opera, and the process remains similar for all.
1. Use Permanent Inspect Element
Go to the Chrome Web Store, and click on Add to Chrome to install the Permanent Inspect Element extension.
Click on Add extension in the confirmation prompt.
Once done, head to the website where you intend to change the elements, and then press Ctrl + Shift + I to open the Inspect Element tool.
Make the desired changes to the elements on the right.
Close the tool, then click the Extensions icon in the browser’s toolbar, and select Permanent Inspect Element.
Click the Save page button, and then wait for a few seconds.
Now, when you refresh the page, the changes remain visible and don’t revert to the website’s original configuration.
To revert changes to the elements, click the Reset button. The Reset all options removes customizations for all websites.
Permanent Inspect Element is the easiest way to make everlasting changes to a website. It offers an easy-to-follow user interface and quickly saves the changes. For minor alterations, it’s your best option!
Open the website where you want to make the changes, and press Ctrl + Shift + I to inspect the elements.
Change the elements through the console on the right.
2.3 Create a new script
Click the Extensions icon, and select Tapermonkey.
Now, click the Tapermonkey extension, and select Create a new script from the flyout menu.
You will now come across the user script: // ==UserScript== // @name New Userscript // @namespace https://tampermonkey.net/ // @version 2024-01-16 // @description try to take over the world! // @author You // @match https://windowsreport.com/ // @icon https://www.google.com/s2/favicons?sz=64&domain=windowsreport.com // @grant none // ==/UserScript==
Add a name and description, while leaving the other fields as they are. Also, make sure the match field lists the website’s URL.
Paste the changes you made to the elements in the section underneath.
Once done, click the File menu, and select Save.
Finally, head back to the website and refresh the page. If everything is in order, the changes should still reflect.
Tapermonkey is a more advanced tool and is best for users who understand JavaScript and CSS, amongst other aspects of website development.
Also, if the changes are not visible after a while, the developers may have changed the elements. In this case, re-open the Inspect Element console, identify any changes, and make the appropriate modifications in the Tapermonkey script.
You now understand how to make Inspect Element changes permanent on Chrome, Firefox, Edge, and Opera. Before you leave, discover some quick tricks to unblur content on a website.
For any queries or to share how you saved the Inspect Element changes, drop a comment below.
Copilot on Windows 11, and Windows 10 devices will now generally support the read-aloud feature, effectively making the AI tool more accessible to larger categories of people, including those with disabilities.
Spotted by tech enthusiast, @Leopeva64, the feature is gradually rolled out to the general public these weeks. The feature was first teased back in November 2023, when Microsoft released it to Windows Dev and Canary within the Windows Insider Program.
The read-aloud feature will allow users to get Copilot to read the task inquiries, effectively making it more accessible and versatile, not only to people with disabilities but also to those who don’t want to read the results.
Fortunately, there won’t be any update to install in order to access this feature, as Microsoft will update Copilot automatically with it in the following weeks. Chances are, you might already have the feature integrated into your Windows Copilot. Want to know if it’s there? Follow along.
How to use the Windows Copilot’s read-aloud feature?
Open your Copilot, and assign it a task.
Wait for it to handle the task for you, and then click on the Read-aloud button, as you can see in the image below.
Copilot will read the results for you.
You can pause the read-aloud feature by clicking the same button, and it will stop.
The feature should be out to all Windows users, (except, of course, those who don’t have access to Copilot yet, such as EU Windows users), in the next weeks, as the Redmond-based tech giant is rolling it out.
Speaking of Copilot, Microsoft announced the release of Copilot Pro which offers advanced AI capabilities, besides the existing ones, for a $20/month subscription. Copilot Pro also introduces Copilot GPT Builder, a special tool that lets users create Copilots with just a prompt.
Microsoft promised 2024 will be the year of AI, and so far, the Redmond-based tech giant is keeping its promises.
Many users have complained about getting the SSL_ERROR_BAD_CERT_DOMAIN error when trying to access their SSL-encrypted website. In this guide, we will discuss WR experts’ recommended solutions to fix the issue.
First, you have to know that these SSL issues may occur due to incorrect installation, outdated browser cache, wrong web address, or domain name mismatch. To fix them, check the solutions below.
How can I fix the SSL_ERROR_BAD_CERT_DOMAIN error?
1. Verify if the web address is correct
The first step is to check if you have typed the correct web address in the address bar and ensure you use HTTPS instead of HTTP, then refresh the browser.
If you are already using HTTPS and getting the error, try replacing it with HTTP. It can help you access the website, but remember it is not secure, so if you own the website, make sure you get a valid SSL certificate.
Also, check if you have the correct time set on your computer, as it can also help you avoid all the HTTPS sites not working issues; read this guide to learn more.
2. Clear browser cookies and cache
Launch the browser which is getting the error. Here, we are demonstrating the steps using Mozilla Firefox as the issue usually appears on it.
Locate & click the three horizontal lines icon, and select History from the drop-down menu.
Click Clear recent history.
For Time range to clear, select Everything.
Place a checkmark next to Browsing & download history, Cookies, Cache, and Form & search history.
Click Clear Now.
Restart your browser and check if the issue persists.
Clearing browser cookies can help you fix the gws_rd=ssl error on Google; read this guide to learn more about the issue.
Try visiting the website again, and if you see the SSL_ERROR_BAD_CERT_DOMAIN error code, click I understand the Risks.
Now click the Add Exception button.
On the Add Security Exception window, click Get Certificate to retrieve the certificate and understand the issues related to it.
Now, to check the certificate for more details, click the View button.
Under General, locate and check the Period of Validity.
Remember that you must always configure SSL certificates for both www and non-www domains to avoid all such error codes.
You can also try restoring the browser to default if you can access the website on one browser but not on another.
To conclude, the SSL_ERROR_BAD_CERT_DOMAIN error code appears if the web address you input is wrong or your SSL has expired.
So, to fix it, you need to check the SSL certificate validation, ensure you are using the correct web address with HTTPS and clear the browser cache & cookies.
In case you are unable to access some websites and stuck with ssl_error_handshake_failure_alert error; we have a separate guide on the issue.
If you have any questions or suggestions about the error code, don’t hesitate to mention them in the comments section below.
Error number 0x8024d001 Windows Update shows up on Windows 11 if you’re using a stand-alone installer and the easiest way to fix it is to run the dedicated troubleshooter. The message reads Installer Encountered Error Code: 0x8024001d. We’ve come across this issue, so here’s what to do.
How do I fix the Windows Update error 0x8024d001?
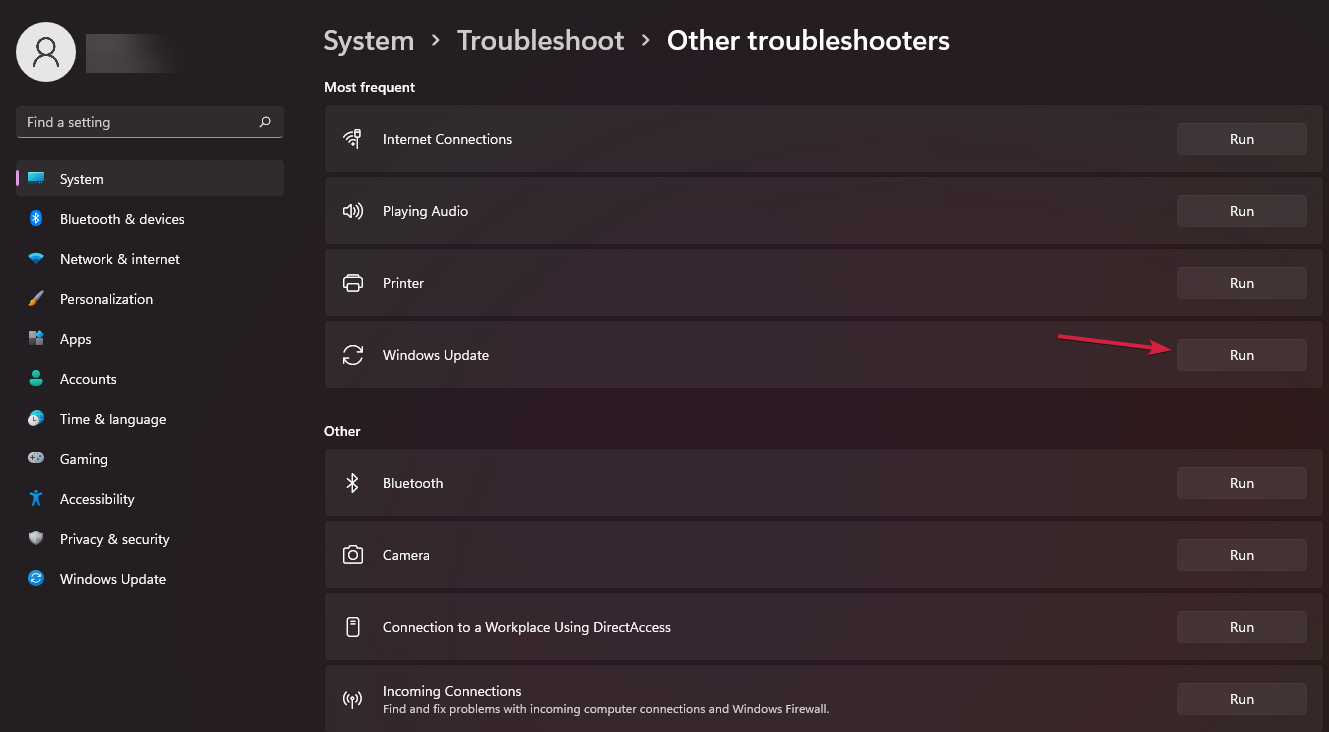
1. Run the Windows Update troubleshooter
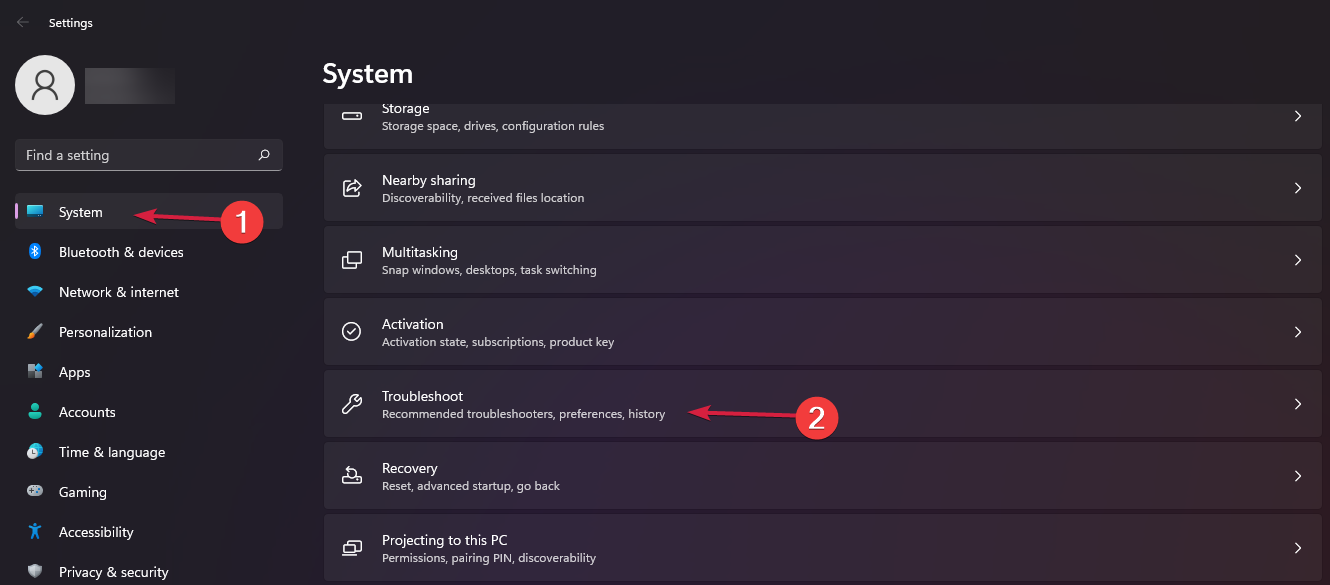
Click the Start button and go to Settings.
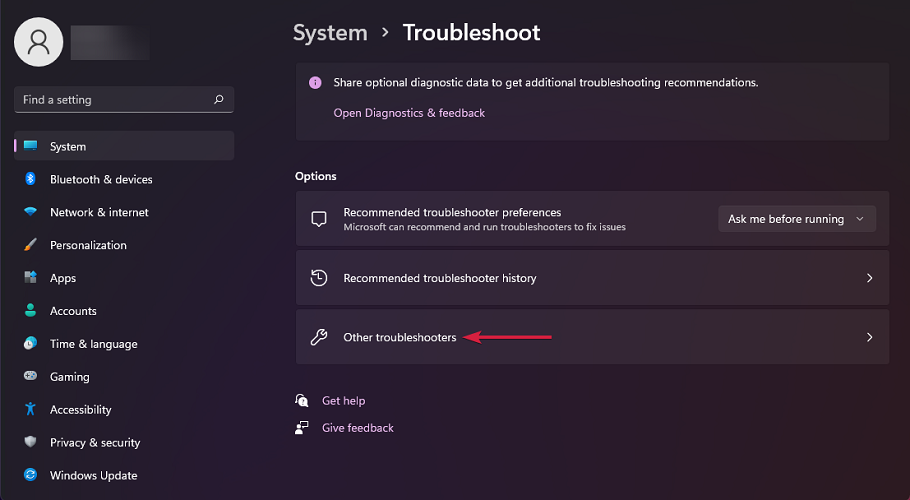
In the System tab, choose Troubleshoot.
Now, click on Other troubleshooters.
Finally, click the Run button for Windows Update.
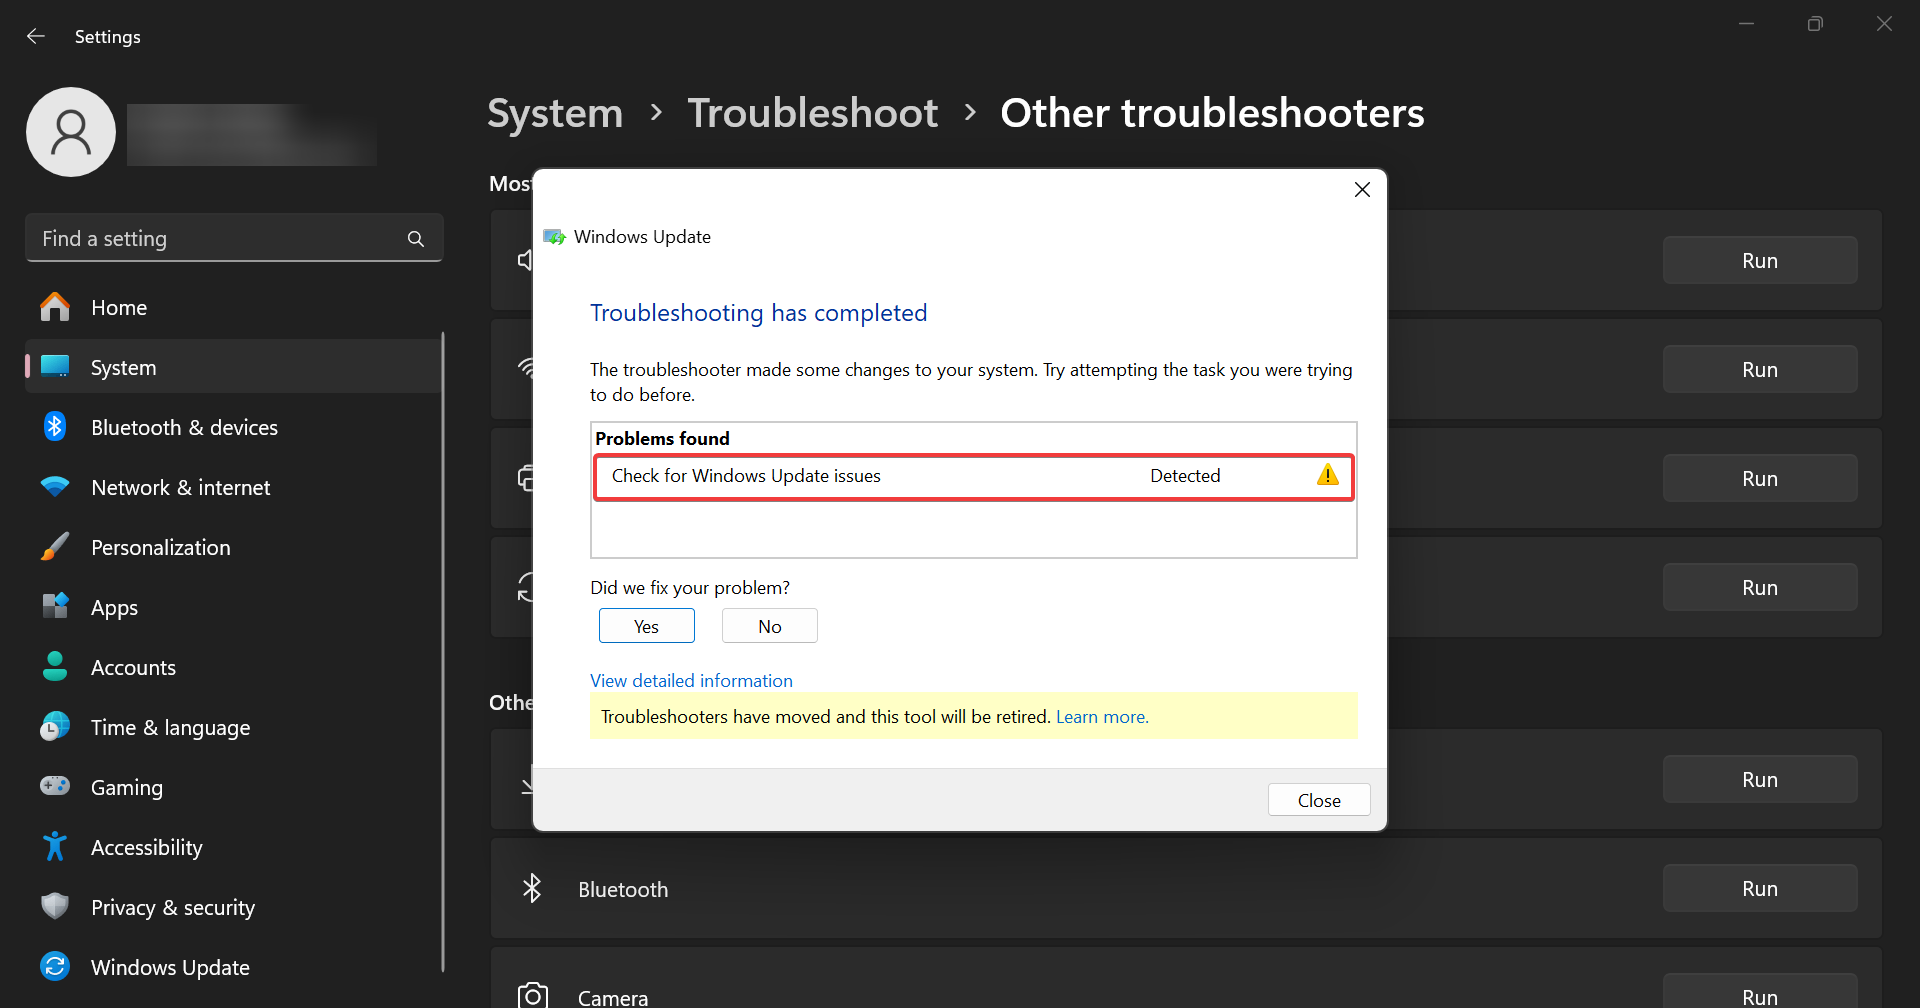
The system will, most likely, find the Windows Update error and fix it. Check to see if the error 0x8024d001 still occurs.
So, the easiest way to fix the error number 0x8024d001 Windows Update is by using the built-in troubleshooter. From our tests in the WR labs, this simple method fixed the problem.
We also have a more general guide on how to fix Windows 11 update errors. You can check it for further information.
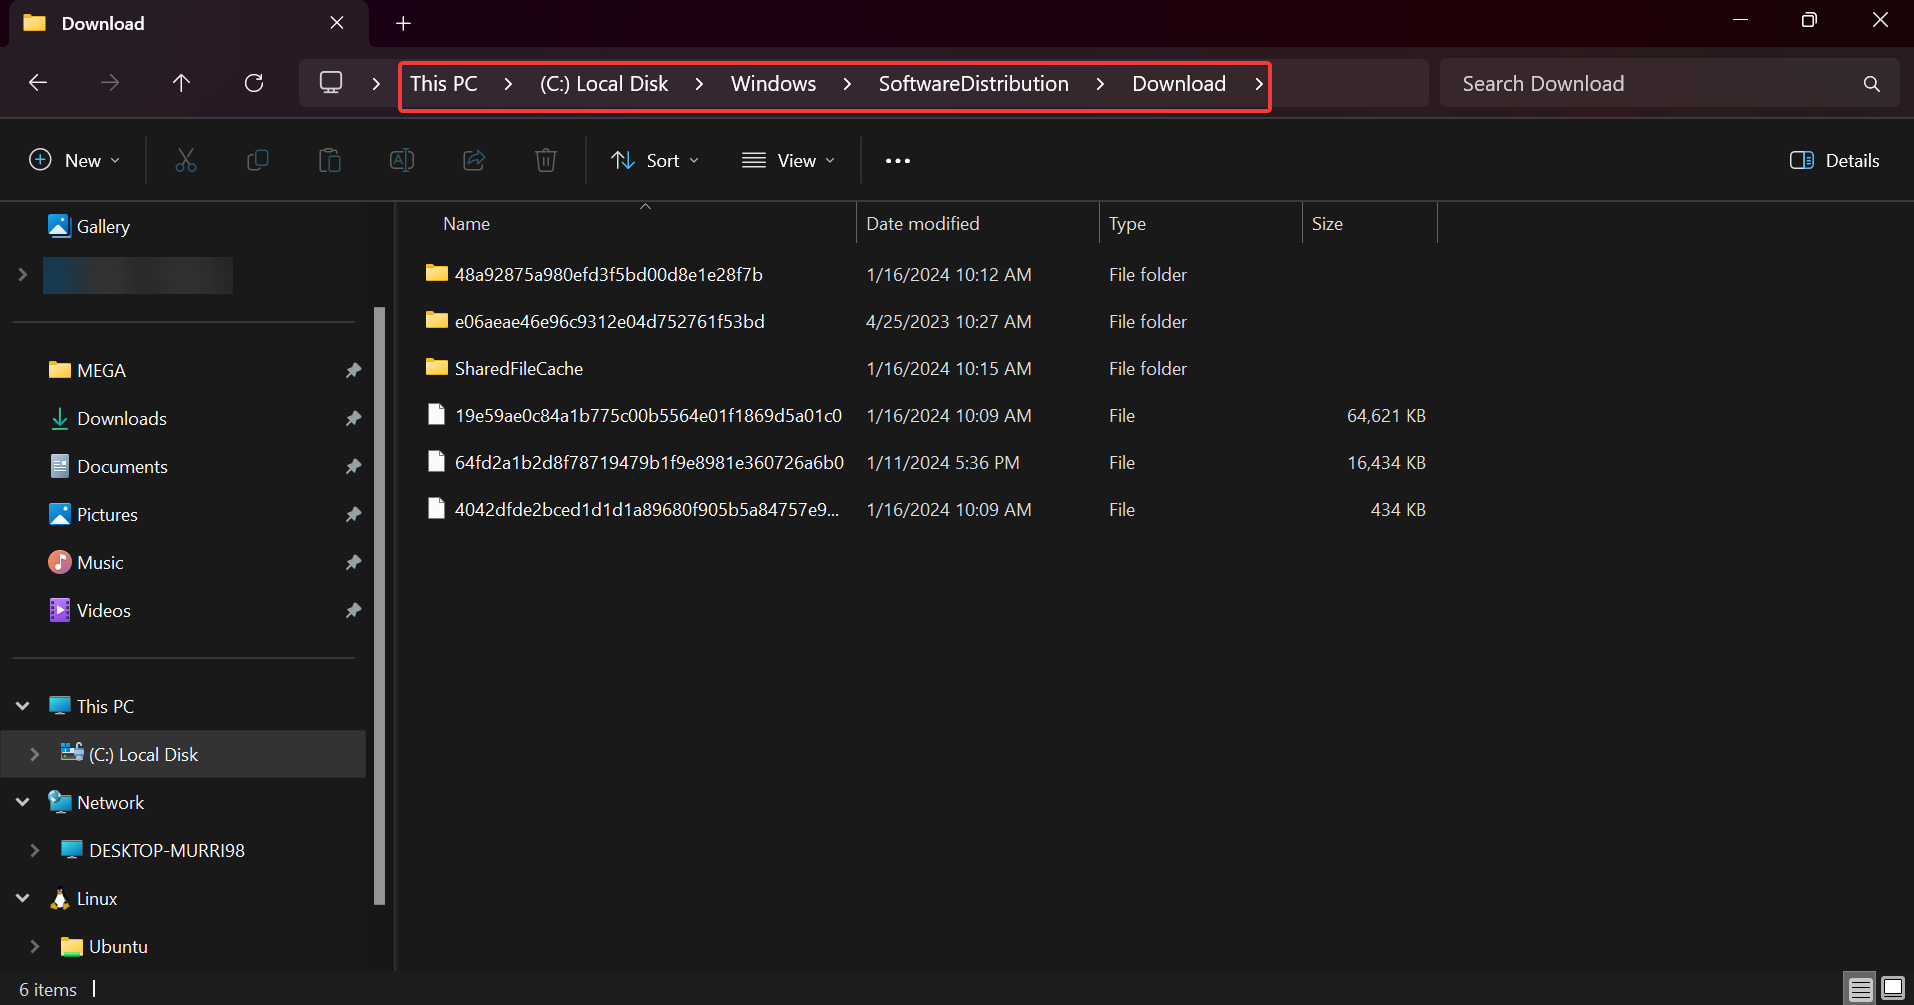
2. Delete the downloads from the SoftwareDistribution folder
Press the Windows key + E to start File Explorer.
Go to the following path: C:\Windows\SoftwareDistribution\Download
Now, select all the files in the folder with your mouse or by pressing Ctrl + A and hit the Del button.
Restart your PC and try the Windows Update again to see if the 0x8024d001 error persists.
The error number 0x8024d001 on Windows Update is sometimes caused by the incomplete or corrupted download of the update. Deleting the contents from the SoftwareDistibution > Download folder will refresh the Windows Update process.
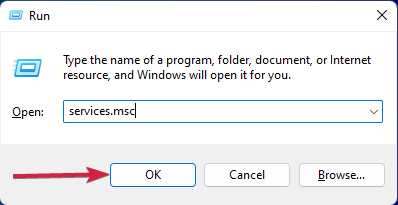
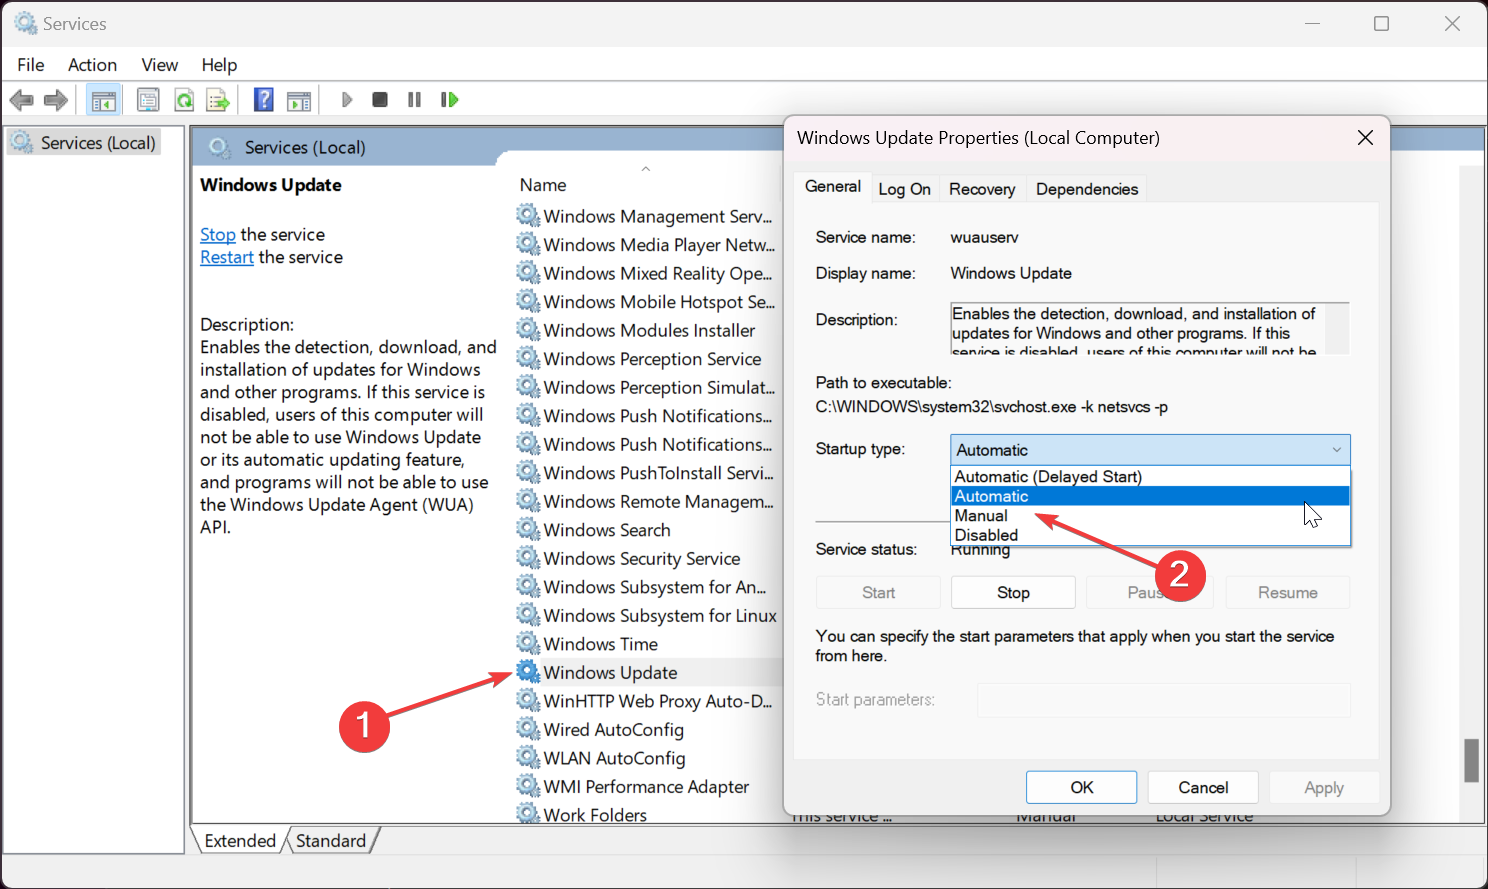
Press the Windows key + R to start the Run console, type services.msc, and press Enter or click OK.
Scroll down, and double-click on the Windows Update service, then make sure that the Start-up type is set to Automatic. If not, change it from the drop-down menu.
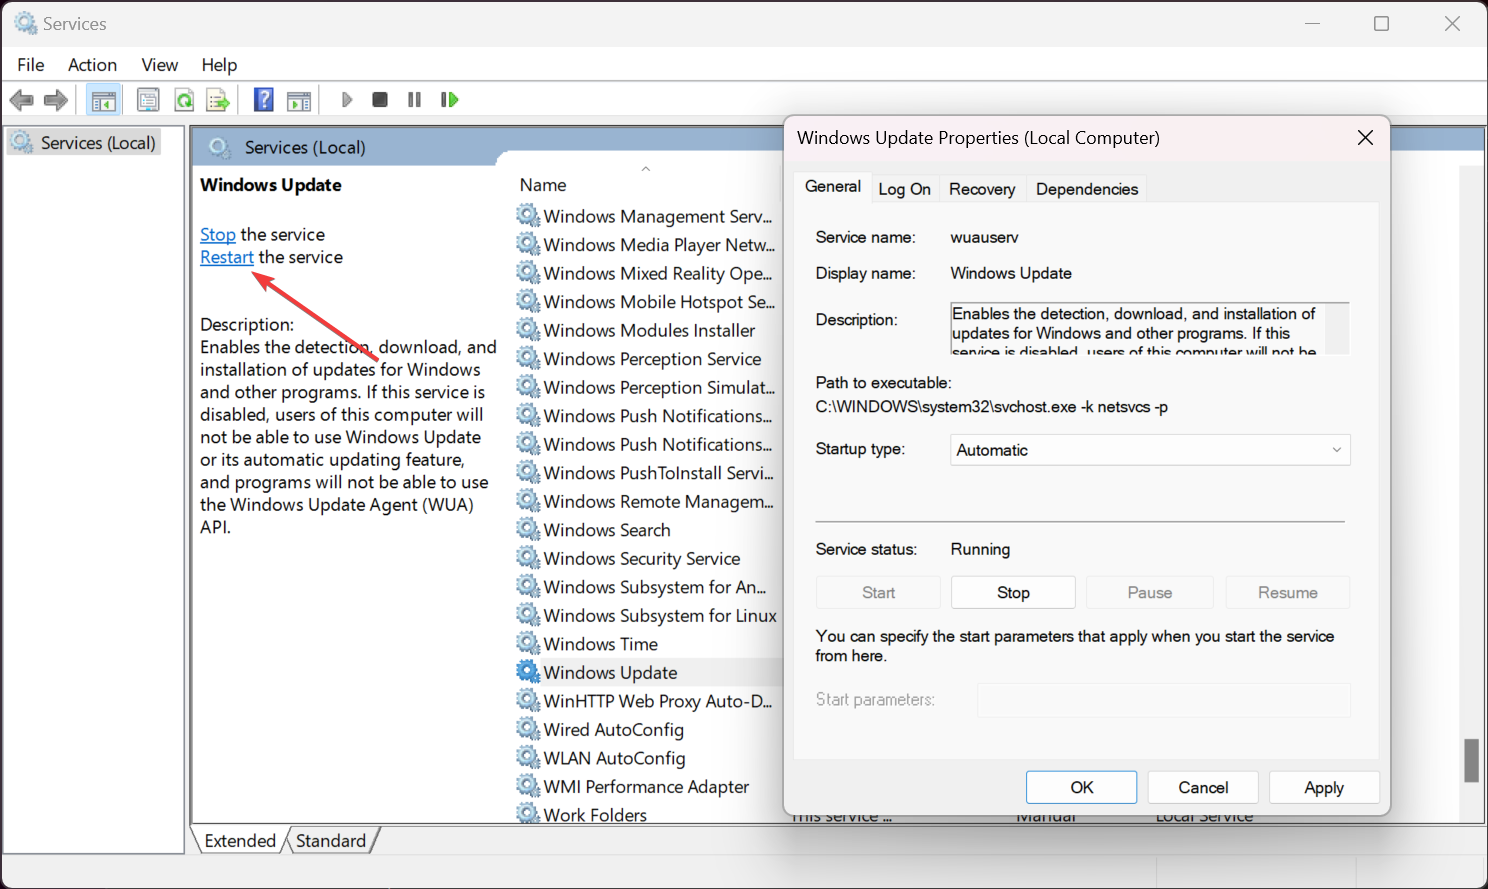
Now, click on Start to turn on the service. If that doesn’t work, return to this window and hit the Restart option from the top left.
This won’t help you if you insist on using a stand-alone installer, but by restarting the Windows Update service, you will be able to use the built-in tool to perform the updates.
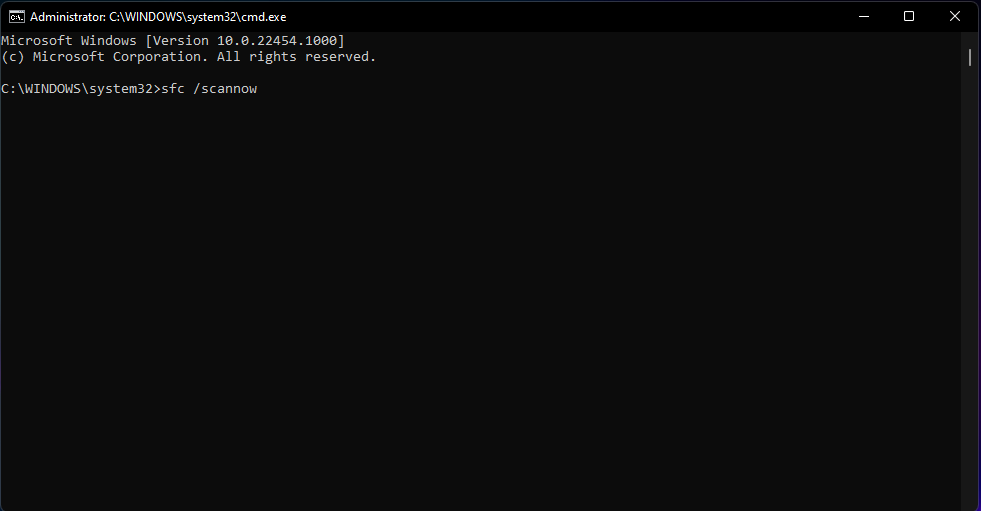
Click the Search icon, type cmd, and select Run as administrator from the results.
Now, type the following command and press Enter: sfc /scannow
Wait until the scan is complete, then restart your PC and check if the Windows Update is working properly.
Sometimes, the Windows Update can return the 0x8024d001 error code due to corrupted system files. The SFC scan will reveal any such issues and correct them.
5. Reset the Windows Update components
Click the Search icon, type cmd, and choose Run as administrator from the results.
Type or paste the following commands one by one and press Enter after each:
net stop wuauserv
net stop cryptSvc
net stop bits
net stop msiserver
ren C:\Windows\SoftwareDistribution SoftwareDistribution.old
ren C:\Windows\System32\catroot2 catroot2.old
net start wuauserv
net start cryptSvc
net start bits
net start msiserver
If all else fails, resetting the Windows Update components as indicated above will completely refresh the OS update process, fixing the 0x8024d001 error along the way.
You can also use a dedicated script to reset the Windows Update components. It’s mostly for more advanced users but if you do it once, you will have the script handy if you need it again.
So, to recap our guide, to fix the error number 0x8024d001 Windows Update, the quickest way is to launch the Windows Update troubleshooter. Deleting the downloads from the SoftwareDistribution folder, and restarting the update service will also work. You might also scan the system for errors and reset the Windows Update components.
Apparently, having Microsoft Edge as your default browser comes with a huge benefit: you can search the Internet using Bing and Google, at the same time, according to Mikhail Parakhin, leader of the Windows and Web Experiences Team.
Microsoft Edge has Bing as the default search engine, but users can also access Google, at the same time, by clicking on a button in the browser, which activates Google Search. The button in question is the Search icon, as you can see in the image below.
Users can set Google as the default search engine within Microsoft Edge, and Bing will be used instead within the Search option, so this feature is somehow interchangeable. You’ll have access to both engines at the same time, without even leaving the current web page.
In Edge, you can search in two engines simultaneously: if Bing is your default and you click on the Search icon, you’ll see, say, Google results (and vice versa). It will stay in sync and refresh with the new query. Have you ever tried it? Is this useful? Asking for a friend 🙂
Accessing Bing and Google simultaneously on Edge: How useful could it be?
Well, that depends strictly on how accurate you want to be when looking up a specific thing on the Internet. Using Google and Bing, at the same time will allow you to compare results, and get more options for the search query.
It’s well known that Bing is not yet at the same level as Google, and even Nadella, Microsoft’s CEO, admitted at some point that Google is just better, when it comes to searching the Internet.
However, that doesn’t mean you shouldn’t use this feature. The more options, the better, as you can see different results, that can lead to different prospects.
Google’s search results follow a certain pattern that is heavily rooted in SEO (Search Engine Optimization) and that doesn’t automatically mean good results. Bing, on the other hand, is more similar to a pristine territory, meaning SEO has not yet overtaken this search engine, so you might still get interesting results.
If you’re getting an error stating that The program can’t start because 3dmgame.dll is missing from the computer. Try reinstalling the program to fix this problem error, it’s because your antivirus removed it.
The 3dmgame.dll missing error is commonly seen on Metal Gear Solid V: The Phantom Pain (mgsvtpp.exe), Mad Max, and GTA V.
To restore a missing 3dmgame.dll, disable your antivirus, add an exclusion for the game’s folder, or reinstall the affected game. Find step by step instructions & more tips and tricks below.
What can I do if 3dmgame.dll is missing?
Tip
Running pirated versions of games is illegal and unethical and, at the same time, can put your PC’s security at risk. We recommend you download the game from the official platform. Only proceed with the fixes if you are certain that the file poses no risk.
1. Recover 3dmgame.dll from the antivirus
Press Windows + S to open Search, type Windows Security in the text field, and click the relevant result.
Click on Virus & threat protection.
Click on Protection history.
Select Quarantined Items from the Filters dropdown menu.
Now, locate the missing DLL and restore it.
Look for other DLLs that are a part of the game and recover them as well.
If Windows Defender deleted the file, recovering it will help restore the missing 3dmgame.dll. Also, if you have another antivirus running on the PC, check its Quarantined and Removed files section as well.
Besides, if you have another PC with the 3dmgame.dll, copy it to an external drive and then move the file to the game’s directory on the affected computer.
2. Add an exception for the game in the antivirus
Press Windows + S to open Search, type Windows Security, and click on the relevant result.
Click on Virus & threat protection.
Click on Manage settings under Virus & threat protection settings.
Now, click on Add or remove exclusions.
Click the Add an exclusion button and select Folder from the menu.
Navigate to and choose the game’s directory (folder), then click on Select folder.
Once done, reboot the PC, and then run the game that is throwing the error.
If Windows Security or another antivirus is blocking 3dmgame.dll, and it’s subsequently missing, the best option is to add an exclusion for the game’s directory.
Remember, when you add an exclusion, the files won’t be scanned for threats. So, only do it for games downloaded from reliable sources.
Press Windows + S to open Search, type Windows Security, and click on the relevant result.
Click on Virus & threat protection.
Click on Manage settings under Virus & threat protection settings.
Disable the toggle for Real-time protection.
Click Yes in the UAC prompt.
3.2 Reinstall program
Press Windows + R to open Run, type appwiz.cpl in the text field, and hit Enter.
Select the affected game from the list, and click on Uninstall.
Follow the on-screen instructions to complete the uninstallation.
Restart the computer, then download and install the game or copy the cracked version again.
Finally, you can re-enable Windows Security or the antivirus activated on your PC.
If a quick removal doesn’t work, use an effective uninstaller software to get rid of the game’s cache, leftover files, and any Registry entries. You can then download and reinstall the game from the source. This also helps fix things when cardgames.dll is missing.
4. Use a DLL repair tool
When faced with missing or corrupt DLLs, your primary approach should be to use an effective DLL repair tool.
Once you are done restoring or downloading the missing 3dmgame.dll file, discover some quick tips to optimize the PC for gaming and get the best performance!
For any queries or to share which fix worked for you, drop a comment below.
Copilot for Microsoft 365 is now available to all businesses, large, medium, or small. Back in November 2023, when Microsoft released Copilot for Microsoft 365, the Redmond-based tech giant decided to release the AI tool only to large companies through a Microsoft 365 E3 and E5 enterprise plan for a $30/month subscription.
However, today, Microsoft decided to change the plan: all businesses, both big and small, will have access to Copilot for Microsoft 365, and companies won’t have to abide by the 300 minimum seat rule anymore. This means Copilot for Microsoft 365 can be integrated into a business run by a single person.
The subscription will cost $30/month, and the AI tool will be integrated into all Office apps: so businesses working with Word, PowerPoint, Excel, Outlook, OneNote, and so on, will instantly have access to Copilot within these platforms.
How can Copilot for Microsoft 365 elevate a small business?
As you might know, Copilot for Microsoft 365 is quite versatile: the AI tool will be virtually present in all Microsoft 365 apps, as we mentioned earlier, including platforms such as OneDrive, as well.
When used properly, Copilot can elevate a business to another level, and Microsoft has the studies to prove it: a study, commissioned by Microsoft, and released earlier last year, showed that startups and small companies could greatly benefit from AI investments, with 47% of small business owners say AI is a game changer and a valuable asset to their company.
Another study, also condoned by Microsoft, shows that investing $1 into AI generates a return of $3.5X. AI could become a valuable and even profitable asset to a company in less than 2 years and it would end up generating almost 4 times the budget spent on investing in it.
For a small business, such as a startup, AI would not only be a game changer, but a life changer, as well, as it could easily be used to generate profit in a short amount of time and scale it up to international markets.
The change of plans is part of the newly announced Copilot Pro, which is a new Copilot model based on the existing model but with far more advanced capabilities. Small businesses can also use Copilot Pro, in case they don’t want to opt for Copilot for Microsoft 365.
This Copilot will debut Copilot GPT Builder, which will allow smaller companies to create their own Copilots, customized and personalized for the business’s needs.
As part of the Copilot Pro announcement, which is an advanced version of the existing Copilot tool on Windows and Microsoft 365, Microsoft also announced the release of the Copilot GPT Builder, a tool that will let users create Copilot GPTs with a single prompt, without any coding knowledge.
The Redmond-based tech giant will let users access the Copilot GPT Builder to create Copilot GPTs that are based on their interests, and it will also provide them with some templates to get things started.
According to the Copilot Pro presentation video, which you can watch below, users will be able to access templates such as designer, travel planner, cooking assistant, or fitness trainer.
Copilot GPTs work similarly to OpenAI’s GPTs, and the Copilot GPT Builder is also influenced in part by OpenAI’s GPTs’ building model.
Copilot GPT Builder: What we know, so far
Copilot GPT Builder will exist as an app, and it will be released as part of Copilot Pro, at a later date, most probably in the following weeks.
We don’t know for sure if Microsoft will encourage the building and the monetization of Copilot GPTs, but if it follows OpenAI, then most probably, the Redmond-based tech giant will debut a special store, or place where these models can be properly monetized.
OpenAI announced the GPT Store just last week, and Microsoft will probably release a similar endeavor, due to the proximity of the two companies, when it comes to AI.
As only 4 templates can be seen so far, Microsoft will likely release more templates users can choose from when creating their Copilot GPTs. And, as you can see below, the Redmond-based tech giant encourages users to as little input as possible, so users won’t need to have any coding skills at all, to be able to create their own AI models.
Copilot GPT Builder will most likely be released in the following weeks, probably in February, or March. The Redmond-based tech giant is also set to debut the new Copilot key by then on Windows devices, just in time.
Copilot Pro is out in the world, and Microsoft is targeting individual consumers for a $20/month subscription. While the free version of Copilot is live on Windows 11, and Windows 10, as well, the Pro version promises advanced AI capabilities that will elevate the whole experience to another level.
Introducing Copilot Pro, a new subscription that delivers the most advanced features and capabilities of Microsoft Copilot to individuals looking to supercharge their Copilot experience. Whether you need advanced help with writing, coding, designing, researching, or learning, Copilot Pro brings greater performance, productivity, and creativity.
Microsoft
The Redmond-based tech giant says users can task Copilot Pro to help them with everything, from writing, to coding, designing stuff, and researching. Finishing a Ph.D. thesis with Copilot Pro? It can be done, eventually.
We’re joking, but the product seems exciting to say the least. Here’s the official video presentation of it:
Copilot Pro: What should you expect from it?
Access to Copilot inside the Microsoft 365 apps, including Word, PowerPoint, Excel, OneNote, and so on.
Priority access to OpenAI’s GPT Turbo-4, meaning users will be able to access the AI model even during peak hours.
Users will be able to create stunning images via Copilot Pro’s Designed. Plus, with an active Copilot Pro subscription, there will also be 100 boosts per day, meaning you’ll have access anytime, and the images will be generated faster, and more accurately to your inputs.
Access to Copilot GPT builder, which works similarly to Open AI’s GPT Studio: users will be able to build their own custom Copilots, without any coding knowledge, to suit their needs.
As you can see, Copilot Pro can be a very useful tool to have especially if you’re a creative professional. The tool can easily help you get work done faster, and its ability to quickly compose, summarize, and edit texts, while also providing you with visuals when needed, could be a game-changer.
However, probably one of the most important aspects to be considered here is the ability to come up with a personalized Copilot that can be customized to suit each customer’s needs. This ability alone would make Copilot an essential tool to have because it can be adapted to each situation, while still being personalized to it.
This means that a personalized Copilot would be more secure and in theory, it couldn’t be replicated. Plus, if we take into consideration that OpenAI is launching a GPT Store, building Copilots could essentially become a profitable job in itself.
Users can build highly personalized Copilots based on customers’ requests or market trends, and then monetize them on the store. Copilot Pro will let users build Copilots with simple prompts, so there is no need to know coding.
All of the aforementioned features will be available to Copilot Pro in the following weeks.
If you’re seeing the error Can’t open AsIO3.sys failed with error code 5: Access is denied while installing or uninstalling ASUS-related software, this guide can help.
What causes the Can’t open AsIO3.sys error? It’s usually triggered by malware, a corrupted hard drive, outdated drivers, problematic Windows updates, or registry issues.
Type services.msc and click OK to open the Services app.
Locate AsusCertService, right-click the services and choose Properties.
Go to Startup type, then select Automatic from the drop-down menu.
Click Apply and OK to save the changes.
2. Run SFC & DISM scans
Press the Windows key, type cmd in the search box and click Run as administrator.
Type the following command to repair system files and press Enter: sfc/scannow
Copy & paste the following to restore Windows system image files and hit Enter: DISM /Online /Cleanup-Image /RestoreHealth
Reboot your PC to save the changes.
Repairing system files can help you fix the Afd.sys, a blue screen error, which is usually caused by a corrupted Ancillary Function driver. You can also use automatic repair tools to prevent other issues from occurring.
3. Clear the registry entries
Press Windows + R to open the Run window.
Type regedit and click OK to open the Registry Editor.
First, take a backup of registry files. To do that, go to File, then select Export. Save the .reg file in an accessible location.
Navigate to this path: Computer\HKEY_LOCAL_MACHINE\SYSTEM\CurrentControlSet\Services\
Look for folders like Asusgio2 and Asusgio3 in the left side pane.
Select Asusgio2, on the right side of the window, locate [ImagePath] and note down the path mentioned next to it.
Once you have noted the path, right-click Asusgio2 and Asusgio3, one by one and select Delete.
Now go to the path you noted, locate the AsIO2.sys and AsIO3.sys files, select them and click the Delete icon from the menu.
Restart your computer to let the changes take effect.
Press Windows + E to open the File Explorer window.
Locate the downloaded folder, locate the Armoury Crate Uninstall Tool.exe file, double-click, and select Run.
The uninstallation process will start, and once done, reboot your computer.
Once the system restarts, rerun the installer file to reinstall the app.
Uninstalling Armoury Crate can help you fix other issues like portcls.sys; read this guide to learn more about it.
5. Update the Universal ASIO drivers
Press Windows + R to open the Run window.
Type devmgmt.msc and click OK to open the Device Manager app.
Expand Universal ASIO Driver, right-click on Universal ASIO Driver and select Update driver.
Click Search automatically for drivers.
Follow the on-screen instructions to complete the process.
You can also carefully check other categories on the Device Manager app for a yellow triangle with an exclamation point and update the drivers using the steps mentioned.
6. Grant full permission for AsIO.sys
Ensure you are logged in with an administrator account, then press Windows + E to open the File Explorer window.
Go to this path: C:\Windows\SysWOW64\drivers\AsIO.sys
Right-click AsIO.sys and select Properties.
Go to the Security tab and click the Edit button.
Choose the username and click Add.
In the Select UsersorGroups window, type Everyone in the box next to Enter the object names to select (examples), and click OK.
Click Apply.
Go to the Folder’s Properties window again, go to the Security tab, and click the Advanced button.
Select Permissions, and click the Change Permissions button.
Click Change.
In the Enter the object name to select field, type Everyone and click OK.
Place a checkmark next to the Replace owner on subcontainersand objects option.
Go to Auditing, click Add.
Click Select a principal, type Everyone in the following box, and select OK.
Select Full control and click OK.
Click Apply to save the changes, then reboot your PC and check if the issue persists.
7. Perform a system restore
Press Windows + R to open the Run dialog box.
Type rstrui and click OK to open the System Restore window.
Select the Choose a different restore point option and click Next.
Choose the restore point from the list and click Next.
Select Finish.
Windows will restart and restore your computer to the selected version. If you get System Restore doesn’t complete successfully message, read this guide to learn the reasons & solutions.
In conclusion, to fix the can’t open AsIO3.sys message, you need to change the startup type of the AsusCertService service, run SFC & DISM scans, reinstall Armoury Crate, or update device drivers.
If you have any questions or suggestions about the subject, feel free to mention them in the comments section below.
If you have encountered the Aswhdske.sys blue screen error, this guide can help! We will discuss some WR experts’ recommended solutions to get rid of the blue screen error.
What causes the Aswhdske.sys blue screen error? It could occur due to an outdated Avast app, corrupted drivers, or overheating.
How can I fix the Aswhdske.sys blue screen error?
Before moving to the troubleshooting steps, go through the preliminary checks :
Disconnect all the USB devices except the mouse and keyboard.
1. Run as a BSOD troubleshooter
If your system can’t boot up to Windows, you need to restart your computer in Windows Recovery Environment (winRE); follow these steps to do so:
Press & hold the Power button for 10 seconds to turn off your PC.
Now press the Power button again to restart your computer. Once you see the device manufacturer’s logo, press & hold the Power button for 10 seconds to turn it off again.
Follow Steps 1 and 2 twice, and when your PC restarts for the third time, let it boot up, and you will be in the Windows Recovery Environment.
Once you are in winRE, follow these steps to turn on your computer in safe mode:
On the Automatic Repair screen, select the Advanced options button.
Select Troubleshoot from the Choose an option screen.
Now, click Advanced options.
Select the Startup Settings option.
Press F5 or number 5, then select Restart.
If you can boot your Windows normally, you can skip the above steps to enter safe mode; instead, use these. Once you are in safe mode, follow these steps to run the troubleshooter:
Press Windows + I to open the Settings app.
Go to System, then select Troubleshoot.
Click Other troubleshooters.
Locate the Blue screen option and click Run.
Follow the on-screen instructions to complete the process.
Accessing safe mode is the safest option to troubleshoot other BSoD issues like Blue screen loop, read this guide to learn more.
2. Reinstall the Avast software
Restart your computer in safe mode using the steps mentioned in Solution 1, then follow these steps:
Press Windows + I to open the Settings app.
Go to Apps, then click Installed apps.
Locate Avast, click the three dots icon and select Uninstall.
Click Uninstall to confirm.
Follow the on-screen prompts to complete the process.
To remove all the files related to Avast, go to this path: C:\Program Files (x86)\Avast
Look for the Avast folder, select it, click the Delete button, and reboot your PC.
Restart your computer in safe mode using the steps in Solution 1, then follow these steps:
Press Windows + I to open the Settings app.
Go to Windows Update and click Update history.
Select Uninstall updates.
Locate the latest update and select Uninstall. Once done, restart your computer.
6. Perform a system restore
Restart your computer in the WinRe environment from Solution 1 and follow these steps:
On the Automatic Repair screen, select the Advanced options button.
Select Troubleshoot from the Choose an option screen.
Now, click Advanced options.
Choose the System Restore option.
Select the Choose a different restore point and click Next.
Choose the restore point you want the computer to return and click Next.
Click Finish.
Windows will restart and restore your computer to the selected version. If you get System Restore doesn’t complete successfully message, read this guide to learn the solutions.
If nothing has worked for you, you need to reinstall Windows on your computer. To conclude, you need to uninstall unwanted apps, reinstall Avast, repair the system files using SFC scan, uninstall a bad Windows update or restore your old Windows settings.
While Microsoft Streams is deprecating its live events feature at the end of January, the platform is also getting a bunch of new useful features. For instance, last week, we found out that Microsoft debuted a pay-as-you-go transcription translation feature on the platform, with over 100 supported languages.
However, even bigger things are coming to Microsoft Streams. According to the latest entry in the Microsoft 365 Roadmap, the Redmond-based tech giant plans to add video reactions to the platform in June 2024, when the feature will be previewed and rolled out to the public.
The new feature will allow users to react to videos on Microsoft Stream in a variety of ways: users can react to the whole video, or only to parts of it, and they will also be able to see others’ reactions to the video.
The feature will also allow users to show support to the owner of the video, and it will let them see a timeline highlighting the most reacted parts of the video, as well.
In case the reaction is negative, and it is due to happen too, the owner of the video can choose to disable the option, so this feature is optional, after all. Here’s what Microsoft says about it:
This feature will allow users to add or remove reactions to specific points of a recorded video via Stream Web App and Embed. Viewers will be able to see how their colleagues feel about a video and show their support towards the video owner. These reactions will be present in the timeline to highlight the most important parts of the video and can be used for navigation. Also, owners of the video can see detailed analytics about when viewers are reacting to videos and have ability to disable the feature.
Microsoft
Microsoft Streams’ video reaction feature is a must, and here’s why
Video reactions to Microsoft Stream will offer important insight regarding the feelings of the people in the organizations about a certain presentation, for instance. When used right, it can be a short way to decide if a presentation is good, or not, or if the other work colleagues agree on it, or not.
It could also be a way to make sure the management side of an organization is keeping in touch with the operational side. If the operational side’s reaction is negative, for instance, the management can take steps to redeem the issue, and vice-versa.
The video reaction is useful due to its natural way of being a poll in disguise, and it can greatly reduce time when deciding on certain products, or services, or even certain perspectives.
Due to its highly customizable nature (we’re talking about the fact that users will be able to easily react to the most important parts of the video), it can also help users find information faster.
We’ll have to wait until June to see how this feature is going to exist, but it’s definitely a useful feature to have. It’s not only a time saver, but it can also predict the general mindset on certain topics.
If you get the no DP (DisplayPort) signal from your device when connecting error on a Dell monitor, this guide can help!
First, know that the no dp signal from your device issue is caused by a cable being defective, the graphics driver being incompatible, or a loose DisplayPort cable connection. But you can fix all these issues by following the steps below.
How can I fix the no dp signal from your device on a Dell Monitor?
Before moving to the detailed steps, make sure you go through the preliminary checks:
Check the cable for damage, or use a new cable.
Ensure you use the right input source to connect your CPU and monitor.
1. Restart your devices
Close all the files and windows on your computer, click the Windows icon, then Click Power, then select Restart.
Disconnect the power and DP cable from the monitor and CPU.
Wait for 30 seconds to drain the extra power. Now reconnect the power and DisplayPort cable to your CPU and monitor.
Turn on your monitor and start your computer.
2. Adjust the monitor input setting
Dell usually supports four types of cables, including DisplayPort (DP), HDMI, DVI, and VGA. First, identify which cord you are using.
Next, locate the Source or Input button, which is usually located in the middle or right-hand side of the monitor.
Use the Menu button and locate Input Source.
Now select DisplayPort from the list.
3. Change the refresh rate
Press Windows + I to open the Settings app.
Go to System, then select Display.
Under Related settings, select Advanced display.
Locate Choose a refresh rate, and select the rate you want.
The refresh rates that appear depend on your display screen and what it can support. Some of the laptops and external displays can support higher refresh rates.
Type devmgmt.msc and click OK to open the Device Manager app.
Click the Monitors category and expand it.
Right-click the monitor driver and select Update driver.
Click Search automatically for drivers.
Follow the on-screen instructions to complete the process.
If there is no update available, follow these steps to reinstall the driver:
Go to the Monitor category, right-click the driver and select Uninstall device.
Click Uninstall to confirm the action.
Go to Action, then choose Scan for hardware changes.
Go through all the categories of the drivers, and look for a yellow triangle with the exclamation; if found, right-click them and select Update driver to install the latest drivers.
Keeping your drivers up to date can also help you fix other issues like the screen doesn’t fit the monitor; read this guide to learn other solutions.
5. Rollback the graphics driver
Press Windows + R to open the Run window.
Type devmgmt.msc and click OK to open the Device Manager app.
Click the Display adapters category and expand it.
Right-click the graphics driver and select Properties.
Go to the Driver tab and click the Roll Back Driver option.
Follow the on-screen instructions to complete the installation of the previous version of the driver.
Reboot your PC to let the changes take effect.
If nothing has worked for you, we recommend you contact the Dell customer support team to explain the issue and fixes you tried to get further help.
To conclude, to fix the no DP signal from your device issue on a Dell monitor, check the cable for damage and ensure you are using the correct port.
Also, restart your device, update the monitor driver, roll back the graphics driver, adjust monitor settings or change the refresh rate.
Last year, when Microsoft updated the Teams’ default client to the new version, the Redmond-based tech giant promised more new features would be released to this new Teams version. And while the tech giant released Copilot to Teams, among other useful features, it hasn’t addressed any Teams’ meeting functionalities.
So, the new features were all part of the Teams’ functionality, as a whole. However, according to the Microsoft 365 Roadmap, the Redmond-based tech giant is set to debut a new functionality to the new Teams Desktop.
This functionality is called Content Camera, and it will turn any Teams meeting into an interactive and more engaging dialogue between work colleagues. The Content Camera will focus on physical objects, such as printed documents, whiteboards, pens, books, and so on, all to create an immersive setting for those who are not physically present in the meeting room.
In other words, hybrid meetings are about to get a bit more immersive, as the Content Camera would focus on objects your eyes would focus on if you were there, in the room. This is a nice way to say Teams meetings can be boring, but if it helps reduce the feeling of isolation, then it’s for the better.
This feature it will be available on new Team Teams on Windows and Mac, making whiteboards, printed documents, books, and other physical objects the focus of your Teams meeting. With minimal setup, you can help meeting attendees who aren’t in the room feel more included and engaged in your next class, demo, or brainstorming session.
Microsoft
Microsoft Teams’ content camera: Is it necessary?
Well, it’s hard to say, truly. The point of this feature is to make Teams meetings more immersive for those who cannot physically attend them.
However, Content Camera could also potentially make these attendees lose focus in Teams’ meetings, as well. By not focusing on the active participant’s face, or presentation, they could easily lose their focus entirely, by paying attention to all sorts of physical objects.
This might sound silly, but this is what is going to happen, at least in the beginning. Once users get used to the new feature, focused immersion should be attainable.
We don’t know yet if this feature is optional, but we reckon it might be, and it would be good if it is. Not all organizations will want to enable the Content Camera, and in important meetings, focusing on what matters should be a priority.
However, we’ll see more of this new feature in February, when Microsoft is set to introduce it to New Teams Desktop.
A while ago, Microsoft added a Copilot section to the Microsoft 365 admin center, to visualize and analyze all stats regarding Copilot, from usage to integration, activity timeline, and so on.
It seems the Redmond-based tech giant is adding another section to the Microsoft 365 admin center, and this time it focuses on giving education admins (and, implicitly teachers) almost total control over the way Microsoft 365 education apps are used.
To be more precise, the Granular Add-ins feature will let admins control the availability of add-ins from the Office store, in a detailed way. The new feature will display three options:
Non-adult student
Adult student
Faculty and staff
Admins will be able to limit the access of these categories to the Office store, effectively stopping them from getting apps or add-ins from the Store.
With this feature, education tenant administrators will be able to manage the availability of Add-ins from the Office store at a more granular level. We will provide three options—Non-adult student, Adult student, and Faculty and staff—under Microsoft admin center > Org Settings > User owned apps and services > Let users access the Office store. The options are based on the user’s role and age group properties.
Microsoft
Granular Add-ins: Is it necessary?
The feature, which is due to arrive in the Microsoft 365 Admin Center in February 2024, according to the Microsoft 365 Roadmap, could lead to stronger security across educational environments.
In case of a security breach, for instance, this feature could give admins the tools to control the damage, by limiting devices and accounts’ access to Microsoft 365 apps and add-ins.
But this is not all: due to the feature’s special age group properties, educational admins will be able to easily manage and set up devices and accounts that follow certain age-based rules of the organization. While the same device could allow adult users to access a specific add-in, non-adult users won’t be able to access it.
It would greatly reduce the time spent on customizing each device for each category of age, and it would ensure minors will not get access to sensitive information.
If you’ve been using Microsoft Rewards to gather points to spend on different gifts, cards, and Xbox consoles, you might have noticed that the 5, 10, and 30 reward points tasks have been out for a while.
Good news for all the Microsoft Rewards geeks: these tasks are now back. According to Xbox enthusiast @IdleSloth84_ (and spotted by @DetroitsReaper), users will be able to complete tasks to get 5, 10, and 30 rewards points in their Microsoft Rewards account.
As you can see in the image below, you’ll be able to complete simple and quick tasks such as answering questions to a quizz, or participating in a daily poll, or reading about different topics to earn these points. In total, they shouldn’t take more than 5 to 10 minutes to complete, and they’re great tasks to complete while taking a break from everything you do on your device.
Now, should you try the Microsoft Rewards program? Yes, most definitely. Here’s why.
This is why you should enlist in the Microsoft Rewards program
If you’re spending a lot of time on your laptop, PC, mobile phone, or tablet, and you’re using Microsoft Edge as your default browser, you should definitely enlist in the Microsoft Rewards program.
The program is designed with daily tasks that can be completed in half an hour, and they will rewards users with points that can be used to purchase different things: from video games to merch, and even Xbox consoles, or other amazing gadgets.
Some folks have been using this program to purchase Game Passes, which is honestly, quite smart, considering you only need a few minutes a day to get the maximum count of points you can earn in a day.
The good thing is that Microsoft Rewards works on Windows-based laptops and PCs, but also Macs, as long as you can access it through Bing or Microsoft Edge. The best thing is that, if you’re a gamer, and you own an Xbox, you can actually access the program from there, as well.
Plus, the Redmond-based tech giant is working on an Xbox-version of the Microsoft Rewards program that will integrate a seamless experience: this means you can earn Microsoft Rewards points by playing games on Xbox, which makes the whole endeavour even more satisfying.
Why? Because it adds the gamification trait to the whole experience of gaming. You’ll be playing games, of course, but you’ll be earning points that can be spend to purchase another month of Game Pass, and even an Xbox console in no time.
To sign up for Microsoft Rewards, visit this site, and make an account. And don’t worry, everything is free.
Eco Mode has been a problematic control, with some saying that it keeps turning on automatically. So, users are looking for ways to permanently turn off Eco Mode on Google Nest.
Why does Eco Mode keep turning on? Eco Mode is set to turn on when Google Nest detects that no one is home, if the Home/away assist setting is enabled. This is done to conserve power. Also, if the sensor is broken or the device malfunctions, Eco Mode may automatically get activated.
How can I turn off Eco Mode on Google Nest thermostat?
Before we begin, touch the Google Nest screen, rotate the dial, and select the Heating or Cooling mode. This will automatically disable Eco Mode as long as a heating or cooling temperature is set. If Eco Mode keeps turning back on, try the methods listed next.
1. Via the Google Nest thermostat
Tap the face of the thermostat, rotate the dial until you get to Settings, and then select it.
Rotate the dial to go to Home/Away Assist, and select the feature.
With the Stop Using option selected, tap the face of the thermostat.
Now, rotate the dial, and then select Eco Mode.
Set both, Heat to and Cool to, to Off, then rotate the dial to highlight Done, and select it.
Next, use the dial to get into the Nest Sense settings.
Select Auto Schedule from the list of options.
Choose No and tap the screen to save the changes.
If you want to turn off Eco Mode on Google Nest without the app, the thermostat offers the option. Also, if this doesn’t work, you may consider clearing any stored schedules to avoid conflicts.
Open the Google Nest app, and select the thermostat that automatically enables Eco Mode. Make sure both the thermostat and the device are on the same network.
Tap the Mode option near the bottom left.
Select the Heat/Cool mode.
Now, go back to the previous screen and tap the Settings icon at the top-right corner.
Select Home/Away Assist from the list of options.
Set the feature to Off.
As per our experience, setting the Mode to Heat/Cool instead of simply Heat or Cool prevents Eco Mode from turning on automatically.
If you don’t yet have the Google Nest app, download it from the store:
Google Nest Thermostat is one of the best products in the market, but given the issues with Eco Mode, many have ditched it for cheaper manual thermostats. Though you can get things working in no time with the right settings in place!
Converting the file system from exFAT to FAT32 involves changing the format of a storage device. We show you various ways to achieve this.
Can I change exFAT to FAT32? Yes, you can convert exFAT to FAT32, but in essence, exFAT is the superior format. It offers better compatibility with newer software, more storage capacity, and is faster than FAT32.
However, being a proprietary format, it does not support older OSes. It is also prone to exFAT file system errors hence the need to convert it to a widely acceptable format like FAT32.
How do I convert exFAT to FAT32?
NOTE
Converting the file system will erase all existing data on the storage device, so it’s crucial to back up any important files before proceeding.
1. By using File Explorer
Press the Win + E keys to open the File Explorer.
Right-click on your drive and select Format from the context menu.
Under the File system drop-down, select FAT32.
You can give a name to your volume label or leave it as is.
Press Windows + R to open Run, type diskmgmt.msc in the text field, and hit Enter.
Right-click on the drive you wish to convert to FAT32, and select Format.
Now, enter a Volume label in the text field, select FAT32 from the File system dropdown menu, choose an Allocation unit size, then untick the checkbox for Perform a quick format, and click OK.
After the drive is formatted, check whether it’s now readable on Windows 11.
3. By using the Command Prompt
Hit the Start Menu icon, type cmd in the search bar, and click Run as administrator.
Type the following command and press Enter: diskpart
Next, type listdisk to display the number of available drives in your system.
Check the number listed against the drive you want to format and Enter the following command. Remember to replace X with the corresponding number of the drive: selectdisk X
Next, type in clean to clear everything from the drive.
Wait for the process to finish, and type in the following command: create partition primary
Next, Enter the following commands to format and assign the drive a letter: select partition xformat quick fs=fat32 quickassign letter C
Restart your PC.
You can perform advanced storage cleanup after converting a drive by following a complete guide on how to format a Windows computer for a clean and stable system.
While manual methods of formatting your drive are straightforward, they don’t always get the job done. Sometimes, your Windows may fail to format your drive. In this case, you can turn to formatting software that can seamlessly help you convert to the FAT32 format.
Simply download and install it on your computer then launch the program to begin the conversion process. Once the software is running, locate and select the storage device that you want to convert from exFAT to FAT32. Ensure you choose the correct device to avoid data loss on other drives.
Why can’t I format USB to FAT32?
Drive size – FAT32 has a maximum file size restriction of 4GB. If your USB drive exceeds this size limit, you will not be able to format it.
OS limitations – Older operating systems may have limitations when it comes to formatting USB drives as FAT32.
It’s important to note that the choice between exFAT and FAT32 depends on your specific requirements and the devices or systems you intend to use the storage device with. If you’re still confused, we have an in-depth comparison of FAT32 vs NTFS file formats to help you make a decision.
You can also review a full guide on the differences between NTFS, FAT32, and exFAT to understand how each format handles storage limits, compatibility, and performance.


 Tip