Fix IGOProxy64.exe Origin (EA App) Error on Windows

If you’re getting an IGOProxy64.exe error when you’re starting a game or the Origin (EA app) client, then apply the solutions in this guide to fix it. IGOProxy64.exe is part of the gaming client but also from the Visual C++ Redistributables package. We have experienced this error when starting BattleFront 3 so here’s how you fix it.

How do I fix IGOProxy64.exe errors on Windows?

1. Repair Microsoft Visual C++

  1. Open the browser of your choice and the Microsoft Visual C++ Redistributable download page.
  2. Download the latest versions for X86 and X64.
  3. Go to the download folder and run them one by one. If you don’t have Visual C++ installed, let the installer work its magic, restart your PC, and start Origin again to see if the IGOProxy64.exe error persists.
  4. If you already have Visual C++ installed, click on the two files and hit the Repair button.

This is the safest way to fix any IGOProxy64.exe errors. Installing or repairing Visual C++ will also repair or replace the file causing this issue.

If you get the Visual C++ Runtime error on Windows 11, this guide will help you deal with the problem.

2. Provide IGOProxy64.exe with administrative rights

  1. Press the Windows key + E to start File Explorer.
  2. Go to the folder where IGOProxy64.exe is located. Usually, you will find it here: C:\Program Files (86)\Origin
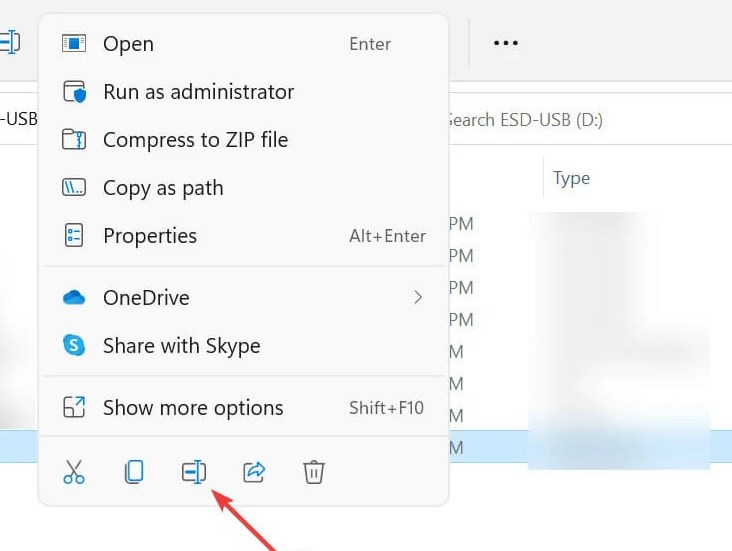
  3. Right-click on the IGOProxy64.exe file and select Properties.
  4. Go to the Compatibility tab, and check the Run as administrator box.
  5. Hit Apply and OK to acknowledge the change.
  6. Open Origin or your game to see if the error still pops up.

3. Reinstall the Origin (EA app) client

  1. Click the Start button and access Settings.
  2. Choose Apps from the left pane and click on Installed apps from the right.
  3. Find the Origin or the EA app in the list of apps, click on the three dots from its right, and select Uninstall.
  4. Now, go to the Electronic Arts website and download a fresh copy of the app.

Reinstalling the EA app is also a quick and easy way to fix the IGOProxy64.exe errors on your PC.

Some of our readers also recommended simply renaming or deleting the file. We tried it as well and it fixed the problem. However, we only advise doing this as a temporary solution.

Other instances of the IGOProxy64 errors you might encounter

  • Igoproxy.exe has encountered a problem and needs to close. We are sorry for the inconvenience.
  • Igoproxy.exe – Application Error. The instruction at 0xXXXXXXXX referenced memory at 0xXXXXXXXX. The memory could not be read/written. Click on OK to terminate the program.
  • Igoproxy.exe – Application Error. The application failed to initialize properly (0xXXXXXXXX). Click OK to terminate the application.
  • Igoproxy.exe has stopped working.
  • End Program – igoproxy.exe. This program is not responding.
  • Igoproxy.exe is not a valid Win32 application.

Also, this problem might be because the Origin client is too old. It was since replaced by the EA app so you should too.

Still, you can use our general guide on how to fix Origin loading issues because many of the solutions work on the EA app too.

Did the IGOProxy64.exe error go away after you applied the solutions from our guide? Let us know in the comments section below.

Core Services UI Agent is Stuck Verifying on Mac [Solved]

You may have come across the Core Services UI Agent popup verifying apps after installation or a recent update. While that’s alright, problems begin when the CoreServicesUIAgent app verification is stuck. And that’s what we will be fixing today!

What is Core Services UI Agent? It’s a part of Gatekeeper, the Mac’s built-in security tool, that ensures app installation from trusted sources. So, every time an app is downloaded, the graphics user interface agent, CoreServicesUIAgent, automatically begins to scan the files.

How do I get rid of the Core Services UI Agent when it’s stuck?

Before we start with the slightly complex solutions, try these quick ones:

  • Restart the Mac and verify whether the Core Services UI Agent still pops up.
  • Make sure you are running the latest version of MacOS. Users on Sonoma, Ventura, and Monterrey didn’t report the error as frequently.
  • If the app is from an untrusted source, uninstall it.

1. Force quit CoreServicesUIAgent in Activity Monitor

  1. Click the Launchpad icon at the bottom, search for Activity Monitor, and click on the relevant result.activity monitor
  2. Now, select the CoreServicesUIAgent process, and then click on Force Quit in the prompt.force quit to get rid of CoreServicesUIAgent

Remember, as per our research, Force Quit better helps fix the problem than Quit. So make sure you go with the former. Also, if you can’t find CoreServicesUIAgent, set Activity Monitor to list All Processes.

Besides, if the Core Services UI Agent pop-up keeps appearing, terminate all related app processes as well. Activity Monitor is also of use when Mac is stuck on Preparing to copy.

2. Choose Open from the secondary menu

  1. Locate the application package (.pkg), right-click on it, and select Open from the menu.open
  2. You will now have another prompt with an Open button in addition to the one for verifying the app. Click Open to proceed.

Manually choosing Open also helps when the Core Services UI Agent starts verifying apps after an update, as is seen with Microsoft Outlook and OneDrive.

3. Reinstall the application from Apple’s App Store

  1. Open Finder from the bottom-left corner, and go to the Applications tab.applications
  2. Click the + (plus) icon near the top right.
  3. Select the first dropdown menu, and choose Other from the list of options.other
  4. Search for System files using the text field, tick the checkbox for it, and click OK.system files
  5. Now, select System files from the menu, and then choose are included from the other one. types
  6. Press CMD + A to select all the files here, right-click on them, and select Move to Bin.move to bin to fix Core Services UI Agent
  7. Next, right-click on the Bin, and select Empty Bin to remove any traces of the application from the Mac.
  8. Finally, reinstall the app from the Apple’s App Store.

While you could simply move the app to the Bin, it doesn’t delete the related files, which may later trigger the Core Services UI Agent and get it stuck on verifying. So, we recommend removing all app files as well!

4. Use the built-in Installer

  1. Click the Go menu at the top, and select Go to Folder from the list of options.go to folder
  2. Paste the following path in the text field, and click on Go: /System/Library/CoreServices/InstallerCoreServices
  3. Double-click the highlighted Installer entry here.
  4. Locate the installer package (.pkg file) from the application triggering Core Services UI Agent, and click Open.installer
  5. Follow the on-screen instructions to complete the installation process.

5. Allow app installation from trusted sources

  1. Click on System Preferences at the bottom and then select Security & Privacy.security and privacy
  2. Click the Lock icon near the bottom left.lock
  3. Enter the Mac’s password in the designated field and click on Unlock.
  4. In the General tab, select the App Store and identified developers option under Allows apps downloaded from, and again click the Lock to prevent further changes.allow apps to remove Core Services UI Agent
  5. Finally, restart the Mac for the changes to apply and then run the app stuck on verifying.

If nothing else works, we recommend allowing app installation from untrusted sources to remove the Core Services UI Agent verifying app pop-up. This setting also helps when Safari cannot download a file.

We don’t recommend downloading apps from untrusted or non-official sources, and your primary approach should be to get rid of Core Services UI Agent when it’s not closing, rather than changing the installation settings.

Also, for enhanced security, we recommend getting an effective antimalware software for Mac.

For any queries or to share which fix worked for you, drop a comment below.

Image Decode Failed in Chrome: 7 Simple Ways to Fix It

An Image Decode Failed error may occur in your Google Chrome browser when you attempt to download extensions. This means it is unable to decode and display the image properly.

If you wonder why Chrome won’t load images, know it’s because of a slow or unstable internet connection, outdated or corrupted cached data, interfering browser extensions or browser settings.

Other possible causes include using VPNs or proxies on websites and streaming services that have enabled VPN protection.

How do I fix the image decode failed error?

Before embarking on the complex solutions, ensure your PC’s date and time settings are in sync, you’re using the latest version of your OS and Chrome browser, and your internet connection is stable.

1. Clear cache and cookies 

  1. Launch your Chrome browser and click the three vertical ellipses in the top right corner.
  2. Select Settings.
  3. Click on Privacy and security, then select Clear browsing data.
  4. Check Cookies and other site data and Cached images and files, then hit Clear data.Clear data

2. Allow pop-ups

  1. Navigate to your Chrome browser and press the three horizontal ellipses in the top right corner.
  2. Select Settings.
  3. Click on Privacy and security then select Site Settings.
  4. Scroll down and select Pop-ups and redirects.
  5. Check the Sites can send pop-ups or use redirects box.

In some cases, pop-ups are used to display images that are loaded in a separate window or tab. If blocked, they can affect the functionality of certain websites or web applications that rely on pop-ups to display essential elements.

3. Remove malicious extensions

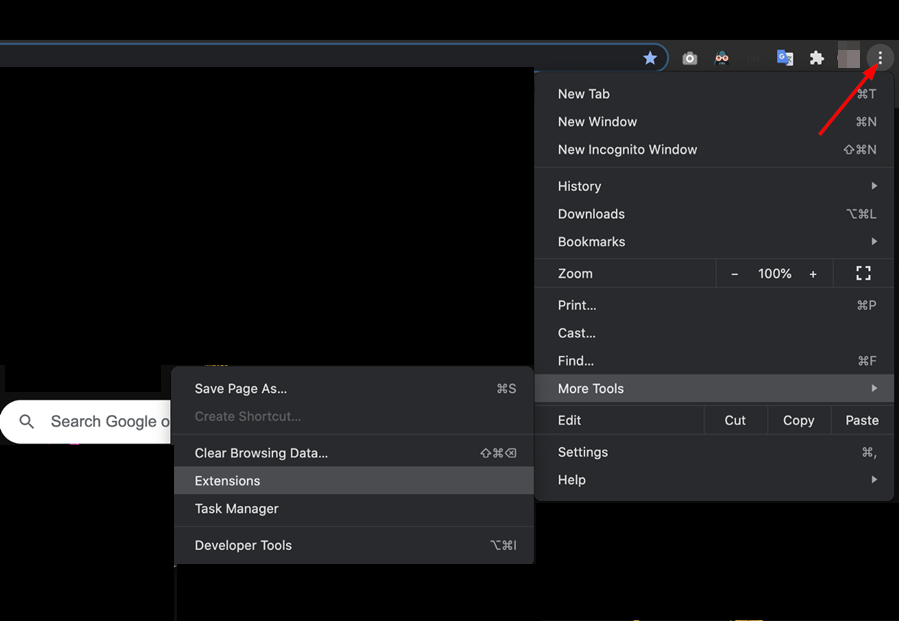
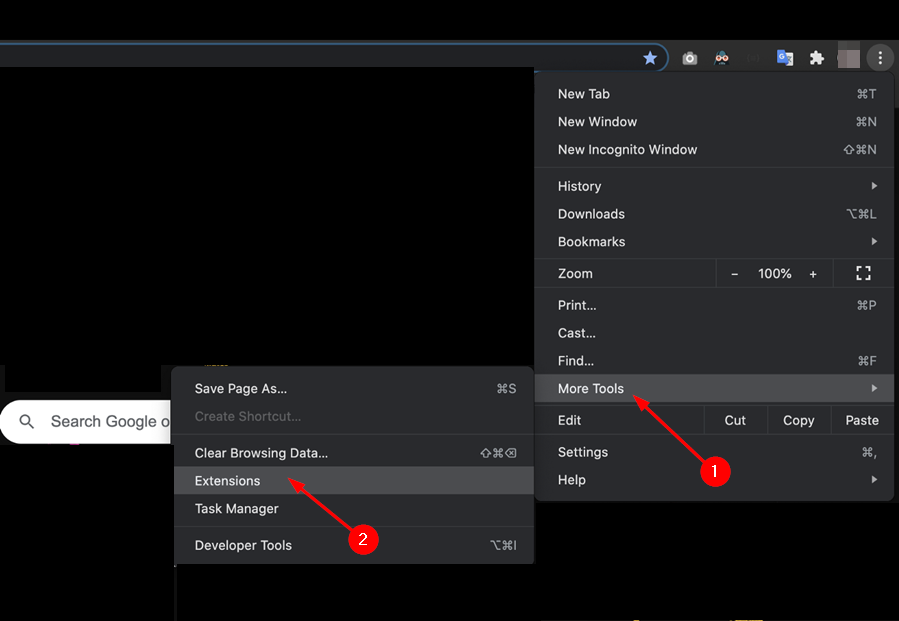
  1. Navigate to your Chrome browser and click on the three ellipses at the top right corner.
  2. Select More tools, then click on Extensions.
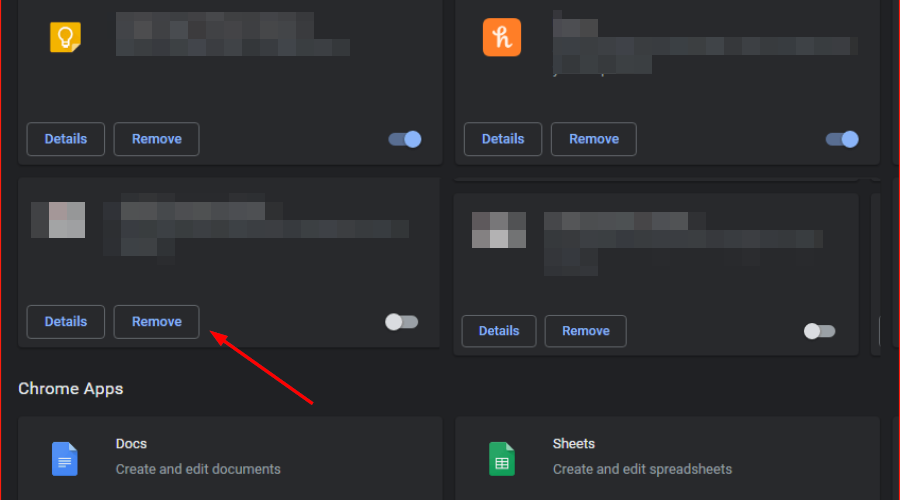
  3. Navigate to the extension you wish to remove, then click on Remove.
  4. Confirm in the new pop-up dialog box that you wish to remove the extension.

You may have to remove all extensions and then reinstall them one by one until you catch the culprit. Adding back the extensions can be a time-consuming task, so if you don’t want to lose them, you can back up your extensions.

4. Disable VPN 

  1. Press the Windows key and select Settings.settings windows 11
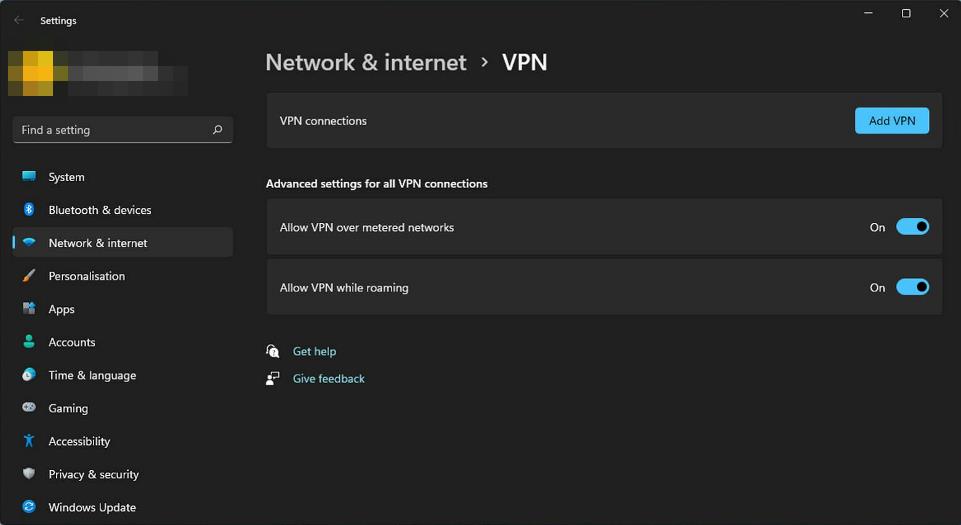
  2. Next, select Network & internet and click on VPN in the right-side menu.
  3. Select the VPN connection you want to disable, click on the drop-down and select Remove.remove VPN

Certain shared VPNs may have multiple users using the same IP address. This, in turn, causes conflicts and results in the error image decode failed. Depending on your situation, you may have to change your VPN server, install an undetectable VPN, or disable it completely.

5. Disable Proxy 

  1. Press the Start Menu icon and select Settings.settings windows 11
  2. Click on Network & Internet on the left pane, then scroll down and click Proxy on the right pane.Network proxy settings
  3. Select Edit next to Use a proxy server option in the Manual proxy setup section, toggle off Use a proxy server and click on Save.Disable proxy server

Proxy configurations can modify or compress images to optimize bandwidth, which is a good thing if you’re trying to save on data. However, if the compression or modification is done incorrectly, it can lead to image decode errors.

6. Reset your browser

  1. Open your Chrome browser and click on the three vertical ellipses at the top right corner.
  2. Select Settings.Settings CHrome
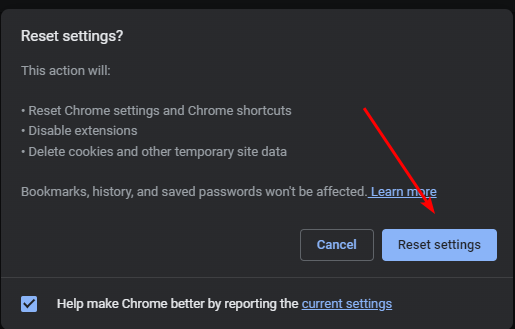
  3. Next, click on Reset and cleanup, then select Restore settings to their original defaults.
  4. Confirm Reset settings in the next dialog box.

7. Reinstall Chrome

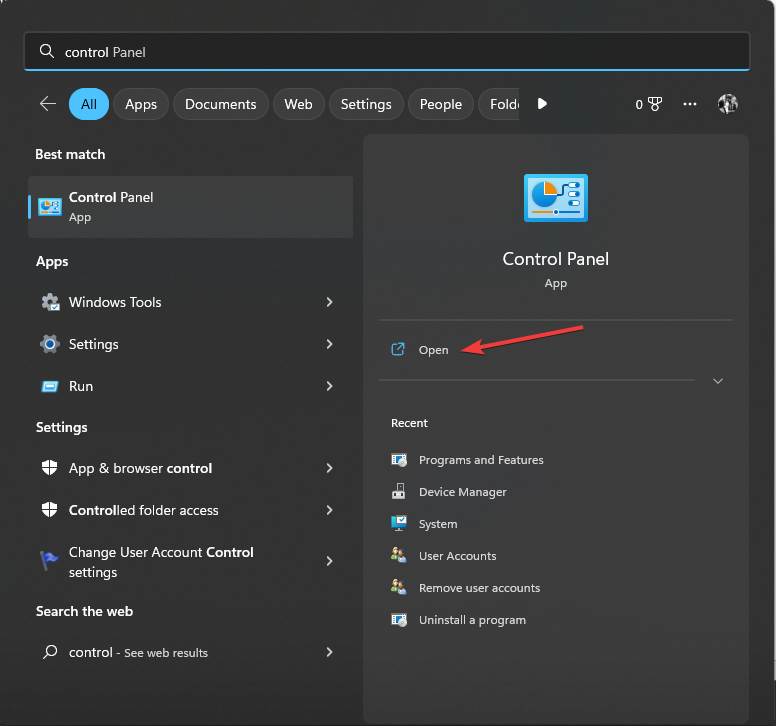
  1. Click the Start button, type the Control Panel, then press Enter.
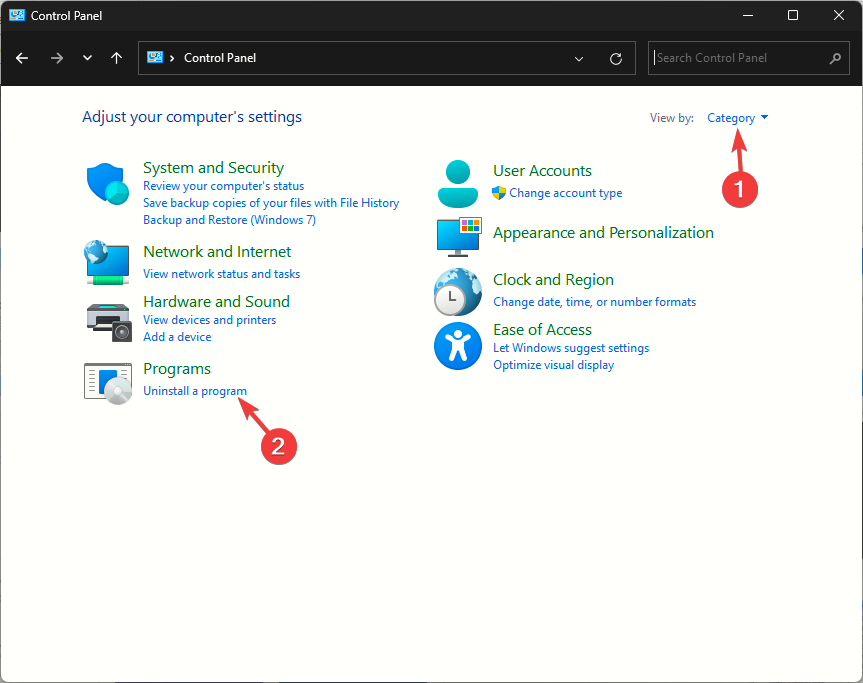
  2. Select Programs and go to the Programs and Features tab.
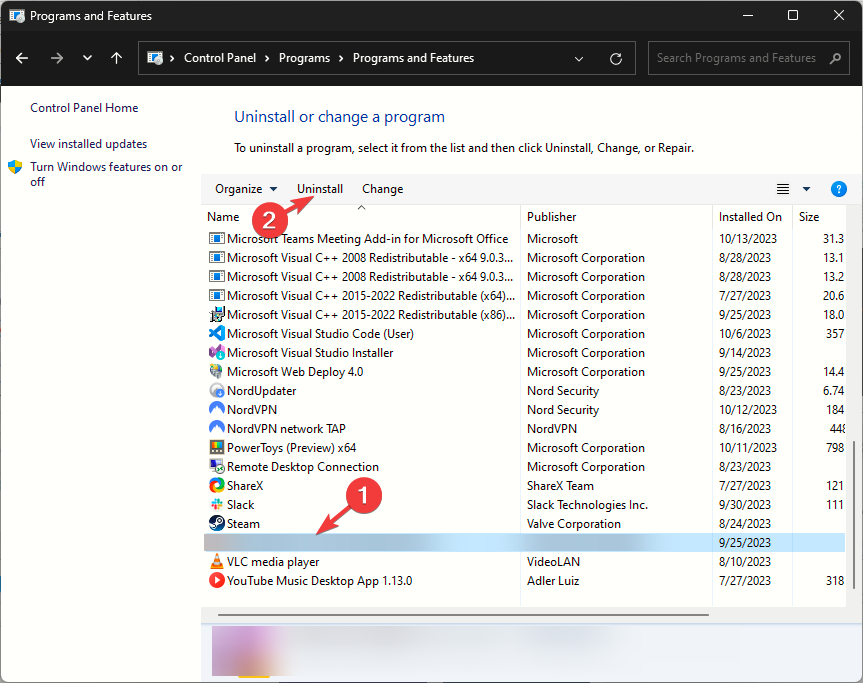
  3. Locate Google Chrome in the list of installed programs, and click Uninstall at the top of the tab.
  4. Now, download the latest version of Google Chrome from the official website or MS Store.
  5. Install Chrome and follow the prompts provided during the installation process.

If the issue persists, try a different web browser, such as Opera. This can help determine if the problem is specific to Chrome or if there’s an issue with the image itself. Alternatively, you can also get in touch with Google support for further assistance.

As you wait for feedback, you can try installing Chrome extensions on the Opera browser. Finally, we encourage you to exercise caution in your browsing activities with our privacy and security extensions to ensure you stay protected.

That’s a wrap from us but don’t hesitate to share any additional solutions that may have worked for you if you’ve come across the image decode failed error.

Get the Latest Realtek Wi-Fi Driver for Windows 11: HP, Asus, Dell, Lenovo

If your laptop or PC is using a Realtek Wi-Fi driver for Windows 11, here, you will learn how to get the latest version and install it. Whether you have an HP, Asus, Dell, Lenovo, or another brand of machine, you’ll find all the steps necessary below.

How do I download the Realtek Wi-Fi Driver for Windows 11?

1. Install the latest Windows 11 updates

  1. Click the Start button and go to Settings.
  2. Next, choose the Windows Update section from the right and click on the Check for updates button.
  3. If you already have pending updates, you will see the Download & install button instead so click it to install all.
  4. After that, just to make sure, go to Advanced options in the Windows Update window, and click on Optional updates.
  5. If you see any driver updates, check their boxes and hit the Download & install button.

Updating your OS is the easiest way to download and install the Realtek Wi-Fi driver for Windows 11.

2. Download the Realtek Wi-Fi driver from the Microsoft Update Catalog

  1. Go to the Microsoft Update Catalog webpage and search for realtek wi-fi driver.
  2. Now, you will see the latest drivers in the list so hit the Download button for the one that matches your OS version.

The advantage of getting the Realtek Wi-Fi driver from the Windows Update Catalog is that if the latest driver is not working, you can get an older one and test it. At the end of this article, we also included a method to install the actual driver if you don’t know how to do that.

3. Download the Realtek Wi-Fi driver from the manufacturer’s website

  1. Go to the manufacturer’s driver support page and indicate the product type.
  2. Now, you can either let the web app detect the product automatically, or enter its serial number below.
  3. Follow the on-screen instructions to get the right Wi-Fi driver for your machine.

Our example focused on HP devices but it’s the same process for all other brand manufacturers such as Dell, Lenovo, Asus, Acer, etc.

4. Download the Realtek Wi-Fi driver using a dedicated app

Some of the manufacturers have dedicated driver download apps that are preinstalled on your device. For instance, Dell has the Support Assist app. For Lenovo, there is the Service Bridge.

By using these preinstalled tools you can quickly get the right drivers for your system.

How do I update the Realtek Wi-Fi driver on Windows 11?

1. Using Device Manager

  1. Right-click the Start button and select Device Manager from the list of options.
  2. Expand the Network adapters section, right-click on the Wi-Fi adapter, and select Update driver.
  3. Click on Search automatically for drivers. The system will scan for new drivers and if it finds any, it will recommend installing it.

2. Using a dedicated app

If you want to save time and make sure new drivers are installed on your laptop as soon as they are released, use a dedicated driver updater software. Fortect Driver Updater is the best option for this.

It is light and easy to use. All you have to do is install the app, run the initial scan, and select what drivers you want updated.

This utility uses a huge library of verified and secure drivers for all sorts of devices, including the Realtek Wi-Fi driver. Not only is it safe, but it’s also quick and easy to use.

→ Get Fortect Driver Updater

So, now you know how to download and install the Realtek Wi-Fi driver for Windows 11.

You might also be interested in how to download the Realtek audio driver for Windows 11.

If you’ve got the right Wi-Fi driver, here’s how to check the Wi-Fi signal strenght on Windows 11 as well.

Let us know in the comments below if you managed to download and install the Realtek Wi-Fi driver.

UBlock Origin Developer unravels YouTube’s slowdown with content blockers

You’re not alone if you have recently noticed YouTube slowing down video buffers with ad block extensions enabled in browsers. But you should know that it’s not Google’s deliberate attempt. Specific ad block extensions like Adblock Plus and Adblock are causing this. UBlock Origin’s developer and creator Raymond Hill investigated and revealed these details.

Google is targeting users who run browser ad blockers, not only on Edge but also on Chrome. They want to disable ad blockers and encourage users to switch to YouTube Premium. This is not new, but recently, users have reported significant performance lag and slowness in Edge, Chrome, Firefox, and other browsers, even when using YouTube Premium.

UBlock Origin creator used profiler tools with ad block extensions in browsers and shared the following details on X (formerly Twitter).

YouTube Performance lag culprits: Adblock Plus & AdBlock

The latest versions of both Adblock Plus (ABP) (3.22) and Adblock (5.17) are causing the performance issues. These blockers share the same parent company and use identical filtering engines. You can’t run two antiviruses simultaneously. Similarly, you should not use both ABP and Adblock, as they could interfere with each other.

The Ublock Origin (uBO) developer says that multiple distinct code paths cause performance regression. They affect various sites where these code paths are triggered. Injected content scripts cause the issue on YouTube, but background script performance issues may also affect other dynamic websites.

Some users and news sites have criticized Google for silently introducing code that adversely affects performance. However, the diagnosis isn’t entirely accurate. The specific culprits are ABP and AdBlock, with versions 3.2 and 5.17, respectively.

Browser Profiling tools reveal the root cause: All browsers come equipped with profiler tools, making it straightforward to identify severe performance bottlenecks. In the case of ABP 3.22, profiling revealed that over 19 seconds out of 41 were spent in ABP’s content script code injected into YouTube webpages.

If you’re affected and running the above-mentioned Ad blocking extensions, disabling them alone won’t help. Content scripts remain active even after disabling an extension. So, to resolve the performance woes, force a reload of affected web pages (reopening them in new tabs is recommended).

For new uBO installations, ensure that filter lists are up-to-date for optimal filtering.

Don’t blame Google or YouTube for this: All the above information highlights Google is not making intentional slowdowns on YouTube with ad blockers, rather it was poorly coded Adblock Plus and Adblock extensions causing this.

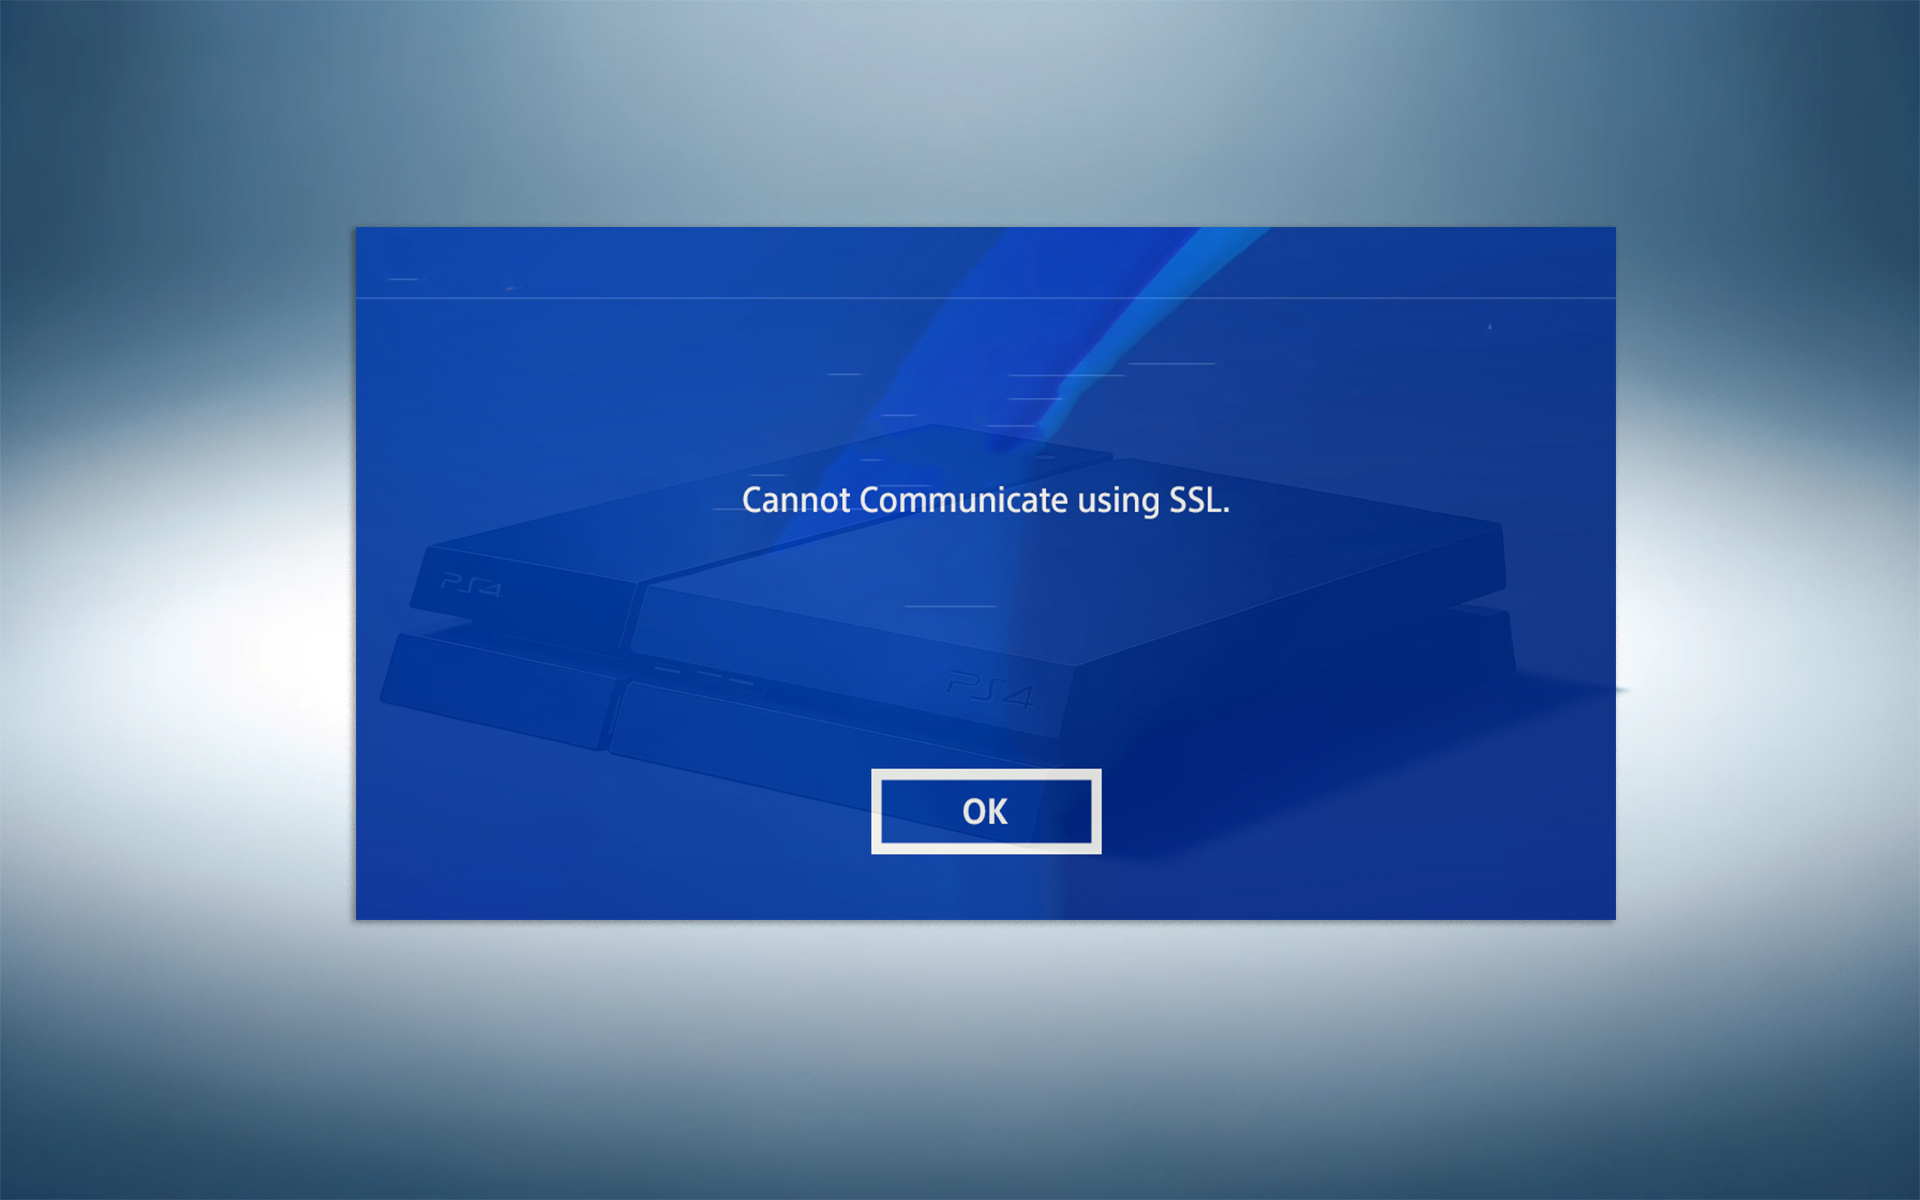
Cannot Communicate Using SSL: How to Fix it on PS4/PS5

When you encounter the Cannot communicate using SSL error on PS4 or PS5, it is generally because of a sign-in problem. Sometimes, it also happens due to database corruption issues.

This SSL error can pop up unexpectedly, even when your internet seems fine, and all games have worked perfectly until now. So, let us look closer at fixing this error and getting you back to gaming.

What causes Cannot Communicate Using SSL error?

Before moving forward, make sure to check for PlayStation network outages. If the service status is up and running, the problem is on your end. A few of the most common reasons behind the error:

  • Router Malfunction – When a router runs constantly for a few days without a break, it can malfunction.
  • Accounts Not Connected – Your PlayStation account is not connected to your EA account.
  • Corrupted Data – The PlayStation’s data is disorganized and not functioning as intended.

How can I fix the Cannot Communicate Using SSL error?

Let’s start with some quick solutions before we try the PlayStation-specific fixes:

  • Turn off your WiFi/Internet router and wait a minute before turning it on. Doing this can iron out minor network glitches.
  • Shut down your PlayStation and then restart after waiting for a minute. This can fix the SSL error, as software issues often get resolved with a restart.
  • If you try logging into the Hotel WiFi through your PS4, consider adding an s after http in the website address. 
    For instance, https://www.hotelwifiaddress.com/login instead of https://www.hotelwifiaddress.com/login

1. Sign into EA using the PS account

  1. Head to EA.com from your browser on a PC, mobile/tablet, laptop, or PlayStation.
  2. Click on the Profile button located at the top-right corner of the screen.
    Fix cannot communicate using SSL on PS4
  3. Then select the Sign In option to proceed.
    Login options to Fix cannot communicate using SSL
  4. After that, click on the PlayStation icon from the options to log in using your PS account.
    Login via PS Account on EA
  5. Now, enter your PlayStation Network login username and password. This should fix the cannot communicate using SSL error on your PS4/PS5.
    Logging into PS4 account

2. Rebuild PlayStation Storage Data

Note icon NOTE
1. Connect your PS4 controller to the PlayStation with a USB wire before moving forward. This will help you navigate the on-screen settings for rebuilding the storage database.

2. The position of the power button on your PS4 may vary depending on the model.

3. If a power outage occurs while you are rebuilding the database, it can cause data loss or corruption for your installed games.
  1. On the PS4 controller, press and hold the PS button to open the Quick Menu.
    Power Button pS4 to open quick menu
  2. Then select Turn off PS4 on the screen to shut down the PlayStation.
    Turn off PS4 manually
  3. Once the console has shut down properly, press and hold the PS4’s power button for 5-7 seconds until you hear two beeps. This will launch the PlayStation in safe mode.
    Long press PS4 Power button
  4. Then press the PS button on your controller once you see the Safe mode on the screen.
    Connect Controller on PS4
  5. After that, select the Rebuild Database option on the screen using your controller through the X key.
    Cannot communicate using SSL
  6. The rebuilding process will take between 10 and 40 minutes to complete. This will solve the SSL communication error.

You can reset the PS4 to fix the SSL issue when none of the methods works. But remember, you will lose the games and their data. So, make sure to backup the data before performing a reset.

Also, if the SSL error persists, you can contact PlayStation support on their official website. Depending on your region, they have email, chat, and phone-based support.

Let us know in the comments below if you know any other way to fix the cannot communicate with SSL error.

What is inetcpl.cpl and How to Fix Its Errors

The inetcpl.cpl or Internet Properties is a built-in utility that allows users to configure Internet-related settings, including security, privacy, certificates, VPN, and add-ons. It’s stored in the following location: C:\Windows\System32

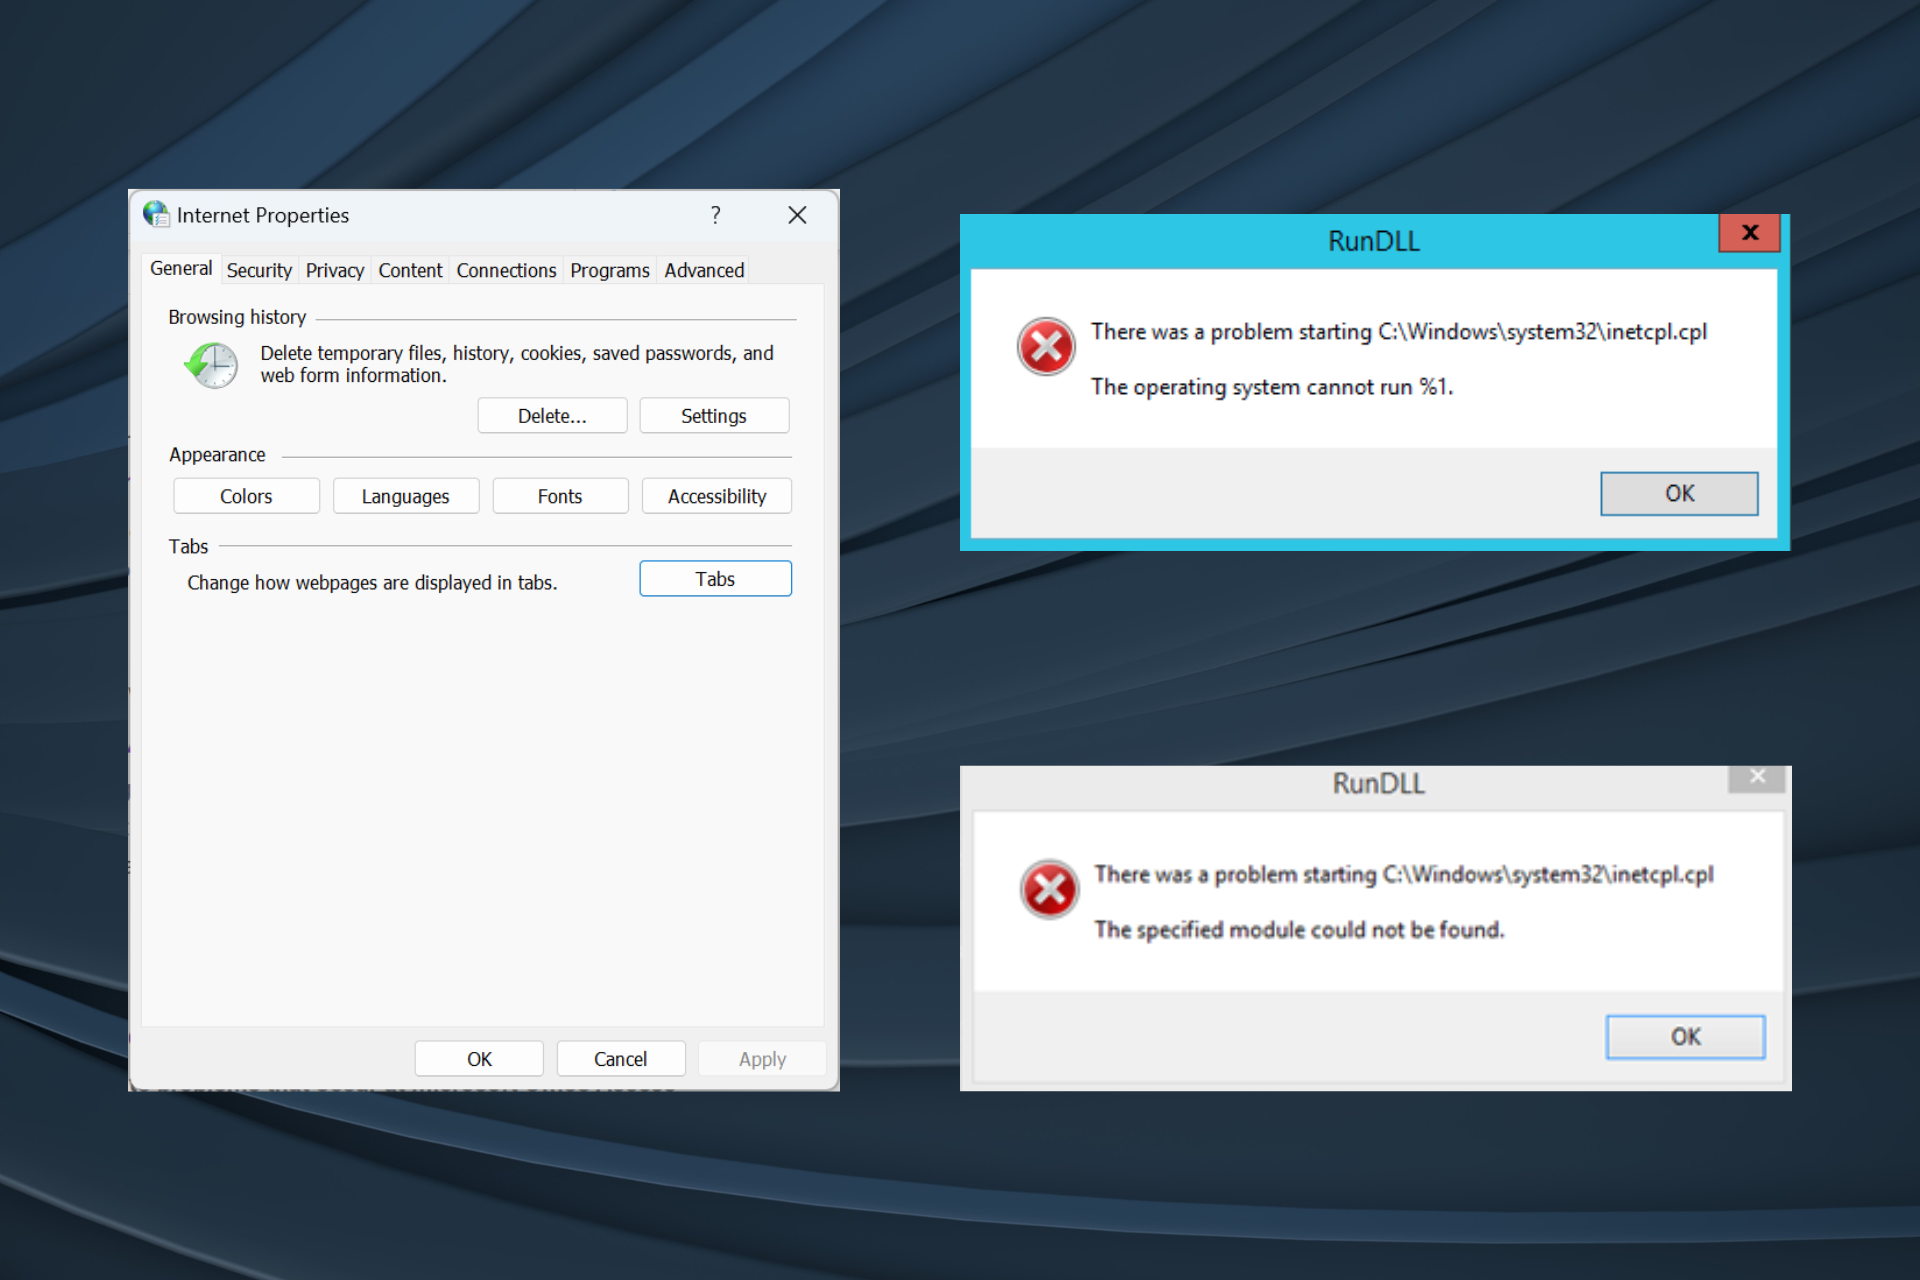
But users sometimes face trouble opening Internet Properties, and the error message reads, RunDLL The specified module could not be found or The operating system cannot run %1. In both these cases, the path to the file is listed. So, let’s find out what to do when inetcpl.cpl is not opening!

How do I fix inetcpl.cpl errors?

Before we start with the slightly complex solutions, try these quick ones:

  • Check for any pending Windows updates and install them.
  • If you are facing an inetcpl.cpl issue with Internet Explorer, we recommend switching to another effective web browser since the former was discontinued on June 15, 2022.
  • Uninstall apps that were downloaded recently on the PC.

1. Download the missing DLLs

The inetcpl.cpl utility requires the following DLLs on the PC to run effectively:

So, you can either replace the missing one with a copy from another PC or get the best DLL repair tool.

2. Run the DISM and SFC scans

  1. Press Windows + S to open Search, type Command Prompt in the text field, and click on Run as administrator.command prompt
  2. Click Yes in the UAC prompt.
  3. Paste the following DISM commands individually and hit Enter after each: DISM /Online /Cleanup-Image /CheckHealth DISM /Online /Cleanup-Image /ScanHealth DISM /Online /Cleanup-Image /RestoreHealth
  4. Once done, run the following command for the SFC scan: sfc /scannowsfc scan to fix inetcpl.cpl
  5. Finally, restart the PC for the changes to apply and check for improvements.

The DISM tool and SFC scan help find corrupt system files and then replace them with their cached copy stored on the PC.

3. Delete the NoBrowserOptions DWORD in Registry

  1. Press Windows + R to open Run, type regedit in the text field, and hit Enter.regedit
  2. Click Yes in the UAC prompt that appears.
  3. Navigate the following path or paste it into the address bar and hit Enter:HKEY_LOCAL_MACHINE\SOFTWARE\Wow6432Node\Policies\Microsoft\Internet Explorer\Restrictionspath
  4. Locate the NoBrowserOptions DWORD, right-click on it, and select Delete from the context menu.delete to fix inetcpl.cpl
  5. Click Yes in the confirmation prompt.
  6. If the DWORD is not found, check the following two paths (keys) as well:HKEY_LOCAL_MACHINE\SOFTWARE\Policies\Microsoft\Internet Explorer\Restrictions HKEY_CURRENT_USER\SOFTWARE\Policies\Microsoft\Internet Explorer\Restrictions
  7. Restart the computer and verify whether inetcpl.cpl is now working.

4. Perform a clean boot

  1. Press Windows + R to open Run, type msconfig in the text field, and click OK.
  2. Go to the Services tab, tick the checkbox for Hide all Microsoft services, and click on Disable all.disable to fix inetcpl.cpl
  3. Head to the Startup tab, and click on Open Task Manager.
  4. Select any program(s) that reads Enabled under the Status column and click on Disable.startup apps
  5. Go back to System Configuration, and click on Apply and OK.
  6. Click Restart in the confirmation prompt.restart

If inetcpl.cpl starts working in the clean boot mode, simply re-enable the services and startup programs one at a time and wait for the problem to reappear. As soon as it does, the one enabled last is the underlying cause.

If it’s a program, uninstall it, and for a service, use the services.msc console to disable it.

5. Uninstall recent Windows updates

  1. Press Windows + I to open Settings, go to Windows Update from the navigation pane, and click on Update history.update history
  2. Scroll down to the bottom and click on Uninstall updates.
  3. Click the Uninstall option next to recently installed update.uninstall to fix inetcpl.cpl
  4. Again, click Uninstall in the confirmation prompt.
  5. Reboot the PC and check for improvements.
  6. If the problem persists, uninstall a few more recent updates.

Two updates, KB2820197 and KB2847204, were found to trigger inetcpl.cpl loading errors. So, uninstall the updates along with any others that might cause problems later on.

6. Create a new user profile

  1. Press Windows + R to open Run, type netplwiz in the text field, and hit Enter.
  2. Click the Add button.add
  3. Click on Sign in without a Microsoft account.
  4. Now, choose the Local account option.local account to fix inetcpl.cpl
  5. Enter the username and, if required, a password, then click on Next to create a new user profile.username
  6. Select the account from the list and click on the Properties button.properties
  7. Go to the Group Membership tab, select Administrator, and click on OK to save the changes.administrator to fix inetcpl.cpl
  8. Finally, sign in with the new local account and check whether you can open inetcpl.cpl.

When creating a new local account, it’s imperative to grant it administrative privileges to not run into permission issues. Once done, copy the critical files from the old user account to an external drive and then move it to the new one. And you can always share programs between user profiles.

7. Perform an in-place upgrade

Note icon NOTE
The steps listed here are for Windows 11. If you are running the previous iteration, learn how to perform an in-place upgrade on Windows 10.
  1. Go to Microsoft’s official website, select the OS version and product language, and then download the Windows 11 ISO.windows 11 iso
  2. Double-click the ISO file and click Open in the confirmation prompt.
  3. Run the setup.exe file.setup.exe
  4. Click Yes in the UAC prompt.
  5. Click Next to proceed in the Windows 11 Setup.next
  6. Read Microsoft’s license terms and click on Accept to continue.
  7. Finally, verify the setup reads, Keep personal files and apps, and then click on Install.in-place upgrade to fix inetcpl.cpl
  8. Wait 1-2 hours for the process to complete. Make sure the PC is plugged into charging.

Since inetcpl.cpl is a built-in Windows component, an in-place upgrade will fix any file corruption or association and get things running!

Remember, inetcpl.cpl is useful in a lot of cases, especially if you receive a Windows proxy error or see a Microsoft Edge white/blank/grey screen, besides allowing you to reconfigure the critical settings.

For any queries or to share which fix worked for you, drop a comment below.

7 Ways to Fix the L1c63x64.sys BSoD Error

A BSoD error dubbed L1c63x64.sys not only causes connectivity issues but also interrupts your work with constant shutdowns. Here’s what we came up with to put an end to this issue.

What is L1C63x64 sys?

This is a system file in the Windows operating system and is responsible for the functioning of the network adapter. This specific driver is associated with the Qualcomm Atheros Ethernet Controller.

You’ll spot the message IRQL_NOT_LESS_OR_EQUAL accompanied by the L1c63x64.sys error, which typically occurs when there is a problem with the driver or when it conflicts with other software or hardware components.

How do I fix the L1C63x64 sys BSoD error?

Before you embark on any of the complex solutions, ensure your system is up-to-date, and you have the latest drivers installed.

1. Clean up temporary folders

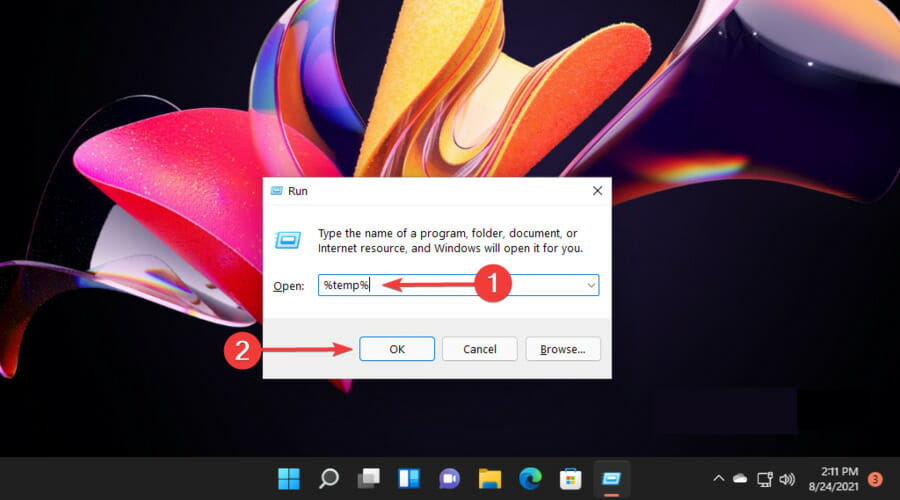
  1. Hit the Windows + R keys to open the Run command.
  2. In the Run dialog box, type %temp%, then click OK.
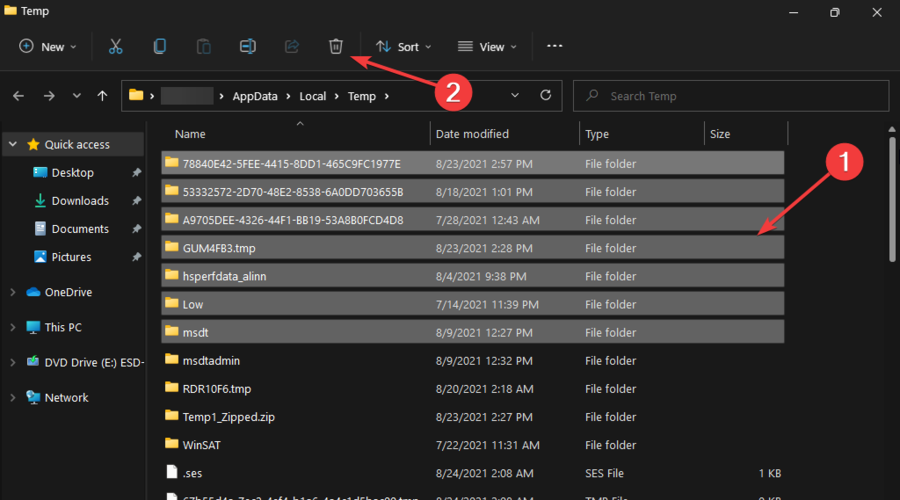
  3. Select the files you need to delete, then click on the Delete icon, marked as a trash.

For more ways to clean up temporary files, check out our expert article.

2. Run Disk Cleanup

  1. Press the Windows + E keys combination to start File Manager.
  2. Click on This PC.file manager windows 11 this pc
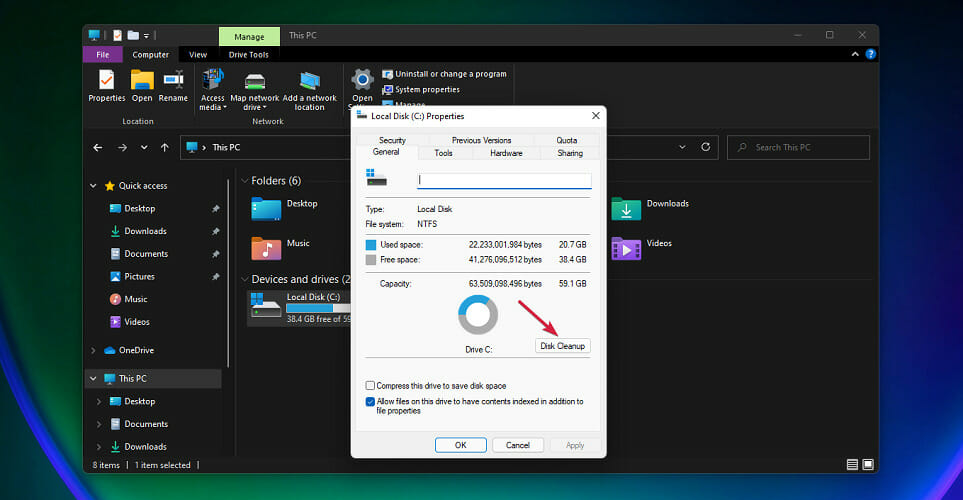
  3. Now right-click the C: drive and select Properties from the drop-down menu.
  4. In the General tab, click on Disk Cleanup to start the app.windows 11 disk cleanup how to
  5. Select the data you want to delete by clicking the corresponding boxes, then on OK.

And if using File Explorer is not a viable method, we have more ways to carry out a Disck Cleanup.

3. Disable your antivirus/firewall temporarily

  1. Hit the Start menu icon, type Windows Security in the search bar, and click Open.
  2. Click on Firewall & network protection, then select Public network.league of legends black screen after champion select
  3. Locate Microsoft Defender Firewall and toggle the off button.turning off Microsoft Defender Firewall Windows

In some isolated cases, your antivirus or firewall program can block your Internet or Wi-Fi, particularly when they interact with network drivers or conflict with other software components.

This, in turn, can trigger a BSoD. A good rule of thumb is to keep your antivirus updated to prevent compatibility issues.

4. Run the DISM and SFC scans

  1. Hit the Start Menu icon, type cmd in the search bar, and click Run as administrator.cmd-run-admin-w11 unexpected kernel mode trap windows 11
  2. Type the following commands and press Enter after each one:DISM.exe /Online /Cleanup-Image /Restorehealth sfc /scannow

5. Update your network drivers

  1. Hit the Windows key, type Device Manager in the search bar, and click Open.device manager w11
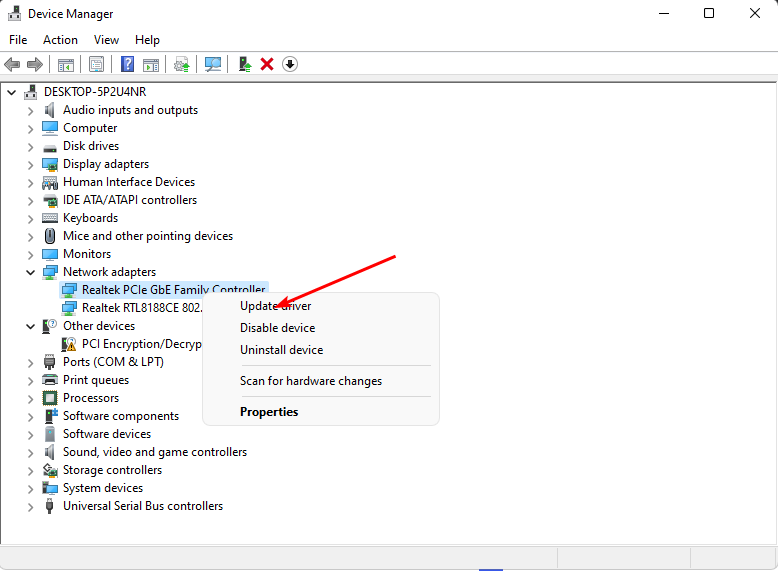
  2. Navigate to your Network adapter, right-click on it, and select Update driver.
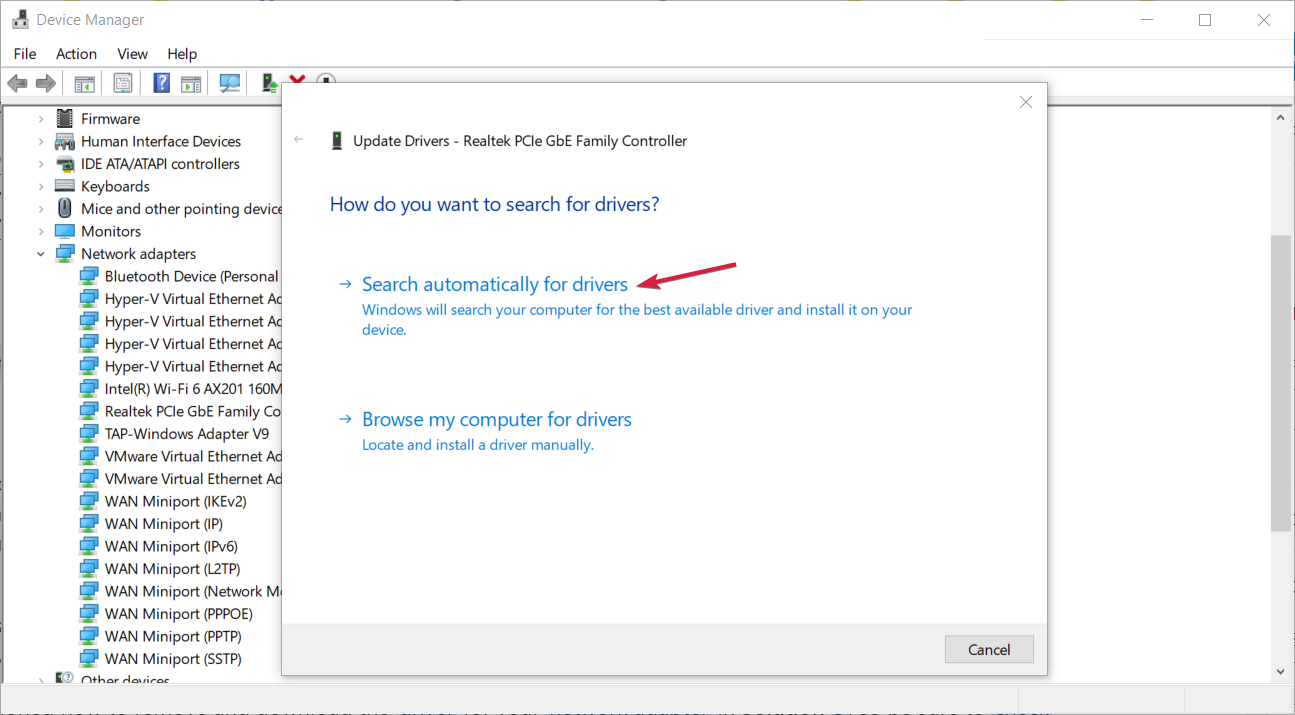
  3. Select Search automatically for updated drivers.

Updating your network drivers can be achieved through various ways, so if this method doesn’t work, you’re free to explore other avenues.

6. Disable Fast startup

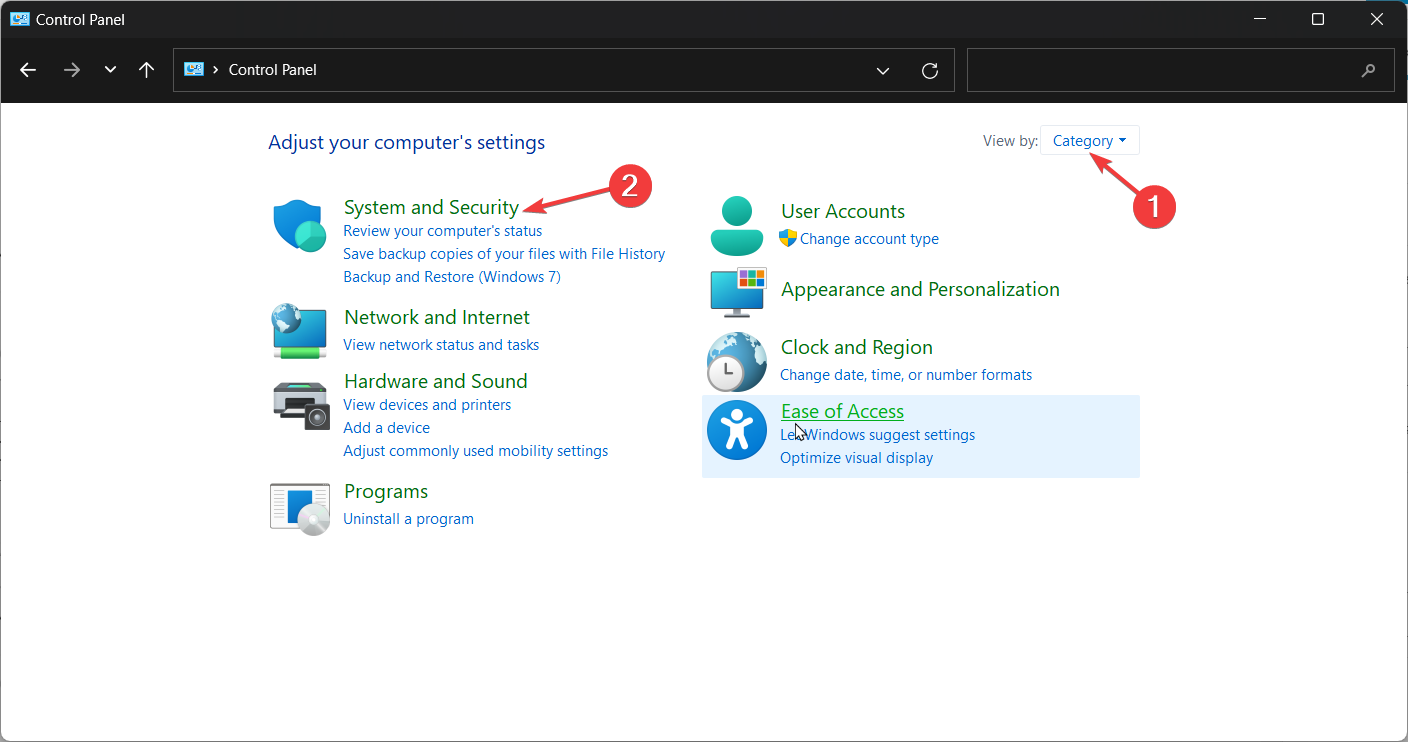
  1. Hit the Windows key, type Control Panel in the search bar, and click Open.control-panel-search fallout new vegas runtime error
  2. Click on System and Security.Security and System
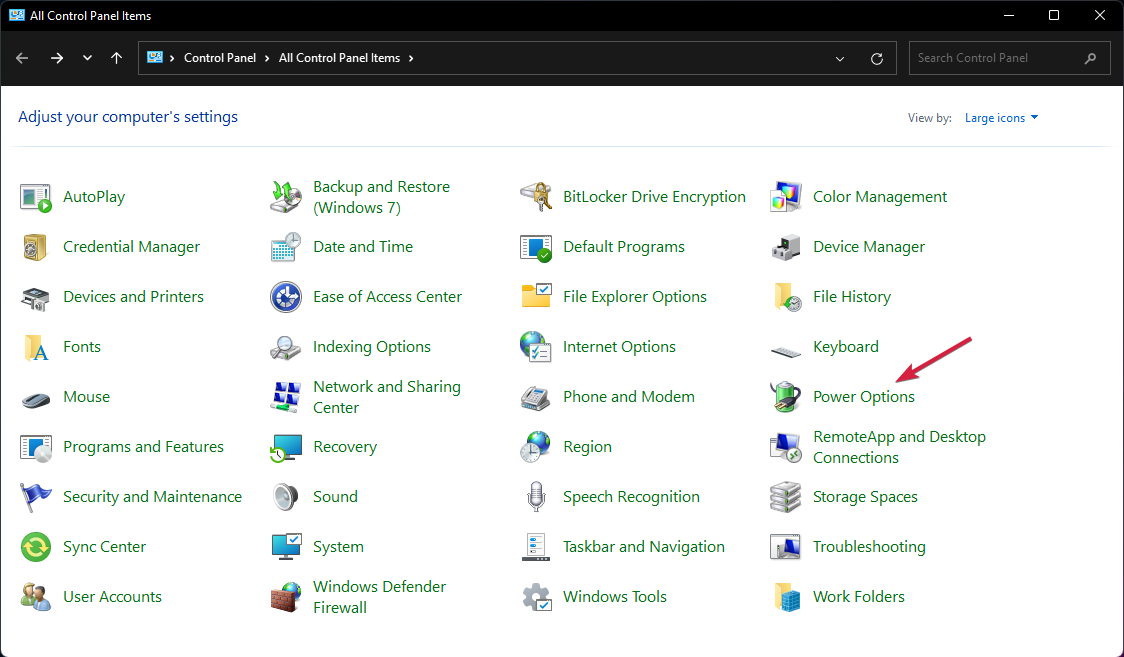
  3. Next, select Power Options.
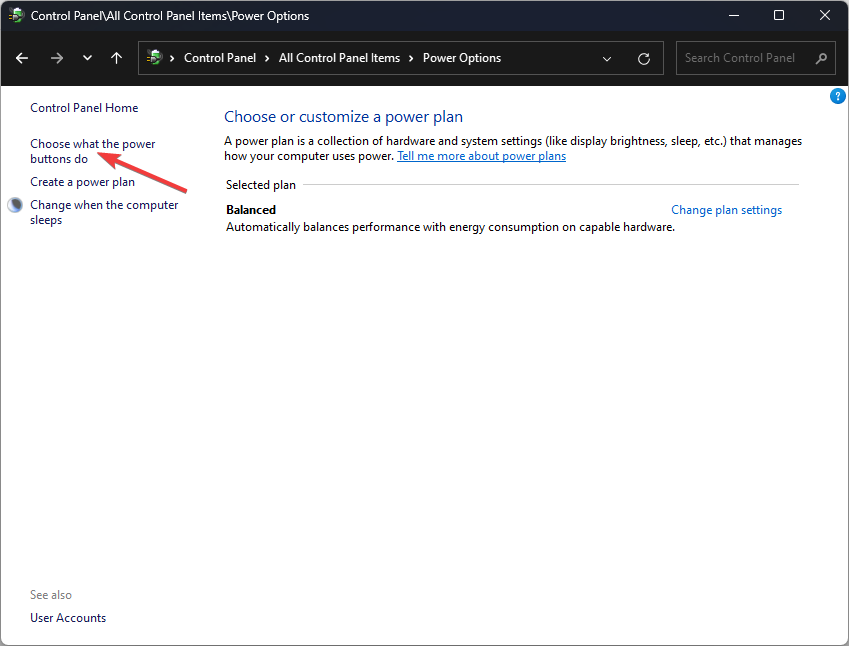
  4. Click on Choose what the power buttons do from the list of options on the left.
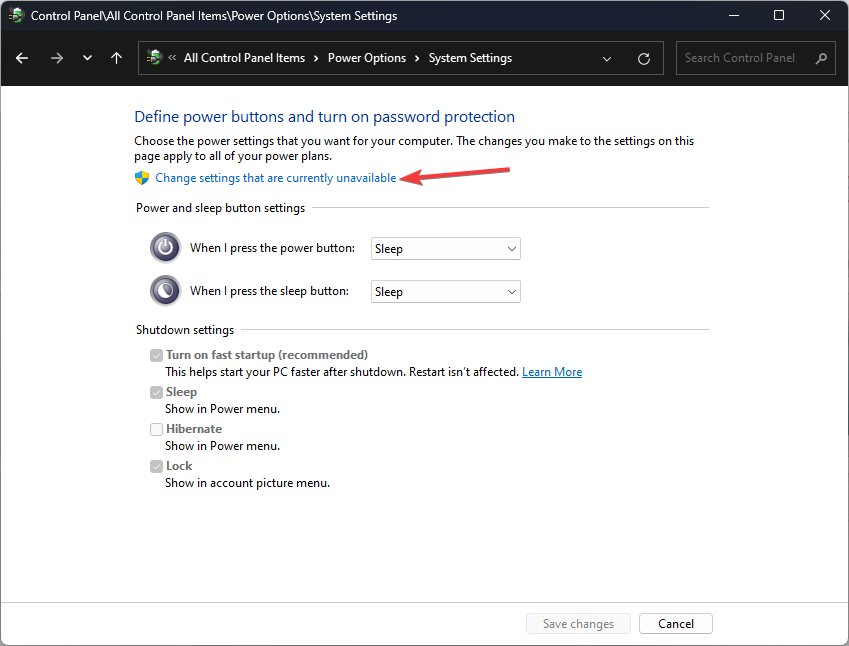
  5. Select Change settings that are currently unavailable.
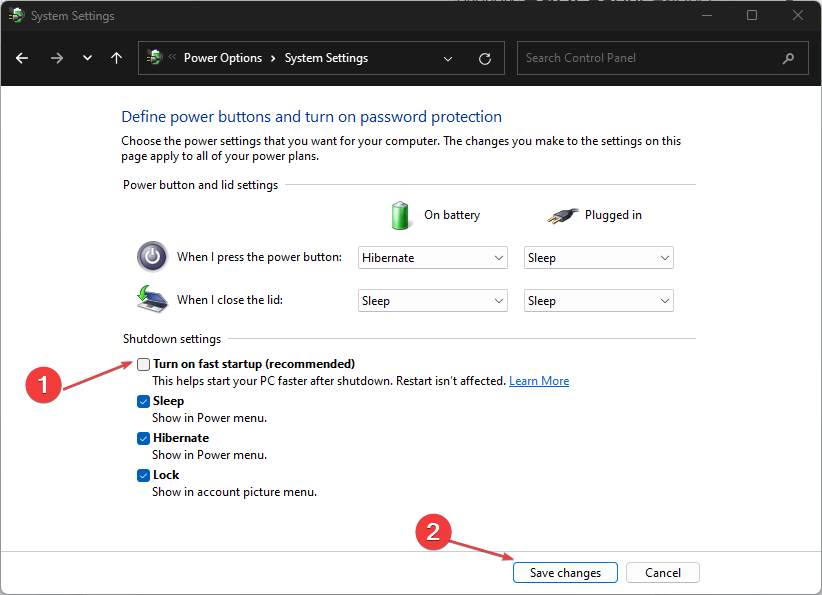
  6. Now, untick the checkbox for Turn on fast startup and then click on Save changes.

While fast startup facilitates a faster boot-up process, it may also cause issues with certain drivers during the startup process. Some drivers may be unable to initialize properly, leading to conflicts and resulting in BSoD errors like the L1c63x64.sys, so disabling fast startup may be the best option.

7. Perform a System Restore

  1. Press the Windows + R keys, type rstui, and hit Enter.
  2. The System Restore window will open. Click on Next.
  3. Select the restore point you wish to revert to and click on Next.
  4. Now click on Finish.

Unfortunately, BSoD triggers vary, and you’ll have to keep jumping from solution to solution in the hopes of finding a remedy for the L1c63x64.sys error. To help you save on time and the headache, we’ve compiled a list of BSoD fixers that will make your work easier.

And because you can never predict when one will occur, we encourage you to create your own BSoD from time to time to keep your system in check. It’s better to save your PC before it reaches its deathbed by making an early diagnosis.

Also, check out other like BSoD errors like the Fileinfo.sys and how you can fix them using our comprehensive guide.

That’s all we had for this error but if you have any other tricks up your sleeve that worked for you, do share them with us. The comment section is open, so we’ll be waiting to hear from you.

What is Proplusww.msi and How to Fix Its Errors

If you encounter issues related to the Proplusww.msi file during the installation or use of Microsoft Office, it may indicate a problem with the installation media or the file itself.

What is the Proplusww.msi file? Proplusww.msi is a file associated with the Microsoft Office suite. ProPlus refers to the Professional Plus edition of Microsoft Office, and the ww part stands for World Wide.

The Proplusww.msi file is located in the Office installation media or installation files. During the installation process, this file is used to install or repair the components of Microsoft Office.

How do I fix the Proplusww.msi installation error?

1. Redownload the installation files

  1. Go to the official Microsoft website or a trusted source and download a fresh copy of Microsoft Office. Make sure to download the edition and version of Office that you have a valid license for.
  2. Once the download is complete, locate the downloaded installation file. If the file is compressed, extract the contents to a folder on your computer using a file extraction tool.
  3. After extracting the installation files, navigate to the folder where they are saved and look for the setup file or installer. It should have an .exe extension. Double-click on the setup file to run it.
  4. Follow the on-screen instructions provided by the installer to proceed with the installation of Microsoft Office. If asked for a product key, enter the valid product key that you have.
  5. Continue following the installation prompts until the installation is completed.

By extracting the compressed files and running the installer separately, you bypass any potential issues with the Proplusww.msi file and ensure that the installation proceeds smoothly. Alternatively, you can change the Microsoft Office install location and see if the error persists.

2. Run a malware scan

  1. Press the Windows key, search Windows Security, and click Open.
  2. Select Virus & threat protection.
  3. Next, press Quick scan under Current threats.
  4. If you don’t find any threats, proceed to perform a full scan by clicking on Scan options just below Quick scan.Scan options
  5. Click on Full scan, then Scan now to perform a deep scan of your PC.Full Scan Scan Now
  6. Wait for the process to finish and restart your system.

Default Windows scans might not always reveal all the issues within your system. For a more in-depth scan, you can always use specialized third-party software, such as TotalAV. This is a professional tool that will not only help you identify potential issues but also act as a real-time defense against malicious software.

⇒ Get TotalAV

3. Repair Microsoft Office

  1. Hit the Windows key, type Control Panel in the search bar, and click Open. control-panel-search fallout new vegas runtime error
  2. Navigate to Uninstall a program under Programs.going uninstall program control panel
  3. Locate MS Office, click on it, and select Change.
  4. Select the Online Repair option and click on the Repair button.

4. Reinstall Microsoft Office

  1. Press the Windows, type installed apps, and launch it.
  2. Navigate to Microsoft Office, click the options icon, and click Uninstall.
  3. Click on Uninstall to confirm your selection.
  4. Alternatively, you can use Microsoft’s uninstall tool to ensure all corrupt files are removed.
  5. Download the MS Office uninstaller tool.
  6. Launch the program and follow the on-screen prompts to install Microsoft Support and Recovery Assistant.
  7. Agree to the terms and conditions.
  8. The Microsoft Support and Recovery tool will begin scanning your PC.
  9. Select MS Office and click on Next.
  10. Check the box that you have saved all your work and hit the Next button.
  11. Next, go to the Office webpage, log in to your Microsoft account if not logged in, and click the Install app button.
  12. Double-click the downloaded file in your browser and follow the on-screen command to install it.

5. Perform a clean boot

  1. Hit the Windows key, type msconfig, and open System Configuration.
  2. Switch to the Services tab and select Hide all Microsoft services.
  3. Click on the Disable all button, then hit the Apply button to save the changes.
  4. Go back and click on the Startup tab, select Open Task Manager then click OK.
  5. In the Startup tab of the Task Manager, Disable all the Enabled startup items.
  6. Close Task Manager and restart your PC.

Sometimes, background programs or services can interfere with the installation process. A clean boot to start your computer with only essential services and programs running can help isolate the issue.

Other variations of Proplusww.msi errors you may encounter

  • Proplusww.msi error
  • Load error: proplusww.msi
  • Proplusww.msi has gone missing
  • Failed to load proplusww.msi
  • Proplusww.msi could not be found
  • The feature you are trying to use is on a network resource that is unavailable. Click OK to try again, or enter an alternate path to a folder containing the installation package “ProPlusWW.msi” in the box below
  • Proplusww.msi registration failed
  • Runtime Error: proplusww.msi
  • ProPlusWW.msi is not a valid installation package

Office installation errors are in plenty but lucky for you, we’ve covered most of them. If the Proplusww.msi error becomes a hard nut to crack, you can always turn to Microsoft Office alternatives.

We’d love to get your feedback on this error, so if you benefited from one of our solutions or have one of your own, drop us a line below.

Edge Copilot may use your Browsing History to Provide AI responses

Microsoft Edge in Canary is testing quite a controversial feature for Copilot where Edge will send your browsing history to Microsoft for AI Assistant to provide relevant answers and suggestions. The respective Copilot setting is not enabled by default, here is more on this.

Microsoft Copilot in Edge

Copilot is an AI-powered tool in Microsoft Edge that provides suggestions and answers to users based on their queries. It generates page summaries and explains images when you submit screenshots to it, to access Copilot, sign into Microsoft Edge and select the Copilot icon in the browser sidebar.

Here are some examples of what Copilot can do in the Edge Sidebar:

  1. Searches and Answers: In the sidebar, Copilot can perform searches and provide answers related to the page you’re viewing.
  2. Product Comparisons: Copilot can compare products right in your sidebar and even create tables to help you compare.
  3. Shopping Notifications: Copilot provides shopping notifications in the sidebar to help you find the best deals.
  4. PDF Summarization: Copilot can automatically generate a summary of the PDF when you click the relevant prompt.
  5. Movie Streaming: Copilot helps you find where to stream a movie.

Additionally, Edge Copilot can rewrite the information you submit, which is useful for sharing short-length posts on social websites like Twitter.

Edge Copilot Settings

Now, let’s explore Copilot settings in the Edge browser. When you visit Edge Settings > Sidebar > App and Notification Settings, you’ll find options to control how Copilot works. Most of these settings are self-explanatory:

  1. Show Copilot: This option toggles the visibility of the Copilot icon in the browser sidebar.
  2. Automatically Open Copilot in the Sidebar: This setting opens the Copilot sidebar automatically when you launch Microsoft Edge.
  3. Allow Microsoft to Access Page Content: By enabling this option, Microsoft can access page content to generate personalized suggestions and answers for you.
  4. Show Shopping Notifications: This setting determines whether you receive chat suggestions automatically when shopping in Edge.

Microsoft to access Edge browsing history for Copilot

Now Edge is adding a new option to the Copilot named Allow Microsoft to access browsing history, this
sends your “browsing history to Microsoft to make AI-generated answers and suggestions more relevant on Copilot”.

Generally, Browsing history includes the list of websites you have visited, passwords, the information you have entered into forms and cookies. It is stored on your device, and if you have turned on sync, your browsing data can also be stored in the Microsoft Cloud to be synced across your signed-in versions of Microsoft Edge.

Going forward, if you or Microsoft, choose to enable this feature in Edge, Microsoft will use your browsing history to generate personalized suggestions and answers for you when you use Copilot.
However, this feature may raise privacy concerns. Some users may be uncomfortable with sharing their browsing history with Microsoft.

Here’s how to enable or disable this behavior that may impact your privacy.

  1. Launch Microsoft Edge 122.0.2339.0 or later
  2. Visit Settings> Sidebar >App and Notification Settings
  3. Toggle the “Allow Microsoft to access browsing history” setting to on or off to enable or disable.

It needs to be seen, if Copilot will seek consent and inform it is using your browsing history to provide personalized answers and suggestions to you like it does when accessing Page content.

Will you allow Edge copilot to use your browsing history to provide information to you? Let us know your thoughts in the comments below.

5 Easy Ways to Fix Zoom Error Code 3003 – Not Meeting Host

If have encountered Zoom error code 3003 while trying to join a meeting, this guide can help. We will discuss the WR experts recommended solutions to fix the issue in no time.

What causes error code 3003 on Zoom? If a regular participant tries to join a meeting using the link sent by the co-host, not the primary host, they might get this error.

How can I fix the Zoom error code 3003?

1. Rectify the meeting link format

  1. Type in the meeting link in the Zoom dialog box.
  2. Replace meeting with j in the link and click Join. Suppose the meeting link is: https://iu.zoom.us/meeting/146431646, then change it to https://iu.zoom.us/j/146431646

2. Update the Zoom app

  1. Press the Windows key, type zoom in the search box, and click Open.Zoom - zoom error 3003
  2. From the top-right corner, click the Profile icon and select Check for Updates.Check for updates
  3. If an update is available, download and install it, then restart your computer.

Keeping the Zoom app updated can help you avoid other issues like Zoom not able to detect camera in Windows; read this guide to learn about other solutions.

3. Create a Zoom Co-host

  1. Go to the Zoom online portal and sign in with the same account.
  2. Next, select Settings from the left pane.
  3. Go to the Meeting tab.Meeting - settings - zoom error 3003
  4. Scroll down to find the In Meeting (Basic) category.
  5. Ensure the Co-host setting is enabled.
  6. Now, to make a participant a co-host, hover over their profile and select More, then choose Make Co-host.

4. Adjust the Schedule Privilege option

  1. Go to the Zoom online portal and sign in with the same account.
  2. Next, select Settings from the left pane.
  3. Select Meeting.Meeting -
  4. Scroll down to find the Other category.
  5. Locate Schedule Privilege and check if there have been any recent changes made. If you see any, revert them.Schedule Privilege - Zoom error 3003
  6. You can also add a new user for managing events under Assign scheduling privilege to

5. Reinstall the app

  1. Press Windows + I to open the Settings app.
  2. Go to Apps, then select Installed apps.Apps - Installed apps - zoom error 3003
  3. Locate Zoom, click the three dots icon, and select Uninstall.Uninstall the app
  4. Click Uninstall to confirm the action.
  5. Go to the official website of Zoom, then locate Zoom Desktop Client and click Download.Download Zoom
  6. Double-click the installation file and follow the on-screen instructions to complete the process.

Reinstalling the Zoom app can also help you fix other issues related to the app, like Zoom video not working; read this guide to learn more.

To conclude, to fix the Zoom error code 3003, you can make changes to the meeting link, update the app, create a co-host, adjust schedule privileges, or reinstall the app.

In case you are getting other error codes like 100000502 on Zoom, it could be due to an outdated app, or antivirus interference; read this guide to learn more.

If you have any questions or suggestions about the subject, feel free to mention them in the comments section below.

Why Does My Chromebook Keep Restarting? Reasons & Fixes

If your Chromebook keeps restarting every time you work on it, this guide can help. We will explore the WR experts’ tested methods to fix the issue.

Why does my Chromebook keep restarting? It could occur if you have too many apps open, experimental features are enabled, misconfigured power settings, or if the device is overheated.

How can I fix the Chromebook keeps restarting issue? 

Before proceeding with any steps to fix the Chromebook keeps restarting, go through the following preliminary checks:

  • Reboot your laptop, check it for damage, and uninstall unwanted apps.
  • Check your device for overheating and ensure your charger is working.

1. Check for updates 

  1. Turn on your Chromebook and connect it to Wi-Fi.
  2. Click the system tray in the bottom-right corner of the screen, and select the Gear or Settings icon.Settings - why does my chromebook keep restarting
  3. From the bottom left, choose About ChromeOS.About OSupdates
  4. Under Google ChromeOS, select Check for updates.Check for updates
  5. If an update is available, it will be downloaded and installed automatically.

2. Adjust the power settings

  1. Click the system tray in the bottom-right corner of the screen, and select the Gear or Settings icon.Settings - why does my chromebook keep restarting
  2. Click Device.
  3. Choose Power.
  4. Locate the When idle section, click the drop-down next to While charging, and choose Turn off display or Keep display on.
  5. Choose the same option for When on battery.
  6. Turn on the toggle for Sleep when cover is closed.sleep  when the cover is closed - my chromebook keep restarting

3. Hard reset your laptop

  1. Turn off your Chromebook.
  2. Press and hold the Refresh button.
  3. While holding the Refresh button, press and hold the Power button.
  4. Continue holding both buttons for 10 seconds or until the screen goes black.
  5. Now, get off the button and let your Chromebook restart.

4. Disable the Experimental features

  1. Launch the Google Chrome browser.
  2. Type in this URL in the address bar and press Enter: chrome://flags/reset all - why does my chromebook keep restarting
  3. Click the Reset all button.
  4. You will get the Your changes will take effect the next time you relaunch Chrome message; click Relaunch.

Remember that adjusting flags may affect the performance of your browser, and it is a good practice to restart your Chromebook after following the steps.

5. Reset your Chromebook to factory settings

  1. Sign out of your Chromebook. Now press and hold Ctrl + Alt + Shift + r.why does my chromebook keep restarting - Ctrl + Shift + Alt + r
  2. Select Restart.
  3. Choose Powerwash and click Continue.
  4. Follow the on-screen instructions, then sign in to your Google Account and use the account that you want to be the admin of the device.
  5. Next, follow the instructions to complete the setup of your Chromebook.

Resetting your Chromebook is a great way to deal with other issues like ChromeOS is missing; read this guide to learn more about it.

6. Recover your Chromebook (The last resort)

  1. Remove the external drive, mouse, and keyboard before you start. Press and hold Esc + Refresh, then press the Power button. In some Chromebook models, you need to replace the Refresh button with Maximize.Press and hold Esc + Refresh, then press the Power button. - why does my chromebook keep restarting
  2. Release the Power button. When you see a message on the screen, let go of other keys as well.
  3. Now go to the Recover using internet connection option using the arrow keys and press Enter to select it.Recover using internet connection
  4. Select Next, then choose a network connection on the next screen.
  5. Follow the on-screen instructions.
  6. Once done, your computer will restart automatically.

In case you encounter unexpected errors while recovering your Chromebook; we also have a guide for that.

If none of the methods worked for you, the chances are your computer has a hardware problem, and Powerwashing or resetting it won’t help. You need to visit an authorized service center to get it fixed.

In conclusion, to fix the Chromebook keeps restarting issue, you can check for system updates, hard reset your device, disable experimental features, or reset it to default settings.

If you want to learn how to run exe files on a Chromebook; read this article to find the best options to run them on the platform.

This isn’t the only issue you can encounter and many reported that the Chromebook keyboard isn’t working, but we have an entire guide dedicated to this issue.

To protect your battery, you might want to learn how to turn on the battery saver on your Chromebook, and we have the perfect guide to show you how to do it.

If you have any questions or suggestions about the subject, feel free to mention them in the comments section below.

3 Ways to Clear the Cache on Xbox Series X

If you are facing performance issues on the Xbox Series X, you should consider clearing the cache to fix them. In this guide, we will discuss three methods along with the step-by-step process to delete cache files in no time. 

How can I clear the cache on the Xbox Series X? 

1. Power cycle your console

  1. Press and hold the Xbox button on the front of your console for at least 10 seconds to turn it off.X button - clear cache xbox series x
  2. Remove the power cord, HDMI, Ethernet, controllers & other USB devices, and wait for 10 seconds to let the power supply reset.
  3. Plug the console power cable back in.
  4. Press and hold the X button on your console to turn it on.

If you don’t see a green boot-up animation when the console starts, repeat the steps. Restarting your console using this method could also help you fix the game loading issues on Xbox Series X; read this guide to learn more.

2. Remove the BluRay cache

  1. Press the Xbox button on your controller.Xbox button
  2. Go to your Profile and choose Settings.Settings - clear cache xbox series x
  3.  Select Devices and connections, then choose Blu-Ray.devices-and-connections
  4. Now select Persistent storage.Persistent storage - clear cache xbox series x
  5. Choose Clear Persistent storage to remove the cache.Clear persistant storage

3. Use the Xbox Settings menu

  1. Press the Xbox button on your controller.Xbox button - clear cache xbox series x
  2. Choose Settings. Settings - clear cache xbox series x
  3. Select System, and from the right pane, choose Console Info.
  4. Select Reset Console. 
  5. Now choose Reset and Keep My Games & Apps. reset

Wait for the console to reset. The process may take up to half an hour, depending on the data and other circumstances. 

In conclusion, to clear the cache on your Xbox Series X, you can either Power cycle your console, clear persistent storage, or reset your console. This will help improve the overall performance of the gaming console.

You can use the steps mentioned here on Xbox Series S as well to clear the cache. In case you are also facing frame rate issues on Xbox Series X; read this guide to learn about the solutions.

If you have any questions or suggestions about the subject, feel free to mention them in the comments section below.

How to Fix The RetroArch.exe Has Stopped Working Issue

If you are getting the RetroArch.exe has stopped working error after updating the RetroArch software, this guide can help.

What causes the RetroArch.exe has stopped working error? It could be due to an outdated graphics driver, cores not downloading, or a corrupted RetroArch app.

How can I fix the RetroArch.exe has stopped working issue?

Before proceeding with any steps to fix the RetroArch.exe has stopped working, go through the following preliminary checks:

  • Ensure your controller firmware is up to date and no Windows updates are pending.
  • Make sure your PC meets the minimum requirements and that you have selected the right core or have compatible ROM files.

1. Run retroArch.exe in administrator mode

  1. Right-click the RetroArch and click Properties from the context menu.Properties - retroarch.exe has stopped working
  2. Go to the Compatibility tab, under Settings, and place a checkmark next to the Run this program as an administrator option.Run as administrator
  3. Click Apply and OK to save the changes.

2. Update the RetroArch databases

  1. Press the Windows key, type retroarch in the search box, and click Open.RetreoArcvh - retroarch.exe has stopped working
  2. Go to the Main menu option from the left pane, and click Online Updater.Online Updater
  3. Click Update Core Info Files. Make sure you are connected to the internet, and this step will extract the files.Update Core Info Files
  4. Click the Update Databases option.Update Databases - retroarch.exe has stopped working
  5. Next, go to Core Updater; from the list present, locate the core that you use a lot, select, and press Enter.
  6. Wait for the process to complete. Ensure you update the core at least once every month.

3. Make changes to the configuration of RetroArch’s core updater

  1. Launch a preferred browser, and visit Libretro Buildbot.
  2. Navigate to this path: nightly/windows
  3. Now, choose between x86 and x86_64, depending on your system.
  4. Double-click the latest folder to open; once you are there, copy the URL address. For us, it was https://buildbot.libretro.com/nightly/windows/x86_64/latest/latest - retroarch.exe has stopped working
  5. Locate the configuration file for RetroArch which has core updater settings saved.
  6. In the file, look for core_updater_buildbot_cores_url and place the URL that you copied right next to it.
  7. Press Ctrl + S to save the changes.

4. Reset RetroArch configurations

  1. Go to the Main Menu from the left pane in the RetroArch app.
  2. Navigate to Configuration File.Configuration file - retroarch.exe has stopped working
  3. Select Reset to Defaults.Reset to defaults
  4. Once RestroArch resets all configurations to default values, restart the app.

5. Reinstall RetroArch

  1. Press Windows + I to open the Settings app.
  2. Go to Apps, then select Installed apps.Apps, installed apps - retroarch.exe has stopped working
  3. Locate RetroArch, click three dots icon, and select Uninstall.Uninstall
  4. Click Uninstall again to confirm the action.
  5. Now go to RetroArch’s official website and click Get RetroArch.Get Download
  6. Double-click the installation file and follow the onscreen instructions to complete the process.

If your PS4 controller is not working in RetroArch, it could be due to outdated drivers; read this guide to learn more.

In conclusion, to ensure RetroArch works on your computer properly, you must have an updated Windows, then ensure core databases are up to date.

In addition to these, to fix the RetroArch has stopped working issue, you need to make changes to the RetroArch’s core updater configuration file, reset RetroArch configurations or reinstall the app.

In case you are still stuck with the issue, you can check out our all-in-one emulators for PC list to get another one in the meantime. Alternatively, you can  download RetroArch for Android from Google Play Store until the issue sorts out.

If you have any questions or suggestions about the topic, feel free to mention them in the comments section below. We will be happy to help!

Hmonitor.exe: What is it And How to Fix its Errors

The hmonitor.exe process is known to cause high CPU and RAM usage, and trigger conflicts with other programs. Besides, the process may be flagged as a threat by some antiviruses, but that’s not the case as long as you get it from the official source.

What is hmonitor.exe? The process is the main executable linked to the Hardware Sensors Monitor program by AB Software. It’s used to monitor the PC’s performance, i.e., the temperature, fan speed, and voltage, amongst others. The .exe file is stored in the following location: C:\Program Files (x86)\Hmonitor

How do I fix hmonitor.exe issues?

Before we start with the slightly complex solutions, try these quick ones:

  • Reboot the PC.
  • Download any pending Windows update.
  • Make sure you are running the latest version of Hardware Sensors Monitor.

1. Run a virus scan

  1. Press Windows + S to open Search, type Windows Security in the text field, and click on the relevant result.
  2. Click on Virus & threat protection.virus & threat protection
  3. Now, click on Scan options.
  4. Select Full scan and then click the Scan now button.scan to fix hmonitor.exe
  5. Wait for the scan to complete. It may take between 20-45 minutes.

If you believe that hmonitor.exe is a malware or virus, run a full malware scan using the built-in Windows Security. In case that doesn’t identify any threats, use an effective antivirus solution, such as TotalAV. This software scans and removes threats instantly and acts as a shield, protecting your device in real time.

Only after the .exe file turns out clean after both scans can you be sure that it’s the actual program file and not a virus disguised as the program’s executable.

⇒ Get TotalAV

2. Remove hmonitor.exe from startup apps

  1. Press Ctrl + Shift + Esc to open the Task Manager, and go to the Startup apps tab.startup apps
  2. Now, select the Hardware Sensors Monitor program from the list, and click on Disable.disable to fix hmonitor.exe issue
  3. Reboot the device.

Now, unless you manually launch the program, it won’t have a high CPU usage or increased RAM consumption.

3. Uninstall Hardware Sensors Monitor

  1. Press Windows + R to open Run, type appwiz.cpl in the text field, and hit Enter.appwiz.cpl
  2. Select Hardware Sensors Monitor from the list, and click on Uninstall.uninstall to fix hmonitor.exe
  3. Follow the on-screen instructions to complete the process.
  4. Restart the PC and check for improvements.

While uninstalling, we recommend that you use an effective software uninstaller to delete any leftover files or Registry entries.

Also, if you plan to reinstall Hardware Sensors Monitor by AB Software, the program is not available for download. So, you will have to use the installer setup downloaded previously.

That’s all the information about hmonitor.exe and fixes for related issues. Remember, it’s a genuine process, but if you have doubts, it’s best to scan the PC for malware.

Before you leave, discover quick ways to extract contents from .exe files without installing it. This will keep your PC safe!

For any queries or to share how you fixed issues with the process, drop a comment below.

Netflix Error aip-703: Easy Fixes For Chromecast and TV

The Netflix error aip-703 is seen on Chromecast and older smart TV models. For the latter, it’s usually incompatibility to blame. And for other devices, server issues and corrupt app cache were the most common underlying causes.

The error message reads, Due to technical limitations, Netflix is no longer available on this device. Please visit netflix.com/compatibledevices for a list of supported devices. Now, let’s get straight to fixing the Netflix streaming error!

How do I fix Netflix error aip-703?

Before we start with the slightly complex solutions, try these quick ones:

  • Log out and then sign back into Netflix. Also, restart the TV and check for improvements.
  • If the error reads, This title is not available at the moment. Please try another title aip-703 R7111-1331, check Netflix’s server status on the official website or a real-time monitoring service like Downdetector.
  • In case you are getting error aip-703 R7121-5006, disconnect the VPN.
  • Make sure you have not blacklisted any websites in the router settings.
Tip icon Tip
The steps listed here are for Amazon Firestick, though the idea remains the same across devices. Simply apply the equivalent fixes to get things up and running!

1. Update the smart TV’s software

  1. Open the TV’s main menu, go to Settings, and then select My FireTV.settings
  2. Select About from the list of options.
  3. Now, scroll down to the bottom and choose Install Update if a newer version is available.update to fix Netflix error aip 703
  4. Once done, reboot the device and check for improvements.

2. Clear the app cache

  1. In the TV’s Settings, go to Applications.applications
  2. Select Manage Installed Applications.installed apps
  3. Select Netflix from the list of applications.
  4. First, select Clear data and then Clear cache to delete all the non-critical app files.clear cache to fix Netflix error aip 703

Clearing the Netflix cache also helps fix the This title is not available to watch instantly error.

3. Factory reset the smart TV

  1. In the device Settings, go to My Fire TV.settings
  2. Scroll down to the bottom and select Reset to Factory Defaults.reset to fix Netflix error aip 703
  3. Choose Reset in the confirmation prompt to proceed.

If you are using Chromecast or another similar stick, reset the streaming device through its built-in settings. Resetting will also work if Netflix is not working on Sony Smart TV.

4. Stream from another device

As a workaround, you can always cast from a PC to the smart TV. It will mirror the screen and allow you to watch Netflix on a bigger display.

Remember, streaming Netflix from a mobile, tablet, or PC is only a workaround and can’t be used in the long run. Also, screen mirroring doesn’t deliver the same performance as actually running the app on the other device.

5. Upgrade the device

If nothing else works and your smart TV is not included in the list of supported devices on Netflix, switch to another smart TV or use a streaming adapter like Chromecast, Amazon Firestick, or Roku Streaming Stick.

Older devices that haven’t received updates in a long time are often not supported by Netflix. Our research revealed several smart TVs from Panasonic, as a result, showing Netflix error aip-703.

The Netflix error aip 703 is a simple problem and can easily be solved as long as support for your device has not been dropped.

Besides, some of the fixes for Netflix error code S7706 may work in this case, so give them a try!

For any queries or to share which fix worked for you, drop a comment below.

How to Fix The Exception From HRESULT 0x800a03ec Error

Many users have encountered the Exception from HRESULT 0x800a03ec error when trying to run a code or import data. In this guide, we will discuss WR experts-recommended solutions to fix it.

What causes the Exception From HRESULT 0x800a03ec error? It could be due to incorrect data formats, corrupted Excel file, virus infection, memory problems, or incompatible programs running at the same time.

How can I fix the Exception From HRESULT 0x800a03ec erorr?

Before moving to the fixes below, here are a few preliminary checks you should do:

  • Make sure your Windows and system drivers are updated to the latest version and run a deep scan using a reliable antivirus tool, then clean junk files from your PC.
  • Ensure you are not performing two actions on the same file in a short amount of time.
  • Make sure you don’t have the equal symbol (=) at the beginning of the data at the time of exporting the file.

1. End all the Excel instances

  1. Press Ctrl + Shift + Esc to open Task Manager.
  2. Go to the Processes tab, locate all the processes related to Excel, select them one by one, and click End task.Details - End Task
  3. Also, check the Details tab for Pror.exe and Excel.exe instances; if found, select and click End task.Processes - End task - Exception From HRESULT 0x800a03ec

2. Save the Excel file in new format

  1. Press the Windows key, type excel in the search bar, and click Open to launch Microsoft Excel.Excel - Exception From HRESULT 0x800a03ec
  2. Go to File, then select Open.
  3. Click Browse, select the file, and click Open.Open - Browse - Exception From HRESULT 0x800a03ec
  4. Once the file is open, click Save as now.Save as - Exception From HRESULT 0x800a03ec
  5. Now, choose the location where you want to save the file and enter a name. Make sure Excel Workbook (*xlsx) is selected for file type, then click Save.

If you have allowed the sheets to open in the Office 2007 version or Compatibility mode, the sheet can’t have more than 65k rows; therefore, also check the number of rows, and if it is exceeding, convert the file to xlsx to get rid of the error.

3. Check the VBA code

The Exception from HRESULT 0x800a03ec error might occur if you have incomplete or wrong queries in the Excel VBA code.

Also, check the code for typo errors, logical flaws, missing references, or syntax errors, and ensure you are not using an invalid method to call a VBA code.

4. Repair the Excel file

  1. Launch the Excel app, go to File, then click Open.
  2. Click Browse.open - Browse - Exception From HRESULT 0x800a03ec
  3. The Open dialog box will appear; navigate to the chosen affected Excel file, and from the arrow next to the Open button, choose the Open and Repair option from the drop-down.Open and Repair - Exception From HRESULT 0x800a03ec
  4. On the next dialog box, select Repair, and Excel will try to repair your file.Repair

Using these steps can help you recover corrupted Excel files in Windows 10; read this guide to learn more about it.

5. Enable disabled add-ins

  1. On Excel, go to File, then click Options.Options - Exception From HRESULT 0x800a03ec Error
  2. On the Excel Options window, click Add-ins.
  3. Locate Manage, click the arrow to open the drop-down, select Disabled Items, and click Go.Add-ins
  4. Select the disabled items one by one and Enable and restart Excel to let the changes take effect.

6. Repair the Microsoft Office app

  1. Press Windows + R to open the Run window.APPWIZ RUN COMMAND  - Exception From HRESULT 0x800a03ec Error
  2. Type appwiz.cpl and click OK to open the Programs and Features window.
  3. Choose Microsoft Office and click the Change button.Change
  4. Click the Yes on the UAC prompt.
  5. Select the Quick Repair option and click the Repair button.Repair the app

Repairing Excel can also help you fix issues like Excel won’t open after a Windows Update; read this guide to learn more.

To conclude, the Exception from HRESULT 0x800a03ec error occurs mainly due to issues with the Excel sheet or VBA code you are running.

So, to fix it, you need to check the VBA code for errors & logical flaws and the method used to call it. However, if the issue appears while making changes in Excel, try repairing the file, saving it as XLSX format or enable the Disabled items from Excel Options.

If Excel is not opening on your computer, ensure the app is not outdated, and read this guide to learn about more solutions.

Did we miss a step that helped you fix the problem? Don’t hesitate to mention it in the comments section below. We will happily add it to the list.

The new Expanded Prefetch Range improves Chromium performance on Windows 11

Since switching to Chromium in late 2018, Microsoft has actively contributed to the new engine for a better Edge experience. Recently, the Redmond giant worked with Google for Chromium browsers to benefit from and use the expanded Application Launch Prefetch range (APLF) available on Windows 11 21H2 or later.

The /prefetch parameter is a key component in how browsers handle file access patterns for their processes. It helps differentiate the behavior of processes with the same name, providing a way to optimize and streamline how various tasks are carried out.

Previously, the /prefetch: N range used on the process command line was in the range of 1-8 (can be seen in the Windows Task Manager). Microsoft shared that Chromium browsers using the 1-8 range leads to less optimal APP launch Prefetch (ALPF) behavior. However, they should use 1-16 for Windows 11 21H2 and later versions.

What are the benefits of Prefetch range expansion?

Improved Process Separation: The expanded /prefetch range allows for better separation of processes, which is particularly beneficial for tasks like rendering web pages and handling utility processes in the background.

Enhanced Performance: With a broader range, the browsers can optimize how they prefetch and access files, potentially improving overall performance.

Adaptation to Modern Operating Systems: As the change is specifically targeted at Windows 11 and later versions, it ensures that these browsers are optimized to work seamlessly with the latest features and improvements in the operating system.

Optimizing Resource Usage: The adjustment in the /prefetch parameter range allows browsers to use system resources more efficiently, contributing to a smoother user experience.

In case you didn’t know, the Prefetch range is not specific to Chrome or other Chromium-based browsers. It is a feature of the Windows operating system that can be leveraged by any application that runs on Windows 11 and later.

The change was added to the Chromium branch, and we noticed that Microsoft tested the Edge browser with the Expanded Prefetch feature in the Canary version today.

Uplay_r164.dll Not Found or Untrusted System File [Solved]

The uplay_r164.dll is developed by Ubisoft and used by several Ubisoft Connect games, including Assassin’s Creed, Far Cry 4, The Division 2, and Watch Dogs, amongst others.

The two common errors associated with the file are, Easy Anti-cheat Untrusted system file and The code execution cannot proceed because uplay_r164.dll was not found. Reinstalling the game may fix this problem. Replacing the DLL will fix things in both cases. Let’s find out how!

How do I fix uplay_r164.dll error?

Before we start with the slightly complex solutions, try these quick ones:

  • Reboot the PC and try relaunching the game.
  • Check for any pending updates and install them.
  • If the game was downloaded from an unreliable or pirated source, get it from the official Ubisoft platform.

1. Use a DLL repair tool

Your primary approach when faced with uplay_r164.dll not found error is to get an effective DLL repair tool.

2. Move the DLL to the game’s installation directory

Another option is to move the DLL into the game’s directory from another PC. It is found in the game’s folder and not System32, as is the case with system DLLs.

dll
Game’s folder

Copy it to an external drive (on the other PC) and paste it into the game’s folder. Also, move a copy of the DLL to the following location: C:\Program Files (x86)\Ubisoft\Ubisoft Game Launcher\uplay_r164.dll08

3. Make an exception for the game folder

  1. Press Windows + S to open Search, type Windows Security in the text field, and click on the relevant result.
  2. Click on Virus & threat protection.virus & threat protection
  3. Click on Manage settings under Virus and threat protection settings.
  4. Scroll down and click on Add or remove exclusions.add or remove exlcusions
  5. Click Yes in the UAC prompt.
  6. Click the Add an exclusion button and select Folder from the dropdown menu.add exclusion to fix uplay_r164.dll
  7. Navigate to the installation directory, choose the game folder, and click on Select folder. select folder
  8. Finally, restart the computer for the changes to apply.

While adding an exclusion to Windows Security, include any paths listed in the error message. This helps when Windows Security is blocking access to uplay_r164.dll. Also, if you have a third-party antivirus, add an exclusion to it as well.

Remember, do not add an exclusion if the game is downloaded from a non-official source unless you are absolutely certain that the files don’t pose any harm.

4. Reinstall the game or Ubisoft Connect (Uplay)

  1. Press Windows + R to open Run, type appwiz.cpl in the text field, and hit Enter.appwiz.cpl
  2. Select the game from the list of applications, and click Uninstall.uninstall to fix uplay_r164.dll
  3. Follow the on-screen instructions to complete the process, and then restart the computer.
  4. Finally, reinstall the game from Ubisoft Connect (Ubiplay).

If that doesn’t work, you may also consider removing Ubisoft Connect and then downloading it again from the official website. We recommend using an effective software uninstaller to automatically clear any leftover files and Registry entries that may trigger issues during reinstall.

5. Disable Windows Security

  1. Press Windows + S to open Search, type Windows Security, and click on the relevant result.
  2. Click Virus & threat protection.
  3. Click on Manage settings.manage settings
  4. Now, disable the toggle for Real-time protection.disable to fix uplay_r164.dll
  5. Click Yes in the UAC prompt to confirm.

After we encountered the uplay_r164.dll error when playing the game for the first time, disabling Windows Security or the active antivirus during installation did the trick. But make sure to re-enable it soon after. This also helps when Uplay can’t launch games.

Remember, missing DLLs in Windows is a common issue. In the case of system DLLs, you could perform an in-place upgrade, and for third-party DLLs, reinstalling the program is the easiest fix!

For any queries or to share what worked for you, drop a comment below.

How to Open The PA File on Windows [Simple Ways]

The PA file extension primarily belongs to Print Artist software by Nova Development. The file is a design project which contains text, layout, image, and metadata of a book cover, letterhead or magazine.

However, we have also come across the same .pa extension, which is a compressed archive created by PowerArchiver, an encryption & backup software or a file related to the add-in by PowerPoint. In this guide, we will discuss the steps to open the PA file of all types.

How can I open the PA file?

Before you try to open any unknown file on your computer, it is recommended to always scan it using reliable antivirus software, such as TotalAV – formerly known as TotalAV.

1. Use the appropriate software

As the file extension is related to three different software, you must first determine which software it belongs to.

If you can’t determine that, follow these steps:

  1. Right-click the .pa extension file, and select Open with.
  2. From the sub-context menu, choose the default program mentioned.
  3. However, if you don’t find Print Artist, PowerArchiver, or PowerPoint in the list or can’t access the file, click Choose another app.Choose another app - open the PA file
  4. Next, select Choose an app on your PC, and locate the executable file of the app.Choose an app on your PC
  5. Once it is added to the list, select the program and click Just once to open the file.PowerPoint - Just Once

If you are not able to open the app in one go, you need to follow the steps again to find the right software.

2. Use the universal file opener

If you can’t find suitable software on your computer to access the .pa extension file, the best option is to rely on a universal file opener; you can check out this guide for the best options.

So, to conclude, to open the PA file on your computer, you need to choose the right software; if you use PowerPoint or Print Artist often, then you can simply select them from the list of Open with options or double-click the file to launch.

However, if it is a backup file, you need to first check the file and use PowerArchiver to open and decompress it.

According to WR experts, you should never manually change a file type, as it may render the file unreadable, resulting in loss of data.

If you have any questions or suggestions about the subject, feel free to mention them in the comments section below.

How to Fix the Speedtreert.dll Missing Error

A speedtreert.dll is not a crucial Windows file, but if you’re playing the Dragon Age game, you’ll need it to be able to run the game. We show you how to fix its related errors in this article.

What is a speedtreert.dll file?

This is an important DLL file related to the Dragon Age game. If it’s missing from your PC, you may be unable to run the game, or it will keep crashing. Missing DLL files in your system can be caused by issues like incompatible drivers, malware infection, or corrupt system files.

How do I fix a missing speedtreert.dll file?

1. Use a DLL-fixer

DLL fixer tools are designed to scan and repair missing or corrupted DLL files on your computer. Most non-system DLL files are due to software incompatibilities so getting an automatic DLL repair tool should seamlessly do the job.

2. Download the DLL file manually

  1. Go to the DLL-FILES website, search speedtreert.dll, select the appropriate option, and click Download.
  2. Open the downloaded folder and copy the .dll file from it.
  3. Navigate to this path and paste the file: C:\Users\Documents\BioWare\Dragon Age Inquisition\Saves
  4. Restart your computer to let the changes take effect.

Note that downloading files from third-party sites can have dire consequences in the absence of a thorough antivirus.

Note icon NOTE
WindowsReport is not affiliated with the DLL-FILES.com website. Do your due diligence before downloading any file.

3. Run the DISM and SFC scans

  1. Hit the Start Menu icon, type cmd in the search bar, and click Run as administrator.cmd-run-admin-w11 unexpected kernel mode trap windows 11
  2. Type the following commands and press Enter after each one:DISM.exe /Online /Cleanup-Image /Restorehealth sfc /scannow

4. Scan for viruses

  1. Press the Windows key, search Windows Security, and click Open.
  2. Select Virus & threat protection.
  3. Next, press Quick scan under Current threats.
  4. If you don’t find any threats, proceed to perform a full scan by clicking on Scan options just below Quick scan.Scan options
  5. Click on Full scan, then Scan now to perform a deep scan of your PC.Full Scan Scan Now
  6. Wait for the process to finish and restart your system.

5. Verify your game files

  1. Start by disabling your antivirus temporarily.
  2. Hit the Start menu icon, type Windows Security in the search bar, and click Open.
  3. Click on Firewall & network protection, then select Public network.league of legends black screen after champion select
  4. Locate Microsoft Defender Firewall and toggle the off button.turning off Microsoft Defender Firewall Windows
  5. Press the Windows key, type steam, and click Open.
  6. Go to Library, locate the Dragon Age game, right-click it, and choose Properties.lIBRARY - pROPERTIES
  7. Click the Installed files option from the left pane, and click the Verify integrity of game files.steamwebhelper_Verify integrity of game files
  8. Once done, the files would be repaired if found corrupted.

While verifying game files can restore missing or corrupt DLL files, it may not be effective in all situations. If the speedtreert DLL file is not part of the game’s installation files or if it is missing from your system entirely, verifying game files may not solve the issue.

6. Reinstall the Dragon Age game

  1. Press the Windows key, type Control Panel in the search box, and click Open.control-panel-search fallout new vegas runtime error
  2. Select Category for View by and click Uninstall a program under Programs.going uninstall program control panel
  3. On the Programs and Features window, locate Dragon Age and click Uninstall.Uninstall Riot vanguard
  4. Follow the onscreen instructions to complete the uninstallation process.
  5. Restart your computer.
  6. Next, launch Steam and download Dragon Age and follow the prompts to install the app.

Remember to remove any remnant files to ensure a smooth and trouble-free installation process. This minimizes compatibility issues that could arise from leftover files and allows you to start with a clean slate.

Other speedtreert.dll variations you may encounter

  • speedtreert.dll is missing
  • Cannot find speedtreert.dll
  • speedtreert.dll error loading
  • speedtreert.dll crash
  • The procedure entry point speedtreert.dll error
  • speedtreert.dll was not found
  • Cannot register speedtreert.dll
  • speedtreert.dll could not be located
  • speedtreert.dll Access Violation

Also, the potential solution that may resolve the speedtreert.dll missing error will be dependent on the particular cause that triggered the error. Some DLL files go missing right after a Windows update, so you might also want to check whether your latest update has known issues.

We cover a lot of content on DLL-related errors like the Widevinecdm.dll file and many others, so don’t hesitate to check out our extensive catalog if you encounter similar issues.

That’s a wrap from us, but if you have any additional thoughts or comments on this topic, feel free to drop us a line below.

Instagram Music Not Available in Your Region: Bypass Restriction

An Instagram Music Not Available in Your Region notification when you try to add some background tunes to your post can dampen your mood. Fret not, as WindowsReport experts experienced the same issue and bring you our findings.

Why don’t I have access to Instagram music? An outdated Instagram app, regional restrictions, account limitations, or device compatibility issues are some of the top reasons.

How do I make Instagram music available in my region?

Before you attempt any of the solutions below, ensure that you have the latest version of the Instagram app, log out and log back in and switch between Wi-Fi and mobile data to resolve any connectivity issues.

1. Use a VPN

1.1 Add a VPN

  1. Press the Windows key and select Settings.settings windows 11
  2. Next, select Network & internet and click on VPN in the right-side menu.
  3. Click on Add VPN and follow the prompts to enable it.
  4. Try logging in again and see if the issue persists.

The availability of Instagram Music varies by region because of licensing agreements with music labels and publishers. Since they differ from country to country, your current region may not have secured the requisite licensing agreements yet.

We’ve also outlined some of the best VPNs for Android and iPhone users. Note that using a VPN to access Instagram Music may go against Instagram’s terms of service, and there is a possibility of your account being temporarily or permanently restricted as a result.

1.2 Change VPN servers

In case using a VPN doesn’t solve the Instagram music not available in your region issue, it could mean you’re accessing it using a region that is still not licensed to publish music. In such a case, you’ll need to switch your VPN location to a country with a licensing agreement.

Still, changing VPN servers may not always guarantee access to Instagram Music, especially if it is a detectable VPN. You can make your VPN untraceable to prevent Instagram from detecting and restricting your account.

2. Reinstall the Instagram app

2.1 Windows

  1. Hit the Start Menu icon on the Taskbar and click on Settings.settings windows 11
  2. Click on Apps on the left pane, then select Apps & features on the right pane.
  3. Navigate to the Instagram app, click on the three ellipses, and select Uninstall.
  4. Launch the Microsoft Store, search for the Instagram app, and click Install.
  5. Follow the on-screen prompts and try again.

2.2 Android

  1. Locate Settings on your phone and tap on it.
  2. Go to Apps.
  3. Search for and open Instagram.
  4. Tap on Uninstall and then tap Yes to confirm.
  5. Once uninstalled, reinstall the app from the Google Play Store.

2.3 iOS

  1. Touch and hold the app in the App Library.
  2. Tap Delete App.
  3. Lastly, tap Delete to confirm.

3. Contact support

If you have tried the above solutions and still cannot access Instagram Music in your region, the next step would be to contact Instagram support for further assistance. Make sure to describe the issue in detail by mentioning your region, type of device and any troubleshooting steps you have already taken.

In some cases, new accounts don’t get access to all of Instagram’s features at once. This is to minimize the number of bots on the platform. You may therefore have to exercise a little bit of patience to enjoy Instagram to its full capacity.

And if your Instagram is stuck on posting, don’t hesitate to check out our article on how to bypass this error.

As always, we advise you to carefully read and adhere to the terms and conditions of Instagram. This will save you from errors like We Restrict Certain Activity to Protect Our Community that limit your activity.

If you’ve encountered the Instagram music is not available in your region error, we’d love to get feedback from you. Which solution worked best for you? Let us know in the comment section below.

Underutilized tools on Google Assistant will be deprecated; here’s the complete list

It’s been 10 days into 2024, and Google is already taking care of its business. Besides the major layoffs happening in the company these days, the tech giant is also getting rid of the underutilized tools on Google Assistant, and it’s planning to effectively deprecate them by January 26.

Users who enjoy using Google Assistant should be aware of the changes, as many tools from it won’t be available anymore. So, if you’ve got a tool inside Google Assistant that you use often, chances are it will be gone by the end of the month. Here’s what Google has to say about the decision:

First, as we continue to make Google Assistant more helpful, we’re prioritizing the experiences you love and investing in the underlying technology to make them even better — which means that some underutilized features will no longer be supported. You can find a list of these features, including suggestions of what you can use in place of them (where alternatives are available). Beginning on January 26, when you ask for one of these features, you may get a notification that it won’t be available after a certain date.

Google

This is not all, though. According to the tech giant, the Microphone icon will now look up results based on the user’s search queries. This means opening up Google Assistant is becoming a bit harder: you’ll have to explicitly say Hey Google, for it to open.

The microphone icon will now trigger Search results in response to your queries, which is its most popular use case. You can continue to activate Assistant as you always have: Just say “Hey Google” or long press on the home or power button (on select phones) on Android, or open the Google Assistant app on iOS.

Google

So, say goodbye to using the microphone icon for tasks such as turning off the lights, or sending a text. Either way, below you’ll find the list of the soon-to-be deprecated tools on Google Assistant.

Here is the list of Google Assistant’s deprecated tools

  • Playing and controlling audiobooks on Google Play Books with your voice. You can still cast audiobooks from your mobile device.
  • Setting or using media alarms, music alarms, or radio alarms on Google Assistant enabled devices. You can create a custom Routine that has similar behavior or use a standard alarm.
  • Accessing or managing your cookbook, transfering recipes from device to device, playing an instructional recipe video, or showing step-by-step recipes. You can use Google Assistant to search for recipes across the web and YouTube.
  • Managing a stopwatch on Smart Displays and Speakers. You can still set timers and alarms.
  • Using your voice to call a device or broadcast a message to your Google Family Group. You can still broadcast to devices in your home.
  • Using your voice to send an email, video or audio message. You can still make calls and send text messages.Google Assistant
  • Rescheduling an event in Google Calendar with your voice. You can still schedule a new event.
  • Using App Launcher in Google Assistant driving mode on Google Maps to read and send messages, make calls, and control media. You can still use voice control on Google Maps the same way.
  • Asking to schedule or hear previously scheduled Family Bell announcements. You can create a custom Routine that has similar behavior.
  • Asking to meditate with Calm. You can still ask for meditation options with media providers such as YouTube.
  • Voice control for activities will no longer be available on Fitbit Sense and Versa 3 devices. You’ll need to use the buttons on your device to start, stop, pause, and resume activities. You can still voice control activities on Pixel Watches.
  • Viewing your sleep summaries will only be available on Google Smart Displays. You can still ask for sleep details by voice on third-party smart clocks.
  • Calls made from speakers and Smart Displays will not show up with a caller ID unless you’re using Duo.
  • Viewing the ambient “Commute to Work” time estimates on Smart Displays. You can still ask for commute times and get directions by voice.
  • Checking personal travel itineraries by voice. You can still ask for flight status.
  • Asking for information about your contacts. You can still make calls to your contacts.
  • Asking to take certain actions by voice, such as send a payment, make a reservation, or post to social media. You can still ask Assistant to open your installed apps. 

Ssvagent.exe: What is it And How to Disable the Java Process

Many users reported seeing error messages related to ssvagent.exe or it triggered high CPU or RAM usage on the PC. In the past, we have seen ssvagent.exe Java pop-ups on Internet Explorer. In most cases, disabling ssvagent.exe did the trick!

What is ssvagent.exe? It’s an executable file linked to the Java(TM) Platform SE binary and is 100 KB in size. The original file has a digital signature from Oracle America, Inc, and is configured to run automatically every time Internet Explorer (or another browser) is launched.

How do I fix ssvagent.exe errors?

1. Disable the Java SSV Helper plugin

  1. Press Windows + S to open Search, type Internet Options in the text field, and click the relevant result.
  2. Go to the Programs tab, and click on Manage add-ons.manage add-ons
  3. Choose Add-ons that have been used by your browser from the Show dropdown menu.used add-ons
  4. Next, select the Java(tm) Plug-in SSV Helper entry, and click on Disable.disable to fix ssvagent .exe
  5. Again, click Disable in the confirmation prompt.
  6. If there are any similar add-ons from Oracle, make sure to disable them as well, and then restart the PC.

Disabling the add-ons also helps when Internet Explorer cannot display the webpage.

2. Scan for malware

  1. Press Windows + S to open Search, type Windows Security in the text field, and click the relevant result.
  2. Click on Virus & threat protection.virus & threat protection
  3. Now, click on Scan options.
  4. Select Full scan and then click the Scan now button.full scan to fix ssvagent .exe
  5. Wait for the scan to complete. A full scan usually takes 30 minutes to 1 hour.

If you believe that ssvagent.exe is a malware disguised as a Java process, a full system scan will clear things up. In case the built-in Windows Security doesn’t help, I suggest you use an effective antivirus solution, like TotalAV, to run a more comprehensive scan and get complete protection features.

⇒ Get TotalAV

3. Reset security settings to default

  1. Press Windows + R to open Run, type inetcpl.cpl in the text field, and hit Enter.inetcpl.cpl
  2. Go to the Security tab, and click the Reset all zones to default level button.reset to fix ssvagent .exe
  3. Finally, reboot the device and verify the ssvagent.exe Java pop-ups stop appearing.

4. Repair the corrupt system files

  1. Press Windows + S to open Search, type Command Prompt, and click on Run as administrator.cmd
  2. Click Yes in the UAC prompt.
  3. Paste the following commands one at a time, and hit Enter after each:DISM /Online /Cleanup-Image /CheckHealth DISM /Online /Cleanup-Image /ScanHealth DISM /Online /Cleanup-Image /RestoreHealth
  4. Now, run the SFC scan with this command: sfc /scannowsfc scan

Run the DISM commands and SFC scan to repair the corrupt system files. The two will replace any such files with the cached copy stored on the PC.

5. Perform a system restore

  1. Press Windows + S to open Search, type Create a restore point, and click the relevant result.
  2. Click the System Restore button.system restore to fix ssvagent .exe
  3. Select Choose a different restore point, and click Next to proceed.restore point
  4. Pick another restore point from the list, preferably the oldest, and click Next.
  5. Verify the restore settings, and click Finish to start the process. A system restore takes 30-60 mins to complete.confirm

If it’s the recent changes to blame, a system restore will revert the PC to the previous configuration and help get rid of annoying pop-ups. In case things don’t work out, you can always undo the system restore.

6. Reinstall Java

  1. Press Windows + R to open Run, type appwiz.cpl in the text field, and click OK.
  2. Select Java from the list of applications, and click Uninstall.uninstall to fix ssvagent .exe
  3. Follow the on-screen instructions to complete the process.
  4. Restart the computer for the changes to apply.
  5. Finally, you can install Java again.

If the ssvagent.exe file itself is corrupt or broken, the only option is to reinstall Java. While manually replacing the file may work for a few, some components may fail. Also, it’s recommended that you use an effective software uninstaller to delete any leftover files and Registry entries.

As per our findings, the ssvagent.exe error is rarely encountered anymore and was most prominently seen after a Java Sun Microsystems update. Install the latest version, and it will automatically disable the process!

Besides, if the process just has a high CPU usage, you can reduce it by disabling background applications or fixing file corruption.

For any queries or to share which fix worked for you, drop a comment below.

Should I Shut Down my PC Every Night? Pros & Cons

Many of our readers ask if they should shut down their PCs every night or before going to sleep so in this article, our WR software experts will discuss every aspect of this conundrum.

Is it better to shut down or sleep PC at night? That’s the whole question and the answer is that most of the time, it’s better to shut down your PC rather than let it sleep. We tear down all the pros and cons below to make it easier for you to decide!

Should I shut down my PC or let it sleep?

Why should I shut down my PC at night?

1. Power consumption

Obviously, the number 1 reason why you should shut down your PC is related to the fact that a sleeping system still consumes a lot of energy.

Well, actually, it’s not that much, around 1-5 Watts on average, but if you crunch the numbers for a month or a year, you get to a lot instead of 0 if the system is shut down.

Moreover, the consumption in Sleep mode depends on a lot of variables such as how energy efficient or old is the PC, if you have peripherals connected, what services are started, and a lot more.

You can use some great PSU test software to monitor the power on your supply unit.

2. Clearing up RAM, errors and events

The best way to see what’s happening on your PC, the best way is to start Event Viewer. And if you leave your computer to sleep even for a week, you will be surprised at how many errors and things are going on in the back of your system.

Don’t get us wrong. These are not so harmful but they wouldn’t happen if the PC were shut down. Also, shutting the PC down or at least restarting it will clear up the memory, and the VRAM, giving your machine a well-deserved break.

For some, the computer shuts down instead of going to sleep. Click on the highlighted guide to learn how to fix that problem.

3. Hardwear wear and tear

Keeping the components of your PC powered at all times reduces their lifetime. It’s as simple as that.

The CPU and GPU fans and the thermal paste are the first to go under stress, but even though most of them don’t have moving parts, they will start failing due to wear and tear.

That’s why shutting down your PC or laptop will preserve the components in a better state. Also, if you have a laptop, disconnect it from the power outlet overnight. Continuously charging its battery will eventually destroy it in a lot less time than if you don’t.

Why should I let my PC sleep instead of shutting it down?

1. To seamlessly continue your work

When you leave your PC in Sleep mode, the next morning, a short movement of the mouse or just pulling the lid of a laptop will wake it up instantly.

And after it wakes up, every window or app you were working on or with will be right there where you left it. If you shut it down and power it on, you will have to open all the apps, windows, and files you were using.

Back in the day, or even now on older PCs, booting up would last minutes. Now, a system will boot up in seconds.

However, some of our readers reported that their PCs closed all the programs in Sleep mode. This guide will help you if you’re in the same situation.

2. Performing updates

If you have set up your PC to perform updates during inactive hours, it’s better to leave your PC to sleep.

It’s incredibly annoying to see that the antivirus is starting its update right when you’re working, consuming resources and slowing your machine down.

This way, with updates performed overnight, in the morning you can start working without any worries.

3. Downloading, rendering or playback

It’s obvious that if you have to perform massive downloads for some reason, it’s better to do that at night. You just leave the PC working on the downloads and in the morning, you’ve got the results.

The same goes for intense graphics renderings that take a lot of resources and time. Additionally, some of us would use the PC or laptop to play some nice tunes before sleep but you may also program the PC to shut down at a certain hour and go to sleep still listening to those.

Conclusion: Is it better to shut down the PC or let it sleep?

Pros
Consume less power
Prolong the lifetime of your PC
Clear up RAM and refresh the system
Cons
Perform updates at night
Start where you've left off
Perform extensive downloads or intensive rendering jobs

We recommend shutting down your PC at night, or at least once every 2 days. That is unless you really need to make some consistent downloads or do some graphics renderings.

How often should I shut down my PC?

We will keep this answer as short as possible: shut down your PC daily, if possible. If not, you should shut down your PC at least once a week for maintenance purposes.

That being said, you still have a third option: hibernate. Learn the difference between sleep and hibernation on Windows.

But what if the PC won’t exit Sleep mode? The highlighted guide has all the methods to fix this problem.

How often do you shut down your PC? Let’s discuss that in the comments section below.

Solved: The UE4 Game Has Crashed Fatal Error

If you have encountered the UE4-Game has crashed and will close Fatal Error pop-up message while trying to launch the game, this guide can help.

Why does my UE4 project keep crashing? It could be failing to start due to missing files, outdated game, corrupted graphics drivers, or your computer is not compatible with DX12.

How can I fix the UE4 game has crashed fatal error?

Before moving to the troubleshooting steps to fix the game crashing issue, make sure you go through these preliminary checks:

1. Delete the DBFighterZ folder

  1. Press Windows + R to open the Run dialog box.local appdata - the ue4 game has crashed fatal error
  2. Type %localappdata% and click OK to open the Local folder in the AppData Directory.
  3. Locate the DBFighterZ folder and select it, then press the Delete icon.
  4. Restart the game to check if the issue persists.

2. Modify a registry entry

  1. Press Windows + R to open the Run dialog box.REGEDIT RUN COMMAND -the ue4 game has crashed fatal error
  2. Type regedit and click OK to open the Registry Editor.
  3. First, create a backup of the registry entries. For that, go to File, then select Export. Save the .reg file in the accessible location.fILE - EXPORT
  4. Navigate to this path: Computer\HKEY_LOCAL_MACHINE\SYSTEM\CurrentControlSet\Control
  5. Select the GraphicsDrivers folder, right-click the empty space, then select New, followed by DWORD(32-bit) and name it TdrDdiDelay.New - dword - the ue4 game has crashed fatal error
  6. Double-click TdrDdiDelay, set the Value data to 30 and select Base as Decimal.Change the value data1
  7. Click OK to confirm.
  8. Next, add another DWORD, name it TdrLevel. 
  9. Double-click it and set the Value data to 3, then choose Base as Decimal and click OK.Change the value data2
  10. Reboot your computer and run the game to check if the issue persists.

3. Edit the hosts file

  1. Press the Windows key, type cmd in the search box and click Run as administrator.CMD elevated - the ue4 game has crashed fatal error
  2. Copy & paste the following command and press Enter: notepad %windir%\system32\drivers\etc\hostsopen hosts file
  3. Once the hosts file is open, add this line at the end of the document – 0.0.0.0 datarouter.ol.epicgames.com datarouter-weighted.ol.epicgames.comedit hosts file
  4. Press Ctrl + S to save the file, close Notepad and close the CMD window as well. Now, try running the game.

4. Update/reinstall the graphics driver

  1. Press Windows + R to open the Run window.DISKMGMT RUN COMMAND - the ue4 game has crashed fatal error
  2. Type devmgmt.msc and click OK to open the Device Manager app.
  3. Locate and click Display adapters to expand the category.
  4. Right-click the graphics driver and choose Update driver.Graphics Driver update
  5. Select Search automatically for drivers.Update driver 2
  6. Follow the on-screen instructions to complete the process, then reboot your computer.

If there is no update available or updating the driver doesn’t help, follow these steps to reinstall the driver:

  1. Open Device Manager again, and click Display adapters to expand.
  2. Right-click the graphics driver and choose Uninstall device from the context menu.Uninstall graphics driver -the ue4 game has crashed fatal error
  3. Click Uninstall to confirm the action.
  4. Go to Action, then select Scan for hardware changes to reinstall the driver.Action scan for hardware changes - the ue4 game has crashed fatal error
  5. Reboot your PC.

Updating the graphics driver can also help you fix the Dx11 feature level 10.0 is required to run the engine; read this guide to learn about other solutions.

5. Verify the integrity of the game files

  1. Press the Windows key, type steam in the search box, and click Run as administrator.Steam Open - the ue4 game has crashed fatal error
  2. Go to Library, right-click the game, and select Properties.Properties of game
  3. Click the Installed files option, and click the Verify integrity of game files. The process will take several minutes as Steam verifies the game files and replaces the corrupted or missing ones in the process.Verify game files integrity

Verifying the integrity of game files can also help you fix the LowLevelFatalError issue; read this guide to learn more about it.

6. Run the game in DirectX11 mode

  1. Press the Windows key, type steam in the search box and click Run as administrator.Steam Open - the ue4 game has crashed fatal error
  2. Go to Library, right-click the game, and select Properties.Properties of game
  3. Choose General from the left pane and locate Launch Options.
  4. In the empty field, type -dx11.launch options
  5. Close the Properties window, then choose Play in DX11 Compatibility Mode.
  6. Now, click Play and check if the issue persists.

Once you have fixed the error, don’t forget to restart your computer in normal mode by reverse engineering the steps of performing a clean boot.

In conclusion, to avoid the UE-4 game crashing Fatal error, you need to make sure your computer meets the minimum system requirements and has Windows & BIOS updated.

In case you have encountered the issue, you need to delete the DBFighterZ file from the AppData folder, update or reinstall the graphics driver, verify the integrity of game files, edit the Hosts file, or add a registry entry.

In case you are facing other game issues, like Unreal Engine 4 won’t launch on Windows and Mac, we have tackled it in a different guide.

Did we miss a step that helped you? Feel free to mention it in the comments section below. We will happily add it to the list.

3 Simple Ways to Open The ENC File

The .enc file is a data type that has encrypted information and can use a variety of encoding standards. In some cases, it might be seen as a second extension as well( filename.txt.enc). In this guide, we will discuss different ways to open the enc file on your Windows computer.

How can I open the ENC file on Windows?

Note icon NOTE
The tool mentioned is downloaded from a third-party website; though it appears to be secure, as a precautionary measure, it is advised to scan the downloaded files using a reliable antivirus, like ESET HOME Security Essential, and keep real-time protection enabled.

1. Use Notepad

First, use a dedicated tool like OpenSSL to decrypt the file; for that, follow these steps:

  1. Download and install the OpenSSL tool.
  2. Once installed, press the Windows key, type system environmental variable, and click Open.edit variables - open enc file
  3. Click the Environmental Variables button.Environmental variables - open enc file
  4. Select Path, then click the Edit button.Edit the path file
  5. Click New and add this path: C:\Program Files\OpenSSL-Win64\bin
  6. Click OK on all three windows to save the changes.Add the path - edit variables - open enc file
  7. Press the Windows key, type cmd in the search box, and click Run as administrator.
  8. Type the following command and hit Enter after replacing output.enc with the filepath, then replace :J#u2n!KpL9&zDcR with the password and D:\ with the drive where you want to save the outcome: openssl enc -d -aes-256-cbc -in output.enc -out D:\decrypted.txt -pass "pass:J#u2n!KpL9&zDcR" -pbkdf2Decrypted the file

The decrypted file will be in the directory mentioned next to the decrypted.txt file; for us, it was the D drive.

In case you are not able to decrypt the file, you can try using other encryption software available for Windows; check out this guide to learn more.

Once the file is decrypted, follow these steps to open the converted file:

  1. Press the Windows key, type notepad in the search box, and click Open.Notepad how to open enc file
  2. Go to File, then choose Open from the context menu.Open the file
  3. On the Open with dialog box, select All files from the drop-down, choose the file, and then click Open.

2. Use Microsoft Word

  1. Use the steps mentioned in Solution 1 to decrypt the file, then press the Windows key, type word in the search box, and click Open.Word - open enc file
  2. Go to File.
  3. Select Open and click Browse.Word browse - open enc file
  4. On the Open with dialog box, select the file and click Open.

3. Use WordPad

  1. Decrypt the file using the steps mentioned in Solution 1, then press the Windows key, type wordpad in the search box, and click Open.Wordpad - open enc file
  2. Go to File, then select Open.Open Wordpad
  3. Navigate to the file in the Open with dialog box, select the file, and click the Open button.

If you often work with files with different formats, we recommend you use a universal file opener; here is the list of best choices.

For a similar process on working with other file types, you can also check out how to open JSON files on Windows 11.

To conclude, to open the ENC file successfully, first, you need to have the encryption password, and then you must decrypt the file using the appropriate software.

Next, you can use any of the text editors, like Notepad, WordPad and Word, to open the file and make changes to it.

We have also come across another file with the .enc file extension, and it can be viewed in music notation software Encore.

Before you go, you might be interested in our guide on how to convert ENC file into different format, so don’t miss it.

In case you have any questions or suggestions about the subject, feel free to mention them in the comments section below.
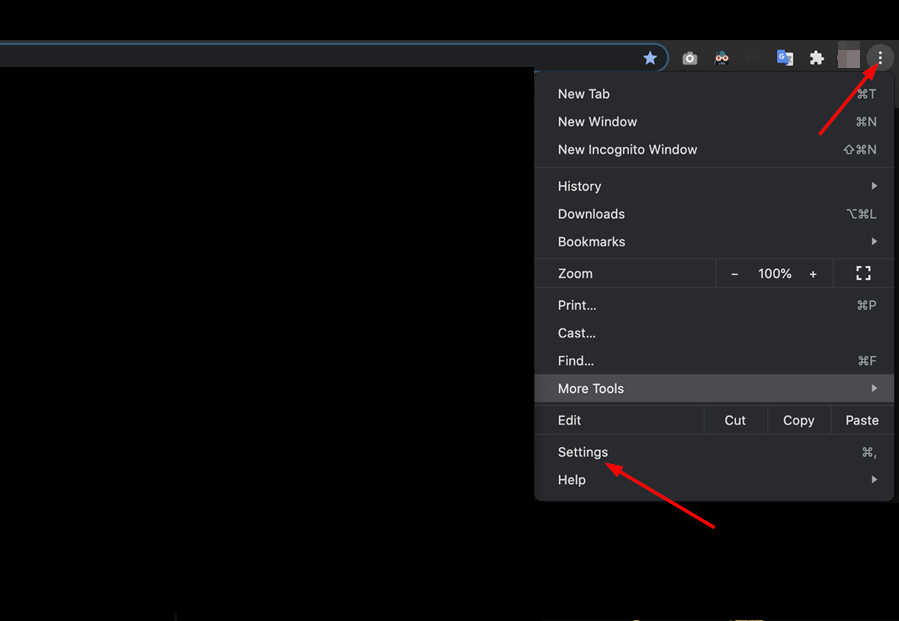
Open CDT Files: 3 Ways to do it on Windows and Mac

CDT (CorelDRAW Templates) files are image templates used by CorelDRAW to create drawings. These contain graphic settings, rulers and grids, object settings guidelines, and different styles and help create CDR images. You can easily open CDT files in Windows, Mac, and Android.

Also, we came across another extension that goes by the same name, CD-Text (.cdt), used by Nero and other CD-burning programs. It contains the metadata, such as the album’s and artist’s name, and is often saved alongside the .cue or .bin files. Let’s find out how to open both formats!

How can I open CDT files?

1. Use CorelDRAW Graphics Suite for .CDT files

  1. Download CorelDRAW Graphics Suite on your PC. The program is available for both Windows and Mac.
  2. Run the setup and follow the on-screen instructions to complete the installation process.coreldraw
  3. Restart the computer for the changes to apply.
  4. Now, right-click on the CDT file, hover the cursor over Open with, and select CorelDRAW from the flyout menu.CorelDRAW to open cdt files

As soon as you download CorelDRAW Graphics Suite or another supported program from the developer, it is automatically set as the default app to open CDT files. If not, you can always change the file association in Settings.

Android users can download CorelDraw Design Templates from the Google Play Store to open .CDT files.

2. Go with Nero or VLC Media Player for CD-Text files

If you find a CD-text file on the PC, it’s best to download Nero. It’s one of the best CD burning software. But Nero is limited to Windows and doesn’t work on MacOS.

For Mac users, VLC Media Player is the best option. Besides, the tool works seamlessly across operating systems, including Android and iOS.

Besides, you could import the CD-text files in programs like WaveLab Pro, given the file has been created as the standard CSV text file in the UTF-8 format.

3. Convert files into a supported format

Lastly, if it’s an image-based CorelDRAW CDT file, you can convert it into JPG using any of the online converters. Also, there are a few downloadable programs that can convert .CDT to .jpg. Once done, you can open the files using the built-in photo viewer.

For CD-Text files, convert them to the .txt format with a reliable program and use Notepad to open the new files.

Remember, never manually modify the extension while changing the file type, as it may render the file unreadable.

Besides, if you frequently work with such extensions, it’s best to get a universal file opener. You will then never have to install a dedicated program for each format. But if it’s just a few, an online CDT opener will be a suitable choice!

For any issues or to share how you opened the CDT file, drop a comment below.

How to Appear Offline on Discord [Step-by-Step Guide]

If you don’t want people to disturb you or have some privacy on Discord, you can go offline. In this guide, we will walk you through simple steps to appear offline on Discord on your app or web version on your Windows.

How can I appear offline on Discord?

1. On Windows PC

  1. Press the Windows key, type discord in the search box and click Open.Discord Open
  2. On the bottom left corner, locate your Profile icon and click it.
  3. You will see a Green dot; click it to get the list of statuses to choose from
  4. To appear offline, select the Invisible option. Once done, the green dot will turn grey.Invisible - appear offline discord

You won’t be active in the group but will be able to browse Discord and send messages to your contacts.

2. On your mobile app

  1. Launch the Discord app from the home screen on your phone.
  2. Locate your profile icon from the bottom-right corner and tap it.Profile icon - appear offline discord
  3. Tap the Profile icon again.Choose profile icon
  4. From the pop-up, tap the Invisible option, and voila, it is done!Change the status to invisible

If you see a red dot on the Discord icon and can’t get rid of it, read this guide to learn what causes it and how to fix it.

Tips to keep in mind while changing the status on Discord

  • Changing the status to offline means you will be invisible to all on Discord, not exclusively to a server or person whom you want to avoid.
  • With the change in status, consider adjusting the privacy settings to avoid interactions.
  • In case you forget to change the status before logging out, don’t worry; you will be reminded to change it when you log in the next time.
  • If you change the status on your phone, it will appear on your computer; however, if you have a slow network connection, the changes may not reflect immediately.

To conclude, you can appear offline on Discord by just selecting the Status to Invisible on your Discord app on Windows or your mobile phone.

In case the Discord app is not opening on your Windows 11 computer, we have tackled this issue in a separate guide.

If you have any questions or suggestions about the subject, feel free to mention them in the comments section below.
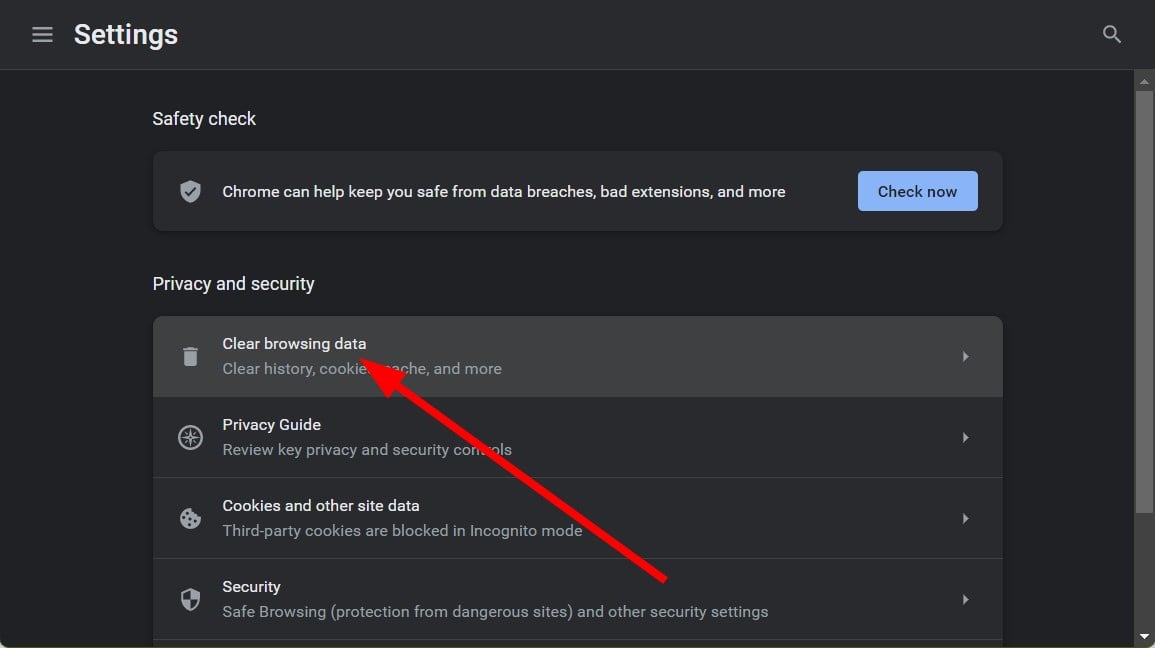
How to Take Screenshots on Xbox [Simple Steps]

Whether you want to show off your game progress to your friends or upload it on social media, taking a screenshot of the same on Xbox is a great way to do it.

How do I take a screenshot on Xbox?

  1. Start your game and play. When you want to capture a screen, press the Xbox button on your controller to launch the guide.Xbox button and Y button - take a screenshot on Xbox
  2. Once the guide is open, press the Y button.
  3. You can press the X button instead of Y if you want to record a video. In case you have a wireless controller, you can press the Share button to take a screenshot.Share button

If you like the captured screenshot to set as background images on Xbox One, then read this guide to learn the steps.

How can I access the screenshots on Xbox?

  1. Press the Xbox button on your controller to open the guide.X button - take a screenshot on Xbox
  2. Go to Profile & system.
  3. Select Settings, then Preferences.
  4. Now, select Capture & share.Capture and share -  take a screenshot on Xbox
  5. Locate Recent Captures and select it. You will see the collection of screenshots. Select any of them to view in larger size or select Show All to view all.

Once you have access to the screenshots, you can view, edit, or delete them when you want.

Remember to delete the old ones to ensure there is always space for the new ones. Alternatively, if you don’t want to remove them, save them to an external storage device.

In case you want to access Xbox screenshots on your Windows 11 computer, you need the Companion app; read this guide to learn more.

How can I share the screenshots on social media?

  1. Press the Xbox Button button on the controller to open the guide.
  2. Go to Capture & share, then select Recent captures.recent captures
  3. Select Screenshots, then Press A to choose the screenshot and select the option from the sharing list.Screenshots - take a screenshot on Xbox
  4. Login to the social media account when prompted.
  5. Choose Share Now.

So, this is how you take screenshots, view & manage the images captured, and share them with your friends on social media.

Remember that sometimes, while taking screenshots or recording game clips, on-screen notifications may get recorded, so make sure you check the screenshot before sharing.

If you are playing console games on your computer, you must check out this guide to learn the steps to take screenshots on Windows 11.

In case you want to learn how to operate your controller in the best way, you must learn all about R1 and L1 Buttons on it.

If you have any questions or suggestions about taking screenshots on Xbox, feel free to mention them in the comments section below.

How to Print PPT With Notes in PowerPoint: 3 Tested Methods

Many of our readers want to know how to print a PPT with notes from the speaker to help them better understand the presentation.

Can I print a PowerPoint presentation with notes? Yes, you can print the PowerPoint slides together with notes at the bottom of the page. Read the tested methods below.

How do I print PPT with notes in PowerPoint?

1. Use the Print option

  1. Open the PPT presentation in PowerPoint.
  2. Click on the File option and select Print from the list.
  3. Now, click on the Full Pages Slides option and select Notes Pages from the top.
  4. You will immediately see that the keynotes were added at the bottom of the slide and you can now click the Print button to get the PPT printed with notes.
  5. If you also want to exclude or print comments, just check or uncheck the Print Comments option from the Notes Pages section. Just so you know, if you choose to print the comments, they will appear on the next print, after the slide and notes page.

Unfortunately, in this mode, there is no way to partition the slide and notes more efficiently. Even if you choose the Landscape mode instead of Portrait, you will still lose a lot from the page.

However, you can enter the numbers of the slides that have keynotes and print the others normally.

If PowerPoint 365 is not opening on Windows 11, the highlighted guide will help you fix the problem.

2. Save the PPT with notes as PDF and then print it

  1. Open your presentation in PowerPoint.
  2. Click the File option, select Save As, then choose PDF as the preferred file format from the list.
  3. Now, click on More options.
  4. Hit the Options button in the next pop-up window.
  5. Next, click on the Publish what drop-down menu and select Notes pages.
  6. If you want to include comments, check that box too, if not, just click on OK.
  7. Now, if you open the resulting PDF, you will have all the notes right below the slide and ready to print as a PDF document.

If you don’t have the desktop app, here’s our guide on how to download PowerPoint 2019 on Windows 10 & 11.

3. Print PPT with notes from PowerPoint online

  1. Log into your Microsoft 365 account, select PowerPoint online, and open the PPT you want to print with notes.
  2. Click on File and select Print. If you don’t see it right away, click on the three dots to get more options and then select Print.
  3. Now, just select Print Notes Pages.
  4. Finally, PowerPoint Online created a PDF that will show you the notes below the slides, just like in Solution 2. Open the PDF and print it.

Printing the PPT with notes in PowerPoint Online can be the easiest way, but only if you upload the presentation to your OneDrive account. Otherwise, you will need an extra step to upload it from your device.

The solution works the same from any browser or mobile app, and you’re good to go whether you’re using Windows 10 or 11.

If you want more tips, here’s how to add a timer to your presentation and follow the schedule.

Did you know that you can record a PowerPoint presentation? It might be even better than printing the PPT with notes.

So, now you know how to print a PPT with notes and even include comments if you need them.

For any other questions or ideas, let us know about them in the comments section below.
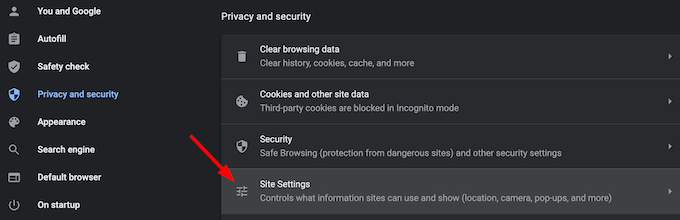
How to Open BFC Files? 3 Easy Ways

BFC files were created using Microsoft Windows Briefcase but slowly became obsolete. As a result, you may find it difficult to open BFC files.

Microsoft Windows Briefcase helps sync files between different PCs. The BFC file format comprises compressed archives that store the data for all the files synced between the two devices. Let’s find out how you can open the .bfc file extension!

How do I open BFC files?

1. Use Microsoft Briefcase

In case you are still using an older iteration of the OS, say Windows 7, Windows Briefcase will be present. The feature was altogether removed in Windows 10 build 14942. So, if you are on Windows 7 or know someone running the OS, ask them to open the BFC file and share the contents.

Creating a new Briefcase

To open a BFC file on Windows, right-click on the file > select Open with > and choose Briefcase from the list of options.

There was a Registry hack to set up Windows Briefcase on Windows 10 and 11, but it no longer works. Besides, the feature can’t be downloaded from the web since it’s integrated with Windows. If you regularly work with Windows Briefcase, it’s best to continue using Windows 7.

2. View the file online

There are a few websites that allow you to view BFC files online. So, if it’s just one or two .bfc files that need to be worked on, this is the best option.

We recommend you have an effective antivirus solution running when accessing such websites and also scan the downloaded files, if any.

3. Convert the file into a supported format

Another option to open BFC files is to convert them into the WAB format. Again, there are several online converters available, and a quick Google Search will help find one.

Remember, always use the right means to convert the file format. Manually changing the extension, say from .bfc to .wab, will render the file unreadable or the characters illegible.

If you frequently deal with such extensions, we recommend using a universal file opener. These support hundreds of formats and negate the need to install a separate program for each one!

For any queries or to share how you managed to open BFC files, drop a comment below.

How to Open BCK File Extension: 3 Ways to do it

BCK is not a common file type,  but some users have encountered it on their PCs and they are wondering how to open a BCK file.

Depending on what the file is used for, you might be able it open it without having to use any third-party tools. Join us while we take a closer look at this file type and see what it can do.

What is a BCK file?

This file type has multiple purposes, but it’s usually used for file backup. Some games use BCK files as a backup for the save game files. In some cases, BCK files can work as animation files.

How do I read a BCK file?

1. Open the file with Notepad

  1. Locate the BCK file and double-click it.
  2. Select Notepad from the list and click on Just once.
  3. The BCK file will now open.

2. Change the file extension

  1. Locate the BCK file on your PC.
  2. Go to View and expand the Show section. Ensure that the File name extensions option is checked.
     
  3. Check the extensions of other files in the directory.
  4. Right-click the BCK file and choose the Rename option.
  5. Change its extension so it matches the extension of other files in the same directory.
  6. When the confirmation dialog appears, click Yes.

Now the file should be able to open with the associated software. Keep in mind that this method usually works for games.

3. Use Blender

  1. Open Blender.
  2. Next, drag and drop the BCK file to it.
  3. Alternatively, you might need to use certain add-ons to import these files.

Keep in mind that this method works only if BCK files are animation files.

BCK files aren’t that common, but if you do encounter them, you should be able to open them with Notepad or by changing their extension to the correct file type.

This isn’t the only backup file type, and in the past, we wrote how to open the SQL BAK files and how to open Outlook BAK files.

In case you want to learn about different file types, our guide on how to access JSON files can come in handy.

To better understand related backup file formats, see what a BAK file is and how it works.

Did you find a different way to open the BCK file on your PC? If so, share it with us in the comments section.

XPW File Extension: How to Open it on Windows

The XPW file extension is rare in the present day since the program creating these files, Accessible FormNet, developed by Intercon Associates Inc., has become obsolete. Still, if you have a few such files lying around, you can open the .xpw format.

What is the XPW file extension? The extension is used for fillable forms created using Accessible FormNet. These forms are generally used to facilitate data collection in organizations or to gather customer feedback.

How do I open the XPW file extension?

1. Use the Accessible FormNet software

The Accessible FormNet software remains the only official program to open the XPW file extension. But the problem is that it’s not available for download anymore. The official page isn’t accessible on the web. More so, third-party websites that usually host such programs don’t offer Accessible FormNet.

Accessible FormNet

But if you already have Accessible FormNet, whether the VisualFill (for regular users) or VerbalFill (for the visually impaired) version, opening it won’t take any time. Once running, the app is automatically set as the default file association.

2. Go with a universal file opener

Your best option, in this case, is to go with a universal file opener. These programs are designed to open all file types and eliminate the need to get one for each format.

As per our findings, opening the XPW file extension may prove difficult to open, given the non-availability of Accessible FormNet. If the program is not available on your PC, check with others who work with the file format.

For any queries or to share how you opened the XPW file, drop a comment below.

Windows 11 Users Speak Out: Exclusive Poll on Microsoft Copilot’s Impact

You might miss out if you’re on Windows 11 and not using Microsoft’s Copilot, especially now that everything is AI-enhanced. And yes, there are a lot of AI assistants out there, but Copilot is the only one fully integrated into an OS. So why not enhance your workflows with a bit of help?

The artificial intelligence era seems to be upon us, with big players like ChatGPT, Bard AI, and Microsoft Copilot at the forefront. But we can’t forget the dozen smaller ones that also are aspiring for the same spot in the “year of AI PC”, as Microsoft named 2024 in a recent blog post.

One thing’s for sure: Microsoft is preparing Copilot to fully cover all your needs if you’re on Windows 11 and not only, as it’s now available for Android and iOS devices. And that’s just one of the many evolution steps Microsoft’s tool has to make in 2024 to be the go-to assistant of Windows (and not only) users.

Knowing all this, we were really eager to find out how people really felt about Copilot 6 months after our first exclusive survey, and let me tell you, things have changed a lot!

Copilot is now streamlined. Sort of.

The biggest new development is that 70% of Windows users know what Copilot is/does and have used it at least once, with 50% using it regularly. Oh, how the tables turned! Our previous research showed the opposite, as 73% of respondents hadn’t heard of the tool back then. That’s a huge upswing, especially considering that 27% use it daily.

But now comes the “sort of” part: most still use it for light tasks and day-to-day activities, not work. To be more specific, 58% of the respondents use it for personal use cases, while just 11% use it professionally. Despite its high technical sealing, most use Copilot to search for things on their PC, write and answer emails, and answer random everyday questions.

That tells us 2 things: the first one is that people aren’t quite ready to fully adopt AI into their work, and the second one is that more and more non-savvy users are getting curious about Copilot’s use scenarios and capabilities.

The business and education areas are pain points for now, as most users want to see bigger developments there and a much more seamless integration:

Make answers much more accurate.[…] And 2, consider incorporating stock market investing models, and financial metrics calculations.

Anonymous respondent

Still, 16% of our respondents are using Microsoft’s Copilot as a fully-fledged assistant or an automation tool, which means that, slowly but surely, the Redmond giant is pushing its tool into the original intended purpose of an all-in-one Windows assistant.

A surprising statistic for the skeptics out there is that for 37% of users, Copilot worked perfectly for the assigned task, with 27% saying that it’s good but still needs some improvements. Only 9% said that they wouldn’t recommend it. For the latest, in most cases, Copilot tends to overcomplicate things:

Copilot gives too many solutions. I asked about how to disable the FN locking feature on Win 11. It gave way too many options and none of them worked on my brand new Acer. Very frustrating! KISS–Keep It Simple Stupid!

Anonymous respondent

Microsoft Copilot: Bang for the buck or rip-off?

The AI assistant is free for now, and we hope it will remain this way so that all Windows users can put it to good use, but experience has taught us that nothing is free in the online environment. So when asked if they would still use Copilot if it included fees or subscriptions, 46% of respondents answered with a definitive no. Here’s what one user said:

I will appreciate more automation on most educational related platform that students from third world countries can seamlessly have access to its usage, without any form of payment

Anonymous respondent

That is surprising, but not as much as the 27% who said yes or the other 27% who said it depends on the pricing. In other words, 54% of Windows users would be willing to pay (depending on the price, of course) for Copilot.

I would try to make it even more personalized to fit even better for the individual person and also make more sense to pay for 🙂

Anonymous respondent

Coincidently enough, the percentage of people willing to pay for the tool is very similar to that of people who use it daily. So, no matter what anybody thinks about AI or Microsoft’s Copilot, there are people out there who are getting a lot out of it even now when it’s not fully featured. That’s a great sign for Microsoft but not for the competition.

Speaking about its competitors, 48% of respondents said that Copilot is better, faster, and easier to interact with than ChatGPT, while just 13% said the opposite.

Things are ramping up for all AI-based tools in 2024, especially now that hardware changes are completing the software on our PCs. Microsoft’s Copilot key is a clear sign that AI is here to stay, but for now, it’s definitely not for everyone. But is it for you? Let us know your take on Copilot in the comments section below.
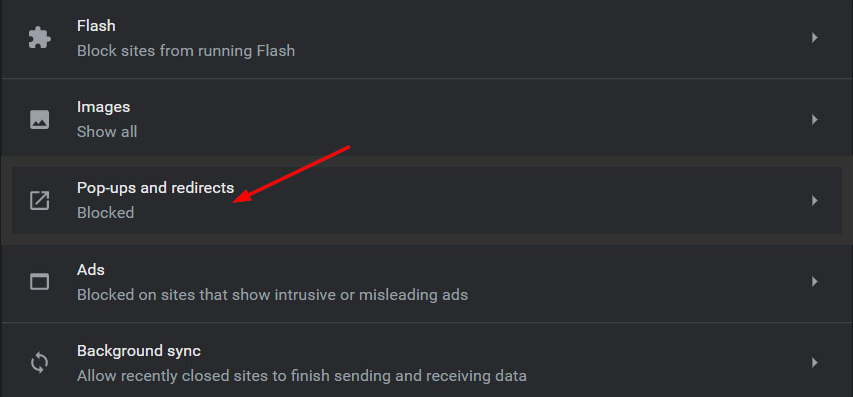
About the data

The research above was constructed based on our readers’ input through an online survey that ran for 30 days on WindowsReport.com. Using Crowdsignal, a popular survey tool, we gathered 1761 complete answers to all our questions from 117 countries, but the most popular locations were:

  • United States of America – 34%
  • India – 13%
  • United Kingdom – 8%

Regarding platform distribution, readers who have completed this survey mainly use Windows 11 (54%) and Windows 10 (34%). We’ve also recorded answers from people using Windows 7, macOS, iPadOS, Linux, or Chrome OS.

The raw data used in the research above can be seen and downloaded here.

How to Open VRF Files [Windows & MAC]

You may have encountered a VRF file and had no idea how to open it. We lay down various ways you can unlock this file format on different OSes.

What is the .vrf file format?

VRF or Ventrilo Audio Recording files are a type of audio file format typically saved in a proprietary format. This makes it a complex audio format that cannot be converted to MP3 or any other standard audio formats hence must use dedicated software to open it.

How do I open VRF files?

By using the Ventrilo software

  1. Navigate to your browser and download the corresponding app for your OS.
  2. Wait for it to finish downloading, locate it in the downloaded file location, then launch it.
  3. Browse your VRF file on your device, then drag and paste it into the app.

The good thing about Ventrilo is that you can be assured of the safety of your files. It is also lightweight on your device, so you don’t have to worry about it taking up storage space. It is also a multi-platform software except for Linux.

A downside is that it only opens VRF proprietary files.

Are VRF files better quality than MP3?

VRF file formats are designed for voice communication over the internet, while MP3 is a universal and popular audio file format known for its compression techniques. Given that VRF files are not intended for general purposes like MP3 files, it may be difficult to make a direct comparison.

However, the VRF file format is optimized for voice communication during online gaming and may prioritize factors such as latency and efficient streaming. Still, you can try other VoIP software for gaming that support multiple formats.

In summary, the choice between VRF and MP3 depends on your specific needs and intended use. If you are looking for a versatile audio format suitable for general playback and compatibility, MP3 is your go-to.

However, if you specifically require voice communication during online gaming, VRF may be the better option. Audio files can be in various formats, so don’t hesitate to check out other file formats like OPUS files and the WPL format to acquaint yourself with the different audio formats.

Have you encountered a VRF file format before? How would you rate its quality compared to other audio formats? Let us know in the comment section below.