Are you a Bridge cards game aficionado? You’ll be delighted to discover that there are some awesome apps for playing your favorite Bridge games on PC.
For those that don’t know, a Bridge game is not one that involves building bridges or anything like that. Connoisseurs will know that we are referring to the popular cards game.
If you have tried an online search or a search through the Windows store, you would have noticed that getting the best Bridge games is not as easy. So, we have made things simple by doing the research for you and testing all the options.
Let us introduce what you should know about bridge games for PC without further ado.
How can I play Bridge on my computer?
Unfortunately, there aren’t many Bridge games in the Microsoft Store, but we hope developers will work on some more apps for your Contract Bridge cards game love.
To play on your PC, you have to pick any of the excellent bridge games, like the ones we have on this list, download them, install them, and you are set to play.
Here’s a short description for those that are yet discovering and learning about this game:
The game consists of several deals, each progressing through four phases: dealing the cards, the auction (also referred to as bidding), playing the hand, and scoring the results.
However, most club and tournament play involves some variant of duplicate bridge, where the cards are not re-dealt on each occasion. In its most basic form, Bridge is played by four people in two teams of competing partnerships.
The points of the compass identify players, so North and South play against East and West.
More can participate, either as individuals or pairs or as teams of up to six, in informal tournaments or social gatherings where the sponsoring host prescribes the governing rules of the event.
Quick Tip:
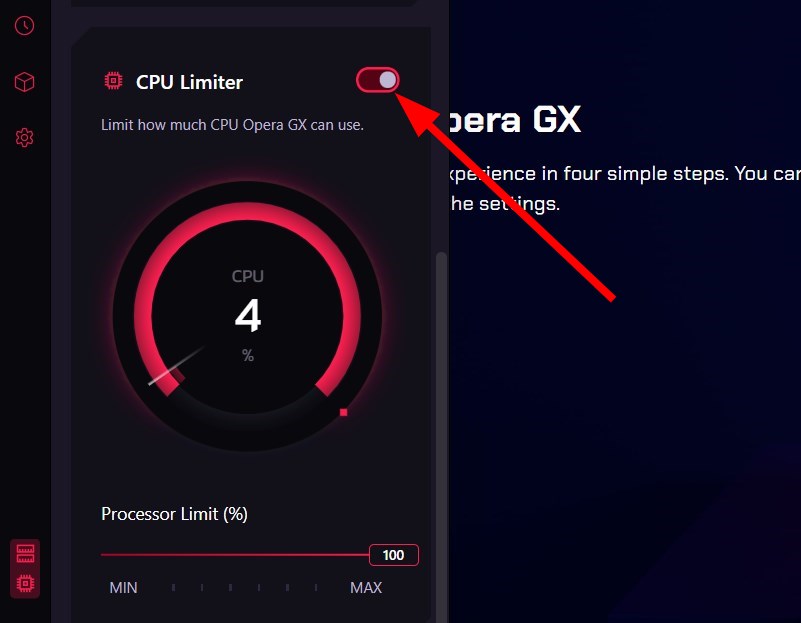
The GX Corner in the Opera GX browser is a community for people who wish to play bridge games straight in the browser. You may also join chats in Discord rooms and challenge adversaries.
An up-to-date release calendar with tips and new game release dates, as well as free gaming advice, are just some of the goodies that Opera GX brings.
Opera GX
Enjoy the metaverse of online and offline bridge games in this cool browser.
One of the most well-known free Bridge applications is FunBridge, which Goto Games provide. You may play against and with computer opponents with this app. You won’t have to wait for other players, and the game won’t end if someone decides to leave.
But if you prefer playing online games, you should try the browser version, which is equally as enjoyable.
FunBridge has various gaming options, including a Two Player Mode, challenges, series tournaments, daily tournaments, and unlimited deals.
The game has many choices and is user-friendly. You are free to stop and start at any time. You may evaluate your performance compared to top players or your friends’ scores. Chatting and interacting with other players is also an option.
To play FunBridge, you must have a reliable internet connection. The software is accessible in several languages and is often updated.
Chicago, Single Hand, Rubber, or Duplicate are the four forms of Bridge that Bridge Baron may play. Deal numbers identify each transaction, and every deal number will produce an identical transaction.
You can replay a deal or appoint it for someone else by acknowledging the deal number. The first deal number is chosen randomly each time the software is launched, and deals are marked sequentially.
This way, you always receive a fresh deal every time you play. You may play real deals from prior bridge events using the Tournaments application.
You may participate in any previous events to see how you’d have performed had you attended the tournament and participated in the live event.
Using the bridge match software, you can play a full match of as many as 16 boards. In addition, you may practice negotiating conventions on countless transactions with the Conventions software.
The Challenges are 264 problem deals created by Easley Blackwood, a longtime American bridge legend and author of numerous bridge publications.
You may design deals using the Deal Generator that adheres to certain point-count and allocation requirements or specific bidding sequences.
The group in charge of creating GOTO Bridge is experienced with it. The developers of the well-known Funbridge software are the same bridge enthusiasts. This dev team includes Vice World Bridge Champion for 2017, Jerome Rombaut.
Play Bridge and test your skills against the best! GOTO Bridge provides limitless transactions, rivalry, and training. Additionally, because there is no need for an Internet connection to play, you may do it anytime and anywhere you like!
ACOL, French 5-card major, Forum D, Nordisk, SAYC, Polish Club, NBB Standaard Hoog, and 2/1 are among the bidding methods available in GOTO Bridge. You may also establish your standards when you create a free profile.
Each family member may play the game and get their results and rankings thanks to the game’s ability to create, update, and remove user accounts.
This is one of our favorite Bridge games to play on Windows. It’s one that you’d be delighted to know that is completely free, without making any compromises on the quality of the game.
Use this straightforward, enjoyable, and user-friendly Windows game of Contract Bridge to hone your bridge table abilities.
The east and west are your foes since the computer controls the plays; you, however, take charge of the North and South. The game employs the Standard American Bidding method as well as the Stayman and Blackwood rules.
The game uses a mix of Lenght points and High-Card points to represent the value of your hand. Additionally, you may redo the current hand or repeat the previous one.
Furthermore, with an on-screen, cool pop-up display of the score sheet, the computer does all the counting for you.
The most sophisticated and reasonably priced contract rubber bridge computer game available now is BridgePro.
Users can enjoy the game on the Windows or Mac OS X platform as if there are three other people seated at the table. It has a nice appearance, is easy to use, and is dependable.
There are several new menu features in edition 4.1 and beyond. Algorithms for card play and bidding have been adjusted. You may bid just as a duplicate bridge player would.
The visual user interface has been enhanced. The game will play identically if the proper conventions are chosen. Additionally, a Chicago scoring option is available.
The game is attractive to look at and simple to play. The user may utilize the scoring, visual and audible warnings, bidding, last trick review, and trick review panels.
As browser technology has evolved, so have the different games offering online versions.
For Bridge enthusiasts, there are plenty of online options to choose from. One to not is FunBridge, which we have talked about in this article. It has both a PC version and an online version. But the list goes beyond this game and includes:
247 Bridge
Arkadium Bridge game
Aarp Bridge game
Bridge Base Online
This article explores the best free computer Bridge game options, including the best Bridge games for windows 10 and 11. In the end, we believe that for every player, the choice of games should depend on their personal preferences.
Also, note that this list has not been made in any particular order, we simply have put forward our best recommendations.
If gaming on your computer is your thing, then you will like these Bridge games for PC. However, if you prefer online gaming, make sure you use any of the best browsers for gaming to get the most enjoyable experience.
For many students, part of going back to school season includes buying a new laptop. While we’ve already highlighted some of the best laptops from Microsoft’s partners, as well as some accessories, we want to turn our attention now to Microsoft’s own devices. Here’s a look at the best Surface devices for students!
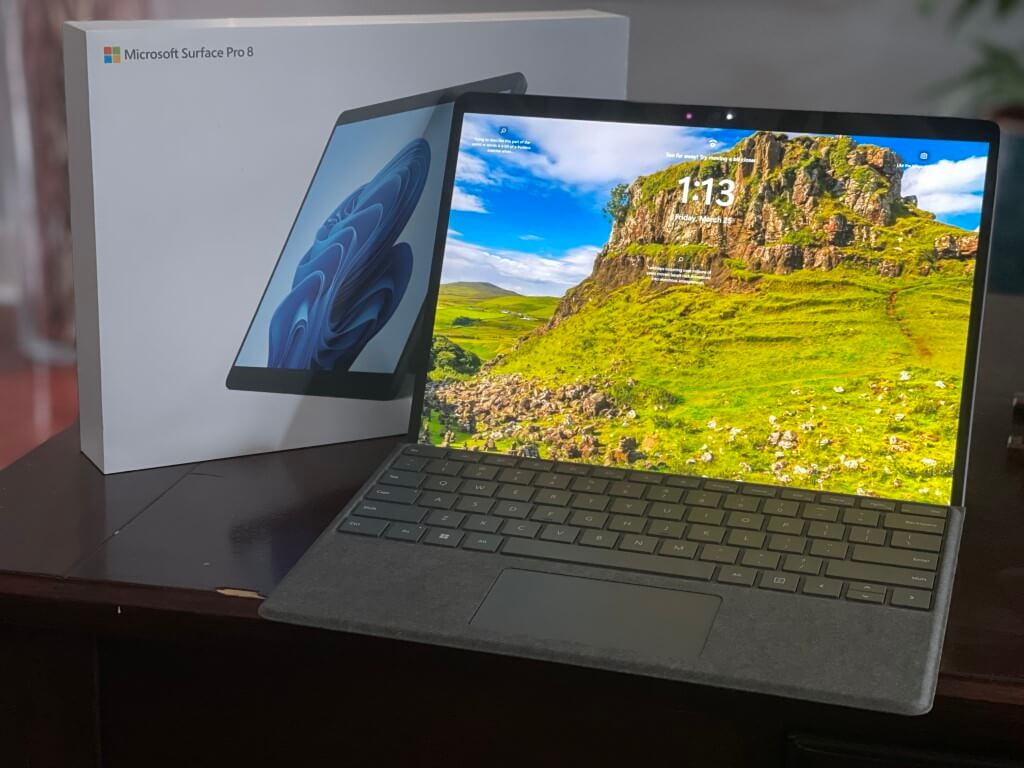
At the top of the list is the Surface Pro 8. This is the best Surface device for most students. We say this because it’s the most versatile Surface Pro yet, and also one of the most beautiful. It sports slim bezels, support for a new Surface Pen that has haptic feedback, and it’s quite thin and light. When paired with the Type Cover, this Surface will also be lighter than a traditional laptop and is easy to carry around and prop up anywhere for watching movies, or use as a tablet thanks to the built-in kickstand. Our Kareem Anderson has a full review of the Surface Pro 8 if you’d like to learn more.
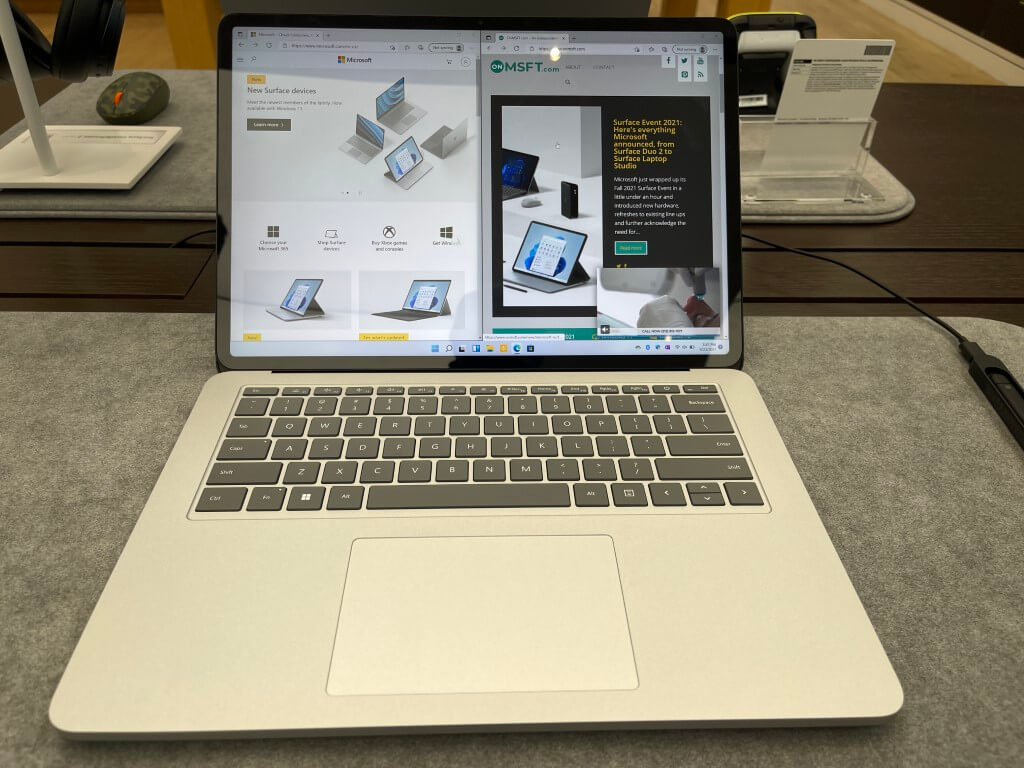
Next on our list is the Surface Laptop Studio. This Surface is Microsoft’s most powerful Surface yet, featuring Nvidia’s RTX 3050 Ti graphics, which is great for gaming as well as data science and engineering. It also has a new convertible form factor, where you can pull the screen out towards you in a “Stage Mode” for showcasing presentations or even drawing. Like the Surface Pro 8, it also supports haptics with the Surface Pen, making it great for drawing. Our full review has more on why this is a good pick.
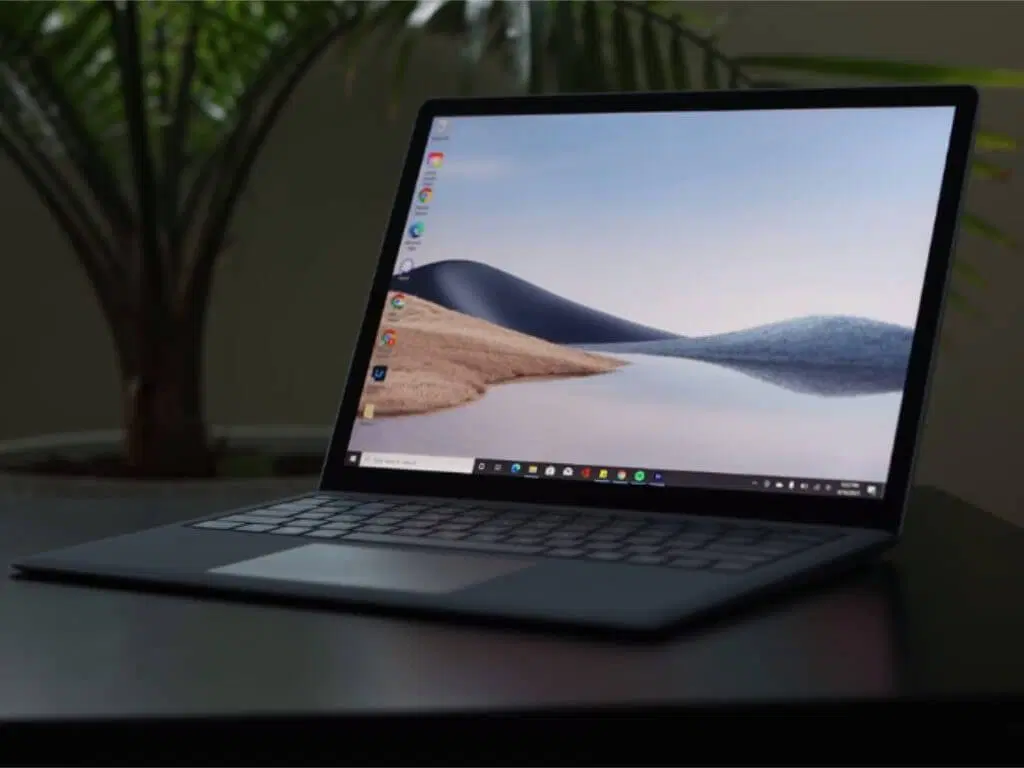
Students might not really want a device that’s a tablet, or something that’s quite as powerful as the Surface Laptop Studio. If it’s a MacBook-like device they want, then that’s where the Surface Laptop 4 comes into play. You can consider this Microsoft’s MacBook device. It’s a traditional laptop, with an amazing keyboard, a touch screen that supports drawing, and a really good battery life. Surface Laptop 4 comes in 13 inches and 15 inches, too, so you can pick a size that’s right for you. Our Kareem Anderson reviewed the Surface Laptop 4 and found that it was a charm.
A lot of the Surface devices we’ve suggested so far are well over $1,000. If you’re on a budget for school, then the Surface Laptop Go 2 is a better option. We have yet to review one, but we reviewed last year’s model. The newer model brings a lot to the table. You’re getting a faster CPU, better webcam, and the same great design that many people have loved. Many things on Laptop Go 2, like the keyboard, are the same as the Surface Laptop. Of course, you’ll miss out on things like support for Surface Pen, a higher-resolution display, or even keyboard backlights, but this is still a great device for note-taking and day-to-day use in school.
If you’re a student or know someone who really wants the convertible form factor of a Windows tablet, but doesn’t want to spend a lot of money, the Surface Go 3 is for you. Unlike its bigger siblings, prices start on this device at $380. That leaves you extra money for buying the Type Cover and Surface Slim Pen and completing your setup. As for the performance, though? Well, the budget-friendly Intel Pentium processors on board aren’t all that bad. We’ve yet to review it, but we did review last year’s Surface Go 2, which had an older CPU.
We’ll end our list of best Surface devices with the Surface Pro X. This Surface device is powered by an ARM-based chip. That means it might not work with a lot of the apps you typically use, as they will be emulated. That doesn’t mean that it’s all a loss, though. The Surface Pro X features LTE connectivity, so you can school from places where Wi-Fi isn’t available. As a fanless device, and also with a low-wattage chip, the Surface Pro X also gets good battery life, too. So if you’re mainly doing web-based work, you’ll get all-day battery out of this device.
The internet is an irreplaceable part of our daily lives, but unfortunately, several Windows users reported issues while accessing certain websites. They are receiving an error message that reads there is a problem with this website’s security certificate, so let’s fix it.
Before we start, we must mention that this issue can affect almost any browser, so even if you change it, you are not guaranteed success. However, some browsers do not get this error as frequently as others.
Some users reported this issue while trying to access specific websites, such as Facebook, while others reported this issue on almost every website.
This can be troublesome, but fortunately, a fix is available.
Why am I getting certificate errors on all websites?
You get this error primarily when your web browser cannot verify a website’s SSL certificate. The website is a potential risk; hence, the warning ensures that your privacy and security are preserved.
Many users reported not accessing their favorite websites after the error message. The error, however, may take a few different forms; these are the most common:
Your PC doesn’t trust this website’s security certificate
The hostname in the website’s security certificate differs from the website you are trying to visit
Internet Explorer certificate error on all sites
Windows 10 certificate error in all browsers
There is a problem with this website’s security certificate no option to continue
There is a problem with this website’s security certificate Chrome, smart TV
All the above mean the same thing with slight variations. For example, some cases may be specific to a device or target a particular software. In whatever situation there are underlying issues with your certificate or miscommunication between a browser and the web resource.
How do I fix there is a problem with this website’s security certificate?
1. Check your antivirus
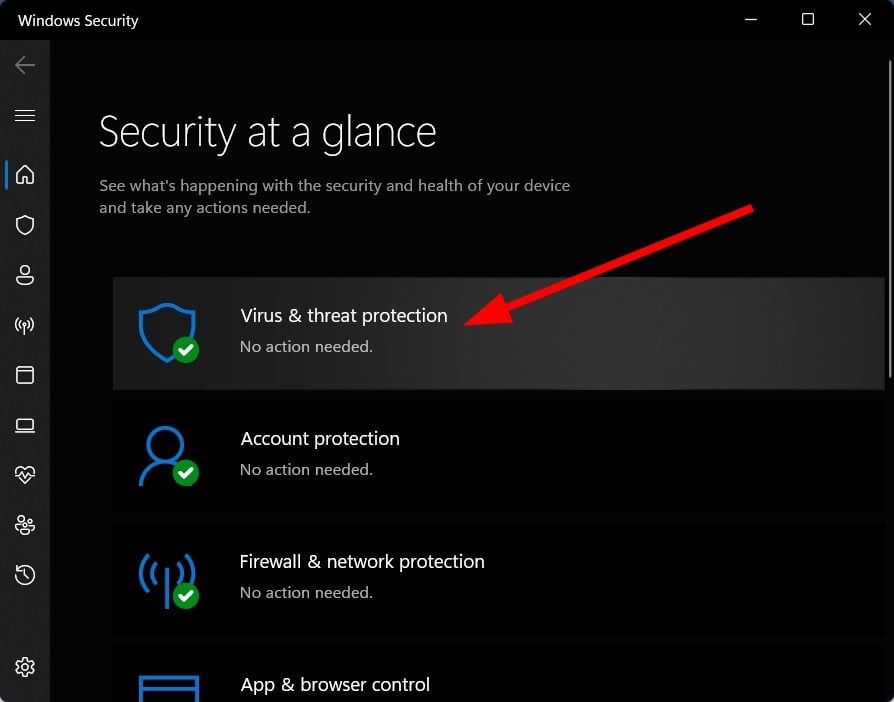
Click on the Start menu, type windows security, and then select the Windows Security application.
On the left pane, click Virus & threat protection, then select Settings on the left.
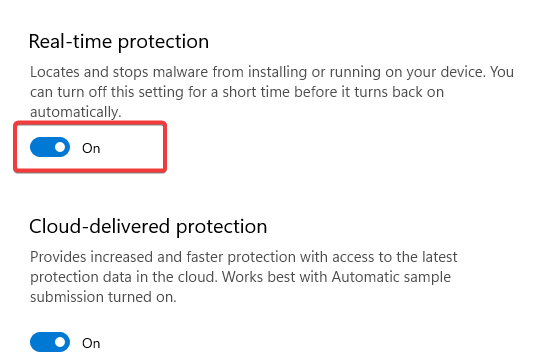
Turn off Real-time protection.
If you’re getting the error message there is a problem with this website’s security certificate on your PC, the cause might be your antivirus.
More precisely, it can sometimes interfere with your browser and cause this and other errors to appear.
However, in most cases, you can fix the problem simply by changing your antivirus settings. Sometimes a single setting can interfere with your browser and cause this problem.
If this doesn’t work, you might be able to fix the issue simply by disabling the antivirus temporarily.
You might have to remove the software if you use a third-party antivirus. After uninstalling it, check if the issue is still present.
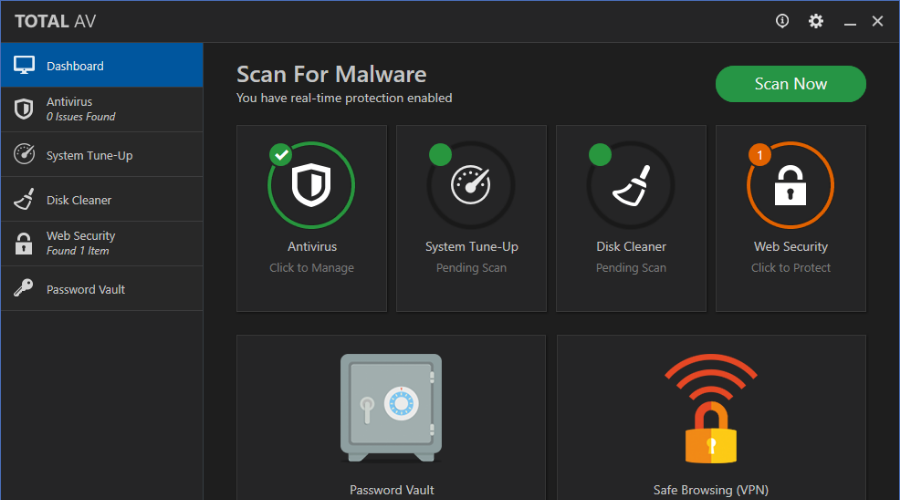
If not, you should consider switching to a different tool. We recommend you pick one of the best antivirus software available, such as TotalAV because a good tool will most likely not interfere with other apps on your PC while keeping you protected.
Good antivirus software is updated constantly to protect you against all threats and ensure they don’t falsely identify malicious activity, thus interrupting your browsing.
2. Check your computer time and date
Right-click the clock icon in the bottom right corner and select Adjust date/time.
Check your time and date. If for some reason, your time and date aren’t correct, you need to turn off the Set time automatically option and then click the Change button.
Set your time and date and click on Change.
If the issue is fixed, turn on Set time automatically option.
Setting the correct time on your computer can also help you avoid the errors related to gws_rd=ssl; read this guide to learn more.
3. Turn off the warning about certificate address mismatch option
Press Windows Key + S, enter internet options, and then select Internet Options from the menu.
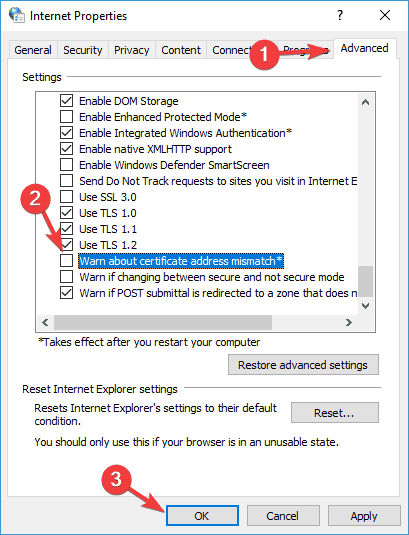
Navigate to Advanced tab and scroll down to Security section, then locate Warn about certificate address mismatch option and uncheck it.
Once the update is blocked from installing, the issue won’t appear anymore.
6.2 Windows 11
Click the Start menu and select the Settings app.
On the left pane, click on Windows update, then select Update history on the right pane.
Scroll down and click on Uninstall updates.
Click on your most recent update and select Uninstall.
7. Change server revocation options
Press Windows Key + S, enter internet options, and then select Internet Options from the menu.
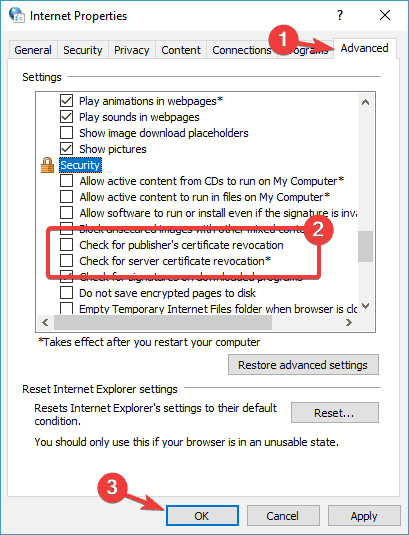
Now go to the Advanced tab, and in the Security section, disable Check for publisher’s certification revocation and Check for server certificate revocation.
Click on Apply and OK to save changes.
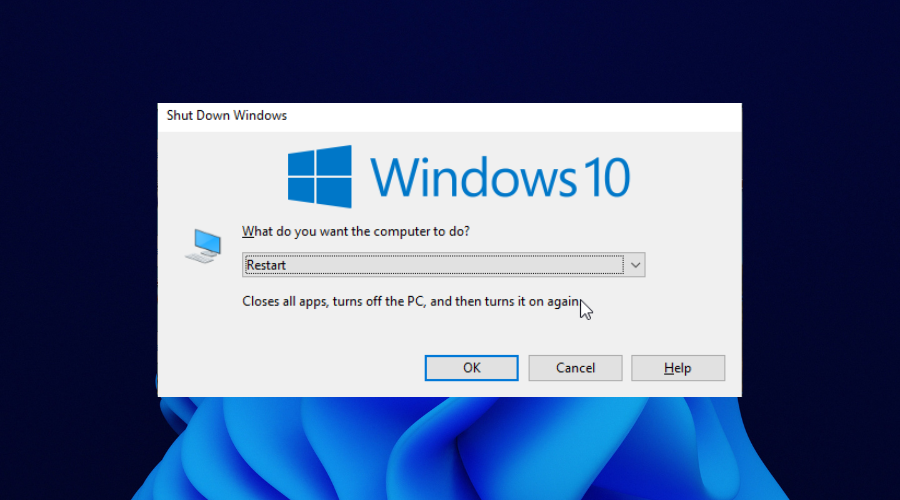
Restart your PC and check if that resolves the problem.
8. Reset your browser to default
Input the path below in the browser’s URL bar, and press the Enter key. chrome://settings/
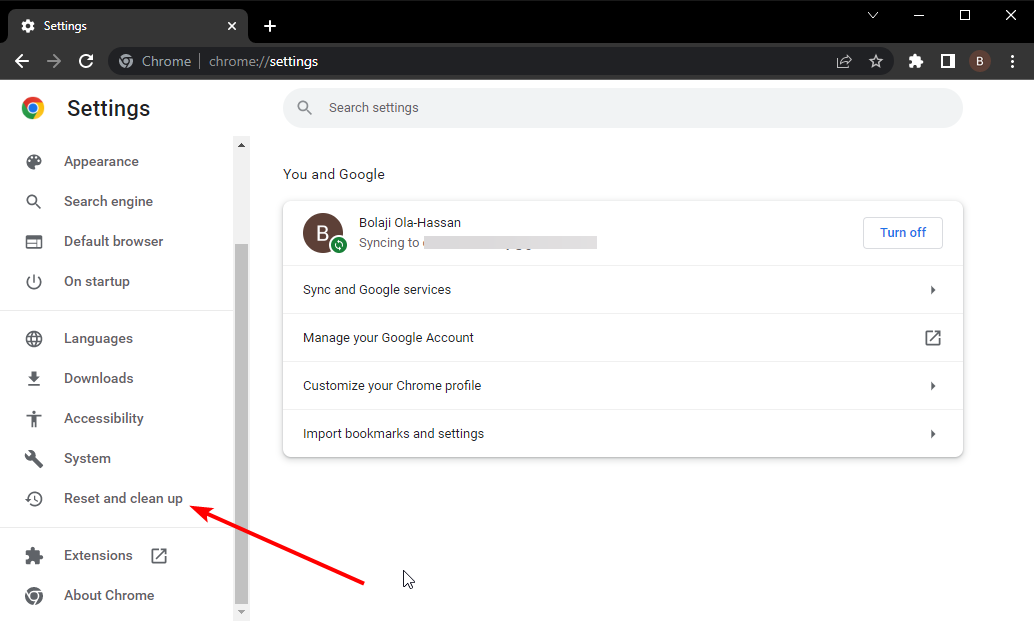
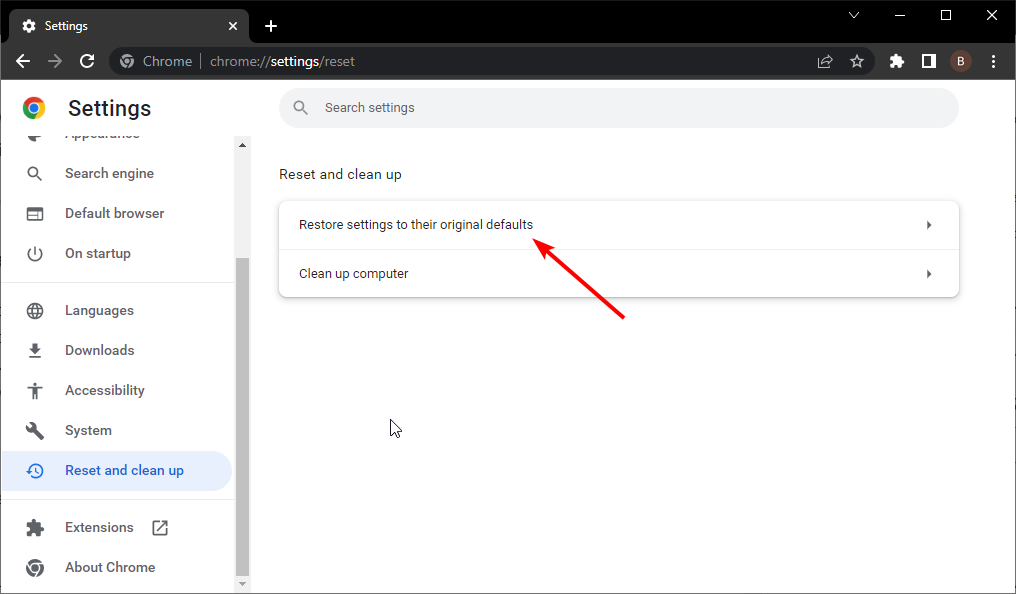
On the left pane, choose the Reset and clean up option, then from the right pane, select Restore settings to their original defaults.
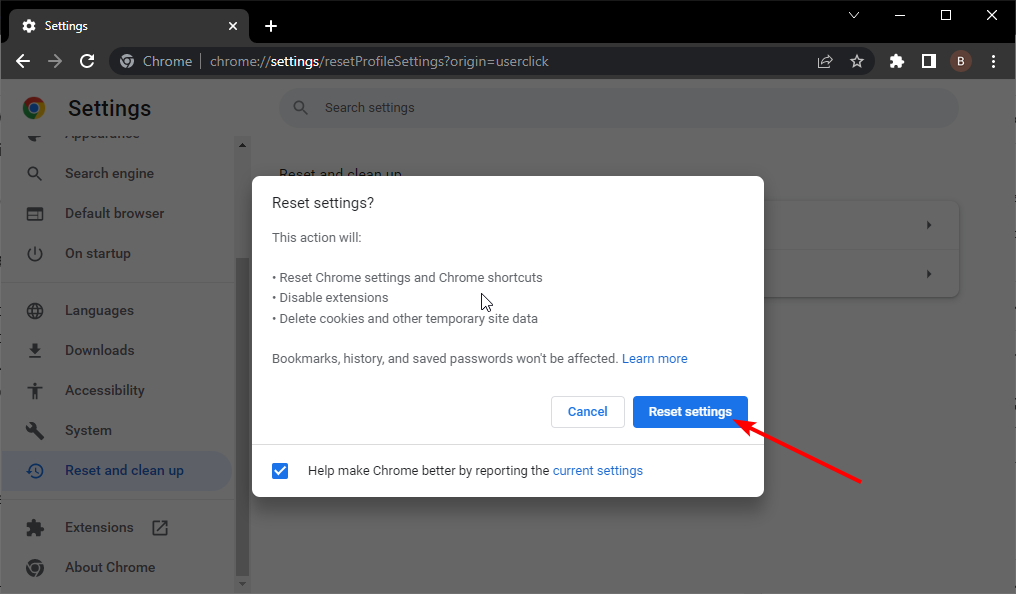
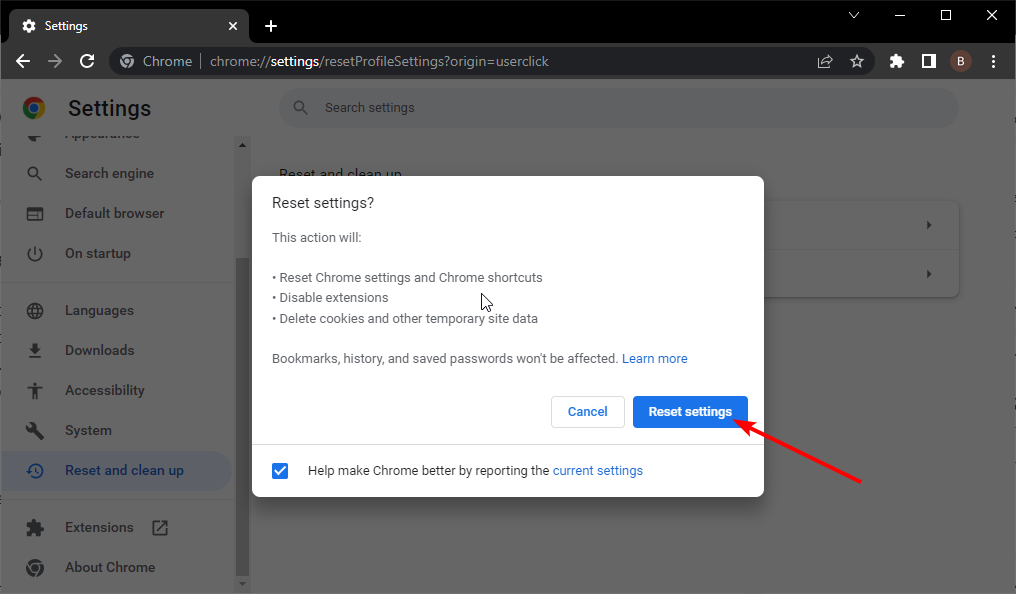
Click the Reset settings button.
The error message can appear in any browser, and its settings might cause it. To fix the problem, be sure to reset your browser to default. Restoring the browser can also help you fix issues like gws_rd=ssl and remove the DNS Unlocker on Google Chrome.
What can I do when getting a Windows 7 certificate error in all browsers?
This error is not unique to Windows 10 and 11. Even users on Windows 7 may encounter the same security error. However, you do not need to consult a different set of fixes.
While the interface may differ, you can apply the fixes for the Windows error there is a problem with this website’s security certificate to other certificate errors in Windows 7.
Certificates are rather important because they are used to encrypt your data and protect it from malicious users.
When you get an error message, you should be careful not to proceed to the site, as it could have malicious content that could compromise your data security and privacy.
Let us know which of these solutions have proved most effective for you, and remember that the solutions that will work for you may be unique to your particular situation.
Google’s Chrome browser is one of the most used browsers today, but that doesn’t get it off the hook regarding technical issues.
Among the issues that make for a frustrating experience is when Gmail won’t load in Chrome on Windows 10. This is a common problem, but there are other occurrences in which the issue is signaled, caused by outdated Gmail settings.
Being able to solve issues promptly can make a huge difference, especially if you use it for work.
Some other users reported that they could not receive emails on Gmail, which, as you might assume, can stop you from using the service entirely. Irrespective of the form the issue takes, this guide contains proven fixes that will help you solve it.
Why is Gmail not working on Chrome?
There are various reasons Gmail is not working on Windows 10. It might be due to the activities of another app or issues with your browser.
Below are some of the known causes:
Outdated browser
Malfunctioning extension
Corrupt browser data
Interference from antivirus
Quick Tip:
Another great browser is Opera One, with a Chromium-based engine. It is designed to be far less resource-intensive, and it offers a free VPN and tracker blocker that allows you to send and receive emails privately.
More so, the vast library of add-ons is filled with tools that can help better integrate Gmail into the browser, allowing you quicker and better access to it.
Opera One
Manage your emails with useful productivity tools and enhanced security.
What can I do when Gmail is not working on Chrome?
1. Restart PC
If Gmail is not working in Chrome on Windows 10, it might be because of some malfunctioning processes on your PC. The source of such issues might be difficult to pinpoint and fix.
In this case, your best bet at solving the problem is to restart your PC. This will relaunch all the processes and eliminate all the bugs causing the glitches.
2. Update Chrome
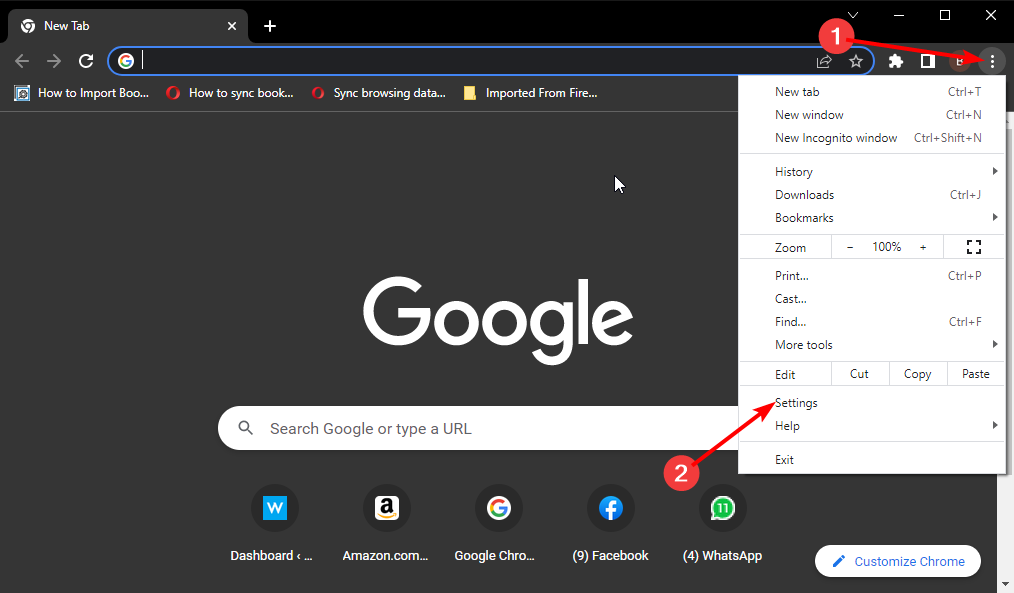
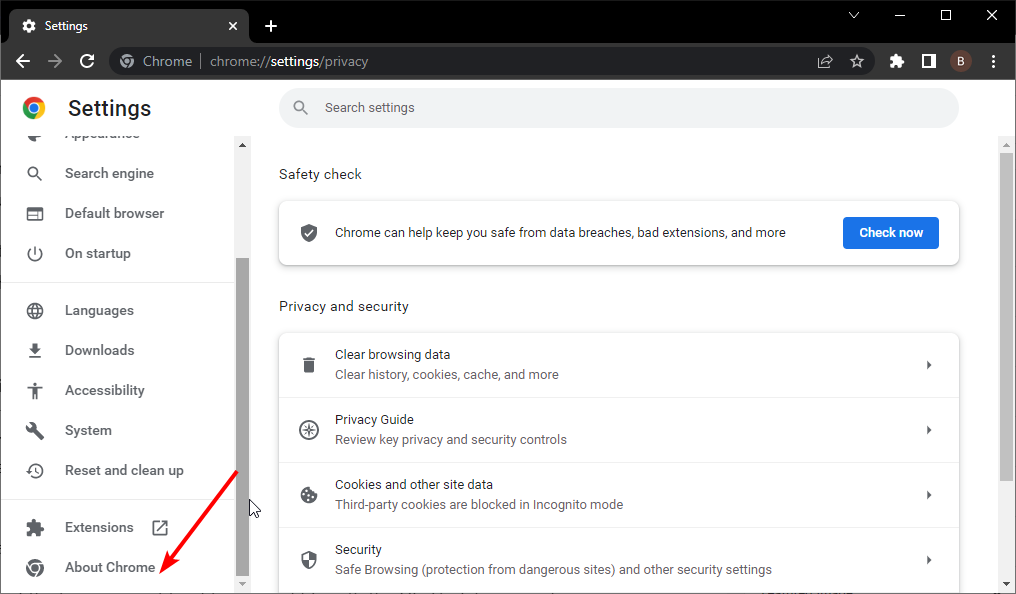
Launch Chrome and click the menu button in the top right corner.
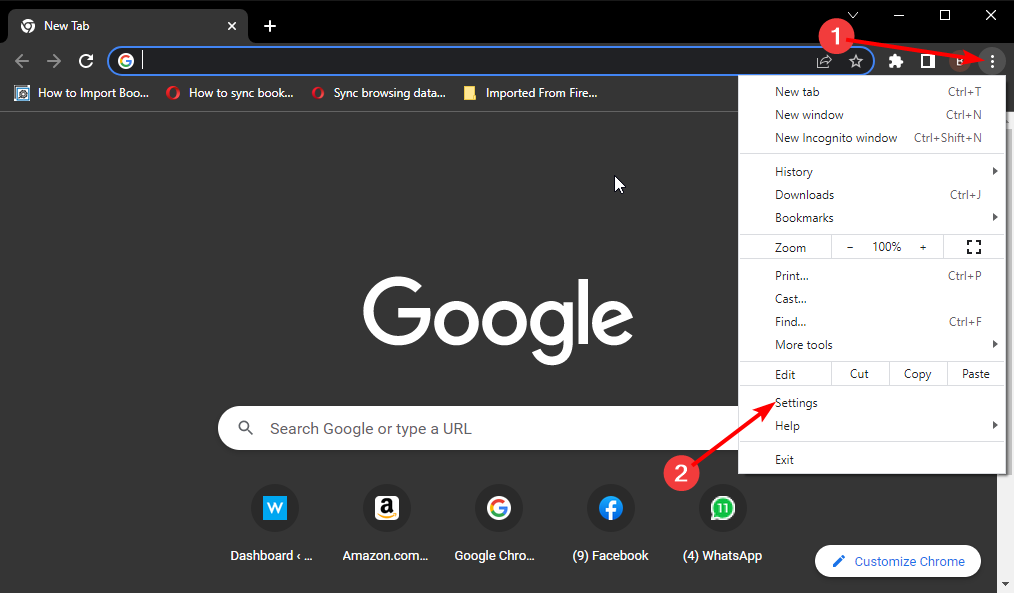
Choose Settings from the options.
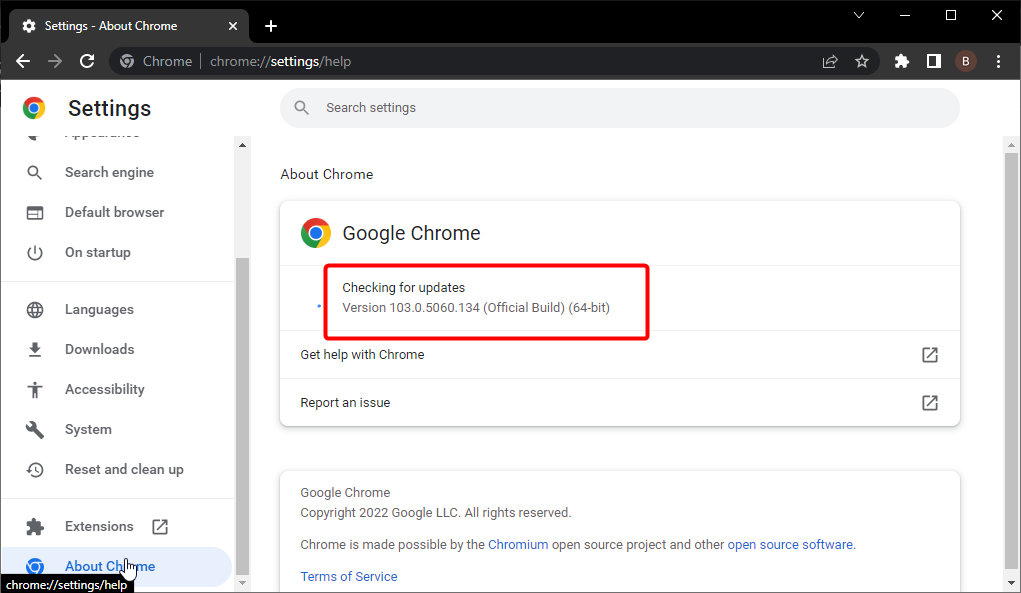
Click the About Chrome option in the left pane.
It will show you if there are any updates to install.
An outdated browser is the source of many problems. It could cause Gmail not working on your Windows 10 PC, especially after an operating system update.
This is because your browser version might not be compatible with the OS. Updating your browser should help fix the compatibility issues and restore normalcy.
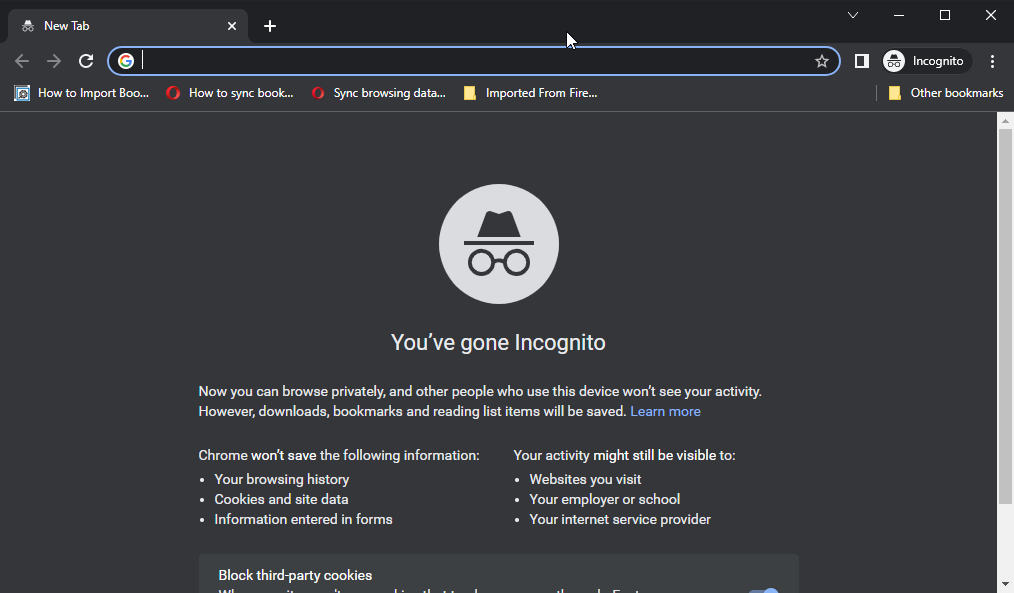
3. Browse in incognito mode
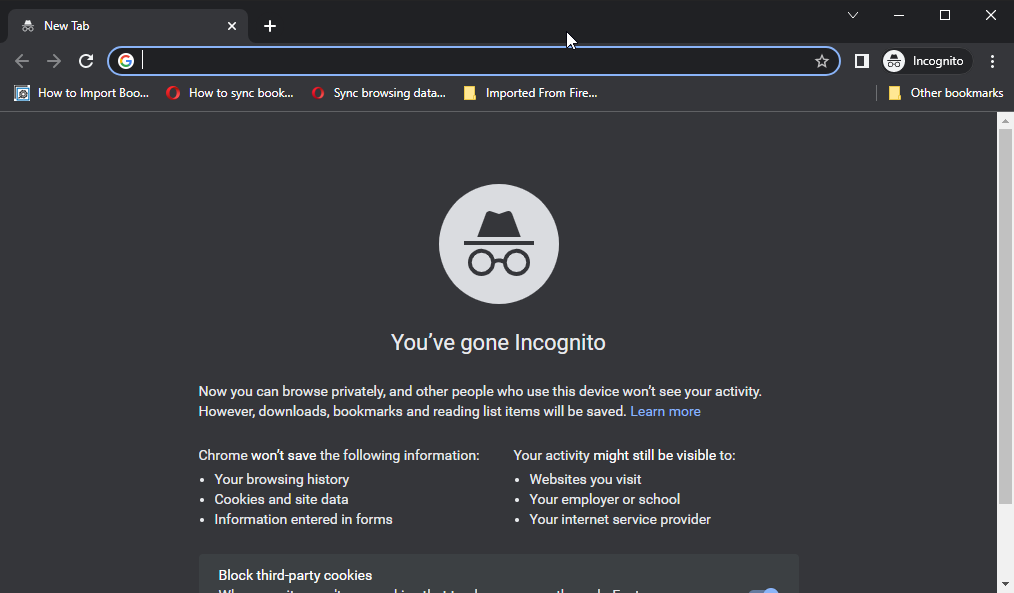
The Incognito mode is a great troubleshooting Window that lets you know how deep-rooted an issue is on your browser. This is because it does not use any of your browser data nor store them.
This bypasses one of the major causes of issues on browsers. So, if Gmail is not working on Chrome on Windows 10, try using it in incognito mode. To open the window, press the Windows + Shift + N keys.
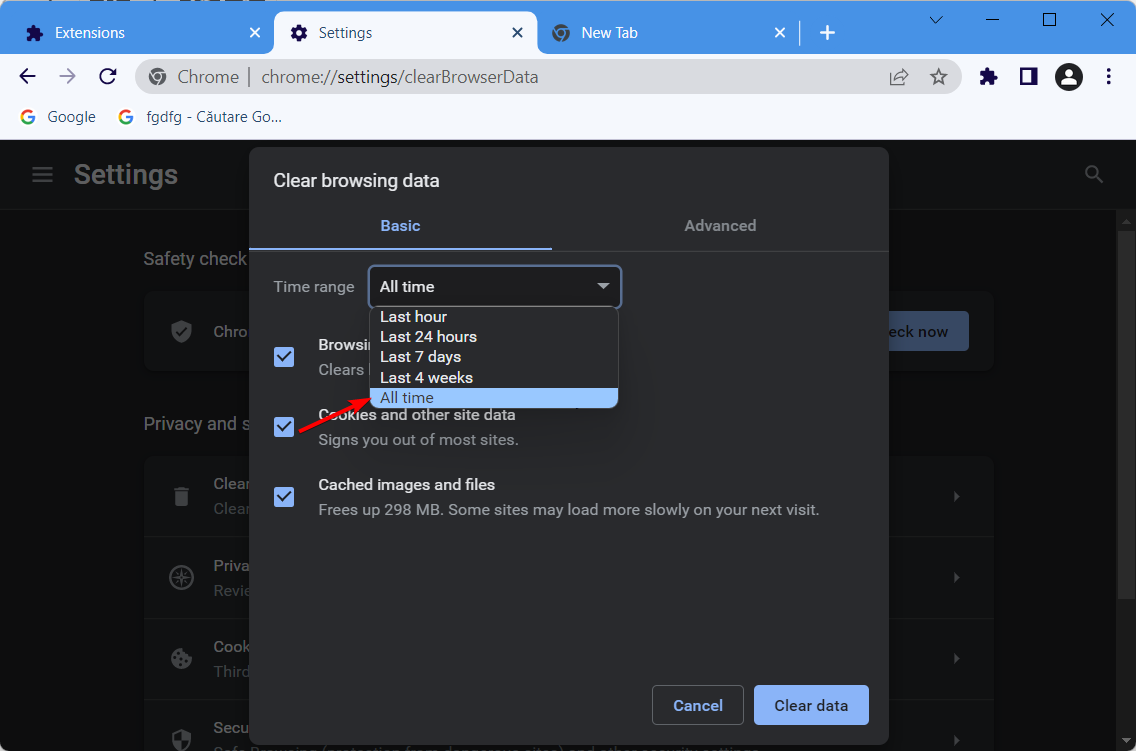
4. Clear browser cache and cookies
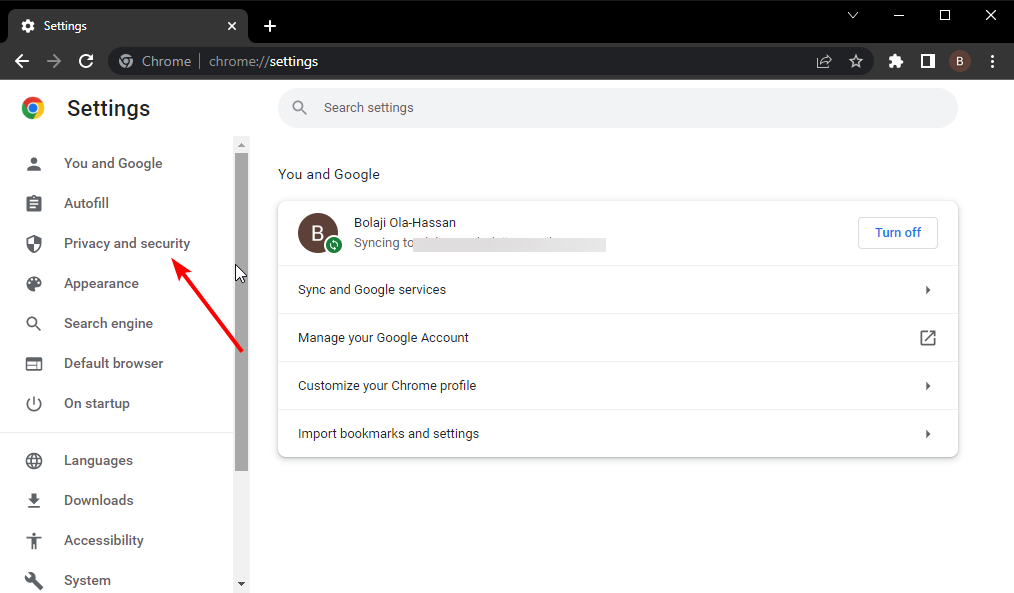
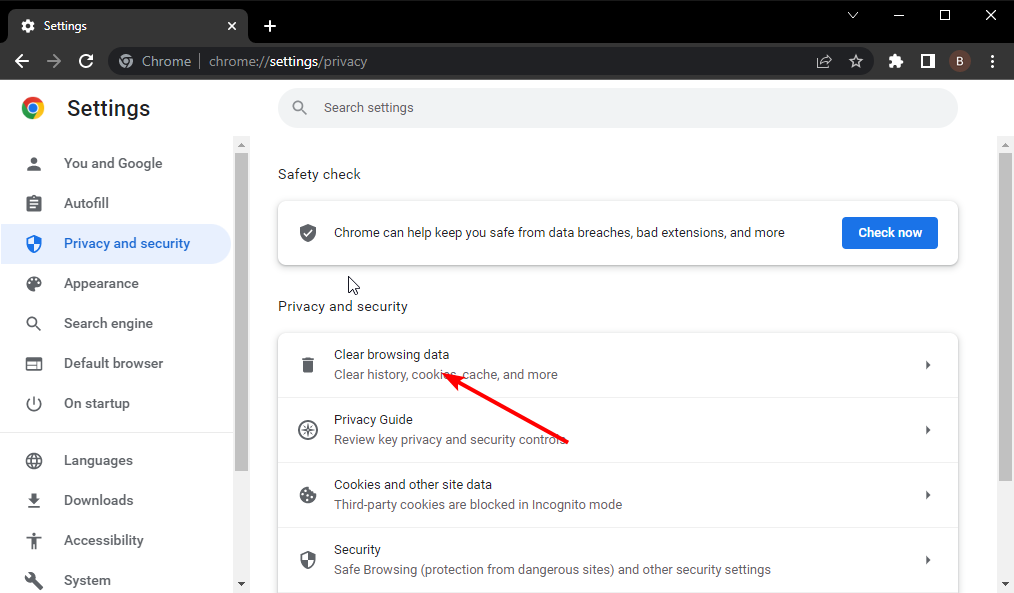
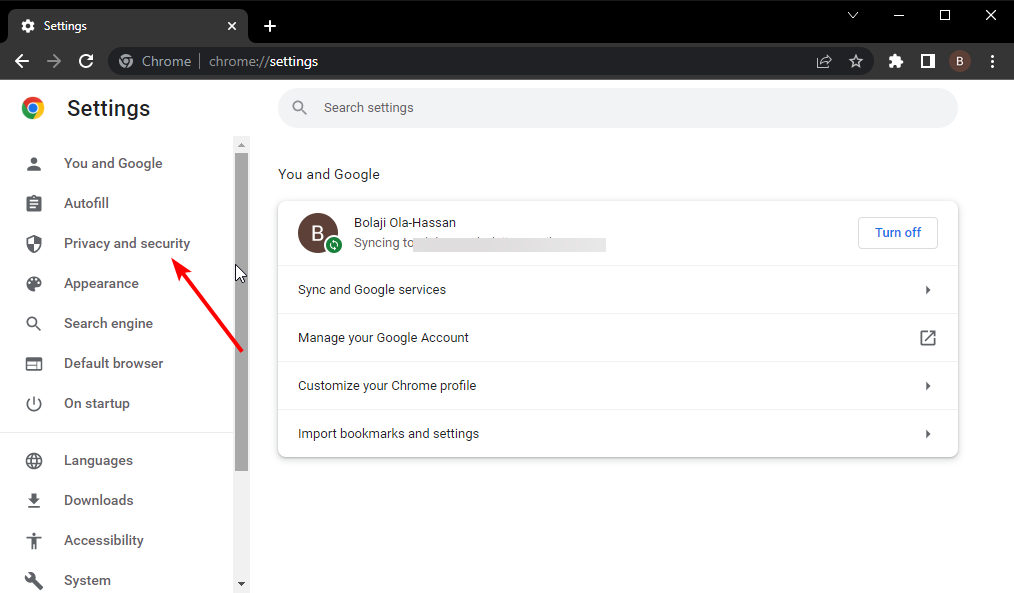
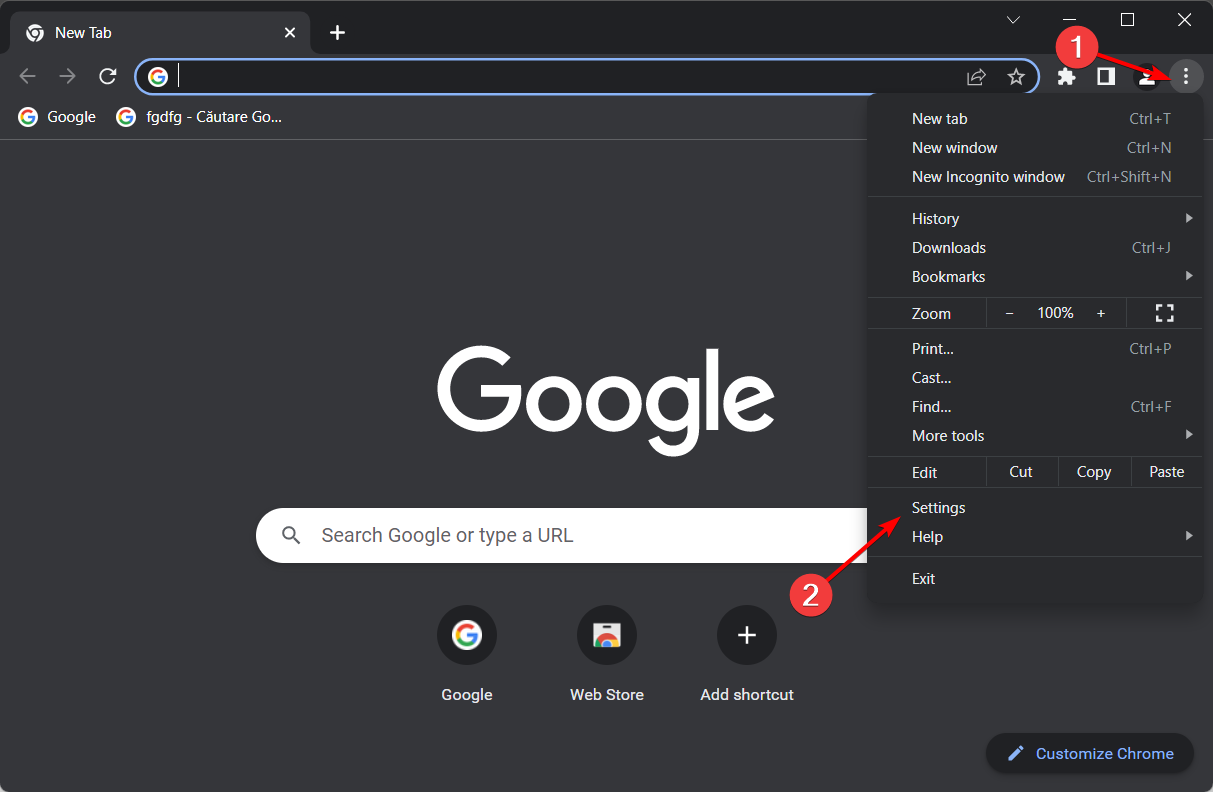
Click the menu button on Chrome and select Settings.
Choose Privacy and security in the left pane.
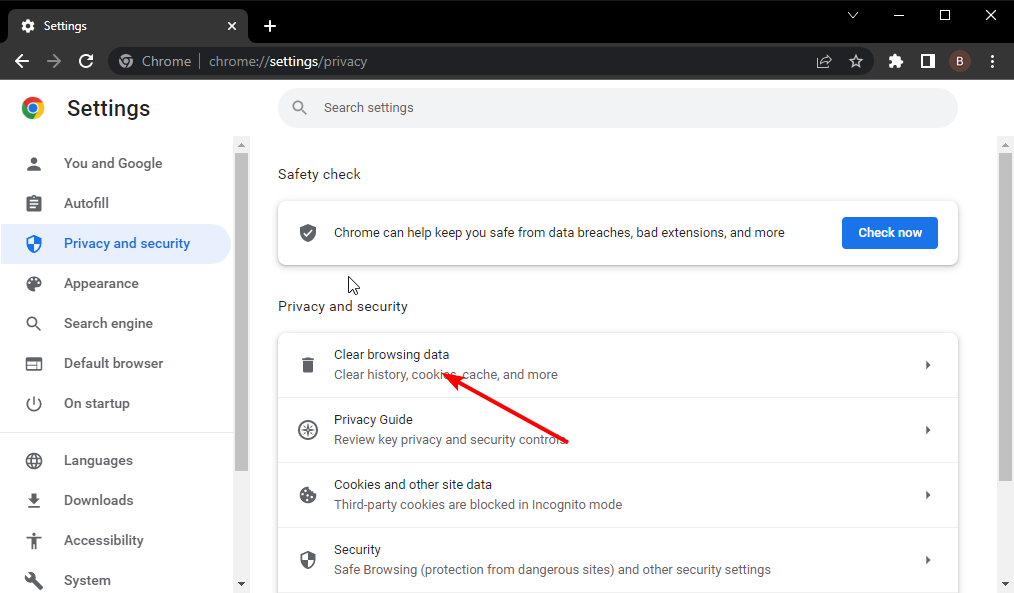
Select Clear browsing data.
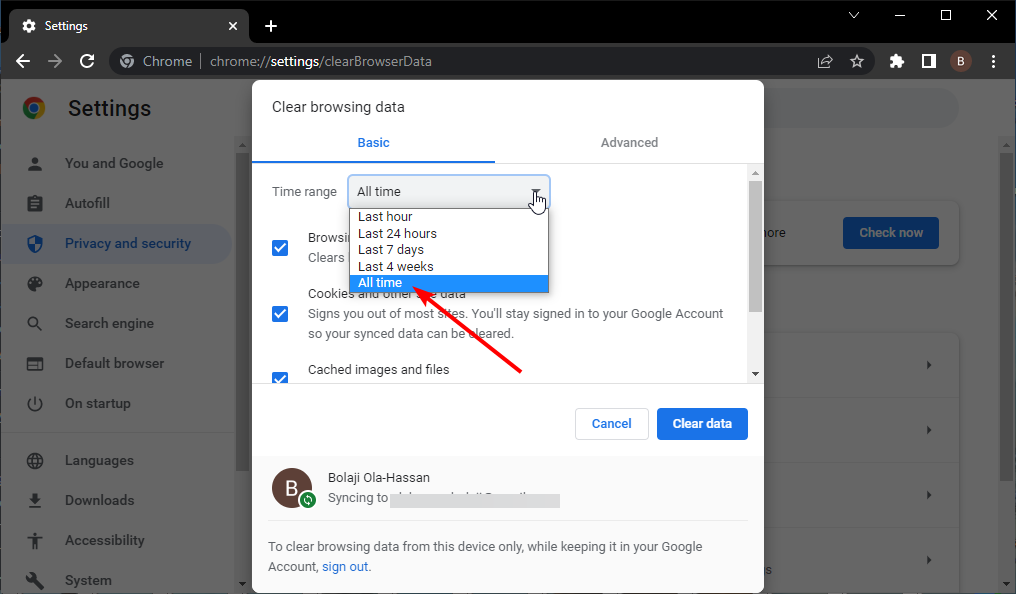
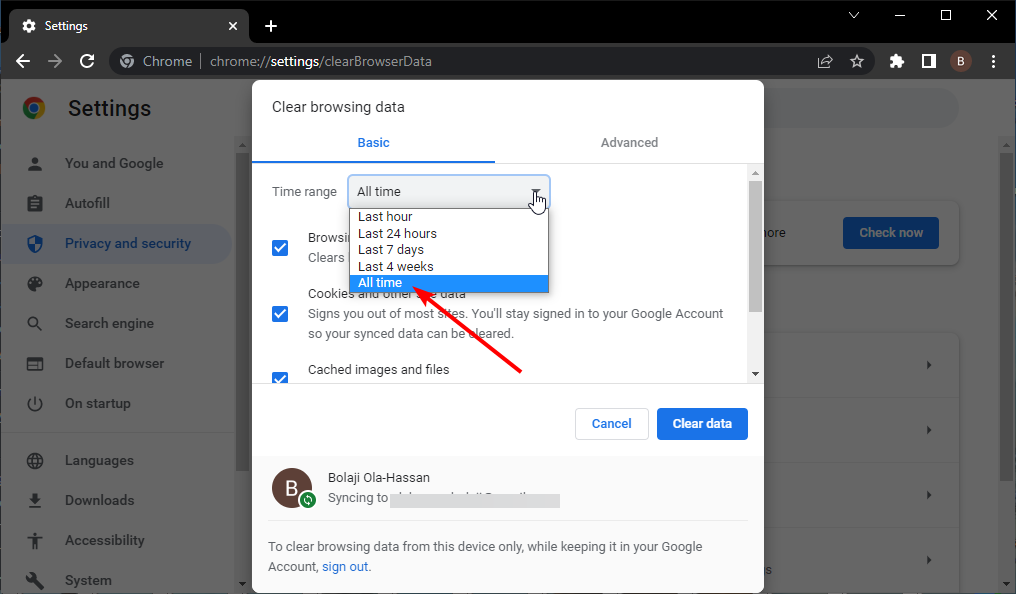
Click the dropdown next to Time range and select the All time option.
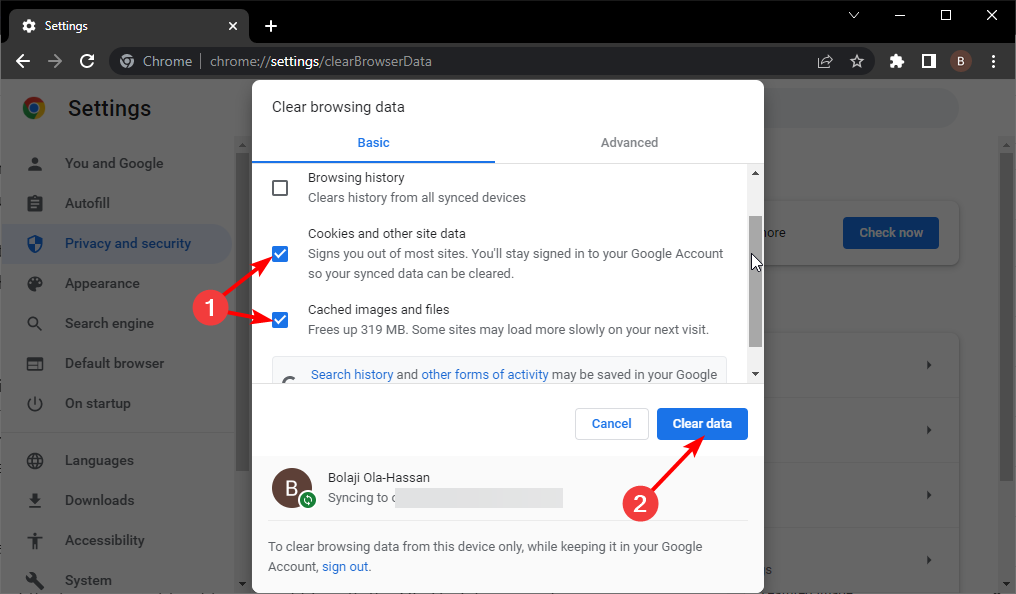
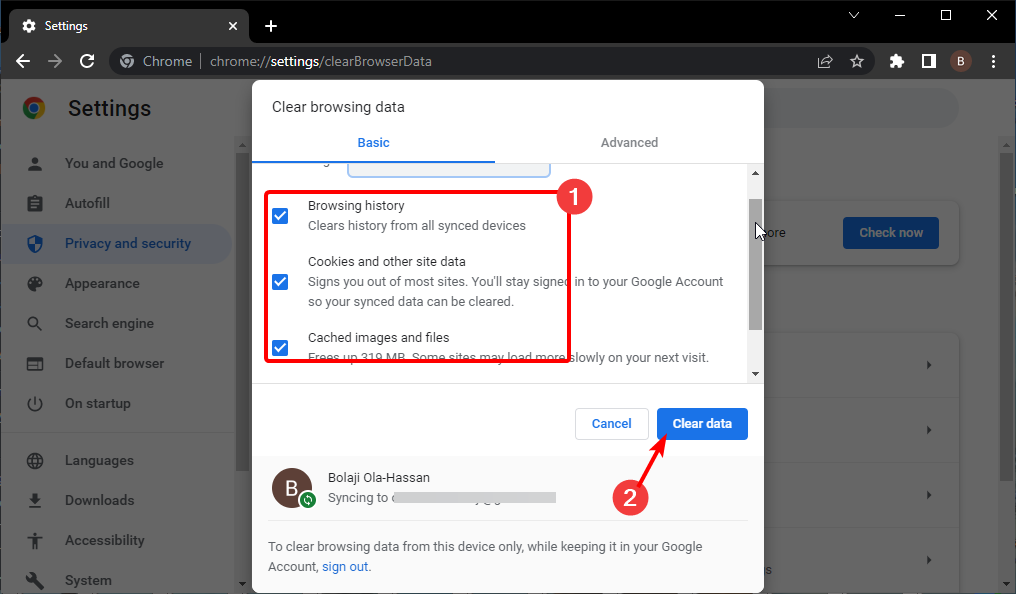
Check the boxes for Cookies and other site data and Cached images and files.
Click the Clear data button.
Browser cache and cookies help make your activities on the web easy, especially on sites you have visited before. But they can get corrupt and start causing problems.
So, if you have not cleared your browser in a while, it might be why Gmail is not opening in Chrome.
5. Disable extensions
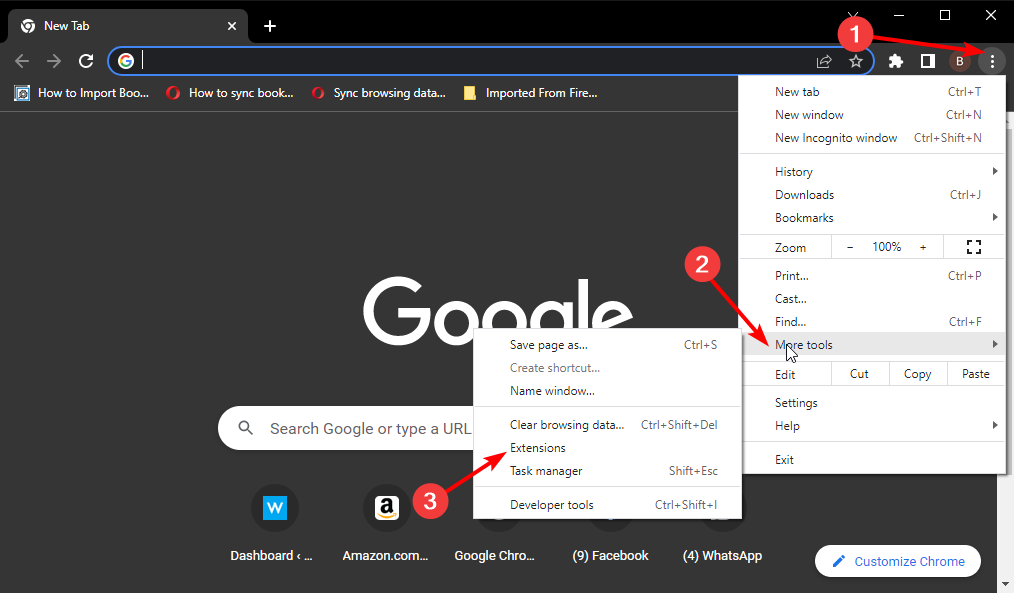
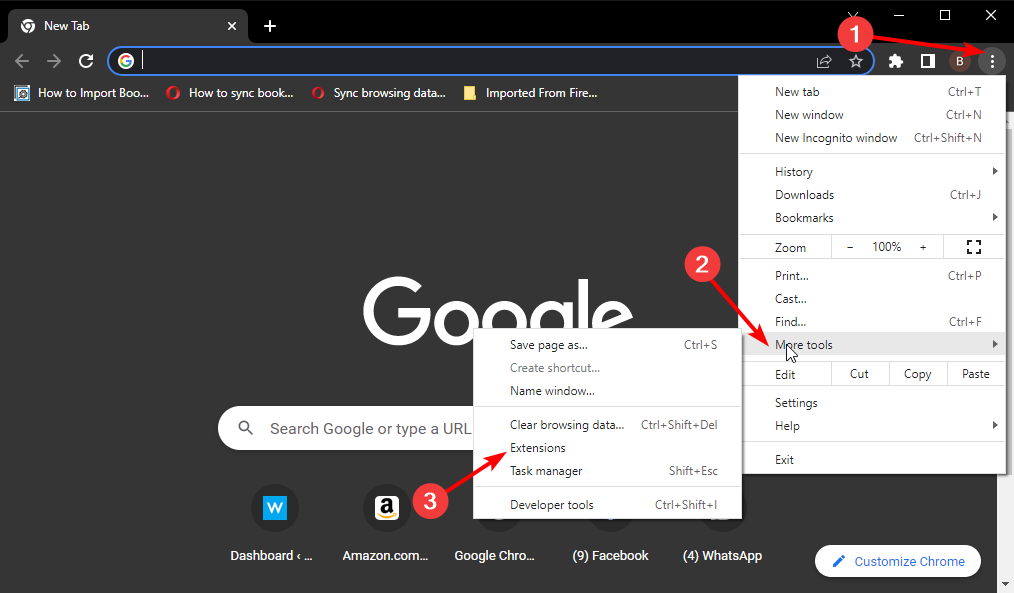
Launch Chrome and click the menu button in the top right corner.
Click the More tools option.
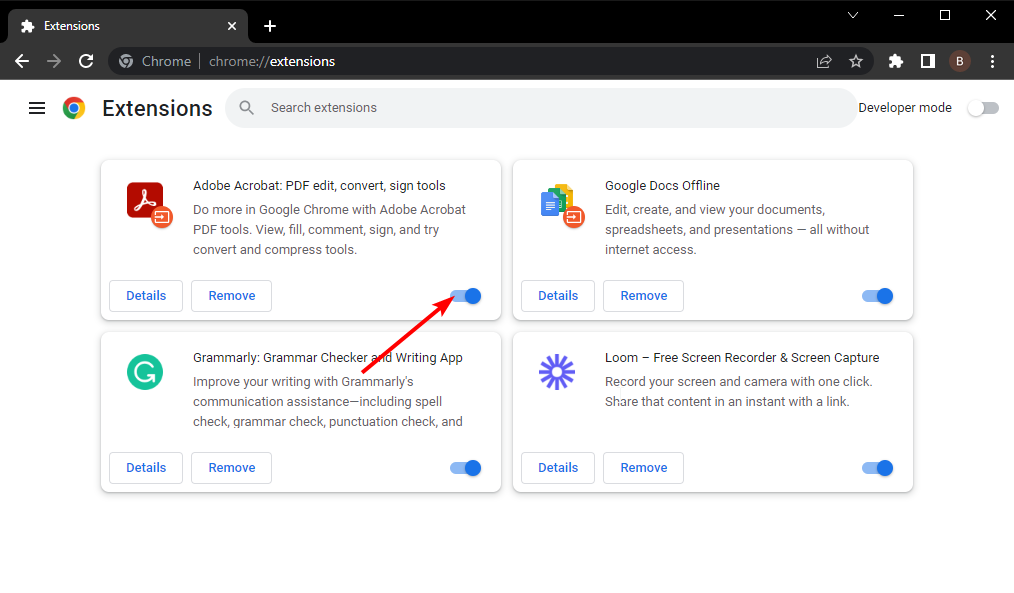
Choose Extensions from the options.
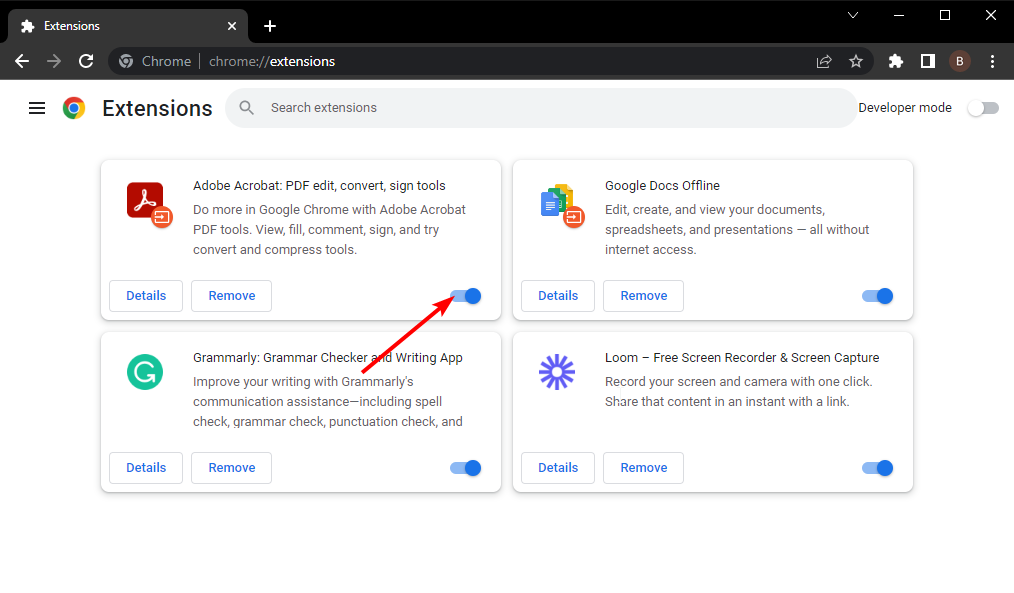
Toggle the switch before each extension backward to disable it.
Sometimes these add-ons or extensions on Chrome can prevent Gmail from working on Windows 10. This is because some of them might contain programs that counter Gmail.
Also, if you have a faulty extension, it can cause problems. If Gmail starts working on your browser after applying this fix, use the elimination method to know the one causing the issue.
6. Check if security software is blocking Gmail from loading
Sometimes, an antivirus or firewall might interfere with your PC activities. This happens when the software raises a false alarm and flags Gmail.
This causes Gmail not working on the Windows issue on Windows 10. You can disable your antivirus temporarily and check if it is the cause of the problem.
If Gmail works after disabling your antivirus, ensure to whitelist Gmail on the app or remove the software.
Click the Reset and clean up option in the left pane.
Select Reset settings to their original defaults.
Finally, click the Reset settings button.
Custom settings and other changes you make on Chrome can have an effect. This can be the reason your Gmail account is not working on your browser Windows 10.
Resetting your browser to the default will restore the usual settings. Note that your important data like passwords and bookmarks will not be deleted.
The Gmail not working on Chrome in Windows 10 issue can make you lose access to important information. This is why a guide with detailed solutions like this is important. If you follow the steps carefully, you should solve the issue in no time.
Are you facing other issues like Google Search not working in Chrome? Then, check our article on the topic to know how to fix it effortlessly.
Were you able to load Gmail again on Chrome using one of our solutions? Let us know in the comments section below.
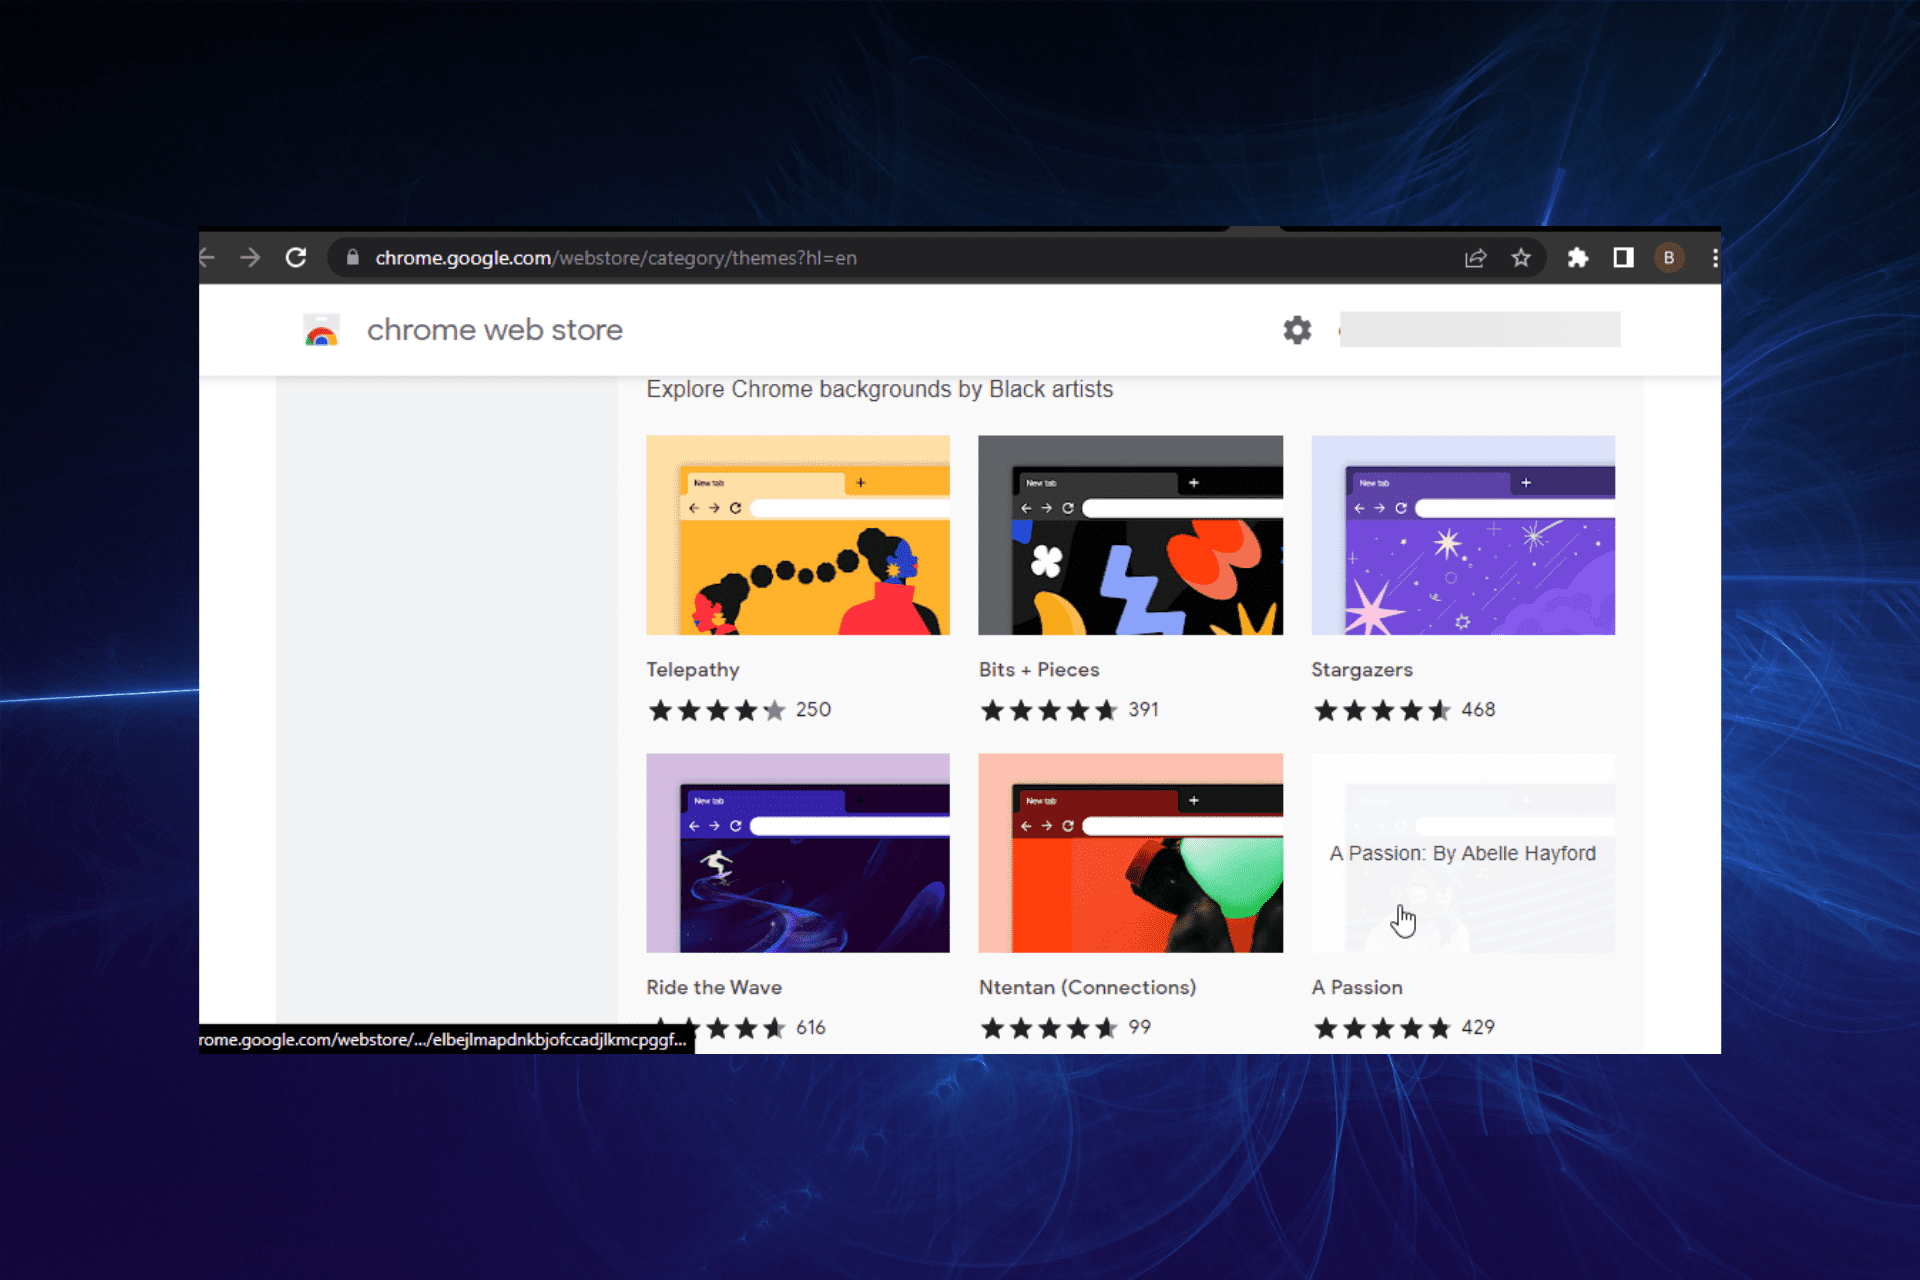
Whether you are looking to match Chrome’s default dark theme look or bored of its bright theme, the Chrome Web Store offers a lot of third-party themes to spruce up the boring old browser.
Changing Chrome’s background color and adding new looks with fresh themes can help improve the overall browsing experience. That said, going through the extensive theme to find the right one can be time-consuming,
To make it easier for you, we have created this list of the ten best Google Chrome themes. These themes will help you optimize and customize your browser to your liking.
If you didn’t know, Google has published a few native themes for its popular browser. All these themes are designed to color the UI uniformly.
There are 14 themes to choose from in multiple colors and hues. All the native themes have a similar design and are a good option if you only want to change the appearance with your favorite color.
If you like color Gradients, Color Fusion is a good theme to apply. With an interface look, the combination of colors makes it look beautiful on your browser. You can also notice the active tab’s strong contrast to the background tabs.
Color Fusion applies separate color gradients for the bookmark bar, tabs, and address bar, making it easier on the eyes.
Dark Material is a crisp-looking minimalistic theme for your browser. The background offers a simplistic abstract design along with the colored buttons making it easy to navigate.
If pink sunset, green plains, and hilly forests are your things, check out the Beauty theme for Chrome. It offers a set of vibrant wallpaper on your homage with stunning looks.
As the name suggests, Dark Space is a space-based theme for the Chrome browser. The new update changes the color of background tabs, and the new tab button offers a uniform color scheme across the browser.
The theme visuals continue fluently into the control area. It is an excellent theme if you want a minimal but dark theme for your browser.
Ride the Wave is another one of the aesthetic Google Chrome themes with a simple yet elegant look. The stylish and atmospheric look is intriguing without going too dark. The Theme background images continue into the header of the browser.
While the theme overall looks good, the opening of tabs can be a little difficult to read.
With its stunning lighting and colors, Nordic Forest is made for nature lovers as it reminds the joy of nature. Like Ride the Wave, Nordic Forest also flows into the browser header. However, solid colors used for tabs and bookmarks make it easy to read.
Sahara theme is based on the huge landscape of Sahara desert at night with the milky way. The theme is made of a lot of photos that include a caravan with camels and gives 1001 Arabian night vibes. Sahara flows right into the browser edges and tabs and bookmark bar.
Like Abstract art-based themes? Take a look at the Paint a Picture theme. It offers excellent artwork on the home page that denotes a beautiful and colorful garden under a beautiful daytime sky.
Paint a Picture boasts some colorful pictures that can easily get the attention of every color lover.
With over 4.6 ratings from 200k+ users, Blue/Green Cubes is one of the popular geometry-based cube themes in the Chrome Store. If you are looking for a fresh new look that is not too distracting, it fits the bill perfectly.
The Chrome Web Store has an extensive library of themes. From Anime Chrome themes to 1440P and 4k quality themes, the options are limitless.
Furthermore, most of these themes are free to download, so you don’t have anything to lose. Lastly, you can create a custom theme and upload it to Chrome.
Are Google Chrome themes safe?
Since the functionality of Chrome themes is limited to changing how your browser looks, they are safe to use. A theme does not change any function within your browser.
However, it is important to know where you are getting the theme. Unless you trust the third-party source, download all your Chrome themes from the Chrome Store to be on the safe side.
Does Chrome have dynamic themes?
Chrome on Android has full support for dynamic themes with changing colors. Also, you can customize and change the color of the built-in Chrome theme on a PC.
This feature allows you to apply different colors on various pages, so there is no shortage of dynamicity.
How do I create a Chrome theme?
There are different ways of creating a Chrome theme. You can use online tools or extensions from the Chrome Web Store.
We have a full guide on the topic, from how to create a Chrome theme to applying it to your browser. Ensure to check it out to make the task easy.
If you prefer using AI, we also have a guide on how to generate an AI theme for Chrome, so don’t miss it.
Can I customize my Google Chrome theme?
Yes. You can change your Chrome browser theme and make it more personalized. This can be done by following the simple steps below:
Open a new tab on Chrome.
Click the Customize Chrome button.
Select Color and theme in the left pane.
Choose the colors to customize your theme with.
Third-party Google Chrome themes come in handy when you want to give a fresh look to your favorite browser.
With so many themes available on the Chrome Store, we have selected the best ten themes to help you eliminate Chrome’s boring and flat default themes. Explore the list and let us know your favorite theme in the comments below.
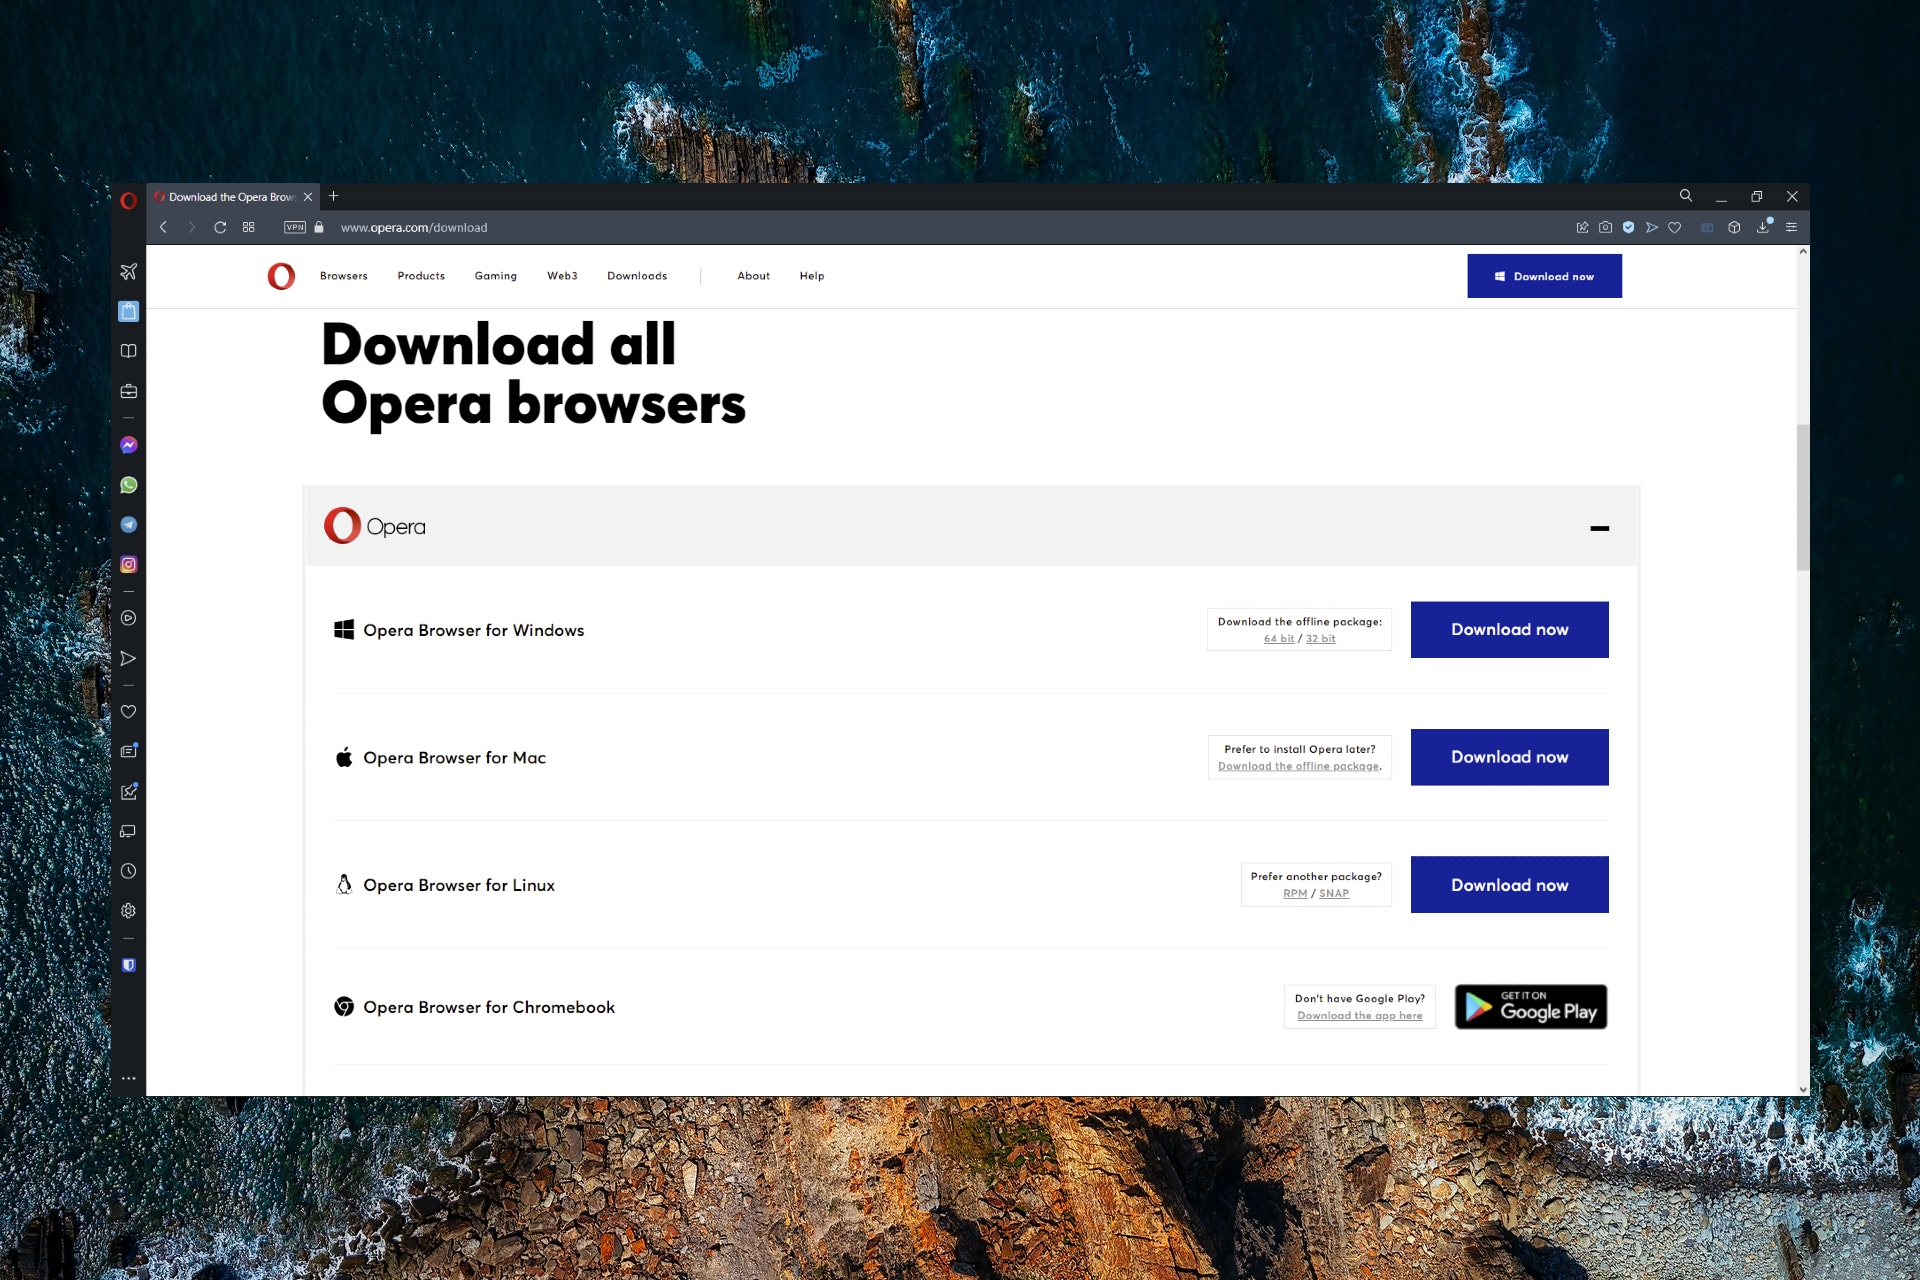
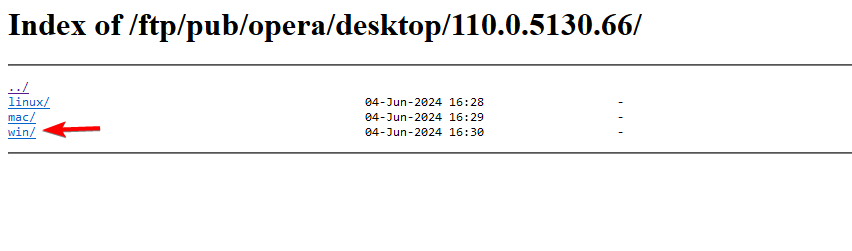
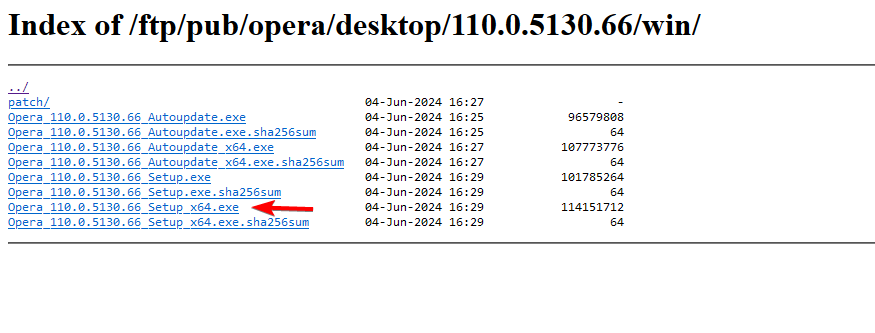
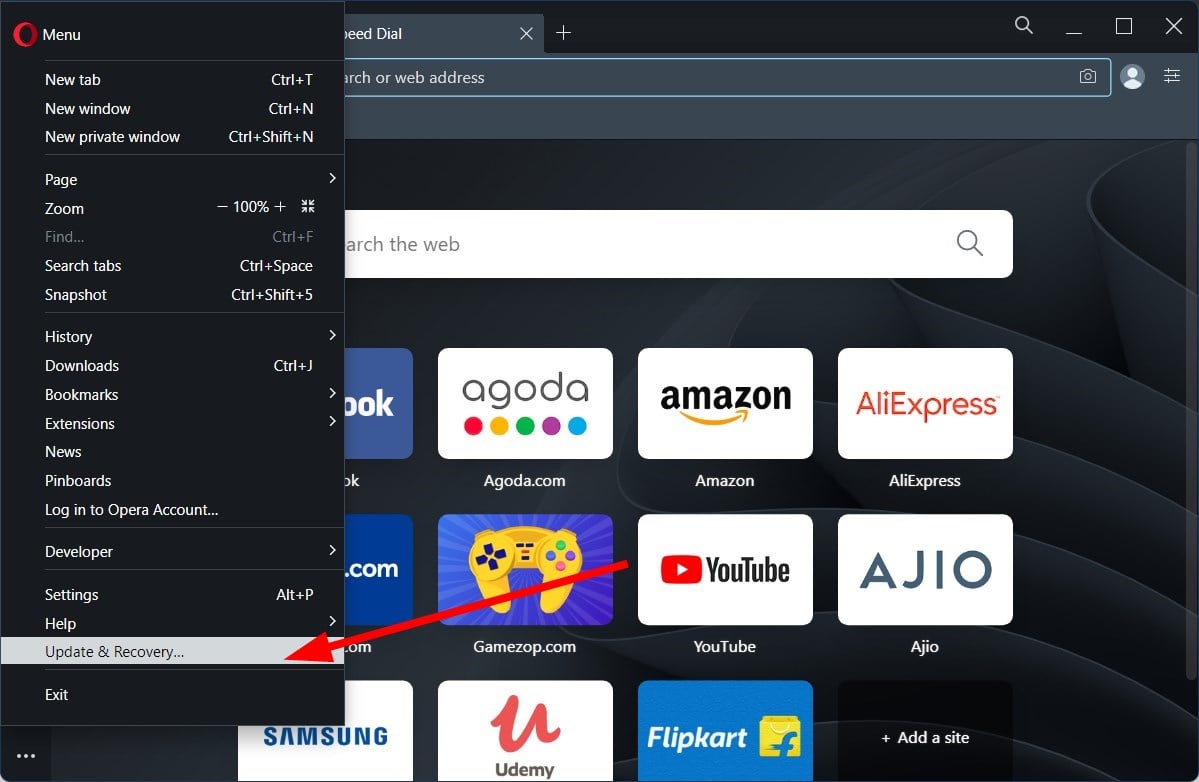
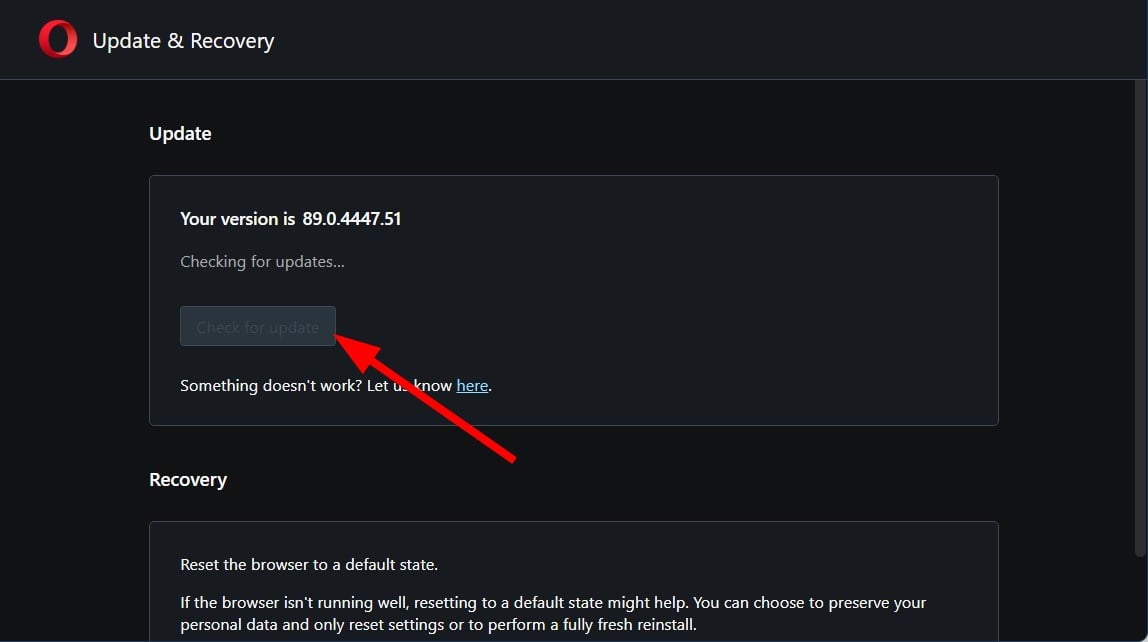
If you’re on an unreliable network or you don’t have a network connection, you can always use the Opera offline installer to install the browser, and today we’ll show you how to do it.
If the previous methods don’t work for you, using third-party sources might be your only option. Keep in mind that not all third-party sources are safe, so you’re using them at your own risk.
Does Opera have a portable version?
Yes, Opera does have a portable browser, and you can install it by doing the following:
Google Chrome is one of the best browsers on all devices. It ticks all the right boxes regarding the features that matter most to users.
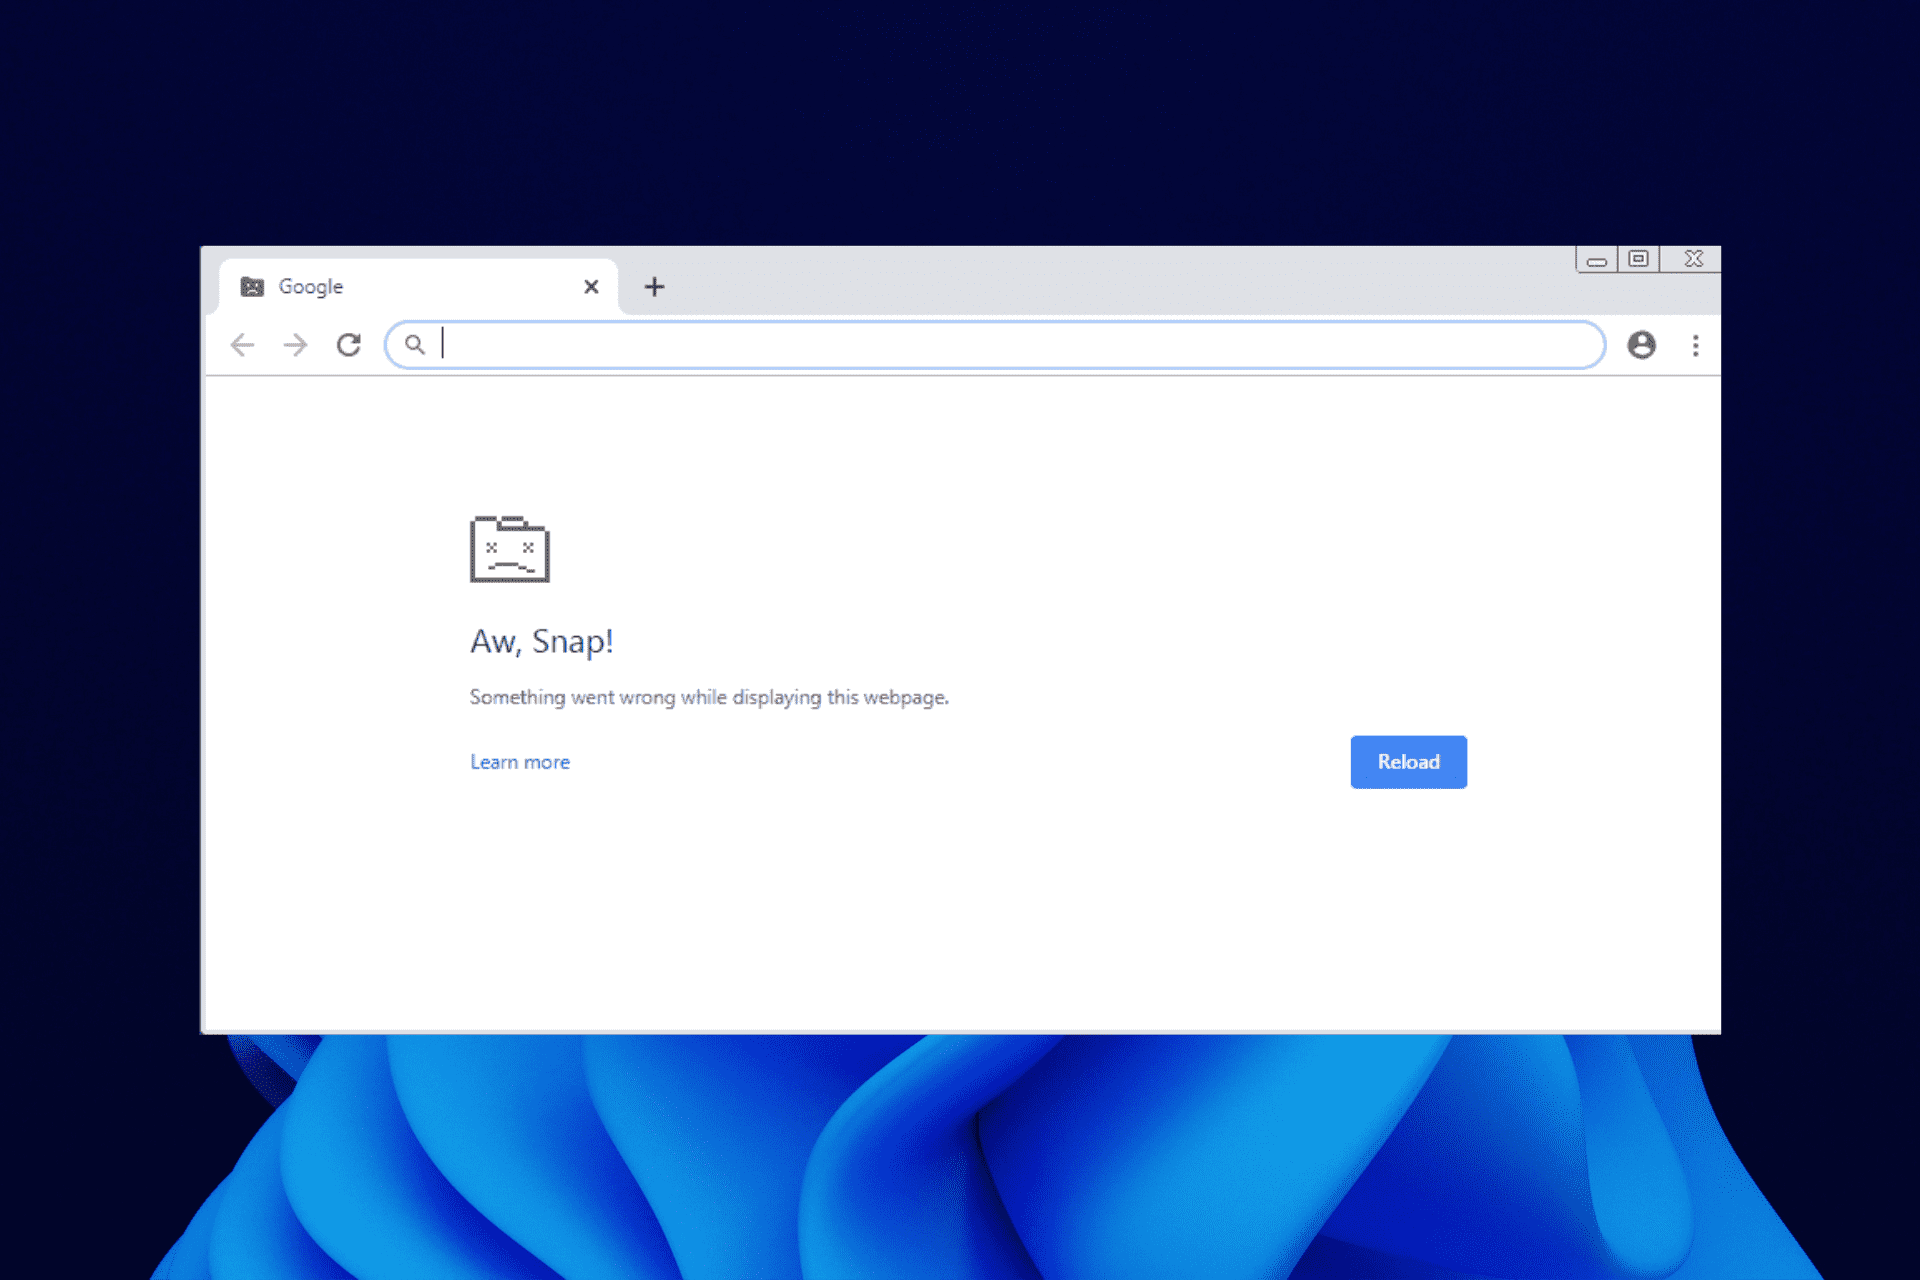
However, there is no perfect app, and users sometimes face issues and error codes on the browser. One of such disturbing issues currently being reported by Windows 10/11 users is the Aw, Snap! error in Chrome.
This error prevents you from loading certain web pages and can slow you down. This guide will show you surefire ways to fix the error for good.
What causes Chrome Aw, Snap! error?
Various factors could cause the Chrome Aw Snap something went wrong on Windows 10 and 11. Below are some of the popular causes:
Accumulation of corrupt browser data
Interference from antivirus
Faulty extensions
Presence of malware
Quick Tip:
A practical workaround to be considered here is to simply switch your browser to another option like Opera One.
In order to avoid such errors, this browser comes with improved security like free VPN support, flexible navigation, online tracker block, or an easy setup panel.
Opera One
Turn the Aw, snap! browsing errors into a faster and guarding navigation on any page.
Why do I keep getting Aw, Snap! Something went wrong?
If you keep getting the Aw, Snap! Something went wrong while displaying this web page error, it is likely due to the activity of an ad blocker on your browser or PC.
Also, it might be caused by a virus on your PC that’s disturbing your browser. Irrespective of the cause, we will discuss the fixes for the error in the following section of this article.
How do I fix Aw, Snap! error in Google Chrome?
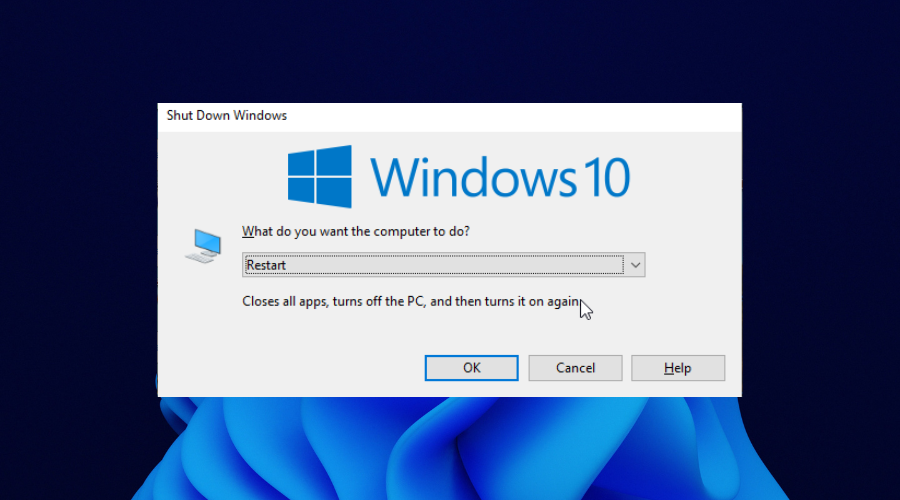
1. Try restarting your PC
If the problem appears constantly, it might be due to a third-party application. Applications can sometimes interfere with each other, thus causing all sorts of errors.
To fix this issue, try to restart your device. Restarting your PC will reset all apps and processes. This can help to eliminate the bugs that could be causing the error code on Chrome.
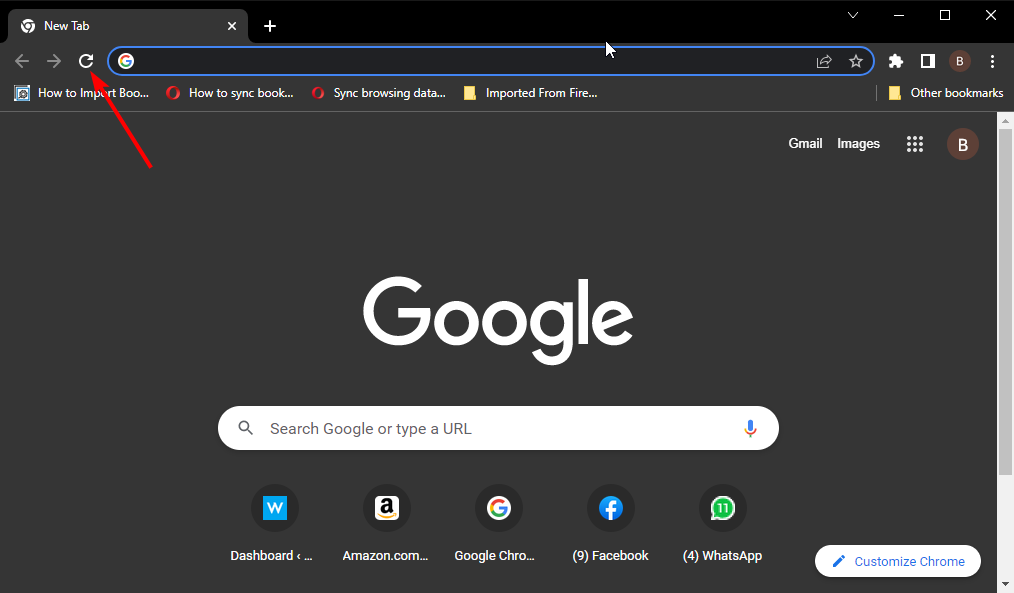
2. Reload the page
If you’re getting an Aw, Snap! error message, it might be because your Internet connection is having some issues or problems with the website you’re trying to access.
To fix this problem, be sure to wait a few seconds and try to reload the page.
If the page loads normally, there was an error with your network connection or with the website you’re trying to access.
3. Close all other tabs
Chrome is a demanding browser, and if you are out of memory, you might get Aw, Snap! Something went wrong while displaying this webpage error code on Windows 10 or 11. To fix this problem, ensure to close all other tabs and windows to create enough RAM space for Chrome.
After closing all other tabs, try to reload the problematic tab again.
4. Open the page in Incognito mode
Sometimes it might be your browser data and other glitches causing the Aw, Snap! error. In this case, you should try to visit the browser in incognito mode, where it will not store or use the data.
To do this, press the Ctrl + Shift + N keys. Remember that any info you access here will remain private, and your browser will not remember it.
5. Disable your extensions
Open Chrome and click the menu button.
Select the More tools option.
Choose Extensions.
Finally, toggle the switch before each extension backward to disable it.
Extensions help to improve the functionality of your browser. However, a faulty one in the mix might cause the Chrome Aw, Snap! error code on Windows 10.
If the error doesn’t appear anymore after disabling your extensions, you can use the elimination method to know the problematic one.
6. Clear browsing data
Click the menu button on Chrome and select Settings.
Select the Privacy and security option on the left pane.
Choose Clear browsing data.
Click the Time range dropdown and select All time.
Tick the boxes for Browsing history, Cookies and other site data, and Cache files and images.
Finally, Click the Clear data button.
While your browser data help to improve your overall browsing experience, it can get corrupt over time. And a corrupt browser is the basis of many issues.
So, it can cause the Chrome Aw, Snap! error on Windows 10 and 11. Ensure to restart your browser after clearing the data to effect the changes.
7. Create a new Chrome profile
Close your Chrome browser if you have it opened.
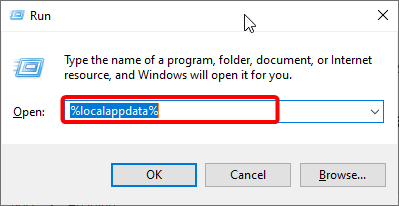
Press the Windowskey + R to open the Run prompt.
Type %localappdata% in the Open box and hit the Enter key.
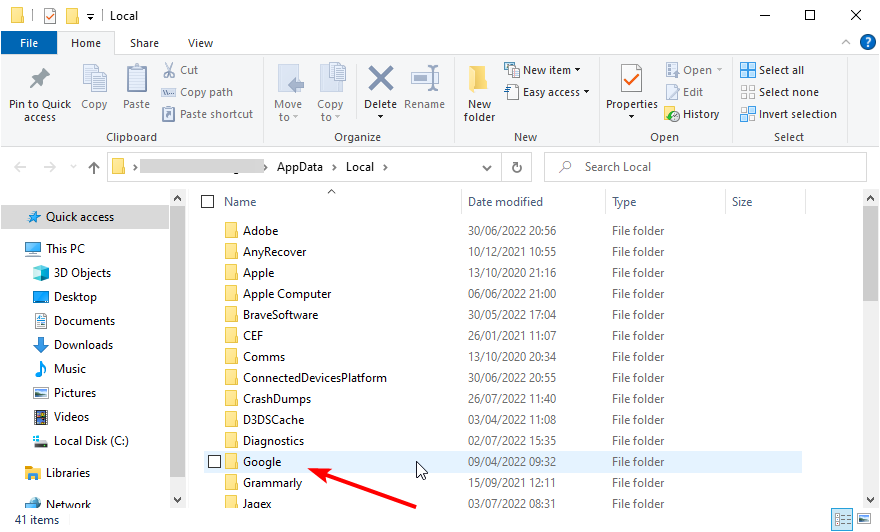
Select the Google folder in the newly opened window.
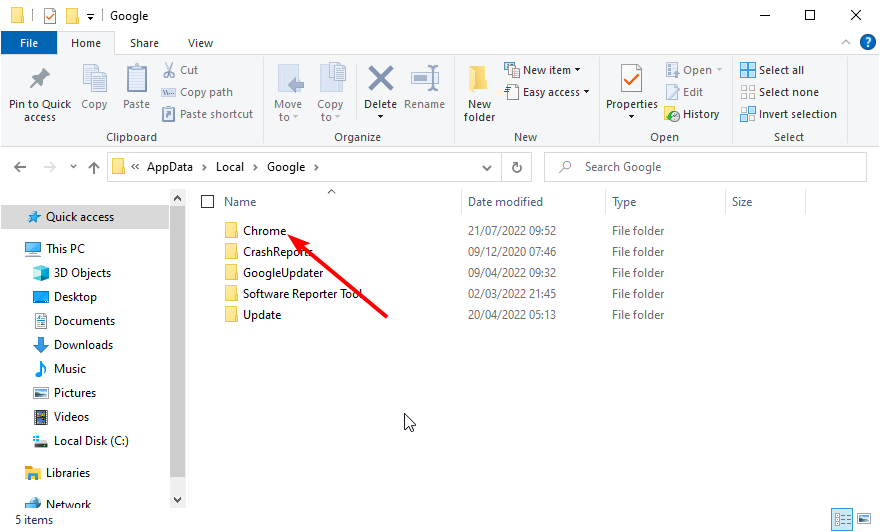
Double-click on the Chrome folder to open it.
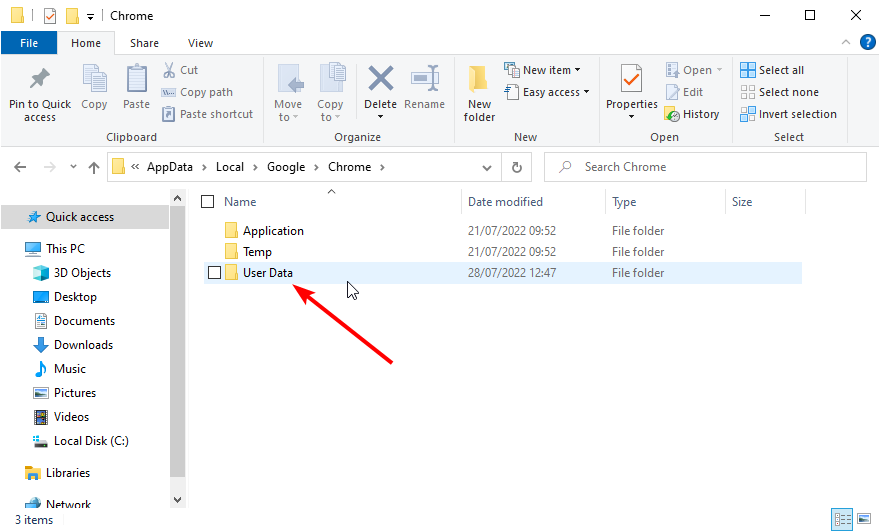
Now, open the User Data folder.
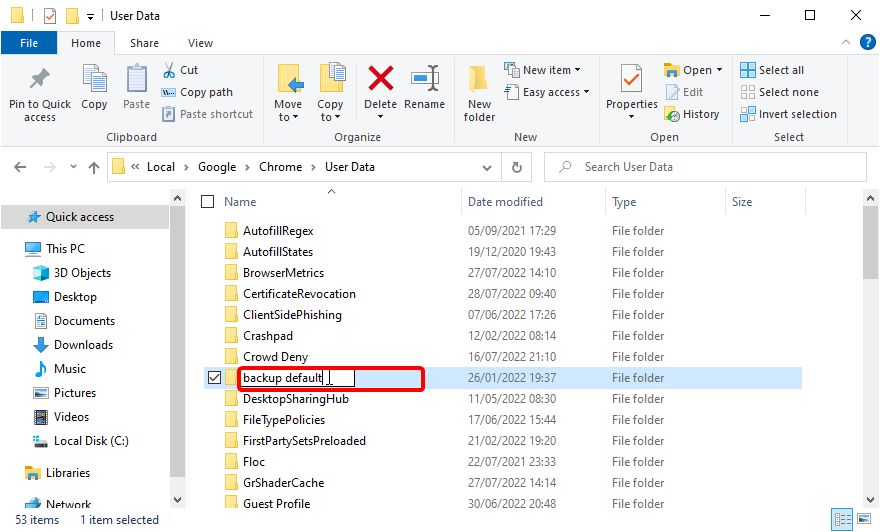
Rename the Default folder to Backup default.
Finally, launch Chrome.
Sometimes the Aw, Snap! error on Chrome on Windows 10/11 is due to corrupt profile data. The default folder is your current profile that Chrome is using.
By renaming it, you will force your browser to create a new profile the next time you launch it.
8. Temporarily disable your antivirus and firewall
Antivirus and firewalls can sometimes interfere with your browser. So, be sure that it is added to the exclusion list.
In addition, you might want to temporarily disable your antivirus and firewall and check if that fixes the Chrome Aw, Snap! error on Windows 10.
If that doesn’t help, you might want to remove your antivirus software temporarily. Depending on the specific antivirus software you use, you will need to follow slightly different steps to complete the uninstall process.
For instance, you can use a dedicated uninstaller tool to uninstall the Norton antivirus and most other security software.
9. Remove problematic software from your PC
Certain programs install additional software to your PC, usually without your knowledge. This software can sometimes interfere with Chrome and cause an error on your PC.
Remove any unknown or suspicious software from your PC to fix this issue. Users reported that AVG PC Tuneup software caused this error. So if you have it on your PC, we suggest you remove it.
The quickest and most effective way to remove unnecessary software is to use one of the best uninstaller software.
While removing from the Windows setting generally works fine, you may encounter issues with apps that will leave behind leftover files. Also, some malicious apps won’t uninstall at all.
But with the right uninstaller software, you should get the removal done easily.
As an alternative, it’s possible to erase unused system files and software using a cleaning tool capable to remove useless files for good.
For example, CCleaneris a popular cleanup tool created to delete residual files and browsing data for any browser. That will help you fix Chrome crashing pages and improve your browsing experience.
10. Disable the preload pages feature
Launch Chrome and click the menu button in the top right corner.
Select the Settings option.
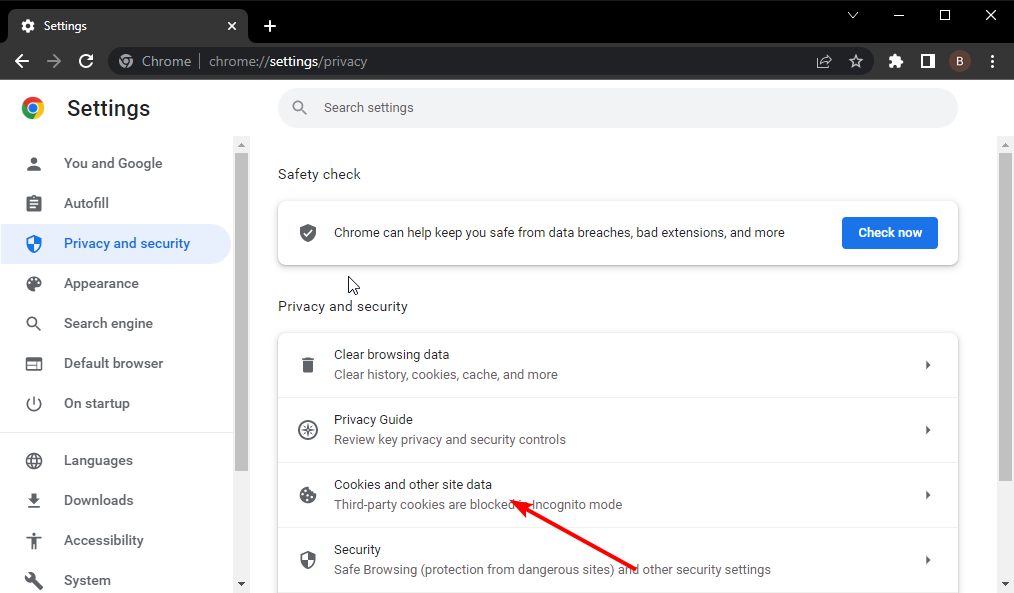
Click Privacy and security in the left pane.
Choose Cookies and other site data.
Toggle the switch for Preload pages for faster browsing and searching backward to disable it.
Sometimes in the quest to improve your browsing speed, you might cause other problems. Users have reported that disabling the preload pages feature on Chrome has helped solve the Aw, Snap! error code on Windows 10 and 11.
Remember to relaunch your browser after applying the fix to sync the changes.
11. Disable hardware acceleration
Click the menu button in the top right corner and choose Settings.
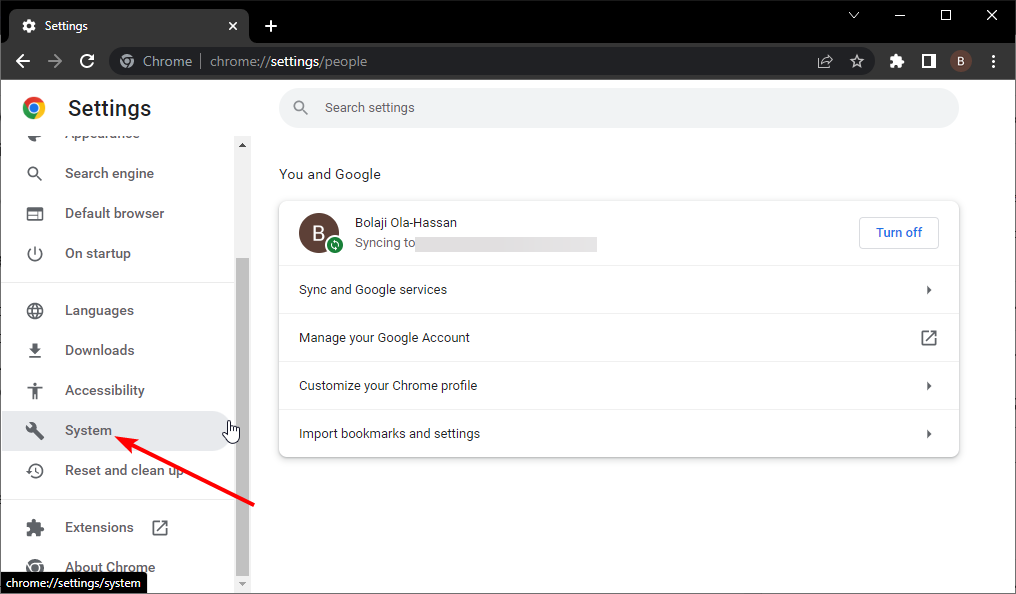
Select the System option in the left pane.
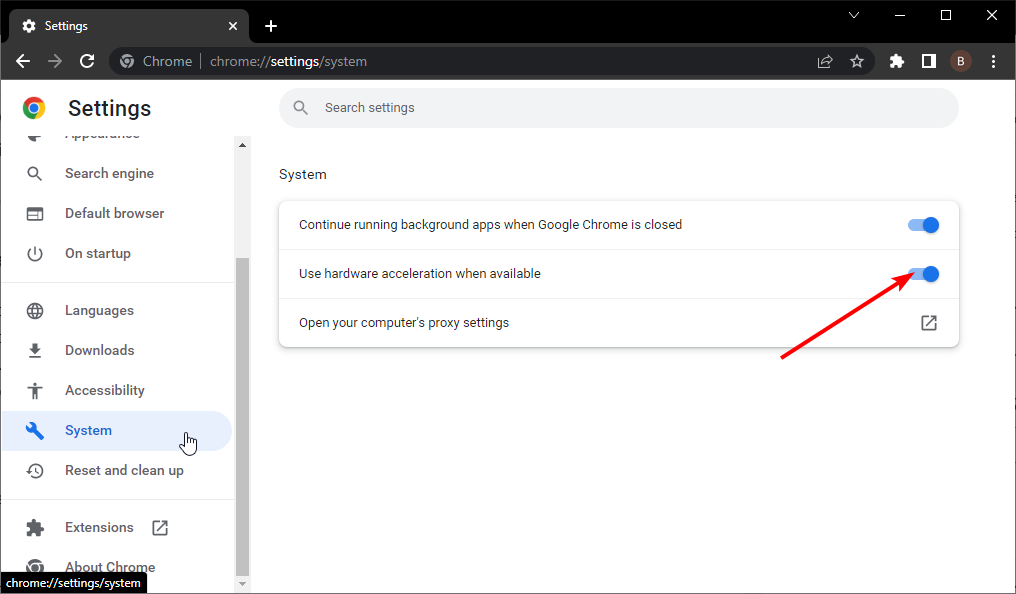
Toggle the switch for Use hardware acceleration when available backward to disable it.
Hardware acceleration helps to improve graphics processing by offloading some of the tasks from the CPU to the GPU. However, if your graphics card does not meet the requirement to use it, it can lead to problems.
Disabling the feature and relaunching your browser should do the trick here.
12. Disable Sandbox mode
Make sure that Chrome isn’t running.
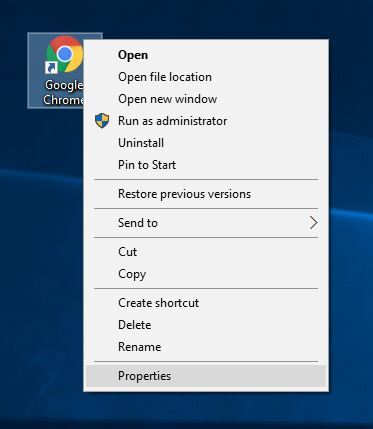
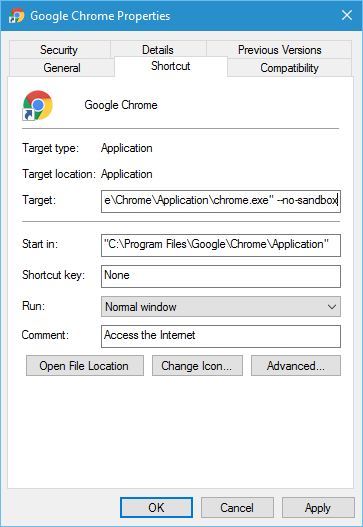
Locate the Google Chrome shortcut, right-click it and choose Properties.
Click the Shortcut tab at the top.
Add –no-sandbox or -no-sandbox in the Target field after the quotes.
Click the Apply button followed by the OK button.
The Sandboxing feature helps to make sure that codes from websites do not get into your computer. But some users have reported that disabling it solved the Chrome Aw, Snap! error on Windows 10 and 11.
So you can try it too. Note that you should only disable this feature for trusted pages. Also, don’t change anything between the quotes. Just add a space and -no-sandbox at the end.
Click the menu button on Chrome and choose Settings.
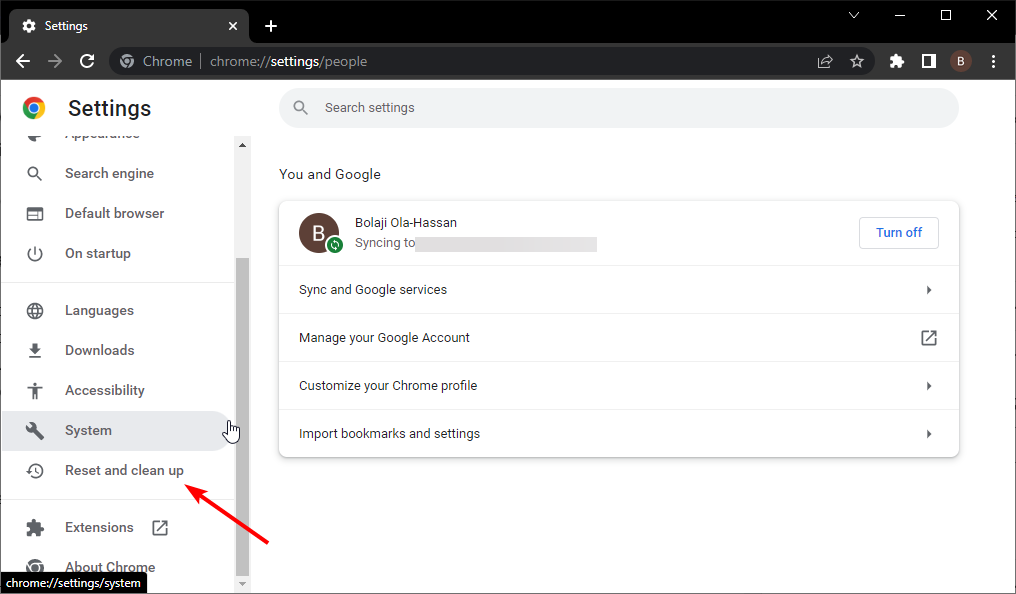
Select the Reset and clean up option in the left pane.
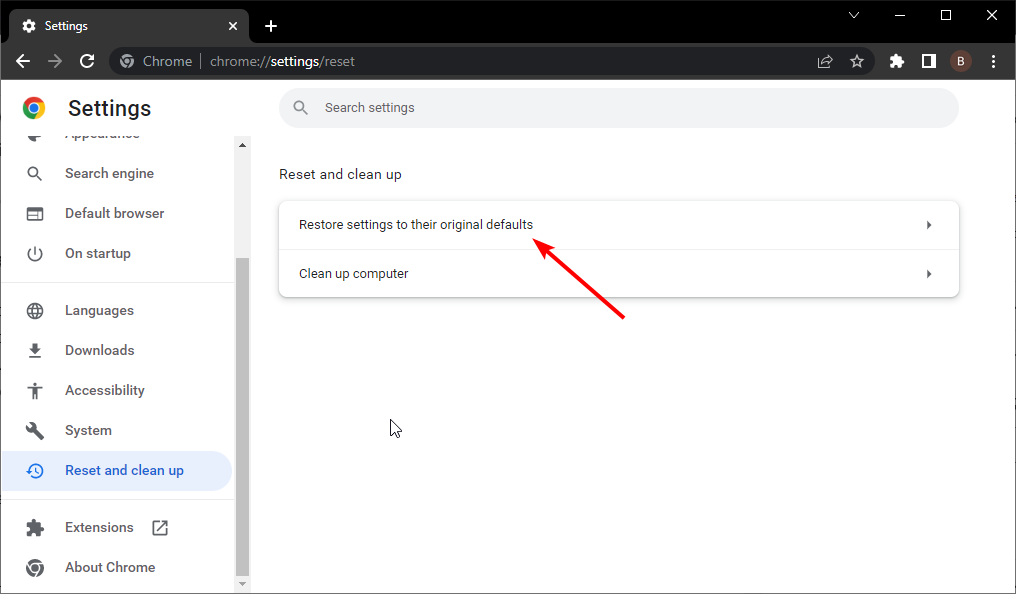
Choose Reset settings to their original defaults.
Click the Reset settings button to confirm the action.
The changes you have made to Chrome can accumulate over time. This could be the cause of the Chrome Aw, Snap! Something went wrong error on your Windows 10 and 11 PC.
Resetting your browser to default will delete these changes but keep your important data like bookmarks and passwords.
14. Reinstall Chrome
Press the Windowskey + I to open Settings.
Select the Apps option.
Navigate to Google Chrome and click on it.
Click the Uninstall button.
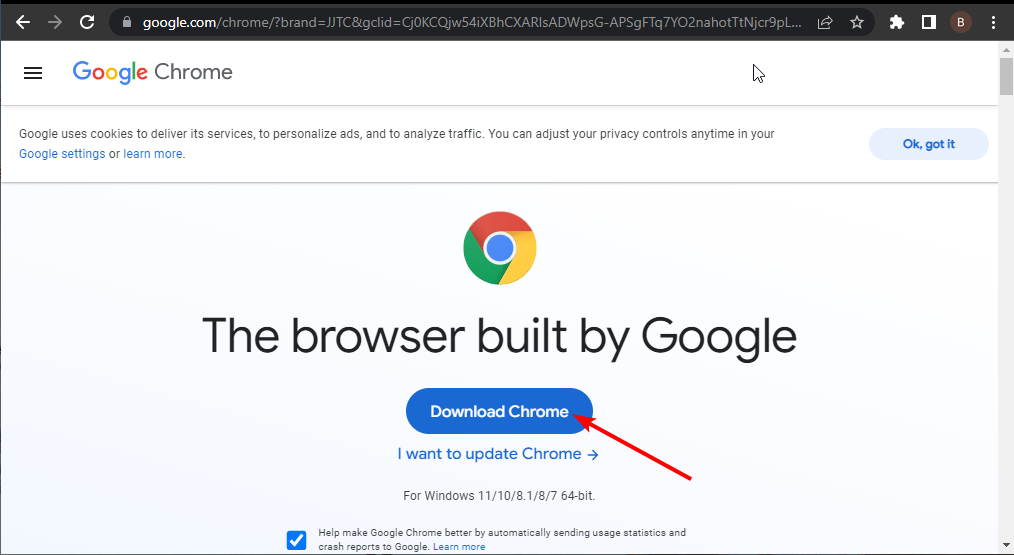
Now, go to the official website to download the Chrome installer.
Click on the Download Chrome button.
Click on the downloaded file and follow the simple onscreen instructions to complete the installation.
If you started seeing the Aw, Snap! error on Chrome after a Windows 10 update, your current browser version might have compatibility issues. In this case, the best thing to do is to uninstall and reinstall the browser from the official source.
15. Try another browser
If you had enough of the Aw, Snap! Chrome error, it’s a good time to switch to a better browser.
Our top recommendation is the impressive Opera One browser. It is a household name in the industry and needs no introduction.
It is one of the constantly evolving browsers with the addition of new features to improve user experience. Here are some of the best features:
Privacy-focused: adblocker, anti-crypto-mining, and free VPN built-in
Enhanced productivity with Workspaces and messengers integrated into the sidebar
Highly customizable, compatible with Chrome extensions + its own extension store
In the past, Opera One was among the browsers where some websites looked strange. Now, based on Chromium, it’s fully compatible with everything.
Switching from Chrome is easy by importing all your bookmarks and settings in a few clicks. What are you waiting for?
Aw, Snap! error in Chrome can prevent you from accessing your favorite websites on your Windows 10 PC. But with the solutions above, you should be able to fix it effortlessly.
Are you facing other error codes like the Err_file_not_found? Then, check our guide for the easy and practicable fixes to apply.
If you have any other suggestions or questions, don’t hesitate to leave them in the comments section below, and we’ll check them out.
Windows OS users have the option to customize the complete look of their computers. The customization option also includes downloading and installing third-party fonts on their computer.
However, at times these adventures can go wrong, and you may end up with completely changed fonts on the web browser making it extremely difficult to read or write.
So, you may be wondering why your browser font is so small or why it’s not the same. Well, read on to learn how to fix this by following our troubleshooting guide.
Why did my browser font suddenly change?
It really is a nuisance when this happens, and when it does it is due to either DPI scaling level, screen resolution, or something getting changed to the default text size.
Another reason why this could happen is your system getting infected with malware, but hopefully, that is not the reason. Just to be on the safe side, perform a full antivirus scan.
What can I do if my browser font is messed up?
1. Delete the problematic font
Press the Windows Key + R to open Run.
Type control and press OK to open the Control Panel.
Click on Appearance and Personalization.
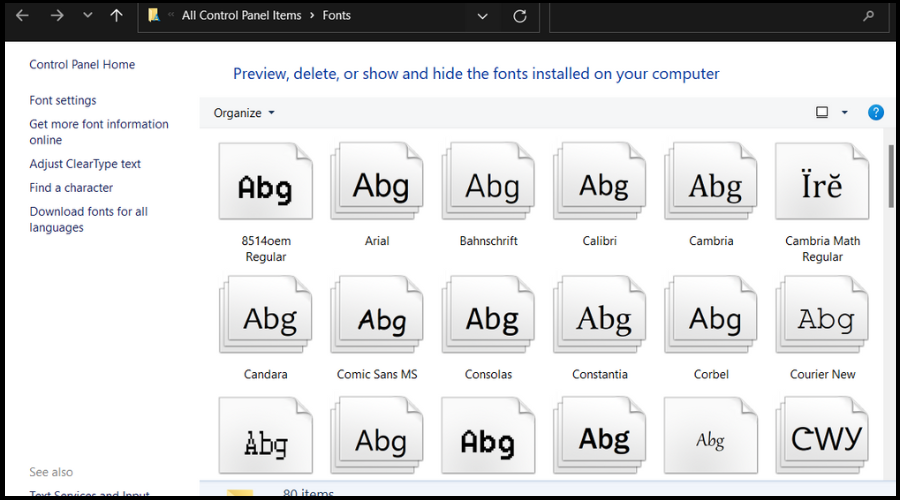
Click on Fonts.
Now find the font that you installed recently and started to cause the issues.
Select the font and click on Delete.
After deleting the font restart the computer.
2. Check for Windows Update
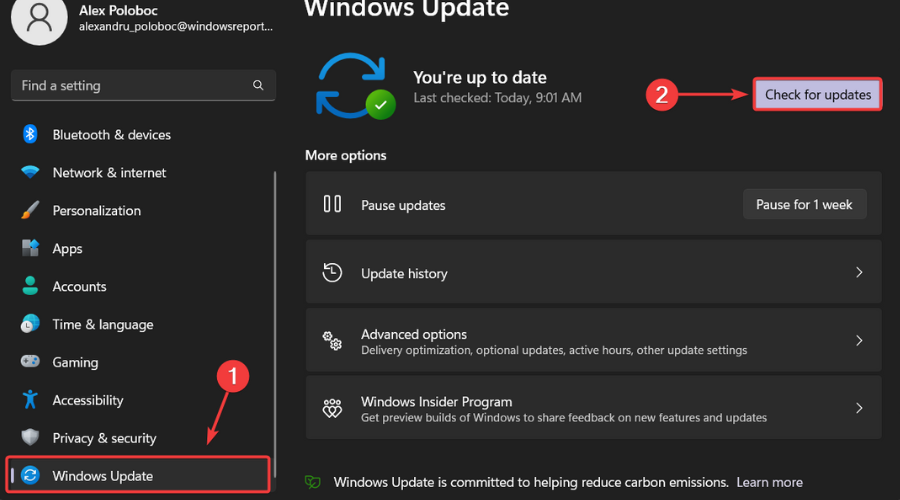
Press Win + I to access Settings.
Select the Windows Updates tab.
Click on Check for updates and install any recent ones.
3. Change Windows Fonts manually
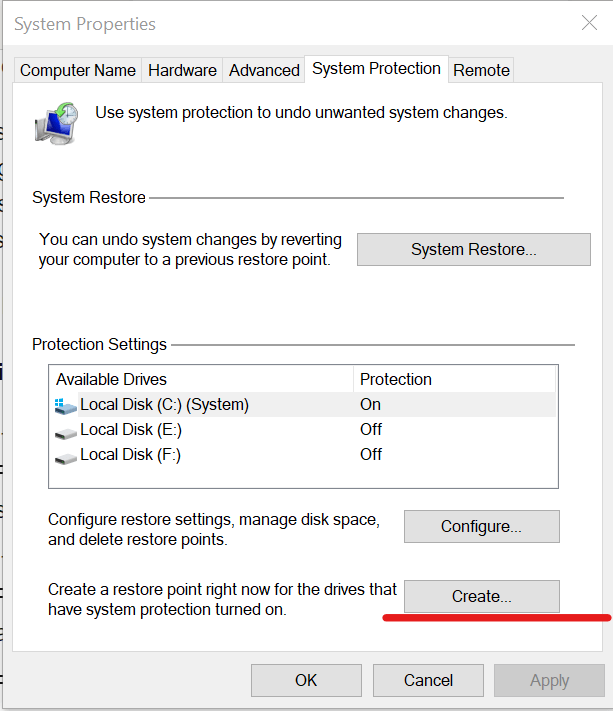
Before changing the font, please create a System Restore Point. Here is how to do it.
Type Restore Point in the search bar.
Click on Create a Restore Point.
Click on Create button and enter a name for the restore point.
Then click on Create button to proceed.
Find the Font you want to use
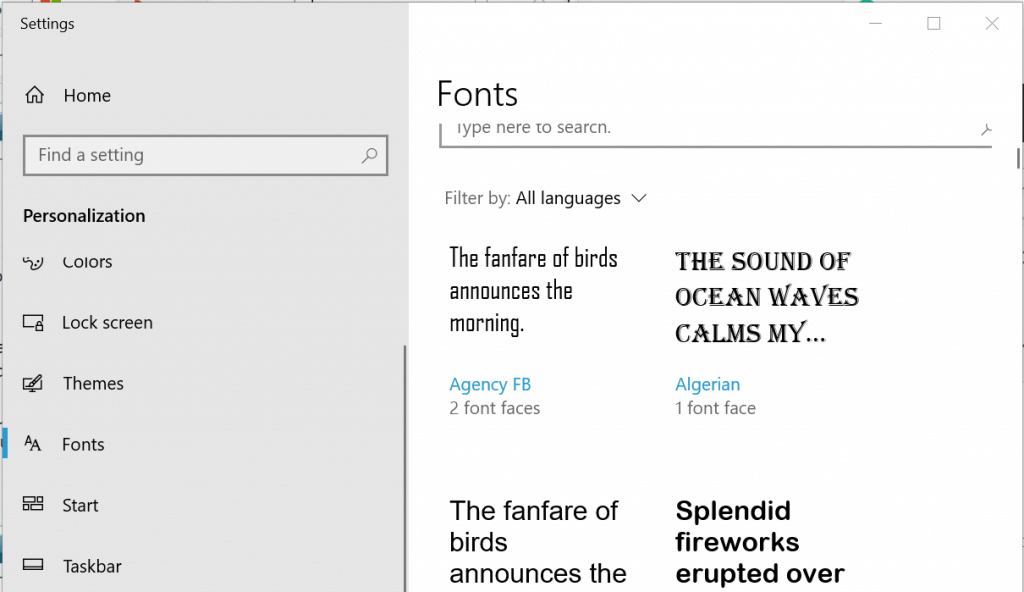
Click on the Start button and select Settings.
Click on Personalization.
From the left pane, click on the Fonts tab.
Now see all the fonts available on your system. Note the exact name of the font you want to use. For this guide, I will be changing the font to Agency FB.
Open Notepad. Copy and paste the following registry code into the text file. [HKEY_LOCAL_MACHINESOFTWAREMicrosoftWindows NTCurrentVersionFonts] "Segoe UI (TrueType)"="" "Segoe UI Bold (TrueType)"="" "Segoe UI Bold Italic (TrueType)"="" "Segoe UI Italic (TrueType)"="" "Segoe UI Light (TrueType)"="" "Segoe UI Semibold (TrueType)"="" "Segoe UI Symbol (TrueType)"="" [HKEY_LOCAL_MACHINESOFTWAREMicrosoftWindows NTCurrentVersionFontSubstitutes] "Segoe UI"="Agency FB"
In the above code make sure you change the Agency FB with your own font name.
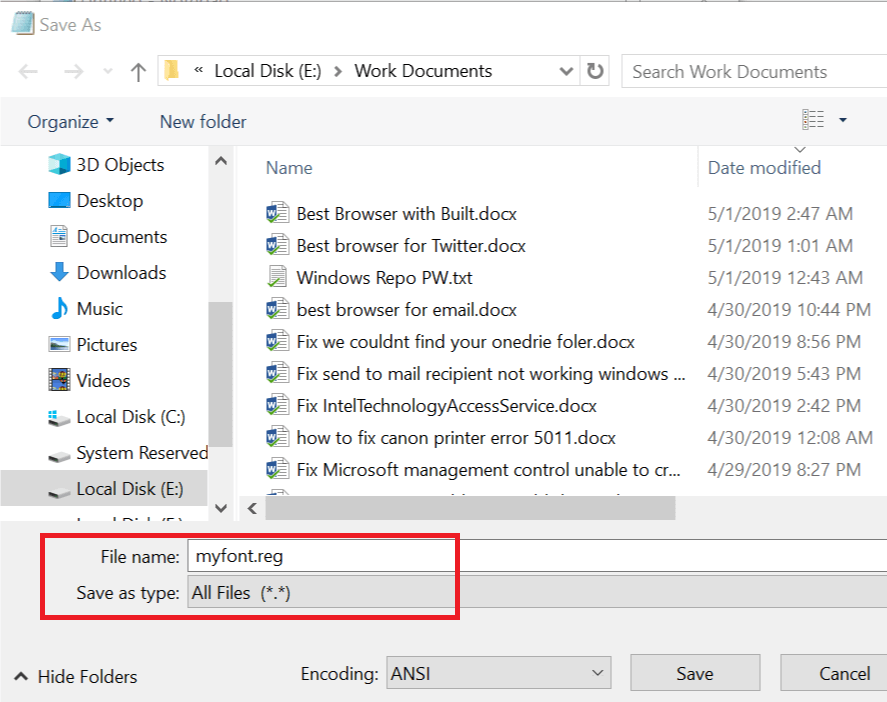
Press Ctrl + S. Under Save as type select All Files and name the file as myfont.reg
Click Save.
Double-click on your newly created file (Myfont.reg) and click Yes. Click OK to merge into the registry.
Restart your computer and check for any improvements.
Revert the changes
Follow these steps to revert the changes you made to the system fonts above.
Open Notepad. Copy and paste the following code into the file.
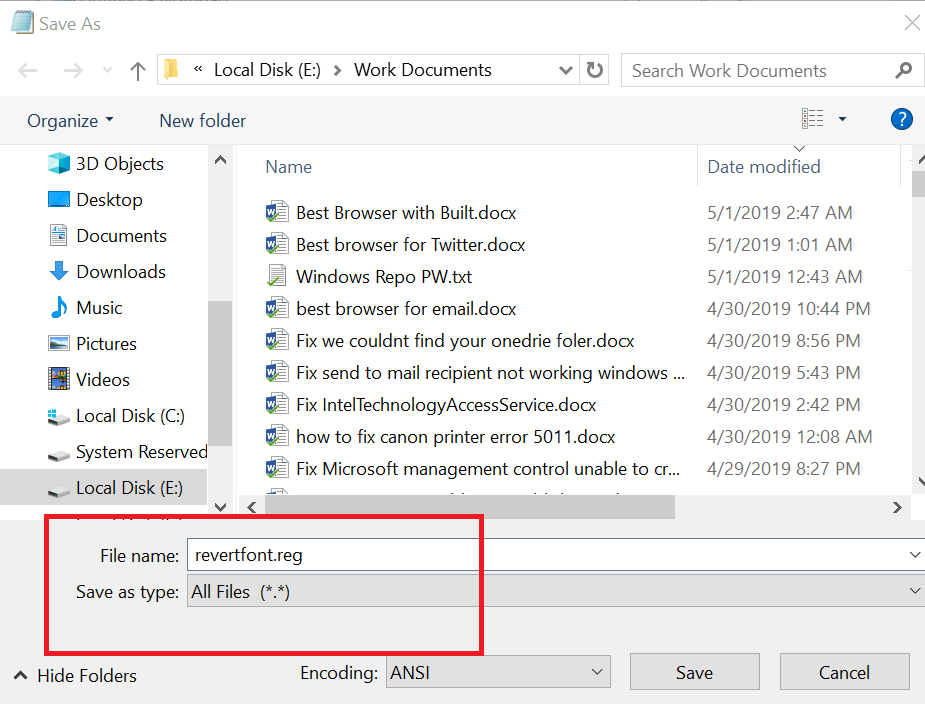
Save the file as Revertfont.reg. Make sure you set Save as Type to All File.
Double-click on revertfont.reg and click Yes > OK to make the changes.
Restart your computer and check if the default font is restored.
What fonts are built into browsers?
Web-safe fonts are the obvious choice in standard web design. Thus, by choosing a web-safe font, you can ensure that your text will always appear as intended.
Some of these are: Helvetica (sans-serif), Arial (sans-serif), Arial Black (sans-serif), Verdana (sans-serif), Tahoma (sans-serif), Trebuchet MS (sans-serif), Impact (sans-serif), Gill Sans (sans-serif), Times New Roman (serif), Georgia (serif), Palatino (serif), Baskerville (serif), Andalé Mono (monospace), Courier (monospace), Lucida (monospace), Monaco (monospace), Bradley Hand (cursive), Brush Script MT (cursive), Luminari (fantasy), Comic Sans MS (cursive).
There you go! Now you have all the knowledge required for when the Google Chrome font changed by itself.
It sounds ridiculous saying my browser font changed by itself, so knowing how to swiftly deal with this issue is a must.
Users have been reporting problems such as the font on the browser being messed up, or the Firefox font changing suddenly for a long time, so it’s actually not something new.
Follow the steps above, and you should no longer have any more font issues with your Internet browser. Let us know which solution you used by leaving us a message in the comments section below.
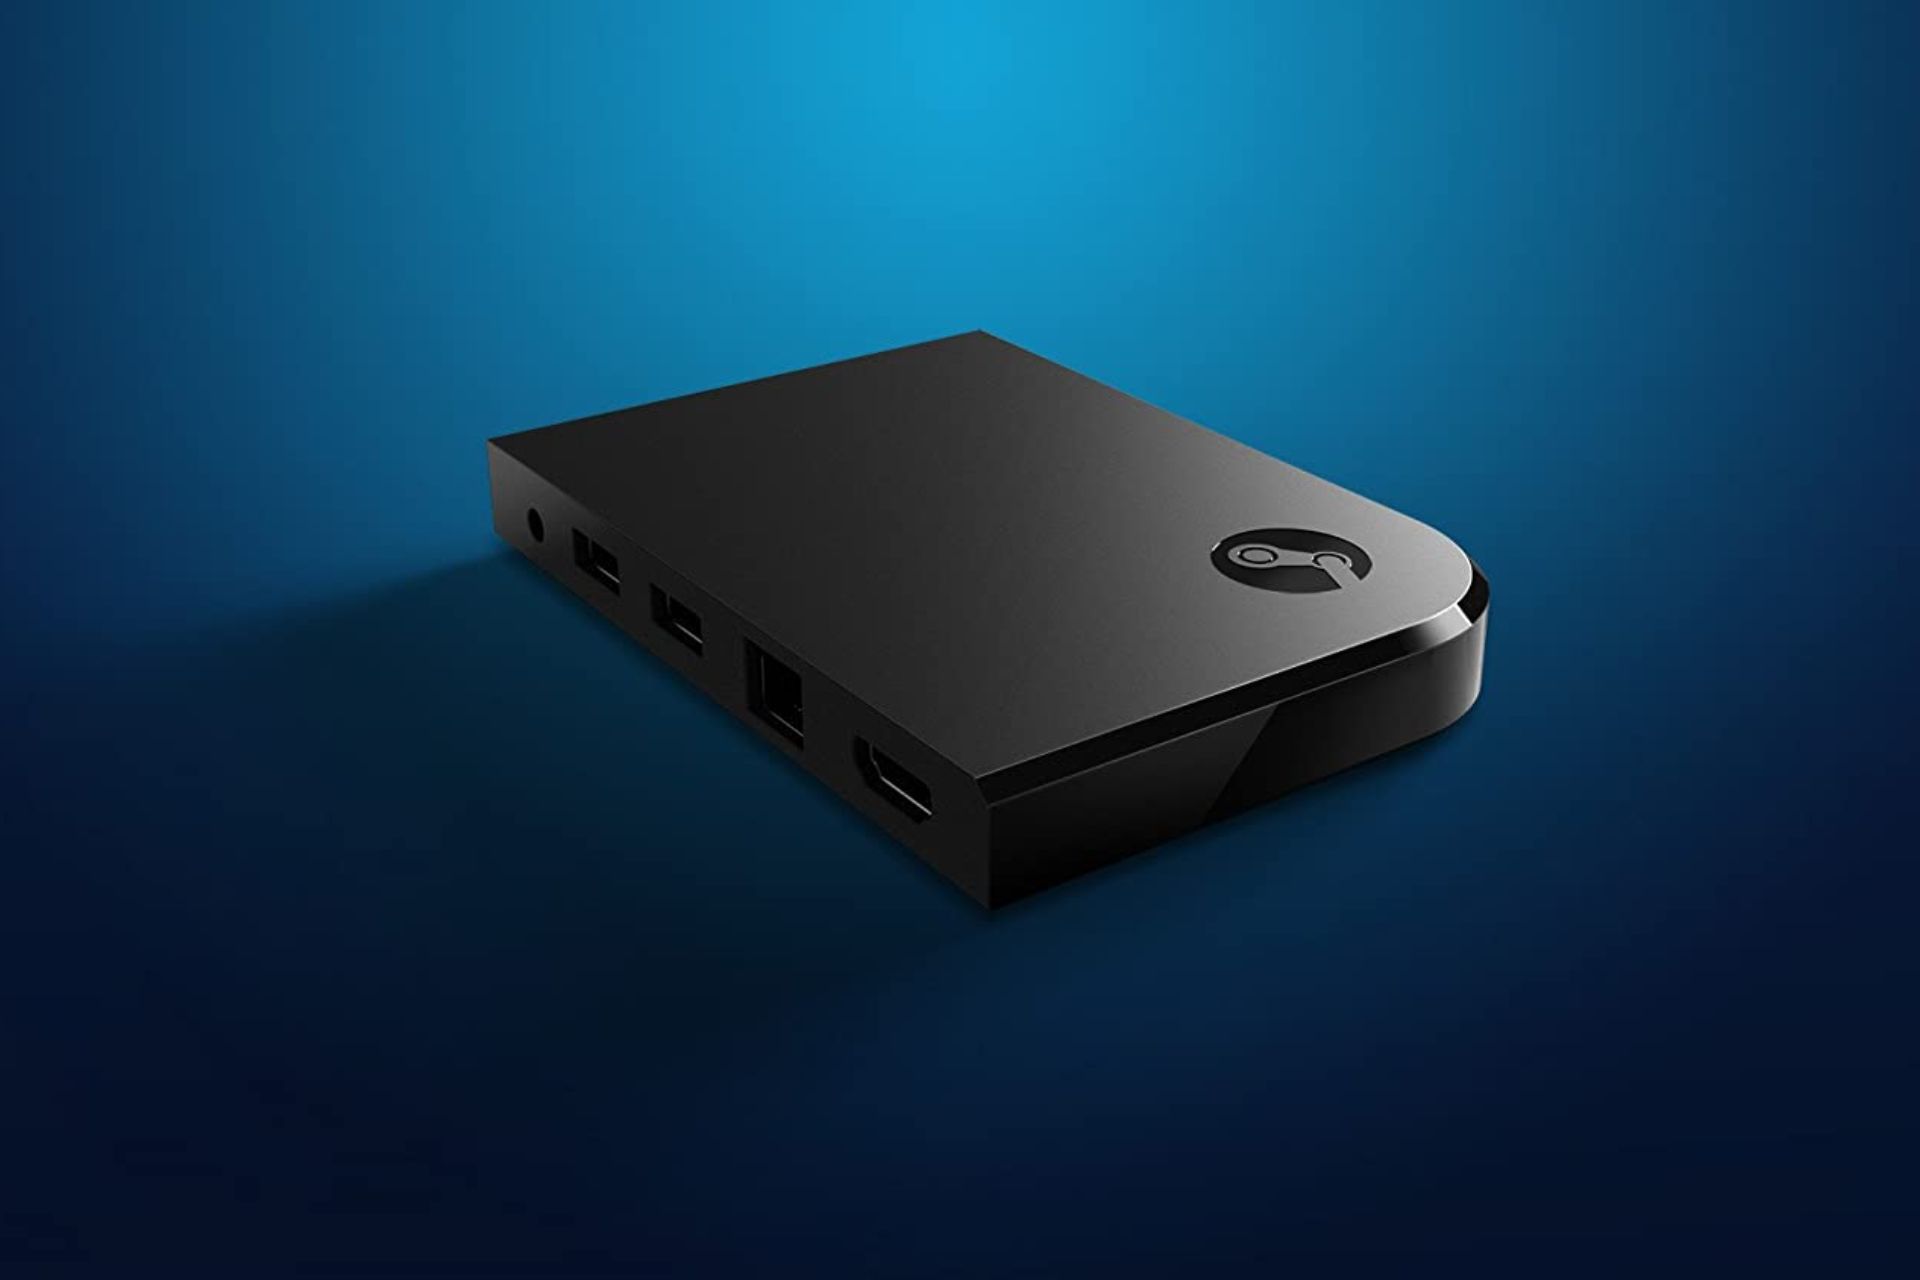
The Steam Link is a great way to play your favorite PC games in the comfort of your living room. It’s a small, affordable device that connects directly to your TV and streams games from your computer.
It comes with a built-in power supply, so most people don’t have to think about cables. The Steam Link supports HDMI and DisplayPort, which is compatible with most modern televisions.
The only problem that may arise is that the Steam Link may not recognize the controllers or the cable included with the device may not be very long. To get a longer cable, you’ll need to buy one separately.
But not just any cable will do. You want something with high-quality construction and low latency that won’t cause problems with your game experience. To help you out, we have compiled some of the best power cables for Steam Link.
What kind of power cable does Steam Link use?
The Steam Link can be used with any controller compatible with Steam. But, if you want to use it with a mouse and keyboard, you’ll need to connect it to a USB hub or other similar device.
It is designed to work with any TV or display with an HDMI input. However, you’ll need to ensure it’s connected via a plug with enough power to deliver the necessary wattage. Better yet, it is advisable to purchase a surge protector for any eventuality.
If you’re connecting your Steam Link to a TV, we recommend using an AC adapter. This is because it helps stabilize the picture quality of your stream and reduces video lag.
Since you are using an AC adapter, it begs the question: Can Steam Link be powered by USB? Yes, you can power your Steam Link by USB. However, it’s not recommended because the Link is designed to work with a wired connection to your router.
The Steam Link runs off a standard AC-to-DC power adapter, typically used with laptops and other mobile devices. It is about 2 feet long and has a barrel connector at one end that plugs into the Steam Link.
The adapter comes equipped with an AC power cord that measures 6 feet long, which gives you more freedom to move around your space while you’re streaming.
This power supply is a compatible replacement for the original power supply included with your product. It is guaranteed to meet or exceed OEM specifications.
High-quality corded cable
100% Brand New
AC to DC adapter for the Steam Link streaming device
The extended length allows you to charge your device while using it at the same time. The unit has an indicator light, which will flash during charging and turn solid green when the battery is fully charged.
It also has a built-in power supply chip that prevents overcharging, which means you can plug it in once and leave it to charge, rather than having to remember to turn it off.
The ZOZO 10W 5V 2A is designed to adapt to worldwide power outlets, and it’s safer with automatic voltage and frequency control, which ensures the same quality of power supply.
The high-quality chipset protects your devices from overcurrent and overheating. Also, it has a durable built-in fuse to protect your device from short circuits and other damaging effects caused by a power surge or lightning strikes.
This power adapter is designed with durable, high-quality plastic housing and has a built-in over-current protection feature.
It also has overload protection which means that if too much power is drawn from any device plugged into this adapter, it will shut down automatically until there is less demand on the system again.
This gives your device extra protection against overloading or damaging itself while using this adapter as its source of power.
The iMBAPrice 5V DC Wall Power is a simple, small, and easy-to-use power supply that works with any standard wall outlet. It has two LED indicators: one shows the power level, and the other shows the charging status.
It features 100-240V 50/60Hz input voltage range and 5VDC 1A output voltage. You can also convert to variable voltage if you wish to do so.
Internet Explorer 11 is the last version of this browser. After that, no more versions were released, but there are ways to install it. However, Windows OS older than Windows 10 doesn’t have Edge. So, IE is the default browser.
Then, Double-click on the installer file from the download folder.
Install the Internet Explorer 8 on XP.
Restart your computer.
The link mentioned in the steps will work for both Windows XP 32-bit and 64-bit. It will even work on XP service pack 3. As it is an offline installer, you can save it somewhere safe so you can reuse it in the future.
In a similar way, you may try to install Internet Explorer 11. But, it will end up showing you an error.
What to do when Internet Explorer won’t install on Windows XP?
If you tried all of the above, but IE seems not to work, try the following:
Make sure you’re installing a compatible version
Download the installer again
Run as administrator
Ultimately, try another browser
If you’re looking for a similar browser, that’s lightweight, fast and reliable, try Opera. It might work better than IE.
You may want to use IE11 on older operating systems like Windows XP, Vista, and 7. But, can you actually do it? Let’s find out.
Opera is a worthy web browser with a lot of features, including a built-in VPN, AdBlocker, and anti-track protection. To get maximum privacy online on XP, there is no alternative to a browser like Opera.
Opera
Feature-rich web browser that works great on both modern and older Windows operating systems.
Usually, Windows updates Internet Explorer with Windows Update. However, as XP is too old to get an update from Microsoft, you will need to do something else to use the latest update of IE.
You can just download the offline installer of the latest build from any trusted sources and install it by following the steps shown in the previous method.
Windows XP is already an OS where you cannot do so many things. It is because there is less compatible software available. But, we have another article where we have featured the software and tools which still work on this OS. You can check out the best available software for Windows XP in 2022.
This article has explained how to download and install Internet Explorer on Windows XP. If you know any other helpful information, feel free to let us know in the comments box.
SharePoint is a very useful online document management platform that allows you and your team to share and store all important documents in one virtual place.
This allows you and your team to access the files when needed, by simply using a password to log in.
Beyond this, SharePoint is fully compatible with the Microsoft Office Suite, giving you unrestricted access to all the tools you need for efficient document management and sharing.
Because this platform is completely stored in the cloud, in order to get the full SharePoint experience, you will need to use good web browser software.
The optimal software for this task would need to have the following features in order to qualify in this top 3:
Fast upload and download speeds
Fast loading of pages
Online privacy features
Good performance when dealing with ads, cookies, trackers, etc.
In this article, we will explore some of the best browser options for SharePoint that contain all the features we mentioned above, and much more.
What browsers work with SharePoint?
SharePoint is compatible with all of the web browsers that are now in widespread use, including Microsoft Edge, Brave, Internet Explorer, Google Chrome, Mozilla Firefox, and Apple Safari.
On the other hand, using particular web browsers may result in SharePoint capability being degraded, restricted, or made accessible only after the completion of alternate actions. These aspects differ, but in general, they are rather simple.
Note that when it comes to macOS users, Safari is still the best browser for Sharepoint to use on Mac, due to their compatibility.
What browser does Office 365 work best with?
These days, we have noticed that both our Firefox and Chrome browsers have gotten much slower. We are unsure as to what appears to be the cause of this change, given that our system is not even close to being obsolete.
Blocking pop-up windows, surfing using tabs, integrated search capabilities, and other critical functions are all included in Opera One, as they should be in any modern web browser.
But what truly separates this browser from the rest is the lightning-fast speed with which it navigates the Internet, and this is true whether or not graphics are being loaded. Thus, we think it is best suited for the Office 365 package.
Without further ado, let’s see what the 3 best browsers for SharePoint are as well as how you can access it from your browser. Follow along!
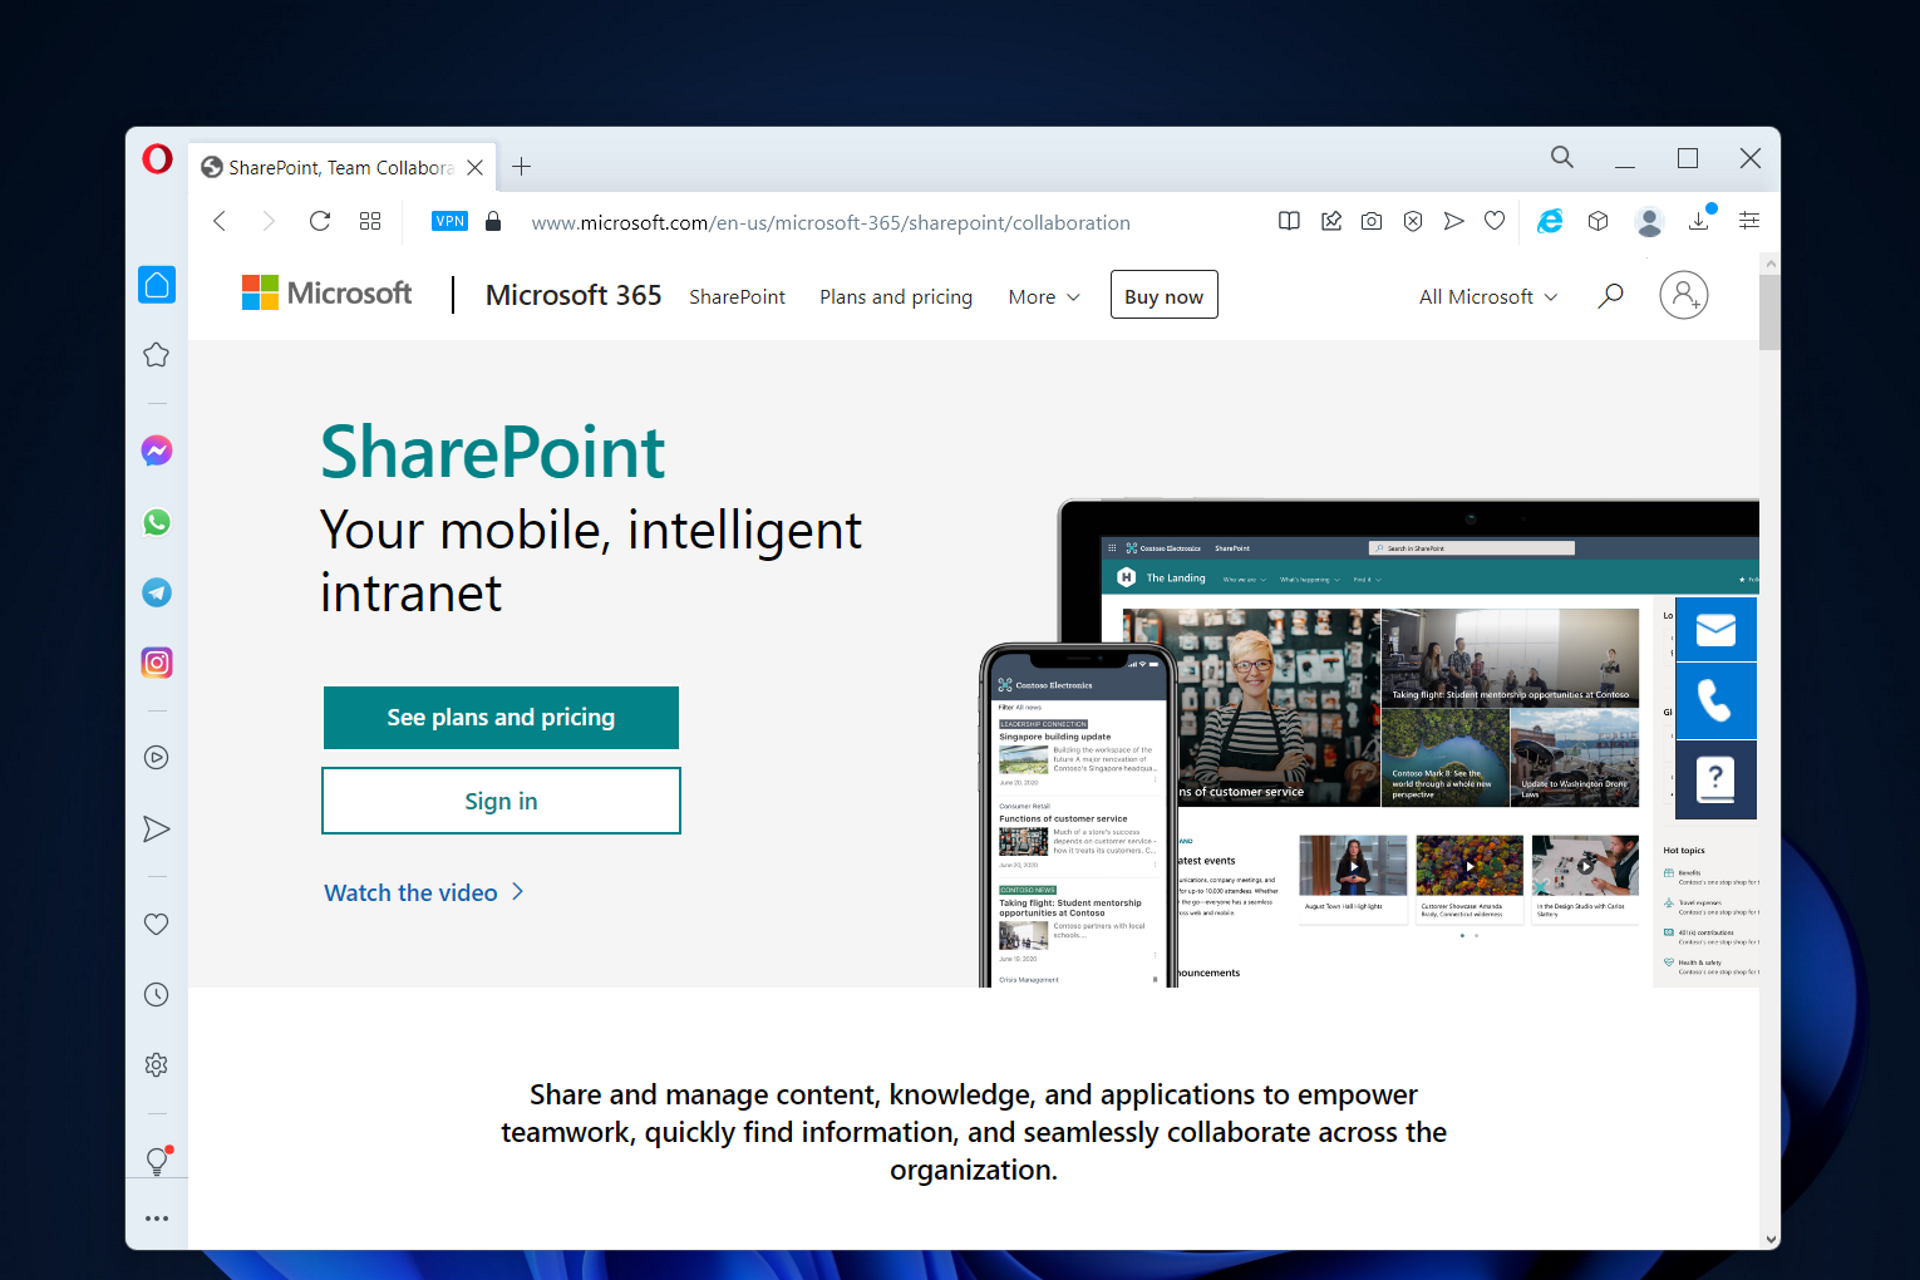
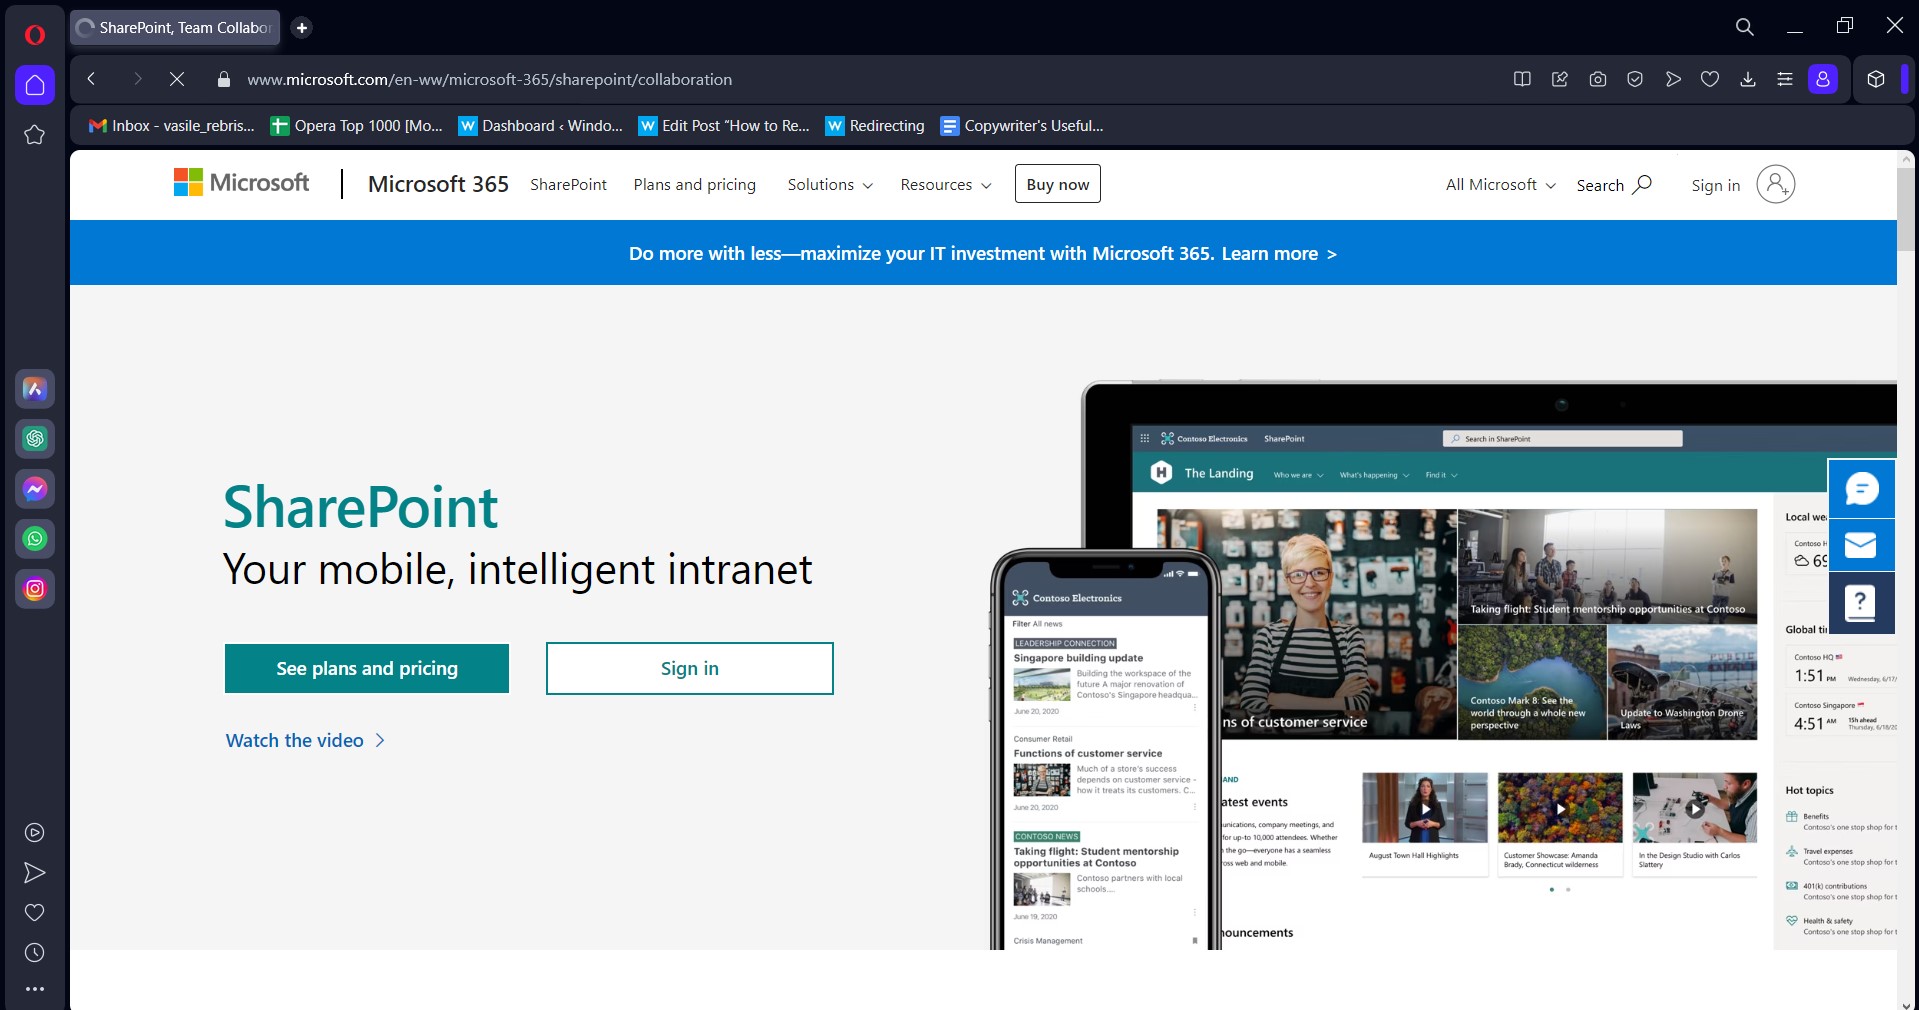
Opera One is a great tool that you can use to share and manage your documents online with your employees/team. The compatibility between Sharepoint and this online browser couldn’t be better.
It offers you access to a wide range of customization options, both for workflow and aesthetics. You can choose a browser theme to change the way how Opera One looks, or add extensions to change the way it works.
When using SharePoint with Opera One, the software performed well, with the speed results of loading large documents, and also complex webpages, coming neck to neck with our second choice. Thus we regarded it as the best browser for SharePoint 2019 and over.
Even though the speeds are only slightly lower than in the case of UR Browser, Opera One still remains the best browser because of the constant innovation and extra-functionalities added over time.
Here are some of the best features found in this browser:
Built-in VPN, Malware protection, Ad Blocker
Side-bar for chatting or social media
AI and modular AI-ready design
Turbo Mode and battery saver
Opera One
Safely use SharePoint and enjoy the loading speed of your documents with Opera One!
UR Browser is a very powerful browser application that contains a wide range of privacy features, and also amazing loading speeds. It is the best browser for SharePoint 2013 due to its lightweight architecture.
This software has a very user-friendly interface, that you can customize to fit your wishes. You can add shortcuts to the most used websites using icons, and can also customize the background of your homepage.
Beyond this, UR Browser also shows you information tailored to your needs inside the home screen – news, weather updates, search, etc.
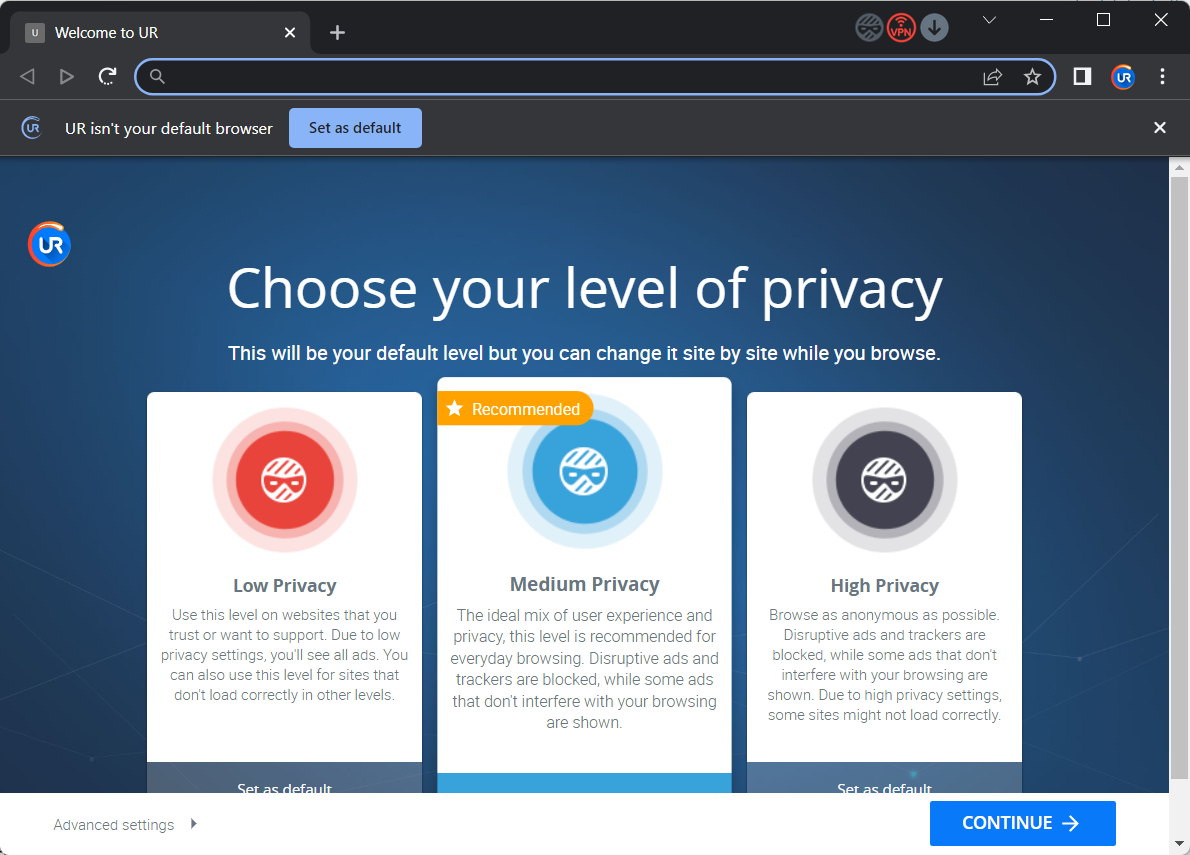
One of the most important features that the software has is its ability to offer great customizable privacy levels. Depending on your needs, you can choose from three privacy settings – low, medium, and high.
The latter option also activates the powerful built-in VPN service (Virtual Private Network). This allows you to never worry about a third party being able to collect your private information.
Another great feature that makes UR Browser our top pick for browsers to use with SharePoint, is its ability to successfully prevent ads.
Even though all browsers have some way of dealing with this issue, UR Browser doesn’t require you to download any extensions, as all these services come included in the installation.
Here are some other useful features of UR Browser:
Fast loading speeds of web pages and online documents
All websites that you visit are automatically scanned for viruses and other threats
All downloads first go through a virus check
Low impact on system resources
UR Browser
Download UR Browser for a fast SharePoint experience, with no ads, viruses, or other online threats.
Mozilla Firefox is another great software option to use with SharePoint, offering you good loading speeds for documents, and a wide range of customization options.
Even though Firefox has great capabilities, all these features make Firefox only the third-best software option for using with SharePoint.
The big difference is the speeds at which each of the browsers is able to load large documents and complex web pages. Opera One is about 2 times faster than Firefox, and also has additional customizable privacy settings.
Even though Borderlands 3 is crossplay-compatible, it is not always working properly. If you encounter issues with it, follow the steps below to address them right away.
The Borderland 3 crossplay works between PC, MAC, Xbox Series, and Stadia. This feature allows players to use any of the aforementioned hardware to play the borderline three games. PS4 and PS5 do not support it.
What can I do if Crossplay doesn’t work in Borderlands 3?
Go to the Epic Games launcher and open your Library.
In the lower-right corner of the homepage, click on the cog icon.
Select verify and wait for the verification process to complete.
Once the verification is complete, relaunch the Borderlands 3 and check if the issue persists.
This is a simple solution, but it can help you if Borderlands 3 crossplay between PC and Xbox is not working.
➡ What can I do if the Borderlands 3 connection timed out?
Users who experience a connection timeout can resolve the issue by unlinking the game from the official website.
They can then go on to restart the game and attempt to reestablish the crossplay connection. This fix is quite efficient and has worked for many users.
➡ What can I do if Borderlands 3 crossplay lags?
Many users have also complained of crossplay lags. In some instances, Borderlands 3 can’t join friends PC at all. Although a common symptom is a bad internet connection, it may also be because of different rate frames for the devices involved.
For instance, a PC gamer going up against an Xbox gamer in crossplay may experience lag.
To fix it switch the game from performance mode to quality mode to make the best of your graphics output.
How to enable crossplay on Borderlands 3?
Ensure that you have the latest version of Borderlands 3 on your system and go to the game’s starting screen.
Go to the game starting page and select opt-in to turn on crossplay.
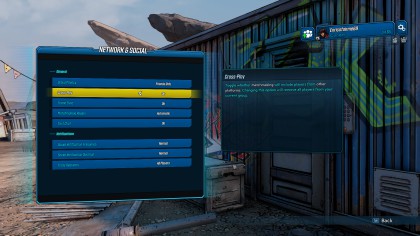
If you didn’t see crossplay on the home screen, go to Options and select Network & Socials.
Click the toggle bar to turn on crossplay.
When turning on crossplay for Borderland 3, certain naming conventions must be observed, such as:
A name that is unique only to you
A name that is between 3 to 16 characters long
A name that starts with a letter and includes numbers and characters.
How do I play Borderlands 3 cross-platform (PC and Xbox)?
The Borderlands 3 cross-platform is compatible with PC and Xbox. If you want to connect your Borderlands 3 on PC to a friend on Xbox, here are some steps to help you:
Open your Borderland 3 and log in, and you will receive a crossplay update message.
Create a unique display name.
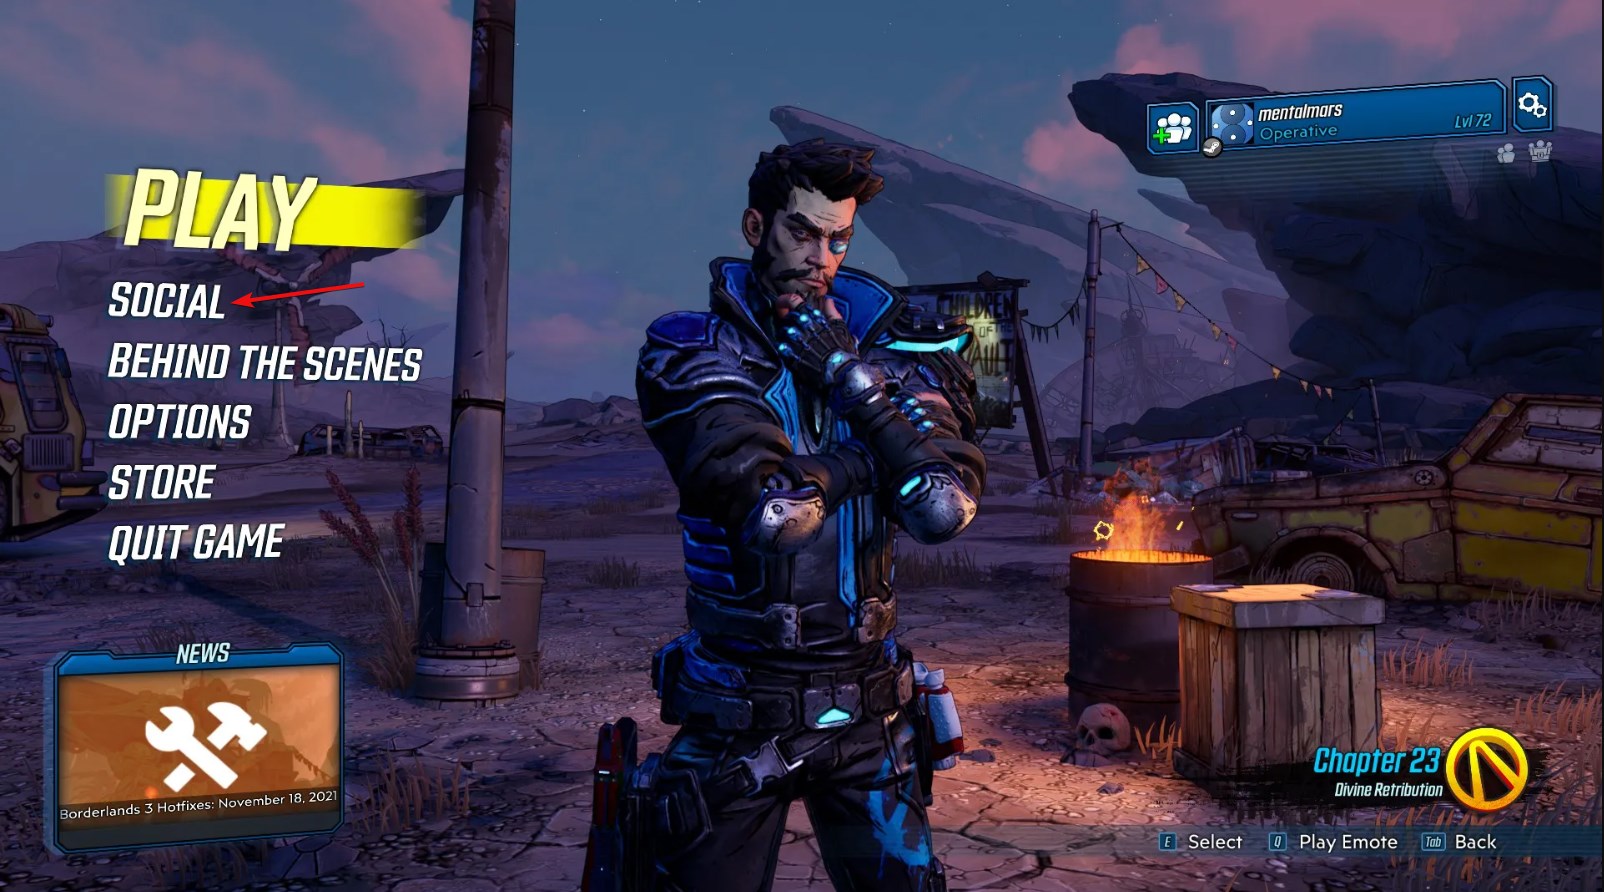
Open the Borderlands 3 menu and go to Social.
Invite the friends you want to play with; in this case, your friend on the Xbox.
Although the Borderland 3 cross-platform is compatible with Xbox and PC, both you and your friend have to be on Epic and Steam Game Store for it to work; otherwise, both parties will have to purchase the game independently.
Keep in mind that sometimes you may encounter certain issues, but we covered those in Borderlands 3 packet loss guide, so be sure to check it out.
The Borderlands 3 crossplay offers more than the cross-platform feature. Players can also enjoy cross-progression which allows them to save their progress and continue on a different game console.
Another feature is the cross-generation, which allows players to interact with one another irrespective of the generation console in use, provided the console supports crossplay.
Here’s to hoping that this article has answered any questions you have about setting up your Borderland 3 crossplay! Let us know how it goes in the comments section below.
Microsoft this week announced the launch of a new line of Xbox-branded merchandise called the Camper Collection targeting Xbox gamers who enjoy spending time in the outdoors. And, yes, despite the stereotype of gamers being indoor introverts, there’s quite a few Xbox fans who enjoy camping and other outdoor activities.
Amongst the new items added to the official Xbox Gear Shop online storefront are an Xbox camper sherpa, utility crew sweater, and Xbox hammock and folding chair, an Xbox water bottle and bandana, plus a windbreaker and vest.
Xbox Gear Shop: Xbox Camper Collection
All of the Xbox Camper Collection items are now available to buy online while supplies last.
There are plenty of websites where you can still play Flash games in your browser. Such sites include games with high-paced gameplay that can be slowed down in Firefox and other browsers.
Lag is delayed server response times, and heavy lag can have a big impact on the game’s performance.
In order to have the best gaming experience on your browser, you need to take care of a few settings. Here we offer you some methods to do just that.
Why are flash games so laggy?
Too many other applications operating in the background is one of the most prevalent reasons why frame rates in games are so poor. When you are playing Flash games on your browser, the same logic applies.
When playing Flash games on Chrome or Firefox, if you have a lot of tabs open and a lot of extensions loaded, this might be the source of the slowdown you experience. All of these gobble up resources that your game may otherwise utilize in different ways.
It is never a bad idea to clean up your browser; even completely closing it and then bringing it back up again might have a beneficial effect. But if you don’t want to go through the trouble of doing this, a simpler solution would be to play the game in a different browser.
It’s possible that’s all that’s required to speed up games played in Flash. Then you may maintain that browser in its original configuration and use it just for playing Flash games if you so like.
Will Flash player games work after 2020?
Adobe Flash was formerly one of the web technologies that had the most widespread adoption. Flash, on the other hand, is being supplanted by other technologies like HTML5, and its use is gradually but certainly being phased out.
No major online browser has support for Adobe Flash Player at the moment; thus, you cannot use it. This covers Google’s Chrome, Mozilla’s Firefox, and Microsoft’s Edge browsers correspondingly. You can, however, make advantage of the Flash add-ons that are available.
And with this, we recommend Opera GX since the gaming community was taken into consideration while designing the aesthetic and functionality of the browser. Check out how to play Flash games without Adobe Flash in Opera GX.
Furthermore, the solutions presented below are helpful if you encounter the following issues in any browser as well:
Flash games lag
Flash player lag
Browser games running slow
Flash games lagging in Chrome
HTML5 games lagging
Without further ado, let’s jump into the list of methods that you can apply to reduce Flash game lag. Follow along!
How do I fix lag in browser games?
1. Consider using another browser
Before following all of the troubleshooting steps listed below, you should first consider the possibility of replacing Firefox altogether if you wonder how to make flash games run faster.
Since playing Flash games is what interests you most in this case, we recommend you try a web browser that advertises itself as the world’s first browser for gamers. This way you won’t need to reduce Flash game lag, since there won’t be any.
This browser is called Opera GX, and it is an ultra-lightweight browser created using the Chromium engine. Everything about it screams that it is made for gamers, from the UI design to the integration of various gamer-oriented tools.
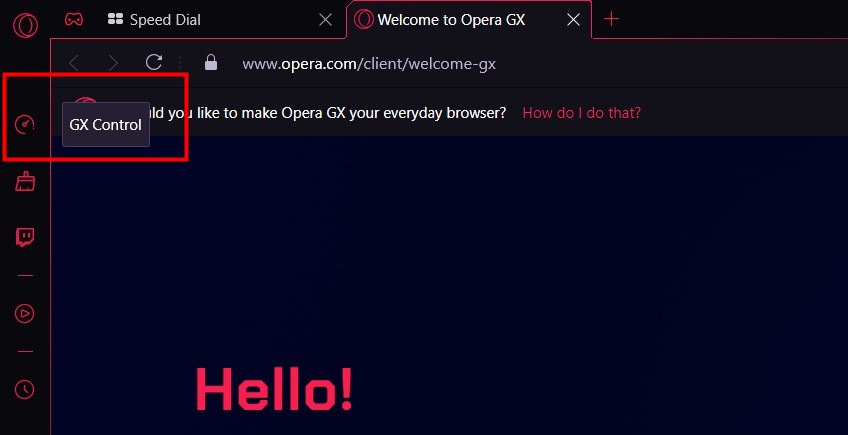
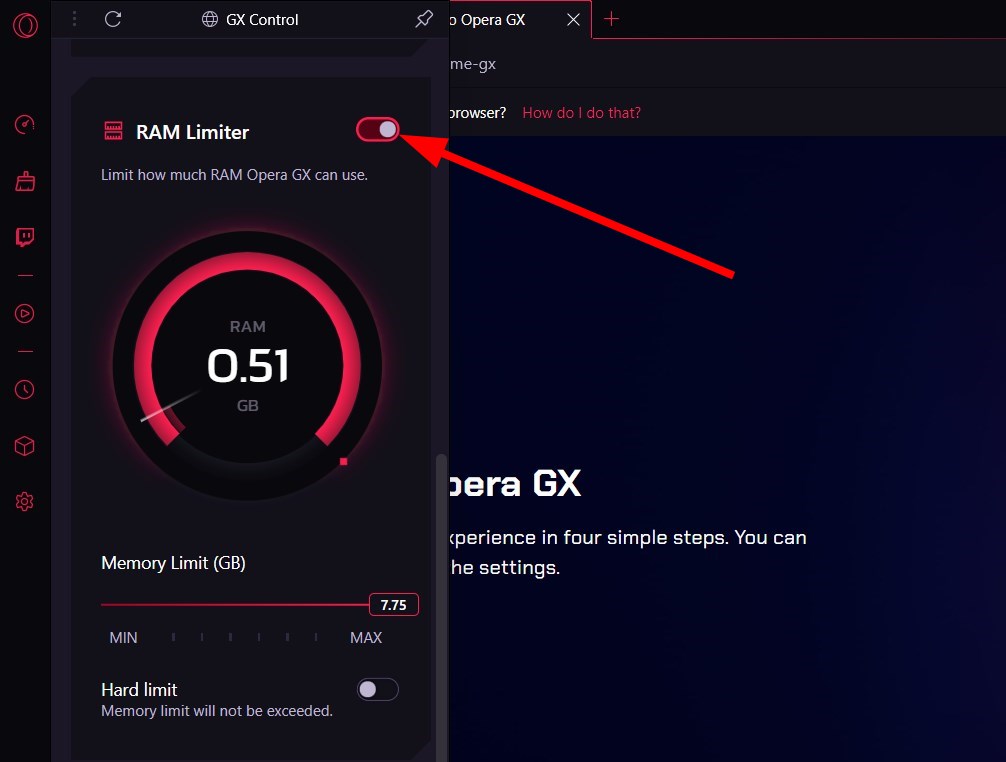
These include Twitch integration and a function called GX Control which features a RAM limiter, a bandwidth limiter, and more, all so that the browser can run in the background without affecting your gaming experience.
All things considered, if you want to play Flash games, why not do it in an environment that makes you feel like it is an AAA game instead?
First, type about:config into Firefox’s address bar and press Enter.
Enter dom.ipc.plugins.asyncdrawing.enabled into the search bar at the top of the about:config page.
If dom.ipc.plugins.asyncdrawing.enabled is set to true, double-click it to switch it to false.
Now you’ve effectively switched off the Flash game rendering.
A previous Firefox 49.0.2 update increased lag in Flash games due to a new flag that enabled Flash game rendering in the browser. This has slowed down games on gaming sites such as Friv.com.
Open Firefox and click on the hamburger menu followed by Add-ons and themes.
Next, click on the toggle button next to all of your extensions to turn them off.
Firefox tabs and add-ons also need some extra RAM. So close all the background page tabs open in the browser to ensure more RAM is available for the Flash games.
4. Reduce the Flash game graphical quality
Launch the Flash game that is giving you problems, then navigate to its Settings menu. You should be able to discover a Quality setting that you can adjust to either Medium or Low in order to decrease the graphics quality.
By doing this, you will significantly reduce the lag you experience inside the game, without having to complicate things that much.
5. Configure the Hardware Acceleration setting in Chrome
Open Chrome then click its menu button followed by Settings.
Here, type hardware inside the search bar then make sure to turn on the Use hardware acceleration when available option.
This will make sure to optimize the resources used by your Flash game.
6. Close running background software
Press Ctrl + Shift + Esc to open Task Manager.
Click the Processes tab that displays both open applications and background processes.
Select third-party software background processes that might be hogging bandwidth, and then press the End task button to close them.
Background software can generate lag and slow down games. Firstly, all software hogs at least a little RAM and system resources, which generally slows down games.
Secondly, some programs will also hog bandwidth, which can generate lag for streaming media and Flash games. As such, you should have just the Firefox window open on your taskbar for the Flash games.
7. Zoom in the game
Although it may seem counterintuitive, increasing the game’s size can occasionally help Flash games run more quickly.
You may zoom in by holding down the Ctrl key and either tapping the Plus (+) key on your keyboard or moving the mouse wheel up in most web browsers.
To return to the previous view, just press the Minus sign (-) while holding down the Ctrl key on your keyboard, or use the wheel on your mouse to zoom out.
You’ll find that some Flash games limit the size of the playing window, but others give you the option to zoom in or out of the action taking place within the game.
So that’s how you can reduce Flash game lag in Firefox and Chrome. Now the games will run quicker and more smoothly than before.
SVG is a unique image format some websites incorporate. Some website developers have posted on forums about an inline SVG issue.
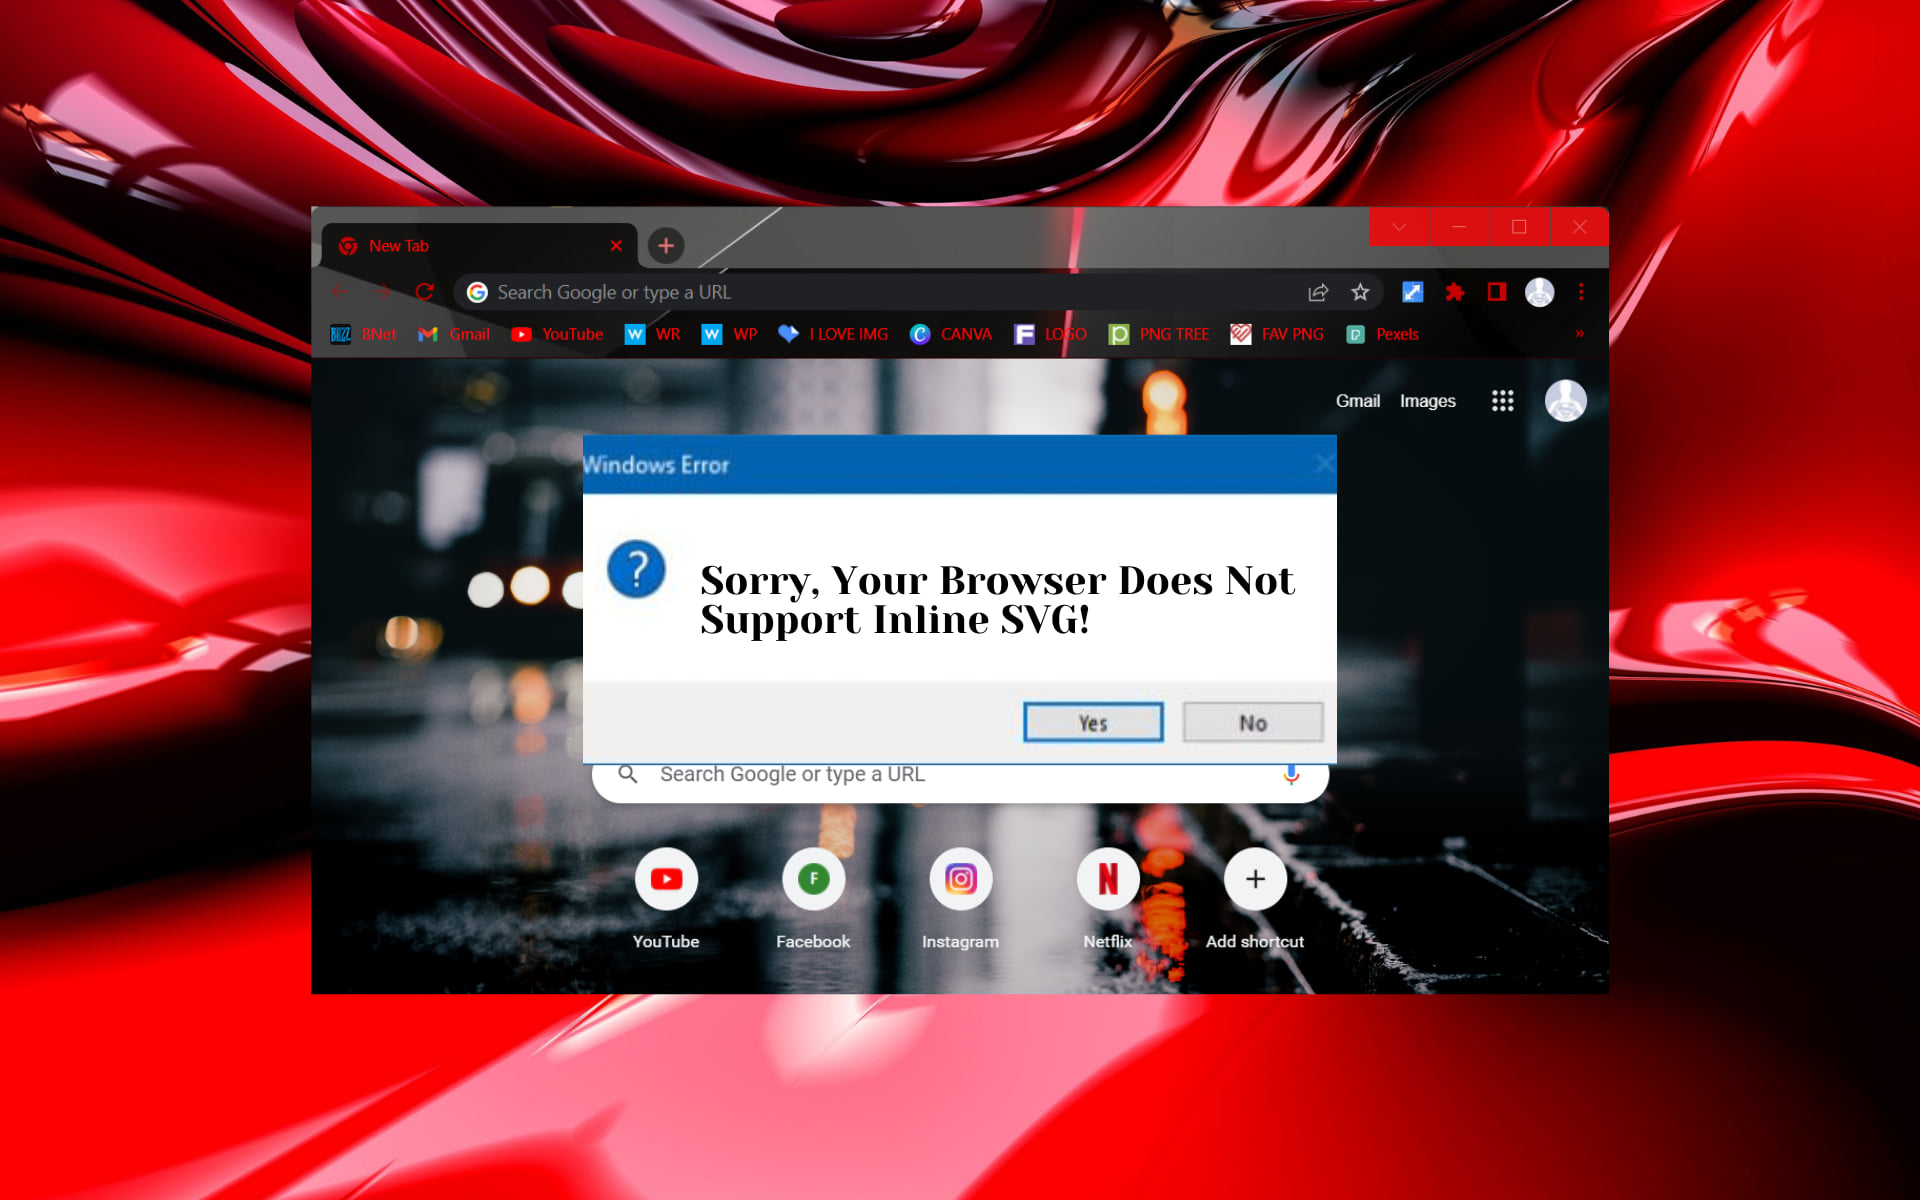
When that issue arises, webpages display a Sorry your browser does not support inline SVG message instead of rendering SVG graphics.
What does it mean your browser does not support inline SVG?
The browser does not support inline SVG issue that appears because developers are trying to embed SVG elements on web pages that are not fully compatible.
A similar issue appears when browsers don’t support inline PDFs and have a similar cause, but it is mostly related to browser compatibility issues.
It can be due to DOM SVG interface issues, or simply because some older browsers don’t fully support SVG. Some developers might also need to correct their SVG code.
Furthermore, allow us to shed some more light on browser SVG support, and if all Internet browsers are compatible with this feature.
Do SVG files work with all browsers?
You might want to know that SVG is officially supported by all main web browsers out there, including the recently defunct Internet Explorer.
In recent tests made on this matter, support for the SVG format across modern web rendering engines proved that, as we stated above, almost all of them are compatible.
Tests were made using four main rendering engines and 15 different browsers including all the popular ones you already know about, including Opera One, Firefox, Chrome, Maxthon, UC, and others.
What can I do if the browser does not support inline SVG?
1. Try opening SVG pages with alternative browsers
You might find alternative web browsers display pages with SVG graphics fine. Most major Chromium browsers, such as Opera One, support SVG page elements.
Opera One is one of the foremost browsers with a Blink engine that will usually render SVG images without issues.
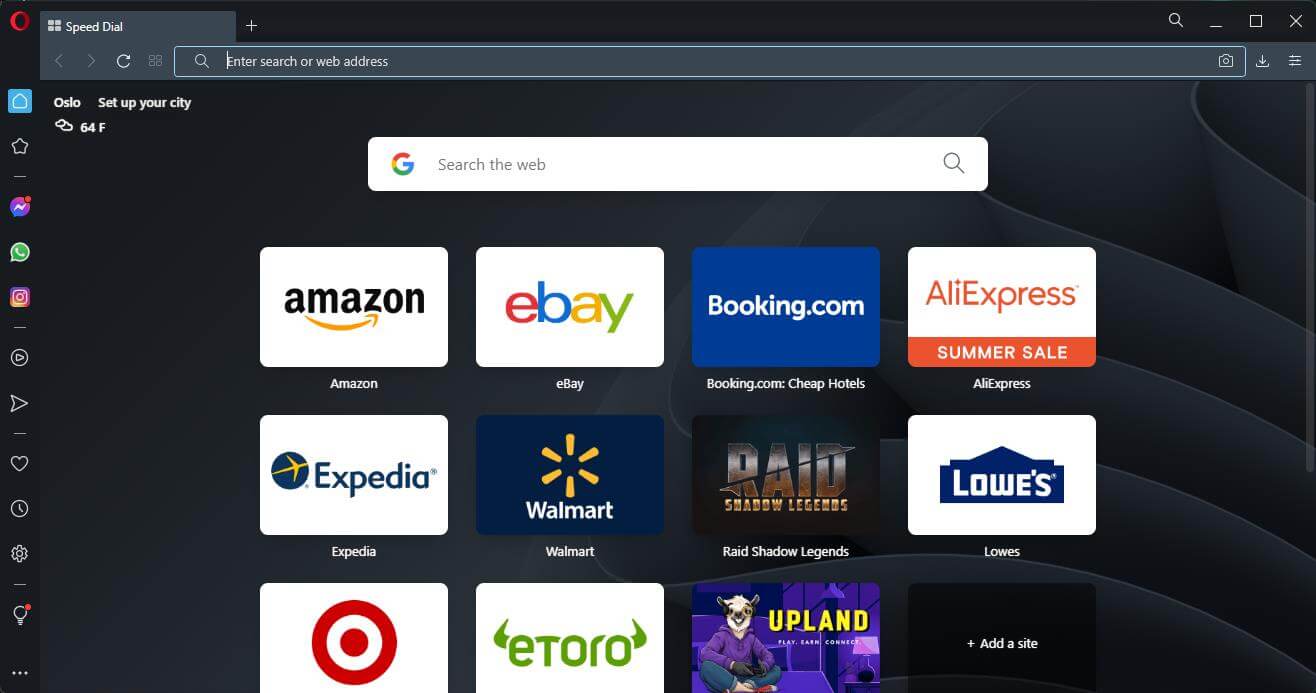
Opera One has many unique and original browsing features. Its start page incorporates novel Speed Dial thumbnail shortcuts for pages. Users can merge those Speed Dials into folders to organize them better.
Opera One’s sidebar also includes an integrated YouTube player and built-in messengers for users.
Other useful Opera One features
Opera’s battery saver prolongs battery life for laptops
This browser includes a built-in VPN
Users can capture webpage snapshots with the Snapshot tool
The ad-blocker feature removes ads from pages open in Opera One
Opera One
Ensure you’ll never encounter SVG support errors with this amazingly versatile and fast browser.
Click the Customize and Control Google Chrome menu button.
Select Help, and click on About Google Chrome to open the tab in the shot directly below.
Click Relaunch when the browser has updated.
Firefox
Click the Open menu button on Firefox’s URL toolbar.
Select Help to open that menu.
Then click About Firefox to open the window directly below.
Press the Restart to Update Firefox button.
Microsoft Edge
Press the Alt and F keyboard keys at the same time.
Select Help and feedback and click About Microsoft Edge to open the tab in the shot directly below.
Then restart Edge if the browser gets updated.
3. Check your SVG code
Make sure you’ve entered the inline SVG code correctly. Check the code for any typos or syntax errors. This is an example of inline SVG code to check your code by:
The above inline SVG code example utilizes XHTML syntax, which most major browsers support. However, it will also work for HTML 5.
You can also find further examples of inline SVG code at U3schools.com. Check that your SVG code matches up with examples for correct implementation.
4. Check out the SVG Web JavaScript plugin
Website developers seeking to implement inline SVG for older browsers that don’t support it should check out SVG Web.
That JavaScript library enables SVG support for older browsers by utilizing Flash. Click svgweb-2011-02-03-Lurker-Above.zip on the SVG Web page to download it.
5. Modify the insertComponent function
Some developers have confirmed they’ve fixed the your browser does not support inline SVG issue by modifying the insertComponent function within Rendering/BrowserRenderer.ts with browser dev tools.
Try modifying the insertComponent so that it utilizes a g tag as shown directly below:
The above fixes might resolve the browser does not support inline SVG issue for some web developers.
Now you know what to do when coming across messages like Your browser does not support SVG., or situations such as inline SVG not displaying, or SVG works in Chrome but not Firefox.
Refer to the guide above for error messages such as Your browser does not support SVG in Chrome, or Your browser does not support SVG in Edge.
Bear in mind that there are also various ways to include SVG graphics on website pages. So, it’s worth trying alternative methods for adding SVG graphics to your website.
Every iteration of Windows comes with a handful of critical utilities to help users effectively manage the computer. One of these is System Configuration in Windows 10, a utility that’s been a part of the OS for long.
Sometimes also referred to as MSConfig, a proper understanding of the System Configuration utility will help you manage the PC much more easily. So, let’s find out all about it!
What is System Configuration in Windows 10?
System Configuration is a well-designed utility in Windows that could do wonders when changing several settings on the PC. It helps users change boot settings or configure the services, drivers, and apps to run.
Though most of the operations here could be done separately, it takes a lot longer, making System Configuration in Windows 10 the first choice of many. The utility especially comes in handy when performing a clean boot during a troubleshooting sequence.
Here are a few of its features:
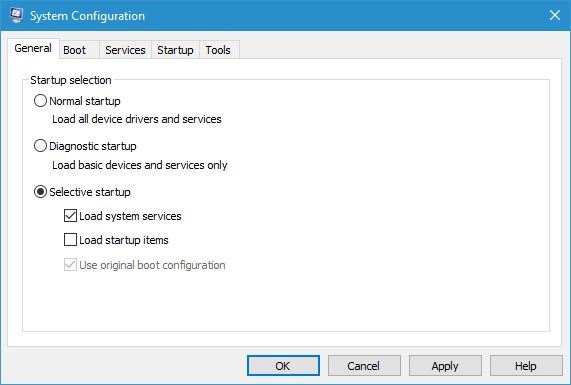
Configure boot settings: The utility provides users with a handful of preconfigured boot options to choose from, namely, Normal startup, Diagnostic startup, and Selective startup.
Enable/disable services: The Services tab in System Configuration lists all the available ones, and users can manually enable or disable the desired services, even a bunch of them, at once.
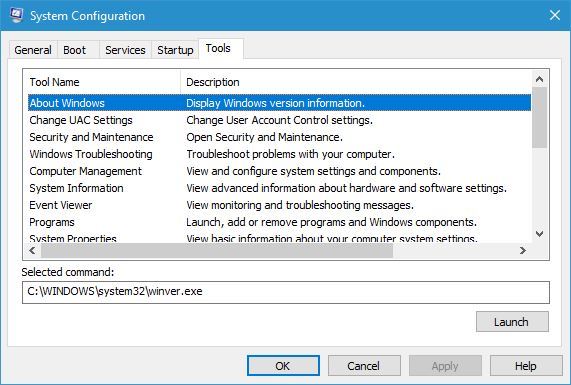
Quickly launches Windows tools: Often unnoticed, the Tools tab in the System Configuration allows users to open a bunch of other built-in utilities in Windows quickly.
How do I access System Configuration?
1. Using the Search menu
Press Windows + S to open Search, type System Configuration, and click on the relevant search result.
The app will now launch.
2. Via Run
You can also start System Configuration on Windows 10 using the built-in Run dialog. All you need to do is use a keyboard shortcut and then input the abbreviation for System Configuration in the search box.
Press Windows + R to open Run, type msconfig in the text field, and click OK.
2. The System Configuration application will launch on your computer.
3. Using the .exe file
Press Windows + E to open File Explorer, paste the following path in the address bar, and hit Enter:C:\Windows\System32
Locate and double-click on the msconfig.exe file.
This will open System Configuration in Windows 10, and you can now make the desired changes.
How do I use System Configuration?
The System Configuration tool is most commonly used to prevent certain applications and services from starting. This procedure is called Clean Boot; with it, you’ll disable all third-party applications and services from starting.
This is extremely useful for troubleshooting computer issues because it allows you to identify problematic applications and disable them if needed. Let’s individually understand all the tabs listed in System Configuration on Windows 10.
General
The General tab in the System Configuration tool allows you to choose between Normal, Diagnostic, and Selective startup options.
Normal startup: This will boot Windows with all third-party services and applications enabled.
Diagnostic startup: This will boot Windows with only the basic services and drivers, similar to Safe Mode. This mode is useful if you suspect that a third-party application or service is causing problems on the PC.
Selective startup: This option will allow you to choose which programs and services you want to disable or enable. You can also disable all system services and startup items by unchecking the appropriate options here or using the Use original boot configuration option.
Boot
The Boot tab allows you to change how Windows 10 starts, and if you have a dual-boot PC with multiple operating systems, you can choose the default operating system here.
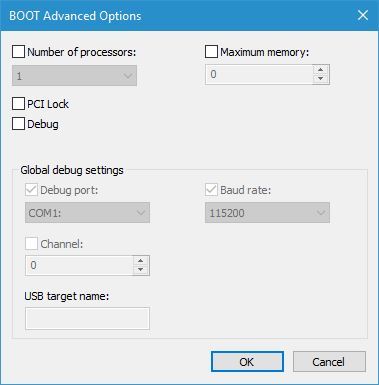
You can also customize certain settings by clicking the Advanced options button. From there, you can assign the number of CPU cores you want a specific operating system to use. Besides, you can assign the amount of memory the select system will use.
Certain debugging options are also available, so use them if you have any issues with the operating system.
You can also boot to Safe Mode using System Configuration in Windows 10. To do that, check the Safe boot entry under Boot options and select one of the available configurations described as follows:
Minimal: it will boot you to Safe Mode without networking while running only crucial system services.
Alternate shell: Similar to the previous option, but it will start Safe Mode with Command Prompt running.
Active Directory repair: It is similar to the previous ones but has Active Directory available.
Network: This option will start Safe Mode but will keep the networking enabled.
There are some additional options available as well.
No GUI boot option will start Windows 10 without the splash screen at the beginning.
The Boot log option will store all the relevant boot information in Ntbtlog.txt file, thus allowing you to examine it later. After your system boots, this file will be created in C:\Windows directory.
Base video option will start Windows 10 in a minimal VGA mode.
OS boot information will show you each driver’s name as it’s loaded during the boot process.
Lastly, there is Make all boot settings permanent option and Timeout field. The latter is extremely useful if you have two or more operating systems installed on your PC.
When setting Timeout to any value other than zero, you’ll have the specified number of seconds to select between the available operating systems, allowing you to choose one seamlessly on every reboot.
Services
As for the Services tab, it holds the list of all available services on your PC. Keep in mind that this list includes both Microsoft and third-party services.
If you have any computer issues, it’s always recommended to disable third-party services and check if that solves the problem.
This tab allows you to turn off services one by one or to disable them all with a single click. Keep in mind that disabling Microsoft services isn’t recommended, so be cautious while disabling these.
Startup
Startup tab went through certain changes over the years, and now it just shows the Open Task Manager option in System Configuration on Windows 10.
In Windows 8, Microsoft decided to move Startup items from System Configuration to the Task Manager, thus making the process of disabling startup apps much simpler.
Tools
The last tab is the Tools tab; with it, you can quickly access many other Windows 10 tools. The list includes Computer Management, Command Prompt, User Account Control settings, Internet Options, Task Manager, System Restore, and many others.
To start any of these tools, simply select it from the list and click the Launch button. You can also see the location in the Selected command field, along with any additional parameters that the tool might use.
How to adjust boot settings in System Configuration on Windows 10?
Open the System Configuration utility, and navigate to the Boot tab.
Now, select Safe Boot and choose any of the modes from the ones listed underneath. You will find Minimal selected by default.
When it comes to boot settings, you have the option to enable Safe Mode in Windows 10 via System Configuration or configure the other options, as discussed in the earlier sections.
What is selective startup in System Configuration on Windows 10?
Selective Startup allows users to limit a particular type of items, be it the services or the startup apps, all at once.
With Load system services checked, all the critical services are running, Load startup items is linked to the startup apps, and Use original boot configuration loads Windows with the default settings, i.e., the settings that were in place when the OS was first installed.
Here’s how you can configure Selective startup with System Configuration in Windows 10:
Launch System Configuration, and choose the Selective startup option in the General tab.
Now, check/uncheck the desired boot options under it, and then click on Apply and OK.
Click Restart in the confirmation prompt that appears.
How to adjust services in System Configuration on Windows 10?
Open System Configuration and head to the Services tab.
Untick the checkbox for the services you want to disable, and then click Apply.
If a confirmation prompt appears, choose the appropriate response.
You can similarly re-enable the services.
To enable/disable all the services at once, click on the Enable all or Disable all button, as the case may be.
To perform a clean boot or to boost the PC’s performance, tick the checkbox for Hide all Microsoft services, and then click on Disable all.
This will disable all non-Microsoft services, but you may face some inconsistencies with the PC.
How do I open System Configuration in Windows 10 CMD?
Press Windows + R to open Run, type cmd in the text field, and hit Enter.
Paste the following command and then hit Enter:msconfig
The System Configuration utility will open right away.
What is the shortcut key for System Configuration in Windows 10?
There is no keyboard shortcut or an individual shortcut key to directly open System Configuration in Windows 10 or any other iteration, for that matter.
You must open it via the Search menu, Run, Command Prompt, or its shortcut in the System32 folder.
That’s all there’s to the System Configuration utility in Windows 10. And by now, you should have a fair understanding of the various settings and options available here.
Total AV is a highly trusted antivirus due to valuable anti-malware tools and real-time monitoring for Windows 7 PCs.
If you need unbreakable security for your device, best use this malware protection tool to monitor digital threats in real-time to avoid serious system troubles.
This antivirus solution delivers strong protection against advanced malware and checks different installs or executables before affecting your PC.
You have access to the following key features ofTotal AV:
Website filtering
Remote firewall
Real-time protection
Anti-Spyware
Anti-Ransomware
Total AV
This thorough antivirus delivers effective anti-malware, browsing, and virus detection tools, so give it a try.
Guard.io is not a traditional antivirus, it is a browser extension that acts as a full-fledged antivirus. It doesn’t take up space on your PC, and since most of the processing is done from the endpoint, it’s essentially low resource consumption.
It only takes a few seconds to add Guard.io to your browser and you can immediately see its capabilities. Malicious websites are blocked before you even click, so no attempt is made to steal your data.
With advanced leak monitoring capabilities, you can track all your email accounts and receive data breach notifications so you can take immediate action.
The main key features of Gurad.io are:
Fast, lightweight, created to keep enhance your privacy
Total ecosystem coverage to protect every aspect of your browser
Client-side detection models
Smart algorithms that continuously scan through large amounts of data
Machine learning, Big Data enable state-of-the-art protection
Guard.io
A browser antivirus for low resource usage and advanced security features.
ESET HOME Security Essential tops our list of antivirus tools for your Windows 7 device. It protects against any type of malware, including viruses, ransomware, worms, and spyware.
Once installed, the solution is lightweight, unintrusive, and efficient, which will make it a great asset for your device.
Let’s see ESET HOME Security Essential’s main features:
Regular detection engine
Updates for the latest threats
Proactive detection module
ESET technical support
ESET HOME Security Essential
Fire up ESET and block ransomware, viruses, and spyware instantly.
If you are using Windows 7 service pack 1 or later, Norton 360 will continue to provide enhanced protection. Windows 7 service pack 0 will be in maintenance mode.
Maintenance mode indicates that the Norton security software installed on Windows 7 SP0 will continue to receive certain services, such as malware definition updates, but that other services, such as new product features, will be discontinued.
If you have Windows service pack 1 or higher, you will be able to make use of all of Norton 360’s features.
You have access to the following key features of Norton 360:
Malware protection
Protection in e-mail, downloads
Online reputation protection
Non-intrusive scans
Bootable Recovery Tool
Norton 360
Lightweight software that protects your Windows 7 PC from viruses, malware, spyware, and ransomware.
To secure your operating system, it’s important to make sure you get updated software from secured, official sources.
This does not include only antiviruses. All your applications should come with Windows 7 compatible versions that still get frequent updates that make them less vulnerable to attackers.
Consider getting a secure browser for Windows 7, as well as a VPN that will help you protect your data. A network monitor can also help you make sure there’s no suspicious device connected to your Wi-Fi.
This has been our rundown for the best antivirus software for Windows 7. We hoped our insights helped you learn more about the operating system’s security requirements and helped you pick your best bet.
Which ones of this software do you think are the best for the job? Do you have any other recommendations for similar software? Let us know in the comments.
Computer errors can cause a lot of problems, and while some are harmless, others can be more severe. For instance, users reported that Err_connection_refused in Windows 10/11 prevents them from accessing their favorite websites.
Is this your case too? If so, start by flashing your DNS via the Command Prompt. That should fix the error immediately.
But what if the Localhost connection refused in Windows 10/11 error persists? If so, change your DNS server to Google’s and give it another go. Alternatively, you can also disable your proxy and check the Search Engine settings.
Why am I getting ERR_CONNECTION_REFUSED?
When Google Chrome’s attempt to connect to a web page results in a connection being rejected, the browser displays an error message that reads Err_connection_refused.
The error code is almost always a client-side error, which indicates that the problem originated on your local computer system. Cache issues, proxy services, and DNS server issues are all common possible causes.
On the other hand, the Err_connection_refused error in Chrome may occasionally be brought on by the web server that you are attempting to connect to.
Errors of this kind can sometimes be brought on by problems that are inherent to the website itself, such as periods of unavailable server time. Check to see whether the website can be reached before attempting any of the other solutions.
Users reported many other similar issues which we have listed below and which we’ll address in the following section:
127.0.0.1 refused to connect in Windows 10/11 – This 127.0.0.1 address is referred to as a loopback. Try appending the port to the IP in order to fix the problem of 127.0.0.1 refusing to connect.
Localhost refused to connect in Windows 10/11 – To begin, if you are using XAMPP or WAMP on Windows, the problem may typically be fixed by modifying the port number used by the Apache web server.
Site refused to connect in Windows 10/11 – In order to solve this issue, you will need to disable the client for your firewall.
This site can’t be reached, localhost refused to connect – Check to check if the page you were trying to access has been taken down.
Err_connection_refused in Windows 10/11 inside Edge/Chrome/Firefox – Turn off your anti-virus and firewall software for the time being.
So, without further a do, let’s see exactly what to do if the Localhost refused to connect in Windows 10/11.
How do I fix ERR_CONNECTION_REFUSED?
1. Try a different browser
To avoid errors like Err_connection_refused Windows 10, we suggest switching to Opera. If you’re looking for a stable and fast browser with a plethora of features and a special focus on privacy and online safety, you just found it.
Not only is it secure and reliable, but you’ll have a wonderful time using it. It is lightweight, looks, and feels very modern, and the customization options are off the charts.
More so, it comes with some neat tools rarely seen in browsers for free,e like a built-in ad-blocker, and a native VPN that doesn’t have a daily traffic limit.
All in all, if you want a browser that is both stable and fun to use, look no further than Opera.
Opera
Looking for a lighting-fast Internet browsing solution that doesn’t sacrifice privacy or stability? Look no further.
Press Windows + X and choose Command Prompt (Admin).
When Command Prompt starts, enter the following commands: ipconfig/releaseipconfig/allipconfig/flushdnsipconfig/renewnetsh int ip set dnsnetsh winsock reset
After all the commands are executed, close Command Prompt.
Command Prompt is a powerful tool that allows you to quickly perform all sorts of commands on your PC. With it, you can change system settings and fix all sorts of computer problems. Now you just need to restart your PC and check if the problem is resolved.
3. Change the DNS server
Press Windows and type network connections then click on the View network connections result.
When the Network Connections window opens, locate your connection, right-click it and choose Properties from the menu.
Select Internet Protocol Version 4 (TCP/IPv4) and click the Properties button.
Select Use the following DNSserver addresses option and enter 8.8.8.8 as Preferred DNS server and 8.8.4.4 as Alternate DNS server. If you want to use OpenDNS instead, you need to enter 208.67.222.222 as Preferred and 208.67.220.220 as Alternate DNS.
After you’re done, click OK to save changes.
In order to access any website on the Internet, you need to connect to the DNS server first.
In most cases, you’ll connect to your ISP’s DNS server. But if it’s having some issues with the DNS, you’ll most likely get the Localhost refused to connect Windows 10 in your browser. Speaking of DNS issues, check out more useful tips to troubleshoot and fix whatever comes your way, just like a pro.
4. Disable your proxy
Open Chrome and click the Menu button in the top right corner and choose Settings from the menu.
When the Settings window opens, search for proxy then click the Open your computer’s proxy settings option.
Make sure to disable the Automatically detect settings option.
A Proxy server is useful if you want to protect your privacy online. However, it can sometimes interfere with your connection and cause the Err_connection_refused in Windows 10/11 message to appear. After turning off your proxy, check if the error is fixed.
5. Check your search engine settings
Open Chrome and press the Menu button in the top right corner and choose Settings from the menu.
When the Settings tab opens, scroll down to the Search section and click the Manage search engines button.
Make sure that Google is set as a default search engine. If you see any search engines that you don’t recognize, be sure to remove them.
Few users reported that the Localhost connection refused Windows 10 error appears in Google Chrome because their default search engine was changed. Sometimes third-party applications can change your default search engine in Chrome, thus causing this error to appear.
Users reported that their default search engine was set to Google Desktop 127.0.0.1 for some strange reason, but after making the necessary changes, the issue was resolved.
6. Reset your router
If restarting your router doesn’t fix the problem, you might want to try resetting it to factory defaults. Sometimes your router configuration can interfere with your Internet connection.
To reset your router, you need to open your router’s configuration page and click the Reset option. Another way to reset your router is to press and hold the reset button on the device for a few seconds.
Both methods work the same, and you should use the one that you’re most comfortable with. Keep in mind that you’ll need to configure your wireless connection again if you reset your router.
For detailed instructions on how to reset your router, we advise that you check your router’s manual.
7. Clear your browser’s cache
Tap the Windows key, type Chrome, and click the first result in order to open the browser.
Open the Clear browsing data menu with the following shortcut:Shift + Ctrl + Delete and select All time as the time range.
Checkmark the Cached images and files option and click Clear data.
When you’re browsing the Internet your browser downloads all sorts of files. Sometimes those files can get corrupted, and that can cause theErr_connection_refused in Windows 10/11 error to appear.
Press Windows and enter firewall. Choose Windows Firewall from a list of results.
Select Turn Windows Firewall on or off from the menu on the left.
Select Turn off Windows Firewall (not recommended) for both Private network settings and Public network settings. Click OK to save changes.
After turning off your firewall, check if the problem is resolved. If the firewall is causing this problem on your PC, you need to thoroughly check its settings in order to fix the problem.
In addition, you need to check if Chrome is allowed to connect to Internet. To do that from Windows Firewall, do the following:
Open Windows Firewall.
Select Allow an app or feature through Windows Firewall.
A list of applications will now appear. To make changes to the list, you need to click the Change settings button.
Look for Google Chrome on the list. Make sure to check Google Chrome in both Private and Public columns.
Click OK to save the changes made.
Firewall is important because it prevents unknown applications from accessing the Internet. However, your firewall can also block your web browser and trigger the Err_connection_refused in Windows 10/11 error.
To fix this problem, you need to turn off your firewall client. If you’re not using a third-party firewall, you’ll have to turn off Windows Firewall.
If you are getting this error in some other browser, be sure that the browser is allowed to connect to the Internet.
9. Disable your antivirus
Your antivirus is just as important as your firewall since it will protect you from malicious users and malicious software.
However, your antivirus can sometimes interfere with your Internet connection, and if that happens, you’ll get the Localhost refused to connect in Windows 10/11 error.
To fix this problem, you need to temporarily disable your antivirus and check if the problem still persists. If disabling your antivirus solves the issue, it means that a certain security setting is blocking your browser.
To fix the problem, you need to check your antivirus configuration. If you can’t fix the problem, you might want to consider switching to a more performant antivirus tool.
Users reported that Norton antivirus was causing this error on their PC, but after removing the tool completely, the issue was fixed.
Another tool that can cause this error to appear is Spyware Doctor, so if you have this tool installed we advise you to remove it and check if that solves the problem.
10. Check third-party applications
Your installed applications can sometimes interfere with your Internet connection. Users reported that the Privoxy tool caused Chrome’s proxy settings to change.
Apparently, if you install this tool you need to run it all the time if you want to access the Internet. To do that, simply enable the option for automatic startup in Privoxy and check if the problem is resolved.
We have to mention that almost any network-related application can interfere with your Internet connection. Therefore be sure to check your installed applications. In some cases, you might have to remove some to fix this problem.
11. Run Chrome as administrator
Right-click the Chrome extension and choose Properties from the menu.
Go to the Compatibility tab and check Run this program as an administrator.
Click Apply and OK.
If you’re having problems with Localhost connection refused in Windows 10/11 in Google Chrome, you can simply try running Chrome as administrator. To do that, locate the Google Chrome shortcut, right-click it and choose the Run as administrator option.
If running Chrome as the administrator fixes the issue, you’ll have to run Chrome as an administrator every time. After doing so, Chrome will run with administrative privileges whenever you start it.
12. Reset Internet Options to default
Open Internet Options by pressing Windows and typing its name inside the search bar.
When the Internet Options window opens, go to the Advanced tab and click the Reset button.
Select Delete personal settings if you wish and click the Reset button.
Wait for the reset process to finish.
Many of your network settings can be configured via the Internet Options tool, and sometimes by changing these settings, you can cause the err_connection_refused error to appear.
To fix this problem, you need to reset your Internet Options to default. After resetting Internet Options to default, restart your PC and check if the problem is resolved.
13. Use the Registry Editor
Press Windows + R then enter regedit and click OK.
When the Registry Editor opens, in the left pane navigate to the following key: Computer/HKEY_CURRENT_USER/Software/Microsoft/Windows/CurrentVersion/Internet Settings
In the right pane, locate the ProxyEnable DWORD and double-click it.
Change Value Data to 0 and click OK to save changes.
Close Registry Editor and check if the problem is resolved.
Err_connection_refused in Windows 10/11 can prevent you from accessing certain websites, but we hope that you managed to fix the problem by using one of our solutions.
Few users reported that they fixed the problem by making a few changes to their registry. Editing your registry can be potentially dangerous, therefore we recommend that you export your registry and use it as a backup in case anything goes wrong.
How do I check proxy settings in browser?
Open Chrome, then navigate to its menu followed by Settings.
Here, go to Privacy and security followed by Security.
Scroll down until you find the Advanced section, here you will see the DNS settings.
Before you go, you might be interested in a similar error err_connection_aborted that we covered in one of our earlier guides.
There you go! If Localhost refused to connect in Windows 10/11, you now have all the tricks up your sleeve to have it fixed in no time. Do let us know which solution worked for you by reaching for the comments section below.
Choosing the right web browser is no easy task. Most people are content with using whatever web browser comes with their computer; be it Microsoft Edge, Safari, or Google Chrome.
But you shouldn’t be content with just the default. You’re missing out on a lot of great software if you stick with what’s on your computer. Case in point, the Opera web browser.
Opera is actually one of the oldest web browsers out there still receiving frequent updates. It even predates Internet Explorer by several months. But unlike Internet Explorer which was heavily criticized for its poor quality, Opera is a great web browser.
It’s built up a loyal following over the past 27 years thanks to its constant evolution. Part of Opera’s success can be attributed to the fact it’s built on top of Google Chromium, the same engine that runs Chrome.
As such, Opera has many of the same benefits and problems as Chrome while also fixing some of them. In this review, we’ll examine Opera and break down its various features, functions, and more.
Is Opera the best browser for me?
There’s no better place to start than with the beginning. You may think that installation is a boring process with nothing noteworthy about it. But that isn’t the case with Opera.
Installing Opera is a straightforward process that doesn’t ask confusing customization questions before you even start. Other browsers may ask you multiple questions like where to install on your computer or install only certain components.
The vast majority of people just want the browser, no questions asked. Let’s see how easy it is to install.
Go to the Opera’s installation page and click Download Opera.
After downloading Opera, run the installation file.
Click Accept and Install in the new window.
Wait for Opera to install, and that’s all you have to do. No extra questions.
Opera Customization
As soon as you open Opera, you’re greeted with a setup process that lets you configure the browser to your liking. Here, you can activate some of Opera’s best features.
The first thing you can choose is which theme you’d like.
Next, you can decide if you want to turn on the in-browser ad blocker which we highly recommend you do. Opera is one of the few browsers that have an ad blocker natively.
Next, you can choose if you want to connect to Facebook Messenger. We’ll cover the messaging apps in more detail later on.
Under Import, you can bring the History, Bookmarks, Passwords, and Cookies from another browser to Opera. Afterward, you can start browsing.
As soon as you open Opera, you’ll be greeted with a clean-looking interface with a speed dial right on the front. The speed dial is filled with popular websites and video games, but you can get rid of them by hovering over them and clicking the three dots in the corner.
There will be an option to trash the app. If you click on Add a site, you can add a new choice to the Speed Dial. Here’s an example of what a custom Speed Dial can look like.
Apart from the Speed Dial in the middle, you have the address bar, bookmarks, and tabs situated at the top of the window. There are also controls for the in-browser VPN which we’ll get into detail later.
On the left-hand side is a vertical sidebar with tons of buttons which make up the bulk of unique features that make Opera as great as it is.
Features
At the bottom of the left vertical bar, you’ll see three dots. Clicking these dots will open the Sidebar Setup page where you can pick and choose what you want to appear on the left. We’ll cover them from top to bottom.
Workspaces
At the top is Workspaces, a handy tool that separates different versions of Opera. You can have one Workspace designated for work and another for personal usage.
What’s great about this tool is how you can have a window focusing on one thing without having to clutter Opera. Tabs can be sorted by relevance too. You’ll start with two but you can have as many as you like by clicking Add more.
You can choose an icon and name the workspace whatever you’d like.
Shopping Center
Next is Shopping Center which pools together product listings from across the internet. There’s a section for eBay, best-selling products, hotel listings from across the world, and a random news section.
The Shopping Center section is fine. It’s hard to imagine actively using it if you’re not a frequent online shopper. For those people, they might get a lot of usage out of this. Many people typically shop at random intervals.
In the Sidebar Setup, you can remove apps by clicking the blue arrow.
Messengers
Opera has the great feature of integrating communication and social media apps into its browser for quick access. There is support for Facebook Messenger, WhatsApp, Instagram, Twitter, Telegram, and VK, which is a Russian messaging app.
To use one of the messaging apps, click one and log in with your credentials. Click on the app and you’re taken to a condensed version of that app. It’s like having the mobile version at your disposal.
Player
Next is another favorite in Player, which is the arrow inside the circle. With Player, you can one of six music streaming apps and play music directly through Opera. No extra app is needed.
You don’t even have to log in to the service to use it, but there is that option. Opera gives you the base version of the respective music streaming app.
If you want to switch services, click the arrow in the upper left-hand corner and a small window will drop down. In that little window, you can hop to another music service.
My Flow
My Flow is another great feature for Opera. It works in conjunction with the Opera mobile app which you can get from the Google Play or Apple App stores.
The mobile app is similar to the desktop version if a more truncated version. You download the mobile version and scan a QR code that appears on Opera. With the feature enabled, you can upload pages from Opera mobile to the desktop browser.
That information comes from other people. We couldn’t get My Flow to work. We scanned the QR code and create an Opera account. We followed the steps Opera provided to us, but it just didn’t work.
From our understanding, My Flow allows people to send a webpage from their mobile device onto the Opera desktop app so seamless browsing. Sounds like a great tool to have to never lose your spot.
Opera Tools/Sidebar Extensions
Below Special Features, you have a series of Opera Tools. These are the portions of the Settings menu thrown into the vertical bar for quick access. You have Bookmarks, Pinboards for organizing ideas, Downloads, and Tutorials.
As for Sidebar Extensions, this gives you direct access to Opera extensions without having to dig through the Settings. Along these features are great and would sell the browser by themselves.
Opera also gives you direct access to its plug-ins page by clicking Add more under Sidebar Extensions. In Opera add-ons, you get a collection of recommended extensions like uBlock Origin, Sidebar for YouTube, and even Pacman.
We’re very pleased with Opera’s vertical bar features. This suite of features alone is enough to recommend Opera. And the fact that they’re all joined together in an easily accessible vertical is icing on the cake.
Opera
Take full advantage of useful browsing tools and enhanced security with unlimited Adds-on.
Apart from the vertical bar on the left-hand side, Opera has an additional customization option on the right-hand side.
Click the three lines in the upper right hand corner to bring up the Easy setup menu.
Under Easy Setup, you can make some of the changes from the initial download like changing the browser theme, turning on/off the ad blocker, and changing the start page.
Something really cool about Opera is its wallpapers. The browser actually supports animated wallpapers that feature a looping video. There’s one already available in the default settings. You can see which wallpaper is animated by seeing which has the Play arrow icon.
You can click on Get more wallpapers and you’ll once again be whisked to the Opera addons page. If you click on the Animated entry on the top bar, you’ll see all of the moving wallpaper available on Opera.
The more popular animated wallpapers are anime related, but if you scroll through the pages, you can find some on nature, space, comics, and simple moving shapes.
To add an animated wallpaper, simply select one and click the green Add to Opera button. Open another tab to your Speed Dial and you’ll see your brand new animated wallpaper. It takes just a few seconds.
Opera also supports the option of allowing people to add their own wallpaper. You can’t simply upload a video or GIF to Opera and have it work immediately.
Instead, you have to use a WebM video file or an animated WebP file on Opera. Fortunately, Opera has a set of instructions on its website that teaches you how to create your own animated themes.
It is a little complicated and requires a bit of technical knowledge. If you’re up for it, we highly recommended that you try it. Apart from the animated themes, other customization options involve clearing out browsing and tweaks to the vertical bar.
Nothing major, but scrolling through the Settings menu is a surprisingly wonderful experience. Everything is nicely laid out. Somehow Opera balances having multiple configurations but none of it feels confusing.
The settings menu on other browsers feel like walking through a labyrinth; confusing and a pain to go through.
Privacy and Security
While Opera does have some pretty good security features and tools, it’s important to address the elephant in the room. Back in 2016, Opera was bought by a Chinese cybersecurity company Qihoo 360.
When people hear that a Chinese company owns Opera, they may jump to conclusions and think that the browser has been compromised by the Chinese government.
Many fear that these tech companies leak information to the Chinese government to spy on people across the world. However, there is no evidence that Opera has been compromised by anyone.
The developer hasn’t had a major security breach since 2016. There have been no reports from anyone that the Chinese government spies on Opera users.
This may seem like a random thing to mention, but doing research for this review, we came across several people expressing their concerns about this news.
There is no evidence whatsoever of this happening. If anything, the security concerns should be focused on locally instead.
Security
As you know, Opera is built on the Chromium browser engine, the same as Google Chrome.
But unlike Chrome, Opera does not use Google Safe Browsing which is a tool that protects people from malware. If you’ve ever gone to a website and had a warning go off in Chrome or it prevents you from entering a website, that’s Safe Browsing in action.
Apart from that, Opera has the neat feature of alerting you if you visit a website with an insecure HTTP connection. But unlike Chrome, it’s easy to miss.
Chrome blocks you from entering the website and gives an explanation why. On Opera, a little triangle with an exclamation point appears in the address bar. It informs you of the insecure connection.
While not as intrusive, it’s not as robust. This would have been the one instance an intrusive blocker would be welcome.
Ad blocker
Opera’s ad and third-party tracker blocker is the browser’s best security feature. You don’t really need to download something uBlock Origin to enhance security. Opera has you covered, although we do recommend Privacy Badger.
Looking through the ad blocker settings, you have options to add exceptions in case you want certain ads to come through. By default, there are exceptions for Google, Facebook, and Bing but you can add more.
Three recommended lists are automatically enabled on Opera. These lists cover most of the annoying ads on the internet. There’s even NoCoin which protects you from bad actors trying to use your computer for cryptocurrency mining.
It’s a very insidious act that can cause your electric bill to skyrocket and your machine to overclock. Other browsers have it too as extensions to download. Opera has it on by default.
The developers have also enabled Allow Acceptable Ads by default. This feature allows ads that are nonintrusive and comply with strict ad criteria. On paper, this sounds great but we can’t verify what a nonintrusive ad is for Opera.
We couldn’t find a detailed description or definition for this on Opera’s website.
VPN
The final major feature of the Opera browser is the in-browser VPN. Opera is one of the handfuls of web browsers that has this feature for free. The VPN sits to the left of the address bar. You can click on it to turn on the feature and change your virtual location.
You can have three rather vague choices for the location: the Americas, Asia, and Europe. Presumably, “Americas” refers to both North and South America so you can, in theory, watch content from Latin America.
We wish there was some kind of distinction, however. In fact, we wish Opera gave more details about how its VPN works and what kind of encryption is uses. The developers state the browser has a no-log VPN which means it doesn’t collect information on your web browsing.
That’s good to know, but that doesn’t answer our on what kind of encryption the VPN uses. Going through the rest of the VPN, you have a helpful graph that shows how much you’ve used it.
If you’re worried about bandwidth, don’t be because it’s unlimited. You can use VPN as often as you want and still have the service available to you.
The VPN’s speed is a mixed bag. It’s recommended that you stick to the Optimal Location option for the highest speeds. If you choose a global region far from where you live, you’ll experience a considerable slowdown.
To give some perspective, this review was written on the west coast of the US and experienced the greatest slowdown when Asia was selected.
We also don’t like how the VPN’s IP address appears in the drop-down window. It’s small and not your actual IP address, but we would’ve liked it if it was hidden better.
Our final complaint is how the VPN is sort of hidden. It’s a little box next to the address box that you can easily miss. The tool also isn’t available in the vertical sidebar which is a missed opportunity. But still, a free VPN is still a free VPN. It’s a welcomed service.
A free VPN insinuates the existence of a premium version and there is Opera VPN Pro. The paid service isn’t a big jump in quality. You get some extra security features but that’s pretty much it. No additional choices for locations or increased speed.
With VPN Pro, the entire device is protected from tracking instead of just the browser. That’s a data-saving mode for smartphones and the ability to cover multiple devices.
You can secure up to six Android or desktop Windows machines with a single subscription. But VPN Pro still has the same criticisms: the vague encryption standard, okay speeds, and exposed IP address.
The new security features and multiple device support are fine, but we would’ve liked more.
Is Opera better than Google Chrome?
For the most part, yes it is. Google Chrome does have the company’s Safe Browsing program which other browsers use in their own software. Firefox, for example, has implemented the Safe Browsing.
However, Google itself is less trustworthy. The tech giant is constantly fighting off allegations and lawsuits over user privacy. Back in January, Google was accused of tracking people into allowing them to record their location without consent.
And there’s the story of Google tracking using tracking users even when they’re in incognito mode which defeats the purpose of the feature. Google Safe Browsing may make you safe against third parties, but what about itself?
Opera doesn’t do any of that. In fact, as of Opera 65, the browser will show you who is tracking you on the internet. As stated earlier, Opera’s own security features are not as good as Chrome’s Safe Browsing but you can always remedy that.
We recommend using extensions to patch up the holes in Opera. And of course, there are features housed in the vertical bar that are the reason we fell in love with the web browser.
Similar to our Opera GX review, we ran both Opera and Chrome through multiple tests on BrowerBench to see which of the two browsers were the fastest in terms of web apps, browser graphics, and responsiveness.
OperaTest
Runs per minute
JetStream 2
157.949
MotionMark
661.86
Speedometer
118
Chrome Test
Runs per minute
JetStream 2
155.040
MotionMark
780.31
Speedometer
146
As you can see from these test results, Chrome is substantially faster than Opera in terms of responsiveness and web app speed. However, Opera is able to render graphics a little bit faster.
Opera doesn’t blow Chrome out of the water judging by these results. But if you care more about features, tools, and protection more than performance, Opera comes out on top.
As for other browsers, it’s a similar question. Opera does certain things better, like having a free VPN, but lacks in others. It depends on what you look for in a browser and what’s most important.
If you want a browser that has a ton of features with decent security features, then Opera is the browser for you.
Is Opera better than Opera GX?
Yes, but it depends on who you ask. If you’re a big gamer, Opera GX is better. The two are both based on the Chromium with the same exact features: privacy, VPN, music players, the works.
The difference is that Opera GX has three additional features: GX Corner, GX Control, and GX Cleaner. Corner gives an overview of all your gaming settings in the browser where you can then tweak them.
Control lets you adjust video game-related features and certain computer settings like the CPU limiter. And Cleaner lets you clear out browsing data. These features make Opera GX better for gamers.
If you’re not a bigger gamer, you’re better sticking with the normal version. If you don’t use them, they’re just extra, unnecessary features.
Final thoughts
Pros
Has tons of customization options
Free and unlimited VPN
Integrated messaging and music apps
Built-in robust adblocker
Cons
Slower than some mainstream browsers
Security is lacking
VPN Pro is limited in features
With all that said, would we still recommend Opera? Yes, absolutely. Yeah, there are some problems with the browser’s security. It’s not as strong as we would like it to be, but it’s still pretty decent for what it is.
Opera’s performance is also disappointing, as we wish it was faster than Chrome in our tests. However, the browser is still plenty fast. We experienced no slowdown watching videos on YouTube or playing browser games.
Streaming content was just as quick as other browsers. In certain scenarios, there may be slowdowns so it was important to mention it. Apart from that, the integrations are fantastic; easily our favorite aspect of Opera.
Being able to message on the browser without needing an extra app is simply amazing. That will greatly save on CPU resources. We also loved the wealth of customization options, like the animated wallpapers. They give a nice personality flair to Opera.
For casual users, Opera comes highly recommended. It packs a ton of features into an easy-to-understand browser. It’s a perfect fusion of security, functionality, and customization.
Feel free to comment below if you have any questions on Opera or other browsers Also, leave comments about reviews you’d like to see or information on other web browsers.
As spotted by Windows Central, users will now be able to buy Windows 11 Home and Windows 11 Pro licenses directly from Microsoft. Initially, users depended on USB drives for these licenses but at $139 and $200, you’ll be able to get digital licenses for Windows 11 Home and Windows Pro respectively.
With this new arrangement in place, users will now be able to build their own devices from scratch more efficiently and effectively, the same also applies to those users that may want to run the OS in a virtual environment. You should also check out our expert guide where we expound on how to install Windows 11 on a Virtual Machine.
These digital licenses are meant for devices that require a new license, of course, the device must meet the minimum requirements of Windows 11. It is also worth noting that you will require a USB drive which will allow you to perform a clean install.
Looking for the best download speed booster to speed up your downloads in the Opera browser? You’re in luck. We tested several options on the market and listed the best performers below.
Check them out and pick the best option for your needs.
What are the best download speed boosters for Opera?
Since the Opera Turbo feature does not exist in version 59 and up, you can enable the hardware acceleration feature, which is the same as the Turbo mode:
Launch the Opera browser, and click on the located gear icon (Settings) on the sidebar.
Next, select Browser on the left.
Now, travel to the right, scroll down to the System section and turn on Use hardware acceleration when available.
Press the Relaunch button to restart Opera and it should speed up now.
Apart from enabling the hardware acceleration feature, here are some of the other most effective methods you can use to speed up Opera Web Browser:
Disable any unnecessary features like integrated messages, pinboards, etc.
Delete all bookmarks
Use an ad blocker to block annoying pop-ups
Clear browser history, cookies, and cache
Disable extensions that you are not using currently
Stop using the built-in Opera VPN
Close any additional tabs that are not in use
Does Opera have a download manager?
Yes, Opera comes with a built-in download manager that allows you to access your downloads easily as shown below:
Open Opera and on the sidebar, click on the Downloads icon.
This will open the Download manager in a new tab.
Here, look for your downloaded file and click on Open to open the file.
Or, you can click on the three dots next to it and select your option to manage your downloaded file.
But, if you want to increase the download speed in Opera, enabling the Turbo mode (in version 59 and below) or the hardware acceleration may help you achieve the speed.
Experiencing Opera browser high CPU usage can slow down your entire system, especially when multiple tabs are open. Whether you’re using standard Opera or Opera GX, certain settings and processes can lead to performance issues. Below are focused solutions that don’t rely on the typical suggestions like clearing cache or disabling extensions.
Scroll down and toggle off the Use Hardware acceleration when available option.
5. Check for the latest update
Click on the Opera logo at the top left.
Select Update & Recovery.
It will automatically start looking for new updates. And if found one, will prompt you to install it.
There are chances that the version that you are currently running has a bug that has increased CPU usage. Install the latest update and check if this fixes the issue.
6. Reinstall Opera
Open Control Panel.
Select Programs and Features options.
Click on Opera from the list of apps.
Hit the Uninstall button at the top.
Once is successfully uninstalled, restart your PC to remove all remaining files.
Turn on the RAM limiter toggle. Or you can manually allocate the RAM you want it to use.
Scroll down and turn on the CPU limiter toggle. You can also set what amount of CPU resources you want the browser to use.
Opera GX has a built-in feature that could help fix this issue.
8. Check for Script-Heavy Websites
Sites with autoplay videos, ad-heavy layouts, or infinite scrolling can drastically increase CPU load.
Open Task Manager in Opera (Shift + Esc)
Identify tabs with high CPU usage
Close or pause the offending tabs
9. Disable Sidebar Apps and Features
Opera’s sidebar includes apps like WhatsApp, Instagram, and Messenger that stay active even when not in use.
Go to Easy Setup > Disable unnecessary sidebar apps
Or right-click the sidebar and hide all unused services
10. Turn Off Background Music Playback (Opera GX Only)
GX includes features like background music or sound effects that consume resources.
Open GX Control
Navigate to GX Sound
Disable background music and sound effects
11. Use the Built-in Task Manager to Identify Resource Hogs
Opera has a built-in tool to show which processes use the most CPU or RAM.
Press Shift + Esc
Sort by CPU or Memory
End high-resource tasks directly from the panel
12. Disable Live Wallpapers (Opera GX Only)
Animated or interactive backgrounds consume both CPU and GPU.
Go to Settings > GX Appearance
Switch the wallpaper to a static one
Turn off animation effects
13. Adjust Battery Saver Settings
Opera’s Battery Saver can conflict with certain system power plans and cause spikes in CPU activity.
Visit Settings > Features > Battery Saver
Try disabling it and monitor CPU usage
14. Switch to the Standard Opera Version (If Using Opera GX)
If Opera GX high CPU usage persists even after adjusting GX-specific settings, consider switching to the regular Opera version, which lacks the gaming-focused overlays and integrations.
Why is Opera power usage so high?
The most common reasons why Opera uses a lot of resources are:
You installed a bunch of add-ons
There are some issues with the beta version
Because of corrupt browsing cookies and data
Presence of malware or virus on the PC
Hardware acceleration is causing high CPU usage
The browser version is outdated
How Much CPU Should a Browser Use?
On average, a browser should use between 5% and 20% CPU during moderate usage (e.g., 3–5 tabs open with media paused). If it consistently spikes above 40–50%, there may be background processes, scripts, or settings draining system resources unnecessarily.
We’ve all used mobile hotspots at one point or another. Whether you created the hotspot yourself to share your internet with other devices or simply connected your phone to a hotspot, it’s a fact that a hotspot can be a super handy tool.
Interestingly, you can also turn on and use a hotspot on your Windows 11 and Windows 10 PC. This feature can come in nifty when you want to connect your smartphone to your PC’s internet.
How to connect your smartphone to your Windows 11’s internet
Enabling your Windows 11 PC’s hotspot is a fairly simple process. Once you do that you can then link your PC’s internet to your smartphone. Here’s how you can get started:
Go to the Start menu search bar, type in ‘settings,’ and select the best match.
Head to Settings > Network & internet > Mobile hotspot.
On the Mobile hotspot tab, click on the dropdown option for Share my internet connection from and select WiFi or Ethernet.
For the Share over option, click on Wi-Fi or Bluetooth.
Click on Edit from the Properties section.
Finally, set the Network name, its password, and set up the Network band to Any available. Click on Save. Now toggle on the Mobile hotspot switch to turn on the Windows 11 hotspot.
That’s it. Now all you’ve to do is turn on the Wi-Fi setting on your smartphone and connect it to your PC’s hotspot.
Sharing Windows 10’s internet with your smartphone
Again, in the case of Windows 10, the process is pretty straightforward as well.
Toggle on the switch for “Share my Internet connection with other devices”.
Set up the network name and password, and you’ll be good to go.
Do this, and you can connect your smartphone to your Windows 10 PC’s internet immediately. So when I try and connect my phone’s Wi-Fi to the desktop, this is what it looks like:
Enter the passwords you set above, and your mobile will be successfully connected to your PC’s hotspot.
Connecting your smartphone to your PC’s internet
If you can’t access your mobile internet for some reason, then your Windows PC’s hotspot can rescue you from this perilous situation. We hope this short guide helped you connect your smartphone to your Windows.
Microsoft Edge engineers continue to refine its user experience as well as building cohesion with other platforms.
The Edge team published the details of its latest Dev channel release 105.0.1329.1 to the Insider Dissuasion blog with the following notes:
Added a button in the PDF toolbar to share documents.
Added a mute indicator on tabs when the browser is muted in the volume mixer
Improved reliability:
Updated max URL length in the side pane for visual search
We added an “always enforce” list to Enhanced Security mode
Improved iOS Feedback prompt to notify when connection is blocking the ability to send feedback
Now it seems the Edge browser will support and recognize changes made in the volume mixer on Windows devices and represent those changes (if muted) in the browser tab which should help users who want more ways to control volume on their devices.
There were other smaller improvements that were pushed through with the Dev channel update that include fixing a crash that occurs when getting the page count in print preview, crashes when adding Favorites folders on iOS, and a couple of others.
The Edge team also highlighted its efforts on Disk caching with that are improving the way the browser “compresses disk caches for improved performance and a reduced disk footprint.”
The end result should be an Edge browser with a lighter footprint and less resource hungry experience that has the potential to bog down an operating system.
The Dev Channel update for Edge was made live yesterday and should be showing up for users in the following days.
If Opera is not connecting to the Internet, you won’t be able to use it at all, and this can be a major problem. Luckily, there are a few ways to fix this issue.
What can I do if Opera is not connecting to the Internet?
Before we try anything else, we suggest checking your Internet connection or trying a different one. Make sure your Kaspersky antivirus or other software isn’t interfering with or blocking Opera.
1. Update your Opera browser
Launch the Opera browser on your computer.
In the top-left corner of the screen, click on the Menu button.
Scroll down and select Update & Recovery.
On the Update and Recovery tab, Opera will automatically scan and download updates if there are any updates available.
Restart the Opera browser and try connecting to the internet.
2. Disable VPN
Open Opera and navigate to the following page: opera://settings/vpn
Make sure VPN is completely disabled.
Check if that solves the problem.
3. Disable HTTPS over DNS
Click the Menu icon in the top left and choose Settings.
Scroll all the way down and click on Advanced.
Locate Use DNS-over-HTTPS instead of the system’s DNS settings and disable it.
The Microsoft Threat Intelligence Center (MSTIC) along with the Microsoft Security Response Center (MSRC) published a blog post identifying and detailing the malware exploits of an Austrian-based group as KNOTWEED.
According to the joint MSTIC and MSRC report, a private-sector offensive actor (PSOA) has been using multiple Windows and Adobe Zero-day exploits to develop and sell malware dubbed Subzero to attack banks, consultancy, agencies and law firms in European and Central American regions.
In its technical blog post, which is being used as written testimony submitted to the US House Intelligence Committee this week, Microsoft details the actions of DSIRF which is the official name of developers of KNOTWEED.
Despite DSIRF claims of legitimacy as a multinational risk analysis business that makes use of “a set of highly sophisticated techniques in gathering and analyzing information”, Microsoft has surveilled and tagged the bad actor as a distributor of spyware intended for unauthorized surveillance.
Multiple news reports have linked DSIRF to the malware toolset Subzero which took advantage of Zero-day exploits in Windows and Adobe Reader, in 2021 and 2022.
In May 2022, MSTIC found an Adobe Reader remote code execution (RCE) and a 0-day Windows privilege escalation exploit chain being used in an attack that led to the deployment of Subzero. The exploits were packaged into a PDF document that was sent to the victim via email. Microsoft was not able to acquire the PDF or Adobe Reader RCE portion of the exploit chain, but the victim’s Adobe Reader version was released in January 2022, meaning that the exploit used was either a 1-day exploit developed between January and May, or a 0-day exploit. Based on KNOTWEED’s extensive use of other 0-days, we assess with medium confidence that the Adobe Reader RCE is a 0-day exploit. The Windows exploit was analyzed by MSRC, found to be a 0-day exploit, and then patched in July 2022 as CVE-2022-22047. Interestingly, there were indications in the Windows exploit code that it was also designed to be used from Chromium-based browsers, although we’ve seen no evidence of browser-based attacks.
Microsoft also details KNOTWEED exploits that involve Subzero disguising itself as an Excel file in real estate documents. “The file contained a malicious macro that was obfuscated with large chunks of benign comments from the Kama Sutra, string obfuscation, and use of Excel 4.0 macros.”
Fortunately, Microsoft has been able to implement protections since identifying KNOTWEED but advises users to be on the lookout for other behaviors of known and unknown malware that include examining directories such as C:\Windows\System32\spool\drivers\color\ where legitimate programs my inadvertently house spyware.
If digging through registries is too in the woods for some, Microsoft also suggests some more practical high-level options such as prioritizing patching of CVE-2022-22047 when it hits machines, making sure Microsoft Defender Antivirus is up to date, changing Excel macro security settings, enabling multifactor authentication (MFA) and reviewing authentication activity from remote access infrastructures regularly.
Don’t know what to play on Game Pass? With well over 100 games to choose from across just about every genre out there, it can be tough to know where to start. Thankfully we’ve got you covered with these Game Pass recommendation for Star Wars fans. For these folks, Game Pass does not disappoint with four awesome games (and six total editions) from the franchise. Let’s check them out.
Star Wars Jedi: Fallen Order
This third-person action game holds with the Metroidvania approach to balancing action and exploration. Armed with a lightsaber and the Force, players assume the role of former Jedi Padawan Cal Kestis. Along the way Cal will acquire new abilities that will allow him to reach areas that were previously inaccessible. There isn’t anything here that reinvents the wheel, but it doesn’t need to. What Fallen Order does do is deliver a rock-solid Star Wars adventure that will be a treat for fans casual and hardcore alike.
Star Wars Jedi: Fallen Order has sold over 10 million copies. The game is set to get a sequel in 2023 with Jedi: Survivor.
To be clear, this is a reboot of the Star Wars Battlefront subseries than launched in 2004 with a game of the same name. This 2015 title reflects the new Star Wars mythology that came about after Lucas Arts was acquired by Disney. An action-shooter that can be played in either first or third person, Battlefront is really geared toward the multiplayer experience. This is seen in the wealth of modes and maps available. Multiplayer games can accommodate up to 40 players.
Battlefront has sold 14 million copies, and has won several awards. It was nominated for Best Shooter at The Game Awards in 2015. PC Game Pass members are treated to the game’s Ultimate Edition, which includes content from the season pass.
Star Wars Battlefront II
As you might have guessed from the game’s title, this is the follow up to the previous entry. Much like its predecessor, it is a first- and third-person shooter with both single player and multiplayer game modes. The game spans multiple eras of Star Wars history, each with exclusive maps.
There are several classes present in Battlefront II in addition to a roster of Heroes (and villains) who can be leveled up as with other classes. These include series icons like Luke Skywalker, Leia Organa, Han Solo, Boba Fett, and many others.
If you enjoyed the first Battlefront, then you will enjoy this too. And PC Game Pass members get the Celebration Edition with all cosmetic options in the game.
We end with something different. Star Wars Squadrons is a space combat game played in the first-person perspective. Players can choose to fly starfighters from either the Galactic Empire or the New Republic. Each has four distinct starfighter classes: Fighter, Bomber, Interceptor and Support.
Squadrons has a single player story mode as well as two online modes – a team deathmatch mode for u to ten players called Dogfight, and Fleet Battles. In Fleet Battles 2 teams of up to 5 players fight to destroy each other’s Capital Ships. All in all, Squadrons is geat for a soaring good time for die-hard Star Wars aficionados and casual fans alike.
Wrap up
Which of these great Star Wars games are you going to tear into first? Let us know in the comments. And if you haven’t already signed up for a Game Pass subscription, you can do so here. Learn more about Game Pass over on its FAQ page. And don’t forget to check out our other “What to play on Game Pass” posts for other Game Pass recommendations. And may the Force be with you.
If you purchased a license for a Microsoft 365 product and tried to activate it, you might see the This product key cannot be used in your country/region. Please double-check your product key and try again error.
This error prevents users from activating Office products even if they spend money to get them. However, you can quickly fix this problem by using a service that bypasses geo-blocks and makes it look like you’re trying to activate Microsoft 365 from another country where it’s allowed.
Why is Microsoft not accepting my product key?
If you see this notice, it indicates that the product key you are using was purchased in a different nation or area from the one where you are now situated.
Product keys for Microsoft Office may only be redeemed in the country or area where they were originally purchased.
However, there are ways to bypass this notice. One is using a VPN service that will mask your actual region. Follow along to see what else you can do if Microsoft Office is not accepting your product key!
How do I get rid of the This product key cannot be used in your country/region message?
1. Use a VPN service
Using a VPN is the best way to get rid of the Sorry this product key cannot be used in your country/region message and activate your Microsoft 365 product successfully.
A VPN changes your IP address and geo-location to fool Microsoft into believing you’re trying to connect its products from a country where licensing is permitted. The trick is to choose the right country.
We recommend ExpressVPN because we believe it’s the best VPN for circumventing firewalls and accessing blocked websites.
ExpressVPN comes with a very user-friendly graphical user interface that can be used on a variety of platforms, including Windows, Mac OS X, Android, Linux, and straight in your web browser.
It provides superb connection speeds whether you are browsing the web safely, downloading or streaming content, or gaming with friends.
More about ExpressVPN:
Password Manager
Supports torrenting and streaming
Servers in 105 countries
No logs or leaks
VPN for Gaming
ExpressVPN
Use a reliable VPN service like ExpressVPN to activate Microsoft 365 products without any geo-restrictions or licensing issues.
You need to search for the product key with great attention to determine whether you are utilizing the appropriate kind of product key.
For instance, if you acquired the activation key for a different package of Microsoft Office or an earlier or newer version of Microsoft Office, then it will not function for the various versions of Office that you have.
Moreover, you must always get the product key from an authentic, official, or approved source. If you purchased the key to activate Office 365 from anywhere other than the Microsoft Store, there is a reasonable risk that the vendor gave you an unauthorized duplicate of the product key.
Press Windows + I to open Settings then navigate to Time & language followed by Language & region.
Scroll down to the Region section and select the country or region which corresponds to your key’s source, by clicking on the drop-down menu next to Country or region.
Restart your computer in order to apply the changes made
Note that although this method will indeed change your region or country, this simple setting might not convince Office 365 thus you might have to resort to a VPN after all.
4. Contact customer support
You are welcome to contact Microsoft’s customer support service if you believe the mistake is on their end and there is nothing wrong with the region in which you are located or the key you are using.
As stated on their website, you can reach them at this number if you are calling from within the United States: (800) 865-9408. If that is not the case, you should look at their list of phone numbers for other countries.
Microsoft Office 365 country restrictions
As stated on their website, customers who acquire Microsoft 365 can assign a license to a user residing in any country except Cuba, Iran, the Democratic People’s Republic of Korea, Sudan, and Syria.
How to check if the Microsoft Office product key has been used?
Unfortunately, there is no method to check whether other users have previously utilized a product key; nevertheless, you will receive an error notice if you attempt to use it.
Always acquire your items from a legitimate vendor to avoid situations in which you purchase already-used keys. You can also purchase authentic and reliable licenses from the Microsoft Store.
To summarize, you can use a trustworthy VPN to get rid of the This product key cannot be used in your country/region error message by connecting to a VPN server in a country where the key activation is allowed.
Although it’s tempting to use a free VPN, it doesn’t usually work the way you expect. Instead, resort to a premium VPN service like Private Internet Access.
Don’t hesitate to comment in the section below and tell us what you think. Thanks for reading!
LinkedIn has quietly introduced a new feature for its members which could help your brand and business – Cover Stories. Cover Stories allow you to create a video clip showcasing your business and skills. You can add the video clip to your profile and viewers can see your video when they click on your profile.
LinkedIn Cover Stories profile video
As a small business over, this video addition to your profile could enhance your personal and business brand and help you get more customers. And the great thing about Cover Stories is it is not only available for Premium members. All users who have a profile on the platform can take advantage of marketing this feature.
When you look at someone’s profile when they have Cover Stories enabled, you will see three seconds of their muted video. Clicking on the video icon will display the entire video with sound enabled. You can record up to 30 seconds of video and add it to your LinkedIn profile for everyone to see. Unfortunately, profile videos are not currently available for members accessing the platform from China.
Recording LinkedIn Cover Stories
You can only record the video clip and upload it from the LinkedIn mobile app – not from your desktop. To upload a video using your mobile device, go into the LinkedIn app and find your profile photo. Click the plus sign on your profile photo and tap ‘Add profile video’. Make sure that you have enabled the camera and the microphone for LinkedIn before you record.
You do not need to do a live recording for your profile directly from your mobile device. You must upload a minimum of three seconds up to a maximum of 30 seconds from your phone. However, you do not need to do a live recording for LinkedIn directly from your mobile device. I recorded my LinkedIn cover story using the video capability in the Windows Desktop Camera app and transferred the video to my Android phone using OneDrive.
If you do record the video from your phone, after you have finished recording, you can preview the video by tapping the ‘visibility’ icon at the bottom left of the screen on your mobile device.
Then, set the audience to either ‘All LinkedIn members’ or ‘Connections only’ to select who you want to see your video. If you want to attract new customers, then set the audience to ‘All LinkedIn members’. Finally, when you are happy with the video, tap the ‘Share to profile’ link from the ‘Adjust preview’ page.
Standard LinkedIn profile roundel for Allister Frost
My buddy Allister Frost has also uploaded his Cover Story and gave me permission to use screenshots from his profile. You can see his normal profile, and when you hover over the roundel in his image you can see the muted three-second preview of his Cover Story.
LinkedIn Cover Stories muted video preview
Clicking on the roundel will open up the entire video in a new window which will play with the associated sound.
LinkedIn Cover Stories full video with sound
If you want to answer a question on your video, select ‘Add prompts’. This will enable you to respond to a prompted question about your work. You will be given prompts such as ‘What’s your mission or purpose?’, ‘What problems are you trying to solve?’, or ‘What does your job look like behind the scenes?’. These prompts will frame the video and enable you to say what you want to say in your video.
You can also add stickers and text to your video if you choose and choose one or two frames for your own profile roundel. You can choose to keep the image as original, or select one of two options – either #hiring or #opentowork. Of course, Frost has gone one better than that and created his own custom frame for his roundel which he uploaded as his profile image. By the way, LinkedIn, the ability to customise the frame in your roundel would be a very good idea for influencers to make their profiles stand out from the crowd.
Adding Closed Captions to LinkedIn Cover Story videos
You can also add Closed Caption SRT (SubRip Subtitle) files to LinkedIn so that viewers watching on mute can see subtitles for the video. You could use a tool such as Rev or Zubtitle to generate the SRT file to add the captions to the LinkedIn video
If you want to add closed captions to your video, switch to LinkedIn for Desktop. Click on your profile icon at the top of your page and click ‘View profile’. Then, click your profile photo in the introduction section and select the ‘view or edit profile video’. Click the ‘closed captions’ icon, upload your SRT file using the ‘Select captions file’, then preview the captions and upload them.
Of course, you do not need to add closed captions to your video – but if you want to make sure that everyone can see your message – whether they’re on mute or not. It is certainly worth considering if you want to connect across the LinkedIn platform.
A well-crafted Cover Story could enhance your LinkedIn profile, and let people see who you really are behind the words and the static image on your profile page. And that could bring you more business and really extend your brand.
The weekend is right around the corner, and that means its time for the latest round of games with Xbox Free Play Days. Three games will be available to play from Thursday through Sunday at no additional cost for Xbox Live Gold members (and by extension those with a subscription to Game Pass Ultimate). Let’s check out the lineup.
Generation Zero
Naruto to Boruto: Shinobi Strikers
WWE 2K22 (available for both Xbox One and Series X|S)
These games are all on sale throughout the weekend too. Generation Zero is at 65% off; Naruto to Boruto: Shinobi Striker can be purchased at 90% off (yes, you read that right); and WWE 2K22 is available at 45% off.
You can learn more about the Xbox Free Play Days over on the FAQ page.
Windows PCs have some of the best battleship games that allow you to take charge of a battleship in a modern, sci-fi fantasy.
However, what if you don’t want to download a huge game to your PC and go through the installation process?
Online battleship games are a popular alternative among casual gamers looking to play battleship games on their web browser.
These 3D battleship online games require you to develop your own battleship and sail the sea to battle with other players.
In this article, we explore the best online battleship multiplayer games that you can play on your browser and put your admiral mind to test.
How do you play Battleship with a friend online?
A game is regarded to be multiplayer if it can support more than one player at a time. Multiplayer games are played via the Internet the vast majority of the time; however, they can also be played through a LAN (local area network) or dial-up connection.
Multiplayer gaming using a split screen is common on consoles, although the number of players is often limited to between two and four.
Many games provide players the ability to construct and manage their own private servers, even while the main game servers are managed by the game’s producers.
But when it comes to Battleship games, you can opt for a multiplayer version. Check out the list below as we have listed some of them as well. Follow along!
Quick Tip:
You can play browser-based online games on any web browser; however, some web browsers like Opera GX are developed specifically for gamers by keeping their needs in mind.
Opera GX is a gaming counterpart of the Opera web browser for Windows and macOS built to complement your online gaming sessions.
Opera GX
This software offers you access to game-oriented browser features and a lightning-speed browsing experience.
Apart from offering greater control over shortcuts to apps, Opera GX also allows you to control your PCs resources such as GPU, RAM, GPU, and network bandwidth usage using the built-in limiters.
What are the best battleship games to play online?
Drednot.io is a fun battleship game in which you must develop your own battleship and crew. You, as the captain, sail the sea to battle with other players online.
You can also join forces with other players to create a mighty vessel to havoc destruction on your opponents.
Drednot.io allows you to choose the type of ship you want to create. You can build a small and fast destroyer or gigantic ship with loads of guns and armor, compromising on agility. As a school unblocked online battleship game, you can enjoy it everywhere.
While the game is not the best aesthetically, it is still fun and offers tons of customization to play with. That said, it requires you to create a user account before you can begin.
Krew.io – Multiplayer game that doesn’t require an account
Krew.io is another online multiplayer browser-based battleship game. Unlike Drednot, it allows you to play as a guest without creating an account.
We ranked it as the second best online battleship game for 2 players since it allows you to sail on many seas.
Krew.io uses the standard WASD controls to move your player and mouse to rotate and shoot. You can select from the two available and a place where you want to play, including Sea, Brazil, Spain, etc.
You play as a cannon on a ship and try to destroy the enemy ships and collect coins. In the multiplayer mode, you can join forces with other players to strengthen your army.
Boat Simulator is not exactly a battleship game, but if you like to play with different kinds of boats in simulation, this game has tons to offer.
Boat Simulator is a 3D simulator game in which you have the freedom to control different sea vessels and explore around. Not exactly a battleship simulator, but it can still be tons of fun.
This game is made on Unity WebGL for web browsers. You can move the boat using the WASD control.
Hold the right mouse button to move the camera, press C to change the camera view, press V to change the vessel, and use the mouse scroll to zoom in/out.
You begin by selecting one of the two simulation environments. You can explore the environment and play around with objects like oil barrels and jump high using the ramps.
Battleships Pirates is an action pirate strategy game with various abilities, that caught our attention. Thus we regarded it as one of the best free battleship games for PC. Use the left mouse click to interact with the game.
The game begins by taking you through building a rowboat and then placing the captain on the boat.
You need to look at the enemy energy bar and then use your skills to hit the enemy fleet. You will certainly enjoy the game if you are into strategy-based battleship games.
Follow the on-screen instructions, and you are good to go. Use the left mouse click for all the actions.
Battleship is another best warship online game. The game puts you as the commanding officer. Your job as the commanding officer is to lead your powerful fleet in a battle against another fleet.
Begin with positioning your battleships carefully on the map. You need to also decide if you want to put them vertical or horizontal to gain strategic advantage.
The objective is to guess where the enemy battleship’s position is and shoot missiles to destroy all of them. Being a browser game, Battleship is compatible with your PC as well as mobile devices.
The online battleship games may not be as sophisticated as their PC counterparts. However, these games offer decent effects like an explosion and require you to employ brilliant strategies to outperform the opponent and destroy their battleship.
Which one do you like the most? Let us know in the comments section below. Thanks for reading!
If Opera has no sound, you won’t be able to enjoy any online multimedia, but luckily, you can fix this problem with these solutions.
Why does my Opera have no sound?
The issue is likely caused by settings in Volume Mixer and Opera might be muted or using a different output device. Sound settings in Opera can also cause this problem.
How to fix the no sound issue on Opera?
Before we start, make sure that the tab playing music isn’t muted. Reinstalling audio drivers can also help.
1. Adjust your audio settings
Press the Windows key + I to open the Settings app.
Go to System and then select Sound.
Navigate to Volume mixer.
Locate Opera and make sure it’s not muted. Also, move the slider to the max value.
Next, click the arrow next to the volume slider and set the Output device to Default or your output device of choice.
If the problem is still there, click the Reset button at the bottom.
2. Allow sites to play sounds
Launch the Opera browser open the Menu in the top left click the Settings icon.
Select the Advanced settings option.
Select Privacy and Security, then click on Site Settings.
Go to Additional content settings and select Sound.
Toggle on the Sites can play sound option.
3. Change launch parameters
Locate the Opera shortcut, right-click it and choose Properties.
In the Target field, add the following after quotes: --disable-features=AudioServiceSandbox --disable-features=AudioServiceOutOfProcess
To monetize the live streams, Twitch shows non-skippable embedded ads at the beginning of the video. Keep in mind that even Prime users see these ads.
While the ad blockers should block these ads, some users have reported uBlock Origin is not blocking Twitch ads when streaming.
This is due to developers removing all the client-side fixes that disabled advertisements. You can overcome this limitation on uBlock Origin by installing the Twitch HLC AdBlock extension.
In this article, let’s walk you through the steps you can follow to fix the uBlock not blocking ads on Twitch videos issue.
Why does uBlock Origin not block Twitch ads?
As with all software, you are bound to run into some errors, bugs, or lack of functionality, which is why it’s important to know what to do in that type of situation.
uBlock Origin not blocking Twitch ads issue occurs due to the new changes made to Twitch.tv, which prevents ad blockers from blocking ads.
However, you can bypass this restriction by either adding the Twitch HDLS AdBlock extension or by using the Alternate Player.
What can I do if uBlock Origin is not blocking Twitch ads?
1. Use AdBlock
AdBlock is a popular ad blocker extension available on multiple platforms, including Chrome and Firefox. Unlike Ublock, AdBlock has a better success rate of blocking Twitch ads.
You can download and install the add-on from the AdBlock website. It also works on Android and iOS devices if you watch on your smartphones.
AdBlock blocks not just pre-roll embedded ads but also removes pop-ups, banners, and video ads that start playing as soon as you open a web page.
Another added advantage includes the privacy option that prevents advertisers from tracking your internet activity.
Check and download the latest release of Twitch HLS AdBlock from Github.
Unzip the downloaded file into a directory and note down the path as you will need to access it later on.
Now, hit the Windows key, type Chrome, then open the browser.
In the address bar, type the following location, then press Enter: chrome://extensions/
Make sure to enable the DeveloperMode.
Click on Load Unpacked.
Navigate to the extracted directory and select the Extension folder inside theTwitch HLS AdBlockfolder.
Click on SelectFolder and wait for Chrome to install the extension.
Once installed, relaunch Google Chrome and visit Twitch. Try to open any video or stream to see if the ads are still showing.
2.2 Mozilla Firefox
Download the xpi file Twitch HLS AdBlock extension.
Press on the Windows key, search for Firefox, and open the first result.
Type the following in the search bar to open the addons section, then hit the Enter key: about:addons
Click the Tools (gear icon top right).
Select Install add-on from a file.
Select the download xpi file, then click on Open.
Next, click the Add button when a Firefox prompt appears.
Once installed, relaunch Firefox. Open Twitch and check if the ads are still running.
3. Use an Alternate Player for Twitch.tv
If you want to use uBlock Origin without any add-ons, try installing the Alternate Player extension for Twitch.tv. The major advantage of using Alternate Player is that it allows you to bypass embedded ads using uBlock Origin.
AdLock is by far one of the most secure and trustworthy extensions for blocking unwanted ads on Twitch. Those who already used it know that it is a highly effective script blocking tool that anybody can use to prevent on-page ads.
Other great choices include the one we’re talking about right now, uBlock Origin, AdGuard, CyberSec (NordVPN), and Total Adblock.
There are others as well, as you would’ve imagined, but these are pretty much the best ones you can find right now.
So, if you encounter situations such as uBlock not blocking Twitch ads, uBlock not working on Twitch at all, or doesn’t block Twitch ads on Firefox, you will be better prepared.
Now that you’ve fixed the problem with uBlock, why not give BetterTTV for Firefox a try, and take your Twitch experience to a new level?
With games such as PUBG and Fortnite, the battle royale games became incredibly popular on every gaming platform.
Some battle royale games don’t even need to be installed in order to run, and today we’re going to show you how to play battle royale games in your web browser.
In addition, battle royale games can be demanding, and for best performance, it’s advised to use a gaming-oriented browser.
What is the best browser to use for gaming?
Browser developers will always claim that their browser was specifically made to fit all purposes, among which is gaming, and that it’s an obvious choice.
However, if you want a browser that was built specifically for that role, then we’re going to say that you should go for Opera GX.
This is a special version of the Opera browser built specifically for gamers and all the needs that come with gaming.
Opera GX includes unique features like CPU, RAM, and Network limiters to help you get the most out of both gaming and browsing.
Speaking of resources, using the Control GX feature you can limit the number of resources that your browser uses. Doing so will ensure that other applications on your PC are running smoothly.
As for additional features, a built-in ad blocker will surely come in handy when playing browser games. Opera GX also has built-in messengers and VPN support.
Opera GX
Play browser-based battle royale games and be the last man standing by using Opera built for gaming.
You can create an account in order to unlock quests and other features.
3. Play on gaming websites
Visit your favorite online games website.
Now search for battle royale or go to the Battle Royale section.
Select the game you wish to play and click the Play button.
There are many websites that host these types of games, and the process is almost identical regardless of the website you’re using.
What other games can I play in my browser?
It goes without saying, but battle royal games aren’t the only video games you can play using your browser.
Besides battle royal and all sorts of vintage console games, via browser emulation, you can access adventure and strategy titles, arcade and puzzle games, sports titles, and the list goes on.
We compiled a list featuring the best browser games to play in 2022, so you might want to check it out if that’s what you are interested in.
When talking about browser games, it all comes down to preferences, so if you want battle royale online games with no download, you’ll find everything you need here.
Choose from a huge world of 2D battle royale browser games, and 3D battle royale browser games, where you will find all the battle royale browser game unblocked.
What are your thoughts on battle royale browser games and what is your favorite one? Let us know in the comments below.
Since developers need more than just browsing online, the best browsers for them should be capable of performing certain things. The possibility to see the code through plugins is, for example, one important feature. Also, the browser should be able to use some of the best extensions for developers, among other tools.
To cover all these requirements, we have put together a list of the best web development and coding browsers for you to choose from.
Firefox is one of the best browsers for web development and is quite popular in the field.
This powerful browser is much faster than others, allowing developers to create fantastic websites in no time.
Firefox also comes with a Developer Edition to which you can upgrade and access a next-generation CSS engine (written in RUST).
Moreover, you will also have the possibility to access the host of Firefox DevTools. Using this browser, you’ll also get access to a JavaScript debugger, a Master CSS Grid, and various other features. With these tools, you can effortlessly build your reliable CSS grid.
Our next recommendation is Chrome, a browser that has gained much popularity over the years. Regarding web development and design, Chrome offers some great features.
The Chrome browser for Developers is one of the products you can ever lay your hands on. With it, you can design websites specifically optimized for the latest versions of the digital world.
Using this browser, you can easily test, in real-time, cutting-edge APIs for web-based platforms.
PHP consoles, screenshot tools, and LastPass control are some of the tools and add-ons that Chrome comes packed with.
Safari is a powerful browser and one of the best ways to ensure an amazing performance on your website on Mac, iPhone, and iPad.
With the Safari Developer edition, you will be able to experiment with advanced features as well. Moreover, you’ll have the option to add Apple Play to your website, allowing customers more ways to check out online.
All in all, Safari comes with excellent features for increasing conversions to your website.
The Opera One browser is one of the best apps you can use for coding. It is stable and even has a dedicated developer stream where you can find updates in the field.
Also, it is a fast browser with many built-in features that save you from the stress of installing add-ons. It just offers so much for you in terms of coding.
Why do developers prefer Firefox?
Most developers prefer the Firefox browser because of its stability and low resource usage. When several tabs are opened on Firefox, it still uses less RAM and CPU compared to some other browsers.
Another feature that endears the browser to developers is the suite of tools it provides for developers. Good examples of this are the CSS and Javascript debugging tools.
Is Safari good for programming?
Overall, the Safari Developer browser is one of the best programming and web development apps. It is fast and light, assuring you of smooth testing and operation.
Also, it allows you to test how your apps will perform on Apple products easily. Also, it allows you to use extensions to extend its features to meet your requirement. So, you can always use Safari.
Is Chromium good for web development?
Chromium is a simple browser best used by advanced users and developers. Like Chrome, it supports the DevTools protocols.
However, for more reach and compatibility, you should use Chrome and the other modern browsers for developers.
There are several good browsers that developers can use. But if you are looking for the most efficient and professional, you can confidently choose from the options provided in this guide.
If you are looking for a list of the best lightweight browsers for developers, check our detailed guide on the topic to make an informed decision. And once you’re in the thick of things, feel free to explore the Microsoft Graph Command Line tools to extend the functionality of the Microsoft ecosystem.
Please let us know in the comments below if you have additional suggestions or recommendations.