LinkedIn is an official networking platform where professionals can connect with other professionals, companies, and top executives and step up the ladder in their professional careers.
LinkedIn has helped millions across the globe secure a new job, get a promotion, and find a business partner. Although recently, it has become a professional version of Facebook, where you will see fake motivational posts, the platform is still viable.
There are several user reports that confirm that LinkedIn is not working for them in Firefox. Well, this could be frustrating in case there is something important, such as a job or business offer, waiting for your reply.
Moreover, HR’s tasks of recruiting could also get hampered, as they rely on LinkedIn for finding talent, which is a nice medium to connect and get information about them in a better way than a CV.
In any case, if LinkedIn is not working for you in Firefox, and you are looking for solutions, then you have landed in the right place. Because this guide will list some top methods that will help you resolve the problem. Let us get right into it.
Why is LinkedIn not working in Firefox?
Well, there are not one but many reasons why LinkedIn may not be working as expected in Firefox. The problem could be from either LinkedIn’s or Firefox’s end.
After careful research, we have found some common reasons that could trigger the LinkedIn not working in Firefox error for you:
The LinkedIn website is down
There are some issues with your LinkedIn account
Corrupt browser data is triggering the problem
VPN is interrupting
Ad-blockers are causing problems
The browser isn’t up to date
Installed software is causing issues
The next step after you know about the common reasons for an error is to apply the solutions, one by one, which you would find in the next section.
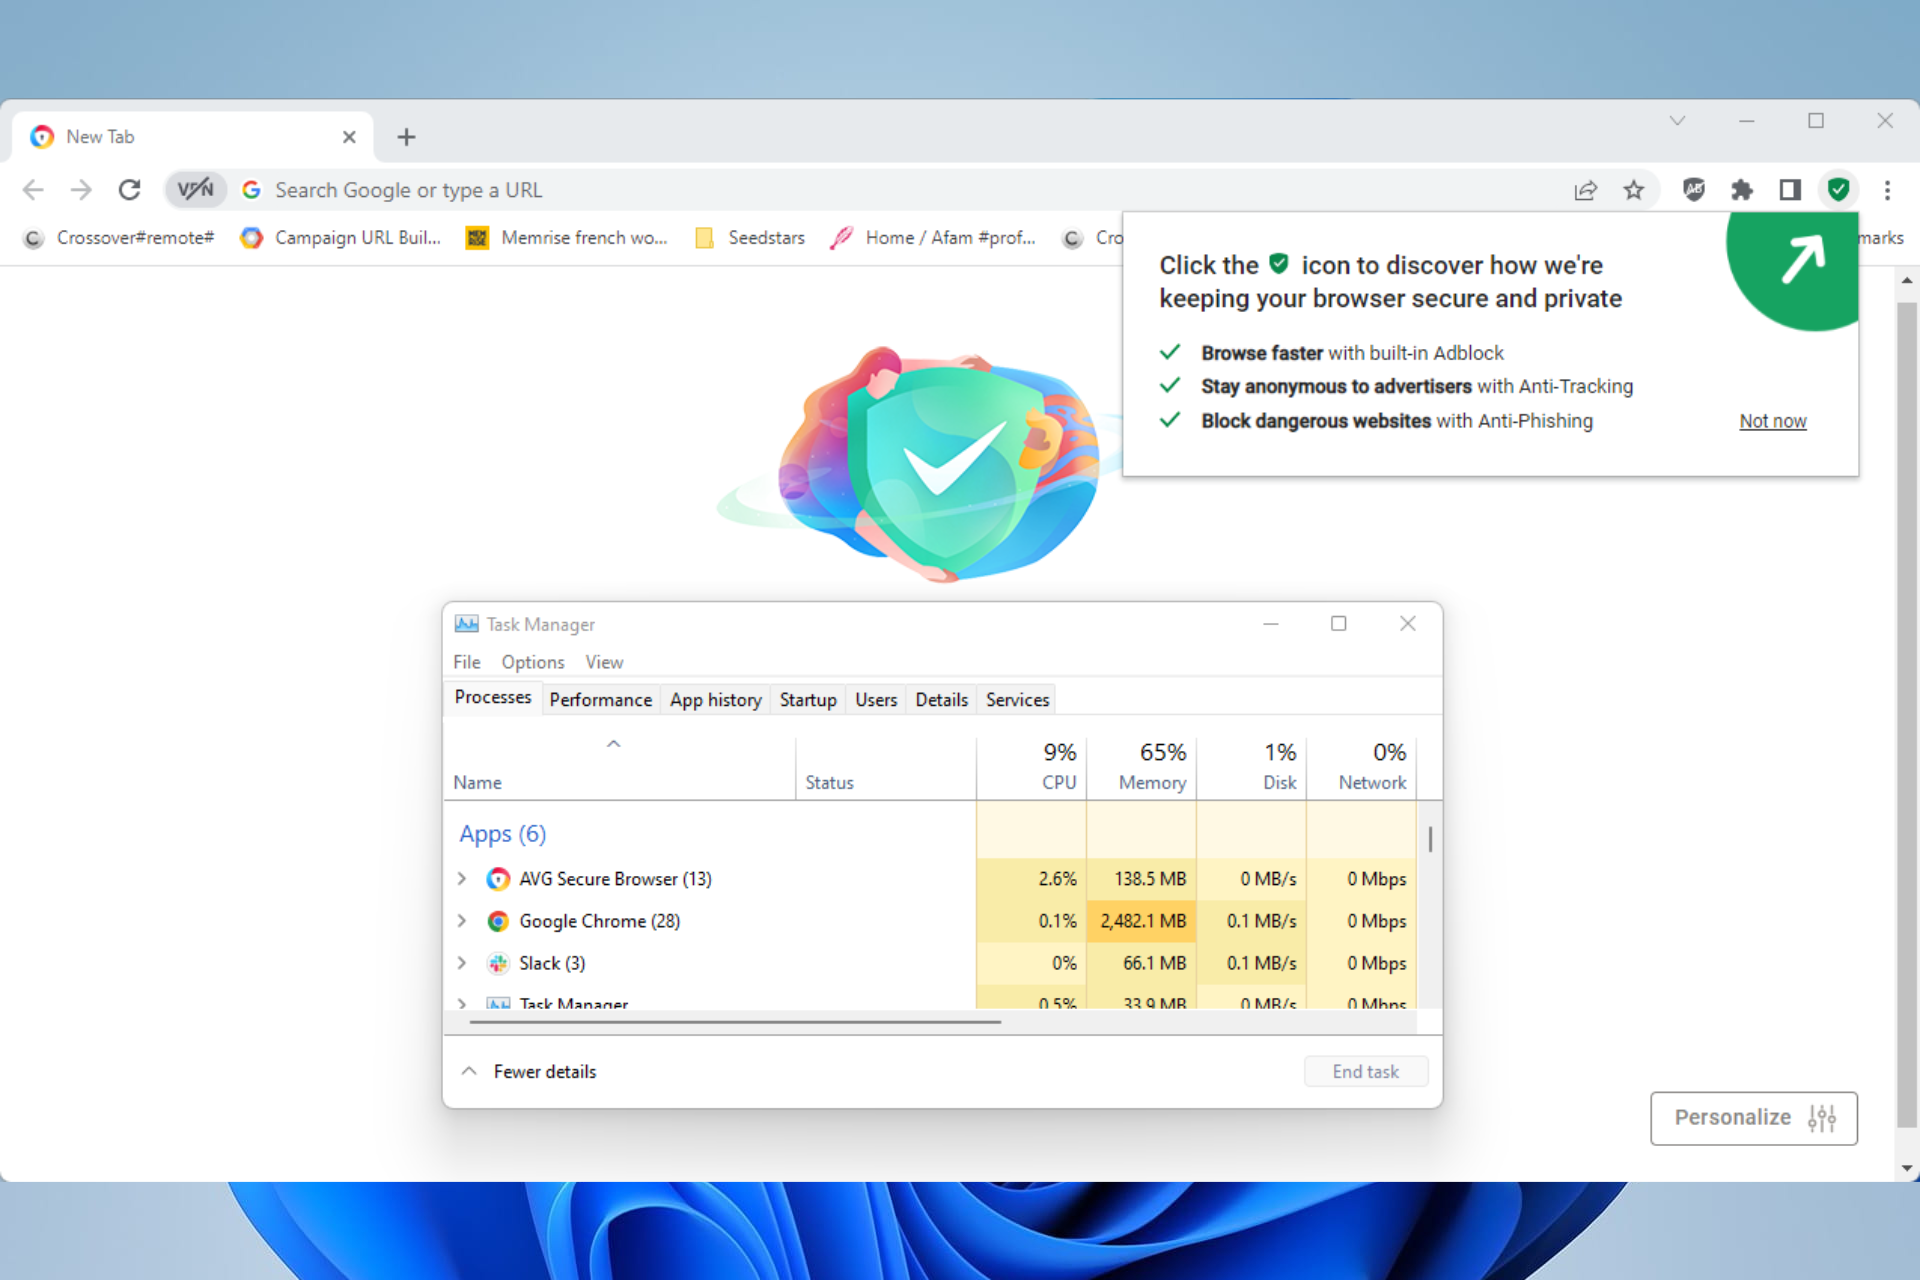
Quick Tip:
Another efficient method to resolve LinkedIn malfunctions is to change your browser to Opera One.
Opera One offers lots of unique features. You’ll find already built-n things like VPN, Ad blocker and even an AI. Beside it is great in the organizational department also with its workspaces and tab islands.
Opera One
Access your LinkedIn account without any issue with this fully integrated browser.
Often, the error is from the website’s end and not from the user’s end. There are chances that the LinkedIn server is undergoing maintenance due to which you will face issues logging in.
You can use websites such as Downdetector or IsItDownRightNow to know the current status of the LinkedIn servers. If the LinkedIn servers are down, then there isn’t much that you can do apart from waiting for the servers to go back up.
2. Re-login to LinkedIn
You can also try re-logging into your LinkedIn account. If the issue still exists, then create a temporary account and check if it works.
In case the temporary account works without any issues in Firefox, then there could be some issues with your primary account.
We would advise you to report this issue to LinkedIn support and get a resolution from their end.
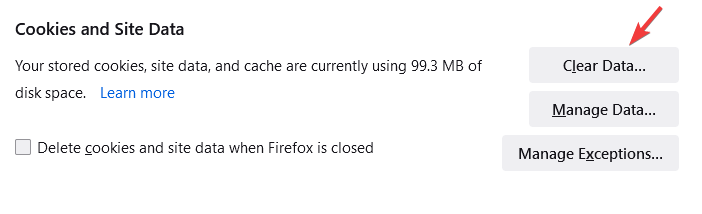
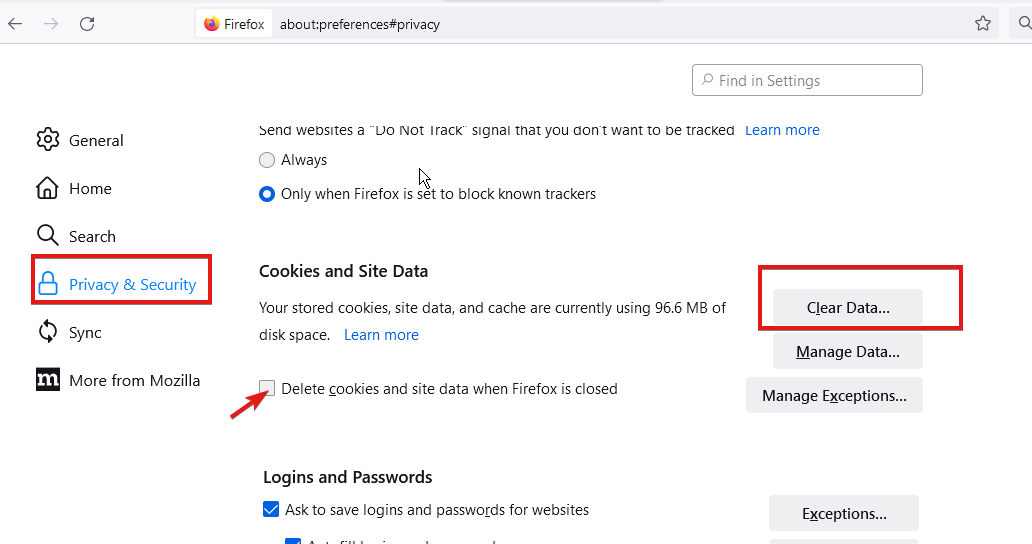
Scroll down and under Cookies and Site Data, hit the Clear Data button.
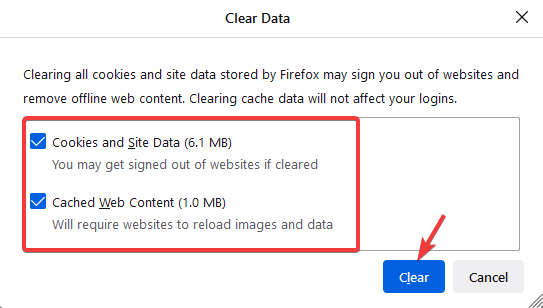
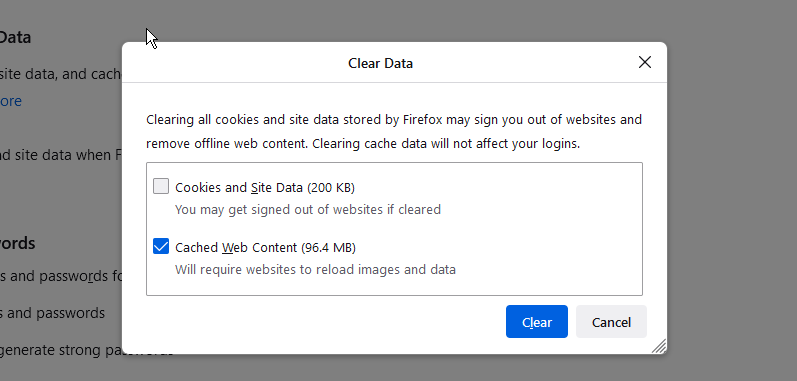
Check the boxes for Cookies and Site Data and Cached Web Content.
Click on Clear.
4. Disable VPN
If you are using a VPN and trying to use LinkedIn, then you will likely be blocked by LinkedIn if the IP address provided by VPN continuously changes.
So, in order to access LinkedIn, turn off or disable the VPN app and check if this fixes the LinkedIn not working in Firefox issue.
5. Disable ad-blockers
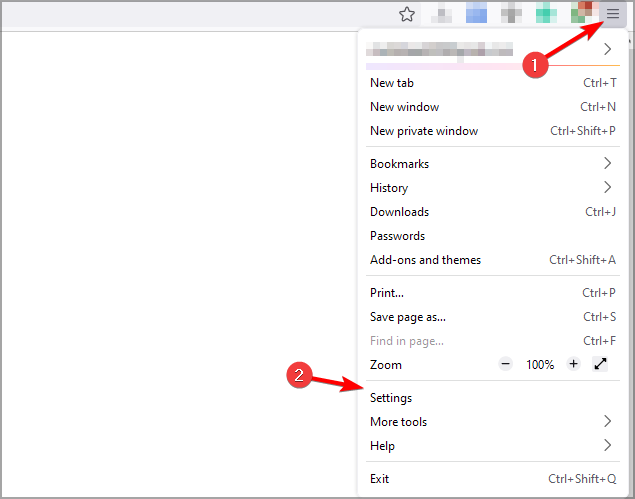
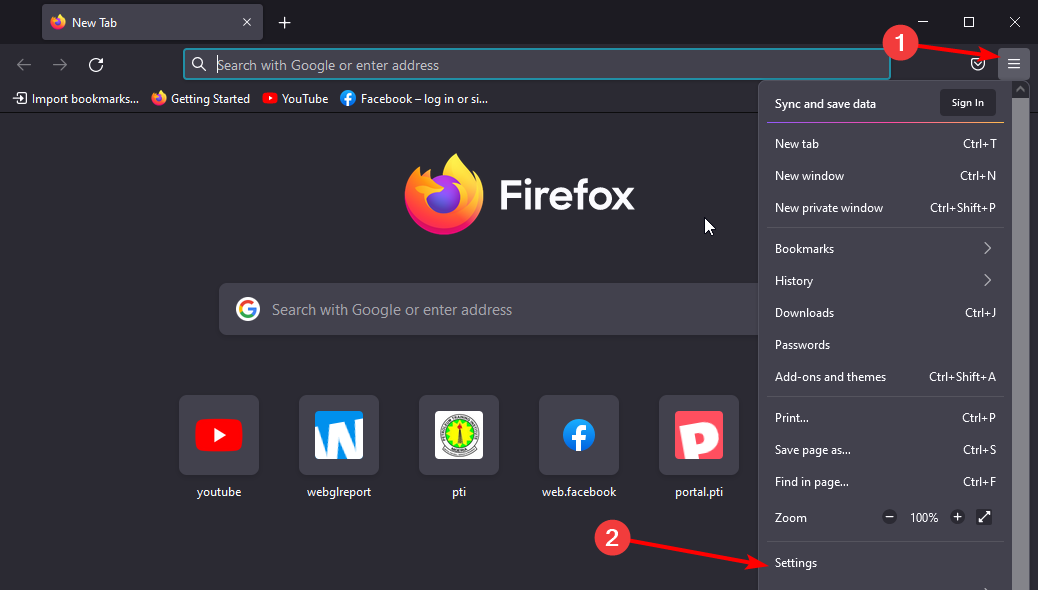
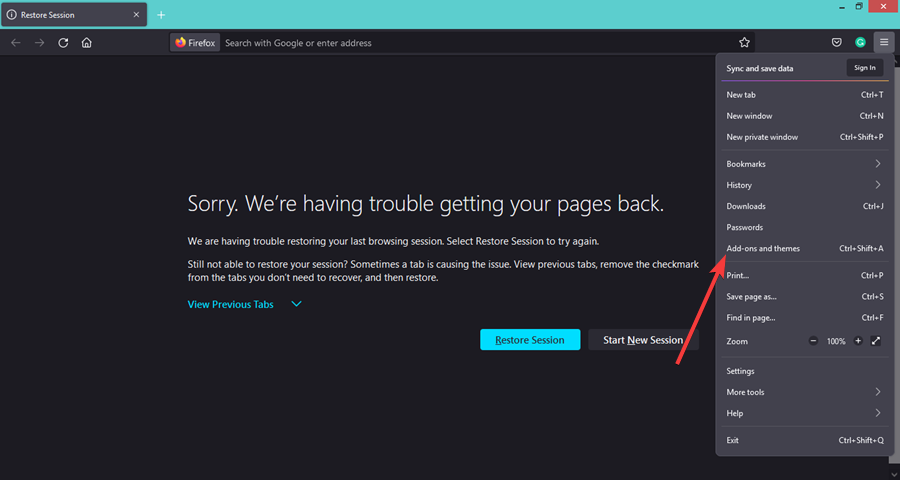
Click on the 3-line menu icon.
Select Add-ons and themes.
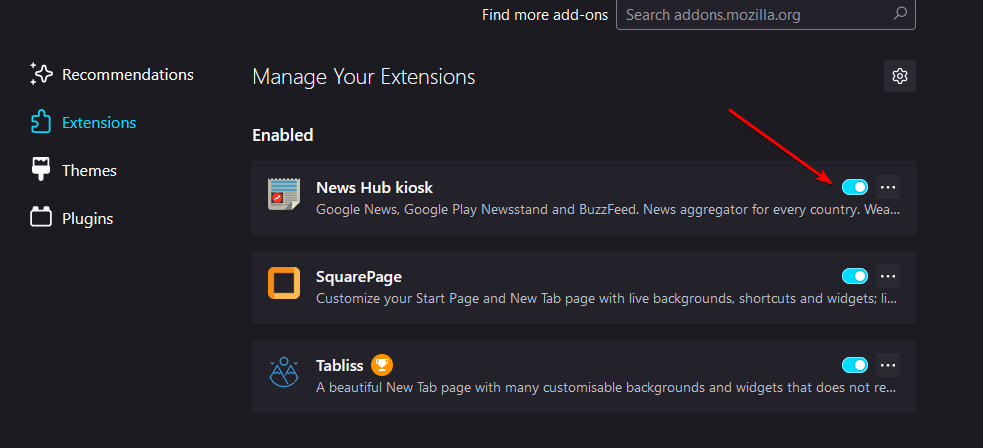
Toggle off the ad-blocker extension if you have installed any.
Ad-blocker extensions block and interfere with the website’s script, thus blocking ads and giving you an ad-free experience.
While it enhances your browsing experience, it can sometimes cause unexpected issues and block essential scripts, resulting in multiple website errors. Disable the ad-blocker extension and check if this fixes the issue or not.
6. Install the latest browser update
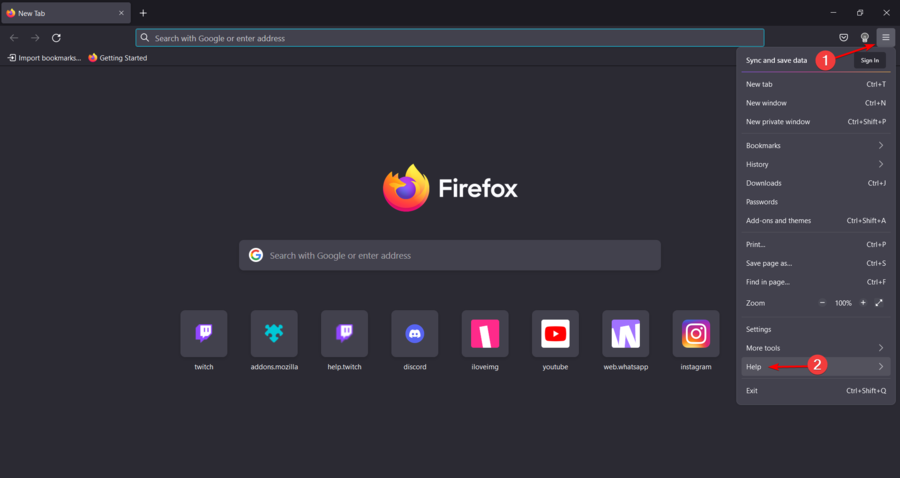
Launch Firefox.
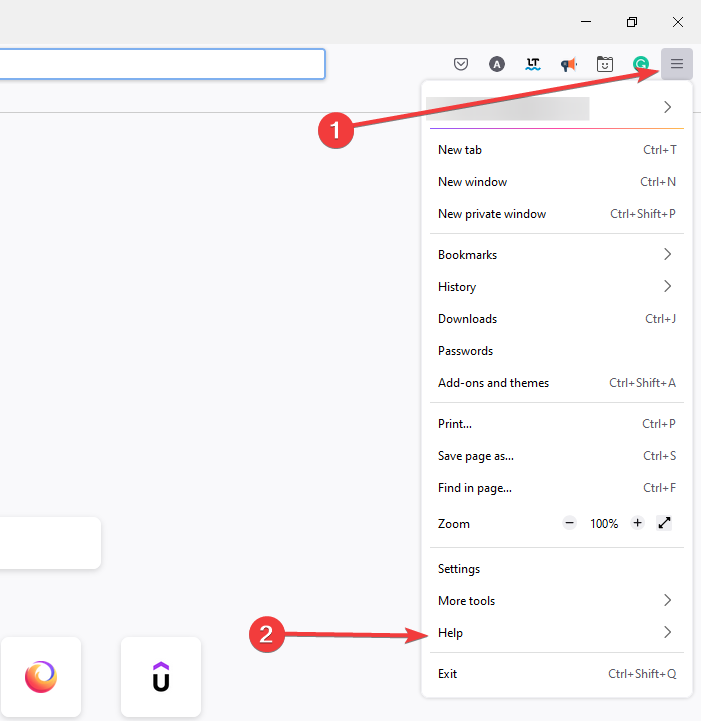
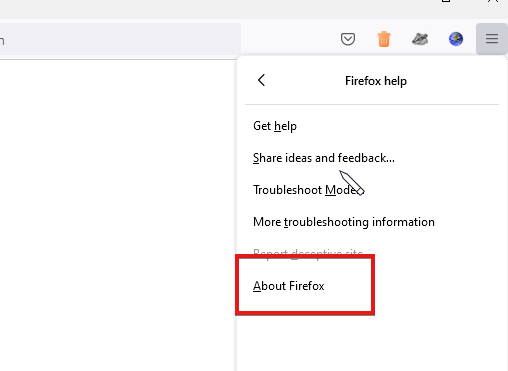
Click on the 3-line menu icon.
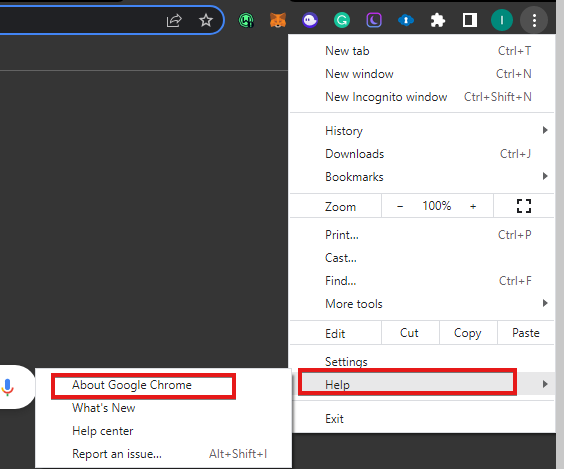
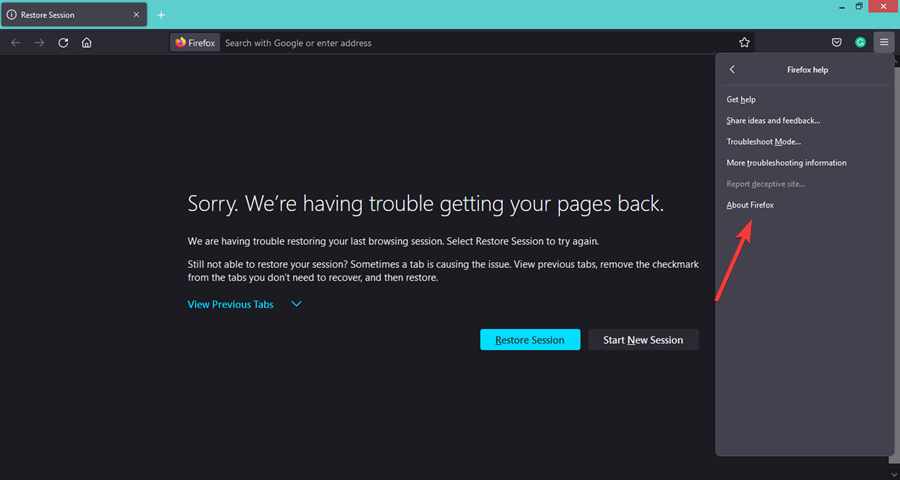
Select Help > About Firefox.
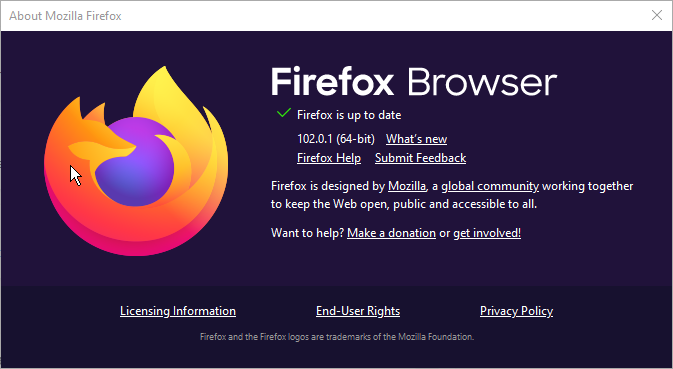
Firefox will automatically start looking for new updates, and will install it if it detects a new one.
There might be some glitch or bug present in the current version of the Firefox browser which may trigger multiple problems.
In such a case, it is advised that you keep the browser up to date to not only enjoy the latest features but also the bug fixes that come along with them.
7. Reboot in Safe Mode
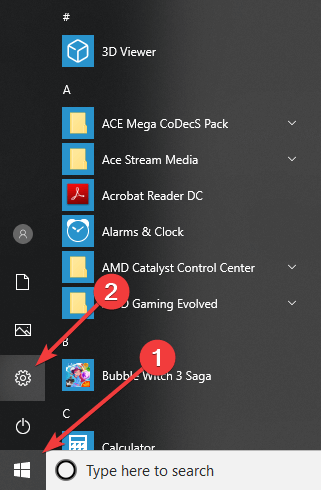
Press Win + I to open Settings.
Select System then click on Recovery.
Hit the Restart Now button for Advanced startup.
You PC will reboot.
In the Advanced options screen, select Troubleshoot.
Click on Advanced options.
Select Startup Settings.
Click on Restart.
Press the F4 to get into Safe Mode.
This is just one of the ways of entering Safe Mode on a Windows 11 PC. You can check out our guide on 8 ways to start Windows 11 in Safe Mode to learn about the other methods.
We hope that this guide helped you fix the problem of LinkedIn not working in Firefox. Let us know in the comments below which one of the above solutions helped you solve the issue.
Browsers with built-in VPNs allow you to access region-restricted content and unblock websites without the need for a third-party VPN client. However, many apps make promises but fail to deliver.
To save you time, we’ve researched browsers with integrated VPNs and only included those that truly offer a private network, sufficient bandwidth, and strong security.
Which browser has the best built-in VPN?
We’ve tested them and concluded that the easiest option for most users is to get a browser that already has a built-in VPN. Here are some of the best we’ve found:
Opera One – Amazing security, modular UI and AI
UR Browser – Great customization and safety tools
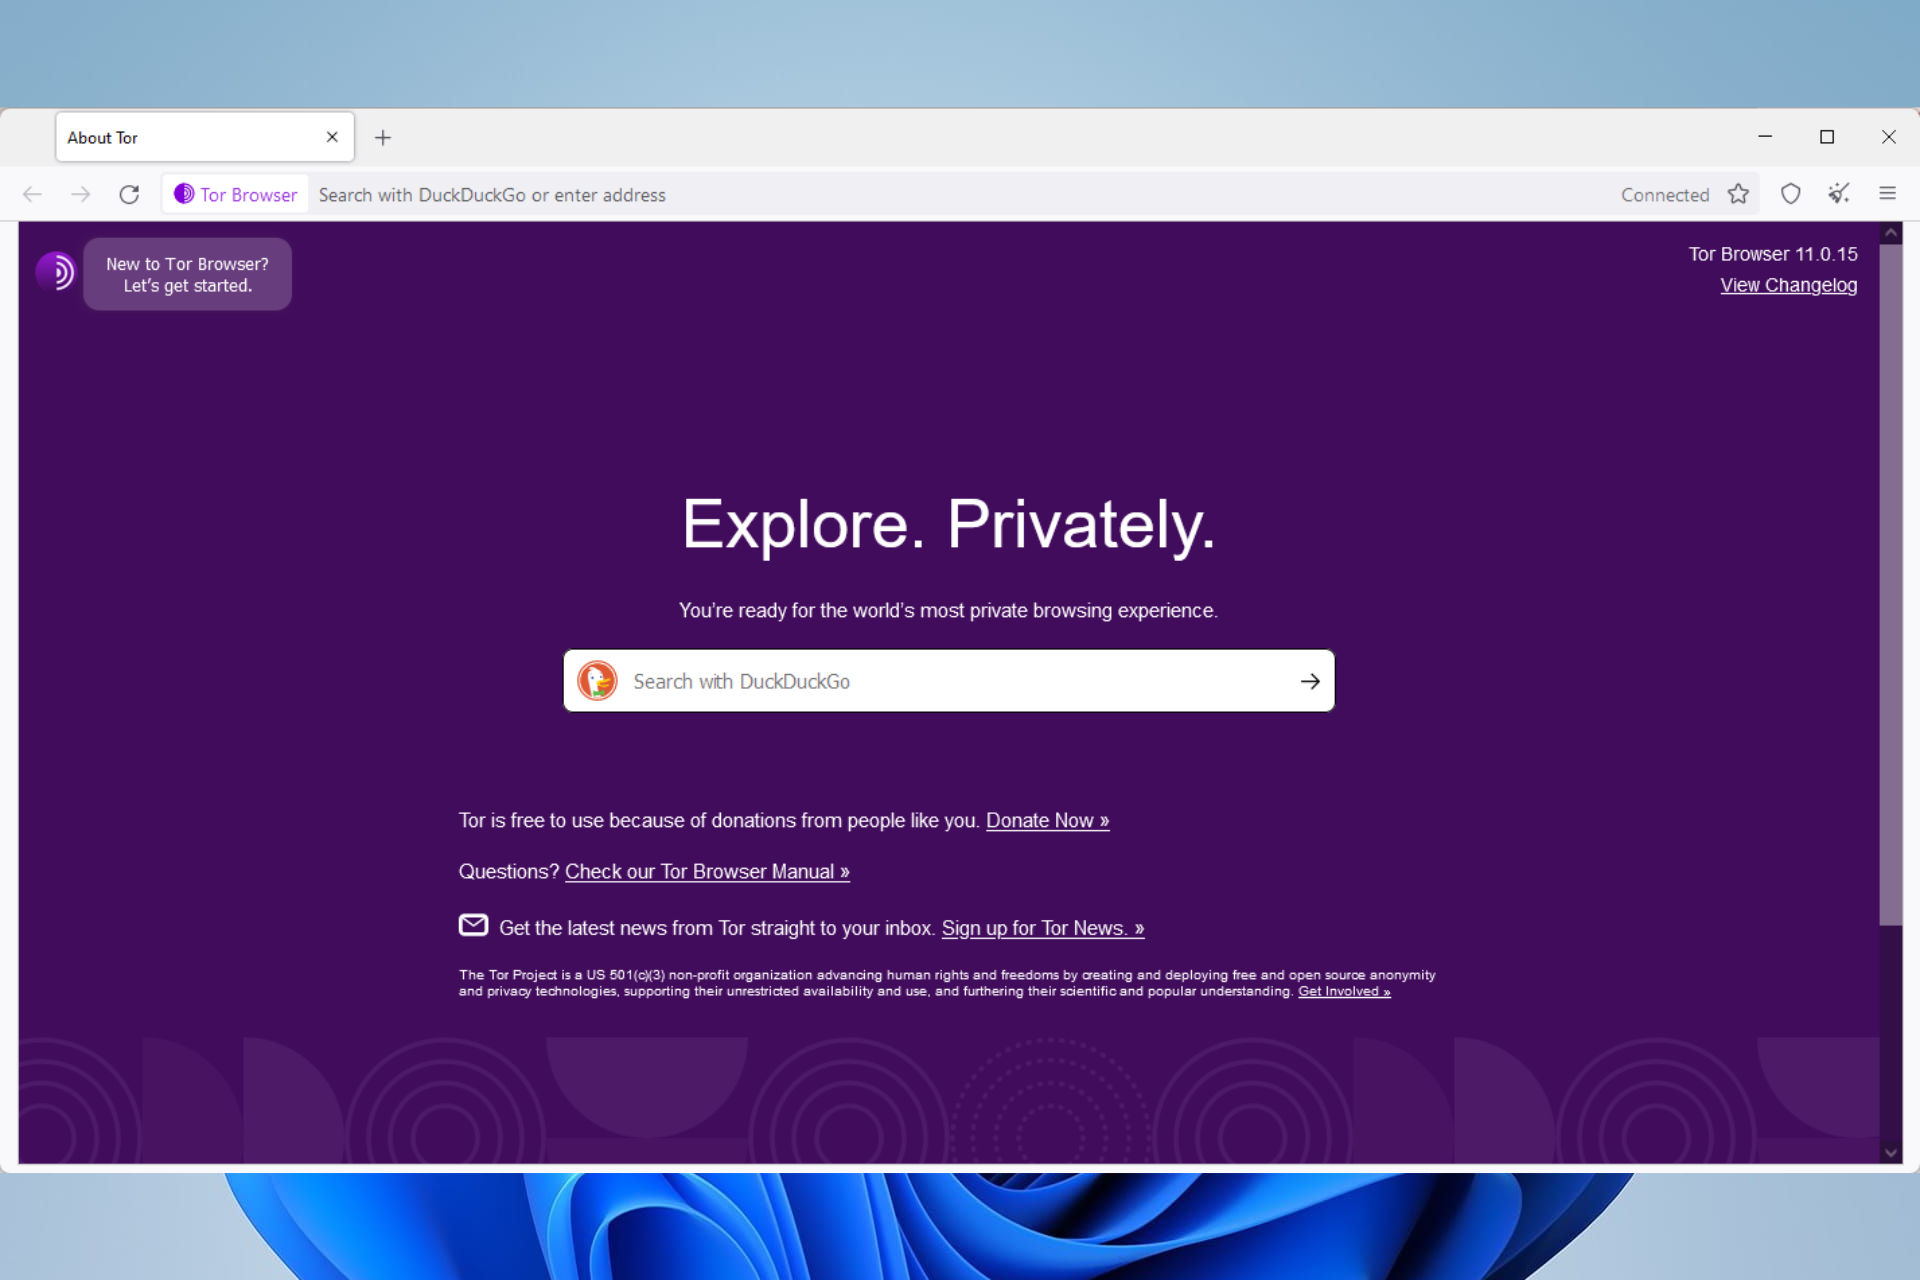
Tor Browser – The absolute privacy champion with built-in VPN
Epic Browser – Simple yet efficient VPN service
Aloha Browser – one of the best iOS browsers with a built-in VPN
Opera comes with a built-in VPN as well as Ad-blocker support. The VPN is not the fastest of the lot when compared to the independent VPN clients. However, it’s reliable and offers unlimited bandwidth.
You can selectively enable or disable the VPN based on the site. Also, the VPN can be configured to only start in Incognito mode or bypass it when using the default search engine.
For added security, Opera One offers security badges to alert the user, fraud, and malware protection, an ad blocker to block unwanted ads and offers cryptocurrency mining protection.
Opera
Get free and unlimited VPN right in the navigation bar!
UR Browser comes with an inbuilt VPN, and it also has some serious privacy features to keep you safe online. Also, there’s the 2048-bit RSA encryption which ensures safe browsing and information exchange.
The built-in ad-blocker makes sure that the web page does not load any ads or scripts resulting in faster web page loading time. It also integrates a virus scanner that checks downloaded files.
It also allows you to customize the look of the browser with wallpapers from the browser catalog as well as custom wallpapers from the users.
UR Browser
UR Browser also offers a built-in VPN that creates an encrypted connection between you and the VPN servers for extra privacy.
Tor Browser – The absolute privacy champion with built-in VPN
Tor is a multi-platform web browser with excellent privacy tools to protect your data from prying eyes as well as access region-restricted content and websites.
Even if Tor is blocked by your ISP or the state, you can configure Tor to connect to a bridge during the setup process.
Apart from unblocking the websites, the Tor browser is the only browser that allows you to access the sites with the .onion suffix.
Epic Browser is built with privacy in mind, offering a robust VPN that works in eight countries and blocks intrusive ads, trackers, and crypto miners.
The browser offers enhanced privacy features like blocking fingerprinting, ultrasound signaling, and more. Epic is based on Chromium, which ensures compatibility with most websites while providing a fast and secure browsing experience.
The VPN encrypts your data and hides your location, allowing you to access blocked sites safely. Epic also includes a built-in price tracker, making it a practical option for privacy-conscious users who want to compare prices online securely.
Aloha Browser – one of the best iOS browsers with a built-in VPN
Aloha Browser is another handy tool on your hard drive, as it offers a great set of valuable features, including a built-in VPN service.
Being a mobile-based browser, this light and easy-to-use app will ensure that your online privacy is respected no matter how many third parties you encounter during your browsing session.
Even though it can’t be compared with Opera One or UR Browser, Aloha still deserves to be present on this list, and it might be the best iOS browser with a VPN service.
Check out all the great features by downloading and trying it out on your preferred mobile device with Android or iOS operating systems.
➡ What’s the best browser with a built-in VPN for PC?
After countless hours of testing and benchmarking some of the most well-known browsers on the market, we can safely state that Opera One is the best browser with a built-in VPN for PC. And if you’re a gamer, Opera GX is a gaming-oriented version of the same browser.
Not only does Opera One protect your privacy with the VPN service, but at the same time provides you with fast browsing speeds, excellent customization tools, and a built-in ad blocker and pop-up blocker as well.
➡ What’s the best browser with a built-in VPN for iOS?
The best browser with a built-in VPN for iOS devices is Aloha Browser, which we described in detail inside the main list.
This browser offers a great set of features for iOS users and a powerful VPN that will help you avoid any geo-restricted content online.
➡ What’s the best browser with a built-in VPN for Android?
The best browser with a built-in VPN for Android is Opera One, which packs an incredible amount of power into a small, user-friendly app that will surely recalibrate how you experience your online environment.
Close behind it, we have the Psiphon browser, which combines the versatility of Opera One with the customization features of Chrome to offer you an excellent browser for everyday use on Android.
Which browser has a free VPN?
To answer this question, our team of testers has gathered information after each of the benchmark tests they do, and by far, the best browser with a free VPN is Opera One.
Opera One is not only an incredibly versatile software by default but allows you to customize it and make it your own while enjoying the wide range of built-in features such as the VPN, ad blocker, pop-up blocker, etc.
As you can see, we recommend Opera Oneas the best VPN-enabled browser, but you can check out any other tool from this list because they are all very reliable.
Chrome and Firefox don’t come with built-in VPN support. However, you can add a third-party VPN extension to perform the same task.
Most VPN extensions have some limitations but offer enough bandwidth to bypass region-restricted websites and offer some anonymity.
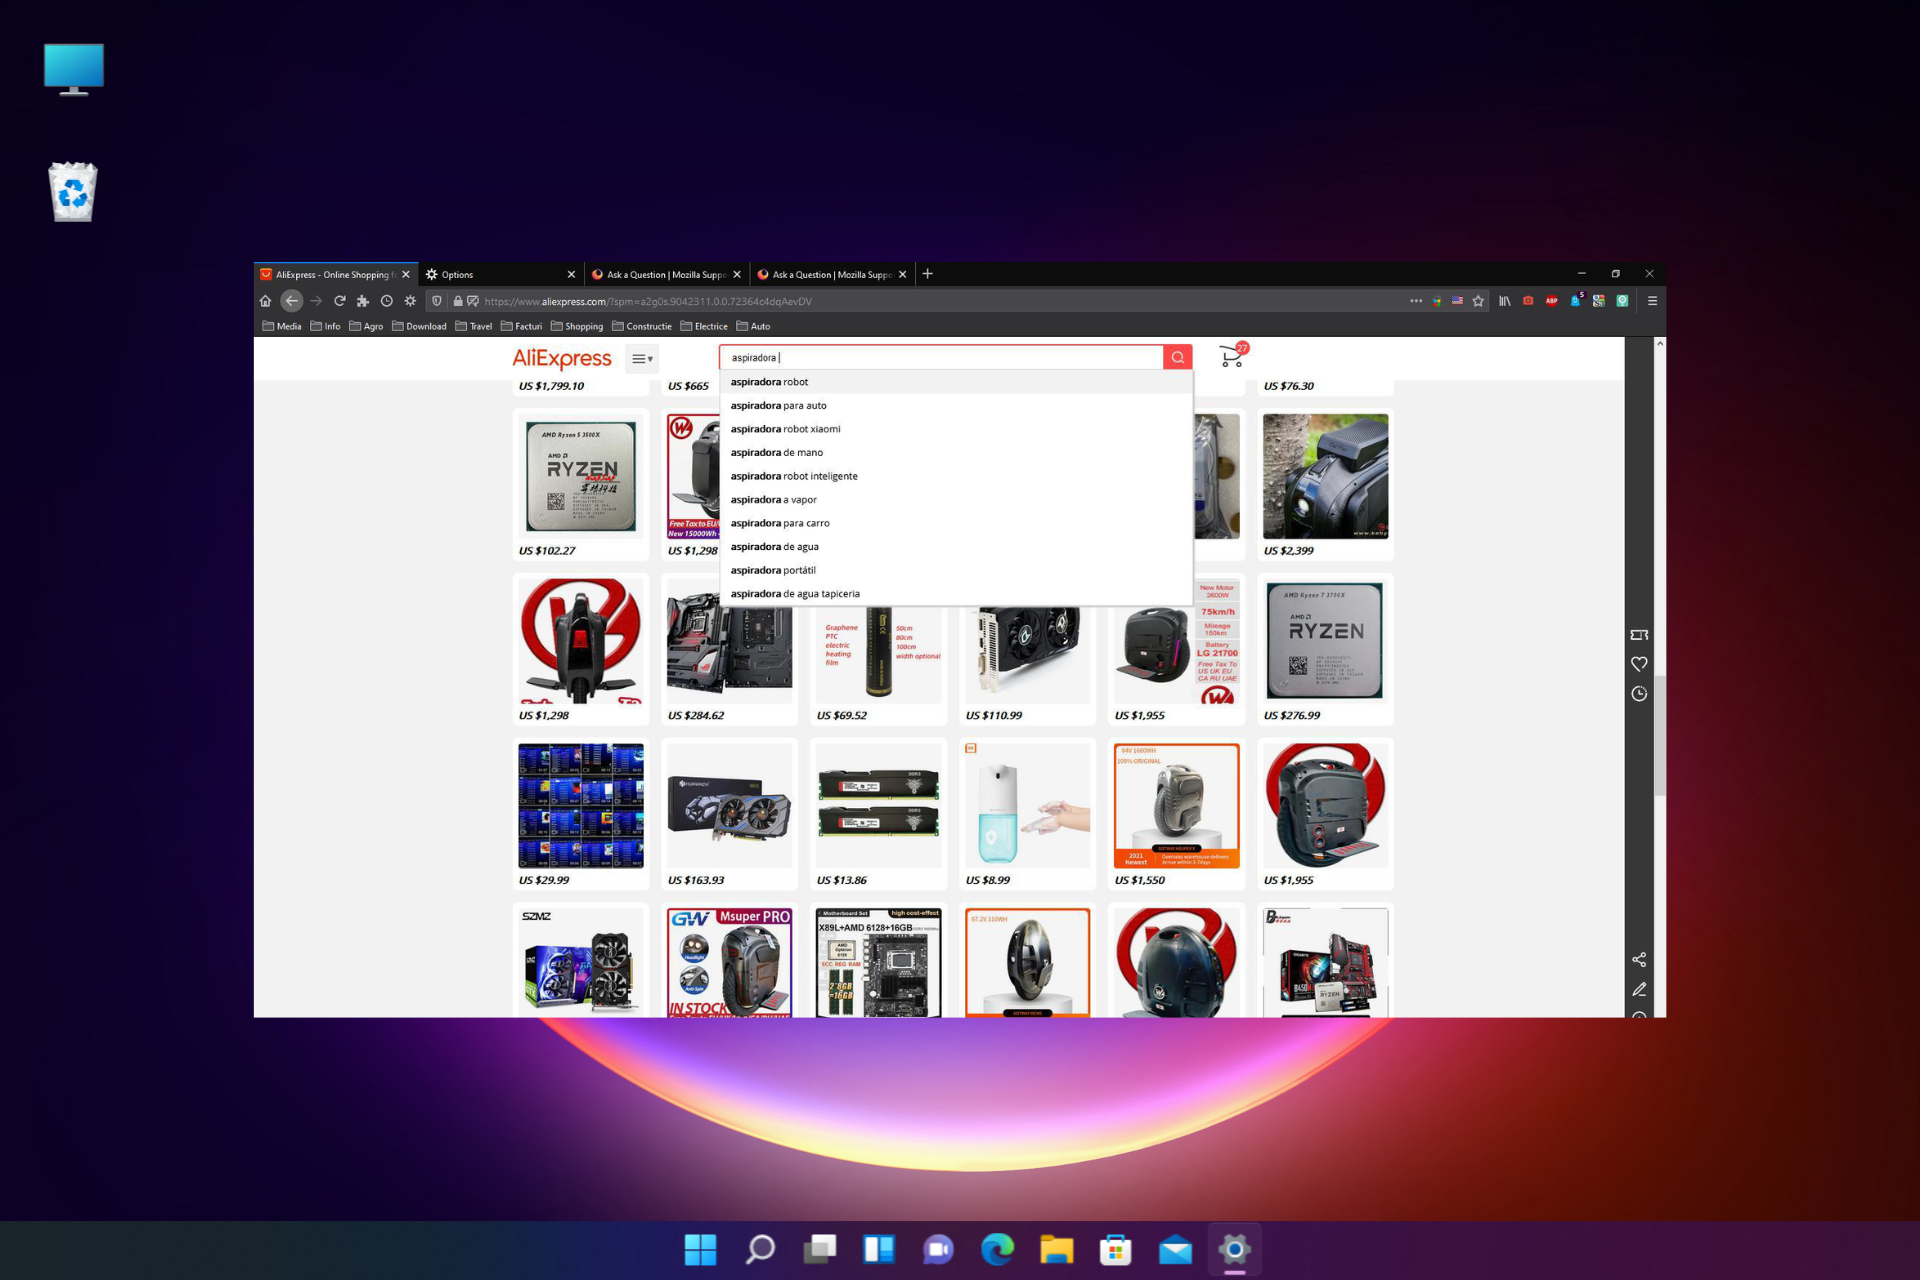
Aliexpress is one of the largest and most popular online shopping platforms out there and so, when it’s not working in Firefox, it can be frustrating.
Apparently, some users are unable to search on Aliexpress for products using the text search. For example, you are writing in the search box, and when you press the search button, nothing happens.
Before you move over to the solutions, let’s understand the reasons why you may come across the Aliexpress search not working issue in Firefox.
Why can’t I search on Aliexpress?
The Aliexpress search function may sometimes malfunction in Firefox due to some of the reasons below:
Due to data history and cookies
Interference by an add-on or an ad-blocker
Due to theme settings
If the Hardware acceleration enabled
When the userChrome.css is turned on
A problem with the Aliexpress website
While sometimes, the issue may get resolved automatically in a few days, in most cases it does not.
Fortunately, we have some effective solutions that will help you fix the Aliexpress search function not working issue.
Quick Tip:
If you don’t have the time to fix the Firefox issue to access Aliexpress, don’t worry because you have Opera One.
This sleek browser will bring you app integrations with social media apps, customization tools like a speed dial or pinboards to access your most visited websites, and cutting-edge security tools.
Opera One
Go to Aliexpress in seconds using this most private and skillful browser of all.
How do I fix the Aliexpress search function not working in Firefox?
1. Clear cache and cookies
Launch Firefox, click on the there lines at the top right and click on Settings.
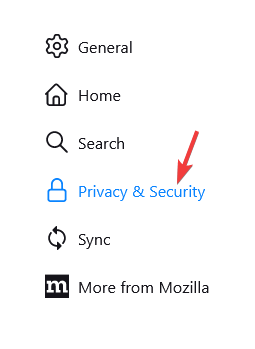
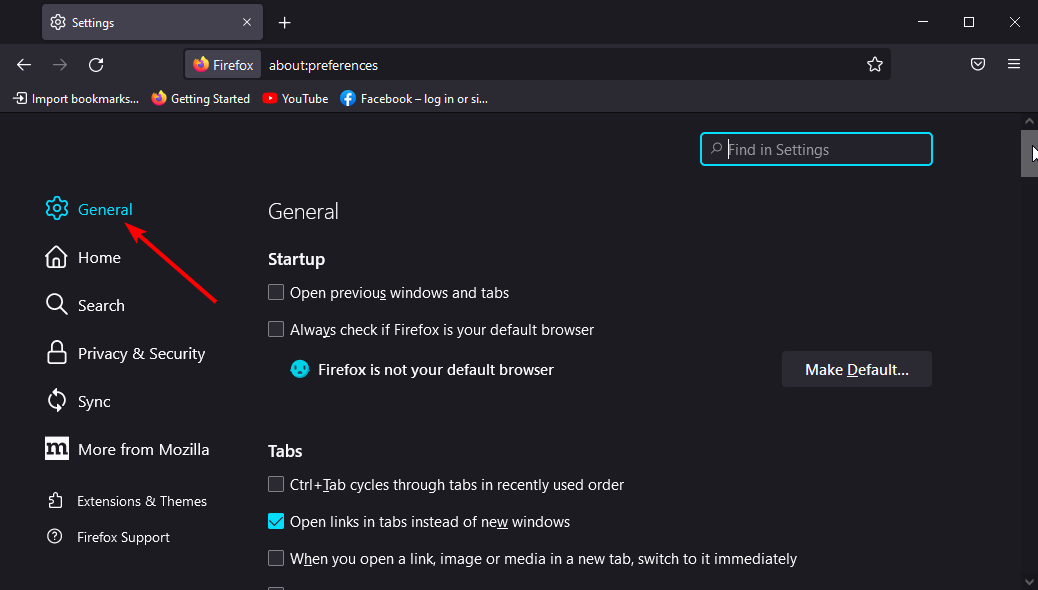
On the preferences screen, click on Privacy & security on the left.
Now, go to the right and under Cookies and Site Data, click on Clear Data.
Next, in the Clear Data pop-up window, select both Cookies and Site Data, and Cached web Content.
Press Clear to confirm the removal.
Once the cookies and cache are removed, restart Firefox and check if the Aliexpress search is working now.
2. Start Firefox in Safe Mode
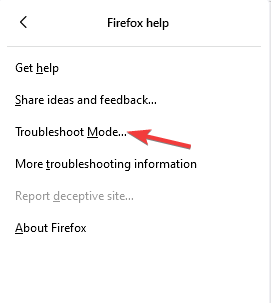
Open Firefox, click on the menu (three lines) on the upper right, and select Help.
Next, click on Troubleshoot mode.
You will now see a confirmation prompt. Click on Restart again to start Firefox in the Safe Mode without extensions, themes, and custom settings.
If the Aliexpress search works fine in the Safe Mode, then it may be an extension that may be causing the issue in the normal mode. Find that extension and disable it to fix the issue.
3. Remove the ad-blocker
Click on the three parallel lines at the top right of the Firefox browser.
Next, click on Add-ons and themes in the menu.
On the addons page, look for the ad-blocker, click on the three dots next to it and select Remove.
Once done, try searching on Aliexpress and the function not working in Firefox issue should be resolved.
NOTE
You can also identify which one of your disabled add-ons is causing the issue. For this, re-enable each add-on one at a time and you should find the culprit.
4. Switch to the default theme
Open Firefox and navigate to the upper right side.
Click on the three lines (menu) and select Add-ons and themes.
Now, in the add-ons window, on the right side, you can change to a different theme. Click on Enable for the preferred theme.
Once you have selected a different theme, check if the Aliexpress search is working now.
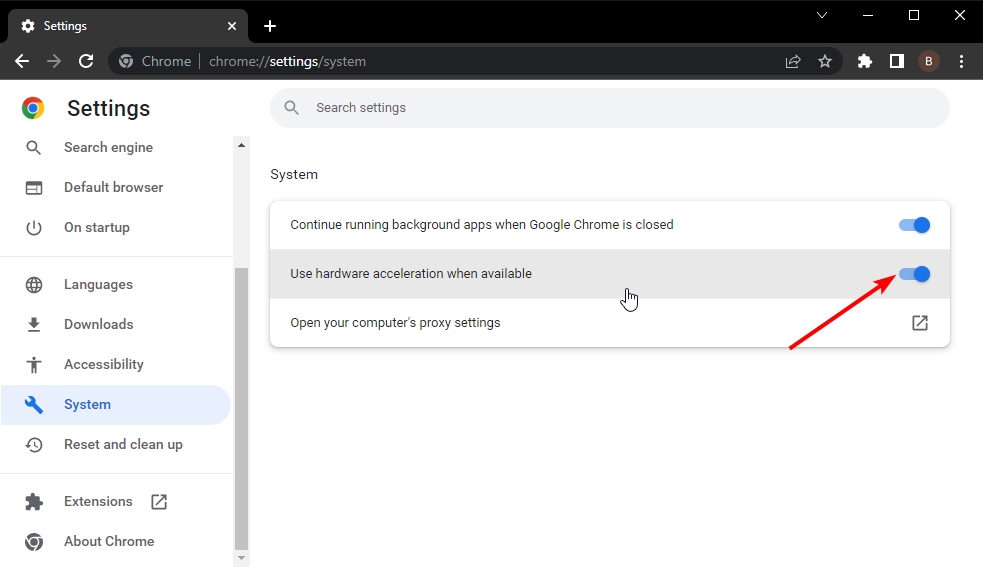
5. Turn off hardware acceleration
Click the three lines at the top right of Firefox and select Settings.
While on the General panel, go to the right side and scroll down to Performance.
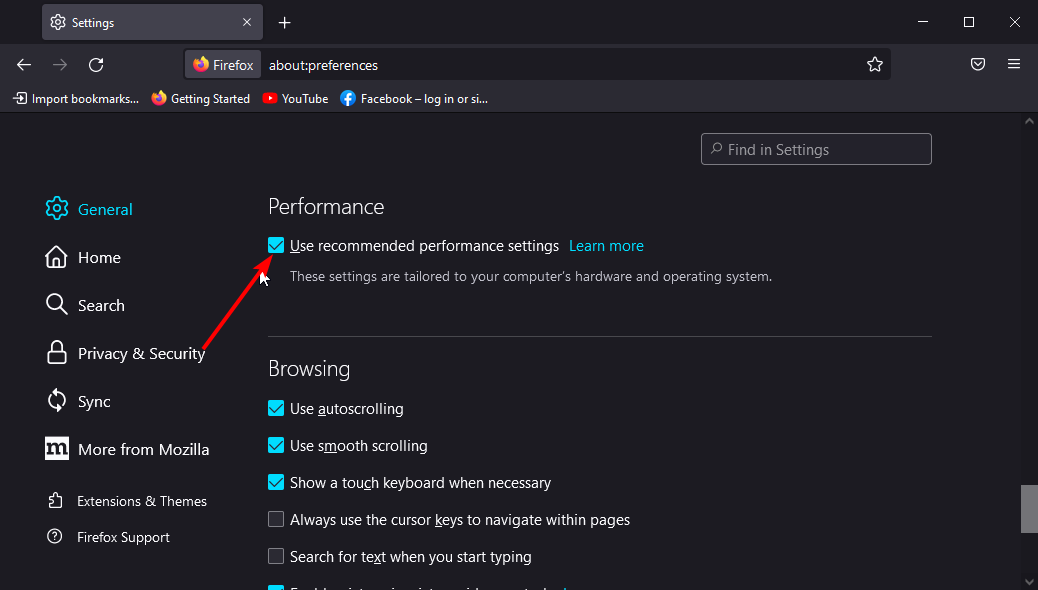
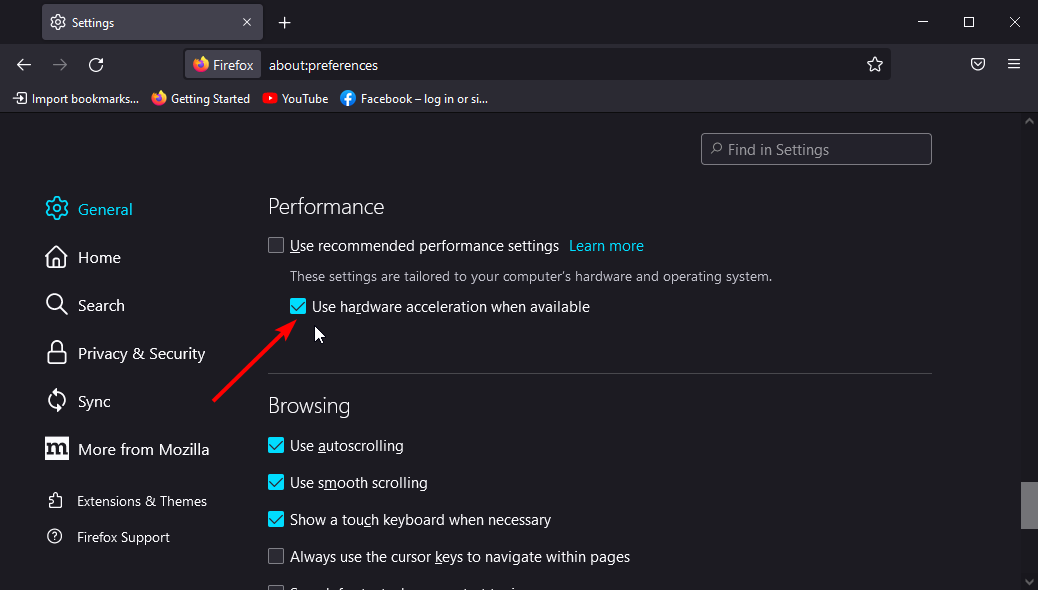
Here, uncheck the box next to Use recommended performance settings.
Also, uncheck the Use hardware acceleration when available option.
Restart Firefox and now, try searching on the Aliexpress website and it should work now.
6. Disable userChrome.css
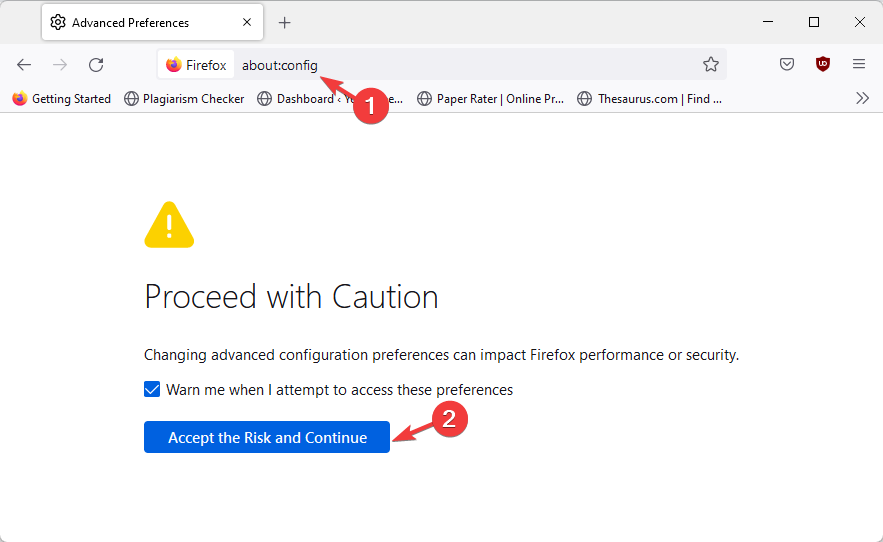
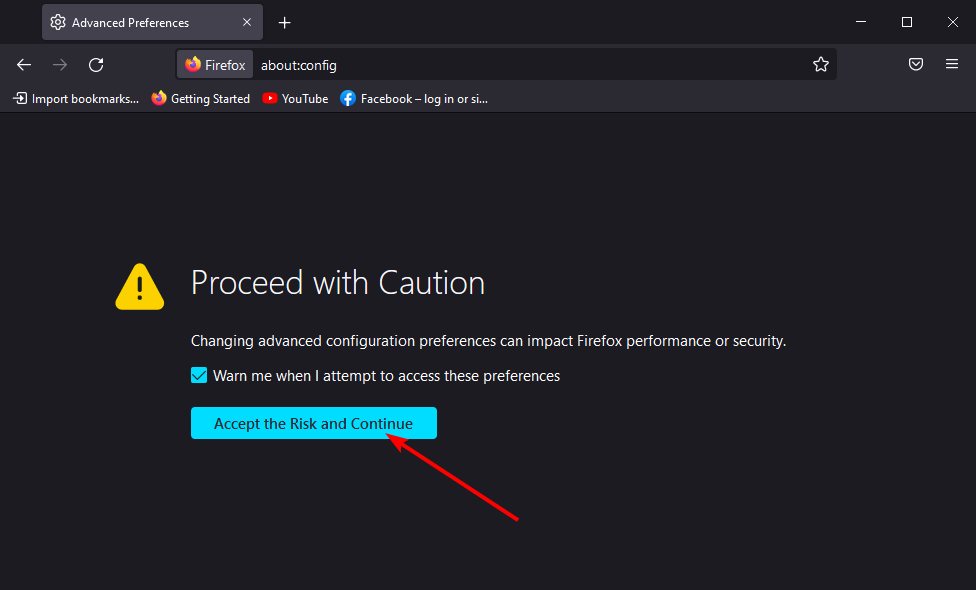
Open Firefox and navigate to the below path: about:config
Next, click on Accept the risk and continue.
Now, search for the below path in the search bar: toolkit.legacyUserProfileCustomizations.stylesheets
Click on the double arrow to change it into False.
Now, restart Firefox and check if the Aliexpress image search not working in Firefox issue is resolved.
Why is the Aliexpress search by image not working?
Aliexpress search by image is a feature available on smartphones and tablets through its app.
This function is usually not available for your desktop or laptop, therefore, if you try to look for the camera button on a website in Firefox, you will not find it.
This is the main reason why the Aliexpress search by image function does not work on your PC.
However, you can install an extension like the Aliexpress Search by Image or similar other add-ons, to look up products using the saved images.
If the problem is not due to an extension, make sure that you check for any updates and install the latest version of them.
You can also open a private window instead of Safe Mode to find out if the Aliexpress search issue is due to an extension.
As a last resort, you can uninstall the Firefox browser and re-install it to check if it helps fix the issue.
Chrome is a Chromium-based browser by Google. It is relevant for how fast and reliable it is. Another feature of Chrome is security and privacy. However, there are some issues that users encounter while using the browser.
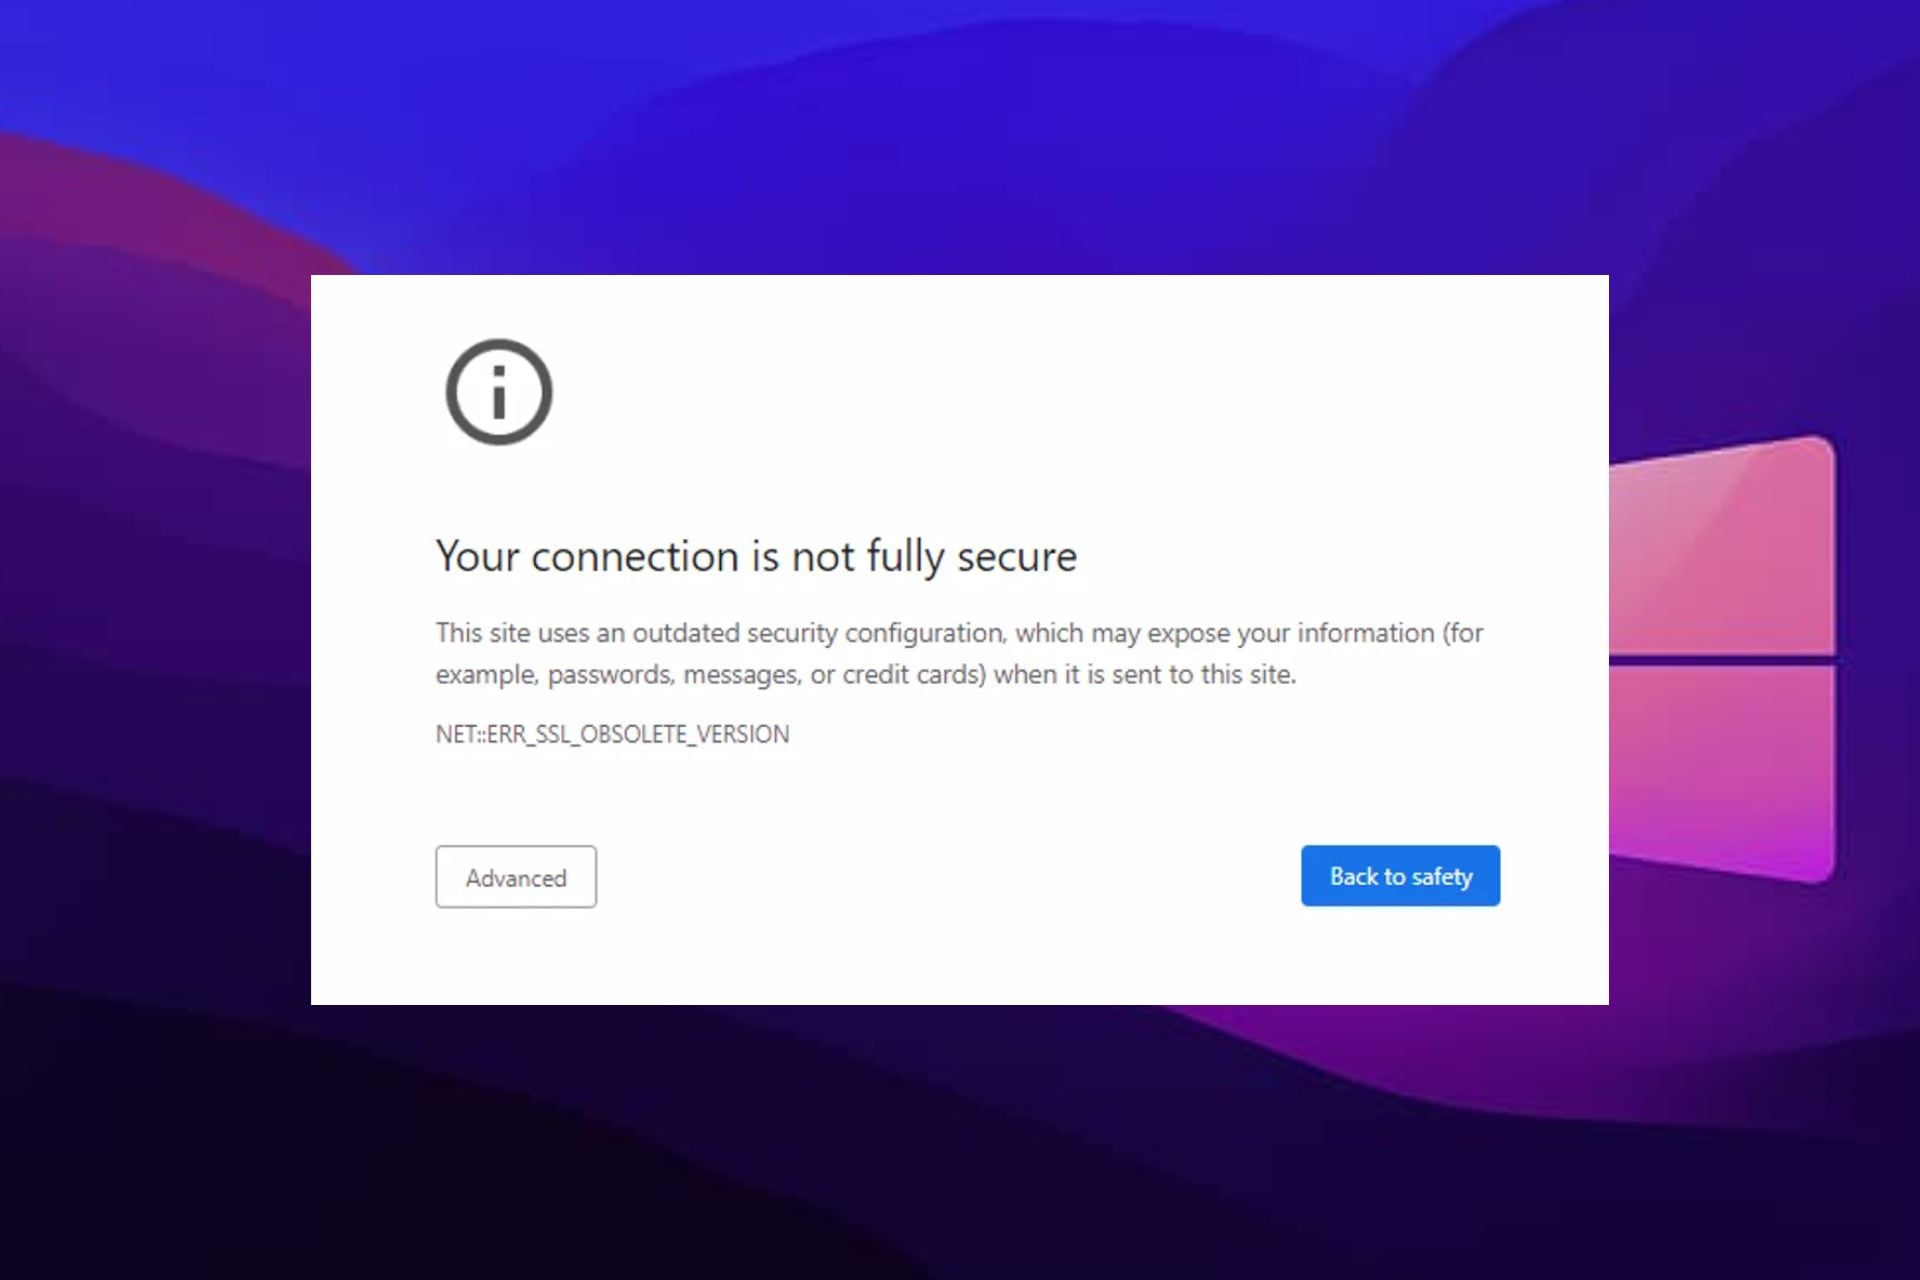
One is the Chrome certificate’s outdated security settings. This error occurs in other browsers like Safari, Firefox, and others.
Furthermore, ensuring the security and privacy of websites and users has taken a high turn. Hence, browsers are using strict measures to ensure that website owners and administrators adhere to using updated SSL security. It will provide more safety for the site users, as well as the owners.
We’ll take you through the solutions for the ‘Chrome certificate outdated security settings’ error. So, you don’t need to panic if you encounter it.
Why does my browser keep saying the security certificate is not valid?
1. Old caches and cookies: Caches and cookies are data that the browser stores to help load websites faster and smoothly. However, old caches and cookies can cause issues with security certificates not being valid.
Sometimes, there is nothing wrong with the websites. It means that the browser is malfunctioning. Hence, old or corrupt cookies can be responsible for it.
2. Incorrect device date and time: Sometimes, using a different time or an incorrect time that doesn’t match your current location can cause issues. Most times, it is the cause of This website has an outdated security configuration error on the iPhone. Likewise, it can cause the Outlook outdated security configuration error.
3. DNS issues: Another cause of Chrome certificate errors is DNS problems. However, browsers use these IP addresses to load internet pages. Nonetheless, the DNS can cause issues on your internet connection if it is not functioning properly.
You should check the validity of your certificates using a different browser until we can resolve the Chrome problem. Opera One has already adopted Extended Validation certification methods and is at the forefront of standard compliance.
There are advanced options that may be used to automatically verify that everything in a website’s certificate is correct. Plus, this browser comes with built-in AI, VPN and Ad blocker.
Opera One
Verify the integrity of a certificate using the advanced setup in Opera One.
How do I fix outdated security settings certificates on Chrome?
1. Remove all DNS-related files on the device
Press the Windows + R keys to prompt the Run page.
Input cmd in the search box and press Enter key.
Input the following in the command window:ipconfig/flushdns
Then, click on Enter.
Doing this will completely clear the DNS records and the faults in them. Then, try using your Chrome browser and see if the error persists.
2. Clear your browser’s cache and cookies
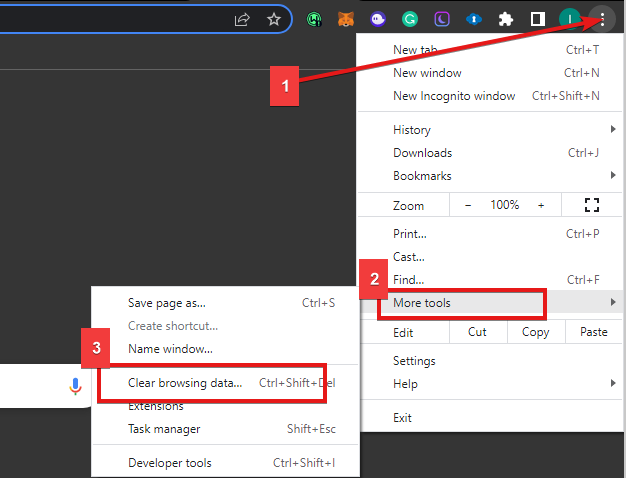
Launch the Chrome browser on your computer and click the Menu button.
Select More tools from the drop-down and click on Clear browsing data.
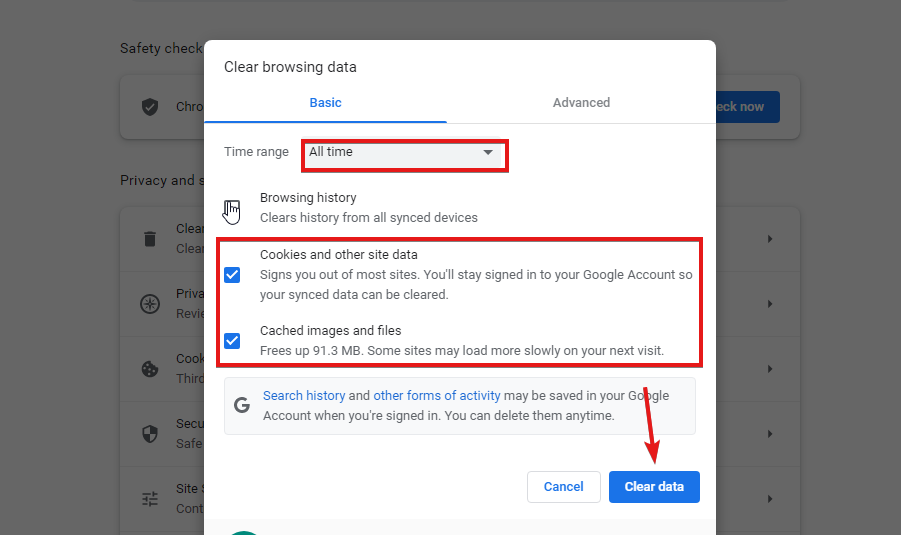
On the Clear browsing data page, select Advanced.
Choose the time range you want to clear.
Check the boxes for Cookies and other site data & Cached images and files.
Click Clear data.
After it finishes, relaunch your browser and see if the issue persists. There are reputable third-party tools that can perform this automatically.
When you run CCleaner software by default, it deletes all cookies for all of your web browsers except those listed in the Cookies to Keep column.
This option may be found in the program’s Options > Cookies section. You may do a custom cleaning, and CCleaner will remember your choice the next time you open it and wish to perform this cleanup.
Right-click the time and date on the right side of your Taskbar.
Click on Adjust time/date from the options listed.
Toggle on the Set time zone automatically.
So, changing your device’s date and time to the correct one can help fix the Chrome outdated certificates error. Likewise, it can stop your browser from showing this website has an outdated security configuration Safari.
4. Switch up your Internet connection
Another solution that you can use to fix browser certificate issues is changing your internet source. For instance, if you’re using a Wi-Fi connection, switch to another one or use a cable connection and see if the errors pop up. If it doesn’t, then the issue is from there.
By following the guide above, you should be able to fix browsers certificates issues. Likewise, we have an article you can read through to know more about how to approach problems with the website’s security certificates.
You can leave your suggestions and questions below. We’d like to hear from you in the comments area.
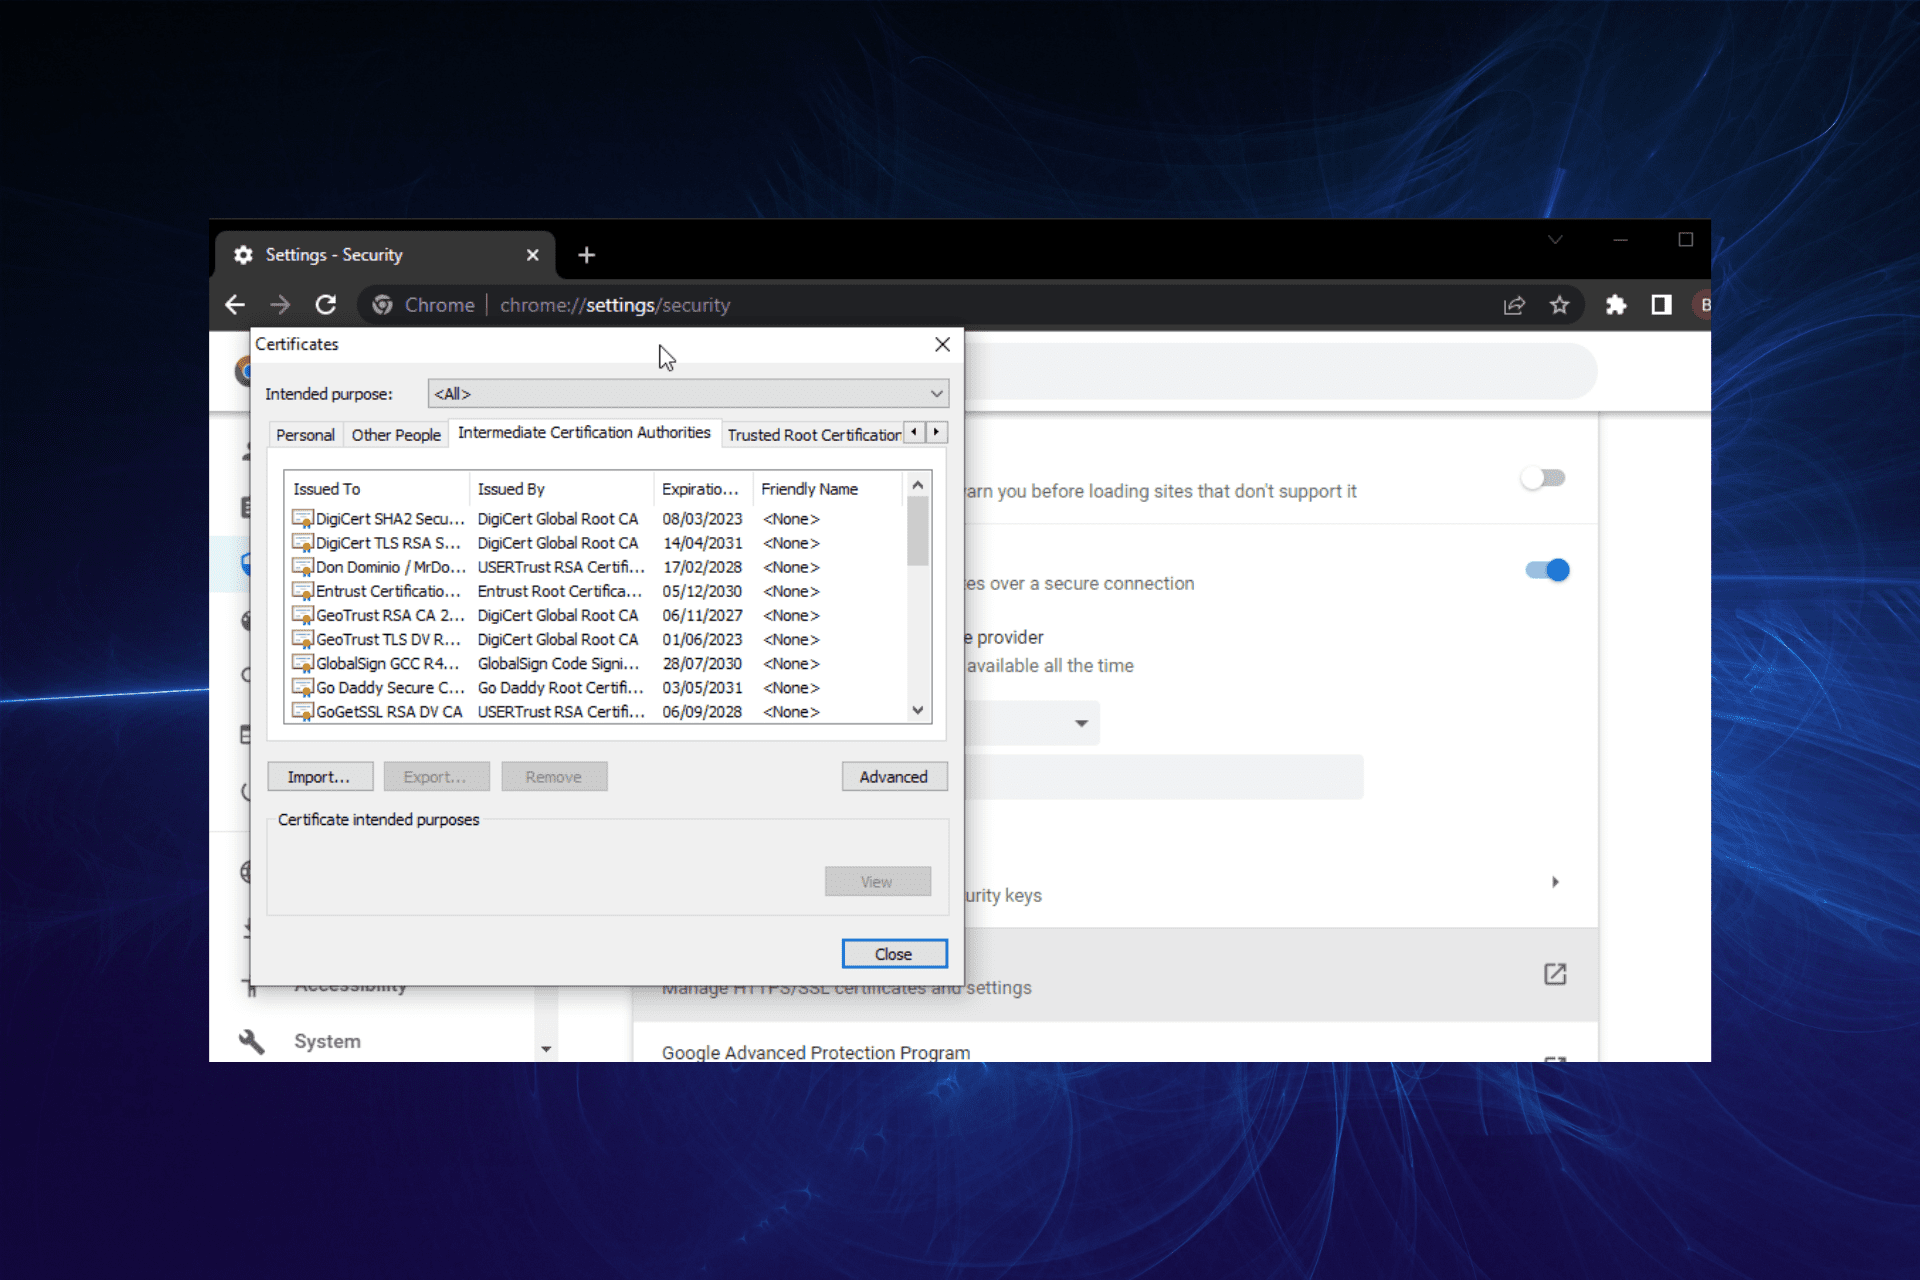
There are several reasons why users can encounter certificate errors on Google Chrome. However, whenever you encounter certificate errors in your browsers, it indicates that something is wrong with the certificates, browsers, or your device.
The Chrome view certificate greyed out is an error user reports. It prevents you from viewing certificates in Chrome. So, it is advisable that users have a bit of knowledge about website security certificate issues and how to resolve them.
The grey-out issues in Chrome affect different parts of the browser. Hence, this article will enumerate possible causes and how to fix the problem.
What causes certificate errors in Chrome?
1. Incorrect device time and date: Using an incorrect time and date on your device will prompt some errors like certificate errors in browsers. Google Chrome is a browser with strict security and privacy settings. Hence, using an incorrect device time and date can cause certificate errors.
2. Old/corrupt Cookies and Caches in Chrome: The chrome browser collects some browsing data and stores them in caches and cookies. They help the browser load websites faster and more smoothly. However, these stored data can cause issues when they become corrupt or old.
3. Outdated Windows: Another thing that can cause the Chrome certificate error is running an outdated Window. It makes some features needed to run your browsers incompatible because your operating system is old.
So, the SSL Certificate’s encryption algorithm is having issues communicating with your operating system. It can also result in the Chrome clear browsing history greyed out error.
4. Third-party app interference: Applications like antivirus and VPNs can cause issues with your browser. They can affect your internet traffic, raising attention that can prompt a suspicious activity on your browser certificate.
5. Using a self-signed certificate for your website: This issue is a result of the activities of the site owner. Using a self-signed certificate for your website can result in Chrome certificate errors.
Furthermore, browsers recognize certificates from legitimate authorities. However, whenever the browser can’t verify your certificate authority, it can prompt some certificate errors in Chrome.
Quick Tip:
Before getting in-depth with the solutions, a guaranteed way to fix this issue is by switching to Opera.
This new-age browser will enhance your navigation due to its 3rd party apps integration, unit converter for time and date, or in-house VPN protection.
Opera
Change your current browser and take care of certificate issues using Opera’s practical tools.
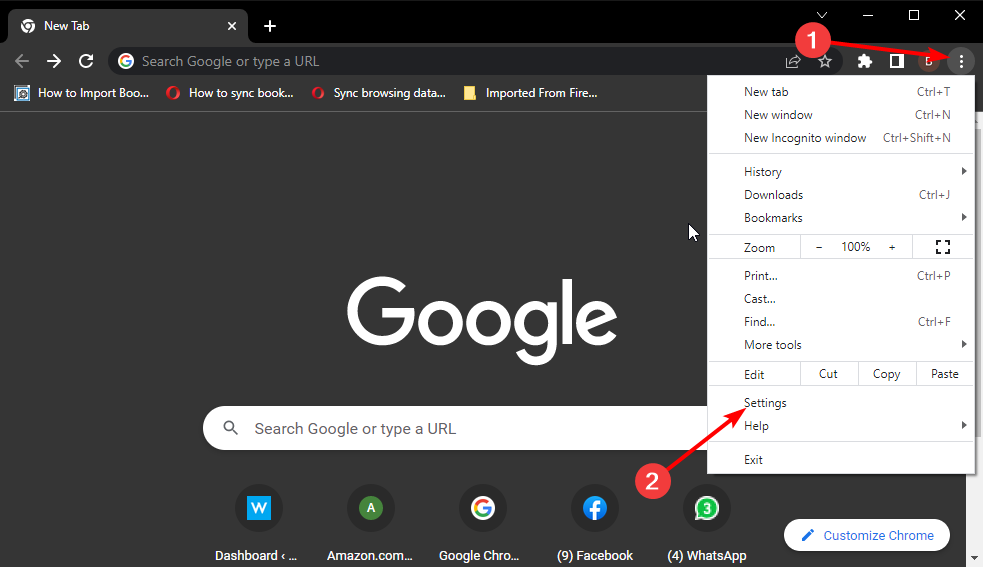
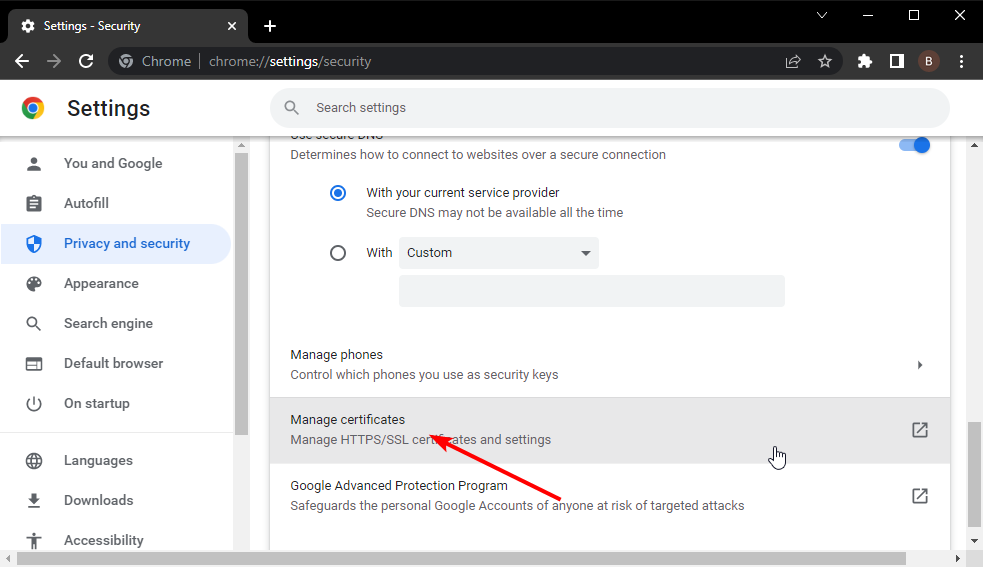
In the top-right corner of the screen, click the Menu button.
Scroll down and select More tools.
Click the Developer Tools, then select the Security tab.
In the Security tab, click on the View Certificate option to see the SSL certificates on your browser.
What can I do if the view certificate grey out on Chrome?
1. Clear Chrome browser’s cache and cookies
Launch the Chrome browser on your computer, then click the More button.
Select More tools and click on Clear browsing data.
On the Clear browsing data window, select the Advanced option.
Choose the time range you want to clear.
Check the boxes for Cookies and other site data & Cached images and files.
Click Clear data.
Close your browser and relaunch it when the process is complete, then check if the error still pops up.
2. Close third-party apps
As said earlier, running apps like antivirus can cause issues with your browser. So, close the antivirus programs you have running on your device, and check if the grey certificate error persists.
The Steam game launcher has some customizable elements. One way you can customize Steam is to change its profile background picture.
Its default dark background isn’t that interesting, but you can add many more appealing game wallpapers to Steam.
In today’s article, you’re going to find the easiest ways to do it, so make sure you read it completely.
How do I get a Steam profile border?
They’re actually called Avatar Frames and, if you would like to get one, you need to head on over to the Steam Shop and look for the Profile Items category on the left-hand side.
Here, you can find both static and animated frames for your profile’s avatar, which you can purchase with money or Steam points.
Can you make your Steam profile picture a GIF?
Yes, you can. If you are among those who want to have a GIF as their Steam avatar, then you have to upload the GIF to your artworks first.
After that, you can go ahead and set it as your Steam profile avatar and complete it with an animated frame, for the ultimate profile experience.
What do profile backgrounds do on Steam?
In case you don’t already know, Steam profile backgrounds are Inventory items. You can get them by creating badges and trading with your friends or through the Steam Marketplace.
If you choose to get them from the store, do not forget that they are usually they’re pretty cheap.
Keep in mind that you can change the profile background only by getting one through the above options.
Now, let’s see what you can to do easily change your Steam profile background.
How can I change the Stream profile background?
1. Add profile backgrounds to your inventory
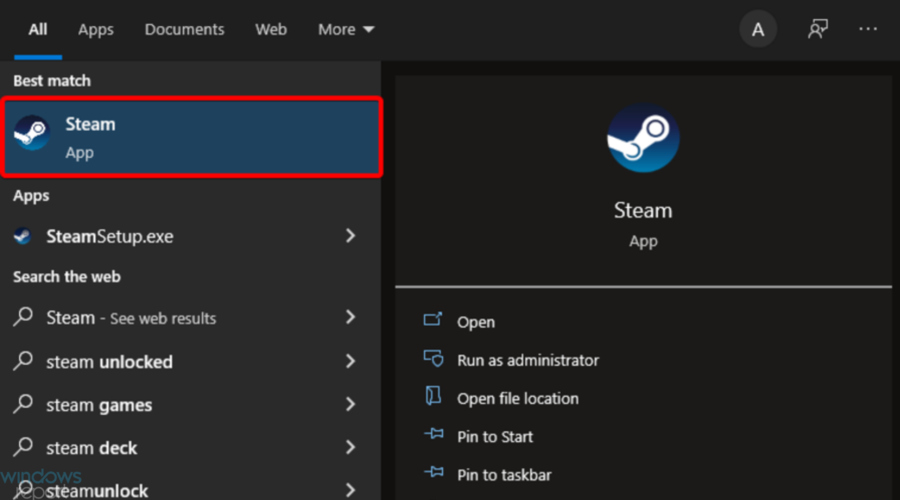
Press on the Windows key, type Steam, then open the app.
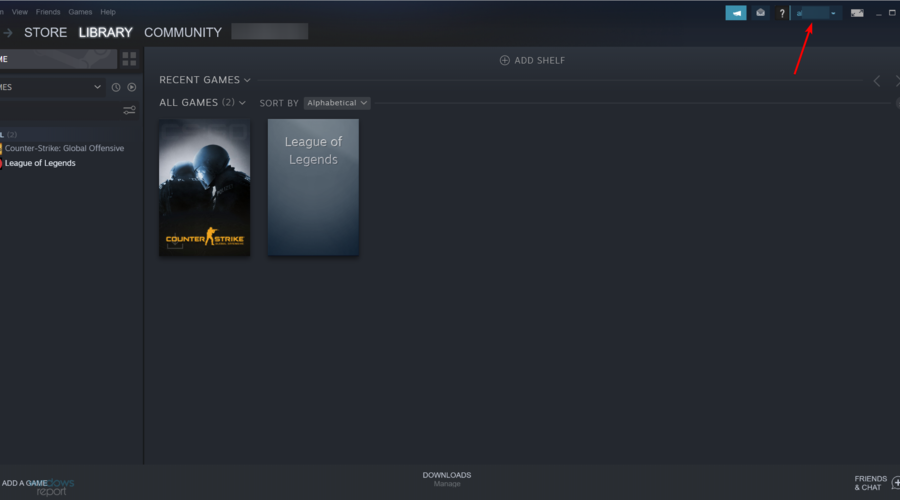
From the top menu, click on View, then select Inventory.
Click Inventory and the Steam tab to open your background card list shown directly below.
If you don’t have any profile background for Steam, hover the mouse over the Community tab, then select Market on the menu that opens.
In the right window pane, under the Search for items section, click on Show advanced options….
Press on the Windows key, search for Steam, then open it.
Click Profile to open further options.
Select the View my profile section.
Press on the Edit Profile button shown directly below.
From the left window pane, click on Profile Background.
Click the Select Background button to open the Choose profile background window.
Select a game background on that window.
Press the Save Changes button at the bottom of the profile options. Thereafter, you should see the new Steam profile background.
What other profile changes can I perform in Steam?
Many users seem to be interested in fully personalizing their profiles. If it’s happening to be in the same boat, keep in mind that you can also customize your profile picture using some simple steps.
In this matter, we strongly recommend checking our step-by-step guide and discovering how to easily change your Steam profile picture.
There you go! All the knowledge you need on how to get Steam backgrounds, change Steam backgrounds, or change the Steam mini profile background.
So, it’s pretty straightforward to add alternative profile backgrounds to Steam.
Many of the backgrounds are available for less than 10 cents. Adding a new profile background is one of the best ways to customize Steam.
Should in case your microphone is not working on Firefox, there are numerous reasons this might be happening. Some may be personal while others are permissions turned off by default on your device or browser.
Although it is rare for Firefox to have issues with the microphone, it can happen sometimes. In fact, if you are using an external microphone, you are more likely to encounter this issue.
Hence, this article will provide the best troubleshooting fixes to fix the microphone not working on the Firefox issue.
Why is the microphone not working in Firefox?
1. Microphone is disabled on device: Sometimes these issues occur if your microphone isn’t set as default or if it’s disabled, the following is how can enable your microphone and set it as default.
2. Microphone is muted: Often, some users have complained about this issue but only to realize that they have mistakenly muted their Microphone on their device. Especially the Windows users, the volume mixer can be tampered with and thereby, muting the Microphone.
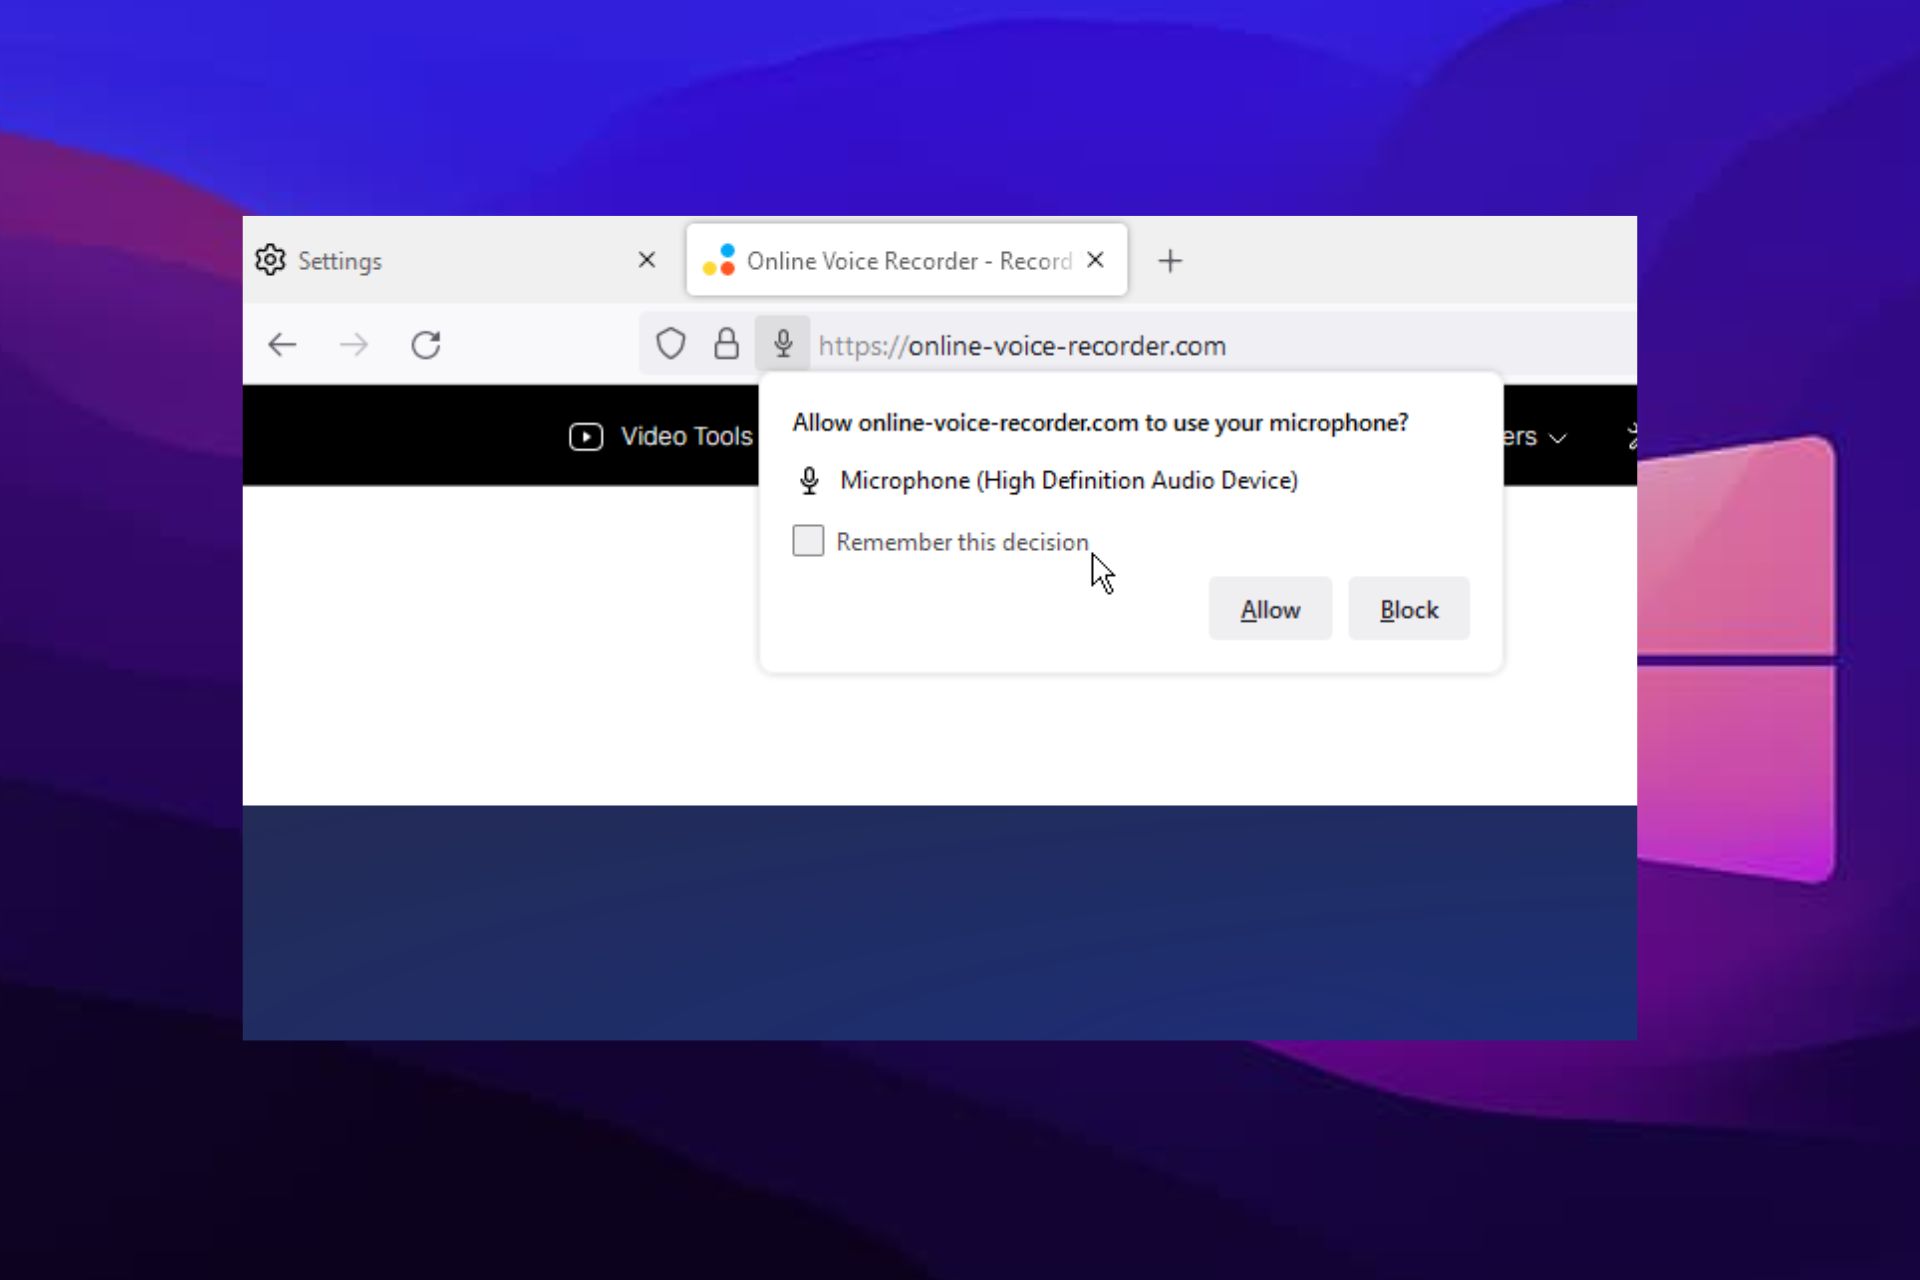
3. Site permission prompt disabled: If you have visited a site that requires a microphone such as Google Meet, you will be required to grant permission to the site to use your device microphone. Ignoring this prompt, or failure to enable it results in the issue we have at hand.
Where is the Firefox microphone?
To locate Firefox Microphone, follow the steps below:
Open Firefox.
Expand the Menu button at the top right edge of your page.
Locate the Settings and expand it.
Scroll to the Privacy and Security section and expand the Permissions section.
The Firefox Microphone is located there.
Quick Tip:
If you need a time-saving alternative to fix your Microphone malfunctions fast, Opera One is the key browser to use.
By choosing this new browser, you will benefit from quick access panels to settings, app integrations on the sidebar, or enhanced security to guard your digital behaviors. Also it brings a built-in AI.
Opera One
Waste no more time with sound issues using this easy and fully private browser.
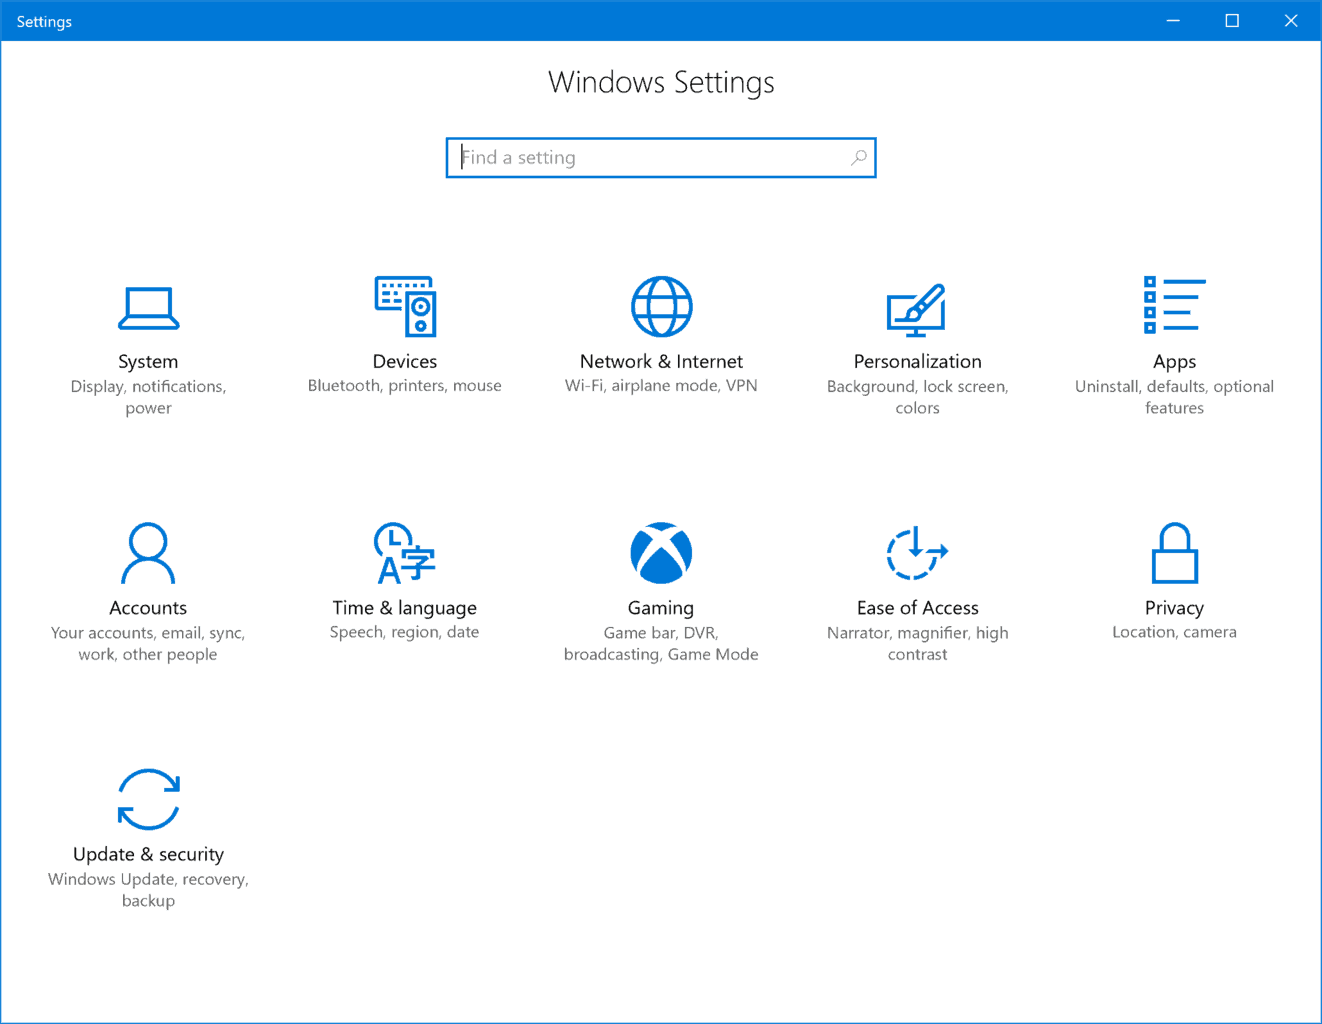
Launch the Settings app by pressing the Windows Key and I.
Click on Privacy.
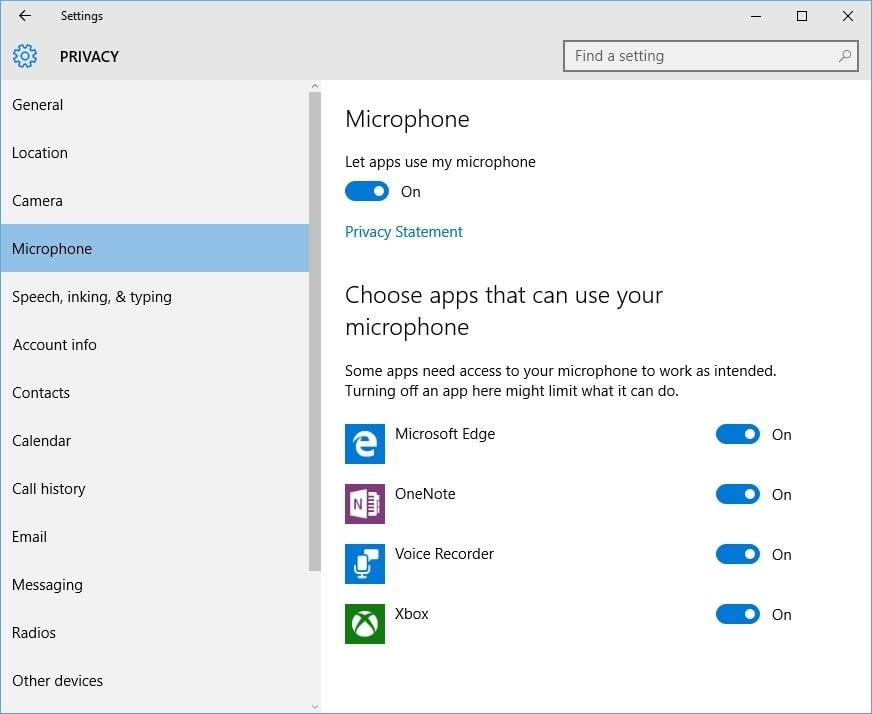
On the left pane, select Microphone.
Locate Let apps use my microphone to ensure that the indicator is set to On.
If your microphone isn’t working on Firefox we hope that at least one of these solutions was helpful to you. However, you can further read on how to turn on the microphone in Windows here.
Editor’s tip
In case the problem persists after trying the solutions it might be related to your device. So, you can update your sound drivers using automated driver software like Outbyte Driver Updater.
Popular web browsers like Google Chrome offer a lot of customization options built-in. Unfortunately, changing the Chrome background color is not one of them.
Thankfully, Chrome did make some effort to allow more customization to change the appearance of the browser by introducing a few official theme designs via its Chrome Web store.
In this article, let’s take a look at the different ways to change the Chrome background color with an easy step-by-step guide.
Note that while using Chrome, changing the background color of the page might not be possible on certain websites.
Can you change the background of Google Chrome?
Indeed you can. You can customize Chrome’s background in all sorts of ways, making the browser feel more like the rest of your system.
You can do so by downloading and adding themes from the Chrome Web Store or creating your own theme and adding them from the Settings menu.
Why is my Google Chrome background black?
Don’t panic, there’s nothing wrong with Chrome. When you use either Dark Mode or a dark theme in Chrome, your homepage, toolbar, settings, and some other pages will be dark as well.
Quick Tip:
If you want more customization options, use Opera One. The browser lets you create your own workspace where you can integrate your favorite add-ons and tools.
Not only that, but it includes tons of themes and you can also create your own. You can customize the look and the tools available on your start page, and much more.
Opera One
Change background color, install beautiful themes, and integrate any tool or add-on easily.
How do I change the browser background color on Google Chrome?
1. Install themes from Chrome Store
Launch Google Chrome.
Click on the three-dots and select Settings.
From the left pane, open the Appearance tab.
Click on Themes. This will open the Themes section in the Chrome web store.
Go through the themes and select the one that you want to apply.
Click the Addto Chrome button.
Once installed, Chrome will automatically apply the installed theme and change the appearance of the browser. The changes will be applied to even the browser background.
Chrome offers a bunch of in-house minimalist themes to change the Chrome background. If you want to spice it up a bit more, then scroll through other themes listed by third-party developers in the Themes tab.
If you want to revert to the default theme for any reason, here’s how to do it:
Open Settings on Chrome.
Select Appearances.
Click the Reset to default button for Themes.
How can I change the default theme for Incognito mode?
Chrome’s Incognito mode has the default black background. Even if you have applied a custom them to your Chrome, it will not affect the background of the Incognito tab.
Fortunately, the Chrome web store has a few themes that solely focus on Chrome’s Incognito color scheme.
The first is the Material Incognito Light Theme. It makes your Incognito tabs look just like normal tabs. However, the Incognito icon is still active on the top-left corner.
Material Classic Blue Theme is for those preferring the old classic Chrome look. Apart from the color options, it also helps you better distinguish between a normal and Incognito mode compared to Material Incognito Light Theme.
Uncheck the Automatically pick an accent color from my background box.
Now pick a color from the Recent Colors or Windows Color option.
Windows will apply the selected color to all the supported apps, including Chrome.
While this is a quick and simple solution, unlike the Chrome theme, Windows personalization color changes only affect Chrome tabs and header. So, that’s something to keep in mind.
How do I customize my Google Chrome theme?
Open Chrome and make sure you are logged in with your Google account.
When you are done, press the Pack and Install button.
Thus, if you’re not happy with the current Chrome background color and you would like to change Chrome’s background color to white, it can be done in a matter of seconds.
You can also change the Chrome background color to black by using the Chrome change background color extension.
Staring at the same old Chrome background can become boring. By using the Chrome themes or changing colors in the Windows personalization option, you can make your Chrome experience a bit more colorful.
When you are using Discord on your Windows 10 device and all of a sudden you cannot continue to communicate with your friends, can be very frustrating.
Occasionally, you may experience such issues where you can’t figure out why Discord can’t unmute from your browser.
Don’t worry though, we have looked out for ways to fix this issue easily and in this article, we will explore the exact steps we recommend you follow.
Why can’t I unmute Discord in browser?
The situation is pretty simple. The unmute option for Discord is directly connected to the microphone usage permission for it.
Thus, if you find yourself unable to unmute yourself in the Discord app, there surely is a microphone permission issue on your device.
Needless to say, if you don’t grant the microphone access to the Discord app, it cannot let you join in a voice chat as you won’t be able to talk.
Why can’t Discord unmute my browser?
Before getting into the main subject, let’s have a look at some reasons why Discord can’t unmute your browser.
Mic doesn’t have access to Discord or to your browser – In order to hear your Discord teammates while using the browser, you should always ensure that the microphone has access to your apps.
Incorrectly configured output device – Keep in mind that if you didn’t configure the right output device from the Discord app, you might think that your browser is actually muted. Make sure you match the device with Discord.
Wrong site settings – You should also ensure that your browser allows you to use the mic through Discord. It is easy to check and configure and we’re going to show you how.
Problems with your browser – Last, but not least, there might be problems with your browser. In this case, you should choose a different one, dedicated to using Discord without any issue.
Now, let’s see what you can do to solve each of the above aspects. To discover more useful info, we recommend reading the entire guide.
Quick Tip: If you keep having problems with your current browser, use Opera GX for Discord. It has the app pre-installed and offers quick access to it from the sidebar.
The browser is designed for gaming enthusiasts with useful features like a snapshot tool, tab management, free VPN, and an adblocker.
Opera GX
Hide the address bar, group together your favorite tabs, and reposition your menu icons with Opera.
What should I first do if Discord can’t unmute in my browser?
Make sure your mic is unmuted
Access the Discord browser app, then enter your credentials (username and password), and click on the Login button.
Look at the left-bottom of the page, if the mic is cut by a red line, click on it to unmute.
In the pop-up window, click on Allow.
Even if it looks like an obvious step, some users might forget to do it. We recommend first checking if your mic is unmuted in Discord.
Try an incognito window
Hit the Windows key, the type your main browser’s name (Chrome, Firefox, Edge, Opera, etc), then open the first result.
Look at the upper-right-hand corner of the browser window, then click on it (usually 3 lines or dots set next to your username image), and select New incognito window.
Now, try running Discord here.
Because there might be a temporary bug related to your main browser window, you should also try accessing an incognito one.
What can I do if Discord can’t unmute in my browser?
1. Check the microphone access
Open Windows Settings by using the following keyboard shortcut: Windows + I.
Navigate to Privacy.
Scroll down and under App Permissions click on Microphone.
In the right section, under Allow apps to access your microphone toggle the switch to On.
As mentioned before, if Discord can’t unmute your browser, it is probably due to the incorrect permissions of your mic. It should always be
2. Use the correct Output Device
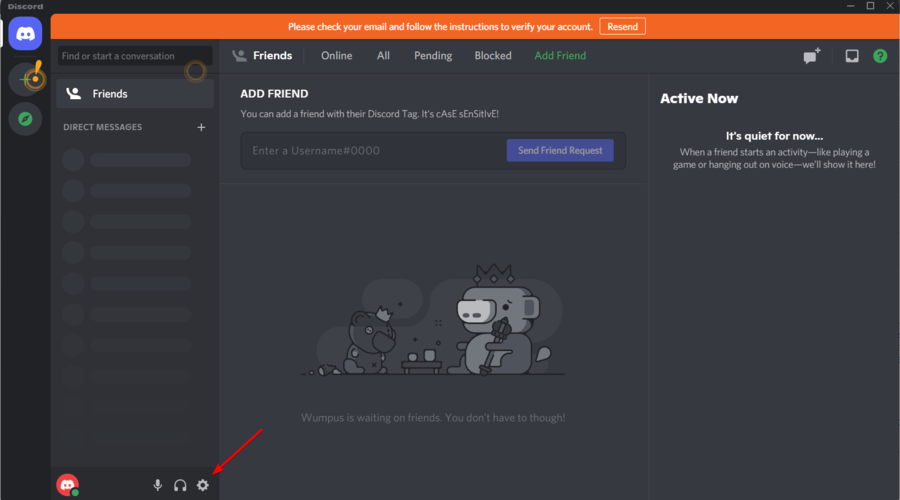
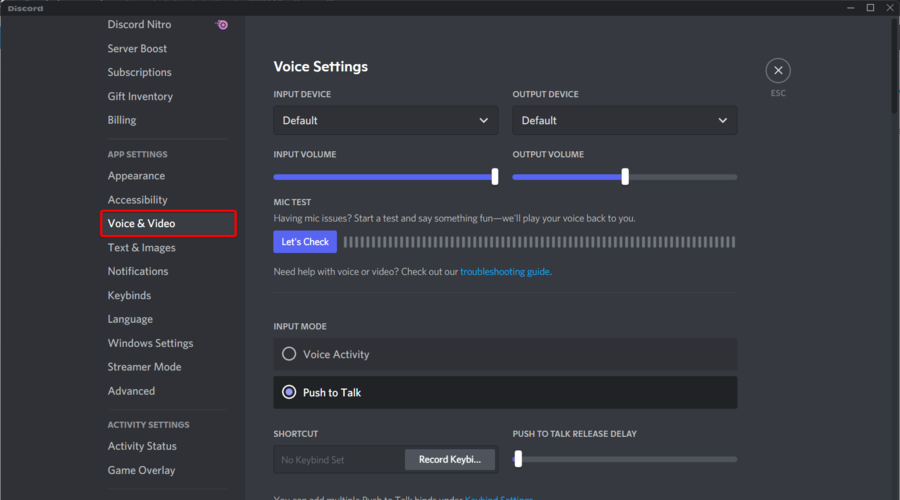
Open Discord and click on User Settings, from the left bottom window corner.
In the left menu choose Voice & Video.
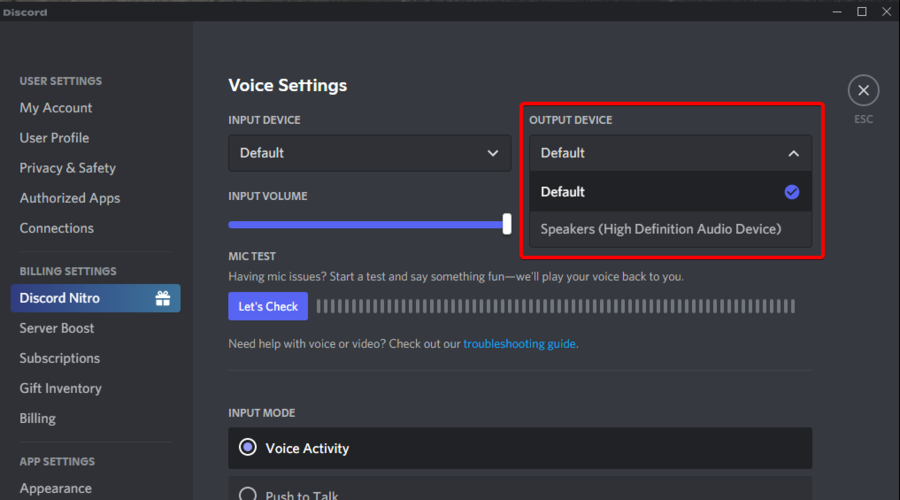
Under the Output device, choose your preferred device and make sure that the output volume is not 0.
If you notice that Discord seems to not unmute your browser, you should make sure of choosing the correct output device. So, you need to select the microphone that you’re going to use while running Discord.
Any other configured device may get you into our presented trouble.
Hit the Windows key, type Chrome, then open the first result.
Click on the 3 vertical dots to open the More menu (these are set in the right-top corner of the window).
Navigate to Settings.
From the left window pane, go to Privacy and security, then click on Site settings, from the right window pane.
Next, in the Site settings option select Microphone.
Make sure the Sites can ask to use your microphone option is checkmarked.
3.2 Mozilla Firefox
Hit the Windows key, type Firefox, then open the first result.
In the right-top corner of the window, click on the 3 horizontal lines to open the More menu.
Go to Settings.
From the left window pane, select Privacy and security.
Now, scroll down in the right window pane until you find the Permissions section.
Click on the Settings button, next to the Microphone section.
In the Search Website bar, search for Discord, then click on it.
Click on Save Changes.
3.3 Microsoft Edge
Hit the Windows key, type Edge, then open the first result.
Look at the top-right corner of the window, then click on the 3 horizontal dots.
In the left window pane, navigate to Cookies and site permissions.
Now, scroll down in the right side of the window, then click on Microphone.
In the Allow section, make sure you have Discord.
Before following the above steps, you should always make sure that your mic is activated and you turned on its access from Windows Settings.
How do you unmute Discord on the keyboard?
Press the Settings button.
Access Keybinds.
Press the Add a Keybind button, then select the Toggle Mute option from the dropdown.
Select the desired Keybind and close the menu.
Now, every time you press the assigned key, you will mute and unmute your discord directly from your keyboard.
How to grant Discord access to the microphone on Mac?
Select the Apple menu and then click on System Preferences.
Click on Security & Privacy and then select Privacy.
Click on Microphone and select the checkbox next to the Discord app.
If none of the above options worked for you and Discord still can’t unmute the browser, with Opera GX you’ll not have to worry again about our today’s issue.
Can I encounter any other problems between Discord and my browser?
You should know that our presented issue is only one of the several problems you can face between Discord and your browser. Fortunately, we’ve compiled a shortlist, where you also can find dedicated guides to fix each error.
Discord live viewing not working in browser– In this case, you’ll notice a black screen arising on your desktop. Fortunately, you can easily solve this problem by using our recommended solutions.
Knowing what to do when Discord won’t let me unmute, Discord can’t unmute MIC in browser, or you can’t find a unmute Discord shortcut is a must, and now you do.
Users have also dealt with situations like Discord mute glitches, or errors such as Discord says in muted but I’m not.
If Discord is not able to unmute your browser, these are the steps we recommend you follow. In case you didn’t manage to solve this issue, we suggest accessing the Discord official support page.
Please let us know in the comments section below which of the proposed solution worked best for you, we’d love to hear it.
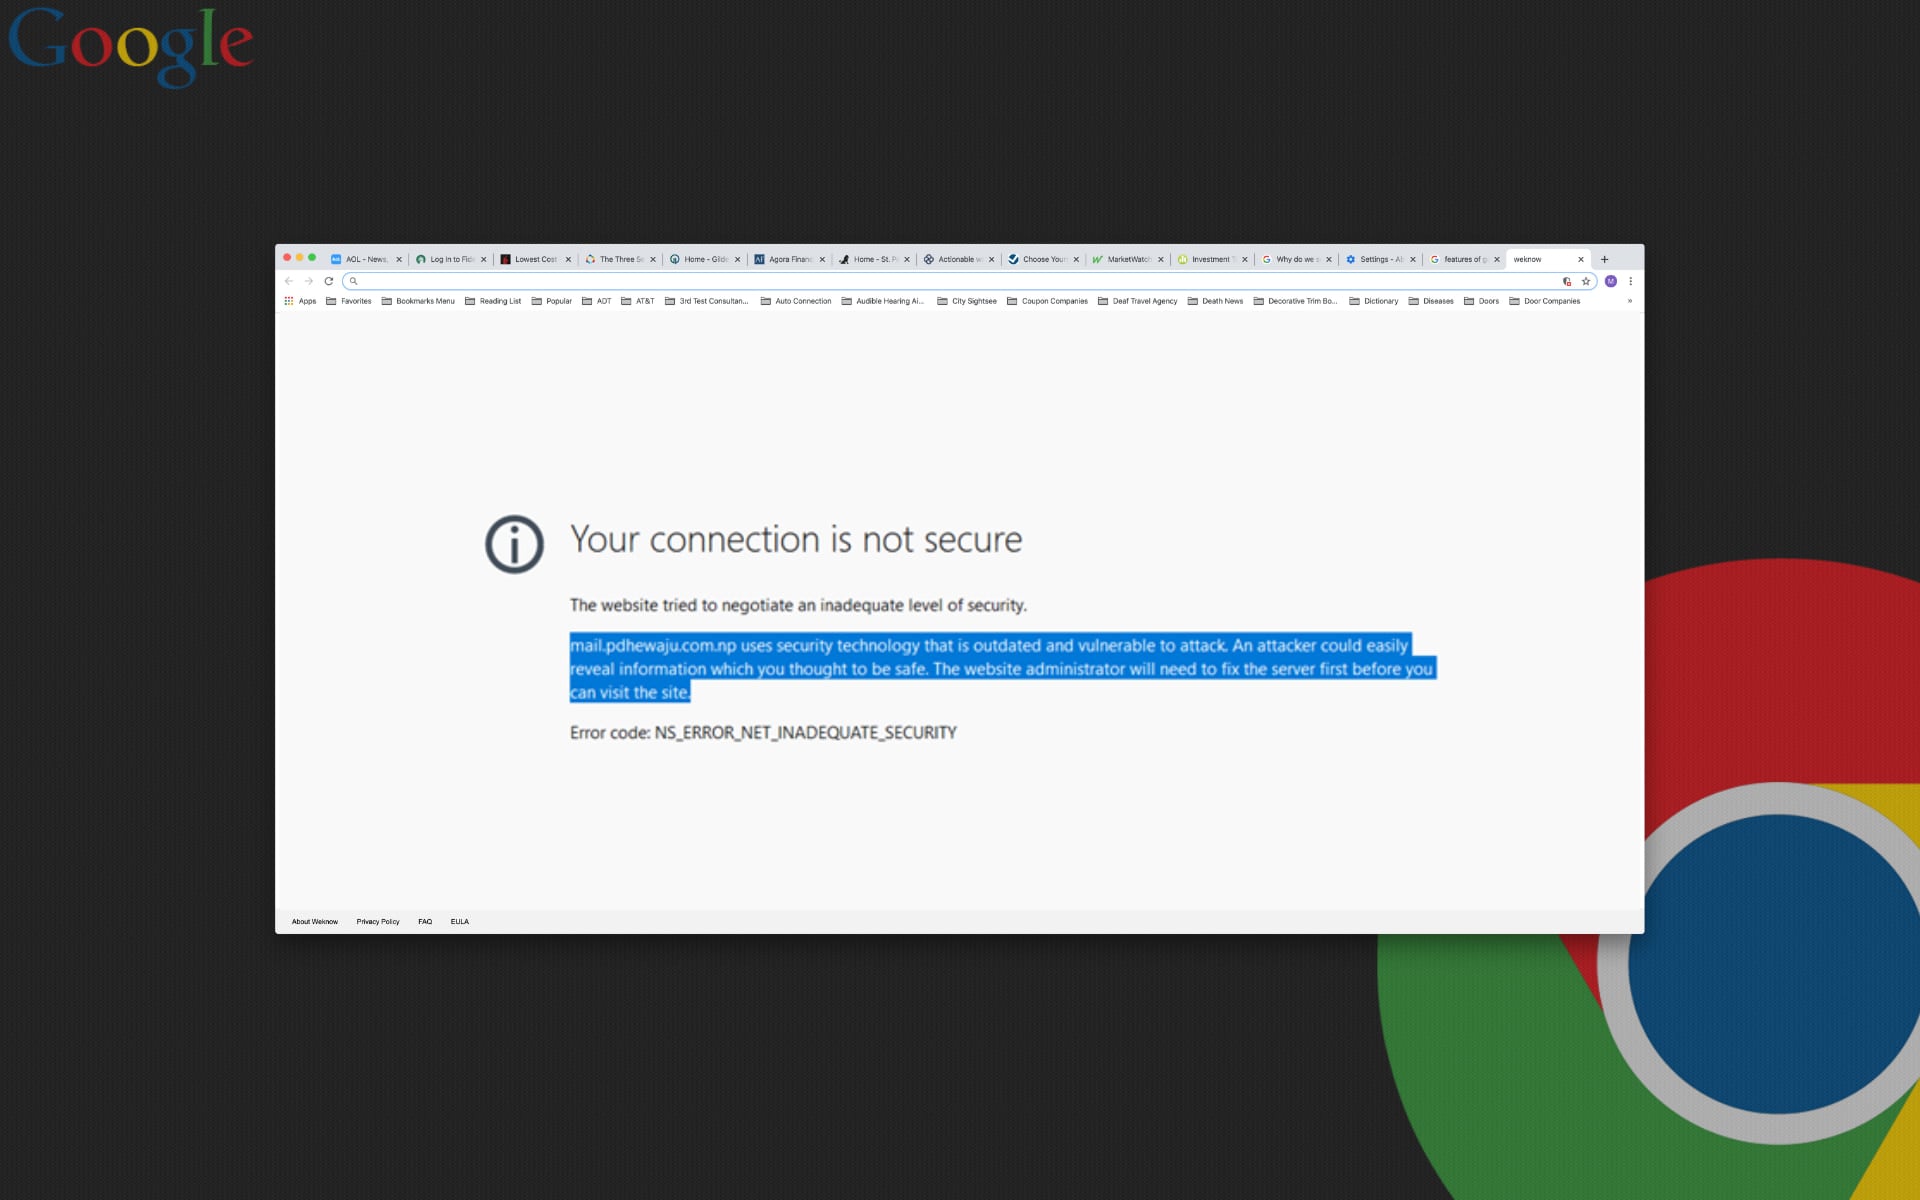
Chrome is a great web browser, but sometimes issues with it can occur. One issue that users reported is err_spdy_inadequate_transport_security message.
This issue usually affects web developers, and it can interfere with the development process. It’s also called the NS_ERROR_NET_INADEQUATE_SECURITY error and it usually occurs when accessing websites hosted on IIS 10.0.
What happens is that in its default configuration, the IIS 10.0 has the HTTP/2 protocol enabled. However, the protocol was not supported in the default configurations of Chrome and Firefox browsers.
However, fixing this issue is relatively simple, and today we’ll show you how to fix it.
What is ERR_ SPDY_ INADEQUATE_ transport_ Security?
This is an error that could be a result of using an outdated version of Chrome, old and corrupted browser cookies, or HTTP/2 is enabled.
Furthermore, if your Windows Server is using some weaker ciphers and protocols, this error message might be triggered as a result.
Quick tip:
Before we start fixing this issue, it’s important to determine if the problem is only appearing in Chrome. To do that, you can use any other browser, but we would recommend using Opera One.
Opera One offers some unique features, and it allows you to organize tabs into workspaces. If needed, you can also use the built-in search to find any open tab with ease.
Opera One
Forget all about the annoying err_spdy_inadequate_transport_security error in your browser by switching to this browser.
How can I fix err_spdy_inadequate_transport_security error?
1. Modify the registry
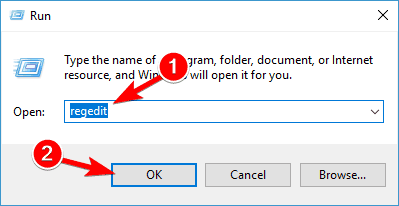
Press Windows Key + R and enter regedit. Press Enter or click OK.
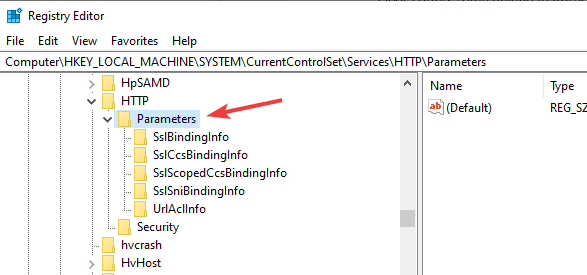
When Registry Editor opens, navigate to the following path: HKEY_LOCAL_MACHINE\System\CurrentControlSet\Services\HTTP\Parameters
Right-click the right pane and choose New and select DWORD (32-bit) Value.
Enter EnableHttp2Tls as the name and set the value of the DWORD to 0.
Create a new DWORD, name it EnableHttp2Cleartext, and set its value to 0.
After making these changes, restart your computer.
Keep in mind that these changes might cause your website to load slower. It’s also worth mentioning that this err_spdy_inadequate_transport_security Google Chrome fix applies only to Windows Server.
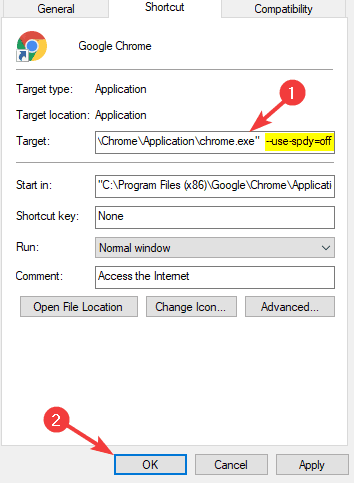
2. Change Chrome launch parameters
Locate Chrome shortcut, right-click it, and choose Properties from the menu.
Navigate to the Shortcut tab. In the Target field add one of the following lines at the end:
--use-spdy=off
--disable-http2
After doing that, the HTTP2 or SPDY protocols will be disabled in Chrome.
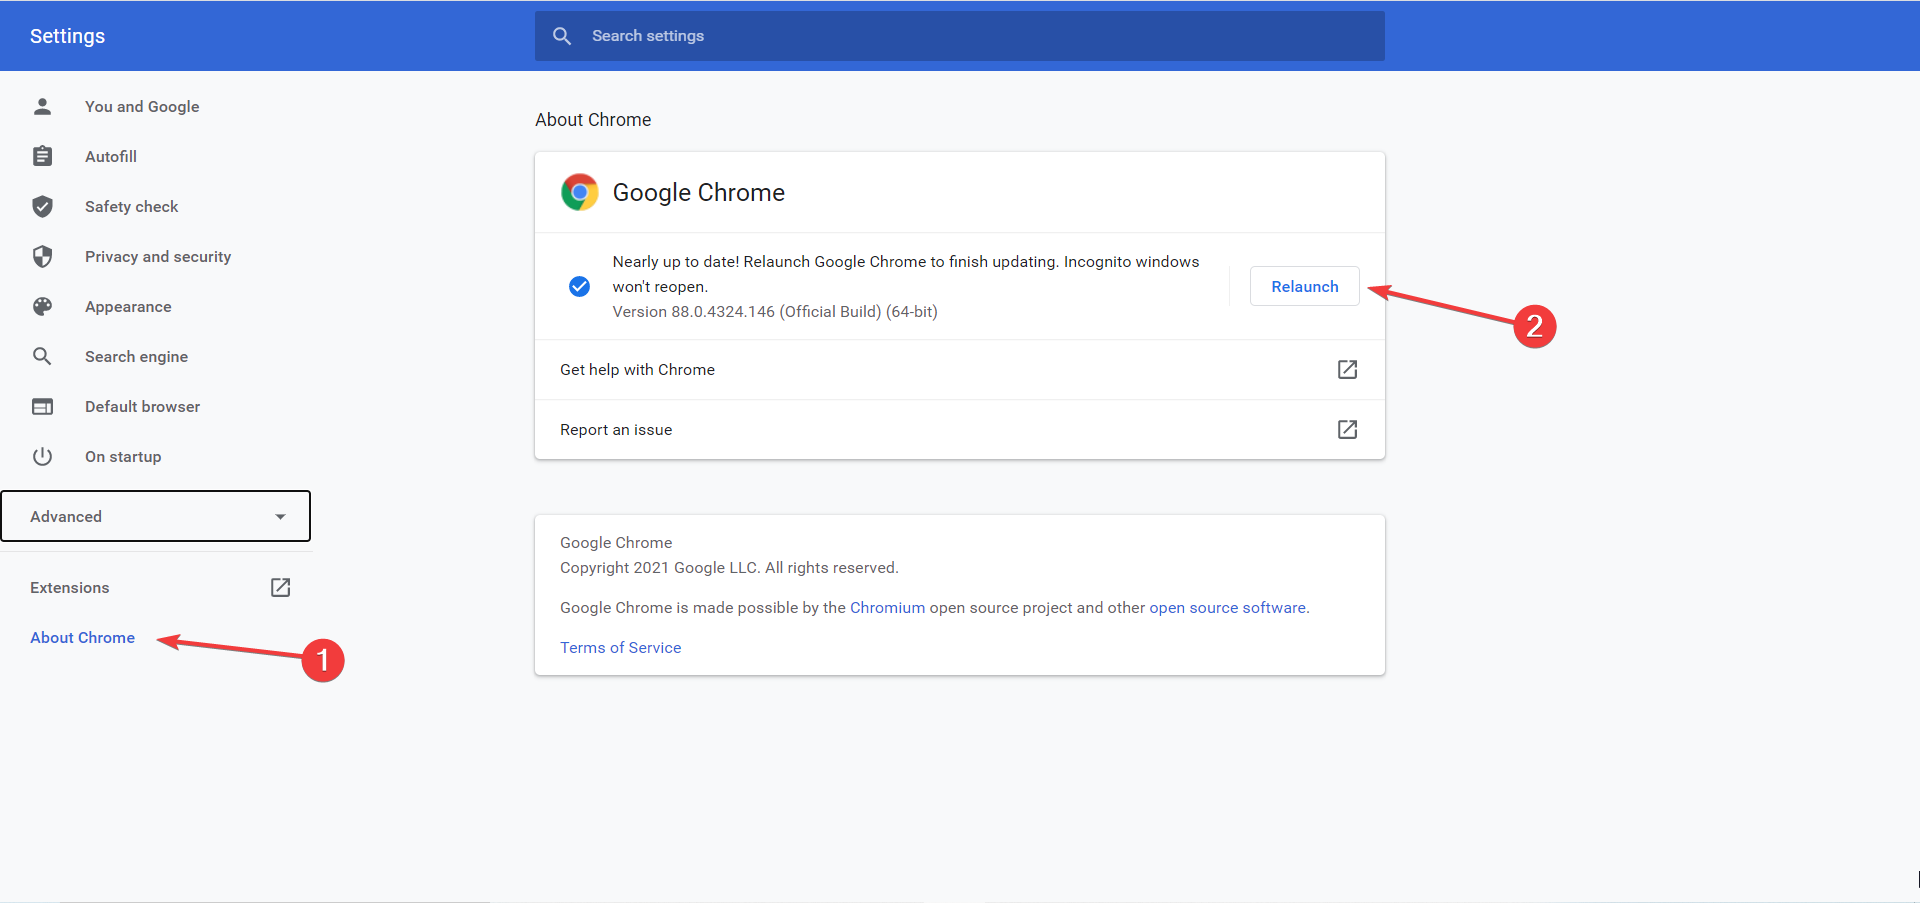
3. Update Chrome to the latest version
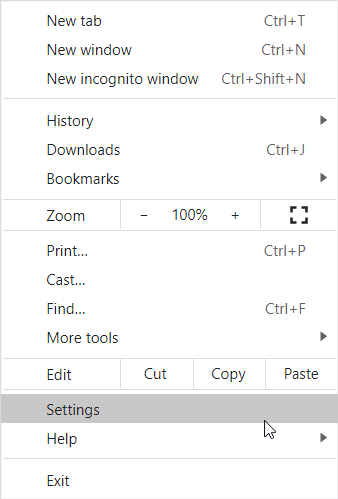
Click on the three vertical dots from the upper right corner in Chrome. and select Settings.
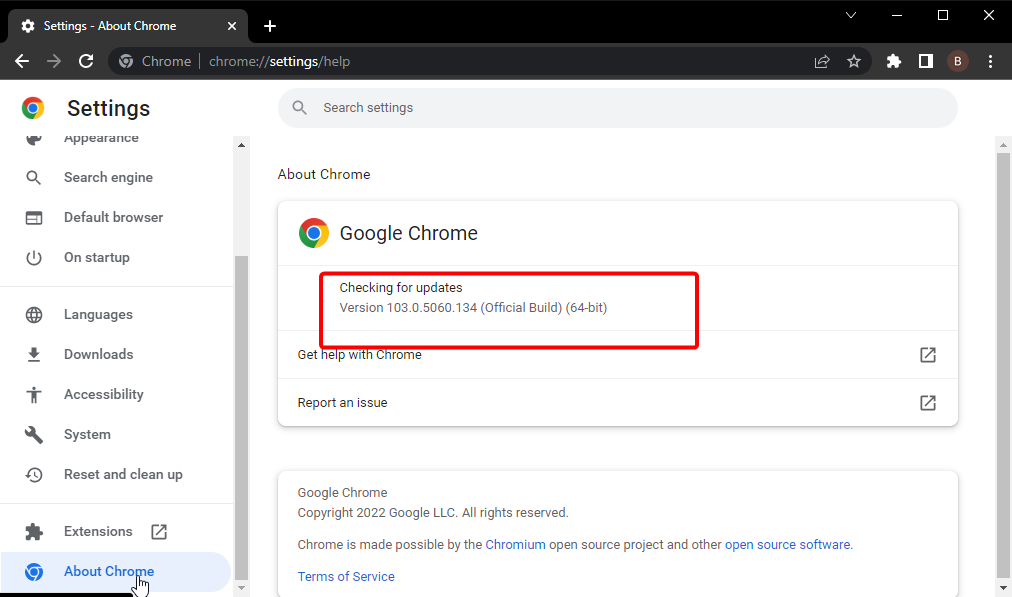
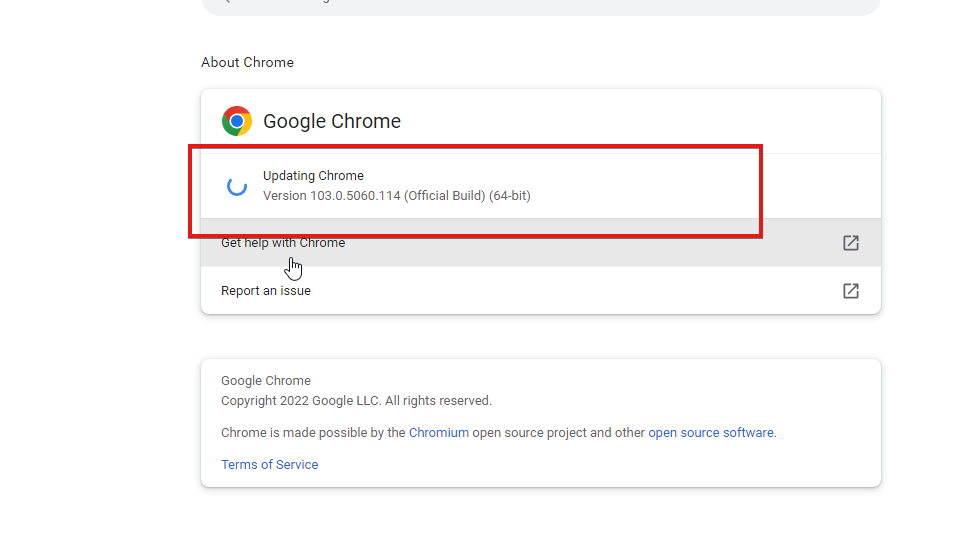
Clicking on the About Chrome setting from the left pane will trigger the search for Chrome updates.
After the update is installed click on the Relaunch button.
Updating your browser may clear this error so make sure you try this solution to get rid of this problem.
There you go! Now, when you encounter err_spdy_inadequate_transport_security in Chrome, you will know how to handle it.
Users have also reported the err http2 inadequate transport security variant, but you are covered either way.
Err_spdy_inadequate_transport_security Chrome error can cause problems on your PC, but hopefully, you should be able to fix it using our solutions.
Following the saying: In case of inadequate transport security, call Windows Report, let us know in the comments section below if your problem was solved.
Before you dive into the solutions, let’s understand why the drag and drop function stops working in Firefox.
Why can’t I drag and drop in Firefox?
If the drag and drop in Firefox is not working for you, it is primarily due to the fact that the Firefox Launcher Process is enabled and the Windows UAC is disabled on your PC.
The Launcher Process is a security-based feature that aims to prevent harmful codes from overwriting sensitive files of the operating system.
So, when the Windows OS does not allow lower integrity/less privileged applications to send data to the higher integrity applications, you bump into the error.
But, before you move over to the troubleshooting methods, you need to verify if the Launcher Process is enabled as shown below:
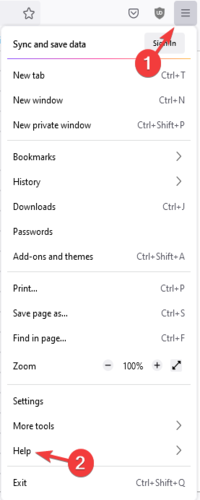
Launch Firefox, click on the three lines on the upper right, and select Help.
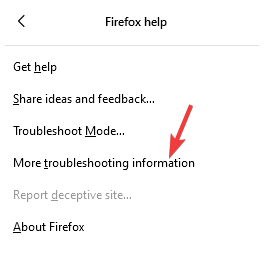
Next, select More troubleshooting information.
Now, on the Firefox support page, go to Application Basics and look for Launcher Process.
Check if it shows Enabled.
Fortunately, we have some effective solutions to fix the drag and drop function not working in the Firefox issue.
Quick Tip:
If Firefox keeps causing problems, switch to a more stable browser like Opera One. It’s lighter than Firefox with a very small footprint on your system.
The browser is frequently updated and should be able to support drag-and-drop with no issues. It includes standard browsing features, plus an adblocker, social media integrations, a VPN and native AI plus a modular AI-ready design.
Opera One
Use this responsive browser to avoid drag-and-drop errors and other bugs and enjoy uninterrupted web surfing!
What can I do if drag and drop isn’t working in Firefox?
1. Enable User Account Control (UAC)
Press the Win + R keys together to launch the Run console.
Type useraccountcontrolsettings in the search bar and hit Enter.
In the User Account Control Settings window, move the slider on the left to Always notify.
Press OK to save the changes and exit.
Now, check if you can drag and drop files or images in Firefox.
2. Do not run Firefox as an administrator
Go to desktop, right-click on the Firefox shortcut, and select Properties.
In the Firefox Properties dialogue, go to Compatibility.
Next, go to Settings and uncheck the box next to Run this program as an administrator.
Press Apply and then OK to save the changes and exit.
Once done, the drag and drop not working issue in Firefox should be resolved.
3. Launch Firefox using the no-deelevate command
Right-click on the Firefox shortcut on the desktop and select Properties.
In the Firefox Properties window, go to the Shortcut tab.
Here, go to Target and add the -no-deelevate command after firefox.exe” in the path.
Press Apply and OK to save the changes and exit.
Now, check if the drag and drop issue in the Firefox browser is resolved.
4. Create a new Firefox profile
Open Firefox and type the below path in the address bar: about:profiles
Now, click on Create a New profile.
In the Create Profile Wizard, press Next and then follow the on-screen instructions to finish creating the new profile.
This will help you create a new user for Firefox and you can then transfer all your data to it. Once done, you should be able to use the drag and drop in Firefox again.
But if the drag and drop function is not working in Firefox on your Mac, you need to uninstall the Tor button extension from the addons-manager.
Alternatively, you can also use the Copy and Paste function instead of the drag and drop to move a file from Firefox to another location.
Sometimes, it could be a bug causing the drag and drop feature not working issue in Firefox for Outlook.
In this case, the only option is to check for any recent updates on the type of bug which is usually filed under their Bugzilla forum.
Firefox cannot drag and drop bookmarks
Firefox hides the https:// from the beginning of a web address to remove the clutter and for increased security. This issue is not detected on secure sites where you see https://.
Therefore, on such secure sites, if you select and drag the address to the Bookmarks Toolbar it works but not on the regular ones.
To get https:// back, and fix the drag and drop not working for Firefox bookmarks issue, you can disable the hiding action:
Launch Firefox and type the below path in the address bar: about:config
Next, click on Accept the Risk and Continue.
Now, type urlb in the search field, and a list will appear.
Here, look for the browser.urlbar.trimURLs preference, click on the double arrow to change it from true to false.
Besides, for the Javascript drag and drop not working issue in Firefox, you can follow the procedure on their MDN Web Docs for the correct coding and resolve the issue.
Or, as a final resort, you can try uninstalling and reinstalling Firefox, however, make sure to save your bookmarks first.
While we have covered most of the drag and drop issues in Firefox here, if the problem is with Windows 11 Drag and Drop not working, then follow our post for more solutions.
For any other errors with Firefox or other browsers, do let us know in the comments below.
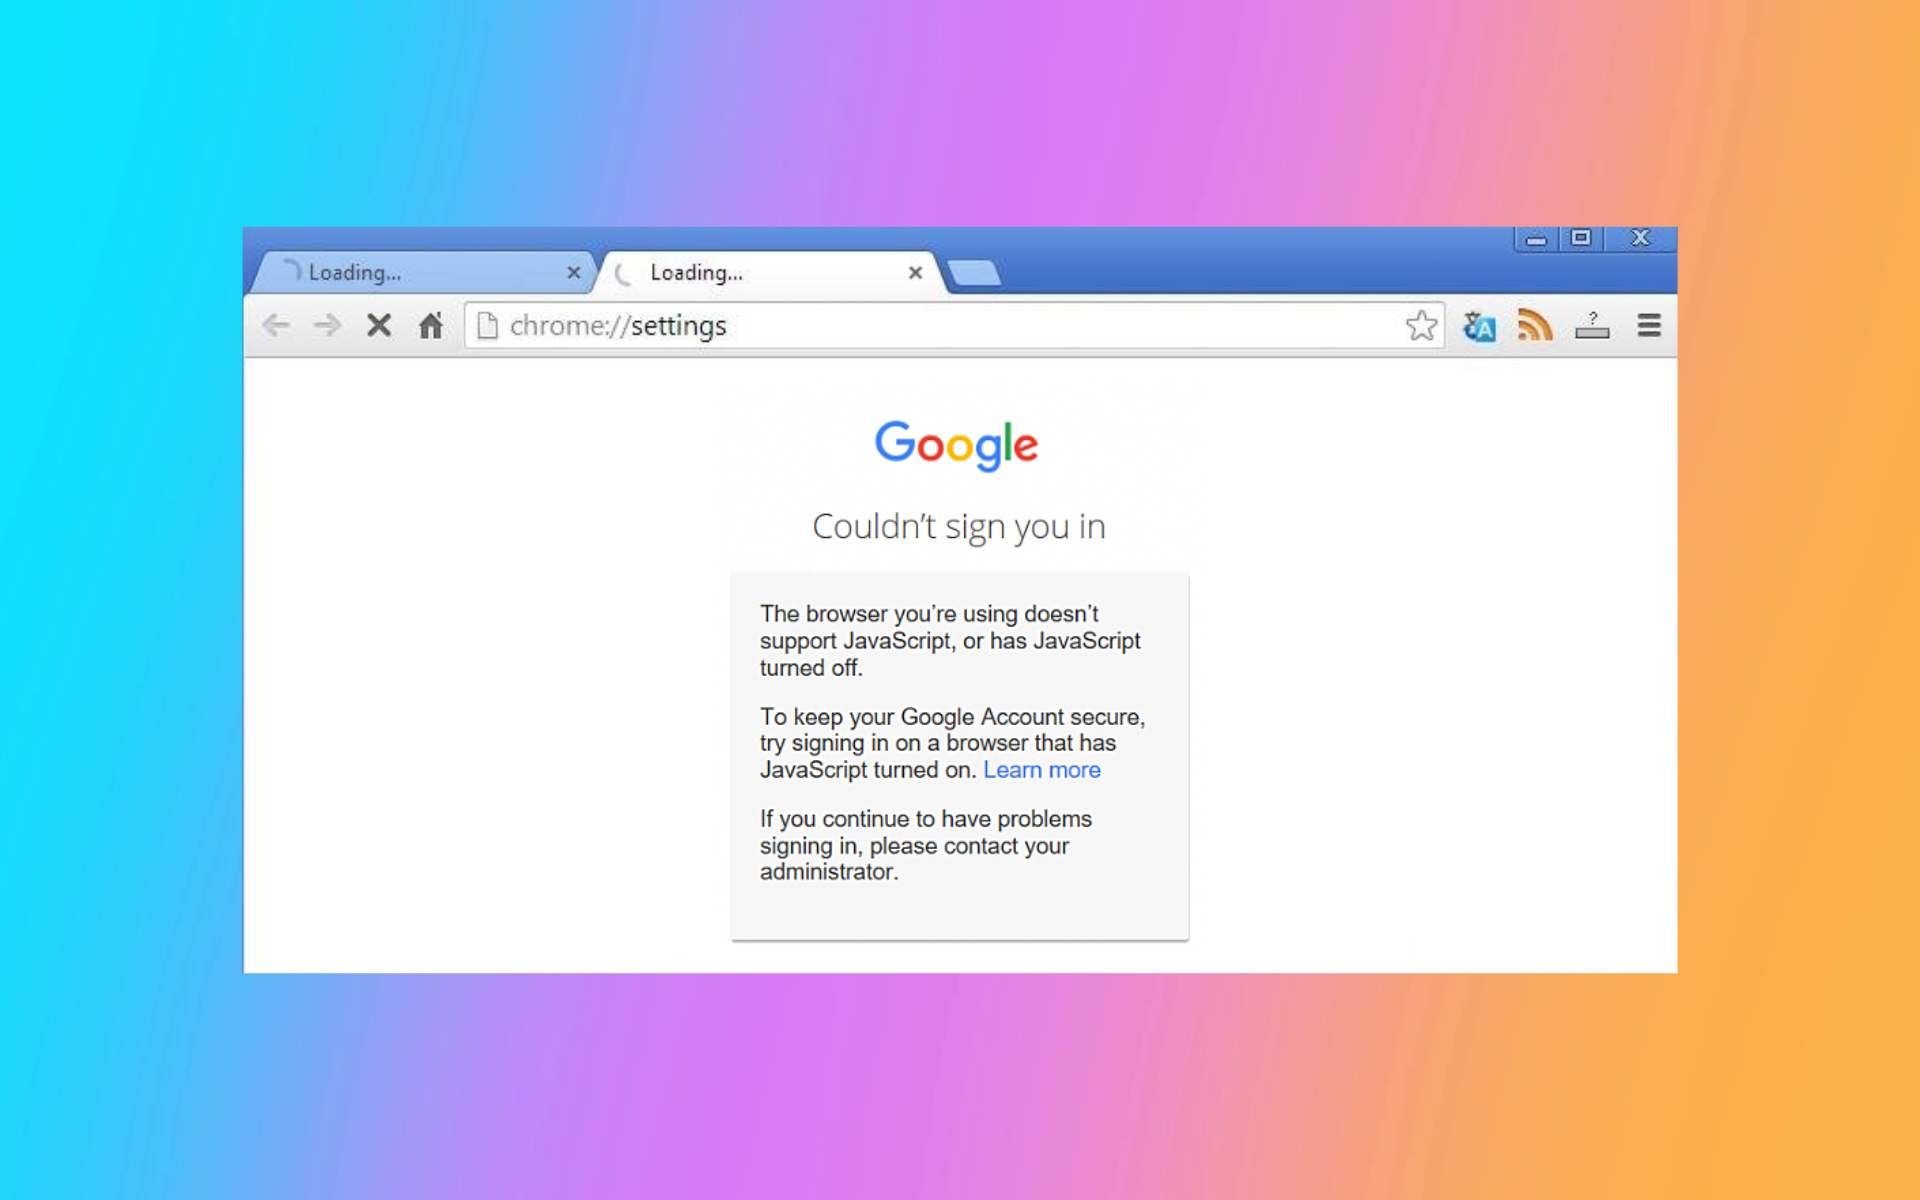
With the help of JavaScript many specific features from the web pages become functional.
In case JavaScript has been disabled or is not working properly, then the content of the webpages can become unavailable or limited.
Users report getting the error messageYour browser does not support JavaScriptwhen accessing certain webpages.
In this article, we will show you how to fix this JavaScript error and regain full access to all web pages content.
Is JavaScript supported by all browsers?
You don’t even need to worry about this if you are not using any old or already obsolete web browsers. Why, you ask?
Well, because all the modern browsers come with built-in support for JavaScript. It goes without saying that, frequently, you might need to enable or disable this support manually.
How do I fix JavaScript is not supporting my browser?
1. Use a dedicated browser
Opera One is one of the most used and popular browsers out there, thanks to the available functionalities and redesigned interface with built-in AI assistant.
Perhaps one of the most important selling points for Opera One is that this browser is error-free and any JavaScript error is uncommon to happen.
Moreover, the browser comes with a built-in VPN and ad-blocker designed to ensure your online privacy while browsing the Internet.
Opera One
Use the world’s best browser and enjoy an error-free browsing experience.
Open the browser and go to Tools and select Internet Options.
Select the Security tab and click on the Custom level option.
In the Security Settings – Internet Zone go to the Scripting section.
Click Enable for Active Scripting.
Click OK at the bottom of the Internet Options window to close the dialog.
Chrome
Go to the web browser menu click on the Customize and control Google Chrome.
Next, select Settings and click on the Show advanced settings.
UnderPrivacy click on the Content settings.
Locate the JavaScript section and select Allow all sites to run JavaScript (recommended).
Click on the OK button.
Firefox
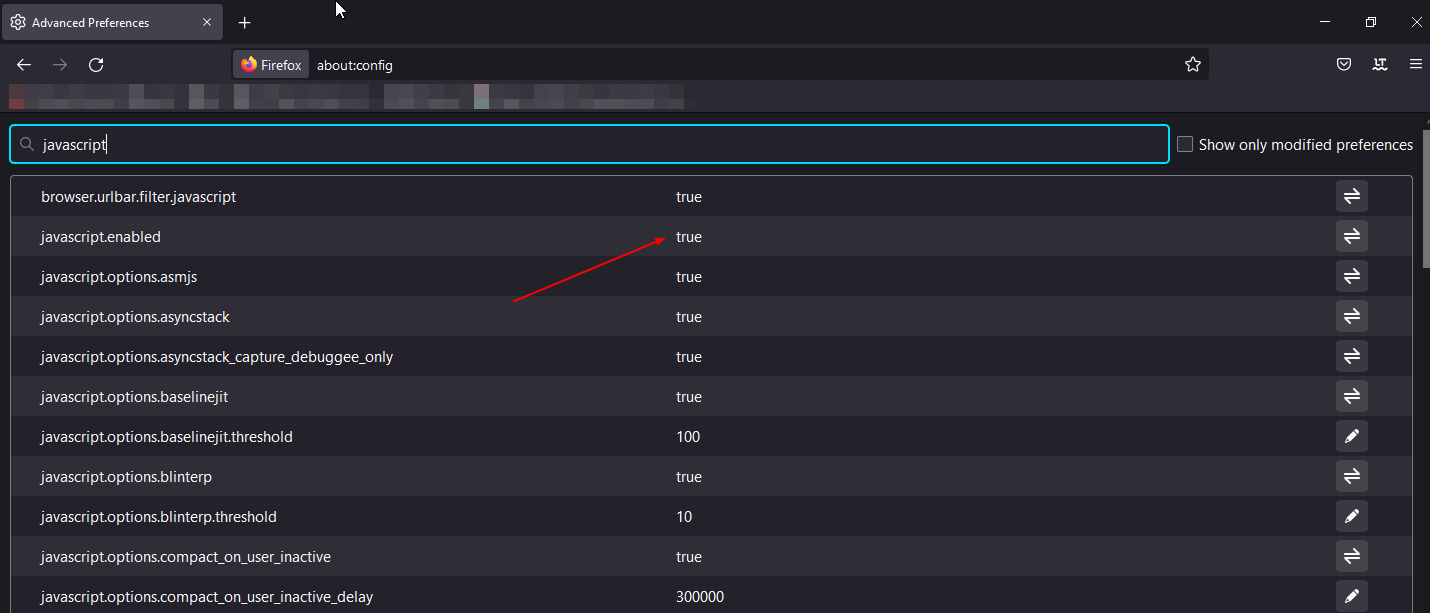
In the address bar, type about:config and press Enter.
On the message I’ll be careful, I promise click OK.
In the search box, search for javascript.enabled.
Toggle the javascript.enabled preference to change the value to true.
You now have a better knowledge of why the browser you’re using doesn’t support JavaScript, or has JavaScript turned off.
We recommend using a modern browser, since your browser does not support JavaScript, and you must constantly face situations like pressing the continue button once to proceed.
Users also reported errors such as Your browser does not support javascript. Please enable it or change a javascript-capable browser to access Amazon message center, but using a state-of-the-art browser should fix this.
JavaScript is an important tool that ensures you view a web page without any restriction. Solving the JavaScript error can be pretty easy following the steps indicated in this article.
Let us know in the comments section below if you have additional recommendations and suggestions.
Epic PrivacyBrowser is a web browser built for minimizing as much as possible the user’s online footprint, but many reported that the Epic PrivacyBrowser is not working on Windows 10.
This can be a big problem, but in today’s article, we’ll show you how to fix this once and for all.
The quickest way is to update your operating system. In most cases, apps don’t work because of outdated security patches. If that doesn’t solve the problem, disable the Firewall and flush the DNS.
To learn how you can do that, follow the steps below.
Does Epic browser work with Windows 10 & 11?
If you like this browser and would like to have it on your Windows device, go ahead and install it. Yes, the Epic Privacy browser for Windows 10 and 11 is completely free to download and use.
Furthermore, it has a simple, easy-to-understand Graphical User Interface (GUI) and it also supports some of the same features as seen in Chrome, such as opening multiple tabs, creating and importing bookmarks, and printing selected pages.
How can I fix the Epic browser on Windows 10?
1. Try a different browser
If you value the confidentiality of your data and have a particular interest in preserving your online activities anonymous and untraceable, you would not want to miss the chance to use Opera One, the browser with the utmost concern for privacy.
This privacy-focused browser offers everything that Epic PrivacyBrowser has to offer and more. Having undertaken a complete overhaul, Opera One is built as a powerful, but lightweight browsing solution that doesn’t use too much of your resources.
Boasting some special features such as a built-in VVPN tool to anonymize your browsing history and an integrated adblocker to keep invisible trackers at bay, you can be sure that whatever you do online remains strictly your business and yours alone.
Let’s quickly look at its key features:
Fully customizable UI with themes, modes, sidebar display, and keyboard combo
In the Windows search box type cmd, right-click the first result, and select Run as Administrator. If you can’t run Command Prompt as an administrator, check out our guide on how to fix it.
Then type: ipconfig /flushdns
After the process is over, you will see the Windows IP Configuration Successfully flushed the DNS Resolver Cache.
5. Get a new IP address
Open Control Panel.
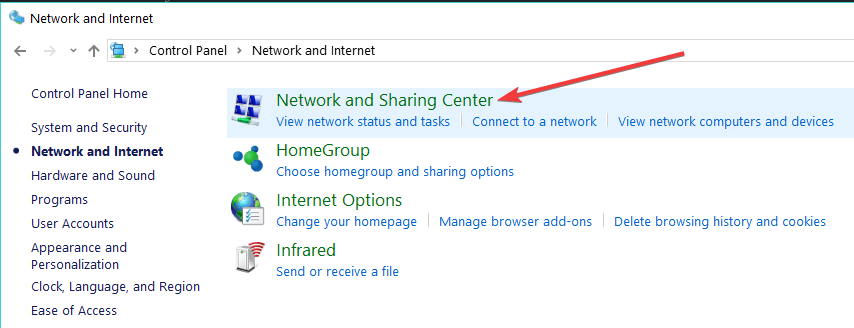
In Control Panel select Network and Internet, then Network and Sharing Center.
Now, in the right section, you’ll see 2 options: Access type and Connections. Click on the link next to Connections.
In the new window that appears, click on Properties.
Click on Internet Protocol Version 4 (TCP/IPv4) and click on Properties.
In the new window click on the checkmark in front of Use the following IP address.
Enter your new IP address and then check Validate settings upon exit.
Click OK on all windows.
What can I do if the Epic Privacy browser VPN is not working?
You should know that, if pages aren’t loading or the proxy is very slow, it could be that the server you’re connected to is either down or overloaded.
If you face a similar situation, you have to try changing your proxy country or try closing and re-opening Epic to connect to a different server.
Furthermore, if you are connected to a certain country, but the website says that you’re not in that country, close then re-open Epic to connect to a different server for that country.
So, now you now have the answers for problems such as the Epic browser not installing, the Epic browser installer not working, or even the Epic privacy browser proxy not working.
That’s it. If you followed the steps closely, your Epic Privacy Browser should now work without any problems on Windows 10.
Got any more questions or suggestions? Feel free to post them in the comments section below and we’ll be sure to take a look.
Pinterest is a great platform for sharing images, pictures, and works of art. It offers a simple way to keep in touch with your friends and people with similar hobbies.
Usually, the platform is error-free, but there are some instances in which users need to fix some issues. One of these problems is related to the browser button.
In other words, the Pinterest browser button is not working. The Pinterest extension is very useful to those who want to access Pinterest with only one click.
So, the Pinterest browser button should run smoothly. But this is not always the case. Luckily, we have some solutions for you to fix the issue in no time, as we did with Pinterest not working on the Chrome issue.
Why is the Pinterest button not working?
There are various reasons the Pinterest button is not working on your browser. Thankfully, it is not a wide circle, as it can majorly be narrowed down issues with your browser.
Below are the common causes:
Outdated browser
Corrupt browser data
Malfunctioning extensions
We will take a look at these issues and give you step-by-step instructions on how to fix them in no time.
Quick Tip:
Use Pinterest from another browser. We recommend Opera One because it runs the same engine, meaning it is compatible with Chrome extensions.
Unlike Chrome, this browser doesn’t send your data to Google and further protects privacy with VPN and Ad blocker. Moreover, it includes social media integrations, and a native AI and modular AI-ready design.
Opera One
Rest assured that this issue will be gone for good by using Opera One.
What to do if the Pinterest browser button isn’t working?
1. Clear cache and cookies
Press Shift + Ctrl + Delete to open the Clear browsing data menu.
Select All time as the time range.
Select Browsing history, Download history, Cookies, and other site data, Cached images and files.
Click on the Clear Data button.
This issue might appear if you didn’t clear the cache and cookies from your browser for a long time. These temporary Internet files could get corrupted and will affect your browser.
If Pinterest is not working on Google Chrome, follow the steps above to delete the cache and cookies. For other browsers, the steps are somewhat similar.
2. Disable other extensions
Launch your browser and click the menu button.
Select the Settings option.
Click the Extensions option in the left pane.
Toggle the switch before each extension backward to disable them.
If the Pinterest button is not working, it might be due to an extension that is not good for your browser. Disable them one by one to see which extension causes the issue.
Also, we recommend not to keep many extensions because they might affect your browser’s performance.
Click the menu button on Chrome in the top right corner.
Select the Settings option.
Choose About Chrome in the left pane.
It will show if there is an update available to install.
An updated browser is more efficient and secure. Keep in mind to update your browser constantly to have an error-free online experience. This general fix can fix Pinterest not working on Safari, Chrome, and other popular browsers.
How do I fix the Pinterest Save button if it’s not working?
When the Pinterest Save or Pin it button is not working, it is mostly down to issues with your browser, as we have stated earlier. So the fixes in this guide should resolve easily.
If the Pinterest browser button is not working, we have a few solutions for you that will work, as you can see above. They seem to do wonders when facing any of these issues as well:
Pinterest Save button not working – Usually, this problem is not as serious as it seems and can be solved with basic operations that are beneficial to your browser. You can update your browser, clear the cache, or check if one of your extensions is faulty.
Pinterest button greyed out – If that’s your issue, the above tips may help you. Of course, if you lack time to go through all these steps, download Opera One.
If you are still running into problems after trying these fixes, the issue might be related to your account or website setup. In that case, you should also check out this guide on how to fix Pinterest validation error for more detailed solutions.
With all the information provided in this guide, we believe the button problem should be fixed for good. Feel free to let us know the solution that helped you solve the issue in the comments below.
Many users are complaining about the Chrome certificate authority invalid error. It is annoying to be interrupted by error messages.
The ERR CERT AUTHORITY INVALID error in Google Chrome can occur for a couple of reasons that we will enumerate as we go further. Most times, website owners face this error on their website, and it causes difficulties accessing it.
Likewise, users trying to access a particular website can encounter this error. It is common on the Chrome browser across different operating systems like Android and Windows.
However, if you’re facing this issue, don’t panic. In this article, we have a step-by-step guide to fixing the fix Chrome certificate authority invalid errors.
What is net:: ERR CERT AUTHORITY INVALID?
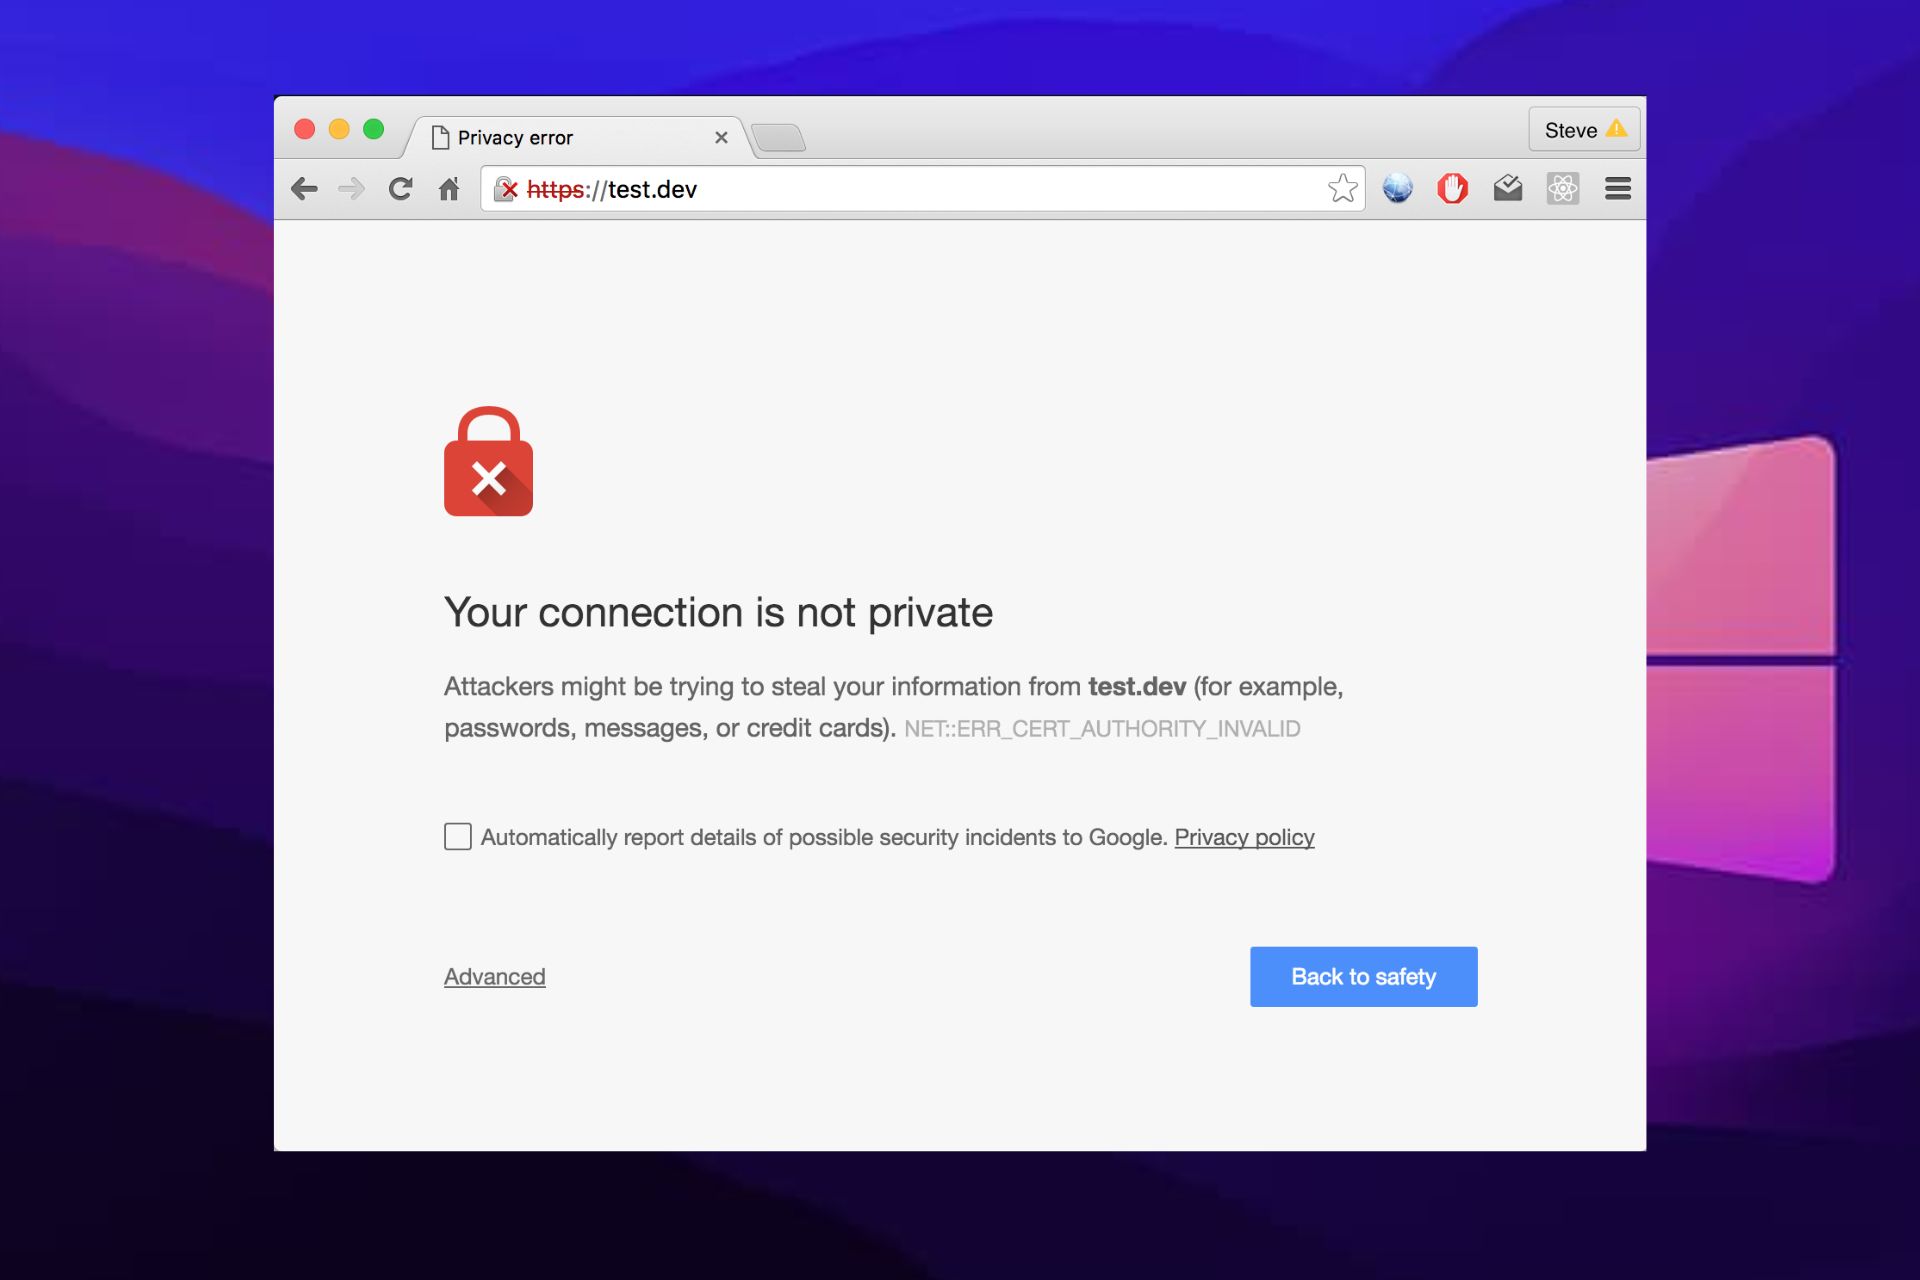
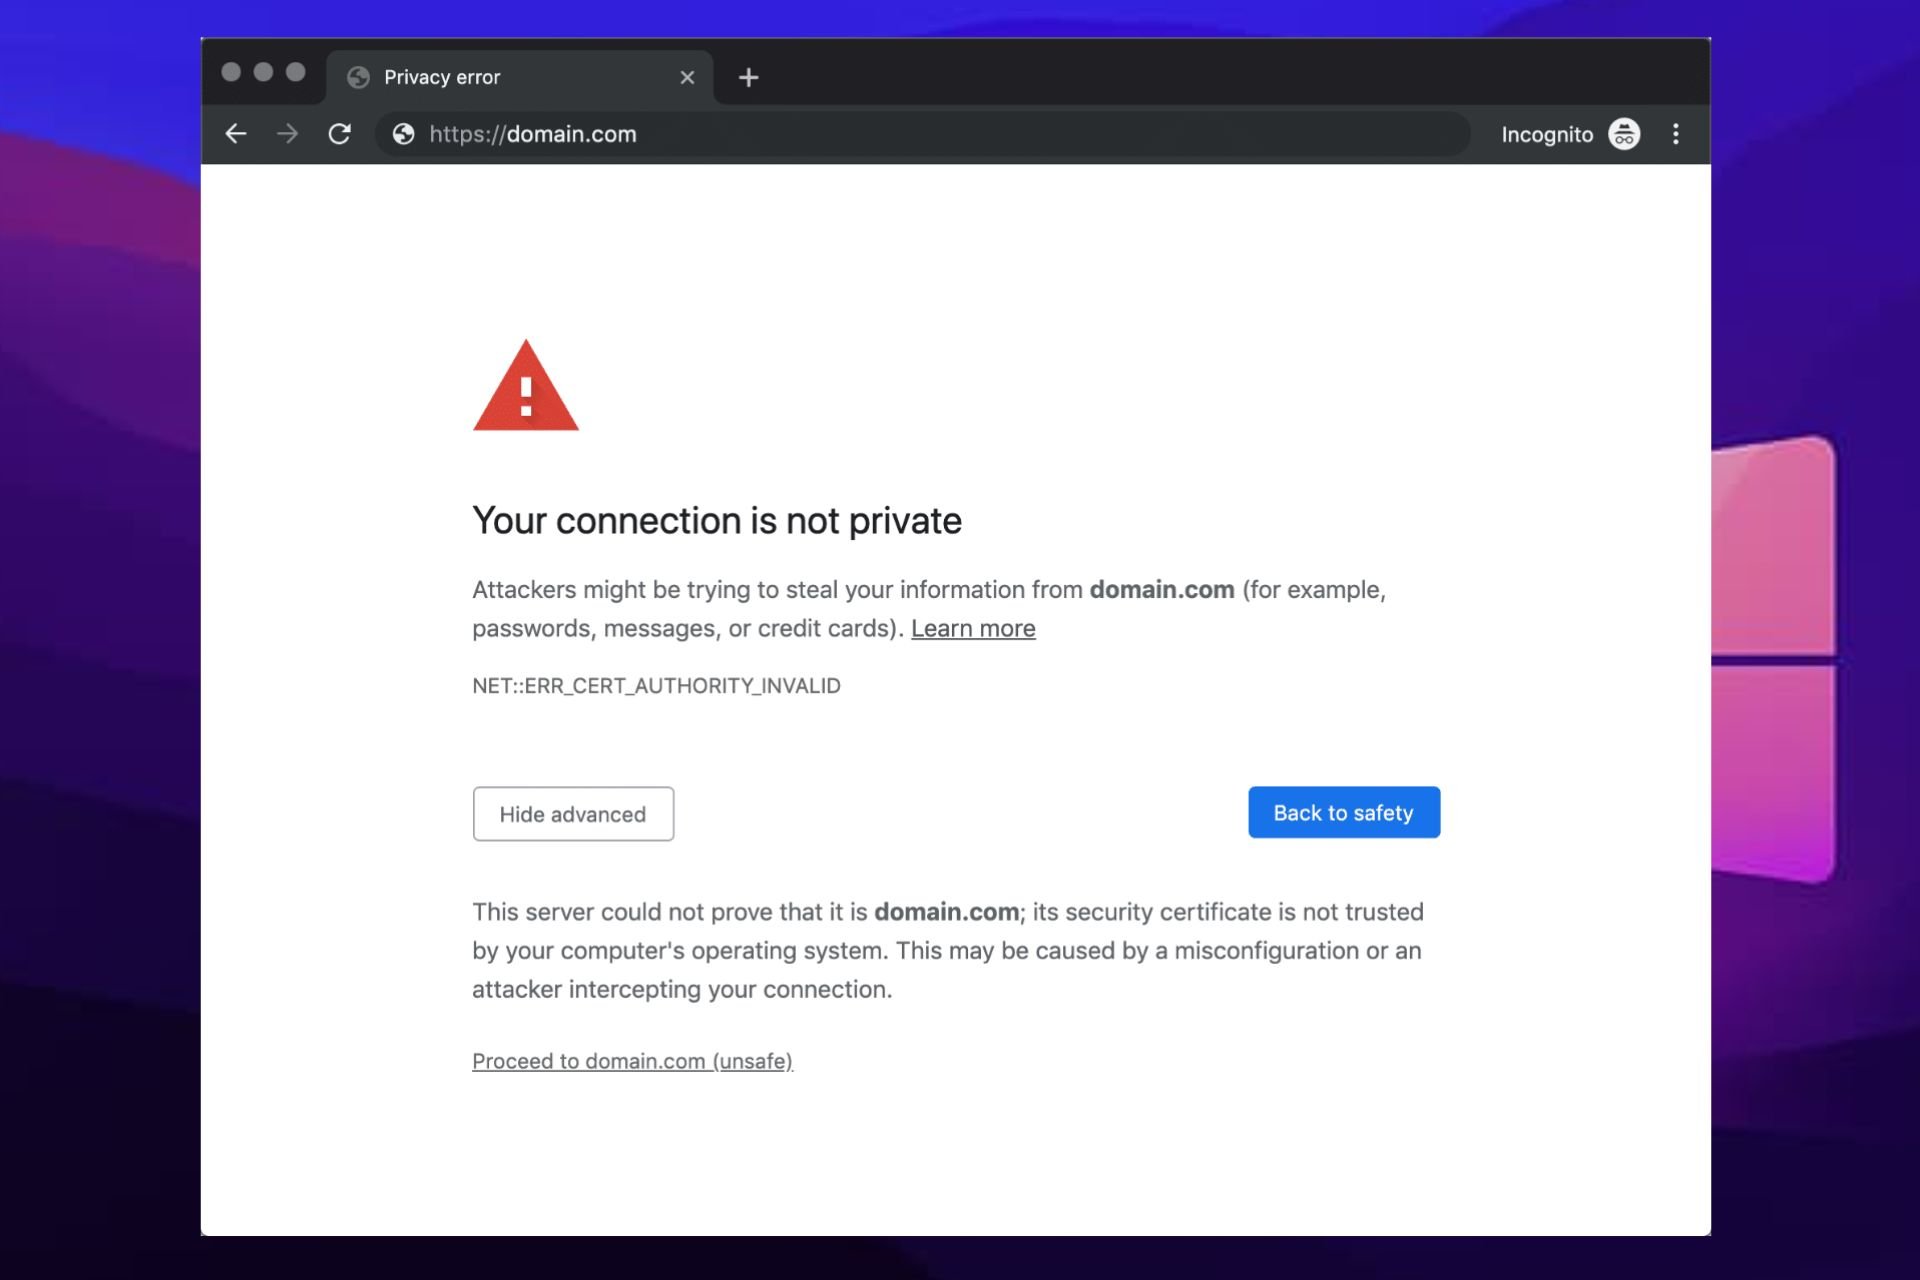
The net:: ERR CERT AUTHORITY INVALID error pops up when Chrome browser doesn’t recognize the validity of a website’s certificate. However, the error sounds like a severe one, but it is not.
The simple way to describe this error is that your browser can’t detect a valid website’s SSL certificate for the website you want to access.
The whole idea of certificate validation is to protect users from running into internet threats on uncertified websites. Thus, your browser displays this error to keep you safe and let you know something might be fishy on the website.
Why does my browser keep saying the security certificate is not valid?
➡You areusing an expired certificate
The idea of certificate expiry is to keep your website in check. The SSL certificate has an expiry date to serve as a security precaution.
Depending on your certificate, how long it lasts can vary. So, you may need to renew your certificate at some point.
➡ The SSL certificate is self-signed
Using a self-signed SSL certificate means you don’t have to purchase it from anyone, and can save you some money. However, this can cause several security issues for your users.
A self-signed SSL certificate can prompt the Chrome error cert authority invalid local host error.
➡You are using a certificate from a non-trusted source
It is another cause of the Security certificate not valid error. Browsers like Firefox are security conscious and can detect faults easily.
However, when the browsers can’t verify the authority that generated the website certificate, it will prompt the Chrome certificate authority invalid error.
Quick Tip:
A practical alternative to resolve authority invalid SSL is with another skillful browser like Opera One. You can navigate faster and without certificate errors due to security improvements or site settings control.
Opera One detects suspicious URLs by comparing the page you request to a database of known phishing and malware websites. Opera One also comes with built-in VPN, Ad blocker and AI.
Opera One
Call in for Opera One when you want to verify the integrity of your certificates.
How do I fix the Chrome certificate authority invalid?
1. Get a valid authority for your certificate
As a site owner, you can sign your own certificate but in the long run, that may cause a lot of problems for you and your users.
So, it is best to contact a certified and valid authority for your SSL certificate. Furthermore, sites like Let’s Encrypt can help you generate a free valid certificate.
2. Renew your SSL certificate
Renewing the SSL certificate for your website helps it remain recognizable, and it verifies your domain’s identity. Some valid authorities offer free SSL certificates, and there are paid certificates.
Depending on which certificate you get, you can contact your authority to renew your certificate.
3. Clear your browser’s cache and cookies
Launch the Chrome browser on your computer.
Click the Menu button.
Select More tools and then click Clear browsing data.
Choose a time range for the data to be cleared (to delete everything, select All time).
Next to Cookies and other site data and Cached images and files, check the boxes.
Finally, click Clear data.
After the process is complete, restart your browser and check if the error persists.
You found this article because you need to remove a browser hijacker. So, let’s tell you all you need to know.
Usually, when people refer to malware, they talk about a Trojan32-like virus freely roaming through your system.
However, there are much less dangerous but still threatening adware attacks that can create a lot of trouble.
One of the most common adware bugs is a browser hijacker, a remarkably sturdy and resilient annoyance that takes complete control of your browser.
We offer a step-by-step list of instructions you should follow to relieve yourself of this digital vermin.
How do I know if my browser is hijacked?
The most apparent indication that a web browser is hijacked is if your home page has changed from how it was or if unfamiliar toolbars have appeared.
Underneath the URL bar, or if you browse the bookmarks, you could also observe new bookmarks or favorites. Another possible sign that anything has crept in is if browsing sessions appear much slower.
It’s likely that you now use a search engine that steers you away to irrelevant results instead of your previous preferred search engine.
How does a browser get hijacked?
A browser hijacker usually infiltrates your PC while installing a third-party program or browser extension.
It acts like a toolbar extension that changes your home page and search engine within the affected browser. It’s easily recognizable as it bombards users with pop-ups and ads.
Furthermore, it’s not easy to deal with since it tends to integrate and dig deep into your system, so even if you reinstall your browser, it may still be there.
What happens if your browser is hacked?
If your browser is hijacked, your data has been compromised. The attackers will now access your browsing history, personal details, and as much info as you have stored on the browser.
With that said, let us show you how to remove a browser hijacker.
Quick Tip:
Before anything else, you should know there’s a practical browser like Opera One that can guard you against such threats due to its improved security like Ad blocker or Cryptojacking protection.
Starting with the most efficient Private Browsing mode and continuing with the build in VPN and AI, it is not only a safe-side browser but will also protect your privacy.
Opera One
Try this completely private browser to kill hijacking threats from your PC with reliable defense.
Click on the Start menu, type control, and select the Uninstall an application option.
Navigate to one (or multiple) suspicious and untrusted programs, right-click and select Uninstall/Change.
Restart your PC.
You can see all the toolbars and software installed on your computer in Control Panel. This is the first place to look when you want to see and remove any of your installed apps.
2. Scan for viruses with a dedicated tool
Click on the Start menu, type Windows, and select the Windows Security app.
Click on Virus and threat protection.
Under the Current threats section, select Scan options.
Select the Full scan option and click Scan now.
Another thing you should do when dealing with malware is to use the best antivirus you can get. It can also be used as a browser hijacker removal tool.
It is a great antivirus solution that will protect your computer from ransomware and other types of malware with its multilayered protection, trusted by millions of users worldwide.
The integrated firewall prevents unauthorized access to your computer and misuse of your data and protects your computer from malicious network traffic.
TotalAV
Use a great antivirus to remove any malware, including browser hijackers, ransomware, or spyware.
Under the Reset and clean up menu, click on Restore settings to their original defaults.
Finally, click on the Reset settings button.
Mozilla Firefox
Launch the Mozilla Firefox browser.
Click on the 3-line menu and open Help.
Open More Troubleshooting information.
Click Refresh Firefox.
This is an excellent option to remove a browser hijacker from Firefox.
Edge
Start Edge.
Click on the 3-dot menu and open Settings.
Click on Reset Settings.
Select the option to Restore settings to their default values.
Click on the Reset button.
Resetting your browser to the default settings can help you with several issues and can remove any toolbars. You should save your browser’s favorites before the reset procedure.
Also, resetting is how to remove search marquis from Windows 10 and 11 if your browser has been hijacked.
Not only your browser can get infected but also your entire PC. Keep your computer safe by installing the recommended antivirus or any of these great malware remover tools.
Remember that a good antivirus is a reliable browser hijacker removal tool and your best option if you are wondering how to stop browser hijacking.
That should do it. In case you have additional hardships with browser hijacker in Windows 10, or maybe a solution or two that you would like to share, feel free to do so in the comments section below.
The popular live video streaming platform Twitch allows its users to integrate custom and built-in emotes. If you’re wondering what are the best Twitch emote makers software, read this article completely.
There are several websites that offer pre-designed emotes, but sometimes you may want to create your own for the streams.
While looking for emote makers, note that it’s important to check the waiting time, whether you get direct download in all sizes or not, and also the ability to preview the emotes before making a purchase.
In this article, we explore the best Twitch emote makers to create custom emoticons for your chat during streaming.
And as a streamer, you usually look at your chat a lot. Instead of constantly switching between apps, keep in mind that you can view it directly from the browser.
How do I make my own Twitch Emotes?
Making your Twitch emotes is simple. You only need to get an emote maker for Twitch like Canva or Clip Studio Paint.
The good thing is that while some of these tools are paid, there are many that are free to use. To make things even better, you don’t even need to download any app to use most of them.
We have gathered the best of them in a later section of this article to help you make the best choice.
Why are the Twitch emote makers important?
One thing is known for sure – you need to stand out from the crowd. The best way to do it is by creating engaging content.
Twitch users like to express themselves in the chat because it makes them feel like they are part of the community and are actually interacting with the streamer since he also responds to messages in the chat.
The Twitch chat is, in a way, a stream of its own. That’s why having cool, funny, and interesting emotes for your chat is a big plus. No one likes a dull streamer!
Using different extensions will also enhance the experience for both followers and the streamer. To discover the best Twitch extensions anybody should use, make sure you take a look at our dedicated guide.
One of those extensions actually adds more general emotes to your channel. It’s called BetterTTV (Better Twitch TV), and it’s completely free!
However, no matter how popular an emote is, nothing compares to a personalized one, made by you. Thankfully, there are lots of tools that will help you create your own emotes.
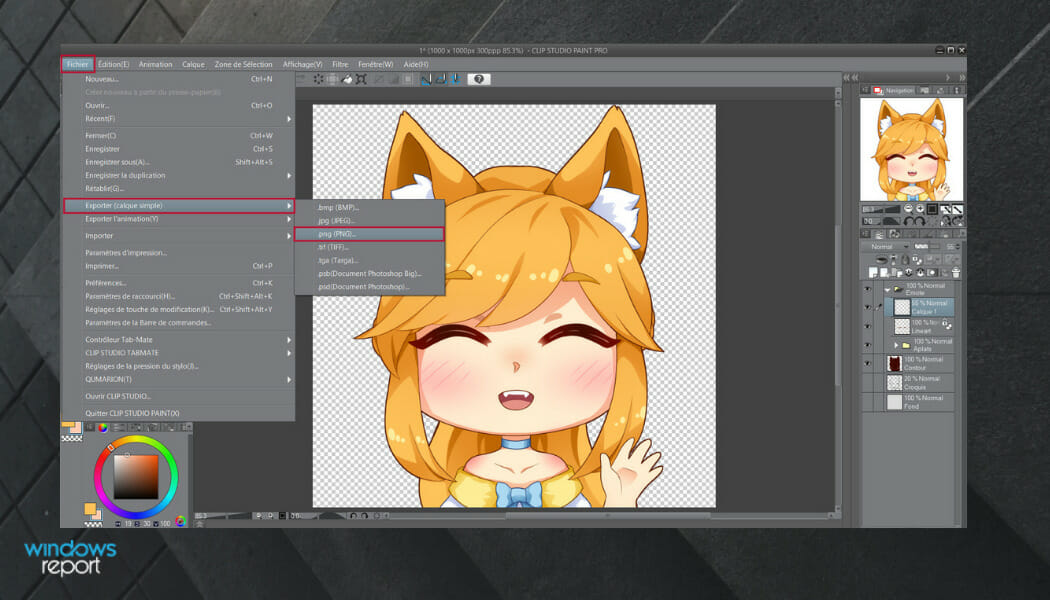
Rebranded from the name Manga Studio, Clip Studio Paint is ideal for a wide range of painting techniques, including oil painting, watercolor, and cell shading. You may edit your brushes to paint in your own style, add textures to them for a more conventional look, and import Photoshop brush files to create dynamic dual brushes.
Clip Studio Paint Pro can be used for character art, concept art, and illustration, and it’s more suited for designing emotes for Twitch.
It includes tens of thousands of ready-to-use elements like brushes, patterns, and 3D models.
Clip Studio Paint’s fill tools are intelligent enough to fill gaps in the lines without spillage, so you may drag to fill several places consecutively or fill missed spots all at once.
When you want to create your emote, just click on the Paper icon in the left upper corner of the screen and start sketching!
Clip Studio Paint has changeable 3D models to help you sketch out human forms, and it really shines when it comes to designing emotes. Using filters and adding effects to photos such as blur, sharpening, noise, and mosaic, opens up the mind to new perspectives and makes you stand out with your emotes.
Register frequently used objects in a personalized palette, such as menus, auto actions, tools, and drawing colors, and access your favorite tools with a single click to streamline your workflow. This makes it easy to sketch the same image with diverse emotions through them.
You can add text, change line, and word spacing, and rotate, tilt, and flip text without switching to different software.
Clip Studio Paint Ex is designed and much more suited for bigger projects like comics, manga, webtoons, and animations.
Clip Studio Paint
This configurable interface includes a myriad of tools for perfecting artwork, concept art, emotes, and comics.
KAPWING is a free emote creator that you can take advantage of in order to create PNG emoticons for Discord, Twitch, Slack, etc. Note that it offers tons of video and image editing tools.
Add layers to your images, and easily import media by pasting links and finding assets from plugins. Adding content to KAPWING is simple.
Since the service runs on the browser, your work will be automatically saved to the cloud, so you can access projects from any device.
Similar to Google Docs, you can share links with editors and work with the team in real-time. The third-party plugins and apps increase the range of usable templates and features.
KAPWING can be used by both professionals and amateurs. The available templates help any modern content creator on social media platforms like Twitch.
Visit the website and click the Make It button to get started. It will open the emote editor with a random image. Begin by uploading an image that you want to use for your emoticon.
To delete the default image, click the little trash can icon beside the image. You can add more images to the emote using the Add Scene option.
That said, the emoticon will last for 6 seconds, so keep that in mind when adding multiple scenes. Other editing features offered by the tool include an output side selector, expand padding, background-color mixer, and layers option.
You can also add Text, shape, and audio to the emote if you want. As you finish editing, click the Publish button to generate your emote.
It may take a minute or two to complete, so wait until it is finished. Once done, click the Download button to save it on your local drive.
KAPWING
If you’re an amateur, KAPWING is perfect for creating emotes, so do not hesitate to give it a try.
PiZap Emoji Maker is a free web-based emoji maker and one of the best Twitch emote makers to design your own emoticon with ease. It is a flash-based tool, so make sure that you have enabled flash on your browser.
Up next, click on Start and then select Emoji maker. Begin by choosing a body shape for your emoji. You can customize the tool by adding eyes to the text and coloring the object if you want.
While the basic tools are free, PiZap Emoji Maker does have additional features and shapes that you can only access if you have a Pro account.
Besides editing and creating images of all kinds, you can also create collages. There are plenty of twitch emote template of different sizes and lots of items that can be added to them.
If you want to upload your own picture to create an emoji, simply click on the Cut-Out tool. Upload the image and then mark the background or any area that you want to remove. Click on Finish to remove the background.
PiZap Emoji Maker also allows you to share your work with your friends and invite them to review the same.
The free version of the software is limited, but you can upgrade to paid premium. There’s also a 7-day trial period that lets you test out the software before buying it.
OWN3D claims to be the world’s first emote maker. Whether you want to create an emoticon for your Twitch, Discord, or YouTube channel, OWN3D offers it all.
The tool works with professional illustrators who constantly supply their emote makers with different drawing styles so that you always have something new to show to your community.
Creating an emotion using OWN3D is easy. Begin with choosing your character from the library. Next, customize the emote and download the file to your PC.
They offer the largest assortment of Twitch subscriber emotes with 100+ remove in multiple categories like gaming, etc.
Besides allowing you to enjoy memes, you can also create stream overlay designs. This includes logos that you can use in the outros or intros of your channel.
And that’s not all. You can create sub-emotes, badges, avatars, gaming logos, even trailers for the channel. OWN3D offers frequent discounts as well!
OWN3D
If you want to enjoy memes and create stream overlay designs like a pro, make sure you use OWN3D.
If you prefer an offline tool to make emoticons for Twitch, Paint.NET is a lightweight utility for Windows computers that can be used to create quick emoticons, being one of the best Twitch emote makers.
While it does not offer the features and functionalities of the web-based emote makers, as it is an image manipulation tool, it does offer more control over your work.
Paint.NET is a photo and image editing tool for Windows PCs, featuring an intuitive and comprehensive UI, supporting layers, unlimited undo, as well as lots of effects.
The software has a dedicated online community that is friendly enough to help newcomers with tutorials, plugins, tips, and more.
The tool started out as a senior college project and developed into a powerful editing tool the likes of Adobe, Corel, GIMP, and others.
Paint.NET was designed to be intuitive and simple to use. Thanks to its comprehensive UI, users don’t need any assistance to learn how to utilize it.
When working with multiple images, the tabbed document interface displays live thumbnails of the image in the top-right corner.
The developers have poured an extensive amount of hours to ensure that Paint.NET does not have any serious impact on the device’s performance.
Moreover, the software utilizes layers, a feature usually found on expensive professional software. They form the image when grouped together.
GIMP is a popular image editing tool for Windows and other platforms. Like Paint.NET, GIMP can work as a Twitch emote maker for creating any size of emoticons.
This drawing and painting software comes with many advanced features and is better suited for digital artists. It comes with dedicated graphic design elements for high-quality image editing.
GIMP is also a free and open-source image editor that can be developed by anyone who has some coding knowledge.
It is available for GNU/Linux, OS X, Windows, and other operating systems and has multi-language support such as C, C++, Perl, Python, Scheme, and more!
The multiple-language support provides extensibility & flexibility, which results in a large number of community-created scripts and plug-ins.
Additionally, you can manipulate high-quality images by retouching, restoring, or creating composites.
The software provides top-notch color management features that ensure an exact color reproduction of digital and printed media.
Whether you are a professional or a newbie, GIMP is one of the Twitch emotes makers, great for everyone who wants a better experience. The comprehensive UI is easy to understand, even when using sophisticated tools.
The tool provides everything you need to get the job done and create images, emotes, logos, and anything related to image and graphic design.
Click the Upload Emote icon to select the emote to animate.
Click on the Choose Animation dropdown and select from the list of animations.
Fill in the Enter Emote Name field.
Finally, click the Upload button in the bottom right corner.
Note that before you can add or make animated emotes on Twitch, you must be qualified as a Partner or Affiliate streamer. Else, this option will be unavailable to you. Lastly, note that the emotes you make are subject to manual review before approval.
During the review period, you won’t be able to use the emote created.
What makes a Twitch emote great?
Before making a Twitch emoticon, it is important to visualize the concept behind the emote. What exactly do you wish to express with it?
Maybe you want to create an emote that represents an action, a state of mind, or perhaps you want to encompass a certain silly moment during the stream.
Creating emotes is easy, but that doesn’t mean they will be popular among your subscribers. Take a look at the chat and see what people like talking about.
How can I add an emote to my Twitch channel?
Twitch will automatically add the emotes to your channel after approximately 48 hours. Some creators can avoid this waiting period if they fulfill the following requirements:
Partners:
60 days have passed after receiving the Partner status
The Twitch TOS or Community Guidelines weren’t violated for a minimum of 60 days
Affiliates:
At least 60 days of streaming as an Affiliate for two years
Lack of suspension or warnings received in the last 60 days
No denied or removed emotes 60 days prior
Once done, you can make them come to life using the Twitch emote makers listed in this article. If you cannot check your chat after uploading the new emotes, read our thorough guide dedicated to fixing the Twitch chat.
In the case of planning to make a living out of streaming, things are clear from the start. Just take a look at all those popular streamers out there. You’ll find that they all have customized emoticons for their chat and subscribers.
What are you waiting for? Entertain your audience. We’re sure these Twitch emote makers have everything you need to create awesome content for your channel.
Try them out, and tell us which one you picked in the comments below.
Want to add Opera to your Kindle? You’re in the right place. Kindle Fire uses the Amazon Store, which complicates the process a little bit, but we’ll explain all you need to know, step-by-step.
How do I install the Opera browser on my Kindle?
1. Allow apps from 3rd parties
Swipe down from the top of your device’s screen and click the Settings or Gear icon.
Under the settings menu, scroll down and click on the Security option.
Under the Advanced section of your security menu, toggle on the switch for Apps from unknown sources.
Click on the warning message.
Note that even though Opera isn’t natively listed in the Amazon Store, it’s completely safe to use it in your Kindle Fire.
When you’re done installing the browser, you can return and toggle off the Apps from unknown sources settings.
When the download is done, click on the option that says open.
Once you successfully toggled on the Apps from unknown sources option, you should see a screen with a prompt to install. Click on Install. This should take a few seconds, then you will have the Opera One app running on your Kindle device.
How do I remove the Silk browser from my Kindle Fire?
Unfortunately, there is no way to remove the Silk browser from Kindle Fire. This is because it is part of the Fire operating system of the device.
For exchanging emails, you can easily make an account on your Hotmail account. However, a lot of users are complaining of Hotmail not working in Firefox because of which they are not able to send emails.
Since Mozilla Firefox is one of the leading search engines or web browsers used for internet surfing, a lot of people often use it for their online activities in which exchanging emails is done regularly.
While there might be issues related to servers and connectivities, not having access to your Hotmail because of Firefox can be annoying. Hence, we will provide some troubleshooting tips to fix your Hotmail not working on the Firefox issue.
Why is my Hotmail not working?
These are some of the most common reasons that can cause your Hotmail account to not work:
1. Microsoft has shut down the server
2. Network connectivity problem
3. Incompatibility of Hotmail with the web browser that you are currently using
4. Incorrect username or password
5. Improper configurations
6. An older version of Outlook, or there can be a problem with your Outlook account
7. The application you are using to send emails might not be working properly
8. Something can be wrong with your iPhone, computer, Android device, or tablet through which you are trying to access your Hotmail account
The above are multiple ways your Hotmail is not working on Firefox. Here in this guide, we are going to enlist some of the most effective yet common fixes for Hotmail not working properly.
Are Hotmail accounts being closed down?
Hotmail is a free as well as paid service that allows users to send and receive emails over its web client. Hotmail was shut down in 2013 because Microsoft wanted to move users towards Outlook, which had a much better reputation and cleaner codebase.
As of this present moment, Hotmail no longer exists as an email service provider. Hotmail accounts are now migrated to Outlook.com.
This web application has already new features and services that help users manage emails through the web.
Quick Tip:
Try opening Hotmail using another browser. Opera One is a very good alternative, and given the fact that it’s often updated, it’s very responsive, with little to no errors.
It includes standard browsing features like bookmarking, and installable extensions, but also advanced features like an integrated adblocker, a free VPN, as well as a native AI.
Opera One
Keep track of all your Hotmail inbox with this lightweight and responsive browser!
First of all, check your Internet connection if the connection is proper or not. If not then try to fix your internet because of which online applications work.
2. Clear all cookies and cache files
Go to Options/Preferences and select Privacy & Security.
Click on Cookies and Site Data.
Select Clear Data.
Confirm clear Cached Web Content by ticking both boxes.
Clearing the Cache and site Cookies should fix the Hotmail not working on the Firefox issue.
This will automatically update Firefox if there are new updates and reset the browser.
This can be an effective fix should in case the browser has issues that caused Hotmail to not work.
Are Hotmail and Outlook the same thing?
Hotmail is one of the most recognizable emails like Outlook. They are completely different, however since Hotmail got shut down, users are already migrated to Outlook.com, so when you access Hotmail.com you will be redirected to Outlook.com.
Privacy is under siege in the data economy. Left on their own, the big tech companies of Silicon Valley harvest your data in exchange for their “free” services.
The tide has slowly begun to shift, however, with many services now offering privacy as their selling point. One such service is Proton Mail, which offers perhaps the most secure and privacy-oriented webmail available to personal and enterprise users.
If you’ve been a long-time Outlook user but are now looking to switch to Proton Mail, you’re at the right place. Before you do that, however, you’d naturally want to take all your essential data with you. In what follows, we’ll lay down the exact step-by-step process to transfer your Outlook emails to Proton Mail.
How to transfer your Outlook emails to Proton Mail
Moving your Outlook emails to Proton Mail is a relatively simple process. In fact you can even carry a bunch of other files apart from emails as well. For instance, you can take all your important Outlook files—including attachments, contacts, etc.—directly to Proton Mail.
In this piece, though, we’ll only stick with Outlook emails for now. So let’s get started.
Moving Outlook emails to Proton Mail
You can transfer your Outlook emails to Proton Mail with the help of Easy Switch, a free tool to help you move your emails across different email service providers.
To launch Easy Switch, head to your Proton Mail account and sign into it. Then head to the Settings menu, select Go to settings > Import via Easy Switch, and click on the Outlook icon.
You’ll get a dialog box asking you what you want to import. From there, select Emails and click on Continue.
You’ll then get a few instructions about the things you’ll have to do on your Outlook account; follow them. Basically, all you need to do is head to the Outlook settings, enable the two-step verification, and generate the App password.
To create an app password, click on Create a new password app, note down the password somewhere safe (preferably offline) that you get on the next screen, and click on Done. You’ll have to enter this password when prompted by Proton Mail.
All right. Now that we’ve set up the basics, it’s time to enter your Outlook credentials in Proton Mail.
Enter your Outlook email address, along with the password you just set up above, and then click on Next. That’s about it. Follow the on-screen instructions, and the app will transfer your Outlook emails to Proton Mail without any hassles.
Setting up mail forwarding
The above method is specific to moving your old messages. You’ll have to use email forwarding if you want to transfer all your future messages to Proton Mail. Here’s how.
Head to Outlook settings again, and click on View all Outlook settings. Then select Mail and click on Forwarding.
Then click on Start forwarding, enter your Proton Mail address and click on Save. Do this, and the new emails landing on your Outlook mailbox will get transferred to Proton Mail.
Moving your Outlook emails to Proton Mail
If you’ve finally made up your mind to move from Outlook to Proton Mail, it will be best to bring your old emails to your Proton Mail account along with you. Hopefully, the above methods helped you move your files quickly and without any trouble.
HTML5 came with the <audio> tag, as well as the JavaScript APIs that make it possible for browsers to support audio elements without having to install an external element. Some of the supported codecs in HTML5 for playing audio include Wav, MP3, and Ogg Vorbis.
Unfortunately, some people have encountered an error stating that your browser does not support audio element error despite all these improvements.
That notwithstanding, we still do not have a single codec that supports all browsers. However, HTML5 allows developers to specify different sources of audio files to get around the problem of codec incompatibility.
This way, the browser looks for the type of audio element that it can support.
What browsers support the audio element?
As discussed above, different browsers support different types of audio. You cannot find an audio codec that is supported across all browsers. That notwithstanding, there are browsers that support the audio element;
Firefox 5 and above supports Ogg and Wav.
Internet Explorer 6 and above supports MP3 and AAC.
Safari 5 and above supports MP3, WAV, and AAC.
Chrome 12 and above supports AAC, Wav, MP3, and Ogg.
Opera 11 and above supports Wav and Ogg.
Audio element support has been improving with every release of a new version of browsers. However, you should be careful with your browsers to ensure that they support your audio elements. But what do you do when the browser you are using does not support the audio element?
How do I enable audio in HTML?
The HTML <audio> element is used to enable audio or play an audio file on a web page. For you to enable audio, you need to make sure that you have specified different sources for the audio file.
The browser chooses the first format that it can recognize. Here is an example of an HTML code with audio sources;
Quick Tip: If you want to have an up-to-standard experience when browsing online, we recommend you use OperaGX. It supports <audio> element and everything HTML5.
In fact, it’s actually built to offer a good multimedia experience, both for gaming and streaming. It includes light-dark modes, a CPU and RAM limiter for better performance, as well as a free VPN.
Opera GX
Get industry-standard features for secure and uninterrupted browsing, on any platform!
How can I fix the Your Browser Does Not Support Audio Element error?
1. Check your audio sources on HTML
Open your code using a code editor.
Navigate to the lines of code where you have specified the audio sources.
<audio controls>
  <source src="audiofile.mp3" type="audio/mpeg">
  <source src="audiofile.ogg" type="audio/ogg">
  <!-- add more audio sources here -->
  <!-- fallback for non supporting browsers goes here -->
  <p>Your browser does not support HTML5 audio</p>
</audio>
Ensure that you have different audio codecs for your browser to choose from.
2. Check if the web page is muted
Visit the web page where you are supposed to listen to some audio.
Right-click on the tab opening that particular web page.
Check if the site is muted, and then select unmute site.
3. Allow sites to play sound on Chrome
Launch Chrome and click on the three dots at the top right corner.
Scroll down and select settings on the drop-down menu.
Click Privacy and security and then select Site settings.
Scroll down to Content and then expand the additional content settings.
Scroll down and select Sound.
Allow sites to play sound button should be on.
Do all browsers support audio elements?
Different browsers support different audio codecs. You will rarely find a single audio codec that works well on all browsers without any problems.
If you are facing a problem with your browser not supporting audio elements, one of the solutions shared above should solve the problem for you. You can also use browser audio players to test your audio on browsers.
If you have any more questions or suggestions, feel free to leave them in the comments section below and we’ll make sure to check them out.
We use password managers not only to save our passwords securely but also to use other features provided by it, such as autofill, etc.
When certain features do not work, then the software itself becomes half-useful. Bitwarden users are facing something similar.
You will find several user reports on official forums and Reddit regarding Bitwarden autofill not working in the Firefox browser. In simple words, Bitwarden fails to autofill usernames and passwords on websites.
This could be frustrating as you might use a password manager for this specific feature. Luckily, we have a few tips to help you resolve the Bitwarden autofill not working in the Firefox issue. Let us check it out.
Why is Bitwarden autofill not working in Mozilla Firefox?
There aren’t any specific reasons why Bitwarden might fail to fill in your username and password in the Mozilla Firefox browser.
However, after our research, we discovered a few simple things that users have been overlooking that could be the potential cause for this issue, which we have mentioned below.
Your browser isn’t up to date
Corrupt cache files are triggering the problem
The extension shortcut is missing
You are using multiple password managers
Bitwarden extension isn’t enabled
Now that you are aware of the common causes that could lead to Bitwarden autofill not working in the Firefox issue let us turn our attention towards how to resolve it.
Quick Tip:
A quick and low-effort way to eliminate this issue is to use a different browser. If you want a smooth transition with straightforward support to transfer all your bookmarks and preferences, use Opera One.
Opera One is a very responsive browser with a low error rate. You can install the Bitwarden Opera One extension directly from the official Opera One add-on store. Plus, this browser comes with a native AI.
Opera One
Use Bitwarden error-free with a responsive, secure, and easy-to-use browser!
How can I fix Bitwarden autofill not working in Firefox issue?
1. Uninstall other password managers
It is essential to ensure you are not using multiple password managers in the Firefox browser.
If you are using multiple password managers, this could conflict with the performance of each other. Many important functions, such as autofill, won’t work, as the browser may get confused about which password manager to use for the specific task.
So, if you are using multiple password managers, uninstall all of them except Bitwarden, and make sure Bitwarden is the only password manager installed.
2. Update Firefox
Open Firefox.
Click on the 3-line menu icon on the top toolbar.
Head to Help, then to About Firefox.
Firefox will automatically check for new updates and if it detects one, will install it.
After the download is complete, click on the Restart to update Firefox button.
Under the Cookies and Site Data section hit the Clear Data button.
Make sure to check the boxes next to Cookies and Site Data and Cache Web Content.
Hit the Clear button.
4. Check if the extension shortcut is missing
Open Firefox.
In the address bar, enter the below address and press Enter: about:addons
From the left pane, select Extension.
Hit the cog wheel Settings icon next to the Manage Your Extensions heading.
Select the Manage Extension Shortcuts option.
Check if the Auto-fill the last used login for the current website is set or not.
5. Check if the extension is enabled or not
Open Firefox.
Click on the 3-line menu icon.
Select Add-ons and themes.
Check if Bitwarden is enabled or not. If not, then enable it.
6. Manually trigger autofill function
Head to the website where you want to use the Bitwarden autofill function.
Right-click on the username and password field.
Select Bitwarden, then Autofill.
Hit the Login button and check if this fixes the issue.
This isn’t a permanent solution, but it can work wonders if the autofill feature isn’t working automatically.
If nothing works, then you can check out other password managers that have the same autofill feature and get rid of the issue. Many users also reported Cannot decrypt error in Bitwarden, but we covered it in a separate guide.
Let us know in the comments below which one of the above solutions helped you resolve the Bitwarden autofill not working in the Firefox problem.
Twitch is an excellent platform that has gone beyond just game streaming. It has a well-built app, and you can also use the best browsers for Twitch streaming to access the platform.
One of its standout features is the incorporation of hardware acceleration. This feature is aimed at reducing latency and increasing throughput.
However, you might sometimes get the opposite effect on your stream, with noticeable lagging and other issues. That is why it is important to know how to turn on and off hardware acceleration for Twitch, as will show in this guide.
What is hardware acceleration good for?
Hardware acceleration is a technology specifically for improving performance. It involves offloading certain tasks to specialized hardware components in a system.
This takes off some load from the CPU and, in turn, improves efficiency and speed. In gaming and streaming, for example, an application takes advantage of a system’s GPU (Graphics Processing Unit) to take off the graphics processing from the CPU.
Is it better to turn on hardware acceleration?
All-in-all, it is advisable to always turn on hardware acceleration. This is because it improves the processing time of certain tasks spontaneously.
However, if it affects your performance, you might need to turn it off temporarily.
Does hardware acceleration affect FPS?
One of the benefits of using the hardware acceleration on streaming apps like Twitch, for example, is that it scales the performance. This usually comes in the form of an improved frame rate, which is the number of images shown per second.
With this higher frame rate comes a smoother animation. All of these help to prevent latency and lagging in streaming. So, hardware acceleration has a positive effect on FPS.
How to enable hardware acceleration on Twitch?
Open the Twitch app and click on your profile picture.
Select the Settings option from the dropdown menu.
Click the General option in the top menu.
Toggle the switch for Software Rendering Mode forward to enable it.
With these steps, the hardware acceleration for the Twitch app will be enabled.
Note that the effect is only limited to the Twitch app and not the online version. To take advantage of the hardware acceleration on the website, you need to enable it in your browser.
Before changing these settings, make sure your account is fully set up on the device by following this guide to activate your Twitch account.
How do I disable hardware acceleration on Twitch?
1. Disable on Twitch app
Launch the Twitch app and click on your profile picture.
Choose the Settings option.
Toggle the switch for Software Rendering Mode backward to disable it.
As mentioned earlier, you should only disable the hardware acceleration feature on Twitch if it is causing problems. For instance, if it causes lagging instead of improving streaming speed, it is best to disable it.
2. Disable on Chrome browser
Launch Chrome and click the menu button (three vertical dots) in the top right corner.
Click on the Settings option.
Choose the System option in the left pane.
Toggle the switch for Use hardware acceleration when available backward to disable it.
To enable it later, just toggle the switch forward.
Scroll down and uncheck the box for Use recommended performance settings.
Finally, uncheck the checkbox for Use hardware acceleration when available.
Firefox is another browser with the hardware acceleration feature users use to access Twitch frequently. As with Chrome, disabling this feature on Firefox affects all other streaming and gaming tasks.
How do I speed up my Twitch stream?
You can do different things to improve your streaming speed on Twitch. If you are using a browser, you will be better served disabling unnecessary extensions and clearing your cache.
Generally, you should disable VPN, close background apps, and ensure your antivirus software is not disturbing Twitch. Lastly, don’t forget to turn on hardware acceleration if it does not negatively affect you.
Twitch hardware acceleration is overall a good to have feature. This guide has covered how to enable and disable it on different platforms. So, you can always take advantage of the feature.
If Twitch keeps buffering on your browser, check our guide for quick and effective fixes to get it working fine again.
Feel free to share your experience with this feature in the comments below.
Chrome is one of the most-used browsers for testing web apps and websites. This is understandable, as it has the largest share in the browser industry.
Chrome allows users to add self-signed certificates to test web apps. Unfortunately, the private key missing certificate warning is starting to ruin the process. This is despite some users trying to ignore the certificate error in Chrome.
In this guide, we will show you how to correctly import your certificate on Chrome and get past the private key missing error message.
Why does my certificate not have a private key?
Most SSL certificates do not come with their private keys. Instead, the keys are located on the server where you generated the Certificate Signing Request (CSR).
So, all you need to do is install the certificate correctly, and the private keys will match up with it.
Quick Tip:
The Certificate Manager in Opera’s Advanced settings is a valuable tool, and you may easily import a certificate’s private key. You may import any saved passwords associated with previous installations.
The Import key and certificate dialogue box will reveal the contents of the file, allow you to pick the certificate, and install it together with the associated private key.
Opera
Manage SSL certificates easily in this friendly-user browser faster.
What can I do if Chrome’s import certificate private key is missing?
Launch Chrome and click the menu button (the three vertical dots) in the top right corner.
Select the Settings option.
Choose Privacy and security in the left pane.
Select the Security option.
Choose Manage certificates.
Click the Intermediate Certification Authorities tab in the top menu.
Finally, click the Import button and add your certificate.
The reason you are getting the private key missing error while trying to import a certificate is that you are doing it wrongly. Since you only want your browser to trust your self-signed certificate, you should import it through the Authorities tab.
But if you try to add it from the Your Certificates tab on Chrome, you will face several problems.
You don’t necessarily need private keys if you are importing a self-signed certificate on Chrome. This is because your browser only needs public keys, not private ones.
Also, getting the private keys of Certificate Authority (CA) certificates is almost impossible. Hence, using the method above to import the certificate will help you overcome the hurdle of missing a private key when you want to import a certificate on Chrome.
The private key missing issue when trying to import a certificate on Chrome can stall your web app testing. But if you follow the fix provided in this guide carefully, you should get past the error easily.
While the official website for Stan TV recommends a list of compatible browsers, we have our own list that can help you watch your favorite shows on your PC or Mac.
Can you watch Stan on a web browser?
Yes, you can watch Stan on a browser on your PC or Mac, provided it’s compatible, and you have an active internet connection.
Stan TV recommends the latest versions of the browsers like Chrome, Edge, Firefox, and Internet Explorer for Windows.
It recommends the latest versions of Safari, Chrome, and Firefox browsers for macOS.
For more details about the minimum requirements of the compatible browsers, you can refer to the Stan TV official help page.
Can you watch Stan outside Australia?
Yes, you can watch Stan outside Australia, however, using a high-quality VPN or a VPN-enabled browser.
This is because Stan TV is specifically for the Australian audience and does not have a global presence.
While you cannot access it normally across the globe, a trustworthy VPN can help you stream Stan TV outside Australia.
Google Chrome – Wide range of extensions for enhanced streaming
With 2.65 billion users worldwide and a seamless video streaming capability, there’s no doubt about the popularity of Chrome.
It combines extensive HTML5 support with the latest technologies to provide an exceptional video playback service.
Moreover, it comes with a wide collection of extensions that can help you enhance your video streaming experience with Stan TV and other streaming platforms.
Best of all, the Blink rendering engine by Chromium makes it lighter and faster, thus, helping it to load pages faster than other browsers.
Some of its other major features include:
Effortless syncing of data across devices
Dedicated media hub to access media controls
Option to keep Chrome info separate via profiles
Keeps your passwords safe
Manage multiple pages with better tab organization
Microsoft Edge – Fastest browser with high-quality videos
Microsoft Edge comes integrated with both Windows 10 and Windows 11 and proves to be one of the best browsers for streaming your Stan TV shows in high quality.
Re-engineered using the Chromium engine, and the fact that it does not consume a lot of resources makes it one of the fastest browsers around.
Besides, it’s also known for its safety feature, for example, it warns you when you are about to visit a harmful website.
Moreover, the InPrivate mode offers increased privacy by not saving your browsing history, cookies, passwords, site data, etc.
Some of its other significant features are:
Dark theme setting to enjoy video streaming
Option to cast video from the browser to compatible devices
Ensures complete security of saved passwords, payment data, etc.
Allows you to organize your web pages as a collection
Stan browser update required – What does the error mean?
Sometimes, you may come across an error that says, Browser update required. Please update your browser to the latest version and try again or visit our help center for more information.
This means that you are running an outdated web browser and hence, to continue to watch Stan, you need to update the browser to the latest version.
Update Google Chrome
Open Chrome, click on three dots on the top right, select Help, and then select About Google Chrome.
Now, on the right side, you should notice that Chrome will automatically start checking for updates
If available, it will automatically install the latest version.
But, if it says, Chrome is up to date and the error message still shows up, follow the next solution.
Launch Chrome and navigate to the below path: chrome://components/
In the Chrome components screen, look for Widevine Content Decryption Module.
Click on the Check for update button.
The Widevine CDM component enables your browser to decrypt protected content otherwise, the error code A19 may frequent your screen. Now, check if the error is gone and you can watch Stan TV on your Chrome browser.
Twitter is a social media platform that needs no introduction. It’s a massively popular website that has around 465.1 million active users as of April 2022. A marketing team could potentially reach six percent of the global population.
Firefox is one of the most popular browsers in the United States with a 3.48 percent market share. So naturally, people hop on Firefox to check out their Twitter page and see what people complaining about for the day.
However, sometimes Twitter will suddenly not work on Firefox thereby leaving you out of the feed of cute cats. This guide will show you how to fix Twitter not working on Firefox.
But before fixing it, it’s important to know why it stopped working in the first place.
Quick Tip:
Open Twitter from a different browser. We recommend Opera One because it has a dedicated social-media sidebar where Twitter is pre-installed. You just have to enter your credentials.
You can expand/hide the sidebar from any webpage to quickly check your feed or add a new tweet. The browser lets you connect to other social media apps as well and includes a VPN, an adblocker, and more.
Opera One
Get quick access to Twitter using this modern browser with built-in social media support.
There are multiple reasons why Twitter stops working. There may be some kind of problem with the browser’s cache getting in the way or an extension mucking things up.
Other times, Firefox’s own security measures get in the way so you’ll have to disable them although it’s not recommended that you do so. You should also check if your internet connection is working.
Obviously, if your internet connection doesn’t work, then you can’t connect to Twitter.
How do I get Twitter to open in Firefox?
1. Clearing cache
On Firefox, press the Ctrl, Shift, and Del keys on your keyboard to open the Clear Data window.
Make sure only the boxes next to Cookies, Cache, and Browsing & Download History are checked.
Set your Time range to clear to either Today (if the problems started to happen the same day) or Everything.
Once done, select OK.
Give Firefox time to clear everything out and go back to Twitter to see if it works.
2. Disable extensions
In order to figure out which extensions are causing problems, you must first enable Troubleshoot Mode.
Click the Menu button in the upper hand right corner of Firefox.
In the menu, click Help then in the next window, select Troubleshoot Mode.
A small window will appear asking you if you want to restart Firefox in Troubleshoot Mode. This will disable themes, extensions, and other custom settings.
While in Troubleshoot Mode, go back to Twitter. If the websites work, then one of the extensions is causing a problem.
Close Firefox and reboot it in normal mode.
Type in about:addons in the address bar and hit Enter.
On the Add-ons page, disable all of your extensions.
Turn on the extensions one by one and go to Twitter as you do. You’re trying to replicate the problem.
If you find that the one or multiple extensions causing the Twitter problem, click the three dots and select Remove to get rid of them.
3. Disable SmartBlock
SmartBlock stops third-party websites from using tracking scripts to follow people. It may also cause issues with certain websites, including Twitter, so in the address bar, type about:config and hit Enter.
A warning page will appear. Click Accept the Risk and Continue.
In the preference search bar, type extensions.webcompat.enable_shims and hit Enter.
Click the arrows on the far right to toggle true into false.
4. Change tracking protection
In the address bar, type about:preferences#privacy and hit Enter.
Select Standard if it isn’t selected. If it’s already selected, click something else and then click Standard again.
Click the Reload All Tabs button.
All of the tabs will load. Go back to Twitter and see if the page works now.
5. Unregister Twitter
In the address bar, type about:serviceworkers and hit Enter.
On this new page, scroll all the way down until you find the Twitter entry.
Click Unregister to remove Twitter from the Service Workers list.
Twitter will load the next time you go there.
Why some websites are not opening in Firefox?
For other websites that aren’t opening in Firefox, it all comes down to the same issues. Bad internet connection, the browser cache is full, or the security features are in the way.
The solutions for those websites are exactly the same as the guide you just read. Clearing out the cache and disabling the right extensions will solve the vast majority of your problems.
Mozilla even has a page on their Support website saying the same thing. As a last-ditch effort, you can try reinstalling Firefox. And if that doesn’t work, use a different browser.
Feel free to comment below if you have any questions on the above procedures. We’re eager to help.
Among the many problems people have with their browsing experiences is the Firefox screen suddenly turning black or blank.
The problem happens with most browsers, Google Chrome, Microsoft Edge, or Internet Explorer included. But it appears it’s with Mozilla Firefox users that the problem causes most frustrations.
Often, this error happens without warning, and while you are already logged into Firefox. It happens randomly and for varying lengths of time.
A black screen will also log you out of all the web pages, and in more severe cases, you won’t be able to use Firefox at all.
Why did my Firefox background turn black?
Judging from the reports sent by those who have encountered this problem, there could be several causes for it.
Some only started facing the problem after installing a new driver, extension, antivirus, or other forms of software.
Others say they started noticing the issue after they upgraded the OS. Yet there are also quite a few who don’t recall installing any new software prior to this problem popping up.
There are a few fixes you could try to resolve the Firefox black screen video problem from within the browser. But what if you can’t even access the browser?
So we would start with those fixes that do not need you to be logged into the browser. And then we’ll move on to other solutions.
Quick Tip:
If you’re experiencing a black screen on Mozilla Firefox, perhaps this is the right time to test a different browser. You can switch from Firefox browser to Opera One and import all your bookmarks and passwords.
Further on, you can customize the browser by changing settings for usability to make Opera One your backup browser in case you decide to stick to Firefox as your main.
Opera One
Take your browsing experience to the next level with this highly customizable browser.
Whenever your computer starts to misbehave, your first suspicion is usually a virus attack. Unfortunately, these have become quite common and everyone, especially those who work online, is at risk.
Another common source of viruses is external devices, like memory sticks and external hard drives, that you connect to the computer. Before you consider the other fixes, you should perhaps first scan your computer for viruses.
On this note, we recommend using a powerful third-party antivirusto perform an in-depth scan. Please make sure that you run a reliable and up-to-date antivirus utility.
It is very important to have a security tool that keeps track of all cyber threats because new risks arise on a daily basis. We recommend you look for an antivirus that comes with multi-layered protection.
If you secure your system with more than just one type of shield, the chances of detecting and blocking threats grow significantly.
Additionally, make sure that your antivirus comes with a powerful firewall and a straightforward privacy policy.
For the most part, antiviruses are built to protect your identity and browsing data, but it is important to check and know for sure that that’s the case.
Perform a full system scan and see the results. If your AV found any threat, make sure to quarantine or remove it. After you get rid of the intruder, check to see if the error persists.
2. Uninstall recent software
Press Windows + R to launch Run, enter appwiz.cpl in the text field, and click on OK.
Now, select the problematic program from the list, and click Uninstall.
Follow the on-screen instructions to complete the process.
If the Firefox black screen flash problem starts to occur after you have recently installed a new piece of software on your Windows computer, there is a big chance that software could be interfering with your Firefox browser.
In fact, randomly installing third-party software has many risks for your computer. And if you have installed more than one such software, you may want to make a list of these and uninstall them one by one.
Ideally, you will want to uninstall them, starting with the one you installed immediately before you started encountering this problem.
An instance where this quick fix has been proven to work is where people started facing this problem after recently updating their graphics driver. The problem was fixed by simply undoing the update and reverting to the previous version.
For a more efficient result in terms of removing programs, we suggest using a dedicated uninstaller tool. Removing with the help of Windows settings will most likely leave behind some leftover files.
These will not only take up memory space for no reason, but they may also interfere with the functionality of your PC. Uninstallers can detect and safely remove all these types of files.
On top of that, in case the problem is caused by a malicious app, dedicated uninstallers are the way to go as well. They can force-uninstall apps that you won’t be able to remove otherwise.
So, if you earlier came across Firefox black screen when playing video, uninstalling conflicting apps should do the trick.
3. Disable hardware acceleration within Firefox
Launch Firefox, paste the following path in the address bar, and hit Enter:about:preferences#general
Scroll down to Performance, first uncheck Use recommended performance settings, and then the Use hardware acceleration when available option under it.
This solution works if the Firefox turned black and remains inaccessible.
Hardware acceleration is meant to improve your browser’s performance by enabling the hardware to take over functions that the software on your PC isn’t able to execute as efficiently.
But it tends to clash with some graphics processors and drivers, which can cause this black screen problem to occur.
After disabling the feature as shown, check if the Firefox blank screen problem is fixed.
4. Start Firefox in Troubleshoot Mode
Launch Firefox, click on the hamburger icon near the top-right, and select Help.
Now, click on Troubleshoot Mode.
Click Restart on the confirmation prompt.
Finally, click Open in the dialog box that appears.
Go ahead and check if the problem still comes up.
Starting Firefox in Troubleshoot Mode might work because a potential cause of the problem could be an extension you recently added to your browser.
By default, starting Firefox in Troubleshoot Mode temporarily disables all extensions, installed themes, and custom settings on your browser. This is also a good way of temporarily disabling the hardware acceleration feature mentioned before.
How do I fix Google Maps’ black screen in Firefox?
If you are getting a black screen when opening Google Maps in Firefox, it could be a problem with the extensions or cache. First, press Ctrl + Shift + R to reload the page and bypass the existing cache.
If that doesn’t work, look through the extensions installed on Firefox, and disable the non-critical ones. Also, clearing the browsing data has helped fix the problem for many users.
Hopefully, one of the possible fixes discussed here has helped you solve the Firefox black screen problem in Windows 10/11.
Also, find out what to do if the problem is not limited to Firefox, but you are seeing a black screen on Windows.
If you have suggestions or even other solutions, share them with us using the comments section below.
Browser games are becoming more and more popular as they don’t require any downloads and don’t use up drive space. In-browser games are perfect for those that don’t have a gaming PC.
For the best gaming experience, use a browser that can handle your favorite games without lagging. Not every browser can support gaming, check out our picks for the best browsers for gaming.
And, if you are wondering how to make online games run smoother, go through the following sections for the best tips and tricks.
Why is Adobe Flash Player no longer available?
Adobe Flash Player provided support for multimedia files in browsers and on your PC. Most browser games were supported by Flash Player, however, Adobe stopped supporting Flash Player at the end of 2020.
Adobe announced the reason for this was that Flash Player was too susceptible to cyber-attacks. Many websites also moved to the advanced HTML5 for their structural needs and thus didn’t require Flash Player any longer.
Most browser games that used Flash Player adjusted to the change, however, if you come across a game that says it requires Flash, it probably means it hasn’t been updated in a while. It’s best to steer clear of any websites that offer download links to Flash as they are likely not trustworthy.
This browser is built with gamers in mind, with features like GX Corner and Twitch and Discord integration that enhance gaming. Opera GX offers all the same features as the regular Opera browser with the addition of some unique features that set it apart from other browsers.
The GX Control feature allows users to regulate network, RAM, and CPU usage so your games can run smoothly without any lag.
For a fast and smooth gaming experience, consider switching to the Opera GX browser.
Opera GX
Enjoy lag-free gaming and keep in touch with your peers with the Discord integration.
Right-click on Start and select Run(or press Windows + R).
Type dxdiag and click OK.
Check requirements.
Some games require you to have a 64-bit PC and won’t run properly on a 32-bit operating system. Most games will let users know what PC requirements they need to run properly.
However, many browser games aren’t as demanding as games that require heavy downloads.
3. Disable unused extensions
In your browser, open Extension Manager.
Go through your extensions and disable orremoveunneeded extensions.
Restart your browser.
Finding the extension manager is straightforward in most browsers, and the process to remove them is relatively similar. Sometimes the extension manager can be found under settings or preferences.
A faulty extension or an overload of extensions can cause your browser to run slower, and thus impact the way browser games run.
Extensions are usually created by third-party companies, and if not regulated or updated often, they may cause bugs or crashes. Of course, extensions can be useful and optimize the browsing experience, but it’s wise to remove the ones that you don’t use anymore or are outdated.
4. Clear cache
In your browser, go to Settings.
Open history, cache, and cookie settings.
Select Clear data.
As you surf the web, your browser collects files to optimize browsing. However, the browser cache can build up and may cause problems over time, including slowing down browser games.
If it’s been a while since you last cleared your browsing or cache, then it may be causing games to run slow or lag. Try clearing unnecessary data and starting fresh.
Most browsers allow users to clear out cookies as well. Cookies are usually harmless and are only meant to personalize your browsing experience. A regular clearing out of cookies will remove any unnecessary or corrupted ones that might be slowing down your browser.
5. Manage tabs
If you’re someone who constantly has a ton of tabs open at once, try closing some that aren’t being used to speed up in-browser games. That way your browser can focus on the tab with the game running.
Some browsers have features that help manage multiple tabs and resources. Opera GX, for instance, has Hot Tabs Killer, which displays which tabs are consuming a lot of resources and will slash the tabs that are hogging resources.
6. Adjust in-game settings
While the game is open, find the Settings or Optionsmenu.
Locate quality control and adjust to a lower level.
Refresh or restartthe game.
Some games offer options to adjust visual graphics and quality. If the graphics are set to a high level and you’re experiencing lags, try lowering it a bit.
If a game provides the option to turn off specific visual elements, like enhanced water or shadow features, then turning it off might improve game performance.
7. Check internet connection
Sometimes your browser might not be the one at fault for slow games. It could be your internet connection. Ensure you have a strong network when playing browser games.
Oftentimes, public WIFI can have weaker connections than private ones and can cut in and out, make sure to connect to a stable network.
8. Reinstall your browser
Press Windows + S, search for Control Panel, and then hit Enter.
Under Programs, select Uninstall a program.
Find the browser you use for gaming and select it, then click Uninstall.
After removing the browser, reinstall the browser from its home page online.
If all else fails, reinstalling the browser is always a quick fix. This will clear out corrupted files or extensions and give you the most updated version of the browser.
Be sure to back up any bookmarks, passwords, and other data that you don’t want to be wiped from the browser before doing this step.
How do I fix lag in browser games?
Most browser games generally run fine without any lag, but if you notice it, there are a few things that might help. First, check for slow Internet speed using a network speed monitor. In case you rely on a wireless connection, switch to Ethernet.
Also, use an effective antivirus to scan your device for malware. Verify that you are not using a VPN since it’s known to affect the Internet speed. Also, certain games don’t allow its use, and as a result, you may be encountering problems.
Browser games have become increasingly popular in recent years because of their compatibility with most PCs. Users don’t need to invest in a powerful gaming PC to be able to play browser games. We hope the solutions in the guide helped speed up in-browser games on your PC.
Opera GX is the perfect browser for gamers and will optimize in-browser games. It has features designed for gamers like GX Control and GX Corner that provide all the latest gaming news.
Let us know in the comment section what browser you use and what your favorite in-browser games are.
Gaming is a nice way to socialize and have a lot of fun. In the past, gaming consoles got all the attention with some high-level games.
However, these days, the best browser games are gaining traction. To make things better, they are not just limited to single-player games.
There are numerous fun, multiplayer browser games to play with friends without downloading. This guide has gathered the best of them to help you keep up the fun while adding friendly competition.
Are browser games safe?
Browser games are generally safe. You do not need to download anything, as they are purely web-based.
The most important condition is to play on a secure website. Also, be careful of submitting your details on any gaming website. If you can keep to the usual online security routines, you won’t have problems with browser games.
What are the best browser games to play with friends?
If you’re a fan of board games, you should try Catan Universe. This is one of the free online games you can use to play a game of Catan with your friends right from your web browser.
In case you’re unfamiliar with Catan, it’s a board game in which you build your settlement and compete or cooperate with other players.
So if you’re a fan of board games or just a fan of Catan, Catan Universe is a game you must try.
Available as a mobile app and browser game, Slither.io is the more attractive version of Snake, the popular Nokia game from the 2000s.
Your objective is to control a worm to consume smaller worms and pellets. Defeat your opponents and become the most massive and longest player in this multiplayer game.
Avoid collision with other players because if your worm head collides with another, your game will end. Test your skills as you compete against multiple opponents simultaneously.
Slither.io is a fun game, one of the better multiplayer browser games to play with friends.
Time Heist is one of the few online browser games to play with friends on different computers. The game requires players to split into two teams, Guardians and Thieves, with each team having a captain.
The captain must give hints about historical events or people, and the team must guess the answer.
The game has a special and easy-to-follow ruleset, and it’s a perfect game to play with friends, so you might want to try it out.
Wanderers.io is a unique strategy game in which you lead a small tribe of settlers in a sandbox world. You can gather resources, cut trees, hunt animals, and even create your settlements.
The game is played against other players, so you’ll need to watch them. However, you can play the game with friends, form alliances, or play against another.
Overall, it’s a unique strategy game, and if you and your friends like strategy games, Wanderers.io is a game that you should try.
If you’re looking for fun browser games to play with friends, then Wanderers.io might be what you need.
Minecraft is a well-known game, but did you know that you can play Classic Minecraft in your browser for free? Just visit the game’s website, and you’ll get a server URL that you need to share with your friends, and that’s it.
Your friends can join your game and help you build objects. We must mention that the number of blocks and features is very limited, and many elements from the game are missing.
However, if you’re a fan of Minecraft and similar games, Minecraft Classic is one of the better online multiplayer games to play with friends during quarantine or holidays.
Squadd.io is a multiplayer shooter arena game in which you compete against other players. The game has a top-down perspective, and your goal is to be the last man standing.
Currently, the game offers two maps and three different modes, but its number of characters makes it stand out from the rest. Each character has unique passive abilities, and each in-game weapon has different stats.
If you need a simple and fun browser game to play with friends, Squadd.io might be just what you need.
Join your friends in a side chat and take turns drawing. When one of you has drawn something, the others must guess the meaning of your artwork.
Skribbl is one of those browser games to play with friends that is easy to prepare. The only things you must do are to create a private room and use a link inviting your friends to join.
If you need a browser for multiplayer games to play with friends, Skribbl.io is a must-try.
Create a private room and invite friends there to enjoy a nice card game on a virtual tabletop. Choose six friends, send them an invite link, and start your own game.
The Playingcards.io also allows you to choose from several types of games. Select from fun browser card games to play with your friends and compete in Go Fish, Crazy Eights, Match Up, Remote Insensitivity, and more.
This is a party game composed of questions and answers where you and your friends will use black and white cards. Ask them a question (written on a black card), and every one of them must answer using his most amusing white card.
You will have to create a private room and send a secret code to a maximum of 10 friends.
There is a minimum requirement of 3 players to play this game. Challenge your friends and see which one of you is talented enough to give the ridiculous answers.
If you’re looking for fun browser games to play with friends, Cards Against Humanity is one of our top picks.
Have you ever wished to play a fun 3D shooter game without buying and installing it? If you are searching for one of the top browser games to play with friends immediately, then wait no more and choose Krunker.
You must visit their website, create a custom game and invite your friends to play. Find out who are your most skilled buddies, and invite up to 10 of them to play a shooting match.
Some PC games have online versions that you can always play on your browser. Also, there are a series of browser games that are only available on PC.
You can choose from the best tower defense games, aircraft simulations, and other available options. However, some PC games are limited to downloading the app and are not playable on browsers.
Can I play Steam games on a browser?
Steam games cannot be played on a browser. They are not flash or HTML games you can play on your browser.
Instead, it requires you to download the app, log in to your account, and choose a game from its massive library. The Steam app is free to download, so you can always get it on your PC.
We hope you try out our recommended games and enjoy good-quality moments spent with your friends.
Have a lot of fun and share with us in the comments section your favorite browser games to play with friends.
Bootstrap’s success lies in its ability to make things look good, even when you’re not an expert. This makes it ideal for people who are learning how to code. However, if you’re using Bootstrap with Firefox, you might encounter some issues when it is not working.
This can be very frustrating, especially when all other browsers work fine with Bootstrap. Bootstrap is written in HTML, CSS, and JavaScript. This makes it one of the most popular frameworks for developing websites and applications.
With the right browser extensions for coding, you can do a lot. Now, back to Bootstrap not working in Firefox, you first need to understand why it is happening if you are to troubleshoot successfully.
Why is my bootstrap not working?
Is your Bootstrap not working in Firefox? Here are some common reasons why:
Unsupported bootstrap version – This could be because you’re using an old version of Bootstrap, for example, or because there is no bootstrap browser support because you’re using an outdated version.
Corrupted extensions – Check for any browser extensions or plugins that might be interfering with Bootstrap’s CSS or JavaScript files. If possible, disable these extensions and try again.
Invalid CSS code – Bootstrap uses a lot of CSS classes to style its components. If you’ve customized the CSS in any way, it may not work.
Do all browsers support bootstrap? Bootstrap works on all major browsers, including Firefox, Safari, Chrome, Opera One, and Microsoft Edge.
However, some features may not work or behave as expected on older browsers due to a lack of support for CSS features or JavaScript APIs used by Bootstrap’s JavaScript plugins.
Quick Tip:
In case you need an easier solution to fix Bootstrap on your browser, you may consider changing your browser.
Opera One is a practical workaround because it supports the Bootstrap framework and helps you develop good-looking websites or web programs. Plus, it comes with own built-in AI.
Opera One
Take this advantageous browser and enjoy tons of app integrations and sound navigation.
What can I do if Bootstrap is not working in Firefox?
1. Update Firefox
Launch your Firefox browser and click on the three horizontal ellipses in the top right corner.
Select Help.
Click on About Firefox.
If your browser is up-to-date, you will get the following dialog box.
2. Enable Javascript
Launch your Firefox browser and navigate to the following address: about:config
On the page that appears, under Proceed with Caution, select Accept the Risk and Continue.
Type Javascript in the search box, then double-click until it turns to true.
3. Disable extensions
Launch your Firefox browser and click on the three horizontal ellipses in the top right corner.
SelectAdd-ons and themes.
Disable the suspected extensions and reload the tab.
This can be a time-consuming task if you have a significant number of extensions enabled. You will have to disable one and keep reloading to check whether Bootstrap is working.
Bootstrap’s CSS is designed to be compatible with Firefox, but you may experience unexpected results when using it in the browser.
It’s important to keep your Firefox browser up to date so that you’re not running an outdated browser version. The update process happens automatically in the background on most platforms, but you can always check for updates manually.
Also, ensure that you are using add-ons responsibly. They are useful additions that can enhance your web browsing experience by providing extra features and functionality or changing how certain websites look or behave.
However, they can also cause compatibility issues in some cases as they aren’t always compatible with each other or with newer versions of Firefox.
Lastly, you should consider using the Firefox Developer Edition browser. It has been optimized for web developers, has better-suited tools, and offers a more stable environment.
Let’s introduce you to games like Clash of Clans for PC. Here is all you need to know.
Clash of Clans is an exciting and addictive fantasy strategy game for Android and iOS. As a player, you take on the role of a village leader. You must manage and coordinate the village inhabitants and help them build their town.
This is where the challenging part comes up: your village needs to attack other players to gain access to more resources, especially gold, elixir, and dark elixir.
Collaboration features are also supported: players can join their teams to create clans, back each other up with troops and resources when necessary, and more.
The greatest CoC emulator for playing the game online, on a PC or laptop is LDPlayer.
The emulator allows you to play numerous CoC accounts at once on a Windows PC while also providing quick and seamless gaming assistance.
How to set up your PC to play games like CoC
Go ahead and download LD Player, and click on LD PLAYER 9 or LD PLAYER 4.
Wait for the .exe file to download, then open the LD Player-Installer and allow it to Run.
Follow the wizard to install the app.
Click on Start and wait a few moments for the program to do the setup with your PC.
Next, click on the Play Store icon in your Systems Apps to download the game.
Enjoy hundreds of Android games available now on the PC. Most games are free to play, and some are available to buy, but all of them will run smoothly and effortlessly for the best gaming experience.
You are all set; hopefully, LD Player is your cup of tea because there is a long list of games like Clash of Clans to be played on your PC.
What are the best games like Clash of Clans for PC?
Age of Empires II is a real-time strategy game that explores exciting storylines from the Middle Ages and 1,000 years of human history.
In the beginning, the game puts you in control of a few villagers, some herdable animals, and resources. The goal is to progress and build the most powerful civilization on the map.
The rules will differ depending on the type of game you opt for, and you can play against AI or human opponents.
Besides a wide range of options regarding how you’ll manage your city’s resources and how you choose to use diplomacy with your neighbors, Age of Empires II will offer you countless hours of fun.
Age of Empires II features a fully remastered soundtrack and impressive 4K Ultra HD graphics. There are three new campaigns and four new civilizations, putting at your disposal 35 different societies.
All the elements we mentioned above made us choose this game as the top contender for games similar to Clash of Clans.
Even though this game has changed since the early stages, Age of Empires II is bound to offer older gamers some level of nostalgia while exploring the well-developed maps and challenges from this game, which from our point of view, is a plus.
If you want to try it out, the strategy game is available on multiple platforms, including on Green Man Gaming.
Also, this is one of the games like Clash of Clans you can play on Steam.
Created by Sid Meier and designed by Soren Johnson, this is a turn-based strategy game in which players need to build a powerful civilization using their resources.
You start from a humble beginning, with a small group of settlers by your side, in the middle of an unexplored world. From there, you will meet with other civilizations, and you will either help each other or fight for world domination.
In this version of the game, players will enjoy fresh features like new technologies and units, as well as new ways they can control their cities and government.
Besides the newly-added elements, Civilization VI offers a life-like overall gaming experience while allowing you to explore the most profound intricacies of diplomacy, resource management, development pace, and others.
This fact makes Civilization VI a bit more complex than the previously-mentioned game and even bigger than Clash of Clans.
But, because the devil is in the details, this game promises people a real challenge and thus a more satisfactory experience overall when tasks and missions are completed. So if you’re up for a challenge, this game is worth a try.
Developed by The Creative Assembly, Total War: ROME II Spartan Edition is a strategy game where players can discover the wonders of the Ancient Greek and Roman worlds.
You begin the game by forming an army and recruiting the members you want to fight along with. Through battles, you can sharpen your skills, and this version allows you to assign traits to legions once they gain experience.
Thanks to the real-time strategy battle systems combined with the captivating visuals – you will be completely immersed in this exciting empire-building adventure.
Total War focuses more on the battle side of things and, besides the extensive and enveloping fighting engines, focuses more on strategies for battles and coordination than management of resources and diplomacy.
This is the best option if you’re more inclined to enjoy the challenging world of battle strategies. If you would like a more diplomacy-based experience, then the previous games we presented in this list will suit your needs.
Total War Battles: Kingdom is a world strategy game where players must build their kingdom, defend against enemies, and conquer other kingdoms through combat.
The most exciting part of the game is finding new strategies to defeat rival lords to gain more power and expand. At the same time, another essential element will be your capability to cooperate with other players and band up against common enemies.
Your abilities to use the game mechanics to your advantage and the experience of your troops will determine your success. Still, it is also essential to cover other elements like diplomacy, resource management, prioritization of tasks, and others.
Even though, as the game title suggests, this game focuses more on the battle elements, it can be classified as balanced compared to other options presented in this list.
The game is compatible with Windows Vista 32-bit Service Pack 2 and requires 2 GB of available space. You can download it also from Kinguin.
As its name suggests, this game challenges you to build your empire and lead it to greatness. You start in the Stone Age and gradually progress through major eras to reach the ultimate era: Oceanic Future.
As a player, you must carefully manage your production to collect as many coins and tools as possible to expand your building space further.
Of course, if you want to upgrade your empire faster, you can also use real money to buy diamonds and technological advances.
This option comes in handy if you’re running out of time. Remember that you need to unlock the eras within a limited timeline; otherwise, your progress won’t get validated.
Speaking of progressing through eras, as expected, technological research is the key, so constantly focus on that area.
Interested in playing Forge of Empires? The game is available on Microsoft Store, but you can download it and play it free using BlueStacks.
Since we previously mentioned Vikings, let’s stay on the same line and focus on an elf-themed game this time.
As its name suggests, Elvenar is a city-building game where elves roam freely in a natural enchanted realm.
Whether you play an elf or a human, your main tasks remain the same: upgrade your village, increase productivity and transform it into a kingdom.
As you already might have guessed, each character has unique skills. For example, playing as an elf gives you access to powerful magic, which is very handy when building.
If you play as a human, you’ve got a significant advantage when using medieval weaponry.
Elvenar’s game mechanics are similar to any city-building game: you must explore the map to discover and collect rare resources and increase production.
You will also need technological research to upgrade your little village and unlock many unique resources.
Keep in mind that being able to defend your territory at all times is as important as upgrading your infrastructure and advancing technology research.
Raise a strong army of fantastic creatures and be ready to defend your territory when under attack. Interested in playing Elvenar? The game is available on Microsoft Store, or you can download it using BlueStacks.
Rage War is an interesting medieval-themed strategy game that challenges you to expand your empire.
You’ll start small, from a tiny city, and you have the chance to upgrade to a large town, gather a powerful army, and battle enemies to conquer new territories.
You will battle barbarians, massive armies, and experienced individual players that all have the game end goal in mind, just like you.
Of course, the first prerequisite and engine of the game are the resources that will be needed to upgrade the buildings in the city.
Next, you will also use them to evolve a pretty impressive science tree that will provide you with more advanced buildings and more formidable troops, among others.
One of the game’s goals is to find and rebuild the time machine. It sounds mysterious, right? You can play the game directly on your browser or download it on your computer from Microsoft Store or 2Axion.
Lords Mobile is an addictive and trendy multiplayer game for Android and iOS. So, this is the perfect game for you if you’re into fast-paced action and vicious battles. It is one of the free online games like Clash of Clans for PC.
The game successfully mixes world-building mechanics, open-space RPG, and RTG. So, you’ve got all these game types into a single title.
PvP battles are also supported if you want to show your friends who is the best player. Build your base, create a strong army, and attack and destroy enemy bases.
If you want to be successful, show no mercy and destroy everything in your path. Don’t forget to seize resources and use them to advance your empire.
Speaking of resources, you’re going to battle monsters and other bosses from time to time. So, kill them as soon as possible and then capture all the resources you can from them.
If you like to compete against other players, Lords Mobile also offers you the chance to participate in various contests. Be the first to capture a location on the map; the prize and resources are yours.
Are you curious to play Lords Mobile? Then download the game for free using BlueStacks.
This is a top recommendation for games like Clash of Clans for PC. If you’re interested in Viking mythology and looking for a fun Viking-themed game to play, Vikings: War of Clans is the suitable game for you. We guarantee you’ll love it.
Vikings: War of Clans is a very challenging MMO that forces players to cooperate to build stronger clans — just like the Vikings did.
As in the Viking world, hierarchy plays a vital role in the game mechanics, and clans have their ruling order.
Depending on their hierarchical role, players have different authority levels, and all of them must work to achieve collective goals and help other clan members to progress.
Each group or clan has its own rules and management structure, so communication is critical when coordinating your actions.
Just like any world-building game, Vikings: War of Clans challenges players to accumulate as many resources as possible by upgrading resources buildings.
You can also discover new resource locations and attack and loot other players. You will need the precious resources to upgrade your empire.
Each kingdom has a place of power in its center, reaching and capturing that place of power is the main objective of the game.
Now, if you prefer a military-themed game, then Boom Beach is the perfect game for you.
This title was developed by Supercell, the same company that also created Clash of Clans, so this element guarantees that you’ll fall in love with it.
Boom Beach is set in a tropical archipelago, and your main task is to protect your island against attacks.
The title focuses primarily on the military strategy, challenging gamers to build their base from scratch and upgrade their buildings and troops.
The game supports both single-player missions as well as multiplayer campaigns. To increase your upgrade capacity, you must collect various resources (gold, stone, iron, diamond).
You can use these items for unique purposes; for example, gold allows you to train and upgrade your soldiers.
Don’t forget to build unique statues using Power Powder, Power stones, and other similar elements to speed up troop health, health recovery, and more.
This is a very subjective debate since, in the end, it falls on your personal preferences. Both are great games, but we lean more towards Clash Royale. Here is why:
You may play Clash Royale anytime you feel like it. After single, three-minute combats in Clash of Clans, you must wait before receiving your army back.
Clash Royale takes less playtime. To gather reactivate traps and resources, you must continuously check your Clash of Clans account.
If you don’t feel like playing Clash Royale, you are not required to play; there won’t be any consequences beyond losing a crown chest. However, in Clash of Clans, you must play every day to avoid having your base repeatedly attacked and losing more than 90% of its resources.
More strategy is present in Clash Royale. In Clash of Clans, you will often conquer a base if you assault it.
What we considered when creating the list with the best games similar to Clash of Clans
Our team of game testers, with a lot of experience in this domain, not only chose games based on this element but also took the time to install, try out, and compare games directly.
Of course, the baseline of their decision was a direct comparison with the experience you get while playing Clash of Clans, but some other important elements were considered:
➡ Graphics levels
Because almost everybody has at least a decent gaming PC in the 21st century, our team of testers didn’t aim for any high-end graphics games but also made sure to include options with a good graphics level.
This can impact both the immersive-ness of the game in its entirety but also how much time you will spend exploring the virtual worlds.
➡ Balance of city-building VS war-strategy gameplay
Not all games are alike, and not all players are alike either. For this reason, choosing games that include city-building, managing capabilities, and war strategy was considered important.
As you can observe from our list, the options cover both extremes of this spectrum and games that fit somewhere in the middle on the same scale, with balanced gameplay all around.
➡ Storyline
Because no game is fun without an actual storyline to follow with your city and heroes, having an immersive and complex story is also important.
Our list includes a variety of storyline types, but no matter which option you choose, you will not be disappointed in this department.
➡ Level of difficulty/ complexity
As we consider that games that don’t offer a challenge will be the ones you stop playing faster, we also created our list while considering the difficulty required to complete missions and the complexity of those missions.
Now, it is safe to say that you cannot only choose a perfectly fitting game from this list but also understand what principles were taken into consideration when choosing them.
As soon as you make a choice, simply download BlueStacks on your PC to enjoy hours on end of fun strategy quests and challenging adventures.
However, if Bluestacks is not your cup of tea, we also have an excellent list that includes the best Android emulators for your PC, and you will indeed find a match. Some players can also opt for games like Clash of Clans for PC and offline gameplay.
Do you know any other PC games like Clash of Clans? Feel free to recommend them in the comments section below.
If Opera is not opening on Windows 11, you won’t be able to use it or browse the web. This can be a major issue, but luckily, the solutions is available.
How do I fix Opera not opening in Windows 11?
Before we try anything else, check if your antivirus is interfering with Opera. Sophos users reported various problems, but after disabling it, the issues were gone.
1. Update browser
Press the Windows key + R and type %localappdata% and click OK.
Next, navigate to Programs\Opera
Navigate to the folder of the version you have installed and run the setup file.
Alternatively, you can download the latest version from Opera’s website and use it instead.
2. Reinstall Opera
First, you need to uninstall Opera. In the Start menu, search for the Control Panel and hit Enter.
Under Programs, click Uninstall a program.
Locate Opera in the list of programs and select it, then click Uninstall.
Alternatively, you can try using the older version by using an offline Opera installer from Opera’s FTP server. Before uninstalling, you might also ant to transfer Opera data and have a backup ready.
Before you go, don’t miss this guide on what to do if Opera GX is not responding. Its solutions are universal, so they should work for all versions of Windows.
We also have a similar guide that shows you what to do if Opera GX isn’t opening, so don’t miss it.
We hope one of the solutions above solves the issue. If you still have issues or know of another solution that wasn’t listed, leave a comment below.
Most people prefer to watch their favorite shows and movies on the Internet rather than on a tiny TV screen. Users like to explore the best streaming services seamlessly from more significant devices such as Smart TVs.
The Amazon Fire TV is well regarded for its streaming capabilities. It is a digital media player developed by Amazon. It is a small network appliance that can deliver digital audio and video content to a television set.
This device also allows users to access the Amazon Appstore and stream music, photos, and videos from their compatible devices to the TV.
The considerable HD screen provides a realistic streaming experience. Amazon TV also allows you to explore numerous web pages, which is not something many other players can do.
However, there have been numerous complaints from Amazon customers regarding their browsing servers, which state, unable to open browser links. Read on and get the solutions.
How do I open browser links on Fire Stick?
If you want to open browser links on your Fire Stick, there are a few different methods that you can use. The first is to use the Silk browser pre-installed on your device.
You can also install other browsers, such as Firefox or Chrome, which will give you more web browsing options.
To open a link in Silk, press the menu button on your Fire Stick remote and select the link icon. This will open a new tab in Silk where you can enter the website address you want to visit.
If you want to use a different browser, such as Firefox or Chrome, you can install them from the Amazon App Store. To do this, open the App Store and search for the browser you want to install. Once you have found it, select it and press the Install button.
Once the browser has been installed, you can open it by selecting it from the Home screen on your Fire Stick. Then, enter the website address you want to visit in the Address bar.
Which browser works on Fire TV?
The two default and well-known browsers for Fire TV are the Amazon Silk browser and Firefox. Also, the Downloader can work as a browser if you need it.
However, if you are looking for a lightweight browser that ticks all the right boxes, you should go for Opera One. Lastly, the Glance Browser also does a very good job on the Fire TV.
What can I do if Amazon Fire TV does not open browser links?
Select the Amazon Fire TV option from the list of devices.
Tap Install to download and install the app on your Amazon Fire TV.
Open Opera One and try opening links again. They should now open in the browser without any problems.
If the Amazon Silk web browser app is saying currently unavailable or not opening links on your Fire TV, you can try using a different browser. Opera One is a good option because it’s lightweight and easy to use.
Opera One
Use this fast and reliable browser on your Fire TV for safe and error-free surfing on the web!
2. Install the Amazon Silk Browser on your Fire TV
Open the Silk Browser on your computer.
Click Preferencesin the toolbar.
Click Advanced in the Preferences window.
Check the box to enable opening links externally.
Close and reopen the Silk Browser on your computer.
Drag and drop any link into the address bar.
The link will open in a new window on your computer.
Open the Silk Browser on your Fire TV.
Navigate to the link you dropped in the address bar on your computer.
The link will open in the Silk Browser on your Fire TV.
3. Check the connections of your Amazon Fire TV
Go to the Settings menu.
Select System.
Choose Developer Options.
Toggle on ADB Debugging.
Connect your Amazon Fire TV to your computer.
Open a Command Prompt window and type in ADB devices.
Find the address of your Amazon Fire TV and enter it into the browser on your computer.
You should now be able to open links on your Amazon Fire TV.
4. Power on and off your Amazon Fire TV
Unplug the power cord from your Amazon Fire TV.
Wait for 30 seconds.
Plug the power cord back into your Amazon Fire TV.
Turn on your Amazon Fire TV.
Try opening the link again.
5. Install the Downloader App
Open the App Store on your Amazon Fire TV.
Type the Downloader into the search bar and press the Enter key on your remote.
Select the Downloader app and press the Select button on your remote.
Press the Install button on the next screen to install the Downloader App.
After installing the Downloader App, open it by pressing the Home button on your remote and selecting the Downloader App.
In the Downloader App, type https://www.amazon.com/ into the URL field and press the Go button on your remote.
The Amazon website should open in the Downloader App. If it doesn’t, try pressing the Back button on your remote and then select the URL field again.
You can now browse the Amazon website on your Amazon Fire TV. To return to the Downloader App, press the Home button on your remote.
To close the Downloader App, press the Back button on your remote until you return to the Home screen. Then select the Settings icon and press the Select button on your remote.
Select Applications and then press the Select button on your remote. Finally, select the Downloader App and press the delete button on your remote.
If the Silk Browser is not working on Firestick, you can install the Downloader app, as it can double as a browser.
Select the Settings option from the top menu on the homepage.
Choose the Apps option.
Choose Silk Browser from the list.
Now, select the Privacy option.
Click the Clear browsing data option.
Check the boxes for Browser history, Cache, and Cookies.
Finally, choose Clear Data.
What does an unsupported browser link mean on Fire Stick?
If you see an unsupported browser link on your Fire Stick, your device isn’t compatible with the app or website you’re trying to use. This link can usually be found in the top-left corner of your screen.
Additionally, Fire Stick does not support specific browsers, which may prevent you from accessing certain content. This is why checking for the unsupported browser link before accessing an app or website is essential.
Don’t worry – there are plenty of great apps and websites compatible with Fire Stick. You need to find ones compatible with your device’s browser.
If you’re having trouble finding a compatible app or website, try using the Amazon App Store or Amazon Prime Video.
This might make it seem like the perfect browser, but sadly, it is not averse to issues. One of the recent complaints is that the Enter key is not working on Firefox.
This has greatly reduced the ease of use of the browser and made it frustrating. However, it is a simple issue to fix, as we will show in this guide.
Why is my Enter key not working on Firefox?
The reason why the Enter key is not working on Firefox is numerous. It can be due to problems with your browser or some issues with the PC.
Below are some of the specific causes:
Presence of virus on PC
Faulty browser extensions or theme
Wrong browser settings
Outdated browser
Quick Tip:
Instead of troubleshooting Firefox, get back to surfing the web with no issue with a more reliable browser. Opera One is a good alternative, with standard browsing features like bookmarking and private browsing.
All Opera One apps are frequently updated to provide peak performance. It has a modern and customizable UI. You get free built-in AI, VPN and an Ad Blocker.
Opera One
Surf the web error-free and enjoy modern themes, quick access to social media, and other advanced features!
Click the Check for updates button under the Firefox Updates section.
This will show you if there is any update available.
Outdated apps are the root cause of many problems, and browsers are not different. The Enter key not working on Firefox issue might be due to a bug in your browser version.
This issue might have been fixed in a newer release. Updating your browser, in this case, should help solve the problem quickly.
2. Perform virus scan
2.1. Scan for viruses manually
Press the Windows+ Ikeys to open the Settings app.
Select the Update & Security option.
Click Windows Security on the left pane.
Choose the Virus & threat protection option.
Select Scan options.
Choose from the options provided and click the Scan now button.
Viruses need no introduction. They mess up with your PC and could be why the Enter key is not working on Firefox.
You should select either the Full scan or Microsoft Defender Offline scan option for a deep and thorough scan.
2.2. Scan for viruses automatically
Instead of going through the enormous steps above to scan for viruses, you can automate the process with the TotalAV.
TotalAV is a fast and light software that does not take up space on your PC. It only requires you to install the software and will take care of your security needs.
It uses cutting-edge technology to provide you with multilayered, proactive protection online and offline. What’s more, it provides malware, phishing, and ransomware protection at all times.
It is just the complete security package to ensure your PC and apps work perfectly.
Click the Restart button when prompted to confirm the action.
As much as extensions and themes help improve the looks and functionality of Firefox, they can also be why your Enter key is not working. This is because some of these addons might encounter problems and start malfunctioning.
Restarting Firefox in Safe Mode will start your browser with the extensions, themes, and custom settings disabled.
When the Enter key is not working on Firefox limits the accessibility features of the browser. While the issue can be frustrating, it can be fixed easily with the solutions provided in this guide.
Are you facing a more critical issue like the keyboard not working on Firefox? Then, check our detailed guide on how to make your browser work normally again.
Feel free to let us know the fix that helped you solve the problem in the comments below.
You may be in an unpleasant situation where YouTube is not working on Edge. We will give you the best solutions in this article.
Microsoft Edge is the latest browser from Microsoft, and it’s designed as a replacement for Internet Explorer.
Even though Microsoft Edge has a lot to offer, Windows 10 and 11 users reported that Microsoft Edge is giving them an error while watching YouTube.
It is not uncommon to run into browser issues and this is not specific to Edge; users have also complained that YouTube freezes or crashes on Chrome.
Why does Microsoft Edge block videos?
By default, the browser prevents videos from automatically playing as of Edge 92. When this option is turned on, the browser will restrict specific streams from playing while enabling others.
In some other cases, videos may be blocked because third-party applications are not very compatible with the browser. These could be add-ons and extensions.
In other cases, it could be your browser’s way of protecting you from malware or viruses. Whichever is the case, we will run you through the very best fixes.
What are some of the most common YouTube errors in Edge?
YouTube is the most popular video streaming service, but many Edge users reported various YouTube errors. Speaking of issues, here are some of the most common problems reported by users:
Microsoft Edge YouTube not working, black screen – Many users reported that YouTube isn’t working, and a few users reported a black screen while trying to play YouTube videos. This can be a problem, but you can fix it simply by enabling software rendering.
YouTube videos not loading in Edge – If YouTube videos aren’t loading at all in Edge, the issue might be the SmartScreen feature. This is a security feature, but if it’s interfering with YouTube, be sure to disable it.
Microsoft Edge YouTube error not showing, no sound, no video – These are some common problems that can occur with YouTube and Microsoft Edge, but you should be able to fix them by using one of our solutions.
Now let’s get to the solutions if YouTube stopped working with Microsoft Edge.
Quick Tip: You can load YouTube using a more stable browser, such as Opera One. It runs on a Chromium engine as well and includes useful features to boost YouTube functionality: adblocker, hardware acceleration, and dark modes.
Not only that, but this sleek and customizable browser has extensive add-on support, as well as a VPN that will let you access the geo-restricted content on YouTube.
Opera One
Enjoy YouTube videos with the help of this high-speed and ultra-lightweight browser.
Sometimes unknown third-party applications can be installed on your system and cause Microsoft Edge YouTube errors. Therefore, you need to find and remove the problematic application from your PC to fix this problem.
Users reported that an application called KNTCR caused this issue to appear, and after uninstalling the application, the problem was entirely resolved.
Remember that almost any third-party application can interfere with Microsoft Edge; therefore, keep a close eye on all installed applications.
If you want to remove problematic applications from your PC altogether, it’s advised to use an uninstaller software.
2. Check Use software rendering option
Press Windows + S and enter internet options. Select Internet Options from the menu.
When Internet Properties window opens, go to theAdvanced tab and check the Use software rendering instead of GPU rendering option.
Click Apply and OK to save changes.
Restart your computer in order for changes to be applied.
Web browsers tend to use your graphics card to process video, but if there’s an issue with your graphics card or web browser, you might not be able to use GPU processing.
In most cases, this will cause an error to appear, but you can fix problems with Edge and YouTube simply by turning on the software rendering option.
3. Disable the SmartScreen feature
Open the Settings app. You can do that quickly by pressing Windows + I shortcut.
Navigate to the Update & Security section.
Select Windows Defender from the menu on the left and click on Open Windows Defender Security Center.
Now navigate to App & browser control.
Now make sure to disable SmartScreen for Microsoft Edge. If you want, you can also disable all SmartScreen options in the same window.
SmartScreen is used to scan URLs before opening them to protect you from malicious websites. This is a valuable feature, but it can sometimes interfere with Edge and cause YouTube errors to appear.
After disabling SmartScreen, you should be able to view YouTube videos without any issues. This solution will work even if you are having Windows 11 YouTube issues.
We must mention that disabling SmartScreen will slightly reduce your security online, so be sure not to visit malicious websites.
4. Disable and remove Flash
Click the Start menu, type control, and select the Control Panel app.
Select the Flash Player option.
In the Storage tab, click Delete All button.
Check Delete All Site Dataand Settings and click the Delete Data button.
Open Microsoft Edge.
Click the Menu button in the top right corner and choose Settings.
Scroll down to the Advanced settings section and click on View advanced settings.
Locate the Use Adobe Flash Player option and turn it off.
Restart your PC, start Edge again, and check if the YouTube not working on Edge is corrected.
Before the introduction of HTML5, Flash was in charge of web video, but Flash is almost replaced with HTML5 today. Many users suggest removing and disabling Flash if you want to fix Microsoft Edge YouTube errors.
5. Reset flags in Edge
Start Microsoft Edge.
Now in the address bar, enter the path below; then click the Reset all flags to default button. about:flags
According to users, YouTube errors in Edge can appear due to specific advanced settings. Many advanced users can sometimes enable hidden features in Edge, which can lead to certain issues.
In some rare cases, certain hidden features might be enabled by default, which can lead to this problem.
After resetting these advanced settings to default, restart Edge to apply changes. Once you start Edge, all advanced settings will be restored to default, and the issue should be resolved.
6. Disable experimental JavaScript
Start Edge, paste the path below on the Address bar, and hit Enter. about:flags
In the search box, type experimental JavaScript and hit Enter.
Disable the experimental JavaScript option.
Once you disable this feature, restart Edge, and the issue should be permanently resolved.
In some cases, the problem might be just a single option, and to fix the problem, you need to find and disable that feature.
Many users reported that Experimental JavaScript features caused this issue, but you can disable them by following these steps:
7. Install Media Feature Pack
If you’re unfamiliar, there’s a Windows 10 N version that doesn’t have media features available by default.
This is a version of Windows for the European market, and if you’re using the N or KN version of Windows 10, you might encounter YouTube errors in Microsoft Edge.
However, you can always install the media components from Microsoft’s website. Microsoft offers a Media Feature Pack for N and KN versions of Windows 10 on their website, and you can download it for free.
If you have any issue with multimedia, download Media Feature Pack and install it, and your problem should be resolved.
8. Make sure that the correct audio device is set as the default
Right-click the sound icon in the bottom right corner of your Taskbar and choose Playback devices from the menu.
Select your speakers or headphones on the list, right-click them and choose Set as Default Device from the menu.
Now click Apply and OK to save changes.
After setting the correct playback device, the issue should be resolved, and you’ll be able to play YouTube videos and other multimedia without problems.
Sometimes you might have multiple audio devices on your PC or even a virtual audio device. So, you might encounter issues if the incorrect audio device is set as the primary audio processor.
However, you can always fix this problem simply by changing your default audio device.
9. Update your graphics card driver
Right-click on the Start menu and select the Device Manager option.
Right-click on your graphics driver and select the Update option.
Launch your browser and try watching a YouTube video again.
10. Clear the cache
Click the Menu icon in the top right corner and choose Settings from the menu.
In the Clear browsing data section click the Choose what to clear button.
Select the components that you want to remove and click the Clear button.
After clearing the cache, check if the problem with YouTube is resolved.
According to users, the issue might be your cache if you’re having YouTube problems in Microsoft Edge. Unfortunately, your cache can get corrupted, sometimes leading to various problems.
However, you can quickly fix this problem simply by removing your cache.
What is the best browser for watching YouTube?
We have written a comprehensive guide on the best browsers for watching YouTube videos. At the top of this list, we have the Opera One browser. It is not just the best browser for watching YouTube videos but also the best for all sorts of streaming.
It has an interface that gives you quick access to the tools you need the most. Opera One also incorporates messenger and WhatsApp, so sharing your favorite videos becomes even more accessible.
There you have it, the best solutions for when YouTube is not working on Edge. All the steps may not work for all cases, but you can always try different fixes until you get one that works.
Note that these solutions may also be handy if Microsoft Edge YouTube has a black screen.
You can usually fix Microsoft Edge YouTube errors simply by turning on software rendering or changing your system settings.
Let’s share with you our top recommendations for no-tracking browsers. Anyone with access to your browser can also look inside for more detailed information, such as your income, preferences, what places you have visited, and so on.
Unfortunately, not all browsers offer the same privacy features when navigating the Internet, which can leave you uncovered.
In this article, we will present you with the best browsers to ensure your privacy so that you can make a more informed decision.
For more security, you should surf the net with any of the best private search engines, or use any other search engines that allow no tracking.
How can I use a browser without tracking?
How you achieve internet surfing without tracking would depend mainly on your browser.
Generally, here are a few steps you should take:
Use the Do Not Track browser option – This way, you are rescinding any permission that a website may have to track you or take your information.
Make use of a VPN – VPNs mask your IP address and encrypt and obscure your traffic.
Use Tor – Tor or an equivalent will route any traffic you send out through other computers.
Being anonymous online is not easy, but you often give out your info on sites when you agree to sign in using your email account. And even though this is standard nowadays, it is not a very anonymous way of surfing the web.
Which search engine does not track users?
We may recommend a few, but no one can be sure of zero tracking. Among the most trusted are:
If you’re primarily looking for fully private web navigation with no tracking whatsoever, the AVG browser is the key.
This well-known brand is used by countless people to surf the web securely due to high-end security tools against phishing or tracking scripts.
In other words, every user has control of their digital information and can navigate online without leaving their sensitive data behind.
That is because AVG Secure Browser comes with anti-tracking tools that force websites to not collect users’ data while accessing the page.
In addition, there is a privacy cleaner feature that allows you to remove all browsing data in one second. Plus, the stealth mode protects you from identity threats all over the web.
AVG Secure Browser
Don’t compromise on digital privacy and use this browser with killer anti-tracking tools.
UR Browser is a browser with unique privacy features to ensure your online security, such as the built-in VPN.
Moreover, with the built-in ad-blocker, you can also browse the Internet without being bothered by annoying commercials.
This browser is fast and does not affect the system’s overall performance like other browsers. Even if multiple tabs are opened, the resource usage is controlled well by the browser.
Another great feature that UR Browser has is the built-in virus scanner that checks all your downloaded files.
Key features of UR Browser:
Invisible tracker blocker
Virus scanner
Ad blocker
UR Browser
A browser that protects your online privacy thanks to the incorporated features and built-in options.
Thanks to the newest updates, Firefox Quantum is one of the best browsers to use when your online privacy is a priority. It is also a great no tracking browser choice for Windows.
This browser has great protection features, customization options, good security, and, most importantly, regular updates.
Thanks to the available add-ons and extensions, you can customize this browser precisely how you want it.
You can enable when needed tracking protection, geolocation, cookies control, or password completion, depending on your needs.
All the above features and available settings will ensure a private and secure environment.
Tor, often known as the Onion Router browser, is likely the safest browser available.
It is among the few main internet browsers that, upon connecting, make many hops over a number of secure nodes and forbid the execution of scripts, which in most circumstances keeps you from being fingerprinted.
As you can see in this article, several amazing browsers will ensure your online privacy at all times. The items mentioned are your best bet for no-tracking browsers.
Let us know in the comments section below which one you have tried; we would love to hear your thoughts. If you have any more questions or suggestions, please let us know.