Your computer exceeds the power rating [STEP-BY-STEP GUIDE]

There are various errors that can appear on your PC, and many users reported Your computer exceeds the power rating message. In today’s article, we’ll show you how to fix this error once and for all on your Windows 10 PC.

How can I fix Your computer exceeds the power rating error?

1. Reinstall Microsoft ACPI

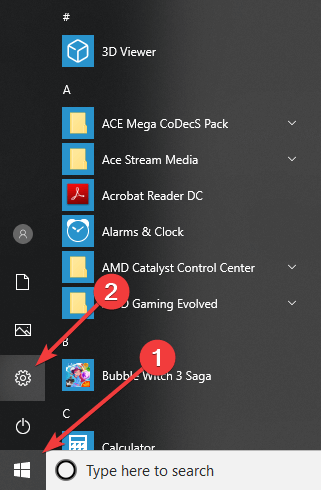
  1. From your Start Menu, select Device Manager.
  2. Now expand Batteries, right-click the desired batter and choose Uninstall device.
    uninstall device Your computer exceeds the power rating message
  3. Once it’s complete, Windows will attempt to reinstall the drivers for you.
  4. Now you can restart your machine.

2. Change Power Settings

  1. Open Control Panel.
  2. Now head on over to Hardware and Sound, and select Power Options.
    Your computer exceeds the power rating choose a power plan
  3. Choose the appropriate power plan for your PC.

3. Unplug your device

charger disconnect Your computer exceeds the power rating

  1. Disconnect the power cord until the battery drops down to 15%.
  2. Now you’re gonna turn off your machine and power it back up after half an hour. But do keep in mind to unplug all USB devices you might have plugged into your laptop.

4. Perform UEFI tests

PC power button Your computer exceeds the power rating

  1. Keep your machine connected to the power cord.
  2. Now, you’re going to press and hold the Power button until the laptop turns off.
  3. Now turn on the laptop.
  4. As your system boots up, press the F2 key repeatedly, until the UEFI Diagnostics screen is displayed.
  5. At the UEFI menu, select Component Tests, and then select Power.
  6. Now select AC Adapter test, and run the tests.
  7. Follow the onscreen instructions.
  8. Depending on the results, you’re good to go, or you should follow up with the last solution.

5. Replace your power output

power output Your computer exceeds the power rating

  1. Check your power adapter.
  2. If you suspect that your adapter is faulty, be sure to replace it and the problem will be resolved.

There you go, these are our solutions for Your computer exceeds the power rating message error.

RELATED STORIES TO CHECK OUT:

New Xbox One S Fortnite Special Edition bundle to launch on June 7th, along with Xbox “greatest deals of the year” sale

The new Xbox One S Fortnite Special Edition bundle leaked a couple of weeks ago, but Microsoft has finally made it official. The purple-colored console and matching controller will launch on June 7, along with the just-announced Greatest Xbox Deals of the Year sale.

“The new Xbox One S Fortnite Battle Royale Special Edition bundle includes a Special Edition purple 1TB Xbox One S, the Dark Vertex cosmetic set featuring Legendary Outfit, Epic Glider, and Rare Pickaxe (available in free Battle Royale and Creative modes only), 2000 v-bucks, and one month Xbox Live Gold subscription and Xbox Game Pass trial,” the blog post reads.

Just ahead of E3, this massive sale will offer big discounts on Xbox bundles, including $100 off Xbox One X and $50 off the aforementioned Xbox One S Fortnite Special Edition Bundle. The $249 Xbox One S All-Digital Edition that Microsoft launched last month will also be $50 off, along with other Xbox One S bundles. All these console discounts will be available at the Microsoft and participating retailers from June Friday, June 7 to June 17.

Microsoft has continued to launch cool-looking new Xbox Wireless controllers over the past couple months, and for a limited time you’ll be able to Save $10 on black, white, special edition and limited-edition Xbox Wireless Controllers. If you prefer to design your own Xbox Controller, be aware that Xbox Design Lab controller will also be available starting at $64.99.

As you can expect, the Greatest Xbox Deals of the Year will also offer lots of Xbox games at a discounted price. We don’t have the full list yet, but Microsoft mentioned up to 75% discounts on a list of games that will include recent titles such as such as Mortal Kombat 11, Sekiro: Shadows Die Twice, and Tom Clancy’s The Division 2. We’ll share more details about the Xbox game sale once Microsoft publishes the full list of discounted games.

You don’t have account privileges on 2K19 for Xbox [FIX THIS]

NBA2K19 is a fun game with realistic graphics and innovative basketball gameplay. However, Xbox users have reported that they are unable to play the game online due to an error. The full error reads This feature is unavailable. You don’t have the required account privileges error while trying to play the game in online mode.

Some of them shared their experience with the error.

I get this message any time I try to enter my park or pro am. I played my park the day I got the game so I don’t know what happened today as to why I’m getting this message. Is this a glitch and happening to other people or did something happen to my account? I am playing on xbox one btw.

Solve the error with ease with the solutions we provided below.

How to solve You don’t have account privileges error on 2K19 for Xbox?

1. Check for Live Account Subscription Status

  1. On the Xbox menu, Go to Settings and select All Settings.
  2. On the Account tab, click on Subscriptions.
  3. Wait for the Subscription details to load.xbox subscription
  4. Under Subscription check the status of your Xbox Live Account.

If your Xbox Live subscription is expired, you need to renew the subscription to resolve the error and play the game online.


2. Check Xbox Live Gold Share Content Setting

  1. From the Xbox home screen, press the Xbox button on the controller.
  2. Scroll left from Home to open the guide.
  3. Select Settings and then click on Account.
  4. Go to Privacy and Online Safety.
  5. Next, select View details and customize tab.
    Xbox Privacy Setting
  6. Make sure “Share Content using Kinect“, “Others can communicate with vice” and “You can see and share content” options are set to “Allow/Everybody”.

Try to play the NBA 2K19 and check if the error is resolved.


3.  Clear Cache

  1. Press the Guide button your controller.
  2. Go to Settings and select Restart Console. When prompted, select Restart.Restart xbox
  3. Check again after the reboot for any improvements.

In case you are unable to access the Guide or settings Menu, you can force restart the Console. To do this, press and hold the Power button for 10 seconds until the console turns off.

Press the Xbox button on the console again to restart the device and check for any improvements.


4. Re-download your Xbox Live Gamertag

  1. From the Xbox Home screen, press the Menu button on the Controller.
  2. Select Settings.
  3. Scroll to the right and under Other People, select Remove Accounts.
    Sign in security and passkey xbox
  4. Select the account that you want to remove. Select Choose this person to remove it.
  5. Again select “Remove from this Xbox” to confirm.
  6. Select Close, restart the Console.
  7. After the restart, select Sign in.
  8. Sing into your Gamertag by entering the account credentials.
  9. Allow your profile to download.

RELATED STORIES YOU MAY LIKE:

Microsoft news recap: flagship store opening in London next month, Xbox Game Pass coming to PC, and more

Microsoft news recap is a weekly feature highlighting the top Microsoft news stories of the past week. Sit back, grab some coffee, and enjoy the read!

It’s official, Xbox Game Pass is coming to PC and will offer over 100 “high-quality PC games” at launch

This week it has been confirmed that Microsoft’s game subscription service, Xbox Game Pass, is coming to PC and that it will have over 100 games at launch.

Microsoft’s flagship London Store to open on July 11

Microsoft’s first store in London is opening soon. Its new flagship store in London is set to open on 11th July.

Microsoft to build two new 100% sustainable, zero waste datacenters in Sweden

Microsoft’s commitment to caring for the environment continues to show as it plans to build 2 new datacenters in Sweden that are 100% sustainable and have zero waste.

Microsoft ready to show off 14 new Xbox Game Studios at its E3 briefing on June 9

With E3 nearing, it has become known that Microsoft plans to show off 14 new Xbox Game Studios at its briefing, continuing to bolster the number of studios under the Xbox brand.

That’s it for this week. We’ll be back next week with more Microsoft news.

Windows Face Recognition Not Working: 4 Ways to Fix it

Face recognition is a security technology to protect your PC, but many users reported that Windows 10 face recognition isn’t working for them.

This can be a problem and leave your PC vulnerable. So in today’s article, we’ll show you how to fix things when facial recognition is not working.

How do I get Windows Hello face to work?

1. Reset Face Recognition Settings

  1. Press Windows + I to open the Settings app.
  2. Click on Accounts and then the Sign In option.
    accounts windows 10 face recognition not working
  3. Go to the Face Recognition option, then select Remove.
  4. Click on Get Started and follow the onscreen instruction to set up face recognition again.
  5. Restart your computer.

2. Reinstall drivers

  1. Press Windows + X, and select Device Manager.
    device manager facial recognition not working
  2. Locate Biometric Devices in Device Manager.
  3. Right-click on the device, then select the Uninstall option.
    uninstall device face recognition problems
  4. Next, click on Scan for hardware changes. This will reinstall the drivers.
    scan for hardware changes windows 10 face recognition not working

When Windows face recognition is not working, the problem may lie with the driver, and reinstalling it should do the trick!

3. Restore older driver

  1. Open the Device Manager.
  2. Click on System Devices and then Surface Camera Windows Hello.
  3. Click on the Driver tab and then click on the Roll Back Driver button.
    driver rollback face recognition problems
  4. Choose the reason for rolling back, click Yes to proceed, and then restart the computer.

4. Turn on/Enable Biometrics

  1. Press Windows + R to open Run, type gpedit.msc, and press the Enter key.
    gpedit run window windows 10 face recognition not working
  2. Click on Computer Configuration and then on Administrative Templates.
    administrative templates windows 10 face recognition not working
  3. Also, click on Windows Components, then Biometrics.
    biometrics windows 10 face recognition not working
  4. Now, double-click on Allow the use of biometrics option in the setting.
    allow the use of biometrics windows 10 face recognition problems
  5. Select the Enabled option.
  6. Now, click on Apply, and then on OK.
    enable allow use of biometrics windows 10 face recognition not working
  7. Similarly, enable the Allow users to log on using biometrics policy.
  8. Restart your computer and see if the problem persists.

There you go! These simple solutions can help if Windows 10 face recognition isn’t working.

Before you leave, check some quick tips to enhance security in Windows. We also have a great guide on Microsoft Azure Face API alternatives, so don’t miss it. Let us know in the comments section if our solutions were helpful to you.

Check if an Update is Installed in Windows: How to Do It

Windows OS is a complex piece of software, and the regular Windows 10 updates make it a reliable system to use. Installing service packs and minor or major updates is an ongoing process, and it is important to check which updates are installed in Windows.

Windows updates usually solve bugs and glitches, introduce security updates to protect the system from external threats, and add new features. Knowing which updates you have installed in Windows can help diagnose issues. Keep reading to find out!

How do I know if Windows Update is installed?

1. Check Windows OS Build

  1. Click on Start and select Settings.
  2. Go to System.
  3. Click on the About tab.
  4. Under About, go to Windows Specification section.
    about section to check installed updates in Windows
  5. You can check the Windows OS information, such as OS build, installation date, and version.
  6. Compare your OS build with the official Windows 10 release doc from Microsoft.

The easiest way to check if you have a specific Windows update installed or if the Windows OS was upgraded is to check the Windows OS build info.

2. Check installed updates

  1. Click on Start and select Settings.
  2. Go to Updates and Security.
  3. Click on Windows updates.
  4. Click on View Update History.
  5. You can now view all the updates that were installed in the recent past.
    view update history
  6. To remove a version, click on Uninstall Updates.
  7. You will now see all the recently installed Windows updates with dates and other details. 
    Uninstall Windows Updates- Check History
  8. If you want to uninstall any update, select Update and click on Uninstall, and confirm the change.

For a full breakdown of past releases, you can also check the Windows 10 update history page.

When unsure if you have installed the latest Windows update on your system, you can check it from the Windows History. Later, you can easily manually download and install updates based on your update history via the Microsoft Update Catalog.

3. Via Command Prompt or PowerShell

  1. Press Windows + R to open Run, type cmd, and hit Ctrl + Shift + Enter.
  2. Click Yes in the UAC prompt.
  3. Paste the following command and hit Enter: wmic qfe list full /format: table
    wmic command
  4. You will now see a list of all recent updates in a tabular format for easy understanding.

Need more PowerShell-focused methods to list, filter, and export update history? Open this step-by-step guide: Windows Update History with PowerShell.

For any action that can be performed via GUI, there is a dedicated command. In the same way, you can check if a KB or Windows patch is installed via the command line. The wmic command works both in Command Prompt and PowerShell.

You now know how to check and view installed updates in Windows 10 and the latest iteration. Before you leave, find out how to configure the Windows Update settings for the best performance.

For any queries or to share which update you were concerned about, drop a comment below.

BitLocker Asks for Password Every Time: 3 Ways to Stop it

BitLocker is a Microsoft-developed full volume control encryption tool built into Windows OS. While this tool is useful, many reported that BitLocker can ask for passwords every time.

This can get tedious, especially if you use a long and secure password. In some cases, you might be having issues with Bitlocker password prompt screen, but we covered those in a separate guide.

Join us while we tackle this issue and show you the best ways to fix it.

Why do I have to enter a BitLocker password every time?

  • Minor glitches with BitLocker can cause this issue to appear on your PC.
  • Auto lock feature in BitLocker will lead to Bitlocker asking constantly for a password.
  • In some cases, missing updates or new hardware can cause this problem to occur.

How can I stop BitLocker from asking for password on boot?

1. Suspend and resume BitLocker

  1. Press Windows Key + R, to open Run.
  2. Type control and press OK to open Control Panel.
  3. Go to BitLocker Drive Encryption.
  4. On the C drive, select Suspend Protection option.
    Suspend BitLocker Protection
  5. If asked to confirm the decision, click on, Yes.
  6. Now reboot the computer.
  7. After the reboot, open BitLocker Drive Encryption again and make sure that the BitLocker is resumed. If not, select Resume Protection option.
  8. Exit the Control Panel.

Note that whenever you want to make any changes to the BIOS and Disk, make sure you suspend protection and resume the Protection after making the changes. This will avoid any conflict with the BitLocker and the disk drive.

2. Turn off Auto-lock for BitLocker

  1. Press Windows Key + R, to open Run.
  2. Type Control and click OK open the Control Panel.
  3. In the Control Panel, go to Bit Locker Encryptions.
    Turn Off Auto Unlock BitLocker 
  4. Select the driver and click on Turn off Auto Bit Lock.

Now reboot the system. Since you have disabled the Auto-lock feature, BitLocker should avoid asking for the recovery repeatedly.

3. Other fixes to try

  1. Uninstall newly installed hardware – If you have installed new hardware such as docking station, it may create issues with the BitLocker. You need to make sure no unnecessary peripheral devices are connected to the computer when the machine is booting.
  2. Update Windows OS – If the issue is due to a bug with the Windows OS, try to update the OS. Microsoft usually releases an update fixing known issues with the OS and the tools. Go to Start > Setting > Update and Security > Windows Updates. Check for any pending update.Windows Update check for updates button

We hope these solutions helped you solve the issue with Bitlocker asking for a password every time.

Remember to keep your BitLocker password safe, but if you lose it, you can always find Bitlocker recovery key without too much hassle.

What method worked for you? Share it with us in the comments section below.

What to do if Thunderbird Keeps Asking for Password [SOLVED]

Thunderbird is among the most popular email clients available for Windows computers. Recently some users have reported that Thunderbird keeps asking for a password while trying to access their email accounts.

However, the matter itself is not with the Thunderbird client but occurs due to an issue with the email service provider or bad Thunderbird configuration.

Some users are quite bothered by the regular password prompts.

Every time i ask mozila to “get messages” or to “send” a message it asks for my password when using my laptop but this doesn’t happen when using my desktop, as far as I can see the settings are the same on both machines, am I missing something ? If anybody can help I would appreciate it.

Read the step-by-step solutions below.

How to fix Thunderbird keeps asking for password?

1. Ask Thunderbird to remember your password

  1. Launch Thunderbird and log in to your email account.
    Thunderbird Password Remember
  2. In the login screen, make sure to select “Remember password” option and click Continue.
  3. Exit and relaunch Thunderbird and check for any improvements.

2. Use a file cleanup tool

You can as well utilize an efficient method that will erase any temporary files or browsing data that can generate such Thunderbird issues on your device. By using a professional system optimizer you can do that quickly and without having to worry about anything going wrong.

3. Remove and Re-add the Account

Remove and Re-add the Password

  1. Launch Thunderbird.
  2. Click on Tools and select Options.
    Thunderbird Password Remove
  3. Now, go to the Security tab and then to the Passwords tab.
    Remove Thunderbird password
  4. Click on the “Saved Passwords” button.
  5. Select your email account with the issue and click on the Remove button.

Exit and relaunch Thunderbird. Enter the password to log in and make sure you check the “Remember password” option.

If the issue persists, try to remove and re-add the account.

  1. In Thunderbird, go to Tools and select “Account Settings”.
  2. From the right-pane, select the problematic email account.
  3. At the bottom, click on Account Actions and select Remove Account.
  4. Click Yes to continue.
    Thunderbird Remove account
  5. Exit and relaunch Thunderbird.
  6. Again go to Tools > Account Settings.
  7. Click on Account Actions and select “Add Mail Account”.
  8. Enter the email credentials and make sure to check the “Remember password option”.

4. Temporary Issues

Thunderbird

If nothing seems working, it could well be just a network-related issue. In the meantime contact your email service provider just in case to know if the issue is from their end.

How to fix common Pagan Online bugs [FULL GUIDE]

Pagan Online is an early access hack and slash multiplayer game, but many users reported various Pagan Online bugs. These bugs will prevent you from enjoying your game, and today we’re going to show you how to fix them.

How can I fix Pagan Online bugs?

1. Game not launching

  1. Open Windows Firewall.
  2. From the menu on the left select Allow a Program through Windows Firewall.
  3. Click on Change settings and make sure to check both Private and Public for Pagan Online. If the game isn’t on the list, be sure to add it and make the aforementioned changes.
    allow apps through windows firewall Pagan Online bugs

2. Display bug fix

  1. Right-click on the Desktop and click on the Display Settings.
  2. Now you’re going to select Advanced Settings. Next click on Adjust Resolution.
    display settings Pagan Online errors
  3. Select which one suits your screen, keeping in mind the refresh rate of your screen. Also, you can disable V-sync in your in-game menu.

3. Frame rate drops fix

  1. Open your Nvidia Control Panel.
  2. Select Manage 3D Settings and select Pagan Online from the Program Settings.
  3. Set Power Management to Prefer Maximum Power.
    power management mode prefer maximum performance
  4. Save your changes and exit.

4. Network issues fix

  1. From your Start Menu, select Device Manager.
    device manager Pagan Online bugs
  2. Select a category to see names of devices, then right-click on the one you’d like to update.
    update driver Pagan Online bugs
  3. Select Update Driver, and click on Search automatically for updated driver software.
  4. Once it’s done updating you’re all set.

Alternatively, you can try using a driver updater tool to automatically update all your drivers.

⇒ Get Fortect Driver Updater

If the driver update didn’t help, reinstall the driver by doing the following:

  1. Repeat the first step from the previous workaround.
  2. Right-click on the name of the device, and select Uninstall.
  3. Restart your machine.
  4. Windows will attempt to reinstall the driver at start-up.

5. No audio fix

  1. Right-click on the volume icon on the bottom right corner of your screen and click on Sounds.
  2. Now head on over to the Playback section and disable all the sound devices except the internal speaker or the speaker you wish you want to use. Also, keep in mind that changing your audio from surround sound to stereo can do the trick too.
    disabled devices playback Pagan Online bugs

6. Save game fix

  1. Launch your Steam client.
  2. From your Library section, right-click on Pagan Online and choose Properties from the menu.
  3. Now select the Local files tab and click on the Verify integrity of game files.
    verify integrity of game files Pagan Online bugs
  4. After this is done, try running the game again.

There you go, several quick and easy solutions that will help you fix Pagan Online bugs on your PC.

Xbox Live Keeps Asking for Password [Guaranteed Fix]

Every time you turn on your Xbox, it wants you to sign in. You most likely put in your email and password. After hitting the check box to remember the password, an error message says your email or password is incorrect. However, it still allows you to connect and play online; it does not remember the information each time.

What to do if Xbox Live keeps asking for a password?

1. Restart Xbox One

  1. Hold press the Xbox button right in the middle of the controller. This will open the Power Center on Xbox One.
  2. Then, select the Restart Console and then select Restart to confirm.
  3. After Xbox One restarts, try signing in once more.

2. Clear the cache

clear xbox one cache Xbox live keeps asking for password
  1. On your controller, press the Guide button. Then, navigate to Settings.
  2. Select System Settings.
  3. Choose the Memory or Storage Option.
  4. Highlight a storage device of your choice and Press Y on your controller.
  5. Choose the Clear System Cache option.
  6. Restart your Xbox One Console using the steps in the solution above.

3. Restore all Factory Settings

factory settings Xbox live keeps asking for password
  1. Press the Xbox button, this will open the guide.
  2. Select Settings and navigate to System Settings then Console Info.
  3. Select the Reset Console option.
  4. After step 3, two options will pop up on your screen.
    • Reset but keep my apps and games: this option will reset the OS and will help you delete any corrupt data but it will keep your apps and games
    • Reset and remove all: this option resets all the settings back to default and removes everything including saved games, games, apps, and user data

4. Delete your Profile on the Xbox One Console

delete xbox profile Xbox live keeps asking for password
  1. Delete your Profile.
  2. Clear your System Cache by following the steps in Solution 2.
  3. Restart your Xbox as it is done in Solution 1.
  4. Download your Profile again then check if the issue persists.

5. Remove your account and add again to your Console

remove xbox one account Xbox live keeps asking for password
  1. Remove account from Console.
    • Press the Xbox button, this will open the guide.
    • Select Settings and navigate to System Settings then Select Remove accounts.
    • Select your account and confirm.
  2. Restart Xbox One
    • Hold press the Xbox button right in the middle of the controller, this will open the Power Center of Xbox One.
    • Select the Restart Console and then select Restart also.
  3. Add your account to Console again.
    • Press the Xbox button, this will open the guide.
    • Select the Sign In option and then Select Add New.
    • Input the email address and password of your Microsoft account.
    • Follow the onscreen instruction to personalize your settings.

With these solutions, you should be able to resolve the Xbox Live keeps asking for password issue. You can also try switching Xbox accounts on Windows and see if the issue persists.

For more password-related problems, don’t hesitate to check our Fix: Windows Command Line Generates Random Password [Solved] guide.

FIX: Gears of War 4 installation interrupted [Windows 10/11]

Gears of War 4 is a third-person shooter video game developed by the Coalition and published by Microsoft Studios.  You can play this awesome game on both Microsoft Windows and Xbox One.

The shooter game benefits of high popularity between gamers. Many users reported experiencing a frustrating issue during the game installation process.

The error message Couldn’t install, we’ll retry shortly”. The error code is 0x80070015 often blocks the install process.

Some of the issues that cause this error could be related to: setup files being corrupted, software conflicts or outdated Windows versions.

In order to fix this issue, we managed to come up with a series of tested solutions that you can follow.

What to do if GOW 4 failed to install

  1. Corrupted installation files
  2. Run the troubleshooter
  3. Update Windows
  4. Reset the Microsoft Store cache
  5. Fix the error through Power Shell

1. Corrupted installation files

Having a damaged installation setup could cause this specific issue to occur while trying to install the game.

Downloading the setup from different untrustworthy websites could cause serious damage to your system as well.

These setups might contain infected files that will be installed your computer.

We recommend that you only try downloading a clean setup through the Windows Store.

2. Run the troubleshooter

The Windows troubleshooter detects and fixes eventual issues within the system.

Try running the troubleshooter and see if it fixes the installation issue.

In order to run the troubleshooter, follow these steps:

  • Open the Control Panel > select System & Security

  • Under the Security and Maintenance section, select the Troubleshoot common computer problems

  • Choose the Program compatibility troubleshooter > click Run the troubleshooter.

3. Update Windows

Sometimes errors occur when having an outdated Windows version. Certain programs might not be compatible with your version of Windows.

Perform a system update in order to make sure that the error isn’t occurring on the OS side.

Performing a Windows update requires you to follow these steps:

  • Press the Start button > open Settings

  • Click Update & Security

  • Select Windows Update > click Check for updates
  • If it finds any updates, let it complete the process and restart your computer
  • After rebooting your PC, check if updating Windows fixed the issue.

— RELATED: The best Windows 10 RPG games to play in 2019

4. Reset the Microsoft Store cache

Corrupted Store cache might cause this installation issue to occur. Some users reported that performing a Microsoft Store reset fixed the issue.

In order to reset the Microsoft Store cache, follow these steps:

  • Click the Start button > open Settings

  • Find in the search box the Apps & Features section

  • In the Apps & Features section, find Microsoft Store and select it > click Advanced options

  • Click Reset

  • Try installing Gears of War 4 again and see if it fixed the issue.

5. Fix the error through Power Shell

Sometimes the installation is interrupted by previous installations that you performed on your computer. Old GOW4 install files could trigger system conflicts.

Removing these old installation bits is required in order to fix the issue.

Follow the next steps, allowing you to go through with the process:

  • Press the Windows logo key + X on your keyboard > click Windows Power Shell (Admin)
  • Input the following command into Power Shell and press Enter

get-appxpackage -all |% {if ($_.packageuserinformation.installstate -eq “Staged”) {$_.packagefullname}}

  • Find the following package name and copy it in Notepad

Microsoft.SpartaUWP.8174f199b5_12.0.0.2_x64__8wekyb3d8bbwe

  • Remove this specific package by inputting the following command

remove-appxpackage Microsoft.SpartaUWP.8174f199b5_12.0.0.2_x64__8wekyb3d8bbwe

  • Close Power Shell and see if it fixed the issue

We hope that you managed to fix your Gears of War 4 issues using the solutions from our guide.

If you found this article helpful, leave a comment in the comment section below.

READ ALSO:

How to remove Amazon Script error on Internet Explorer [Super Guide]

At times, users get a script error message that reads A script on this page is causing your web browser to run slowly. This error is often accompanied by a web address, which reads https://ubp-common-uk-prod.s3.amazonaws.com/require/require.js. With the contents in the web address, it is evident that the error is associated with an Amazon program, specifically the Amazon Assistant program. Moreover, the error occurs on Internet Explorer exclusively.

The problem isn’t common, but there are multiple reports.

“I have recently started to see a ‘script error‘ message appear on my desk top. I searched the topic and only found errors that affect IE. This error occurs before I launch my browser. There is a URL in the message box (https://ubp-common-uk-prod.s3.amazonaws.com/require/require.js). The ‘error‘ doesn’t seem to cause any problems and is a pain to have to clear it. Any thoughts?“

Deal with the problem at hand by reading our step-by-step instructions below.

How to fix the Script Error Amazon on Internet Explorer

1. Uninstall the primary program

  1. Click on the ‘Windows‘ icon (on your desktop window) to open the Start menu.
  2. Now, type apps and features and then click on it.apps & features
  3. Click on Uninstall a program option.uninstall a program control panel
  4. From the list of installed programs, locate Amazon Assistant and then uninstall it.
  5. Confirm the action in the confirmation window.

2. Run the Autoruns64 program under Sysinternals

  1. Once you’ve download Sysinternals, from here, unpack and extract the ZIP file and save it in a separate folder.extract compressed folder
  2. Locate the program named “Autoruns64”, and launch it.
  3. In the program‘s window, type”amazon” in the filter board and hit the Enter key.
  4. In the results, locate all programs related to Amazon Assistant; notably “Amazon1buttonservice64.exe” and “Amazon1buttonApp”.
  5. Navigate to the login tab and uncheck the boxes next to each of the programs/processes.
  6. Save changes and exit program.

3. Restart computer

  1. Navigate to your desktop window.
  2. Click on the Windows icon to open the Start menu.
  3. In the menu, locate the Power icon and click on it.
  4. From the displayed options, select Restart.restart PC
  5. Wait for the system to restart.

After restarting your system, you can proceed to the next and final step.


4. Remove Amazon1buttonservice64.exe & Amazon1ButtonApp

  1. Open Windows Explorer: click Windows + E
  2. Select This PC.
  3. Select C:drive (local disk).system drive partition C:
  4. In the C: drive, locate and double-click on the Program Files (x86) folder.program files
  5. In the folder, find the Amazon1ButtonApp subfolder and right-click on it.
  6. Delete the folder.delete folder program files

After going through this procedure from step 1 to 5, you should encounter the script error no more, and your browser should now load fine.

Hope you find this helpful in fixing “script error Amazon” problem?

RELATED STORIES YOU SHOULD CHECK OUT:

Windows 10/11 Won’t Enter Recovery Mode [Troubleshoot]

Windows Recovery Environment not booting? You’re not alone. Some PCs fail to boot or get stuck during startup, and sometimes Windows won’t even load the recovery tools when it should.

In this guide, we’ll show you what to do when recovery mode won’t start—no matter how many times you restart.

What should I do if Windows 10 won’t enter recovery mode?

1. Hard Reboot PC

  1. Disconnect all external devices from your PC.
    usb cable
  2. Disconnect the charger from the power source.
  3. Press & hold down the power button (hold for up 25 seconds).
  4. Remove the battery and reinsert it.
  5. Reconnect the charger and press the power button again (to power it up).

2. Force-Enter Safe Mode

  1. Disrupt the boot process as many times as you can. This should bring up the recovery window.
  2. If the recovery window comes up, you can proceed; otherwise, abort.
  3. In the recovery window (Advanced Startup Options), select Troubleshoot.
  4. Select Advanced options.
  5. On the list of options, click on Startup Repair.
    advanced options - startup repair
  6. Follow on-screen commands to repair startup and restart the system in safe mode.

If you cannot boot up in safe mode using this method, you can try the next solution.

3. Use a Recovery Drive

Step 1: Create a recovery drive

  1. Get another Windows 10 PC and a flash drive (>512 MB storage capacity).
  2. Slot in the flash drive.
  3. Go to Start > Control Panel, type Create a recovery drive and then click on it.
    create a recovery drive
  4. Follow the prompt commands to finish the process.

Step 2:  Boot up PC

  1. Enable the flash drive as “bootable”. This can be done in the BIOS settings.
  2. Slot the drive in your PC.
  3. Open Advanced Startup Options.
    advanced startup restart now
  4. Click on Continue to restart PC. Alternatively, select the Use a device option, and use the recovery drive (flash drive) to restart the system.

4. Repair startup

  1. Go to Troubleshoot.
  2. Select Advanced options
  3. Click on Startup Repair, and follow the prompt instructions to the process.
    advanced options

5. Restore system

  1. In the ‘Advanced Startup Options’ window, click on Troubleshoot.
  2. Select Advanced options > System Restore.
    advanced options system recovery
  3. Follow on-screen instructions to finish the restore process.

One of the troubleshooting techniques here (using the recovery drive) should fix the problem. However, if the problem persists, you can try and enter the recovery mode via an installation media.

If you’ve tried all the troubleshooting techniques in this tutorial without making any headway, there is the likelihood of system corruption and/or hardware damage. Hopefully, that’s not the case, and the Windows 10 won’t enter Recovery mode error won’t appear again.

Now that you’ve fixed this issue, why not look at our guide on how to exit Windows Recovery Mode?

Still stuck? You might want to double-check that you’re following the correct method for your version of Windows. Here’s how to enter recovery mode in Windows 10 and Windows 11, step by step.

If you can access the screen but your keyboard isn’t responding, see our fix for Windows 10 recovery mode keyboard not working.

In the event of corruption, you can use an antivirus program to scan and fix the error.

Still Setting up Class Configuration: Fix Code 56

Did you get Windows is still setting up the class configuration for this device error message? Don’t panic! We will show you how to resolve this error message.

The error message occurs when the PC doesn’t have network connectivity or the Internet speed is slow. Problems may also arise due to a VPN conflict with your network adapter. Let’s find out how you can fix things!

How do I fix Setting up the class configuration for this device error?

1. Use the Network Adapter troubleshooter

  1. Press the Windows key to launch the Start Menu.
  2. Now, type troubleshoot and hit the Enter key.troubleshoot windows 10
  3. Go to the Network Adapter option and click on it.troubleshoot network adapter windows 10
  4. Select Run the troubleshooter.run the network adapter troubleshooter
  5. Follow the prompts to finish up the process.
  6. Restart PC.

After restarting your PC, you can then start your Internet connection to see if it works.

2. Disable your VPN connection

  1. Press Windows + R to open Run, type ncpa.cpl, and then hit Enter.run ncpa.cpl
  2. Right-click on your VPN and then select Disable from the list of options.disable network
  3. Now, launch your web browser and check if the Internet is working or not.

Once done, verify whether the Windows is still setting up the class configuration for this device error is resolved.

Note icon NOTE
Some recommended VPN programs, such as BullGuard VPN, NordVPN, and CyberGhost are notable for working effectively with any type of Internet connection. Therefore, you should migrate to such a VPN to prevent errors with your Internet connection.

3. Reset network settings

  1. Press Windows + I to launch Settings.
  2. Go to Network and Internet.network & internet settings
  3. Scroll down to locate the Network reset option, then click on it.reset network settings windows 10
  4. Click on Reset now and wait for the process to be complete.Network reset Reset now

4. Run Windows Update

  1. Go to Start, type Windows Update in the search box, and then click on the relevant search result.
  2. Now, click on Check for updates and install the available updates.windows update check for updates
  3. After the update is complete, restart your Windows PC.

We do hope that you are able to fix the Windows is still setting up the class configuration for this device error by applying any of the aforementioned solutions above.

Before you leave, do check the best driver update tools to prevent such issues from arising.

For any queries or to share more solutions with us, drop a comment below.

NBA 2K17 My Career file missing/corrupted on Xbox One [EASY GUIDE]

NBA 2K17 is the go-to game when it comes to basketball simulations. For the past few years, 2k Sports developers are doing an amazing job.

It is hard to make something already great even better. But, with online modes and realistic gameplay, this game passed its predecessor. Nevertheless, its predecessors are the only competition.

Statistics say that for the previous few years, the NBA 2K has been one of the most popular console games. Besides some minor bugs, the game functions solidly.

However, there are some issues that can prove challenging from time to time. One of those is data corruption.

Namely, some Xbox One users reported corrupted save files that are unable to load. One of the most common issues affects the game‘s My Career file.

More specifically, My Career file is missing or got corrupted. We have prepared some workarounds to fix this issue.

How do I get My Career back in NBA 2K17? The simplest method is to load your backup files from the cloud. Usually, My Career is missing because of data corruption. If that doesn’t work, restart your network and then reinstall the game.

To learn how to do that, check the guide below.my career is missing/corrupted in NBA 2k17

What can I do if NBA2k17 My Career file is missing/ got corrupted?

  1. Load backup files from cloud
  2. Restart the network
  3. Reinstall the game

Solution 1 – Load backup files from cloud

If you are prompted with the ”File is corrupted” or “File is missing” errors, this workaround can help you. For starters, for no apparent reason, your files get corrupted and all you can do is delete them.

However, since the Xbox One saves your data, you can retrieve it from cloud easily. Be aware that you are deleting only the files stored on your console, not the ones from the cloud storage.

  1. Go to your Dashboard and select NBA2k17.career file is missing/corrupted xbox one nba 2k17
  2. Choose Manage game.
  3. Go to Saved data > Clear Reserved Space file.
  4. Exit and go to Settings > All Settings.
  5. Open System.xbox one system settings nba 2k17 career file corrupted
  6. Then open Storage.
  7. Select Clear local saved games.
  8. Restart your Xbox One.
  9. Start Nba2k17 and wait for files to be synced.

Once the files are synced, you should be able to continue your My Career or any other corrupted mode.

Solution 2 – Restart the network

An alternative workaround is manually switching your network. It seems that some online modes can occasionally cause file corruption. This can cause a small breakdown and we were all there. So, follow these instructions in order to resolve this issue:

  1. Go to Settings > Network Settings.
  2. Choose to Forget your network or Go Offline.xbox Network settings nba 2k17 career file missing
  3. Shut down the console and unplug your Power Source.
  4. Start Xbox One again.
  5. Enable your Network.
  6. Start the Game.

-READ ALSO: NBA 2K17 errors 49730116, a21468b6 prevent gamers from loading the Career mode

Solution 3 – Reinstall the game

If you didn’t manage to fix the game with the previously-listed solutions, the re-installation is your best bet. On some occasions, the corrupted or missing files can affect the all-around game, and there so, lead to crashes or lags.

You can reinstall the game by following these instructions.

  1. Highlight NBA2k17 and press the menu button on your controller.
  2. Select Manage Game.
  3. Choose the stored device where the game is installed.
  4. Select Uninstall.
  5. Once the game has uninstalled, return to My Games & Apps.
  6. Scroll right to the Ready to Install section under Games.nba 2k17 career file is missing on xbox one
  7. Highlight the NBA2k17.
  8. Press A to select.
  9. Choose Install.

After the installation is completed, start the game. In addition, the saved files should be automatically synced from the cloud.

Also, check your account. Sometimes this issue can be triggered by an expired account or a wrong one. Log in with the right account and check if it’s expired or not.

We hope you managed to resolve your issues and keep on progressing in your favourite mode. Moreover, if you have any questions or suggestions, be sure to tell us in the comments section below.

[wl_navigator]

Microsoft ready to show off 14 new Xbox Game Studios at its E3 briefing on June 9

With E3 2019 now just a couple of days away, the Xbox team is getting ready to “go big” at the annual trade show where Microsoft plans to have its biggest presence ever. Of course, what everyone will be looking at is the Xbox press briefing on June 9, and Xbox head Phil Spencer teased us about what to expect yesterday.

According to the Xbox exec, Microsoft will showcase 14 upcoming Xbox Game Studios titles during the event, including “more first party games than we’ve ever had in the show.”

Gears 5 and Halo: Infinite are among the new first-party games that will undoubtedly make an appearance, but we may also see the rumored Fable 4 game that Forza Horizon 4 developer is rumoured to be working on. Microsoft also acquired several new studios since last year, and we also don’t know yet what the company’s brand new studio named The Initiative is currently working on.

Xbox Game Studios also acts as a publisher for some high-profile third party games. You may remember Microsoft’s timed-exclusivity deals on Rise of the Tomb Raider, Dead Rising 4, or PUBG in recent years, though it remains to be seen if Microsoft is willing to pursue this strategy. Otherwise, the much-anticipated Ori and the Will of the Wisps will also be published by Xbox Game Studios this year, and we should finally learn its release date on Xbox One and Windows at E3.

In addition to all these new Xbox Game Studios titles, Microsoft will share more details about its new Xbox Game Pass for PC offering that was announced yesterday. After Sony shared the first hardware details about the PlayStation 5, we also expect Microsoft to announce its next-gen “Scarlett” consoles at E3.

Microsoft’s E3 press briefing will kick off at 1PM PST on June 9, and the Xbox Mixer channel will be the only place where you can watch it in 4K. Even better, Microsoft will once again offer some “MixPot” digital rewards to Xbox fans who watch the event on Mixer.

Fix: Keyboard Lights not Working on Windows [5 Ways]

Keyboard lights are extremely useful when working in dark environments, but many users reported that laptop keyboard lights won’t turn on their PCs.

This can be an issue because you won’t be able to see your keys in the dark, but you’ll be pleased that there’s a way to fix this problem.

Since the last windows 10 update I have lost the keyboard backlight on my Toshiba Satellite laptop. I have checked for updated drivers and my keyboard function light is set for ON. What is up with this?

Why is my keyboard not lighting up?

There are reasons your keyboard is not lighting up within a close circle. Below are the two popular ones:

  • Reduced backlight: The first thing to consider if your keyboard light is not working is whether you have mistakenly reduced it. If it is, you need to increase it appropriately.
  • Glitches with the hardware: Sometimes, this problem might be due to a minor issue with your keyboard. In this case, you need to run the Keyboard troubleshooter to diagnose and fix the issue.
  • Outdated driver: Some users have found outdated keyboard drivers to cause this issue. To fix this, you need to update your driver to the latest version.

Now that you know the causes of the issue, below are some of the variations of this issue you can fix with this guide:

  • Keyboard light not working Dell
  • Keyboard light not working Asus
  • Keyboard light not working Lenovo
  • Keyboard light not working HP

How do I get my keyboard to light up again?

1. Press the keyboard shortcut

keyboard shortcut laptop keyboard lights won't turn on
  1. In the case that the Spacebar on your keyboard has a keyboard icon on its left side, hold the function Fn key and hit the Spacebar once.
  2. Hit the F12 key.
  3. Then, press the F5 key.
  4. Also, press the key with the backlight sign on it.

2. Increase the lighting of the backlit keyboard

  1. Press the Windows key, type control, and select Control Panel.
    control keyboard light not working
  2. Click the dropdown next to View by and select Large icons.
    large icons keyboard light not working
  3. Now, select Windows Mobility Center.
    mobility
  4. Navigate to the Keyboard backlit icon and click on it.
  5. A Keyboard backlit window will come up. Choose On under Keyboard lighting. To adjust the keyboard brightness, choose either the Bright or Dim option.  
  6. Click on OK to save changes.

Once your keyboard backlight is working again, you can personalize it to your liking. Learn how to change your keyboard backlight color using built-in tools or RGB control software.


3. Check if the keyboard application exists

  1. Press the Windows key.
  2. Type Keyboard backlit in the search box, there you will find the settings.
    backlit
  3. You can confirm if the keyboard backlit is enabled or not.

4. Troubleshoot your keyboard

  1. Press the Windows key + I and select the Update & Security option.
    update and
  2. Click Troubleshoot in the left pane and select Additional troubleshooters.
    troubleshoot keyboard light not working
  3. Finally, select the Keyboard option and click Run the troubleshooter.
    run keyboard

Sometimes, the keyboard light not working might be minor issues with your hardware. The built-in troubleshooter is perfectly placed in this case to fix this.

5. Update the keyboard driver

  1. Press the Windows key + X and select Device Manager.
    device manager
  2. Double-click the Keyboard option to expand it and right-click the device there.
  3. Now, choose Update driver.
    update driver keyboard light not working
  4. Finally, select the Search automatically for drivers option and install any available updates.
    search auto

If the fixes above fail to fix the keyboard light not working issue, you need to update your drivers. You can go to the manufacturer’s website to download and install the latest driver if Windows can’t find them.

That is everything you need to fix the keyboard not working issue. You only need to follow the steps carefully, and things should be back to normal.

If your keyboard is typing the wrong characters and letters, check this detailed guide to fix it quickly.

So these are the steps to carry out when your laptop keyboard lights won’t turn on. If you found this article helpful, let us know in the comments below.

Digital pre-orders for Call of Duty: Modern Warfare’s 3 versions are now open Xbox One

The new Call of Duty: Modern Warfare video game is now available to pre-order digitally on Xbox One.

The game is being released in three different digital versions; a Digital Standard Edition (which comes with the base game, a Digital Edition bonus item, and a Prestige Token for Call of Duty: Black Ops 4), an Operator Edition (that comes with everything in the Digital Standard Edition plus Operator Edition premium digital items), and the Operator Enhanced Edition (which has everything from the previous two versions and 3,000 Call of Duty Points).

Here’s the official game description and trailer:

Prepare to go dark, Modern Warfare is back! The stakes have never been higher as players take on the role of lethal Tier One operators in a heart-racing saga that will affect the global balance of power. Call of Duty: Modern Warfare engulfs fans in an incredibly raw, gritty, provocative narrative that brings unrivaled intensity and shines a light on the changing nature of modern war. Developed by the studio that started it all, Infinity Ward delivers an epic reimagining of the iconic Modern Warfare series from the ground up.

In the visceral and dramatic single-player story campaign, Call of Duty: Modern Warfare pushes boundaries and breaks rules the way only Modern Warfare can. Players will engage in breathtaking covert operations alongside a diverse cast of international special forces throughout iconic European cities and volatile expanses of the Middle East. And the story doesn’t end there. In Call of Duty: Modern Warfare, players will be thrust into an immersive narrative spanning the entire game. Experience the ultimate online playground with classic multiplayer, or squad-up and play cooperatively in a collection of elite operations accessible to all skill levels.

Call of Duty: Modern Warfare made headlines earlier today when it was announced that the game would be the first in the franchise to support crossplay between Xbox One, PlayStation 4, and PC. Console to PC crossplay is expected at launch in October with Xbox and PlayStation crossplay planned soon after.

Call of Duty: Modern Warfare will also see the removal of the Season Pass DLC system.

Are you excited for Call of Duty: Modern Warfare? Let us know which version you’re planning to pre-order in the comments below and then follow us on Pinterest for more Xbox gaming content.


How to fix Camera App bugs after Windows 10/11 Update

Microsoft finally released Windows 10 May 2019 Update to the general public. The company listed some known issues that come along with this update.

Apart from the known issues, Windows 10 users also reported a series of additional issues on Microsoft’s forums.

Many Windows 10 users who installed the May 2019 Update reported Camera app launching issues. Microsoft acknowledged the bug and stated that it affects Intel RealSense series. Microsoft says that:

After updating to the Windows 10 May 2019 Update and launching the Camera app, you may get an error message stating: ‘Close other apps, error code: 0XA00F4243.

Microsoft placed an upgrade block for Intel RealSense S200 and Intel RealSense SR300. There are various workarounds that you can try to temporarily fix the issue.

Let’s have a look at some of the recommended solutions that can fix the bug.

Quick workarounds for Camera App issues

1. Reconnect the camera

It is one of the easiest workarounds that you can try. Microsoft suggests that you should unplug and reconnect the camera to your device. This technique is going to resolve the issue by establishing a new connection.

This should technically reset the connection to your Windows 10 May 2019 Update device. So, if you’re lucky enough, everything should then work normally.

Move on to the second option if the issue is not resolved.

2. Restart RealSense service

Microsoft recommends its users to visit Task Manager in order to restart the RealSense service.

  1. You need to Right click on the taskba
  2. Navigate to Task Manager > Services
  3. Right-click RealSense > Restart.restart RealSense driver

You should not experience any issues when launching the Camera application. You may need to restart the service in case you reboot your system.  

3. Disable camera in Device Manager

If the above two solutions did not work, you can simply try this third method. You can navigate to the Device Manager to disable your camera. Try the following steps to fix the issue:

  1. Right click on the Start Menu and navigate to Device Manager 
  2. Expand Cameras
  3. Right-click RealSense disable the camera.

RELATED ARTICLES YOU NEED TO CHECK OUT:

How to fix Direct 3D full screen issues in Windows 10/11

We already know that every Windows 10 update brings a new series of bugs that frustrates users. The same is valid for the May 2019 Update.

Microsoft recently confirmed that some ‘Direct3D (D3D) applications and games may fail to enter full-screen mode on displays where the display orientation has been changed from the default (e.g., a landscape display in portrait mode’.

Microsoft says that its engineers are working on a fix which should be available in June. However, Microsoft recommended users to resort to some temporary solutions to fix the issue.

Steps to fix D3D full-screen issues on Windows 10

1. Run the apps/ games in windowed mode

The first solution is pretty handy and it can quickly solve the issue for you. You can try to run your apps in windowed mode.

However, this feature is not available on some high power games. Luckily, there is also a workaround for those games.

You should use a secondary display to launch such games. Keep in mind that this display should not be rotated before launching the game.

This solution may not help too many users because of two obvious reasons. First, you must have a secondary display. Secondly, the method does not work on a previously rotated display.

2. Disable full-screen optimizations

If the above-mentioned solution does not work, you can try a second option. You need to disable Full-Screen optimizations by updating the application’s compatibility settings. Try the following steps to change the settings:

Open the application’s or the game‘s root folder and look for the main executable file. Now, right click on the .exe file and navigate to Properties >> Compatibility tab >> Settings >> Disable fullscreen optimizations >> Apply. disable full screen optimizations PC

You don’t need to restart your PC now because the settings will be immediately applied.

3. Reboot your system

A third option, that’s not recommended by Microsoft, but which could do the trick is a simple system reboot. Microsoft says the bug only happens on a device where the screen orientation was previously adjusted.

So, if you reboot the computer and don’t make any changes in this regard, the games should launch normally in full screen with no issue whatsoever.

RELATED ARTICLES YOU NEED TO CHECK OUT:

There was a problem acquiring personal certificate Skype issue [FIX]

Some Windows 10 users reported experiencing an issue when trying to sign-in using Skype for Business (Office 365). The error message There was a problem acquiring a personal certificate required to sign in. If the problem continues, please contact your support team pops-up, blocking access to their Skype for Business accounts.

Here’s how one user describes this problem:

I have worked with a user on a problem with skype for business online for quite a long time now and i can’t seem to figure it out. […]
Case: User is not able to sign in to skype for business, with the following error message: “There was a problem acquiring a personal certificate required to sign in. If the problem continues, please contact your support team.”

This issue could be caused by software or certificate conflicts.

In order to fix this sign-in issue, we managed to come up with a series of fixes.

Solutions to fix Skype sign-in certificate problems

1. Delete the sign-in info

  1. On the Skype for Business sign-in window, click Delete my-sign in informationdelete skype sign-in info windows 10
  2. This deletes your saved password, certificates, and connection settings
  3. Next, you have to input the account info and see if you can log in.

2. Flush DNS cache

  1. Open Command Prompt (Run as Administrator) > type the following command and press Enter:
    ipconfig
    /flushdns
  2. Wait until the process completes and then close CMD.


Windows 10 Firewall might be blocking Skype as well. Learn how to unblock it here.


3. Make changes through the Registry Editor

  1. Press the Windows logo key + R on your keyboard > type regedit and hit Enter to open the Registry Editor
  2. Find the following registry path: HKEY_LOCAL_MACHINESOFTWAREMicrosoftCryptographyMachineGuidThere was a problem acquiring personal certificate Skype
  3. Double click on MachineGuid > if the value contains a list of numbers and letters in brackets – e.g. {c1cbd94c-0d35-414c-89ef-dd092b984883} – delete itThere was a problem acquiring personal certificate Skype
  4. Close the Registry Editor > restart Lync and try signing-in to Skype for Business.

4. Perform some troubleshooting steps for Lync 2010 and Lync 2013

If you’re still using Lync, here is how you can fix this problem:

  1. Locate the app data folder: %LOCALAPPDATA%MicrosoftCommunicator<[email protected]
  2. Delete the folder containing information associated with your email address
  3. Restart Lync and try to sign-in using Skype for Business

If you’re using Lync 2010, delete the personal certificate following these steps:

  1. Press the Windows logo key + R on your keyboard > type certmgr.msc and hit Enter
  2. In the Certificates Manager, click to expand Personal > CertificatesThere was a problem acquiring personal certificate Skype
  3. Click to sort by Issued By column > locate the certificate issues by Communications Server
  4. Check to see if the certificate exists and isn’t expired
  5. Delete the certificate > try to sign-in to Skype for Business.

If nothing seems to help, try reaching the Support Center on the official Microsoft web page and let them know about the issue.

Let us know in the comment section if you found this article helpful and you were able to fix the There was a problem acquiring personal certificate Skype error.

READ ALSO:

Intel 10th-Gen Ice Lake CPUs enable 3x faster wireless speeds

Intel recently announced its new Ice Lake (10th gen Core processors) CPU lineup at Computex 2019.

The company plans to introduce these processors for 2-in-1 PCs and laptops. These processors will be available in three different variants Core i3, i5 and i7.

Furthermore, Ice Lake CPUs will feature 8 threads and 4 cores. The graphics frequency is set up at 1.1 GHz and the turbo frequency can reach up to 4.1.

The company says that users will enjoy their favorite games at 1080 with the new Iris Plus graphics. The graphics are based on Intel’s Gen11 graphics architecture.

The power graphics support other activities such as 4K video editing, 4K HDR video streaming, and high-resolutionphoto processing.

Support for Wi-Fi 6 and Thunderbolt 3 is also included. Windows 10 users will enjoy wireless speeds 3x higher than the current standard.

For more information about the tech details, you can check out Intel’s press release post.

Intel’s highly integrated 10th Gen Intel Core processors give OEM partners the freedom to innovate on design and aesthetic by reducing the silicon footprint while still delivering the latest and greatest standards and world-class performance.

First batch lands next month

intel 10th-generation CPU windows 10

The first batch of Intel’s 10th-gen chips is expected to arrive next month. The company announced that the 10th Gen Ice Lake processors with 30 or more designs will hit the stores during the holiday season.

It all depends on Intel’s supply, but Intel believes that it is capable to meet the demand. Finally, Intel wants PC manufacturers to come up with innovative features such as extended battery life and others.

The chip maker confirmed it’s currently working on the first version of 10th-Gen Ice Lake CPU laptops. Intel wants PC manufacturers to meet specific targets such as a battery life of 9 hours.

We can’t wait to get out hands on these 10th-Gen Ice Lake CPU machines.

RELATED POSTS:

FIFA 17 stuck on loading screen [UPDATED FIXES]

Fifa is one of the most played online soccer game nowadays, with millions of players worldwide. Although Fifa 17 launched a few years ago, many Xbox users still enjoy playing it pretty consistently.

The game certainly is an improvement compared to its predecessor with more realistic gameplay and better online features. And there is no better way to experience FIFA 17 online matches than on Xbox One.

However, there are reports about a loading screen issue, according to active Xbox One players in the community. On some occasions, the game won’t load past the Marco Reus initial screen.

Additionally, some users reported a black screen that follows. The problem has been present since the release of the game and is quite unpredictable.

What can I do if FIFA 17 is stuck on the loading screen? The simplest solution is to clear the network settings. In most cases, game crashes on Xbox are caused by network issues or corrupted files. If that doesn’t work, clear your consoles cache and then reinstall the game.

Check the steps below to learn how to do that.

How to get past the FIFA 17’s loading screen on Xbox One:

  1. Clear the Mac address
  2. Try disconnecting unused controller
  3. Clear console cache
  4. Reinstall the game
  5. Reset your console to factory default settings

Solution 1 – Clear the Mac address

This solution is confirmed as working by the majority of users, and that’s why you should try it first. To clear your network settings, follow the steps:

  1. Go to Settings.fifa 17 stuck on loading screen
  2. Choose Network Settings.advanced wi-fi settings xbox one fifa 17 stuck
  3. Navigate to Advanced Networks and then Alternete MAC address.
  4. Hit Clear.
  5. Restart your Xbox.
  6. Unplug the power cord and plug it back in.
  7. Now start your console.

After this, the issue should be gone and your Fifa 17 should get pass the Reus screen.

  • READ ALSO: Fix: FIFA 17 won’t update on Xbox One

Solution 2 – Try disconnecting unused controller

Some users managed to fix this issue by disconnecting unused controllers or other USB peripheral devices. It seems that some bug inflicts the game when all of them are connected.

Additionally, you’ll probably want to assign your controller to your profile. To do so, follow these steps:

  1. Return to your Xbox dashboard.
  2. Go to Settings.
  3. Open All Settings.
  4. Choose Kinect and Devices.
  5. Open Devices and Accessories.
  6. Choose the controller you use while playing FIFA 17.
  7. Select Assign to someone.
  8. Assign controller to your profile.
  9. Save and exit.

This can be an easy workaround for your issue. On the other hand, if the problem is persistent, try other solutions below.

  • READ ALSO: Grab this cool Phantom White Special Edition Xbox One controller now

Solution 3 – Clear console cache

Clearing your Xbox One cache may work. On some occasions, corrupted files stored in your cache can invoke freezing issues. In addition, this will give you an insight on the game‘s state.

So, if the game is still unresponsive, a reinstall would be the next step. To clear the cache from your console, do as follows:

  1. Go to System Settings.
  2. Select Storage.
  3. Choose hard drive device.
  4. Press Y for additional options.
  5. Choose Clear System Cache.
  6. After it is done, reboot your console.

-READ ALSO: How to fix Your network is behind a port-restricted NAT error on Xbox One

Solution 4 – Reinstall the game

If you completed the previous steps and all you still see is Marco Reus followed by an unwelcoming black screen, reinstalling the game is the next logical solution.

One thing to remember is to back up your in-game data to the cloud. To reinstall the game, follow these instructions:

  1. Go to Xbox dashboard.fifa 17 stuck at first screen xbox dashboard
  2. Select My games and apps.
  3. Highlight FIFA 17 and press Menu button.
  4. Choose Manage game from the pop-up menu.
  5. Use the Saved data option from the left side to save your in-game data.
  6. When you are ready, select Uninstall all and wait until the process is finished.

Next step would be reinstalling the game. You can do so by following these instructions:

  1. If you own the physical copy of FIFA, the install process will start as soon you insert the disc in the console. Just choose Install when prompted.
  2. For the digital copy, go to the My games and apps.
  3.  You should see FIFA 17 in Ready to Install.install fifa 17 online xbox one
  4. Select Install and wait until the process is done.

Have in mind that on some occasions, the game is not shown in Ready To Install section. This is a common bug related to a Xbox Game Store. You should wait for some time, and the game will appear in the list.

Solution 5 – Reset your console to factory default settings

In the end, if all of the previous troubleshooting options are unsuccessful, you should move on to resetting your console. This proved as a valid solution for many users.

It seems that some of the settings interfere with the FIFA 17 and prevent the game from starting. We don’t want you to rush things and lose achievements, so follow the next steps closely:

  1. Go to the Settings.
  2. Choose All settings.
  3. Select System.
  4. Select Console info and updates.
  5. Choose Reset console.
  6. Choose Reset and keep my games and apps.
  7. The resetting process will start and finish after few minutes.

This is our best bet for overcoming stuck loading screen issue.

If you follow the steps in each solution properly, you’ll most certainly get the job done. Afterwards, you can return to your game and enjoy competing with the rest of the world.

If you’re interested in bugs affecting the newer versions of the game on Xbox and how to solve them, check out this awesome guide.

If you managed to fix the game with some other solutions, please share your method. Also, if you have any more questions, don’t hesitate to leave them in the comments section below.

[wl_navigator]

FIFA 17 Not Launching or Opening: 4 Ways to Fix it

Many reported that FIFA 17 is not launching for them, and if this happens, you won’t be able to play the game at all. Luckily, there are a few methods you can use to fix this issue.

Why is my FIFA 17 not working?

The most common problem is damaged Visual C++ Redistributable packages. Corrupted game installation can also cause this problem.

How do I fix FIFA 17 not launching?

1. Repair the VC++ packages

  1. In the Windows search box, type Control Panel and hit Enter.
  2. In the Control Panel, under Programs, click on Uninstall a program.fifa 2017 doesn't start
  3. In the new window that appears, search for all Microsoft C++ Redistributable packages.
  4. Right-click on each and select Change.
    change repair
  5. When Microsoft C++ Redistributable Setup appears, click on Repair.
  6. Hit Close once the setup completes.
  7. Repeat the step for every C++ package you have.

2. Run the game as Administrator

  1. Right-click on the FIFA 17 desktop shortcut.
  2. Select Properties.
  3. Click on the Compatibility tab, and check the box at the bottom under Privilege Level where it says Run this Program as an administrator.
    run this program as administrator
  4. Click OK.

After setting the game to run in this compatibility mode, check if FIFA 17 is still not opening. If the problem still persists, move on to another solution.

3. Update your drivers

  1. Go to Search, type devicemng, and open Device Manager.
  2. Find your graphics card drive in the list of installed hardware.
  3. Right-click the driver, and select Update driver software.
  4. If the update is available, it will automatically update the driver, so just follow along.

There may be some other hardware in your computer that needs to be updated. In that case, check out our article about updating drivers in Windows 10, for additional info.

If you want to go for other methods than the one mentioned above, we suggest you try a reliable updater tool to update your drivers automatically with the latest versions from a large database with a single click.

⇒ Get Fortect Driver Updater

4. Repair the game

  1. Open Origin.
  2. Go to your library.
  3. Next, locate FIFA 17, right-click it, and choose Repair.
    repair sims 4 origin
  4. Wait for the process to finish.

This isn’t the only issue, and many reported that FIFA 17 stops working on PC or that FIFA 17 won’t connect to EA servers, but we already covered those issues in other guides.

If you have any other problems, visit our dedicated FIFA 17 issues article to learn how to fix them.

How to Fix Frequent Dota 2 Issues, Bugs and Crashes

We’ve prepared a list of the Dota 2 most common issues, with crashes and launching failures. Of course, with detailed explanations on how to fix them. Most problems can be fixed in the Steam client. Usually, they are triggered by faulty internet connection or corrupted files. After that, change some router settings and verify the integrity of the game cache.

Solve Dota 2 common issues, start failures, and crashes

1. Unable to download install file from Steam

  1. In order to download the game, Steam needs the HTTP connection. Disable any VPN or web proxy software on your PC, so the platform can function unrestricted.
  2. Check your system’s date and time. This is being overseen quite often, but it seems that wrong time and date can prevent Steam from downloading the game. Set it right!
  3. Try changing the Download Region. The reason for this is because your current region might be faulty at the time.
  4. Corrupted files in Steam installation folder can inflict this issue. To get rid of an interfering file, exit the Steam client, go to the Steam folder (default location is C:\Program Files), and then to userdata<your accountID>config. There, you should find the localconfig.vdf file. Delete it and restart the Steam client.

2. Common connectivity issues and troubleshooting

  1. Connect your PC with a router trough wired connection. Wireless is not best option when it comes to online gaming.
  2. Some providers include multiple additional features in the router setup. The risky ones are Stateful inspection, Dynamic packet filtering, QoS (Quality of Service) and UPnP (Universal Plug and Play). Disable these features within your router.
  3. Look out for Firewall exception for Steam, Dota 2, and related processes. The firewall can block Steam features and prevent the connection with servers. Turning off the firewall is not advisable, but you can give it a try, as well.dota 2 crashes on win 10
  4. Check the Steam Server status to be sure it is not being maintained or down.
  5. Next, check the Dota 2 latency to see if the servers are not overcrowded.
  6. Disable any background applications that may interfere with the client. Most of the programs that use the internet connection can prevent login or disturb in-game performances. This is especially the case with antivirus/antimalware/antispyware programs.
  7. Scan your PC for viruses. System infections can corrupt the Steam client.
  8. Make sure your router ports are opened.

What is the core of technical issues in online multiplayer games? Yes, PC components may lose power, or software may go astray. But, the ruler of MMO’s misbehaving is the faulty internet connection.

3. Incomplete Installation error

Some users reported that after the installation process is finished, they get prompted with the ‘Incomplete Installation’ error. There are multiple reasons for this issue and we are presenting them bellow.

We’ve already explored the most common Incomplete Installation’ error codes, so if this is your problem, click the highlighted link.

4. Unable to achieve multiple connections to server from the same router

There is a probability that your router can’t manage multiple PCs at one remote address. This obstruction does have a workaround and we found some possible solutions.

In order for multiple clients to function on a single router you have to follow these guidelines:

  • Each PC must have a different client port settings.
  • All respective PCs must have a unique MAC address.
  • Different PCs must have a unique Steam account with different game licenses registered to the account.
  • The router must be updated.

Additionally, you should change the Client Port in userconfig.cfg file. To do so, follow these steps:

  1. Go to C:Program FilesSteamsteamapps< your user name>Dota 2dotacfg.
  2. If you already have userconfig.cfg in that location, open it with Notepad.
  3. In case you don’t, create New Document with Notepad and name it userconfig.cfg.
  4. Open userconfig.cfg and type this: client port 27XX. Here XX are the last two digits of the client port number. Acceptable values include 05 – 19 and 21 – 32.
  5. Save the document.

5. Files unable to read/Files corrupted error

  1. Restart PC and open Steam client.
  2. Open Library.
  3. Right-click Dota 2.
  4. Click Properties.
  5. Select Local Files tab.
  6. Choose Verify integrity of game cache.
  7. The process execution time is proportional to the game size.
  8. If there is a corrupted file, Steam will highlight it.

Sometimes due to viruses or other unwanted content, game files can get incomplete or corrupted. Steam implemented a great solution for this, with a built-in tool that checks for file integrity.

6. Laptop with dual GPU malfunction

  1. Use AMD Catalyst or nVidia Control Panel.
  2. Find Manage 3D settings.
  3. In global settings set dedicated GPU as Preferred Graphic Processor.dota 2 bugs in windows 10

There are plenty of laptop configurations with two GPUs. Most of the time one is integrated Intel’s GPU with many variations. Other is probably a punchy AMD or nVidia.

On-board Intel is for standard use, while the other one is activated when some high graphical processes are involved. Like playing Dota 2, for example. The problem occurs when your SLI isn’t reaching to dedicated graphics when the game starts.

However, sometimes AMD graphics can’t resolve the issue even after you change the settings. If the primary solution couldn’t settle your issue with AMD GPU, you should try out the modded driver.

You can find it here. Have in mind that these are not official drivers.

7. Dota 2 crashes after pressing Start Game

  1. Go to Steam client > Library.
  2. Right-click the Dota 2 and choose Properties.
  3. In the General tab open Set Launch Options.
  4. Type -nod3d9ex.
  5. Save and start Dota 2.

Dota 2 crashes while in the matchmaking queue

In some cases, the screen ratio (yeah, you wouldn’t expect that) can cause game crashes. To fix this, go to in-game Graphic Settings and change the screen ratio. Keep switching them until you find a working one.

This was our list of the most common issues in Dota 2. We gave our best to help you overcome your problems and enjoy the game and all of its features undisturbed.

If you’re interested in more nifty guides to solve different Dota 2 problems, check out these articles:

Have you encountered some other issues related to the game? Please share them with us in the comments section below.

Void Bastards and Outer Wilds launch on Xbox One and jump straight to Xbox Game Pass

Outer Wilds and Void Bastards are both now playable on Microsoft’s family of Xbox One video game consoles and both are also playable for free for Xbox Game Pass subscribers.

Here’s the official game descriptions, trailers, and shopping links for each title.

Outer Wilds

Outer Wilds is an open world mystery about a solar system trapped in an endless time loop. Welcome to the Space Program! You’re the newest recruit of Outer Wilds Ventures, a fledgling space program searching for answers in a strange, constantly evolving solar system. Mysteries of the Solar System… What lurks in the heart of the ominous Dark Bramble? Who built the alien ruins on the Moon? Can the endless time loop be stopped? Answers await you in the most dangerous reaches of space.

A World That Changes Over Time. The planets of Outer Wilds are packed with hidden locations that change with the passage of time. Visit an underground city of before it’s swallowed by sand, or explore the surface of a planet as it crumbles beneath your feet. Every secret is guarded by hazardous environments and natural catastrophes.

Void Bastards

Forget everything you know about first-person shooters: Void Bastards asks you to take charge, not just point your gun and fire. Your task is to lead the rag-tag Void Bastards out of the Sargasso Nebula. You make the decisions: where to go, what to do and who to fight. And then you must carry out that strategy in the face of strange and terrible enemies.

On board derelict spaceships you’ll plan your mission, taking note of the ship layout, what hazards and enemies you might encounter and what terminals and other ship systems you can use to your advantage… Move carefully through the dangerous ships, searching for supplies and manipulating control systems. React to what you find – will you detour to the generator to bring the power back online or will you fight your way into the security module to disable the ship’s defenses? Choose carefully when to fight, when to run and when just to be a bastard.

Xbox Game Pass is a monthly subscription service that gives users access to around 100 Xbox video games. Most titles in the Game Pass library are available on Xbox One for a while before they’re added to Xbox Game Pass but some are also added on the same day that they launch to increase the player base and increase brand awareness.

Are you planning to buy either of these titles or are you just going to play them with Xbox Game Pass? Let us know which option you’ll choose in the comments below and then follow us on Pinterest for more Xbox gaming content.

Outer Wilds
Outer Wilds
Price:
$24.99


Void Bastards
Void Bastards
Developer:
Humble Games
Price:
$29.99

Get free Xbox video game DLC by watching E3 on Microsoft’s Mixer streaming service

As is now tradition, Mixer will once again be gifting those who view E3 livestreams on their platform with free digital content for Xbox video games.

The specifics of the free digital content has yet to be revealed but the official Mixer E3 web page does specify that the awards will only be given to those who watch the Xbox E3 Briefing on June 9th and/or the Sea of Thieves: Mixer Invitational on June 10th.

The gifting will also only work for those that have linked their Mixer account to their Microsoft/Xbox account as the codes for the content will be sent to viewers via an Xbox DM.

With Sony taking a break from conferences this year, Microsoft’s Xbox E3 Briefing is thought by many to be the big event of this year’s E3. In addition to the announcement of new and upcoming video games for the Xbox One, Microsoft is also expected to properly unveil their next generation Xbox console.

We’ll be covering all of the latest Xbox and Microsoft news coming out of E3 next month so make sure to check back here for all of the latest, bookmark our E3 2019 hub, and follow us on Twitter for news as it breaks.

Fix keyboard file building issues in Microsoft Keyboard Layout Creator

Microsoft Keyboard Layout Creator is an application allowing Windows users to create keyboard layouts containing different symbols.

It seems that there is an issue bugging many users.

After editing the new keyboard layout, MSKLC fails to build the keyboard file. This makes it impossible for users to actually use their needed keyboard layout.

Usually this error occurs due to a conflict generated by the path containing the Microsoft Keyboard Layout Creator.

Follow the instructions below to fix this issue.

Steps to fix keyboard file building issues

It seems that systems with 8.3 file names (or short file names) trigger this specific issue.

Because the installation folder is located in Program files and contains spaces in the app directory, MSKLC converts short file names in order to successfully compile the required data.

Having the short names disabled makes the system fail when building the keyboard file.

Fixing this issue requires you to move or install MSKLC to another folder that does not contain short names.

In order to solve the keyboard file building issue, you should have MSKLC located in a path similar to C:\msklc.

We hope that our simple guide on fixing the keyboard file building issue helped you out. If you liked this article, let us know in the comment section below.

READ ALSO:

Surface Pro intermittent pen accuracy issue [FIXED by EXPERTS]

If the form factor wasn’t enough, the other big plus with the Surface Pro is its compatibility with the Surface Pen which only adds to the tablet’s functionality. Unfortunately, things often aren’t the way they should be with the Surface Pen. And the one issue that is known to be have been causing considerable headache to its users is the Surface Pro intermittent pen accuracy.

How do I improve my Surface Pen accuracy? Firstly, you probably want to update Windows 10 on your Surface Pro as updates bring fixes and calibrate the pen. After the update, the problem should be gone. In addition, try disconnecting peripherals or resetting the Pen.

Check below for the detailed instructions.

How to deal with the Surface Pro intermittent pen accuracy issue

  1. Update Windows 10
  2. Disconnect peripherals
  3. Reset the Pen
  4. Test with another Surface Pen

1. Update Windows 10

check for windows updates

Surface Pro has often been diagnosed with the intermittent Surface Pen accuracy issue. Recognizing the shortcoming, Microsoft has issued a fix for the same which after undergoing the requisite tests has also been released for users to download on their devices. So, for those who have been facing this problem are requested to go on and update their Surface Pro devices to the latest build of Windows 10.

The steps should already be known though we mention it here again for convenience or for the first- time users.

  1. To update the Surface Pro, go to Start > Settings > Update & Security.
  2. There should be a Check for Update button shown. Click on it to see if there are any updates available.
  3. Click on Download if prompted to download the update.
  4. Follow on-screen instructions that might appear.

Alternately, you might also get to see a list of updates that have already been downloaded if you had opted for the automatic download option for the requisite updates. In that, you only have to click on the Install button to install those on your device.

2. Disconnect peripherals

One way to be sure there aren’t any peripherals interfering with the Surface Pen’s behavior is to disconnect them and see if normalcy returns. The best thing for you to do will be to disconnect all the accessories and such followed by restarting your Surface Pro device. See if the Pen is performing as desired.

3. Reset the Pen

Alternatively, you can reset the Surface Pen within settings. In order to do so, follow the steps below:

  1. Go to settings, select Devices, then Bluetooth & other devices.
  2. Click on Surface pen and select “Remove device”.
  3. Press and hold your pen’s top button for up to 7 seconds and only stop when a green light flash in the middle.

The Pen should reconnect and, hopefully, the intermittent pen accuracy issue will be resolved.

4. Test with another Surface Pen

surface pen and keyboard

There also are chances the Surface Pen itself is at fault. To rule out such a possibility, test with another Pen and see if the accuracy issue is still there. If no, you have other ways to deal with the issue (as has been outlined above), or else, you need to seek help from the service department to help remedy the problem. In the worst-case scenario, you might be needed to buy a new Pen altogether.

So, that should sum up almost all the scenarios on how to deal with the situation when the Surface Pen works intermittently.

Bye-bye Windows: Huawei announces its own OS for laptops

Huawei recently faced a major set back due to the latest US-imposed ban. Microsoft stopped selling Windows licences to Huawei. The Chinese telecom company is now looking for alternative ways to keep its devices alive.

Huawei’s very own OS code named Hongmeng recently came under the spotlight. Now the company made a major move, as it registered the trademark for the much-awaited OS.

The telecom giant submitted the trademark application on August 24, 2018. The trademark will remain valid from May 14, 2019 to May 13, 2029.

The head of Huawei’s consumer business branch, Richard Yu Chengdong confirmed that the operating system may be available in Spring next year.

Huawei first announced Hongmeng OS back in 2012. It looks like the company is now speeding up the development process. This decision was made after the US banned the sale of American hardware and software to Huawei.

Hongmeng coming to multiple platforms

The company registered the application under different categories such as Computer Operating Program, Operating System Program, and Computer Operating Software.

Richard Yu shared Huawei’s plans to use the new OS for various platforms such as smartphones, cars, tablets, TVs, computers and wearable devices.

The company further revealed the upcoming OS would offer compatibility with Web apps and Android apps.

The telecom giant acknowledged some challenges that may come in the way of the OS. Huawei says that it is easy to develop an operating system but building an ecosystem for Hongmeng is a challenging task.

Huawei confirmed it would launch two versions of the OS. The first one will target the global market and the second will be available to the domestic market. We will have to wait for a few more months to get some additional details from the company.

RELATED POSTS:

Windows needs to check one of your disks for consistency [EXPERT FIX]

It isn’t uncommon to have come across the Windows needs to check disk for consistency error message. You are more likely to encounter the error if your PC went for an improper shutdown, such as due to a sudden power outage or such.

An error with a system file that is preventing Windows to boot up could also be another reason for the error to crop up. An incomplete file change or the disk itself getting corrupted are among the other reasons for the error to appear. In the worst-case scenario, the frequent sighting of the error can also be the early signs of your disk likely to fail completely sometime soon.

Why Does My Computer Run Chkdsk at Startup? In order to fix this, perform the Chdsk scan and let it finalize. Once done, hopefully without errors found, it won’t reappear again. Alternatively, you can clear Check Disk entry from the Registry or deal with dirty bit status.

Read about solutions in detail below.

Why does my computer run chkdsk at startup?

  1. Perform the CHKDSK scan
  2. Clear Check Disk entry via Registry Editor
  3. Deal with dirty bit status

1. Perform the CHKDSK scan

A good first step to deal with the error is to not see it as an error in the first place. In other words, there might be valid reasons after all for Windows to flash the message Windows needs to check disk for inconsistency error during start-up. That makes it extremely important to perform the CHKDSK scan to rule out chances of your disk having any issues.

So, if your PC is opting for the scan during start-up, let it complete by not pressing any key while it’s in progress. Or you can also invoke the scan manually. Here are the steps.

  1. Open the Command Prompt For that, simply type cmd in the Cortana search box and press enter.
  2. In the Command Prompt window, type CHKDSK and press enter.CHKDSK cmd windows needs to check disk for consistency
  3. The process may take some time to complete. Please don’t interrupt during the process for an effective scan of your disk.

If the error no longer shows, your problem has been resolved. If not, try out the other methods listed below.


2. Clear Check disk entry via Registry Editor

If you are getting the Windows needs to check the disk for consistency error every time the windows boots up and even after successful completion of the CHKDSK process, here is something else you need to do – clear CHKDSK scans from the registry editor.

  1. Open Registry Editor by typing regedit in the Cortana search box.
  2. In Registry Editor, on the left-hand column, navigate to the following location.
    HKEY_LOCAL_MACHINE\SYSTEM\CurrentControlSet\
    Control\Session Manager
    .
  3. On the right panel, you should get to see BootExecute. Double click on it.
  4. See if its value is set as autocheck autochk *.
  5. If its set to anything else, like autocheck autochk * /r\DosDevice\C: , change it back to autocheck autochk *.
  6. HKEY_LOCAL_MACHINE -> SYSTEM -> CurrentControlSet -> Control -> Session Manager
  7. Close Registry Editor and restart your PC.

The error should be gone by now. If not, there is something else you can try.


3. Deal with dirty bit status

Yet another reason to be faced with the Windows needs to check the disk for consistency error is that it is the dirty bit of the disk that is set. Here is what you need to do to rule out such a scenario.

  1. Open Command Prompt. To do so, simply type cmd in the Cortana search box and select from the results shown.
  2. In the Command Prompt, type the following command and press enter – fsutil dirty query X:fsutil dirty query X: cmd windows needs to check disk for consistency
  3. Here X refers to the problematic drive letter.
  4. If the drive is shown to be dirty, run the following command and press enter – chkdsk D: /f /x
  5. However, if the drive is shown to be NOT Dirty, you can simply exit the Command Prompt.

So, this makes for quite a comprehensive method of dealing with the Windows needs to check disk for consistency error.

RELATED STORIES YOU SHOULD CHECK OUT:

We Couldn’t Save the List of Folders in OneDrive [Fix]

Syncing issues are among the most common with cloud accounts. Needless to say, the same applies to OneDrive as well, which makes it quite common to have the We couldn’t save the list of folders you chose to sync error once in a while, if not too frequently.

The error message often disappears automatically and then re-appears out of the blue. It could be linked to a server-related issue or problems with how OneDrive links to the PC. Keep reading to find the solutions!

How do I fix We couldn’t save the list of folders OneDrive error?

1. Unlink and then link your PC again

1.1 Unlink

  1. Right-click on the OneDrive icon. It should be on the lower right corner of your taskbar.
  2. From the options that show up, select Settings.
  3. In the Microsoft OneDrive window that shows up, select the Account tab if it isn’t showing by default.
  4. There, under OneDrive, click on Unlink this PC.unlink this PC
  5. There is going to be a confirmation box that shows up. Click on Unlink account for your PC to be de-linked from your OneDrive cloud account.

1.2 Re-link

  1. Click on the OneDrive icon located in the taskbar as before. This will launch the Set up OneDrive window.
  2. Enter your Microsoft email ID in the space provided and click on Sign in.
  3. Enter the login password in the next window that opens, and click on Sign in.
  4. Depending on whether you have enabled the two-step verification process for the Microsoft account, select how you wish to receive your security code.
  5. Follow on-screen instructions and enter the code where applicable.
  6. Once the verification process is over and you have been successfully signed in, you will be shown the OneDriver folder located on your PC.
  7. You can choose this location or opt for a new one. Follow the instructions accordingly.
  8. Once you are done, you can close the Microsoft OneDrive window.
  9. You should now be able to sync the desired folders to OneDrive.

Often unlinking and re-linking the accounts helps when you get the We couldn’t save the list of folders error box in Windows.

2. Select the folders you want to sync

  1. Right click on the OneDrive icon on the taskbar as before.
  2. Select Settings.
  3. Under the Account tab in the Microsoft OneDrive window that opens, click on Choose folders.
  4. Select the folders that you wish to sync and click on OK.sync folders to fix We couldn't save the list of folders

That’s it. You should not be able to sync to your OneDrive account with ease. On the other hand, if the issue persists, move to the last solution.

3. Reinstall the OneDrive client

3.1 Desktop client OneDrive for Windows 10

  1. Open the Control Panel and click on Uninstall a program.uninstall a program
  2. Select OneDrive from the list of applications, and click Uninstall.
  3. Go to the official site and download the OneDrive desktop client installation.
  4. Install OneDrive and log in with your credentials.

3.2 UWP OneDrive

  1. Search for white-cloud-icon for OneDrive in the Start Menu, right-click on it, and select Uninstall it.uninstall onedrive
  2. Open Microsoft Store and search for OneDrive.onedrive
  3. Install the app again and sign in with your credentials.
  4. Check whether the error is resolved.

Finally, if none of the aforementioned steps helped you fix the We couldn’t save the list of folders error, reinstalling the OneDrive client on Windows should resolve it.

Huawei banned from using Windows licenses, but we expected that

Previously, we reported that Google stopped working with the Chinese firm Huawei. Microsoft is now following suite.

The big M announced it would no longer provide Windows licences to the Chinese tech giant. Microsoft’s services team has already left Huawei’s headquarters based in Shenzhen.

As we reported earlier, the US added Huawei to its recent trade blacklist and imposed sanctions on the company. The government restrictions prevented the company from buying technology from American sellers. Microsoft suspended services for upcoming Huawei products.

No official statement so far

Both the concerned parties (Huawei and Microsoft) remained unavailable for comment. Furthermore, some other US companies that stopped supplies to Huawei include Qualcomm, Broadcom, Intel, and Xilinx.

The Chinese company received a major blow from Google. The search engine giant stopped future updates on Huawei’s Android smartphones. This clearly means that Google apps won’t be available on Huawei smartphones in the future.

Huawei managed to establish itself as the second largest smartphone vendor around the world. The company recently entered into the business of personal computers.

Huawei decided to target the US market in January this year. The company launched new laptops aiming to expand its business operations.

Hongmeng OS coming soon

Microsoft already started to remove Huawei products from its Store. Now, Huawei is working on releasing its own OS.

The upcoming in-house OS codenamed Hongmeng will support various products manufactured under Huawei’s banner. Hongmeng will replace Windows and Android operating systems on Huawei’s devices. 

Luckily, updates for existing Huawei machines running Windows 10 won’t be blocked. There are some reports that Microsoft may resume its collaboration with Huawei at some point later based on future conditions.

Hongmeng is expected to be available for Chinese users in the Fall of 2019. Moreover, the OS will go live internationally next year.

RELATED ARTICLES YOU NEED TO CHECK OUT:

Fix: SugarSync quits unexpectedly on Windows 10/11

In today’s world, living without decent cloud storage services is like living without a smartphone. Nowadays, there are a lot of different cloud services, but many of them are complicated and require a lot of time to setup.

Luckily, SugarSync makes it easy for you to sync your files between computers.

It has desktop and mobile apps that are intuitive and easy to use, and its online cloud storage and syncing service constantly monitors the folders on your computer and synchronizes changes whenever you add, edit, or delete a file.

However, SugarSync is not perfect and you will encounter errors from time to time. In this roundup, we are going to show you some workarounds to try if SugarSync quits unexpectedly.

What can I do if SugarSync keeps on quitting unexpectedly on Windows 10? The simplest fix is to reset the SugarSync Manager. The most common cause of the problem is data conflicts between the PC and SugarSync servers. If that doesn’t work, uninstall and reinstall the desktop app.

For more info on how to do that, check the guide below.SugarSync quits unexpectedly

How to fix SugarSync crashing on start:

  1. Reset the SugarSync Manager
  2. Uninstall and Reinstall the desktop app

Solution 1 – Reset the SugarSync Manager

While data conflicts between SugarSync servers and your computer is one of the major causes of syncing issues, it was singled out as a possible cause of the app quitting unexpectedly.

To fix the problem, force a resync by resetting the SugarSync manager app on your PC. To do so, follow the steps below:

  1. Open the SugarSync Manager application.
  2. Press and hold the CTRL + SHIFT + R keys on your computer’s keyboard to initiate the reset procedure.
  3. When the reset confirmation dialogue box pops up, click ‘Yes’. SugarSync will reset itself and shut down.
  4. Open the SugarSync Manager app again and enter your login credentials in the respective fields. Ensure the box asking whether you want to restore the sync folders is ticked, although it should be checked by default. This will enable SugarSync to synchronize the data between its online folders and your computer.

Solution 2 – Uninstall and Reinstall the desktop app

If the application keeps on crashing or quitting unexpectedly, there is no much you can do beyond uninstalling and reinstalling the app. After uninstalling the app, be sure to download and install the latest version.

Later versions come with bug fixes and also addresses issues with the previous versions. If the desktop app continues to misbehave even after a reinstall, then the issue might be with your account.

If that happens, send your log files to SugarSync’s customer support through a ticket for expert review. To do so, follow the steps below:

  1. Launch the SugarSync desktop app.
  2. Locate and click the menu icon with 3 horizontal lines (see the GIF video below). Then go to the help section.
  3. A dialogue box will pop up. Enter the error you are receiving along with the description of the problem. Also, include any ticket number you may have received.
  4. Click ‘Send’.

If your desktop app is not running and you need to send the log files, click here for a guideline on how you can send the files manually.

To keep things running smoothly, SugarSync recommends you avoid using characters such as backslashes, asterisks, colons, and others that are incompatible with the Windows file system.

Also keep in mind that any file name with more than 255 characters (file path included) will cause syncing problems.

Hope that these solutions helped you solve the problem. If you have any more questions or maybe you’re aware of another fix for the issue, don’t hesitate to share in the comments section below.

[wl_navigator]

Download KB4499147, KB4499162 to fix looping redirects in browsers

Microsoft brought two new cumulative updates to users running older versions of Windows 10. These updates are KB4499147 for Windows 10 Fall Creators Update (version 1709) and KB4499162 for Windows 10 Creators Update (version 1703).

It is worth mentioning that Microsoft supports these versions of Windows 10 only in Enterprise, Education and IoT Enterprise editions. The Home and Pro editions won’t get these recent updates because they are no longer supported by Microsoft.

In Windows 10 version 1703, this update was preceded by KB4505055 and in Windows 10 version 1709, the recent update was preceded by KB4505062.

What’s new in KB4499147 and KB4499162?

KB4499147 increases OS Build number to 16299.1182 for Windows 10 version 1709 and KB4499162 increases OS Build number to 15063.1839 for Windows 10 version 1703.

Both updates fix an issue regarding looping redirects between Microsoft Edge and Internet Explorer 11.

Also, they fix a plethora of problems such as an “Incorrect Username or password” login error when using an empty or null password and Windows Defender Credential Guard is enabled.

KB4499147 and KB4499162 are similar, but not the same

Taken separately, KB4499147 also solves a DNS issue in Windows 10 version 1709, as it is described on Microsoft official website:

Addresses an issue that may cause event 7600 in the Domain Name System (DNS) server event log to contain an unreadable server name.

For further details about this recent update, check out Microsoft’s website.

KB4499162 brings a major improvement for Windows 10 version 1703 as Microsoft explains on the official website:

Improves performance related to case-insensitive string comparison functions such as_stricmp()in the Universal C Runtime.

To learn more about this update, go to Microsoft’s website.

Do you still use Windows 10 version 1709 or 1709? Let us know what you think about these updates in the comments section below.