Windows 10 Line app updates with new features & disappears from the Start Menu

The official Line app for Windows 10 computers updated this week with a rather dramatic update that unpinned it from the Start Menu, causing users to manually repin it again.

Interestingly, this update, which brings Line to Version 5.10.0, features two completely different release notes that mention different changes made to the app.

Here’s the release notes from the Microsoft Store app listing:

  • Added the ability to unsend messages.
  • Reply directly to specific messages in chats.
  • Use paid emoji in chats.
  • Minor bug fixes and other small improvements

And here’s the release notes from within the app itself:

  • We’ve made some improvements to the video player.
  • Increased the max character limit for group names to 50.
  • Added an option to receive notifications when you are mentioned in a chat.
  • Minor bug fixes and other small improvements.

Line is a one of the most-popular messaging apps in Japan and Taiwan but also has a growing userbase internationally as well. An official Line app is also available for Windows phone users.

Do you use Line on your Windows device? Let us know why or why not in the comments below and then follow us on Pinterest for more Windows 10 content.

(Old)LINE
(Old)LINE
Developer:
LINE Corporation
Price:
Free

Assassin’s Creed Odyssey video game is now live for all Xbox One gamers

Assassin’s Creed Odyssey is now live on Xbox One consoles for all players after being available in early access for several days for those who pre-ordered the Ultimate and Gold editions.

Assassin’s Creed Odyssey is the latest major entry in the popular Assassin’s Creed video game franchise and takes the player to Greece. Players can choose to play as either a male or female protagonist and the game features a variety of custom options to make the gameplay experience more personal. Assassin’s Creed Odyssey will also play in 4K resolution when played on an Xbox One X console.

Here’s the official game description and launch trailer:

Write your own epic odyssey and become a legendary Spartan hero. Forge your destiny in a world on the brink of tearing itself apart. Influence how history unfolds in an ever-changing world shaped by your choices. LEGENDARY SPARTAN HERO

  • Embark on your journey from outcast to legendary Spartan hero. ANCIENT GREECE AWAITS
  • Explore an entire country full of unexpected encounters in untamed environments and bustling ancient cities. CHOOSE YOUR PATH
  • Your choices shape the world around you. Play in a living world that constantly reacts to your every decision. FIGHT EPIC BATTLES
  • Charge into epic clashes between Sparta and Athens in battles pitting 150v150 soldiers against each other.SAIL THE AEGEAN SEA
  • Recruit crewmembers and customize your ship as you explore and battle your way on the open seas.

Have you had a chance to play Assassin’s Creed Odyssey yet on your Xbox One? Let us know if you like it in the comments below and then follow us on Pinterest for more Assassin’s Creed content.

Assassin's Creed® Odyssey
Developer:
Ubisoft
Price:
Free

Fix: DVD Player not Working After Windows 10/11 Upgrade


My DVD drive is not Working on my Windows PC/laptop. What to do?

  1. Check if your DVD drive is turned on
  2. Check if all necessary drivers are installed
  3. Manually fix corrupted registry entries
  4. Create a registry subkey
  5. Uninstall your PC’s CD/DVD drive
  6. DVD drive-related issues

Some Windows users have reported that their DVD drive has stopped working after upgrading the system from Windows 8 to Windows 8.1. Various factors could affect this issue, and we’ll try to cover all the possible solutions and help you solve this annoying problem.

How to fix your DVD-ROM if it is not reading disks after Windows 10 update?

1. Check if your DVD drive is turned on

Installing or updating software on your computer, in this case updating from Windows 8 to Windows 8.1 could sometimes disable some system features. This is because something happens during the installation process, and it may turn off your DVD drive without you noticing it. To check if your device is turned on properly, do the following:

  1. Open the DVD drive properties by clicking the Start button Picture of the Start button, clicking Computer, right-clicking the DVD drive, and then clicking Properties.
  2. Click the Hardware tab, and then click the DVD drive.
  3. Under Device Properties, click Properties, click the Driver tab, click Enable, and then click OK.

If your DVD drive is turned on, you might want to check if your drivers are up to date.


2. Check if all necessary drivers are installed

One of the first solutions for this problem you’re going to find anywhere is definitely to check if your drivers are up to date. You probably already know how to check if your drivers are updated, but if you don’t here’s what you should do:

  1. Go to Device Manager
  2. Find your DVD drive under DVD/CD-ROM drives
  3. Double-click on your DVD device and go to Drivers tab
  4. Go to Update Driver and if your driver is not up to date, your computer will update it, otherwise, your driver version will stay the same

We often forget to update our drivers and that may cause a lot of confusion not only with DVD drive but with other parts of our computer or system, especially when the new system is installed. We recommend a third-party utility to automatically download all the outdated drivers on your PC.

This is necessary for an important reason: you will keep your PC safe from malfunctioning because of the wrong driver version. With a dedicated tool, you will be able to choose what drivers to install for which component as it will scan the manufacturer’s websites for the good driver versions.

⇒ Get Outbyte Driver Updater

In case updating your drivers didn’t help, then try some of these other solutions, listed below.


3. Manually fix corrupted registry entries

If the previous two solutions didn’t help, then maybe our problem lays in the registry of the system. In that case we’ll have to manually fix a couple of registry entries, in order to make our DVD drive work again. Here’s what you should do:

  1. Press the Windows key and R at the same time to open the Run dialog box
  2. Type regedit in the Run dialog box, then press Enter. If you are prompted for an administrator password or for a confirmation, type the password, or click Allow
  3. In the navigation pane, locate and then click this registry subkey:
    • HKEY_LOCAL_MACHINESYSTEMCurrentControlSetControlClass{4D36E965-E325-11CE-BFC1-08002BE10318}
  4. In the right pane, click UpperFilters
  5. On the Edit menu, click Delete
  6. Click Yes when you’re asked to confirm the deletion
  7. In the right pane, click LowerFilters
  8. On the Edit menu, click Delete
  9. Again, click Yes when you’re asked to confirm the deletion
  10. Exit Registry Editor
  11. Restart the PC

If the problem is still present after this registry tweak, you’ll need to create one registry subkey.


4. Create a registry subkey

To create the registry subkey and enter it into registry, follow these steps:

  1. Press the Windows key and  R to open the Run box.
  2. Type regedit in the Run box, then press Enter. If you are prompted for an administrator password or for a confirmation, type the password, or click Allow
  3. In the navigation pane, locate the following registry subkey:
    • HKEY_LOCAL_MACHINESYSTEMCurrentControlSetServicesatapi
  4. Right-click atapi, point to New, then click Key
  5. Type Controller0, and then press Enter
  6. Right-click Controller0, point to New, and then click DWORD(32-bit) Value .
  7. Type EnumDevice1, and then press Enter
  8. Right-click EnumDevice1, click Modify
  9. Type 1 in the Value data box, and then click OK.
  10. Exit Registry Editor
  11. Restart the computer

5. Uninstall your PC’s CD/DVD drive

This might be an ultimate solution at the first sight, but it isn’t. After uninstalling your CD/DVD drive and restarting your computer, the CD/DVD drive and its drivers will be automatically reinstalled. So, here’s what you need to do in order to perform this ‘hard reset’:

  1. Right-click on the Start Menu
  2. WinX menu will open. Select and click Device Manager
  3. Select DVD/CD-ROM drives and expand it by clicking the arrow at the left of this optionfix dvd not working from device manager
  4. Right-click on your DVD drive and select Uninstalluninstall dvd drive windows 8.1
  5. If a warning pops-up, click OK
  6. After the drive was uninstalled, close all the windows and restart your pc
  7. After the restart, check if it can read CDs and DVDs

6. DVD drive related issues

There are plenty of DVD-ROM issues that we have written about. You can simply have the DVD drive missing on your PC or some specific players simply not working in Windows. You may also encounter a very annoying error that is CD/DVD-ROM eject button not working. If you are facing these issues and cannot play your DVDs, try  to use one of the DVD player apps from this list.

Read Also: Fix: DVD Won’t Play on ASUS Laptop

VirtualBox Can’t Install Windows 10: How to Fix it

If you want to try Windows 10 but don’t want to uninstall your old OS, creating a virtual machine is probably the best solution. It’s even the preferred choice to run multiple iterations on the same PC. But many found that VirtualBox can’t install Windows 10.

In some cases, it’s accompanied by the error code 0x0000005D, and a few users reported a VirtualBox fatal error during the installation of Windows 10. No matter the case, the following solutions should help!

What can I do if Virtualbox can’t install Windows 10?

1. Check for the Latest Version of VirtualBox

First, make sure you’re using the latest version of VirtualBox because older versions are probably not compatible with Windows 10, so you won’t be able to run it or even install the OS.

You will find the latest version on the VirtualBox official site. You can also check for updates within the VirtualBox interface; if your version is outdated, download the latest version.

If your version is up to date, then the problem is not with the compatibility between VirtualBox and Windows 10.

2. Disable Floppy Drive and Change The Pointing Device

  1. Go to Settings in VirtualBox.
  2. Go to System and then to Motherboard.
  3. Under Boot Order, uncheck Floppy and Network.
  4. After that, set your pointing device to PS/2 Mouse.
  5. Click OK and restart VirtualBox.
Install Windows 10 on VirtualBox

As you may have noticed, Windows 10 often has touch input and floppy drive issues.

This may be the reason you are getting the error. So disable the floppy drive, change the pointing device, and see if your simulation of Windows 10 works well now.

3. Check the system version in Settings

Go to General and check the system version listed here. If the version is Other Windows, change it to the one you are actually using.

wind8apps virtualbox2

This also could be the cause of your problem because some users have reported on VirtualBox’s forum that they accidentally left their version of the system to Other Windows. And after they changed it, the system usually worked.

4. VirtualBox error after Windows 10 update

Many users have encountered issues installing Windows 10 on a virtual machine or after. Most problems are related to the recently applied Windows updates. To fix these issues, you have to consider the followings:

That’s it! One of the solutions should have helped when VirtualBox can’t install Windows 10, and things should now be up and running fine.

Before you leave, find out how to speed up emulators on the PC and get the best performance.

Tell us which fix worked for you in the comments section.

FIX: Start Screen Went Black After Upgrading to Windows 10

Windows 10 users have reported one unusual problem after the update from Windows 8/8.1 to Windows 10. According to them, after the update and reboot phase, they were left with a black screen. Master Boot Record issues are the main cause of this problem. Fortunately, you can easily fix this if you have Windows 10 Recovery disk.

If you don’t have a Windows 10 Recovery disk, you can use your bootable install media for Windows 10 or you can find a working Windows 8.1 device and create a recovery disk.
black start center in windows

SOLVED: Black screen after Windows 10 update

Solution 1: Use the Media Recovery Tool and bootrec /fixmbr

In order to create a recovery disk from a working Windows 10 device you’ll need to do the following:

  • On the working device, go to Search.
  • In the Search charm type ‘Create a Recovery Drive’.
  • You’ll get a prompt asking you to allow the Recovery Media Creator Wizard to run so make sure that you allow it. Insert a writable USB Key, however, bear in mind that all of your files on this USB key will be deleted.
  • After that, in the Recovery Media Wizard, you need to select your USB key as your Recovery drive.
  • The Recovery Drive Creator will format the USB key and create a bootable partition with the Recovery tools installed. One the process is finished, restart your computer and boot your PC via the new USB Recovery Drive.
  • You might have to hit ESC or F9 during the reboot to select your boot drive. After pressing ESC or F9, you just need to selected the USB key you created during the Recovery Drive Creator.
  • From the Recovery Disk Menu – select Troubleshoot.
  • From the Troubleshoot menu – select Advanced options.
  • From the Advanced options menu select – Command Prompt.
  • After that in the command prompt type ‘bootrec /fixmbr‘ and press Enter. You should see a confirmation like above, so type exit and hit Enter to exit.

— RELATED: Full Fix: Black Screen on the Latest Windows 10, 8.1 and 7 Build

Solution 2: Check external devices

If you keep all your peripherals (mouse, keyboard, external drive) connected to your PC during the update, this may sometimes trigger black screen issues. To avoid this, you need to unplug all the peripherals and use only the touchpad to check for updates.

Solution 3: Use Clean Boot

When you install new updates, the best approach is to simply disable all unnecessary apps and programs. This step is somehow similar to the previous one. The only difference is that now you’re ‘disconnecting’ unnecessary software, not peripherals.

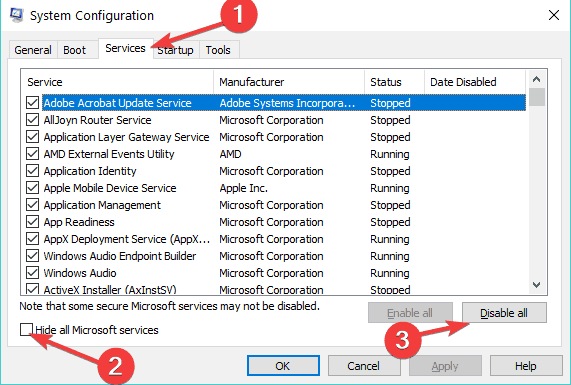
  1. Go to Start > type msconfig > hit Enter
  2. Go to System Configuration > click on the Services tab >  check the Hide all Microsoft services check box > click Disable all.hide all microsoft services
  3. Go to the Startup tab > Open Task Manager.
  4. Select each startup item > click Disable > close Task Manager > restart the computer.

disable startup programs

After doing there you’ll have two options at your screen…you can continue to Windows 8.1/Windows 10 or Turn off your PC and restart it, which we highly advise.

If the problem persists, check out the troubleshooting guides listed below for additional solutions:

Bitcoin Mining Software: Best To Use in 2026

Bitcoin is the most popular cryptocurrency in the world. Unlike traditional money systems, this digital payment system is completely decentralized and works without an administrator or intermediary.

Everybody can earn Bitcoins with the help of a Bitcoin mining software. Bitcoins are created by computers as a reward for your mining efforts.

This means allowing the system to use your computer resources in order to solve the complex equations that lead to the creation of new Bitcoins.

You can then use your Bitcoins in real-world transactions. As a quick reminder, one Bitcoin is currently worth around $6,500.

If you want to enter the cryptocurrency world or simply mine more Bitcoins, we strongly suggest you check out some of the best Bitcoin mining tools for your Windows PC.

Bitcoin mining software to install on your PC

1. Bitcoin Miner

Bitcoin Miner app

Bitcoin Miner is perhaps the most popular Bitcoin mining app available in the Microsoft Store. With the help of this tool, your computer earns you virtual money that you can then exchange for real-world currency.

This Bitcoin mining app has a very intuitive, easy to use interface, as well as a series of features that allow you to track your mining progress, such as profitability reports.

Other features include mining pool support, fast share submission, DirectX 10 & 11 GPU mining, and more.

Bitcoin Miner takes good care of your computer, and also includes a night mode and power saving mode that you can turn off to better control CPU and GPU strain.

It is worth mentioning that this tool only runs in an open window, if you minimize or lock screen your PC, the mining process will pause. Bitcoin Miner also includes ads, but that’s the price to pay for downloading the app for free.

You computer may sometimes heat up while running Bitcoin Miner. Make sure to use a cooling pad or install a cooling software.

Download Bitcoin Miner for free from the Microsoft Store.


2. MultiMiner app

multiminer bitcoin mining software

MultiMiner is a free desktop application that you can use for mining and monitoring your Bitcoins.

It also has a very interesting feature that allows you to switch individual devices between cryptocurrencies, meaning that it’s compatible with other cryptocurrencies and well.

MultiMiner has a very simple an straightforward UI. It detects all the available mining hardware and then lists the coins that you can mine.

The software is perfect for both new miners and power users. As a matter of fact, many of the advanced features in require no configuration.

Most importantly, MultiMiner is an open source project, which means that users can help develop the tool with features, bug fixes, and more.

Here are a couple of useful tips when using this free mining app on your PC:

  • Click the Daily column header to toggle between cryptocurrency and USD
  • Click the Pool column header to display the port along with the domain

You can download MultiMiner from the app’s official webpage.


3. BFGMiner

bfgminer bitcoin miner

BFGMiner is an interesting Bitcoin mining software that you should try out.

This multi-threaded and the multi-blockchain tool is a pretty versatile program. It supports dynamic clocking, fan control, crypt mining for both CPU and OpenCL (GPU).

Unlike other cryptocurrency mining tools, BFGMiner doesn’t primarily focus on the GPU.

You can download BFGMiner for free from GitHub.


4. EasyMiner

easyminer bitcoin mining tool

EasyMiner can be used for both solo and pooled mining.

This tool allows you to constantly monitor your mining activity thanks to its configurable performance graphs. It displays hash rate, total shares accepted/invalid, and total shares in the past hour ensuring maximum transparency.

You can use EasyMiner to mine Bitcoin, Litecoin or other cryptocurrencies.

The software is free and open-source, allowing you to customize it according to your needs. It is highly optimized for x86, x86-64 machines and supports the network mining protocol as well as the Stratum mining protocol.

You can download EasyMiner for free from the software’s official webpage.


This brings us to the end of our list. Remember that you can only install one Bitcoin mining software on your computer at a time.

Keep in mind that mining is possible with any old computer. Although, the slower the computer is, the smaller the chances are of actually getting a reward. Therefore, consider pool joining and getting a suitable computer for mining.

Here are 2 best mining computers for beginners.

Cryptocurrency is the money of the future, so investing in such tools is a very good decision. Download the Bitcoin mining program that best suits your needs and start making money today.

RELATED STORIES TO CHECK OUT:

Windows 10 October Update causes all these bugs

You just installed the Windows 10 October 2018 Update but you wish you hadn’t? Well, you’re not the only one. Many users complained about various issues after installing Windows 10 v1809.

In this post, we’re going to list the most common Windows 10 October Update issues reported by users. For some, reading this post this will be some form of therapy.

Knowing that they’re not the only ones experiencing these problems will probably make them feel better. For others, this will be a wake-up call that will determine them to postpone the update.

And now, let’s dive in into the meat of the article.


Looking for the best tools to fix Windows Update issues? Here are the best options.


Windows 10 October Update issues and errors

Issue 1: Install fails

This is an age old problem and it also affects this OS version as well. There are various elements blocking the update process, including download errors, system errors, and so on.

If you’re interested, you can read more about this problem in this report.

Additionally, you can also check out the troubleshooting guides listed below. Hopefully, some of the solutions listed there will help you fix the issue.

Issue 2: Mouse is unusable

Some users reported that certain features are no longer available on their peripherals.

For example, the cut, copy or paste functions no longer work and there is no highlighting.

Yesterday my wireless mouse worked perfectly. Installed the October update today and now the mouse highlights everything except what I want. When I do highlight the words I want, I can’t delete, can’t drag and drop and can’t copy. This is making every office app really hard to use. Please send a fix QUICK. or tell me how to uninstall update

Issue 3: Files and folders get deleted

Another frequent bug regards user files and folders. After the update, some of your files may be gone.

Some users lost all their documents, while others lost only particular files such as photos, music files, etc.

Just had this happen to a client of mine. Laptop with Windows 10 Home. Yesterday, it wanted to update to 1809, so he let it go. It completes and he boots and logs in — and notices that all of his Documents and Pictures are gone. His background image is there. His desktop is there. His iTunes music is there. But all of his Documents and Pictures are gone. And not just moved somewhere else — I scanned through with TreeSize just to make sure. They are gone.

Issue 4: Monitor won’t work on 144 Hz

If you want to setup your monitor to 144 Hz, we’re afraid this may not be possible on the latest Windows 10 version. Here’s how one user describes this problem:

I just updated to Windows 10 October 2018 Update (1809), and I can’t set my main monitor to 144 Hz. It is connected via DisplayPort, and I have no problem setting the refresh rate in my other monitors. Also, if I set the refresh rate to 120 Hz or 60 Hz on my main monitor, it will go down to 59 or 119 Hz. I have clean-installed the latest graphics drivers (NVIDIA 411.70) to no help.

Issue 5: Audio stopped working

This issue was first reported in connection to a Surface Book device.

There is not enough information to conclude whether this affects only Surface devices or occurs on desktop computers, as well.

After Windows 10 October 2018 Update, Surface Book audio stopped working
I think It has something to do Intel’s audio chip. My Surface Book no longer has any sound through the speakers, only headphones. Any suggestion on what I can do to fix the issue?

Issue 6: Controllers are glitchy

Don’t be surprised if your controller no longer responds properly. Some users complained that their controllers aren’t as smooth after installing the update.

i did get a notification from windows about the firmware update, i let it go lights flashed in sequence on the controllers, then went to the normal state, when i got into the cliffhouse i noticed that it wasn’t as smooth as before, and the controllers were very glitchy and twitchy, when they never used to be just before the update.

This pretty much sums up the most common bugs reported by users. We’re sure that Microsoft is listening and a hotfix will be deployed in the shortest time possible.

Let us know if you encountered other bugs. How did you manage to fix them?

RELATED STORIES TO CHECK OUT:

FIX: Windows 10 October 2018 Update stalled midway


What to do if the October Update won’t install

  1. Disconnect the internet
  2. Restart the device
  3. Run the Update Troubleshooter
  4. Check the SoftwareDistribution folder
  5. Reset Windows Update components

Microsoft might have announced the launch of its Windows 10 October 2018 Update during the just concluded Surface event but the update process has already run into issues. No wonder, the company’s support forum has already been flooded with complaints about how the update tends to stop midway and just hangs on there with no progress thereafter.

With that being the case, here are a few things you can do in the unfortunate scenario if you are facing the same.

However, before we start, we also have to keep in mind updates like these can be heavy. As such, downloading all the files can take a toll on performance, especially if the device isn’t able to spare enough memory. In that case, it would be best to wait until the installation is complete.

However, if you feel it’s taking too long for your comfort, here are some things that you might try.

Steps to fix Windows 10 v1809 install bugs

Before we dive in into general fixes, here’s a fix that you can use if you own an Intel-powered device. As Intel explains, the Windows 10 October 2018 Update may be blocked due Intel Display Audio Driver issues.

A fix for these issues is already included in Intel Display Audio Driver version 10.25.0.10, which is bundled with Intel Graphics Driver version 24.20.100.6286 and newer. Intel strongly recommends that all users with 6th Generation (codenamed Skylake) or newer processors confirm that Intel Graphics Driver version 24.20.100.6286 or newer is installed on their computers before attempting to update to Windows 10 October 2018 Update.

Solution 1- Disconnect the internet

Be it a Wi-Fi or an Ethernet connection, just shut out the connection. You can also invoke the Airplane mode from the Action Center to cut out internet connection. Next, check to see if there is any progress in the update process.

Solution 2 – Restart the device

Re-establish the internet connection again and restart your PC. Check if things progress. If the issue persists, go to the next solution.

— RELATED: How to fix installation error 0xc000021a on Windows 10

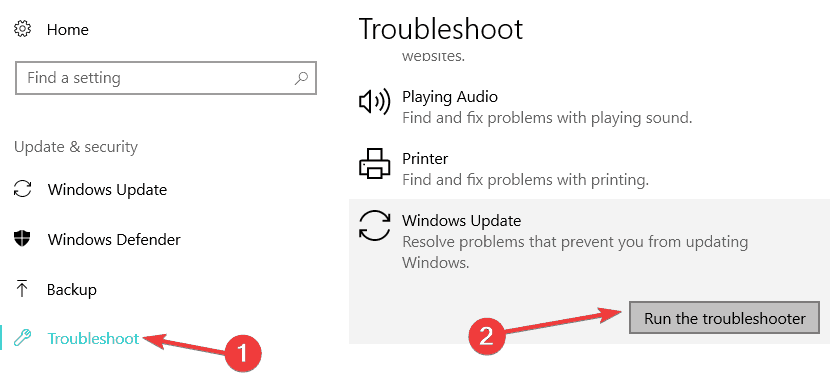
Solution 3 – Run the Update Troubleshooter

  1. Launch Settings App > Update & security.
  2. Select Troubleshoot from the options on the left.
  3. From the option on the left, select Windows Update.
  4. windows update troubleshooter
  5. Select Run the Troubleshooter and follow on-screen instructions.
  6. Re-start your PC and check if this solves the problem.

It is recommended to run the Troubleshooter at least three times if the issue isn’t resolved in the initial steps.

Solution 4 – Check the SoftwareDistribution folder

Open Command Prompt by typing CMD at the taskbar search box, and right clicking on the Command Prompt app that gets listed and selecting Run as administrator.

Type all the commands listed below and press Enter.

  • taskkill /f /fi “SERVICES eq wuauserv” (Do this multiple times)
  • net stop cryptSvc
  • net stop bits
  • net stop msiserver
  • ren C:WindowsSoftwareDistribution SoftwareDistribution.old
  • rmdir C:WindowsSoftwareDistributionDataStore
  • rmdir C:WindowsSoftwareDistributionDownload

Re-start your PC and see if the download resumes again.

Solution 5 – Reset Windows Update components

Open Command Prompt again as before. Run the commands mentioned below and hit Enter.

  • Net Stop bits
  • Net Stop wuauserv
  • Net Stop appidsvc
  • Net Stop cryptsvc
  • Ren %systemroot%SoftwareDistribution SoftwareDistribution.bak
  • Ren %systemroot%system32catroot2 catroot2.bak
  • Net Start bits
  • Net Start wuauserv
  • Net Start appidsvc
  • Net Start cryptsvc

Check if the update is progressing.

However, in the unlikely scenario of the update yet being stalled, you can try and upgrade manually. For more information on how to install the Windows 10 October 2018 update, you can check out this guide.

RELATED GUIDES:

How to fix corrupted FoxPro DBF files once and for all

DBF is a database file format that you can utilize in FoxPro and other DBMS software, such as dBase and MS Access. The DBF format is one prone to corruption, so it’s worth saving a backup DBF copy. However, if you haven’t kept a backup, you can still fix a corrupted DBF. Below are a few resolutions that might fix corrupted DBF files.

Solutions to fix corrupted FoxPro DBF files

  1. Check if There’s a Previous DBF Version
  2. Fix the DBF at Recovery Toolbox
  3. Fix the DBF with DBF Repair Toolbox

1. Check if There’s a Previous DBF Version

First, check if File History has kept a previous version backup of your DBF. If you’ve enabled File History in Windows 10, you might be in luck. To check for an earlier file version, open the DBF’s folder in Explorer. Then right-click the DBF and select Restore previous versions. Select the Previous Versions tab on the window that opens to see if there’s another file version. If so, you can select the previous DBF file and click Restore to restore it.

— RELATED: How to fix corrupted Microsoft Access databases

2. Fix the DBF at Recovery Toolbox

Recovery Toolbox is a DBF recovery service that you can utilize in your browser. You can fix a FoxPro, dBase and Clipper DBF at Recovery Toolbox. Note that the service charge amounts to $10 per one GB, so it might be more economical to utilize third-party software if you need to repair a three or four GB DBF.

  • To fix a DBF at Recovery Toolbox, open this webpage in your browser.

  • Then you can press the Select File button to select your corrupted DBF.
  • Enter your email address and the captcha code in the email and image text boxes.
  • Click the Next Step button to fix the corrupted file.

3. Fix the DBF with DBF Repair Toolbox

There are numerous third-party software utilities that repair FoxPro DBF files. The DBF Repair Toolbox software fixes most Visual FoxPro DBF file versions. DBF Repair Toolbox is retailing at $27, and you can try out a trial version. This is how you can repair DBFs with DBF Repair Toolbox.

  • Click Download on this page to save the DBF Repair Toolbox setup wizard to a folder.
  • Open the software’s installer to install DBF Repair.
  • Then click DBF Repair Toolbox on the Start menu to open the software’s window.
  • Click the folder button on the right of the Source file name path box to select a corrupted DBF to fix.
  • Click the Analyze button, and select the Yes option on the Confirm dialog box.

  • After fixing a DBF, the software will show you content of the file as below. Click the Yes button to continue.

  • Select a folder path and file title for the fixed DBF in the Repaired file name box.
  • Choose a file version for the DBF from the drop-down menu in the snapshot directly below.

  • Then select the Save option to save the fixed file.
  • Press the Finish button to exit.

So you can repair a corrupted DBF with DBF Repair Toolbox and Recovery Toolbox. DataNumen DBF Repair and SysInfoTools DBF Recovery are also two other utilities worth noting that fix FoxPro DBF files.

RELATED STORIES TO CHECK OUT:

How to block Windows 10 October Update install

The Windows 10 October 2018 Update is here but not all users want to install it on their computers. Their reasons may vary: some fear the notorious Windows update issues, while others simply fell in love with a previous Windows version and prefer to stick to it.

If you want to delay the Windows 10 version 1809 there are a few solutions that you can use. However, it is worth mentioning that some of them won’t work on particular Windows versions. More specifically, Windows 10 Pro users have access to additional options when it comes to blocking updates. We’ll give you all the details below.

Steps to block Windows 10 October Update on Windows 10 Home

Solution 1: Disable the Windows Update Service

  1.  To to Start > type services.msc > hit Enter.
  2. Select the Windows Update service > double click on it to access additional options.stop windows update service
  3. Click on the General tab > go to Startup Type> select Disabled as shown in the screenshot below.disable windows update service
  4. Restart your computer. This should prevent further update installs.

Solution 2: Set up a metered connection

Using a metered connection that limits your bandwidth allows you to block updates:

  1. Navigate to Settings > Network and Internet > Wi-Fi > Manage known networksmanage known wifi networks
  2. Select your Wi-Fi network > Properties
  3. Enable the metered connection option as shown in this screenshot.

enabled metered connection windows 10

Steps to block Windows 10 October Update on Windows 10 Pro

If you’re a Windows 10 Pro user, here’s what you can do to defer this update:

Solution 1: Pause updates

For this, you need to follow this path: Settings > Updates & Security > Advanced Options > Pause updates.

pause windows 10 october update


This options blocks the update only for a limited period of time. If you want to block Windows 10 v1809 for a year, go to  Settings > Updates & Security > Advanced Settings > click on ‘Choose when updates are installed’ > block feature updates for 365 days.

stop windows 10 spring creators update install

Solution 2:  Block the October Update via Group Policy

  1. Go to Start > type gpedit.msc > hit Enter.
  2. Go to  Computer Configuration > Administrative Templates >Windows Components > select Windows Update > Defer Windows Updates.
  3. Then double-click on ‘Select when Preview Builds and Feature Updates are received’ if you’re an Insider or ‘Select when Feature Updates are received’ if you’re a regular user.block spring creators update group policy
  4. Select ‘Enable’ > select the time frame you want.

We hope these quick tips and tricks helped you.

RELATED GUIDES TO CHECK OUT:

How to download and install Windows 10 October Update

Well, folks, we have a very good piece of news for you: the Windows 10 October 2018 Update is finally available for download. You can now test the new features and improvements and tell us if Microsoft did a good job with this OS version. We just downloaded this OS and we’re currently testing it.

So, if you want to install it on your computer as well, you’ve come to the right place. In this guide, we’re going to show how you can download and install Windows 10 version 1809 on your PC.

Note: Microsoft will be gradually rolling out the update. As a result, not all of you will be able to download it at the same time. If the update is not available in your region, just have a little patience and check for updates later.

How to download the Windows 10 October Update

You can upgrade to the October 2018 Update automatically using Windows Update. You can also install the new OS version manually.

As always, before you upgrade your computer, check the Windows 10 October Update system requirements. Hit the update button only if your computer meets all of them. Otherwise, you may encounter various technical issues.

Windows 10 October Update system requirements

  • Processor: 1GHz or faster processor or SoC
  • RAM: 1GB for 32-bit or 2GB for 64-bit
  • Hard disk space: 16GB for 32-bit OS or 20GB for 64-bit OS
  • Graphics card: DirectX9 or later with WDDM 1.0 driver
  • Display: 800×600

It’s always better to go beyond the minimum system requirements in order to enjoy the full advantage of the newest Windows 10 features.

Install Windows 10 version 1809 through Windows Update

The quickest and safest way to download the Windows 10 October Update is through Windows Update. If you’re not a power-user, this is the best method for you.

All you need to do is navigate to Settings > Update & security > Windows Update and check for updates.

windows 10 october update check for updates

If your computer doesn’t detect any updates, this means that the new OS is not available for your machine yet. Wait a few days for Microsoft to deploy the OS to your region.

If the Windows 10 version 1809 is available, start the download process by following the on-screen instructions. It’s as simple as that.

Now, if the update is not available but you don’t want to wait until the Redmond giant finishes deploying it to your region, you can manually download the corresponding ISO file.

How to manually install Windows 10 October Update

The installation files of the update are available on Microsoft’s official website under the Media Creation tool section. You can use it to either download the ISO file and mount it on a USB drive or create the installation media on the spot.

Although the whole process sounds complicated, it really is not. There is a detailed step-by-step guide on the official Microsoft webpage taking through absolutely all the steps you need to follow.

windows 10 october update media creation tool

Well, this is how you can install the October Update OS on your machine. As always, it’s best to wait for a few days before before getting the latest Windows 10 version. Should the OS be affected by severe issues that went under the radar during the test phase, Microsoft will have enough time to fix by the time you install it.

Have your say: Are you going to install the update as soon as it’s available or you prefer to wait? Hit the comment section below.

RELATED STORIES TO CHECK OUT:

How to Downgrade From Windows 10 to Windows 8.1

If you want to upgrade your current system from Windows 8 or 8.1 to the new Windows 10 Technical Preview and try the new features, there’s something important you need to do before you update your system. You’ll need to create a recovery image of your current system in case you want to downgrade it from Windows 10.
wind8apps windows 10

How to go back to Windows 8.1 from Windows 10?

Do a recovery image of your current system by following these steps:

  • Go to Search
  • Enter recovery drive in the search box, and then click on Create a recovery drive. (Administrator permission is required for creating a recovery drive)
  • After the recovery drive tool opens, make sure the Copy the recovery partition from the PC to the recovery drive check box is selected, and click on Next.
  • Insert a USB flash drive into your PC that is at least as large as the size indicated on the screen.
  • Choose the USB drive you would like to use for your recovery drive, and then go to Next.
  • Click on Create.

The recovery image and all necessary recovery tools will be no stored to your USB drive. After the process is done do some of the following:

  • If you want to keep the recovery partition on your PC, click on Finish.
  • If you want to remove the recovery partition from your PC in order to free some space on your disk, go to Delete the recovery partition. Then choose Delete. When the removal is done, click on Finish.
  • Remove the USB flash drive.

Other Windows downgrading guide you should consider

Even if you have followed all the steps above, you might want to have a more detailed guide on more technical steps. We have this guide and you can find all the details in our detailed guide on how to downgrade from Windows 10 to Windows 8.1, 7. You can also follow our how-to article on how to downgrade Windows 10 Pro to Windows 10 S. Even if the article is for Surface users, you can try to apply this on your own PC.

The mobile users are may also be concerned about downgrading their Windows version. The reason is that Windows 10 Mobile was available for a limited number of device models when it was launched. That’s why many users wanted to downgrade back to 8.1 If you are one of this users, try to follow the steps from our guide and downgrade your Windows Phone from Windows 10 to Windows 8.1

Now you have created the recovery image of your current Window 8/8.1 system and you’re good to upgrade it to Windows 10 Technical Preview. And in case you have some reason to downgrade your system after that, all you need to do is to apply the installation of this recovery image and your old system will be back.

Read Also: Windows 10 Preview Gets Fresh Patch Prior to January Launch

How to avoid Windows 10 October 2018 Update install issues


Steps to install Windows 10 October Update without any problems

  1. Windows 10 October Update system requirements
  2. Run a full system antivirus scan
  3. Free up some space
  4. Use Clean Boot
  5. Disable VPN
  6. unnecessary peripherals

The Windows 10 October 2018 Update is finally available for download for the general public. You can quickly grab this new Windows 10 version right from Microsoft’s update page. The Update Assistant will then take care of everything and in about an hour or so, you’ll be able to test the new OS.

However, the Windows 10 update process is notorious for triggering various system issues. In most cases, this happens because users haven’t thoroughly prepared their PCs for the upgrade.

We want to help you to avoid all those nerve-wrecking Windows 10 upgrade bugs and errors. In this guide, we’re going to show what you need to do to get your computer ready for the Windows 10 October 2018.

How to install Windows 10 October 2018 Update faster

Step 1: System requirements for Windows 10 October 2018 Update

If your machine doesn’t meet all the system requirements to run the latest Windows OS version, you’re definitely going to experience technical issues. So, the best approach to avoid this unpleasant situation is to make sure your PC is capable of running the OS version that you’re planning to install. So, what are the system requirements for Windows 10 October 2018 Update?

Windows 10 v1809 system requirements as listed by Microsoft:

Processor: 1 gigahertz (GHz) or faster processor or SoC
RAM: 1 gigabyte (GB) for 32-bit or 2 GB for 64-bit
Hard disk space: 16 GB for 32-bit OS 20 GB for 64-bit OS
Graphics card: DirectX 9 or later with WDDM 1.0 driver
Display: 800×600

— RELATED: KB4457136 gets your PC ready for the Windows 10 October Update

Step 2: Run a full system antivirus scan

Virus and malware infections may block the update process preventing you from getting the latest OS version. To strike off this possible cause of your list, you need to run an in-depth antivirus scan before hitting the update button. You can use Windows’ built-in security tool, Windows Defender, or a third-party antivirus tool.

We also recommend installing an antimalware tool as well to make sure no threat goes undetected. Make sure that the antimalware solution is fully compatible with your antivirus tool.

For more information on the best antivirus and antimalware tools to install, check out these guides below:

Step 3: Free up some space

Make sure that you have enough storage space to download Windows 10 version 1809. For this task, you need to delete your junk files, temporary files and folders and uninstall the apps and programs that you never or rarely used.

For detailed instructions on how to delete unnecessary files and folders, check out the following guides:

Step 4: Use Clean Boot

You don’t want other apps and programs to interfere with your Windows 10 October Update install process. For this reason, you should clean boot your computer. In this manner, your machine will use only a minimum set of drivers and programs. Here are the steps to follow:

  1. Go to Start > type msconfig > hit Enter
  2. Navigate  System Configuration > go to the Services tab > Hide all Microsoft services > click Disable all.hide all microsoft services
  3. Go to the Startup tab > Open Task Manager.
  4. Select all the startup items > click Disable > close Task Manager > reboot your machine.

— RELATED: Windows 10 Redstone 5 won’t include Sets tabbed windows

Step 5: Disable VPN

Oftentimes, your VPN software may block updates. So, before you install the new Windows 10 version, turn off your VPN tool to avoid any potential issues. Sometimes your VPN may block your Windows components or programs without your permission. So, the safest approach is to simply disable it while updating. Once the updates installed, you can enable your VPN.

Step 6 – Disconnect unnecessary peripherals

Many users confirmed that disconnecting unneeded peripherals helped them to install the update much faster. You can then plug your peripherals back in after the update has been installed.

These tips should help you to install the Windows 10 October 2018 Update smoothly. For any additional suggestions on how to avoid Windows 10 install issues, feel free to comment below.

RELATED GUIDES TO CHECK OUT:

FIX: OneDrive Won’t Sync After Windows 10 Upgrade

If you have problems with syncing your files to OneDrive after updating your system to the latest Windows 10 version, you might find a solution here. Solving this problem is easy, and it requires you to take just a few steps in order to solve it.

windows 10 onedrive wind8apps
Microsoft presented a lot of changes in their latest build, and most of them were unnoticed by an average PC user. But one bigger change definitely caught some attention. OneDrive no longer uses the same smart file syncing system from Windows 10/8/8.1, which is good for many users because it caused a lot of confusion in the past. And now it looks like Microsoft finally decided to fix things up, after so many complaints. Changing the method of sync may cause your sync process to crash, so here’s what you should do to make things right.

Quick fix to solve OneDrive syn problems

  1. Stop the onedrive.exe process
  2. Move all your files from OneDrive to an another location, probably another drive, or even another PC, just in case they aren’t synced
  3. Delete local OneDrive folder. This folder is probably located in your user files, for example C:UsersMichael, where “Michael” is your username
  4. Then start onedrive.exe again

After performing this solution, you’ll see a window that wasn’t shown before, where you can choose which files and folders you want to sync with OneDrive. As you can see, you can sync all of your files and folders from OneDrive, or you can choose separately. When you complete all the steps and finish the process, you’ll be notified that Windows has created a new OneDrive folder and it will automatically sync your files, based on settings you chose before.

onedrive wind8apps

Besides all of that, you should keep in mind that this is still a pre-release software, so you shouldn’t be surprised if errors like this are present. But, if you still want to use it, besides all the bugs, we’re here to support you. So if this solution didn’t help you with your OneDrive sync issue, leave your comments below, and we’ll surely find a real solution.

Meanwhile, we found some additional solutions to fix OneDrive file sync issues and we’ll quickly list them below:

  • Check your disk space – if you don’t have enough disk space, you’re going to experience file sync errors quite often.
  • Check the file size – if you’re trying to sync a file larger than 10 GB, this won’t work. In this case, you need to reduce the file size and then try again.
  • Re-connect your OneDrive account to Windows
  • Reset all your OneDrive settings. For more information, you can use this guide.

We hope that some of the suggestions available in this quick guide helped you fix your problem.

RELATED STORIES TO CHECK OUT:

Some early adopters for Windows 10 October 2018 Update are reporting lost data after updating

The Windows 10 October 2018 Update is officially available to download since October 2, and we’re starting to wonder if Microsoft didn’t put the cart before the horse. The build 17763, which Microsoft chose as the October 2018 update, may have needed a bit more Insider testing as some early adopters have been reporting issues with deleted files after updating.

https://twitter.com/WithinRafael/status/1047748753665359872

Several users who lost their personal files after updating have shared their story on Reddit and other places over the last two days, though it’s still hard to know if the issue is really widespread. The main issue seems to be that in case documents saved in the user directory are lost, users find that the Windows.old folder is empty and rolling back to the April 2018 doesn’t restore lost personal files.

As an example, this is what happened to Reddit user sophormoon:

Prior to the 1809 update I had over fifteen-thousand photos in a particular folder. After the 1809 update the same folder exists with exactly ONE photo left. I have backups of the individual photos, but that folder contained a specially curated set that will take months to recreate if it’s even possible.

Windows.old is empty and nothing was sent to Onedrive.

Deleted personal files is apparently not the only issue that early adopters have been encountering this week. As reported by ZDNet today, Microsoft has acknowledged an incompatibility problem affecting PCs with a specific Intel Audio Display device driver (intcdaud.sys, versions 10.25.0.3 to 10.25.0.8) installed. The incompatibility issue may cause “excessive processor demand and reduced battery life” after updating, and Microsoft said that it would block the update until compatible drivers (available on this page) are installed.

It’s also worth noting that the build 17763 actually shipped with two known bugs causing the Windows 10 Task manager to report inaccurate CPU usage, and also blink constantly when expanding background processes. Microsoft will hopefully address these bugs and the more concerning data loss issues on Patch Tuesday, but in the meantime you may want to backup all your important files before installing the October 2018 update.

We were quite surprised this week to see Microsoft announce the availability of the October 2018 update as the same time as it started rolling out to Windows Insiders on the Release Preview ring. Release Preview Insiders usually get the chance to test the latest major Windows 10 update a couple of days before the public release, and this is a good way to make sure that important bugs haven’t slipped under Microsoft’s radar. Unfortunately, the release of the April 2018 update was also plagued by various issues, and it seems that millions of amateur testers may not be enough to raise the quality bar.

Microsoft adds another TV White Space partner – Redline Communications to offer low cost radio technology

Today, Microsoft has officially announced that they are partnering with Redline Communications, a company focused on bringing broadband to more rural areas across the world. The Redmond tech giant plans to use vacant television broadcasting frequencies, known as TV White Space, to create a much-faster broadband internet connection to areas that currently don’t have the infrastructure.

The plan is part of Microsoft’s recent Airband Initiative, which the company promises will “close the broadband gap” by as early as 2022. The partnership will be Microsoft’s most recent step in achieving this goal.

Microsoft explains that broadband connectivity has become a very important part of America’s growing economy. Microsoft’s senior director of the Airband Initiative, Paul Garnett, explains the company’s reasoning for the partnership even further, saying,

“Our work with Redline will increase the availability of competitively priced TV White Space technology, enabling internet service providers (ISPs) to provide access to customers at an affordable price point. This availability and utilization of TV White Space is absolutely critical to closing the broadband gap. This partnership will bring rapid evolution to the technology, making a real impact on real lives.”

Microsoft also mentioned that it has also invested and partnered with other ISP’s and telecommunication companies, which has put it much closer to achieving its bold goal. However, with as many as almost 20 million Americans without broadband internet according to Microsoft, the tech giant still has a long way to go before completing its mission.

What do you think Microsoft can do the end the “broadband gap”? We’d love to hear your thoughts down below.

Xbox One 1810 update now available for all Xbox Insiders ahead of public release

Now that the October 2018 update has been released for Windows 10 PCs, it will soon be the turn of the Xbox One to get its own October update. Yesterday, the Xbox Insiders on the Omega Ring got their first Xbox One 1810 build, which means that all Xbox Insiders can now test the next Xbox One system update.

The Xbox One 1810 update brings several new features such as Dolby Vision support for video content, the redesigned Xbox Live Avatars, Alexa integration and more. There are also some UI changes for the My Games & Apps section, with the “Ready to Install” section being replaced by a new toggle for switching between “Installed” and Ready to install”. We’ll go more in depth once the update is generally available, but this is a pretty exciting release overall.

If the Xbox One 1810 is now almost fully baked, the Xbox team has already started testing the next Xbox One system update, also codenamed “19H1” with Skip Ahead Xbox Insiders. The only new feature that Microsoft has announced so far is upcoming support for mouse and keyboard, and this expected to roll out to Skip Ahead Insiders later this month.

Full Fix: ‘We couldn’t stream from your console’

Streaming from Xbox One to Windows 10 is one of the highlights of Windows 10, and we did a quick guide on how to connect Xbox One to Windows 10. Unfortunately, a number of users reported they are unable to stream properly and that they are receiving We couldn’t stream from your console error message.

SOLVED: Xbox One streaming issues

We couldn’t stream from your console message can be problematic, and prevent you from streaming content. However, you might be able to fix this issue by doing the following:

  • We were unable to turn on your console – This is another common message that can appear. If this happens, try signing out of Xbox app and then signing back in.
  • We are not able to find an Xbox One console with the IP address provided – To fix this problem, you need to make sure that you’re using the correct IP address. You can easily check that from the settings page on your Xbox One.
  • Xbox One streaming not working – If streaming isn’t working at all, you might be able to fix the problem simply by using one of our solutions.

Solution 1 – Hard reset your console

In order to fix We couldn’t stream from your console error message, some users are advising to hard reset your consoles. To do that, just press and hold the power button on your Xbox for about 10 seconds and wait for it to turn off.

If the process is successful, you should hear a sound different from a standard turn off the sound. Wait for a minute or two and then turn on your Xbox again.

Alternatively, you can turn off your Xbox and unplug the power cable from the console. Wait for a few minutes and connect the power cable again. Once you’ve connected the power cable, wait for the power brick light to turn orange and turn on your console.


Solution 2 – Turn on your notifications and check the broadcasting settings

According to users, We couldn’t stream from your console error message is displayed if your notifications are turned off, so if you’re having this problem, make sure you turn on your notifications. In addition, check your broadcasting settings and make sure that broadcasting isn’t disabled.


Solution 3 – Install Microsoft Media Feature Pack

Certain versions of Windows 10 don’t come with Media Feature Pack installed, and that can cause We couldn’t stream from your console error message to appear while trying to stream Xbox One games. In order to fix this problem, we advise you to download Microsoft Media Feature Pack and install it. After installing Media Feature Pack, problems with streaming should be fixed.


Solution 4 – Sign out and sign back into the Xbox app

If you keep getting We couldn’t stream from your console message, you might be able to fix the problem simply by signing out of the Xbox app. This is quite simple to do, and you can do it by following these steps:

  1. Press Windows Key + S and enter xbox. Select Xbox from the list of results.
    We were unable to turn on your console
  2. When the Xbox app opens, click the Settings icon in the left pane. In the right pane, click the Sign out option.
    C:UsersmetalPicturesWork picturesFix ‘We couldn’t stream from your console’ on Windows 10
  3. Start Xbox app again and click Sign in.
    We are not able to find an Xbox One console with the IP address provided

After signing back in, the problem should be completely resolved and you should be able to stream your games.


Solution 5 – Remove your Microsoft account from Xbox One and add it again

According to users, sometimes there might be a bug with your Microsoft account, and that can cause We couldn’t stream from your console message to appear. However, you can fix this problem simply by removing your Microsoft account from Xbox one. To do that, just follow these steps:

  1. Press the Xbox button on the controller to open the guide.
  2. Now go to the System > Settings > Account > Remove accounts.
  3. Select the account you want to remove and choose the Remove option.
  4. Now select Close.

After doing that, turn off your Xbox One completely. Once the indicator lights are off, disconnect the power brick from the console. After 30 seconds or so connect the brick to the Xbox One and turn it on. By doing so you’ll clear the cache and fix any potential issues with the cache.

After doing that, you need to add your profile again. To do so, follow these steps:

  1. Press the Xbox button to open the guide.
  2. Now select your gamerpic in the upper-left corner and choose Add new.
  3. Enter the email address and password associated with your account.
  4. Accept terms of services and your account should be added and ready to use.

Now you just have to power off your Xbox and you’ll be able to start it from Xbox app on your PC. If everything works, the streaming feature should start working once again.


Solution 6 – Make sure you’re using the correct IP address

If you’re getting We couldn’t stream from your console message, the problem might be your IP address. You can connect to your console by entering its IP address, but many users reported that this didn’t work for them.

It appears that the address they were using was wrong, and this caused the error message to appear. However, you can fix the problem by entering the correct address of your console. To get the correct address, you just need to do the following:

  1. On your Xbox One go to System > Settings.
  2. Now select Network > Network settings.
  3. Navigate to the Advanced settings.

Here you should be able to see your IP address as well as the port number. Once you obtain the IP address, enter it in the Xbox app and you should be able to stream once again.


Solution 7 – Make sure that Xbox app is up to date

Sometimes We couldn’t stream from your console message can appear if there’s an issue with your Xbox app. To keep your Xbox app bug-free, it’s important that you keep it up to date. For the most part, this application keeps itself up to date, but you might have to manually check for updates.

To do that, just open Windows Store and locate Xbox app and check if it needs any updates. Once the updates are installed, check if the issue with streaming is still there.


Solution 8 – Rename the Xbox console

According to users, We couldn’t stream from your console message can appear as a temporary glitch, but you can fix the problem simply by renaming the console. To do that, just follow these steps:

  1. Press the Menu key on your controller.
  2. Go to Settings > System and select Name.
  3. Enter the desired name and restart your Xbox.

Once you restart your console, restart the PC and start the Xbox app once again. Now you should be able to access your console and start streaming.


Solution 9 – Check the date and time

If you’re getting We couldn’t stream from your console message on your PC, the problem might be your date and time. Sometimes this problem can occur if the date and time aren’t correct on your PC. However, you can fix this issue simply by adjusting your time and date. To do that, follow these steps:

  1. Right-click the clock icon on your Taskbar. Choose Adjust date/time from the context menu.
    We were unable to turn on your console
  2. Locate Set time automatically option and turn it off. Wait for a few moments and enable this feature back on again.
    We are not able to find an Xbox One console with the IP address provided

If the time and date aren’t properly adjusted, you can use the Change button and adjust them manually. Once the date and time are configured correctly, the issue should be resolved and you’ll be able to stream your games without issues.


Solution 10 – Run Windows apps troubleshooter

Xbox app is a Windows Store application, and if you’re having any issues with it, you might be able to fix them by running the appropriate troubleshooter.

Windows comes with various troubleshooters, and if you have any problems with Xbox app, you might be able to fix this those problems by running the troubleshooter. To do that, just follow these steps:

  1. Open the Settings app. You can do that quickly by using Windows Key + I shortcut. Now go to the Update & Security section.
    Xbox One streaming not working
  2. Choose Troubleshoot from the left pane. Now select Windows Store Apps in the right pane and click the Run the troubleshooter button.
    Xbox One streaming not working
  3. Follow the instructions to complete the troubleshooter.

Once the troubleshooter is finished, check if the issue with Xbox app still appears.

We couldn’t stream from your console error message can seriously interfere with the streaming process, and if you have this problem, make sure to try some of our solutions. Microsoft is aware of this problem, so rest assured that official fix is on the way.


READ ALSO:

How to Backup Apps Data in Windows 10


How do I backup my app data on my Windows laptop or PC?

  1. Backup Apps Data With The Windows 8 Apps Data Backup
  2. Restore Apps Data With The Windows 8 Apps Data Backup
  3. Alternative Ways To Backup Apps Data

Microsoft doesn’t offer a way to backup data of Metro apps in Windows 8.1, 10. To backup your apps data, you’ll have to go through complicated steps of manual backup, which isn’t very handy. Fortunately, there’s a way to backup your data with third-party software, the Windows 8 Apps Data Backup. This is a very simple program, which doesn’t need to be installed, just download it and start backing up and restoring your apps data in Windows 8.
First thing first, let’s have a word about why should you occasionally perform data backup of your apps. There are a lot of reasons for this, like uninstalling an app, or if your app becomes corrupted, in all the cases you will lose all your settings and data. To prevent that from happening, backing up your data is strongly recommended. And with the Windows 8 Apps Data Backup you can easily backup and restore your apps data in just a few steps.

How to backup your app data on a Windows 10 PC?

Backup Apps Data With The Windows 8 Apps Data Backup

This is how you can use the Windows 8, 8.1 Apps Backup to easily backup your data:

First, download the Windows 8 Apps Data Backup program, and then open it. When you run it, you’ll get a message that tells you to close all your Metro apps, so the program could do the work. Just click on Backup and the process will start. The Windows 8 Apps Data Backup will show you the list of all your installed apps. And you can choose what app you want to backup by clicking on the checkbox beside it. Of course, you can choose to backup data of all your apps by clicking on Select All. After you chose which apps you want to backup, just click on Backup Now and the program will do the rest.

The Windows 8 Apps Data Backup saves all backed up data as ZIP archives, in that way you’ll be able to store a large amount of compressed data and save a lot of space. When the process is finished, you’ll need to choose where you want data to be stored, and you can store them anywhere in your computer. The of backup is very fast, it lasts from a few seconds to a couple of minutes, depending on how many apps you’re backing up.

Restore Apps Data With The Windows 8 Apps Data Backup

You can restore your backed up data at any time, simply by clicking on Restore in the Windows 8 Apps Data Backup. You will be asked first if the backup file is in a ZIP format, confirm it and continue with the process. As long as the app is installed on your computer, you’ll be able to select Restore option. After you chose which app you want to restore, click on Restore Now.

After you choose an app, you’ll be asked to confirm to restore the app data. Restoring will overwrite existing data of the app, and replace it with the files from ZIP folder. Restoration process takes little bit more time than backup, so just let the Windows 8 Apps Data Backup do the work for you. After the restoration process is finished, you’ll get a pop-up message that will tell you that the restoration was successful.

Alternative Ways To Backup Apps Data

Using the Windows 8 Apps Backup is a good idea for backing up your data, but if you don’t want to use a third-party software, you can backup your data manually. Metro apps’ data are stored in C:UsersAppDataLocalPackages. The applications themselves are stored in C:Program FilesWindowsAPPS. You can go to that path, and manually copy app data to the safe location. And if when you need to restore your backup data, just overwrite existing data files with those you saved earlier.

You can also use EaseUs Todo Backup as an alternative way to back up your data. It has some awesome features that let you backup your desktop files, browser favorites and documents folders. If you prefer other software, you can try out more of them from our dedicated backup software list. This software is especially efficient for Windows 10 users.

If you are interested in backing up your Windows settings, you can find a great guide here. It refers primarily to Windows 8.1, but you can try to do the same thing to a Windows 10 PC.

Read Also: How to Backup the Taskbar in Windows 10, 8.1

Here’s how to hide completed tasks on Microsoft To-Do

We live in a fast-paced world and technology has a lot of ways to help us better organize our schedules and tasks. Microsoft To-Do is Microsoft’s response to a lot of To-Do applications, like Wunderlist, Evernote, or Google’s native Keep. It comes with a great interface and all important features one can expect from a similar app in this niche. If you use it regularly, chances are it’ll get a bit stuffed with too many tasks, including the completed ones. We offer you an explanation on how to hide the completed tasks in Microsoft To-Do.

How to hide completed tasks in Microsoft To-Do

Microsoft To-Do was lacking this option until the last year. Then, based on the user‘s feedback, developers decided to add this feature. And it’s more than welcome addition to an already well-balanced tool. Active users who have a lot of daily tasks can hide all completed tasks and make the work charts better organized. This is something lot’s others task organizers/reminders have for a long time and the mere addition of this feature makes Microsoft To-Do much closer to its competition.

Hidding the completed tasks is as simple as one would imagine. All you have to do is click on the 3-dot menu in the active section and select the “Hide completed tasks” option. After that, all completed tasks are hidden until you restore them by opening the same menu. By simply clicking on “Show completed tasks“, you can restore them back to the current section.microsoft to do hide completed tasks

With that and the integrations Microsoft To-Do has with Office programs, you’ll have an easy time organizing your extensive schedule without the overcrowded interface fill of completed tasks.

With that said, we can conclude this article. Hopefully, this was a helpful and informative read. Do you like Microsoft To-Do? On which devices you use it? Make sure to tell us in the comments section below.

RELATED STORIES YOU SHOULD CHECK OUT:

New Surface devices are nice, but here are 3 larger take aways from Microsoft’s event

During its big Surface refresh event in New York yesterday, Microsoft unveiled a plethora of devices updates and even entered into a new wearable category that’s in hot contention as of late.

Surface Pro 6

There was the reveal of the latest entrant to the Surface Pro family with Microsoft’s Surface Pro 6, which reinstate the company’s numerical naming convention that was previously dropped with its predecessor the Surface Pro (5th edition). The Surface Pro 6 comes with all the bells and whistles expected from a now 6th generation Microsoft 2-in-1 device.

Microsoft claims the Surface Pro 6 is the most powerful Surface Pro yet with an 8th generation Intel Quad Core processor, as well as being 67 percent faster with an improved Pixel Sense Touch Display that’s even brighter than last years.

Surface Laptop 2

Microsoft also updated its highly touted traditional clamshell offering by introducing the Surface Laptop 2. Perhaps, the second most improved device of the day was, in fact, the Surface Laptop, now sporting the same Surface Pro 8th generation Quad-Core Intel processor. The new processor raised the performance of the SL2 to 85% faster than last years model. Microsoft also claims 14.5 hours of battery life which is a slight improvement over the 2017 model. However, the company was oddly silent on whether or not Windows 10 S would be powering the device.

Surface Studio 2

Microsoft seemingly saved much of its improvement efforts for the Surface Studio refresh that brought the All-in-One better graphics performance, faster processing, and shorter ink-latency with new NVIDIA Pascal Graphics, even more teraflops, 2TB SSD and a 38% brighter display.

But the Surface computers weren’t among the most important items Microsoft showed off at this event, in my opinion.

Surface Headphones

Microsoft entered into a new wearable category, one that it may stand a chance in, despite the historical relevance of current incumbents. The new Surface Headphones could be considered a run-of-the-mill headset as far as price is concerned, coming in at just above the industry standard cost of over-ear headphones with a price tag of $349.99.

However, it’s the tech inside that may catapult Microsoft’s new offering them into the upper echelon of auditory and software combined experiences.

The Surface Headphones are an over the ear style listening experience that sport 40mm drivers, 2 beam-forming microphones in each ear cup, 8 microphones in total, capacitive touch surfaces for volume control and noise cancellation.

Microsoft is incorporating a new technology that involves a 13-level adjustment control of ambient noise, allowing listeners to go from amplified outside noise to a completely isolated listening experience.

However, the trick that elevates the Surface Headphones and makes them relevant is the built-in Cortana technology. As a recent, The Verge article highlights, Microsoft has joined the fray of ambient voice computing with a device more essential to some, than a smart speaker or watch.

Everyone appears to now recognize that headphones are our second most essential gadget after our smartphones. It stands to reason, doesn’t it? Phones have subsumed city workers’ papers and organizers, tourists’ maps and cameras, and students’ books and notepads, but they haven’t and never will replace the discreet functionality of a pair of headphones. Good headphones help to both quiet the outside world and liven up our internal milieu with music. And now that wireless radios and battery endurance are approaching maturity, headphones are becoming the new hotly contested battleground for the companies that like to dominate the rest of our digital lives.

Apple, seemingly took the first stab at the market with its Air Pods, while Google followed up with its own Pixel Buds in a subsequent year. With Apple rumored to expand its auditory efforts with a premium over-ear headphones, undoubtedly leveraging its Beats Headphone purchase, it seems Microsoft is offering its Surface Headphones at just the right time.

The Surface Headphones may not compete with straight music focused efforts like Beats, B&O or Sony, but it does offer the convenience of streamline use cases. Offering a respectable noise canceling listening experience while also being work-place friendly in functionality. Tied to Windows 10 and Cortana, the Surface Headphones are a no-brainer for the office and the seamless 13-level adjustable noise canceling tech empowers employees to stay abreast of office conversation or tune them out for optimal productivity.

Your Phone App Mirroring

Next up is Microsoft cross-over move to get around its mountain of a problem with getting developers reinterested in its desktop platform. With the advent of ChromeOS devices recently being imbued with Android apps, Microsoft found itself with an existential problem. How to undercut its competitor, and quickly?


While many were deriding Microsoft’s efforts to push UWP and the company’s slow pivot to PWA’s, Microsoft’s new viable solution had been unfolding in plain sight.

Microsoft’s new Your Phone app does as labeled and, in the near future, much more.

No need to dig for your phone to text. And you can finally stop emailing yourself photos. With the new Your Phone app you get instant access to your Android phone’s photos and texts on your computer. Snap a pic on your Android phone, see it on your PC. You can also drag and drop photos from your phone onto your PC. And you can copy, edit or ink that photo, right from your PC. Text your friends, group message and type with a keyboard — Your Phone app allows you to view, send and receive the SMS from your Android, on your PC. Android 7.0+ are compatible with Your Phone app[1], which also helps link iPhones to your PC.

While that is impressive, what gives Windows 10 usage a stay of execution, so to speak, was Microsoft’s mention of Your Phone’s ability to mirror app experiences from an Android device (to start).

As Windows Central reported yesterday, a Microsoft executive quickly demoed a new functionality coming to Windows 10 that will allow users to use their Android phones on Windows 10 devices through a process of screen mirroring.

The feature essentially allows you to mirror your entire phone in a Windows on your Windows 10 machine, allowing you to open apps, respond to notifications, and, well, anything else you’d typically do with your phone in the palm of your hand.

While it’s not native usage as would be seen on a Chromebook, it does offer, in-a-pinch functionality which could be just enough to stave off a $200 future ChromeOS purchase for some. Microsoft’s mirror screening, while inelegant as it may appear, does give it some breathing room for Android users frustrated with the lack of continuity between Windows and Android.

Surface All Access

Perhaps, not as flashy as a new piece of hardware or platform bridging technology like the Your Phone announcement, but I also thought was worth highlighting is the Surface All Access plan.

The barrier to Surface entry has been lowered with Microsoft announcing its Surface All Access program that helps people finance all of the fancy new hardware showcased yesterday. Surface All Access replaces the recently shuttered Surface Plus program. For anyone looking to join the family of Surface owners, they can get in at the low monthly price of $25 per month depending on the hardware choice. Surface devices can be financed over 24 month period and come with a two-year subscription to Microsoft premium Office 365 suite. Where SAA and SPP differ is there are no upgrade paths involved in the new financing plan.

Microsoft unpacked a lot yesterday and with the official release of Windows 10 October 2018 Update, fans and users have a lot to comb through for the next few days, however, the gems I highlighted above are items I think people should keep an eye out for, not only for the rest of 2018 but going into 2019, as an indicator of where the company is taking its consumer and enterprise base.

Top Keyboards to Buy for Your Windows 10/11 PC

Keyboards are one of the most important output devices, and you definitely need a quality one for your gaming or other works on the PC. So, we compiled this list of the best keyboards to connect your Windows computer. Most of them are for gaming, but there are also some quality keyboards for office and creative works. Enjoy.

What keyboard should I buy?

  1. Razer BlackWidow Ultimate
  2. Corsair Vengeance K70 RGB
  3. Diatec Filco Majestouch 2
  4. Logitech Wireless Illuminated Keyboard
  5. Microsoft SideWinder X4
  6. Microsoft All-In-One Media Keyboard
  7. Logitech G910 Orion Spark
  8. Microsoft Sculpt Ergonomic Desktop
  9. Cooler Master Storm QuickFire Rapid
  10. Feature-specific keyboards

Razer BlackWidow Ultimate

Razer BlackWidow Ultimate wind8appsRazer BlackWidow Ultimate is a stunning combination of the responsive typing, absolutely amazing design, a bunch of software options and a very satisfying amount of macro keys. Razer BlackWidow is without the doubt the best gaming keyboard made in 2014, especially because it features a lot of features, but still isn’t over-sized or cumbersome.

Some of the features which stand out are On-the-fly macro recording, which will help all MMO players to have a rotation of their favorite spells at the touch of one single button, or the Gaming Mode, which will ensure you that accidentally hitting the Windows key won’t do anything. The BlackWidow Ultimate is an excellent choice with about any gaming genre or any productivity software.

Corsair Vengeance K70 RGB

Corsair Vengeance K70 RGB wind8appsThe Corsair Vengeance K70 RGB is definitely one of the best mechanical keyboards in the market. It offers three different switch types: Cherry MX Red for those who like to gaming with a light touch, Cherry MX Blue for those who want a lot of resistance and noise and Cherry MX Brown for gamers who like a little bit of both.

With a great, comfortable wrist rest, and no too-shiny keys, Vengeance K70 RGB offers an amazing gaming experience for all players of real-time strategy, first-person shooters, role-playing games, action-adventure and MMO games.

— RELATED: 6 best VPN software for laptops: Top picks for 2018

Diatec Filco Majestouch 2

Diatec Filco Majestouch 2 wind8appsYou’re maybe wondering why’s 2013’s keyboard on the list of the best keyboards from 2014? Well, the answer is simple, this keyboard deserves it. The Filco Majestouch 2 isn’t shiny and noisy, like most of the gaming keyboards, but that is exactly its charm.

This keyboard is the best constructed and the most refined and responsive keyboard of 2013, and it still can compete with others today. Majestouch fulfills all the key requirements of the mechanical keyboard and is perfect for all office or creative works.

Logitech Wireless Illuminated Keyboard

Logitech Wireless Illuminated Keyboard wind8apps

Logitech Wireless Illuminated K800 keyboard is definitely one of the best 2014’s wireless keyboards in the market, and is the only actual gaming wireless keyboard on our list. Illuminated K800 is not even bad for gaming, but not many gamers like to play their favorite game with the wireless keyboard.

However, this keyboard is well-designed, durable and its battery lasts charged up to 10 days with a regular use. One of the most interesting features of this keyboard is that it detects when our hands are near to the keyboard and triggers the backlight, which is pretty cool.

— RELATED: How to fix a corrupted keyboard driver in Windows 10

Microsoft SideWinder X4

Microsoft-SideWinder-X4 wind8appsThe Microsoft SideWinder X4 stands out as one of the best budget gaming keyboards of 2014, and is a perfect choice if you want a quality keyboard for a reasonable price. The SideWinder X4 delivers as much as a keyboard twice its price.

It features smooth orange LED backlight, application-specific profiles, and space for 18 programmable macros. The keyboard is very responsive and is able to bear up to 26 keystrokes at the same time.

Microsoft All-In-One Media Keyboard

Microsoft All-In-One Media Keyboard wind8appsThe Microsoft All-In-One Media Keyboard is a small, portable, wireless qwerty keyboard with an integrated track pad. This keyboard supports various gestures, like swipe and pinch-to-zoom, for example. It has customizable media hotkeys, and connects via wireless USB.

The All-in-One Media keyboard is mainly purposed for your desks at home, and besides PC, you can also use it to navigate your home movie center or digital audio rig.

— RELATED: Fix: Keyboard not working in Google Chrome

Logitech G910 Orion Spark

Logitech G910 Orion Spark wind8apps

The Logitech G910 Orion Spark is the keyboard designed for playing massively multiplayer online games. Because this genre really demands a keyboard which can provide a lot of durable, mechanical keys for customized macro, and the Orion Spark provides just that in style.

The Orion Spark provides nine programmable macro keys and three easily switchable profiles, so the players will have all the tools to rise their MMO to the finest level, with the full accessibility. This is also a full RGB keyboard, which means that players could experiment with various colors and patterns for each key on the keyboard.

Microsoft Sculpt Ergonomic Desktop

Microsoft Sculpt Ergonomic Desktop wind8appsMicrosoft Sculpt Ergonomic Desktop is definitely something unusual. This futuristic-designed keyboard will definitely attract everyone’s attention. Besides its design, the keyboard is very responsive and durable. But all features of the Microsoft Sculpt Ergonomic Desktop keyboard and mouse require a PC with Windows 10, Windows 8.1, Windows 8, Windows RT, so we can tell that this keyboard is the real Windows 10/8/8.1 device.

— RELATED: How to disable keyboard shortcuts on Windows 10, 8, 8.1, 7

Cooler Master Storm QuickFire Rapid

CM Storm QuickFire Rapid wind8appsIf you want a compact and simple keyboard, that is still pretty much responsive or durable, the CM Storm QuickFire Rapid an output device you’re looking for. This pretty mechanical keyboard measures only 14.5 inches and offers you up to five different kinds of switches, depending on how much you want your keyboard to be resistant or whether you’re a fan of audible clicks, or not.

The QuickFire Rapid also offers an extra key caps and has the ability to disable the Windows key during gaming, so you don’t have to worry about it.

    –  Buy it now on Amazon

— READ ALSO: 5 best laptop security software for ultimate protection in 2018

Feature-specific keyboards

Now, if you’re looking for more specific keyboards, we got you covered as well. Following the feedback given by our readers, we compiled additional keyboard lists focusing on one particular characteristic. So, if you want to purchase a backlit keyboard, a mechanic keyboard, or other types of keyboards, then check out the posts listed below:

Windows Insider team turns Ignite 2018 into a Road Trip, stays out of jail

The Windows Insider Team has come back from Microsoft Ignite held every year in Florida and Two lucky Insiders got invited to join them this year to try something different and it was a success!

Paul Warren and Eddie Leonard, have been working on the WIP4BIZ Project for the last two years with the Insider Program, they were Hustling other organizations into the same business lifestyle at Microsoft Ignite.

This year at Microsoft Ignite they had a booth for both Windows Insiders and the Office Insiders, and as this shows, both Windows and Office have come together to form Microsoft 365 Insiders.

They had more sessions this year than ever before, FIVE in total.

  • Why the Windows Insider Program is your secret superpower
  • Windows Insider Program for Business — Set up your OWN rings
  • Insider Programs — Your Crystal Ball for Microsoft
  • Model 47: How to run experiments in your organization (while remaining employed)
  • Spin Your Tale

You can watch all these sessions on the Microsoft Ignite Website 

Announcements made at Ignite 

  • SCCM now has Insider rings from popular feedback
  • You can be an Author too!,  Co-Author in Docs for WIP4BIZ
  • Microsoft Ignite on Tour – coming to a city near you
  • Hero make you! They want you to tell them your story

Also, they hosted a Mixer Webcast and also flighted a new build whilst hustling, as you can see in this video:

Nobody went to Jail! ?

You can read more about the exploits of Windows Insiders at Ignite on today’s blog post announcing Insider Skip Ahead/Fast Ring build 18252.

Also announced in today’s blog post: new Badges for Insiders ….

When you get your new badge, use the hash tag #builds4badges on twitter.

Sign up to the Windows Insider Program now 


Top 6 Windows 10/11 security apps to download for free

Unfortunately, the Windows App Store doesn’t offer a lot of quality security apps, but it certainly has some worth mentioning. So, we made a list of six of the best security apps which could be found in the Windows App Store so far. We featured various security tools in this list, including some file scanners, password encryption tools, additional tools for some desktop antiviruses, and so on.

windows 10 security apps

Protect your Windows 10 PC with these security apps

  1. Kaspersky Now
  2. Password Padlock
  3. McAfee Central
  4. Total Virus Scanner
  5. VPN Shield Subscription
  6. Shredder8

Kaspersky Now

kaspersky now wind8apps
Kaspersky Now is definitely the best additional tool for any Kaspersky Antivirus product or service. Kaspersky Now displays your PC‘s protection status, right in your Windows 8 or Windows 10 User Interface. Even if you don’t have any Kaspersky Lab products installed on your PC, Kaspersky Now still provides you some valuable information about your system’s security.

It also provides a RSS Feed, from Kaspersky’s security website securelist.com. Kaspersky Now is compatible with: Kaspersky Internet Security and Kaspersky Anti-Virus products.

Password Padlock

Password Padlock wind8apps

With Password Padlock you can easily manage all your passwords. This simple password master uses very efficient AES-256 encryption to keep your files absolutely safe. Password Padlock offers you an option to backup and restore all encrypted passwords to OneDrive.

You can even backup your passwords on one device, and restore them on another. Passwords are also very easy to manage, because they’re organized into categories. Another great feature of Password Padlock is the fact that it has no adds.

McAfee Central

McAfee Central wind8apps

McAfee Central provides unites all subscriptions, status updates and McAfee features to one place. The app sends you the security status, which provides you with a protection overview, and alerts you to all potential risks and threats for your system.

With Membership overview, you can easily manage your subscription, so you’ll could always extend it on time. McAfee Central offers you the LiveSafe feature, a personal locker tile which allows you to store all your important documents in a secure online vault. All in all, McAfee Central is definitely one of the best security apps from the Windows App Store.

Total Virus Scanner

Total Virus Scanner wind8apps

Total Virus Scanner is an online file scanner. It scans all your desired files and applications, and informs you about all malicious activities on your (viruses, trojans, worms) on your uploaded files. This app also allows you to upload any unknown application to this app.

Total Virus Scanner does not provide real-time protection, so if you want to be safe all the time, you must look for another security app.

UPDATE: Total Virus Scanner is no longer available in the Microsoft Store. As an alternative, you can download 360 Total Security. This app displays information about your computer protection status, startup time and disk usage, and more.

VPN Shield Subscription

VPN Shield wind8apps

VPN Shield Subscription is an additional tool for VPN Shield desktop and mobile applications. So logically, you can’t use VPN Shield Subscription without having VPN Shield desktop application for Windows installed on your computer. This app offers you a wide range of subscription options, from just a few days, to a whole year. It also allows a various payment methods, so you can get your subscription from anywhere in the world. All you need to do is to create your VPN Shiled account, and you’re good to go.

UPDATE: This app is no longer available in the Store. However, you can download VPN Shield 2 as an alternative. This security app encrypts your messages, protect your online date, changes your real location and hides your IP allowing you to browser anonymously. 

Shredder 8

shredder8 windows 10 app

Another interesting security app to install on your computer is Shredder 8. With the help of this tool, you’ll make sure that nobody can restore the files and folders that you deleted from your computer.

Shredder allows to permanently destroy file contents and wipe previously used storage space, so that secret data can’t be restored even by advanced recovery tools

So, if you work with sensitive and confidential information, this app will buy you peace of mind.

We’ll end our list here. If you’ve got any suggestions or recommendation about other security apps, let us know in the comments below.

RELATED SECURITY GUIDES TO CHECK OUT:

Release Preview finally updated to 17763.1, at the same time as the full Windows 10 October 2018 Update

The Release Preview Ring, which usually previews a full release by a week or so, saw 17763.1 at the same time as the Windows 10 October Update was announced yesterday.

Release Preview users were waiting to see the latest version before it was released to consumers, but it never arrived.  This is a change in how the rings work, but it was done on purpose according to Brandon LeBlanc on the Windows Insider Team.

Release Preview is now for servicing validation and rollout testing.

This is a stable release and yours truly has tested the install on Release Preview.

Don’t Forget to submit feedback in the Feedback Hub App on Windows 10.

You can also find more information in the official blog post.

Star Wars: Battlefront II, Stardew Valley, and more are discounted on Xbox One this week

Microsoft has released this week’s Deals with Gold sale, with one of the big games being Star Wars: Battlefront II. Xbox Live Gold subscribers can grab the game for just $29.99, a savings of $10 from the official price.  In addition, the much older Star Wars: Battlefront Ultimate Edition is only $4.50 for Gold members.

There’s also a ton of retro-style games on sale. Stardew Valley is one of the big ones, and all Xbox gamers can get the game for only $11.24, which is 25% off the normal list price of $14.99. Additionally, Windows 10 gamers can save up to 60% on titles like the Songbringer Bundle, Asdivine Hearts, Moonlighter, and Phantom Trigger, which are also playable on Xbox One via the Xbox Play Anywhere program.

Current owners of the Battlefield 1 game can get the In the Name of the Tsar and They Shall Not Pass add-ons for free. Destiny 2 owners can also get the Expansion Pass for half off. Other Spotlight game sales include Overcooked: Gourmet Edition and its The Lost Morsel add-on each for 67% off, as well as The Surge and UFC 3 Notorious Edition, which are also on sale.

Which game have you been eyeing? Is there a game you’d like to see on sale? Share us your favorites on the comment section below.

With acquisitions like GitHub and LinkedIn, Microsoft looks for communities where “we’re a better owner,” says CFO Amy Hood

In the past couple of years, Microsoft has been a relative spending spree as the company added Xamarin, Mojang, Acompli, Sunrise, LinkedIn, Beam, and GitHub to its business portfolio. In the last five years, Microsoft has struck 57 public and not so publicized deals with companies for purchase.

Outwardly, Microsoft’s purchases seemed strategic in nature as the company pivoted from being a licensor of boxed software to more a cloud solutions company that creates software across multiple platforms.

However, Microsoft’s CFO Amy Hood layered an additional reasoning that included the company attempting to be good faith arbiter of the future of the companies they purchased.

CNBC reported that during a conversation at the 2018 Fortune Most Powerful Women Summit, Hood spoke with Fortune senior writer Michael Lev-Ram about the last five years of Microsoft purchases.

“For the past five years, we’ve been incredibly consistent — buy communities, look for networked assets, look for growing markets, and look for where we’re a better owner.”

To Hood’s claim, since Microsoft acquired ownership of LinkedIn, the company has grown the asset to 575 million members, which is an improvement on its prior 433 million member number. As of today’s reporting, the GitHub community sits at 28 million associated developers and Microsoft’s most widely reported Minecraft purchase has 91 million monthly players.

Perhaps, Microsoft is taking a different approach than it did with its historic purchases such as Skype and Nokia, but whatever the new acquisition scheme is for the company, it appears to be paying off for its customers right now.

Windows 10’s Game Mode will now block Windows Update interruptions

Yesterday’s release of the Windows 10 October Update 2018 hosted several new features and improvements. Among those is Microsoft’s new Game Bar app that comes pre-installed on this new update. The app can be accessed from both the Start Menu as well as using Ctrl + G, and includes new audio controls that allow customization of the different audio channels running on the system.

Additionally, Microsoft’s newest Windows update includes improvements to Game Mode. Windows 10 users running the October 2018 Update will have the option of having the system turn off Windows Update automatically. This will allow the system to focus its resources on running the game as smoothly as possible and block unwanted update notifications that get in the way of fun.

These new features will surely make many gamers happy, as fewer interruptions and smoother gaming should help alleviate frustration when games become increasingly challenging.

Do find Microsoft’s update to Game Mode useful? Please share your thoughts below.

New Microsoft Business Profile will let brands control their presence across Microsoft’s online services

Along with the release of the Windows 10 October Update 2018 yesterday, Microsoft has also announced improvements for Outlook.com. Users of Microsoft’s free email service will soon be able to see a verified icon from businesses, in much the same way as Twitter and Facebook use one to verify legitimate businesses. This will likely help users to easily identify fake and fraudulent emails.

In addition, users will also be able to click the business’s profile card to access contact info and location, as well as track package deliveries. Users will also be able to check which newsletters they’re subscribed to and easily opt-out of ones they no longer wish to clutter their inboxes.

US Companies can participate in Microsoft’s Business Profile beta, so customers will be able to see the verified icon. Businesses can add in their own profile details, photos, and contact info for Outlook.com users to see. Microsoft is starting with its email service for now, but the official page for the Business Profile beta says that verified businesses will be able to control their presence across other Microsoft services in the future.

Do you think a verified icon will be able to help you identify spam better? Feel free to share your thoughts in the comment section below.

How to Run an FTP Server on Windows 10

If you want to have your own FTP server on your Windows 10, Windows 8 or Windows 8.1 computer, you came to the right place. This article will show you how to set-up your own FTP server, without installing any third party apps, using just Windows‘ built-in features.
wind8apps ftp server
Using a FTP server on internal or external network is definitely very fast and easy way to share and access files across the network. Fortunately, Windows 10, Windows 8 and Windows 8.1 have built-in FTP server feature, which is located under Internet Information Service features, but isn’t installed with the system, and needs to be installed afterwards. But there are other solutions to help you create a website, if that’s what you’re interested in.

Steps to setup FTP Server on Windows

1) Open control Panel, go to Programs and Features and choose Turn Windows features on or off.

turn windows feature on or off

If Internet Information Service was not installed with your system, then you’ll need to install it separately. Screenshot below shows you what features you need to turn on to run a FTP server on your Windows 10/8/8.1. Click OK to install the features you selected.

Internet Information Service

2) After installation is finished, open Internet Information Services (IIS) Manager in Administrative Tools in Control Panel, as shown in the screenshot below.

administrative tools control Panel

Expand the sites, right click on it and click on ‘Add FTP Site’.

add FTP site

3) Give a name to your FTP site and browse for the local folder which is need for the access to others through your FTP server.

4) Next, you’ll have to select your computer’s IP from the drop down box.

If you don’t have any certificates for this connection, check No SSL option, but if your FTP network is for professional use, you might need to enable SSL.

bind ftp site


Set Up FTP Access Permission on Windows

In this section, you’ll learn how to set permissions for other users of your FTP network. You’ll be able to set the way others will access your network and who will have Read-only or Read and Write privileges. Let’s say that you want specific users to read and edit your content, of course they’ll need username and password for that. Other users, who will be able only to read the content, and not to edit it are called anonymous users.

First of all, create a group on Windows 10, Windows 8 local computer and add users who will be able to write and edit the content.

Set Up FTP Access Permission


You must give Windows permission, in this case, Modify access, to this group, which is directly linked with your FTP site.

full access FTP


In the next screen to give the permission, check Basic, this feature will request username and password from certain users. To specify these users, select Specified roles or groups option from drop down menu and type the name of the group you’ve just created. Set Read and Write permission for the group. Click on Finish and complete the setup.

Basic Authentication is enabled in Windows 10/8/8.1 by default, but you should check for it just in case. Open ‘FTP Authentication’ settings of the site and make sure Basic Authentication is enabled.

Now when we created permissions for Read and Write users, we should do the same thing with the anonymous users.

To start, Open ‘FTP Authorization Rules’ for the FTP site you created. Create an ‘Add Allow Rule’ and set the permissions as shown on the screenshot below:

FTP Authorization Rules


Make sure that second rule is also listed.

additional FTP authorisation rules


Anonymous users access needs to be enabled from FTP Authentication settings.

Anonymous user access FTP Authentication

Check the Firewall

The last thing you need to do is to check your Firewall. You need to either allow your FTP inbound or disable the firewall, to make sure your FTP server will run perfectly without any interuptions.

That’s it, now you’re able to create your own FTP network on your Windows 10, Windows 8 or Windows 8.1. If you have any uncertainties, please leave your comments below. And if you are interested in increasing your cloud storage, you can have a look at these apps, as well.

In case you’re experiencing any FTP issues on your machine, here are a few solutions to fix your problem:

  • Use Passive FTP
  • Temporarily turn off your firewall and antivirus
  • Allow FTP connections and check your FTP settings once again.

For additional solutions and detailed instructions on how to perform the steps listed above, you can check out this troubleshooting guide.

RELATED STORIES TO CHECK OUT:

Learn new foreign languages with these Windows 10/11 apps

If you want to merge beautiful and useful, and want to start learning the new language in the Windows 8 or Windows 10 environment, you’re in the right place. I chose a few apps which will definitely help you to expand your knowledge of languages. These apps will learn you major World languages with interesting lessons and well-designed interfaces. So if you were uncertain about what app to choose, I hope this article will help you in making a decision.

Use these apps to learn foreign languages

  1. Duolingo
  2. iTooch Language Arts
  3. Human Japanese
  4. Babbel
  5. MobileFusion Language Learning Apps

Duolingo

duolingo windows 10 app

If you want to Spanish, French, German, Portuguese, Italian, Irish, Dutch, Danish or English, then Duolingo is perhaps the best apps that you can use. The learning process is fun and helping to become fluent in your foreign language of choice in no time. Totally fun and 100% free.

Users are very satisfied with this app, as you can see from the reviews they added on the app’s download page:

It’s free, for real. No fees, no ads, no gimmicks. A college-quality education without the price tag.

So, if you’re finding hard to believe that, go ahead and download Duolingo and see for yourself.

iTooch Language Arts

itooch wind8apps

If you want to help your kids to learn some foreign language, you definitely should try iTooch. This apps is much more oriented to elementary scholars and children then Babbel, and it should provide them an interesting and effective way to learn something new. But, iTooch is not only the language-learning-oriented app, it offers you probably the largest collection of educational activities that could be found on the App Store.

iTooch is based on the US National Common Core Standards and it offers you lessons in Math, Language arts, Science and Health. This app will definitely help parents, teachers and students to learn amazing new things in a fun and motivating way. Every iTooch learning app is available in the App Store individually, for the price of $4,99.

Human Japanese

human japanese wind8apps

And at the end of our list, something for the fans of Japanese culture. If you want to learn Japanese language on your Windows 8 device, Human Japanese is definitely the best choice. This amazing Japanese learning app will provide you with a thousands of recordings, clear and understandable explanations, intelligent quizzes and reviews, animations of hiragana, katakana and kanji characters, and much more. Besides a huge variety of learning techniques and lessons, Human Japanese has an amazing, metro-style interface, which will increase your will to learn this language even more. Human Japanese is available in the Windows App Store for the price of $18.99, with an option for the free trial.

Babbel

babbel wind8apps

Babbel will definitely be your first choice if you want to learn some foreign language with ease. Babbel language learning apps were first available to iOS users, and they were absolutely delighted with them. And now, Windows 8 users will finally have that privilege to learn various tongues with Babbel. Babbel doesn’t come as a single app, but as 11 apps, one app for each language. With Babbel apps you’ll be able to learn: Dutch, English, French, German, Indonesian, Italian, Polish, Portuguese, Spanish, Swedish and Turkish. Babbel uses various methods of learning, such as repetition, visual cues, spelling exercises and voice recognition in order to provide you an easy and interesting way to learn the new language.

Every single app is free to download from Windows App Store, with a company spokesperson saying that the WP8 builds “are mainly vocabulary trainers with 3,000 words broken down into themed lessons.” So, only if you’re willing, you have anything you need to learn any of above-mentioned languages without paying a single penny.

UPDATE: The app is no longer available for Windows 10, but you can download it on Android on iOS devices.

MobileFusion Language Learning Apps

MobileFusion wind8apps

If you somehow want an alternative for Babbel, your shot might be some of the free language learning tools from MobileFusion. This developer offers you eleven free language learning tools, including: Learn Russian Deluxe, Learn German Deluxe, Learn Turkish Deluxe, Learn Greek Deluxe, Learn Dutch Deluxe, Learn Danish Deluxe, Learn French Deluxe, Learn Portoguese Deluxe, Learn Spanish Deluxe, Learn Italian Deluxe and Learn Swedish Deluxe. MobileFusion assures you that using their apps will be the most entertaining way you have learned some of these languages so far, it’s up to you to decide whether they’re telling the truth or not.

UPDATE: The app is no longer available for download in the Store.

For more information about specific language learning apps, you can check out the guides below:

Top 10+ Windows Travel Apps to Download for Free

If you’re planning to go on a trip or a vacation, the only thing you’re going to need to help you organize is your Windows device. Here is the list of ten Windows platform apps which will make your traveling and orientating in the foreign city easier than ever. You’ll find anything you need for your trip in this list, from hotel booking app, to a translator app which will help you getting in contact with local citizens.
windows 8 travel apps

Windows 10 travel apps

  1. TripAdvisor
  2. Inrix Traffic (no longer available)
  3. GMaps
  4. MSN Travel (no longer available)
  5. Foursquare
  6. Bing Translator
  7. Skyscanner
  8. XE Currency
  9. The Weather Channel
  10. Photobucket
  11. Uber

TripAdvisor

tripadvisor wind8apps
Trip Advisor is well known as one of the best hotel finding and booking websites on the internet, and it now comes in a form Windows 8 app, which is more than useful. Trip Advisor will help you do decide which is the best place for you to rest at. Trip Advisor has over 75 million reviews and opinions by travelers about various hotels, hostels, restaurants and attractions. Besides finding a place to stay, you can also book a room online with Trip Advisor, so all your problems about where to spend a night while on vacation should be solved with this app.

Inrix Traffic

inrix wind8apps

Traffic has always been the main source of driver’s headache. While colored routes appears on the map is nothing innovative, Inrix Traffic’s smooth interface shows you exactly why you’re not getting where you’re headed and when you’ll possibly get there. Inrix Traffic features a bunch of icons illustrating every obstacle which prevented you go come to the destination on time. So if you’re late somewhere, now you’ll have a visual proof that it’s traffic’s fault.

UPDATE: The app is no longer available in the Windows Store.

GMaps

gmaps wind8apps

GMaps is probably the best alternative for Google Maps on Windows platforms. Very useful feature of this app is an ability to download all the maps and use them offline. With 3D maps and 3D compass modes, you’ll be able to orient yourself better in the 3D environment. Besides 3D maps, you can also explore 360-degree panoramas of various cities around the world. And finally, something that separates this app from other navigation apps, it will provide you fresh information about traffic and incidents on your selected route.

MSN Travel

msn travel wind8apps

One Microsoft app definitely deserves to be on list, and that app is MSN Travel. This app is very useful because you can use it as a complete travel guide. MSN Travel will help you to find a perfect destination for your vacation and easily plan your trip. You can also book hotels with this app, so that makes MSN Travel a couple of tools in one app.

UPDATE: The app has been discontinued and is no longer available in the Microsoft Store.

Foursquare

foursquare wind8apps

Forthsquare collects info about what places you like to visit from you, and shows you search results of best places to check-in, based on your interests. Just like the description of the app says: “Foursquare is all about searching and discovering great places, wherever you are in the world.” You can find interesting places even without creating a Forthsquare account, just search for some simple keywords, like “French wine” or “indoor seating,” and Fourthsquare will show you the best places relevant to the keyword. Fouurthsquare’s job is not done even if you pick a place, because it will show you reviews and useful tips abut that place itself.

Bing Translator

translator wind8apps

It is always useful to have a translation app with yourself in order to overcome language barrier, and Translators arises as your best choice. You can use your camera, voice or typing to enter words you want to translate. Big advantage of Translator is it’s fully functionality in an offline mode. Camera translation is another very useful feature, because it will translate signs, newspaper and any other text printed with your device’s camera.

Skyscanner

Skyscanner wind8apps

If you need to find a cheap flight fast, Skyscanner is a great tool for that. With Skyscanner, you’ll be able to search for over a million routes of over 1,000 companies and find the most affordable priced flights. When you find a flight, Skyscanner will connect you directly to the airline or travel agency and you can book a flight in just a few taps on your screen.

XE Currency

xe currency wind8apps

It is always useful to know exchange rates, especially when you’re on a trip, and XE Currency will show you changes of almost every currency exchange rate in no more than ten minutes. Select the currencies you want to calculate, enter the monetary amount and let the app do all the work for you. XE Currency’s live tile toggles between other currencies you’ve selected in the app and their equivalent to your main currency. So XE Currency is the only thing you’re going to need if you want to exchange your money for the money from the country you’re currently in.

The Weather Channel

the weather channel wind8apps

Weather is very important factor of every vacation. The Weather Channel will provide you the most precise weather forecast of all other weather apps. Over 200 meteorologists are working together to bring as much accurate forecast as possible. So with Weather Channel bad weather conditions will never trick you again.

Photobucket

photobucket wind8apps

What a vacation would be without taking a bunch of pictures? With Photobucket you don’t have to worry anymore if your photos will be safe. Photobucket is one of the oldest photo-hosting services on the Web, which is now available as an app for Windows 8/8.1/10. Photobucket is more focused on storing your photos and creating online albums than on being a social network, like Instagram or Flickr. The app scans your device for photos and uploads desired pictures to an online storage, and you can easily share them with your loved ones.

Uber

uber windows 10 app

If you need a taxi to quickly take you from A to B when you’re travelling, then Uber is one of the best apps to install on your Windows 10 device. The Uber app is very useful especially if you’re not familiar with the city you’re in.All you need to do is download the app, set your profile information, open the app and tell Uber where you want to go.

RELATED STORIES TO CHECK OUT:

How to Unlock New Text to Speech Voices in Windows 10

Microsoft has a tradition of adding new text-to-speech voices in the new versions of its operating system. Windows Vista presented Anna to the World, which retained even in Windows 7. Windows 8 also introduced some new voices, including David, Zira and Hazel. And Windows 10  also introduced some new additional voices.

Windows 10

Some Windows 10 enthusiasts have discovered these new voices in the US English version of the operating system:  Microsoft Mark Mobile and Microsoft Eva Mobile, and a special test voice designed for Microsoft’s personal assistant, Cortana. But unfortunately, Eva voice is locked by Microsoft, but don’t worry about that, because here’s how you can unlock it with just a couple of registry tweaks.

Steps to unlock new text to speech voices in Windows 10

The voice of Eva Mobile can be unlocked with a following registry tweak:
Windows Registry Editor Version 5.00
[HKEY_LOCAL_MACHINESOFTWAREMicrosoftSpeechVoicesTokensMSTTS_V110_enUS_EvaM]
@="Microsoft Eva Mobile - English (United States)"
"409"="Microsoft Eva Mobile - English (United States)"
"CLSID"="{179F3D56-1B0B-42B2-A962-59B7EF59FE1B}"
"LangDataPath"=hex(2):25,00,77,00,69,00,6e,00,64,00,69,00,72,00,25,00,5c,00,53,
00,70,00,65,00,65,00,63,00,68,00,5f,00,4f,00,6e,00,65,00,43,00,6f,00,72,00,
65,00,5c,00,45,00,6e,00,67,00,69,00,6e,00,65,00,73,00,5c,00,54,00,54,00,53,
00,5c,00,65,00,6e,00,2d,00,55,00,53,00,5c,00,4d,00,53,00,54,00,54,00,53,00,
4c,00,6f,00,63,00,65,00,6e,00,55,00,53,00,2e,00,64,00,61,00,74,00,00,00
"VoicePath"=hex(2):25,00,77,00,69,00,6e,00,64,00,69,00,72,00,25,00,5c,00,53,00,
70,00,65,00,65,00,63,00,68,00,5f,00,4f,00,6e,00,65,00,43,00,6f,00,72,00,65,
00,5c,00,45,00,6e,00,67,00,69,00,6e,00,65,00,73,00,5c,00,54,00,54,00,53,00,
5c,00,65,00,6e,00,2d,00,55,00,53,00,5c,00,4d,00,31,00,30,00,33,00,33,00,45,
00,76,00,61,00,00,00
[HKEY_LOCAL_MACHINESOFTWAREMicrosoftSpeechVoicesTokensMSTTS_V110_enUS_EvaMAttributes]
"Age"="Adult"
"Gender"="Female"
"Version"="11.0"
"Language"="409"
"Name"="Microsoft Eva Mobile"
"SharedPronunciation"=""
"Vendor"="Microsoft"
"DataVersion"="11.0.2013.1022"

Save the text above as a .reg file, or download it as a already packed and ready to use Registry file below:
Download Registry tweak for Eva voice

Now, do the following steps:

  • Open Control Panel
  • Go to the following path:

Control PanelEase of AccessSpeech Recognition

unlock eva in windows 10 1“]

  • On the left, click the “Text to speech” link. Eva Mobile voice should now appear in the menu. Click on Preview Voice to hear the voice you just installed:

unlock eva in windows 10 2

English US version of the operating system isn’t the only one having various text-to-speech voice ‘characters. You can find more localized voices if you install other Language Packs for your version of Windows. For example, Spanish version features Helena and Sabina, French version has Microsoft Hortense, Chinese Traditional version includes Tracy and so on.so on.


How to add a new Narrator voice in Windows 10

As  a quick reminder, if you want to change the TTS voice in Windows 10, all you need to do is navigate to Settings > Time & Language > Region & Language and add a new language.
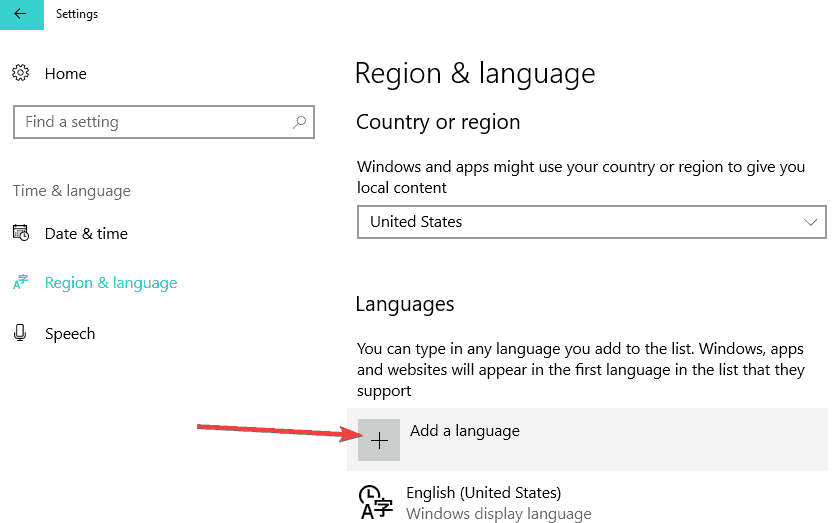
add new language

Then select the new language and go to Options. Select Download language pack >  Speech > hit Download.
When the download finished, go to Settings  > Ease of Access > Narrator. Navigate to ‘Choose a voice’ and simply select the new voice that you want to add.

List of all the TTS voices available in Windows 10

As stated above, not all the voice are applicable for particular languages. Here’s the list of all the Narrator voices available in the latest Windows 10 versions:

Download Candy Crush Soda Saga on Windows 10/11 for Free

If you’re a fan of Candy Crush-like games, then you should know that the newest game Candy Crush Soda Saga is now available as a free download for Windows 10 users.

candy crush soda saga windows 10

Candy Crush Saga was finally released on the Windows Phone back in 2014, and this has met with enthusiasm by lovers of the genre. After that, Microsoft has partnered with King.com and decided to preload the game to Windows 10.

Download Candy Crush for Windows 10

Many follow-ups to the popular casual matching game have become available, such as Candy Crush Soda Saga. Since this is an universal game, you can download it on your Windows 10 desktop and touch devices, as well as on Windows 10 Mobile.

Here’s how the description of the game sounds like:

Candy Crush Soda Saga is the latest game from the makers of the legendary Candy Crush Saga. New candies, more divine combinations and challenging new game modes brimming with purple soda and Candy Bears! Candy Crush Soda Saga is completely free to play, but some in-game items such as extra moves or lives will require payment.

And here are the main features of the game:

Hundreds of Sodalicious levels
* New Game Modes include:
Soda – switch bottles and candies to release purple soda and save the Candy Bears
Green Soda – switch and match candies in green soda to turn them into Swedish Fish
Frosting – match candies to smash the ice and set the Candy Bears free
Honey – match candies next to the honey to release the trapped Candy Bears
* Scrumptious new candies and sublime new combinations:
Match 4 candies in a square to make a Swedish Fish
Match 7 candies to create the remarkable Coloring Candy
New 8th purple Candy that gives instant and powerful effects when matched
* Explore juicy new environments and meet the kookiest characters
* Mouth-watering new graphics, Candy Crush Soda Saga never looked so tasty
* Easy and fun to play, yet challenging to fully master

The game currently has an average customer rating of 4.6 from 5 from hundred of thousands of ratings. Overall, those who have downloaded the game are apparently pleased with its performance, so go ahead and give it a try and let us know what you think of it.

install candy crush saga

Candy Crush games annoyed many Windows 10 users

While there are many Candy Crush game fans, there are also many Windows 10 users who simply can’t stand this game. They are very angry at Microsoft for pushing the game onto their computers with every new OS update. You can read more about their complains in this post.

If you truly hate Candy Crush games and you want to prevent Microsoft from installing them on your machine, check out this guide to learn what are the steps to follow.

RELATED POSTS TO CHECK OUT:

Slow SSD in Surface Book: Here’s how to fix this issue


Steps to fix slow SSD on Surface Book:

  1. Download the Samsung NVM Express Controller
  2. Disable Onboard VGA
  3. Disconnect your peripherals
  4. Free up some space
  5. Use a high power plan

The Surface Book is an amazing device, there’s no doubt about it. Along with the Surface Pro 4, they represent the best of personal computing hardware that has come out of Microsoft’s labs.

However, as it’s always the case, there have been various problems reported, but Microsoft responded to a few of them, fixing problems with the faulty display drivers, flickering screens but there did remain a few unsolved issues. And one of these problems has been for a long while the slow SSD for new Surface Book owners.

Surface Book owners complaining about slow SSD speeds

Problems have been reported since the end of October, and here’s what some users have been complaining about on the Microsoft support forums:

I am experiencing very poor SSD writing performance in my Surface Book. It’s i5 dGPU 8GB RAM and 256GB storage model. Installing applications and copying files have been really slow. Windows 10 is updated to the latest. Has anyone having the same? Disabling BitLocker slightly helped (10~20%) but not very much.

Many users suggested trying a full reset of the device, but this measure only worked for a couple of users. Besides the slow SSD, one furious user says he has even more problems:

Mine (i5 256GB) Pro 4 is even slower, with sequential writing 88MB/s and 4K at 0.87MB/s. Horrible speed!!!! And I also have battery drain, loss screen touch response, camera won’t take picture, Input personalization server using more than 30% of CPU all the time. and so on.

A couple of Reddit users are suggesting that the 128GB Surface Pro 4 models use perhaps the worst NVMe based SSD in production, which means this is actually a hardware problem. There’s another lengthy thread on OverClock.net, as well.

So, the harsh truth in all this is that Microsoft seems to be using a poor piece of hardware in such an expensive device, at least for some users. This user puts it really well:

I don’t understand why Microsoft would offer this drive in a $1500 notebook; this 128GB drive has the slowest sequential writes that I have seen of any SSD in the past four years. Literally, spinning hard disks write faster than this drive. That 6TB spinning disk writes @ 215MB/s.

You know what’s most aggravating? There are much faster 128GB SSDs (all non-NVMe) that have been available for years. Sure, in any one line of SSDs, the 128GB model is the slowest (or whatever the lowest capacity is). But, in general–128GB SSDs can hold their own. Just not this one.

But, I suspect Microsoft didn’t expect users of the lowest-end model to really be copying lots of files (even though they paid $1500 for their system). Honestly, though, this SSD is an embarrassment to 2015 SSDs and a bad mark on PCIe NVMe drives. To make it even worse, this uses TLC NAND from Samsung. I still haven’t forgiven Samsung for the issues they caused in the 840 EVO and the 840

This could actually turn out to be a big problem for Microsoft if more users hear about this. Some of them have resorted to some drastic decisions, such as returning the Surface Book:

After reading this post and observing the same lame speeds, and especially knowing that the Apple MacBook pro gives 1400 mbps speeds both in read and write I am returning my surface book today. What’s the point of paying more than an Apple computer if you don’t even get their quality /specs.

How to fix slow SSD on Surface Book

Solution 1 – Download the Samsung NVM Express Controller

What seems to have worked for some users is installing the Samsung NVM Express Controller which allegedly doubled the write speed. This seems to be the single solution at the moment, because you can’t user-upgrade the SSD as it is soldered in.

Solution 2 – Disable Onboard VGA

Some users also said that disabling Onboard VGA helped them fix their slow SSD issues. In order to disable this feature, go to Advanced BIOS Settings. However, if you haven’t tweaked your BIOS settings before, you should skip this step. Incorrect BIOS settings may brick your computer.

Solution 3 – Disconnect your peripherals

Other users confirmed that disconnecting their peripherals before booting up their devices helped them mitigate this issue. While this was not the case for all users, it may help you to alleviate this problem.

Solution 4 – Free up some space

If your SSD is almost full, this definitely explains why your Surface Book is slow. Maintain a minimum of 20% free space on your SSD in order to avoid performance issues. For more information on how to delete junk files, check out these guides:

Solution 5 – Use a high power plan

If you enabled a balanced power plan on your device, chances are that another hardware may be using too much power. As a result, your SSD doesn’t receive enough power to run properly. Go to Control Panel > Hardware & Sound > Power Options and enable a High Power Plan.

change power plan settings

At the moment Microsoft has still not reacted to this, and chances are it won’t, since it will have to admit to having made a poor decision. Did you manage to increase your SSD speeds on your Surface Book? Leave your comment below and let us know how you did it.

RELATED STORIES TO CHECK OUT:

FIX: Yahoo Messenger Video Doesn’t Work in Windows 10

According to multiple online reports, it seems that there are various issues with Yahoo Messenger in Windows 10, especially with the video calling features. Here are a few potential fixes.

yahoo messenger windows 10

Many Windows users have been complaining that there still isn’t an official app for Yahoo! Messenger on the Windows Store, but the default program has proved to be ok so far. And there have been various other submissions to the Windows Store, although they weren’t official.

Leaving that aside, let’s talk about the issue at hand. Here’s what the affected user has been saying:

HI, AM UNABLE TO VIDEO CALL IN YAHOO MESSENGER 11 . AM USING WINDOWS 10. FOR AUDIO CALL NO PROBLEM. BUT IN VIDEO CALL VIDEO IS NOT WORKING(web camera). KINDLY HELP ME TO SOLVE THIS PROBLEM.

Others have been reporting that the video call button in grey and they can’t click on it.

How to fix Yahoo Messenger video call issues

  1. Update your drivers
  2. Reinstall Yahoo Messenger
  3. Install an old YM version

Solution 1 – Update your drivers

Of course, it goes without saying that the very first thing you need to do is to check whether you have the latest graphics drivers installed and, of course, if you’re running the latest version of Yahoo Messenger.

Solution 2 – Reinstall Yahoo Messenger

Also, you can try and reinstall the software, as well. This is one of the quickest ways to fix YM problems.

If all this is good, then you need to try and start the program in Administrator mode. Right click on the .exe file, then select Properties > Compatibility > Change settings for all users, then add a checkbox to run this program as administrator and then click Apply.

yahoo messenger windows 10 video fix

— RELATED: Keep your chat messages private with Signal Private Messenger

Solution 3 – Install an old YM version

Other users affected by this problem have been reporting that they managed to solve it by installing an older version of Yahoo messenger. You can also try refreshing your Windows 10, but make sure that you back up everything up before you proceed.

For the time being, this is all that we know regarding this problem. If you happen to know some other fixes, go ahead and leave your comment below and let us know which these are.

UPDATE: Yahoo shut down its instant messaging tool on July 18, 2018. This means that the tool is no longer available for users. However, Yahoo said that it would soon start work on a better instant messaging tool and more details would be revealed along the way.

The good news is that there are many chat apps available on the market which are compatible with Windows 10. You can check out our guide to learn more about the best chat apps that you can install on your computer.

RELATED STORIES TO CHECK OUT: