How to Fix USB Error Code 43 on Windows 10

Most external devices, such as external hard drives, webcams, mice, and more depend on USB connectivity. However, some users are complaining of a code 43 USB error on Windows 10.

This error prevents you from connecting to your external devices. Thankfully, it is an error you can fix quickly with the solutions in this guide.

What is device status code 43 Windows 10?

Below are some of the factors that can cause the code 43 error for USB devices on Windows 10:

  • Outdated driver: In some cases, this issue is due to faulty or outdated USB drivers. The solution to this is to uninstall or update your drivers.
  • Issues with power settings: Sometimes, this issue can be due to the fast startup feature. Many users have been able to fix it by disabling the feature.
  • Hardware issues: On rare occasions, this error code might be due to problems with your hardware components. You can fix this by running the hardware and devices troubleshooter.

How do I solve Error Code 43 for USB devices on Windows 10?

Before delving into the solutions in this section of this guide, there are some preliminary troubleshooting steps that might fix this issue. They are listed below:

  • Insert the USB Device into an Alternative USB Slot
  • Restart Your Laptop or Desktop

If the steps above do not solve the problem, proceed to the solutions below:

1. Run the Hardware and Device Troubleshooter

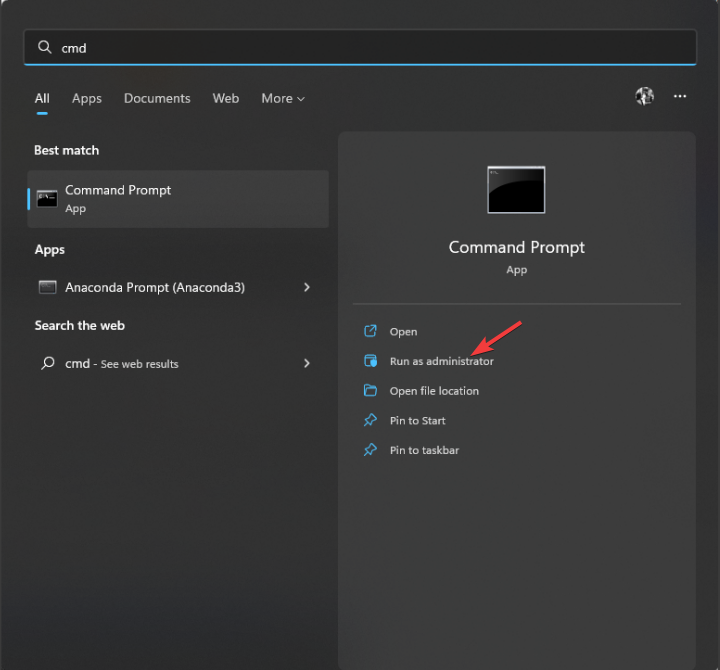
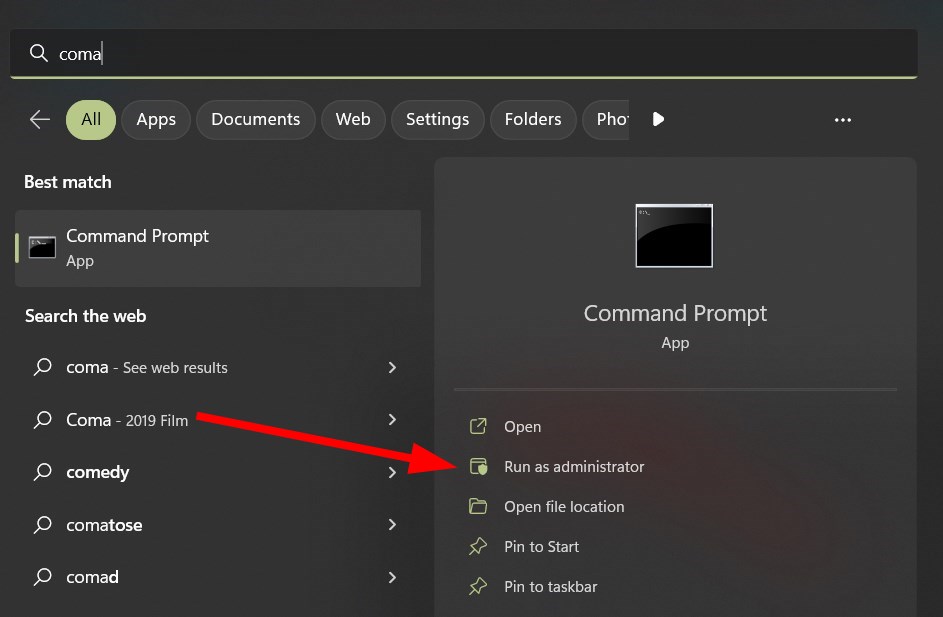
  1. Press the Windows key, type cmd, and select Run as administrator under Command Prompt.
    cmd admin code 43 usb windows 10
  2. Type the command below and hit Enter to fix it: msdt.exe -id DeviceDiagnosticmsdt
  3. Finally, wait for the diagnosis to be complete and apply the recommended fixes.

If you are facing the code 43 USB error on Windows 10, it might be due to hardware issues. Running the Hardware and Devices troubleshooter should help you diagnose and fix this issue.

2. Update the USB device drivers

  1. Press the Windows key + R, type devmgmt.msc, and click the OK button.
    devmgmt
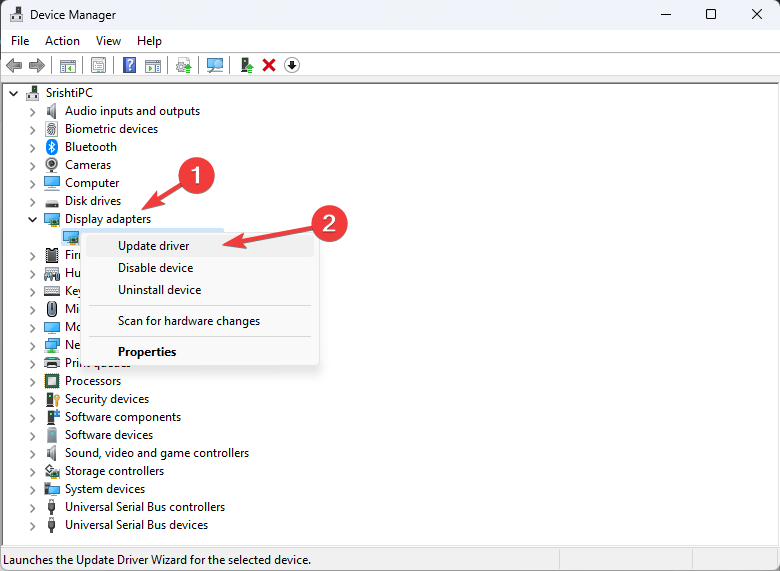
  2. Now, double-click the Universal Serial Bus controllers option to expand it and right-click each of the drivers there.
  3. Select the Update driver option.
    update drive code 43 usb windows 10
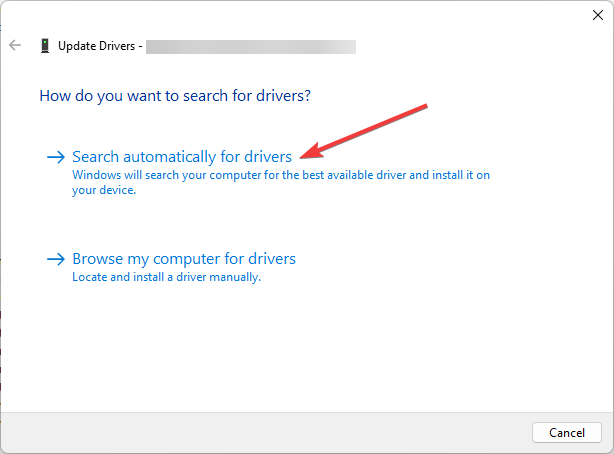
  4. Finally, select the Search automatically for drivers option and install any available update.
    search auto

It might be the case that the USB Device has an outdated driver. If that’s so, that’s probably why you’re getting this code 43 USB error on Windows 10.

You can update the driver by downloading it from the USB device manufacturer’s website or update it with the Device Manager by following the steps above.

3. Uninstall the USB Drivers

  1. Press the Windows key + X and select the Device Manager option.
    device manager
  2. Expand the Universal Serial Bus controllers option and right-click each of the drivers there.
  3. Now, select the Uninstall device option.
    uninstall device code 43 usb windows 10
  4. Next, click the Uninstall button to confirm the action.
    uninstall button
  5. Finally, restart your PC, and the drivers should be reinstalled automatically.

If updating your USB drivers does not fix the code 43 error on Windows 10, you need to uninstall the driver. This should eliminate any glitch causing the issue.

4. Restore Windows to the Previous Date

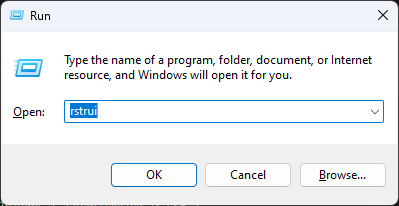
  1. Press the Windows key + R, type rstrui.exe, and click OK.
    rstrui
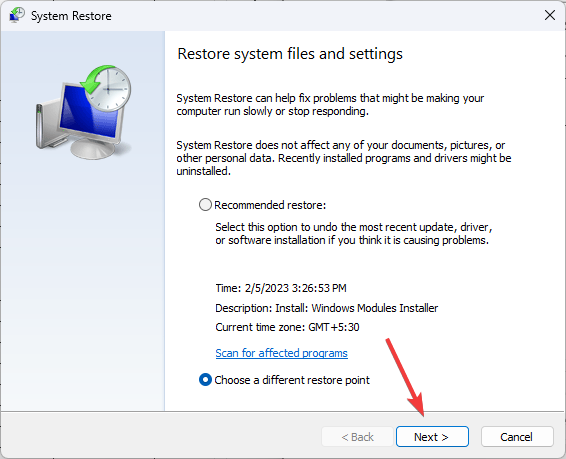
  2. Click the Next button.
    next code 43 usb windows 10
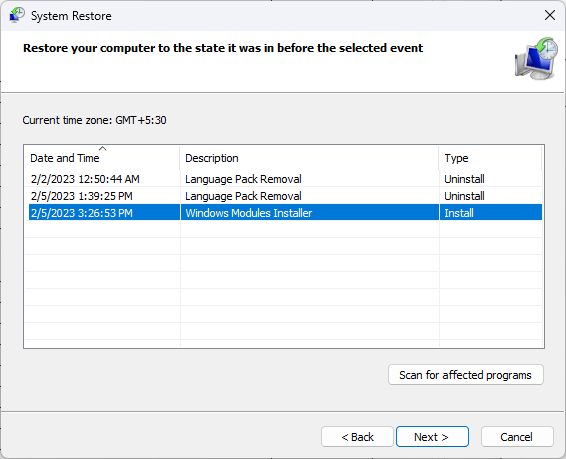
  3. Now, select a restore point and click the Next button.
    restore point code 43 usb windows 10
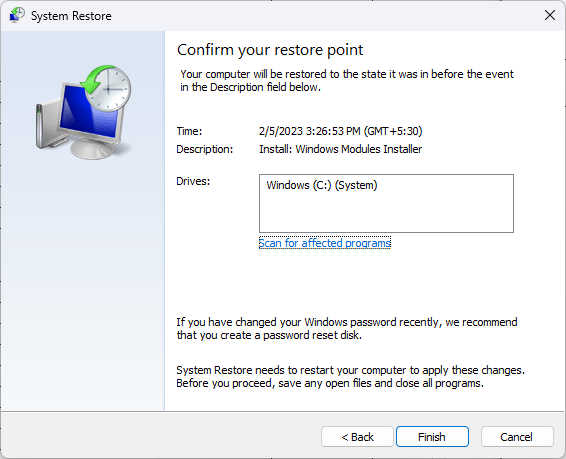
  4. Finally, click the Finish button to confirm the action and follow the onscreen instructions.
    finish

If the USB device worked fine a few weeks back, the System Restore tool in Windows 10 could feasibly fix error code 43. It could fix any hardware that Windows isn’t recognizing.

5. Switch off the Fast Startup

  1. Press the Windows key, type power plan, and select Choose a power plan.
    choose power
  2. Click Choose what the power buttons do on the left of the window.
    choose what  code 43 usb windows 10
  3. Now, select Change settings that are currently unavailable.
    change settings
  4. Uncheck the box for Turn on fast startup (recommended).
  5. Finally, click the Save Changes button and restart your PC.
    disable fast code 43 usb windows 10

At times, the code 43 USB error on Windows 10 can be due to the fast startup feature. While this feature improves your PC startup time considerably, it can sometimes lead to issues.

Hence, you need to disable the feature.

6. Adjust the USB Selective Suspend Settings

  1. Press the Windows key + S, type power plan, and select Edit power plan.
    edit power
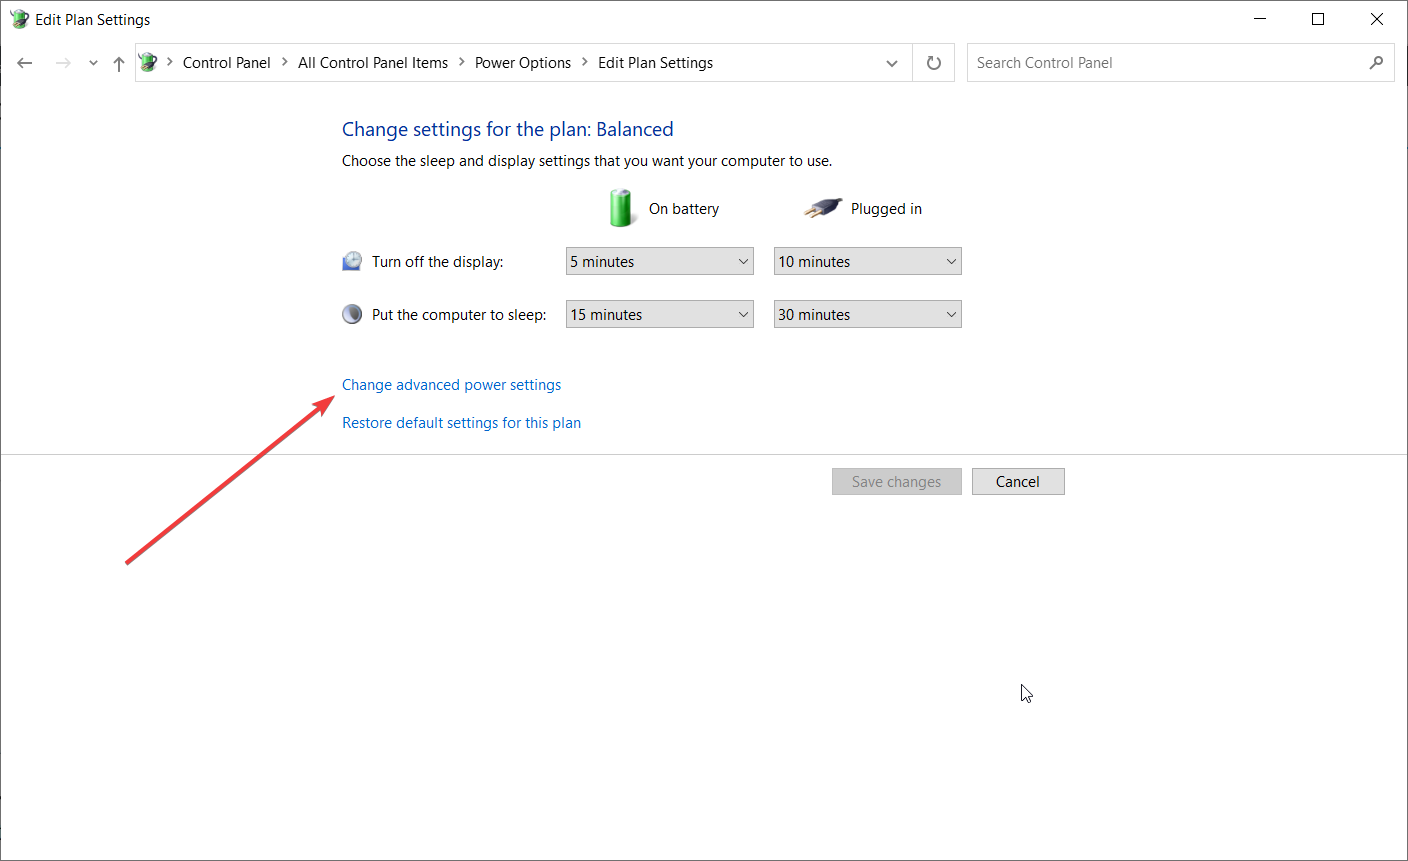
  2. Now, select the Change advanced power settings option.
    change advanced
  3. Click the + beside USB settings and USB selective suspend settings.
    usb settings code 43 usb windows 10
  4. Next, set the On battery and Plugged in battery settings to Disabled.
  5. Finally, click the Apply button, followed by OK, and restart your PC.
    disabled

If the fixes above fail to solve the code 43 USB error on Windows 10, it might be because of your power settings. This is because your power setting might be set to suspend your USB to save power.

Hence, you need to change this feature to restore normalcy.

With this, we can conclude this guide on how to fix the code 43 USB error on Windows 10. You only need to follow the steps above and everything should be back to normal.

If you are facing the error code 43 on your graphics card, check our detailed guide to fix it.

Feel free to let us know the solution that helped you solve this issue in the comments below.

How to Fix Try Catch PowerShell Not Working?

The Try-Catch statement in PowerShell handles errors and exceptions in your code. If Try-Catch is not working as excepted on PowerShell, it can be frustrating. 

In this guide, we will cover all the ways to fix the issue along with the probable causes of the problem. Let’s start!

What causes the Try-Catch not working issue in PowerShell?

There could be various reasons why the statement is not working on PowerShell. Here are some of the most common ones: 

  • Default ErrorAction set – If the ErrorAction is set to Continue, then Try-Catch will not work as expected. 
  • Syntax errors – If the syntax used is improper, the formatting is incorrect, or it is missing keywords, Try-Catch will not work.
  • Cmdlet or function behavior – Some functions and cmdlets come with their error-handling behavior, which might not be compatible with Try-Catch.
  • Incorrect logic or use of variables – If there is an inappropriate use of variables or incorrect logic, then Try-Catch will not work. 

What can I do if the Try-Catch is not working on PowerShell?

1. Check Syntax

  1. First, you need to check if you have used the correct syntax for the version of PowerShell you are using.
  2. Next, verify that you have placed the Try and Catch blocks in the correct sequence.
  3. The basic syntax for Try-Catch is mentioned below. Replace # code to run here with the code and # error handling code here with the error handling code:

Try {
# code to run here
}
Catch {
# error handling code here
}

2. Check if you are trapping a specific error 

You need to verify if you are trapping specific errors you want to handle and not all the errors. Follow these steps to do the same:

  1. Press the Windows key, type PowerShell, and click Run as administrator.Script
  2. To trap an error, you need to use the $ variable in the Catch block to access information about the error that was thrown. Let’s check the example of the same to understand better: Try {
    Get-ChildItem -Path C:\DoesNotExist
    }
    Catch {
    if ($_.Exception.GetType().Name -eq "DirectoryNotFoundException") {
    Write-Output "Directory not found."
    }
    else {
    throw $_.Exception|
    }
    }

3. Set ErrorAction value 

The default value for ErrorAction is Continue; however, for Try-Catch to work, you need to set the ErrorAction value to Stop. To do this, follow these steps:

  1. Open PowerShell as administrator.
  2. You need to use the Set-StrictMode cmdlet or the ErrorAction parameter on individual cmdlets. To understand it better, let us look at an example: 
Try Catch with ErrorAction Stop PowerShell

Try {
Get-ChildItem -Path C:\DoesNotExist -ErrorAction Stop
}
Catch {
Write-Output $_.Exception.Message
}

4. Use the correct exception type

It is important to use correct exceptions when using Try-Catch, as it can only handle exceptions of the System.Exception type. If you have used non-System.Exception errors, then Try-Catch will not work.

As for non-System.Exception, you need to use the NET” framework’s error handling mechanism or catch the error.

5. Avoid script termination 

If your script is terminated before reaching the Catch block, Try-Cach will not get a chance to handle the error. To avoid script termination, follow these steps:

  1. Launch PowerShell with admin rights.
  2. You need to use the Continue statement after the Catch block. Let’s understand it by an example: 
try catch finally

Try {
Get-ChildItem -Path C:\DoesNotExist
}
Catch {
Write-Output $_.Exception.Message
Continue
}

6. Use the Try-Catch-Finally

 If the Try-Catch statement is still not working, you can use the Try-Catch-Finally construct instead. This ensures that your code runs to completion, even if an exception is raised.

  1. Open PowerShell as administrator.
  2. Type the command with Try-Catch-Finally. Here is an example to understand the script better: 

Try {
# Your code here
} 
Catch [System.Exception] {
# Exception handling code here
} 
Finally {
 # Clean-up code here
}

So, these are ways in which you can resolve the Try Catch not working issue on PowerShell. If you have any questions related to Try-Catch, please mention them in the comments section below. We will be happy to help!

If you want to know how to stop PowerShell from closing after running a script, you can read this.

How to Integrate ChatGPT with Discord [+ 5 Smart Tips]

Integrating ChatGPT with Discord allows you to add a conversational AI assistant to your Discord server to answer your queries and perform other tasks.

Integrating it is a bit tricky as it involves several steps. But don’t worry; we’ve got you covered! Let’s start!

 Best tips on using ChatGPT with Discord

  1. Use Discord API –  Discord API has excellent functionality and lets you interact with the Discord platform. Also, it makes using ChatGPT with Discord easier. 
  2. Clear input = correct output – While chatting with ChatGPT, you must use a concise input to get relevant output. 
  3. Keeping the bot secure – Ensure the ChatGPT bot you created is secured and is implementing security measures to protect user data. 
  4. Allow users to give feedback – It is essential to allow your users to provide feedback on their conversations with ChatGPT; this can help you improve user experience.
  5.  Check performance – You must regularly monitor the accuracy and response time of ChatGPT so that you can ensure it is functioning correctly. 

How can I integrate ChatGPT with Discord?

Before engaging in detailed steps, you should consider performing the following checks:

1. Create your server on Discord

  1. Log in to Discord with your username.
  2. Click on the + sign to create your server.
    Discord Server -integrate chat gpt with discord
  3. Click on Create My Own.
    Create My Own
  4. Now select For me and my friends.
    For me and my friends
  5. On the next screen, type in the name of your server and upload a picture if you click.  Then, click Create.
    ChatGPT for friends Create

2. Build a bot

  1. Go to Discord Developers Portal.
    Apps Developers portal -integrate chat gpt with discord
  2. Now click on Applications, then select Create Application.
    BOT APP
  3. Go to General Information, name the app, and add the App icon.
    Portal change image go to BOT
  4. Click Save Changes.
  5.  From the left pane, select Bot.
  6. Click Add Bot.
    Add BOT
  7. Now, click Yes do it on Add this bot to this app.
    Yes do it

3. Generate a URL

  1. Go to OAuth2, click URL Generator, and put a checkmark next to Bot.
    BOT Selected -integrate chat gpt with discord
  2. Scroll down and select Administrator.
  3. At the bottom of the page, you will get a URL, copy it and paste it on a notepad.
    ADMIN URL
  4. Now Go to OAuth2 again, then click General.
  5. Under Default Authorization Link, select Custom URL from the dropdown for Authorization Method.
  6. Paste the URL that you copied and click Save Changes.
    Save changes
  7. Go to Bot, toggle on the switch for Message Content, and click Save Changes.
    Message content

4. Reset Token

  1. Go to Bot, and click Reset Token.
    Reset Token
  2. Click Yes do it on Reset Bot’s Token.
    Yes do -integrate chat gpt with discord
  3. Now click Copy to copy the Token and paste it into a notepad for future use.
    Copy token

5. Authorize

  1. Paste the generated URL in the browser. From Add to Server, select the name of the server you created. Click Continue.
    Click Continue
  2. Put a checkmark next to Administrator and click Authorize.
    Click Authorize -integrate chat gpt with discord
  3. Verify that you are human.
    I am human
  4. Once you are Authorized, proceed.
    Authorized

6. Use the Command Prompt

  1. Press the Windows key, type CMD, and click Open.
  2. Copy and paste the following command and press Enter: Cd desktop mkdir ChatGPT_Friends cd ChatGPT_Friends code .
    Folder MKDIR

7. Create files and folders in Visual Studio Code

  1. Go to the left pane, click the Folder icon, and name it App.
    Folder structure
  2. Create a file and name it _init_.py.
  3. Next, create a folder and name it chatgpt_ai.
  4. Select chatgpt_ai and create a file and name it _init_.py.
  5. Create another file under chatgpt_ai and name it connect_openai.py.
  6. Now, create another folder under the App folder, and name it discord_bot.
  7. Select the discord_bot folder and create a file and name it connect_discord.py.
  8. Now outside the app folder, create a file and name it run.py.
  9. Create another file and name it .env.

8. Write code in the .env file

  1. Go to the .env file.
    Token added env
  2. Type the following command and mention the token that you copied from the Discord Developers portal next to Discord_Token and copy the API key next to OPENAI_Key: DISCORD_TOKEN=key
    #OPENAI_KEY=

9. Download modules

  1. Go to the terminal and copy and paste the following command, and press Enter: python -m pip install python-discord
    connect discord install
  2. Once installed, type the following command to install the dotenv module: python -m pip install python-dotenv
    install dotenv
  3. Now copy and paste the following command to install the Open API module: pip install openapi
  4. To install the request module, run this command – pip install requests

10. Write code in the connect_discord.py file

  1. Go to the connect_discord.py file.
  2. Copy and paste the following script as it is mentioned. Please don’t make changes: from dotenv import load_dotenv
    import os
    import discord
    load_dotenv()
    discord_token=os.getenv('DISCORD_TOKEN')
    class MyClient(discord.Client):
    async def on_ready(self):
        print('Logged in as: ', self.user)
    async def on_message(self, message):
       print(message.content)
    if message.author == self.user:
         return
    await message.channel.send(f"{message.content}")
      intents=discord.Intents.default()
     intents.message_content = True
    client=MyClient(intents=intents)
    client.run(discord_token)
  3. Once done, click on the Run icon to run the code.
    Script to run Discord
  4. In the Terminal, you will see that you are Logged in as the name of your primary folder.
  5. Go to the Discord app, and type Hi.
  6. The bot will respond. At this stage, it will only replicate what you type.

11. Get the API key from OpenAI

  1. Go to the OpenAI website.
  2. Log in and click on Personal.
  3. Click View API keys.
    ViewAPI keys
  4. Now click Create new secret key.
  5. Copy the key and paste it into a notepad.
    OpenAI key -integrate chat gpt with discord
  6. Also, paste it into the .env file next to OPENAI_KEY.

12. Check the model

  1. Go to the OpenAI website, and log in.
  2. Navigate to Documentation.
    Documentation
  3. Now under Get Started, click Models, then select GPT-3.
  4. Copy the name of the latest model from the right pane.

13. Write code in connect_openai.py

  1. Open connect_openai.py on Visual Studio Code.
    Connect_openai
  2. Copy and paste the following script: from dotenv import load_dotenv
    import openai
    import os
    load_dotenv()
    openai.api_key=os.getenv('OPENAI_KEY')
    def chatgpt_response(prompt):
        response = openai.Completion.create(
        engine='text-davinci-003',
         prompt=prompt,
         temperature=0.75,
         max_tokens=100
        )
        #print(response)
        return response ['choices'][0]['text']

14. Make changes to connect_discord.py

  1. Replace the command mentioned below with the following command: await message.channel.send(f"{message.content}")
    await message.channel.send(f"You said: {message.content} \n {chatgpt_response(message.content)}")
    Connect_Discord changed
  2. Add this command to line number 5: from app.openai_chat.connect_openai import chatgpt_response

15. Write code in run.py

  1. Go to the run.py file.
    Runpy file
  2. Type the following script: from app.Discord_bot.connect_discord import client, discord_token
    if  _name_ == '__main__':
  3. Now go to the connect_discord file, cut the following command from there, and paste it into the run.py script: client.run(discord_token)
  4. Now run the file by clicking the Play button located at the top of Visual Code Studio.

16. Chat with ChatBot

  1. Go to your channel.
    Chatbot chat - integrate chatGPT with discord
  2. You can see ChatBot is online.
  3. Type a question or start a conversation.

So, this is how you can integrate ChatGPT with Discord and begin a conversation with the bot—stuck somewhere during the process? Feel free to mention all your queries in the comments section below.

To enrich your new AI powered Discord server even more, you can also follow this guide on adding Arcane Bot to Discord and unlock powerful leveling and automation features for your community.

You can read this if you want to know how to use ChatGPT with Whatsapp.

WaasMedic Agent.exe High Disk Usage: How to Stop It?

WaasMedic Agent.exe is a legit process that runs in the background and plays an integral part in installing Windows updates smoothly.

If you see high disk usage due in Task Manager and the reason is WaasMedic Agent.exe, then you are not alone.

In this guide, we will cover some methods to fix high disk usage caused by WaasMedic Agent.exe after discussing the cause. Let’s begin!

Why is WaasMedic Agent.exe causing high disk usage?

There could be several reasons for the issue; some of the common ones are mentioned below: 

  • Conflict with security software – If misconfigured, the security software may conflict with third-party antivirus on your computer, causing this issue.
  • WassMedic Agent busy with updates – If WaasMedic Agent.exe is busy processing updates, you may also see a spike in your computer’s disk usage.
  • System files are damaged – If your system files are corrupt or damaged, you may experience high disk usage. To fix it, you need to repair the system files.

How do I fix WaasMedic Agent.exe, causing high disk usage?

Before moving on to the troubleshooting steps, you should consider performing the following checks:

1. Repair the system files

  1. Press the Windows key, type CMD, and click Run as administrator.DOS COmmand Prompt
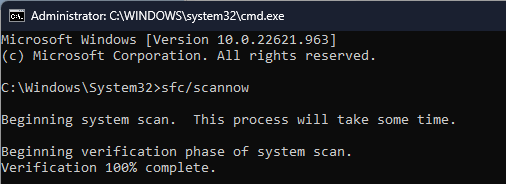
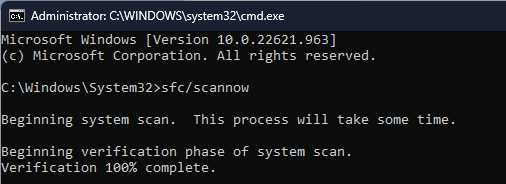
  2. Type the following command and press Enter: sfc/scannowCMD sfc scan waasmedic agent exe high disk usage
  3. Once the process is complete, restart your computer.

2. Repair Windows Update components

  1. Press the Windows key, type CMD, and click Run as administrator.
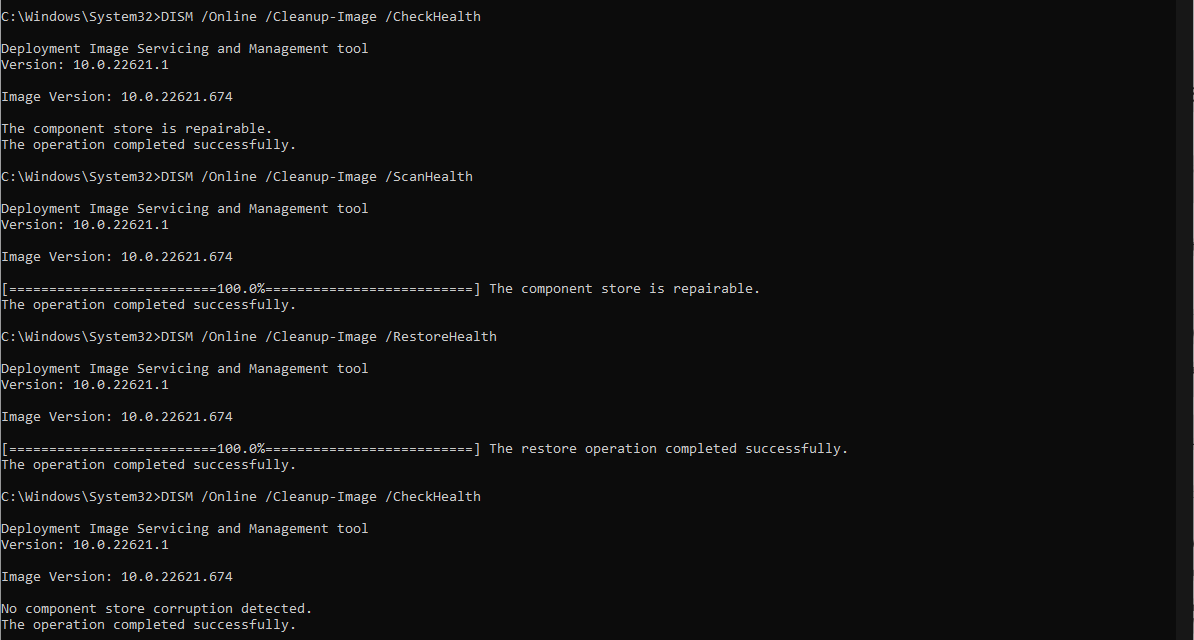
  2. Copy and paste the following commands one by one and press Enter after each command: DISM /online /cleanup-image /checkhealth DISM /online /cleanup-image /scanhealth DISM /online /cleanup-image /restorehealthDISM command
  3. Once the process is complete, restart your PC.

3. Pause Windows Updates

  1. Press Windows + I to open Settings.
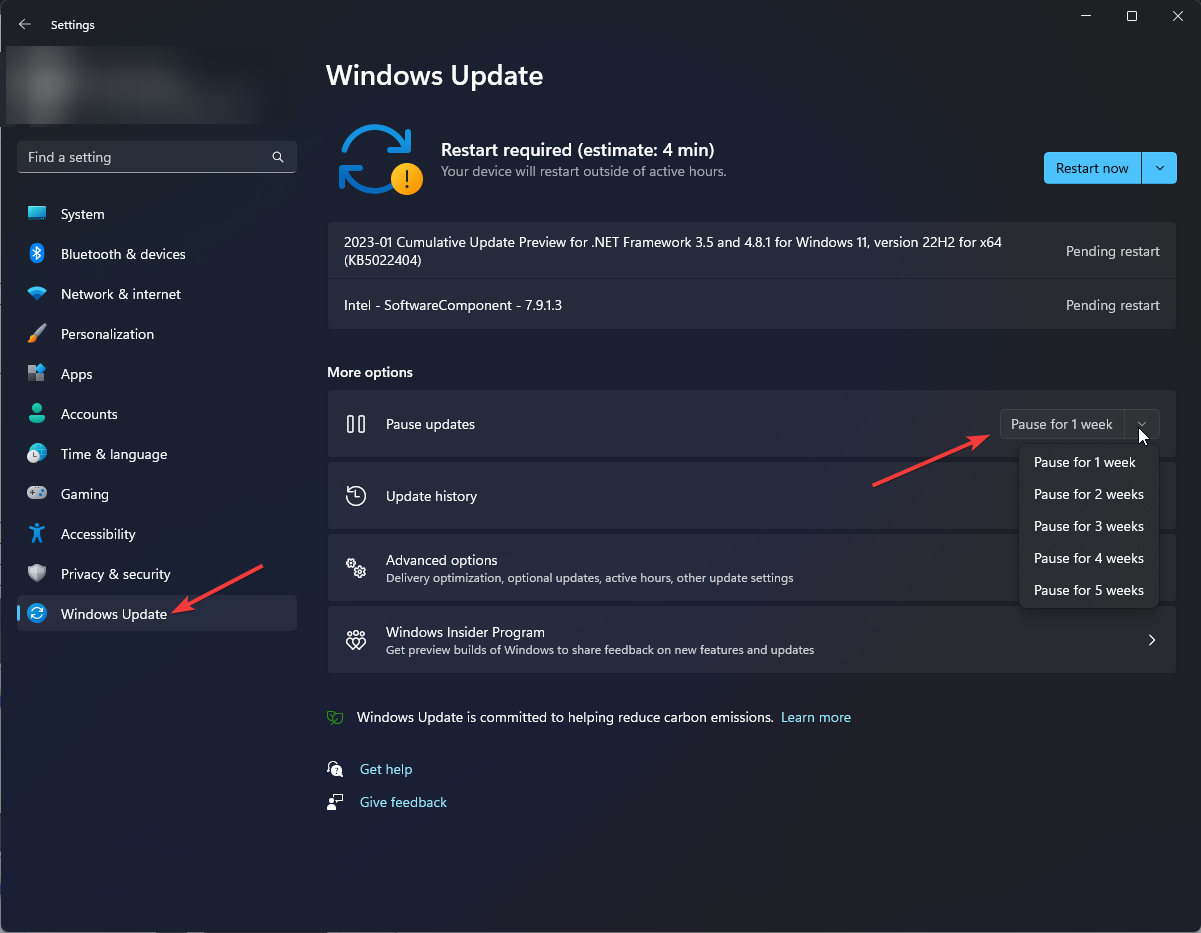
  2. Click Windows Update from the left pane, and go to Pause updates. Then, from the drop-down, select an appropriate option. Windows Update -waasmedic agent exe high disk usage
  3. Restart your computer and check if the issue persists. If it still causes high disk usage, resume the updates and proceed further.

4. Disable WaasMedic

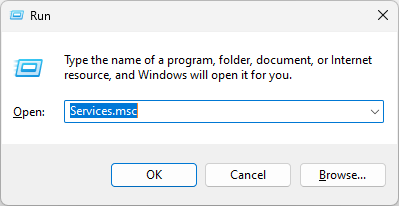
  1. Press Windows + R to open the Run box.Services
  2. Type services.msc and press Enter to open Services.
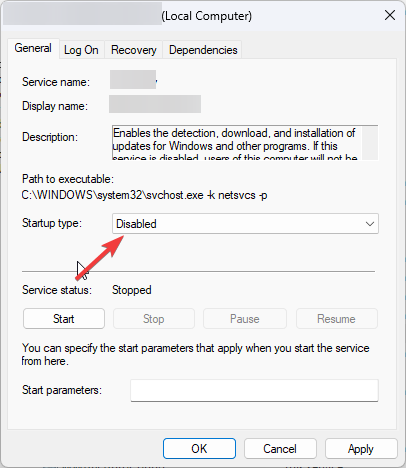
  3. Locate and double-click the Windows Update Medic service to open Properties.
  4. For the Startup type, select Disabled from the drop-down.Disabled -waasmedic agent exe high disk usage
  5. If it is disabled, then restart your computer. However, if you get Access is denied error, proceed.
  6. Press Windows + R to open the Run box.REGEDIT RUN COMMAND
  7. Type regedit and hit Enter to open Registry Editor. 
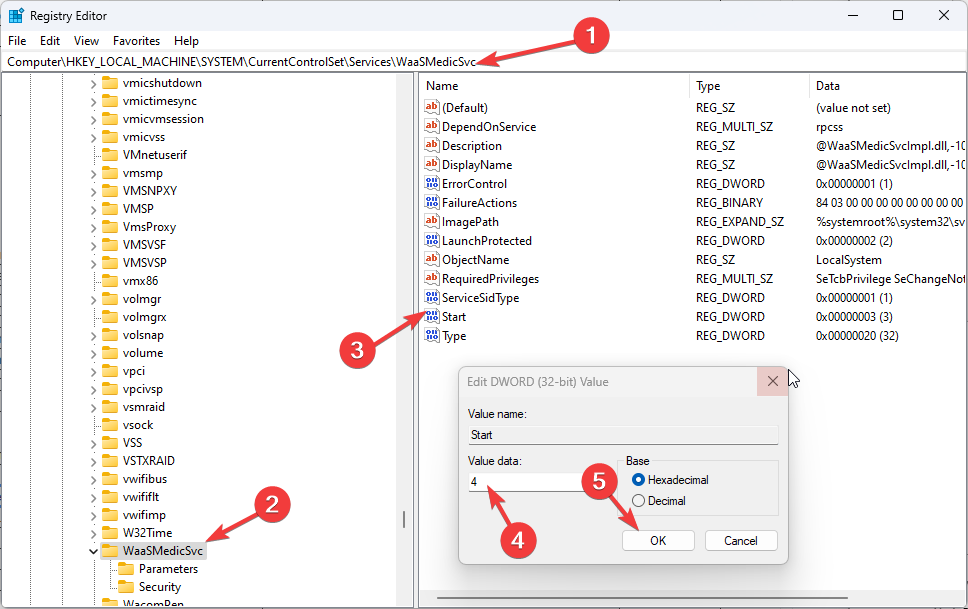
  8. Follow this path: Computer\HKEY_LOCAL_MACHINE\SYSTEM\CurrentControlSet\Services\WaaSMedicSvcReg Start -waasmedic agent exe high disk usage
  9. From the right pane, locate and double-click Start, and modify the Value data from 3 to 4.
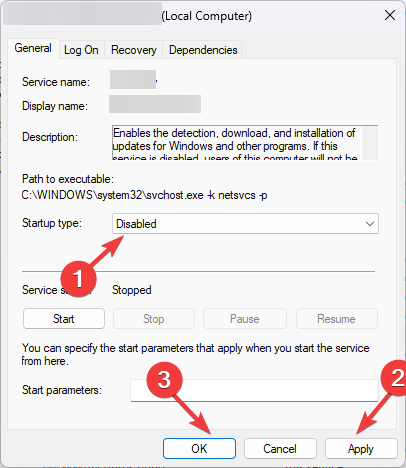
  10. Now go to Services again and try to disable the service. Once done, click Apply and OK.Disabled 2
  11. Restart your PC to save the changes.

5. Use the Disk Cleanup

  1. Press Windows + R to open the Run window. Run console -
  2. Type cleanmgr and press Enter to open Disk Cleanup.
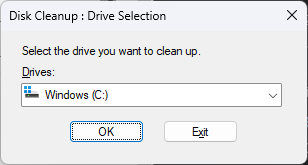
  3. On the next window, select C drive and click OK.C
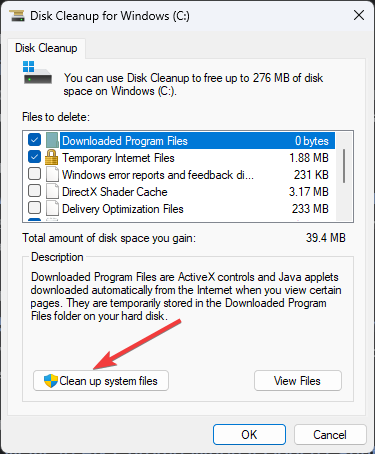
  4. Now click Clean up system files.Clean up -waasmedic agent exe high disk usage
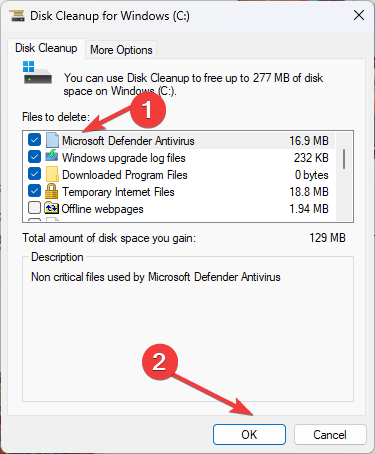
  5. Again select C drive and click OK.
  6. Select the files listed under Files to delete option and click OK.Cleanmgr 4
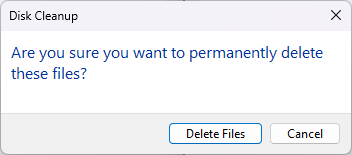
  7. Click Delete Files to confirm.Cleanmgr 5

6. Enable DEP( Data Execution Prevention)

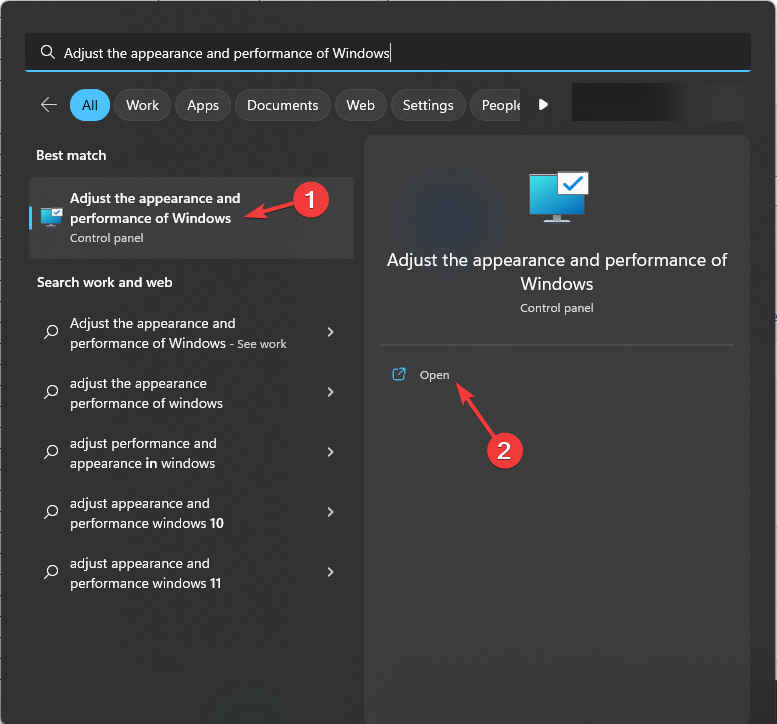
  1. Press the Windows key, type Adjust the appearance and performance of Windows and click Open.Adjust the appearance and performance of Windows
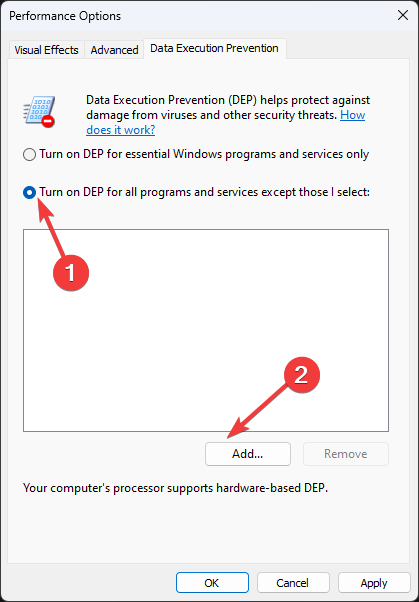
  2. Switch to the Data Execution Prevention tab and select the radio button next to Turn on DEP for all programs and services except those I select.
  3. Click Add.DEP -waasmedic agent exe high disk usage
  4. Select the file and click Open to add.
  5. Click Apply, then OK to save changes. 
  6. Restart your computer.

So, these are the methods to fix the WaasMedic Agent.exe causing high disk usage issues. If you have questions about WaasMedic Agent.exe, feel free to mention them in the comments below.

Group Policy Editor is Missing on Windows 10: How to Enable

Many users complained that their version of Windows 10 doesn’t have a Group Policy Editor. This can be an issue for some users, especially those that need to modify certain policies.

If that’s the case for you, in today’s article, we’ll show you how to fix this problem once and for all.

What to do if Local Group Policy Editor is missing?

1. Upgrade to the Pro version of Windows

  1. Press the Windows key + I to open the Settings app and select Update & Security.
    update and windows 10 group policy editor missing
  2. Click the Activation tab in the left pane.
    activation
  3. Now, select Go to Store.
  4. You’ll be asked to make a purchase of the Pro version of Windows 10.
  5. Once your system is upgraded to the Pro version, Group Policy should be natively available.

The Group Policy Editor will be missing on your PC if you are using a Windows 10 Home. This is because the tool is only available on the Pro versions of Windows.

Hence, if you want to use the Group Policy Editor natively, it’s advised to upgrade to the Pro version.

2. Use Policy Plus

policy plus Windows 10 Doesn't Have Group Policy Editor

If you don’t have Group Policy Editor on your PC and don’t want to upgrade to Windows 10 Pro, you might consider using Policy Plus.

This is a freeware application, and it works just like Group Policy Editor. The application is completely free and portable, so we strongly encourage you to try it out.

⇒ Get Policy Plus

If the Group Policy Editor is missing on your Windows 10 PC, it can be problematic. However, you should be able to fix it by upgrading to the Pro version and using a third-party tool.

If you want to know how to enable gpedit.msc on Windows 10, check our detailed guide to do it effortlessly.

Feel free to let us know the solution that helped you fix this issue in the comments below.

Ucrtbase DLL: What is It  & How to Fix It If It’s Missing?

Sometimes, you may encounter the ucrtbase.dll missing error while launching an app or software on your computer.

This can be pretty frustrating as it prevents you from running the app. The error indicates that ucrtbase.dll is either corrupted or damaged.

In this guide, we will discuss what ucrtbase.dll is, different methods to fix the issue, and the causes of the problem. Let’s begin! 

What is ucrtbase.dll?

Ucrtbase.dll is a software component of the Universal C Runtime Library. The ucrtbase.dll file contains several standard C library functions, including string manipulation, memory allocation, and more.

The file is essential for properly functioning Windows apps and is used by both Microsoft Store and desktop apps.

Whenever an application needs the  ucrtbase.dll file, the operating system loads it into the memory, and the app uses the functions and classes in the file.

If this DLL file is corrupted or missing, the apps that need it to function might not launch.

What causes the ucrtbase.dll is missing error?

There could be various reasons why you are facing this error; some of the common ones are mentioned below:

  • Outdated OS – Windows needs to be up to date to function properly; if there are pending updates, you may get all kinds of errors, including this one.
  • Incomplete installation of the program – If the program you are trying to launch is not installed correctly, it might not be able to use the ucrtbase.dll file, hence the error.
  • DLL file is corrupt – If the ucrtbase.dll file is corrupt, then the app depending on the file to function, won’t start and will show the error.
  • Obsolete drivers – If you don’t have the latest drivers installed on your computer, you might get this system error. Make sure drivers are updated.

What can I do to fix the Ucrtbase.dll is missing error?

Before engaging in advanced troubleshooting steps, you should consider performing the following checks:

 1. Repair system files

  1. Press the Windows key, type CMD, and click Run as administrator.CMD elevated
  2. Type the following command and press Enter to scan and repair the system files: sfc/scannowCMD sfc scan -ucrtbase dll
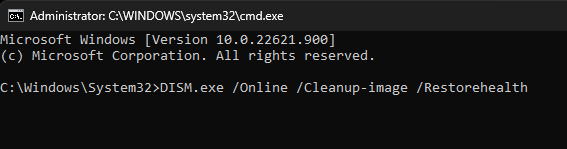
  3. If there is an error, copy and paste the following command and press Enter:  DISM.exe /Online /Cleanup-Image /RestorehealthCMD DISM
  4. Once done, restart your computer.

An even easier procedure for repairing your system files would be to use dedicated repair software that helps you run an in-depth scan to find corrupt, damaged, or missing files and automatically replace them with healthy units.

2. Reregister ucrtbase.dll file

  1. Open the Command Prompt with admin rights using the steps mentioned in the above method.
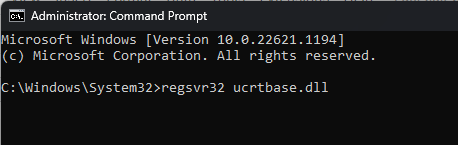
  2. Type the following command and press Enter to reregister the ucrtbase.dll file: regsvr32 ucrtbase.dll Reg
  3. Once the process gets completed, restart your PC to confirm the changes.

3. Repair/reinstall the Microsoft Visual C++ Redistributable

3.1 Repair Microsoft Visual C++ Redistributable

  1. Press Windows + I to open Settings.
  2. Go to Apps, then click Installed apps.Apps, installed apps -ucrtbase dll
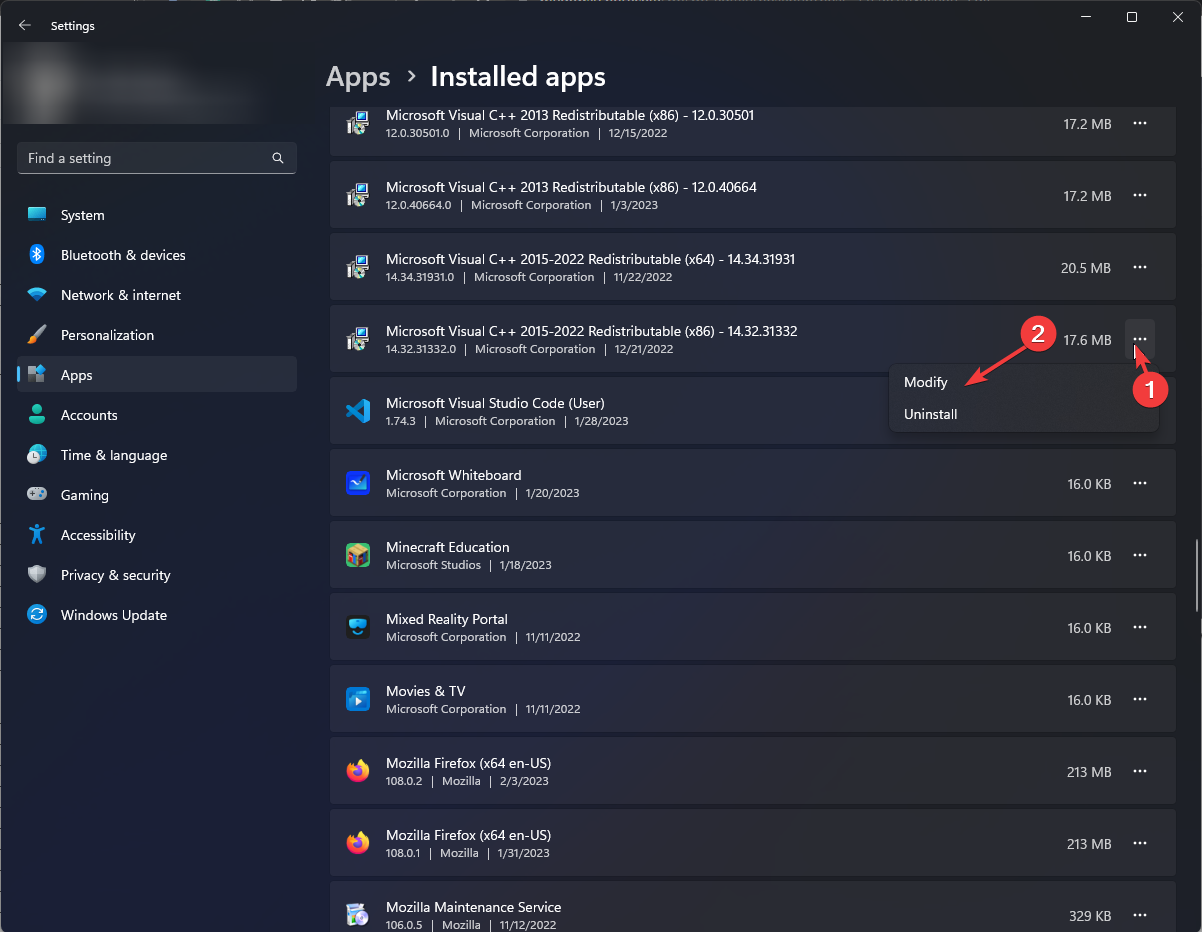
  3. Locate Microsoft Visual C++ Redistributable, and click on the three dots next to it. Select Modify.Modify
  4. Click Yes on the UAC prompt.
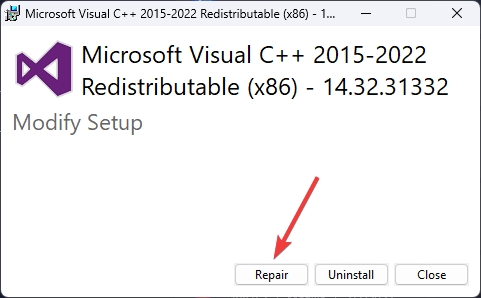
  5. On the next window, click Repair. Repair

3.2 Reinstall the Microsoft Visual C++ Redistributable

  1. Open Settings. Go to Apps, then click Installed apps.
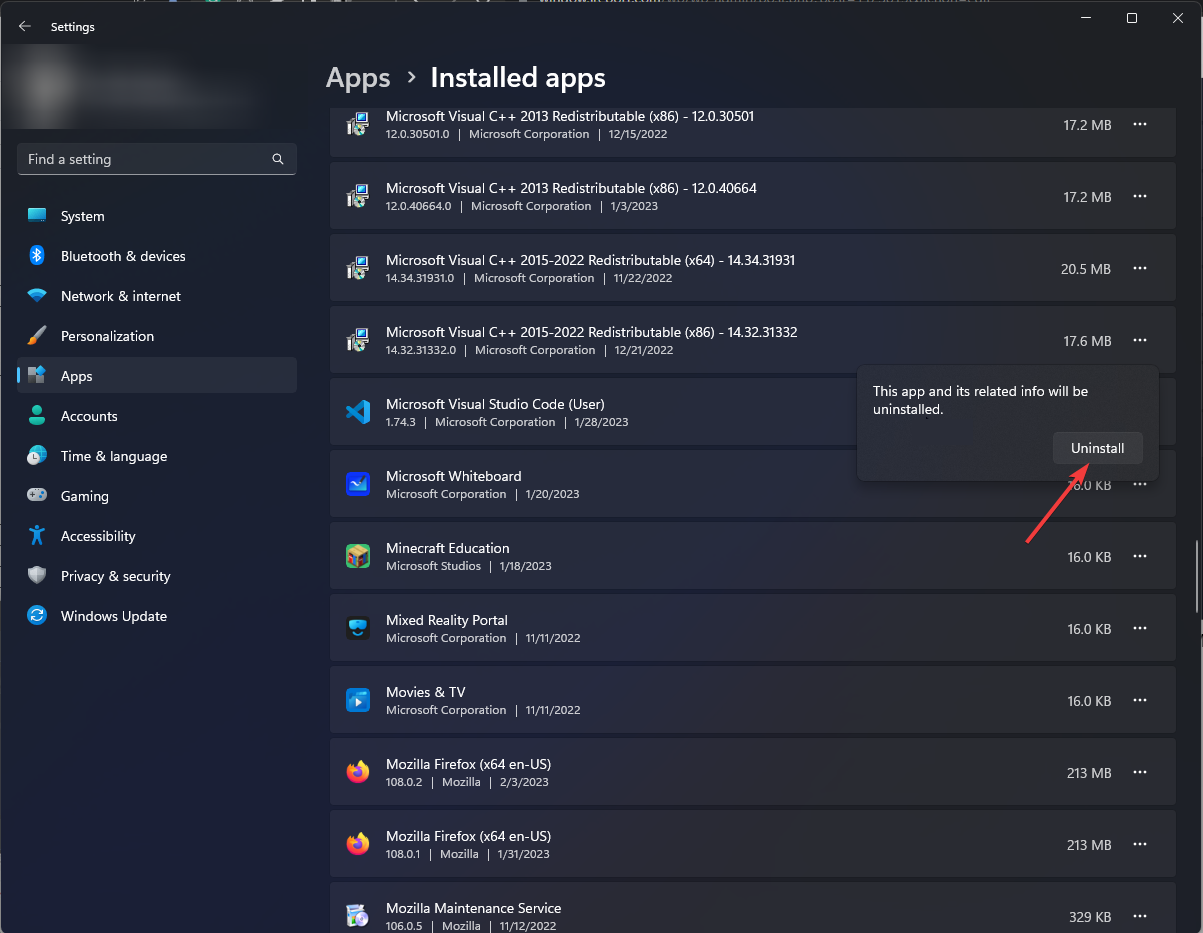
  2. Locate Microsoft Visual C++ Redistributable, click on three dots, and select Uninstall.UIninstall -ucrtbase dll
  3. Again, click Uninstall.
  4. Download the Microsoft Visual C++ Redistributable, and double-click the installer file.Uninstall step2
  5. Follow the on-screen instructions to install.

4. Update the graphics drivers

  1. Press Windows + R to open the Run console.Device Manager RUN COMMAND
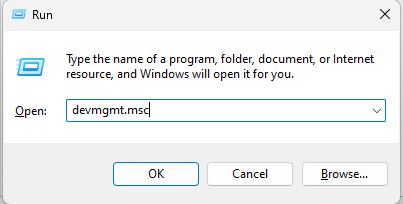
  2. Type devmgmt.msc and hit Enter to open Device Manager.
  3. Click on Display adapters to expand it, right-click the graphics driver and select Update driver.Graphics Driver update
  4. On the next page, click Search automatically for drivers.Search automatically for drivers
  5. Follow the onscreen instructions to complete.
  6. Restart your computer.

5. Perform System Restore

  1. Press the Windows + R to open the Run window.Restore point -ucrtbase dll
  2. Type rstrui and press Enter to open System Restore.
  3. On the System Restore window, click Next.Next -ucrtbase dll
  4. Now, on the next page, place a checkmark next to Show more restore points.
  5. Select a restore point from the available list and click Next.Select Next
  6. Click Finish to restore the previous settings, and Windows will restart.Finish

So, these are methods that you need to follow to fix the ucrtbase.dll missing error. If you have any questions about  ucrtbase.dll, please feel free to mention them in the comments section below. 

Fix: Event ID 7023 Error in Windows 10 & 11 [& What Is]

Some users have posted on Microsoft’s forum about a Connected Devices Service error with event ID 7023. This happens when a service stops unexpectedly.

If you are also facing this issue, this guide contains the solution that will help you fix this issue for good.

What does the event ID 7023 indicate?

The event ID 7023 error means that the service specified in the error message stopped unexpectedly. This can be due to corrupt system files and some other factors.

Irrespective of the cause, the solutions in this guide should help you fix the issue quickly.

How can I fix the Event ID 7023 error in Windows 10?

1. Run a System File Checker scan

  1. Press the Windows key, type cmd, and click Run as administrator for Command Prompt.
    cmd event id 7023
  2. Before running an SFC scan, input this command and hit Enter: DISM.exe /Online /Cleanup-image /Restorehealthdism restore
  3. Then type in this SFC scan command and press Enter: sfc /scannowsfc scan
  4. Wait until the scan has reached 100 percent.
  5. When you have received a scan outcome, restart your desktop or laptop if the outcome says Windows Resource Protection repaired system files.

A few users reported nothing happening while using the SFC scan on their PCs. If that’s the case, try to use DISM commands in Windows 10 to fix the corrupt system files causing the event ID 7023.

2. Check the Connected Devices Platform Service is enabled and running

  1. Press the Windows key + R, type services.msc, and click OK.
    services event id 7023
  2. Then double-click Connected Devices Platform Service.
    connected platform
  3. If that service is disabled, select Automatic (delayed) in the Startup type drop-down menu.
    auto connected
  4. Now, click the Start button to run that service if it’s not running.
  5. Finally, click the Apply button, followed by OK to save the settings.
    start event id 7023

As mentioned earlier, the event ID 7023 might be due to a disabled service. The solution to this to set the service to run automatically.

3. Check that dependent Connected Devices Platform services are enabled

  1. Open the Services window as outlined within the first few steps of resolution one.
  2. Next, double-click Network Connection Broker to open the properties window for that service.
    network connection
  3. Select the Automatic option on the Startup type drop-down menu.
  4. If the service isn’t running, press the Start button.
  5. Now, click Apply, followed by OK to complete the process.
    auto network
  6. Next, double-click TCP/IP NetBIOS Helper to open its service window.
    tcp event id 7023
  7. Choose the Automatic startup option.
  8. Next, click the Start button (if needed).
  9. Select the Apply and OK options to finish.
    auto tcp

In some cases, this event ID 7023 issue can be down to services that are dependent on the Connected Devices Platform. You need to enable these services to fix this.

4. Select the Restart the Service option

  1. Open the Services window as outlined for the first resolution.
  2. Double-click Connected Devices Platform Service to open that service window.
    connected
  3. Now, select the Recovery tab.
  4. Select the Restart the service option for the First and Second Failures.
  5. Press the Apply button, followed by OK to close the Connected Devices Platform Service window.
    recovery

Sometimes, the Connected Devices Platform can fail for some reason, leading to the event ID 7023. To circumvent this, you need to set the service to restart when it fails.

5. Turn on the Share across devices option

  1. Press the Windows key + I to open the Settings app and select System.
    system event id 7023
  2. Next, click Shared experiences on the left pane.
  3. Toggle the Share across devices option on if it’s off.
    shared

Some users have found the Shared experiences feature to be the cause of the event ID 7023. Hence, you need to disable the feature and restart your PC.

6. Clean boot Windows 10

  1. Press the Windows key + R, type msconfig, and click OK.
    msconfig event ID 7023
  2. Click the Services tab at the top.
  3. Now, uncheck the Hide all Microsoft services checkbox and select Disable all.
    services hide
  4. Click the Startup tab and select Open Task Manager.
    startup task
  5. Next, right-click each of the apps there and select the Disable option.
    disable
  6. Finally, go back to the System Configuration window and click Apply, followed by OK.
    apply event ID 7023

This resolution will ensure no third-party programs can conflict with Connected Devices Platform Service.

A conflicting third-party program was most likely the culprit if this solution fixes the issue. If you restore your original boot settings, you’ll need to identify that program to uninstall it.

The above resolutions are among the most likely fixes for the event ID 7023 error that crashes Windows 10. Even more, use this guide on how to fix high CPU usage event ID error.

Before you go, don’t miss our guide on Event ID 7034 for more useful tips.

Note that there might still be other ways to fix the same issue; users who have resolved this error with other resolutions are welcome to share their fixes in the comments below.

How to Fix AnyDesk ID Not Showing in Windows 11?

If your AnyDesk ID isn’t showing, you’ll have trouble establishing a remote connection. Let’s see why this happens and how to fix it:

What causes the AnyDesk ID not showing error on Windows 11?

There could be various reasons for the AnyDesk ID not appearing; Here are some of the most commons ones: 

  • Outdated AnyDesk software – An outdated version of AnyDesk software can become incompatible; therefore, the ID won’t show. Check for updates or the latest version of the software.
  • AnyDesk incorrectly installed – If the software is not installed correctly or some configuration files are missing, you might face this issue.
  • Antivirus interference – Sometimes, security software can interfere, hampering the software’s functionality, hence the issue.
  • Misconfigured network settings – If the network settings on your computer are misconfigured, then you might not be able to use AnyDesk or see the ID.

How can I fix the AnyDesk ID not showing error on Windows 11?

Note icon NOTE
The first thing we advise is to install the AnyDesk desktop app if you’re using the portable version. If that doesn’t solve the problem, keep reading:

1. Check for Updates

  1. Launch AnyDesk on your computer. 
  2. Click the four horizontal lines and select Settings.Settings AnyDesk -anydesk id not showing in windows 11
  3. Go to About AnyDesk and check the version to ensure you have the latest.AnyDesk Version
  4. From the left pane, select Security. 
  5. Scroll through the options and go to Updates in the right pane.Update
  6. The Enable Auto-Update -Main Channel option should be selected to keep the app updated.

2. Get ID from Main Menu

  1. Launch AnyDesk.
  2. Locate and click on the New Session from the top bar on the software.AnyDesk ID
  3. Check This Desk space, and you can see your ID.

3. Use the Services

  1. Press Windows + R to open the Run console.Servicesmsc
  2. Type services.msc and press Enter to open Services. 
  3. Locate AnyDesk and double-click it to open Properties.AnyDesk Service -anydesk id not showing in windows 11
  4. Select Automatic for Startup Type, and click the Start button under Service status.AnyDesk Service Properties
  5. Click Apply and OK to complete the process.
  6. Restart your computer to let the changes take effect.

4. Check network settings 

  1. Press the Windows key, type Control Panel, and click Open.CP Control Panel
  2. Select View by as Large icons, and click Windows Defender Firewall.Windows Defender Firewall- anydesk id not showing in windows 11
  3. Select Allow an app or feature through Windows Defender Firewall from the left pane.Allow an app
  4. Scroll through the Allowed apps and features list to check if it has AnyDesk. If it doesn’t, then click Change Settings.Change settings
  5. Now, click Allow another app button.Allow another app
  6. On the next window, click the Browse button.Add
  7. Browse to the app’s location and click Open.Open
  8. Once the app is selected, click Add.Add browse
  9. On the Allowed apps window, click OK to confirm the changes.OK

5. Reinstall AnyDesk

  1. Press Windows + R to open the Run window.APPWIZ RUN COMMAND
  2. Type appwiz.cpl and hit Enter to open Programs and Features.
  3. From the list of installed programs, select AnyDesk, and click Uninstall.AnyDesk Uninstall  - anydesk id not showing in windows 11
  4. Now go to AnyDesk’s official website.Download AnyDesk
  5. Download the latest version, run the installer, and follow the onscreen instructions to fix the issue.

6. Try connecting using the AnyDesk address

  1. Log in to your my.AnyDesk II account.
  2. Navigate to the Address Books section.anydesk my address book
  3. In the Personal tab, open My Address Book to view your saved addresses.
  4. This will show your custom AnyDesk address, which you can use for remote connections.

If you’ve set up a custom AnyDesk address, use it if your ID isn’t showing. This won’t solve the underlying issue, but it’s a good backup for securing a remote connection.

7. Contact Support

anydesk id not showing in windows 11 - Contact Adobe Support

If nothing worked for you and you are stuck with the issue, then it is advised to contact AnyDesk support. Explain to them the whole scenario and steps taken to fix the case; this will help them better understand the situation and help you.

So, these are the methods you can follow to fix AnyDesk ID not showing on Windows 11. If you have questions or concerns about the issue, feel free to reach out in the comments section below. 

LenovoVantageService High CPU Usage: 2 Methods to Fix it

Let’s highlight the steps to fixing the LenovoVantageService high CPU problem.

The Lenovo brand is famous globally for its efforts at churning out a veritable line of quality electronics and PC hardware. Responsible for several tablets, workstations, storage devices, IT management programs/software, and servers, the System Update Service is of concern to us today.

Many Windows 10 users have complained about their PCs using a much higher CPU rate than usual upon using the System Update Service. Because this update is supposed to ease computer processes, it’s pretty worrying.

Why is LenovoVantageService causing high CPU usage?

There are several possible reasons why the Lenovo Vantage Service may be causing high CPU usage:

  1. Background updates – Lenovo Vantage Service may be downloading or installing updates in the background, which can consume significant resources and cause high CPU usage.
  2. Conflict with other software – If Lenovo Vantage Service conflicts with another program or application on your system, it can cause high CPU usage.
  3. Corrupted files – If the Lenovo Vantage Service files have become corrupted, it can cause the service to behave abnormally and consume high resources.
  4. Background scanning – The Lenovo Vantage Service may perform a background scan of your system, which can consume many resources and result in high CPU usage.
  5. Software bug – The Lenovo Vantage Service may have a software bug causing high CPU usage.

It is crucial to identify the cause of the high CPU usage and take the steps we recommend below to resolve the issue.

What is Lenovo Vantage?

Lenovo Vantage is a software tool provided by Lenovo for its Windows-based computers.

It offers a central location for managing various aspects of your Lenovo PC, including system updates, hardware scanning, system settings, support, and productivity tools.

Its centralized management approach makes keeping your system up-to-date and running smoothly easier.

How can I fix the LenovoVantageService’s high CPU usage?

1. Use the Task Manager

  1. Open the Task Manager by pressing Ctrl+ Shift + Esc.
  2. Under the processes tab, scroll down to the SUService.exe process and click the End Task button.
    lenovovantageservice high cpu

2. Uninstall the Lenovo System Update service

  1. Open the Windows tab by pressing Win + S.
  2. In the search bar, enter the term Lenovo, then click on Uninstall.
  3. On the next screen, click Lenovo System Update and click on Uninstall.
    lenovovantageservice high cpu

Unfortunately, there aren’t many fixes for this issue. So, short of uninstalling the app or ending the process from the Task Manager.

Finding quick software fixes for Lenovo devices is tricky because there’s no official customer support forum. Instead, they have an FAQ-style how-to page.

You can also check out some software to help fix CPU overuse issues.

You should note that the SUService.exe process is not unique. It’s possible to have malware disguising as the real thing especially. To be doubly sure, you can check out the local path; it’s advisable to run an antivirus scan.

Thank you for reading this article; we hope it’s been informative! Please share your thoughts on LenovoVantageService high CPU in the comments section below.

Best Drawing App for Surface Pro: Top 5 of 2026

The Surface Go, Pro, and Book are 2-in-1 tablets you can utilize with stylus pens. Since many utilize these devices for digital art, wanting to find the best Surface Go 2 drawing apps or the best drawing apps for Surface Pro makes total sense.

In fact, this is far from being a novelty as users have been searching for the best software for drawing tablets for a while now.

However, brands such as Huion, Gaomon, XP Pen, or Wacom seem to be preferred both by aspiring and consecrated digital artists. So, where does that leave our Surface devices?

Can you use the Surface Go 2 for drawing? How about the Surface Pro? If so, what app do you use to draw on Surface Pro? These are all legitimate questions that we shall try to address accordingly.

Is a Microsoft Surface good for drawing?

Users can draw more naturally with the stylus Surface Pens than with laptop mouse controls.

So, many digital artists love Microsoft Surface devices. However, it’s the great digital art toolkits included within the Surface tablets’ best drawing software that really enable artists to unleash their creativity.

These are some of the best drawing software for Microsoft Surface devices:

Software nameBrushes and pencil libraryKey feature
Adobe Photoshop✅Best drawing app for Surface Go 3 & 2
One-click edits
Adobe Illustrator✅Best digital art software for Surface Pro
Background remover
Clip Studio Paint✅3D, AI, Animation-capable
Various style brushes
Corel Painter✅Enhance painting responsiveness by reducing brush lag
Concept art drawing

What app can I use to draw on my Surface?

Adobe Photoshop – Best drawing app for Surface Go 3 & 2 (raster-based)

Adobe Photoshop - Best Painting Software

The world’s favorite image editor is also top-notch graphics & design software for painting and drawing.

Adobe Photoshop users can draw with its flexible Pen Tool, shape options, pencil and pen brushes, or the Freeform Pen utility. So, Photoshop offers almost limitless creative scope.

Adobe Photoshop includes more than 1,000 paint, pencil, pen, and marker brushes among others. Its users can create new pencil and pen brushes for illustrations via Photoshop’s Brush Settings panel.

There are also many custom brush packs available for download on numerous websites.

Adobe Photoshop also incorporates five pen tools for drawing. Users can draw naturally with the Freeform Pen Tool.

Its standard Pen utility enables users to draw lines and curves more precisely with anchor point paths. With those tools, users can manipulate path outlines in many ways to modify vector shapes.

Other useful features:

  • Photoshop’s Layer palette enables users to draw in layers
  • Includes 3D tools for animating three-dimensional models
  • Enables users to draw and paint symmetrically with symmetric options
  • Users can turn pictures into animations with Photoshop’s video layers

Adobe Photoshop

Don’t miss out on the best drawing app for Surface Go, Pro, and Book. Try it yourself today!
Free trial Visit website

Adobe Illustrator – Best digital art software for Surface Pro (vector-based)

Adobe Illustrator is an industry-standard application for vector artwork and the best digital art software for Surface Pro and Go.

If you need to lay down designs with more technical drawings generated from mathematical formulas, then this is the perfect drawing app for you.

With Illustrator, you can draw designs for logos, product packaging, billboards, icons, and much more.

It includes about 20 drawing tools with various types of shapes and unique effects. Its anchor point Pen tool is similar to Photoshop’s one, allowing users to draw as they would on paper with the Pencil utility.

Graphics designers will also greatly appreciate Illustrator’s Perspective Grid feature with 3 different presets.

Other useful features:

  • Enables users to generate large-scale art on a 100x canvas
  • Includes a pixel grid for aligning objects
  • Users can select a Scribble effect on Illustrator’s Stylize menu
  • Illustrator’s Adobe Color Themes panel provides appealing color combinations

Adobe Illustrator

In comes the best vector-based image editor. Try it now and see why!
Free trial Visit website

Clip Studio Paint – 3D, AI, Animation – Ideal for drawing on Surface Pro 7

The Clip Studio Paint software has had many rave user reviews. Users love CSP’s natural brush behavior, customizable brushes, and animation features.

This software is especially good for manga and comic drawing, but it’s suitable for a wide range of digital art.

Clip Studio Assets provides users with thousands of brush presets and other drawing materials. Users can directly download and import pencil and pen brush preset from the CSA community into their software.

Or they can set up custom brushes with Clip Studio Paint’s customization settings.

Clip Studio Paint also includes dedicated tools for comic creation. It incorporates numerous manga tools for adding speech balloons, effect lines, backgrounds, and frame borders to comic drawings.

The 3D manga-style figures CSP users can import to canvases are also handy reference materials for comic art. Users can also bring their pictures to life with Clip Studio’s Paint animation tools.

Other useful features:

  • Users can adjust tablet pen pressure via CSP’s Adjust pen pressure window
  • Enables users to draw with vector layers
  • Include AI-created coloring support
  • It supports the Kindle and EPUB e-book formats for digital books
  • CSP provides 3D previews for page layouts

Clip Studio Paint

If you want to have the power to create beautiful digital art in the palm of your hand, then you’ll need this.
Free trial Visit website

Corel Painter – Enhance painting responsiveness by reducing brush lag

Corel Painter is a complete digital arts studio for painting and drawing. Don’t be fooled by Painter’s title, as this software has an advanced toolkit for drawing as well as painting.

It boasts brush, color, and compositional tools few other digital art software can match.

Painter’s library of more than 900 brushes includes more than enough pens, pencils, liquid ink, and markers for illustrators to draw with. Users can also customize selected brushes to set up their own variants.

There are also handy compositional tools included in Corel Painter. Users can divide canvases with layout grids. Painter’s mirror and kaleidoscope tools enable users to draw and paint symmetric patterns.

With Painter’s Divine Proportion tool, users can also establish focal areas in their pictures.

The most unique Corel Painter feature, however, is its Brush Accelerator. The Brush Accelerator is a performance optimizer that chooses optimal settings for your PC’s hardware.

That feature enhances Painter’s drawing and painting responsiveness by reducing brush lag.

Other useful features:

  • Enables users to design mosaics from scratch or sources
  • Includes a Harmonies panel that displays effective color combinations
  • Corel Paint users can apply 12 AI styles to images
  • Users can select different paper textures for canvases

Corel Painter

Draw wonderful art on your Surface tablet effortlessly with Corel Painter.
Check price Visit website

Those are some of the best drawing packages for Surface devices to take your pick from.

Those digital art applications are optimized for drawing with Surface tables and include advanced creative tools few other software can match.

Rainbow Six Siege Slow Loading: 6 Ways to Make it Faster

We believe you have found this guide because you are experiencing Rainbow Six Siege’s slow loading. We explore this problem in detail in this guide.

Tom Clancy’s Rainbow Six Siege is a game that challenges players to engage in massive sieges. They’ll confront smart enemies who know how to transform their environments into strongholds and prevent breaches by Rainbow teams.

Rainbow Six Siege offers a series of exciting tools to players, allowing them to combine tactical maps, observation drones, and a new rappel system.

Why does my Rainbow Six Siege take so long to load?

There could be several reasons your Rainbow Six Siege takes a long time to load. Some common causes are:

  • Outdated graphics card – If your graphics card is not up-to-date, the game may not run as smoothly, causing longer load times.
  • Poor Internet connection – Online games like Rainbow Six Siege rely on a stable internet connection for updates, downloads, and online play. A slow or unstable connection can result in longer load times.
  • Hard drive speed – If the hard drive your game is installed on is slow, it may take longer to access the data required to run the game.
  • Overcrowded system memory – If there is more free memory on your system, the game may be able to run efficiently, resulting in longer load times.
  • Corrupted game files – If game files have become corrupted, the game may have trouble loading. This also triggers the Rainbow Six Siege error code 10-0x00000.
  • Overly demanding game settings – If graphics settings are high, the game may take longer to load as it requires more resources.

Regardless of what triggers the problem, the solutions below should help you through the problem.

How to speed up Rainbow Six Siege’s loading time?

Before going into any solutions, we suggest using an SSD. An SSD (Solid-State Drive) can help reduce load times in Rainbow Six Siege if the slow load times are due to the hard drive’s speed.

1. Run a malware scan

  1. Type Windows Security in the Search bar, and click on the relevant search result.
    rainbow six siege slow loading
  2. Now, click on Virus & threat protection here.
    rainbow six siege slow loading
  3. Click on Scan options.
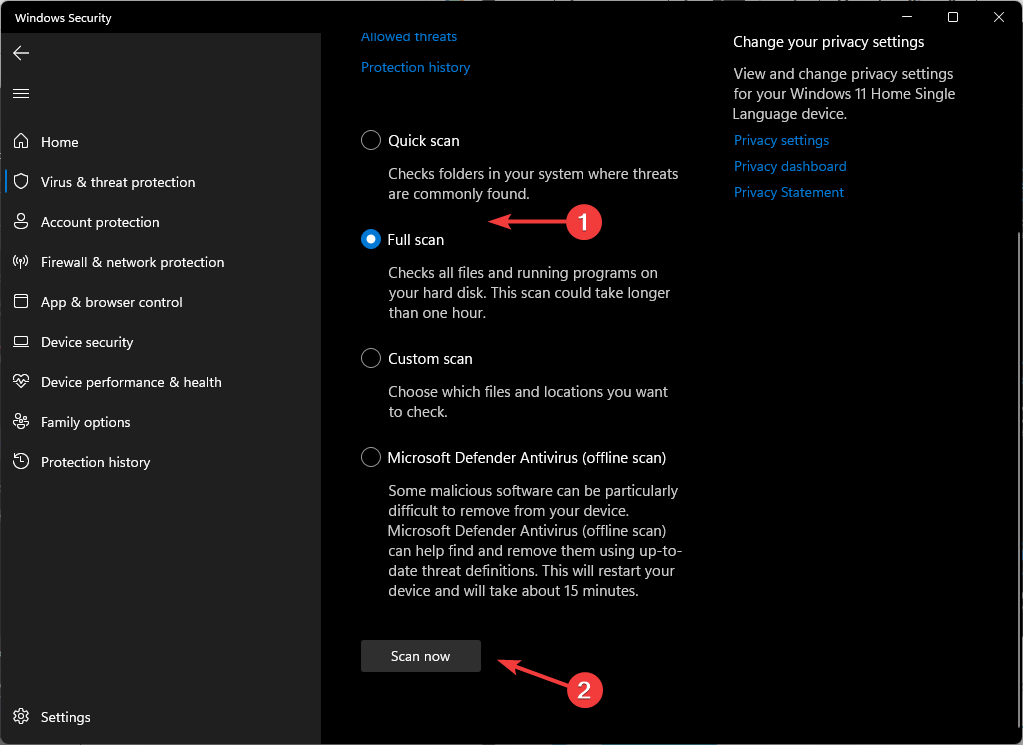
  4. Now, select Full scan and click on the Scan now button at the bottom.

While Windows Security is a reliable method of scanning for malware, we recommend a more advanced tool like TotalAV to do the job.

Not only does this tool run a comprehensive scan of your computer to detect and successfully remove any cyber threats, but it also prevents them from entering and damaging it.

⇒ Get TotalAV

2. Delete unnecessary files and folders with Disk Cleanup

  1. Press the Windows key, type disk, and open the Disk Cleanup app.
    rainbow six siege slow loading
  2. Select your disk and hit Enter.
  3. Click on OK.

3. Defrag the hard drive

  1. Type defragment in the search and select the Defragment and optimize drives option.
  2. Select the drive that needs optimization; this should be the same drive where you have Rainbow Six Siege, then click Optimize.

4. Close the Uplay Overlay

  1. Launch Rainbow Six Siege.
  2. Open the Uplay Overlay and close it.
  3. Then press any key on the screen.

This solution helps you skip all the intro videos and could cut through the excess loading times.

5. Close all running background applications

  1. Press Windows + R, type msconfig, and hit Enter.
    rainbow six siege slow loading
  2. In the General tab, select Selective Startup, then uncheck Load Startup Items.
  3. Click Apply and OK, then reboot your computer.

Background apps can slow down the game-loading process. So, it would be best to close all running background apps before starting your game.

6. Flush your DNS

  1. Press Windows + X and select Command Prompt (Admin).
    rainbow six siege slow loading
  2. Type in the command below and hit Enter:
    ipconfig /flushdns
  3. Finally, renew your IP by running the command below:
    ipconfig /renew

The DNS cache stores the IP addresses of the websites you have recently viewed. Therefore, it would be best to clear them from time to time for your PC to communicate with game servers correctly. It can also help you fix the error code 3-0x000c0054 and error code 4-0xFFF0BE25 in the Rainbow Six Siege game.

In conclusion, you may adjust the frame limit. Turning on the frame limit to 120 FPS may improve the loading time. Even though this is a long shot, much of the CPU’s processing power is used to render frames instead of loading the game.

Also, you may consider lowering your game settings because the higher the settings, the longer the loading time.

We hope the tips above helped you improve Rainbow Six Siege’s loading time. If you’ve found other solutions to fix this issue, please share them in the comments section below.

Powershell Tutorial: How to Convert String to Date?

Dates are an essential part of several applications and scripts. Still, the date information is usually stored in string format, which makes it difficult to perform operations such as date arithmetic or comparison.

Therefore you need to convert strings to dates; this will make it easier to perform everyday tasks, such as retrieving information about the current date and time, calculating between two date values, and formatting them.

This guide will cover all the simple methods and commands to convert string to date in PowerShell. We will also include examples to make it even easier. Let’s start! 

How can I convert String to Date?

1. Use the Parse command

  1. Press the Windows key, type PowerShell, and click Run as administrator. Windows PowerShell -powershell convert string to date
  2. Type the following command after replacing  02/03/2023 with the date you want to convert and press Enter: $dateString = "02/03/2023"
    $parsedDate = [DateTime]::Parse($dateString)
    Write-Output $parsedDate
    powershell_Parse

2. Use the ParseExact command

  1. Launch PowerShell with admin rights.
  2. Copy and paste the following command after replacing  02/03/2023 with the date you want and Enter: $dateString = "02/03/2023"
    $format = "MM/dd/yyyy"
    $parsedDate = [DateTime]::ParseExact($dateString, $format, $null)
    Write-Output $parsedDate
    ParseExact -powershell convert string to date

3. Use the GetDate cmdlet

  1. Open PowerShell with administrator privileges. 
  2. Type the following command after replacing 02/03/2023 with the date you want to convert and Enter:$dateString = "02/03/2023"
    $parsedDate = Get-Date $dateString
    Write-Output $parsedDate
    Get DAte -powershell convert string to date

4. Use the DateTime Accelerator

  1. Launch PowerShell with admin rights. 
  2. Copy and paste the following command, but replace 02/03/2023 with the date you want and press Enter: $dateString = "02/03/2023"
    $parsedDate = [DateTime]$dateString
    Write-Output $parsedDate
    DateTime

5. Use the Cast function

  1. Open PowerShell with administrator rights. 
  2. Type the following command after replacing  02/03/2023 with the date you want and press Enter: $dateString = "02/03/2023"
    $parsedDate = [DateTime]$dateString
    Write-Output $parsedDate
    CAST

So, these are the standard methods you can use to convert string to date in PowerShell. If you have any questions or concerns about the process, feel free to mention them in the comments section below.

How to Fix Time on Windows 10 [Clock is Wrong]

Although Windows 10 is an amazing operating system, there are still some minor issues that can appear once in a while. One issue reported by the users is the wrong time on their Windows 10 PC.

Although this isn’t a big problem, it can be inconvenient. So let’s see how to fix it.

Why is my Windows 10 clock wrong?

Below are some of the factors that can cause the Windows 10 clock to be incorrect:

  • Outdated PC: In some cases, the wrong time on your PC can be due to the fact that your PC is outdated. You can fix this by updating your Windows 10 to the latest version.
  • Faulty CMOS battery: Sometimes, the CMOS battery on your motherboard might be faulty, leading to this wrong time issue. The solution to this is to replace the battery.
  • Presence of malware: Viruses can mess with every aspect of your PC, including the time. Scanning for malware with Microsoft Defender or a third-party antivirus should fix this.

After listing the causes of this issue, below are some of its variations, as reported by users:

  • CMOS clock wrong
  • The Windows clock is out of sync (This usually happens when time synchronization fails with time.windows.com).
  • Windows 10 time wrong after reboot/daylight savings/sleep
  • Windows 10 time is always wrong (time zone/date and time wrong – Sometimes, Windows 10 won’t let you change the time zone at all, but luckily we have a few fixes prepared).
  • Computer clock wrong Windows 7/11
  • Windows 10 time wrong by a few minutes (up to 1 hour)
  • Microsoft Edge time wrong
  • Windows 10 clock wrong dual boot
  • Windows 10 domain clock wrong

How do I fix the clock is out of sync Windows 10?

Before delving into the solutions in this section, below are some preliminary steps to try:

  • Update BIOS
  • Change CMOS battery
  • Check your PC battery

If this does not fix the issue, you now proceed to the fixes below:

1. Scan your computer for malware

  1. Press the Windows key, type virus, and select Virus & threat protection.
    virus how to fix time windows 10
  2. Click Scan options.
    scan option
  3. Finally, select the Full Scan option and click Scan now.
    scan now

Malware, viruses, and other cyber threats may interfere with your Windows 10 clock and cause it to display time inaccurately. Hence, you need to scan your PC for malware to fix the wrong time issue on Windows 10.

2. Check Windows Time service settings

  1. Press the Windows key + R, type services.msc, and click the OK button.
    services how to fix time windows 10
  2. Double-click the Windows Time service to open its properties.
    windows time
  3. Now, set the Startup type to Automatic.
    automatic
  4. Check the Service status. If the service is running, click Stop and then click Start again. If the service isn’t running, click the Start button to start it.
  5. Finally, click Apply and OK.
    start ok  how to fix time windows 10

Another effective method to fix the wrong time on Windows 10 is ensuring the required services are running.

Few users suggest changing the Startup type to Disabled and restarting your computer. We’re not sure if changing the Startup type to Disabled works, but you could also try doing that.

3. Change the Internet Time server

  1. Press the Windows key + S, type control, and choose Control Panel from the results list.
    control pane
  2. Select the Clock and Region option.
    clock and
  3. Now, click on Date and Time.
    date and how to fix time windows 10
  4. Click the Internet Time option at the top.
  5. Next, click the Change settings button.
    internet time
  6. In the Server section, select time.nist.gov instead of time.windows.com and click Update now.
  7. Finally, click OK to save changes.
    update now

The wrong time on Windows 10 might be caused by a problem with the Internet Time Server, and you can fix it by following the steps above.

4. Unregister and register the Windows Time service

  1. Press the Windows key + S, type cmd, and select Run as administrator under Command Prompt.
    cmd admin
  2. Type the following commands and press Enter after each: w32tm /unregisterunregister how to fix time windows 10 w32tm /registerregister net start w32timenet start how to fix time windows 10 w32tm /resyncresync
  3. Finally, wait for the commands to finish running and restart your PC.

You can also fix the wrong time on Windows 10 by re-registering the Windows Time service. This is a rather simple process; you can do it as described above.

5. Temporarily change your time zone

  1. Press the Windows key + I and select the Time & Language option.
    time and language
  2. Click the dropdown under the Time zone section.
    time zone how to fix time windows 10
  3. Now, select a different time zone and leave it for some minutes.
    change zone
  4. Finally, repeat the steps above and switch back to your time zone.

Some users confirmed that temporarily changing the time zone helped them fix the wrong time problem on Windows 10.

6. Remove Adobe Reader

  1. Press the Windows key + I and select the Apps option.
    apps
  2. Click the Adobe Reader option.
  3. Now, click the Uninstall button and follow the onscreen instructions to complete the removal process.
    uninstall adobe
  4. Change your time zone as shown in solution 5 above and restart your PC.
  5. Finally, set your time zone to the correct one and reinstall Adobe Reader.

This is a rather peculiar solution, but users claim it to fix the wrong time on Windows 10 issue. So, you should try it.

7. Add RealTimeIsUniversal DWORD in Registry Editor

This solution applies if you’re using the dual-boot of Windows 10 and Linux. If you’re not using dual-boot, you can skip this solution because it won’t work.

To complete this solution, you need to make some changes in both Linux and Windows.

  1. Log in to Linux and run the following commands as a root user: ntpdate pool.ntp.org hwclock –systohc –utc
  2. Now, restart to Windows 10, press the Windows key + R, type regedit, and click OK.
    regedit
  3. Once Registry Editor opens, navigate to the following key in the left pane: HKEY_LOCAL_MACHINE\SYSTEM\CurrentControlSet\Control\TimeZoneInformationpath how to fix time windows 10
  4. Right-click the space and select New > DWORD (32-bit) Value.
    new dword
  5. Enter RealTimeIsUniversal as the name of the new value and double-click it.
    realtime
  6. Finally, set its Value data to 1 and click OK to save changes.
    value data how to fix time windows 10

After completing the aforementioned steps, you should be able to fix the wrong time on Windows 10 issue.

8. Update Windows 10

  1. Press the Windows key + I and select Update & Security option.
    update and
  2. Click the Check for updates button.
    check for
  3. Finally, install the available updates and restart your PC.

Running an outdated Windows 10 version may also trigger clock issues on Windows 10. Moreover, if this is a known issue, chances are that Microsoft has already fixed it in the latest patches.

With this, we can conclude this detailed guide. We believe you now have everything you need to fix the wrong time issue on Windows 10 for good.

If you are facing a related issue in Windows 10 time keeps changing, check our detailed guide to fix it convincingly.

Feel free to let us know the solution that helped you fix this issue in the comments below.

Azure Functions Runtime Is Unreachable Error: Fix

Azure Functions Runtime is unreachable error occurs when the Functions runtime can’t start. Usually, this happens if you have exceeded the daily execution quota or deleted the storage account.

In this guide, we will help you troubleshoot the causes of the error and resolve the issue. Let’s start!

What causes the Azure functions runtime is unreachable error?

There could be various reasons why functions app runtime error occurs; some of the popular ones are: 

  • Lost access to storage account – If the function app has lost access to the storage account, you might get this error. 
  • Storage account deleted– If you have mistakenly deleted the storage account, then you can encounter this error. You need to create a new storage account.
  • Storage account settings – If you have input the wrong credentials or deleted some of the settings, then you might get this error message. Check the storage account credentials and application settings to know the issue.
  • Daily execution quota – If you have exhausted the daily execution quota assigned, then the function app will be disabled temporarily. Increase the quota to fix the issue.
  • Network connectivity issues– If the function app has IP restrictions blocking internet access or inbound traffic, you might get this error.

How can I fix the Azure functions runtime is unreachable error?

1. Check if the storage account has been deleted 

Storage account - azure functions runtime is unreachable

All function apps need a storage account to work, and if the account is deleted, functions won’t operate. To fix this, check these elements: 

  1. First, look for your storage account in the application settings. 
  2. Now check whether WEBSITE_CONTENTAZUREFILECONNECTIONSTRING or AzureWebJobsStorage contains a storage account’s name as part of a connection string.
  3. You can also search for it in the Azure portal to confirm the storage account exists.
  4. If you can’t find the account, you need to recreate the storage account.
  5. Then, replace the storage connection strings. 
  6. Also, check for the function code; if not available, you need to deploy it again.

2. Check if storage account application settings are deleted

If the connection string was overwritten or deleted, you might not find it. This could have happened because you use Azure Resource Manager scripts or deployment slots to set application settings.

These are the actions you need to take:

  1. To avoid this error, it is recommended that you use the AzureWebJobsStorage element.
  2. Do not activate the slot setting options for any of the settings.
  3. These settings must be provided and valid at the time of the creation.

3. Check if the storage account is accessible 

storage account accessible - azure functions runtime is unreachable

The Azure function application must have access to the storage account to operate. Here are some things you need to do to resolve the issue: 

  1. Verify that the firewall for your storage account is disabled and allows incoming and outgoing traffic to the functions.
  2. Set the allowSharedKeyAccess to True as the default value.
  3. Check if the Azure function app is installed in ASE (App Service Environment) with the proper network rules, allowing incoming and outgoing traffic to the storage account. 

4. Daily execution quota exhausted

  1. Go to the Azure portal, and click Settings.
  2. Navigate to Configuration and click Function App Settings.Configuration
  3. Check the Daily Usage Quota if you have exhausted the limit.
  4. If yes, remove or increase the daily quota and restart your app. However, if you can’t do that, you must wait until the next day.

5. Check the firewall settings for the function app

A firewall could restrict the function app; check these areas to be certain: 

  1. Your function app is hosted within an App Service Environment that uses internal load balancing and is set to prevent incoming internet traffic.
  2. The function app has IP restrictions to prevent access to the internet.
  3. Once you know there are restrictions, go to the subnet’s NSG (Network Security Group), which contains the App Service Environment.
  4. Ensure that the inbound rules are set to permit traffic originating from the computer’s public IP address you are using to access the application.

6. Container errors on Linux

Docker logs download

If there is a problem with the container, then the function apps running on Linux in a container can show the error. To fix this, follow these steps: 

  1. First, follow the below-mentioned https link to go to the function app’s Kudu endpoint after replacing Function_App with the app name: https://<FUNCTION_APP>.scm.azurewebsites.net
  2. Then, download the Docker logs and analyze the content on your computer.
  3. Finally, check the logged errors to find out the reason for the error.

So, these are some things you need to check to fix azure functions; runtime is an unreachable error. If you have any questions or concerns, please feel free to mention them in the comments below. We will be happy to help!

The Remote Procedure Call Failed: How to Fix it

The Windows 11 Remote Procedure Call failed is an error that indicates that a connection cannot be established. It pops up when the Remote Procedure Call software, which makes it easy to access and interact with programs on another computer remotely, encounters an issue.

Why does the Remote Procedure Call fail?

The Remote Procedure Call serves as a communication protocol for programs to request access to a program running on another computer. This error can occur for numerous reasons, but we will highlight the most important causes:

  • Poor connection – If the connection between the two computers is unstable or poor, the system won’t be able to establish communication with the remote PC, hence, this problem.
  • Incorrect settings – The RPC settings are probably not configured correctly, causing this issue.
  • Corrupted system files – If any systems have corrupted files, this error may arise.

Likewise, it can affect different procedures in the system. For instance, the Remote Procedure Call failed add a printer. It indicates that the RPC failed when adding or installing the printer driver.

Users can check our article about how to reinstall preinstalled apps in Windows 10.

How do I fix the Remote Procedure Call that failed?

1. Configure RPC settings

  1. Click on Start at the bottom of the screen and type Services in the search space.
  2. Scroll down and select Remote Procedure Call (RPC).
  3. Ensure that the Startup type is changed to Automatic.
  4. Go to DCOM Server Process Launcher and ensure that the Startup type is also set to Automatic.
  5. Navigate to Remote Procedure Call (RPC) Locator, then the General tab.
  6. Select Manual as the Startup type.

We recommend you restart your computer to help the changes sync better with the system.

2. Perform an SFC scan

  1. Click on the Start button and type in Command.
  2. Right-click Command Prompt and select Run as administrator.
  3. Select Run as administrator, wait for the software to launch, then type the following in the search space and press Enter: sfc /scannow

Wait for the command to run the diagnosis to scan and detect the faulty files. It can help fix the Remote Procedure Call that failed Windows 10 at login problems.

You can also choose a tool that performs all these steps automatically, as it may be a valuable option that helps you find damaged files and repair or replace them instantly from its massive repository.

3. Run Windows Troubleshooter

  1. Press the Windows + I keys to prompt Settings or type troubleshoot in the search space and press Enter.
  2. Select Troubleshoot from the results.
  3. Navigate to Other troubleshooters and select the Windows Store Apps troubleshooter.
  4. Click on Run to start the process and follow the on-screen instructions.

The diagnosis will help you detect where the error is from. It is an effective fix for Excel app errors like the Remote Procedure Call failed exception from the result: 0x800706be.

4. Reinstall the services

  1. Click the Start button, type cmd, and select Run as administrator from the results.
  2. Type the following commands one by one in Command Prompt and press Enter after each one:
net start rpcss
net stop wuauserv
net stop cryptSvc
net stop bits
net stop msiserver
ren C:\Windows\SoftwareDistribution SoftwareDistribution.old
ren C:\Windows\System32\catroot2 catroot2.old
net start wuauserv
net start cryptSvc
net start bits
net start msiserver

5. Scan your computer for malware

  1. Click Start and type in Virus.
  2. Select Virus & threat protection from the results.
  3. Click on Advanced scan and select Full scan, then click Scan now.

The Windows Defender will scan your computer for Malware. Delete them if there are any detected.

A faster solution would be TotalAV because it offers excellent protection and strong performance. It protects your devices from malware, phishing scams, ransomware, and other online threats.

⇒ Get TotalAV

Some of our readers asked: What happens if I disable the Remote Procedure Call?

Disabling the Remote Procedure Call on your computer will affect the functionality of services dependent on it. Likewise, it may result in the breakdown or malfunction of the PC. It impedes the communication between the Windows app and services.

These are the most effective fixes that can solve the Windows 11 remote procedure call failed problem. Ensure to follow the steps outlined for each solution to get optimal results.

Users may be interested in reading about how to fix Windows if it couldn’t connect to the update service.

Also, if you have questions and suggestions about this post, you can leave them in the comments section. We’d like your feedback.

Fix: GeForce Game Ready Driver Installation Can’t Continue

The GeForce Experience is a unified driver and software package by NVIDIA that allows you to install the latest driver update as soon as a new game comes out.

However, you may encounter difficulties, resulting in error messages like GeForce Game Ready driver installation can’t continue.

Why does GeForce Game Ready Driver keep failing during installation?

GeForce Game Ready Drivers installation cannot continue error may occur on your PC for several reasons:

  • Outdated graphics card driver – The GeForce Game Ready Drivers installation process may run into problems if the graphics card driver on your computer is outdated.
  • Outdated operating system – Your OS version may not be compatible with the driver you want to install, so it’ll prevent it from installing. Try to update your system.
  • Interference with other apps – Applications such as antivirus can affect the installation process, preventing it from running on your device.
  • Issues with the GeForce Experience App / Installation files – One or more GeForce Experience installation files may be corrupted, or the installation of the app was not complete.

Read about what to do if Nvidia Control Panel is not working on your PC.

What can I do if GeForce drivers can’t continue the installation?

Before going into more complicated solutions, there are a few steps that may fix the problem quickly:

  • Restart the app and your system. As simple as it seems, this might fix everything like magic.
  • Install all the latest Windows updates. An update might contain important fixes or driver updates you are missing.
  • Make sure you have at least 3GB of free space on your drive to install GeForce Experience.
  • Reinstall the Nvidia GeForce Experience and Nvidia Graphics Driver apps using the Windows Settings app.

If these preliminary fixes didn’t solve the problem with GeForce Game Ready Driver, proceed with the solutions below.

1. Update the Nvidia graphics driver

  1. Press Windows + R keys to prompt the Run console, type devmgmt.msc into the search space and click OK.
  2. In the search results, click on Display adapters and select the Nvidia driver from the drop-down menu.
  3. Click the Update driver software option and select Search automatically for drivers.

Restart your computer after the updating process is complete, and check if you can install the GeForce Game Ready driver.

2. Disable Windows Defender Firewall

  1. Click on Start and type Windows Security in the search box.
  2. Select Windows Security from the search results.
  3. Click Virus & threat protection on the Windows Security tab.
  4. Then select Manage settings under Virus & threat protection settings.
  5. Toggle off Real-time protection and restart the PC.

If you have a third-party antivirus installed, open its settings and disable it temporarily from there.

3. End all NVIDIA background processes

  1. Click on the Start menu, then type taskmgr in the search box.
  2. Select Task Manager from the search result.
  3. Go to the Processes tab and find the NVIDIA processes, then right-click on each and click on the End Task option to end all the processes.
  4. Restart your computer.

4. Install the GeForce driver manually

  1. Go to Nvidia’s driver download page and search for the correct Game Ready driver for your system.
  2. Once you have found the driver, hit the Download button.
  3. You will be prompted that you can optionally get the latest GeForce Experience app. Click the Download button.
  4. After the download finishes, press the Windows key + E to start File Explorer, go to the Downloads folder, right-click the file, and select Run as administrator.
  5. Go through with the installation and restart your PC afterward.

5. Restart the NVIDIA services

  1. Press the Windows + R keys to open the Run dialog.
  2. Type services.msc and press ENTER.
  3. Scroll through and find services running in NVIDIA.
  4. Right-click on each of them to select the Restart option.

We recommend you restart your computer and check if you can install the GeForce Game Ready driver.

What happens if I uninstall GeForce Experience?

Uninstalling the GeForce Experience on your computer won’t affect its performance. However, you won’t be able to access and use the features that come with the suite.

Consider, for instance, checking for the latest drivers for your graphics card.

These are the best fixes for the GeForce game-ready driver installation can’t continue issue. If you follow all the outlined steps, the problem should be solved.

Nevertheless, you can read about how to fix the NVIDIA drivers not installing errors on Windows 11.

Likewise, we have a detailed guide about Nvidia GeForce Experience not working and how you can get it working in just a few steps.

Users also complain about Nvidia graphics cards not being detected in Windows 11, so you can check how to fix it.

If you have any questions or potential solutions that may work, let us know in the comments section below.

Windows 11’s Paint app received further cosmetic improvements

We’ve already discussed the fact that most of the apps on Windows 11 got redesigned and modernized, to fit the new software environment they are in.

The redesign process for Paint was among the most requested, as for some reason, people can’t let go of this classic Windows app.

Now, Microsoft has considered that the properties window for the popular app could also use some refurbishing.

If you, however, use Paint 3D instead of Paint, we can show you how to easily download, install and make the most of it on your PC.

The Properties box for Paint is brought up to standards

The Redmond-based tech giant has just provided a brand new update for the Paint app in Windows Insiders’ Dev Channel.

Now, even though there is still no promised dark mode support, Windows Insiders will be glad to know that the app now has a redesigned Image Properties dialog box that looks on par with the rest of Windows 11’s UI.

After this redesign, the Image Properties dialog lets you check out file attributes, such as last saved, size on disk, and the image resolution.

Furthermore, you can also change units (inches, centimeters, and pixels), color mode, and adjust the image size.

Also, with this latest update, the Image Properties UI features Windows 11-like radio buttons, input boxes, better fonts, and an overall nicer-look aesthetic.

As you know, you can download the latest Paint update directly from the Microsoft Store. Please note that the redesigned Image Properties UI is only available to Windows Insiders in the Dev Channel.

We’ll keep an eye out and report on upcoming changes as well. Be sure to leave your thoughts, opinions and suggestions in the comments section below.

How to Fix PS4 Error SU-42118-6 in 5 Easy Steps

PlayStation users have been experiencing SU-42118-6 on their Slim consoles for a while now, along with other PS4 errors such as SU-30746-0 and SU-30767-3.

The tricky thing about PS4 error code SU-42118-6 and the others is that the messages only display the numerical codes with no real clue as to what causes the issue.

Don’t worry, we’ll not only show you how to fix PS4 SU 42118 6 but also understand what triggers it and how to avoid it in the future.

What is the error code SU 42118 6?

PS4 error SU-42118-6 comes from a broken ribbon connector between your motherboard and BD-ROM. You risk triggering it if you disassemble your console either while cleaning it or for another reason.

When this happens, the system won’t be able to communicate with the BD-ROM.

Improper assembling of your PS4 hardware can also cause it to start turning off randomly. Thus, SU-42118-6 can often leave you stuck in a restart loop.

You may have also stumbled upon this variation of the error: PS4 system software update error SU-42118-6.

If your console cannot find an appropriate firmware update file, it will simply say that an error has occurred SU-42118-6.

You usually get PS4 update error SU-42118-6 when you’ve not updated your console for a long time, and the firmware version it runs is no longer supported by Sony.

The issue is pretty similar to SU-30746-0 which displays a black screen with the following error message whenever you boot your PS4 console:

An error has occurred.

(SU-30746-0)

If you are facing this challenge on your console, continue to the troubleshooting section below.

How do I fix my PS4 system update error SU-42118-6?

1. Reboot the console with Safe Mode

  1. Turn off the system completely and leave it off for around one minute.
  2. Press and hold the Power button (release the button when it beeps twice).
  3. Connect your controller to the PS4 by USB cable and hit the PlayStation button to pair the controller.
  4. Once you successfully pair your controller to the system, restart the console again.
  5. Press X on the controller to reboot via Safe Mode.

When the device turns on, it should no longer display the PS4 error code SU-42118-6. If it does, try the next method below.

2. Update the PS4 via Safe Mode

  1. Power off the system completely.
  2. Download the most recent PS4 firmware version.
  3. Save the file in an external USB drive, such as a hard drive or USB disk. If your console is connected to an ethernet network, you can skip this step.
  4. Press and hold the Power button until the console beeps twice.
  5. In Safe Mode, connect your controller to the PS4 via a USB cable and press the PlayStation button to pair them.
  6. Go to Update System Software and press the X button on the controller to select the option.
  7. If you’re using an ethernet network, select Update Using Internet.
  8. If not, insert the USB with the downloaded firmware and select the Update from USB Storage Device option.
  9. Restart the PS4 console and confirm that SU-42118-6 is cleared.

3. Initialize the console via Safe Mode

  1. Power off the console and leave it off for around one minute.
  2. Press and hold the Power button, and stop pressing after the console beeps twice.
  3. Connect your PS4 controller to the system with the use of a USB cable and pair them by pressing the PlayStation button.
  4. Next, select Initialize PS4 (Reinstall System Software).
  5. Click on the Yes button and hit X.
  6. Finally, restart the PS4 console.

4. Restore the PS4 to default settings via Safe Mode

  1. Turn off your console completely.
  2. Next, press and hold down the Power button and wait until the system beeps twice.
  3. In Safe Mode, attach your PS4 controller using a USB cable.
  4. Press the PlayStation button to pair it to the console.
  5. Scroll down and select the Restore Default Settings option.
  6. Click on Yes with the X button, and this will restore the console to default settings.

5. Check the BD-ROM ribbon and replace your HDD

As already mentioned, the issue can not be related to software at all, but to a broken ribbon connector between your motherboard and BD-ROM.

To fix it, investigate the BD-ROM ribbon connection between the drive and the motherboard. Check for broken tabs, and if any, replace the damaged component.

Replacing the hard disk drive on your console usually gets rid of PS4 error code SU-42118-6. Nevertheless, some users reported the issue resurfaces if you attempt to update the console on the replacement HDD.

As you can see, the PS4 error SU-42118-6 can be a software issue or a result of faulty hardware.

Replacing your HDD will solve this in most cases. However, we encourage you to try all the solutions listed here.

SU-41350-3 and PlayStation WC-36547-5 are similar errors, so don’t miss their guides for more potential solutions.

Don’t hesitate to let us know if you found this guide helpful by using the comment section below.

Windows Defender Engine Unavailable: How to Fix This Error

You will find multiple user reports on users complaining about an error that reads Windows Defender Engine unavailable. This prevents the users from installing the security updates and also does not allow them to safeguard their PCs against threats.

Suppose you are also facing similar issues and are looking for solutions. In that case, we suggest you check out the solutions mentioned in this guide and hopefully fix the Windows Defender engine unavailable error. So let us get right into this guide.

Why am I getting the Windows Defender engine unavailable error?

Take a look at the most common reasons that could trigger the Windows Defender Engine unavailable error we found out after carefully digging through the internet:

  • There are some issues with the Windows update: Some internal problems with the Windows update might be causing the Windows Defender Engine unavailable error.
  • Windows Security is experiencing some issues: Chances are some critical files are facing issues running in your PC related to Windows Security that is causing the problem.
  • Corrupt system files: If essential system files are missing or corrupt in your PC, then this could trigger multiple issues.
  • Third-party antivirus is conflicting: You should ensure that you do not have any third-party antivirus installed on your PC if you are already using Windows Defender. This could cause both programs to misbehave.

How can I fix the Windows Defender engine unavailable error?

1. Run the Windows Update troubleshooter

  1. Press the Win + I keys to open Settings.
  2. Click on Troubleshoot.
  3. Select Other troubleshooters.
  4. Click on the Run button for the Windows Update.
  5. Follow the on-screen prompts to begin the scan.
  6. Apply the fix prompted by the troubleshooter.
  7. Once the fix is applied, restart your PC.

Some typical issues can be easily fixed by running the Windows Update troubleshooter. For example, you can follow the above steps and check if this resolves the issue of Windows Defender Engine being unavailable because the definition updates for Windows Defender are rolled out via Windows updates.

2. Manually install Security Intelligence updates

  1. Visit the official Microsoft website.
  2. Scroll down, and under the Latest security intelligence update heading, you will find the information about the latest available security intelligence update.
  3. Click on the version of your PC and download the update.
  4. Launch the update and install it by following the on-screen instructions.

If the Windows update isn’t downloading for some reason, you can manually download the latest security update on your PC.

3. Fix corrupt system files

  1. Press the Win key to open the Start.
  2. Run Command Prompt as an admin.
  3. Type the below command and press Enter.sfc /scannowCMD sfcscannow
  4. After the process completes, type the below command and press Enter.DISM /Online /Cleanup-Image /RestoreHealthdism restore system detected an overrun of a stack-based buffer
  5. Restart your PC.

You can take the help of the in-built SFC Scan, and DISM commands to fix corrupt system files or missing system files and also resolve several problems. However, these SFC and DISM commands often don’t help improve the corrupt system files.

So, we suggest you use a dedicated system repair and optimization software. With these tools, you can fix system crashes, and damaged DLLs, remove ransomware from your PC, and much more.

4. Tweak the Registry

  1. Press the Win + R keys to open the Run dialogue.
  2. Type regedit and press Enter.
  3. Navigate to the below path. HKEY_LOCAL_MACHINE\SOFTWARE\Policies\Microsoft\Windows Defender
  4. Double-click on the DisableAntiSpyware key.
  5. Change the value to 0.
  6. Open the DisableAntiVirus key.
  7. Change the value to 0.
  8. If the keys are missing, right-click on an empty space, select New, and click on DWORD (32-bit) Value.
  9. Name the key DisableAntiSpyware.
  10. Set the value to 0
  11. Perform the same steps for DisableAntiVirus.

5. Reset Windows Security

  1. Press the Win + R keys to open the Run dialogue.
  2. Type wt.exe and hit Enter.
  3. Type the below command and press Enter. Get-AppxPackage Microsoft.Windows.SecHealthUI | Reset-AppxPackage
  4. Exit the Windows Terminal.
  5. Restart your PC.

There might be some issues with the program which is why it can’t load all the files correctly. In such a case, you should reset the Windows Security tool and check if this resolves the Windows Defender Engine unavailable error.

6. Reset your PC

  1. Press the Win + I keys to open the Settings menu.
  2. Select Recovery.
  3. Hit the Reset PC button.
  4. Choose the Keep my files option to reset your PC without removing your personal files.

If none of the above solutions fixed the problem for you, you should go ahead and reset your PC following the above steps, as this would help you reset your PC without deleting your files.

That is it from us in this guide. We have a guide that will help users facing the Virus & threat protection option that isn’t working on their Windows 11 PC.

You can also refer to our guide on the missing Windows Defender from your Windows 11 PC, which will help you resolve the issues and get back to Windows Defender pretty quickly.

Feel free to share your views on which solutions helped you fix the Windows Defender Engine unavailable problem in the comments below.

DirectStorage will only work on Windows 11 for the Forspoken title

It’s time to touch on some gaming, and what better title to start 2023 with, than the upcoming Forespoken title, which looks amazing.

If you remember, back in March 2020, Forspoken, which was the first title set to receive Microsoft’s DirectStorage API support was shown off yielding very impressive numbers.

On the off chance you don’t remember what DirectStorage is, it is actually a feature that was designed to take advantage of the latent power of NVMe SSDs, especially in games.

At first, it was announced that both Windows 10 and Windows 11 users are going to benefit from it, but it was later disclosed that it will only be available for Windows 11.

The better Forspoken experience will be on Windows 11

Note that, in some instances, the new storage API was up to 70% better than legacy technology, but the title kept getting delayed over and over until Square Enix finally settled on a release date.

This new gaming-oriented feature promised enormous improvements in performance over legacy technology and preliminary tests indeed show extremely impressive results.

Ever since Forspoken’s launch, enthusiasts have been testing the tech inside the game, trying to better grasp the benefits and see if it has drawbacks too.

The overall verdict has generally been positive, and by a large margin as well. Game and game-level loading times have improved tremendously as a result.

Even for a title as heavy and intense as this, navigating between the menu and the game has been a breeze, according to users.

At 1440p and higher resolutions, DirectStorage has virtually no impact on frame rate. When CPU limited at 1080p, however, DirectStorage can have a significant positive effect on frame rate, frame time consistency, and GPU utilization.

If you are actually looking towards performance improvement aspects of the feature like in framerate terms, there are positives to share here as well.

In fact, the frame timings have been smoothed out in Forspoken, which will lead to much tighter percentile low figures.

As gamers know, in real life, this should translate to smoother gameplay even when textures and other assets are streaming in and out of disk.

That being said, it looks like the biggest benefit of this technology will be seen at lower resolutions, such as 1080p.

Tech-savvy gamers that tested it noted that, at Full HD resolution, the frame times were much better due to better CPU utilization when DirectStorage was enabled.

Of course, this might have to do with GPU decompression working behind the scenes as it is known to reduce CPU overhead.

Thus, DirectStorage looks like a big reason to be excited in the case of SSDs. However, not every NVMe-related news is positive. 

At first glance, the CPU and GPU requirements seem, seem fairly reasonable as an Nvidia GTX 1060 / RX 5500 XT alongside 3rd Gen Core i7 / 1st Gen Ryzen 5, are the minimum recommended specs.

That is until you see that this is only meant for a 720p30 experience. The system memory and storage requirements too are certainly anything but modest.

Furthermore, even minimum specs suggest you need 16GB of system RAM and 150GB of HDD storage. Expectedly, the requirements only get even more expensive from there.

And, in case you are wondering what you get for all these hefty requirements, Luminous Productions has also detailed some of the PC features that Forspoken brings to PCs.

Note that even though the title is supported on Windows 10 November 2019 update or later, it looks like DirectStorage will only work on Windows 11.

Previously, Microsoft has stated that the newer OS features additional optimizations in the IO stack even though the technology should work on both Windows 10 and Windows 11.

This new storage API was built on Xbox Velocity architecture and was set to revolutionize gaming. Early demos had shown extremely promising results and third-party testing on compatible hardware was equally impressive.

Earlier today, the Senior Social Media Manager at Square Enix, Sunil Godhania, published some expected performance numbers when DirectStorage is used.

He mentioned NVMe drives should reduce load times to around a couple of seconds, and SATA SSDs on the other hand will be able to do the same job in around 10 seconds.

Twitter users also noted the load times where the game loaded back into the level almost in the blink of an eye when the Continue option was clicked.

That being said, not every scene may yield great results, as many note that their loading times were far longer, with a few scenes taking over six seconds, even on a WD_BLACK SN850 Gen4 NVMe SSD.

However, we have to keep in mind that it’s a fairly new release which means the future overall looks really bright for DirectStorage and gaming on NVMe SSDs.

Have you already bought Forespoken for your gaming rig? Share your excitement and concerns with us in the comments section below.

Microsoft fears CMA will join the FTC in attempting to block its Activision deal, according to sources

While the Federal Trade Commission has been openly vocal about its intention to block Microsoft from acquiring mega-game publisher Activision Blizzard, the company remained hopeful that other regulators would be more favorable to the deal but it looks like that optimism is fading.

According to a New York Times report, four anonymous sources that have been briefed on the CMA’s investigation into the Activision deal, are saying that even Microsoft believes the UKs regulatory body is preparing to issue a block to the acquisition.

Microsoft has been public about its intentions to work with regulatory bodies to grease the wheels of an approval for its Activision bid, but has yet to receive a list of concessions from concerned authorities.

Despite Microsoft’s eagerness to work with antitrust regulators, authorities remain critical of the implications of such a high-profile merger as the Activision deal could result in with FTC bureau of competition director Holly Vedova stating, “today we seek to stop Microsoft from gaining control over a leading independent game studio and using it to harm competition in multiple dynamic and fast-growing gaming markets.”

Game industry competitors have also voiced their concerns about Microsoft buying Activision Blizzard both publicly and in Sony’s case, directly with antitrust regulators, meanwhile Microsoft continues to maintain that it believes many of those concerns are overblown hypotheticals that simply don’t make business sense.

Sony is the console market leader and it would defy business logic for us to exclude PlayStation gamers from the Call of Duty ecosystem. Our goal is to bring Call of Duty and other games—as we did with Minecraft—to more people around the world so they can play them where and how they want. – Microsoft communications lead Frank Shaw.

When questioned about the New York Times report by the publication Game Developer, a Microsoft spokesperson says that its legal team hasn’t indicated the deal will be blocked in the UK and that the company has a “strong case” in the country.

Microsoft and Activision had hoped to have the deal approved by all the necessary regulatory bodies by June of 2023, but it’s looking like they may need to readjust their calendars soon.

Fix Do You Want to Allow This App From an Unknown Publisher

Have you been wondering why you keep getting the error message: do you want to allow this app from an unknown publisher to make changes to your device? If so, you’re in luck.

What does it mean when it says do you want to allow this app to make changes to your device? Is it safe to download from unknown publisher? These are all legitimate questions that we shall try to address.

We’ll explain that as well as how to get rid of this obsessively recurrent UAC permissions issue for good.

In fact, you can fix this unknown publisher error with the solutions we have compiled for you. But first things first.

Do you want to allow this app to make changes to your device what does it mean?

This error popup usually occurs when you attempt to launch a particular program on your Windows PC.

It may imply that the program does not have a valid certificate root authority or that it fails to satisfy UAC requirements in order to obtain permissions.

Sometimes, it can be a valid warning, but that is not always the case. Occasional glitches or improper system settings can just as well be triggering it.

Let’s quickly review some of the most common issues reported by our users:

  • Do you want to allow this app from an unknown publisher Windows 10, Windows 11, Windows 7
  • Windows has found a problem with this file cesu4650.exe – Cesu4650.exe unknown publisher Epson
  • Unknown publisher error – UAC unknown publisher
  • Do you want to allow this app to make changes when uninstalling apps
  • Do you want to allow this app to make changes to your device only option is NO

So, how do you fix do you want to allow this app from an unknown publisher to make changes to your device? Read on to find out.

How do I fix unknown publisher warning?

  1. Repair your file registry
  2. Run a full system scan
  3. Modify UAC settings in Control Panel
  4. Create an elevated shortcut to bypass UAC

1. Repair your file registry

  1. Type cmd in the home screen search bar.
  2. Right-click on Command Prompt and select Run as Administrator.do you want to allow this app from an unknown publisher run cmd as admin
  3. Now type sfc /scannow and hit Enter.do you want to allow this app from an unknown publisher sfc /scannow
  4. Wait for the scanning process to complete and then restart your computer. All corrupted files will be repaired on reboot.

As you can imagine, the mentioned error message may be caused by a corrupted file registry in the system. This corruption manipulates the program registry file data, thereby causing the error message.

The SFC scan tool provides a convenient way to repair corrupted system files in Windows 10. Nevertheless, running command strings might not be everyone’s cup of tea.

If you prefer an easier way to deal with digital corruption, go ahead and try a specialized file repair software program.

2. Run a full system scan

  1. Type windows defender in the home screen search box and launch the tool.
  2. In the left-hand panel of the program, select the shield icon.windows defender antivirus and threat protection
  3. Go to Scan options and choose Advanced scan.scan options windows defender
  4. Check the full scan option to launch a full system scan.

3. Modify UAC settings in Control Panel

  1. Go to Control Panel.
  2. Locate System and Security and click on Action Center.control panel system and security
  3. From the left pane, select the Change User Account Control settings option.control panel UAC
  4. Drag the scroll button to Never notify.UAC never notify
  5. Finally, click on OK and launch the program again.

User Account Control (UAC) is a security feature that notifies you before changes are made to your Windows PC.

These notifications appear whenever you want to run some programs that require Administrator level permissions, or when the program you run does not have a valid certificate root authority

In order to prevent this error message, you may have to disable the notifications from the UAC settings.

Note icon NOTE
Turning off UAC may enable potentially dangerous applications to make changes on your PC. Ensure you have a strong and active antivirus program in place before you try out this fix.

4. Create an elevated shortcut to bypass UAC

  1. In the home screen search field, type Schedule Tasks and hit Enter.task scheduler
  2. In the Actions tab, click on Create Task.create a task
  3. Under the General tab, give the task a name of your choice (preferably a name you can identify with the affected program).
  4. Tick the Run with highest privileges box.
  5. Proceed by clicking on the Action tab and then, on the New button.
  6. Browse to the folder location of the affected program.
  7. Click on the Settings tab and tick the Allow task to be run on demand box, then OK.
  8. Next, right-click on the desktop and select New > Shortcut.
  9. In the Create Shortcut wizard, type: schtasks /run /TN task name
  10. Click on next and proceed with the prompts to complete the shortcut creation.
  11. Right-click on the new shortcut, go to Properties, and Change icon.
  12. Select your preferred icon, and then click OK.Windows icons too small
Note icon NOTE
After these steps above, double-click on the shortcut so as to launch the program. This procedure will enable you to bypass the error message.

Any of the fixes above will solve the error message do you want to allow this app from an unknown publisher to make changes to your device on your Windows PC.

Feel free to comment below if you have any additional solutions that you’ve successfully used to fix this.

Malwarebytes Blue Screen: Use These 4 Solutions to Fix it

Malwarebytes is one of the most robust anti-malware programs available, eliminating advanced threats from your PC.

While incremental security application updates help improve performance, some users still experience several issues, including occasional crashes and blue screens of death.

We will cover that in the article, explaining in great detail what you can do to stop BSoDs caused by running Malwarebytes.

Why is Malwarebytes causing a blue screen?

There can be various reasons why Malwarebytes can cause a blue screen (also known as the “blue screen of death” or BSOD) error on your Windows PC. Some common reasons include the following:

  • Compatibility issues – If you’re running an older version of Malwarebytes on an outdated version of Windows, it may not be compatible with your system and cause a BSOD error.
  • Conflicts with other software – Malwarebytes can sometimes conflict with other security software or drivers installed on your system, causing a BSOD error.
  • Corrupted or outdated drivers – Outdated or corrupted drivers can cause a BSOD error, and Malwarebytes may identify these drivers during a scan and trigger a BSOD error.
  • Malware or virus infections – Malwarebytes is designed to detect and remove malware and viruses from your system. However, it may cause a BSOD error if it encounters hazardous malware.

We will now explore some of the top recommended solutions.

How can I fix Malwarebyte’s blue screen?

Before you jump into the recommended solutions, consider using another antivirus software. There are many good options, and you may be able to avoid this issue.

You should consider the most reliable antivirus tools on Windows 10 and enhance your security without causing system errors.

1. Reinstall Malwarebytes

  1. Download the Malwarebytes Support Tool.
  2. Run the installer, and press OK in the UAC pop-up. You need Microsoft .NET 4.0 Framework to be installed.
  3. Check the empty checker box in the Malwarebytes Software License Agreement pop-up window and click Next.
  4. After it is installed, open the Malwarebytes Support Tool and select Advanced.
    malwarebytes blue screen
  5. In the Advanced Options, select Clean and then Yes.
  6. Restart your PC.
  7. The UAC pop-up will appear again, and you need to click Yes.
  8. When prompted with the Reinstall Malwarebytes for Windows pop-up window, click Yes.
  9. Select where you want to reinstall Malwarebytes, and click Install.

2. Turn off Fast Startup

  1. Press Windows + R, type control, and hit Enter.
  2. Navigate to the path below:
    Control Panel\All Control Panel Items\Power Options
  3. Click on the Choose what the power buttons do link.
  4. Click on Change settings that are currently unavailable.
  5. Uncheck the Turn on fast startup box from under the Shutdown settings.

3. Disable any other conflicting antivirus

While Malwarebytes is a complete security solution, some users prefer installing it with other antivirus tools, such as Bitdefender. Still, the problem is that having two antivirus tools can lead to issues.

Many users suggested disabling web filtering in Bitdefender.

Another similar solution would be to disable Web Protection in Malwarebytes since that may also help.

4. Run a third-party BSoD troubleshooter

BSoDs and crashes can be caused by many things, ranging from hardware incompatibilities to software inconsistencies, which makes identifying the problem complicated and time-consuming.

That’s precisely why third-party software solutions are becoming more and more of an acceptable alternative since they run your PC through a complete set of troubleshooting steps with minimal user input.

Thus, you can remove the specified corrupted or malfunctioning software files that determine such BSoD issues. The process is mainly automated, so the job is finished within a few minutes.

This pretty much wraps up our troubleshooting guide covering BSoDs triggered when running Malwarebytes.

Let us know which solution you went for by leaving us your feedback below.

Additionally, you can use the comments section to add other solutions we may have missed out on, and we will update the article accordingly.

Still using Xbox 360 marketplace? Microsoft has bad news

Microsoft will stop providing purchase option for a number of game titles and add-ons in a few selected territories on the Xbox 360 marketplace as of February 7.

That means, several items will not be available for purchase, but for those who’d acquired them before, there’s always an option to re-download them. 

Is Microsoft shutting down Xbox 360 marketplace?

Contrary to popular reports, however, Microsoft is not shutting down the marketplace for good, but rather stopping the distribution of several game titles. 

Previously, fans were worried after a message from Microsoft encouraging them to purchase any 360 games or DLC by May 2023 because they’ll put an end to the Xbox 360 marketplace over the course of the year.

In a statement to Gematsu, however, a Microsoft spokesperson says that the message was an error. 

As a reminder, beginning on February 7, 2023, a limited set of games, add-ons, and in-game content will no longer be purchasable in select markets via the Xbox 360 stores.

The list of items that will not be available on the marketplace

The list varies from one region to another, but in the United States, these titles will be removed from the Xbox 360 marketplace.

Aegis WingLeft 4 Dead
Assassin’s Creed BrotherhoodLeft 4 Dead 2
Assassin’s Creed® IIILIMBO
Assassin’s Creed® IVLost Odyssey
Assassin’s Creed® Liberation HDMass Effect 2
Blood of the WerewolfMONOPOLY DEAL
Blue DragonMutant Blobs Attack
BreakdownN+
Call of Duty: Advanced WarfareOutpost Kaloki X
Call of Duty: GhostsPeggle ® 2
Castle CrashersPhantom Breaker: Battle Grounds
Cloning ClydePrince of Persia
Counter-Strike: GOR.U.S.E.
Dark Souls™Sega Vintage Collection: Alex Kidd & Co.
Darksiders IISkate 2
DAYTONA USASouth Park™: The Stick of Truth™
Defense GridSpelunky
Eets: ChowdownSplinterCellConviction
Far Cry® 2Star Wars Battlefront
Final Fight: DblImpactStar Wars KOTOR 2
Iron BrigadeThe Orange Box
Jeremy McGrath’s OffroadThe Raven Episode 1
Jet Set RadioThe Witcher 2

If you’re re-downloading previously purchased titles from the Xbox 360 marketplace, here are some tricks you can do to speed up the download process from the Xbox app.

Have you purchased or planned to buy any of these 360 titles? Share your thoughts in the comments section below!

Steam Won’t Open on Windows 10: How to Fix & Causes

Steam is a highly reliable application that allows users to access and buy various immersive games of different genres easily. However, despite being reliable, some users will complain that Steam won’t open on Windows 10.

This prevents users from playing Steam games on their PC. If you are also facing this issue, this guide will show you quick ways to fix it for good.

Why is Steam not opening?

Below are some of the factors that cause the Steam client not to open on your PC:

  • Issues with Steam: The first thing to check in while trying to fix this issue is if the Steam client is working well. If it is not, you can refresh your Steam installation by running a few commands.
  • Interference from third-party apps: Another cause of this problem is interference from a third-party app. The solution is enabling Safe Mode and checking if Steam opens normally. If a third-party app is the cause of the problem, you might need to disable or remove the app using uninstaller software.
  • Outdated PC: Some users have also found this problem due to an outdated operating system. The quickest way to fix this is to update your PC to the latest version.

It is worth mentioning that the solutions presented in this guide apply to a variety of Steam error messages:

  • Steam client won’t open: This happens occasionally, and a restart should be enough. Otherwise, this guide will help.
  • Steam app won’t open when I click the icon: In both scenarios, double-clicking on the desktop icon or using the Start Menu, the result is the same and is fixed in this guide.
  • Tera won’t open on Steam: This can happen if a game is not properly integrated with Steam.
  • Steam won’t open on PC: This error might show if there’s conflicting software installed that prevents Steam from opening.
  • Steam won’t open Windows 7: Steam won’t open error is encountered by users of Windows 10, Windows 8, and Windows 7 alike. There’s no difference, so the advice stays the same.
  • Steam game says running but won’t open: In this case, Steam is already running, but it is not responding. You can end the process in Task Manager.

How can I fix Steam if it won’t launch on Windows 10?

Before proceeding to the fixes in this section, below are some of the troubleshooting steps you can try:

  • Check if Steam is down
  • Restart your PC
  • Restart your network device
  • Temporarily disable your antivirus and/or firewall

1. Use a command

  1. Press the Windows key + R to open the Run utility.
  2. Once the dialog is open, type in or copy this command: steam://flushconfigfix steam
  3. Next, press Enter or click OK.
  4. Finally, click OK when the Steam dialogue appears.

The command above is used to refresh the installation of the Steam application. Therefore, it is used to fix several issues related to the gaming client, including the Steam won’t open on Windows 10 issue.

2. End Steam processes

  1. Press the Windows key + X and select the Task Manager option.
    task manager steam wont open windows 10
  2. Right-click all Steam processes and select End task.
    end task  steam wont open windows 10
  3. Now, restart the Steam client.

In some cases, Steam might not open on Windows 10 because it encountered minor glitches. The easiest way to fix this is to restart all instances of Steam.

3. Update PC

  1. Press the Windows key + I and select Update & Security.
    update and
  2. Click the Check for updates button.
    check for
  3. Now, install any available updates, including the optional ones.

The Steam client needs Windows 10 to be up-to-date to run without glitches. Hence, if your PC is outdated, you need to update it to the latest version.

4. Enter Safe Mode

  1. Press the Windows key + I to open the Settings app and select the Update & Security option.
    update and
  2. Select Recovery in the left pane and click the Restart now button under the Advanced startup section.
    restart now steam wont open windows 10
  3. When your PC restarts, select the Troubleshoot option.
    troubleshoot steam wont open windows 10
  4. Now, choose the Advanced option.
    advanced options
  5. Select Startup Settings.
    startup settings
  6. Next, click the Restart button.
    restart steam wont open windows 10
  7. After your PC restarts, press 5 or F5 to Enable Safe Mode with Networking.
    safe networking
  8. Finally, relaunch the Steam client.

Configuring your PC’s settings to start in Safe Mode is another method to solve the Steam won’t open on Windows 10 issue. Safe Mode only starts your PC with the minimum drivers and processes required to run it smoothly.

So, if there are third-party programs interfering with the starting of the steam application, then Safe Mode should fix the problem.

5. Reinstall Steam

If all else fails, there is always the option of reinstalling Steam.

If you want to avoid going through the tiring process of redownloading and reinstalling all of your games, then you can move the steamapps folder (the folder containing all of your games) from the Steam directory and save it in another place on your HDD.

Afterward, uninstall your Steam software and completely delete the remaining location of your previous installation. After you reinstall Steam you will want to copy the steamapps folder back into the new location of your Steam directory.

⇒ Get Steam [Latest version for Windows 10]

6. Perform a system restore

  1. Press the Windows key + R, type rstrui.exe, and click the OK button.
    rstrui
  2. Click Next in the window that pops up.
    next steam wont open windows 10
  3. Now, select a restore point and click the Next button.
    restore point
  4. Finally, click the Finish button and follow the onscreen instructions to complete the process.
    finish

If Steam still won’t open on Windows 10 after applying the troubleshooting steps above, you might need to restore your PC to a point when everything is working well.

This is because you might have made some changes that are hard to trace to your PC, causing the issue. Performing a system restore will reverse these changes and restore normalcy on your PC.

The Steam won’t open on Windows 10 issue can be frustrating, as it denies you access to your games. But with the solutions in this guide, you should be able to fix them for good.

If Steam games won’t launch on Windows 10, check our detailed guide to fix it quickly.

Feel free to let us know the solution that helped you fix this issue in the comments below.

Fix: Error Code Deep Ocean on Minecraft [Error 0x80070057]

Minecraft is one of the best games in the gaming community. Regardless of its accolades, users complain about many errors they encounter with the game. The error code Deep Ocean in Minecraft is a common error. Also, users report Minecraft Realms’ internal server errors in the game.

What causes the Minecraft Deep Ocean error code?

Error code: 0x80070057 code: Deep Ocean in Minecraft indicates that something went wrong in the login process. It can occur for several reasons that may vary for different players. However, an outdated game app is the most likely cause of the error.

Other factors that may be responsible for the Minecraft Deep Ocean error code include:

  • Network congestion/unstable network connection – Minecraft needs a stable network connection to connect to its server and initiate its functionality. If your network connection is congested, it can affect the communication between the game and its servers.
  • Issues with Minecraft launcher – You can run into numerous problems with the game if the Minecraft launcher on your PC is not working or is missing. It can prevent the game from working and stops its components from running as they should.
  • Outdated Windows operating system – Running your games on an outdated system can result in many errors because the PC lacks updates and patches to fix its bugs. It can affect how the Minecraft client works, so make sure to get things on the right track and solve any Windows Update errors.
  • Interference with other apps – Apps like antivirus software can block the functionality of other apps running on your computer due to their activities. Also, having many apps running can affect Minecraft.

However, you may experience the error for reasons not listed above. Nonetheless, we’ll take you through some fixes that can fix the problem.

How do I fix Minecraft’s Deep Ocean error code?

Before proceeding with any advanced troubleshooting on your game and PC, go through the following:

  • Perform a power cycle on your network router and reconnect your PC.
  • Close background apps running on your PC.
  • Disable any antivirus software you have installed on your computer.
  • Restart Windows in Safe Mode and check if the error persists.
  • Install all Windows updates from the Settings menu.

If you cannot fix the error, proceed with the troubleshooting process below.

1. Update the Minecraft client on your PC

  1. Left-click the Start button, type Microsoft Store in the search space, and launch it.
  2. Select the Library in the bottom left corner of the page.
  3. Choose the Downloads and updates option from the drop-down.
  4. Select the Get updates option to prompt updates for installed apps, then press Update all.

You can check how to update Minecraft on Windows 10/11 PCs if you encounter issues with the steps above.

2. Repair the app

  1. Click the Start button and select Settings.
  2. Now select Apps.
  3. Look for Minecraft in the list of apps, click on it, and select Advanced options.
  4. Scroll down and click the Repair button. Check if the game works fine. If not, come back here and click the Reset button.

If this solution doesn’t fix the problem, you should also consider uninstalling and reinstalling Minecraft.

3. Run the Windows Store Apps troubleshooter

  1. Click the Start button and go to Settings.
  2. Select Update & Security.
  3. Click on Troubleshoot from the left and select Additional troubleshooters from the right pane.
  4. Click on Windows Store Apps and hit the Run the troubleshooter button.
  5. Follow the on-screen instructions to finish the troubleshooting and fix the problem.

4. Temporarily disable Windows Defender Firewall

  1. Left-click the Start button, type Windows Security in the search box, and press Enter.
  2. Click the Virus & threat protection option from the search results, then click Manage settings.
  3. Toggle off the Real-time protection option to disable the Windows Defender Antivirus.

Disabling the Windows Firewall antivirus will fix any interference its service is causing with the Minecraft game. Read how to fix the Windows Defender Firewall if it can’t change settings on Windows 11.

5. End task for Minecraft

  1. Press the Windows + R keys to open the Run box, type taskmgr, and press Enter to launch Task Manager.
  2. Right-click the Minecraft client, click the End task button, and click OK to confirm.
  3. Restart your PC and check if the issue persists.

Ending tasks for the Minecraft client on your PC will close background activities that might have interrupted the client.

We hope our solution helped you fix the error code unknown Deep Ocean Minecraft, and now it’s working fine.

You can also check for other ways to open the Task Manager via shortcuts on your PC if there’s an issue with the process outlined.

We also have a detailed guide to help you fix the Minecraft Forge installer not opening on Windows 11. You can also check how to make your own Minecraft server for free.

Another similar error is the Minecraft error code Obsidian, so don’t miss it. We also have a new guide on the Minecraft error code Drowned on Switch, so you might want to check it out.

If you have further questions and suggestions, kindly drop them in the comments section below.

5 Easy Fixes to Tinder Failed to Update Profile Pic

The beauty of using Tinder is how easy it is to meet people. Unfortunately, many users reported that Tinder failed to update a profile pic.

Normally, all it takes is just swiping through profile images to like a profile. And if the other user does the same to like you back, then it is a match. You can also use Tinder in a browser, yet the app is far more popular.

But if Tinder failed to update profile pic, you’re excluded from the game before it even started.

Whenever you have problems like there was an error updating your profile on Tinder, it’s frustrating.  But why do these update or upload errors occur, to begin with?

Many users wonder, and legitimately so – why do my pictures keep failing to upload on Tinder? Let’s find out together.

Why won’t Tinder upload my photos?

Whenever you see that there was an error updating your profile on Tinder, you can expect picture-related issues, but not only.

In addition to Tinder photo upload spinning, you can also expect the following:

  • Tinder failed to process video
  • Updating your job title failed Tinder
  • Can’t edit Tinder profile at all – BIO, name, etc.
  • Tinder photo upload taking forever

Obviously, you need to make sure that you have the latest version of the app installed. If that’s not the case, go ahead and update or even reinstall it.

Cache accumulation can be just as bad, so you might want to clear any piled-up clutter. Last, but certainly not least, you should think about what photos are not allowed on Tinder.

Does Tinder block certain photos? It is possible and according to their Terms & Conditions, they do perform regular checks and remove content that violates their policies.

How do I fix Tinder error updating profile?

1. Update your Tinder profile picture the proper way

  1. Launch the Tinder app on your device.
  2.  Next select Settings in the top left corner. 
  3. At the top of your screen, select the option Edit info. It can be found just beneath your username, and current profile picture.Tinder-error-updating-profile-pic-upload-picture
  4. A window with six squares in total will then appear, where you can upload pictures will be displayed.
  5. Select the + sign on one of the squares to upload any image of your choice.error-updating-profile-pic-hit-the-plus-sign
  6. Wait for the picture to display on Tinder before closing the window.
  7. Your new profile picture should now be set.
Note icon NOTE
If you upload more than one image, you have to move the picture of your choice to the first position. This way, Tinder will recognize and set it as the first image on your profile.

2. Restart your mobile

  1. Hold down the Power button on your mobile device until it displays the Shutdown, and Restart options.
  2. Choose the Restart option and wait for two minutes for your device to complete its restart process.
  3. Next, open the Tinder application.
  4. Enter your login credentials, and retry the steps to set up a profile picture.

If restarting your device does not work, let’s try updating your Tinder application on your device.

3. Update your app to avoid the Tinder error updating profile

3.1. Update Tinder on Android

  1. Launch the Google Play store.
  2. Select the menu and choose My apps & games.
  3. From the list, find the Tinder app and tap Update.

3.2. Steps to update Tinder on iOS

  1. Click on the App Store on your device to open it.
  2.  Type in Tinder in the search bar . Select Tinder app when it comes up from the displayed suggestions.Tinder-error-updating-profile-pic-appstore-search-bar
  3. Next click on the update button to start updating the Tinder app on your smartphone.error-updating-profile-pic-update-button
  4. Click on the Accept/I Agree button if you are prompted with the list of permissions.
  5. Proceed with selecting the Open option to start using the updated version of Tinder on your device.
  6. Finally, go ahead and update your Tinder profile.

4. Clear Data & Cache

  1. Open Settings on your device, and navigate to Applications.
  2. Scroll till you find the Tinder application icon.
  3. Click on the Tinder application to open a new window, and click on the Clear Cache button.
  4. Next click on Clear Data.  After that launch the Tinder app.
  5. Log in to your account, and try to update your profile picture again.

Sometimes the simplest way to solve this error is by clearing the cache files on Tinder.

5. Contact Tinder Customer care

Send an email to [email protected]. In the email explain the problem you are facing, which in this case you cannot update your Tinder profile picture.

Tinder’s support will respond to your email with useful information about the cause of your problem and hopefully, get your account back in order.

If you’ve managed to solve your Tinder error by following the above-mentioned steps, or if you have any suggestions, please use the comment section below.

Twitter subscriptions reportedly at 290,000, well below Elon’s 50% revenue mark

According to a report seen by The Information, a total of 180,000 people based in the U.S. had made subscriptions to Twitter mid-last month. These numbers are significantly low, considering the fact that Elon has been intending to make the subscriptions represent 50% of the platform’s total revenue.

Elon’s plans aren’t quite taking shape as he had hoped them to, with the total number of subscriptions coming in at 290,000. A huge number of subscriptions made are from users based in the States which constitutes approximately 62%.

It should be noted that this figure also features the new Twitter Blue subscription which was launched shortly after Musk’s takeover. Currently, a Twitter Blue Subscription will cost you $8 per month, however, this is for web users. If you are making the subscription from your Android or Apple device, it will cost you $11 per month. The subscription will grant you access to premium features such as editable Tweets and more.

The Information further noted:

All together, the global number of subscribers would equate to around $28 million in annual revenue — less than 1% of the $3 billion Musk has said Twitter aims to make in revenue this year.

In related news, Twitter announced its plans to shut down free access to its APIs, but this has since changed. Elon has made revisions to this arrangement after receiving suggestions and feedback from developers.

Musk’s amendment incorporates a new provision that allows verified users to a write-only API. with one limitation, that the bots must be providing good content for free. It is not yet clear what constitutes as “good content” but if this becomes well-defined bots will continue lurking on Twitter. This also doesn’t address researchers’ etc. need for read access to Twitter, to monitor hate speech, for example.

It will be interesting to see how Twitter will distinguish good content from bad, and how Elon plans to increase subscriptions.

Are you a Twitter Blue user? Share your thoughts with us in the comment section.

via: Thurrott

Four upcoming indie games showcased at special ID@Xbox event

2023 promises to be a landmark year for Xbox in terms of AAA titles, with Hogwarts Legacy and Atomic Heart releasing this month, and later in the year the likes of Redfall, Forza Motorsport and Starfield at last releasing to the anticipation of Xbox fans everywhere.

The same holds true for indie games on Xbox in 2023, thanks in no small part to the ID@Xbox program. On Monday the ID@Xbox team hosted a special showcase event giving us a fresh look at four previously announced indie games headed to Xbox later this year. Without further ado, let’s check them out below.

Planet of Lana (Wishfully)


A planet that used to be a place of undisturbed balance between human, nature and animal has now become something else entirely. The disharmony that had been in the making for hundreds of years has finally arrived in the form of a faceless army. But this is not a story about war. This is a story about a vibrant, beautiful planet –and the journey to keep it that way. Planet of Lana is a cinematic puzzle adventure coming to Xbox & PC in Spring 2023.

The Last Case of Benedict Fox (Plot Twist)

Dive into a twisted world of secret organizations, forbidden rituals, and cold-blooded murders. Enter the consciousness of the victims to explore their memories in search for clues. Take up the last case of Benedict Fox, a self-proclaimed detective bound to his demon companion.

The game will launch on April 27th.

Everspace 2 (Rockfish Games)

EVERSPACE™ 2 is a fast-paced single-player spaceship shooter with deep exploration in space and on planets, tons of loot, RPG elements, mining, and crafting. Experience a thoughtful story, set in a vivid, handcrafted open world full of secrets, puzzles, and perils.

This game is currently playable on Game Pass in Preview. The full release will be available on April 6th. 

Lightyear Frontier (FRAME BREAK AB, Amplifier Game Invest)

Start your interstellar homestead in this peaceful open-world farming adventure!
Build your sustainable exofarm, grow alien crops, and explore a new world full of mystery with up to three friends!

Release date TBA.

Wrap up

If there’s anything these showcases from the ID@Xbox event prove, it’s that the future looks bright for indie games on Xbox. Which of these upcoming indie titles are you excited for? Let us know down in the comments.

Via glitched.online. 


5 Best Bose Receiver for your Speakers: Best Sounds Only

Bose is a resounding name in the world of audio electronics, and this is why many are looking to get a Bose receiver.

But not all stereo receivers can fully showcase what your speakers can do. That is why you should go more towards quality and not the cheapest ones you find.

If you own Bose speakers, today we’re going to show you the best receivers that can work with your set of speakers.

Note: Deals are subject to change. Keep in mind that the price tag often varies. We recommend going on the vendor’s website to check the price. Some of the products may be out of stock by the time you’ve made your purchasing decision. So, hurry up and hit the buy button.

What are the best stereo receivers for Bose speakers?

Sony STRDH190 2-ch – Best overall

  • 100 watts x 2 (8 ohms, 1 Kilo Hertz)
  • Phono Input, 4 Stereo RCA Audio Inputs, 3.5-millimeter Input, Stereo RCA Output
  • Connect up to 4 speakers; A/B switching to play all at once, or in separate zones
  • Doesn’t handle sounds when cranked too high

The Sony STRDH190 is an elegant and probably the best receiver for Bose speakers that lets you enjoy the pristine sound quality in a good-looking package that will make it fit with pretty much any audio system.

You aren’t limited to using it just on your Bose speakers since the Bluetooth connectivity lets you use it with pretty much anything that has an audio output.

The built-in FM Radio has 30 stations presets; the wireless remote control comes with batteries included.

Donner Stereo Receiver – Great budget solution

  • Bluetooth 5.0 support
  • 4 channels
  • Up to 440W power
  • SD, USB, RCA and ECHO input
  • Humming sound

If you’re looking for a Bose receiver, then this model might be perfect for you. It comes with 4 channels and maximum power of 440W. This means that it can support up to four groups and up to 8 speakers with 4-8 ohms.

The receiver has Bluetooth 5.0 allowing you to easily connect any Bluetooth device to it with ease. Regarding the analog input, there’s SD card, USB disk, RCA input and ECHO microphone input.

FM function is available as well, and you can save up to 50 different radio stations. Overall, this is a great receiver that should work perfectly with your Bose speakers.

Pyle PT696BT.7 – Rather powerful

  • 5.2 channels
  • 1000W, 4-16ohm impedance
  • Bluetooth support
  • Equalizer controls
  • Standby light constantly flashing
  • Noticeable low level sound noise

This is a 5.2-channel stereo receiver and it can deliver up to 1000W of power. In addition, the device supports 4-16 ohms impedance, and it let’s you enjoy in high quality amplified audio.

Bluetooth is available as well, so you can steam music wirelessly from any device. The receiver is compatible with has 4K UHD TV support and Blu-ray passthrough.

As for connectivity, there’s USB, RCA, HDMI, and optical/digital audio support. Pyle PT696BT.7 offers great power and functionality, so it’s a great choice for all types of users.

Bose Music Amplifier – Wi-Fi powered

  • Wi-Fi support
  • Custom equalizer
  • Supports Bluetooth, Apple AirPlay 2, Spotify Connect, and Chromecast
  • Aux connectors
  • Inability to independently control different speaker pairs

If you’re using Bose devices, then this is probably the best Bose receiver that you can get. This device is has Wi-Fi so it can stream music wireless. You can also access Bose Music app’s integrated music services.

In addition to Wi-Fi, there’s also Bluetooth, Apple AirPlay 2, Spotify Connect, and Chromecast support. The device also has Bose signal processing technology that adjusts the tonal balance.

If you want to use your TV or any other audio devices, there are also aux connectors available. Bose Music Amplifer is an amazing device that will work perfectly with any Bose speaker, so be sure to consider it.

Onkyo TX-SR393 – Offers high-quality sound

  • 5.2 channels
  • 155W per channel
  • Bluetooth support
  • HDMI, ARC, HLG, Dolby Vission, BT.2020
  • Minor issues with firmware

This is a 5.2 channel receiver, and it can deliver up to 155W per single channel. The device works with video standards such as HDR10, HLG, Dolby Vision, and BT.2020.

There are 6 HDMI inputs, ARC-ready MAIN OUT, and SUB OUT as well as a 4K/60p passthrough. We also have to mention that all terminals support HDCP 2.2.

Bluetooth streaming is also available, so you can stream content seamlessly from any Bluetooth device. This is a great receiver, and if you want to enjoy in high-quality music, you should consider this device.

When you get your hands on a pair of good speakers, it would be a shame to bottleneck their potential just because you have a cheap stereo receiver.

That’s precisely why you should always go for the best products available, or at least the best ones within your budget range.

In the end, it’s you who is going to pay the price for having to listen to inferior-quality music or watching movies with bad-sounding soundtracks.

3 Ways to Prevent Automatic Dimming of the Laptop Screen

Display forms an integral part of any PC, and issues can affect the overall user experience. Of late, many users have reported that their laptop screen is witnessing automatic dimming, and they are looking for ways to prevent it.

While there are a few quick and standard solutions, they don’t seem to fix screen problems for everyone. And that’s why we must look at the most effective ways to prevent the automatic dimming of the laptop screen.

Why is my screen dimming automatically?

Here are a few reasons you are facing the problem:

  • Misconfigured settings: There are certain features responsible for the automatic dimming of the screen, and if these are enabled, you might encounter the problem.
  • Outdated graphics driver: An outdated driver is just as likely to cause the issue, and to prevent automatic dimming of the laptop screen, make sure you have the latest driver version.
  • Bug in the OS: If you haven’t updated Windows in a while, it’s time you do because there could be a bug triggering the issue.

How do I stop my screen from dimming in Windows 10?

Before heading to the slightly complex solutions here, give these a try:

  • Restart the computer.
  • Check for Windows updates and install the latest available version.
  • Disable the display power-saving feature on Intel PCs and verify whether it helps prevent automatic screen dimming on a laptop.

If none of these worked, move to the fixes listed next.

1. Disable adaptive brightness

  1. Press Windows + R to open Run, type control panel, and hit Enter.control panel
  2. Click on System and Security.system and security to fix automatic screen dimming in Windows 10
  3. Next, click on Power options.power options
  4. Click on Change plan settings next to your active power plan.
  5. Click on Change advanced power settings.
  6. Expand Display, and then under Enable adaptive brightness, select Off for both On battery and Plugged in.disable adaptive brightness

If Adaptive Brightness is causing automatic laptop screen dimming, modifying its settings should prevent that. If you can’t turn off Adaptive Brightness, fixing it shouldn’t take much time.

2. Update your display driver

2.1 Update drivers manually

  1. Press Windows + R to open Run, type devmgmt.msc in the text field, and hit Enter.device manager to prevent automatic laptop screen dimming
  2. Click on the Display adapters section to expand it.
  3. Right-click the adapter and select Update driver.
  4. Select Search automatically for drivers.Automatically search for drivers - Wireless drivers are missing
  5. Wait for the system to install the updated driver and restart your PC for the changes to take effect.

In case you see automatic dimming of the laptop screen and can’t think of ways to prevent it, updating the graphics driver should be a good start. Also, if Windows is unable to find a newer version, manually install the latest driver.

2.2 Update drivers automatically

The manual method is fine if you have the time, but sometimes it won’t work as expected, so you might also need to go to the manufacturer’s website and get the updated driver.

It is a lot easier to use a dedicated tool that will update all your drivers, not only the graphics one, automatically, with little input from yourself.

Therefore, try this solution to resolve your light-dimming issue with specialized driver software like Outbyte Driver Updater.

Outbyte Driver Updater

Avoid various driver-updating issues and use Outbyte Driver Updater for automatic updates.
Free Trial Download now

3. Disable the device

  1. Right-click the Start button and select Device Manager.device manager
  2. Expand the Batteries section, right-click the Microsoft ACPI-Compliant Control Method Battery, and select Disable device.
  3. Click Yes in the confirmation prompt.

Some users managed to prevent automatic dimming on the laptop screen by disabling the Microsoft ACPI-Compliant Control Method Battery from Device Manager, so you should also try that.

And while you are fixing things, also find out the best ways to boost performance in Windows 10.

If you have any comments, suggestions, or maybe some other solutions for this problem, feel free to write to us in the comments section below. We would love to hear your opinion.

Fix: Mouse and Keyboard Not Working After Power Outage

Power outages, and the surges that come with one, can be pretty disastrous as they can cause serious damage to a computer, like frying internal systems, so nothing can be read.

And in this particular instance, we’ll recommend what you should do when those devices stop working. It would be a shame if your keyboard got ruined by a power surge.

What other problems can a power outage cause?

Before going into the solutions, it’s important to point out the other computer problems a power outage can cause. That way, if they ever happen to you, you’ll know how to fix it:

  • USB ports can suffer from connectivity problems – You might also get an error message stating your USB drive has malfunctioned. In this instance, you should update the USB driver.
  • The internet connection may start malfunctioning – Check if there are any flashing lights on your internet router. We also recommend resetting the router.
  • Data on your hard drive can become corrupt – To clear out the corruption, you will need to run the CHKDSK command on your computer.
  • Your computer might not even turn on – While this is a worst-case scenario that rarely happens, it still can and is quite debilitating. You should get a technician to check out your machine.

To fix these peripheral errors, there are a variety of hardware and software solutions that you can do. There are a ton of fixes that you can try out. Even if one doesn’t work, you’re bound to find one that does.

How can I fix my mouse and keyboard after a power outage?

Here’s what you should do first:

  • Try unplugging and replugging your peripherals into a different USB port. A lot of the time, doing that simple action is what you need to do to fix the malfunction.
  • Use your mouse and keyboard on a different computer. See if they work on the other machine. If they don’t, then it’s recommended that you replace them.
  • Run the Windows 11 System Restore to return your computer to the previous state before the problem started. Power outages can mess with the settings.
  • However, if the mouse and keyboard work on the second computer but not on yours, you have a driver problem. You will need to download any recent Windows Updates.
  • And if all else fails, you will need to contact your computer’s manufacturer and see if there’s anything that can do. Otherwise, you may have to replace the machine outright.

1. Run Hardware Troubleshooter

  1. Launch the Command Prompt through the Windows 11 Search bar. You don’t need to run it with administrator permissions.
  2. Type the following command into the window and press Enter on the keyboard: msdt.exe -id DeviceDiagnostic
  3. On the Hardware and Devices window, click Next.
  4. Give the program enough time to finish scanning for any hardware changes.
  5. Once it finishes scanning, select Apply this fix to restart the machine and fix the problematic USB port. Otherwise, select Skip this fix.
  6. If you choose Skip this fix, you configure how Windows 11 checks the latest whenever a new device is installed, whether automatically or manually.

If you’re using a laptop, it’s recommended that you first unplug all of your USB peripherals and then restart the computer using the touchpad.

2. Reinstall drivers for the mouse and keyboard

  1. Launch the Device Manager from the Search bar.
  2. Expand the entry for the device drivers you want to uninstall, be it the mouse or keyboard.
  3. Right-click the device name and select Uninstall device.
  4. In the following window, select the Uninstall button.
  5. Now go to the website of your device’s manufacturer and download the latest drivers. Below is a sample image.

3. Turn off Power Management settings

  1. Return to the Device Manager, right-click your peripheral, but this time, select Properties.
  2. Go to the Power Management tab in this new window.
  3. Uncheck the box next to Allow this device to wake the computer, then select OK.

4. Run System File Checker

  1. Bring up the Command Prompt on the Windows 11 Search bar and select Run as administrator.
  2. Type the following command in and hit Enter to begin scanning: sfc /scannow
  3. Give your computer enough time to complete the process.
  4. If you’re still experiencing problems, type in the following three commands and hit Enter one after the other: DISM /Online /Cleanup-Image /CheckHealth DISM /Online /Cleanup-Image /ScanHealth DISM /Online /Cleanup-Image /RestoreHealth
  5. Once that’s done, try running the SFC scan and see if that works.

Power outages can cause drives and files on your computer to become corrupted. This is why you should run both an SFC scan and a Disk Check to clear the corruption.

5. Run Disk Check

  1. Open File Explorer and right-click the hard drive you want to scan.
  2. Select Properties.
  3. Go to the Tools tab. Click Check underneath Error Checking to begin scanning.
  4. Select Scan drive in the new window that appears.
  5. Give your computer enough time to finish scanning.

Disk Check is a Windows system tool that scans that hard drive for any system errors. If it does detect anything, the tool immediately cleans it out.

We recommend running Disk Check semi-regularly to keep up with good computer hygiene. After scanning, the tool creates a log file telling what it found. Be sure to check it out.

6. Clean boot Windows 11

  1. Launch System Configuration from the Search bar.
  2. Go to the Services tab, then select Hide all Microsoft services.
  3. Click Disable all next. Right after that, select Apply.
  4. Now go to the Startup tab of System Configuration and select Open Task Manager.
  5. In this new section, disable each app with the Enabled status. You can do this by selecting a program and clicking Disable in the upper right corner. Pay attention to what you disabled.
  6. Close the Task Manager to return to System Configuration. Click OK to restart your computer.

After restarting, your computer will launch under a Clean Boot. Go back to the Task Manager and reenable the apps you disabled earlier. See if there are any issues that arise.

If you encounter any problem with an app, uninstall it. If you don’t, you may have a faulty Windows Update affecting your computer, which you should immediately roll back.

7. Disable Selective Suspend

  1. Launch the Control Panel and select Power Options. Make sure the View By setting is set to Large Icons.
  2. Select Change plan settings next to the computer’s selected power plan.
  3. On the following page, click Change advanced power settings.
  4. Scroll down in the new small Power Options window until you find USB settings. Expand that entry.
  5. Click each entry you see, if there are multiple, and set them to Disabled.

What can I do if my motherboard is failing?

Power outages can also short-circuit a motherboard which can result in systemic failures, random reboots, and crashing, complete with the infamous Blue Screen of Death.

Fixing this problem is a multi-step process you can do right at home. It does require you to open up your computer, replace some damaged parts, and clean out the motherboard.

If something like this intimidates you, you should take in your computer for repairs or send it back to the manufacturer.

Feel free to comment below if you have questions about other keyboard or mouse problems. And please tell us if there’s a specific guide for a Windows 11 error that you’d like to see.

Best Browsers For Windows XP to Use in 2026

Finding a browser for Windows XP isn’t easy. If you’re one of the 0.37% PC users who haven’t given up on it yet, you know that. Many dropped support for the legacy system. But if you still use it, we found some options.

Let’s check them out:

Which web browser still supports Windows XP?

We selected Windows XP browsers that still work in 2024. You can download our top picks for Windows XP 64 and 32-bit from trusted sources to ensure security and compatibility.

1. Supermium – Best overall

supermium main window

Supermium is an up-to-date browser built on a Chromium engine. If you want to use Google Chrome on Windows XP, this is the closest option.

It gets frequent security updates and offers a similar sandbox environment to Chrome’s, so security shouldn’t be an issue.

Other great features:

  • Up-to-date Chromium browser
  • Works on Windows XP, Vista, and Windows 7
  • Sandbox feature
  • Google sync support

⇒ Get Supremium

2. MyPal 68 – Fast browser

mypal browser open

MyPal 68 is a pretty fast browser for XP and loads up most modern pages without issues. Moreover, it 68 supports some Firefox extensions like uBlock Origin and themes.

It is designed to work smoothly on old computers, making it a viable Windows XP browser. Built on Firefox Quantum, it still gets security updates and ensures stability.

Other features:

  • Pretty secure
  • Can be easily customized
  • Loads many modern pages

⇒ Get MyPal 68

3. K-Meleon – Lightweight browser

k-meleon browser main page

K-Meleon is a lightweight browser powered by the Gecko engine, similar to Firefox, requiring just 256 MB RAM.

It offers extensive customization options for the toolbar, menu, and hotkeys. Use it clean for optimal speed on older Windows systems like XP and Vista.

Other features:

  • Highly customizable
  • Works with extensions
  • Low resource usage

⇒ Get K-Meleon

Which browser is most secure on an old Windows XP system?

If you’re looking for security, then Supermium might be the best option, since it’s getting the latest Chromium updates. Industry leaders known for security like Chrome and Mozilla dropped support for XP, so this is your best bet.

There you have it: a list and review of the best browsers on Windows XP. These apps all have different strong points, but they are all safe.

That said, if you run Windows XP without security, the risks are high. So, along with a good browser, we also recommend using a reliable antivirus that still supports Windows XP.

Do you need a list for current operating systems, like the best browsers for Windows 11? Then check our detailed guide for the best options. Conversly, if you’re into vintage OS, check our rundown of the best browsers for Windows 7.

If you like the legacy OS, you may also need tools like the best Windows XP software, a reliable VPN client for Windows XP, solid antivirus for Windows XP SP2, or even PC optimization software for Windows XP to keep things running smoothly.

If you want to learn more, we have a great guide that answers if you can keep using Windows XP, so don’t miss it.

Feel free to let us know the browser that boasts the right combination of features for you in the comments below.

How to save messages in Microsoft Teams and why you would want to on Windows 11

Do you ever find yourself scrolling through hundreds of messages in Microsoft Teams, trying to find that specific message you need? If so, then you need to learn how to save messages in Microsoft Teams. Not only will you find messages easier, but it also helps to keep important information organized and easily accessible.

In our last guide, we went over how to bookmark messages in Microsoft Teams, but this time around we will also explore how to save messages, why you would want to, with the benefits of saving them, and provide some tips on how to access and use the feature in Microsoft Teams.

What are “Saved” messages in Microsoft Teams?

Bookmarked messages in Microsoft Teams are simply messages that you’ve marked as important and want to save for later. These messages can be easily access from a separate bookmark section, making it much easier to find important information when you need it.

Save messages in Microsoft Teams

Saving messages in Microsoft Teams is easy and can be done in just a few simple steps. Here’s how:

  1. Open the message you want to save in Microsoft Teams.
  2. Click on the three dots menu (…) located in the upper right corner of the message.
  3. Select Save this message from the dropdown menu. save messages in microsoft teams

That’s it! The message will now be bookmarked and can be easily accessed from the Saved section in Microsoft Teams. You can easily access and search through messages that you just saved in Microsoft Teams when you need them, just follow these steps:

  1. Click your profile in Microsoft Teams.
  2. Click Saved from the dropdown menu. save messages in microsoft teams
  3. Browse or search to find the saved message you are looking for in Teams.

Why would you want to save messages in Teams?

There are many benefits when you save messages in Microsoft Teams, including:

  1. Increased organization: Saving messages helps keep important information organized and easily accessible, so you don’t need to scroll through hundreds of messages to find what you need.
  2. Improved productivity: Being able to find what you are looking for when you need it will save time and boost your productivity as a result.
  3. Better collaboration: Saved messages can be shared with other team members, making it easier to collaborate and stay on the same page.

When saving messages in Microsoft Teams use descriptive labels to easily identify them later and only save the most important messages to avoid clutter. Be sure to share your saved messages with your team to improve collaboration and ensure everyone is on the same page.

Conclusion

save messages in microsoft teams

Saving messages is a simple, but powerful feature in Microsoft Teams that can help improve organization, boost productivity, and enhance collaboration. By following the steps outlined in this guide, you can start to save messages in Microsoft Teams to stay organized and get more done in less time.

What Is an Unknown Hard Error & How to Quickly Fix It

The unknown hard error is a generic term for any hard error that occurs when the operating system cannot complete an operation in a timely manner.

Your PC cannot execute commands or processes, so it cannot complete the requests without causing errors and slowing down the computer. If you’ve encountered any of these errors, we have compiled a handful of solutions that have worked for other users.

What is a hard error?

The unknown hard error is the most common message you’ll see while working with your computer. It’s usually accompanied by a process ranging from applications to services. 

For most users, closing the prompt made things go back to normal, but for the unlucky ones, they were plagued by a black screen, the disappearance of desktop icons and their PCs were generally unusable.

Some of the common triggers for this error include:

  • Software bugs – Some software bugs may cause the system to crash and generate an unknown hard error.
  • Hardware problems – If your hardware is broken or damaged, it can also generate an unknown hard error. Some symptoms of HDD failure are easy to detect.
  • Virus infection – Viruses can cause this type of problem because they interfere with the normal function of the operating system and prevent it from running properly.
  • Problematic Windows update – Windows Update is a service that automatically checks for quality updates, critical updates, and other important fixes to your computer. If an update fails to install, you’ll see an error message like this.
  • Corrupt system files – The most common system file that causes the unknown hard error is a corrupt Windows Registry. 

How do I fix an unknown hard error?

Before jumping to the slightly technical steps, try these basic ones:

  • If you have been using the same user profile for a long time and suddenly, your PC goes into an unknown hard error, you may want to switch to another user profile. You may have a corrupt user profile in your hands. If the new profile works, then you can take the necessary steps to repair your old one.
  • Close any background processes.
  • End any suspicious or associated processes from the Task Manager.
  • Try restarting your PC.

1. Run the DISM and SFC scans 

  1. Hit the Windows key, type cmd in the search bar, and click Run as administrator.cmd-run-admin-w11 unexpected kernel mode trap windows 11
  2. Type the following commands and hit Enter: Dism /online /cleanup-image /restorehealth sfc /scannow
  3. Restart your PC.

2. Run the CHKDSK command 

  1. Hit the Windows key, type cmd in the search bar, and click Run as administrator.cmd-run-admin-w11 unexpected kernel mode trap windows 11
  2. Type the following command, replace the C letter with your drive’s letter, and press Enter: chkdsk C: /fchkdsk-f repair corrupted directory

3. Run a virus scan 

  1. Press the Start Menu icon, search Windows Security, and click Open.
  2. Select Virus & threat protection.
  3. Next, press Quick scan under Current threats.
  4. If you don’t find any threats, perform a full scan by clicking Scan options just below Quick scan.
  5. Click on Full scan to perform a deep scan of your PC.Full Scan Scan Now - ethernet not working but wifi is
  6. Wait for the process to finish and restart your system.

4. Uninstall recent Windows updates 

  1. Hit the Windows key and select Settings.settings windows 11
  2. Click on Windows Update and select Update history on the right pane.windows-update-history logitehc unifying not working
  3. Scroll down and under Related settings, click on Uninstall updates.uninstall-updates restart to repair drive errors
  4. This will take you to the most recent installed updates.
  5. Select the topmost update and click on Uninstall.Windows Updates Uninstall
  6. Restart your PC and check if the problem persists.

5. Check for Windows updates 

  1. Hit the Windows key and click on Settings.settings windows 11
  2. Select Windows Update and click on Check for updates.check-updates lenovo-ideapad-keyboard-not-working
  3. Download and install if available.

6. Uninstall recently downloaded programs

  1. Click on the Start Menu button type Control Panel in the search bar and click Open.control panel
  2. Select Uninstall a Program under Programs.going uninstall program control panel
  3. In the Programs list, click on the name of the program you want to uninstall.
  4. Click Uninstall on the menu bar at the top of this window or in the Uninstall or Change a Program window that appears when you right-click on your program from this list.uninstall steam
  5. Follow any additional prompts that may appear when you complete this process. 

Don’t forget to remove any software leftovers after uninstalling the programs. If leftovers are found, they can cause errors and slow down your computer. A program such as IObit Uninstaller will help you identify any leftover files from recently installed software.

If you still have problems after uninstalling programs and removing software leftovers, try running your antivirus software again and restarting your computer.

7. Run the Windows update troubleshooter

  1. Hit the Windows key and click on Settings.settings windows 11
  2. Click on System on the left pane then Troubleshoot on the right pane.Open system troubleshooter
  3. Select Other troubleshooters.
  4. Scroll down, locate Windows Update, and click the Run button.windows-update-run-troubleshooter runtimebroker.exe error

8. Check for errors on the system drive 

  1. Hit the Windows + E keys to open File Explorer.
  2. Click on This PC, then right-click on the drive containing your OS (usually drive C) and select Properties. 
  3. In the Properties window, navigate to the Tools tab and click Check under Error checking.check for errors
  4. A scan on your hard drive will begin, so be patient, as it may take some time.

In case Windows was unable to repair the hard drive, do not despair, as there are still some steps you can take to resolve the issue. Alternatively, you can opt for bad sector repair tools that will do the job automatically.

9. Perform a Clean boot

  1. Hit the Windows key, type msconfig, and open System Configuration.
  2. Switch to the Services tab and select Hide all Microsoft services.
  3. Click on the Disable all button, then hit the Apply and OK buttons to save the changes.
  4. Go back and click on the Startup tab and select Open Task Manager.
  5. In the Startup tab of the Task Manager, disable all the Enabled startup items.
  6. Close Task Manager and restart your PC.

If you’re still experiencing the unknown hard error after going through all these steps, consider resetting your PC. Your OS may be corrupted, so try this method as a last resort. Remember to back up all your files first.

That’s it for this article, but keep the conversation going in the comment section below by letting us know any other method that worked for you but is not mentioned here.

Fix: This Blu-ray Disc Needs a Library for AACS Decoding

Some users have repeatedly reported This Blu-ray Disc needs a library for AACS decoding, and your system does not have it error when trying to play a Blu-ray disc without the Blu-ray player software.

VLC Media Player is one of the most popular media players on the Windows platform. And it is fully capable of playing several video formats. This error can occur on both the older and newer version of Windows, including Windows 7, 10, and 11.

What are the possible causes for the AACS decoding error?

There are several causes for this error, but these are the most common ones:

  • Missing libraries – The error is usually caused by missing libraries. This can be easily resolved, and it’s slightly more complicated that downloading video codecs.
  • Encryption – Blu-ray discs are usually protected by encryption, but you can circumvent it using Blu-ray copy software.

What are the variations of AACS decoding errors?

Moreover, here are some error variations that you may encounter, but fix with the solutions below:

  • VLC AACS decoding in Windows 10 and Windows 11 – This error affects all versions of Windows, including the latest one.
  • VLC blu-ray disc is corrupted – A disc error will sometimes give you this message while trying to play it.
  • No valid processing key found in AACS config file – Missing files can cause this error to appear while trying to play Blu-ray videos.
  • Missing AACS configuration file (VLC) – This error is self-explanatory, and it usually appears if the necessary config file is missing.

How do I fix this Blu-ray needs a library for AACS decoding error?

1. Add libraries files to AACS

Note icon NOTE
The following steps require downloading a file from a third-party site while your browser may appear unsafe.

We have scanned the files and found them to be safe to use.

However, due to the unsigned nature of the file, the URL and the file will be flagged by the browser and then the computer. Download the file at your own risk.
  1. Visit the whoknowsmy.name website. You may see a warning showing the site does not have an SSL certificate. Click on the Continue link if you want to proceed.
  2. Under Keys Database, click on the get the file link.
  3. It will download the KeyDB.cfg file. Next, under the AACS Dynamic Library section, click that file hyperlink associated with your VLC Media Player version.
  4. Once downloaded, copy the KeyDB.cfg file.
  5. Press Windows + R to open Run, type %appdata%, and hit Enter.
  6. In the Roaming folder, click the New folder icon on top, and name the folder as aacs.
  7. Open the newly created aacs folder and paste the KeyDB.cfg file copied earlier.
  8. Next, open the Downloads folder and copy the libaacs.dll file to your clipboard.
  9. Press Windows + E to open File Explorer and navigate to the install folder for VLC, which could be either of the following two: C:\Program Files\VideoLAN\VLC or C:\Program Files(x86)\VideoLAN\VLC
  10. Paste the copied libaacs.dll file inside the VLC folder.

Once done, check if the AACS decoding error in VLC is still showing up. After copying the required library files to the correct folder, the VLC Media Player should play the Blu-ray disc.

Users are also suggesting using libbdplus instead, so you might want to try that as well.

2. Remove AACS protection using Leawo Blu-ray Ripper

  1. Go to the dedicated Leawo Blu-ray Ripper website, download it, and then install the software on your machine.
  2. Start Leavo Prof. Media and click on Blu-ray Ripper.
  3. Under the Convert tab, click on Add UHD/Blu-ray/DVD and select Add from CD-ROM.
  4. Now, you need to select the output format.leawo-format blu ray needs a library for aacs decoding
  5. Finally, select the output folder and hit the Convert button.

This is another method of dealing with This Blu-ray disc needs a library for AACS decoding, and your system does not have it error.

Instead of tinkering with the VLC libraries, you can convert the video and remove any protection. Including AACS with a tool like Leawo Blu-ray Ripper.

After you complete the steps presented above, the Blu-ray disc protection will be successfully removed. And you will get digital video files from the source Blu-ray disc for smooth playback.

Of course, you can also avoid VLC errors by getting one of the best media players.

We hope the above solutions will help you fix this issue, and now you can view your Blu-ray without any errors.