Mfc110u.dll is a type of DLL file associated with Microsoft’s Visual Studio developed for Windows operating systems. Sometimes, you get the mfc110u.dll missing error when launching some programs.
Various reasons can cause this, and the fix is not far off. This guide will show you how to restore the DLL files and get back to opening your apps usually.
Why is mfc110u.dll missing?
If you are getting the mfc110u.dll missing error while trying to open the Age of Empires 2 or other programs, below are some factors that can cause it.
Corrupt system files: You can get the mfc110u.dll missing error on Abrites, PowerDirector, and other apps due to corrupt system files. Running the SFC scan to restore these files should help you fix this easily.
Damaged dll file: At times, the missing mfc110u.dll error might be because the file has been damaged by an app. In this case, you need to download the required Visual Studio package.
Activity of third-party apps: Third-party antivirus apps have been shown to cause this issue. This is mainly for third-party antiviruses. You must remove these apps and their components using one of the best uninstaller software.
How do I fix the missing Mfc110u.dll error?
1. Perform an SFC scan
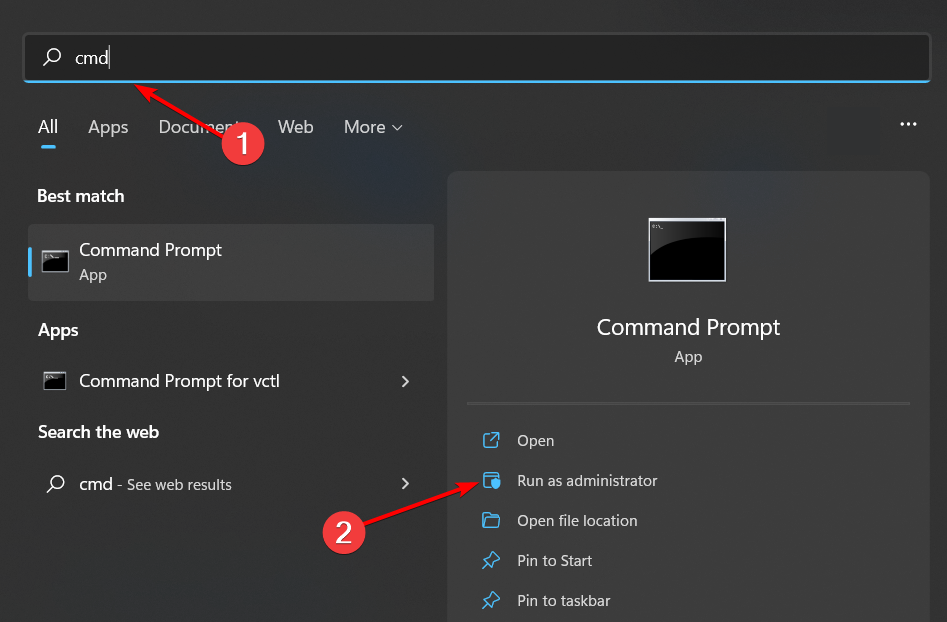
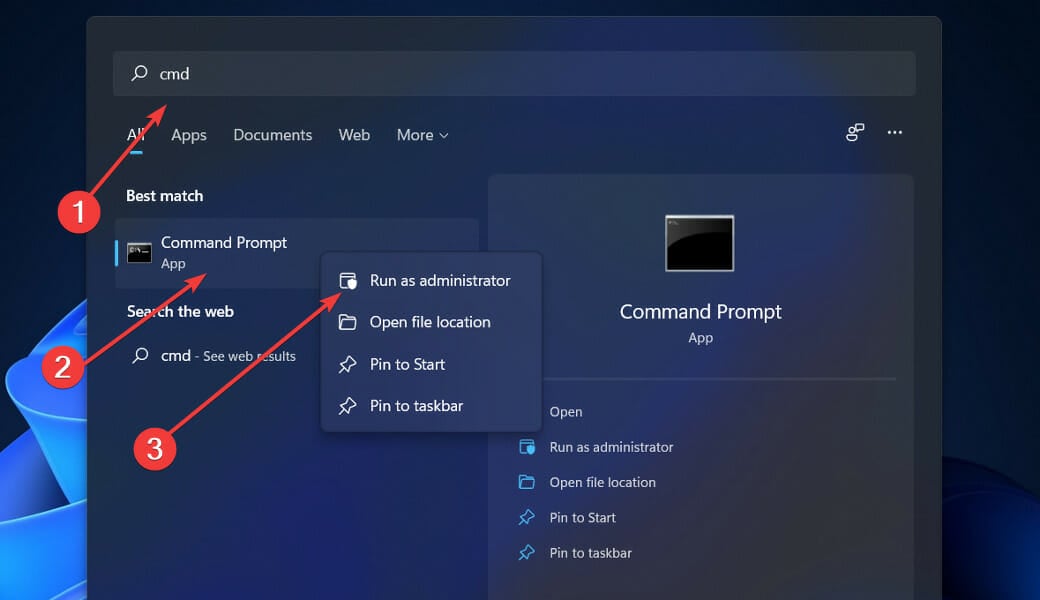
Press the Windows key, type cmd, and click Run as administrator under Command Prompt.
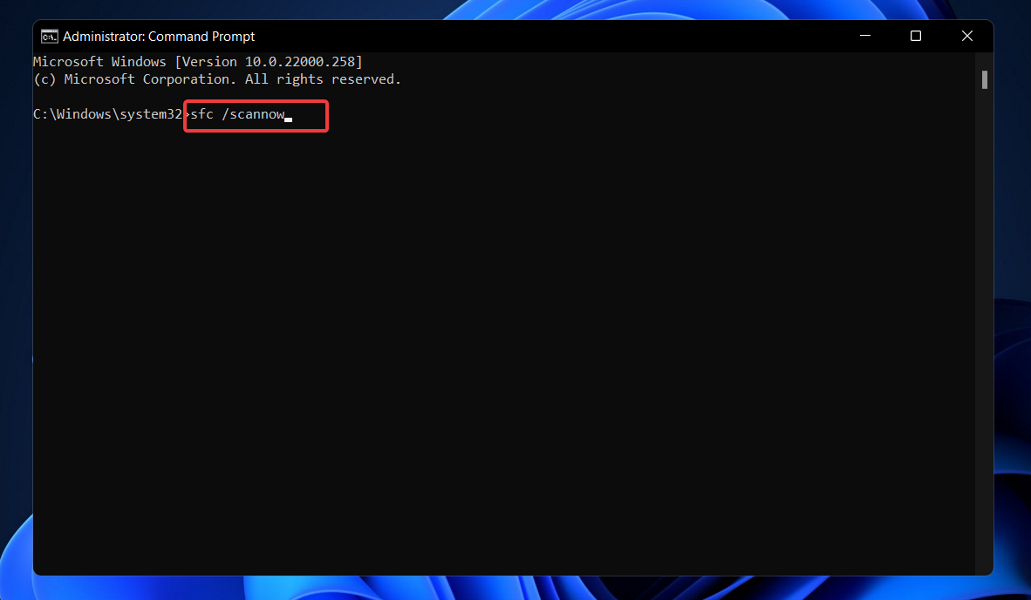
Type the command below and press Enter: sfc/scannow
Now, wait for the scan to complete.
The SFC scan is one of the built-in repair tools that can fix broken system files. This can solve various instances of this error, including the Worms WMD mfc110u.dll missing issue.
Another option is to use a third-party system file and DLL fixer in order to scan for corrupted or damaged files and restore them with the original ones.
2. Re-install the Visual C++ Redistributable Package
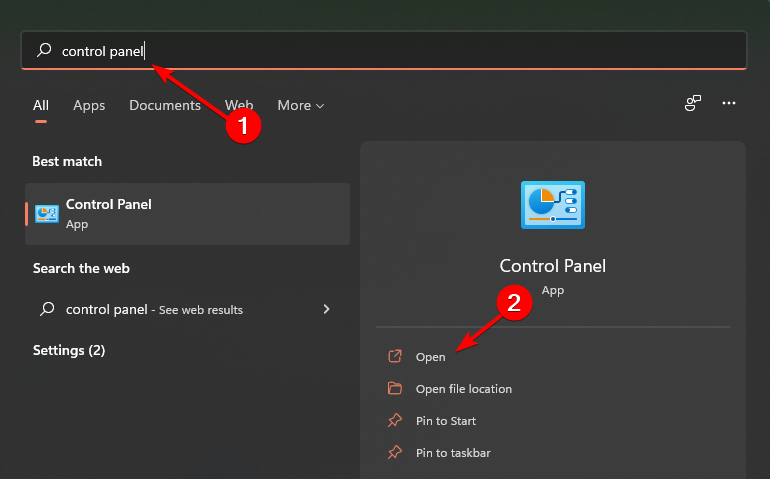
Press the Windows key + R, type control, and click the OK button.
Choose Uninstall a program under Programs.
Click the Microsoft Visual C++ 2012 Redistributable x86 and x64 options.
Check the boxes for VSU_4\vcredist_x64.exe and VSU_4\vcredist_x86.exe if you use a 64-bit processor. If you are using a 32-bit process, select only the x86 version.
Now, click the Next button and run the downloaded file after the download is complete.
Finally, reboot your PC after the process is complete.
Since mfc110u.dll is part of the Microsoft Visual C++ Redistributable Package for Visual Studio Update 4 2012 version, you can fix this problem simply by downloading and installing this package again from Microsoft’s website.
This should fix the msvcr110.dll missing on the Wamp server issue.
Press the Windows key + I and select the Apps option.
Choose the third-party antivirus and click the Uninstall button.
Finally, follow the onscreen instructions to complete the process.
Some users have reported that the mfc110u.dll is missing due to interference from a third-party antivirus program. AVG is one of the programs that was said to cause this issue.
Hence, make sure you remove the app and all its components. To ease the process, you can use one of the best software uninstallers in CCleaner.
This tool removes even the most stubborn components of these files and ensures no residual file can cause future issues—CCleaner is just about ridding your PC of any unwanted files.
That would be all. We believe you have everything you need to fix the mfc110u.dll missing on your PC with the information in this guide.
What’s Privacy Sandbox for Android and how does it work?
The idea behind Privacy Sandbox is to create an advertising solution that protects user privacy. Although Android uses app sandboxing, SDKs are running from the host’s app sandbox and they have the same privileges as the host app.
This means that they can potentially get access to undisclosed user data. This will change with Android 13 and the new SDK Runtime will have stronger safeguards regarding access to user data.
To achieve this, the Privacy Sandbox for Android will replace cross-app identifiers and covert tracking with Attribution Reporting, Topics, and FLEDGE APIs.
Topics API will determine the user’s interests based on the applications that he has installed. By doing so, advertising SDKs can use these topics to serve ads to users.
With FLEDGE, developers can show ads to users depending on the interaction with their app. And lastly, Attribution Reporting will help with the measurement of conversions using machine learning.
The developers can already enroll for Privacy Sandbox and familiarize themselves with it. Regarding the release date to the general public, there’s no official information at the moment.
However, we know that Google plans to start the Privacy Sandbox beta on Android 13 mobile devices early next year, so you might get the chance to give it a try.
We’re still not sure how this change will impact Windows Subsystem for Android, but we assume that there won’t be any issues with it.
What are your thoughts on Privacy Sandbox for Android? Let us know in the comments below.
Windows 11 PC reset not working? We’re here to help. Everything from bugs to a damaged OS and corrupted system files can cause this issue.
The good news is that if you get the error message “There was a problem resetting your PC” on Windows 11, you should be able to fix it using the solutions recommended below.
What can I do if Windows 11’s Reset PC option is not working?
Here are quick steps explained in video format. If you want more details and further info, keep reading. We explain everything in simple steps down below.
1. Install the latest updates
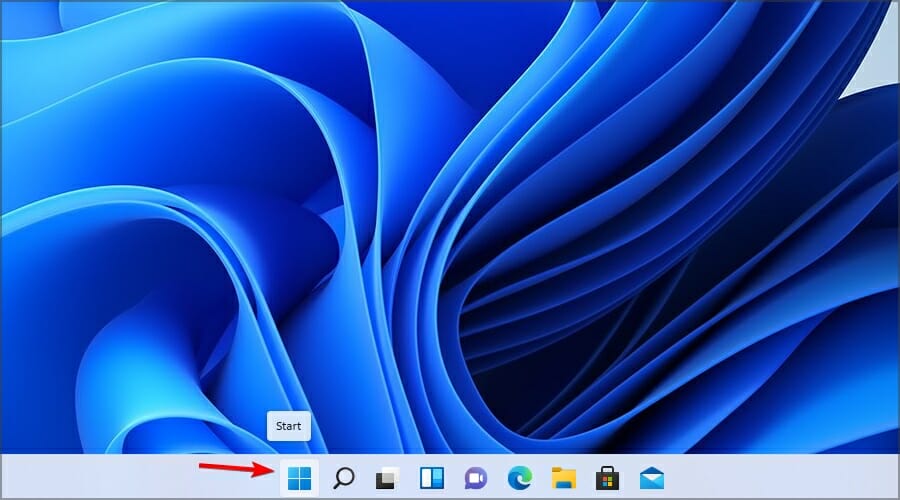
Click the Start button.
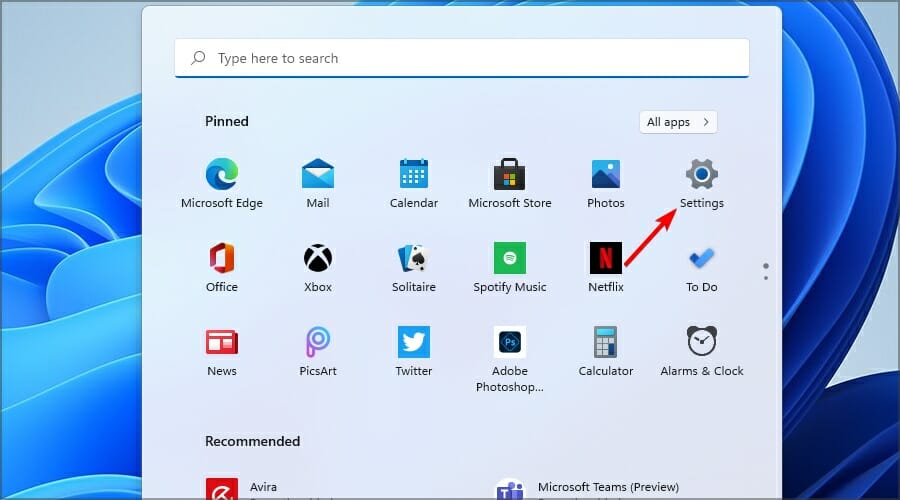
Now select Settings.
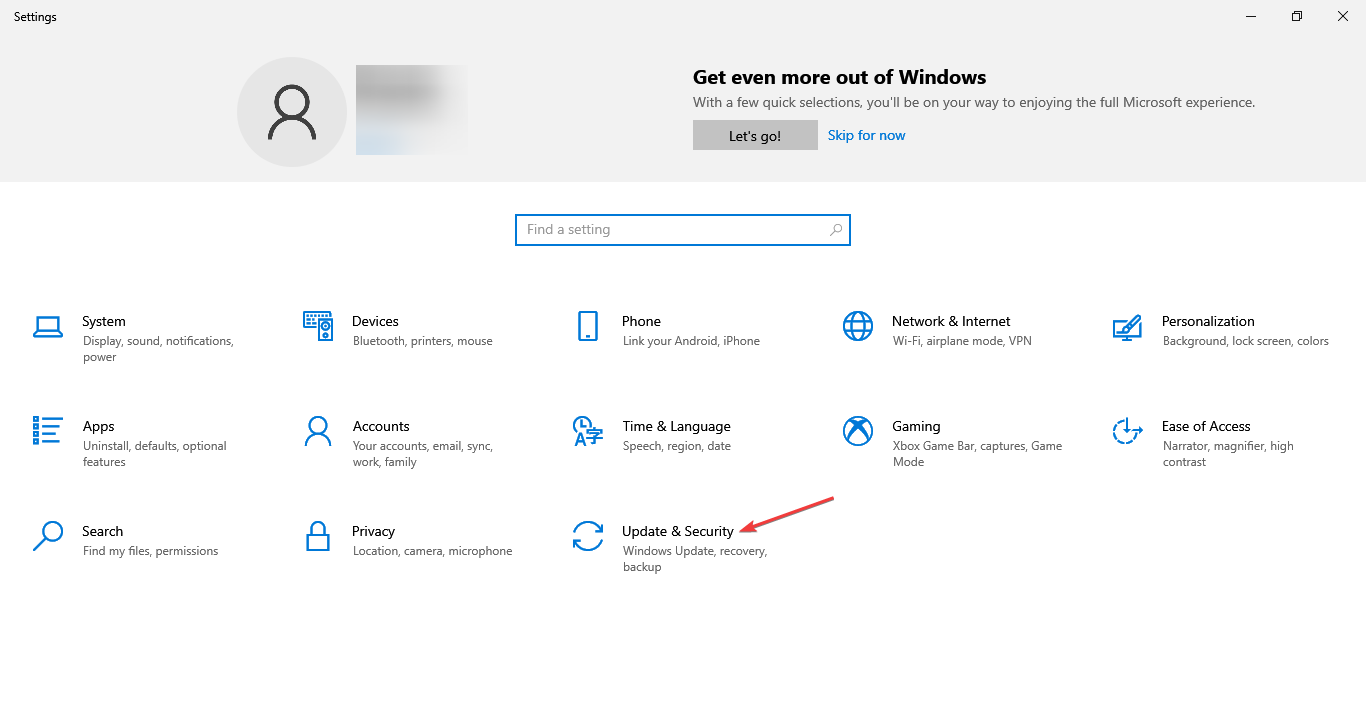
Navigate to the Update & Security section in the left pane.
Download and install any available updates.
Once your system is updated, check if the Reset option is available.
2. Use System Restore
Press Windows + R and enter rstrui. Press Enter.
Click Next to proceed.
Select the desired restore point and click Next.
Click on Finish to confirm your selection.
Follow the instructions on the screen to complete the process.
After restoring your system, check if the problem is still there.
Remember that to use this feature, you need to create a system restore point beforehand or use one created by your system.
Restoring your system to a previous state can fix a number of system issues. A simpler way to safely restore your system is by using a specialized repair tool that can do all the work for you.
3. Use the Uninstall feature update option
Click the Start button.
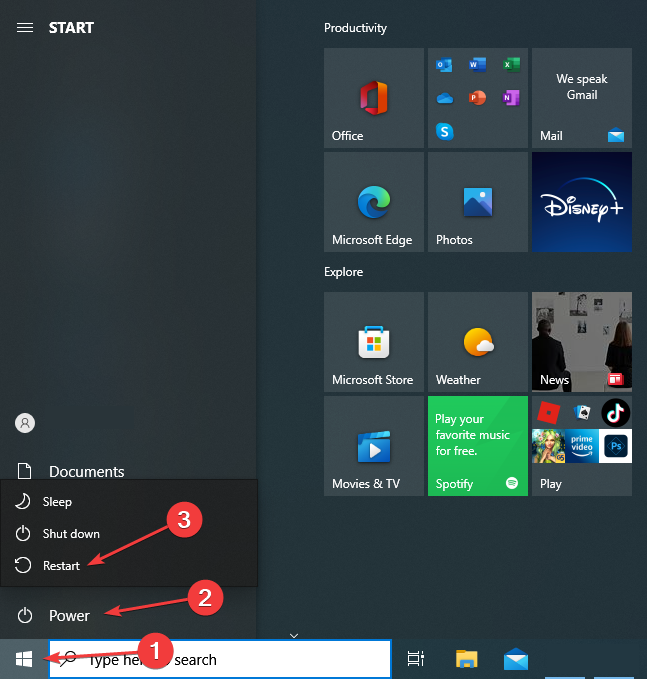
Now click the Power button, hold Shift, and select Restart.
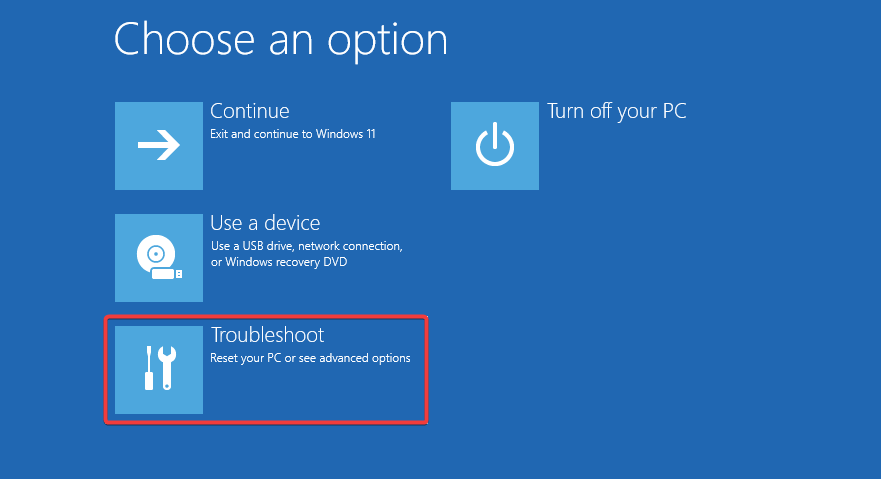
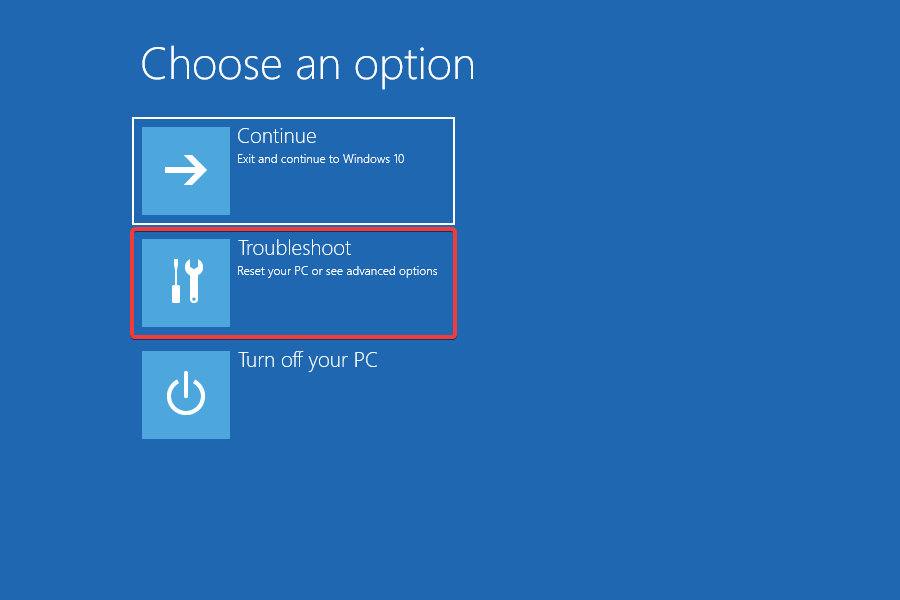
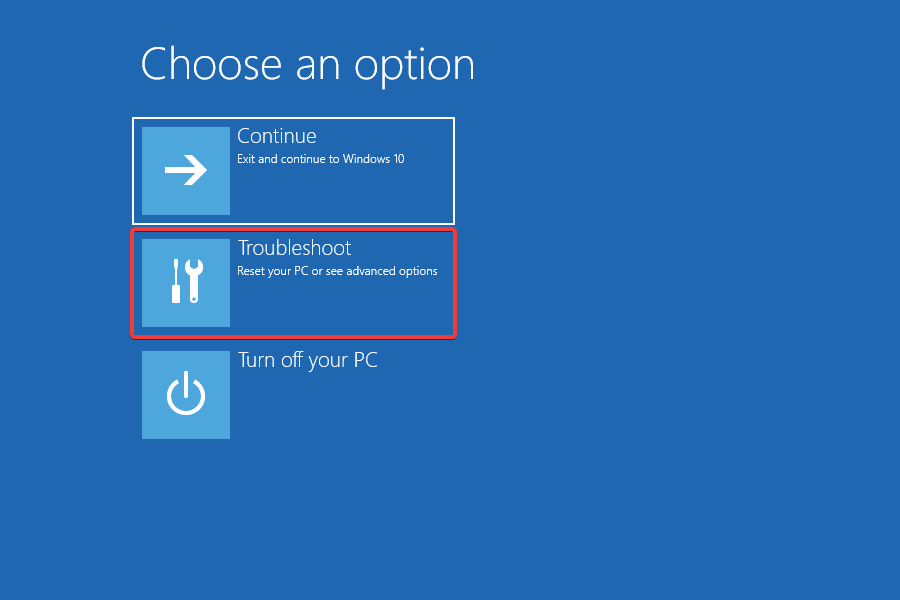
Select Troubleshoot.
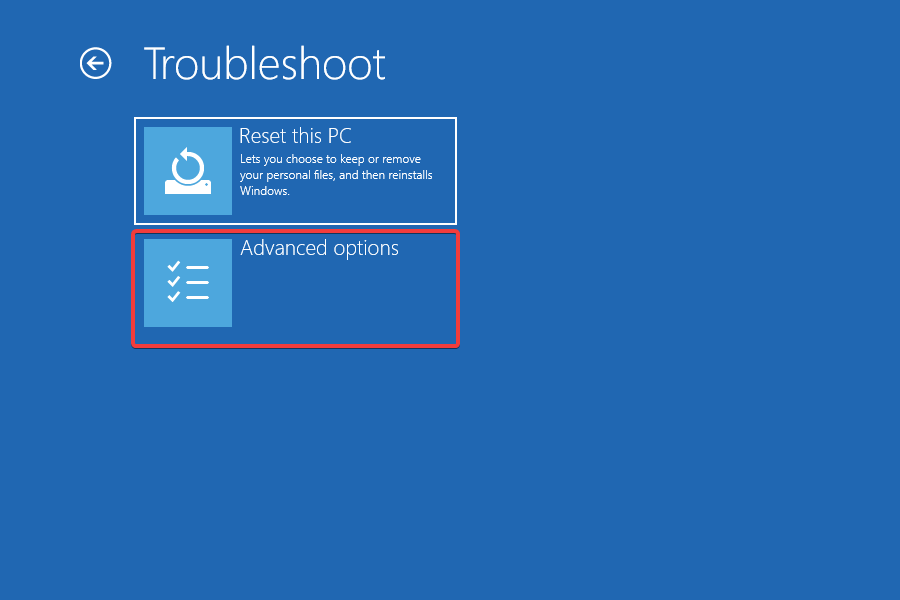
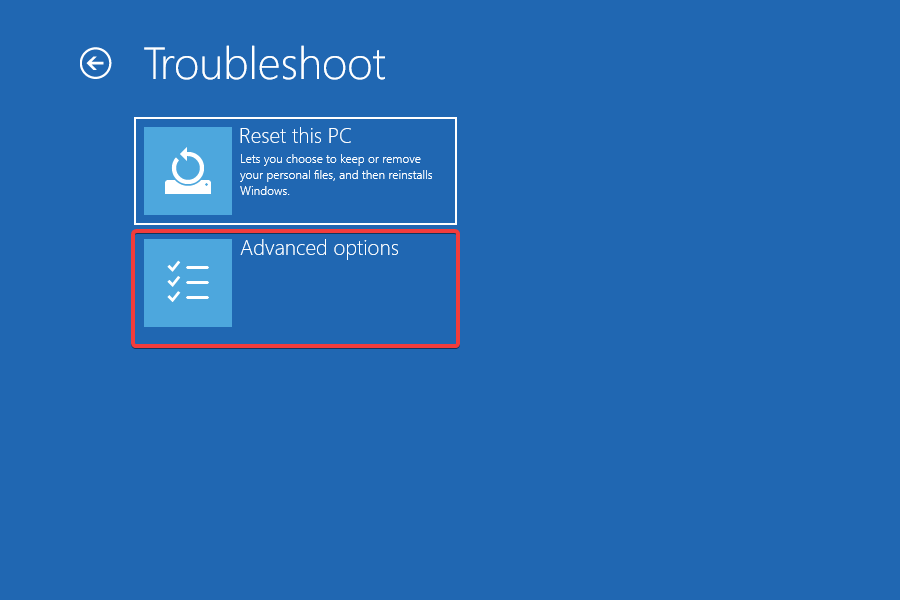
Navigate to Advanced options.
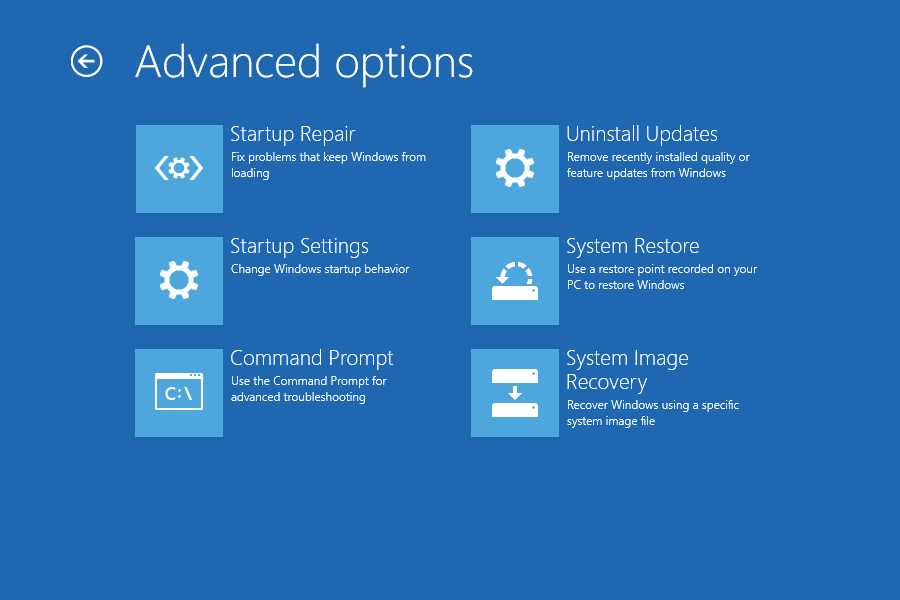
Now go to Uninstall Updates.
Select Uninstall latest feature update.
Click the Uninstall feature update button to confirm.
Follow the instructions on the screen to complete the process.
Select what data to keep. We suggest using the Keep personal files and apps option. Click Next to proceed.
Follow the instructions on the screen to continue.
If the reset PC option is not working on your PC, updating your system or using the System Restore usually helps.
In case the issue is still here, you might have to reinstall Windows 11 to fix this problem. Just be sure to back up your files with proper backup software before doing so.
Did you find a way to fix this problem on your own? If so, feel free to share it with us in the comments section below.
Using a 3D printer can come in handy to anybody, as you can easily print out parts for your kid’s toys, and create utensils for eating, cups, etc.
Even though it can be very fun to create everyday objects by using a 3D printer, the most important aspect of this technology is that it can be applied in architecture.
If you’re an architect, you can create amazingly intricate 3D models in your preferred 3D modeling software, and then transform them into real-life models.
This can give you a better understanding of the forces involved, and the sustainability aspect, and allows you to change the model easily to make it more efficient.
Note: All the prices and offers in this article are subject to change, so be sure to check the official product page to get the latest deal. If the product or offer you’re looking for is no longer available, you can try to find it on its official manufacturer page or get another one from our list.
What is the best 3D printer for architectural drawings?
The Creality Ender 3 from Comgrow is a very good 3D printer that can print out complicated structures fast and efficiently, from the comfort of your own home.
It is very easy to assemble, requiring at most 2 hours of your time to get everything set up. This makes it an even more attractive solution to your 3D printing needs.
TheCreality Ender-3 V2 3D Printer is another affordable 3D printer option that can help you design amazingly-looking buildings without worrying about the levels of complexity of your work.
This amazing 3D printer offers an array of cool and useful tools – an XY-axis tensioner, stable movement, low noise, a rotary knob, and a 4.3-inch color Screen.
The MakerBot Replicator+ is an amazing machine that offers an incredible array of technology that can be used efficiently by any architect.
This great 3D printer uses a Smart Extruder that can be changed at any point in time, and it allows you to print using hard materials like PLA and tough filament.
The 9676 – Ultimaker 3 Extended 3D Printer is an incredibly versatile and exact 3D printer that allows the usage of a wide range of printing materials.
You can use ABS, HIPS, PLA, PVA, PETG, Nylon Layer, etc. This allows your creative skills to not be bounded by the characteristics of a specific type of material.
Using a 3D printer as an architect can give you the edge when facing competition in a modeling contest, and can help you create amazing structures.
In today’s buying guide we presented you with the best 3D printers found online, including low-cost, medium-range, and also expensive options.
Don’t forget to share with us what option you chose to buy. You can do so by using the comment section below.
You don’t always know when the gaming fever hits you so you need a cool gaming solution wherever you are.
While multi-monitor displays may be common nowadays, not everyone can stand them. That is when a portable monitor comes in handy, as they extend your viewing field, but not by too much.
That is why we’ve decided to make your life easier by compiling a list of what we consider to be the best 5 portable monitors for gaming.
Note: All the prices and offers in this article are subject to change, so be sure to check the official product page to get the latest deal. If the product or offer you’re looking for is no longer available, you can try to find it on its official manufacturer page or get another one from our list.
The AOC e1659Fwu features a sleek design and a very fast USB 3.0 connection which can achieve high transfer rates and fast response times between the Xbox One and the display.
It is designed to have a jet-black glossy finish, which goes well with the 15.6-inch diagonally viewable image. Speaking of which, the e1659Fwu offers a 500:1 contrast ratio, 5 ms response time, and a 1366 x 768 resolution at 60 Hz, making it an extremely fast option for gaming.
What makes the MB168B portable USB-powered monitor great is that it needs just one USB cable for both its video signal and power, delivering a signal to a 15.6-inch, 1366 x 768 Full HD resolution screen.
The USB 3.0 cable allows rapid transfer of data to the screen, bringing fast, fluid images from your connected device that makes having an on-the-go multi-display setup a reality.
The Lepow Portable Monitor is the epitome of what it means to mix portability with incredible imagery, thanks to the sleek and lightweight design that doesn’t fail to deliver stunning images.
This is thanks to the 1080p display IPS display, which allow you to view images and movie at a quality that is hard to imagine for such a small device.
This is another ultra-portable option with a 1920×1080 resolution on a 15.8-inch screen made of an ultra-slim ISP panel.
Innoview is very light, weighing only 1.5 lb. It comes with its own protective case which is also very compact so you can easily carry it wherever needed.
It is a great travel monitor that can quickly connect to a wide range of input devices including laptops, PCs, tablets, smartphones, and many more. It comes with a USB type C and Mini HDMI cable.
The UPERFECT Portable Monitor is the perfect choice for those that prefer a more rugged monitor, thanks to the aluminum alloy body that makes it both resistant and lightweight.
What also makes it incredibly great is how configurable it is with other devices, not just PCs, since it can also be used to extend the screen of an Android or iOS phone.
The Asus MB16AC advertises itself as the ideal travel companion for laptops. This is especially thanks to its 15.6-inch Full HD IPS Zen Screen, which brings fantastic imagery along with portability.
It also comes with a smart cover and a smart pen hole, making it great as a substitute tablet, not just a PC monitor.
If you’re looking for an elegant 15.6-inch portable monitor, you have to take HORI’s alternative. This monitor can connect to any gaming console or PC through the HDMI port. Actually, it has 2 HDMI ports so it can connect to as many devices simultaneously.
It’s a 720p resolution screen but it’s perfect for gaming with a high refresh rate. All this is packed in a leatherette protective case and a body that weighs under three pounds so it’s highly portable.
Portability always comes at a price, and in the case of portable monitors, this includes screen resolution, performance, image quality, and connectivity issues.
However, if you are the type that is always on the road and you find that your laptop’s screen just doesn’t cut it anymore, then getting a portable monitor is the right thing to do.
It is common for users to encounter an error message saying that a certificate was revoked by its issuer. The error can occur in numerous instances, such as during BIOS upgrades. It can be due to various reasons.
What does it mean when a certificate has been revoked?
When a certificate is revoked, the TLS/SSL is invalidated or retracted by the issuer before its due date of expiry. It renders the certificate invalid and with no authorization.
However, a certificate that has been revoked most times is because the certificate’s private key has been compromised. Hence, the issuer terminates every right to use the certificate for security purposes.
Furthermore, many other reasons may cause a certificate revoked by its issuer error on your PC. Some are:
Issues with the Certificate Authority (CA) –Many errors may arise from an unstable or compromised Certificate Authority. So, when it’s not working, it won’t be able to authenticate content sent from web servers, resulting in errors.
The Certificate has changed to a new one from another issuer – You may encounter the certificate being revoked error on your system if the certificate you’re using is stopped by the issuer or changed to another.
Third-party program interference –Some programs installed on your device can interfere with the certificate verification process. Apps like antivirus software and VPNs can sometimes impede certificate use.
Incorrect time and date on your PC –Certificates may prompt errors if your time and date are set to their expiry date. Certificates have expiry dates when they’ll be invalid or need replacement. So, you can encounter the certificate being revoked error if your time and date read the time frame.
There are other causes not mentioned above that may prompt the error. Nevertheless, you can fix the problem by troubleshooting some settings on your system.
What can I do if a certificate was revoked by its user?
Before going through any troubleshooting process regarding the error, apply the following:
Press Windows + I to open the Windows Settings app.
Select Time and Language from the menu and click on Date & time.
Toggle on the option for Set Time Automatically, and Set time zone automatically options.
If your time and date are set past the certificate’s expiry date, changing to the correct time and date is essential. It will prevent certification issues that may occur due to expired certificates.
Also, you can encounter the revoked certificate issue on your browsers. Read about the Chrome certificate revoked error and some fixes for it.
Many use the Microsoft Office suite for various tasks, and it’s undoubtedly one of the best. However, some users reported that Office keeps asking them to sign in.
The problem can be encountered on all versions of Office and doesn’t seem to go away on its own. So, if you are wondering how to stop Office 365 sign-in pop-up, here’s everything you need to know.
Why does Microsoft Office keep making me sign in?
Here are some of the reasons Microsoft sign-in keeps popping up:
Running a non-licensed copy of Office – Many users encountered the error when using a non-licensed copy or after getting a license through unofficial means. So, make sure that’s not the case.
Corrupt credentials – In some cases, users reported that their login credentials were corrupt, and, as a result, the login message popped up.
Limit the number of devices you are signed in to – Microsoft Office supports up to 5 devices at a time, and if you are logged into more, you may receive the sign-in prompt.
And while we are at it, here are some similar errors:
Outlook keeps asking me to sign in – Sometimes your profile can get corrupted, and fix the issue, it’s advised to recreate it.
Microsoft Word keeps asking me to sign in – Like other tools in the suite, too, it shows continuous prompts to sign in, and our solutions would help.
What do I do if Office keeps asking me to sign in?
Before trying the solutions listed here, make sure to try these:
Ensure you are not using Office on more than the approved devices. Try signing out on others and verify if that fixes things.
Update Windows to the latest available version.
If these two don’t work, the ones listed next surely would.
1. Check your credentials
Press Windows + R to open Run, type control panel in the text field, and hit Enter.
Click on User accounts.
Now, choose to Manage Windows Credentials under Credentials Manager.
Locate any entries that start with MicrosoftOffice or OneDrive, select them individually, and click on Remove.
Now, click Yes in the confirmation prompt.
Once done, again press Windows + R, paste the following command, and then hit Enter:%localappdata%\Microsoft\OneDrive\onedrive.exe /reset
According to users, if Office keeps asking you to sign in, it might be issues with the Credentials Manager to blame. So, once done with the steps here, go ahead and open Microsoft Office, log in, and verify if the problem is fixed.
2. Modify the Registry
NOTE
Before you try this solution, make sure to create a restore point or back up the Registry. And follow the steps here as it is without making any other changes.
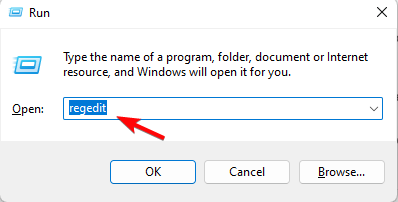
Press Windows + R to open the Run command, type regedit in the text field, and click OK.
Now, paste the following path in the address bar and hit Enter:HKEY_CURRENT_USER\Software\Microsoft\Office\16.0\Common\Identity
Now, right-click on the Identity folder in the navigation pane, and select Delete.
Click Yes in the confirmation prompt.
Now, please restart the computer, launch Office and verify whether it still keeps asking you to sign in. If yes, try the next solution.
3. Change OneDrive settings
Click on the OneDrive icon in the System Tray, choose the gear icon, and select Settings.
Please navigate to the Office tab, and uncheck the option for Use Office applications to sync Office files that I open.
Press Windows + R to open Run, type appwiz.cpl, and click OK.
Now, select Microsoft Office, and click on Change.
Click Yes in the UAC prompt.
Next, select Online Repair, and then click on the Repair button.
Again, click Repair in the confirmation prompt.
If the previous methods didn’t work and Office still keeps asking you to sign in, it could be a problem with the program itself, and a repair should fix things.
5. Update Office
Launch any Microsoft Office application (we used Word), and click on the File menu.
Navigate to Account, click on Update options, and select Update now.
If a newer version is available, it will automatically be installed.
That’s it! This should fix the problem and get things running if all the previous solutions fail. So now on, Office won’t keep asking you to sign in.
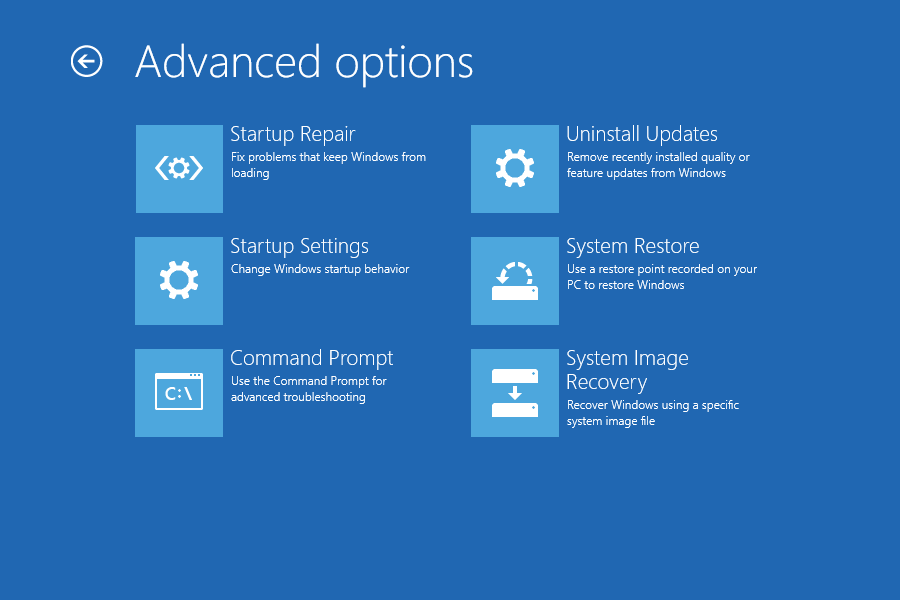
That Recovery Mode assists users in troubleshooting Windows when it doesn’t boot as expected. It offers many options, including the Command Prompt, UEFI settings, Startup Repair, System Restore, and Startup Setting (accessing Safe Mode).
To boot in Recovery Mode, press Win + L to get to the sign-in screen, then press Shift while you select the Power button and select Restart in the lower-right corner of the screen.
For issues related to your windows, you can always rely on the help of specialized software. It will perform the required tasks faster and safer.
Here are the 5 methods to enter Recovery Mode from boot.
How can I boot into Recovery Mode on Windows 10?
1. Press F11 during the system startup
The easiest way to get into recovery mode is by pressing the F11key shortly after turning on your PC. You can enter Windows 10 Recovery Mode from boot.
Note, however, that this method might not work on all PCs. For example, some may have the F9or F12keys set by default, so verify that with the manufacturer.
2. Use Start menu’s Restart option
Click on the Start icon, select the Power button, hold the Shift key, and click on Restart.
Now, click on Troubleshoot.
Next, click on Advanced options.
You now have all the recovery options listed on the screen.
You can similarly access Windows 10 Recovery Mode from the login screen by clicking the Power button and choosing Restart with the Shift key held.
That’s it! And if you were wondering, there is no Windows 10 Recovery Mode key that you need to access it. Similar steps can be applied if you want to enter Recovery Mode in Windows 11.
The solutions would help access Windows 10 Recovery Mode in Dell, Asus, HP, and most other devices. In case you face issues, find out how to perform a repair upgrade, one of the most effective troubleshooting methods.
Those of you that are trying to build a PC on a tight budget probably realized by now that one of the most expensive parts of a PC is the CPU.
That is why some manufacturers have decided to produce motherboards that already have CPUs included.
However, such combos are fairly weak compared to most standalone CPUs that you could buy.
As such, we’ve decided to compile a list of the best motherboard and CPU combos that you could buy today, and that can surely save you some bucks compared to buying them separately.
Note: All the prices and offers in this article are subject to change, so be sure to check the official product page to get the latest deal. If the product or offer you’re looking for is no longer available, you can try to find it on its official manufacturer page or get another one from our list.
The Intel Core i7 3.60GHz processor features a socket LGA 1700 socket for PCB installation and a 25MB L3 cache to improve command processing and system performance.
MSI motherboards are packed with features that bring more speed, greater overclocking ability, and stability to your system’s memory. Optimized traces and fully isolated memory circuits ensure complete stability and performance, so you never have to worry about system crashes. This bundle is also VR-ready.
If you’re looking for a budget-friendly motherboard and CPU combo, then the MSI B550-A PRO AM4 DDR4 ATX Motherboard and AMD Ryzen 5 5600X processor is a good choice to start your search.
AMD offers 6 cores and 12 processing threads and can deliver ultra-fast 100+ FPS performance. At the same time, the motherboard provides automated system-wide tuning, with overclocking and cooling profiles that are tailor-made for your device.
With the fastest AMD 8-core processor, its design is perfect for gaming and performance, with a maximum boost of 4.7 GHz, unlocked for overclocking, 36 MB of cache, and DDR-3200 support.
The motherboard features next-gen connectivity via PCIe Gen 4 support, dual M.2 support, and USB 3 Gen 2 ports.
Also, if you have some RGB gear, this motherboard can synchronize all your gear for the best visual aesthetics on your gaming computer.
This is actually the most expensive combo on our list.
It features an Intel Core Coffee Lake i9-9900K Desktop Processor with 8 cores and 16 threads, 3.60 GHz up to 5.00 GHz turbo boost, 16 MB Intel Smart Cache, and Intel UHD Graphics 630.
The CPU supports up to 128 GB, DDR4 2666 MHz, No ECC memory, up to 2 memory channels, and 41.6 GB/s max memory bandwidth.
Yet another combination of Intel’s super-fats, world-leading gaming processor, combined with an MSI motherboard.
The processor features a 14 nm design that offers great efficiency for computing and delivers nimble processing with balanced cost, performance, and power along with 16 MB of L3 cache that rapidly retrieves the most used data available to improve system performance.
The motherboard supports DDR4 Memory, up to 5333(OC) MHz, and includes a premium thermal solution, an extended heatsink design, and M.2 Shield Frozr that are built for high-performance systems and non-stop work.
The only conceivable reasons why one would opt to buy a motherboard and CPU combo would be because of budget limitations or to build their own systems.
What’s your take on such combinations? Do you think they are worth it? Tell us in the comments.
Previously, people had to purchase a separate DVD player along with a TV to watch their favorite movies. Today, many brands are offering TV-DVD combos to eliminate the need for a separate DVD player.
A built-in DVD player provides a better value to the buyers as it saves a lot of space required for a separate DVD player set. Their use is quite large, and you can choose between different alternatives to fit your space, budget, and needs.
For the movie fans out there, we have compiled a list of the best TV sets with built-in DVD players that are worth your money.
NOTE
All the prices and offers in this article are subject to change, so be sure to check the official product page to get the latest deal. If the product/offer you’re looking for is no longer available, you can try to find it on its official manufacturer page or get another one from our list.
What is the best TV with built-in DVD player?
Proscan 24-Inch LED TV – best price for value
Continuus 28” LED HDTV – incredibly lightweight
RCA RTDVD3215 – big 32 inch display
Sceptre 32″ – one of the most popular
Proscan PLDV321300 LED HDTV – great in small spaces
Now let’s take a closer look at the pros and cons of each one.
If you want to chill with a nice DVD movie, get the disk straight into the Proscan 24 inch LED TV. Not only that it’s convenient but it will display the image in awesome Full HD resolution.
This TV could be a great investment for a small room in your home or for a hotel. The price is certainly a big pro argument.
Continuus 32” LED HDTV is probably the most light-weight and slim TV with a built-in DVD player on our list, thanks to the crystal clear display and audio quality.
The TV-DVD combo comes with 3 HDMI ports, USB port, VGA port, and RF cable port. It is considered to be one of the reliable options because of the 1-year warranty.
The RCA RTDVD3215 LED is the right choice if you want to instantly switch over to your movies. It offers easy navigation and multi-language on-screen displays, and digital closed captioning.
A separate DVD player is no longer a necessity, as the 32-Inch LED HD TV with a built-in DVD player.
Purchasing a Proscan 19-Inch LED HDTV is one way to make sure things will be OK during movie nights with your friends and family. It is a perfect choice for living rooms, children’s bedrooms, and kitchens.
You can easily manage the television and the DVD with a full-function remote control. It offers multiple connection options including PC Audio, YPbPr, HDMI, Headphone, VGA, Coaxial Out, RF and AV Audio/Video.
It is easy to get confused, with the plethora of different options available in the market, but not all of them offer the best value for money.
However, remember to check the necessary functionalities and the size of your room before you make a purchasing decision.
Wireless networks are great, especially if you don’t want to deal with LAN cables, however, not all Windows 10 and 11PCs have built-in Wi-Fi adapters.
Fortunately for you, there’s a wide array of wireless adapters available, and today we’re going to show you some of the best USB network adapters.
Bear in mind that public wireless networks might not be the safest, and if you decide to purchase a wireless adapter for your Windows 10 and 11 device, make sure to properly protect your Windows 10 PC on a public Wi-Fi network.
How we chose the best Wi-Fi adapters
Our team of expert testers, with a combined experience of 15 years, has tackled a variety of testing tasks for any device you could imagine.
Their experience comes into play as a very important element when choosing the products we described in this guide, and a large variety of factors have been taken into consideration.
The options that have been chosen offer great quality and cover the entire spectrum of price ranges, thus enabling everybody to find something that fits their needs both financially and otherwise.
Note: All the prices and offers in this article are subject to change, so be sure to check the official product page to get the latest deal. If the product/offer you’re looking for is no longer available, you can try to find it on its official manufacturer page or get another one from our list.
The first thing you’ll notice about Panda 300Mbps Wireless N USB Adapter is its size. This is a tiny USB Wi-Fi adapter, so you can carry it with you at all times.
That’s not all, besides being compact, this model is also affordable, so you won’t have to break the bank to get one.
This Wi-Fi adapter works with a wide range of operating systems, including all older versions of Windows, Windows 11, Linux, and even on Raspberry Pi. Regarding the connectivity, there’s infrastructure and ad-hoc mode support.
In terms of security WEP 64/128bit, WPA, WPA2, 802.11i protocols are supported. However, this model is limited to 2.4GHz frequency. Due to its small size, and its low power usage, it’s a perfect companion for any type of laptop.
Panda Ultra is a great USB Wi-Fi adapter for Windows 10 and 11, so it’s worth checking out.
This device supports both 2.4GHz and 5GHz frequencies and it works with the latest 802.11ac wireless standard. Of course, the older 802.11n standard is supported as well.
Regarding the speed, you can get up to 300Mbps on 2.4GHz, and up to 867Mbps on 5GHz networks.
One feature that sets apart Alfa Long-Range Dual-Band AC1200 from other devices is its 5dBi dual-band dipole antennas. Thanks to that, you’ll get a decent range, but if want, you can easily remove them and replace them with any other more powerful antennas.
As for the connectivity, the device connects to your PC using a USB 3.0, and it works with a wide array of operating systems including Windows 11 and older, macOS, and Linux.
Regarding security, this adapter supports WEP 64-Bit, WEP 128-Bit, WPA-PSK, and WPA2-PSK encryption.
Overall, this model offers great speed and performance, so it’s worth checking out.
This adapter comes with a miniature design and it uses 802.11b/g/n standard, and it can achieve speeds up to 300Mbps, so it’s perfect for both streaming and gaming.
As for the supported networks, 2.4GHz networks are supported allowing you to have great range and stable connection at all times.
TP-LINK TL-WN823N allows you to use Soft AP mode thus turning it into a Wi-Fi hotspot for mobile devices, which can come in handy.
WPS button is also available, so it’s possible to easily connect to a network simply by using the WPS option on your router.
Additional features include Clear Channel Assessment and Multiple Input Multiple Output technologies.
The adapter is incredibly simple to set up, and it should work with any operating system, including Windows 11.
Overall, TP-LINK TL-WN823N is a small, reliable, and faster Wi-Fi adapter, so it’s worth checking out.
TP-LINK Archer T4U AC1200 utilizes an 802.11ac wireless standard providing you with speed up to 1200Mbps, which makes it perfect for file transfer, streaming, and gaming.
Regarding the supported networks, this model works with both 2.4GHz and 5GHz frequencies, so you’ll get a great range and a fast, lag-free connection.
As for the file transfer speeds, you can expect up to 867Mbps on 5GHz, and up to 300Mbps on 2.4GHz networks.
To achieve such speeds, this adapter uses a USB 3.0 port, so make sure that you have one available on your PC.
SoftAP feature is also available, allowing you to create a hotspot so that other devices can connect to your wireless network, even if they are far from your router.
Lastly, the adapter comes with a 1m extension cable, so you can position it on your desk to get a better signal.
Panda Wireless PAU06 fully supports 801.11n wireless standard, but at the same time, it’s compatible with older 802.11g wireless networks as well.
This means that you can expect speeds up to 300Mbps, which should be enough for most less-demanding users.
The adapter comes with a 5dBi antenna and thanks to the low power consumption, it will be perfect for your laptop.
The WPS option is available, allowing you to quickly connect to your network by pressing the WPS button.
Regarding security, Panda Wireless PAU06 works with 64b/128bit WEP, WPA, and WPA2 (TKIP+AES) encryption, and it’s compatible with a wide range of operating systems.
Supported operating systems include all versions of Windows, including Windows 11 and Linux.
Unfortunately, this adapter doesn’t work with 5GHz frequency, so if you plan to use it on a 5GHz network, this model might not be for you.
Bottom runners
Some models didn’t make it to the top 5 list, due to certain factors, but if you want a affordable Wi-Fi adapter that works with Windows 11 and older, you should consider these models:
After extensive testing, we can say that all these models work perfectly on Windows 11 and older versions, so you won’t have to worry about compatibility issues.
It’s also a good idea to have the best tri-band router to go along with your adapter to achieve the maximum download speed.
What is your Wi-Fi adapter of choice? Let us know in the comments section below.
Gaming on a laptop is possible, especially if you have enough hardware power to run the latest games. Dota 2 isn’t a new game, so it should be able to work on older gaming laptops as well.
If you’re looking to get a new laptop strictly for playing Dota 2, in this guide we’re going to show you the best gaming laptop for Dota 2.
Note: All the prices and offers in this article are subject to change, so be sure to check the official product page to get the latest deal. If the product or offer you’re looking for is no longer available, you can try to find it on its official manufacturer page or get another one from our list.
If you’re looking for a high-end laptop, then ASUS ROG Strix G15 might be the right choice for you. The laptop has a 10th Gen Intel Core i7-10750H processor and GeForce RTX 2070 8GB GDDR6 graphics.
The device has a 15.6-inch full HD display and a 16GB DDR4 at 2933MHz, so it should be able to handle the latest games. As for the storage, there’s a 1TB PCIe SSD available.
ASUS ROG Strix G15 is an amazing laptop, and it should handle the latest games with ease, as well as older games such as Dota 2, so be sure to consider it.
If you need a budget laptop for Dota 2, then Acer Aspire 5 might be the right choice for you. This model has a 15.6-inch display with full HD resolution, and it’s powered by AMD Ryzen 3 3200U up to 3.5 GHz.
As for memory, there’s 8GB DDR4 RAM and 128GB for storage which might not be enough for additional games and applications.
Acer Aspire 5 is the best budget laptop for Dota 2, and its only drawback might be the low storage space, but that won’t be a problem if you don’t install too many games.
Another great laptop for Dota 2 is HP Pavilion 15. This model comes with Ryzen 5 4600H 3.0 GHz CPU and a 15.6-inch full HD display. Regarding storage, the device has 512GB SSD and 1TB HDD.
HP Pavilion 15 has 8GB DDR4 SDRAM and it’s powered by NVIDIA GeForce GTX 1650 4GB graphics, so it should be able to handle gaming and other resource-intensive tasks with ease.
Overall, HP Pavilion 15 is a solid device, and it’s the best gaming laptop for Dota 2 that won’t break your bank.
When it comes to the best gaming laptop for Dota 2, the Acer Nitro 5 might be what you need. This is a 15-inch full HD device, and it’s powered by Intel 9th gen Quad-Core i5-9300H 2.4 GHz CPU.
As for multimedia, the laptop has NVIDIA GeForce GTX 1650 Graphics with 4 GB GDDR5 VRAM, so it should handle other games as well. As for the memory, there’s 8GB DDR4 and 256GB NVme SSD.
Acer Nitro 5 is a solid gaming laptop, but 256GB might be a little limiting if you plan to play other games besides Dota 2, so keep that in mind.
Lenovo is a well-known laptop manufacturer and if you’re looking for the best Lenovo laptop for Dota 2, then Lenovo Ideapad 3 is just what you need.
This is a 14-inch full HD device, and it’s powered by AMD Dual-Core Ryzen 3 3250U 2.6GHz processor and integrated AMD Radeon Vega 3 graphics. As for the storage, the laptop has 512GB SSD available.
Lenovo Ideapad 3 has 12GB DDR4 RAM, so it should be able to handle multitasking with ease, and run Dota 2 smoothly at the same time.
Microsoft grabbed much attention during this period with its latest release, Windows 11. The design, the visual features, and the excellent upgrades are just a few capabilities of what users were seeking.
After checking some of the most valuable forums, we found that Windows 11 is not booting in some cases.
From what we selected, this is the most common reported manifestation:
This PC can’t run Windows 11 – While this PC doesn’t meet the system requirements to run Windows 11, you’ll keep getting Windows 10 updates.
Let us explore some causes and solutions to this booting problem.
Why is Windows 11 not booting?
After seeing a lot of user complaints, we gather that a few elements often trigger this boot problem. The top culprits include the following:
Bad system files – When you have some critical files damaged on your system, you may have difficultybooting up. To fix it, you can try to open CMD when your PC boots up & run the SFC scan.
Hardware issues – Sometimes, you need to update some hardware to make it work again. You may need to change RAM or your hard disk.
Peripherals – Sometimes, the problem is not the computer but the devices attached. Once you get rid of such a device, you can boot.
This article will clarify important information and present the best options you should consider to make your Windows 11 work.
What can I do if Windows 11 does not boot?
Before you go into any of these solutions, do the following:
First, check the power supply – There are chances that it is not plugged into power.
Check the monitor– In some cases, especially on a PC, you may not have connected the monitor, and even if the computer has booted up, it will seem to be off still.
Double-check that your PC meets the minimum requirements for Windows 11 – Considering that if it is based on aged specifications, it might not be compatible with the operating system you want to boot.
Unplug peripherals – This is important because, while the PC may have no issue, an attached device may be faulty and cause boot issues.
Most of the solutions below apply if this booting error comes up randomly.
1. Enable TPM
1.1 Check if TPM is enabled
Press the Windows + R keyboard shortcut.
Once the Run dialog box is opened, type tpm.msc, then press Enter.
Look at the Status section and ensure you see the following message: The TPM is ready for use.
If this is what appears in the Trusted Platform Module, then your TPM is enabled and should work fine. If you cannot see the mentioned message, read the steps below.
1.2 Update TPM to boot Windows 11
Restart the system.
Right-click on the Start menu and open Device Manager.
Expand the Security devices tab, right-click on the TPM device, and select Update driver.
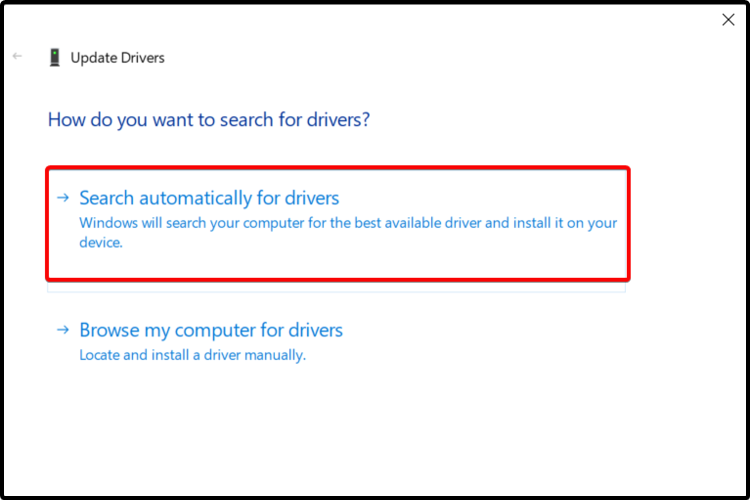
Click on Search automatically for drivers.
The OS will automatically scan and update for any required drivers.
Restart your PC.
In case that does not help, we recommend Outbyte Driver Updater for automatic scans of missing or outdated drivers; besides the TMP device, it will scan your entire PC and prompt you to choose which ones to update.
2. Enable Secure Boot
Press Windows + R.
In the opened Run dialog box, typemsinfo32, then press Enter.
Take a look at the Secure Boot State, and check the status. For example, if your computer does not support Secure Boot, the group will be Unsupported, but if you see the option On, you’re all good.
If it is Off, then continue with the following steps.
Press Windows + I to open the Settings app.
On the left pane, click on Windows update, then select Advanced options on the right.
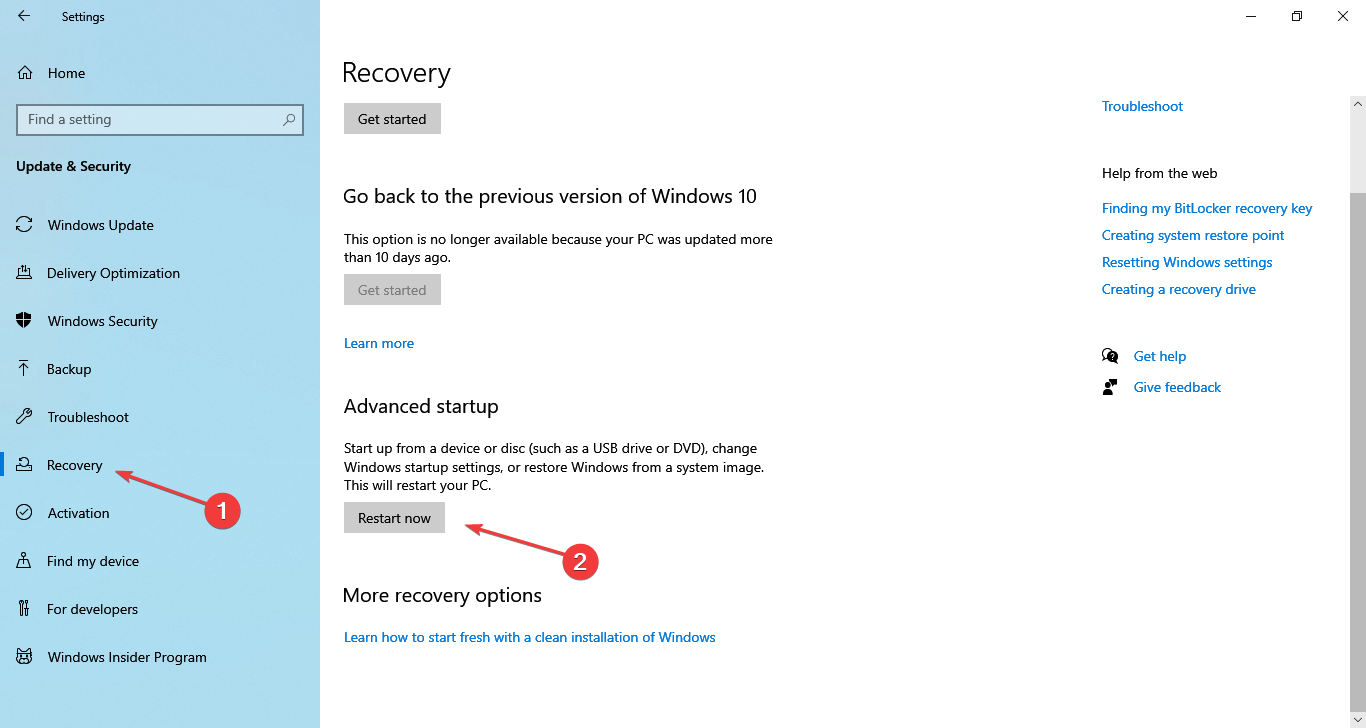
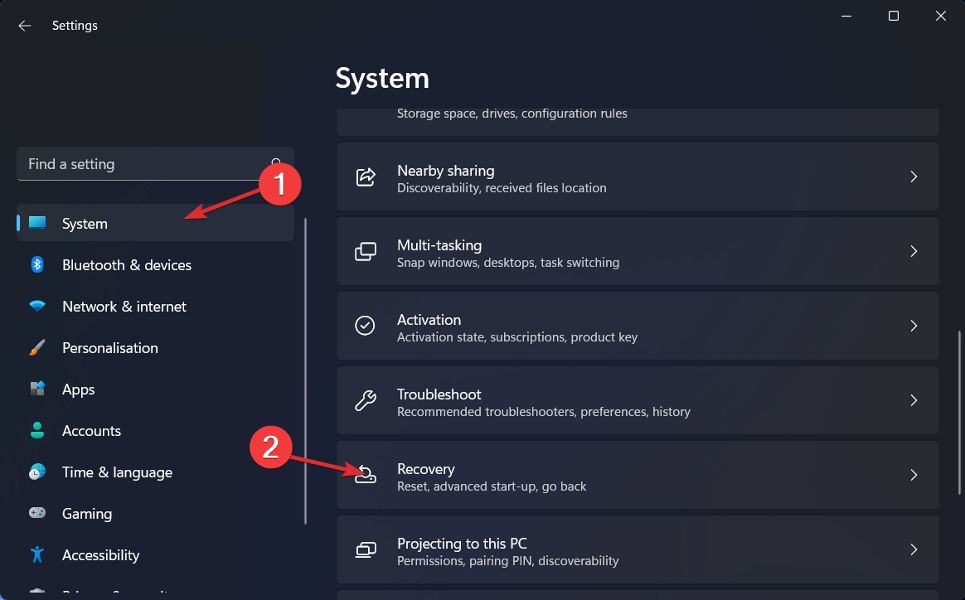
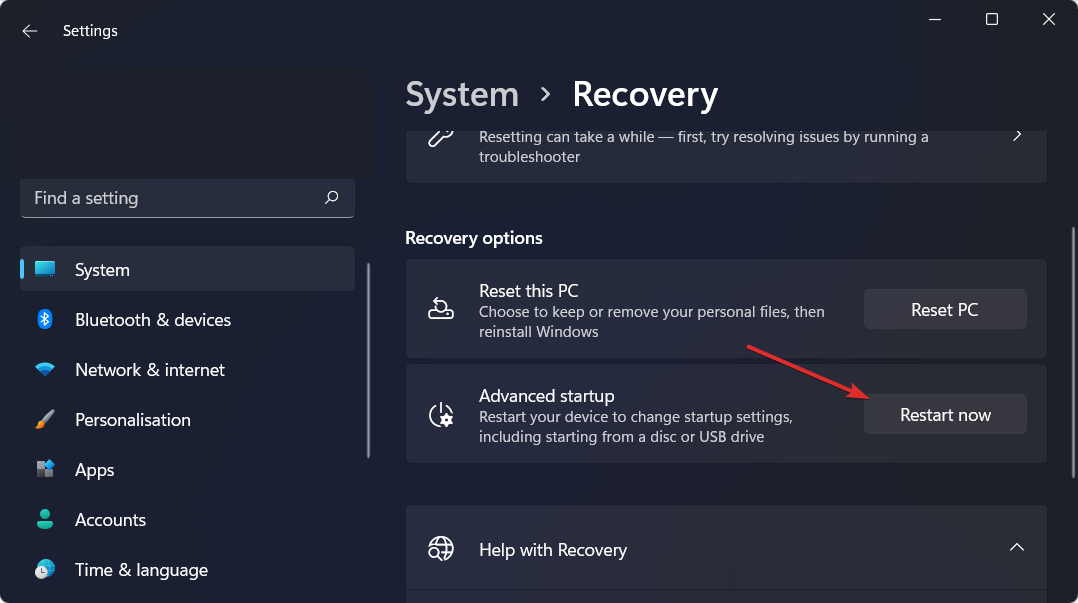
Scroll down and selectRecovery.
Click on Restart now.
From the options, select Troubleshoot.
Click on Advanced options, then select UEFI Firmware settings.
Click on Restart.
Now, navigate the Advanced, Security, or Boot settings page (this depends on your motherboard).
In the Search menu, type recovery and click the Recovery option.
Go to Open System Restore.
Click Choose a restore point and click the Next button.
Select the appropriate restore point, click Next, then follow further on-screen instructions.
Wait for the process to finish, and see if the reboot issue is resolved.
As you can see, some of the most efficient ways are related to the Trusted Platform Module. Thus, we strongly recommend also checking our guide dedicated to Windows 11 and TMP.
In addition, we are here to support you. So, if you have any other questions, do not hesitate to let us know in the comment section below.
There are quite a few things that you don’t know you need until you have them. The head trackeris one such gear that can immensely improve gaming sessions, especially when it comes to simulation games.
The gaming head motion trackers help the user turn his head movements into virtual head movements.
Imagine playing a flight simulation game likeDigital Combat Simulatorand being able to look around and control the viewing by moving your head instead of using the keyboard or joysticks.
Turning your head left or right will change the in-game view as well. Most head trackers usually support either 3DoF (three degrees of freedom) or 6DoF (six degrees of freedom).
The differences between these two techniques are quite significant. In summary, a gaming head tracker with 6DoF is any day better than the head tracker with 3DoF, as it offers a more immersive experience in games.
Having said that, head trackers can be quite an expensive affair if the user doesn’t research thoroughly before making the purchase.
PC gamers don’t need highly sophisticated and costly head trackers, as one can build an IR (infrared) head tracker themselves for as low as $10.
If you don’t like this idea, feel free to purchase a commercial gaming head tracking system for around $150 for that matter.
Today, we will be looking at some of the best motion head trackers for gaming. The list includes both DIY methods and commercial head trackers with 6DoF support.
Note: All the prices and offers in this article are subject to change, so be sure to check the official product page to get the latest deal. If the product/offer you’re looking for is no longer available, you can try to find it on its official manufacturer page or get another one from our list.
What are the best head motion trackers for 6DoF gaming?
TrackIR 5 is the latest gaming head tracker from NaturalPoint. It comes with an improved tracking system and offers an immersive experience.
It is a 6DoF based tracker which means, in games with6DoF support, users can raise and lower their head, lean left and right, move backward and forward, and the view in-game will adjust accordingly.
The TrackIR 5 kit includes a USB infrared camera with adjustable mounts, TrackClips with three reflectors, and a disc to install the TrackIR software.
The USB infrared camera goes on top of the monitor with the help of mounts. The TrackClip, however, requires users to wear a baseball cap and attach the TrackClip onto the brim.
Those that don’t want to wear the baseball cap all the time can opt for the TrackClip Pro clip which can be clipped onto the left side of the gaming headset.
However, the TrackClip Pro costs $10 more (when purchased as a bundle) and the build quality is poor, to say the least.
It’s also a wired solution, which means the user has to be connected to the power every time they want to use it.
For those who can shell a little extra, we would recommend a third-party track clip from TrackHat. TrackHat Plus is wireless, custom-made, and supports TrackIR head tracking system.
Setting up TrackIR 5 is easy. After installing the software, mount and connect the camera to the USB port, put the TrackClip in place and you are ready to roll.
TrackIR 5 works smoothly with major titles like ARMA 11, GTR2, Tom Clancy’s HAWX, and Race Driver: GRID, X-Plane, etc.
However, if you are planning to use it with other triple-A titles like Far Cry 2 and Battlefield 2, the experience is not pleasant, mainly due to a lack of support from the game developers.
TrackIR 5 comes to life in racing games and flight simulation games. It does take some time getting used to, but once you do, you won’t go back to the usual game-playing modes.
The TrackIR 5 is one of the best gaming head trackers available today, and it is well worth the money spent as it takes sim gaming to a whole new level.
The only negative aspect to TrackIR 5 is having to pay extra for the Pro clip which ideally should be included in the TrackIR 5 standard bundle.
Trackhatis a head tracker company that offers TrackHat Plus Head Tracking Kit, a decentalternative to TrackIR 5. It not only costs 2/3 of its rival but also offers a similar head tracking experience in sim games.
The best thing about the TrackHat is a custom-made baseball-style cap that has three inbuilt infrared LEDs with a battery integrated into it.
The battery lasts up to 10 hours and can be recharged using the USB cable which is built into the TrackHat Clip.
The company also offers two more products, the TrackHat Clip and TrackHat Clip Plus, which can be separately purchased from the official online store.
For the head tracker, the company has smartly utilized the already available resources rather than building its own. For example, the infrared head tracker camera in the package is manufactured by Sony.
The complete TrackHat Kit includes an Eye Camera which acts as the head tracker camera that has been customized to work with the company’s own OpenStack software.
OpenTrack is an open-source head tracking project that claims to offer joystick and controller key binding, low CPU usage, and a cleaner UI. OpenTrack uses FreeTrack protocol which makes it compatible with all the video games compatible with TrackIR 5.
TrackHat also sells TrackHatPlus (baseball cap), without the head tracking kit for those who already have a TrackIR head tracker but want a reliable track clip.
The downside to TrackHat is that it is not available on any of the leading e-commerce stores as the company prefers to sell its product from its official store with global shipping on offer.
Gaming head trackers are made of three things: a camera, a track clip with reflectors, and software. Those that don’t wish to spend hundreds of dollars on buying a head tracking kit, can build one with ease.
The software part is covered by FreeTrack. FreeTrack is a free software tool that allows users to simulate head movements in sim games. It also supports 2DoF and 6DoF for compatible games.
FreeTrack uses the PC’s/laptop’s built-in webcam to track the head movement. You can download the FreeTrack software right away.
For the Track Clip, users can buy a premade track clip for around $10. The downside to FreeTrack is the limited number of sim games supported by this free initiative.
The gaming head motion trackers are not meant to replace VR devices but offer a similar experience to an extent, without breaking the bank.
For those that need a pre-built head tracking kit with 6DoF support, both TrackIR 5 and TrackHat Head Tracking Kit are good options except for the price, which is a debatable topic though.
For casual users and everyone else, FreeTrack is a good option as it offers a similar experience, almost for free. So, let us know your choice in the comments area below.
If you are using Windows, and you are trying to install AMD graphic drivers, then you might encounter the Windows cannot find bin64\installmanagerapp.exe error.
Updating your graphic drivers is essential for our computers to work properly. For example, you might have noticed that when you try to play some games on your computer, the game doesn’t run smoothly or it crashes. This is due to incompatible or corrupted drivers.
Why can’t I find Bin64\installmanagerapp.exe?
If you’re wondering why the Windows cannot find bin64\installmanagerapp.exe error is appearing on your screen, here are some possible reasons:
Corrupt files – If you accidentally delete or move a file and don’t save it elsewhere first, then that file will become corrupted if it’s not recovered. This could be a corrupted registry entry or a damaged hard drive sector.
Incompatible drivers – If you are using a new graphics card or a new version of your existing graphics card, then it may not be compatible with the install manager.
Firewall restriction – If you have an antivirus program or firewall, the installation process may have been blocked by your firewall.
Outdated OS – This can happen if you are using an old version of Windows or the previous installation was interrupted.
Where is Bin64?
The AMD Catalyst Control Center is a desktop application developed by AMD that allows users to configure their graphics card and monitor the performance of their computers. It also allows users to view information about their computer’s hardware and software.
The AMD Catalyst Control Center is designed to work with all brands of ATI Radeon graphics cards and select AMD A-Series APUs. AMD Catalyst Control Center provides a number of tools to help users configure their ATI graphics card and Bin64 is part of the software component. These include:
Software Update – This feature allows users to update their drivers in order to get the latest features and bug fixes from AMD. The software will automatically detect any new updates when run, and prompt you to install them if applicable.
3D Application Settings – This tool allows users to customize various settings for 3D applications like video games or applications. Users can choose between various resolutions, color depth, and refresh rates depending on their needs.
Video Overlay – This feature allows users to change how they see their desktop while using their computer. For example, if you have multiple monitors connected together, this tool will allow you to display a picture-in-picture window showing what’s happening on your second screen within your primary monitor’s space.
If you have downloaded the Installmanager app, you should be able to find it in the following location:
C:\Program Files\AMD\CIM\BIN64\
How can I fix Bin64 InstallManagerapp.exe missing?
Restart your PC and check whether the error is still there.
Performing a clean install in Safe Mode allows you to check whether there is an underlying issue preventing the installation.
2. Run DISM and SFC commands
Hit the Windows key, type cmd in the search bar, and click Run as administrator.
Type the following command and press Enter: sfc /scannow
Now type the following command and press Enter: DISM /Online /Cleanup-Image /ScanHealth
Restart your PC.
If you don’t necessarily want to proceed with the manual steps, you can easily try an automated method that will thoroughly scan your device for damaging elements or crashing apps and then will try to replace them with healthy parts from its up-to-date database.
3. Disable the firewall temporarily
Hit the Windows button, type Windows Security in the search bar, and click Open.
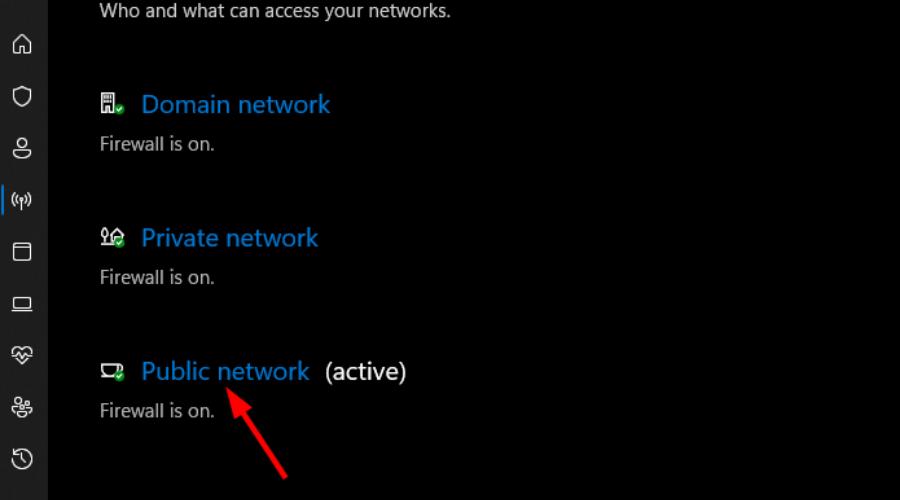
Click on Firewall & network protection then select Public network.
Locate Microsoft Defender Firewall and toggle the off button.
Press the Windows + I keys simultaneously to open Settings.
Navigate to Windows Updates and go to Update history.
Click on Uninstall updates.
Select the most recent update then click Uninstall.
5. Update your OS
Hit the Windows key and select Settings.
Click on Windows Update, then select Check for updates.
Download and install if any are available.
If you’re still getting Windows cannot find Bin64\installmanagerapp.exe error after performing all these recommended steps, you should try resetting your PC.
In the worst-case scenario, you may have to perform a clean install of Windows as it is possible your version was corrupted during installation.
Should you encounter any other AMD driver installation issues, we have a comprehensive guide to that effect to help you resolve the majority of them.
And in case you are done with AMD drivers and want to try others in the market, we have a resourceful list of the best Windows 11 graphic cards that promise you an unmatched experience.
Let us know if you have been able to fix this issue in the comment section below.
Arduino is gaining more and more popularity by the day, and Arduino kits for your children are perfect to get more people involved in creating awesome projects with just a bunch of seemingly random components.
The concept behind all these project creation bundles is to provide you with everything you need (guides included) to develop your own version of the projects.
Moreover, they are ideal to learn a thing or two about automation, robotics, and programming. Therefore, don’t hesitate to take a closer look at our top picks below.
Note: All the prices and offers in this article are subject to change, so be sure to check the official product page to get the latest deal. If the product or offer you’re looking for is no longer available, you can try to find it on its official manufacturer page or get another one from our list.
Which Arduino kit is best for beginners and children?
Since you already have an idea regarding what you are looking for, let us tell you more about the MEGA2560 complete starter kit.
It comes with over 200 pcs components, as well as free PDF tutorials on the CD. Those 35 lessons will certainly help you and your child as they include detailed steps on how to connect each part to the main chip (Arduino).
No less important, there’s a nice plastic case that holds all the components and they are all individually wrapped and fully protected.
The UNIROI UNO starter kit for Arduino can be the perfect gift if you want to spark your kids’ curiosity for robots and automation, as it holds everything it needs to get them started.
The bundle comes with a free set of tutorials, a great UNO R3 board, a breadboard, a flame sensor, as well as a bunch of multi-colored LEDs.
Included in the package are also an active buzzer, a button, a set of resistors, a 1 digit 7-segment display component, a set of jumper wires, and an RGB LED.
The REXQualis UNO Project super starter kit is an Arduino kit that’s a bit more complex than a standard, basic one.
However, it comes with everything you need to get your children into robotics and automation. Compared to a basic, more limited starter kit, this one comes with more awesome stuff, including but not limited to a classic UNO R3 board, a breadboard, a power supply module, a joystick, and a servo module.
You can also find an ultrasonic sensor, an IR receiver, a temperature and humidity module, two potentiometers, an LCD module, and remote control.
The ELEGOO UNO Project super starter kit is a starter Arduino project development kit that could turn into the perfect gift for your children.
Granted, the ELEGOO UNO Project Super Starter Kit is a tad more complex than its predecessors, but it’s still suitable for any Arduino enthusiast, regardless of previous experience with these projects.
The kit holds a UNO R3 controller board, a breadboard, an ultrasonic sensor, a 9V battery with DC, an LCD screen module, a temperature and humidity sensor, a remote controller, a servo motor, a joystick module, an IR receiver, a couple of buzzers and lots of other accessories.
The A&R Nano Uno Mega Monster starter kit for Arduino is exactly what its name says. Well, maybe except for that monster part, because there’s nothing monstrous about this bundle (not in a bad way, of course).
This starter kit comprises everything you need to get your children started with understanding what Arduino is all about and considering the size of this package, you’re going to make a more-than-fair point.
With components such as a UNO R3 controller board and a NANO V3 one, a Bluetooth module, an Ethernet shield, an IR remote kit, an ultrasonic range sensor, a vibration sensor, a real-time clock module, proto shields, 4×4 keypads, and much, much more, you’re sure to win the Parent of the year contest this time.
If you feel that you don’t have enough time to plan for the perfect gift for your children, try sparking their interest in programming, robotics, and automation with these awesome Arduino creation kits.
Whether it’s the A&R Nano Uno Mega Monster starter kit for Arduino, the REXQualis UNO Project super starter kit, or the UNIROI UNO starter kit for Arduino you’re going to aim for, you simply can’t go wrong if you have even the tiniest hunch that your kid is into creating awesome stuff.
Take a closer look at all our top picks above, make a choice, then don’t hesitate to share it with us via the comments area below.
Today we have a list of the best WiFi extenders for gaming, but not only that you can pair with your Windows PC.
Note: All the prices and offers in this article are subject to change, so be sure to check the official product page to get the latest deal. If the productor offer you’re looking for is no longer available, you can try to find it on its official manufacturer page or get another one from our list.
D-Link DAP 1520 is a minimalistic Wi-Fi booster that doesn’t have a power cable and a stand, instead, it connects directly to the power outlet.
This device doesn’t have any additional ports, so if you want to connect your hard drive or printer to your wireless network, you won’t be able to do that by using this device.
D-Link DAP 1520 supports the latest dual-band 802.11ac standard, and it comes with 2 internal antennas. If you want a Wi-Fi extender without any additional ports, D-Link DAP 1520 offers great performance at a reasonable price.
Linksys RE6500 is a powerful Wi-Fi booster, and unlike several other devices on our list, you cannot connect Linksys RE6500 directly to a power outlet, instead, you need to power it using a standard power cable.
This Wi-Fi extender comes with 2 replaceable 3dBi dipole antennas and it supports both 2.4GHz and 5GHz wireless bands as well as the latest AC wireless standard.
Regarding connectivity, this device has 4 LAN ports as well as a 3.5mm headphone jack. Unfortunately, there’s no USB port available, and that’s the only flaw of this Wi-Fi booster.
Linksys RE6500 is a powerful Wi-Fi extender, it offers great performance, and it’s one of the best Wi-Fi extenders on our list.
ASUS RP-N53 supports both 2.4GHz and 5GHz frequencies and it offers decent speed. This Wi-Fi booster comes with one Ethernet port meaning you can connect any wired network device to it.
In addition to an Ethernet port, there’s also an audio jack available.
ASUS RP-N53 connects directly to your power outlet, so it won’t take up too much space in your home.
It’s worth mentioning that this Wi-Fi extender doesn’t have a USB port available, and it also doesn’t support the latest AC Wi-Fi standard.
ZyXEL WRE2206 is a compact Wi-Fi booster that connects directly to your power outlet. This device doesn’t support the latest AC wireless standard, but it allows you to easily extend your wireless network.
This Wi-Fi extender comes with an LED indicator that shows you how many devices are currently connected to the extender, and thanks to the WPS button you can easily expand your wireless network.
In addition, this device comes with a single Ethernet port, so you can connect any wired network device to it.
ZyXEL WRE2206 isn’t the best wireless extender, but with its humble specs, it should be great for basic home users.
NETGEAR EX7000 AC1900 Nighthawk supports AC1900 standards and it can achieve amazing speed as long as you have a compatible router.
Regarding the frequency, this extender supports both 2.4GHz and 5GHz frequencies.
NETGEAR EX7000 AC1900 Nighthawk comes with three external antennas so it has a decent range, and thanks to 5 Ethernet ports and USB 3.0, you can easily connect any device to this Wi-Fi booster.
This is an impressive device with amazing performance, however, such a device comes with a steep price.
Trendnet TPL-410APK is a Wi-Fi booster, but at the same time it supports Powerline technology, so you can use it to easily expand your network around your home.
This device supports N wireless standard, and thanks to the 2 Ethernet ports you can easily connect additional network devices to it.
It’s worth mentioning that Trendnet TPL-410APK is fully compatible with TRENDnet Powerline 500 and 200 models, and in order to keep your data safe, TPL-410APK encrypts the Powerline signal.
This might not be the best wireless extender, but since it offers Powerline support, it can be a perfect solution for your home.
Netgear EX6100 might not be the most compact Wi-Fi booster on our list, but it provides great specifications. This device supports the latest 802.11ac standard along with 2.4GHz and 5GHz frequencies.
This device comes with one Ethernet port so you can easily connect any wired network device to it. Netgear EX6100 is a great device, and the only flaw might be the lack of a USB port.
Netgear EX2700 is similar to the previous model on our list, but it offers more humble specifications.
Just like the previous model, this Wi-Fi booster also comes with a single Ethernet port so you can easily connect any wired network device to it.
Unfortunately, this device only supports 802.11 a/b/g/n standards and 2.4 GHz frequency, so it doesn’t offer the same performance as the previous model, but it’s still a decent Wi-Fi extender for your home network.
D-Link DAP-1650 comes with an impressive design, and we have to admit that it looks more like a wireless speaker than a Wi-Fi booster. Alongside visually appealing design, this device offers support for AC1200 Wi-Fi standard thus delivering maximum speed.
We have to mention that this device can work as a range extender, access point, or media bridge. As for additional features, this device comes with 4 Ethernet ports, one USB, and one audio jack.
D-Link DAP-1650 is an impressive device with great design and amazing features, however, such a device comes with a price.
Amped Wireless REC22A is another Wi-Fi booster that connects directly to your power outlet.
Despite being a compact device, this Wi-Fi extender provides you with high Wi-Fi speed thanks to the latest 802.11ac wireless standard. Of course, both 2.4GHz and 5GHz frequencies are fully supported.
We also have to mention that this device comes with a detachable antenna, so if you need a more powerful antenna you can easily replace it.
TP-LINK TL-WA850RE is another Wi-Fi booster that connects to your power outlet. This device supports the 802.11n/g/b standard and it comes with 2 internal antennas.
Additional specs include 1 Ethernet port that you can use to connect other wired network devices such as your PC or a game console.
TP-LINK TL-WA850RE offers humble specs, however, it might be perfect for basic home users due to its affordable price.
Google Chrome is a great browser that usually plays videos without any issues; however, some users have said on forums that YouTube videos freeze on Google Chrome.
This situation is not ideal, and while various reasons may cause it, in most cases, you will need to take a few easy steps to correct the problem.
We will explore a few resolutions that might fix YouTube freezes on Chrome.
We have had many users ask why does my youtube keep freezing?
Streaming or watching videos on YouTube should be a smooth, rewarding experience, but some of the following factors may cause your videos to hang:
Hardware issues – Sometimes, it has nothing to do with the Youtube service but with the devices you run it on. You may have a faulty hard disk or RAM.
Corrupted cache – Your cache stores vital information regarding your activity, but if corrupted, it may also lead to crashes.
Overclocking of the CPU – Many activities may increase your CPU clock rate. Streaming is one such activity.
Low memory – Streaming or playing videos is often memory intensive, and if you undertake this activity when low on memory, you may experience crashes.
Compatibility issues – In most cases, this may be triggered by third-party extensions. Once they are removed, the problem should be solved.
Whichever the case is, we will suggest fixes for you below.
Quick Tip:
With a complete makeover, Opera One comes out strong to deliver matching and often surpassing features that other popular browsers such as Chrome or Mozilla provide.
The Video pop-out is one particular option that offers you a flawless Youtube viewing experience without ever leaving your browser.
Opera One
Load YouTube videos in seconds with this speed-focused browser!
Click on the ellipses or three vertical dots in the top right corner of your browser.
Select More tools, thenClear browsing data.
Click the checkboxes for Browser history, Cookies, and other site data, and Cached images and files, then click on the Clear data button.
Chrome’s data can also clog up YouTube’s video output. So, clearing Chrome’s data might make some difference when playing videos in the browser. This fix is beneficial, especially if YouTube freezes when playing games.
2. Update Google Chrome
Click on the ellipses or three vertical dots in the top right corner of your browser.
Select the Help option and from the list of further options, click on About Google Chrome.
The browser will check for updates, and you can install a recent update if available.
Once installed, restart the browser for the changes to take effect, and try playing your YouTube videos again.
While browsing, you will have the best user experience using the most recent browser version. In addition, the latest versions will generally provide superior video playback to older versions.
3. Turn Off Hardware Acceleration
Click on the ellipses or three vertical dots in the top right corner of your browser.
Then select Settings on the menu.
On the left pane, click on the Systems option.
Then toggle the Use hardware acceleration when available option off if it’s on.
Restart Chrome after turning hardware acceleration off.
This is a viable solution if YouTube freezes when playing videos. You can also turn off hardware acceleration from your Windows 11 Settings app.
Paste the address below onto your Chrome address bar and hit Enter. chrome://extensions
Search for your most recently added extensions from the list of extensions displayed.
Toggle the switch off to disable the specific extensions.
YouTube’s freezes can also be due to conflicting extensions. So, turning off problematic Chrome extensions might resolve the issue.
5. Reset the browser
Paste the address below onto your Chrome address bar and hit Enter. chrome://settings
On the left pane, click on Reset and clean up.
Click on Reset settings to their original default.
Click the Reset settings at the bottom.
There will be a confirmation box. Click on the Reset tab for the process to begin.
Note that you can disable all extensions by resetting Chrome, which will clear the browser’s data. We, however, believe a reset may be overkill for a YouTube hanging problem and should only be used as a last resort.
6. Update the Graphics Card Driver
Right-click on the Start menu and click on the Device Manager option.
Expand the Display adapters option, right-click on your graphics card, and select the Update diver option.
Click on Search automatically for drivers.
If there are any updates, you will be able to install them.
YouTube crashing in Chrome could be due to antiquated or corrupt video card drivers. Some video card drivers might even be incompatible with some of YouTube’s new features.
The above resolutions will often fix YouTube video playback errors in Chrome. However, remember that users can also utilize alternative browsers that might provide more reliable YouTube playback.
If your YouTube keeps freezing and you have read up to this point, we are confident you should be able to fix it. Let us know in the comments which of the solutions worked for you.
Stop motion is an animation technique that involves physically manipulating objects to give the illusion of movement. This is done with an interesting technique.
In other words, the respective objects are moved over very short distances and then photographed individually which gives the impression that they move.
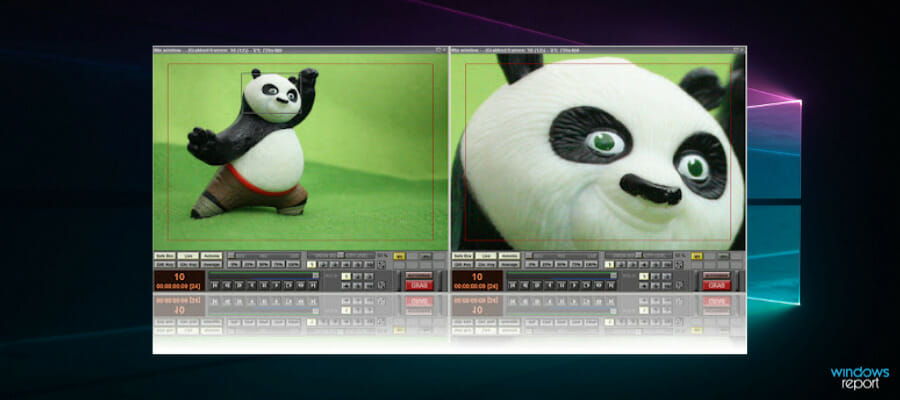
The photos are then played in a fast sequence to create movement. So, if you’re into stop-motion animation, you’ll also need a dedicated stop-motion animation tool for your creations.
Moreover, so-called stop-frame animation is not a simple process, and animators who use this technique have to work carefully to create really fluid animation.
Hence, if you desire to learn this animation method or you’re using it regularly then third-party software comes in handy and can provide real help.
In this article, we’re going to list the best stop-motion animation software that you can use on your Windows PC. Read the product description and if a particular tool suits your needs, download it on your computer.
Note: All the prices and offers in this article are subject to change, so be sure to check the official product page to get the latest deal. If the product/offer you’re looking for is no longer available, you can try to find it on its official manufacturer page or get another one from our list.
Which software is best for stop-motion animation?
Adobe Premiere Pro – powerful tool with pro features
Filmora Video Editor – lots of visual & audio effects
Movavi Video Editor – all-in-one editor
Dragon Frame – easy-to-use
Stop Motion Studio – very intuitive interface
Stop Motion Pro Eclipse – direct connectivity with your camera
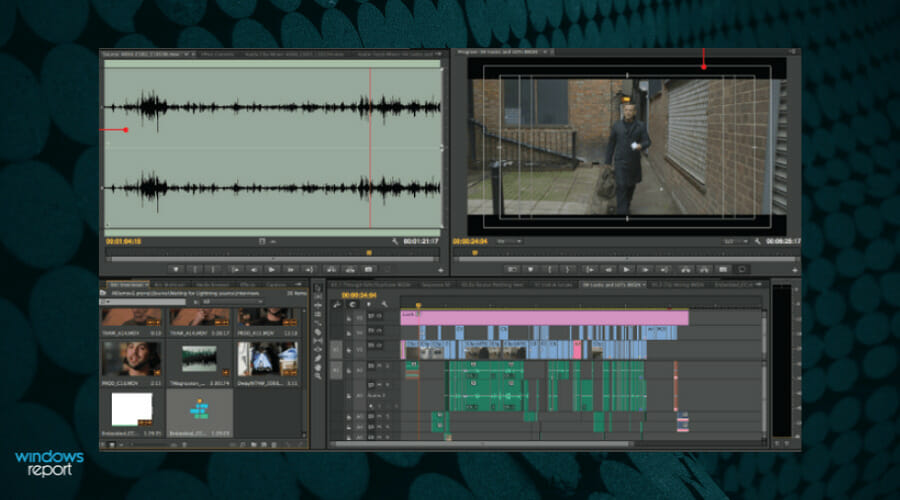
Adobe Premiere Prois well known for its strong video and audio features. I think we don’t surprise you by mentioning that Adobe can help you in creating stop motion animation effects.
You will be able to make your cartoons more dynamic with the help of Motion effect features and keyframes that Adobe offers you.
The editing process becomes easier as you are free to use Adobe’s animated motion templates or you can create your own motion graphic using the instruments from the Essential Graphics panel.
Moreover, in recent years, several graphic enhancements considerably eased the process of creating a fast sequence of movements.
In the videography process, you are offered to benefit from color correction, color grading, precise trim footage, and more.
You don’t have to be worried about the complexity of Adobe’s instruments, as it provides a lot of tutorials so you can create the quality animation that you like.
Adobe Premiere Pro
Create and edit your video projects from any device, using the cutting-edge techniques employed by this expert tool
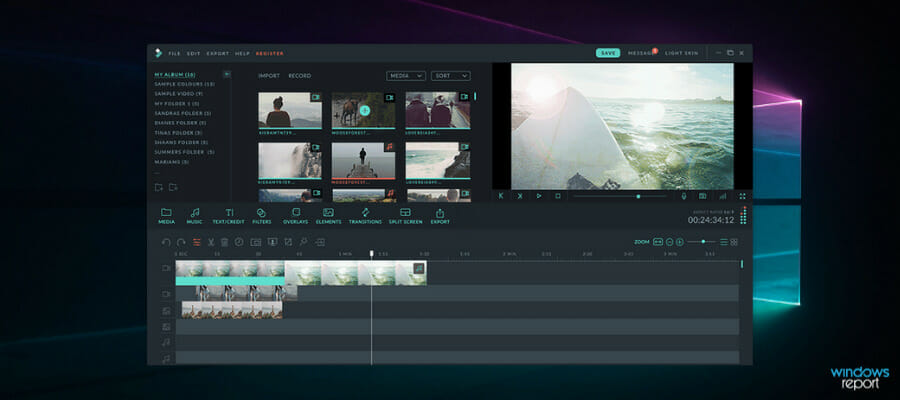
Although Filmora Video Editor is not a stop-motion software per se, you can easily use it to get the best out of your animation projects.
To this end, Filmora brings a plethora of visual and audio effects, including filters, transitions, overlays, custom titles, and elements that will help you create professional videos.
The software adds updates every month so you can make your creations more eye-catching.
The tools come with a user-friendly layout, with all editing options at hand so that you can stay more productive.
Moreover, with this software, it’s easier to create professional-looking videos using technology that will increase your video quality instantly.
For example, you can use audio ducking to improve your recording, color match, or hotkeys commands. Hence, don’t hesitate and create your animations with Filmora to stand out with your movies.
Filmora Video Editor
Give your video projects a new flavor with all the filters and effects this tool brings
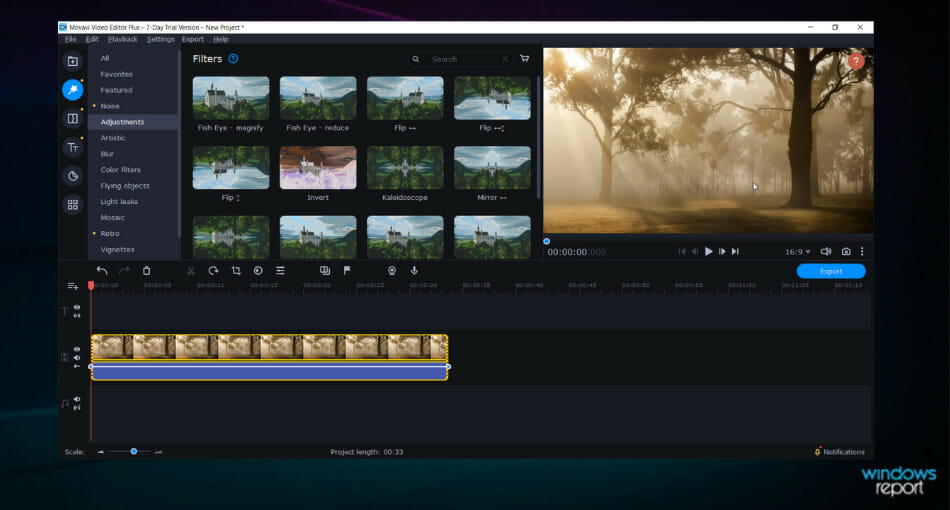
Movavi Editor is an all-in-one solution for editing your videos in a very creative manner and in a very simple way.
With this video editor software, you can explore your imagination by creating professional videos, using an intuitive editing program. So with powerful functionalities like keyframe animation and other video effects, your video will shine.
More exactly, the program allows you to edit videos with a basic timeline editor and lively effects or text animations, transitions, or chroma backgrounds that will boost your creation beyond expectations.
Moreover, with Movavi it is possible to create stop motion videos easily by importing your photos in the editing program, arranging your scenes, and finally adding some effects or transitions.
Hence, using this video editor solution will drastically simplify your workflow with stop motion animation thus creating a remarkable outcome or put a smile on every single face.
In addition, if you need to create a professional or business-purpose video using stop-motion animation, this software is perfectly suited to add extra quality and make your product popular.
Movavi Video Editor
Using this incredible tool, you can edit and create stop-motion videos professionally!
Dragon Frame is a powerful stop-motion animation tool that will help you create really stunning images.
The software allows you to bring animations to life with the help of a bevy of professional on-screen tools.
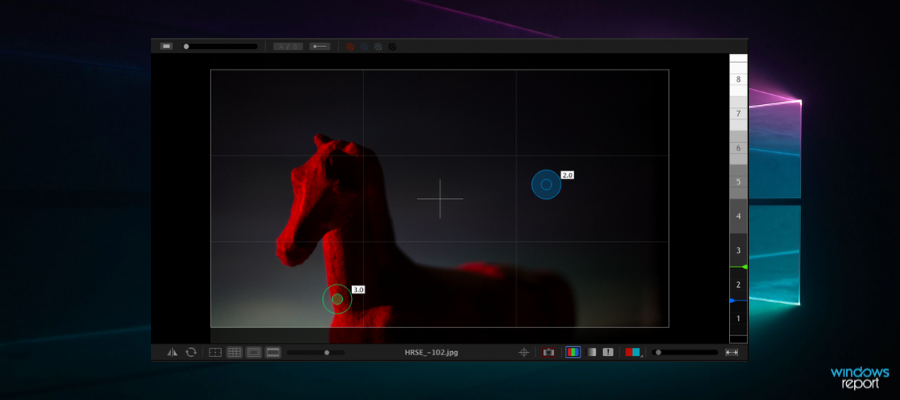
Dragon Frame lets you capture precise movements, compose and light the perfect shot with camera controls, and edit images with the help of advanced image review tools.
What’s more, you can animate your video using tools like toggling, looping, or onion skin and make amazing shots with cinematographic features to set the camera settings or adjust focus.
You can also insert audio and edit it according to your characters’ needs. Some of its key features include:
Timeline: You can edit your frame with a simple drag-and-drop move to adjust timing, reshoot sequences, or restore deleted frames
Drawing tools: Vector-based drawing tools allow you to better control your animation
Live view magnification support
Color detection lets you compare tone ranges between shots and adjust them
You can try out the tool-free for 30 days. The trial period allows you to test the software with your camera and become familiar with its features.
Keep in mind that all the images captured using the trial version of the tool will have a watermark. Dragon Frame is suitable for professionals and experienced animators.
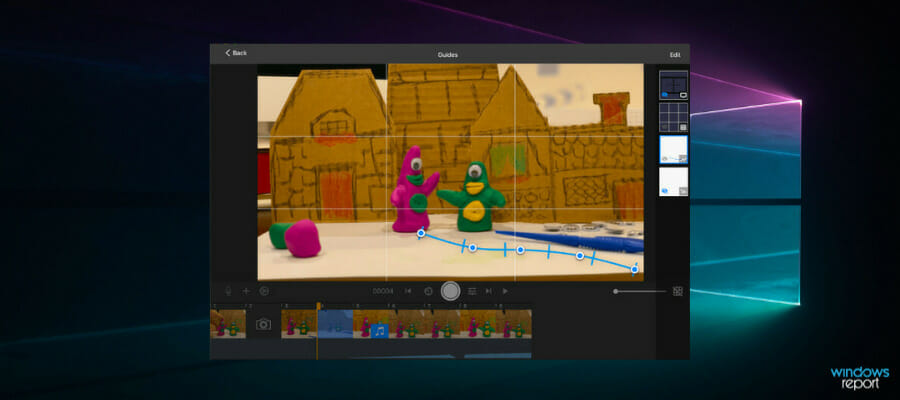
The next solution on our list is Stop Motion Studio, powerful and rounded software that will make your animation movie look as famous as Lego animation productions.
Firstly, using this intuitive software will help you in creating valuable stop-motion videos with its frame-by-frame editor, simplistic timeline, or sound editing tools.
You should know by now that stop-motion animation is a slow process, and you have to take several pictures to create your final creation. However, using simple tools offered by this program you can edit your videos quickly on desktop or mobile versions.
Additionally, using this program you can produce desktop-class videos and edit them by cutting, removing, copy or paste single photos frames and adding them to any position that fits perfectly for the sequence.
Besides that, you can capture the perfect moment with your digital camera because this program supports known camera brands like Canon, Nikon, or Sony.
Therefore, you can try out the software on different devices including Windows PC, Mac, or Android, and enjoy your movies anywhere.
Stop Motion Pro is an interesting animation software that easily connects to your camera or webcam. You can use it to capture and paste images and convey interesting stories through your animated characters.
You can also use markers to track and plan your characters’ movements. The tool can play up to 30 frames per second and allows you to record audio while playing back animation. Lip-sync support is also available.
The software is compatible with dozens of cameras and features advanced project management tools which are very useful when managing long-term animation projects.
Furthermore, you can create your story using practical features offered by this tool, such as tracking movement with markers, smooth playback of 30 frames per second, audio recording, multiple frames with one click, and more.
Stop Motion Pro’s UI is available in five languages: English, French, German, Spanish, and Chinese.
Therefore, take advantage of its user-friendly interface and create your animation films and characters using this robust software.
The next entry is Frames, a powerful stop-motion software designed to produce impressive clay animation or other great animated videos.
With this specialized program, you can dive deep into your animated story and create powerful stories to transmit any message you conceive.
To be more clear, this tool provides help with capturing webcam images or importing folders with images from your digital camera. You can enjoy features like onion skin, chroma key, or time-lapse to simplify the animation process.
Moreover, if you are eager about cartoon animation you can benefit from dedicated tools to make your story alive. For example, you have drawing tools, clip art, and art animation paths, plus more soundtracks to combine narration.
If you want to expose an inspirational digital story, using images text, and videos, this program will not only provide technical help but inspire you to grow out of your comfort zone.
All in all, using Frames you will perfect your video animation skills and get the opportunity to express the stories you always needed to share with the world.
iKITMovie is a stop motion animation tool compatible with Windows XP/Vista/Windows 7/8 or Windows 10 PCs.
If you’re into LEGO or claymation, this is the perfect tool for you. Most importantly, unlike most stop-motion tools, this program can be used by users of all ages, including older kids and teenagers.
IKITMovie features over 2,200 free sound effects and background music tracks to customize your creations.
The tool also features a green screen that allows users to replace backgrounds with still or moving images. This feature is very popular among animators using this type of animation technique.
If you’re new to stop-motion animation, you can watch step-by-step video tutorials to learn how you can better use the tool. IKITMovie is perfect for students and educators.
With that being said, you should use this solution if you need influential animation videos and qualitative editing features.
AnimatorHD is a Windows-based software that you can use to create stop motion and time-lapse animation.
The tool also supports stereoscopic 3D movies and DSLR cameras, including Canon and Nikon Live View, as well as 3D stereo shooting.
You can use your laptop’s webcam and other video recording devices as input sources. The RAM Player with live frames allows you to control and edit each frame according to your needs.
Once you’re satisfied with the results, you can export your animations to After Effects and further enhance them.
In addition, using this software you can benefit from powerful traits such as advanced frames and AVI movie export, multi-exposure for video feed, variants of each sequence, 3D stereo live preview, camera preview, and many more.
That being said, this software solution will offer all the functional resources you need to create unbeatable stop-motion films.
So, we’ll end our list of the best stop-motion animation software here. If you’ve used other similar tools that you think we should add to this list, let us know in the comments below.
We will show you today how to enter recovery mode in Windows 11. This will come in handy when you try to figure out what’s causing your computer to act up, display errors, or be buggy.
Users can boot their computers into recovery mode, which provides a more stripped-down experience by deactivating some programs and drivers.
How can I boot in recovery mode in Windows 11?
1. Via Settings
Go to the Settings app and navigate Recovery under the System section.
You should click on the Restart now button next to Advanced startup. That’s it! Your PC will enter recovery mode.
2. Press F11 during the system startup
This is one of the most basic approaches to enabling recovery mode to be used.
You can enter recovery mode by pressing the F11 key immediately after powering your computer, and you will enter Windows 11 recovery mode from the boot.
It should be noted, however, that this strategy may not be compatible with all PCs. For example, some may use the F9 or F12 keys, so verify with the PC maker to ensure this is the case.
3. Restart and press Shift
Click on the Start icon, then tap on the Power button.
Press and hold the Shift button and click on Restart now. That’s it! You will now be redirected to the recovery mode menu.
Lastly, please type or copy-paste the following command and let it run. You will be redirected to the recovery mode menu: shutdown /r /o
What does the Recovery Mode do?
Recovery mode makes it possible to debug, repair, and restore the system, a recovery environment (WinRE) featuring several Advanced Startup Options.
More specifically, the recovery mode in Windows 11 inherits the majority of the recovery options from previous operating systems, such as:
Startup Repair – Checks for and corrects issues that prevent Windows from loading.
System Restore– If your computer is experiencing system troubles, you can restore it to a prior restore point.
System Image Recovery– Restore your computer from a system image backup that was taken before.
Command Prompt – Advanced troubleshooting can be accomplished by using various command-line options.
Startup Settings – Change how Windows starts up and see if it helpsto debug.
The Microsoft page gives more information on what these Windows 11 recovery methods are intended to do. However, if you want to enter it, follow one of the methods below.
Before going to recovery mode, you must get into clean boot mode and identify if the issue is related to third-party apps.
Alternatively, you can try to fix your Windows with the help of a professional repair tool. This will provide you with a much safer and smoother experience.
Summary
You may find yourself addressing a problem that necessitates restarting your computer in Safe Mode numerous times. However, if you have to go through the entire method we’ve just described every time you restart your computer, it can become a real hassle.
The System Configuration tool included with Windows provides the opportunity to enable the safe boot option for your computer. Restarting the PC effectively compels Windows to boot into Safe Mode every time you do so. Check our keyboard not working for recovery mode if you’re experiencing issues.
Was this guide helpful for you? Also, do let us know in the comments section below by leaving us a review. Finally, you can share any other methods you have in mind with us.
Many users reported a usual desktop icon spacing on their PC. This isn’t a major issue, but it can cause inconvenience. Luckily, there are ways to fix it.
Why are my icons spread out on my Desktop?
Multiple monitor setups are usually responsible for this issue because certain apps don’t handle them well. In some instances, new applications can be positioned randomly on your screen.
How do I change the spacing between icons on my desktop?
1. Manually resize the icons
Hold the Ctrl key then press + or - keys to adjust the size and spacing of the Desktop icons.
As you increase the size, the spacing increases, and vice versa.
Navigate to the following location: HKEY_CURRENT_USER\Control Panel\Desktop\WindowMetrics
Click on WindowMetrics on the left pane then double-click on IconSpacing on the right pane to modify the value.
Choose any value between -480 to -2730 (-480 is the minimum spacing, -1128 is the default and -2780 is the maximum spacing).
Tap OK to save changes.
These steps are for horizontal spacing. For the vertical spacing:
Click on WindowMetrics on the left pane then double-click on IconVerticalSpacing on the right pane to modify the value.
Choose any value between -480 to -2730 (-480 is the minimum spacing, -1128 is the default icon spacing and -2780 is the maximum spacing in Windows 10).
Tap OK to save changes.
Restart your computer to save the changes.
If you are doing a free size and selecting random values, you may have to repeat these steps a few times until you get your desired spacing.
If you would like to do more with your Desktop, we have outlined some desktop customization software that will address a lot of your needs.
If you struggle with organization, you will be relieved to find out that there exist Desktop app launchers to free up some space and streamline your work.
Keep in mind that other issues can sometimes occur, and users reported that desktop icons keep moving, but we tackled that in a separate guide.
Do let us know if you have been successful in adjusting your Windows 10 icon spacing in the comment section below.
Microsoft’s Windows 11 operating system allows you to simultaneously launch four to six windows by dividing the screen. But several users reported that the split screen is not working in Windows 11.
Several users have encountered the error, and some shared it online. However, we saw a shortage of reliable solutions and took matters into our hands. So, let’s find out how you can fix things when the Windows split screen shortcut is not working.
Why is the split screen not working on Windows 11?
Here are a few reasons why the split screen is not working in Windows 11:
Snap windows feature is disabled – In most cases, users later realized that the snap windows feature was disabled.
Corrupt system files – If the system files are corrupt, it would trigger a range of issues and affect the operating system’s functionality.
Outdated or corrupt display driver – Running a corrupt or outdated driver is just as likely to cause the problem, and this is usually the case after you have just upgraded to Windows 11.
How can I fix Windows 11 split screen if it’s not working?
Before we try the slightly complex solutions, here are a few quick ones to try:
Restart the computer.
Update Windows 11 since it could be a bug in the current version.
If the split screen in Windows 11 is working, but you find one half to be lighter/darker than the other, verify the same in the system BIOS. And if the problem persists, it’s likely a problem with the display.
HP device users should disable Focus Mode in the HP Command Center, a feature often responsible for affecting the brightness in split screen on Windows 11.
If these two don’t work, head to the fixes listed next.
1. Enable Snap windows
Press Windows + I to open the Settings app, go to System, and click on Multi-tasking.
Now, switch the toggle button to enable the Snap Windows option and click on it to see a drop-down menu with all the detailed splitting scenarios.
The feature should have been enabled by default once you installed Windows 11 on your computer. However, due to specific bugs or personal errors, the option ends up being disabled. Once you enable it, verify whether Windows 11 split screen is still not working.
2. Update the graphics driver
Press Windows + R to open Run, type devmgmt.msc in the text field, and hit Enter.
Expand the Display adapters entry, right-click on the graphics adapter, and select Update driver.
Now, select Search automatically for drivers.
A compatible driver might not have been installed if you just upgraded to the latest iteration. So, check for it and even try manually updating the driver to fix things when Windows 11 split screen is not working.
If the driver wasn’t properly installed or you just couldn’t find the right one, we recommend using an automated driver updater, Outbyte Driver Updater.
Outbyte Driver Updater
Have your graphics driver updated with all other outdated drivers to avoid future errors.
Press Ctrl + Shift + Esc to open the Task Manager, go to the Details tab, and locate the explorer.exe task. Once you have found it, right-click on it and chooseEnd Task.
Press Windows + S to open the Search bar, type cmd, right-click on the result, and select Run as administrator.
Click Yes in the UAC prompt.
Paste the following commands one at a time, and hit Enter after each to run the DISM tool:DISM /Online /Cleanup-Image /ScanHealthDISM /Online /Cleanup-Image /RestoreHealth
Similarly, execute the following command to run the SFC scan:sfc /scannow
If that does not work, you can try using a specialized third-party repair software, which will scan your PC and repair it if the error is related to corrupted system files or missing DLLs.
5. Use the keyboard shortcut
If the previous methods didn’t work, you could use the keyboard shortcut to split the screen in Windows 11 manually.
Open the program you want to split, hold the Windows key, and press the desired arrow key. For instance, to place the current program to the left, hit Windows + Left, and the other open applications appear on the right.
That’s all! It would be best if you now had the split screen feature working in Windows 11 and could easily place programs across the screen, thus increasing productivity.
Please let us know in the comments section below which method worked best for you and which operating system version you prefer to use the most. Thanks for reading!
Having low vision due to age or illness can become extremely frustrating, especially if you’re the type of person that enjoys reading or playing games off of devices that have small screens.
While software for text magnification does exist, it can be pretty tricky, especially for those that aren’t too tech-savvy.
That is why physical magnifiers were invented, and we’ve compiled a list of what we think are the best ones yet.
Note: All the prices and offers in this article are subject to change, so be sure to check the official product page to get the latest deal. If the product or offer you’re looking for is no longer available, you can try to find it on its official manufacturer page or get another one from our list.
What is the best screen magnifier for the visually impaired?
The Kantek MAXVIEW LCD Monitor Magnifier is a simplistic screen modifier for monitors of all the most common sizes. It is manufactured with an optical grade acrylic Fresnel lens with a high groove density which provides sharps and enhanced imagery with minimal distortion.
The screen itself consists of concentric grooves, and the contours of the grooves act as spatial refracting surfaces that bend the light rays to magnify the visual image, more than doubling its size.
Pros:
Comes in sizes between 15 and 24 inches
Fully assembled, elegant, lightweight, and patented design
Designed for LCD monitors
Manufactured of an optical grade acrylic Fresnel lens
Adjustable magnification minimizes distortion
Designed for general office use in a normal ambient light environment.
Light tint for contrast enhancement thereby increasing readability
Cons:
Not suitable for laptops
Any intense lighting in the perimeter of the work area will cause a distracting visual
If you’re looking for a simple way to magnify a telephone or tablet screen, or even a book, then the simplest of all solutions is the MagniPros 3X Large Ultra Bright LED Page Magnifier.
Put in very simple terms, it is basically like a rectangular magnifying glass that doesn’t distort the image you are hovering over, and it also features bright LED lights to let you read better even in dark places.
It is made to sit comfortably in your hand thanks to the ergonomic design, and the materials and battery efficiency make it so that this device will last for as long as you may ever need.
Pros:
Equipped with 12 SMD led lights which are covered by an anti-glare reflector
Optical grade magnifying lens covers a large viewing area
Designed to last 100,000+ hours not only provide a more evenly lit and brighter viewing area but consume less power than traditional LEDs
It only weighs 6 ounces
The grip of this LED magnifier is ergonomically designed for most hands
The brightness level peaks at 720 lumens
LEDs are designed to last for more than 20 years without burning out or overheating
If you want an efficient way of reading books or the small text off of the screens of phones or tablets, but prefer to remain as stationary as possible, then the Mag&Read Tablet with Workstation is the device for you.
It features an 8-megapixel camera that offers about 20x the magnification, and if your eyesight is severely affected, you can use the integrated text reader to read and playback the text for you.
Pros:
Features an 8-megapixel camera for clear magnification of up to 20x
Includes a powerful reader that quickly scans printed text and reads it
Simplifies the tablet interface to make it easy to do email, browse the web, and more
Displays high-contrast, large text that is adjustable in contrast and size
Operates via touchscreen and voice commands
Includes workstation accessory package to transform your Mag&Read Tablet into a portable desktop video magnifier
Cons:
Mounting and dismounting the workstation accessory can be annoying if you’re on the move
The ViSee Electronic Digital Video Magnifier is pretty much a reversed version of the previous entry. With these devices, you hold the screen or book in place, and you run the optical mouse over it.
The mouse features a camera pointing downwards, and it will record any surface it passes over, projecting it on your monitor TV or any device with a display and RCA input.
The ergonomic design and compatibility with older devices make it an excellent choice for the elderly that are both visually impaired and have arthritis as well.
Pros:
Eight adjustable magnification levels from 1x-32x (based on a 21-inch screen)
Zoom in/out digitally.
Image system: NTSC.
Video connector: RCA.
Four display modes: full color, black type on white, white type on black, and high contrast
Bright long-lasting LED lights illuminate the reading material for a clearer image
Screen Lock: freeze a text image on the screen for easier reading
An oversized, ergonomic mouse for comfortable use, even for those with arthritis
4 roller wheels for easy and smooth moving on reading material
Simple to use with single clicks for all features and functions
The green ON button lets you know the mouse is switched on
80-inch (nearly 7-ft. long) Video Output Cable
Compatible with any TV/monitor with RCA input
Cons:
You need to be careful when using on screens not to accidentally scroll
The Merlin HD is a screen and book magnification tool that features an HD camera to provide high-resolution images on an LCD screen.
It comes in both 22-inch and 24-inch LCD sizes, and it is extremely maneuverable, as the screen easily pivots horizontally and vertically to provide the most comfortable viewing position.
It also has a wide range of adjustable magnification and adjustable viewing modes that allow you to personalize the Merlin HD viewing experience.
Pros:
24-inch LCD Monitor
Projects high-quality images
Easy-to-use tactile controls
Cons:
Pretty bulky and mostly suitable for those that don’t go out too much
It is extremely frustrating when old age or an ailment can prevent you from doing your favorite hobbies, and the same could be said about the visually impaired and their ability to read, look at pictures and watch movies.
Thankfully, technology has evolved to the point where it lets you bypass these minor inconsistencies, allowing you to resume your favorite hobbies as if nothing happened.
Have you recently purchased a Microsoft Arc Touch mouse for your PC operating system, and it is not working correctly? Unfortunately, you are not alone, as this is a regular complaint from many users.
Fortunately, it is an issue that can be easily fixed with the correct information. And the proper fixes for the Microsoft Arc mouse not working problem is what we have prepared for you in this guide.
Why is my Microsoft Arc Mouse not working?
If your Microsoft Arch Touch mouse does click but not working, it might be due to issues with your PC or the device. Below are some of the causes as reported by users:
Outdated PC: The first thing to check if the Microsoft Arc mouse is not responding is whether your PC is up-to-date. If it is not, you need to install the latest updates, including the optional ones.
Wrong power setting: The devices connected to your PC need the power setting to function correctly. We have found the power setting of the Bluetooth adapter to cause the Microsoft Arc not to connect or working issue. A quick way to fix this is to fix this effectively.
Outdated mouse driver: An obsolete driver is the chief cause of many issues, including this one. To get your mouse working again, you need to update the driver to the latest version.
How can I fix Microsoft Arc Mouse if it’s not working?
Before delving into the detailed fixes in this section, it is advisable to go through the preliminary fixes below and see if they fix this issue:
Test the mouse on another PC to know if it is faulty and needs to be replaced.
Enable and disable the Airplane mode on the Taskbar for some minutes.
If these do not work, you can now proceed to the fixes below:
1. Refresh the connection
Open the Settings app and choose the Devices option.
Select the Microsoft Arc mouse option from the list of connected devices and click the Remove device button.
Now, scroll up and click Add Bluetooth or other device.
Choose the Bluetooth option.
From here, select the Microsoft Arc mouse option.
Finally, tap the Pair button.
The Microsoft Arc mouse not working issue can be caused by simple connection problems. Refreshing the connection should help restore normalcy in this case.
2. Install the latest Bluetooth driver
Press the Windows key + X and Device Manager.
Double-click the Bluetooth option to expand it, and right-click the device there.
Choose the Uninstall device option.
Now, click the Uninstall button to confirm the action.
Since the Microsoft Arc mouse is a Bluetooth device, it requires the latest drivers on your PC to work correctly. You are downloading the newest version of the driver from the Intel website has worked for many users. So, you can give it a try too.
Alternatively, you can use a specialized tool to update your Bluetooth driver automatically. This helps to remove the ever-present risk of installing the wrong drivers.
3. Run the Bluetooth troubleshooter
Press the Windows key + I and select the Update & Security option.
Choose Troubleshoot in the left pane and click Additional troubleshooters.
Select the Bluetooth option and click Run the troubleshooter.
If the Microsoft Arc mouse is not working on your PC, it might be because of minor glitches. The Bluetooth troubleshooter should help diagnose the cause of these glitches and recommend applying the fixes.
4. Disable power management for the Bluetooth adapter
Press the Windows key + X and select the Device Manager option.
Expand the Bluetooth option and double-click the adapter there.
Click the Power Management tab at the top and check the box for Allow the computer to turn off this computer to save power.
The power management feature can put your adapter to sleep when it needs to save power. Unfortunately, this can cause the Microsoft Arc mouse not working issue.
5. Update the PC
Press the Windows key + I and select the Update & Security option.
Click the Check for updates button.
Click the Download and install button to install the latest update, including the optional ones.
If your Microsoft Arc mouse is connected but not working, it might be because you don’t have the necessary updates. Restart your PC after installing the updates.
The Microsoft Arc mouse not working issue, takes away the dynamicity of the wireless device. But if you follow the fixes in this guide carefully, you should be able to solve the problem effectively.
If you are facing other issues like
Feel free to let us know if the solutions in its guide helped you solve the problem in the comments below.
If you need to create an animated video, there’s plenty of animation software for Windows. Animation software falls largely into 2D and 3D categories.
The 3D applications develop CGI videos, whilst 2D packages enable users to set up video animations based on 2D illustrations.
Moreover, the history of animation started hundreds of years ago with rudimental resources, of course. One of the first animations was created in the 1900s by a cartoonist named Emile Cohl, even before the Disney era.
The animation was reproduced in a short movie called Fantasmagorie, using only hand-drawn animation on individual frames.
Today, we have high-tech computerized animation and visual effects that can provide unique animation stories available for everyone out there. Here’s a quick preview of our favorite picks:
Adobe Animate – Excellent 3D animation software
Autodesk Maya – Best animation app for Mac
Animaker – Built-in custom character builder
Visme – Best animation program for beginners
Harmony – Best 2D animation software
Viddyoze – Best video animation software for social media
Moho – Top-notch cartoon maker utility
Blender – Best open-source animation software for Windows
Animation Desk – Nifty overlay of adjacent frames
Even though CGI animated film is prevalent in cinema, 2D animation programs are far from redundant. This is some of the best video animation software for Windows.
Note: All the prices and offers in this article are subject to change, so be sure to check the official product page to get the latest deal. If the product or offer you’re looking for is no longer available, you can try to find it on its official manufacturer page or get another one from our list.
Adobe Animate, previously Flash Professional, is Adobe System’s latest multimedia animation software. Many choose Adobe Animate to create rich Flash content and animated video for the web. It’s great for game development, movies, and a website video.
Adobe Animate is packed with a variety of graphic design and drawing tools such as customizable vector art brushes, a rotatable canvas, and colored onion skinning for configuring animations.
With the software’s TimeLine and Motion Editor tools, you can create flowing animations with natural motion. Users can create both 3D and 2D animations with some terrific effects for landscape details such as clouds, flowers, trees, etc.
Adobe Animate supports 4K resolution so you can export and optimize videos for Ultra HD display. The software is also integrated with Creative Cloud gives you cloud storage and access to Adobe Stock images, videos, and graphics.
Here are the main features of Adobe Animate CC:
Asset panel with clips and animations
Adobe Fresco live brushes
Web or mobile content for games/ads
Publish on desktop, mobile, or TV
“Getting started” tutorials
Adobe Animate CC
Adobe is the best professional multimedia animation software that also supports 4K video for unprecedented quality.
Maya is the industry-standard software for 3D animations that has a comprehensive set of tools for animation, modeling, and rendering.
It’s compatible with Windows and Mac OS X and has generated graphics and effects for films such as Monsters Inc, Finding Nemo, Avatar, and Up and Hugo.
This isn’t really software for hobby animators, and a one-year subscription for Maya is pretty expensive. Blender might be a better value alternative. Nevertheless, you can still try out a one-month free trial for the software.
Maya comes packed with extensive toolsets for 3D modeling, motion graphics, texturing, and scene animations.
The latest edition includes a new Time Editor for non-linear 3D animation editing so that you can easily navigate between key-level details and clip-level views.
With its motion graphics tools, users can create stunning animations and effects with instanced objects. In addition, the software enables you to add a wide variety of atmospheric, liquid, and other 3D dynamic effects to animations.
So Maya is a serious bit of kit with which users can create animations and effects for animated films, games, or TV series.
But as this software has advanced tools, it also has hefty minimum system requirements amounting to 8 GB RAM, 4 GB HDD storage, and 64-bit Intel or AMD multi-core processor. Quadro M, GeForce GTX, FirePro W, and Radeon R9 are among the required graphics cards.
Here are the main features of Autodesk Maya:
3D modeling tools
Revamped UV toolkit
Brush sculpting tools
3D animation and rigging
Indie game workflow
Autodesk Maya
Some of the most important blockbuster movies like Avatar and Finding Nemo were created using Maya. Enough said.
Animaker is not like the first two giants from our list but it still boasts a huge animated library. This tool is directed more to market professionals who need to create marketing campaigns with simple graphics, intros, or instructional videos.
And again, unlike the two software above, Animaker is pretty easy to use and learn because it’s accompanied by a pretty big database with guiding clips to train you on how to use it.
You will be able to create up to 720 types of animated videos. Just to mention a few there are 2D and 2.5 animations, whiteboard animation, infographics, and many many more.
Even the interface is pretty friendly as you will have familiar functions like cut and copy/ paste, drag & drop, edit and record but also specialized functions like camera, record, transition, and enter/ exit effects.
And as it’s mostly for marketing, you will be able to add your own backgrounds and branding, sounds, music, and even voice recordings.
Animaker offers a very good feature/ price balance so check it out to see if it fits your requirements.
Here are the main features of Animaker:
Professionally crafted templates
Video asset library
Custom character builder
20+ facial expressions
Smart move functionality
Animaker
Animaker comes with one of the largest animation libraries and it’s very easy to use to get the perfect results.
Visme is a graphic presentation tool created for teams or beginners who need to offer animated visual experiences.
The software is quite intuitive and includes a variety of templates and pitch decks to easily showcase your ideas and visions in an interactive manner.
With multi-functional support, the platform can guarantee diverse tools for different presentation types like charts and infographics, social media templates, visual documents and reports, mockups, etc.
Besides, you benefit from thousands of professional templates, animated icons, or characters that will impress your managers or important clients.
It’s worth mentioning that you’ll be able to animate every element. It’s possible to animate objects, icons, or people in your presentation to add extra value and dynamics.
Here are the main features of Visme:
Animated vector icons
30+ data widgets like charts, statistics, figures
Collaboration with your team
Interactivity tools
Photos & videos add-on
Visme
Need to better present your pitch? Using this animation presentation tool will capture your message flawlessly.
Harmony, formerly Toon Boom Studios, is one of the industry-standard packages for 2D animation. There are three upgrade options from Toon Boom Studios to the Harmony editions. They are Harmony Essentials, Advanced and Premium versions.
Harmony is software at the cutting edge of 2D animation technology. This software blends the more traditional art tools with digital alternatives. It enables its users to combine 2D animations with imported 3D models and add a range of special effects to animated videos.
One of the best things about Harmony is its built-in compositing with which you can set up flexible cut-out character rigs.
The program enables users to set up 2D game animations that can be exported to a variety of game engines. Harmony also supports more than 13 alternative file formats.
Viddyoze – Best video animation software for social media
We have chosen this tool for all people working in video marketing or who need to create videos for academic purposes. Viddyoze is a versatile tool that will assist you in creating beautiful animations in 3D.
It is perfect for web marketers and for video-editing professionals because it allows you to create stunning intros, outros, call-to-actions, and social actions.
Even if it’s focused on short/generic creations, it remains a powerful tool to use when you want to enhance your videos in terms of quality and visual aspects.
It has a pretty fair price and includes all Viddyoze features so you can create amazing animations, have full support for any questions, and have the best export quality for your videos.
Moho, formerly Anime Studio, is vector-based 2D animation software compatible with both Windows and Mac OS X. This is also renowned software in the animated film industry that has a Pro and Debut edition.
The Pro edition has more extensive options, but Debut is a better program for beginner animators.
This software enables you to sketch out animations with freehand drawing tools and brushes, or you can also use its cartoon maker’s character wizard. Moho’s revolutionary bone-rigging system enables users to realistically animate cartoon characters.
The latest version of Moho Pro includes a variety of new tools such as Bezier handles that create smoother line bends.
Moho Pro also includes realistic motion blur effects to add to moving objects, and both versions have an updated GUI with revamped layers and library panels.
Blender – Best open-source animation software for Windows
Blender is an open-source 3Danimation software that has extensive options for 3D graphic editing. This is a multi-platform application compatible with Windows, Mac OS X, and Linux with which you can set up some stunning 3D models and animations.
There’s also a portable version of Blender for USB drives. Click the Installer (.msi) button on the software’s website to save its setup.
Blender includes a multitude of animation, lighting, texture, and modeling tools. The software has photorealistic GPU and CPU rendering that supports HDR lighting.
This program enables users to sculpt organic subjects with its sculpting toolset that provides 20 alternative brushes, mirrored sculpting, and Dynamic Topology sculpting.
It has a variety of simulations with which you can add realistic smoke, fluid, fire, and particle effects to animations. Blender is ideal for game animations as it includes a full 3D game engine that supports Open GL and Python scripting API.
Another good thing about Blender is its built-in video editor with which you can edit videos. The software has a flexible UI and a variety of extensions.
It also incorporates import/export options and is compatible with numerous video, image, and 3D file formats. Overall, Blender is probably the best open-source video animation software for Windows.
Animation Desk is one of the best free video animation apps for Windows, Android, and iOS mobile devices This app enables users to combine separate picture frames into a single animation.
There’s also an Animation Desk Pro version that has extended export formats, tag and annotation options, more extensive editing tools, and Kdan Cloud storage space.
Animation Desk has a UI that’s based on a traditional animation desk with separate frames that you can sketch on. It includes numerous paint tools such as crayons, fountain pens, pencils, and a triumvirate of brush types.
The app has onion skinning that provides users with an overlay of adjacent frames, and it includes four frame rates for users to select.
You can also crop, move, and delete frames with the app’s frame manager. So this is an intuitive and comprehensive app that brings doodles to life.
So those are some of the best software for video animation. You can set up fantastic 2D or 3D animations and effects for videos, flash content, and games with those programs.
Harmony and Maya probably have the most extensive toolsets and options, but Moho, Adobe Animate, Blender, and Animation Desk offer better value.
We compiled this animation software list with user experience in mind. Do share your opinion with us regarding these solutions and let us know how they worked in your case.
During the Ignite 2022 Conference, Microsoft announced that it will be rebranding Office 365 to Microsoft 365. This cuts across the Office app on Windows, mobile, and the web. And it now seems that the company is well on its way to better positioning itself for the future.
According to the Microsoft 365 Roadmap, Microsoft announced that it has commenced rolling out the Microsoft 365 app for the web. The company has further indicated that the rollout will be done in phases, therefore, it will be available to customers gradually in the coming weeks.
According to Microsoft:
The Microsoft 365 app enables you to create, share, and collaborate all in one place. You can create new content using a wide variety of apps and templates, access your files and apps, and leverage the intelligence of Microsoft Graph to deliver insights and recommendations for making work easier. The app also integrates third-party apps and storage solutions you’ve purchased.
Some of the changes that customers can look out for with this feature tagged 98173 include a new URL, a new visual style, and a new favicon which is similar to the new Microsoft 365 icon. This is on top of a couple of new features that Microsoft plans on launching in the few weeks to come.
Feed: a new page that uses intelligence from Microsoft Graph to surface relevant content based on who you work with and what you do.
Tagging: a new feature that helps you organize content with custom “tags”, regardless of where the content is stored. Tagging is done on an individual basis and is not seen by others across the organization.
A new Apps module: a more robust experience that connects you to your Microsoft 365 apps, including third-party apps integrated with Microsoft 365.
The feature is expected to hit broad availability by late November 2022. Another notable change to look out for in January is that “links across Microsoft websites pointing to www.office.com will be updated to point to www.microsoft365.com”. Later on, whenever users click on www.office.com they will be redirected to www.microsoft365.com. That said, if you use strict firewall protections, you’ll need to add the domain to your allow list to access it.
It is worth noting that this only applies to the web client, the Office app for Windows, iOS, and Android will transition to the Microsoft 365 app in January 2023. Recently, we also got the chance to have a glimpse of what the app will look like when it will be launched.
Different languages worldwide have unique writing styles, alphabets, and punctuation marks that differ from others. For instance, the upside-down question mark makes little sense to English speakers, but it does in written Spanish. Likewise, using mathematical symbols like the does not equal sign when typing.
What does the upside-down question mark mean?
The upside question mark is a punctuation mark written at the beginning of an interrogative sentence. It indicates that the sentence that follows is a question. Unlike the regular one present on English keyboards, the inverted question mark can’t be found anywhere on the keyboard.
Furthermore, in the Spanish written language and other languages written with the Latin alphabet, punctuation is used to create interrogative sentences.
Its question function is indicated at the start rather than the regular question mark functioning at the end.
However, most users copy and paste the inverted mark because it is unavailable on their keyboard.
Nevertheless, this punctuation not on regular keyboards doesn’t mean it can’t be used or typed in your sentences. There are ways to use it on different devices and operating systems.
How do I type an upside-down question mark?
As said earlier, the upside-down question mark can be typed and used on devices like Windows, Mac, and Android. To do this, you need to use specific key combinations depending on the device. Next, we’ll take you through how to use it on your device.
1. Insert it into Windows
Move your cursor to where you want to type the code.
Enable the Num lock option on your keyboard.
Press and hold the Alt key, then type any of the following to insert it: Alt + 168Alt + 0191Alt + 6824.
Release the Alt key.
Note that you can use any of the three key combinations and still get the same result.
Move your cursor to the point where you want the punctuation.
Press the following keys simultaneously to type the upside-down question mark: Option + Shift + ?
4. How to type the upside-down question mark on Android?
Go to where you want to put the punctuation.
Tap your screen to open the keyboard, then press the number/special characters to switch the button in the bottom-left corner of the keyboard.
Press and hold the question mark button until a pop-up appears with an option for the upside-down question mark.
Before releasing the key, swipe to the right or left based on your keyboard to select it.
The above steps apply to iPhone users also.
We have other detailed articles about typing more characters not available on your keyboard. For example, read how to type the does not equal sign on your PC.
Remember how Google and other popular search engines throw automatic suggestions at you as soon as you type in search suggestions on your Windows? Microsoft has now introduced a similar feature for Windows 11 users.
The feature is Suggested action and is Microsoft’s latest attempt to simplify your actions on Windows. In this article, we look into how you can use and make the most out of Suggested action on Windows.
How to use Suggested action on Windows 11
With the Suggested action feature enabled, you can schedule your phone calls and events automatically. A new suggestion will pop up as soon as you copy a phone number or set a future date.
Before we get started, though, let’s first look at how to enable the Suggested action feature in the first place. Head to the Settings menu to get started and click on System. From there, click on Clipboard and then toggle on the Suggest action button.
Let’s go over how to make a call with Suggested action first. First, you need a calling app for your Windows PC. It doesn’t matter which app you use; Zoom, Vimeo, Hangouts, etc., are all excellent options.
Highlight and copy the phone number you’d like to call. Then, right next to the Call number option, select the desired calling app, and follow the on-screen instructions to make your call.
How to use Suggested action for events
Similar to calls, before you use the Suggested action, you must have a calendar event app on your PC. Note that if you’re using the default Calendar app, this method will work just as well. To get started, select and highlight a date or time, and click on Create event.
From there, select your desired app, and fill in all the other relevant details for your event from there.
Using Suggested action on your Windows 11
So, that’s all about setting up and using Suggested action on your Windows. Note that this feature is only applicable for Windows 11 computers, so if you’re on Windows 11, you’re out of luck. Even if you’re using Windows 11, you first need to have Windows 11 22H2 update installed on your PC before you can use the Suggested action on your PC.
EIZO is one of the world’s top display manufacturers. It has been around for over 50 years in the industry and it’s well-known for creating high-performance displays that deliver some of the best imagery that money can buy.
However, anyone that owns or has ever owned an EIZO monitor knows that they don’t come cheap, and that is why we decided to compile a list of the best EIZO monitors that won’t empty your pockets.
This is because you’re going to make quite an investment anyway, so you might as well buy an item that you truly feel good about in the process.
Note: All the prices and offers in this article are subject to change, so be sure to check the official product page to get the latest deal. If the product or offer you’re looking for is no longer available, you can try to find it on its official manufacturer page or get another one from our list.
This EIZO EV3285FX-BK 4K 31.5″ widescreen TFT IPS LCD monitor is a great choice too, especially if you want the very best image quality.
The touch controls are very impressive. They respond immediately, while the 4K resolution makes a huge difference when it comes to those passionate about design, photography, and not only.
They can see more detail on the screen than ever before and this happens without needing to zoom in and out all the time.
The EIZO CG2420-BK monitor lets your imagination soar with a professional-level model for use in photography, design, print, and post-production.
The monitor features a built-in self-calibration sensor for hassle-free monitor maintenance and it works flawlessly, as confirmed by users all over the world.
Additionally, vivid colors are reproduced to industry standards and the exceptionally high contrast is great for producing true blacks.
The EIZO FlexScan EV2730QFX monitor features a unique 1920 x 1920 resolution that provides users with 78% more pixels compared with a standard widescreen 1920 x 1080 monitor.
This extended vertical space is convenient for displaying large amounts of information, making it an excellent choice for work environments and other activities where multi-tasking is a must.
The FlexScan series includes frameless monitors that let you focus more on your projects and less on your actual monitors.
It also provides you with a reduction in glare and eye fatigue, letting you work in comfort for long hours.
Why is the EIZO FlexScan EV2450FX-BK 23.8-inch screen LED-Lit monitor worthy of your full attention? Well, let us tell you from the start about the fact that the smart screen adjusts to the condition of the natural light in the room.
A clear view from all angles is guaranteed as well, so there is no wonder that users say how much this monitor helped them release their eye strain.
This monitor adjusts to every height, every angle, and every position too and it won’t take up that much space on the desk.
As you may have probably guessed already, EIZO monitors are not exactly for everyone. They are used for graphics design, and even the budget ones come with quite a hefty price tag.
However, the few that can afford and need an EZIO monitor for their home or work will truly appreciate the quality product that they are about to get.
This article is part of a generous selection of monitors you can currently find on the market. Take a closer look and don’t hesitate to let us know your pick in the comments area below.
USB flash drives are extremely useful if you need to transfer files from one PC to another, or if you need to create a backup.
We checked out some of the most popular and highly recommended USB flash drivers. Make sure you take a look at our list and pick out the best one for your needs.
Note: All the prices and offers in this article are subject to change, so be sure to check the official product page to get the latest deal. If the product or offer you’re looking for is no longer available, you can try to find it on its official manufacturer page or get another one from our list.
The first thing that you’ll notice about SanDisk Cruzer Fit is its size. This USB flash drive offers up to 64GB of storage space.
Due to its size, this USB flash drive is perfect for your laptop, console, or any other device.
This is a USB 2.0 flash drive, so it doesn’t offer the same transfer speed as other models. However, if you’re looking for a small and affordable USB flash drive, Cruzer Fit is perfect for you.
Kingston DataTraveler 100 is a USB 3.0 flash drive with a smooth design. Regarding the transfer speed, this drive offers 100MB/s read and write speed. Just like all other USB 3.0 devices, this one is compatible with USB 2.0.
Unlike other USB 3.0 drives, this one is rather affordable, and you can get an 8GB model for about $6. If you need more storage, there are models up to 128GB available.
Kingston DataTraveler 100 offers decent transfer speed, a great design, USB 3.0 support, and an affordable price, so you should definitely check it out.
PNY Pro Elite 512GB is a USB 3.0 device that offers a reading speed of 400MB/s and 250MB/s writing speed. Compared to standard USB 2.0 drives, this one is about 80 times faster.
Besides the speed, this device also comes with a great design. PNY Pro Elite is a capless drive and it has a premium gunmetal finish, so it looks impressive. This is a high-quality device with an impressive design and great speed.
SanDisk Extreme Go is a high-quality USB 3.0 flash drive. The drive offers to write speeds up to 150MB/s. This drive is about 35 times faster than regular USB 2.0 drivers.
This means that you can transfer a movie or a music collection to the flash drive in seconds. The drive comes with the SanDisk SecureAccess software that protects your files from unauthorized access.
In addition, this device also comes with a durable casing that will protect it from shocks. SanDisk Extreme Go is a fast device with a great design.
Kingston’s Data Traveler Generation 4 (DTIG4) USB Flash drive features USB 3.0 for quick and easy transfers of your favorite data.
It has a practical design and also fashionable colors for specific capacities (8GB Yellow, 16GB Blue, 32GB Red, 64GB Violet, 128GB Green).
Its backward is compatible with the existing USB 2.0 ports, and it has a practical cap to protect the USB plug. This Kingston Digital 32GB Data Traveler Generation 4 has a five-year warranty, free technical support, and legendary Kingston reliability.
Samsung BAR Plus is another USB 3.0 flash drive. This drive offers read speeds up to 300MB/s, so it’s perfect for large files. Despite its speed, this drive also has both a stylish and sturdy design.
Thanks to Samsung 5-Proof Technology, this drive is waterproof, shockproof, temperature-proof, magnetic-proof, and X-ray-proof. The drive also has a large keyring hole, so you can easily attach it to your keychain.
Samsung BAR Plus USB 3.0 is both a stylish and durable device, and you can purchase the 128GB model on Amazon.
Keeping your files protected is important, and in order to do that, you’ll need a rugged USB flash drive. Kingston DataTraveler R3.0 G2 has a shock-resistant rubber casing that protects your drive from shock or dirt.
In addition, this drive is water-resistant and it can withstand water depths up to 1m for 1 hour. The drive is rather durable, and the USB 3.0 standard also provides you with fast transfer speed.
Kingston DataTraveler R3.0 G2 has 120MB/s read and 25MB/s write speed which is decent for its price. If you need more storage space, there are also 32GB and 64GB models available.
This drive is rugged and affordable and it has a decent transfer speed, so it will be perfect for any user.
The Samsung MUF-64AB 64GB flash drive helps you to get secondary, upgraded storage for your devices. It has USB 3.1 speeds and Samsung-trusted reliability.
It was designed to seamlessly stay in your device, and always be ready for use. This great flash drive has read speeds up to 300 MB/s.
Samsung’s leadership in flash memory makes the FIT Plus a trustworthy drive to store your valuable data.
The type-C USB connector is designed for tablets and smartphones, but some PCs use it as well. SanDisk Ultra USB Type-C flash drive is a USB 3.1 device and it offers transfer speeds of up to 150MB/s.
The device has a retractable design that will protect the USB connector at all times. Even though this is a USB 3.1 flash drive, it’s fully compatible with USB 3.0 devices.
We have to mention that this device is designed for tablets and smartphones that have a Type-C connector. If you don’t have a Type-C connector on your PC, you’ll have to use an appropriate adapter to transfer your files.
Now you can store and protect your data with the SanDisk Cruzer Glide USB Flash Drive. It is available in capacities of up to 256 GB.
The Cruzer Glide USB Flash Drive features an easy-to-use retractable slide-in/out design, protecting the USB connector from damage when not in use.
You can also create a private folder on your drive thanks to the SanDisk SecureAccess software. This 128-bit AES encryption software makes it easy to password-protect critical files. You only have to drag and drop the desired files into the vault, and they’ll be protected.
The Micro Center USB Flash Drive is a 3.0 flash drive with read/write transfer speeds up to 70MB/s and 5MB/s respectively. It is constructed from quality components and strictly tested to offer well performance.
The memory stick’s hard plastic cover prevents rough treatment. This USB flash drive has 64GB capacity and meets your needs of daily use.
Just plug in the thumb drive then start data storage, backup, and transfer between devices and locations. It supports Windows OS and is compatible with PC, laptops, TV, cars, Audio, etc.
The Netac USB flash drive 32GB is a reliable and secure drive, compatible with Windows 7/8/10/Vista/XP/Unix/2000/ME/NT Linux/macOS, and compatible with USB 2.0.
You only have to plug in the thumb drive, then start to transfer and store data between devices. (there is no need to install any software).
This great flash drive has a size of 58mm×19.5mm×10.8mm, and it helps keep your digital files in the mini size, but also stay with them in your pockets.
The 360° rotated design is made from stainless steel, and the interior part is made of ABS plastic.
If you have sensitive files on your flash drive, you’ll need to protect them properly. Apricorn Aegis is a dust and water-resistant device with an IP58 certificate.
This drive will also encrypt your files using FIPS 140-2 Level 3 and Military Grade Full-disk 256-bit AES XTS Hardware Encryption. In order to protect your files, you can set a 7-16 PIN code.
This is a USB 3.0 device, so it will offer great transfer speed. Apricorn Aegis is a durable and safe device that will protect your files from unauthorized access.
However, such a secure device isn’t affordable, and you’ll have to pay a little for an 8GB model. There are different models available with up to 480GB of storage space.
The great offer from SamData of 2 USB 2.0 flash drives 32GB available in 2 different colors – black and blue, to store different content.
There is no need to install any other software, you only plug in and use it. The metal clip rotates 360° around the ABS plastic body. The capless design can avoid losing the cap, and provides efficient protection for the USB port.
This great flash drive supports Windows 7 / 8 / 10 / Vista / XP / 2000 / ME / NT Linux and macOS. It is also compatible with USB 2.0 and below.
Thanks to the amazing 10 Pack, multi-color 16GB flash drives you can store, organize or share data in separate USB sticks.
These flash drives are compatible with USB 2.0 and backward. There is no need to install any additional drivers to use the flash drive. It supports Win98/ME/2000/XP/Vista/7/8/10, macOS, and Linux.
This drive supports also portable speakers, and car speakers with USB 2.0 ports. It has a 360-degree spinning design and a 12-month warranty.
PNY Turbo is another USB 3.0 flash drive. This drive has a read speed of up to 115MB/s which allows you to quickly transfer your files
Just like all other USB 3.0 devices, this one is fully compatible with USB 2.0. Regarding the design, this device has a sliding collar, and you can easily attach it to any keychain or backpack.
As for compatibility, this device is compatible with both PC and Mac computers. PNY Turbo is rather affordable. There are different models available, and you can get a 256GB model on Amazon.
SanDisk iXpand is another USB 3.0 drive, but unlike other devices on our list, this one comes with a Lightning connector. Thanks to the Lightning connector, you can easily transfer files from your iPhone or iPad to this flash drive.
Thanks to the flexible Lightning connector you can easily connect this drive to your iOS device without removing the case. SanDisk iXpand offers amazing design and functionality, especially if you’re an iOS user.
Keep in mind that you can’t use both Lightning and USB 3.0 connectors at the same time. Although SanDisk iXpand is an amazing device, it comes with a steep price.
The basic 32GB model doesn’t cost much, and there are also 64GB and 128GB models available.
If SanDisk Extreme CZ80 is too expensive for you, be sure to check SanDisk Extreme. This is another USB 3.0 drive and it offers up to 245MB/s read and up to 190MB/s write speed.
This drive also comes with SanDisk SecureAccess software that will protect your files from unauthorized access.
SanDisk Extreme doesn’t have the same transfer speed and design as the Pro model, but it has an affordable price. 16GB model is very affordable and there are different models up to 128GB available.
SanDisk 128GB Ultra Fit is a low-profile USB 3.0 flash drive. This device is so small that you can easily attach it to your laptop and completely forget about it.
Regarding the transfer speed, this device offers up to 130MB/s read speed. It writes up to 15X faster than standard USB 2.0 drives.
In addition to its compact design, this device is rather affordable, and you can get a 32GB model on Amazon.
Kingston Digital Data Traveler SE9 G2 is another USB 3.0 flash drive and just like all other flash drives, it offers high transfer speed. This device is compact, and it comes with a capless design along with a ring key.
In addition, Data Traveler SE9 G2 has a sleek metal casing that will protect it from drops and shocks. There are several models available, ranging from 8GB to 128GB, and the 64GB model.
Kingston Digital Data Traveler SE9 G2 is a fast, durable, sleek flash drive with affordable prices, so it’s perfect for almost any basic user.
ADATA Superior Series S102 Pro is a USB 3.0 flash drive, but unlike other drives on the list, it offers slightly lower speeds. This device offers 90MB/s read and 25MB/s write speed, which is lower compared to other models on our list.
We have to mention that the speed changes according to the model, and models with higher capacity offer higher transfer speeds.
Regarding the models, there are several available ranging from 8GB to 256GB. All models have aluminum housing and a titanium color finish, which makes them somewhat durable.
If you’re looking for an affordable USB flash drive and speed isn’t your main priority, ADATA Superior Series S102 Pro might be perfect for you.
SanDisk Ultra Flair comes with a sleek durable metal casing that will protect your files from accidental drops. This is a USB 3.0 device and it offers read speeds of up to 150MB/s.
This drive comes with SanDisk SecureAccess Software that offers 128-bit encryption for your files. The drive offers from 16GB to 128GB storage, and 128GB and is rather affordable.
SanDisk Ultra Flair offers decent speed, solid design, and a great price, so it’s perfect for any basic user.
SanDisk Ultra OTG is another USB 3.0 flash drive with support for OTG devices. Using this device you can transfer files from your PC to any Android device with OTG support.
Regarding the speed, this flash drive has a 130MB/s file transfer speed. With both standard USB and micro-USB connectors available, you can easily use this device on your PC or on your Android device.
There are 3 models available, 16GB, 32GB, and 64GB.
This is another USB 3.0 flash drive with OTG support which makes this drive perfect for your Android device.
Samsung Flash Drive Duo Plus comes with a metallic design that offers water, shock, and temperature protection.
The device has a standard USB connector on one side and micro-USB on another, so it will work on your PC and on any Android device that supports OTG, and file transfer speeds up to 200MB/s.
If you need more storage space, you might be interested in 64GB or 128GB models.
Recording sound on a computer is an essential function we take for granted due to its simplicity. This, plus the availability of some of the best voice and sound recording apps on Windows 10 makes the process seamless.
However, configuring and troubleshooting it cannot be accessible when it doesn’t work out of the box. Users have faced problems recording sound in every version of Windows or any other operating system. And Windows 10 is no exception.
Today we’ll go through some easy ways to quickly fix this issue on your device.
Why does my screen recording have no sound on Windows 10?
A number of factors may trigger issues with the Windows voice recorder. On the top of the list, we have the following factors:
Outdated device drivers – A simple update will fix the error in this case.
Wrongly configured settings – If the voice recorder is not working on Windows 10/11, it might be because you have not enabled the recording device you want to use.
Microphone levels – If these are not properly set, the mic may not pick up sound properly. You should adjust these settings too.
Disabled audio recording permission – You should as well enable this to ensure the system can record.
You can effectively fix this by updating your drivers with a dedicated tool. However, no matter the cause, we have prepared the surefire ways to improve it in this guide.
How to fix the Windows voice recorder not working?
1. Enable microphone/recording device
If your computer uses more than one recording device, some of them might be disabled. This might lead to the Windows recorder not working issue.
Right-click the sound icon on the Taskbar and Sounds.
2. Click the Recording tab at the top.
3. Right-click your recording device and select Enable.
2. Update your drivers
Press the Windows key + X and select Device Manager.
Click the arrow next to the Sound, video, and game controllers option to expand it.
Right-click the driver there and select Update driver.
Select the Search automatically for drivers option.
Wait for the scan to complete and install the available updates.
Drivers are the pieces of software that help the OS communicate with the hardware components and are usually the first thing to check. Using the built-in updater is a reliable method of updating the drivers in most cases.
If this fails, you’ll need to download them from the manufacturers’ website. You’ll usually find a Support or Download section where you’ll find the latest drivers.
We highly recommend a professional tool to download all outdated drivers to your PC automatically. This type of tool helps you find the right driver updates and automatically installs them.
3. Grant audio recording permission
Press the Windows key + I to launch the Settings app.
Select the Privacy option.
Choose Microphone in the left pane.
Toggle the switch for Allow apps to access your microphone forward to enable it.
Now, you can scroll down to control the apps that can access your microphone.
The privacy option gives more control over the data you share and how you, and other users, access the installed hardware. One of them is the option to grant access to the microphone or not.
If this privacy feature is disabled, you might face the Windows voice recorder not working issue.
4. Adjust microphone levels
Right-click the sound icon on your Taskbar and choose the Sounds option.
Click the Recording tab at the top.
Now, right-click the recording device you have plugged in and select Properties.
Switch the Levels tab and make the necessary changes.
Each device has input and output levels which can be adjusted depending on your needs. For example, you can effectively fix the Windows voice recorder issue by setting the sound level correctly.
5. Select the correct recording device
Repeat Steps 1 and 2 in the previous solution.
Right-click on your recording device.
Now, choose Set as Default Device.
Finally, click the Apply button, followed by OK.
If you have multiple recording devices installed on your machine, Windows might not know which one to use, and you’ll have to select it manually as the default recording device.
This will let Windows know which of the installed devices you want to use and make it the default one for all situations.
If you switch between recording devices, like the microphone and stereo mix, you’ll have to change it each time you want to use one or the other.
6. Try a different recorder application
Sound recording applications are a dime a dozen, and some can work differently from others. However, the fact that one of them doesn’t work for you doesn’t mean that all of them won’t work, and sometimes the problem might be with the application and not with your PC.
Depending on how they connect to the recording device, some applications might also need to be updated to work with recent versions of Windows.
Before you look for faults in your system, you might want to try a different recording application. A good choice is WavePad since it’s got all the professional features you require.
WavePad has many audio editing and recording features. You can use it to restore audio, reduce noise, sample single voices, and more.
Finally, click the Run the troubleshooter button and follow the onscreen instructions.
If you still can’t record sound on Windows 10, try running Microsoft’s dedicated audio recording troubleshooter. This tool automatically detects and repairs audio issues that may prevent you from recording sound on your computer.
Press the Windows key + R, type msconfig, and click OK.
Uncheck the Load startup items under Selective startup.
Click the Services tab at the top.
Check the box for Hide all Microsoft services and click the Disable all button.
Now, click the Startup tab at the top.
Select, Open Task Manager.
From here, right-click each of the startup programs and select Disable.
Now, go back to the System Configuration window and click Apply, followed by OK.
If certain apps and programs are preventing you from recording audio on your computer, try performing a clean boot. Placing your machine in Clean Boot allows you to identify any third-party apps causing this problem.
Finally, click the record button, and you can start recording with your recording device.
There you have it: A list of the best solutions to fix the Windows voice recorder not working issue. With this, we believe you should be able to resolve the issue for good.
NOTE
If the Windows voice recorder is not working on Windows 11, you might need to enable the recording device before using it. Another solution to try is to run the audio recording troubleshooter. We have shown how to do all these in the above solutions list, plus more.
Do you need a list of the best vocal recording software you can use today? Then, check our excellent guide for the top picks available.
If you re-record audio, use the comments below to tell us which solution worked for you.
The Minecraft Forge modding API and loader provides players with new ways to play Minecraft. However, some players have reported in forums that the Minecraft Forge installer is not opening on their system.
Some of those cite a Forge install error message that states, These libraries failed to download. And being unable to install Java Minecraft Forge affects the whole experience.
So, let’s find out why Forge is not installing on your PC and the solutions that worked for most users.
Why cant I install Forge?
Note that Forge only works for the Java version of Minecraft. So, the Forge installer would not be working for the Minecraft MS Store app.
Also, if you are using an outdated version of Java, the Forge installer won’t open. Even using a version released very recently can also lead to issues owing to the presence of bugs in it.
The best way is to uninstall Java, and then use the version recommended by Forge when downloading it.
Also, the antivirus or firewall on your computer may be behind Minecraft Forge not installing. Disabling them should do the trick.
Lastly, if the Forge installer opens and then closes, check whether you have provided administrative privileges, i.e., are running it as an administrator.
How do I install Forge 2022?
Head to the download page then hit the Installer button.
Next, press the Skip button in the top right corner then wait for the file to download.
Simply opening the installer that you downloaded will start the process of installing the software. Make sure that the Install Client option is still selected.
Launch Minecraft and make sure the profile is set to forge when it asks you. When the game loads, you will see that there is a new Mods option available at the beginning of the experience.
You will now have access to the Mods folder, and you can use Minecraft Forge to add all of your preferred mods to the game.
How do I fix Forge installer error?
1. Update Minecraft Java to the latest version
Open your Minecraft Launcher app.
Click the drop-down menu to the left of the Play button.
Then select Latest release on the menu to update the game.
The Forge version you download and try to install must match your current Minecraft Java game version. To verify, check Minecraft’s version at the bottom-left corner of its menu screen.
2. Restart your internet router
To restart (not reset) your router, simply unplug the cable from the back of it. Wait for about 10-20 seconds, and then plug the router back in.
Wait for about five minutes for all the router’s lights to come back on. Then try installing Minecraft Forge again.
3. Reinstall Java
If the Minecraft Forge installer is not opening in Windows 11, an effective solution would be to reinstall Java. Oftentimes, corruption or problems with the app can lead to issues, and reinstalling is the only viable fix.
PressWindows+Rto open theRuncommand, typeappwiz.cplin the text field, and clickOK.
2. Next, selectJavafrom the list of programs, and clickUninstall.
3. Follow the on-screen instructions to complete the process.
4. RestartWindowsfor the changes to come into effect.
6. Once done, launch theJava installerpackage and follow the on-screen instructions to complete the process.
4. Uninstall Minecraft completely
Uninstalling Minecraft and reinstalling the latest game version could do the trick for some players. You can thoroughly uninstall Minecraft with IObit Uninstaller.
That’s a highly-rated third-party uninstaller tool that can eradicate all leftover residual files for Minecraft along with the game.
Whatever software you need to remove, you’ll find CCleaner to be an invaluable tool. With it, you can remove Windows updates, browser toolbars and extensions, and UWP apps.
It is also worth noting that manual removal of Minecraft is rarely 100 percent effective.
As a result, we recommend that you use specialized remover software, such as the CCleaner uninstaller and cleaning program.
CCleaner is a valuable software for cleaning the system of temporary and unwanted files as well as resolving registry issues, making it ideal for completely removing Minecraft for a clean reinstall.
Find Minecraft in the list and click on it once to highlight it. Then, on the right, click the Uninstall option, and the operation will begin; simply wait for it to finish, then restart your PC and reinstall Minecraft if desired.
Therefore, with this reliable uninstaller tool, you will erase even the most stubborn apps or programs out there in just a few clicks.
CCleaner
Clean your PC of junk files and incompatibilities with a simple scan.
Press Windows + S to open the Search menu, enter Windows Defender Firewall in the text field, and click on the relevant search result.
Click Turn Windows Defender Firewall on or off on the left.
Select Turn off Windows Defender Firewall option for both Private network settings and Public network settings, and then click on OK to save the changes.
Once done, try installing Minecraft Forge with the firewall disabled, and verify if the Forge 1.8.9 installer is not working. If that’s the case, head to the next method.
Also, whether the fix works or not, make sure to re-enable Firewall after you are done trying since it’s a critical protection tool, and disabling it is not advisable.
6. Install Minecraft Forge via PowerShell
Press Windows + E to open the File Explorer, and navigate to the folder that stores the Minecraft Forge installer file.
Right-click the Minecraft Forge installer file, selectRename, and then enter forge.JAR.
Hold the Space key, right-click anywhere within the folder that includes the forge.JAR file and select Open PowerShell window here.
Next, input the PowerShell command and press Enter:java -Xnx2G -jar forge.jar
That’s it! If Minecraft Forge installer was not opening earlier, it should now. In case the error persits, head to the last method.
7. Reset Windows
Resetting Windows 10 might seem a bit drastic, but some users have confirmed doing so can fix Minecraft Forge installation issues. However, you will need to reinstall the software previously installed on the computer after resetting Windows 10.
After you are done resettings the OS, the install process should go through, and you would now be able to tell others how to install Minecraft Forge, and help them troubleshoot issues with it.
How do I install mods without Forge?
While you would require Forge to use most mods, there are other applications that too work well. One of the most prominently used ones is Fabric, an effective mod loader.
Many users rely on Fabric instead of Forge for its simple design and high-performance. So, if you can’t find out how to download Forge on Windows 10, Fabric will come to your rescue.
So, these are some of the best ways to fix things when Minecraft Forge installer is not opening in Windows. The methods would work if Forge verion 1.12 is not installing.
Steam is one of the most popular digital distribution platforms in the world. One of the most common issues users have reported is the Not enough disk space error.
It often appears when trying to download a game, even though there was plenty of space on the computer. Fortunately, there are a lot of solutions to this problem, and today we will go through them.
Why does it say I don’t have enough disk space when running Steam?
From user experience, we have observed that a few elements may trigger this problem. On top of the list are the following:
A full or almost full disk – This annoying issue will probably appear when your hard drive is almost full or already full. In these terms, you won’t be able to save or properly use large files on this drive. You might consider getting additional storage.
Problems with the cache – There are chances that the cache is full or corrupted.
Partial game download – Some errors may have led to the partial game file download making any new attempt at downloading the file trigger this error message.
Corrupted game files – If the downloaded files are corrupted, it may trigger this error.
Note that software like CCleaner is great for cleaning download residue. It analyzes your PC and recommends quick fixes, then automatically tunes and updates it, so it starts and runs faster and is more secure. Plus, keep in mind that outdated apps are a security risk.
Old systems and devices can have vulnerabilities, which can be discovered and shared amongst cybercriminals, but CCleaner updates your software automatically to close security holes before they can be found.
How do I fix Not enough disk space on Steam?
Before trying any of the solutions recommended in this guide:
We recommend a system reboot. A restart can reboot certain processes and fix simple computer issues.
1. Run Steam as an administrator
Right-click on the Steam icon on your desktop, then navigate to Properties.
Click on the Compatibility tab, then check the Run this program as an administrator box.
Select the Apply button, then the OK button.
2. Clear Steam Download cache
Press on the Windows key, type Steam, then navigate to the first result.
From the top-left window corner, click on Steam.
Now, go to Settings.
In the left panel, choose Downloads.
Look at the bottom of the window, then click on the Clear Download Cache button.
Restart Steam, log in with your credentials, and start the game download.
It’s possible that some of the files that the app’s cache are incomplete, corrupted, or take too much memory, so if there is not enough disk space on Steam, the best solution is to clear the cache.
Also, if you have slow download speeds on Steam, you can easily fix the problem by following our dedicated guide.
3. Repair Steam Library files
Hit the Windows key, type Steam, then open the app.
From the top-left corner of the window, select Steam.
Now, navigate to Settings.
From the left panel, choose Downloads.
In the Content Libraries section, click on Steam Library Folders.
A new Steam Library Folders window should appear. Right-click on the Steam RegistryC:Program Files (x86) Steam and select Repair Library Folder.
Once the process is finished, restart Steam, log in with your credentials and start the game download again.
Hit the Windows key, type Steam, then navigate to the first result.
In the main menu, go to Library.
Find the game that’s of interest to you, right-click it, and choose Properties.
Select the Local files tab.
Now, click on Verify Integrity of Game Files.
Restart Steam, log in with your credentials, and continue the game download.
The Steam Library is where all your games are, and sometimes it’s not configured correctly. Additionally, you can verify the integrity of the game files:
5. Delete the partially downloaded file
Use the following keyboard shortcut: Ctrl + Alt + Delete.
Navigate to Task Manager.
Find all the Steam services that are running and click on End task for each of them.
Go to your Steam directory following the path below: C:Program Files (x86)Steam
Go to the Steamapps folder and then downloading folder, then locate and delete the folder causing the problems. You can identify it by the application ID.
Restart your PC, log in to Steam with your credentials and continue the game download.
If the download was interrupted by an error, the files are incomplete, thus creating a Steam conflict. To fix this, follow the above steps.
If you can’t delete the folder, you might have made it read-only. To fix it, do the following:
Press the Windows key, type cmd, right-click on the result, then choose to Run as an administrator.
In the cmd window, type the following scripts followed by Enter after each one. cd c:/program files (x86)/Steam attrib -r /S *.*
This should make your folder R/W again, and you should be able to delete it.
If you do not have enough disk space on Steam, the fastest way to solve the issue is to clear the Steam download cache.
In most cases, incomplete or corrupted files are triggering the error. If that doesn’t work, repair your Steam library files and delete the partially downloaded game.
We hope that one of these solutions solved your problem. If you have any more questions or know other ways to solve the disk space issue on Steam, reach for the comments section below, and we’ll be sure to check it out.
Blue Yeti is one of the most popular microphone brands in the world and for a good reason. This incredible piece of engineering helps you capture even the finest sound details.
If you’re planning to buy a new Blue Yeti microphone but you don’t know what software to use with this device, you’re in the right place.
Such a microphone is trusted by most content creators because it provides sound quality to be heard. So regardless of your domain, you can perform incredible content with the right software on your game streaming, music, podcasts, and others.
In case you want to grow an online community and offer distinguished recording quality, you can use Blue mics and expand your audience on YouTube, Twitch, or other social media.
Using a state-of-the-art microphone such as Blue Yeti also requires using advanced audio recording and editing software.
Read this article to learn what are the best tools to use with your Blue Yeti microphone.
Note: All the prices and offers in this article are subject to change, so be sure to check the official product page to get the latest deal. If the product/offers you’re looking for is no longer available, you can try to find it on its official manufacturer page or get another one from our list.
What is the best software for Blue Yeti microphones?
Blue Yeti mics are well-known around the world for their high standards in terms of quality and sound. Thus, you couldn’t just use any audio software tool since most of the hardware’s potential would be wasted.
However, that won’t be the case if you decide to use your Blue Yeti mics in conjunction with Adobe Audition.
This digital audio workstation not only features a multitrack, non-destructive mix and edit environment, but it also comes with a destructive-approach waveform editing view.
This allows you to perform any task with your high-performance microphone, while also letting you tweak the effects in real-time, or make remixes afterward.
Another professional tool designed for musicians is FL Studio. This great option lets you use the full capacity of Blue Yeti mics and capture the sound entirely. Be it voice recording or work video calls, you can enjoy complex services to better transmit any sound.
This software is undoubtedly a matching choice for any artist who needs to record his music. If you are a singer or a guitarist in dire need of qualitative music production, you can rely on FL Studio’s capacities.
By choosing this solution you have access to music production instruments, like the mixer setup. That contains up-to-date features including advanced automation, sidechain control, delay compensation, or audio sends.
Elements sequence or piano roll are other leading-industry traits of the software. It offers complete DAW support and a very user-friendly browser in order to boost your music projects.
Plus, this digital audio workstation includes a great variety of editing tools, such as drums beats or other instrument effects, to personalize your tracks and deliver full-hearted music for the audience.
Here are some of the benefits of using FL Studio:
Complete effects to manipulate sounds
Instruments effects and sounds
Visual features and video add-ons
Infinite library of sounds and beats
Unlimited free trial period
FL Studio
Take your music to the highest peak today with FL Studio for complex music production.
PreSonus Studio One is one of the best choices when it comes to Blue Yeti-compatible audio software.
This program allows you to record excellent professional vocals that will definitely impress your listeners. Whether you create podcasts or record music, Presonus Studio One is always up to the task.
There are many custom templates for voice-overs, podcasts, and music that you can choose from. Thanks to all these features, you can increase your productivity and create professional content.
You can use your Blue Yeti microphone and Presonus Studio One to record single-person speeches, multi-person interviews, music jams, and more.
Hence have a try this professional audio recording tool and fully benefit from studio sound quality, perfect for music recording and editing.
Audacity is a name that doesn’t need any introduction. This tool has been around for long enough to prove its usefulness.
You can use Audacity to record podcasts or interviews, mix audio, convert old recordings into digital recordings, and more. It also features a series of advanced effects that you can rarely find in free software.
If you need a functionality that’s not included in the standard version, you can simply install a plugin and use the respective feature.
To enable the microphone, go to Edit > select Preferences then select Devices. Go to Interface and select Host: MME, then go to Playback and Recording and select Yeti Stereo Microphone as your device.
When the Mute button on the Yeti microphone is solid red and not blinking, you can hit the Record button.
Also, make sure to use a project rate between 44100 to 48000 Hz. You can also go to Effects and enable the Noise Reduction feature. Click on the ‘Get noise profile’ option and hit OK to improve audio quality.
You can also go to Effects > Equalization > Bass Boost to add a bit of extra bass to your audio recording. These settings may vary depending on your needs and the purpose of your audio recording.
Blue Sherpa is a free software designed for Blue Yeti mic to unlock advanced vocal broadcast effects and access firmware settings. So you can manage stunning Blue mics on this panel with Logitech G Hub software
Assuming you perform some kind of content creation and need a professional sound, you also might need all-rounded software to manage your recordings. Using this audio tool, you only have to press record and do your job.
If you always wanted to reach a wider audience and share valuable thoughts, it’s no problem for this software to offer any sound requirements, whether you need it for gaming recording, streaming, YouTube videos, or singing videos.
Moreover, this type of activity requires great technical support, audio, and video, meaning that you should treat your viewers kindly and let them hear clearly while you are talking or explaining a topic.
Besides that, this recording mic and software provide superior quality for professional life, like video calls for work meetings or online school classes.
That being said, this choice is most probably your way to success due to the rewarding audio results. Therefore download it for free and manage multiple Blue mics so easily.
VB-Audio Voicemeeter allows you to adapt the sound recorded using your Blue Yeti microphone in real time. This software is perfect for mixing voice and video game audio.
The tool supports the following audio formats: MME, Direct-X, KS, WaveRT, WASAPI, and ASIO.
Of course, you can also use VB-Audio Voicemeeter to mix your voice with your music on social media as well as broadcast your live podcast.
If you’re a teacher and you want to create education programs, you can also use the 2x USB headset on your computer.
This feature is very helpful especially when it comes to creating tutorials using your own audio/video recording software.
VB-Audio Voicemeeter also supports multichannel conference and interview recording features. You can then use the respective audio recording for post-production tasks.
The viral Black Friday and Cyber Monday events for 2022 aren’t officially starting until the last weekend of November. That being said, we’re already seeing great deals appearing earlier than initially predicted.
Most retailers are so keen to start this year’s sales that we can think about starting our holiday shopping earlier.
This means you can snipe incredible bargains from Walmart, Amazon, Target, Best Buy, and many online stores eager to offer you the deal of the year.
But what about all the software out there that is also on sale? You should keep an eye out for games or apps you want.
When is Black Friday 2022?
Black Friday this year will fall on the 25th of November. Knowing this info means there isn’t much time left to take advantage of sales even before the official period starts.
However, the reality is that retailers have been anticipating the hype and launching Black Friday and Cyber Monday deals earlier.
Black Friday appears to have unofficially started earlier than ever, with several significant retailers already offering massive deals.
So we must prepare our credit cards for this massive event because surely people will be flooding the shop floors. This statement applies even more than usual, as the COVID pandemic no longer restricts us.
How can you spot the best possible deals?
With many retailers participating and many products at reduced prices, finding the best possible deal seems daunting.
Indeed, you can find your favorite product with a 15% discount; But how can you be sure that it is a bargain you’re getting?
An excellent idea would be to make a list of exactly what you want to buy. After this task is completed, you can check the current price, and you’ll surely recognize a good deal.
You can start checking which stores stock the products you’re after. This makes it easier to know precisely where to check when the sales start rolling.
Will next-gen consoles be cheaper on Black Friday?
Going on the hunt for your favorite gaming console, no matter if Microsoft or Sony makes it, will still be a daunting task in the 2022 Black Friday bonanza.
To dive deeper into this subject and see what console fits our pocket’s depth this year, let’s cover each of them.
Is the PS5 in stock?
Even though the PS5 console has been regularly sold out on most retailers’ websites constantly, we can safely state that you will be able to find a PS5 console for yourself this year if you take advantage of Black Friday.
One way of securing a PS5 for yourself this year would be to pick one of the incredible bundles available at online retailers:
It seems that the PS5 bundles are the first to get re-stocked, but they keep flying off the shelves, so check all the stores presented above for the best deal.
Is the Xbox Series X in stock?
The same principles described in the PS5 section also apply to this product, as people have been fighting to get their hands on the Xbox Series X models since they came out.
Considering how fast these latest consoles are being sold, finding a suitable offer should be enough for you to pull the trigger and buy it as quickly as possible.
Here are the offers we could find online for this product:
However, that doesn’t mean there won’t be even better Black Friday Xbox PlayStation 5 or Series X deals, so check these links constantly.
We should see plenty of sales on games, controllers, and accessories, and we could also potentially see some discounts on the previous generation consoles like the Xbox One and PlayStation 4.
But you don’t necessarily have to wait until then, as some of these accessories we mentioned have already gone on sale; yes, we’re talking games, controllers, and headphones ready for the taking at lower prices.
Laptops already went on sale, and it’s not even Black Friday yet
We’ve not even reached November, and dozens of laptop deals are already ahead of Black Friday.
Retailers are so keen to start this year’s sales that we can already bring you many excellent early offers should you be ready to buy a new portable PC today.
Whether you want a Windows laptop, a Chromebook, or a MacBook, there’s plenty to choose from.
We’re already seeing some early Black Friday laptop deals landing right now. Best Buy and Walmart launched early offers last week, with significantly reduced prices for this year’s Black Friday event.
Certain items in the sale can be registered if you’re a member, and the retailer will refund you the difference if the price drops any further over the holiday season.
While their website promises the usual doorbuster specials around Black Friday and Cyber Monday, it also pays to look at the company’s website. You might be surprised to see that some future discounts are already available.
Software is also on early sale before Black Friday
Of course, not only hardware goes on sale during this time of year, and most of you know this because you took advantage of these offers in previous years.
The same principles apply to antivirus software which is sure to keep your system protected online while also ensuring that no third parties would ever have access to your private information and content:
Photo and video editing software like Corel, Adobe Photoshop, and Movavi Video Editor are also great investment choices if you’re interested. There are plenty of other software types to keep an eye out for.
But these are just some of the pre-Black Friday deals you will be able to find, so expanding your search could result in some pleasant results.
What will the best Black Friday gaming deals be?
Massive amounts typically cut prices for headsets, keyboards, hard drives, and other peripherals during the sale. This makes it the best time to grab anything you’ve had your eye on.
But that doesn’t mean that you can’t already find some goodies on the internet. All you need to know is what to search for and where to look.
Razer, for example, has all kinds of different products on the go at any moment. As you might have assumed already, the price reductions have already begun here.
And many other retailers have similar deals, so all you need to do is wish for something, search for it, and buy it if the price is right.
Video games are also on sale this time of the year, even before the much-anticipated Black Friday event.
Simply accessing shops on Steam, Epic Games, Blizzard’s BattleNet, Xbox, or the PlayStation Store will find deals that are hard to resist, considering the knocked-off percentage.
You might also want to stop at GameStop, which has already started discounting products. For example, Microsoft’s Flight Simulator for Xbox Series X also went on sale ahead of Black Friday.
The list is long, so it’s worth searching for your favorite games to see if they are already discounted.
What are some of the retailers worth watching this Black Friday?
As always, people will stick to the retailers that gave them awesome deals in the past, but that doesn’t mean it’s not worth trying something new.
Amazon, Best Buy, Verizon, Home Depot, Target, and Walmart are some of the biggest and the ones people have grown accustomed to.
But it’s also worth checking out manufacturer websites, not only retailers, as you have even better chances of finding the best deals and saving some money.
Remember that Black Friday is a global event, and everyone will want to get in on the action, so all you have to do is find the offer you like most and act on it.
But you better be quick because stocks usually vanish rapidly during Black Friday, so creating a wishlist or pre-loading your online cart would also be a good idea.
What product have you set your eyes on for the year’s Black Friday? Share your thoughts with us in the comments section below.
Subwoofers change the way you can listen to music and even watch movies. They add bass and allow you not just to hear the sound, but also feel it down to your very core.
Thus, it is obvious that a lot of AV and stereo receivers have subwoofer outputs.
That’s precisely why we’ve compiled this list of what we think are the best receivers that support subwoofers so that finding the right for you is much easier.
Note: All the prices and offers in this article are subject to change, so be sure to check the official product page to get the latest deal. If the product you’re looking for is no longer available, you can try to find it on its official manufacturer page or get another one from our list.
Which receiver has the best sound quality with subwoofer output?
Pyle PTA44BT – best Bluetooth stereo receiver with subwoofer output
The Pyle PTA44BT is a good all-around stereo receiver that is compatible with pretty much any device you want to pair it with, including smartphones, tablets, laptops, and computers.
More so, you can stream things on the Internet and even via Bluetooth, so you don’t need any wires, you just need to be in range.
Pros:
500W peak power which can be used for multi speakers w/ 4-8 ohms impedance
Supports Bluetooth wireless music streaming
Compatible with almost any device
Supports iPod or MP3, USB, micro SD, and AUX playback
If you love simplicity in all of your gadgets, then you’ll want the Sony STRDH190.CEK as a stereo receiver.
It has a low-profile design that makes it fit into pretty much any cabinet, and the minimalist controls and the low number of knobs and buttons make it a great fit into the modern household.
Connectivity is the name of the game when it comes to the Onkyo TX-NR575E stereo receiver.
This is because it has support for pretty much any connection method you can imagine, including Wi-Fi and Bluetooth, and it can stream content off of Spotify, TIDAL, Amazon Music, TuneIn, and more
More so, the sound it delivers is of the highest quality, thanks to the 5.2.2-Channel Dolby Atmos and DTS:X playback, as well as the traditional 7.2 Channel, surround sound.
Audio and video output from the Internet will be something you’ll enjoy every day if you get the Onkyo TX-8270.
Not only will you get to enjoy all the benefits of online streaming, but the image and sound quality you’ll receive will be top-notch, clearly showing you that it was worth every extra penny.