Avast antivirus is a tool that protects your internet connection and devices from viruses and malware. It is available across different operating systems like Linux, Microsoft Windows, iOS, and android.
Unlike most antivirus apps, Avast is very intelligent. It operates automatically in detecting and blocking any form of attack.
Avast comes with a Firewall feature that allows it to block threats, although it has its own shortcomings too.
Users complain about several difficulties they encounter with Avast. In this article, we’ll be examining Avast blocking the remote desktop.
By default, the Avast firewall is not always on. It means that when your Windows Firewall is active, Avast won’t run its Firewall system. However, Avast does not disable the Windows firewall if you have not allowed it.
But, if Avast Firewall is running on your Windows, the Windows Firewall will be disabled. It happens to avoid conflict between the two defenders.
More so, running both Windows and Avast Firewall on a computer can be conflicting and cause some troubles.
Should I turn off Windows Defender if I have Avast?
The Avast Firewall Defender is a feature that comes with the Avast antivirus. As said earlier, running two different Firewall defenders on a desktop can cause issues.
So, turning off Windows Firewall when you have a third-party antivirus like Avast can help. It allows the Avast defender to function smoothly without interference.
Some benefits come with selecting Avast defender for your computer. For instance, Avast Firewall allows Remote Desktop. Thus, you should use a reliable third-party antivirus like Avast instead of Windows Firewall.
Can I run Avast and Windows defender at the same time?
There is a possibility that the Windows and Avast Firewall Defenders are running simultaneously. However, it will result in a conflict and can cause the system to malfunction or become sluggish.
Running these two Defenders on your desktop at the same time causes miscommunication in security. This happens because only one Firewall can run at a time on a desktop, and it controls how the protection system works.
So, the simple answer to this question is no. It is not advisable to run Avast and Windows defender at the same time.
What can I do if Avast is blocking the remote desktop?
1. Turn on Remote Desktop Connections
Launch Avast antivirus and navigate to Protection, then select Firewall.
Click Settings in the right-hand corner, then go to View Firewall rules.
In View Firewall rules, select Basic Rules.
Click on the switches in front of the Allow incoming Remote Desktop (RDP) connections.
Turning them on will unblock your Remote Desktop and give you access to your computer remotely.
Press the Windows + I keys to launch the Settings app.
Select System and choose Remote Desktop in the left pane.
Toggle the icon beside the Enable Remote Desktop.
Enabling this will ensure your computer is fully aware of every connection, and it also prevents Avast from overriding it.
Following the guide above, you should be able to fix the avast blocking remote desktop connection issue. For further information, you can read how to fix the Remote Desktop connection not working.
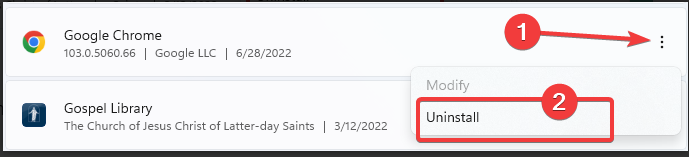
Another solution you can try if you are unable to fix the issue with the guide above is to uninstall the Avast antivirus app. It will reset all the configurations and settings on Avast and allow you to start afresh.
Nonetheless, you can learn about how to fix Remote Desktop app issues on Windows 10/11.
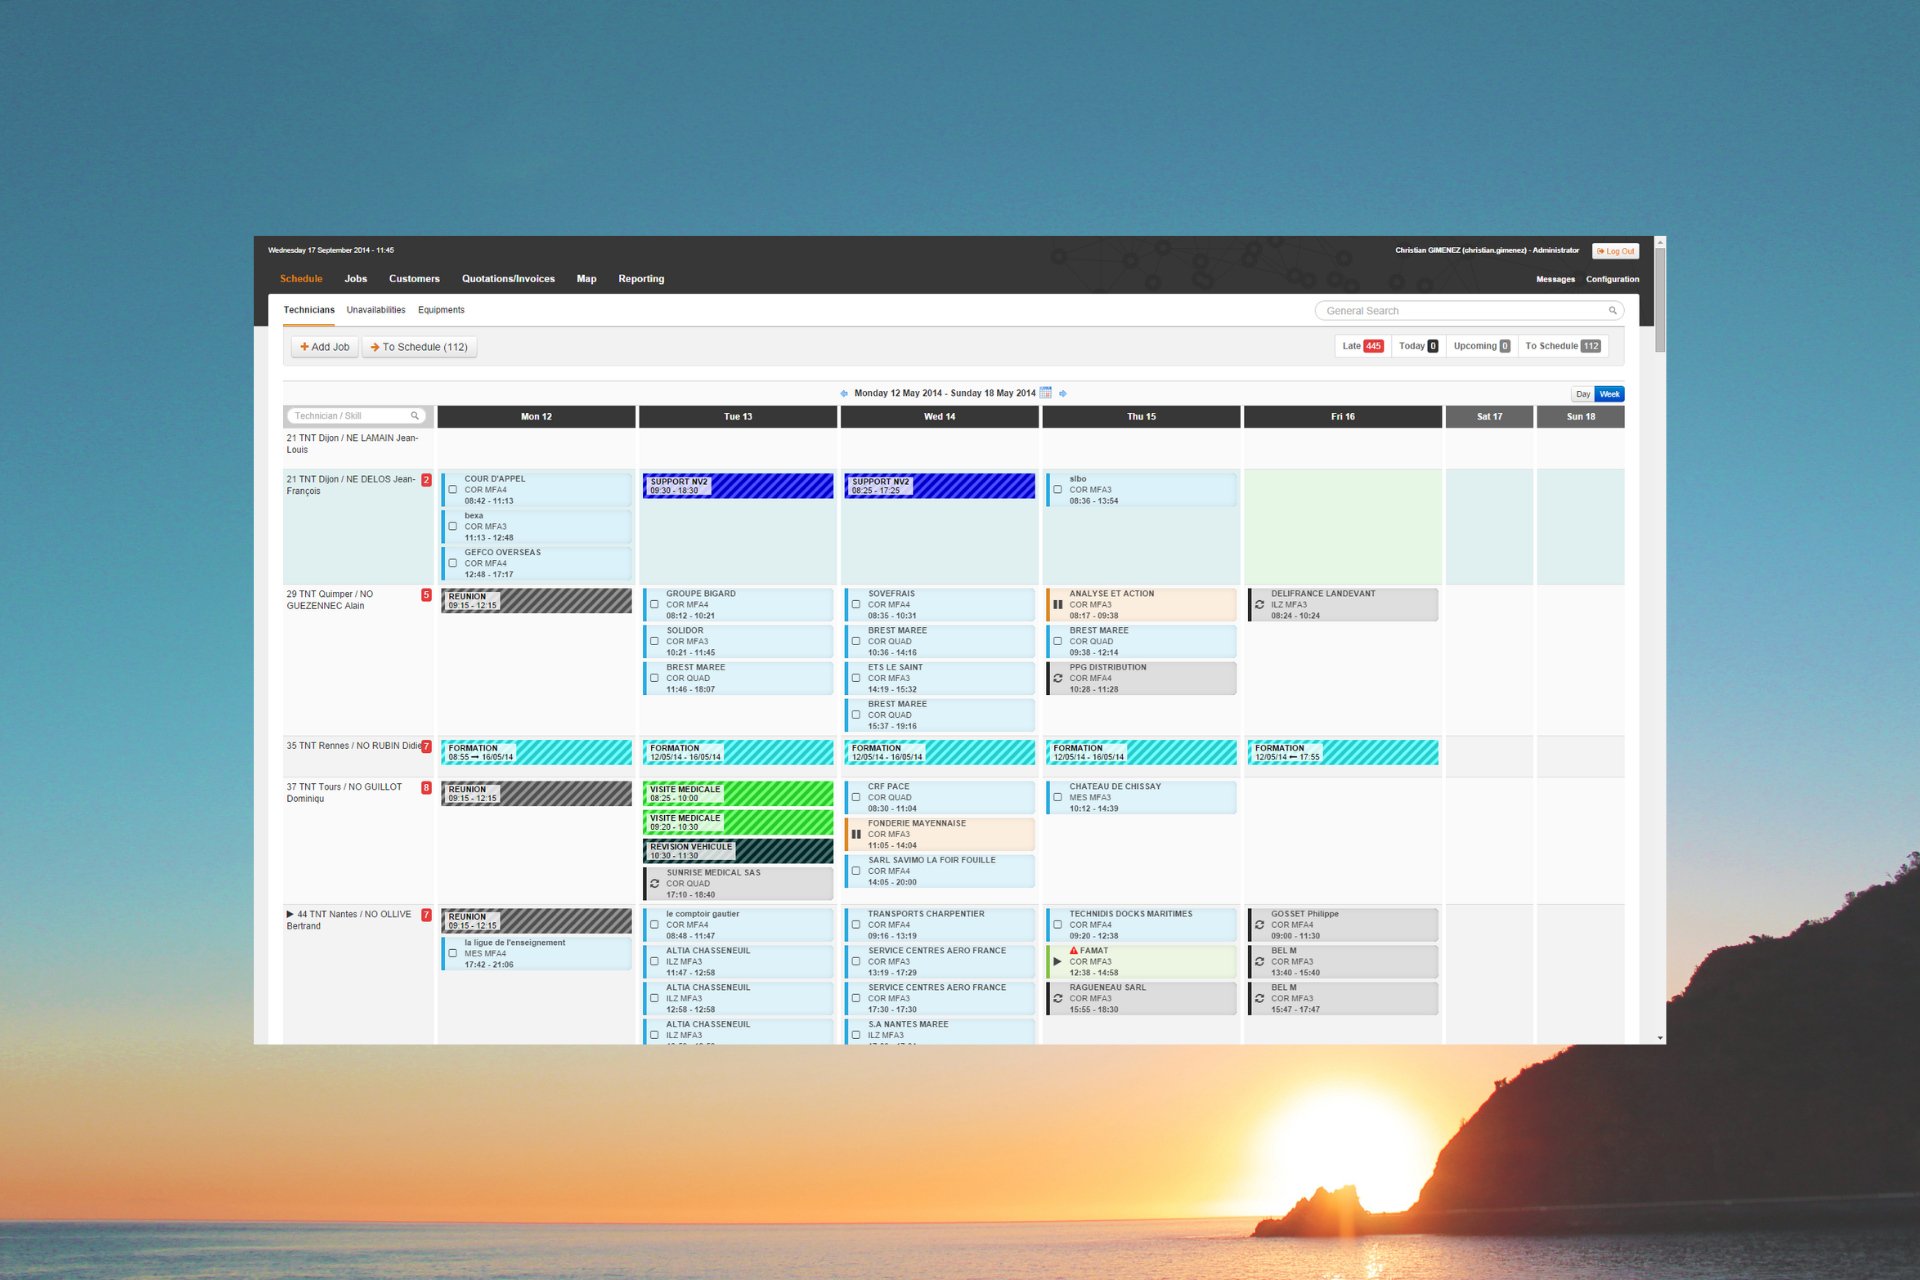
Nowadays people are quite busy and often don’t have the skills or the time to handle everything themselves. Therefore the handyman businesses have bloomed and stepped into the technology era.
If you are running such a business it is advised that you also get good handyman software. These tools will help you manage everything you need for your work.
Specialized software can help you send digital quotes, assign work to handymen, send invoices, and even general accounting.
The very best software for the handyman business will come with additional utilities such as secure payment processing and an advanced customer service portal to make everything smooth and efficient.
Now, we will be exploring the best software for handyman businesses and their powers in this article. But just before we venture into the deep end, here are some tips to help you decide which software would serve you best.
How can I choose the right handyman business software?
As you will see shortly, there are quite a number of products. Here are some useful questions to help you select.
➡ How big is your business? – The number of jobs you receive matters a lot and that’s because some software is targeted at different-sized businesses; some can handle sophisticated tasks, others not as much
➡ How customizable is the software? – A program you can tailor is likely to better accommodate your entire business requirements
➡ Does it have a corresponding mobile app? – Your field team will appreciate real-time updating of their job status and related issues. Since they will have their smartphone always, a mobile app would be very handy.
➡ Does the software integrate with other essential programs? – Software that integrates with other business support applications is more efficient. For instance, those that link with QuickBooks make bookkeeping super simple.
Here now are the best software that made the cut for your handyman business.
What is the best software for the handyman business?
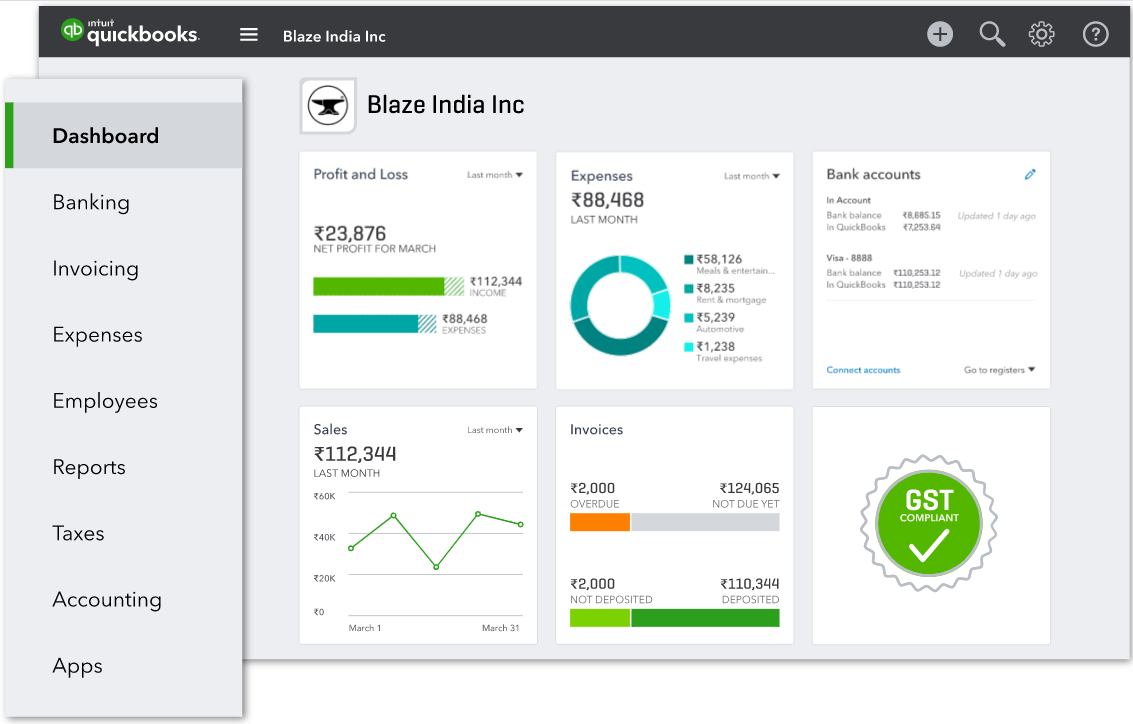
QuickBooks is a well-known software, mostly for money-handling parts of a business or company. But that is also what makes it one of the best tools for handling your handyman business.
This software comes with a lot of great features that will help you better manage, your work, schedule, employees, and of course finances.
Quickbooks is packed with powerful tools such as business analytical, app integration, inventory tracking, mileage tracking, cash flow, and many more.
This software stands out also for it 24/7 support it offers to its customers. You can’t go wrong with this tool if you need some help managing your handyman business.
Here are just a few of the key features QuickBooks is offering:
Track income & expenses
Allows multiple users
Maximize tax deductions
Create custom fields
Automate processes & tasks
QuickBooks
Try this amazing software that will help you better manage your handyman business.
Synchroteam is a field service management and scheduling software that serves industries that require direct contact with customers.
It works great for medium-sized companies and enterprises in electrical, cleaning, inspection, maintenance, plumbing, HVAC, and many more.
It is a cloud-based SaaS that integrates with iOS, Android, and also Quickbooks for seamless invoice issuing.
You can easily drag and drop jobs into employee schedules based on qualifications and location. It also provides a real-time view that is especially helpful for dispatchers.
The API integration lets you synchronize the app with your preferred CRM tool.
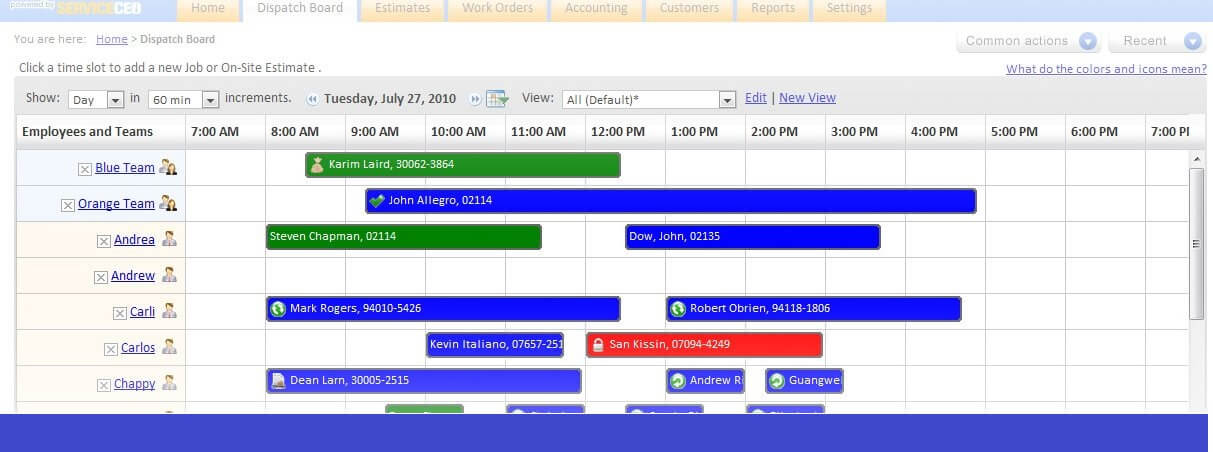
ServiceCEO is one of the most comprehensive software for managing a handyman business.
It does practically everything in a breeze so you can concentrate on writing your own business’s success story and not drown under a flood of cumbersome papers.
You will love the extreme customization while it’s also web-based meaning you can run your business from anywhere on the planet. The ServiceCEO mobile app is similarly resource-rich.
Best of all? ServiceCEO is super easy to learn- thanks to the easy interface and you should get the hang of its operations in no time.
Rated as one of the very best in the handyman business, Housecall Pro delights with its amazing automation.
Essentially, the software digitizes every aspect of your business – while remaining easy to use- enabling you to deliver premium services whether you’re tech-savvy or not.
From email marketing automation, auto job SMS/ email notifications, GPS and online time tracking, online client booking, and even in-the-app/web payments, I can’t think of something this program won’t do.
Interestingly, it’s one of the most affordable software for handyman business.
Housecall Pro is the ultimate all-in-one operations software to run every handyman business. It’s also very affordable.
Field Promax is one of the ideal choices for your handyman business because it takes care of all aspects, from scheduling to payments.
To be more precise, this solution helps you manage your team of technicians, communicate with your customers, handle the work orders digitally, and standardize your workflow.
And all that without any paperwork! Moreover, Field Promax has a cloud dashboard you can access from anywhere, on almost any device.
At the heart of this tool, there are the scheduling functions to create and dispatch work orders, auto-generate work orders for recurring jobs and convert the service requests to orders.
Because it’s also available on mobiles, the field technicians can see any pending jobs and update their progress on the spot.
On the other side, the supervisors will be able to track every technician’s moves in real-time.
Jobber prides itself as the go-to software for business people overwhelmed by routine tasks such as preparing quotes, scheduling, invoicing, and chasing payments.
And true to its word, Jobber’s array of tools can potentially transform the way you deliver services.
You will have all the necessary info to help organize and dispatch teams at your fingertips while each team member is kept up-to-date by the Jobber app.
Users also enjoy Jobber’s solid invoicing process, elaborate reporting, precise time tracking, and meticulous accounting.
You, your teams, and even your customers will find Jobber easy, available, and importantly, reliable. As the company proudly proclaims, Jobber always delivers!
The key features include:
Xero and Quickbooks sync
Client hub
Route the day’s tasks for your team and assign new jobs to the nearest technician on the map
Easily track chemical/pesticide usage and report on the same
We started by looking at how you can identify the best software for the handyman business before coming to a summary of the options.
I now believe that you are now in a position to make an informed decision so go ahead and good luck.
Whether you are looking for a general management tool or just an accounting tool to help you with your finances, it’s always a good idea to do thorough research when picking the software you work with.
Avast is available for all operating systems (OS). It is one of the best antivirus apps that it’s widely accessible. It detects viruses and malware by scanning your devices and also blocking the impacts of these viruses.
Likewise, it makes use of a highly secure system to protect your device from external attacks and also protects your internet connection.
However, the Avast antivirus can develop faults, and they can affect some parts or the whole system.
There are lots of issues that you can come across while using the Avast antivirus. A common one is the Avast RPC server unavailable which we’ll be discussing in this article.
It means that the Avast antivirus RPC server is not accessible. It is common on Windows and can occur due to different reasons.
Why is Avast not working on Windows 10/11?
1. Outdated Windows
Avast antivirus is an intelligent software that requires a stable system to function. However, if you are trying to run it on outdated Windows, you may encounter some issues.
Some features are expected to be available on your Windows but are missing due to a lack of updates. So, running the Avast on outdated Windows may prevent it from working.
2. Firewall Defender interference
The Firewall protects your computer from incoming threats. However, if it perceives Avast as a threat, it can prevent it from working or installing on your Windows.
3. Avast needs a repair
Like other software, Avast may stop working if there’s something wrong while installing or configuring it. So, it may not work on Windows because it requires you to run a software repair on it.
Can Avast deliberately slow down my computer?
Avast, like other antivirus software, can slow down your computer. This is due to the real-time protection it offers. So, the activities of the Avast antivirus may have some effects on your computer.
Some app components install with the Avast antivirus, these apps can draw down the speed of your computer. However, you can disable these apps in Avast settings.
What can I do if the Avast RPC server is unavailable?
1. Repair system error using Windows Troubleshooting Tool
Click the Start icon on the left-hand bottom of the screen.
Select Settings and click Update & Security.
Click Troubleshoot and select the type of troubleshooting you want to initiate, then select Run the troubleshooter.
Follow the prompts, and once it detects an error, click the Repair All errors option.
Reboot your computer.
2. Repair corrupted registry files
Press the Windows + R keys to launch the Run dialog box.
Type Regedit in the search box and click the OK button to execute the command.
Go to the following directory or path: HKEY_LOCAL_MACHINE\SYSTEM\CurrentControlSet\services\RpcSs
Double-click on the Start folder under the RpcSs to correct the Remote Procedure Call.
Set the Value data to 2 and click the OK option to save the changes.
Restart your computer to sync the changes.
If the errors stem from corrupted files, making these changes will fix them directly in the registry editor.
As an alternative, you have automatic methods that will do your job in less time and without causing other issues.
For instance, you may use a repairing tool created to fix broken system files in your registry and replace them from its official online repository.
This way, you resolve corrupted registry files and fix the connection errors with Avast servers now.
3. Configure Windows Firewall filter
Press the Windows key, input the Control panel, and launch it.
Select Windows Firewall and click on the Allow an app through Windows Firewall option.
This is an effective alternative to fix complications that could have risen from the package installation process. However, uninstalling the Avast app should be the last option to try. It will completely delete the app’s saved data from your device, and you’ll have to reinstall it again.
Also, Updating your Windows is another effective fix for the Avast RPC server not available’ issue. You can also check this guide on the RPC server is unavailable problem to understand the wider connection failure that affects Avast and other Windows components.
It should not break when you need it the most, or you end up in a soup, running for printouts at the eleventh hour.
Hence, you would need a dedicated and good-quality USB printer cable that can easily manage all your extensive printing needs.
What are the different types of USB printer cables?
There are different types of USB printer cables, viz., USB Type A, Type B, Mini B4, and B5 pin, and Micro USB A-B.
However, most of the printers are compatible with a USB 2.0 A/B cable, which is a standard cable and is easily available.
Having said that, there are numerous such USB printer cables available online, but not all are worth the money.
Hence, in this post, we recommend a list of some of the best USB printer cables. These are not just sturdy and reliable, but make an overall good-quality purchase.
Rated number 1 in the best quality USB printer cable category, this FT long USB 2.0 A Male to B Male cord is perfect for connecting your thermal printer, MIDI controller/keyboard, etc.
From Canon or Dell to Epson, HP, and Panasonic it supports a wide range of printers with USB 2.0 B port, and other USB A-based devices.
It boasts a high-speed transfer rate of up to 480Mbps and backward compatibility with USB 1.1 and USB 1.0.
Best of all, the gold-plated connector and the aluminum shell extends its life span and offers a stable connection.
From a scanner or printer to camera or piano, the UGREEN USB 2.0 printer cable connects a broad range of USB-enabled devices for data transfer.
One of its other USP is high-speed data transmission of up to 480 Mbps for USB 2.0 devices.
The USB Type B cable is backward compliant with full-speed that’s faster than a Wifi, and provides a more stable data transmission comparatively.
Talking of it’s compatibility with printers, there’s less competition since it supports most devices that includes, Canon, HP, Epson, Brother, and so on.
The nylon braid look and the gold-plated connectors make it easily the best-looking USB printer cable of all.
While it sports a clean tangle-free design and corrosion-resistant connectors, it also supports high-speed transfer up to 480 MBPS.
At the same time, it’s compatible with a long list of scanners, printers, servers, and cameras of most of the big names like HP, Canon, Dell, Xerox, Samsung, etc.
Best of all, you get a USB B-type cord length in three colors, Red, Blue, and Grey, and in three different sizes, 6.6 Ft, 10 Ft, and 15 Ft.
Therefore, if you are in the hunt for the best USB printer cables that are fast, stable, long yet durable and damage-resistant, you can refer to our recommendations.
Mozilla Firefox is one of the many available browsers to help you browse the Internet faster, safer and easier. It is free, open-source, and developed by the Mozilla Foundation.
As with other browsers, this one will install all the features with default options. However, Firefox allows you to change some of these defaults.
When you click on a link, the way it will open by default depends on the webpage settings. It can either open in a new tab or in the same tab.
When speaking about how to open all links in a new tab on Firefox, instead of the same tab as the default settings of the site, there are two ways to do that.
Quick Tip:
As a more effective option than Firefox, you can utilize the featured browser from Opera One.
Containing numerous practical features, this browser also offers quicker navigation or optimization tools like battery saving and light system resource usage. Plus, you can easily customize everything on your homepage, including opening links in a new tab.
Opera One
Navigate seamlessly on this new browser and open links how you prefer.
While there is no clear data available on this, the number should be around 5,000-10,000 given that Chrome has set the limit at 9,000. But, most of you wouldn’t be able to open these many tabs ever!
Most users generally open a few and close the ones not required anymore and that should be the ideal approach. The number of tabs a normal user would generally open is 5-10, or at max 20.
What happens if too many tabs are open?
When too many tabs are open, Firefox would most likely crash. There is no specific number here but it all boils down to the installed RAM and how much resources the tab consumes.
For instance, opening the Google homepage on several tabs wouldn’t require a lot of resources, but using an online map or watching a high-definition video in a single tab will.
First, the computer will start to slow down as you open more tabs in Firefox, and if you keep adding more, the browser will crash after a while.
How do I force Firefox to open links in a new tab?
1. Use the dedicated shortcut
Hover the cursor over the link that you want to open in a new tab.
Now, press and hold the Ctrl key, and then left-click on the link.
How do I get Firefox to automatically open links in a new tab with the keyboard? Assuming that’s your question too, rest assured that you’re in the right place to find answers.
Let us tell you from the start that there is a simple keyboard shortcut to have Firefox open link in new tab. Just refer to the above steps in that regard.
Launch Firefox, paste the following path in the address bar, and hit Enter:about:config
Click on Accept the Risk and Continue.
In the Search preference name bar, enter browser.search.openintab.
It has to be set to true (false by default). Just click on the toggle from the right side to do that.
Set these three, browser.urlbar.openintab, browser.newtabpage.enabled, and browser.tabs.loadBookmarksInTabs, to true as well.
Now, search for browser.link.open_newwindow, click on the Edit icon, and set the the value 3.
Similarly, set the value forbrowser.link.open_newwindow.restriction to 0.
Restart Firefox for the changes to come into effect.
If you always want to have Firefox open all links in new tab when you normally click on them, modifying the advanced configuration settings would do the trick.
Both methods presented above are easy and work each time. From now on, you can have Firefox open link in new tab without switching, no matter the default site settings. Just choose the method you feel more comfortable with.
Also, if the Firefox open link in a new tab feature is not working, it’s likely a conflicting extension, and launching the browser in Troubleshoot Mode will help identify it.
Avast Cleanup Premium has been developed by one of the most reliable and oldest software companies in the world. This means that its performance is expected to match the experience they have had. However, it is not uncommon to face issues with the application. Some users have raised concerns about Avast Cleanup not opening.
However, if you are facing this problem, it does not mean that that is the end of the road for you. This is because you can fix the problem easily without seeking any technical help. You do not even need to have technical skills to handle this issue.
Is CCleaner better than Avast cleanup?
Apart from the experience that the developers of this application have, CCleaner comes with some of the best features that make it stand out from its competitors. For instance, it has an advanced bloatware removal tool that scans an entire computer looking for unwanted files, apps, and any junk data for removal.
Avast Cleanup Premium comes with an interactive design that is easy to use. You do not need any help when cleaning up your computer. Avast came into view notoriety due to its antivirus software, but the brand now offers much more, including its own VPN, private browser, and registry cleanup.
In a nutshell, if you are looking for a security-oriented cleaner and protection software, Avast Cleanup Premium is the tool for you. On the other hand, CCleaner is the safest choice if you need a tool fit for removing unwanted apps, optimizing your PC health checker, and boosting your pc performance.
What can I do if Avast Cleanup won’t open?
1. Uninstall Avast Cleanup
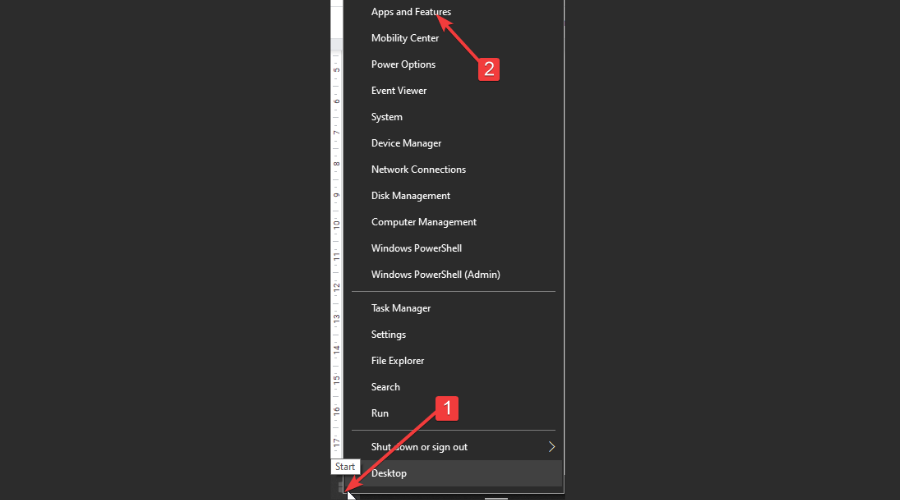
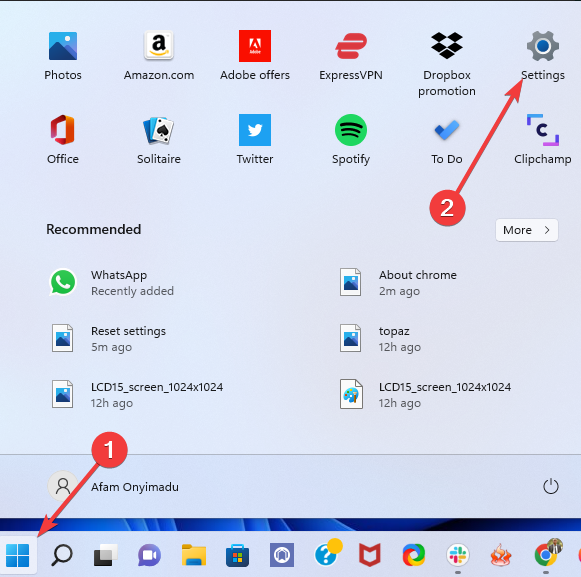
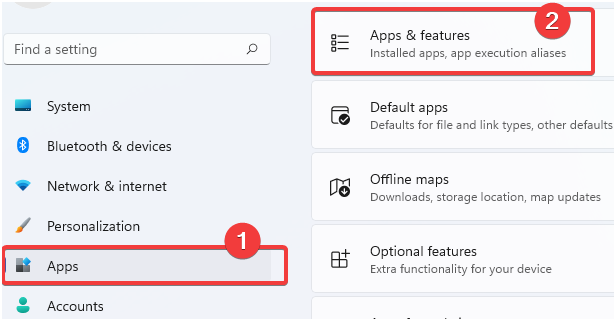
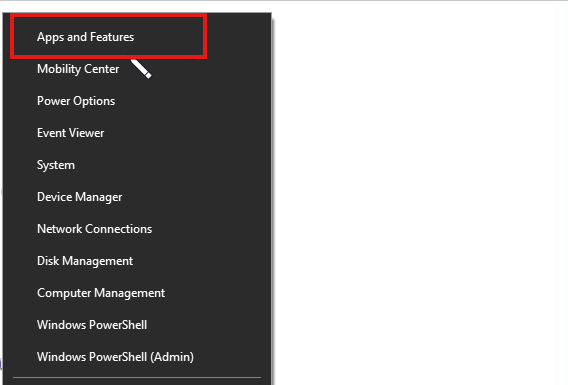
Right-click the Windows start button and select Apps and Features.
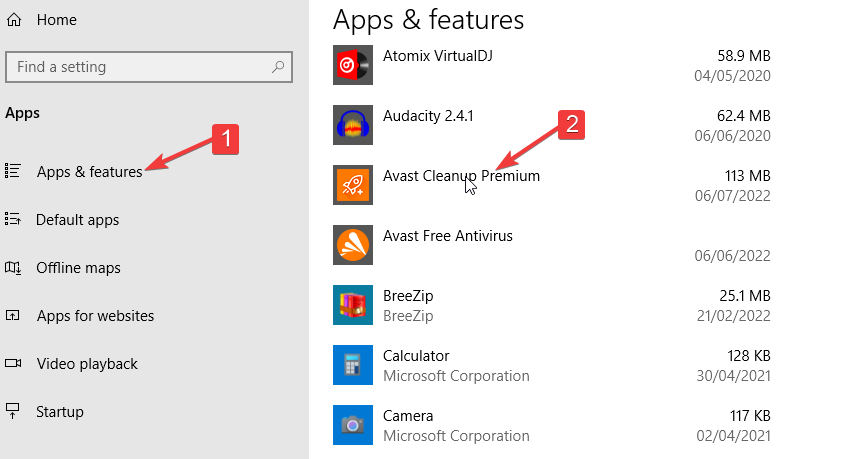
Select Apps and Features on the left panel.
Click on Avast Cleanup on the list of applications.
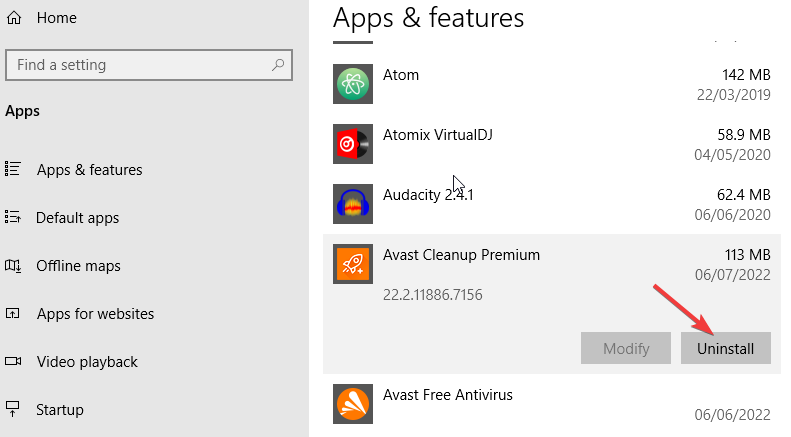
Select Uninstall.
Click Yes to give permission for the uninstallation process to begin.
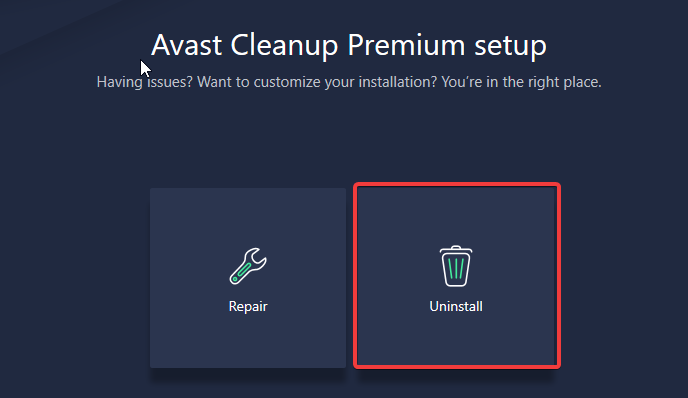
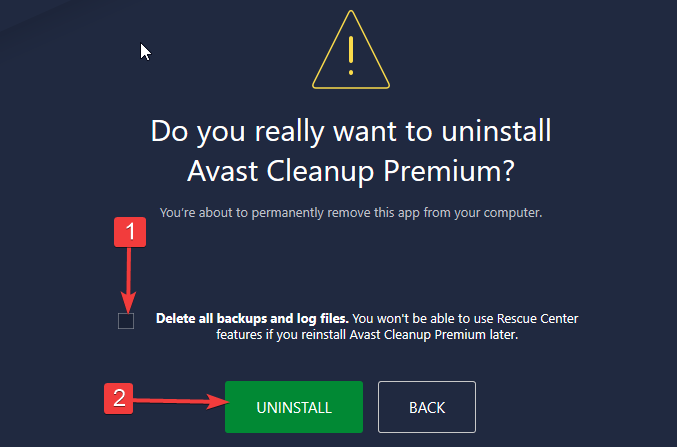
Click Uninstall on the Avast Cleanup Premium setup window that appears.
If you wish, click on the checkbox next to Delete all backups and log files and then click on the Uninstall button.
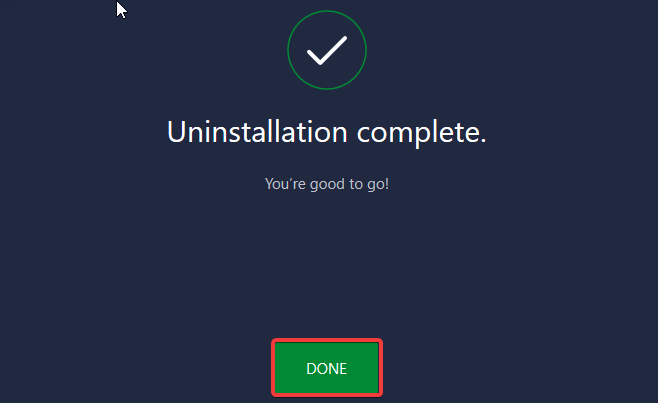
Wait until the uninstallation process completes and then click on Done.
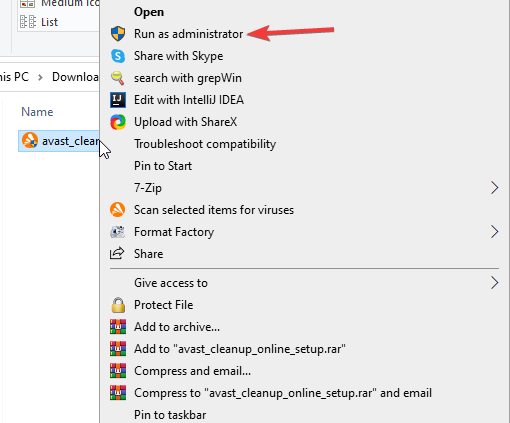
Right-click on the downloaded setup file and select Run as administrator.
Click Yes to give permission for the installation to begin.
When Avast Cleanup Premium opens, you can review the terms of the agreement and then click Install now.
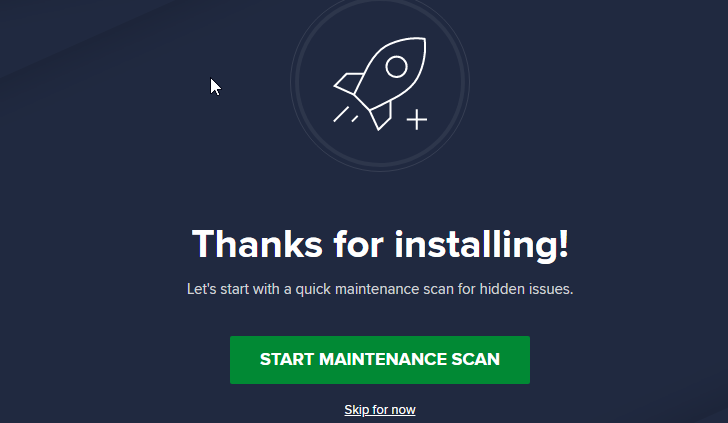
Wait for the installation to complete. You can now start the maintenance scan.
What can I do if a face an unexpected problem or suspected bug?
Sometimes, you might face an unexpected problem or a suspected bug with Avast Cleanup Premium. When this happens, it is always advisable to report the problem or suspect bug to Avast support.
However, you have to make sure that you send a detailed description of the problem. You should also include the version of Windows OS you are using, your computer’s brand and graphics card, the error message produced, and any changes on your computer after installing Avast Cleanup.
Electricity is an essential utility that helps us navigate through our day-to-day activities with ease, and at the same time helps reduce the rate of pollution. For instance, Ireland has approximately 400 wind farms that harness more than 35% of the island’s electricity, which is of course affected by the variation of the intensity of the wind.
“As the supply of renewable energy increases, a growing problem for electric power grid operators is created. That’s because they need to only put on the exact amount of energy that users are pulling out,” says John Roach. As such, Microsoft is intending to use the Banks of lithium-ion batteries at the data center in Dublin to counter this issue. Essentially, they will serve as backup power for the datacenter in the event of a power outage or emergency, thus, allowing uninterrupted service provision.
This will in return help lower the overdependency of power grid operators on running coal and natural gas fired power plants to help maintain balance and ensure that it’s business as usual. A better alternative that will help them maintain the “spinning reserve” as the batteries feature a new technology that enables real-time interaction with the electric power grid.
These batteries are part of the uninterruptible power supply(UPS) for the datacenter. Therefore, if this new approach takes effect “about two million metric tons of carbon dioxide emissions could be avoided in 2025”, according to Baringa, an energy advisory firm that Microsoft commissioned to analyze the potential impact of the technology. Ultimately helping Ireland save “tens of millions of dollars” that they would have otherwise spent on fuel required to keep the spinning reserve afloat.
To ensure that datacenters continue to provide “five nines” of reliability, the operators depend on the batteries in the UPS to step in whenever there is a power outage whilst waiting for the backup generators to take charge. “The main purpose of the UPS system is to provide power conditioning for the servers. The UPS system is always on, providing protection to the servers”.
“Grid frequency is becoming more volatile as the supply of variable renewable energy on the grid increases,” noted Christian Belady, distinguished engineer and vice president of Microsoft’s datacenter advanced development group.
We have this battery asset in the datacenter that is just sitting there, Belady said. Why don’t we offer it to the grid and come up with a dynamic way of managing it as a dual-purpose asset and thus drive more efficiency and asset utilization? That’s what drove this win-win situation.
They continue to strive to ensure that they are providing a similar, if not more efficient arrangement to that of UPS while “at the same time, providing ancillary services back to the grid with secure communication between the datacenter and the utility”,
As such, Microsoft saw it fit to invest in Ireland based on the fact that its variable renewables already account for more than 35% of the island’s electricity, which is expected to exponentially grow to 80% by 2030.
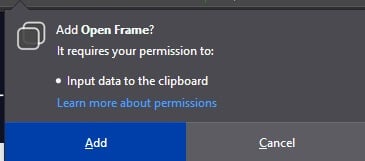
The iframe has not configured – see warning in console message signals an issue that will prevent certain components of the website from properly rendering, but you can easily fix this issue.
How can I fix The iframe has not configured – see warning in console?
1. Disable all add-ons from your browser
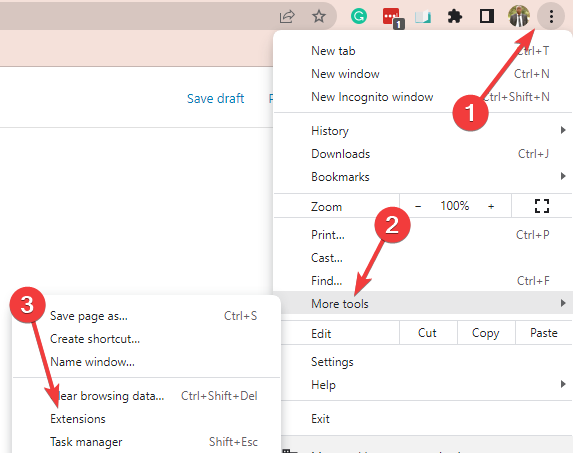
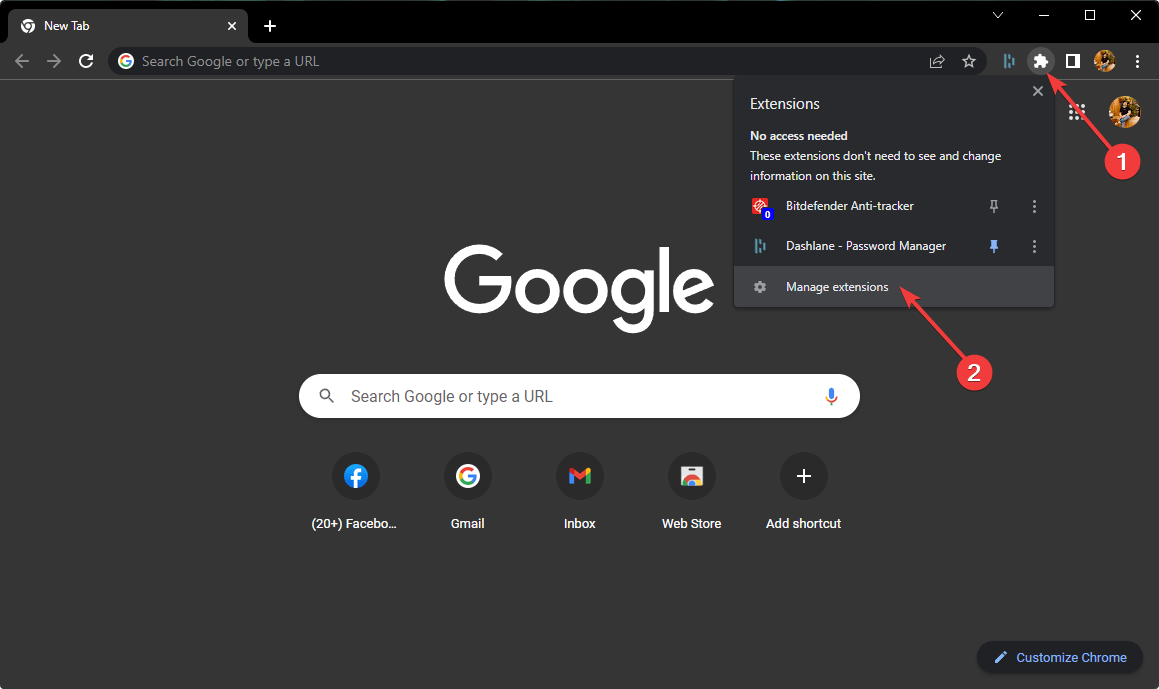
In Chrome, select the three dots at the top-right side of your screen, select More tools, then choose Extensions.
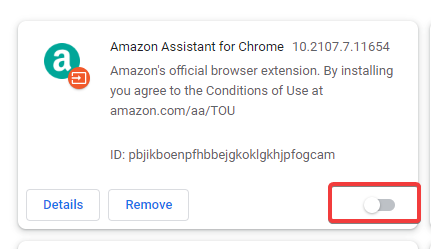
Inside the Extensions window, de-activate all add-ons.
Try to see if this method solved your issue.
If iframe not working in Chrome or any other browser, disable extensions that interfere in real time with pages such as uBlock or Privacy Badger and check if that helps.
2. Disable/enable iFrames from Internet Options
Click on the Windows Search tab,type inInternet Options, and select the first option.
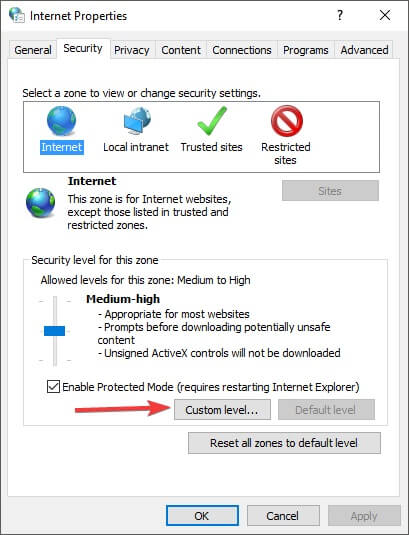
Select the Security tab.
Click on the Custom level button.
Scroll down to Launching programs and files in an IFRAME option.
Now, select Disable if you want to remove it completely, or Promptto choose for each website you visit.
Repeat steps 4 and 5 of this method for each of the desired security zones.
Click Ok to apply and exit the Internet Options menu.
Check to see if this method solved your issue.
3. Stop your antivirus service
Depending on the antivirus software you’re using, these steps will vary. (we are using BitDefender for this example).
Open up BitDefender.
Select the Protection tab.
Select Settings under the Antivirussection and toggle the blue button to deactivate protection.
Check to see if the issue still persists.
We have shown you how to disable the feature in BitDefender but the method is very similar in all other antiviruses.
Restart Firefox and check to see if the issues are resolved.
Hopefully, these methods heled you fix the iframe has not configured – see warning in console error. You can also read our guide on fixing This content cannot be displayed in a frame error which addresses the issue on Internet Explorer.
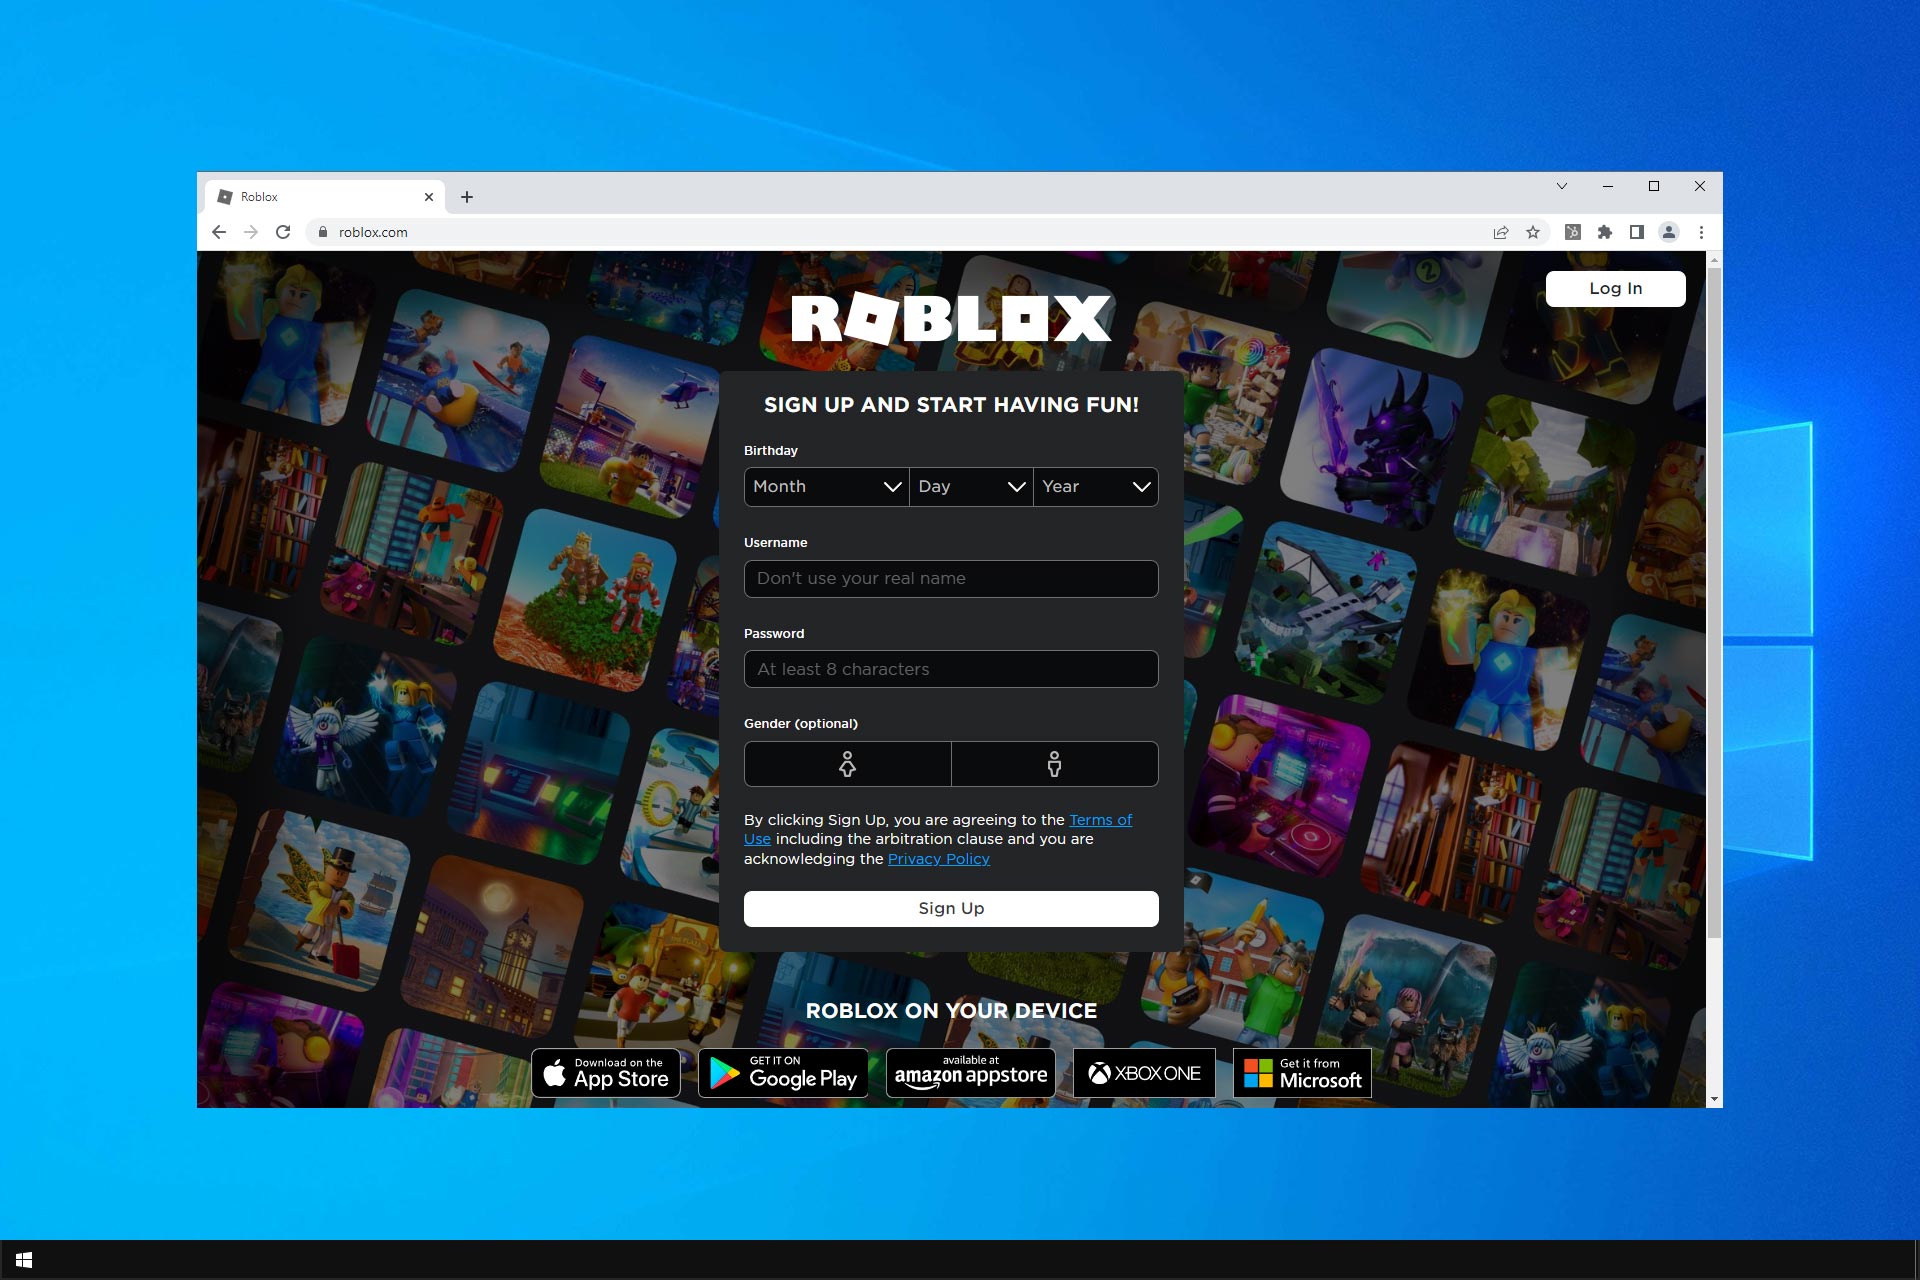
Hundreds of worldwide players report that Roblox won’t work in Google Chrome. Despite its huge popularity, the complex game platform faces serious issues preventing it from starting.
To use Roblox in Google Chrome, it is essential to ensure that everything is up to date and that no app or process in your system interferes.
This isn’t the only error, many reported Error Code 264 in Roblox, and we covered this issue in a separate guide.
Many underlying issues can cause this, so if you wonder what you can do if Roblox says Google Chrome OS can’t open this page or other similar messages, we’ve got you covered.
Your browser files may be corrupt, so the Roblox app won’t open in Google Chrome. Consider looking at the permission settings as well.
Some also report experiencing an endless install loop or crashes when attempting to open or connect to an online game.
This type of issue signals that your temporary files may be corrupt or your firewall prevents Roblox from starting.
Why is Roblox not working in Google Chrome?
Many users report having problems with the Roblox web app when accessing it from Google Chrome. Most common issues that cause this include:
Your browser is outdated: Roblox may not be able to load correctly on an old browser version
Multiple tabs are open: Chrome is notorious for having issues when you have too many tabs open at the same time
Corrupt browser files: make sure to check and reinstall your browser if necessary
Your antivirus or firewall is blocking Roblox
Faulty browser settings block the game
Roblox servers are down: in which case you will have to wait until their team remediates it
Continue reading for step-by-step instructions on how to check your applications and make Roblox work again in Chrome OS and in the Google Chrome browser running on Windows.
These tips also apply if you get other similar message prompts like Roblox is not found by your browser.
Quick Tip:
While Chrome is an industry-leading browser, it’s known for using up many system resources. This can cause your Roblox problems, so switching to a lighter browser like Opera GX is optimal.
Opera GX is similar in functionalities and user experience; you can customize it with themes, add your favorite add-ons, and get the best of your gaming by enabling the Opera GX Corner.
Opera GX
Enjoy Roblox with no interruptions with this performance-oriented browser.
Click the menu button, which looks like three lines in your Google Chrome browser on the top right.
Select More Tools in the pop-up menu.
Open Task Manager.
Find the process or program that you wish to force quit and click End Process on the bottom-right of the screen.
When the Roblox website is not loading in Chrome, a simple restart of the application may fix the problem. It will force the browser to reconfigure and stop any unnecessary resource-consuming process.
In case you’re getting Roblox requires Microsoft Internet Explorer 6.0 or greater message, update your browser or switch to a different one.
Sometimes connection or launch issues are mistaken for login problems, so it helps to first check that you can login to Roblox successfully before troubleshooting Chrome-specific errors.
2. Restart your device
In the taskbar, click your account photo select Sign out, and then Turn off.
Press the power button to turn it back on once your device has been powered down for 30 seconds.
Reopen the Roblox app.
3. Update date and time
Type settings in the taskbar to open the Settings panel.
Scroll to the bottom of the Settings page
Select Time and Language and update the data.
Click on Sync now to update date and time.
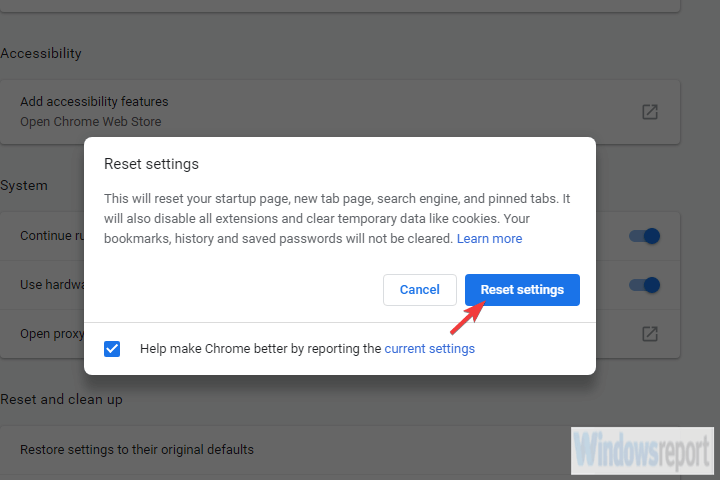
4. Reset internet options for Windows
Open Google Chrome
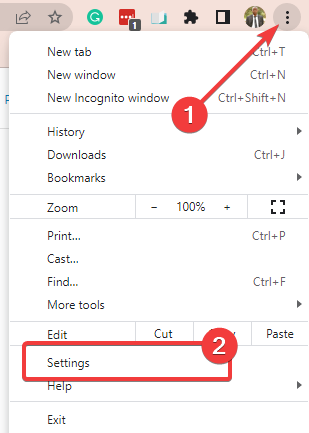
Click the three dots to open Settings
Select Settings
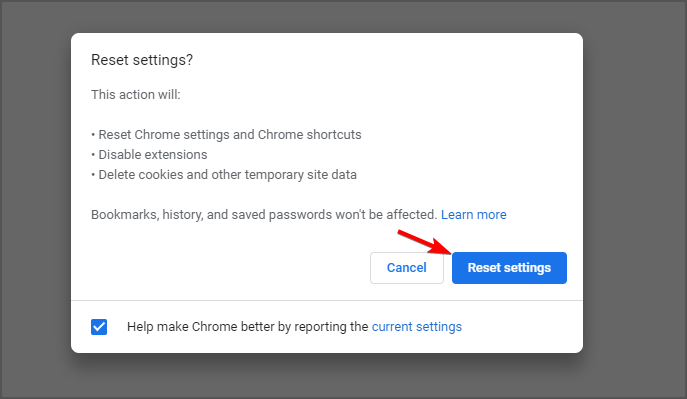
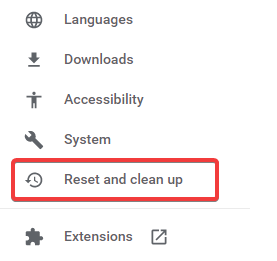
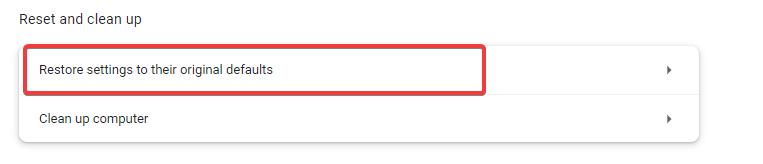
In the left pane, click on Reset and clean up.
Click Restore settings to their original defaults.
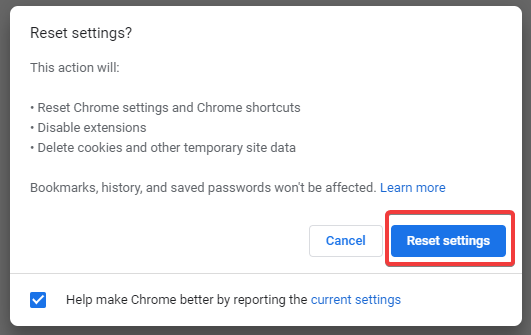
Click the Reset Settings button.
If you find that Roblox won’t work on Google Chrome, reset your computer’s internet options, as this fixes many problems even for players using Internet Explorer or Firefox.
Once you reset, close Google Chrome to allow the changes to take effect, then go back to using your web browser of choice.
Resetting the browser can help you fix the Privacy error on Roblox issue; read this guide to learn about other solutions.
Press Windows key + S and enter cleanup. Select Disk Cleanup.
Select your system drive and click OK.
Make sure that Temporary Internet Files are checked and click OK.
Wait for the process to finish.
An important step in any uninstall or reinstall process is to clear your browser’s temporary internet files, so as to help with any corruption issues that might have arisen.
6. Check your Firewall
1. Firewall/Security programs
Type allow an app in the taskbar and open Allow an app through the firewall.
Find Roblox and allow unrestricted access to the internet.
Open Chrome again and try to run Roblox.
If Roblox website not loading in Chrome, it’s possible that your firewall or certain extension is causing this.
NOTE
For help with specific software, consult your program’s help manual or manufacturer’s website.
2. Antivirus
Your antivirus or antimalware could be running in the background and act as an overly cautious firewall, thus preventing important communication between Roblox/Roblox Studio and related servers. To fix this, update your antivirus or add Roblox to your whitelist.
In some cases, Roblox is flagged as a concern by your antivirus, but note that it is virus-free and has no malware. This happens because sometimes antivirus flags programs incorrectly, something called a false positive. To resolve this, do the following:
Update your antivirus to the most recent version
Flag the report as a false positive and set it as a permitted program for any antivirus or antimalware app. When searching for exclusions on Windows, Roblox files are found in the folder: C:\Users\(Your Windows Username)\AppData\Local\Roblox
Roblox isn’t bound to use specific ports for outgoing data, but it scans to find any free port on your machine. If your router is blocking UDP packets on any port, then Roblox won’t work on Google Chrome. Ports for Roblox are selected and assigned for each game dynamically.
Check your router’s manual to see how to unblock, and if you run a DSL modem that blocks ports, check with your ISP for instructions on how to do this.
7. Re-install the App
In the address bar, enter: chrome://plugins/
Press Enter.
Where it lists Roblox Launcher Plugin, make sure it is allowed
If Roblox is unable to run or provides a prompt to download Roblox, even though it’s already installed, you should check if the Roblox plug-in is allowed in your preferred browser. To do this:
NOTE
Chrome no longer supports plugins as of version 42, so these only work in older versions of Chrome.
8. Reinstall Roblox
Type remove to open the Add or remove programs settings panel.
Locate Roblox in the app list, select it and click on the Uninstall button.
Wait for the process to complete.
Here’s how to reinstall:
Roblox player
Go to the Roblox website and log into your account.
Visit any game and click on the green Play. A pop-up window will appear informing you that Roblox Player is installing, then the game will automatically open.
A secondary pop–up window may appear asking you to select a program, in which case select Roblox and confirm. If you select to remember your choice, you will not need to perform this action in the future.
Roblox Studio
Go to the Roblox website and log into your account.
Visit any of your games, click the three square (dots) in the upper-right corner, and select it. A pop-up window will appear informing you that Roblox Studio is installing, and Roblox Studio will automatically open.
A secondary pop–up window may appear asking you to select a program, in which case select Roblox and confirm. If you select to remember your choice, you will not need to perform this action in the future.
Restart your computer.
If you have issues during the re-installation, clear Temporary Internet Files as this will help with any corruption issues that might have arisen.
Roblox not working on Chromebook
1. Restart Chromebook
Click your account photo.
Next, click on Turn off.
Wait for 30 seconds and press the Power button to start it again.
2. Reinstall the app
Open the Launcher.
In the All Apps menu, locate the Roblox.
Right-click the app icon.
Select Remove from Chrome.
In the confirmation window, click Remove.
3. Make sure date and time are correct
Click the status area on the Taskbar and then pick Settings.
Click on Show advanced settings.
Now in the Date and time section, make sure your date and time are correct.
If Chrome OS can’t open this page in Roblox, then be sure to try one of the methods mentioned above.
Were you able to resolve Roblox won’t work on Google Chrome using the solutions here? Let us know in the comments section below.
Want to know more about Roblox? We cover guides and fixes on our Roblox page. Once you fix Roblox in Chrome, it is equally important to secure your account. Learn step by step how to sign out of Roblox on any device to prevent unauthorized access.
Some Windows 10/11 users that have been using Avast Antivirus claims to see something unusual upon checking their Event Viewer logs or Reliability Monitor. They are seeing regular Avast Update Helper Errors 1316, 1638 or 1603 listed (every hour or so).
Although the issue doesn’t manifest itself outside Event Viewer, neither does it have an adverse effect on the PC. Some affected users are however concerned that due to this issue, they are leaving their system exposed to security issues.
If the Avast Update Helper Errors 1316, 1638, or 1603 has occurred on your Windows 11/10 PC, you can try our recommended solutions. Follow the order presented below and see if that helps to resolve the issue on your system.
Why is Avast not updating?
The major reason for Avast not updating the virus definitions is incompatibility issues. Your Avast version may not be compatible with the Windows version installed on your system.
This can pose a problem if you don’t regularly update your Windows and other software. You can also face this error if you have Avast installed incorrectly. This can occur if an update failed or was canceled during installation.
How often should Avast antivirus be updated?
It is important to constantly update the anti-virus software on a computer because computers are regularly threatened by new viruses. The anti-virus updates contain the latest files needed to combat new viruses and protect your computer.
Your security software should be set to check for updates at least once a day. This will already be the default setting for most current security programs, although it’s worth investigating your program’s settings to make sure this is the case.
How can I fix the Avast error 1638 on my PC?
1. Update Avast to the latest version
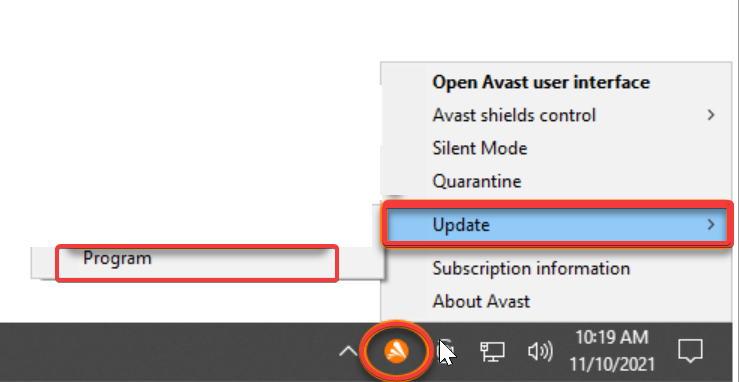
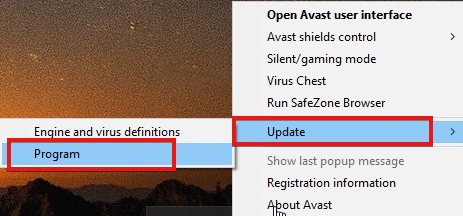
Right-click the Avast icon on the computer’s notification bar.
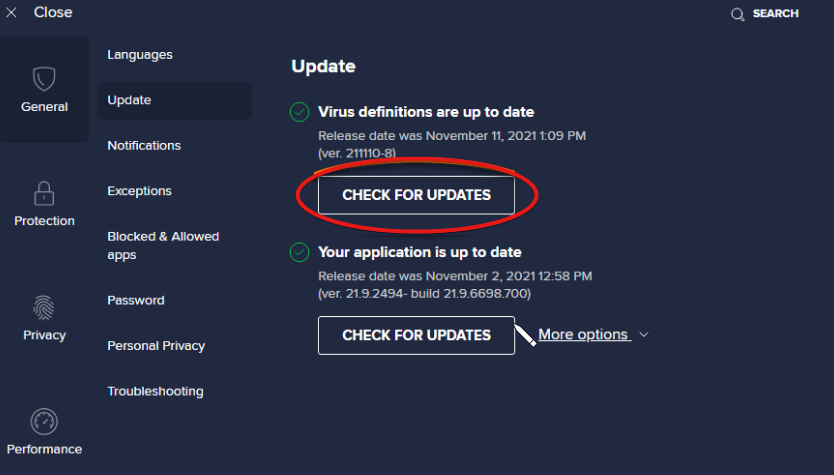
Click Update and select Program.
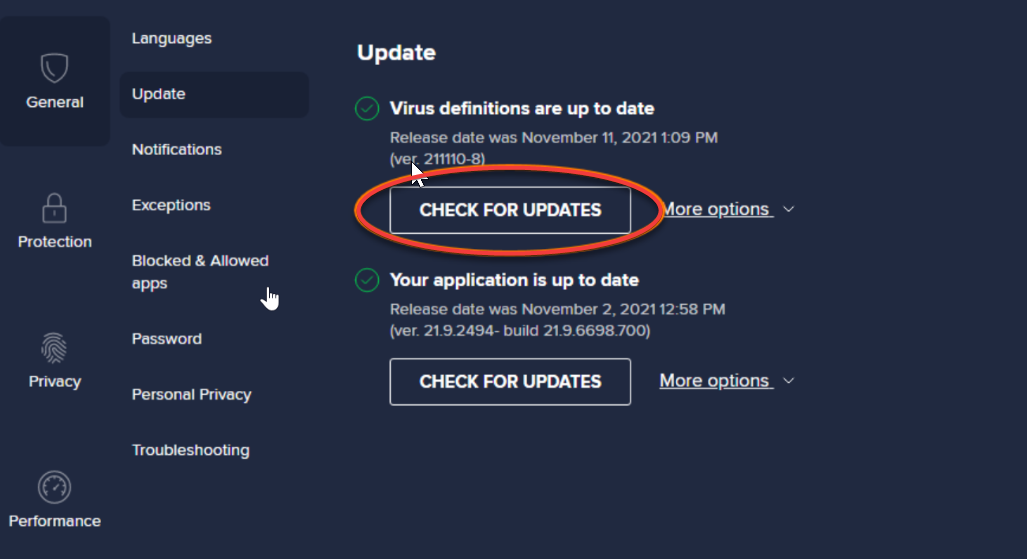
If it doesn’t update automatically, click Check for Updates.
Wait for Avast to update.
If prompted, tap Restart now to complete the update process.
Clicking the Restart now button will restart your computer. And reboot your device alongside the Avast Antivirus application.
2. Repair Avast
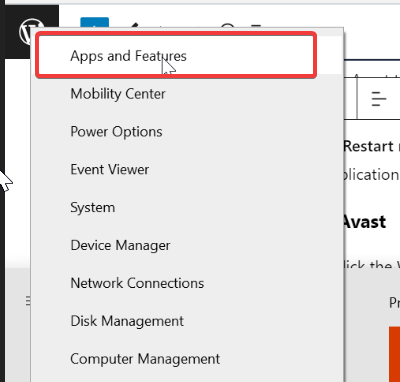
Right-click the Windows Start button and select Apps and Features.
Click your Avast Antivirus version and tap Uninstall.
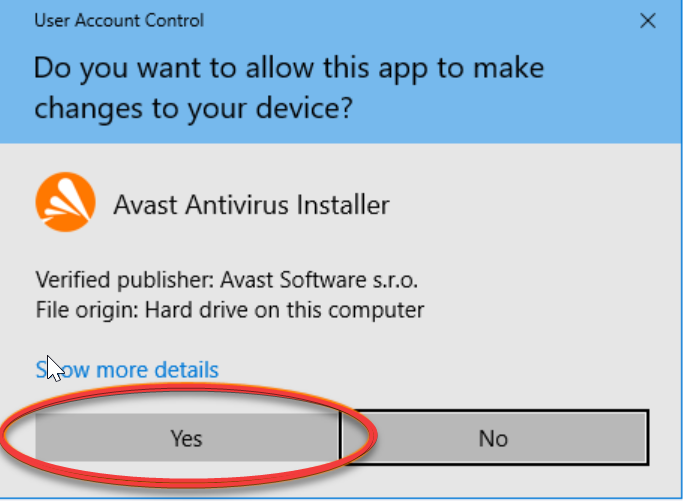
If the User Account Control dialog pops up, click Yes.
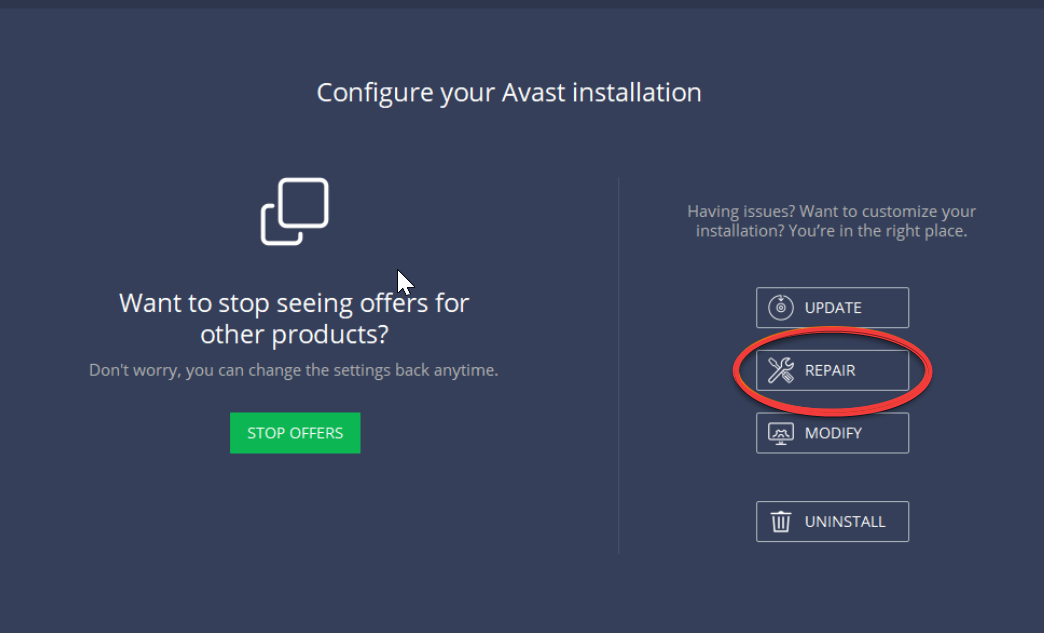
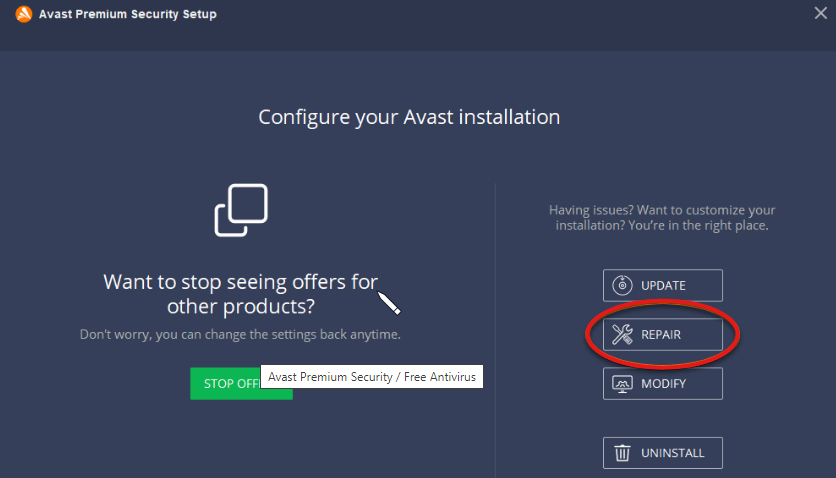
Once the Avast Setup wizard appears, select Repair.
Tap Yes to confirm the action.
Click Done.
If prompted, click Restart computer.
Due to a partially corrupted Avast application installation, the Avast update helper errors can be triggered. In this case, to make the errors go away, you can repair Avast using the application inbuilt function.
3. Disable or Uninstall Avast Secure Browser
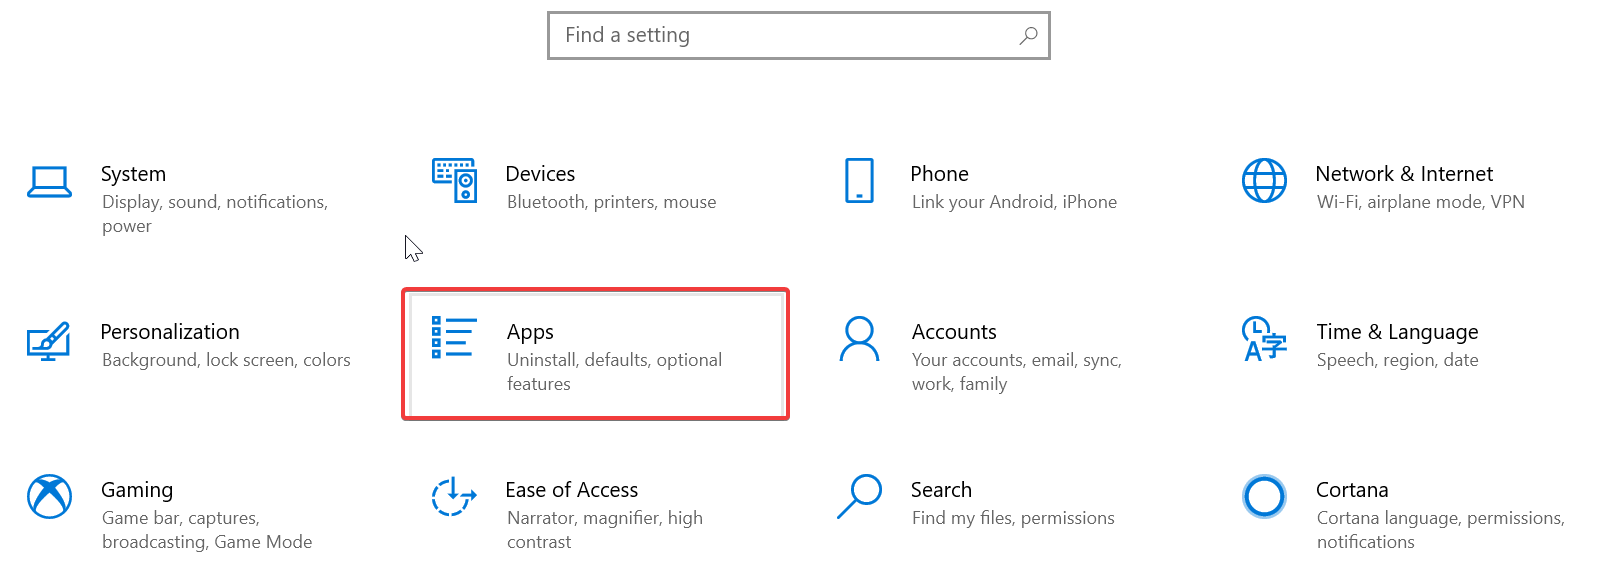
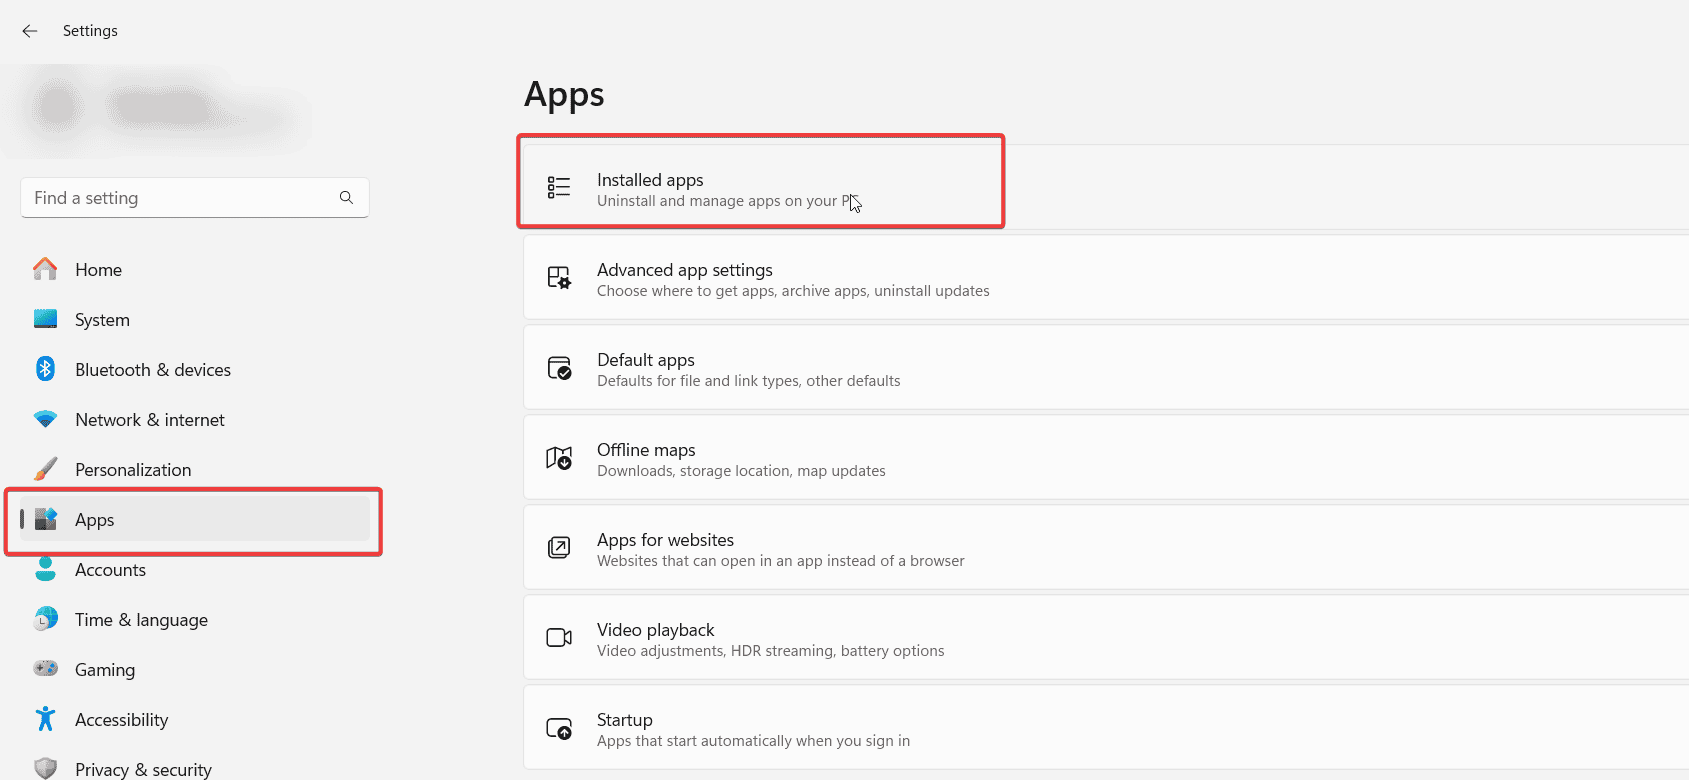
Press Windows + Ito open the Settings app.
Click on the Apps from the Settings app.
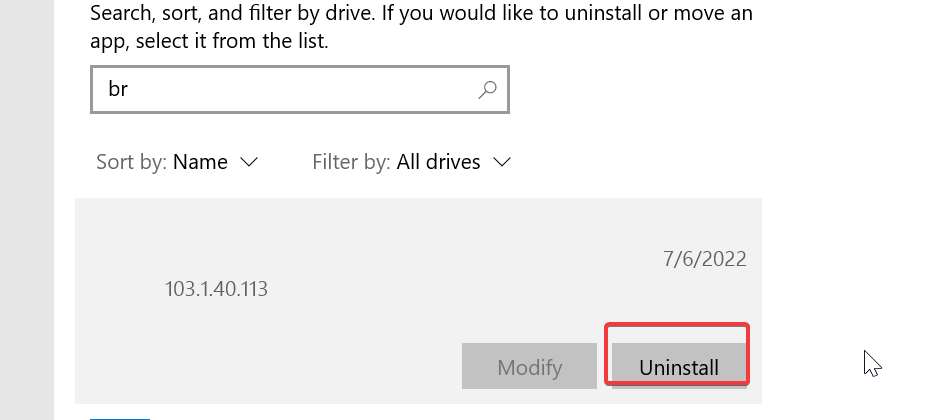
Locate Avast, click on it, and select Uninstall.
Follow the instructions on the screen to uninstall.
After uninstalling, go to the Avast official website and download the latest Avast antivirus. Then install the software.
That’s it from our side in this guide. Let us know in the comments below which one of the above solutions works best for you.
Xbox Free Play days is back with another incredible lineup of games for Xbox Live Gold and Game Pass Ultimate members to install and play. These will be available from Thursday (July 7) through Sunday (July 10). Let’s check out what’s available this week.
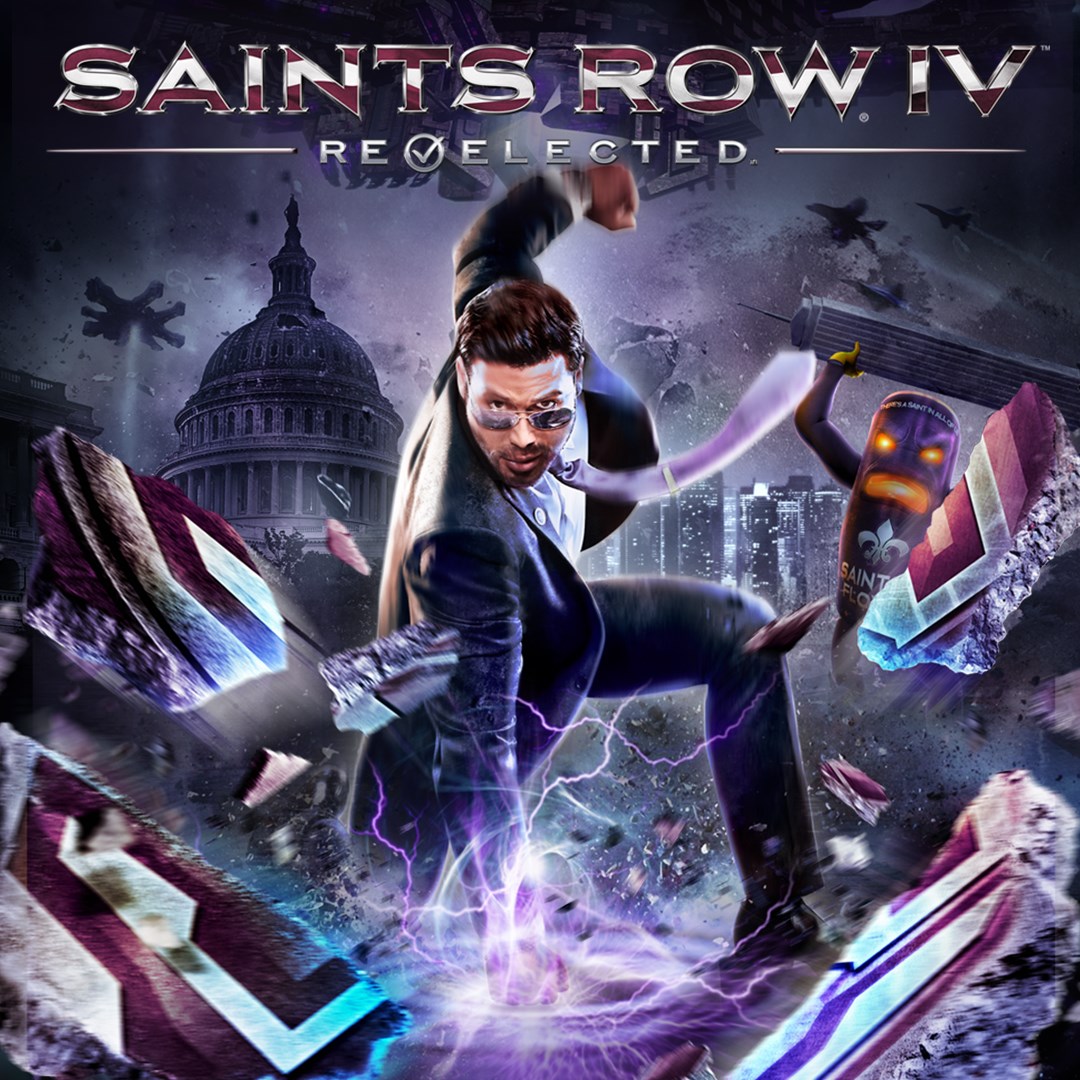
As president of the United States of America, you must save the world from an alien invasion. The game includes a whopping amount of content including DLC mission, weapon, wardrobe and vehicle packs, as well as some visual enhancements.
The official GT World Challenge video game. Not to mention one of the most authentic road racing simulators to hit consoles. Strap in and get ready for the ultimate GT racing experience.
Explore America from coast to coast in this open-world driving game – one of the largest ever created. Take the wheel of a variety of vehicles: cars, motorcycles, planes, boats and more.
How to get started
You can check out each game’ details page over on Xbox.com. And if you would like to learn more about Xbox Free Play Days, check out the FAQ page.
This week’s Free Play Days lineup looks particularly sweet, with three blockbusters that are more than worth checking out. Which are you most excited to play? Let us know in the comments below.
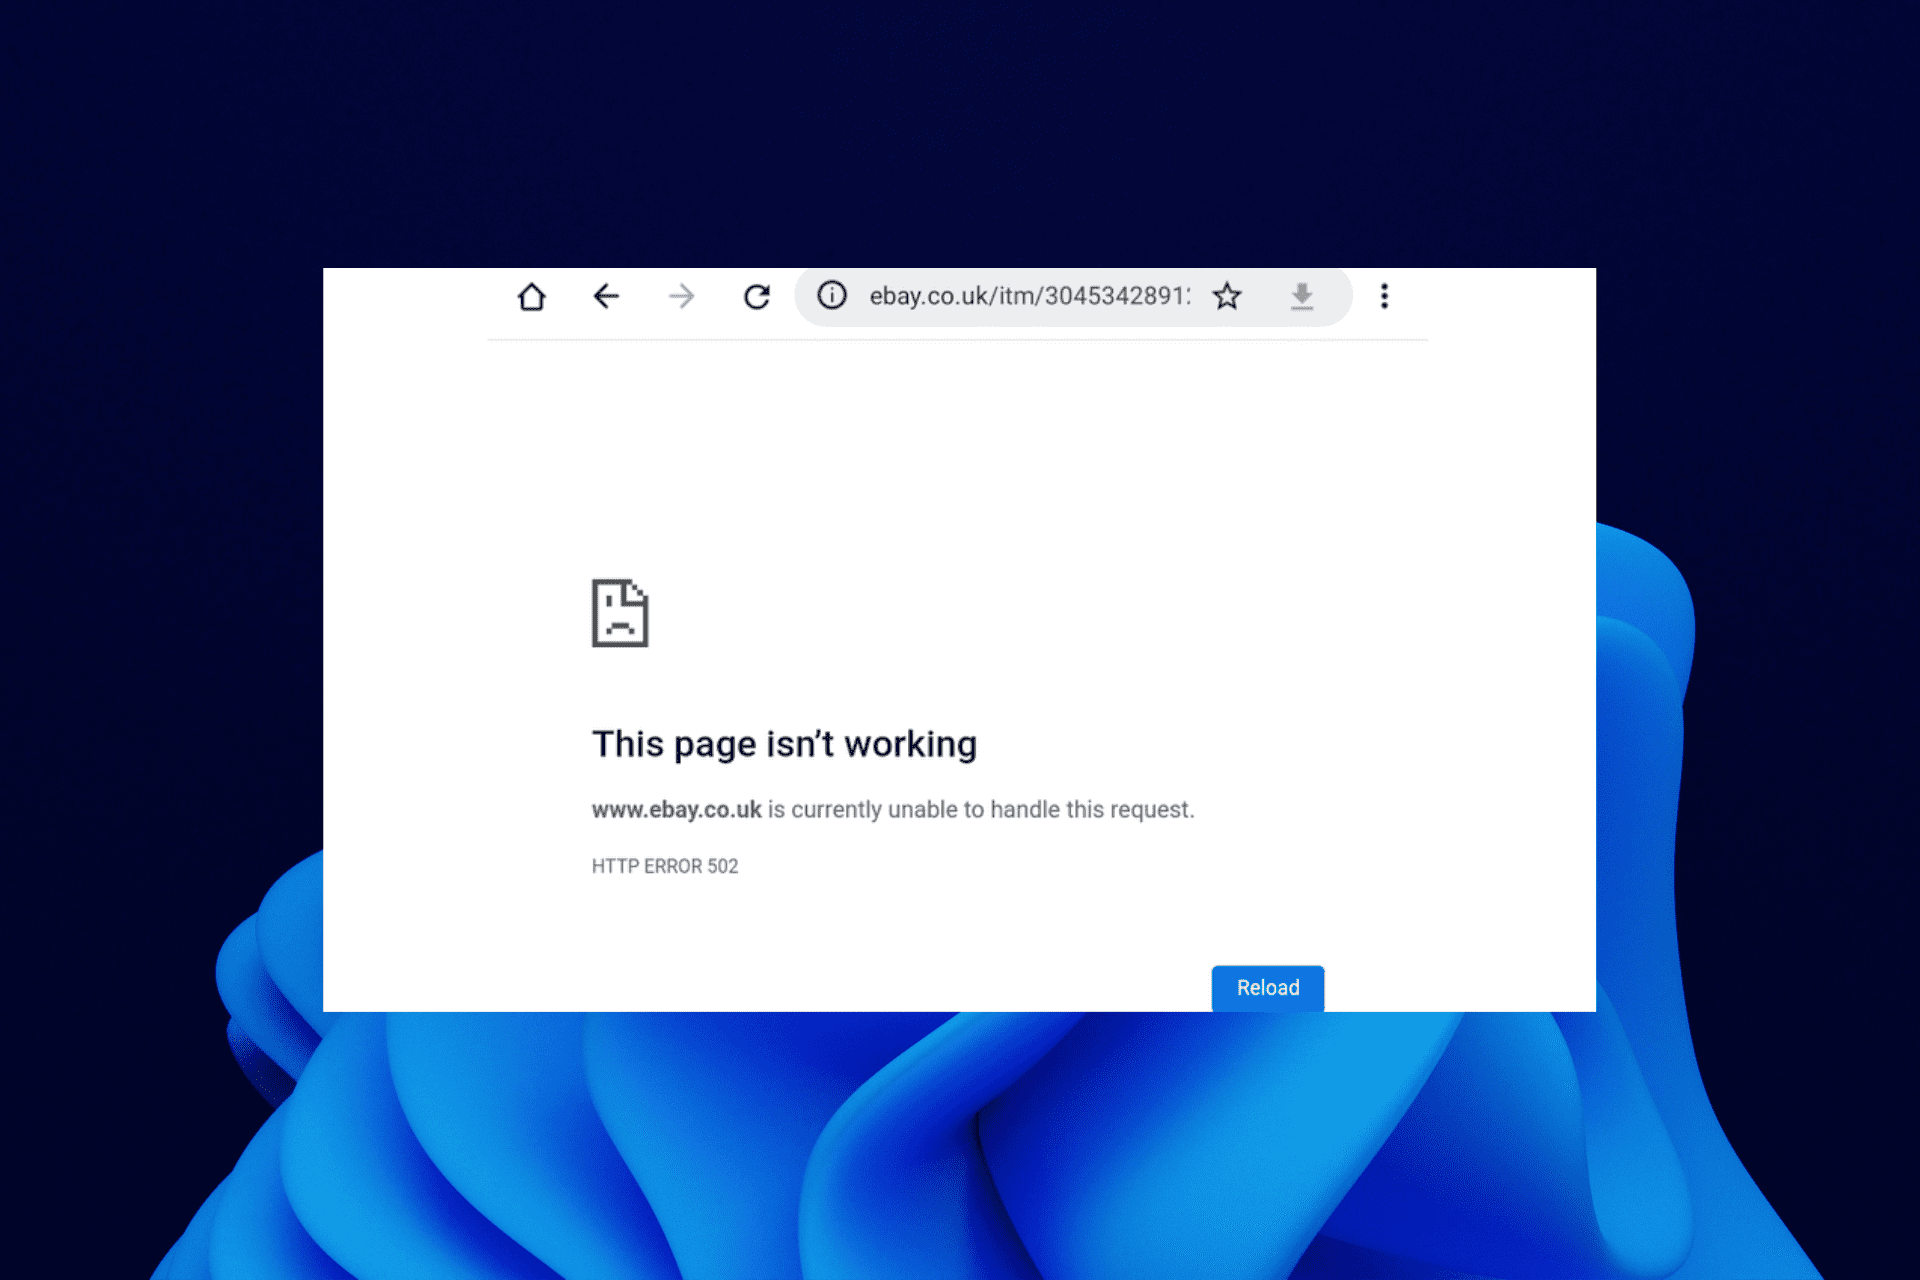
The error 502 is one of the prominent issues stopping users from accessing the eBay website even on some of the best browsers for eBay sellers. This has cost a lot of people, as it prevents them from bidding for items and completing checkouts.
Many factors can cause this issue, from problems on eBay’s end to browser issues. Thankfully, it is an error that is easy to fix.
This guide will show you four quick ways to solve error 502 and get back to shopping on the top-notch platform.
Quick Tip:
Try loading eBay from a different browser. We suggest Opera because it is fast, with its built-in adblocker that reduces loading times, and additional performance features like a VPN and hardware acceleration.
Opera
Access eBay securely and hassle-free with one of the fastest browsers in the game!
Why do I keep getting the bad gateway error 502 on eBay?
Error 502 is generally down to server downtime, and eBay is not different. Also, it can be due to the accumulation of corrupt browser data.
Thankfully, the issue is easy to fix, as we will show in subsequent sections of this guide.
How do I get rid of error 502 on eBay?
1. Reload page
Sometimes, the issue with the eBay website might be temporary and resolved quickly. Hence, if you are getting the error 502 on eBay, wait a few minutes and reload the page.
2. Check eBay server status
Launch your browser and type ebay server status in the Address bar.
Choose one of the trusted websites like Downdetector.
You will see a live update on the status of the eBay server.
If the results show that the error 502 on eBay is due to server downtime, there is nothing you can do but wait for it to be resolved.
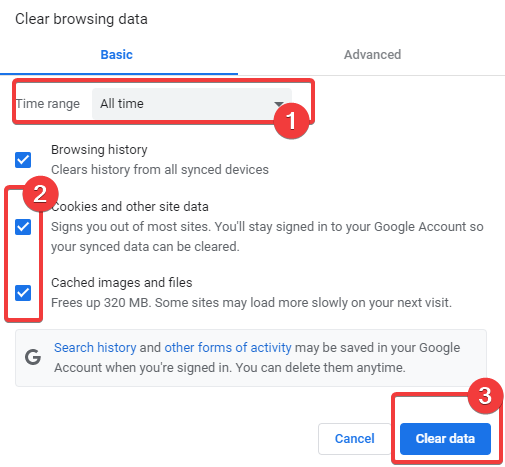
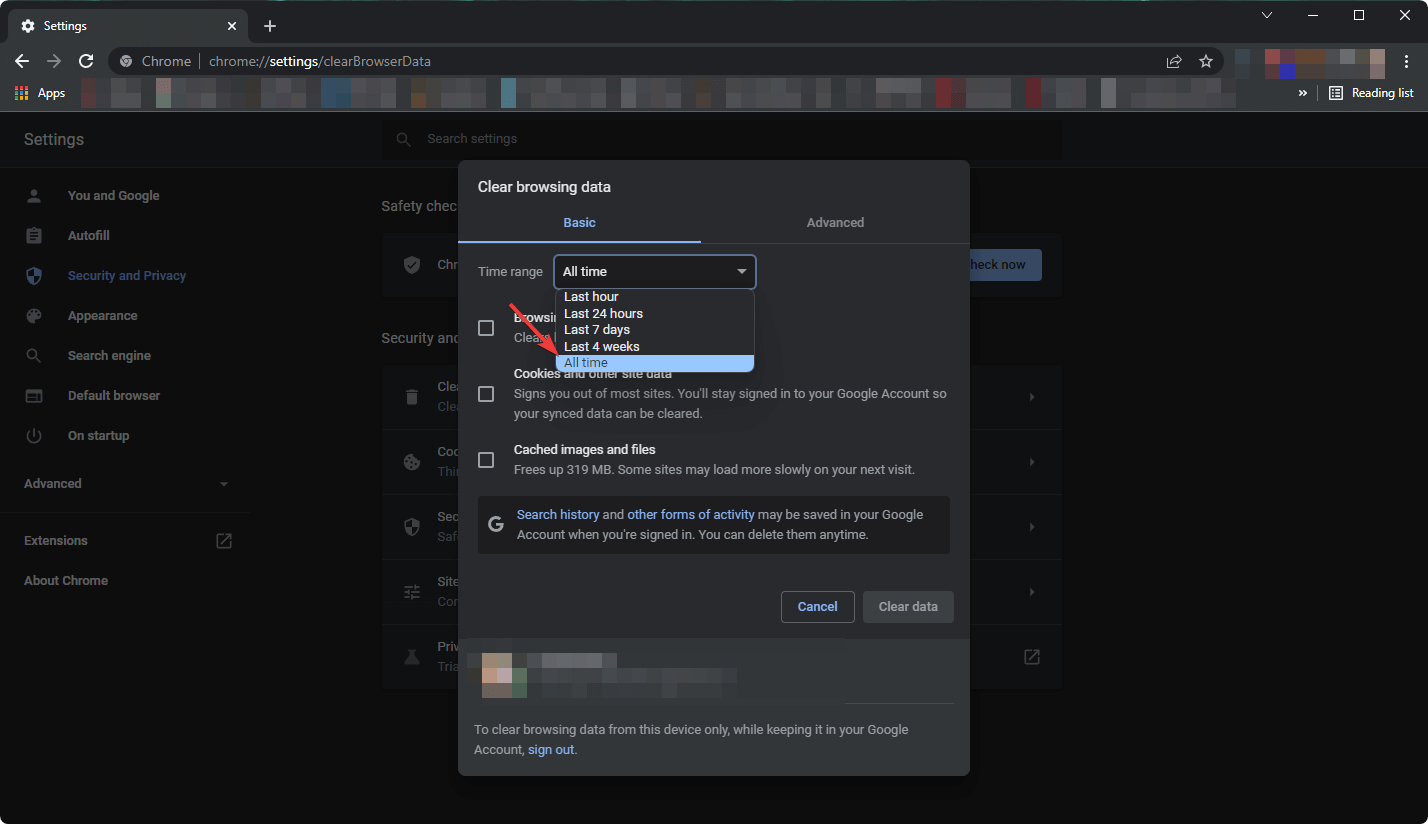
3. Clear browsing data
Open your browser and click the menu button.
Select the Settings option.
Now, choose the Privacy and security option on the left pane.
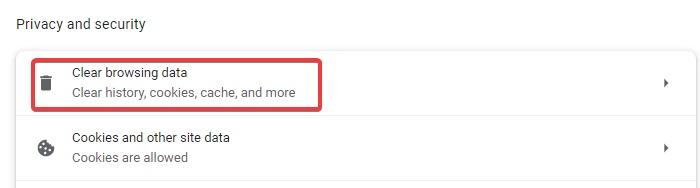
Select Clear browsing data.
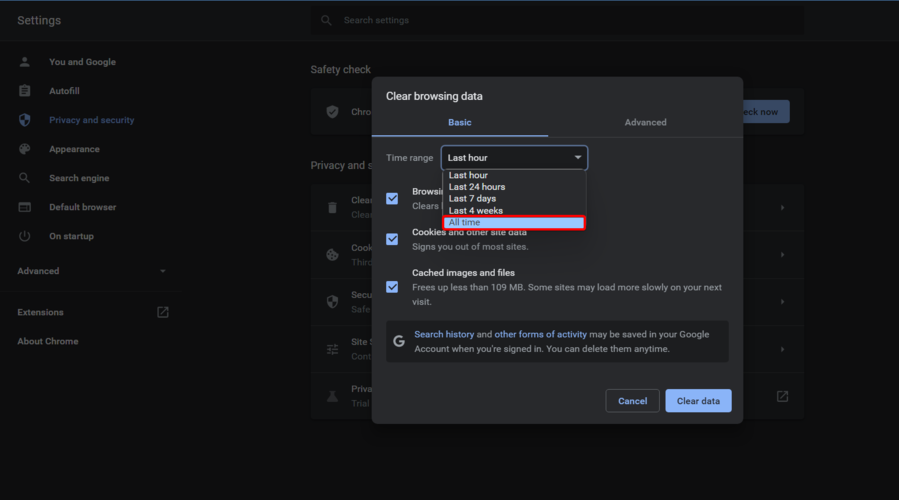
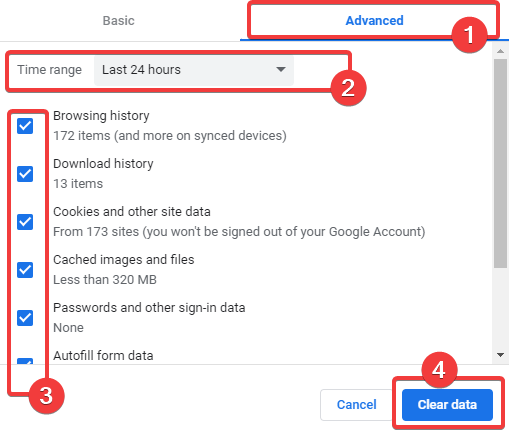
Click on the dropdown next to Time range and select the All time option.
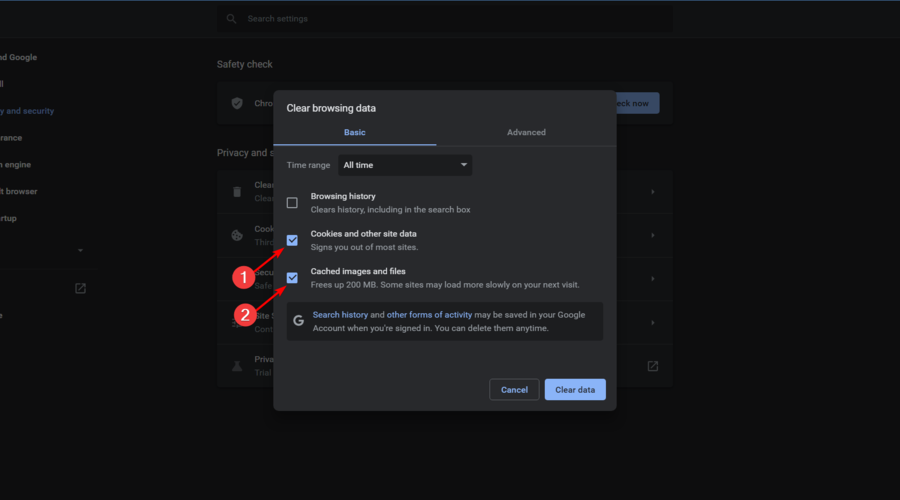
Check the boxes for Cached images and files, Cookies and other site data, and Browsing history.
Finally, click the Clear data button.
Accumulating corrupt browser data can cause problems, including the error code 502 on eBay. Clearing and allowing your browser to gather fresh data is a quick way to fix this issue. We used Chrome as an example here but you can apply the fix to other browsers.
If you want to save time and automate the task a little bit, use a dedicated utility instead. We suggest CCleaner because it’s user-friendly and safe.
You might need to switch to another browser if you still can’t get past the error 502 after clearing your data. You can always use some of the best browsers for all devices like Opera, Chrome, and Firefox.
This is because the issue might be down to the particular browser you are using at the time.
The error 502 on eBay can be costly, as it can prevent you from closing important deals. This is why it is important to apply the fixes in this guide.
We’re excited to confirm that Xbox will be back on the show floor at Gamescom 2022 in Cologne, Germany. Fans in Europe and around the world can expect updates on some announced games coming to Xbox in the next 12 months.
What we may also glean from the statement is that Xbox will stick with the messaging from June’s Xbox & Bethesda Games Showcase events, with a focus on the next 12 months of gaming.
The statement also seemed to emphasize “updates on announced games.” Which probably means we shouldn’t expect any surprise game reveals. Still, the prospect of getting some new info on upcoming games that we’ll be able to play in the next year is an exciting one.
Here’s hoping we see more on the likes of Redfall, the new Forza Motorsport and Starfield come August. Gamescom will be broadcast from Wednesday, August 24 to Sunday, August 28. The event will be a hybrid one, with both in-person and online aspects.
It has been known since June that the annual Electronic Entertainment Expo (E3) will return as an in-person event in 2023, but we now finally know the details as to what to expect. This is all thanks to the parent company of the expo, ESA, which announced on Twitter that they’ve partnered with ReedPop (which runs New York Comic Con) to be responsible for the biggest video game event.
We're back! ????#E32023 will take place in June at the Los Angeles Convention Center— with new partner ReedPop (the folks behind @PAX!)
With ReedPop behind it, E3 2023 will be held in Los Angeles, California, at the Los Angeles Convention Center, timed for the second week of June. That means both in-person showcases, as well as digital showcases. Media, meanwhile, will be invited to register to attend later this year.
“We are thrilled to bring back E3 as an in-person event with ReedPop, a global leader in producing pop culture events,” said ESA president and CEO Stanley Pierre-Louis.
There’s no word yet if any of the major players in the video game industry will plan to attend this in-person E3 event. Microsoft hasn’t attended in a while, instead doing its own Xbox Games showcase via a live stream. The same also applies to Sony and Nintendo.
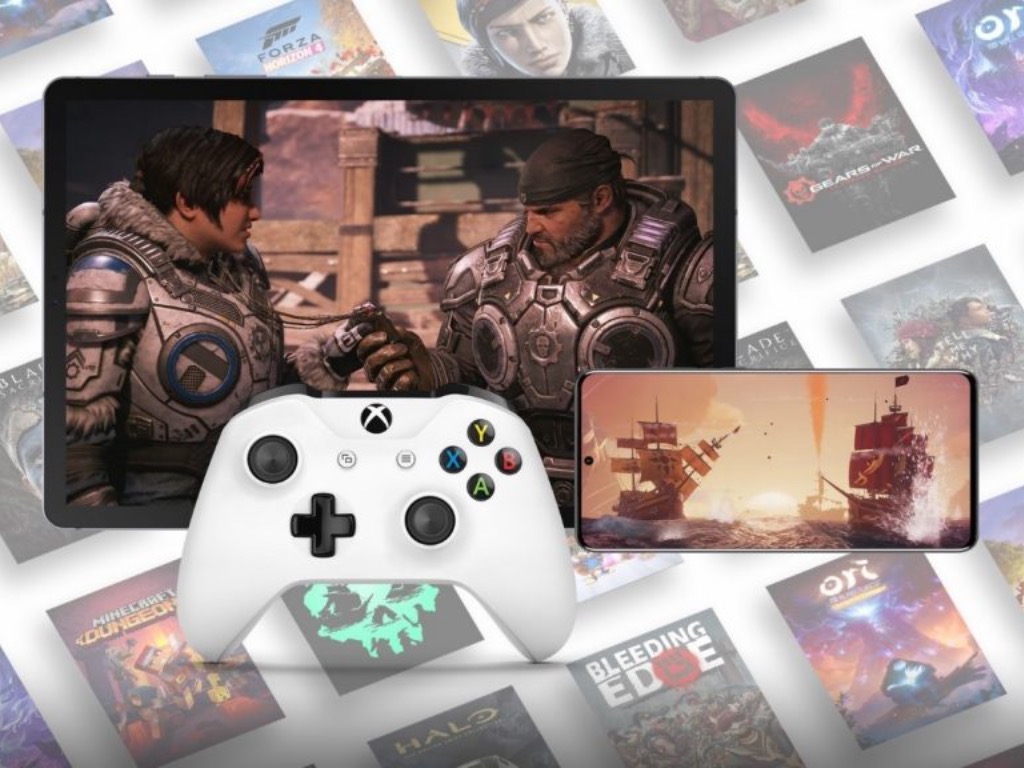
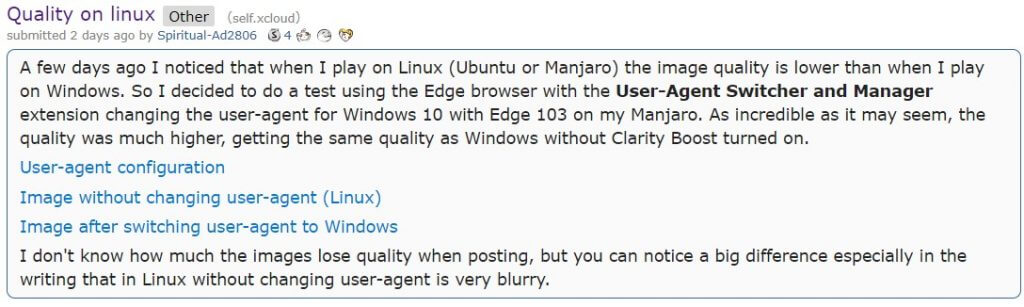
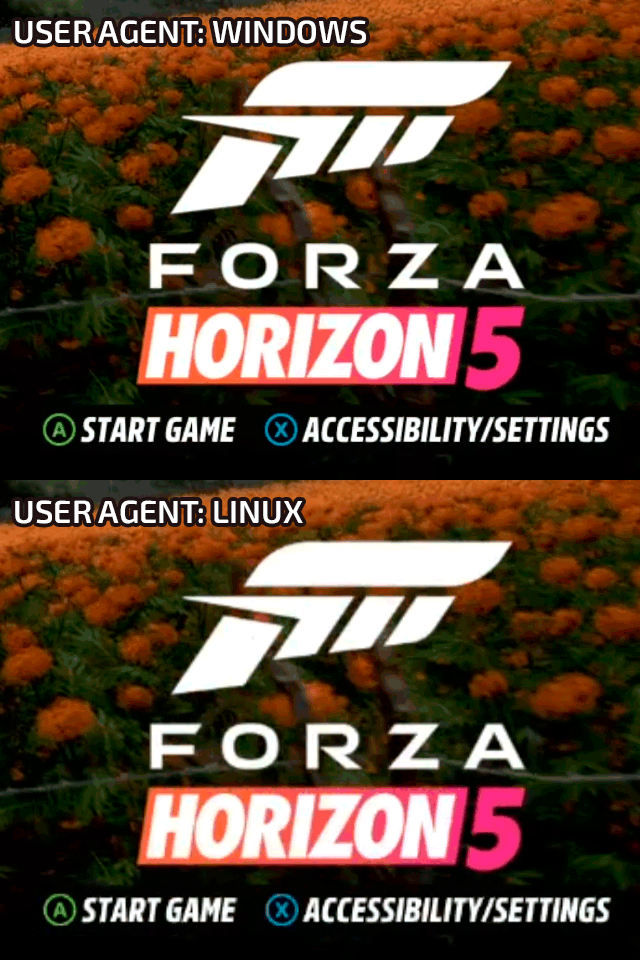
Microsoft’s Xbox Cloud Gaming game streaming apparently takes a performance dive when running on Linux. This is according to a Reddit user who conducted a test of xCloud streaming in both Windows and Linux.
The user posted his findings earlier this week, noting that visual quality saw a noticeable dip in Linux (Manjaro). As you can see in the GIF below, edges are considerably sharper in Windows. Also colors have a washed-out appearance in the Linux image, and the text and logo are blurry in comparison to that of the Windows image.
But even more interesting is that when Clarity Boost is activated, the quality dip vanishes. Clarity Boost is, of course, exclusive to Microsoft’s Edge Browser. Could this be intentional on the part of Microsoft in an effort to attract more xCloud users to Windows OS and/or Edge browser, or perhaps just a bug?
If you want to know about the best Chrome start pages, this article can help you with exciting information.
Google Chrome’s default New Tab (or start) page might be a little threadbare for some users. Sure, you can add custom wallpapers, shortcuts, and alternative background colors to it.
However, that’s about all the customization options Chrome’s New Tab page includes at the moment.
Nevertheless, there is a wide variety of Chrome start page extensions that can help you transform that browser’s New Tab page.
You can add those special start page extensions to Google’s flagship browser by clicking the Add to Chrome buttons on their Web Store pages. In this article, we’re going to see which is the best homepage for Chrome.
How do I customize my startup page in Chrome?
You can set any web pages or anything as your chrome home page. You can set any custom web address as your home page by following these instructions:
Open Google Chrome.
Type the following address in the address bar and press enter to open Chrome settings: chrome://settings/
Go to Appearance from the sidebar.
Toggle on the Show home button.
Check Enter custom web address and type your preferred web address.
You also can set a specific page as a startup page from here.
What is the most popular home page?
Right now, the Google search page is the most popular home page in the world. As Chrome is holding the majority of the browser market share, it helps to make Google the number one home page.
In past, we saw Yahoo or MSN as the most popular ones. But, it has been changed.
Even though the default home page for Chrome is simple and perfect for most users, you still may need something more powerful, elegant, and flexible. So, we have prepared a list of the best Chrome start pages. In the next section of this article, you will know about them.
Quick Tip:
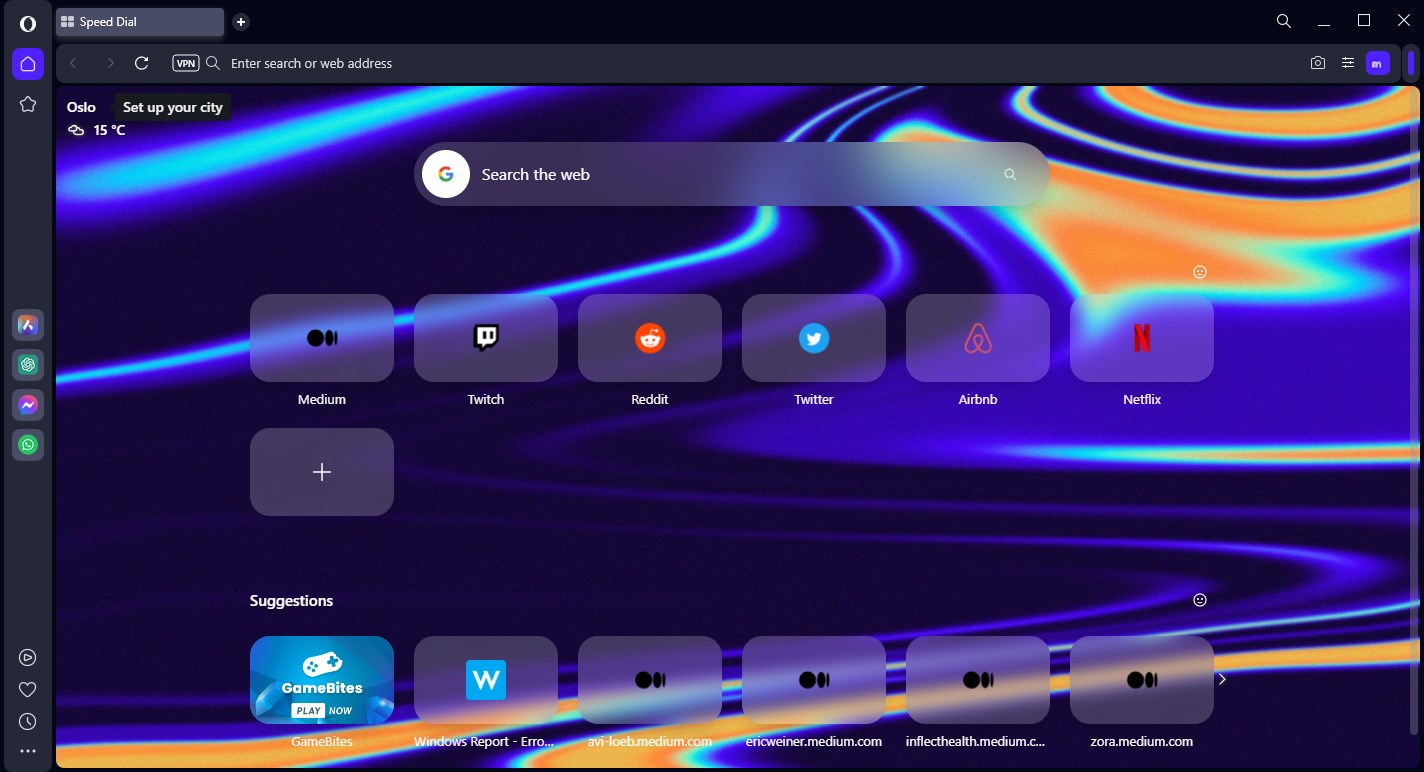
If you want more freedom to organize your start page, try Opera One instead. It’s more customizable than Chrome while being very easy to use and adjust to.
You can pick your theme and wallpaper, change the language, set up startup preferences, and integrate thousands of extensions.
Opera One
Create your very own start page from design, custom search engine, extensions, and more!
Infinity New Tab is an extension that adds a start page with circular or square icon shortcut icons to Google Chrome.
It packs in more than 200 shortcut icons for a wide variety of big websites. You can add your own shortcuts to the page with customized colors and image icons.
You can also select to add weather, page history, bookmarks, browser extension, calculator, note, and to-do lists apps to your Infinity New Tab page among others.
Aside from adding your own background images, you can click a windmill button at the bottom right of Infinity’s start page to select from random wallpapers.
Alternatively, you can include Bing wallpapers on the New Tab page by selecting Infinity’s Sync Bing wallpaper option.
So, this extension provides users with a huge variety of alternative HD wallpapers for the New Tab page.
Speed Dial [FVD] is rightfully considered a very visually appealing Chrome start page extension. It displays your webpage shortcuts with 3D page dials.
Speed Dial also displays your most visited and recently closed pages for easy access. This extension includes various customization options for its page’s fonts, dial shortcuts, and background.
You can also sync FVD Speed Dial with the EverSync extension. EvernSync enables you to sync this extension’s speed dial shortcuts between different devices and browsers.
Then you can access all your dials from alternative devices.
If you’re looking for the best Chrome start page Incredible StartPage then this is a perfect choice that includes features such as My Bookmarks, My Apps, and Most Visited tabs.
My Bookmarks tab displays all your bookmarked webpages and apps within a customizable frame for quick access. You can add your own custom backgrounds to the frame or select from a variety of themes included with the extension.
This extension also includes a handy notepad. With that, you can note down webpage login details, numbers, or anything other reminders for browsing.
Infinite Dashboard is an extension that displays a clutter-free New Tab page with a customizable background and search bar.
It combines that with a separate Hub window, so users can add bookmark shortcuts there easily.
The Hub includes a wide variety of Google, iCloud, messaging, and game app shortcuts that you can open directly from Infinite Dashboard. In addition, the Hub incorporates a calendar and notepad for users.
Infinite Dash incorporates good background customization options. It includes Unsplash images for you to choose from. You can also select to add a variety of Flixel video backgrounds to the New Tab page.
The best thing about Infinite Dashboard, however, is its browser sessions manager. With that, you can save a combination of page tabs open in your browser.
You can utilize the sessions’ manager as a more flexible bookmarking tool to save and open groups of website pages.
ProductivityTab is one of the most comprehensive and flexible New Tab extensions for Google Chrome. This extension currently provides 43 widgets for users to add to its New Tab page.
Users can add site links, bookmarks, clock, weather, search, calendar, notes, apps, RSS, to-do, calculator, and even system stat widgets to their Productivity Tab pages among others.
Therefore, the Productivity Tab page can be so much more than just a Chrome start page for bookmarks.
This extension also has good theme options. Aside from adding your own wallpapers, you can select from a wide variety of theme backgrounds included with it.
Some of those themes are live video ones. Alternatively, you can add website images with their URLs.
Without the extension, you cannot set a customizable dynamic page as your home page. It is also safe to use start page extensions if it comes from a trustable source like Chrome Web Store.
In our above list, we have mentioned some home pages which can be installed via their official extensions. In addition to the list, you also can consider using Live Start Page – Living Wallpapers. This is an excellent extension that helps to build an elegant home or start page on Chromium-based browsers.
Those are some of the best homepage extensions for Chrome that add much more appealing and customizable New Tab pages to that browser.
You can also install the above extension on other Chromium-based browsers. That means you can add those extensions to Microsoft Edge, UR, Vivaldi, and Opera One as well!
We’d like to hear more from you on this subject, so drop us a comment in the section below.
We recently reported on the latest Google Chrome release which was in place to address zero-day vulnerabilities for Windows users. And as it now seems, Microsoft has followed suit by releasing an updated version of Edge which is slated to address the same issue as spotted by Neowin.
Here’s the information Microsoft provided regarding this update on Edge’s changelog:
This update contains a fix for CVE-2022-2294, which has been reported by the Chromium team as having an exploit in the wild.
Your browser should auto-update to the latest version, however, if this does not happen you can trigger it manually by navigating through Microsoft Edge’s menu, then selecting Help and Feedback, and finally clicking on the About Microsoft Edge option. Wait for the update to complete the download then restart your browser.
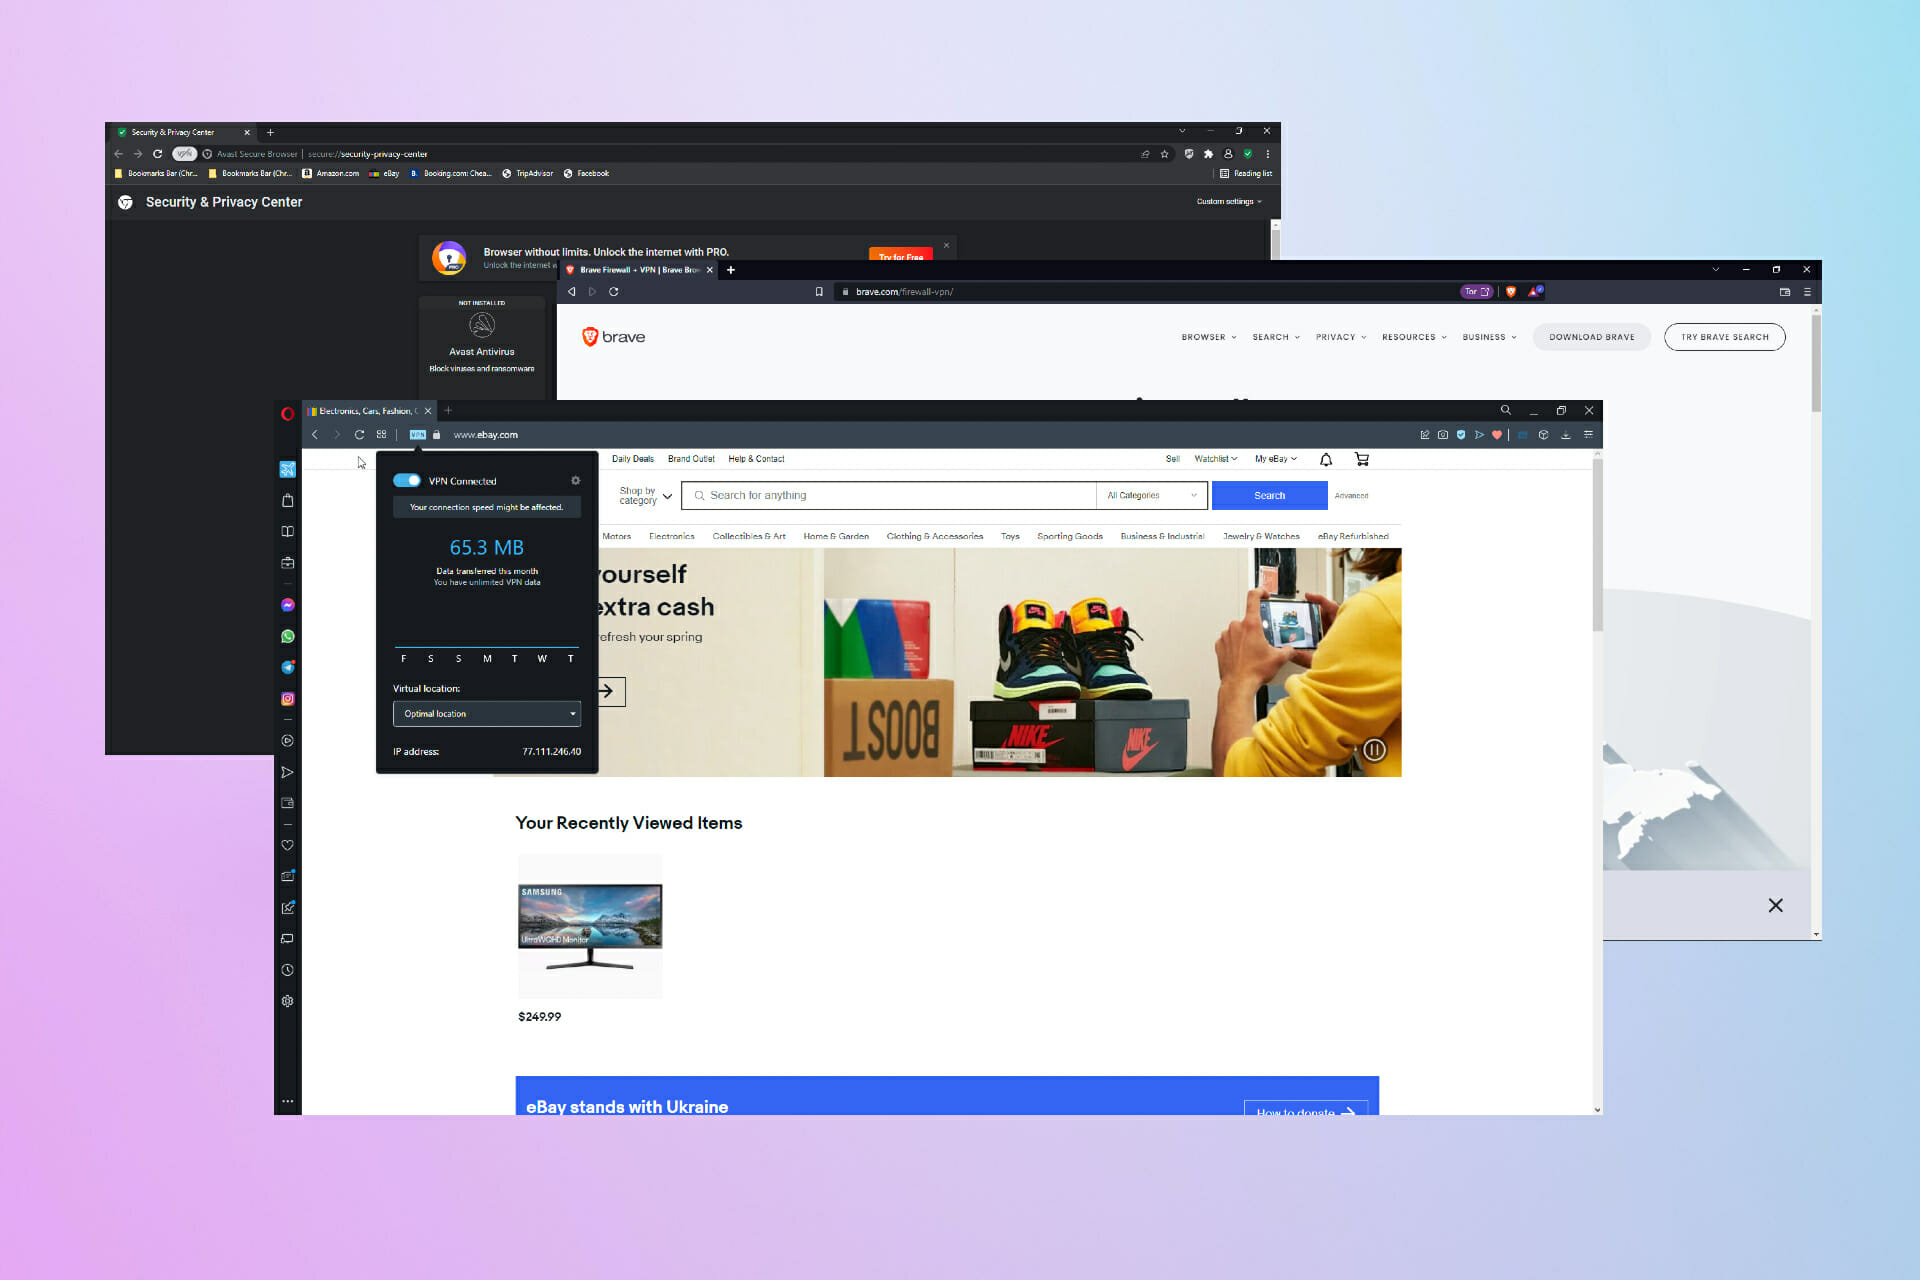
Virtual Private Networks (VPNs) provide cybersecurity for users while browsing and allow users to access geo-restricted content by masking locations.
Typically, users must download and install a separate app or add-on to access VPN or adblocking services. But luckily, there are browsers with these features already built-in, and some even provide users with free VPN services.
Keep reading for an in-depth look at the best browsers with VPN and adblockers built-in.
It’s not required, but it’s highly recommended. With so much of our lives revolving around the internet, protecting sensitive information is vital.
When you browse without a VPN, your data is susceptible to cyber-attacks and third-party trackers that collect and sell your personal information.
If you’re using a browser without a built-in VPN or you want to add an extra layer of protection, it’s recommended that you get a VPN. Keep your data protected with a good VPN for your laptop if you travel a lot or use public Wi-Fi.
Can I use VPN and ad blocker?
Yes, you can use a combination of the two. They serve different functions. While a VPN masks your IP, an ad-blocker keeps the incessant ads off your browsing experience.
Is there any browser with built-in VPN?
There are a few excellent options for browsers with VPN. One such browser that we will be highlighting in this article is the Opera One browser.
Even though a built-in VPN for browsers may not have all the bells and whistles of a stand-alone VPN, they are efficient and will give you some server customization options.
What are the best browsers with VPN and adblocker?
Opera One has hundreds of millions of users and for good reason. This browser is full of features to provide fast and secure browsing, including a built-in VPN and adblocker.
Opera One VPN is easy to use and is free for all users. It doesn’t require any registration or sign-up. The built-in VPN also has unlimited data and doesn’t slow browsing speed.
However, users cannot select a specific country with the VPN, so users cannot bypass geo-restrictions to get access to specific content.
The built-in ad blocker prevents annoying ads from weighing down web pages and protects user privacy by blocking malicious ads. The adblocker provides a clutter-free browsing experience and speeds up the loading time of web pages.
Some websites can detect ad blockers and won’t work correctly when enabled. Users can manage what sites they want the adblocker to work on and which sites they wish to be excluded from for a customizable experience.
The browser has one of the best free VPNs with Adblock.
Key features:
Opera One VPN is unlimited and free
No hidden fees or premium version
Customizable adblocker
VPN and adblocker easily toggled from the menu bar
Opera One
Have a secure and clutter-free browsing experience with a browsing free VPN and ad blocker.
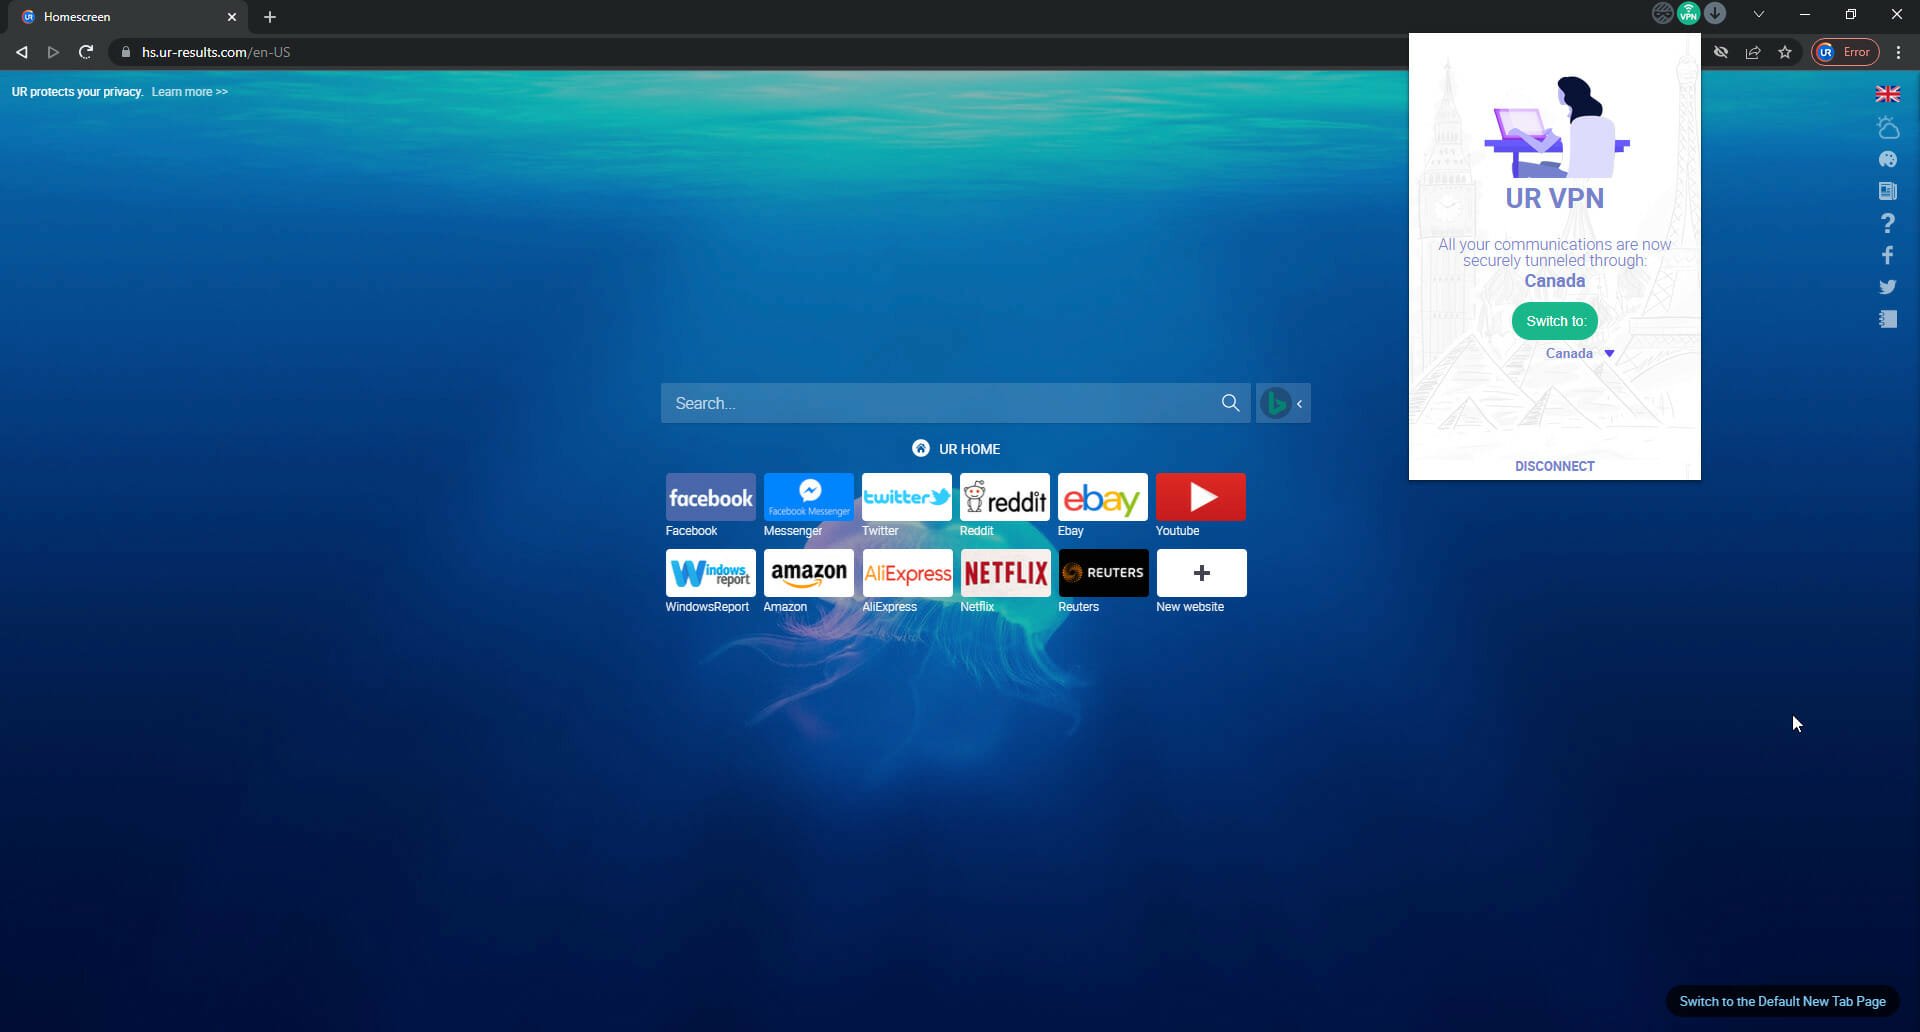
UR Browser is a Chromium-based browser known for its built-in security features. It has an integrated virus scanner and redirects users from insecure websites.
In addition to its long list of privacy protection features, UR Browser also has a built-in VPN and adblocker.
The VPN has no limits and offers 16 locations to choose from. However, users do need to register to use it. After making an account, users have access to the VPN, but they still need to upgrade to get the full perks of it via a monthly subscription.
If users upgrade to the premium VPN, they will have access to all the locations and can connect up to four devices. With premium, the VPN will work on all PC apps, not just UR Browser.
UR Browser has three levels of privacy for users to choose from low, medium, and high. The adblocker is only enabled on medium and high levels of security. Users can easily toggle the adblocker and other security features from the icons above the search bar.
Key features of UR Browser:
Integrated virus scanner
Free and unlimited VPN
Adjustable levels of privacy
Adblocker and VPN are easily accessible
UR Browser
Keep your data protected using UR Brower’s unlimited VPN.
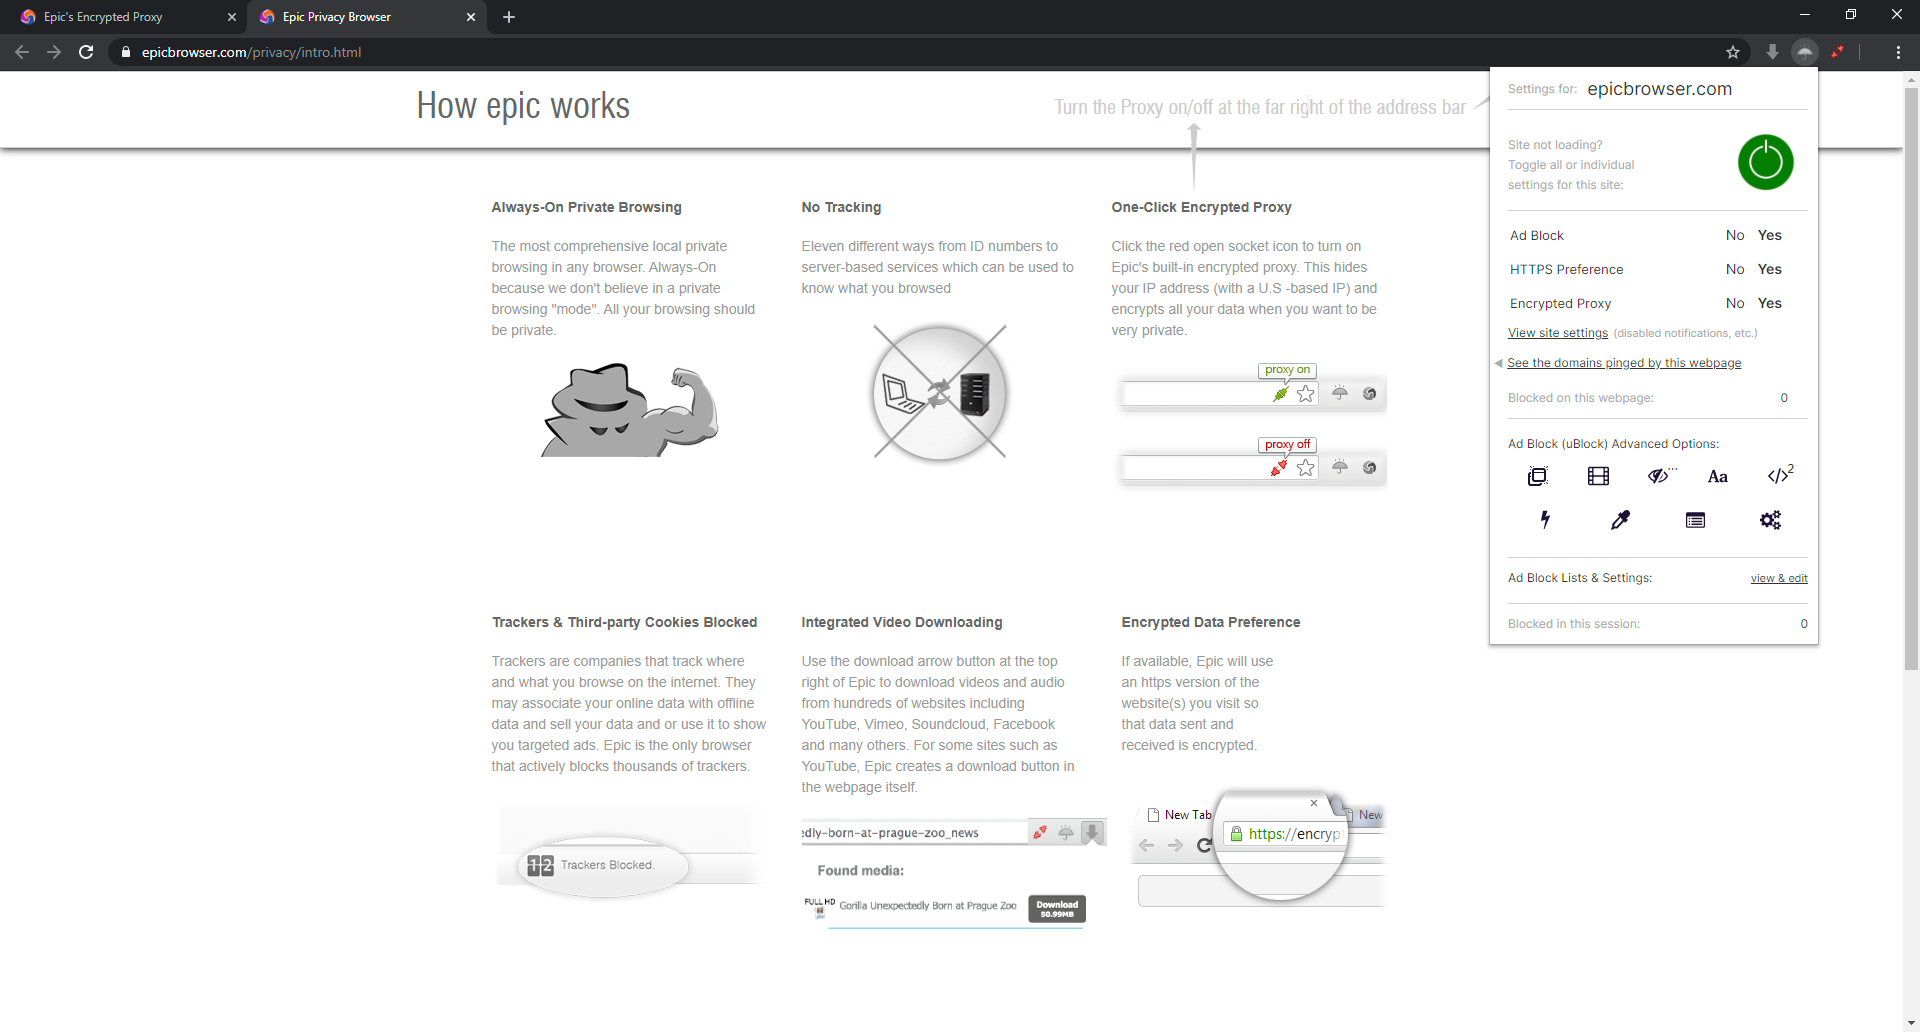
Epic Privacy Browser is another browser that puts user privacy first. It has a no-logs policy and a download manager that protects users from malicious attacks.
Epic’s Encrypted Proxy (VPN) is free to use and does not require registration. When the encrypted proxy is enabled, user data is encrypted in a secure tunnel between Epic browser and remote servers. The service also hides user IP addresses and locations.
The VPN and ad blocker are easily accessed from the menu bar and allow users to select from nine countries. In addition, users can customize what sites the encrypted proxy works on by whitelisting them.
Epic’s adblocking feature has advanced options that users can adjust to customize what types of ads are blocked on certain pages.
Key features of Epic Privacy Browser:
Strict no-logs policy
Epic Encrypted Proxy is free and doesn’t require sign-up
Easy access to VPN and ad blocker from the menu bar
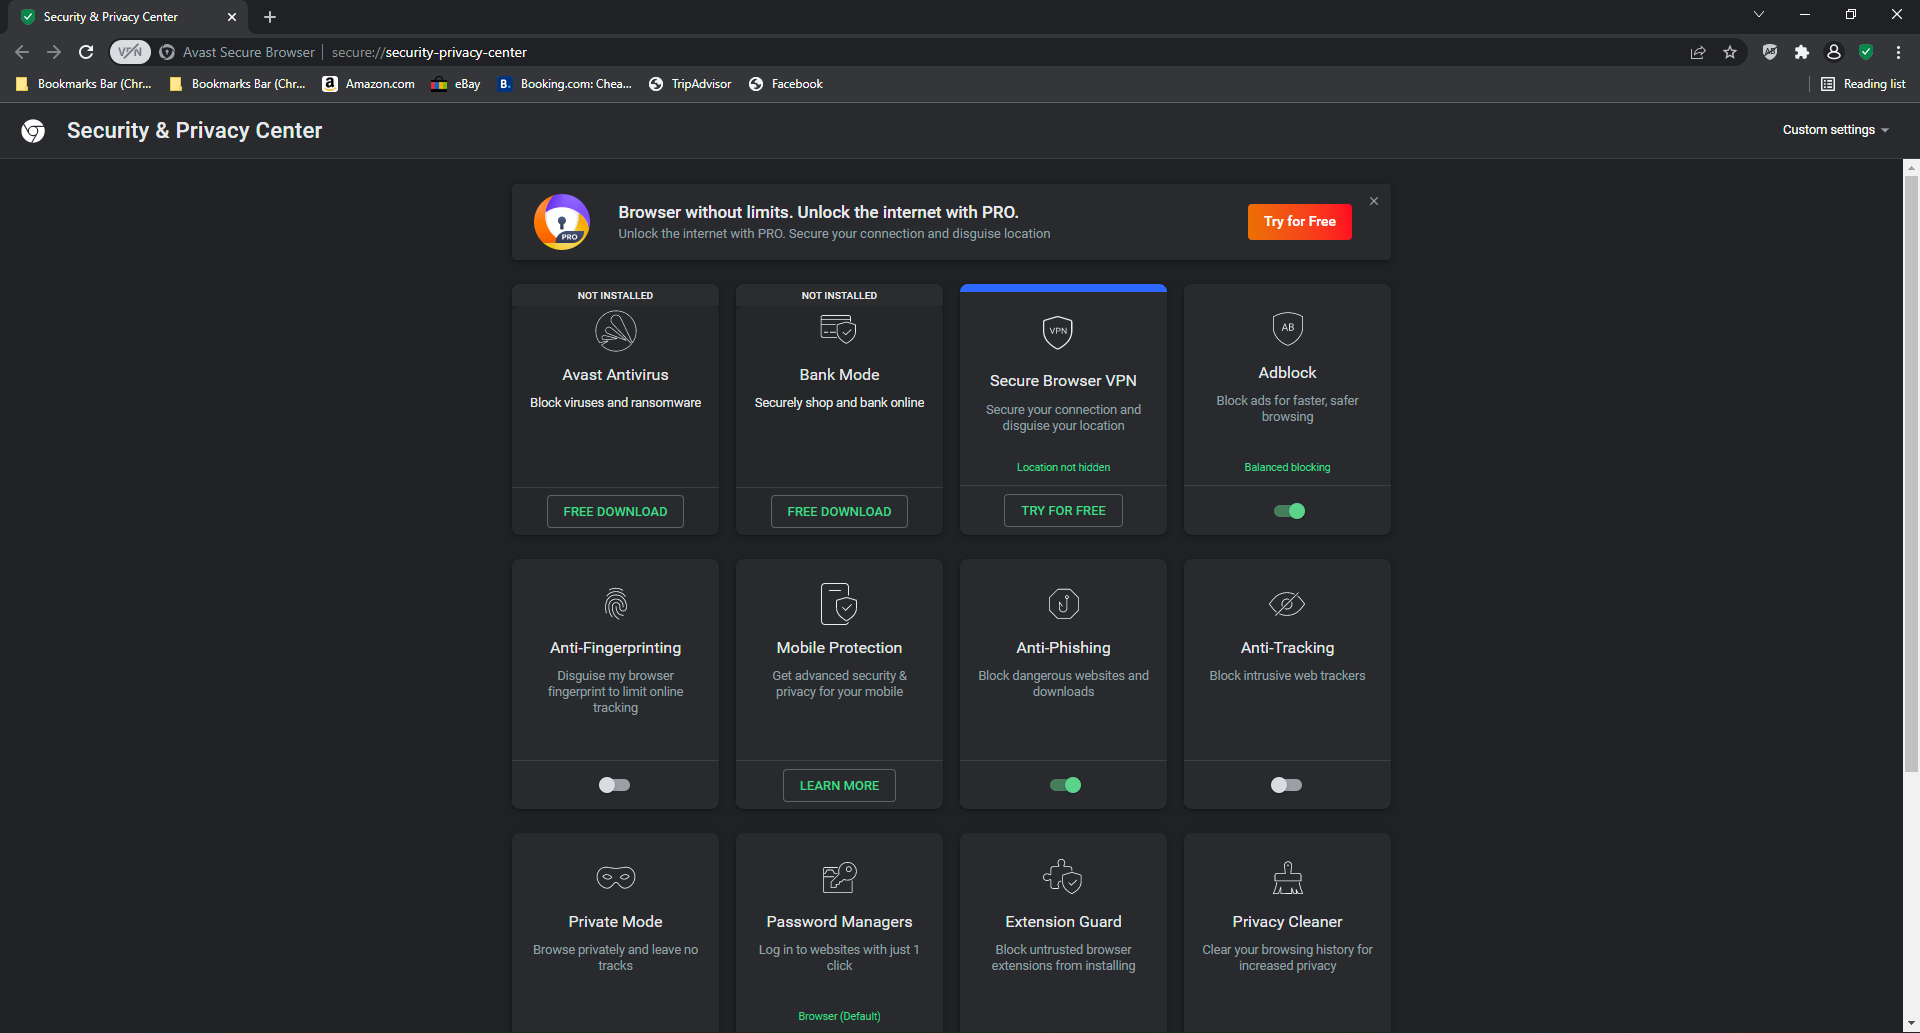
Avast Secure Browser is another browser that values user privacy. This browser is free, but to have access to the VPN, users must upgrade to Avast Secure Browser PRO.
Users can try the Avast SecureLine VPN for 30 days to see if it’s to their liking. The VPN protects user browsing activity and has a no-log policy, meaning Avast doesn’t collect data from users. The VPN protects users on public WIFI and home networks with bank-grade encryption.
The built-in ad blocker allows users to filter the websites that require the ad blocker to be turned off. Users can also adjust the strength of the adblocker between essential, balanced, and strict.
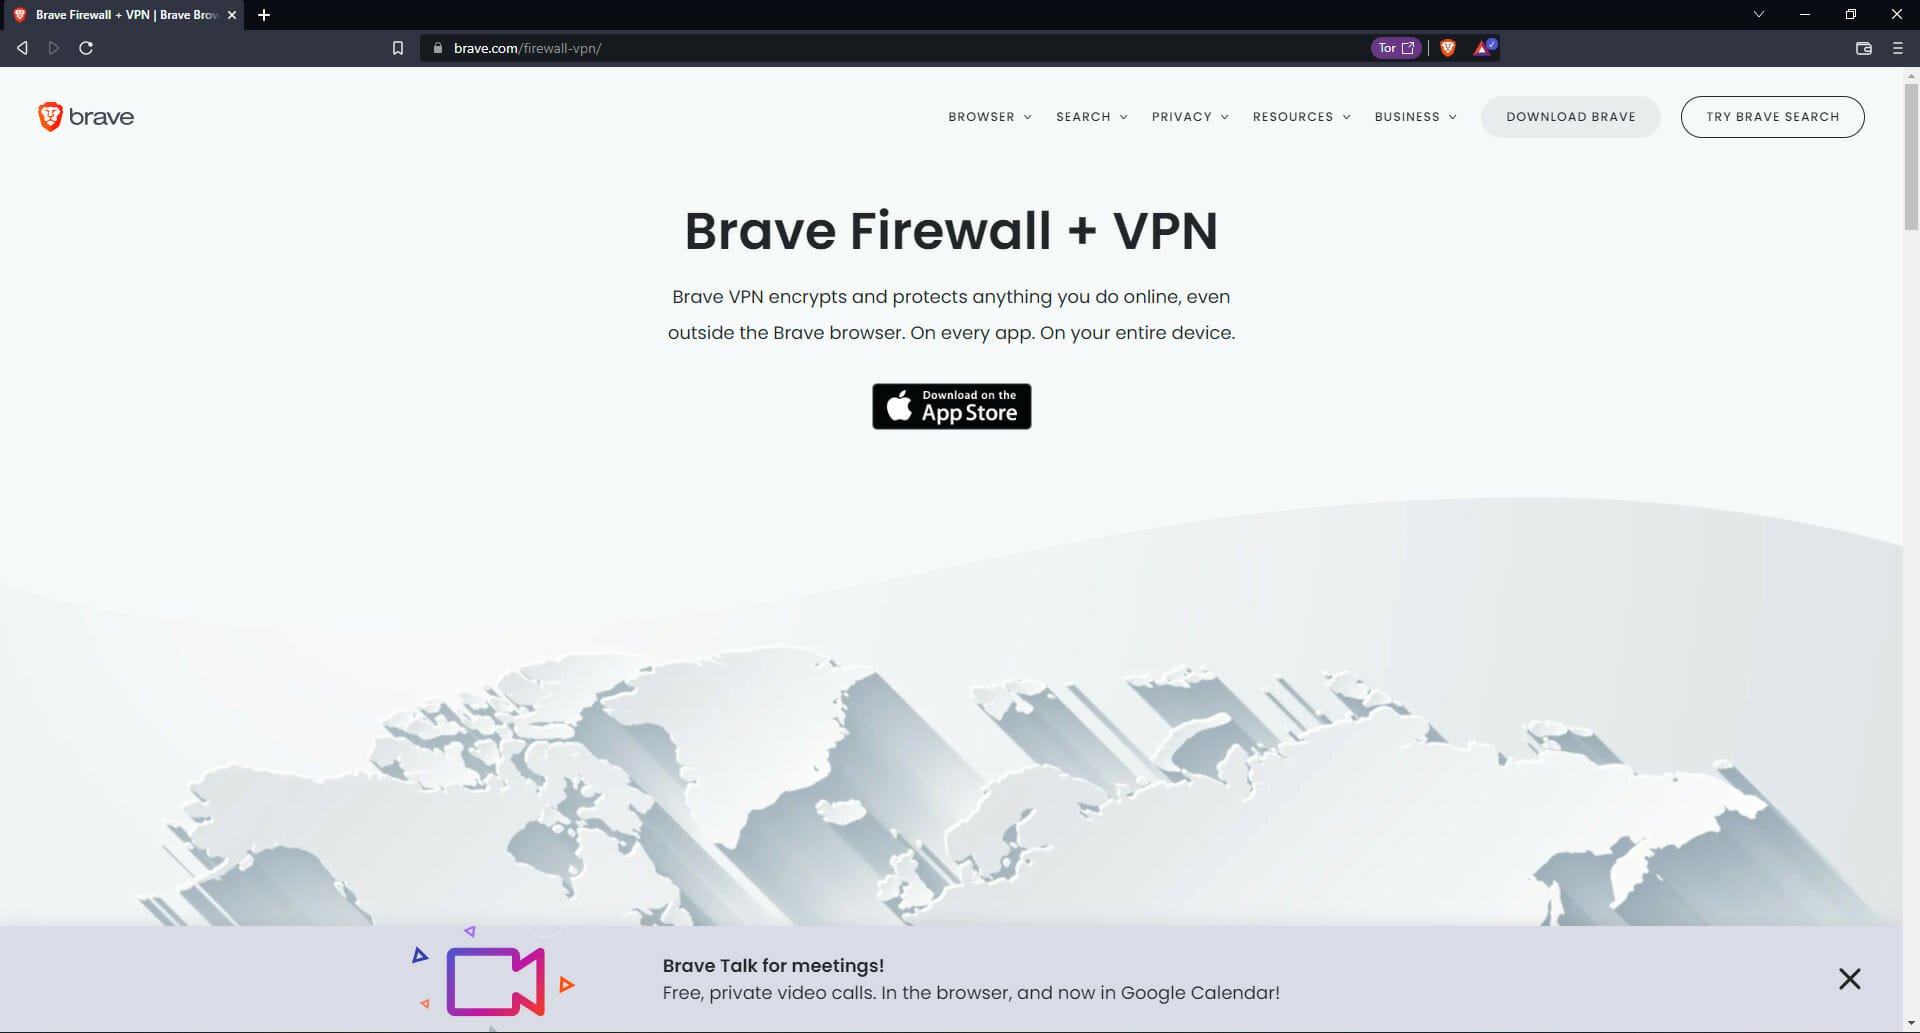
Brave browser is an up-and-coming browser because of its security features and speed. This browser does offer a VPN and firewall service, but not for free. In addition, the VPN operates on a monthly subscription basis.
With the VPN, users can have a secure connection everywhere they go, and it works on all apps, not just on Brave. The VPN is built into the browser for subscribers; there is no need to deal with a separate app. The service is fast, offers unlimited data, and allows up to five connected devices.
The Brave adblocker, however, is 100% free, and the level of protection can be adjusted between standard and aggressive. Users can take the adblocker a step further and apply additional filters to types of ads.
Key features of Brave:
Offers firewall service in combination with the VPN
Aloha Browser is an alternative browser that is not as well known. However, it’s another privacy-oriented browser with many unique features, including a secure file manager and a built-in player for streaming.
Aloha’s VPN is more than an average proxy. It has unlimited data and automatically chooses the fastest server near you. The VPN is free for users to access its basic features, but it has a Premium version that provides more options for subscribers.
This browser also comes with the Adblock Plus plugin already installed. Adblock Plus is the leading free adblocker and is an extension that users typically need to install onto their browser.
However, Aloha Browser was built for Android and iOS, and the PC version is still in beta. The desktop browser provides VPN and adblocker access, but it’s not as advanced as the mobile app.
Blocking dangerous sites and 3rd-party trackers is where VPNs shine. For this cause, investing in a dependable ad blocking add-on that blocks ad content in addition to your VPN is highly recommended. For best security, combine ad blocker and anti-tracker technologies in this manner.
That said, it is possible to have a combo of VPN and ad-blocking in one software, which may be the ultimate security package.
We hope you enjoyed our selection of the best browsers with built-in VPNs and adblockers. Cybersecurity is something everyone should prioritize. Using a browser that gives you peace of mind with the knowledge that your data is secure while surfing the web is essential.
These browsers make it easy to remain protected while browsing with built-in security functions. So let us know in the comments below what browser you use to stay secure.
Many want to know if is it still possible to download Adobe Flash Player for Windows 10 64-bit or newer, and in this guide, we’re going to answer this question once and for all.
How do I download Adobe Flash Player for Windows 10 64-bit?
Risks include vulnerabilities, exploits, and compatibility issues. Installing an old version is still possible, but proceed with caution.
Can you download Flash Player on Windows 10?
It might be possible to download Flash Player from third-party websites, but that isn’t advised. The setup file might be malicious, and there’s a strong chance that Flash won’t work with your current browser.
What is the replacement for Adobe Flash Player?
Adobe Flash has been phased out as a technology by HTML 5 and other modern technologies. If you still want to view Flash content, then you might have to rely on browser extensions.
Finally, let us note that Flash is phased out for a good reason, so if you are looking to use the tech, you should be careful because of its security risks.
Jira is one of the best project management tools in the market, and it’s getting better with every update. However, one of its biggest limitations is that it is browser dependent.
This means that if you’re using a browser that is not supported by Jira then you won’t be able to access your projects or work on them. This can be very frustrating for users who want to do their work from any device or computer they have access to.
Luckily, there are some browsers that are fully compatible with Jira and we’ve compiled a list of them for you below.
With the Jira platform, you may also benefit from Desktop monitoring Web Apps to keep track of all your activities.
Is Jira browser-based?
Jira is a web-based application, so you can access it on any device that has a web browser, including Android phones and tablets. However, you may not have the latest features if you’re using an older browser version.
Since Chrome is one of the most popular browsers in the world, it is common for most users to ask: Does Jira work in Chrome? Yes. Jira is fully supported in all modern browsers including Chrome.
So, How do I access Jira in my browser? Easy. Simply launch your browser, navigate to the Jira website, and log in or sign up.
Google Chrome is one of the most widely used browsers in the world. It has been around for quite some time and supports the most recent web standards and technologies for Jira.
One thing about the browser is that it is also very fast, reliable, and secure. For the best performance, ensure you are running the latest version.
Mozilla Firefox is a free open-source browser. It continues to innovate by adding new features like extensions and themes while maintaining backward compatibility with older versions of websites.
The latest version of Firefox is fully supported by Jira but older versions may not be compatible with some features or bugs may occur when using them.
Microsoft Edge is the default web browser on most Windows devices, but it can be installed on any other computer as well.
It’s fast and secure and offers a great user experience with little to no crashes or errors. It works best with Jira when you run the latest stable version.
Safari is the default web browser on Mac OS X devices, but you can install it on other operating systems as well. It’s fast, secure, and easy to use for everyone.
However, when it comes to Jira, the platform will only work on the browser on the specified operating system and the latest stable browser version.
Sometimes, when you try accessing Jira, you may get a message that says: Apologies start Atlassian com doesn’t work on your browser. Chances are that you are running an outdated version of the supported browser or your selected browser is no longer supported.
You can check from the official Jira website to see if support for the browser has been withdrawn and try another one that meets the requirements.
The Hmmm… can’t reach this page message will prevent you from opening your favorite websites, and it can negatively impact your browsing experience.
This is a common problem, and it’s usually caused by issues with your DNS or network connection.
Luckily, it can be fixed with the solutions below.
How do you fix can’t reach this page?
1. Clear browsing data
Launch Edge, click on the three-dot menu, and select the Settings option.
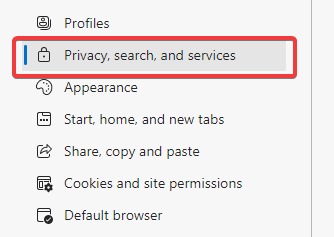
Click on Privacy, search and services on the left pane.
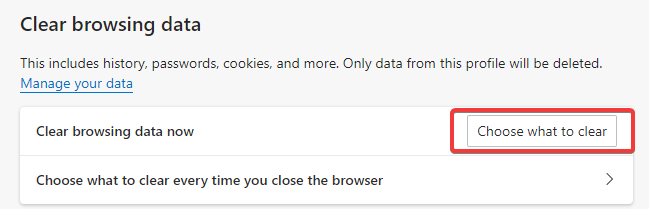
Scroll down to the Clear browsing data section and click the Choose what to clear button.
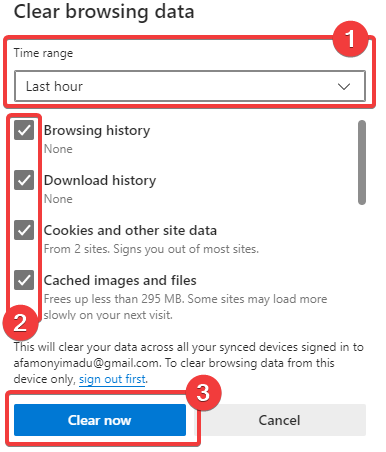
Pick a Time range, tick the checkboxes for Browsing history, Download history, Cookies and other site data, and Cached images and files, then click the Clear now button.
Relaunch Edge, then visit the webpage that triggered the can’t reach this page error in Edge to see if it still occurs.
2. Change DNS server addresses
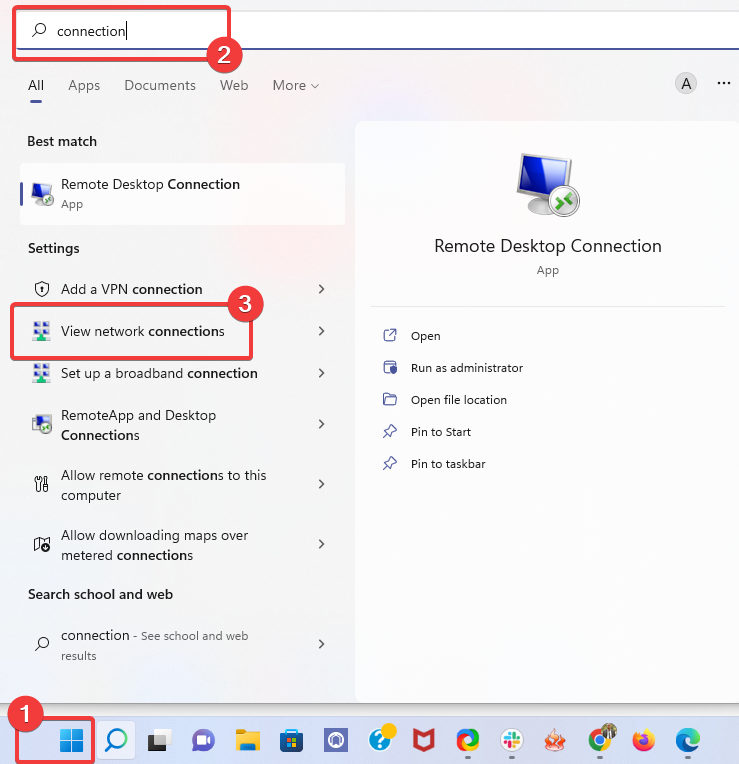
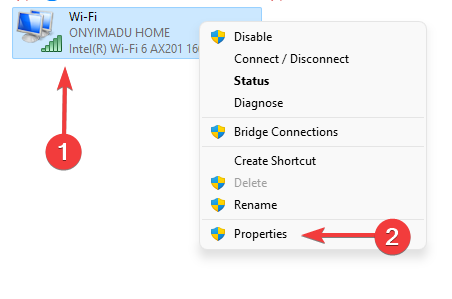
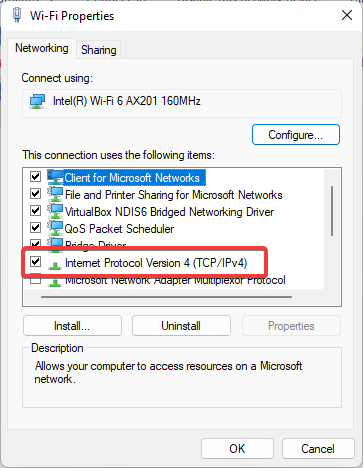
Click on the Start menu, type connection, then open View network connections.
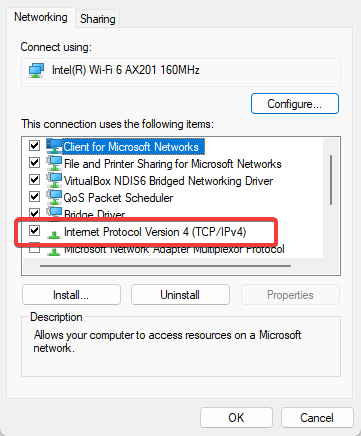
Right-click on your current network connection, and go to Properties.
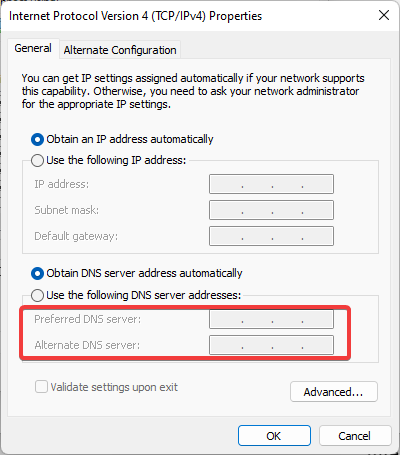
Now, double-click on Internet Protocol Version 4(TCP/IPv4).
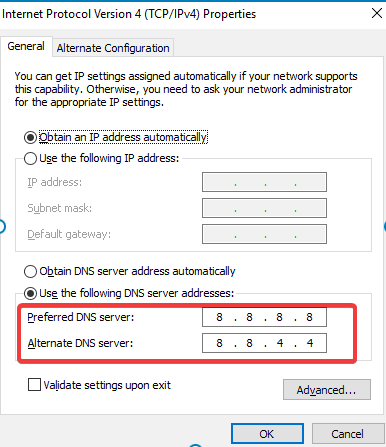
Check Use the following DNS server addresses, and enter the following values:
Preferred DNS server: 8.8.8.8
Alternate DNS server: 8.8.4.4
Click OK.
Concerning changing DNS settings, it is worth mentioning that Cloudfare’s 1.1.1.1 server is more secure than Google’s. You can use this one or 1.0.0.1 as your DNS settings to see if this fixes your problem.
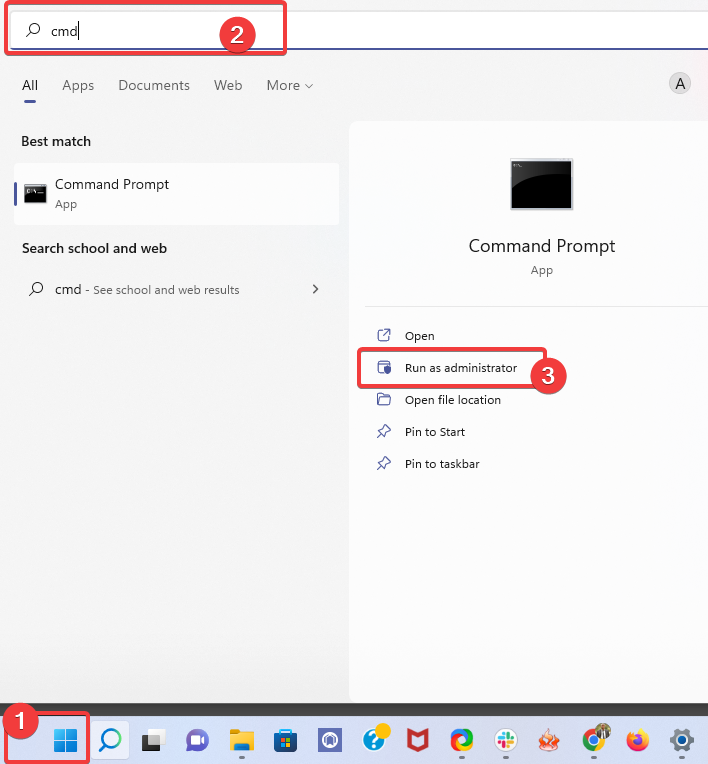
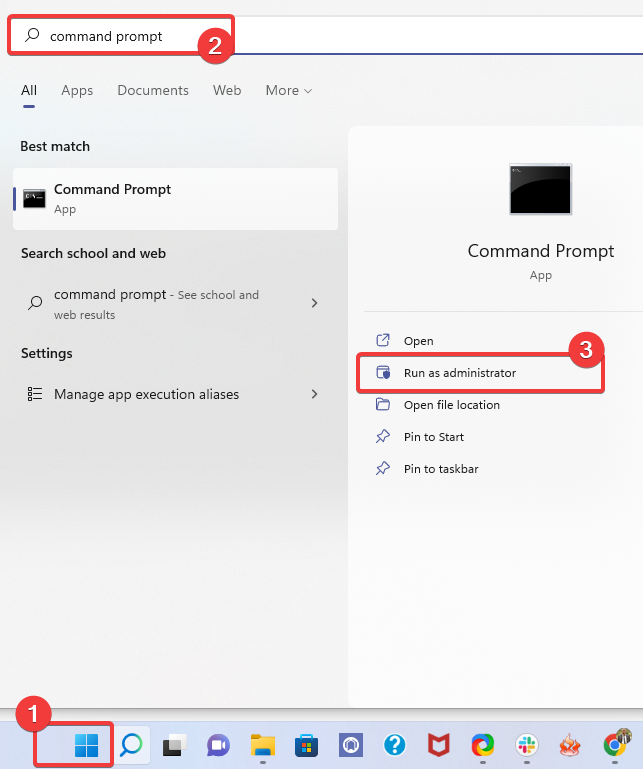
Type cmd in the Start menu, click on Run as administrator.
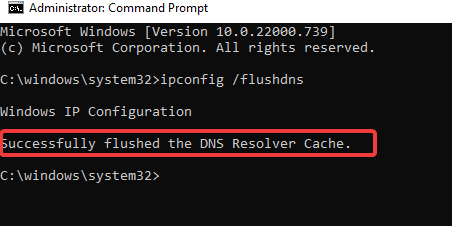
Run the following commands one by one and press Enter after each one: netsh winsock reset netsh int ip reset ipconfig /release ipconfig /renew ipconfig /flushdns
Launch the browser and see if the error is gone.
4. Reset network connection
Press Windows key + S and enter network reset. Select Network Reset from the list of results.
Click on the Reset now button.
Follow the instructions on the screen.
5. Edit hosts file
Press the Windows key + S and type notepad. Right-click Notepad and choose Run as administrator.
Next, go to File and select Open.
Navigate to C:\Windows\System32\Drivers\etc\hosts
Set Text Files to All files and open hosts file.
If you notice that a website you’re trying to access is on the list, delete it.
It has been reported that antivirus can sometimes modify the hosts file, so to fix this you might need to reset the hosts file.
We also covered Webpage might be temporarily down error that is similar to this one, so don’t miss it. This site can’t be reached error is similar to this one, so don’t miss its dedicated guide for more solutions.
Since this is usually a DNS problem, our guide on DNS issues might be able to provide you with some useful information.
Ctrl + F is the keyboard shortcut to quickly find something on a page. It’s used by many people every day on the web and in software applications, but what if it’s not working?
Firefox uses Ctrl + F to search the page you’re currently viewing, so if the browser doesn’t respond when you press the shortcut, it can be frustrating.
Fortunately, there are a few quick fixes you can try in order to make Ctrl + F work properly in Firefox. You can also check out other useful keyboard shortcuts to boost your productivity.
Does Ctrl F work on Firefox?
Ctrl + F is one of the most commonly used keyboard shortcuts in Firefox, yet sometimes even this simple function can stop working. It is important to note that Ctrl + F is not a browser-specific shortcut, but an operating system shortcut.
How do I force a shortcut to open in Firefox?
If you want to create a shortcut, follow the steps below:
Select the site you want to force open with a shortcut.
Navigate to the address bar, click and hold on the lock icon.
Drop the address on the desktop.
What can I do if Ctrl f doesn’t work in Firefox?
1. Restart Firefox
Restarting Firefox fixes a lot of problems. When you restart Firefox, it clears the memory cache and closes out any open tabs and windows.
This gives the browser a fresh start without any lingering problems or settings that might be causing the problem with Ctrl + F not working.
If Ctrl + F isn’t working, it could be because you have Sticky Keys enabled. Sticky Keys is an accessibility feature that allows people who have trouble pressing multiple keys at once to use keyboard shortcuts by holding down one key at a time.
You may have enabled them accidentally so you can disable the Sticky Keys by pressing Shift five times in a row.
3. Restart in Safe Mode
Launch Firefox and click on the menu icon at the top right corner.
Select Help.
Click on Troubleshoot Mode.
Hit Restart in the window that pops up.
Hopefully, you are now able to use the Ctrl + F shortcut with ease again after attempting these solutions. We also have a useful guide if your desktop shortcuts are not working so don’t hesitate to check that out.
This isn’t the only problem and many reported that the Firefox search bar is not working, and we have a special guide that tackles this issue, so don’t miss it.
As always, your feedback matters to us so let us know what solution worked for you in the comment section below.
Users with a wide range of PC configurations have complained via online forums that their Twitch extensions are not working.
In some cases, these fail to load entirely or don’t appear in the list of the installed extensions. Because the possible causes for this issue could vary a lot from user to user, we compiled some of the best troubleshooting steps that are worth trying out.
Follow the methods we listed in this article carefully, and check to see if the issue is resolved after trying each one out.
Why are the Twitch extensions not working?
There are many possible intricate reasons why the Twitch extensions stopped working, but some of the most common ones are the following:
Twitch servers are down – This is one of the most common reasons that explain our presented issue. Fortunately, you can always check the Twitch server status and we’re going to show you how.
Browser-related issues – Like any other app or program, your browser might randomly get into trouble. However, we strongly recommend using a dedicated option, that will never fail while streaming on Twitch.
Outdated extensions – It is important to keep your elements always up to date. If your Twitch extensions are outdated, it is probably that they won’t work in proper condition. You’ll discover how to update them later in this guide.
Users reported a plethora of Twitch extensions that failed to load or function properly. Some of them are the following:
My Instagram extension Twitch not working – In this case, updating your browser extensions will fix the error.
Destiny 2 Twitch extension not working – Uninstalling and reinstalling your extensions is another way to address the issue.
Own3D design panels not working – Don’t forget to check out their servers to see if the extension is being updated or tweaked.
Giphy Twitch extension not working – Issues with the Giphy extension are most probably from their side as was indicated in an earlier announcement.
Twitch Spotify extension not working – Don’t hesitate to contact the support team for the Spotify extension in order to find out what to do about it, in case the solutions below are not working.
EchoCast Twitch extension not working – Clearing your cookies and cache proved to be an efficient solution to the EchoCast Twitch extension not working error.
Twitch Now not working – Switching to another browser is yet an alternative method to fix extension issues.
The reason why your Twitch extensions are not working might be your browser so the smartest and easiest solution to this problem can be to switch to a more reliable browser like Opera GX.
Such a browser was specially designed for game streaming so it’s optimized to offer the best experience for that purpose. Not only that, it won’t interfere with Twitch due to the widget on its sidebar.
Opera GX
Obtain the most out of both gaming and surfing using Opera GX unique tools.
What can I do if Twitch extensions are not working?
1. Make sure Twitch servers are not down
Even though this method won’t help if Twitch extensions are not working, it is very important to try it out. This will allow you to be sure that all the troubleshooting methods you will be trying are not in vain.
You can check if the servers are up and running by visiting the Twitch status website and checking their stats.
In addition, you can also try running the online troubleshooter called the Twitch Inspector. You only have to log in withyour Twitch credentials, then authorize the inspector.
2. Try using the Twitch client instead of the website
Follow the on-screen instructions to install the desktop app then login with your Twitch credentials and start the app.
Some users have had success by simply swapping their online Twitch use with the downloadable Windows 11 client.
3. Allow Twitch and extension manager through antivirus
Make sure that your Twitch app is allowed to run without interruptions by both your antivirus software and firewall service.
If you want to stay protected but don’t want to mess up your system by disabling your antivirus, you need a reliable solution for gaming.
One reliable solution is TotalAV which won’t interfere with your Twitch streaming or gaming sessions since it comes with a Gamer Mode.
This can be activated whenever you stream or play any kind of game since it’s specially designed for optimizing your gaming experience.
All pop-up windows will be disabled, no extensions will be interfered with, and the scheduler’s activities will be completely halted if you choose this option.
4. Update your Twitch extensions
Hit the Windows key, type your browser’s name, then open the first result (In this case, we’re using Chrome as an example).
Now, click on the three-dot menu from the top right corner of the window, then hover over More tools and click on Extensions.
From the top-right corner of the page, turn on the Developer mode.
Next, click on the Update button.
Restart your browser and check if the problem is still there.
In some cases, the reason for extensions such as the Twitch Now extension not working properly is that they are outdated. Fortunately, you can easily update them and the process is somehow similar for all the available browsers.
We recommend making sure to download the latest version of the extension/extensions with issues and check to see if this fixes the problem.
Hit the Windows key, type Chrome, then click on the first result.
Use the following keyboard shortcut to open the Clear browsing data menu:Shift + Ctrl + Delete and select All time as the time range.
Checkmark the Cookies other site data and Cached images and files sections.
Click on the Clear Data button.
5.2 Mozilla Firefox
Press on the Windows key, type Firefox, and open the first result.
Click on the hamburger menu button from the top right corner.
Navigate to History.
Click on Clear Recent History.
Click on the Time range dropdown menu and select Everything.
Checkmark anything you want to clear from the History and Data sections. We recommend checking all the boxes except Active logins.
Click on OK and go again to the Firefox general menu.
Navigate to Settings.
From the left window pane, choose Privacy & Security.
Scroll down to Cookies and site data, then click on the Clear Data… button.
You can try this method manually, by opening each of the browsers you use with Twitch and clearing cookies and cache.
If you want to make the entire process a lot simpler and more efficient, you can use a PC optimizer tool to clean everything up.
The tool will perform not only a system optimization but will also carry out an in-depth cleaning and provide a simple read of the report.
You don’t need to read extensive manuals. With only one click all the optimization processes will run seamlessly. Even the useless Registry entries will be wiped out in the process.
6. Contact Twitch support
In case none of the methods presented above were successful for you, our recommendation is that you let the professionals handle the matter.
You may report a problem with your account by going to the Contact us page on Twitch and getting in touch with their customer support.
Please provide the specifics of your account, including the extensions that you are using, as well as any other information that may be required to complete the procedure.
What are the best Twitch extensions?
Twitch splits extensions in various ways within its Extensions Discovery page. Firstly, it divides extensions by general purpose into:
Viewer Engagement
Loyalty and recognition
Games in Extensions
Extensions for Games
Schedule and Countdowns
Streamer Tools
Polling and Voting
Music
Take a look at the list below and discover the most popular and efficient Twitch extensions to try today.
This professional live streaming platform will help you host your streams on all channels. The tool’s notable advantage is its multistreaming support.
Using this Twitch extension, you’re able to stream on Twitch of course, and other essential platforms that will bring you closer to the right audience.
You can therefore go live on 2 up to 8 channels and interact with your public in one integrated chat. Plus, it’s possible to schedule your streams, store them in a secured cloud and track analytics results.
This complete video-streaming and studio production software offer everything you need, from professional camera inputs to screen-sharing tools and multistreaming presets for multiple channels.
Hence, you can improve the entire workflow of your Livestream content using professional audio/video tools and produce your content for the broadcast channels like Twitch or YouTube.
That said, using this complex live streaming tool will enhance your video content quality and help with practical streaming features.
This one is an all-in-one tool. Thus, a streamer’s viewers can earn loyalty points, request songs, vote in polls, enter giveaways, and play mini-games that will keep them coming back to the channel.
Technically, only the downloadable Streamlabs widgets are Twitch extensions. These are available from the Twitch Extension Manager and include widgets for Alertbox, ChatBox, Event List, Loyalty, Guilds, Donation Goal and Ticker, The Jar, and All-Stars.
Snap Camera brings one of the most popular features of Snapchat to Twitch – Snapchat Lenses. You can choose from thousands of face Lenses— from iconic classics to Lens Studio community creations.
You can unlock whatever Lens a steamer is wearing. Keep in mind that if you’re a Twitch affiliate partner, you can even drive subscriptions to their channel with this extension. The Lens activates whenever someone subs for a custom way to thank the streaming community.
It lets a channel’s viewers become part of the game by exchanging coins for items that can help or hinder your in-game progress.
Crowd Control works with multiple games and the first three that it supports are Super Mario Brothers 3 (SMB3), Super Mario World (SMW), and The Legend of Zelda: A Link to the Past (ALLTP).
However, developers are working on expanding Crowd Control to cover other games, so make sure you keep an eye on updates.
This extension allows streamers to upload their own sounds or select sounds from other streamers and assign them multiple buttons.
They are allowed to let their viewers press a button using Bits to play the sound on the stream. The broadcaster receives 20% of the money paid for the Bits used.
How many Extensions can you have on Twitch?
Through the use of Twitch Extensions, third-party developers are given the ability to design interactive experiences that may be integrated directly into the Twitch video player, the panels’ section, and on mobile devices.
Extensions may assist producers in generating cash, communicating critically needed information, and even creating extra options for user participation.
You are only allowed to have a maximum of three-panel Extensions, one overlay Extension, and two-component Extensions active at any one time. This restriction applies to all types of Extensions (for a total of 6 Extensions).
It should be noted that Mobile Extensions do not constitute their own category. An Extension may have the capability to work with mobile devices, but it does not have its own dedicated mobile slot.
So, these are the best solutions to try if your Twitch extensions are not working. Be sure that at least one of them will work for your particular case.
Also, many users reported that their Twitch achievements are not updating. If it’s happening to be on the same boat, make sure you check our dedicated guide.
Please feel free to let us know if your issue was solved by any of these troubleshooting steps. You can send us a message by using the comment section below.
Opera browser has come a long way since its initial release in 1995. Today, it is one of the most popular alternative browsers available. In recent years, Opera expanded and released browsers to cater to specific user needs, including the Opera GX gaming browser.
Opera GX has all the same functions as Opera but with some extra features to optimize gaming. Like all Opera browsers, Opera GX is a Chromium-based browser that values speed and security while adding its unique touch.
However, Microsoft Edge has made some significant changes and has laid its previous reputation as Internet Explorer to rest. Edge has gone through a serious redesign and was rebuilt on the Chromium engine, placing it on par with other popular browsers.
This article will look at the features of both Opera GX and Microsoft Edge in a head-to-head comparison of the two browsers.
What’s the difference between Opera and Opera GX?
Opera and Opera GX share many of the same features, but they are two very different browsers. Many consider Opera GX the more advanced version of Opera because of its extra features that enhance gaming.
Opera GX has a limiter for Network, CPU, and RAM so it doesn’t hog PC resources while gaming. It also has a different feel from Opera, which is much more minimalist. The customization features on Opera GX go far beyond any browser with customizable background music and sounds.
Opera GX
For what is worth, this browser was designed for gaming needs with interactive UI and resource limiters.
While both Opera GX and Microsoft Edge are Chromium-based, they look very different from one another.
Opera GX is designed for gamers with a dark theme and customizable colored accent that gives a cyberpunk feel. Customization is endless with the option for users to upload their wallpaper.
With force dark pages, users with a sensitivity to bright web pages or who prefer to browse in the dark can enable dark mode on any page.
Microsoft Edge, on the other hand, has a much more minimalistic appearance. While users can adjust the theme and toggle between light or dark mode, it doesn’t offer as many customization features as Opera GX.
However, the number of personalization options might be a little overwhelming for users that just want a simple and minimalistic browsing experience. It’s up to the user which interface they think is best.
➡ Productivity features
Microsoft Edge caters to the user with the My Feed page. This feature displays news stories, articles, and videos that are curated to the users’ interests.
Edge also has features that help with organization and productivity, such as the Collections feature which allows users to group web pages. With the vertical tabs feature, users can easily access a webpage from their multiple tabs.
While Opera GX caters to gamers with Twitch and discord integration, it also helps with productivity. Users can use the workspaces feature to keep different subjects separate. Opera GX also has messaging services that can be accessed right from the sidebar so users can keep up with their social media.
The video pop-out feature on Opera GX, allows users to continue watching a video after leaving the tab. The video stands in its frame that can be moved around the screen and it is adjustable. This feature is perfect for multitasking.
Edge works seamlessly with Windows Defender through the SmartScreen security feature. This feature automatically checks websites for reputation and any suspicious activity. Edge also has tracking prevention with adjustable tiers of security.
Opera GX has all the same security features as Opera, such as the built-in VPN and ad-blocker. It has a tracker blocker that prevents trackers from collecting user data. These features not only protect user privacy but also make pages load faster.
For many users, resource consumption is a big deal. Opera GX has built-in resource controls that allow users to limit the amount of RAM and CPU usage. This is especially important for gamers or those with less powerful PCs.
With the GX Cleaner, users can quickly clean excess browser files. Browser caches, cookies, and history can weigh down browsers over time. With GX Cleaner, junk files can be cleared and it will improve Opera GX performance.
To save memory and CPU usage, Microsoft Edge has a feature called sleeping tabs. This feature puts unused, background tabs to sleep after a couple of hours of inactivity. Sleeping tabs frees up resources and improves the performance of active and new tabs.
With efficiency mode, Edge’s resource usage is reduced to save battery by activating sleeping mode after a few minutes of inactivity. This increases browsing time for users by saving power on an unplugged laptop.
Is Opera faster than EDGE?
With a plethora of built-in features, Opera has also time and again proved to be faster than Edge. Various tests conducted in recent days reported Opera as one of the fastest browsers.
So, if you are wondering which one wins the Edge vs Opera debate, it’s most certainly the latter. At times you may notice Opera taking too long when using the VPN feature, but that’s the case with any browser if you set up a VPN. At least you get one built-in with Opera.
Opera GX vs. Microsoft Edge: Final verdict
After analyzing the features and functions of each browser, it’s tough to say which is the better browser.
Opera GX is highly customizable and offers resource-saving features to optimize browsing. Although it was designed with gamers in mind, it’s also optimized for the average user with features to promote organization and productivity, making it a versatile browser.
Microsoft Edge offers a simple, effortless approach to browsing. It’s fast, reliable, and secure with the collection feature and the efficiency mode.
Because these are two very different browsers that cater to different types of users, it’s impossible to definitively say one is better than the other. If you’re an avid gamer, then Opera GX is a clear choice, but if you’re looking for something more minimalistic and simpler, then Edge is the browser for you.
We hope you enjoyed this comparison of Opera GX and Microsoft Edge. Both are great browsers, but it’s ultimately up to you, the user, to decide which is best.
While we could have drawn a comparison between Opera GX vs Chrome vs Edge, Chrome is a resource-hungry browser and we left it for now. If you are interested, we already did a review of Google Chrome and you can read it.
Let us know in the comments down below which browser you like best.
When you’re trying to convert a video, few tools are able to transform it into the format you need. Wondershare UniConverter 14 does that seamlessly and without any video quality loss.
We are used to this kind of performance from this solution, but the new version comes with a lot of major improvements that we will talk about in this article.
Moreover, we will highlight the best features, installation, and use of Wondershare UniConverter 14 so you can decide if you want to buy it.
But first, let’s go through the main features you will find in this complex tool.
How can Wondershare UniConverter 14 help me?
Definitely, as its name suggests, Wondershare UniConverter 14 is a video conversion software designed for beginner and intermediate video creators.
However, this app has a lot more to it apart from converting to and from over 1000 video formats. Let’s go through them quickly:
Downloader – It supports downloading videos from more than 10.000 dedicated websites; just pasting the URLs (yes, you can download more at the same time) and hitting the Download button will het them on your PC
Compressor – UniConverter 14 can get your video to 1/9 of its original size quickly and effortlessly
Editor – The built-in video editor can help you trim and crop your video, add watermarks, effects, audio, subtitles, or change its speed
Merger – Joining two or more videos is a child play just by adding your clips and hitting a button
Screen Recorder – Everything on your screen can be recorded with this feature, including your webcam, an app, the full screen, or just a selection
DVD Burner – After you finish converting, compressing, or editing your videos, just add them to a burning list, select a template, and hit a button to create your own video DVD
Wondershare UniConverter 14 has many more features under its sleeve including a whole set of AI tools, an image converter, a GIF maker, media fixer, data transfer tool, and even a VR converter.
What are the Wondershare UniConverter 14’s new features?
1. AI audio function
We often record our videos in a noisy environment but that can be very problematic when we are editing a conference recording for instance.
With the new Noise Remover feature from Wondershare UniConverter 14, we can say goodbye to those cars, wind, rain, and other sounds that interfere in the background.
It’s enough to load your video into the app and start the Noise Remover function and after a few seconds, you get the clean result.
In the same way, you can use the Vocal Remover feature to get rid of any vocals in a music video for example.
After analyzing the clip, you will get the separate audios of the voice and the one without any voice so you can decide which one to keep.
Now, Wondershare UniConverter 14 is even faster, with a 50% increase and that’s because now it supports multi-file simultaneous GPU acceleration and GPU batch processing.
It also features 4K/8K HDR HD video full-process GPU acceleration which means that it will take advantage of your powerful graphics card to perform the conversion a lot faster.
3. Lossless compression
Your video almost fit into the email, cloud storage, memory stick? You need to slim it down and there are lots of video compressors out there.
However, most of them will mess up the quality of your video, cutting up its framerate or causing other undesired effects.
The Compressor tool from Wondershare UniConverter 14 can make your clip for up to 1/9 of its original size but without losing any of that precious quality.
Moreover, you can set up any compression rate you want by just dragging a percentage slider from the tool’s settings.
4. Incredible format support
Wondershare UniConverter 14 is a video conversion software at its base but it also has a dedicated player.
But it’s not your simple average player. It supports playback and conversion of over 1000 formats such as RMVB (which we’ve never heard from before) apart from the most popular ones.
It’s also fast and smooth because it supports GPU decoding and 4K/8K video playback without any interruptions.
Well, let’s just say that is on par with the VLC professional player but with the set of editing tools right there, in the app.
5. Special encoding methods
In the screenshot above, we convert a MOV video which is pretty hard for some other conventional tools.
But the new feature within Wondershare UniConverter 14 is that it supports HEVC encoding in both MP4 and MKV outputs.
Also, for MKV and WEBM formats, the software can use the AV1 encoding which is outstanding.
The cherry on top is the MP4 output format in CFHD encoding which is also known as CineForm and is usually used only for AVI and MOV videos.
To top up the list, UniConverter 14 added the MP4 (Alpha) and WEBM (Alpha) formats, supports the Alpha transparent output, and its corresponding encoding methods: CFHD, VP8, and VP9.
Other improvements can be seen in the user interface itself. It is even more focused on the services and core functions of the software.
They’ve also reduced the amount of advertisements, and added file management to better the file search function.
How do I convert a video quickly using UniConverter 14?
Open UniConverter 14.
Click on the Converter option from the main dashboard.
Now, you can either click the big folder button or simply drag and drop your files right in the window.
The file will be loaded and if you want to speed things up, you can hit the High Speed Conversion button and enable the option for your graphics card. But for that, you need a Premium account.
Before converting the file, you may also use the Trim, Crop, and Effect options to edit your video quickly.
Click on the Choose Format button and select the format you want to convert your file from the left pane, then select the resolution from the right pane.
Now, if you don’t know much about formats, click on the Device tab, select the product from the left, then the resolution from the right to convert the video exactly for the device you want to view the clip on.
In the same way, you can select the Web Video tab and convert your video to upload it straight to the social media platform of your choice, whether it’s YouTube, Facebook, Instagram, or others.
If you don’t know much about encoding, you should be fine just clicking the Convert button but if you do, hit the Settings button. Here, you can change the name, select the quality, the video and audio encoding and click the Save button after that.
The only thing left to do is either hit the Convert button from the right side of the video, or, if you have more videos, click on the Start All button below.
As you might have noticed, you may also merge your videos or even upload them to your Cloud account and the selection is remarkable.
After the conversion is done, just select the Finished button to see the result. All the files have all the details necessary, you can open them or their file location, and add them to a burning or compression lists.
As you could clearly see, it’s extremely easy to convert a video. And although it looks like there are a lot of steps, once you configure the app, you will be able to skip a lot of them.
You will receive an installer file and after you open it, click Next to install Wondershare UniConverter 14.
Accept the terms and select Next.
After you have chosen the installation location, click Install.
At the end of the process, hit Finish to start the app.
We left this part at the end because it’s the easiest one of all. As you can see, we recommend getting the Trial version first to test all its features, with some limitations, of course.
But at any point, you can go back to the website, buy a licence and change your account with the one you made the acquisition with.
Wondershare UniConverter 14
Get the ultimate conversion software and transform your videos losslessly into genuine works of art.
This is an easy to use software dedicated to both beginners and advanced users that can help you do more than converting your videos.
Pros
Simple and friendly user interface
Converting to and from more than 1000 formats
Downloads videos from more than 10,000 websites
Ultra-fast conversion with GPU acceleration
Converts videos directly for devices and social media
Cons
The Free trial version has limited features
Final impressions
As we’ve mentioned above, we already tested the previous versions of Wondershare UniConverter and its latest iteration didn’t disappoint one bit.
The sheer number of tools inside this software is incredible. You can do absolutely everything to your videos, from editing and conversion to extreme compression.
And now, if you have a potent GPU, everything will be carried out at haft the time of the previous version.
The amount of supported formats and encodings is also impressive. And the fact that you can convert a video for a specific device or social media website is great for beginners.
But the friendly interface and usage, with guidance for every step won our appreciation the most.
You stumbled on this article because you got the error message that read this version of Chrome is no longer supported.
Chrome is far and beyond the most popular web browser of this era. Even though people complain about high RAM usage and privacy issues, Chrome is still one of the best browsers.
However, a strange error seems to bother some users, which states that this version of Chrome is no longer supported.
Now, you need to know that some Chrome features won’t work if you’re determined to stick to an outdated version. Updating is mandatory and hard to circumvent.
On the other hand, if updates are just not coming on their own, try getting rid of this error message with the steps we shall be discussing.
Some Chrome users have experienced similar issues of Chrome plug-ins not supported; you would also be able to scale through in a few clicks.
What does it mean when my browser is no longer supported?
This message means that the website or web app you are trying to access has features that your current browser version can not render.
The leading cause is old browser versions that have not been updated. You may also use the following variations of the error:
This version of Chrome is no longer supported – It’s unfortunate to have to deal with this issue, so don’t postpone scanning for malware and PUPs.
Browser no longer supported – If that’s the issue you encounter, don’t hesitate to clear Chrome’s cache or disable all extensions.
It looks like your browser is no longer supported – When getting this error message, it’s time to act fast. You may try to download an alternative version of Chrome.
This version of Google Chrome is no longer supported – If Chrome constantly fails to meet your expectations, do note that Opera One is a well-worthy alternative.
How do I fix Chrome browser is not supported?
1. Switch to a new browser
When finding a constantly updated browser to meet the users’ demands, we can’t avoid recommending Opera One.
This web browser is built on the Chromium platform, with an increased focus on users’ privacy and online safety, not to mention that you’ll feel right at home when using it.
On top of that, making the actual switch is far from being a burden. Once installed, Opera One automatically prompts you to import whatever data you want to keep from Chrome.
Opera One
Try Opera One and enjoy an error-free browser experience.
Click on the Start menu, type Windows Security and click on the Windows Security app.
Choose Virus & threat protection on the left pane.
Choose Scan options.
Select Windows Defender Offline Scan, save everything you’re doing in this mode, restart the PC, then clickScan now.
We recommend you use an adware antivirus removal tool to make sure you remove this issue. It will get rid of malicious browser add-ons and pop-ups.
3. Clear Chrome’s cache
PressShift + Ctrl + Delete to open the Clear browsing data menu.
Select All time as the time range, tick the checkboxes for Cookies and other site data and Cached Images and Files, then click on the Clear Data button.
Relaunch the browser, click on the ellipses (3 dots) at the top right corner, choose Help, and then About Google Chrome.
If Chrome still doesn’t update, try the next step since there might be internal issues with the Google Chrome browser.
4. Disable all extensions
Launch the Chrome browser.
Click on the 3-dot menu, click More Tools, and then Extensions.
Toggle the little switch to disable an extension and do this for all your extensions.
Restart Chrome.
Faulty extensions can also be the reason for some Chrome issues, and disabling or uninstalling them, should help in this case.
5. Reset Chrome to factory values
Launch the Chrome browser.
Click on the 3-dot menu and open Settings.
On the left pane, click on the Reset and clean up option.
Please select the option to Restore settings to their original defaults.
Click the Reset settings button.
6. Uninstall and reinstall Chrome
Close every open instance of your Chrome browser.
Click on your Start menu and choose the Settings app.
On the left pane of the Settings app, select Apps and the Apps & features option.
Scroll down to Google Chrome, click its vertical dots, then click Uninstall.
Click on the newly-downloaded file and follow the wizard to reinstall Chrome.
If you still see the error message, your chrome browser version is not supported, a reinstall is the most reliable solution to try.
Try the last step below if you’re met with the same error despite the previous solutions.
7. Download an alternative version of Chrome
There are various Chrome alternatives based on Chromium, so that you might try them out. Or, you can wait until Google resolves the problem with a new update.
This version of Chrome is no longer supported; error rarely appears so that they might be addressed swiftly.
How do I force Chrome to update?
Any of the steps in this guide should force your Chrome to install. For extreme cases, you will have to install a fresh browser copy. This is the most trusted way of resolving the Chrome problem.
In extreme cases, problems with your OS could need to be sorted out first. Therefore, we will recommend ensuring the OS is updated before proceeding with any of the solutions we have proffered.
If your browser is no longer supported, you should have been able to fix it by now. However, please do not use Chrome44 or an older version as they are most vulnerable to this error and generally do not offer as much as newer editions.
With that said, we can conclude this article. If you have any questions or suggestions regarding this issue, feel free to tell us in the comments section.
You found this article because you want to know the best browser for Roll20, and here is all you need to know.
Roll20 is an internet site comprised of all the tools for role-playing games. These tools are essential aids for playing remotely or in-person and are referred to as virtual tabletop.
This website had a fruitful Kickstarter campaign and has not looked back since 2012
With many big games to its credit, most people will remember Dungeons and Dragons as a big performer.
In today’s article, we’ll show you the best web browser you can use with Roll20. Many of these also make up the best browsers for gaming.
Does Roll20 work on Opera One?
In recent years, Opera One has become the go-to browser for many users because of its sleek and easy-to-use design and performance.
That said, for gamers and any gaming-related application, Opera One is an easy choice, and this holds for Roll20, where Opera One works perfectly.
Does Roll20 work better in Chrome?
We will say Opera One is easily the best browser to use for Roll20.
While two primary considerations for the web-based application remain the network connection speed and the graphics rendering ability of the client machine, Opera One helps provide a hitch-free use and makes the most efficient use of system resources for Roll20.
Now let’s get to our list of Roll20-supported browsers in 2022.
Opera GX is a dedicated gaming browser, so it’s perfect for services such as Roll20 and similar.
The browser has a GX Control feature that allows you to allocate resources to your browser. Doing so will ensure that browser and other applications are running smoothly.
Opera GX also has a Hot tabs killer feature that allows you to see how much CPU and RAM each tab uses. Of course, you can use the feature to close a specific account quickly.
The browser has Twitch integration so that you can keep track of your favorite streamers at all times. In addition, thanks to the video pop-out feature, you can watch videos while working on other tasks.
Discord integration is also there, so you can easily communicate with your teammates without closing your game tabs.
The browser supports Workspaces, and you can easily organize your tabs. Features such as ad blocker, tracking protection, and built-in unlimited VPN are also there.
If you’re looking for a browser that can handle browser games, Opera GX is the best way to go.
Additional feature:
Built-in resource limiters
VPN
Private browsing mode
Opera GX
Be the best at tabletop games in physical and digital form by using the best browser for gamers today!
Firefox offers low resource usage, so it’s perfect if you’re planning to multitask or use an older PC. It is one of the best browser options for Roll20.
A non-profit company makes the browser, so you can rest assured that your browsing data is safe from third parties.
Firefox offers tracking protection, so you’ll be safe from tracking scripts and cookies. This feature will also block most of the ads out of the box.
It’s worth mentioning that the browser supports extensive customization, and you can customize your user interface any way you want.
Of course, there are hundreds of extensions available as well.
Google Chrome is one of the most popular browsers on the market, and it’s perfect for services such as Roll20.
There’s support for extensive customization, and the Chrome web store offers thousands of extensions.
Of course, the sync feature is available, so you can easily sync browsing data with your phone.
Chrome also has built-in protection that will detect malicious websites and downloads. There’s also a built-in ad blocker, so you won’t ever have to deal with ads.
The browser is fast, and it can easily handle multiple tabs with ease, so you might want to try it out.
Another great browser that might be an excellent choice for Roll20 is Vivaldi. This browser has its tracking protection to block tracking cookies and scripts.
In addition to tracking protection, the browser has a built-in ad blocker, so you won’t have to deal with ads again.
Vivaldi supports advanced tab management, so you can group or tile two tabs and show them side by side in a single tab.
The browser also supports various quick commands and can work with Chrome extensions, a significant plus.
Microsoft Edge is another solid browser; the newest version brings some significant changes. First, it offers a better performance so that websites will open faster than before.
The new version also has better tracking protection, and thanks to the Microsoft Defender SmartScan feature, you’ll remain protected from malicious websites and files.
Edge is built on the Chromium engine and works with Chrome extensions. It’s also available on older Windows, Android, macOS, and iOS.
These are the best browsers that you can use for Roll20. Opera GX is our number one choice due to its Twitch and Discord integration.
Additional features such as GX Control, low resource usage, tracking protection, and built-in VPN are also great features that will be useful to gamers and regular users.
Not all browsers will work optimally with the web application, and we advise against using any Roll20 unsupported browser.
We all know how stressful and sometimes annoying it can be to fill the same login parameters. LastPass is a browser extension that helps to save passwords and login details. Also, it stores other information online like addresses and links that allow you to finish processes like shipping.
You can reach your saved passwords and use autofill on other devices.
However, LastPass has some issues that plague it. A frequent question is ‘why does LastPass keep logging me out? It means LastPass keeps asking for the master key to log in again.
If you encounter the same issue, don’t panic, as we’ll help you get solutions to it.
Why does LastPass automatically log out when all browsers are closed?
1. Incorrect account settings
Using the Share login between browsers can prompt LastPass to request access code recurrently. It means you are using the same account on different browsers.
2. Browser cookies clear automatically
If your browser settings clear Cookie when it is close, it can clear off the information you store on LastPass. Cookies allow you to load websites faster.
3. Interference from other Browser extensions
Users can encounter the ‘LastPass App keeps logging out’ issue if they use privacy extensions and ad blockers. They can interfere with other extensions like LastPass.
4. Outdated browser
When your browser is not up-to-date, it lacks the new patch that should help it work better.
Quick Tip:
If you prefer stability over adventure and don’t feel like being risky, the reliable Opera browser is your best option for day-to-day browsing.
It will automatically update to the next version when it is available, and you can even install the LastPass extension to manage it more efficiently.
Opera
Steady and efficient, and auto-updating when it’s needed.
Yes, LastPass allows you to access your data across different browsers. It is a cross-browser extension, so it is possible to use it on multiple browsers.
How do I stop LastPass from logging me out automatically?
Disable Log out when all browsers are closed and log out after this many minutes of inactivity.
2. Disable other extensions
Launch Chrome and click on the extensions icon.
Select extension manager from the the drop down menu.
Toggle off the icons before each of the other extensions to disable them.
Another way to fix LastPass logging out issue is by disabling your browser extensions one after the otter to detect which one is interfering with LastPass.
3. Change browser settings
Launch Chrome and go to Settings.
Select Privacy and Security.
Go to Cookies and other Site Data, then disable the Clear cookies and site data when you quit Chrome option.
4. Update browser
Launch Chrome and click the More button.
Go to Settings and click the About Chrome option.
Select Update Google Chrome.
If there’s an update available, it’ll update automatically.
What is LastPass Reprompt?
It is a setting in LastPass that allows you to further secure your password. It means you can enable the ‘Require master password reprompt’ option.
LastPass Reprompt requires you to provide the master password before you can gain access to your data.
Let us look at the best email browser on this list. But first, here is what you must note.
Many email users still prefer web-based email services over desktop-based email clients.
While a desktop email client offers more features, the idea of having to install additional software on their system isn’t feasible for everyone.
That said, the right web browser can significantly affect how fast and efficiently you access webmail accounts.
However, the browser you are currently using might not be the right fit for your work. On the other hand, changing your default browser used for many years can be a tricky choice.
To fix this dilemma around the best web browser, we have compiled a list of top browsers for email and other tasks that offer more features, use fewer resources, and are faster than your current browser.
Which email clients work in a browser?
Straight off the hat, we must say that most of the email clients you currently use will work well on the web because they are designed to be web-based services.
A few that we love include:
Gmail
Spike
Outlook
ProtonMail
Yandex
Regardless of the client you prefer, any of the browsers we will discuss in this article should enhance your emailing experience. However, many people seem to use Gmail on different browsers, and this is because it is the best browser email client available.
Its strong ties with all the different Google services help make a good case for the client.
With that said, let us jump straight into our list of the best email client browsers.
Opera One may not be the most popular web browser on the Internet. But it is a preferred choice among users with a slow internet connection thanks to the excellent Turbo Mode that boosts the page loading speed.
Opera One offers a clean user interface as well with built-in VPN support to protect user privacy. So, the user doesn’t need to download a VPN to surf the web or unlock region-restricted websites.
What we find convenient is what Opera One calls Workspaces. It’s a way to group tabs and organize them in different workspaces that you can customize.
This way, you can have your email account and a bunch of personal tabs in one workspace.
The other workspace can be work-related or project-related, where you can open your different email accounts and the related tabs.
Other features:
The ability to search in tabs
Integrated messengers
Battery saver
Opera One
Read and compose emails easily and get increased privacy and faster loading times.
UR Browser is the newest kid in the block but comes with a rich feature set. It offers a modern user interface with a built-in VPN and ad-blocker features to protect your privacy and improve the browsing experience.
The fact that UR Browser comes with a built-in ad-bock makes it faster in comparison to other browsers when it comes to loading web pages.
UR Browser comes with lots of personalization options. For example, the user can change the home screen with personalized wallpaper from the dedicated gallery or use their custom image as the browser wallpaper.
The home screen can also be personalized to get all the information in one place. For example, you can customize your favorites, news feed, weather, search, and widgets from one place.
In addition, UR Browser offers an excellent download manager with claims of accelerated download speed. For security, it provides alerts for unsafe sites, automatic HTTPS redirection, and a built-in virus scanner.
It also comes with Anti-tracking, anti-profiling, and anti-fingerprinting for better privacy.
Other features:
No complicated settings
Invisible tracker blocker
Third-party cookie blocker
UR Browser
A great Chromium-based browser with a multitude of functionalities. Download UR Browser and give it a try.
Google Chrome is the most popular browser for both PCs and smartphones; it is fast, clean, and offers a ton of extensions; you will have a pick of the best email browser extensions.
On the security front, the users are in safe hands as Chrome gets regular updates to keep the user safe from known threats.
It also tags any website without an SSL certificate as non-secure and alerts the user if the web browser tries to load scripts from an unknown source.
Chrome also supports password-free login and offers a decent password manager and a well-organized settings menu with the search function.
The built-in virus removal tool can scan the system and remove any programs affecting its performance.
Chrome, with all its glory, is not without downsides. To begin with, Chrome still struggles with age-old resource management issues.
While systems with exemplary hardware configuration may not notice the resource usage and its impact on the system, users with a lower configuration system will have performance issues.
Then there is a concern for privacy as the browser is developed and maintained by the internet giant Google. Also, the download manager offered by Chrome would rank lowest among all the browsers listed in this article.
Firefox from Mozilla needs no introductions, and the fact that Firefox has received a complete overhaul makes it one of the best browsers for Windows 11 computers.
After a long wait, Mozilla finally released the new version of Firefox, and it is the best thing to have happened to the browser in 13 years.
The browser’s speed has improved significantly compared to its rivals and is on par with browsers like Chrome.
However, the USP of Firefox still uses fewer resources, even with multiple tabs, compared to other browsers like Chrome.
On the Privacy front, Mozilla has always been more trustworthy because of its non-profit business nature. The developers also release frequent updates to keep the security of the user intact.
Firefox now gets password-free login and automatic ad-tacker blocking features as well. You can also browse the web in virtual reality using the new version of Firefox.
Edge is comparatively faster than Chrome and uses fewer resources as well. This is why many users prefer to go with this Windows 11 built-in browser and not install another one.
Because it is based on Chromium, Microsoft Edge supports all the extensions available for Google Chrome from the Chrome store.
Since this is Microsoft’s default browser, users can rest assured that it will be updated and modernized constantly to keep up with the latest trends.
Edge allows you to surf several devices while syncing your bookmarks, passwords, and preferences. There are many features as well, particularly for productivity and online shopping.
Edge has a superior appearance overall compared to many browsers. In contrast to Safari and Chrome, its navigation menus are less intrusive, bringing your search results front and center and making other options more condensed.
There you have it; our list includes the best browser for emails. So while we have given you our top pick, we have made this list in no particular order and expect that your personal preferences dictate your final choice.
Since emails may contain sensitive information, we suggest using a browser like Opera One that offers anti-tracking and a built-in VPN. Alternatively, you may use any of the best VPNs for enhanced security and speed.
So, if you’re a fan of webmail use, which browser have you tested so far, or which one do you prefer? Tell us in the comments.
There are all sorts of errors that can appear when browsing through your social media account. The Expand your browser window to see this story is one that stands out.
In fact, this is one of those error messages that appear when trying to view a story on Facebook. So exactly how do you expand your browser?
Well, in this article, we’ll show you just how to expand your browser on Facebook to get rid of this issue. This isn’t the only problem, and many reported Facebook black screen issues on Chrome.
After all, you most likely want to get back to enjoying Facebook as soon as possible.
What does it mean to expand my browser window?
This issue occurs on Facebook when you try to view a story. Certain content isn’t optimized for the size of your browser, so this is why you’re getting this error message.
Although this issue will prevent you from viewing the desired story, it can be fixed with ease, and in today’s guide, we’re going to show you how to do that.
How do I expand my browser window?
1. Switch to a different browser
If you get the To view your items, you need to expand your browser window or a similar message, perhaps your web browser is the problem. If that’s the case, why struggle with how to expand the browser on Facebook when you can simply switch browsers?
For instance, Opera One is light on your resources which means that it can handle all sorts of multimedia tasks with ease. Besides that, it also has a built-in full-screen so you’ll enjoy an ad-free browsing experience.
There’s also a free and unlimited VPN that will protect your privacy. Additional features include a battery saver, built-in messenger, support for Chrome extensions, and countless add-ons to choose from.
Overall, Opera One is a great alternative. Instead of wondering how do you expand your browser, switching to this alternative might be a better idea.
Opera One
Struggling to see stories in your browser? Switch now and enjoy your social media time.
In your web browser, press F11 or Fn + F11 to go to full-screen mode.
If that doesn’t work press Ctrl and – key a few times to zoom out.
Refresh your page and check if the problem is resolved.
Some users claim that the zoom level needs to be set at 100%, so be sure to try that as well. This is a neat little workaround, and it can help you fix the Expand your browser window to see this story Facebook error.
3. Reset scaling settings
Open the Settings app. You can do that quickly with the Windows key + I shortcut.
Go to the System section.
Now locate the Scaling option and set it to 100%.
This is a universal solution and it will help you with Expand your browser window to see this story in Google Chrome, Safari, and Firefox.
If you ever wondered how do you expand your browser window to view a story on Facebook, well now you know.
After making these changes, check if the problem is still there. This error usually occurs due to your settings, and we hope that this article helped you fix your problem.
The <!– a padding to disable msie and chrome friendly error page –> comment is a workaround, not an error. It’s added to short HTTP error responses (like 404 or 500) to prevent older browsers like Internet Explorer and Chrome from replacing them with their own “friendly” error pages.
If this line shows up in your web app or API response, it likely signals a misconfigured server. Here’s how to fix it.
How can I fix a padding to disable MSIE and chrome friendly error page?
Before we start, check if there are any issues with the server, such as downtime. If you’re using Zapier with Slack, this problem will appear if the desired channel isn’t found. If you using AWS, whitelist Grafana dashboards.
1. Clear browser cache
Launch Google Chrome.
Click the three-dots menuicon and select Settings.
On the Settingspage, scroll down to the Privacy and Security section.
Click on Clear Browsing Data.
Open the Advanced tab, then select a time range. Next, check all the data that you want to clear. Finally, click the Clear Data button and wait for the browsing data to be removed.
Close and relaunch the browser and check for improvements.
2. Clear local DNS cache
Click on the Start menu, type command prompt, and select the option to Run as administrator.
In the Command Prompt, type the following command and hit Enter to execute: ipconfig /flushdns
You should see the Successfully flushed the DNS Resolver Cache message when it is completed.
Go to Network and choose Network and Sharing Center.
From the left pane, click on Change adapter settings.
Right-click on your network adapter and select Properties.
In the Properties window, locate and double-click on Internet Protocol Version 4 (TCP/IPv4).
Under Use the following DNS server addresses option, enter for the Preferred DNS server and Alternate DNS server the two addresses below in that order: 8.8.8.8 8.8.4.4
Click OK to save the changes.
4. Adjust your AWS configuration
Open your AWS configuration.
Look for the AWSManagedRulesPHPRuleSet rule, it should look like this: { "Name": "AWS-AWSManagedRulesPHPRuleSet", "Priority": 32, "Statement": { "ManagedRuleGroupStatement": { "VendorName": "AWS", "Name": "AWSManagedRulesPHPRuleSet" } }, "OverrideAction": { "None": {} }, "VisibilityConfig": { "SampledRequestsEnabled": true, "CloudWatchMetricsEnabled": true, "MetricName": "AWS-AWSManagedRulesPHPRuleSet" } }
Remove the rule and check if that solves the problem.
If <!– a padding to disable msie and chrome friendly error page –> message appears on your website, you can go ahead and contact the support to look into this error.
Prevent It from Happening Again: Remove Unnecessary Padding
If your web app is still returning the <!-- a padding to disable msie and chrome friendly error page --> comment in error responses, it’s likely due to outdated server configurations. This padding was once used to bypass friendly error pages in Internet Explorer and early versions of Chrome, but it’s no longer needed.
To prevent this issue from recurring:
Check your error handling templates and remove the padding comment if you’re not targeting legacy browsers.
Update your web server or framework settings to send proper error messages without artificial padding.
Test error responses using tools like curl or browser dev tools to ensure modern behavior.
By removing legacy workarounds, you reduce confusion, clean up your codebase, and avoid issues with modern browsers or integrations like Zapier, Slack, or AWS.
When your keyboard isn’t working on Google Chrome but seems to have no issue on any other application, you have to check your browser settings.
Incompatible extensions, hardware acceleration, outdated software as well as an infected device could all lead to such issues. Nevertheless, there are ways to fix it. And in most cases, it takes just a few minutes:
What can I do if my keyboard is not working in Chrome?
1. Uninstall and reinstall Chrome
Start by shutting down all Chrome instances already running on the PC.
Click on the Start menu and click the Settings application.
Select the Apps option on your Settings left pane, then click on the Apps & features menu on the right pane.
Scroll down to the Chrome app, click on the vertical dots, and click the Uninstall option.
Once again, click Uninstall when prompted for the process to begin.
Next, re-download a new version of the Chrome app from the official website by clicking the Download Chrome button.
Double-click the downloaded file and follow the prompts to reinstall Chrome.
To ensure that your data isn’t removed, we advise you to sign in to Chrome and sync your data.
Click on the Start menu, type windows security, and then select the Windows Security app.
Select the Virus & threat protection menu on the left pane, then click on Scan options on the right pane.
Click on the Full scan option, then click the Scan now button.
Depending on the antivirus you have, the process may differ. However, in some cases, when you use third-party antimalware, they may not be perfectly compatible with your OS and will need to be disabled.
3. Temporarily disable or uninstall the antivirus
Click on the Start menu, type control panel, and then select the Uninstall a program option under the Control Panel app.
Click on your antivirus and select the Uninstall option.
Follow the prompts to complete the uninstallation.
Tip
Uninstalling your antivirus can fix this issue, but make no mistake: you should always run an antivirus software on your PC. If the one you have now is interfering with Chrome, switch to another option or enable Windows Security.
4. Press the Windows key twice
This is a simple workaround, but it works according to users. For example, if your keyboard isn’t working in Google Chrome, you can quickly fix this problem by pressing the Windows Key twice.
After doing that, your keyboard should start working in Chrome. This is an unusual workaround, but it works according to users, and you’ll have to use it every time your keyboard stops working.
5. Disable the Hardware acceleration
Click on the ellipses or three vertical dots on the top right corner of your browser.
Then select the Settings option.
On the left pane of the browser, click on the Systems option.
Scroll down to the System section, and uncheck Use hardware acceleration when available.
After you uncheck this option, restart Chrome and check if the problem is resolved.
6. Disable extensions
Copy and paste the address onto your Chrome URL bar and hit Enter. chrome://extensions
Search for the recently added extensions, and toggle the switch off to disable the specific extensions.
Verify to see if the Chrome keyboard works.
Users reported that the IDM extension could cause this error, but even Google’s extensions such as Google Docs or Google Docs Offline can cause this issue to appear, so be sure to disable them all.
If disabling the extensions fixes the problem, you should try enabling extensions one by one until you find the one causing this problem.
After finding the problematic extension, you can update it or remove it from Chrome.
7. Clean Chrome’s cache
Click on the ellipses or three vertical dots on the top right corner of your browser.
Selects the More tools option, then Clear browsing data.
Click the checkboxes for Browser history, Cached images and files, and Cookies and other site data, then click on the Clear data button.
8. Try using the Incognito Mode
Click the Menu button in the top right corner.
Select New incognito window from the menu.
A new incognito window will open, and your keyboard should usually start working.
9. Update Chrome
Click the Menu icon in the top-right corner.
Choose Help, and select About Google Chrome.
A new tab will now appear and check for available updates. If any updates are available, they will be downloaded automatically.
Once the updates are downloaded, restart Chrome and check if the issue is resolved.
Paste the address below onto your Chrome address bar and hit Enter. chrome://settings
Click on Reset and clean up on the left pane of the browser.
Now click Restore settings to their original defaults.
Click the RESET SETTINGS button to confirm.
After Chrome resets your settings to default, it will restart itself. Once the browser restarts, check if the issue is still there.
11. Enable Hardware Media Key Handling in Chrome flags
Open Chrome flags by pasting the address below on your URL bar. chrome://flags
In the search box, type Hardware Media Key Handling.
Click the Hardware Media Key Handling dropdown button and select the Enabled option.
Restart the Chrome browser and verify if the keyboard Chrome issue is solved.
If you still can’t type in Chrome, move to the final solution.
12. Check for startup applications
Press Windows Key + R and enter msconfig.
Press Enter or click OK.
When the System Configuration window opens, go to the Services tab. Check Hide all Microsoft services and click Disable all button.
Go to the Startup tab and click Open Task Manager.
When Task Manager opens, right-click the first item on the list and choose Disable. Repeat this step for all startup items.
After you disable all startup applications, close Task Manager and go back to the System Configuration window; now click Apply and OK to save changes. Restart your PC.
Not being able to use your keyboard in Google Chrome can be a significant problem, but we hope our solutions have helped you solve this issue.
There may be a few variations to this issue; it could be a problem of the arrow keys not working in Chrome or the CtrlT not working in Chrome. Regardless, using these solutions, you can have your browser up and running again.
Without a blue light filter on your monitor, your eyes will get fatigued during long sessions of work on your PC.
So, whether you’re a web designer, an accountant, or work a full shift behind the screen, you should definitely use one, or get blue light filter glasses.
How do the blue light filters work?
As you know, the colors you see on any screen are formed by combining the red, green, and blue colors together.
However, the blue light component is pretty harmful to our eyes, especially at long exposure.
The blue light filters, as their names suggest, filter this blue light to an extent, thus protecting your eyes.
Most LEDs on the monitors have a blue light with wavelengths between 400 and 490 nanometers.
Now, you should know that after applying such a filter on your monitor, the image will have a yellowish tint and reduced brightness.
Therefore, when you mount the film onto your screen, you should increase the brightness by 15 to 20%.
Now that we cleared these things up, let’s look at the best blue light filter screens for your 23″ to 24″ monitor.
What are the best blue light filter screens for your monitor?
The VisoBlueX blue light protecting screen covers the 380 to 495 nm and can be installed easily on any 23 to 24-inch monitor.
However, it attaches to the monitor with only a tiny part that is folded to 90 degrees to the screen, so it’s recommended to stick it with a double-sided adhesive strip to prevent it from detaching itself.
The good part is that it works on any brand monitor, but also on TVs and Mac monitors.
The blue light protector filter screen from Vintez blocks up to 95% of UV light from reaching your eyes and 43%-61% of blue light in the range of 420nm-460nm.
It fits any 23”-24” computer monitor, and it simply attaches from the top of the monitor, without any cutting, trimming, or tools required.
With a strong 4H rating for hardness, the 2.2 mm film acts as a barrier against dust and abrasive cleaning wipes that can permanently damage its clarity.
That’s why, in the package, you will also receive a soft cleaning wipe that will help you clean it completely safe.
TikTok is a popular platform for content creators, and while most users tend to use it on their phones, you can also use TikTok in your web browser.
To use this platform on your smartphone you should download the official application. However, if you want to watch the content on your computer, you can do it from your browser.
Do keep in mind that sometimes issues can occur, and we already covered how to fix TikTok network connection error in a separate guide, so be sure to check it out.
This is incredibly simple to do, and in today’s article, we’ll show you how to do it. Moreover, the functionality is exactly like in the smartphone application and you can log in to your account.
Can you browse TikTok without the app?
Yes, the service is available on multiple platforms, and you don’t have to use the mobile app if you want to browse it.
The service is available as a web app as well, so it can be accessed by anyone easily, and in today’s guide, we’re going to show you how to do that.
Just scroll to the next video or use the keyboard shortcuts.
With this method, you can watch TikTok in the browser just like you would on your phone.
As a quick tip, we suggest you consume TikTok content from a featured browser like Opera One that includes dedicated apps for social media navigation.
You can use the in-built video player to watch entertaining content from TikTok, block tracking ads with Adblocker, or get access to various content from other regions using VPN support.
Hence, following TikTok catchy videos can be done more practically from a faster and more secure browser.
Opera One
Enjoy the social media content in one place using this full-integrated browser with TikTok.
Do you get a virus alert on your web browser? This article explains how to get rid of the Microsoft Edge Notification virus.
Why does Microsoft Edge telling me I have a virus?
Edge is a trustworthy browser, so it won’t generate fake virus alerts on its own. However, it may block harmful sites through its SmartScreen Defender.
If you see messages like Your system is infected, or are prompted to install antivirus software, don’t click on anything. It might be because of a malicious extension. These fake alerts are designed to trick users into taking actions like installing software or calling fake support numbers.
How do I get rid of Microsoft Edge notifications for viruses?
1. Disable third-party extensions
Turn off the internet connection by disconnecting the WiFi or unplugging the ethernet cable.
Open Microsoft Edge.
Click on the Extension icon and then on Manage extensions.
Toggle the switch off next to the extensions you want to disable.
In this way, disable all extensions.
Remove any suspicious extensions that you have not installed.
Note: It is crucial to disable the internet connection before trying this or any other methods to fix the Microsoft Edge notification virus problem. The adware extension or program may not let you access the Settings when it gets the internet connection.
2. Clear browsing data
Open Edge.
Press CTRL + Shift+ Del on your keyboard.
Choose All time as the time range.
Check Cache images and files and Cookies and other site data.
Click on Clear Now.
After clearing the data, you should no longer encounter a Microsoft Edge fake virus alert.
Sort by date installed and remove any unnecessary software/ software that you recently added to your PC.
4. Use an antivirus with reliable real-time protection
The Windows Defender is a decent security measure, but modern viruses are clever enough to know how to hide from it.
Therefore, you need something that outsmarts these pesky programs. More precisely, a powerful antivirus software.
Choosing an antivirus that uses advanced algorithms to scan, find, and monitor suspicious activity on your devices would be best.
Besides that, many apps come with extra security measures that protect your data from being stolen. This will guarantee your safety while making online payments.
Having a well-protected PC ensures that all of your data, both online and offline, is safe and people trying to access it will have a hard time getting their hands on your data.
That is why it is very essential to have the best and most updated browsers with advanced security features, and more importantly, an antivirus tool installed on your PC.
Avast is one of the most popular antivirus programs out there. But, what to do when avast is blocking your downloads? We’ve gotten reports such as Avast won’t let me download a file, Avast blocking download manager, and so forth.
That could be frustrating, we can relate. Worry less, in this article, we will show you how to fix these Avast issues on your PC.
Quick Tip:
There are so many different types of security software that you may install on your devices that you don’t have to stick with Avast if it causes too many problems.
TotalAV is another reliable tool for effortlessly managing downloads and attachments in emails. This is more than just another antivirus, it is a true AI assistant that responds to your daily needs.
TotalAV
A true assistant that protects, prevents, and can be easily set up to manage downloads.
You need to know why Avast won’t let you download a file in the first place. Avast blocks downloads and websites because its software and installation program are outdated and need immediate repairing.
This causes the web shield and HTTPS scanner to falsely detect legitimate downloads or websites as unprotected ones. System glitches and errors can sometimes cause Avast to malfunction, too.
Does Avast block torrenting?
Avast can block torrents if you are using the Avast VPN alongside the antivirus. While this is actually anti-malware and a piece of very good news for security enthusiasts, a large number of people have had complications with this protection application.
How do I stop Avast from blocking my file download?
1. Disable Antivirus Auto-Protect
Select the menu options in the low right corner of your PC’s taskbar.
Right-click on the Avast program.
Select Avast Shields Control.
Click Disable for 10 minutes.
2. Update the Avast Antivirus application
Right-click the Avast icon on the computer’s notification bar and click Update.
Select Program and wait for the settings page to pop up.
If it doesn’t update automatically, click Check for Updates.
Wait for Avast to update.
Reboot your device after this process takes effect. Once this is done, Avast should let you download files.
3. Repair Avast installation program
Right-click the Windows Start button and choose Apps and Features.
Click your Avast Antivirus version and tap Uninstall.
Once the Avast Setup wizard appears, select Repair.
Launch the Avast Antivirus application and tap the menu icon.
Click Protection located on the right bar and select Core Shields.
Click and hold the green marker, then slide it to the lowest sensitivity setting
Avast web shield protects your computer from unsafe downloads. Reducing it will help prevent Avast from meddling with download activities on your device.
5. Disable HTTPS scanning
Launch the Avast Antivirus application and tap the menu icon.
Click Protection located on the right bar and select Core Shields.
Scroll down and locate the Configure shield settings section and tap the Web Shield tab.
Then, untick the box next to HTTPS scanning.
With the solutions in this article, you should have successfully resolved any problems blocking your downloads in Avast. If the problem persists, you could equally find out how to uninstall the Avast Secure Browser with just a few clicks.
Let us know in the comments if you have found this article useful.