10 Best Opera GX Extensions: VPN, Adblockers, Web Clippers & More

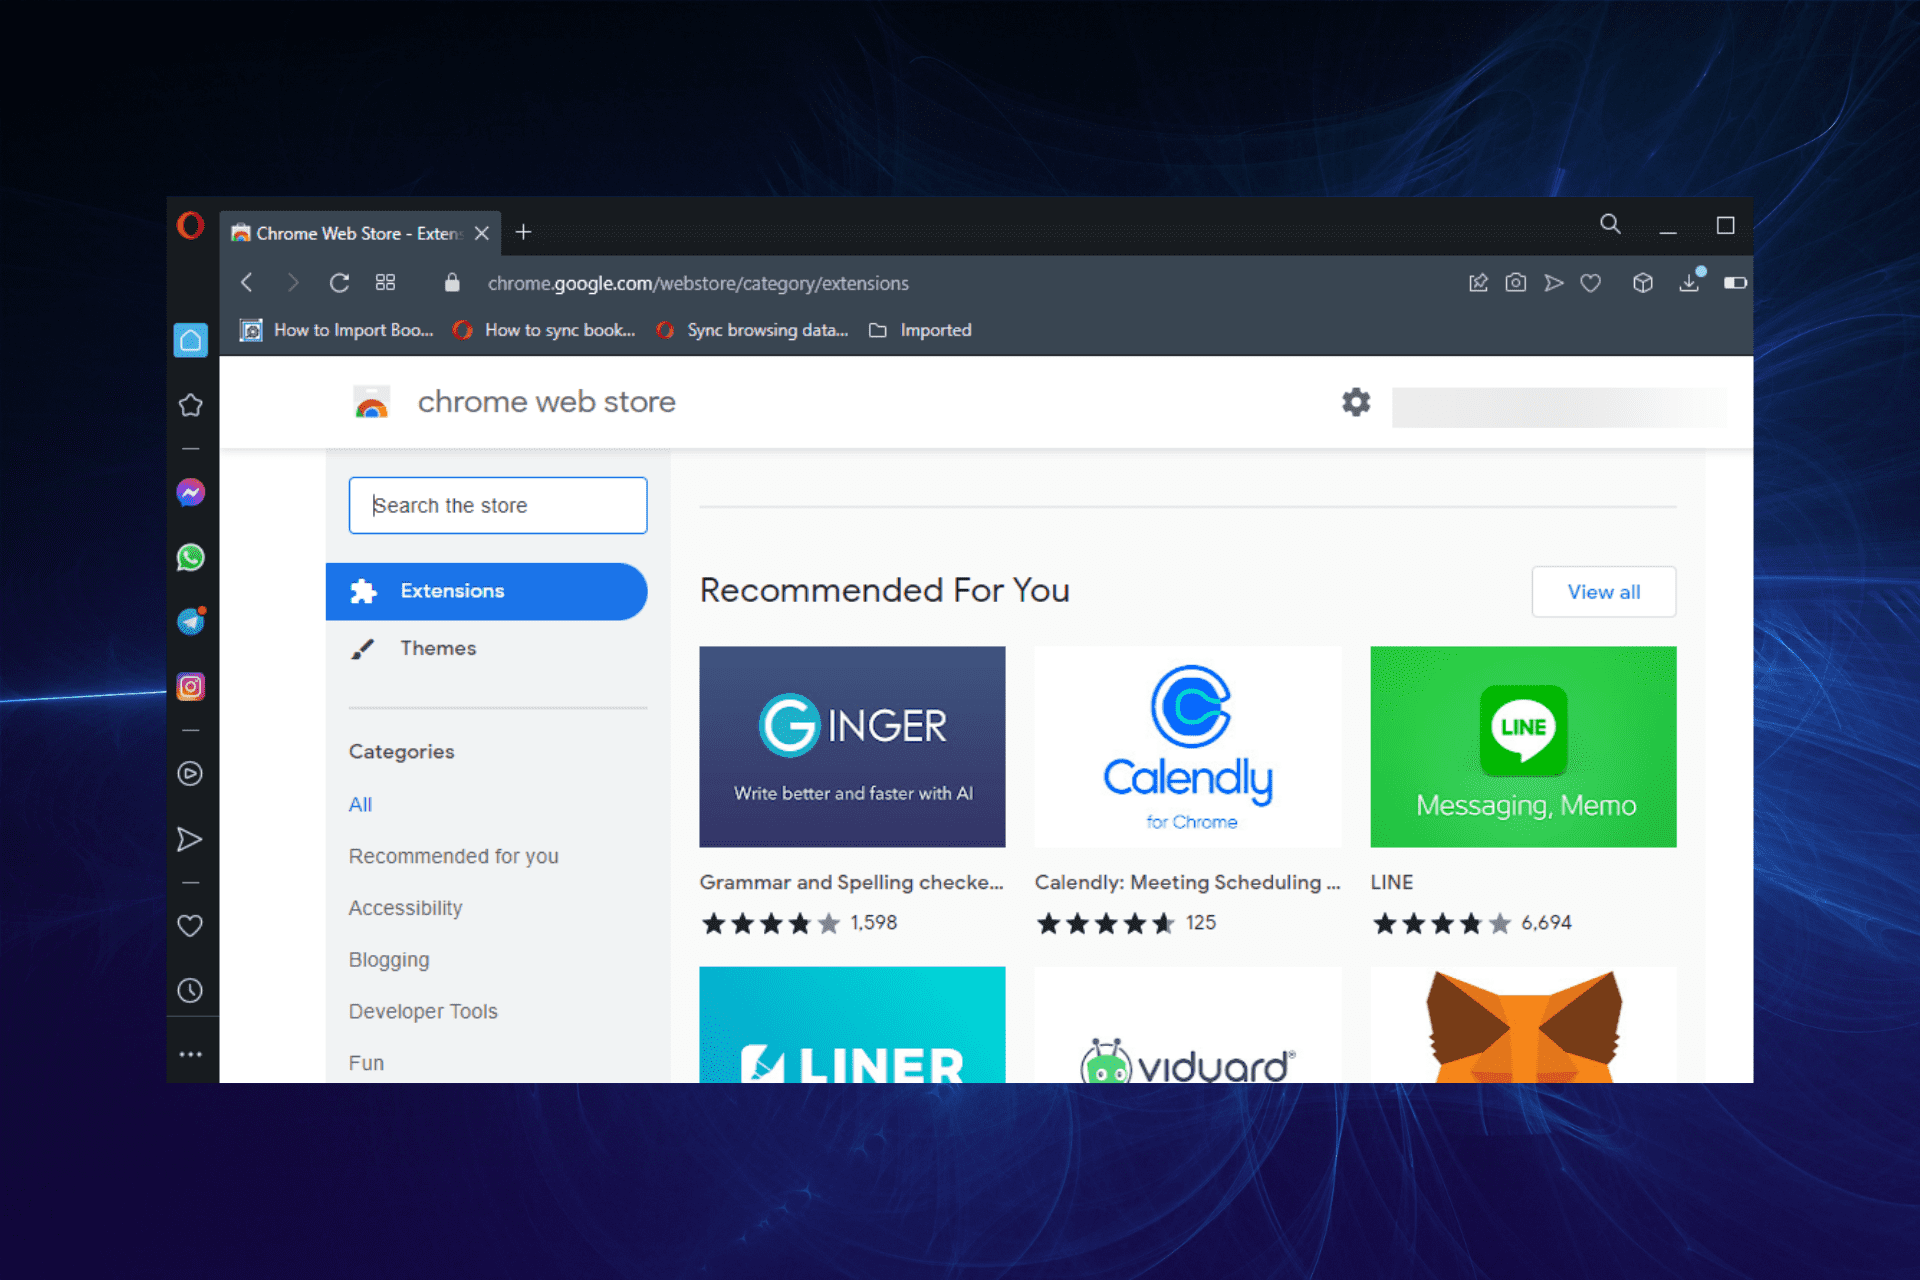
With the best extensions, you can transform Opera GX in your go-to browser not only for gaming but also for streaming and even task management.

Today, we’ll show you the best options that’ll power up your browser. From VPNs, adblockers, and web clippers, to productivity tools, you can find all you need to build a strong arsenal.

What are the best extensions for Opera GX?

1. Opera Free VPN – Best Opera GX VPN extension

opera gx vpn extension

Opera VPN is the free, built-in virtual private network on Opera GX. It allows you to browse the internet with a virtual IP address that hides your location.

With it, you can access location-restricted content without being noticed. It also protects you from identity and data theft online. No wonder it is regarded as one of the best browser VPNs available.

Other features:

  • No activity login or data collection
  • Does not require any subscription
  • Unlimited access to multiple servers

⇒ Get Opera Free VPN here

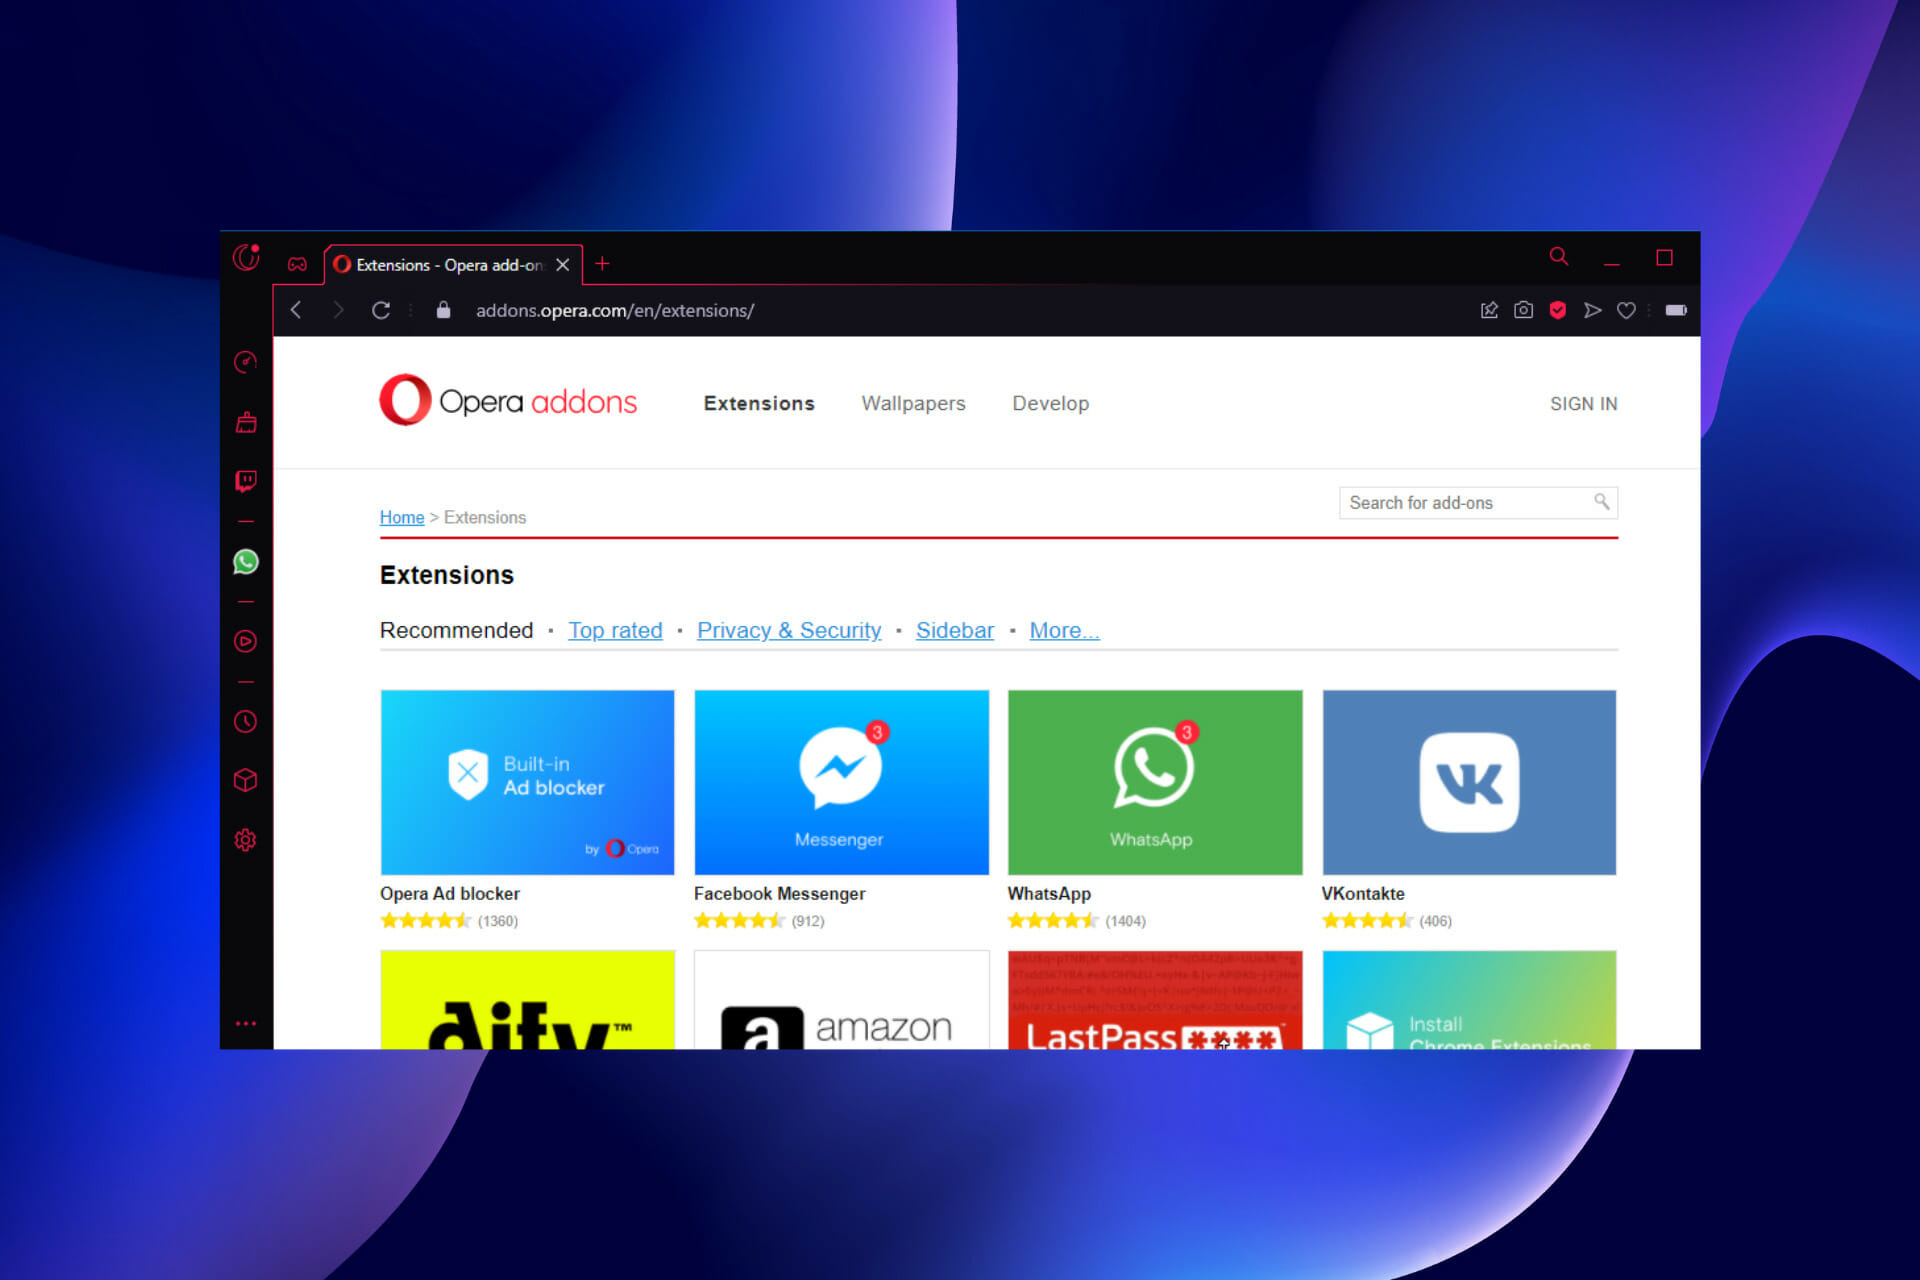
2. Opera Ad Blocker – Best ad blocker extension

opera ad blocker

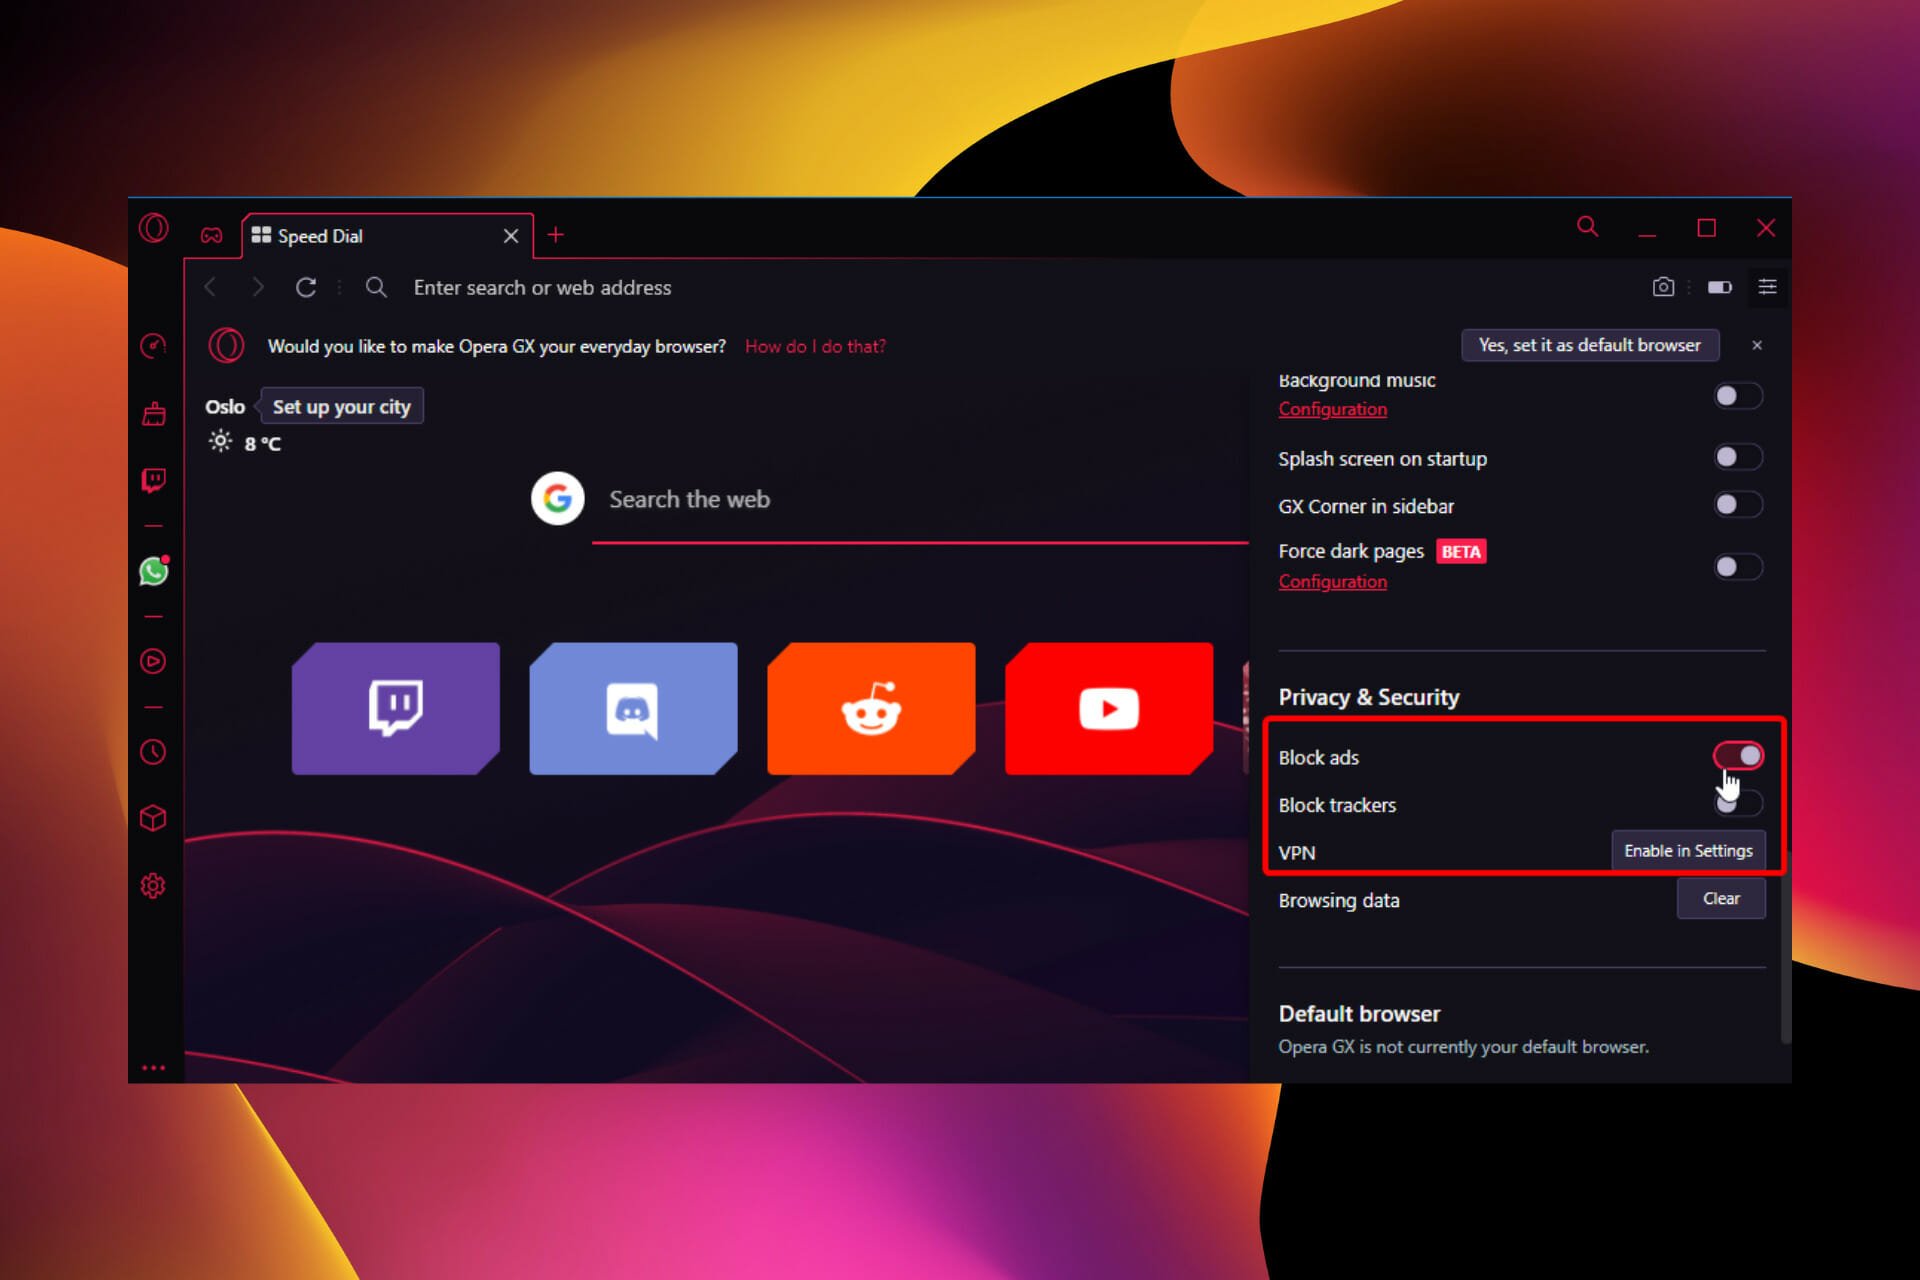
This is the built-in ad blocker extension for Opera GX. It is a privacy-focused and speed-enhancing addon that does not slow down your PC.

It removes even the most stubborn of ads and banners. As it is already on your Opera GX browser, you only need to enable it in the extension manager to get going.

Other features:

  • Provides the option to whitelist websites
  • Load web pages 90% faster
  • Mobile and desktop compatibility

⇒ Get Opera Ad Blocker

3. SaveFrom.net helper – Free video downloader

save from browser extension

It’s common knowledge that you can’t download videos from YouTube. With this extension enabled on your browser, you can download any YouTube video of different quality.

It is also not limited to YouTube, as you can download videos from sites like Facebook and Instagram. It just ensures no video gets away from you.

Other features:

  • On click download from more than 40 websites
  • Faster download to your device
  • Supports different video, audio, and image files format

⇒ Get SaveFrom.net helper

4. Evernote Web Clipper – Free extension for note-taking

evernote listing in opera addon shop

Don’t want to lose track of anything as you browse? Evernote helps you clip web pages and stay organized.

With this extension, you don’t need to open endless tabs when you don’t want a piece of information to get away from you. It allows you to clip, save, and highlight anything you see online.

Other features:

  • Allows saving brief excerpts or all the contents on a page
  • Clips can be shared
  • Clipped notes reminders

⇒ Get Evernote Web Clipper

5. Google Translate – Multiple language translator‎

google translate add on for opera

When was the last time you left a website because it was written in a foreign language? This addon offers instant translation of web pages or selected parts.

It auto-detects the content on a web page and prompts you to translate it into your preferred language. It is everything you need to communicate with anyone from any part of the world.

Other features:

  • Translates between 100 languages
  • Lock-in preferred language
  • Automatic language detection is optional

⇒ Get Google Translate

6. Pocket – Easy content-saving tool

pocket extension for opera gx

Pocket helps you save contents to be accessed later on the web. You can save everything with this extension from videos and audio to images and social media posts.

What’s more, you can access all your saved content later without an internet connection—all with just a mouse click.

Other features:

  • Saves anything any time
  • Syncs across all your devices
  • Keyboard shortcut

⇒ Get Pocket

7. AtaviBookmark – Easy bookmarks sync

atavi bookmark extension for opera gx

AtaviBookmark is a free Opera GX extension that provides options to customize your bookmarks. It makes the task easy by allowing access to your data on any device after logging in.

What’s more, it is compatible with a host of devices, as it can be used on your smartphone or PC. It just makes bookmarks management super-easy.

Other features:

  • Save bookmarks into groups
  • It works with all popular browsers
  • One login on any browser or device

⇒ Get AtaviBookmark

8. Similar Web – Free tool for complete website data

similar webs extension for opera gx

Want quick data about any website? Install the Similar Web extension on Opera GX, and you’d get more than you asked for.

It shows you the keywords, traffic data, ranking statistics, engagement sources, and info that makes a website. It is one of the best productivity extensions you don’t want to miss out on in Opera GX.

Other features:

  • Access key metrics about websites you visit
  • In-depth analysis of website data
  • Easy to use

⇒ Get Similar Web

9. Web Apps by 123apps – All-in-one file editor

123web app extension for opera gx

Web Apps is a collection of addons for working on different file formats. It allows you to edit videos and audio within your Opera GX browser.

It also offers pdf editing and file conversion from one format to another. All these for free and with little to no stress.

Other features:

  • Video and image conversion
  • Documents and Ebooks editing option
  • Built-in tool to crop, rotate and resize videos

⇒ Get Web Apps by 123apps

10. Search by Image – Effective image finder

search by image extension for opera gx

Search by Image is an easy-to-use extension to conduct image searches on the internet. It helps users verify the authenticity and source of images.

It accesses your search result page and allows you to pick pictures for search from your device. This extension also supports searching for screenshots of web pages.

Other features:

  • Search images from the context menu and your browser toolbar
  • Search images from private sites
  • Different search modes are available

⇒ Get Search by Image

Are Opera GX extensions safe?

Opera extensions are verified by Opera, so they are perfectly safe. To be on the safe side, always use extensions from reliable developers with good ratings.

There you have it: an extensive and in-depth guide on the best Opera GX extensions. These are just extensions from Opera’s store, but you can just as easily install Chrome extensions in Opera.

As for further customization, check our picks for the best themes for the Opera browser.

Feel free to let us know if other worthy mentions just missed out on our list in the comments section below.
Windows 11 Weather in Taskbar: How to Add it in 2 Steps

We all need to check the weather forecasts now and then, right? There are many ways you can check weather details for your location on a Windows 11 PC. Most users will probably look at online forecasts or the Weather app that comes with Windows.

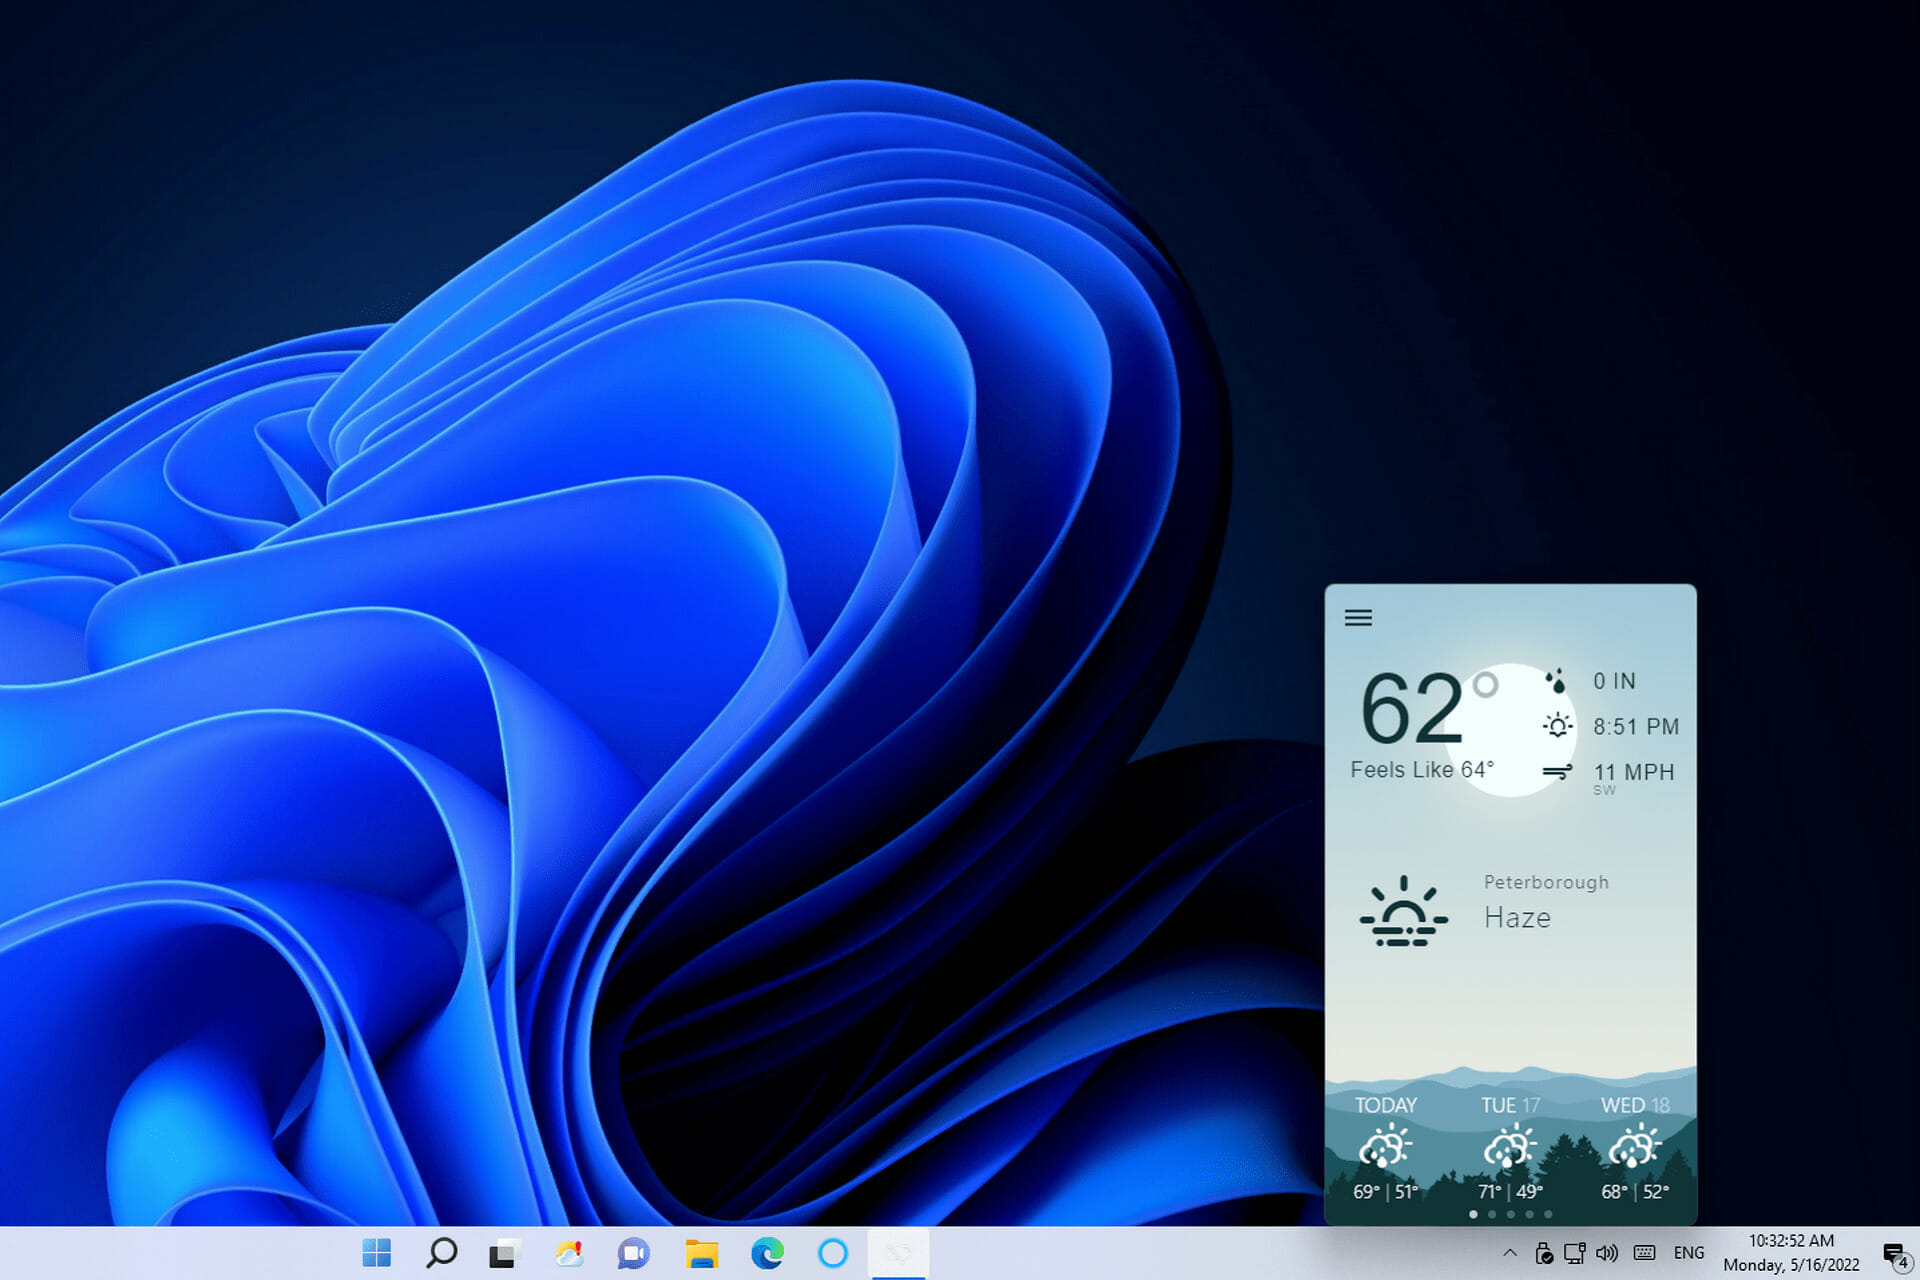
However, you can also add weather details to Windows 11’s taskbar with its Weather widget and the Weather Bar app. By doing so, you’ll be able to view weather info for your location from the taskbar and its system tray area. This is how to add weather info to Windows 11’s taskbar.

How do I get the weather forecast on my taskbar in Windows 11?

1. Enable Windows 11’s Weather widget

  1. First, right-click the Windows 11 desktop to select the Personalize option on its context menu.
  2. Select Taskbar to view the options in the screenshot directly below.
    The Widgets option windows 11 weather in taskbar
  3. Turn on the Widgets option if it’s disabled.
  4. Click the Widgets button on Windows 11’s taskbar.The Widgets button windows 11 weather in taskbar
  5. Select the + Add widgets button shown directly below.
    The Weather app's add button windows 11 weather in taskbar
  6. Then select the Weather widget.

Selecting the Weather widget adds a forecast icon to the taskbar as shown directly below. Hover your cursor over that icon to view weather info for your area. You can view more detailed forecasts for your region by looking at the widget panel.

Weather taskbar icon windows 11 weather in taskbar
Note icon NOTE
Windows 11’s Weather widget won’t show any weather info on the taskbar if your PC hasn’t received the KB5010414 update. You can download and install that update from its Microsoft Update Catalog page. Alternatively, check for new updates via the Windows Update tab in Settings.

2. Add weather details to the system tray

  1. Open the Weather Bar webpage.
  2. Then click the EXE Windows button on that page.
    EXE Windows button windows 11 weather in taskbar
  3. Bring up the folder in which Weather Bug downloaded.
  4. Double-click the win32-weather-bar-1.0.0.exe to install the app.
  5. Then double-click the Weather Bar shortcut that appears on the desktop after installation.
  6. Click the Weather Bar system tray icon to open the app.
  7. Press the Weather App’s hamburger button. 
  8. Select the New Location option.
    New Location option windows 11 weather in taskbar
  9. Then enter your city or town within the search text box. If you don’t live in a city or large town, input your nearest city location.
    Location search box windows 11 weather in taskbar
  10. Now you can hover the cursor over the Weather Bar system tray icon to view further weather info for your geographical area.
    Weather Bar's system tray icon windows 11 weather in taskbar

How do I change the weather language on Windows 11?

You can change the display language of the Weather widget, and others, in Windows 11 by configuring language and region settings. Settings include a Windows display language option with which you can change the language for features. This is how to change the Weather widget’s language in Settings:

  1. Press the Windows + I keyboard key combination to view Settings.
  2. Click Time & language > Language & region in Settings.
    Language & region option windows 11 weather in taskbar
  3. Select the Add & language option.
    Add & language button windows 11 weather in taskbar
  4. Input a language in the search box, and then select the one you want.
    Choose a language to install menu windows 11 weather in taskbar
  5. Click Next and Install to add the language.
  6. Then select the language you just added in the Windows display language drop-down menu.
    Windows display language drop-down menu windows 11 weather in taskbar
  7. Click Sign out to apply the new language settings.

How can I fix the Windows 11 weather in the taskbar not updating?

Some users have said in forum posts that the temperature in Windows 11’s Weather widget not updating. Consequently, that widget always displays the same temperature and weather info (even after restarting Windows). If the same thing happens for your Weather widget, try restarting its process.

  1. Press the Windows + X keyboard keys, and select the Task Manager menu option.
    Task Manager option windows 11 weather in taskbar
  2. Click the Processes tab if it’s not already selected.
  3. Scroll down to and select Windows Widgets.
  4. Press the End task button.
    End task button windows 11 weather in taskbar
  5. Click the Widgets taskbar button to restart the process.

How do I turn off the weather info in Windows 11’s taskbar?

You can turn off the taskbar’s weather info by unpinning the Weather widget. Click the Widgets button to open its panel. Then click the More options button at the top right of the Weather widget to select Unpin widget. The original Widgets button will be restored after restarting Windows.

The Unpin widget option windows 11 weather in taskbar

Both the Weather widget and Weather Bar will display current weather info for your location along the taskbar. You can click their icons to quickly check forecasts for upcoming days. Both taskbar additions make weather info more directly accessible in Windows 11.

So, you won’t need to open your browser to check weather forecasts ever again with the Weather widget enabled or Weather Bar installed. Do you prefer Weather Bar or the Weather widget? Let us know which one you prefer in the comments section below.

Rust Console Discord: The Complete Guide

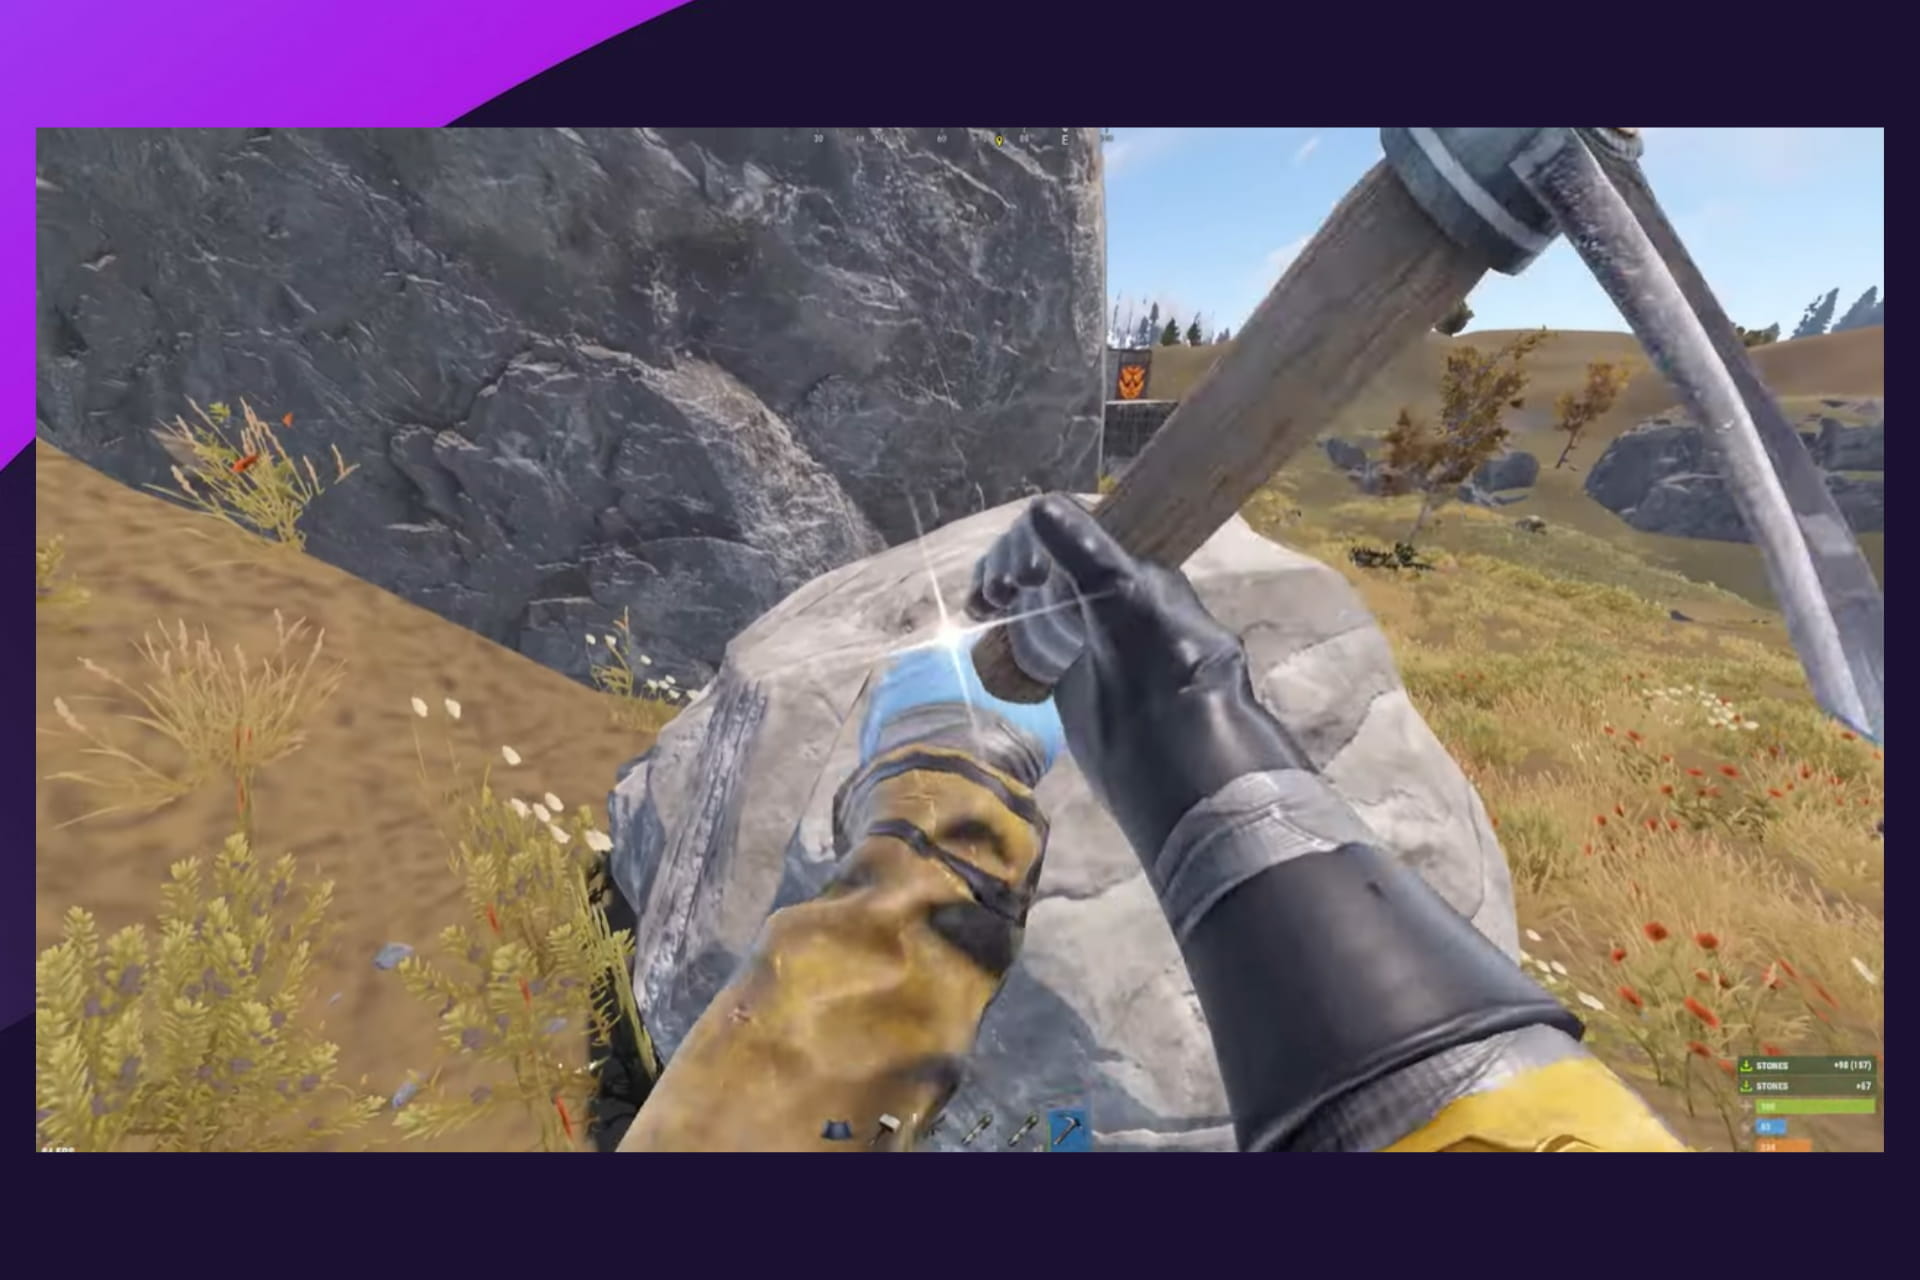
Let’s explore the Rust Console integration on Discord, but first here is what you need to know about the game.

Rust was among the first breakthrough survival hits on Steam when it was launched in 2013. There have indeed been games like it, but few have been in the limelight as long as it has. 

In 2021 it launched a console version of the game, and with the hype of Rust, many players were eager to play the Rust Console version. 

In this complete guide, we love to explore the Rust Console Discord and let you know all there is to it. You should stick around if you play Rust on PS4, Xbox, or even PC.

Users also complained of some errors in settings, but any of these 3 fixes will resolve errors with saving settings.

What is the Rust Console?

Facepunch Studios created Rust, a multiplayer-only survivalist video game initially made available in December 2013, with a full release in February 2018.

Rust began as a replica of DayZ, a successful ARMA 2 mod featuring crafting mechanics similar to those seen in Minecraft.

The game is compatible with both macOS and Windows, and the Xbox One and PlayStation 4 console versions, created in collaboration with Double Eleven, were published in May 2021.

Rust’s goal is to survive in the woods by stealing or gathering things, and you risk death if you can’t effectively control your health, thirst, as well as your hunger.

However, despite dangerous creatures such as wolves and bears, your primary threat is other players owing to the game’s multiplayer nature.

What do I need to know about Rust Discord?

➡ Does Rust Console have a Discord?

Rust Console Edition gamers may join an active Discord channel to talk about the game and meet friends.

However, when you join this official Discord server, you are expected to treat fellow players and the broader community with respect.

While the game requires players to murder each other for survival, the Discord server is a friendly community of like-minded gamers.

Lastly, It has highly effective moderators, and anybody who breaks any of the rules is quickly blocked.

➡ How do I join Rust Console Discord?

  1. Navigate to the official Rust Discord page.
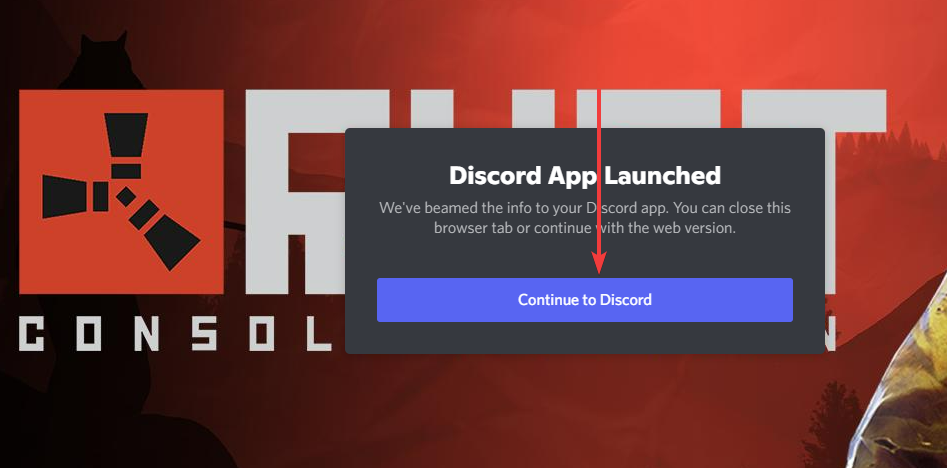
  2. Click on the Continue to Discord button.
    rust console discord
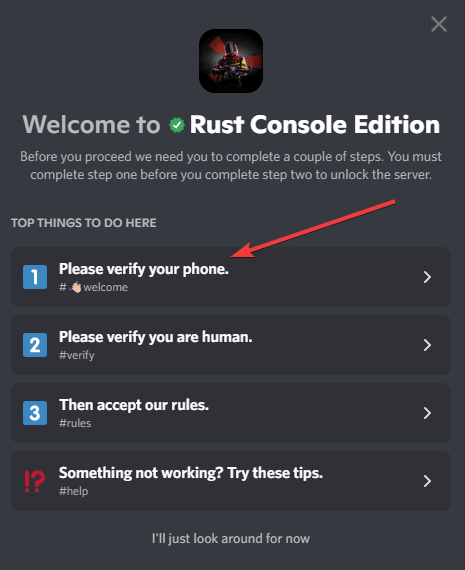
  3. Click on the option for Please verify your phone.
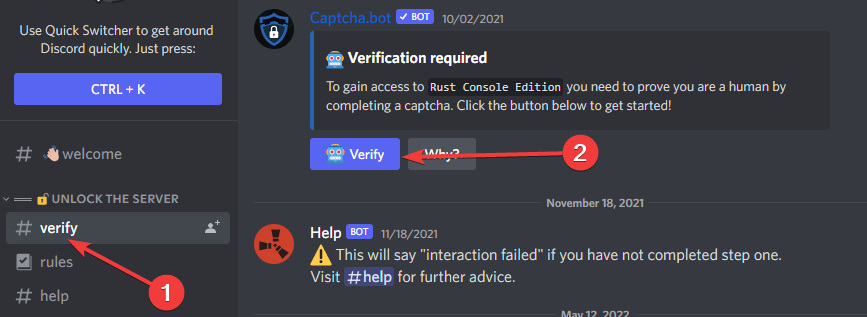
  4. On the Discord app, click on Verify on the left panel, then Verify on the right pane under the Verification required menu.
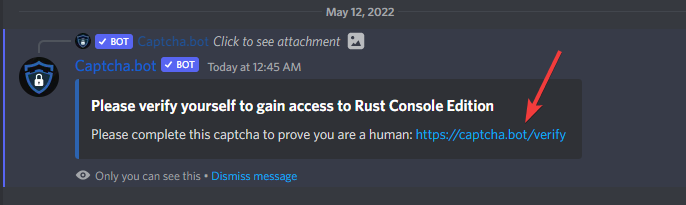
  5. Click on the captcha link under the chatbot menu.
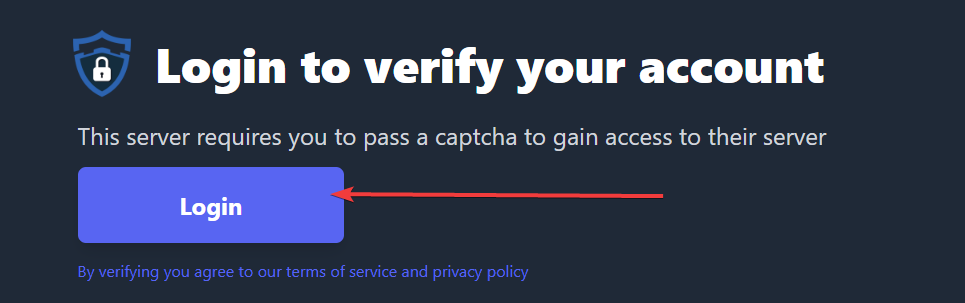
  6. On the new tab, click on Login to access the captcha.
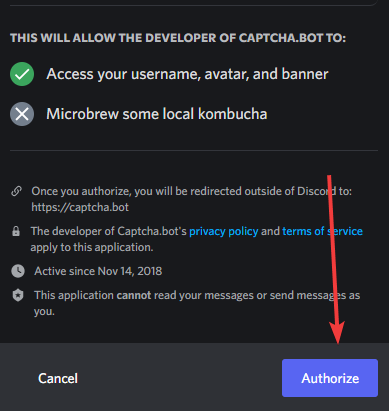
  7. Click on Authorize to give Captcha access to your account.
  8. Select images to pass the captcha test.
  9. Click on the Open Discord button.
    rust console discord
  10. Visit the #rules channel.
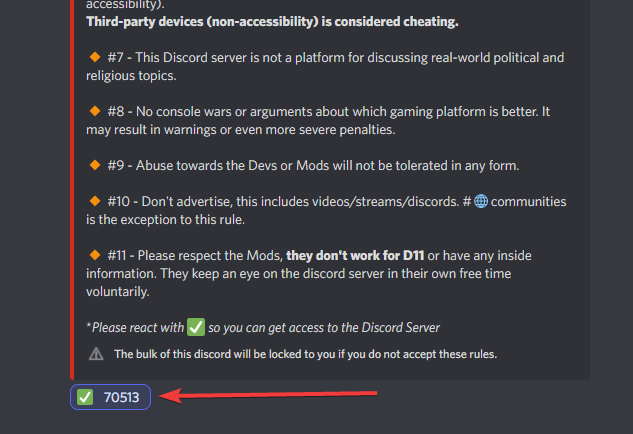
  11. At the bottom of the rules, click on the green checkmark.
    rust console discord

Now you are in and can chat and meet fellow Rust lovers.

➡ Will private servers come to Rust Console?

The great news is that the game’s console version will allow players to create Private Servers on Xbox One and PlayStation 4, but the unfortunate thing is that this feature is currently unavailable.

However, on either the Playstation 4 or Xbox One versions of Rust, players who attempt to create a Private Server will receive a ‘Coming Soon’ message.

Unfortunately, operating servers costs money, so be prepared to part with some of your Xbox Live or PlayStation 4 money if you decide on this.

Looking on the bright side, the fact that several gamers are interested in Rust is fantastic, particularly considering the game’s age.

And lastly, it’s reassuring to see the game still has a solid fanbase, particularly on current consoles, given how many players have created memes about the survival game.

➡ How do you link Discord to Rust?

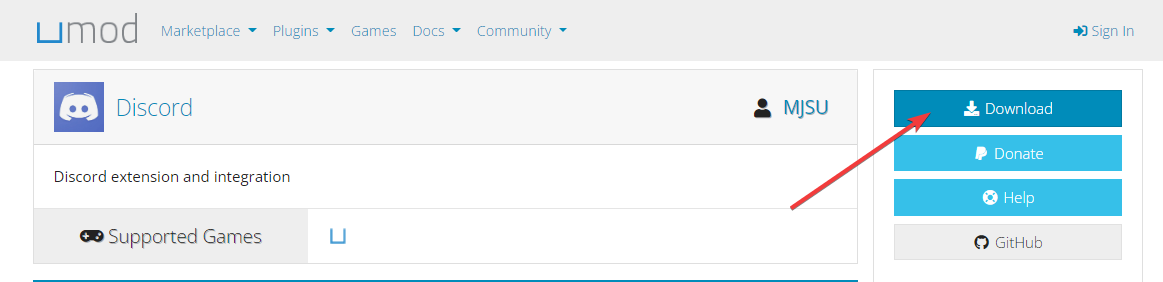
  1. Visit the umod site.
  2. Click the Download button on the right pane. It downloads as a DLL file.
    rust console discord
  3. Turn off your server.
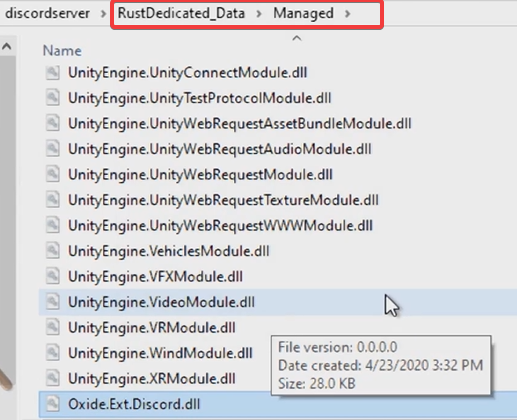
  4. Save this file in your server under this location:
    RustDedicated_Data/Managed
  5. Start the server with the extension in place.
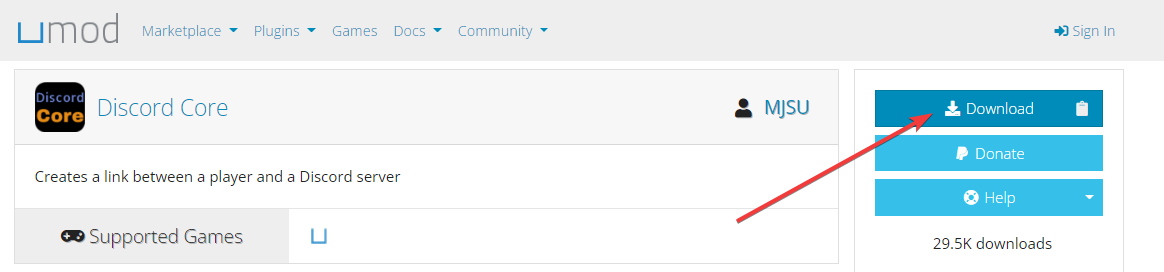
  6. Download the Discord Core plugin from MJSU.
  7. Install the plugin by adding it to this server location:
    oxide/plugins
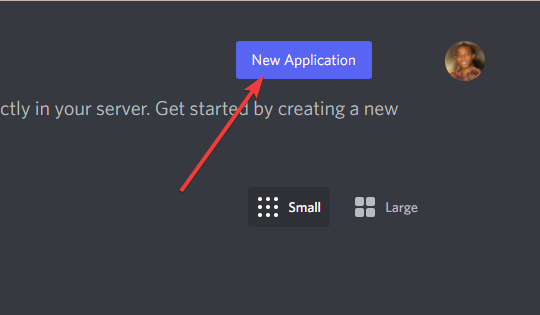
  8. Visit Discord applications and click on New Application at the top right side of your browser.
    rust console discord
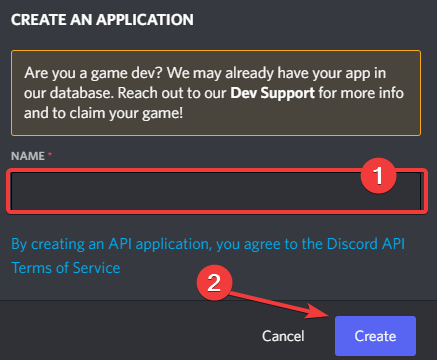
  9. Please give it a name and click on the Create button.
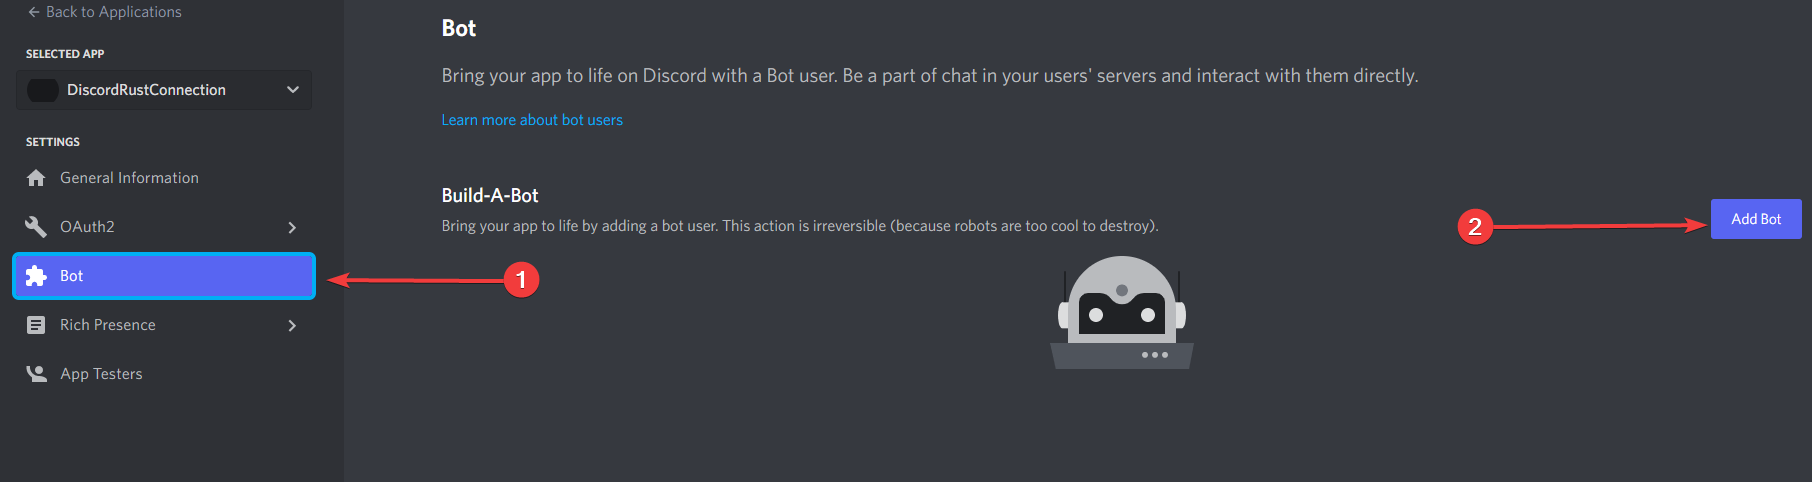
  10. On the left pane of Discord, click on Bot, then click on the Add Bot button on the top right to create a new Rust Discord bot.
    rust console discord
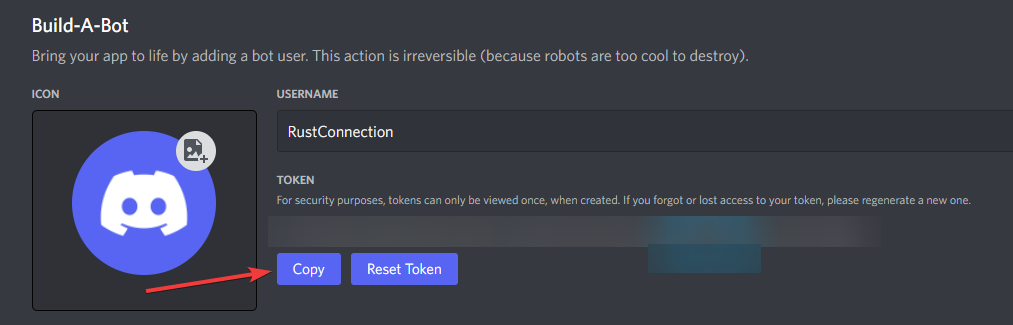
  11. Click the Copy button to copy your token API.
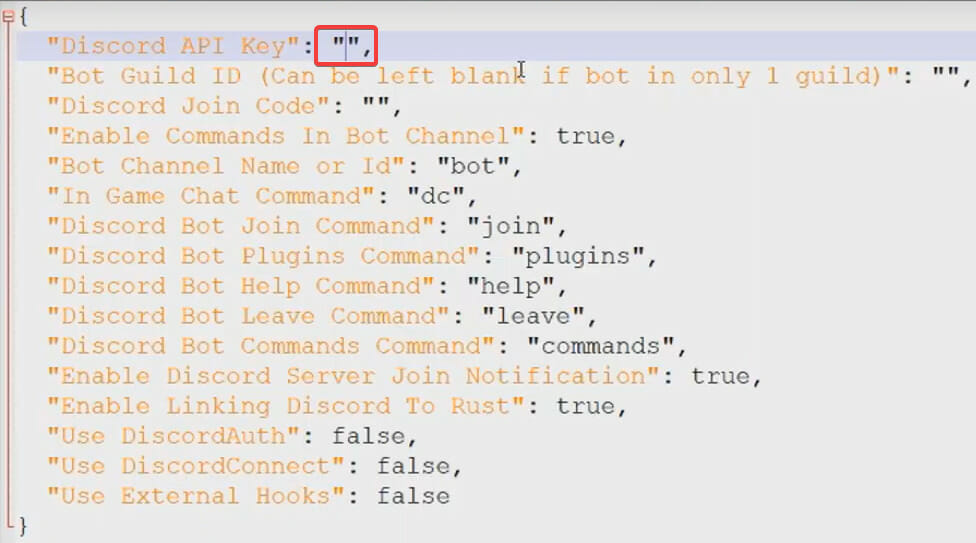
  12. Open your configuration file for Discord Core and paste the API between the parenthesis of the Discord API Key value.
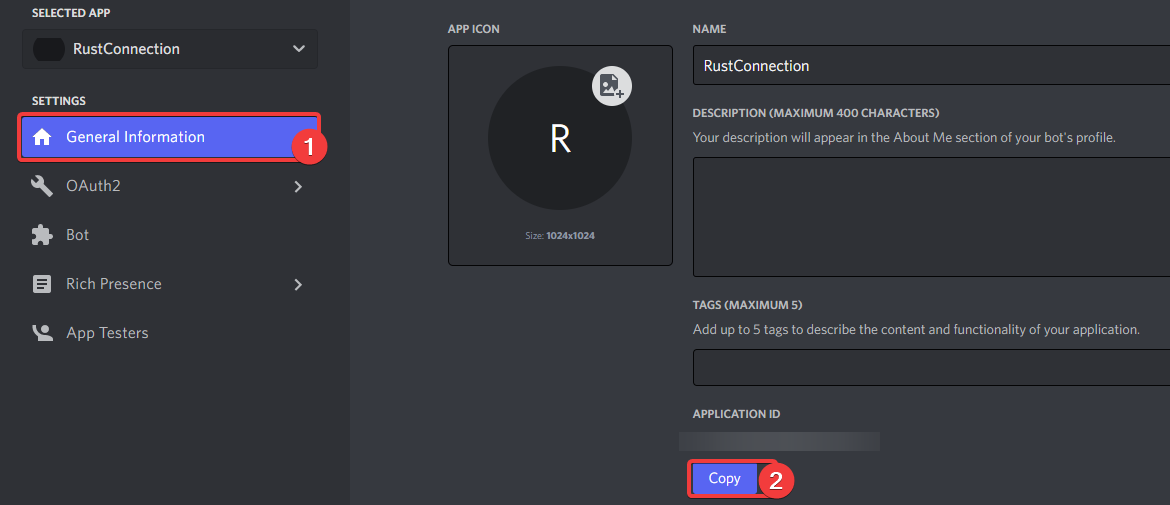
  13. Go back to your discord bot page. Here, click General Information on the left pane, then click the Copy button of Application ID. Lastly, save the copied ID for step 15.
  14. Open your browser and paste the below code:
    https://discordapp.com/oauth2/authorize?client_id=482577811954049558&scope=bot&permissions=8
  15. Replace 482577811954049558 with your application ID and press enter.
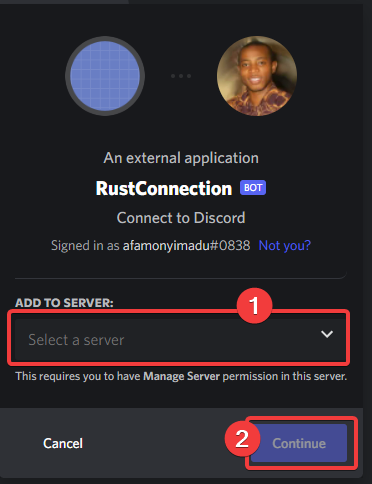
  16. Click the dropdown box to select what discord server you want to invite the bot to, then click Continue.
  17. Download the Chat plugin.
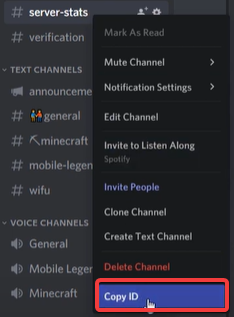
  18. Right-click on the channel for chats (this could be any channel you want), and click the Copy ID button.
  19. Navigate to your config folder.
    oxide/config
  20. Paste the copied link as the value for the Chat Channel name or id.
    rust console discord
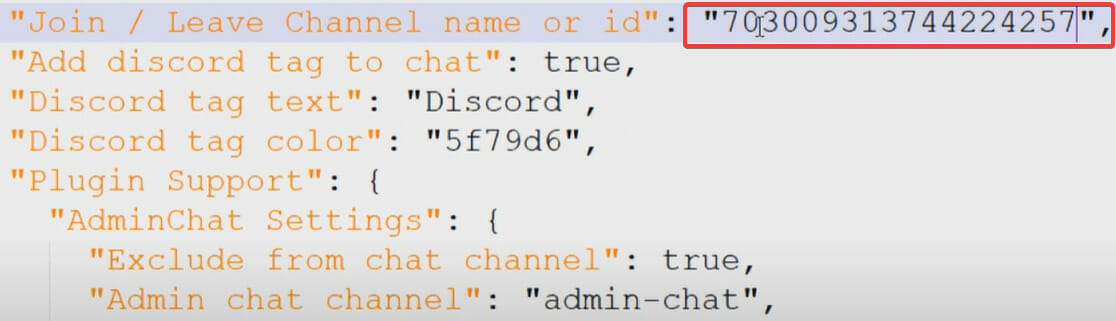
  21. Copy the Channel ID and paste it as the value of the Join / Leave Channel name or id.

Now you can start Rust, and your chats will be displayed on your Discord channel.

If you’ve read this far, you probably have been able to configure your Discord server to work with Rust chats.

In conclusion, with this connection, you will be able to communicate more with your community while enjoying Gameplay. We advise that as it’s the case with all internet connections, you use the best VPNs to play Rust.

Firefox Isn’t Updating Passwords: 3 Ways to Easily Fix This Error

In the article, we explore the problem of Firefox not updating passwords. But firstly, you should know that Firefox has been the browser of choice for many users for years. Its numerous features ensure there is something for every kind of user.

The browser is a fine blend of good security, solid privacy protection functionality, frequent updates, and an active development team.

Features like anti fingerprinting help you maintain privacy and make sure your data does not fall into the wrong hands, which has been the draw for many users.

Furthermore, the browser boasts of an advanced passwording system. With the introduction of official add-ons like Firefox Lockwise, you can sync encrypted passwords across different devices.

Users also have encountered unexpected errors on Windows using Firefox, but just like most browser issues, you should be able to resolve it quickly.

Opera One

Choose to save your usernames & passwords in Opera One’s local storage for comprehensive data management!
Free Download Visit website

There are a few practical ways you can utilize in order to save your passwords safely in the Firefox browser without losing any of them.

So follow along with these step-by-step solutions if you need to resolve this password updating issue.

How to save passwords in Firefox automatically without asking?

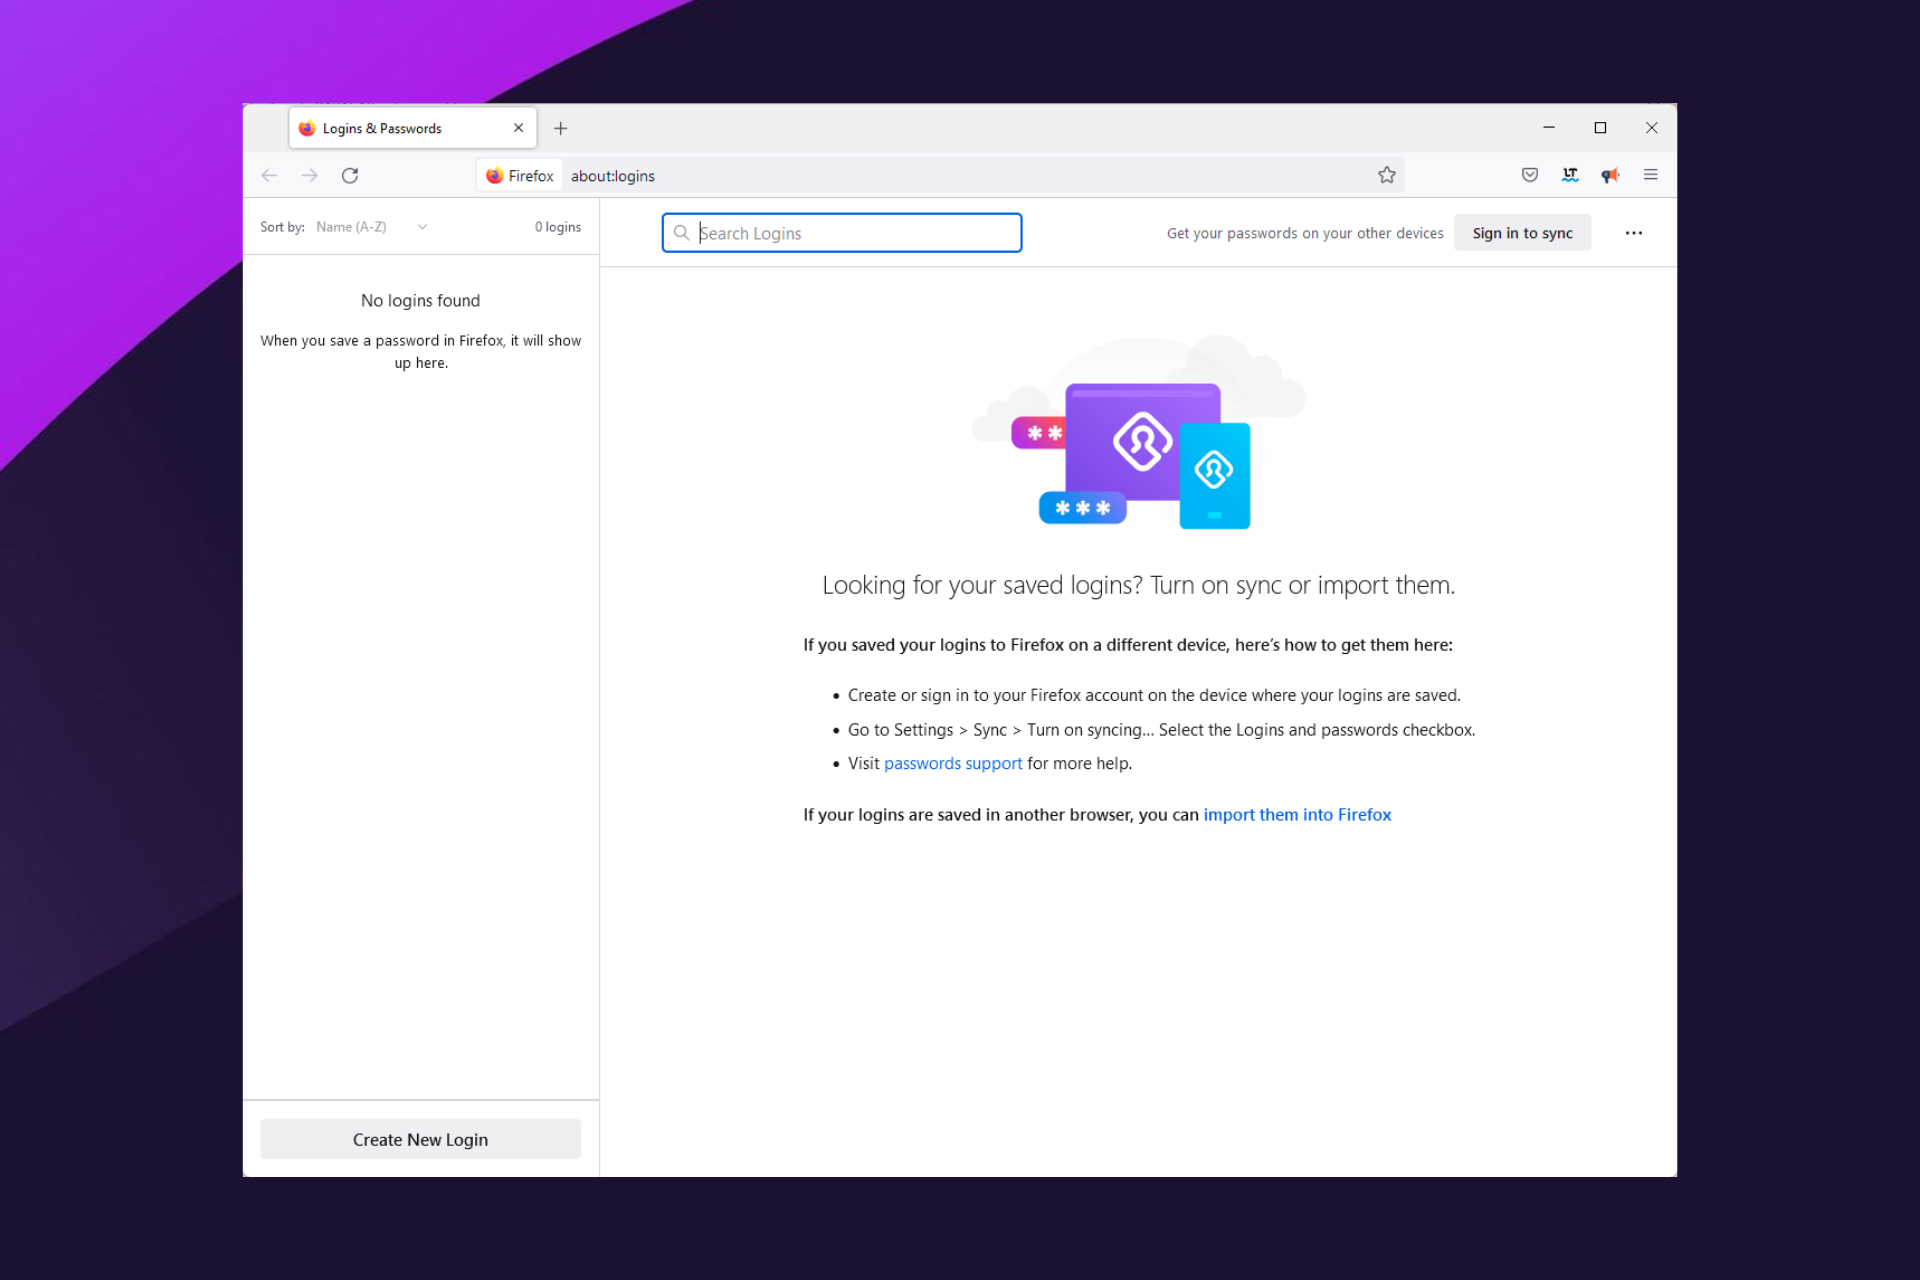
  1. Click on the three horizontal lines at the top-right corner of your browser.
    firefox not updating passwords
  2. Select the Password option, or simply type the below code in the address bar:
    about:logins
    firefox not updating passwords
  3. Click on the login menu, the three dots at the top right corner, then select Options. This will open the Logins and Password options.
  4. Check the box beside the Ask to save logins and passwords for the websites option. Also, check the option to Autofill logins and passwords.
    Firefox not updating passwords

Once this is completed, you will always receive a password prompt after you have used a new password.

It’s worth noting that the password field’s length on certain websites is limited. If you autofill or paste very lengthy data, you may trigger a prompt that directs you to reduce the text. In such cases, you will need to use shorter passwords. 

Configuring this setting is a great way to guard against sync issues including Firefox iOS not syncing passwords. If a Firefox update lost passwords, this will also be a preventive measure.

How can I force Firefox to update a password?

1. Remove the website from your never saved list

  1. Launch the Firefox browser.
  2. Click on the three horizontal lines at the top-right corner of your browser.
    firefox not updating passwords
  3. Select the Settings option.
  4. On the sidebar, select Privacy & Security.
    Firefox not updating passwords
  5. On the right, scroll to Logins and Passwords, then select Exceptions.
  6. Click on the site from the Website section, then click on the Remove Website option.
  7. Lastly, click on the Save Changes button.

You should first determine if the problem is restricted to a few websites or every site you visit. If the former is the case, you probably have elected not to remember the passwords for these websites. 

Therefore, your browser will not prompt you to store the login information again until they have been removed from the list of your password exceptions.

2. Remove the browsing data

  1. Launch the Firefox browser.
  2. Click on the three horizontal lines at the top-right corner of your browser.
    firefox not updating passwords
  3. Select the Settings option.
  4. On the sidebar, select Privacy & Security.
    Firefox not updating passwords
  5. On the right, scroll down till you get to the Cookies and Site Data menu, then select the option to Clear Data.
  6. Lastly, tick the checkbox for Cookies and Site Data as well as that for Cached Web Content, then click Clear.
    Firefox not updating passwords

While Firefox is a great browser choice, we often recommend the Opera browser. It gives an excellent customization range and ensures users can select security features that work best for them.

Furthermore, it is built on Chromium and affords users a vast library of plugins, many of which are used to enhance user privacy and security. Clearing the browser data is also a useful solution for cases where your Firefox on Android is not syncing passwords.

3. Disable most recently added extensions

  1. Launch the Firefox browser.
  2. Click on the three horizontal lines at the top-right corner of your browser.
    firefox not updating passwords
  3. Select Add-ons and themes.
  4. Finally, under the list of enabled add-ons, toggle off the switch to disable any recently added extension.

Remember that you should only adopt this solution if the problems start after installing new extensions. It, however, could be a helpful fix if some extensions have become corrupted.

There you have it; the best fixes if Firefox is not updating passwords. The best part is that for most of these, you don’t need a Firefox account.

We have made these solutions in no particular order but recommend that as a best practice, you should restart the browser and also restart your PC before trying any other fixes.

A restart gives your computer time to reset and fix some issues on its own, and it is also a great way to make sure stubborn programs are forced to shut down.

This and other browser issues like errors due to no compatible sources can be fixed in a few steps on the Firefox browser.

How To Fix Reddit When It’s Not Loading in Chrome

In this article, we help you resolve any problems of Reddit not loading in Chrome. But before we get into it, here is what you should know about Reddit.

It is a platform that mixes a forum, social news, online content, and a social network into one massive social network. Users may add data to the platform in the form of videos, photographs, text, and links. Other registered members may vote down or upon any material on the site.

Interesting stuff climbs to the top, while dull information sinks. As a consequence, most viral phenomena and online memes originate on Reddit.

It’s fantastic because the network is a meeting point for media, trends, micro-cultures, micro-communities, and inside jokes.

Before jumping into this Chrome issue with Reddit, note that some fixes in this article may also be helpful if you have a Reddit Unauthorized Error 401.

What is the Reddit Enhancement Suite?

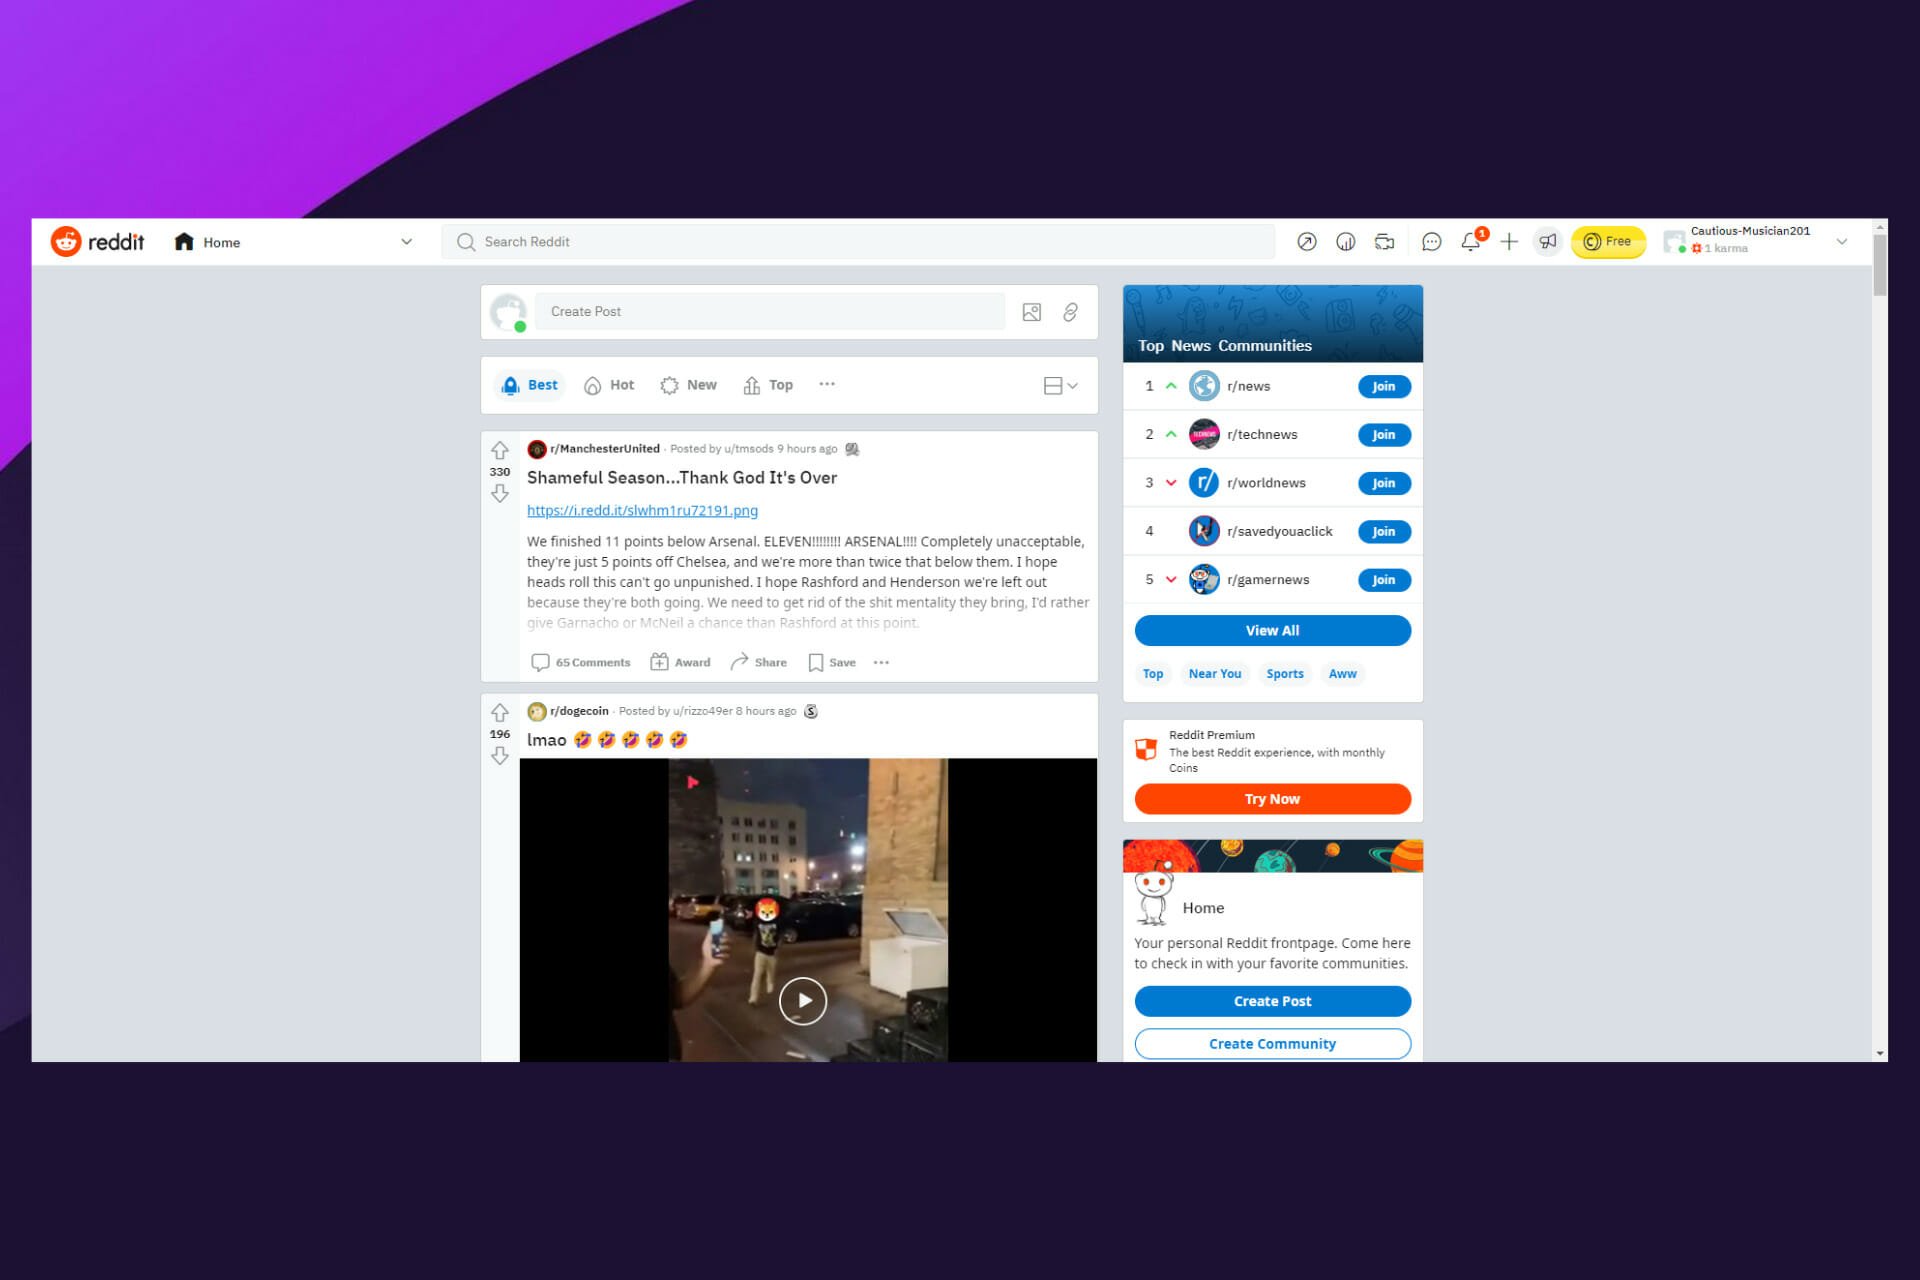
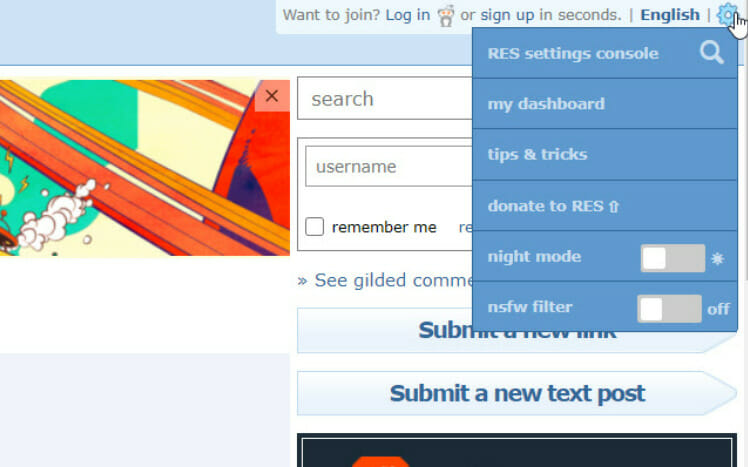
Reddit Enhancement Suite (RES) is the unofficial Reddit browser add-on created by the community. It’s a collection of modules designed to improve the experience while browsing Reddit.

Reddit not loading in chrome

Chrome, Safari, Opera One, and Firefox are all compatible with the Reddit Enhancement Suite add-on. If you believe you can do without it, consider the following characteristics, which will persuade you to install it right now.

  • It blocks NSFW information – Although Reddit includes a built-in setting that asks whether you want to see not safe for work (NSFW) material, it’s not very good at screening it out. The NSFW filter tool excels at this.
  • It shows images and videos – One of its most valuable characteristics is the ability to let you open and view videos and pictures directly on a page, rather than needing a new tab.
  • RES features essential keyboard shortcuts – For easy navigation and activities, it offers shortcuts. By default, you may downvote a post with the Z key and upvote a post with the A key.
  • Switch between accounts – If you have different accounts split between your interests, then RES quickly helps you switch in and out of them.

What can I do if Reddit is not loading?

1. Check your internet connection

This should be your first call. Reddit and other resources will not respond if you have a faulty or wrong internet connection.

You may verify this by using any other internet service or visiting other websites. If you are not able to access them, then you may just be having an internet connection issue. In this case, the Reddit app not working on wifi may have nothing to do with the Reddit service itself.

Simply restart your router or wait for service to be restored by your ISP.

2. Close and re-launch Reddit on Chrome

  1. Launch your browser.
  2. Navigate to Reddit.
    Reddit not loading in chrome
  3. Use hotkeys Fn + F5, on some computers, you just use the F5 key to refresh the page.

If Reddit’s servers are not offline, you may only need to restart your browser. Close and reopen the browser to check whether the issue is resolved. Even if you are experiencing the Reddit app not loading on Android or iPhone, closing and relaunching the app will still come in handy.

3. End and Restart Chrome

  1. Right-click on the Start menu, then select Task Manager.
  2. Click the Processes tab, then from the list of processes, right-click on Google Chrome and select End task.
  3. Relaunch the browser and navigate to Reddit.

With Google Chrome not loading Reddit ending the process will trigger a forced stop and a complete restart at launch.

4. Clear the browser cache

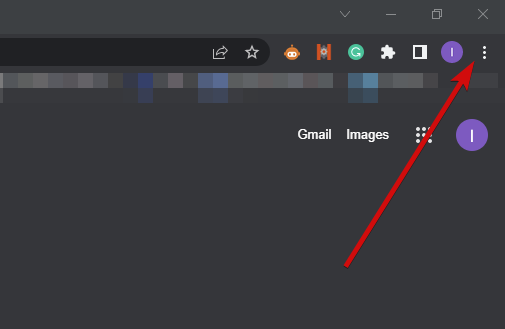
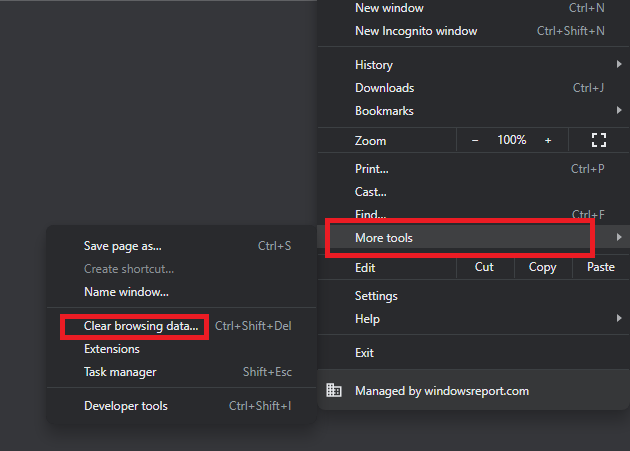
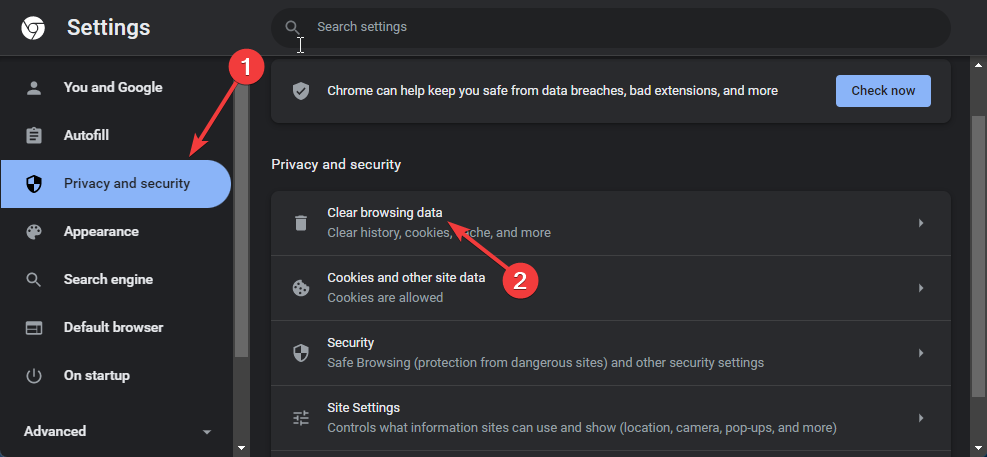
  1. Launch your browser, click on the menu, expand More tools, and select the option to Clear browsing data.
    Reddit not loading in chrome
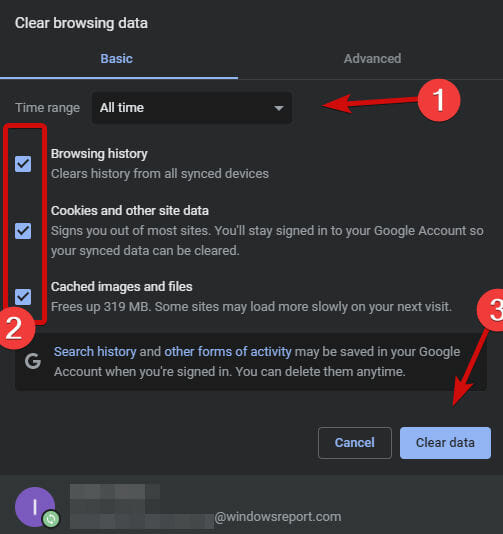
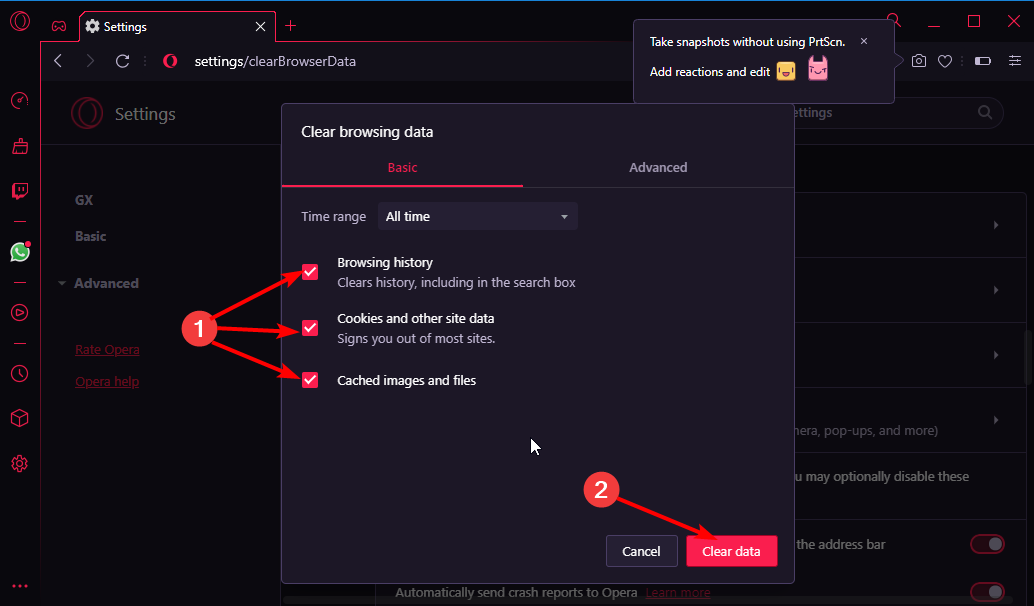
  2. Select the Basic tab, pick a Time range of your choice, and mark the checkboxes for Browsing history, Cookies and other site data, and Cached images. Then at the lower right corner, click the Clear data button.

When you visit a website, the web browser saves information like the site’s location and previous versions of forms. However, your web browser may continue to utilize outdated files even after being updated on the website.

You could continue to see outdated forms if you don’t delete your browser cache, which may create access or display issues, and may be a reason for your Reddit app not loading images. This also helps with the Reddit user agent error.

To efficiently resolve the browser cache problems, there is a cleanup software like CCleaner that performs this task and many others to optimize your PC and delete browsing data automatically.

With these simple fixes, you should be able to correct any issues stopping Reddit from loading in Chrome. While we have not written them in any particular order, we always encourage you to start by reloading the browser. This easy fix may save you the trouble of more complex solutions.

To further enhance your experience on Reddit, you should use any of the best Reddit apps for Windows 10 and 11.

If you want to take your Reddit experience to a new level, Reddit Enhancement Suite for Firefox and Chrome is the extension you must try.

We would like to hear your thoughts on which solutions worked best for you. Please leave us a comment.

Watch this super cool teaser video for the Project Volterra ARM-powered desktop PC from Microsoft

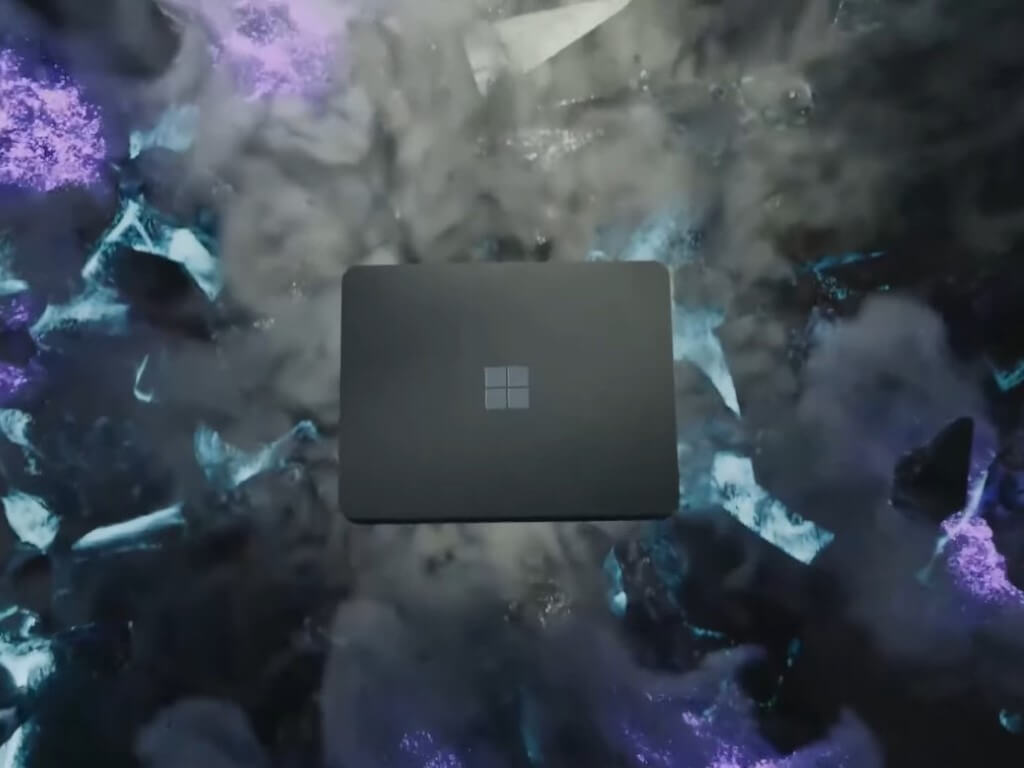
One of the things gathering attention at Build 2022 is Project Volterra. It’s a new ARM-powered PC that’s specifically made for Windows developers. Microsoft wasn’t very specific on the details of the actual hardware, but they did share a Surface-like teaser video for the upcoming device.

From the roughly minute-long teaser, we can see a couple of different things about the device. First of all, we can see that it looks a lot like the base part of a Surface Studio, but without the display mechanisms. Microsoft also shared that it is made of recycled ocean plastic, hinting that this could be an all-plastic developer device, much like the Snapdragon Developer Kit from 2021. This gives it a very Mac-mini-like compact shape, with Microsoft even showing how the device could be stackable for desktops as well as rack deployment.

Other than that, we can see the insides at one point, with Microsoft showing off a single fan, as well as the internal SoC. Microsoft even goes as far to mention the ports, though sparing technical details. We can make out a power jack, ethernet port, mini display port, as well as USB-A ports on the back. As for the sides, there look to be two USB-C ports and three additional buttons.

Again, we’re just speculating what we’re seeing based on the video. The video doesn’t represent the final hardware, as far as we know. Microsoft still promises that it will share more “at a later date.” We were involved in a Twitter thread that asked about the hardware. Microsoft’s Rich Turner tells us, and other writers, that they’ll be sharing more details later in the summer once they’re more certain about actual availability.


According to Windows Central, however, it does look as though the Surface team was involved in this design, in partnership with Qualcomm. They also believe that it will ship with a “flagship SoC.” It’s unknown at this point what this could be, as the Snapdragon 8cX Gen 3 is the latest flagship SoC from Qualcomm. But even if it is a flagship, it would be very much different in terms of performance from the entry-level 7c chip inside last year’s Snapdragon Developer Kit. This makes total sense, as Microsoft is targeting this for development on ARM with optimized apps like Visual Studio, .Net 6 and Java, Classic .Net, and even the Windows Terminal WSL / WSA.

What we also do know about is the Neural Processing Unit or NPU inside Project Volterra. The NPU is “an “accelerated runtime for the execution of deep neural networks.” This can help developers explore AI scenarios in their apps for AI- and machine learning-specific workloads without comprising performance, as well as battery life.

All that said, Project Volterra is a developer PC and isn’t targeted at consumers. It still, though, seems like an attractive PC for Windows and Surface fans, as it could shape up to be the first desktop PC from Microsoft, Surface-branded or not.

5 Best Gift Certificate Maker [Templates Included]

Who says that you need to be a designer to create professional gift certificates for your business? Think twice before agreeing to this statement.

In fact, don’t answer before taking a look at some of the best gift certificate template makers available today.

These certificates remain an inspired marketing tool for small and large companies alike when trying to reach consumers, encourage traffic to the store, increase sales, and gain credibility.

Your trust account may hold greater importance than your bank account. Moreover, with all your passion for graphics and design, you can’t go wrong with any of the below gift certificate template software tools.

What should I look for in a gift certificate template app?

If you are an experienced graphics designer, you already know how to create a gift certificate by using a dedicated professional tool.

But if you’re new to graphics and you just started your business, some of the tools on our list below will help you a lot.

That’s because most of them include lots of templates for many marketing artworks that not only will inspire but also help you get the job done in only a few minutes.

So, here’s our selection of the best gift certificate maker tools

What’s the best gift certificate template software to get?

Adobe Photoshop – Best software for professionals

No graphic editing experience is needed when choosing Adobe Photoshop. After all, this is the most popular imaging and graphics software of the moment for a good reason.

All of us know that a good desktop image editor is one that not only comes with professional templates but also offers almost endless creative possibilities.

There’s no reason to doubt that Photoshop can’t outshine the competition in terms of gift certificate creation. Before going any further, we shall state a few of the Photoshop characteristics that you should consider.

Well, keep in mind that the software enables you to edit graphics and texts across desktop and iPad with ease. Moreover, it allows you to refine your work and play with colors and effects.

Refer to these key features for further details:

  • Improved Content-Aware Fill to fill multiple areas of an image without leaving the window
  • Incredible Warp tool to add control points and divide images with a customizable grid
  • Impressive gradients, swatches, layers, patterns, and styles to choose from
  • Lens Blur feature for a more natural look when blurring objects
  • Exciting features are rolled out regularly

Adobe Photoshop

Pick this professional photo editor to design eye-catching gift certificates that will generate applause.
Check price Visit website

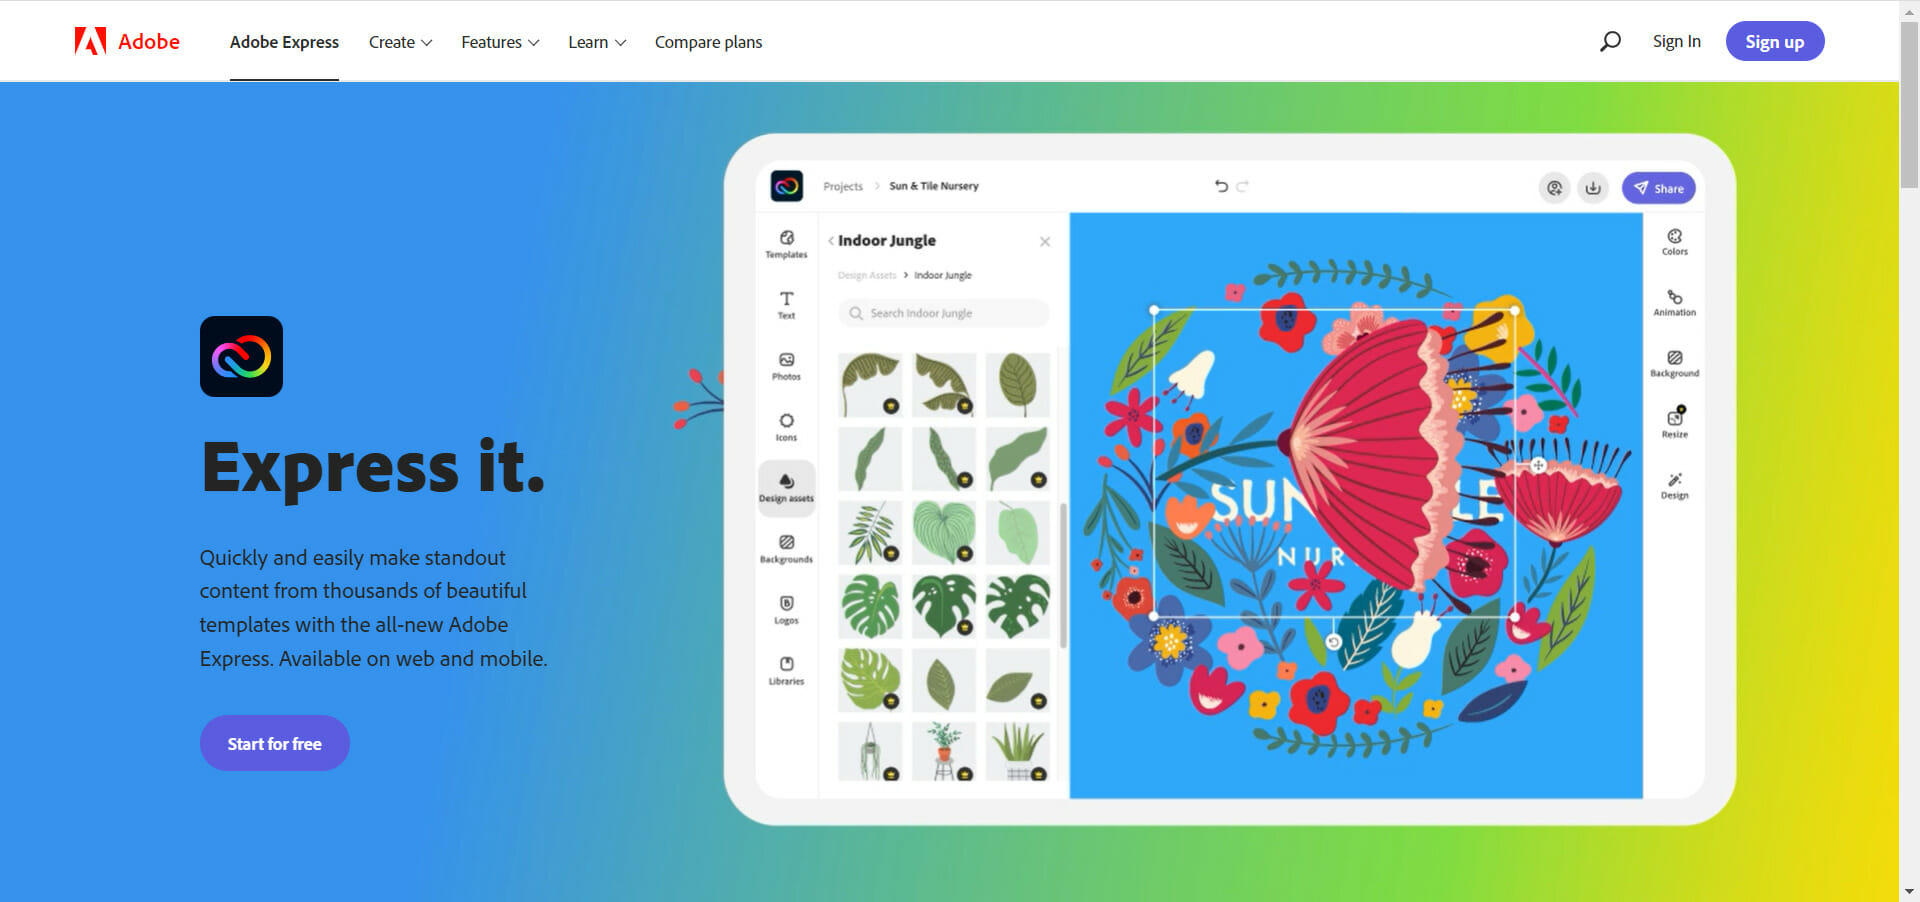
Adobe Creative Cloud Express – Great integration tool

Adobe Creative Cloud Express is a powerful free design tool you should also take into consideration. Unlike Photoshop and Canva, it does not have an extensive set of features.

However, a decent amount of design customization options is part of the package.

This will most likely sound like music to your ears, especially if don’t have professional experience and feel less comfortable using high-tech tools.

Another great fact about this software is that it comes from Adobe. Therefore, you know from the start that it has great customer support.

Refer to these key features for further details:

  • A generous selection of printable gift certificates to choose from
  • A broad set of lettering choices to express the very essence of your business
  • Simple and straight-forward team management features
  • Various support videos to teach you the basics of this software

Adobe Creative Cloud Express

Go beyond your creative limits and use amazing graphics to make both professional and expressive certificates.
Check price Visit website

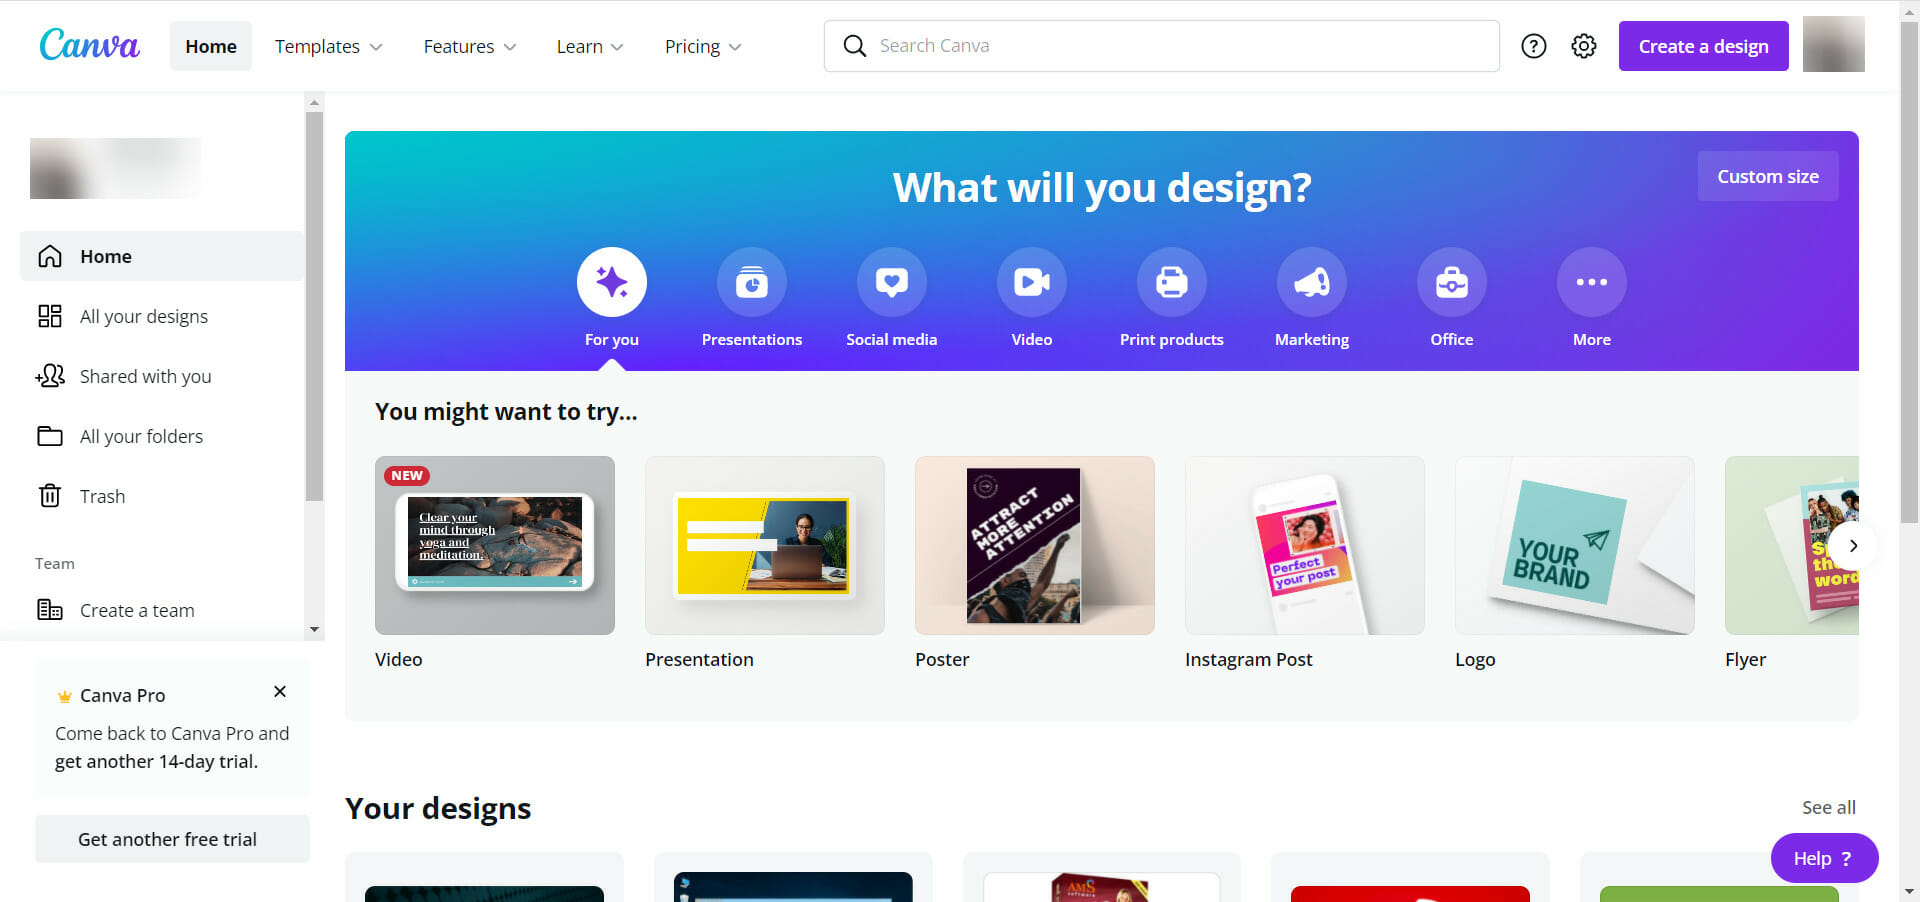
Canva – Best online gift certificate maker

You need to know from the start that Canva has a seemingly endless collection of templates and layouts. However, don’t look at this in the wrong way.

If you fear seeing the same graphics over and over, keep in mind that this tool provides you the complete liberty of expressing yourself.

With impressive illustrations, stock images, vectors, and icons at your disposal, not to mention Canva’s efficient design editor, you may literally accomplish graphics in minutes.

Refer to these key features for further details:

  • Numerous design types for social media posts, letters, presentations, and more
  • Professional layouts to select for all your future projects
  • An impressive selection of fonts
  • Thousands of elements for your designs at your disposal (you may also upload your own)

Canva

Using Canva to create business papers or documents is the right choice for making inventive gifts.
Check price Visit website

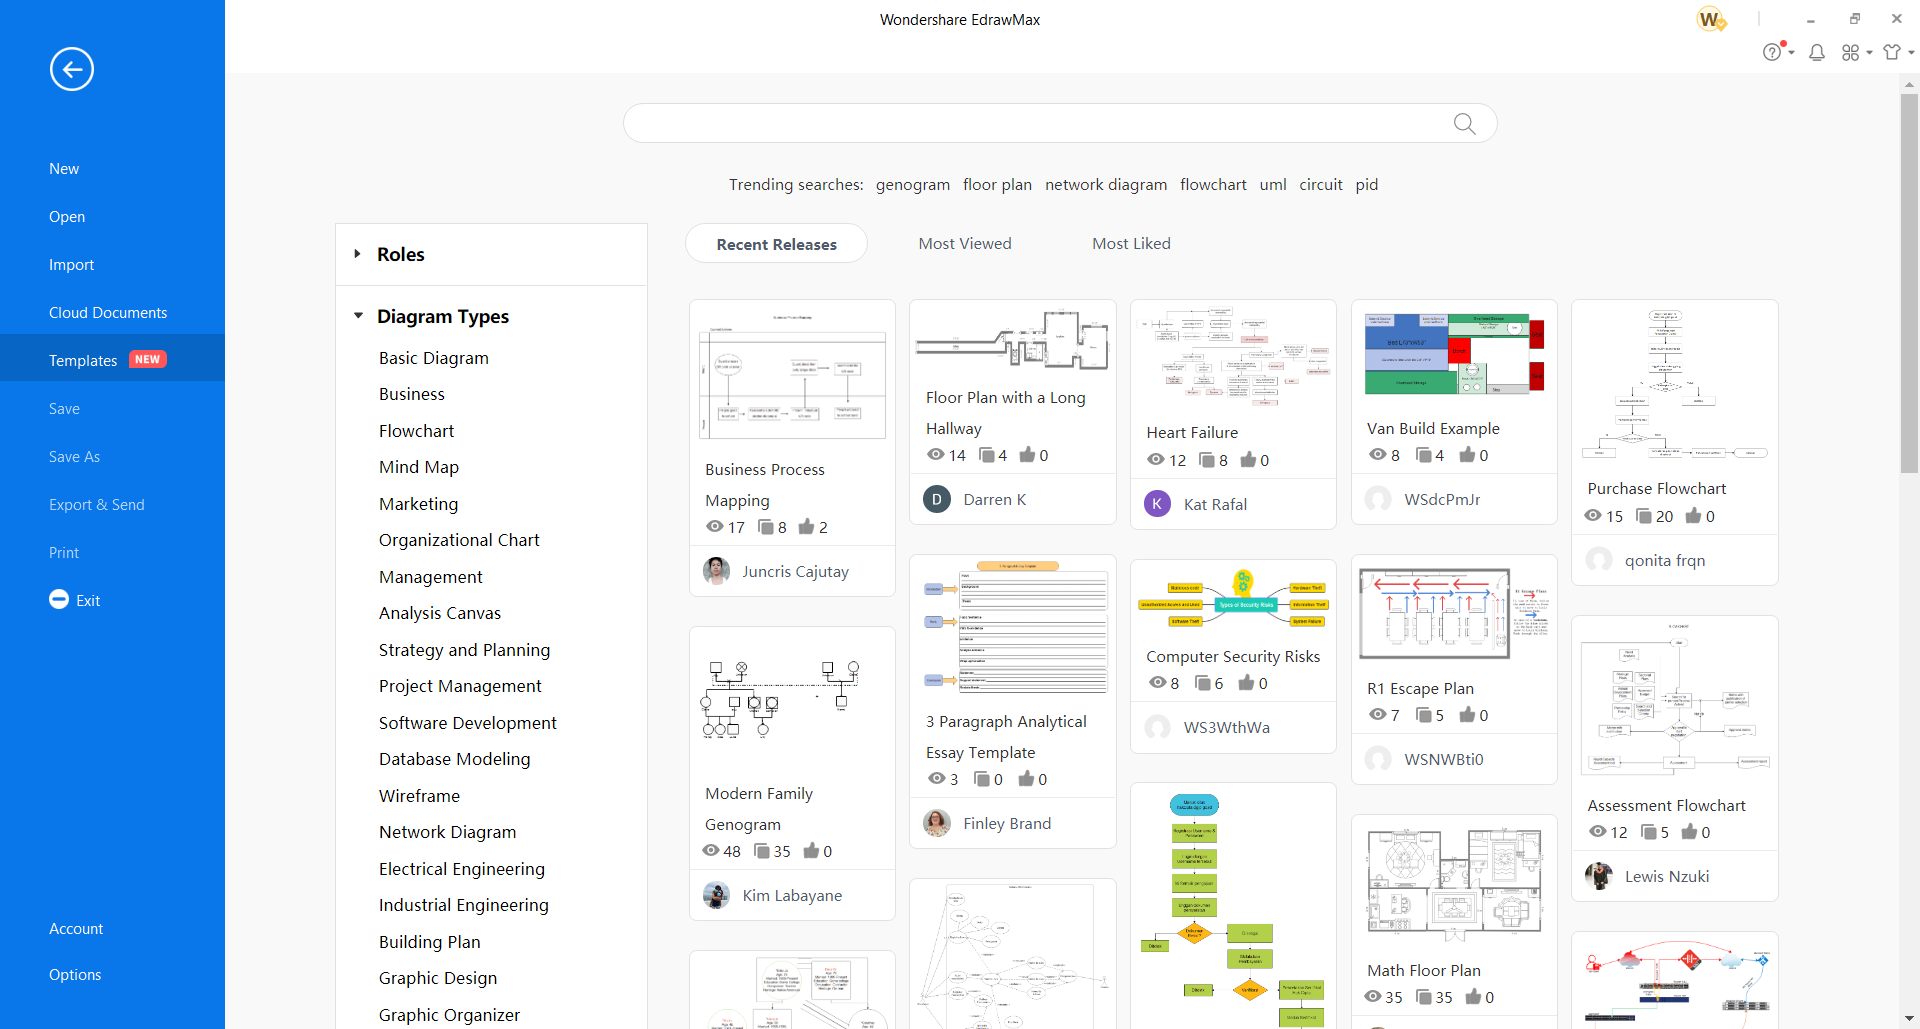
Edraw Max – Friendly and comprehensive interface

If you want to feel like an already professional designer without spending a fortune on high-tech software to create relevant content, then Edraw Max is an inspired choice.

This program promises more than a few gift certificate templates. Chances are you’ll find it appealing that they are customizable, while the intuitive interface resembles the Microsoft Office interface.

On top of that, this software makes it incredibly easy to create more than 280 sorts of diagrams, from the technical diagrams that we all know so well to the impressive infographics that would amaze your audience.

Refer to these key features for further details:

  • Comprehensive gallery, with thousands of our professionally designed templates
  • Editing tools to insert graphics, change the font, re-edit texts, and more
  • High-quality vector graphics to decorate your gift certificates
  • Export formats include Word, PDF, PPT, JPG, Html, SVG, and more

EdrawMax

This multi-area software can provide free support for anyone who needs impressive certificates to offer.
Check price Visit website

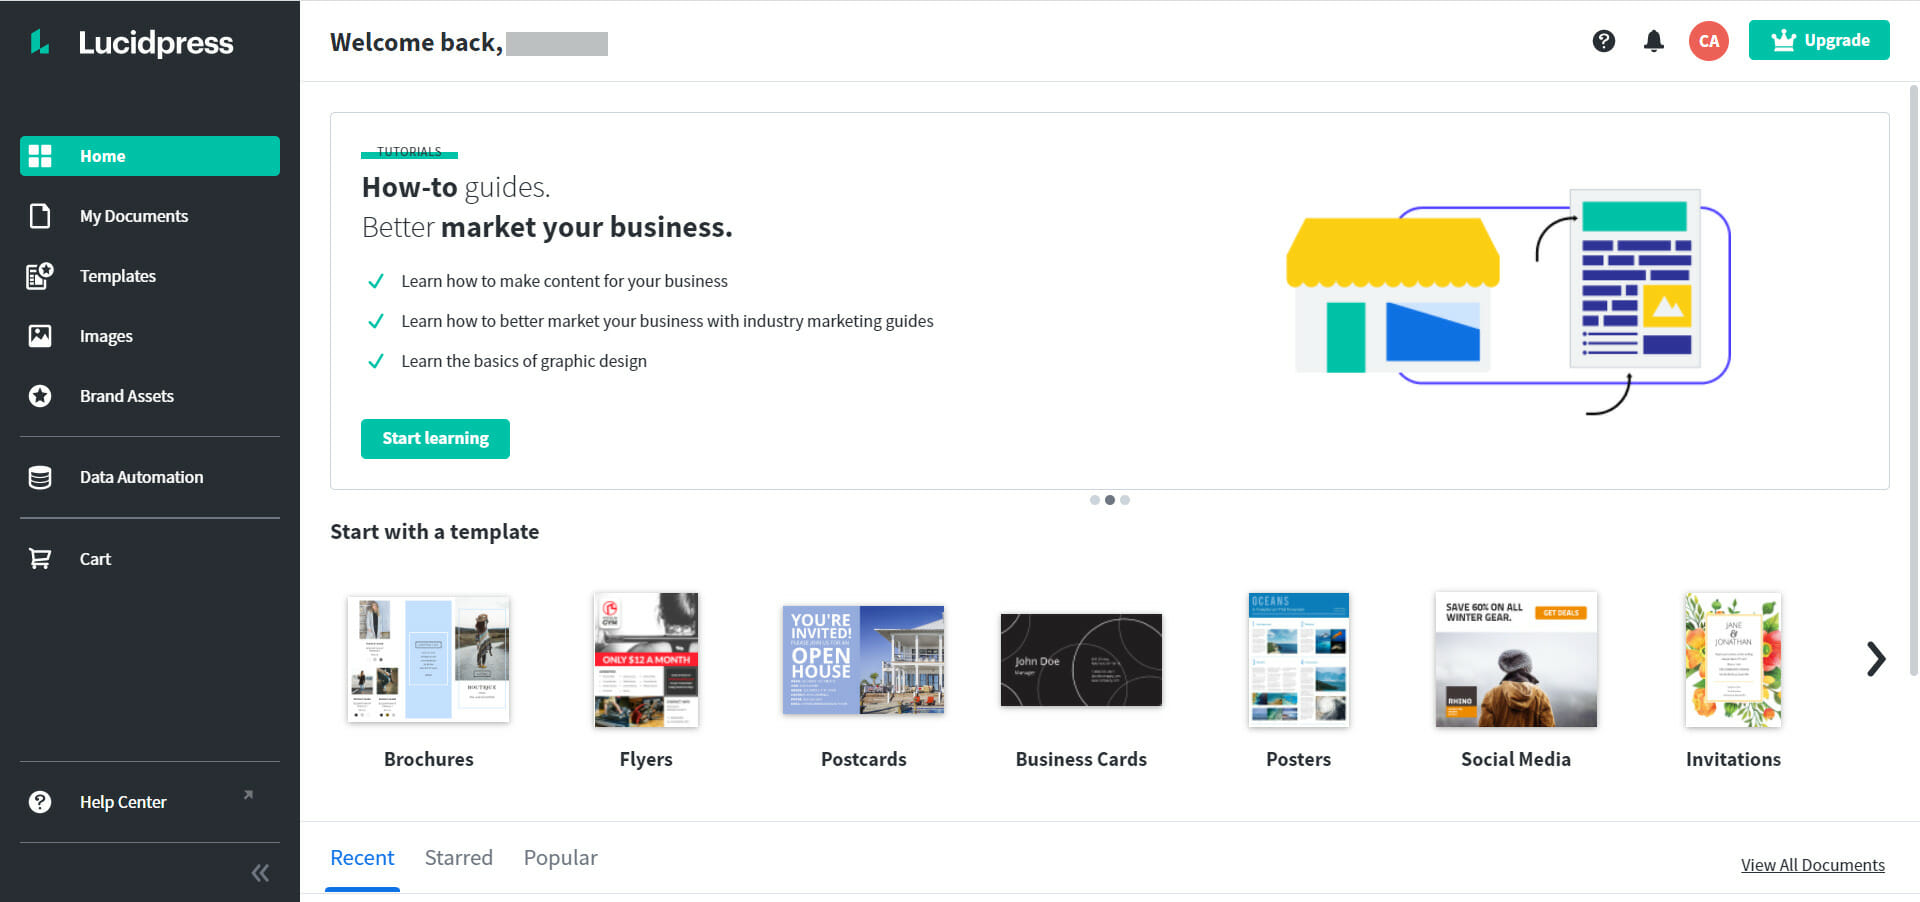
Lucidpress – Ideal for desktop publishing

Lucidpress is an interesting web-based desktop publishing software application designed by Lucid Software.

You’ll most likely appreciate the custom-made gift certificates from Lucidpress. To be more precise, different stylish templates and an extremely intuitive editor are available from the program.

Then, delivering a gift certificate couldn’t get any easier. You may share via email in an instant or post it on social with only a few clicks.

You also have the option to do it the old-fashioned way and download your gift certificate as a high-quality PDF, JPG, or PNG.

Refer to these key features for further details:

  • Very friendly and simple user interface
  • Numerous customizable templates to help you shape most of your dreams
  • Useful drag-and-drop editor
  • Intuitive keyboard shortcuts to save you precious time

⇒ Get Lucidpress

With these options available for gift certificate making, you’re sure to find a good fit with your company’s goals. You don’t need to settle for one choice only.

No one is stopping you from giving a try to two or even more programs to find the one that returns the desired results.

So, we can only invite you to take a closer look at our list including the best logo design software.

Let us know if you’ve found your top certificate template software in the comments section below.

How to Properly Set Up your Chrome Storage Sync

Chrome Storage is one of those power features that make this staple browser so appealing for many. Now, local storage is supported by most modern browsers, it’s Chrome Storage Sync that takes it up a notch.

And what better way to make the most of these capabilities than by using APIs?

Here’s the twist, the Chrome Storage API works better and faster. On the one hand, it allows users to store data as objects (as opposed to the localStorage API that operates only with strings).

Furthermore, it’s asynchronous, which enhances speed and responsiveness. Then there is also Chrome Storage Sync. This API enables synchronization between devices running the same app.

Here’s the big question: Does Chrome sync local storage? Storage.sync allows users to seamlessly access, store, and share data across devices under the following conditions:

  • The user has to be logged in to the Chrome browser via a Google account
  • Chrome must be online (connected to the Internet)
  • The sync feature needs to be enabled

Should Chrome be offline for whatever reason, the data will be stored locally and synced later on when the browser is online.

The same goes for disabling the Chrome Storage Sync feature. Should you choose to deactivate it, the API will simply act as a localStorage API.

As you can see, the Chrome Storage API is ideal for storing, retrieving, and tracking changes to user data. However, setting it up properly is essential and so is knowing how and when to remove the stored data.

How do I set and use local storage data in Chrome?

As always, the syntax is key. So here’s how to deal with the different keys, values, and arguments in Chrome Storage:

  • localStorage. getItem() – This is used to check if a specific value is listed in the local storage. You can use it to read or retrieve specific items from localStorage.
  • localStorage.setItem() – This is used to add items (such as keys or values) or simply to save data to Local Storage.
  • localStorage.removeItem() : The command removes a specific item (key) from local Storage.
  • localStorage.clear() – This command removes or clears all the items for this domain.
Tip icon Tip
➡ Chrome provides chrome.storage.local.remove to help you identify the keys you want to remove, and chrome.storage.local.clear to allow you to remove all data from the local storage.
➡ However, items from the Sync Storage area are synced via the Chrome Sync feature.
➡ If joggling with all the different APIs seems a bit overwhelming, you can always switch to Opera One.

You don’t have to worry about syncing issues as Opera One allows you to easily export bookmarks from Chrome along with other preferences and settings so that you can enjoy browsing without skipping a beat.

What is the difference between chrome.storage.sync and chrome.storage.local?

  • Chrome.storage.sync operates asynchronously, making the app more responsive and faster than the Chrome.storage.local API.
  • In Chrome.storage.sync, data is automatically synced, and you can access it on any other device. As for Chrome.storage.local, the information is stored locally on the machine where the browser is installed.
  • Chrome.storage.local stores data in strings, which makes it more difficult to manage the keys. On the other hand, Chrome.Storage.Sync operates with objetcs.
  • Finally, Chrome Storage Sync allows preserving extension settings even when using incognito mode.

In conclusion, Chrome storage sync enables files on any local storage device to be synced. Thus, you can easily store, share, and access files across storage systems and the cloud.

What is the difference between local storage and cookies/cache?

ItemUseSizeSecurity
Storage vs Cookies➡ Cookies convey data to the server through HTTP requests.
➡ Local storage is intended for the client reading only.
➡ The latter will confine data at the browser level without it reaching the server.
➡ Clearly, localStorage provides a much larger capacity than cookies.
➡ In fact, the max size of a cookie is around 4 KB.
➡ This makes local storage more suitable for storing any data that you would later want to have in your browser.
➡ Cookies are generally perceived as a safer alternative.
➡ However, vulnerabilities exist on both sides.
➡ They are both prone to XSS attacks, for instance.
Storage vs Cache➡ The cache is a temporary backup of in-use data (accelerate access for URLs).
➡ Storage is a long-term retention solution.
➡ It does not expire and it only disappears if you clear the cache.
➡ Cache operates with bytes, while local storage deals with blocks of data.
➡ This is relevant in order to determine the actual storage capacity.
➡ Cache is mostly used for small amounts of data as opposed to local storage.
➡ Just like local storage, the cache can be hacked through malicious scripts that steal your data.
➡ LocalStorage allows you to set additional encryption methods.
➡ However, we suggest you avoid storing confidential or sensitive information.

How do I manage my Chrome Storage?

1. Clear browsing data

  1. Open Chrome on your computer.
  2. Click on the vertical three dots at the top-right corner to reveal More.
  3. Next, click More tools and select Clear browsing data.
  4. In the basic tab (the default one), choose a Time range. 
  5. Select the types of information you want to remove (Browsing history, Cookies and other site data, respectively Cached images and files). 
  6. Click Clear data.

Chrome Storage Sync set is not that difficult to manage. However, you might want to clear your browser storage space every now and then. This is one way to do it.

You can also use the CTRL + Shift + Delete shortcut on your keyboard to perform the action quicker.

Alternatively, you can download CCleaner and with a single push of a button you can wipe clean all the piled files that occupy space, eat up memory and slow down your navigation.

2. Clear storage data

  1. Open Chrome on your computer.
  2. Click on the vertical three dots at the top-right corner to reveal More.
  3. Select Settings from the list of options. 
  4. In the left pane, select Privacy and security. 
  5. Now, choose Site Settings from the list.
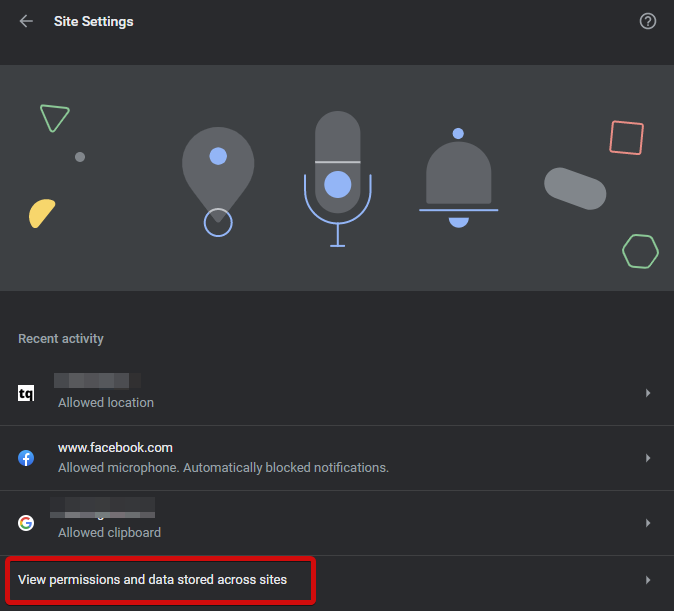
  6. Open the View permissions and data stored across sites section.
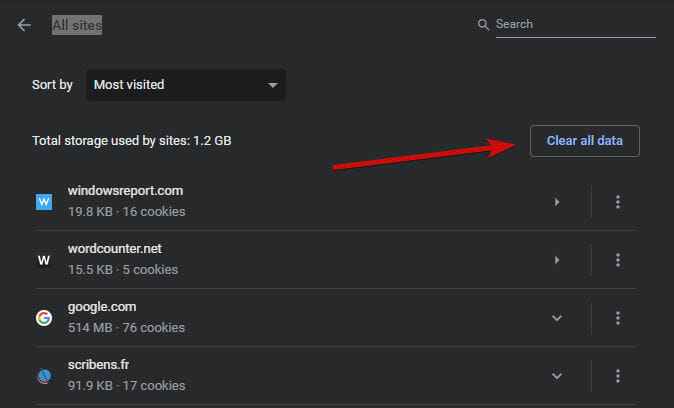
  7. Press the Clear all data button. 
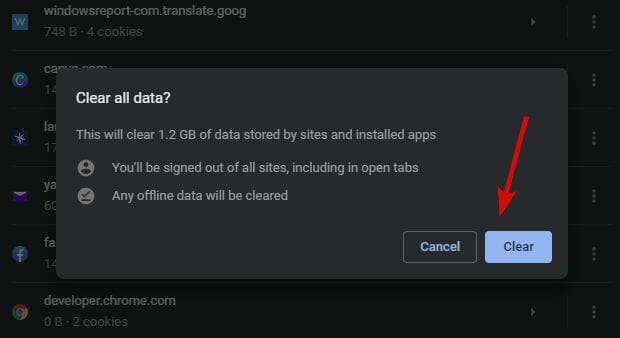
  8. In the new window, click on the Clear button once again to confirm the action.

Optionally, you can free up your browser storage by also tweaking your cookie permissions.

  1. Repeat steps 1-4 as described above.
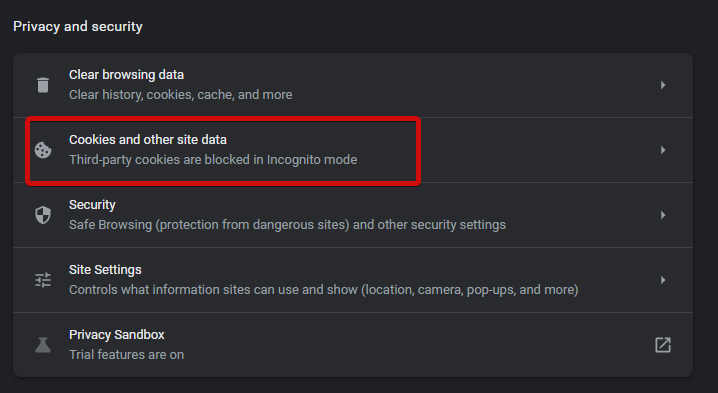
  2. Instead of Site Settings, select Cookies and other site data.
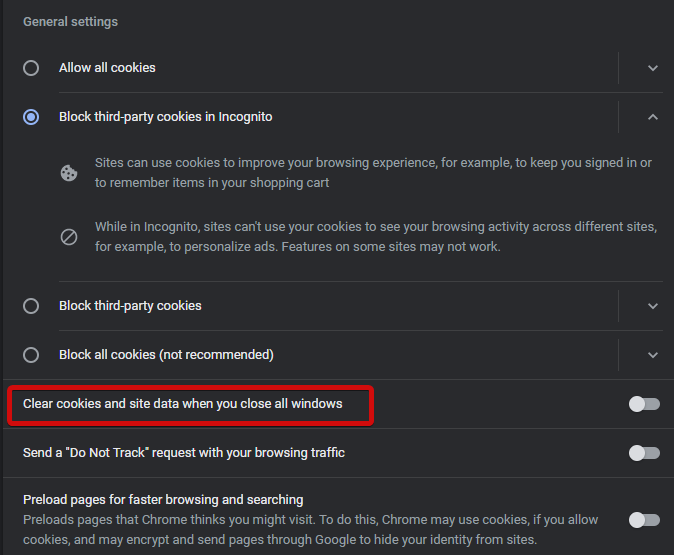
  3. Toggle the switch next to Clear cookies and site data when you close all windows to On.
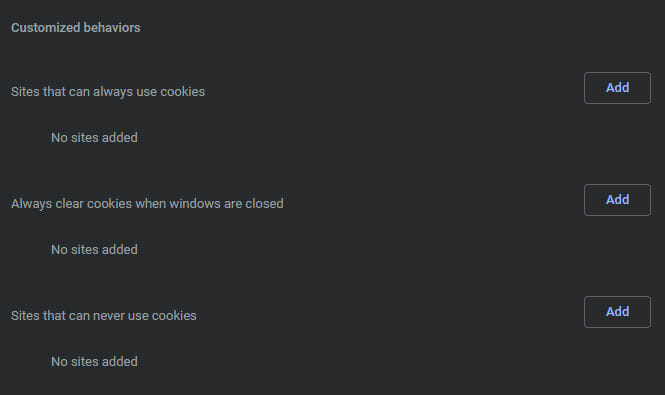
  4. Alternatively, you can define individual settings and customized behaviors for Sites that always use cookies, Always clear cookies when windows are closed for specific sites, and Sites that can never use cookies.

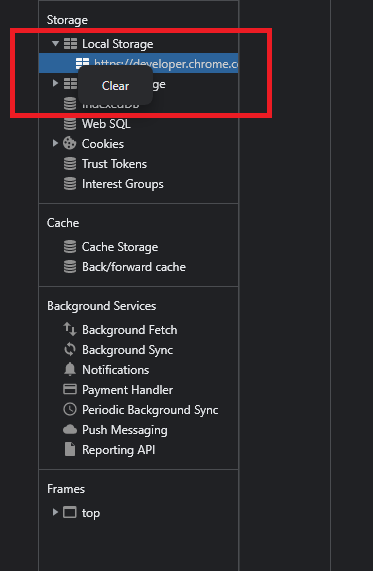
3. Clear local storage

  1. Open the extension’s background page.
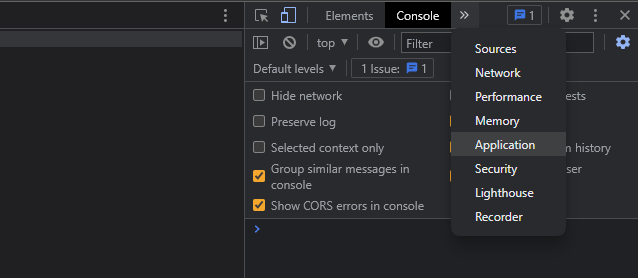
  2. Next, open Chrome’s menu and select More tools, then Developer Tools.
  3. Select the Application tab from the menu. 
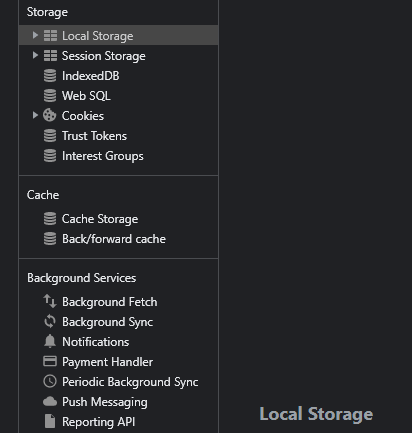
  4. Next, expand the Local Storage section in the right pane.
  5. Right-click your site(s), then click Clear to delete the local storage. 

This is how you open localStorage in Chrome and also how you can clear localStorage after some time. Now you might also be wondering about the storage path.

Where is local storage stored Chrome? Google Chrome stores web data in your user profile.

The location on Windows can usually be found by following this path: AppData\Local\Google\Chrome\User Data\Default\Local Storage

What can I do if the Chrome.storage.sync.set is not working?

Chrome.storage.sync.set not working issues are more common than you think.

Thus, you might experience problems with Chrome.storage.sync.set not saving values or not returning them directly, getting out of sync, and so on.

Depending on the specific situation, here are a few useful tips for you to try:

  • Make sure you declared the storage permission in the extension manifest in order to be able to use the storage API.
  • Use the callback method to get notified when the asynchronous function is completed. Also, you can use the Promise API to solve the asynchronous issue. 
  • When values do not save in chrome.storage.sync.set, you might be using the wrong method to set them. Try using a variable key instead. 
  • You can re-run your account and try setting values with the same codes you used in the sync.set.
  • Remember that you cannot select multiple values in chrome.storage.sync.set. Instead, set a single one with subsequent statements.
  • Use clear() and removeItem() to empty the entire local storage object for the domain you are on.
  • If Chrome is facing sync errors, perform Reset sync in order to force Chrome to sync.
  • Grant storage permission to Chrome via Windows Settings, and Apps. Select Chrome, then choose Permissions and allow Chrome to access storage.

This is our take on how to properly set your Chrome Storage Sync and respectively, address Chrome.storage.sync.set not working instances. Feel free to try them out and see what works best for you.

What is PPTP VPN and How to Set It Up in Windows 10/11

PPTP is the oldest protocol implemented by Microsoft (in 1995). And most platforms have native support for PPTP, including Windows, Mac, Android, and iOS.

As such, you might be interested in setting up a VPN connection over PPTP on Windows 10 or other operating systems.

What is PPTP VPN?

PPTP VPN is a virtual private network client that uses the Point-to-Point Tunneling Protocol to connect to the VPN server.

It uses port 1723 over TCP and GRE (IP protocol 47). That means you have to open firewall ports to allow PPTP traffic from and to your PC.

Pros
Most devices have native support for PPTP, including routers
Speedy and stable connections, ideal for streaming
A perfect fit for older computers with weak hardware
Cons
An obsolete VPN protocol due to low security
Can be easily blocked by firewalls
Not suitable for business use

Why use PPTP VPN?

A company’s network administrator could set up a VPN server over PPTP to allow employees to remotely connect to the office and use the intranet resources, including files and printers.

It’s also possible to set up a VPN with Remote Desktop to remotely access a personal computer that’s in another network.

Or, you can simply connect to a VPN on your laptop through PPTP to enhance your online privacy and security.

Whatever your reasons are, you need to set up a VPN at home through the PPTP protocol.

The best part about it is that you don’t have to install any software since you can configure the Windows 10 VPN settings.

How do I use PPTP VPN on Windows 10?

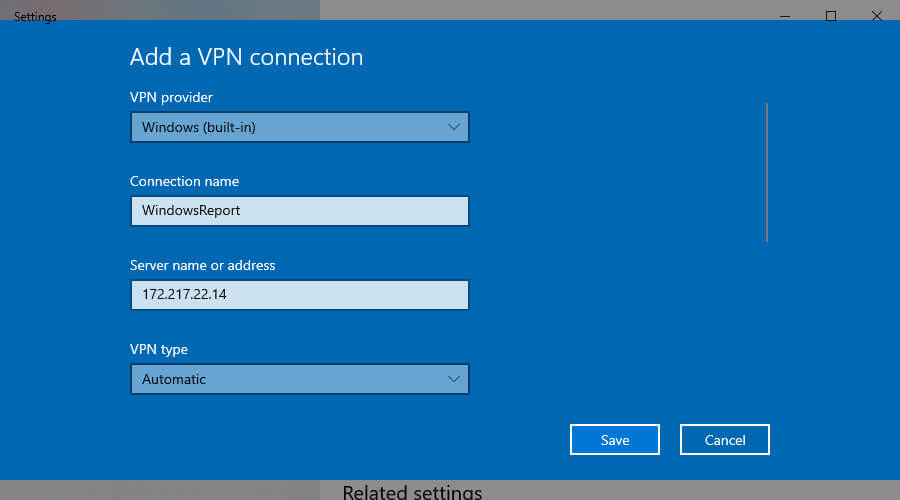
1. Create a PPTP VPN connection

add a VPN connection in Windows 10
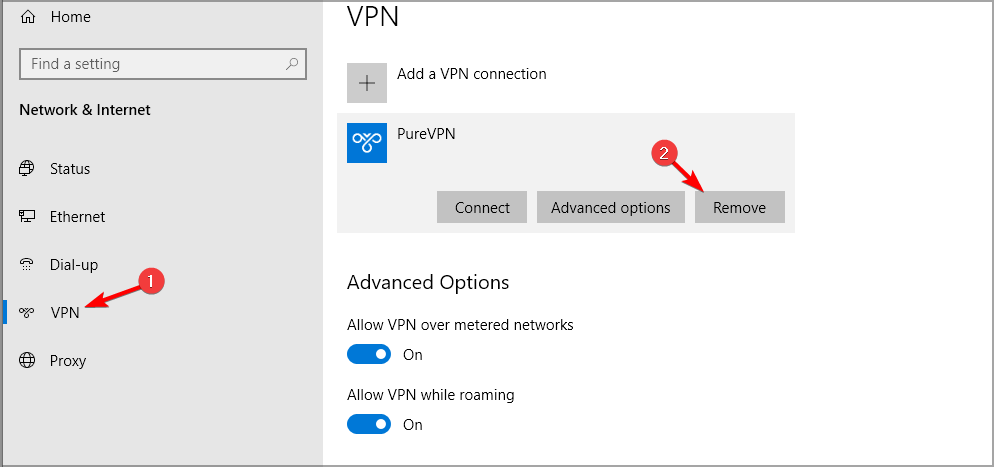
  1. Right-click the Start button and go to Network Connections.
  2. Select VPN.
  3. Click Add a VPN connection.
  4. Set VPN provider to Windows (built-in).
  5. At Connection name, type a display name.
  6. Set Server name or address, write the VPN server.
  7. At VPN type, select Point to Point Tunneling Protocol (PPTP).
  8. Set Type of sign-in info to User name and password*.
  9. Write your VPN credentials at User name (optional) and Password (optional).
  10. Check Remember my sign-in info.
  11. Click Save.

*You can also set up a PPTP VPN connection on Windows 10 using a smart card, one-time password, or certificate authentication. However, the username-and-password combination is more common.

If you wish to use the VPN as soon as your PC gets online at startup, you can make Windows 10 auto-connect to VPN.

But if you want to be thorough about it and make sure your IP address doesn’t get leaked in the time it takes you to input your PIN or login credentials, you can make Windows 10 connect to VPN before logon.

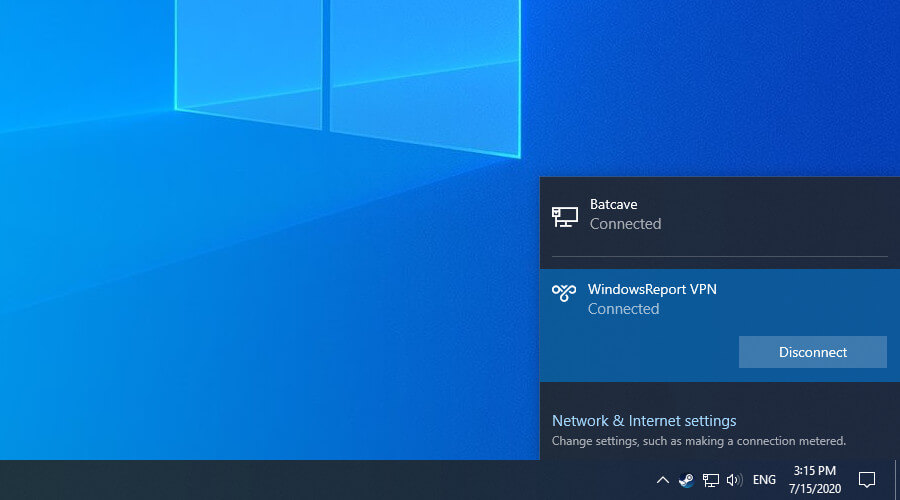
2. Connect to the PPTP VPN

Windows 10 is connected to VPN
  1. Click the network icon in the systray.
  2. Select your PPTP VPN connection.
  3. Click Connect.
  4. Ask Google what’s your IP address to see if it changed.

As you can see, connecting to the PPTP VPN is as easy as joining a Wi-Fi network. However, if the PPTP VPN is not connecting on Windows 10, make sure to fix this problem.

For example, if your VPN connection gets blocked by Windows Firewall, you need to configure advanced firewall settings and enable a rule for PPTP.

To remotely access a PC on another network through the Internet by setting up a PPTP VPN with Remote Desktop, you need a router that supports PPTP connections.

But if you want to protect your online privacy and security, we suggest using a more secure VPN protocol like OpenVPN or WireGuard. These protocols are supported by Private Internet Access.

Why use a third-party VPN?

Private Internet Access is a VPN service that delivers premium security features for your entire household. It supports not only PPTP but also modern protocols like OpenVPN or WireGuard.

Additionally, the VPN service supports exclusive DNS servers, 10 simultaneous connections, port forwarding, a kill switch, and split-tunneling mode.

You can also install it at the router level to share your VPN connection with all nearby devices.

What else you should know about PIA:

  • +3,300 VPN servers in 48 countries
  • Optimized for streaming and torrenting
  • No logs
  • 24/7 live chat support
  • 30-days money-back guarantee (no free trial)

Private Internet Access

Enjoy secure browsing, anonymous torrenting, lag-free gaming, and unlimited streaming by using PIA.
Check price Visit website

Does Windows 11 support VPN?

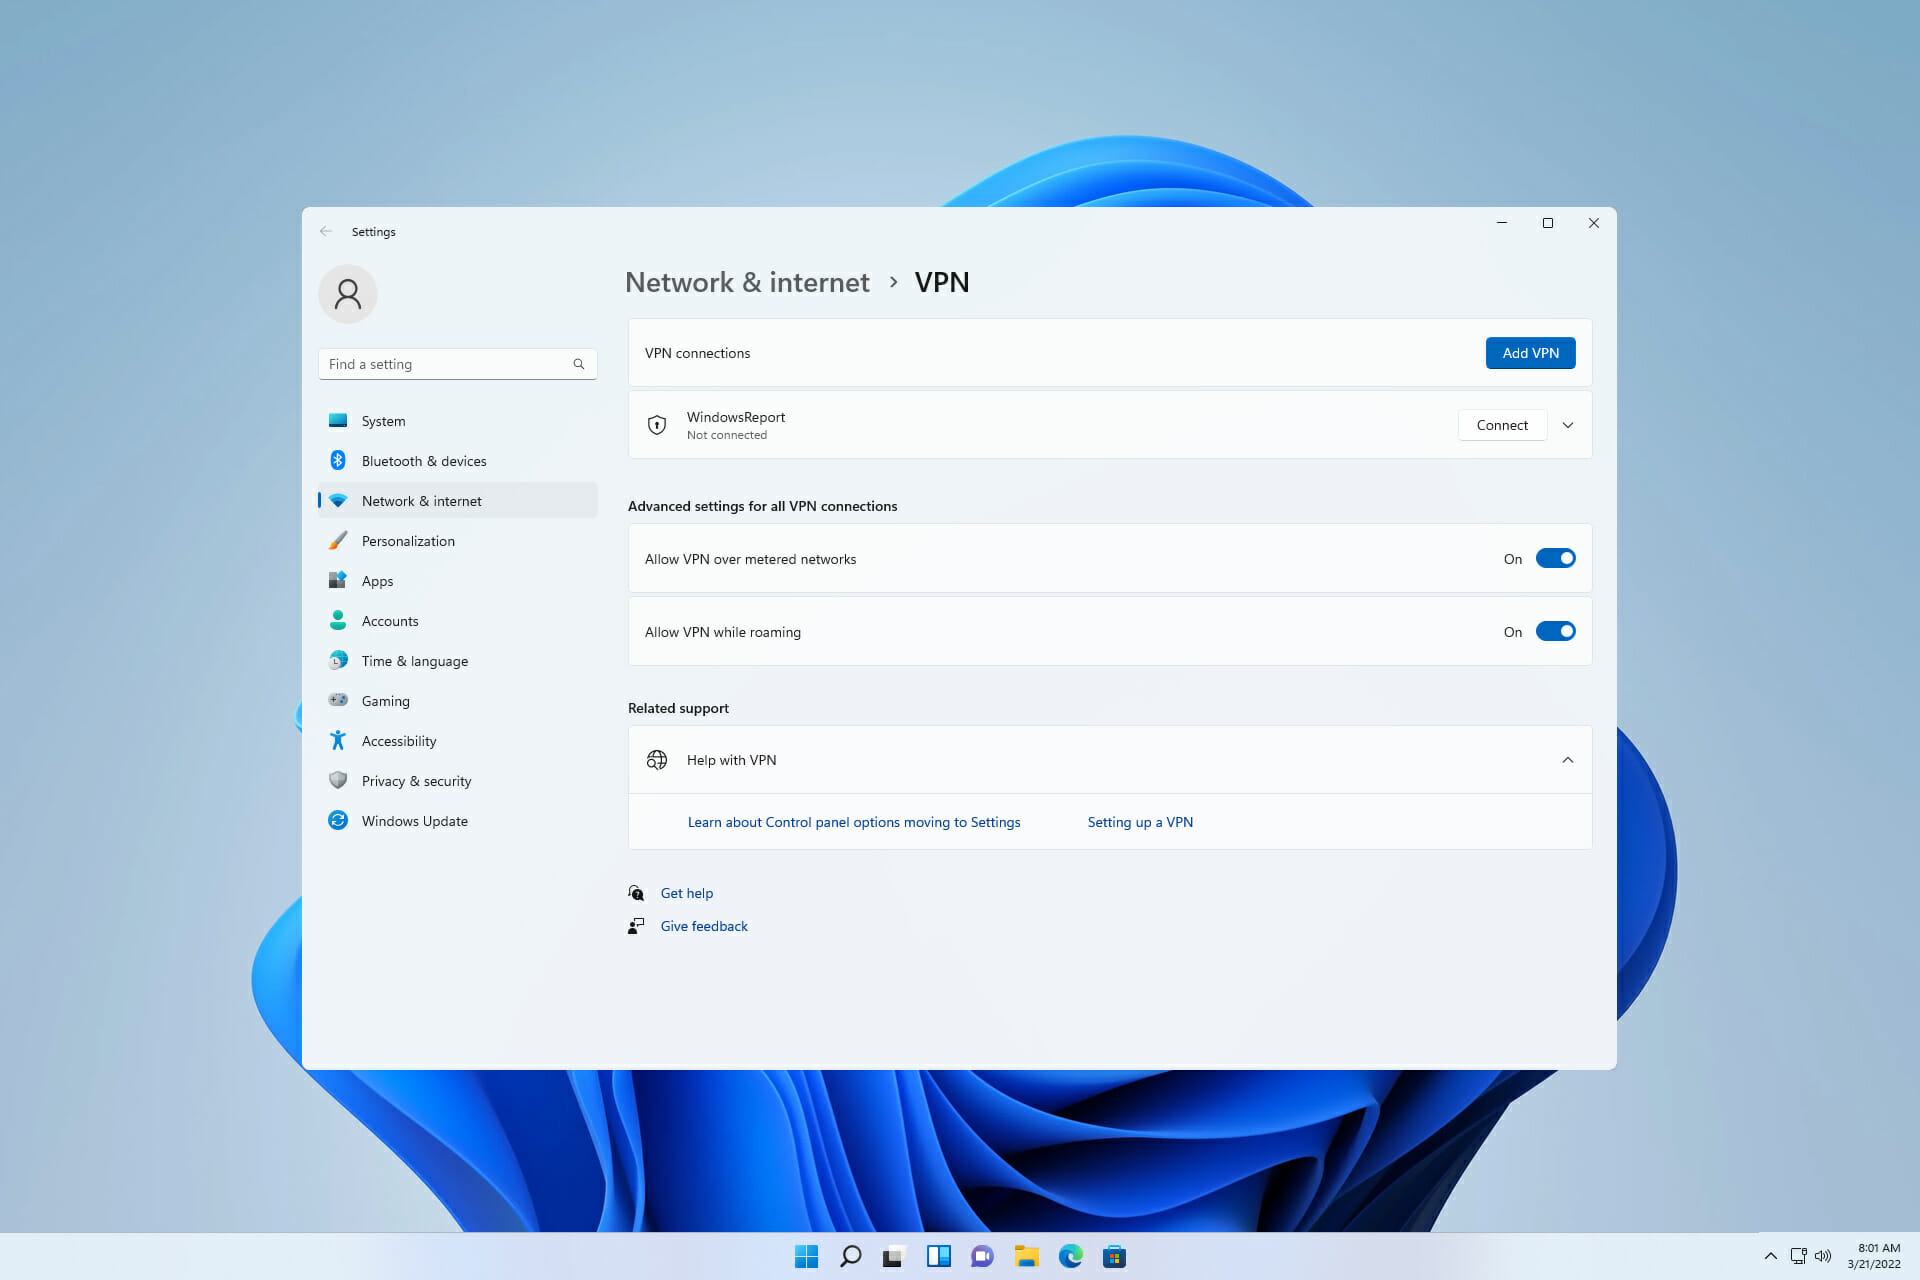
Just like Windows 10, Windows 11 has a pre-installed VPN feature. You can easily activate it from the Settings panel, with just a few clicks.

How do I set up a VPN in Windows 11?

To connect to a VPN in Windows 11, you must first create a VPN profile:

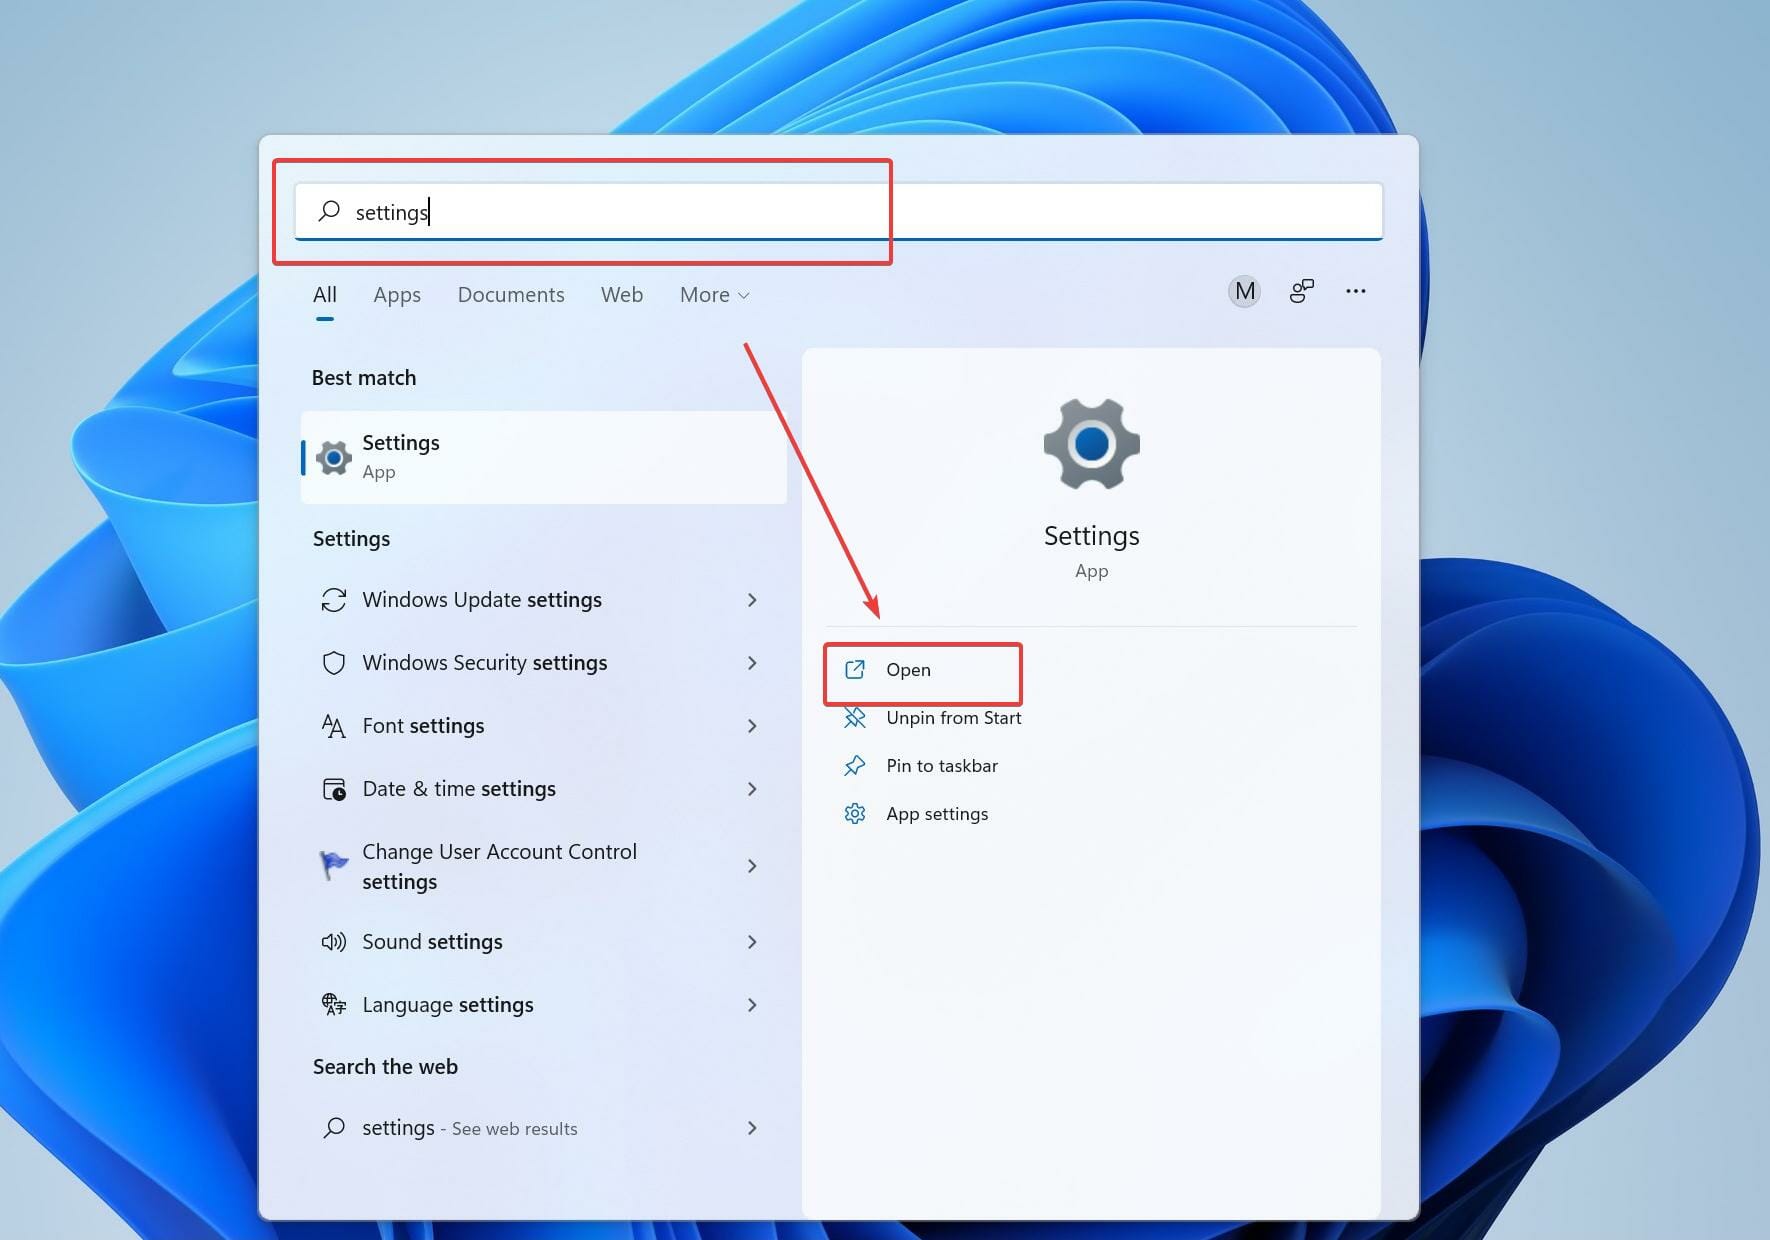
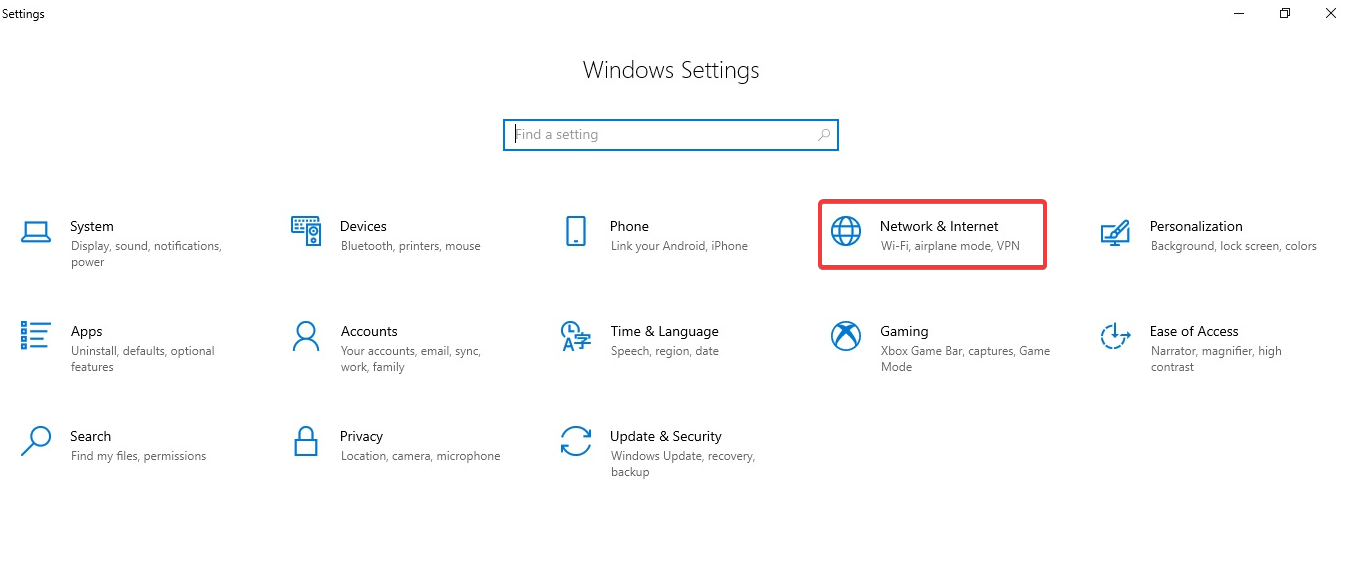
  1. Type settings in the taskbar and open the Settings Panel.
  2. Select Network & Internet, and then VPN>Add VPN.ppt vpn
  3. Choose Windows (built-in) and enter a connection name of your choice.
  4. Choose the type of protocol (in this case, PPTP). Add a username and a password (optional) and hit Save.pptp vpn windows 11 10

How do I enable PPTP VPN on Windows 11?

Now, to connect to your VPN:

  1. Open the Settings panel again and select Network and Internet.
  2. Head to VPN and select Connect.
  3. Enter your credentials.

We must also mention that most reputable VPN services already released dedicated apps that are compatible with Windows 11.

Windows 11 does also support a proxy server. It’s just as easy to set up, but a VPN may be better when it comes to privacy. A proxy only masks your IP and browsing data for one app and lacks encryption.

Conclusion

To summarize, you can effortlessly set up a PPTP VPN connection using the Windows 10 built-in VPN provider, without having to install any additional software.

It’s a great way to remotely connect to the workplace, gain access to your company’s internal resources, and access files through the VPN.

However, if you want to get a VPN to increase your privacy on the Internet, we strongly discourage using the PPTP protocol because it’s terrible at security and can be easily hacked.

Instead, use a modern VPN protocol like OpenVPN or WireGuard. They are supported by Private Internet Access.

Windows 10 Build 19044.1739 (Release Channel): All you need to know

Still haven’t upgraded to the latest Microsoft-designed operating system? Not really a problem, considering that Windows 10 will still be supported until 2025, and probably some time after as well.

Now, Insiders that use Windows 10 21H2 have just received a brand new cumulative update today, full of further attempts at fixes for apps closing unexpectedly when dependent on d3d9.dll with certain graphics cards.

This latest software also contains unrelated fixes that prevented Microsoft Excel and Outlook apps from opening.

KB5014023 brings a long list of fixes

The new build 19044.1739 (21H2), which is KB5014023, tests if certain non-security fixes can make it through to the next Patch Tuesday, it is available now through the Release Preview Channel.

Among everything else, Microsoft also introduced a new sorting version 6.4.3, which addresses the sorting issue that affects Japanese half-width katakana.

Fixes

  • Prevented users from bypassing forced enrollment by disconnecting from the internet when they sign into Azure Active Directory (AAD).
  • Fixed an issue that might run an AnyCPU application as a 32-bit process.
  • Fixed an issue that prevents Azure Desired State Configuration (DSC) scenarios that have multiple partial configurations from working as expected.
  • Fixed an issue that affects remote procedure calls (RPC) to the Win32_User or Win32_Group WMI class. The domain member that runs the RPC contacts the primary domain controller (PDC). When multiple RPCs occur simultaneously on many domain members, this might overwhelm the PDC.
  • Fixed an issue that occurs when adding a trusted user, group, or computer that has a one-way trust in place. The error message, “The object selected doesn’t match the type of destination source” appears.
  • Fixed an issue that fails to display the Application Counters section in the performance reports of the Performance Monitor tool.
  • Fixed an issue that might affect some apps that use d3d9.dll with certain graphics cards and might cause those apps to close unexpectedly.
  • Fixed a rare issue that prevents Microsoft Excel or Microsoft Outlook from opening.
  • Fixed a memory leak issue that affects Windows systems that are in use 24 hours each day of the week.
  • Fixed an issue that affects the IE mode window frame.
  • Fixed an issue that prevents internet shortcuts from updating.
  • Fixed an issue that causes an Input Method Editor (IME) to discard a character if you enter the character while the IME is converting previous text.
  • Fixed an issue that causes print failures when a low integrity level (LowIL) application prints to a null port.
  • Fixed an issue that prevents BitLocker from encrypting when you use the silent encryption option.
  • Fixed an issue that occurs when you apply multiple WDAC policies. Doing that might prevent scripts from running when the policies allow scripts to run.
  • Fixed an issue that affects the behavior and shape orientation of a mouse cursor for Microsoft Defender Application Guard (MDAG), Microsoft Office, and Microsoft Edge. This issue occurs when you turn on a virtual graphics processing unit (GPU).
  • Fixed an issue that might cause the Remote Desktop client application to stop working when you end a session.
  • Fixed a reliability issue in the Terminal Services Gateway (TS Gateway) service that randomly causes clients to disconnect.
  • Deployed search highlights to devices that are domain-joined. For more information about the feature, see Group configuration: search highlights in Windows. You can configure search highlights at the enterprise scale using Group Policy settings defined in the Search.admx file and Policy CSP – Search.
  • Fixed an issue that displays the wrong image for the Input Method Editor (IME) mode indicator icon when you turn on the Font Mitigation policy.
  • Fixed an issue that causes a yellow exclamation point to display in Device Manager. This occurs when a Bluetooth remote device advertises the Advanced Audio Distribution Profile (A2DP) source (SRC).
  • Fixed an issue in which the Cluster Windows Management Instrumentation (WMI) provider (ClustWMI.dll) generates high CPU usage in WMIPRVSE.EXE.
  • Fixed an issue that causes Microsoft’s deduplication driver to consume large amounts of nonpaged pool memory. As a result, this depletes all the physical memory on the machine, which causes the server to stop responding.
  • Fixed an issue that causes file copying to be slower.
  • Fixed an issue that might cause a system to stop responding when a user signs out if Microsoft OneDrive is in use.
  • Fixed a known issue that might prevent recovery discs (CD or DVD) from starting if you created them using the Backup and Restore (Windows 7) app in Control Panel. This issue occurs after installing Windows updates released January 11, 2022 or later.

This is pretty much what is coming with this new cumulative update, just so that you have the general idea on what to expect from the Redmond tech giant.

Thankfully, there are no known issues, and as previously pointed out, no new features either. Furthermore, this is an optional C update which is generally released in the third or fourth week of the month and is designed to test new bug fixes and improvements for other non-security issues.

Know that these C updates are optional, and Windows Update won’t automatically install them on your PC, when offered outside of Windows Insider channels.

Tell us if you encountered any issues after installing KB5014023 in the comments section located below.

Best Free & Free Trial VPNs for Windows 11

This curated list of VPNs that can be tried for free will provide you insight into what a VPN can and should do to protect your privacy and against data stealing.

ProductBest FeaturesRatingFree Trial TypeLink
ExpressVPN● Fastest VPN on the market (up to 98 Mbps on 100 Mbps internet)
● Servers in 100+ countries
● No logs
● Strong AES-256 bit encryption
⭐⭐⭐⭐⭐30-day money back guarantee (Prepaid)➡️ Get It Now
Private Internet Access● Highly configurable
● Servers offer good speeds
● No Logs Policy
⭐⭐⭐⭐⭐30-day money back guarantee (Prepaid)➡️Get It Now
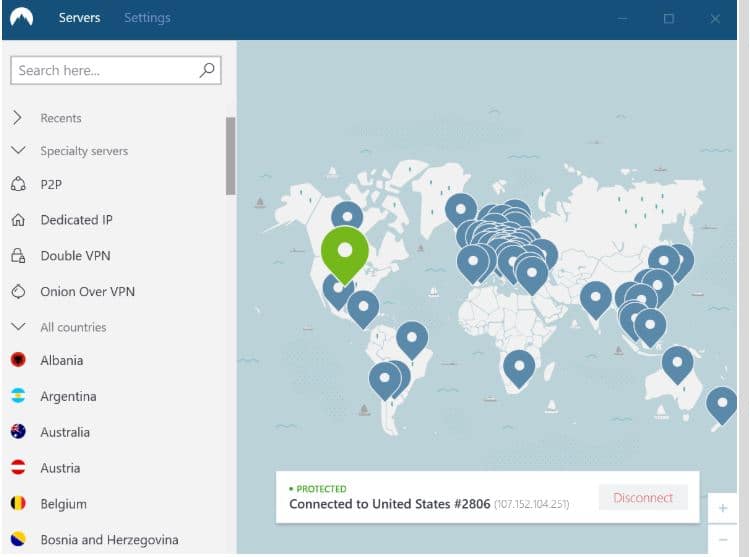
NordVPN● Multiple layers of data security
● Kill Switch
● Auto-connection
⭐⭐⭐⭐⭐NordVPN Meshnet Feature – free forever
+ 30-day money-back guarantee
➡️Get It Now
Surfshark● Top-level security
● Multiple security protocols
● Multi-hop and split tunneling
⭐⭐⭐⭐7-day free trial (no pre-pay needed)➡️Get It Now
CyberGhost● 256 AES encryption
● Over 7,900 servers
● Ad-blocking
⭐⭐⭐⭐1-day free trial for PC (no pre-pay needed)
7-day free trial for mobile (no pre-pay needed)
➡️Get It Now
TunnelBear● VPN speed is consistent
● Servers from 49 countries
● Top-notch protection
⭐⭐⭐Free forever version (limited locations)➡️Get It Now
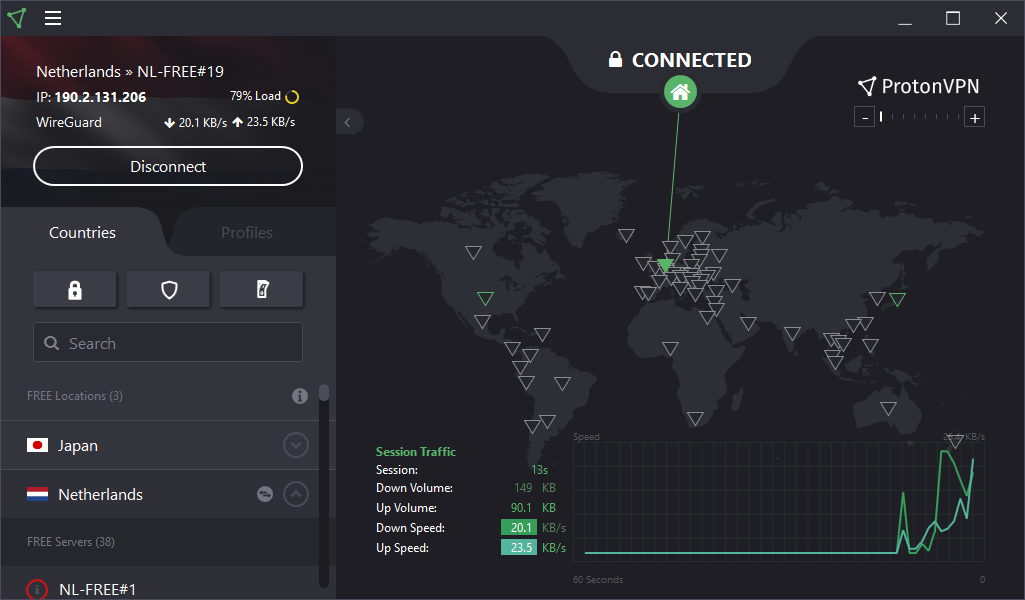
ProtonVPN● Unlimited bandwidth on the free version
● Fast
● Compatible with various OS
⭐⭐⭐Free forever version (limited to US, Japan and Netherlands servers)➡️Get It Now
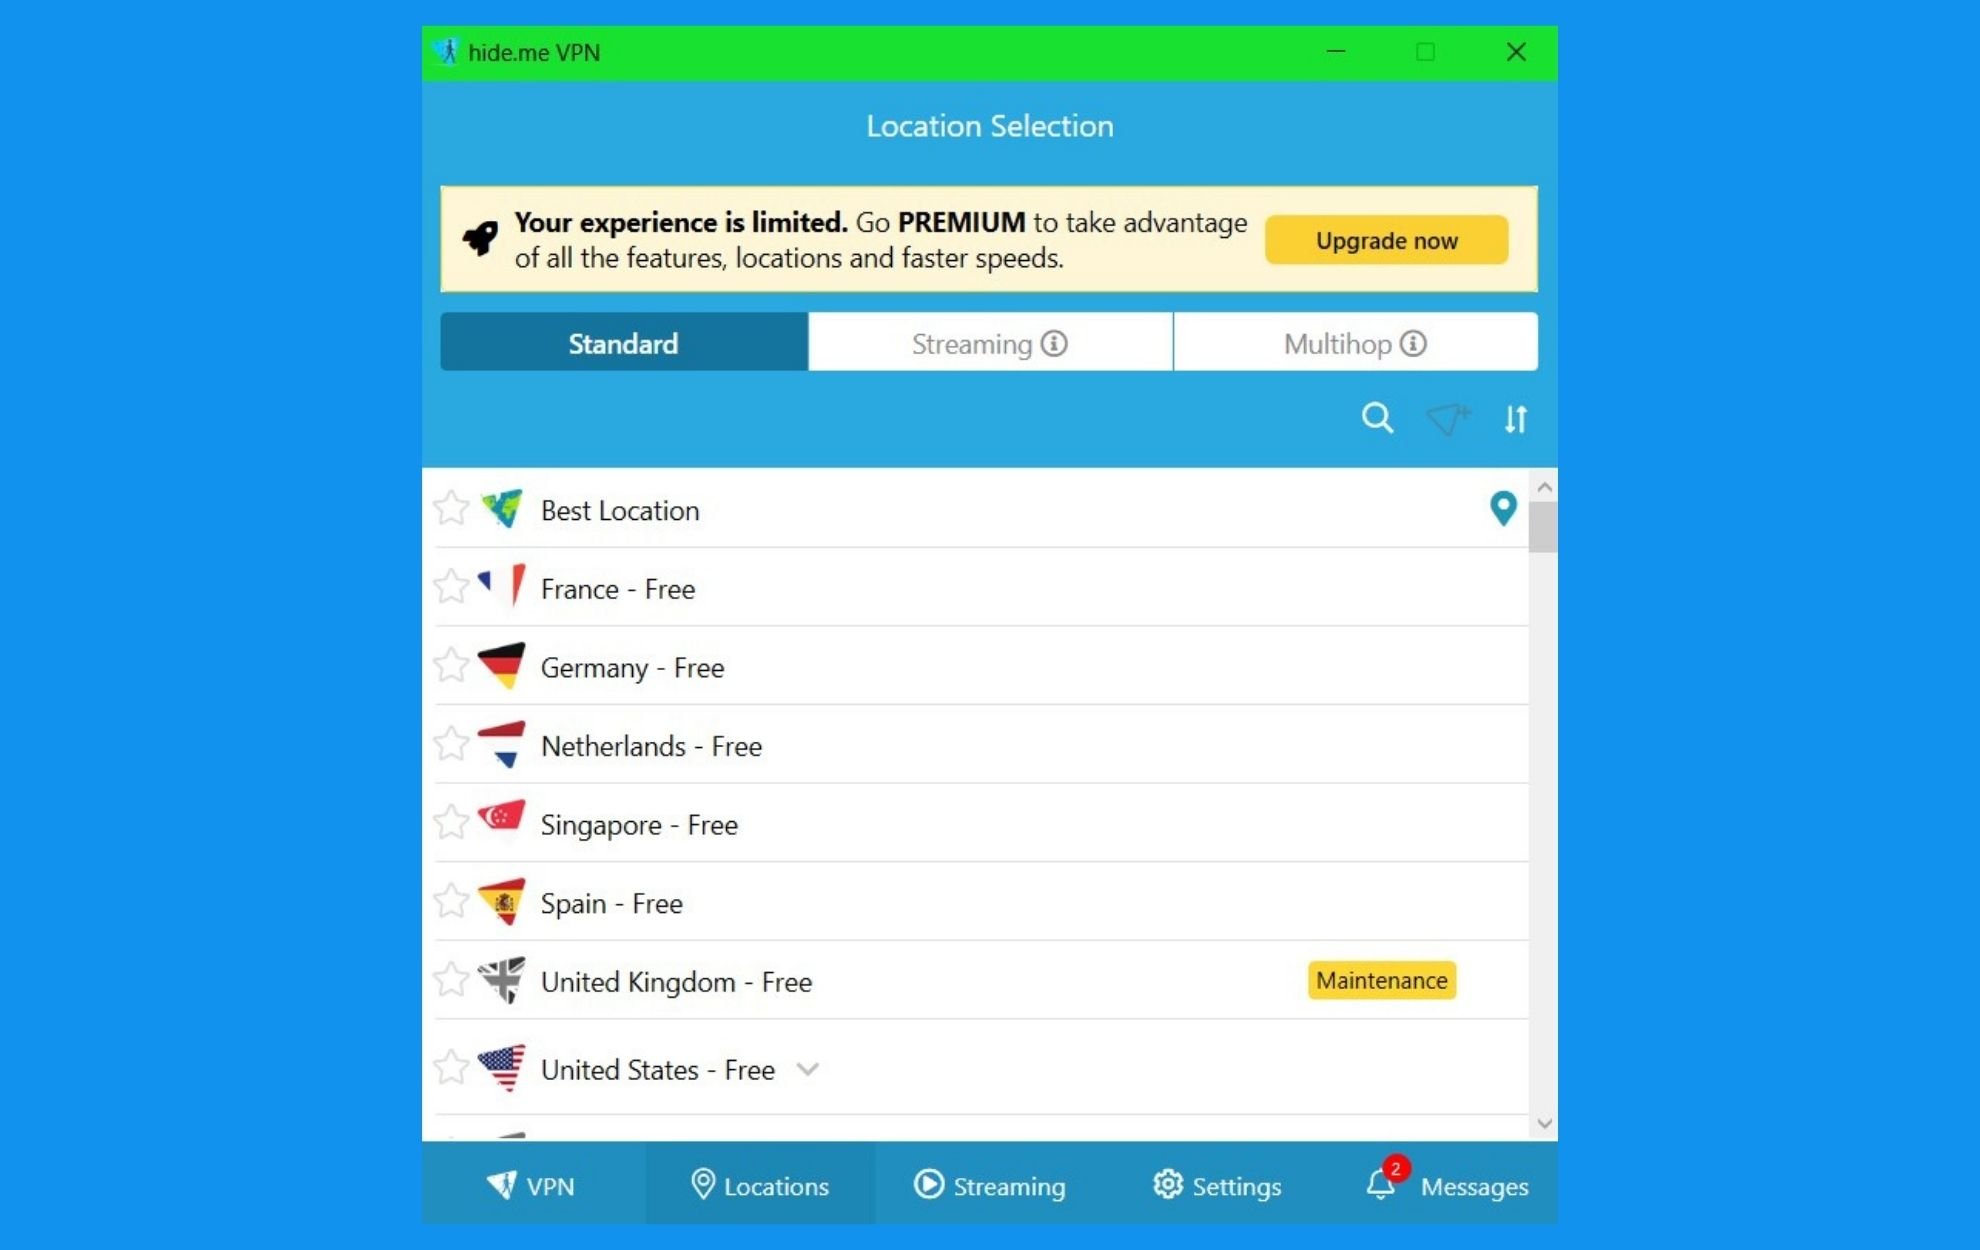
Hide.me● Easy to use
● 256-bit AES encryption
● Servers in all major global regions
⭐⭐⭐2 GB/month for free, limited server locations➡️Get It Now
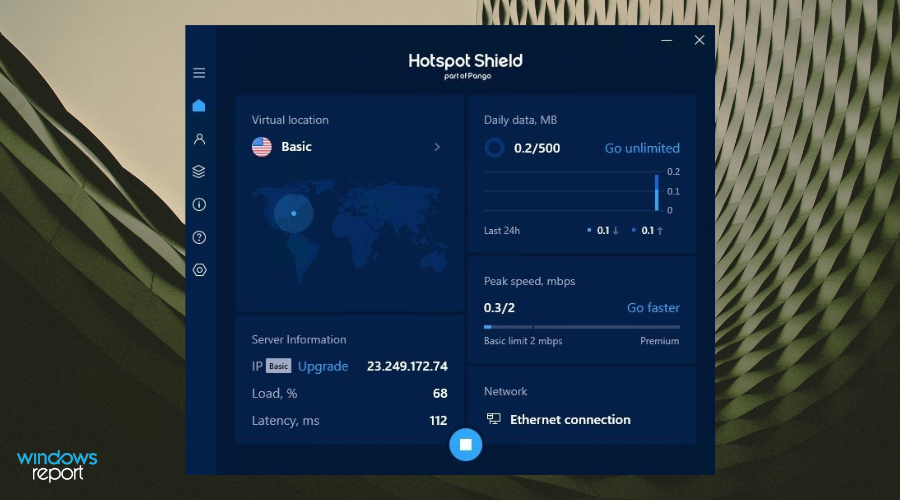
HotSpot Shield● Kill switch
● Global server network
● Lightweight
⭐⭐⭐15 GB/month for free➡️ Get It Now

What are the best free Windows 11 VPN apps?

Note icon NOTE
Completely free VPNs often come with limitations in speed, server options, and security. That’s why we also included premium VPNs that offer free trials or money-back guarantees—these options generally provide a better overall experience

1. ExpressVPN – fastest VPN on the market with servers in 100+ countries

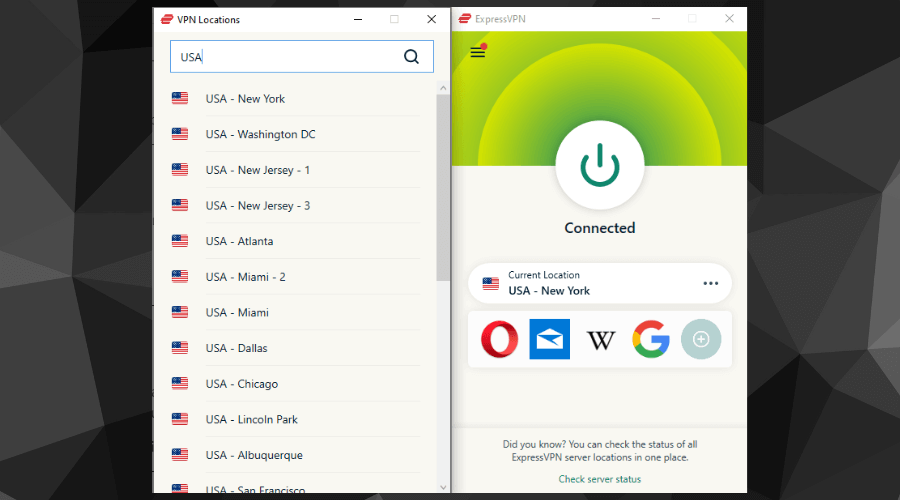
expressvpn us servers windows

With 100+ servers all around the world, ExpressVPN is one of the best options on the market. You can use it for free for 30 days, but you’ll have to pre-pay and opt for a refund.

It’s a great choice if you want a truly private VPN that doesn’t compromise on anything – be it speed, server availability, or ease of use.

Just make sure you don’t surpass the 30-day limit, and you’re all good to try all the features and get your money back ASAP.

Other notable features include:

  • AES-256 bit-encryption
  • Built-in obfuscation on all servers
  • You can use it on 5 devices with one subscription
  • No logs

ExpressVPN

Ready to protect your privacy, and access any site without slowing down your connection? Try ExpressVPN today!
Free Trial Visit Website

2. Private Internet Access – Unlimited torrenting support

set up private internet access

Private Internet Access is one of the best free trial VPNs for Windows 11.

This tool will let you redirect your internet traffic through one of its many servers located all around the world.

It comes with features for all kinds of users, be it novice or more advanced, you can surely find what you need in this VPN solution.

There is a reliable kill switch, built-in ad blocking, split tunneling, unlimited torrenting support, and much more.

Here are some of the benefits of using PIA VPN:

  • Highly configurable
  • Servers offer good speeds
  • Offers built-in ad blocking
  • Easy to use
  • No Logs Policy

Private Internet Access

Get a highly customizable VPN that offers good speed scores and reliable split tunneling.
Free Trial Visit Website

3. NordVPN – Dedicated kill switch

NordVPN has a strict no-log policy, meaning it saves no data of yours on its servers.

This software is very fast, doesn’t slow down your internet, and allows you to do all your favorite things, be it binge-watching, streaming, or even gaming.

It has unlimited bandwidth support, offers servers in multiple countries, features smart ad-blocking for uninterrupted internet usage, and much more.

Here are some of the highlights of NordVPN:

  • Offers ultra-fast servers.
  • Multiple layers of data security.
  • Gives you the option of a Kill Switch, auto-connection, quick connect, and more.
  • Comes with smart ad-blocking and unlimited bandwidth support.

NordVPN

Use NordVPN’s ultra-fast servers, which offer multilayered security features to your computer.
Free Trial Visit Website

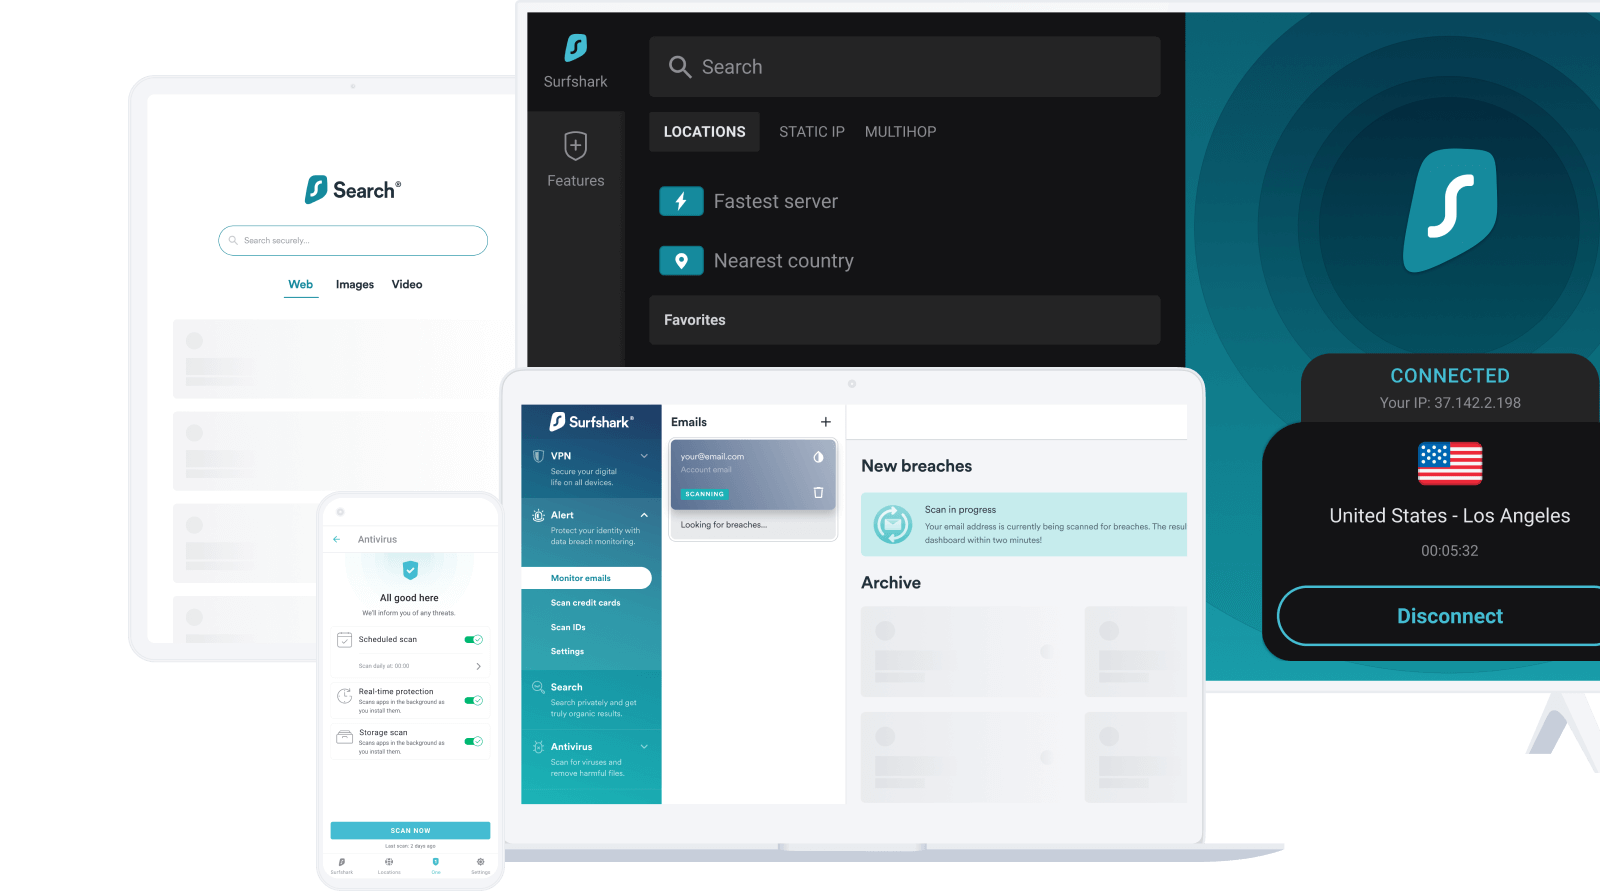
4. Surfshark – Highly rated VPN source

Surfshark has over 3200 servers in 100+ countries, with the best possible speed. Surfshark keeps its protocols up-to-date to tackle the newest threats.

It comes with a kill switch, high levels of encryption, double VPN, and other privacy-oriented features.

This software is available on multiple platforms without any limitations to its features. If you are really serious about staying anonymous online, then this 30-day trial with a money-back guarantee is worth it.

Check out the key highlights of Surfshark VPN:

  • Provides top-level security.
  • Multiple security protocols.
  • Offers features such as Kill Switch.
  • Multi-hop and split tunneling tools.

Surfshark

With this VPN, you get top-level security and access to over 3000 servers available in 65 countries.
Free Trial Visit Website

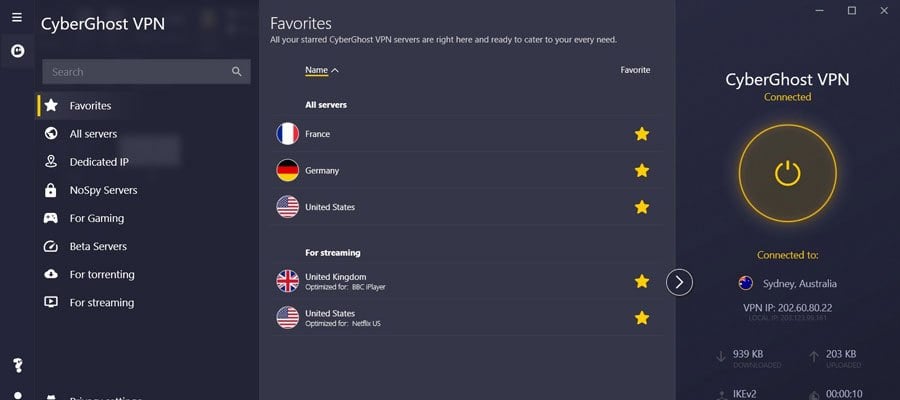
5. CyberGhost – 256-AES encryption

If you are looking for a VPN but want to test the waters before subscribing to the full version, then you can try CyberGhost VPN.

Its features, such as the option to one-click connect, fast and reliable servers, unlimited torrenting, region-restricted streaming, etc., make this VPN a good option.

CyberGhost VPN also features ad-blocking, Wi-Fi protection, a kill switch, and never stores your data traffic on its servers.

Below are some of the key features of CyberGhost VPN:

  • Provides 256 AES encryption.
  • Has built-in Kill Switch.
  • Offers over 7,900 servers.
  • Comes with ad-blocking as well.

CyberGhost

Protect your privacy and enhance your streaming experience with CyberGhost VPN.
Free Trial Visit Website

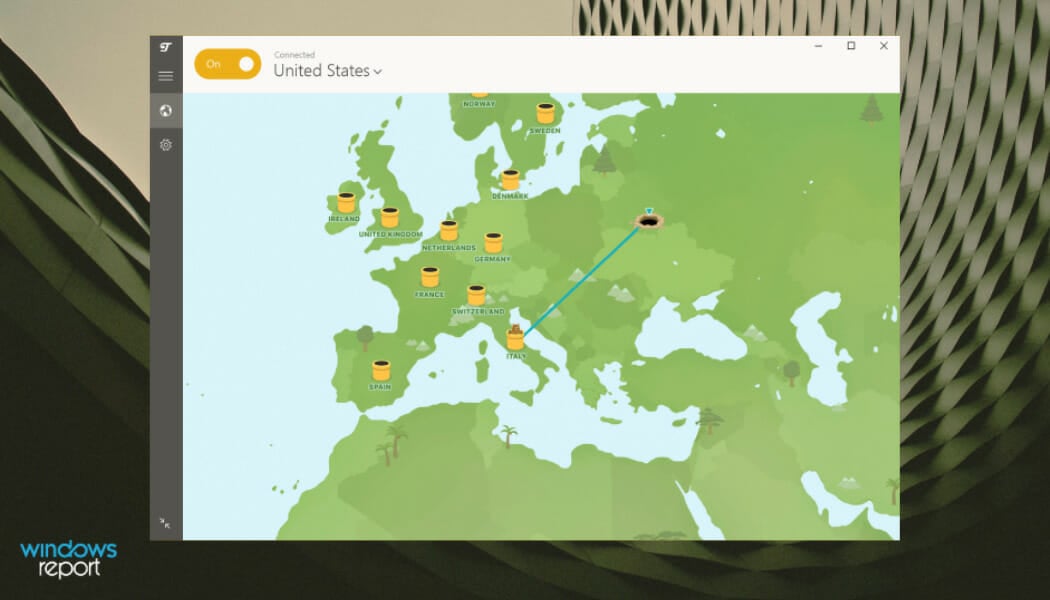
6. TunnelBear – Password protection

TunnelBear is another alternative if you are looking for a great VPN for your Windows 11 PC. If you want to use the basic version or the free version of TunnelBear, then you get only 500MB of data a month.

Though it may sound very limited, it gives you access to its full server network. And there are over 100 servers in over 40 countries across the globe.

However, there is a nice way to get extra data with TunnelBear. You can tweet about TunnelBear VPN and get 1GB of free data.

Check out the best features of TunnelBear:

  • The free version gives you access to all its servers.
  • Provides top-notch protection.
  • Offers servers from 49 countries.
  • VPN speed is fairly consistent.

TunnelBear

Prevent your IP from being tracked and try TunnelBear VPN to provide data protection.
Free Trial Visit Website

7. ProtonVPN – Clutter-free interface

ProtonVPN

ProtonVPN is a reliable free Windows 11 VPN app that comes with many features that you can use for free.

To start off, there is no bandwidth cap or anything of the sort, and you can browse and stream content without any restrictions.

With the free version, you get access to two dozen servers from three countries. ProtonVPN’s free version does not include any ads, which is a nice deal.

Here are some of the key features of ProtonVPN:

  • No bandwidth cap.
  • Free version does not feature any ads.
  • It offers multi-platform support.
  • The servers are some of the fastest for free VPN apps.

ProtonVPN

Safeguard your data with 256-AES encryption and browse and stream content without restrictions.
Free Trial Visit Website

8. Hide.me – 24/7 live chat support

Hide.me offers some of the best free VPN services that you can find from a VPN app. It gives you access to five of its servers and includes 10GB of data usage per month.

There is no bandwidth throttling. If you opt for the paid plan, then you get access to over 2,000 servers in 75 countries.

Even with the free plan, it gives you the best protection, allowing you to surf the internet tension-free.

Below are some of the best features of Hide.me VPN:

  • No signup or payment necessary for free plan usage.
  • Offers 10GB of data per month with the free plan.
  • Over 2,000 servers in over 75 countries.
  • 24/7 live chat support.

Hide.me

Hide.me VPN will prevent bandwidth throttling and allow you to browse the internet tension-free.
Free Trial Visit Website

9. Hotspot Shield – Restricted content access

Hotspot Shield is a free VPN that you can opt for as it gives you 15GB of free data per month, which might be sufficient for many users. Do note that you only get 500MB per day.

The only downside to the free service is that it gives you access to only one server in the US, which often provides average speed.

But there are features just like popular VPNs, such as a Kill Switch, AES 256-encryption, and IP or DNS leak protection.

Check out the key highlights of Hotspot Shield:

  • The free version gives you 15GB of data per month (500MB per day).
  • Allows access to region-restricted content.
  • There is no need to sign up or register.
  • It provides a kill switch, AES 256 encryption, and more.

Hotspot Shield

Unblock any restricted content with one of the most reliable VPN services.
Free Trial Visit Website

The above list contains some of the best free Windows 11 VPN apps you should try to keep your internet presence anonymous. Download the desired client or set up VPN manually on Windows 11 and keep your online activity private.

Let us know in the comments below which one of the VPNs mentioned above you choose for your internet safety.

Watch the Microsoft Build 2022 opening keynote right here!

Microsoft’s Build developer conference is finally upon us. Today, May 24, marks the opening day of the annual event, and we’re expecting a ton of Windows, Azure, Teams, and Office news.

That said, you don’t want to miss the opening keynote featuring Microsoft CEO Satya Nadella. You can watch it via the link below, right with us starting at 8:00 AM PT and lasting for about an hour. Nadella is set to talk about ” how Microsoft is creating new opportunities for developers across our platforms.”


During the keynote, and after the keynote is over, expect to see a lot of news from us! We will be posting on the news coming out of the developer event all day long, so if you don’t want to miss out, be sure to check out our Build 2022 tag.

We also remind you that you can sign up to attend Build 2022 for free, virtually of course to keep in the action once the opening keynote ends. Plus, once you sign up you can add various sessions to a backpack and your schedule, letting you keep up to date on all the news and see it first right away.

As we mentioned during our last OnPodcast episode, there are a few sessions you might want to keep an eye on. Many Microsoft employees seem to be pointing to a 10:15 AM PT session with Panos Panay, “Create next-gen experiences at scale with Windows” as a big one. Other sessions that you might not want to miss out on include an 11:30 AM PT “Building great apps with the open platform of Windows,” as well as a 12:30 PM PT one titled “Microsoft Build Into Focus: Preparing for the metaverse.”

You can expect a lot of Teams, Windows, and Office news out of those three sessions, as well as more on Microsoft’s take on the Metaverse. But don’t let that stop you! There are a ton of breakout sessions and other content that you can watch online via the Microsoft Build catalog.

Have a happy and safe Build 2022 experience, everyone! And remember, follow us on Twitter for all the Build 2022 and other Microsoft news, features, and op-eds throughout this three-day-long Microsoft developer event!

Logitech MX Mechanical & MX Master 3S Review: A mechanical keyboard truly designed for productivity

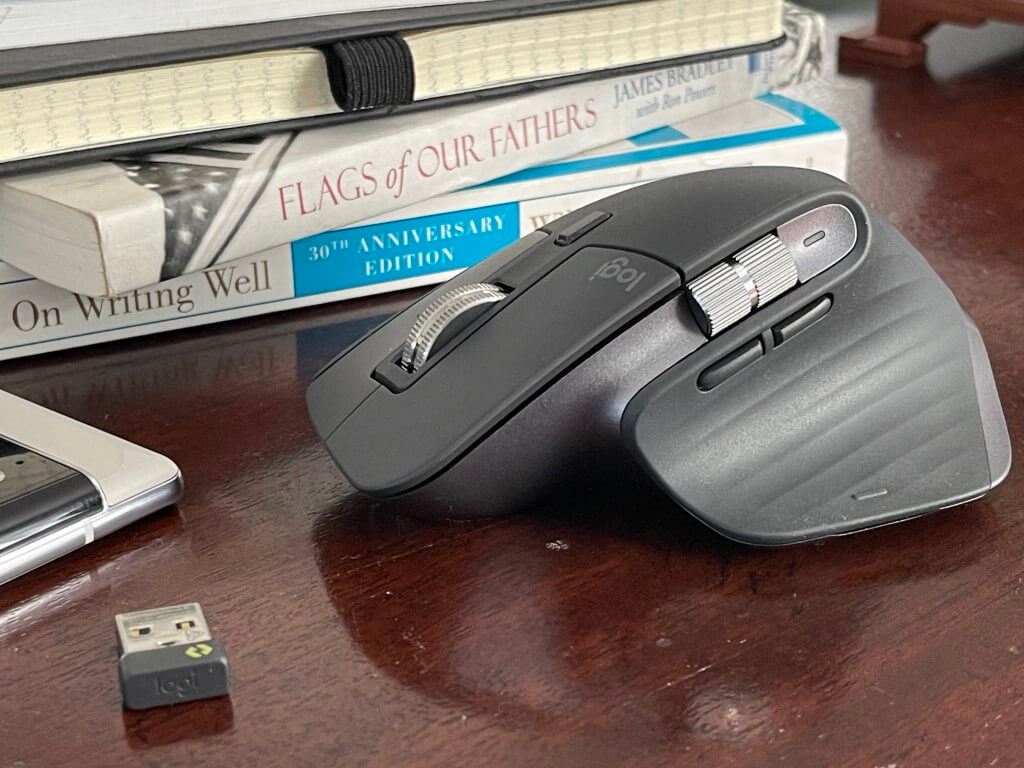
Inspired by what makes the Logitech MX Keys and MX Master 3 products so perfect, Logitech has launched the MX Mechanical and the MX Master 3S. The MX Mechanical combines lessons learned from Logitech’s G-series gaming line, with the awesome productivity features from the MX Keys series. It is a new accessory for folks who like gaming and mechanical keyboards, but want the same control in their professional desktop keyboard for use at work or at home. The MX Master 3S, meanwhile, refines the Master 3 in more ways than one with quieter clicking mechanisms, and a new sensor. I was provided both for review ahead of today’s launch, and I think these are the perfect feeling keyboard & mouse, designed for productivity.

Logitech MX Mechanical

Specs & Price

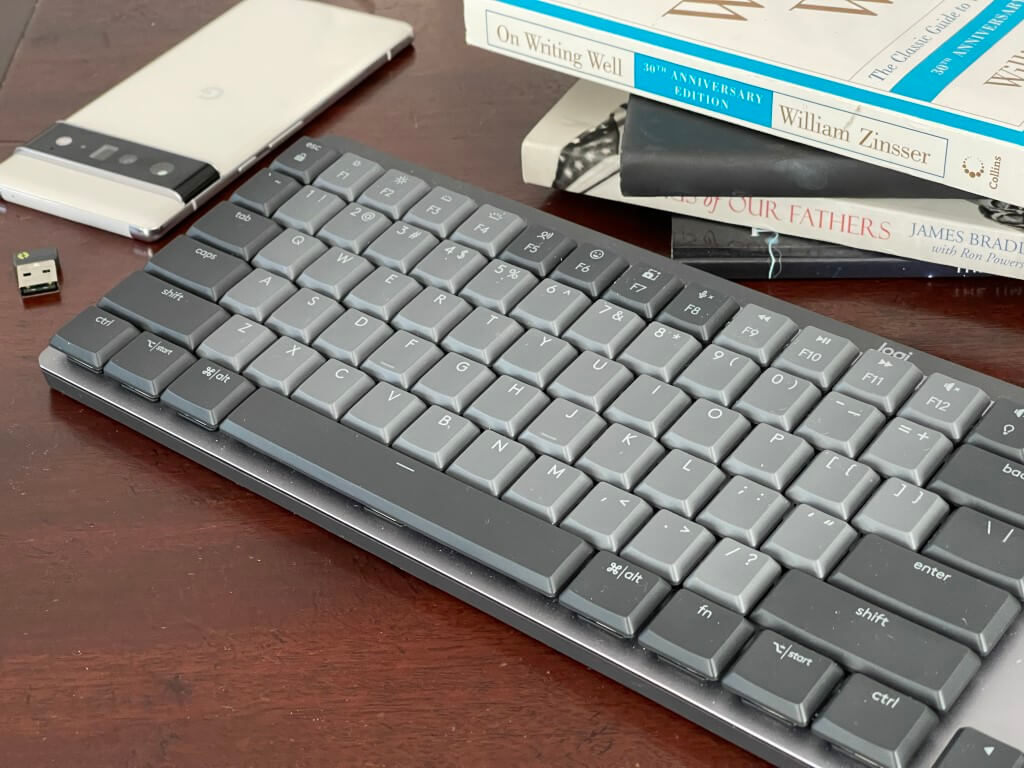
The Logitech MX Mechnical sitting on a desk next to a phone and books.

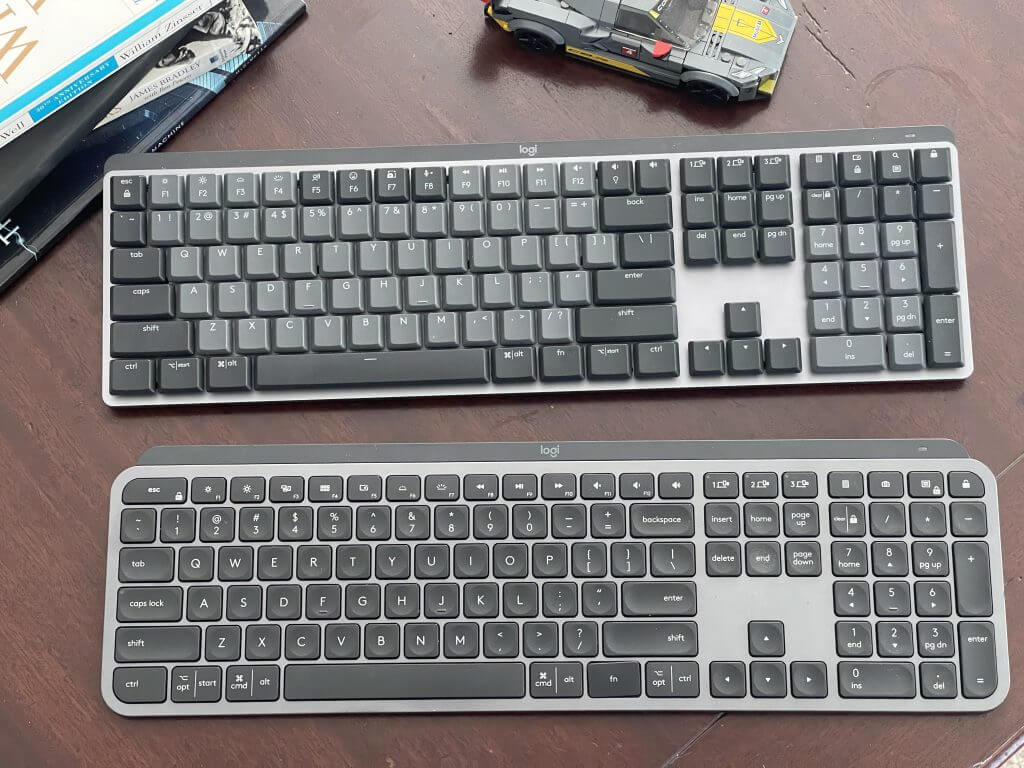
The Logitech MX Keys Mechanical retails for $170. The minute I unboxed this keyboard, I knew I would be impressed. MX Mechanical takes a similar shape and design as the MX Keys but with some added gaming-like touches here and there to make for a better typing experience.

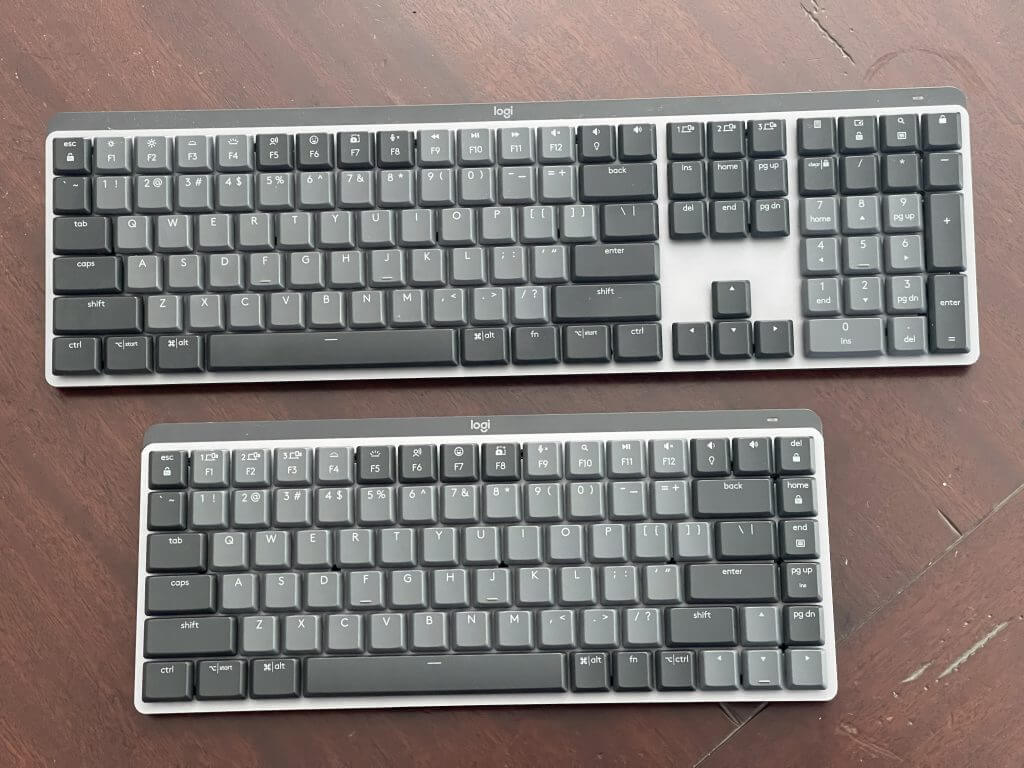
Oh, and for you technical folk, it measures 26.10 mm in height, 433.85 mm in width, 131.55 mm in a depth, and 828 grams in weight. That’s way different from the heavier, bulky, wired RGB gaming mechanical keyboard from Aukey that I use when gaming. It’s even slimmer than Logitech’s own G915, which is 22 mm in height, 475mm in height, 150mm in depth, and 1025 grams in weight.

Logitech is also offering a mini version of the keyboard known as MX Mechanical Mini. It is cheaper at $150, but it has the same features I get into throughout this piece, sans the number pad. It should be familiar to anyone who used MX Mini in terms of size and layout. The only exception is it has bigger full-size arrow keys and delete, home, end, page up, and page down buttons on the side. The idea is that the Mechanical Mini is the same great keyboard as MX Mechanical, but for smaller desks. Logitech clearly understands the needs of everyone.

Design

The Logitech MX Mechnical sitting on a desk next to a phone and books but on the left.

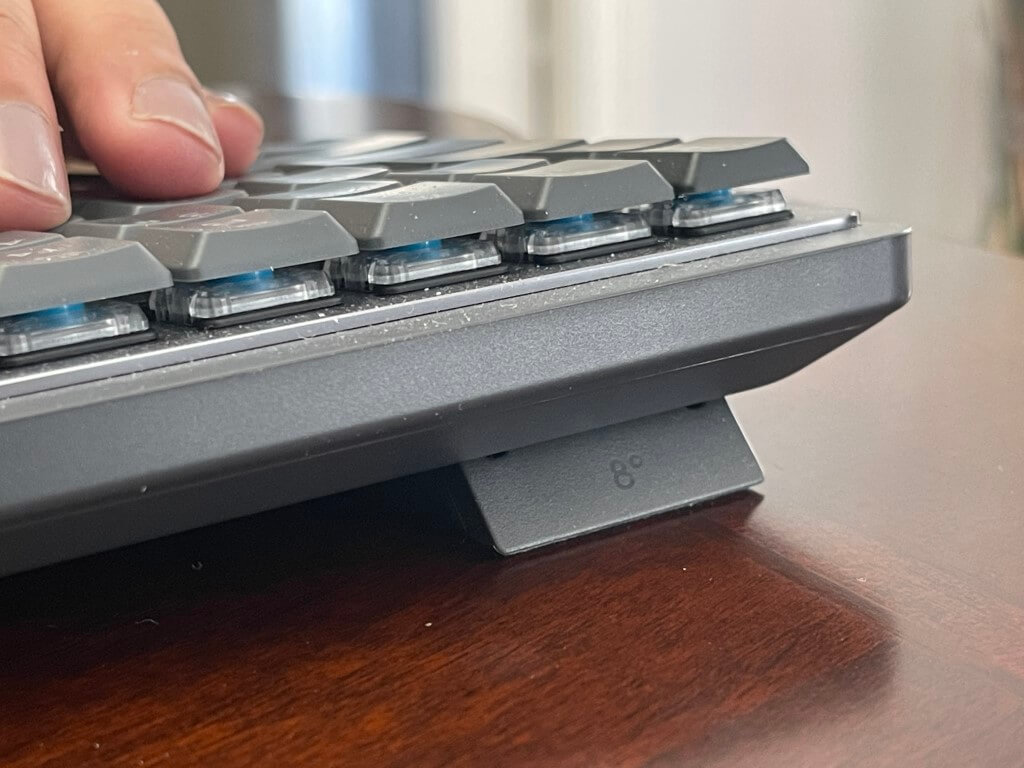
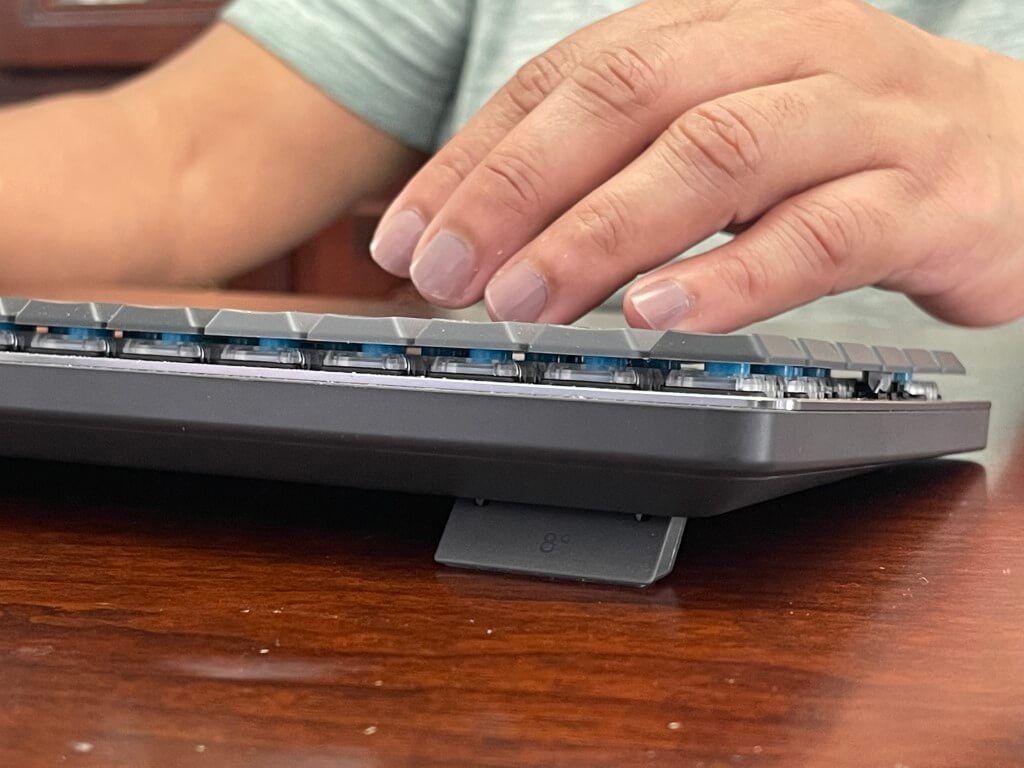
The MX Mechanical keyboard has a metal top cover, and plastic bottom, for a super sturdy build. However, there are also feet tucked inside the bottom casing that you can pull out if you need a better typing angle. This is to help lift the keyboard to a more ergonomic position for typing. That is a very important design choice, too as Logitech is also marketing this keyboard for those who want a product with deeper travel and a better feel.

In terms of suitability, a portion of the plastic parts on the keyboard is made from post-consumer recycled (PCR) plastic. 45% for MX Mechanical and 47% for MX Mechanical Mini. That includes plastic in printed wiring assembly, the FFC cable, and packaging.

The feet on the Logitech MX Mechanical.

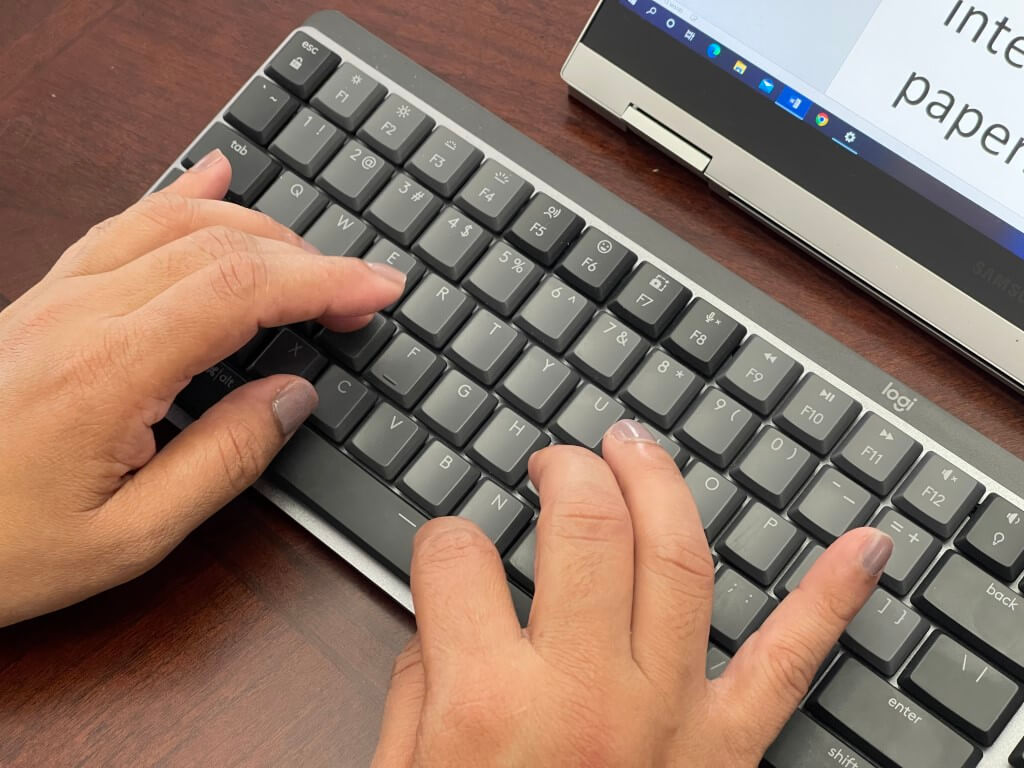
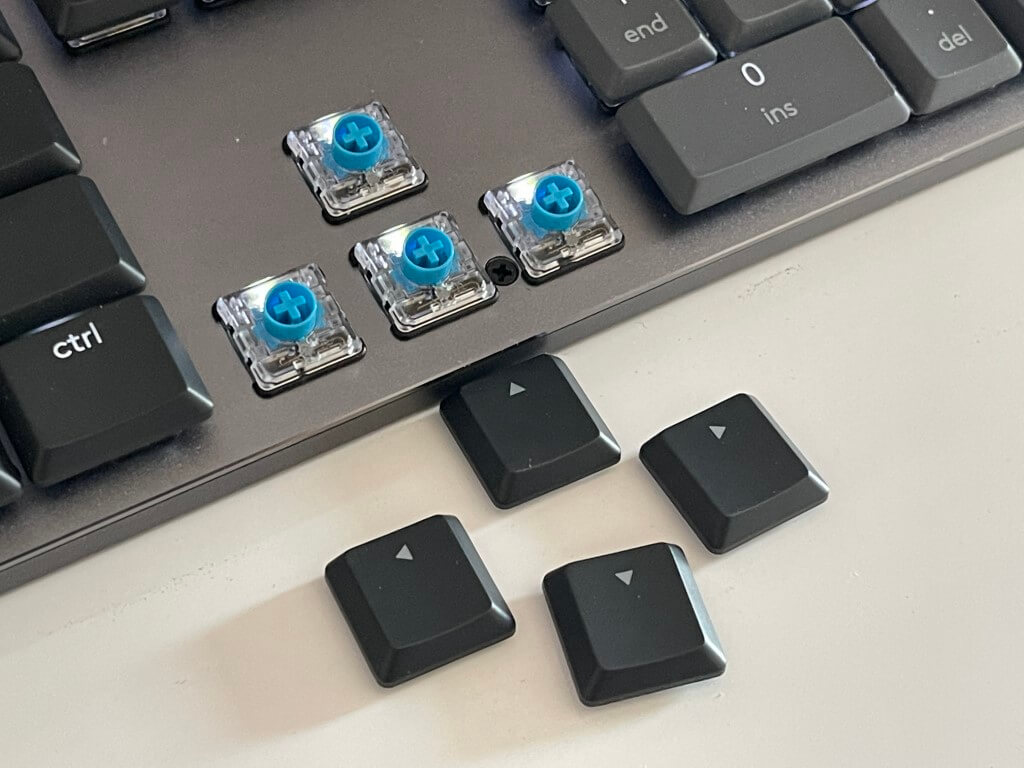
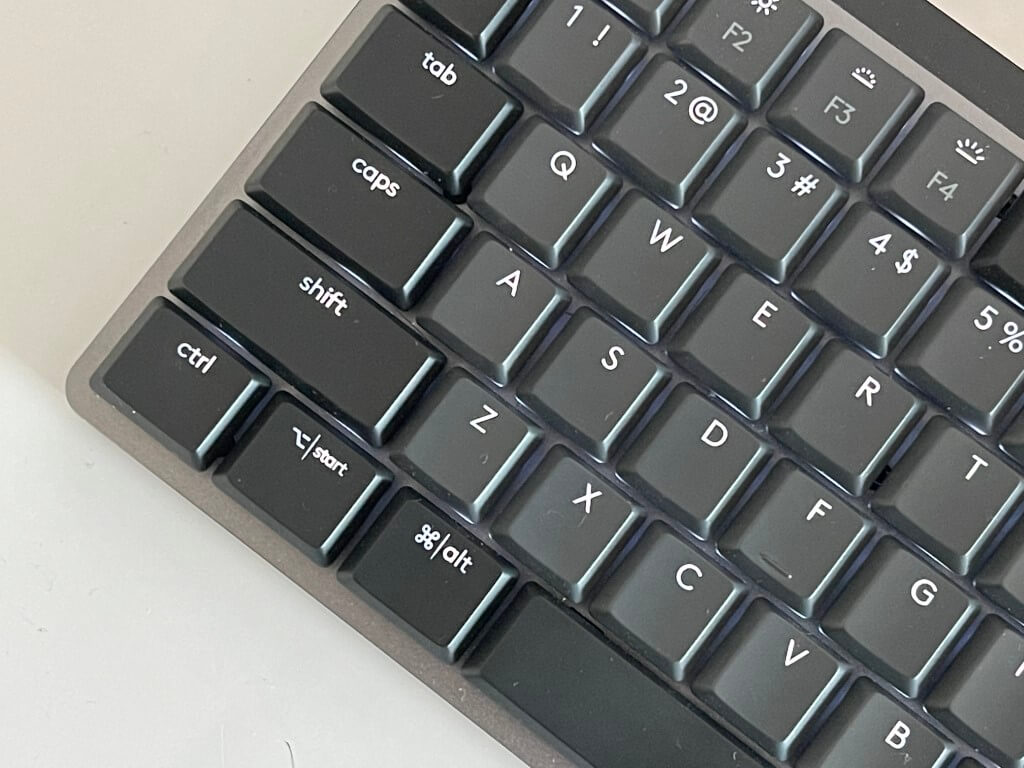
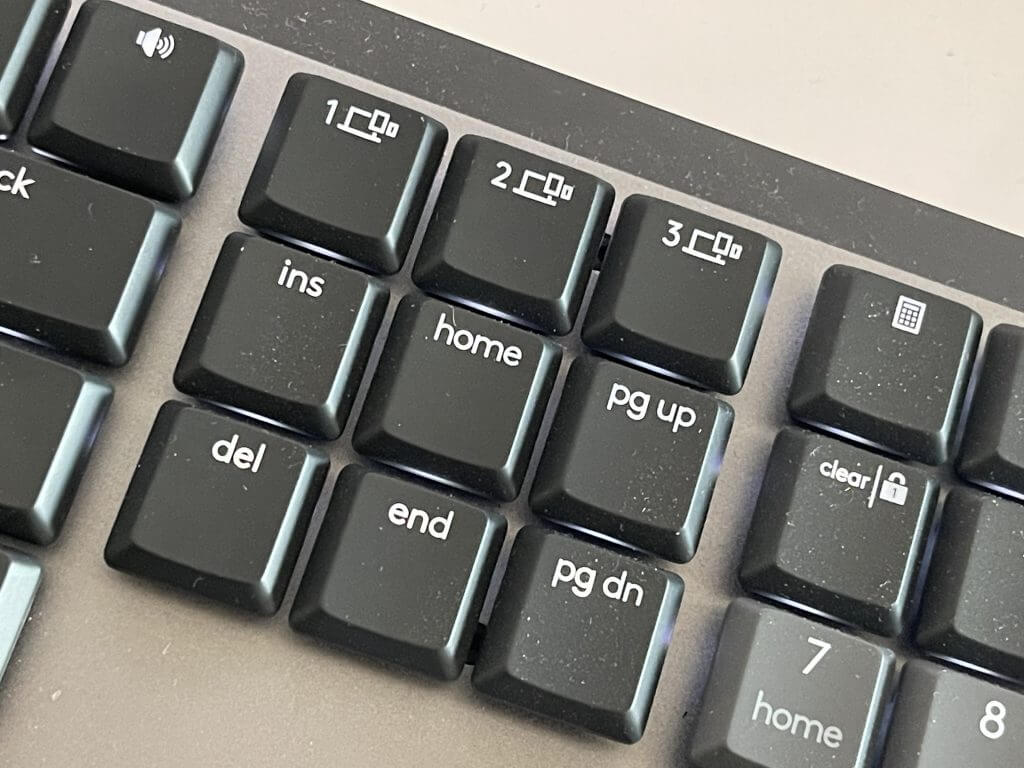
But since this is a mechanical keyboard, you’ll notice some big design differences over the MX Keys. The first of those is the keycaps, which have two colors. This choice is all about peripheral vision. It is to make commonly used keys easier to spot. It also is to make the keyboard feel less distracting in an office environment, over traditional gaming keyboards that you might come across.

I like that choice, as it helps me focus on where my fingers are when I am speeding through a document and quickly glancing down at my keyboard. I did ask Logitech, though, if they’d sell different color keycaps. I was told that this is not something that’s available at launch. I also was told that the switches can not be replaced.

Typing experience

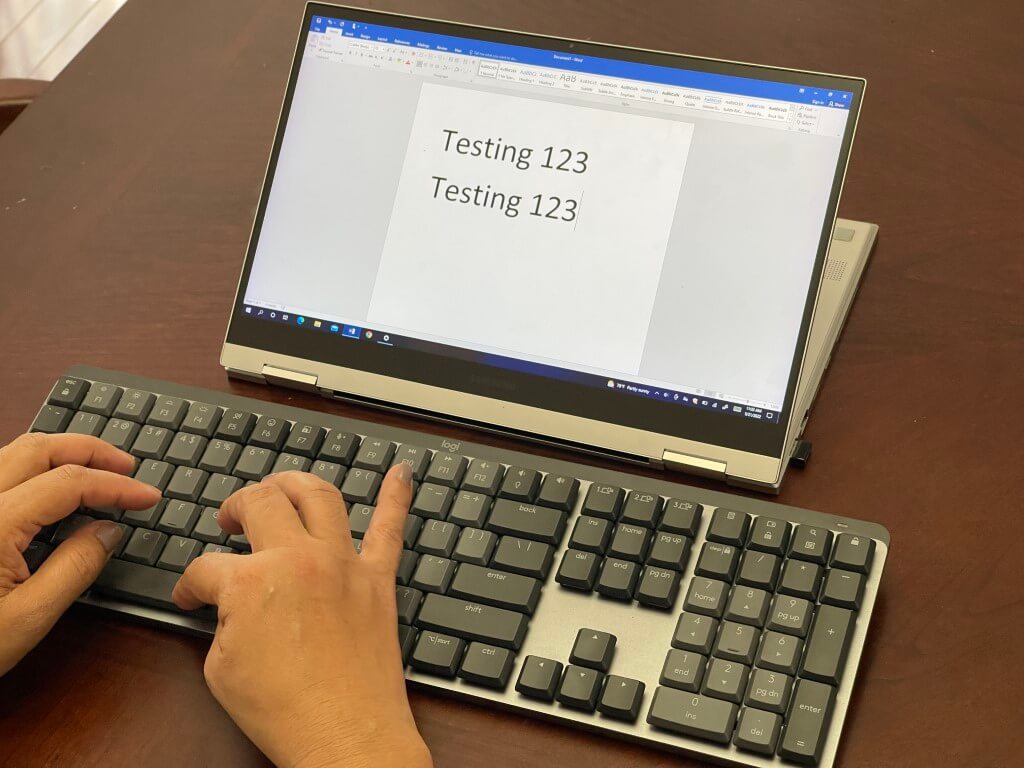
My mom Typing on the Logitech MX Mechanical.

A second difference in this product over MX Keys is the typing experience. Combined with the low-profile look and the matte-top feel on the keycaps, typing on this keyboard feels very fluid. For me, it is a big and positive change from MX keys, where the keycaps are much softer, a lot less tactile, and have a laptop-like feeling.

As someone who rarely uses mechanical keyboards, I’ll say that MX Mechanical has great tactile feedback that makes me feel like I am in control and typing faster. The key travel is also amazing, as well as actuation. Logitech tells me that the MX Mechanical keyboard travel distance is 3.2 mm and the actuation force is 55 grams. That’s versus the 60-gram actuation force and 1.8 mm travel on the MX Keys.

In my tests, I got to around 92 words per minute in a typing test on Bing. That’s just a few words more than my usual speed on MX Keys. I really think the 19mm pitch Logitech has on this product helps promote better typing, as well as the shorter distance between keys. Yet after two weeks with a mechanical keyboard like this one, I really do think it’s hard to go back to something that isn’t mechanical. The accuracy and feedback are amazing.

I do want to note that I am reviewing a unit with clicky switches. As a mechanical keyboard, I liked the clicky-clack noise and tactile feedback of the keyboard that I get as I type away in a document, but Logitech is aware this might not be for everyone, especially those in office environments. That’s why Logitech is offering three switch types.

There are tactile and quiet (brown switches,) Clicky (blue switches,) and linear (red switches.) The Tactile Quiet switches give you a tactile bump with precise feedback, but with less noise. The Linear Red switches give you uninterrupted key travel and minimal spring force for faster reactions and smoother typing. All three are priced the same at $170.

A teardown of the blue switches on the MX Mechanical.

You can pick and choose which one fits your needs. The tactile/quiet switches will be sold broadly, and the clicky and linear will only be available online at Logitech.com, Bestbuy.com, or Amazon.com. Logitech also provided me with a linear switch sample unit, and after unboxing and trying it, I went back to the clicky switch. I really do love hearing that feedback as I jam my way through typing posts.

Lighting effects

Just like MX Keys, MX Mechanical has special lighting. The keyboard has proximity sensors that automatically light the keys as your hand approaches, and also based on the lighting in the room from the time of day. However, this time around, Logitech added six different lighting effects that you won’t find on MX Keys.

There’s static, breathing, contrast, wave, random, and reaction. These are reminiscent of what you’d get on a gaming keyboard but really toned down to just the white color that’s also on the MX Keys. I love this, as it’s not overly fancy. Out of all the effects, I love the wave one as it reflects nicely off my white-colored desk. You can switch between the various lighting modes with the FN Key+ a lightbulb icon on top of the volume up key. Backlighting is evenly distributed, with no bleeding through the keys.

Multi-platform use & battery life

The Start and Command buttons on the MX Mechnical.

MX Mechanical is designed for multi-platform use. You’ll notice that there’s both a Start key for Windows, as well as a command Key for Mac OS. Everything is placed perfectly for folks like me who cross between different devices. Even the OS-related function and media keys are perfectly placed. Compared to MX Keys there is a new emoji key, dictation key, and mic mute key. This makes it easy to use with calls in Teams. Not to forget the screenshot button. You can toggle the FN lock if you want to keep using the function row without OS-related actions.

And I can’t forget the way the keyboard connects to multiple devices. You can pair the keyboard with three different devices via the Logi Bolt, or Bluetooth Low Energy. Just tap the respected Logitech Easy-Switch 1, 2, or, 3 buttons at the top left of the MX Mechanical to switch. Logitech is always great with this multi-device stuff, and it’s no surprise to see this signature feature make a return to MX Mechanical.  I used the one keyboard across my Mac Mini, Surface Laptop Studio, and iPad Pro.

Logitech' Easy-Switch buttons on the MX Mechanical keyboard.

As far as battery life, you can get up to 15 days on a full charge, when using the backlights. I have yet to charge the keyboard in my two weeks of use. Outside of that, you can get 10 months without the backlights on. Charging is via USB-C just like with the MX Keys.

Logitech MX Master 3S

The MX Master 3s Mouse sitting next to books.

The Logitech MX Master 3S costs $99. It has the same design that I love from the MX Master 3. That means it is a palm-grip mouse for righties, with a wide and tall profile, so your hands fit in the nook on the left side. There’s also the MagSpeed Electromagnetic wheel, which can be used for 1,000 lines of scrolling in one second. USB-C charging returns as well.

For more on the design, I invite you to check out my MX Master 3 review, especially if you’re not familiar with the design and button choices. Nothing major changed there, other than a new Pale Gray color.

What has changed on the MX Master 3S is the clicking mechanism. Like the Lift Vertical Ergonomic mouse, it is now a lot quieter. Logitech claims it’s 90% quieter between generations but still has a lifespan of 10 million clicks. Yet, the clicks still are precise and satisfying. I had no issues in two weeks of use, with every one of my clicks registering properly. The quiet clicks also meant I did not annoy anyone on my Teams calls.

The sensor on the MX Master 3S.

Another change on MX Master 3S is the tracking sensor. Designed for advanced creators, the sensor can now track up to 8,000 DPI, which is double the 4,000 DPI over the MX Master 3. This is for folks who might be using high-resolution monitors or multi-monitor setups.

This is a great change, as it really helps make the mouse future-proof and means I need to move my hands less when tracking my mouse across my massive 34-inch monitor. Tracking is just as accurate as clicking and scrolling are, as I used the mouse on wood, glass, and fabric, and it still worked fine.

Logitech Options +

Logitech Options + Software.

To help you manage and customize your Logitech MX Master 3S and Logitech MX Mechanical devices, Logitech also has the new Logitech Options + software. Tested in beta for the last few months, it’s now launched to everyone in the public with a fresh new UI.

This app lets you create application-specific shortcuts for the MX Master 3S and also customize the functions of buttons. I used it to change the buttons on the side of the MX Master 3S to switch between open tabs in Microsoft Edge. Not to forget this app also unlocks the benefits of Logitech Flow, which allows you to use the mice across Macs and PCs simultaneously and also share files.

As for what this helps you do with the MX Mechanical, you can change the FN keyboard shortcuts, add app-specific shortcuts, and configure backlighting. Across both devices, you’ll get Easy-Switch options, too. This lets you see which devices your keyboard or mice are paired up to.

Completing Logitech’s lineup

These products now round out Logitech’s lineup of products. They both will sell right alongside the MX Keys, MX Keys Mini, MX Master 3, MX Anywhere 3, and the Craft. There’s a little bit of everything for everyone, and that’s what makes Logitech so great.

The Specified Port is Already Open VPN Error: 4 Quick Fixes

The specified port is already open error is not uncommon. Many VPN services can deal wth it, but it seems to be prevalent for Sonicwall VPN’s NetExtender. 

Many users have also reported that they got this error after updating their operating system. Here’s what you can do to fix it.

How can I fix specified port is already open VPN error on Windows 11/10?

1. Restart the PC

  1. Click the Start button.
  2. Click the Power button. Now select Restart.
  3. Wait for your PC to reboot.

Although this is a basic fix, it is one of the most efficient methods to troubleshoot most PC problems. The locked connection is closed after a reboot and the VPN can create a new connection. 

So be sure to try this method if you’re getting VPN error The specified port is already open on Windows 11.

2. Use the Registry Editor

  1. Press the Windows key + R, input regedit in the box, and press Enter key. 
  2. In the Registry Editor, navigate using the following path: HKEY_LOCAL_MACHINE\SYSTEM\CurrentControlSet\Services\Tcpip\Parameters
  3. Right-click the right pane, choose New, and select Multi-string Value. 
  4. Rename it to ReservedPorts and open it. 
  5. Input 1723-1723 in the Value data box and click OK. 

  6. Close and restart the PC to take effect. 

By editing the registry, you might fix VPN The specified port is already open when using L2TP protocol, so be sure to try this method.

3. Modify connection port in Command prompt

  1. Press the Windows key, search for command prompt and select Command Prompt from the list of results.
  2. Input the following code: netstat -aon 
  3. Identify process PID for any program using port 1723.
  4. Input the following command and press Enter key. We used this command as an example, but you’ll need to change the number at the end so it matches your process: taskkill /F /PID 1242
  5. Close Command Prompt.
  6. Restart PC to take effect. 

This is a forceful attempt to stop an app from using the VPN’s dedicated port, and it can help you if you’re getting The specified port is already open error when using PPTP protocol.

4. Use the Control Panel

  1. Press the Windows key, search for control panel and launch it.
  2. Change the view by to Small icons and select Phone and Modem. 
  3. Open the Modems tab, choose the modem and click Remove. 
  4. Restart PC to take effect. 

This fix is for modem-related issues that cause VPN the required port is open problem on Windows 11/10. 

5. Try another VPN

If you’re still having issues, even after trying the above-mentioned fixes, it might be worth considering a different VPN.

The one you’re currently using could be suboptimal. For a fast and error-free experience, we recommend ExpressVPN.

Known for its reliable performance, strong security features, and ease of use, ExpressVPN can offer a smoother VPN experience and help you avoid the specified port is already open error.

ExpressVPN

Ditch errors and enjoy seamless browsing with ExpressVPN!
Check price Visit website

What causes the specified port is already open error when using VPN?

Although this error can be caused by many reasons, its major cause stems from any attempt by another application on your device to open a non-sharable network connection port used by the VPN. 

Secondly, the error message could also occur if another application attempts to use the same port as the non-sharable connection used by the VPN. 

Although this is more associated with Mac and Linux, SSH forwarding could prompt this error message. Both Meraki and SonicWALL VPN users reported The specified port is already open, but you can experience it on other VPN clients.

In addition, software bugs and lags due to computer updates could be another reason why this VPN error message may come up. 

Summary

We hope this guide helped you address the specified port is already open error. At this point you should be able to use your virtual private network hitch free.

However, if you’re still having issues, don’t hesitate to contact us in the comments below.

Anthem’s player count: How many open-world gamers are there?

You surely must have heard about Anthem by now right? yes, we’re talking about the online multiplayer action role-playing video game developed by BioWare and published by Electronic Arts.

Since the game came out back in 2019, millions of players rushed to the fictional planet named Coda, where they assumed the role of Freelancers.

These heroic adventurers, who wear powerful exosuits, make it their job to defend humanity from the threats beyond their cities’ walls.

If you were also wondering about the game’s title, know that it refers to the Anthem of Creation, a powerful and mysterious force responsible for most of the extraordinary technology, phenomena, and threats in the world.

Wondering how many users flock to this virtual world on a monthly basis and escape their daily lives? We’re about to take a deep dive into that and find out together.

How many people bought and played Anthem?

As we’re sure you are already aware, there are a lot of MMOs out there, each better or more entertaining than the other.

Among the fan-favorite ones, we can mention Runescape, World of Warcraft, Runescape, Elder Scrolls Online, Neverwinter, and Lost Ark.

But don’t underestimate Anthem, because according to MMOPopulation, this game is actually among the best 20 MMOs out there.

Now, according to the available statistics, Anthem managed to gather quite an impressive army of gamers, peaking at 8.39 million users.

Now, even by today’s standards, that is a massive fanbase, considering that most people don’t seem that invested in these types of games anymore.

How many people still play Anthem?

We don’t know exactly what you were expecting, but the situation is pretty dramatic, as far as what is left of the Anthem gaming community.

Even though fans seemed pretty excited to play this awesome title at first, it seems that the love affair between fans and game ended as abruptly as it started.

Yes, we said that over 8 million players were recorded playing Anthem, but the present statistics will shock you, to say the least.

So, if we’re talking daily players, Anthem now has less than 20. No, that wasn’t a typo, it is what remains of the once-mighty Anthem community.

The most dramatic drop in player count actually happened in the last month, when the numbers went from close to a hundred thousand to almost zero.

Apparently, the game had nothing more to offer the content-hungry fans, and everyone simply decided to abandon this virtual world in the quest to find a new, more entertaining one.

We almost forgot to mention that this is the count for the entire Anthem player base, which includes the PC, Xbox, and PlayStation platforms.

⇒ Get Anthem PC Key from Kinguin

⇒ Get Anthem PC Key from G2a

⇒ Get Anthem for Xbox

⇒ Get Anthem for PlayStation

Understandable, considering that a lot of MMO enthusiasts are now playing Lost Ark a lot, and many have returned to World of Warcraft’s Shadowlands expansion, with more to come for the upcoming one, which is called Dragonflight.

The remaining Anthem players are wondering if playing the game is even worth it in these conditions since they can’t seem to find more than 3-4 players in any given mode.

This is a sad fate for what once seemed to be a masterpiece, with everyone being ultra-excited after only watching the game’s pre-release trailer.

Things are unlikely to change for the better, but we’ll keep an eye out for any changes and let you know if the community somehow magically decided to come back.

Have you ever played Anthem? Share your experience with us in the dedicated comments section located below.

What is Error Code 727e66ac on 2K22? 8 Best Solutions

NBA 2K22 error 727e66ac is a network connection-related problem. However, for 2K game players, it is an unidentified error. The game requires a good internet connection, so any connectivity issues lead to an error. 

Error code 727e66ac only occurs in MyCareer. During your career, it takes your player to MyPark, causing a disconnection with the 2K servers. When the error occurs, it becomes difficult to access a New Game.

You cannot play games or go to MyPark since it locks your characters. To solve such an issue, you have to start your entire career. 

The possible causes of the error could be the disconnection of the PC or console from the server, corrupted files, or damaged software.

For a smooth gaming experience, you can check out the updates and patches that the 2K sports developers release frequently. You can log in easily and enjoy your favorite basketball simulator.

Since this is one of the best basketball games for PC, in today’s article we’re going to show you the best methods to fix this problem.

How do I check NBA 2K22 server status?

  1. Open your browser.
  2. Visit the NBA2K server status website.
  3. Check if all services are properly running.

This is a great method to check if there are any issues with error code 727e66ac in 2K22 on Xbox, or any other platform.

How do I fix NBA2K22 error code 727e66ac?

1. Connection check

  1. Visit your router’s configuration page and log in with your credentials.
  2. Now locate the port forwarding option.
  3. Make sure you forward the following ports:
    • TCP: 27015-27030,27036-27037
    • UDP: 4380,27000-27031,27036
  4. Save changes.

You should also try using an Ethernet connection instead of a wireless one and see if that solves the issue.

This solution also works if you’re getting NBA 2K22 error code 727e66ac on your PS4 or any other console.

Note icon NOTE
Be sure to check your router manual to see how to correctly change forward your ports.

2. DNS Server Change

  1. Press Windows key + S and type network. Select View network connections.
  2. Locate your current connection, right-click it and choose Properties.
  3. Select Internet Protocol Version 4 (TCP/IPv4) and click on Properties.
    Internet Protocol Version 4 shows Properties
  4. Select Use the following DNS server addresses and set the following values:
    • Preferred DNS server: 208.67.222.222
    • Alternative DNS server: 208.67.220.220

  5. Click OK to save changes.

DNS can cause 2K22 error code on next gen consoles as well, so be sure to check their DNS settings as well.

3. Create a new MyPlayer in MyCareer 

  1. Start the game.
  2. Go to the MyPlayer section and create a new player to start a new game.
  3. Now quit the current game.
  4. Load your previous game.

This is a simple workaround, and it works if you’re getting NBA 2K22 Rec error code, so feel free to try it.

4. Check for updates and install

  1. Start Steam.
  2. Now go to your Library.
  3. Try to start NBA 2K22.
  4. If there are any updates available, be sure to download them.
  5. Once the game is updated, run it.

5. Power cycle your networking equipment 

  1. Press the Power button on your router.
    power button
  2. Once the device is off, wait for 30 seconds.
  3. Now press the Power button again.
  4. Wait while the device boots again.
  5. If you have any additional network equipment, be sure to restart it as well.

6. Restart the NBA 2K21 game 

  1. Close the game.
  2. Now press Ctrl + Shift + Esc.
  3. Select Steam on the list and click on End task.
  4. Now start the Steam again.
  5. Start NBA 2K22 and check if the issue is gone.

7. Repair NBA 2K game files

  1. Start Steam.
  2. Locate the NBA 2K22, right-click and select Properties.
  3. Head over to the Local Files tab and click Verify integrity of game files.
    Verify Integrity of Steam Files
  4. Wait for the process to finish.

8. Reinstall the game 

  1. Start Steam and go to your Library.
  2. Select the game you want to remove, right click it and go to Manage and then select Uninstall.
  3. Click Uninstall to confirm.
  4. Now you need to go to the game’s page and click the Install button to download it again.

Why do I keep getting the error code 727e66ac on 2K22?

You might receive messages with error codes EFEAB30C or 4B538E50. These errors may occur because you have not downloaded the latest data, and you cannot play until you download the latest updates. 

Exceeded amount of allowed accounts on NBA 2K account may also trigger error codes on 2K22. The maximum number that you can create on a single console is 5. Any number above triggers a security protocol that denies server access to the added accounts. 

As you can see, fixing this error is pretty simple, and we hope that you managed to fix it by using our solutions.

Unfortunately, this isn’t the only error that you can encounter, and many reported NBA 2K error codes 0f777c90, a21468b6, and 4b538e50 on their system.

Try error code 727e66ac fixes and see which of them works for you. Leave a message in the comment section. We would be glad to hear from you.

5 Ways to Fix the Most Common Pinterest Privacy Issues

Users were recently perplexed with some Pinterest privacy issues after the company stated that it will track users’ search activity.

They also said that this functionality will assist users in discovering more related ideas, giving Pinterest users a more enjoyable experience.

Pinterest’s home feed shows you Pins, people, and businesses that Pinterest believes you’ll like based on your current activity and search history.

However, how can one make his or her account private in order to keep it safe? Let’s look at the ideal settings for a private Pinterest account on any platform.

?️ Quick Tip:

Privacy issues are the most harmful characteristics of using Pinterest or any other social networking platform. To avoid these attacks, you can try the privacy-guard Opera Browser, which features a VPN and anti-tracking features. Plus it has it’s own AI.

Because Opera One is another Chromium browser, its precise control process might well be familiar. Opera one by default blocks ads and trackers. Unlike many other adblockers, when you start it for the first time, it immediately toggles on.

Opera One

Natively eliminates ads and trackers, providing you with a safe zone where you may browse privately and securely.
Free Download Visit website

Can you get hacked through Pinterest?

Unfortunately, your Pinterest account, like any other, can be hacked, especially if you have a weak password.

And then, if the Pinterest password gets compromised and you use it for other accounts, those will be also in danger.

The best way to prevent getting hacked through Pinterest is to use a strong password or get a password generator software that will do that for you.

Here are our answers to other important questions that some of our readers had:

➡ Does Pinterest read my texts? – If your account is public, everyone can see your texts; as for Pinterest’s privacy policy, they collect the data that you have voluntarily submitted such as your name, comments, pins, likes, and your email address

➡ Does Pinterest track IP address? – Yes, and also the last site you visited before you came to Pinterest; they also use cookies and track the type of device you’re using to access Pinterest, but that’s what most websites do nowadays

➡ Does Pinterest see my online history? – Pinterest now uses your online history to provide recommendations, but this can be avoided by using browsers that have Do Not Track features

Pinterest said it completely supports the Do Not Track option in some browsers, which prohibits personal data from being collected automatically by cookies.

Let’s look at the most important Pinterest privacy issues we can address so that you can protect your account better.

How do you stay safe on Pinterest?

1. Enable the Search Engine Privacy

  1. Tap the drop-down (next to the profile icon) menu in the top right corner and then select Settings.
     how to access settings for the account
  2. Then, select Privacy and Data and then check the box next to Hide your profile from search engines.
    hide account from the search engine
  3. Following that, select Done or Save.
    save settings or click done

Keep in mind that if your Pinterest account wasn’t previously hidden from search, it could take several weeks for search engines to remove your profile from results.

If you ever want to make your Pinterest account public to search engines again, follow the same procedures but uncheck the option this time.

This method is the most effective to counter the Pinterest privacy issues we address within this guide.

2. Make a Board secret

  1. Hover over the Board you want to make a secret and tap the Edit button (grey pencil icon).
     grey pencil icon on the boards
  2. Now navigate to the Settings area at the bottom of the pop-up window. Next, to Keep This Board Secret, you’ll find a toggle switch. Turn it on and your board will be hidden. Finally, click Done.
    keep the board secret setting and then the done button

Your hidden boards are only visible to you (and anyone you invite). Secret Pins and boards won’t show up in your home feed, search results, or anywhere else on Pinterest.

When you save Pins to a secret board, the person from whom you saved them will not be notified, and the Pin count will not rise.

This is certainly a way to address one of the Pinterest privacy issues that our readers have been trying to fix.

3. Create a secret board

  1. Go to your Pinterest profile, click the + sign and then create Board.
    how to create a board in the profile
  2. You’ll be prompted to name your Board and decide whether to Keep this board secret.
     create a board that is secret

This step can be used to create hidden Boards for all of your personal stuff, and it will be hidden from the public.

4. Clear the Pinterest browser history

  1. Click into the search bar at the top of Pinterest.
    the search bar in pinterest
  2. Select the delete icon next to Recent searches.
    delete recent searches

Other devices, such as Android, may have a different method of accessing this setting.

To clear the search history on an Android device, you should be able to delete the application’s cache from the Settings menu.

5. Hide your pins on Pinterest

  1. First, log in to your Pinterest account.
  2. From your home feed, click the three dots icon in the bottom-right corner of the Pin.
     three dot button on the buttom of the pin
  3. After that, click Hide Pin.
     hide the pin option
  4. Select a reason for hiding the Pin.
    selecting a reason for hiding the pin

Individual Pins can be hidden from your home feed, or you can unfollow the board, topic, or account from whence the Pin originated.

This helps Pinterest figure out what kinds of Pins you want to view. If you accidentally conceal a Pin, you can restore it.

What can my followers see on Pinterest?

All of your regular boards, as well as any group boards, are visible to Pinterest followers. If you have secret or archive boards, only you, the account owner, can see them.

These are hidden from followers. Unless you are the owner of a group board, your followers will not automatically follow it.

Pinterest collects data you have willingly provided in addition to your name, profile picture, pins, comments, likes, and email address.

It’s an excellent time to make your account private and enjoy some privacy now that it collects search data as well.

With the techniques outlined above, you will be able to not only secure your account but also hide your personal boards and pins from public view.

These processes can be reversed to make your profile search engine friendly and your boards accessible to your followers.

Along with adjusting your privacy settings, it’s also important to keep your account properly verified. If you face issues during verification, see this guide on how to fix Pinterest validation error to make sure your profile works without restrictions.

In the comments section below, let us know if you know of any other Pinterest privacy settings.

How To Fix Multiplayer Not Working For Bugsnax

So, you were trying to enjoy your new favorite game with your friends and ran into some trouble? Don’t worry, you came to the right place to get this fixed.

Many people are experiencing some sort of problems with the titles closest to their hearts, and all of these so-called hiccups can be dealt with.

For example, some players said that Bugsnax wasn’t loading at all for them, and we came up with a quick workaround for the annoying situation.

Now, reports indicate that there are also some issues with the multiplayer part of the game, which is why we are here, ready to help you with this.

How can I fix the Bugsnax multiplayer not working?

Now, before we begin the troubleshooting process, you have to make sure that your Internet connection is actually working properly.

If we isolate this as being the issue, all you have to do is either change your router or contact your Internet provider.

1. Troubleshoot your internet connection

  1. Test if your network connection is working
  2. Restart your router (make sure you unplug the power cord and leave it for 30 seconds switched off)
  3. Right-click the network icon in the Taskbar and select Troubleshoot problems
  4. Open a Command Prompt and type the following commands (one by one):
    • ipconfig/release
    • ipconfig/all
    • ipconfig/flushdns
    • ipconfig/renew
    • netsh winsock reset
  5. Try to run Steam again

2. Allow Bugsnax through the Windows Firewall

  1. Press the Windows key, search for Firewall and select Open.open firewall
  2. Click on Allow an app through Firewall.allow app through firewall
  3. If Bugsnax isn’t in the list, click Change Settings, then Allow another app.Allow another app
  4. Click the Browse button, locate your game and press the Add button.browse firewall games

3. Update the network driver

  1. Press the Windows key, search for Device Manager and click on Open.run device manager
  2. Expand Network Adapters, right-click on the one you use and select Update driver.network driver
  3. Select Search automatically for drivers.search for driver automatically

Gaming is relaxing and fun, and surely you can do without all the crashes, lags, or freezes by keeping all drivers up to date and error-free easily. 

Sometimes, manual checks are hard to perform, that’s why we recommend using an automated assistant that will scan for fresh driver versions daily.

In case you’re a beginner, you don’t have to worry! Outbyte Driver Updater is smart, simple, engaging and its user interface was built to make your life easier.

⇒ Get Outbyte Driver Updater

4. Check the game’s file integrity

  1. In Steam, right-click Bugsnax and select Properties.dying light steam properties
  2. Select the Local Files tab and click on the Verify integrity of game files.game file integrity

5. Run Steam as administrator

  1. Locate your Steam installation folder.steam folder
  2. Right-click on the Steam executable and select Properties.steam properties
  3. Click on the Compatibility tab and tick the box next to Run this program as an administrator.run as admin - steam
  4. Press the Apply button and close the window.apply

6. Opt out of all Steam beta programs

  1. Click on Steam and select Settings.Steam settings
  2. Select Account and press the Change button under Beta participation.Steam account
  3. Click on None – opt out of all beta programs and press the OK button.opt out of beta

There you go! After going through this troubleshooting process, your Bugsnax problems will be solved and you can go back to enjoying it.

If you encounter any other issues be sure to stop by our Gaming page and find out how you can get on top of the situation rapidly.

Have you experienced any other Bugsnax-related issues? Let us know in the comments section below.

How to fix Authentication error 403 in Discovery Go

Discovery Go is a popular streaming app that allows users to enjoy shows without hassle.

But now and then, the app misbehaves and you start experiencing authentication issues such as the Discovery Go error 403 Forbidden with videos not loading when you try to access the services.

Since the provider boasts some of the best TV shows, it’s easy to see how such issues can generate frustration and leave users wondering how to fix 403 Forbidden errors on Discovery Go sooner rather than later.

Don’t worry, we have prepared several fixes for you to try to troubleshoot and get rid of 403 Forbidden errors during authentication. Before we dig in, let’s see why this happens in the first place.

What causes a 403 Forbidden error in Discovery Go?

Some of the common problems users face when they try to log in to their Discovery Go account are due to one or several of the following elements:

  • Unstable internet connection
  • No communication between Discovery Go servers (Discovery Go down)
  • Use of outdated apps and/or older and sometimes deprecated devices
  • Change of geographic location, especially when using a VPN

In other words, error 403 Forbidden is a status code generally known to mean the same thing: access denied.

We figured this is a valuable statement to make since this pesky error is by no means a Discovery Go-specific issue. It can affect all kinds of Internet resources and the causes behind it can be just as diverse.

Depending on the environment, it can be a corrupted access file, incorrect server permissions, faulty plugins, and so on. Here are some of the most common scenarios in which you can encounter this error.

What is a 403 Forbidden Error and where can it occur?

  • Mobile platforms (403 Forbidden on Android, US Cellular phone calls, and so on)
  • Browsers – Chrome is frequently targeted (The 403 Forbidden error on Google Chrome prevents you from loading local resources in Chrome, such as XML or JSON files.)
  • 403 Forbidden error in Rest API
  • Forbidden you don’t have permission to access this resource (The resource access issue is common on Airbnb and is usually triggered by duplicate accounts.)
  • 403 Forbidden access to this resource on the server is denied! (The IP address allocated by your ISP is a likely suspect behind the Acces denied on this server error with status code 403 Forbidden).
  • HTTP 403 error on Google Drive (This error prevents users from accessing or downloading certain files from Google Drive.)
  • Error 403 Forbidden PayPal (This error is likely to appear if your IP address has been blocked or blacklisted by PayPal).

As you can see, the HTTP status code implies a permission issue, which ultimately leads to access denied errors. If you wish to find out more about the topic, have a look at these common causes and solutions to error code 403 Forbidden.

As far as Discovery Go is concerned, we’ve got you covered below. So read on and don’t worry, most solutions are straightforward and do not require any technical knowledge.

How do I fix a 403 Forbidden error in Discovery Go?

1. Restart the device or try a different one

  1. Click on the Start menu.
  2. Click on the Power button and select Restart.
  3. Wait for Windows 11 to restart.

If you use your mobile phone, TV, or laptop to access your account, first try restarting the device. Some require unplugging, while for others such as laptops and mobile, a system shutdown will do.

After restarting, try accessing the account to see if the Discovery Go error 403 persists.

If you were getting the error when using a web browser, try changing the device and test it again. Should it work on one, then the problem is related to the device you were using.

Thus, you can focus on troubleshooting local issues such as outdated software, slow Internet connection, and so on.

2. Clear your browser cache

  1. Launch your browser and click on the three dots located on top of the browser.
  2. Select More tools and then, choose the Clear browsing data option. Reddit not loading in chrome
  3. On the Time range tab, choose the range, and check all 3 options: Browsing history, Cookies, and other site data, as well as Cached images and files.
  4. Finally, click on Clear data to finish the process.

Don’t forget to restart the browser and check if the Discovery Go error 403 Forbidden is still there.

Now, the steps described above are available for Google Chrome, but all modern browsers incorporate similar features to delete cookies and cache.

On the other hand, a professional cleaning application such as CCleaner can be used to automatically delate your browser leftovers without causing any data loss.

3. Try a different browser

Speaking of browsers, it might be a good time to reconsider your options. As we mentioned a bit earlier, the Discovery Go error 403 Forbidden can impact any of them, but it tends to appear more often in connection to Google Chrome.

Chrome maps IP addresses from the DNS cache to speed up webpages’ loading and this can lead to HTTPS errors such as the Discovery Go error 403 especially if you’re using a VPN to change your IP address.

Given the context, we recommend switching to Opera One. Also Chromium-based, Opera One provides a solid alternative to conciliate all your browsing needs from gaming to streaming on Discovery Go and everything in between.

Equipped with a pleasant UI that is packed full of cutting-edge features, Opera One is a powerhouse of functionalities. Such as built-in VPN, Ad Blocker, AI and video pop-out player

Its unique blend will provide discretion, enhanced security, and enhanced customization options for error-free navigation every time.

⇒ Get Opera One

4. Confirm your TV provider/location

  1. Open the official Discovery Go webpage and click on Link TV Provider.
  2. In the following window, simply select your provider from the list or use the search field to look it up.
  3. If your provider is no longer listed here, you might need to update your preferences.

Sometimes, TV providers change the contract agreements. As a result, they are excluded from the TV providers list and stop working with Discovery Go.

If you struggle with the Discovery Go error 403, check if your TV provider still works with the streaming platform.

This settles it as far as TV providers are concerned. What about location? As you already know, Discovery Go is available to United States residents only.

Should you try to access it from different parts of the world, you’re likely to see this frustrating message:

Now, you probably had your fair share of geographically restricted content and you’re probably familiar with warnings such as: Sorry, this video is not available in your country.

If you don’t reside in the United States, using a VPN to change your IP address and unblock Discovery Go makes sense.

But many users end up connecting to the service via a different location, which has no support for the platform, thus triggering the Discovery Go error 403.

How can you access Discovery Go outside the USA?

  1. Download and install a trusted VIA with US-located servers and streaming optimizations such as PIA VPN.
  2. Launch the app on your device and log in using the credentials provided by your supplier.
  3. Expand the server list and choose a server located in the USA.
  4. Once you’ve connected to the VPN server, open the Discovery Go website in your browser and start enjoying your favorite shows!

5. Check the Internet connection

When using your home or Telecom internet, you have to ensure that it’s strong and has high speed. Discovery Go requires a network speed of around 1.5 Mbps and 3-6 Mbps for SD and HD videos.

You can also third party sites such as Fast with dedicated tools to check your Internet speed instantaneously.

Reboot the network devices

While you’re at it, check your modem, router, and switches, and unplug/reboot them one by one. After that, reconnect them and try accessing the site to see if the Discovery Go error 403 Forbidden is solved.

6. Uninstall and reinstall the app

When using the Discovery go app, sometimes you can fix the issue by uninstalling and installing the app afresh.

Fast uninstall the app and restart the devices. Perform a fresh installation and try re-accessing the account. If you were getting the error when using a web browser, try changing the device and accessing it using the app.

This error is somewhat similar to Discovery Plus error 400, so be sure to check our dedicated guide and see how to fix it.

Finally, if you have tried all the above methods but still face the issue, we suggest you get in touch with the Discovery Go customer service.

Here’s how to contact Discovery Go: visit the services on your browser or app, fill out the contact us form and wait for 24 hours. Hopefully, they will help you fix the Discovery Go error 403 for good.

Microsoft Build is on us once again – here’s what you need to know

On May 24-26, Microsoft Build is on us once again, and once again it will be a virtual event. As usual, the conference will kick off with a series of keynotes followed by deep dive sessions, and in its virtual capacity Build is able to offer a number of added perks as well (although no free t-shirts or stickers, alas).

Unlike the pre-pandemic Builds, but similar to those after 2020, Build is free for participants, you only need to register. Once you’re signed up and logged in, there’s lots to do. You can check out regional spotlights, with language specific mini-sites for France, Germany, Japan, Latin America, and new this year, the UK. You’ll want to go through the sessions and create your own schedule, choosing from developer focused sessions on Azure, Teams, Windows and more, keynotes, and breakout sessions.

You can also check out the Connection Zone, where you can interact with experts and peers, with Ask the Experts sessions, one on one consultations, and ways to network and connect with others in your locality.

There’s also the Learning Zone, where you can dig deeper into Microsoft’s Learning Zone, a Cloud Skills Challenge, and the Imagine Cup, whether you’re just getting started in tech or want to develop your career.

As usual, the conference will kick off with a keynote headed by Microsoft CEO Satya Nadella, and featured speakers for the event include CTO Kevin Scott, Cloud & AI EVP Scott Guthrie, Panos Panay, and Amanda Silver, CVP and Head of Product Developer Division.

Throughout build, you’ll learn more about Azure, Microsoft 365 and Teams, Windows, and preparing for the Metaverse. Remember to stay tuned to OnMSFT.com for all the latest news and info coming out of Build, and make sure to register for the event to get the most that Microsoft has to offer.

Panos Panay talks about Windows 11 high quality score, new features and devices during Computex 2022

Computex is a leading global ICT AND IoT event where big players in the tech industry come together and highlight major strides taking place. Microsoft is also part of this event given the recent announcement that they had made earlier indicating that Windows 11 is now ready for broad deployment. This could probably be attributed to the fact that a lot of people are adopting the OS, which according to Microsoft is twice that of Windows 10.

During Computex 2022, Microsoft’s Panos Panay and Nicole Dezen talk about Windows 11 high quality score. Panos Panay reiterates that maintaining quality is the top priority for the Windows 11 development team. He further indicated that users who made the upgrade have been enjoying the experience thus far, which further builds on the premise of “product satisfaction”.

As noted by Windows Central, “since the start of the pandemic, 70% of more people streamed content from Netflix, Hulu, and YouTube on Windows devices. There’s also been a six-times increase in people using communication apps like Slack and Zoom on Windows. Additionally, Windows 11 has a doubled adoption rate compared to Windows 10.”

Panay also talks about Windows 11’s new accessibility features, as well as new devices from some of Microsoft’s partners such as Dell and Lenovo among others. He further indicated that Microsoft is taking customers’ feedback into account and using it to enhance the user experience.


What is Microsoft Math Solver and How to Use It

Microsoft Math Solver is an online tool that helps you find a solution to a math problem. The program can solve linear, quadratic, and systems of equations by graphing, matrix operations, recurrence relations, and optimization problems.

If you have a deadline to meet or are just poor in Maths, this online tool is all you need to solve all kinds of mathematical problems in record time.

The web-based version has more features than the add-in because it has access to all of its functions without requiring any additional software. You can also download it as an application on your devices.

It is often confused for Microsoft Mathematics but it was discontinued and replaced with Microsoft Math Solver.

The tool works with many standard mathematical formats including expressions and allows you to take a picture of your problem and upload it for it to solve.

Is Microsoft Math Solver free? 

Microsoft Math Solver is a free, web-based tool that helps you solve and practice math problems. It is also available as an application.

Wondering how to download Microsoft Math Solver? You can download it from the Google Play Store for Android devices and Apple Store for iPhones. Once installed, you can take a picture for the math solver and wait for it to generate solutions.

How do I use Microsoft Math Solver?

  1. Navigate to your browser and open Microsoft Math Solver.
  2. Scroll down to the Try Math Solver entry and click the calculator-like icon.
  3. Select your type of Math problem.
  4. Type your problem on the entry field and click Solve.
  5. You can now view your solution.

How do I get Microsoft Math Solver to show steps?

If you would like to see a detailed view of how the tool arrived at the solution, you can choose to show the steps.

It can help you understand the process of solving a problem and provides explanations for your solution. When you run the tool, it shows the steps it takes to solve the problem. You can click the View solution steps button. The steps include:

  • The problem itself
  • The steps it takes to solve the problem
  • Corresponding graph

When you have a complex equation that involves many steps to solve, or has multiple ways of solving the problem, the tool will categorize the steps by method.

You can select which method to show with its corresponding steps. If Microsoft Math Solver is not showing steps, simply refresh the page.

How do you use Microsoft Math Solver in Edge?

The tool is also built-in to the Edge browser which enables it to detect problems and solve them without switching between windows. You will have to add the tool to your Edge toolbar before you use it.

To use it in Edge, follow the steps below:

  1. Tap on the three ellipses in the top-right corner on your Edge browser.
  2. Select More tools and click on Math Solver.
  3. Now drag the box around any problem you want to solve.

Microsoft Math Solver vs Photomath: Which one is better? 

Microsoft Mathematics Solver and Photomath are two of the most popular math problem-solving apps. If you are looking for a math solver with steps, either of the two can do the job.

The two apps have a lot in common: they both use artificial intelligence to solve math problems quickly and accurately. They also both allow users to upload images of their handwritten homework assignments, which the apps then analyze for correct answers.

This feature alone makes them useful for those who don’t want to spend hours typing out their solutions. When it comes to performance, Microsoft Math Solver takes the crown. It can solve more complex problems than Photomath.

Microsoft Math Solver also goes the extra mile by providing additional learning resources and similar problems so that you can practice.

As a Math Solver app, it is more advantageous as it connects to the Microsoft Suite allowing you to solve your math problems without leaving your document. The built-in add-in to the Edge browser also makes solving problems easier.

We hope this guide brought you a step closer to solving your math problems quickly. For more complex mathematical problems, we have an excellent list of mathematical equation writing software you can try when typing special characters.

Also, check out our list of the best education software to build upon your knowledge and hone your skills in various areas.

Let us know what other problem-solving applications you use to make your work easier in the comment section below.

Windows news recap: Windows 11 hits ready for broad deployment status, Microsoft Teams arrives in Microsoft Store, and more

Welcome back to our Windows news recap, where we go over the top stories of the past week in the world of Microsoft’s flagship operating system.

Windows 11 hits a big milestone as it is now ready for broad deployment

Windows 11 has now hit ‘ready for broad deployment’ status, which essentially means that it is ready to be installed on any Windows 10 PC that meets the minimum requirements; a big milestone in pushing Windows 11 adoption.

Windows 11 hits a big milestone as it is now ready for broad deployment - OnMSFT.com - May 18, 2022

Microsoft Teams and Windows 11 compromised on the first day of Pwn2Own 2022

On the first day of the Pwn2Own 2022 event, both Microsoft Teams and Windows 11 were compromised. Hector Peralta made $150,000 off of an improper configuration flaw in Microsoft Teams.

Pwn2Own

Apple’s AR/VR project began with Windows-powered prototypes

A new report suggests that Apple presented a proof-of-concept for its AR/VR project to former US Vice President Al Gore and former Disney CEO Bob Iger, in which it reportedly used a Windows-powered device to show its idea, as Apple’s desktop and iPhone platforms had no substantial AR/VR presence.

Apple-New Headset

Microsoft Teams is now available in the Microsoft Store on Windows 10 and Windows 11

Microsoft Teams is now available to download via the Microsoft Store on Windows 10 and 11, making it easier and quicker to obtain Teams and keep it up to date.

That’s it for this week. We will be back next week with more Windows news.

Gaming Stats: 5 Players That Own the Most Games on Steam

Steam is an online gaming, social networking, and DRM platform, and it is the largest digital game distributor in the world.

It has more than 100 million active users, and more than 20 million people use it every day. That’s a lot of people! 

According to statistics, an average gamer owns about 20 games, but there are a few players on Steam who are more interested in collecting games and building large Steam libraries.

These players already have a staggering number of titles under their belts.

How many online Steam games are there

According to the website, there are over 50,000+ titles available for purchase on Steam. That’s not all, there are even more free-to-play games on the platform.

The number of games that can be purchased on Steam is constantly growing, as developers release more titles every year. 

Who has the most games on Steam

Sonix – 28,000+ games

Sonix Steam profile

Sonix is a player with the biggest library and has amassed a collection of over 28,000 games on Steam.

Not only that, this player has almost 10,000 games still on his Wishlist. So, he is not stopping any time soon.

Dwight schrute – 27,000+ games

dwight-schrute profile

Dwight Schrute is one of the most prolific game collectors on Steam. He currently owns 27,073 games in his library and counting. He started playing 13 years ago and has almost 37,000 hours of gameplay under his belt.

Jieyu – 26,900+ games

jieyu Steam profile

Jieyu is a member of the community with nearly 27,000 games in his account. As a result of this achievement, he has taken a spot on the ownership leaderboard.

Darcy – 26,500+ games

darcy profile

Following closely behind Jieyu is Darcy, who at 320 level owns the library of 26,500+ Steam games.

Hush_Please – 25,000+ games

Hush please Steam profile

With 25,000+ games, Hush_Please is the owner of one of the most impressive collections. The player has been active since 2014 and has been adding a game every few days since then.

If you’re looking to start building your game collection on Steam, you can take inspiration from the above five players who already have a staggering number of titles under their belts.

Opera GX: How Good is the Integrated Adblocker?

Is the Opera GX adblocker good? Let’s find out!

Today we take a closer look at how the integrated feature works, how to use it, and how efficient it is.

How can I enable the built-in ad blocker in Opera GX?

  1. Open Opera GX and click the Settings icon in the sidebar.
    settings home opera gx adblock
  2. Click the Basic option on the left pane.
  3. Toggle the switch for Block ads and surf the web up to three times faster forward under the Privacy protection section.
    enable adblock

What about websites that don’t allow ad blockers? If you trust the site, you can whitelist is an exception and allow ads on it:

How can I whitelist a website on Opera GX Adblock?

  1. Open Opera and click the Settings icon in the sidebar.
    settings home opera gx adblock
  2. Select the Basic option.
  3. Click the Manage exceptions option under Block ads and surf the web up to three times faster.
    manage site exception adblock opera gx
  4. Click the Add button.
    add whitelist
  5. Finally, enter the URL of the website you want to whitelist and click the Add button.enter site address opera gx adblock

The Opera GX Adblock will not work on the website you added whenever you visit the page. You can add as many sites as you like.

What can I do if Opera GX is not blocking ads?

1. Update the browser

  1. Launch Opera GX and click the Opera icon in the top left corner.
    opera gx icon
  2. Select the Update & Recovery option.
    update and recovery opera gx adblock
  3. Opera GX will automatically check download available updates.
    opera gx checking update

An outdated browser, just like any other app, can cause all sorts of problems. The reason Opera GX Adblock is not working might be the presence of bugs in your current browser version.

In this case, simply updating your browser should be enough. Remember to restart Opera GX when the update is complete.

2. Clear browsing data

  1. Click the Settings icon in the sidebar.
    opera gx adblock hoome settings
  2. Select Clear browsing data under the Security and Privacy section.
    clear browser data
  3. Click the dropdown next Time range and select All time.
    all time range opera gx adblock
  4. Check the checkboxes for Browsing history, Cookies and other site data, and Cached images and files.
  5. Click the Clear data button.
    clear data button

The importance of browser data on the ease of use of GX cannot be stated enough. They are instrumental when visiting a website you have used in the past.

However, this data can get corrupted with time. It can also save some site data counter-programs to the Opera GX Adblock.

Such a program will affect its performance, preventing it from blocking ads on some or all websites. In this case, you must clear your browser data and restart Opera GX to restore normal service.

3. Uninstall and reinstall Opera GX

  1. Press the Windows key + I to open the Settings app.
  2. Select the Apps option.
    settongs app option opera gx adblock
  3. Locate the Opera GX app and right-click on it.
  4. Select the Uninstall option and follow the simple onscreen instructions to complete the process.
    uninstall browser
  5. Go to Opera GX’s official page.
  6. Click the Download Opera GX button.
    opera gx download adbblock
  7. Open the downloaded installer and follow the onscreen instructions to complete the process

If you have tried the fixes above and Opera GX is still not blocking ads on all websites, your browser might have encountered a bug.

The best fix is to uninstall and reinstall it. This is because when you remove the browser, all the bugs troubling it will go with it too.

4. Install an Adblock extension

  1. Open Opera GX and go to the Opera addons store.
  2. Search for uBlock Origin and select the extension.ublock search

  3. Click the Add to Opera button.
    add ublock origin to opera gx
  4. Press the Ctrl + Shift + E keys to open the Extension Manager.
  5. Toggle the switch for Opera Ad Blocker backward to disable it.
  6. Toggle the uBlock Origin switch forward to enable it.
    disable opera gx adblock

This fix is specifically for cases where Opera GX is not working for specific websites like YouTube and Twitch.

YouTube’s case is incredibly well-known, with users complaining that Opera and Opera GX Adblock are not working on YouTube ads anymore.

This should not be surprising, with ads being a significant part of YouTube and its parent company, Google. So, it develops new ways to bypass ad blockers time and again.

But with a dedicated adblocker extension like uBlock Origin, you should be able to block YouTube ads and other websites.

Can you get an Adblock extension on Opera GX?

Yes. Besides the built-in adblocker, you can install third-party options like uBlock Origin from the Chrome Web Store.

What is the best AdBlock app for Opera GX?

There are several effective Adblockers for Opera Gx in the Opera add-ons store. Below are three of the best you can use:

  • Opera Adblock: free, requires no installs, works on most sites & resource friendly
  • uBlock Origin: easy to use and does not use much of your PC resources; customizable with blocking filters
  • Adblock Plus: fast, has a simple interface, with a counter that shows the ads that have been blocked on a website

Do you need an Opera GX in-depth review of Opera GX that shows you the features you have not yet been maximizing? Check our detailed guide to take advantage of your gaming browser.

Keep in mind that there are users who reported that Opera GX adblock is not working on YouTube, so don’t miss that guide for more information.

To learn more, we have a great guide on how to block ads in Opera, so don’t miss it.

Feel free to share your experience with the Opera GX adblocker in the comments below.

6 Easy Ways to fix Binance Alerts not Working

Binance is the world’s largest cryptocurrency exchange in terms of the daily trading volume of cryptocurrencies. It offers you a versatile way to invest and trade cryptocurrencies online.

Binance offers a price alert feature that helps you stay in touch with the market by notifying you when a specified buy or sell price is reached.

Once you set a price alert on the Binance desktop app, you can select the market, trading pair, condition, live prices, and an alert sound. You may also add a note for each alert.

But recently, many users have been complaining about Binance alerts not working. Being a very common problem among users, it mainly occurs when the price alert exceeds the 90-day validity period and gets canceled automatically.

As it’s an issue of concern, it’s essential to fix it. In this post, we have compiled a list of some workarounds that may help you.

Does Binance do price alerts?

Yes, Binance offers a price alert feature on the Binance app. These price alerts help users stay on top of the market by notifying them when a certain price or condition is met. You can set a price alert for price changes as well. 

The Binance price alert desktop comes with a 90-day validity period. Price alerts that exceed the 90-day validity period will be automatically canceled.

What can I do if Binance alerts are not working?

1. Restart the Binance Alerts desktop app

Before getting started with complex troubleshooting methods, you should simply restart the Binance alerts app.

As expected, this can fix minor bugs and issues automatically.

2. Clear Binance cache

  1. Open the Binance app and click on the Gear icon at the bottom left corner.
  2. Click on Clean Cache.
    binance alerts not working

Binance Alerts not working issue can sometimes occur due to the app’s cache data. Clear the cache data, restart the Binance alerts app, and check if the issue is fixed.

If you’re facing the Binance Android alert not working issue instead, rest assured that clearing the cache will help.

3. Re-Login into your account

  1. Click on your user name in the top right corner.
  2. Hit the Log Out button.
  3. Once done, log in again using your email and password.
    binance alerts not working

Logging out and then logging back in will refresh your account’s data that may have encountered this error. It will also establish a proper connection between you and Binance servers.

4. Check Binance servers

Binance Alerts not working could also occur due to server issues. If the servers are currently down, you can do nothing but wait.

Meanwhile, you can visit downdetector and check when Binance servers will be back online. By doing so, you can determine if the problem is on your system or from their side.
Binance Servers

5. Disable your VPN

Using a VPN modifies your IP address; as a result, your device will use a foreign VPN server to connect with Binance Servers. Doing so could trigger many errors, especially if the service you are trying to use isn’t available in that area.

Turn off your VPN, restart your device, and check if Binance alerts not working issues get resolved. However, if you do want to use Binance with a VPN. Read our post on how to use VPN for Binance.

6. Use a third-party alerting service

If none of the above-mentioned workarounds were able to fix the Binance alerts no sound issue, try using a third-party alerting service like cryptocurrencyalerting. This website creates customizable Crypto Alerts based on market price, volume, volatility, etc.

Cryptocurrentlyalerting currently monitors 26495 cryptocurrencies for real-time customizable price alerts. You can choose from many ways to receive alerts, such as Telegram, Discord, or Slack bots.
cryptocurrencyalerting

Well, that’s all from our side on how to fix Binance Alerts not working. Follow the steps mentioned above to fix this error. If the troubleshooting methods mentioned above cannot help you, contact Binance Support.

Also, please take a look at our article on the best cryptocurrency price alert apps and services. These cryptocurrency alert apps can be highly profitable tools if you’re into crypto trading and want to make the most of your investments.

If you still have any issues, feel free to drop a comment below. We’re eager to hear from you.

How to Enable Scan to Computer on Windows 11 [7 Ways]

Are you in search of information on how to enable scan to a computer in Windows 11? Well, the OS is enabled to scan an image, document, and any other compatible files to your computer.

They can then be saved anywhere you prefer and probably uploaded to the cloud, hence, accessible from anywhere you want.

Dedicated software controls most scanners. They are made available by their manufacturers.

It is also possible to control them using an application provided by Microsoft itself or one of the best scanner apps for Windows 11. But then, users have complained that they experience some problems while trying to scan.

Why will my printer not scan to the computer?

Generally, the reason for Windows scanners not being detected can be broadly categorized into two: situations when the computer does not detect the printer at all, and instances when the printer is detected but scanning does not work.

These issues especially the latter can be caused by one of the following reasons:

  • Faulty cable connection – Using a bad or incompatible cable would prevent a successful connection between a computer and the printer. This will inevitably hinder the scan from working.
  • Error in wireless connection – The use of non-cable connections such as WiFi doesn’t guarantee there will be no error. Issues with the connection will automatically affect the ability to scan.
  • Outdated printer driver – Whenever peripheral hardware like a printer is connected to a computer, a driver is responsible for smooth communication. Any problem with the driver will directly tamper with scanning.
  • Insufficient memory on the system – If you have a low memory space on your computer, scanning may not be possible if the expected result would exceed the available storage.
  • Disabled Windows Image Acquisition (WIA) Service – This is a special service on the Windows Operating System designed to support the optimal function of scanning. Disabling it will prevent the scan from effectively executing.
  • Disabled Shell Hardware Detection Services – The ShellHWDetection manages Autoplay hardware events in Windows. This feature allows the computer to detect images and triggers needed applications to display them. It has to be enabled for the scan to work.

How do I enable scan to computer?

1. Setup the scanner

  1. Connect the printer to the computer using cable or WiFi.
  2. Press the Windows key to open Windows Search.
  3. Type Printers & Scanners. Select Printers & scanners under the Best match result(s) and choose Open.
    Printers and Scanners
  4. Select Add device.
  5. After successfully adding the printer device, go back to Windows search by tapping the Windows key.
  6. Input Fax and Scan in the Search box. Select Windows Fax and Scan. Then click, Open.
    Fax and Scan
  7. Choose New Scan.
    New Scan
  8. Put the document you want to scan in the printer scanner section. Select Preview to assess the final result and adjust if need be after which you can click Scan.

For a quick, step by step walkthrough of the scanning workflow, see our guide on how to use your printer to scan.

2. Check the wireless connection

Here are some of our recommendations:

  • Make sure the WiFi, computer, and printer are all within range. If this is not the case, adjust the location and, if impossible, switch to an alternative by connecting using cable instead. You can check out wireless printers compatible with Windows.
  • For the wireless connection to function, you might need to restart the WiFi.
  • It is also recommended that you check if the printer is wireless compatible to enable scan to a computer.

3. Update printer drivers

  1. Right-click on the Windows logo icon in the Taskbar.
  2. Pick Device Manager.
    Device Manager
  3. Check and click on the small drop-down arrow beside Printer.
  4. Right-click on the connected printer and then select Update driver.
    Update Driver

Instead of updating drivers manually, you can use another method to manage all your drivers more efficiently.

With a dedicated driver updater, you have full support to install or update old drivers on your system. Not only this, you can handle drivers’ errors and repair them right away.

The software will scan your Windows 11 PC for outdated driver files and detect them rapidly. Afterward, you can choose one driver or many others to start the update.

⇒ Get Outbyte Driver Updater

4. Reduce scan resolution

  1. Download Windows Scan from Microsoft Store.
  2. Press the Windows key and type Scan in the Search box.
  3. Change File Type.
  4. Set Resolution to low. Then start Scan.

This method is recommended in case your PC is low on can device memory. It would also work for readers in search of solutions on how to enable scan to computer on Windows 10.

5. Activate Shell Hardware Detection Services

  1. Tap Windows Key + R simultaneously.
  2. Enter the command below and then press Shift + Enter.
    services.msc
  3. Locate Shell Hardware Detection. Now, right-click on it and select Restart or Start.

6. Enable Windows Image Acquisition service

  1. Press Windows key + R to open Run.
  2. Type this command and press Enter:
    services.msc
    Services
  3. Scroll to locate Windows Image Acquisition; the options are arranged in alphabetical order.
  4. When found, right-click on it and then choose Start.
    WIA

Windows Image Acquisition (WIA) enables unhindered communication between graphic software on the computer and imaging hardware like scanners. The solution above can also work for readers looking for guides on how to scan to a computer in Windows 7.

7. Tweak Compatibility Mode

  1. Right-click on the printer/scanner icon on Home Screen.
  2. Choose Properties.
  3. Select Compatibility. Tick Run this program in compatibility mode for: then select the Windows version you prefer.
    Compatibility
  4. Select Apply. Next, restart your system and retry scanning.

Why is my computer not detecting my scanner?

In the second section of this solution guide, we listed the common reasons why Windows may not enable scan to computer in Windows 11. Also, not all printers are designed with scanners, so, it is important to ascertain if yours possess the feature.

Users who have just upgraded their Windows 11 usually face hiccups with scanning. Sometimes, to fix this, you will need to go and download the official software for the scanner on the manufacturer’s website.

Another thing that could make your computer not detect the scanner is when the scanner software is not compatible with the PC.

What can I do if my Windows scanner is not detected?

1. Troubleshoot printer

  1. Open Run by pressing Windows key + R.
  2. Type Control Panel and then press Enter.
  3. Click View devices and printers.
  4. Right-click on the affected printer and then choose Troubleshoot.

2. Download scanning software from the manufacturer

  1. Visit the printer manufacturer’s website.
    Software and Updates
  2. Enter your product name to get the most compatible driver download link.
    Driver Site
  3. Download and Install the software on the computer.
  4. Retry scanning.

Make sure that your VPN is disconnected when visiting your printer manufacturer’s official website to get the best recommendation for your need.

Meanwhile, there are lots of free scanning software tools for Windows 11 on the market today that work seamlessly with any computer with the required compatibility.

One of them is the Windows scan developed by Microsoft and available for download in the Microsoft Store.

If you are looking for alternatives that are both effective and free, we have a review on free scanning software for Windows 11/10 to help you decide which to choose.

What scanners are compatible with Windows 11?

Literally, all printers with scanners are expected to be compatible with Windows 11, but some of our readers have reported that after contacting Microsoft Support when they had issues, they were told the latest Windows OS version is not compatible with all printers.

The reason for this is many, but one specific one is that the manufacturer hasn’t updated their drivers to synergize with Windows 11. This is a move many big boys in the printing industry don’t hesitate to act upon.

When searching for scanners that are compatible with Windows 11, check out our review of the best printers with feeder scanners to make an informed decision.

Experiencing any issue with scanning all because you updated Windows is something that could be frustrating. We hope any of the solutions discussed so far has helped you fix the problem. If not, also take a look at our article on what to do if the HP scanner is not working on Windows 11.

Let’s know how you were able to enable scan to a printer on Windows 11 after reading through this guide. Don’t hold back from sharing any other useful tips you discovered in the comments section below.

How to Speed Up Indexing In Outlook: 5 Ways

There are different tricks to speed up indexing in Outlook on Windows 11 and today we’ll show you all of them. People report that filtering emails eventually slows down their system performance.

We understand this can be annoying especially when you need the email content to get something done quickly. Read on as we explain different methods you can use to fix the issue.

How can I speed up indexing in Outlook on my Windows 11?

1. Reduce indexing locations

  1. Open Settings by pressing Windows key + I.
  2. Type and select Indexing Options in the Search Box.
    Indexing Options
  3. Select Modify.
    Modify Index Options
  4. Choose Show all locations.
  5. Untick all other locations leaving only Microsoft Outlook to speed up the indexing.

You can also use this method if you have been finding solutions on how to speed up indexing in Outlook 2007.

2. Close all other running apps

  1. Right-click on the Windows logo in the Taskbar.
  2. Select Settings.
    Windows settings
  3. Type Indexing options in the Search Box.
  4. Check if there is any message like Indexing speed is reduced due to user activity.
    Indexing speed reduced
  5. Open Task Manager through Run (press Windows key + R).
  6. Type the command below and press Enter:
    taskmgr
    Run taskmgr
  7. Under Processes, right-click on programs you which to close, and then select End task.
    Task Manager

3. Disable your antivirus

Note icon NOTE
Only do this as a temporary fix, and once you’ve gone through the emails you wanted, re-enable your antivirus. If it is constantly causing performance problems, consider switching to a better one.
  1. Tap Windows key + I to open Settings.
  2. Select Privacy and Security then click on Windows Security.
    Privacy and Security
  3. Select Virus & threat protection.
    Virus protection
  4. Scroll to locate Manage Settings.
  5. Under Real-time protection, toggle the control from On to Off. Select Yes if the User Account Control prompt is displayed.

4. Repair corrupt personal (PST) files

  1. Close Outlook.
  2. Tap the Windows key.
  3. Type and select Show hidden files in the Search Box.
  4. Choose Show settings.
  5. Tick the Show hidden files, folders, or drives option.
  6. Next, press the Windows key again. Type Outlook in the Search box.
  7. Select Open file location.
    Outlook
  8. Right-click on Outlook. Choose Open file location.
  9. Copy and paste the folder path in a document editor or write it in your Notepad. Next, scroll to locate and select the SCANPST Application.
  10. Pick Windows (C:), click on Users.
  11. Next, choose the folder with your Username. Select AppData, then Local.
  12. Find and click on the Microsoft folder. Scroll to choose Outlook in the list of displayed folders.
  13. Select the Outlook account you want to fix.
  14. When this is done, click Start and wait for the check to complete. Follow the system prompt to fix any identified issue.
    Start repair

This fix can correct many abnormalities that could be experienced by your Outlook account especially if it is not searching all mails. Alternatively, you can use a third-party tool to fix PST files.

The Stellar PST File Recovery software is designed to repair different Outlook errors like mailbox data file corruption or resolve various data file errors.

5. Rebuild the search index

  1. Open Settings by pressing Windows key + I.
  2. Type Indexing Options in the Search Box.
  3. Click on Advanced.
    Index Options
  4. Select Rebuild.
    Rebuild

This solution can also be used if you have been finding tips on how to speed up indexing in Windows 10.

How do I restart paused indexing in Windows 11?

  1. Open Run by pressing Windows key + I simultaneously.
  2. Enter the command below:
    services.msc
  3. Scroll to locate and select Windows Search. After this, choose Restart.
    Windows Search

This method on how to unpause indexing in Windows 11 can also be used if you are in need of how to speed up indexing in Outlook 2010 on Windows 7.

It is effective in repairing errors encountered when Windows Search is turned off too. We also have an article on how to fix Windows 11’s Search indexing.

How long should Outlook indexing take?

The number of files you have would literally determine how long it would take Outlook to complete indexing. Without any issues, no matter how large the size of the files you possess, the process shouldn’t exceed 24 hours.

If you notice any delay, then try one of the solutions we highlighted above. Let us know which option worked best for you.

Discord Account Disabled: How to Get It Back Fast

Got your Discord account disabled? Let’s see how to get it back in just a few easy steps.

Some get banned because of using bad words, others break a particular channel’s rules. Some willingly, others without intention.

Regardless, we put together a roadmap that’ll help you fix it.

We’ll help you undisable your Discord account further down in this article. But if you’re curious why it might happen:

Is Discord disabled permanently?

A disabled account is an account that has been temporarily banned by the Discord staff. This means that you will not be able to log into your account for a period of time. The length of time will vary depending on the severity of the action.

So, how long is an account disabled on Discord? Accounts that are temporarily suspended may be reactivated if you agree to comply with Community Guidelines after a two-week period. 

When you disable a Discord account, it is still visible in the Discord web client but is not active on any server. Disabled accounts can also not receive any messages or calls.

How can you recover a disabled Discord account? 

1. Check the FAQ section 

If you believe your Discord account was disabled for no reason, check the FAQ section and see whether there is a clause that addresses your problem.

Some of the common reasons why your account may be disabled abruptly include:

  • Discord account disabled for age – Discord requires that all users on the platform be at least 18 years of age.
  • Account disabled for invalid or no email – If your Discord account is not linked to an email or an invalid email, it may be disabled.

If you don’t meet the minimum age requirements, your account will be disabled. Sometimes it is due to a simple glitch. Ensure you check for any answers before making official communication.

2. Email Discord 

If your Discord account was disabled for suspicious activity, you will need to write to Discord official email explaining in detail what happened and wait for the verdict.

Attach as much evidence as possible for review. Your account may be restored with a stern warning or suspended for a few days then restored.

3. Send a Direct Message on Twitter 

You can check out Discord’s official Twitter account and reach out to them via tweet or direct message. In this case, you will have to provide all details and reasons you suspect your account is disabled.

Always ensure to check for the official verification mark as there are a lot of accounts pretending to be Discord fishing for your personal details. If everything checks out, your account will be restored.

4. Message Discord on Facebook 

If Twitter is not your preferred channel, you can also message Discord on Facebook to restore your disabled account.

Remember to include all relevant details such as your associated Discord email, username, and any other open tickets regarding the issue.

5. Message Discord on Instagram 

Discord is also on Instagram and you can also submit your request for account restoration on the platform. The steps are similar to Facebook and Twitter for you to recover your account.

You may get a reply asking you to submit your ticket number, fill in a form or write an email so ensure you have all the details at hand.

6. Submit an appeal form 

For a more detailed approach, you can submit an appeal form. This is usually after your Discord account is disabled for spamming.

Head over to their Submit appeal form page and fill in the form. You will then receive a ticket ID that you should keep close. When the team responds, you will be asked for the ID and hopefully, your account will be restored.

7. Send a message on Reddit

Discord is also quite active on Reddit with several moderators so your issue is likely to get addressed in a timely fashion on this platform.

Message them with the relevant details and a moderator will get back to you as soon as possible. The good thing about the moderators s that they can also give you tips on other issues you may have with your account.

Is a disabled Discord account banned? 

Disabling your account is different from being banned. When you disable your account, it stays the same until you restore it. However, if you are banned, all information will be removed from the servers.

So. what does a disabled Discord account look like?

A disabled account is one that is temporarily suspended. This means that you cannot access the account, but it will be restored after a certain period of time. 

On the other hand, a banned Discord account is one that has been permanently deleted from Discord for a violation of the Terms of Service. 

If you believe your account has been disabled erroneously, you need to know how to appeal. You can contact the support team through email or the Developer support center. You can also contact them via their official Twitter page.

You can also contact Discord directly

If none of these work, you can submit a Discord account disabled appeal form. You will need to write a short explanation about why you believe your account should be re-enabled.

There is no guarantee that they will be able to reinstate your account. This process can take up to 48 hours before any action is taken on the appeal request.

Like any platform, always make sure to read the Terms of Service to ensure you do not violate any that could result in disabling or permanent ban of your account.

If you experience any other issues such as Discord keeps freezing, refer to our expert guide and try our recommended fixes.

Let us know if your Discord account has been disabled before and what steps you took to restore

Who Has The Most Followers On Xbox?

When playing a game, comparing scores and chatting about the gameplay makes it more interesting. You can even learn a few tips from more experienced gamers from Xbox Social.

The number of followers on Xbox is a measure of how popular you are. It’s also a way for you to compare yourself against other players.

With the Xbox One achievement tracker, it is easy to stay in the loop while maintaining transparency on the achievements earned.

Your Xbox Gamerscore is a representation of your skill and dedication to gaming. You can secure gamer points which are virtual currencies that you earn by playing games on Xbox Live. 

They are not real money and have no real value outside of the game itself but you can redeem them. Some of the goodies in store include gift cards, gaming devices, in-app purchases, and accessories among others.

Who are my followers on Xbox? 

Xbox is the most popular gaming console in the world and with that comes a lot of attention. The platform has over 100 million monthly active users, which means there are a lot of people playing games on Xbox One and Xbox 360. 

This is an excellent opportunity for players to showcase their talents to an audience of millions. The more followers you have, the more likely people will be to play with you.

Who has the most followers on Xbox?

You may be wondering who has the most followers on Xbox One. Major Nelson also known as Larry Hryb has the most followers on Xbox. Being part of the Xbox team, it is no surprise why he earns this spot.

He is a programmer at Xbox Live and runs a podcast where he talks about all things Xbox and gaming. Most of his followers tune into his show as he brings along other gaming enthusiasts to decipher what’s new in the gaming community.

Another fun activity he engages his followers in is his gaming contest where he challenges them to name the game based on the features of Xbox One or Xbox Live.

What Xbox account has the most Gamerscore?

Stallion83 or Ray Cox currently holds the record of the highest gamerscore for one achievement on Xbox. He has been recognized by the Guinness World Record and presented with an Xbox Live lifetime subscription by Microsoft.

You too can earn Xbox Gamerscore points through the games you play. It’s not a competition but it is fun to be part of a gaming community.

Want to know which game is the most played on Xbox or other interesting facts, read this guide.

To add to the fun, you can download the Xbox HDR app to customize your gaming and improve the overall visual experience.

Let us know in the comment section what accounts you follow on Xbox and why.

How To Install & Manage Chrome Extensions on Opera

You can easily install Chrome extensions on Opera and we’ll show you exactly how.

So, if you’re an Opera user who doesn’t want to miss out on Chrome-native extensions like Grammarly, Evernote, or StayFocused, don’t worry. You can easily integrate them by following the steps below.

How to install Chrome extensions on Opera?

Here are 3 different ways in which you can add Chrome extensions to your Opera browser:

1. Install extensions from the Chrome Web Store

  1. Open Opera One and go to Chrome Web Store.
  2. Search for the extension you want to install. We will use Loom as an example here.
    install loom
  3. Select the Loom result.
  4. Click the Add to Opera One button by the right.
    add loom extension chhrome opera install
  5. Click Add extension when prompted that the extension is not from Opera One.
    add loom extension
  6. After installing the extension, press Ctrl + Shift + E to open the Opera One extensions settings.
  7. Finally, click the Details button to adjust the permissions to your preferences.
    loom details

There are no restrictions to the Chrome extensions you can install from the Web Store.

2. Download the Install Chrome Extensions add-on

  1. Launch Opera and go to the Addons store.
  2. Search for Install Chrome.
    install chrome extensions in addon store
  3. Choose the Install Chrome Extensions option.
  4. Click the Add to Opera One button in the top right corner.
    add extension
  5. Wait for the confirmation that the extension has been installed and restart Opera One.
    extension installed install chrome opera

If you’re having any troubles with the Chrome web store, you can install this add-on on Opera and use it whenever you want to browse for and install a Chrome-native extension.

3. Install the extension in developer mode

  1. Open Opera One and press the Ctrl + Shift + E keys. This will open the Extension Manager window.
  2. Toggle the Developer mode switch forward to activate it.
    switch developer mode install chrome extensions opera
  3. Now, go to the Chrome Web Store on Opera One to install the Extension source viewer.
  4. Click the Add to Opera One button.
    download extension source viewer
  5. Now, go to the Chrome Web Store to search for the extension you want to use. We will use Grammarly as an example here.
    searchh grammarly chrome install to extension opera
  6. Right-click on the extension title and choose View extension source.
    view extension source
  7. Click the Download option at the top.
    zip extensions download chrome install opera
  8. Open File Explorer and create a new folder. Do not delete this folder after the installation of the extension.
    open new folder
  9. Copy the downloaded zip file into the folder.
  10. Right-click on the zip file and select Extract here.
    extract extension install chrome opera
  11. Open Opera Opera and go to the Extension Manager.
  12. Click the Load unpacked button.
    load unpacked extension
  13. Choose the folder where you extracted the zip file and click the Select folder button.
    select grammarly folder
  14. The extension will now be displayed on your extensions list.
    grammarly added to extension

This is a more technical workaround. It takes slightly more time and requires more attention, but it’ll give you what you want when the Web Store and the Install Chrome Extensions add-on don’t work.

How do I enable extensions in Opera One?

  1. Launch Opera One.
  2. Press the Ctrl + Shift + E keys to open the Extension Manager.
  3. Search for the extension you want to enable.
    search adblock
  4. Click the Enable button.
    enable adblocker install chrome extension opera

There you have it: everything you need to know to install and use Chrome extensions on Opera One. We also have another similar guide on how to install Google extensions on Opera GX so feel free to check it out.

Feel free to let us know your experience with Chrome extensions on Opera One in the comments section below.

5 Easy Steps to Stop Skyrim From Crashing When Loading

Gamers and lovers of games attest to the diverse features of Skyrim. Skyrim is an open-world game with lots of DLCs and attractive flexibility like adding mods and creation clubs.

Fantasy and avid RPG fans have Skyrim in their lists of collections, with over 100 hours of playtime. The freedom in the intriguing environment makes it a delight.

As intriguing as Skyrim is, with all its amazing and spectacular graphics, some users have said that Skyrim crashes on load are frequent and annoying.

Gamers know that there are bugs and some annoying features that one can experience when gaming, however, a freeze or crash is too interruptive to ignore and would need fixing.

Why does Skyrim keep crashing when loading?

  • Modding your game – Skyrim is fun since it offers users the opportunity to modify the code of the game, to enable it to work in a different manner than its original design. Yet many say modded Skyrim crashes and freezes. This is because if the author’s file mentions incompatibility, and the user does not take note of it, this may cause Skyrim to crash when loading.
  • Unclean DLC and Mod – imagine your PC having a lot of residual files and contributing to a lag. It may not stop the optimal function, but when clean may slightly improve performance, even though it is minimal. The same can happen when you leave your mod or DLC unclean. It is important to clean residual files, especially when you mod your game. The accumulation of residual files over time may be a contributing factor to Skyrim crashing when loading.
  • Corrupted game file – this may not be any fault of yours. It could be a virus or malware that may have attacked the file, or there was a power outage in the process of loading a game. All these could lead to a corrupt game file and may cause Skyrim to crash.
  • Outdated graphics card driver – outdated graphic card drivers are incompatible with the new Skyrim updates. Therefore, if you are using an outdated graphics card driver, you will experience crashing or lagging when using your game.
  • Quick saves outside mod – as you use your Skyrim game, you would notice some autosaves or quick saves that keep coming on. These are changes that you save yourself when you mod your game, they save automatically, and maybe large files. If they are large files, they are probably unstable as they may not save properly and cause a crash.
  • High Shadow Setting – shadow setting often has to do with the high graphics display of the Skyrim games. If the game keeps crashing, reducing graphic quality may be an option.
  • Incorrect load order – the load order is the order in which the game loads up your mod. The game takes your mod and loads it up step by step as it detects the mod. If this is not correct, it may lead to a crash.

It is vital to note that when there is a new loading order, it tries to override the already existing mod, therefore it is best to optimize your load order in order to avoid conflicts. As for how many mods Skyrim can handle, rest assured that it can handle as many as possible, once arranged accordingly.

Users have experienced Skyrim crashes on load on PS4, PCs, and Xbox One, while loading music or when loading games. The frustration is the same regardless of the device, and this can be resolved in no time.

How do I fix Skyrim from crashing when loading?

1. Update the graphics card driver

  1. Press the Window and R keys on your keyboard to open the Run tab.
  2. Type in devmgmt.msc and press the Enter button.
  3. Right-click to select your graphic card under the Display adapter.
  4. Click on Properties.
  5. Select the Driver tab.
  6. Click on Update driver.
  7. Select Search automatically for updated driver software.

Importantly, if updating the driver does not work, then you can download it from the hardware vendor. Note that the brand name of the drive comes first before the numbers. Check them online, and download them.

Driver upgrades make the pathways the Graphics Card takes to conduct its work quicker by reducing superfluous activities or better spreading the workload.

An automated solution such as Outbyte Driver Updater has a vast daily-updated driver database, so it will provide the most recent drivers available after scanning your system.

In addition, you will receive a completely thorough report detailing the precise state of your Windows missing, damaged, or obsolete drivers. You may rely on Outbyte Driver Updater to make such enhancements to ensure a proper update with the most recent graphics card drivers.

⇒ Get Outbyte Driver Updater

2. Restore the previous version

  1. Go to the drive where you stored your game file.
  2. Right-click on the folder and select Properties.
  3. Select the previous version.
  4. Click on the latest modified date file.
  5. Select Restore.
  6. A tab with Are you sure you want to restore the previous version? will dropdown. Click on Restore.

Steam has an API for developers to use to integrate the Steam function into their products, and Skyrim has it too.

Another way to fix corrupted game files is to login into the built-in Steam of your game, click on Library, navigate to the Local files and click on Verify integrity of game files.

3. Optimize your load order

  1. Place your mod categories from top to bottom.
  2. Always check mod descriptions.
  3. Check to see mods that are add-ons.

Thus, think of how much the game will change by the mod, because if the mod will cause a big change to the game, then it should be at the top.

There is a general rule to load order, which is that It is easy for a big mod to override a small mod, but way harder for a small mod to override a big mod.

Arrange your mods in this order:

  • Patches and bug fixes.
  • Quest mods and mods that affect the environment like towns, cities, and landmasses.
  • Scales, level, capabilities, and magic mods.
  • NPCs, enemies, allies, or companions mods.
  • Mods that alter or add visual, textual, or atmospheric changes.
  • Mods for cheats.
  • Modules and textures mods.
  • Mods for armors and weapons.
  • Crafting weapons and scrolls or other items mods.
  • Small objects and items mods.
  • Mods that alter clothes and weapons.

Some mods may not be compatible or may not follow the arrangement above, therefore you would have to decide the level of impact that it would have on your game.

Understand that the overall purpose is to enjoy the mods, which make Skyrim more fun, while you use your games without Skyrim crashing.

4. Turn off Quicksave

  1. Go to Settings using the Launcher.
  2. Select Gameplay.
  3. Deactivate the Save on rest, Save on travel, and Save on wait buttons.

5. Reduce shadow setting

  1. Go to the Main Menu of the game.
  2. Navigate to Options and click on Advanced options.
  3. On the Detail tab, you will find the Shadow setting.
  4. Set the shadow on low.
  5. Start your game and observe for any lag.

In conclusion, Skyrim crashes on loading if you do not install it properly, so you would need to uninstall your Skyrim and ensure that you install it properly to prevent the issue from happening again.

For instance, if there was an interruption like a power outage or lack of a good connection, in the process of installing Skyrim, the loading save will crash. So, you need to look out for this in order to have a good save when loading.

Let us know in the comments below if you tried any of these steps and if they were of any help.

4 Easy Ways to Fix Steamworks Common Redistributables Error

Steamworks common redistributables error is not peculiar to one gamer, it’s something that has been experienced by virtually every game lover.

This free suite of tools is available for everybody on the Steam platform and its basic function is to help game developers easily distribute their products. Steamworks is one of the most popular online platforms where players can play, create, and manage different games.

Whenever you download a game, it is expected to be optimized for your device’s OS for optimal performance. Steam automatically adds all the required files for smooth operations to your device when downloading a game from its cloud database.

How do I get rid of Steamworks common redistributables?

Many users of the Steam platform who have been seeing the Steamworks Common Redistributables Error notification are as confused just like you might be at the moment. They aren’t sure if it is something they need to worry about or not.

Here’s the thing, if you are not having any issues while launching any game downloaded or played on the Steam platform, you have nothing to worry about. However, there is a way to hide the folder such that it doesn’t ruin your game enjoyment.

How can I fix Steamworks Common Redistributables errors?

1. Steamworks common redistributables disk write error

1.1. Restart the Steam application

  1. If it’s your first time experiencing the error, close the Steam client.
  2. Reopen the application and try to re-download the game again.

1.2. Run Steam as an administrator

  1. Check your system Start Screen to locate the Steam icon.
    Steam Icon
  2. Right-click on the icon, select Run as Administrator.
    Steam Admin
  3. Select Yes in the User Account Control prompt.

1.3. Remove write protection from Steam Application

  1. Open File Explorer by pressing Windows key + E.
  2. Locate the folder that Steam is stored on your computer.
  3. Right-click on the. Now, you will see a pop-up with list of options, select Properties.
    Steam properties
  4. In the Steam Properties, select General. Next, uncheck Read-only under Attributes if it’s ticked. Then, choose OK to save.
    Steam Folder properties

1.4. Get rid of corrupted files

  1. Find the Steam icon on Home Screen.
    Steam Icon
  2. Right-click on it. This will trigger a list of options, choose Open file location.
    File Location Steam
  3. In the Steam folder, locate Steamapps folder.
  4. Check the folder for any files that are 0 KB and have the same name as the game you are trying to launch.
  5. If you find any of such files, delete them, and try to relaunch your game.

1.5. Check the system firewall

  1. Open Settings by pressing Windows key + I.
  2. Select Privacy & security. Then choose Windows Security.
  3. Choose Virus & threat protection.
    Virus threat
  4. Under Virus & threat protection settings, select Manage settings.
    Virus Manage Settings
  5. Scroll to locate Exclusions then click Add or remove exclusions.
    Remove exclusions
  6. Add an exclusion by clicking the cross sign and selecting the location of the files.

This issue can also be resolved by completely disabling the firewall (antivirus/antimalware) but we don’t recommend this as it could expose your system to attacks.

2. Steamworks common redistributables not downloading/slow download

2.1. Check internet connection and speed

  1. Check if your network is still connected by trying to load something in the browser.
  2. Test internet speed by using any online checker like Fast.
    Fast.com
  3. Check if VPN is connected. Disable it.
  4. Retry the download.
  5. If still the same, try the method below.

2.2. Verify Integrity

  1. Open Steam.
    Steam main window
  2. Right-click on Steamworks Common Redistributables.
  3. Choose Library.
  4. Select Properties. Choose Local Files.
  5. Select verify integrity.

2.3. Clear Steam Download Cache

  1. Press the Windows key and type Steam. Then select Open to launch Steam.
  2. Go to Settings.
  3. Select Downloads.
  4. Next, choose Clear Download Cache. Then select, OK.

If any of the methods highlighted above does not work, you may want to reinstall your Steam. Some gamers reported this fixed the issue after trying different solutions.

3. Steamworks common redistributables keeps downloading

3.1. Restart your Steam client

If the issue is occurring for the first time, allow the application to complete the download. The operation is used by Steam to keep your files up to date.

But, if the redownload is consecutive and would not finish, close the Steam application and restart it. This should any non-critical problem.

3.2. Restart your PC

For this solution, you may decide to restart or completely shut down the system. It would have the same effect.

After restarting or rebooting the system, relaunch Steam to check if the problem is gone.

3.3. Change download region

  1. Launch Steam.
  2. Select Settings. Next, click on the Download tab.
    Steam settings-
  3. Check Download region and choose the region you think is closest to you.
  4. Try different regions closer to you to see if there is any difference.

3.4. Run Steam://flushconfig command

  1. Open Run by pressing Windows key + R.
    Empty Run
  2. Type the command below and press Enter:
    Steam://flushconfig
  3. Wait for a few minutes. Now, restart your computer.
  4. Run Steam.exe from the Steam folder in File Explorer (scroll up to read how to locate the folder).

3.5. Reinstall Steam

  1. Go to your Downloads folder in File Explorer. Then find SteamSetup.
  2. Right-click on it and Run as administrator.
  3. Follow the System Prompts to reinstall Steam.

4. Steamworks common redistributables has shared content

4.1. Check if the Steamapp folder is available

Steam stores some important files necessary for your game’s launch in the Steamapp folder. Some gamers prefer having this folder in a separate folder aside from the main Steam folder.

Problems usually arise when the folder is mistakenly deleted and Steam cannot find it anymore. For a quick fix, create a folder in the main Steam folder and name it Steamapp, then relaunch the app.

4.2. Delete the Registry key

  1. Open Run by pressing Windows key + R.
  2. Type the Command below:
    regedit
  3. This will open the Registry Editor.
  4. Locate any of the Registry keys below (depending on your Windows processor):
    HKEY_LOCAL_MACHINE\SOFTWARE\Valve\Steam\Apps\CommonRedist
    HKEY_LOCAL_MACHINE\SOFTWARE\Wow6432Node\Valve\Steam\Apps\CommonRedist

  5. When located, delete it.

As much as the errors in Steam could be frustrating, we hope you find all of the solutions explained so far easy to use.

Before you go, comment on your experience trying out any of these methods and if you tried to find another solution, share it with others below.

Quick Assist is Not Working or Opening? 5 Ways to Fix it

If Quick Assist isn’t working on your PC, you won’t be able to remotely help others, so today we’re going to show you a few solutions that can help you fix this issue on your PC.

Why does my Quick Assist not work?

Recent updates or problems with your temporary files can often cause this problem.

How can I fix Quick Assist not working, try again later error?

Before trying anything else, try running the app as administrator and check if that helps. You can also try opening Quick Assist again, without closing the instance that is stuck.

1. Remove recent updates

  1. Open the Settings app and go to Windows Update.
  2. Next, go to Update history and choose Uninstall updates.
    uninstall updates
  3. Locate the recent update and remove it.

Users reported issues with KB5044273 so if you have it installed, remove it and check if that helps.

2. Recreate QuickAssist folder

  1. Press the Windows key + R, type %localappdata% and click OK.
    localappdata run dialog
  2. Next, go to the Temp folder.
  3. Locate QuickAssist folder and delete it.
  4. Start Quick Assist again.

3. Reset the Quick Assist app

  1. Go to Start and choose the Settings option.Quick Assist Fixes
  2. Choose the Apps section located on the left menu.Quick Assist Fixes
  3. Click on the Installed apps option.
  4. Find the Quick Assist app, right-click on the three-dotted line, and choose the Advanced options to open more settings.
  5. Under the Reset tab, click on the Repair option. It will take some time for the whole process to finish. After the procedure is over, try re-accessing the app again to see if the error persists.Quick Assist Fixes

Resetting the app will help when Quick Assist is stuck on the loading screen.

4. Reset the Internet settings

  1. Go to the Search box, type Internet options and click the Open tab.
  2. When the window opens, choose the Advanced tab.
  3. Scroll downwards and choose the Restore advanced settings option. Click on the Apply button and then OK to apply the changes.
  4. Restart the machine and try using the app again to see if the problem still exists.

5. Use Windows Powershell to reregister the User Account app

  1. Go to Search, type windows powershell, and choose the Run as administrator option.
  2. When the shell opens, type the following command and press Enter to run it: Get-AppXPackage | Foreach {Add-AppxPackage -DisableDevelopmentMode -Register "$($_.InstallLocation)\AppXManifest.xml"}
  3. Restart the PC and try reusing the app again.

If the Quick Assist stopped working, it’s likely that a recent update caused the problem, or you might have a temporary glitch with the app cache. You can also view Quick Assist logs to determine what went wrong.

If the issue is still there, we also have a guide on how to download Quick Assist in case you need to reinstall it. For users who prefer different tools, we have a guide on how to enable Remote Assistance in Windows 11, so feel free to check it out.

Let us know which method worked for you by dropping us a comment in the section below.
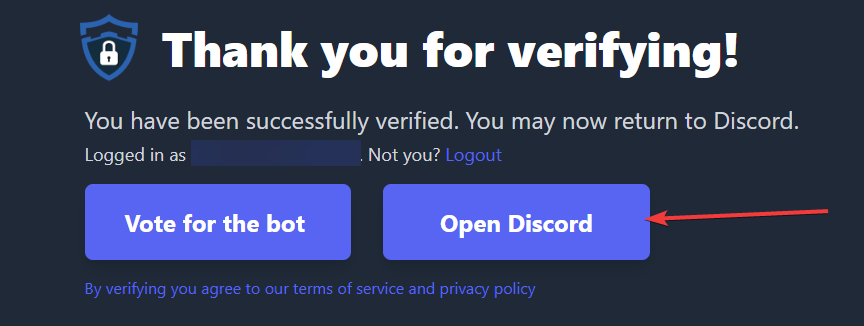
5 Quick Ways to Fix Evil Dead When It’s Not Working

The Evil Dead: Ghost was just launched a few days ago for PS5, PS4, Windows, Nintendo Switch, and Xbox One, Xbox Series X, and Series S. This game was released widely, but a few users have reported that the game is not working.

This is an action-horror game where you play with the iconic characters of the Evil Dead franchise: Ash, Kelly, Scotty, and other friends that were portrayed in the 1981 movie.

Saber Interactive quietly released the game on May 13th, but since then, users have reported that the Evil Dead game is not working on PS5 and other devices.

Keep reading as today we have got 3 quick fixes that you can use to fix the Evil Dead game that is not working and make it work again on your Windows computer, Xbox, PS5, and so on. 

What can I do if the Evil Dead game isn’t working on my PC?

1. Evil Dead does not work on PC

1.1 Verify game files in the EPIC launcher

  1. Open the launcher, and next to Evil Dead: The Game, click the three dots.Opening Epic Games Launcher
  2. Select Verify to initiate the verification. During this process, there is a possibility that additional files may download as well.Verifying the game files of Evil Dead
  3. Once done, restart the computer and relaunch the game.

If the game is still not working, follow the below steps.

1.2 Use Windows CHKDSK Utility

  1. Click on the Start button and search for the Command Prompt.
  2. Open it as an administrator by selecting Run as administrator.Opening the command prompt as an administrator
  3. Type chkdsk C: /r and press Enter.Running the CHKDSK command using the command prompt
  4. Enter your password and the scan will begin automatically.

1.3 Check for Windows Updates

  1. Click on the Start button and search for Settings.Opening Settings from the Start page
  2. Now, click Windows Update and then select Check for updates.Checking for new updates from Microsoft to download
  3. If there are new updates available, download and install them.Downloading and installing the new updates from Microsoft
  4. Once the installation is complete, restart your computer.
  5. Reinstall the game 

If you’ve tried everything and still Evil Dead: The Game is not working, try re-installing the game again from the Epic store.

2. Evil Dead not working on PS5

2.1 Update your PS5

  1. Go to the Settings page of your PS5 and select System and then System Software.Selecting System inside the PS5 settings page
  2. Choose System Software Update and Settings and then select Update System Software.Selecting System Software Update to update the software of PS5
  3. Choose Update Using Internet and go back to System Software and select System Feature Updates.Updating the PS5's software
  4. Restart your PS5 to apply the changes.

2.2 Delete Saved Game Data

  1. Go to Settings again, and select Storage.Selecting the Storage in the settings menu of PS5
  2. Now open Games and Apps. Select Saved Data and then select Evil Dead.Opening the Games and Apps menu to select games and delete their data
  3. On the controller, press the Options button, and then select the saved game data files.
  4. Select Delete and then a window will pop up asking if you are sure. Confirm your decision to proceed ahead.
  5. Now reboot your console once the saved game data has been deleted.

2.3 Reset your PS5

  1. Go to Settings and select System.Selecting System inside the PS5 settings page
  2. Now, select System software and and then Reset options.Selecting Reset options inside PS5 settings page
  3. Select Reset Your console and then select Reset.Selecting Reset Your Console to reset the PS5 to factory settings
  4. Your PlayStation will now return to its factory settings. This process may take a few hours to complete. Make sure your console doesn’t lose power during the process.
  5. Once the process is completed, restart your PS5.

3. Evil Dead not working on Xbox

Unfortunately, there isn’t a fix at the moment for Xbox users due to a system error as per the Saber support. But the problem has been acknowledged by them, and they have tweeted out that a fix is on its way.

4. Controls for Evil Dead Regeneration are not working

Try disabling and re-enabling the gamepad, or if you are using a controller, disconnect the keyboard and the mouse from your computer. 

The game controls occasionally fail to function because multiple input devices are connected and it is unsure which one to use.

5. The Evil Dead 4K is not widescreen

Yes, the Evil Dead 4K is not widescreen, but instead it has its original aspect ratio of 1.33.

Is it a problem? Absolutely not. You’ll get used to the aspect ratio without an issue.

To make the 4K version of the movie, the negatives were scanned in full native 4K with both Dolby Vision and HDR 10. But due to technological constraints, the movie can not be scaled to widescreen.

The Evil Dead: Ghost is based on the original movie that was released in 1981. The game was released with a lot of bugs, but developers are currently hard at work releasing patches.

Meanwhile, you can try the above-mentioned fixes to fix the issue and play the game.

500 Internal Server Error in NGINX [Troubleshooting Guide]

NGINX is an open-source software used for web serving, reverse proxying, caching, load balancing, etc. It started as a web server designed for maximum performance and stability.

The 500 Internal Server Error is a common issue that prevents it from returning a proper response. Errors like these can occur due to a faulty script or missing files referenced by code.

NGINX is typically a reverse proxy server, so one of the most common reasons for the 500 Internal Server Error could be one of its web servers like Apache.

Keep reading this post to know more about this error and how to fix it in no time.

What is the meaning of the 500 Internal Server Error?

The 500 Internal Server Response code indicates that the website has encountered an unexpected condition that is this evening it from fulfilling the request.

It’s a generic catch-all response that shows that the server cannot find a better error code in response. This error code is a very general HTTP status code on the website server but isn’t precisely the exact problem.

Quick Tip:

The Opera One browser has a VPN proxy that allows you to connect to a few servers. Accessing and connecting to a different server is helpful when you have internal server issues with another browser.

When you click on the blue VPN box, a drop-down menu appears, allowing you to switch the VPN on or off and pick a location.

Opera One

With the built-in VPN, you can change the location and bypass internal server issues in NGINX.

What can I do to fix the 500 Internal Server Error in NGINX?

1. Reload the web page

This error can occur sometimes due to a temporary problem on the webserver. If that’s the case reloading the page might help.

Reload the page by pressing F5 or CTRL + R and check if the NGINX 500 Internal Server Error localhost message disappears.

2. Clear your browser’s cookies and cache

On Chrome

  1. Open Google Chrome and click on three vertical dots at the top right corner.
  2. Click on Settings and navigate to Privacy and Security.
  3. Click on Clear Browsing Data.
    500 internal server error NGINX
  4. Check the options Cookies and other site data and Cached images and files.
  5. Once done, click on Clear Data.
    500 internal server error NGINX

If Chrome’s cache data gets corrupt or full it can cause the 500 Internal Server Error NGINX. Clear Chrome’s cache data and cookies then check if the error gets fixed.

Alternatively, you may want to use a free multi-purpose utility that not only clears the cache but removes any unnecessary data on the computer.

On Firefox

  1. Open Firefox, click on the hamburger icon at the top right corner, and click on Settings.
    firefox-settings-1
  2. Navigate to Privacy & Security and in the Cookies and Site Data section, click on Clear Data.
    500 internal server error NGINX
  3. Now click on Clear to confirm the process.
    500 internal server error NGINX

3. Disable VPN

  1. Press Windows key + I to open the Settings app.
  2. Navigate to Network & Internet.
  3. Select VPN from the left pane. In the right pane, pick your VPN connection and click on Remove.
    vpn remove
  4. If you’re using a VPN client, make sure to disconnect from the VPN.

Once done, restart your device and check if the 500 Internal Server Error NGINX is resolved.

4. Check your Internet connection

  1. Visit Fast i.e., a speed test website.
    Speed test
  2. As soon as the website opens it’ll automatically start testing your network’s speed.
  3. Wait while your connection is being tested.

If you don’t prefer this, you can use any other Internet speed tester to check your connection.

That’s all on how you can fix the 500 Internal Server Error in NGINX. Several issues are to be blamed, but this usually occurs due to a bad Internet connection. Things are no different for those complaining about getting the 500 Internal Server Error when using the React app

Follow the steps mentioned above to fix this error. If the troubleshooting methods mentioned above could not help you, feel free to drop a comment below. We’re eager to hear from you.