Projection Mapping Software: 9 Best to Use in 2026

Video mapping, also known as projection mapping or spatial augmented reality, refers to projection technology used to transform or turn objects into display surfaces for projecting videos.

Nowadays, this technology is widely used for a lot of parties, outdoor and indoor exhibitions or shows all over the world

How can video mapping software help me?

Simply put, video mapping is the projection of visual animations on objects or other elements of architecture.

Such objects can be buildings or other industrial landscapes which are often irregularly shaped.

So, using the best software for video mapping spatially maps a two or three-dimensional object onto the virtual program, which in turn apes the real environment it will be projected onto.

Artists and advertisers use projection mapping software to add extra dimensions, notions of movement, or even optical illusions to objects that are or were previously static, to create an audio-visual kind of narrative.

They do this in two phases: manufacturing, where the scenario, modeling, motion graphics, video editing, and other processes are created, and then the production phase that adds elements like software, cabling, and installation among others.

So, what are the best software solutions for video projection mapping to use with your PC? Check out our top picks below.

What are the best software tools for video mapping?

Adobe Premiere Pro
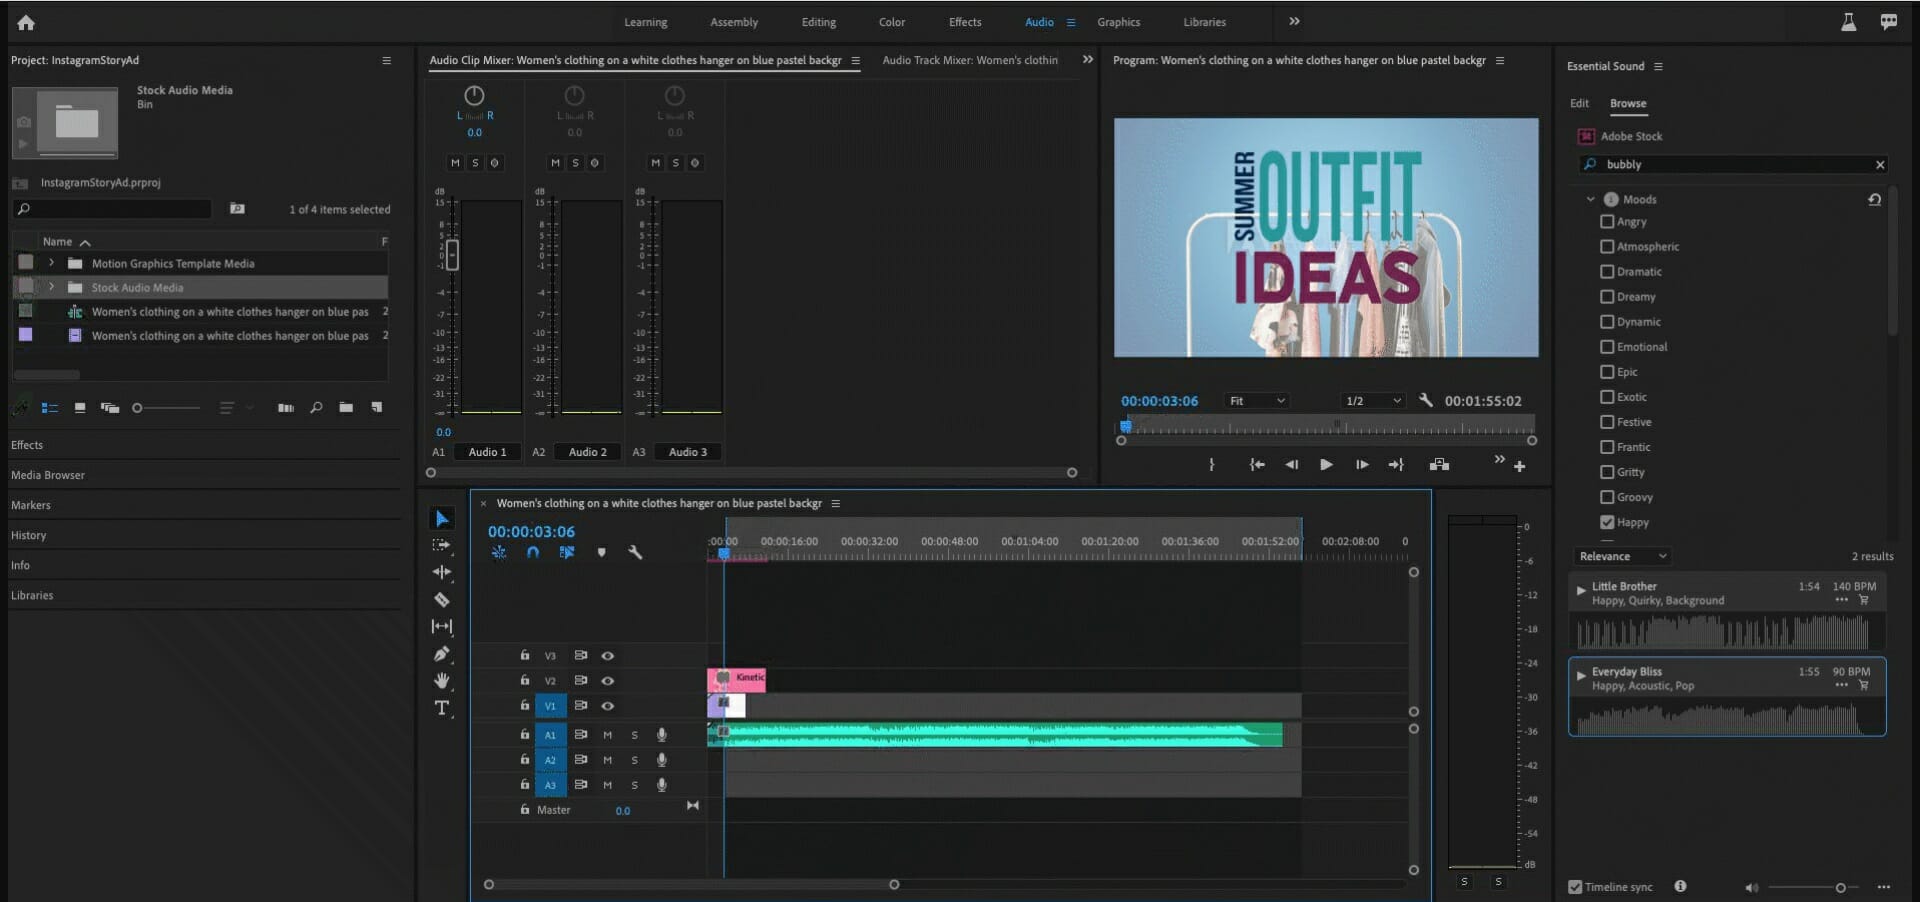
Adobe Premiere Pro is a software tool well known for its great video editing features and because it can handle pretty much all the editing you may need.

But it’s also very good for creating video mapping. Moreover, with Premiere Pro, you can edit footage in any format, from 8K to virtual reality.

The software can work with any file format you have, no matter it came from your phone or from a professional camera.

The lightweight proxy workflows and faster ProRes HDR let you work the way you want with your media, even on mobile workstations.

With Adobe Premiere Pro is relatively easy to map simple shapes and to create a linear timeline. Thus, it is a good choice, no matter if you are new or already a professional in the industry.

The video projection mapping features within Premiere Pro let you add advanced sequencing and layering.

If your project also has audio tracks, you can easily import those and get real-time previews of how they go along with the visual effects. 

Premiere Pro has a decent library of stock audio tracks ready to use in your project. It also has motion graphics templates.

Other key features include:

  • Supports all video file formats
  • Advanced color and lightning options
  • Easy sequence creation feature
  • Map simple shapes and create linear timelines
  • Advanced sequencing and layering

Adobe Premiere Pro

The industry-leading video editing software, Adobe Premiere Pro is a great tool to have for video mapping projects.
Free trial Visit website

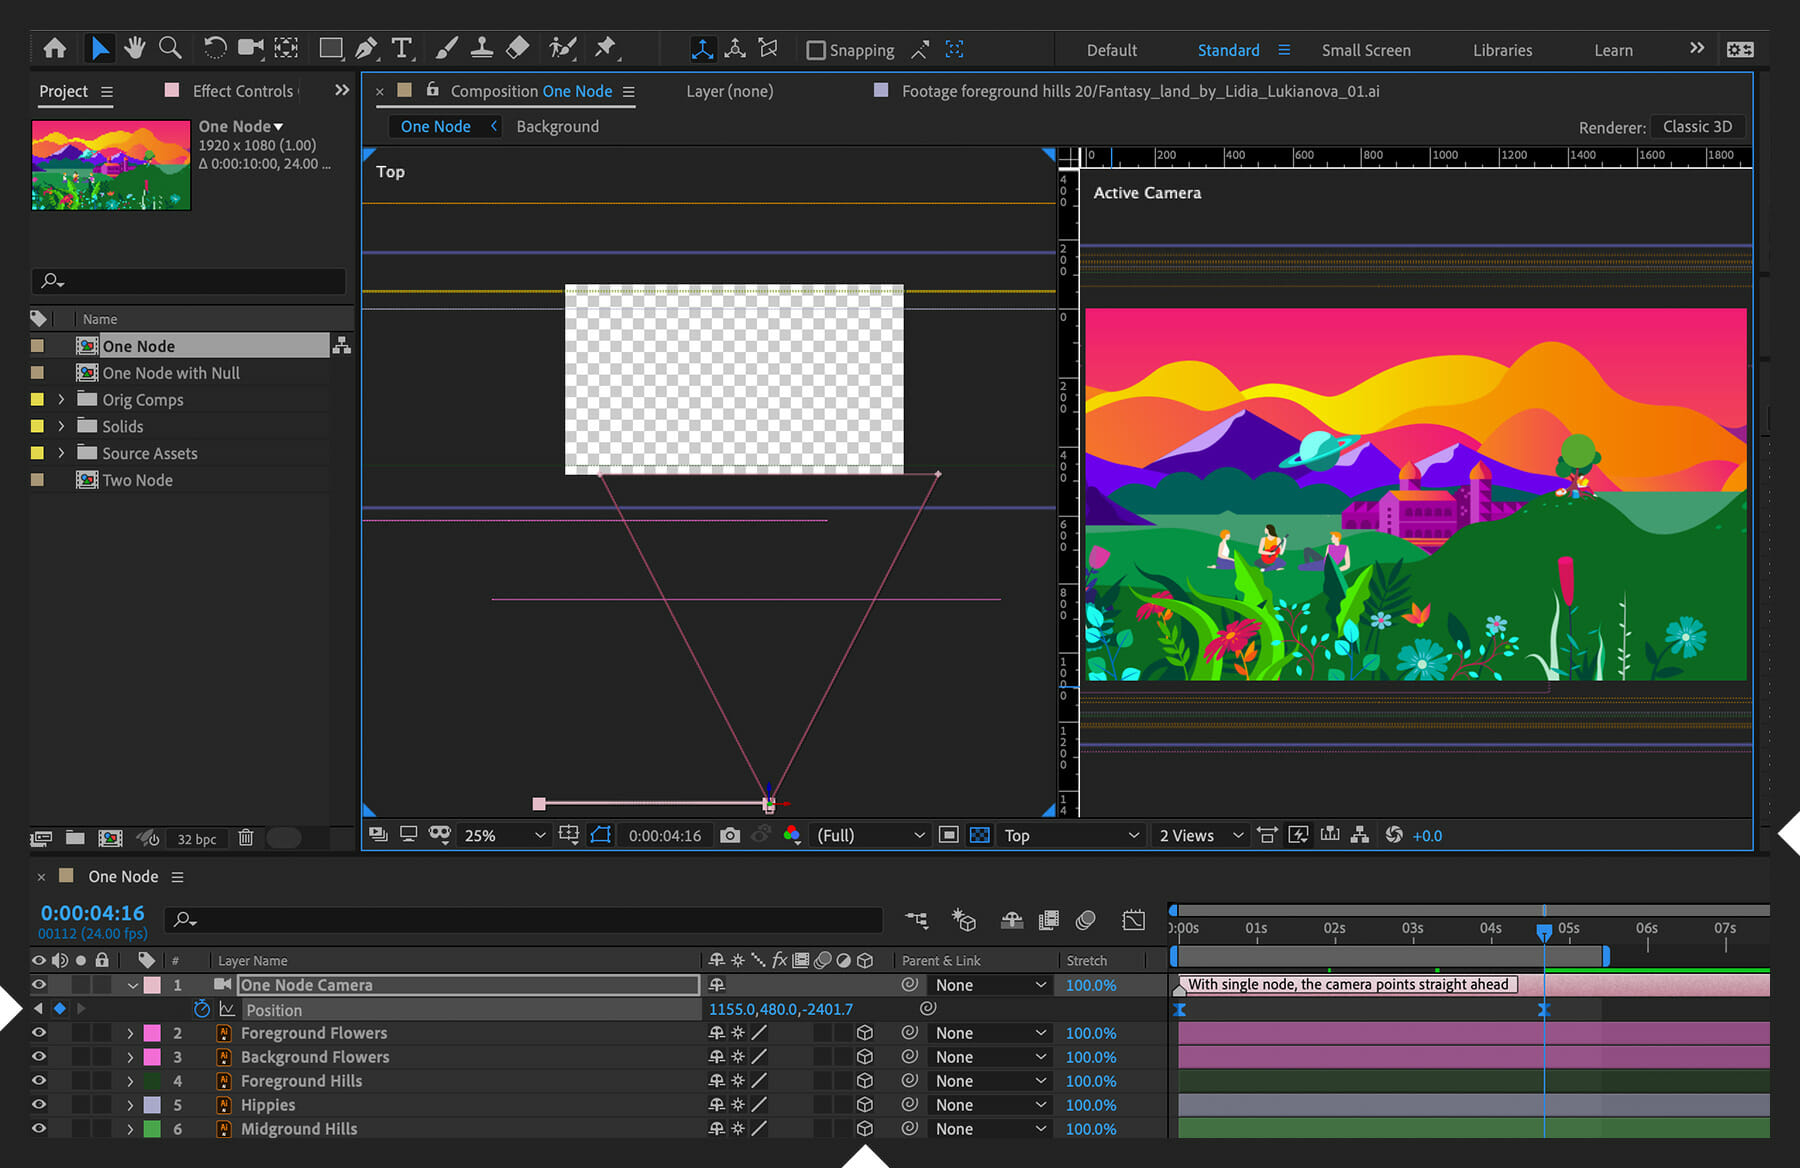
Adobe After Effects is another great software, part of the Adobe Creative Cloud suite’s tool.

It is capable of producing stunning works of visual art and is the video industry standard for visual effects and motion graphics.

This software can be used successfully as mapping software and functions fairly well in relation to creating masks, shapes, manipulating clips, etc.

Its new feature, 3D Transform Gizmo, allows you to scale, position, and rotate 3D layers. This multifunctional gizmo offers more power when navigating 3D due to the visual guides and multiple modes.

There are many great free or paid plugins for camera projection mapping and photo parallax animation. Adobe After Effects allows you to install them.

After Effects can connect to your projector and set it as your display output. Just select the specific resolution of the surface you want to project onto and start adding and editing video mapping effects.

Then, add 3D objects and use advanced masking in your composition. After Effects also has straightforward drawing options and 3D objects features.

Adobe After Effects is a subscription service. It is available as standalone software or a Creative Cloud subscription that offers additional Adobe products.

All of these tools work seamlessly together. You can try After Effects for free for 7 days.

Other key features include:

  • Preset animations
  • Motion graphic templates
  • 3D geometry and depth support
  • Use the 3D Transform Gizmo feature for scaling, positioning, and rotating 3D layers
  • Great integration with other Adobe software

Adobe After Effects

With After Affects you can take any idea and make it move. That’s why this software is perfect for video mapping.
Free trial Visit website

MadMapper

MadMapper is probably the best video mapping software tool, thanks to its simplicity. It can be used on the go.

Furthermore, the application is powerful, yet versatile, which makes it the ultimate video mapping tool.

With MadMapper, you can map an unlimited number of videos on any real-life surface with as many projectors as your graphic card can handle.

Control LED arrays when light mapping, in real-time, and feed these with video content or generative materials, plus control moving lights with pixel content.

MadMapper is backed by a big community, so they keep updating the software constantly, which is why it has new features such as a Dark User Interface, a live editor to code your own materials, and an online library to share the materials.

It also features the miniMAD hardware companion which now controls the light, with automatic network synchronization for multi-projection and DMX output to control lighting equipment.

Other salient features include an ultra-fast video player, multiple inputs, masking, video effects, mesh warping, 3D Calibration, and lighting, soft edge, spatial scanner, LED mapping, and much more.

You can use MadMapper software for architectural video mapping, art installation, stage design, and live shows.

Other key features include:

  • Supports multiple projectors
  • 3D lightning support
  • Support for audio input
  • LED scanner
  • Control LED arrays when light mapping, in real-time

⇒ Get MadMapper

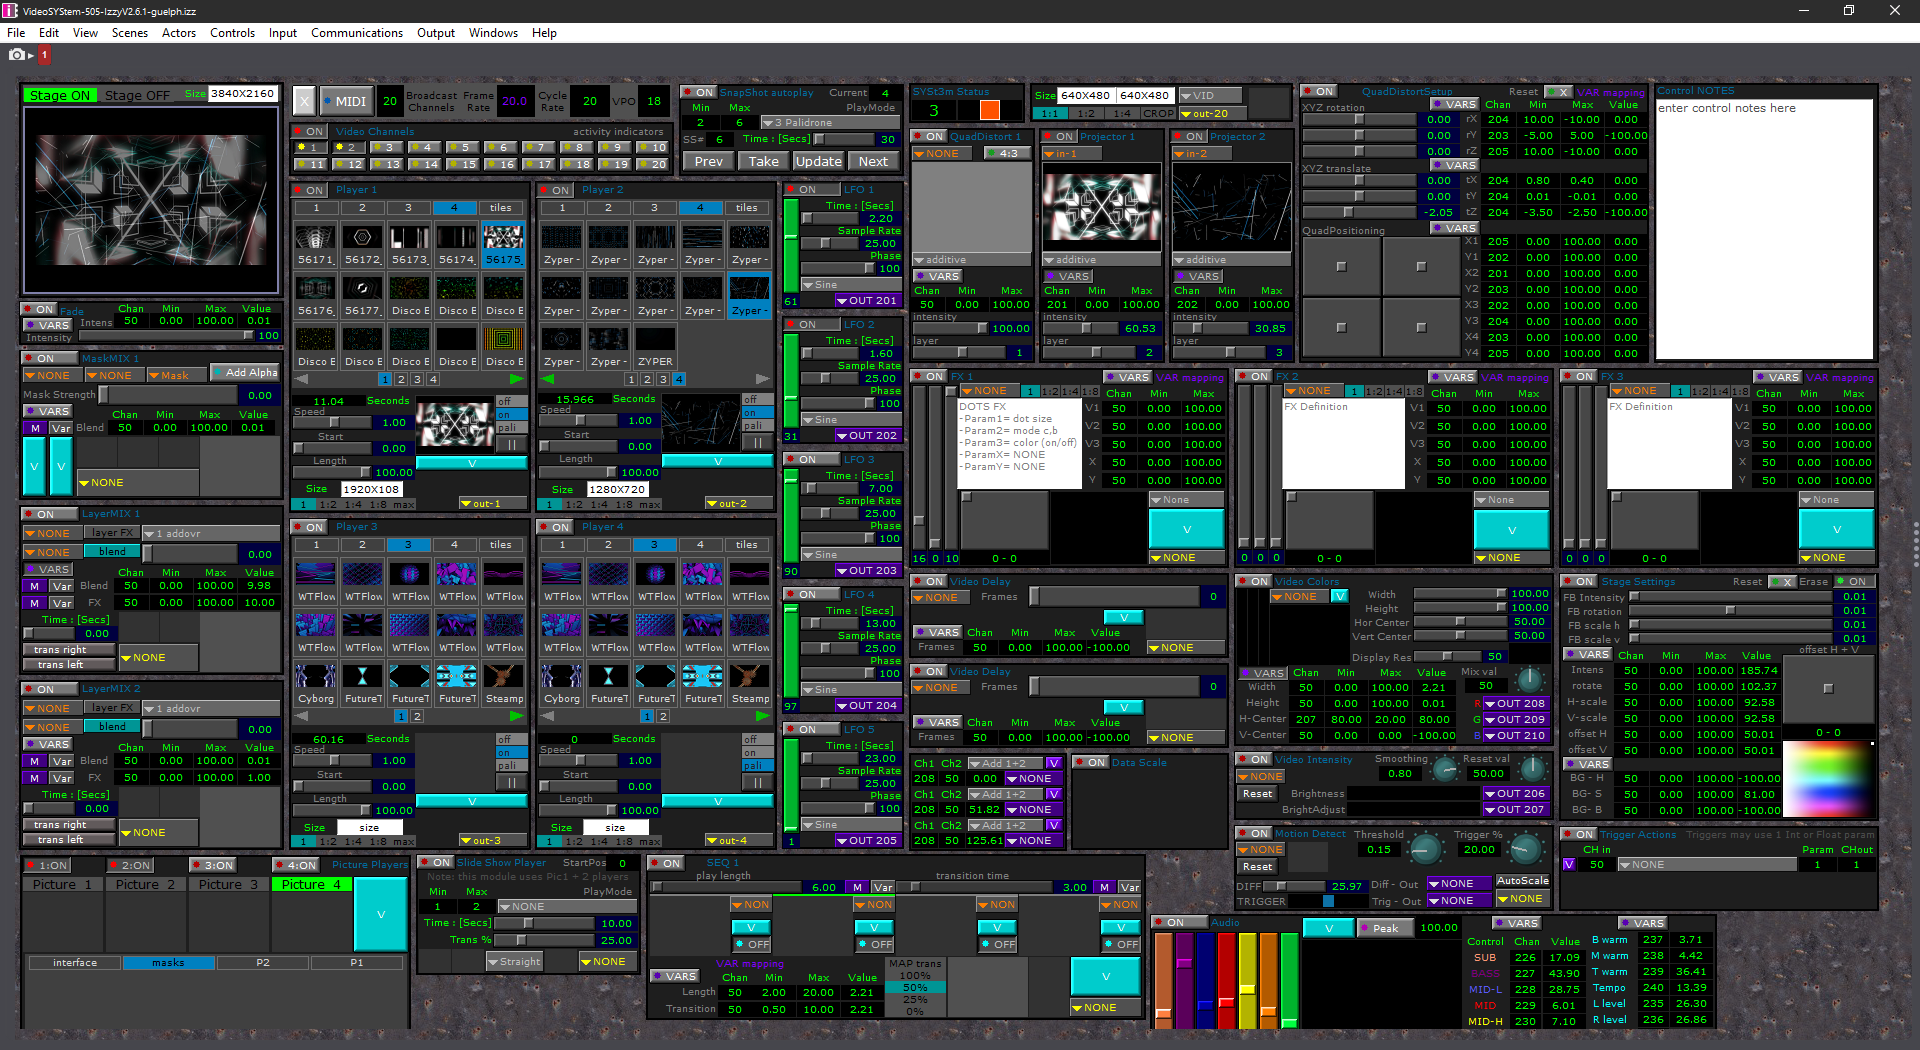
Isadora (Troikatronix)

If you want video mapping but your project needs a lot more, Isadora is the best software for video mapping you can use.

This tool works well with artists, designers, and performers who want to add video and interactive media to their projects, as it combines a media server, visual programming environment, and powerful video/audio processing engine for interactive media playback.

Create stunning effects in real-time in a user-friendly and easy to learn and use platform, which features 8 HD video playback channels, unlimited video layers, and 6 independent video projector outputs

It also comes with an integrated video mapping tool, 4 live camera feeds, custom effects via Open GLSL, built-in video tracking, low latency response to real-time output, and so much more.

One of the great things about it is it lets you generate customization sequences fast, but it is held back by its learning curve and playback performance which reduces frame rates for non-optimized projects.

Isadora has in-depth lighting settings. The node-based interface lets you control any DMX value in real-time.  Not only that, but it can also convert video signals into pixel-mapped values for project outputs.

This software lets you set up multiple projector outputs at once. It has an advanced stage editor that lets you integrate each sequence into its corresponding projectors. It has a blending wizard that can help you generate the best possible adjustments for your particular setting.

Probably one of the biggest assets of this software is that it is highly interactive. You can change your settings as you project and get instant, real-time results.

Isadora is a licensed-based software that is compatible with Windows OS and macOS. It has a free trial version with quite a lot of limitations.

Other key features include:

  • Motion tracking capabilities
  • Quick movie playback options
  • Timecode for projections
  • 8 HD video playback channels and unlimited video layers
  • 6 independent video projector outputs

⇒ Get Isadora

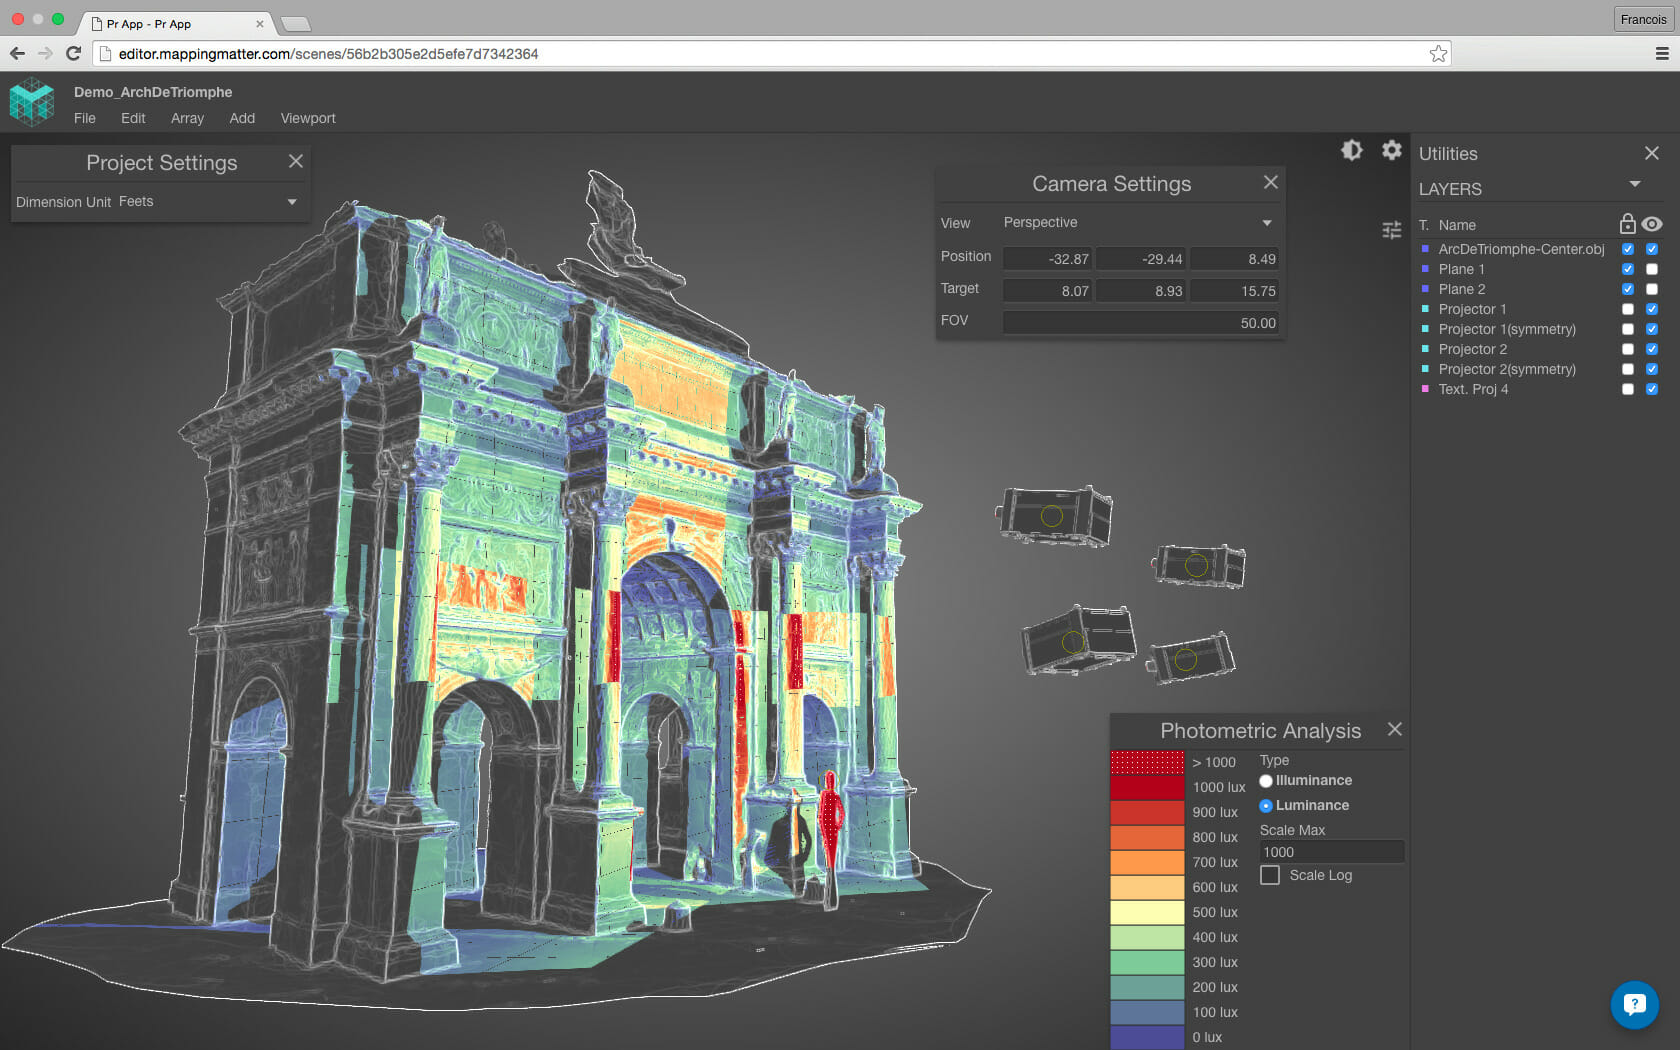
Mapping Matter

Mapping Matter is a web-based video mapping tool with advanced, error-free planning and simulation features.

This is one of the best options when it comes to convenience. You can start working right away, from your browser, without any installation.

Moreover, the toolset is easy to understand even if you are not accustomed to the workflow of similar 3D tools.

Mapping Matter lets users generate quick PDF documentation based on their model. It has annotations options if you need to add any further information. This feature can create detailed projector spec lists.

This online mapping tool allows you to interact with projectors by providing throw ratios settings, projection beams width adjustments, lock targets, and more.

Mapping Matter has some basic parametric geometries options, but it does not support full 3D modeling. It supports already made models and helps you add the settings necessary for projection. This tool is compatible with 3D .obj models.

The tool allows to change directional and ambient lighting, create symmetries, apply textures on objects, and more.

Mapping Matter is subscription-based with monthly charges. It has dedicated plans for individual users and for teams. It does provide a 14-day free trial.

Other key features include:

  • Endless undo 
  • Large pattern library
  • Projection distance assistance
  • Generate quick PDF documentation based on your model
  • Provides throw ratios settings, projection beams width adjustments, lock targets, and more

⇒ Get Mapping Matter

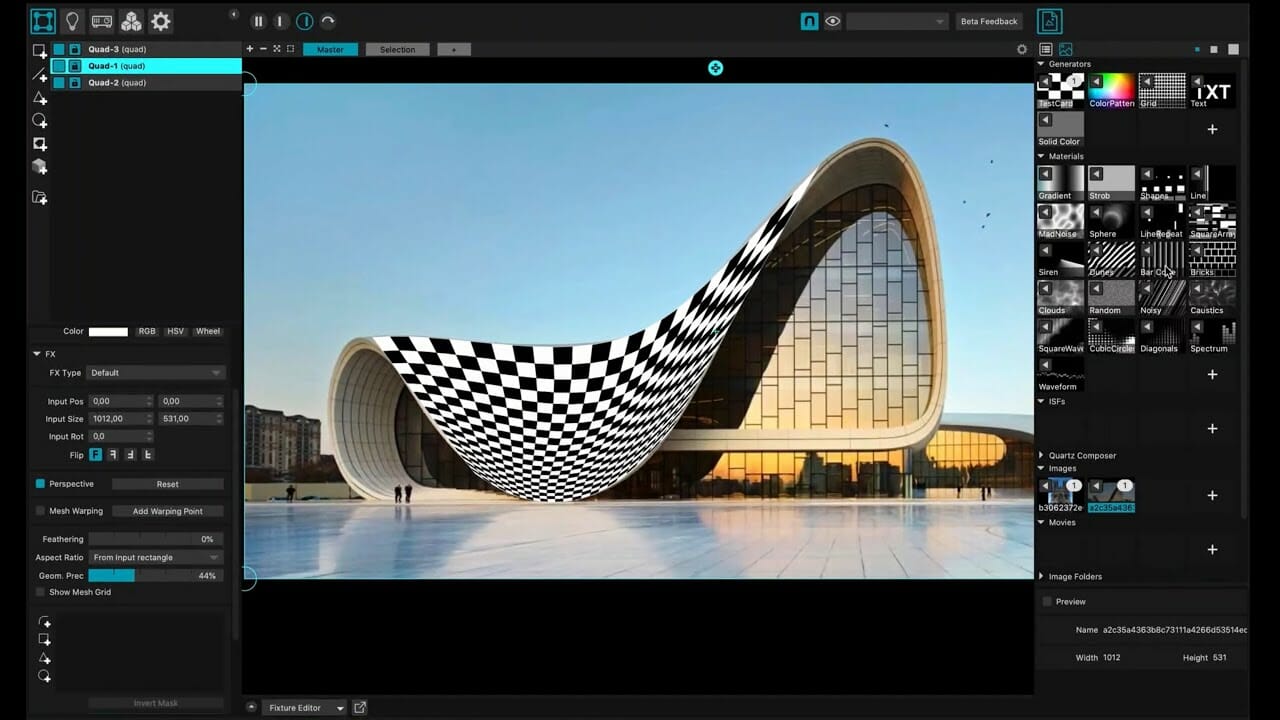
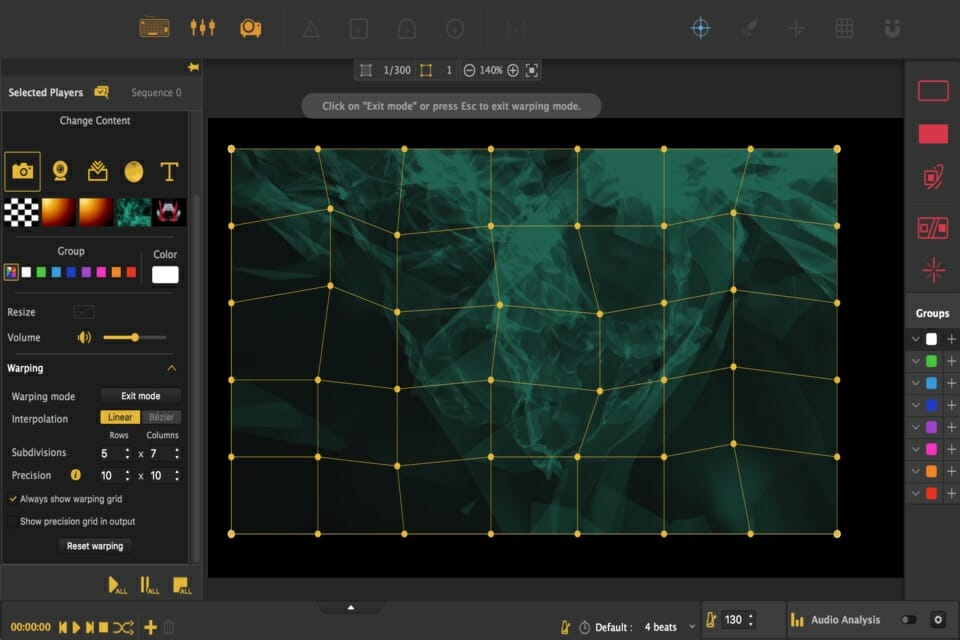
HeavyM

Heavy M positions itself as a quick and easy tool for projection mapping that provides professional features without a huge learning curve.

This tool lets you draw advanced models with multiple layering and masking options. The draw tool allows you to adapt your mapping for any projection surface by working with simple Bezier curves.

You can either create your own shapes from scratch or use some of the presets available.

HeavyM has a large library of visual effects that allow you to apply pretty much any type of idea to your projection mapping project.

It lets you animate effects and improves quality with effects rendering. It also has readily available preset parameters that can save plenty of time.

Another feature that keeps you organized is the sequencer. You can organize your whole projection by creating a sequence list. It offers 40 transition effects that can help create a more seamless experience. 

Considering that projecting shows most certainly use music tracks or live music, the music synchronization feature is a must.

It has a built-in sound analysis that can identify the best coherence between visual sequences and music.

Heavy M is a paid service with multiple options including subscription plans and a lifetime license. It has a demo version that is free of charge and has no time limit.

Other key features include:

  • Easily import video files
  • Media file manager with playback feature
  • Lets you create playlists
  • Large library of visual effects
  • Animates effects and improves quality with effects rendering

⇒ Get Heavy M

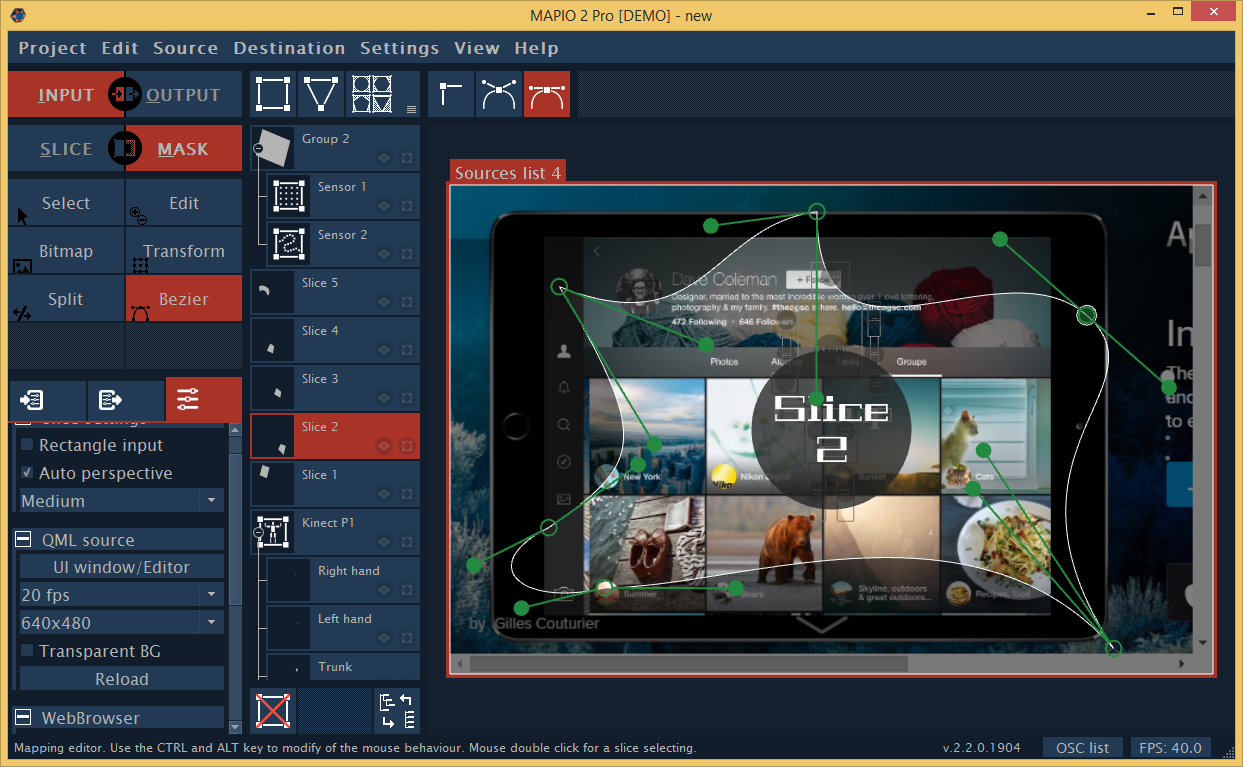
Mapio

Mapio is the best software for video mapping if you want to create projection shows, as it not only lets you use a standard screen, but also any inclines like cylindrical and spherical shapes, among others.

Its key features include Spout (Windows) support, two app modes as a plugin or stand-alone app, solid color or gradient for a slice, capture broadcasting video streams and snapshots.

But it also allows importing 3D files, editable vectors and image masks, tools for splitting masks and slices, edge blending, advanced warping Bezier tool, and so much more.

You can also use undo unlimited times, copy and paste slices or masks, and autosave and recover your project after a crash.

Mapio supports multiple file-formats including AVI, MOV, MP4, WEBM, TS, and GIF for videos and JPEG, BMP TIFF, WEBP, ICO, SVG for image files.

The software provides preset QML sketches for gradient, color grid, GLSL generators, patterns, and more. 

Mapio is a paid service and it’s compatible with Windows and macOS. Download a free trial to see how it works, but it does not include all the features and places a watermark on all your projects.

Other key features include:

  • Multi-screen output
  • Video and audio sync
  • Automatic and Manual pixel mapping
  • Extensive file format support
  • Preset QML sketches for gradient, color grid, GLSL generators, patterns, and more

⇒ Get Mapio

TouchDesigner

TouchDesigner is a visual programming environment for PC that is free but not for commercial use.

The video mapping software solution gives you the tools needed to create stunning, real-time video mapping projects with rich user experiences, whether it’s architectural projections, rapid-prototyping, or interactive media systems.

For video mapping, you can make custom solutions for each project as now two setups are similar.

TouchDesigner’s suite of features and open customization makes each project possible, with multiple solutions to tackle every job, whether small or large in ways that fit each scenario and budget.

Features include tight integration with the real-time 3D engine for complete pre-visualization, support for different projection formats for mapping, dome, VR, stitching, and environment lights.

The stoner tool is useful for keystoning, grid mesh warping, and masking, while the Kantan Mapper helps with 2D mapping and masking which includes Bezier and freeform shapes.

3D is usually the most challenging bit, so TouchDesigner’s CamSchnappr tool for 3D model-based projection alignment and calibration comes in handy.

It also supports third-party apps like Vioso and Scalable Display’s auto-mapping calibration tools.

Other key features include:

  • Support for video and audio devices
  • Complete pre-visualization of project setups
  • Sync operators
  • 3D engine real-time integration
  • Support for various projection formats for mapping, dome, VR, stitching, and environment lights

⇒ Get TouchDesigner

Did your favorite video mapping software tool make the list? Don’t hesitate to share with us your thoughts and experiences by leaving a comment in the section below.

Outstanding visual effects can be the missing piece that can completely transform your event into a memorable experience.

Video editing software can be a great starting point in producing high-quality projections.

If you worked with any of the tools we outlined above, feel free to share your experience in the comments section below.
Transfer Photos From iPhone to PC Without iTunes: 5 Simple Ways

Want to transfer photos from your iPhone to your Windows PC without iTunes? You’re in the right place.

No matter why you decided to opt out of Apple’s Media Player, we’ll show you a few ways to do it.

Copying photos from your iPhone not only saves your phone storage, but it’s also a good backup method.

Let’s get started.

How can I transfer iPhone photos to a PC without iTunes?

Here are a few easy methods to quickly move your iPhone photos to Windows without iTunes:

1. Use iCloud

  1. On your iPhone, go to Settings.
  2. Locate iCloud and then Photos.
  3. Enable transferring photos to iCloud. You can transfer all photos or select which ones you want to transfer.
  4. On your PC, navigate to the iCloud website.
  5. Now sign in with your Apple ID.
  6. Once you sign in, you should be able to see all your photos and download them to your PC.

Alternatively, you can install iCloud software on your PC to have quick access to your photos at all times.

2. Use Windows Photos

  1. Connect your iPhone to the PC using the USB cable.
  2. Enter your passcode on the phone if asked and tap on Trust.
  3. Press Windows key + S and enter photos. Select Photos from the list of results.
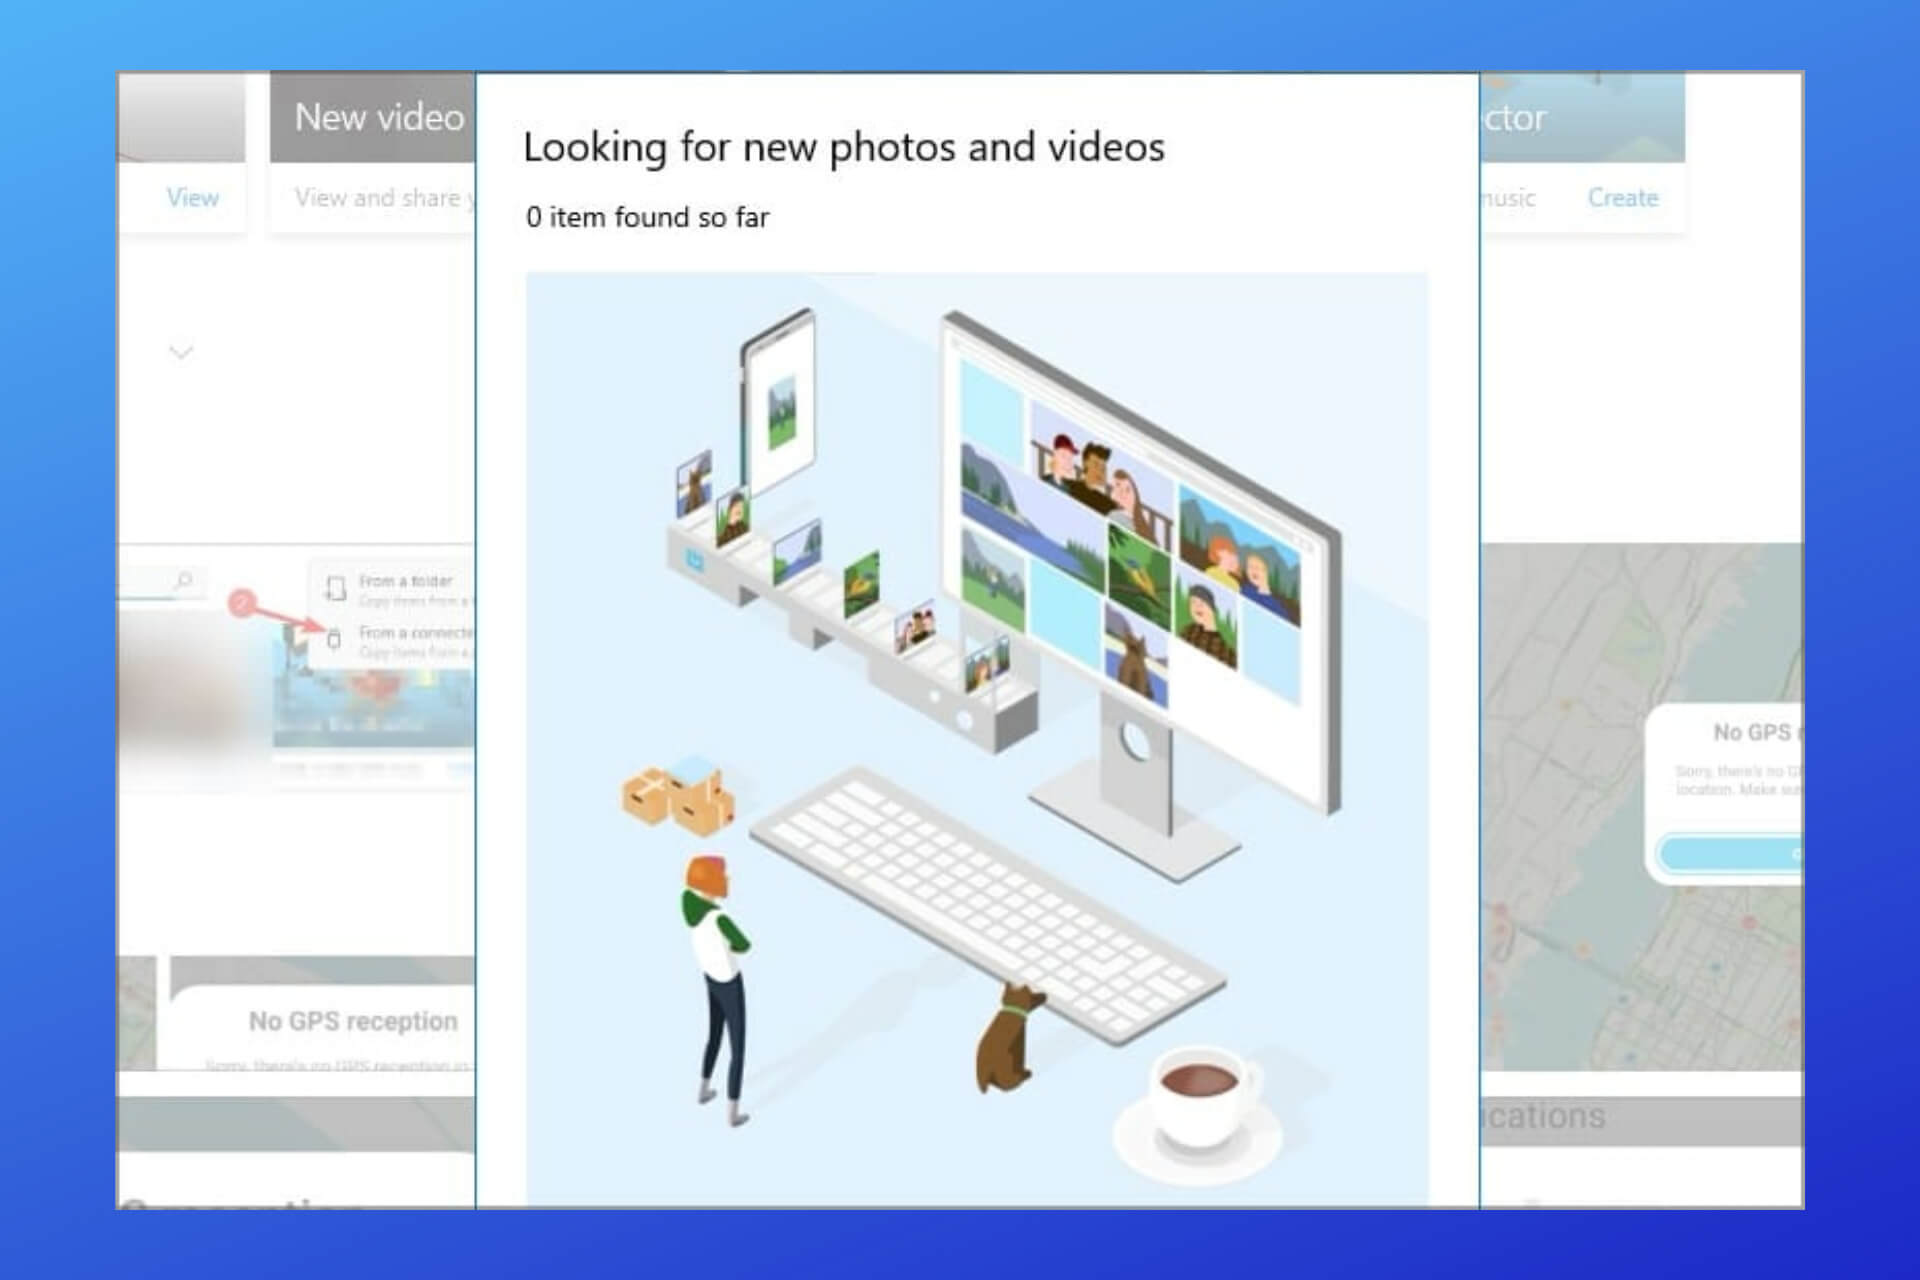
  4. Select Import and choose From a connected device.
  5. The application will now scan your phone for any available images.
  6. Select the files that you want to import and click on Import selected.
  7. Wait for the process to finish.

3. Use File Explorer

  1. Connect your iPhone to your PC with a USB cable.
  2. If asked, enter the passcode on your phone and choose the Trust option.
  3. Open File Explorer. You can do that with Windows key + E shortcut.
  4. Select your phone from the list of devices.
  5. Now go to Internal storage.
  6. Navigate to the Download folder.
  7. Now go to the 100APPLE directory and copy the desired photos.

4. Use cloud services or email

You can also add your photos to a cloud service and access them on your PC. If you’re not a big fan of iTunes and don’t want to use iCloud either, there are these are good and cheap (or free) options.

The process is as simple as it sounds: sign up for a cloud service account, add your iPhone photos to it, and then download them onto your PC. Here are some services you can rely on:

  • Google Photos: 15 GB free storage, up to 30 TB storage on paid plans
  • Dropbox: 2 GB free storage, up to 3 TB storage on paid plans

Or, if you don’t have a whole lot of photos, you can also email them to yourself from your iPhone and access them on PC.

5. Use third-party iPhone transfer tools

  1. Download a dedicated iPhone transfer tool on your PC. We highly recommend Tenorshare iCareFone for its reliability and ease of use.
  2. Connect your iPhone to your PC via a USB cable.
  3. Once the app recognizes your phone, select the Manage submenu.tenorshare manage
  4. Select Import from the bottom menu.
  5. Pick the files you want to add to your PC and confirm.

Tenorshare iCareFone lets you effortlessly backup iPhone photos to PC. Export photos, contacts, and more seamlessly with a virtual USB drive. Simplify backup with 2-way file sync.

⇒ Get Tenorshare iCareFone

Can you back up the iPhone to PC without iTunes?

As you can see, you can easily back up your photos to PC without iTunes, but what if you want to make a full phone backup?

It’s possible to do that and to see how to do it, we suggest reading our iPhone backup software guide for more information.

These are some of the solutions that you can apply if you want to backup iPhone photos to a PC without using iTunes.

In case you’re having problems with the file transfer, we suggest visiting our Can’t transfer photos from iPhone to Windows guide for more information.

What method do you use to back up your iPhone photos? Let us know in the comments section below.

Best Digital Marketing Software: 14 Best for 2026

We live in a time where your product is not as important as the next consideration, that being how you market it. That is why advertisements and marketing campaigns can sometimes require more funds than creating the actual product or service.

The same principle applies in the digital world, where it is hard to stand out on a myriad of websites. That is why having some extra help from some marketing services can give you the edge.

While marketing is a critical component of any successful business, we can all agree that a huge slice of its magic happens online and that none of it could be possible without specialized tools.

What are the most essential marketing tools to grow your startup?

  1. Planning: help you set goals, understand the market and customers, create and delegate tasks, follow and assess your progress, and more 
  2. Social media advertising: help you schedule your posts, get insights on reach, create engaging written and visual content
  3. Display advertising tools: create banners and other brand-related visual elements
  4. Content Marketing: to help you create original and qualitative content that is SEO optimized, well-structured, engaging, and accessible
  5. Email Marketing: to help you create email lists, build engaging newsletters with pre-made templates, get information about customer experience

What are the most effective marketing tools for startups?

Promoting your startup business is never an easy task, as it requires you to implement and follow well-thought strategies.

To successfully put your business on the map, you should use a toolset that is proven to be highly effective in capturing and keeping your potential client’s attention.

To position yourself as a powerful brand you will have to create a good planning strategy and visual identity with the help of fitting designs and task management software.

You also need tools that help you assess the market and the profile of your potential customers/audience, and figure out what are the most effective ways to communicate your unique selling points.

1. Best Social Media & Marketing Tools

How your services or products are presented to your potential customers can make or break a startup. For this reason, choosing the right tools that enable you to create outstanding visual content can be an enormous asset.

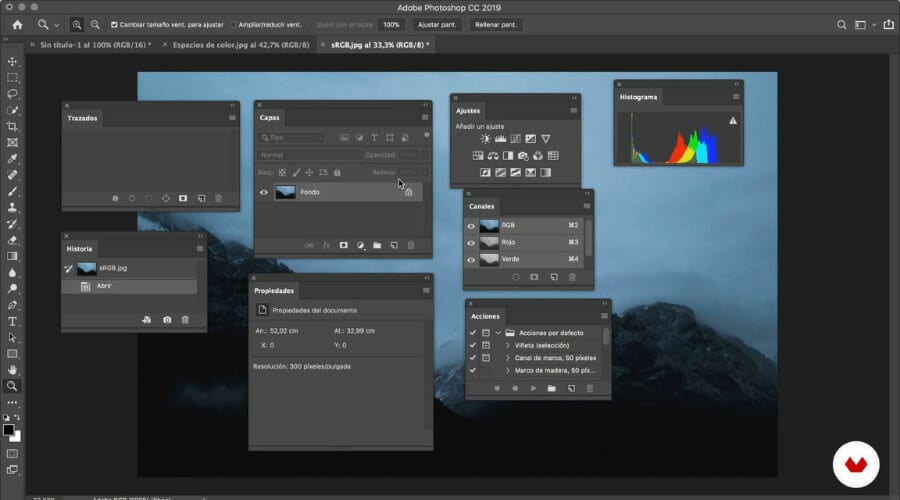
1. Adobe Photoshop

Photoshop is an excellent tool to create digital images to promote your products and services. You know what they say: a picture speaks a thousand words.

If the images associated with the product or service that you’re promoting draw people’s attention, then you already won half of the marketing game.

Photoshop is the best tool to optimize your images for social media: edit and resize your images for different types of screens, profile picture formats, and banner photo parameters.

Creating mobile-friendly images is a must in today’s world, and this tool offers full support for that.

You can use the ready-made image templates and save marketing ideas on Photoshop. This can help you boost your email marketing campaign and keep you organized.

You can also use Photoshop to design promotional t-shirts and other such items (t-shirts, mugs, pens, you name it).

The thing this tool does best offers a plethora of handy features to create amazing images that will increase brand awareness.

You have everything you need, from resizing and cropping solutions to masking, layering, color correcting tools, not to mention the huge amount of inspiring filters.

Other key features of Photoshop include:

  • Light on system resources
  • User friendly interface
  • Compatible with mobile devices
  • Tone adjustement features
  • Object seection tool
  • Batch processing

Adobe Photoshop is subscription-based. You can integrate it within the Adobe Creative Cloud if you use other Adobe tools. You can try it for free for 7 days.

Adobe Photoshop

Build your brand’s visuals from start to finish with this full-featured photo manipulation tool.
Free trial Visit website

2. Canva

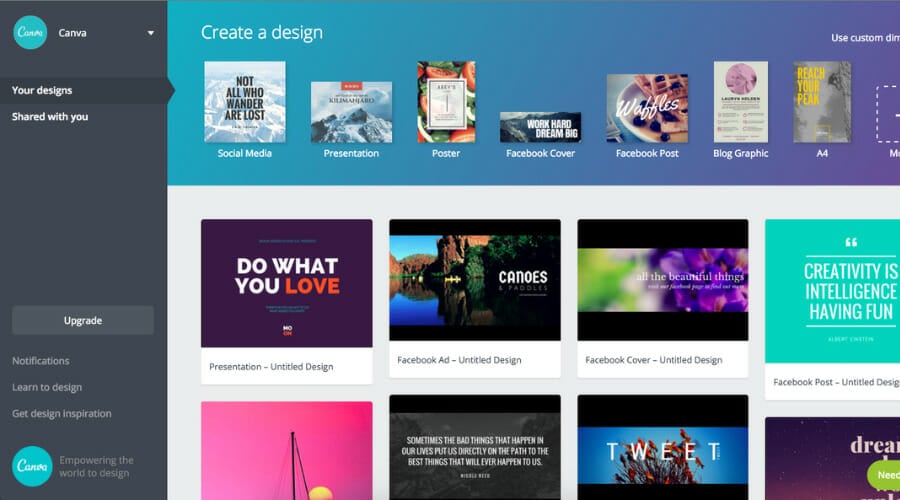
Canva is one of the best marketing tools for startups when it comes to visual design. It has quickly grown to become a user favorite due to its accessibility and resourceful template library.

The tool is very versatile. You can use it directly from your browser, or download it as a desktop application. It also has a dedicated mobile app that lets you quickly make and adjust designs on the go.

This graphic design applications lets offers pre-made layouts for various types of designs including presentations, logos, Facebook posts, Instagram stories, business cards, flyers, YouTube thumbnails, and many more.

Users of this application are very happy with these layouts, as there are available in plenty of styles and they represent a quick and easy solution to create engaging content in a short period of time.

The editing tool is based on drag and drop. You can add various types of objects and text, resize them, adjust the colors, add background images, and more.

Not only can it help you with your visual identity, but it can also be a good planning solution. Canva can help you create business plans and presentations.

Other key features of Canva include:

  • Background remover tool
  • Includes animated objects
  • Supports multiple image formats
  • Teamwork support

Canva has a free, limited version. It is highly functional and good to get started, but some of the features are not available and many of the images are watermarked.

The paid version is available under several subscription plans. You can change or cancel them whenever you want.

Canva

Use drag-and-drop-based editing tools to create jaw-dropping content in just a few clicks.
Free trial Visit website

3. Adobe Illustrator CC

adobe illustrator CC

Adobe Illustrator CC is a versatile tool that you can use to create logos, illustrations, and other vector images.

If you need a reliable tool to increase brand image and brand awareness, Illustrator should definitely be on your list.

You can be sure your images always remain nice and crips. Once you’ve created an image, you can quickly scale it up for billboards or scale it down for smartphone screens.

You can use the built-in typography features to create impressive typographic designs to convey your brand’s message. Use unique characters and styles to create mesmerizing logos and flyers.

Adobe can also help companies streamline their workflows through the Experience Manager.

You can use this tool to allow all the team members of your creative team to access Illustrator and Photoshop projects in a distraction-free environment for enhanced productivity.

Other useful features for your marketing campaign include:

  • Best vector image creator and editor
  • Big online community that spread around useful guides and tricks
  • Integrates well with other Adobe products
  • Plug in support

You can download Adobe Illustrator CC for free and try it out for 7 days. If you want to continue using the tool, you will have to get a subscription plan. The free trial lets you test out all the features included.

Adobe Illustrator CC

Design your logo and make engaging graphics that tell your brand’s story.
Free trial Visit website

2 Best Planning and Organizing Apps for Startup

As your company’s presence on social media can have such a huge impact on how your company is perceived, having all the right tools for creating engaging and interactive content is absolutely essential.

Below you can find some great tools that will streamline the entire process of posting regularly, managing your company’s content, and provide you with some useful feedback about engagement.

1. Monday.com

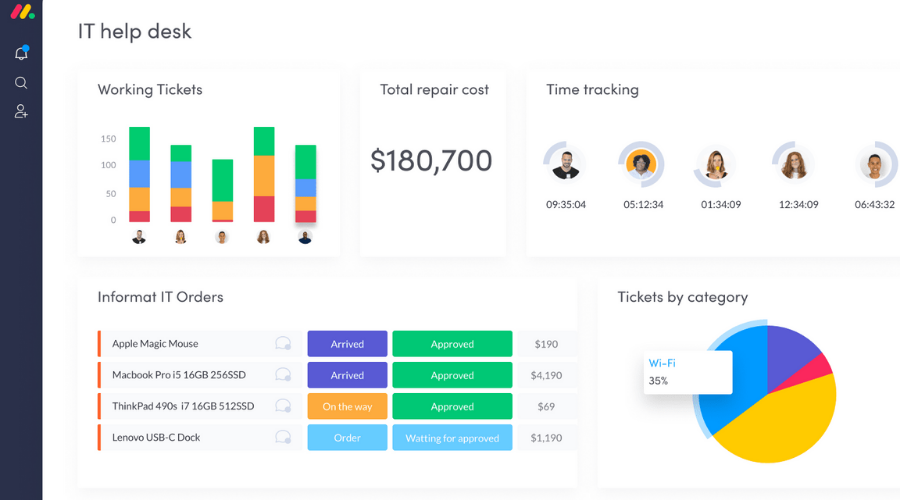
Monday.com is a great business management tool that offers top-level collaboration, marketing, and project management tools.

Even though it integrates a lot of tools in just one dashboard, Monday.com is built to be intuitive and friendly.

It lets you create your own customized workflow or choose from over 200 pre-made templates.

You can easily create and manage your projects by adding columns, groups, items, sub-items, and more. It includes 30+ customizable column types, drag-and-drop columns and rows, and real-time updates for each item.

You get a real-time overview of the project’s progress and see how your team is doing.

Monday offers multiple types of visual reports on your project’s status. You can use a Kanban view, a calendar, a timeline, and more.

Other key features of Monday.com include:

  • Dedicated applications for Android and iOS
  • Contact management tools
  • Customer onboarding solutions
  • Centralize client comunication with email integrations

Monday.com has a free, limited plan that lets you create workflows for individual projects. For a team-focused project, you will have to get a subscription. Each subscription plan has a free trial.

Monday.com

Establish your plan and check your progress in real-time with this intuitive management tool.
Check price Visit website

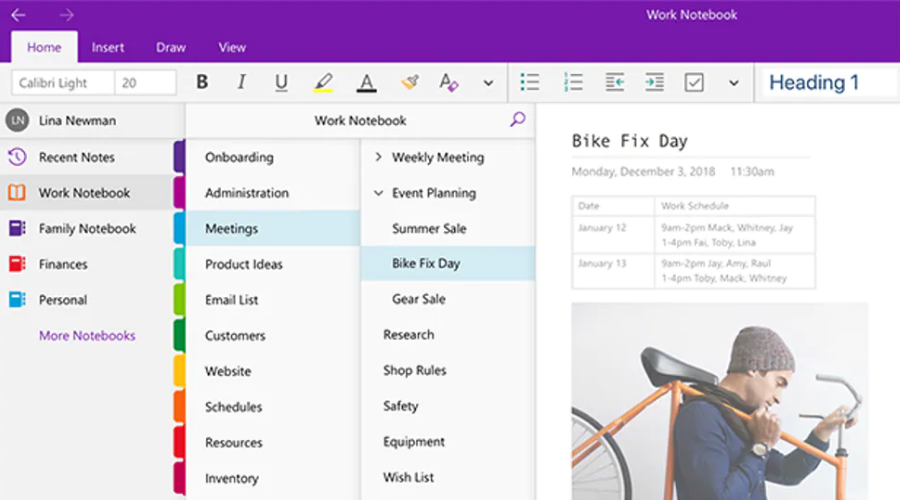
2. Microsoft OneNote

Microsoft OneNote is a versatile note-taking application that lets you create highly customizable notes.

You can create your own workspace with the help of powerful sorting tools for making notebooks, categories, tags, all with easy search and navigation functions.

The tool lets you create text-based notes, but also offers free handwriting and doodling support. You can highlight, change text color and size, add annotation, images.

It is the perfect space to gather all your resources and keep track of them across all devices. The app is compatible with mobile devices and you get real-time synchronization so you can start right where you left off and make quick adjustments on the go.

OneNote also lets you create audio notes, insert videos and integrate multiple types of files within your notes.

The application offers quick share options so you can collaborate with your coworkers. 

Other key features of Microsoft OneNote include:

  • Sync to the cloud
  • Support for mixed media
  • Compatible with Andorid and macOS devices

Microsoft OneNote is a free application for Windows computers and mobile devices. You can download it directly from the Microsoft Store.

Microsoft OneNote

Gather all your resources, including videos, audio files, and images, and access them on all your devices.

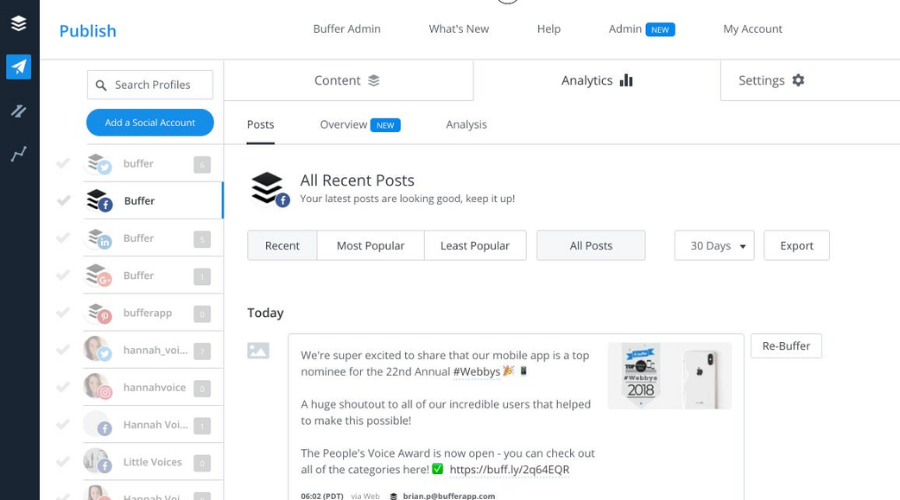
3. Buffer

Buffer is a great social media marketing tool that gives you a combination of features that let you know how, when, and how frequently to post in order to grow your audience and engagement rates.

The application offers simple to use scheduling tools so you can take care of each little post ahead of time so you can have a better structure and thus less stress.

Buffer also helps you engage with your audience in a productive way. You can use labels and hotkeys to prioritize the comments you respond to based on relevancy.

The application offers pre-made plans for scheduling and managing posts for popular platforms such as Instagram, Facebook, and Tiktok. 

It takes care of the whole process, from planning, scheduling, the actual post, and more. You can even set up an automated first comment for your Instagram posts.

Buffer’s dashboard is designed to integrate all valuable information so it is easy to access.

You can get insights about boosted posts and compare paid and organic results, see key engagement metrics for each social account you manage, measure stories, individual posts and hashtags.

On top of that, the tool also gives you information about your audience’s demographics. Knowing who you speak to is a key factor in winning in this game.

Other key features of Buffer include:

  • White label reporst
  • Daily updates of all activity
  • Download reports as PDFs 
  • Browser extension

Buffer has a free basic plan that is suitable especially when you start out. If you need more advanced tools and integrated collaboration solutions, you can get one of the two paid plans. Each plan has a 14-day free trial.

⇒ Get Buffer

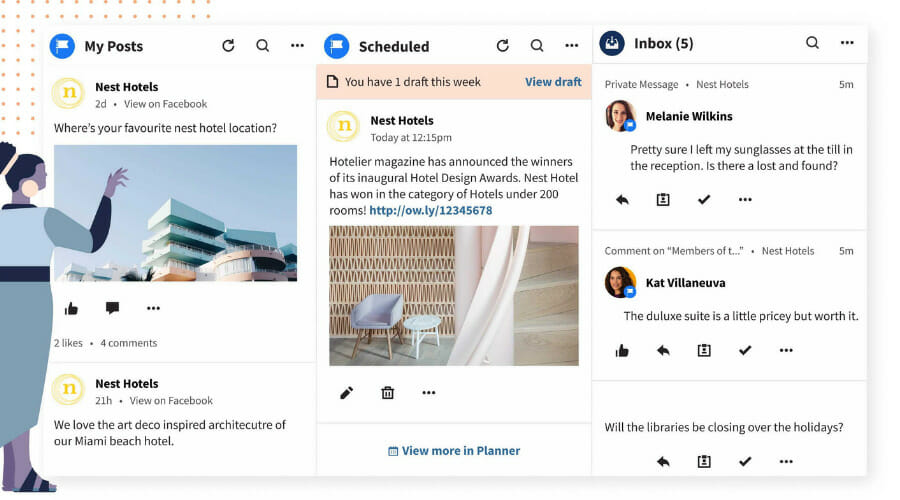
4. Hootsuite

Hootsuite is a powerful social media management platform that comes with solutions for planning, engagement, analytics, and more.

With over 18 million users worldwide, Hootsuite offers efficient social media post scheduling options.

If you plan to promote your business on social media, you probably know that using more than just one platform is recommended in most cases.

Hootsuite can help you plenty in this case, because it lest you manage all your social media accounts from one unified dashboard.

You get quick information about how each of your accounts is doing directly from the home page. Then you can start scheduling your posts and see more in-depth reports about engagement rates.

The tool also facilitates the interaction between you and your audience. The Hootsuite dashboard displays all your comments and you can respond right away, without having to browse around your accounts.

The analytics feature gives you insightful reports on how your social media posts are doing, the amount of reach and visibility you gain from each of them.

Other key features of Hootsuite include:

  • Support for teamwork
  • Two-step authentication
  • Unlimited scheduling
  • Custom analytics
  • Exportable reports

Hootsuite has 3 major subscription plans. They differ when it comes to the number of accounts you can manage, ad spend limit and the type of analytics you get.

⇒ Get Hootsuite

3. Best Digital Marketing & SEO Tools for Startups

1. SEMrush

The dashboard of SEMrush

SEMrush is one of the most (if not the most) popular SEO tools currently on the market, and for good reason, too.

Its suite encompasses a wide variety of tools that can help even small business owners grow their online presence. it does this by providing them with useful insight on how to manage the contents of their website so that they become more relevant to search engines.

The SEMrush marketing workflow holds utilities for virtually any need regarding investing in one’s online presence, ranging from SEO and advertising to social media, content management, strategy building, reporting, and management, as well as competitive research.

Some of the power features of the SEMrush suite are its organic research, keyword research, site audit, rank tracking, ad builder, advertising research, social media poster, and tracker, content audit, topic research, post tracking, brand monitoring, traffic analytics, ranks, charts, marketing calendars, and reports.

SEMrush is able to handle everything from search engine optimization to social media advertising.

Other key features include:

  • Trending topic recommendations
  • Insights about competition
  • PPC advertising support

This tool comes with a 7-day free trial so you can try it out and see how you like it.

SEMrush

Increase your online visibility by implementing powerful SEO strategies with SEMrush.
Free trial Visit Website

2. Ahrefs

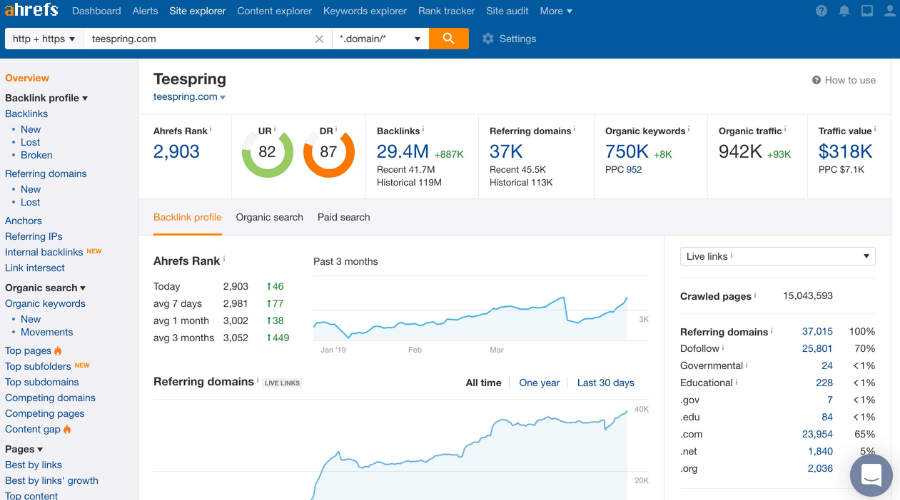
Ahrefs is a full-featured SEO platform that gives users all tools they need to reach a large number of customers with the help of audits, keywords research, and competition research.

This SEO management tool has an easy-to-use dashboard that gives you quick access to everything you need, including an overview of all your webpages, access to the keywords explorer, the rank tracker, and many more.

It lets you integrate and track an unlimited number of pages. You can easily manage them all from one unified homepage.

The tool is compatible with Google Search Console and lets you connect your accounts and access GSC data directly from the Ahref menu.

Arefs’ keywords explorer gives users thousands of keyword suggestions. It gathers proven keyword information from an extensive database of over 7 billion keywords.

The database is updated every month with new and relevant keywords to help your webpage stay relevant.

Ahref is suitable for web pages all around the world, as it provides keyword solutions for 171 countries outside the US.

Other key features of Ahrefs include:

  • Uses 10 different search engines for the research
  • Reports on return rates
  • SERP overview and position history

Ahrefs is a paid tool, with 4 different plans available. If you are just starting out, the Lite or Standard plan should suffice, as they let you manage an unlimited number of projects and give you insightful audits.

⇒ Get Aherfs

Free digital marketing tools:

  •  Google Analytics (GA): keep track of website traffic, conversion rates, and audience behavior
  •  Google Search Console: see the queries that bring you viewers, submit sitemaps and URLs for webcrawling, and use the free guide to learn how to optimize your search appearance on Google
  •  Google Trends: see reports on high-ranking topics and search queries across multiple regions

4. Best Email Marketing Software for Small Business

1. Mailbird

email marketing tools

Mailbird is one of the best email client providers on the market. Not only does it provide industry-leading solutions for email management, but it also includes task management tools and powerful collaboration solutions.

Users of this email client can connect an unlimited number of accounts and easily access them from one unified inbox.

Mailbird also lets you check on your social media pages. It has integrations for all major platforms so you can have a quick glance at how your customers interact with your posts.

Not only that, but the tool is also compatible with productivity and collaboration applications such as Google Calendar, Slack, Google Note, and Microsoft To-Do.

You can easily create your own workspace, add team members and facilitate collaboration and thus help your business grow.

Users of Mailbird are very fond of its advanced search options. You can easily find emails, attachments, and contacts by providing a few keywords. It offers advanced search options with filtering.

Other key features of Mailbird include:

  • Multiple layouts
  • Available in several international languages
  • Intuitive keyboard shortcuts
  • 24/7 support
  • Compatible with multiple platforms

If you want to integrate Mailbird into your toolset you will have to get a subscription. There are several plans available, each with a 14-day free trial.

Mailbird

Stay in touch with your audience and collaborate with your team to offer a premium-level customer experience.
Free trial Visit website

2. Mailchimp

Mailchimp is a powerful customer relationship management tool that offers automatic solutions for email marketing.

The tool integrates audience measurement and management features. You get valuable information about your customers so you can build personalized marketing messages that fit their profiles.

Not only does this tool help you build and manage emails, but it also gives you the possibility to create and host your own website.

It offers intuitive tools to help you create engaging content. These include the content studio feature, templates for promotional campaigns, subject line helper, and a creative assistant.

The tool lets you create and automate customized marketing strategies for each of your customers.  The tool creates a profile on how the customer interacts with your business and decides which is the best way to maintain contact to keep them engaged.

Mailchimp offers several email scheduling options. You can set a specific time, send according to the customer’s time zone, or let the application decide the best send time for maximum engagement.

Other key features of Mailchimp include:

  • Integrates popular eCommerce platforms like WooCommerce and Shopify
  • Create targeted emails based on client behavior 
  • Transactional email support with API or SMTP
  • RSS-to-email

Mailchimp has a free plan and three paid subscription-based plans. Each of them includes marketing CRM tools.

⇒ Get Mailchimp

How to promote my online business for free?

  • Use social media platforms: create engaging posts, join groups that are related to your niche and post about your business and what you offer for free
  • Use email marketing strategies: you can gather inspiration from the above-mentioned products and use their free versions to address potential customers 
  • Create a blog: there are plenty of platforms that offer free blog hosting where you can use creative ways to market your business, including niche-related informative articles, product listings, and more. Some free blog platforms do offer some minimal eCommerce tools, so you can sell your product for free
  • Implement SEO strategies: SEO is essential for growth regardless of the platforms you use. Using relevant keywords is crucial if you want to rank high and be found by as many potential customers as possible

Closing thoughts on best marketing software deals

The bottom line, regardless of their domain of activity, almost every business needs a solid marketing campaign at one point or another.

Carrying this type of activity online proved to be not only sevenfold as effective as offline campaigns, but also more accessible to a higher number and a broader variety of users.

However, no marketing technique could be even half as effective as those that are backed by specialized tools such as Promo Republic, SEMrush, Fotor, and Horizon.

Explore AI social media management tools to boost planning, content creation, scheduling, and analytics.

A software conflict was detected while running Steam [Fix]

Steam is a popular digital distribution platform for purchasing and playing video games, but many users reported that conflict software was detected while running it. One of the errors reads like this:

An incompatible version of LavasoftTCPService.dll (related to Lavasoft Web Companion has been detected inside of the Steam process).

We suggest updating or uninstalling this software if you experience crashes or network slowdowns while running Steam or individual games.

Since many Steam users are facing this problem, we have put together this guide including all the possible solutions to fix this error on Windows computers.

What is a software-conflict error?

Because you need to be aware of any important detail implied in your issues, keep in mind that a software-conflict error occurs when two programs cannot run on the same PC at the same time.

In general terms, this kind of issue can appear due to a programming bug and typically manifests when two programs compete for the same resource (memory, peripheral device, register, etc.).

If you want to discover more about this kind of program, make sure you read this article completely, because at the end of it we’ve prepared some useful information.

How can I fix the conflict software detected Steam error?

  1. Uninstall conflicting software
  2. Run Windows Defender
  3. Run Antivirus software
  4. Reset network adapter

1. Uninstall conflicting software

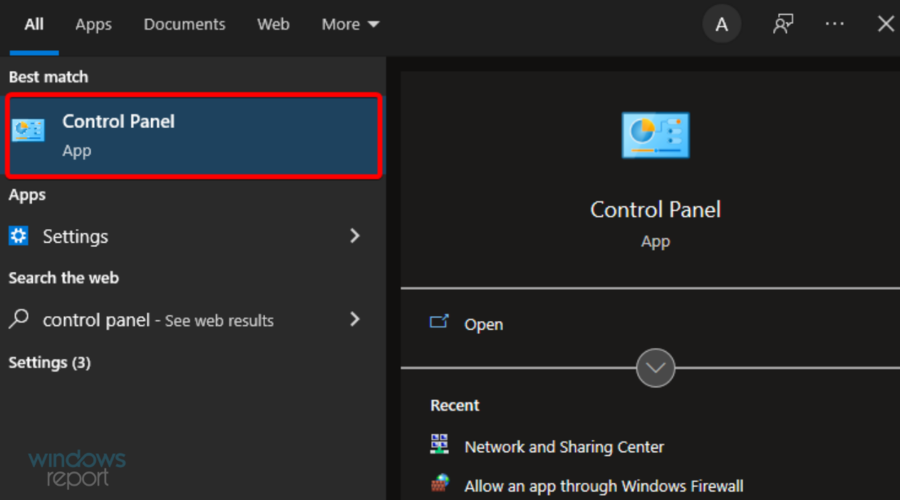
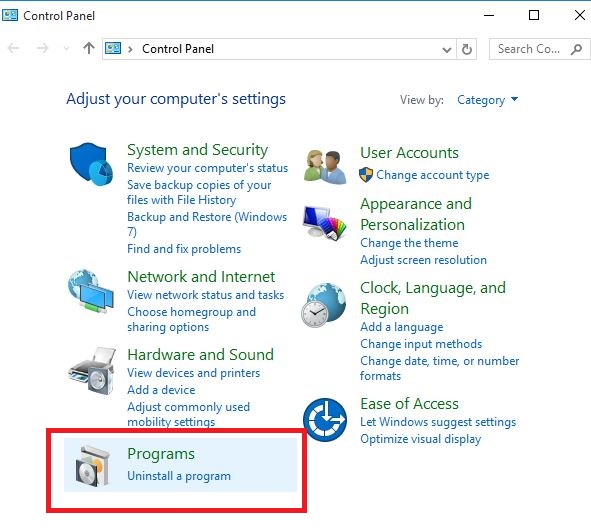
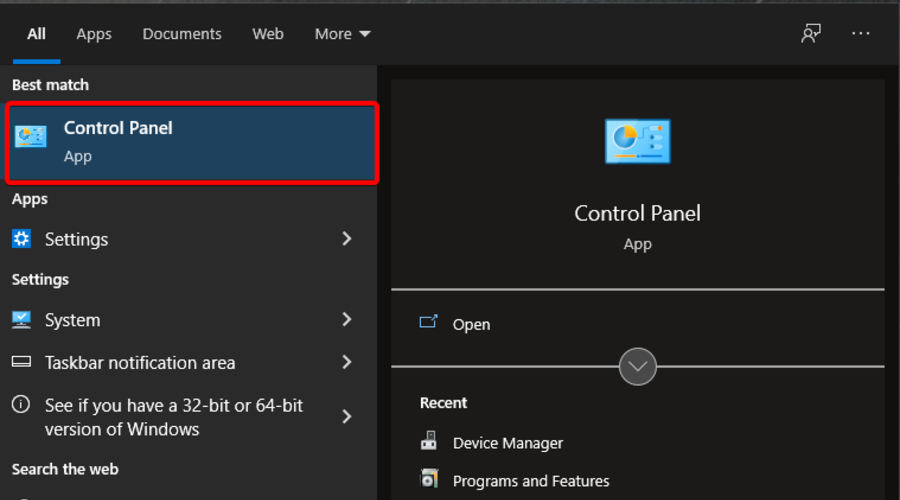
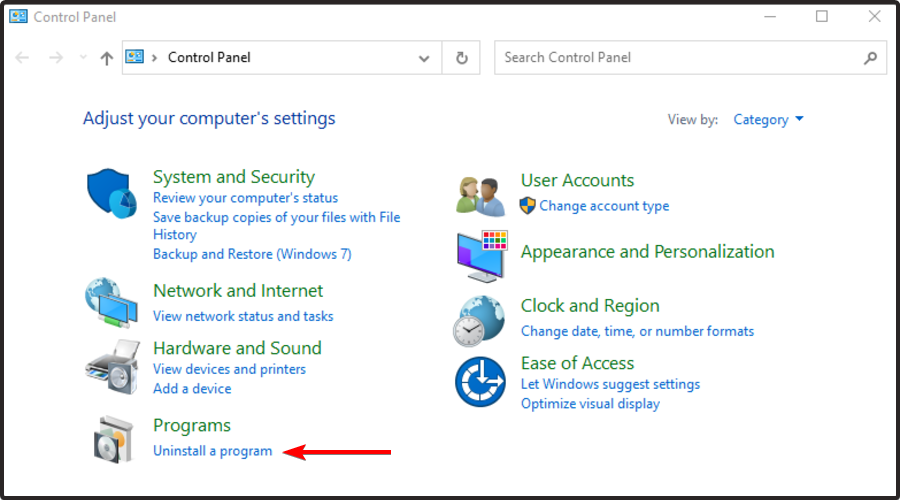
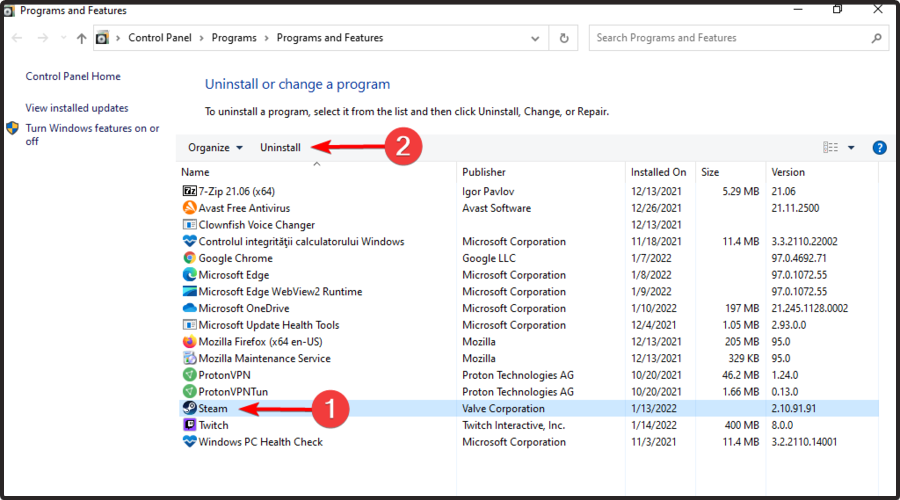
  1. Hit the Windows key, type Control Panel, then open it.
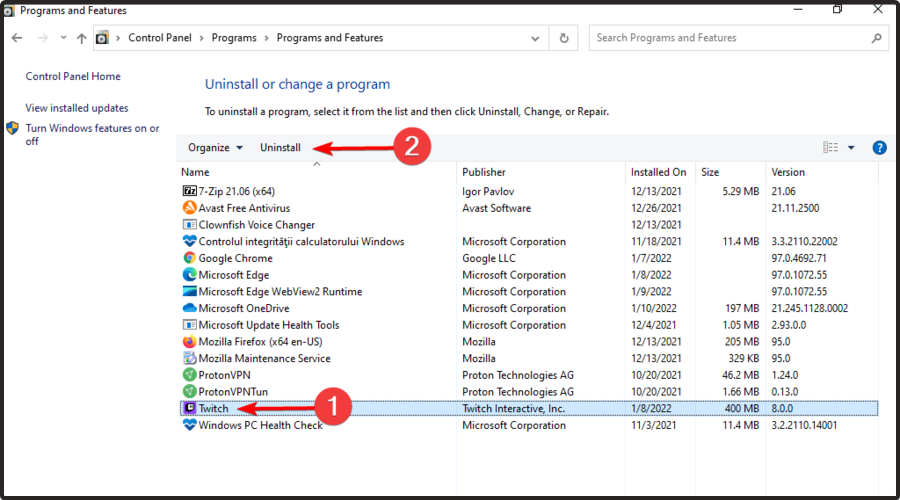
  2. Now, click on Uninstall a program.
  3. Look for Lavasoft or any other software mentioned by the error message.
  4. Click on it, then choose to Uninstall it (as we show you in the picture below, with Twitch as an example).
  5. If you don’t find Lavasoft software in the Control Panel, look for any other related program like WEN Companion, etc.
  6. Click Uninstall and restart your PC.

The best guess here is that some software is creating a conflict with the Steam process resulting in the Conflict software detected message.

Depending on the error you get, try to find the mentioned software (like Lavasoft in the above example) and uninstall it.

A lot of software leave unwanted leftovers after you uninstall them and if you want to make sure you got rid of any Lavasoft remaining files.

You might thus consider other options to eliminate the issue of conflicting software and put your Steam services back on track. Hence, it’s feasible to check other efficient uninstaller software for Windows 10 PC.

2. Run Windows Defender

The conflict software detected error usually appears if you have junkware on your PC. Sometimes these unwanted applications can interfere with your system and lead to various problems.

To get a more secure digital activity it’s often recommended to rely on Windows antivirus services and be always secured from online threats that may appear.

Plus, by protecting your system with Windows Defender you can stay relaxed when browsing on different sites, or downloading certain programs, knowing you will be alerted.

You also benefit from account protection, firewall, and network protection, or PC security regarding hardware issues that appear over time.

After removing the infected files, the issue should be permanently fixed.

3. Run Antivirus software

In case the last solution didn’t seem to work out for you, no need to worry. You can always find other qualitative antivirus choices to protect your system from application errors.

More so, if you are a notorious Steam user and always run your games using this platform, then strong antivirus is required to protect the PC from malware and other issues.

ESET HOME Security Essential is the best option on the market that you should definitely try out today, not only because it is a powerful tool, but it also provides tons of other valuable features.

It will ensure high-end system protection, but it won’t interfere with any apps, especially with those ones similar to Steam.

It is the ideal software to use for Internet activities such as work, communication, online banking, and shopping. Use it to secure any of your Windows, Android, Mac, or Linux devices.

ESET HOME Security Essential is the perfect tool to protect your passwords, sensitive data, online payments, webcam, and smart home devices.

More than a performant antivirus, ESET HOME Security Essential will also scan your home network and keep it safe from various online threats across all connected devices.

In addition, if you’re looking for more solutions like this, we strongly recommend checking the most effective antivirus software for your PC today

Check out the most impressive features of ESET:

  • Compatible Windows, Android, Mac, Linux
  • Protects your passwords, sensitive data, online payments
  • Powerful against viruses, malware and any potential threat

ESET HOME Security Essential

Looking for powerful and secure antivirus software? You should definitely try ESET.
Free Trial Visit Website

4. Reset network adapter

  1. Press on the Windows key, type Command Prompt, then right-click on it and choose to Run as administrator.
  2. Type the following command and hit Enter: netsh winsock reset
  3. Close the Command Prompt window.

Some users have reported conflict software was detected due to some Internet connection-related troubles. This could be because the adware has altered your network settings.

You can easily fix the problem by resetting the network adapter through Command Prompt.

Launch any web browser and open a web page to see if the Internet connectivity is restored.

An incompatible version of LavasoftTCPService.dll (related to Lavasoft Web Companion) has been detected inside of the Steam process is caused by a potentially unwanted program (PUP)

The PUP might have infected your PC during an unsafe browsing session on the Internet or after downloading something from a torrent site.

It is always recommended to use an Antivirus, such as ESET Internet Security to keep your PC protected from unknown threats.

Also, if you have bought a new PC, always clean install Windows OS to remove any bloatware or hidden adware (although rare) to be on the safer side.

What programs might interfere with Steam?

As we’ve already promised at the beginning of this guide, it is time to discover more about the programs that might interfere with the Steam app.

1. Antivirus, anti-spy software and firewall & security apps

This article already presented that antivirus software and security apps are some of the most popular elements that can generate conflict when running Steam.

Keep in mind that antivirus programs hook very deep into your system and can affect disk and network operations which will cause issues with Steam.

Aggressive spyware detection apps might also interfere with the Steam client from receiving updates or prevent connection to content servers.

2. VPNs

Some virtual private networks might also prevent your client from accessing the app’s network. If a game requires network capability, it may also interfere with that connection.

3. Peer-to-Peer (P2P) Clients & File Sharing Software

In this case, if not configured in a proper manner, you have to know that P2P clients consume a large portion of your bandwidth or other system resources.

This can limits connections or traffic that Steam depends on, while also interfering with resources required by games.

4. Download Accelerator and Download Manager Programs

These ones curate your network experience, so your Steam and game traffic may be hindered. You’ll probably also want to disable this kind of app while using Steam.

Do let us know if any of the solutions worked for you and if you’ve managed to fix our presented issue. So, feel free to use the comment section listed below.

Airbnb not accepting payment: How to easily pay for bookings

If you want to book on Airbnb, you’ll be asked to confirm your payment details as soon as you try to make a reservation.

There is no later time, no bargain, no wiggle room, and certainly no shady offline payments deals, just solid card credentials (and a few other methods).

By keeping things simple, both the hosts and the guests are protected. But what happens if the Airbnb payment doesn’t go through?

Before we dig in, let’s make sure we have a clear understanding of the whole picture.

How do you pay on Airbnb?

  • Credit/Debit/Prepaid cards (Visa, MasterCard, American Express, JCB, Discover)
  • Google Pay and Apple Pay (for Android and iOS users on mobile platforms)
  • PayPal (if available in your country)
  • Gift cards and promotional coupons

Airbnb supports different payment methods from standard ones that will be available for all guests to very specific ones, depending on the country and region of interest.

You will be able to see all available methods for which you are eligible on the checkout page of your reservation.

Can I pay cash for Airbnb? / Can you pay by bank transfer on Airbnb?

Cash payment, offline payments, and in fact any type of payment made outside the boundaries of the Airbnb app and/or website are strictly forbidden and can attract further sanctions.

These measures aim to protect users against fraud attempts and other security risks.

But sometimes, the Airbnb payment simply won’t go through, either from the first attempt or for some, it can be a second payment that fails. So let’s why does that happens.

Why does my card keep getting declined on Airbnb?

There can be several reasons for which you are unable to complete a card transaction via Airbnb and we distinguish between two major categories, as shown below:

Issues on the users’ side (card-related)Airbnb internal checks
Expired card, insufficient funds, exceeded spending limits, debit cards that cannot be processed as credit cards, and so onFraud prevention, fraud pattern detection (billing address and/or phone number mismatch, flagged transactions when payments are routed through several banks, and so on)
In these cases, the user simply most sort the issue with the bank, respectively the credit card company.These cases are trickier and unfortunately, more frequent. In fact, most of the time, transactions are declined for security reasons.

Here are the most common error messages that can appear on Airbnb when trying to pay with a card:

  • Looks like this payment method can’t be added. Use an existing method or try this one again later.
  • We were unable to authorize use of your credit card. Please confirm that all the details are correct. You may also contact your bank.

How do I fix my payment decline on Airbnb?

1. Use Payoneer

  1. Get yourself a physical card from Payoneer. To do that, simply open the Payoneer platform and go to Settings.
  2. Next, go to Payoneer Cards and click Order Card.
  3. Note that there is an eligibility clause in place that only allows you to request a physical card if you met the minimum amount of payments received in your Payoneer account in the last 6 months.
  4. Next, log in to your Airbnb account and select Account from the drop-down menu situated in the upper-right corner of the page.
  5. On the new screen, select Payments & payouts.
  6. Remain on the first tab (Payments) and press Add payment method.
  7. Fill in the details of your Payoneer Mastercard card and set it as the default payment method afterward.

By following these steps, you should be able to see the Payoneer card as the primary payment method set to be charged during the checkout phase of your reservation.

If you’re just setting up your Payoneer account, it will take some time before will are able to request a physical card in regard to the eligibility conditions explained above.

Meanwhile, you can safely use our next recommendation.

2. Use Revolut

  1. Get a phisical Visa or Mastercard card from Revolut. To do that, you must first register on the Revolut platform.
  2. Note that you can either access the Revolut website via desktop or download the Revolut app from your mobile platform store.
  3. Fill in the required details (name, adress, phone number, etc.) in order to complete the registration.
  4. Then log into your newly created account and head to the Cards tab.
  5. Select or tap the Add card option.
  6. Complete your order (delivery method and delivery address along with any other details including the preferred payment method to cover the delivery).
  7. Once your brand new Revolut card is shipped, you can head over to the Airbnb platform and repeat the steps 4-7 from our previous solution.

If you need further help on this topic, we have prepared more tips on how to use the Revolut web app on your PC. Obviously, there can be situations in which the app itself misbehaves.

Should it ever be the case, you can scoop some useful solutions to help you out when the Revolut login simply won’t work.

3. Use PayPal

  1. From the Airbnb app, select Paypal as your payment method.
  2. Next, log in to your PayPal Account and head to Choose a way to pay.
  3. From this menu, you can select one of the payment methods linked to your account, then click Continue and agree to the different prompts displayed on the screen.
  4. The final step is to confirm the payment via this method on the checkout window of your reservation.

Note that PayPal will only be displayed for users residing in countries where this online payment solution is available. You might also be required to check the eligible currency.

Airbnb is not accepting payment? Not a problem, you can tweak these options and make use of our recommendations to pay for your bookings even if Airbnb declined your payment at first.

Airbnb isn’t the only platform that can run into problems. Other services face similar issues, and you can see more in this guide on Rightmove not working.

Once this is covered, you’re all set to enjoy traveling!

Clipchamp Review: How Good is Microsoft’s Video Editor?

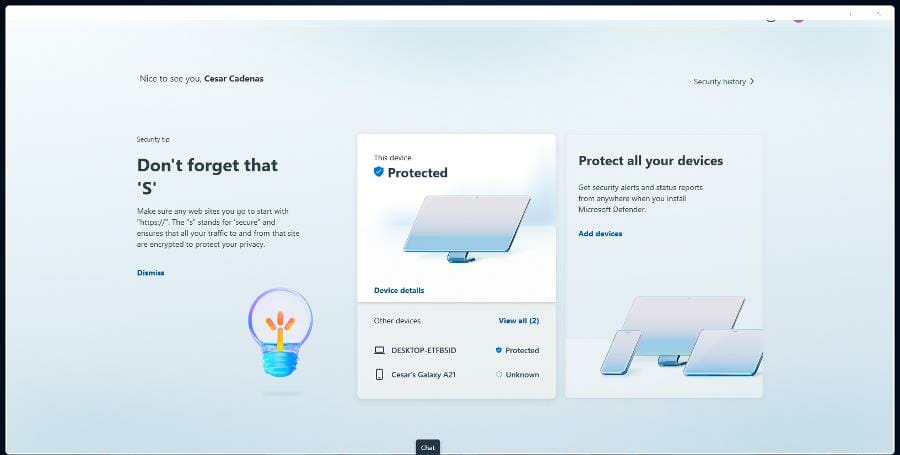
On March 9, Microsoft began to roll out the latest build for the Dev Channel of the Windows 11 Insider Program: Build 22572. In the update, some features and updates were released like the new Microsoft Defender Preview.

Microsoft Defender Preview is a standalone app that serves as a central hub for the Windows Security system. Some new features have been added to Windows 11, the most notable of which is Clipchamp.

Clipchamp is the new video editing app for Windows 11 that Microsoft says has a focus on “making video creation easy, fast, and fun.” It comes equipped with a lot of the basic tools a video editor requires like trimming and splitting.

It also has professional-level features like transitions and animated text. Clipchamp also has a webcam and screen recording functionality.

The app also comes with a video timeline, which is new to Windows video editors and functionality usually reserved for professional-grade editing apps. Clipchamp has access to a massive stock library filled with over a million assets.

These assets include royalty-free videos, audio files, and images. The app has a text-to-speech generator powered by Microsoft Azure and supports over 70 different languages.

Clipchamp also integrates with several Windows apps and connects to OneDrive for easy file transport. Needless to say, Clipchamp is packed to the brim with features and has a lot going for it.

The company behind Clipchamp was acquired by Microsoft in September 2021, and it looks like the app will be the replacement for the iconic Windows Movie Maker program from years past.

What does Microsoft intend to do with Clipchamp?

For almost 20 years, Windows Movie Maker was the premiere video editing tool for Windows computers up until 2017 when Microsoft officially discontinued it. It was a pretty simple and easy-to-use software that any amateur filmmaker could pick up.

But like a lot of native apps on Windows, it is criticized for oversimplification and lack of any meaningful features. It was just too bare-bones and eventually, Microsoft moved on.

Since then, Microsoft has been working on the next generation of its native apps. Typically, the apps that came on Windows computers were criticized and even mocked for how poor they were in comparison to third-party apps.

People in the past made the joke that Internet Explorer was only good for downloading a better web browser. From this, Microsoft listened to what people were saying and made major changes to its native apps.

Native apps like Calendar and Email got a much-needed revamp with new features and redesign aligned with Windows 11. Movie Maker had a spiritual successor in the form of a Video Editor feature in the Photos app.

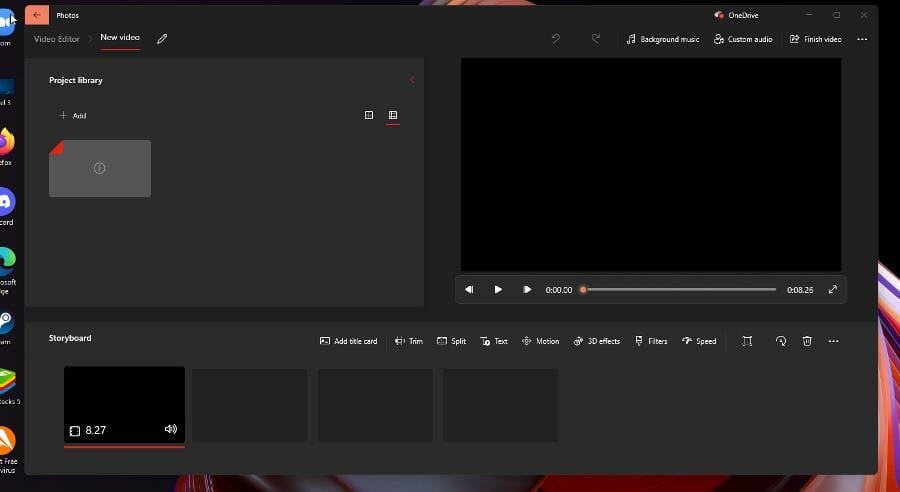
However, the Video Editor is still basic and barebones. It doesn’t have a timeline, but instead a Storyboard, which you can split up and add text. It’s fine, but you wouldn’t consider it to be a great video editor.

And so, this brings everything back to Clipchamp, a web-based video editor that Microsoft is turning into a proper app on Windows 11. Here is how you can download and use Clipchamp.

What are some noteworthy features for Clipchamp?

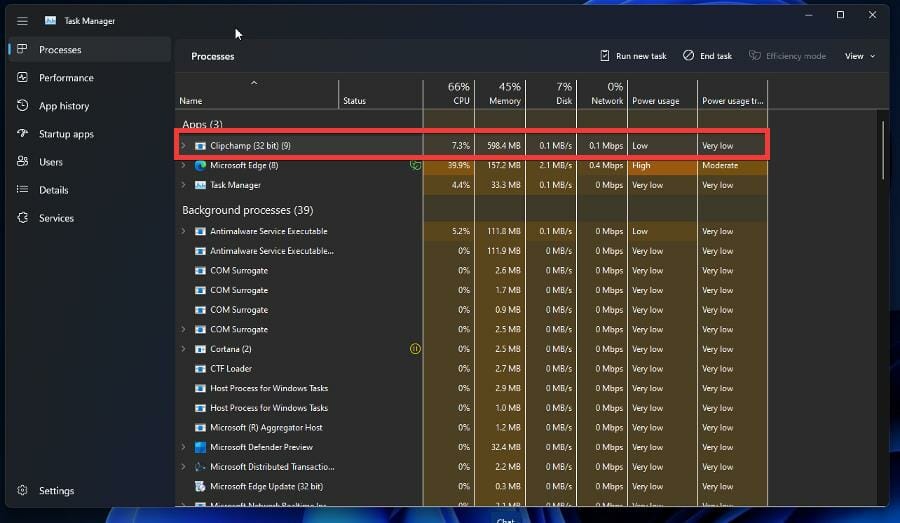
What’s unique about Clipchamp is that it uses a PC’s GPU to process video. It does this to free up your CPU of processing power, an important resource for programs to use.

➡ Low impact on your CPU

A computer’s CPU only can support a certain amount of tasks and apps. When resources get strained, that causes performance issues and your computer starts to slow down immensely.

As you can see in the image of the Task Manager, Clipchamp is taking up very little of the CPU, but a large portion of the RAM which is directly from the GPU usage.

If your Windows 11 computer has a good enough GPU, the Clipchamp will save you a lot of CPU resources. But if your GPU isn’t up to snuff, then rendering videos will take a long time to complete.

That said, moving resource management to the GPU is a great solution to resource hogs like Google Chrome. While you render your video, you can surf the internet or whatever else is on your itinerary.

➡ Large stock content library

The stock library available is pretty extensive. The company did not cheap out in this regard. You have a wide selection of choices from base backgrounds to neon lights for stock video.

There are tons of free stock images from various LGBT pride flags and outer space, although more specific stocks images are locked behind a paywall. You’ll know which ones you’ll have to buy if they have an orange diamond in the corner.

Music options run the gamut from lo-fi chill music to hip hop to acoustic guitars. Sound effects stuff like fake police radio transmissions to creepy ghost/zombie sounds for Halloween videos.

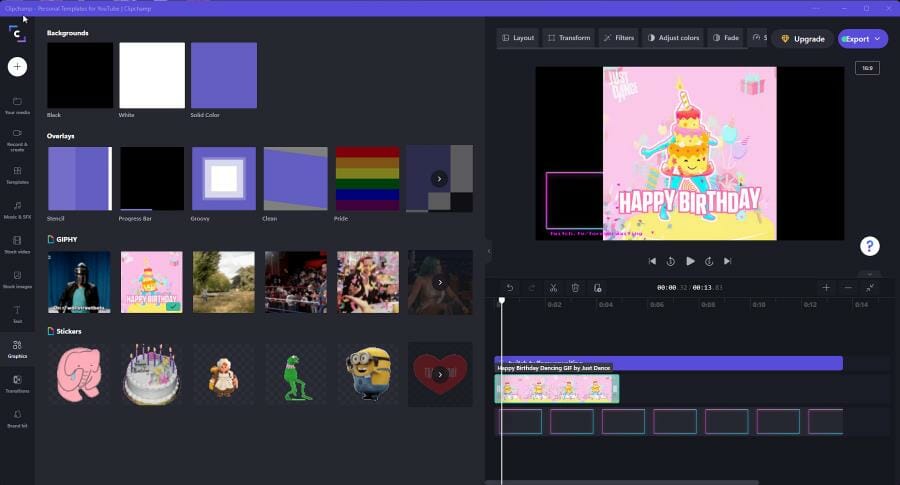
If you select the Graphics tab, you will see the entire GIPHY library at your disposal, meaning you add your favorite internet onto your video for no extra charge.

The amount of GIFs you have at your disposal is very impressive. , and stickers from GIPHY are part of that package. Speaking of free content, all of the text and transition options are free on Clipchamp.

➡ Paid plans and what they offer

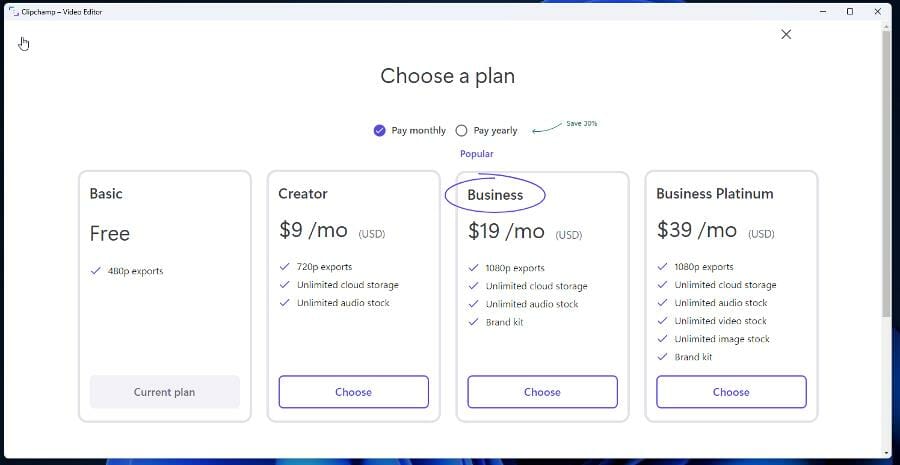
Clipchamp also has several paid plans that you can choose from that add on features and capabilities. The more expensive the plan, the higher the quality videos you can create.

The base plan limits you to videos at 480p, which is a little disappointing to see. This option offers a fairly low-quality resolution and would have liked to see 720p set as the standard. Honestly, 720p doesn’t look that good anymore.

Video resolution has made leaps and bounds in the last several years that devices and platforms can now output video at 4K resolution, and in some cases, even more. Having the 1080p option as the maximum is also disappointing to see.

And certain parts of the stock library are locked behind a particular level. The Business Platinum level gives you access to absolutely everything while the creator limits you to music and sound effects.

It would have been better if the paid plans offered more than what they’re giving its customers. Below is a demonstration of how you can create a video with Clipchamp using the Basic plan.

How can I create a video on Clipchamp?

For this example, the instructions will create a video based on what is available on the Basic plan. The process is the same for every plan. But with higher-paid plans, you’ll have more tools at your disposal, and thus the results could be better.

That being said, to be able to set up and use Clipchamp with ease, you will need to follow some steps. Below you can observe the entire process.

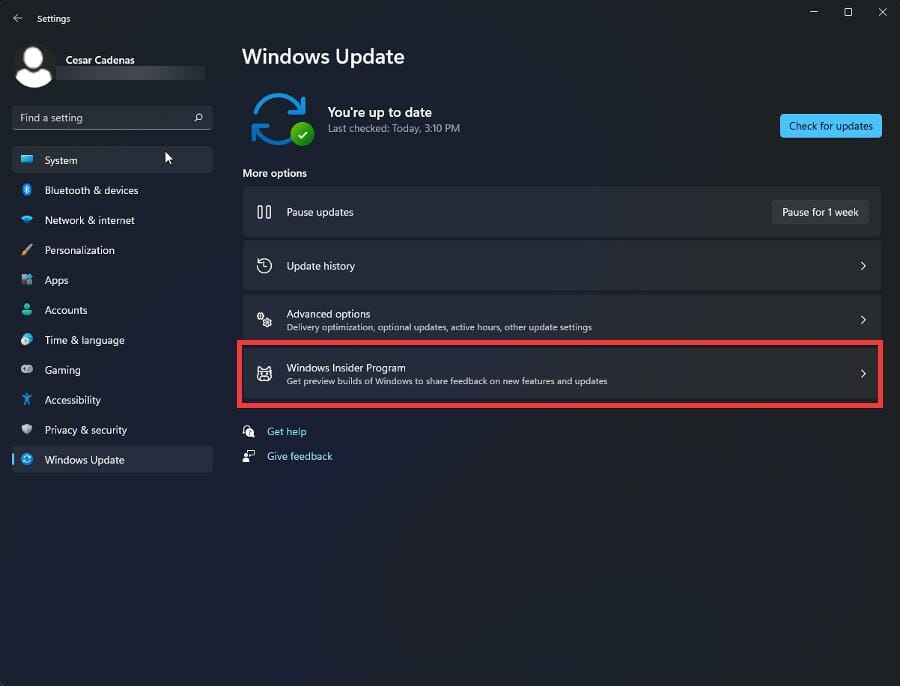
1. Join the Windows Insider Program

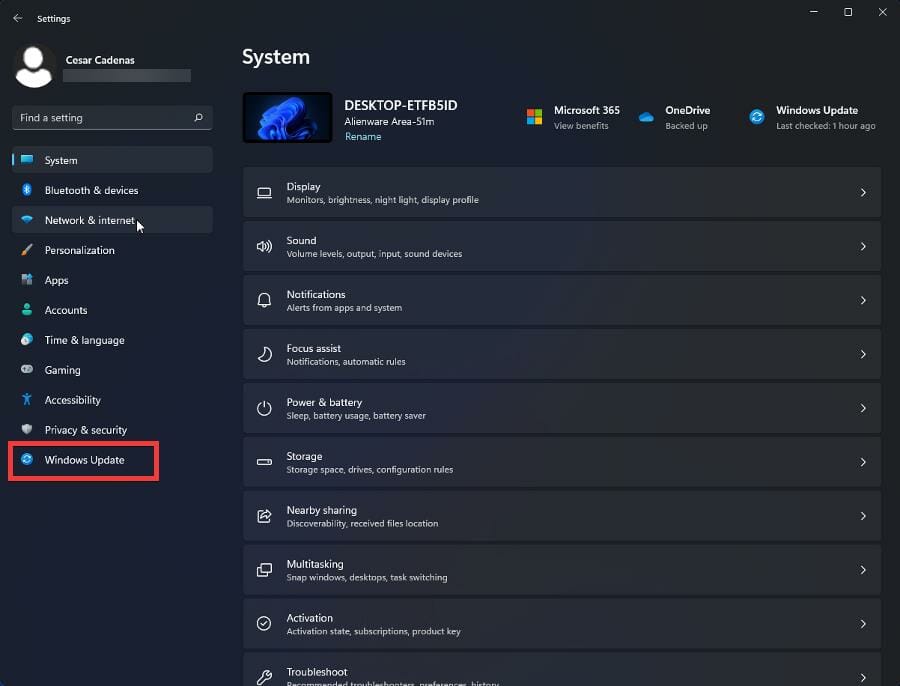
  1. Open the Settings menu on your Windows 11 computer.
  2. Click the Windows Update tab on the left hand side.
  3. In this section, click Windows Insider Program.
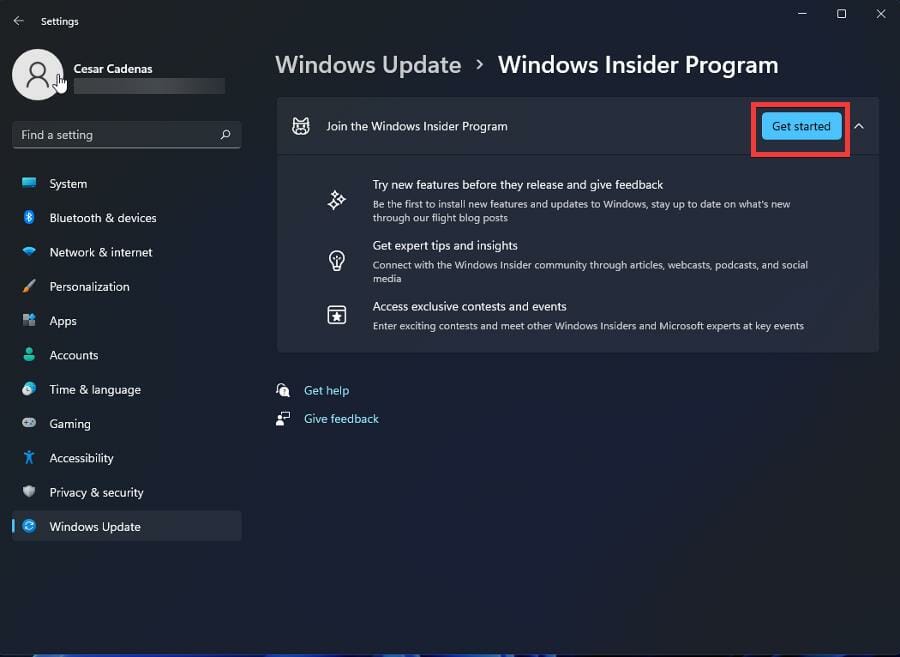
  4. Click the Get started button in the upper right corner.
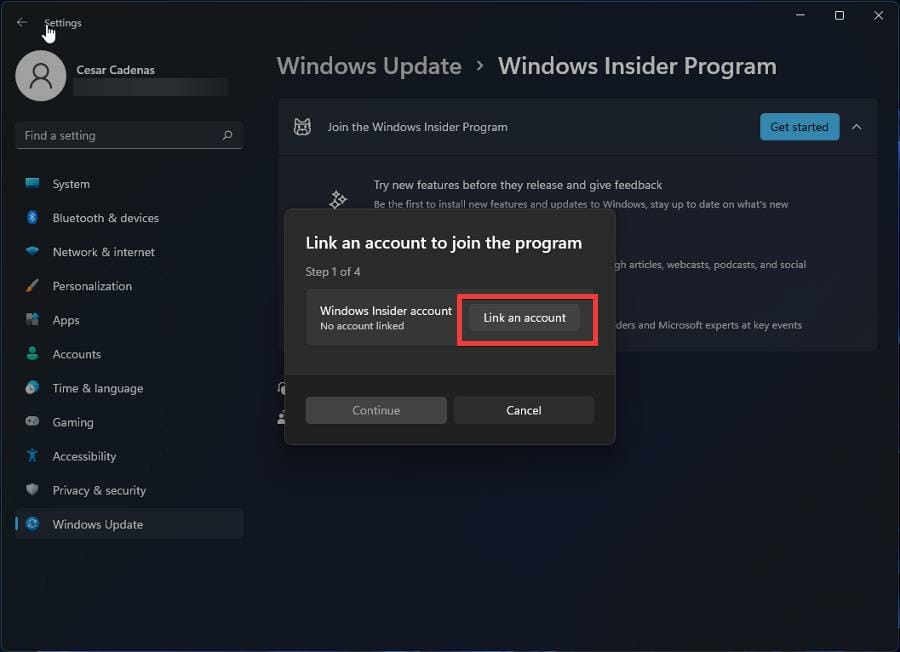
  5. Click Link an account to connect your account to the Insider Program.
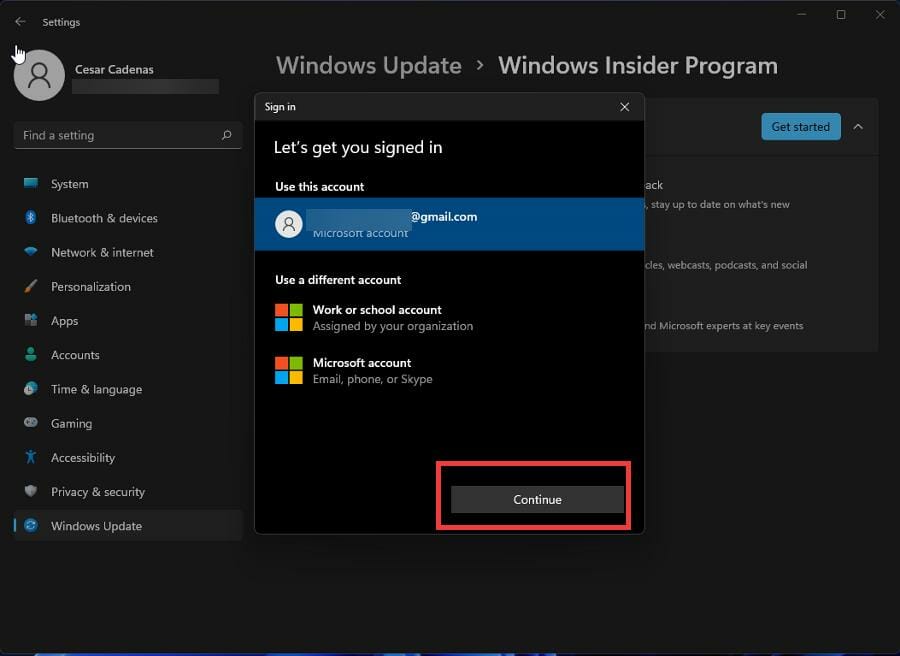
  6. Select your account and click Continue.
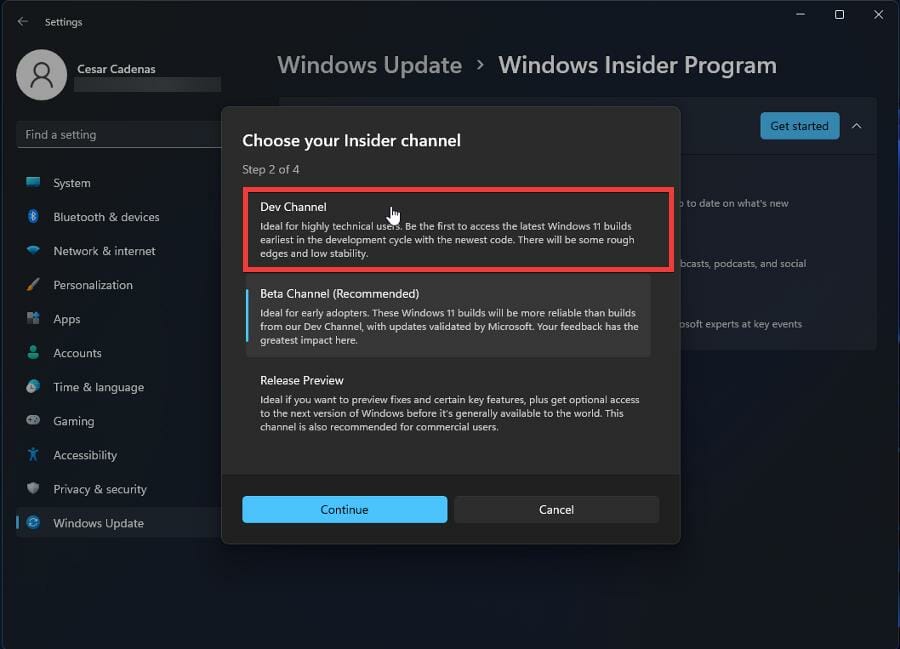
  7. Select Dev Channel so you can try out the preview build.
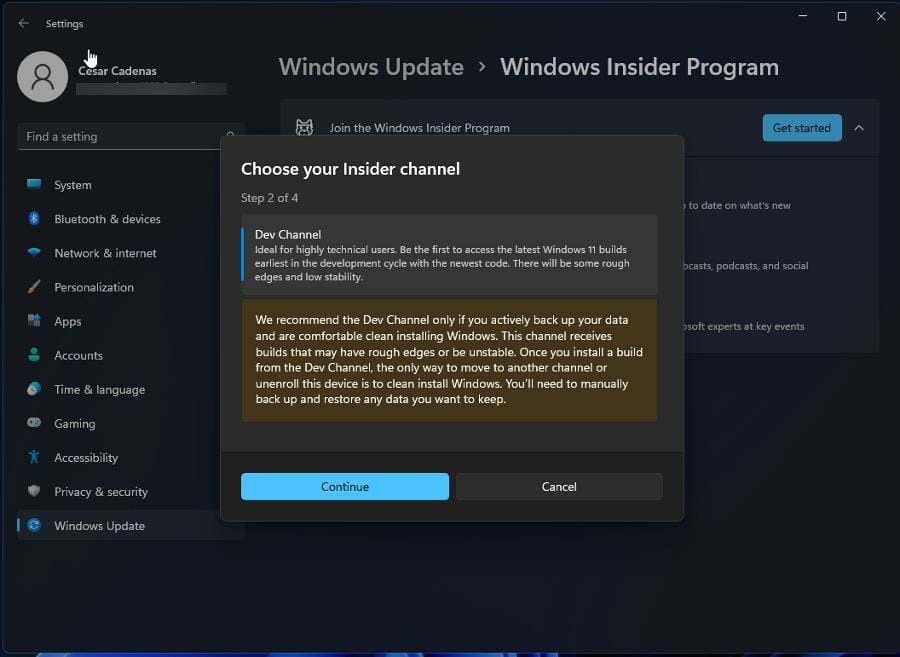
  8. Click the Continue button. You may receive a notice that states it is recommended that you only use the Dev Channel if you back up your data. After backing it up, you’ll need manually restore your data.
  9. Click Continue.
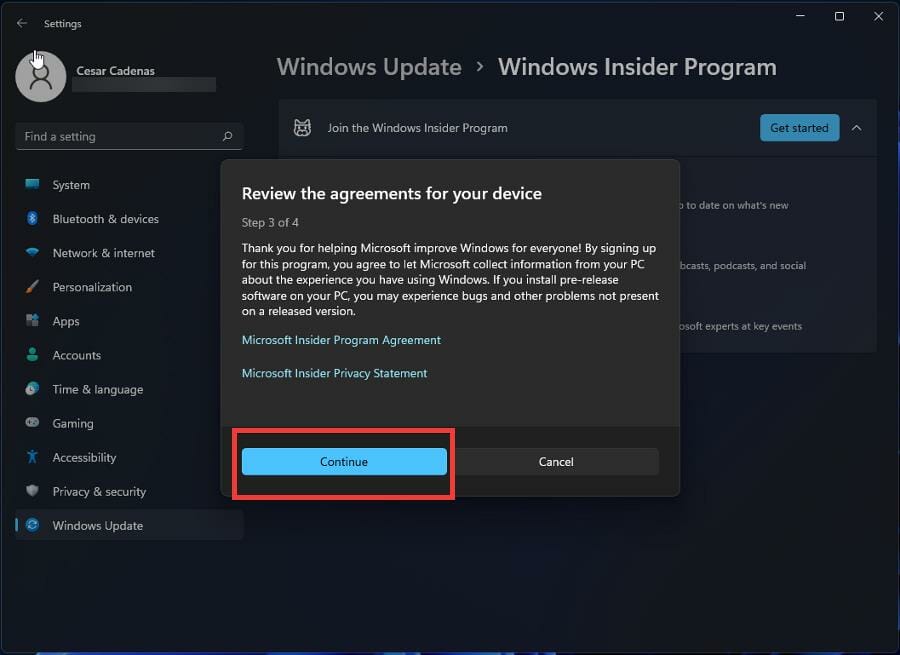
  10. You’ll be given the opportunity to read the Insider Program’s agreement and privacy statement. Click Continue.
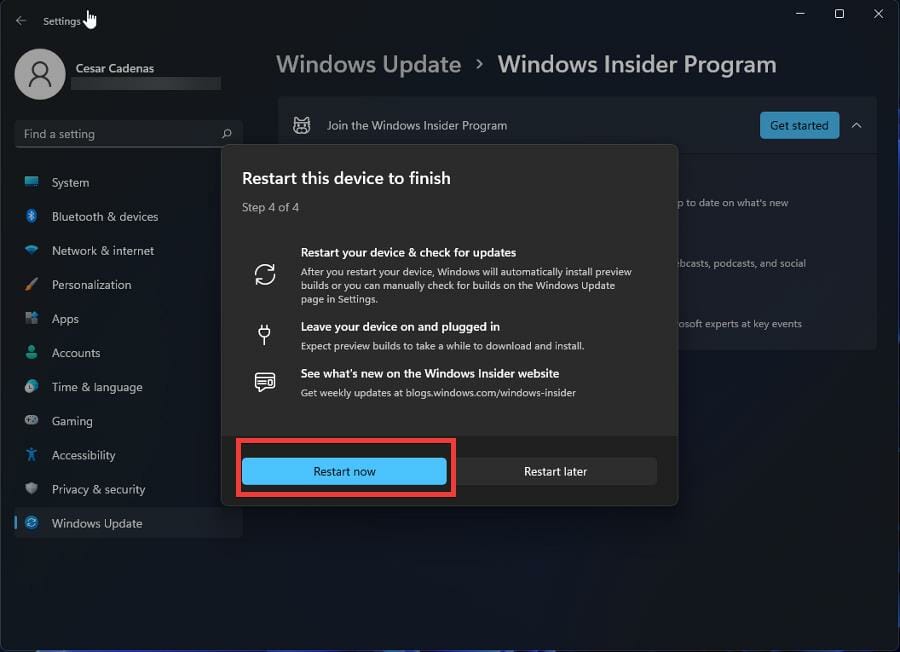
  11. To start the Insider Program, click Restart now.
  12. Give your computer some time to restart and enter the Insider Program.

2. Download the latest Windows Insider preview build

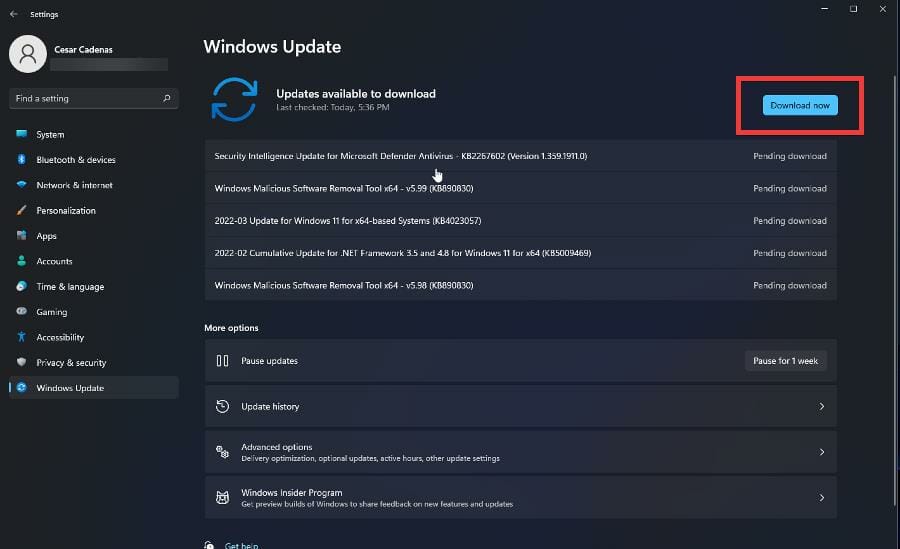
  1. Go back to the Windows Update section. You will see everything that is going to be added to the Preview Build.
  2. Click Download now in the top right corner.
  3. Give your computer time to download the build.
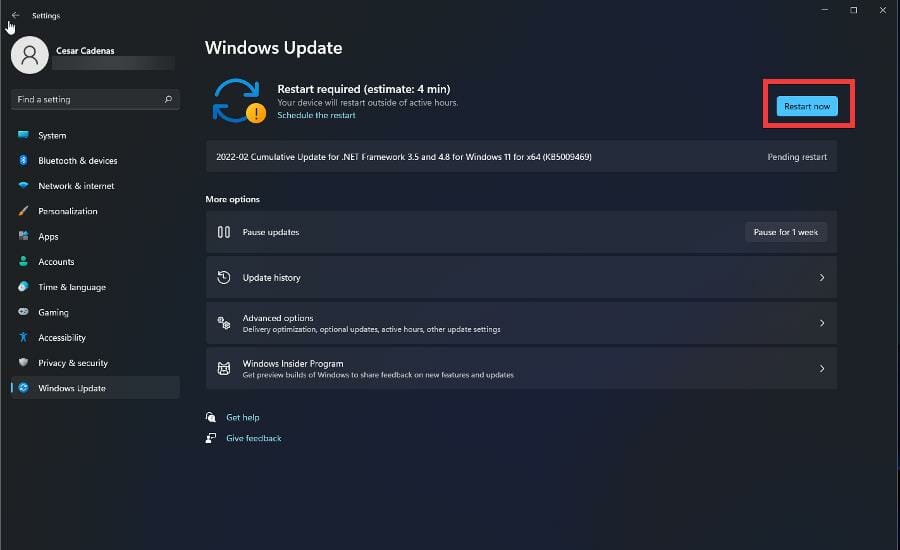
  4. After downloading, click Restart now to finalize the installation.
  5. Like before, give your computer a short amount of time to install the update.
  6. Restart your computer again to add these updates.
  7. After restarting, your Windows 11 computer will have the app. Open the search bar and search for Clipchamp.
  8. Open it to begin configuration.

3. Configure Clipchamp

  1. Upon launching the app, sign in by creating a new account or use a Gmail account.
  2. Clipchamp will then ask you about what you intend to use the app for, but you can skip it. For this example, Personal will be chosen.
  3. Clipchamp will take you through a tutorial showing you the various features of the app.
  4. From there, you can start making your own videos on Clipchamp.
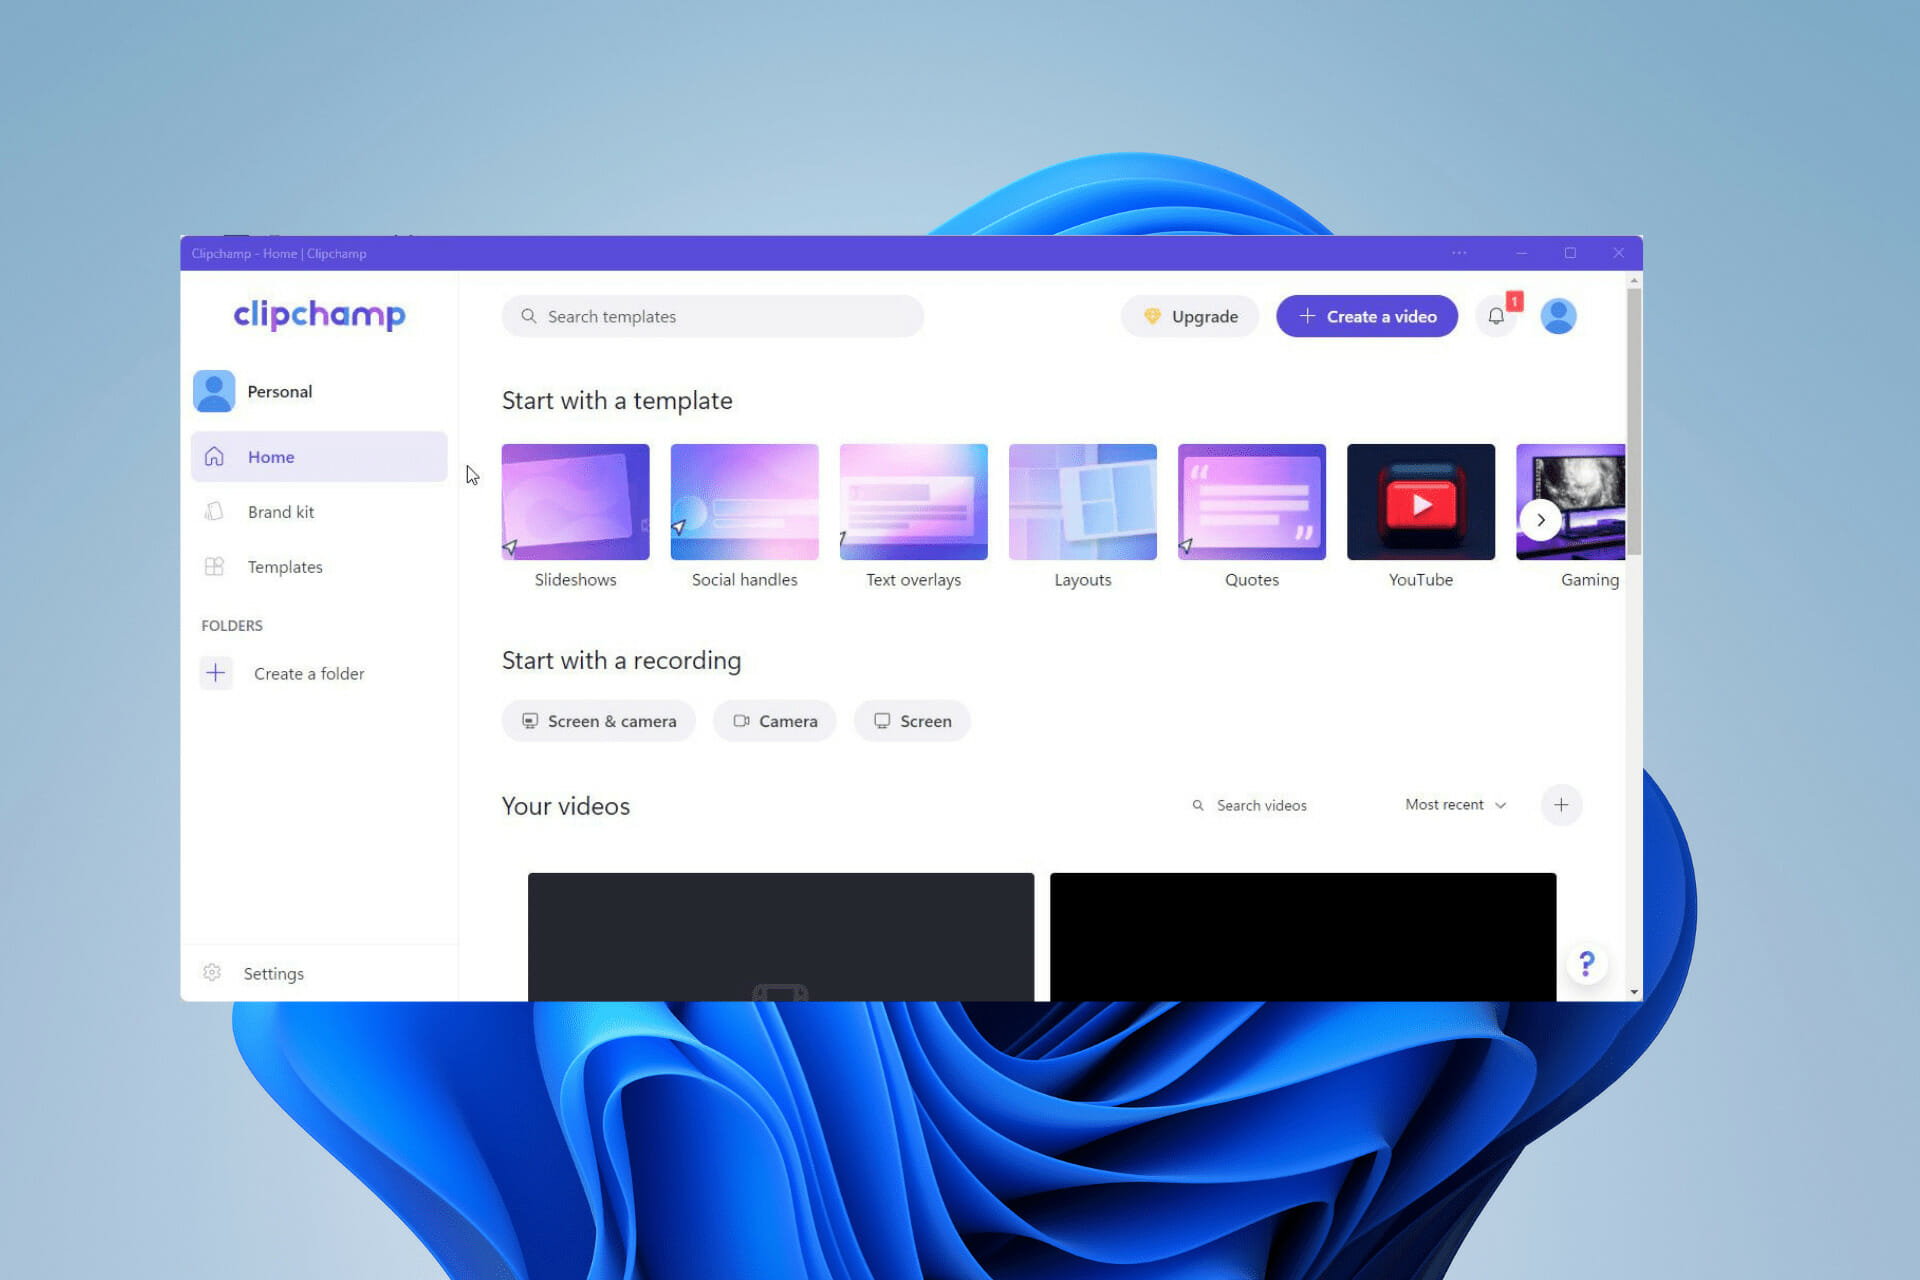
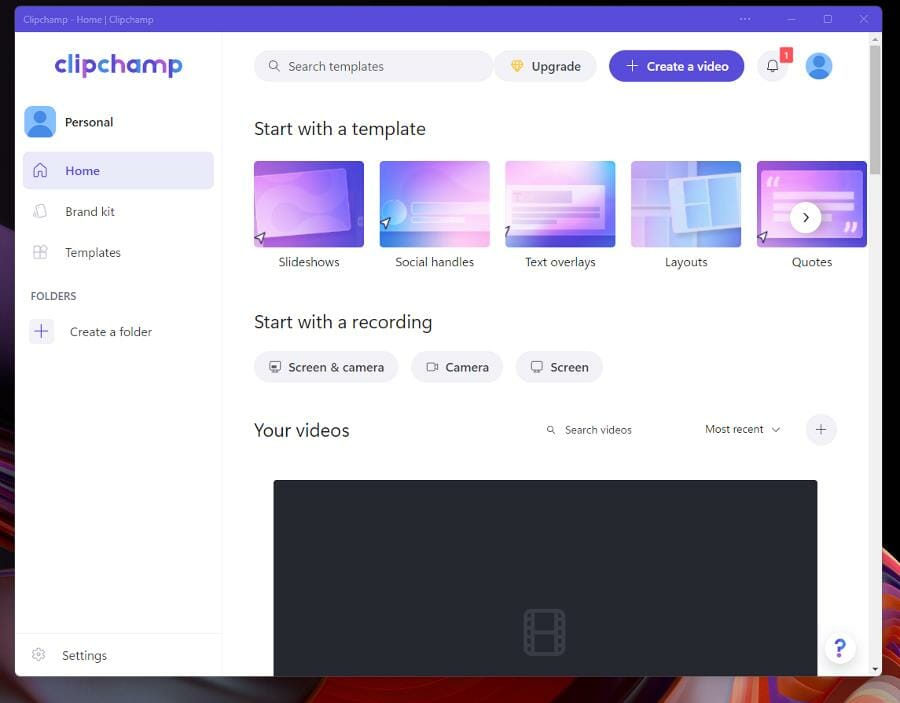
  5. The Home is where you can start making videos, by starting with a templete or a recording. Or click Create a video in the corner to get started.
  6. The Brand kit tab is a part of the paid aspect portion of Clipchamp, where you can create your own logo, fonts, and color for your business.
  7. The Templates tab show a bigger selection of the templates that you can choose from when starting a video.
  8. If you click on the Settings in the bottom left corner, you’ll be taken to the Settings menu where you can directly connect your app to your Google, Facebook, and Dropbox accounts to save and share your videos.

4. Record video

  1. Open the Clipchamp app on your Windows 11 computer.
  2. You can start by clicking the Create a video button in the top right corner or select a template.
  3. This guide will select a gaming template to start off with.
  4. Here you will see a variety of templates you can choose from for your YouTube channel or Twitch livestream.
  5. The guide will select Reaction YouTube gaming video.
  6. Select the Use this template button.
  7. A sample video will render.
  8. Click on the Plus sign in the upper left hand corner.
  9. A new window will appear where you can drag and drop files or upload them from a Google Drive, Zoom, OneDrive, Dropbox account.
  10. In this example, the video will be gaming reaction video and will need a recording.
  11. You can record your screen by selecting Record your camera or screen.
  12. A recording button will appear from the bottom. If it doesn’t appear, select Screen recording.
  13. Click the Record button and make sure your mic is on so audio can be recorded as well.
  14. If you have multiple monitors, Clipchamp will ask you what you want to share.
  15. Select an option, then click Share system audio to get the audio file.
  16. Click Share.
  17. Clipchamp will start recording your screen. Proceed to record your gaming reaction video as you planned.
  18. Once you’re done, press the Stop sharing button that appeared when you first started to record.
  19. The recording will play back in a preview window. You can either retake the video or select Save and edit.
  20. The recording will be saved to your computer and be automatically uploaded to Clipchamp.
  21. To record yourself, select Camera recording.
  22. A preview of yourself from your computer’s webcam will appear showing you the webcam being used and which microphone your using.
  23. You change the mic and camera being used by clicking on their respective popup menus and selecting something else.
  24. Once you’re done setting up, click the red Record button. Be aware that you’re limited to 30 minutes max.
  25. After you’re done recording yourself, click the Stop button to end and save the video.
  26. The recording will play back as a preview. You can either select to retake the recording or Save and edit.
  27. The file will be saved to your computer and uploaded to Clipchamp automatically.

5. Edit the video

  1. In the timeline, you can get rid of something by clicking it to highlighting it and select the trash can icon.
  2. If you want to cut up your recording, go to where you want the recording to start and double click that point to place the playhead there.
  3. Click the Split button which is the scissors icon to cut the video at that point.
  4. Highlight the part you want to get rid of and click the trash icon to delete it.
  5. Drag the newly edited video portion to where you would like it to be on the timeline, like the beginning of the reaction.
  6. You can add an outro by clicking Templates on the left and choosing an option. Keeping in the tune with the video, the guide will select Gaming.
  7. Clipchamp has a dedicated gaming outro card that you can add. Hovering over it will reveal a green Plus sign that lets you add the template to the timeline.
  8. It’s recommended that you add the outro card at the beginning or after the video has been created, but during editing as Clipchamp will create a new video and you’ll have to start from scratch.
  9. Clicking Music & SFX tab lets you add music to your video.
  10. Hover over it and you will see the same green Plus sign from before to add to timeline.
  11. You can edit the music track like videos. You can speed up or slow down audio, clip it, or trash it.
  12. Once you’re done with editing, click the Export button and a drop down menu will appear with options on which resolution you would like. The Basic plan only allows you to export in 480p.
  13. A preview of the video will. You can create a video link where you can share your video or save to Google Drive/whatever cloud service you have.
  14. You can also directly upload to YouTube.

6. Add stock video, music, and graphics

  1. If you add certain flourishes, click on their respective tab.
  2. Clicking on Stock video opens all the stocks video available.
  3. Hover over the video you want to add and click the green Plus sign to add to your video.
  4. If you want to stretch out or shorten the length the clip, highlight it and click the Speed icon.
  5. Clicking Slow stretches out the length and clicking Fast shortens it.
  6. To add GIFs, click on Graphics on the left.
  7. Select the right facing arrow under GIPHY.
  8. In the search bar, look for whatever GIF you want to add. GIPHY has a pretty extensive service.
  9. Over the GIF you want to add and click the green Plus sign to throw it onto the timeline.
  10. You can place the GIF in the corner by clicking Layout then select Picture in picture.
  11. You adjust the GIF’s place by making a selection in the Position arrangement and the size by dragging the slider.
  12. Clicking Color allows you to adjust the Exposure, Saturation, Temperature, and Contrast of the highlighted section.
  13. Clicking Filters lets you add a filter.

This is was a brief rundown of what Clipchamp is capable of. The purpose was to show how easy and simple it is to record videos on Clipchamp and how easy it is to edit them.

Editing can be a complex procedure that takes a long time, but this app cuts the process down. The amount of time saved using this app cannot be overstated.

Is Clipchamp a good video editing app?

Clipchamp is a pretty good video editor, although there are some weak points in the software. First, it’s incredibly easy to use that even someone who’s never edited a video before can use.

It is so beginner-friendly that anyone looking to venture out into the world of video editing should try out Clipchamp first. The app gives you so many tools to start with. You can create pretty decent videos with it.

Not shown in the step-by-step guide were hints and the tutorial that Clipchamp runs you through to teach you what you have at your disposal. The user interface is clean and marked. Nothing is hidden.

Everything is just a few clicks away. Templates support various types of videos like YouTube, Instagram, Facebook ads, TikTok, holidays, sales videos, and more.

The support for GIPHY is amazing with an almost limitless amount of GIFs at your hands. The stock library alone feels like more should be behind a paywall, but a large portion is free.

It is such a great beginner’s tool, but don’t get it confused with better apps. Clipchamp pales in comparison to software like Vegas Pro or Adobe Premiere which are industry-level video editors.

Third-party apps like that are much more powerful in terms of features, capabilities, and tools. Those set the standard, but Clipchamp is meant for people who are starting, not professionals.

That said, it’s disappointing to see no 4K or even Quad HD resolution as a part of Clipchamp and this is something that pertains to the web browser version as well.

The web browser version and app are identical in every way and are only available on Chrome and Edge. Because of this, Clipchamp on web browser uses CPU resources instead of the GPU which can lead to performance issues.

Just a side note, but important to point out. Also, not supporting 4K resolution is a weird decision since so many websites like YouTube and Twitch allow people to upload videos and stream at that high quality.

People who want to upload to those sites probably won’t be using Clipchamp since it restricts people to such a low resolution. Regardless of what it can’t do, Clipchamp is still a great app.

What else can I look forward to in the latest Insider Preview build?

One of the big new additions is a Microsoft Defender app. It’s only available as a preview for users in the United States, but it’s a security app that brings a Windows 11 security standard to mobile devices and a hub for all your machines.

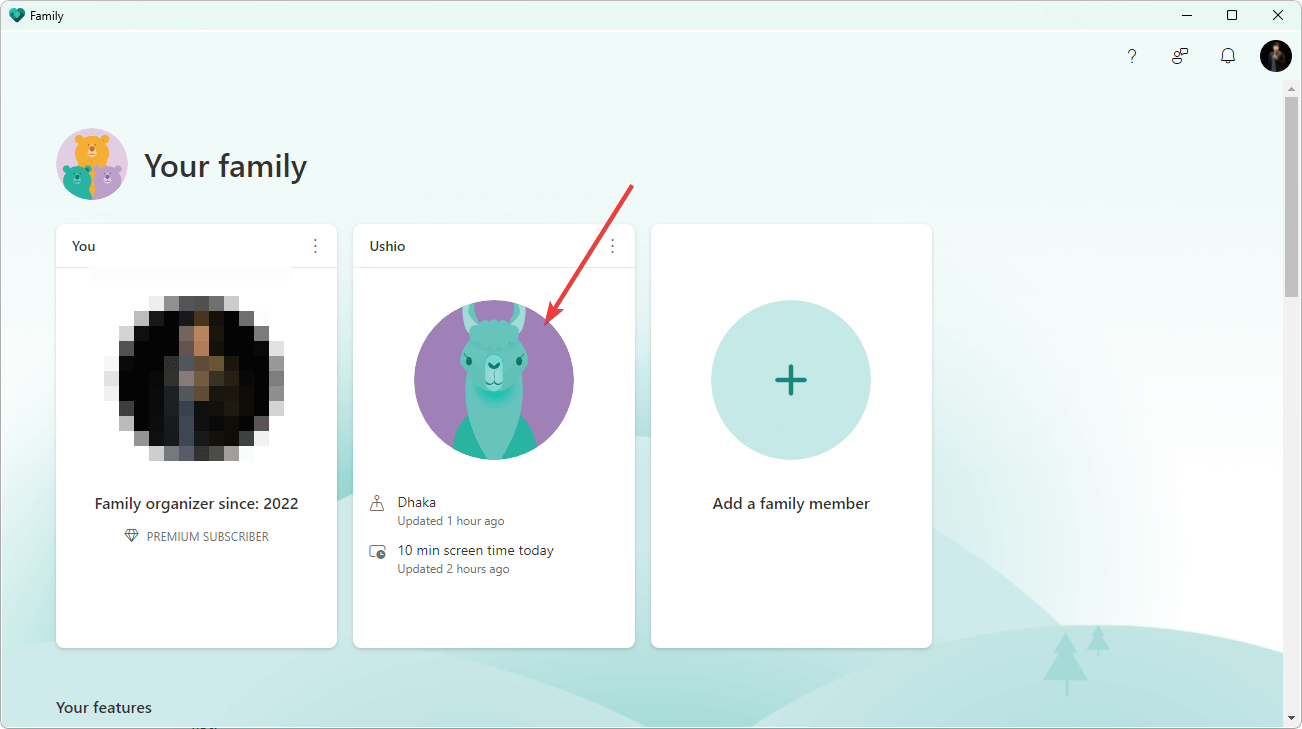
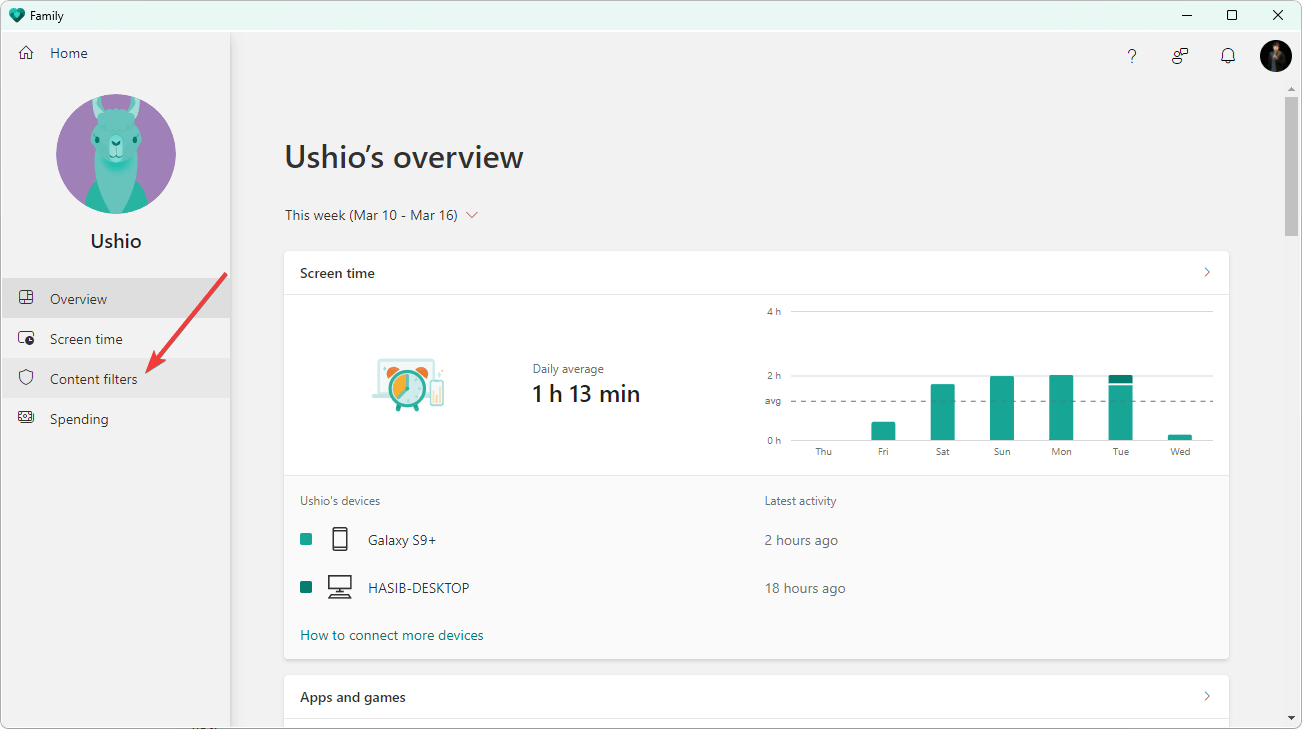
There’s also Microsoft Family which is a parental control app that establishes barriers of what children can and can’t access. It’ll make sure that children can only access family-friendly websites and keep them safe.

And if you ever run into any issues concerning this latest update, it’s recommended that you uninstall it. You can also try disabling your antivirus software which has been known to clash with Windows in the past.

Pros
Low impact on CPU
User-friendly interface
Large stock of library content
No learning curve
Cons
The base plan limits you to videos at 480p
Maximum quality rate is 1080p

Final Verdict: 4/5

While the low resolution for videos made from Clipchamp is disappointing, the app is pretty good. You have to look at what the purpose of the app is and who is it for? Not for the filmmaker or the tech-savvy person.

Clipchamp is meant for the common layperson who doesn’t want the most high-quality videos or amazing editing tricks. It’s also meant for small businesses who want a simple video editor with some neat tools.

It has succeeded in being Movie Maker 2.0, in that it’s a video editing app that is easy to use, fun, and teaches you how to make videos along the way.

That said, it’s disappointing to see to see the video resolution cap off at 1080p when so many video streaming sites that can do 4K videos. And this isn’t something that Clipchamp is incapable of.

It’s baffling to see this feature not transfer over to the Windows 11 app version, especially when it focuses so heavily on gaming.

Clipchamp has a lot of tools and templates with a focus on YouTube gaming videos and Twitch streams. This is a community that demands high-quality videos and gaming.

Low-resolution videos that won’t allow a game’s quality to shine through are a confusing move on the behalf of Microsoft. Hopefully, Clipchamp adds Full HD and 4K support soon.

Feel free to leave a comment below if you have any questions on other Windows 11 apps. Also, leave comments about reviews that you’d like to see or information on other Windows 11 features.

eBay is Not Accepting Credit Card Payments? Try Our Methods

eBay is a leading e-commerce platform with a twist. You pay exactly what you feel the right price for a particular item should be.

In other words, eBay focuses on auctions and peer-to-peer sales, and both online merchants, as well as buyers, simply cannot get enough of it.

Now, eBay is an international platform, and has distinct versions for different countries, such as Canada, the UK, Australia, Belgium, France, Germany, India, Sweden, Singapore, Italy, and more.

Payment options are also secure due to their sophisticated anti-fraud systems, a huge bonus for people who actively engage in transaction-making regularly.

Plus, you can always add a VPN for eBay to ensure your sensitive information is impenetrable.

But is it all perfect? Hardly. In fact, many users complained about eBay not accepting credit card payment issues.

As you probably know already, 2 main entities use this online shopping site, the sellers and the buyers, and things are a bit different in terms of payments for each of these categories.

Today, we’re focusing on the buyers and how to solve their declined payment situation. But first, let’s see what eBay has to say about that.

What payment methods does eBay accept?

  • Credit or debit cards
  • Gift cards + coupons or eBay Bucks (all offered as part of a reward-based program and that you can redeem during checkout)
  • Apple Pay
  • Google Pay
  • PayPal or PayPal Credit

These are the default options that will appear on every checkout page. These methods are wired to protect both the seller and the buyer against potential fraud attempts, thanks to the eBay Money Back Guarantee.

In addition, the following methods can also be accepted, according to the category of the purchase (and as long as the seller agrees to provide them for their listings):

  • Checks
  • Payment orders
  • Cash on delivery/pickup

For these special cases, there is no money-back guarantee coverage.

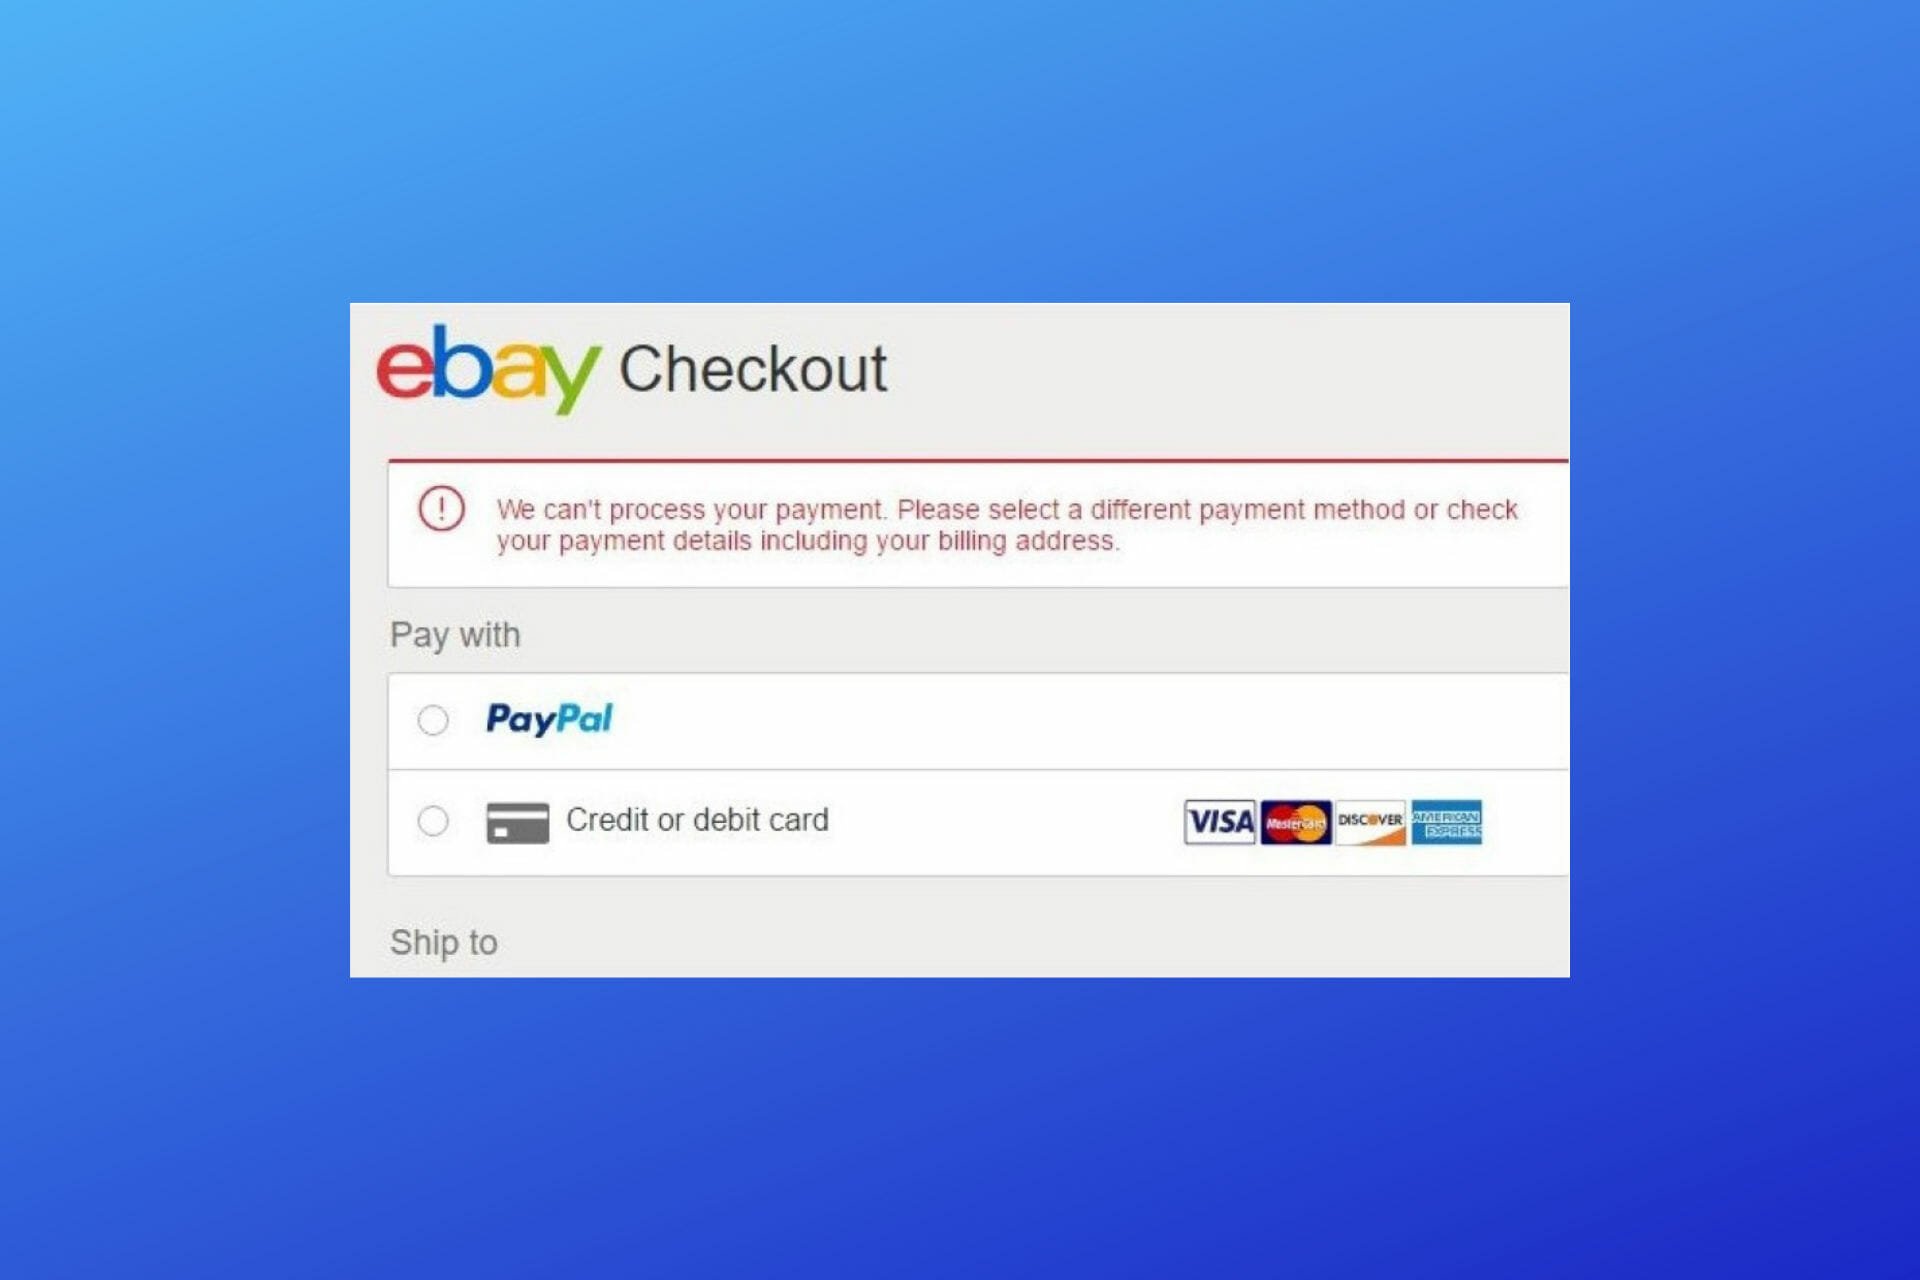
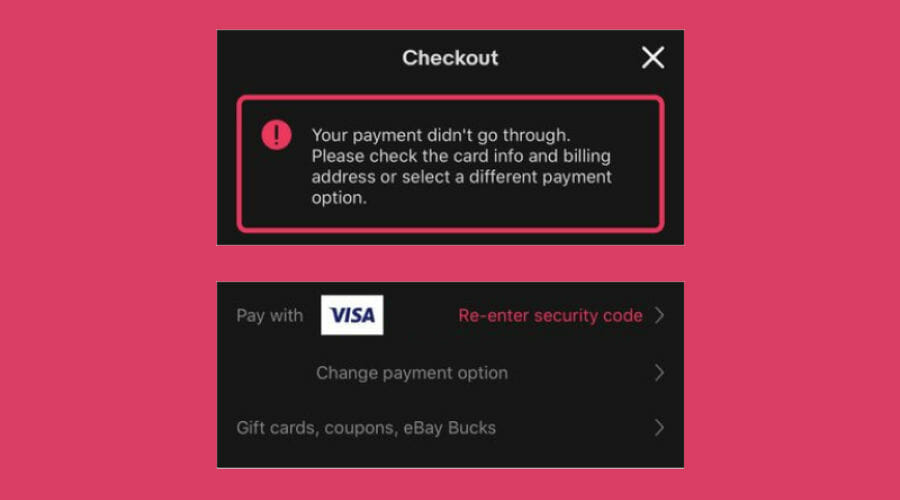
Now, payment via credit card is hugely popular, but also more likely to fail. In fact, many users reported their purchase could not go through in regards to various error messages, including:

  • eBay please check your payment details or use a different payment option
  • We can’t process your payment. Try again, or select a different payment method

What can I do if eBay won’t accept my payment?

1. Use Payoneer

eBay is now managing payments directly and has partnered with Payoneer. However, this method is only available for sellers.

Its goal is to enable them to receive funds generated from their listings directly in the Payoneer account linked with eBay.

But where does that leave the buyers? What happens if eBay won’t accept payment via credit card or even via PayPal?

If you’re a buyer, you can ask for a physical card from Payoneer and use it to pay for your eBay purchases.

Here’s how to get yourself a Payoneer card:

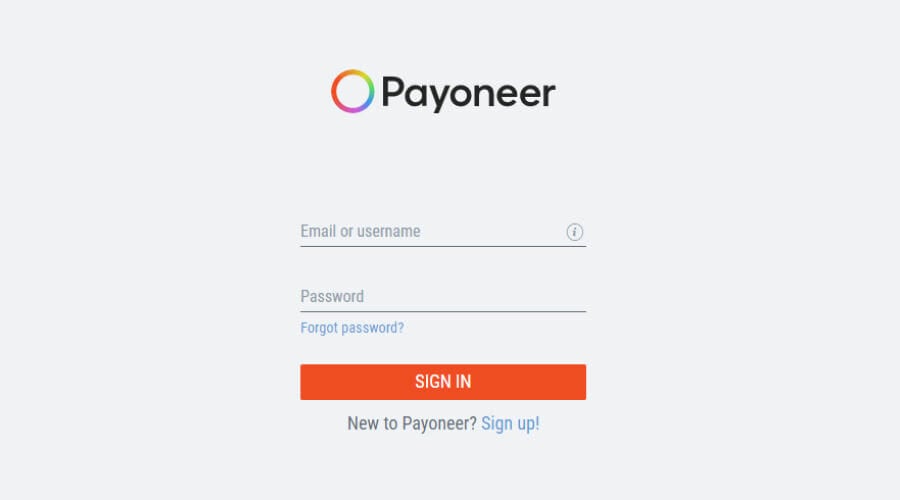
  1. Open the Payoneer platform and register to create an account or sign in if you already own one.
  2. Next, head over to Settings and Payoneer Cards.
  3. Click the Order Card menu and follow the prompts on the screen to complete your request.
Note icon NOTE
There is also an eligibility condition to consider when requesting a physical Payoneer card.

This criterion refers to the minimum amount of payments received in your Payoneer account in the last 6 months. Don’t worry, everything will be clearly explained if you happen to encounter this particular situation.

What else should I know?

  • A Payoneer card is a physical or virtual Mastercard debit card that can be used both in stores and online
  • The delivery can take up to 25 business days
  • You can choose to receive your card via expedite shipping for an extra fee (you Payoneer account balance must cover the fee)

2. Use Revolut

While sellers can opt for various integrations, including eBay & Revolut combinations to receive their payouts, things are much simpler for buyers.

All you need is a Revolut card (preferably physical, not virtual) that you will be able to use on the eBay checkout page in order to complete your purchase successfully.

Here’s how to get yourself a Revolut card:

  1. Register on the Revolut platform (you can either access the Revolut website via desktop or download the Revolut app from your mobile platform store).
  2. Insert the required details in order to complete the registration.
  3. Once your user account is set up and you are logged in, go to the Cards tab.
  4. Next, hit the Add card button, and select Debit.
  5. Complete your order (delivery method and delivery address along with any other details including the preferred payment method to cover the delivery).

What else should I know?

  • You can use your Revolut card to make international payments without extra charge
  • Revolut cards can be either Visa or Mastercard cards
  • Your Revolut card is a prepaid card (not a credit card)

There you go; now you have two safe and tested methods to pay for your online purchases if eBay won’t accept payment via credit card.

You may also be interested in reading about how to fix the eBay 403 forbidden error for more information.

No app that is 100% error-free has been invented yet, so occasional hiccups may come along. Don’t worry, if your Revolut login is not working, we will be able to assist you.

For any other questions, feel free to access the comments section below and leave us a note.

Five ways how you can turn a Chromebook into a “Microsoft Book”

Chromebooks are plentiful these days, with some premium Chromebooks being cheaper than Windows laptops. Even lower-end Chromebooks might perform better than a Windows system. So, if you’re in need of a laptop but don’t want to spend a lot of money on a new Windows device, yet are used to the Microsoft ecosystem, here are some tips on how you can turn a Chromebook into a “Microsoft Book” of sorts.

Tip 1: Use Microsoft Edge

Our first tip involves avoiding using Google Chrome. If you really want to turn your Chromebook into a Microsoft Book, you can opt to use Microsoft Edge on the device instead. You’ll first need to make sure your new Chromebook supports Linux, as using Edge on a Chromebook involves the Linux version of the browser.

Once you can confirm that, it’s as simple as setting up Linux on your Chromebook, downloading the .DEB version of Edge, and launching it from your ChromeOS launcher. Keep in mind, though, that this Linux version of Edge has some limits on ChromeOS. The webcam might not work, and neither will the touch keyboard on tablet devices. We have a guide that might help. 

Tip 2: Use OneDrive storage

Next up is a tip involving Cloud storage. While Google prefers you use Google Drive on a Chromebook, you also can use OneDrive, too. Just confirm your Chromebook supports the Google Play Store, and then download the Android version of OneDrive. From there, sign in with your Microsoft Account in the app. Allow the OneDrive app to sync, and then close it and open it again.

You should then open up the Files app on your Chromebook. Look in the sidebar, and you’ll see a new “OneDrive” section. From here, you can browse your OneDrive files, open pictures, and save them to your Chromebook. Do note, though, that OneDrive is read-only, so you can’t write files to the storage via the Files app. If you want to save files to your OneDrive, you’ll need to open the Android app manually and upload it into a folder from there.

Tip 3: Use Office PWAs

Third up is a tip involving apps you might use for work or school on a Chromebook. Though Google Docs, Slides, Sheets, are the default on Chromebooks, you can still manually use Microsoft’s own apps, too. Just create progressive web app versions of Word, Excel, PowerPoint. We have a guide which can help. Using Office.com is even simpler, as it links out to all these Microsoft Office apps you might want or need. It’ll be your one-stop-shop for Microsoft on your Chromebook.

Tip 4: Use the Microsoft Teams PWA

Naturally, if you use Teams for work or school, you might head to the Google Play Store and download the Android version of Teams on your Chromebook. That version of the app is great, but to get the true “Microsoft Book” experience, you’ll want to create a PWA version of Teams. Our guide covered this in-depth, but the PWA version of Teams looks and feels more like what you’d expect from a Windows desktop app.

Tip 5: Run Windows through the web

Our last tip is one that jumps through some hoops a bit. While so far we’ve focused on how you can run Microsoft apps and services on a Chromebook, we also have some advice for how you can run Windows on the system, too. This one is a bit more technical. You’ll need an actual Windows PC for this to work, but if you have one, you can end up running Windows through the web.

Our previous guide looked at this in detail. Just install the Chrome Remote Desktop extension in Chrome on a PC, download the required program and head back to Chrome Remote Desktop. You’ll then be able to enjoy Windows remotely.  As for running Windows natively on your Chromebook, there are options. You can try out Parallels Desktop for Chromebook Enterprise, though you’ll have to have a higher-end system. There are also ways to install Windows in a virtual machine, yet it isn’t exactly for novice users and doesn’t always work on Chromebooks.

The best of all worlds

As you can tell, Microsoft is no longer just on Windows as it was in olden times. The company is open to having its services on all platforms. We’ve put together similar guides on how you can use Microsoft apps on an iPhone or iPad, and how you can live the Windows Phone life on Android. If you have your own tips, let us know in the comments below.

Computer Activity Tracker: 5 Best for 2026

Many people confuse PC user monitoring tools with spyware. All spy agents use computer monitoring techniques, but not all PC monitoring tools are spyware. It depends on the reasons why you’re resorting to such a tool: to limit the time spent in front of the computer and to restrict access to certain applications or to invade someone’s privacy by monitoring and logging their activity.

Few scenarios make it acceptable to install monitoring software on someone’s computer.

For instance, you can set up a parental control lock to monitor your kids’ activity on the PC and block access to content-sensitive sites. The goal is to protect the online identity of your children and prevent them from accessing websites they’re too young for.

A PC monitoring tool can also be installed on an employee’s workstation to block access to sites unrelated to work, like Facebook, Twitter, Instagram, or Netflix. It’s common practice, even for work-from-home employees.

The best PC monitoring tools give you versatile options. For instance, you can set up a scheduler that allows taking a break from working or studying. What sets it apart from spyware is that the child or employee is aware of the monitor.

Many programs give you the possibility to keep track of someone’s computer. But we found and handpicked the top 5.

What are the top 5 PC user monitoring tools?

ActivTack

computer activity tracking software

ActivTrak allows you to keep track of your employees’ productivity.

If you are an employer and you’re looking to get a more in-depth look at what your employees are doing during working hours, ActivTrak is the perfect solution for your needs.

The software allows users to monitor a few employees’ computers at once and it also manages to provide detailed reports regarding the users’ activity.

ActivTrack lets you capture screenshots of the devices you monitor. You can access this feature from a remote workstation regardless of location.

With the Image Redaction feature, you will be able to keep your private information safe.

ActivTRack gives you real time reports that inform on what is happening on your system.

It provides comprehensive information about the application used, online activity and system usage.

Here are the key features of ActivTrack:

  • Using ActivTrack, you will be able to protect systems and networks by restricting the access to malicious or unsavory websites.
  • With this tool, you will be able to understand and enhance your employees’ productivity.
  • You can record statistics on how and when applications are used.
  • ActivTrack generates charts visualizing the time that was spent on various apps.
  • This tool can be installed remotely if your company is using ActiveDirectory.

ActivTrak is a handy business development tool that offers user behavior analytics, and it comes with a really user-friendly interface.

It’s also straightforward to install, and it will be able to enhance both security and performance.

The tool will start gathering data in a few minutes after you install it. All the data will be stored securely on Amazon Cloud.

You can find out about ActivTrak’s features by heading over to its official website.

ActivTrak

Understand and enhance employee activity with the behavior analytics provided by ActivTrak.
Check price Visit website

TimeDoctor

computer activity tracking software

TimeDoctor is an employee productivity app with various monitoring and ranking features. It can, however, be used individually as a tool to track& boost productivity.

It comes with elaborate time-tracking which can be used both on PC and mobile devices. The tracker generates reports about time spent on certain projects or tasks.

To get started, you just have to create a task and the employee will press an on/off button which will automatically record the time he/she spends on that task.


It can also automatically monitor employee activity without any manual interventions from the users. Just make sure your employees download the software and connect to your business’s workspace.

TimeDoctor provides instant productivity percentages for each day of the week. Moreover, it also provides an overview of all your projects and the total time spent on them. 


The tracker also creates reports on time spent on unproductive apps and websites such as YouTube, Solitaire, or Facebook. This is of great help in figuring out ways to boost productivity.

Other key features of TimeDoctor include:

  • Distraction Alerts for excessive use of social media or other unproductive apps/websites
  • Provides automated screenshots of user’s activity
  • Offline time-tracking
  • Private & Secure sessions with SSL encryption & customizable user permissions 
  • Project management features 
  • Integrates popular employee apps like Trello, GitHub, Asana, Basecamp, Slack, QuickBooks, and more

TimeDoctor is a paid service with 3 types of subscription plans based on the size of your business and integrated features. You can try all plans for free for 14 days. No credit card information is needed.

TimeDoctor

Monitor usage, get complex reports and manage projects across PC and mobile devices with just one easy-to-use and safe tool.
Free trial Visit website

SpyAgent

computer activity tracking software

SpyAgent is award-winning spy software that has been available on the market for more than 17 years. This tool can run in stealth mode, so your kids or employees will not know that they are being monitored.

SpyAgent’s amazing set of features will invisibly monitor all computer usage and Internet activity, and it packs over 15 computer monitoring tools.

Here are the key features of SpyAgent:

  • SpyAgent allows you to control your kids’ Internet while at the same time still allowing them to enjoy their time online.
  • This is a reliable and affordable parental control software that can view transcripts of sent and received emails.
  • You can also have a look at messaging conversations and activity on social media.
  • Even if this program may seem a bit challenging to download and set, once you get the hang of things, it will be a piece of cake to use it.
  • You can adjust filter settings and view activity reports according to your preferences.
  • You will also be able to set the software to monitor activity only at certain times.
  • This program comes with various reporting capabilities including reports delivered via email and remote reporting.
  • Activity logs including screenshots can be filtered based on elements such as specific websites, time of day, restricted access attempts and also keystrokes.
  • You will be able to download any reports and then save it to your system for later study.

⇒ Get SpyAgent

SniperSpy

computer activity tracking software

If you are worried about the ways that your kid or your employee is using the PC, SniperSpy definitely has the potential of becoming your best buddy.

You will be able to watch what happens on a computer’s screen live.

This tool is also able to save screenshots and text logs of websites, chats, keystrokes in any language that you want.

Using SniperSpy, you will be able to remotely monitor everything that is going on on a computer while it’s being used.

Here are the key features of SniperSpy:

  • This tool is easy to install and use even if you are not an expert in using this kind of software.
  • After you install the program, you will get the chance to view the live screen and browse the file system from anywhere and anytime you want to.
  • You will get an online control panel to view the logs.
  • You can easily check out social media activities and filter websites, and chat messengers.
  • This software gives you the chance to block websites, social networks, chat, and apps and send commands to the remote system.

⇒ Get SniperSpy

TheOneSpy

computer activity tracking software

TheOneSpy is one of the most advanced spy apps for computers, tablets, and smartphones. Using this software, you will be able to sneak into any device anytime without getting caught.

This tool comes with a lot of useful and interesting features for monitoring devices.

Here are the key features of TheOneSpy:

  • The program has a lot of features for tracking, spying, remote monitoring, spy chat, and remote control.
  • You will be able to keep an eye on your employees or kids without them knowing it.
  • TheOneSpy allows you to monitor and listen to live surroundings because you can remotely activate the cell phone microphone.
  • You can also listen to cell phone conversations online.
  • This tool offers you the ability to remotely share live screens and view live visuals by using the spy camera app.
  • This is an excellent cell phone monitoring and computer spy software that you can hide on the devices without leaving any noticeable track.
  • All the information on the targeted device is automatically updated on the TheOneSpy user control panel, and you can access it by logging into your personalized user login from any system, and anytime you want.

There are a lot more cutting-edge and exclusive features that are packed in this tool, which you can explore right away.

⇒ Get TheOneSpy’s

Conclusion

These are our top picks regarding software to keep track of computer use and all these tools are compatible with Windows and pack some great sets of features and advantages.

It’s important to remember that monitoring another person’s computer without their knowledge or permission can be a federal crime, so make sure that you are aware of the very few specific conditions in which you are allowed to do this.

It’s best to consider all things involved before you proceed.

If you run a business, check out the best employee monitoring tools! Visit our Security and Privacy hub to read more amazing guides and have a better understanding of this vital topic.

If you have any more questions, just reach to the comments section below.

Software to Limit Computer Time on PC: 5 Best to Use in 2026

Keeping your children safe on the Internet is the primary goal of any parent. Today, children are bombarded by technology and have very premature access to a world of information that they are not always able to manage due to age and maturity.

If you want to protect your children online, you should limit their time on the PC, and today, we’ll show you the best software to limit time spent on the computer.

These tools will let you set up time limitations as well as time intervals that allow or block online browsing.

You can block specific websites and applications, censor bad words, prevent your child from giving away personal information online, and more.

These tools include other valuable parenting tools such as a location tracker, and some offer support for e-learning platforms, ensuring your child is connected to all courses and not surfing on the web.

Qustodio

On the podium, we find Qustodio, a software that installs on all devices for both parents and children, including smartphones, tablets, and desktops.

Mom and dad can use the mobile app or the Family Portal online to monitor kids’ activity in real-time. We can know how much time children spend online and precisely on what sites or applications.

We can set limits for games and apps or completely block those we don’t want them to use.

The application has 29 filters that inappropriate content, even in private browsing mode. Through Qustodio we can monitor the time spent on social networks, calls, and messages and block any contacts we don’t want to reach our children.

And if there is an emergency, the kids can send you a notification thanks to the panic button, which tells the parents their position in real time.

The platform is compatible with multiple Windows, Mac, and Chromebook computers. 
Parents can also verify mobile device activities for Android and iOS, plus screen time and progress reports from Kindle.

This app can also track calls and text messages on mobile phones. You can see call history and read texts. You can also block specific contacts.

Other key features of Qustodio include:

  • Locate family feature
  • Set up SOS and alerts
  • Graph reports on overall activity

Qustodio is a subscription-based service with multiple plans, depending on the number of devices you want to connect.

Qustodio

Monitor time spent on applications, verify activity, and get real-time alerts on computers and mobile devices.
Check price Visit website

Norton Family

Surely, you’ve already heard of Norton as an antivirus. However, the Family version was also developed to protect minors, preventing them from accessing inappropriate content and apps.

You can set filters and time limits, planning specific times of the day or week at which children can use the PC  and Android or iOS devices.

In addition, you can receive reports by e-mail or view them online and monitor your child’s activity closely.

The application also gives the possibility to check text message exchange and the use of social networks.

The software will also generate a list of blocked websites the children have tried to visit, allowing you to closely monitor their activity.

Norton Family allows parents to manage remote learning activities. You can enter your child’s schooling schedule. The app will temporarily block distractions in this interval.

It also supports GPS-powered location verification to permanently access your child’s whereabouts.

Other key features of the Norton Family include:

  • Web use monitoring
  • Mobile and desktop device supervision
  • Compatible with Windows and macOS devices

Norton Family is a subscription-based service with a 30-day free trial included.

Norton Family

Supervise your child’s online activity, set restrictions, and access live localization information.
Free trial Visit website

Kaspersky SafeKids

Our next recommendation includes award-winning parental control features for offline and online device monitoring.

The tool has screen monitoring and time controls that let you set a limited number of hours per day.

Once the limit is reached, the device will be blocked, and your child will not be able to use it anymore.

Another helpful feature is scheduling when to block devices, such as school or homework intervals.

You can also filter the websites that can be accessed and block inappropriate or dangerous content or applications.

You can also create a list of apps requiring your permission before opening.
Kaspersky has an advanced GSP tracking feature that shows your child’s location in real time.

You can set up the area you want your children to stay in, and the software will immediately send a notification in case they leave that location.

Other key features of Kaspersky Safe Kids include:

  • YouTube monitoring
  • Blocks certain search requests
  • Battery tracker
  • Real-time alerts

Kaspersky Safe Kids has a free, limited version and a subscription-based one with monthly charges.

Kaspersky Safe Kids

Limit and secure your child’s online activity, track location device battery, and get real-time alerts whenever something unexpected happens.
Free trial Visit website

Net Nanny

Net Nanny includes the most important protection tools to block dangerous content online. It has 18 filter categories to help parents quickly limit access to websites that cover various inappropriate topics.

In order to keep track of your child’s activity, the program sends you an email alert if the child enables a proxy or a private server to hide online searches.

One of the most exclusive and curious features of Net Nanny is blocking bad words on sites so that kids can’t read them. It also prevents them from typing in search fields and chat messages.

For example, you can change words into funny emoticons while typing them, or the program can completely delete them.

Net Nanny sends a notification to parents when the lousy word was typed. The software also includes time control, so you can limit the amount of time your kids spend on the PC.

Among the cons of Net Nanny is that some essential tools, such as social media monitoring and the acquisition of chat messages, require the purchase of a separate program that works together with the filter.

Other key features of NetNanny include:

  • Track location
  • YouTube monitoring
  • App and website blocker

The software is available for Mac and Windows, Android, and iOS.

⇒ Get Net Nanny

Time Boss

This application comes with a clear and friendly user interface allowing you to set up a time limit for each user on the PC. As for time limitations, you can set weekly or daily limitations with just a few clicks.

The application has an event and screenshot log, so you can easily see which websites or applications are your kids using at all times. It’s also worth mentioning that Time Boss has a stealth mode, so users won’t even know that it’s running.

The tool lets you manually select computer usage time limitations. You can always add additional time or reduce the remaining time. 

The tool is password-protected, so only you can access the data and reports provided by Time Boss.

Other key features of Time Boss include:

  • Internet filter
  • Limit users with administrator right
  • Monitor InPrivate and Incognito browser modes

Time Boss can restrict access to certain system settings or applications, and block any website with just a few clicks. It’s worth mentioning that a single copy of this tool can work on 3 different PCs, so if you’re looking for an application to manage PC usage, be sure to consider Time Boss.

⇒ Get Time Boss

Here are the best applications to use if you want to limit PC usage, considering the alarming increase in screen time increment and the concerning statistics revealed by numerous researchers, so feel free to try any of them.

Dictionary Software for Windows 10 PC [Top 5]

There are lots of advantages of installing a dictionary app on your PC. There are both online, and offline dictionaries, and some of them also support multiple languages.

Advanced dictionary software also supports translation tasks, not only clear definitions of words.

Having an online dictionary with you at all times is great convenience.

Google’s ‘define’ search feature is probably one of the quickest and the most convenient ways to look up a word, but it is only beneficial when you have an Internet connection at your disposal.

Fortunately, there are plenty of apps that allow you to look up definitions even when you are offline.

Benefits of having a dictionary software

This sort of app will improve your work efficiency and flow to the maximum point. There are lots of dictionary apps that are considered 100% accurate.

This means that there will be no inappropriate results for any words that users insert into the apps. On the other hand, some apps will often mistranslate certain words.

When you need to find the exact meaning of a particular word, dictionary tools come in very handy. Today, these tools can be used for online purposes, but also when you’re offline.

Once you downloaded and install the dictionary software, you will always find the words that you want without having to connect to the Internet.

Some dictionary apps also offer example sentences or extra content, such as grammar, tips, phrases, idioms, slang dictionaries, and more.

There are also dictionary apps that support text to speech if you are not really sure how to pronounce a particular word the right way.

Dictionary apps are also useful for people who are trying to acquire new vocabulary skills, or for English language students.

Here are five of the best and of most useful dictionary software that you can easily download and use on your Windows 10 PC.

Ultralingua English Dictionary&Thesaurus (recommended)

Ultralingua English Dictionary&Thesaurus is more than a simple dictionary.

Besides simple definitions, this extraordinary dictionary can conjugate verbs, allow you to choose synonyms and antonyms, and has special tools that will guide you wisely while using this tool.

Here are some of the most important features of this dictionary:

  • Click any word in a definition so you can study it
  • Conjugate all English verbs
  • Create hotkeys in order to define English words in an email, PDF files, web-browser
  • Create flashcards to memorize vocabulary lists, verb forms, etc.

You can try it for free from the official webpage as it has a full trial for 10 days. By using it, you will browse through 85000 entries, more than 300.000 definitions, and 65.000 synonyms.

The dictionary also gives you the possibility to surf through example phrases, idioms, and expressions according to geographic specificities. Try this tool and let us know in the comment section if this is a must-have dictionary.

Ultralingua English Dictionary&Thesaurus

Have this comprehensive dictionary software to learn and practice the English language whenever you need to.
Check price Visit website

WordBook

This is an intuitive and fast English thesaurus app that has numerous words and expressions you can learn right on your Windows PC.

Firstly, this application contains multiple entries and definitions for every English word you need to learn. With 220,000 word definitions, there’s no way you can’t find the sense of most words.

Other features promised by this dictionary tool will help the user with lots of pronunciation guidelines, 30,000 words etymologies, or multiple usage samples.

On the same note, you have human voice audio support for a better understanding of more complex English words that requires more attention.

You can use this Microsoft app in a very simple way, as a sidebar on your desktop. Every time you need to search specific terms you can multitask with other windows on your PC.

It’s good to know that WordBook is specially created for Windows 8 OS, yet it can be used for different versions up to Windows 10.

WordBook

Grow your language proficiency using this complete dictionary application right on your Windows device.
Check price Visit website

Dictionary by Farlex

This tool promises to be the world’s most comprehensive dictionary. Using it, you can search multiple English dictionaries, and you will be able to find various extensive definitions, audio and phonetic pronunciations, etymologies, usage sentences, and much more.

This is also an Offline English dictionary and thesaurus, but you must be aware of the fact that the offline content must be downloaded separately using an Internet connection before the offline mode will be available for access.

With this tool, you can get in-depth info from specialty dictionaries such as legal, medical, acronyms, financial, idioms, and even Wikipedia. You will be able to quickly and easily toggle between them by using the source icons.

You can access dictionaries in 13 more languages including French, Spanish, Italian, German, Portuguese, Chinese, Norwegian, Dutch, Arabic, Greek, Polish, Turkish, and Russian.

You are able to translate English words into over 40 languages that range from Afrikaans and Arabic to Urdu and Vietnamese and dozens of other translation options.

Using this tool you will be able to learn something new every day thanks to the fresh daily content including the following: Word of the Day, The Day in History, Idiom of the Day, Quote of the Day, and much more.

You can browse multiple thesaurus sources, featuring synonyms, antonyms, related words, and also pictures. You will get the opportunity of using Advanced Search options including “Starts with,” “Ends with” and more.

The app lets you share your favorite words and articles via email and social networking websites such as Twitter and Facebook.

The app’s interface is multilingual, and you can navigate it in a dozen languages. You can also log in to sync your bookmarks and track your learning. The tool allows you to play games in multiple languages when you’re bored.

You can customize your homepage including a personalized Horoscope, local Weather and more. It lets you add unlimited bookmarks, jump to Definitions, Translations, and Thesaurus with just one button.

You have the ability to look up the definition of any word on the page with the highlight feature, and you can also create tiles for homepage content like Word of the Day and much more.

You can view the recent search history and remove all ads with the help of the Ad-free Upgrade option.

⇒ Get Dictionary

Perfect Dictionary from Perfect Thumb

This is one of the most comprehensive offline dictionaries on Windows Phone. You can search multiple dictionaries from a massive database in over 50 languages.

The tool features automatic word suggestions such as enabling dictionaries while typing. It also offers you the ability to see the history of your previously searched words and to remove the history any time you want to.

You can choose to mark words as Favorite and pin them to the start screen. You can play audio pronunciations of words.

When you first launch the app, your first order of business will be to select a dictionary to use in your translations or your searches. You just have to tap on the download button to dive deeper into things and to pick your language.

The tool supports more than 50 languages that can be translated from or to.

Each language may feature various dictionaries to choose from, and dictionary download sizes typically are in the neighborhood of one to 50 MB.

You will be able to download as many dictionaries as your Windows Phone storage will allow and as you search for a word, the entire dictionary database that was downloaded will be scanned.

The tool also offers you the option to install dictionaries from your microSD card.

Once you downloaded a dictionary database, the Perfect Dictionary’s interface will turn out to be as straightforward as possible. At the top of the main page, you will find a word search field that will help you find the word that you are looking for.

As you type, automatic suggestions will appear beneath every dictionary heading, and after you see the word that you are looking for, you have to tap it for translation.

In case the dictionary doesn’t have the translation for the particular word that you are looking for, it will just not be displayed.

⇒ Get Perfect Dictionary

TheSage English Dictionary and Thesaurus

This is a comprehensive English dictionary and thesaurus that offers users various useful and in some cases a few unusual search tools. This project is rooted in research, and this tool is a research instrument.

The developers are linguists with many interests in the field. Among these interests are word knowledge and also vocabulary acquisition. The tool’s developers have first created this project to serve their own investigative concerns.

Their colleagues then asked for copies, and this is the way that the whole thing started. Eventually, they were contacted by complete strangers, and the initial public release of the tool is over a decade old.

The software inherited its core wide-ranging scope from Princeton’s George Armitage Miller WordNet of which it has already become a branch.

The tool has continually grown by leaps and bounds following its own path and becoming different from its progenitor in most ways.

The scope of this dictionary is that of English as an international language. The software contains entries from dialects from all over the world including their variant senses and spelling.

The definitions of the words are written using American English for more consistency.

The requests and the ports have consistently increased over the years, and this was a natural consequence of the fragmentation of the operating system landscape brought by the mobile revolution.

Another great thing about this tool is that it is provided for free as it always has been. Most English language-lovers and also casual users appreciate the value of this project and everyone supports its continuing development on Windows and more platforms.

The Sage consists of two different systems including a multi-tool interface and a knowledge database.

The knowledge database consists of a tightly integrated English dictionary and thesaurus.

TheSage’s index contains more than 250,000 words and its dictionary has approximately 315,000 senses, 69,000 etymologies, 55,000 examples of use, and 75,000 phonetic transcriptions.

TheSage’s thesaurus includes approximately 1,850,000 relationships between words and definitions, from synonyms and antonyms to hypernyms, hyponyms, meronyms, holonyms, etc.

The interface allows you to extract and collect data from the knowledge database in a variety of ways. This is accomplished with the tools shown in the left Navigation panel.

The software was created to be used by all kinds of language researchers and pedagogues seeking to carry out certain linguistic analyses.

⇒ Get TheSage

LingoPad

This is a free offline dictionary for Windows, and it contains a German – English dictionary and more dictionaries including Spanish, French, Italian, Japanese, Chinese, Kurdish, Turkish, Arabic, and Norwegian.

You can also import your own wordlists, and you can then use them in parallel with the already existing dictionaries. For each dictionary, there is a user dictionary that can be defined to include additional wordlists.

You don’t have to pay anything for this tool, as it is free of cost. It offers you the possibility to search for the beginning, the ending, and the middle part of a particular word and you can also find collocations.

The activation is possible with a customizable HotKey, and this offers automatic search for a tagged word or a word from the clipboard. The software also provides a list of your latest searches and the possibility to download on a USB flash drive.

You can use the tool when you are offline as well, and it gives you the opportunity to transcript phonetically many English words.

The user interface is in German and in English, and you have direct links to look up words on Wikipedia and lots of search engines.

LingoPad is a software that takes up less storage than many software in the section Science & education software. It’s a program very heavily used in the United States, Indonesia, and Cameroon.

⇒Get LingoPro

WordWeb Pro

The software can look up words in virtually any program with just one click, and all you have to do is hold down the Ctrl-key and right-click on the word.

In case you are online, with one extra click you can also search web references such as Wikipedia, for instance. The hotkey can be customized, or you can also use a keyboard shortcut.

If you are ending a document, you can also select a synonym and replace the look-up word. WordWeb features the option to highlight the widely used synonyms, and this is perfect for helping you write correct and clear easy-to-understand English.

You’re looking for a particular part of speech? You can click on the Verb, Noun, Adjective, or Adverb buttons to show only the relevant synonyms and the related words. To look at a particular sense you can click on the sense number.

Browsing around the related words is very simple, and all you have to do is click on the tabs for synonyms and antonyms, parts, anagrams, and so on.

In case you want to see the definition for one of the related words, just double-click on that particular word, you can also use the back and forward buttons.

Related words also have the – and + buttons so that they can be more or less specific. For instance, in case you look at similar words, maybe you’d like to see words that are more loosely related.

You will be able to do exactly this by pressing the + button.

More than using the comprehensive English dictionary and thesaurus supplied by this cool tool, in case you are online, you can also search your choice of web references.

Every reference is on a separate tabbed page for easy cross-referencing. The list of tabs can be customized to use your favorite references. You should know that Wikipedia. Some online dictionaries are installed by default.

You also have the option of getting third-party dictionaries including the Oxford Chamber and Collins dictionaries, and they will be shown on separate tabs like the web references.

⇒ Get WordWeb Pro

All five dictionary apps that we have presented so far are compatible with systems running Windows 10.

If you have any other suggestions or questions, feel free to reach for the comments section below.

Tethering Software for Professional Cameras [2026 Guide]

In this digital era of photography, digital cameras and computer systems go hand-in-hand in the production of quality photographic shots. The main question here is: how does digital camera sync with a PC? What pops up is the term tethering.

And that is what we’ll be treated in this article. Basically, we are going to be looking at some of the best photo tethering software, any of which can be employed to synchronize digital cameras with computer systems.

Today, most of the beautiful scenes and photos you see around are refined works of specialized computer software, which have been designed to improve picture quality.

Simply put, a photographer takes a shot, exports the shot into his computer, edits, and puts final touches to it. The channel/process of importing photos from a camera into a computer is what we call “photo tethering”.

There is a set of tools, which are specially designed to facilitate this procedure. These tools are collectively referred to as “photo tethering software”. And we’ll be looking at five of the – best photo tethering software – in this article.

What is tethering software?

Essentially, photo tethering refers to the process of connecting a digital camera (or smartphone) to a computer system via a USB cable or a wireless setup. The primary aim is to transfer camera shots into the computer for final retouching, editing, or manipulation.

Using tethering software can exponentially improve the process of managing your photos.

Whether you’re an advanced photographer or just starting, seeing your photos at full resolution on the PC will certainly help you.

You can watch your images as you shoot them and easily select the best ones using your device, either desktop, laptop, or tablet.

If you wonder how to begin using tethering software, here is what you need:

  • A camera tethering software that supports image transfer.
  • A compatible USB cable to connect your camera with the PC.
  • Efficient tethering software to manage your photos.

Note: Not all digital cameras support tethered photography. Hence, we’ll be basing our compilation on only supported cameras.

Best photo tethering tools to organize your camera photos on PC

Adobe Lightroom (recommended)

You all probably know Lightroom as one of the best photo management tools out there.

Guess what? It also stands out as one of the best photo tethering software available. The software is supported on Windows computers.

Lightroom’s tethering functionality is flexibly designed to support about 50+ cameras, including those manufactured by Canon, Nikon, Leica, and others.

It easily imports photos taken by these cameras, and subsequently evaluates (and adjusts) its focus, lighting, and overall quality.

Key features of Lightroom tethering software include photo import, instant view, direct camera settings (from via a tethered system), photo tagging, zooming, 50+ DSLR support, photo rating, lighting adjustment, multi-format image support (including RAW), and more.

Other notable features of Lightroom include Built-in storage (up to 10 TB), HDR support, Color management, Photo library, Image sharing, Smart preview, keywords, and many more.

Adobe Lightroom

Be a professional photographer using Adobe Lightroom to thoughtfully sync your camera with the PC.
Check price Visit website

Capture One Pro

Capture One Pro is a popular RAW image manipulation software, which hosts a powerful set of tethering features. The software hosts exclusive support for only Windows and Mac operating systems.

Furthermore, it houses wide tethering support for a host of camera brands, including Canon, Sony, Fuji, Panasonic, Mamiya, Nikon, Olympus, and Phase One (Capture One developer). This makes it an all-inclusive tool, which is ideal for various classes of photographers.

Capture One Pro stands out as one of the best photo tethering software for Windows, with a unique tethering feature that allows it to access camera settings and modify them directly.

With this, you are able to streamline all your photographic workflow on a single platform, thereby improving your operational efficiency and overall productivity.

Basically, the photo tethering/management software allows you to transfer captured shots, from your digital camera to your Windows PC. And then ensure every photo editing, colorizing, and another photo management function is executed right on Capture One Pro’s platform.

Capture One Pro, aside from being a standard photo tethering software, is an all-around photo manipulation/management/editing tool.

⇒ Get Capture One Pro

Helicon Remote

Helicon Remote is a versatile photo tethering software, flexibly designed to run on all major computer systems and mobile platforms.

The software is widely compatible with Macbook and Windows PC, as well as Android and iOS mobile platforms. However, it hosts exclusive tethering support for only Nikon and Canon digital cameras.

In addition, Helicon Remote hosts an easy-to-navigate UI, which affords you the opportunity of taking tethered shots with unimaginable convenience.

Furthermore, the software features a powerful set of built-in manipulation tools, which enable you to take tethered shots, view and edit those shots directly on a synchronized PC.

Helicon Remote is available in three major options. These options are:

  • Helicon Remote Multi-platform
  • Helicon Remote Mobile
  • or Helicon Remote Mobile (for Focus Pro users)

There is also a free trial edition, for a period of one month, prior to full package purchase.

⇒ Get now Helicon Remote

darktable

darktable best photo tethering software

darktable is another top-rated photo tethering software, which doubles as a RAW converter. It is one of the most widely used apps for streamlining photographic workflow, with exclusive support for the three major computer operating systems: Linux, Mac, and Windows.

Also, darktable hosts exclusive support for virtually all major brands of cameras, including Sony, Canon, Fujifilm, and Nikon among others, with general support for over 50 digital cameras.

It basically facilitates the synchronization of DLSR with PC and consequently simplifies the transfer of RAW photos between both media (from DSLR to PC).

Notable features of darktable include Tethered shooting, Live view, GPU-accelerated photo processing (OpenCL- enhanced), Color management, Zoomable UI, Multi-format support (RAW inclusive), Advanced editing, Optimized photo export, Framing, Split toning, Color balance, Multilingual support (20+ languages) and many more.

The darktable photographic workflow/photo tethering software is an open-source program; hence, it is available for free download.

⇒ Get darktable

TetherPro

TetherPro is one of the first sets of digital tethering tools to be developed. It was originally designed for Nikon digital cameras, before expanding support to Canon and other top DSLR models.

The software currently hosts exclusive support for only Windows.

TetherPro features a customizable UI, which can easily be tailored to suit your photographic workflow.

Furthermore, it features a powerful tagging setup, as well as a unique remote control system that allows you to modify your camera settings, directly from a connected system.

Other noteworthy features of TetherPro include LiveView, accept/reject/maybe photo tagging system, full-screen review, remote control, image security, free lifetime upgrades, money-back guarantee, and more.

⇒ Get Tether Pro

Why use a tethering software?

As a photographer, you can best use photo tethering software to manage all your shots by transferring them to your PC.

This improved workflow will highly support you to organize and edit your images efficiently. Then, you can see your shots on a bigger screen immediately after you take them.

In this way, you have the chance to analyze your best shots directly on your PC, plus observe potential issues with lighting or composition.

What’s more, using tethering tools offers the opportunity to get professional shots quicker and eliminate long photo sessions.

Conclusion

In this guide, we listed and described five of the best photo tethering software in the market, specifically those compatible with Windows operating systems.

These tools facilitate the synchronization of DSLRs (digital cameras) with PCs (or Macbooks) and streamline your entire photographic workflow.

Therefore, if you are a photographer who is in need of photo tethering software, the above-outlined tools are the recommended ones for you.

Fix: Sleep option missing in Windows 10 [Power Options]

Sleep is important for any system, whether it is your own body or your computer. So when you’re missing sleep option on your computer, it can be equally frustrating.  

Here’s how this issue manifests itself, according to our readers and following our own experiments:

Why did my sleep mode disappear?

Some of the reasons why may not be able to put your computer to sleep include:

  • The video card on your computer doesn’t support sleep
  • Your system administrator manages some settings
  • Sleep and other power-saving states are not enabled on your computer’s BIOS

If you already restarted your PC and installed the latest Windows 10 updates, yet the issue persists, follow the troubleshooting listed below to restore the missing sleep option in Windows 10.

What can I do if the sleep option is missing in Windows 10?

  1. Check Power options settings
  2. Update drivers
  3. Check which sleep states are available
  4. Reset and restore the power plans to default
  5. Make Group Policy changes
  6. Switch the account to a local account and then back to a Microsoft account
  7. Rollback the driver
  8. Uninstall and reinstall driver
  9. Perform a Clean Boot
  10. Perform a System Restore

1. Check Power options settings

  • Right-click Start
  • Select Power Options
  • Select Choose what the Power buttons do
Missing Sleep option in Windows 10
  • Click Change settings that are currently unavailable
Missing Sleep option in Windows 10
  • Go to Shutdown settings
Missing Sleep option in Windows 10
  • Find Sleep and tick the box to Show in Power menu
Missing Sleep option in Windows 10
  • Click Save changes
Missing Sleep option in Windows 10
  •  Restart your computer and check if sleep option is restored

Want additional info about the Power menu? Check out this dedicated guide and find out more.


2. Update drivers

2.1. Update drivers from Device Manager

  • Right-click Start
  • Select Device Manager
Missing Sleep option in Windows 10
  • Select Display Adapters and click to expand the list then check for the adapter name
Missing Sleep option in Windows 10
  • Right-click on the name of your adapter and select Update Driver Software
Missing Sleep option in Windows 10
  • Select Search automatically for updated driver software
Missing Sleep option in Windows 10
  • Restart your computer see if it fixes the USB WiFi adapter is not connecting to the internet issue

If you don’t have any driver updates available, right-click on the graphics card driver and click Uninstall, then restart your computer.

2.2.  Use a dedicated third-party driver updater

Outbyte Driver Updater automatically update drivers

In case you install the wrong driver version, your PC might become damaged good. So it’s recommended that you install a dedicated driver updater, such as Outbyte Driver Updater to prevent this from happening.

Outbyte Driver Updater helps detect and update outdated drivers efficiently. The scanning speed is excellent and you will see your drivers’ status in no time.

And if you want to get the latest updates in real-time, then this tool also has an auto driver update that you can easily activate.

Let’s take a look at some of the key features:

  • Updates and detects any outdated drivers.
  • Scans your device fast.
  • Huge database with the latest manufactrer drivers

Outbyte Driver Updater

The sleep option is missing in Windows 10? Use Outbyte Driver Updater to easily update drivers!
Free trial Download

2.3 Update drivers from the manufacturer’s website

  • Right-click Start
  • Select Device Manager
Missing Sleep option in Windows 10
  • Expand the Sound, Video and game controllers option
Missing Sleep option in Windows 10
  • Right-click on the graphics/video card
  • Click Update driver software
  • Restart your computer

2.4 Update drivers from Windows Update:

  • Click Start
  • Select Settings
  • Select Update & Security
  • Select Windows Update
Missing Sleep option in Windows 10
  • Click Check for updates
Missing Sleep option in Windows 10

If you made the jump to Microsoft’s freshest OS, check out more detailed instructions on how to easily update drivers on Windows 11.


3. Check the available sleep states

  • Click Start
  • Type cmd in the search box
  • Right-click Command Prompt and select Run as administrator
Missing Sleep option in Windows 10
  • Click Yes to confirm
  • At the prompt, type powercfg –a
Missing Sleep option in Windows 10
  • Press Enter. The available sleep states available will be displayed.
Missing Sleep option in Windows 10

Most users don’t know what to do when the Windows search box goes missing. You can easily get it back by following this guide.


Having trouble accessing Command Prompt as an admin? Take a closer look at this guide.


4. Reset and restore the power plans to default

  • Click Start
  • Type cmd in the search box
  • Right-click Command Prompt and select Run as administrator
  • Click Yes to confirm
  • At the prompt, type powercfg –restoredefaultschemes and press Enter

This will reset the power plan settings to default. Any customized power plans will be removed, so check if you’re getting the sleep option after resetting the power settings.

Does the power plan keep changing by itself? Don’t worry, we’ve got a dedicated fix guide about that.


5. Make Group Policy changes

  1. Right-click Start
  2. Select Run
  3. Type gpedit.msc
  4. Click OK
  5. Type User ConfigurationAdministrative TemplatesStart Menu and Taskbar
  6. Double click Remove and Prevent access to the Shut Down command
  7. Select Disabled
  8. Double click Change Start Menu power button
  9. Select Enabled
  10. Choose Shutdown

6. Switch the account to a local account and then back to a Microsoft account

  • Click Start
  • Select Settings
Missing Sleep option in Windows 10
  • Click Accounts
Missing Sleep option in Windows 10
  • Go to Your account
Missing Sleep option in Windows 10
  • Click Sign in with a local account instead and follow the instructions to create the local account
  • Once you’re signed in through a local account, go to Settings>Accounts>Your email and accounts and sign in with a Microsoft account instead
  • Enter your Microsoft account credentials during the setup

If you’re having trouble opening the Setting app, take a look at this article to solve the issue.


Windows won’t let you add a new user account? Follow these easy steps to fix the issue.


7. Rollback the driver

  • Right-click Start
  • Select Device Manager
Missing Sleep option in Windows 10
  • Select Sound Video and Game controllers and click to expand the list then choose the graphics/video card.
  • Right-click the graphics/video card, and then select Properties.
Missing Sleep option in Windows 10
  • In Properties, select the Driver tab
Missing Sleep option in Windows 10
  • Select Roll Back Driver, then follow the prompts
Missing Sleep option in Windows 10

If the button is unavailable, that means there’s no driver to roll back to.

After the rollback works, you’ll have to prevent Windows from automatically updating the driver in the future. To do that, just follow this step-by-step guide.


8. Uninstall and reinstall the driver

  • Right-click Start
  • Select Control Panel
Missing Sleep option in Windows 10
  • Click Programs icon
Missing Sleep option in Windows 10
  • Select the name of your Display Drivers
  • Click Change/Remove or Add/Remove button
  • Confirm that you wish to continue with the uninstall
  • Once driver files have uninstalled, restart your computer to complete the uninstallation
  • Turn on your computer and reinstall the graphics/video card driver

Driver files should be uninstalled before you update to newer drivers, or when removing an older graphics/video card and replacing it with a new one.

You can’t open Control Panel? Take a look at this step-by-step guide to find a solution.


9. Perform a Clean Boot

  • Log on as an administrator
  • Go to the search box
  • Type msconfig
Missing Sleep option in Windows 10
  • Select System Configuration
  • Find the Services tab
Missing Sleep option in Windows 10
  • Select Hide all Microsoft services box
Missing Sleep option in Windows 10
  • Click Disable all
Missing Sleep option in Windows 10
  • Close Task manager then click Ok
  • Reboot your computer

Performing a clean boot for your computer reduces conflicts related to software that can bring up the root causes of sleep options missing in Windows 10.

These conflicts can be caused by applications and services that start up and run in the background whenever you start Windows normally.

You will have a clean boot environment after all these steps are carefully followed, after which you can try and check if the sleep option is restored.

If you want to know how to add or remove startup apps on Windows 10, check out this simple guide.


10. Perform a System Restore

  • Click Start
  • Go to the search field box and type System Restore
  • Click Create a restore point in the list of search results
Missing Sleep option in Windows 10
  • Enter your administrator account password or grant permissions if prompted to
  • In the System Restore dialog box, click Choose a different restore point
  • Click Next
  • Click a restore point created before you experienced the problem
  • Click Next
  • Click Finish

Restoring doesn’t affect your personal files. It however removes apps, drivers, and updates installed after the restore point was created.

If you’re interested in more info on how to create a restore point and how would that help you, take a look at this simple article to find out everything you need to know.


Did any of these solutions work? Drop your comment in the section below and let us know your experience.

FIX: For This Game You Need to be Online [Xbox Error]

Xbox allows you to enjoy online multiplayer with millions of other players, but sometimes there might be some issues with online multiplayer.

Users experienced For this game you need to be online Xbox error on their console, and since this error can prevent you from playing games online, today we’re going to show you how to fix it.

Why am I getting for this game you need to be online 0x803f9008 error?

If you get this message it’s possible that there’s an issue with your profile. If that happens, you’ll usually get Failed to read profile error on Xbox One.

Account error can also give you Xbox error 0x803F8001, and if that happens, you might want to check your settings or reinstall the game.

In case you get Person who bought this needs to sign in message, it’s possible that you have issues with your payment information, so you need to update it.

Here are some more examples of this issue:

  • For this game you need to be online Fortnite  – Some Fortnite players have recently reported this problem. Nevertheless, you can still apply the solutions from this article.
  • For this game you need to be online if you re on this Xbox regularly – A very similar error message. Once again the same solutions apply.
  • Xbox One error 0x803f9008 – This is a common Xbox One error code, that basically means the same.
  • The person who bought this needs to sign in – This is actually a sign-in error, but it occurs when you launch a certain game.

How can I fix the Xbox error: For this game you need to be online?

Solution 1 – Restart your router/modem

Sometimes this error can appear due to problems with network configuration. To fix this problem you might need to restart your modem/wireless router. This is a simple procedure and in order to do it follow these steps:

  1. Press the power button on your modem to turn it off.
  2. After modem turns off, wait for 30 seconds and press the power button to turn it on again.
  3. Wait until modem turns on completely.
  4. After that, check if the problem is resolved.

If you have a wireless router, you’ll have to restart it as well in order to fix this error.

Solution 2 – Perform Dashboard refresh

According to users, you can fix this error on Xbox One simply by performing a Dashboard refresh. To do that, follow these steps:

  1. Open your Dashboard.
  2. Press and hold Left trigger, Right trigger and Y button for a few seconds.

After you release these buttons, Dashboard will refresh itself and load all the elements of the Home screen again. Some users reported that this solution doesn’t work unless you go offline and back online before using the aforementioned method. Keep in mind that you might have to repeat this process few times before you fix the problem.

Solution 3 – Clear Alternative MAC address

Network configuration can sometimes interfere with your Xbox and cause For this game you need to be online and many other errors to appear. To fix this problem it’s recommended that you clear Alternative MAC address, and you can do that on Xbox One by following these steps:

  1. Open Settings and navigate to Network settings.
  2. Select Advanced Settings.
  3. Head over to Alternate MAC address.
  4. Select Clear to clear the MAC address and restart your console to save changes.

This procedure is a bit different on Xbox 360, but you can perform it by following these steps:

  1. Open System Settings.
  2. Navigate to Network Settings and select Wireless Network.
  3. Select Configure Network and go to Additional Settings.
  4. Select Alternate MAC Address and make sure that Alternate MAC Address isn’t set.
  5. Press Done to save changes.

After clearing Alternative MAC address the error should be completely resolved.

Solution 4 – Test your network connection

Few users reported that they fixed For this game you need to be online error simply by testing their network connection. To do that on Xbox One, follow these steps:

  1. Open Settings and select Network.
  2. In the Troubleshooting section on the right select Test network connection.
  3. After that, select Test multiplayer connection.

If your console passes both tests, it means that your Internet connection is working properly and there are no blocked ports that interfere with online multiplayer.

To test Internet connection on Xbox 360, do the following:

  1. Press the Guide button on your controller.
  2. Select Settings and go to System Settings.
  3. Choose Network Settings.
  4. Select the name of your wireless network or select Wired Network option.
  5. Now select Test Xbox Live Connection.

If there are any problems with your network connection be sure to resolve them and check if that fixes the error.

Solution 5 – Disable your network connection

According to users, this issue might be solved simply by going offline on your Xbox. To do that, you need to follow these steps:

  1. Scroll left on the Home screen to open the Guide.
  2. Select Settings > All Settings.
  3. Choose Network > Network settings.
  4. Select Go offline option.

After going offline repeat the same steps and choose the Go online option.

Solution 6 – Restart your console

According to users, they managed to fix this problem simply by restarting their console. Restarting your Xbox can fix all sorts of problems, and to restart your Xbox One, do the following:

  1. Press and hold the power button on your console for 10 seconds to turn it off.
  2. After your console turns off, unplug the power cable and wait for few minutes.
  3. After that, reconnect the power cable and press the power button on the console to turn it on again.

You can also restart your Xbox One by doing the following:

  1. Open Settings and go to Power & Startup.
  2. Locate Power Mode and change it from Instant-On to Energy-saving.
  3. After doing that, select Turn Xbox off option.
  4. Turn on your Xbox by holding the Guide button on the controller. You can also press the power button on the console to turn it on.
  5. Optional: After your console turns on, you can go back to Settings > Power & Startup and enable Instant-on Power Mode.

Solution 7 – Clear system cache

You can fix this problem simply by clearing the cache on your Xbox. Your cache can sometimes become corrupted and cause this and many other errors to appear, therefore we strongly suggest that you clean it. To do that on Xbox 360, do the following:

  1. Press the Guide button on the controller and go to Settings > System Settings.
  2. Select Storage.
  3. Select any available storage device and press the Y button on the controller.
  4. Device Options screen will now open. Select Clear System Cache option.
  5. You should see a confirmation message. Select Yes.

To clear cache on Xbox One you need to turn off your console and unplug the power cable. While the power cable is unplugged press the power button a few times to drain the battery completely.

Connect the power cable and wait until the light on power brick turns from white to orange. Now press the power button to turn on the console. Your cache will be cleared and the problem should be resolved.

Solution 8 – Check the status of Xbox Live services

Xbox Live consists of different services, and if one of those services isn’t properly running, you might not be able to play certain games online. To check the status of Xbox Live services, simply visit Xbox’s website using any web browser. If any of these services aren’t running, you can only wait until Microsoft fixes the issue.

Solution 9 – Disable auto sign-in option

According to users, sometimes auto sign-in option can cause this error to appear, and in order to fix the problem you need to disable it. To do that on Xbox One, follow these steps:

  1. Go to Settings and select Sign-in, security & passkey option.
  2. Now select Instant sign-in.
  3. Make sure that Use instant sign-in option isn’t enabled.

To disable auto sign-in on Xbox 360, do the following:

  1. Sign in to Xbox Live.
  2. Go to Settings and select Profile.
  3. Choose Sign-in Preferences.
  4. Select Auto Sign-in and make sure that it’s disabled.

For this game you need to be online error can prevent you from playing games online, and we don’t know how many games are affected by this issue, but you should be able to fix it by using one of our solutions.

Assassin’s Creed Valhalla keeps updating: Check this guide to fix it

In case you notice that Assassin’s Creed Valhalla keeps updating, do not panic! It is a pretty common issue that has been giving headaches to users for a long time.

Assassin’s Creed Valhalla is undoubtedly a masterpiece when it comes to action role-playing video software. 

The game’s big 1.5. 0 patch arrived on 22nd February and definitely improved its stealth features.

Previously, users reported some annoying troubles with Assasin’s Creed Valhalla. In other words, it seems like the game keeps updating or gets stuck while downloading a new update and this is how they describe it:

So anyone having the same problem? Downloading the new 1.04 update stops at around 60% and there’s “ubisoft connect is unable to start your download” error.

I do have Internet connection and enough space on all of my drives, yet the update is stuck.

Starting with 24th February, Steam users are allowed to play Assassin’s Creed Valhalla for free and worldwide players are extremely excited about this news.

However, keep in mind that in the past, some people reported that Steam games were sometimes kept updating. Below you can find what one user had to say about it:

Yesterday my game started to Patch to 1.06 on Steam automatically. After the update was complete, it startet to run the update again. And it has done this now for over 10 times. I know it fully download the first time, the 690mb or something. On the download info page on Steam it says its downloaded 0 bytes of 0 bytes and lists the status as “checking”.

If you ever face similar problems with Assassin’s Creed Valhalla, make sure you check some useful solutions to fix them.

What can I do if Assassin’s Creed Valhalla keeps updating?

1. Delete certain elements in the game’s folder

  1. Right-click on the game’s shortcut, then choose to Open in file location.
  2. Delete the folder in \uplay_download\ (Usually marked as 13504).

2. Reinstall the game

  1. Hit the Windows key, type Control Panel, then navigate to the first result.
  2. Click on Uninstall a program.
  3. In the shown list, search for Assassin’s Creed Valhalla.
  4. Click on it, then choose to Uninstall it, as we show you directly below with Twitch as an example.
  5. Confirm the process by clicking again on Uninstall.
  6. Now, download the game again and follow the on-screen instructions to reinstall it.
  7. Assassin’s Creed Valhalla will be updated and should work at its best.

The steps we’ve just presented are useful, but can sometimes be time-consuming.

If you’re that type of person who really needs to save his/her precious time, we strongly recommend going for an automatic way to uninstall the game, and IObit Uninstaller is the best option you can try.

With this tool, you’ll be able to easily and quickly uninstall programs and remove leftovers for a cleaner PC.

Plus, you’ll get real-time protection to scan and block malware, viruses, spyware, adware, and many others.

So, this is what you can do if Assassin’s Creed Valhalla keeps updating. As you can see, there are just a few simple steps you have to follow.

It also seems like Assassin’s Creed Valhalla might keep constantly minimizing and AC Black Flag is crashing on startup. In case you ever encounter a situation like this, make sure you save our dedicated fixing guide.

Are you facing any additional related questions? Feel free to use the comment section listed below.

Peacock Won’t Accept Your Payment? How to Pay Outside the US

PeacockTV is the go-to streaming service for movies, TV series, and live sports aficionados worldwide, and the best part is that it is as free as a bird, to put it in their own words.

While the plans start at free – and the content made available without any charge is not neglectable (about two-thirds of Peacock’s library) – you will get the most out of Peacock by subscribing to a premium plan.

So, you can go for a monthly subscription or a year-based payment plan (which also saves you a bit of cash), and you can enjoy the service on pretty much any platform, from PCs to tablets, smartphones, Chromecast devices, with various price packages and the payment options are just as diverse.

So where’s the catch? You guessed it, it’s (almost) US exclusive. Once you set foot outside the US, you will face the cruel reality of the Peacock: Unavailable in your region message.

How to watch Peacock TV outside the US?

The beloved Peacock platform made the leap in 2021 and is now available in the US and the UK, and ROI for SKY and NOW customers.

If you’re not in any of these parts of the world, here’s how to enjoy Peacock freely.

  1. Download and install Private Internet Access VPN because it’s fully optimized for speed streaming, plus you have a great variety of servers to choose from.
  2. Launch the VPN app on your desktop and log in with the credentials provided by the supplier.
  3. Next, pick a US server and hit Connect.
  4. Now, for the Peacock part of the deal. Open the Peacock TV website.
  5. If you already have an account, use the Sign in option and if not, click Watch for Free to create a new account.
  6. Fill in the details, choose your package, and enjoy your streaming!
Tip icon Tip
Watching Peacock TV from abroad on your Android or iOS mobile is just as easy!

Visit the store and install the PIA VPN app on your smartphone. Then, connect to a US server just as you would on the desktop platform.

➡ Now, if you’re an Android user, you need to create a new Google account and use it to connect to the Play Store. Install the Peacock TV app from this place and set up your account.
➡ If iOS is your weapon of choice, open your Settings and tap Network. Here, you need to change the Apple ID region to the US. Finally, open the App Store (Apple) and install the Peacock TV app while connected to a US VPN server.

If you need more details on how to watch a video that is not available in your country, we have a lot more tips coming your way!

Why is my Peacock payment not working?

Here’s the million-dollar question. And speaking of dollars, you should know (even though we’re convinced you already do) that Peacock Premium requires an American card, and that’s that.

If you try to pay for your subscription with any other card, you’ll likely see a message stating that Peacock is not accepting payments. So, where does that leave you? Is it really impossible to get Peacock Premium outside the US?

Not really. As always, we got your back. But first, let’s take a closer look at the payment options.

Payment methodDetails
Credit Card Visa/MasterCard/Discover/American ExpressOnly American-issued cards are accepted
PayPal accountGift cards can be redeemed on the Peacocks website during checkout, and they also offer Peacock promotional codes.
Debit/Prepaid card & Online Gift cardsGift cards can be redeemed on the Peacocks website during checkout and they also offer Peacock promotional codes.
Apple PayHowever, Google Pay and Amazon Pay are not accepted
iTunes Available if you install Peacock from the Apple App Store and select your plan.
Peacock payment options

How can I pay for PeacockTV outside the United States?

1. Use the US-unlocked virtual payment card

  1. Install a VPN of your choice (such as Private Internet Access) and connect to a US server.
  2. Head over to the official USUnlocked website and hit the Get your card button.
  3. Follow the registration steps and add funds to your USU account.
  4. Once the deposit is processed, you will see the credentials corresponding to your new virtual card for the US.
  5. Head over to the Peacock TV website (make sure you are still connected to the US VPN server), log in to your user account, and choose to upgrade from Free to Premium.
  6. Finally, choose your plan and use the USUnlocked card to pay for your subscription and any other details required for the upgrade.

2. Create a US Apple account

  1. Install a VPN of your choice (such as Private Internet Access) and connect to a US server.
  2. Now, open the Apple site and choose to Create Your Apple ID (as shown in this screenshot).
  3. Next, fill in the details and make sure you insert a USA-based address (feel free to use online tools to help you set up one).
  4. Head over to the Store section and choose Gift cards, then iTunes.
  5. You will be able to redeem the card on your newly created account (see the new Apple ID you just created).
  6. Finally, download the Peacock TV app from the Apple Store and choose to upgrade to a Premium plan.
  7. You can pay for the subscription with your iTunes gift card in your Peacock account.

There you go; these are two solid methods to help you deal with Peacock not accepting payment cases. Once sorted, you can explore Peacock’s generous offer and binge on Peacock originals as long as you want.

If you still encounter billing errors after using these methods, check out our guide on My Family Cinema not accepting payment for more tips that apply to multiple streaming services.

We know that it’s just as easy to ask a friend from the US to pay for Peacock TV, and there is nothing wrong with this option.

But you can just as well keep Peacock all to yourself and enjoy it on your own terms with one of our tested methods. If faced with Peacock TV error code PAS_41004, we have verified solutions.

Also, find out how to fix the Peacock’s Generic Playback error.

Microsoft Family Review: Take Control of All Online Activity

In the modern era, life is becoming more digital. Everyone uses smart devices, including our children. But, the concern begins when our kids can access such content that is not suitable and when they become addicted to smart devices like smartphones, tabs, game consoles, etc.

For this, many parental control tools are available that can track and monitor your children’s device activity and also let you block their access to inappropriate content.

Every parent wants to keep their children safe. But, choosing the wrong software can make their experience terrible. Microsoft Family is a popular parental controlling software for Android and iOS.

However, In the recent Windows 11 Dev Build 22572, the family safety feature has also been introduced for Windows 11 PCs as an inbox app.

Microsoft Family Safety: A powerful parental control software for smartphones, Tabs, and PCs

Microsoft Family has been designed to monitor and control kids’ activities on smart devices like other family control tools. However, unlike most other software, it is also available for your desktop computer.

What makes it a better choice is its flexibility and customizability. For being a Microsoft product, parents can feel comfortable without worrying about privacy.

Getting started with Family Safety on your device

Setting up Microsoft Family safety is very easy. The installation process is the simplest thing you can imagine instantly. On PC, it’s just installing the app from Microsoft Store. On smartphones, the Family Safety app will ask for some permissions. You must tap on yes or similar options to grant these permissions.

After installing the Family app on your device, you must do a little more, including the sign-in and setup process. You can sign in with your existing MS account or create a new one and sign in.

After that, invite all other family members, particularly your kids in Microsoft Family. You can create new Microsoft accounts for your family members or use their existing email or phone number for the invitation.

Once everyone accepts your invitation, you can start monitoring your kids in the right way. However, you must configure your preferences for how you like to monitor your kid’s activity across the devices.

The Family app is available on Google Play Store, Apple’s App Store, Microsoft Store, etc. Both parents and kids can use them.

What features does the Microsoft Family have?

Microsoft Family has plenty of useful features that let you do many things to monitor your kids. All of its core features are customizable. Here are the details of the most significant ones.

➡ Web & Search filter

The web & search filter features let you block websites and inappropriate searches on your kid’s device. However, It works only on Microsoft Edge browsers on both Windows and Android devices.

When you enable this feature, other web browsers will be blocked automatically so kids cannot access unwanted sites and search for inappropriate content.

The web content feature is easily customizable. You can either list white-listed websites or block just specific sites. However, it doesn’t show any categories you can use to block certain websites more efficiently.

You can enable and disable the Bing safe search feature for the search. It will restrict your kids from searching for unwanted content using the Microsoft Bing search engine.

Web content and Search filter features are available on Android and Windows PCs and laptops.

How to use the Web & Search filter on the Microsoft Family Safety app

  1. Open the Microsoft Family app on Windows.
  2. Click on your kid’s profile.clicking kid profile ms family
  3. Go to Content filters.clicking content filters
  4. Click on the Web and search tab. It should be opened by default.
  5. Toggle the switch for Filter inappropriate websites and searches.enabling inappropriate websites and searches ms family
  6. You can add a list of websites you don’t want your kids to visit or add the only allowed website list.

You can also enable the Web content & search filter feature using the smartphone app and the web portal.

➡ App & Game blocker

If you want to restrict some apps for your kids, the App and games blocker is the option you will need. It allows you to block certain harmful apps and games you don’t want your kid to run.

However, there is an option to set an age. Microsoft Family will automatically block inappropriate apps based on the age you set.

You can easily block a list of apps or even set a time limit for some apps. It helps to protect your kids from being addicted to any specific game or app.

Once configured, when your child tries to install any unsuitable app from Microsoft Store or Play Store, the system automatically blocks the downloads. Not only this, but it will also prevent your kids from opening any existing inappropriate apps.

Even if any blocked or unsuitable app gets opened, the system will automatically close the app within a second.

If your kid needs an app for one-time use only for any urgent task, there is an option for asking permission from you. In this way, you can approve if you think the app is beneficial for that particular moment.

How to use the App and game blocker feature

  1. In the MS Family app, go to your kid’s profile.
  2. Go to Screen time and click on Apps and games.going apps and games filter ms family
  3. Click on the three vertical dots next to the app you want to block or limit.clicking three vertical dots app ms family
  4. Click on the Block app or Set a limit depending on your preference.

➡ Device limits

The device limit feature is available for both Windows and Xbox. This feature lets you set a limit to the supported devices that your kids are using. Your kids cannot use the devices for more than the allowed time. The device limit can be set individually for each device, or you can set a schedule or time limit for all devices combined.

You can set the time limit based on weekdays, too. That ensures your kids don’t spend too much time on smartphones or PCs on any particular day.

How to use the Device limits feature

  1. Go to the Screen time tab.
  2. By default, the devices tab should be opened. If not, click on the Devices tab and toggle the switch on or off next to the Use one schedule on all devices, depending on your needs.schedule on all devices toggle ms family
  3. You can set device limits for each individual device if the above option is off.

➡ Screen time monitor

Microsoft Family lets you track and monitor your kid’s screen time across all the devices, which is important given the alarming screen time statistics. You can see the screen time on a daily and weekly basis in the graph.

It is also possible to see the individual app and game screen time and also modify the limit if necessary.

If your kids exceed the allowed screen time, there is also an option for asking permission. You can allow overuse if you wish.

How to use the Screen time features on Family Safety

  1. In the Family app on Windows, go to Screen time.
  2. There you will see the graph.screen time monitor ms family
  3. In the Apps and games, click on any app or game to see the screen time for that particular item.app indivizual screen time
  4. Click on three vertical dots to find appropriate options to modify that app’s screen time.

➡ Location sharing & alert

One of the key features of any parental control software is location sharing. Microsoft Family also has this feature where you can track your kid’s live location.

There are also options to add new places to the saved list. But the most exciting feature is the location alert. You can get an alert when your child is arriving or departing. However, this setting is available for premium subscribers only.

The location sharing & alert feature is only available on Android and iOS. On the Windows version, you can only see the live location of your family members, including the kids.

How to configure the location alert feature

  1. Open the Family Safety app on your smartphone.
  2. Open Settings.
  3. Tap on your profile (Organizer).
    clicking organizer ms family safety
  4. Tap on location alerts.
    clicking location alert
  5. Tap on Tell me when under your kid’s profile.
  6. Set your preferences there.
    configuring location alert ms family safety

This setting is not available for PCs yet. But, you can view location on both PC and smartphones.

➡ Spending

One of the most exciting features of MS Family is Spending. It lets you add balances to your kid’s account or even add a Credit Card. Then, you can see your kids spending on various apps and games.

You can set an age limit there so your kid cannot purchase adult apps or games. One good thing is that every purchase using your Credit Card will require your approval. So, your kids cannot purchase anything without your consent if you add a credit card instead of adding balances.

Once configured, you will get a notification for every app purchase on your kid’s device, even if the app is free.

➡ Activity summaries

web and search activity ms family

Activity summary is the first thing you will notice when you start using the Microsoft Family app on your PC or other devices.

When you click or tap on the kid’s profile, it will show you a graph of Screen time, apps and games usage, web and search activity, Spending, Xbox online gaming activities, etc.

You can get a weekly report about your kid’s activities if you enable it.

➡ Manage from both App and Web interface

You can manage the parental control features from the Microsoft Family app or the web portal. Both smartphone and desktop apps let you smoothly manage content filtering, apps and games limits, screen time, and location sharing. However, the web interface and the desktop show options better.

The Location Alert feature is available on smartphone apps only. But everything else can be handled from both the app and web interface without any problem.

This parental control app is not available for macOS yet. But you can still manage your kids’ devices from macOS using any browser.

Microsoft Family’s additional features and benefits

Microsoft Family has the features mentioned above. However, it has some other micro-features that you can explore after using it. However, this parental control app is deeply integrated with Microsoft Office.

So, you can get these amazing office features as well if you have an office subscription.

  • Family email

If you have Microsoft 365 subscription, you can create custom family email addresses like [email protected] and discuss anything with your family members via email.

  • Family Calendar

You can have a shared family calendar so that you are aware of upcoming events of everyone in your family.

  • Family OneNote

The Family OneNote lets you easily plan your family matters or any relevant things for your family. As the note is shared within all the family members, it will help you and your kids in many ways.

  • Drive safety

This is one of the most interesting premium features of the Microsoft Family safety app. Driver safety lets you monitor your driving activity and let you share it with the organizers in your family group.

The Drive safety includes the map of the route, top speed, phone usage during driving, hard braking, fast acceleration, etc. when it shares data with the family organizer.

This feature is now exclusively available to Microsoft 365 Family users based in the USA, UK, Canada, and Australia.

Real-world performance and other details

We have tried to explore the Microsoft Family by ourselves to explore its features and benefits and to find how it performs in the real world.

After configuring the app on all of our devices, we immediately started monitoring the test device to find its effectiveness. The user interface on desktop and smartphone apps seems okay, and the web interface is the same.

It was easy to find and navigate between necessary options. However, there were some cases when the screen time limit on Android was not effective for apps and games. But, it worked fine on Windows 11 PC.

While testing, blocking apps worked according to the expectation on the desktop platform. However, on Android, it sometimes didn’t block apps which should not happen.

Web content filtering worked perfectly on Microsoft Edge. When we tried to open other browsers that were closed immediately, we could only use Microsoft Edge as we were expecting.

Location sharing and other features worked exactly how we expected without any problem.

Microsoft Family pricing

Microsoft Family is a free parental control tool. However, it comes with additional benefits when you have the Microsoft 365 Family subscription.

The free version includes:

  • Location tracking
  • Web and search filtering
  • App blocking
  • Screen time

These features can be used for up to six family members.

With Microsoft 365, formerly known as Office 365 family subscription, you can get all the free features plus the premium features like location alerts, Drive safety, Drive history, etc. The other premium benefits are 6 TB (1 TB for each user) OneDrive storage and premium Microsoft Office apps for up to six users.

Each user can use the premium features on up to five devices. It means the premium benefits can be enjoyed on 30 devices in total.

Final verdict

Pros
Free to get start
Built-in with upcoming Windows 11 builds
Drive safety for Microsoft 365 Family users
Location alert
Works on smartphones, PCs, and Xbox game consoles
Can be managed from both app and desktop browsers
Weekly activity report
Monitor kid's spending on app purchases
Cons
Screentime is not 100% effective on Android
App blocking may not work on Android in some cases
No categories to block apps, games, and websites

Overall, Microsoft Family is a good parenting software you can trust regarding privacy. But, in some cases, the performance didn’t meet our expectations.

Also, more features could let the parents monitor more activities on their kids’ devices. For example, the lack of an app category created inconvenience when we tried to block social media apps. We had to do it manually.

All the inconveniences aside, Microsoft Family is an excellent parental control software. Even though it is not the best choice right now, you can try it as it is free. If you already have a Microsoft 365 family subscription, you should try Microsoft Family as some unique features like Drive safety and location alerts exist.

This is a useful feature, but if you don’t plan on using it, don’t miss our guide on how to disable Family Safety features on Windows 11.

If you have been using any parental control software, what do you think after going through our Microsoft Family review? You can let us know in the comment box.

Opera for Raspberry Pi: Does it Work and How to Install it

Opera can run on different platforms, but can you run it on Raspberry Pi? In today’s guide, we’re going to answer that question.

How can I run Opera for Raspberry Pi?

Is it possible to install Opera on Raspberry Pi?

The short answer is no, Opera won’t run Raspberry Pi simply because the developers haven’t released the ARM version of the software.

Although Opera is available for Linux using Snaps, it won’t work on Raspberry Pi due to its architecture.

What are Linux Snaps?

linux snaps showcase

Linux Snaps give users a way to run any application on a Linux environment. The application is bundled with all its dependencies, so it should work right out of the box.

It’s important to mention that apps that are running as Snaps are running in a virtual environment and are getting automatic updates.

The great thing about Snaps is that existing applications can be packaged as Snap, and by doing so, they can run on Linux.

Why can’t I install Opera?

Opera is available for Linux as a Snap, but when you visit the Opera Snap page, you’ll notice that only amd64 version is available. That’s the version for 64-bit PC processors.

opera snap download 64-bit version

As previously mentioned, Raspberry Pi uses an ARM processor that is vastly different that your PC CPU. As such, it’s not possible to run software created for amd64 architecture on ARM devices.

This means that currently, it’s impossible to run Opera on Raspberry Pi since there’s no compatible ARM version available. If Opera releases an ARM version of its Snap, you’ll be able to install it on ARM devices.

What is the best browser for Raspberry Pi 4?

There are several options available and we have a lightweight browser for your Raspberry Pi 4 guide that should help you find the right browser for you.

As you can see, it’s not possible to use Opera on Raspberry Pi, so you’ll have to stick with the default one, or use alternatives.

If you’re using Windows, we have a great guide on how to install Opera on Windows 11, as well as a guide on how to install Opera without losing data, so don’t miss it.

If there is any information we have not included in the article, feel free to leave a message in the comments section.

Trouble may be brewing for Perfect Dark reboot at Microsoft’s newest game studio, The Initiative

Things may not be looking good for the studio behind the ongoing Perfect Dark reboot, if recent reports concerning staff at The Initiative are anything to go by. Game director Dan Neuburger’s apparent departure (as indicated on his LinkedIn profile) is just the latest in a seeming mass exodus from Microsoft’s newest game development studio. Neuburger had been on the Perfect Dark project as director for nearly four years, since the studio’s 2018 formation.

He joins a long list of talent to leave the fledgling studio in recent months. In fact, it has been discovered that more than 30 staff members have left The Initiative since the start of 2021. These include level designers, systems designers and narrative directors.

While turnover in game development studios is hardly news, such a large-scale exodus from a single studio – as much as nearly half the total staff, by some reports – has to be a cause for concern for Microsoft as well as those eagerly awaiting the return of Joanna Dark, who hasn’t seen action since a 2010 remaster of the original Perfect Dark for the Xbox 360. To be sure, some of this was caused when Tomb Raider developer Crystal Dynamics was brought in to co-develop the game back in September of 2021.

What all this will ultimately mean for the new Perfect Dark game remains to be seen. The game was officially revealed back in December 2020 at The Game Awards, along with a teaser trailer. But at this point, the new Perfect Dark is clearly years away, and no release date has been so much as hinted at, at least at the time of this writing.


Party Encountered an Error: 3 Ways to Permanently Fix It

You can use specialized communication facilities to interact with other players while playing online games. One such program made specifically for Microsoft products like Windows and Xbox consoles is Xbox Party.

However, you should be aware about the party encountered an error issue. In fact, many users reported that Xbox Party is not working on Windows 11.

Forming parties is the ideal way to enjoy multiplayer games, and Xbox makes it simple to invite other players. The Xbox Party encountered an error notification that occasionally appears, though, when something goes wrong. 

In this post, we’ll examine possible causes for this error and offer some troubleshooting advice to help you resolve it.

Why does my Xbox Party keep saying party encountered an error?

When attempting to start or join a party on your Xbox system, users can receive party chat encountered an error notice. This error can occur when:

  • Xbox servers are down: In most cases, the Xbox servers are down when users face the problem, and there isn’t much you can do other than wait.
  • Presence of a bug: A bug, usually introduced after a recent update, could also trigger the error.
  • Your Internet connection is unstable: When the Internet connection is slow or keeps randomly disconnecting, you may see the Party encountered an error message.
  • Your network settings are blocking the Party Chat: Misconfigured network settings or even third-party applications blocking Party Chat could be the underlying cause.

How do you fix the party glitch on the Xbox app?

Before we move to the slightly complex changes, here are a few quick things you can try:

  • Verify whether the servers are up and running from the Xbox Status page. If it’s down, wait for a while and try again, while if it’s up, the other solutions will help.
  • Restart the computer.
  • Unplug your router from the power source, wait for 15-30 seconds, reconnect it, and check if the Party encountered an error message disappears.
  • Switch to a wired connection since these are more stable and less prone to errors.

If none of these work, head to the fixes listed below.

1. Reset the Xbox app

  1. Press the Windows + I key combination to launch Settings then select Apps.Settings Apps
  2. Expand the Xbox app below Apps & Features.
  3. Click on Advanced options.Expand Xbox - party encountered an error
  4. Scroll down and then select Reset.Reset Xbox

This is a simple fix if the Xbox party keeps disconnecting on the PC, so be sure to try it.

2. Restart the Xbox app and the associated service

  1. Completely exit the Xbox application.
  2. In the Windows Search bar enter Services to launch the app from the results.Start Services - party encountered an error
  3. Locate the Xbox Live Networking service and right-click on it, then select Restart from the menu that appears. Select Start if this option isn’t accessible.Xbox Live Networking
  4. Repeat the process for the IP Helper service.IP Helper - party encountered an error
  5. Close Services, then launch the Xbox app once more.

3. Check the permissions 

  1. Press the Windows key + I to launch Settings.
  2. Click on Privacy.Privacy - party encountered an error
  3. Choose Microphone from the left pane.
  4. Under the Choose which apps can access your microphone section, turn on the Xbox app.Microphone and Xbox app

Do you need Xbox Live to join a party?

To communicate with your friends while playing a game or watching a show on Xbox, you can invite them to an Xbox party.

You or another user on the device you are using does not have to be subscribed to Xbox Live Gold or Xbox Game Pass Ultimate to launch a party.

Also, on your laptop or mobile device, Xbox Live Gold or Xbox game pass is no longer required.

Having a good time with friends is one of the best things about the Xbox party. However, this can be interrupted by Party encountered an error 0x80190193, making it impossible for you to play games with your friends.

Fortunately, you can fix this error without any issues. Some users reported that the Xbox app is not launching games on Windows 11, but we covered that in a different guide.

Did you manage to fix the issue? Let us know in the comments below.

Xbox to be 100% recyclable by 2030, according to Microsoft

As part of its overarching sustainability efforts, Microsoft has announced that it is committed to making Xbox consoles entirely recyclable by the 2030. The pledge comes via Corporate Vice President of Xbox Operations Dave McCarthy. McCarthy stated in part, “At Microsoft – and, by extension, at Xbox – we’ve set ambitious commitments to meaningfully reduce the company’s environmental impact and operate as a carbon negative, water positive and zero waste company by 2030.

But how exactly is Microsoft taking steps toward reaching this goal? Believe it or not, it is already most of the way there, for both iterations of the 9th gen Xbox (the Series X and Series S) are rated as 97% recyclable according to the ULs (Underwriter’s Laboratories) Environmental Claim Validation Procedure.

The team at Xbox doesn’t seem to be content with this, however, as the consoles have seen further sustainability-minded enhancements. A 2021 system update, for example, saw improvements to the Energy Saver mode that made it even more efficient and added the capability for game and system updates to be downloaded while in Energy Saver mode.

Xbox Series S With Controller 3
The Series S as well as newer Xbox controllers use PCR resins in their manufacture

Also last year, the use of Post-Consumer Recycled resins (PCRs) was instituted for the first time, for some of the Series S casing as well as certain internal parts, as well as in Xbox controllers.

So it seems that Microsoft’s much-touted sustainability efforts aren’t just so much bluster. The company released its 2021 Environmental Sustainability Report back on March 10, in which it outlined ongoing progress toward reducing the company’s overall carbon footprint and eliminating waste. What does this mean for Xbox users? On the subject of gaming, McCarthy had this to say, “While gaming brings joy to players, we also recognize that gaming has an impact on our environment. Our commitment to our players and the industry is to work tirelessly to reduce that impact in a responsible way and consistent with Microsoft’s corporate commitments.”

Featured image courtesy of Xbox.com.

Microsoft announces updates to Teams, PowerPoint, Whiteboard

Microsoft released its latest Work Trend Index today, and along with it announced a number of new features coming to make working from home, or working in a hybrid home/office scenario, easier and more productive. Here are some of the changes coming to Microsoft products:

Outlook

Outlook is adding a feature to meetings RSVPs, allowing you to indicate whether you’ll be attending the meeting in person or remotely, coming in the 2nd quarter of this year.

Teams

Teams is getting a couple of updates to its Teams Rooms experience: a companion device experience that will prompt you to turn on your video when you enter a room, and hide your video from the front-of-room screen and from the gallery of people joining from companion devices in the room, coming in 2nd quarter 2022. Teams Rooms is also getting a new front row meeting layout, bringing remote meeting members into a “front row” at the bottom of the screen. Additional meeting info will be available, including chat, raised hands, and live reactions. Front row is now available in preview, with enhanced features coming later this year.

PowerPoint

PowerPoint has had two recent developments to make remote sessions better – cameo, an experience that integrates your Teams camera into your PowerPoint presentation, and recording studio, which allows you to record your presentation and deliver an on demand video. Cameo will be available in the 2nd quarter, and recording studio is available now. Now, though, Microsoft is bringing cameo and recording studio together:

You’ll now be able to seamlessly create and produce your presentations, decide how and where you want your video to appear on your slides with cameo, and then record yourself speaking to any slide with recording studio. When it’s time to deliveryour message, share your presentation with PowerPoint Live in Teams, whether or not you’re attending the meeting. The combined cameo and recording studio experience will be available in the second quarter of 2022.

Whiteboard

Whiteboard is getting a number of new features, including 50 new templates, collaboration cursors, and external Whiteboard collaboration in Teams Meetings.

Viva

The Viva Insight app in Teams is getting a new Inspiration library feature in preview, offering “thought leadership” and best practices from the Harvard Business Review, Thrive, and Microsoft.

In addition, Microsoft also announced a new Smart Camera, available May 31st for the Surface Hub 2.

Best Garden Design Software [2026 Updated List]

If you are faced with landscaping a yard, it is best to consider using garden design software to assist in organizing your thoughts and putting together a blueprint.

Garden software is mostly needed when considering a landscaping project with multiple gardens. However, it takes some time to learn and utilize this software.

The use of this software helps you to design a concrete plan for your gardens and landscaping. It helps you to make a solid decision on exactly what you want.

It is not very easy for you to visualize landscaping all at once, but when it is sketched out, not only will you remember every detail but you will also have an accurate plan from which to design your outdoor masterpiece.

For interior designs or landscape and garden designs outside your home, powerful garden design software will definitely save the day.

As a result of this, we decided to publish this article showing various design software. Combine them with Feng Shui software, and the recipe for success is ready.

If you like software for designing your yard, there are some premium versions to check out below. They are not expensive and will definitely assist you in putting together the perfect yard.

What are the best garden design tools?

Adobe Illustrator – Most creative garden ideas

Adobe Illustrator comes as a highly-polished application for creating vector graphics.

For planning your perfect garden you don’t need anything more than this since it will let you quickly draw a layout, modify lines according to your landscaping needs, etc.

If you’re accustomed to other Adobe apps, know that the interface looks quite similar. Therefore, creating a simple layout should be quite easy.

The Pen Tool will be your best friend since it’s the main tool you use to draw lines that will eventually turn into shapes. Get accustomed to all of the drawing tools in order to better meet your needs.

The key features included in the program:

  • The Pen tool is one of the most used tools to create all kinds of plans, layouts etc
  • A clean and fully customizable interface that enables you to capture the essence of abstract art
  • Many effects help you express how you want your garden to be divided
  • Learning Illustrator is very easy because of the plethora of online resources available

Adobe Illustrator

Design sketches and blueprints for your projects using Adobe Illustrator’s rich library of features.
Free trial Visit website

DreamPlan Home Design – 3D interior design

DreamPlan Home Design is a full-feature home planner software. It is one of the best products of its kind and it can be used by anyone interested in creating not only garden designs, but also house plans, redecoration, and more.

You don’t need any CAD knowledge to use DreamPlan as it has a visual, intuitive user interface.

DreamPlan Home Design comes with tools for multiple types of architectural projects. If your main interest is gardening, you can combine Exterior and Landscaping tools to create complex designs.

The software allows one to plant trees, add different types of plants, reshape the outdoor terrain, and design front gardens and backyard structures.

Other key features of DreamPlan Home Design include:

  • Generates 3-D models of your desings
  • Import and export support for 3D models
  • Extensive interior design options, including tons of furniture

DreamPlan Home Design is a paid software. It has a free trial, so you can try it before purchasing and see if it meets your needs.

DreamPlan Home Design

Create complex garden designs with intuitive tools. Requires no CAD knowledge.
Free trial Visit website

SmartDraw – Practical landscape designs

If you want to manage your garden designs and projects, SmartDraw makes it simple to draw and plan landscapes and store progress in the cloud.

SmartDraw blends ease of use with a powerful set of design capabilities, so it doesn’t matter if you’re a newbie or a more advanced landscape designer.

SmartDraw comes with a plethora of templates and examples that you can swiftly adjust or start from scratch, to build your own layout. To plan your landscape and home garden renovations, you don’t need fancy CAD tools; all you need is imagination.

You may drag and drop hundreds of ready-made symbols and forms for both professional landscaping and home gardening. Your dream garden can be built using elements such as ground cover, shrubs, irrigation systems, brick patterns, grasses, flowers, decor, outdoor furniture, and even photo-realistic textures.

Thanks to cloud storage, team collaboration has become easier. Share your architecture design with a professional florist to rearrange the flowers for their benefit and your delight, or seek another perspective on the electrical side of your project.

This software makes it easy to share your file through Use OneDrive, Google Drive, or DropBox very quickly, nonetheless you can also generate links to share the file with clients and outsiders.

And if you need assistance, SmartDraw specialists are accessible at any time and at no extra cost.

⇒ Get SmartDraw

My Garden Planner – Drag and drop usage

You can make use of this software to design your garden. It is also a good tool for carrying out plant research. With this software, you can look into plants’ longevity, their varieties, and how to care for them.

It is a user-friendly software that allows you to include fences, buildings, decks, sheds, and even a pond.

If you want a quick and easy way to design your garden, consider using Shoot Garden Planner. In addition, this software is compatible with Windows OS such as Windows XP, Vista, 7, and 8.

⇒ Get My Garden Planner

Marshall’s Garden Visualiser – Realistic garden visuals

This free garden design software is a powerful tool in landscape design. It allows you to visualize your garden in a 3d space. It pretty much looks like a video game.

While using it to build your garden, you can move around, it gives you a real-life feeling. You can specify the size of the garden you desire and also customize its shape exactly the way you plan to build it.

A lot of products could be added to your design using this software. You can add paths, garden surfacing, edgings, summerhouses, paving, and walling.

You can save your garden in your online account while you work. When you are done, get an installer to help you build the garden or you make it yourself.

If you intend to build yourself; request the information from their official website to order all the required products.

⇒ Get Marshall’s Garden visualizer

Chief Architect’s home designer – Professional choice

This powerful software is ideal for landscaping design and of course the garden. It is premium software with multiple packages.

However, the price is somewhat on the high side, but it does not really matter because it is very beneficial. In addition, this software enables you to achieve the right plan. 

If you do not like it after downloading it, you can easily do away with it; at least you didn’t spend any money unlike other design programs out there which are much more expensive.

⇒ Get Chief Architect home designer

Gardena – Various garden products

Gardena is a web-based garden design software. On the website, you will find all types of landscaping products for water management (sprinklers, hoses, etc.), lawn care (lawnmowers), shrub and tree, and others.

However, Gardena keeps people interested in its products. In other words, they do not want to profit from the software itself.

Instead, the software is a way to attract people to their site and promote various products thereby getting a greater gain.

It’s a win/win between Gardena and its consumers looking for free design tools.

Have you used any of the garden design software we mentioned above? Do share your experience with us by commenting below.

⇒ Get Gardena

Conclusion

That said, you made it to the end of our list with the most influential garden design software. We hope you found just the perfect answer for your lovely garden.

If there are other solutions we didn’t include here, feel free to reach us and share your opinion.

You can let us know in the comments section how the recommended tools have supported you or what would you add more.

Best Portable Network Scanner Tools for Efficient Network Management [2026]

In case you work on a network, you definitely know the value of information because reliable information will lead to a secure and worry-free system.

When you’re thinking about network scanning, you may think of some expensive commercial products that not many people can afford.

You don’t need to own such a program to accomplish an easy job such as finding out the open ports on the computers from the same local network.

You can rely on online IP scanners that can help you diagnose the status of your network, but you can also install reliable software and use it to check your network on a regular basis.

Using these tools, you will also be able to troubleshoot accurately and diagnose your network issues. The selection below contains tools that are user-oriented and easy to use, and these port scanners are portable, requiring no installation.

We have gathered ten portable network scanner tools that will come in handy.

What are the best portable network scanner tools?

ManageEngine NetFlow Analyzer

Another good and comprehensive tool for network scanning and optimization is ManageEngine’s NetFlow Analyzer. It is an all-in-one solution for traffic analysis, bandwidth optimization, WLC monitoring, and more.

The software gives insights into the way your bandwidth is being used so that you can know how much space would be optimal. 

On top of that, it also carries out in-depth scans and gives you valuable Network Traffic Analytics.

Manage Engine Netflow Analyzer is meant to be an efficient and time-saving tool which is why it offers intelligible graphic analytics. You can customize your dashboard to view the exact parameters/widgets that you’re interested in. 

The software also has an alerting feature that sets off when the scans and analytics conducted find that your network is not on the right track, so you can fix the problem right away.

Other notable features provided by NetFlow Analyzer include:

  • Monitors traffic in routers/switches
  • Department bandwidth monitoring- monitors a specific department in your organization so you can know exactly how much it consumes
  • Application-specific usage monitoring- helps optimize and prioritize your most important applications
  • Site-to-site traffic monitoring
  • Router Traffic Monitoring

The software comes in two paid editions: Professional and Enterprise. Each of them can be tried for free as part of a 30-day trial.

ManageEngine Netflow Analyzer

Always stay optimized with advanced traffic scans, reports and more. 
Free trial Visit website

PRTG Network Monitor

This tool monitors the network availability and network usage using various protocols such as WMI, Netflow, and SNMP. This is a powerful tool that is able to offer an easy-to-use interface that is web-based and apps destined for Android and iOS.

The PRTG offers comprehensive network monitoring which 0offers over 170 sensor types for app monitoring, QoS monitoring, SLA monitoring, and virtual server monitoring.

Its flexible alerting features include 9 different notification methods, limit alerts, status alerts, threshold alerts, alert scheduling, and conditional alerts.

The tool has an in-depth reporting feature that has the ability to create reports in HTML/PDF formats, pre-defined reports, report templates, and scheduled reports. You should know that the freeware version of this tool is limited to 10 sensors.

The software is available in various forms, depending on your needs. You can access your network scanner online, as it comes in a browser version, but it also has its own central UI.

After you launch the tool you will have to go straight to the configuration wizard in order to get started.

This will run you through the essential config settings required to get the app up and running and it will include the adding of servers to monitors and the required sensors that you have to use.

PRTG Network Monitor

PRTG Network Monitor

Manage the way your PC uses your bandwidth with one of the best network monitoring tools on the market today!
Free trial Visit website

Advanced Port Scanner

Using the Advanced Port Scanner, you will be able to scan hundreds of IP addresses at the same time but also at the highest speeds.

The tool is able to scan ports of network computers and it can find and open well-known TCP ports and also their computer names and addresses.

More than that, the tool allows you to remote shutdown or to wake up any machines that are found on a particular network.

Advanced Port Scanner will turn out to be your go-to tool whenever you need to find any open ports on a particular computer. The tool works on Windows XP up to Windows 7 and 10 both versions of 32-bit and 64-bit.

The download software package includes both portable and installation versions. In case you prefer running the tool without installing in on your machine, you should definitely go for the portable option after you launch the program.

⇒ Get Advanced Port Scanner

GFI LanGuard

This network security scanner and patch management tool acts as your virtual security consultant. The tool includes patch management for Windows, Mac OS, and Linux.

It also adds features such as smart network and software auditing, Vulnerability scanning for computers and for mobile devices and free support so that you will not have to deal with any issues on your own.

Because of the fact that patch management is vital for your business and network security breaches are usually caused by missing network patches, the tool will scan and detect network vulnerabilities before they’re exposed.

It will also reduce the time required to patch machines from your network.

GFI LanGuard also provides a detailed analysis of your network and this will include applications and default configurations that pose a risk for security.

Over 60,000 vulnerability assessments are being carried out across your network.

This tool scans your OS, the virtual environments and all of your apps via vulnerability check databases. It will allow you to analyze the state of your network security and to identify the risks and address how you have to take action before it’s too late.

⇒ Get GFI LanGuard

PortScan & Stuff

PortScan & Stuff is a free port scanner portable tool that is able to identify all the existing active devices on your network and it will also show all open ports and additional info such as MAC address, hostname, HTTP, SMB, SMTP, iSCSI, and SNMP services.

In case a larger network is involved the tool will use up to 100 threads with the purpose of speeding up the performance.

One extremely useful feature of this tool is the Filter feature because it can narrow down the scanning result based on the user’s criteria.

For instance, the user can easily type 3389 in the filter box to find all devices that have the Remote Desktop Protocol turned on to remotely log in without any problems.

Just as its name says, the tool is also able to perform more actions as well and these include searching for devices even if you don’t know the IP address.

You can also look for pinging devices with three standard-sized Ping packets in three different types of pings. Using this tool you can also speed test your Internet connection by downloading and uploading data to various servers.

⇒ Get PortScan & Stuff

Nagios

This is a very powerful monitoring tool that makes sure of the fact that all your critical systems, services, and applications will be always up and running.

The tool provides features including alerting, reporting, and also event handling. The heart of this app is the Nagios Core and it contains the core monitoring engine and also a basic web UI.

More than this, you will be able to implement plugins that will allow you to monitor apps, services, and also metrics, graphs, add-ons for data visualization, load distribution, and MySQL database support.

If you want to try out the program without having to install and configure it from zero, you are advised to download the Nagios Xi and to enable the free version of the tool.

The Nagios XI is the pre-configured enterprise-class version built upon Nagios Core. This is packed up by a commercial company that offers you support and more features such as advanced reporting and more plugins.

The free version of Nagios XI is perfect for smaller environments and it will monitor a maximum number of seven nodes.

After you have installed and also configured Nagios, you have to launch the Web, UI and you can begin configuring host groups and service groups.

After the tool monitors the status of the specified hosts and services, it will be able to show you what the health of your systems looks like.

Nagios’ log monitoring, management, and analysis app allow organizations to view quickly and easily logs from machine-generated data. The tool’s Log Server is designed to analyze, collect and store log data which is based on custom specifications.

It will also provide users with insight into all the data from their network’s infrastructure.

⇒ Get Nagios

MiTeC’s Network Scanner

MiTeC’s Network Scanner is a free multi-threaded ICMP, Port, IP, NetBIOS ActiveDirectory, and SNMP scanner with various advanced features.

The tool is targeted at both system admins and general users who are enthusiastic about computer security. The software is able to perform ping sweep, scans for UDP ports, and open TCP, resource shares, and devices.

For devices with SNMP capability, the program will detect all the available interfaces and the basic properties will be displayed.

More than this, you will have the opportunity of editing the results to save or load them to or from CSV and to print a network device list.

Any information from any section will be able to be exported to CVS. The tool can also resolve hostnames and it will auto-detect your local IP range.

The tool provides three different options: you can automatically scan the network, you can scan the Active Directory or you can use a detected range according to an adapter that is defined by the user.

The whole scanning process will not take much time and the app will show each IP address alongside more useful details including the operating system, CPU and its description, MAC address, domain and user.

MiTeC’s Network Scanner functions on all Windows platforms including on the server versions. The tool is free for both commercial and personal use.

The app doesn’t come with a help manual and this might be the most important drawback because users always need more documentation on a tool’s features.

⇒ Get MiTeC’s Network Scanner

OpenNMS

OpenNMS is a highly integrated open-source platform that is designed for building network monitoring solutions.

The tool can detect service outages and it can measure latency for graphing and thresholding through synthetic polling.

It offers support for many apps with configurable service monitors. It can remotely monitor apps from the users’ perspective.

This tool will use its flexible and extensible architecture to extend service polling and performance data collection frameworks.

OpenNMS includes a client application for the iPhone, iPad or for iPod Touch for on-the-go access and it will give you the ability to view nodes, outages, alarms and to add an interface to monitor.

After you log in to the tool’s web UI you have to use the dashboard to be able to get a quick snapshot view of any notifications. You can drill down and get more info about any sections from the Status drop-down menu.

After you are done, the Reports section will allow you to generate reports which you can then send via email or you can download as a PDF.

⇒ Get OpenNMS

Capsa Free Network Analyzer

This freeware tool is targeted at students, teachers, computer geeks and more. It is a network analyzer that allows users to monitor network traffic, to troubleshoot network issues and analyze packets.

Its features include support for more than 300 network protocols and also the ability to create and customize protocols.

This tool is a must-have network analyzer for Ethernet monitoring, analysis and troubleshooting. It will provide you great experience to learn how to monitor network activities, pinpoint network problems, increase network security and more.

This is the ideal choice for students who learn protocols and networking tech.

The tool will offer your own dashboard, and all the important parameters will be situated in one place. It can record your network profile, set your analysis objective and also perform the customized analysis.

⇒ Get Capsa Free Network Analyzer

The Dude

The Dude network monitor is a new app by MikroTik which can dramatically enhance the quality of the ways you manage your network environment.

This will automatically scan all devices within the specified subnets, it will draw a layout map of your networks, it will monitor services of your devices and it will also alert you in case some of your services have problems.

The tool offers auto network discovery and layout and it is able to discover any type or brand of device. It includes SVG icons for devices and it also supports custom icons and backgrounds.

The app features an easy installation and it is very easy to use. More than that, it allows you to draw your own maps and to add custom devices, also offering direct access to remote control tools for device management.

It supports remote Dude server and local clients and it runs in Linux Wine environment, Windows, and macOS Darwine.

⇒ Get The Dude

Xirrus Wi-Fi Inspector

Xirrius Wi-Fi Inspector is a tool that can be used to search for Wi-Fi networks, manage and troubleshoot connections, verify Wi-Fi coverage, locate Wi-Fi devices, and detect rogue Access Points.

It provides details about each network that it detects including the network SSID, signal strength, network mode, encryption type, frequency, and channel.

This tool has more than 1 million downloads, and it has become the standard for helping organizations from all over the globe to quickly and easily gain visibility into their networks.

The program is designed to provide real-time monitoring of wireless network status. The tool will make sure that you are getting the highest performance available from the wireless network.

Wi-Fi Inspector’s UI includes various modes such as a radar view that displays the closest networks, a view of all networks with their details, and a history view.

The tool is licensed as Freeware for Windows, and it’s available to all software users as a free download.

⇒ Get Xirrus Wi-Fi Inspector

We presented these tools to try and make life easier for you. They will all manage to monitor devices, services, ports, and protocols and they will also analyze the traffic on your network.

Check them all out, and we guarantee you the fact that you will find at least a gem or two amongst these tools above.

If you have any additional suggestions or questions, don’t hesitate to leave them in the comments section below.

FAQs

What is a portable network scanner?

A portable network scanner is a lightweight tool that detects devices, open ports, and services on a network without requiring installation. They’re useful for quick diagnostics and troubleshooting.

What is the best free portable port scanner?

Advanced Port Scanner, PortScan & Stuff, and MiTeC’s Network Scanner are among the best free options. They let you scan IP ranges, identify open ports, and export results.

Can I use network scanners for security testing?

Yes. Tools like GFI LanGuard and Nagios include vulnerability scanning, patch management, and traffic analysis to identify weak points in your network.

Do portable network scanners work on Wi-Fi?

Yes. Many scanners, including Xirrus Wi-Fi Inspector and The Dude, can analyze Wi-Fi networks, show connected devices, and help detect rogue access points.

Our selection of software to check ports includes tools that meet the needs of the individual as well as enterprise-level users.

External Hard Drive Recovery Software: Top 10 in 2026

Hard drives are external storage solutions designed to serve as backup points for computer files, programs, settings, and documents. A typical hard drive often serves as the convenient backup storage medium keeping files safe in the event of a computer system crash and subsequent data loss.

So, what do you do if some or all of the files are lost from this backup option as well? This post provides you with some of the best external hard drive recovery software, to facilitate the recovery of lost files.

Data loss in computer systems is quite common. However, it is not as common on external hard drives.

Nevertheless, it happens. Usually, this is the result of accidental deletion or formatting, damage, or corruption. In this case, swift recovery becomes essential.

Read on to get a good grip on some of the best available tools, which can easily be employed to run such recoveries.

How can I recover data from a hard drive that won’t boot?

To recover data from a hard drive that can’t boot, it’s advised to use recovery software for the damaged hard drive.

In fact, many of these applications have been mentioned in this guide, so keep on reading to find out what are the best tools for this task.

What are the best external hard drive recovery tools for Windows 10 & 11?

Stellar Data Recovery

Stellar Data Recovery is a data recovery tool, specially designed for Windows PCs, ranging from Windows 10 to Windows XP. It is arguably the most popular external hard drive recovery software in the market.

The software is a product of Stellarinfo, a renowned software repair solution provider.

It hosts advanced data recovery features, which make it suitable for recovering various types of files, ranging from videos to audio files to documents.

Furthermore, the software is a versatile recovery tool that can be employed to recover deleted or damaged files from internal storage, external hard drives, USB drives, memory cards, and more.

In fact, it can also recover lost Windows partitions. Basically, Stellar supports various file modules; including NTFS, FAT, FAT16, FAT32, and ExFAT.

Stellar Data Recovery offers a form of freemium license package to users. This means there is the free version, as well as the premium (paid) version.

The free package (with 1GB storage) is essentially designed for home or personal use, while the premium package, which offers more advanced features, is designed for professional use (with unlimited recovery-storage capacity).

Stellar Data Recovery

Recover lost or deleted data from all types of Windows devices and storage media with this all-in-one tool.
Check price Visit website

EaseUS Data Recovery Wizard

Lost data from external hard drives can be retrieved for free instantly with EaseUS Backup & Data Recovery. This powerful data recovery software is reliable for Windows desktops, laptops, hard drives, USB flash drives, and other devices. 

A useful tool for dealing with data loss circumstances such as format, virus attack, unintentional file deletion, abrupt system breakdown, and unexpected power outage, that can really make things go smoothly.

There are several methods for successfully retrieving required files.

With EaseUS Data Recovery Wizard Free you are able to restore 2GB of deleted files with a  preview for desired files to recover. 

Pro version offers you assistance one-on-one so you can get back unlimited files with a preview for desired files plus one license for 1 PC, – monthly, yearly, or lifetime access. 

The Technician bundle is great if you run an online business and want to reclaim unlimited data lost with assistance throughout the recovery process, get one license for multiple computers, – 1 year, 2 years, or lifetime access – and enable service providers to help your customers with technical issues.

Partition Recovery supports FAT, NTFS, Ext2, and Ext3 volumes in Windows.

MS SQL recovery covers servers 2019,  2017, 2016, 2014, 2012, 2008, and older versions and exchange recovery helps you reclaim lost files through email servers. These functions are enabled to recover more than 1000 types of data.  

With EaseUS Todo Backup you can backup and restore your system including files within, and on external hard drives. 

As further processes, the software provides a program for disk imaging at home, with the system cloning in-built solution. 

Should you consider using EaseUS Todo Backup for business purposes, you are able to take advantage of personalized solutions for each individual company such as reducing downtime and protecting corporate data on Windows servers, MS SQL databases, and email databases.

EaseUS Data Recovery Wizard

Create backup tasks on a schedule, have them run automatically to produce duplicates, and cope with data loss scenarios!
Free trial Visit website

MiniTool DataRecovery

If you need to recover accidentally deleted files, then this software might be just what you need. The application is simple but powerful and can recover files from SD cards, USB drives, HDDs, and SSDs.

The software is incredibly simple to use, and you just need to select the drive you wish to scan. Once the scan is finished, preview the recovered files and select the ones that you would like to save.

Regarding the supported file types, the software works with 70 different file types, so it should be able to recover most file types without any issues.

As for practical use, the application can be helpful if you want to restore accidentally deleted files or files that have been corrupted due to malware or hard drive damage.

Overall, MiniTool DataRecovery is a simple but powerful tool that is worth checking out.

MiniTool DataRecovery

With more than 70 different supported file types, MiniTool DataRecovery is a perfect choice for data recovery from any type of drive.
Free trial Visit website

Disk Drill

This software works on multiple platforms, and it can recover files on any version of Windows, or even on Mac computers.

Regarding the supported devices, this application works with SD/CF cards, digital cameras, and USB drives. You can also use it to recover files from HDDs or SSDs that have the TRIM feature disabled.

It’s important to mention that the software works with any brand and it can recover more than 220 file types with ease. Almost every file type you can think of is supported by Disk Drill.

You can use the application to recover accidentally deleted files, and files from formatted external drives. It’s also possible to restore files from crashed drives or lost partitions, so be sure to give this software a try.

Disk Drill

Recover more than 200 different file types from any drive easily with Disk Drill software.
Free trial Visit website

Wise Data Recovery

Recovering your lost files doesn’t have to be hard, and if you want to do that, you can use software such as Wise Data Recovery. This application supports more than 1000 different file types, so it can recover almost any file format.

Regarding the supported devices, you can use this application with HDDs, SSDs, external drives, USB flash drives, memory cards, digital cameras, and almost any other storage device.

It’s important to mention that the most popular file systems are supported allowing you to rescue data from FAT, NTFS, HFS, HFS+, HFSX, Ext2, and Ext3 drives.

The software is incredibly fast, allowing you to easily recover deleted files. To top it off, it’s also portable, so you can run it from a flash drive on any PC.

If you need fast, reliable, and portable software for external hard drive recovery, then this might be the perfect choice for you.

Wise Data Recovery

Recover more than 1000 different file types with ease from any drive with Wise Data Recovery.
Free trial Visit website

Paragon Backup & Recovery 17

Paragon Backup & Recovery is designed to recover lost, corrupted or deleted files from hard drives and other file storage hubs.

At present, the external hard drive recovery software is the primary data backup and recovery tool of over six million people across the globe.

Basically, the software supports 64-bit Windows versions, ranging from Windows Vista to Windows 10. This makes it an ideal backup software for Windows, as its 64-bit support enables it to handle a large amount of RAM.

Also, it hosts various backup and recovery features like WinPE-based recovery media, disk backup, flexible restore, and more.

Furthermore, the software is versatile and can support a variety of hard drives (SSD, HDD, AFD), USB drives, storage disks, memory cards, and other storage media.

Also, it hosts a flexible design that supports all file systems, including FAT 16, FAT 32, NTFS, ReFS, and more.

This makes Paragon Backup & Recovery one of the best available recovery (and backup) tools.

Paragon Backup & Recovery 17

Create new backup strategies using custom backup parameters such as backup type, frequency/scheduling, retention, and scenario-based backup tasks.
Check price Visit website

RecoverIT by Wondershare

recoverit by wondershare

If you want a tool that can recover almost any file type, then you should consider RecoverIT software. This application can recover more than 1000 different file formats, making it perfect for both basic and advanced users alike.

Regarding the supported devices, both hard drives and SSDs are supported, along with external and USB flash drives. You can also recover data from all types of cameras and SD cards as well.

You can use this software to recover data that has been accidentally deleted, or you can recover files from a formatted drive. Data recovery from corrupted drives is also possible, which makes this tool perfect for advanced users.

The software is optimized for video recovery, and it can recover and repair video files from different camera types with ease. Overall, it’s great recovery software, so make sure you give it a try.

RecoverIT

With support for all types of storage devices, RecoverIT is one of the best tools for recovering data from cameras and external drives.
Free trial Visit website

Recuva

Recuva is a product of Piriform, a globally known software repair/solution provider. It is one of the most employed external hard drive recovery software in the market, and it is especially suitable for Windows PCs. The software is supported on Windows versions, from XP to Windows 10.

Recuva is basically a delete-recovery tool i.e. it is equipped to undelete deleted files on both internal and external storage media.

Hence, it is especially suitable for recovering accidentally deleted files from computers, external hard drives, pen drives, memory cards and so on.

Also, like most data recovery tools, Recuva works perfectly well with all FAT and NTSF (file) platforms, and it is able to recover audio files, videos, photos, documents and other file types (and formats). In fact, it is equipped to run deep scans, and retrieve or at least, identify every file you’ve ever deleted on your hard drive.

Furthermore, Recuva, despite being an undelete tool, is designed to permanently erase any file you want to delete from your hard drive or computer.

So a Recuva-deleted file is technically irrecoverable, as the software ensures every trace of such file is completely and permanently erased from your hard drive.

On a final note, Recuva offers a freemium package to users, albeit with limited features. For the full features, you’ll have to go for the premium version (Recuva Pro).

Recuva

Recuva allows you to recover files accidentally erased from memory cards, external hard drives, USB sticks, and other storage devices.

Kernel Data Recovery

Kernel Data Recovery is yet another tool that you can use to recover all your lost files and folders, containing your valuable data.

The tool uses a three-step process: first, it scans the Windows system drives for the lost data, then it allows you to preview the recovered file, and, finally, it retrieves the file.

Besides the recovery option, the program will also fix issues in FAT16, FAT32, NTFS, and NTFS5 partitions – be it corruption in hard disk/ Windows File system, or even a virus attack.

There’s no file size limitation when it comes to the search and scanning process; plus, your files are recovered in their original form, with no alternations in quality, size, or data.

The tool can perform the same action on removable drives as well, including USB, IDE, EIDE, SCSI, SATA, PEN, or ZIP drives.

Kernel Data Recovery

The perfect tool to recover lost, deleted, and inaccessible data from any system partition or storage media.
Free trial Visit website

Hetman Partition Recovery

Hetman Partition Recovery is one of the leading external hard drive recovery software today. It hosts an advanced set of features that makes it suitable for recovering lost data and partitions from Windows PCs (and a host of other desktop brands).

It has relatively low system requirements. Hence, it is supported on virtually all Windows versions, from the old Windows NT to the latest Windows 10.

Like most external hard drive recovery software, Hetman Partition Recovery supports virtually all file system variants, specifically NTSF and FAT (including FAT 16 and FAT 32).

The tool is able to recover video files (MP4, 3gp, and others), audio files (MP3), photographs (PNG & JPEG) documents (docx, PDF, Excel, PPT), and so on. In fact, it is able to recover archive files like zip files, .iso, .cab, and others.

In addition, the recovery software’s applicability is not specific to hard drives. It can also be employed to recover corrupted files and formatted partitions from other external storage media like Flash drives, SD cards, disk drives, and others.

Interestingly, it has the capability to run up to a 100% recovery rate on all files. Also, it hosts a set of sophisticated algorithms, which enable it to recover files that are lost to malware or virus attack(s).

Furthermore, the software is fairly easy to use, as it hosts an in-built recovery wizard that provides simple, start-to-finish, guidelines on data recovery.

Hence, anyone, irrespective of technical know-how, can employ the software to recover lost, damaged, or corrupted files from external hard drives.

It also presents files in read-only format, which makes it uneditable, thereby ensuring the original contents are intact upon recovery.

Hetman Partition Recovery

Get back every piece of data from your hard drive, SSD, memory card, or USB drive. With this software, you recover all your partitions missing data in minutes.
Check price Visit website

Can an external hard drive be recovered?

Yes, an external hard drive can be recovered, but the success rate depends on the type of software that you are using.

All the solutions presented in this guide have been tested, and they offer a great success rate when it comes to file recovery, so be sure to try any of them.

Data loss is practically inevitable, as there are innumerable ways a file can be lost. These could range from accidental deletion or formatting to malware or virus infection. Hence, backing up files is highly essential to file/data safety.

However, at times, due to a host of factors, backed-up files (on external hard drives) could be lost or simply inaccessible.

In such events, this article has provided some of the best external hard drive recovery software available, which can easily be employed to facilitate the recovery of such files.

Feel free to tell us which one you liked best or which one has worked for you. Use the comments section below.

Secure your business using Avast Small Business Solutions

Even if you own or you’re in charge of protecting a small business, which doesn’t mean you don’t need to be always on high alert.

Well, at least that’s what you should do if you don’t have a dedicated security solution like Avast Small Business Solutions.

Phishing, ransomware, spyware, and other threats still lurking online, ready to take a shot at your servers or endpoints and compromise your digital assets.

That’s why, in this article, we will outline the best features of Avast Small Business Solutions and will explain how you can use this solution to protect your organization.

What is Avast Business Solutions and how can it help you?

Avast Business Solutions is a simple, but powerful, and affordable online security solution for your small business that you can trust to keep you protected without extensive maintenance.

Of course, the suites are built on Avast’s famous antivirus product that is present in three possible packages based on the level of security:

➡ Avast Essential Business Security – This solution includes the Avast award-winning antivirus to protect your business and all your devices against viruses, phishing, ransomware, spyware, zero-second threats, Wi-Fi network vulnerabilities, and more.

➡ Avast Premium Business Security – Combines the same antivirus with VPN and privacy tools to help your employees stay private and safe online.

➡ Avast Ultimate Business Security – Besides the antivirus and best privacy tools, you will also get patch management automation software that will keep your devices and applications updated and protected.

So, it all depends on your budget and needs. Whether you just want to keep all your devices secure, need extra privacy, or include automated updates, there’s an option for any situation.

What are the best features of Avast Business Solutions?

1. Online Management Platform (Business Hub)

Nowadays, the employees and the IT management team could be scattered all over the world but that doesn’t mean work has to stop and neither security.

With Avast Business Solutions, you can set up your device protection, manage your subscriptions, monitor, and add devices from a single friendly console anytime, anywhere.

And that includes any number of devices. You may their status, policies, take quick actions, enable and disable security services, and a lot more, remotely.

If something happens, you will get notified immediately to take the necessary action. Of course, the alerts can be customized to get only the notifications relevant to your business.

The IT manager will be able to create and schedule reports to keep up with the health situation of all the devices that are used within your organization.

2. Privacy protection

With the Premium and Ultimate packages of Avast Business Solutions, you will also benefit from a built-in VPN that encrypts your data and secures your Internet connection.

That will come in handy, especially when the members of your organization are using public or unsecured Wi-Fi networks.

However, privacy protection includes end-to-end encryption so all the endpoints will be safe from any communication interception at all times.

3. Always-on protection

Keeping all your devices from your business safe might be a challenge but not if you benefit from the always-on protection from Avast Business Solutions.

That’s because it will provide security for all your devices covering all possible threats from viruses, spyware, phishing, ransomware, and other cyberattacks.

Plus, the File Shield protection scans opened or downloaded files to make sure they are malware-free. It also scans incoming and outgoing emails to ensure they are malware-free.

Moreover, the antivirus blocks any unsecured websites that can potentially infect any device used in your organization.

4. Data protection

We don’t need to stress how important is the client data, and the loss of sensitive information can cost your business a lot of time and money.

Remote attacks are on the rise but the firewall and network inspection tools from Avast block any intrusion attempts by monitoring all network traffic between your employee’s PCs and the outside world.

That will not only protect your business from data theft but also prevent unauthorized communication and interference.

The Behavior Shield from Avast protects against zero-second threats, malicious programs, and cyberspying on passwords and bank account details.

With this kind of endpoint and network security solution, you can rest assured that your personal, business, and customer information is safe from any attacks, including ransomware.

5. Patch management

A lot of the vulnerabilities come from unpatched apps and systems on the endpoint devices but if you opt for the Avast Ultimate Business Security plan, you will forget about that possible threat.

That’s because you will be able to patch the OS and third-party software of all your devices straight from the Patches section of the Avast Business Hub with a single click.

And the IT manager will be able to do that remotely for any device, whether it’s behind a firewall, at remote sites, or even asleep.

In the Dashboard, you will be able to see exactly the status of all the patches and their implementation progress and you can select only the patches you want or all of them in one shot.

6. Webcam & Password protections

The Password Protection and Webcam Shield feature are both built-in for the Premium and Ultimate packages of Avast Business Solutions.

When it comes to password protection, this solution not only stores and secures them, but also monitors their vulnerability and warns you about improving their security.

As for the webcam, unfortunately, cybercriminals developed a special taste in highjacking them to spy on unaware users.

But with the Webcam Shield, the system will always stay on guard to protect you against such malevolent actions at all times.

How do I activate the Avast Business Solutions trial subscription?

  1. Navigate to the Avast Small Business Solutions website, click on Account from the top-right corner, and select Business Hub.
  2. If you already have an account, this will lead to your login page but if you don’t, you may click to the Create an account or just log in with the Google or Facebook account.
  3. You will need to complete a small form with data about your credentials, region, and business name.
  4. Now, select whether you want to implement the solution for one or more companies and click the Continue to Hub button.
  5. In order to use the solution, you have to make a subscription, so select the Set up your subscriptions or if you allready have one, choose the Use activation code option.
  6. Luckily, by activating the trial version, you can test it for 30 days before buying so click on Trial options.
  7. Now, you can compare the three options and hit the Start trial button for the one you need.
  8. Next, click on the Activate trial button to start using the solution, no credit card needed, no complications.

How do I use Avast Business Solutions to protect my organization?

  1. Now that your free trial subscription is activated, click on Devices from the left pane and hit the Add device button from the top-right. As you can see from our screenshot, we already added one PC.
  2. Next, you will be able to choose the OS yu will install the product on, the type of installer, and if you scroll down, there are also options for choosing the antivirus version, the Patch Management add-on, select a group, policies and more. You might have noticed you can also install the software remotely by perform a network discovery procedure.
  3. Once you install the products on the endpoint, it will require a restart and the Avast Business Security – Antivirus Pro Plus (in our case) will perform a scan and notify you of the status of the system.
  4. However, the magic really happens in the Avast Business Hub Dashboard where you will immediately see a status with alerts, threats found, devices, and patches for the devices you’ve set up.
  5. When we went to the Alerts tab, we received a report with all the events and even a patch was resolved automatically.
  6. But a very useful option is the Network discovery tool from the Devices section that you can use to scan your network using one or more scanning agents. Using the endoints, you are able to detect all the devices and protect them by installing the available products.
  7. From the Policy section, it’s possible to enforce company restrictions, monitor ports, control virus protection and set up a myriad of other options remotely for each or your endpoints separately or for distinct groups.
  8. If you opted for a Premium or Ultimate plan, the Patches section will be unlocked, allowing you to apply updates to the OS or third-party apps remotely, with a single click.
  9. Lastly for your review, the Reports section will help you schedule or view a lot of detailed data about the situation of your network and devices for your IT management team.

Of course, there are many other options and functions to tinker with such as setting new accounts for the Business Hub, using the VPN, and others.

However, we believe that our overview provides all the necessary information you need to consider this solution as a very good choice for securing your business.

Avast Small Business Solutions pricing and offers

As we have mentioned at the beginning of this article, there are three possible packages to choose from:

  • Avast Essential Business Security – It is priced at $36.99 for one device/year and it includes the Avast antivirus
  • Avast Premium Business Security – It costs $46.99 for one device/year and adds a VPN and privacy tools
  • Avast Ultimate Business Security – Priced at $56.99 for one device/year that includes all of the above and a patch management automation software

Of course, all the subscriptions include the Business Hub cloud-based dashboard that will help you manage all the devices and security from wherever you are in the world.

⇒ Get Avast Small Business Solutions

Pros
Cloud-based, online, centralized dashboard
Control all your network security and devices seamlessly
Can implement the solution remotely
Schedule reports for vulnerabilities and active threats with just a few clicks
Easy to install and manage from a friendly console
Cons
The Cloud back-up tool is available as an add-on

We were impressed by how easy it is to install and set up a professional-lever solution like Avast Business Solutions.

Although in our review, there seem to be a lot of steps, the whole process took only about a couple of minutes.

Of course, setting up the policies, adding and organizing all the devices on your network will probably keep you busy a bit more, but you only do that once.

After that, it’s just a matter of taking actions based on the users’ activity, installing important patches, and overall, keeping an eye out for any unusual behavior that it instantly detects.

We also liked the Business Hub’s clean and very well-organized dashboard that you can access from any device anywhere you have an Internet connection.

And if you already tried Avast Small Business Solutions, drop us a line about your experience in the comments section below.

Fix: Bluetooth not working after Windows 10 Update

The Windows 10 Update usually contains much-needed improvements, especially for desktop users, but it sometimes generates annoying issues.

Some of the elements that are affected in this process happen to be the Bluetooth drivers.

Sometimes Windows 10 users may encounter problems with Bluetooth connectivity which could be caused by various factors. Speaking of issues, let’s have a closer look at what our readers reported.

When does this error occur and what to expect?

  • Bluetooth disappeared from Windows 10/Bluetooth driver missing after Windows 10 update
  • Bluetooth is not available on this device
  • Windows Update broke/removed Bluetooth
  • Bluetooth not working after BIOS update/Sleep/installing ScpToolkit
  • Bluetooth doesn’t work after you upgrade to Windows 10 from Windows 8.1 or Windows 7
  • Also, Bluetooth not working after Windows 11 update (Fortunately, we have all the tested fixes for when Bluetooth is not working in Windows 11).

In this article, we’re presenting you with some solutions that you can try when Bluetooth is not working after Windows 10 update.

How do I fix Bluetooth not working?

1. Set Bluetooth service startup type to Automatic

1. Press Windows Logo + R, type services.msc, and press Enter.

bluetooth not working windows 8.1 update

2. Double click on Bluetooth Support Service.

bluetooth not working windows 8.1 update 2


3. Go to General Tab and change the startup type from Manual to Automatic.

bluetooth not working windows 8.1 update 3


4. Click on Log On Tab and mark on This Account.

bluetooth not working windows 8.1 update 4

5. Type your account name or browse to find your account name.
6. Now remove your both hidden password and restart Windows 10.

2. Use a Driver Updater

Updating your drivers has never been easier than this because third-party solutions offer the security you need at optimum speed.

In addition, with such powerful software, you can resolve the Bluetooth trouble or any other driver without causing more serious errors.

3. Reinstall Bluetooth drivers

  1. Simply select your Bluetooth driver, then right-click on it and select Uninstall device.
  2. Go to Action and select Scan for hardware changes in order to reinstall the latest Bluetooth drivers.
uninstall bluetooth drivers device manager

Proceed with the reinstall of your Bluetooth drivers by going on the developer’s website. Leave your comment with the exact model if you need help.

If you don’t want to visit your manufacturer’s website to download the latest drivers, you can also launch Device Manager and uninstall the drivers from there.

4. Check for updates

  1. Go to Settings,
  2. Select Update & Security.
  3. Click Update and hit the Check for updates button.
check for updates

If you’re still having trouble with your Bluetooth drivers not working even after the reinstall, then maybe you need to perform a check on the Windows Update tool, as Microsoft usually releases fixes for such situations.

5. Roll back Bluetooth drivers

If it still doesn’t work, go to the Device Manager and see whether you have an exclamation mark there, if so, then try to roll back and then download the latest version from the website of your manufacturer.

6. Run the built-in Bluetooth troubleshooter

  1. Go to Settings.
  2. Click Update & Security and select Troubleshoot.
  3. Run the Bluetooth troubleshooter.
bluetooth troubleshooter windows 10


7. Additional solutions

If the issue persists, you can follow the instructions listed in the following troubleshooting guides:

As you can see the information we offered about Bluetooth not working after Windows 10 Update is complex and thoroughly documented.

Every solution is meant for a particular cause that generates the error and we are sure that our guide will fix your Bluetooth problem. We want to hear from you on this topic so drop us a comment in the comment section below.

File Explorer will soon show ads in Windows 11

Everybody keeps wondering what new and interesting features will Microsoft add to its latest operating system in the near future.

We got some more details on this subject recently when we had a look at what’s coming through the new Dev Channel Insider build.

However, you might want to sit down for this one, as we are sure not everyone will agree with the tech giant’s most recent choice.

You might want to know that Insiders have now received ads for the Windows 11 File Explorer, which isn’t that bad but will surely put off many users.

The new File Explorer now shows ads for Insiders

Spotted by Insiders and shared with the rest of the community via Twitter, this change quickly caught the attention of a lot of Windows users.

Not necessarily in a good way, as most who already heard about this are hoping its only a mistake or a bad dream they desperately want to wake from.

By the way, this new attempt at cross-promoting Microsoft products in Windows is not the first run at displaying ads in File Explorer.

If we remember correctly, back in 2017, the Redmond-based tech company started to advertise its OneDrive service in File Explorer on Windows 10.

In fact, Windows 11 and 10 systems show ads by default and Microsoft has different names for these, including sync provider notifications or tips and suggestions.

And there are ways in which you can turn off both these features if you don’t wish them to be activated.

How do I turn off sync provider notifications?

  1. Open File Explorer.file explorer 1
  2. Click on the See more button.file explorer 2
  3. Select Options.file explorer 3
  4. Uncheck the Show sync provider notifications box.file explorer 4

How can I deactivate tips & suggestions?

  1. Open Settings.settings 1
  2. Select System.settings 2
  3. Click on Notifications.settings 3
  4. Untick the box next to Get tips and suggestions when I use Windows.settings 4

Remember that these advertisements were spotted only in recent Insider builds of Windows 11.

There is a possibility that these features won’t even make it to stable release, but we will just have to wait and see what the future holds for us.

Have you also spotted these changes on your device? Share your experience with us in the comments section below.

Microsoft’s next Windows event will be on April 5 & is centered on “future of hybrid work”

Microsoft has confirmed a Windows event for April 5. The event will feature Windows chief Panos Panay, and is focused on how “Windows Powers the Future of Hybrid Work.”

A webpage for the event is already up and the stream is set to kick off at 8:00 AM P.T on April 5. According to Mary Jo Foley at ZDNet, the event is mainly aimed at commercial customers. That’s hinted at in the footnote on the event webpage. It mentions “find out how Windows propels the business of our customers forward from the client to the cloud.”

What can you expect then? Well, for consumers, there might be some “so-far undisclosed features coming to Windows 11,” per Mary Jo Foley. Also in the works for the event could be some updates for Microsoft 365 services. This includes news around the One Outlook client, or more news about Microsoft Defender. Given some recent Microsoft hires from companies in the consumer space, Teams for consumer might also make the event, too, as well as Windows 365 Cloud PC.

Microsoft’s webpage for the event mentioned that there will be three break-out sessions to demon Windows tools for productivity, collaboration, management, and security. OnMSFT will be watching live, and we’ll be here to cover. So, be sure to follow us on Twitter, so you don’t miss a minute of the news.

Get ready for the Halo show premiere on March 24

There’s no shortage of Halo fans out there, and this one is for each and every one of them. Paramount just revealed that the new Halo show will launch exclusively on its streaming service starting March 24, 2022.

Many were anxiously expecting this game-inspired series, so news that it’s coming so soon is definitely music to everyone’s ears.

Furthermore, Paramount+ is also expected to become available in Europe this year, thus expanding the reach of the popular service.

Master Chief and Cortana partake in a different take on Halo

UPDATE: Today, Paramount+ released a new trailer for the upcoming Halo show. Unlike the past video, this one gives us a better understanding of the story.

It seems like there will be a lot of other characters who impact Master Chief and Cortana’s journey to find the Halo ring, but there may be other stories told in the show too.

The trailer features much more action this time around and recreates some of the most iconic scenes from the acclaimed games.


Halo fans beware, as this series will only briefly follow the events of the games, as it takes place in an alternate timeline. 

In the series, Master Chief and Cortana don’t just randomly stumble upon the Halo ring, a relic that has the power to destroy all life in the galaxy.

What a way to kick off 2022 for Halo fans everywhere, with this blockbuster series that focuses on a totally different approach to the whole plot of the franchise itself.

From the first look we all got, the action will be focused around the Halo ring and the war with the Covenant. However, the video also approaches the SPARTAN-II program that kidnaped children and raised them as soldiers.

And, just like the games, episodes will be set in the 26th century, when humanity is entangled in an intergalactic war against the alien menace. T

In order to win the war, the brilliant scientist Dr. Halsey has created the Spartans, super-soldiers genetically and technologically enhanced to improve their physical and mental capabilities.

Of course, this highly anticipated series follows the story of Master Chief Spartan John-117, the commander of a Spartan unity.

The Halo franchise already had other spin-off media, such as novels and comic books, the TV series is the first product to be placed in a different timeline.

We’re all excited to explore this new take on Halo and see what incredible adventures master Chief will lead us through.

Steam client goes offline randomly [Step-by-step guide]

Many Steam users experienced issues with Valve’s online gaming platform. A frustrating issue forcing the Steam client to go offline randomly left gamers in the dust.

Usually, this issue could be caused by different connectivity factors or system conflicts, but several other reasons can also explain why it appears.

If you also face this problem, don’t worry! We managed to come up with a few solutions in an attempt to stop Steam from randomly putting you offline.

What is the difference between invisible and offline on Steam?

In case you don’t already know, between the invisible and offline status are some huge differences.

The Invisible mode will show you as offline to other players, but you’ll still be able to view your friends’ list, send and receive messages. Plus, you can also join the community.

When it comes to the Offline status, it will actually sign you out of the Steam community. This mode allows you to play games through Steam without having an active connection to the Steam Network.

So, it is undoubtedly that this feature is pretty useful if you have limited or no Internet access.

Now, let’s see what you can do if Steam still goes offline when you’re trying to start a game.

Why does Steam goes offline when I start a game?

1. Check your Internet connection

  1. Hit the Windows key and the I key simultaneously to open Windows Settings.
  2. Navigate to Network & Internet.
  3. Now, in the right window pane, check if You’re connected to the Internet.

Even if some users forget to test it, it is important to check and try out your Internet in your browser.

Thus, after you verified that your connection is stable, access some websites and see if they load quickly, without interruptions.

If Steam still randomly goes offline, you can also try to reboot your router/modem will probably fix it.

2. Allow Steam through Windows Firewall

  1. Press on the Windows key, type Control Panel, then open the first result.
  2. Navigate to System & Security.
  3. Under Windows Defender Firewall, choose to Allow an app through Windows Firewall.
  4. Click Change settings.
  5. Find the Steam app and make sure it has both Public and Private boxes ticked.
  6. Press on OK.
  7. Try reloading Steam and see if it works.

3. Temporarily disable your antivirus software

  1. Hit Windows, type Control Panel, then open the first result.
  2. Navigate to System and security.
  3. Go to Windows Defender Firewall.
  4. Now, from the left window pane, choose to Turn Windows Defender Firewall on or off.
  5. Make sure you checkmark the two boxes shown directly below.

In addition, you may consider changing your current antivirus with a better option that will not block your Steam application.

If we were in your shoes, we would definitely go for TotalAV, as it provides legendary antivirus technology.

With this software, you’ll be able to secure your data and money against digital fraud (with the anti-phishing feature), enjoy the full power of your PC without interruptions, especially when you run your favorite Steam games, and explore the great online, safe from all types of malware threats.

In case you need some more options to choose from, we strongly recommend checking the best antivirus software with low CPU usage, but TotalAV still remains on the top of the list.

4. Reinstall the client

  1. Press on the Windows key, type Control Panel, and open it.
  2. Click on Uninstall a program.
  3. Search for Steam, click on it, then choose to Uninstall it.
  4. Navigate to the Steam download page.
  5. From the top-right corner of the window, click on the green Install Steam button.
  6. Follow the on-screen instructions to reinstall the app.
  7. Log in and check for improvements.

What Steam games can you play offline?

As mentioned before, the Steam Offline mode allows you to play specific games and we considered properly to deliver some of the most popular masterpieces you can try:

  • Hades – A one-of-a-kind roguelike action dungeon crawler video game developed and published by Supergiant Games.
  • Final Fantasy 12: The Zodiac Age – This is a high-definition remaster of the Japanese-only International Zodiac Job System for the PlayStation 4.
  • Valheim – In short terms, this is a brutal exploration and survival game for 1-10 players set in a procedurally-generated world inspired by Norse mythology.
  • Grim Dawn – If you choose to play it, you’ll enter an apocalyptic fantasy world where humanity is on the brink of extinction.
  • Stellaris – This game allows you to explore a galaxy full of wonders, interact with diverse alien races and many more impressive features that are meant to take you out of this world.
  • Divinity: Original Sin 2 – Divinity: Original Sin II is a role-playing video game with near-limitless possibilities, where you can explore the vast world of Rivellon alone or in a party of up to 4 players.

We hope that our quick guide on how to stop Steam from going offline was of help for you. If you liked this article, leave a comment in the comment section below.

Run the Steam alert when a game goes on sale [Tutorial]

Many Steam users seem to be interested in discovering how to get notified when a game goes on sale. If you’re in the same boat, you should definitely use the Steam alert feature.

Steam is one of the biggest online gaming platforms. Millions of gamers use this app on a daily basis, in an attempt to download and play games through the platform.

Knowing when it is the right time to buy their favorite game is very important for gamers. Steam offers serious game discounts through Summer and Winter Sales, but they also offer smaller daily discounts.

Valve’s gaming platform came up with an option, in an attempt to get you notified when you’re favorite games are offered discounts.

We made a quick guide on how to add games to Steam‘s Wishlist. Check the instructions below.

What are the Steam games sale alerts?

Keep in mind that a Steam game sale alert is nothing more than a Wishlist Notification.

In case you choose to enable it, you’ll be notified via email or through the mobile app when the games on your wishlist are on sale.

So, whether you’re riding the bus, walking the dog, or stuck in a meeting, you’ll know when there’s a deal!

Also, do not forget that if you’d prefer not to be notified, it’s easy to opt-out of email or turn off mobile notifications.

How can I enable game sale alerts on Steam?

  1. Hit the Windows key, type Steam, then open the app.
  2. Click on your Steam name in the top right corner of the window.
  3. Navigate to Account Details.
  4. Under the Contact Info section, choose Manage Email Preferences.
  5. Make sure to have the box next to A discount is applied to an item on my Wishlist ticked.
  6. After enabling this option, make sure to have your desired game added to the wishlist.

When a discount is applied to the game, you will receive notifications via the email linked with your Steam account.

How can I change where my Steam notifications appear?

If you’re wondering whether or not you can change where your Steam alerts appear, keep in mind that there is only one way to do it.

In this matter, you should install a third-party skin. Skins come with custom steam. styles files that are not overwritten by the software.

As a consequence, you’ll be allowed to modify the file to set the position of the popup to a different screen corner.

In order to know when Steam sales take place, you need to enable the notification alerting you of the discounts applying to the games placed on your Wishlist.

Make sure to be aware of Steam Winter and Summer sales, as well as Mid-week, Weekend, and Daily sales. Always make sure to constantly check your email for Steam notifications.

Also, you have to know that some users reported that the Steam game doesn’t show up in the library. In case you ever face this issue, make sure you check some useful solutions to fix it.

If you found our quick guide on how to enable Steam notifications helpful, leave a comment in the comment section below.

Major performance improvements come to Xbox Cloud Gaming on iOS and Android

Earlier this month, there were indications that Microsoft was working on a keyboard and mouse that supports Xbox Cloud Gaming. And now, in an attempt to provide a better iOS experience for its users based on the feedback that they have been receiving, Xbox Cloud Gaming is enhancing its support on iOS devices, that is the iPad and iPhone. Essentially, these enhancements will aid in providing a better and seamless gameplay experience.

The engagement with these new enhancements has been received positively by gamers and the performance improvements seem to also be working because of the higher engagement as compared to before, which translates to 35% longer playtimes.

To try out these new enhancements get on your supported iOS device and navigate to Xbox.com/play using the Safari browser, where you will need to sign in to your Microsoft Account. Then to play, you will need to pin the website on your home screen by launching the browser and going to Xbox.com/play. Then, click on the Share button, then select Add to Home Screen. Xbox Cloud Gaming is set to continue making these enhancements based on the feedback that they receive.


Directstorage for Windows 11: How to Enable and Use

Remember when we told you that DirectStorage was coming to Windows 11? Well, the time has come, and DirectStorage is available to Windows PCs. DirectStorage is a method of storing data on a disk that bypasses the file system.

It can be used as a substitute for buffering video frames, audio samples, or other media data in memory before writing them out to disk. If you’re still under a rock and don’t know what DirectStorage is, we unpack what it’s all about here.

Does my PC support DirectStorage?

Since DirectStorage is an API, the Windows 11 requirements are minimal. DirectStorage is compatible with machines running Windows 11 and above, but you’ll need to ensure your computer supports the required hardware. 

The first step is to check whether your PC has an NVMe storage device. NVMe drives are typically found in modern laptops and high-end desktops. However, if you’re unsure whether yours has one, it’s best to contact your computer’s manufacturer or read their documentation for more information.

Here are some things to consider when determining if your PC supports DirectStorage:

  • Fast processor – If you plan on using DirectStorage for video editing, streaming, and other similar tasks, you’ll need a fast processor.
  • SSD card – Many of the benefits of DirectStorage require that you use an SSD for storage.
  • A PC that supports DirectStorage – DirectStorage is compatible with Windows 10 devices, but Windows 11 has the latest storage optimizations built-in and is our recommended path for gaming.

Since DirectStorage is mainly used in compressing data, gamers are the main beneficiaries of this API. As such, you may wonder whether any games use DirectStorage. Given that it is fairly new, developers are still coming up with their versions to ensure they are compatible.

However, Forspoken has released its first DirectStorage game for Windows PCs and PlayStation. Given that it is a roleplaying game, a lot of data is involved when streaming, but with DirectStorage, you can expect significantly improved load times.

How do I turn on DirectStorage in Windows 11?

One of the key benefits of upgrading to Windows 11 is that you don’t need to do anything to enable DirectStorage. The feature already comes shipped with the OS and is enabled by default.

All you have to do is download a game that supports the feature, ensure your OS is up-to-date, and update your drivers regularly.

Still, you can check whether your Windows 11 supports DirectStorage by:

  1. Hit the Windows key, type Device Manager in the search bar, and click Open.device manager w11
  2. Navigate to Storage controllers and click to expand.
  3. If Microsoft Storage Spaces Controllers is available, your PC supports the feature.
  4. You can update the driver and restart your PC to ensure it is working.

What are the benefits of DirectStorage?

After telling you about all the requirements and how to enable DirectStorage on your Windows 11. One significant question we are yet to answer is whether it is worth it. Does it have any benefits? 

If you want to make your game stand out from the crowd, you must ensure a good storage system. This will help to ensure that the game loads quickly and runs smoothly. The storage system should also be robust enough to not crash during gameplay.

Some of the benefits of DirectStorage include:

  • Reduced workload on servers by reducing the number of requests for data
  • Faster loading times for games
  • Improved user experience, especially when using streaming services 
  • The ability to handle larger file sizes than before

While you may see benefits on any storage device, installing games to an NVMe SSD will maximize your IO performance and help you more fully experience the benefits of DirectStorage.

This release of DirectStorage provides developers with everything they need to move to a new model of IO for their games. There’s still work to be done on even more ways to offload work from the CPU but this is a great start.  

Windows 11 has previously been rated the best OS yet for gaming, and with features like DirectStorage, it is easy to see why.

Still, you can tweak some settings to optimize your Windows 11 for the best gaming performance and experience.

Have you gotten a chance to experience DirectStorage with any game on your PC? What is your verdict? Let us know in the comment section below.

Fix: Elden Ring failed to acquire parental control information

Elden Ring is the latest hardcore RPG by From Software and comes up with an impressively developed narrative and open-world map to explore.

Even if its mixture of features works surprisingly well, like any other app or program, this game might sometimes give you headaches.

In this matter, it seems like some users reported that Elden Ring failed to acquire parental control information.

According to them, this problem usually occurs when they want to run the game on PS5. This is what one user had to say about it:

Anyone got the Unable to acquire parental control information on PS5? Cant play online anymore because of this. I have the parental control disabled and yet it keeps giving me this, anyone else got it and managed to fix it?

Fortunately, if you’re struggling with this annoying issue, you can always try the fixing option listed below, as many players claimed that it manage to solve their situations.

What can I do if Elden Ring failed to acquire parental control information?

Customize your DNS servers

  1. Use the following keyboard shortcut to open the Windows run dialog box: Windows + R
  2. Type ncpa.cpl, then hit Enter.
  3. In the opened window, right-click on your network adapter, then choose Properties.
  4. Now, look for Internet Protocol Version 4 (TCP / IPv4), click on it, then select Properties.
  5. Make sure you checkmark the Use the following DNS server addresses.
  6. In the Preferred DNS server box, input 1.1.1.1, then in the Alternate DNS server section, type 1.0.0.1.

As you can see, if Elden Ring failed to acquire parental control information you can easily change the DNS servers and you’ll get rid of this annoying issue.

So, no matter if you’re playing this game on Steam, Epic, or in any other way, be sure that the above solution will help you.

Also, some worldwide gamers reported that Elden Ring is not opening, so if you face the same issue, make sure you check our useful solutions.

Because your opinion is always important for us, do not hesitate to share it by leaving a comment in the section below.