Unable to Terminate Process: 4 Ways to End it by Force

Sometimes you might get Unable to terminate process in Windows. This can be a problem and prevent you from stopping certain processes.

We already covered a similar issue in our Windows won’t end task guide; we encourage you to check it out.

As for this issue, keep reading to find out how to fix it for good.

Is there a way to force close a program?

Yes, you can forcibly close a program by using the following:

  • Use Alt + F4 keyboard shortcut.
  • Task Manager is a great way to terminate a process.
  • Command line can end processes as well.

How can I fix Unable to terminate process message?

Before we start, there is a quick workaround you might want to try:

  • Press Alt + F4 key while in the application to terminate it instantly.

1. Switch to an Admin account

  1. Press the Windows key + S hotkey.
  2. Enter cmd in the Type here to search box.
  3. Right-click Command Prompt to select its Run as administrator option.
  4. Type the following command and press Enter: net user administrator /active:yes net user administrator /active:yes cmd
  5. Thereafter, restart the desktop or laptop.
  6. Log in with the new admin account just set up.

2. Terminate the Process With Taskkill

  1. Start Command Prompt as administrator.
  2. Run the following command: taskkill /im process-name /f
  3. Close the Command Prompt.

However, users will need to replace process-name with the actual process name listed in Task Manager. You can get it by doing the following:

  1. Press Ctrl + Shift + Esc to start Task Manager.
  2. Go to the Details tab.
  3. Locate the name of the process that you want to end.

After using this method, check if the process is closed.

3. Terminate the Process With WMIC

  1. Locate the name of the process in the Task Manager’s Details tab.
  2. Start Command Prompt as administrator.
  3. Run the following command: wmic process where name=‘myprocessname.exe’ delete

4. Check out alternative Task Managers

  1. To add System Explorer to Windows 10, click Download Now on the developer’s website.
  2. Then launch SE’s installer to install the software, and open System Explorer’s window shown directly below.System Explorer application
  3. Select Processes on the left of the window.
  4. Then right-click the process and select End Process (or End Process Tree).System Explorer processes end process

Some third-party task manager utilities display more extensive system details and include more options, so you might want to try them.

If you need more information, we have a great guide on how to stop all processes in Windows, so be sure to check it out.

So, there’s more than one way to terminate software and services, and hopefully, these steps helped you fix Unable to terminate process error.

Did you find a different solution? If so, share it with us in the comments section.

5 best video blocker extensions for your browser [2020 List]

Ads are probably the most annoying thing on the internet. However, many sites live from ads, so it would be nice if you whitelisted at least your favorite websites, including Windows Report.

But something that can be equally annoying are unexpected autoplays or other unwanted video content.

We’re sure you don’t want to watch a ‘million dollar offer’ from a popup ad, or every single video on Facebook.

While Facebook’s videos are automatically muted, other video playbacks may disturb you if you stumble upon any. But, there’s a solution for this problem.

In this article, we’re going to present you five the best extensions for blocking unwanted video content on your browser.

Most of these extensions are for Google Chrome and Mozilla Firefox. But you can install them on other browsers as well.

Since we love Windows 10, we’d like to write about a similar extension for Microsoft’s browser, Edge, but unfortunately such an extension is not available for this browser, yet.

IMPORTANT NOTE

Some video blocker extensions might slow down your browser. Alternatively, you can opt for a browser that comes with a built-in feature that automatically blocks ads, such as UR Browser.download UR-Browser

UR Browser is a privacy-focused browser that lets you control if you want to accept or block ads on the websites you’re visiting.

This browser automatically blocks cookies and trackers that companies use to identify you as a user. This information is then used to create deep profiles about your preferences so that advertisers may send you the right ads.

Since UR Browser doesn’t require installing separate ad blocker extensions, you’re not running the risk of experiencing slow browsing issues.

Interested in testing UR Browser? Then hit the download link below to install it on your computer.

If you prefer to stick to your current browser, keep reading this article to learn what are the best video blocker extensions to use in 2020.

So, here are top five picks for the best video blocking extensions for Google Chrome and Mozilla Firefox.

Best video blockers for Chrome and Firefox

1. Video Blocker

video blocker extension

You constantly find annoying suggestions from a channel you hate on YouTube? The answer is probably yes, because we all do. But, there’s a solution for this problem, and it’s called Video Blocker. This handy extension for Chrome and Firefox allows you to block videos from absolutely any channel on YouTube.

You just go to YouTube, right-click on a video from a channel you want to block, and select the “Block videos from this channel” option. Once you do that, you won’t be seeing videos from that channel ever again, until of course, you turn it back on. If you don’t like this method, you can add channels to be black list manually, on the options page.

But that’s not all, you even can block videos containing a certain keyword in title. So, if you don’t want to see suggested songs from a singer you’re not fan of, just open Video Blocker, and enter the keyword.

You can download Video Blocker from the Chrome Web Store for Google Chrome, or from the Add-ons store for Mozilla Firefox.

2. Video Blocker Plus

video blocker plus extension

Video Blocker Plus allows you to block absolutely any video on Facebook. Whether it’s a video natively uploaded on Facebook, or a YouTube-embedded video. With this extension for Chrome, you can get rid of all videos on this social network.

This extension is specifically designed for Facebook, and it doesn’t work on other sites. While it does great job in blocking videos on Facebook, it still needs a couple of corrections, feature-wise. For example, Video Blocker Plus blocks ALL videos posted on Facebook. That means you cannot choose which videos you want to block. So, if you want to block just Facebook videos, but allow YouTube or Vimeo videos to be display, you’ll have to wait for the new version of this extension. If such feature ever gets released.

But if you want to clear Facebook of absolutely any video, you can’t go wrong with Video Blocker Plus.

You can download Video Blocker Plus from the Chrome Web Store.

3. Video Autoplay Blocker

video autoplay blocker extension

Video Autoplay Blocker is a simple Chrome extension for blocking HTML5 videos. Its usability is not limited to any sites, so you basically can use it to block videos everywhere. It is specifically designed to block HTML5 videos, so if you’re trying to block a flash video, this extension won’t be of much help.

When it comes to blocking YouTube videos, Autoplay Blocker has this site on the whitelist by default. So, if you want to block YouTube videos on Facebook, or the site itself, you should go to options, and remove YouTube from the whitelist.

Video Autoplay Blocker is available in Chrome’s Web Store, and you can install it for free.

4. Silent Site Sound Blocker

silent sound blocker extension

Don’t get confused, we put a sound blocking extension in a list with video blockers on purpose. Most users don’t need to block an entire video, they just don’t want to hear the sound from it. So, if you’re okay with having video playback, but you just want to loose audio, Silent Site Sound Blocker is perhaps the best solution.

This handy extension allows you to block audio from absolutely any site. All you need to do is to blacklist at certain site, and you won’t be hearing any audio from it. It features a lot of options for blocking sound in your browser. You can pick a certain site to mute, or you can make your browser completely silent, by blocking sound from all sites.

Unfortunately, we weren’t able to find such an extension in browsers other than Google Chrome. So, if you know about some sound-blocking extension for other browsers, please let us know. You can read our full review about Silent Site Sound Blocker here.

Silent Site Sound Blocker is available for download from Google Chrome’s Store.

5. Adult Blocker

adult blocker extension

You probably can tell what does this extension do, based on its name. That’s right, Adult Blocker is a great extension for parents worrying about their children accessing inappropriate content. With Adult Blocker, you can block any online content or site you don’t want your child to see/visit.

Adult Blocker allows you to add sites with inappropriate content to the black list manually, but also has its own mechanism of blocking automatically. This extension is programmed to analyze sites for ‘bad’ content and block them automatically. Because of that, some users have reported that it even blocked some safe sites, which can be annoying sometimes. In that case, you just need to whitelist that site, and you’re good to go.

You can download Adult Blocker from the Chrome Web Store for Google Chrome, or from the Add-ons store for Mozilla Firefox.

That should be all for our list of top five video blocking extensions for Google Chrome and Mozilla Firefox. What do you think about our choices? Do you know about some good video-blocking extension we didn’t mention here? Let us know in the comments.

RELATED STORIES YOU NEED TO CHECK OUT:

Something Went Wrong in Azure AD Join: 3 Ways to Fix

Azure AD Join is a popular service, but many users reported Something went wrong error in Azure AD Join.

Unfortunately, this isn’t the only Azure error, and many reported that Azure VPN gateway is not connected.

This error can cause a variety of issues, but in today’s article, we’ll try to fix this problem once and for all.

Why am I getting Azure AD Join something went wrong error?

This can happen due to the following reasons:

  • Users aren’t allowed to join with their accounts.
  • Device limit setting is causing conflicts.
  • Issues with one of the devices.

How can I fix Azure AD Join something went wrong error?

Before we start, try this quick solution:

  • Allow users to join with their own accounts if you’re getting Unable to join device to Azure AD message.

1. Deactivate Azure AD Join

  1. In your browser, go on the Azure portal.
  2. Log in with your user account into your Azure Active Directory tenant with the minimum of Global Administrator rights. Do a multi-factor verification if asked to.
  3. Click on Azure Active Directory from the left pane.
  4. Navigate to Devices.
  5. In the Devices window, click on Device Settings.
  6. Set User may join devices to Azure AD option to None. Note that this will apply to all Windows 10 based devices
  7. Now set User may register their devices with Azure AD to None. This will deactivate Azure-based Workplace Join for Android and iOS devices.
  8. Press Save and close the browser.

With this method, you should be able to fix Something went wrong Azure AD Join error.

2. Increase device limit

  1. Go to your browser and navigate to Azure portal.
  2. Log in with your user account into your Azure Active Directory tenant with the minimum of Global Administrator rights.
  3. Navigate to Azure Active Directory from the left side.
  4. Head over to the Devices and go to Device Settings.
  5. Set Maximum number of devices per use to a desired value.
    azure settings Something went wrong Azure AD Join
  6. Click on Save and exit the browser.

It is possible for you to increase the Azure AD Join device limit and, by doing so, fix the Something went wrong error in Azure AD Join.

3. Delete some device for the person experiencing the error

  1. Open Azure portal and log in with your user account into your Azure Active Directory tenant with Global Administrator rights.
  2. Click on Azure Active Directory and choose Devices.
  3. Search for the name on the top bar.
  4. Randomly select a device, click on the 3 dots at the end of the line, and select Delete from the menu.
  5. Exit browser.

We hope these solutions will help you fix the Something went wrong error in Azure AD Join.

For more Azure issues, we suggest visiting our Hybrid Azure AD error 0x801c03f3 article.

If our solutions were helpful, or if you have found a solution on your own, let us know in the comments.

New Xbox One 1905 Preview build brings Voice Channels in Xbox Live Messaging, better sorting in My Games & Apps

Microsoft finally revealed the list of improvements coming in next Xbox One system update yesterday, but a new 1905 preview build shipping to Preview Alpha Insiders later today will introduce two unannounced new features.

First of all, Microsoft is continuing to improve sorting options in the My Games & Apps section. In previous 1905 builds, articles such as “a,” “an” and “the” were no longer being used to sort titles when using the “Sort A-Z” and “Group by letter” views. In the new 1905 build shipping today, Microsoft is adding more options to sort games and apps by date, with more date categories for sorting by last update or last used.

The other new feature shipping in this build is Voice channels in Xbox Live Messaging. “This feature is only available in Alpha and can only be used between Alpha users,” the Xbox team explained. Lastly, the Xbox Live Friends List will now show where your contacts are playing by showing new console, PC and mobile icons next to their names.

There are other improvements coming in the Xbox One 1905 Update, including a new Message Requests feature in messaging as well as the ability to add Xbox Game Pass titles to a “Play Later” list. These features are not live yet in this build, but you can expect them to appear in a future flight.  

Windows 10 Insider preview 18885 for Fast Ring brings Windows Hello fixes and anti-cheat known issues

Microsoft is still sorting out its Insider releases, re-releases and spot fixes to enable releases and while doing so, the Windows team managed to squeak out a Friday build for testers.

Windows 10 Insider preview build 18885 is being issued to Fast Ring Insiders with a delineating note that includes:

NOTE: Windows Insiders on Build 18362.53 who were unable to update to Build 18875 will need to install Build 18362.86 (KB4497093) *FIRST* before being able to receive today’s build. Build 18362.86 includes the fix needed to update to the latest 20H1 builds from Build 18362.53. If you’re already on Build 18875, this build should come through normally.

Once you’ve got that sorted out, here are the list of fixes and known issues in the build, that Insiders should also be on the lookout for before downloading this latest preview.

General changes, improvements, and fixes for PC

  • We fixed an issue that could result in USBs and SD cards being unexpectedly assigned a different drive letter after upgrading.
  • We fixed an issue that could result in the post install setup message unexpectedly appearing while you were actively using your PC sometime after login.
  • We’ve improved the layout of the App Volume and Device Preferences page in Sound settings and tweaked the page view for better usability.
  • We’ve updated the text of the Storage Sense group policies to make them a bit more clear.
  • We fixed an issue that could result in the “Make Windows better” page appearing after login showing “please wait”, with a progress wheel, for a long period of time. We also fixed an issue that could result in this page unexpectedly appearing while you were interacting with the device sometime after login.
  • We fixed an issue that could sometimes result in Windows Hello looking for the user and immediately signing them back in right after locking the PC, rather than first prompting with “Welcome back, dismiss the lock screen to sign back in”.
  • We fixed an issue that could result in some Insiders seeing only a flat blue screen when connecting to a recent build over remote desktop.

Known Issues

  • There has been an issue with older versions of anti-cheat software used with games where after updating to the latest 19H1 Insider Preview builds may cause PCs to experience crashes. We are working with partners on getting their software updated with a fix, and most games have released patches to prevent PCs from experiencing this issue. To minimize the chance of running into this issue, please make sure you are running the latest version of your games before attempting to update the operating system. We are also working with anti-cheat and game developers to resolve similar issues that may arise with the 20H1 Insider Preview builds and will work to minimize the likelihood of these issues in the future.
  • Some Realtek SD card readers are not functioning properly. We are investigating the issue.
  • If you use remote desktop to connect to an enhanced session VM, taskbar search results will not be visible (just a dark area) until you restart explorer.exe.
  • We’re investigating reports that on certain devices if fast startup is enabled night light doesn’t turn on until after a restart. (Note: The problem will occur on a “cold” reboot or power off / power on. To work around if night light doesn’t turn on, use Start > Power > Restart.)
  • There’s a noticeable lag when dragging the emoji and dictation panels.
  • Tamper Protection may be turned off in Windows Security after updating to this build. You can turn it back on.
  • Some features on Start Menu and in All apps are not localized in languages such as FR-FR, RU-RU, and ZH-CN.

Known issues for Developers

  • If you install builds from the Fast ring and switch to either the Slow ring or the Release Preview ring, optional content such as enabling developer mode will fail. You will have to remain in the Fast ring to add/install/enable optional content. This is because optional content will only install on builds approved for specific rings.

For those still up to the challenge of installing and testing this latest preview, head over to the Settings menu and make sure your Fast Ring preview is enabled. The update is currently rolling out to devices.

How to fix There was a problem connecting to Netflix error

Can’t enjoy the Netflix app on your Windows 10 PC due to There was a problem connecting to Netflix error? Worry not, we got solutions that can help you fix this problem once and for all.

Some of the common scenarios of the Netflix app for Windows 10 do not work:

  • An error message is generated by Netflix Whoops, something went wrong (with any error code).
  • When you try to open the Netflix app on Windows 10, it suddenly crashes.
  • Unable to open the Netflix app for Windows 10.
  • Sorry, there was a problem communicating with Netflix. Please try again. (T1)

Fix There is a problem connecting to Netflix please try again later (-12) error

  1. Try updating video players
  2. Disable hardware acceleration
  3. Clear browser cache
  4. Additional solutions

1. Try updating video players

There was a problem connecting to Netflix error can appear if supported apps encounter issues. Therefore it is advisable to ensure that all video streaming products are updated or not to the latest version.

You need to update some of the important apps on your system such as  Adobe Flash Player, DivX Web Player, Microsoft Silverlight, QuickTime Player, etc. (if these apps are installed on your PC).

We also recommend installing the correct version for your operating system.


2. Disable hardware acceleration

Sometimes, by disabling hardware acceleration and restarting the browser, you can solve the There was a problem connecting to Netflix error.

  1. Right-click on the video you are watching.
  2. Select Settings.
  3. Make sure the Enable hardware acceleration box is unchecked.
  4. Click Close to see if the problem has been solved.

3. Clear browser cache

If the cache files of the Web browser, temporary files, and cookies are corrupted, you might experience There was a problem connecting to Netflix error. To fix the problem, clear the cache:

  1. In the address bar, enter chrome://settings/ learBrowserData and press Enter.
  2. Select the following:
  • Browsing history
  • Download history
  • Cookies and other site and plug-in data
  • Images and files stored in the cache
  • Clear browsing data
clear browsing data There was a problem connecting to Netflix

For more information, visit our guide on how to clear cookies on Netflix.


4. Additional solutions

If There was a problem connecting to Netflix error is still there, try the following:

  • Restart the Netflix app on Windows 10.
  • Make sure your Internet connection works well, since a slow Internet connection may cause communication problems with the Netflix server.
  • Set the time zone and region settings correctly.
  • Make sure your Windows 10 system is up to date, go to Settings -> Windows Update -> Check for updates. This step will automatically download and install the latest updates.
    check for updates netflix connection issue
  • We also recommend that you update all system drivers such as graphics drivers, audio drivers and more.
  • Try uninstalling and then reinstalling the Netflix app on Windows 10.

To do this, follow the next steps:

  1. Navigate to Settings app -> Apps -> Netflix app -> Uninstall.
    apps can't connect netflix
  2. Start menu -> Widows Store.
  3. Search for Netflix -> select it and install it.

If you are in Canada, use our region-specific guide Netflix Canada not working for extra fixes on connectivity and title-loading issues.

If it’s still not working, consider also switching to another streaming provider such as Disney+, one of the biggest streaming services nowadays, providing you with access to amazing and exclusive shows.

⇒ Get Disney+ now

There was a problem connecting to Netflix error can be problematic, but we hope that you managed to fix using our solutions.

READ ALSO:

Here’s how to easily remove Blu-ray region code from a Blu-ray disc

Many Blu-ray discs have a regional block that can prevent most devices in other regions from playing the content from these discs. Put simply, this means that if you decide to buy a DVD in Latin America, you probably could not use it in Europe due to this impediment.

Fortunately, there’s a way to remove the Blu-ray region code, and today we’re going to show you how to do it.

How can I remove Blu-ray region code?

Different regions

regions remove blu ray region code

As explained in the introduction, there are specific areas where it is allowed to play a Blu-ray disc depending on its origin. The regional block prevents you from playing a Blu-ray disc bought in a specific region if you use a reader bought in one of the others. The geographical “regions” are the following:

  1. USA, Canada
  2. South East Asia
  3. Europe, Near East, South Africa, Japan
  4. China
  5. Australia, Central America, and South America
  6. Africa, Asia, Eastern Europe

There are multi-region DVD players that allow you to play all DVDs in the world. Others allow the choice of the region only for a limited number of times. However, a DVD player is limited to its own region. The reasons for the existence of regional blocks are mostly related to the marketing of DVDs between different geographical areas at different prices as well as different release dates.


Use playback programs

If you want to remove Blu-ray region code on your PC there are many other solutions. The simplest thing is probably to use special playback programs that allow the selection of the region before playing the multimedia.

Alternatively, there are programs that can copy the Blu-ray disc and remove the regional block, or change it when creating a copy. In this case, it will be possible to create a copy of the DVD without the regional block.


Blu-Ray Region Code Remover

To meet this problem, a special free program has been developed that allows you to remove the regional protection code from Blu-ray discs. Its name is: Blu-Ray Region Code Remover.

To use it, follow these steps:

  1. Blu-ray selection – Click the button highlighted by the green box to indicate the device containing the Blu-ray disc from which you want to remove the regional protection code.
  2. Region Selection – Click the button highlighted by the fuchsia box to indicate the region to which your Blu-ray disc belongs. Usually, the Region is shown in the back of the Blu-ray case.
  3. Start – Click the Start button highlighted by the red box to start the regional protection code removal of the indicated Blu-ray Disc.

As you can see, removing the Blu-ray region code isn’t complicated, and we hope that you found this guide helpful.

READ ALSO:

Gears of War 4, The Crew 2 are free to play with Xbox Live Gold this weekend

Gears of War 4 and The Crew 2 Standard Edition will be free to play on Xbox One consoles for all Xbox Live Gold subscribers this weekend.

From 12:01 a.m. PT on April 25th through to 11:59 p.m. PT on April 28th, Xbox Live Gold subscribers can download and play both video games in full as if they owned them outright. As with previous free play weekends, all progress will save to the cloud and be available in the future should players choose to buy them.

Note that The Crew 2 is currently selling with a 70% discount for the next four days.

Here’s the official descriptions, trailers, and download links for each game.

Gears of War 4

A new saga begins for one of the most acclaimed video game franchises in history. After narrowly escaping an attack on their village, JD Fenix and his friends, Kait and Del, must rescue the ones they love and discover the source of a monstrous new enemy. Never Fight Alone: Enjoy two-player co-op campaign with friends locally via split-screen or over Xbox Live. Player 2 can select either Kait or Del. Horde 3.0: Team up with four others and battle wave after wave of increasingly difficult enemies by choosing your combat class, leveling up your skills and deploying fortifications anywhere on the map. Explosive Versus Multiplayer: Compete online in new and favorite game types, all at 60fps on dedicated servers. A new visible ranking system means fairer matchmaking for social, competitive and professional players alike.

The Crew 2

In The Crew® 2, take on the American motorsports scene as you explore and dominate the land, air, and sea of the United States in one of the most exhilarating open worlds ever created. With a wide variety of exotic cars, bikes, boats, and planes to choose from, experience the unbridled thrill and adrenaline-pumping excitement of competing across the entire USA as you test your skills in a wide range of driving disciplines. Record every heart-pounding, asphalt-melting moment and share them with the simple push of a button – fame is yours to take! Play with up to7 other friends online.

Are you going to play Gears of War 4, The Crew 2, or maybe both? Let us know in the comments below and then follow us on Twitter for more Xbox gaming news.

The app was not found in the store. ?


The app was not found in the store. ?

How to fix Windows Explorer needs to be restarted error

Windows 10 is a great operating system, but sometimes you might get Windows Explorer needs to be restarted out of the blue. This error can be annoying, so today we’ll show you how to fix it properly once and for all.

What to do if Windows 10 explorer keeps restarting?

  1. Start your PC in Safe Mode
  2. Run the System File Checker (SFC)
  3. Check the system hard drive
  4. Run memory tests

1. Start your PC in Safe Mode

Windows Explorer needs to be restarted error can appear for various reasons, and one way to deal with it is to enter the Safe Mode. In case you don’t know, Safe Mode is a special segment of Windows that runs with default settings, so it’s perfect for troubleshooting issues. Bear in mind that entering Safe Mode won’t fix the problem, but it will allow you to investigate the issue.

If the issue doesn’t appear in Safe Mode, it’s rather likely that your installation or user profile is corrupted.


2. Run the System File Checker (SFC)

If you’re getting Windows Explorer needs to be restarted error on your PC, you might be able to fix it by performing an SFC scan. To do that, follow these steps:

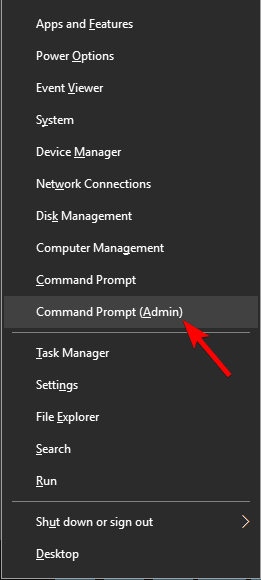
  1. Open the Command Prompt with administrator privilege. To do this, press the Win key + X shortcut key and select Command Prompt (Admin).
    command prompt windows explorer needs to be restarted
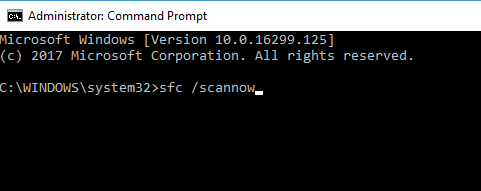
  2. After opening the Command Prompt, you need to run the SFC command. To do this, type sfc / scannow in the Command Prompt window and press the ENTER key to execute this command.
    sfc scannow windows explorer crash
  3. The SFC command will scan all system files and fixes the damaged files.

Once the SFC command is complete, reboot the system and check the error message.

  • READ ALSO: Microsoft brings Xbox One and PC gaming one step closer

3. Check the system hard drive

If the Windows Explorer needs to be restarted error is still there, you might want to try scanning your hard drive. You can do that by following these steps:

  1. Again, open the Command Prompt with administrator permission.
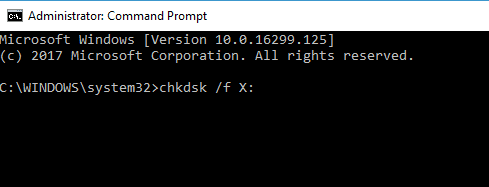
  2. Now, in the Command Prompt, type the command chkdsk /f X: and press ENTER. Replace X with the drive you want to scan.
    chkdsk windows explorer needs to be restarted

This command will check your hard disk for any kind of error, so it will take a long time to complete.


4. Run memory tests

  1. Open the Run dialog box by pressing the Windows key + R keys.
  2. In the Run box, type MdSched.exe and press Enter.
  3. Go to Select the Restart now and check for problems option.

This process will try to correct errors related to your system’s memory

That’s all about Windows Explorer needs to be restarted error and its solutions. We hope that all the solutions described above will help fix the problem for good.

READ ALSO:

Bing Maps now displays real-time traffic camera images

Microsoft recently added a new feature to its Bing Maps application. Users can now utilize their Bing Maps to have a look at traffic camera images of their specific route in real time.

Microsoft enhanced the predictive route calculation capability of Bing Maps by adding real-time traffic information in 2017. You can now track the traffic conditions on your planned route with the help of a new traffic camera icon.

However, users can only see traffic details from a limited area. They can use the Traffic option to access the new feature. You can find this option in the web-based version of Bing Maps.

Track your route in extreme weather

The feature is going to offer numerous advantages to users. Let’s have a brief look at each of them.

You can quickly change your planned route if you have the real-time situation of the route.

It will help you to monitor the current traffic condition during a flood, wind storm, or snowfall. Microsoft believes that drivers can avoid dangerous routes with the help of the camera feed. 

Just like its Google counterpart, Bing Maps monitors the current traffic conditions to allocate particular colors to your routes. For instance, the red color is an indicator of heavy traffic and orange shows a moderate one.

It seems that Microsoft is really putting its efforts to offer you a better and convenient way to plan your trips.

As a matter of fact, the new feature provides some valuable information that comes to the rescue in tricky situations.

Often people get themselves stranded in unpredictable situations such as dust storms or a rainfalls. You can now use Bing Maps to avoid dangerous and challenging routes during a long road trip. 

We can expect Microsoft to release more such features in the next few months.

RELATED ARTICLES YOU NEED TO CHECK OUT:

McAfee security tools are incompatible with Windows updates

Microsoft released a new series of Patch Tuesday updates at the beginning of April. However, the updates didn’t go well with some of the leading antivirus products available on the market.

We can see that the list of antivirus solutions affected by incompatibility issues is increasing day by day. We already reported that the latest patches are not compatible with Avast, Avira, Sophos, ArcaBit.

However, new reports suggest that McAfee users are also experiencing the same issues now.

Microsoft recently updated the support articles for the latest OS updates. The company acknowledged the fact that the bug causes Windows 10 to freeze or boot slowly. Notably, many users experienced this bug due to a conflict with McAfee programs.

CSRSS changes are to blame

McAfee said that the recent Windows Client Server Runtime Subsystem service changes caused this issue.

These changes were responsible for creating a deadlock that eventually triggered the bug. The company described the problem as follows:

Changes in the Windows April 2019 update for Client Server Runtime Subsystem (CSRSS) introduced a potential deadlock with ENS.

According to users, their systems stopped working as soon as they tried to log in into their accounts. In the worst case scenario, it even took more than ten hours for some users to log in.

The bug affected Windows 7, Windows 8.1, Server 2008 R2, Server 2012 R2 and Server 2012. As a result, these systems may sometimes get extremely slow or completely freeze.

Thankfully, you can still boot into Safe Mode. Moreover, Sophos came up with a strange suggestion and recommended its users to update the list of excluded locations with the directory of the antivirus.

Microsoft is currently collaborating with McAfee to investigate the issue. The bug was fixed by Avast and ArcaBit as both released the necessary updates a few days ago.

Comment down below if you are experiencing any such issues on your Windows systems.

RELATED ARTICLES YOU NEED TO CHECK OUT:

The Mass Effect: Andromeda Network Connection error [FIX]

Mass Effect: Andromeda is an action role-playing game with single player and multiplayer modes. However, some players have stated on EA’s forum that they can’t connect to Mass Effect’s multiplayer servers. When they try to connect to the server, this error message pops up: “Network Connection Error. Unable to connect at this time.” Consequently, those players can’t play Andromeda’s multiplayer mode. Here are some fixes for Andromeda’s “Network Connection” error.

Check Out These Resolutions for Mass Effect’s Network Connection Error

  1. Is the Mass Effect Server Down?
  2. Restart the Router
  3. Switch to Google DNS
  4. Clean Boot Windows

1. Is the Mass Effect Server Down?

It might just be the case that Mass Effect’s server is down when the “Network Connection” error message pops up. The server might be down when scheduled for maintenance. To check if ME’s server is down, open Is the Service Down in a browser. Then enter ‘Mass Effect: Andromeda’ in the search box to open the page below, which provides further server status details.

2. Restart the Router

This is a straightforward fix that some Mass Effect players have confirmed fixed the issue for them. Players can do that by turning the router off or unplugging it. Then turn the router back on or plug it back in a few minutes later.

3. Switch to Google DNS

This is the most widely confirmed fix for Mass Effect’s “Network Connection” error. Mass Effect players have resolved the issue by changing their DNS (Domain Name Server) to Google DNS. To do that, follow the guidelines below.

  1. Right-click Windows 10’s Start button to open a menu. Then select Run on that menu.
  2. Enter ‘ncpa.cpl’ in Run and click OK to open the Control Panel window as in the shot directly below.ncpa.cpl run
  3. Then right-click your network connection to select Properties.network adapter properties
  4. Double-click Internet Protocol Version 4 (TCP/IPv4) on the Network tab to open the window shown directly below.network adapter realtek properties
  5. Select the Use the following DNS server addresses option on the General tab.
  6. Enter ‘8.8.8.8’ in the Preferred DNS server text box.
  7. Input ‘8.8.4.4’ in the Alternative DNS server box.
  8. Press the OK button.
  9. Thereafter, restart Windows before launching Mass Effect.

4. Clean Boot Windows

Mass Effect: Andromeda’s “Network Connection” error might also be due to conflicting third-party software. To check if that’s so, users can clean boot Windows without any third-party startup programs or services. Follow the guidelines below to clean boot Windows.

  1. Open Run’s window with Windows key + R hotkey.
  2. Enter ‘msconfig’ in Run and click OK to open the System Configuration utility.
  3. Choose the Selective startup option on the General tab.
  4. To remove startup software, deselect the Load startup items check box.
  5. Select the Load original boot configuration and Load system services checkboxes.
  6. Select the Services tab to open a tab that lists both Microsoft and third-party services.msconfig services
  7. Select the Hide all Microsoft services option to exclude more essential services.
  8. Press the Disable all button to deselect the other services.
  9. Select the Apply option.
  10. Click the OK button to exit System Configuration.
  11. After closing the System Configuration window, a dialog box will pop up. Select the Restart option to restart Windows.

If clean-booting Windows resolves the “Network Connection” error, users will need to identify what third-party program or service is conflicting with Mass Effect: Andromeda if they wish to restore standard boot settings and fix the game’s multiplayer mode. A third-party antivirus utility is the most likely software to block Andromeda.

Those are a few of the resolutions Mass Effect players have fixed the game‘s “Network Connection” error with. Mass Effect players who have discovered other fixes for the same error are welcome to share them below.

RELATED ARTICLES TO CHECK OUT: 

Posted in Fix

How to fix This version of Netflix is not compatible error

Netflix is a popular movie and TV show streaming platform, but many users reported This version of Netflix is not compatible error. This is a common Netflix problem, and the company has tried to address the issue on its official website. Netflix says it is a compatibility issue; however, there is no clear solution to fix the problem permanently.

In this article, we take a look at the best possible solutions to fix this Netflix error on your Windows PC.

How to fix Your device isn’t compatible with this version Netflix error?

  1. Restart your PC
  2. Uninstall and Reinstall Netflix app
  3. Fix the browser issues

1. Restart your PC

restart PC This version of Netflix is not compatible

Begin with a simple solution and restart the PC. This should fix the problem in case a temporary glitch causes the This version of Netflix is not compatible error.


2. Uninstall and Reinstall Netflix app

Another quick solution to fix This version of Netflix is not compatible error is to uninstall the app and reinstall it.  Here is how to do it.

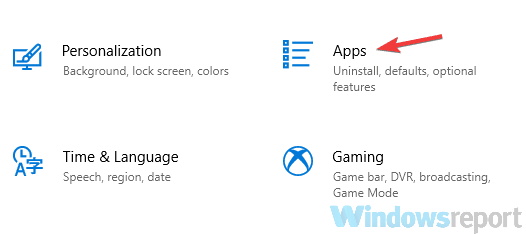
  1. Open the Settings app an go to Apps.
    apps This version of Netflix is not compatible
  2. Locate the Netflix app on the list and uninstall it.
  3. After completing the process, download it again from the Windows Store.

3. Fix the browser issues

google chrome Netflix not compatible

If you are facing the error while using Netflix on your web browser, follow these steps.

  1. Clear browser cookies –  Go to Netflix.com/clearcokkies . This will log you out of the Netflix account and also clear cookies for the Netflix service. Log in again to check for any improvements.
  2. Disable Antivirus – Sometimes the antivirus can interfere with the Netflix player resulting in an error. Try to disable your antivirus temporarily to see if it makes any difference. If it does, you may need to update the antivirus or add Netflix to the Whitelist.
  3. Check your Internet connection – If you are using your cellular device to connect your PC to the network, your service may not support streaming. Make sure the network service provider supports streaming and check if your network meets the minimum streaming requirements.
  4. Try another browser – If the error is happening on the Chrome browser, try to use Microsoft Edge, Firefox or Opera to check if it is a browser specific error

By following all the solutions listed in this article, you should be able to fix This version of Netflix is not compatible error on your Windows 10 PC.

Do let us know if any these solutions helped you fix the issue in the comments below.

RELATED ARTICLES YOU MAY LIKE:

Fix: No Ringtone Sound on Lumia 635

Lumia 635 is one of a few devices that support the earliest build of Windows 10 Technical Preview for phones. But the new operating system brings more problems and bugs, along with its improved features.

This time, we have a sound issue that prevents Lumia 635 from ringing.
Lumia 635 No Ringtone Sound In Windows 10
Reportedly, this issue only appears when the headphones are not connected to the phone. But you can’t always have your earpiece connected, so this issue needs to be solved.

I have no ringtone sound on my Lumia 635. What can I do?

  1. Common checks
  2. Regular reset
  3. Hard reset

1. Common checks

First and foremost, we’ll have to check a few important things:

  1. Check to see if your volume is turned all the way up, and the phone is not in silent mode.
  2. Look in the Notification area. There you will find Airplane mode. It should be off.
  3. Play a music or a video file to check the integrity of the speaker.
  4. If you had a custom ringtone, make sure you didn’t erased it by accident.
  5. Find your Ringtones folder and make sure it’s not erased or empty.

If one of these things was causing your no sound issue, you can fix it fairly easy and things should go back to normal. If all your settings, files and folders are in order and you still experience the problem, go to the next step.

2. Regular reset

To solve the no sound problem, we’ll first try regular restarting and see if it shows any results. To perform that, do the following:

  1. Switch off the phone
  2. Remove the battery
  3. Hold the power button for few seconds
  4. Place the battery
  5. Switch on the device
  6. Check if the issue persists

This is a very simple method that could help you solve your problem.

3. Hard reset

If the issue is still present after the regular reset, you might try with hard reset. But be aware because hard reset will erase all data from your phone, and you should create a backup before you perform it.

After you make sure you made a backup of all your data and that phone is safe for hard resetting, follow these steps:

  1. Switch off your phone.
  2. Press and hold Camera, Power and Volume Down buttons
  3. After few seconds, the phone will vibrate
  4. Release the Power button, but keep holding the Camera and Volume Down button
  5. After 5 to 10 seconds release both the buttons.
  6. Now follow installation wizard instructions and finish the setup

Issues like this are not surprising since Windows 10 Technical Preview for phones is still in its early testing phase, and we should expect more improvements and bug fixes in the future builds.

So, even if these solutions didn’t solve your problem, you should wait a little until the new build is released. And as Microsoft said, we’ll get the new builds very soon.

What is your favourite Windows phone? Don’t forget to tell us the answer in the comments section below and share how you solved the problem.

[wl_navigator]

Team Fortress 2 Not Working in Windows 10/11 [FIX]

Some users have certain problems with Steam games in Windows 10, and these problems didn’t bypass the Team Fortress 2.

This is one of the most popular games on Steam. Luckily, there are two simple solutions for Team Fortress 2 problem in Windows 10, and you’ll find them below. team fortress 2 not working on windows 10

What to do if Team Fortress 2 is not working:

  1. Change the window border
  2. Set the specific screen resolution

Solution 1 – Change the window border

Players were facing problems with Team Fortress 2 ever since the Technical Preview, and they are present even after the full version came out.

Eventually, easy solutions were found that solved the most cases with Team Fortress 2 in Windows 10 Technical Preview and reportedly, it will solve the problem in the full version, as well.

All you have to do is to change the window border, and the game should work normally. Just follow these instructions to solve the Team Fortress problem in Windows 10:

  1. Open your Steam Client
  2. Go to Library
  3. Right-click on Team Fortress 2 and go to Properties
  4. Under General, open Set Launch Options
  5. Enter the following command and press Enter or click OK:

    -windowed -noborder

  6. Try to open Team Fortress 2 again and see if there are any issues

According to the reports, this workaround fixed the majority of issues. If it didn’t get the job done for you, you can try the following solution as well.

Solution 2 – Set the specific screen resolution

If noborder command didn’t work, you can try this similar solution, and hopefully everything will be fixed. Here’s what you need to do:

  1. Check your screen resolution, if you don’t know it, here’s how to find out:
    • Right-click on Desktop and go to Display Settings
    • Go to Advanced Display Settings and see your resolution under Resolution
  2. Open your Steam Client and go to Library
  3. Right-click on Team Fortress 2, go to Properties and to Set Launch Options, again
  4. Enter the following command and click OK:

    windowed -noborder -w [SCR-H] -h [SCR-W] ([SCR-H] and [SCR-W] are height and width of your screen, so here’s an example if your screen resolution is 1400 x 900: windowed -noborder -w 1400 -h 900)

  5. Click OK and try to Run TF2 again

As I said, solutions are very similar, it’s the same command actually, but sometimes your screen resolution is not necessary and sometimes it is. This command solved the problem for most TF2 players on Windows 10, and I hope it will solve it for you, too.

Also, just to be sure, try to run the game as an Administrator. Go to the installation folder, right-click on the TeamFortress2.exe launch file and then select the Run as administrator option.

Don’t forget to tell us in the comments section below if our solutions worked or if you found another fix to the problem. If you have any other Windows 10-related issues you can check for the solution in our Windows 10 Fix section.

[wl_navigator]

Microsoft promotes drone technology with U of N. Dakota grant

A few years ago, drone talk could have been considered a bit taboo as people and communities struggled to come to terms with the how’s and why’s of unmanned air flight within city ordinances.

Fast forward five or so years and the discussion surrounding drones and its $1 billion commercial industry has shifted from outright banishment to terms of regulation and the beneficial aspects of rural and industrial applications.

Lending a voice to the evolving discussion of drone technology and its growing presence in modern communities of agriculture, mapping, weather prediction, infrastructure development, and maintenance is Microsoft with its TechSpark initiative.

Microsoft recently announced plans to invest with the University of North Dakota (UND) Aerospace Foundation, $100,000 worth of project funding to boost innovation in drone technology coming out of the region.

“TechSpark saw the drone innovation in North Dakota’s Red River Valley that is driving exciting advances for the U.S. drone industry and wanted to be a part of it,” said Kate Behncken, general manager of Global Community Engagement at Microsoft. “This cutting-edge project has the potential to increase crop yields and boost the production of renewable energy through safe drone advancements created locally, leading to greater economic opportunities for North Dakotans.”

With Microsoft’s jumpstart investment of $100,000, successful projections see over half a million dollars of “additional investment” in Airtonomy as well as boosting of other economic opportunities throughout the state.

Microsoft’s involvement has already begun to pay dividends as an uncalculated multiplier which helped Airtonomy unlock close to $570,000 in additional funding from local investors confident in Microsoft’s involvement.

Microsoft’s North Dakota partnership comes as one of six other TechSpark related initiatives which began in 2017 as a way to imbue rural and smaller communities with new economic opportunities and potential.

As with the other TechSpark projects, the UND partnership will produce a proof of concept utilizing Microsoft services that include IoT, cloud computing and AI technologies this time around.

Common Pro Evolution Soccer problems in Windows 10/11

Pro Evolution Soccer is one of the most popular sports game franchises in the world. Millions of fans around the world are patiently waiting for the new game every year.

But, although the new version of Pro Evolution Soccer is released annually, every new version has its own problems that are bothering players for years.

For instance, users are reporting game crashes, sound issues, controller problems, and many more.

In this article, we’ll try to cover all known issues in every version of PES since Pro Evolution Soccer 2013.

So, if you’re facing the problems with any of these games, you’ll maybe find a solution here. For a newer version of the game, we recommend you to check this article.

How can I fix Pro Evolution Soccer 2013 problems in Windows 10?

  1. PES 2013 crashes to desktop when launched
  2. Could not load image crash
  3. Crashes with Intel HD Graphic Card
  4. PES 2013 graphic glitches
  5. Xbox 360 or other USB controller doesn’t work
  6. Install fails, Cannot Install
  7. PES 2013 freezes during the Intro Video
  8. Crashes for Nvidia users
  9. Crashes for AMD users
  10. Crashes on Dual monitors
  11. Crashes with Nvidia Optimus cards
  12. No audio
  13. Poor FPS performance, stuttering

1. PES 2013 crashes to desktop when launched

Users have reported that the game randomly crashes to desktop. If you’re experiencing this issue as well, you might want to update your graphics card drivers.

Just visit your graphic card manufacturer and download the latest drivers for your graphics card.

pro evolution soccer windows 10 problems 1

In addition, users also say that turning off SLI / Crossfire improves gaming performance, so if you’re using SLI / Crossfire try to disable it.

Some users claim that disabling your antivirus before you launch the game fixes this issue. Of course, turning off your antivirus completely isn’t a good idea, so before you start Pro Evolution Soccer 2013 disable the antivirus, and as soon as the game starts turn it back on.

Also, make sure that Windows Defender is disabled. If you’re running any background apps that you don’t need, try turning them off as well, before you start the game.

If you have a low-end PC, then it’s recommended that you try running the game in window mode in order to fix this issue. You also might want to disable anti-aliasing and filtering, and then restart the game. If that doesn’t help disable V-sync and restart the game.

In addition, you can also try launching the game from the installation directory instead of using the shortcut or launcher.

If you don’t know how to update your graphics card driver, check out this step-by-step guide that will help you do it with ease.

2. Could not load image crash

To fix this error you need to go to Pro Evolution Soccer 2013 installation folder, locate Pro Evolution Soccer 2013.exe file and run it directly from installation directory.

3. Crashes with Intel HD Graphic Card

PES 2013 crashes

To fix this issue just uninstall your graphic drivers and reinstall them. After you uninstall your graphic card drivers, visit your graphic card manufacturer’s website and download the latest drivers.

Downloading the driver manually can be a difficult task, especially if you don’t know where and which drivers to download. If it doesn’t work downloading the drivers from Device Manager, you can try a third-party software.

⇒ Get Fortect Driver Updater

4. PES 2013 graphic glitches

BIOS switchable graphics PES 2013

This solution is a bit more advanced so before you try it, make sure that you’ve disabled anti-aliasing and filtering. If that didn’t help you, go to BIOS and try disabling Switchable Graphics.

5. Xbox 360 or other USB controller doesn’t work

Before you try using a controller to play Pro Evolution Soccer 2013 make sure that you download the game patch from the official source, instead of downloading it from Steam.

In addition, go to Control Panel and make sure that your Xbox 360 controller is enabled. Then, when you start the game, go to Options > Controls > Customize Controls and make sure that the proper controller is selected.

6. Install fails, Cannot Install

This error is caused by C++ bug and you can fix it by uninstalling C++ files. If you see two instances of Microsoft C++ uninstall them both, and install them again.

7. PES 2013 freezes during the Intro Video

Before we start fixing this issue make sure that your graphic card drivers are up to date, and that you have latest version of DirectX installed.

If you’re using Steam, verify the the integrity of game cache to fix this issue.

  • Can’t install DirectX or stuck at DirectX installation: This issue is caused by software drivers from peripheral manufacturers, such as Logitech, Razer, etc. To fix this, just close those applications or disable them, and try reinstalling DirectX again.

8. Crashes for Nvidia users

threaded optimization nvidia control panel

If you’re are using a Nvidia graphic card, make sure that you go to the Nvidia Control Panel > 3D settings and turn on Threaded Optimization.

9. Crashes for AMD users

If you own an AMD graphic card, make sure that you uninstall Catalyst Control Center and try running Pro Evolution Soccer 2013 again.

Users report that sometimes Catalyst Control Center can interfere with your Radeon card so try turning it off.

10. Crashes on Dual monitors

This issue affects users that have two or more monitors. Users complain that they can’t see main menu, and that game crashes.

So far, only solution is to unplug other monitors and play the game on a single monitor. If that doesn’t help, you can always try running the game in window mode.

If you want to know how to use multiple monitors like a single monitor in Windows 10, follow the simple steps from this guide.

11. Crashes with Nvidia Optimus cards

Users report that Nvidia Optimus cards can cause some crashes, so it’s advised that you check Optimus settings in Nvidia Control Panel.

  1. Open Nvidia Control Panel.PES 2013 crashes
  2. Go on the left pane under Select a task.
  3. Open 3D Settings tree and select Manage 3D Settings.PES 2013 crashes
  4. On the right panel select Program Settings tab.
  5. Under Select a program section click Add and navigate to the Pro Evolution Soccer 2013 .exe file.
  6. Under the Select the prefered graphics select High-performance Nvidia processor.
  7. Click Apply in the bottom right to save changes.

12. No audio

If you don’t hear any in-game sound, or your audio is low, make sure that your audio drivers are up to date.

If your audio drivers are up to date, start the game and press Alt+Tab to minimize it. Go to Volume Mixer in the bottom right of your screen and make sure that volume for Pro Evolution Soccer 2013 is set to maximum.

pro evolution soccer windows 10 problems 2

Additionally, you can try going to Control Panel > Hardware and Sound > Sound > Communications Tab and choose Do Nothing, to fix this issue.

If you want to fix PC sound problems quickly, check out this dedicated guide.

13. Poor FPS performance, stuttering

To fix this issue you will need to change the priority of the game.

  1. Simply start the game, press Alt+Tab and then open Task Manager.
  2. Go to Processes tab and find Pro Evolution Soccer 2013 process.task manager processes tab
  3. Right click it and set its priority to Above Normal or High.

If this works, remember to do it every time you start the game.

If the problem still persists, make sure that your GPU is cool enough. If overheating is not the issue, try lowering the the game resolution or graphic quality settings.

If your PC is overheating on Windows 10, fix the problem quickly by following this awesome guide.

How can I fix Pro Evolution Soccer 2014 issues in Windows 10?

  1. Only detecting integrated graphic card
  2. PES 2014 crashes to Desktop
  3. PES 2014 sounds issues
  4. PES 2014 problem with controllers

1. Only detecting integrated graphic card

Users report that Pro Evolution Soccer settings can only detect integrated graphic card and not your dedicated one.

This is a big problem because it can seriously affect your game performance since integrated graphic card can’t perform as good as dedicated one.

This issue affects Nvidia cards, and in order to fix it you need to download the latest driver for your dedicated graphic card from Nvidia’s website.

We also strongly recommend a dedicated driver updater tool to automatically download all the outdated drivers on your PC.

This kind of tool will keep your system safe as you can manually download and install the wrong driver version using Device Manager.

2. PES 2013 crashes to Desktop

Some users have reported that they can’t even start Pro Evolution Soccer 2014. When they start the game, it just crashes to the Desktop for no particular reason.

After some research, it was concluded that the main cause of this problem is the antivirus tool.

In order to fix this issue you’ll need to create rules within the antivirus and allow Pro Evolution Soccer 2014 full freedom of access. You can also try disabling your antivirus while launching the game.

3. PES 2014 sounds issues

Pro Evolution Soccer 2014 comes with its own sound settings that you can adjust by following these steps:

  1. Insert Pro Evolution Soccer 2014 installation DVD.
  2. When the autorun screen shows click Settings.
  3. Click on the Audio tab.
  4. Make sure that your audio settings match your audio setup. For example, if you’re using surround system make sure that you select Surround option from the Audio tab.
  5. Save settings by pressing OK.

In addition, it wouldn’t hurt to check if your audio drivers are up to date. If Windows 10 drivers are available, make sure that you download them.

4. PES 2014 problem with controllers

If Pro Evolution Soccer 2014 doesn’t recognize your controllers, you have to run PES Settings (from the game installation directory) and select under Controller dxinput for any controller that you use.

How can I fix Pro Evolution Soccer 2015 problems in Windows 10?

  1. PES 2015 launch issues
  2. Failed to connect to Key Server error and downloading
  3. Establishing connection error
  4. PES 2015 stuttering and sound issues
  5. Can’t update Data Pack Error
  6. PES 2015 low FPS while playing
  7. Limited resolution

1. PES 2015 launch issues

If you’re having problems with launching PES 2015, make sure that your computer meets the hardware requirements. If all hardware requirements are met, then the problem might be the installation.

If that’s the case, usually it’s best that you reinstall the game completely.

If the problem still persists, go to the Pro Evolution Soccer 2015 installation directory and create a new text file called steam_appid. Open the file and type 287680. Save the changes and start the game from the game directory.

To fix this problem you might have to reinstall Microsoft Redistributable Visual C++ and install the latest version of DirectX.

2. Failed to connect to Key Server error and downloading

First make sure that your copy of the game is activated. If your game is activated but the problem persists, turn off your computer and restart your router. After your computer reboots try connecting to the server again.

3. Establishing connection error

In order to temporarily fix this error you need to play the game in offline mode. To do this do the following:

  1. Go to Main > Menu > Extra.
  2. Next go to Online settings and make sure that Auto Sign in is set to off.

In addition, you can also fix this problem by starting the game and disconnecting your LAN cable when you get to the “press any button” screen. After you get into the main menu, reconnect your LAN cable.

4. PES 2015 stuttering and sound issues

If your game is stuttering, you should make sure that your drivers are up to date. If not, go to your graphic card manufacturer’s website and download the latest driver.

Same thing goes for sound issues; if you have any issues with sound, update your sound drivers with the latest version.

5. Can’t update Data Pack Error

In order to fix this issue, you’ll have to reinstall the game. Before you reinstall the game, it’s advised that you turn off your antivirus software and firewall, as well.

6. PES 2015 low FPS while playing

Make sure that you disable Crossfire and V-sync from your graphic card Control Panel.

If the problem still persists, you might have to go to the Nvidia Control Panel > Manage 3D settings and choose Prefer Maximum performance.

If you need the best software to show FPS in Windows games, check out our list with the best apps available today.

7. Limited resolution

Many users have reported that for some strange reason their resolution was limited to 1366×768, but there’s a way to fix this strange limitation. To do so, just follow these steps:

  1. Go to Pro Evolution Soccer 2016 installation directory.
  2. Find settings.exe file and right click it. Choose Properties.
  3. Click the Compatibility tab and check the Disable display scaling on high DPI settings.
  4. Click Apply and OK to save the changes.

How do I solve Pro Evolution Soccer 2016 problems in Windows 10?

  1. PES 2016 stuttering issues
  2. Requirement Fail Error
  3. PES 2016 black screen with sound running in the background

1. PES 2016 stuttering issues

Make sure that your graphic card driver is up to date. If not, go to your graphic card manufacturer’s website and download latest drivers.

It is also recommended to you tweak the settings in Nvidia control panel:

  1. Open Nvidia control panel.
  2. Set Maximum pre-rendered frames to 4.
  3. Set Multi-display/mixed GPU acceleration to Single display performance mode
  4. Set Power management mode to Prefer maximum performance
  5. Turn Triple buffering On.
  6. Turn on Vertical Sync.

2. Requirement Fail Error

To avoid this error, make sure that the game is using the dedicated GPU because it gives you better performance than the integrated one.

You can change these settings from the control panel of your GPU (Nvidia Control Center for Nvidia owners and Catalyst Control Center for AMD owners).

3. PES 2016 black screen with sound running in the background

Users have reported black screen with game sounds running in the background and to fix this issue make sure that your game is using the same resolution that you are using on your desktop.

You can also try some solutions from our article about black screen in Windows 10, maybe it will be of some help.

We tried to cover all reported issues with PES 2013-2016, and we certainly hope that at least some of these many solutions helped you to solve your problem.

Don’t forget to tell us in the comments section below what other issues have you encountered in Pro Evolution Soccer and what’s your favorite PES game of all time.

Microsoft teams with Amal and George Clooney on TrialWatch Initiative to address injustice, one court case at a time

One of the good things that the internet can do, despite all of its failings, is to help to shine a light on injustice, and a new initiative launching today aims to do just that. Human rights attorney Amal Clooney and her actor husband George Clooney, with help from Microsoft, have created an app called TrialWatch, based on Azure and Microsoft speech-to-text and machine translation tools. The app allows volunteers to collect and report data on trial proceedings, tracking cases that “involve vulnerable populations, like minorities, LGBTQ individuals, human rights activists, and journalists,” according to a report on GeekWire.

The app, which will be available on iOS, Android, and Windows, has been piloted in Africa, Asia, Europe, the Middle East, and Latin America, and The Clooney Foundation will coordinate and assign volunteers to monitor important trials around the world, with a team of trained experts to review the data, and will issue reports on how fair or unfair these trials prove to be.

The TrialWatch app and initiative is expected to be unveiled at an event in New York City today.


Microsoft, the (almost) trillion dollar company

Yesterday, Microsoft released Fiscal Year 2019 3rd quarter earnings, and with all aspects of the company seemingly raking in the cash, the market is understandably excited. For a short time in after hours trading last night, the company’s “market cap,” or market capitilazation, that is the total shares of a company (for Microsoft, that’s 767 billion at last count) multiplied by its share price. To hit $1 trillion, the share price needs to hit $130.038, which it flirted with last night and has already hit a couple of times this morning, although currently it’s trading at $130.18.

Microsoft’s stock jumped almost 5% overnight on the earnings news, and there’s no reason to think that the company won’t continue its upward trend, at least in the short term. Build is coming up in just a couple of weeks, a good chance for the company to show off what it’s doing, and plans to do, with Azure, Windows, and Office. As the Verge’s Tom Warren pointed out yesterday on Twitter, Microsoft is now composed of three main pillars, all contributing equally:

Microsoft splits its businesses up into three main buckets, and they’re all roughly contributing the same amount of revenue (~30%)
Office + LinkedIn + Dynamics = $10.2B
Azure cloud + server + enterprise services = $9.7B
Windows + Xbox + Surface = $10.7B

Both Amazon and Apple have recently hit the trillion dollar market cap mark, but both have fallen back, with AMZN trading today at about $942B market cap, and AAPL at $975B. Of course you don’t get any special prizes for going over the trillion dollar mark, but it is remarkable how values of tech companies in general, and Microsoft in particular, have gone up. For comparison, in February 2014, when Satya Nadella took over from Steve Ballmer as CEO, stocks were trading at 37.92, and the market cap was about $315B.

Microsoft is still flirting at just under that trillion dollar mark as we bring this post to a close, but there’s no denying that this company is firing on all cylinders right now, with a bright future ahead.

FIX: There was a problem connecting to Gmail

Google’s webmail service is fast, smooth and functional, but sometimes you might get There was a problem connecting to Gmail error. Do you also have problems with Gmail? Here’s what the causes of the blockage can be and how to get your mailbox back up and running.

What to do if Gmail has no connection?

  1. Check your extensions
  2. Wait it out
  3. Check if your mailbox is full
  4. Cache and cookies
  5. Use Gmail HTML
  6. Disable the Labs
  7. Use Gmail offline

1. Check your extensions

Is the network stable and does it load other web pages? If so, it’s possible that your extensions are causing the There was a problem connecting to Gmail error. In this case, simply deactivate them or uninstall them permanently. To see the active extensions and deactivate them, follow the next steps:

  1. Open Chrome.
  2. Click the Menu button in the top right corner.
  3. Select More Tools.
  4. Go to Extensions.
    extensions There was a problem connecting to Gmail
  5. Click Remove next to the extension you want to remove.extensions remove can't connect Gmail

2. Wait it out

If you see the message “Temporary error (502)” when you attempt to access Gmail, it means that the mail service is temporarily out of order.

This error usually resolves quickly, so try logging in again after a few minutes. Even if you can’t log in at that time, your messages and personal data are still safe.


3. Check if your mailbox is full

There was a problem connecting to Gmail error can occur if the mailbox is full and needs to be emptied. Google provides 15GB of total storage between Drive, Gmail, and Google Photos, and in case you’re hosting large files, it’s possible that your mailbox is full.

Free up space in the mailbox by accessing Gmail from another browser (eg. Firefox) and remove old emails and files. To empty Gmail in one go, you can use a very useful and little-known filter.

For example, do you want to delete all mail dating back to before January 1, 2015?
In the search bar, type before: 01/01/2015 and you will see the oldest messages. Now select the message that you want to remove.

  • READ ALSO: Update Windows 10 Mail and Calendar to enable dark mode

4. Cache and cookies

Another reason for There was a problem connecting to Gmail error can be your cache and cookies. In general, deleting the cache from Google Chrome is always useful when you are having problems browsing and your computer is slowed down.

Just go to Settings > Show advanced settings> Clear browsing data. Now select the data you want to remove.

clear browsing data There was a problem connecting to Gmail


5. Use Gmail HTML

You should know that in addition to the standard web version of Gmail there is another one, much simpler version available. This version is lighter because it lacks certain features, however, using it might be a solid workaround if you’re experiencing There was a problem connecting to Gmail error.

To access this simplified version, just click the Load basic HTML link in the bottom right corner.load basic HTML can't connect Gmail


The basic HTML version does not offer all the features of the classic Gmail version, but at least allows you to complete the most important tasks.


6. Disable the Labs

If you use gadgets and themes to enrich your Gmail account, delete them as they can lead to There was a problem connecting to Gmail error. Sometimes, the problem with Gmail is caused by active Labs options.

These are experimental features that you can try on Gmail, but are not yet ready to be officially released. Labs can be found by clicking on the Settings wheel > Settings> Labs. Here the available labs are displayed and you can activate or deactivate them manually.

To avoid feature problems,  deactivate all Labs options.


7. Use Gmail offline

Gmail Offline is an extension that can be added to Chrome that offers a simplified version of Gmail to access your mail even without an Internet connection. Offline e-mails are sent as soon as a connection is available, and the same is true for drafts. As soon as you return online, all messages will be synchronized.

We hope this guide helped you fix There was a problem connecting to Gmail error. Be sure to try all of our solutions and let us know if they worked for you.

READ ALSO:

To update Windows 10 to 1903 from 1803 or 1809, you’ll have to unplug your USB drives and SD cards

The Windows 10 May 2019 Update is just around the corner but select Windows Insiders are already being given the opportunity to upgrade their systems to it if they so choose.

Unfortunately, there appears to be a rather odd issue that’s preventing some users from upgrading. Essentially, those that attempt to download and install the Windows 10 May 2019 Update with a USB drive or SD card installed, will be presented with an error message that says, “This PC can’t be upgraded to Windows 10.”

Basically, Microsoft has detected that if an external drive is connected while the update is installed, the various drive letters, both internal and external, can become jumbled. To prevent this from happening to user’s devices, Microsoft has simply made it so that the update won’t complete with any external drive connected.

The official workaround? Simply unplug all external drives when performing the update and then reconnect them once the update is complete.

A post on ArsT claims that this glitch only affects those upgrading from versions 1803 and 1809 of the operating system while the official status on this issue from Microsoft states that, “This issue will be resolved in a future servicing update for Windows 10. For Windows Insiders, this issue is resolved in build 18877 and later builds.”

Have you been affected by this problem? Share your experience with the community in the comments below and then follow us on Twitter for more Windows news.

We couldn’t add all your attachments the Mail app error [FIX]

The Mail and Calendar app, which comes included with Windows 10, enables users to attach files to emails much the same as most email software. However, Mail might also display a “We couldn’t add all your attachments” error message for some users. Consequently, users can’t attach files to emails within Mail when that error arises. Here are a few potential resolutions for users who need to fix the “We couldn’t add all your attachments” error.

How do I fix the We Couldn’t add all your attachments error

  1. Reset the Mail App
  2. Check the File Attachment’s Size
  3. Don’t Select to Attach Files From Quick Access
  4. Send the Files With the Webmail Client
  5. Reinstall the Mail App

1. Reset the Mail App

Users often fix app errors with the Reset option. Resetting Mail will reset its data, but will not erase login credentials. This is how users can reset Mail.

  1. Open Cortana’s search utility by pressing the Windows key + S hotkey.
  2. Input ‘apps’ as the search keyword.
  3. Click Apps & features to open the Settings window as in the snapshot directly below.
  4. Select the Mail and Calendar app listed and click Advanced options.Mail and Calendar app advanced options
  5. Click the Reset button.Reset the app windows 10
  6. Then press the Reset button on the prompt box that pops up.

2. Check the File Attachment’s Size

Users utilizing webmail services within Mail, such as Gmail, will need to check the file attachment size. Webmail services’ maximum file attachment size restrictions still apply when utilizing them with the Mail app. For example, the max file attachment size for Gmail users is 25 megabytes. Therefore, the “We couldn’t add all your attachments” can be due to file attachments eclipsing the max attachment size limits for the webmail services.

Users who attach files that eclipse the maximum attachment size permitted will need to reduce the number of files attached. If just one file eclipses the max attachment limit, users will need to compress it. Users can do that with compression software for various file types and formats.


3. Don’t Select to Attach Files From Quick Access

The “We couldn’t add all your attachments” error can be due to users selecting to attach files from the Quick access. Quick access displays recently accessed files within the Open file browser window. So, select to attach files from their actual folder paths instead of Quick access.


4. Send the Files With the Webmail Client

Users don’t need to utilize webmail services with the Mail email client app. Instead, try sending the files with the webmail clients instead. Log in to your webmail within a browser, attach the required files, and send the email.


5. Reinstall the Mail App

As a final resolution, reinstall the Mail and Calendar app. Note, however, that reinstalling Mail might also erase log in credentials and emails. Therefore, users might need to add their webmail accounts to Mail after reinstalling the software. Follow the guidelines below to reinstall Mail.

  1. Open Cortana’s search box.
  2. Enter ‘PowerShell’ in Cortana’s search box.
  3. Right-click Windows PowerShell and select Run as administrator.
  4. Then enter ‘Get-AppxPackage Microsoft.windowscommunicationsapps | Remove-AppxPackage’ in PowerShell, and press the Return key.re-integrate AppPackage Windows 10
  5. Restart Windows before reinstalling Mail and Calendar.
  6. Click the Get button on the Mail and Calendar app page to reinstall the software.

The above resolutions might fix the “We couldn’t add all your attachments” error for some Mail users so they can attach files to emails once again. Remember, however, that there are also plenty of alternative third-party email client apps to Mail with which users can attach files to emails without any issues.

RELATED ARTICLES TO CHECK OUT: 

How to fix common Mortal Kombat 11 game issues on PC

As we all know, no game launch is truly without some hiccups. And the newest installment from the Mortal Kombat series makes no exception — with certain issues related to connectivity, game progression and save games. But there are instances of graphical and audio bugs occurring.

But fear not, we’ve got a list of fixes that will help you to fix some of the most frequent Mortal Kombat 11 game bugs.

How can I fix Mortal Kombat 11 issues?

  1. Fix display bugs
  2. Framerate drops
  3. No audio fix
  4. Save game progression fix
  5. Firewall exception fix

1. Display bug fix

Firstly, right click on the Desktop and click on the Display Settings, now you’re going to select Advanced Settings, next click on Adjust Resolution.

Select which one suits your screen, keeping in mind the refresh rate of your screen. Also you can disable V-sync  in your in-game menu.

2. Frame rate drops fix

Firstly, you’re going to Open your Nvidia Control Panel, and select 3D Settings, then turn off the Dynamic Super Sampling. When dealing with FPS drops, try lowering the image quality, change your graphics quality to medium from high.

This helps with consistent frames when you might be experiencing drops.

3. No audio fix

For this fix, you’re going to right click on the speaker icon on the bottom right corner of your screen or toolbar for hidden icons and click on Sounds.

Now head on over to the Playback section and disable all the sound devices except the internal speaker or the speaker you wish you want to use.

Also, keep in mind that changing your audio from surround sound to stereo can do the trick too.

4. Save Progression fix

More or less, this issue can be traced to faulty game files, maybe some got corrupted at some point. But we’ve got a solution for this, simply follow these steps:

  1. Start your Steam client.
  2. In the Library section, right-click on your Mortal Kombat 11 game and click on Properties from the menu.
  3. Now select the Local files tab and click on the Verify integrity of game files.

  4. After this is done, try running the game again.

5. Firewall exception fix

You can disable your Windows Firewall, if it’s causing any connections issues to your game. To add any program to a whitelist, follow these steps:

  1. Open your Start Menu.
  2. Now select Control Panel.
  3. Then click on Windows Firewall.
  4. Now, click on Allow an app or feature through Windows Firewall.Allow app feature Windows Firewall
  5. Now, the Allowed App windows will open.
  6. Click on the Change Settings
  7. Check the boxes next to the apps or programs you want to allow through Windows Firewall, or network connections.
  8. Click OK to save your new settings.

Tip

Both firewall and save progression solution work well in tandem when you’re facing issues from your game client.

Tip

Always remember to check out the minimum system requirements when running a new game. Here are the ones for Mortal Kombat 11:

  • Operating System: 64-bit Windows 7 / Windows 10.
  • Processor: Intel Core i5-750, 2.66 GHz / AMD Phenom II X4 965, 3.4 GHz or AMD Ryzen 3 1200, 3.1 GHz.
  • Memory: 8 GB RAM.
  • Graphics: Nvidia GeForce GTX 670 or Nvidia GeForce GTX 1050 / AMD Radeon HD 7950 or AMD Radeon R9 270.
  • DirectX: Version 11.

We hope that these fixes are of help. In the meantime, let us know on how are you enjoying the game so far, in the comment section down below.

RELATED STORIES TO CHECK OUT:

Lenovo next wave Legion hardware gets new 9th Gen Intel, GeForce RTX 2080, GTX 1650 and 1660Ti GPUs

Yesterday, April 23, 2019, Lenovo unleashed a torrent of news regarding its Legion gaming line of laptops that involve processor updates, new GPU’s and the addition of two more models to its line up of mobile gaming offerings.

Starting with the new additions, gamers that may not have had their interest piqued by the design or price of the previous Y730 or the Y530 can now be on the lookout for the Y7000 and new Idepad L340 devices.

The Y7000 comes in a 15-inch wrapper with a crimson red “Y” backlit keyboard and thin bezels surrounding a full HD display sporting up to 144Hz refresh rates and offering 300 nits of brightness on an IPS anti-glare screen. The Y7000 carries a similar design to other Legion hardware with its slate gray color scheme and angular edges and signature “Y” light up the lid and comes with all the latest Intel and NVIDIA updates as the rest.

Y7000: pricing will be shared later

However, the new Ideapad L340 is where Lenovo is beginning to meld its more traditional consumer aesthetic with its gaming specs and produces a more mainstream looking device that just happens to be able to run a few games at higher fidelity. The L340 comes in both 15 and 17-inch options sporting Doly Audio support, something called Intel Opten for increasing game speeds all in a case that could easily be mistaken for an elegant mainstream direct MacBook competitor.

Ideapad L340: starting at $869.99 15″ & $919.99 17″ in May 2019

Now for the meat and potatoes. Lenovo’s Flagship Legion Y700 line is getting bumped to Y740 and getting refreshed with the latest Intel 9th generation Intel Core i7 processor and a lineup that includes NVIDIA GeForce RTX 2080 Max-Q GPU and GeForce GTX 1660 Ti options. In addition to the beefed up specs gamers will gain access to FHD display with 144Hz refresh rate, NVIDIA G-SYNC, Dolby Vision and a screen as bright as 500 nits. Matching the impressive display output is the Y740’s Dolby Atmos Speaker System with Dolby Sound Radar for crisper sound quality. The aesthetic remains roughly the same with RGB backlit keyboard and system lighting with over 16 million color customization options to choose from. Gamers will also be able to beef up their system with an option 32GB DDR4 2666Mhz RAM.

Lenovo Legion Y740: starting at $1,699 17″ & $1,609.99 15″ in May 2019

Lenovo’s Y500 series gets its yearly bump to the Y540 and comes with similar accouterments such as the 9th gen Intel i7 and GeForce TRX 2060 GPU as well as some nifty new features such as the ColdFron dual fan thermal layout for cooling systems during intense gameplay and Harman Kardon speakers with Dolby Atmos support.

Lenono Legion Y540: Starting at $1209.99 for GeForce 1660 Ti 15″ & $1269.99 GeForce 1660 Ti 17″ in May 2019 and June 2019

Last but not least is the Lenovo Legion Y7000p which is also known as the less cool brother of the Y7000 comes as the affordable gaming hog donning the same Intel 9th gen i7 processor, NVIDIA GeForce RTX 2060, GTX 1660, and 1650 GPUs and subtle white backlit keyboard. The Y7000p comes in a one size fits all 15″ design.

Lenovo Legion Y7000: Starting at $1199.99 in May 2019

Next month is shaping up to be a good month to start looking at PCs for gamers to purchase ahead of some interesting E3 2019 announcements a month later. With the continued merging of Xbox console and PC gaming platforms by Microsoft, finding a PC that is both a mainstream machine and a gaming rig in after-hours could become a shopping segment Lenovo could corner with its Legion line of devices.

Windows 10 1903, Windows Server 1903 to drop password expiration requirements in proposed security guidelines

Today on the Microsoft Security Guidance blog, the company has published an explanation of its draft release of its security configuration baseline settings for Windows 10 1903 and Windows Server 1903. This document sets guidelines for Group Policy baseline settings, and with this latest draft there are some significant changes. Among the most noteworthy is a change to no longer set password expiration policies that require “periodic password changes,” a long standing baseline that Microsoft says has become “an ancient and obsolete mitigation of very low value.”

The blog post goes on to explain why Microsoft is dropping the password expiration policy, noting first that “we are not proposing changing requirements for minimum password length, history, or complexity:”

Periodic password expiration is a defense only against the probability that a password (or hash) will be stolen during its validity interval and will be used by an unauthorized entity. If a password is never stolen, there’s no need to expire it. And if you have evidence that a password has been stolen, you would presumably act immediately rather than wait for expiration to fix the problem.

While the baseline guidelines are dropping the outdated expiration policy, the blog post also notes that “we must reiterate that we strongly recommend additional protections even though they cannot be expressed in our baselines,” and notes that Azure AD password protection and multi-factor authenitcaion are much better alternatives.

In addition to the news about password expiration, default disabling of built in Guest and Administrator accounts are also being proposed for elimination.

Note that removing these settings from the baseline would not mean that we recommend that these accounts be enabled, nor would removing these settings mean that the accounts will be enabled. Removing the settings from the baselines would simply mean that administrators could now choose to enable these accounts as needed.

The proposed guidelines are just that, proposed, and interested parties can download the draft and comment via the blog post.

List of Mortal Kombat 11 PC bugs reported by gamers

Choose your destiny! The newest installment of the Mortal Kombat series is out. Brought to us by NetherRealm Studios and published by Warner Bros. Interactive.

Test your skills out on the platform of your choice, warrior, the game is available on Microsoft Windows, Xbox One and other platforms.

To fans already familiar with the previous games, the X-Ray Mode is making a comeback in the form of Fatal Blows. The catch being that it can be performed once an opponent’s health drops to 30%, and it can be performed once per round.

Also, if you’re a fan of variety in your gameplay experience, you can ramp it up by using the Custom Variation feature, which allows you to customize your character’s moves.

As we’ve learned across the years, no game launch can be truly flawless, except some player victories. But there are instances of players reporting various bugs and glitches in the game. With threads dedicated to this on official game forums.

So here is a list of common bugs discovered so far by the player base.

Frequent Mortal Kombat 11 game issues

  1. Kollector infinite combo bug
  2. Server errors
  3. Game freezing
  4. Bonus features unlockable
  5. Save progression

1. Kollector infinite combo bug

There have been instances where players have reported that the new character, Kollector, is a bit overpowered, being able to spam attacks and gain easy victories with its combo attacks

Character is pretty awesome, just has a little broken exploit that SHOULD BE FIXED NOT REMOVED!.

2. Mortal Kombat 11 servers errors

Saving your progress is essential to your gaming experience. With modern day games requiring a constant internet connection with your game account.

Your account is basically your calling card where your results and achievements are stored and displayed for your friends to see. But there are reports of some players losing their whole progression in the game.

I had a server error deleted EVERYTHING from my Scorpion’s kustom options. he’s got nothing not even moves left.. all locked erased and gone…

3. Mortal Kombat 11 freezes at certain points

Progression is key to climbing the combat ladder in the Mortal Kombat franchise. But the ocassional freeze up of the game is not the most ideal of circumstances to be in.

With reports stating that the game freezes up at certain points in the game, and the Story Mode being close to unplayable.

Same thing happens when I try the Fatality practice mode. And if I wait long enough, it’ll just take me back to the home screen.Hell I can’t even play the Story Mode because it freezes up.

4. Bonus features unlockable

Bonus features are the core of any game, with custom outfits for your character of choice. It’s the details that count too. But in some cases, not everything can be unlocked.

At the moment, only Kitana seems to have features that can’t be unlocked in-game.

I’ve done all the characters tutorials, and unlocked all their skins for completion – except Kitanas. For some reason, it will not unlock her skin. I’ve gotten the completion message multiple times, but she is the only one that didn’t unlock. Weird…

5. Save progression

Fortune favors the bold and the skilled, and progression through the game offers rewards. But not everytime, with reports stating that they can play all the game modes but their progress won’t be saved or get rewards.

Same with Classic Towers. It allows me to play but warns that my progress won’t be saved and I won’t get any rewards.I’ve been able to play story mode, tutorials, and AI battle no problem.

We hope the you’ve enjoyed our little list of bugs encountered so far in Mortal Kombat 11. Let us know in the comment section down below, on what other issues have you encountered so far while playing the game.

RELATED STORIES TO CHECK OUT:

Revisiting the Lenovo Smart Tab P10: A versatile Smart Display

I recently reviewed the Lenovo Smart Tab P10 and came away thinking it was a device on a trajectory similar to Microsoft’s Surface Pro. In what I considered the early awkward phases of its future proposition, I saw the P10 and its less-premium M10 version as a tablet and separate connected speaker experience attempting to leapfrog the current model of ambient computing known to buyers today and similar to the Surface Pro, I overlooked perhaps one of its biggest selling points, choice.

While the Surface Pro was clunky in its early execution, one of its biggest selling points and what is proving to be its greatest staying power is that it’s a consolidation of financial resources that I often feel tech reviewers take for granted when reviewing expensive and even seemingly inexpensive tech; these devices come with shelf lives much longer than the 30-60 day window we as reviewers become accustomed to. Much like the Surface Pro, the Lenovo Smart Tab P10 and M10 empower their buyers to choose how they use the device.

Where the Surface Pro can make for an awkward dedicated tablet at times, a buyer is also free to use it in tablet mode for as long or as little as they may actually use a dedicated tablet and the same goes for its productivity experience. The Smart Tab P10 and M10 allow buyers the freedom to use it as a tablet or docked Smart Display in a myriad of configurations that more traditional Smart displays are limited by their dedicated construction.

With that being said, much of my earlier review that still holds, however, I took some extra time to play around with the P10 before sending it back to Lenovo and now feel compelled to amend my initial review. The P10, for some, will still be a tablet posing as Smart Speaker/Home Hub-like device, but others might just see what I saw in my late-phase testing of the device, a Smart Speaker/Home-hub-like device that can also offer all the productivity and consumption benefits of a tablet, for roughly the same price as a traditional smart speaker.

Off the top, Lenovo already offers a more traditional smart display experience in its Smart Display powered by Google. The Lenovo Smart Display was first unveiled at CES 2018 and it comes with all the accouterment customary for this type of device, including 10W full range speakers, 8 or 10-inch FHD display and voice assistant for hands-free operations all for the starting price of $199. Other Smart Speakers/Display in this category range from Google’s Home Hub at $149 to Amazon’s pricier Echo Show at $229 and this is where I had to reevaluate the way I reviewed the P10 in that it’s a device that offers all of the features of Smart Display experience while also offering customary benefits of a tablet for a $199.99 starting price.

Being able to dock and undock the display from the premium speaker portion of the P10 and M10 enables a wider range of use cases that move beyond the single room uses often showcased during demos of other Smart Displays. The P10 and M10 can definitely hold their own in a kitchen, living room, bedside table, but they can also do all three at once without having to be moved or the addition of extra hardware.

Once I was able to figure out the Bluetooth issues I was initially having with the dock, I unlocked a whole new world of Alexa Assistant commands and skills used when the tablet was in my bedroom but was gonna later be used in the kitchen or began playing music and video content from different rooms. The P10 and M10 aren’t the only devices that can utilize this sort of Bluetooth magic, but a Sonos set up is arguably more expensive, Chromecast requires the purchase of several pieces of hardware and other Smart Displays are fundamentally limited by their single-use design.

Beyond the Smart Display of the P10 and M10, using the tablet for my more consumption-oriented task led to a better free-flowing of data transfer in the entire experience. When I couldn’t shout out queries for recipes from other rooms due to sleeping children, I was able to un-dock the tablet and take my time to curate a recipe book for lunches and dinners for the week, peacefully and quietly on my couch, that I could later have read to me when cooking.

I also took the time to review the unit as a true Amazon stand, by linking my Amazon Prime music collection the device which made jumping in and out of lists much easier than what I had originally tried doing, which consisted of starting a song in Spotify and having it amplified when docked, thus bypassing the selling points of the Alexa mode.

When initially reviewing the P10 there were two sticking points that I kept running into when using the device, and I was reminded that one of them can be resolved by simply buying the M10. Perhaps, in an attempt to offer a familiar premium smartphone experience in a home hub device, Lenovo opted for glass on glass design for the P10, which for anyone who uses a glass on glass phone without a case knows how unsettling it can be to hold anywhere that isn’t a cushioned couch flanked by tons of soft pillows. However, the M10 offers the same functional experience of the P10 for around $30 less and with a soft-touch back for better grip when the device is being used undocked. The other sticking point was the processing power of the tablet, to which I am still hung up on, but have come to live with. The processing power of the tablet only becomes apparent when compared to my use-case on my Galaxy Note 8 which seems to be quicker at completing tasks.

I use my Note 8 for everything from revising PowerPoint presentations to catching up on Game of Thrones via the Showtime app, but when using any dedicated tablet, I tend to limit my use case scenarios thanks to the proximity of either my smartphone or computer, and I would venture to say a lot of people are in the same boat. While I would like to see the P10 and M10 at least make use of a more powerful Snapdragon processor, I’ve come to acknowledge my actual uses of the tablet were already limited before reviewing the device.

In the end, the M10/P10 are still two devices attempting to offer an experience that’s some might find best served by dedicated hardware, but the reality of spending $199 to $249 to get everything from a tablet, smart assistant, home and kitchen display, Bluetooth speaker and potential home hub is something that more industry manufacturers should look to embrace in the near future.

Here’s how to fix Windows was unable to find a certificate error

If you have set up a new wireless router or Internet connection, the possibility is that you may end up with the Windows was unable to find a certificate to log onto to the network error while trying to connect to the network.

This error can be problematic, but there’s a way to fix it.

How can I fix WiFi certificate error on Windows 10?

  1. Disable FIPS for your network
  2. Check for disabled startup services
  3. Manually add a wireless network
  4. Connect to another PC
  5. Flush DNS and reset Winsock catalog
  6. Restore Windows to an earlier point

1. Disable FIPS for your network

If you’re getting Windows was unable to find a certificate error on your PC, you might fix it by disabling FIPS for your network.

  1. Open Control Panel from the search/Cortana bar.
  2. Open Network and Internet > View Network Status and tasks.
  3. Under Active Networks, click on the problematic WiFi network.
  4. Click on Wireless Properties button.
    FIPS Wireless Properties Windows can't find certificate
  5. Next, click on Security tab and click Advanced Settings.
    FIPS Advanced Settings Windows was unable to find a certificate
  6. Uncheck Enable Federal Information Processing Standards (FIPS) compliance for this network option.
    FIPS compliance disable Windows can't find certificate
  7. Click OK on all the open windows to save the changes.

2. Check for disabled startup services

Windows was unable to find a certificate can sometimes appear if you have disabled important startup services. To fix that, follow these steps:

  1. Press Windows Key + R.
  2. Type msconfig and hit Enter.
  3. In the System Configuration window, go to Services tab.System configuration Windows can't find certificate
  4. Go through all the services. If you see any service that is disabled (unchecked), simply check the box to enable it again.
  5. Click Apply > OK button to save the changes.
  6. Restart your PC and check for any improvements.

3. Manually add a wireless network

To fix this error you can create or add a wireless network profile manually to your Windows computer. Follow these steps to create a wireless network manually. The steps work across all the version of Windows since Vista.

  1. Open Control from the Cortana/search bar.
  2. Click on Network and Internet.
  3. Open Network and Sharing Center.
  4. Click on Set up a new connection or network option.
    Setup a new network connection Windows certificate
  5. A new dialogue box will open. Select the Manually connect to a wireless network option and click Next.
    Manually connect to a network place Windows can't find certificate
  6. Here you need to enter information for the wireless network you want to add. So, enter, Network Name, select the type of security from the drop-down menu and enter the security key (password for the network).
    enter information for the wireless network Windows can't find certificate
  7. Select Start this connection automatically and Connect even if the network is not broadcasting option. Click Next and close the window.
  8. Go to Network and Sharing Center > Manage network connections. And try to connect using the newly created network.

Now try to access the Internet to see if the issue is resolved.


4. Connect to another PC

To make sure the problem is with your computer and not related to your Wireless router, try to connect another laptop or PC to the same network. If connected, the problem is mostly with your computer and not the router.

In addition, you might want to check your wireless card. Sometimes certain Wi-Fi adapters aren’t fully compatible with certain routers or versions of Windows, so be sure to check your adapter as well.


5. Flush DNS and reset Winsock catalog

In some cases, Windows was unable to find a certificate error can appear due to problems with DNS cache. To fix that, do the following:

  1. Type cmd in the search /Cortana bar. Right-click on Command Prompt from the results and select Run as administrator.
    command prompt administrator Windows can't find certificate
  2. In the Command Prompt, type the following command and hit enter:
    • ipconfig /flushdns

Next, you need to reset the Winsock catalog. Here is how to do it.

  1. Open the Command Prompt as administrator.
  2. In the Command Prompt window, type the following command and hit enter:

    • Winsock reset
  3. Once it’s complete, you will see a Winsock reset completed successfully message.
  4. Restart the PC and check if the network is resolved.

6. Restore Windows to an earlier point

Windows OS by default creates a System Restore point in your local hard drive. If you’re getting Windows was unable to find a certificate error, you might be able to fix it by doing the following:

  1. Type Restore Point in the search/Cortana bar and Create a Restore Point option.
  2. Click on System Restore. Click Next when the new dialogue box appears.
    System Restore Point Select Windows can't find certificate
  3. Check Show more restore points option.
  4. Go through all the system restore points and select the recently created restore point.Confirm your System Restore point certificate wireless network
  5. Click on Finish. Wait for the Windows to restore the PC to an earlier point.
  6. After the restart check for any improvements.

There you go, these are a couple of solutions that might fix the Windows was unable to find a certificate error on your PC.

RELATED ARTICLES YOU MAY LIKE:

Life is Strange 2 Episode 2 is now playable for free with Xbox Game Pass

The second episode of Life is Strange 2 is now available to play for free for all Xbox Game Pass subscribers on Xbox One.
This latest episode follows the events of the first one and also features a tie-in with the Captain Spirit spin-off.

Here’s the official description and trailer:

The two brothers continue their journey on the road into the winter months & struggle against the cold. As Daniel gradually falls ill, Sean’s concern for his younger brother increases and decides the pair of them must make their way to their distant grandparent’s house to recover and seek shelter. During their stay, they encounter next-door neighbour Chris, a young boy the same age as Daniel who believes he is a super-hero by the name of Captain Spirit. As Daniel and Chris begin to form a friendship, Sean insists on Daniel following a set of rules around his power. Will Daniel keep his power concealed or break the rules in a time of need?

Xbox Game Pass is a Netflix-like subscription service for Xbox video games. Every month new game content is added while older games are removed. Subscribers can play the current games in the Xbox Game Pass library in full as if they owned them outright.

Are you an Xbox Game Pass subscriber and are you playing Life is Strange 2? Let us know if you’re enjoying it in the comments below and then follow us on Pinterest for more Xbox gaming content.

The app was not found in the store. ?

Intel drivers are ready for Windows 10 May 2019 Update

Intel recently rolled out new graphics driver updates for the 64-bit version of Windows 10 v1903. The company released these updates in order to avoid another October 2018 Update bug episode.

Last year, many Windows 10 users who tried to install the latest OS version update experienced some really nasty issues with Intel drivers.

Intel DCH Drivers version 26.20.100.6709

The latest Intel driver update addresses some major problems introduced by the previous release. Users reported they experienced graphics anomalies while playing various game titles.

Intel addressed the issue for three popular games including Arma 3, Dreamfall the Longest Journey, and Re-Legion.

Secondly, the company also fixed a bug with Devil May Cry 5. The bug was causing crashes and hangs for gamers while playing the title with DX11.

Last but not least, some users reported an error message while playing Rise of the Tomb Raider with DX12. 

As always, the update came with some issues of its own. Intel acknowledged that gamers who play Apex Legends, Generation Zero, Devil May Cry 5 (DX12) and Tom Clancy’s The Division 2 (DX12) may experience some minor graphics anomalies.

Furthermore, World War Z (Vulkan) and Anno 1800 (DX12) may cause hangs or crashes. Your videos may get corrupted if you are using Cyberlink screen recorder.

Intel upgrade block in place

The majority of Windows 10 users reported audio issues because of the Intel Smart Sound Technology driver version 09.21.00.3755. Furthermore, Microsoft avoided some major problems caused by the graphics drivers by putting an upgrade block in place.

Microsoft has yet to remove the upgrade block for systems that are running 24.20.100.6344/24.20.100.6345 versions of Intel display drivers. According to Microsoft, some OEMs accidentally received these drivers.

Microsoft warned users to expect audio playback issues after installing these drivers. The bug affected Windows 10 users who connected their PC to a television or monitor with the help of a DisplayPort, HDMI or USB-C cable.

Intel released the new drivers to address audio playback issues. However, the tech giant will not release an update for PCs running the October update.

Download Intel Graphics Driver 26.20.100.6709

You can visit Intel’s website if you want to download the latest driver versions. Unlike previous versions, this time Intel launched both the .zip and .exe formats at the same time.

RELATED ARTICLES YOU NEED TO CHECK OUT:

Block Windows 10 v1903 install with Windows Update Blocker 1.2

Windows Update Blocker version 1.2 just got released with added support for Windows 10 2019 May Update. This is a handy tool that you can use to enable/disable the Windows Update service with a single click. 

There is no built-in option in the Windows 10 Control panel or Settings app that allows users to permanently turn off Windows updates.

Windows 10 May 2019 Update includes a feature that allows you to defer or delay updates for up to 30 days.

Microsoft has a bad record of releasing bug-ridden Windows 10 updates. That is why more and more users are looking for new options to delay or completely block Windows 10 updates. Others want to sit back and wait until a stable version is released.

Windows Update Blocker 1.2 changelog

Today. most of the users are using third-party tools to block automatic system updates.

Microsoft is preparing to release a new OS version in May. You must be worrying about the possibility of facing a series of new bugs all over again.

However, Windows Update Blocker 1.2 comes as a lifesaver for all of you. The latest version now supports the Windows 10 2019 May Update.

You can use this program to completely disable the Windows Update service on your PC. The tool prevents your system from downloading or installing the latest updates. 

Furthermore, now you can also block other services that are associated with the Microsoft Upgrade Server. However, there is a twist in it. You will be required to manually edit the wub.ini file. 

Notably, the software also comes with a special setting that prevents any unauthorized changes. 

Microsoft is all set to release Windows 10 May 2019 Update next month. Insiders who are currently enrolled in the Windows Insider Preview Preview Ring can access the RTM version of the upcoming update.

How to download Windows Update Blocker 1.2

You can visit Sordum.org download the latest version of Windows Update Blocker on your Windows 10 PC. This version brings newly added support for the May 2019 Update.

Are you excited about to use this new tool?  Let us know in the comments section below.

RELATED ARTICLES YOU NEED TO CHECK OUT:

SyncToy for Windows 11 & 10: Download & Install Guide

Here’s how to download and install SyncToy. This freeware syncing app is written using Microsoft’s .NET framework and it utilizes Microsoft Sync Framework.

To get started, select a source folder on the left and a destination folder on the right. Also, any folder can be used as the source or destination.

Hence, just follow the steps to set it up and start syncing your data easily.

How can I install Microsoft SyncToy on Windows 10?

Download from Microsoft Download Center

  1. Visit Microsoft Download Center.
  2. Click the Download button.
    synctoy-download
  3. Select the version you wish to download. If you use 32-bit version of Windows 10 select the x86 version, but if you use 64-bit Windows, be sure to select 64-bit version of SyncToy. Click the Next button to start the download.
    synctoy-version-select
  4. Once the download is completed, locate the file you just downloaded and double click it to start the setup.
    synctoy-setup-file
  5. The first thing you’ll notice is the Microsoft Sync Framework 2.0 Core Components agreement. Read it, and click the Accept button.
    synctoy-agree
  6. Wait until setup installs Microsoft Sync Components.
    synctoy-microsoft sync
  7. Setup will now give you a warning message. Read it, check I have read and understand the warning above and click the Next button.
    synctoy-warning
  8. Now you’ll see License agreement. Read it, select the I Agree option and click the Next button.
    synctoy-liscense-terms
  9. Select the destination directory where you want to install SyncToy. If you want, you can install the application just for the current user or for all users on this computer. Once you’re done, click the Next button.
    synctoy-directory
  10. Click Next button once again to start the installation process.
    synctoy-confirm-installation
  11. Once the setup is completed click the Close button.
    synctoy-close-install

After the SyncToy is installed, you can start it by double clicking the SyncToy 2.1 shortcut.

synctoy-synctory-application

Start synchronizing your folders

  1. When the application starts click the Create New Folder Pair.
    synctoy-create-new-folder-pair
  2. Now you need to select left folder and right folder. Click Browse and select the two folders that you want to synchronize. After you’re done click the Next button.
    synctoy-left-right-next
  3. At this point you need to select which method of synchronization you want to use. There are three methods available: Synchronize, Echo and Contribute. If you’re not sure which to pick, we have a quick explanation of what each does below.
    synctoy-sychronize-options
  4. Enter the name of the folder pair and click the Finish button.
    synctoy-backup

After creating the folder pair, you can see its properties. Afterwards, you can change the Synchronization settings at any time and you can even exclude certain files from synchronization. 

synctoy-run-sync
synctoy-results

Now you should see a detailed report.

Types of synchronizing methods

There are three methods: Synchronize, Echo, and Contribute.

  • Synchronize: syncs any new, deleted, or renamed files between both folders, meaning changes in one folder are mirrored in the other.
  • Echo: similar to Synchronize, but only applies changes from the left to the right folder, so changes in the right folder won’t affect the left.
  • Contribute: the safest option, allowing the renaming of files in the left folder to update the right, without deleting any files.

Wrapping up

That’s about it when it comes to setting up and using the SyncToy app.

Bear in mind that you can have as many folder pairs as you like, and you can sync them all with just a single click, or you can sync them individually.

What is Telnet and how to use it in Windows 10?

If you’re not familiar with it, today we’re going to explain you how Telnet works and can you use it on Windows 10.

The development of Internet saw the invention of many protocols that allowed us to use it better. One of these protocols was Telnet.

What is Telnet and how does it work?

Telnet is an Internet protocol that allows you to connect to a different computer on your local network or on the Internet.

Telnet was invented in 1969, and it’s often considered an ancestor of modern Internet.

Today most users use a graphical user interface, but when Telnet was invented there were no browsers or graphical operating systems. Therefore, users had to rely solely on command line interface.

It’s worth mentioning that Telnet still works like it did decades ago, and Telnet clients are available for almost any platform.

Telnet changed the way how people use Internet because in the time before Telnet users had to manually use the server in order to get certain data.

With Telnet, users could access the server remotely from the comfort of their home for the first time.
In addition to remote access, multiple users were able to connect to the server over Telnet. Therefore, it’s not hard to see how Telnet influenced the development of the Internet.

We have to mention that there are two different terms when it comes to Telnet: Telnet server and Telnet client. The former is a computer designed to run as a Telnet server.

You can easily turn your Windows PC into a Telnet server and you should be able to access it over Telnet.

Bear in mind that having a public IP address leaves your computer open for access by any computer on the Internet, so be sure to use a firewall in order to protect your PC from unauthorized remote access.

The same principles apply to running Telnet on Windows 11, so make sure to check it out if you’re running the latest OS from Microsoft.

Telnet client is a PC that uses a Telnet connection to connect to a Telnet server. In fact, you can use Telnet from Windows 10 by following these steps:

  1. Press Windows Key + S on your keyboard and enter features. Select Turn Windows Features on or off.
    telnet-windows-features
  2. When Windows Features opens, scroll down and check Telnet Client. Click OK to install Telnet.
    telnet-client-enable
  3. Wait until Windows installs the necessary components.
    telnet-searching-required-files
  4. Once the installation is completed click the Close button.
    telnet-completed

After you install Telnet, you can start it by doing the following:

  1. Press Windows Key + S and enter telnet. Select Telnet from the list of results.
    telnet-search
  2. Command line will now open, and you should be able to use Telnet without any problems.
    telnet-line

Why is Telnet obsolete?

Although running Telnet on Windows 10 is fairly simple, the question remains why would you use Telnet for? Telnet is an outdated protocol, and most people don’t use it anymore.

This protocol is great if you are a computer geek, and you want to access Internet by using command line. Unfortunately, there aren’t many Telnet servers available nowadays, so you might have to do some research before you find one.

One of the biggest flaws of Telnet is its lack of security. Telnet transmits all the data between the client and the server without any encryption which means that almost anyone can intercept your data.

This is especially important if you’re sending sensitive information over Telnet, such as your username or password. Due to lack of encryption, malicious users can easily steal your password and see all the data between the Telnet client and server.

Also, Telnet doesn’t have authentication, which means that malicious users can easily intercept your traffic. Lastly, Telnet has several additional security vulnerabilities which make it quite unsafe to use.

Even though Telnet in Windows 10 might not be the safest Internet protocol, newer protocols, such as SSH for example, were inspired by Telnet. They are designed to fix many flaws that original Telnet had.

Telnet might not be as popular as it was a few decades ago. Stll, it’s certain that Telnet changed the way how Internet works forever.

READ ALSO:

How to take and save screenshots on Windows 10 [STEP-BY-STEP GUIDE]

Sometimes you need to quickly share a screenshot with someone online. Creating and sharing them is relatively simple, and today we’re going to show you where your screenshots go on Windows 10.

How do I take screenshots on PC?

  1. Use Print Screen key
  2. Use Windows Key + PrtScn shortcut
  3. Use the Snipping tool
  4. Use Game Bar in Windows 10

Creating screenshots on Windows 10 is fairly simple, and it doesn’t even require you to use a complex software application.

You can easily create screenshots on Windows 10 with built-in tools or with dedicated tools, and today we’re going to show you where your screenshots are saved by default on Windows 10.

Where does Windows 10 save my screenshots?

If you haven’t changed your default settings, you should be able to find your screenshots under the following path: C: Users[User]My PicturesScreenshots.

Of course, you can also create a dedicated folder where you can save your screenshots. You can create the folder on your desktop or use a location of your choice.

Furthermore, you can also upload your screenshots if you need to share them with someone. Follow this article to find out more about how to upload screenshots and what tools to use.

Editor’s choice: Use a dedicated tool for screenshots

By using a simple yet with enough features to accomplish what you want but not confuse you. Keep your screenshots organized, ready to be used right away with innovative software.

With screen recording software you can save your screenshots straight to your hard drive to the destination of your choosing. And, you will be able to store the screenshots in various file formats.

You may quickly capture an image to highlight key areas or sections, capture videos, schedule a screen recording, keep a history of your work, and even edit using a drawing panel.

4 quick methods to take screenshots on PC

Method 1 – Use Print Screen key

This is probably one of the oldest methods of creating screenshots. To create a screenshot simply press the Print Screen or PrtScn key on your keyboard. By pressing this key you’ll create a screenshot of your entire screen.

If you want to create just a screenshot of your current window, you can do so by using Alt + PrtScn shortcut.

By using these shortcuts your screenshot will be saved to your Clipboard. In order to save it to your hard drive, you need to start Paint or any other image editing software and paste the screenshot from the Clipboard by pressing Ctrl + V shortcut.

Although this method is rather simple, we have to warn you that you won’t be able to view any previously made screenshots. Clipboard saves only one entry at a time, and if you accidentally copy something else into Clipboard you’ll remove your screenshot.

If you use this method, it’s recommended to paste the screenshot to your image editor as soon as you can in order not to lose it. By using any image editing tool you can save the screenshot to any folder that you want.

We have to mention that you can somewhat avoid the problem with Clipboard simply by using a clipboard manager tool. These types of tools allow you to view all items that were copied to your Clipboard so you won’t ever lose your unsaved screenshots again.

If you’re having trouble with copy-pasting on Windows 10, this complete guide will help you solve any issues with it.

Method 2 – Use Windows Key + PrtScn shortcut

Print Screen shortcut was available in previous versions of Windows, but with Windows 8 Microsoft introduced a new shortcut. In Windows 8 we got Windows Key + PrtScn shortcut, and this one made its way to Windows 10.

We have to mention that some laptops might use a slightly different shortcut, so be sure to check your laptop’s instruction manual for details.

By using this shortcut your screen will become dim for a half second and you’ll hear the shutter sound. This means that you successfully created a screenshot.

Keep in mind that this method will create a screenshot of an entire screen.

By using this method all your screenshots are saved to C:UsersYour_usernamePicturesScreenshots directory.

You can also access your Screenshots by opening Photos app and going to Albums > Screenshots section.

where-do-my-screenshots-go-alumbs-1

We have to mention that you can change the default screenshot directory if you wish to do so. To do that follow these steps:

  1. Open your current screenshot directory. By default it should be C:UsersYour_usernamePicturesScreenshots.
  2. Right click the empty space and choose Properties from the menu.
    where-do-my-screenshots-go-properties-1
  3. Go to Location tab and click the Move button.
    where-do-my-screenshots-go-properties-2
  4. Select a new directory for your screenshots. You’ll see a message asking you to move all the files from the old location to the new one. Choose Yes.
  5. After doing that, your screenshot folder will change. Regarding new screenshots, they will be saved to the new screenshots folder.

Although this method is rather simple, it has its flaws. By using this method you can’t create screenshot of a single window, which can be an issue for some users.

If you want to keep all your screenshots nicely organized in a single folder, we suggest that you try this method.

Method 3 – Use the Snipping tool

Windows 10 comes with built-in Snipping tool that allows you to easily create screenshots. This is a simple yet powerful tool, and in order to run it, do the following:

  1. Press Windows Key + S and enter snipping.
  2. Select Snipping Tool from the list.
    where-do-my-screenshots-go-snipping-1

Snipping tool allows you to create window snips so you can easily create a screenshot of a currently opened window. If you want, you can create full-screen screenshots as well.

This application supports free-form and rectangular screenshots so you can easily screenshot only the specific parts of the screen.

The application also has a delay function which can be rather useful especially if you want to screenshot open menus.

After you create a screenshot, you can edit it with a pen tool or highlight certain items. If you require any advanced editing, you can copy the screenshot to the Clipboard and paste it to any photo editing tool.

Regarding saving, you need to save each screenshot manually while using the Snipping Tool.

Also, we have to mention that there’s no dedicated screenshot folder, so you’ll have to manually choose the save location for each screenshot.

This is probably one of the most advanced methods to take and save screenshots on Windows 10.

Using this method you can screenshot certain parts of your screen and perform basic editing operations which can be extremely useful.

If you can’t find the snipping tool in Windows 10, take a look at this easy to follow guide to help you get back on track immediately.

Method 4 – Use Game Bar in Windows 10

Windows 10 comes with useful feature called Game Bar. This feature allows you to record videos and take screenshots while in game. Of course, you can use this feature to create screenshots from any application as well.

To create a screenshot with Game Bar, simply press Windows Key + Alt + PrtScn. Keep in mind that in order to use this feature you need to enable Game DVR option from Xbox app.

When you press the keyboard shortcut a small window might appear. If that happens, be sure to select Yes, this is a game option. After doing so, you’ll be able to create screenshots without any problems.

Regarding your screenshots, they will be saved to C:UsersYour_usernameVideosCaptures directory.

Also, you can see your saved screenshots from the Xbox app. To do that, follow these steps:

  1. Press Windows Key + S and enter xbox. Choose Xbox from the menu.
    where-do-my-screenshots-go-xbox-1
  2. When Xbox app opens, from the menu on the left choose Game DVR.
  3. Select On this PC and you’ll see all created screenshots.
    where-do-my-screenshots-go-xbox-2
  4. If you want, you can click individual screenshots and choose Open Folder option to open the save directory.

As you can see, creating screenshots on Windows 10 is rather simple, and depending on the method that you use your screenshots will be stored in a different location.

In conclusion, now that you know how to create screenshots and where to find them, feel free to try any of our methods. If you have any more questions, feel free to drop them in the comments section below.