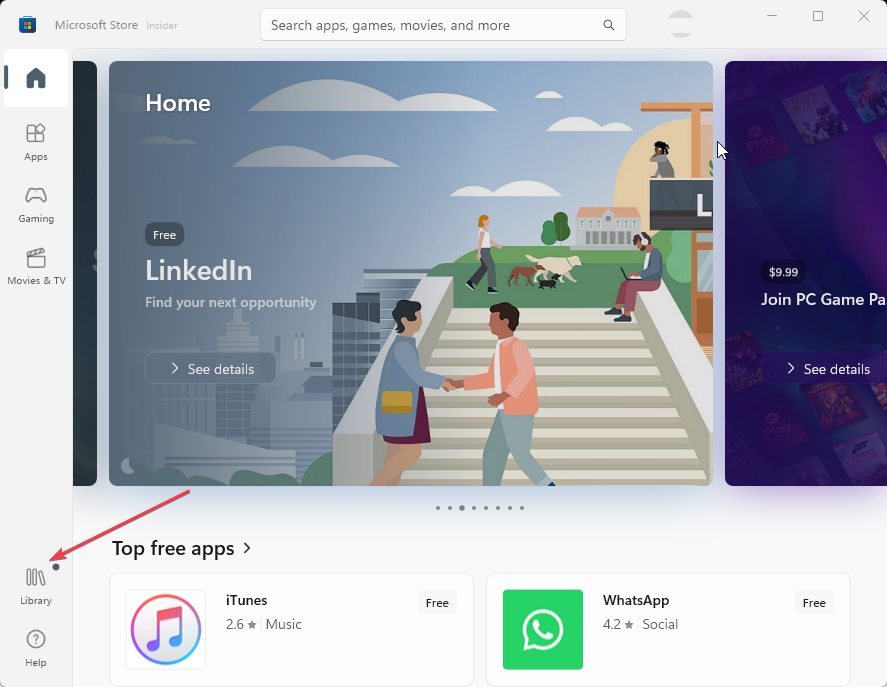
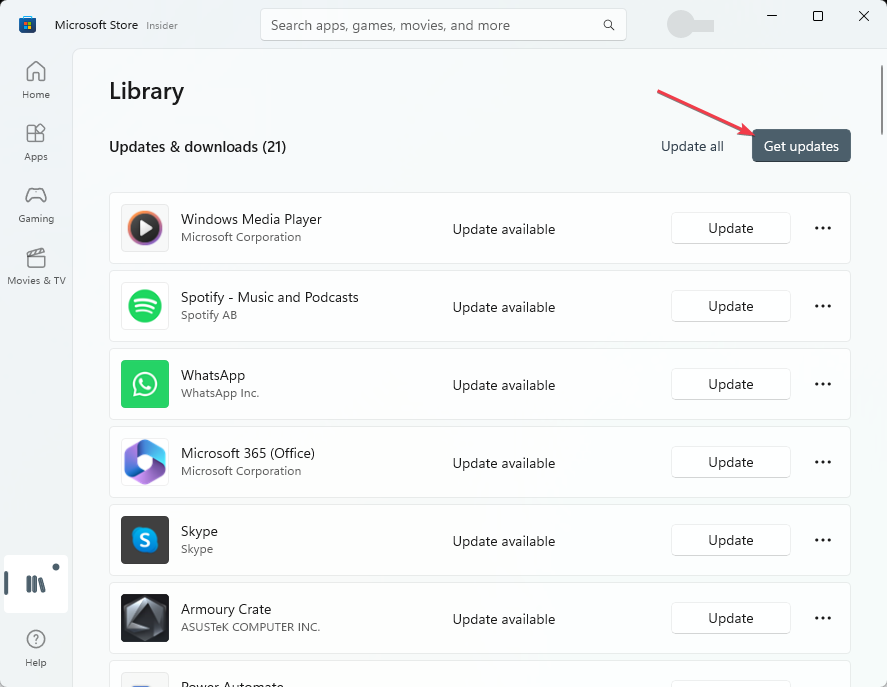
Many Windows users have recently reported encountering a mbamtray.exe application error on their PCs. The error can appear randomly and impede the activities of the system. However, this article will take you through ways to fix the mbamtray.exe error.
There can be several reasons for encountering a mbamtray.exe application error. Here are a few common causes:
Conflicts between Malwarebytes and other security software or third-party applications can lead to application errors.
If the installation of Malwarebytes or its associated files is incomplete or corrupted, it can result in application errors.
Malware or viruses can target and corrupt Malwarebytes files, including mbamtray.exe.
Outdated or incompatible device drivers on your system can cause conflicts with Malwarebytes.
How do I fix the mbamtray.exe application error?
Before attempting any advanced fixes, try the following preliminary checks:
Restart your computer to resolve temporary issues and clear any conflicting processes causing the application error.
Perform a clean boot to start your computer with minimal drivers and programs.
Consider temporarily disabling background apps or uninstalling any recently installed security software
Update Malwarebytes to install bug fixes and improvements that can resolve application errors
If the issue persists after trying these steps, proceed with the solutions below:
1. Disable the Self-Protection module in Malwarebytes
Launch the Malwarebytes client on your computer.
Click the Settings icon in the top bar, then select the Advanced Settings option from the left pane menu.
Then, uncheck the box for the Enable Self-Protection module option.
Exit the Malwarebytes app and check if the mbamtray.exe application error persists.
Disabling the Self-protection module can resolve the security settings causing the mbamtray.exe application error.
2. Uninstall and reinstall Malwarebytes
Launch your browser and download the Malwarebytes Support Tool on your PC.
Double-click the mb-support-x.x.x.xxx.exe file, then click Yes to continue the installation.
Check the box for Accept the License Agreement. Then, click Next to complete the installation.
In the Malwarebytes Support Tool, click Advanced, then Clean.
Click Yes on the Malwarebytes Cleanup pop-up, then click OK to restart your PC.
Then, tap the Yes button on the Reinstall Malwarebytes for Windows prompt.
Follow the on-screen instructions, then click Install. The Malwarebytes client will launch automatically, then check if the mbamtray.exe application error persists.
Reinstalling the Malwarebytes client will fix corrupt files and install the latest Malwarebytes versions. Also, it resolves any configuration conflicting with the mbamtray.exe executable process.
Some of our readers are experiencing similar issues and are eager to know what OfficeC2RClient.exe is and possible methods to address the issue.
What is OfficeC2RClient.exe?
OfficeC2RClient.exe is an executable file associated with Microsoft Office. Further, the C2R in the name stands for Click-to-Run, which is a technology used by Microsoft to deliver and update Office applications.
OfficeC2RClient.exe is part of the Click-to-Run service and is responsible for managing the installation, updating, and maintenance of Microsoft Office applications. Also, it provides automatic updates to keep the Office suite up to date with the latest features and security patches.
Moreover, OfficeC2RClient.exe runs in the background and periodically checks for updates to Microsoft Office. When updates are available, it downloads and installs them silently, without requiring user intervention. It ensures that the Office suite remains current and secure.
Should I disable OfficeC2RClient.exe?
Disabling OfficeC2RClient.exe is not recommended unless you have a specific reason to do so. While some users may experience high CPU or memory usage due to OfficeC2RClient.exe, it is usually a temporary issue that occurs during certain operations, such as updates or background maintenance tasks.
If you’re facing persistent performance issues related to OfficeC2RClient.exe, it is advisable to try the following steps before considering disabling it:
Restart your computer, as it can help resolve temporary resource usage problems.
Monitor the behavior of OfficeC2RClient.exe over time.
Check the location of the executable file – If the officec2rclient.exe process is found under C:\Program Files\microsoft office 15\clientx64\integratedoffice.exe, it is expected to be a safe Windows process.
However, if after confirming the above checks, you still encounter performance issues, you can work your way through any of the methods provided below on how to disable officec2rclient.exe.
How can I disable officec2rclient.exe?
1. Disable officec2rclient.exe in Task Manager
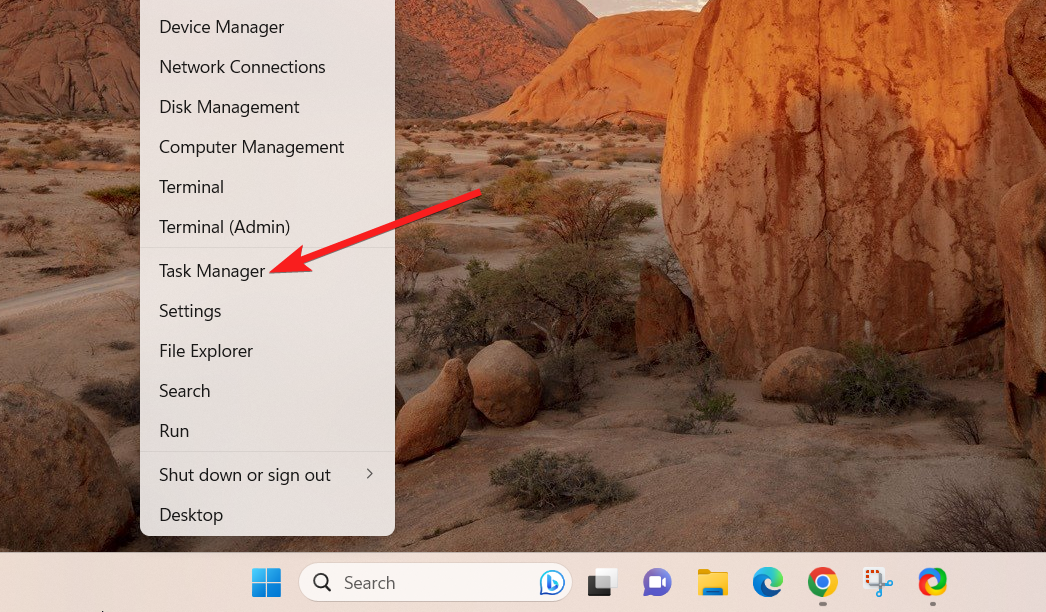
Right-click on the Start button and select Task Manager from the context menu.
Then, navigate to the Processes or Details tab. Right-click the officeClickToRun.exe and selectEnd Task to terminate it.
Now restart your PC.
It’s recommended to only disable it temporarily for troubleshooting purposes and enable it again afterward to ensure the proper functioning and security of your Office applications.
Do not hesitate to explore our detailed guide on how to fix the Start menu issues on your PC.
2. Disable the Microsoft Office Click-to-Run Service
Press the Windows + R keys to open the Run command dialog box. Type services.msc in the dialog box and press Enter to open the Service Manager.
Further, search for Microsoft Office Click-To-Run Service, right-click on it, and then select Properties.
Then, change the startup type to Disabled and click the OK button to save the changes.
3. Limit the resource usage of the officec2rclient.exe
Press the Windows + R keys to open the Run command dialog box. Type appwiz.cpl in the dialog box and press Enter.
Then, locate Microsoft Office 365 in the Programs and Features window. Click on the Change button and wait for a few seconds.
Now, check the Quick Repair box in the pop-up window and click on the Repair button below.
Then, click Repair again and wait for the process to complete.
Restart your PC.
Repairing the entire Office installation is a viable means to fix the high CPU usage.
In case none of the above methods works for you, seek assistance from a professional technician or Microsoft Support rather than disabling the process outrightly.
If you use a browser on your computer, you must have encountered a few add-ons. The Java Plug-in SSV Helper is one such tool. In this guide, we discuss its use and show you the easiest way to enable or disable it.
Before going further, check out our list of the best Edge browser extensions if you like improved browser functionality.
What is the Java TM plug-in SSV helper add-on from Oracle America?
The helper aids in managing and controlling Java applets and programs inside web browsers. It comes as part of the A part of the Java Runtime Environment (JRE). If interested, you may learn how to fix a missing JRE using instructions in our other guide.
What does Java Plug-in SSV Helper do?
The Java helper add-on guarantees the compatibility of Java-based content.
The add-on offers Java Runtime Environment (JRE) automatic upgrades.
It performs security checks to find any potential flaws.
The extension can improve the interoperability of web browsers with Java content.
It makes engaging with online Java-based information a fluid and easy process.
NOTE
Running Java applications in your browser does not require the SSV assistance plug-in; it is different from the JRE, which is required.
How do I enable or disable Java Plug-in SSV Helper?
Launch the setup and click Yes in the UAC prompt, then the Java installation wizard will appear on your screen. Follow the Wizard to complete the process.
Click Close at the end.
Now, the helper should work when you encounter a web applet that needs Java.
How to disable Java Plug-in SSV Helper?
Disable the helper using apps and features
Press Windows + R to open the Run dialog.
Type appwiz.cpl and hit Enter.
Scroll down, click on a Java entry, then click Uninstall and follow the wizard to complete the process.
This decision is ultimately yours to make; however, you may consider the following:
You may want to disable it if you use an older version of Java since you may be more vulnerable to security attacks.
You may prefer to keep it enabled if you visit websites that use Java applets.
Disabling it may be helpful if you notice any reduced performance while using the plugin.
That will be all for this guide. If you have read this far, you should have chosen to keep or disable the tool.
If you need Java running on your computer, remember the helper does not replace the JRE. We have a guide that shows you how to install Java on your Windows 11 computer.
Lastly, please let us know if you have any additional questions in the comment section below.
This guide will walk you through the ins and outs on how to enable Microsoft 365 Copilot so you can integrate it into your workflow and do more for you. Microsoft outlines its frequently asked questions about AI and Microsoft 365 Copilot, and provides a brief roadmap for Copilot as well as existing AI-powered tools in Microsoft 365.
What is Microsoft 365 Copilot?
Microsoft 365 Copilot is a smart, AI-powered productivity tool that helps you navigate your workday with ease. It provides personalized recommendations, tips, and insights based on your work patterns, preferences, and habits. Copilot is designed to work seamlessly with your existing Microsoft 365 tools, such as Teams, Outlook, and Word. At the time of this writing, Microsoft 365 Copilot is only available in a “very limited preview.”
Microsoft 365 Copilot Key Features and Benefits
Microsoft 365 Copilot uses AI and machine learning algorithms to understand your work patterns and preferences. It analyzes your communication, collaboration, and productivity data to provide you with personalized insights, tips, and recommendations.
Feature 1: Proactive Monitoring and Issue Detection
Microsoft 365 Copilot continuously monitors your Microsoft 365 environment, analyzing data and detecting potential issues before they escalate. It provides real-time alerts and notifications, allowing you to address problems promptly and minimize downtime. With proactive monitoring, you can ensure that your organization’s productivity remains uninterrupted.
Feature 2: Automated Troubleshooting and Remediation
Copilot goes beyond monitoring and offers automated troubleshooting and remediation capabilities. It can automatically resolve common issues, saving you time and effort. By leveraging its intelligent automation capabilities, Microsoft 365 Copilot provides personalized recommendations and insights tailored to your organization’s specific needs. It analyzes your usage patterns, security settings, and compliance requirements to offer customized suggestions for improving your Microsoft 365 environment. These recommendations help you optimize your workflows, enhance security measures, and achieve regulatory compliance.
Implementing Microsoft 365 Copilot
Check out this Microsoft Mechanics video to learn what you need to be ready for Copilot.
Step 1: Assess Your Organization’s Needs
Before implementing Microsoft 365 Copilot, it is essential to assess your organization’s needs and goals. Identify the pain points and challenges you are currently facing in managing your Microsoft 365 environment. Determine the specific areas where you require assistance and define your objectives for using Copilot.
Step 2: Familiarize Yourself with Copilot’s Features
To make the most of Microsoft 365 Copilot, take the time to familiarize yourself with its features and capabilities. Explore the proactive monitoring and automated troubleshooting functionalities. Understand how Copilot generates recommendations and insights to help you optimize your Microsoft 365 environment.
Step 3: Plan the Implementation Process
Creating a detailed implementation plan is crucial to ensure a smooth transition to Microsoft 365 Copilot. Define the roles and responsibilities of the individuals involved in the implementation process. Establish a timeline and allocate resources accordingly. Consider any potential challenges or risks and develop contingency plans.
Step 4: Enable Copilot and Configure Settings
Once you have planned the implementation process, it’s time to enable Copilot and configure the necessary settings. Follow the instructions provided by Microsoft to activate Copilot for your organization. Customize the settings according to your specific requirements, such as selecting the workloads to monitor and defining notification preferences.
Step 5: Monitor and Optimize
After enabling Copilot, actively monitor its performance and the insights it provides. Regularly review the recommendations and take appropriate actions to optimize your Microsoft 365 environment. Continuously assess the impact of Copilot on your organization’s productivity, security, and compliance, making necessary adjustments as needed.
Best Practices for Microsoft 365 Copilot
Microsoft 365 Copilot Message Center
With Microsoft 365 Copilot, your team gains access to a motherload of collaborative features designed to enhance productivity and streamline communication. From real-time co-authoring to seamless file sharing and team chat, Microsoft 365 Copilot empowers your employees to work together efficiently and achieve remarkable results.
Encourage Collaboration: Copilot offers a range of collaborative features such as real-time co-authoring, file sharing, and team chat. Encourage your employees to leverage these capabilities to foster teamwork and streamline communication.
Emphasize Security: As with any cloud-based solution, security is of utmost importance. Educate your employees about best practices for data protection, password management, and device security. Enable multi-factor authentication and implement data encryption to safeguard your organization’s sensitive information.
Stay Updated: Microsoft regularly releases updates and new features for Copilot. Stay informed about these updates and ensure that your organization is leveraging the latest enhancements. Regularly review the Microsoft 365 roadmap and explore how new features can benefit your workflows.
As you embark on your Microsoft 365 Copilot journey, remember that security and staying updated are key pillars of success. By prioritizing data protection, password management, and device security, you can ensure the safety of your organization’s sensitive information. Additionally, staying informed about Microsoft’s regular updates and new features enables you to leverage the latest enhancements and maximize the benefits of Microsoft 365 Copilot. By fostering collaboration, emphasizing security, and embracing innovation, your organization can unlock the full potential of Microsoft 365 Copilot and elevate your workflow to new heights.
When users try to install a version of this program that is incompatible with their operating system, they may encounter the 0x80096002 Windows Update Standalone Installer error. This error indicates an incompatibility issue between the software and the user’s operating system.
The topic under consideration is the resolution of 0x8024800c Windows Update error on Windows 11, which we have already discussed in depth.
Nonetheless, in this article, we will focus on fixing this pesky error and provide a comprehensive guide to troubleshooting it. Join us as we unravel the necessary steps to rectify this vexatious issue.
What is error code 0x80096002?
This is an error that occurs while using Windows Update Standalone Installer, and it’s caused by the following:
Missing components such as Windows Identify Foundations.
Issues with Windows Update.
How can I fix the 0x80096002 error?
1. Enable Windows Identity Foundations
On your home screen search bar type Turn Windows features on or off and open it.
Check mark the Turn Windows features on or off option that pops up.
Scroll down to locate the Windows Identity Foundations and check it.
Click OK to save.
Lastly, reboot your PC.
2. Extend the operation duration of WSUS cookie with Command Prompt
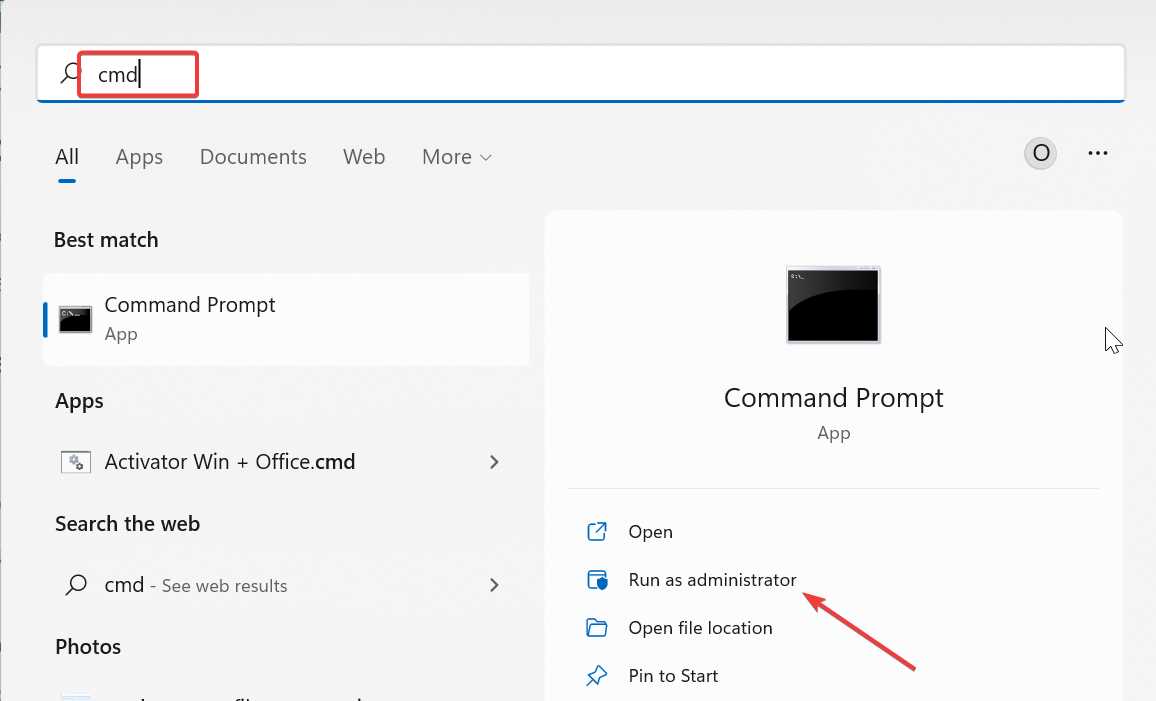
On your home screen search bar, type cmd and Run as Administrator.
When the command window opens enter the line command and tap Enter: wuauclt /resetauthorization /detectnow
Tap the Windows key on your PC and inside the search bar, type Troubleshoot settings and open it.
Now select the Other troubleshooters.
Lastly, click Run on the Windows Updates section.
We are confident that this guide has provided you with the necessary assistance to address your concern. While it may initially seem daunting, as demonstrated, resolving this issue is not as difficult as it may seem.
However, if you encounter any further difficulties, we suggest referring to our comprehensive guide on how to run Windows Update Troubleshooter. This invaluable resource provides solutions that could be precisely what you need.
We are eager to hear your feedback on this matter. Please don’t hesitate to comment below and let us know which solution proved most effective for you. Your insights are highly respected and appreciated.
If you’re looking to customize your desktop background in any way possible then DeskSpaces is for you. Deskspaces adds a host of background features, such as animated wallpapers and advanced background customizations. You can use the included design tool for creating animated wallpapers, and use the cloud to share either animated or standard wallpapers.
“The new version of DeskScapes is compelling both for animated and standard wallpapers,” said Brad Sams, Vice President of Stardock Software. “For fans of animated wallpapers, we include DreamMaker Pro, which is both powerful and easy to use for creating or enhancing desktop backgrounds. We also added seamless integration to cloud-based services for finding desktop backgrounds.”
DeskSpaces 11 is designed to integrate with the Windows built-in background manager to support features such as custom directories for backgrounds, fast searching, timed playlists, and even using videos for your background. DeskSpaces 11 supports multi-monitors, wallpaper filtering, and scheduling your favorite wallpaper as well. The included DreamMaker Pro tool makes it easy to create animated backgrounds, using drawing effects, logos, particle effects, and more.
DeskSpaces 11 us available as part if the StarkDock Object Desktop package or separately for $3.99. Head over to Stardock.com to get your copy.
Dealing with the Camera App error 0xa00f4240 on Windows can be a real headache. It’s a problem that can disrupt your ability to engage in videoconferencing, streaming, or even capturing images with your webcam.
However, in this piece, we will delve into troubleshooting a different error that arises when attempting to utilize your computer’s camera. Let us explore the steps necessary to rectify this issue.
What is error code 0xa00f4240?
This is a Camera app error, and it’s caused by the following:
Your PC’s privacy settings may also be incorrect, preventing camera access for certain applications.
Your system may be denied access to the camera due to third-party antivirus software blocking its activation.
Your camera may have incurred some physical damage, leading to its malfunction.
There could be internal glitches within the Camera app that are affecting its performance.
How do I fix error code 0xa00f4240?
Before we start, try the following:
Inspect your PC for physical damage and ensure your webcam is working properly.
Deactivate your Antivirus software since it can interfere with the Camera app.
1. Reset your Camera app
On your home screen hold the Windows + I keys together to open the Settings.
Locate the Apps section and click on Apps & Features.
Now find the Camera app, click on the three dots, and next select the Advanced options.
Finally, scroll down and click on Reset.
2. Check Privacy settings
On your home screen tap the Windows button and select Settings.
Locate the Privacy & Security section and click it.
Next, choose the Camera to open it.
Lastly be certain that the Camera access is on, if it is off you can switch the toggle.
After doing that, check if the Camera error 0xa00f4240 is gone on your PC.
On your home screen hold the Windows + I buttons to open.
Locate the Windows Update section and click on Advanced Options.
Now select Optional Updates.
If the Drivers Update is available will be shown here, just in case it’s available click on Download andInstall to update your drivers.
We sincerely believe that this guide has equipped you with the essential aid to tackle your concern. It might seem daunting at first, but as you have seen, resolving this issue is not as challenging as it may appear.
If you still face difficulties, we recommend consulting our comprehensive manual on how to fix 0xa00f4244 NoCamerasAreAttached error. This valuable resource offers solutions that could be just what you need.
We are keenly interested in hearing your feedback on this matter. Please feel free to leave a comment below and let us know which solution helped you the most. Your insights are highly valued and appreciated.
Getting An internal system error occurred message with references to dxerror.log and directxl.log in Windows 11? It’s a common issue that pops up when people try to install DirectX.
Below, we’ll show you how to put an end to all these issues in just a few steps:
How can I fix dxerror.log and directx.log errors?
To start, disable your antivirus and see if you can install DirectX. Also, run the DirectX installer as administrator and see if that helps. Should you still be facing issues, follow the advanced steps below:
1. Install .Net framework using Command Prompt
On your home screen search bar type cmd.
Choose Command Prompt and click on Run as administrator.
Input the following command and tap Enter: DISM /Online /Enable-Feature /FeatureName:NetFx3 /All /LimitAccess /Source:D:sourcessxs
Next, click on Display Adapter to expand the options.
Now right-click on the Intel HD Graphics and click on Update driver.
With an active internet connection, click on Search automatically for drivers.
When you check for driver updates, the system will inform you if the latest drivers are installed. However, if they are not, it will install the most recent updates available.
Alternatively, you can use professional driver updating software to scan for and update all your drivers. Tools such as Fortect Driver Updater, can identify the correct driver for your system and update them after just a quick scan.
On your home screen search bar type Control panel and click Open.
Now the next screen select Programs, next choose Programs and Features.
Next you will see a list of Programs, locate the Microsoft Visual C++ Redistributable. Note: When it comes to having multiple versions of software installed, it’s not uncommon for different applications to require specific versions. You may need to check if the 2015 version is available, and if so, consider reinstalling it. However, if the 2015 version is unavailable, you may need to download and install it separately.
Click on Visual Studio 2015, 2017, 2019, and 2022.
Lastly, choose the specific package for your system, and once you have downloaded it and completed the installation process,Rebootyour PC.
We hope this guid provided you with the necessary assistance to resolve your concern. The issue isn’t as much of a headache as it ay seem at first glance.
If all else fails, consider removing all files related to DirectX (previous version too) from your PC and reinstall it afresh.
We’re eager to hear your opinion on the matter, so don’t hesitate to comment below and share which solution made the biggest difference for you. Your input is greatly appreciated.
Windows is the most popular operating system on earth. You spend a lot of time on Windows, but what do you know about it? If you’re like most people, probably not much. And that’s OK.
Windows is an extremely complex operating system with a lot going on behind the scenes. We use it to navigate our lives and perform our tasks, but have you taken a second to think about the OS? Why do we love it so much?
Well, some little-known facts include:
Windows was almost called Interface Manager
The first version of Windows occupied 265kb space
Mosaic was the first web browser for Windows
The OS has a lot to offer. There are plenty of hidden gems that can improve your experience if only you knew where to look. So what are all these other features that make Windows so great?
We’ve rounded up some of our favorite lesser-known facts about Microsoft Windows to help you get more out of your PC.
What is Microsoft Windows known for?
Windows is a family of operating systems developed by Microsoft. It consists of several families of client and server operating systems.
If you’re like most people, you know Windows for its intuitive user interface, which has changed little over time and is easy to use even for novices. It’s also known for its compatibility with thousands of applications and devices.
Some know it for its security flaws. Looking at Windows 11 disadvantages will paint a picture of just how some users loathe the OS. Luckily, the good outweighs the bad, so let’s focus on the good things.
After all, when you take the number of computers available in the world and what percentage have Windows installed, Windows wins the war. Not that there was any in the first place.
What are some of the interesting facts about Windows?
1. Windows was not the first OS
Contrary to popular opinion, Microsoft Windows was not the first operating system to be developed by Microsoft.
Xenix was the first debut OS that Microsoft created in the 1970s before they started working on DOS.
This version was meant for microcomputers, but eventually, personal computers were developed to allow people to do their own computing and not depend on large centralized machines.
Also, Microsoft did not seem interested in co-developing the OS and abandoned Xenix for Windows. And that’s how the first Windows version: Windows 1.0, was born.
The complete Microsoft Windows version history includes:
Windows 1.0 – 1985
Windows 2.0 – 1987
Windows 2.1x -1988
Windows 3.0 – 1990
Windows 3.1 – 1992
Windows NT 3.1 – 1993
Windows 3.2 – 1993
Windows NT 3.5 – 1994
Windows NT 3.51 – 1995
Windows 95 – 1995
Windows NT 4.0 – 1996
Windows 98 – 1998
Windows 2000 – 2000
Windows ME – 2000
Windows XP – 2001
Windows XP Professional x64 Edition – 2005
Windows Vista – 2007
Windows 7- 2009
Windows 8 – 2012
Windows 8.1 – 2013
Windows 10 – 2015
Windows 11 – 2021
You’ve probably not interacted with half or more of the Windows versions on this list, as some have been discontinued.
Since then, it has been a journey of success with the subsequent releases, each version topping the other with an enhanced interface and new features.
You can compare the latest Windows version, Windows 11 features and see just how far the OS has come.
2. Interface Manager was the original name for Windows
When you think about it, any other name apart from Windows would not be fit for the software we have all come to love. The billionaire Bill Gates and his team was responsible for coming up with the name, and they thought Interface Manager would do.
Of course, Windows is an interface manager, but it made more sense to name it Windows based on all the tasks one can perform.
A user can easily open multiple windows on the screen and switch between them. This makes it easier for users to multitask within their computer environment than other operating systems.
Here is where the name Windows came from. The graphical user interface provided a view of a desktop with multiple windows that could be moved around and resized.
When you think about it, the name is as literal as it sounds. Whenever you’re using the OS, you’re basically opening and closing different windows on your browser or desktop.
3. The first-ever browser was called Mosaic
Nowadays, the browser pool has expanded vastly you’ll be spoilt for choice on which one to go for. However, when Windows was first launched, there was only one browser called Mosaic. It was released in 1993, years before Microsoft’s Internet Explorer (IE) became dominant on PCs.
As ancient as the name sounds, it was way better compared to other browsers at the time. Picture this. Before Mosaic, you could not view images directly on your browser. You had to download them first.
Given how storage space was not yet advanced back then, you can imagine all the effort it took in downloading and deleting images just to keep your PC running.
Mosaic was the first user-friendly browser and set the tone for today’s browsers. It would later be replaced by Microsoft’s Internet Explorer, now Microsoft Edge, but its influence lives on today’s modern browsers.
In the world of computers, you cannot talk about the evolution of Windows without talking about how viruses have played a role in influencing the security of the OS.
In 1992, a virus was released that would change the course of Windows history. It was called Winver 1.4, the first ever Windows virus that targeted Windows 95.
The many antivirus solutions available today have been influenced by the viruses that occasionally plague Windows systems. It’s almost an oxymoron, as without viruses, there probably wouldn’t be a need for antiviruses.
Cybercriminals have since upped their game, and the viruses today are nothing compared to the first. It just goes to show how with each version, Microsoft is continuously working to mitigate these security threats.
Winver 1.4 would probably not stand a chance today in Windows 11, given all the security settings you can tweak. It has also been voted the most secure OS version yet.
5. Windows has had unreleased versions
Apparently, it’s not only artistes who have unreleased projects. Microsoft also has software that they chose to shelve.
There are some Windows operating systems that you’ve probably never heard of. Microsoft has a long history of releasing new versions of Windows, but some have never been officially released.
Some were canceled as part of Microsoft’s regular development cycle, while others were in development for years before being scrapped.
Among versions that have never seen the light of day include:
Windows Neptune – This was a Windows version planned to be released in 1999. It would have been the successor to Windows 98 and featured a new user interface. Although it never came to fruition, most of its features were seen in Windows XP.
Windows Cairo – The Windows Cairo project was a planned version of Microsoft Windows intended to succeed the Windows NT version. It was canceled, but some of its features were incorporated into later operating systems.
Windows Nashville – Nashville would have been the first of Microsoft’s Windows OS intended to be used with new hardware technologies. This included desktop integration with web. Most of its features were shipped to Windows 98.
5 Facts about Microsoft Windows for students
One thing about Microsoft is that it has all its users’ needs on deck. It’s not just for businesses but also students.
The student-centered OS has a lot to offer, and some of the facts you probably didn’t know include the following:
The education-centered OS works on any device – With most Windows versions, there are usually certain system requirements to run the OS. For instance, older hardware that does not meet Windows 11 system requirements cannot install the software. With Windows for students, you don’t have to own a laptop or desktop PC to learn. Your mobile device can work too.
No Internet is required – Internet is a prerequisite to run some of these Windows versions, but for students, Microsoft has a catalog of affordable learning devices that work whether you are connected to the Internet or not.
Student-tailored devices – Depending on your school level, Microsoft has curated the Windows devices to be intuitive and to meet individual student needs.
Free Product Keys – If you didn’t already know, Microsoft has affiliations with many colleges to offer students free product keys. All you have to do is enroll in a college eligible for the product keys!
5 facts about Microsoft for kids
Windows 11 SE is largely known to be tailored for kids. Users for this OS are between the ages of 5 and 14. Some interesting facts include:
Microsoft Store is unavailable – This may seem like a con at first glance, but given this user group’s age range, it is a win to help them stay focused. Only IT admins are allowed to install apps.
Office apps work without an Internet connection – It is paramount for kids to have a distraction-free experience hence why most learning apps are able to work without the Internet.
Limited devices – Windows 11 SE works only on select devices. You cannot upgrade to Windows 11 SE like you normally would when upgrading to Windows 11.
Edge browser but Chrome capabilities – Although Windows 11 SE comes shipped with Microsoft Edge as the default browser and you can’t install other apps, you’ll be happy to know you can use Chrome extensions to add more functionality.
Snap layouts – You don’t have to keep restoring windows down to view others if you have multiple windows open. With the Snap layout feature, you can easily multitask and enhance your productivity.
5 fun facts about Windows
Other interesting, fun facts about Microsoft Windows include:
Windows 2000 was the first version to be released in multiple languages – The reason why Windows’ market share has catapulted over the years is that it has become more inclusive. Windows 2000 started with three languages, but now, it supports up to 110 languages.
Some folder names are prohibited – Windows will not allow you to create a folder named CON, NUL, or PRN. In addition, any folder that contains any of the following characters: * / \ [ ] : ; , = ? $ & % # is also prohibited. These names and characters cannot be used in file names because they are reserved for system use.
The Start button and Taskbar did not appear until Windows 95 shipped – Could you imagine life without the Start Menu? In earlier versions of Windows, before the Start button was introduced in Windows 95, there was a program called Program Manager that would list all apps.
Windows XP was the first version to introduce the 64-bit version – With earlier versions of Windows, memory was constantly an issue, but with the 64-bit version introduction, you can run RAM-intensive software, plus it’s more secure.
Excel came before Word – It’s easy to assume that Word came first in the Microsoft Office suite as it is one of the most-used apps in the collection. However, Excel came first and was originally called Multiplan. Its first platform was also not Windows but Apple.
Conclusion
Knowing Windows better will help you use it to its maximum potential. Although most of us know some basic things about Windows, there are a lot of interesting and little-known facts about the Microsoft Windows operating system and its history that you probably weren’t aware of.
So, there you have it. Hopefully, some of those interesting facts were surprising to you. It’ll be exciting to see what other facts will crop up in the coming years.
Still, on interesting facts, we have an exciting article on Google Drive facts that we’re positive you were probably not aware of.
What fact surprised you the most about Windows? Do you have any other little-known facts about the OS? We’d love to hear your feedback, so let us chat in the comment section below.
Microsoft Teams is one of the most popular apps to use in organizations or schools for a reason. It gets a lot of new and excellent features very often, almost on a weekly basis. For example, just recently AI recap made its way into the app, and you’ll be able to take notes in the Teams as well.
For teachers, AI will help you build comprehension passages and comprehension questions for your students. The feature is live starting this week. So you’re missing out on a lot of cool stuff if your organization is not on Teams yet.
And some time ago, Teams announced that you can preview and play videos in Chat as well. Speaking of Teams Chat, it seems Compact Chat Lists are coming to Microsoft Teams. And the feature is exciting.
This feature addition will be available in the new Teams desktop experience later this calendar year. But some organizations can gradually experience it sooner.
Here’s how to use Compact Chat List in Microsoft Teams
You will be able to use this feature by switching to compact mode. To do so, you need to:
Go to Settings and then select the General tab.
Once you’re there, go to the Chat density section.
From there, you only need to select the Compact option.
When you exit Settings, you will see a more condensed view of messages in your message pane, as well as a compacted chat list.
The compacted chat list includes hidden message previews and allows you to see more chats on your screen at a given time.
Your screen will look approximately like this.
Microsoft Teams has been very popular in organizations and still is. And the features are always helping users to get work done efficiently.
However, the platform has its misfortunes as well. In a recent study, research has shown that Teams is very prone to malware, and viruses. 80% of Microsoft 365 accounts were hacked in 2022. And unfortunately, it can easily become the target of hackers.
So it might not be a good option for every organization out there, especially the ones that are holding very sensitive information. Alternatively, you can utilize the block feature in Teams to avoid receiving messages from bots and unknown users.
But what do you think? Is Microsoft Teams worth the risks? Let us know in the comments section below.
So the future is looking bright for Xbox. But it seems that the latest FTC v. Microsoft hearing has revealed a lot of secrets from Microsoft. Secrets that involve Xbox. The giant wanted to buy Sony out of business, and also acquire a lot of other video games studio such as Sega. And it seems, Microsoft offered a $117 million sum to Ninja Theory back in 2018.
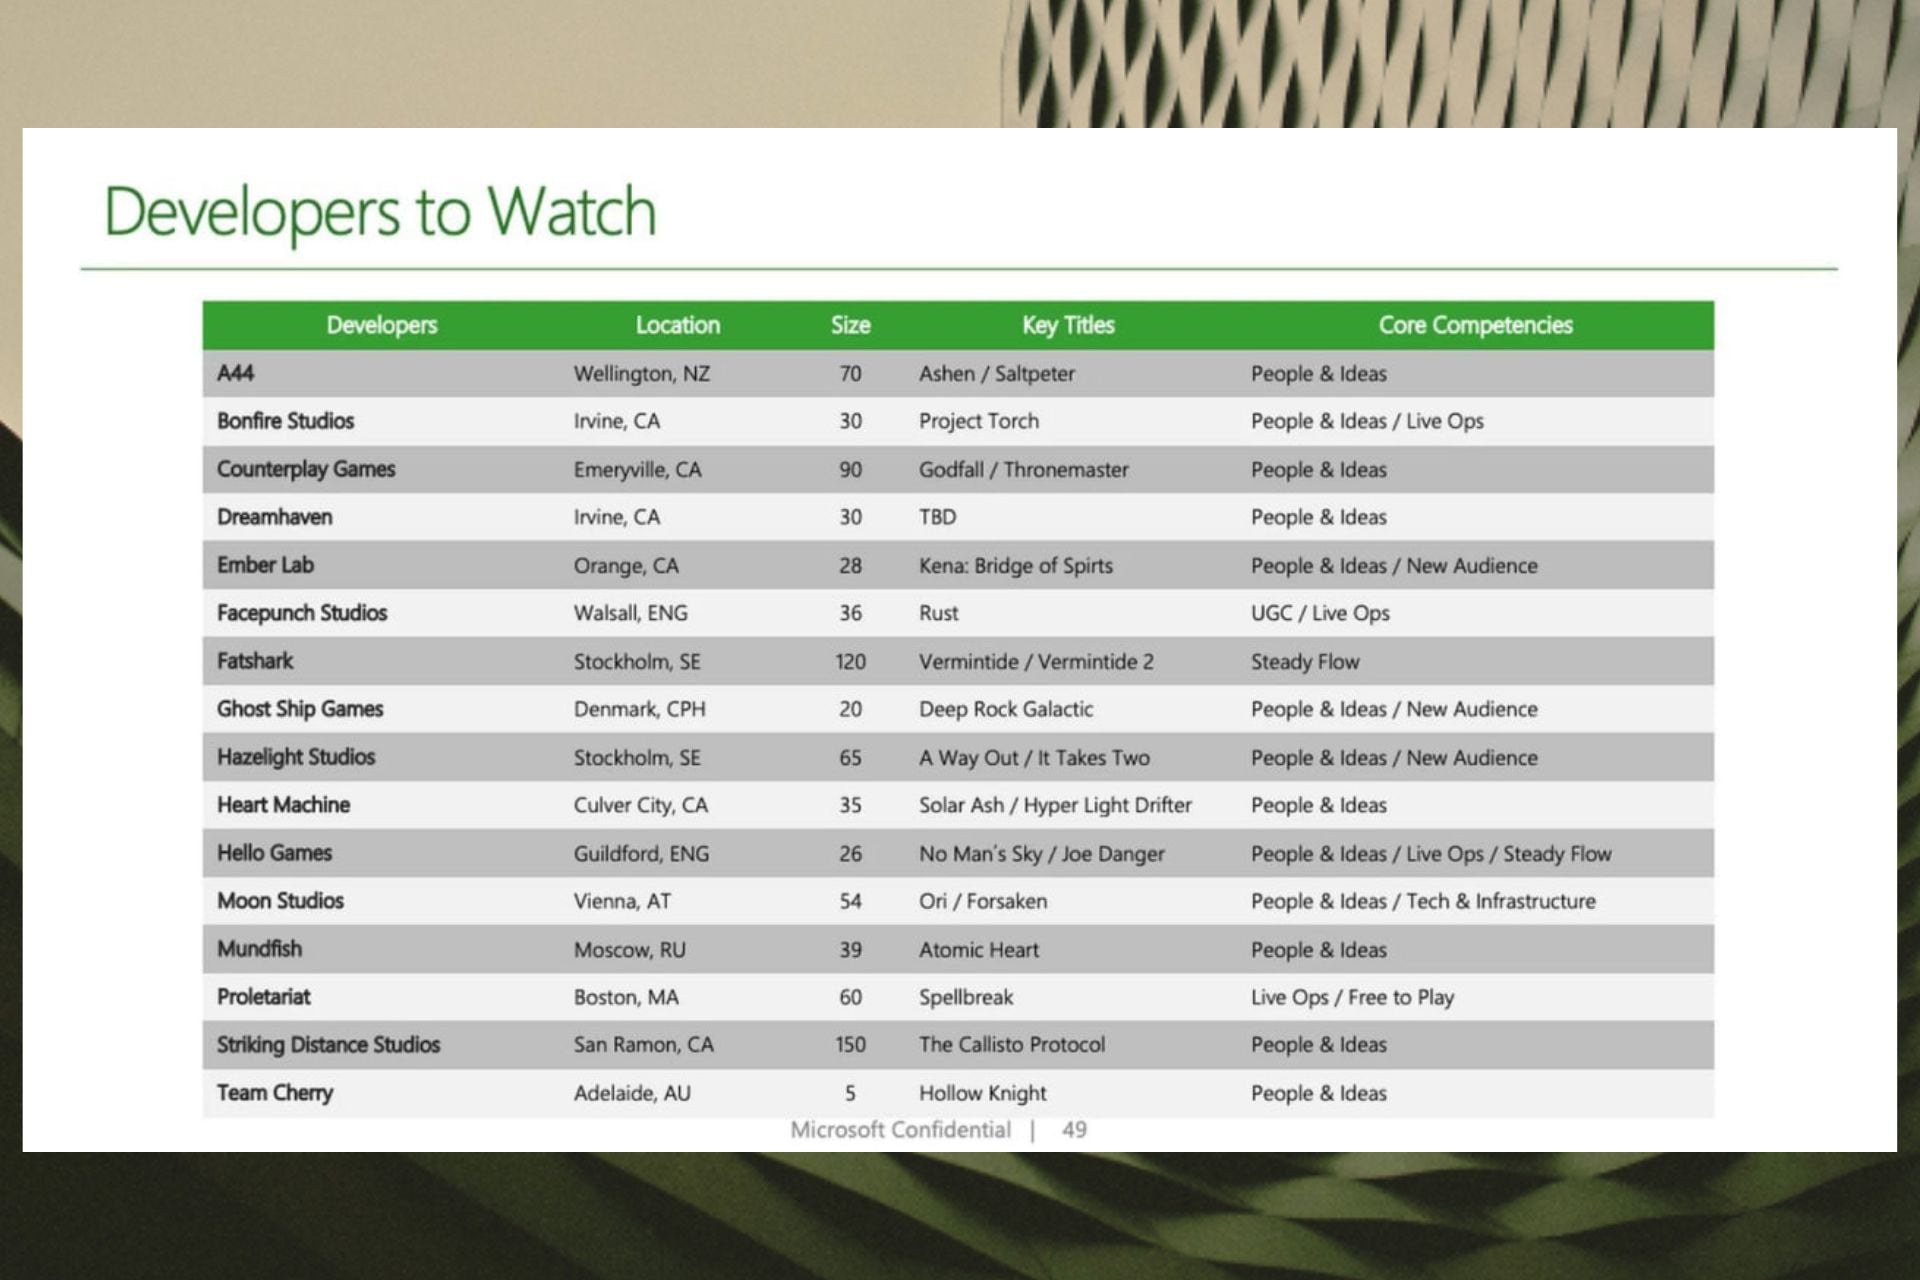
It seems that Microsoft does this often. And just recently, an internal plan from Microsoft has apparently leaked. If the leak is true, then Microsoft is eyeing no less than 16 video game studios for acquisition.
First of all, take it with a pinch of salt. The leak was first seen on Reddit, and the list numbers 16 video game studios that are in Microsoft’s focus for an acquisition.
A44
Bonfire Studios
Counterplay Games
Dreamhaven
Ember Lab
Facepunch Studios
Fatshark
Ghost Ship Games
Hazelight Studios
Heart Machine
Hello Games
Moon Studios
Mundfish
Proletariat
Striking Distance Studios
Team Cherry
Ironically, Xbox’s acquisition list features Dreamhaven, which is a video game studio founded by former Blizzard employees. Given that Microsoft is in talks to acquire Blizzard, this would be an informal gathering, all over again.
The list also features Hello Games which developed No Man’s Sky, and Team Cherry, which developed the cult Hollow Knight. The studios are from everywhere, which is a sign that Microsoft is looking for global talent for Xbox.
A lot of these video game studios developed amazing video games, and a lot of them are still played all over the world. If this list is true, then at least, Microsoft is keeping an eye on them. And if the Blizzard acquisition will succeed, some of these studios might soon be part of Xbox’s repertoire.
What do you think about this list? Let us know your opinion in the comments section below.
Sunless Sea is an adventure/exploration video game with survival genre elements. The video game is available on a lot of platforms, and Microsoft Windows is one of them. The game, which you can buy from Steam or from its official website, was released in 2015, following a successful Kickstarter campaign.
In the years to come, Sunless Sea has sold hundreds of thousands of copies and has become a classic in the making. The video game is not so old, and thanks to its portability, you can play it on Windows 11, without any issues. Older games, such as Gothic 2 or Mirror’s Edge, often encounter issues on Windows 11.
However, Sunless Sea should work just fine on Windows 11. In case it doesn’t, then you must check for a few things. Some users reported that Sunless Sea is crashing on Windows 11, but you shouldn’t worry. There are solutions that you can try.
Remember, Sunless Sea is perfectly compatible with Windows 11. If it’s crashing, then we have these solutions for you.
How to fix Sunless Sea on Windows 11
Make sure your Windows 11 is up to date to the latest version
If Sunless Sea is not loading on your Windows 11, then it might be due to lacking certain performance updates that often come with Windows 11 updates.
Go to Settings > Windows update > Check for updates.
Wait for your Windows to update, restart the PC and see if Sunless Sea is working.
Make sure your drivers are up to date as well
Sunless Sea might not be loading due to internal conflicts with your drivers. Make sure your drivers are up to date with the latest version. We’re interested in the video card, so make sure it’s updated.
In the Search Bar, type in Device Manager and open it up.
Once there, look for Display adapters, click on them, and select the video card.
Right-click on the video card and select Update driver.
Click on Search automatically for drivers, and let Windows 11 update your cards.
After the process is done, restart your PC, and see if the game is loading.
Here it’s also recommended that you should update your video card drivers on the specific apps that are linked to your card. For example, NVIDIA has a specific app, from where you can update your video card. AMD has one as well. So use these apps to update your drivers, and always perform a restart of your PC for the updates to work.
If any of these solutions worked for you, we’d love to hear from you in the comments section below.
An error Windows users have complained about recently is the error code 0x80073d21 when installing or updating Xbox games on their PCs. The error can occur due to many potential issues. However, this article will outline some causes and ways to resolve the error.
The error code 0x80073d21 indicates a problem with installing or updating Xbox games on a PC.
This error is specific to the Windows Store and often occurs when there is a conflict or issue with the installation files or the Windows Store itself.
What causes error code 0x80073d21?
The installation files for the Xbox game are corrupted or incomplete, it can result in error 0x80073d21.
Insufficient permissions for the Windows Store or the installation directory can lead to error 0x80073d21.
Using an outdated Windows Store or Windows version can cause compatibility issues, prompting the error.
Insufficient or low storage space for games on the local disk may be responsible for the error during installation or updates.
Antivirus software can interfere with the installation process and trigger error 0x80073d21.
How do I fix the error code 0x80073d21 on Xbox?
Observe the following preliminary checks before trying any advanced troubleshooting steps:
Restart your computer to resolve temporary issues with the Windows Store or the installation process.
Ensure you have a stable internet connection, or consider switching to a different network.
In situations where the above preliminary checks are ineffective, we recommend you go ahead with the fixes outlined below:
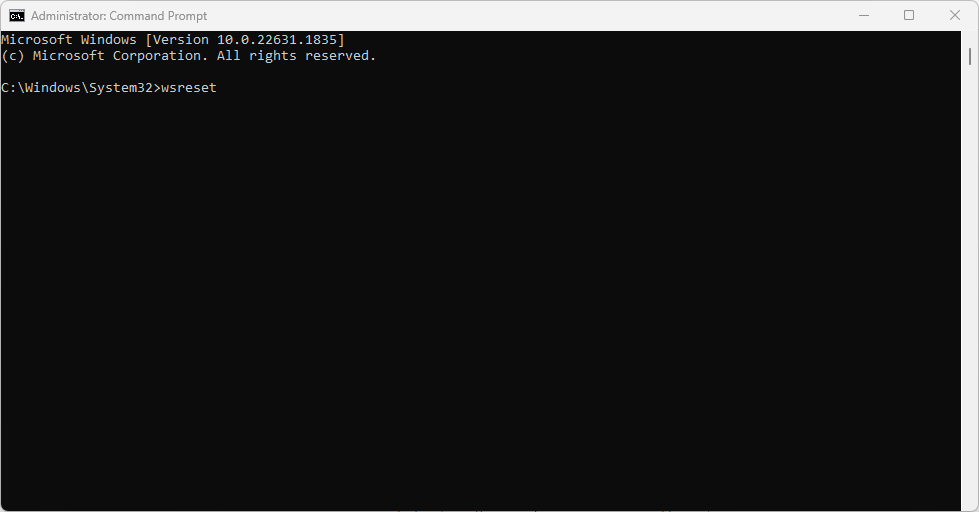
1. Clear the Windows Store cache
Press Windows + R keys to open the Run dialogue box, type the following, then press Ctrl + Shift + Enter keys to clear the cache as an administrator: wsreset.exe
Wait while the process runs until it closes automatically.
Restart your PC and launch the Microsoft Store to check if the error code 0x80073d21 persists when installing Xbox games.
The above steps will clear the cache data for Windows Store as an administrator, delete any bugs and corrupt cache files, and fix the game installation or update error.
2. Change the installation location for your games and apps
Press the Windows + I key to open the Windows Settings app.
Select System from the left pane, then click on Storage.
Under Advanced storage settings, select where new content is saved.
Navigate to the New apps will save to option, then select the system drive for your device.
Restart the computer and try to install the game again to see if it resolves the issue.
Changing the installation location for new games and apps will allow you to select the system drive for your device.
It seems Microsoft Teams is getting another feature for its Enterprises version. You will be able to use a Notes tab in Teams. The feature is rolling, and you should be able to enjoy it now.
It’s an excellent week for Teams users out there. The app got another feature, for teachers and educators, that uses AI to generate passages and comprehension questions. Plus, it seems that the app will be able to soon convert any file to PDF, via Microsoft Graph. So it’s safe to say, Teams is getting a lot of love from Microsoft.
This new Notes tab is powered by OneNote, and will be added by default on new channels that are created. Its purpose, according to Microsoft, is to enable a rich notetaking experience. However, you should know that this feature will only be available to standard channels. For the private or shared channels, you’ll have to wait until Microsoft implements the feature on them too.
So, while there is nothing you should do to enable the notes, we can show you to use them in Teams. It’s a rather exciting feature, for when you need to drop down some info.
Here’s how to use the Default Notes Tab in Teams for Enterprises
Open Microsoft Teams and go to any standard channels of your organization.
Once you’re there, you can see a new option, Notes.
Click on it, and a new pane will open.
Here you can take notes, you can customize them, you can edit them. It’s pretty much similar to using OneNote.
Since it’s powered by OneNote, working with notes on Teams will be similar. You’ll be able to:
Maintain an easy collaboration on OneNote pages across the team with co-edit and page-level conversation.
All channel notes are organized within a single OneNote notebook, making them easier to find.
Richer OneNote editing with typing, ink annotations, highlighting, file attachments, etc.
Easy recall and search for channel notes within OneNote on any platform.
Access your notes from anywhere, even outside Teams on OneNote.
What do you think about this new feature? Will you use it? Let us know in the comments section below.
Notepad++ is used by developers primarily for editing source code and by casual users to edit text. However, downloading and Installing the app on your system if you just upgraded to Windows 11 may be challenging.
Thus, we will discuss downloading and installing Notepad++ on Windows 11. Also, you can read our detailed guide about fixing Notepad++ not responding on Windows with ease of steps.
Can Notepad++ run on Windows 11?
Yes, Notepad++ can work effectively on Windows 11 without compatibility issues. More specifically, no bloated options or bugs, just all you need in a very small editor.
Also, it is best suited to use a Windows 64-bit processor to install the app for a hitch-free experience.
Which Notepad++ should I download?
Different variants of Notepad++ are available for download on the Official website for Windows 11. The primary determinant of the version to download on your computer depends on your computer’s processor.
The 64-bit Notepad++ can process over 4GB of data while the multiple files are open, while the 32-bit can process less data.
Yes, Notepad++ is free to install. It is an open-source text editor that can be downloaded and used without cost. Being open-source means the source code is free to view and modify.
Further, there are regular updates by the community of developers to fix bugs, provide improvements, and add new features to improve user experience.
What are the advantages of Notepad++ over Notepad?
These are some of the benefits of using Notepad++ over Notepad:
Notepad++ offers advanced features such as syntax highlighting, code folding, auto-completion, and a multi-tab interface.
Personalized customization options for the editor’s display, shortcuts, and coding style.
Provides regular updates with active community support to provide fixes.
Extensive support of plugins to boost performance and increase functionality.
How do I download and install Notepad++ for Windows 11?
Download Notepad++ via their official website
Launch your web browser, go to the Notepad++ Official website, and click Download from the left pane.
Select the Notepad++ vision you want to download from the list. (Notepad++ v8.5.4 is the latest version)
Select Installer under the Download 64-bit x64 if your computer is 64-bit, or Download 32-bit x86 if your computer is 32-bit.
Wait for the download process to complete, and double-click on the downloaded file to open it.
Select Yes if the UAC prompt.
Select your preferred language and click on OK.
Click the Next button on the next window and select the I Agree key on the license agreement window.
Click on Browse if you want to change the installation location and select Next.
Select the installation type you want and click on Next.
Check the Create Shortcut on Desktop box to create a desktop shortcut and click the Install button.
The steps above allow you to download and install Notepad++ on your Windows 11 computer. We have a detailed guide on downloading the Notepad++ app from the MicrosoftStore to your PC.
Microsoft Teams is not just a popular app for organizations, but it’s also very suited for school, especially online courses. While the AI recap helps you take notes from a meeting much easier, Microsoft has come up with a new AI feature for Teams.
And this is, it’s meant for teachers and educators. You’ll be able to generate text passages with Reading Progress in Teams. Using AI, you’ll have the text ready in less than a couple of minutes. Plus, you’ll be able to customize it according to how you see fit.
The Redmond-based tech giant has unveiled the feature this week, and it’s part of Microsoft’s campaign to enhance its products with AI. Plus, Microsoft also has some more useful features in store.
Along with this feature, teachers and educators will be able to use AI to generate comprehension questions based on texts. According to Microsoft, these features will save a lot of time and further customize learning for each class.
We’re excited about the potential for these features to save time and further customize learning for each student or class. Passage generation and comprehension questions leverage the power and security of Azure OpenAI, plus platform innovations to support responsible usage in education. Both features are in an initial private preview with our testing community.
Microsoft
Here’s how to generate text passages with Reading Progress in Teams
Open Microsoft Teams, go to the Assignment pane, and from there head over to Reading Progress.
In the Reading Progress panel, you should be able to see the new options available.
Choose the Generate custom passage feature, and a new window will open.
From here you can customize your passage before generating it.
After you’re done with the customizing, click on Generate Passage.
Your passage is here, and you can use it for your students.
As you can see, you can highly customize your passage. You have a lot of options when it comes to topics, such as Animals, Art, Science, and Space. You can choose the length of the passage. And you can also pick a language that you prefer.
This way you can generate passages for different classes. You can choose the tone of the story, you can set challenging words and you can even set the age. For example, you can generate texts for children that are of different ages.
The feature is available to Microsoft Teams now, in the Reading Progress pane. So you can try it all summer before the new school year begins this fall.
What do you think about this feature? Are you as excited as we are about it? Let us know in the comments section below.
Windows utilizes several .exe programs and processes to facilitate the functionality of the OS. Some of our readers have reported the mediaget.exe process running on their PC and are puzzled about its purpose.
This article will briefly discuss the mediaget.exe process and offer the methods to help you remove it.
What is mediaget.exe used for?
Mediaget.exe is an executable file that belongs to the Mediaget Torrent client. It is not an essential Windows file, but software developed by MediaGet Developer. The .exe file does the following:
Allows you to watch the downloaded media in the same application, even while downloading.
Used as torrent search and download for your favorite media content.
Often, the application runs as a background process to ensure continuous media downloads.
Should you remove mediaget.exe?
If you notice the process running in your Task Manager, your first thought is to disable it. This is because Microsoft didn’t develop the file, which is not essential to the system’s functionality.
The file is not considered malicious but can still be a security threat if corrupted or camouflaged as a virus. In such cases, disabling it is the only way to protect your PC.
Is mediaget.exe a virus?
If you’re still unsure about the legitimacy of mediaget.exe, the following are a couple of verification processes you can follow to check the file’s legitimacy:
Check the spelling – The best way to know a dummy file is to check the file’s name. The file is not genuine if it’s incorrectly spelled with variations other than mediaget.exe.
Verify Digital Signature – Every software a developer releases is digitally signed according to their name; if the signature isn’t Mediaget, the file is not genuine.
If you find out that the file is not legitimate or just want to get rid of it, here’s how you can do that.
How can I remove mediaget.exe?
1. Disable the process in the Task Manager
Right-click on the Windows button, and select Task Manager from the menu.
Locate mediaget.exe in the Processes or Details tab, click on it, and select End Task.
Click OK in the popup window to confirm that you want to end the task.
Restart your PC to finalize the process.
Disabling the mediaget.exe process in the Task Manager stops the software from operating and prevents any threats that the software can cause.
Right-click the Start menu and select Task Manager from the menu.
Then, locate mediaget.exe in the Processes or Details tab, right-click on it, and click on Open File Location.
Further, right-click on mediaget.exe in the next window, and click on Delete.
Once the file is deleted, restart your PC to check if the error is fixed.
Deleting the executable file directly from the software’s folder location will disable the software and its operations.
While deleting, you can run into the can’t delete folder error, ensure you read our guide to fix it.
If you’ve got any more questions or suggestions, please let us know in the comments. You can also check out our guide on how to fix too many background processes on Windows.
— HazzadorGamin, Dragon of Dojima (@HazzadorGamin) June 27, 2023
For those of you who don’t know, Ninja Theory has developed and released the beloved Hellblade: Senua’s Sacrifice, a Dark Souls-inspired action-adventure game set in a dark fantasy world. It went on to sell over 1 million copies in less than a year after its release.
And it was also a critical success, far beyond the scope of an independent game studio, which Ninja Theory was at the time.
However, in 2018 Microsoft approached Ninja Theory with an offer, and the purchase was made then. It is revealed now that Microsoft actually paid $117 million for the studio. Which now is a good deal, because the studio is preparing to release Hellblade 2 in 2024. And it will surely be a win for Microsoft.
Is $117 million enough for Ninja Theory?
Of course, there is also the question of whether $117 million is enough for a game studio such as Ninja Theory. Considering Microsoft plans to pay $68.7 billion for Blizzard, $117 million for Ninja Theory seems very little compared to what the studio offers.
Yes, we can’t really compare the two game studios. Blizzard has some big titles in its repertoire, with names such as Diablo, World of Warcraft, and many more earning a lot of money monthly. But not all agree on the sum received by Ninja Theory.
Seems pretty cheap for such a talented studio.
Reddit user
Let’s not forget that Hellblade: Senua’s Sacrifice sold 1 million copies in less than a year after its release. And the game also established itself as an important point in the gaming industry. It was widely acclaimed by critics, who are seeing it as a fine example of video games as art.
And it also helped revolutionize the genre. It brought a complex story, and its depiction of psychosis in video games made it a cult classic.
So there is no doubt Microsoft will greatly benefit from this release. Ultimately, it’s good that Ninja Theory now has the means to build video games that come from a passionate team. Let’s just see how Microsoft will play into it in the long run.
What are your thoughts on this? Be sure to let us know in the comments section below.
Executable files are indispensable for launching applications but some of our readers have noticed an uncommon file which is the mictray64.exe.
If you’d like to know more about the mictray64.exe file, this article provides a complete overview and steps to help you remove it.
What is mictray64.exe?
mictray64.exe is an audio driver file developed by Conexant Systems, Inc. The file aids the Conexant Audio II driver interface allowing users to control program settings related to Conexant audio chipsets.
The mictray64.exe is not a Windows essential file but plays a vital role in facilitating the functionality of Conexant audio devices.
Should I remove the mictray64.exe?
Traditionally, the mictray64.exe is a legitimate file with a digital signature signed by Verisign. However, you might have reasons to disable the file because it can also act as a keylogger which can cause harm to your PC.
Since the file is not a Windows essential file, you’ll have no problems if you choose to remove or disable it. However, it can affect the functionality of Conexant devices.
How to verify if it’s safe?
If you’d like to keep the mictray64.exe file but need to be sure it’s safe, here are a couple of ways to verify if the file is safe or a virus:
Check the Digital signature – The legitimate mictray64.exe file should have a Verisign digital signature; if it doesn’t, the file is not genuine.
Check the file name – The correct iteration of the file is mictray64.exe; if you notice a file with any variation, the file is not genuine.
If you discover that the file is not legitimate or you just want to get rid of it, here’s how to remove mictray64.exe.
How can I remove the mictray64.exe?
1. Scan for viruses
Press the Windows key, type in windows security, and hit Enter.
Then, click on Virus and Threat Protection. Under the Current Threats section, click on Scan Options.
Select the Full Scan option and click Scan Now to initiate the scan.
If the mictray64.exe is camouflaged as a virus, you can remove the file by running a virus scan. You can also check out our guide on the best third-party antivirus software for Windows.
One of our top products from the third-party antivirus software list is TotalAV because it scans your PC’s system in-depth to eliminate almost immediately any kind of digital threat.
2. Disable and delete via the Task Manager
Right-click on the Start button and select Task Manager from the menu.
In the Task Manager window, locate mictray64.exe in the Processes or Details tab, click on it, and select End Task.
Click on OK if you’re prompted to confirm the operation.
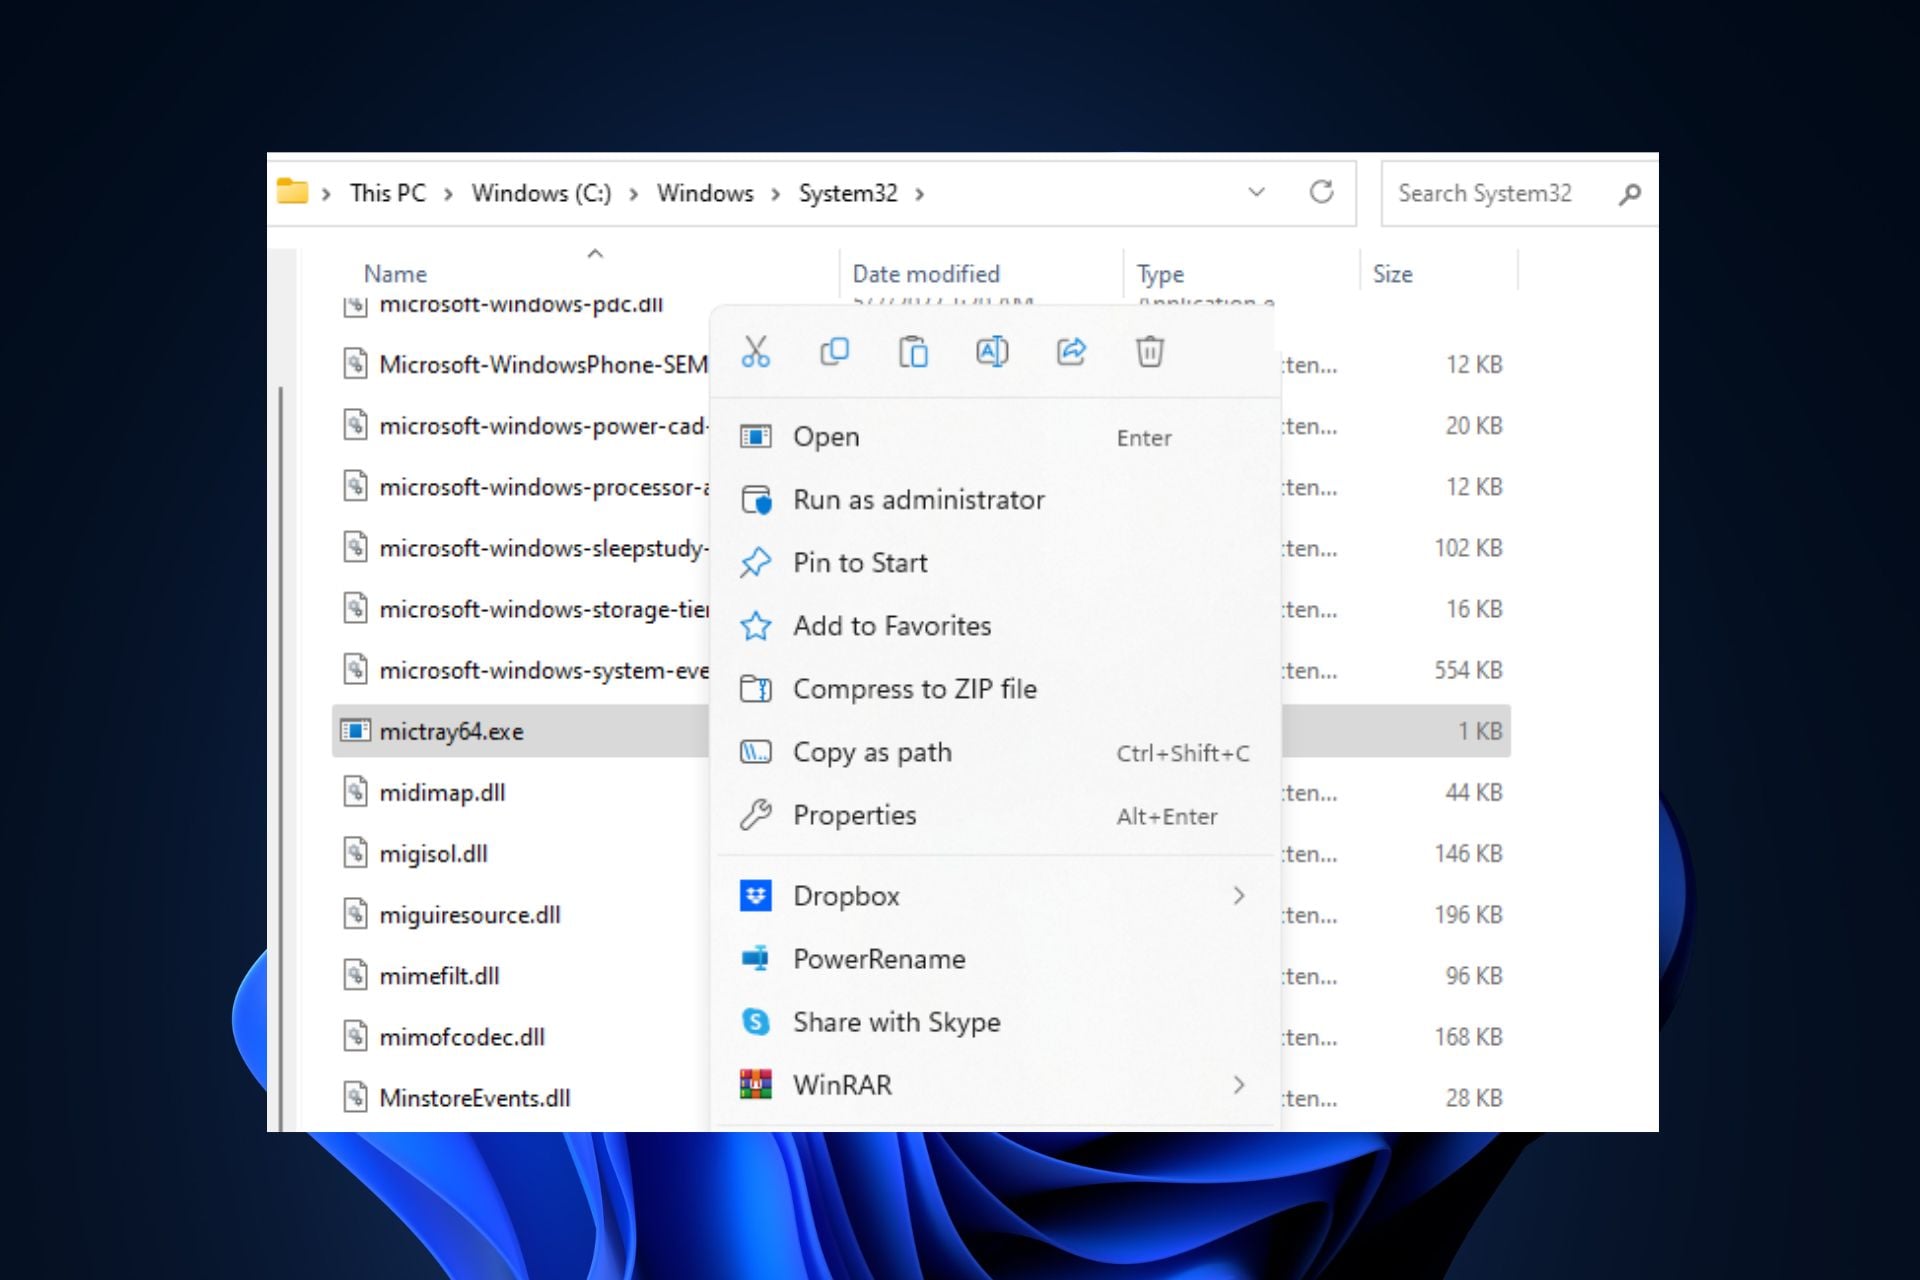
Right-click the mictray64.exe and click Open file location.
Then, right-click the file and select Delete.
Repeat the steps till you’ve disabled all running instances of mictray64.exe and close the Task Manager.
All executable files have running processes that can be accessed in the Task Manager; disabling the mictray64.exe process is one way to restrict the program from functioning. Here are some alternate shortcuts to open the Tasks Manager.
Gone are the days of struggling with complicated editing tools and spending endless hours trying to fix noisy backgrounds or dull colors.
With advanced tools like Filmora Video Editor, you get AI-powered features to enhance clarity, remove unwanted noise, and infuse vibrant colors into your footage.
This guide will discuss the challenges video curators face regarding noise & color correction, how AI can help, and how to use the Filmora Video Editor to create visually striking works of art.
What are the challenges with noise & color issues in your videos?
Removing noise and adjusting colors manually is time taking, but that’s not the only problem you face as content creator; some of the common ones are listed here:
Background noise – Often, you deal with unwanted background noise, such as wind, traffic, or equipment hum, which can distract from the main audio content.
Color inconsistencies – Maintaining consistent color throughout a video can be challenging, especially when footage is captured under different lighting conditions or from multiple sources.
Over/underexposure – Incorrect exposure settings during shooting can lead to washed-out or dark & muddy footage, requiring adjustments during editing.
Technical limitations -Some video editors may not have the hardware capabilities or correct software to address noise & color issues and get desired results effectively.
So, these are challenges that a video editor may face while editing videos with heavy noise and color issues.
What is AI Denoise technology?
AI Denoise technology refers to using artificial intelligence algorithms to reduce or remove noise from audio or visual content.
By analyzing patterns and characteristics of noise, AI Denoise algorithms can intelligently filter out or minimize unwanted noise, resulting in cleaner and clearer audio or visual output.
This technology is particularly useful in video editing, where it helps enhance the quality and overall viewing experience by reducing distracting background noise in videos.
How can Filmora’s color correction capabilities help?
Color correction capabilities can significantly assist video creators in enhancing their footage’s color quality and overall visual appeal. Here’s how it can help:
Efficient color enhancement — Through lookup tables or color temperature features, users are able to quickly unify different clips into the same color tone to have the look they want.
Color accuracy — By balancing out the contrast and lighting in the clips using color match and color correction tools, videos will look more consistent and natural.
Overall, Filmora’s color correction capabilities provide robust and efficient tools to enhance the color quality of videos, enabling video creators to achieve their desired visual aesthetics with ease.
Double-click the installation file and click Install.
Follow the onscreen process to complete the installation.
2. Remove noise
Once the software is installed, launch it and click New Project.
Select Click here to import media. Choose the media file and click Open from the next window.
Once added to the tool, drag the media file to add it to the timeline.
From the toolbar at the top, click Effects.
In the search bar, type smart denoise and select it from the list.
Select the video clip and then drag the Smart Denoise effect to the timeline. You can modify the Opacity, threshold, and Radius.
To denoise audio separately, right-click the video in the timeline and click Detach Audio.
Double-click the Audio track to open the editing panel, locate Denoise and adjust the settings as you like.
3. Adjust colors
Double-click the video to open the editing panel and select the Color tab.
Right below presets, you will find LUTs, where you can find and select one of our LUTs and adjust the strength of it. As seen in the sample below, the Gravity LUT is selected, and the strength is adjusted to 40%.
To adjust color manually, scroll down to find the temperature, tint, vibrance, and saturation adjustment tools. Adjust the toggler based on your desired color look.
Scroll down further in the color tab to find the contrast and lighting adjustments. In the sample below, you can see that the exposure, brightness, and contrast were adjusted using the toggler.
To access the Color Match tool, scroll down to the very bottom of the Color tab. There, you will find a button where you can show the color match tools.
Once the Color Match tool is turned on, you can select Comparison View where you will be able to match the colors of your clip based on another part of your video. Sample shown below.
Filmora Video Editor
Removes pesky background noises and the dull, lifeless colors plaguing your videos.
How can Filmora Video Editor help you as a content creator?
Filmora Video Editor offers several benefits, making it a valuable tool for your video editing arsenal. Here are some key advantages:
Wide range of features – It offers comprehensive features and tools to enhance and refine videos, including trim, crop, merge, color grading, audio mixing, and visual effects.
AI denoise & color correction – These tools help reduce background noise and enhance video quality, producing professional-looking and visually appealing content.
Extensive media library – It provides an extensive library of built-in elements, including royalty-free music, sound effects, transitions, titles, and overlays.
Multiple output options – The tool supports various output formats, including MP4, WMV, AVI, HEVC, MOV, & MKV, which makes publishing content on social media platforms easy.
With a user-friendly interface, AI-powered enhancements, a versatile media library, output flexibility, and ongoing support, Filmora Video Editor is a beneficial tool for content creators.
So, are you ready to take your videos to the next level? Download Filmora Video Editor now and discover the true potential of your videos.
If you have any questions or concerns, feel free to mention them in the comments section below.
While installing the gaming services for your Xbox device, you can trigger the 0x80073d27 error. When it occurs, you’ll be unable to access the Xbox service.
In this article, we’ll discuss some common causes of the error and provide steps to fix this gaming services issue.
What causes the 0x80073d27 error?
The 0x80073d27 error is caused by the following:
Outdated software – If you’re running an outdated version of the Xbox gaming services, it could be the reason behind the 0x80073d27 error.
Conflicting third-party apps – Sometimes, the operations of third-party apps can conflict with Windows essential apps causing the apps to crash or display an error message.
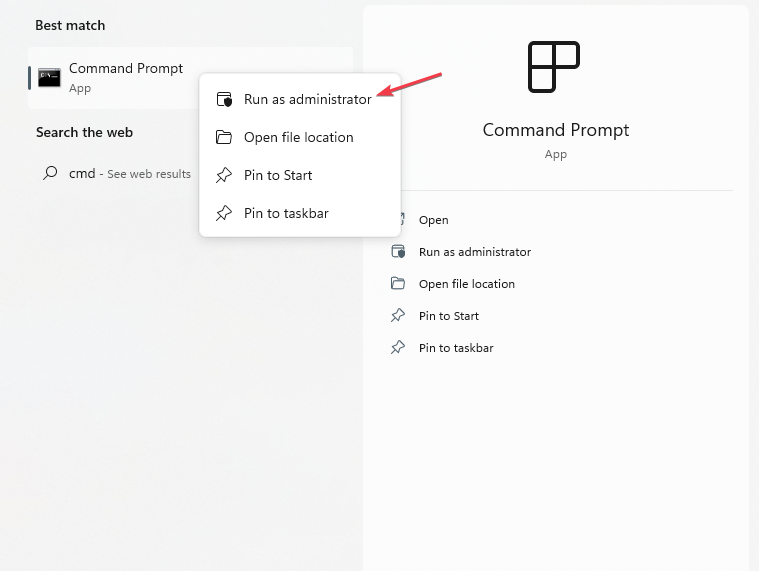
Press the Windows key, type in cmd, right-click on the app, and select Run as Administrator.
Click Yes in the UAC window to open the command prompt as an administrator.
In the command prompt window, type the following and hit Enter: wsreset
This will reset the Microsoft Store application, close the command prompt, and restart your PC to apply the fix.
If the Microsoft Store is not loading due to a corruption by viruses and malware, it can cause errors. Resetting the app reverts it to its default settings, free of errors and bugs.
Press the Windows key + I to open the Settings app.
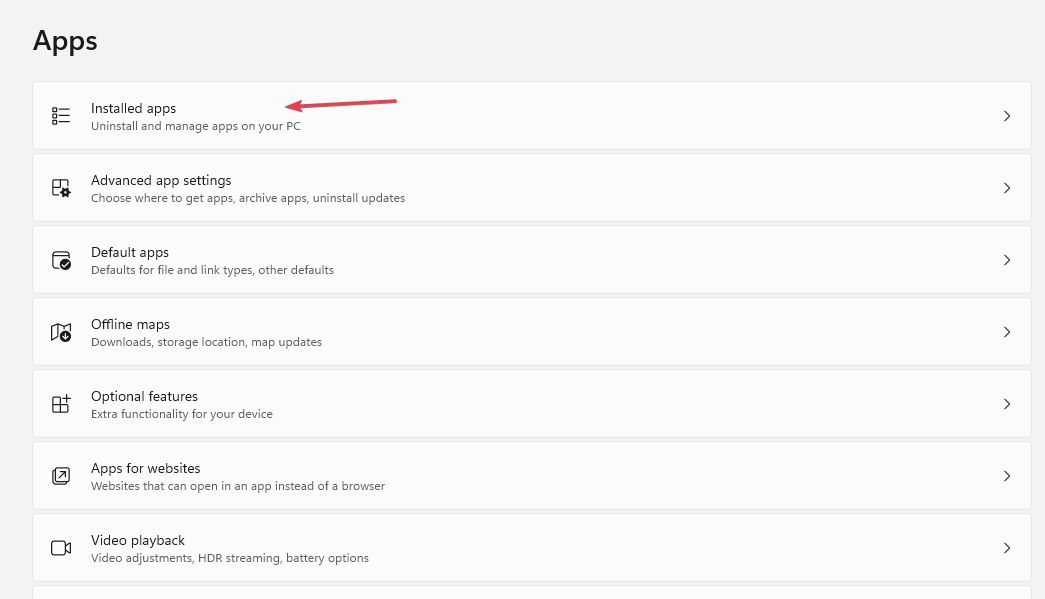
In the Settings app, click on Apps and select Installed apps.
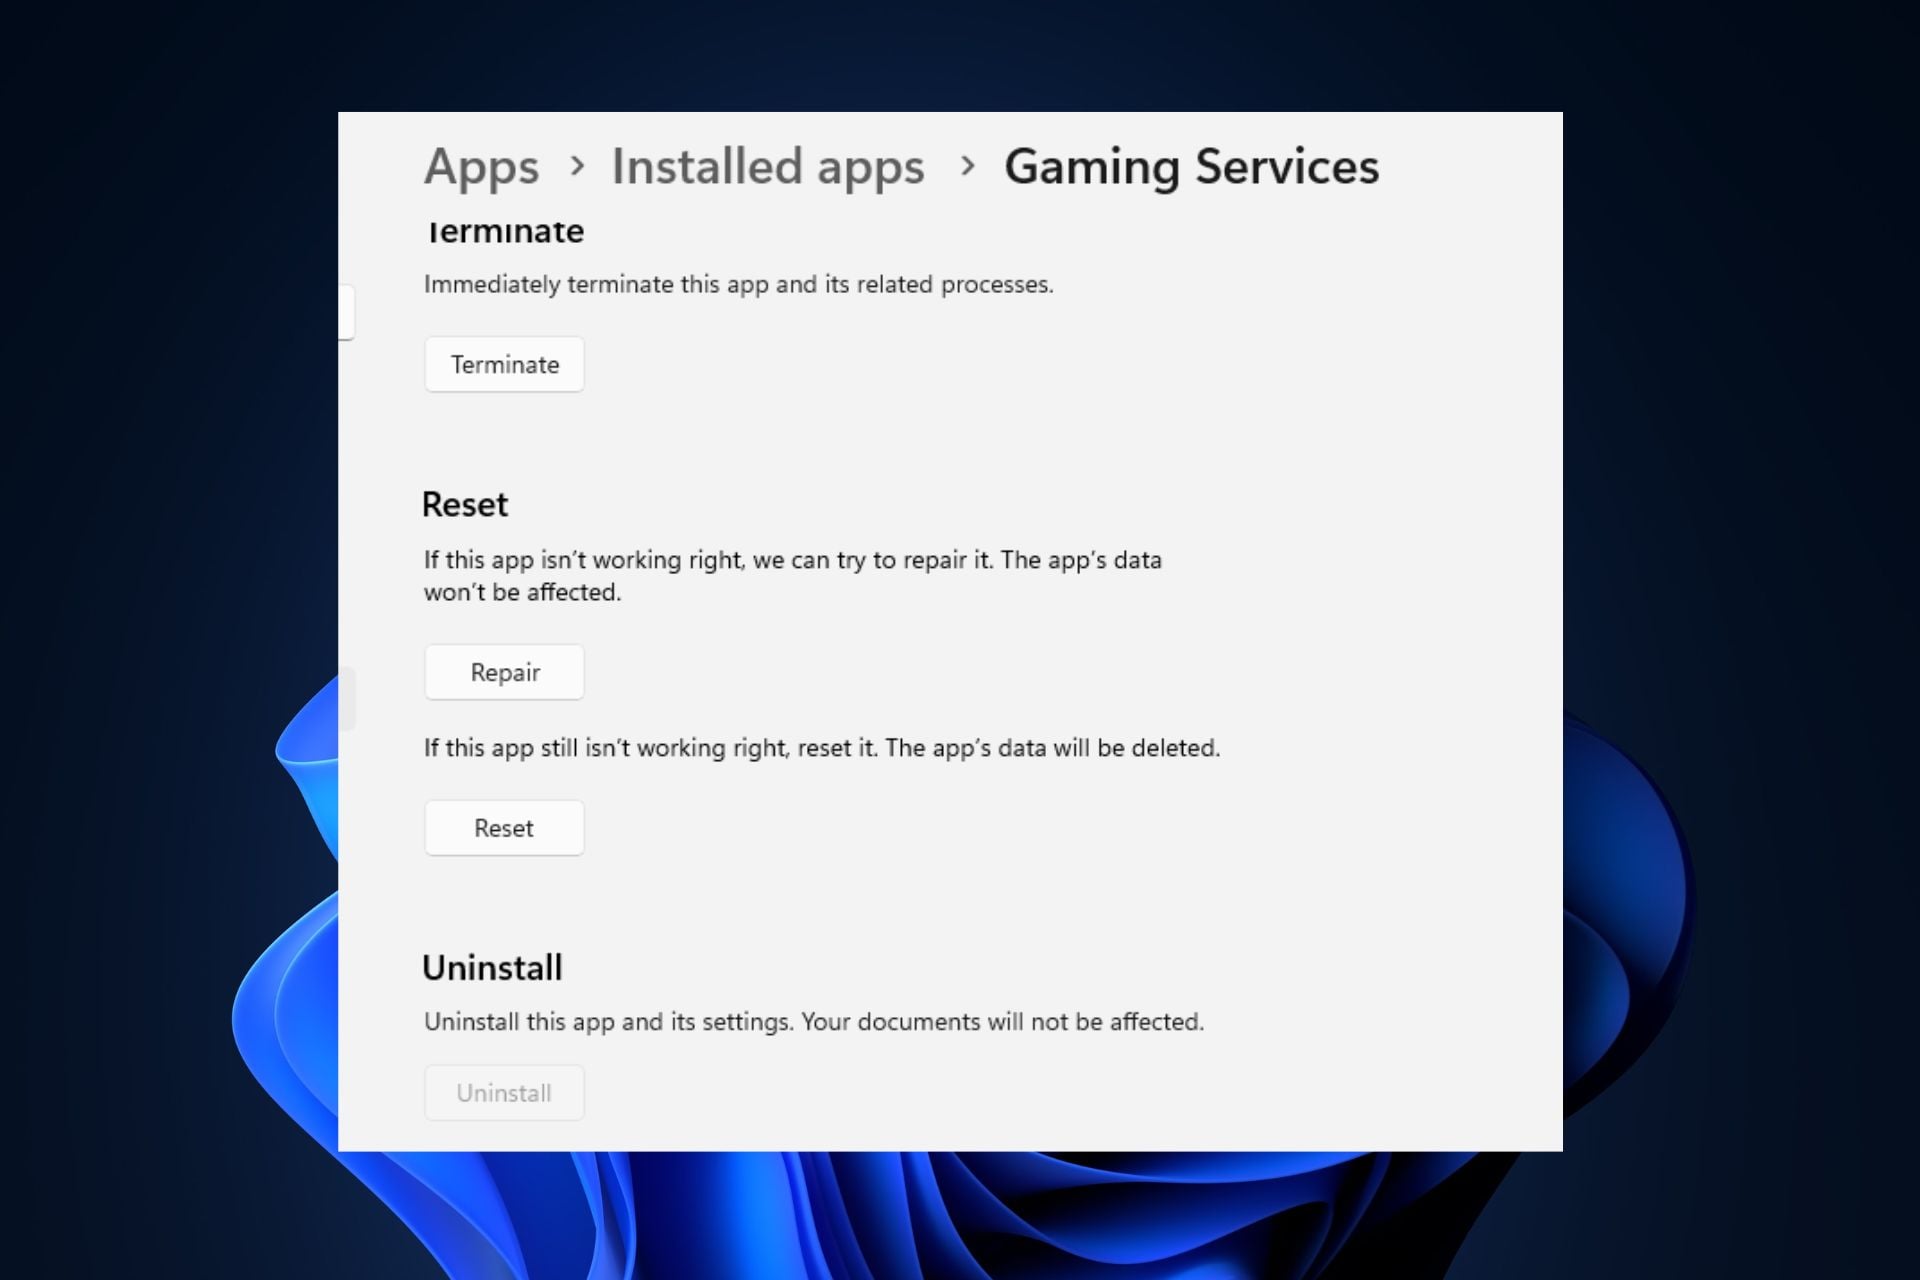
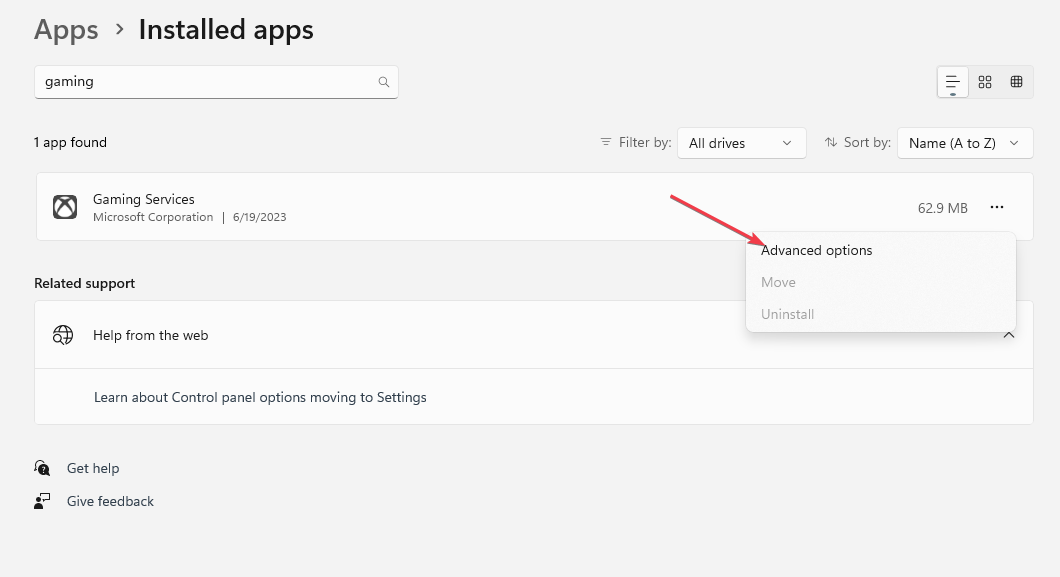
Click the search bar on the right pane, and type Gaming Services to locate the app. Then, click the options icon and select Advanced Options.
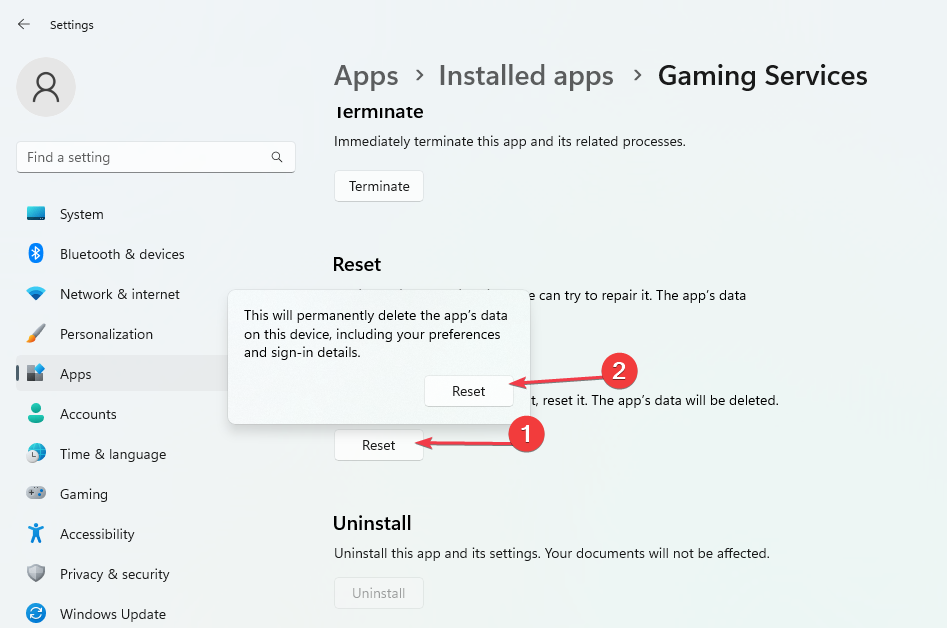
Click Reset in the next window and click Reset again to finalize the app reset.
4. Reinstall the Gaming services
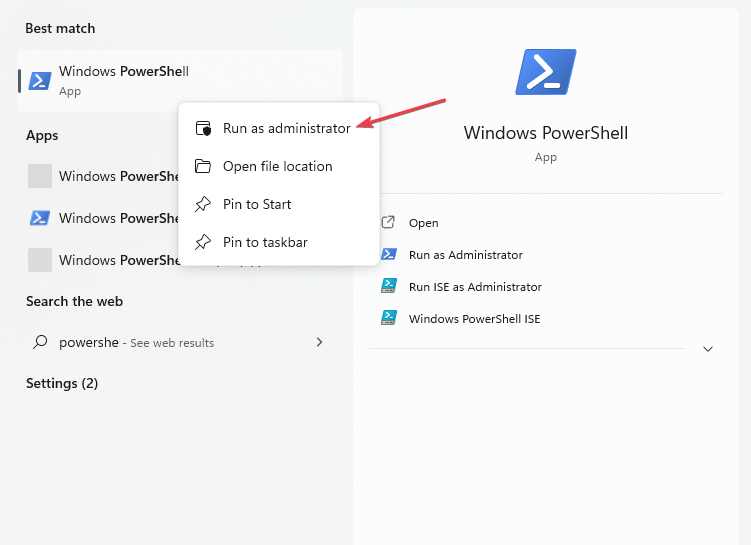
Press the Windows key, type PowerShell, right-click on the app, and select Run as Administrator.
Click Yes in the popup UAC window.
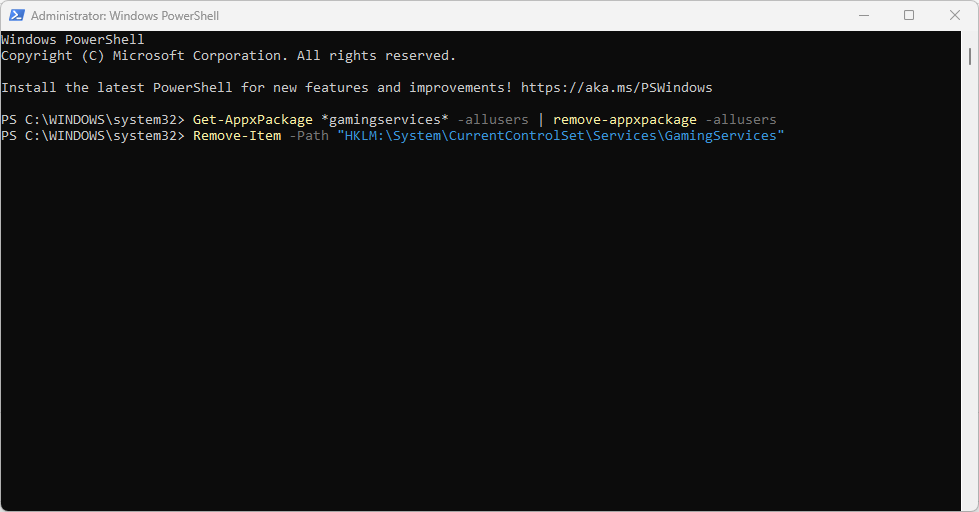
In the PowerShell window, enter the following commands simultaneously: Get-AppxPackage *gamingservices* -allusers | remove-appxpackage -allusersRemove-Item -Path "HKLM:\System\CurrentControlSet\Services\GamingServices" -recurseRemove-Item -Path "HKLM:\System\CurrentControlSet\Services\GamingServicesNet" -recurse
Hit the Enter key after typing each command till you execute the last command.
Close the PowerShell and restart your PC to check if the 0x80073d27 error is resolved.
Running the above commands cleans up corrupt registry entries. If damaged registry entries cause the error, this step will help fix it. Check out our guide on how to fix PowerShell if it’s not working.
Fixing the 0x80073d27 error is easy and involves little technicality; with the steps listed here, you should be able to resolve it.
If you’ve got questions or further suggestions on fixing the error, let us know in the comments.
Many of our readers have reported the 0x800f0823 error while trying to update their PCs. The error isn’t familiar to most users and it prevents installing the Windows updates.
Therefore, in this article, we’ll discuss the causes of the 0x800f0823 Windows update error and how to fix it.
What causes the 0x800f0823 Windows update error?
Here are some of the most common causes of the 0x800f0823 error:
Corrupt Update Components – While checking for updates, the components can get corrupted for several reasons, triggering the 0x800f0823 error.
Outdated Service Stack – Microsoft releases regular service stack updates (SSU) for the Windows OS; running an outdated version can cause update errors.
Now that we know the causes behind this update issue, let’s try to fix it with the solutions below.
How can I fix the 0x800f0823 Windows update error?
Before we proceed with advanced troubleshooting solutions, be sure to make the following checks:
Restart your PC.
Ensure you have a reliable internet connection.
Log in as the administrator.
If the error persists, the following are the best troubleshooting techniques to fix the 0x800f0823 Windows update error.
1. Launch the Windows Update troubleshooter
Press the Windows key + I to open the Settings app.
Click System and select Troubleshoot.
On the right pane, click on Windows Update and select Run.
Allow the troubleshooter to run entirely and answer the prompts accordingly to fix the error.
If the troubleshooter locates any errors with the Windows Update, it’ll attempt to fix it.
The update troubleshooter can identify, and fix errors related to Windows updates.
2. Manually reset Windows Update components
Press the Windows key, type cmd in the search bar, right-click on the displayed result, and select Run as Administrator.
Click Yes to grant the command prompt admin access in the User Account Control (UAC) window.
Run the following commands step by step: net stop bitsnet stop wuauservnet stop cryptsvcren %systemroot%\softwaredistribution softwaredistribution.bakren %systemroot%\system32\catroot2 catroot2.bak
Now, input the following: net start bitsnet start wuauservnet start cryptsvc
Once you’ve executed all the commands, close the command prompt, and restart your PC to check if the error is fixed.
If the Windows Update has corrupt components, it can lead to the 0x800f0823 error; resetting the components restores Windows Update to its default state, eliminating all bugs and errors.
Press the Windows key, type winver, and hit Enter (Note the KB number running on your PC).
In the next window, check the Windows Edition and Build to know which version of the update to download.
Press the Windows key, type your browser’s name in the search bar, and hit Enter.
Navigate to the Microsoft Update Catalog page, copy and paste the corresponding KB number in the search bar, and hit Enter.
Click the one that corresponds with your PC’s architecture, and click the Download button.
In the next popup window, click the link bearing the .msu extension, and wait for the file to be downloaded.
Once the download is complete, double-click on it and follow the onscreen instructions to complete the installation.
Once the installation completes, restart your PC and check to see if the error is fixed.
If you’ve attempted all solutions and the error remains unfixed, you’ll have to manually download and install the latest service stack update to fix it.
These are the best ways to fix the 0x800f0823 service stack update error. If you have further questions, please drop them in the comments below.
Microsoft may have a $10 billion dollar investment and partnership with OpenAI for its ChatGPT Large Language Model but it looks like the company could be hedging its bets with its own smaller transformer technology.
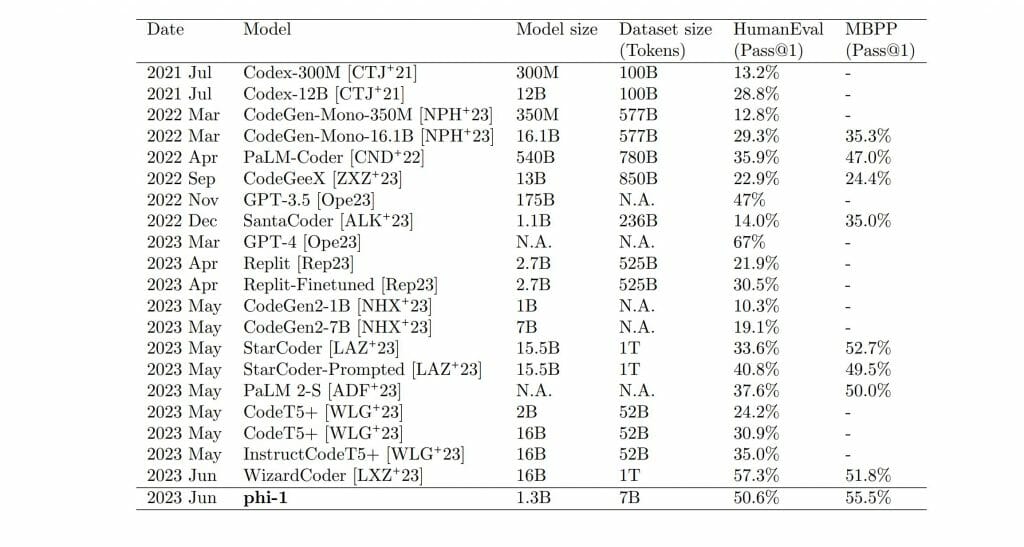
Microsoft researchers recently revealed its Phi-1 1.3B transformer-based language model beat much larger models including HumanEval, MBPP, and even partnered ChatGPT when tasked with coding.
Combing “textbook quality” from The Stack and The StackOverflow datasets to train the artificial intelligence of Phi-1 1.3B and the use of eight NVIDIA A1000 GPUs over four days produced 6 billion high-quality training tokens based on GPT-4 classifiers and 7 billion generated using GPT 3.5 standards.
Not only did Phi-1 1.3B outperform some of its larger language model counterparts, it did so using fewer parameters.
While the researchers may be popping bottles of champagne in excitement, Phi-1 1.3Bs achievements are tempered by its comparative limited versatility. Unlike larger models, Phi-1 1.3B gains ground through its specialized training in Python programming and as such, misses out on specific API programming resulting in less knowledge about domain specifics than larger models tend to have.
At the end of the day, Phi-1 1.3B success highlights the need for higher quality data to flow through these language models to optimize their output.
Microsoft’s other SML Orca has also proven to outperform ChatGPT in similar testing, further lending credence to the necessity for high quality data to shrink the resource question of LLMs.
Microsoft is planning to open-source Phi-1 1.3B through HuggingFace, but as of now, there is no official date for the release.
While using your PC, you can run into an annoying Windows error 999 notification which is often triggered while trying to open an application.
In this article, we’ve outlined the most common causes of the error code 999 and some of the best-known fixes to help you resolve it.
What causes the error code 999?
The error code 999 is usually caused by the following:
Virus & Malware – Viruses and malware infections can corrupt system files and restrict Windows apps from functioning correctly.
Low memory – If you’re running on low memory, you’ll likely experience crashes and error codes like code 999.
Incorrect Registry entries – Incorrect registry entries can damage the Windows registry, leading to the error code 999.
Bad graphics driver – If you install an incompatible or outdated driver on your PC, it can lead to conflicts with Windows and trigger errors like code 999.
How can I fix the error code 999?
1. Close the background programs in Task Manager
Press the Ctrl + Alt + Del keys simultaneously to launch the Task Manager.
Navigate to the Processes tab, right-click on any of the processes, and click the End task button.
After ending the process, check if error 999 is fixed.
If it persists, repeat the steps to keep closing all the processes until you discover which is triggering the error.
Once you locate the process, you can uninstall or troubleshoot the parent app hosting the process.
The actions of some third-party apps can conflict with Windows operations. Disabling such processes in the task manager can help fix the error code 999.
Press the Windows key, type in windows security, and hit Enter.
Click on Virus and Threat Protection. Under the Current Threats section, click on Scan Options.
Select the Full Scan option and click Scan Now to initiate the scan.
Viruses and malware are the most common causes of Windows errors; you can resolve the error code 999 by running a virus scan. If you’d like, here are the best third-party antivirus tools for Windows.
The safest option to scan your PC for viruses and also remove them is by using TotalAV because it has the latest antivirus protection and high detection capabilities that will surely keep away all threats.
3. Run a Disk Cleanup
Create a PC backup before attempting a disk cleanup to prevent file loss.
Press the Windows key + E to open File Explorer.
Right-click on your main directory (usually C:), click on Properties, and select Disk Clean up.
In the next window, click Clean up system files.
Then, restart your PC to check if the error is fixed.
Disk Cleanup can remove corrupt App data from your PC; however, you also lose files that aren’t backed up. Ensure you backup your PC before running a disk cleanup.
4. Reinstall the graphics driver
Press the Windows key, type Device Manager, and hit Enter.
Locate your display adapters from the list of drivers, right-click on the graphics driver, and select Uninstall device.
Then, click uninstall again to confirm the process.
Restart your PC once the driver is uninstalled.
After a reboot, Windows should automatically install the drivers. However, if you’d like to install it manually, here is a detailed guide showing you how to manually install drivers on Windows.
GitHub, the leading platform for software development collaboration, has unveiled the latest tool called actions-permissions. This tool is specifically designed to address the need for better security and control over the repository token used in GitHub Actions workflows.
GitHub Actions
GitHub Actions, which allow users to automate various tasks and workflows within their repositories, utilize a temporary repository access token known as GITHUB_TOKEN. In the past, these tokens possessed wide-ranging permissions, granting full read and write access to the repository, with only pull requests from forks being an exception. However, GitHub implemented a more fine-grained permission model for workflow tokens in 2021. As part of this change, the default permissions for new repositories and organizations were set to read-only, providing a more secure starting point.
Despite these advancements, a significant number of workflows still rely on a write-all token due to default workflow permission settings. In many cases, writing permissions are not actually necessary. To help users identify if their workflows are using overly broad default permissions, GitHub provides a simple way to check the “Workflow permissions” section in the repository or organization settings.
While switching to a read-only permission setting is considered a security best practice, doing so may inadvertently disrupt existing workflows that rely on write-all permissions. Another challenge arises when applying the principle of least privilege, as complex workflows often involve multiple actions, making it easy to overlook specific permission required for proper workflow execution. Additionally, the diverse steps and error-handling mechanisms present in workflows can make it difficult to determine the precise set of privileges needed for more intricate workflow definitions.
To assist users in transitioning to a more secure workflow permission model, GitHub has introduced a set of powerful tools called actions-permissions. These tools provide monitoring and recommendation features that simplify the process of identifying and assigning the minimum required permissions for a given workflow.
Monitor action
The Monitor action, one of the key components of actions-permissions, installs a local proxy within the workflow runner. It actively collects information about any interactions with the GitHub API initiated by the workflow, allowing users to review and understand the minimum permissions needed. The recommendations are conveniently presented as part of the workflow run summary, providing clear insights into the required permissions.
In addition to the Monitor action, GitHub offers the Advisor action, which functions as both a local tool and a way to summarize the recommendations from multiple workflows runs. This feature provides users with a comprehensive overview of the permissions required across various iterations of their workflows.
Once users have implemented the recommended permissions in their workflows, they can discontinue the use of these tools. If any additional permissions become necessary for future iterations, users can easily add them as required.
GitHub welcomes users to try out these tools and provide valuable feedback, contributing to the ongoing improvement of GitHub’s offerings. With actions-permissions, GitHub continues to demonstrate its commitment to providing a safe and efficient environment for developers and organizations worldwide.
Several Windows 10 & 11 users have recently complained about the 0xc0000218 BSoD error, which has hindered their system from starting up properly. The error code 0xc0000218 refers explicitly to a registry file failure which can often appear due to misconfigured system settings.
If you’re seeing this post or experiencing similar issues, check some potential fixes to troubleshoot the issue seamlessly.
What causes the 0xc0000218 BSoD error?
There can be several reasons behind the 0xc0000218 BSoD error. Below are some of the potential factors:
Incorrect registry edits – If you make incorrect changes using registry editing tools or manually modifying values, it can result in a corrupted registry. Such misconfigurations can trigger the 0xc0000218 error during the system startup process.
Conflicting system settings – Certain system settings, such as incompatible driver configurations, can lead to issues with the registry or system stability.
Corrupt or missing registry hive files – If the registry hive files are corrupted or get accidentally deleted, they become inaccessible during startup and trigger this error.
Unlike other BSOD errors, you may still have access to your computer. However, you will experience processing failures at different instances while at it.
How can I fix the 0xc0000218 BSoD error?
Before engaging in any advanced troubleshooting or settings tweaks, you should consider performing the following preliminary checks:
Restart your computer to fix all temporary issues prompting the errors.
Press the Windows + R keys to open the Run command dialog. Type rstrui in the text field and press Enter.
Select System Restore under System protection.
Click Next to proceed.
Select the desired restore point and click Next.
Click on the Finish button to confirm your selection and restart your PC.
The system restore should help revert your PC to a perfect state before the 0xc0000218 BSOD error code. Windows automatically creates restore points, but you can check our article to learn how to create a system restore point manually.
If you don’t want to go through the manual procedure, you can let third-party repair software do the job for you.
3. Manually repair the registry
Follow the instructions provided in Solution 1 to boot from the bootable drive.
In the Windows Setup screen, click on Repair your computer, then select Troubleshoot.
Next, select Command Prompt.
Type the following command and press Enter (replace D with the drive letter of your bootable drive): reg load HKLM\TempHive D:\Windows\System32\config\SOFTWARE
Next, type the following command to check the registry files and press Enter: dir HKLM\TempHive
Type the following command and press Enter (make sure that the output displays the SOFTWARE file): copy D:\Windows\System32\config\SOFTWARE D:\Windows\System32\config\SOFTWARE.bak
Rename the registry files by entering the following command: ren D:\Windows\System32\config\SOFTWARE SOFTWARE.oldren HKLM\TempHive D:\Windows\System32\config\SOFTWARE
Type the following in the text field and press Enter to close the Command Prompt: exit
Finally, remove the bootable drive and restart your PC.
Now check if the 0xc0000218 BSOD error has been fixed. If not, seek assistance by contacting Microsoft support to file a query ticket.
In conclusion, several registries and blue screen issues can be fixed using relative but specific methods. You can check our suggested solutions for the registry & blue screen errors in Windows 10/11 for further assistance.
Please use the comments section below to ask any questions or suggestions regarding this issue.
Microsoft CEO Satya Nadella unveiled an ambitious goal to double the organization’s revenue by the year 2030. The company aims to achieve a staggering $500 billion in revenue, more than double its current size.
During a recent Federal Court hearing related to Microsoft’s acquisition of Activision Blizzard Inc, the CEO’s comments shed light on the company’s strategic objectives and unwavering commitment to innovation and growth. In a memo, Nadella outlined Microsoft’s plan to achieve at least 10% annual revenue growth by implementing a growth-oriented strategy aligned with the company’s enduring mission and culture.
The fiscal year 2022 results demonstrated Microsoft’s strong growth trajectory, despite not reaching the exact targets outlined in the “20/20” strategy. The company achieved an impressive 18% increase in top-line revenue, surpassing the industry average and generating $198.27 billion.
Nadella’s memo also highlighted the driving factors behind the company’s growth. It differentiated between Microsoft Plus, which encompasses consumer-focused products, and Microsoft Cloud, a suite of products primarily targeting commercial clients. With offerings such as Azure, Microsoft 365, and LinkedIn, Microsoft Cloud emerged as the primary driver of growth for the company. Recently, the Redmond company also gained an annual growth of 32% in cybersecurity revenue.
Azure, the company’s flagship cloud computing platform, has experienced significant success, positioning itself as a major player in the industry. Competing directly with Amazon Web Services (AWS) and Google Cloud Platform (GCP), Azure provides organizations with a comprehensive range of cloud services, including infrastructure, platform, and software solutions.
TLDR: Microsoft CEO memo
In summary, Nadella’s memo emphasized the company’s commitment to maintaining growth rates above the market average, enabling the company to extend its lead over competitors like GCP and close the gap with AWS. Microsoft’s strong performance, along with its focus on innovation and strategic expansion, positions the company on a promising path toward achieving its ambitious revenue target of $500 billion by 2030.
Some of our readers have recently reported that they are unable to use their printer as it keeps displaying the 0x00000bbb printer error message. Some users in the Microsoft forum have also reported similar issues.
In this article, we will take you through quick steps to fix the issue seamlessly.
What causes 0x00000bbb printer error?
The specific cause of the 0x00000bbb printer error can vary depending on the printer model, software, or operating system used. However, some common causes for this error code include:
Printer connection issues – Hardware issues such as loose cables or faulty USB ports can lead to communication errors between the printer and the computer.
Network configuration problems – If you use a network-shared printer, incorrect network settings or misconfigurations can result in the 0x00000bbb printer error.
Regardless of your printer model, you can work through any of the solutions below.
How can I fix the 0x00000bbb printer error?
Before attempting any of the advanced troubleshooting or settings tweaks provided below, you should consider performing the following preliminary checks:
Restart your PC to fix the temporary issue prompting this error.
Turn off your printer, disconnect the power cable, and wait for a few seconds before restarting the printer.
Disconnect all the unnecessary peripherals.
Having confirmed the above checks, if the problem persists, you can proceed to the next section for advanced solutions.
1. Run the Printer troubleshooter
Press the Windows + I keys to open the Windows Settings app.
Go to System and click on Troubleshoot. Then, click Other troubleshooters.
Locate the Printer and click Run next to it.
Follow the troubleshooting processes recommended to complete and click on Apply this fix in the next prompt.
Press the Windows + R keys to open the Run dialog box. Type services.msc and press Enter to open the Services window.
Locate Print Spooler in the list of services, right-click on it, and select Restart from the context menu.
Wait for the Printer Spooler service to restart, then check if the error has been fixed. Most people have been able to fix their printer issues by restarting the Spooler service.
And that’s it on how to fix the 0x00000bbb printer error. Hopefully, one of the methods provided in this guide will help you fix the issue.
Some users have also reported the 0x00000b11 printer error on Windows 10 & 11, and a lot have been able to resolve the issue here. You can also explore the article for further information.
Please use the comments section below to ask any questions or suggestions regarding this issue.
Some of our readers have reported that they come across a rpcnetp.exe process on their Windows PC, but they don’t seem to know what it is. Others in the Microsoft Community forum are anxious to know whether the file is safe or a virus/Trojan.
In this article, we will discuss the rpcnetp.exe executable file and whether to delete it or keep it on your PC. Also, you may be interested in knowing why exe files are deleting themselves on Windows 11.
What is rpcnetp.exe?
The rpcnetp.exe is a legitimate executable file extension for Remote Procedure Call from Absolute Software Corp.
Although there is no reliable information yet about the file producer, several users in the file.net forum claim that rpcnetp.exe is part of the security software called LoJack for Laptops made by Absolute.
This executable file does the following:
Laptop-tracking software that helps recover stolen laptops by sending information about the laptop’s location connected to the Internet.
This process does not appear as a visible window only in Task Manager.
Should I delete rpcnetp.exe?
The decision to delete the rpcnetp.exe executable file is exclusive to the user. However, if you are not using the file to track your stolen laptop, you can delete it.
Moreover, if a rpcnetp.exe camouflages as a virus, it may threaten the System’s security, hence the need to remove it. Also, since rpcnetp.exe is not a Windows file, deleting it from your PC should be a safe call.
Can I verify if rpcnetp.exe is safe?
We recommend you review some verification processes to determine whether rpcnetp.exe is unsafe and should be deleted. Apply the following checks:
Check the file location – Verify if the rpcnetp.exe process on your PC is in the legitimate directory: C:\Windows\System32
Check the spelling – The original file is spelled as rpcnetp.exe. If the spelling of the file on your PC differs from this, it is not genuine.
Use a third-party tool – Run the Security Task Manager or antivirus tools to verify the file.
Having confirmed the above checks, you can proceed to the next section to remove the rpcnetp.exe executable file from your computer.
How can I remove rpcnetp.exe?
1. End the rpcnetp.exe process in Task Manager
Right-click on the Start button and select Task Manager from the options.
Navigate to the Details or Processes tab. Locate the rpcnetp.exe process, right-click on it, and then click on End task from the context menu.
Click OK to confirm that you want to end the task for the program.
Right-click on the Start button and select Task Manager from the options.
Navigate to the Details or Processes tab. Locate the rpcnetp.exe process, right-click on it, and then click on Open file location.
Alternatively, open the File Explorer, navigate to your C: drive and search for the rpcnetp.exe file.
Once you’ve found it, right-click on it and select Delete from the context menu.
You need to provide administrator permissions before deleting the file. In case you encounter permission issues, double-check that you have administrative privileges.
And that’s it on how to remove rpcnetp.exe from your PC. If you cannot open .exe files, you can explore our detailed guide to know why exe files are not opening on Windows 11.
If you have any questions or suggestions, please let us know using the comments section below.
Victoria 2 is a grand strategy game released in 2010, and ever since it has become a cult classic. In it, you are able to control one of approximately 200 states of the world between 1836 and 1936. You’ll be in charge of managing the economy, science, domestic politics, diplomacy, army, and navy.
The game can be played as a single-player, or even multiplayer.
Since it was released in 2010, you would think that Victoria 2 will be having issues while playing on Windows 11.
And truth is, several older games have been experiencing issues on Windows 11: Mirror’s Edge, and Gothic 2, for example, are some of them. But it seems Victoria 2 keeps crashing on Windows 11, Reddit users agree.
But don’t worry, there is a simple fix to solve this issue.
Here’s how to fix Victoria 2 on Windows 11
First of all, for this game crashing might be because the Smart Access Memory on AMD systems is turned on, or Resizable Bar on NVIDIA systems is turned on. So to fix this issue, you need to disable these features, depending on the system that you have.
If you have an NVIDIA video card you’ll need to enable/disable it from BIOS. Make sure you have the latest BIOS installed on your motherboard.
Restart your PC and go to the BIOS setup.
Go to Advanced Mode > Settings > IO ports > Re-Size BAR Support.
Turn it from Auto to Disabled.
On AMD systems, you need to disable SAM (Smart Access Memory), and this is pretty simple.
Follow the BIOS steps, and enable your BAR support.
After restarting your PC, open AMD Adrenaline and go to the Performance label.
Once there, go to the Tuning pane and scroll down.
You’ll see that the AMD SmartAccess Memory is enabled. Disable it.
Reddit users confirmed that Victoria 2 was working again after disabling these features. However, if you’re playing other games, especially, newer games, then make sure the feature is on. When this feature is on, it optimizes GPU performance, but on older video games it might cause the game to crash, or lag.
In AMD Adrenaline, for example, you can easily disable/enable it. In NVIDIA, you can do that in BIOS.
Are you playing Victoria 2? Have you encountered this issue? Let us know in the comments section below.
Microsoft has brought some important features to Microsoft Teams over the last two months. for example, AI recap is coming to the platform, allowing you to quickly take notes from a meeting.
You’ll also be able to set working hours and locations, so you’ll be able to know exactly when to schedule meetings. However, there might be another feature coming to Teams in the following weeks. You will be able to use Teams to convert files to PDF.
This developer has initiated a request, showcasing a demo on how to do it on Teams. You’ll be able to convert to PDF through Microsoft Graph API. You can convert one file or multiple, and you can have the option to merge multiple files into a single PDF file.
Pull Request – Microsoft Teams SSO Tab to convert different types of documents into PDF via the Microsoft Graph API, and then merge them together in order to form one document pack. TeamsToolkit 5.0 + Azure Function (.Net) Integration@Microsoft365Dev@MicrosoftTeamspic.twitter.com/1y6zjyifjI
— Ejaz Hussain | Microsoft MVP (@EjazHussain_) June 25, 2023
According to the developer, you’ll be able to convert different types of files, including .xlsx, .docx, and .pptx, and possibly many more formats to come.
Here’s how you can convert to PDF directly in Teams
In Microsoft Teams, you would need to go to the Document Pack pane and click on Create document pack.
Click on Drop files here or click on to browse panel to upload your files.
Select the files you want to upload.
Click on Create document pack and wait for the files to convert to PDF.
However, the feature is not yet on the public servers, and as far as we can tell, it’s still a demo. But there is a possibility that it might come to Teams in the following weeks or months.
The whole demo looks very intuitive and easy to use. Not to mention the option of merging multiple documents into one single PDF file. You could easily deal with a lot of documents, especially if you’re already working in Teams.
What do you think about this feature? Are you excited for it to come to Microsoft Teams? Be sure to let us know in the comments section below.
Wscript.exe, also known as Windows Script Host is a genuine Windows process file by Microsoft Corporation. This executable file imparts scripting abilities to the Windows operating system and offers a range of system objects and functions.
The wscript.exe file is also responsible for launching VBScript and JScript components, and it is also capable of interpreting and running plain text Jscript (.JS and .JSE files) and VBScript (.VBS and .VBE files).
Is the Wscript.exe malware?
Wscript.exe being a core Windows application file is a relatively safe one. But there have been several instances when cyber criminals name trojan horses and worms as the wscript.exe file to avoid seeking users’ attention.
However, in some cases, antivirus software also flags legitimate Windows executables as threats providing false positives. In such cases, you should verify the authenticity of the file.
Bring up the File Explorer window using the Windows + E shortcut.
Copy and paste the following path in the address bar to navigate to the following location in the C drive. C:WindowsSystem32
Scroll down and find the wscript.exe file, right-click it, and select Properties from the context menu.
Access the Digital Signatures tab of the Properties window and check whether Microsoft Corporation is mentioned as the name of the signer.
If the signer is not verified, there is a high probability that a virus or trojan is masquerading as wscript.exe.
How to fix the issues with the wscript.exe file?
1. Temporarily disable wscript.exe
Right-click the Windows icon on the taskbar and choose Task Manager from the context menu.
Look for wscript.exe in the Processes tab, right-click it, and select the End Task option.
Disabling the wscript.exe background process should fix the issues like system freeze due to high CPU usage. However, the solution is temporary, and you should implement the methods discussed below to investigate and analyze the situation.
2. Get rid of trojans and worms
Bring up the Settings app using the Windows + I shortcut.
Access Privacy & security settings from the left sidebar and Windows Security from the right.
Choose Virus & threat protection located under Protection areas.
Next, click Scan options located in the Current threats section.
Finally, choose the Microsoft Defender Antivirus (offline scan) option and press the Scan now button.
Wait for the scan to complete and reboot your system.
Of course, if you have access to an efficient third-party antivirus, you can scan your PC to get rid of the threats.
Hit the Windows key to bring up the Start menu, type cmd in the top search bar, and select Run as administrator from the search results section.
Type or paste the following command and press the Enter key to run the SFC scan. sfc /scannow
Wait for the command prompt to display the Verification is 100% complete message and type the following command and press the Enter key to initiate the DISM tool. DISM.exe /Online /Restorehealth
Performing the System File Checker (SFC) and Deployment Image Servicing and Management (DISM) scans will repair or replace the protected system files with the ones stored in the compressed folder, thus fixing the corrupt or infected wscript.exe.
4. Modify the registry
NOTE
We recommend you back up the Windows registry before proceeding and perform the procedure with caution to avoid tampering with the registry keys.
Use the Windows + R shortcut to launch the Run dialog box, type the following command in the text box, and press Enter. regedit
Navigate to the following path in the address bar to directly access the concerned key. HKEY_CURRENT_USER/Software/Microsoft/Windows/CurrentVersion/Run
Look for other names of this trojan, such as OUzzckky, Shakira, and I-WORM.LEE, VBS/VBSWG.AQ@mm, LEE in the right section, and if you find any, right-click them and choose Delete from the context menu.
After all the suspicious keys and successfully deleted, exit the registry editor and reboot your PC as you normally would.
There have been reports of the wscript.exe hiding dangerous worms named VBS_VBSWG.AQ. If such is the case, it will be evident by a malicious registry file that will reside in the above directory.
5. Perform a system restore
Bring up the Start menu by pressing the Windows key, type system restore in the search box, and select Create a restore point from the search result.
Click the System Restore button present in the System Protection tab of the System Properties window.
Press the Next button on the System Restore wizard to proceed further.
Choose a suitable restore point from the list when you did not witness any issues and press the Next button.
Review the restore point and press the Finish button on the Confirm your restore point window to initiate the system restoration process.
If the issue isn’t resolved yet, restoring your PC to a previous point in time should roll back all the changes that may have commenced the wscript.exe-related problem.
In case you still witness suspicious activity by the malware disguising as wscript.exe, performing a clean install of Windows is recommended.
That’s pretty much it! Hopefully, the tactics explained in this guide proved beneficial in diagnosing and resolving the problems caused by wsript.exe.
You may also be interested in knowing about the view.exe file and whether you should be concerned about it. Many also reported Dltray.exe, and we have a special guide dedicated to it.
If you need further assistance in this regard, feel free to reach out to us in the comments section.
While Microsoft is making technological breakthroughs with AI, Copilot, and scientific discoveries, it seems that working at the Redmond-based tech giant is not so great, after all.
According to an internal poll at Microsoft, leaked to Insider, Microsoft employees showed less confidence in leadership, and they also gave the worst score to the question about whether working there is a good deal.
This is somewhat a bit difficult, considering just how much Microsoft achieved in the past couple of years. Windows 11 is 2 years old now, and a lot of other changes and improvements on the overall Microsoft products happened.
We were all excited when Microsoft decided to delve deep into AI. At the Microsoft Build 2023 conference, held in May, everyone was thrilled about the excitement of Microsoft. And now, it seems that the employees are not very excited to work at the company.
Are Microsoft employees unhappy?
Well, according to the leaked internal reports, not all of them are unhappy, but a great deal of the Microsoft staff is not really excited to work for the company.
According to the report leaked to Insiders, when asked about confidence in leaders, 73% of Microsoft employees gave a positive response. That might seem almost generally positive, but last year, 78% of them gave a positive response to the same question.
So it looks like fewer people at Microsoft are really content with the leadership that they have there.
Even more, when asked if they think they got a good deal at Microsoft, and by a good deal, it means work vs. compensations, 69% of the Microsoft employees gave a positive answer. That’s a bit higher than 2022 when 66% responded with a positive answer to the question. Ultimately, it even prompted Microsoft to announce raises and more benefits.
However, it seems that less than of the Microsoft employees would consider staying if they got another and a better offer. That’s lower than when the same question was raised last year.
So it seems that almost half of the Microsoft employees are unhappy, overall.
What do you think about it? Be sure to let us know your thoughts and opinions in the comments section below.
Imagine you had a long day and are looking forward to playing Fortnite to relax. You just downloaded the game when all of sudden you’re greeted with a FortniteClient-Win64-Shipping.exe error message.
Similar to an upload packet loss error, the Win64 error prevents you from playing Fortnite. Don’t worry; this guide has a variety of solutions that you can try out to fix the error so you can play.
What causes the Win64 error?
But before solving this error, it’s important to find out what causes it. Fortnite isn’t the only game that can suffer from a Win64 error, but the culprits are typically the same:
There could be an error with internal files, specifically EasyAntiCheat. Other games, like Elden Ring, have been known to into problems with EasyAntiCheat getting in the way.
RGB software that interacts with Fortnite can cause your computer’s Firewall or antivirus software to flag everything as malicious. You may have to uninstall the RGB app to bypass the error.
Corrupt files can lead to widespread system errors. It’s possible to fix this with an SFC scan or with file repair software instead.
How do I fix the Fortnite Win64 error?
Before going into the more complex solutions, there are a couple of things that you can do to fix the Win64 error. These take almost no time at all.
Be sure your computer is running the latest Windows 11 update. Microsoft is always churning out frequent security fixes and it’s important that you stay up to date.
Reinstall Fortnite. Go to whichever gaming launcher you use, uninstall Fortnite, and reinstall it all over again.
Open the game launcher that houses Fortnite (in this example, it’s the Epic Game Launcher) and uninstall it.
Go to where Fortnite is located on File Explorer. There shouldn’t be anything there, but if you do see the Fortnite folder, delete it.
Now restart your computer.
After it turns back on, search for the Command Prompt and run it as an administrator.
Type this in the Command Prompt. Your computer will begin scanning and fixing its files: sfc /scannow
Once it’s done, reboot your computer and reinstall Fortnite.
If you want to be safer about this process, you can try using third-party software to help you scan your device in-depth and present complete information about corrupted or missing files. After that, the software will repair or replace them automatically with new elements from its substantial database to keep your PC running smoothly.
4. Clean install GPU drivers
First, find out what kind of GPU you have. In this example, we going to download the drivers for a GeForce RTX 2060 graphics card.
Head on over to the manufacturer’s website and download the necessary drivers from there.
Run the file you download to save the drivers to your computer.
Select Custom (Advanced) in the installation wizard and click Next.
On the NVIDIA installer, click the box next to Perform a clean installation. If you have an AMD Radeon graphics card, you’ll select Factory Reset (Optional).
Besides the Win64 error, there’s nothing worse than launching a game and being greeted with a black screen. This is because of a problem with the graphics car drivers and has been seen affecting Minecraft and Overwatch.
Fixing a plain black screen is simple; most of the time you just update the drivers but you also may have to adjust your computer’s power plan.
For specific titles, we recommend learning how to Assassin’s Creed Black Flag suddenly crashing upon startup. You’ll get a crash course on how to replace DLL files and install Blag Flag in compatibility mode.
Feel free to comment below if you have questions about other video game problems or bugs. And please tell us if there’s a specific guide for a game that you’d like to see.
DRAM (Dynamic Random Access Memory) is the memory your computer uses to manage its running tasks. The DRAM frequency, on the other hand, denotes the percentage of data that can be transferred per second on your PC’s data wire.
This parameter holds a lot of importance, and you need to know how to manage it properly. In this guide, we will delve into everything you need to know about DRAM frequency and how to set it up.
What is DRAM Frequency?
As mentioned earlier, the DRAM frequency denotes the percentage of data that can be transferred per second on your PC’s data wire. It is usually half the speed of Random Access Memory.
This is so because of the DDR (Double Data Rate) clock, which allows you to transfer data twice per cycle instead of the usual one. With this, you will have the double frequency needed.
Is increasing DRAM frequency safe?
Increasing your DRAM frequency is risky, and experts warn against doing it. You should leave it alone unless there is a dire need to increase it. And if it is needed, it should only be done by an expert.
Another option will be to use Intel’s XMP technology. With this tool, your RAM will always run at the factory pre-set frequency. This setting should be enough to meet your PC requirements.
Also, if you are wondering if you should set DRAM frequency to the highest, you should never do that. This is because while you might get a marginal performance benefit, the risk of damage to your PC is incredibly high.
How to check DRAM Frequency?
1. Use CMD
Press the Windows key + S, type cmd, and select Run as administrator under Command Prompt.
Type the command below and press Enter to run it: wmic memorychip get speed
Now, wait for the command to finish running, and you will find the parameters there.
After the command finish running, you will find your RAM speed and DRAM frequency listed there.
2. Use CPU-Z
Download and install the CPU-Z app and launch it.
Click the Memory option under the Timings tab.
You will find the DRAM frequency and other crucial parameters listed there.
If you don’t want to use the built-in option to check the parameter, you can use a trusted third-party app. This app will also display other important PC parameters, and it can help you monitor your PC resources.
How can I change my DRAM frequency?
Power off your PC and power it on again. While it boots, keep pressing the BIOS key (Del, Esc, F2, or any one that works for your device).
After entering the BIOS, click the OC button from the main menu.
Now, locate the Extreme Memory Profile (XMP) option from the list.
Next, change the XMP option to Profile 1. You can also change any of its parameters to match your RAM’s timing and speed.
Finally, save the changes and exit BIOS.
With this, you should be able to change your DRAM frequency without issues. This is especially useful if you are overclocking your PC, as it will help your RAM meet the requirements.
It is advisable to choose profile 1 as it is stable and should meet the requirement of RAM. This is because increasing the voltage unnecessarily can cause serious damage to your PC.
Your RAM’s maximum permitted speed determines the maximum speed you can set your DRAM frequency to. So, you can set the DRAM speed to the maximum permitted speed of your RAM.
In cases where the maximum speed of your RAM is too much for your CPU, you will need to set it to the resonant speed of your CPU. If increasing the frequency causes any problems, you can change it back to 1333 MHz.
You should also keep the voltage at 1.5V to prevent further issues. Increasing it above this poses more risks than benefits. While at it, below the DRAM frequency ranges by RAM generations:
DDR1 frequency range: 200-400 MHz
DDR2 frequency range: 400-1066 MHz
DDR3 frequency range: 800-2133 MHz
DDR4 frequency range: 1600-5333 MHz
DDR5 frequency range: 3200-6400 MHz
For DDR6, there is no official frequency range released yet. But that should be done soon.
With this, we can conclude this detailed guide on everything you need to know about the DRAM frequency. This can be useful, especially if Windows 11 is showing the wrong RAM speed on your PC.
If you want to know what DCOP does, check our guide for trusted information.
Let us know if you encounter any problems with this feature in the comments below.
The user folder name and the account name are set during setting up your user account. However, there are times when you need to change your user folder name on Windows 11 for some reason.
Unlike renaming standard folders, this process is not as straightforward. But with the right information, the process can be effortless, and that is what we have to offer you in this guide.
Is it safe to rename my user folder name?
As mentioned earlier, changing the user folder name on Windows 11 is not as straightforward as renaming ordinary folders. Even when you change your user account name, the user folder name will still remain the same.
Microsoft advises against changing your user folder name because it might cause some apps not to work. This is because the registered path name for these will have changed from the default.
Though this can be fixed by changing the path of the faulty apps and processes so there is no lasting damage.
But, it is advised not to change your user folder name unless you have a good reason for it.
How can I change my user folder name on Windows 11?
1. Create a new admin account
Press the Windows key+ I to open the Settings app and select the Accounts option in the left pane.
Select Family & other users in the right pane.
Now, click the Add accountbutton under Other users.
Next, select I don’t have this person’s sign-in information.
Click Add a user without a Microsoft account.
From here, enter the username, password, and other details and click Next to complete the process.
Now, choose the new account you created and select Change account type.
Click the Account type dropdown and choose the Administrator option.
Click the OK button to save the changes.
Finally, sign out of your account and sign in to the new administrator account created.
The first thing to do in the quest to change your user folder name on Windows 11 is to create a new administrator account. This is because you cannot make changes to the account you are currently logged into.
If you don’t want to go through the stress of creating a new admin account, as shown above, you can enable the hidden admin account instead.
After creating the new admin account, you must proceed to the next section to determine your account SID.
2. Determine the SID
After signing out of your current user account and logging into the new admin account, press the Windows key + R, type netplwiz, and press Enter.
Now, select the account you are logged into and click the Properties button.
Check the User name and Full name under the User Properties section.
Next, set your preferred user name and full name.
Click the Apply button, followed by OK.
Exit the User Accounts page and restart your PC.
Now, press the Windows key, type cmd, and select Run as administrator under Command Prompt.
Type the command below and hit Enter to view the SID (Security Identifier) for all users on your PC: wmic useraccount get name,SID
Finally, take note of the SID of the account you want to change the user profile folder name for.
Before changing your user folder name on Windows 11, you need to determine the account SID. First, you need to set a user name for your new administrator account to differentiate it from the old one.
Then you need to run a command to determine the SID of the account you want to make changes to. After doing this, you must proceed to the next section to change your user folder name from your registry.
Note that you need to proceed with caution in this step, as mistakes can be costly. Preferably you should create a restore point before proceeding.
While you are in Command Prompt, you can quickly check the device name for reference by following our guide to find your computer name in Windows 11.
3. Modify your registry to change the user folder name
Press the Windows key + R, type regedit, and click the OK button.
Navigate to the path below in the left pane: HKEY_LOCAL_MACHINE\SOFTWARE\Microsoft\Windows NT\CurrentVersion\ProfileList
Now, select the ProfileList key.
Next, check for the SID you noted in solution 2 above and click on it.
Double-click the ProfileImagePath in the right pane.
Delete the old name at the end of the path in the Value data box and add the new one of your choice.
Finally, click the OK button and exit the Registry Editor.
This is the most integral part of this process, and it requires you to be careful. After changing the user folder name in the Registry Editor on Windows 11, you can now proceed to the section below to complete the process.
4. Confirm the change in File Explorer
Press the Windows key + E to launch File Explorer and navigate to the path below: C:\Users\
Right-click the user folder you want to change and select Rename.
Now, type the new name and press Enter. Note that it must correspond with the name you set in the Registry Editor.
Finally, click Continue when prompted.
With this, you have successfully changed your user folder name on Windows 11. If you encounter an error like You can’t perform this action while renaming the folder, it means you did not sign out of the user account properly.
You need to sign out of the account properly or, better still, restart your PC. After completing the process, you can log into the profile with the new folder name and use it normally.
With this, we can conclude this guide on how to change your user folder name on Windows 11. While the process is pretty easy if you follow the steps above, we reiterate that some of your apps might encounter issues.