KB5022360 has been released to the Windows 11 Release Preview Channel

There has been a lot of talk about lately about all the Insider Preview builds that have been released to the Dev and Beta Channels for Windows 11.

Today, however, we’re going to talk about the changes that actually made it to the Release Preview Channel, as Microsoft just put out a new build.

Before we jump into it, remember to check out this month’s Patch Tuesday rollout. You’d also like to know that Microsoft is planning to retire MSDT for the Windows OS.

Also, if you are using Windows 11, know that it has been discovered that the Secure Boot feature for the operating system is not actually working.

Secure Boot was actually one of the most important Windows 11 system requirements and this represents a major safety issue.

Circling back to the Release Preview Channel, we are going to take a more in-depth look at Windows 11 Build 22621.1192 and find out what makes it tick.

What should I expect after downloading KB5022360?

The Redmond-based tech giant, also known as Microsoft, has provided Insider build 22621.1192 (KB5022360) to the Windows 11 Release Preview channel.

In short, this new build will now offer .NET Framework updates that will be displayed inside the Settings app, among others.

You should definitely know that it also fixes a TPM-related issue, a search indexing issue, a thread deadlock issue, and more.

There are no major, system-changing differences, just some fixes, and minor changes brought to some of the areas of the OS.

Let’s take a closer look at this changelog and discover firsthand what we are dealing with after downloading and installing KB5022360.

Changes, improvements, and fixes

  • Changed the experience for preview .NET Framework updates. After you installed this update, all future preview (optional) .NET Framework updates will be displayed on the Settings > Windows Update > Advanced options > Optional updates page. On that page, you could control which optional updates you wanted to install.
  • Fixed an issue that affected searchindexer.exe. It randomly stopped you from signing in or signing out.
  • Fixed an issue that stopped you from searching for a file based on the file’s contents.
  • Fixed a resource conflict issue between two or more threads (known as a deadlock). This deadlock affected COM+ applications.
  • Fixed an issue that affected conhost.exe. It stopped responding.
  • Fixed an issue that might have affected the Domain Name System (DNS) suffix search list. When you configured it, the parent domain might have been missing.
  • Fixed an issue that might have occurred when the Input Method Editor (IME) was active. Applications might have stopped responding when you used the mouse and keyboard at the same time.
  • Fixed an issue that might have affected FindWindow() or FindWindowEx(). They might have returned the wrong window handle.
  • Fixed an issue that might have occurred when you converted or reconverted Japanese Kanji using a multibyte character set (MBCS) app. The cursor might have moved to the wrong location when you typed.
  • Fixed an issue that might have affected applications that used Microsoft Edge WebView2 to display content. Applications that used WebView2 included Microsoft Office and the Widgets app. The content might have appeared blank or greyed out.
  • Fixed an issue that affected certain systems that had firmware Trusted Platform Modules. (TPM). This issue stopped you from using AutoPilot to set up those systems.
  • Fixed an issue that affected picture files you found using search on the taskbar. This issue stopped you from opening those pictures.
  • Fixed an issue that affected mstsc.exe. It stopped responding while connecting to a RemoteApp and Desktop Connection.
  • Fixed an issue that affected a Group Policy for Expanded Toasts.
  • Fixed an issue that caused Windows Server 2022 domain controllers (DC) to stop responding. This occurred when they processed Lightweight Directory Access Protocol (LDAP) requests.
  • Fixed an issue that affected the Resilient File System (ReFS) MSba tag. The issue caused a nonpaged pool leak.
  • Fixed an issue that affected the ReFS. The issue caused high nonpaged pool usage, which depleted system memory.
  • Fixed an issue that affected devices that were subject to Microsoft Exploit Protection Export Address Filtering (EAF). Some applications stopped responding or did not open. These included Microsoft Office and Adobe Reader.
  • Fixed an issue that affected some game controllers. When the game controller was connected to the computer, the computer might not have gone to Sleep mode.

If you are also a Windows Server 2022 user, you might have noticed that the tech company has fixed an issue that caused Windows Server 2022 domain controllers (DC) to stop responding.

If you weren’t totally aware, this problem occurred when they processed Lightweight Directory Access Protocol (LDAP) requests.

Also, we don’t have to worry about an issue that might have affected applications that used Microsoft Edge WebView2 to display content anymore.

Users reported that applications that used WebView2 included Microsoft Office and the Widgets app, and the content might have appeared blank or greyed out.

What can I do if I can’t install KB5022360?

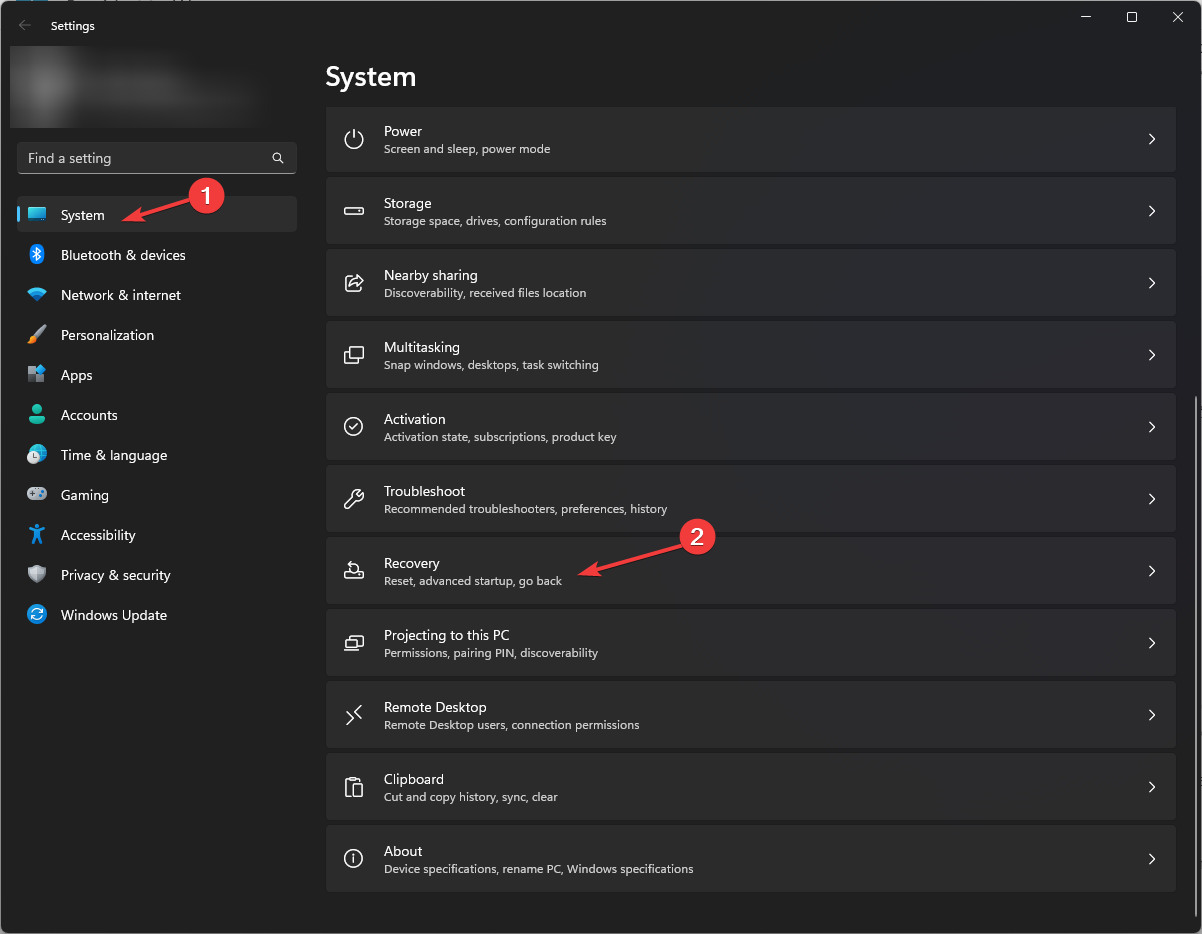
  1. Press Win+ I to access Settings.
  2. Select the System category and click on Troubleshoot.w11 troubleshoot
  3. Press the Other troubleshooters button.other troubleshooters windows 11
  4. Press the Run button next to Windows Update.windows update troubleshooter

Also, make sure to report any other issues you might come across, in order for Microsoft to address and improve the overall OS experience for us all.

This is everything you can expect if you are a Windows Insider. Leave a comment below if you found any issues since installing this build.

How to Create & Run Shell Scripts on Windows [Step-By-Step]

A shell script is a shell programming language program typically used on Linux and another Unix-based operating system. However, you can create and run shell scripts on Windows with additional steps. 

Here in this guide, we have mentioned a step-by-step method to run a shell script on Windows. Let’s get started!

How can I create and run shell scripts on Windows?

1. Install the Windows Subsystem

  1. Press Windows + I to open Settings.
  2. Go to Privacy & Security, and click For developers. Settings - Privacy Security
  3. Click the toggle switch next to Developer mode. Now click Yes on the Use developer features window.Developer settings
  4. Press the Windows button and type Turn Windows features. Next, select the option displayed and click Open. Windows features - shell script for windows
  5. Locate Windows Subsystem Linux and place a checkmark next to it. Click OK.Windows Subsystem for Linux
  6. Follow the onscreen instructions and restart your PC to finish. 

2. Download Ubuntu & Integrate it with WSL

  1. Press the Search button and type Microsoft Store.
  2. Launch the store app and type Ubuntu in the search bar.Ubuntu -shell script for windows
  3. Click Ubuntu from the search and click on Get to download it.
  4. Search for the app and launch it.
  5. The Linux command prompt will install on your disk.Ubuntu - shell script for windows
  6. The integration with WSL will also initiate.
  7. Enter the username and password and note it down for future use. The process might take some time to complete. 

3. Create a shell script

  1. Go to the desired location on your computer, press the Shift key, and right-click on the blank space.Powershell  -shell script for windows
  2. From the context menu, click the Open PowerShell window here.
  3. Type the following command to get redirected to the bash shell: bashBash
  4. Next, copy and paste the following command after replacing the filename with the name of your file and press Enter to create a shell script file: cat>filename.shcatscript - create script
  5. Check the created file and go back to PowerShell. Press Ctrl + C to terminate the process. 
  6. To run the shell script, you need to add some data. On the PowerShell window, type the following command after replacing the filename with the name of the file and press Enter. This command will open a file for editing: vi filename.shvi script1.sh
  7. Press the I key to access the file and start editing it. 
  8. Type the following command in the file: echo “Hello World”Enter -shell script for windows
  9.  To save the contents of the file and close it, press the Esc key from the keyboard and type the following command, and press Enter: wq 

4. Run the Shell Script

4.1 Use the PowerShell

  1. Go to the location where your sh file is present, press the Shift key, and right-click the blank space. 
  2. From the context menu, click the Open PowerShell window here. 
  3. Type the following command and press Enter to go to the bash shell: bash
  4. Next, copy and paste the following command and press Enter: sh filename.shHello world output -Enter -shell script for windows
  5. You will see the output. 

4.2 Use Command Prompt

  1. Press the Windows key, type CMD and click Open.
  2. Type the following command and replace the E:/New folder with the path of your file, and press Enter: cd /d E:/New folder.
  3. Next, copy and paste the following command, replace the filename with the name of the file, and press Enter: bash filename.shBash output cmd -Hello world output -Enter -shell script for windows
  4. You will get output on your command prompt window. 

 So, these are steps that you can follow to run shell script commands on Windows. Try this step-by-step guide and if you have any questions, let us know in the comments section below.

Xbox boss Phil Spencer honored at the New York Game Awards 2023

Last night the New York Video Game Critics Circle hosted the 12th annual New York Video Game Awards. The event recognizes not only the best games but also those who make noteworthy contributions to the industry in some way or another.

Various awards were given in a slew of categories. Among those honored were:

  • God of War Ragnarok for “Herman Melville Award for Best Writing in a Video Game.”
  • Metal: Hellsinger for “Tin Pan Alley Award for Best Music in a Game.”
  • Vampire Survivors for “Off Broadway Award for Best Indie Game.”

And those are just a few mentions. Elden Ring was the only game to win multiple awards, those being the “Statue of Liberty Award for Best World” and the ultimate prize of the evening: the “Big Apple Award for Best Game of the Year.” This likely came to the surprise of no one.

Also acknowledged was Microsoft Gaming CEO Phil Spencer, who was this year’s recipient of the Andrew Yoon Legend Award. In his acceptance speech Spencer said,

Today, there are so many games, more than ever before, available to more players than ever before. But also, it can feel like there is more despair in the world, a steady stream of bad news. With the ongoing leapfrogging from crisis to crisis, it feels to me that that joy I experienced as a child has become much more elusive for us, for all to find, more of a guilty pleasure. It feels like today, seeking joy is an act of defiance. Yet today, as creators, as leaders, as world-builders, our greatest responsibility is to inspire and invite joy. Each one of the hundreds of titles that players have at their fingertips today and tomorrow is a calling card for joy.

Previous recipients of the Andrew Yoon Legend Award include the likes of Tim Shafer and Hideo Kojima.

7 Best Ways to Protect Active Directory From Ransomware

Ransomware attacks are increasing day by day as the world has shifted over to the internet. This puts organizations under a lot of stress as everything important to them is available on a network, which can easily be accessed in case necessary measures aren’t in place.

In this guide, we will show you how to protect Active Directory from ransomware attacks. This guide will help you apply measures and safeguard your AD from increasing ransomware attacks. Protecting Active Directory is important because an intruder can take ownership rights of the network, and get hold of everything important.

Why ransomware attacks are increasing on Active Directory?

To put it in simple terms, accessing the Active Directory anyone the gateway to everything on the network. This includes important files, apps, and services.

It can also allow a user to manage the network, manage groups, authenticate permissions, allow or deny permissions, and secure users across the domain network.

Cybercriminals understand the importance of Active Directory because of a few of the above-mentioned reasons, thus attacking the Active Directory.

Is Active Directory encrypted by ransomware?

No. Ransomware does not encrypt the Active Directory. However, it uses it as a gateway to encrypt connected hosts and domains joined systems. You can imagine the loss if a ransomware attack happens to an organization.

Their main goal is to gain admin access to everything on a domain controller. They will own the network and access all the apps and services on it. If necessary precautions or tools aren’t used, then recovering from a ransomware attack becomes quite difficult.

How can I protect Active Directory from ransomware?

1. Use a specialized tool and protect Active Directory

  1. Download and install ManageEngine ADSelfService Plus.
  2. Launch the tool.
  3. Click on the Configuration tab at the top.
  4. Select Password Policy Enforcer from the left pane.policy enforcer
  5. Choose the best and a complex password policy for the Active Directory.
  6. Click on the Multi-factor Authentication option on the left pane.
  7. Here you can set up multi-factor authentication or MFA for the AD using a third-party tool such as Google Authenticator or Microsoft Authenticator and apply other policies.
  8. Click on the MFA Endpoints tab.
  9. For MFA for VPN Login, select Enable.
  10. From the Choose authentication for VPN login drop-down, select the appropriate option.
  11. Go to the Authenticators Setup tab.
  12. Click on Push Notifications Authentication.
  13. Click on Enable Push Notification Authentication button.

These are some of the best measures that you can take to protect the Active Directory from ransomware attacks. But there is a specialized tool called ManageEngine ADSelf Service Plus that can help you with all the above and more to help strengthen the security of your AD.

It gives you multi-factor authentication for different OSs, cloud apps, and VPNs, provides conditional access, self-service password reset, password expiration notifications, password policy enforcer, and much more.

ManageEngine AdSelfService Plus

A well-packed and self-service password management tool.
Check price Visit website

2. Apply strong custom password policies

You should make sure that strong password policies are in place. This includes setting long and complex passwords, not allowing dictionary words as passwords, and avoiding already compromised passwords.

Passwords should consist of a combination of characters, text, and numbers. You should also apply password policies such as the usage of at least one capital letter, etc.

3. Use multi-factor authentication

In today’s era, two-factor authentication (2FA) or multi-factor authentication is a necessity. It adds an additional layer of security to the Active Directory accessing process.

You can use a single sign-on tool that gives you a better way to provide access to users on your network, without worrying about setting multiple passwords. It can also allow you to set multi-factor authentication and apply other security measures.

If you are confused about which single sign-on tool to use, do not worry. As we have a dedicated guide that gives you a list of 5 of the best SSO tools you can use for your organization.

4. Provide access only via VPN with MFA

One of the best ways of protecting Active Directory from ransomware attacks is to route the AD access via VPN. And also set VPN with MFA (Multi-Factor Authentication).

5. Reduce the number of privileged accounts

Privileged accounts are those that have the access to the most number of services and apps on the network. Ransomware attacks succeed and are more prevalent when such privileged accounts get compromised.

To avoid this issue, network admins should regularly audit the user accounts, and reduce the number of privileged accounts in the Active Directory.

6. Screen every account in the Active Directory

In order to maintain the best health of the Active Directory, you should ensure that all account activities, permissions, and privileges are regularly monitored. You should delete admin accounts that are no longer required.

7. Create alerts or notifications for ransomware attacks

Set alerts or notifications in case the network detects unauthorized access or ransomware attacks. Admins can set to be alerted via email so that they can detect and neutralize the attack right at its inception.

That is it from us in this guide. We have a guide that will guide you on how you can check NTFS permissions via 2 methods.

You can also check out our guide on how to find the source of Active Directory account lockouts. We also have a guide on what is and how you can set a domain password policy.

Feel free to let us know your thoughts on what other measures are there that one should take to protect Active Directory from ransomware.

Fix: ‘Java’ is not Recognized as an Internal or External Command

While trying to compile a Java program or running tools like Activit BPM you may encounter the ‘java’ is not recognized as an internal or external command, operable program or batch file error. Now, two big questions arise, and we shall try to address them accordingly.

Why my Java version is not showing in CMD? You might be wondering, and legitimately so, what’s this all about. Since this is a common Command Prompt error, the reasons can vary depending on the user.

Then, there is the most crucial matter of how to recognize Java in CMD. So, let’s take a closer.

Why is Java not detected on my computer?

This error can occur due to multiple reasons, including:

➡️ an incorrect path for java.exe file – In this case, the system variables such as JDK or JRE \bin directory may not be not properly set

➡️ Java is not installed or not enabled

Here are some of the most common problems related by users worldwide:

  • Java not recognized after setting path
  • ‘JAVAC’, JRE, ‘MVN’, JAR’ is not recognized as an internal or external command, operable program or batch file. If you’re unable to run JAR files, we have a few extra tips for you.
  • Minecraft, Arduino, VScode, IntelliJ: ‘Java’ is not recognized as an internal or external command, operable program or batch file.
  • Java is not recognized as an internal or external command Windows 10 (64 bit, 32 bit)
  • Java is not recognized as an internal or external command Windows 11

How do you fix Java is not recognized as an internal or external command operable program or batch file?

1. Check if Java is properly installed on your PC

via Control Panel

  1. Open the Start menu and select Control Panel.
  2. Then go to Programs. Look for Java on the list (you can have either JRE or JDK installed).
  3. If you find it here, you will also be able to check the current version and the build number.
  4. If not, it’s likely that you don’t have Java installed.

via Command Prompt

  1. Open the Start menu and type CMD.
  2. Select and open Command Prompt.
  3. Next, type in this command: java -version

In addition to these two methods, you could also try to check:

  • the Bin directory because the Java folder is usually located in this path: C:/Program Files/Javaversion/bin
  • your hard drive and look for the executable file Java.Exe

If the java is not recognized as an internal or external command error persists and should Java be installed, it’s likely that the directory was not added to the path, making it unable to find Java at runtime.

Here’s what you need to do next.

2. Change the system variable path

  1. Press Windows Key + R to open Run.
  2. Type control and click OK to open the Control Panel.
  3. Search for Advanced System Settings.
  4. Click on the View advanced system settings option.
  5. On the System Properties window, open the Advanced tab.
  6. Click the Environment Variables button.
  7. Under the System Variables section select Path.
  8. Click the Edit button. Check Environment Variables in System Properties 3
  9. In the Variable value editor, click New.
  10. Enter the following path: C:\Program Files\Java\jdk1.7.0_72\bin java is not recognized as an internal or external command
  11. Click OK to save the changes and restart the command prompt to check for any improvements.

Notes:

  • Make sure you use the right version of Java. You can find the right path by navigating to:
    • C:Program FilesJava.
  • Once you have got the right version, add the bin directory to your path.
  • Do not delete any other values in the Variable path editor.

3. Install a compatible Java version

If the issue persists, try installing the Java version that is compatible with your Windows OS.

For example, if you are using a 64-bit Windows 10, download and install the 64-bit version of Java. If you are using a 32-bit Windows OS, install the 32-bit version of the program.

Several users have reported the issue to have been resolved after installing the right edition of Java. You can also install both versions of Java to use either 32-bit or 64-bit, depending on your use.

⇒ Download Java latest version for Windows 10 [32bit / 64bit]

If you see a message telling you what version of Java you have installed, it means that you have it. However, if the installation cannot complete with Java error 1603, we have a few extra tips for you.

Now, Java can be downloaded on its own just as it can be a plug-in extension. If that is the case, you might want to check your browser and ensure the Java add-on is enabled.

The ‘java’ is not recognized as an internal or external command, operable program or batch file. error occurs if the environment variables are not configured correctly.

You can resolve the issue by adding the correct path to an environment variable. If the error persists, try installing the compatible Java version.

This isn’t the only issue you can encounter, and many reported The term is not recognized as the name of a cmdlet in PowerShell, and we have a special guide that addresses that issue.

If you know of any other solutions to this Java-related problem, leave us a message in the comments section below.

Microsoft will officially cut 10,000 jobs over the next three months

Yesterday Microsoft was rumored to be preparing to reduce its workforce by 11,000 jobs, and today the company made the official announcement that it would be in fact cutting 10,000 jobs over the next three months.

According to the Official Microsoft Blog, Microsoft CEO Satya Nadella shared in part, the following,

Today, we are making changes that will result in the reduction of our overall workforce by 10,000 jobs through the end of FY23 Q3. This represents less than 5 percent of our total employee base, with some notifications happening today. It’s important to note that while we are eliminating roles in some areas, we will continue to hire in key strategic areas.

Microsoft is the latest big tech firm to tighten its purse strings and move to cost saving measures via massive layoffs as it joins crosstown rival Amazon who is sent out is its own severance notice today to 18,000 employees.

The move by tech firms to reduce their labor comes as pandemic-led acceleration comes to halt, and customer bases begin to “do more with less,” according to Nadella.

While Nadella opens his letter to employees highlighting the effects of a pseudo post-pandemic economy, he also notes the company also made some bets that haven’t panned out the way company may have initially planned.

These are the kinds of hard choices we have made throughout our 47-year history to remain a consequential company in this industry that is unforgiving to anyone who doesn’t adapt to platform shifts. As such, we are taking a $1.2 billion charge in Q2 related to severance costs, changes to our hardware portfolio, and the cost of lease consolidation as we create higher density across our workspaces.

It is unclear what hardware was/will be cut that could add to the $1.2 billion debt Microsoft took on, but we do know the company has sunk a lot of money into revamping and expanding its Redmond campus over the past two years to only be met with increasing work-from-home demands by its employees.

While unfortunate as the news is today for all affected by the planned layoffs, Microsoft noted that it’s factoring in severance compensation for those who will leave the company in the form of a variety of benefits packages.

We are committed to ensuring all those whose roles are eliminated have our full support during these transitions. U.S.-benefit-eligible employees will receive a variety of benefits, including above-market severance pay, continuing healthcare coverage for six months, continued vesting of stock awards for six months, career transition services, and 60 days’ notice prior to termination, regardless of whether such notice is legally required. Benefits for employees outside the U.S. will align with the employment laws in each country.

Microsoft is not unique in its current position but that doesn’t make today’s announcement of layoffs any less unfortunate to report on.

4 Easy Ways to Delete Steam Cloud Saves From Your PC

From the old days of hundreds of CDs and DVDs, larger and larger hard drives, to cloud services, gaming has grown significantly. More and more space became imperative with bigger and better games.

Steam, one of the best gaming platforms, is well aware of that aspect. That’s why the Steam Cloud service is continuously improving, offering more space and faster gaming speeds.

Steam Cloud’s job is to save your data and synchronize it automatically so that you can play your favorite titles across multiple computers without any worries.

But sometimes, after months or even years of gaming, many unwanted files and old backups/saves need to be deleted to free up some space for new games. Today we’ll find out how to do that.

Does Steam Cloud keep old files?

One of the endearing features of Steam Cloud is that it backs up your game save files automatically. This happens with the help of the Steam Cloud sync feature.

Also, your games can use the Steam Cloud to save just about anything. From game settings to profile stats and other user info, the cloud is available for use.

Do all Steam games have cloud saves?

Not all available games on Steam support cloud saves. This is down to the developer’s choice. Since games work differently, developers determine which one requires the feature.

You can determine if a game has cloud saves or not from the game properties.

How can I delete Steam Cloud saves?

1. Check if you have the game backup features enabled

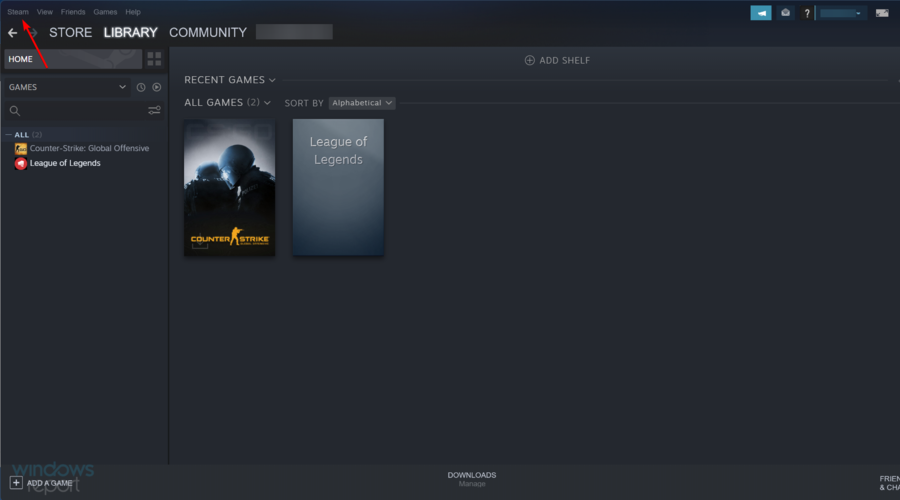
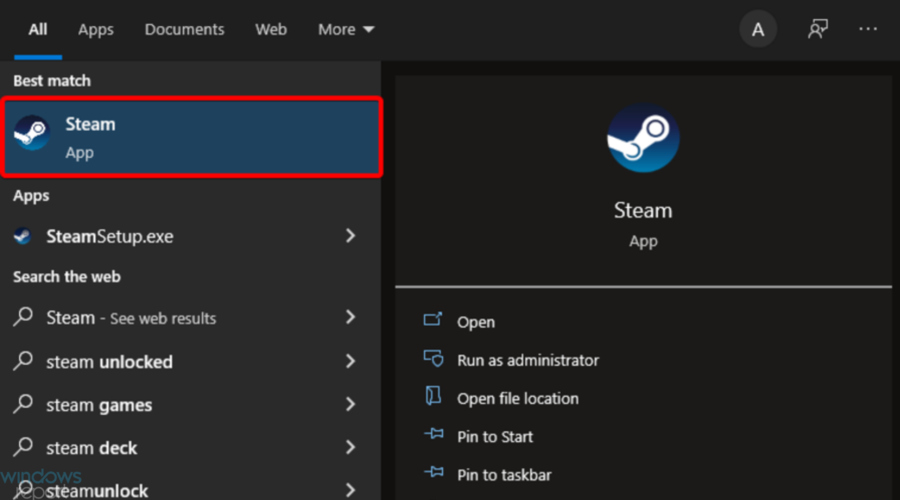
  1. Press the Windows key, type Steam, then open the desktop client.
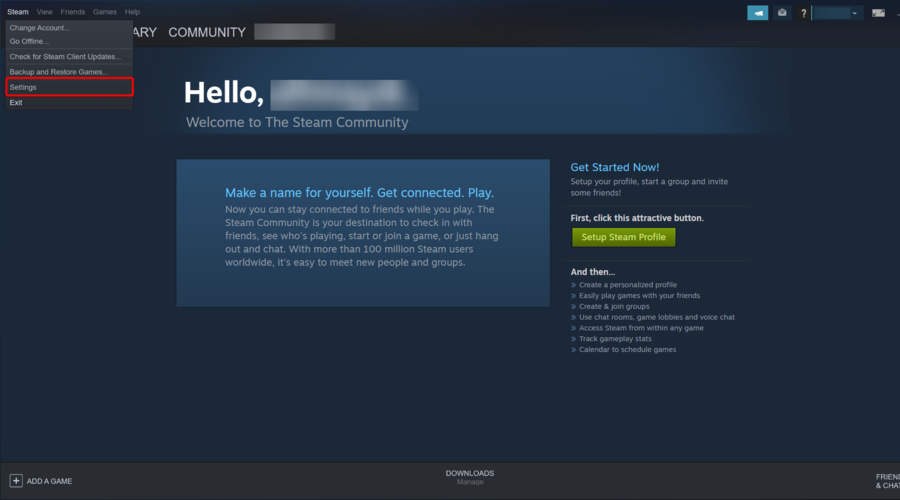
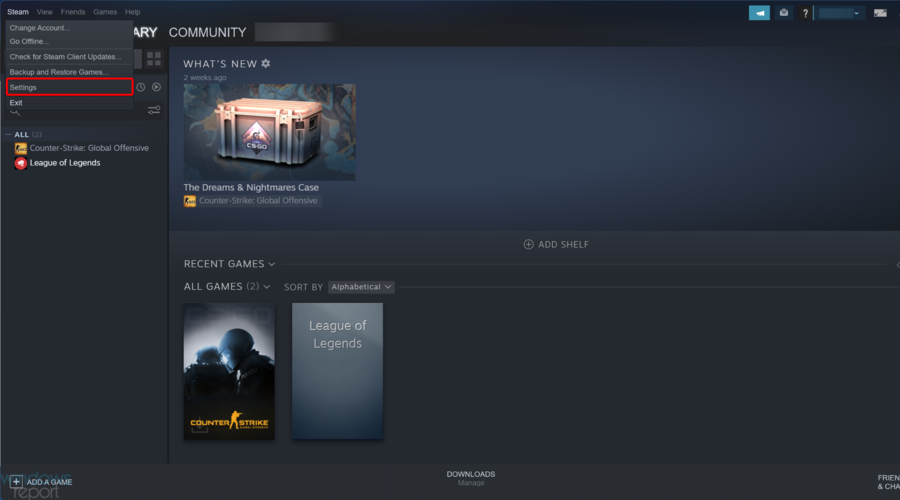
  2. From the top-left corner of the window, select Steam.
  3. Now, navigate to Settings.
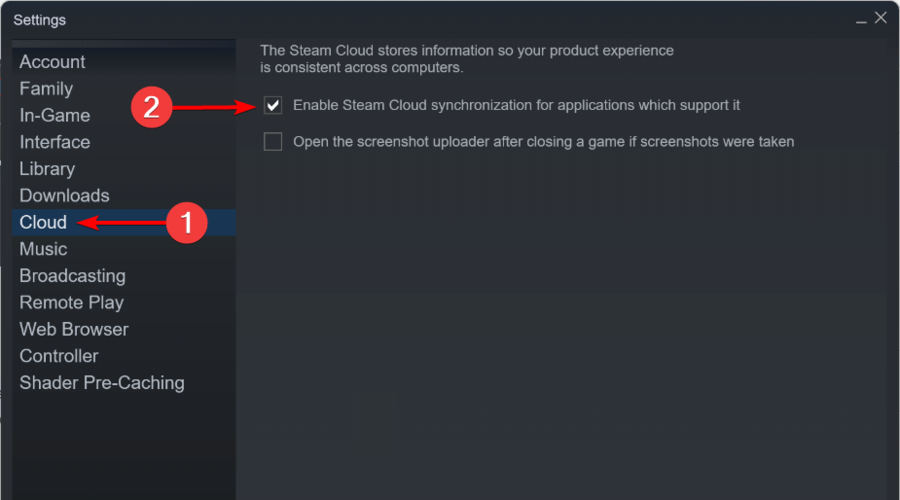
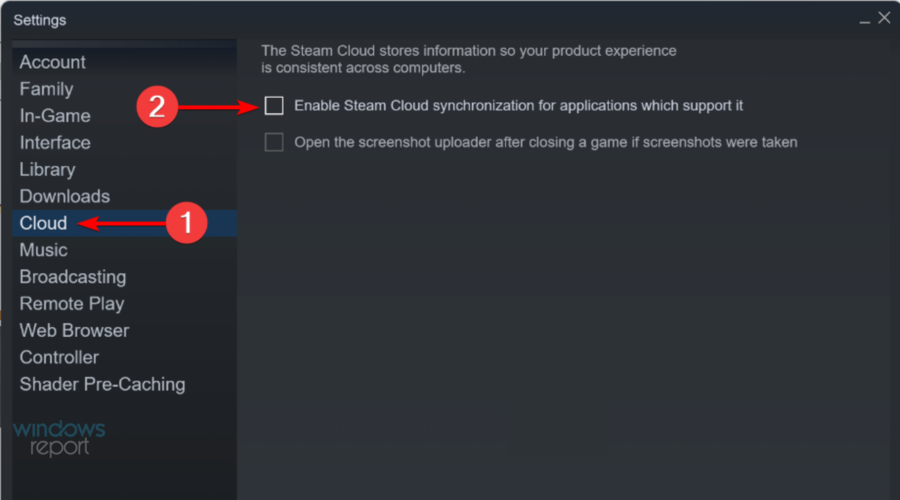
  4. From the left window pane, go to the Cloud tab, then check if the Enable Steam Cloud synchronization for the applications which support it is enabled. If not, checkmark the box next to it.
  5. Now, exit the Settings window.
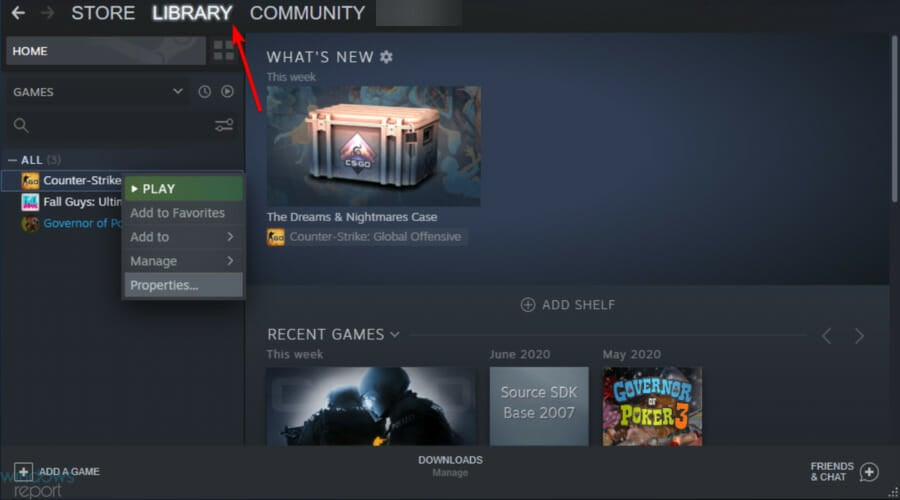
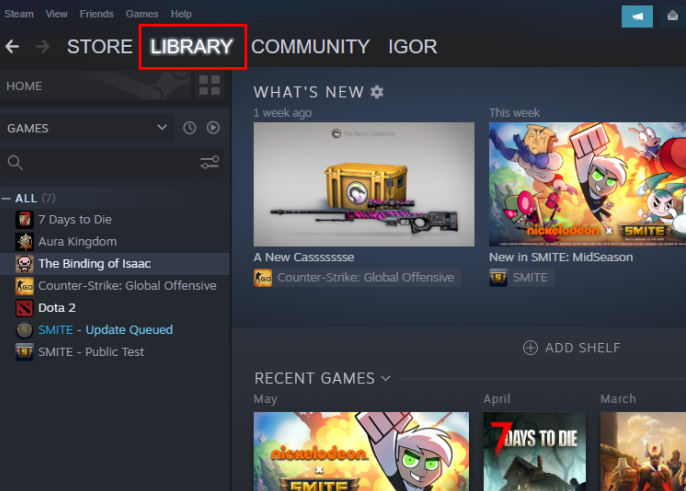
  6. From the main Steam menu, click on Library.
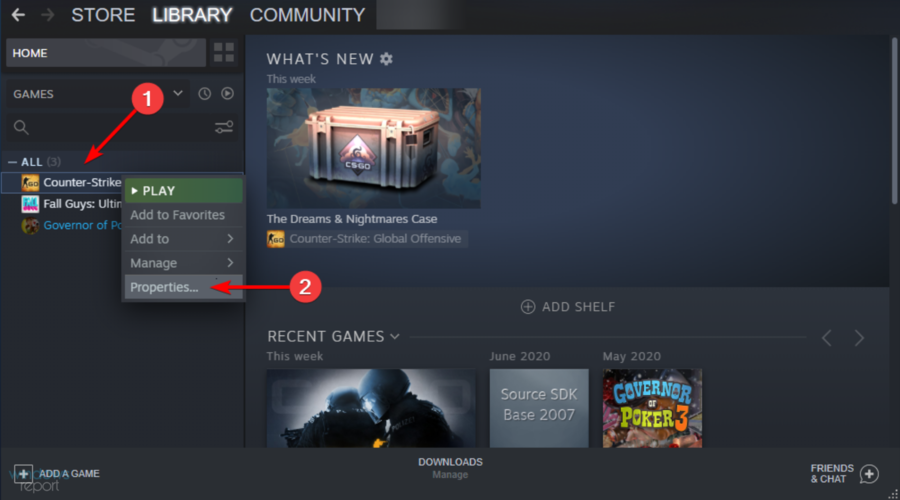
  7. From the left window pane, right-click on your game and select Properties.
  8. Go to the Updates tab.
  9. See whether the Enable Steam Cloud synchronization for [Your game’s name] option is checked.

Before trying to delete any Steam cloud save, ensure that your games are backed up in the first place.

If both options are checked, your games are backed up on the Steam cloud. That said, follow the steps below to delete your Steam Cloud saves.

2. Bring up the Steam Cloud Conflict dialogue

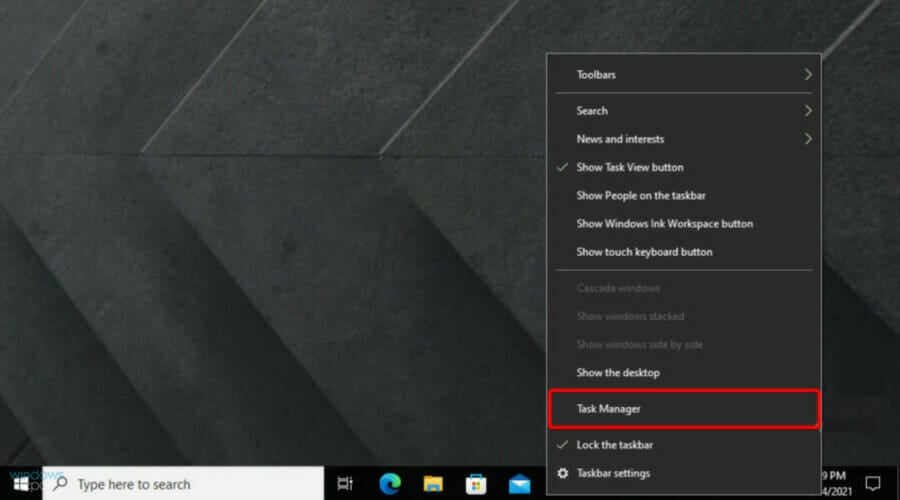
  1. Right-click on your Windows Taskbar, then click on Task Manager.
  2. Exit Steam and clear all Steam-related processes from the Task Manager.
  3. Go to your Steam directory to this location: Steam\userdata\SteamID\AppID\remote
  4. Shift + right-click the folder and select Open PowerShell Window here.
  5. Type in the following string in PowerShell: clc –path “C:Program Files (x86)\Steam\userdata\SteamID\AppID\remote*"

Follow the steps in the next solution as soon as the Steam Cloud Conflict error has been triggered.

3. Delete the stored Cloud files

  1. Go to this path: Steam\userdata\SteamID\AppID
  2. Delete all the files within this location
  3. Go back to the conflict window and select Upload to the Steam Cloud.
  4. Launch your game and Alt + Tab from it.
  5. Hit the Windows key, type Steam, then open the app.
  6. From the top-left corner of the window, click on Steam.
  7. Go to Settings.
  8. Click on the Cloud tab, then uncheck the Enable Steam Cloud synchronization for the applications which support it feature.
  9. Return to your game, and exit it.
  10. Exit Steam and delete the AppID folder again, as shown above

4. Deleting in Offline Mode

  1. Launch Steam, and make sure it downloads all of the Cloud saves to the respective AppID game folder.
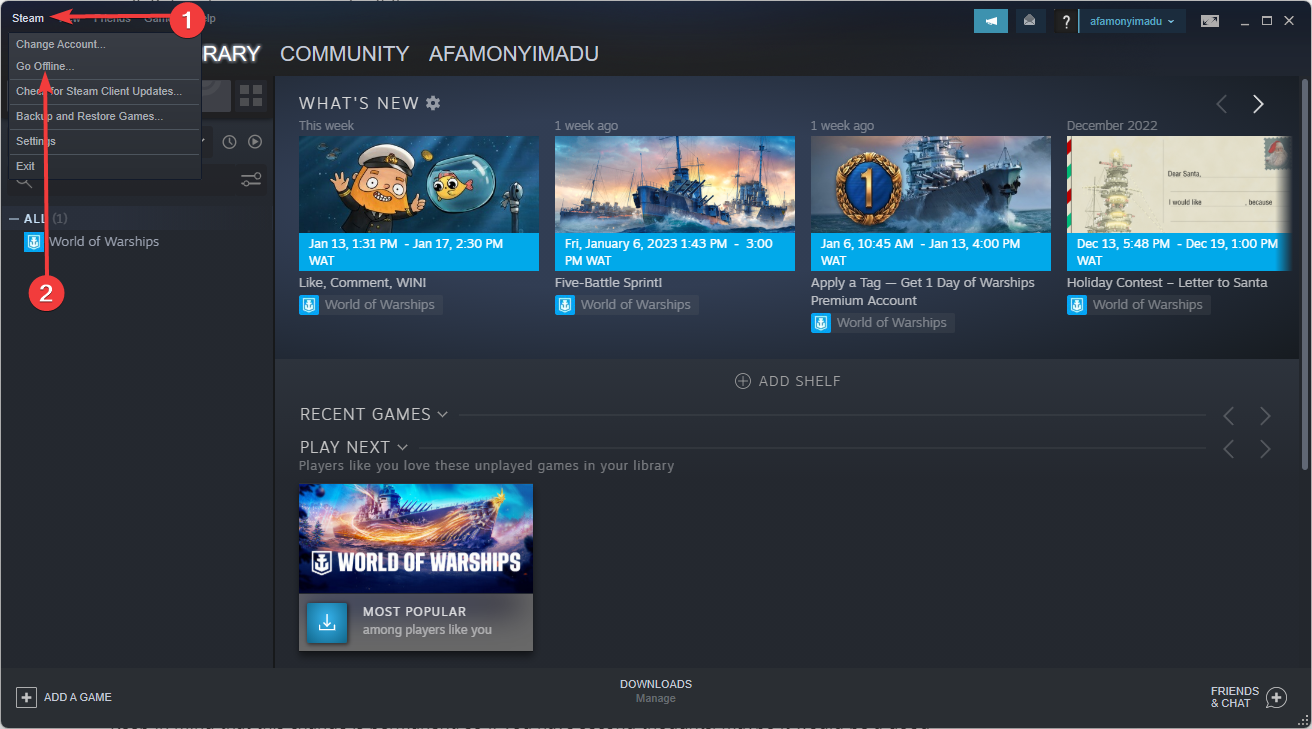
  2. Click on Steam menu in the top left corner and select the Go Offline option to put Steam into Offline Mode.
  3. Go back to the AppID game folder (found in the path below) and remove all the saved files or delete everything but the saves you want to keep.
    C:\Program Files (x86)\Steam\steamapps\common
  4. Launch the game.
  5. Close the game.
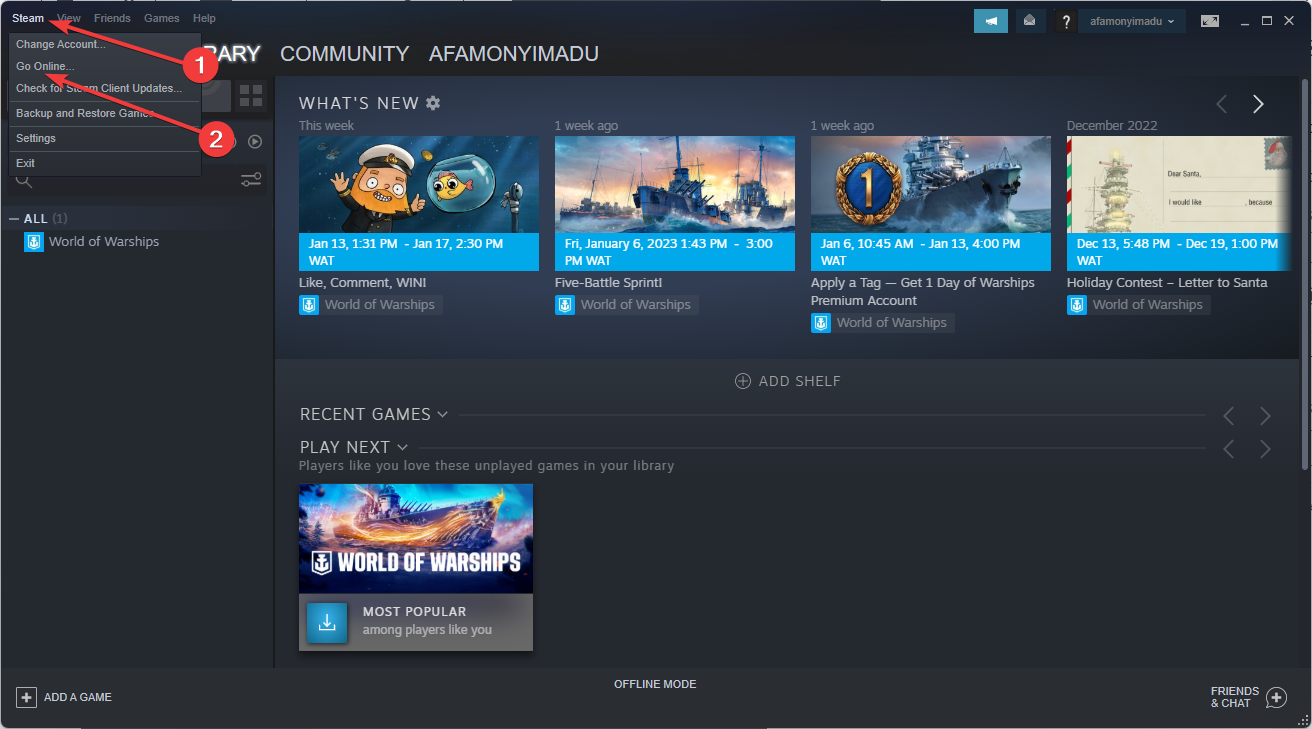
  6. Click on the Steam menu in the top left corner, and select the Go Online option to put Steam into Online Mode.
  7. Navigate to the game’s library page, and you will see a file conflict status.
  8. Click the conflict status, and pick the local files to override what is in the Cloud.

Does uninstalling Steam games delete saves?

Most games keep your saves after uninstalling them. So, you can always get back to playing them easily when you reinstall them.

However, to eliminate all doubts, back up the game folder before uninstalling them.

Following these steps, you can delete all Steam Cloud saves for CIV 5, Fallout 4, Witcher 2, Skyrim, and other games that support the feature.

Keep in mind that this change is permanent, so if you have second thoughts, maybe it would be a good idea to create a backup of your Steam games beforehand.

Let us know if the above methods helped you with your issue by leaving us a message in the comments section below.

4 Ways to Fix Samsung Data Migration Stuck at 0%, 99%, 100%

The Samsung Data Migration stuck issue is a common and annoying problem that many users encounter. It can stop at 0%, 99%, or 100% while users are trying to clone an HDD to SSD or a new hard drive for system & data transfer.

The exact underlying issue is usually hard to identify. Still, with the right approach and a decent knowledge of the process, you can easily fix things when the Samsung Data Migration is stuck. Let’s find out how.

Why is the Samsung Data Migration stuck?

Here are a few reasons Samsung Data Migration is stuck:

  • Insufficient storage space: If the SSD you are transferring the data to has insufficient storage, the migration may be stuck.
  • Issues with the cable: A damaged or improperly connected cable can also trigger issues with the migration.
  • Drive is failing: Most users usually transfer the data out of a drive when it shows signs of failure, which is one of the very reasons Samsung Data Migration is stuck.
  • Transferring large files: Large files take longer to transfer, and it might give the impression that the migration is struck.

How can I fix the Samsung Data Migration stuck error?

Before moving to the slightly complex solutions, here are a few quick ones to try:

  • Make sure the cables are properly connected at both ends and are not damaged. If you have spare cables, try using them for the transfer.
  • Verify whether the SSD you are transferring files to has enough free storage. Usually, it’s recommended that you transfer file up to 75% of the capacity of the SSD and keep the remaining space free.
  • Restart the computer and start the migration process again. Many users reported that on the first attempt, the migration was stuck at 99%. At the same time, all the data had already been transferred, and only upon reinitializing the process, the confirmation was received.

If none of these work, head to the fixes listed next.

1. Disable encryption

  1. Press Windows + I to open Settings, choose Privacy & security from the navigation pane, and click on Device encryption.device encryption
  2. Now, disable the toggle next to Device encryption.disable to fix Samsung Data Migration stuck
  3. Click Turn off in the confirmation prompt that appears.turn off
  4. Once done, restart the computer for the changes to come into effect.

You can now run Samsung Data Migration, and it shouldn’t be stuck anymore. In case your PC has it, you will have to disable BitLocker as well.

Remember to re-enable encryption after the data migration is complete since it’s a vital security feature in Windows.

2. Run the Check Disk tool

  1. Press Windows + R to open Run, type cmd in the text field, and hit Ctrl + Shift + Enter.cmd
  2. Click Yes in the UAC prompt.
  3. Now, paste the following command and hit Enter to run the Check Disk tool:chkdsk C: /f /r /xcheck disk to fix Samsung Data Migration stuck

If the problem lies with the drive itself, the Check Disk scan will identify and fix it. The utility identifies and fixes bad sectors, if possible, along with repairing the drive. Once the scan is complete, verify whether Samsung Data Migration is still stuck.

3. Download the latest Samsung Data Migration app

  1. Open any reliable web browser and head to Samsung’s official website.
  2. Under Data migration, expand Samsung Data Migration Software for Consumer SSD, and click on the Download option next to Data Migration Software.samsung data migration
  3. Once downloaded, run the installation setup, and follow the on-screen instructions to complete the process.install

If you are using an outdated version of the Samsung Data Migration app, the process would be slow and might even stop at times. Hence, we recommend you download the latest version from the official website.

4. Use another software

Samsung Data Migration app, though quite advanced, isn’t the best of the lot. There are many other user-friendly and more effective data migration tools available to choose from.

Try one but remember not to fall prey to shady software available on the web since there are plenty of these too.

In this situation, we recommend MiniTool Partition Wizard. This great partition management program can recover lost partitions and redeem lost or deleted files from damaged drives and folders.

It has disk clone and migration features with which you can back up and upgrade your hard drive with just a few clicks.

Moreover, this program provides you with full control over your partitions, allowing you to resize, move, extend, split or convert them.

By now, you should have been able to complete the data transfer, whether with or without Samsung Data Migration, and the process shouldn’t have gotten stuck.

And once you have done that, find out how to boost the performance of an SSD.

For any other queries or recommendations, or to share a solution with us, drop a comment in the section below.

Twitch Audio Desync: Fix the Delay With These 6 Methods

Even if it is one of the most efficient streaming services, some users claim they experience audio desync on Twitch.

This problem can negatively impact your viewing experience, so today, we’ll show you how to fix this issue on your PC. Note that you may also experience Twitch audio delay on mobile devices. And while the interface may differ, some solutions in this guide will also work.

What causes Twitch audio desync?

There are many reasons why this may happen. Many users have described this problem as often starting with your Twitch audio cutting out or a minor Twitch audio lag. Here are the primary culprits:

  • Slow or bad internet connection: If your Twitch audio and video are out of sync when live streaming, your internet connection is the first thing you need to check. You must switch to a robust and active network to get the best experience.
  • Incompatible extensions: While extensions improve your browser experience, they can cause problems at some point. If you installed an extension before noticing this issue, you need to disable or remove the extensions and clean your browser with PC cleaner software.
  • Problems with drivers: Another potential cause of Twitch VOD audio desync is faulty or outdated drivers. The quick way out of this is to update your drivers to the latest version.
  • Issues with your browser: many users have complained about the Twitch audio desync on Firefox and Chrome. You might need to switch to one of the best browsers for streaming to fix this.

What are the most common Twitch audio delay issues?

Twitch audio issues can be pretty problematic, and speaking of audio issues, here are some common problems that users reported:

  • Twitch streaming audio out of sync, game audio out of sync: This issue can occur while streaming using OBS. To fix it, set the delay to your microphone to match the audio delay.
  • OBS audio out of sync: This issue usually occurs due to OBS settings, and many users reported that they fixed the problem by disabling the Use device timestamps option.
  • Twitch audio lagging behind video, audio lag: Many causes lead to these errors, and if you encounter them, try all of our solutions.

Quick Tip:

If your problems persist, and you think your web browser might be to blame, it may be time to try a different one. Avid gamers may like to try Opera GX, the world’s first web browser created specifically for gamers.

Thanks to the visuals powered by Razer Chroma and the features of Twitch integrations, it looks fantastic, allowing for a better Twitch experience when viewing streams from it.

Opera GX

This gamer’s browser is the perfect choice for uninterrupted streaming on Twitch, so have a try with no doubts.

How can I fix Twitch audio desync?

Before exploring the fixes in this section, below are some troubleshooting steps you should try:

  • Refresh the page.
  • Ensure that your internet connection is strong and active.
  • Try streaming in incognito.

If these preliminary fixes do not work, you can now explore the fixes below.

1. Update your GPU drivers

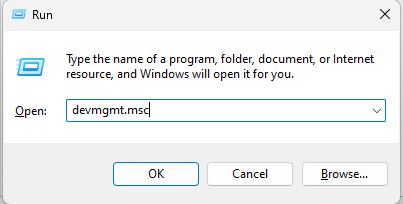
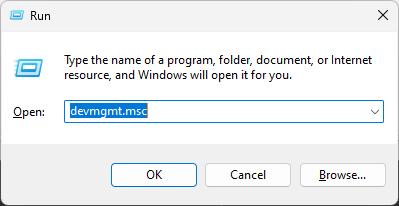
  1. Press the Windows key + R, type devmgmt.msc, and click OK.
    devmgmt twitch audio desync
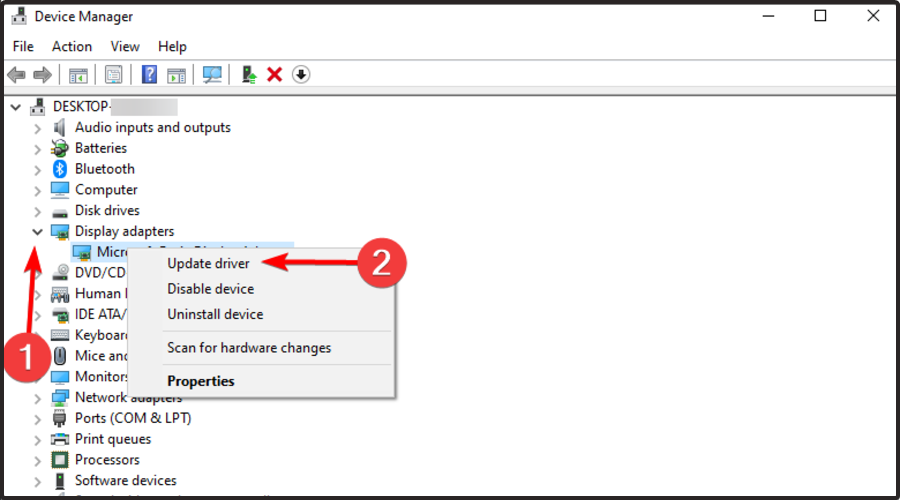
  2. Expand the Display adapters section, then right-click your graphics card and select Update driver.
  3. Click on Search automatically for drivers.
  4. You’ll get the following message if the best-found driver is already installed.
  5.  If there are any available drivers to update, you’ll be notified.

Your GPU drivers are pretty important, and if your drivers are corrupted or out of date, perhaps you’ll need to update them to fix audio delay issues in Twitch.

This is relatively simple, and the best way to do that is to visit your graphics card manufacturer’s website and download the latest drivers for your model. Once you download the latest versions, install them and check if that solves your issue.

If you don’t want to update your drivers manually, you can always use third-party tools such as Outbyte Driver Updater to automatically update all your drivers with just a couple of clicks. Once your drivers are updated, check if the problem is still there.

The program is fast and reliable; with it, you’ll be just two clicks away from having your PC’s drivers updated to the latest versions.

2. Disable the HTML5 player

  1. Visit the Twitch website.
  2. Open the desired stream and click the Gear icon below the video.
  3. Choose Advanced from the menu.
  4. Locate the HTML5 Player option and disable it.

According to users, the Twitch audio desync can sometimes appear due to the HTML5 player. HTML5 almost completely replaced Adobe Flash on the web. But apparently, some people are having issues with HTML5 players on Twitch.

To fix this problem, users are suggesting disabling HTML5 players on Twitch.

After that, the problem should be resolved, and your audio issues will be fixed. Remember that you might have to repeat this workaround for each stream you want to play.

3. Disable hardware acceleration

  1. Launch Firefox and click the menu button (three horizontal lines) in the top right corner.
  2. Click on Settings.
    settings twitch audio desync
  3. Now, scroll down and uncheck the Use recommended preferences settings box under the Performance section.
  4. Finally, uncheck the Use hardware acceleration when available box.
    hardware

According to users, sometimes the Twitch audio desync issue can occur due to problems with hardware acceleration in your browser. Hardware acceleration is helpful because it utilizes your GPU to render content and improve performance.

However, this feature can sometimes lead to audio delays and other issues on Twitch. Many users suggest disabling hardware acceleration in your browser to fix the problem.

4. Disable extensions and clear browser data

  1. Launch your browser and press the Ctrl + Shift + A keys.
  2. Select the Extensions option in the left pane.
  3. Now, toggle the switch before each extension backwards to disable it.
    disable extension
  4. From here, click the menu button in the top right corner and select the History option.
    history twitch audio desync
  5. Choose Clear recent history…
    clear recent
  6. Now, click the Time range to clear dropdown and select Everything.
    everything twitch audio desync
  7. Tick the boxes for Browsing & download history, Cache, and Cookies.
  8. Finally, click the OK button.
    okkay

Extensions and browser data can cause any browser to misbehave. Hence, they can be the cause of the Twitch audio desync issue. The solution is to clear data and disable your extension.

If this fixes the issue, you start enabling your extensions one after the other to know the one causing the issue. Note that we have used Firefox here because most users are facing the issue on the browser. However, the solution can also be applied to any other browser with a few tweaks.

5. Disable Fast Boot

  1. Use the following keyboard shortcut to open the Windows search box: Windows + S.
  2. Type power settings in the search field, then choose Power & sleep settings from the results list.
  3. In the right pane, go to the Related settings section and click Additional power settings.
  4. Look at the left pane, and select Choose what the power button does.
  5. Click on Change settings that are currently unavailable.
  6. Uncheck Turn on fast startup (recommended) option, then click on Save changes.

According to users, this Twitch audio desync issue can be caused by the Fast Boot feature on Windows. This is useful since it will allow your system to boot faster by putting it in a state similar to hibernation.

Although this feature is useful, some users claim that it’s causing audio issues on Twitch. To fix the problem, it’s advised to disable it altogether.

6. Uninstall third-party audio drivers

6.1 Use the Control Panel

  1. Press Windows + R, type control, and press Enter to open the Control Panel.
  2. Click on Programs and Features or Uninstall a program to see a list of all the installed programs on your computer.
  3. Locate the Realtek HD audio driver in the list and click on it, then click on the Uninstall button to begin the uninstall process.
  4. Follow the prompts to complete the uninstallation process, then restart your computer to complete the uninstallation process.

Note: If you cannot find the Realtek audio driver in the Programs and features, you can try uninstalling it from the device manager.

6.2 Use the Device Manager

  1. Press the Windows + X keys, and click on Device Manager.
  2. Expand Sound, video, and game controllers.
  3. Locate the audio driver, right-click on it, and select Uninstall device.
  4. Confirm your choice when prompted, and restart your computer.

This solution may work if you are using Realtek audio drivers. We believe the Realtek drivers provided by ASUS for the Prime z370-a motherboard just have this bug unresolved. And uninstalling it will force your computer to use the native audio driver.

7. Disable the Use Device Timestamps option

  1. Launch OBS and click the Gear icon under the audio you want to disable this feature for.
  2. Select the Properties option.
    properties
  3. Now, uncheck the box for the Use Device Timestamps option to disable it and click OK.
    use device

Some users reported Twitch audio desync while streaming and using OBS. To fix this problem, it’s advised to change a single setting in OBS.

After doing that, check if the problem is resolved. If this feature is already disabled, try enabling it and check if that solves your problem.

Audio delay issues in Twitch can negatively impact your viewing experience, but try all our solutions if you have this problem. They should help you fix it for good.

Also, if you have no audio on some Twitch streams, check our detailed guide to fix it quickly.

Use the comment section below for additional questions or suggestions about the subject matter.

How to Use Active Directory MFA on Premise

Active Directory, a Microsoft directory service, allows administrators to configure permissions and access rights to the network. While some use cloud-based options to protect the AD, many still rely on Active Directory MFA on-premise.

And if you are wondering whether there are any good options, we have just the right set of tools you could deploy for Active Directory MFA on-premise.

Should I set up MFA for the Active Directory?

There are both arguments in favor and against setting up MFA (Multi-factor Authentication) for the Active Directory. With MFA, you add an additional layer of security which helps protect the network and its resources.

On the other hand, it makes the login process slightly more complex and time-consuming. However, if the network’s security is of prime concern, we recommend setting up MFA for the Active Directory on premise using one of the options here.

How do I use Active Directory MFA on premise?

Use ADSelfService Plus

  1. Download ADSelfService Plus, proceed with the installation, and open the web console once done.
  2. Now, enter the domain details and the credentials for it.domain details for active directory mfa on premise
  3. Next, navigate to the Configuration tab, under Self-Service on the left, choose Multi-factor Authentication, and then click on MFA for Endpoints.Setup MFA
  4. Now, select a policy from the dropdown menu.
  5. Tick the checkbox next to MFA for Machine Login, choose the number of authentication methods you want to configure, select them from the dropdown menu, and finally, click on Save Settings.enable active directory mfa on premise

That’s it! The next time users try accessing the network, they would be required to bypass the authentication, in addition to Windows login.

With more than 18 authentication methods to choose from, ADSelfService Plus is one of the best tools when it comes to setting up Active Directory MFA on-premise. It’s quick, user-friendly, and seamless.

Also, under the Advanced settings, you will find an option, Skip MFA when ADSelfService Plus server is down or unreachable, which ensures that users are able to access the network even when the ADSelfService Plus services are down.

ADSelfService Plus

Get the perfect tool for multi-factor authentification and protect your organization from within.
Free trial Visit website

That’s all for now! Remember, it doesn’t mean that there are no other options available, but we found these two to be the most trustworthy and easy to use.

Before you leave, do not forget to check our recommendations for antivirus solutions.

Tell us your favorite tool to set up MFA for Active Directory in the comments section below.

How to Export List of Active Directory Users in a Group

Apart from monitoring the network, auditing, and providing access to all the apps and services on the network, IT admins also often need to get a list of users in a group or group members from the Active Directory. This data is helpful while auditing, permissions review or allotment, or moving into other systems.

In this guide, you will learn how you can export an active directory list of users in a group. We will show you a couple of methods, one of which is via PowerShell and also using a specialized tool. Let us get right into it.

Why do Admins need to export a list of Active Directory users in a group?

Admins need to monitor a lot of things, to ensure that the network is out of blockage and that every member in the network can access the required apps and services.

Along the same line, admins need to monitor the Active Directory group members to know that all members have required access and permissions to resources that they are authorized to access.

Sometimes, overlooking can happen, and this could provide unnecessary access to group members to unauthorized apps and services.

How can I export a list of Active Directory users in a group?

1. Use Windows PowerShell

  1. Press the Win key to open the Start menu.
  2. Type powershell and open Windows PowerShell as an admin.
  3. Type the below command and press Enter. Get-Module -ListAvailable
    • If you do not have the RSAT tools installed on your PC, then you can download and install the RSAT tools.
    • After you have installed the RSAT tools on your PC, run the command mentioned in step 3, and it will show that the module is installed.
  4. Type the below command and press Enter. Get-ADGroup -filter * | sort name | select name
    • The above command isn’t for the admins that know the name of the group.
    • In case you do not know the name of the group, the above command will list all the Active Directory groups.
  5. Execute the below command to load all members of a specific group. Get-ADGroupMember -identity "Group name"
    • In place of the Group name in the above command, enter the name of the group of which you wish to list all the members.
  6. To get the filtered result and just the member name, then type the below command and press Enter. Get-ADGroupMember -identity "Group name" | select name
  7. Run the below command to export the group members’ results to a CSV file. Get-ADGroupMember -identity "Group name" | select name | Export-csv -path c:\it\filename.csv -Notypeinformation

This is one of the usual ways via which admins can get export list of users in a group from the Active Directory. However, there is another more efficient way to get the list of all users in a group from the Active Directory, using a specialized tool.

2. Use a specialized tool

  1. Download ManageEngine ADManager Plus.
  2. Install the program.
  3. Launch the program.
  4. Click on the Reports tab.
  5. Select User Reports.
  6. Under the General Reports section, click the All Users report.
  7. Select the domain under the Selected Domain drop-down menu.
  8. Choose the OU.
  9. Hit the Generate button.
  10. Hit the Export as button from the top and select the format among CSV, PDF, HTML, CSVDE and XLSX and export the file.

One of the best ways to export a list of users in a group from an Active Directory is to use the ManageEngine ADManager Plus tool.

Using this specialized tool, you can instantly export groups and members of an Active Directory. It even lets you schedule reports, export reports in multiple formats, search and sort results, and much more.

ManageEngine ADManager Plus

A complete Active Directory management, auditing, and reporting solution.
Check price Visit website

For users looking for ways to install Active Directory, we have a step-by-step guide that will help you install Active Directory on a Windows server.

You can also check out our guide on how to view Active Directory groups on Windows 10 and Windows 11.

Let us know in the comments below, which one of the above methods you used to export a list of group members in the Active Directory.

How to Fix Hyper-V No Internet Connection: 3 Quick Ways

Users trying to use Hyper-V VM on Windows 10 reported not connecting to the Internet.

This can be an extremely annoying issue, especially if you need the VM to work remotely or run a program with specific requirements that need an Internet connection.

Knowing the importance of Hyper V to users, we have prepared this guide to help fix this issue for good, just like we did with the can’t install Hyper-V problem.

How do I get the internet back on Hyper-V?

1. Make a new Virtual Network Switch

  1. Turn off your Windows 10 virtual machine.
  2. Press the Windows key, type hyper v, and select the Hyper-V Manager.
  3. Click on the Virtual Switch Manager option in the panel to your right.
    virtual switch hyper v no internet
  4. In the newly opened window, click the New virtual network switch option in the left pane.
  5. Now, choose External > Create virtual switch.
    external
  6. Next, change the name of your virtual machine inside the Virtual Switch Properties window.
  7. Under the Connection type section, choose External network > Realtek PCIe GBE Familly Controller.
  8. Finally, check the box next to Allow management operating system to share this network adapter and click the OK button.
    external network

If you are facing the Hyper V no internet on your default switch, you might need to create a new virtual machine.

Tip icon Tip
Note:
In case an error appears saying Error applying Virtual Switch Properties changes, open the host machine network > right-click > select Properties > uncheck the option Hyper-V Extensible Virtual Switch > click OK.

2. Set the configuration parameters for the network adapter

  1. Launch the Virtual Machine Manager.
  2. Click Settings in the Windows 10 section.
    settings hyper v no internet
  3. Now, choose Network Adapter in the left pane.
  4. Next, click the drop-down Virtual Switch menu and choose the switch created in Solution 1 
  5. Finally, click OK to save the changes.
    adapter

If you are experiencing the Hyper V no internet issue while trying to access a connection guest, you should try to set the configuration parameters for the virtual network adapter you created earlier.

3. Set up your Network Connection to share it with Hyper-V

  1. On your host Windows 10 machine, right-click the Network icon in the taskbar and select Open Network & Internet Settings.
    open network
  2. In the Status tab, click on Change adapter options.
    change adapter hyper v no internet
  3. Inside the Network Connections window, right-click your VM and click Properties.
    properties
  4. Now, enable the Allow other network users to connect through this computer’s Internet connection option.
  5. Choose the network switch created earlier and click OK.
  6. Finally, turn on Windows 10 in Hyper-V to finish the fix method.

We have come to the end of this guide on how to fix the Hyper V if it has no network. We believe you now have everything needed to fix this issue.

If you want to know how to change the network adapter type of VMWare, check our detailed guide to do it quickly.

Please let us know the solution that solved this issue in the comments below.

What is Audit Success in Windows: How to Improve Security

Do you want to learn about Windows audit success? Here is all you should know. Windows auditing is a critical security feature that allows administrators to track and monitor user activity on a Windows-based system.

Also, this includes recording events such as logins, file access, and changes to system settings. Furthermore, tracking and monitoring these events is essential for various reasons, including compliance with regulations, troubleshooting, and identifying security threats.

So, in this article, we will discuss the importance of Windows auditing and examine what audit success is in the context of the Windows operating system.

What is Windows auditing?

Windows auditing is an essential tool for ensuring the security and integrity of a Windows-based system. It provides a detailed record of user activity for identifying and addressing security threats and compliance with regulations.

There are several advantages of using Windows auditing to track and monitor user activity on a Windows-based system, including:

  • Security – Windows auditing allows administrators to identify and address security threats by providing a detailed record of user activity. This can detect and respond to unauthorized access and monitor potential security breaches.
  • Compliance – Windows auditing helps organizations to comply with various regulations, such as HIPAA, PCI-DSS, and SOX, by providing a comprehensive record of user activity to demonstrate compliance.
  • Troubleshooting – Windows auditing can help troubleshoot system problems by providing a detailed record of user activity. This can be useful for identifying the cause of a problem, as well as for determining the best course of action to resolve it.
  • Forensics – Windows auditing can be used for forensic purposes, allowing administrators to reconstruct past events and understand how security breaches occurred. This can help identify the cause of a problem and determine the best course of action to resolve it.

Note that tools like AD Manager Plus play an important role in Windows audit success. Firstly, it allows you to view, track and report on all Active Directory changes, user activities, and security events in real time.

Also, it helps to automate the process of creating, modifying, and deleting user accounts, as well as resetting passwords, enabling or disabling accounts, and managing group membership.

ADManager Plus

Useful in conjunction with other tools and practices to achieve comprehensive Windows audit success.
Free Trial Download

What is Windows audit success?

1. How it works

Windows audit success events recording is done in the Windows event log. The event log is a system-wide log that records events that occur on a computer, such as a system startup and shutdown, security events, and application events. 

Audit success events recording stays in the security event log, one of the three main event logs in Windows (the other two are the application event log and the system event log).

An administrator must first configure the audit policy settings on the computer or network to enable auditing. 

These settings determine which actions require auditing and which events require logging into the event log. After configuring the audit policy settings, the operating system will begin tracking and recording the specified actions and events.

Audit success events recording in the event log show up as event ID 4648. The event log entry includes the following:

  • Information about the user who performed the action
  • The date and time of the action
  • The resources that were affected
Windows audit success

This information can identify who acted when it was performed and what resources were affected.

2. Use Windows Audit Success to Improve Security and Compliance

Auditing can improve security and compliance in several ways. For example, audit success events are useful for the following:

  • Identify security breaches – Audit success events can identify suspicious activity and potential security breaches. For example, it logs an audit success event if a user logs in to a computer using an account without the authority to access the system.
  • Detect suspicious activity – Audit success events detect suspicious activity on a computer or network. For example, it logs audit success events if users access a file or resource they do not typically access.
  • Improve compliance – Audit success events improve compliance with regulatory standards. For example, if an organization is subject to HIPAA regulations, audit success events track access to protected health information (PHI).
  • Improve incident response – Audit success events improve incident response. For example, if an incident such as a security breach occurs, audit success events determine actions taken and by whom.

Windows audit success is a powerful tool that improves security and compliance.

Audit success events can identify security breaches, detect suspicious activity, and improve compliance with regulatory standards by tracking and recording specific actions on a computer system or network.

Hope you have found this guide helpful. Lastly, let us know your thoughts in the comments below.

How to Notify Users of Password Expiration in Active Directory

Frequently changing the Active Directory password is a great way to protect it, but many users are wondering if there’s a way to notify users of password expiration in Active Directory.

It’s crucial that you change your password for both security reasons and to avoid Active Directory account lockout.

Password notifications are relatively simple to configure, and in this guide, we’re going to show you a couple of methods that you can use.

How can I notify users of password expiration in Active Directory?

1. Edit Group Policy

  1. Press Windows key + R and enter gpedit.msc. Click OK.
     
  2. Navigate to Computer Configuration and expand Windows Settings. Next, go to Security Settings and select Local Policies. Lastly, choose Security Options.
  3. Now double-click Interactive Logon: Prompt user to change password before expiration in the right pane.
  4. Now adjust Begin prompting this many days before password expires to the desired value.
  5. Save changes.

If you want to notify users of password expiration in Active Directory, this is the simplest method to use.

2. Use Powershell script

Note icon NOTE
This is an advanced solution, and it requires you to read the documentation and manually adjust the script settings before it could work on your network.
  1. Visit meoso’s GitHub page.
  2. Click on Download zip.
  3. Once the file is downloaded, extract it.
  4. Configure the PowerShell file and run it.

3. Use ADSelfService Plus

  1. Log in to the ADSelfService Plus admin portal.
  2. Next, navigate to the Configuration tab. Select Password Expiration Notification. It should be located in the Self-Service section.
  3. Select the domains, OUs, and groups that you want to receive the notification.
     
  4. Set the desired Scheduler Name and choose the Notification Type.
  5. From the Notify via menu select the method you want to use to send notifications.
  6. Next, configure the notification frequency and schedule time.
  7. Now fill in the Subject and Message fields.
  8. Click on Advanced and configure the desired settings.
  9. Save changes.

ManageEngine ADSelfService Plus

Easily notify users about password changes and manage your organization network with ADSelfService Plus software.
Free trial Get it now

As you can see, it’s pretty simple to notify users of password expiration in Active Directory, and you can use any of the methods mentioned in this guide.

To ensure that your passwords are safe, it’s always recommended to use reliable password manager software.

What method do you use to notify users about password expiration? Let us know in the comments below.

Amazon Firestick Not Booting Up: Why & How to Fix

The Amazon Fire TV Stick is popular among users. However, it is not all roses; some users complain the Firestick is not booting up.

It just gets stuck on the Amazon or Fire TV logo. This makes it unusable, as you won’t be able to access your files. The good news is that there are a series of ways to fix this issue, as shown in this guide.

How can I do if FireStick is not booting?

1. Unplug and then plug the device back in

Unplug the fire stick from the TV and the power source to fix the problem. Plug the stick back in after five minutes.

While this might look too simple, it has worked for many users. So, you shouldn’t hesitate to try it.

2. Use the original power accessories

cable and adapter firestick not booting up

One of the significant reasons the Firestick might not be booting up is insufficient power supply. The first thing to do here is to ensure you are using the original cable and adapter that came with your device.

This is because Amazon recommends using the power tools included with the device. Using others with a substandard rating can damage your Firestick.

Also, ensure that your device is connected directly to a power source and not your TV’s USB port. Your TV USB port can not supply the power rating needed to make the Firestick work properly.

3. Check HDCP compatibility

One of the anti-piracy features introduced in digital content nowadays is HDCP. This helps to limit the rate at which digital content can be distributed illegally.

Modern TVs now incorporate an HDCP-compatible HDMI port to match this HDCP requirement. The same cannot be said about old TVs.

Hence, if you use an old TV with this feature, Firestick might be stuck on the Fire TV logo and not boot up. The surefire solution is to change your TV to a modern one.

Another option is using an HDMI splitter to take advantage of its fallback mode. Just note that you should not copy or distribute any content you don’t have rights for.

4. Change HDMI ports and cables

hdmi cable and port

HDMI ports and cables are the connective tools and mediums between your Firestick and your TV. Hence, they need to be properly connected and firing to ensure your device boots up properly.

So, if your Firestick is not booting up, you must change between HDMI ports if your TV has multiple ports. Note that you need to turn off your Firestick before changing HDMI ports.

Also, you should not just use any cable. High-speed HDMI cables are the recommended ones you need to make the Firestick-TV connections successful. Lastly, check if there is no physical damage to cables and ports.

5. Try another TV

Sometimes, your Firestick might not be booting up because of a problem with your TV. To eliminate all doubts and know where to focus your energy, you should try to connect to a different TV and see if Firestick works.

If the device boots up normally on the new TV, your TV might have hardware issues like faulty HDMI ports that might require the intervention of a technician.

6. Wait for some time

If you have tried the solutions above and can’t make headway on the Firestick not booting up issue, you need to wait it out.

According to Amazon, you might need to wait up to 25 minutes or more. In essence, you should wait till the device boots.

7. Reset Firestick

  1. Press and hold the Right navigation and Back buttons on your Firestick remote for about 10 seconds.
    remote
  2. Choose OK when prompted to confirm the action.
  3. Finally, wait for the process to complete.

If all other solutions fail to get Firestick to boot up normally, you might need to reset your device for the jugular. This will delete all the devices’ apps, files, and other contents.

The Firestick not booting up the issue can be frustrating, rendering the device useless. Thankfully, it is not an issue that is impossible to fix, as shown in this guide. For network-related issues with your Firestick, don’t hesitate to check out our expert article.

Are you looking to connect your Amazon Firestick to Bluetooth devices? Then check our detailed guide to do it effectively.

If you’re having trouble with ITVX not working on Firestick, check this guide for tested solutions. We also have a guide on Disney Plus not working on Fire Stick, so don’t miss it.

Let us know the solution that helped you fix this issue in the comments below.

ADB Reboot Bootloader Not Working: How to Get It Fixed?

ADB reboot bootloader is an integral part of the Android ecosystem. It enables users to execute advanced tasks, including unlocking the bootloader, flashing firmware, and rooting the device. Unfortunately, many users have reported issues with the ADB reboot bootloader command not working. 

This could be due to a faulty USB connection, debugging, or corrupt or wrong USB drivers. Whatever the reason may be, it can be fixed. 

Here, we will discuss various troubleshooting methods to resolve this issue, along with the causes of its occurrence. 

What does the ADB reboot bootloader do? 

Android Debug Bridge (ADB) reboot bootloader is a command that can reboot your Android phone into bootloader mode. It is a separate boot mode from Android OS and helps root the device, unlocking its bootloader or flashing firmware. 

The bootloader mode allows you to access partitions you can’t access from Android OS. Advanced users primarily use it to access specific system files and troubleshoot issues on the device. 

What causes the ADB reboot bootloader not working issue?

The Android Debug Bridge reboot bootloader command might not work for several reasons. Some of the popular ones are listed below: 

  • The device is not connected correctly – If your Android is not connected to your computer correctly, this mode might not work. Check the USB cable and replug it to establish a connection.
  • Outdated USB drivers – If your device is connected to a USB and your computer is missing the correct USB drivers, then the bootloader won’t work. 
  • USB debugging disabled – To enter developer mode, it is essential to turn on USB debugging. If it is not enabled, then you can face the issue. 
  • Outdated version of ADB – If you don’t have the latest version of ADB installed on your computer, you can get the issue. 

How to get ADB reboot bootloader working?

Before moving to the troubleshooting steps, please go through these preliminary checks to fix the issue: 

  • Check the cable you use to connect your Android and computer for any physical damage. 
  • Make sure your Android and computer have no pending updates. 
  • Use USB 2.0 for lesser conflicts. 

1. Update the USB drivers 

  1. Press Windows + R to open the Run window. Device Manager RUN COMMAND
  2. Type devmgmt.msc and press Enter to open Device Manager. 
  3. Go to the USB controller and expand it. Right-click on the driver listed and select Update driver.USB DEVICE MANAGER -adb reboot bootloader not working 
  4. Now click Search automatically for drivers. Follow the onscreen prompts to complete the process. 

2. Check if USB debugging is enabled 

  • Go to Settings. 
  • Click About Phone. About phone
  • Tap on Build Number (MUI) seven times to get into developer mode.MUI
  • Once done, close the Settings app. 
  • Relaunch the Settings, click Additional Settings, then tap Developers options. 
  • Tap on USB debugging to enable it. USB DEBUGGING -adb reboot bootloader not working
  • If it is enabled, disable it, wait for a few seconds, and will allow it again. 

3. Clean Install of ADB drivers 

  1. Download the ADB installer file. Then, extract the zip file and save it in the accessible location.
  2. Connect your Android to your PC, and double-click on the installer file. It will take you to the blue interface; type Y to continue. 
  3. Again for the following prompt, Install ADB system-wide. Type Y. ADB error -adb reboot bootloader not working
  4. If you get a system path not specified error, press Windows + R to open the Run box. 
  5. Type %userprofile% and press Enter. On the next window, create a folder and name it desktop. 
  6. Now return to the window with the ADB installer file, and double-click it to run. 
  7. Now type Y to initiate the process. Again type Y when it asks to install ADB system-wide. 
  8. Once files are copied, type Y to install device drivers. ADB installer -adb reboot bootloader not working
  9. Follow the onscreen instructions to complete the process. 
  10. The last window will show the Status as Ready to use; click Finish. 

4. Check if the ADB daemon is running in the background

  1. Press the Windows key, type CMD and click Run as administrator. DOS COmmand Prompt -adb reboot bootloader not working
  2. Type the following command and press Enter: adb devices
  3. You will get a list of devices. If you see your device name, it is correctly connected to your computer. 

5. Check OEM lock is enabled 

You must check if OEM locks your device if nothing works for you. Some devices come with an OEM lock, which stops the user from flashing firmware and unlocking the bootloader. First, you need to check on the device manufacturer’s website or device manual. If that’s the case, you need to connect your device to the computer and use a tool to unlock your device. 

So, these are the methods you need to follow to fix the issue of the ADB reboot bootloader. Try them and let us know which worked for you in the comments below.

Before you go, don’t miss our guide on what to do if the ADB command is not found since it covers a similar subject.

AutoRun.Inf Not Working / Missing: Quick Fixes

Although it has been a great tool for managing finances, Microsoft Money is no longer actively developed, being announced in 2008 that there are no new plans for another release in 2009.

Some users report that they have bought Microsoft Money 2006 to replace my Microsoft Money 2002 for example, but they receive the error message autorun.inf file is missing or corrupt.

We will explore in this article how you can solve the autorun.inf file is missing or corrupt, so make sure to keep on reading.

How can I fix the autorun.inf file is missing or corrupt?

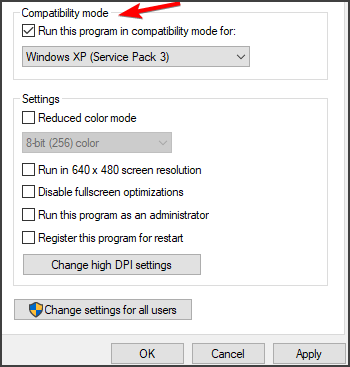
1. Run the program in Compatibility mode

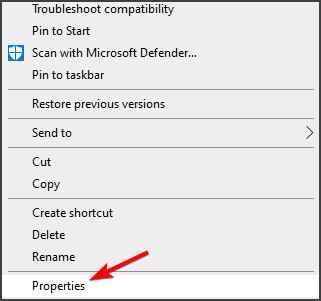
  1. Locate the program’s icon, right-click on it and select Properties.
  2. Click on the Compatibility tab.
  3. Check the box Run this program in compatibility mode for and select the desired Windows version.
  4. Click OK and try to run the program again.

This is a pretty simple solution, and it should help you if you’re getting autorun.inf file is missing or corrupt error while trying to run older software.

2. Use command line

  1. Copy the USMoneyDlxSunset.exe into your Documents folder.
  2. Next, go to Start and type in cmd to open a command prompt.
  3. Enter the following commands and press enter:
    cd %USERPROFILE%*documents
    USMoneyDlxSunset.exe /C /T:%TEMP%\Sunset
    cd %TEMP%\Sunset
    setup
  4. These commands should fix the issue so make sure you try again to run the program.

This is one method that you can use to circumvent autorun.inf file is missing or corrupt while trying to run Microsoft Money Deluxe.

3. Rename the registry key

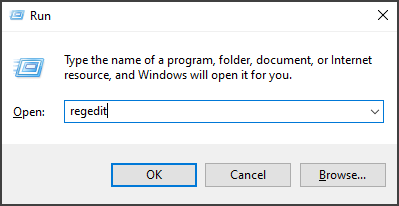
  1. Press Windows Key + R and enter regedit. Press Enter or click OK.
  2. Here locate the HKEY_LOCAL_MACHINE\SOFTWARE\Microsoft\Windows NT\CurrentVersion\IniFileMapping\Autorun.inf
  3. Right-click the Autorun.inf key and choose Rename.
  4. Rename the key to Autorun.inf.bak.
  5. Run the program again and it should work now.
  6. Finally, you can return and change the registry name to its initial name.

You can also delete Autorun.inf key, but it would be safer to just rename it. After renaming or deleting this key, check if the autorun.inf file is missing or corrupt message is gone.

4. Create the Autorun.inf registry key

  1. Open the Registry Editor.
  2. Navigate to the following key: Computer\HKEY_LOCAL_MACHINE\SOFTWARE\Microsoft\Windows NT\CurrentVersion\IniFileMapping
  3. Right-click the IniFileMapping and select New. Now choose Key from the context menu.
  4. Name the new key Autorun.inf.

This solution can fix autorun.inf file is missing or corrupt error, but the solution only works if you don’t have the Autorun.inf key in your registry. If that’s the case, create the key by following the steps above.

What do I do if autorun.inf is not working?

1. Make sure AutoPlay is enabled

  1. Press Windows + I to open Settings, choose Bluetooth & devices from the navigation pane, and click on AutoPlay.autoplay
  2. Now, make sure the toggle for AutoPlay is enabled at the top, and choose the appropriate settings for the device from the dropdown menu.enable to fix autorun.inf not working

If you wondering whether autorun.inf does work on Windows 10, the answer is Yes. And you now also know what to do when autorun.inf is not working when USB is plugged in.

Also, you can similarly fix things when Windows 10 autorun.inf is not working.

2. Reset Autoplay settings to default

  1. Press Windows + S to open Search, type Control Panel in the text field, and click on the relevant search result.control panel
  2. From the View by dropdown menu, choose Small icons.small icons
  3. Now, click on AutoPlay.autoplay
  4. Scroll down to the bottom and click on Reset all defaults.reset all defaults to fix autorun.inf not working
  5. Finally, click on Save to apply the changes.save

If AutoPlay is not working in Windows, resetting things to defaults should do the trick.

With this last step, we will conclude our article. We hope that one of the solutions presented in this article will help you solve things when autorun.inf file is missing or corrupt or if auto run is not working in Windows 10.

Also, before you leave, find out how to disable Autorun in Windows.

If you have additional recommendations or suggestions, don’t hesitate to let us know in the comments section below, we would love to read them.

Sims 2 Keeps Crashing on Windows 10: Solved

Sims 2 is a sequel to the bestselling computer game ever. It was released in 2004 for Microsoft Windows and can be played on mobile platforms as well.

Anyone who has played it knows how addictive it can get. But there are times when you have problems that hinder you from enjoying the game, like when Sims 2 crashes or doesn’t launch or freezes altogether.

Users have reported their Sims 2 crashing at the loading screen, on startup, or during play. This article takes you through what you can do when Sims 2 keeps crashing in Windows 10.

Why does my Sims 2 game crash?

One of the reasons for this is that games that were working in previous operating systems, may or may not work in Windows 10 owing to compatibility issues. However, it may also occur due to file or driver corruption, or when you’ve not updated your drivers or graphics card.

Note: If you’re playing off a disc, these games use Safedisc which isn’t supported on Windows 10. Check if you can get digital versions of the games you can download and play.

How do I stop my Sims 2 from crashing?

1. Restart your computer or device

Sometimes when Sims 2 is crashing in Windows 10, it can be due to a temporary issue that can be fixed by restarting your computer or device. This resets anything running in the memory that can cause the game to crash.

Ensure there’s nothing open or unsaved before you continue as this will automatically close any open applications. To do this, click Start>Power>Restart. Once your computer restarts, sign back in and see if your game works.

2. Check for Windows updates

  1. Press Windows + I to open Settings, and click on Update & Security.update & security
  2. Now, click on Check for updates on the right.check for updates
  3. If an update is listed after the scan, click on Download & install to get it.

Updating the OS also helps when The Sims 2 is not working on Windows 11.

3. Reinstall the driver

Driver files should be uninstalled before you update to newer drivers, or when removing an older graphics card and replacing it with a new one.

  1. Press Windows + R to open Run, type control in the text field, and hit Enter.control panel
  2. Click on Uninstall a program.uninstall to fix sims 2 keeps crashing
  3. Right-click the graphics card driver you’re using and select Uninstall
  4. Confirm that you wish to continue with the uninstall
  5. A prompt will appear asking if you want to delete all saved profiles. Clicking Yes will delete all its software and saved profiles. Clicking No will remove its software but the profile files are saved on your hard disk.
  6. Once driver files have been uninstalled, restart your computer to complete the uninstallation
  7. Turn on your computer and reinstall your graphics card driver

You can also downgrade the graphics drivers and see if it helps when Sims 2 is crashing in Windows 10.

3.1 Update drivers automatically

Downloading and updating drivers manually may damage your system by choosing and installing the wrong versions. To prevent that from the start, we strongly suggest doing it automatically by using specialized driver updating software.

4. Check if your computer meets the system requirements for the game

Some games have specific minimum system requirements for Windows 10 to play them seamlessly. Check if your computer or device can run the game without problems.

5. Sign in as a different user

Sometimes when Sims 2 is crashing in Windows 10, it can be due to corrupted profile data on your computer or device.

1. Click Start

SIMS 2 crashing in windows 10

2. Click on your account name at the top left corner and click Sign Out

SIMS 2 crashing in windows 10

3. Click Switch account

4. Sign in with the other account and restart the game to see if it works

6. Repair or reinstall the game

Game files can get corrupted or altered if there’s malware in your computer, or you’re running a game modification on it. This solution will remove and replace the files that run the game. Some games even repair original files without you having to completely remove the game.

How to reinstall the game from Microsoft Store

  1. Click Start
  2. Select All apps.all apps
  3. Find the game in the list of application
  4. Right click the game and select Uninstall
  5. Follow the steps to uninstall it
  6. Reinstall the game by opening the Store app and select profile buttonstore
  7. Click My Library
  8. Find the game and click Download

Reinstall from a different location

  1. Click Start
  2. Select Settings
  3. Type Programs and Features and select it from the search results.programs and features
  4. Find your game in the list of available programs and apps
  5. If it supports repair, the Repair function will appear as an option on the list of games. Select it to access the in-game repair process. Some games support repair through Uninstall/Change options.
  6. Select Uninstall or Remove and follow the instructions to remove the game
  7. Insert the media you used to install the game and follow the instructions

7. Reset the game

This helps restore corrupted game installation files.

  1. Click Start
  2. Select Settings
  3. Select System.system
  4. Select Apps and Features.apps and features
  5. Find the game and click on Advanced options
  6. Click Reset
  7. Restart your computer to effect the changes

8. Run DISM tool

The Deployment Image Servicing and Management (DISM) tool, helps fix Windows corruption errors when Windows Updates and service packs fail to install due to corruption errors, like if you have a damaged system file.

  1. Click Start
  2. In the search field box, type CMD
  3. Click Command Prompt in the search results list.command prompt
  4. Type Dism /Online /Cleanup-Image /ScanHealth to scan for missing components
  5. Type Dism /Online /Cleanup-Image /CheckHealth to check for missing or broken files
  6. Type Dism /Online /Cleanup-Image /RestoreHealth to scan and correct any causes of the Windows 10 desktop is slow to load issue
  7. Press Enter

Once the repair is complete, reboot your computer and check if the problem persists, after which you can run an SFC scan as described in the next solution.

Note: The DISM tool usually takes 15 minutes to complete, however, sometimes it may take longer. Do not cancel when it is running.

9. Use System File Checker to repair damaged files

This checks or scans all protected system files, and then replaces the incorrect versions, with the genuine, correct Microsoft versions.

Here’s how to do this:

  1. Click Start
  2. Go to the search field box and type CMD
  3. Right click Command Prompt and select Run as Administrator.command prompt
  4. Type sfc/scannow.sfc scan
  5. Press Enter
  6. Restart your computer and try to install updates again.

10. Clear the Windows Store cache

  1. Press Windows + R to open Run, type wsreset.exe, and hit Enter.wsreset.exe
  2. Waif for the reset process to complete. Ideally, it shouldn’t take more than a few seconds.

11. Perform a System restore

  1. Click Start
  2. Go to the search field box and type System Restore
  3. Click Create a restore point in the list of search resultssystem restore
  4. Enter your administrator account password or grant permissions if prompted to
  5. In the System Restore dialog box, click System Restore then Choose a different restore point
  6. Click Next
  7. Click a restore point created before you experienced the problem
  8. Click Next
  9. Click Finish

Has any of these solutions helped fix the Sims 2 crashing in Windows 10 issue? Let us know by leaving a comment in the section below.

How to Fix SSD Freezing on Windows 11: A Step-by-Step Guide

SSD works faster than HDD and allows smoother operation on Windows. However, it is not free from issues. For example, some users have complained that their SSD keeps freezing on Windows 11 for no reason. It can be frustrating but don’t worry; it is fixable.

Here, in this guide, we will talk about all the expert-recommended fixes to resolve the problem right after discussing the causes of its occurrence.

What causes the SSD keeps freezing on Windows 11 issue?

There could be various possible reasons for SSD freezes issue; some of the popular ones are: 

  • SSD connected to the wrong port – If the SSD port to which you have connected is SATA2 instead of SATA 3. This means your SSD might not be working to its full potential. Hence the issue.
  • AHCI disabled – If Advanced Host Controller Interface (AHCI) is not enabled, your SSD might be able to work correctly and use SATA advantages.
  • Bad sector on hard disk – If any sector on your SSD is corrupt or damaged, you might experience slow performance while using SSD.
  • Bugs in Windows update – If the issue started just after updating your Windows, then the update might have bugs. This could cause slow computer issues and SSD performance issues.

What can I do if the SSD keeps freezing on Windows 11?

Before diving into troubleshooting methods, make sure you go through these preliminary checks: 

  • Check if the SSD is connected to the SATA 3 port.
  • Replug the SSD.
  • Check if the BIOS is up to date.
  • Make sure you have KB5007262 and KB5008353 updates installed 

1. Enable AHCI

1.1 Confirm if it is disabled

  1. Press Windows + R to open the Run window. DEVICE MANAGER - SSD crashing
  2. Type devmgmt.msc and press Enter to open Device Manager. 
  3. Go to IDE ATA/ATAPI controllers section, and check for AHCI. If present, then you don’t need to proceed. If not, move ahead. AHCI - ssd freezing windows 11

1.2 Make changes in Registry Editor

Tip icon Tip
Before making changes to any registry entry, please take a backup. For that, go to File, then click Export. Next, save the .reg file at the desired location. To import it, go to File, then click Import. 
  1. Press Windows + R to open the Run consoleREGEDIT RUN COMMAND
  2. Type Regedit and press. Enter to open Registry Editor.
  3. Follow this path: Computer\HKEY_LOCAL_MACHINE\SYSTEM\CurrentControlSet\Services\iaStorV
  4. Locate, double-click DWORD Start, and change the Value data to 0. Click OK.START - ssd freezing windows 11
  5. Follow this path: Computer\HKEY_LOCAL_MACHINE\SYSTEM\CurrentControlSet\Services\iaStorV\StartOverride
  6. Double-click the DWord 0, modify the Value data to 0 and click OK.Starrtoveride
  7. Now navigate to this path: Computer\HKEY_LOCAL_MACHINE\SYSTEM\CurrentControlSet\Services\storahci
  8. First, Double-click the DWORD Start, change the Value data to 0 and click OK.Start Storahci
  9. Now go to the StartOverride key, double click DWORD 0 to modify its Value data to 0, and click OK.Startoveride Storachci 

1.3 Makes changes in BIOS

  1. Press Windows + I to open Settings. 
  2. Go to System, then click Recovery.System-Recovery-Windows-11 
  3. Now next to Advanced startup, click Restart now. Recovery Advanced Startup-Recovery Advanced Startup -ssd freezing windows 11
  4. From the Choose an option, click TroubleshootChoose an option - Troubleshoot
  5. Select Advanced Options.Advanced options -ssd freezing windows 11
  6. Now choose UEFI firmware settings and click Restart. UEFI 2 -adb reboot bootloader not working
  7. The computer will restart, and you will get options to choose from. First, select the appropriate option to enter BIOS. 
  8. Locate Storage Confirguration.
  9. Select Configure SATA as AHCI. 
  10. Go to Exit, and select the Save and exit option. 

2. Check if your SSD is 4K aligned

  1. Press Windows + R to open the Run console.msinfo32 -ssd freezing windows 11
  2. Type msinfo32 and press Enter to open the System information. 
  3. Go to System Summary, locate, and double-click Components. 
  4. Choose Storage, then click Disks. 
  5. From the right pane, locate Partition Starting Offset and check its Value. The value should be divisible by 4096 to be 4K aligned. MSINFO -ssd freezing windows 11
  6. If not, then you need to align it manually. For example, you might have to format and reassign partitions, or you can use a third-party tool to help you with that. 

3. Repair bad sectors 

  1. Press the Windows key, type CMD, and click Run as administrator. DOS COmmand Prompt -ssd freezing windows 11
  2. Copy and paste the following commands and replace E with the drive letter you want to scan, and press Enter after every command: chkdsk /f E chkdsk /r E
  3. Repeat this for all the drives to fix the bad sectors.

Is the Windows 11 SSD freezing issue resolved? 

Microsoft released a few updates to address the Windows 11 SSD freezing issue. The tech giant first released KB5007262 in 2021 to resolve the SSD performance issues.

However, some of the problems after were still left unaddressed, which later were resolved with KB5008353. This update also fixed 30 more topics related to performance and other reported cases. 

So, these are some methods you can use to fix the SSD freezing issue on Windows 11. If nothing has worked for you, it is advised to take a backup of your drive, format it and reinstall Windows 11 to fix the issue. 

Please let us know in the comments section below if you have any questions or concerns related to the SSD freezing up.

What is CompatTelRunner.exe & Should I Disable it?

Windows users may sometimes notice some strange files on their computers. Usually, these files go undetected until they impact your computer negatively.

High CPU usage is usually the most common tell-tale sign. In this article, we’re going to talk about the CompatTelRunner.exe file.

We’ll tell what this file is and how it affects your computer, so don’t hesitate to keep on reading.

What is CompatTelRunner.exe?

The CompatTelRunner.exe file is a Microsoft Compatibility Telemetry file located in the C:WindowsSystem32 folder.

Microsoft uses Telemetry to collect system data in order to keep Windows devices secure and improve the quality of its services.

The CompatTelRunner.exe file is also used to upgrade your system to the latest OS version and install the latest updates.

How to disable CompatTelRunner.exe?

1. Disable it from Task Scheduler

  1. Start Task Scheduler.
  2. Go to Task Scheduler Library > Microsoft > Windows > Application Experience.task scheduler application experience CompatTelRunner.exe
  3. Disable all three tasks in that folder.
  4. Go to Ask Scheduler Library > Microsoft > Windows > Customer Experience Improvement Program.
  5. Disable all three tasks in that folder.

For all versions of Windows, start by removing it from the Task Scheduler as above explained. If Task Scheduler won’t run on your PC, you should read our easy solutions guide.

2. Tweak the Registry

  1. Start Registry Editor (regedit.exe) as Administrator.
  2. Go to
    • HKEY_LOCAL_MACHINESOFTWAREMicrosoftWindows NTCurrentVersionAppCompatFlagsTelemetryController
      telementry controller registry editor CompatTelRunner.exe
  3. Rename the entry from TelemetryController to TelemetryControllerX.
  4. Restart your PC.

Then for Windows 10, you need to kill CompatTelRunner.exe from the registry. If Registry Editor doesn’t open, check this detailed article to see how to fix it.

3. Run SFC

  1. Launch Command Prompt (Admin) as an administrator.
  2. Enter sfc /scannow and hit Enter.SFC scan command prompt CompatTelRunner.exe
  3. Wait until the repair process is completed (this may take a while).

This command helps you to fix system file issues by replacing missing or corrupted files. Follow the steps above to launch the scan.

4. Clean boot your PC

  1. Navigate to Start > type msconfig > press Enter.
  2. Go to System Configuration, and click on the Services tab.
  3. Check the Hide all Microsoft services check box, and click Disable all.hide all microsoft services CompatTelRunner.exe
  4. Go to the Startup tab, and open Task Manager.
  5. Select each startup item, and click Disable.disable startup programs CompatTelRunner.exe
  6. Close Task Manager, and restart your PC.

Clean booting your device allows you to start your machine using only a minimum set of drivers and programs to avoid software compatibility issues.

However, the catch is that you’ll need to do this every time Windows installs new updates on your machine.

Have you applied the above procedures? Let us know if any of them worked for you by using the comments area below.

Best VPNs With Free Trial [No Credit Card Required]

VPNs are an increasingly popular tool for modern internet users. They encrypt your traffic to protect your privacy, let you get around network restrictions, and unblock content intended for certain countries.

If it’s your first foray into the world of VPNs, you probably want to test a few out before making a purchase. The catch? As you’ve likely realized, many VPN services ask for billing details upfront. 

Even worse, review sites are packed with misleading info that fails to mention whether a free trial requires a credit card or another payment method. 

That’s why we’ve compiled a list of legitimate try-before-you-buy offers. These are free trials that let you download the VPN app and use it without any kind of commitment.

Best VPNs with free trial and no credit card requirements

To make the list, VPNs have to offer a genuine free trial that doesn’t need payment information. The trial must also offer enough features to be comparable to the premium version, so you can really test if it’s for you. 

Alternatively, you’ll find some good free forever plans that have many of the same features found in premium ones. 

CyberGhost – 24-hour free trial with no limitations

cyberghost all server locations

Not only is CyberGhost one of the best all-around VPNs, but it also offers an unrestricted free trial for 24 hours.

Simply download the Windows or macOS app, click Start Free Trial after launching, and it’s yours for a day. 

This means you get access to all 9400+ servers in some 91 countries. The capacity to unblock any geo-restricted content anywhere in the world is at your fingertips.

What’s more, CyberGhost has hundreds of optimized servers for specific tasks, including gaming, torrenting, and streaming.

For example, if you’re in the United States but want to access the Australian Netflix library, there’s a server just for that.

You can also get free trials on Android for 3 days and iOS for 7 days, but billing info is required upfront. However, if you cancel before the final day, you won’t be charged.

CyberGhost top features:

  • Dedicated IP addresses
  • Pick and choose which URLs and apps to encrypt
  • Automatic kill switch and advanced leak prevention
  • 45-day money-back guarantee

CyberGhost

Enjoy an unrestricted 24-hour free trial and a 45-day money-back guarantee with CyberGhost.

Hide.me – 5-day free trial and a free forever plan

hide.me vpn free trial activated

Hide.me currently offers the best of both worlds – a full 5-day free trial to test drive its premium plan and a whole separate free plan with 5 locations. 

To unlock this offer, simply go to the website and proceed with a free account, then once your email is confirmed a button will appear asking you to try the premium service – no credit card needed.

Now you can enjoy all the features until the date displayed.

You get over 2,000 individual servers in 77 countries. Its architecture is fast enough to handle 4K streaming and P2P file sharing. It also supports up to 10 devices at once.

Once the trial expires, you can easily revert to the free forever plan, with servers in the Netherlands, Germany, Canada, and the West and East coasts of the United States. You get 10GB of data a month.

Hide.me additional features:

  • Dedicated IP addresses
  • Zero logs policy
  • Multihop to connect through 2 VPN servers
  • IPv6 and DNS leak prevention

Hide.me

Access a 5-day trial or enjoy Hide.me’s free-forever plan without any obligations.

HideIPVPN – full 3-day free trial

hideipvpn connected to netherlands server

To enable the HideIPVPN free trial, you must click the trial link on the website and provide your email address. You’ll then get an email with an automated username and password to log in on the desktop or mobile app.

HideIPVPN is a simple and user-friendly service with 23 servers, spanning 11 countries. 

These are:

The United States, UK, Canada, Poland, Netherlands, Germany, France, Lithuania, Luxemburg, Singapore, and Australia. 

It can easily bypass geo-restrictions, so if there’s a service you want to access in any of these countries, it’s well worth using the free trial.

The VPN has some great features, including a fully customizable kill switch. This lets you choose specific apps to freeze if the VPN connection drops, rather than halting everything. 

Other HideIPVPN features:

  • DNS leak prevention
  • Choose from 5 protocols, including OpenVPN
  • Smart Connect to the fastest server
  • Sort server locations by speed

HideIPVPN

Get a test drive for 3 full days and enjoy HideIPVPN’s user-friendly service risk-free.

Bitdefender VPN – 7 days free on mobile with 200MB data

bitdefenter vpn free trial 7 days left

The Bitdefender VPN offers a reasonable middle-ground when it comes to its free trial policy. While you’re limited to 200MB a day in data, it genuinely has no commitment, so you’re never at risk of being charged.

Of course, 200MB is not enough to stream or game for any length of time. However, it’s enough to test its capabilities on your favorite services, so you know whether to purchase a premium plan.

To get started, download the app via Google Play or the Apple App Store. Then provide your email address and tap Start 7 days Trial. That’s it.

All other features are available, including an automatic kill switch and split tunneling. It has servers in over 50 countries, with multiple choices in the US, UK, and Canada.

Our only criticism is that you can’t access the free trial on a desktop.

What else to know about Bitdefender VPN free trial:

  • Free ad blocker with anti-tracking
  • Choose your VPN protocol manually
  • Set to auto-connect on public Wi-Fi
  • Easily upgrade in-app

Bitdefender VPN

Give BitdefenderVPN a go for 3 full days on mobile – no commitment required.

ProtonVPN – unlimited free data in 3 countries

ProtonVPN conected to free netherlands server

ProtonVPN recently dropped its 7-day free trial, but its free forever plan gives you a good indication as to what’s available, with a 1-device limit.

Unlike most free VPNs, you get unlimited data and access to all the important VPN features. 

This includes an automatic kill switch and other leak prevention measures, split tunneling for choosing what to encrypt and what should get a regular connection, and your choice of protocol.

It also has a useful Accelerator feature, which automatically moves you to a faster server in the same country.

Proton is generous enough to provide hundreds of free servers. The only downside is these are all in the United States, Japan, or the Netherlands. You’ll have to look elsewhere to unblock content in other countries.

However, if you like the free plan, the premium covers 60 different countries. 

Premium ProtonVPN features:

  • Over 1,400 individual servers
  • 30-day money-back guarantee
  • 10 simultaneous connections
  • Malware and ad blocker

ProtonVPN

Give ProtonVPN a test drive for as long as you like with its fully-functional free-forever plan.

Windscribe – 70 free servers with 10GB data

windscribe vpn connected to washington dc server

Winscribe is well known for its high-performance free plan. This gives you access to all VPN features and 10GB of data per month. 

If you want absolute anonymity, you can register without an email address and get 2GB of data a month. Confirm an email address and this is instantly boosted to the 10GB advertised.

The data is more than enough to test the VPN, even if you won’t get away with prolonged streaming and high-bandwidth tasks.

Windscribe covers 70 countries and the detail for each server is excellent. You can view if it’s overloaded with users, the server latency, and whether it’s suitable for P2P file sharing.

The free plan works on all mobile and desktop apps.

What else you get with Windscribe:

  • Kill switch and split tunneling.
  • Use its DNS or enter your own
  • Stealth protocol for hiding VPN usage
  • MAC address spoofing

⇒ Get Windscribe

Pros and cons of using a free trial VPN

As you can see, there are some common benefits and drawbacks to using a VPN with a risk-free trial.

Pros:

  • Never risk being charged or exposing your financial information.
  • Test a good number of features before committing.
  • Never get locked into one particular VPN provider.
  • Some features are free forever.

Cons:

  • Some features might not be available, so you have to trust they work well.
  • Data restrictions mean you really only get to test the service, not use it to your full desire.
  • Free servers can be slower, congested, and not a fair representation of premium servers.
  • Not every top-tier VPN offers a real free trial, so you could be missing out without realizing it.

Ultimately, if you’re new to VPNs, choosing a no-obligation free trial is a good way to familiarize yourself with how they work. 

How to sign up for a free trial VPN without a credit card

Signing up for a VPN free trial with no credit card required is a simple process. Most services that offer the feature will actively tell you. Furthermore, you’ll only need to verify an email address, if even that.

Here’s how to sign up to CyberGhost’s 24-hour free trial:

  1. Google or go directly to the current free trial page at: https://www.cyberghostvpn.com/en_US/vpn-free-trial
cyberghost vpn start your free trial
  1. Click Start Free Trial and the Windows or macOS app will automatically download.
  1. Install the app and create an account with your email address.
  1. You’ll now be automatically enrolled in the free trial for 24 hours.

Once the trial has expired, the app will lock down and prompt you to sign up for a premium plan.

Conclusion

It can be frustrating when you search for VPN free trial with no credit card requirements, only to find misleading reviews or providers hiding their real free trial policy.

Fortunately, we found some good VPNs like CyberGhost, Hide.me, and HideIPVPN, that offer legitimate free trials. These include all servers and features, with no data limitations.

Moreover, it’s surprising to learn there are also a lot of good free plans that never require payment and come with GBs of available data.

Whether you’re new to VPNs or looking for something different, now you have lots of options to try.

FAQ

How can I get ExpressVPN free trial without a credit card?

ExpressVPN offers a legitimate 7-day free trial for mobile users. Simply download the app on Android or iOS, and when you first launch it, click Start Free Trial.

Unfortunately, it’s not a risk-free trial because you must provide billing information in advance. However, you can use Paypal or your network provider billing, rather than entering your credit card information.

Moreover, you can cancel at any time during the 7 days, and you won’t be charged. ExpressVPN will notify you 2 days in advance of being billed, which is a safe time to cancel the trial.

What VPN has the longest free trial?

The longest no-obligation free trial for a good-quality premium VPN is 5 days, offered by Hide.me.

While Bitdefender offers 7 days, this is hindered by a 200MB-a-day data limit.

Some other providers have a free-forever service, such as Windscribe and ProtonVPN. However, these are restricted in terms of servers and data allowances.

Can I get a VPN for just 1 month?

Yes, you can purchase a VPN for just one month. In fact, all good VPN services provide a rolling monthly plan without any long-term commitment.

This means you’re not obligated to subscribe for longer than a month and you can only pay for one month at a time.

However, you must still cancel your subscription before the second month is billed. You usually do this within your account page on the VPN provider’s website or app.

The option is sometimes worded as “turn off automatic billing” rather than canceling your subscription. Both methods will stop payments and the service. Most will also let you resume in the future without re-registering.

Note: Make sure to cancel at least 24 hours before the billing date, or else you may still be charged. Many providers will still continue the service right until the minute it’s due to renew.

Posted in VPN

How to Fix Amazon Fire TV Stick no Signal / Not Working

The Amazon Fire Stick is a handy little device that lets you essentially turn any old TV (as long as it has an HDMI port) into a Smart TV. However, like every other electronic device, it is not free from problems, as some users report that Firestick is showing no signal.

This issue can be frustrating, as it renders the device useless for some time. Fortunately, it is not the most difficult problem to solve, and we will show you how to do it in the ensuing sections of this guide.

Why is my Firestick saying no signal?

Below are some of the causes of the Firestick no signal issue:

  • Faulty HDMI and ports: The first thing to check If you are troubled by the Amazon Fire TV no signal issue is your HDMI cable and the ports. If any of these are faulty, you might need to replace them.
  • Internet connection issues: Another cause is a weak or unstable internet connection. The solution here is to try to connect to a different network or check the strength of your network on another device.
  • Issues with Firestick: In some cases, your device might encounter some glitches. You might need to reboot or reset Firestick to get past the no signal issue.

How do I get rid of the No Signal message on my TV?

1. Check the HMDI cables and Ports

amazon fire stick no signal hdmi
  • Make sure the HDMI cable is firmly connected to the Port and that it isn’t cut or scraped
  • If the HDMI cable is connected correctly, try using a different Port
  • Try using the original HDMI cable the Amazon Fire Stick came with
  • If all Ports are fully functional, try using the HDMI that has Pin 13 removed
  • Try using a power converter box

2. Consider doing an Amazon Power Stick “Reboot”

  1. Turn off the TV and remove the HDMI stick from the HDMI Port
  2. Disconnect the Amazon Fire Stick from its power source, and wait for around 10 minutes
  3. Turn on your TV
  4. Reconnect the Amazon Fire Stick
  5. Press a random button on the Amazon Fire Stick remote and keep it pressed for a few seconds before moving on

3. Check to see if the screen resolution is adequate

amazon fire stick no signal resolutions

Incorrect or un-adaptive resolution may also affect the streaming with the Amazon Fire Stick.

As such, try to modify the screen resolution as per your Amazon Fire Stick’s compatibility.

  1. Press Up and Rewind on your Amazon Fire Stick remote.
  2. Choose Use current resolution.

4. Check your Internet connection

amazon fire stick no signal internet
  • Check whether your Internet connection is working or not. If not, contact your ISP.
  • Move your Amazon Fire Stick closer to the Router.
  • Have the Amazon Fire Stick hardwired directly to the router or modem.
    • For this, you will need an Amazon Ethernet Adapter for Amazon Fire TV devices.
  • Perform a power cycle on the modem or router.
  • Switch the channels if you have a dual-band router.
  • Reset the Amazon Fire Stick to its factory settings, and connect to your network again.

5. Check the input source

  1. Press the Input (can also Source) button on your TV remote.
  2. Now, go through your input options to know the one your Firestick is connected to.

In some cases, the Firestick, no signal for the current input device issue, might occur because you are checking the wrong input source. You need to go through all the input channels on your TV to be sure.

6. Check the power source

Sometimes, this no-signal issue might be because the power equipment you use for your Firestick can not serve it well. This happens if the cable or adapter is not the original one that came with your device.

If you don’t have the original power set, you might need to order another one. Also, you should check your cable and adapter for any physical damage.

This is because any wear or tear on your power equipment can make them malfunction, leading to different issues.

7. Check HDCP compatibility

Another factor that can cause this issue is HDCP compatibility. HDCP is a feature introduced in modern TVs that puts a limitation on the rate at which digital content can be distributed illegally.

However, this feature is not available on older TVs. This can be the cause of the Firestick no signal error on TV. Unfortunately, the surest fix to this is to get a newer PC that is HDCP compatible.

Another option is to use an HDMI splitter which has a fallback mode. However, it must be noted that you should never use the HDMI splitter to distribute or private any digital content.

Finally, this option is not set in stone to work, but it has worked for some users. So, you should try it too.

With this, we can safely conclude this detailed guide on how to fix the Firestick no signal issue on Samsung TV and other products.

If Amazon Firestick does not load the home screen, check our detailed guide to fix the issue quickly.

Feel free to let us know the solution that helped you fix this issue in the comments below.

How to Fix Bellsouth.net Email Login Problems: 8 Quick Ways

Outlook is a great email client, but many users reported that Bellsouth email is not working in Outlook. This can be a problem, but there’s a way to fix this issue.

Many users have Bellsouth email, but some users reported issues while using Bellsouth email and Outlook. Speaking of issues, here are some common problems that users reported:

  • Bellsouth email login problems, authentication error – Sometimes you might not be able to login to the Bellsouth email. If this happens, you might have to change your password and create a secure mail key.
  • Bellsouth email not sending emails – If Bellsouth email isn’t sending mail in Outlook, the issue is probably your email configuration. Simply configure the email again and check if the necessary information is correct.
  • Bellsouth email won’t work – If Bellsouth email won’t work at all with Outlook, you might want to try using webmail or different email client as a temporary solution.

How to fix Bellsouth.net email not working problem?

Solution 1 – Change your password and create a secure mail key

If Bellsouth email is not working in Outlook, you might be able to solve the problem simply by changing your password. This issue can occur with some legacy accounts, and in order to fix this issue, it’s advised to visit Bellsouth’s website and change your password.

After changing the password, check if the problem is still there. If the problem is still appears, you might want to try creating a secure mail key. This is basically a password that you’ll use only for Outlook. Using secure mail key is a great method if you want to ensure that your email stays safe from malicious users.

To create a secure mail key, do the following:

  1. Go to your Bellsouth profile page and click on Sign-in info.
  2. Now select the email account that you want to create a secure mail key for.
  3. Scroll down to the Secure mail key section and choose Manage secure mail key.
  4. Now select Add secure mail key option.
  5. If you want, you can enter the name for your security key in order to recognize it better. This isn’t mandatory, but it might come helpful in the future.
  6. Now select Create secure mail key. Click Copy secure mail key to clipboard.
  7. Click OK.

Now you just have to go to Outlook and replace your password with the secure mail key. After doing that, check if the problem is still there.

Solution 2 – Check your antivirus


In some cases, it’s possible that your Bellsouth email isn’t working in Outlook due to your antivirus. Your antivirus or firewall can sometimes prevent your email client from working properly, and that can cause this error to appear.

However, you can fix this issue simply by adding Outlook to the list of exclusions in your firewall or antivirus. In case the problem is still there, you might want to try disabling certain antivirus features or disable your antivirus altogether.

If disabling the antivirus doesn’t help, your next step would be to completely remove your antivirus. If you’re concerned about your safety, you should be protected by Windows Defender, so there’s no need to worry.

Once you remove your antivirus, check if the problem is still there. If the issue doesn’t reappear, this might be a perfect time to consider switching to a different antivirus solution.

There are many great antivirus tools on the market, but if you want an antivirus that won’t interfere with your email client, you should definitely try TotalAV.

⇒ Get TotalAV

Solution 3 – Make sure that your account is properly configured

If your Bellsouth email is not working with Outlook, the problem might be because your account wasn’t properly configured. To fix this, you just need to locate your account and make the necessary changes.

We’re going to show you how to properly add and configure a Bellsouth account, but if you already have a Bellsouth account, you just need to modify it slightly. To add a Bellsouth account in Outlook, you just need to do the following:

  1. Open Outlook and go to File > Add Account.
  2. Select Manual setup or additional server types and click Next.
  3. Now select POP or IMAP and click Next.
  4. Now you’ll be asked to enter your display name and email address.
  5. After doing that, you need to enter server information. If you’re using a POP3 account, enter inbound.att.net and outbound.att.net for Incoming and Outgoing servers respectively.Enter your login information and click More Settings. Now go to the Advanced tab and set Incoming server port number to 995. Set Outgoing server port to 465. Save changes.If you’re using IMAP account, set Incoming and Outgoing servers to imap.mail.att.net and smtp.mail.att.net respectively. As for the port numbers, use 993 for Incoming and 465 or 587 for Outgoing server.
  6. If you want, you can click the Test Account Settings button and check if your configuration is correct.

After configuring your account, the problem should be resolved and everything should start working again.

Solution 4 – Just wait it out

In some cases, it’s possible that this is a server-side issue. If that’s the case, there’s not much you can do until Bellsouth fixes the problem on their own.

If you’re having issues with Bellsouth and Outlook, you can contact Bellsouth and they’ll let you know if the problem is caused by their servers or by your client.

Solution 5 – Repair your Outlook profile

Sometimes your Bellsouth email is not working in Outlook because your Outlook profile is corrupted. This can occur for various reasons, but you can fix this issue by doing the following:

  1. In Outlook, go to the File tab and choose Info.
  2. Select Account and then Account Settings.
  3. Change Folder to Outlook Data File, then Inbox.

After doing that, save changes and check if the problem is resolved.

Solution 6 – Forward emails from Bellsouth email to Outlook email

If you aren’t receiving Bellsouth emails in Outlook, you might be able to fix this problem simply by setting all your emails to be forwarded from Bellsouth email to Outlook email.

This is just a workaround, but until you find a permanent solution, this workaround might work for you. To forward your emails, be sure to access Bellsouth’s server and set up email forwarding to the desired email account.

Solution 7 – Use webmail

If you’re having problems with Bellsouth email and Outlook, you might be able to temporarily solve the problem by using webmail. Many email services offer webmail, and if you’re having problems with Outlook, we suggest to temporarily switching to webmail

This isn’t the best solution, but it’s a decent workaround until you find a permanent solution.

Solution 8 – Switch to a different email client

Sometimes Bellsouth email will not work in Outlook, and if you can’t fix the problem on your own, perhaps you should switch to a different email client.

There are many great email clients on the market, and you can always try using Mail app in Windows 10.

However, if you want something that offers a bit more features, Mailbird might be just what you need.

Mailbird is a resourceful email client that provides both individual and professional level email management tools.

It has a unified email box where you can access all your email accounts. It comes with handy filtering and organizing features that can save you plenty of time.

On top of that, the transition should be seamless, as Mailbird has a very easy-to-use interface. If you are familiar with the way Outlook works, then using this alternative should be really easy for you.

This article will also help you fix the following issues:

  • Bellsouth email not working
  • Bellsouth email login problems
  • Bellsouth.net email login problems
  • My bellsouth email stopped working
  • Bellsouth email problems today
  • Can’t login to bellsouth email
  • Bellsouth email issues

If Bellsouth email is not working in Outlook, the problem can be your configuration, so be sure to try all of the solutions from our article and let us know if our solutions helped you with this problem.

For more information on Bellsouth, visit our Bellsouth section.

Are you looking for another e-mail client? We have the Most Useful Guides For Email Clients just for you.

Access Is Denied 0x80070005 [Solved]

Are you trying to rename, delete, move, or copy a certain folder from your Windows 10 device, but you can’t? If you received the Access is denied error 0x80070005, and you don’t know how to fix it, you are in the right place.

We will show you how to quickly fix this system problem with the help of the following troubleshooting steps.

What does the 0x80070005 access denied error mean?

As outlined, the problem occurs when you try to rename, copy, move, or delete certain folders. Usually, the 0x80070005 Access is denied error code pops up when you try to make changes within system files.

So, the error code is a security warning that tells you this: you don’t have the right to remove, rename or move/copy that certain folder or file.

In this case, the issue can be easily fixed if you switch to the administrator account. However, if you have admin privileges and you are still experiencing the same problem, you must apply additional troubleshooting steps.

If you also have issues with the default save location that couldn’t be set, the highlighted guide will provide the right solutions to fix it.

The goal is to solve any possible errors that might cause folders or files related to malfunctions. And here is how you can do that.

How do I fix the access is denied 0x80070005 error?

1. Gain administrator rights

  1. Right-click on the folder or file that you want to change / modify.
  2. Choose Properties from the list that will be displayed.
  3. From Properties, switch to Security tab.files security settings windows 10
  4. Look for the Group or user section.
  5. If you don’t have ownership rights for this folder choose the Advanced option.
  6. Select the Owner field located under Advanced Security Settings and pick Change.
  7. The User or Group window will be displayed.
  8. From there, click on Advanced.
  9. Type your username and click on Check Names in order to display the list of available accounts.change file permissions
  10. Select your account and click on OK.
  11. In the end check Replace owner on sub containers and objects.
  12. Click OK and Apply all the changes.

The first thing you should try is to gain admin rights within the folder you want to modify.

2. Use Microsoft’s File and Folder Troubleshooter

You need to scan for problems related to system files and folders. Also, if there are such problems, you need to fix them immediately. Well, this process can be completed automatically by using a default troubleshooting process supported and offered by Microsoft.

I am talking about the Filer and Folder Troubleshooter service, which can be initiated from this page.

3. Run SFC

  1. Right-click on the Windows Start icon and select Command Prompt (admin).
  2. Elevated command prompt window will be opened on your computer.
  3. There, type sfc /scannow and press Enter.sfc scannow
  4. Wait while the system tries to find and repair possible Windows 10 system errors.

Another way in which you can fix system errors is by using another troubleshooter featured by default on your Windows 10 system. So if the above-explained steps aren’t helpful, you should start an SFC scan.

4. Update Group Policy Settings

  1. First, open an elevated cmd window
  2. In the cmd window type gpupdate /force and press Enter.
  3. When done, close the cmd window.
  4. Reboot your computer and see if this solution helped you.

If Group Policy Settings were recently changed, you might end up experiencing the 0x80007005 Access is denied error code.

As you noticed, some files can be modified only if you have administrator rights. Moreover, if there are problems within the Windows 10 system your access to folders and files might be restricted, and you can get the 0x80007005 Access is denied code error.

The steps listed above should help you fix these problems right away. However, if you cannot manage to address the issues, try to give us further details to help us better understand why you cannot modify your folders and files.

The same error code can also come up on the Microsoft Store or via Windows Update. If you get the 0x80070005 Microsoft Store or 0x80070005 Windows Update errors instead, check out our dedicated guides for more help.

Let us know which steps helped you fix this issue by leaving us a message in the comments section below.

16 Best Image Compression Software [2026 Guide]

We store images on our hard drives and online, but in order to save space, we sometimes need to make them occupy less. What can be better than using dedicated image compression software to shrink down photos without compromising on quality?

If you’re uploading your images online and if you have limited online storage, image compression is even more important. We reckon there is no shortage of tools that promise to do just that.

Nevertheless, the compression technique implies a certain degree of loss when it comes to clarity. So, we only focus on resizer programs that will not affect quality.

Here’s a quick preview of our favorite picks:

  • ? Adobe Photoshop – Best image compression software without losing quality
  • ? WinZip – Excellent choice for reducing email attachments
  • ? Pixillion – Top-notch JPEG compression software
  • NX Power Lite Desktop – Easily adjust the ratio between quality & compression
  • FILEminimizer – Scan specific folders or the entire hard drive
  • Caesium Image Compressor – Best picture compression software free download
  • JPEGmini – Lossless compression software

Compressing your images is fairly simple, and today we’re going to show you some of the best image compressor software options. You can use them on Windows 10, Windows 11, and prior versions.

Best picture compression software for PC

Adobe Photoshop – Best image compression software

If you want the very best photo compression software, Adobe Photoshop is well suited for the job. The world’s greatest imaging and graphic design software lets you crop, retouch, combine, and compress photos with ease.

Photoshop is professional and gives new dimensions to the art of photography. So, you may only imagine how well it covers basics such as image compression.

One of its most interesting features is that you may work with unlimited layers and masks. Moreover, chances are you’ll love its slick interface.

You can choose from several workspace layouts or feel free to create your own custom layout of panels and windows.

The bottom line, it shouldn’t take too long to get used to Adobe Photoshop. Even if you’re a newbie, once you understand how the application works, it’s so much fun to use.

Other key features include:

  • A rich set of tools for professional mobile and web design
  • Various effects can be easily applied to layers
  • 3D design capability to make your work stand out
  • Fast Edit features that are essential for professional work
  • It’s extremely versatile, so it works with other Adobe apps like Illustrator and InDesign

Adobe Photoshop

If you’re looking for the best photo compression software for Windows 10, then try out Adobe Photoshop!
Free trial Visit website

WinZip – Excellent for reducing email files

get WinZip

We’ve compiled a list of the best compression software tools for Windows 10, so WinZip clearly deserves a spot here.

Since Zip files reduce email attachment size, do not hesitate to give them a try. Moreover, do note that it provides splitting of files according to the media and advanced file-sharing options.

WinZip also comes with a highly responsive interface for all devices you may own, so you won’t encounter any issues while using it.

Great key features brought by WinZip to the table:

  • It protects files with strong banking-level encryption
  • cloud support is a bonus that you’ll most likely find useful
  • Integration with Microsoft Office
  • Instant sharing
  • Image format converter

WinZip

If you want great image compression software, this is clearly a reliable choice!
Check price Visit website

Pixillion – Top-notch JPEG compression

try out Pixillion

Another comprehensive photo compression software for Windows 10 we want to cover is Pixillion.

Use this tool to convert to a variety of target formats, including JPEG, JPG, PDF, PNG, GIF, BMP, ICO, SVG, TGA, TIF, PGF, RAW, RAF, WMF, EMF, DNG, CR2, and many more.

You may actually convert or compress thousands of photos at a time with batch conversion and get them ready for posting on the web or displaying on your smartphone, without loss of quality and detail.

Besides the one-click process of converting files, Pixillion allows you to easily add text captions or different kinds of watermarks to your images.

Furthermore, you have the option to resize them until they’re perfect. That’s why this professional tool is the one-stop solution for all your image editing and image conversion requirements. Give it a try!

Pixillion

Pixillion helps you compress thousands of photos at a time and there is no format it cannot handle.
Check price Visit website

NXPower Lite Desktop – Quality & Compression adjustment

get NX Power Lite Desktop

NXPowerLite Desktop 8 shrinks your JPEG, PNG, TIFF, JPG, and other popular image formats but also your Word, Excel, or PowerPoint documents.

Files remain in their original format and there is no need to unzip them before using them. It also allows you to customize the balance between quality and compression ratio, which is a very useful feature for images.

It’s a user-friendly tool: just select the file you need to minimize, choose a compression level, and click the Optimize button.

You can also optimize file size from within Windows Explorer and Microsoft Office programs, or choose to automatically optimize email attachments as they are sent.

You can use NXPowerLite Desktop for free but if you need to have access to more sophisticated features to accomplish your work – you can buy the full version.

⇒ Get NXPower Lite Desktop

FILEminimizer – Specific folders or hard drive scan

get FILEminimizer

FILEminimizer Pictures is a simple free application and image compressor for Windows. The first thing that you’ll notice when you start this application is its simple and a bit outdated interface.

In order to compress your images, you just need to find them and add them to the application.

There’s a useful feature available that will scan certain folders, or even an entire hard drive and allow you to add pictures to the FILEminimizer Pictures tool.

Regarding the configuration, you can choose between three presets or you can set the custom level of compression. You can also choose an output directory or add suffixes or prefixes to compressed images.

This is a simple tool for image compression, and its biggest flaw is an outdated user interface. Speaking of the user interface, there’s no preview window, so you won’t see any changes until you compress your images.

FILEminimizer Pictures is a simple tool, and if its outdated user interface isn’t a problem for you, be sure to try it out.

⇒  Get FILEminimizer Premium Version

Caesium Image Compressor – Free photo compression tool

get Caesium Image Compressor

Caesium Image Compressor is an open-source image compressor. In order to compress your images, you simply need to add them to the application and set the desired options.

If you want, you can also add entire folders directly to Caesium Image Compressor. The user interface is split into three columns.

The first column is Compression Options and from there you can set the image quality. You can also choose between several formats such as JPG, PNG, and BMP.

Unfortunately, you can’t change image quality for PNG or BMP images. If you want, you can use the same quality for all images on your list.

The next column is in charge of resizing. From there you can set an absolute or relatively new size for your images.

If you want, you can also apply the same settings for all images on the list. Of course, there’s an option available that will let you keep your aspect ratio.

The last column is in charge of the output folder. You can set a different output folder for your compressed images or keep them in the same folder.

If you want, you can also add a suffix to your images so you can easily distinguish them.

Even though this is a simple application, it has its share of flaws. In order to see a new size, compression ratio, and quality of the image, you’ll have to check the list of files.

We have to mention that the list can be sometimes sluggish, so it can take about five or more seconds for data to update. You can force data to update by clicking the Set Quality button if you don’t want to wait.

Even though there’s a side-by-side comparison, the compressed image preview won’t update automatically unless you click the Preview button, which is also a flaw in our opinion.

Caesium Image Compressor is a great application for image compression. This tool is simple to use and it has all the basic options available.

Unfortunately, some users might be turned away by some of its minor flaws. We have to mention that a portable version is also available, so you can run this app without installing it on your PC.

⇒ Get Caesium Image Compressor

JPEGmini – Lossless compression software

get JPEGmini

JPEGmini is a lossless image compressor, and according to its developers, this tool can reduce the file size of your pictures up to 5 times.

All your pictures will keep their original format and they will suffer almost no quality loss during compression.

We have to mention that this tool is rather simple, and all that you have to do is to add your images to it, and it will automatically compress them.

Keep in mind that by default JPEGmini overwrites the original images with compressed ones, so be sure to change your settings first.

Speaking of settings, we have to say that JPEGmini offers few settings. There’s no quality slider, so you’ll have to rely on the application algorithm to figure out the best quality settings for your images.

The application does a good job, so you’ll hardly notice any visual changes after compressing your images. In addition to compression, you can resize the images or set a specific output folder for compressed images.

JPEGmini is a simple application that allows you to resize your JPEG images without any configuration. This application will be perfect for primary users, especially with its visually appealing and simple user interface.

If you want more advanced options, you’ll have to use a different application. We also have to mention that JPEGmini is available as a free trial.

The free version allows you to compress up to 20 images per day, which should be enough for basic users.

⇒ Get JPEGmini

FileOptimizer – Nifty photo compressor app

get FileOptimizer

FileOptimizer is another free tool that can optimize your images. This application was originally designed for compressing all sorts of files, but you can also use it to compress your images.

FileOptimizer comes with a humble user interface, and in order to optimize your images, you just need to add them to the tool. Regarding compression, you can choose between several compression levels.

We have to warn you that by default this application moves original files to Recycle Bin and replaces them with compressed files. Of course, you can turn this option off if you want.

There’s no preview window or any advanced settings, which can be a flaw for some users. During the compression process, you’ll see the original size and optimized size of each file, which is rather useful.

This tool isn’t optimized for image compression, but if you want to compress your images and other files, this tool can be useful.

This application is available in a portable format, so you can run it on your PC without installing it.

⇒ Get FileOptimizer

Mass Image Compressor – Preview & file size information

get Mass Image Compressor

Mass Image Compressor is another free image compression software. Unlike other tools on our list, this one is designed to compress entire image folders.

In fact, you can’t add single images to this app, so you’ll have to organize images that you want to compress.

After selecting the desired folder, you should be able to change options such as image quality and image size.

You can choose between fixed width or set a percent-based width for your images. In addition to changing quality and size, you can also change the image format to JPEG or PNG or keep the same file format.

You can also save compressed images to a specific directory, or you can overwrite the original images. Mass Image Compressor comes with a preview window that lets you see a sample image.

This is a useful feature, but unfortunately, there’s no way to toggle between different images, which is a flaw in our opinion. In addition to the image preview, there’s also information regarding the file size next to it.

This is a simple application for image compression, but unfortunately, this tool isn’t designed for single images.

You can’t add individual images to the application, and you can’t see previews or compression results for individual images which can be a problem for some users.

Overall, if you have multiple photos that you want to compress, this tool will be perfect for it.

⇒ Get Mass Image Compressor

PNGGauntlet – PNG-focused photo compressor

get PNGGauntlet

PNGGauntlet is an image compression software optimized for PNG files. The application allows you to convert other file formats such as JPG, GIF, TIFF, and BMP to PNG.

Unfortunately, you won’t be able to save images to JPG or any other format except PNG. This tool uses PNGOUT, OptiPNG, and DelfOpt to compress your images, and you can configure each of them individually.

Just like with many other tools on our list, you can choose an output directory or overwrite original files. Unfortunately, there’s no preview window available, which is another flaw in this application.

PNGGauntlet is a great application if you want to optimize PNG files, but if you have your images stored in any other file format, we suggest that you try a different app.

⇒ Get PNGGauntlet

RIOT – Color quantization & encoding

get RIOT

RIOT stands for Radical Image Optimizer, and this is another free image compression tool. This tool is lightweight, but it offers advanced features, so it can be used by both basic and advanced users alike.

Regarding file support, this tool allows you to optimize JPEG, GIF, and PNG images. The tool comes with two panes that will show you the original and optimized image.

RIOT comes with an in-place compare feature that will temporarily replace the original image in the preview pane with the compressed one so you can examine the changes in a single pane.

The tool allows you to change the image quality of JPEG images, but it also allows you to choose different encoding options.

If you want, you can also perform image adjustments and change brightness, contrast, gamma, and other settings.

You can also rotate or flip your image if you need to. There’s a resample option available, and you can use it to resize the image using 6 different resampling filters.

During resampling, you can set the desired width or height in pixels or percents and choose to keep the aspect ratio if you want.

Regarding PNG images, you can change the color reduction profile or choose the number of colors manually. In addition, you can change the compression, and color quantization, or use external optimizers.

As for GIF images, you can choose color reduction presets or reduce the number of colors manually. You can also add images to RIOT directly from the clipboard, which is useful.

RIOT also comes with a useful option that lets you compress the image to the desired size in KB. There’s also support for batch optimization, so you can quickly edit and compress multiple images at the same time.

One thing that we don’t like about batch optimization is the lack of ability to set the desired quality. There’s also no preview window for batch optimization, which can be a problem for some users.

Despite those minor flaws, this is still one of the best image compression tools on our list.

⇒ Get RIOT

JPEG Compressor – Detail quality equalizer

get JPEG Compressor

JPEG Compressor is probably the most advanced image compression software on our list. This application comes with a cluttered user interface that might confuse basic users.

If you want to quickly compress an image, simply choose one of the presets on the left. You can choose between original, lossless, and other compression modes.

The app allows you to customize compression in great detail, and you can change Luma and Chroma compression values.

There’s also a Detail Quality Equalizer that you can use to fine-tune your image. You can also change values such as Unsharp Masking, Luma Equalizing, and many others.

If you want, you can crop or resize your image but you can also change color balance, saturation, or brightness along with other settings.

You can even set the desired size in KB for your image, and it will be automatically optimized.

JPEG Compressor allows you to create profiles that you can use to batch edit your images. Batch editing allows you to save compressed images in a specific folder or add prefixes or suffixes to them.

JPEG Compressor is the most advanced image compression tool, and the number of settings that you can change is daunting.

This tool isn’t designed for basic users, but if you want to fine-tune your images and create custom profiles for batch compression, this is the perfect tool for you.

We have to mention that this tool isn’t free, but you can download it and try it free of charge.

⇒ Get JPEG Compressor

PhotoRazor – Prefixes for saving specific images

get PhotoRazor

PhotoRazor is another simple image compression software. This tool comes with a simple design and features, therefore it’s perfect for basic users.

To use this tool, simply select the folder with images that you want to compress. After doing that, you need to select the desired size and image quality.

We have to mention that PhotoRazor has limited options when it comes to image compression and resizing, but those options will be enough for basic users.

It’s worth mentioning that you can preview each image individually and see how compression will affect it. In addition to the preview, you can also see the estimated file size.

All your images are saved in a dedicated folder, and you can even add prefixes to compressed images. You can also select which images you want to compress, so you’re not forced to compress an entire image folder.

PhotoRazor is a simple tool with simple features, and if you’re a basic user, this tool will be perfect for all your needs.

⇒ Get PhotoRazor

Jpeg Resampler – Precise width & height

get Jpeg Resampler

Jpeg Resampler is an advanced image compression tool. This tool comes with a humble user interface, but it makes up for it with its features.

Before you can use this tool, you need to select the source file or directory and desired output directory. This tool allows you to make many adjustments to your pictures.

For example, you can compress the image and convert it to a different format right from Jpeg Resampler 2010. Of course, you can resample the picture to a specific size in KB.

If you want, you can resize the picture by using pixels or percent values. You can even set the size of the larger side or the exact width or height.

You can choose between several resampling filters and you can add various effects. If you wish, you can even change the color format or save your presets for later use.

Of course, you can change the image quality and all sorts of advanced options. You can even set custom names for compressed images.

You can also see all your images along with the necessary information, but you can’t see how will your image look after compression.

In addition, there’s no estimated file size available before the compression. Jpeg Resampler offers many great features, but it has some user interface flaws.

If you don’t mind the lack of image and size preview, this app could be useful to you.

⇒ Get Jpeg Resampler

FastStone Photo Resizer – Joggle with different formats

get FastStone Photo Resizer

FastStone Photo Resizer is a free tool for image compression. After you select the desired images, you can choose between several different formats. If you want, you can also set a different output folder.

This tool allows you to change all sorts of options regarding image quality, but you can also change other settings. You can crop images, resize them, and make all sorts of adjustments.

You can even set custom names for all your compressed images. If you want, you can even save your presets and use them later.

Before compressing your images you can also preview them and see how will compression affects them. In addition to the individual image preview, you can see the estimated size as well.

FastStone Photo Resizer is an amazing tool, and it offers all features that both basic and advanced users need.

The only flaw of this tool might be its complexity, so it might take you a few tries to get the desired results. This might not be the simplest tool on our list, but it’s definitely one of the best.

⇒ Get FastStone Photo Resizer

Light Image Resizer – Custom images destinations

get Light Image Resizer

Light Image Resizer is available as a free trial, and this image compression software will allow you to compress up to 100 images in the free version.

The application comes with a simple interface and you just have to add your images or image directories and set the desired preset.

You can also set custom to resize options, different actions, and custom destinations for compressed images. Regarding advanced options, you can adjust the image quality or set a specific size for your images.

Changing image format and filter is extremely easy with this tool. If you want, you can also set custom names for compressed images. If needed, you can also make adjustments and add certain effects to your images.

After you set the desired parameters, you can preview your images. You can preview individual images and see how the compression will affect them.

Of course, you can also see the estimated file size of each image before you compress it.

Light Image Resizer is a simple yet powerful tool that has all the necessary options for image compression. This is a great tool, but unfortunately, it’s not available for free, so you’ll have to obtain a license.

⇒ Get Light Image Resizer

If you’re looking for powerful and free image compression software, our recommendation is FastStone Photo Resizer.

This software has all the advanced features, and it’s also free, but it might take you a bit to get used to it. If you want something more user-friendly but just as powerful, we suggest that you try the RIOT tool.

How to Download & Install Microsoft InfoPath: Quick Guide

Over the years we saw all sorts of great tools from Microsoft. Many of these tools have a big number of users and fans worldwide, but unfortunately, some of these tools had to be discontinued.

One of these tools is Microsoft InfoPath, and today we’re going to show you how to install it on Windows 10.

What is Microsoft InfoPath?

Microsoft InfoPath is software designed for creating and filling electronic forms without writing code, in a cost-effective way.

This application comes with “what you see is what you get” from the designer. It allows you to quickly add input fields, text boxes, buttons, and other elements.

How to install Microsoft InfoPath on Windows 10?

If you wish to download and install Microsoft InfoPath on Windows 10, you can do that by following these steps:

  1. Go to Microsoft InfoPath download page.
  2. Click the Download button.
    microsoft-infopath-download
  3. Check the version you want to download. If you have a 64-bit version of Windows we advise that you download the 64-bit version of InfoPath. Once you select the version you want click the Next button.
    microsoft-infopath-version-choose
  4. Wait for the InfoPath to download.
  5. When the download is completed, locate the setup file and double click it.
    microsoft-infopath-setup-file
  6. Read the license agreement, check the I accept the terms of this agreement and click Continue.
    microsoft-infopath-agree-continue
  7. Now you can choose between express installation and customized installation. If you want to install Microsoft InfoPath to a different directory or choose what components you want to install, click the Customize button. If you want to install the software to the default directory click the Install Now button.
    microsoft-infopath-install-now
  8. Wait until Microsoft InfoPath installs.
    microsoft-infopath-installing
  9. Once the setup is completed, click the Close button.
    microsoft-infopath-completed

After completing the setup, you can start the application by following these steps:

  1. Double click the InfoPath Designer 2013 shortcut.
    microsoft-infopath-info-path-designer
  2. You’ll be asked to install the updates for Office and other Microsoft software. Choose any of these options and click Accept.
    microsoft-infopath-first-things
  3. Now you’ll be offered to register InfoPath 2013. This program is available as a free trial for 30 days. If you want to use a full version you need to activate it online.
    microsoft-infopath-activate
  4. After activation InfoPath Designer should start. You’ll have the option to choose from several available templates.
    microsoft-infopath-main-screen
  5. After choosing the template, you’ll be able to customize it anyway you want.
    microsoft-infopath-main-screen-2

Microsoft InfoPath works great with Windows 10. However, keep in mind that this isn’t free software. Therefore, be sure to activate it as soon as you can.

This application was on the Microsoft Office programs list, but even if it’s discontinued, you can still download it. and use it.

If you have any other questions, don’t hesitate to leave them in the comments section below.

Can’t Find Snipping Tool [Missing]: How To Restore It

The Windows 10 Snipping Tool is a utility for capturing screenshots. You can usually open it by entering ‘Snipping Tool‘ in the Cortana search box.

However, not all users can always find the Snipping Tool via the Windows 10 search box. This is how you can open the Snipping Tool if Window search tool doesn’t find it for you.


What can I do if my Snipping Tool is missing?


1. Rebuild the Search Index

  1. Press the Windows key + R keyboard shortcut.
  2. Then enter ‘Control Panel’ in Run’s Open text box, and press the OK button.
  3. Click Indexing Options to open the window in the snapshot directly below.
  4. Press the Advanced button to open the Index Settings tab below.
  5. Then press the Rebuild button and click OK.

The Windows 10 search index is disabled on some laptops and notebooks with SSD storage. Does your laptop include SSD storage?

If so, that might be why the search tool doesn’t find the Snipping Tool. Rebuilding the search index will then be a probable resolution.


2. Open the Snipping Tool with Run

However, you don’t always have to search for the Snipping Tool to open it. There are various ways that you can open the Snipping Tool.

For example, you can open it with Run. Press the Windows key + R hotkey to open Run, enter snippingtool in the text box and then press the OK button.


3. Add a Snipping Tool shortcut to the Windows 10 desktop

  1. First, right-click the desktop and select New > Shortcut.
  2. Then enter in the text box shown directly below.
    • C:\\Windows\System32\SnippingTool.exe
  3. Press the Next button.
  4. Press the Finish button to add the shortcut to desktop.
  5. Thereafter, you can add the Snipping Tool shortcut to the Start menu or taskbar. To add it to Start menu, right-click the shortcut and select Pin to Start.
  6. To add the shortcut the taskbar, you can right-click it and select Pin to taskbar.

Alternatively, you can add a Snipping Tool shortcut to the Windows desktop. Then you can open the Snipping Tool with its desktop shortcut instead.


4. Open the Snipping Tool From its System32 Folder

  1. Press the File Explorer button on the Windows 10 taskbar
  2. Open this folder in File Explorer:
  3. C:/Windows/System32
  4. Click Snipping Tool in the System32 folder to open it from there.

5. Enable the Snipping Tool in the Group Policy Editor

  1. Press the Windows key + X hotkey.
  2. Then select to open the Run accessory from the Win + X menu.
  3. Enter Gpedit.msc in Run’s Open text box, and press the OK button.
  4. Then click User Configuration > Administrative Templates > Windows Components > Tablet PC > Accessories on the left of the Group Policy Editor window.
  5. You’ll see a Do not allow Snipping Tool to run option on the right of the window. Select the Do not allow Snipping Tool to run option to open its window.
  6. Then click Disabled if Enabled is currently selected.
  7. Press the Apply and OK buttons to confirm the new setting.

Note that the Group Policy Editor in Windows 10 Pro and Enterprise includes a Do not allow Snipping Tool to run option. As such, the Snipping Tool doesn’t run with that option selected. This is how you can check if that option is configured to enabled in Win 10 Pro and Enterprise.


What are some Snipping Tool alternatives?

Remember that there are plenty of third-party software alternatives to the Snipping Tool, such as Share X, Greenshot, Lightshot and Screenshot Captor.

Some of those third-party screen capture tools also include more options for capturing and annotating screenshots than the Snipping Tool. This software guide provides further details for some of the best Windows 10 screen capture utilities.

Snipaste is one alternative to the Snipping Tool that’s worth noting. That’s a freeware screen capture tool which automatically captures UI elements on software windows.

Snipaste users can select Line strip, Marker pen, Pencil, Arrow and Text annotation options on its toolbar.

Snipaste also includes plenty of customization options and hotkeys that you can utilize the software with. You can add that program to Windows 10/8/7 by pressing the 32-bit or 64-bit button on this webpage.

So you don’t really need the Snipping Tool even if you can’t find it in Win 10.


By following this guide, you should be able to make use of the Snipping Tool in Windows 10 once more.

Know of another way to access the tool? Let us know by leaving some feedback in the section below, and we’ll be sure to update the article.

Orbi Router Troubleshooting Guide [Internet, Wi-Fi]

The Netgear Orbi is a fast and reliable router that has had Frave reviews. Yet, users can still encounter Orbi network connection issues.

Some users have said on Netgear’s forum that Orbi keeps going offline with regularity. Users can also encounter issues when they try to install the router.

How can I fix Orbi connectivity issues?

1. Run the Internet Connections troubleshooter

  1. Press the Windows key + S keyboard shortcut for the search utility.
  2. Type internet connections into the search box.
  3. Then click Find and fix network problems to open the window in the shot directly below.
     Internet Connections troubleshooter orbi connection issues
  4. Click Advanced to open more options.
  5. Select the Run as administrator option.
  6. Click the Apply repairs automatically option to select it.
  7. Press the Next button.

2. Power cycle your PC and the Orbi network

  1. First, turn off your desktop or laptop (and other devices connected with it) and unplug it.
  2. Then unplug your Orbi router and its modem, and wait for a few minutes.
    An Oribi router Internet Connections
  3. First, plug the modem back in.
  4. When the modem has restarted, plug the router back in.
  5. Thereafter, plug your PC back in.

3. Factory reset the router

  1. First, find a small paperclip.
  2. Unwind the paperclip.
  3. With the Orbi router on, insert the paperclip into the small hole for its Reset button.
    An Orbi router orbi connection issues
  4. Press the Reset button with the paperclip until the Orbi starts blinking.

    Note: Resetting the router will erase all the router’s personalized settings. Users might also need to reinstall Orbi software after resetting its router.


4. Check if your network adapter is enabled

  1. Right-click the Start button and select Run.
  2. Input ncpa.cpl in Run and click OK to open the Network Connections applet.
    Network Connections applet orbi connection issues
  3. If the network adapter for Orbi is disabled, right-click that adapter to open the context menu.
  4. Select the Enabled option.

5. Renew for the network adapter IP address

  1. Launch Run by pressing the Windows key and R simultaneously.
  2. Enter cmd in the Open box and click OK to start the Command Prompt.
  3. Type in this command and press Enter: ipconfig /release
    ipconfig/release command orbi connection issues
  4. Next, input this command: ipconfig /renew
  5. Press Enter to initiate the ipconfig command. Thereafter, a new IP address will be assigned.

6. Use an Ethernet cable

Ethernet cable orbi connection issues

If you have an Ethernet cable, connect it with your Orbi router. Plug the Ethernet cable into your PC and then an Ethernet port on the router.

Those resolutions can potentially resolve numerous Orbi connectivity issues. If the above resolutions aren’t enough, however, you can still contact the toll-free Orbi Helpline at 1-855-869-7373 (USA/CA).

Alongside a good connection, if you are a privacy-conscious user of the internet, you should definitely consider getting a VPN on your router.

How To Add Data Labels In Power BI: Step-By-Step Guide

Adding data labels is one of the most basic functions in Power BI. As you well know, the visualizing of data is one of the most important features of this tool.

However, using this option is not as easy as one might believe.

Users want to know how to show all data labels on their charts. One user reported the following:

I want to have a visual with all the data labels displaying count and percentage both. I guess only pie-chart and donut chart shows both % and count but the problem is that somehow some data labels (for smaller values) are still missing and I am unable to see all the data labels for pie chart. I have already selected  “All detail labels” in Label style  i.e. the full details option of data labels in pie-chart.

So, the OP wants to add a visual with all the data labels because some labels are still missing. Fortunately, there is a simple solution to this problem.

Today we will show you how to add data labels in Power BI in a few easy steps.

How can I add data labels in Power BI?

  1. Go to the Format pane.
  2. Select Detail labels function.power bi data labels
  3. Go to Label position.
  4. Change from Outside to Inside.
  5. Switch on the Overflow Text function.power bi label position

Keep in mind that selecting Inside in Label Position could make the chart very cluttered in some cases.


So, adding data labels in your charts is pretty easy, but the steps to do that are not always as obvious as they seem.

Also, it is worth mentioning that the solution above is available for pie charts and donut charts. For other types of charts, the steps may vary.

Still, the method described above is the heart of the matter when it comes to adding data labels in Power BI.

Just adapt the solution to your project and there you go: your data visuals are now top-notch!

Did you find our method useful? How do you use data labels in Power BI? Do let us know in the comments section below!

Some Content In This Message Has Been Blocked: Fix

If most of your office work evolves around your email, organizing your messages is crucial. With no filters applied, not only will you get a lot of unwanted messages, but you can also miss some important information.

By default, email filtering is applied by any email client, according to certain anti-spam protocols, to protect the end-user.

Consequently, users can sometimes receive emails with the following warning:

Some content in this message has been blocked because the sender isn’t in your safe-senders list or Attachment pictures and links in this message have been blocked because the sender isn’t in your safe-senders list.

If you trust the sender, to view the full content of the message, you just have to whitelist their email address. Read on to find out how to do it.


How do I get rid of the some content in this message has been blocked error?

1. In Outlooksafe senders list outloook

  1. On the Home > Delete >  Junk > Junk E-mail Options.
  2. On the Safe Senders tab > check the Automatically add people I e-mail to the Safe Senders List box.
  3. Or, you add emails one by one, by selecting them/domain name > Add > OK.

2. In Gmailsafe senders list gmail

  1. Open the Settings menu (in the right upper corner).
  2. Go to the Filter and Blocked Addresses tab.
  3. Select the email address or addresses that you want to unblock.
  4. Similarly, you can create a filter for safe domains or addresses using the Create a filter option, and send them to your Inbox.

3. In Yahoo!create safe sender list yahoo

  1. From the drop-down menu next to your name (upper right-hand corner) select Settings.
  2. Go to Filter > Add new filter > in the To/CC box put the email address that you want to unblock.
  3. Leave the Inbox as the default folder where you want messages to be sent.

We’ve looked at a few ways to filter your emails and stay more productive in your day-to-day activity. As soon as you whitelist an email, you will no longer encounter the some content in this message has been blocked error message.

Speaking of blocked content, we wrote about You have been blocked from originating in Messages, so that guide might interest you as well.

If you have any comments regarding this subject, please use the dedicated section below.


Fix: Amazon Fire Stick Won’t Download & Install Apps

Many Amazon Fire TV owners reported that Amazon Fire Stick is not installing apps. This is a significant problem since you won’t be able to access any content.

However, there’s a way to deal with this error once and for all, and today, we’ll show you how to do it.

What to do if Amazon Fire Stick isn’t installing apps?

1. Check your 1-Click ordering settings

  1. Log in to your Amazon account.
  2. Now go to the 1-Click Settings page.
  3. Make sure that 1-Click Ordering is enabled.
  4. If your location isn’t correct, be sure to change it accordingly.
  5. Save changes and check if the problem is resolved.

2. Make sure that 1-Click Setup is configured

  1. Go to your Amazon account.
  2. Head over to Content and devices > Preferences.
  3. If the 1-Click setup isn’t selected, be sure to add the necessary details and check if that helps.

In addition, try accessing this page for your local version of Amazon.

Several users reported fixing the problem simply by visiting the regional Amazon website.

After following the instructions above, they were asked to transfer their digital content to the regional version.

After doing so, the issue was resolved.

3. Try downloading the applications from Amazon’s website

This is a simple workaround, but it might help if you can’t install apps on Amazon Fire Stick.

  1. Go to Amazon’s Appstore website in your browser.
  2. Select Fire TV from the Device Type section in the left pane.
    device type fire TV amazon fire stick not installing apps
  3. Select the app you want to download.
  4. Set Deliver to your Amazon Fire TV device and click Get app.

In most cases, you won’t be able to install apps on Amazon Fire Stick because your 1-Click settings aren’t correct, but after adjusting them, the problem should be gone.

Some readers had problems with ITVX not working on Firestick as well, but the highlighted guide will provide the solutions to fix it.

If you found this article helpful, please let us know by leaving a comment below.

My Printer Prints Red Instead of Black: Why & How to Fix

At times your printer may start printing in red even if you want to print a black and white document. This issue mostly occurs if the color cartridge has run out of ink and needs replacement. Several users took the Microsoft community forum and Reddit community to explain the issue.

Why is my printing coming out RED instead of  BLACK or  BLUE???????????  I have an Epsom C88 printer, and have
neverhad this kind of problem before.  I changed my black cartridge and that did not make any difference.

Follow the below-given steps to fix this printer issue.

Why is my printer printing red and how to fix it?

1. Reset the Printer

  1. Make sure the printer is turned on.
  2. With the printer turned on, disconnect the power cord from the printer.
  3. Now remove the power cord from the wall outlet as well.
  4. Wait for a minute or two.my printer prints red instead of black
  5. Plug the power cord back to the wall outlet.
  6. Plug the power cord back to your printer.
  7. Start the printer and print a test page. Check if the issue is resolved. Make sure you wait until the printer is silent to proceed with the print job.

2. Replace the Ink Cartridge

  1. If your printer cartridge is low on ink, it will create issues with the print quality.
  2. For some users replacing the Cyan ink cartridge has helped them resolve the red printing issue.
  3. So, open the printer toner and check if any of the cartridges are running low on ink. You can also check Low Ink from the Control Panel of the printer.my printer prints red instead of black
  4. Press the Setup button (wrench icon) on the Printer.
  5. In the Setup Menu, press the down arrow button to select the Tools option.
  6. Press the OK button to select the option.
  7. Press the down arrow button and select “Display Estimated Ink Levels“. Press OK.
  8. The printer will now display the ink level on the control panel. If any of the cartridges are low on ink, you may need to replace them to fix the problem.

3. Clean the Printheads

  1. Load a clean white paper in the input tray. Make sure it is loaded properly.
  2. On the Control Panel of your printer, press the Setup key (wrench icon) and select Tools using the down arrow button. Press OK to select the option.my printer prints red instead of black
  3. Press the arrow down button again and select “Clean Printhead” option. Use the OK button to select the option.
  4. Now the printer will initiate the printhead cleaning process. Wait for the process to complete. The printer will print a test page report to check if the issue is resolved.

4.  Clean All the Cartridges

my printer prints red instead of black
  1. Remove all the cartridges from the printer one by one and clean the head a couple of times.
  2. Reinsert the cartridges and try to print again. Check if the issue is resolved and you are able to print in Black again.

Remote Desktop Keeps Freezing On Windows 11: 5 Fixes

In this article, we’ll look at how to fix Remote Desktop freezing on Windows 11, an issue many users have reported after upgrading to version 22H2. Sessions freeze, devices fail to connect, or connections drop unexpectedly.

There’s a known bug behind this, and while there’s no official fix yet, there are a few reliable workarounds. We’ll walk you through the most effective ones below.

What can I do if the remote desktop freezes on Windows 11?

1. Use the Task Manager

  1. Press Ctrl + Shift + Esc to open the Task Manager.
  2. Go to the Processes tab from the left pane.
    End task -remote desktop keeps freezing windows 11
  3. Navigate the mstsc.exe process and right-click on it to select End Task.

2. Use the Command Prompt

  1. Press the Windows key, type CMD and click Run as administrator.
    DOS COmmand Prompt -change password on Remote Desktop
  2. Copy and paste the following command and press Enter: reg add "HKLM\software\policies\microsoft\windows nt\Terminal Services\Client" /v fClientDisableUDP /d 1 /t REG_DWORD
  3. Close Command Prompt and restart your computer.

3. Use the Group Policy Editor

  1. Press Windows + R to open the Run console.
    GPEDIT - Go back -remote desktop keeps freezing windows 11
  2. Type gpedit.msc and press Enter to open Group Policy Editor.
  3. Navigate to this path: Computer Configuration > Administrative templates > Windows components > Remote Desktop Services > Remote Desktop Connection client
    CLIENT -remote desktop keeps freezing windows 11
  4. Double-click on Turn Off UDP On Client and select Enabled.
    Enabled
  5. Click Apply and OK. 
  6. Restart your computer to confirm the changes.

4. Use the Registry Editor

  1. Press Windows + R to open the Run window.
    REGEDIT RUN COMMAND
  2. Type regedit and press Enter to open Registry Editor.
  3. Follow this path: HKEY_LOCAL_MACHINE\SOFTWARE\Policies\Microsoft\WindowsNT\Terminal Services\Client
    DWORD -remote desktop keeps freezing windows 11
  4. Go to the right pane, right-click and click New. Next, select DWORD (32-bit) value.
  5. Rename the key as fClientDisableUDP and double-click on it.
  6. Set Value data to 1 and select Base as Decimal.
    Fclient
  7. Reboot your PC and check if the remote connection is working.

5. Rollback to the previous version 

  1. Press Windows + I to open Settings.
  2. Go to System, then click Recovery.
    System-Recovery-Windows-11
  3. Under Go Back, click the Go back button.
    Go back -remote desktop keeps freezing windows 11
  4. Follow the on-screen prompts to complete the process.

What causes the remote desktop keeps freezing on Windows 11?

There could be various reasons for this bug that causes remote desktops not to connect on Windows 11, some of the popular ones are: 

  • Firewall issues –  If firewall issues are on your computer, it could affect your Remote Desktop Protocol, hence crashing the Remote Desktop app.
  • Connectivity issues – If the internet connection is not stable, then the Remote Desktop app might freeze due to network failure.
  • DNS issues – If your computer has misconfigured DNS settings, then those settings cause the Remote Desktop app to freeze or misbehave

So, these are some workarounds that you can use to fix the remote desktop that keeps freezing windows 11 issues. Try them and let us know which worked for you in the comments below. 

Searching for Dota 2 Game Coordinator Error: Why & How to Fix

Dota 2 is a great game, but many users reported that they are unable to search for a match due to Searching for Dota 2 game coordinator error.

If you encounter this problem, you would not be able to participate in any online match. In fact, more and more people have reported that the Dota 2 Game Coordinator just gets stuck while loading.

In some of these cases, the reason for the issue was that the Game Coordinator was updating, or that the Steam servers were offline.

There are also situations in which the issue might be coming from your own PC.

In this article, we will explore some of the best options for dealing with the Dota 2 Searching for Game Coordinator issue. Read on to find out more.

How do I fix Dota 2 Search Coordinator?

1. Have a practice match with bots

  1. Open up Steam, and run DotA 2.
  2. On the top of your screen, you should see the Searching for the DotA 2 game coordinator message.
  3. Click on the Play DotA 2 button found at the bottom right side of your screen.
  4. After clicking Play, choose the option Practice with bots, and then select Solo game mode.
  5. Click on Start Bot Match, and choose any hero you want to play with.
  6. Play for 5 to 10 minutes with the bots, and then press the Menu button > Disconnect.
  7. Once you return to the main screen of the game, check if the error is still there.

2. Try playing as a Learner

  1. Open up Steam, and run DotA 2.
  2. Click on the Learn tab found at the top of your screen.
  3. Play the tutorial for 5 to 10 minutes.
  4. Disconnect from the game and check if the Searching for the DotA 2 game coordinator error is still there.

3. Use specialized software

As we mentioned above, the culprits responsible for the Dota 2 Coordinator problem are diverse and they can be located on the game servers just as they can hide close to home.

If you suspect your Internet connection is likely to cause this error, it might be a good idea to get specialized help. In fact, you could use a specialized tool to optimize your game connection date.

In some sort, this resembles a VPN, but we are actually talking about a more gaming-oriented solution. This is a Gamers Private Network also known as a GPN.

A GPN works to improve your game connection data by selecting an optimized traffic path. As a result, you will enjoy a better gaming experience overall with lower ping rates, fewer lost packets, and less latency.

A better server route can also correct error such as the Dota 2 searching for Game Coordinator and generelly strenghten your connection.

As opposed to VPNs, a GPN does not encrypt or modify traffic, nor does it unblock geo-restricted content. Instead, it focuses on game traffic only.

WTFast

Eliminate latency, errors, jitter, and more with your very own gaming-focused private network.
Free trial Visit Website

4. Play in Arcade mode

  1. Open up Steam, and run DotA 2.
  2. Click on Arcade mode at the top of your screen.
  3. Wait for a few seconds so the game loads a number of games, and then click Play on any one of them.
  4. Play for 5-10 minutes.
  5. Disconnect from the game by using the Menu button.

Now check if the Searching for DotA 2 game coordinator message is still there.

5. Check your game files for integrity

  1. Open your Steam client, and click Library at the top of your screen.
  2. Search for DotA 2 in the games list, right-click on it, and select Properties.
    properties searching for the dota 2 game coordinator
  3. In the Properties window, click on the Local Files tab, and then click on Verify Integrity of Game Files.
    verify integrity dota 2 game coordinator
  4. Navigate to Settings, found at the top left side of your screen inside the Steam menu.
  5. Click on the Downloads tab.
  6. Click on the Steam library folders option.
  7. A pop-up window will appear that will show you all the recorded library information.
  8. Right-click on the folder found there and hit Repair Library Folder.
  9. Restart Steam and check if the error has dissipated.

6. Change the default download region in Steam settings

  1. Open Steam, and click on Settings.
  2. Choose Downloads, and then under Download Region, click on the drop-down list and choose a different location.
    download region
  3. Restart Steam and check if the Searching for the DotA 2 game coordinator message is still there.

There you go, these are some of our solutions that might be able to help you with Searching for the DotA 2 game coordinator error.

Feel free to let us know if this article helped you by using the comments section below.

Disable Auto Arrange on Windows 11 [Simplest Steps to do it]

One fascinating thing about Windows is how customizable it is. Unlike other operating systems like Mac OS or Linux, Windows has features that make it the best.

Windows allows users to access unlimited display settings and adjustments to help them create a visually appealing display for their computers. Nonetheless, the Windows 11 Auto arrange icons display feature is optional, and you can rearrange your folder and files as you wish.

Windows 11 auto arranges icons by default. However, users can choose to disable the feature and manually toggle the icon arrangement. Likewise, Windows allows you to change icon images and titles.

Furthermore, Windows automatically sorts new folders/files alphabetically to ensure easy access and orderliness. Although it is a built-in feature, users can decide to disable it and set their preferred interface display order.

Hence, this article will discuss how to set your display icon arrangement to a specific type manually. Also, we’ll see how to change icons on Windows 11 from the default display.

Why are my desktop icons automatically arranged?

  • Default settings for Windows: Windows automatically sets icons, files, and folders to be arranged in alphabetical order by default. Hence, all your files will align and go by the directives of the default icons arrangement. So, the Windows 11 Auto arrange icons problem is not a permanent issue. However, Windows has other icon arrangement orders that users can choose. Hence, users can manually position the icons.
  • Screen resolution: Different screen resolutions come with various display settings. Hence, changing your screen resolution will change your icon arrangement settings to fit into the default icon arrangement of the new screen size. Also, switching to another monitor can cause Windows 11 to auto arrange icons. It is because the length and width of the previous monitor can differ from the new one. Hence, Windows will automatically arrange icons to fit the new screen.
  • Outdated graphics card driver: This can affect your computer’s display and result in the Windows 11 auto arrange icons problem. This will prevent users from accessing some display settings, and adjusting the default icon arrangement will be challenging.
  • Outdated Windows: Outdated Windows can be responsible for countless issues with the computer. The computer cannot repair or fix the bugs affecting it. Likewise, it doesn’t have access to the new patches and updates to help it function smoothly, and this can cause the Windows 11 Auto arrange icons problem.

How do I align apps in Windows 11?

Enable align icons to the grid

  1. Right-click on any space on your computer screen.
  2. Click on View from the options.
  3. Select the Align icon to grid option.

It will check the align icon option and immediately align apps in Windows 11. Alternatively, you can manually drag and drop the icons to align them as highlighted below:

  1. Click on the app icon you want to align.
  2. Drag it to the preferred aligned space.

Although this is stressful compared to enabling the align icons to grid option. However, it is also a valuable alternative to placing desktop icons anywhere on Windows 11.

How do I disable Auto arrange icons in Windows 11?

  1. Right-click on any space on your computer screen.
  2. Click on View from the options.
  3. Go to Auto arrange icons and check the option to enable it.
  4. Likewise, uncheck the Auto arrange icons option to disable it.
  5. Restart your computer to allow the changes to sync correctly with the computer.

Nonetheless, the above solution may not be enough to turn off auto arrange icons on Windows. Hence, we’ll recommend that you update graphics card drivers and the Windows OS.

How do I stop auto-sorting files and folders?

Disable Auto arrange in folders

  1. Launch File Explorer on your computer.
  2. Right-click on any space inside the folders and select View.
  3. Uncheck the Auto arrange option.

It will stop the auto sorting of files and folders on Windows. Also, it allows users to use the drag and drop option to move files and folders to the desired spot.

Moreover, users can encounter many difficulties with the Windows display settings and icon arrangement. Hence, we recommend that you check and read through our article about how to fix drag and drop issues in Windows 10/11.

In conclusion, you may find it beneficial to know how to manage the Windows 11 taskbar on multiple monitors.

Kindly leave your suggestions and questions in the comments section, we’d like to hear from you.

Can’t Move Icons On Desktop: 5 Easy Fixes To Try

Some Windows users reported that they can’t move icons on the Desktop on their PC. This is a small but annoying problem, but today we’re going to show you how to fix it once and for all.

What can I do when I can’t move icons on Desktop?

To fix the issue, open the Folder options window and restore the default settings. If that doesn’t solve the problem, restart Windows Explorer from Task Manager.

You can also try changing the arrangement options for icons as a potential solution.

1. Restore Folder options

If you can’t move icons on desktop on your PC, be sure to check your Folder options.

  1. From your Start Menu, open Control Panel.
  2. Now click on Appearance and Personalization > File Explorer Options.
    reset folder options can't move icons on desktop
  3. In the General tab click on Restore Defaults.
  4. Now in the View tab, click on Reset Folders, followed by clicking on Restore Defaults.
  5. Now click on Apply, then click on OK.
  6. Restart your machine.

2. Auto-arrange icons

For this, we’re going to try out the simplest method to solve your icon-related issue.

  1. Firstly, you’re going to right-click on your Desktop.
  2. Now click on View.
    context menu view can't move icons on desktop
  3. Check or uncheck Auto-arrange icons.
  4. Once again click on View.
  5. Now select Align icons to grid.

3. Check your graphics card

In the event that your icons get rearranged every time you exit a program, you could be dealing with a faulty graphics card. We advise you to update your graphics card drivers. To do this, simply visit your graphics card manufacturer’s website and download the latest drivers for your model.

If this sounds too complicated, you can also use a third-party tool to update all outdated drivers with just a few clicks.

⇒ Get Outbyte Driver Updater

4. Restart Windows Explorer

Sometimes a glitch with Windows Explorer can make you unable to move icons on your Desktop. To fix this problem, do the following:

  1. Press Ctrl + Shift + Esc to open your Task Manager.
  2. In the Process tab section click on Show Processes From All Users, now select the Windows Explorer and right-click on it.
  3. Now select Restart.restart windows explorer can't move icons on desktop

5. Run check disk in Command Prompt

Sometimes this issue is caused by corrupted files. To fix it, you just need to do the following:

  1. Start Command Prompt as administrator.
  2. Type chkdsk /f X: and press Enter (replace X with the letter that represents your hard drive partition).
    chkdsk command prompt can't move icons on desktop
  3. Wait for the scan to finish. If asked to schedule a scan, press Y and restart your PC.

We hope that these fixes were helpful and that you can now move your Desktop icons without problems. If you found any of these solutions helpful, feel free to leave us a comment below.